
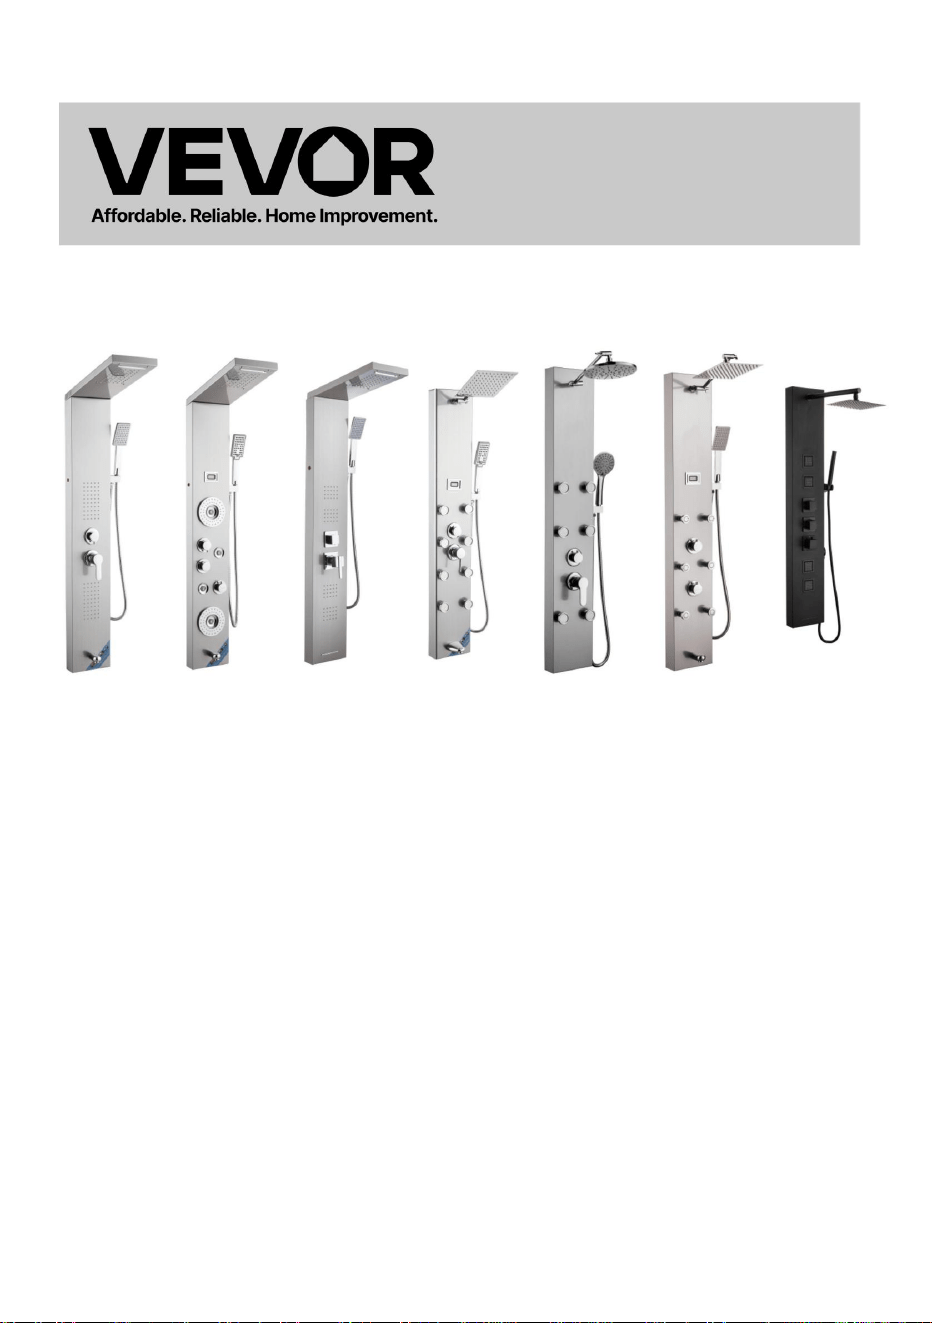
SHOWER PANEL TOWER
MODEL:
6002FL、8039FL、7009FL、6012FL、8124FL、7016FL、7002FL、7015FY
Technical Support and E-Warranty Certificate
www.vevor.com/support

- 1 -
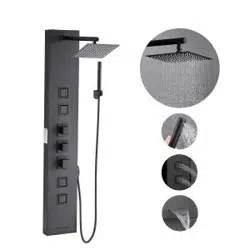
6002FL
6012FL
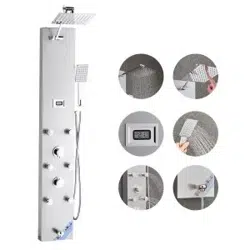
8039FL
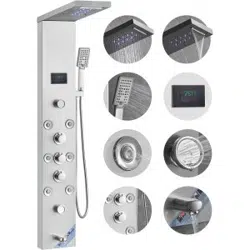
8124FL
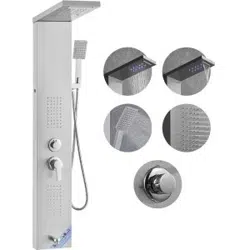
7009FL
7016FL
7002FL
7015FY
This is the original instruction, please read all manual instructions
carefully before operating. VEVOR reserves a clear interpretation of our
user manual. The appearance of the product shall be subject to the
product you received. Please forgive us that we won't inform you again if
there are any technology or software updates on our product.
SHOWER PANEL TOWER
- 2 -
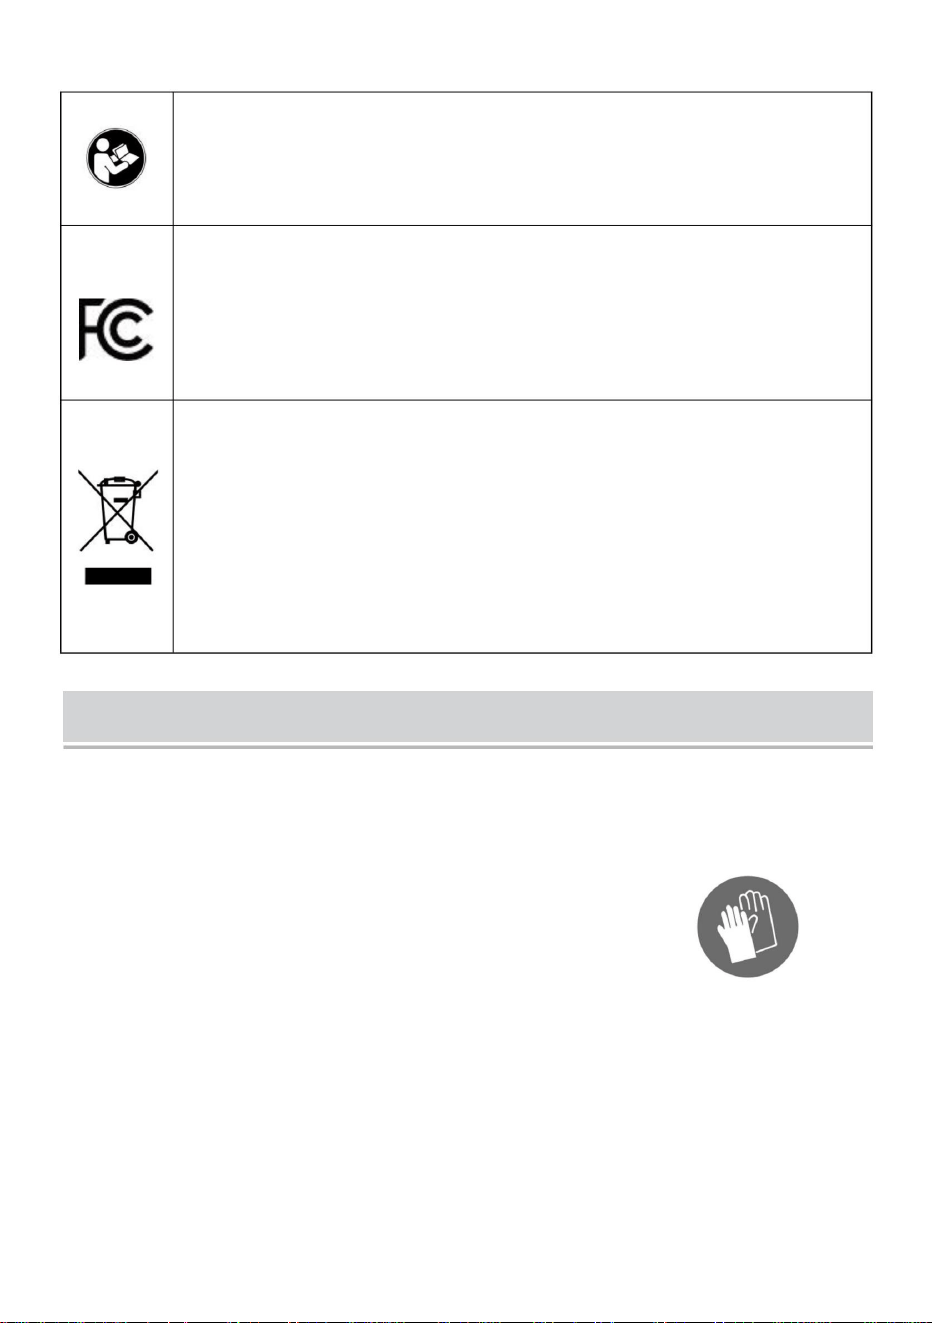
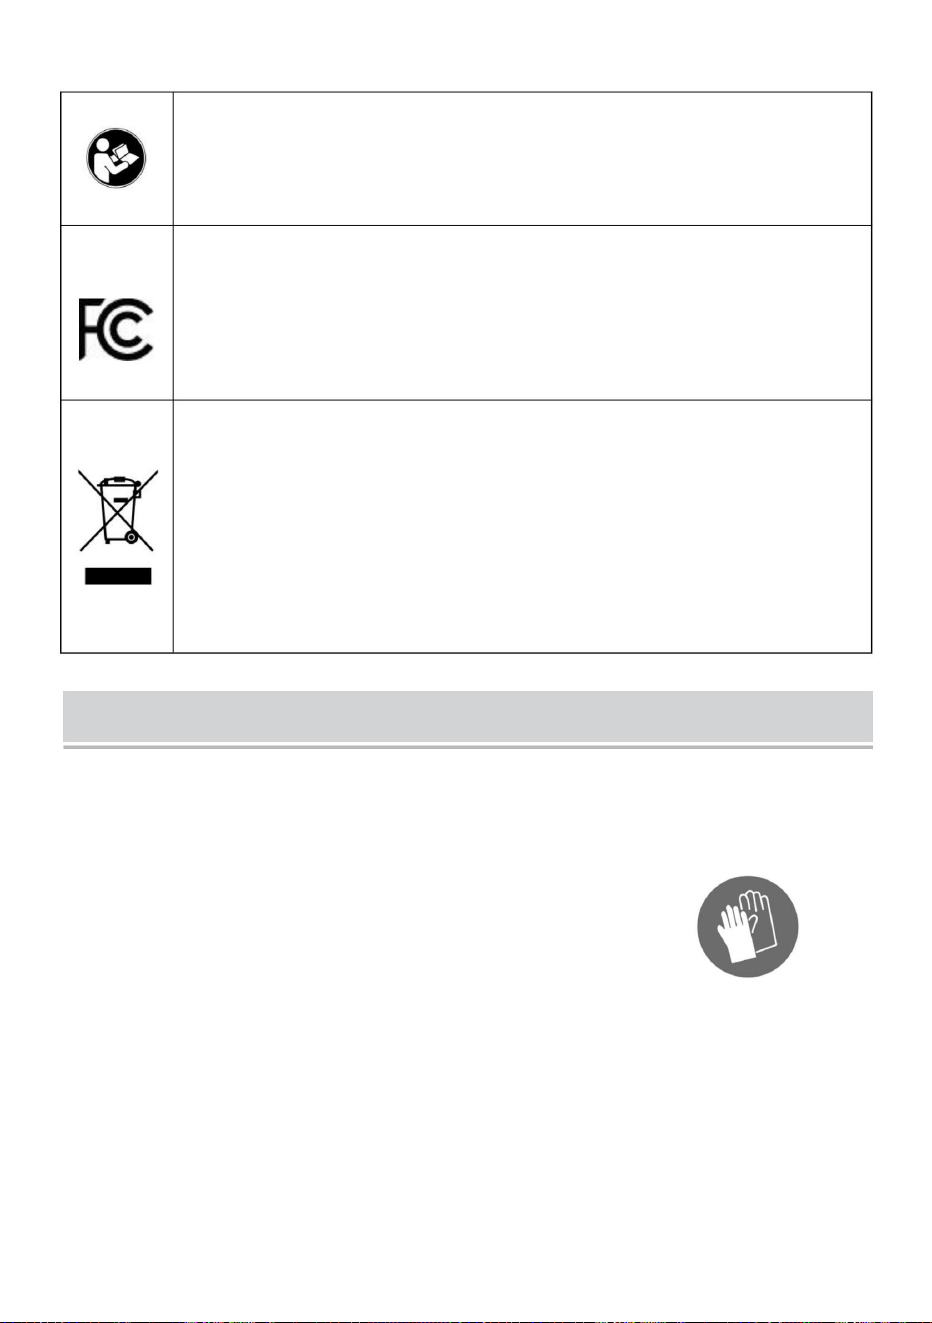
Warning-To reduce the risk of injury, user must read
instructions manual carefully.
This device complies with Part 15 of the FCC Rules. Operation is
subject to the following two conditions:(1)This device may not cause
harmful interference, and (2)this device must accept any interference
received, including interference that may cause undesired operation.
This product is subject to the provision of European Directive
2012/19/EC. The symbol showing a wheelie bin crossed through
indicates that the product requires separate refuse collection in the
European Union. This applies to the product and all accessories
marked with this symbol. Products marked as such may not be
discarded with normal domestic waste, but must be taken to a
collection point for recycling electrical and electronic devices
INSTRUCTIONS
Warning Tips:
1. During the installation process, it is best to wear gloves to prevent sharp
corners on the panel from scratching the palm of the hand.
2. When installing the shower, ensure that all joints are fully
tightened to avoid water leakage.
3. Ensure that the red and blue water inlet pipes inside the panel are in a non
folded state to avoid affecting water pressure.
4. When the shower is not in use, please close the switch valve of the shower.
SAVE THESE INSTRUCTIONS
- 3 -
INSTALLATION INSTRUCTIONS
Model
6002FL
8039FL
6012FL
8124FL
7009FL
7016FL
7002FL
7015FY
Mounting
Type
Wall Mount
Connection
Thread
G1/2"
Functions
Four
Modes
Six
Modes
Five
Modes
Five
Modes
Five
Modes
Three
Modes
Four
Modes
Four
Modes
Tub Spout
√
√
√
√
√
×
√
√
Temperature
Display
×
√
×
×
√
×
√
×
LED Lamp
√
√
√
√
×
×
×
×
Power
Dry Cell
(DC3V)
Dry Cell
(DC3V)
Dry Cell
(DC3V)
Dry Cell
(DC3V)
Dry Cell
(DC3V)
×
Dry Cell
(DC3V)
×
Hand
Shower
1-Setting
3-Setting
1-Setting
1-Setting
3-Setting
5-Setting
1-Setting
1-Setting
Finish
Fingerprint-free Brushed Nickel shower system
Black-
Painting
Material
304 Stainless
Steel, Brass,
PVC, ABS
201 Stainless
Steel, Brass,
PVC, ABS
304 Stainless Steel, Brass, PVC, ABS
- 4 -
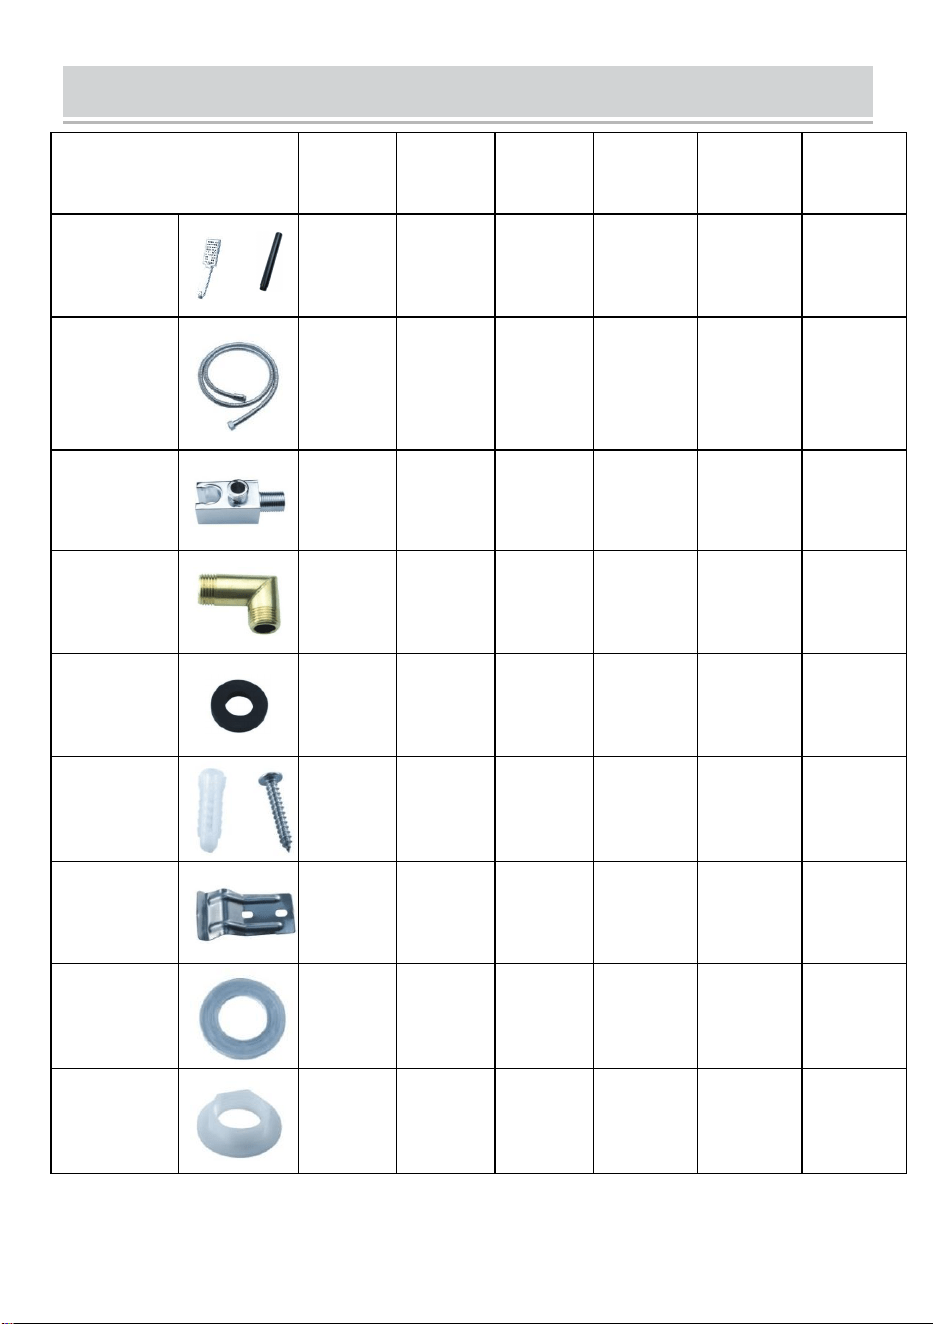
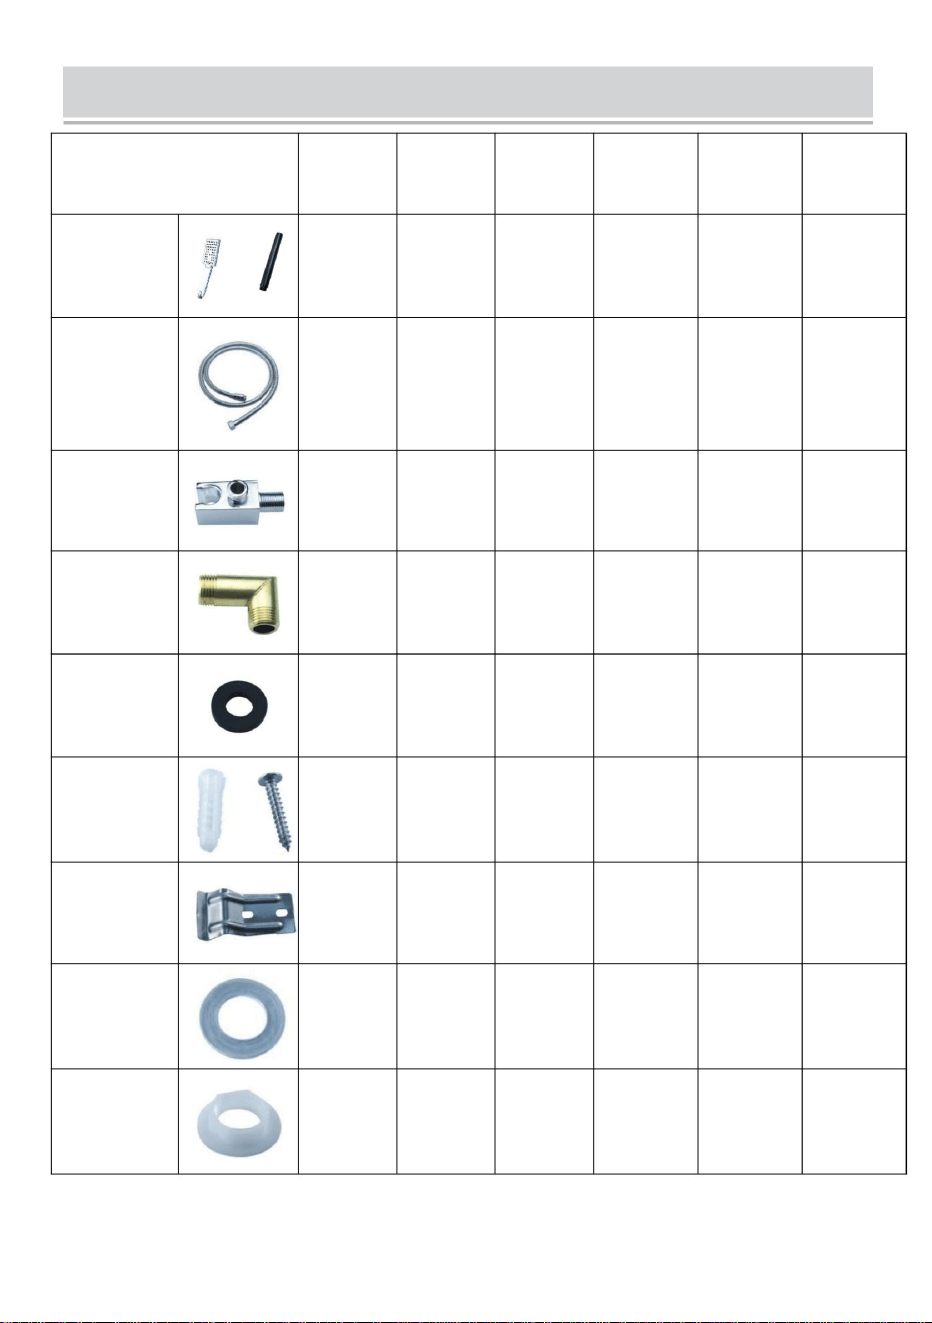
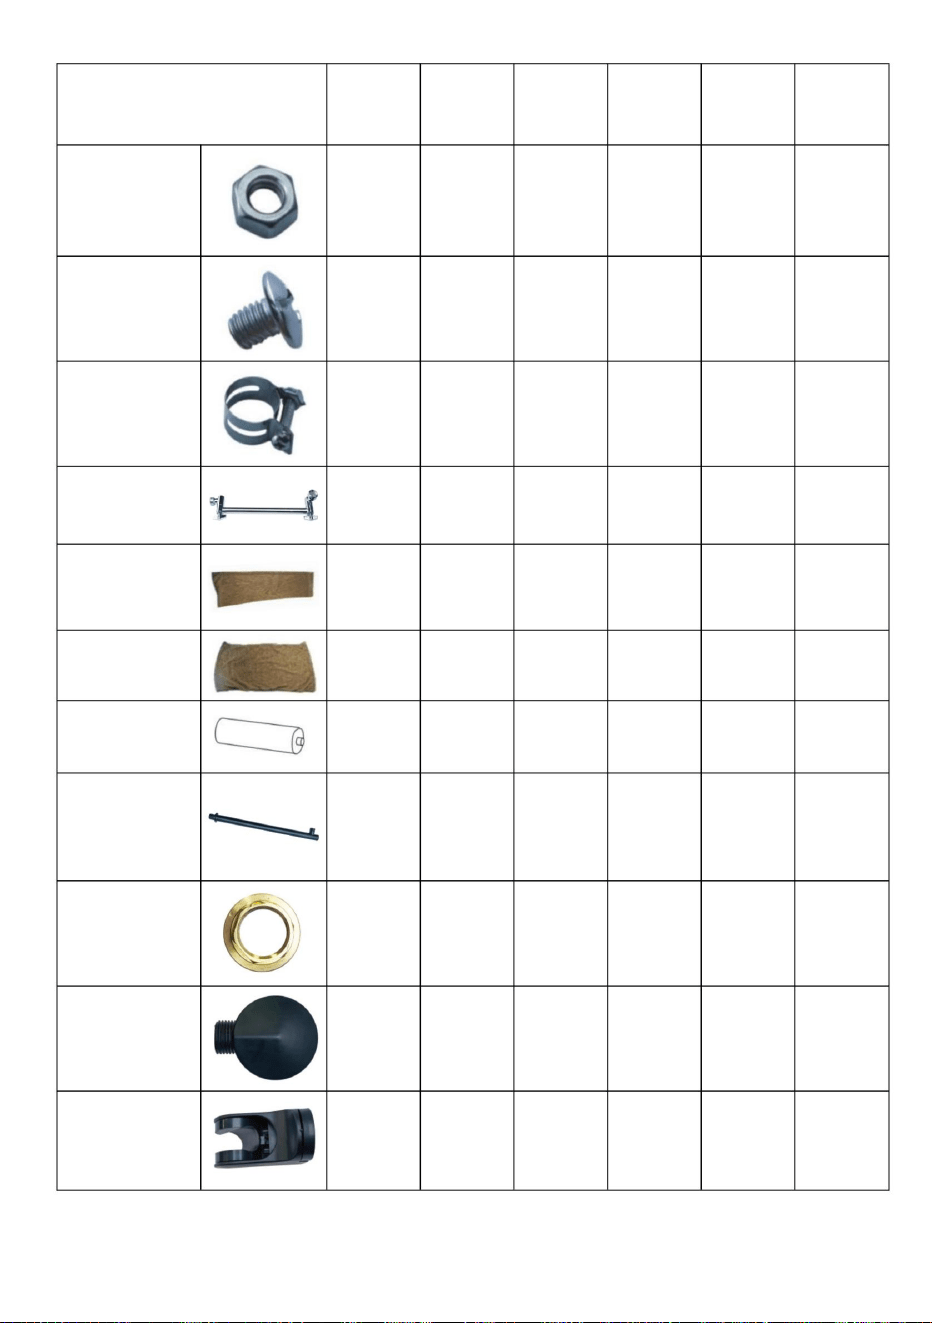
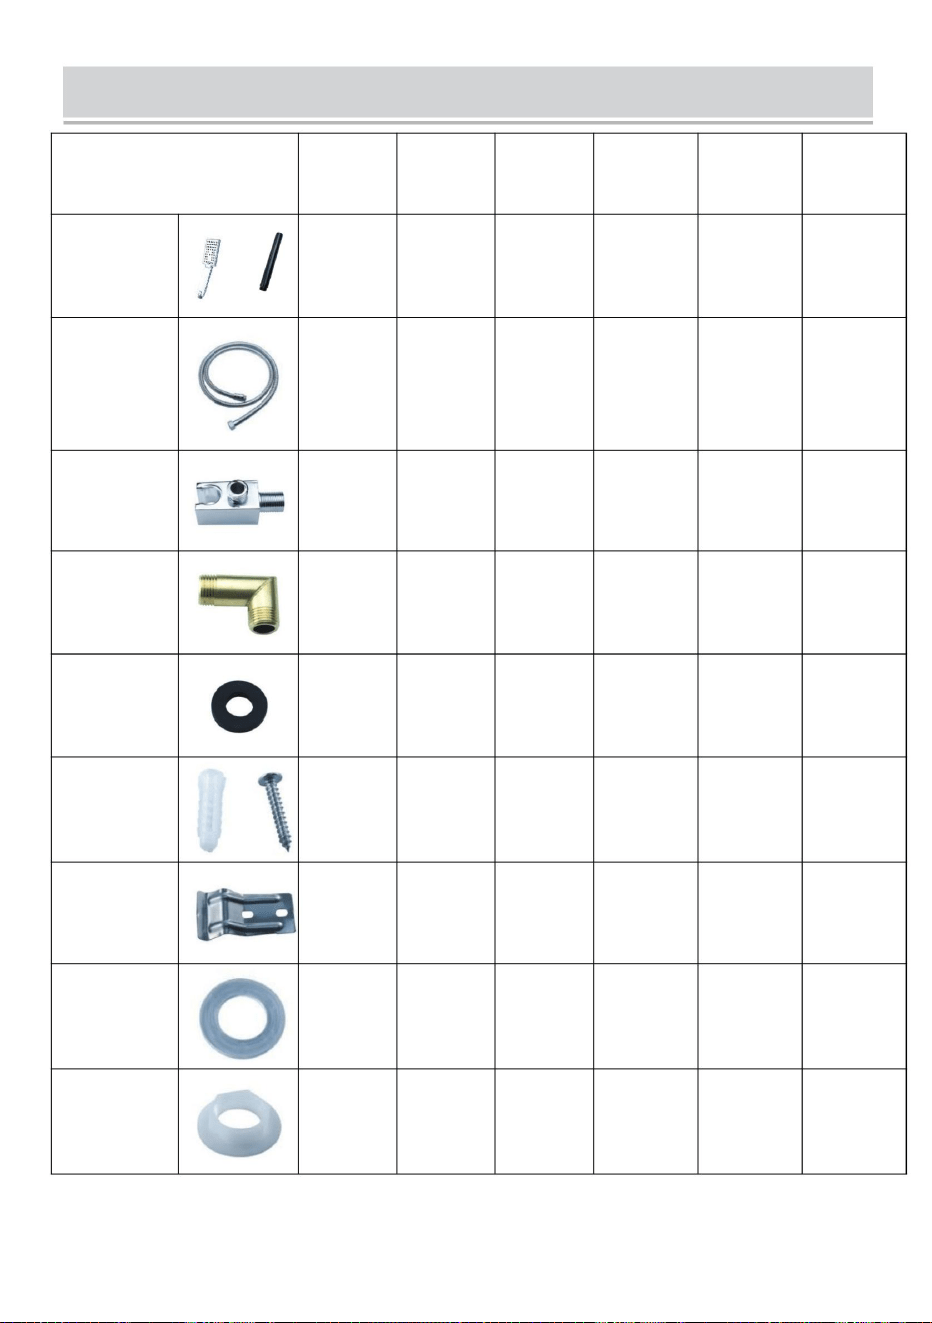
PARTS LIST
MODEL
8039FL
6002FL
6012FL
8124FL
7009FL
7016FL
7002FL
7015FY
Handheld
Shower
or
1pcs
1pcs
1pcs
1pcs
1pcs
1pcs
1.5 Meter
Hand
Spray
Hose
1pcs
1pcs
1pcs
1pcs
1pcs
1pcs
Hand
Spray Seat
1pcs
1pcs
1pcs
1pcs
1pcs
0pcs
1/2 Right
Angle
Adapter
2pcs
2pcs
2pcs
2pcs
2pcs
2pcs
4-Point
Rubber
2pcs
2pcs
2pcs
2pcs
2pcs
2pcs
Self
Tapping
Screw
4pcs
4pcs
4pcs
4pcs
4pcs
4pcs
Fastener
2pcs
2pcs
2pcs
2pcs
2pcs
2pcs
Grommet
1pcs
1pcs
1pcs
1pcs
1pcs
2pcs
Hexagon
Nut
1pcs
1pcs
1pcs
1pcs
1pcs
1pcs

- 5 -
MODEL
8039FL
6002FL
6012FL
8124FL
7009FL
7016FL
7002FL
7015FY
M6 Nut
4pcs
4pcs
0pcs
0pcs
0pcs
0pcs
M6*10
Screw
4pcs
4pcs
0pcs
0pcs
0pcs
0pcs
Hose Clamp
2pcs
2pcs
0pcs
0pcs
0pcs
0pcs
Brass
Shower Arm
0pcs
0pcs
1pcs
1pcs
1pcs
0pcs
Panel
Cotton Bag
1pcs
1pcs
1pcs
1pcs
1pcs
1pcs
Top Spray
Cotton Bag
1pcs
1pcs
0pcs
0pcs
0pcs
0pcs
Battery
AA1.5V
2pcs
2pcs
2pcs
0pcs
2pcs
0pcs
Stainless
Steel
Water Outlet
Arm
0pcs
0pcs
0pcs
0pcs
0pcs
1pcs
Brass Hex
Nut
0pcs
0pcs
0pcs
0pcs
0pcs
1pcs
Water Outlet
Adapter
0pcs
0pcs
0pcs
0pcs
0pcs
1pcs
Wall Mounted
Spray Booth
0pcs
0pcs
0pcs
0pcs
0pcs
1pcs
- 6 -
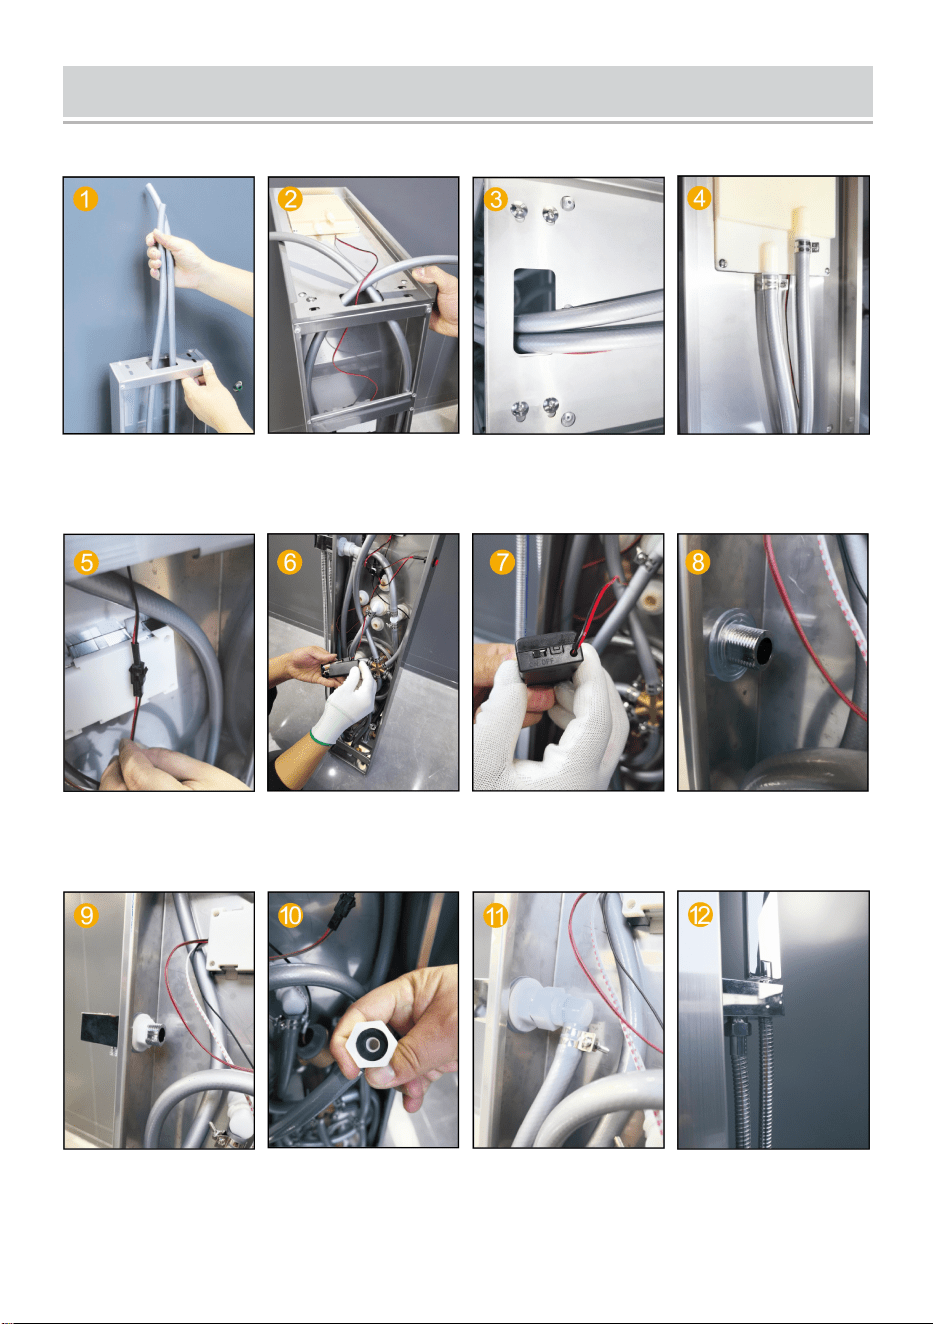
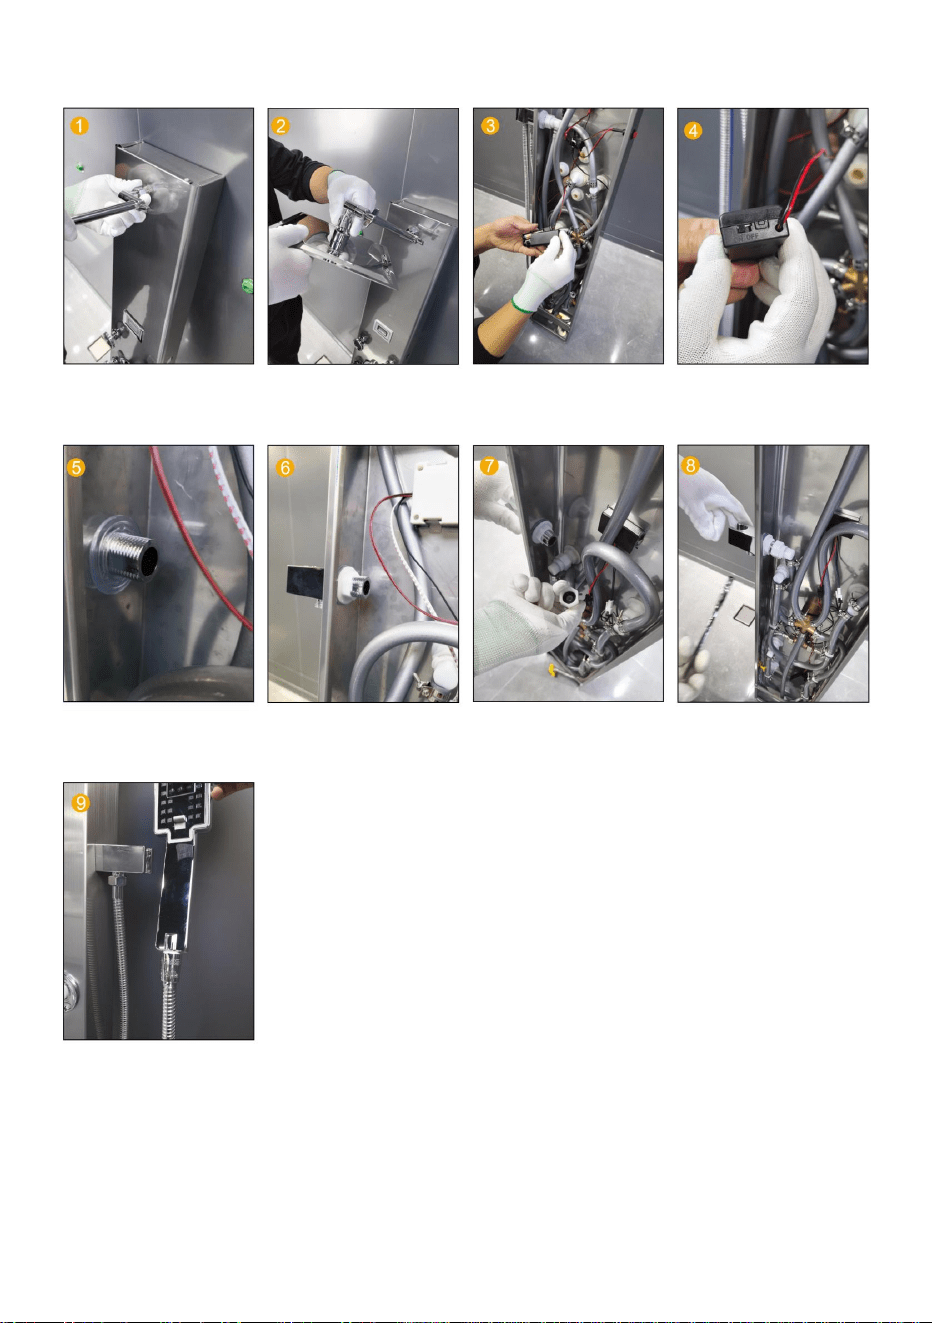
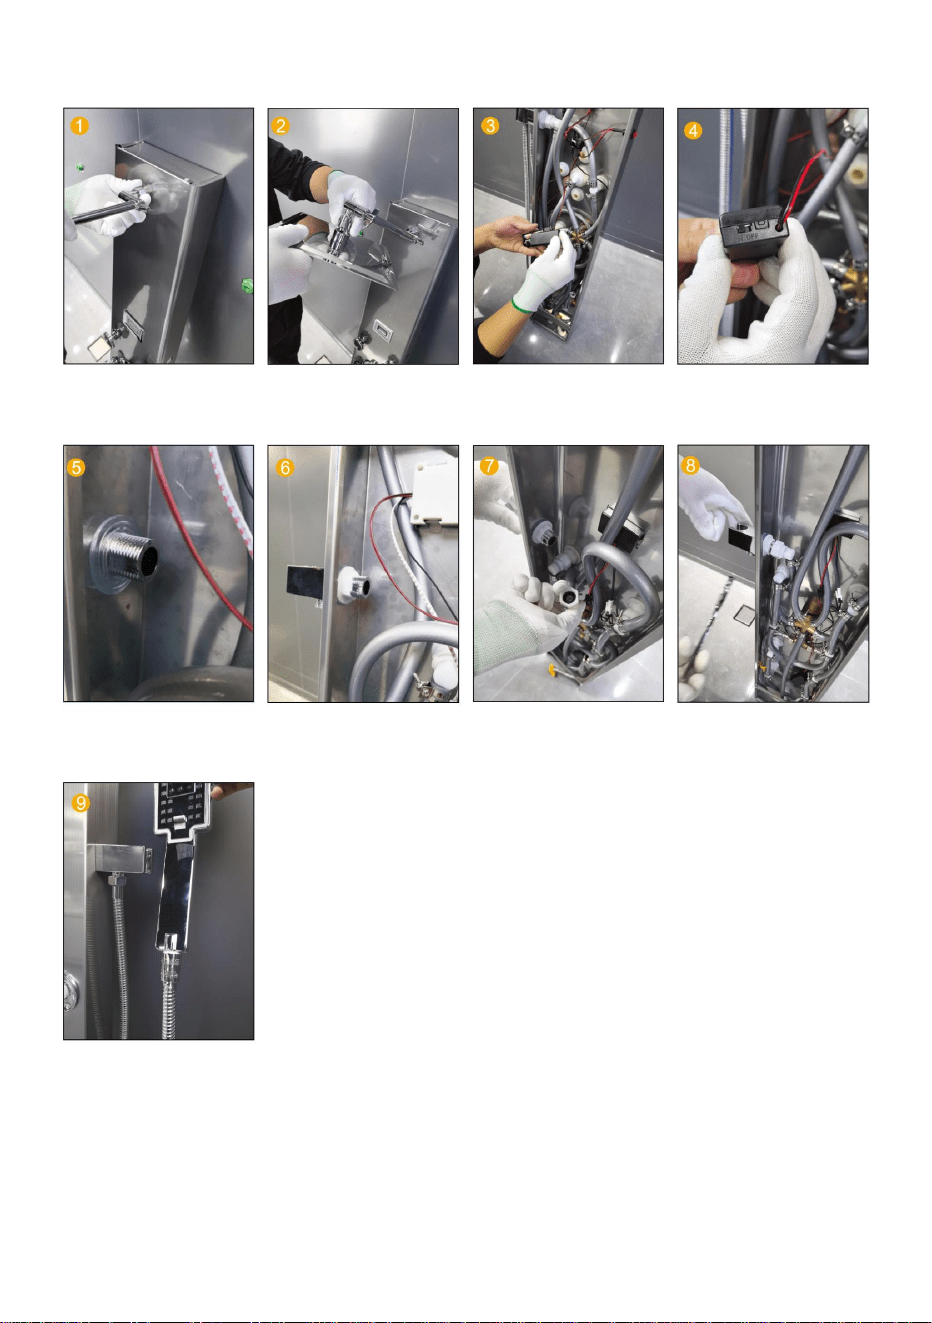
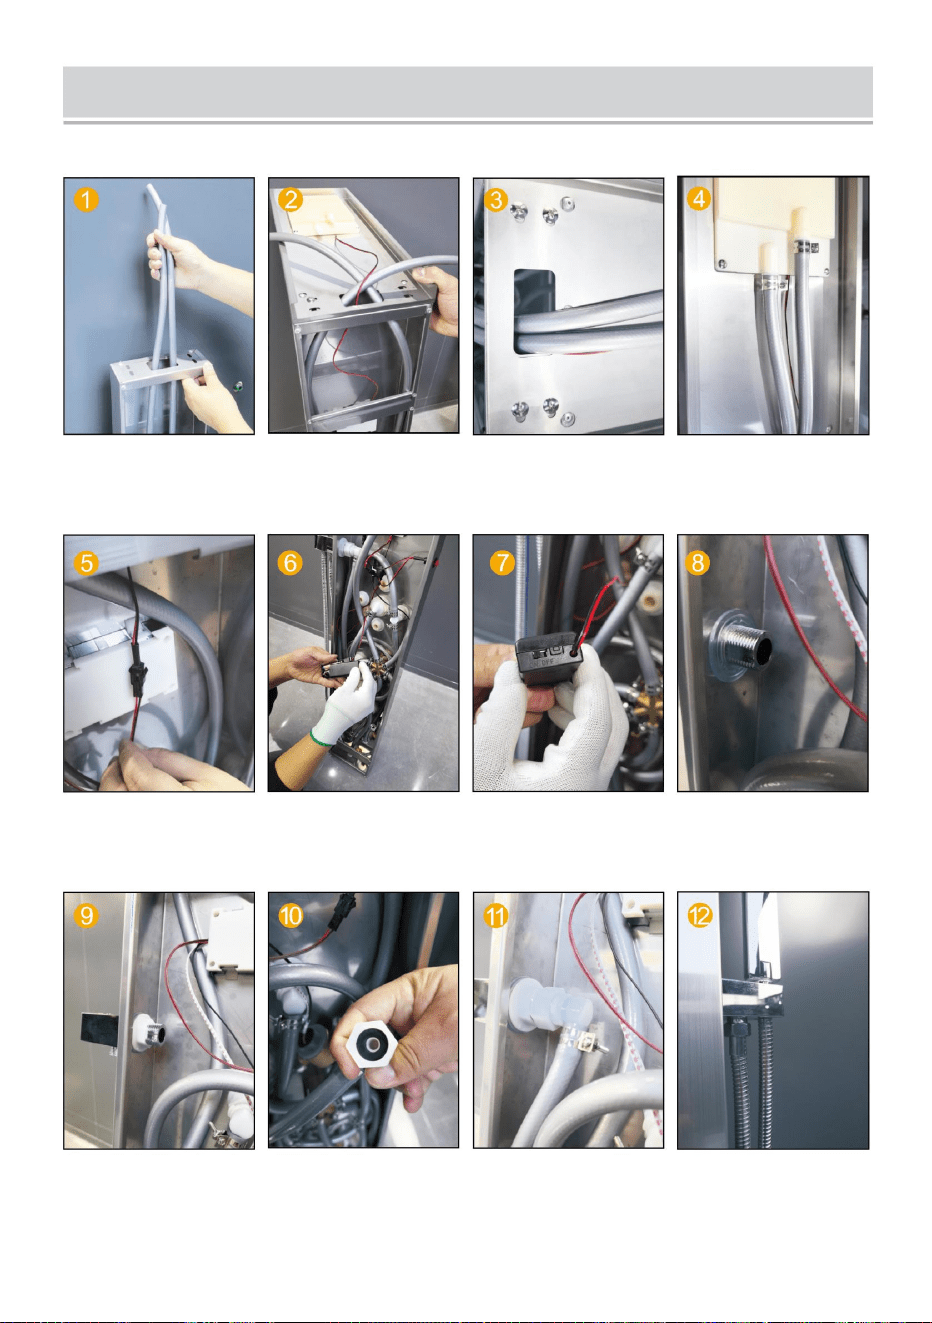
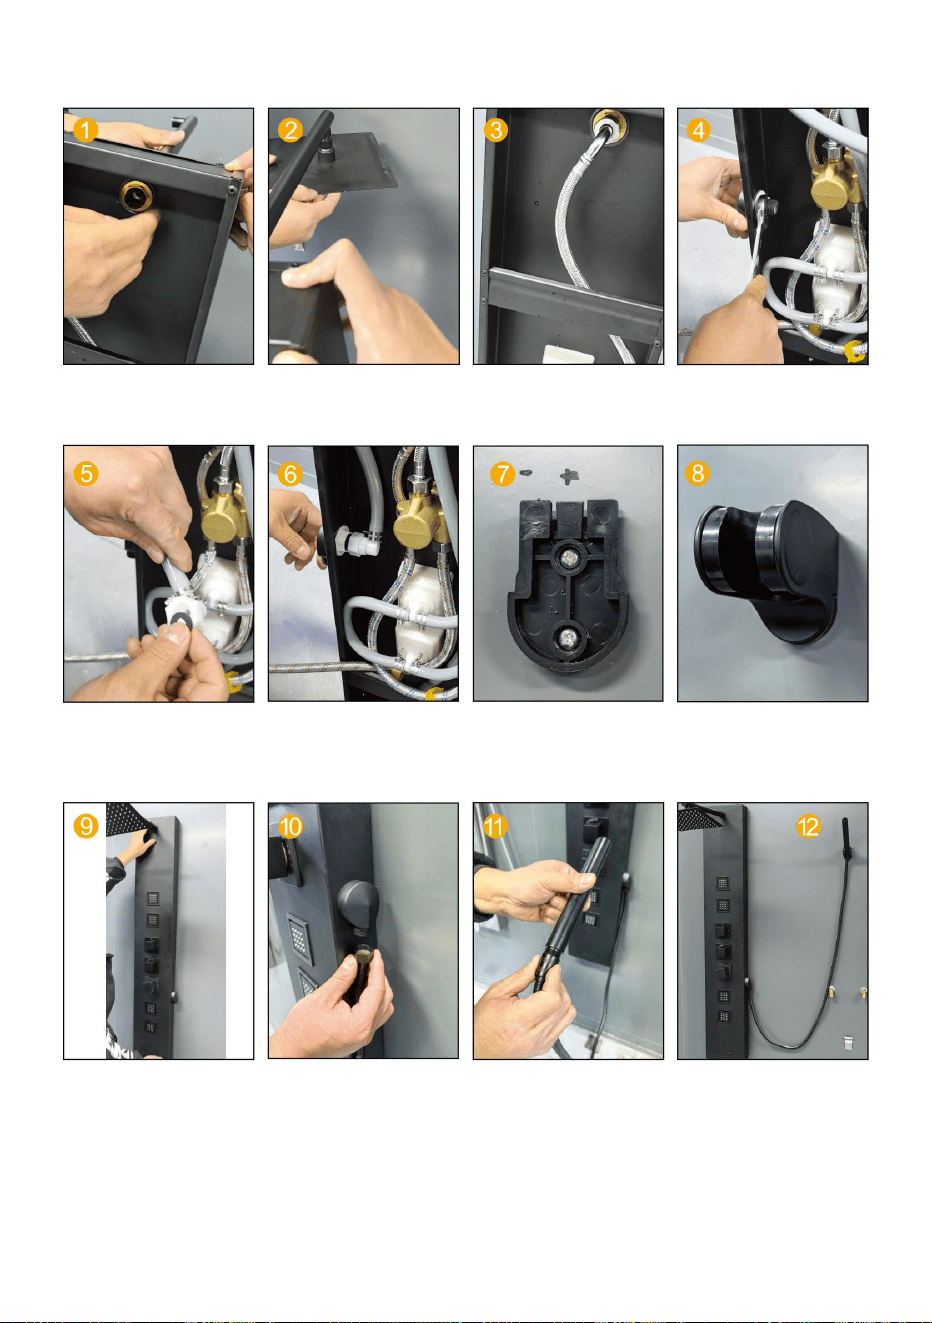
ASSEMBLY INSTRUCTIONS
MODEL 6012FL/6002FL/8039FL/8124FL
Insert the PVC pipe
from the top opening
to pierce out.
Route the LED light
wire along the hole
insert into the
motherboard.
Fix the motherboard
and top spray with 4
pairs of M6 screws
and nuts.
Fix the PVC pipe with
a throat clamp on the
top spray joint.
Connect the LED
light cable and power
supply line.
Load 2 AA batteries
into the battery
compartment.
Switch the battery
box to ON.
Insert the hand spray
nozzle into the panel
And install the
gasket.
Insert the hand spray
nozzle into the panel
And install the
gasket.
Put the 4-point rubber
into the hand spray
Inside the joint of the
seat.
Connect the water
outlet connector and
hand spray seat joint
Connect the hand
spray hose to the
handheld one shower
head.
- 7 -
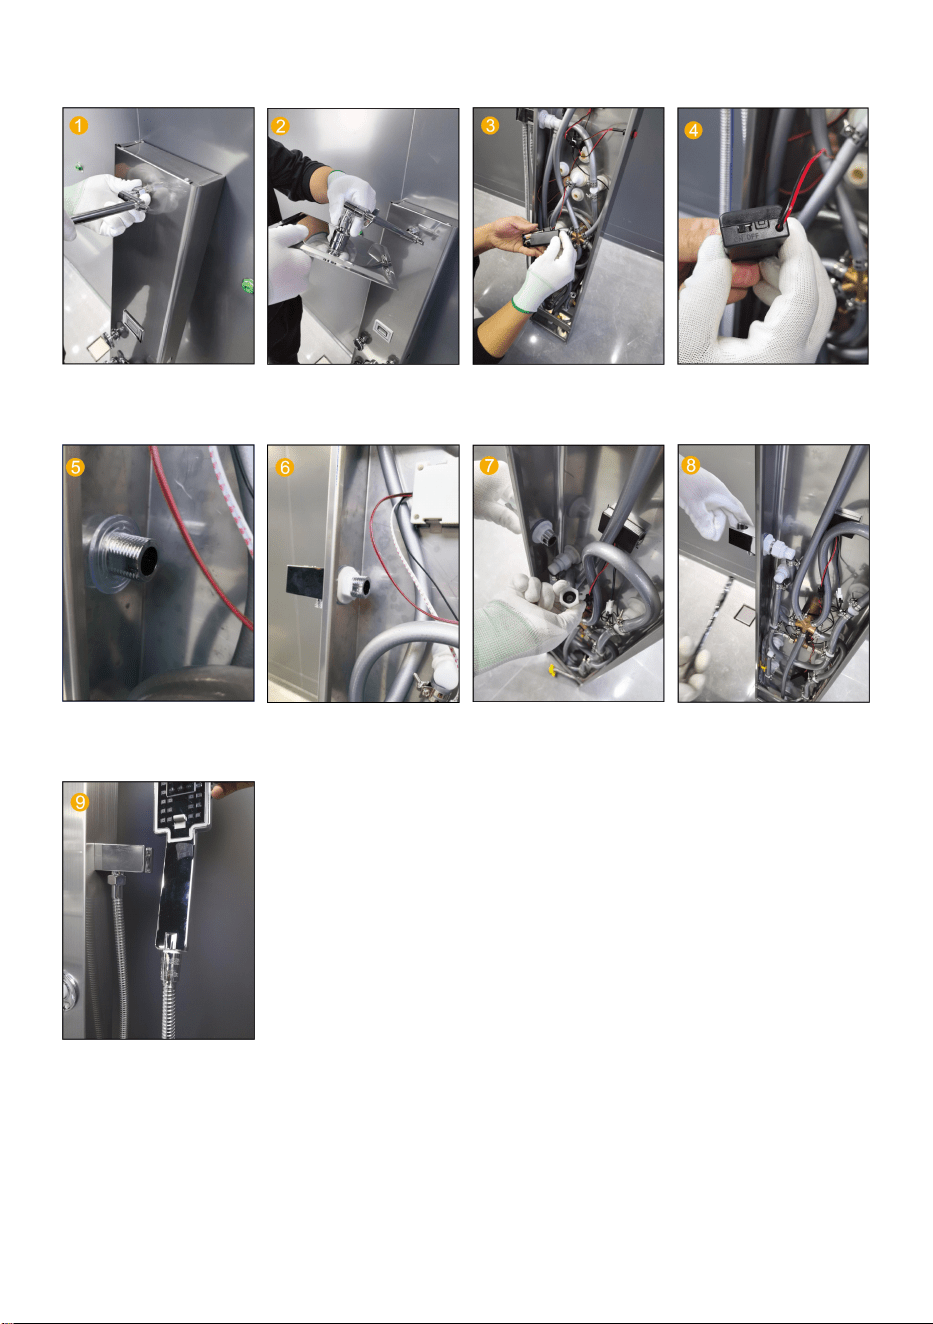
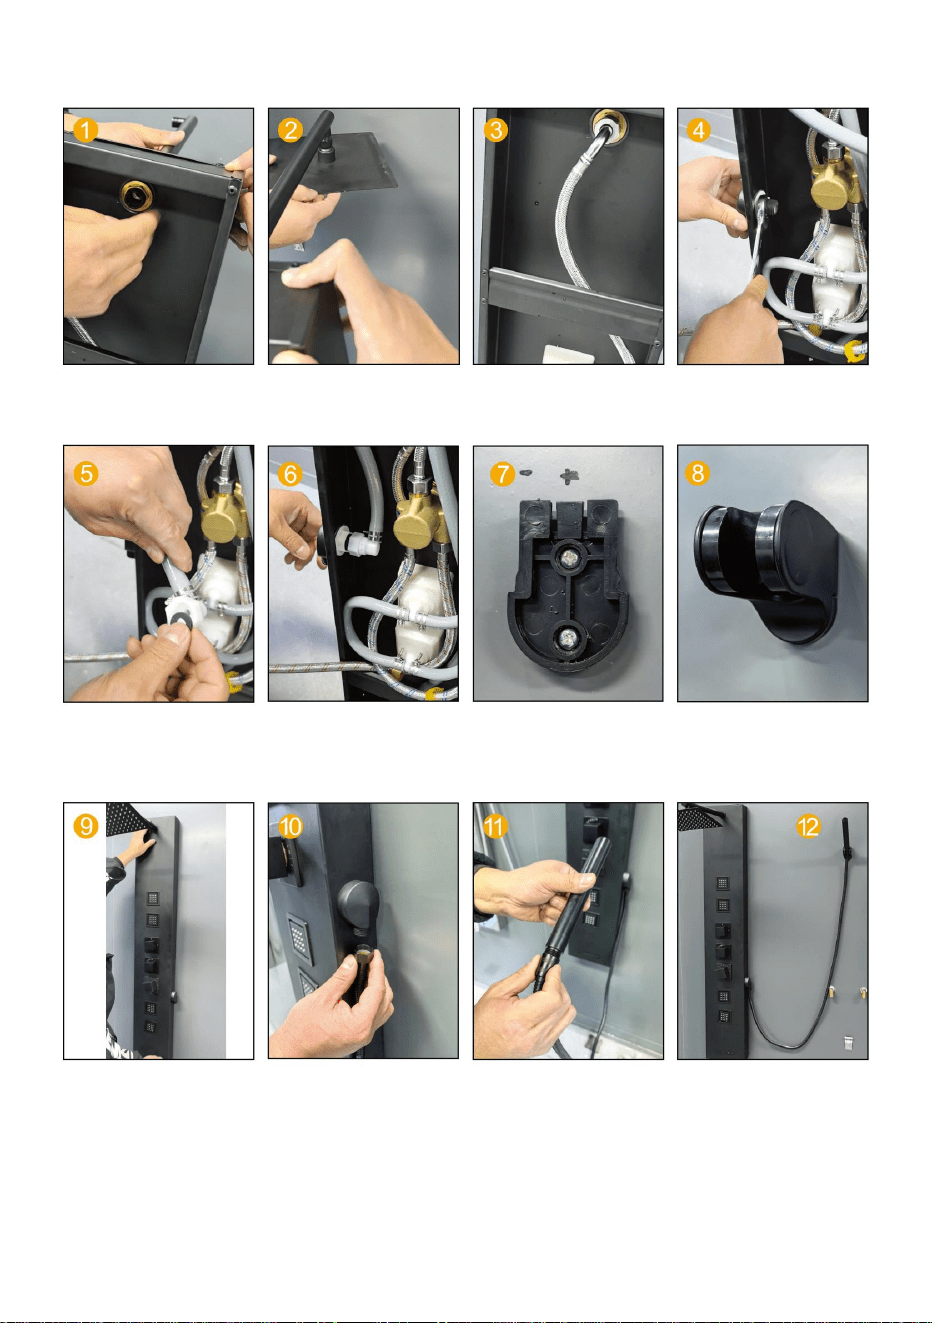
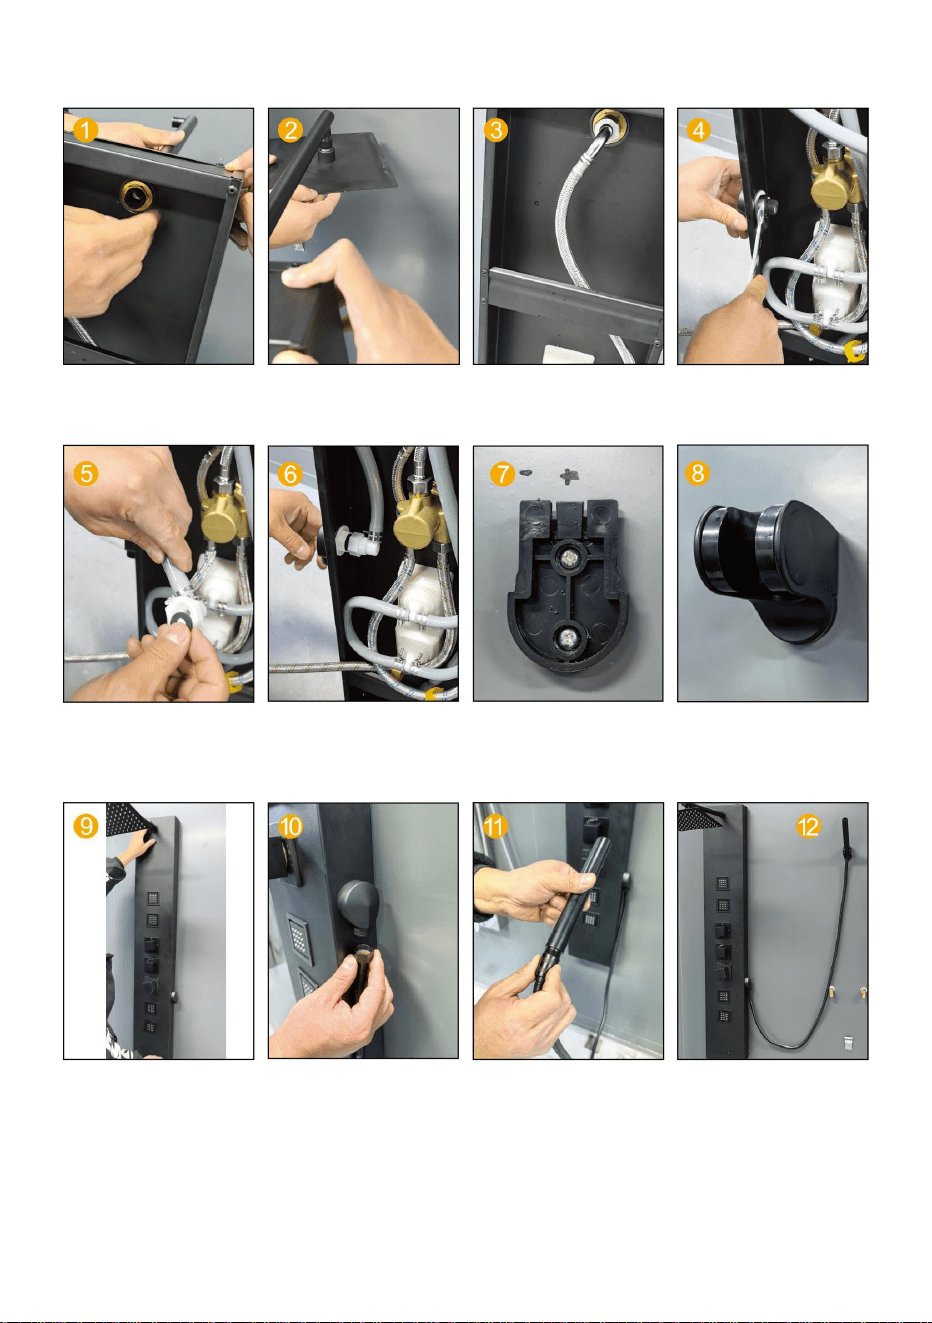
MODEL 7009FL/7016FL/7002FL
Fix the water outlet arm
to the main board.
Connect the top spray
and the water outlet arm
joint.
Load 2 AA batteries into
the battery
compartment.
Switch the battery box
to ON.
Insert the hand spray
nozzle into the panel
and install the gasket.
Insert the hand spray
nozzle into the panel
and install the gasket.
Put the 4-way rubber
into the connector of the
hand spray seat.
Connect the water outlet
connector to the hand
spray seat connector.
Connect the hand-held
shower hose and the
hand-held shower head.
Note:7016FL no step 3 and 4.

- 8 -
MODEL 7015FY
Fix the water outlet arm
to the main board with
nuts and washers.
Connect the top spray
and the water outlet arm
joint.
Connect the steel wire
pipe and the shower
arm and tighten it.
Fix the shower outlet
connector to the panel
with a nut.
Put the 4-way rubber
into the shower head
connector.
Connect the water outlet
connector and the
shower head water
outlet connector.
Fix the shower head
bracket to the wall at the
appropriate position with
screws and nuts.
Installation of the
shower head bracket
completed.
Fix the panel to the wall
at the appropriate height
with the bracket.
Connect the handheld
shower head to the
hose.
Connect to the
handheld shower head.
Installation completed.
- 9 -
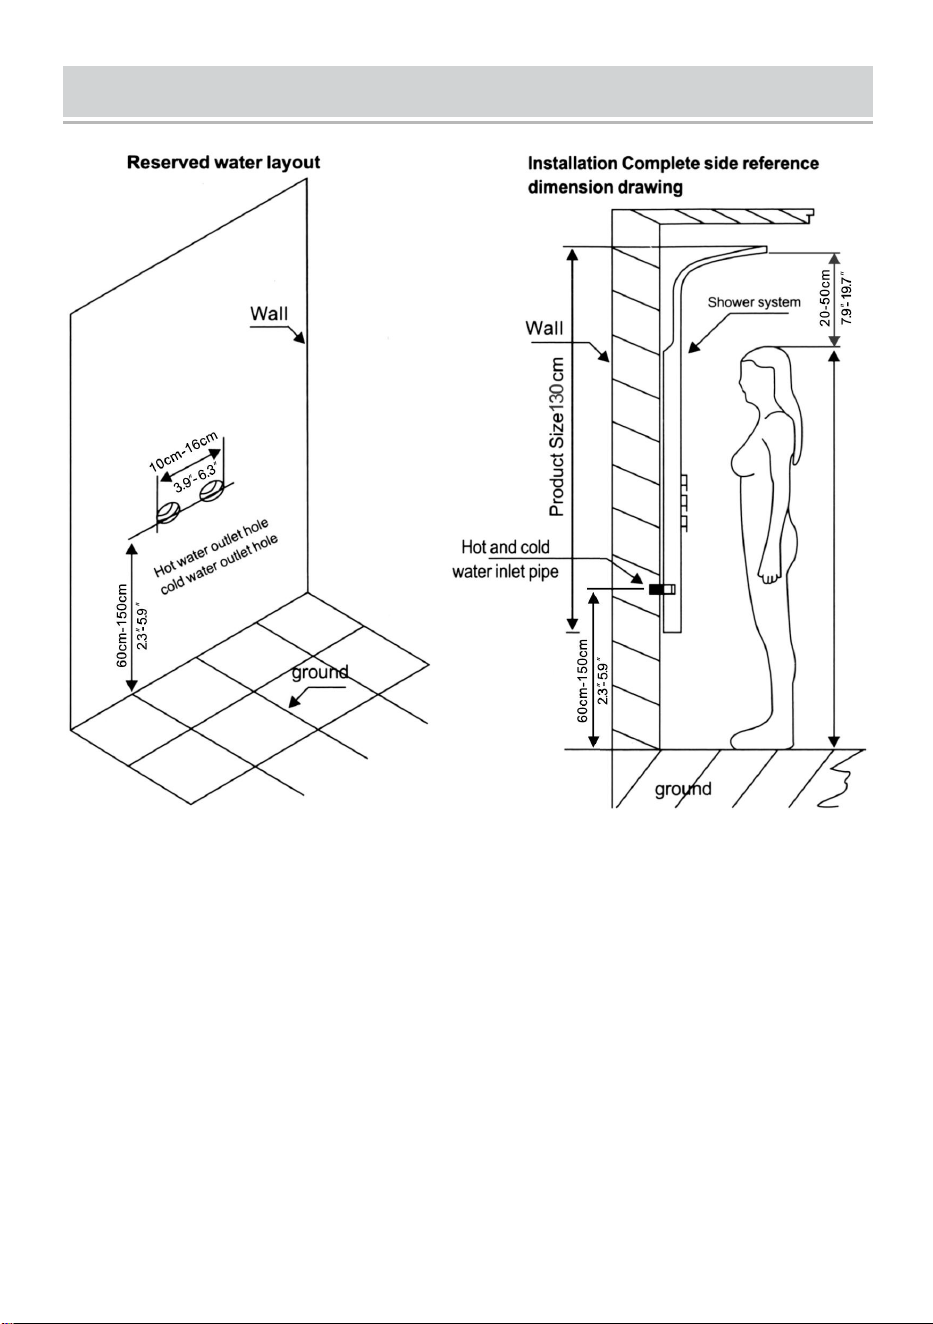
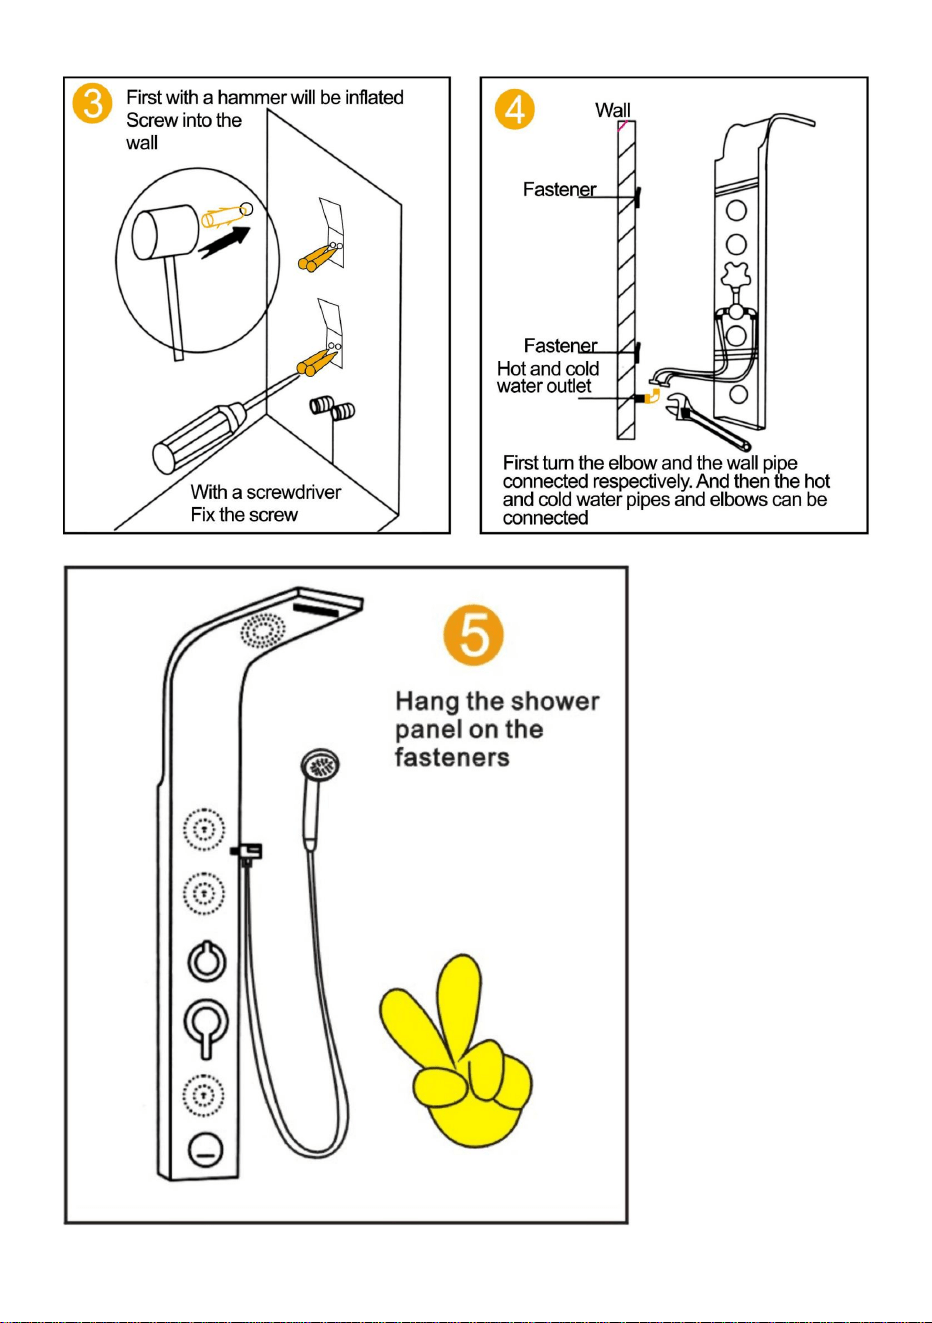
INSTALLATION STEPS (GENERAL)
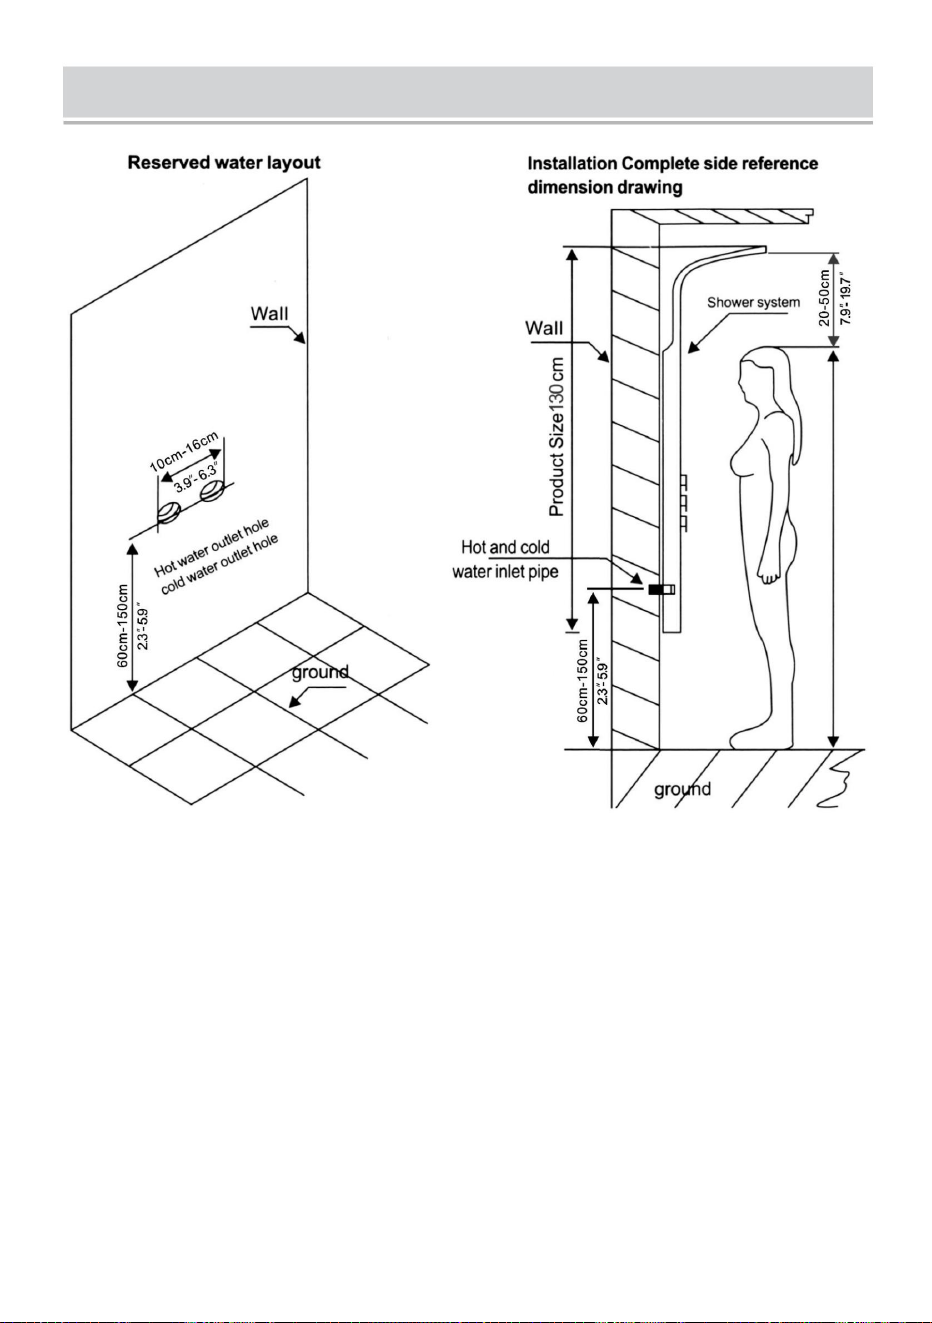
Installation Notes
1. According to the height of the family height budget shower system installation
height, measure the shower system on the back of the bar Distance, mark on the
wall, in the corresponding position of the tag fixed hanging iron (up and down each
one).
2. Connect the hot and cold water hose (be sure to clean the magazine and the
dirt in the wall Scale so as not to block, affect the water effect).
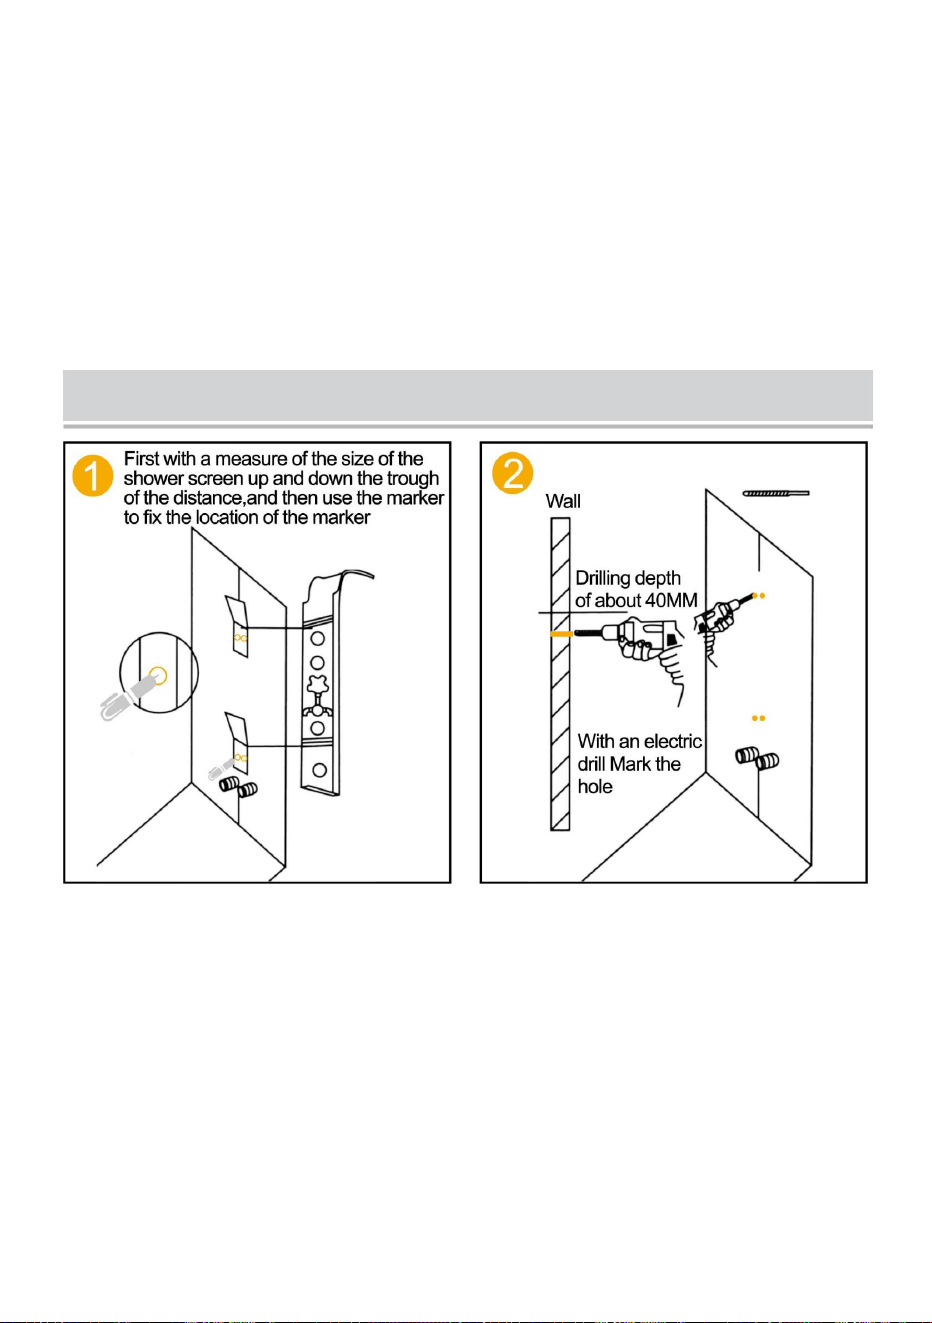
3. Shower system hanging on the wall, the upper and lower two cards were
clamped in two hanging pastes (Note: shower After the system wall, the main body
close to the wall is not shaking, do not need to use another glass glue and other
tools fixed).

- 10 -
Stainless steel shower system maintenance methods:
1. Regular cleaning of the product in order to keep its appearance bright and
clean;
2. Clean the surface with water or a mild detergent and wipe it with a soft towel.
3. Note that the clean product of the hidden position, timely cleaning can make
products lasting.
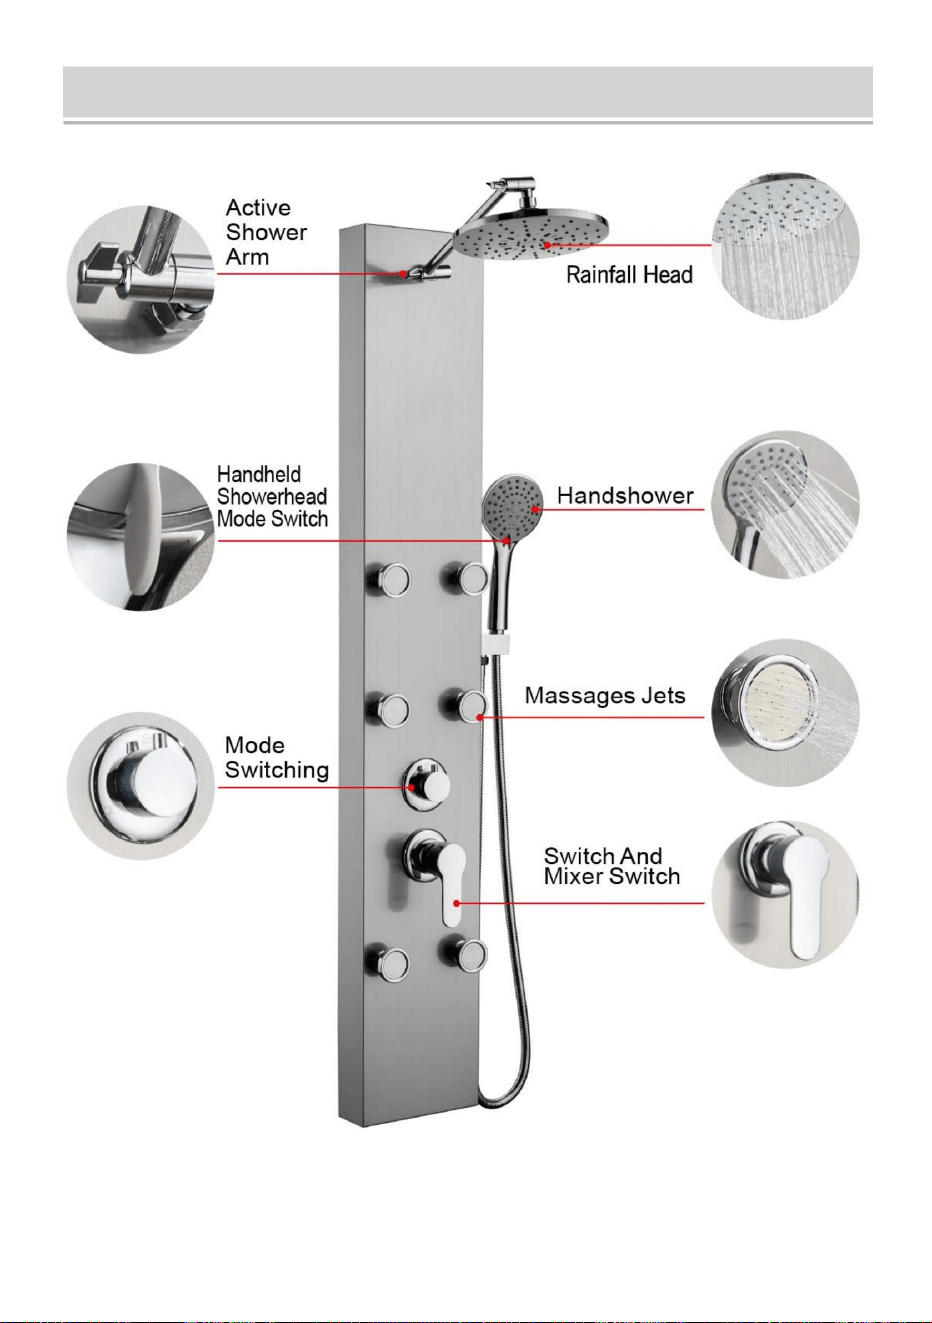
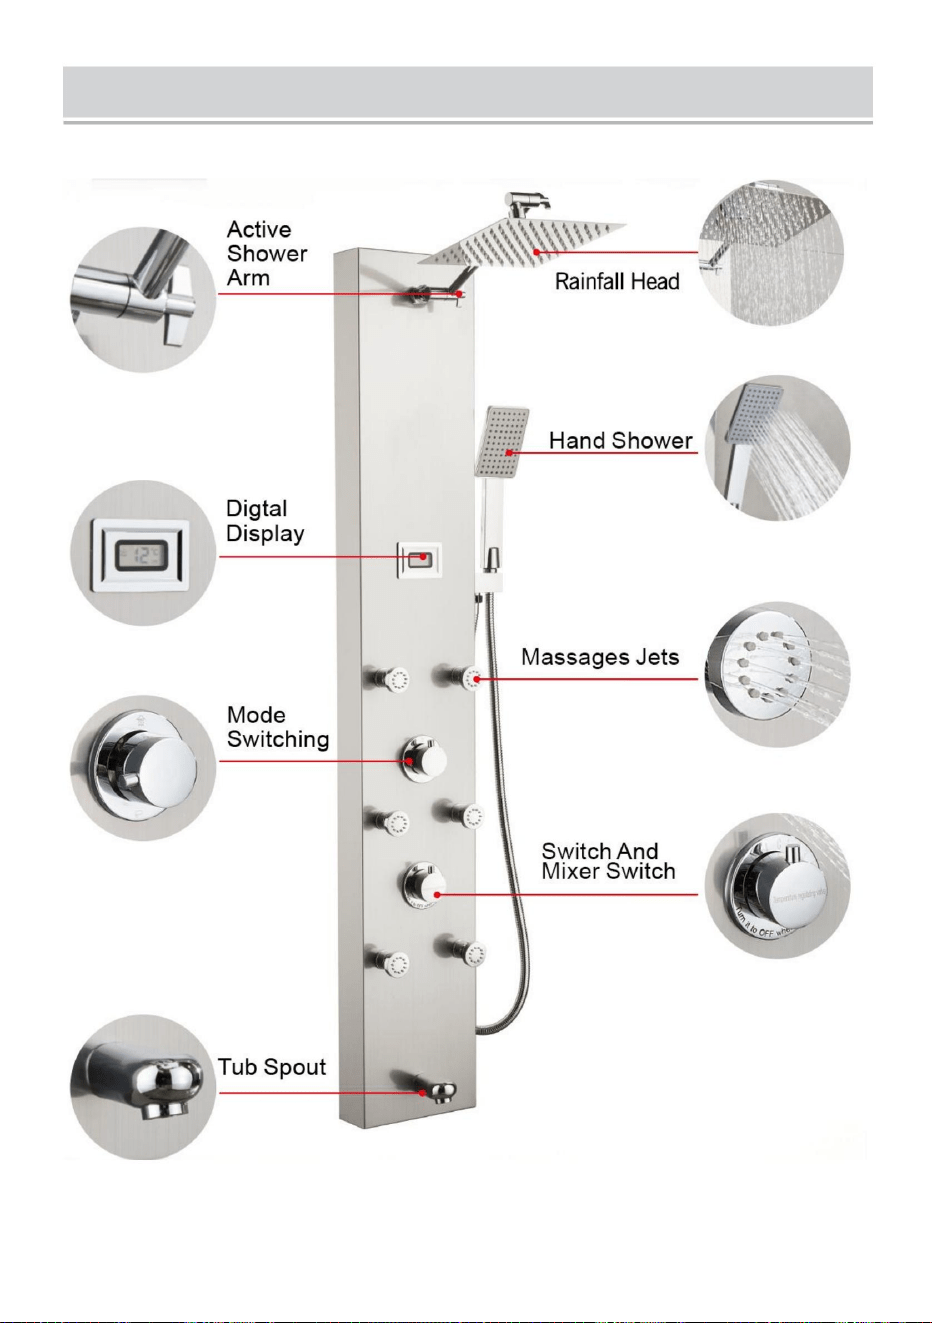
SHOWER PANEL SERIES INSTALLATION DIAGRAM

- 11 -
- 12 -
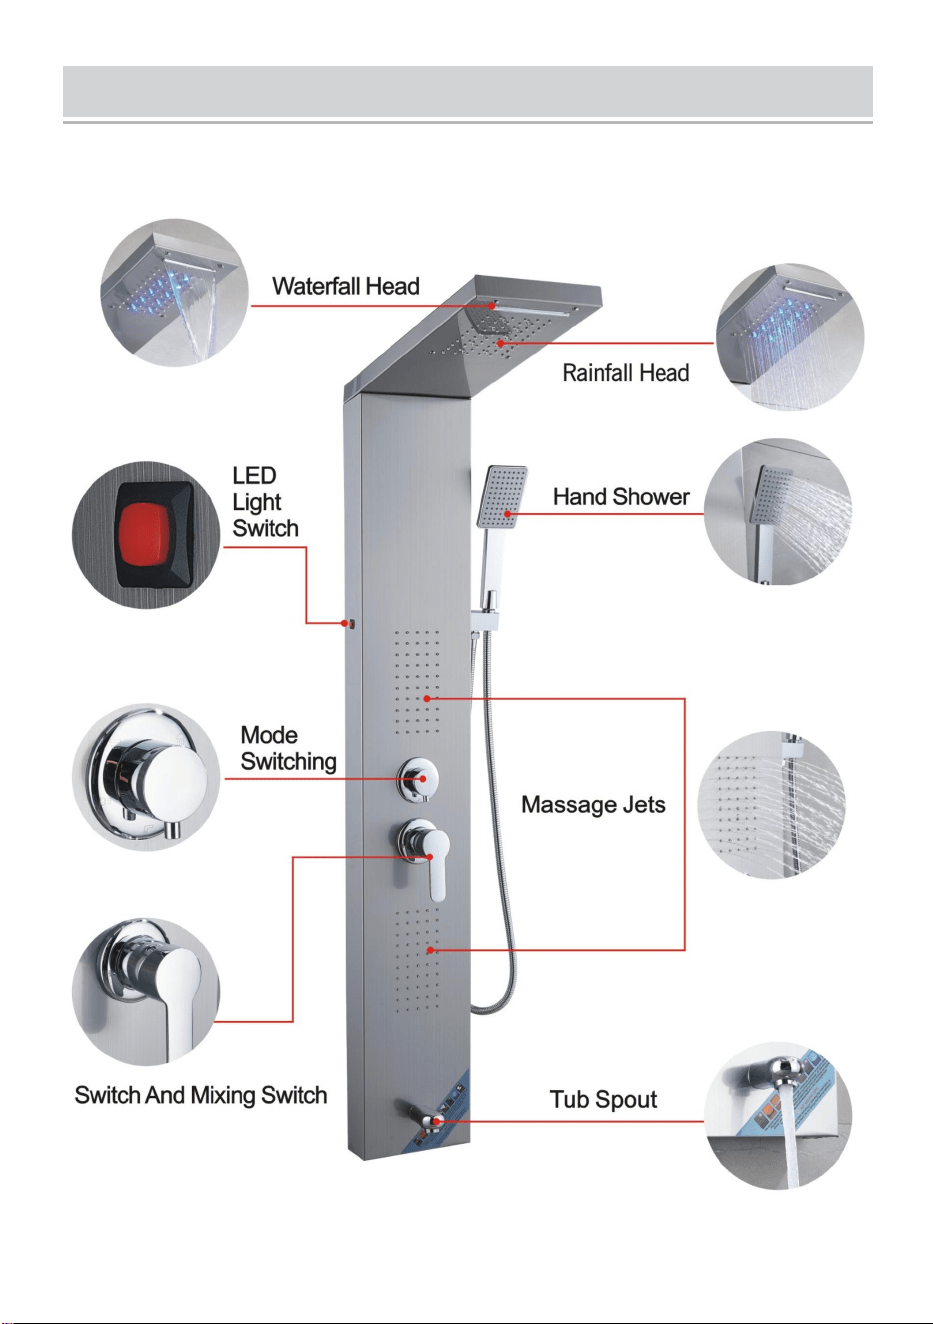
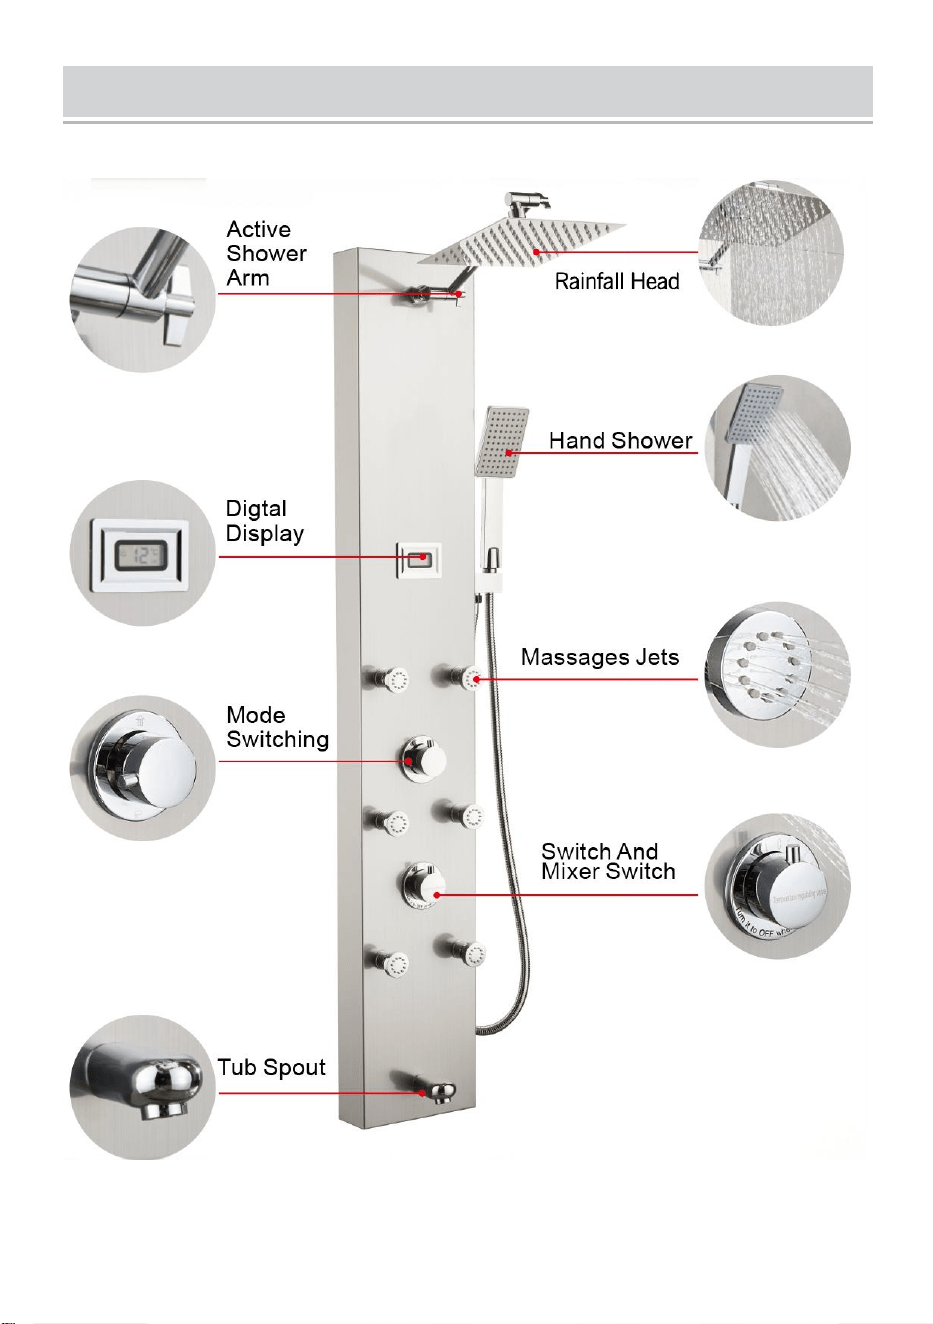
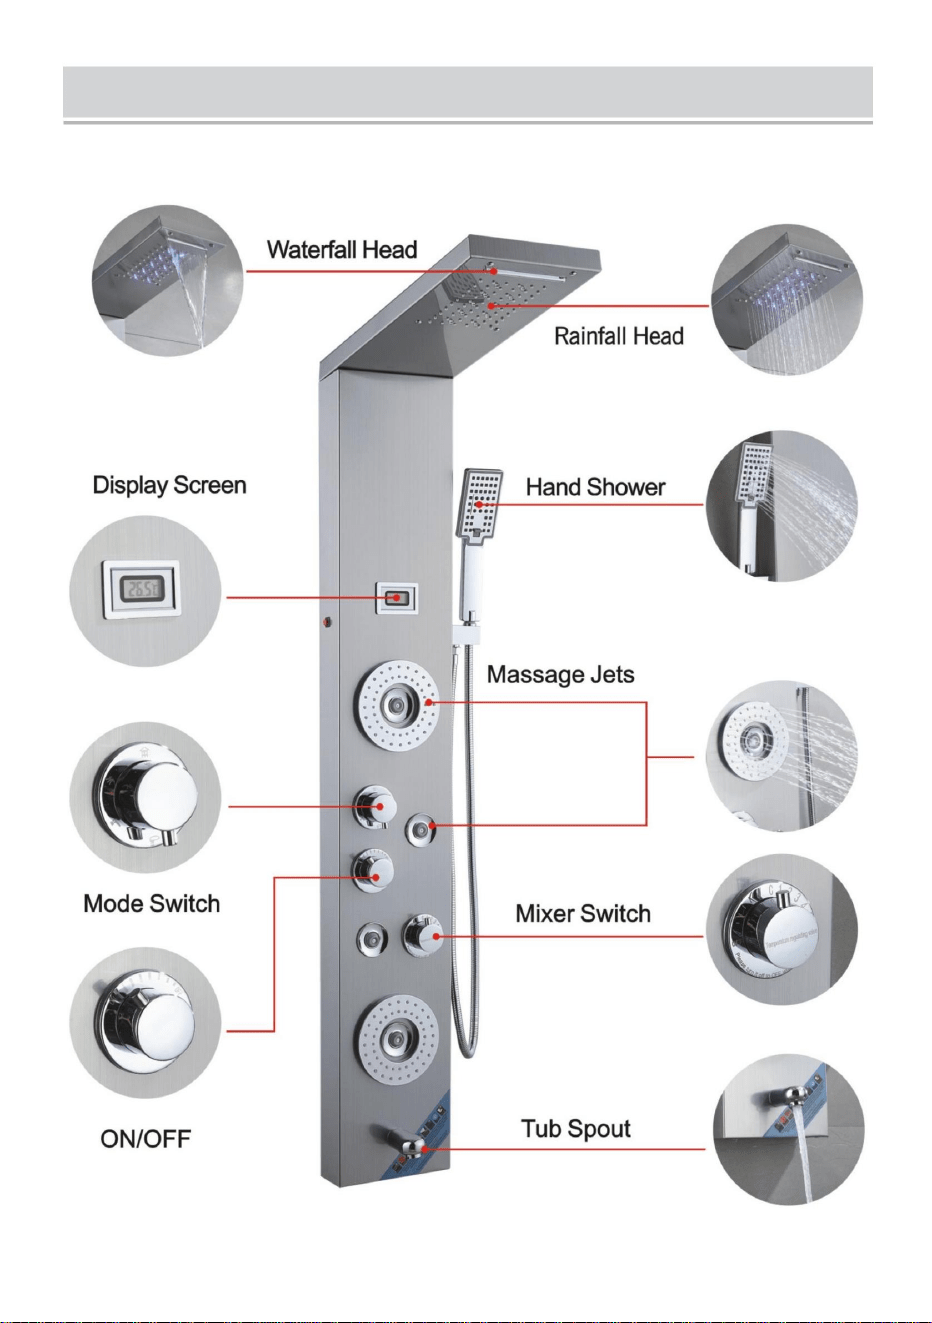
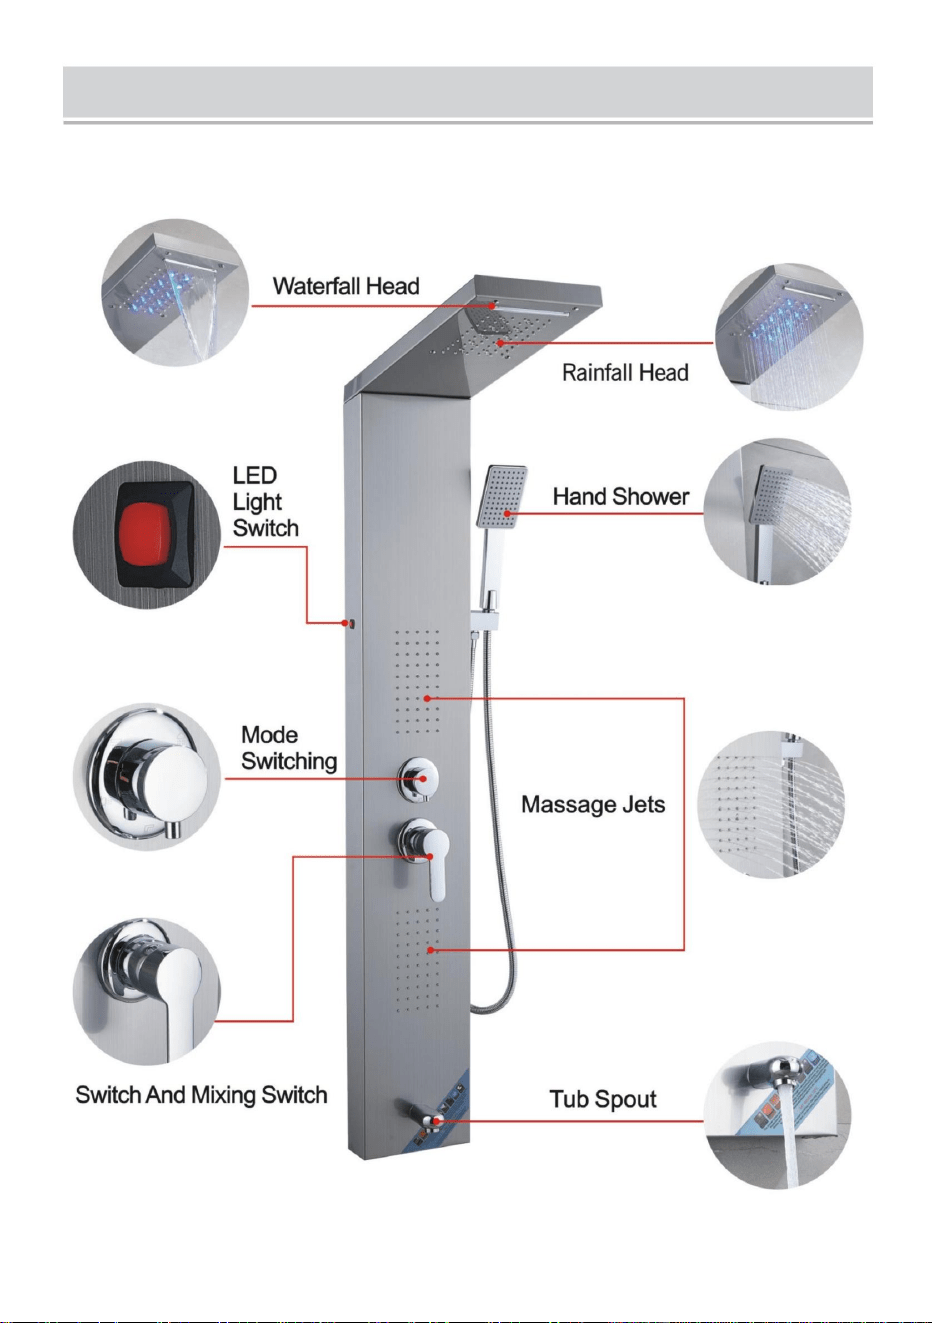
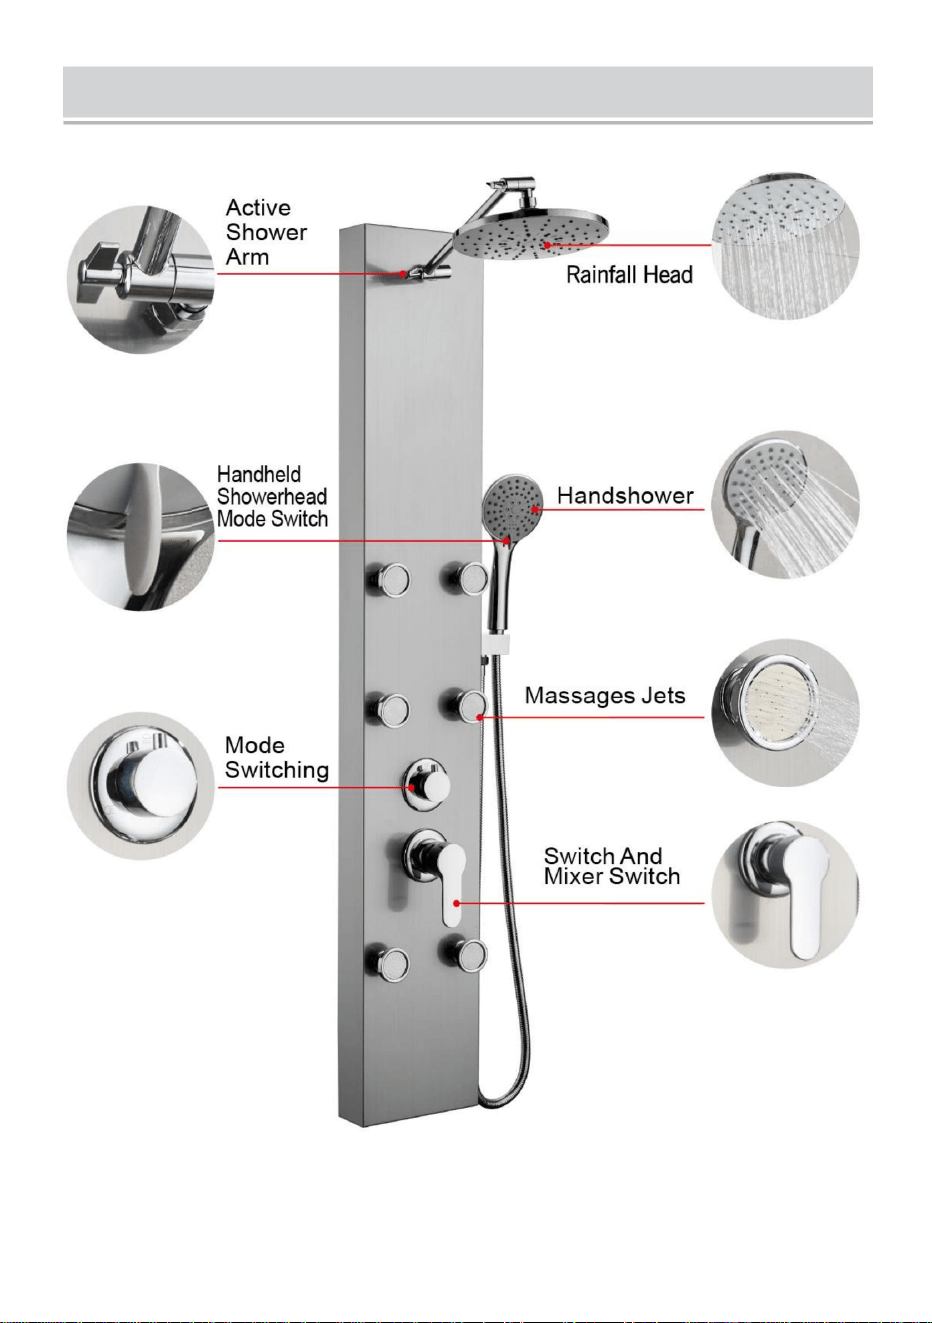
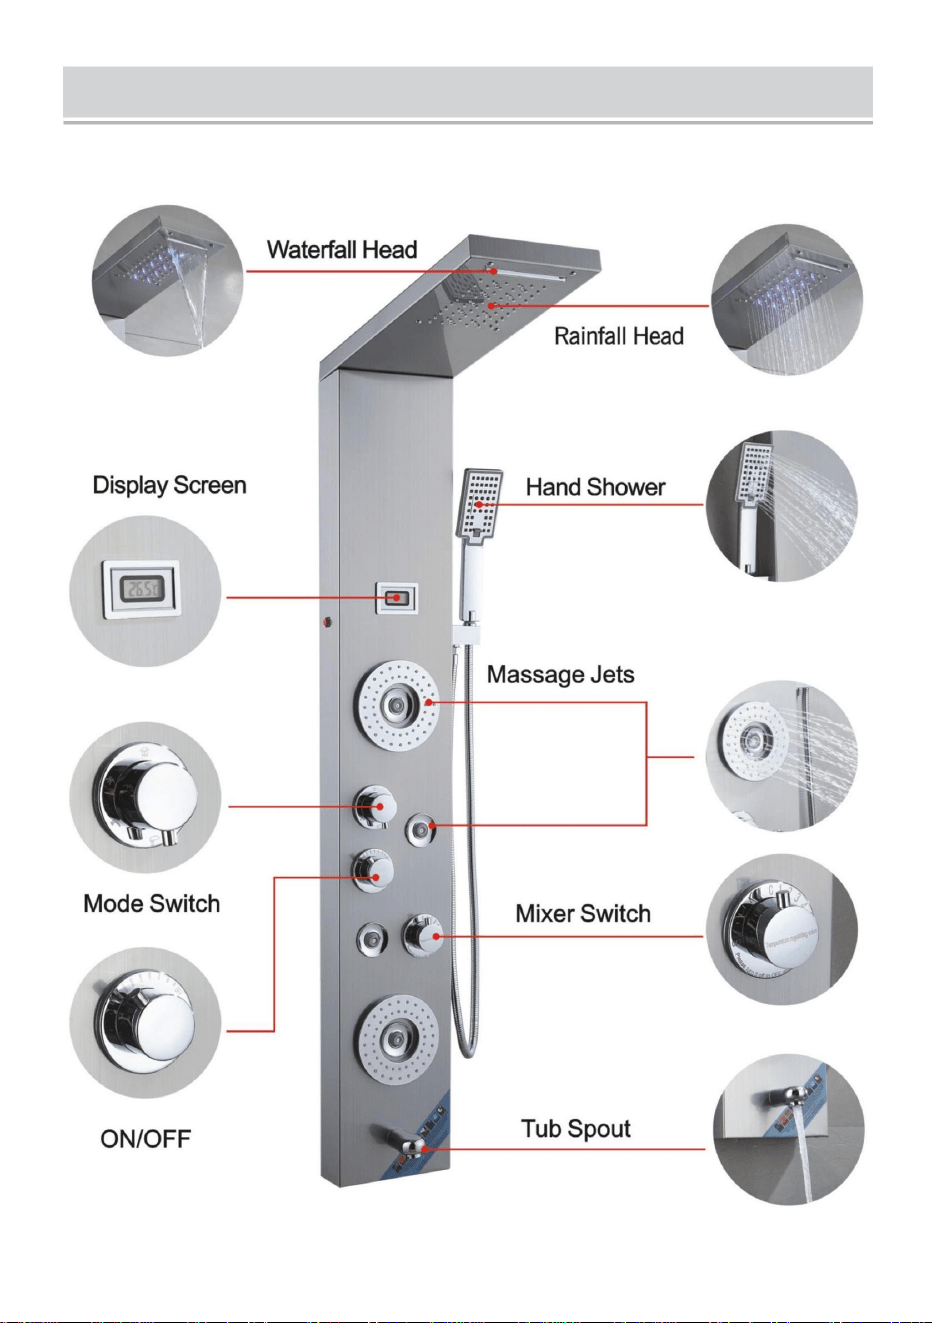
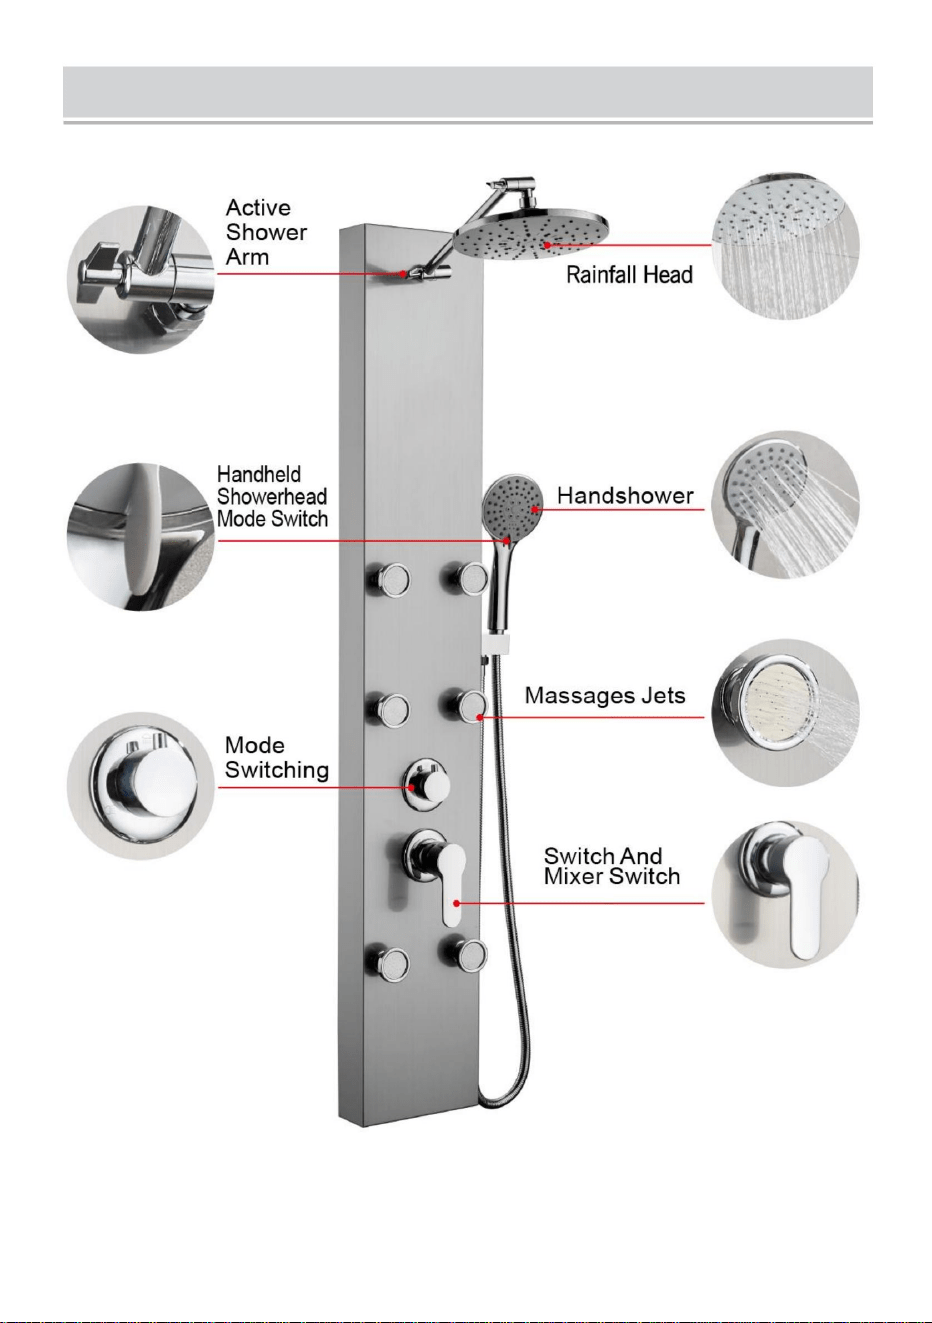
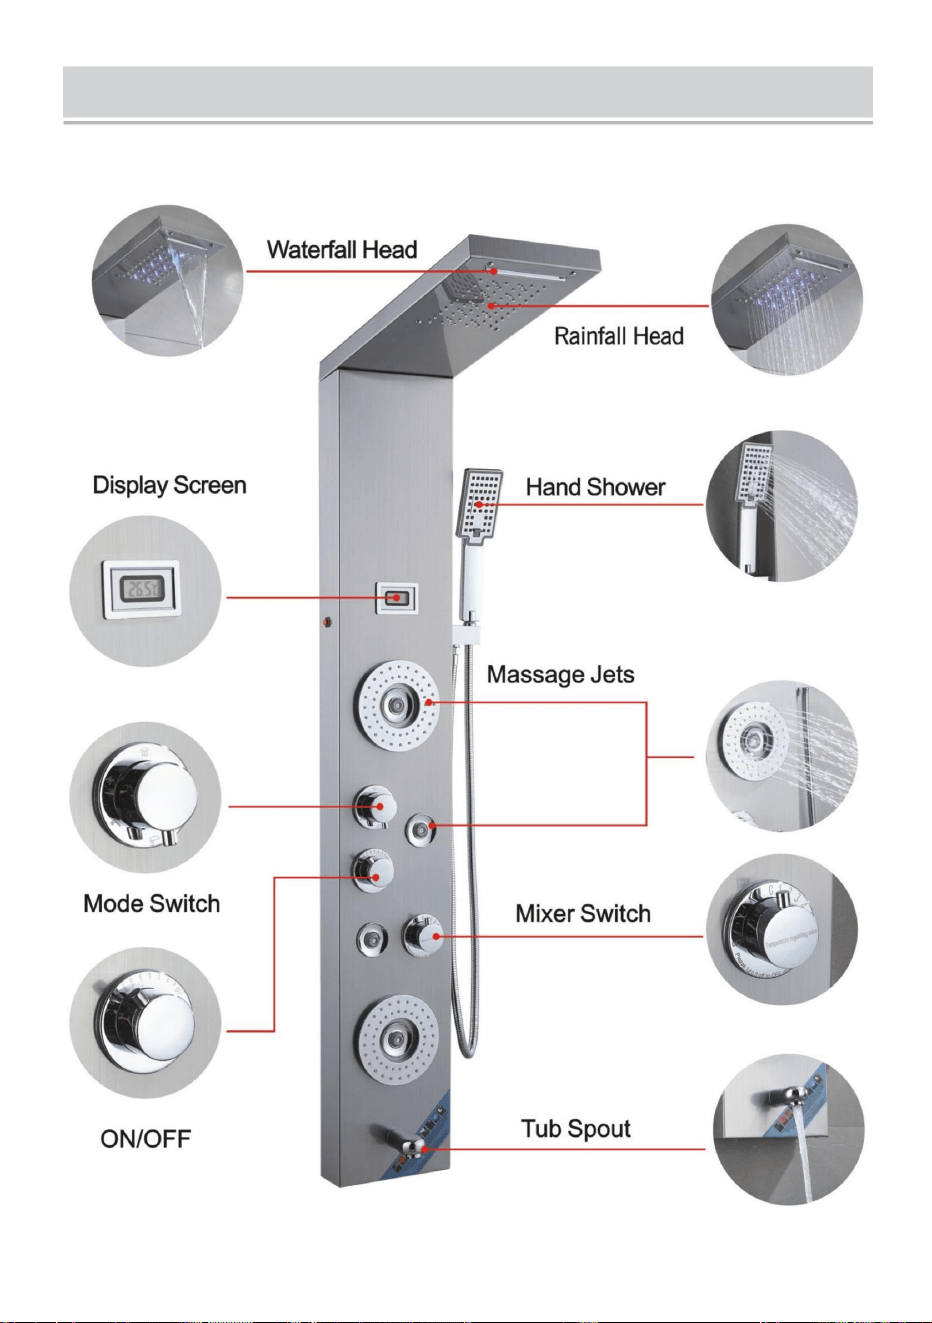
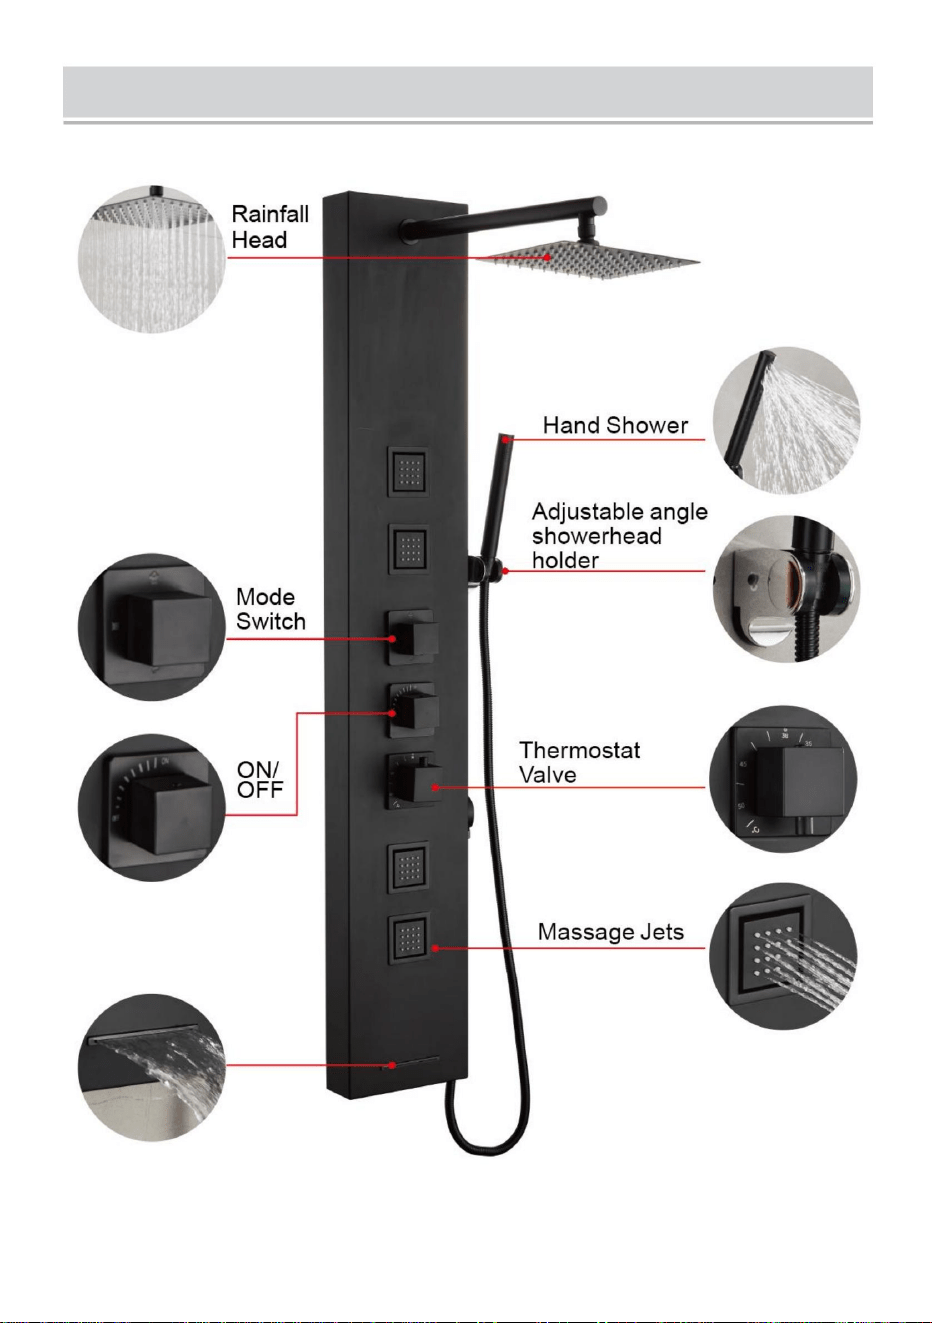
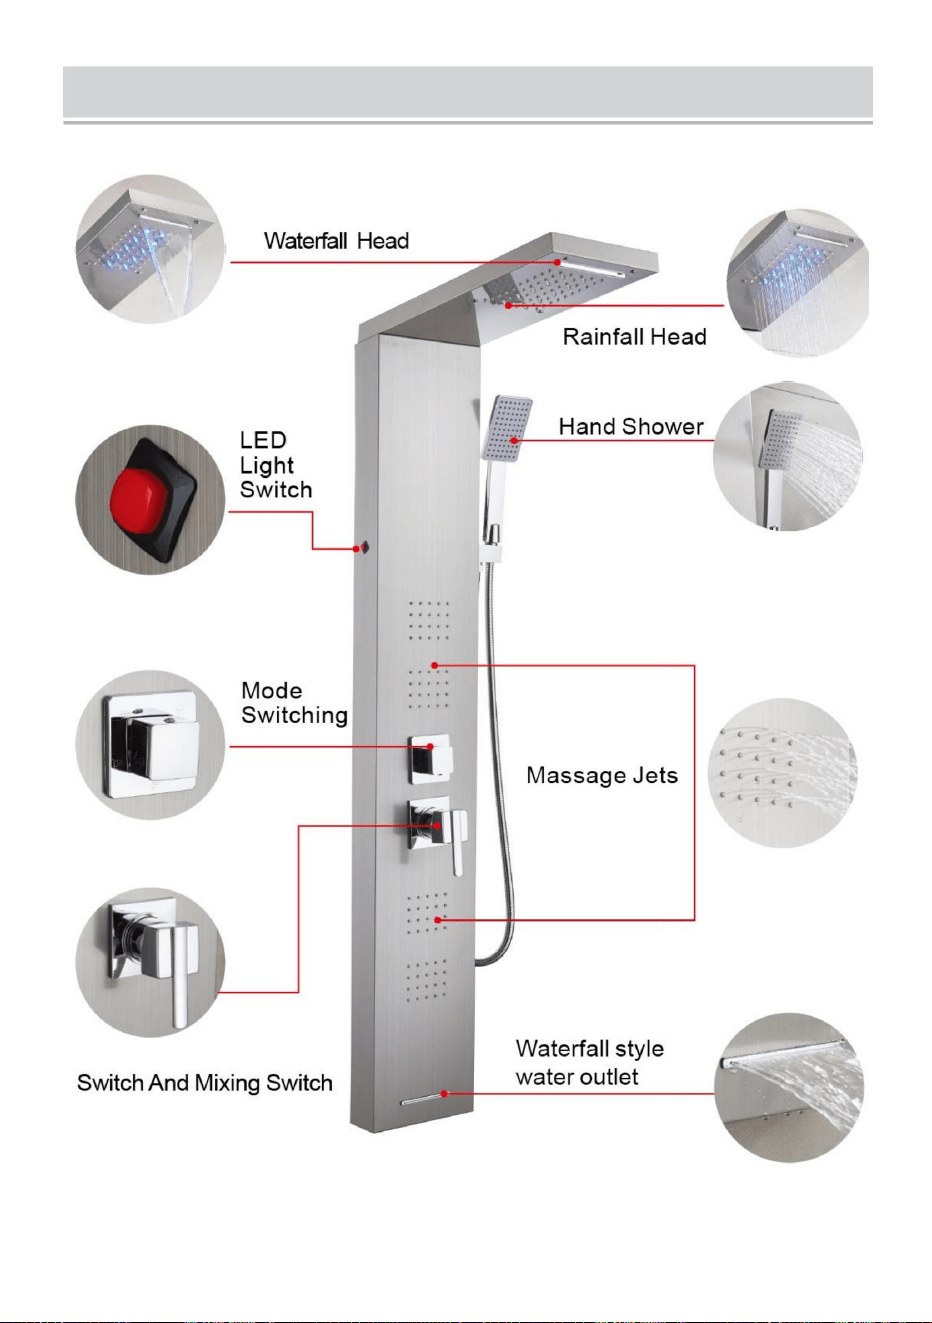
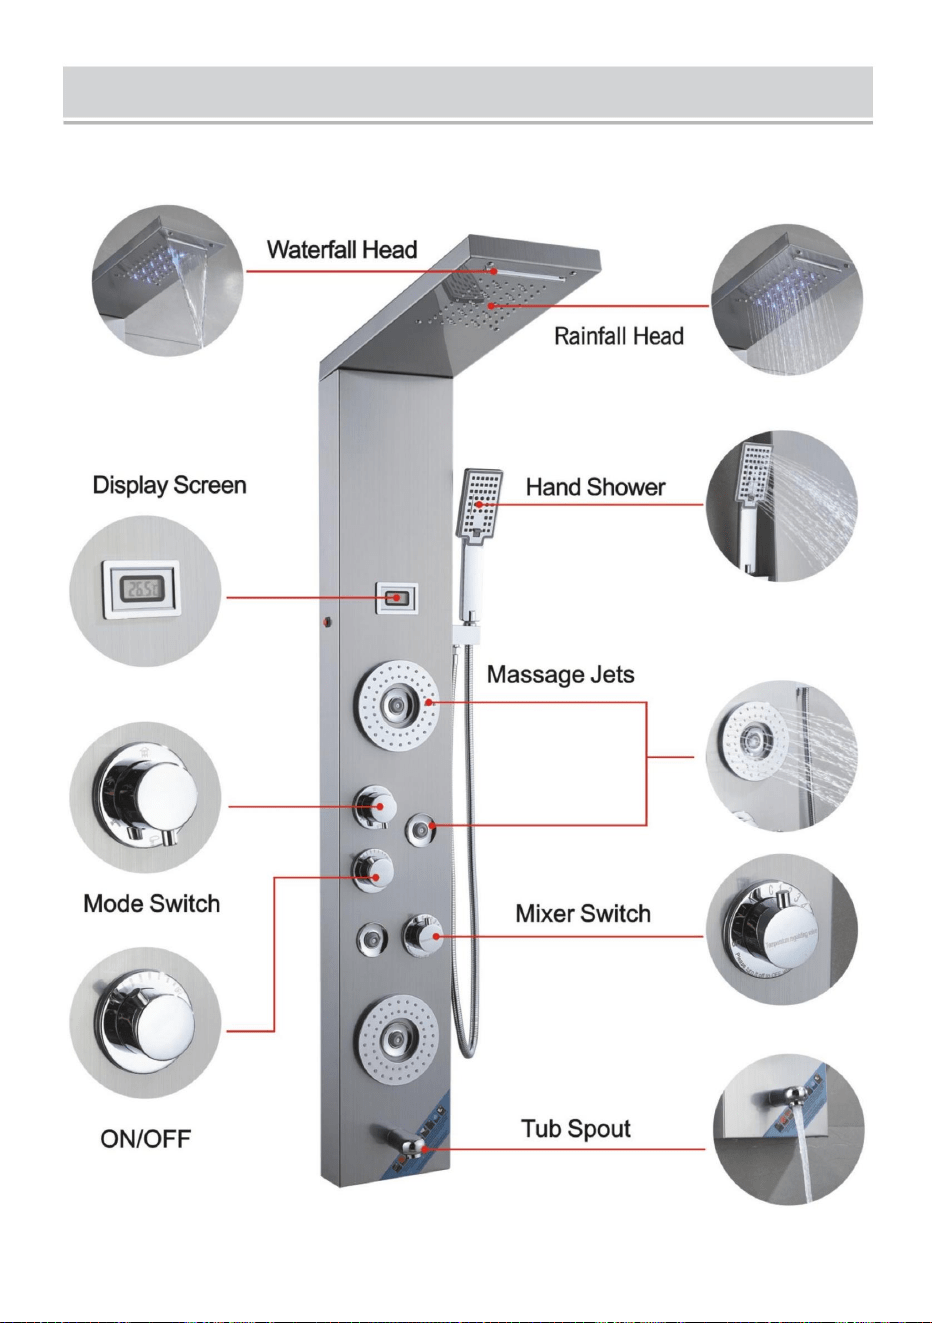
FUNCTION INTRODUCTION
6002FL / 6012FL
- 13 -
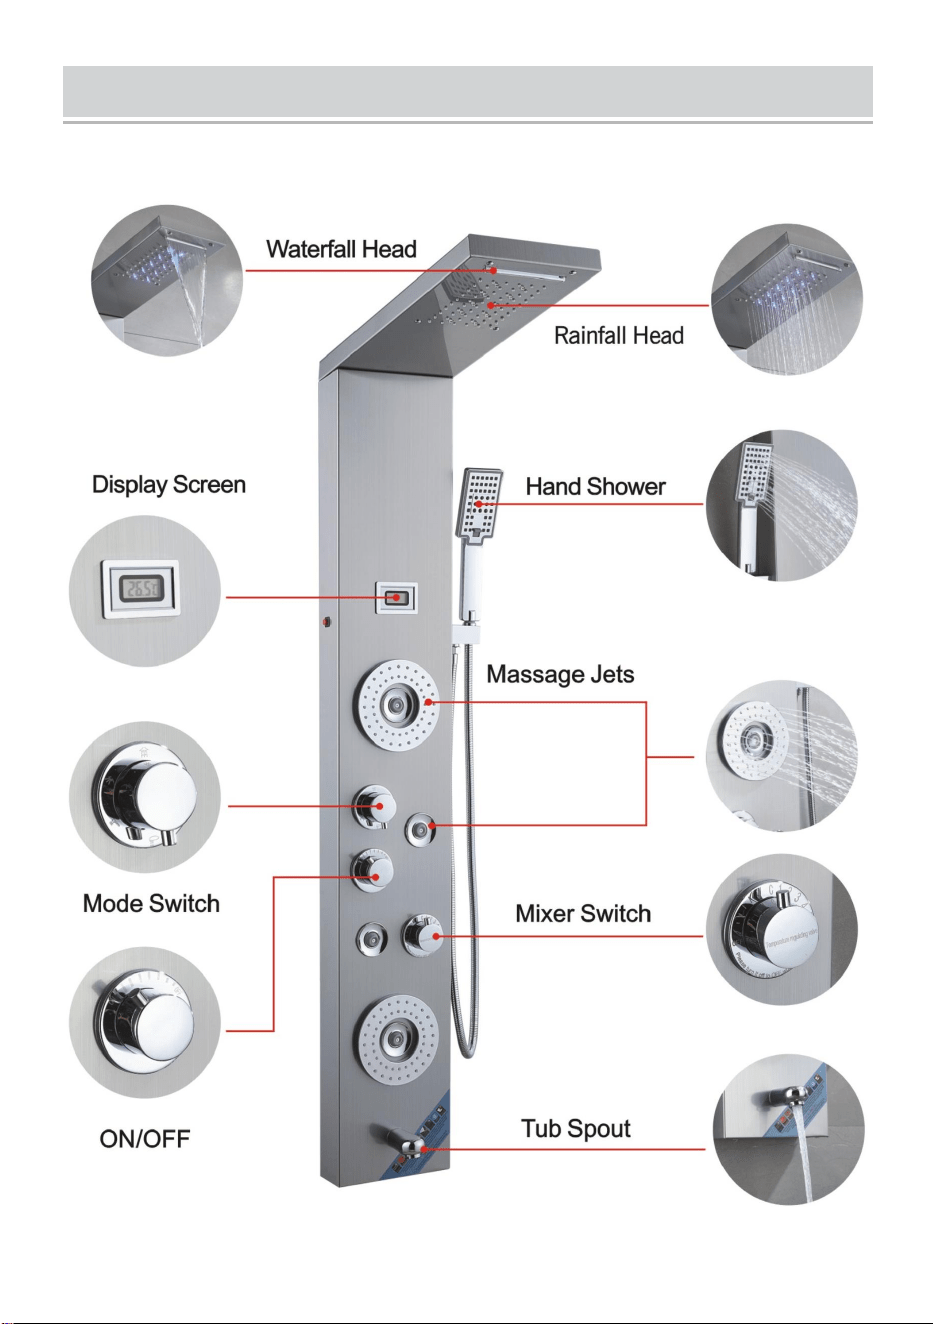
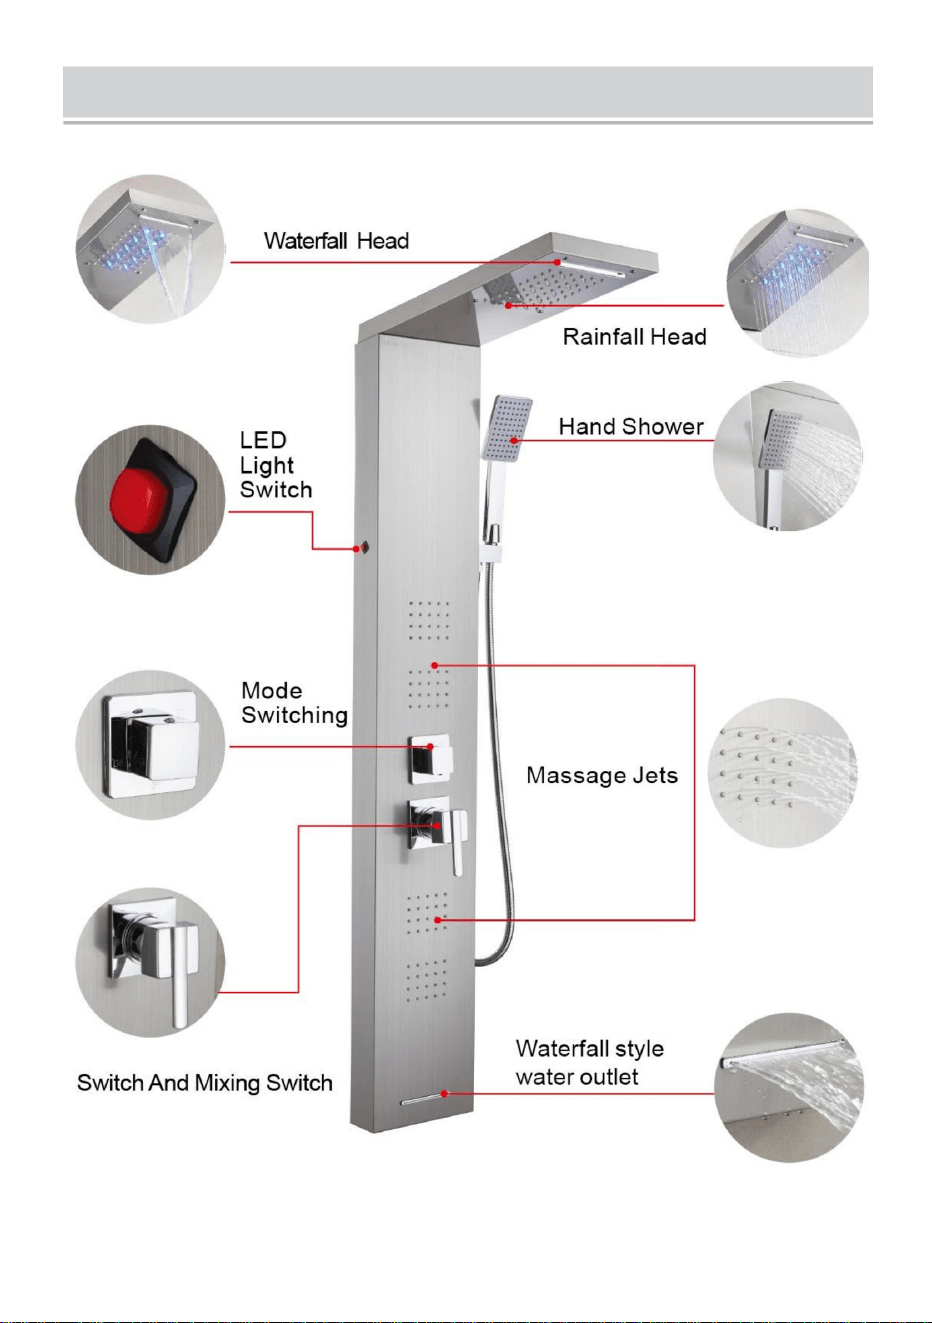
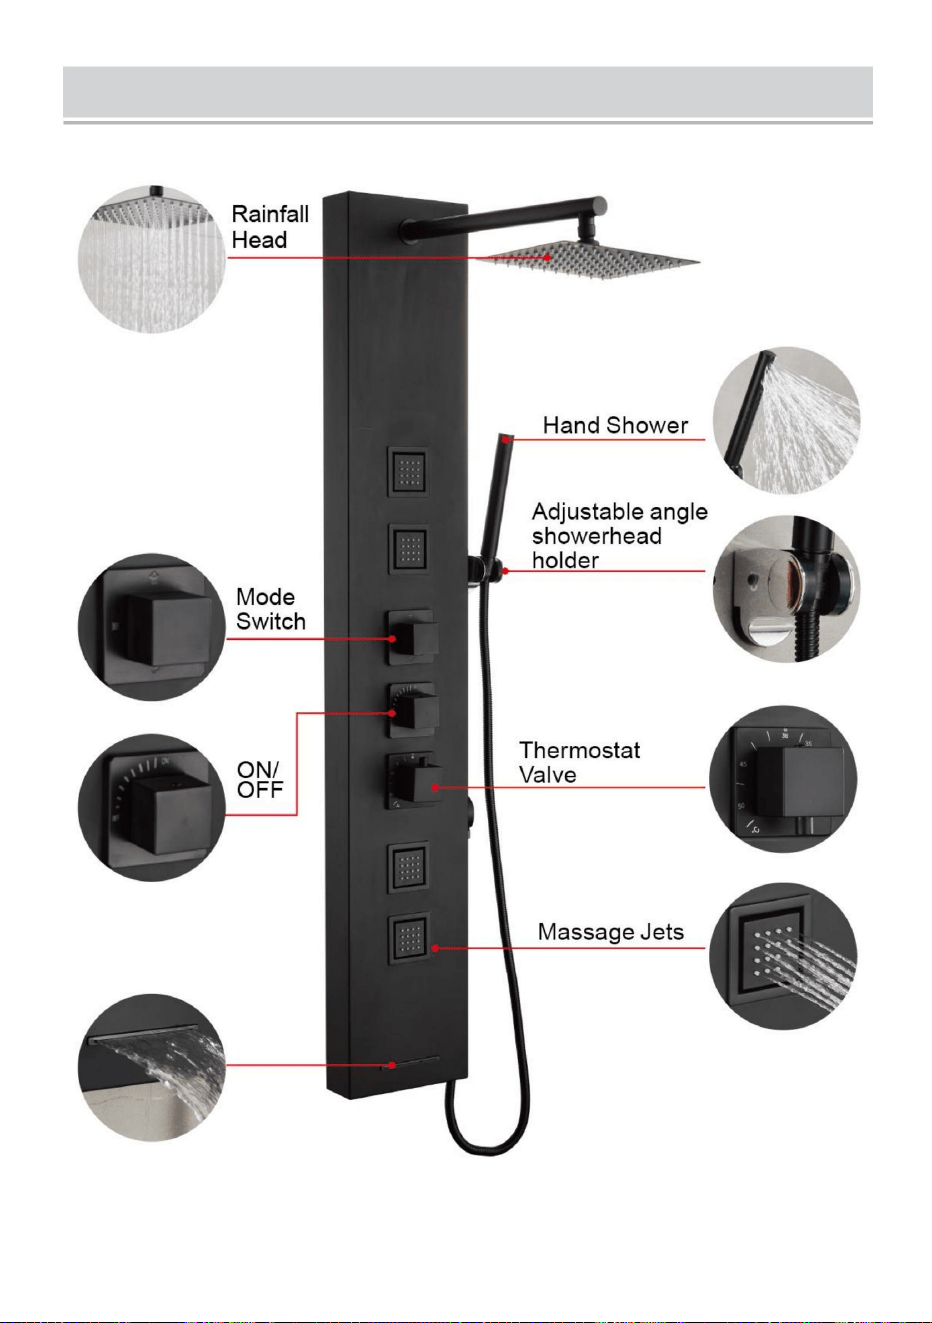
FUNCTION INTRODUCTION
8039FL
- 14 -
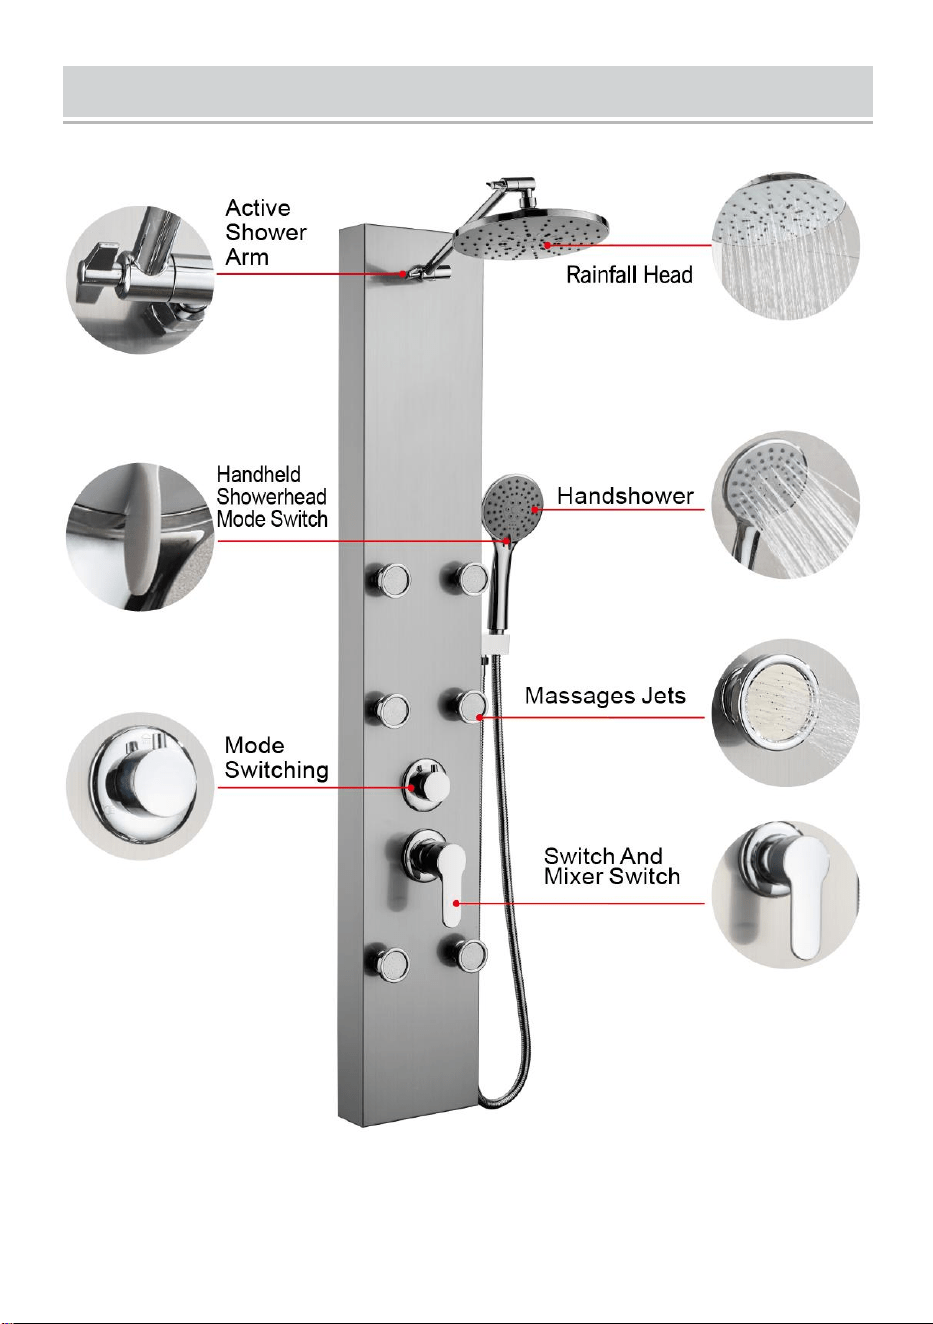
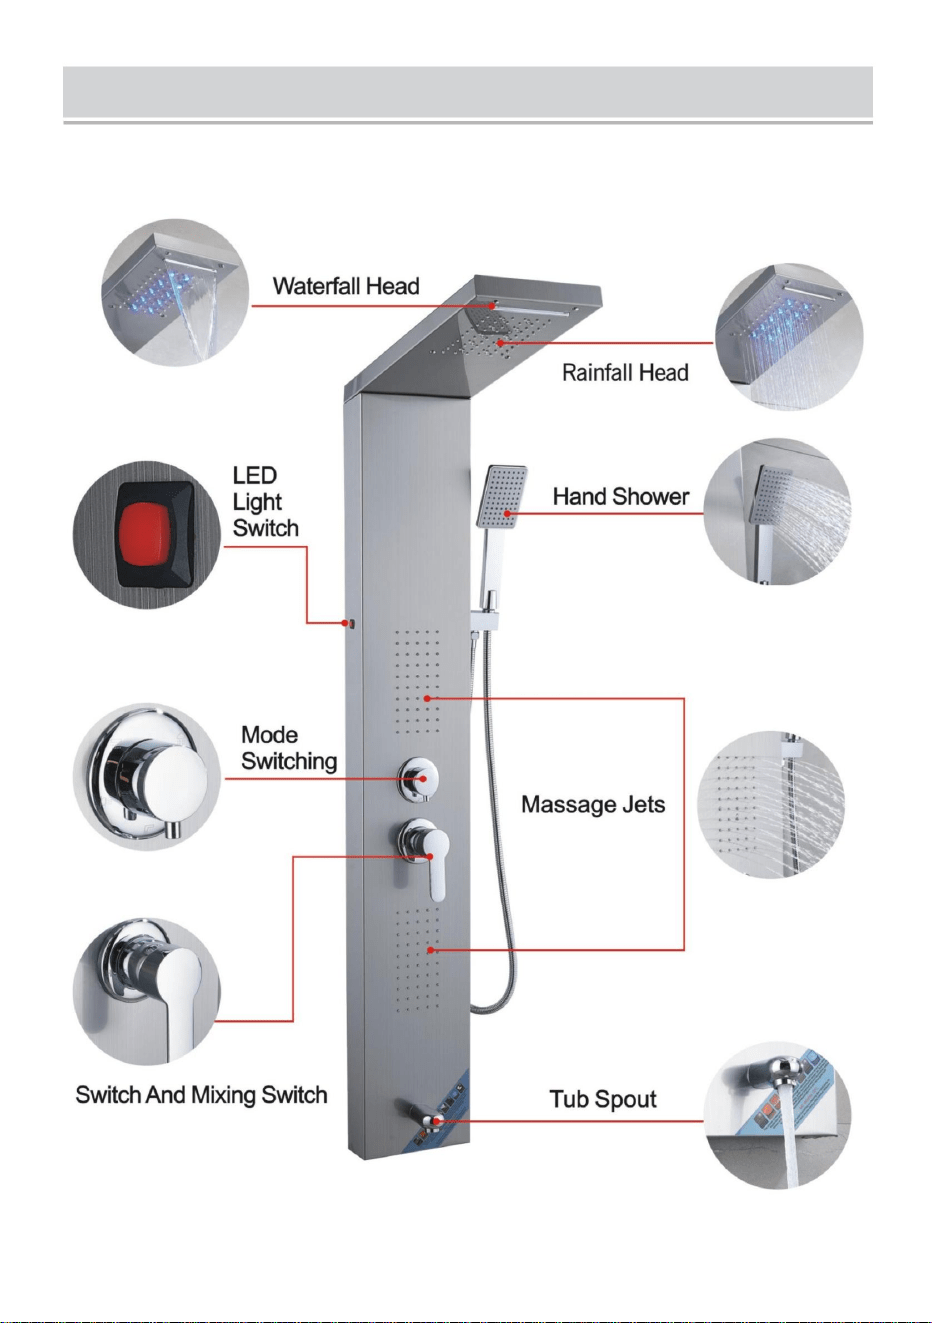
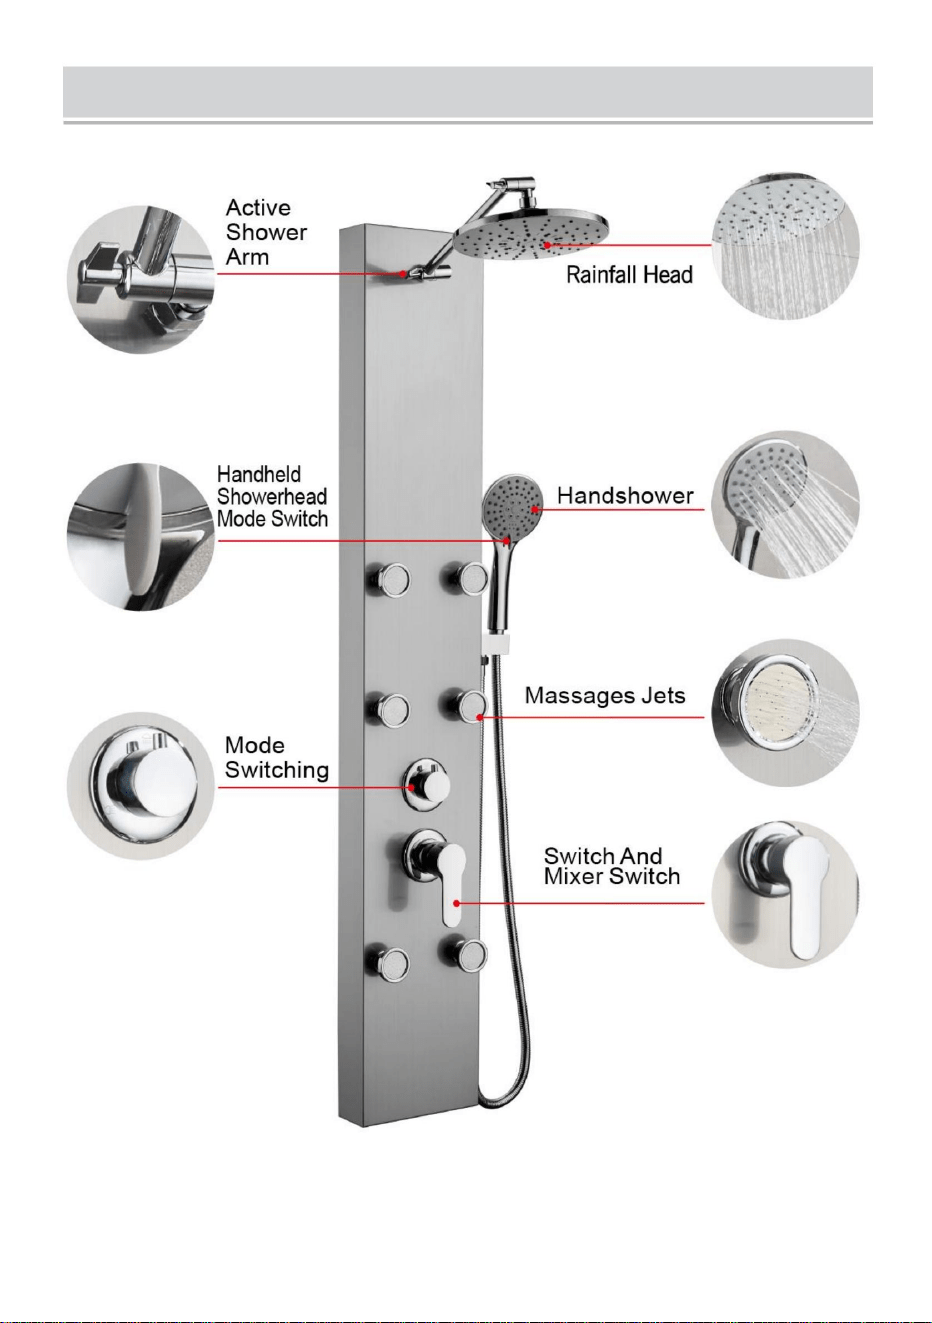
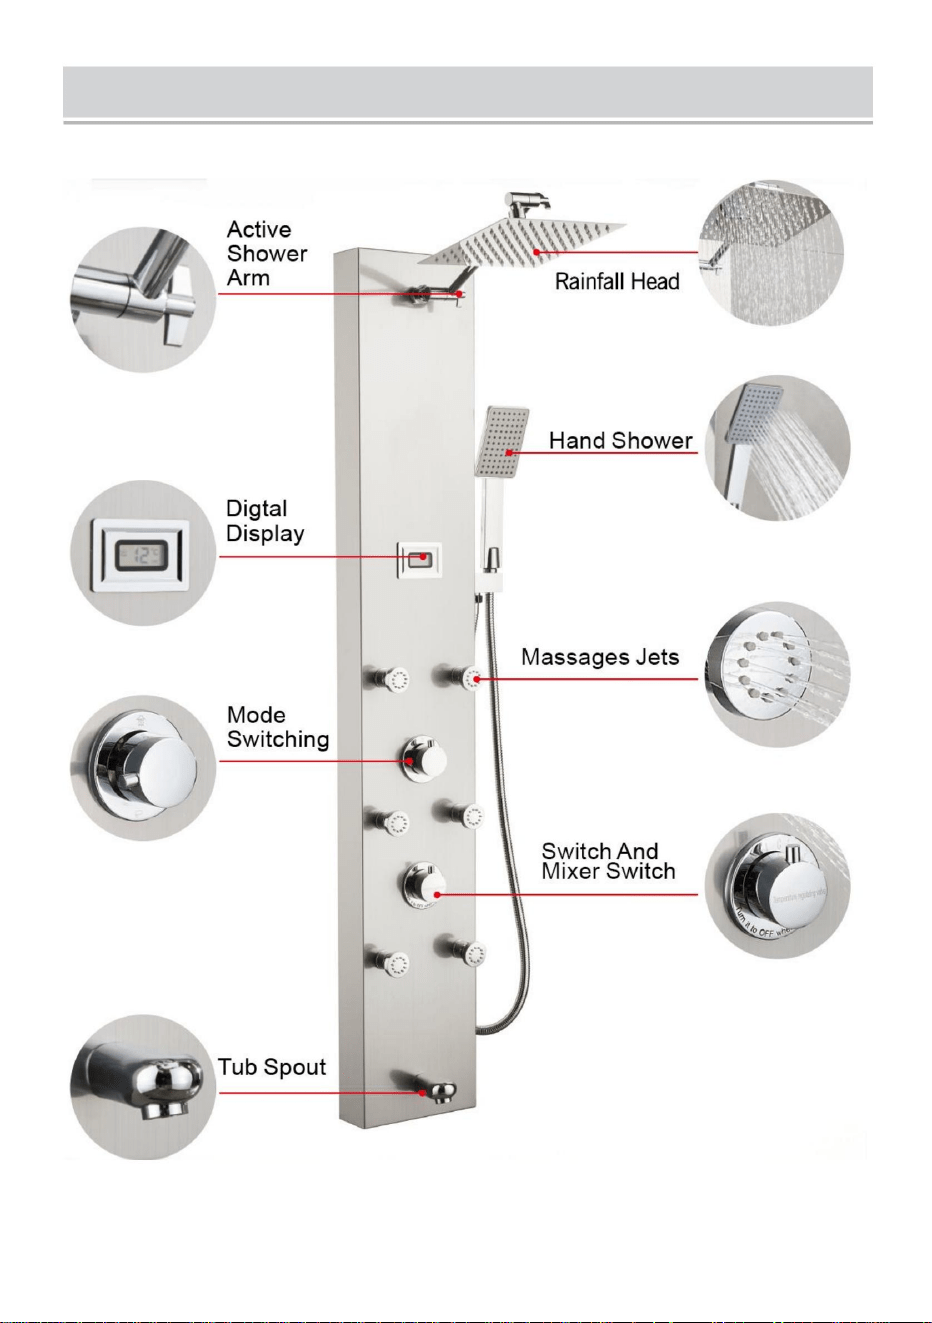
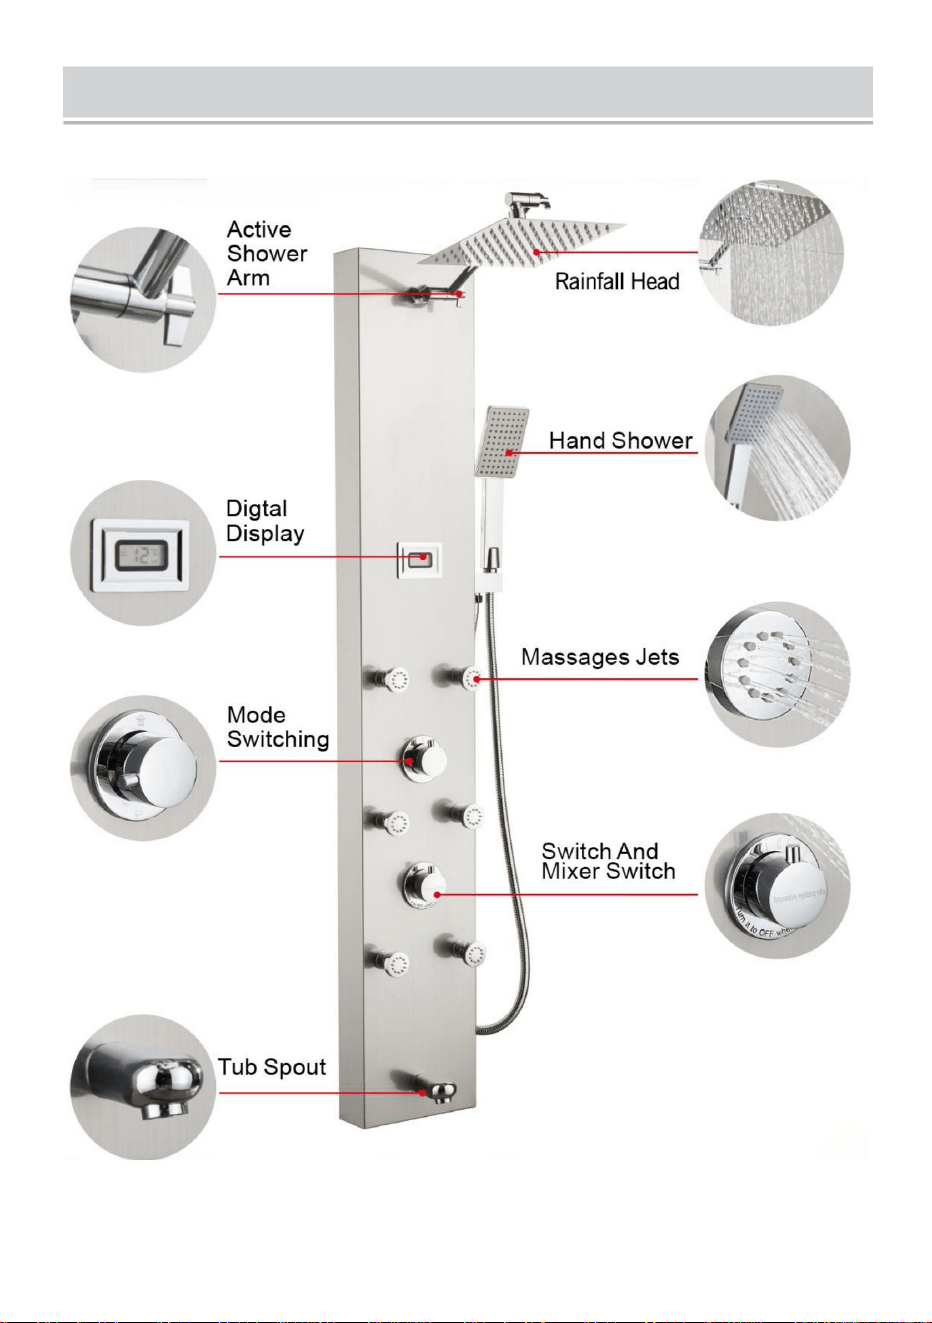
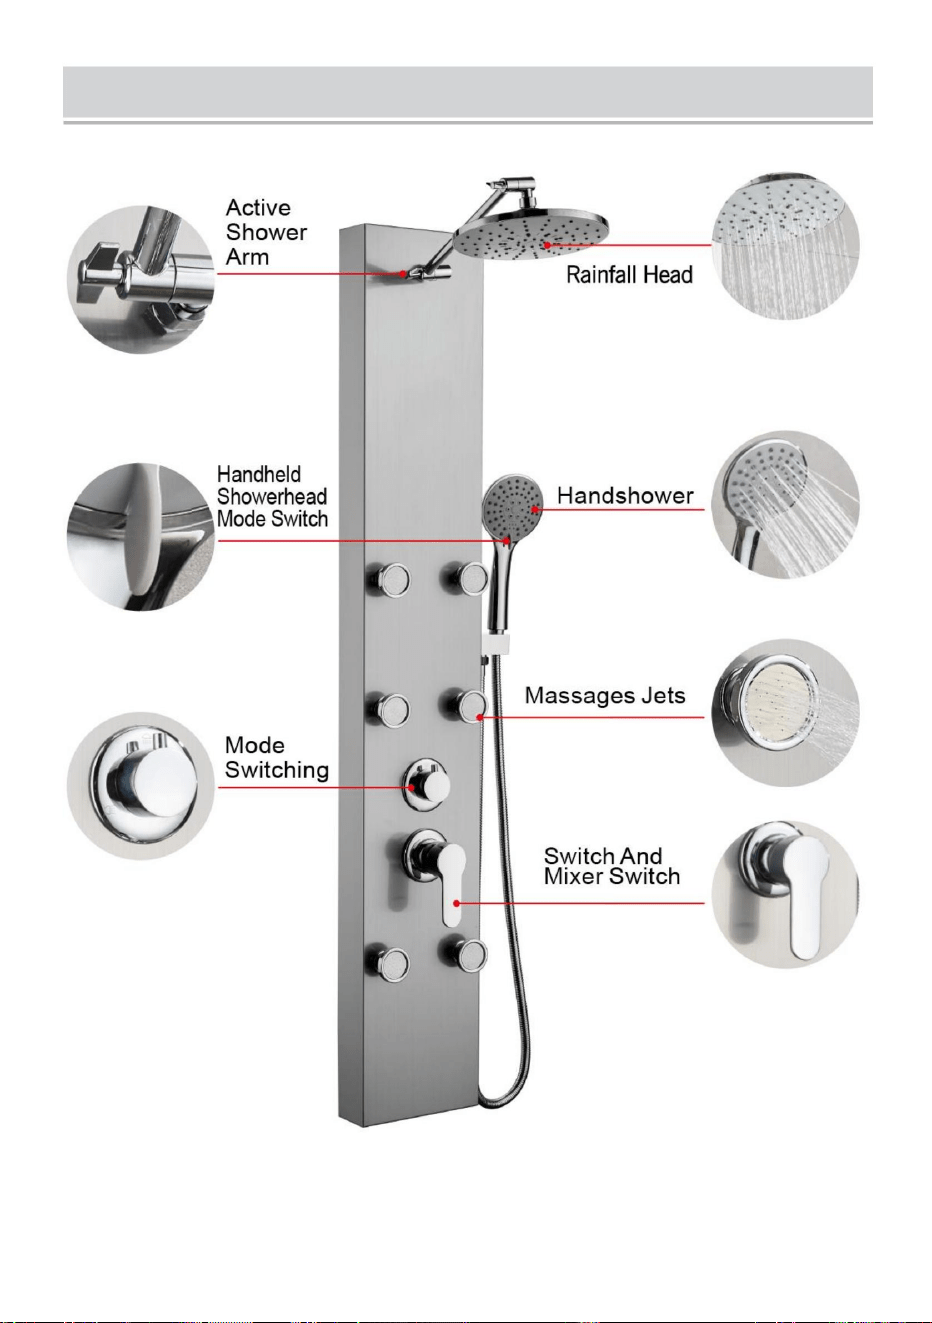
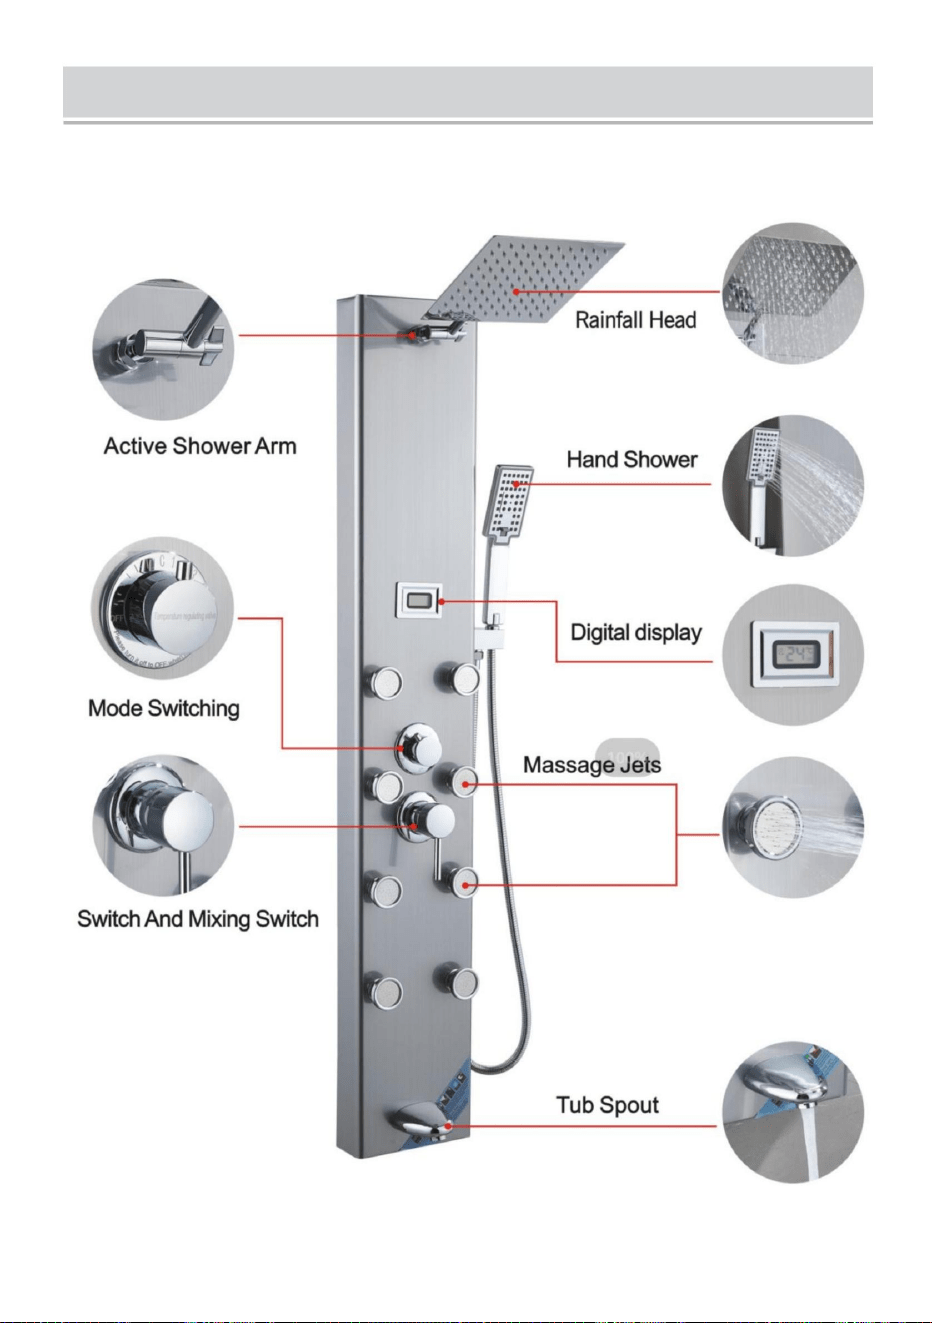
FUNCTION INTRODUCTION
7009FL

- 15 -
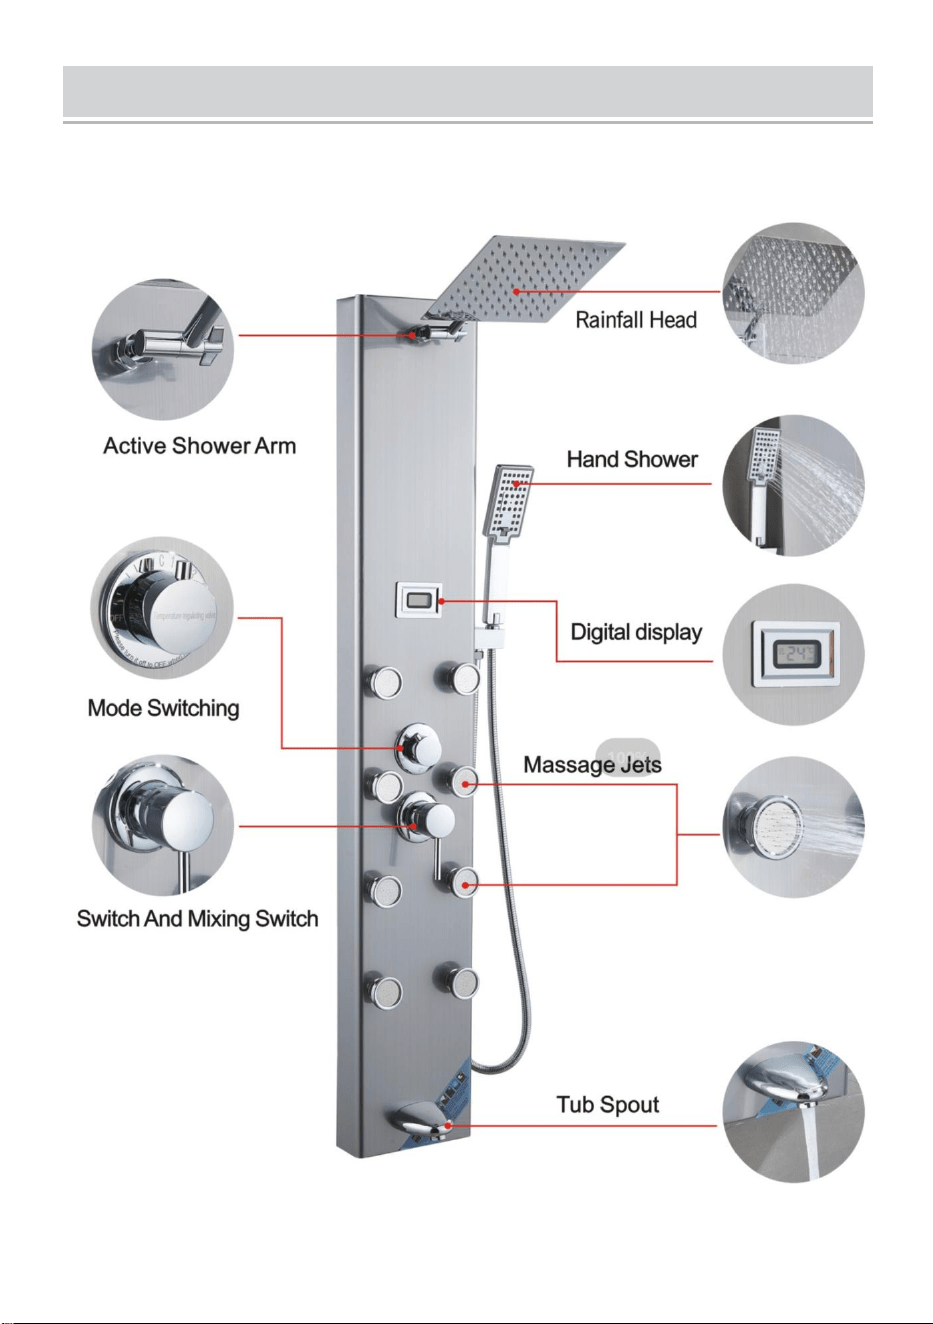
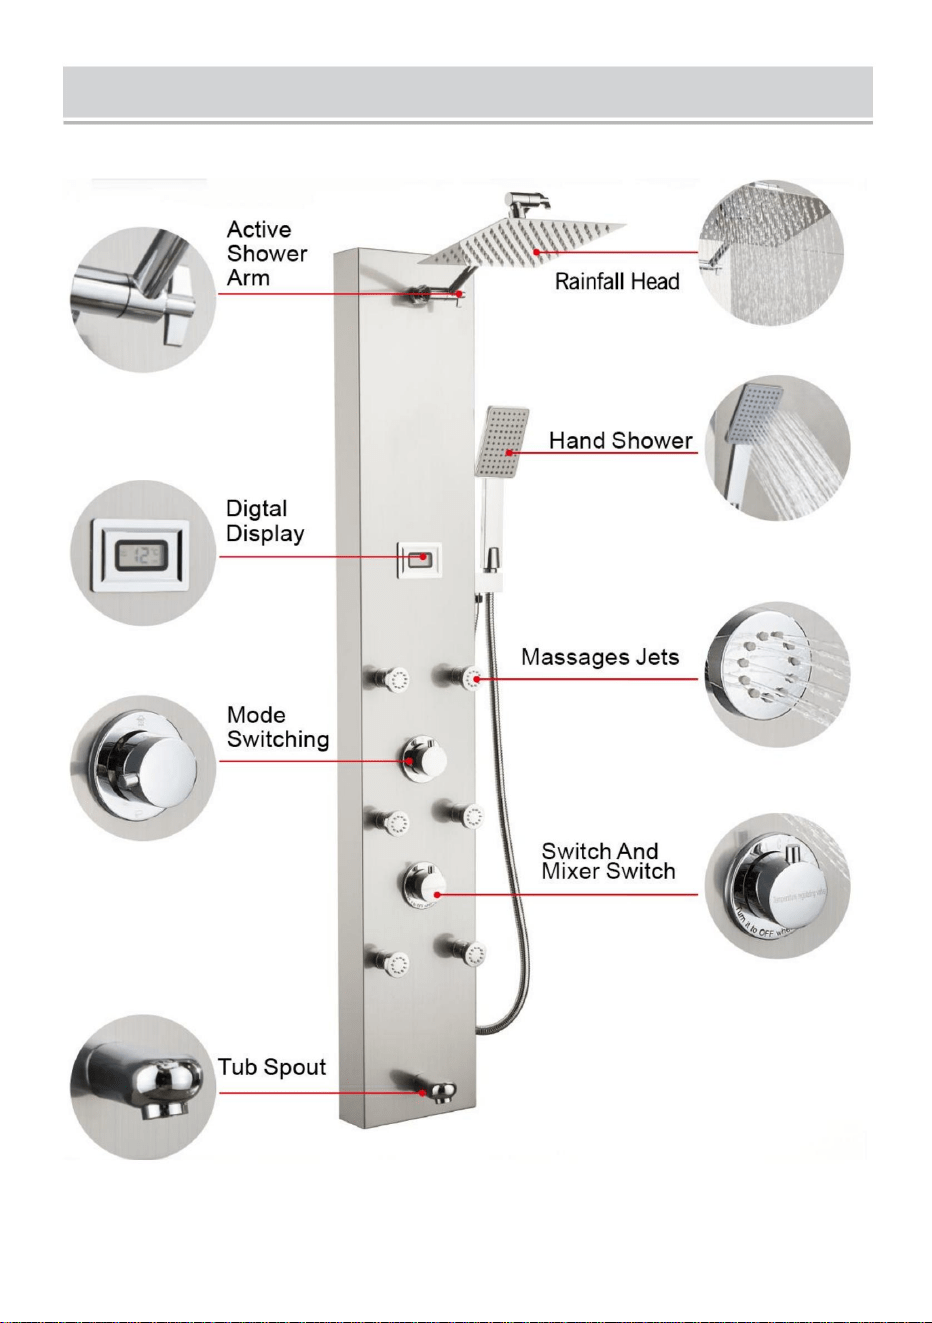
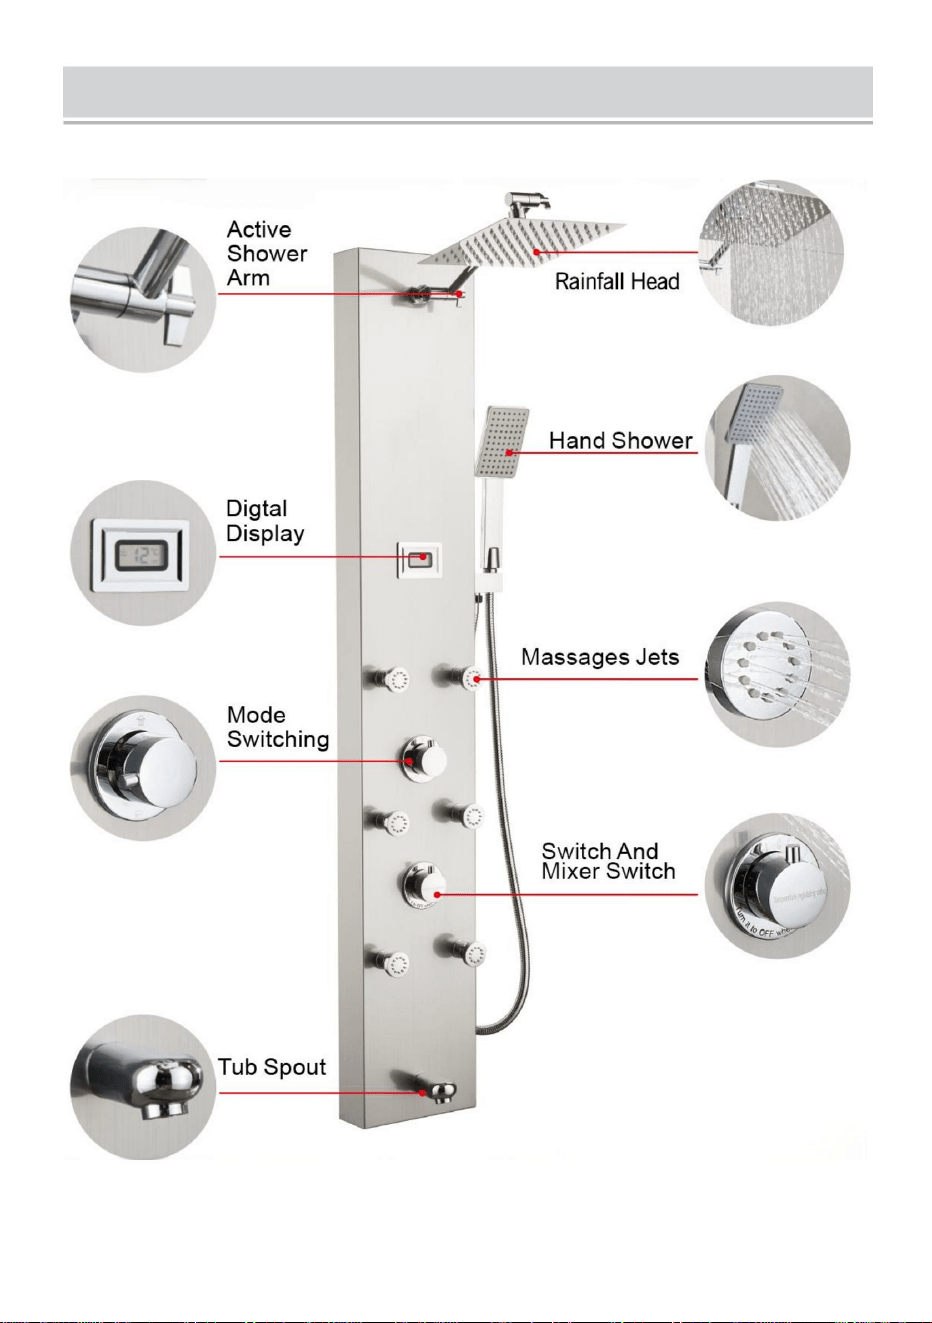
FUNCTION INTRODUCTION
8124FL
- 16 -
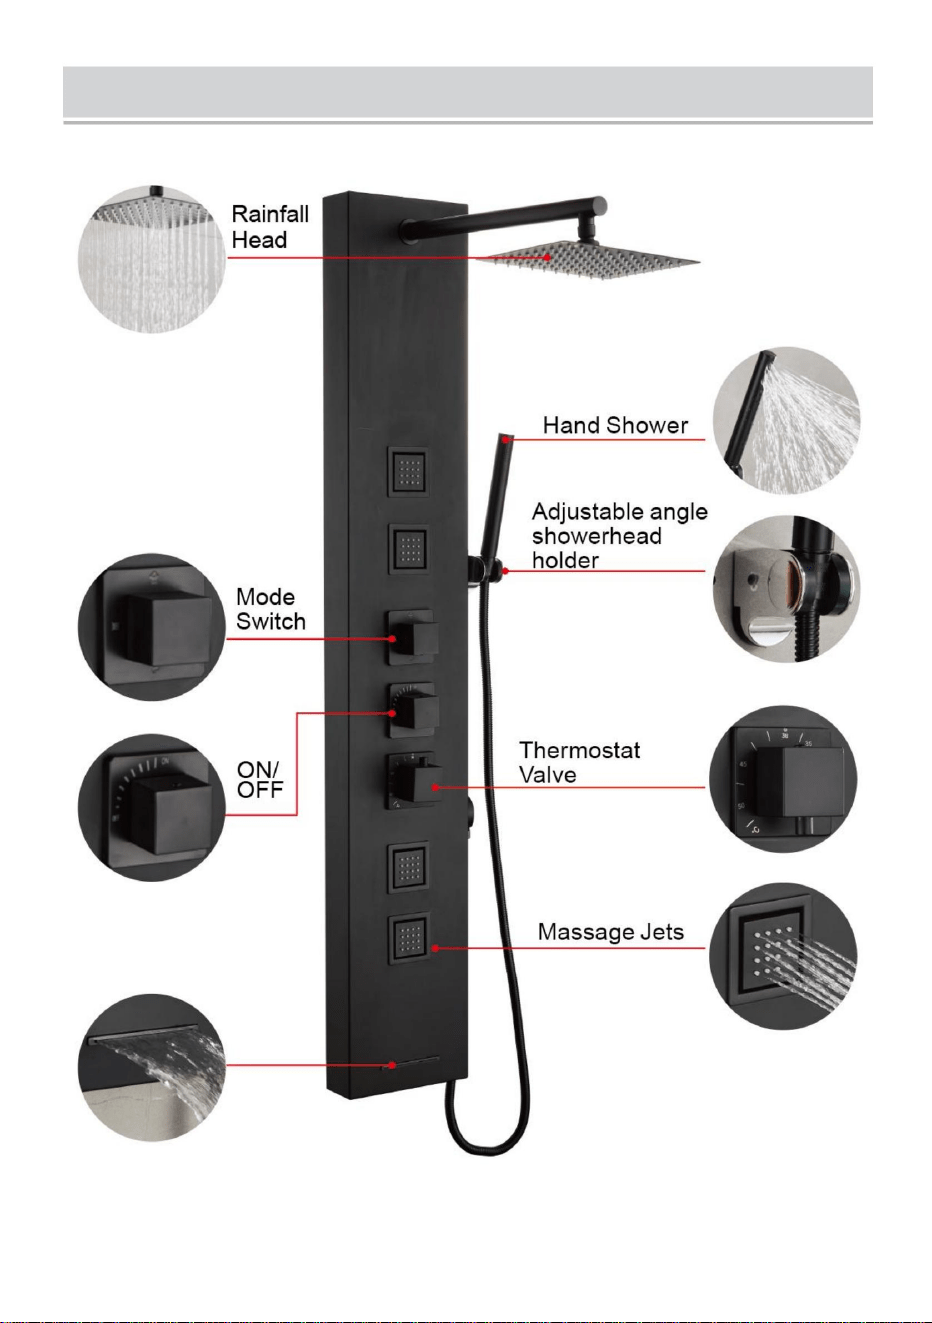
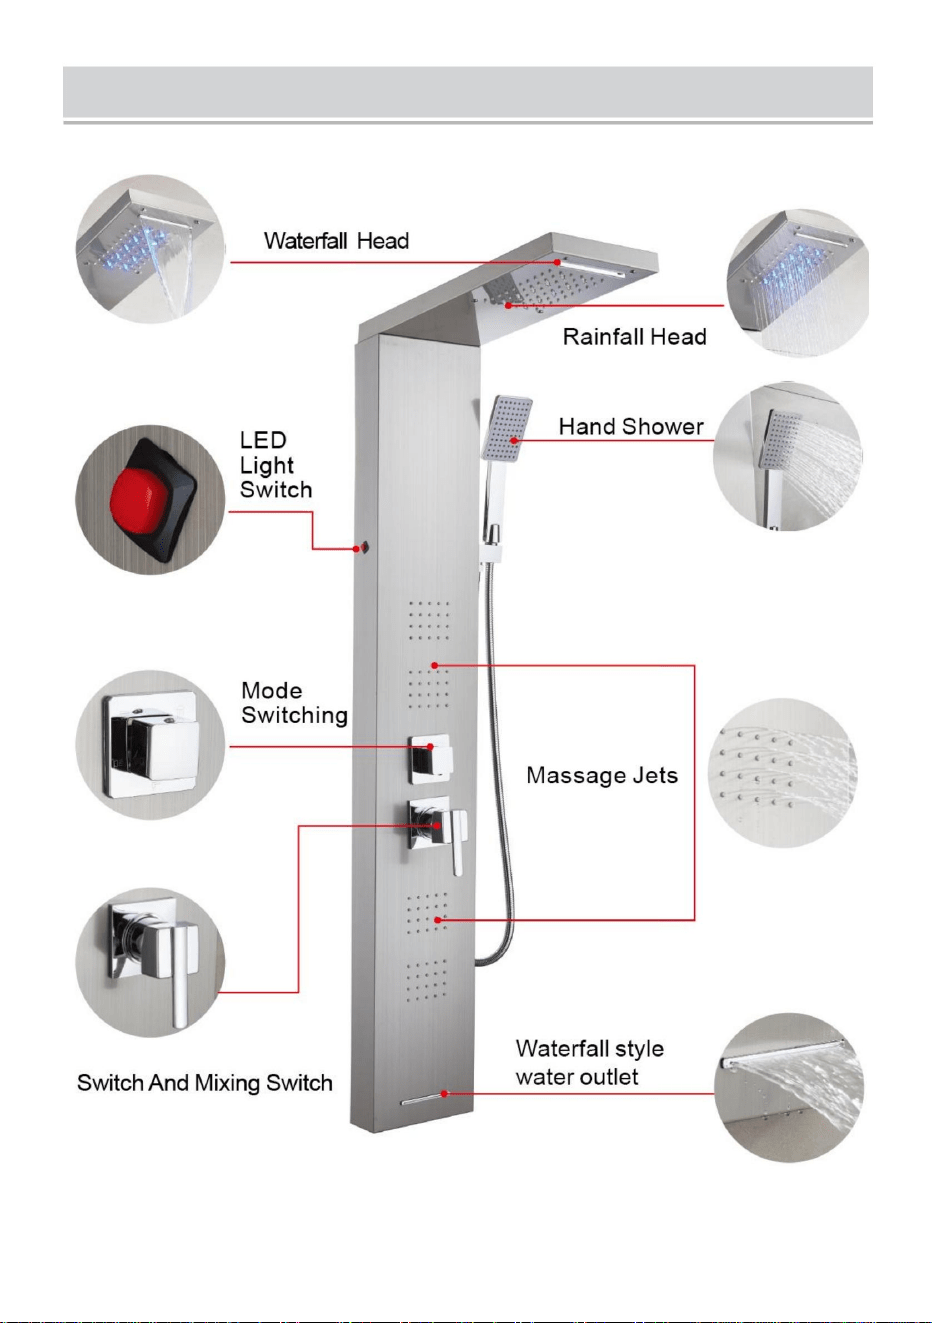
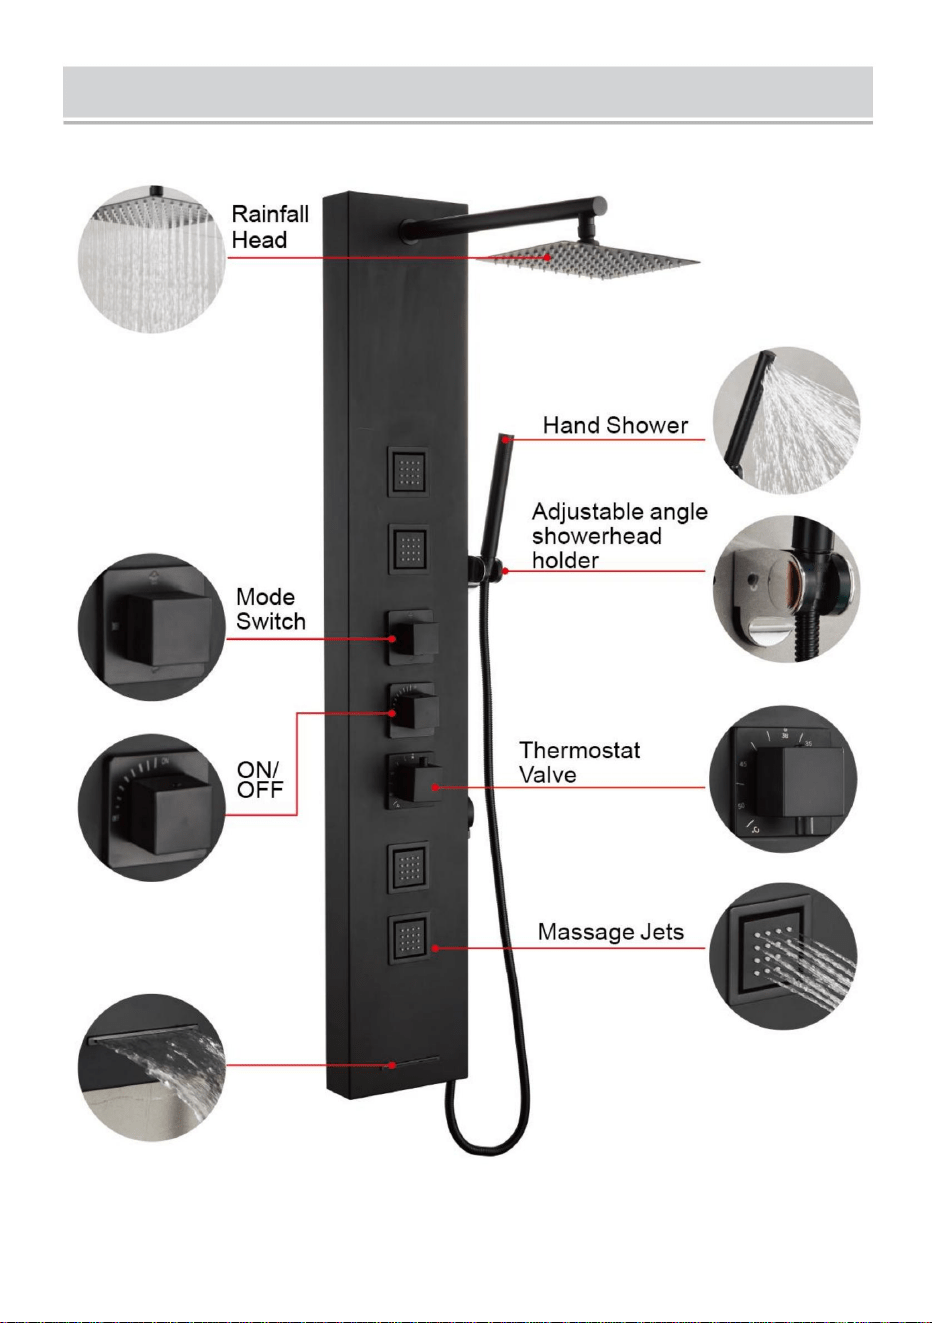
FUNCTION INTRODUCTION
7016FL
- 17 -
FUNCTION INTRODUCTION
7002FL

- 18 -
FUNCTION INTRODUCTION
7015FY

Note:For the detailed installation video, please refer to the
corresponding model and scan the QR code below to view.
6002FL / 6012FL
8039FL
8124FL
7009FL
7016FL
7002FL
7015FY
Technical Support and E-Warranty Certificate
www.vevor.com/support

6002FL,8039FL,7009FL,6012FL,8124FL,7016FL,7002FL,7015FY
MODÈLE:
PANNEAUDEDOUCHETOUR
Assistancetechniqueetcertificatdegarantie
électroniquewww.vevor.com/support
Machine Translated by Google

6012FL
Ils'agitdelanoticed'utilisationd'origine.Veuillezlireattentivementtoutes
lesinstructionsdumanuelavantdel'utiliser.VEVORseréserveledroitd'interpréter
clairementnotremanueld'utilisation.L'apparenceduproduitdépendduproduit
quevousavezreçu.Veuilleznousexcuser,nousnevousinformeronsplussides
misesàjourtechnologiquesoulogiciellessontdisponiblessurnotreproduit.
8039FL8124FL7009FL7016FL7002FL7015FY
6002FL
PANNEAUDEDOUCHETOUR
1
Machine Translated by Google

INSTRUCTIONS
CONSERVEZCESINSTRUCTIONS
Ceproduitestsoumisauxdispositionsdeladirectiveeuropéenne
1.Pendantleprocessusd'installation,ilestpréférabledeporterdesgantspouréviterlesobjetstranchants.
2012/19/CE.Lesymbolereprésentantunepoubelleàroulettesbarrée
coinsdupanneaupouréviterderayerlapaumedelamain.
indiquequeleproduitnécessiteunecollecteséparéedesdéchetsdansle
2.Lorsdel'installationdeladouche,assurezvousquetouslesjointssontentièrement
Unioneuropéenne.Cecis'appliqueauproduitetàtouslesaccessoires
serrépouréviterlesfuitesd'eau.
marquésdecesymbole.Lesproduitsmarquéscommetelsnepeuventpasêtre
3.Assurezvousquelestuyauxd'arrivéed'eaurougeetbleuàl'intérieurdupanneausontdansunendroitnon
Cetappareilestconformeàlapartie15desrèglesdelaFCC.Sonfonctionnementest
jetéaveclesorduresménagèresnormales,maisdoitêtreapportédansun
étatpliépouréviterd'affecterlapressiondel'eau.
sousréservedesdeuxconditionssuivantes:(1)Cetappareilnedoitpasprovoquer
pointdecollectepourlerecyclagedesappareilsélectriquesetélectroniques
4.Lorsqueladouchen'estpasutilisée,veuillezfermerlavannedecommutationdeladouche.
interférencesnuisibles,et(2)cetappareildoitacceptertouteinterférence
reçus,ycomprislesinterférencespouvantentraînerunfonctionnementindésirable.
Lisezattentivementlemanueld'instructions.
AvertissementPourréduirelerisquedeblessure,l'utilisateurdoitlire
2
Conseilsd'avertissement:
Machine Translated by Google

1Réglage3Réglage1Réglage1Réglage3Réglage5Réglage1Réglage1Réglage
INSTRUCTIONSD'INSTALLATION
×
√
Supportmural
×
×
Acierinoxydable201
LampeLED
Modes
Pilesèche
Noir
√
√
Pilesèche
Matériel
Modes
Montage
√
(3VCC)
Peinture
Trois
Pilesèche
Fonctions
Quatre
Pilesèche
Becdebaignoire
Main
√
G1/2"
×
×
Acier,Laiton,
Modes
Modèle
Cinq
√
(3VCC)
√
Acierinoxydable304,laiton,PVC,ABS
Taper
√
Modes
Acierinoxydable304
(3VCC)
Acier,Laiton,
Quatre
Température
Douche
Pilesèche
Six
×
√
PVC,ABS
×
(3VCC)
×
Finition
√
Cinq
Pouvoir
√
3
Connexion
×
Modes
Fil
Modes
(3VCC)
×
×
PVC,ABS
Afficher
Modes
Pilesèche
Quatre
Modes
6002FL8039FL6012FL8124FL7009FL7016FL7002FL7015FY
(3VCC)
√
Systèmededoucheennickelbrossésansempreintesdigitales
√
Cinq
√
×
Machine Translated by Google
8039FL
Oeillet
Caoutchouc
Hexagone
Noix
4
4points
Vis
8124FL
Tapotement
6012FL
Adaptateur
Siègeàjet
6002FL
Soi
Main
Portable
Douche
Main
1,5mètre
Tuyau
1/2Droite
Angle
7009FL7016FL7002FL7015FY
Pulvérisation
Attache
1pièce
1pièce
2pièces2pièces2pièces2pièces
1pièce
1pièce
1pièce
1pièce
1pièce
4pièces4pièces4pièces4pièces
2pièces
1pièce
1pièce
1pièce
4pièces
1pièce
1pièce
1pièce
1pièce
2pièces
2pièces
1pièce 1pièce
1pièce
1pièce
2pièces
1pièce
1pièce
1pièce
1pièce
1pièce
4pièces
1pièce
1pièce
1pièce
2pièces2pièces2pièces2pièces
0pièces
2pièces2pièces2pièces2pièces
2pièces
1pièce
2pièces
2pièces
1pièce
MODÈLE
ou
LISTEDESPIÈCES
Machine Translated by Google

1pièce
MODÈLE
1pièce
Brasdedouche
Noix
Fixationmurale
Hexenlaiton
8124FL
Cabinedepeinture
5
Laiton
7009FL7016FL7002FL7015FY
Collierdeserrage
Sortied'eau
AA1,5V
6012FL
Bras
Sacencoton
8039FL
Batterie
Inoxydable
M6*10
6002FL
Vis
Sacencoton
ÉcrouM6
Spraysupérieur
Acier
Panneau
Sortied'eau
Adaptateur
1pièce1pièce0pièce
1pièce1pièce1pièce1pièce1pièce1pièce
1pièce1pièce0pièce0pièce0pièce0pièce
2pièces2pièces2pièces0pièces2pièces0pièces
2pièces2pièces0pièces0pièces0pièces0pièces
0pièces0pièces1pièces
4pièces4pièces0pièces0pièces0pièces0pièces
4pièces4pièces0pièces0pièces0pièces0pièces
0pièces0pièces0pièces0pièces0pièces 1pièce
0pièces0pièces0pièces0pièces0pièces1pièces
0pièces0pièces0pièces0pièces0pièces
0pièces0pièces0pièces0pièces0pièces
Machine Translated by Google

MODÈLE6012FL/6002FL/8039FL/8124FL
INSTRUCTIONSDEMONTAGE
Connectezlecâble
d’éclairageLEDetlaligne
d’alimentation.
Insérez2pilesAAdansle
compartimentà
piles.
Mettezleboîtierde
batteriesurON.
Connectezletuyaudu
pulvérisateuràmainà
lapommededoucheàmain.
Fixezlacartemèreetle
spraysupérieuravec4
pairesdevisetécrous
M6.
FixezletuyauenPVCavecun
collierdeserragesurlejointde
pulvérisationsupérieur.
Acheminezlefildela
lumièreLEDlelongdu
trouinsérédans
lacartemère.
InsérezletuyauenPVC
parl'ouverturesupérieure
pourlepercer.
Placezleraccordencaoutchoucà4points.Connectez
l'eaudansleconnecteurdesortiedupulvérisateuràmain
etàl'intérieurdujointdusiègedupulvérisateuràmain.
Insérezlabusede
pulvérisationmanuelledans
lepanneauet
installezlejoint.
6
Insérezlabusede
pulvérisationmanuelledans
lepanneauet
installezlejoint.
Machine Translated by Google

Insérez2pilesAAdans
siègeavecdouchetteàmain.
articulation.
dansleconnecteurdu
Connectezlegicleursupérieur
etlebrasdesortied'eau
Mettrelecaoutchoucà4voiesInsérezlabusedepulvérisation
manuelledanslepanneauet
installezlejoint.
àlacarteprincipale.
tuyaudedoucheetle
Réparerlebrasdesortied'eau
Insérezlabusedepulvérisation
manuelledanslepanneauet
installezlejoint.
pommeaudedoucheàmain.
Changerleboîtierdelabatterie
àON.
Connectezl'appareilportatif
connecteurdesiègedepulvérisation.
compartiment.
labatterie
Connectezleconnecteurdesortie
d'eauàlamain
Remarque:7016FLsansétapes3et4.
MODÈLE7009FL/7016FL/7002FL
7
Machine Translated by Google

articulation.
Réparerlepommeaudedouche
tuyau.
Connectezlegicleursupérieur
etlebrasdesortied'eau
connecteurdesortied'eau
depommeaudedouche.
pommeaudedoucheàla
Connectezl'ordinateurdepoche
écrousetrondelles.
Connectezleconnecteurde
sortied'eauetle
connecteur.
àlacarteprincipaleavec
Fixezlepanneauaumuràla
hauteurappropriéeàl'aidedu
support.
Installationdu
Réparerlebrasdesortied'eau
danslapommededouche supportdepommeaude
doucheterminé.
Fixezleconnecteurde
sortiededoucheaupanneau
avecunécrou.
Mettrelecaoutchoucà4voies
visetécrous.
positionappropriéeavec
letuyauetlebrasde
doucheetserrezle.
pommeaudedoucheàmain.
Installationterminée.
Connectezlefild'acier
supportaumuràla
Connectezvousau
MODÈLE7015FY
8
Machine Translated by Google

9
ÉTAPESD'INSTALLATION(GÉNÉRALITÉS)
Notesd'installation
2.Raccordezletuyaud'eauchaudeetfroide(assurezvousdenettoyerlechargeuretlasaleté
danslemurÉchelleafindenepasbloquer,affecterl'effetdel'eau).
1.Selonlahauteurdelahauteurd'installationdusystèmededoucheàbudgetfamilial,mesurez
ladistancedusystèmededoucheàl'arrièredelabarre,marquezsurlemur,danslaposition
correspondantedel'étiquettefixéeaufersuspendu(dehautenbaschacun).
3.Systèmededouchesuspenduaumur,lesdeuxcartessupérieureetinférieureontétéserrées
dansdeuxpâtessuspendues(Remarque:doucheAprèslemurdusystème,lecorpsprincipal
prèsdumurnetremblepas,n'apasbesoind'utiliseruneautrecolleàverreetd'autresoutils
fixés).
Machine Translated by Google

2.Nettoyezlasurfaceavecdel’eauouundétergentdouxetessuyezlaavecuneserviettedouce.
3.Notezqueleproduitpropredelapositioncachée,unnettoyagerapidepeutfaire
faireleménage;
1.Nettoyagerégulierduproduitafindeconserversonaspectbrillantet
produitsdurables.
10
SCHÉMAD'INSTALLATIONDELASÉRIEDEPANNEAUXDEDOUCHE
Méthodesd'entretiendusystèmededoucheenacierinoxydable:
Machine Translated by Google
11
Machine Translated by Google
6002FL/6012FL
INTRODUCTIONAUXFONCTIONS
12
Machine Translated by Google
8039FL
INTRODUCTIONAUXFONCTIONS
13
Machine Translated by Google

7009FL
INTRODUCTIONAUXFONCTIONS
14
Machine Translated by Google

8124FL
INTRODUCTIONAUXFONCTIONS
15
Machine Translated by Google
7016FL
INTRODUCTIONAUXFONCTIONS
16
Machine Translated by Google
7002FL
INTRODUCTIONAUXFONCTIONS
17
Machine Translated by Google
7015FY
INTRODUCTIONAUXFONCTIONS
18
Machine Translated by Google

8124FL
7009FL
7016FL
www.vevor.com/support
modèlecorrespondantetscannezlecodeQRcidessouspourvoir.
8039FL
6002FL/6012FL
Remarque:pourlavidéod'installationdétaillée,veuillezvousréféreràla
7015FY
Assistancetechniqueetcertificatdegarantieélectronique
7002FL
Machine Translated by Google

6002FL, 8039FL, 7009FL, 6012FL, 8124FL, 7016FL, 7002FL, 7015FY
MODELL:
DUSCHPANEELTURM
Technischer Support und E-Garantie-Zertifikat
www.vevor.com/support
Machine Translated by Google

8039FL 8124FL 7009FL 7016FL 7002FL 7015FY
Dies ist die Originalanleitung. Bitte lesen Sie alle Anweisungen sorgfältig durch,
bevor Sie das Gerät in Betrieb nehmen. VEVOR behält sich eine klare Auslegung unserer
Bedienungsanleitung vor. Das Erscheinungsbild des Produkts richtet sich nach
dem Produkt, das Sie erhalten haben. Bitte verzeihen Sie uns, dass wir Sie nicht erneut
informieren, wenn es Technologie- oder Software-Updates für unser Produkt gibt.
6012FL
6002FL
DUSCHPANEELTURM
- 1 -
Machine Translated by Google

ANWEISUNGEN
BEWAHREN SIE DIESE ANWEISUNGEN AUF
Dieses Produkt unterliegt den Bestimmungen der europäischen Richtlinie
1. Während des Installationsvorgangs ist es am besten, Handschuhe zu tragen, um scharfe
2012/19/EG. Das Symbol einer durchgestrichenen Mülltonne
Ecken des Panels vor Kratzern in der Handfläche.
weist darauf hin, dass das Produkt einer getrennten Müllentsorgung im
2. Bei der Montage der Dusche ist darauf zu achten, dass alle Fugen vollständig
Europäische Union. Dies gilt für das Produkt und alle Zubehörteile
festgezogen, um ein Austreten von Wasser zu verhindern.
gekennzeichnet. Produkte, die mit diesem Symbol gekennzeichnet sind, dürfen nicht
3. Stellen Sie sicher, dass die roten und blauen Wasserzulaufrohre im Inneren des Panels nicht
Dieses Gerät entspricht Teil 15 der FCC-Bestimmungen. Der Betrieb ist
nicht mit dem normalen Hausmüll entsorgt werden, sondern müssen an einen
gefalteten Zustand, um eine Beeinträchtigung des Wasserdrucks zu vermeiden.
unter den folgenden beiden Bedingungen:(1) Dieses Gerät darf keine
Sammelstelle für das Recycling von elektrischen und elektronischen Geräten
4. Wenn die Dusche nicht benutzt wird, schließen Sie bitte das Umschaltventil der Dusche.
schädliche Interferenzen, und (2) dieses Gerät muss alle Interferenzen akzeptieren
empfangen werden, einschließlich Störungen, die einen unerwünschten Betrieb verursachen können.
Warnung-Um das Verletzungsrisiko zu verringern, muss der Benutzer
Lesen Sie die Bedienungsanleitung sorgfältig durch.
- 2 -
Warnhinweise:
Machine Translated by Google

× ×
×
×
ÿ
Wandhalterung
201 Edelstahl
Schwarz-
LED-Lampe
Modi
Trockenzelle
Material
ÿ
ÿ
Modi
Montage
ÿ
Trockenzelle
Malerei
(DC 3 V)
Trockenzelle
Funktionen
Drei
Trockenzelle
Wannenauslauf
Vier
Hand
Stahl, Messing,
×
ÿ
G1/2"
Modi
×
Modell
Fünf
ÿ
304 Edelstahl, Messing, PVC, ABS
(DC 3 V)
ÿ
ÿ
Modi
Typ
304 Edelstahl
(DC 3 V)
Stahl, Messing,
Dusche
Trockenzelle
Vier
Temperatur
Sechs
PVC, ABS
×
×
ÿ
Beenden
(DC 3 V)
×
ÿ
Fünf
- 3 -
Leistung
ÿ
×
Modi
Verbindung
(DC 3 V)
×
×
Faden
Modi
PVC, ABS
Trockenzelle
Anzeige
Modi
Vier
Modi
6002FL 8039FL 6012FL 8124FL 7009FL 7016FL 7002FL 7015FY
Fingerabdruckfreies Duschsystem aus gebürstetem Nickel
(DC 3 V)
ÿ
ÿ
Fünf
ÿ
INSTALLATIONSANLEITUNG
1-Einstellung 3-Einstellung 1-Einstellung 1-Einstellung 3-Einstellung 5-Einstellung 1-Einstellung 1-Einstellung
Machine Translated by Google

MODELL
oder
Gummi
7009FL 7016FL 7002FL 7015FY
Spray
1.5 Meter
Schlauch
1/2 Rechts
Handgerät
Hand
Hand
Dusche
Sprühsitz
Winkel
Adapter
6002FL
Selbst
Tippen
6012FL
Verschluss
Schrauben
Tülle
8124FL
Hexagon
Nuss
- 4 -
4-Punkt
8039FL
TEILELISTE
1 Stück
1 Stück
2 Stück 2 Stück 2 Stück 2 Stück
1 Stück
1 Stück
2 Stück
1 Stück
1 Stück
4 Stück 4 Stück 4 Stück 4 Stück
1 Stück
1 Stück
1 Stück
1 Stück
4 Stück
1 Stück
1 Stück
1 Stück
1 Stück
2 Stück
2 Stück
1 Stück
1 Stück
1 Stück
1 Stück
2 Stück
1 Stück
1 Stück
4 Stück
1 Stück
1 Stück
1 Stück
1 Stück
1 Stück
1 Stück
2 Stück 2 Stück 2 Stück 2 Stück
0 Stück
2 Stück 2 Stück 2 Stück 2 Stück
2 Stück
1 Stück
2 Stück
2 Stück
1 Stück
Machine Translated by Google

1 Stück
MODELL
1 Stück
Bedienfeld
Nuss
M6 Mutter
Baumwolltasche
Wasserauslass
- 5 -
M6*10
Top-Spray
Edelstahl
Schrauben
6002FL
Baumwolltasche
Stahl
8039FL
Batterie
Wasserauslass
6012FL
AA 1,5 V
Arm
Adapter
7009FL 7016FL 7002FL 7015FY
Schlauchschelle
Wandmontage
8124FL
Messing
Spritzkabine
Duscharm
Messing Sechskant
1 Stück 1 Stück 0 Stück
1 Stück 1 Stück 1 Stück 1 Stück 1 Stück 1 Stück
1 Stück 1 Stück 0 Stück 0 Stück 0 Stück 0 Stück
0 Stück 0 Stück 0 Stück 0 Stück 0 Stück
2 Stück 2 Stück 0 Stück 0 Stück 0 Stück 0 Stück
0 Stück 0 Stück 1 Stück
4 Stück 4 Stück 0 Stück 0 Stück 0 Stück 0 Stück
4 Stück 4 Stück 0 Stück 0 Stück 0 Stück 0 Stück
0 Stück 0 Stück 0 Stück 0 Stück 0 Stück 1 Stück
2 Stück 2 Stück 2 Stück 0 Stück 2 Stück 0 Stück
0 Stück 0 Stück 0 Stück 0 Stück 0 Stück 1 Stück
0 Stück 0 Stück 0 Stück 0 Stück 0 Stück
Machine Translated by Google

MODELL 6012FL/6002FL/8039FL/8124FL
MONTAGEANLEITUNG
Schließen Sie das LED-
Lichtkabel und die
Stromversorgungsleitung an.
Legen Sie 2 AA-Batterien in
das Batteriefach ein.
Schalten Sie das
Batteriefach auf ON.
Setzen Sie die Handsprühdüse
in die Platte ein und installieren
Sie die Dichtung.
Befestigen Sie die Hauptplatine
und das Top-Spray mit 4 Paar
M6-Schrauben und Muttern.
Befestigen Sie das PVC-Rohr
mit einer Halsschelle am oberen
Sprühanschluss.
Verlegen Sie das LED-
Lichtkabel entlang des
Locheinsatzes in
die Hauptplatine.
Führen Sie das PVC-Rohr
durch die obere Öffnung ein,
um es durchzustechen.
Setzen Sie die Handsprühdüse
in die Platte ein und installieren
Sie die Dichtung.
- 6 -
Stecken Sie den 4-Punkt-Gummi in den Handbrausen-
Auslassanschluss und in die Verbindung des Handbrausen-
Sitzes. Schließen Sie das Wasser an.
Schließen Sie den
Handbrausenschlauch an
den Handbrausenkopf an.
Machine Translated by Google
die Batterie
Schließen Sie den
Wasserauslassanschluss an die Hand
Fach.
Sprühsitzanschluss.
Wechseln Sie den Batteriekasten
Verbinden Sie das Handgerät
auf EIN.
Brauseschlauch und der
Befestigen Sie den Wasserauslassarm
Setzen Sie die
Handsprühdüse in die
Platte ein und installieren Sie die Dichtung.
Handbrause.
zur Hauptplatine.
Setzen Sie die
Handsprühdüse in die
Platte ein und installieren Sie die Dichtung.
Verbinden Sie die obere
Brause und den Wasserauslassarm
Setzen Sie den 4-Wege-Gummi
gemeinsam.
in den Anschluss des
Legen Sie 2 AA-Batterien in
Handbrausensitz.
Hinweis: 7016FL ohne Schritte 3 und 4.
MODELL 7009FL/7016FL/7002FL
- 7 -
Machine Translated by Google
Schlauch.
Verbinden Sie den Stahldraht
Halterung an der Wand an der
Verbinden Sie sich mit dem
Rohr und Brausearm und
ziehen Sie es fest.
entsprechende Position mit
Handbrause.
Befestigen Sie den
Duschabflussanschluss mit
einer Mutter an der Platte.
Schrauben und Muttern.
Installation abgeschlossen.
Setzen Sie den 4-Wege-Gummi
Installation der
Befestigen Sie den Wasserauslassarm
in den Duschkopf Duschkopfhalterung
fertiggestellt.
an die Hauptplatine mit
Anschluss.
Befestigen Sie das Panel mit der
Halterung in der entsprechenden
Höhe an der Wand.
Muttern und Unterlegscheiben.
Verbinden Sie den
Wasserauslassanschluss und die
Verbinden Sie das Handheld
Verbinden Sie die obere Brause
und den Wasserauslassarm
Wasserauslassanschluss
des Duschkopfs.
Duschkopf zum
gemeinsam.
Den Duschkopf reparieren
MODELL 7015FY
- 8 -
Machine Translated by Google

3. Das Duschsystem wird an die Wand gehängt. Die oberen und unteren beiden Karten werden mit zwei
Aufhängestiften festgeklemmt. (Hinweis: Nachdem das Duschsystem an die Wand gehängt wurde, wackelt der
Hauptkörper nicht mehr dicht an der Wand. Es ist nicht nötig, einen weiteren Glaskleber oder andere Werkzeuge
zur Befestigung zu verwenden.)
1. Messen Sie entsprechend der Installationshöhe des Familien-Budget-Duschsystems den Abstand an der
Rückseite der Duschstange, markieren Sie ihn an der Wand und befestigen Sie die Aufhängevorrichtung an der
entsprechenden Stelle (jeweils oben und unten).
2. Schließen Sie den Warm- und Kaltwasserschlauch an (achten Sie darauf, das Magazin zu reinigen und den Schmutz in der
Wandablagerung zu entfernen, damit es nicht zu Verstopfungen kommt und die Wasserwirkung beeinträchtigt wird).
Installationshinweise
INSTALLATIONSSCHRITTE (ALLGEMEIN)
- 9 -
Machine Translated by Google

DUSCHPANEEL-SERIE - INSTALLATIONSDIAGRAMM
2. Reinigen Sie die Oberfläche mit Wasser oder einem milden Reinigungsmittel und wischen Sie sie mit einem weichen Tuch ab.
3. Beachten Sie, dass das saubere Produkt der versteckten Position, rechtzeitige Reinigung kann machen
sauber;
1. Regelmäßige Reinigung des Produkts, um sein Aussehen hell und
Produkte von Dauer.
Wartungsmethoden für Edelstahlduschsysteme:
- 10 -
Machine Translated by Google

- 11 -
Machine Translated by Google
6002FL / 6012FL
FUNKTION EINFÜHRUNG
- 12 -
Machine Translated by Google

8039FL
FUNKTION EINFÜHRUNG
- 13 -
Machine Translated by Google

7009FL
FUNKTION EINFÜHRUNG
- 14 -
Machine Translated by Google
8124FL
FUNKTION EINFÜHRUNG
- 15 -
Machine Translated by Google
7016FL
FUNKTION EINFÜHRUNG
- 16 -
Machine Translated by Google
7002FL
FUNKTION EINFÜHRUNG
- 17 -
Machine Translated by Google

7015FY
FUNKTION EINFÜHRUNG
- 18 -
Machine Translated by Google

8124FL
7009FL
7016FL
www.vevor.com/support
6002FL / 6012FL
8039FL
entsprechendes Modell und scannen Sie den QR-Code unten, um es anzuzeigen.
Hinweis: Das ausführliche Installationsvideo finden Sie im
7015FY
Technischer Support und E-Garantie-Zertifikat
7002FL
Machine Translated by Google

Supporto tecnico e certificato di garanzia
elettronica www.vevor.com/support
TORRE PANNELLO DOCCIA
6002FLÿ8039FLÿ7009FLÿ6012FLÿ8124FLÿ7016FLÿ7002FLÿ7015FY
MODELLO:
Machine Translated by Google
- 1 -
TORRE PANNELLO DOCCIA
Italiano:
Questa è l'istruzione originale, si prega di leggere attentamente tutte le
istruzioni del manuale prima di utilizzare. VEVOR si riserva una chiara
interpretazione del nostro manuale utente. L'aspetto del prodotto sarà
soggetto al prodotto ricevuto. Vi preghiamo di perdonarci se non vi informeremo
di nuovo se ci sono aggiornamenti tecnologici o software sul nostro prodotto.
6012FL
6002FL
Machine Translated by Google
interferenze dannose e (2) questo dispositivo deve accettare qualsiasi interferenza
2012/19/CE. Il simbolo raffigurante un bidone della spazzatura barrato
angoli del pannello per evitare di graffiare il palmo della mano.
Questo prodotto è soggetto alle disposizioni della Direttiva Europea
1. Durante il processo di installazione, è meglio indossare guanti per evitare tagli affilati
contrassegnati con questo simbolo. I prodotti contrassegnati come tali non possono essere
serrato per evitare perdite d'acqua.
3. Assicurarsi che i tubi di ingresso dell'acqua rosso e blu all'interno del pannello siano in una posizione non
Unione Europea. Ciò si applica al prodotto e a tutti gli accessori
indica che il prodotto richiede una raccolta differenziata dei rifiuti
2. Quando si installa la doccia, assicurarsi che tutti i giunti siano completamente
soggetto alle due condizioni seguenti: (1) Questo dispositivo non può causare
punto di raccolta per il riciclaggio di apparecchiature elettriche ed elettroniche
4. Quando la doccia non è in uso, chiudere la valvola di commutazione della doccia.
Questo dispositivo è conforme alla Parte 15 delle Norme FCC. Il funzionamento è
smaltito insieme ai normali rifiuti domestici, ma deve essere portato in un
stato piegato per non influire sulla pressione dell'acqua.
ricevuti, comprese le interferenze che potrebbero causare un funzionamento indesiderato.
Suggerimenti di avvertimento:
ISTRUZIONI
attentamente il manuale di istruzioni.
Attenzione: per ridurre il rischio di lesioni, l'utente deve leggere
SALVA QUESTE ISTRUZIONI
- 2 -
Machine Translated by Google

×
Tre
Pila a secco
Funzioni
Pittura
(CC3V)
ÿ
Modalità
ÿ
ÿ
Montaggio
Pila a secco
Lampada a LED
Modalità
Pila a secco
Nero-
Materiale
201 Inox
ÿ
Montaggio a parete
×
×
×
304 Inox
(CC3V)
Tipo
ÿ
Modalità
(CC3V)
ÿ
Acciaio inossidabile 304, ottone, PVC, ABS
Cinque
ÿ
Modello
Modalità
ÿ
G1/2"
×
×
Acciaio, Ottone,
Mano
Quattro
Pila a secco
Beccuccio per vasca
Connessione
×
Modalità
(CC3V)
ÿ
Energia
- 3 -
ÿ
Cinque
(CC3V)
×
Fine
×
ÿ
PVC, ABS
×
Sei Quattro
Temperatura
Doccia
Pila a secco
Acciaio, Ottone,
×
ÿ
Cinque
ÿ
(CC3V)
ÿ
Sistema doccia in nichel spazzolato anti-impronta
Modalità
Italiano:
Quattro
Display
Modalità
Pila a secco
PVC, ABS
Filo
Modalità
×
ISTRUZIONI PER L'INSTALLAZIONE
1-Impostazione 3-Impostazione 1-Impostazione 1-Impostazione 3-Impostazione 5-Impostazione 1-Impostazione 1-Impostazione
Machine Translated by Google

O
MODELLO
2 pezzi
1 pz
2 pezzi
2 pezzi
1 pz
1 pz
1 pz
2 pezzi 2 pezzi 2 pezzi 2 pezzi
0 pezzi
2 pezzi 2 pezzi 2 pezzi 2 pezzi
1 pz
2 pezzi
1 pz
4 pezzi
1 pz
1 pz
1 pz
1 pz
1 pz
1 pz
1 pz
1 pz
1 pz
2 pezzi
1 pz
1 pz
1 pz
2 pezzi
2 pezzi
1 pz
4 pezzi 4 pezzi 4 pezzi 4 pezzi 4 pezzi
1 pz
1 pz
1 pz
1 pz 1 pz1 pz
2 pezzi 2 pezzi 2 pezzi 2 pezzi
1 pz
1 pz
1 pz
Occhiello
- 4 -
1,5 metri
Tubo flessibile
1/2 Destra
Numero di modello: 7009FL
Spray
6002FL
Sedile a spruzzo
Adattatore
Se stesso
Doccia
Portatile
Mano
8124FL
Mano
Angolo
Vite
6012FL
Fissaggio
Esagono
toccando
Noce
Gomma
8039FL
4 punti
ELENCO DELLE PARTI
Machine Translated by Google

1 pz
MODELLO
1 pz
8124FL
- 5 -
Dado M6
Borsa di cotone
Noce
Uscita acqua
Pannello
8039FL
Borsa di cotone
Batteria
Acciaio
Vite
M6*10
6002FL
Numero di modello: 7009FL
Spruzzo superiore
Fascetta stringitubo
Inossidabile
6012FL
Batteria AA1.5V
Uscita acqua
Braccio
Esagonale in ottone
Adattatore
Montato a parete
Braccio doccia
Ottone
Cabina di verniciatura
1 pz 1 pz 0 pz
1 pz 1 pz 0 pz 0 pz 0 pz 0 pz
1 pz 1 pz 1 pz 1 pz 1 pz 1 pz
0 pezzi 0 pezzi 0 pezzi 0 pezzi 0 pezzi
2 pezzi 2 pezzi 0 pezzi 0 pezzi 0 pezzi 0 pezzi
0 pezzi 0 pezzi 1 pezzo
4 pezzi 4 pezzi 0 pezzi 0 pezzi 0 pezzi 0 pezzi
4 pezzi 4 pezzi 0 pezzi 0 pezzi 0 pezzi 0 pezzi
1 pz
0 pezzi 0 pezzi 0 pezzi 0 pezzi 0 pezzi
0 pezzi 0 pezzi 0 pezzi 0 pezzi 0 pezzi
0 pezzi 0 pezzi 0 pezzi 0 pezzi 0 pezzi 1 pezzo
2 pezzi 2 pezzi 2 pezzi 0 pezzi 2 pezzi 0 pezzi
Machine Translated by Google

MODELLO 6012FL/6002FL/8039FL/8124FL
ISTRUZIONI DI MONTAGGIO
Inserire 2 batterie AA nel
vano batterie.
Fissare il tubo in PVC con una
fascetta stringitubo sul giunto
di spruzzatura superiore.
Accendere il vano
batteria.
Inserire l'ugello spruzzatore
manuale nel pannello e
installare la
guarnizione.
Fissare la scheda madre
e lo spray superiore con 4
paia di viti M6 e dadi.
Collegare il cavo della
luce LED e la linea di
alimentazione.
Far passare il filo della
luce LED lungo il foro
inserito nella
scheda madre.
Inserire il tubo in PVC
dall'apertura superiore per
perforarlo.
Inserire l'ugello spruzzatore
manuale nel pannello e
installare la
guarnizione.
Inserire la gomma a 4 punti Collegare l'acqua al
connettore di uscita dello spruzzatore manuale e
all'interno del giunto del sedile dello spruzzatore manuale.
Collegare il tubo
flessibile della doccetta
alla doccetta portatile.
- 6 -
Machine Translated by Google
giunto.
scomparto.
connettore del sedile di spruzzatura.
la batteria
Collegare il connettore di uscita
dell'acqua alla mano
Fissare il braccio di scarico dell'acqua
Inserire l'ugello spruzzatore
manuale nel pannello e
installare la guarnizione.
tubo flessibile della doccia e il
soffione doccia portatile.
su ON.
Cambiare la scatola della batteria
Collegare il palmare
Collegare lo spruzzo superiore
e il braccio di uscita dell'acqua
Metti la gomma a 4 vie
alla scheda principale.
Inserire l'ugello spruzzatore
manuale nel pannello e
installare la guarnizione.
Caricare 2 batterie AA in
nel connettore del
spruzzatore manuale per sedile.
Nota: 7016FL senza passaggi 3 e 4.
MODELLO 7009FL/7016FL/7002FL
- 7 -
Machine Translated by Google
Collegare lo spruzzo superiore
e il braccio di uscita dell'acqua
tubo e il braccio della
doccia e stringerlo.
posizione appropriata con
soffione doccia portatile.
Collegare il filo di acciaio
staffa al muro al
Fissare il braccio di scarico dell'acqua
nella doccia
Installazione del
supporto per soffione
doccia completato.
Metti la gomma a 4 vie
Fissare il connettore di
uscita della doccia al
pannello con un dado.
viti e dadi.
dadi e rondelle.
Collegare il connettore di uscita
dell'acqua e il
Collegare il palmare Connettiti al
alla scheda principale con
connettore.
Fissare il pannello alla parete
all'altezza appropriata con la
staffa.
Installazione completata.
tubo flessibile.
giunto.
connettore per uscita
acqua soffione doccia.
Riparare il soffione della doccia
soffione doccia al
MODELLO 7015FY
- 8 -
Machine Translated by Google

2. Collegare il tubo dell'acqua calda e fredda (assicurarsi di pulire il caricatore e lo sporco nella parete
in modo che il calcare non si ostruisca e non comprometta l'effetto dell'acqua).
1. In base all'altezza di installazione del sistema doccia del budget per l'altezza della famiglia, misurare
la distanza del sistema doccia sul retro della barra, segnare sul muro, nella posizione corrispondente
del ferro appeso fissato all'etichetta (su e giù per ciascuno).
3. Sistema doccia appeso alla parete, le due schede superiore e inferiore sono state fissate in due
paste sospese (Nota: dopo la doccia il sistema a parete, il corpo principale vicino alla parete non
trema, non è necessario utilizzare un'altra colla per vetri e altri strumenti fissi).
Note di installazione
FASI DI INSTALLAZIONE (GENERALI)
- 9 -
Machine Translated by Google

SCHEMA DI INSTALLAZIONE DELLA SERIE PANNELLO DOCCIA
- 10 -
2. Pulire la superficie con acqua o un detergente delicato e asciugarla con un panno morbido.
3. Si noti che il prodotto pulito della posizione nascosta, la pulizia tempestiva può rendere
pulito;
1. Pulizia regolare del prodotto per mantenerne l'aspetto brillante e
prodotti durevoli.
Metodi di manutenzione del sistema doccia in acciaio inossidabile:
Machine Translated by Google

- 11 -
Machine Translated by Google

Modello 6002FL / 6012FL
INTRODUZIONE ALLA FUNZIONE
- 12 -
Machine Translated by Google
8039FL
INTRODUZIONE ALLA FUNZIONE
- 13 -
Machine Translated by Google

7009FL
INTRODUZIONE ALLA FUNZIONE
- 14 -
Machine Translated by Google
8124FL
INTRODUZIONE ALLA FUNZIONE
- 15 -
Machine Translated by Google
7016FL
INTRODUZIONE ALLA FUNZIONE
- 16 -
Machine Translated by Google
7002FL
INTRODUZIONE ALLA FUNZIONE
- 17 -
Machine Translated by Google
7015FY
INTRODUZIONE ALLA FUNZIONE
- 18 -
Machine Translated by Google

7016FL
7009FL
8039FL
www.vevor.com/support
modello corrispondente e scansiona il codice QR qui sotto per visualizzarlo.
8124FL
Modello 6002FL / 6012FL
Nota: per il video di installazione dettagliato, fare riferimento al
7015FY
7002FL
Supporto tecnico e certificato di garanzia elettronica
Machine Translated by Google

MODELO:
6002FL,8039FL,7009FL,6012FL,8124FL,7016FL,7002FL,7015FY
TORREDEPANELDEDUCHA
Soportetécnicoycertificadodegarantía
electrónicawww.vevor.com/support
Machine Translated by Google
8039FL8124FL7009FL7016FL7002FL7015FY
6012FL
6002FL
Estassonlasinstruccionesoriginales,leaatentamentetodaslas
instruccionesdelmanualantesdeutilizarelproducto.VEVORsereservauna
interpretaciónclaradenuestromanualdeusuario.Laaparienciadel
productoestarásujetaalproductoquerecibió.Perdónenospornoinformarle
nuevamentesihayactualizacionesdetecnologíaosoftwareennuestroproducto.
TORREDEPANELDEDUCHA
1
Machine Translated by Google

INSTRUCCIONES
EsteproductoestásujetoalasdisposicionesdelaDirectivaEuropea
1.Duranteelprocesodeinstalación,esmejorusarguantesparaevitarobjetosafilados.
esquinasdelpanelparaevitarqueserayenlapalmadelamano.
2012/19/CE.Elsímboloquemuestrauncontenedordebasuratachado
UniónEuropea.Estoseaplicaalproductoyatodoslosaccesorios.
indicaqueelproductorequiererecolecciónderesiduosporseparadoenel
marcadosconestesímbolo.Losproductosmarcadoscomotalnopueden
2.Alinstalarladucha,asegúresedequetodaslasjuntasesténcompletamente
3.Asegúresedequelastuberíasdeentradadeaguarojayazuldentrodelpanelnoesténenunaposición
Apretadoparaevitarfugasdeagua.
desecharseconlabasuradomésticanormal,sinoquedebenllevarseaun
EstedispositivocumpleconlaParte15delasNormasdelaFCC.Sufuncionamientoes
Estadoplegadoparaevitarafectarlapresióndelagua.
4.Cuandoladuchanoestéenuso,cierrelaválvuladeinterruptordeladucha.
Puntoderecogidaparaelreciclajedeaparatoseléctricosyelectrónicos
sujetoalasdoscondicionessiguientes:(1)Estedispositivonopuedecausar
interferenciadañina,y(2)estedispositivodebeaceptarcualquierinterferencia
recibidas,incluidaslasinterferenciasquepuedanprovocarunfuncionamientonodeseado.
Advertencia:Parareducirelriesgodelesiones,elusuariodebeleer
Leaatentamenteelmanualdeinstrucciones.
GUARDEESTASINSTRUCCIONES
Consejosdeadvertencia:
2
Machine Translated by Google
×
×
×
Montajeenpared
√
201inoxidable
Negro
Modos
Pilaseca
LámparaLED
Material
√
√
Montaje
Modos
√
Pilaseca
(CC3V)
Cuadro
Funciones
Pilaseca
Tres
Cañodebañera
Pilaseca
Cuatro
Mano
×
Acero,latón,
G1/2"
√
×
Modelo
Modos
Cinco
√
Aceroinoxidable304,latón,PVC,ABS
√
(CC3V)
Modos
√
Tipo
(CC3V)
Aceroinoxidable304
Acero,latón,
Pilaseca
Ducha
Cuatro
Temperatura
Seis
×
PVC,ABS
√
×
Finalizar
×
(CC3V)
Cinco
√
3
√
Fuerza
Modos
×
(CC3V)
Conexión
×
×
Hilo
Modos
PVC,ABS
Pilaseca
Modos
Mostrar
Cuatro
6002FL8039FL6012FL8124FL7009FL7016FL7002FL7015FY
Modos
Sistemadeduchadeníquelcepilladosinhuellasdactilares
√
(CC3V)
Cinco
√
√
×
INSTRUCCIONESDEINSTALACIÓN
1configuración3configuraciones1configuración1configuración3configuraciones5configuraciones1configuración1configuración
Machine Translated by Google

MODELO
o
6002FL
Ser
6012FL
Tocando
Tornillo
Cierre
8124FL
Ojal
Hexágono
Tuerca
4
4puntos
8039FL
Goma
7009FL7016FL7002FL7015FY
Pulverización
1,5metros
Manguera
1/2Derecha
Portátil
Mano
Mano
Ducha
Asientoconrociador
Ángulo
Adaptador
LISTADEPIEZAS
2piezas
1pieza
1pieza
1pieza
1pieza
1pieza
1pieza
1pieza
1pieza
1pieza
1pieza
4piezas
1pieza
0piezas
2piezas2piezas2piezas2piezas
2piezas2piezas2piezas2piezas
1pieza
2piezas
1pieza
1pieza
2piezas
2piezas
1pieza
1pieza
1pieza
2piezas
1pieza
2piezas2piezas2piezas2piezas
1pieza
1pieza
4piezas
1pieza
1pieza 1pieza
4piezas4piezas4piezas4piezas
1pieza
2piezas
2piezas
1pieza 1pieza 1pieza
1pieza
Machine Translated by Google

1pieza
MODELO
1pieza
8039FL
Batería
6012FL
BateríaAAde1,5V
Salidadeagua
Brazo
7009FL7016FL7002FL7015FY
Abrazaderademanguera
Adaptador
8124FL
Latón
Montadoenlapared
Cabinadepintura
Brazodeducha
Hexágonodelatón
Panel
Tuerca
TuercaM6
Bolsadealgodón
Salidadeagua
5
M6*10
Rociadosuperior
Inoxidable
Tornillo
6002FL
Bolsadealgodón
Acero
1pieza1pieza0piezas
1pieza1pieza1pieza1pieza1pieza1pieza
1pieza1pieza0piezas0piezas0piezas0piezas
1pieza
2piezas2piezas0piezas0piezas0piezas0piezas
0piezas0piezas1piezas
4piezas4piezas0piezas0piezas0piezas0piezas
4piezas4piezas0piezas0piezas0piezas0piezas
0piezas0piezas0piezas0piezas0piezas1piezas
0piezas0piezas0piezas0piezas0piezas
0piezas0piezas0piezas0piezas0piezas
0piezas0piezas0piezas0piezas0piezas
2piezas2piezas2piezas0piezas2piezas0piezas
Machine Translated by Google

MODELO6012FL/6002FL/8039FL/8124FL
INSTRUCCIONESDEMONTAJE
Conecteelcablede
luzLEDylalíneade
alimentación.
Coloque2pilasAAenel
compartimentode
laspilas.
Enciendalacajadela
batería.
Insertelaboquillarociadora
manualenelpanele
instalelajunta.
PaseelcabledeluzLED
alolargodelorificiode
inserciónenla
placabase.
FijeeltubodePVCconuna
abrazaderadegargantaenla
juntaderociadosuperior.
Fijelaplacabaseyel
rociadorsuperiorcon4
paresdetornillosy
tuercasM6.
InserteeltubodePVC
desdelaaberturasuperior
paraperforarlo.
Insertelaboquillarociadora
manualenelpanele
instalelajunta.
Coloqueelconectordegomade4puntosConecteel
aguaenelconectordesalidadelrociadormanualy
dentrodelajuntadelasientodelrociadormanual.
Conectelamanguera
rociadoramanualal
cabezaldeduchademano.
6
Machine Translated by Google

7
Nota:7016FLsinpasos3y4.
MODELO7009FL/7016FL/7002FL
Insertelaboquillarociadora
manualenelpaneleinstalela
junta.
Arreglarelbrazodesalidadeagua
Alaplacaprincipal.
Insertelaboquillarociadora
manualenelpaneleinstalela
junta.
cabezaldeduchademano.
Conecteelrociadorsuperioryel
brazodesalidadeagua
Coloquelagomade4vías
articulación.
enelconectordela
Coloque2pilasAAen
Asientoconrociadordemano.
Labatería
Conecteelconectordesalidade
aguaalamano.
compartimiento.
Conectordelasientodepulverización.
Cambielacajadelabatería
Conectareldispositivoportátil
Paraencender.
mangueradeduchayla
Machine Translated by Google

8
MODELO7015FY
Arreglarelbrazodesalidadeagua
Enelcabezaldeladucha
alaplacaprincipalcon
Conector.
Soportedecabezaldeducha
completado.
Fijeelpanelalaparedalaaltura
adecuadaconelsoporte.
Tuercasyarandelas.
Conecteelconectordesalidade
aguayel
Conectareldispositivoportátil
Conecteelrociadorsuperiory
elbrazodesalidadeagua
Conectordesalidade
aguadelcabezaldeducha.
cabezaldeduchaala
articulación.
Arreglarelcabezaldeladucha
manguera.
Conecteelcabledeacero
soportealaparedenel
Conectarseala
tuboyelbrazodeladucha
yapriételo.
posiciónapropiadacon
cabezaldeduchademano.
Fijeelconectordesalidade
laduchaalpanelconuna
tuerca.
tornillosytuercas.
Instalacióncompletada.
Coloquelagomade4vías
Instalacióndel
Machine Translated by Google

9
Notasdeinstalación
PASOSDEINSTALACIÓN(GENERAL)
2.Conectelamangueradeaguafríaycaliente(asegúresedelimpiarelcargadorylasuciedad
enlaparedparanobloquearlaescala,loqueafectaelefectodelagua).
1.Deacuerdoconlaalturadeinstalacióndelsistemadeduchadepresupuestofamiliar,mida
ladistanciadelsistemadeduchaenlaparteposteriordelabarra,marqueenlapared,enla
posicióncorrespondientedelaetiquetadehierrofijaparacolgar(arribayabajodecadauna).
3.Sistemadeduchacolgadoenlapared,lasdostarjetassuperioreinferiorsesujetancondos
pastasparacolgar(Nota:despuésdeladucha,elsistemadepared,elcuerpoprincipalcerca
delaparednotiembla,noesnecesarioutilizarotropegamentoparavidrioniotrasherramientas
fijas).
Machine Translated by Google

2.Limpielasuperficieconaguaoundetergentesuaveyséquelaconunatoallasuave.
Productosduraderos.
limpio;
1.Limpiezaperiódicadelproductoparamantenersuaspectobrillantey
3.Tengaencuentaqueelproductolimpiodelaposiciónoculta,lalimpiezaoportunapuedehacer
ESQUEMADEINSTALACIÓNDELASERIEDEPANELESDEDUCHA
Métodosdemantenimientodelsistemadeduchadeaceroinoxidable:
10
Machine Translated by Google

11
Machine Translated by Google

6002FL/6012FL
INTRODUCCIÓNDEFUNCIONES
12
Machine Translated by Google
8039FL
INTRODUCCIÓNDEFUNCIONES
13
Machine Translated by Google

7009FL
INTRODUCCIÓNDEFUNCIONES
14
Machine Translated by Google

8124FL
INTRODUCCIÓNDEFUNCIONES
15
Machine Translated by Google
7016FL
INTRODUCCIÓNDEFUNCIONES
16
Machine Translated by Google
7002FL
INTRODUCCIÓNDEFUNCIONES
17
Machine Translated by Google
Añofiscal7015
INTRODUCCIÓNDEFUNCIONES
18
Machine Translated by Google

8124FL
7009FL
7016FL 7002FL
modelocorrespondienteyescaneeelcódigoQRacontinuaciónparaverlo.
8039FL
6002FL/6012FL
Nota:Paraverelvideodeinstalacióndetallado,consulteel
Añofiscal7015
www.vevor.com/support
Soportetécnicoycertificadodegarantíaelectrónica
Machine Translated by Google

Wsparcie techniczne i certyfikat gwarancji
elektronicznej www.vevor.com/support
PANEL PRYSZNICOWY WIEŻA
6002FL, 8039FL, 7009FL, 6012FL, 8124FL, 7016FL, 7002FL, 7015FY
MODEL:
Machine Translated by Google
- 1 -
PANEL PRYSZNICOWY WIEŻA
8039FL 8124FL 7009FL 7016FL 7002FL 7015FY
To jest oryginalna instrukcja, przed użyciem należy uważnie przeczytać
wszystkie instrukcje. VEVOR zastrzega sobie jasną interpretację naszej instrukcji
obsługi. Wygląd produktu będzie zależał od produktu, który otrzymałeś.
Prosimy o wybaczenie, że nie poinformujemy Cię ponownie, jeśli w naszym
produkcie pojawią się jakiekolwiek aktualizacje technologiczne lub oprogramowania.
6012FL
6002FL
Machine Translated by Google

narożniki panelu od zarysowań wnętrza dłoni.
2012/19/WE. Symbol przedstawiający przekreślony kosz na śmieci na kółkach
Niniejszy produkt podlega postanowieniom Dyrektywy Europejskiej
1. Podczas instalacji najlepiej jest założyć rękawice, aby zapobiec uszkodzeniom ostrym
oznaczone tym symbolem. Produkty oznaczone w ten sposób nie mogą być
3. Upewnij się, że czerwone i niebieskie rury doprowadzające wodę wewnątrz panelu znajdują się w miejscu, w którym nie ma
dokręcone, aby zapobiec wyciekaniu wody.
Unia Europejska. Dotyczy produktu i wszystkich akcesoriów
oznacza, że produkt wymaga oddzielnej zbiórki odpadów w
2. Podczas montażu prysznica należy upewnić się, że wszystkie połączenia są w pełni dokręcone.
punkt zbiórki sprzętu elektrycznego i elektronicznego do recyklingu
z zastrzeżeniem następujących dwóch warunków: (1) Urządzenie to nie może powodować
4. Jeżeli nie korzystasz z prysznica, zamknij zawór przełączający prysznica.
wyrzucać razem z normalnymi odpadami domowymi, lecz należy je oddać do punktu zbiórki odpadów.
To urządzenie jest zgodne z częścią 15 przepisów FCC. Działanie jest
w stanie złożonym, aby nie wpływać na ciśnienie wody.
odebrane, w tym zakłócenia, które mogą powodować niepożądane działanie.
szkodliwe zakłócenia, a (2) urządzenie to musi akceptować wszelkie zakłócenia
Wskazówki ostrzegawcze:
INSTRUKCJE
Przeczytaj uważnie instrukcję obsługi.
Ostrzeżenie – aby zmniejszyć ryzyko obrażeń, użytkownik musi przeczytać
- 2 -
ZAPISZ TE INSTRUKCJE
Machine Translated by Google

Tryby
Funkcje
Trzy
Komórka sucha
Malarstwo
(prąd stały 3V)
Tryby
Montowanie
Tworzywo
Komórka sucha
Czarny-
Lampa LED
Tryby
Komórka sucha
201 Stal nierdzewna
×
×
Montaż ścienny
×
Stal nierdzewna 304
(prąd stały 3V)
Tryby
Typ
Stal nierdzewna 304, mosiądz, PVC, ABS
(prąd stały 3V)
Pięć
Model
Tryby
Stal, Mosiądz,
×
G1/2"
×
Ręka
Komórka sucha
Wylewka wannowa
Cztery
×
Tryby
Połączenie
(prąd stały 3V)
- 3 -
Moc
Pięć
Skończyć
(prąd stały 3V)
×
PCV, ABS
×
×
Sześć
Prysznic
Komórka sucha
Cztery
Temperatura
Stal, Mosiądz,
×
Pięć
System prysznicowy z szczotkowanego niklu bez odcisków palców
(prąd stały 3V)
Tryby
6002FL 8039FL 6012FL 8124FL 7009FL 7016FL 7002FL 7015FY
Cztery
Komórka sucha
Wyświetlacz
Tryby
PCV, ABS
×
×
Nitka
INSTRUKCJA INSTALACJI
1-Ustawienie 3-Ustawienie 1-Ustawienie 1-Ustawienie 3-Ustawienie 5-Ustawienie 1-Ustawienie 1-Ustawienie
Machine Translated by Google

Lub
MODEL
1 szt.
2szt. 2szt. 2szt. 2szt.
2 szt.
2 szt.
1 szt.
1 szt.
1 szt.
2szt. 2szt. 2szt. 2szt.
0 szt.
1 szt.
2szt. 2szt. 2szt. 2szt.
2 szt.
1 szt.
4 szt.
1 szt.
1 szt.
1 szt.
1 szt.
1 szt.
1 szt.
1 szt.
1 szt.
1 szt.
2 szt.
1 szt.
1 szt.
1 szt.
2 szt.
2 szt.
1 szt.
4szt. 4szt. 4szt. 4szt. 4szt. 4 szt.
1 szt.
1 szt.
1 szt.
1 szt. 1 szt.1 szt.
1 szt.
2 szt.
1 szt.
1 szt.
Przelotka
- 4 -
1,5 metra
Wąż gumowy
1/2 w prawo
7009FL 7016FL 7002FL 7015FY
Rozpylać
6002FL
Nakrętka
Adapter
Siedzisko natryskowe
Prysznic
Ja
Ręka
Ręczny
Ręka
8124FL
Kąt
Śruba
Łącznik
6012FL
Stukający
Sześciokąt
Guma
8039FL
4-punktowy
LISTA CZĘŚCI
Machine Translated by Google
1 szt.
MODEL
1 szt.
- 5 -
Torba bawełniana
Nakrętka M6
Wylot wody
Nakrętka
Płyta
8039FL
Bateria
Montaż na ścianie
Torba bawełniana
Śruba
6002FL
Nierdzewny
M6*10
Górny spray
7009FL 7016FL 7002FL 7015FY
Zacisk węża
Stal
AA1,5V
6012FL
Ramię
Wylot wody
Adapter
Mosiężny sześciokąt
Ramię prysznicowe
Kabina lakiernicza
Mosiądz
8124FL
1 szt. 1 szt. 0 szt.
1 szt. 1 szt. 0 szt. 0 szt. 0 szt. 0 szt.
1 szt. 1 szt. 1 szt. 1 szt. 1 szt. 1 szt.
2szt. 2szt. 2szt. 0szt. 2szt. 0szt.
4 szt. 4 szt. 0 szt. 0 szt. 0 szt. 0 szt.
0szt 0szt 1szt
2szt. 2szt. 0szt. 0szt. 0szt. 0szt.
4 szt. 4 szt. 0 szt. 0 szt. 0 szt. 0 szt.
1 szt.
0szt 0szt 0szt 0szt 0szt
0szt 0szt 0szt 0szt 0szt
0szt 0szt 0szt 0szt 0szt
0szt 0szt 0szt 0szt 0szt 0szt 1szt
Machine Translated by Google
MODEL 6012FL/6002FL/8039FL/8124FL
INSTRUKCJA MONTAŻU
Włóż 2 baterie AA do
komory baterii.
Zamocuj rurę PCV za pomocą
zacisku gardzielowego na
górnym złączu natryskowym.
Przełącz pojemnik na
baterie w pozycję ON.
Włóż dyszę spryskiwacza do
panelu i zamontuj uszczelkę.
Poprowadź przewód
diody LED wzdłuż otworu
w płycie głównej.
Podłącz kabel
oświetlenia LED i przewód
zasilający.
Zamocuj płytę główną i
górną osłonę za pomocą
4 par śrub M6 i nakrętek.
Włóż rurę PCV od górnego
otworu, aby ją przebić.
Włóż dyszę spryskiwacza do
panelu i zamontuj uszczelkę.
Podłącz 4-punktową gumę do złącza wylotowego
spryskiwacza ręcznego i do wnętrza stawu gniazda
spryskiwacza ręcznego.
- 6 -
Podłącz wąż natrysku
ręcznego do słuchawki
prysznicowej.
Machine Translated by Google

łącznik gniazda natryskowego.
przedział.
bateria
Podłącz złącze wylotu wody do
ręki
Napraw ramię wylotu wody
Włóż dyszę spryskiwacza
do panelu i zamontuj
uszczelkę.
słuchawka prysznicowa ręczna.
wąż prysznicowy i
na WŁ.
Zmień skrzynkę baterii
Podłącz urządzenie przenośne
Podłącz górny natrysk i
ramię wylotu wody
Załóż gumę 4-kierunkowąWłóż dyszę spryskiwacza
do panelu i zamontuj
uszczelkę.
do płyty głównej.
Włóż 2 baterie AA do
siedzisko z ręcznym natryskiem.
do złącza
wspólny.
MODEL 7009FL/7016FL/7002FL
Uwaga: 7016FL nie wykonuje kroków 3 i 4.
- 7 -
Machine Translated by Google
głowica prysznicowa do
odpowiednia pozycja z
rurę i ramię natrysku, a
następnie dokręć je.
słuchawka prysznicowa.
Podłącz drut stalowy
wspornik do ściany przy
Napraw ramię wylotu wody
do słuchawki prysznicowej uchwyt na słuchawkę
prysznica ukończony.
Instalacja
Załóż gumę 4-kierunkową
Połącz się z
Instalacja ukończona.
Przymocuj przyłącze wylotu
prysznica do panelu za
pomocą nakrętki.
śruby i nakrętki.
nakrętki i podkładki.
Podłącz złącze wylotu wody i
Podłącz urządzenie przenośne
złącze.
do płyty głównej z
Za pomocą uchwytu przymocuj
panel do ściany na odpowiedniej
wysokości. wąż gumowy.
wspólny.
Naprawa głowicy prysznicowej
Złącze wylotu wody do
słuchawki prysznicowej.
Podłącz górny natrysk i
ramię wylotu wody
MODEL 7015FY
- 8 -
Machine Translated by Google

2. Podłącz wąż doprowadzający ciepłą i zimną wodę (pamiętaj o dokładnym wyczyszczeniu magazynka i usunięciu zanieczyszczeń z
kamienia w ścianie, aby nie dopuścić do jego zablokowania, co mogłoby wpłynąć na przepływ wody).
1. Zgodnie ze wzrostem rodziny, wysokość instalacji systemu prysznicowego zmierz z tyłu
drążka. Odległość systemu prysznicowego zaznacz na ścianie w odpowiedniej pozycji
przymocowanego wieszaka żelaznego (w górę i w dół).
3. System prysznicowy zawieszony na ścianie, górna i dolna karta zostały zamocowane na dwóch
klejach do zawieszania (Uwaga: po zamontowaniu systemu na ścianie, główna część prysznica
blisko ściany nie trzęsie się, nie ma potrzeby używania kolejnego kleju do szkła i innych narzędzi
mocujących).
KROKI INSTALACJI (OGÓLNE)
Notatki dotyczące instalacji
- 9 -
Machine Translated by Google

SCHEMAT INSTALACJI SERII PANELÓW PRYSZNICOWYCH
- 10 -
2. Wyczyść powierzchnię wodą lub łagodnym detergentem i wytrzyj ją miękkim ręcznikiem.
3. Należy pamiętać, że czysty produkt w ukrytej pozycji, terminowe czyszczenie może sprawić, że
czysty;
1. Regularne czyszczenie produktu w celu zachowania jego jasnego wyglądu i
produkty trwałe.
Metody konserwacji systemów prysznicowych ze stali nierdzewnej:
Machine Translated by Google

- 11 -
Machine Translated by Google

6002FL / 6012FL
WPROWADZENIE DO FUNKCJI
- 12 -
Machine Translated by Google

8039FL
WPROWADZENIE DO FUNKCJI
- 13 -
Machine Translated by Google

7009FL
WPROWADZENIE DO FUNKCJI
- 14 -
Machine Translated by Google
8124FL
WPROWADZENIE DO FUNKCJI
- 15 -
Machine Translated by Google

7016FL
WPROWADZENIE DO FUNKCJI
- 16 -
Machine Translated by Google

7002FL
WPROWADZENIE DO FUNKCJI
- 17 -
Machine Translated by Google
7015rok podatkowy
WPROWADZENIE DO FUNKCJI
- 18 -
Machine Translated by Google

7016FL
7009FL
8039FL
www.vevor.com/support
6002FL / 6012FL
8124FL
odpowiedni model i zeskanuj poniższy kod QR, aby wyświetlić.
Uwaga: Aby obejrzeć szczegółowy film instruktażowy dotyczący instalacji, zapoznaj się z
7015rok podatkowy
Wsparcie techniczne i certyfikat e-gwarancji
7002FL
Machine Translated by Google

Teknisk support och e-garanticertifikat
www.vevor.com/support
DUSCHPANELTORN
MODELL:
6002FL, 8039FL, 7009FL, 6012FL, 8124FL, 7016FL, 7002FL, 7015FY
Machine Translated by Google

- 1 -
DUSCHPANELTORN
6012FL
Detta är den ursprungliga instruktionen, läs alla instruktioner
noggrant innan du använder den. VEVOR reserverar sig för en tydlig
tolkning av vår användarmanual. Utseendet på produkten är beroende
av den produkt du fått. Ursäkta oss att vi inte kommer att informera dig igen
om det finns någon teknik eller mjukvaruuppdateringar på vår produkt.
8039FL 8124FL 7009FL 7016FL 7002FL 7015FY
6002FL
Machine Translated by Google

hörn på panelen från att repa handflatan.
2012/19/EG. Symbolen som visar en soptunna på hjul korsad
Denna produkt omfattas av bestämmelserna i det europeiska direktivet
1. Under installationsprocessen är det bäst att bära handskar för att förhindra vassa
märkt med denna symbol. Produkter märkta som sådana kanske inte är det
3. Se till att de röda och blå vatteninloppsrören inuti panelen är i ett icke
åtdragna för att undvika vattenläckage.
Europeiska unionen. Detta gäller produkten och alla tillbehör
indikerar att produkten kräver separat sophämtning i
2. När du installerar duschen, se till att alla skarvar är helt
med förbehåll för följande två villkor:(1)Denna enhet får inte orsaka
insamlingsställe för återvinning av elektriska och elektroniska apparater
4. När duschen inte används, stäng duschens omkopplingsventil.
kasseras med vanligt hushållsavfall, men måste tas till en
Denna enhet uppfyller del 15 av FCC-reglerna. Operation är
hopvikt tillstånd för att undvika att vattentrycket påverkas.
mottagna, inklusive störningar som kan orsaka oönskad funktion.
skadlig störning, och (2)denna enhet måste acceptera alla störningar
Varningstips:
INSTRUKTIONER
Varning - För att minska risken för skada måste användaren läsa
bruksanvisningen noggrant.
- 2 -
SPARA DESSA INSTRUKTIONER
Machine Translated by Google

- 3 -
Hand
Fyra
torr cell
Badkarspip
Modell
Lägen
ÿ
G1/2"
×
×
(DC3V)
ÿ
Stål, mässing, 304 rostfritt stål, mässing, PVC, ABS
Fem
ÿ
304 Rostfritt
(DC3V)
Typ
ÿ
Lägen
ÿ
Väggfäste
×
×
×
LED-lampa
Lägen
torr cell
Svart-
201 Rostfritt
ÿ
Lägen
ÿ
ÿ
Montering
torr cell
Tre
Material
torr cell
Funktioner
Målning
(DC3V)
PVC, ABS
Tråd
Lägen
×
×
Fyra
Visa
Lägen
torr cell
(DC3V)
ÿ
Duschsystem av borstat nickel utan fingeravtryck
Lägen
6002FL 8039FL 6012FL 8124FL 7009FL 7016FL 7002FL 7015FY
×
ÿ
Fem
ÿ
Fyra
Temperatur
torr cell
Dusch
Stål, mässing,
×
ÿ
PVC, ABS
×
Sex
ÿ
Fem
(DC3V)
×
Avsluta
Förbindelse
×
Lägen
(DC3V)
ÿ
Driva
INSTALLATIONSINSTRUKTIONER
1-Setting 3-Setting 1-Setting 1-Setting 3-Setting 5-Setting 1-Setting 1-Setting
Machine Translated by Google
eller
MODELL
1 st
2st 2st 2st 2st
2 st
2 st
1 st
1 st
1 st
2st 2st 2st 2st
0 st
1 st
2st 2st 2st 2st
2 st
1 st
4 st
1 st
1 st
1 st
1 st
1 st
1 st
1 st
1 st
1 st
2 st
1 st
1 st
1 st
2 st
2 st
1 st
4st 4st 4st 4st 4 st
1 st
1 st
1 st
1 st 1 st1 st
1 st
2 st
1 st
1 st
Grommet
- 4 -
1,5 meter
Slang
1/2 rätt
7009FL 7016FL 7002FL 7015FY
Spray
6002FL
Mutter
Adapter
Spray säte
Dusch
Själv
Hand
Handhållen
Hand
8124FL
Vinkel
Skruva
Fästanordning
6012FL
Tappning
Sexhörning
Gummi
8039FL
4-punkts
DELLISTA
Machine Translated by Google

1 st
MODELL
1 st
- 5 -
Bomullsväska
M6 Mutter
Vattenuttag
Mutter
Panel
8039FL
Batteri
Väggmonterad
Bomullsväska
6002FL
Skruva
Rostfri
M6*10
Top Spray
7009FL 7016FL 7002FL 7015FY
Slangklämma
Stål
AA1,5V
6012FL
Ärm
Vattenuttag
Adapter
Hex i mässing
Duscharm
Spraybås
Mässing
8124FL
1st 1st 0st
1st 1st 0st 0st 0st 0st
1st 1st 1st 1st 1st 1st
2st 2st 2st 0st 2st 0st
2st 2st 0st 0st 0st 0st
0st 0st 1st
4st 4st 0st 0st 0st 0st
4st 4st 0st 0st 0st 0st
0st 0st 0st 0st 0st 1 st
0st 0st 0st 0st 0st 1st
0st 0st 0st 0st 0st
0st 0st 0st 0st 0st
Machine Translated by Google

MODELL 6012FL/6002FL/8039FL/8124FL
MONTERINGSINSTRUKTIONER
Sätt i 2 AA-batterier i
batterifacket.
Fäst PVC-röret med en
halsklämma på den övre
sprayfogen.
Slå på batterilådan.
Sätt i 4-punktsgummit Anslut vattnet till
handsprayutloppsanslutningen och inuti skarven på
handspraysätets ledsäte.
Fixa moderkortet och
toppsprayen med 4 par M6-
skruvar och muttrar.
Anslut LED-ljuskabeln
och strömförsörjningsledningen.
Dra LED-ljuskabeln längs
hålinsatsen i moderkortet.
Sätt in PVC-röret från den
övre öppningen för att sticka
ut.
Sätt in handspraymunstycket
i panelen och installera
packningen.
Anslut handsprayslangen
till det handhållna
duschhuvudet.
- 6 -
Sätt in handspraymunstycket
i panelen och installera
packningen.
Machine Translated by Google

spray säte kontakt.
avdelning.
batteriet
Anslut vattenutloppskontakten
till handen
Fäst vattenutloppsarmen
Sätt in handspraymunstycket
i panelen och installera
packningen.
handhållet duschhuvud.
duschslang och
till PÅ.
Byt batterilåda
Anslut den handhållna
Sätt på 4-vägsgummit
Anslut den övre sprayen
och vattenutloppsarmen
Sätt in handspraymunstycket
i panelen och installera
packningen.
till huvudstyrelsen.
Sätt i 2 AA-batterier
handspray säte.
in i kontakten på
gemensam.
Obs: 7016FL inga steg 3 och 4.
MODELL 7009FL/7016FL/7002FL
- 7 -
Machine Translated by Google

- 8 -
MODELL 7015FY
duschhuvud till
lämplig position med
röret och duscharmen och
dra åt den.
handhållet duschhuvud.
Anslut ståltråden
fäste på väggen vid
Fäst vattenutloppsarmen
in i duschhuvudet duschhuvudsfäste färdigt.
Installation av
Sätt på 4-vägsgummit
Anslut till
Installationen är klar.
Fäst duschutloppsanslutningen
till panelen med en mutter.
skruvar och muttrar.
muttrar och brickor.
Anslut vattenutloppskontakten
och
Anslut handenheten
kontakt.
till huvudstyrelsen med
Fäst panelen på väggen i
lämplig höjd med fästet.
slang.
gemensam.
Fixa duschhuvudet
duschmunstycke
vattenuttag.
Anslut den övre sprayen och
vattenutloppsarmen
Machine Translated by Google
- 9 -
INSTALLATIONSSTEG (ALLMÄNT)
Installationsanmärkningar
2. Anslut varm- och kallvattenslangen (var noga med att rengöra magasinet och
smutsen i väggen Våg för att inte blockera, påverka vatteneffekten).
1. Enligt höjden på familjens höjd budget duschsystem installationshöjd, mäta
duschsystemet på baksidan av stången Avstånd, markera på väggen, i motsvarande
position av taggen fast hängande järn (upp och ner var och en).
3. Duschsystem hängande på väggen, de övre och nedre två korten klämdes fast i
två hängande pastor (Obs: dusch Efter systemväggen skakar inte huvudkroppen nära
väggen, behöver inte använda ett annat glaslim och andra fixerade verktyg).
Machine Translated by Google
2. Rengör ytan med vatten eller ett milt rengöringsmedel och torka av den med en mjuk handduk.
3. Observera att den rena produkten av den dolda positionen, snabb rengöring kan göra
rena;
1. Regelbunden rengöring av produkten för att hålla dess utseende ljust och
produkter som håller.
- 10 -
DUSCHPANEL SERIE INSTALLATIONSDIAGRAM
Underhållsmetoder för duschsystem i rostfritt stål:
Machine Translated by Google

- 11 -
Machine Translated by Google

6002FL / 6012FL
FUNKTION INTRODUKTION
- 12 -
Machine Translated by Google
8039FL
FUNKTION INTRODUKTION
- 13 -
Machine Translated by Google
7009FL
FUNKTION INTRODUKTION
- 14 -
Machine Translated by Google

8124FL
FUNKTION INTRODUKTION
- 15 -
Machine Translated by Google
- 16 -
FUNKTION INTRODUKTION
7016FL
Machine Translated by Google
- 17 -
FUNKTION INTRODUKTION
7002FL
Machine Translated by Google

- 18 -
FUNKTION INTRODUKTION
7015FY
Machine Translated by Google

7016FL
7009FL
8039FL
7002FL
6002FL / 6012FL
8124FL
motsvarande modell och skanna QR-koden nedan för att se.
Obs: För den detaljerade installationsvideon, se
www.vevor.com/support
7015FY
Teknisk support och e-garanticertifikat
Machine Translated by Google

6002FL, 8039FL, 7009FL, 6012FL, 8124FL, 7016FL, 7002FL, 7015FY
MODEL:
DOUCHEPANEEL TOREN
Technische ondersteuning en e-garantiecertificaat
www.vevor.com/support
Machine Translated by Google

8039FL 8124FL 7009FL 7016FL 7002FL 7015FY
Dit is de originele instructie, lees alle handleidingen zorgvuldig door
voordat u het product gebruikt. VEVOR behoudt zich een duidelijke interpretatie
van onze gebruikershandleiding voor. Het uiterlijk van het product is
afhankelijk van het product dat u hebt ontvangen. Vergeef ons dat we u niet
opnieuw zullen informeren als er technologie- of software-updates voor ons product zijn.
6012FL
6002FL
DOUCHEPANEEL TOREN
- 1 -
Machine Translated by Google
INSTRUCTIES
Waarschuwingstips:
2012/19/EG. Het symbool met een kliko-afvalbak doorkruist
hoeken van het paneel tegen krassen op de handpalm.
Dit product is onderworpen aan de bepalingen van de Europese richtlijn
1. Tijdens het installatieproces is het het beste om handschoenen te dragen om scherpe voorwerpen te voorkomen.
vastgedraaid om waterlekkage te voorkomen.
gemarkeerd met dit symbool. Producten die als zodanig gemarkeerd zijn, mogen niet
geeft aan dat het product gescheiden afvalinzameling vereist in de
2. Zorg er bij het installeren van de douche voor dat alle verbindingen volledig zijn
3. Zorg ervoor dat de rode en blauwe waterinlaatleidingen in het paneel niet in een
Europese Unie. Dit geldt voor het product en alle accessoires
onder de volgende twee voorwaarden: (1) Dit apparaat mag geen
inzamelpunt voor het recyclen van elektrische en elektronische apparaten
4. Wanneer de douche niet in gebruik is, sluit u de hoofdkraan van de douche.
Dit apparaat voldoet aan Deel 15 van de FCC-regels. De bediening is
weggegooid met het normale huisvuil, maar moet naar een afvalverwerkingsbedrijf worden gebracht.
opgevouwen toestand om te voorkomen dat de waterdruk wordt beïnvloed.
ontvangen, met inbegrip van storingen die een ongewenste werking kunnen veroorzaken.
schadelijke interferentie, en (2) dit apparaat moet elke interferentie accepteren
Lees de gebruiksaanwijzing zorgvuldig door.
Waarschuwing - Om het risico op letsel te verminderen, moet de gebruiker de volgende informatie lezen:
- 2 -
BEWAAR DEZE INSTRUCTIES
Machine Translated by Google

1-Instelling 3-Instelling 1-Instelling 1-Instelling 3-Instelling 5-Instelling 1-Instelling 1-Instelling
INSTALLATIE-INSTRUCTIES
Schilderen
PVC, ABS
×
×
Draad
Modi
Vier
Droge cel
Modi
Weergave
Vingerafdrukvrij geborsteld nikkel douchesysteem
ÿ
(3V gelijkstroom)
6002FL 8039FL 6012FL 8124FL 7009FL 7016FL 7002FL 7015FY
Modi
×
Vijf
ÿ
ÿ
Droge cel
Douche
Vier
Temperatuur
Staal, Messing,
×
PVC, ABS
ÿ
×
Zes Vijf
ÿ
Finish
×
(3V gelijkstroom)
Modi
×
(3V gelijkstroom)
Verbinding
- 3 -
ÿ
Stroom
Hand
Baduitloop
Droge cel
Vier
Model
Modi
×
Staal, Messing,
G1/2"
ÿ
×
304 roestvrij staal, messing, PVC, ABS
ÿ
(3V gelijkstroom)
Vijf
ÿ
(3V gelijkstroom)
304 roestvrij staal
Modi
ÿ
Type
×
×
Muurbevestiging
ÿ
×
Zwart-
Modi
LED-lamp
Droge cel
201 roestvrij staal
Montage
Modi
ÿ
Materiaal
ÿ
ÿ
Functies
Droge cel Droge cel
Drie
(3V gelijkstroom)
Machine Translated by Google

1,5 meter
Slang
1/2 Rechts
Ringetje
7009FL 7016FL 7002FL 7015FY
Spuiten
- 4 -
Adapter
Spuitstoel
6002FL
Zelf
Hand
Draagbaar
Hand
Douche
Hoek
Schroef
Bevestigingsmiddel
8124FL
Tikken
Zeshoek
Moer
6012FL
8039FL
Rubber
4-punts
1 stuks
1 stuks
1 stuks
2 stuks 2 stuks 2 stuks 2 stuks
1 stuks
1 stuks
1 stuks
1 stuks
4 stuks 4 stuks 4 stuks 4 stuks
1 stuks
2 stuks
1 stuks
1 stuks
1 stuks
1 stuks
4 stuks
1 stuks
1 stuks
1 stuks
2 stuks
2 stuks
1 stuks
1 stuks
2 stuks
1 stuks
1 stuks
1 stuks
1 stuks
1 stuks
1 stuks
4 stuks
1 stuks
1 stuks
1 stuks
1 stuks
0 stuks
2 stuks 2 stuks 2 stuks 2 stuks
2 stuks 2 stuks 2 stuks 2 stuks
2 stuks
1 stuks
2 stuks
2 stuks
of
MODEL
ONDERDELENLIJST
Machine Translated by Google

0 stuks 0 stuks 1 stuks
1st 1st 1st 1st 1st 1st 1st
1st 1st 0st 0st 0st 0st
0st 0st 0st 0st 0st
2 stuks 2 stuks 0 stuks 0 stuks 0 stuks 0 stuks
1st 1st 0st
4 stuks 4 stuks 0 stuks 0 stuks 0 stuks 0 stuks
4 stuks 4 stuks 0 stuks 0 stuks 0 stuks 0 stuks
1 stuks
0st 0st 0st 0st 0st
0st 0st 0st 0st 0st
0st 0st 0st 0st 0st 0st 1st
2 stuks 2 stuks 2 stuks 0 stuks 2 stuks 0 stuks
Messing
M6 moer
Katoenen tas
Waterafvoer
Paneel
- 5 -
Moer
Aan de muur bevestigd
Katoenen tas
8039FL
Batterij
Roestvrij
M6*10
Schroef
6002FL
Bovenste sproeier
Staal
Adapter
7009FL 7016FL 7002FL 7015FY
Slangklem
Waterafvoer
AA1.5V
6012FL
Douche arm
Arm
Spuitcabine
Messing zeskant
8124FL
1 stuks
MODEL
1 stuks
Machine Translated by Google

Sluit de LED-lichtkabel
en de stroomtoevoer aan.
Zet de batterijdoos op
AAN.
Bevestig de PVC-buis met
een klem aan de bovenste
spuitverbinding.
Plaats de handsproeikop
in het paneel en monteer
de pakking.
Leid de LED-lichtdraad
langs het gat in het
moederbord.
Plaats 2 AA-batterijen in
het batterijvak.
Bevestig het moederbord
en de bovenste spuitbus
met 4 paar M6-schroeven
en moeren.
Steek de PVC-buis door
de bovenste opening naar
binnen.
Plaats de handsproeikop
in het paneel en monteer
de pakking.
- 6 -
Plaats de 4-punts rubberen aansluiting voor het water
in de aansluiting van de handsproeieruitlaat en in de
aansluiting van de zitting van de handsproeierzitting.
Sluit de
handdoucheslang aan
op de handdouche.
MONTAGE-INSTRUCTIES
MODEL 6012FL/6002FL/8039FL/8124FL
Machine Translated by Google

- 7 -
Let op: 7016FL geen stap 3 en 4.
MODEL 7009FL/7016FL/7002FL
in de connector van de
compartiment.
sproeierzitting connector.
de batterij
Sluit de wateruitlaatconnector
aan op de hand
doucheslang en de
Bevestig de wateruitlaatarm
Plaats de handsproeikop
in het paneel en monteer
de pakking.
handdouchekop.
Schakel de batterijdoos om
naar AAN.
Sluit de handbediende
Sluit de bovenste sproeier
en de wateruitlaatarm aan
Plaats de 4-weg rubberPlaats de handsproeikop
in het paneel en monteer
de pakking.
naar het moederbord.
Plaats 2 AA-batterijen in
handsproeier stoel.
gewricht.
Machine Translated by Google

Aansluiting voor
waterafvoer douchekop.
buis en de douchearm en
draai deze vast.
geschikte positie met
douchekop naar de
Sluit de staaldraad aan
beugel aan de muur bij de
Maak verbinding met de
handdouchekop.
Installatie van de
Bevestig de wateruitlaatarm
in de douchekop Douchekophouder is
voltooid.
Bevestig de douche-
uitlaataansluiting met een
moer aan het paneel.
Plaats de 4-weg rubber
schroeven en moeren.
Installatie voltooid.
Sluit de handheld aan
moeren en ringen.
Sluit de wateruitlaatconnector
en de
verbindingsstuk.
naar het hoofdbord met
gewricht.
De douchekop repareren
Bevestig het paneel op de
gewenste hoogte met de beugel
aan de muur. slang.
Sluit de bovenste sproeier
en de wateruitlaatarm aan
MODEL 7015FY
- 8 -
Machine Translated by Google

2. Sluit de warm- en koudwaterslang aan (zorg ervoor dat u het magazijn en het vuil in de muur
schoonmaakt om verstoppingen te voorkomen die het watereffect beïnvloeden).
1. Meet, afhankelijk van de hoogte van het gezinsbudget voor de installatie van het douchesysteem,
de afstand van het douchesysteem op de achterkant van de stang, markeer deze op de muur, in de
overeenkomstige positie van het label dat het strijkijzer ophangt (elk omhoog en omlaag).
3. Douchesysteem aan de muur hangen, de bovenste en onderste twee kaarten zijn vastgeklemd in
twee ophangpasta's (Let op: douchesysteem Na de wand van het systeem schudt het hoofdgedeelte
dicht bij de muur niet, hoeft u geen andere glaslijm en andere gereedschappen te gebruiken om het
vast te zetten).
Installatie-opmerkingen
INSTALLATIESTAPPEN (ALGEMEEN)
- 9 -
Machine Translated by Google

INSTALLATIEDIAGRAM DOUCHEPANEELSERIE
- 10 -
schoon;
3. Houd er rekening mee dat het schone product van de verborgen positie, tijdige reiniging kan maken
2. Maak het oppervlak schoon met water of een mild schoonmaakmiddel en veeg het af met een zachte handdoek.
1. Regelmatige reiniging van het product om het uiterlijk ervan helder en mooi te houden
producten die lang meegaan.
Onderhoudsmethoden voor roestvrijstalen douchesystemen:
Machine Translated by Google
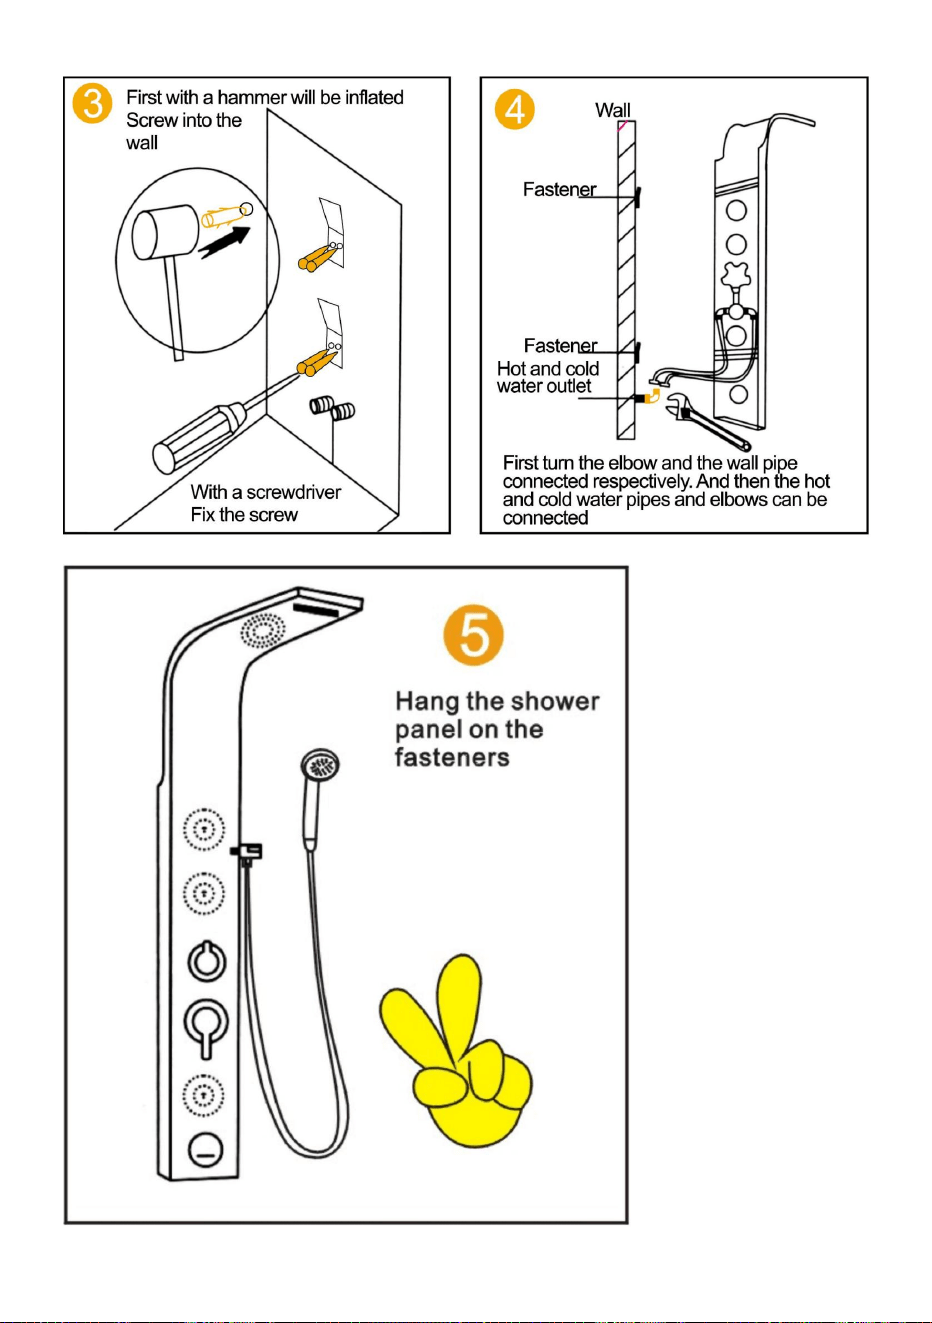
- 11 -
Machine Translated by Google
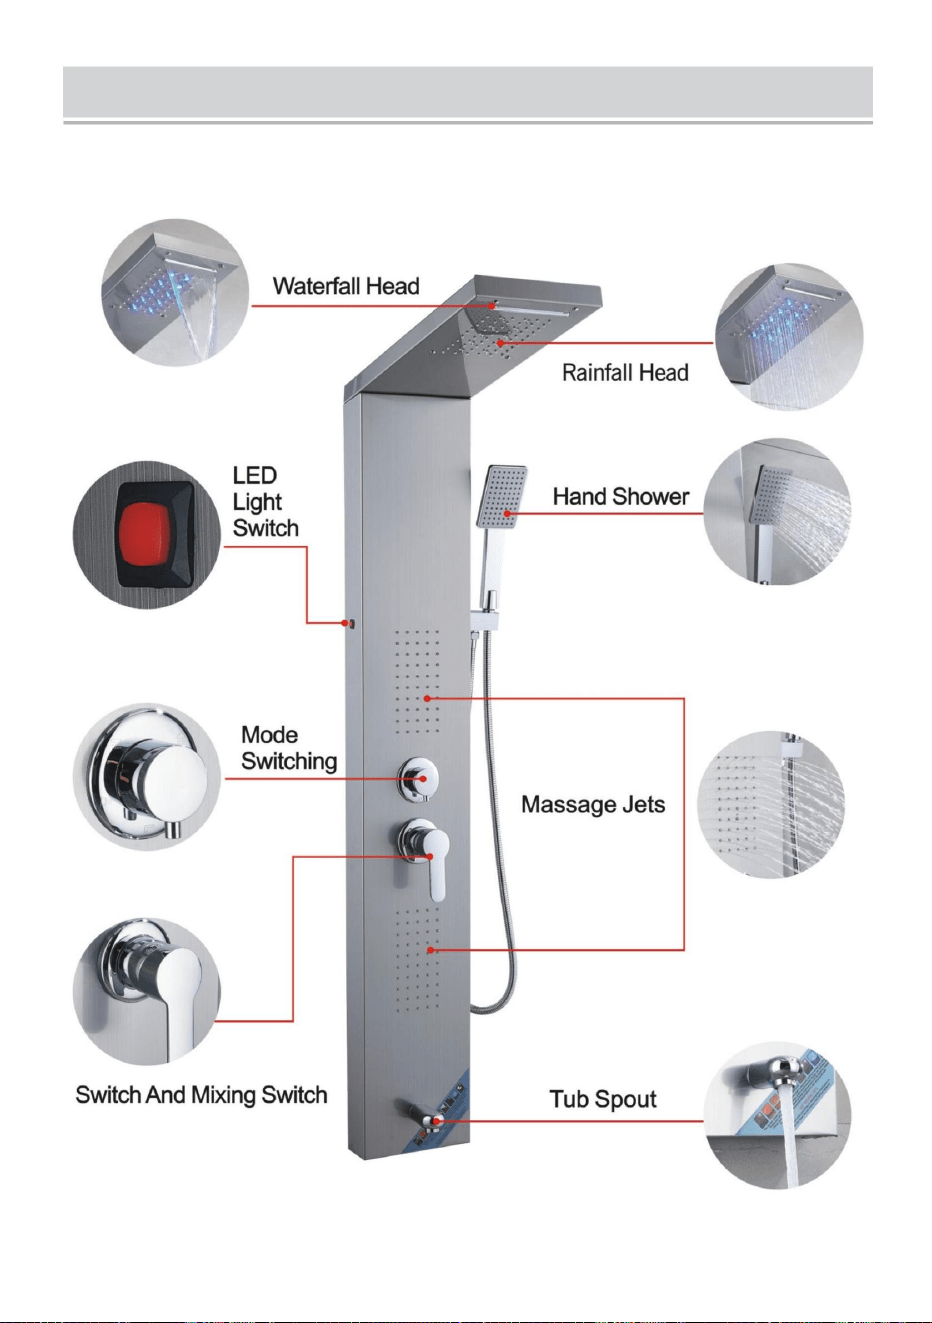
6002FL / 6012FL
FUNCTIE INLEIDING
- 12 -
Machine Translated by Google

8039FL
FUNCTIE INLEIDING
- 13 -
Machine Translated by Google

7009FL
FUNCTIE INLEIDING
- 14 -
Machine Translated by Google

8124FL
FUNCTIE INLEIDING
- 15 -
Machine Translated by Google

7016FL
FUNCTIE INLEIDING
- 16 -
Machine Translated by Google

7002FL
FUNCTIE INLEIDING
- 17 -
Machine Translated by Google

7015FJ
FUNCTIE INLEIDING
- 18 -
Machine Translated by Google

8124FL8039FL
7009FL
www.vevor.com/support
6002FL / 6012FL
7016FL
overeenkomstig model en scan de onderstaande QR-code om te bekijken.
Let op: voor de gedetailleerde installatievideo verwijzen wij u naar de
7015FJ
Technische ondersteuning en e-garantiecertificaat
7002FL
Machine Translated by Google