
AV Receiver
User Guide
EN

CONTENTS
ABOUT THIS PRODUCT AND MANUAL 8
Features of this product.............................................................................8
About the manuals of this product...............................................................9
About the manuals of this product.. .........................................................................................................................................9
Notes about the safety information in the User Guide.. ........................................................................................................10
NAMES OF PARTS AND THEIR FUNCTIONS 11
Names of parts and functions on the front panel..........................................11
Names of parts and functions on the rear panel.. ......................................... 13
Names of parts and functions on the front display........................................14
Names and functions of remote control parts..............................................16
PREPARATION FOR USE 19
Preparation............................................................................................19
Checking the supplied accessories and required commercially-available
items.....................................................................................................21
Preparing the remote control....................................................................23
Placing the product at the desired location.................................................24
Placing the speakers at the desired location................................................25
Names and functions of speakers...........................................................................................................................................25
Channel configuration quick reference.. ................................................................................................................................27
Recommended speaker layouts (Basic).. ............................................................................................................................... 28
Other speaker layouts (Basic).. ............................................................................................................................................... 33
Zone connections (Advanced)................................................................................................................................................. 37
Bi-amp connections (Advanced).............................................................................................................................................39
Connecting speakers................................................................................40
Preparing the speakers and speaker cables...........................................................................................................................40
Connecting the Speaker Cables.. ............................................................................................................................................42
Connecting a TV.. .................................................................................... 45
Preparing a network connection................................................................47
2
CONTENTS

Turning on the product.. .......................................................................... 49
Connecting to power.. .............................................................................................................................................................49
Turning on the power (Main zone).. ........................................................................................................................................50
Making initial settings using the Setup Guide.. ............................................ 51
Connecting to the network using the dedicated app.....................................58
Connecting an AV device...........................................................................59
Connect an AV device by HDMI................................................................................................................................................59
Connecting an AV device by method other than HDMI.. ........................................................................................................60
Connecting a radio antenna...................................................................... 61
Connecting an FM antenna......................................................................................................................................................61
Connecting a DAB/FM antenna.. .............................................................................................................................................62
PLAYBACK 63
Basic operation.......................................................................................63
Basic playback operations.. ....................................................................................................................................................63
Checking audio/video signal information.. ............................................................................................................................64
Listening to TV audio.. ............................................................................. 65
Listening to the radio...............................................................................66
DAB tuning................................................................................................................................................................................ 66
Listening to the radio...............................................................................................................................................................68
Displaying Radio Data System information............................................................................................................................69
Displaying DAB information.. ..................................................................................................................................................70
Registering and deleting radio stations..................................................................................................................................71
Playing back audio from a Bluetooth® device.. ............................................ 73
Playing music on a USB device...................................................................75
Listening to music via AirPlay.. ................................................................. 78
Listening to Internet radio........................................................................79
Listening to streaming services.................................................................80
ENJOYING THE SOUND 81
Selecting your preferred sound (Sound modes).. ......................................... 81
Enjoying original audio (Straight Decode)...................................................82
Enjoying higher-quality playback (Pure Direct).. ......................................... 83
Enjoy sound optimized for video content (MOVIE)........................................84
Enjoy sound optimized for music content (MUSIC)........................................85
3
CONTENTS

Enjoy stereo playback without sound field effects (2 CH STEREO)...................86
Enjoy stereo playback through all speakers (ALL CH STEREO)........................87
Enjoying bass (Extra Bass)........................................................................88
Enjoying Dolby Atmos® and DTS:X®.. .......................................................... 89
USEFUL FUNCTIONS 90
Sleep timer function................................................................................90
Scene function........................................................................................91
About the Scene function.. ......................................................................................................................................................91
Calling and registering a scene.. .............................................................................................................................................92
Enjoying music in multiple rooms (Zone function)........................................95
About the Zone function..........................................................................................................................................................95
Connecting zone speakers.. ....................................................................................................................................................96
Operating a zone......................................................................................................................................................................98
SETTINGS 100
Menus..................................................................................................100
Settings for each playback source (OPTION menu).. ................................... 101
Basic operation of the OPTION menu...................................................................................................................................101
OPTION menu list...................................................................................................................................................................103
Adjusting the audio tone.. .....................................................................................................................................................104
Adjusting volume differences................................................................................................................................................105
Enabling/disabling lip sync correction.. ...............................................................................................................................106
Selecting the audio input jacks and video input ports.. ......................................................................................................107
Setting the reception mode (stereo/mono) for FM radio.. ..................................................................................................108
Registering and deleting radio stations................................................................................................................................109
DAB tuning.............................................................................................................................................................................. 110
Checking the signal strength of each DAB channel..............................................................................................................111
Setting shuffle/repeat playback............................................................................................................................................112
Automatically play Internet radio and podcast stations.. ...................................................................................................113
Registering a Bluetooth® device with this product.. ............................................................................................................114
Automatically selecting the Bluetooth® input......................................................................................................................115
4
CONTENTS

Setting functions (SETTINGS menu)..........................................................116
Basic operation of the SETTINGS menu................................................................................................................................116
SETTINGS menu list.. .............................................................................................................................................................118
Performing initial setup.........................................................................................................................................................122
Configuring the speakers....................................................................................................................................................... 123
Configuring HDMI settings.....................................................................................................................................................127
Configuring audio settings.. ..................................................................................................................................................130
Configuring scene settings.. ..................................................................................................................................................133
Configuring advanced function settings (Function).. ..........................................................................................................134
Configuring the network settings..........................................................................................................................................138
Configuring the Bluetooth® function.. ..................................................................................................................................141
Setting the menu language.. .................................................................................................................................................142
Initializing the settings...........................................................................143
UPDATING THE FIRMWARE 144
Firmware Update...................................................................................144
Updating the firmware...........................................................................145
Updating the firmware via a network.. ................................................................................................................................. 145
Updating the firmware using a USB flash drive....................................................................................................................146
TROUBLESHOOTING 148
Check the following first.........................................................................148
Problems with power, system, and/or remote control.. .............................. 149
Power fails to turn on.............................................................................................................................................................149
Power does not turn on in sync with the TV.. .......................................................................................................................150
Power does not turn off.........................................................................................................................................................151
Power turns off right away.. ..................................................................................................................................................152
Power switches to standby automatically.. .........................................................................................................................153
The product does not respond to operations.. ....................................................................................................................154
This product cannot be operated from the remote control.. ..............................................................................................155
Cannot select the desired input even when pressing the INPUT keys................................................................................156
5
CONTENTS

Problems with the audio.........................................................................157
No sound.. ..............................................................................................................................................................................157
Volume cannot be increased.................................................................................................................................................158
No sound is output from a particular speaker.. ...................................................................................................................159
No sound is output from the subwoofer...............................................................................................................................160
No sound is output from the AV device connected via HDMI.. ............................................................................................ 161
When using HDMI Control, audio from the AV device is not output from this product...................................................... 162
When using HDMI Control, audio from the TV is not output from this product..................................................................163
When the input is set to “TV”, sound from another device is heard....................................................................................164
Only the front speakers produce sound during multichannel playback.. ..........................................................................165
Noise is being output.............................................................................................................................................................166
Sound is distorted..................................................................................................................................................................167
Problems with video..............................................................................168
Video does not appear...........................................................................................................................................................168
When video from an AV device connected via HDMI does not appear................................................................................169
SETTINGS menu and OPTION menu do not appear on the TV.. ..........................................................................................170
Problems with FM radio..........................................................................171
Radio reception is poor or has noise.....................................................................................................................................171
Unable to automatically select FM radio stations................................................................................................................172
Cannot select a radio station using the PRESETS key..........................................................................................................173
Problems with DAB radio........................................................................ 174
Cannot receive DAB radio stations........................................................................................................................................174
DAB radio cannot be received even after performing the initial scan.. ..............................................................................175
DAB radio reception is poor or has noise.............................................................................................................................. 176
DAB information is unavailable or displayed incorrectly.. ..................................................................................................177
No sound from DAB radio.. ....................................................................................................................................................178
Problems with network..........................................................................179
Network functions cannot be used....................................................................................................................................... 179
Cannot connect to the Internet via a wireless LAN router (access point)........................................................................... 180
Cannot find the wireless network.. .......................................................................................................................................181
Cannot play Internet radio.. ..................................................................................................................................................182
When using AirPlay, this product is not detected by the iPhone.........................................................................................183
Music doesn’t play via AirPlay.. ............................................................................................................................................. 184
Unable to update the firmware via the network.. ................................................................................................................185
Problems with USB.. ..............................................................................186
The USB device is not recognized.. .......................................................................................................................................186
USB drive folders and/or files are not displayed..................................................................................................................187
Files on the USB device fail to play consecutively.. .............................................................................................................188
Problems with Bluetooth® connection......................................................189
Unable to connect with a Bluetooth® device........................................................................................................................189
When connected via Bluetooth®, there is no sound, or there are audio dropouts.............................................................190
6
CONTENTS

Problems with dedicated app..................................................................191
The dedicated app cannot detect the product.. ..................................................................................................................191
SPECIFICATIONS 192
Specifications.. ..................................................................................... 192
Supported devices and formats...............................................................198
Supported Bluetooth devices.. ............................................................................................................................................. 198
Supported USB devices.. .......................................................................................................................................................199
Supported file formats...........................................................................................................................................................200
APPENDIX 201
Making a wireless connection to a network.. ............................................. 201
Selecting a wireless connection method to a network........................................................................................................201
Using iPhone to set up a wireless connection......................................................................................................................202
Connecting wirelessly by selecting from the access point list.. ..........................................................................................203
Making a wireless connection manually...............................................................................................................................204
About height speaker placement..............................................................205
Height speaker placement.. ..................................................................................................................................................205
Installing height speakers as Front Height.. .........................................................................................................................206
Installing height speakers as Top.......................................................................................................................................... 207
Using Dolby Enabled Speakers as height speakers..............................................................................................................208
Subwoofer output conditions..................................................................209
About the dedicated app.........................................................................210
Support centers.....................................................................................211
Trademarks..........................................................................................212
About third-party software programs.......................................................214
7
CONTENTS

ABOUT THIS PRODUCT AND MANUAL
Features of this product
This is a genuine 7-channel AV receiver that supports 8K and network content and allows you to enjoy a wide
range of input sources with Dolby Atmos, DTS:X, and other formats. It enables you to enjoy authentic 7-
channel surround sound at an affordable price.
Its modern, simple design blends well with a wide range of interiors.
8
ABOUT THIS PRODUCT AND MANUAL > Features of this product

About the manuals of this product
About the manuals of this product
The following guides are included with this product or are available on the Yamaha website.
Safety Guide
This contains important information required for the safe use of the product. Be sure to read this guide
before use.
Quick Guide
This explains the steps from opening the box after purchase to enjoying audio from your TV and other
devices.
User Guide (this guide)
This explains all functions and operating procedures, including those not covered in the Quick Guide.
9
ABOUT THIS PRODUCT AND MANUAL > About the manuals of this product

Notes about the safety information in the User Guide
(
The User Guide (this guide) uses the following signal words for important safety information.
(
WARNING
Content that indicates a risk of serious injury or death.
(
CAUTION
Content that indicates a risk of injury.
(
NOTICE
Content that must be followed to prevent product failure, damage, malfunction, data loss, and ensure
environmentally friendly use.
(
NOTE
Usage tips, functional limitations, and helpful supplementary information.
(
The illustrations and screenshots in the descriptions are for explanatory purposes only.
(
The company names and product names in this guide are the trademarks or registered trademarks of their
respective companies.
(
In this guide, various smartphones and tablets are collectively referred to as “smartphones”. When
necessary, the specific type of device is noted within the explanations.
(
In this guide, iPhone and iPad are collectively referred to as “iPhone”. Unless otherwise specified,
“iPhone” refers to iPhone and iPad.
(
This guide mainly explains operations using the remote control. If it is necessary to perform an operation
on the product itself, this is noted in the relevant section.
10
ABOUT THIS PRODUCT AND MANUAL > About the manuals of this product
NAMES OF PARTS AND THEIR FUNCTIONS
Names of parts and functions on the front panel
This section explains the names and functions of each part on the front panel.
PHONES
INPUT
SETUP MIC
USB
5V 1A
PURE DIRECT
SCENE 1 SCENE 2 SCENE 3 SCENE 4
DISPLAY
k
b ec da
g
f h i j l
a
z (Power) key
Turns the Main zone on and off (standby) (p.50).
b
INPUT
Used to select the input source.
c
Remote control sensor
Receives infrared signals from the remote control (p.16).
d
Front display
Displays various information (p.14).
e
Volume
Adjusts the volume.
f
Standby indicator
Lights up when the product is in standby in any of the following conditions:
(
HDMI Control enabled (p.127)
(
HDMI pass-through enabled (p.127)
(
Network standby enabled (p.138)
(
Bluetooth standby enabled (p.141)
g
USB port
For connecting a USB device (p.75).
11
NAMES OF PARTS AND THEIR FUNCTIONS > Names of parts and functions on the front panel

h
PHONES jack
For plugging in headphones.
i
SETUP MIC jack
When performing the speaker setup (Room Correction) during the initial setup, connect the supplied Setup
Microphone (p.51).
j
PURE DIRECT lamp
Lights up when Pure Direct is enabled (p.83).
k
SCENE key
Used to switch to different scenes. The Scene function allows you to switch multiple settings with a single touch
(p.91). When the product is in standby, pressing this key also turns the power on.
l
DISPLAY key
Used to switch the information shown on the front display (p.14).
12
NAMES OF PARTS AND THEIR FUNCTIONS > Names of parts and functions on the front panel
Names of parts and functions on the rear panel
This section explains the names and functions of each part on the rear panel.
SURROUND BACK/ZONE B/BI-AMP
SCENE 4
HDMI IN 1
DIGITAL AUDIO IN
OPTICALCOAXIAL
RCA 2RCA 1
HDMI IN 2 HDMI IN 3
SCENE 1 SCENE 2 SCENE 3
HDMI IN 4 HDMI OUT
eARC/ARC
L
R
SUBWOOFER
ANALOG AUDIO IN
ANTENNA
CENTER
FRONTSURROUND
SPEAKERS
R L
ASSIGNABLE
HEIGHT
R L R L
2
1
75
FM
NETWORK
i
gda b c e f
h
a
ANALOG AUDIO IN jack
For connecting AV devices that have analog audio output to input audio (p.60).
b
SUBWOOFER terminal
For connecting to a subwoofer with a built-in amplifier (p.42).
c
DIGITAL AUDIO IN jack
For connecting AV devices that have digital audio output to input audio (p.60).
d
NETWORK jack
For connecting a network cable when connecting this product to a wired network (p.47).
e
HDMI IN 1 to 4 ports
For connecting AV devices that have HDMI output to input video/audio (p.59).
f
HDMI OUT eARC/ARC port
For connecting a TV that has an HDMI input to output video/audio (p.45). When using eARC/ARC, audio from the TV
is input to this product.
g
Power cord
For connecting the power plug to an AC outlet (p.49).
h
ANTENNA terminal
For connecting a radio antenna (p.61).
i
SPEAKERS terminal
For connecting to speakers (p.25).
13
NAMES OF PARTS AND THEIR FUNCTIONS > Names of parts and functions on the rear panel
Names of parts and functions on the front display
This section explains the names and functions of the parts of the front display.
k
l
a jb c d e f g h i
a
Lights up when a Dolby signal is received.
Lights up when a Dolby Atmos signal is received (p.89).
b
Lights up when a DTS signal is received.
Lights up when a DTS:X signal is received (p.89).
c
HDMI
Lights up when audio is being input from or output to the HDMI IN or HDMI OUT eARC/ARC port (p.45, p.59).
HDMI-OUT
Lights up when audio is being output from the HDMI OUT eARC/ARC port (p.45).
d
STRAIGHT
Lights up when “STRAIGHT” is selected as the sound mode (p.82).
e
SLEEP
Lights up when the sleep timer is set (p.90).
f
ZONE
Lights up when the power for ZoneB is on (p.98).
g
MUTE
Lights up when the sound is muted.
h
Bluetooth
Lights up when a Bluetooth device is connected (p.73).
14
NAMES OF PARTS AND THEIR FUNCTIONS > Names of parts and functions on the front display

i
Wireless LAN
Lights up when connected to a wireless network (p.201).
The received signal strength is also displayed.
Flashes during WAC setup.
j
Volume indicator
Displays the volume.
k
Information display
Shows the selected input, sound program, and other information. The displayed information can be switched by
pressing the DISPLAY key on the front panel or remote control (p.11).
l
Speaker indicators
Icons light up according to your speaker configuration.
(
L: Front speaker (left)
(
R: Front speaker (right)
(
C: Center speaker
(
SL: Surround speaker (left)
(
SR: Surround speaker (right)
(
HL: Height speaker (left)
(
HR: Height speaker (right)
(
SBL: Surround back speaker (left)
(
SBR: Surround back speaker (right)
(
SW: Subwoofer
15
NAMES OF PARTS AND THEIR FUNCTIONS > Names of parts and functions on the front display
Names and functions of remote control parts
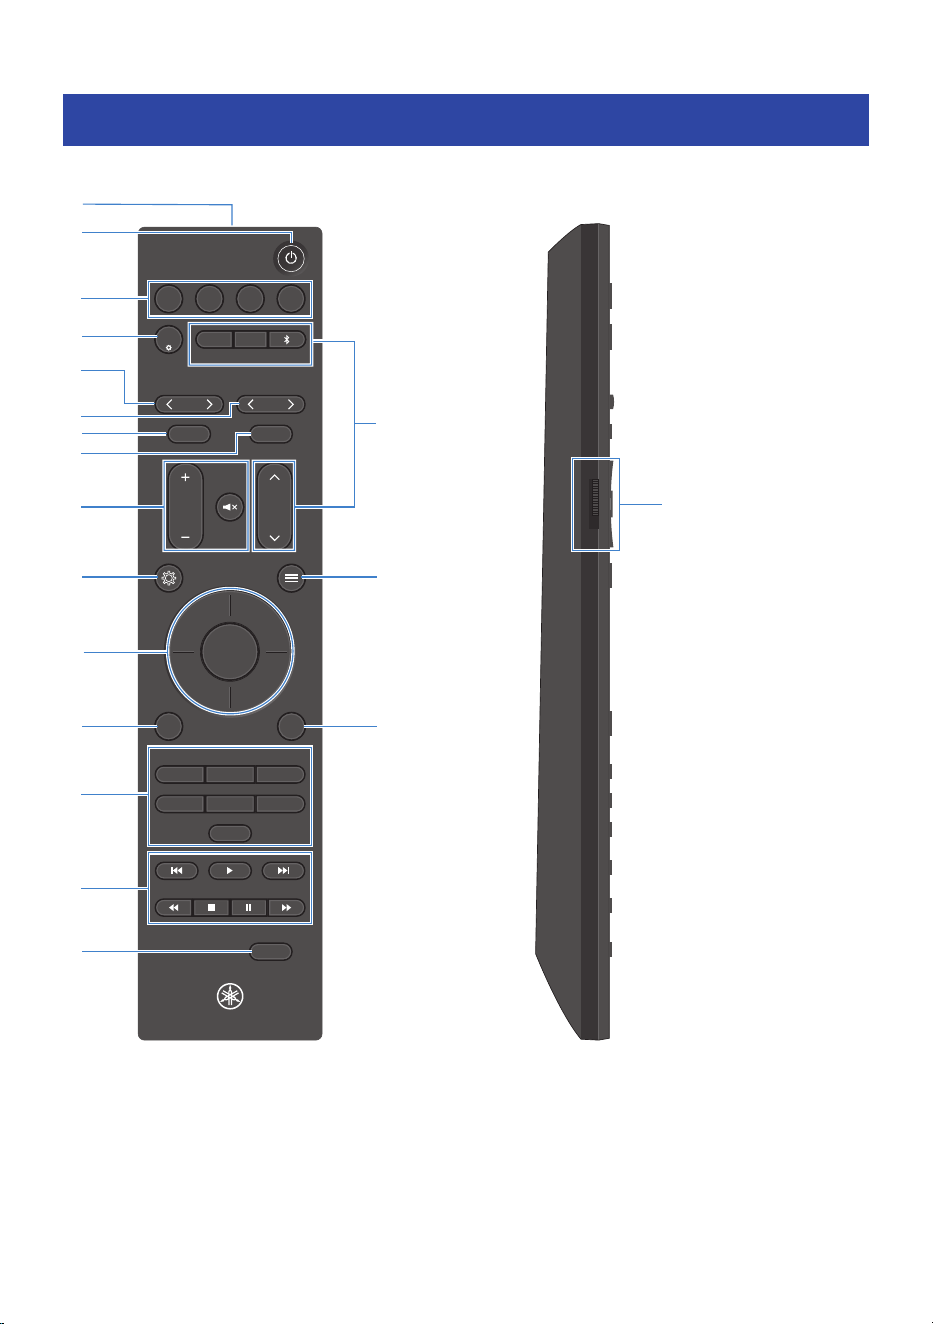
This section explains the part names and functions of the remote control.
MAIN ZONE B
VOLUME
1 2 3 4
SCENE
PRESETS
INPUT
MEMORY
NIGHT
DISPLAY
BACK
ALL CH STEREO
MUSIC
2 CH STEREO
PURE DIRECT
MOVIESTRAIGHT
NET TUNER
INPUT
SCENE
SOUND MODE
INFO
TUNING
FM MODE
d
k
n
s
h
c
j
e
f
g
i
a
p
r
l
o
m
b
q
a
Remote control signal transmitter
Sends infrared signals from the remote control.
b
z (Power) key
Turns the power of the selected zone on/off using the Zone switch (p.98).
16
NAMES OF PARTS AND THEIR FUNCTIONS > Names and functions of remote control parts

c
SCENE key
Enables switching to a multiple setting configuration that was set in the Scene function with a single touch (p.91).
When the product is in standby, pressing this key also turns the power on.
d
SCENE~ key
Displays the “Scene Settings” screen on the TV and sets the items to be recalled using the Scene function (p.92).
e
INPUT key
Used to select the input source to be played back.
f
PRESETS key
Used to select a radio station registered as a preset (p.71).
g
TUNING key
Used to change the radio frequency (p.68).
Holding the key for approximately one second enables automatic tuning.
h
MEMORY key
Registers the currently tuned radio station as a preset (p.71).
i
FM MODE key (U.S.A. and Canada models)
You can select the FM radio reception mode (stereo/mono).
BAND key (U.K., Europe, and Australia models)
Used to select the radio band to receive (FM/DAB).
j
VOLUME key
Adjusts the volume.
| (Mute) key
Mutes the sound.
k
~ (SETTINGS menu) key
Displays the SETTINGS menu on the TV screen (p.116).
l
" (OPTION menu) key
Displays the OPTION menu on the TV screen (p.101).
m
ENTER / Cursor key
Used to operate the menus displayed on the TV screen.
n
BACK key
Used to return to the previous screen in menu operations displayed on the TV.
o
INFO key
Shows or hides signal information on the TV screen (p.64).
p
Sound mode key
Switches the sound mode (p.81).
17
NAMES OF PARTS AND THEIR FUNCTIONS > Names and functions of remote control parts
q
External device operation keys
Used to control playback on AV and Bluetooth devices that support HDMI Control.
r
DISPLAY key
Used to switch the information shown on the front display.
s
Zone switch
Switches the zone controlled by the remote control (p.95).
n
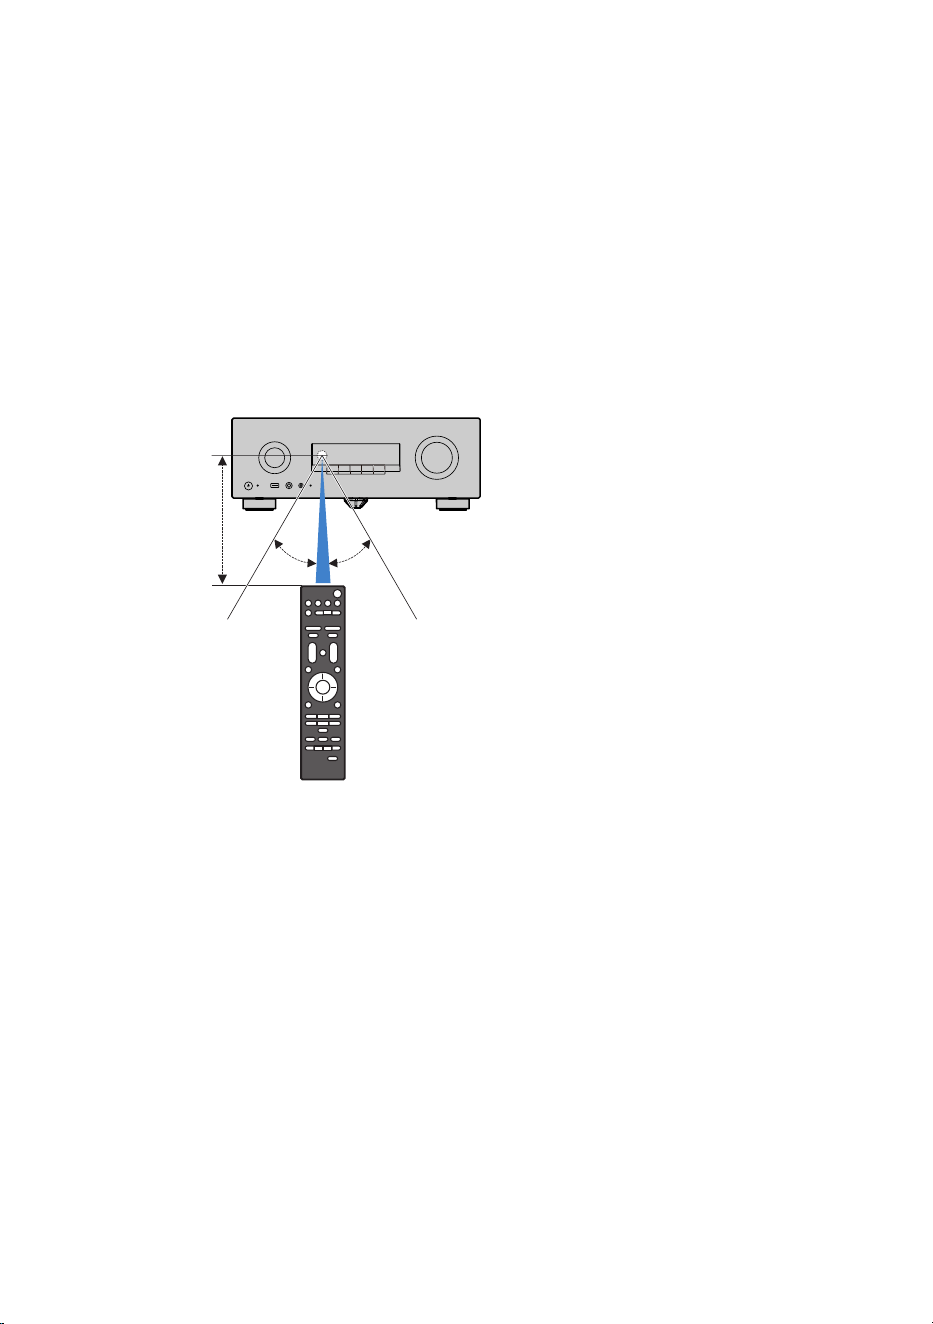
Remote control operating range
The operating range of the remote control is shown in the following illustration.
Use by pointing the remote control toward the product’s remote control sensor.
Within 6 m (20 ft)
30° 30°
18
NAMES OF PARTS AND THEIR FUNCTIONS > Names and functions of remote control parts

PREPARATION FOR USE
Preparation
The basic preparation procedure before using this product is as follows.
1 Check the supplied accessories and required commercially-available items.
“Checking the supplied accessories and required commercially-available items”(p.21)
2 Prepare the remote control.
“Preparing the remote control”(p.23)
3 Place the product at the desired location.
“Placing the product at the desired location”(p.24)
4 Place the speakers at the desired location.
“Placing the speakers at the desired location”(p.25)
5 Connect the speakers.
“Preparing the speakers and speaker cables”(p.40)
“Connecting the Speaker Cables”(p.42)
6 Connect the TV.
“Connecting a TV”(p.45)
7 Prepare the network connection.
“Preparing a network connection”(p.47)
8 Turn on the product.
“Connecting to power”(p.49)
“Turning on the power (Main zone)”(p.50)
9 Perform the initial setup.
“Making initial settings using the Setup Guide”(p.51)
10 Use the dedicated app to connect to the network.
“Connecting to the network using the dedicated app”(p.58)
19
PREPARATION FOR USE > Preparation


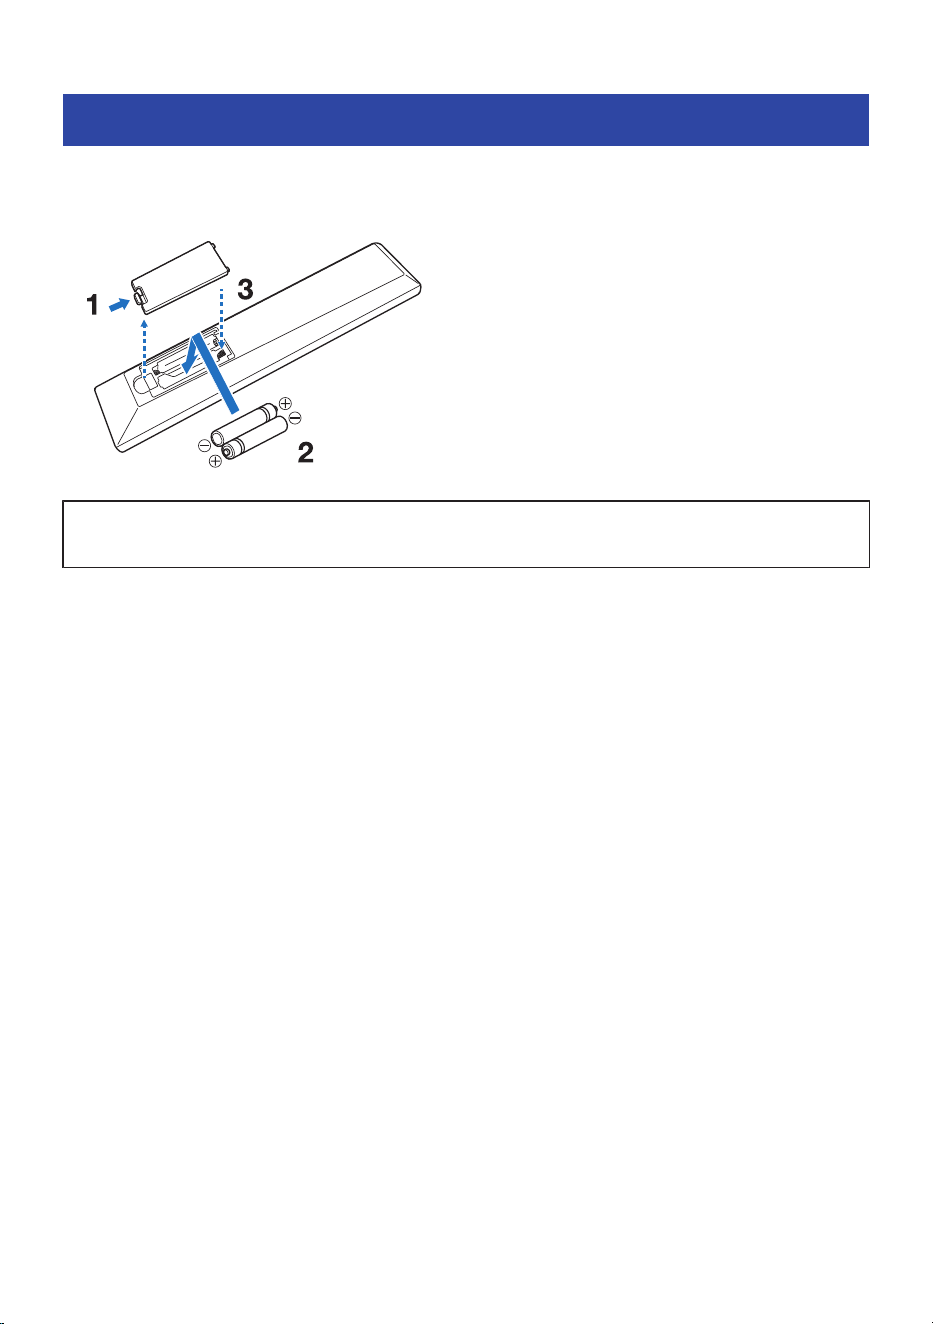
Checking the supplied accessories and required
commercially-available items
n
Checking the supplied accessories
This product comes with the following accessories. Make sure you have received all of the following
accessories:
(
Remote control (×1)
(
AAA batteries (LR03, UM-4) (×2)
(
FM antenna (U.S.A. and Canada models) (×1)
(
DAB/FM antenna (U.K., Europe, and Australia models) (×1)
21
PREPARATION FOR USE > Checking the supplied accessories and required commercially-available items

(
Setup Microphone (×1)
(
Cardboard Microphone Stand (×1)
(
Quick Guide (×1)
(
Safety Guide (×1)
n
Obtaining commercially available items
Obtaining the necessary items beforehand will help make the setup process smoother.
(
TV
(
HDMI cables (one for each device to be connected)
(
Speakers
(
Speaker cables (one for each speaker)
(
Monaural pin cables (for subwoofer connection)
(
Banana plugs (if used to connect speaker cables)
(
Wi-Fi router
(
Network cable (for a wired network connection)
Next step
(
“Preparing the remote control”(p.23)
22
PREPARATION FOR USE > Checking the supplied accessories and required commercially-available items
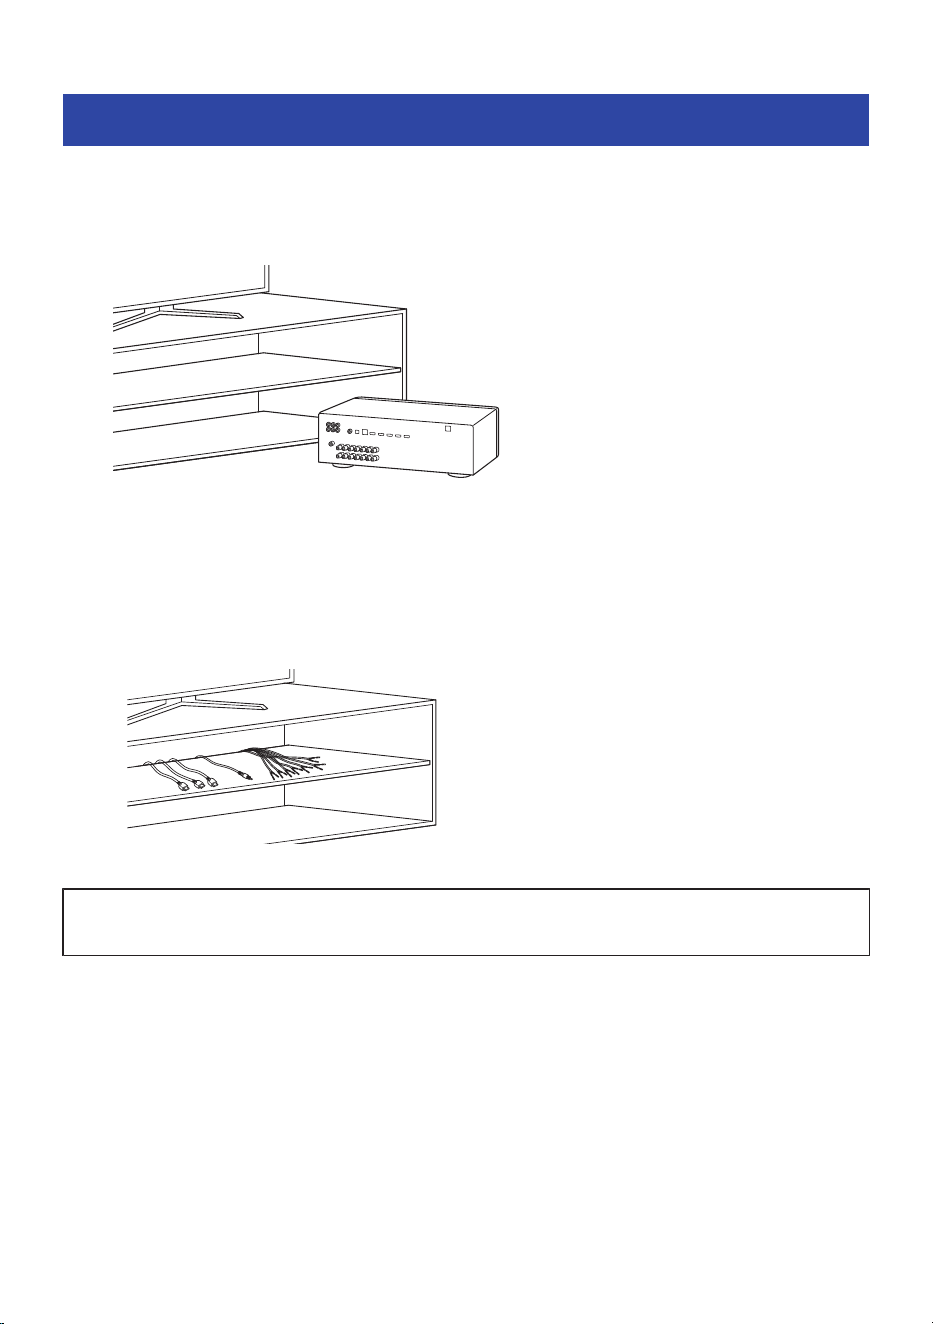
Placing the product at the desired location
Temporarily place the product in a location where wiring and operation will be easy to perform.
After completing all connections and settings, install the product in your preferred location, such as in a rack.
Reference example
NOTE
(
Make sure there is sufficient space around the product.
(
If installing the product in a rack, it is recommended to route the cables to be connected to the product through the back of the
rack beforehand.
Reference example
Next step
(
“Placing the speakers at the desired location”(p.25)
24
PREPARATION FOR USE > Placing the product at the desired location
Placing the speakers at the desired location
Names and functions of speakers
This section explains the names and functions of the speakers that can be connected to this product.
FL
SW SW
SL
FR
C
SR
SBRSBL
HL
HL HR
HR
HL HR
Speaker type Abbrev. Function
Front
FL
/
FR
Outputs front-channel audio (stereo sound).
Center
C
Outputs center-channel audio such as movie dialogue or vocals
positioned at the center of the screen.
Surround
SL
/
SR
Outputs surround-channel audio.
Height
HL
/
HR
Outputs upper-channel audio for Dolby Atmos and DTS:X content.
Three placement options are available: Top (ceiling), Front Height (front
wall), and Dolby Enabled Speakers (on top of the front speakers). Choose
the option that best suits your listening environment.
Surround back
SBL
/
SBR
Outputs surround back-channel audio.
Subwoofer
SW
Outputs LFE (Low-Frequency Effects) channel audio and low-frequency
content from the front and surround channels.
Next step
(
“Preparing the speakers and speaker cables”(p.40)
25
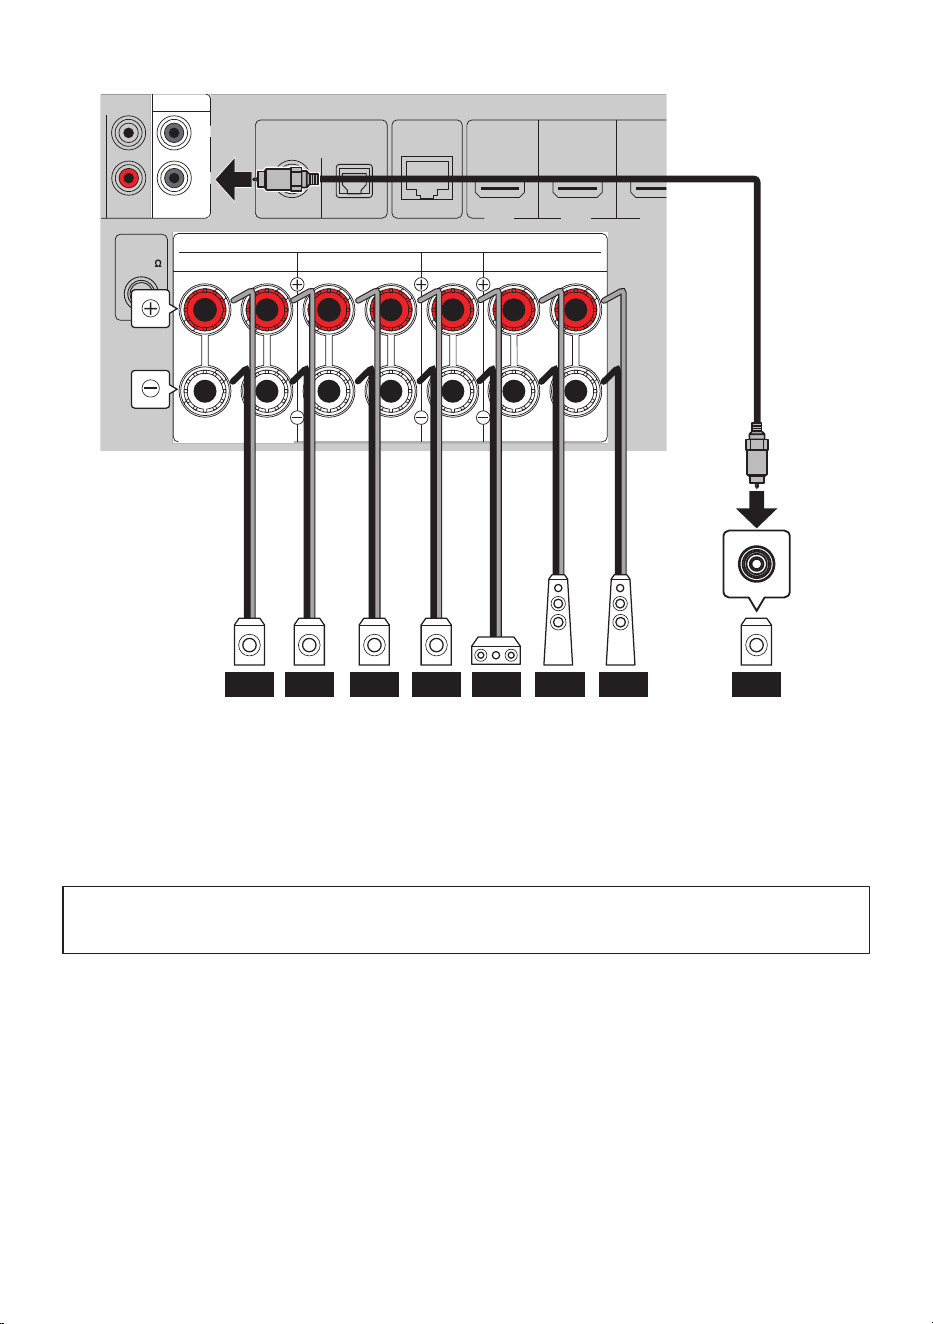
PREPARATION FOR USE > Placing the speakers at the desired location


Channel configuration quick reference
This presents examples of channel configurations according to the usage and listening environment.
Number of channels Features Required speakers Speaker terminals used Page
5.1.2 (Height speakers:
Front Height placement)
Dolby Atmos basic
configuration.
Emphasizes sound expansion
in the front height direction.
Floor speakers: 5
Subwoofer: 1
Height speakers: 2
FRONT L/R, CENTER,
SURROUND L/R,
SUBWOOFER, HEIGHT L/R
28
5.1.2 (Height speakers:
Top placement)
Dolby Atmos basic
configuration.
Emphasizes sound expansion
from overhead.
Floor speakers: 5
Subwoofer: 1
Height speakers: 2
FRONT L/R, CENTER,
SURROUND L/R,
SUBWOOFER, HEIGHT L/R
7.1
Prioritizes floor speaker
channels.
Enhances the sense of
surround from the rear.
Floor speakers: 7
Subwoofer: 1
FRONT L/R, CENTER,
SURROUND L/R,
SUBWOOFER, HEIGHT
(SURROUND BACK) L/R
5.1
Standard configuration for
basic surround sound.
Floor speakers: 5
Subwoofer: 1
FRONT L/R, CENTER,
SURROUND L/R,
SUBWOOFER
33
3.1.2
Space-saving configuration.
Prioritizes dialogue and
height effects.
Floor speakers: 3
Subwoofer: 1
Height speakers: 2
FRONT L/R, CENTER,
SUBWOOFER, HEIGHT L/R
(SURROUND not used)
Zone (Main zone +
ZoneB)
Simultaneous output to
separate speakers in another
room.
Main zone: Up to 5.1 ch
recommended
ZoneB: 2 ch required
Main zone: 5.1 to 3.1 ch
(FRONT/CENTER/
SURROUND+
SUBWOOFER)
ZoneB: 2 ch (HEIGHT L/R)
37
Bi-amp connection
(Front L/R)
Improves the driving power
and control of the front
speakers.
Floor speakers: 2
FRONT L/R, HEIGHT L/R
(assigned to BI-AMP
terminals)
39
Next step
(
“Preparing the speakers and speaker cables”(p.40)
27
PREPARATION FOR USE > Placing the speakers at the desired location
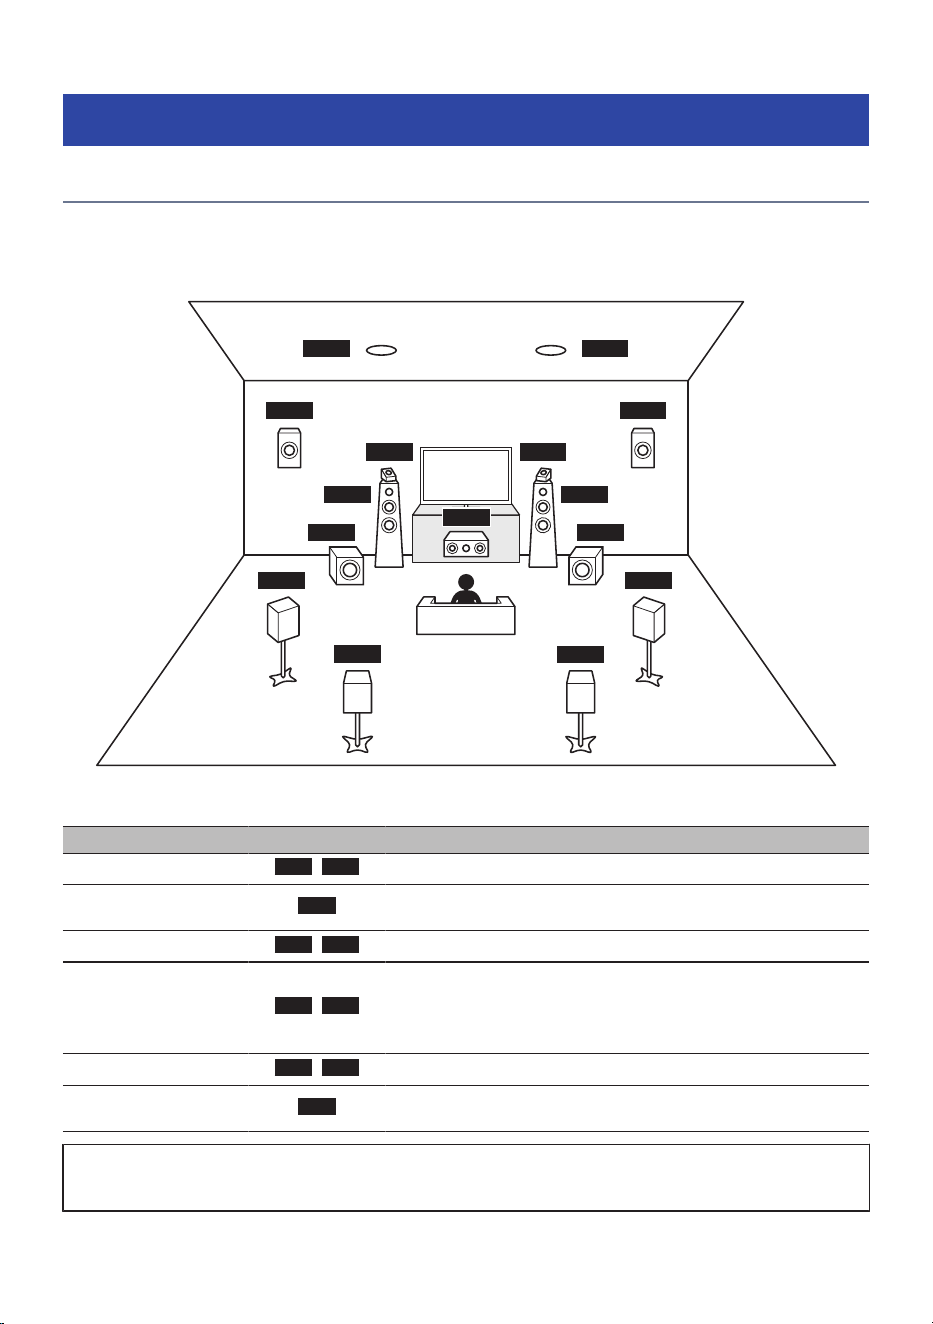
Recommended speaker layouts (Basic)
The following layouts are ideal speaker configurations that allow you to fully utilize the performance of this
product.
The following sections present the speaker placement for 5.1.2-channel and 7.1-channel configurations.
n
5.1.2-channel configuration
It provides a natural and immersive listening environment suitable for all types of content. It is
recommended for Dolby Atmos and DTS:X.
There are three placement options for height speakers: Top (ceiling), Front Height (front wall), and Dolby
Enabled Speakers (on top of the front speakers).
Setting changes are required when placing the height speakers on the front wall or when using Dolby
Enabled Speakers as height speakers.
When the height speaker placement is Front Height
FL
SW
SL
FR
C
SR
HL HR
10° to 30° 10° to 30°
0.5 to 1 m 0.5 to 1 m
1.8 m 1.8 m
28
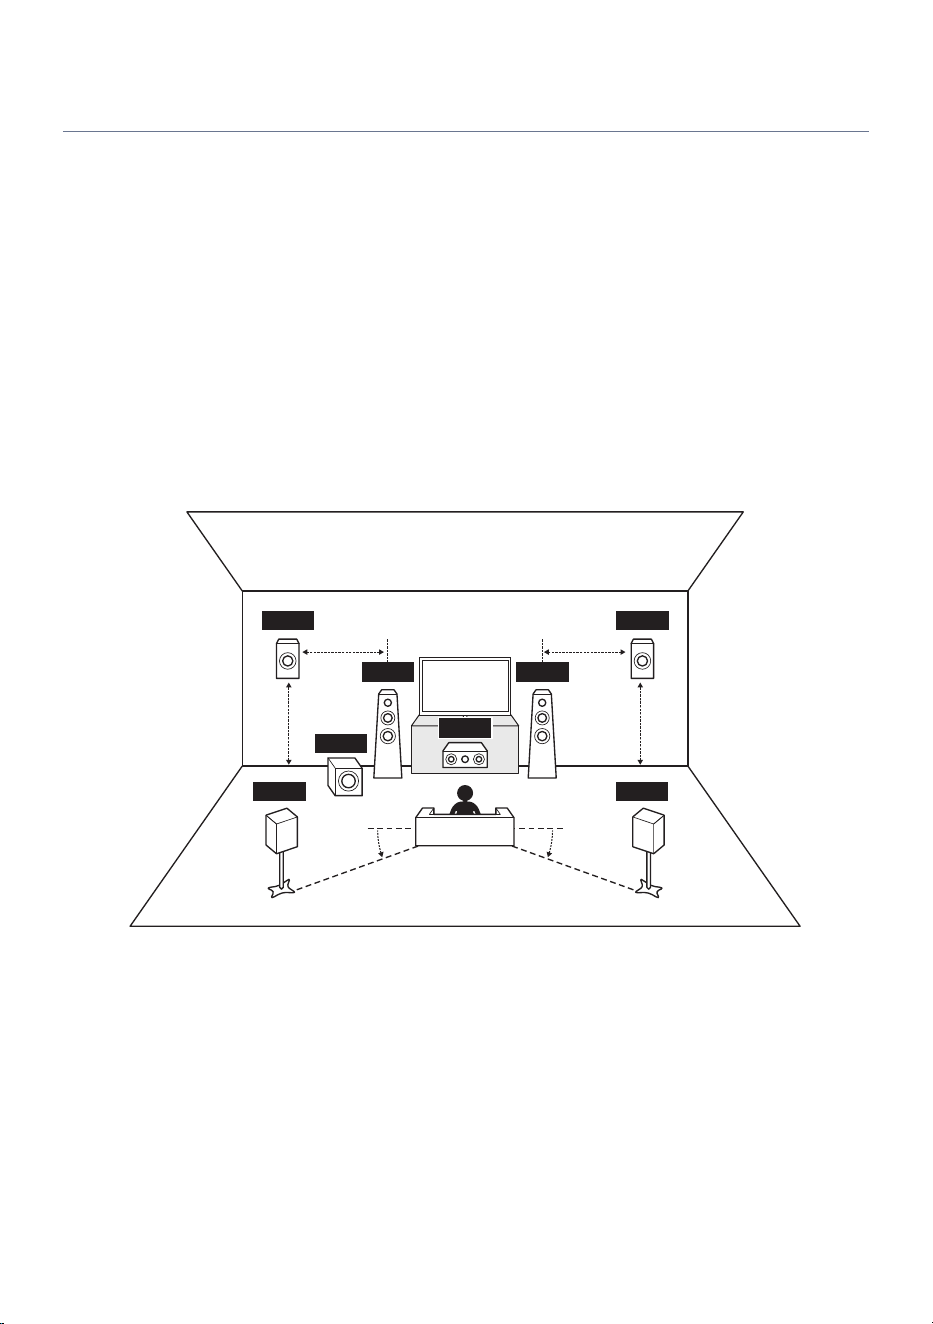
PREPARATION FOR USE > Placing the speakers at the desired location
When the height speaker placement is Top
FL
SW
SL
FR
C
SR
HL
HR
10° to 30° 10° to 30°
SURROUND BACK/ZONE B/BI-AMP
HDMI IN 1
DIGITAL AUDIO IN
OPTICALCOAXIAL
RCA 2RCA 1
HDMI IN 2 HDMI IN 3
SCENE 1 SCENE 2 SCENE 3
SUBWOOFER
ANALOG AUDIO IN
ANTENNA
CENTER
FRONTSURROUND
SPEAKERS
R L
ASSIGNABLE
HEIGHT
R L R L
2
1
75
FM
NETWORK
C FR FLSR SWSLHR HL
29
PREPARATION FOR USE > Placing the speakers at the desired location

NOTE
(
You can connect up to two subwoofers (with built-in amplifiers). Both subwoofers output the same audio signal.
(
If using only one subwoofer, you may place it on either side.
(
The following connections cannot be used at the same time:
(
Height speakers
(
Surround back speakers
(
ZoneB speakers
(
Bi-amp connections
Related links
(
“Configuring the speakers”(p.123)
(
“About height speaker placement”(p.205)
30
PREPARATION FOR USE > Placing the speakers at the desired location
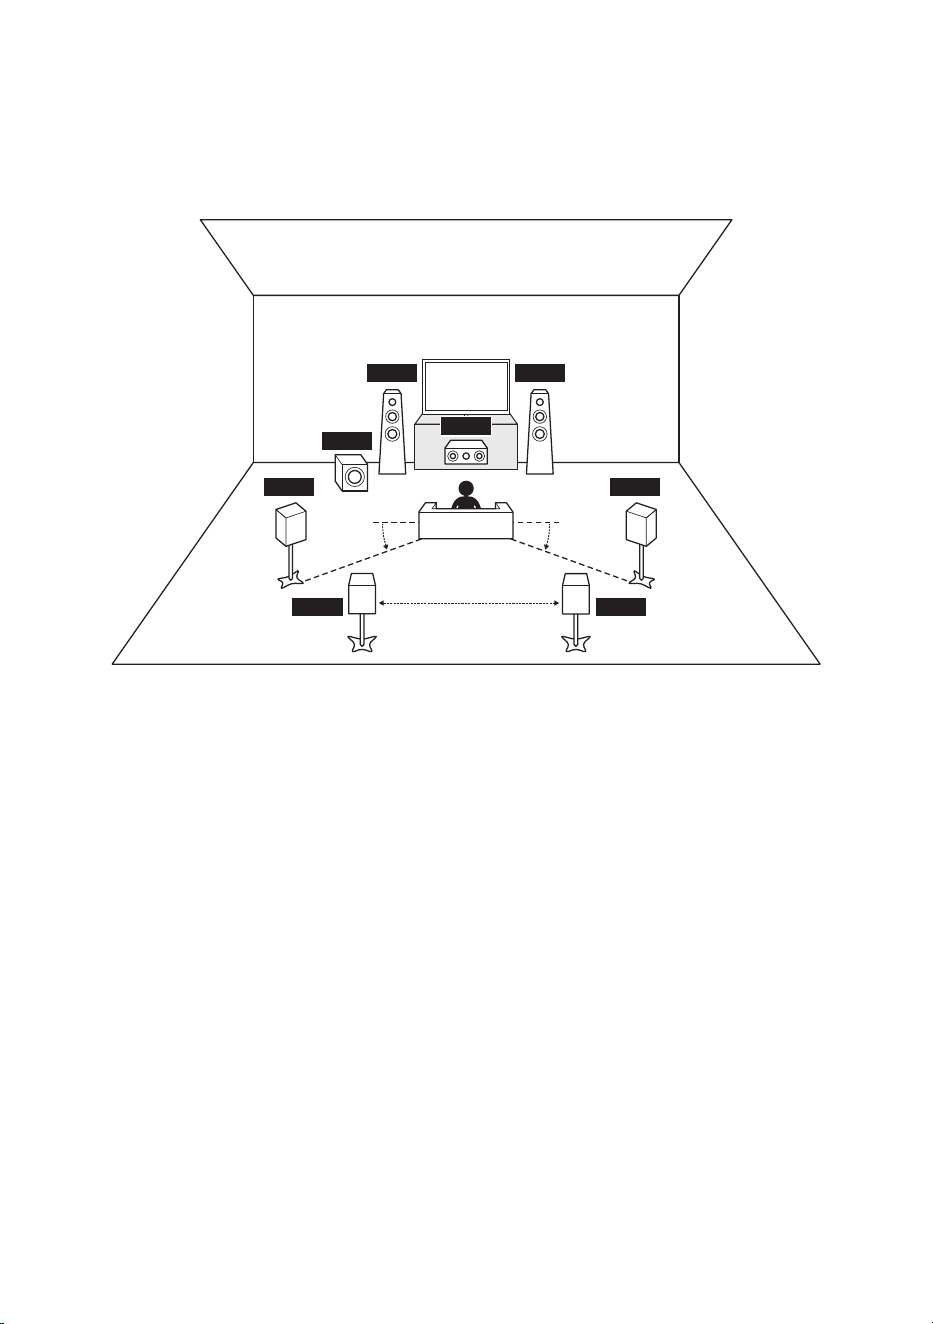
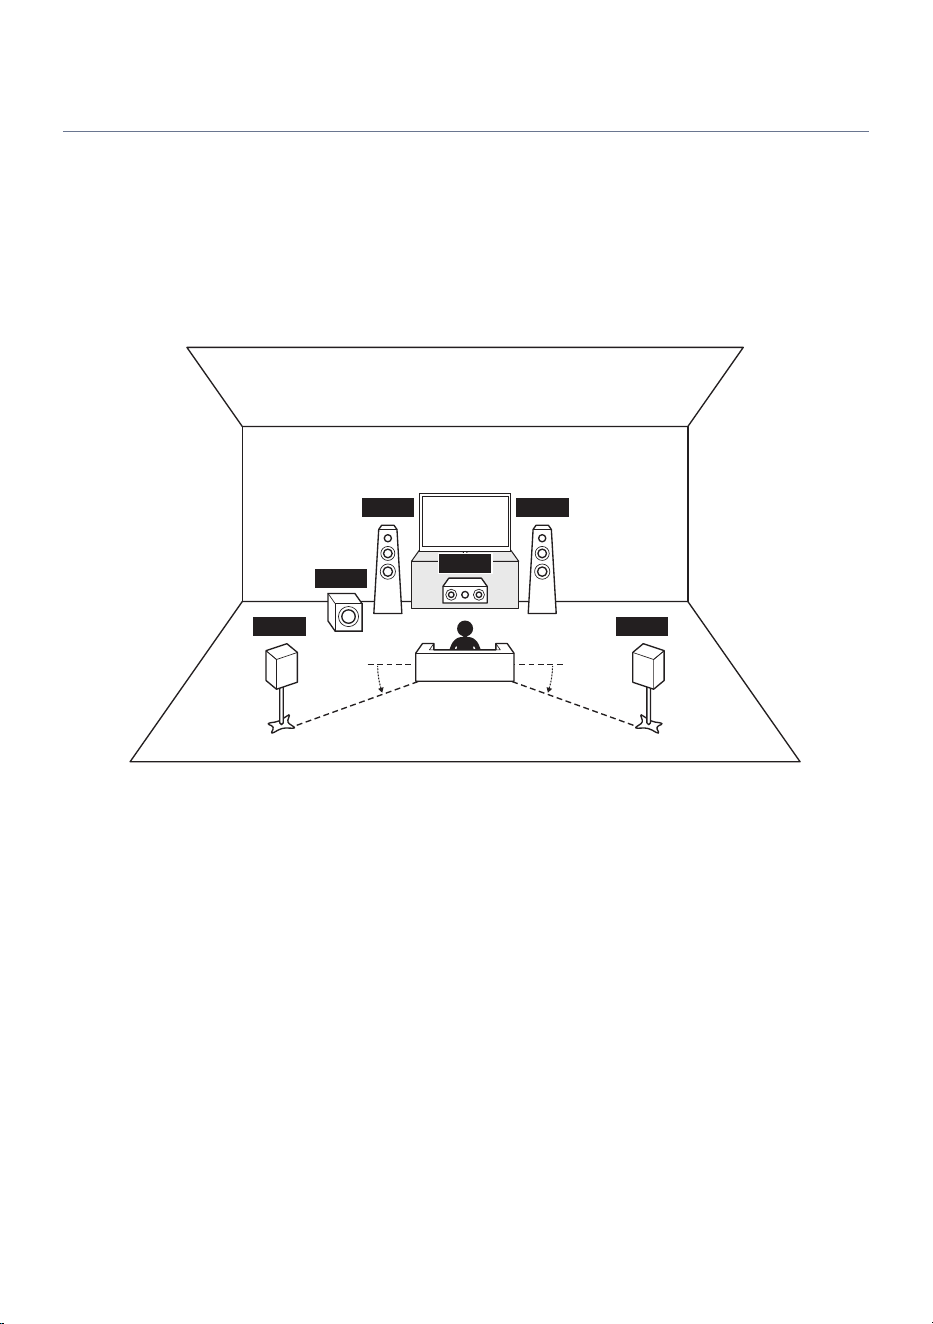
n
7.1-channel configuration
This system allows you to enjoy extended surround sound using surround back speakers.
If surround back speakers are used, the settings must be changed.
FL
SW
SL
FR
C
SR
SBRSBL
10° to 30° 10° to 30°
0.3 m or longer
31
PREPARATION FOR USE > Placing the speakers at the desired location
SURROUND BACK/ZONE B/BI-AMP
HDMI IN 1
DIGITAL AUDIO IN
OPTICALCOAXIAL
RCA 2RCA 1
HDMI IN 2 HDMI IN 3
SCENE 1 SCENE 2 SCENE 3
SUBWOOFER
ANALOG AUDIO IN
ANTENNA
CENTER
FRONTSURROUND
SPEAKERS
R L
ASSIGNABLE
HEIGHT
R L R L
2
1
75
FM
NETWORK
C FR FLSR SWSLSBR SBL
NOTE
(
You can connect up to two subwoofers (with built-in amplifiers). Both subwoofers output the same audio signal.
(
If using only one subwoofer, you may place it on either side.
Related links
“Configuring the speakers”(p.123)
Next step
(
“Preparing the speakers and speaker cables”(p.40)
32
PREPARATION FOR USE > Placing the speakers at the desired location
Other speaker layouts (Basic)
NOTE
(
You can connect up to two subwoofers (with built-in amplifiers). Both subwoofers output the same audio signal.
(
If using only one subwoofer, you may place it on either side.
n
5.1-channel configuration
This is a basic layout for enjoying surround playback.
FL
SW
SL
FR
C
SR
10° to 30° 10° to 30°
33
PREPARATION FOR USE > Placing the speakers at the desired location
SURROUND BACK/ZONE B/BI-AMP
HDMI IN 1
DIGITAL AUDIO IN
OPTICALCOAXIAL
RCA 2RCA 1
HDMI IN 2 HDMI IN 3
SCENE 1 SCENE 2 SCENE 3
SUBWOOFER
ANALOG AUDIO IN
ANTENNA
CENTER
FRONTSURROUND
SPEAKERS
R L
ASSIGNABLE
HEIGHT
R L R L
2
1
75
FM
NETWORK
C FR FLSR SWSL
34
PREPARATION FOR USE > Placing the speakers at the desired location
n
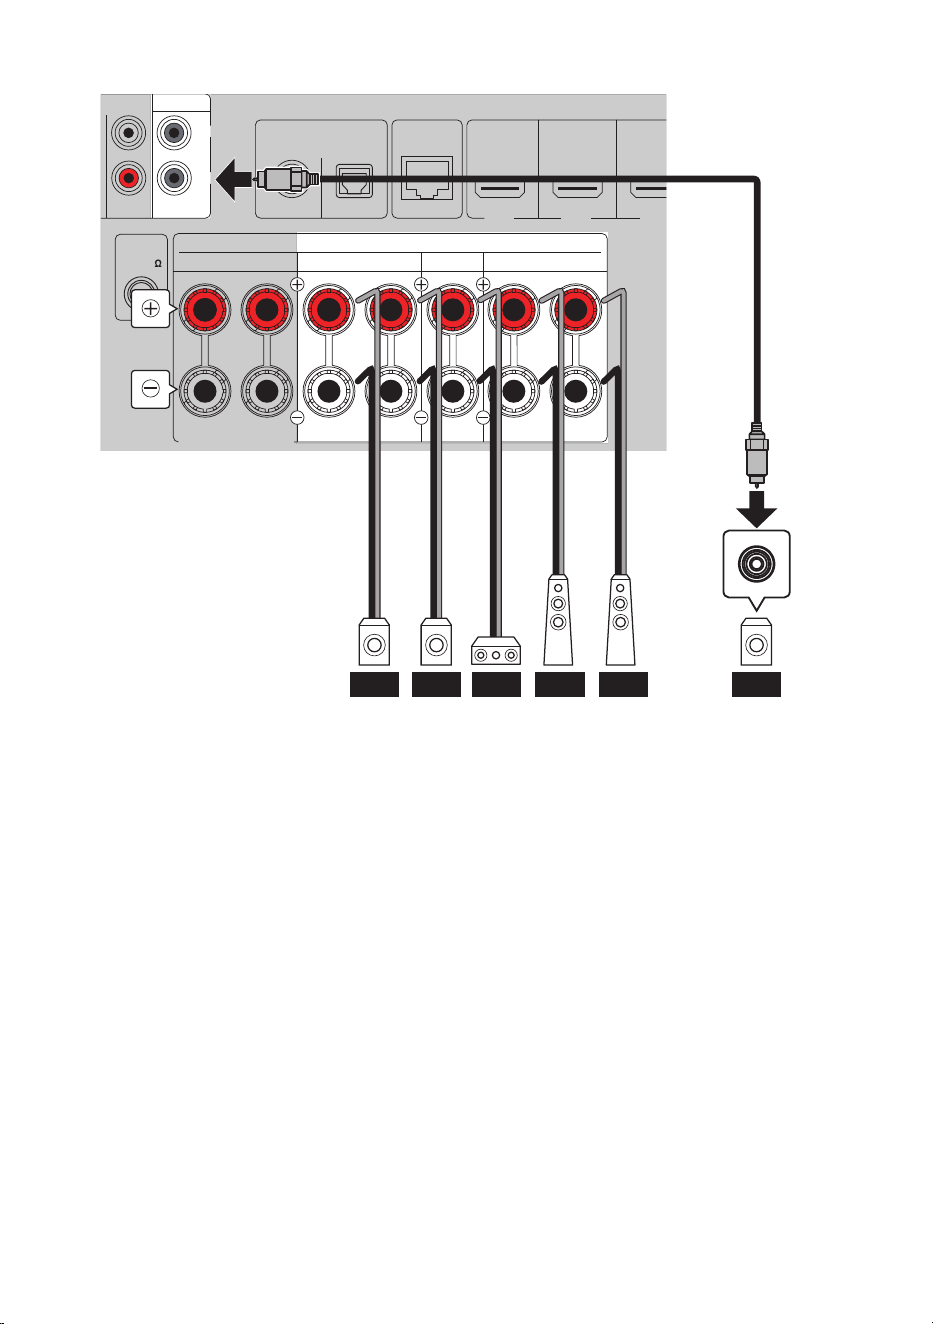
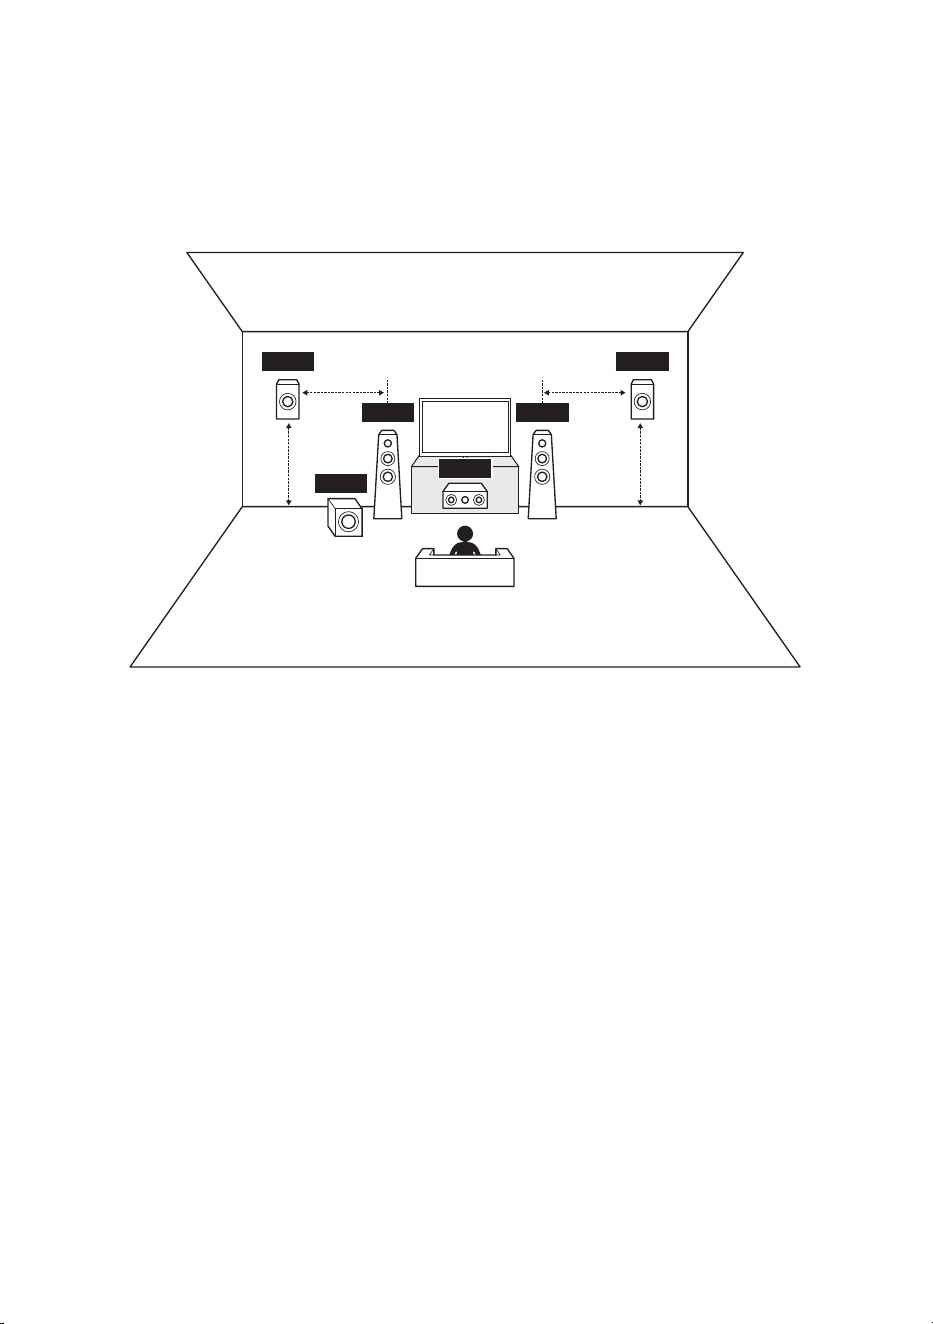
3.1.2-channel configuration
This system is recommended when speakers cannot be placed behind the listening position. This speaker
system also supports Dolby Atmos and DTS:X.
Setting changes are required when placing the height speakers on the front wall or when using Dolby
Enabled Speakers as height speakers.
FL
SW
FR
C
HL HR
0.5 to 1 m 0.5 to 1 m
1.8 m 1.8 m
35
PREPARATION FOR USE > Placing the speakers at the desired location
SURROUND BACK/ZONE B/BI-AMP
HDMI IN 1
DIGITAL AUDIO IN
OPTICALCOAXIAL
RCA 2
HDMI IN 2 HDMI IN 3
SCENE 1 SCENE 2 SCENE 3
SUBWOOFER
ANALOG AUDIO IN
ANTENNA
CENTER
FRONTSURROUND
SPEAKERS
R L
ASSIGNABLE
HEIGHT
R L R L
2
1
75
FM
NETWORK
HR HL SWC FR FL
Next step
(
“Preparing the speakers and speaker cables”(p.40)
Related links
“Configuring the speakers”(p.123)
36
PREPARATION FOR USE > Placing the speakers at the desired location
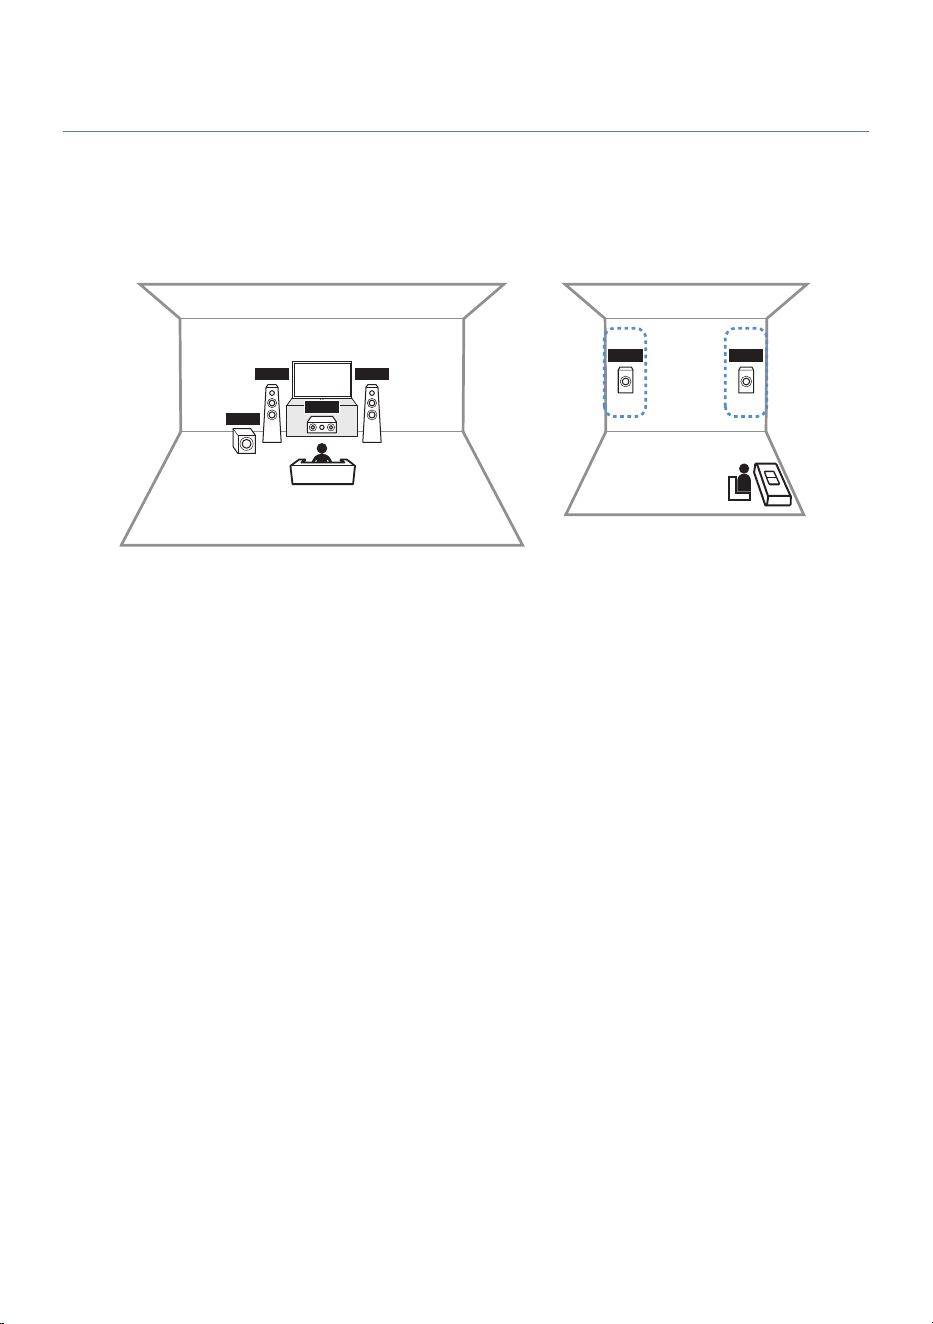
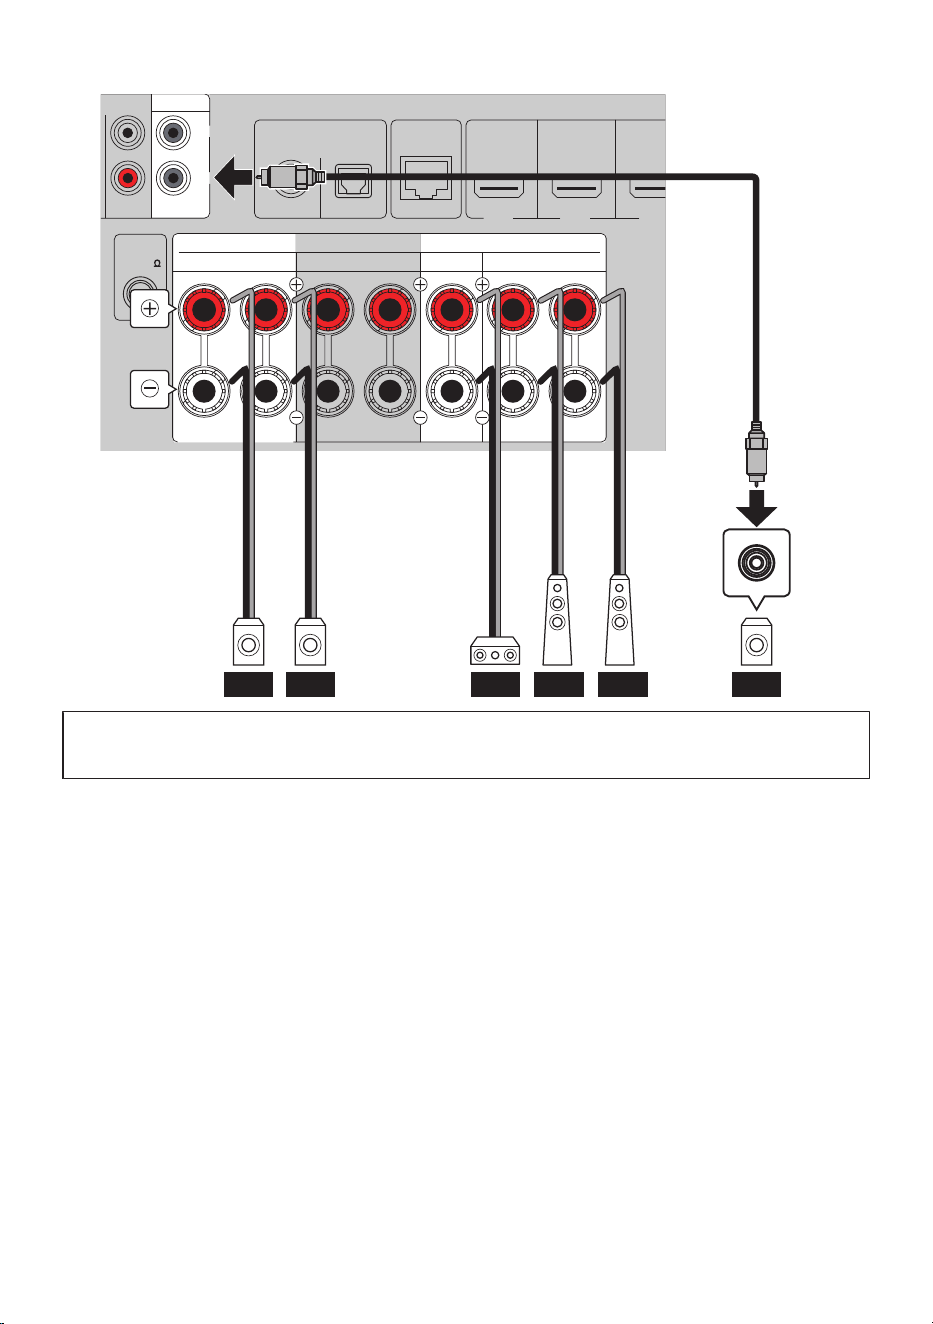
Zone connections (Advanced)
Using the Zone function, you can play audio in another room separate from the one where this product is
installed.
The figure below shows an example using a 3.1-channel Main zone and ZoneB.
To use zone speakers, you must change the settings.
Main zone
ZoneB
C
SW
FL FR
FL FR
37
PREPARATION FOR USE > Placing the speakers at the desired location
SURROUND BACK/ZONE B/BI-AMP
HDMI IN 1
DIGITAL AUDIO IN
OPTICALCOAXIAL
RCA 2
HDMI IN 2 HDMI IN 3
SCENE 1 SCENE 2 SCENE 3
SUBWOOFER
ANALOG AUDIO IN
ANTENNA
CENTER
FRONTSURROUND
SPEAKERS
R L
ASSIGNABLE
HEIGHT
R L R L
2
1
75
FM
NETWORK
FR FL SWC FR FL
ZoneB
NOTE
(
You can connect up to two subwoofers (with built-in amplifiers). Both subwoofers output the same audio signal.
(
If using only one subwoofer, you may place it on either side.
(
The following connections cannot be used at the same time:
(
Height speakers
(
Surround back speakers
(
ZoneB speakers
(
Bi-amp connections
Next step
(
“Preparing the speakers and speaker cables”(p.40)
Related links
(
“Configuring the speakers”(p.123)
(
“Enjoying music in multiple rooms (Zone function)”(p.95)
38
PREPARATION FOR USE > Placing the speakers at the desired location
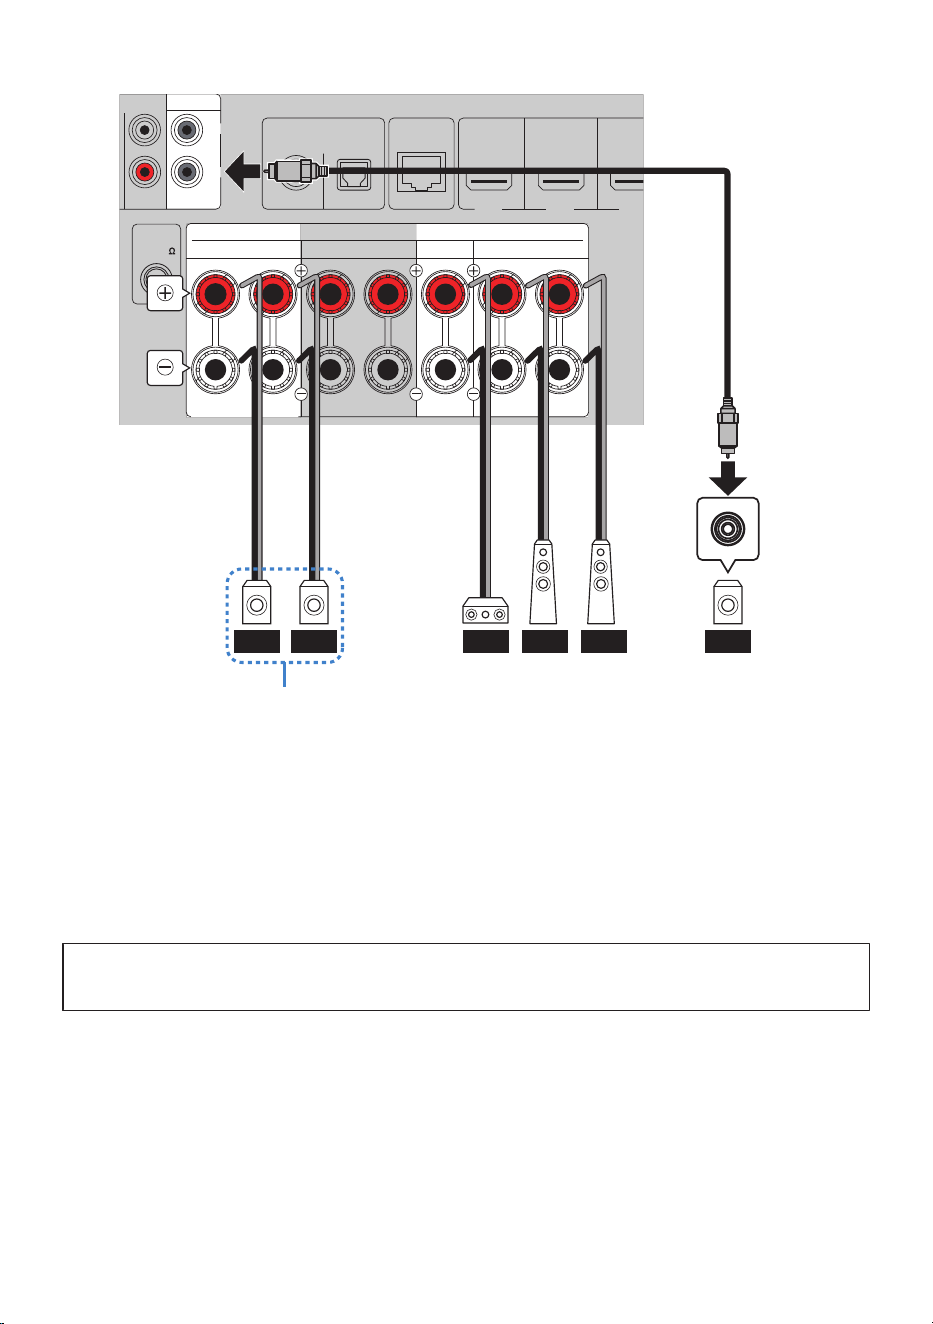
Bi-amp connections (Advanced)
Connect front speakers that support bi-amping.
When the bi-amp function is enabled, two amplifiers are assigned to each of the front left and right speakers.
By driving the high and low frequency ranges with separate amplifiers, clearer and more dynamic sound
quality can be achieved.
To enable the bi-amp function, you must change the settings.
SURROUND BACK/ZONE B/BI-AMP
CENTER
FRONTSURROUND
SPEAKERS
R L
ASSIGNABLE
HEIGHT
R L R L
FL FR
NOTICE
(
Before making bi-amp connections, be sure to remove the metal jumpers (or cables) that link the high-frequency and low-
frequency terminals on the speaker side. If not using bi-amp connections, be sure the jumpers (or cables) are installed when
connecting the speaker cables. For details, refer to the user’s manual for your speakers.
NOTE
The following connections cannot be used at the same time:
(
Height speakers
(
Surround back speakers
(
ZoneB speakers
(
Bi-amp connections
Next step
(
“Preparing the speakers and speaker cables”(p.40)
Related links
“Configuring the speakers”(p.123)
39
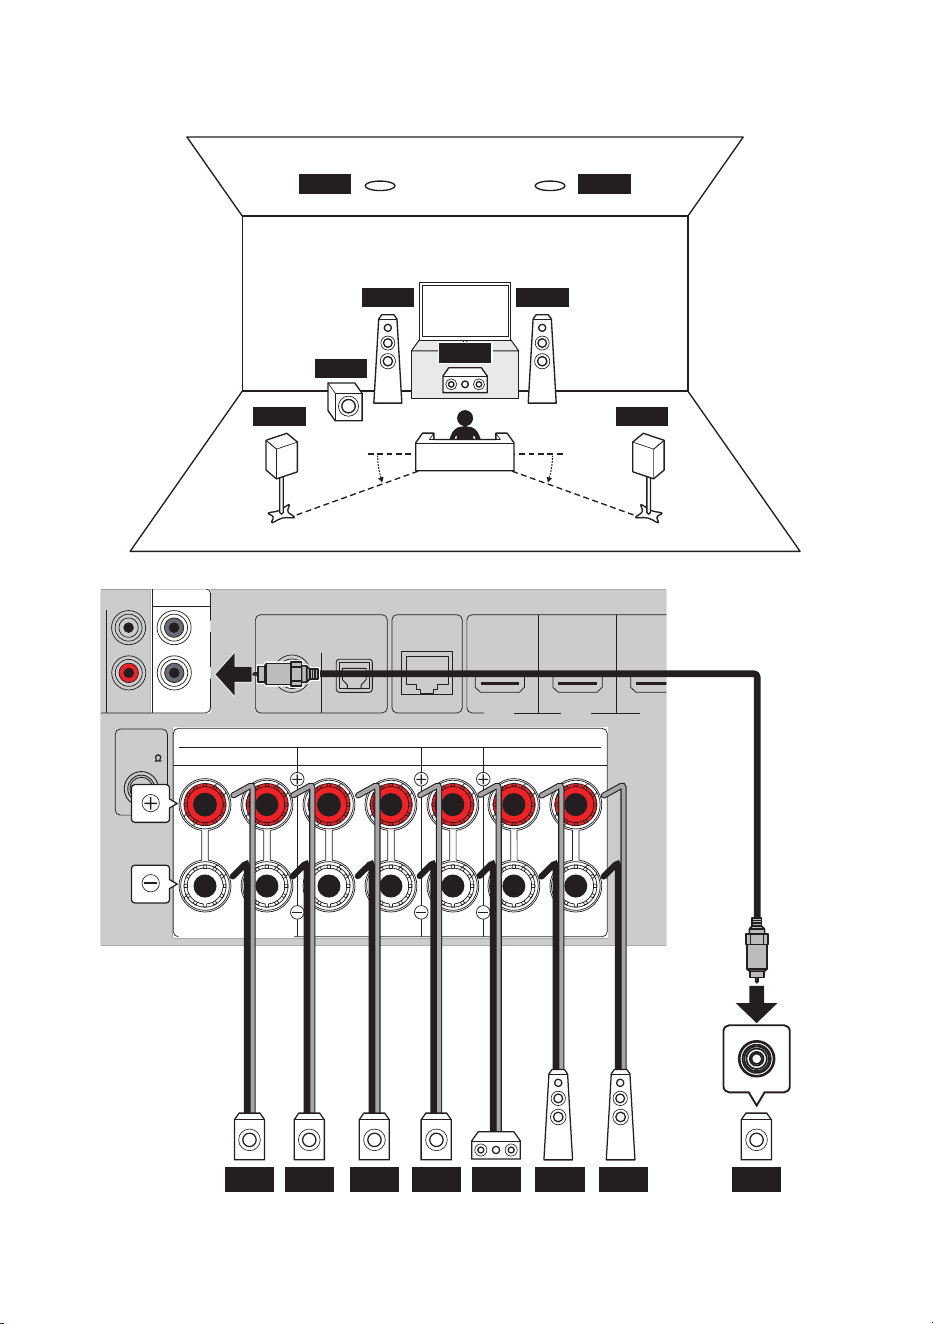
PREPARATION FOR USE > Placing the speakers at the desired location

Connecting speakers
Preparing the speakers and speaker cables
NOTE
(
Prepare the number of speakers required for your speaker system.
(
Always connect the front left and right speakers.
(
When using surround back speakers, be sure to connect two speakers (left and right). A single speaker cannot be used on its own.
n
Preparing the speakers
This product contains a built-in 7-channel amplifier. Depending on your environment and preferences, you
can connect 2 to 7 speakers and 1 to 2 subwoofers.
Prepare the speakers and subwoofers to be connected by keeping the following points in mind.
Model For
U.S.A. and Canada
(
The speaker impedance of this product is set to 8-ohm by default. If connecting 6-ohm speakers, change the speaker-impedance
setting.
(
“Configuring the speakers”(p.123)
(
Use subwoofers with a built-in amplifier.
Model For
U.K., Europe, and Australia
(
Use speakers with an impedance of 6-ohm or higher.
(
Use subwoofers with a built-in amplifier.
Related links
“Configuring the speakers”(p.123)
n
Preparing the speaker cables
To connect this product to your speakers, obtain the following commercially available cables.
(
Banana plugs (if used to connect speaker cables)
(
Speaker cables (for speaker connection)
–
+
–
+
(
Monaural pin cables (for subwoofer connection)
40
PREPARATION FOR USE > Connecting speakers

Connecting the Speaker Cables
Connect the speakers and subwoofer to this product.
Before making any connections, disconnect this product and the speakers/subwoofer from the AC outlet.
Use the speaker cables to connect the negative (–) terminals of this product and the speakers together, and
connect the positive (+) terminals together. On this product, the red terminals are positive (+) and the black
terminals are negative (–).
n
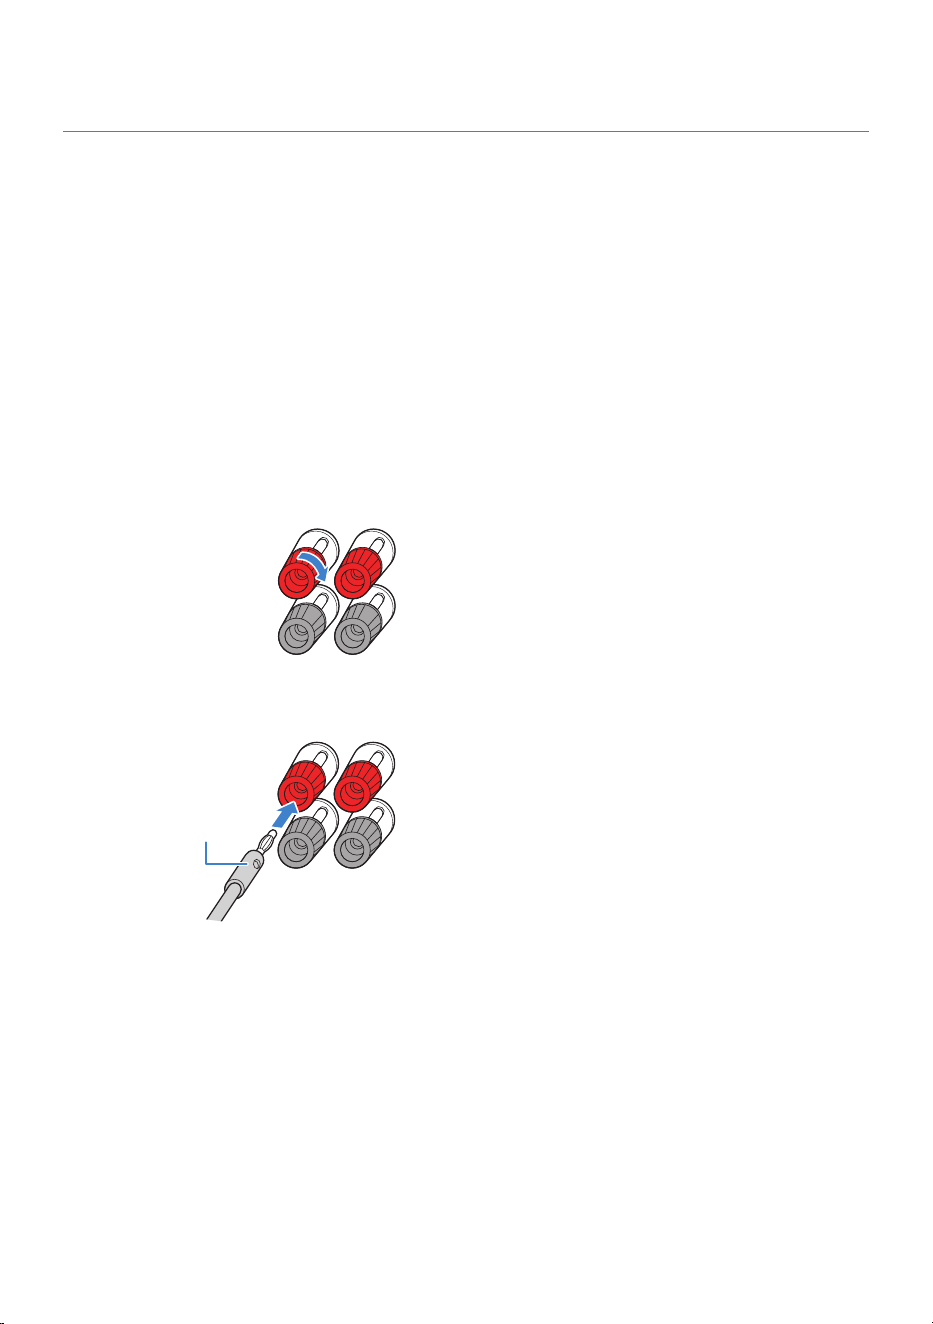
When using banana plugs
Model For
U.S.A. and Canada
Using banana plugs allows easier and safer connections than using bare speaker cables.
1 Tighten the speaker terminal.
2 Insert the banana plug into the input terminal.
Banana plug
42
PREPARATION FOR USE > Connecting speakers
n
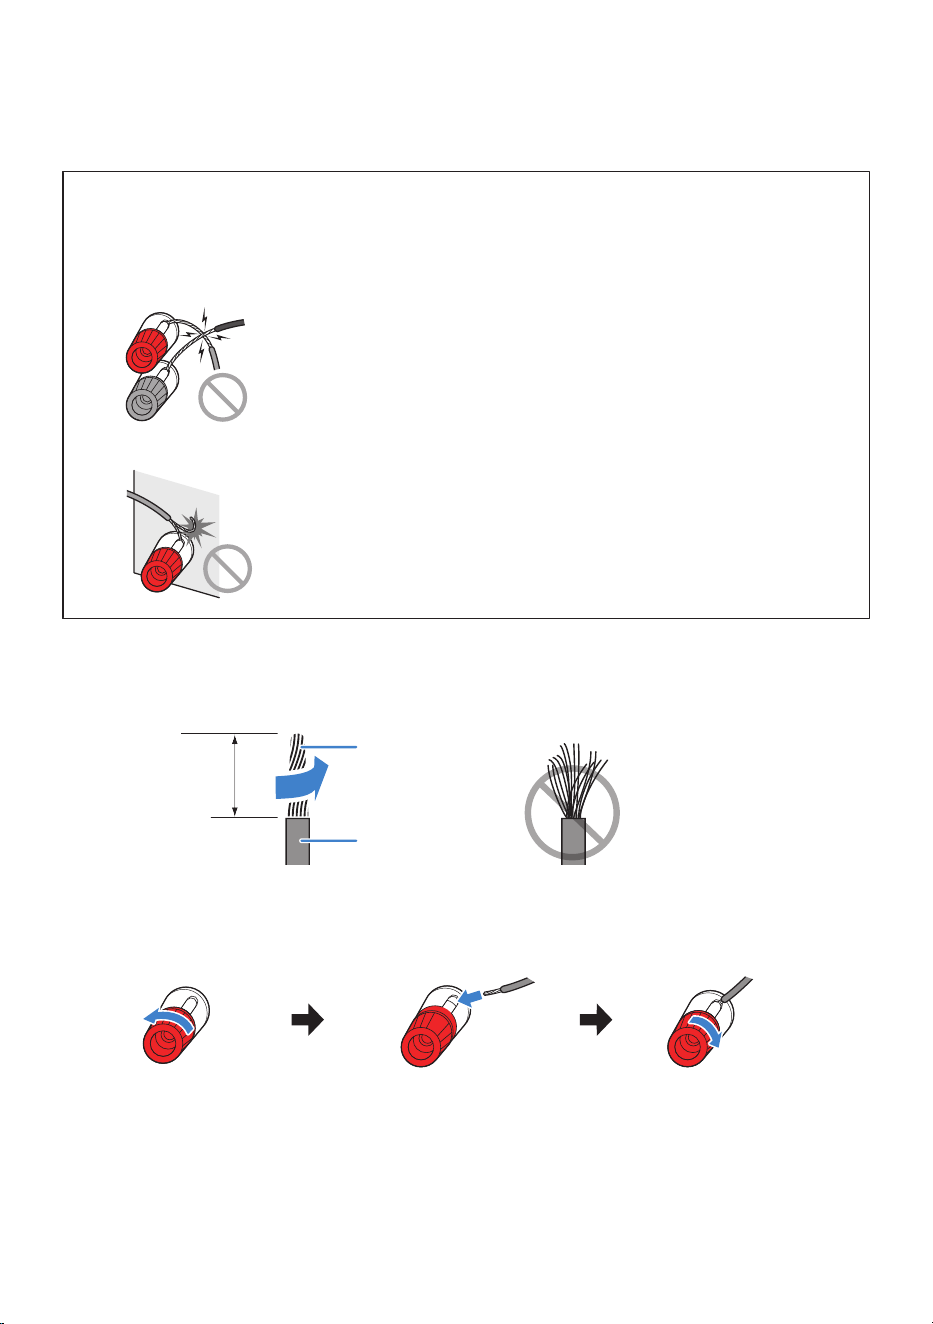
When using speaker cables without banana plugs
If banana plugs are not used, the speakers can be connected using speaker cables only.
NOTICE
(
When preparing the speaker cables, work away from the product. Otherwise, pieces of the cable strands of the speaker cable
may fall inside the product and cause a short circuit, resulting in malfunction.
(
Incorrect speaker cable connection may cause a short circuit and result in damage to this product or the speakers.
(
Do not allow cable strands to touch each other.
(
Do not allow cable strands to touch metal parts of this product (rear panel, screws, etc.).
1 Strip about 10 mm (3/8”) of insulation from the end of the speaker cable and twist
the strands tightly.
10 mm
Core wire
Insulation
2 Connect the speaker cable to the speaker terminal.
Loosen the speaker
terminal.
Insert the core wire of the speaker
cable into the gap on the side of the
terminal (upper right or lower left).
Tighten the terminal.
This completes the speaker connections.
43
PREPARATION FOR USE > Connecting speakers
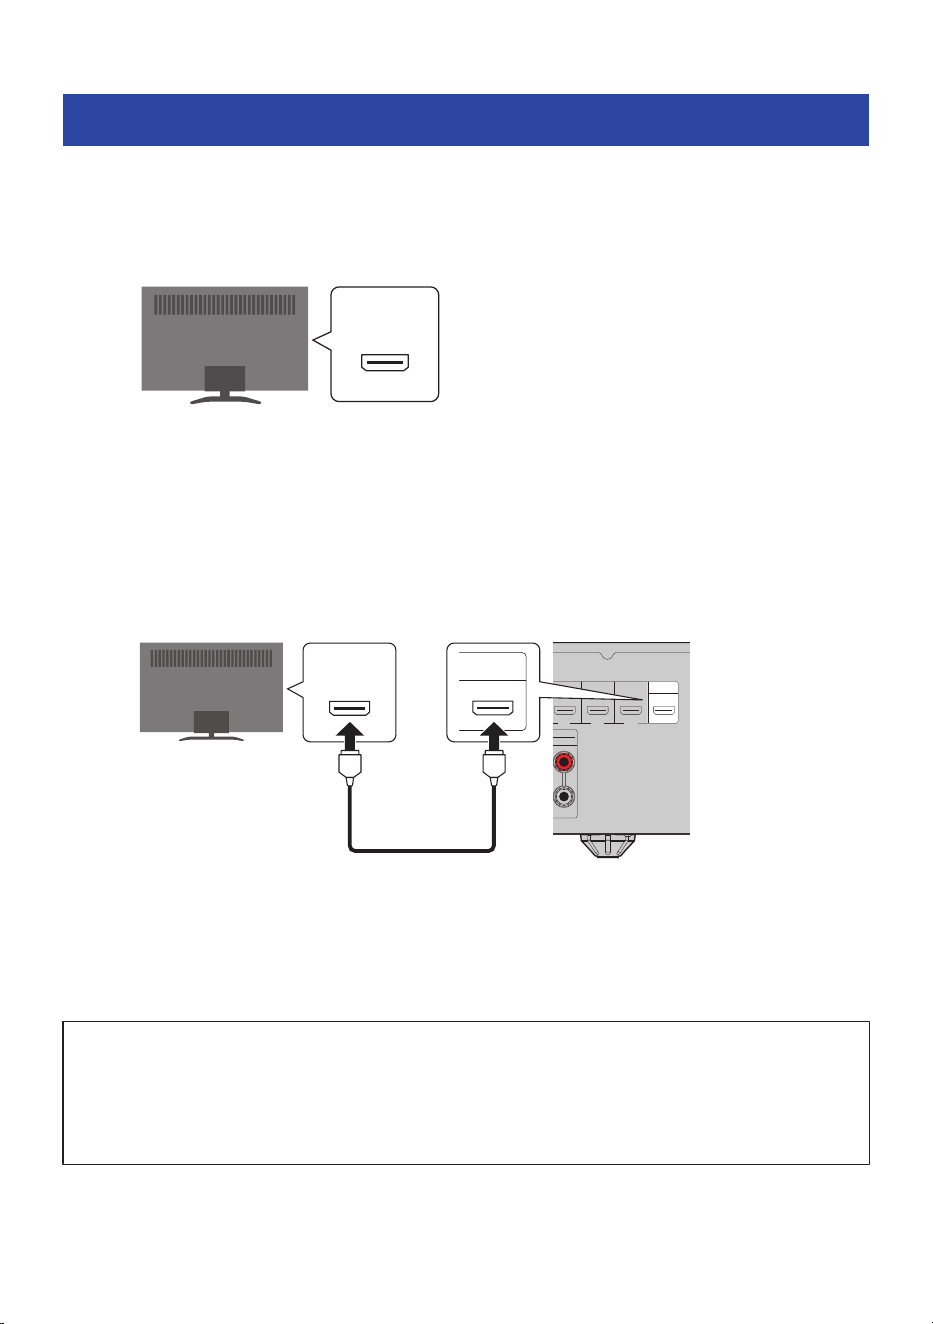
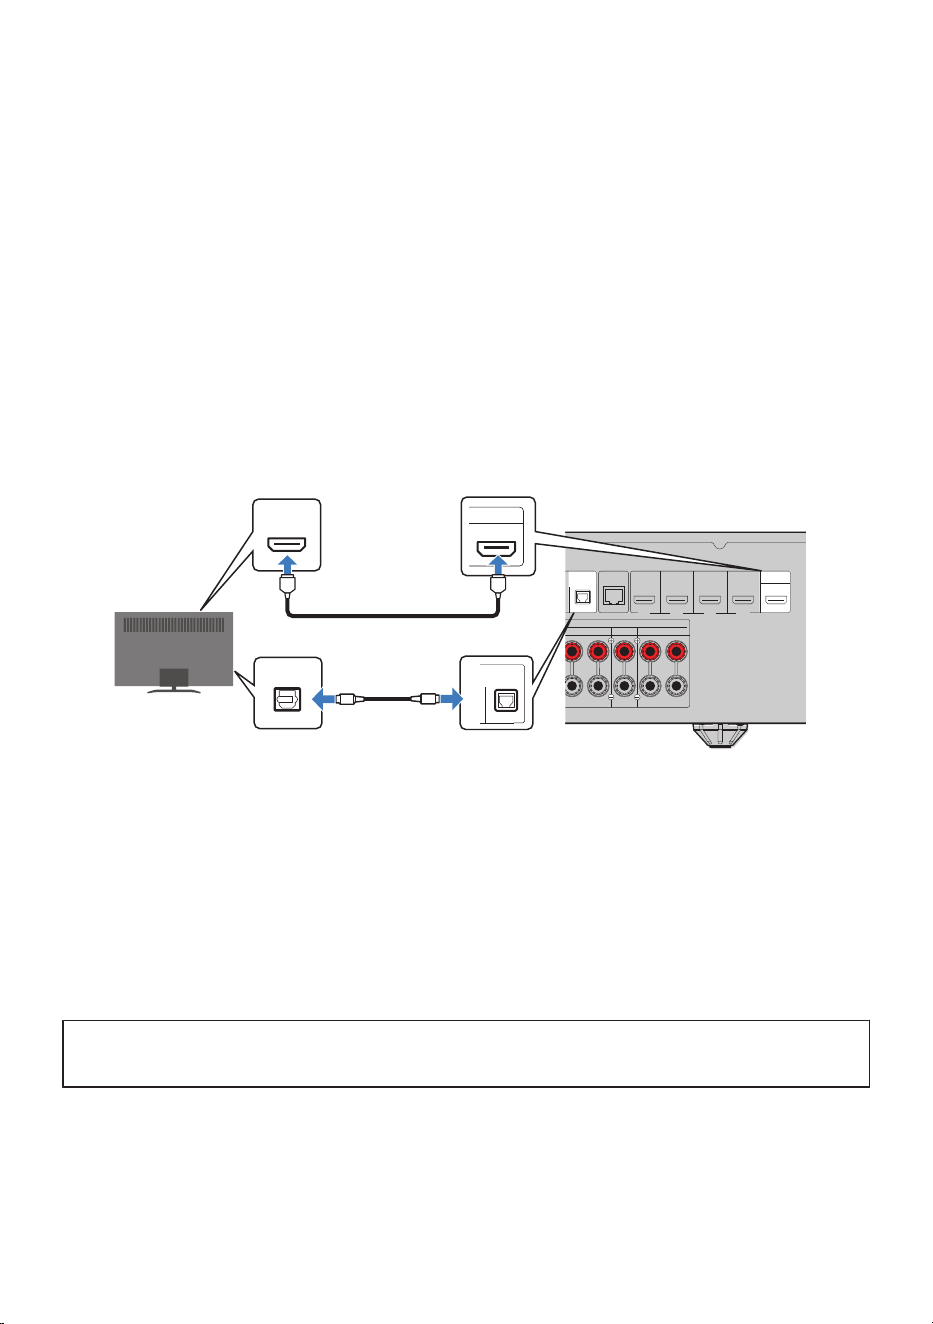
Connecting a TV
Use an HDMI cable to connect the TV to this product. This allows video from this product to be displayed on
the TV and TV audio to be played back through this product.
1 Check the location of the TV’s eARC/ARC HDMI port.
(eARC/ARC)
HDMI
If the TV does not have an eARC/ARC-compatible HDMI port, use a digital optical cable for
audio playback.
For the connection method, refer to “Connecting with a digital optical cable” below.
2 Use an HDMI cable to connect the HDMI OUT port of this product to the TV’s eARC/
ARC HDMI port.
SCENE 4
HDMI IN 2 HDMI IN 3
SCENE 2 SCENE 3
HDMI IN 4 HDMI OUT
eARC/ARC
FRONT
L
F"3$"3$
)%.*
HDMI OUT
eARC/ARC
HDMI
HDMI
Rear of this product
HDMI OUT port
eARC/ARC-
compatible HDMI
input port
TV
HDMI cable
If there is no eARC/ARC HDMI port, connect to an available HDMI port.
3 Make a note of the name of the HDMI port on the TV that you connected.
You will use this when selecting the TV input later.
What are eARC and ARC?
(
ARC is an abbreviation for Audio Return Channel. By connecting the ARC-compatible HDMI input port on the TV to the ARC-
compatible HDMI output port on an AV device (such as an AV Receiver or a Sound Bar) via an HDMI cable, audio from the TV can
be played on the AV device without using an optical cable.
(
eARC is an abbreviation for Enhanced Audio Return Channel. It is an enhanced version of ARC and allows transmission of
uncompressed 5.1-channel, 7.1-channel, and object-based audio (such as Dolby Atmos and DTS:X) from the TV.
45
PREPARATION FOR USE > Connecting a TV
NOTE
(
Use a 19-pin HDMI cable with the HDMI logo. To prevent signal quality degradation, we recommend using the shortest possible
cable.
(
To enjoy playback of 8K video, use an Ultra High Speed HDMI cable or an Ethernet-compatible Ultra High Speed HDMI cable.
(
To enjoy playback of 3D and 4K Ultra HD video, use a Premium High Speed HDMI cable or an Ethernet-compatible Premium High-
Speed HDMI cable.
(
When using eARC or ARC, use an Ethernet-compatible High Speed HDMI cable or another HDMI cable that supports eARC/ARC.
(
You may have to change settings on the TV. Please also refer to the user's manual for your TV.
(
When using a projector, connect to the projector’s HDMI input port.
Related links
“Listening to TV audio”(p.65)
n
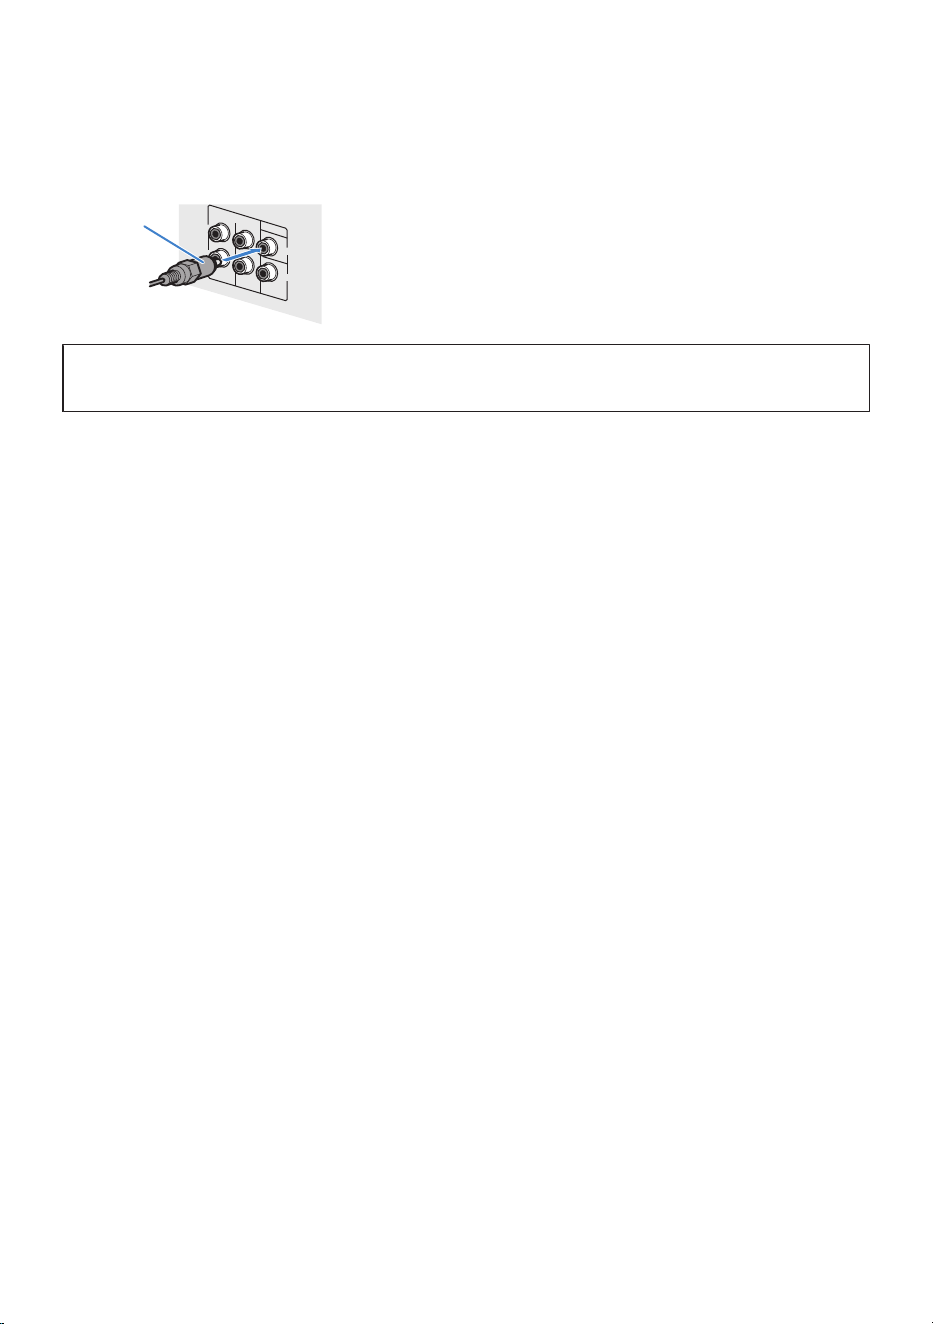
Connecting with a digital optical cable
If the TV does not support eARC or ARC, also connect a digital optical cable.
SCENE 4
HDMI IN 1
DIGITAL AUDIO IN
OPTICALCOAXIAL
HDMI IN 2 HDMI IN 3
SCENE 1 SCENE 2 SCENE 3
HDMI IN 4 HDMI OUT
eARC/ARC
CENTER
FRONTSURROUND
SPEAKERS
R L R L
NETWORK
OPTICAL
O
O
DIGITAL AUDIO IN
OPTICAL
HDMI OUT
eARC/ARC
HDMI
HDMI
HDMI
HDMI
Rear of this product
HDMI OUT portHDMI input
TV
OPTICAL jack
Audio output (Digital optical
audio)
HDMI cable
Digital optical cable
NOTE
Depending on the TV’s audio output jacks, you may also connect via digital coaxial or analog stereo instead of digital optical. In that
case, change the settings in SETTINGS menu > “TV Audio Input”.
Related links
(
“Listening to TV audio”(p.65)
(
“Configuring advanced function settings (Function)”(p.134)
Next step
(
“Preparing a network connection”(p.47)
46
PREPARATION FOR USE > Connecting a TV

Preparing a network connection
By connecting to a network, you can listen to Internet radio through this product.
n
Selecting a network connection method
This product supports both wired and wireless network connections.
If both are available, the wired connection takes priority. To use a wired connection, see “Connecting a
network cable” below. If a LAN cable is not connected to this product, a wireless connection will be used.
Select a connection method that matches your network environment.
NOTICE
(
Do not connect this product to a public Wi-Fi and/or Internet service directly. Set up an appropriate password for the router
that it goes through. Do not connect directly to communication lines (including public LANs) of telecommunications carriers
(mobile communication companies, fixed-line providers, Internet providers, etc.).
Related links
(
“Connecting to the network using the dedicated app”(p.58)
(
“Selecting a wireless connection method to a network”(p.201)
n
Connecting a network cable
Use a commercially available LAN cable (STP straight cable that is CAT-5 or higher) to connect this product to
the router. If your router functions as a DHCP server, no network settings are required on this product.
SCENE 4
HDMI IN 1
DIGITAL AUDIO IN
OPTICALCOAXIAL
RCA 2RCA 1
HDMI IN 2 HDMI IN 3
SCENE 1 SCENE 2 SCENE 3
HDMI IN 4 HDMI OUT
eARC/ARC
L
R
SUBWOOFER
ANALOG AUDIO IN
ANTENNA
CENTER
FRONTSURROUND
SPEAKERS
HEIGHT
2
1
75
FM
NETWORK
LAN
WAN
Internet
Router
Computer
Network cable
Rear of this product
47
PREPARATION FOR USE > Preparing a network connection

NOTE
(
To help prevent electromagnetic interference, use an STP (Shielded Twisted Pair) cable.
(
If your router does not support DHCP, or if you want to configure the network parameters manually, network settings will be
required.
Related links
“Configuring the network settings”(p.138)
Next step
(
“Connecting to power”(p.49)
48
PREPARATION FOR USE > Preparing a network connection
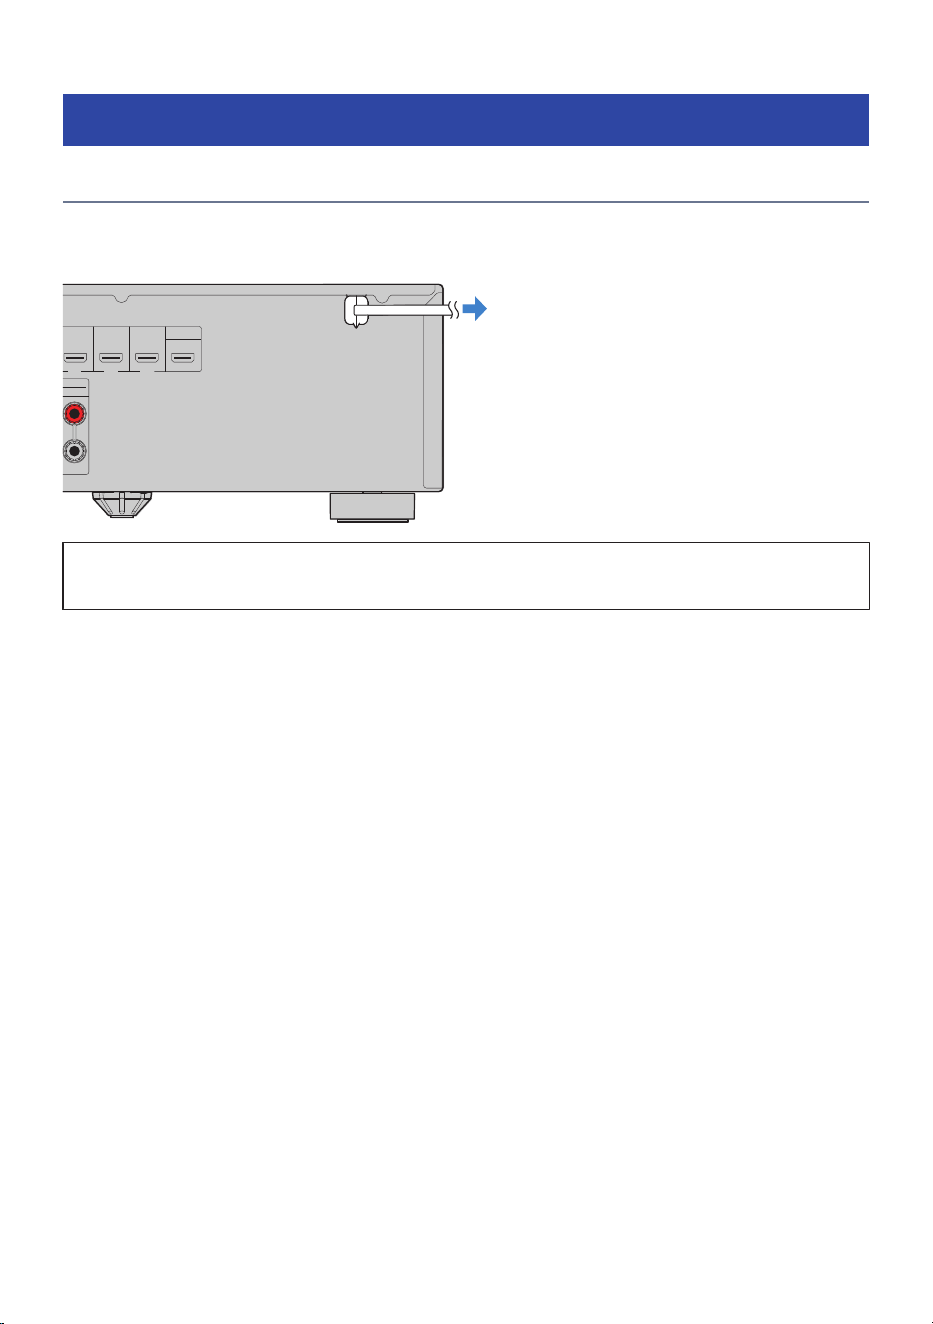
Turning on the product
Connecting to power
After making all the connections, plug this product’s power cord into an AC outlet.
SCENE 4
HDMI IN 2 HDMI IN 3
SCENE 2 SCENE 3
HDMI IN 4 HDMI OUT
eARC/ARC
FRONT
L
Rear of this product
Connect to a power outlet
Next step
(
“Turning on the power (Main zone)”(p.50)
49
PREPARATION FOR USE > Turning on the product

Turning on the power (Main zone)
Turn on the power for the Main zone.
The Main zone refers to the room where this product is installed.
1 Switch the Zone switch to “MAIN”.
MAIN ZONE B
VOLUME
1234
SCENE
PRESETS
INPUT
MEMORY
NIGHT
DISPLAY
BACK
ALL CH STEREO
MUSIC
2 CH STEREO
PURE DIRECT
MOVIESTRAIGHT
NETTUNER
INPUT
SCENE
SOUND MODE
INFO
TUNING
FM MODE
Zone switch
2 Press the z (Power) key.
Each press of the key turns the Main zone on or off (standby).
Next, follow the on-screen instructions on the TV to configure the language and speaker settings.
Next step
(
“Making initial settings using the Setup Guide”(p.51)
Related links
“Names and functions of remote control parts”(p.16)
50
PREPARATION FOR USE > Turning on the product
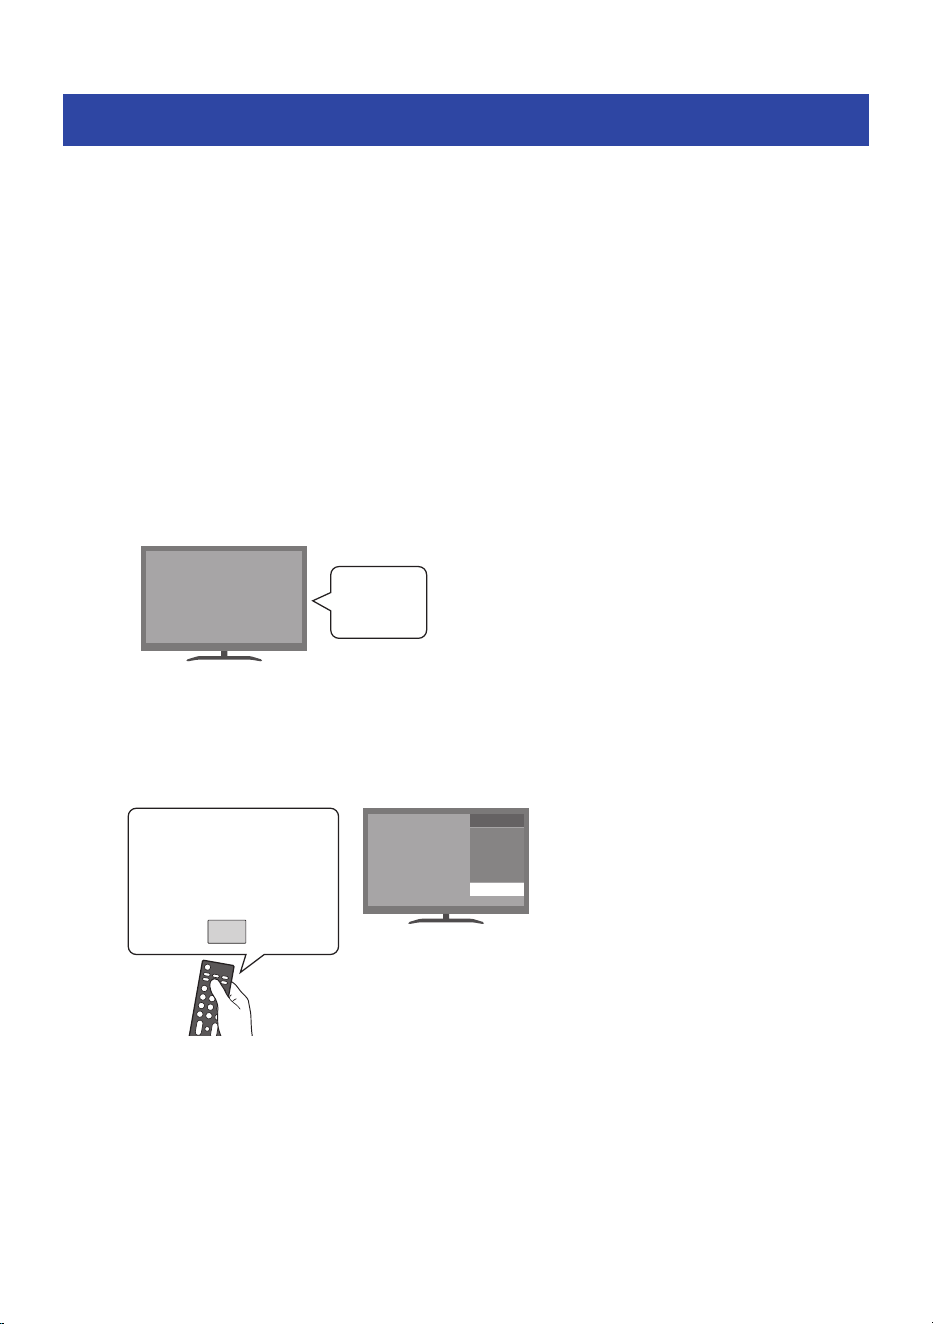
Making initial settings using the Setup Guide
When you turn on this product for the first time, follow the on-screen instructions (Setup Guide) on the TV to
perform the initial settings.
The settings include the following:
(
Setup Guide
(
Language settings
(
Speaker setup using “Room Correction”
NOTE
Even if you skip the Setup Guide here, you can perform the initial setup later from SETTINGS menu > “Setup Guide”.
n
Setting the language
1 Turn on the TV.
Power
2 Switch the TV input.
Switch the TV input to the HDMI input connected to the HDMI OUT port of this product.
INPUT
TV
VIDEO �
VIDEO �
HDMI �
HDMI �
INPUT
Input selection button on the
remote control
The display may vary depending on the type of TV you are using.
51
PREPARATION FOR USE > Making initial settings using the Setup Guide
3 Make sure that the Setup Guide is displayed on the TV screen.
It may take several seconds for the screen to appear. If it does not appear after waiting for a
while, start again from “Connecting a TV”(p.45).
NOTICE
(
Do not connect the Setup Microphone to this product at this stage.
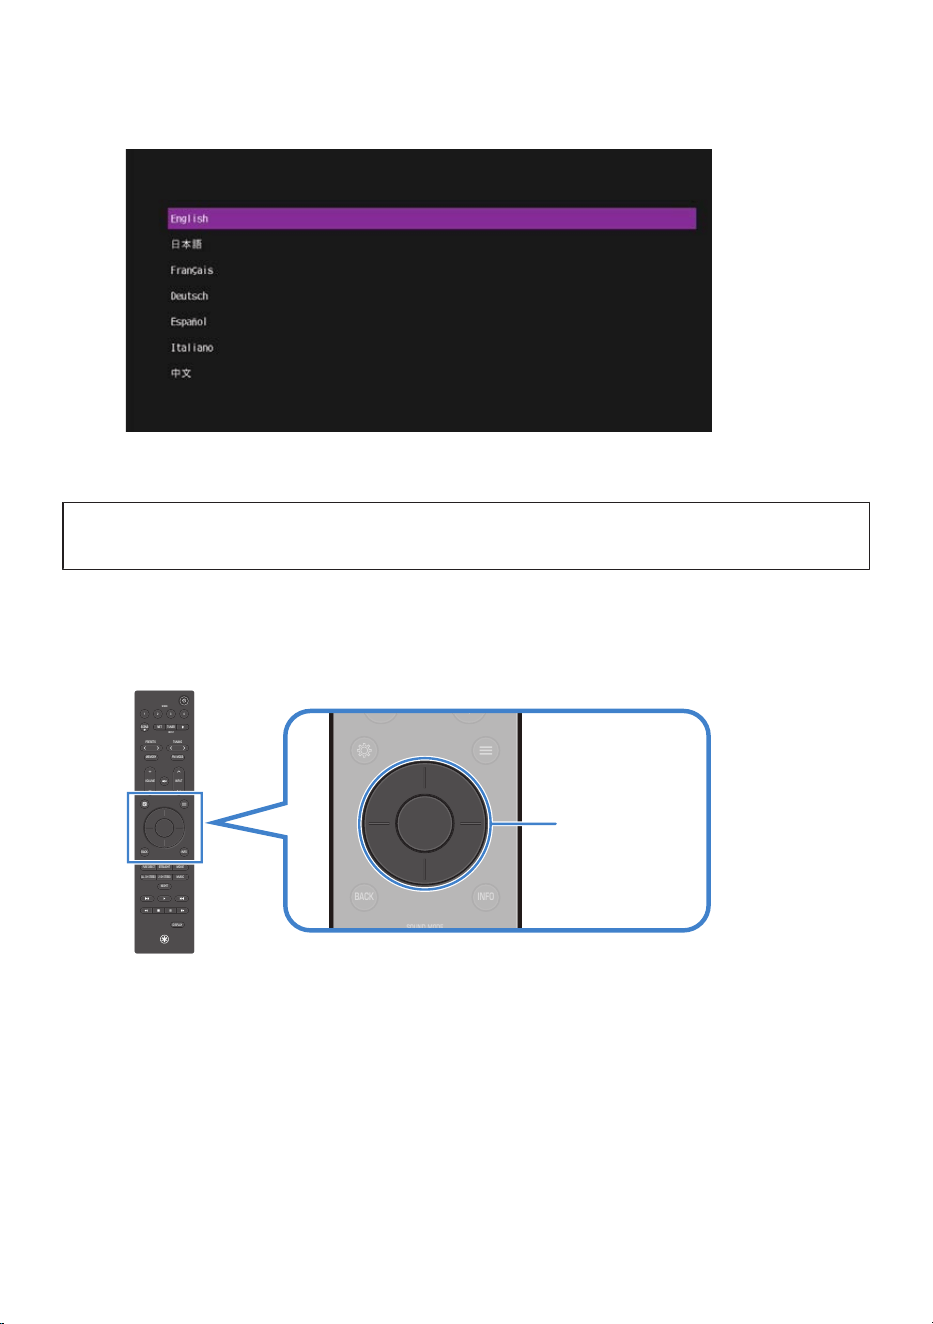
4 Select the language.
Use the cursor keys to select a language, then press the ENTER key.
VOLUME
1234
SCENE
PRESETS
INPUT
MEMORY
NIGHT
DISPLAY
BACK
ALL CH STEREO
MUSIC
2 CH STEREO
PURE DIRECT
MOVIESTRAIGHT
NETTUNER
INPUT
SCENE
SOUND MODE
INFO
TUNING
FM MODE
VOLUME
1234
SCENE
PRESETS
INPUT
MEMORY
NIGHT
DISPLAY
BACK
ALL CH STEREO
MUSIC
2 CH STEREO
PURE DIRECT
MOVIESTRAIGHT
NETTUNER
INPUT
SCENE
SOUND MODE
INFO
TUNING
FM MODE
ENTER / Cursor keys
52
PREPARATION FOR USE > Making initial settings using the Setup Guide
n
Set up the speakers using “Room Correction”
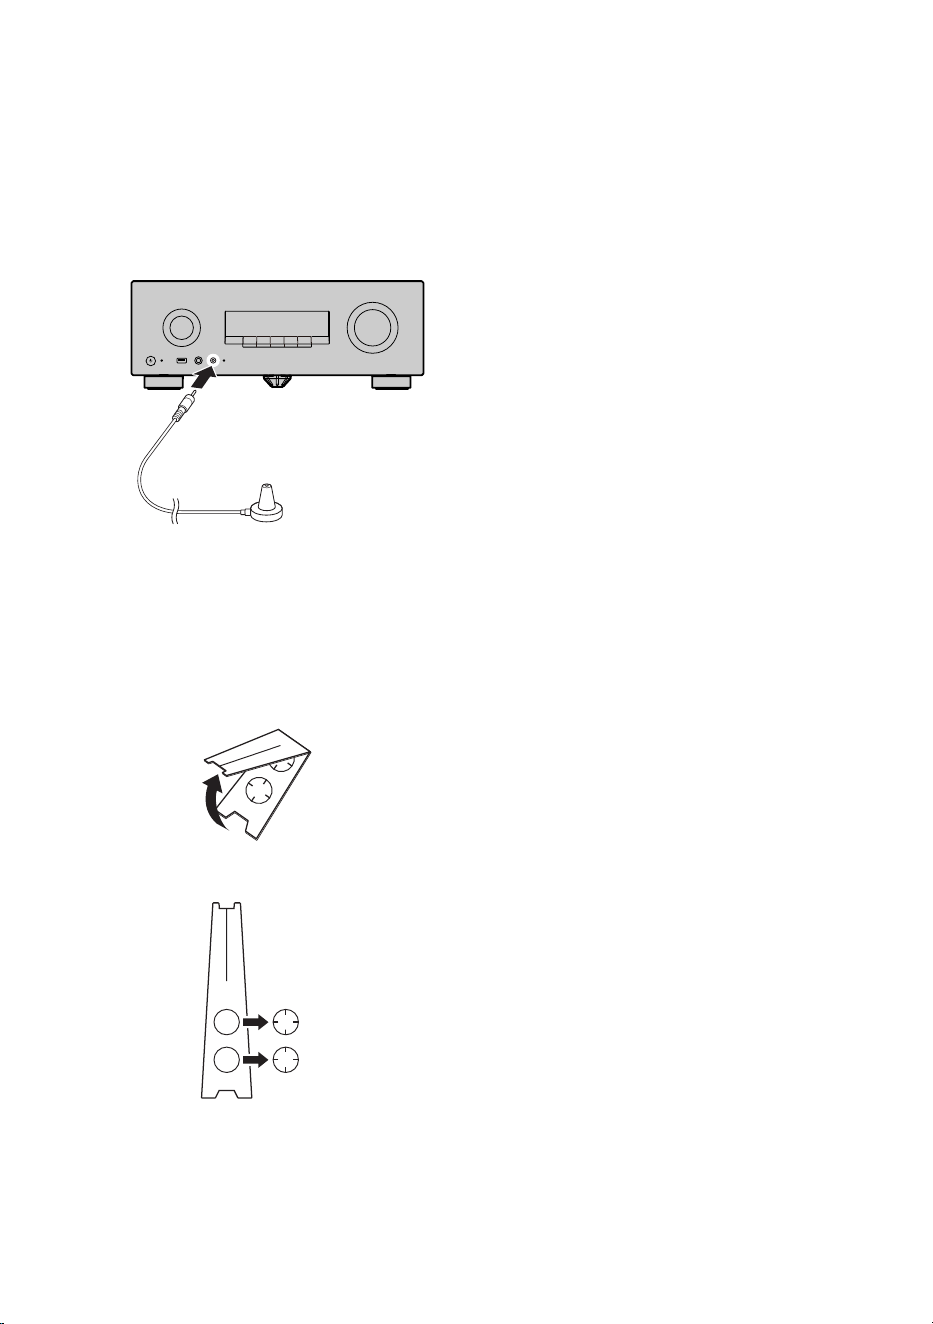
1 Connect the Setup Microphone.
Connect the supplied Setup Microphone to the SETUP MIC jack of this product.
Front of this product
SETUP MIC
Setup microphone
NOTE
“Room Correction” detects the speaker connections and the distance to the listening position, and automatically adjusts
the volume balance, delay, and tone.
2 Assemble the Cardboard Microphone Stand.
1
Spread
2
Remove
53
PREPARATION FOR USE > Making initial settings using the Setup Guide

3
Take off
4
Insert
5
Insert into the top and bottom
54
PREPARATION FOR USE > Making initial settings using the Setup Guide
6
Microphone stand assembled
3 Place the Setup Microphone at the listening position.
1 Place the Setup Microphone on top of the Cardboard Microphone Stand.
Place the microphone
2 Hook the Setup Microphone cable into the hole in the Cardboard Microphone Stand.
3 Place the Cardboard Microphone Stand with the microphone attached at the listening
position.
Setup microphone
TV
55
PREPARATION FOR USE > Making initial settings using the Setup Guide
NOTE
For best results, position the microphone at ear height when seated. You can also use a camera tripod.
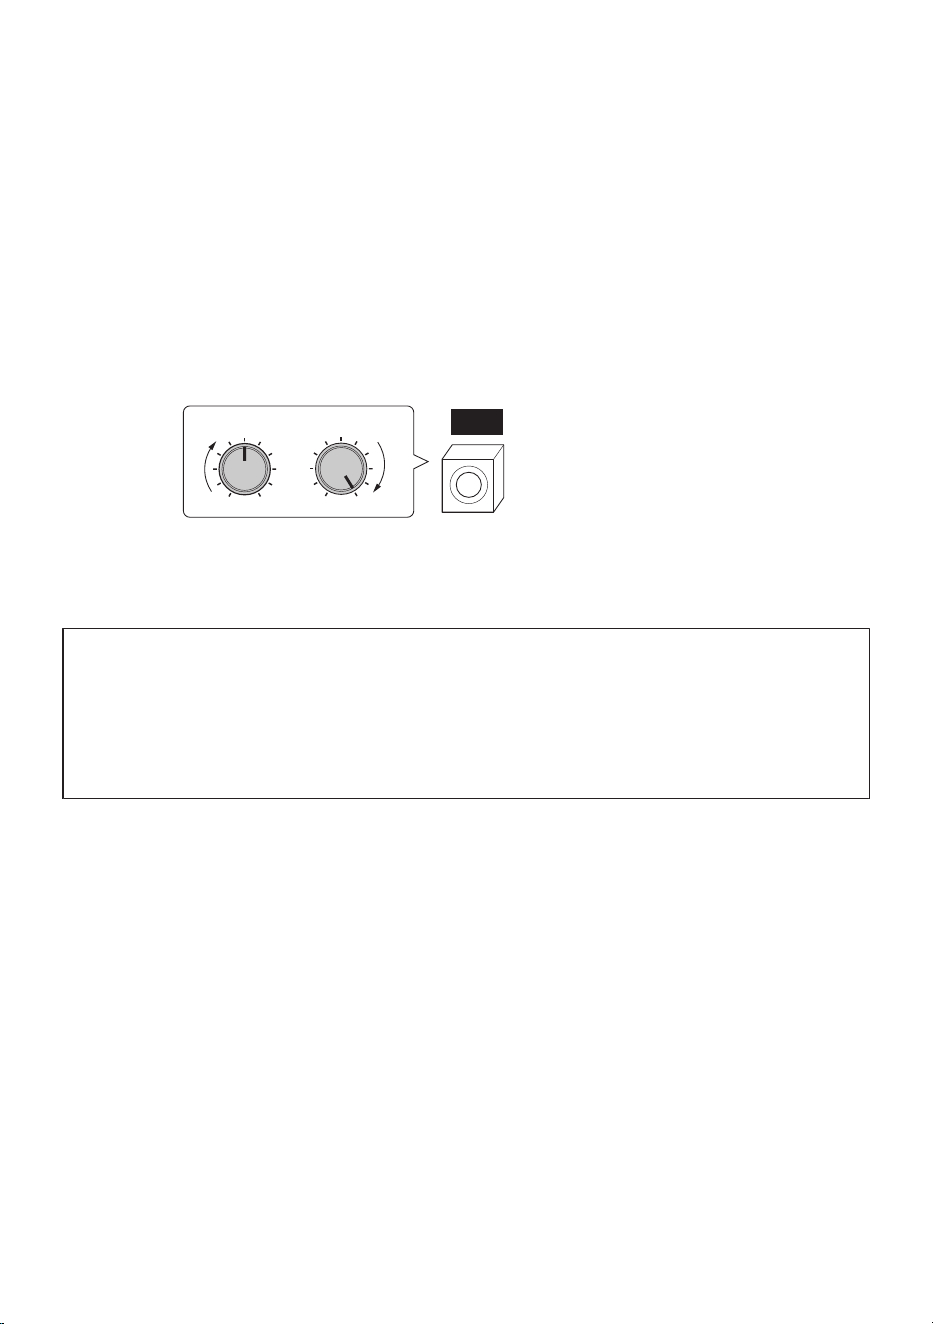
4 Set up the subwoofer.
Setting up the subwoofer allows you to enjoy powerful bass sound. If you are using a
subwoofer, configure this setting.
1 Turn on the subwoofer.
2 Set the volume to half of the maximum level.
3 If the crossover is adjustable, set it to the maximum.
VOLUME HIGH CUT
CROSSOVER/
MIN MAXMIN MAX
SW
5 Follow the on-screen instructions on the TV to perform the measurement.
NOTICE
(
Loud test tones will be output during the measurement. If small children are present, please take appropriate precautions.
(
The volume cannot be adjusted during the measurement.
(
Keep the room quiet during the measurement.
(
During the measurement, stay in a rear corner of the room and avoid blocking the path between the speakers and the Setup
Microphone.
(
Do not connect headphones.
6 Check the measurement results and select “Save”.
When the measurement is complete, the results are displayed on the TV.
Check the results and, if there are no issues, select “Save”.
7 When the setup completion screen appears, disconnect the Setup Microphone from
this product.
This completes the “Room Correction” process.
56
PREPARATION FOR USE > Making initial settings using the Setup Guide

Next step
(
If connecting to the network wirelessly:
(
“Connecting to the network using the dedicated app”(p.58)
(
If connecting to the network using a wired connection:
(
“Connect an AV device by HDMI”(p.59)
(
“Connecting an AV device by method other than HDMI”(p.60)
Related links
(
“Performing initial setup”(p.122)
(
“Setting the menu language”(p.142)
(
“Configuring the speakers”(p.123)
57
PREPARATION FOR USE > Making initial settings using the Setup Guide
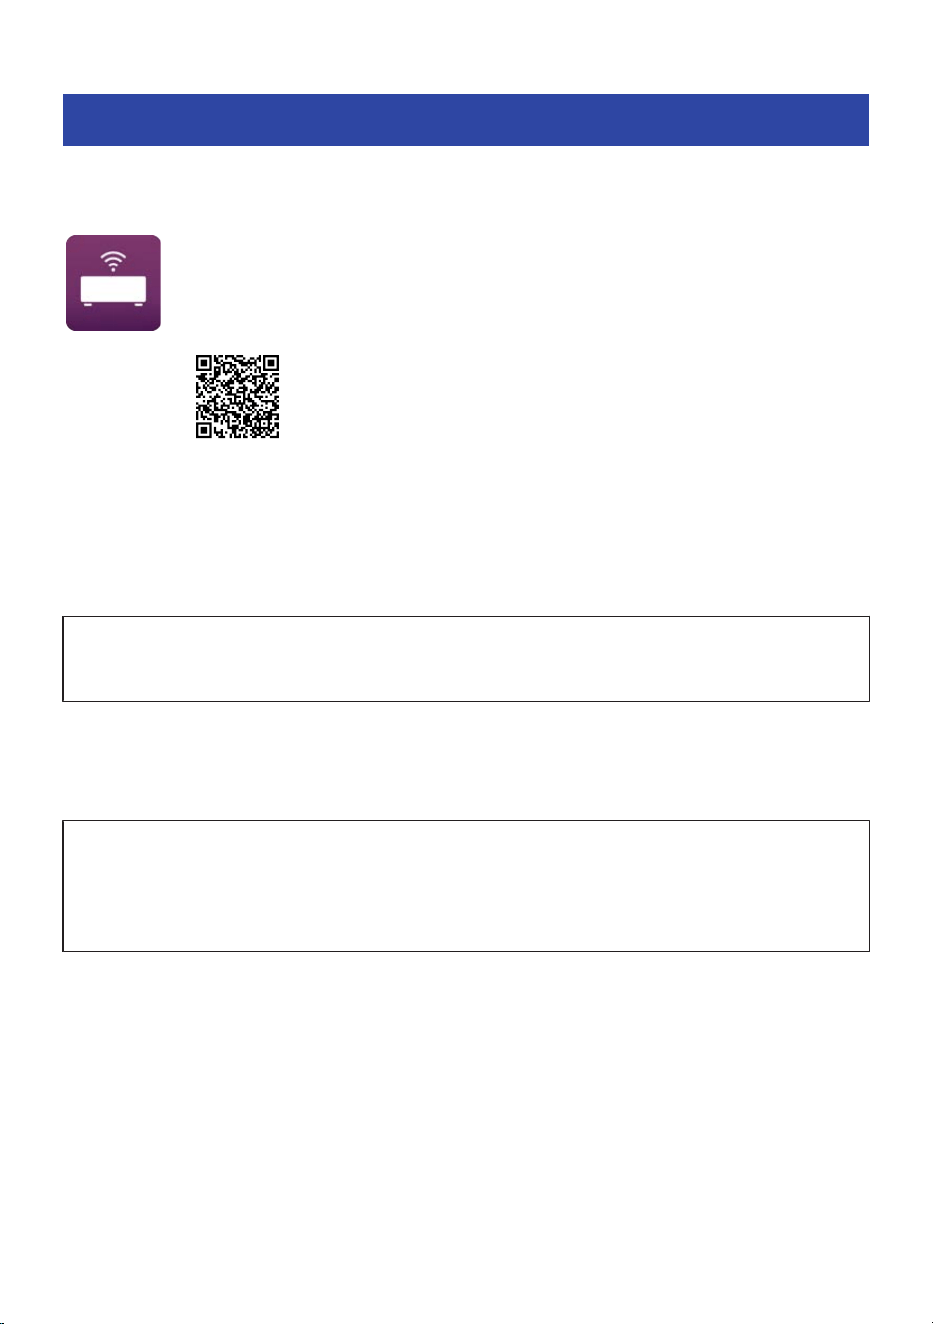
Connecting to the network using the dedicated app
When connecting to the network wirelessly, use the dedicated app “Audio Connect” to connect to the
network. If using a wired connection, skip this step.
You can also connect this product to the network using the dedicated app “Audio Connect”. With “Audio
Connect”, you can also use network content. To use the Google Cast function, setup using this app is
required.
“Audio Connect” can be installed using the QR code displayed on the TV screen or from the QR code
below.
1 Install “Audio Connect”.
2 Open “Audio Connect” and connect to the wireless network.
Follow the on-screen instructions in the app to connect to the wireless network.
NOTICE
(
Even when using a wired network connection, app-based setup or operation is required to use Internet radio, podcasts, and
Google Cast.
NOTE
You can also display the QR code from: SETTINGS menu > “Wireless Connection” > “Connect with App”.
Next step
(
If connecting an AV device by HDMI:
(
“Connect an AV device by HDMI”(p.59)
(
If connecting an AV device by method other than HDMI:
(
“Connecting an AV device by method other than HDMI”(p.60)
Related links
(
“Configuring the network settings”(p.138)
(
“About the dedicated app”(p.210)
58
PREPARATION FOR USE > Connecting to the network using the dedicated app
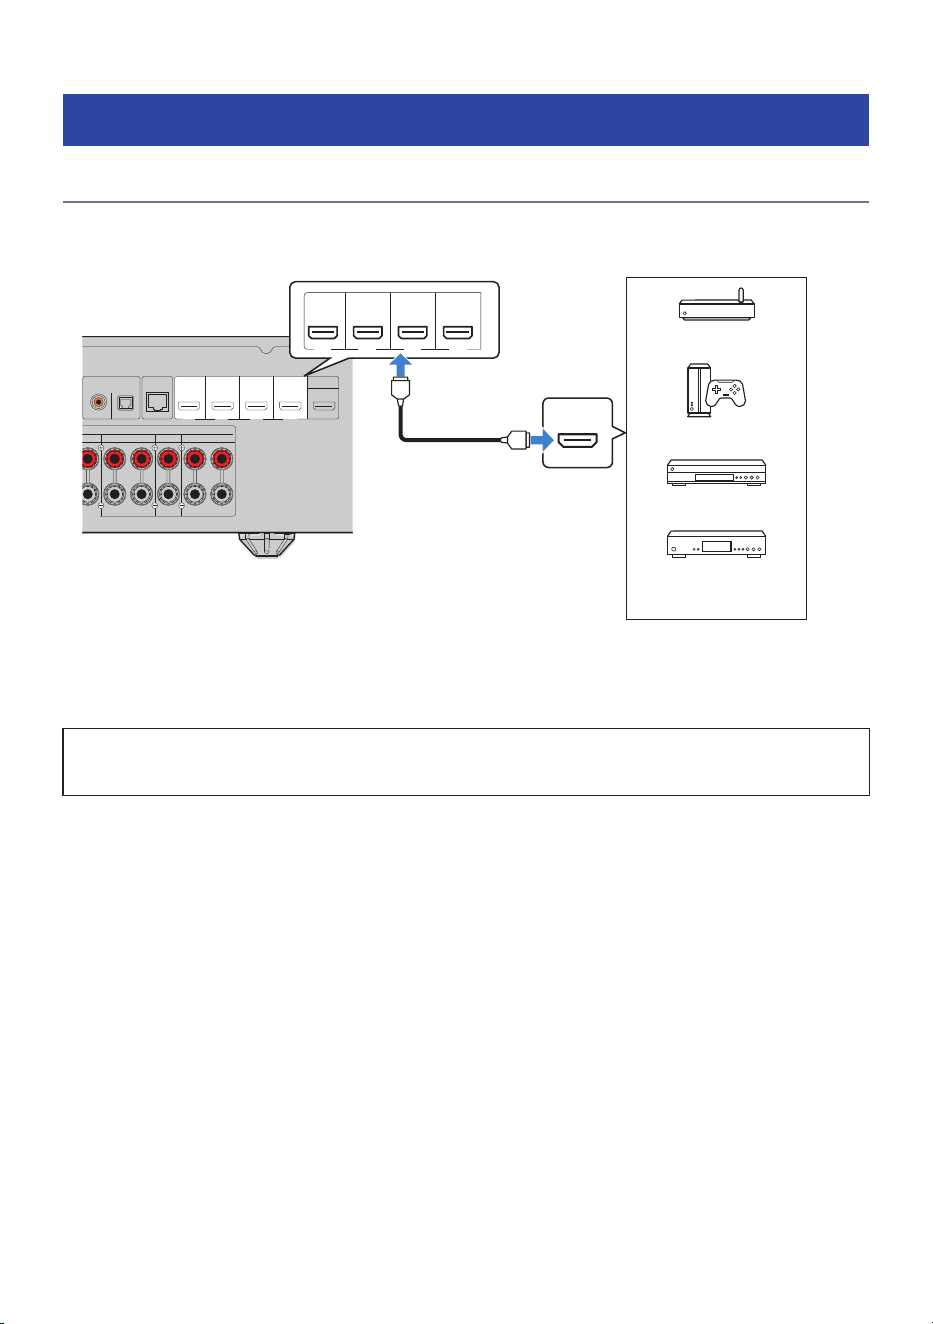
Connecting an AV device
Connect an AV device by HDMI
Use an HDMI cable to connect an AV device to this product.
SURROUND BACK/ZONE B/BI-AMP
SCENE 4
HDMI IN 1
DIGITAL AUDIO IN
OPTICALCOAXIAL
HDMI IN 2 HDMI IN 3
SCENE 1 SCENE 2 SCENE 3
HDMI IN 4 HDMI OUT
eARC/ARC
CENTER
FRONTSURROUND
SPEAKERS
R L
ASSIGNABLE
HEIGHT
L R L
NETWORK
HDMI
SCENE 4
HDMI IN 1 HDMI IN 2 HDMI IN 3
SCENE 1 SCENE 2 SCENE 3
HDMI IN 4
Rear of this product
HDMI output
HDMI IN 1-4 ports
Streaming device
HDMI cable
Game console
BD/DVD recorder
Satellite/Cable TV tuner
NOTE
To enjoy 8K video, set SETTINGS menu > “HDMI” > “Video Format” to “8K Mode”.
Next step
(
“Connecting a radio antenna”(p.61)
Related links
“Configuring HDMI settings”(p.127)
59
PREPARATION FOR USE > Connecting an AV device

Connecting an AV device by method other than HDMI
This explains how to connect an AV device, such as a CD player, to the product without using an HDMI port.
Choose a connection method based on the audio output jack on the AV device.
AV device audio output jack
Audio input jack on the rear panel of
this product
Jack name displayed in the TV menu and on
the front display
Digital coaxial DIGITAL AUDIO IN (COAXIAL) COAXIAL
Digital optical DIGITAL AUDIO IN (OPTICAL) OPTICAL
Analog stereo ANALOG AUDIO IN (RCA 1, RCA 2) Analog RCA 1, Analog RCA 2
SURROUND BACK/ZONE B/BI-AMP
HDMI IN 1
DIGITAL AUDIO IN
OPTICALCOAXIAL
RCA 2RCA 1
HDM
SCENE 1 SCENE 2
L
R
SUBWOOFER
ANALOG AUDIO IN
ANTENNA
CENTER
FRONTSURROUND
SPEAKERS
R L
ASSIGNABLE
HEIGHT
R L R
2
1
75
FM
NETWORK
R
L
COAXIAL
OPTICAL
OPTICALCOAXIAL
RCA 2RCA 1
L
R
L
R
L
R
C
C
O
O
Rear of this product
COAXIAL and OPTICAL jacks
Audio output (digital optical, digital coaxial, or
analog stereo)
AV device
RCA 1 and RCA 2 jacks
Next step
(
“Connecting a radio antenna”(p.61)
Related links
“Names of parts and functions on the rear panel”(p.13)
60
PREPARATION FOR USE > Connecting an AV device
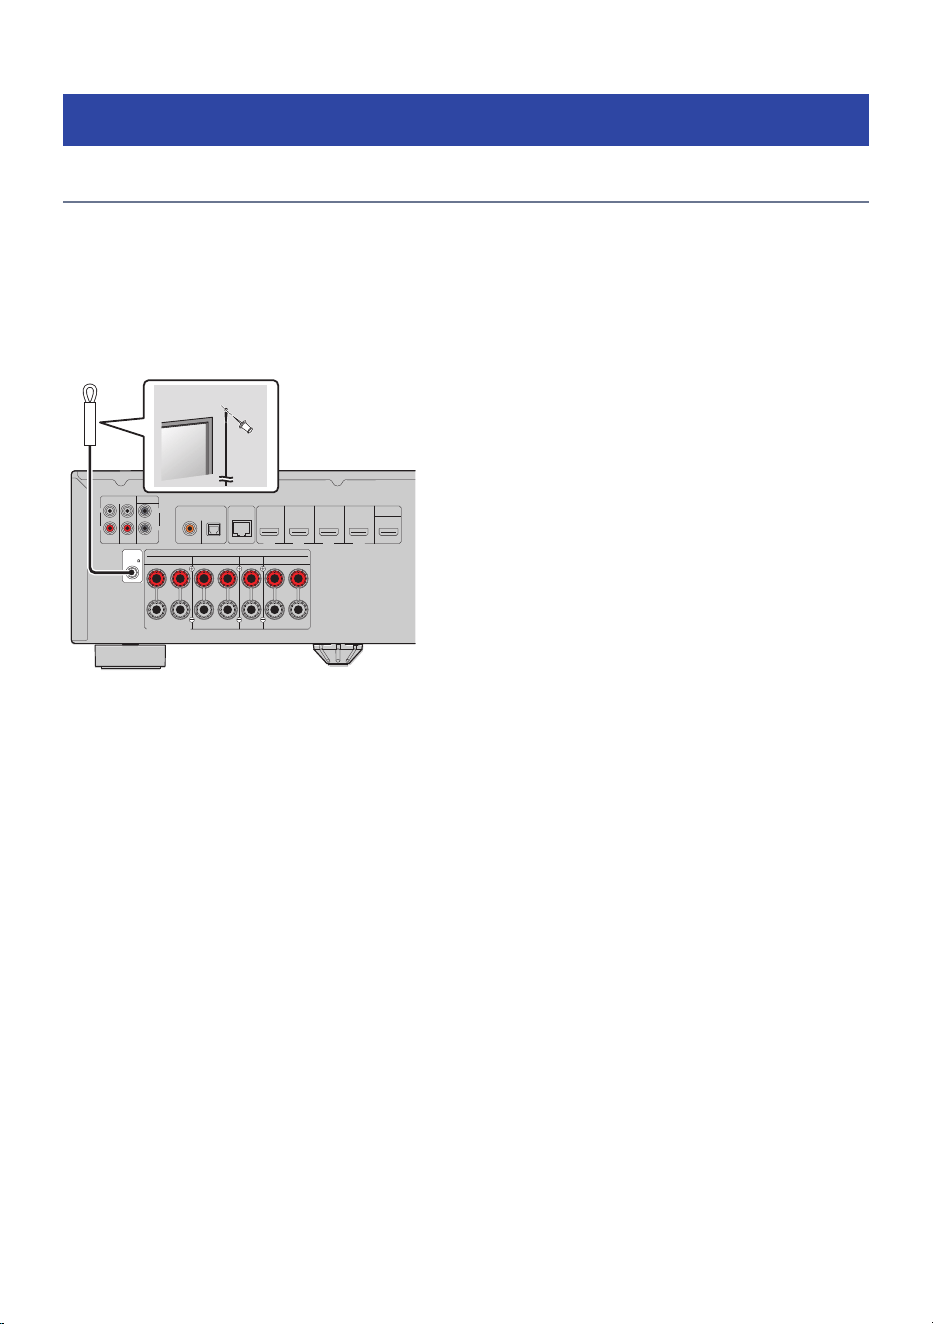
Connecting a radio antenna
Connecting an FM antenna
Model For
U.S.A. and Canada
Connect the supplied FM antenna to this product.
After connecting it, secure the FM antenna to a wall.
SURROUND BACK/ZONE B/BI-AMP
SCENE 4
HDMI IN 1
DIGITAL AUDIO IN
OPTICALCOAXIAL
RCA 2RCA 1
HDMI IN 2 HDMI IN 3
SCENE 1 SCENE 2 SCENE 3
HDMI IN 4 HDMI OUT
eARC/ARC
L
R
SUBWOOFER
ANALOG AUDIO IN
ANTENNA
CENTER
FRONTSURROUND
SPEAKERS
R L
ASSIGNABLE
HEIGHT
R L R L
2
1
75
FM
NETWORK
Rear of this product
FM antenna
NOTE
Reception quality varies depending on where the antenna is positioned. If radio reception is poor, adjust the height, direction, or
placement of the FM antenna.
61
PREPARATION FOR USE > Connecting a radio antenna
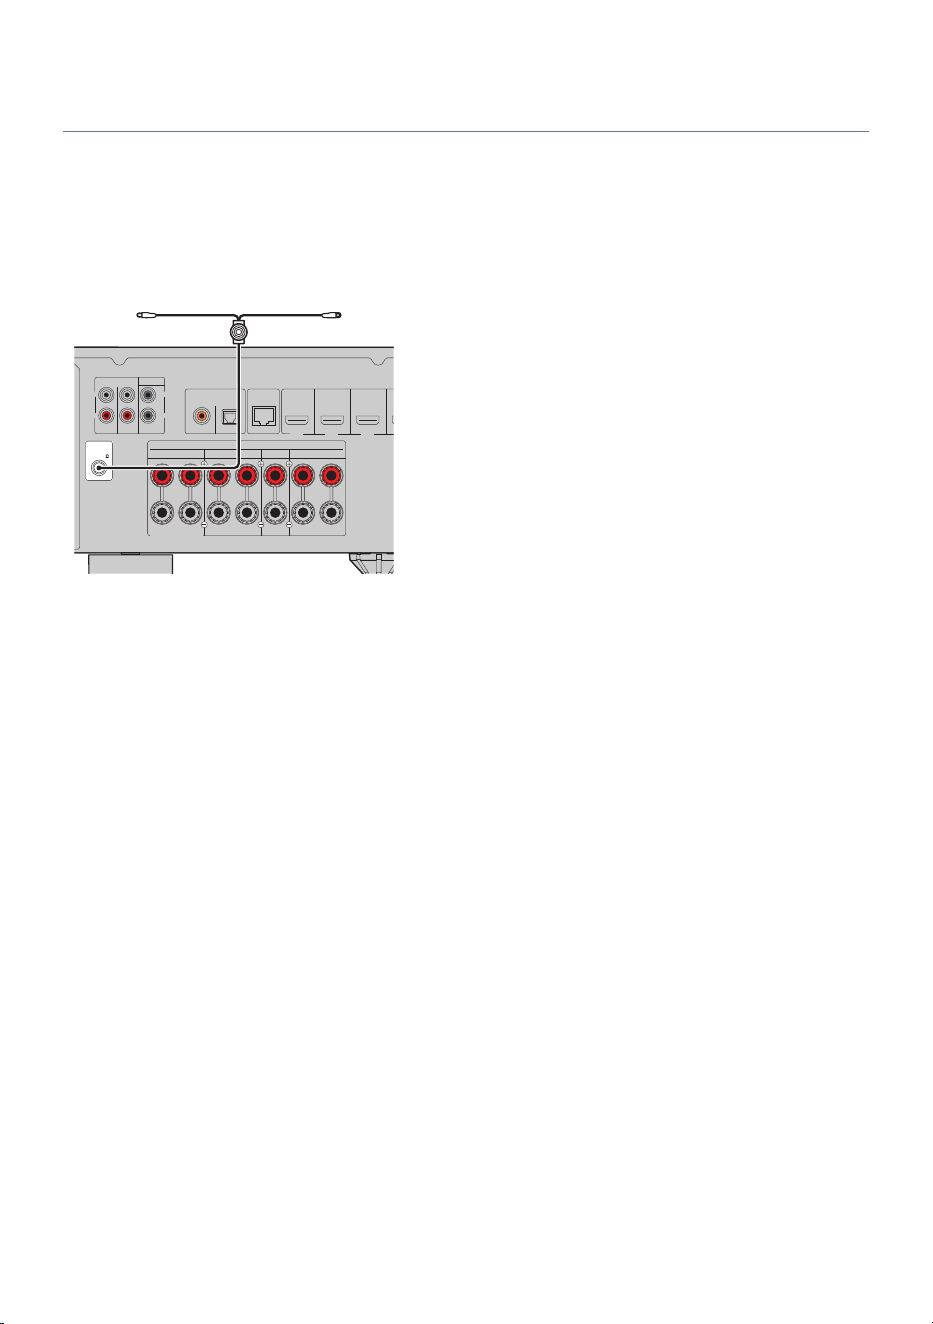
Connecting a DAB/FM antenna
Model For
U.K., Europe, and Australia
Connect the supplied DAB/FM antenna to this product.
After connecting it, secure the DAB/FM antenna to a wall.
SURROUND BACK/ZONE B/BI-AMP
HDMI IN 1
DIGITAL AUDIO IN
OPTICALCOAXIAL
RCA 2RCA 1
HDMI IN 2 HDMI IN 3
SCENE 1 SCENE 2 SCENE 3
L
R
SUBWOOFER
ANALOG AUDIO IN
CENTER
FRONTSURROUND
SPEAKERS
R L
ASSIGNABLE
HEIGHT
R L R L
2
1
NETWORK
ANTENNA
75
DAB/FM
Rear of this product
DAB/FM antenna
NOTE
(
Extend the antenna horizontally.
(
Reception quality varies depending on where the antenna is positioned. If radio reception is poor, adjust the height, direction, or
placement of the DAB/FM antenna.
62
PREPARATION FOR USE > Connecting a radio antenna
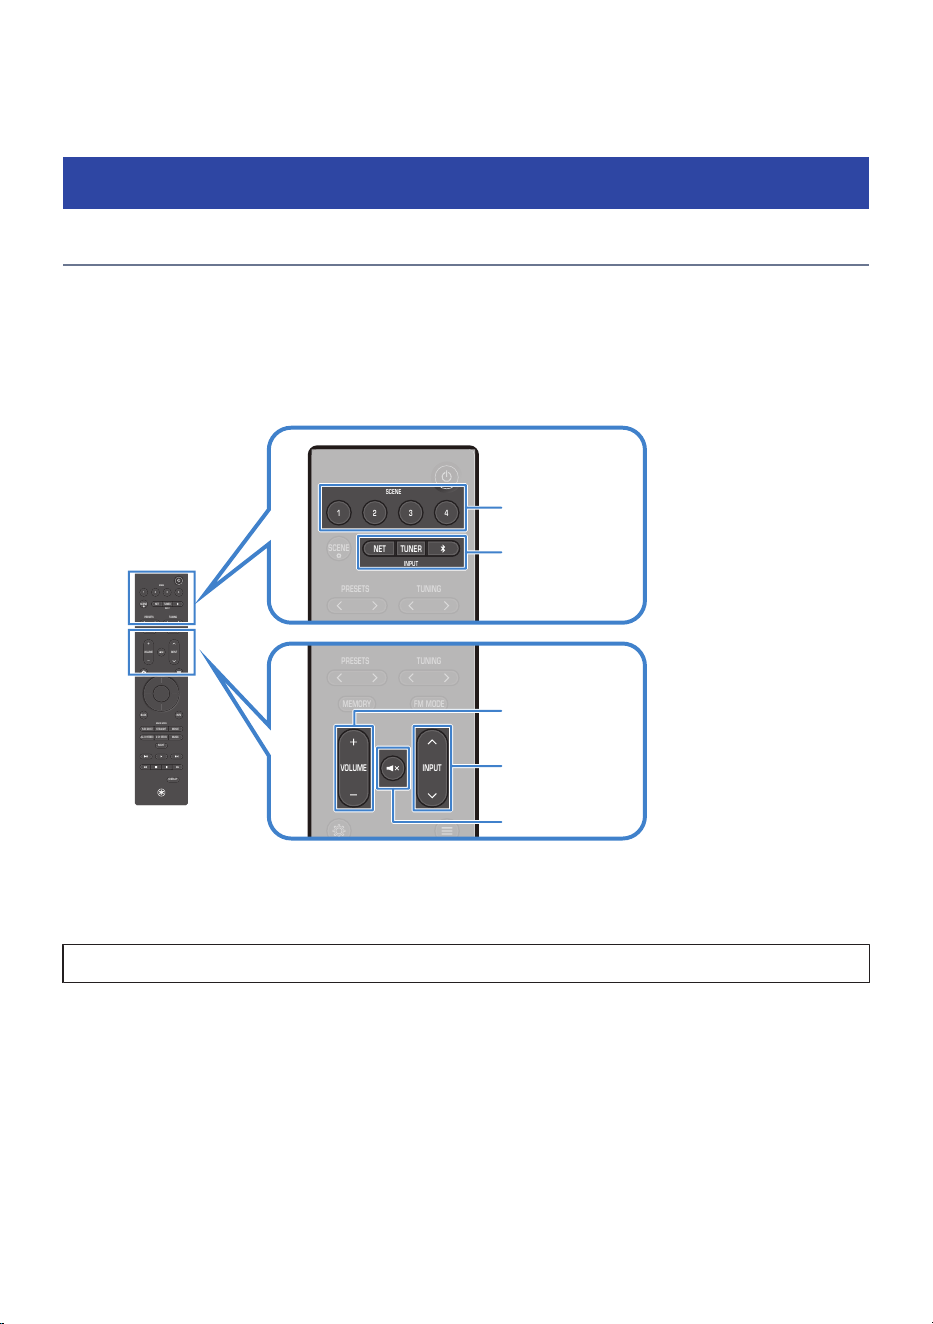
PLAYBACK
Basic operation
Basic playback operations
This section explains the basic procedures for playback of video and audio.
1 Turn on the external device that you want to watch or listen to.
2 Use the INPUT keys to select an input source.
VOLUME
1234
SCENE
PRESETS
INPUT
MEMORY
NIGHT
DISPLAY
BACK
ALL CH STEREO
MUSIC
2 CH STEREO
PURE DIRECT
MOVIESTRAIGHT
NETTUNER
INPUT
SCENE
SOUND MODE
INFO
TUNING
FM MODE
VOLUME
1234
SCENE
PRESETS
INPUT
MEMORY
NIGHT
DISPLAY
BACK
ALL CH STEREO
MUSIC
2 CH STEREO
PURE DIRECT
MOVIESTRAIGHT
NETTUNER
INPUT
SCENE
SOUND MODE
INFO
TUNING
FM MODE
1234
SCENE
PRESETS
NETTUNER
INPUT
SCENE
TUNING
SCENE
INPUT
VOLUME
Mute key
INPUT
3 Start playback on the external device, or select a radio station.
4 Use the VOLUME keys to adjust the volume.
When the SCENE key input settings are at their default values, pressing SCENE keys 1-4 will select HDMI inputs 1-4.
NOTE
(
Press the | (Mute) key to mute the sound. Press it again to cancel muting.
(
For information on operating your external device, refer to its user’s manual.
63
PLAYBACK > Basic operation

Checking audio/video signal information
Press the INFO key on the remote control to display audio/video signal information on the TV screen.
Format Audio format of the input signal
Channel
Number of channels in the input signal (front/surround/LFE)
If “3/2/0.1” is displayed, it indicates 3 front channels, 2 surround channels, and 0.1 LFE
(Low-Frequency Effects) channel.
Sampling Number of samples per second of the input digital signal
Video In Type and resolution of the input digital video signal
Color Format Video signal format
HDR HDR (High Dynamic Range) format
NOTE
(
Some items may not be displayed depending on the input signal.
(
When Dolby Atmos is being played, Channel is not displayed.
64
PLAYBACK > Basic operation

Listening to TV audio
n
Listening to TV audio using eARC/ARC
When you connect an eARC/ARC-compatible TV to this product with an HDMI cable, the TV’s audio can be
played through this product.
Then, when you select a TV program using the TV’s remote control, the input on this product automatically
switches to “TV”, and the TV audio is output from this product.
NOTE
(
The TV must support the HDMI Control function.
(
If you do not want this product and the TV to operate together, turn off the HDMI Control function. This setting is available only
when using eARC.
(
To use ARC, both the HDMI Control function and the ARC function must be turned on.
(
You may have to change settings on your TV. Depending on the TV, settings for both eARC and ARC may be required. For more
details, refer to the user's manual for your TV.
(
If the TV does not support eARC/ARC, or if audio dropouts occur when using eARC/ARC, connect this product and the TV using a
digital optical cable.
n
Using a digital optical cable to listen to connected TV audio
If the TV does not support eARC/ARC or you want to output TV audio using a connection other than HDMI,
you can input the TV audio to this product using a digital optical cable.
1 Set in the SETTINGS menu > “ARC” to “Off”.
2 Use the remote control to select the content (program) that you want to watch on
TV.
Then, the input on this product automatically switches to “TV”, and the TV audio is output
from this product.
NOTE
(
The TV must support the HDMI Control function.
(
To listen to TV audio via a coaxial or analog connection, change the setting for SETTINGS menu > “Function” > “TV Audio Input”.
(
If “HDMI Control” is set to “Off”, manually switch the input to “TV” before operating the TV with its remote control.
Related links
(
“Connecting a TV”(p.45)
(
“Configuring HDMI settings”(p.127)
65
PLAYBACK > Listening to TV audio

Listening to the radio
DAB tuning
Model For
U.K., Europe, and Australia
Before listening to DAB (Digital Audio Broadcasting) radio, perform an initial scan to automatically register
DAB radio stations.
1 Press the TUNER key to switch the input source to “TUNER”.
2 Press the BAND key to switch to the DAB band.
When the initial scan finishes, the product automatically tunes to the first DAB radio station in frequency
order.
NOTE
(
DAB uses digital signals to provide clearer audio and more stable reception compared to analog signals. This product also supports
DAB+. DAB+ is an upgraded version of DAB and supports stations that use the MPEG-4 HE-AAC v2 audio codec, which provides a
more efficient transmission method.
(
Because not all regions are covered yet, be sure to check DAB coverage in your area. For nationwide DAB status and a list of DAB
frequencies worldwide, visit WorldDAB Online at http://www.worlddab.org/.
(
If the initial scan does not find any DAB radio stations, the front display switches to the initial scan menu. Press the BAND key again
to start the initial scan.
(
You can check the signal strength of each DAB channel label. From the OPTION menu, select “Tune AID”, and then select the
desired DAB channel label. The signal strength of the DAB channel label is shown from 0 (none) to 100 (best).
(
If you run the initial scan again after registering several DAB stations, the current DAB stations registered to the preset numbers will
be cleared.
(
You can also perform the initial scan from “Init Scan” > “Init Scan” in the OPTION menu.
n
DAB frequency information
This product supports Band III (174–240 MHz) only.
Frequency Channel label
174.928 MHz 5A
176.640 MHz 5B
178.352 MHz 5C
180.064 MHz 5D
181.936 MHz 6A
183.648 MHz 6B
185.360 MHz 6C
187.072 MHz 6D
188.928 MHz 7A
190.640 MHz 7B
66
PLAYBACK > Listening to the radio

Frequency Channel label
192.352 MHz 7C
194.064 MHz 7D
195.936 MHz 8A
197.648 MHz 8B
199.360 MHz 8C
201.072 MHz 8D
202.928 MHz 9A
204.640 MHz 9B
206.352 MHz 9C
208.064 MHz 9D
209.936 MHz 10A
211.648 MHz 10B
213.360 MHz 10C
215.072 MHz 10D
216.928 MHz 11A
218.640 MHz 11B
220.352 MHz 11C
222.064 MHz 11D
223.936 MHz 12A
225.648 MHz 12B
227.360 MHz 12C
229.072 MHz 12D
230.784 MHz 13A
232.496 MHz 13B
234.208 MHz 13C
235.776 MHz 13D
237.488 MHz 13E
239.200 MHz 13F
Related links
(
“DAB tuning”(p.110)
(
“Checking the signal strength of each DAB channel”(p.111)
67
PLAYBACK > Listening to the radio
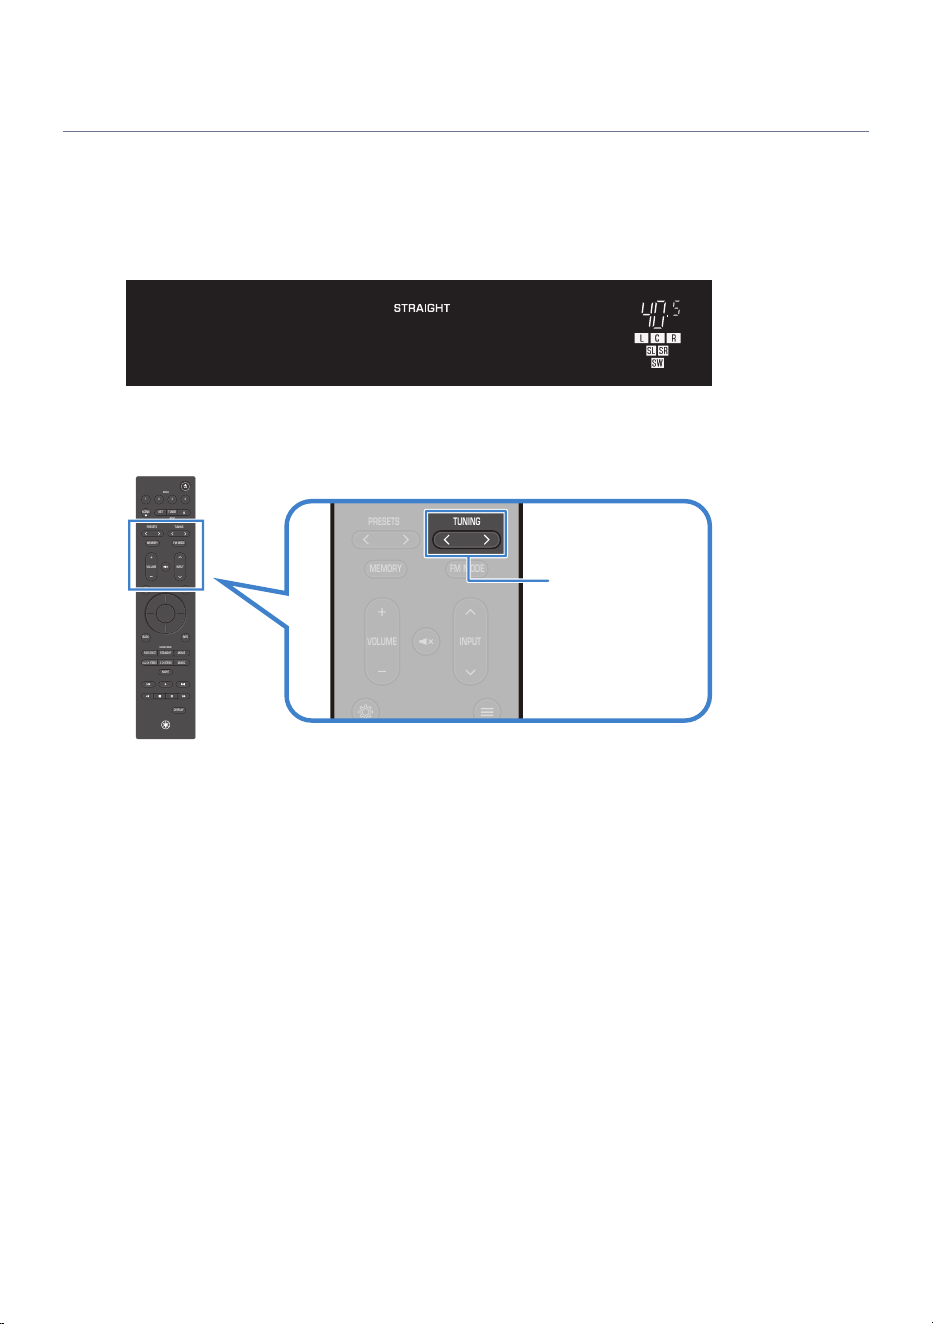
Listening to the radio
You can use this product’s built-in tuner to listen to the radio.
1 Press the TUNER key to switch the input source to “TUNER”.
The currently selected frequency is shown on the front display.
FM 87.50MHz
2 Press the TUNING key repeatedly to change the frequency.
Holding the key for approximately one second starts automatic tuning.
VOLUME
1234
SCENE
PRESETS
INPUT
MEMORY
NIGHT
DISPLAY
BACK
ALL CH STEREO
MUSIC
2 CH STEREO
PURE DIRECT
MOVIESTRAIGHT
NETTUNER
INPUT
SCENE
SOUND MODE
INFO
TUNING
FM MODE
VOLUME
1234
SCENE
PRESETS
INPUT
MEMORY
NIGHT
DISPLAY
BACK
ALL CH STEREO
MUSIC
2 CH STEREO
PURE DIRECT
MOVIESTRAIGHT
NETTUNER
INPUT
SCENE
SOUND MODE
INFO
TUNING
FM MODE
TUNING
NOTE
(
You can enjoy video from an external device while listening to the radio. For details, refer to the following related links.
(
To select a registered radio station, press the PRESETS key. For details on how to register radio stations, refer to the following
related links.
Related links
(
“Selecting the audio input jacks and video input ports”(p.107)
(
“Registering and deleting radio stations”(p.71)
68
PLAYBACK > Listening to the radio

Displaying Radio Data System information
Model For
U.K. and Europe
Radio Data System (RDS) is a data transmission system used by FM broadcasters. When tuned to a Radio
Data System (RDS) station, this product can receive various types of data.
1 Tune to the desired RDS broadcast station.
2 Press the DISPLAY key on the remote control or front panel to cycle through the
available display items.
The information will appear in the front display.
Frequency
Frequency
PS
Program service name
PTY
Current program type
RT
Information on the current program
CT
Current time
Sound Mode
Sound mode name
Audio Decoder
Decoder name
NOTE
Use of the “Auto Preset” function is recommended for receiving Radio Data System stations. For details on “Auto Preset”, refer to the
following related links.
Related links
“Registering and deleting radio stations”(p.71)
69
PLAYBACK > Listening to the radio

Displaying DAB information
Model For
U.K., Europe, and Australia
When tuned to a DAB radio station, this product can receive various types of DAB information.
1 Tune to the desired DAB radio station.
2 Press the DISPLAY key on the remote control or front panel to cycle through the
available display items.
The information will appear in the front display.
Station Name
Station name
PTY
Station genre
DLS
Information on the current station
Ensemble Name
Ensemble name
Channel No.
Channel number
Channel Frequency
Channel frequency
Sound Mode
Sound mode name
Audio Decoder
Decoder name
NOTE
Depending on the selected DAB radio station, some information may not be available.
70
PLAYBACK > Listening to the radio

Registering and deleting radio stations
You can select a radio station and register it to a preset number.
n
Manually registering a radio station
1 Tune to the radio station that you want to register.
2 Press the MEMORY key.
3 Press the PRESETS key to select a preset number.
4 Press the MEMORY key.
This completes the registration.
NOTE
(
(U.S.A. and Canada models only)
Up to 40 radio stations can be registered.
(
(U.K., Europe, and Australia models only)
Up to 40 radio stations each for FM and DAB can be registered.
(
To register the tuned station to the next available preset number after the one most recently registered, press the MEMORY key
while tuned to the station you want to register.
(
To return to the previous screen without registering, press the BACK key.
(
If no operation is performed for 30 seconds, the display automatically returns to the previous screen.
n
Automatically registering radio stations (Auto Preset)
FM radio stations can also be registered automatically. This function automatically registers FM radio
stations with strong signals to preset numbers.
1 Switch the reception band to FM.
2 Tune to the radio station from which you want to start registration.
Radio stations with frequencies starting from the current station are automatically registered.
3 Press the "(OPTION menu) key.
4 Select “Preset”.
5 Select “Auto Preset”.
The preset number from which registration will start is displayed. You can select the starting
preset number.
6 Press the ENTER key.
The auto preset process will begin.
71
PLAYBACK > Listening to the radio

NOTE
(
A maximum of 40 radio stations can be registered.
(
(U.K. and Europe models only)
With the auto preset function, only radio stations that provide Radio Data System services will be registered automatically.
n
Deleting a registered radio station
1 Switch the input source to “TUNER”.
2 Press the "(OPTION menu) key.
3 Select “Preset”.
4 Select “Clear Preset”.
5 Use the cursor keys to select the registered preset number to be cleared.
6 Press the ENTER key.
7 To delete another registered station, repeat steps 5 and 6.
8 Press the "(OPTION menu) key.
Related links
(
“Listening to the radio”(p.68)
(
“Registering and deleting radio stations”(p.109)
72
PLAYBACK > Listening to the radio
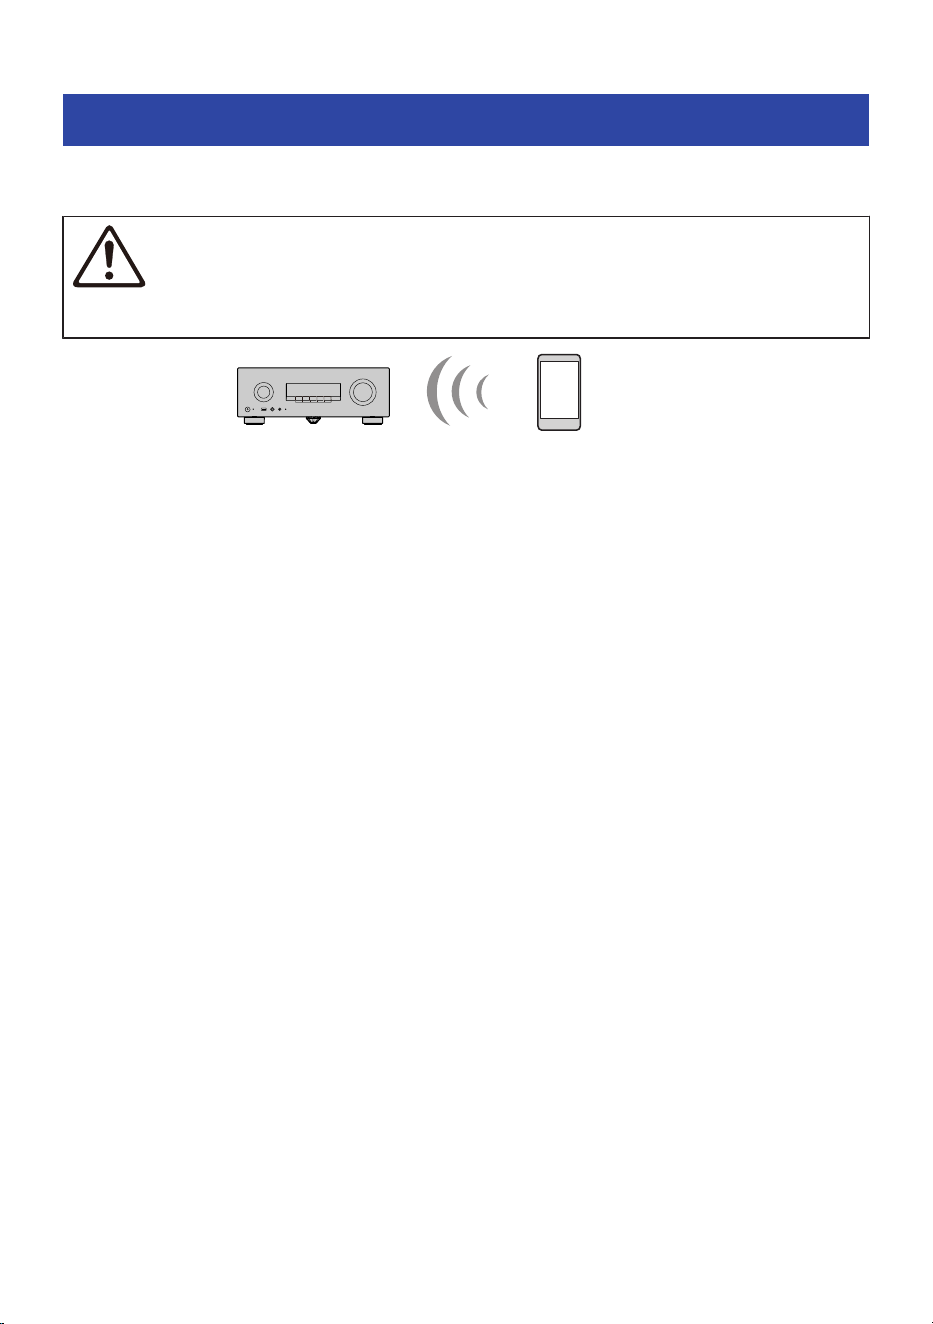
Playing back audio from a Bluetooth® device
Wirelessly connect a Bluetooth device (such as a smartphone) to this product to play music files and other
audio.
CAUTION
(
Adjusting the volume on the Bluetooth device may cause the sound to become unexpectedly loud, which can result in hearing
impairment or damage to equipment. If the volume suddenly becomes too loud during playback, stop playback immediately.
Bluetooth device
(smartphone, etc.)
This product
1 Press the $ key on the remote control to switch the input source to “Bluetooth”.
2 Check that “Pairing…” is displayed on the front display.
If it is not displayed, press and hold the $ key.
This product enters pairing mode. When pairing mode is enabled, the “$” icon on the front
display flashes.
You can also access pairing from “Pairing” in the OPTION menu.
3 Select this product (network name of this product) on the Bluetooth device.
The default name of this product is “RX500A-1b08fa”.
If a passkey is required, enter the number “0000”.
4 Start playback of the audio on the Bluetooth device.
73
PLAYBACK > Playing back audio from a Bluetooth® device

NOTE
(
When the input is switched, if a paired Bluetooth device is detected, it connects automatically.
(
Depending on the Bluetooth device, you may be able to control the volume of this product from the Bluetooth device during
playback.
(
To disconnect the Bluetooth device, do any of the following.
(
Perform a disconnect operation on the Bluetooth device.
(
Switch this product’s input source to something other than “Bluetooth”.
(
In the SETTINGS menu, set “Bluetooth” > “Bluetooth” to “Off”.
(
When a Bluetooth device is connected, “$” lights up on the front display.
Bluetooth
Related links
(
“Registering a Bluetooth® device with this product”(p.114)
(
“Automatically selecting the Bluetooth® input”(p.115)
(
“Configuring the Bluetooth® function”(p.141)
74
PLAYBACK > Playing back audio from a Bluetooth® device
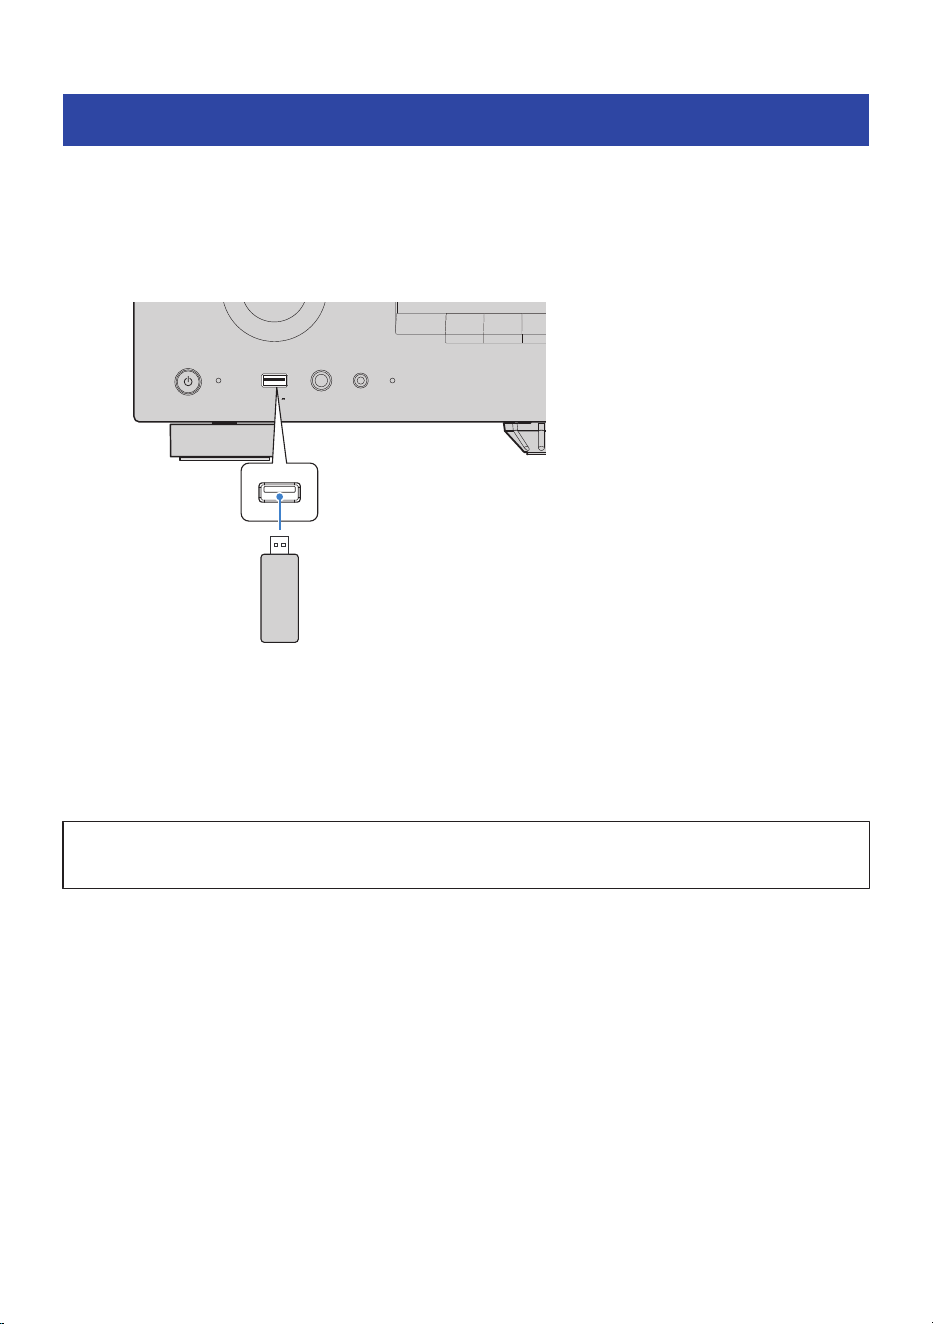
Playing music on a USB device
This explains how to play music and other audio files saved on a USB device on this product.
1 Plug the USB device into the USB port.
PHONES
INPUT
SETUP MIC
USB
5V 1A
PURE DIRECT
SCENE 1 SCENE 2 SCENE 3
Front of this product
USB device
2 Switch the input source to “USB”.
The Browse screen appears on the TV.
3 Select content on the Browse screen of the TV.
Playback of the selected content begins.
NOTICE
(
Some USB devices may not operate properly.
NOTE
(
If there are a lot of files, loading may take some time.
(
Up to 999 items (folders and files combined) can be displayed on the Browse screen. Folders and file names that exceed this limit
are not displayed. Up to 10 levels of folders are supported, including the root level.
(
Remove the USB device only after stopping playback.
(
Connect the USB device directly to this product’s USB port. Do not use extension cables.
(
Power is not supplied to the USB device while the product is in standby.
(
Shuffle playback and repeat playback are available.
(
When a USB device is connected to this product for the first time, playback will automatically begin from the first track in the top-
level (root) folder.
Related links
“Setting shuffle/repeat playback”(p.112)
75
PLAYBACK > Playing music on a USB device
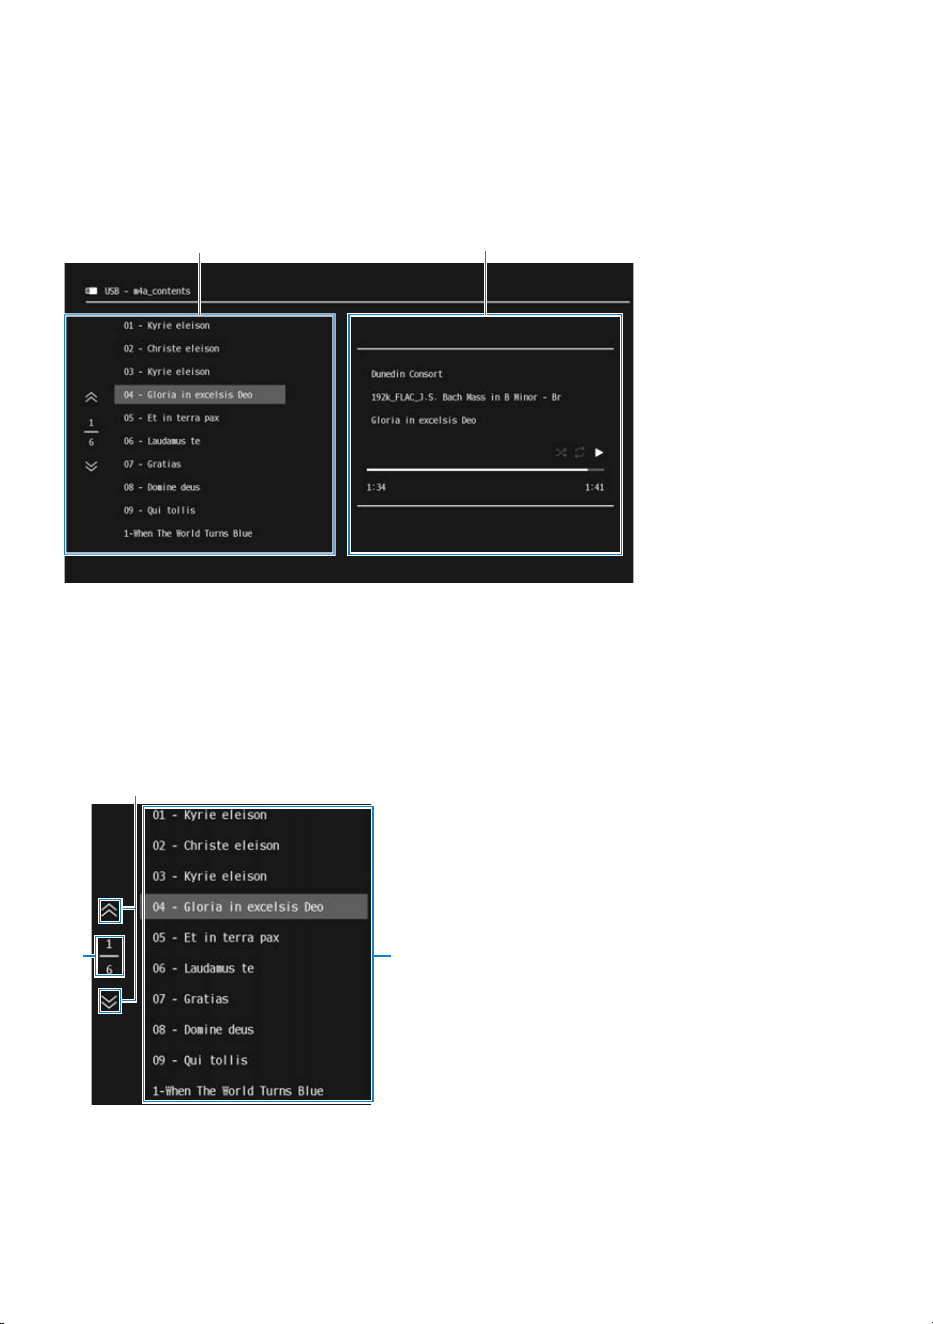
n
Names of parts and functions on the Browse screen
When a USB device is connected to the USB port, the Browse screen appears on the TV.
The Browse screen consists of the browse part (left side of the screen) and the playback information part
(right side of the screen). When playback from the USB device is stopped, only the browse part is displayed.
a
b
a
Browse part
b
Playback information part
Browse part (left side of the screen)
Select the content to play from the USB device.
b
c
a
a
Operation buttons
Use the cursor keys to select an icon, and press the ENTER key. Moves the list up or down by one page.
b
Current page/Total number of pages
76
PLAYBACK > Playing music on a USB device
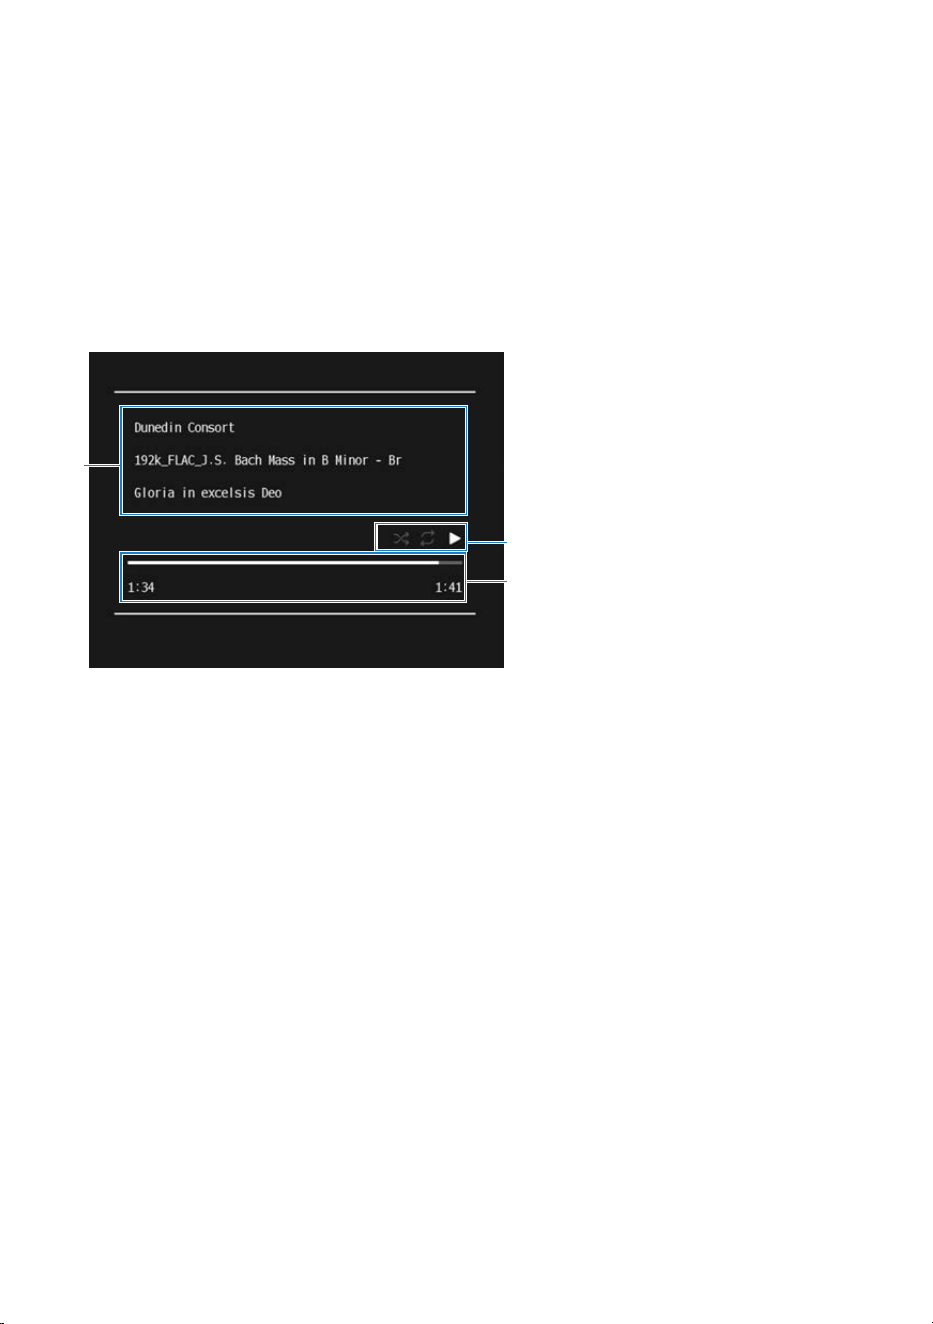
c
Content list
Displays a list of available content. Use the cursor keys to select the desired content, and press the ENTER key.
NOTE
When playing music from a USB device together with video from another input, a Screen Off button appears below the page number.
Press this button to hide the USB device Browse screen. Press the BACK key to display it again.
Playback information part (right side of the screen)
When playback of content starts, the playback information part is displayed.
b
c
a
a
Music information
The artist name, album name, and song name (track name) are displayed.
b
Playback information
Shuffle playback, repeat playback, and playback status (play/pause, etc.) are displayed.
c
Progress bar and time
The playback time, track length, and progress bar are displayed.
NOTE
The information shown varies depending on the content being played.
77
PLAYBACK > Playing music on a USB device
Listening to music via AirPlay
This explains how to play music and other audio files on this product via AirPlay. Tap (or click) the AirPlay
icon on your iPhone or iTunes/Music, and then select this product as the output device.
CAUTION
(
Adjusting the volume on the AirPlay device may cause the sound to become unexpectedly loud, which can result in hearing
impairment or damage to equipment. If the volume suddenly becomes too loud during playback, stop playback immediately.
NOTE
(
You can set this product to turn on automatically when your AirPlay device starts playing.
(
You can change the network name of this product that is displayed on your AirPlay device.
(
You can control the volume of this product from your AirPlay device during playback.
(
The product is compatible with AirPlay 2.
(
For details about AirPlay, visit Apple’s official website.
Related links
“Configuring the network settings”(p.138)
78
PLAYBACK > Listening to music via AirPlay

Listening to Internet radio
Select an Internet radio station, and start playback.
1 Press the NET key to switch the input source to “Net Radio” or “Podcasts”.
2 Select content using the dedicated app.
Playback will begin.
NOTE
(
To switch input sources, press the NET key repeatedly.
(
Depending on the Internet radio station or the time of day, reception may not be possible.
(
This function uses the airable.Radio service. The airable service is provided by the company airable GmbH.
(
This service is subject to change, suspension, or termination without notice. Yamaha Corporation shall not be held responsible for
any resulting inconvenience or damages.
Related links
“About the dedicated app”(p.210)
79
PLAYBACK > Listening to Internet radio

Listening to streaming services
This explains how to play content delivered by a variety of streaming services.
For information on supported streaming services, go to the product information pages of the Yamaha
website or refer to the dedicated app.
n
Streaming services
Supported streaming services vary depending on the product and region. Even if the product supports a
service, it cannot be used outside the service’s supported regions. Likewise, even within a supported region,
the service cannot be used if the product does not support it.
NOTE
(
Some streaming services require a subscription to their paid services. For details on each service provider, see its official website.
(
Streaming services are subject to change, suspension, or termination without notice. Yamaha Corporation shall not be held
responsible for any resulting inconvenience or damages.
Related links
“Configuring the network settings”(p.138)
80
PLAYBACK > Listening to streaming services
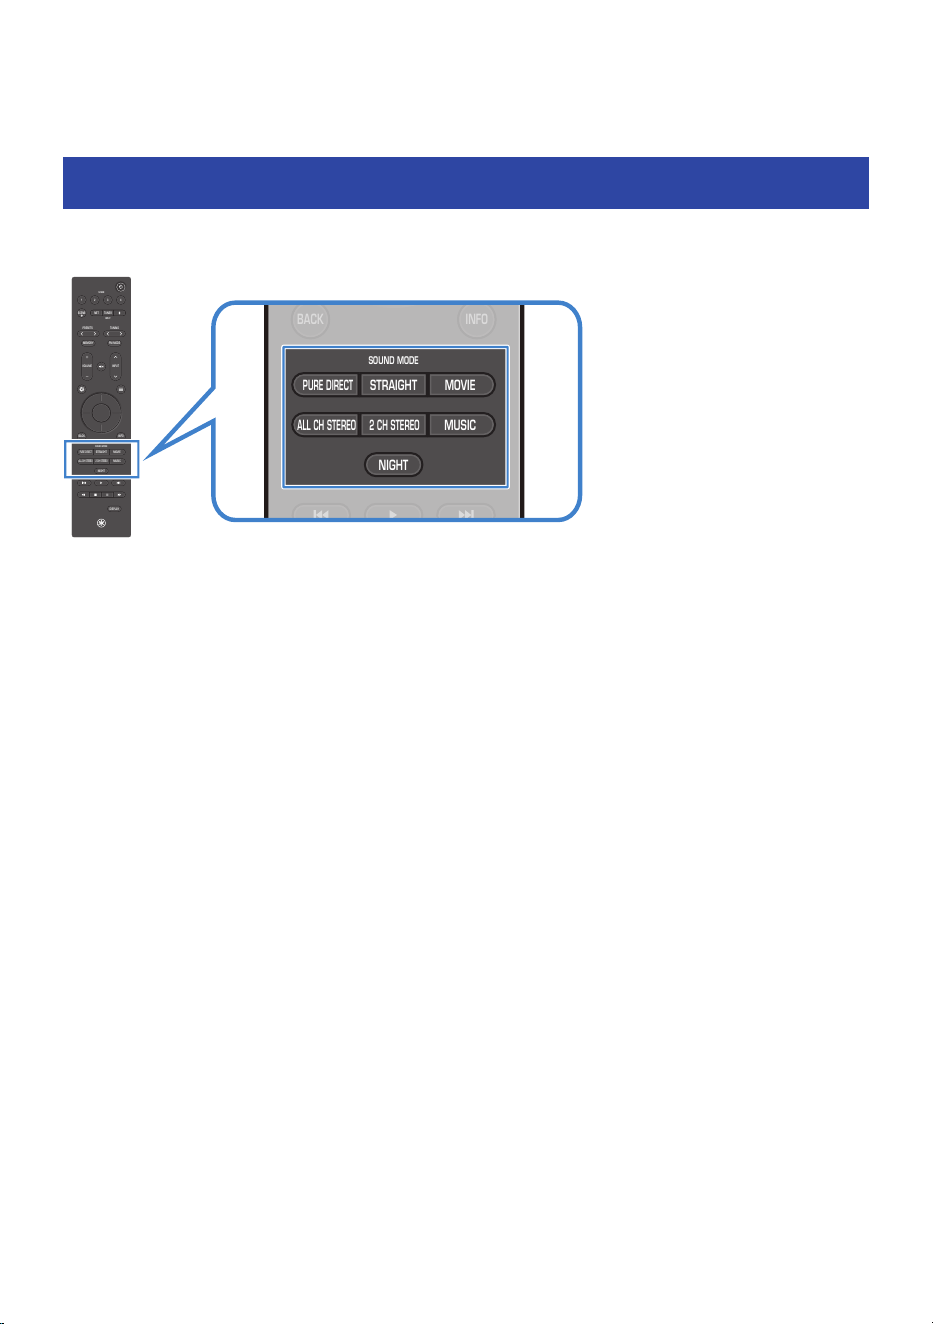
ENJOYING THE SOUND
Selecting your preferred sound (Sound modes)
This product is equipped with sound modes for surround playback and for stereo playback. There are also
various sound settings for adjusting the sound to better suit your preferences.
VOLUME
1234
SCENE
PRESETS
INPUT
MEMORY
NIGHT
DISPLAY
BACK
ALL CH STEREO
MUSIC
2 CH STEREO
PURE DIRECT
MOVIESTRAIGHT
NETTUNER
INPUT
SCENE
SOUND MODE
INFO
TUNING
FM MODE
VOLUME
1234
SCENE
PRESETS
INPUT
MEMORY
NIGHT
DISPLAY
BACK
ALL CH STEREO
MUSIC
2 CH STEREO
PURE DIRECT
MOVIESTRAIGHT
NETTUNER
INPUT
SCENE
SOUND MODE
INFO
TUNING
FM MODE
(
PURE DIRECT: Suppresses noise for higher-quality audio playback. It disables various processing modes
and circuits (such as the front display) except those required for basic playback.
(
STRAIGHT: Plays audio in stereo or multichannel without applying sound field effects.
(
MOVIE: Applies a sound field effect optimized for video content and plays it through all speakers. It
emphasizes clear dialogue, powerful bass, and a surround sound that fills the entire room.
(
ALL CH STEREO: Plays stereo sound from all speakers without applying sound field effects.
(
2 CH STEREO: Plays stereo audio through the front speakers without applying sound field effects.
(
MUSIC: Applies a sound field effect optimized for music content and reproduces it through all speakers. It
emphasizes a natural vocal soundstage, tight bass, and a natural, unobtrusive surround effect.
(
NIGHT: Makes audio easier to hear at low volumes, such as during nighttime playback. It plays sound from
all speakers.
NOTE
Sound modes are stored individually for each input source.
Related links
(
“Enjoying original audio (Straight Decode)”(p.82)
(
“Enjoying higher-quality playback (Pure Direct)”(p.83)
(
“Enjoy sound optimized for video content (MOVIE)”(p.84)
(
“Enjoy sound optimized for music content (MUSIC)”(p.85)
(
“Enjoy stereo playback without sound field effects (2 CH STEREO)”(p.86)
(
“Enjoy stereo playback through all speakers (ALL CH STEREO)”(p.87)
81
ENJOYING THE SOUND > Selecting your preferred sound (Sound modes)

Enjoying original audio (Straight Decode)
Audio can be played back without applying any sound field effects. Two-channel sources such as CDs are
played in stereo through the front speakers, while multichannel sources are played in their native
multichannel audio format.
Press the STRAIGHT key to switch the sound mode to “STRAIGHT”. “STRAIGHT” appears on the front display.
NOTE
If surround back speakers are connected, and a 5.1-channel audio signal is input, the audio is played back in 7.1 channels.
82
ENJOYING THE SOUND > Enjoying original audio (Straight Decode)

Enjoying higher-quality playback (Pure Direct)
This mode enables higher-quality playback with reduced noise. It disables various processing modes and
circuits (such as the front display) except those required for basic playback.
Press the PURE DIRECT key to switch the sound mode to “PURE DIRECT”. The “PURE DIRECT” lamp on the
front panel turns on.
NOTE
When Pure Direct is enabled, the following functions cannot be used:
(
Zone function
(
Operation of the OPTION menu and SETTINGS menu
(
Indicators on the front display (when no operations are performed)
n
Signal processing when using Pure Direct
When using Pure Direct with this product, analog audio signals are output without being converted to digital
audio signals.
The following table shows the differences in operation when using Pure Direct.
Item Analog signal Digital signal
Speaker distance adjustment Disabled Enabled
Speaker level adjustment Disabled Enabled
Equalizer selection Disabled Disabled
Extra Bass (Subwoofer enabled) Disabled Enabled
Extra Bass (Low-frequency enhancement) Disabled Disabled
Bass adjustment Disabled Enabled
Other sound adjustments (Tone Control, Dynamic Range, Room
Correction, etc.)
Disabled Disabled
Related links
“Configuring the speakers”(p.123)
83
ENJOYING THE SOUND > Enjoying higher-quality playback (Pure Direct)

Enjoy sound optimized for video content (MOVIE)
This mode applies a sound field effect optimized for video content and plays the sound through all speakers.
It emphasizes clear dialogue, powerful bass, and an immersive surround sound. Sound effects, ambient
sounds, and moving sounds are positioned three-dimensionally, with effects and ambient sounds placed
particularly above the listener.
Press the MOVIE key to switch the sound mode to “MOVIE”.
84
ENJOYING THE SOUND > Enjoy sound optimized for video content (MOVIE)

Enjoy sound optimized for music content (MUSIC)
This mode applies a sound field effect optimized for music content and plays the sound through all speakers.
It emphasizes a natural vocal soundstage, tight bass, and a natural, unobtrusive surround effect. It prioritizes
the balance and tone of the original sound while extending only the sense of hall ambiance and airiness
upward.
Press the MUSIC key to switch the sound mode to “MUSIC”.
85
ENJOYING THE SOUND > Enjoy sound optimized for music content (MUSIC)

Enjoy stereo playback without sound field effects (2 CH
STEREO)
You can enjoy stereo sound from the front speakers. When a multichannel signal is input, it is down-mixed to
2 channels and output from the front speakers.
Press the 2 CH STEREO key to switch the sound mode to “2 CH STEREO”.
86
ENJOYING THE SOUND > Enjoy stereo playback without sound field effects (2 CH STEREO)

Enjoy stereo playback through all speakers (ALL CH
STEREO)
In this mode, direct sound can also be heard from the rear speakers, allowing the sound to be enjoyed over a
wide listening area. Sound is output from all speakers, making it ideal for background music at home parties.
Press the ALL CH STEREO key to switch the sound mode to “ALL CH STEREO”.
87
ENJOYING THE SOUND > Enjoy stereo playback through all speakers (ALL CH STEREO)

Enjoying bass (Extra Bass)
This feature enables you to enjoy richer, more powerful bass regardless of the size of your front speakers or
whether a subwoofer is connected.
Configure the setting in SETTINGS menu > “Speakers” > “Configuration” > “Extra Bass”.
NOTE
Depending on the environment or settings, the effect may be difficult to notice.
Related links
“Configuring the speakers”(p.123)
88
ENJOYING THE SOUND > Enjoying bass (Extra Bass)

Enjoying Dolby Atmos® and DTS:X®
Dolby Atmos and DTS:X let you experience realistic, immersive sound from every direction, including
overhead.
To play Dolby Atmos or DTS:X content on this product, input the signal via HDMI, using eARC. To fully enjoy
Dolby Atmos or DTS:X content, we recommend using a speaker system that includes height speakers.
NOTE
(
In the following cases, Dolby Atmos content will be played in the Dolby TrueHD or Dolby Digital Plus format instead (Dolby Atmos
PCM content will always play in Dolby Atmos):
(
When neither surround back speakers nor height speakers are being used
(
When headphones are connected (playback will be in 2-channel)
(
When playing DTS:X content that supports DTS Dialogue Control, you can adjust the volume of centrally positioned sounds (such
as dialogue) using SETTINGS menu > “DTS Dialogue Control”. For details, refer to the following related links.
Related links
(
“Recommended speaker layouts (Basic)”(p.28)
(
“Other speaker layouts (Basic)”(p.33)
(
“Configuring audio settings”(p.130)
89
ENJOYING THE SOUND > Enjoying Dolby Atmos® and DTS:X®

USEFUL FUNCTIONS
Sleep timer function
Once the specified time elapses, the product goes into standby. From SETTINGS menu > “Function “ >
“Sleep”, the sleep timer can be set to 120 minutes, 90 minutes, 60 minutes, 30 minutes, or Off.
While the sleep timer is active, “SLEEP” is lit on the front display.
HDMI 1
Related links
“Configuring advanced function settings (Function)”(p.134)
90
USEFUL FUNCTIONS > Sleep timer function

Scene function
About the Scene function
The Scene function lets you switch multiple preset settings, such as sound mode and sound field effects,
while simultaneously selecting the input source with a single press of the SCENE keys (1–4) on the remote
control or front panel. The following settings can be registered: These items can be selected from the Scene
function screen and set to enabled or disabled.
(
Input
(
Content
(
Volume
(
Dialogue Level
(
Subwoofer volume level adjustment
(
Sound mode
(
Tone Control
(
Extra Bass
(
Dimmer
(
HDMI Control
(
Lip sync
Related links
“Calling and registering a scene”(p.92)
91
USEFUL FUNCTIONS > Scene function
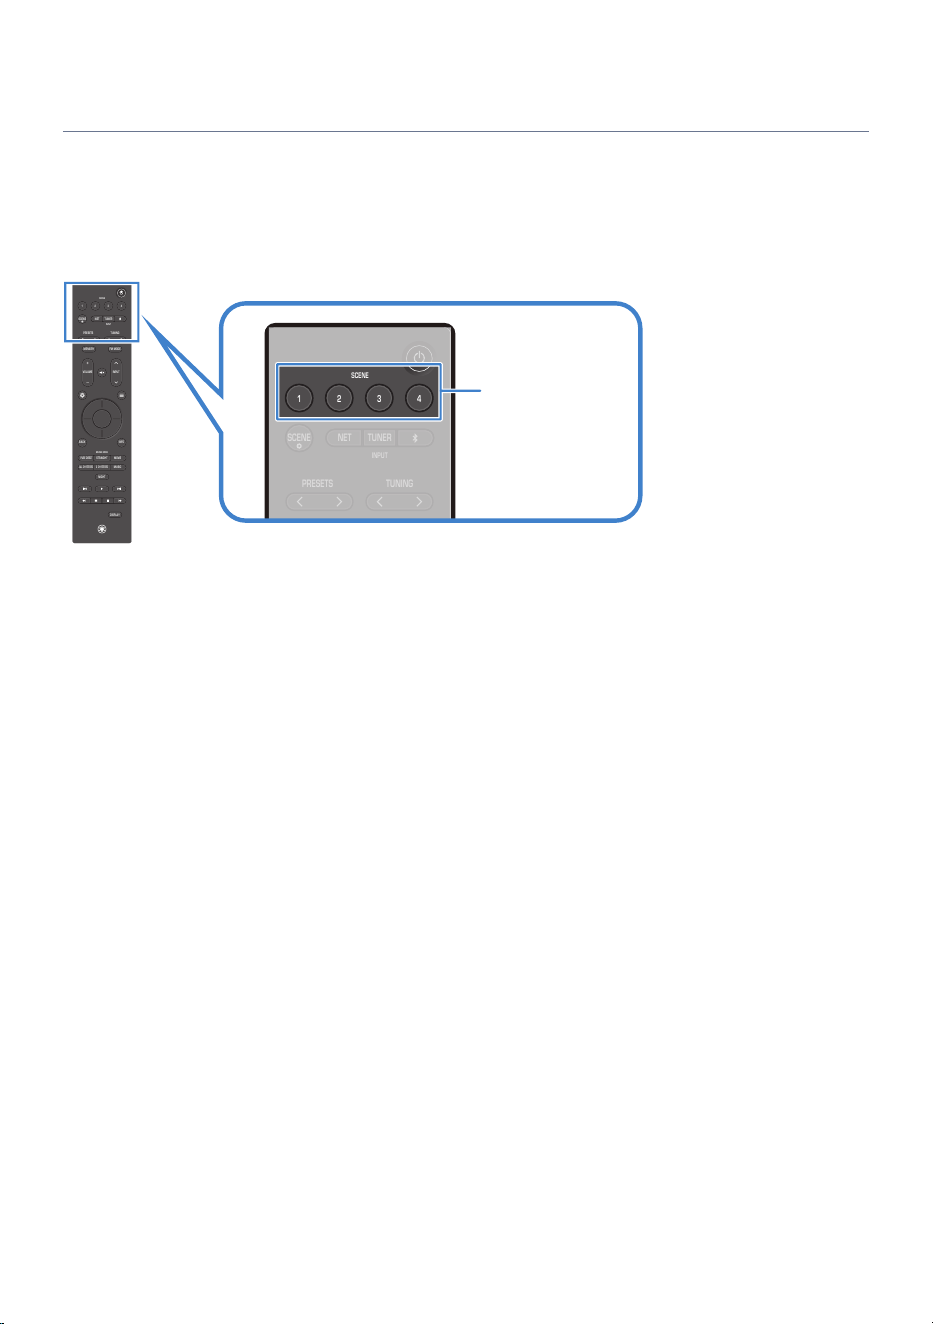
Calling and registering a scene
n
Calling a scene
Press one of the SCENE keys (1–4) on the remote control to recall a registered scene. When the product is in
standby, pressing this key also turns the power on. SCENE 1–4 can also be called using the SCENE keys 1–4
on the front panel.
VOLUME
1234
SCENE
PRESETS
INPUT
MEMORY
NIGHT
DISPLAY
BACK
ALL CH STEREO
MUSIC
2 CH STEREO
PURE DIRECT
MOVIESTRAIGHT
NETTUNER
INPUT
SCENE
SOUND MODE
INFO
TUNING
FM MODE
1234
SCENE
PRESETS
NETTUNER
INPUT
SCENE
TUNING
SCENE
n
Scene default settings
By default, each scene has the following input settings registered:
Main zone
(
SCENE key 1: HDMI 1
(
SCENE key 2: HDMI 2
(
SCENE key 3: HDMI 3
(
SCENE key 4: HDMI 4
n
Registering a scene
You can register the current state of this product to a SCENE key.
1 Set the product to the state that you want to register to the SCENE key.
2 Press and hold the desired SCENE key until “SceneX Created” appears on the front
display.
The current state of this product is registered to the SCENE key.
Here, “X” indicates the Scene number.
This completes the registration.
NOTE
We recommend registering a scene while actually watching or listening to the content you want to assign.
92
USEFUL FUNCTIONS > Scene function
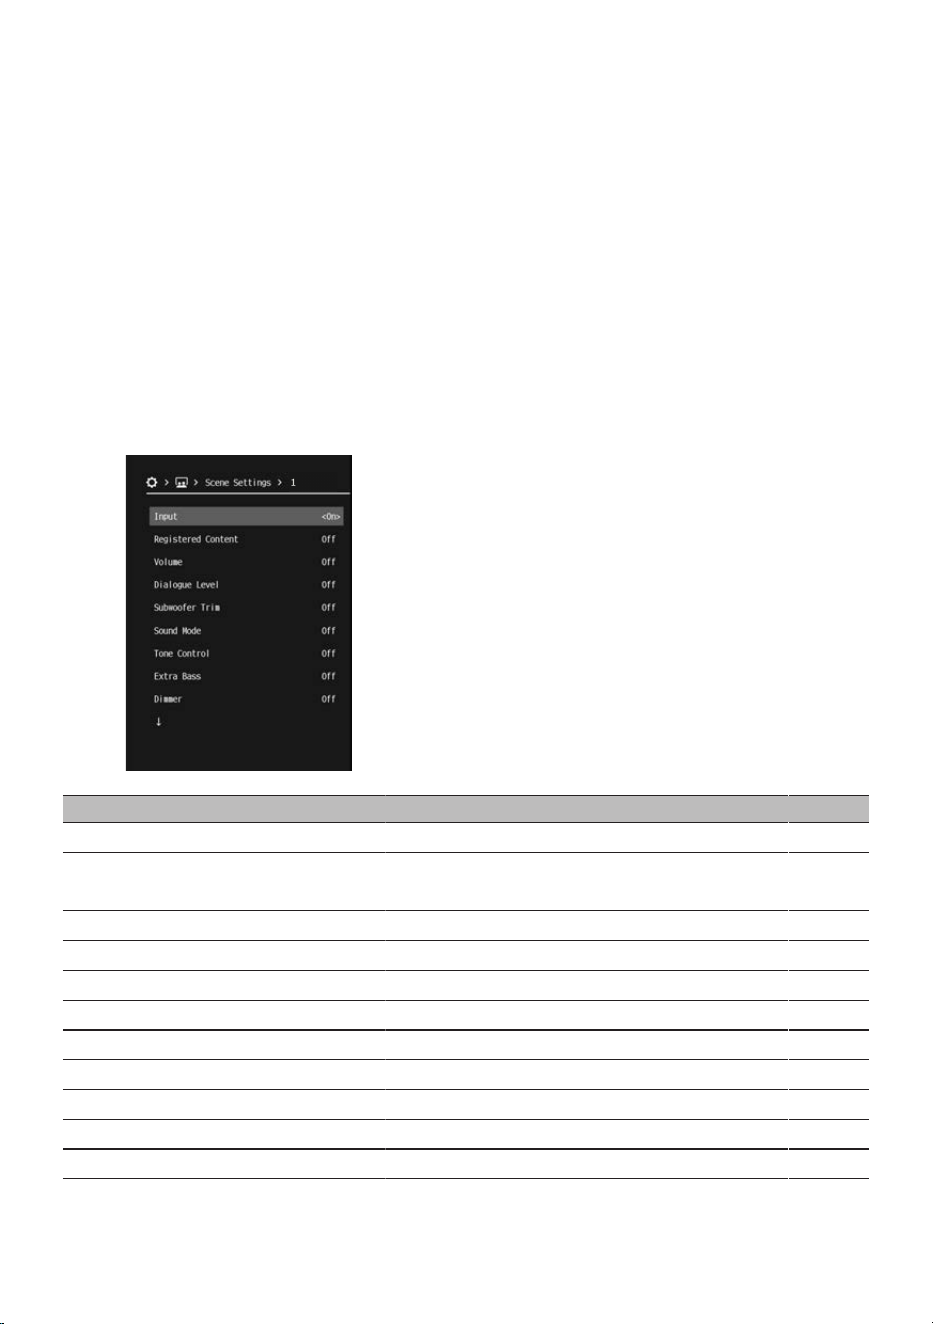
n
You can set the items recalled by the Scene function.
Choose which setting items will be recalled by the scene. When a SCENE key is pressed, only the functions set
to “On” are recalled. This is useful when you want to change the input without changing the audio settings.
1 Press the ~(SETTINGS menu) key.
2 Select “Scenes”.
3 Select “Scene Settings”.
4 Select a scene name (1-4), and press the ENTER key.
5 Select an item, then switch it to “On” or “Off”.
Setting item Content recalled Page
Input Input
63
Registered Content
Registered broadcast station / music content
(for inputs that support content registration)
―
Volume Master volume
63
Dialogue Level Dialogue volume adjustment
130
Subwoofer Trim Subwoofer volume level adjustment
105
Sound Mode Sound mode
81
Tone Control Treble/Bass volume adjustments
104
Extra Bass Extra Bass setting
123
Dimmer Dimmer
134
HDMI Control Control synchronization
127
Lip Sync Lip sync setting
130
93
USEFUL FUNCTIONS > Scene function
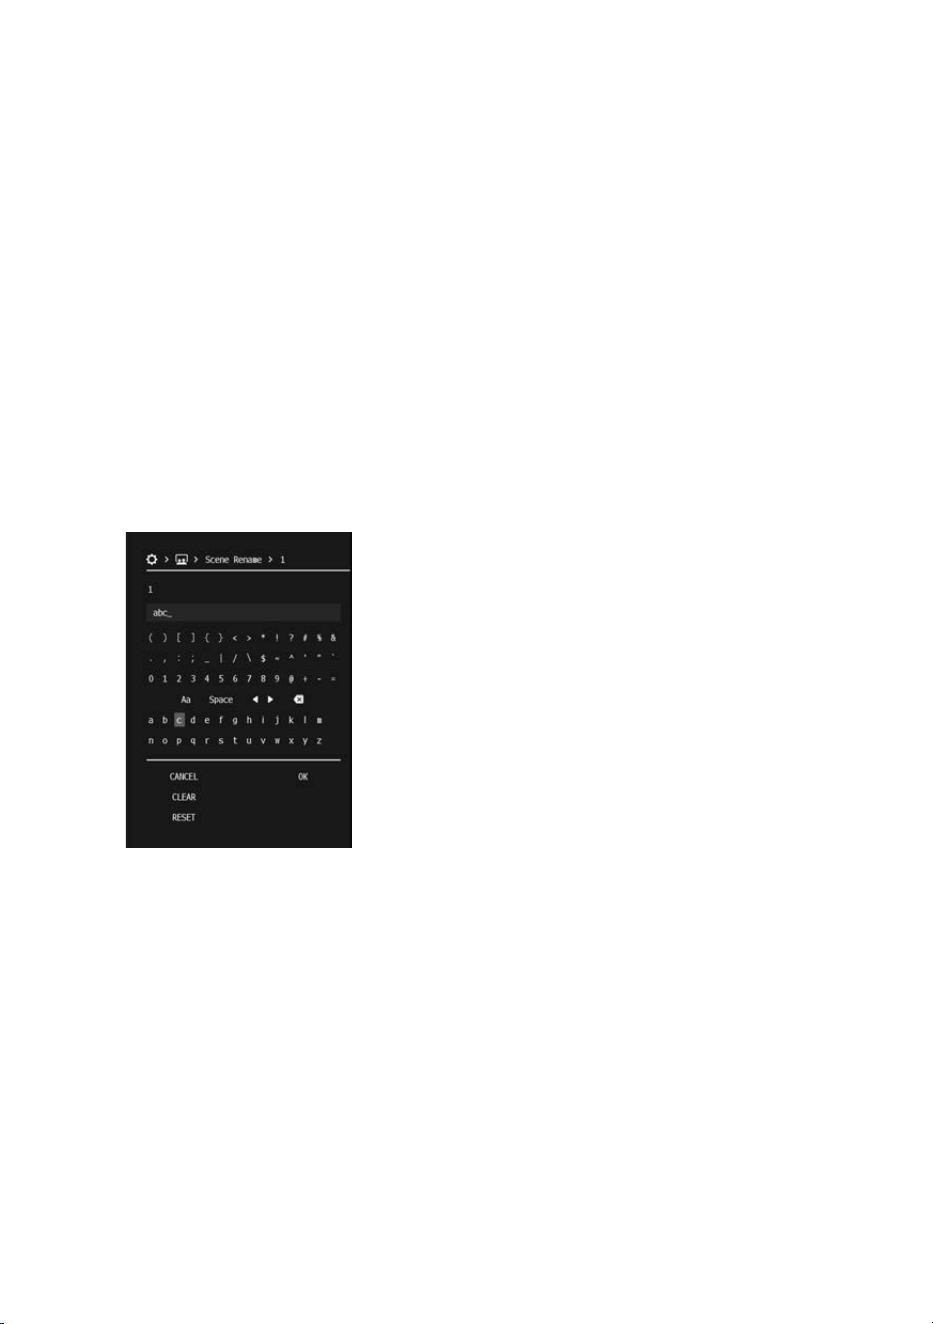
NOTE
(
To enable “HDMI Control” for the Scene function, from the SETTINGS menu, set “HDMI” > “HDMI Control” to “On”.
(
When you press the SCENE~ key on the remote control, the “Scene Settings” screen appears directly.
n
Renaming a scene
This renames a scene. The scene name is displayed on the front display or the TV screen.
1 Press the ~(SETTINGS menu) key.
2 Select “Scenes”.
3 Select “Scene Rename”.
4 Select a scene name (1-4), and press the ENTER key to open the editing screen.
5 Change the name.
6 Select “OK”.
This completes the setting.
NOTE
(
To delete all entered characters, select “CLEAR”.
(
To restore the setting to its default value, select “RESET”.
Related links
(
“About the Scene function”(p.91)
(
“Configuring scene settings”(p.133)
(
“Configuring HDMI settings”(p.127)
94
USEFUL FUNCTIONS > Scene function

Enjoying music in multiple rooms (Zone function)
About the Zone function
The Zone function allows playback in the room where the front speakers are installed (Main zone) and in
another room (ZoneB).
For example, you can use it as follows according to your preferences.
(
Play back in the Main zone when you are in the living room, and in ZoneB when you are in the study room.
(
You can also set an open-plan living/dining/kitchen area (LDK) as Main zone and specially set the kitchen
as ZoneB, and then adjust the volume when the TV audio is difficult to hear in the kitchen.
Main zone
Study room (ZoneB)
Related links
(
“Connecting zone speakers”(p.96)
(
“Operating a zone”(p.98)
95
USEFUL FUNCTIONS > Enjoying music in multiple rooms (Zone function)
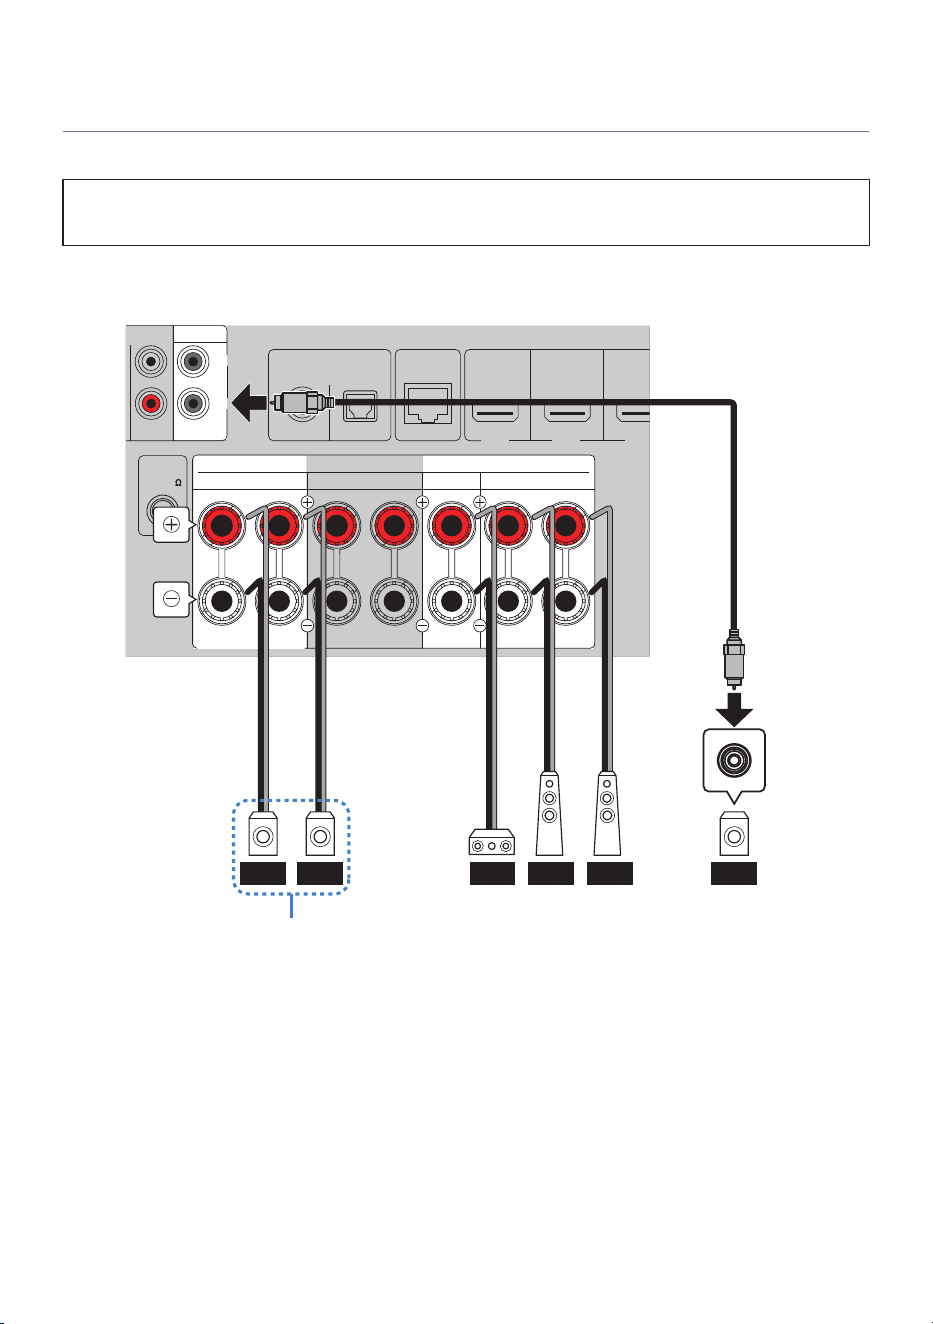
Connecting zone speakers
Connect the zone speakers to this product using speaker cables.
NOTICE
(
Before connecting the speakers, unplug this product’s power plug from the wall outlet.
1 Connect the ZoneB speakers to the HEIGHT terminals.
SURROUND BACK/ZONE B/BI-AMP
HDMI IN 1
DIGITAL AUDIO IN
OPTICALCOAXIAL
RCA 2
HDMI IN 2 HDMI IN 3
SCENE 1 SCENE 2 SCENE 3
SUBWOOFER
ANALOG AUDIO IN
ANTENNA
CENTER
FRONTSURROUND
SPEAKERS
R L
ASSIGNABLE
HEIGHT
R L R L
2
1
75
FM
NETWORK
FR FL SWC FR FL
ZoneB
ZoneB signals are output from the HEIGHT terminals.
2 In the SETTINGS menu, set “Speakers” > “Configuration” > “Power Amp Assign” to
“Zone B”.
96
USEFUL FUNCTIONS > Enjoying music in multiple rooms (Zone function)
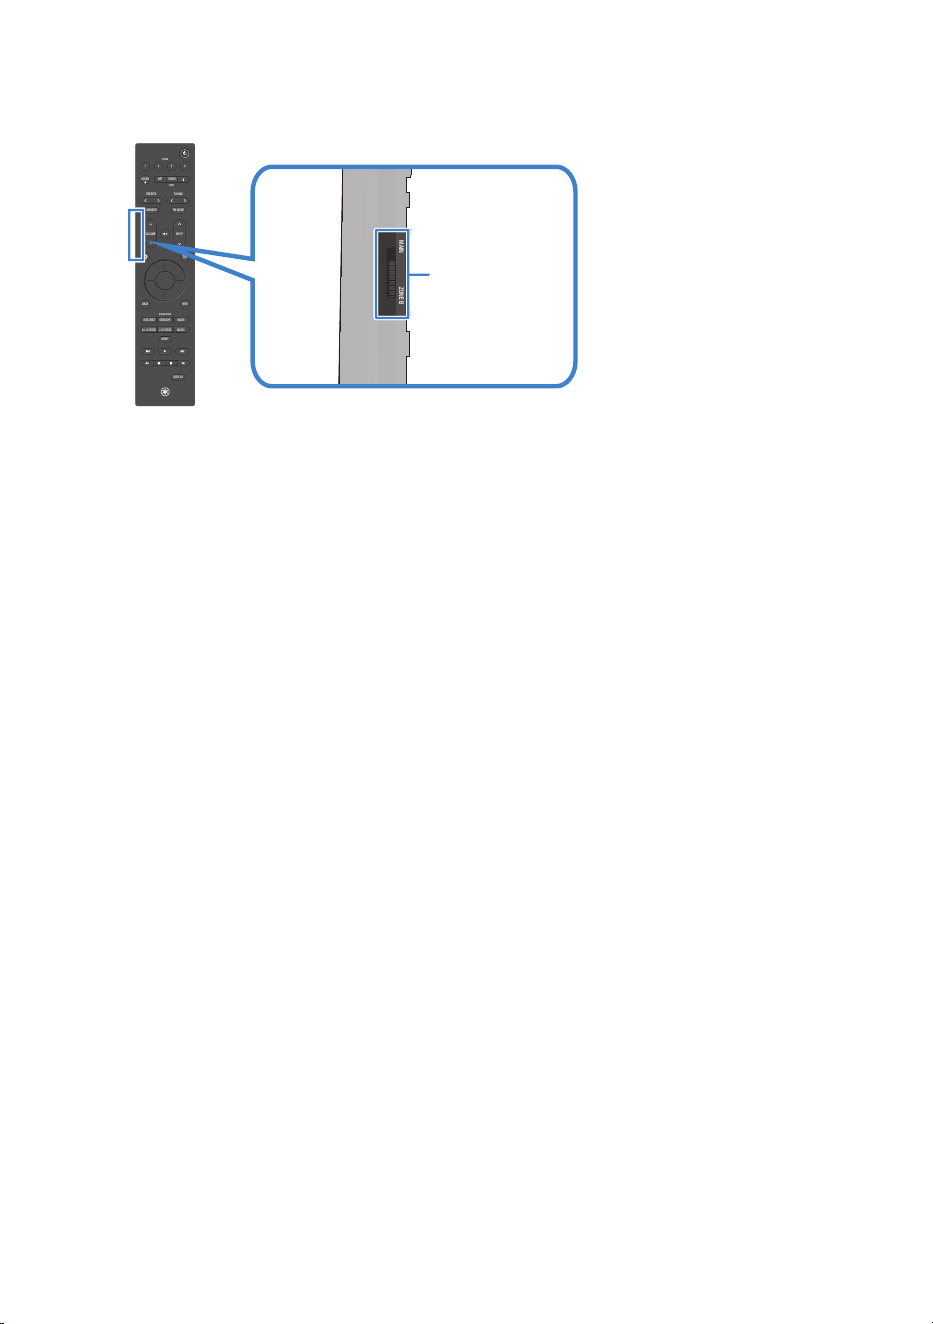
3 Set the Zone switch on the remote control to “ZONE B”.
MAINZONE B
VOLUME
1234
SCENE
PRESETS
INPUT
MEMORY
NIGHT
DISPLAY
BACK
ALL CH STEREO
MUSIC
2 CH STEREO
PURE DIRECT
MOVIESTRAIGHT
NETTUNER
INPUT
SCENE
SOUND MODE
INFO
TUNING
FM MODE
Zone switch
NOTE
When ZoneB is being used, the following connections and functions cannot be used at the same time:
(
Height speakers
(
Surround back speakers
(
Bi-amp connections
Related links
(
“Zone connections (Advanced)”(p.37)
(
“Configuring the speakers”(p.123)
(
“Names and functions of remote control parts”(p.16)
97
USEFUL FUNCTIONS > Enjoying music in multiple rooms (Zone function)

Operating a zone
NOTE
Even when the Zone switch on the remote control is set to “ZONE B”, operations other than power, volume, and mute will control the
Main zone.
n
Turning zone power on/off
Turn the power for the zone that you want to operate on or off.
1 Set the Zone switch on the remote control to the zone that you want to operate.
2 Press the z (Power) key.
Each time you press the key, the zone’s power toggles on/off.
When the ZoneB power is on, “ZONE” is lit on the front display.
HDMI 1
NOTE
When the power for all zones is turned off, the product enters standby.
n
Basic operations for a zone
After turning on the zone power, you can operate the zone selected with the Zone switch.
1 Turn on the external device connected to this product.
2 Use the INPUT keys to select an input source.
3 Start playback on the external device, or select a radio station.
4 Use the VOLUME keys to adjust the volume.
NOTE
(
For information on operating your external device, refer to its user’s manual.
(
The input source is shared between the Main zone and ZoneB.
98
USEFUL FUNCTIONS > Enjoying music in multiple rooms (Zone function)

n
Correcting volume difference between zones
If there is a large volume difference between the Main zone and ZoneB, you can adjust the ZoneB volume
using the following procedure.
1 Press the "(OPTION menu) key.
2 Select “Volume Trim”.
3 Select “Zone B Trim” to adjust the volume.
This completes the setting.
NOTE
(
To operate the menu, switch the remote control’s Zone switch to “MAIN”.
(
If SETTINGS menu > “Zone B Volume Interlock” is set to “Async.”, the adjusted volume setting becomes invalid.
n
Adjusting Zone’s volume independently
By default, the ZoneB volume follows the Main zone. You can adjust the ZoneB volume independently using
the following procedure.
1 Press the ~(SETTINGS menu) key.
2 Select “Sound”.
3 Select “Volume”.
4 Select “Zone B Volume Interlock”.
5 Select “Async.”.
6 Press the ~(SETTINGS menu) key.
7 Switch the Zone switch to “ZONE B”.
8 Use the VOLUME keys to adjust the volume for ZoneB.
NOTE
(
To operate the menu, switch the remote control’s Zone switch to “MAIN”.
(
Selecting “Async.” for “Zone B Volume Interlock” temporarily sets the ZoneB volume to –40 dB.
(
Press the | (Mute) key to mute the sound. Press it again to cancel muting.
(
Only the z (Power), VOLUME, and | (Mute) keys on the remote control can operate the Main zone and ZoneB independently.
Related links
(
“Adjusting volume differences”(p.105)
(
“Configuring audio settings”(p.130)
99
USEFUL FUNCTIONS > Enjoying music in multiple rooms (Zone function)

SETTINGS
Menus
This product provides the following menus.
The following menu is operated with the remote control while viewing the TV screen.
n
OPTION menu
You can set playback-related functions to match the source that is currently playing.
n
SETTINGS menu
You can configure detailed settings for the functions of the product.
Related links
(
“OPTION menu list”(p.103)
(
“SETTINGS menu list”(p.118)
100
SETTINGS > Menus
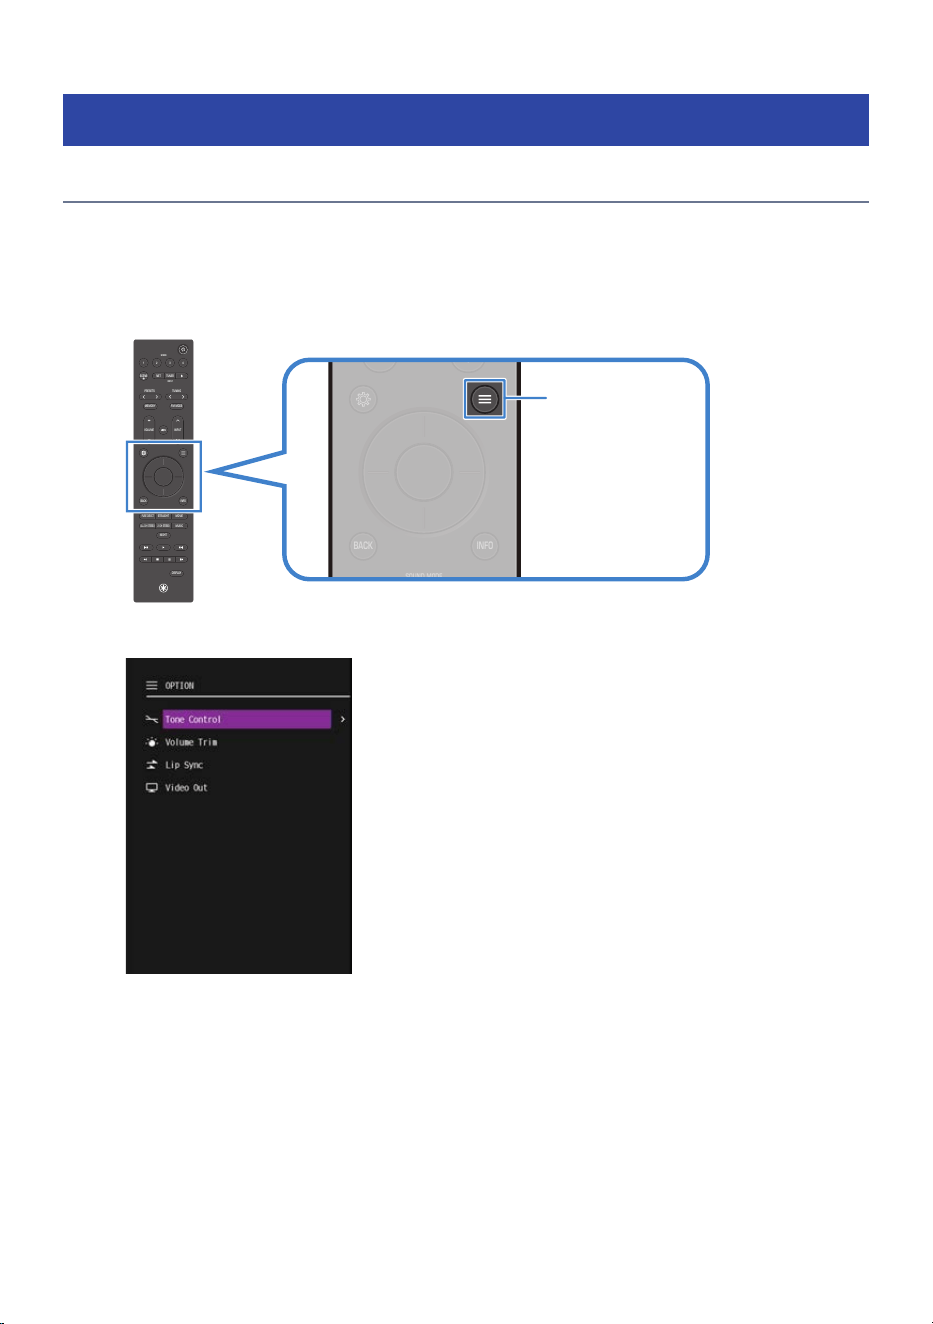
Settings for each playback source (OPTION menu)
Basic operation of the OPTION menu
This section describes the basic control operations of the OPTION menu. This menu is operated with the
remote control while viewing the TV screen.
1 Press the "(OPTION menu) key on the remote control.
VOLUME
1234
SCENE
PRESETS
INPUT
MEMORY
NIGHT
DISPLAY
BACK
ALL CH STEREO
MUSIC
2 CH STEREO
PURE DIRECT
MOVIESTRAIGHT
NETTUNER
INPUT
SCENE
SOUND MODE
INFO
TUNING
FM MODE
VOLUME
1234
SCENE
PRESETS
INPUT
MEMORY
NIGHT
DISPLAY
BACK
ALL CH STEREO
MUSIC
2 CH STEREO
PURE DIRECT
MOVIESTRAIGHT
NETTUNER
INPUT
SCENE
SOUND MODE
INFO
TUNING
FM MODE
OPTION menu key
The OPTION menu screen appears on the TV. If it is not displayed, switch the input on the TV.
2 Select a menu item.
3 Change the setting.
4 Press the "(OPTION menu) key.
The OPTION menu screen closes.
This completes the setting.
101
SETTINGS > Settings for each playback source (OPTION menu)


OPTION menu list
This is the OPTION menu list. For more information, refer to the links in the page column.
Item Page
Tone Control
Treble
104
Bass
Volume Trim
Input Trim
105
Subwoofer Trim
Zone B Trim
Lip Sync
106
Audio In
107
Video Out
FM Mode
108
Preset
Auto Preset
109
Clear Preset
Init Scan
110
Tune AID
111
Shuffle
112
Repeat
Auto Play
113
Pairing
114
Input Interlock
115
NOTE
The available settings vary depending on the selected input.
103
SETTINGS > Settings for each playback source (OPTION menu)

Adjusting the audio tone
This function separately adjusts the volumes of the high (Treble) and low (Bass) frequency ranges.
OPTION menu
“Tone Control” > “Treble” / “Bass”
Settings
-6.0 dB to 0.0 dB to +6.0 dB
Default setting
0.0 dB
Related links
“Basic operation of the OPTION menu”(p.101)
104
SETTINGS > Settings for each playback source (OPTION menu)

Adjusting volume differences
This function adjusts the volume differences between inputs, the subwoofer, and between the Main zone and
ZoneB.
OPTION menu
“Volume Trim” > “Input Trim” / “Subwoofer Trim” / “Zone B Trim”
Settings
(
Input Trim: -6.0 dB to 0.0 dB to +6.0 dB
(
Subwoofer Trim: -6.0 dB to 0.0 dB to +6.0 dB
(
Zone B Trim: -10.0 dB to 0.0 dB to +10.0 dB
Default setting
0.0 dB
Related links
(
“Operating a zone”(p.98)
(
“Basic operation of the OPTION menu”(p.101)
105
SETTINGS > Settings for each playback source (OPTION menu)

Enabling/disabling lip sync correction
You can enable lip sync (adjustment of timing differences between video and audio output). The correction
value can be set in SETTINGS menu > “Lip Sync”.
OPTION menu
“Lip Sync”
Settings
(
On: Enables correction using lip sync.
(
Off: Disables correction using lip sync.
Default setting
On
Related links
(
“Configuring audio settings”(p.130)
(
“Basic operation of the OPTION menu”(p.101)
106
SETTINGS > Settings for each playback source (OPTION menu)

Selecting the audio input jacks and video input ports
This allows you to combine your preferred HDMI video and audio for output. For example, you can listen to
your favorite music while playing a game.
n
Selecting the audio input jack (Audio In)
You can select the audio input jack that is paired with the current video input port. This option is displayed
only when the video input is HDMI.
OPTION menu
“Audio In”
Settings
HDMI 1/HDMI 2/HDMI 3/HDMI 4/Analog RCA 1/Analog RCA 2/OPTICAL/COAXIAL
Default setting
Currently-selected audio input jack
n
Selecting the video input port (Video Out)
You can select the video input port to be paired with the current audio input jack. This option is displayed
when audio input is not HDMI.
OPTION menu
“Video Out”
Settings
HDMI 1/HDMI 2/HDMI 3/HDMI 4/Off
Default setting
Off
Related links
“Basic operation of the OPTION menu”(p.101)
107
SETTINGS > Settings for each playback source (OPTION menu)

Setting the reception mode (stereo/mono) for FM radio
You can select the FM radio reception mode (stereo/mono). If FM radio reception is unstable, switching to
mono reception may improve the signal.
OPTION menu
“FM Mode”
Settings
(
Stereo: Receives FM radio in stereo.
(
Monaural: Receives FM radio in mono.
Default setting
Stereo
Related links
“Basic operation of the OPTION menu”(p.101)
108
SETTINGS > Settings for each playback source (OPTION menu)

Registering and deleting radio stations
n
Automatically registering FM radio stations to preset numbers
You can automatically register FM radio stations to preset numbers. This function automatically registers FM
radio stations with strong signals to preset numbers.
OPTION menu
“Preset” > “Auto Preset”
Settings
01 to 40 (preset numbers)
Default setting
01
NOTE
(
A maximum of 40 radio stations can be registered.
(
(U.K., Europe, and Australia models only)
You can register up to 40 radio stations each for FM and DAB.
(
To abort the auto preset process before completion, press the BACK key.
n
Deleting a radio station registered to a preset number
You can delete a radio station registered to a preset number.
OPTION menu
“Preset” > “Clear Preset”
Settings
01 to 40 (preset numbers)
Default setting
Currently selected preset number
Related links
(
“Registering and deleting radio stations”(p.71)
(
“Basic operation of the OPTION menu”(p.101)
109
SETTINGS > Settings for each playback source (OPTION menu)

DAB tuning
Model For
U.K., Europe, and Australia
Before listening to DAB (Digital Audio Broadcasting) radio, perform an initial scan to automatically register
DAB radio stations.
When you select the menu item, the initial scan will start.
OPTION menu
“Init Scan”
Related links
(
“DAB tuning”(p.66)
(
“Basic operation of the OPTION menu”(p.101)
110
SETTINGS > Settings for each playback source (OPTION menu)

Checking the signal strength of each DAB channel
Model For
U.K., Europe, and Australia
You can check the signal strength of each DAB channel.
When you select the desired DAB channel label, the signal strength is displayed from 0 (none) to 100 (best).
OPTION menu
“Tune AID”
Related links
(
“DAB tuning”(p.66)
(
“Basic operation of the OPTION menu”(p.101)
111
SETTINGS > Settings for each playback source (OPTION menu)

Setting shuffle/repeat playback
You can perform shuffle or repeat playback of music and other audio files saved on a USB device.
n
Shuffle playback
OPTION menu
“Shuffle”
Settings
(
On: Enables shuffle playback.
(
Off: Disables shuffle playback.
Default setting
Off
n
Repeat playback
OPTION menu
“Repeat”
Settings
(
Off: Disables repeat playback.
(
One: Repeats a single track.
(
All: Repeats all tracks.
Default setting
Off
Related links
(
“Playing music on a USB device”(p.75)
(
“Basic operation of the OPTION menu”(p.101)
112
SETTINGS > Settings for each playback source (OPTION menu)

Automatically play Internet radio and podcast stations
Sets whether Internet radio and podcast stations are automatically played.
OPTION menu
“Auto Play”
Settings
(
Off: Disables auto playback.
(
On: Enables auto playback.
Default setting
On
NOTE
When enabled, the last played Internet radio or podcast station is automatically played.
Related links
(
“Listening to Internet radio”(p.79)
(
“Basic operation of the OPTION menu”(p.101)
113
SETTINGS > Settings for each playback source (OPTION menu)

Registering a Bluetooth® device with this product
You can register a Bluetooth device with this product.
OPTION menu
“Pairing”
1 Press the $ key to switch the input source to “Bluetooth”.
2 Press the "(OPTION menu) key, select “Pairing” from the menu, and press the
ENTER key.
You can also register a Bluetooth device with this product by holding down the $ key on the
remote control.
3 Select this product (network name of this product) on the Bluetooth device.
Related links
(
“Playing back audio from a Bluetooth® device”(p.73)
(
“Basic operation of the OPTION menu”(p.101)
114
SETTINGS > Settings for each playback source (OPTION menu)

Automatically selecting the Bluetooth® input
When this setting is enabled, the input automatically switches to “Bluetooth” when a paired Bluetooth
device is powered on, even if another input is currently selected.
OPTION menu
“Input Interlock”
Settings
(
Off: Does not automatically switch the input to Bluetooth.
(
On: Automatically switches the input to Bluetooth.
Default setting
On
Related links
(
“Playing back audio from a Bluetooth® device”(p.73)
(
“Basic operation of the OPTION menu”(p.101)
115
SETTINGS > Settings for each playback source (OPTION menu)
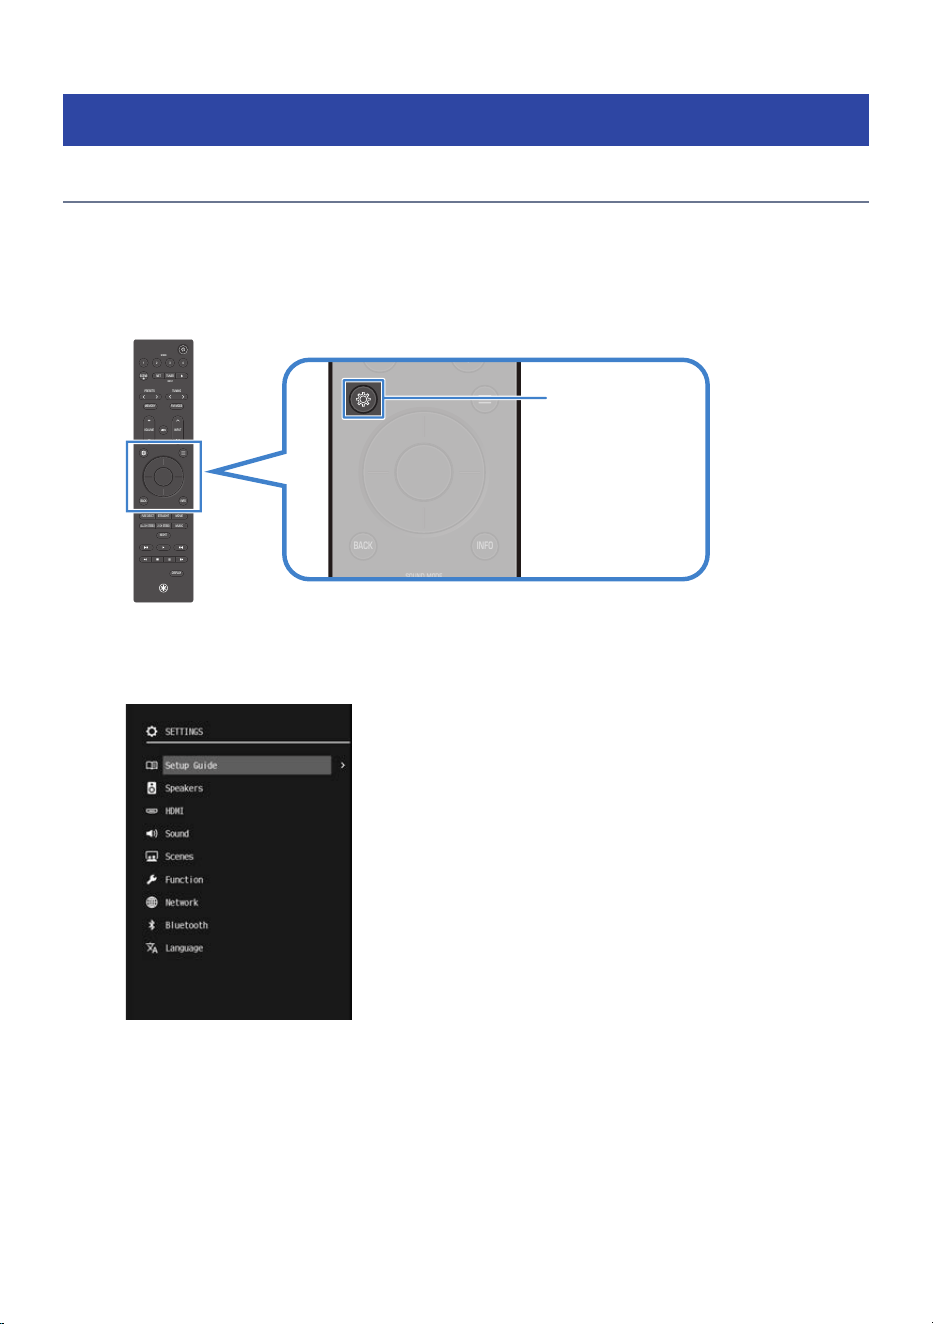
Setting functions (SETTINGS menu)
Basic operation of the SETTINGS menu
This section describes the basic control operations of the SETTINGS menu. This menu is operated with the
remote control while viewing the TV screen.
1 Press the ~(SETTINGS menu) key on the remote control.
VOLUME
1234
SCENE
PRESETS
INPUT
MEMORY
NIGHT
DISPLAY
BACK
ALL CH STEREO
MUSIC
2 CH STEREO
PURE DIRECT
MOVIESTRAIGHT
NETTUNER
INPUT
SCENE
SOUND MODE
INFO
TUNING
FM MODE
VOLUME
1234
SCENE
PRESETS
INPUT
MEMORY
NIGHT
DISPLAY
BACK
ALL CH STEREO
MUSIC
2 CH STEREO
PURE DIRECT
MOVIESTRAIGHT
NETTUNER
INPUT
SCENE
SOUND MODE
INFO
TUNING
FM MODE
SETTINGS menu key
The SETTINGS menu screen appears on the TV. If it is not displayed, switch the input on the TV.
2 Select a menu.
3 Select a menu item.
4 Change the setting.
116
SETTINGS > Setting functions (SETTINGS menu)


SETTINGS menu list
This is the SETTINGS menu list. For more information, refer to the links in the page column.
n
Setup Guide (p.122)
n
Speakers
Item Page
Configuration
Power Amp Assign
123
Subwoofer
Front
Center
Surround
Surround Back
Height
Layout
Subwoofer Phase
Extra Bass
Distance
Unit
Front L
Front R
Center
Surround L
Surround R
Surround Back L
Surround Back R
Height L
Height R
Subwoofer
Level
Front L
Front R
Center
Surround L
Surround R
Surround Back L
Surround Back R
118
SETTINGS > Setting functions (SETTINGS menu)

Item Page
Level
Height L
123
Height R
Subwoofer
Equalizer
EQ Select
GEQ Edit (display only, settings cannot be changed)
Channel
32 Hz
63 Hz
125 Hz
250 Hz
500 Hz
1 kHz
2 kHz
4 kHz
8 kHz
16 kHz
Test Tone
Front L
Front R
Center
Surround L
Surround R
Surround Back L
Surround Back R
Height L
Height R
Subwoofer
Off
Speaker Impedance*
Room Correction
* U.S.A. and Canada models only
n
HDMI
Item Page
HDMI Control
127
Audio Output
Pass Through
119
SETTINGS > Setting functions (SETTINGS menu)

Item Page
Video Format
127
HDCP Version HDMI 1/HDMI 2/HDMI 3/HDMI 4
Standby Sync
ARC
n
Sound
Item Page
Lip Sync
Select
130
Adjustment
Dialogue
Dialogue Level
DTS Dialogue Control
Volume
Scale
Dynamic Range
Max Volume
Initial Volume
Zone B Volume Interlock
Speaker Virtualization
n
Scenes
Item Page
Scene Settings
133
Scene Rename
n
Function
Item Page
Input Rename
134
Input Skip
TV Audio Input
Dimmer
Sleep
Memory Guard
Auto Power Standby Timer
Firmware
Version
USB Update
Network Update
120
SETTINGS > Setting functions (SETTINGS menu)

Item Page
Factory Reset
All Reset
134
Network Reset
n
Network
Item Page
Information
138
Wireless Connection
Connect with App
Network Scan
WAC(iOS)
Manual Setting
IP Address DHCP
Network Standby
Network Name
n
Bluetooth
Item Page
Bluetooth
141
Bluetooth Standby
n
Language (p.142)
121
SETTINGS > Setting functions (SETTINGS menu)

Performing initial setup
Perform initial setup by displaying the Setup Guide on the TV screen.
This is also displayed when you turn on this product for the first time.
The settings include the following:
(
Language settings
(
Speaker setup using “Room Correction”
SETTINGS menu
“Setup Guide”
NOTE
(
Language settings can also be configured in SETTINGS menu > “Language”.
(
Speaker settings (Room Correction) can also be configured in SETTINGS menu > “Speakers” > “Room Correction”.
Related links
(
“Making initial settings using the Setup Guide”(p.51)
(
“Basic operation of the SETTINGS menu”(p.116)
122
SETTINGS > Setting functions (SETTINGS menu)

Configuring the speakers
n
Configuring the speaker system
You can set the speaker configuration according to your speaker system.
Power amplifier assignment
Sets the signal output from the HEIGHT terminals.
SETTINGS menu
“Speakers” > “Configuration” > “Power Amp Assign”
Settings
(
Height: Outputs height signals.
(
Surround Back: Outputs surround back signals.
(
Bi-Amp: Outputs bi-amp signals (same as the front speakers).
Use this setting when connecting the front speakers using a bi-amp connection.
(
Zone B: Outputs ZoneB signals.
Use this setting when using ZoneB speakers in addition to the Main zone speaker system.
Default setting
Height
Subwoofer
SETTINGS menu
“Speakers” > “Configuration” > “Subwoofer”
Settings
(
Use: Select when one or more subwoofers are connected.
Audio from the LFE (Low-Frequency Effects) channel, along with bass redirected from the
other speakers, will be output from the subwoofer.
(
None: Select this option when no subwoofer is connected.
Low-frequency audio will be output from the front speakers.
Default setting
Use
Each Speaker
SETTINGS menu
“Speakers” > “Configuration” > Each Speaker
Settings
(
Crossover: 40 to 80 to 200 Hz (in 5 Hz increments)
Sets the low-frequency range that the selected speaker can output. Audio signals below the
set frequency are output from the subwoofer or front speakers.
(
Full Range: Outputs the full frequency range from the selected speaker.
(
None*: No speaker is connected.
Default setting
Crossover 80 Hz
* This setting cannot be selected for front speakers.
123
SETTINGS > Setting functions (SETTINGS menu)

Layout
SETTINGS menu
“Speakers” > “Configuration” > “Layout”
Settings
(
Front Height: When the height speakers are installed on the front wall.
(
Top: When the height speakers are installed on the ceiling.
(
Dolby Enabled Speaker: When using Dolby Enabled Speakers as height speakers.
(
---: When height speakers are not used.
Default setting
Top
Subwoofer Phase
SETTINGS menu
“Speakers” > “Configuration” > “Subwoofer Phase”
Settings
(
Normal: Does not invert the subwoofer phase.
(
Reverse: Inverts the subwoofer phase.
Default setting
Normal
Extra Bass
SETTINGS menu
“Speakers” > “Configuration” > “Extra Bass”
Settings
(
Off: Disables Extra Bass.
(
On: Enables Extra Bass.
Default setting
Off
n
Setting individual speaker distances
Unit
SETTINGS menu
“Speakers” > “Distance” > “Unit”
Settings
Meters/Feet
Default setting
(
Feet: U.S.A. and Canada models
(
Meters: Models for all other regions
Each Speaker
SETTINGS menu
“Speakers” > “Distance” > Each Speaker
124
SETTINGS > Setting functions (SETTINGS menu)

Settings
(
When “Meters” is selected under “Unit”:
0.3 m to 3.0 m to 24.0 m (in 0.05 m increments)
(
When “Feet” is selected under “Unit”:
1.0 ft to 10.0 ft to 80.0 ft (in 0.2 ft increments)
Default setting
(
When “Meters” is selected under “Unit”:
3.0 m
(
When “Feet” is selected under “Unit”:
10.0 ft
n
Setting individual speaker volumes
SETTINGS menu
“Speakers” > “Level” > Each Speaker
Settings
-10.0 dB to 0.0 dB to +10.0 dB (in 0.5 dB increments)
Default setting
0.0 dB
n
Setting an equalizer
Equalizer selection
SETTINGS menu
“Speakers” > “Equalizer” > “EQ Select”
Settings
(
Auto EQ: Applies the equalizer values obtained by “Room Correction”.
(
GEQ: Manually adjusts the equalizer.
(
Off: Does not use an equalizer.
Default setting
GEQ
NOTE
“Auto EQ” can be selected only when automatic measurement has been performed using “Room Correction”.
Manual equalizer adjustment
This setting is available only when “GEQ” is selected in “EQ Select”.
SETTINGS menu
“Speakers” > “Equalizer” > “Channel”
Settings
Each Speaker
After selecting a speaker, choose a frequency and adjust the level.
SETTINGS menu
“Speakers” > “Equalizer” > Each Frequency
Settings
‒6.0 dB to 0.0 dB to +6.0 dB (in 0.5 dB increments)
Default setting
0.0 dB
125
SETTINGS > Setting functions (SETTINGS menu)

n
Outputting a test tone
SETTINGS menu
“Speakers” > “Test Tone” > Each Speaker / Off
Settings
(
Each Speaker: Outputs a test tone from the selected speaker.
(
Off: Does not output a test tone.
n
Setting the speaker impedance
Set according to the impedance of the connected speakers.
Model For
U.S.A. and Canada
SETTINGS menu
“Speakers” > “Speaker Impedance”
Settings
(
6 Ohm MIN: Select when using speakers rated at 6 Ω or higher.
(
8 Ohm MIN: Select when using speakers rated at 8 Ω or higher.
Default setting
8 Ohm MIN
n
Automatically adjusting volume balance and tone (Room Correction)
Using the supplied Setup Microphone, the product detects speaker connections and measures the distance,
level, frequency, and phase relative to the listening position (measurement position). Based on these
measurements, the product can automatically adjust the volume balance, tone, and other settings.
Configure the settings by following the instructions on the TV screen.
SETTINGS menu
“Speakers” > “Room Correction”
Related links
(
“Recommended speaker layouts (Basic)”(p.28)
(
“Zone connections (Advanced)”(p.37)
(
“Bi-amp connections (Advanced)”(p.39)
(
“Preparing the speakers and speaker cables”(p.40)
(
“Making initial settings using the Setup Guide”(p.51)
(
“Basic operation of the SETTINGS menu”(p.116)
126
SETTINGS > Setting functions (SETTINGS menu)

Configuring HDMI settings
n
Setting up HDMI Control
SETTINGS menu
“HDMI” > “HDMI Control”
Settings
(
Off: Disables HDMI Control.
(
On: Enables HDMI Control.
When set to “On”, linked operation with the TV and HDMI input devices is enabled.
The “Standby Sync” and “ARC” settings are applied. This setting consumes more power than
when set to “Off”.
Default setting
On
NOTE
After connecting an HDMI Control–compatible TV or AV device to this product, you must configure the linkage settings.
n
Setting whether HDMI audio is output from the TV’s speakers
SETTINGS menu
“HDMI” > “Audio Output”
Settings
(
Off: Does not output audio from the TV.
(
On: Outputs audio from the TV.
Default setting
Off
NOTE
This can be set only when SETTINGS menu > “HDMI Control” is set to “Off”.
n
Configuring HDMI pass-through
You can set whether to output audio/video input to the HDMI ports to the TV when this product is in standby.
SETTINGS menu
“HDMI” > “Pass Through”
Settings
(
Off: Does not output to the TV.
(
On: Outputs to the TV. When this product is in HDMI pass-through mode, it consumes more
power than in “Off” or “Auto”.
(
Auto: Automatically determines whether to output based on the status of the connected
device.
Default setting
Auto
NOTE
If SETTINGS menu > “HDMI Control” is set to “On”, only “On” and “Auto” can be selected.
127
SETTINGS > Setting functions (SETTINGS menu)
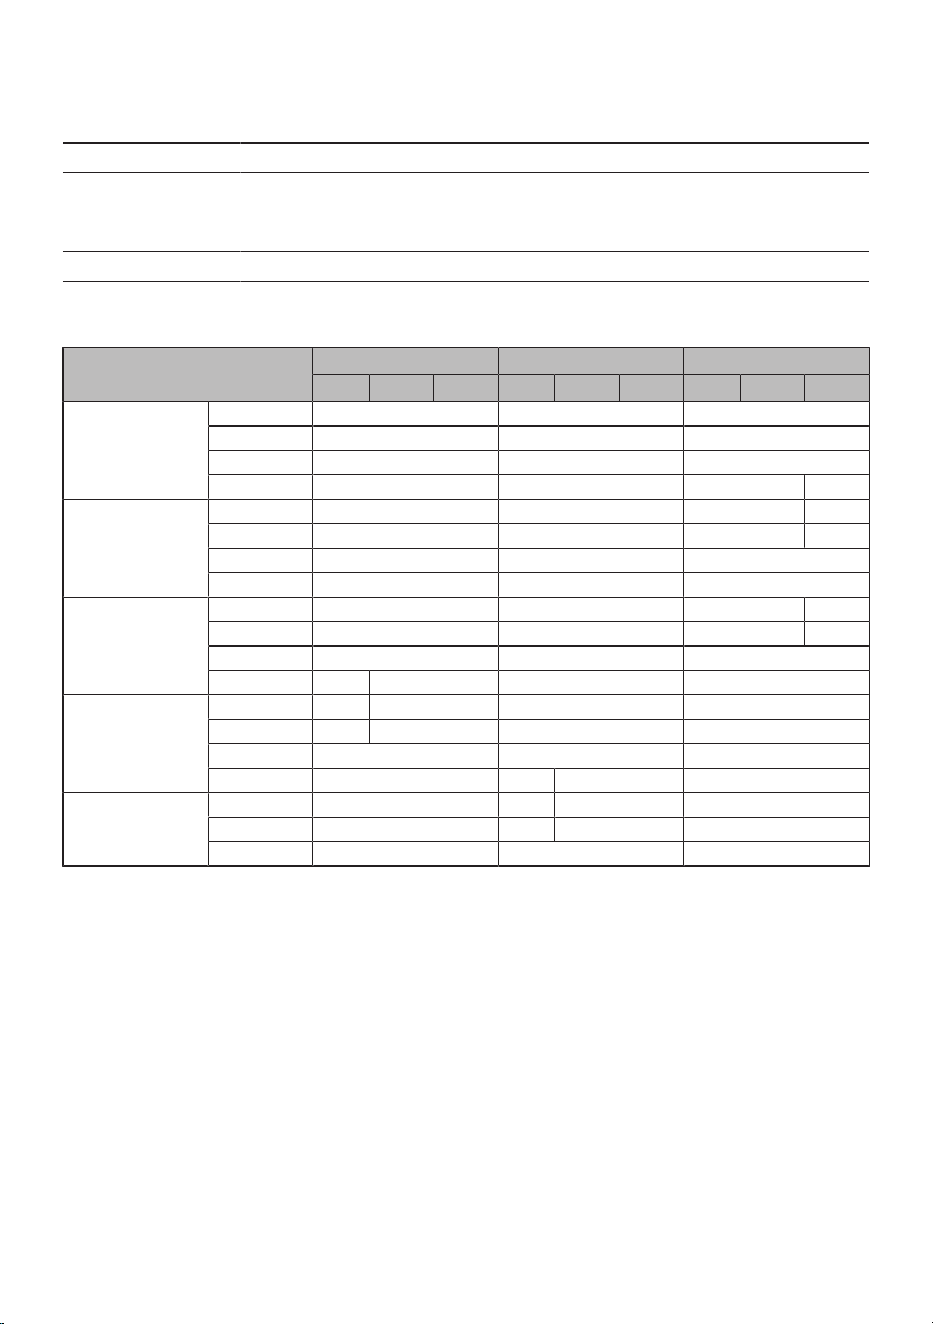
n
Setting the HDMI 4K/8K signal format
SETTINGS menu
“HDMI” > “Video Format”
Settings
(
4K Mode 1: Inputs/outputs the 4K signals listed in the table below.
(
4K Mode 2: Inputs/outputs the 4K signals listed in the table below.
(
8K Mode: Inputs/outputs the 4K/8K signals listed in the table below.
Default setting
4K Mode 1
Formats
4K Mode 1 4K Mode 2 8K Mode
8-bit 10-bit 12-bit 8-bit 10-bit 12-bit 8-bit 10-bit 12-bit
8K/60, 50 Hz
RGB 4:4:4 – – (
YCbCr 4:4:4 – – (
YCbCr 4:2:2 – – (
YCbCr 4:2:0 – – ) (
8K/30, 25, 24 Hz
RGB 4:4:4 – – ) (
YCbCr 4:4:4 – – ) (
YCbCr 4:2:2 – – )
YCbCr 4:2:0 – – )
4K/120, 100 Hz
RGB 4:4:4 – – ) (
YCbCr 4:4:4 – – ) (
YCbCr 4:2:2 – – )
YCbCr 4:2:0 ) – – )
4K/60, 50 Hz
RGB 4:4:4 ) – – )
YCbCr 4:4:4 ) – – )
YCbCr 4:2:2 ) – )
YCbCr 4:2:0 ) ) – )
4K/30, 25, 24 Hz
RGB 4:4:4 ) ) – )
YCbCr 4:4:4 ) ) – )
YCbCr 4:2:2 ) ) )
* A ○ mark indicates a supported format.
* A ● mark indicates a format that is supported only when using DSC (Display Stream Compression). DSC is
a video signal compression technology standardized by VESA.
NOTE
(
Depending on the connected device or HDMI cable, the video may be distorted. In that case, change this setting.
(
When set to “8K Mode”, use an Ultra High Speed HDMI cable or an Ethernet-compatible Ultra High Speed HDMI cable.
(
When set to “4K Mode 1”, use a Premium High Speed HDMI cable or an Ethernet-compatible Premium High-Speed HDMI cable.
n
Setting the HDCP version for HDMI input ports
You can set the HDCP version for each HDMI input port. When viewing 4K/8K video, if you are using a TV that
supports up to HDCP 1.4, set this to “1.4”. The setting can be changed for each HDMI input port.
128
SETTINGS > Setting functions (SETTINGS menu)

SETTINGS menu
“HDMI” > “HDCP Version” > “HDMI 1” to “HDMI 4”
Settings
(
Auto: The HDCP version is automatically determined by the content.
(
1.4: The HDCP version is fixed at 1.4.
Default setting
Auto
n
Setting standby synchronization with the TV
You can configure whether the TV and this product enter power standby together.
SETTINGS menu
“HDMI” > “Standby Sync”
Settings
(
Auto: This product enters standby in sync with the TV power standby only when this product
is receiving a TV audio input or an HDMI signal input.
(
Off: Disables power standby synchronization.
(
On: This product always enters standby in sync with the TV power standby.
Default setting
Auto
NOTE
This setting is applied when SETTINGS menu > “HDMI Control” is set to “On”.
n
Configuring ARC
TV audio can be played back via an HDMI cable. To listen to TV audio using other connection methods,
configure the setting in SETTINGS menu > “Function” > “TV Audio Input”.
SETTINGS menu
“HDMI” > “ARC”
Settings
(
On: Enables ARC.
(
Off: Disables ARC.
Default setting
On
NOTE
(
This setting is applied when SETTINGS menu > “HDMI Control” is set to “On”.
(
To use the eARC function, “ARC” does not need to be set. If the TV supports eARC, it is automatically recognized and connected.
Related links
(
“Listening to TV audio”(p.65)
(
“Basic operation of the SETTINGS menu”(p.116)
129
SETTINGS > Setting functions (SETTINGS menu)

Configuring audio settings
n
Setting lip sync
You can set the lip sync to correct timing discrepancies between video and audio output.
Setting the lip sync adjustment method
SETTINGS menu
“Sound” > “Lip Sync” > “Select”
Settings
(
Manual: Manually adjusts the timing difference between video and audio.
The value entered under “Adjustment” is applied as the correction value.
(
Auto: Applies the lip sync value set on the TV.
This is available only when the product is connected via HDMI to a TV that supports
automatic lip sync correction.
You can fine-tune the correction time under “Adjustment”.
Adjusting the lip sync correction value
SETTINGS menu
“Sound” > “Lip Sync” > “Adjustment” > “Lip Sync”
Settings
0 ms to 500 ms
Default setting
0 ms
NOTE
In the OPTION menu, you can set “On” or “Off” for each input in “Lip Sync”.
n
Adjusting dialogue volume
You can adjust the volume of dialogue when it is difficult to hear. The higher the level, the more the dialogue
is emphasized.
SETTINGS menu
“Sound” > “Dialogue” > “Dialogue Level”
Settings
0 / 1 / 2 / 3
Default setting
0
Adjusting dialogue volume during DTS:X playback
You can adjust the volume of dialogue when it is difficult to hear during playback of DTS:X content. The
higher the level, the more the dialogue is emphasized.
SETTINGS menu
“Sound” > “Dialogue” > “DTS Dialogue Control”
Settings
0 / 1 / 2 / 3 / 4 / 5 / 6
130
SETTINGS > Setting functions (SETTINGS menu)

Default setting
0
NOTE
(
This function is available only for DTS:X content that supports the DTS Dialogue Control feature.
(
It cannot be adjusted when a DTS:X signal is not being input.
n
Setting the volume
Setting the volume display
SETTINGS menu
“Sound” > “Volume” > “Scale”
Settings
(
dB: Displays the volume in decibels (dB).
(
0-97: Displays the volume as a numerical value (0–97).
Default setting
0-97
Setting the dynamic range adjustment method
You can set how the dynamic range (difference between maximum and minimum volume) is adjusted during
playback of Dolby Digital and DTS signals.
SETTINGS menu
“Sound” > “Volume” > “Dynamic Range”
Settings
(
Maximum: Plays back the input signal without applying any correction.
(
Standard: Plays back with a dynamic range suitable for typical home use.
(
Min/Auto: Plays back with a narrower dynamic range that makes audio easier to hear at night
or at low volume levels.
Dolby TrueHD playback is based on input signal information.
Setting the maximum volume
You can set the maximum volume that can be adjusted using the VOLUME keys on the remote control.
SETTINGS menu
“Sound” > “Volume” > “Max Volume”
Settings
‒60.0 dB to +15.0 dB, +16.5 dB (50.0 to 97)
Default setting
+16.5 dB (97)
Setting the power-on volume
This is used to select whether to fix the volume level when the power is turned on.
SETTINGS menu
“Sound” > “Volume” > “Initial Volume”
131
SETTINGS > Setting functions (SETTINGS menu)

Settings
(
Off: Uses the volume from the last time the power went into standby.
(
Mute: Mutes the volume.
(
-80 dB to +16.5 dB (0.5 to 97): Uses the specified volume. Enabled only when the volume is set
lower than “Max Volume”.
Default setting
Off
Synchronizing the volume of the Main zone and ZoneB
You can set whether ZoneB’s volume is adjusted in sync with the Main zone.
SETTINGS menu
“Sound” > “Volume” > “Zone B Volume Interlock”
Settings
(
Sync.: Adjusts ZoneB’s volume in sync with the Main zone.
(
Async.: Does not sync the volume of Main zone and ZoneB.
Default setting
Sync.
n
Setting Speaker Virtual
This is used to select whether to use Speaker Virtual when the sound mode is set to “MOVIE”, “MUSIC”,
“NIGHT” or “STRAIGHT”.
When Speaker Virtual is enabled, audio signals intended for unconnected speakers are processed virtually
and output from the connected speakers.
SETTINGS menu
“Sound” > “Speaker Virtualization”
Settings
(
On: Enables Speaker Virtual.
(
Off: Disables Speaker Virtual.
Audio signals intended for unconnected speakers are down-mixed and output from the
connected speakers.
Default setting
On
To play back using DTS Virtual:X
When “Speaker Virtualization” is set to “On”, audio is played back using DTS Virtual:X only when a DTS signal is input.
To play audio using DTS Virtual:X, do not set ”Height” or “Surround Back” in “Speakers” > “Configuration” > “Power Amp Assign”.
Instead, configure a 5.x / 4.x / 3.x / 2.x channel setup.
Related links
(
“Enabling/disabling lip sync correction”(p.106)
(
“Operating a zone”(p.98)
(
“Basic operation of the SETTINGS menu”(p.116)
132
SETTINGS > Setting functions (SETTINGS menu)

Configuring scene settings
n
You can set the items recalled by the Scene function.
SETTINGS menu
“Scenes” > “Scene Settings” > Each scene
NOTE
For detailed instructions on this setting, refer to “Calling and registering a scene”(p.92).
n
Renaming a scene
SETTINGS menu
“Scenes” > “Scene Rename” > Each scene
NOTE
For detailed instructions on this setting, refer to “Calling and registering a scene”(p.92).
Related links
“Basic operation of the SETTINGS menu”(p.116)
133
SETTINGS > Setting functions (SETTINGS menu)
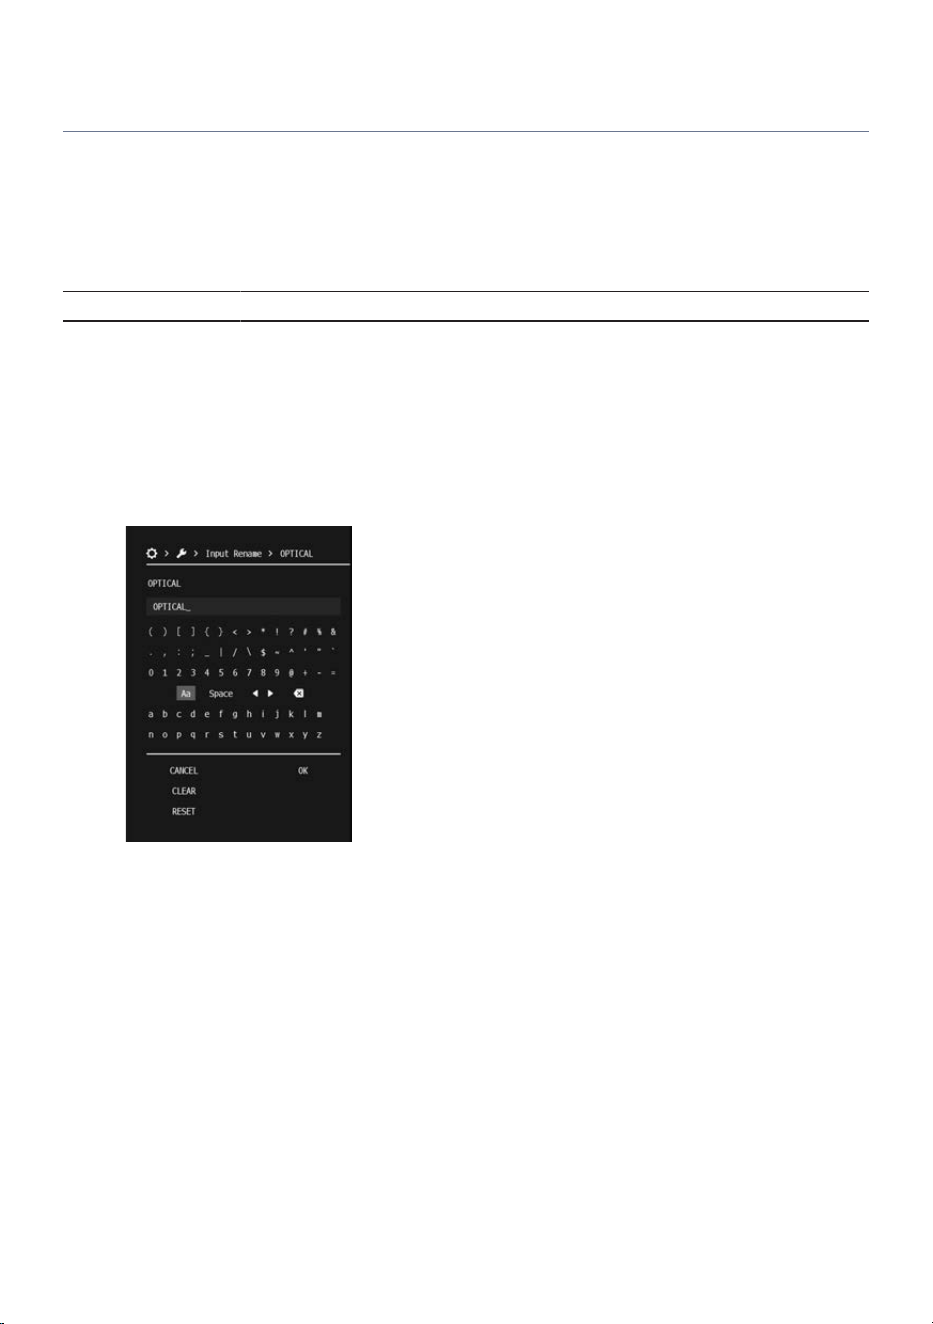
Configuring advanced function settings (Function)
n
Setting input names automatically or manually
This renames the input name.
Automatic input name setting is available only for HDMI, and the information set on the connected input
device is automatically applied.
SETTINGS menu
“Function” > “Input Rename” > Each Input
1 Select the input whose name you want to change.
2 Choose “Manual” or “Auto” (available only for HDMI inputs), and press the ENTER
key.
3 If you selected “Manual”, edit the name, and select “OK”.
4 To change the name of another input, repeat steps 1–2 (or 1–3 for manual entry).
This completes the setting.
NOTE
(
Even if an external device is disconnected, the assigned input name is retained. To restore an input name set by “Auto” to its
default, temporarily switch it to “Manual” with nothing connected to the corresponding input port, and then switch back to “Auto”.
(
To delete all characters entered in “Manual”, select “CLEAR”.
(
Selecting “RESET” restores the input name to its default setting.
n
Setting input skip
Select the inputs to be skipped when using the INPUT key or the INPUT knob on the front panel. By skipping
unused inputs, you can quickly select the desired input.
134
SETTINGS > Setting functions (SETTINGS menu)

SETTINGS menu
“Function” > “Input Skip” > Each Input
Settings
(
Off: Does not skip this input.
(
On: Skips this input.
Default setting
Off
n
Setting the audio input jack for TV audio
Select the audio input jack used for playback when the input is set to “TV”. This setting is available only when
the eARC function is disabled or the ARC setting is set to “Off”.
SETTINGS menu
“Function” > “TV Audio Input” > “TV Audio Input”
Settings
OPTICAL/COAXIAL/Analog RCA 1/Analog RCA 2
Default setting
OPTICAL
NOTE
(
When using the ARC function to input audio via an HDMI cable, in the SETTINGS menu, set “HDMI Control” to “On” and “ARC” to
“On”.
(
To use the eARC function, “ARC” does not need to be set. If the TV supports eARC, it is automatically recognized and connected.
(
You may have to change settings on your TV. Please also refer to the user's manual for your TV.
n
Setting the brightness of the front display (Dimmer)
You can adjust the brightness of the front display. The closer the value is to 0, the higher the brightness.
SETTINGS menu
“Function” > “Dimmer” > “Dimmer”
Settings
-4 to 0
Default setting
0
n
Setting the sleep timer
Once the specified time elapses, the product goes into standby.
SETTINGS menu
“Function” > “Sleep” > “Sleep”
Settings
120 minutes/90 minutes/60 minutes/30 minutes/Off
Default setting
Off
NOTE
For more details on this function, refer to “Sleep timer function”(p.90).
135
SETTINGS > Setting functions (SETTINGS menu)

n
Protecting settings
You can protect the product’s settings to prevent them from being changed.
SETTINGS menu
“Function” > “Memory Guard” > “Memory Guard”
Settings
(
Off: Does not protect settings.
(
On: Protects settings.
Default setting
Off
n
Setting the auto-standby time
You can set the amount of time before the product power automatically switches to standby mode.
SETTINGS menu
“Function” > “Auto Power Standby” > “Timer”
Settings
(
Off: Does not switch to standby automatically.
More power is consumed when set to a setting other than “Off”.
(
5 minutes/20 minutes: The product switches to standby when both the product has not been
operated for the specified period of time and no input signal has been detected for the
specified period of time.
(
2 hours/4 hours/8 hours/12 hours: The product switches to standby when it has not been
operated for the specified period of time.
Default setting
20 minutes
NOTE
(
Just before switching to standby, the front display shows “auto standby xxs” (where xx is the number of seconds) indicating the
number of seconds remaining until standby.
(
If the auto-standby time is set to “5 minutes/20 minutes” and the Analog RCA 1 or Analog RCA 2 input is selected, this product will
remain continuously active. As a result, the “Auto Power Standby” function will not operate.
n
Checking the firmware version
You can confirm the version of the current firmware.
SETTINGS menu
“Function” > “Firmware” > “Version”
n
Selecting the firmware update method
SETTINGS menu
“Function” > “Firmware” > “USB Update” or “Network Update”
136
SETTINGS > Setting functions (SETTINGS menu)

NOTE
(
For instructions on how to perform updates, see “Firmware Update”(p.144).
(
“Network Update” cannot be selected until the product is ready to update the firmware.
(
Do not execute this other than when updating the firmware. Before executing an update, check the information provided with the
firmware.
(
A firmware update via a network takes about 20 minutes.
(
Firmware update over the network may fail if the Internet connection speed is not fast enough or due to network conditions during
connection to a wireless network. If this occurs, try updating the firmware again later, or perform the update using a USB flash
drive.
n
Initializing the settings
You can reset (initialize) the various settings of the product.
SETTINGS menu
“Function” > “Factory Reset”
Settings
(
All Reset: Initializes all settings.
(
Network Reset: Initializes network settings only.
NOTE
For details on the specific operations, refer to “Initializing the settings”(p.143).
Related links
(
“Configuring HDMI settings”(p.127)
(
“Firmware Update”(p.144)
(
“Initializing the settings”(p.143)
(
“Basic operation of the SETTINGS menu”(p.116)
137
SETTINGS > Setting functions (SETTINGS menu)

Configuring the network settings
n
Checking network information
You can display the networking information of this product.
SETTINGS menu
“Network” > “Information”
Displayed screen
(
Status: State of network jack connections
(
Connection: Method of connecting to a network
(
SSID (for wireless connections only): Access point where this product is connected
(
MAC Address [Ethernet]: MAC address of this product when using a wired connection
(
MAC Address [Wi-Fi]: MAC address of this product when using a wireless connection
(
IP Address: IP address of this product
(
Subnet Mask: Subnet mask setting
(
Default Gateway: IP address of the default gateway
(
DNS Server (Primary): IP address of primary DNS server
(
DNS Server (Secondary): IP address of secondary DNS server
n
Configuring wireless network connection settings
SETTINGS menu
“Network” > “Wireless Connection” > “Connect with App” / “Network Scan” / “WAC(iOS)” /
“Manual Setting”
NOTE
(
The “Wireless Connection” setting cannot be configured when the network is connected via a wired connection.
(
For detailed instructions on this setting, refer to “Selecting a wireless connection method to a network”(p.201).
n
Automatically configuring network information (DHCP function)
This function automatically configures the network information (IP address, subnet mask, default gateway,
etc.) of this product using a DHCP server.
SETTINGS menu
“Network” > “IP Address” > “DHCP”
Settings
(
Off: DHCP server is not used. The network information is set manually.
(
On: DHCP server is used. The network information is set automatically.
Default setting
On
n
Manually configuring network settings
You can manually configure the network settings of this product (such as the IP address, subnet mask, and
default gateway).
138
SETTINGS > Setting functions (SETTINGS menu)

SETTINGS menu
“Network” > “IP Address”
1 Select “Off” in “DHCP”.
2 Select the menu item to be set.
3 Set the network settings.
4 Press the ENTER key.
5 To set another menu item, repeat steps 2 to 4.
6 Press the ~(SETTINGS menu) key.
This completes the setting.
n
Setting network standby
This sets whether the power of this product can be turned on from a network device.
SETTINGS menu
“Network” > “Network Standby”
Settings
(
Off: Disables network standby.
(
On: Enables network standby. This setting consumes more power than when set to “Off”.
(
Auto: Enables network standby.
Disconnecting the network cable will place the product into power save mode, reducing
power consumption.
Default setting
Auto
NOTE
When in the power save mode, this product cannot be turned on from a network device, even if it is connected via a network cable.
Turn on the power of this product using the power key on the remote control or the front panel.
n
Setting the network name of this product
You can change the network name of this product that is displayed on the network.
SETTINGS menu
“Network” > “Network Name”
1 Press the ENTER key.
2 Edit the name, and select “OK”.
3 Press the ~(SETTINGS menu) key.
This completes the setting.
139
SETTINGS > Setting functions (SETTINGS menu)

NOTE
(
To delete all entered characters, select “CLEAR”.
(
Selecting “RESET” restores the network name to its default setting.
Related links
(
“Preparing a network connection”(p.47)
(
“Selecting a wireless connection method to a network”(p.201)
(
“Configuring the Bluetooth® function”(p.141)
(
“Basic operation of the SETTINGS menu”(p.116)
140
SETTINGS > Setting functions (SETTINGS menu)

Configuring the Bluetooth® function
n
Configuring Bluetooth
You can set whether to use the Bluetooth function.
SETTINGS menu
“Bluetooth” > “Bluetooth”
Settings
(
Off: Disables the Bluetooth function.
(
On: Enables the Bluetooth function.
Default setting
On
n
Setting Bluetooth standby
You can set whether the power of this product can be turned on from a Bluetooth device. When set to “On”,
this product is turned on automatically whenever a connection is made with a Bluetooth device.
SETTINGS menu
“Bluetooth” > “Bluetooth Standby”
Settings
(
Off: Disables the Bluetooth standby function.
(
On: Enables the Bluetooth standby function. This setting consumes more power than when
set to “Off”.
Default setting
On
Related links
(
“Playing back audio from a Bluetooth® device”(p.73)
(
“Basic operation of the SETTINGS menu”(p.116)
141
SETTINGS > Setting functions (SETTINGS menu)

Setting the menu language
You can set the display language of the SETTINGS menu and other menus.
SETTINGS menu
“Language”
Settings
(
English
(
日本語
(
Français
(
Deutsch
(
Español
(
Italiano
(
中文
NOTE
The display language of short messages and the front display is not changed.
Related links
“Basic operation of the SETTINGS menu”(p.116)
142
SETTINGS > Setting functions (SETTINGS menu)

Initializing the settings
You can reset (initialize) the various settings of the product.
Follow the procedure below to initialize the settings.
1 Press the ~(SETTINGS menu) key.
2 From the SETTINGS menu, select “Function” > “Factory Reset” > “All Reset” or
“Network Reset”.
“All Reset”: Initializes all settings.
“Network Reset”: Initializes network settings only.
3 Select “Execute”.
When initialization is complete, the power of this product turns off automatically.
When “Network Reset” is selected, a message indicating that initialization has been completed
appears, and the power remains on.
This completes the initialization procedure.
NOTE
When “All Reset” is executed, the next time you turn on the power of this product, the Setup Guide will start automatically.
Related links
(
“Configuring advanced function settings (Function)”(p.134)
(
“Making initial settings using the Setup Guide”(p.51)
143
SETTINGS > Initializing the settings

UPDATING THE FIRMWARE
Firmware Update
Updated firmware is provided to add functionality to this product or improve performance. For more
information about firmware, visit the Yamaha website at https://www.yamaha.com/.
Firmware can be updated via the Internet or using a USB flash drive.
Related links
(
“Updating the firmware via a network”(p.145)
(
“Updating the firmware using a USB flash drive”(p.146)
144
UPDATING THE FIRMWARE > Firmware Update
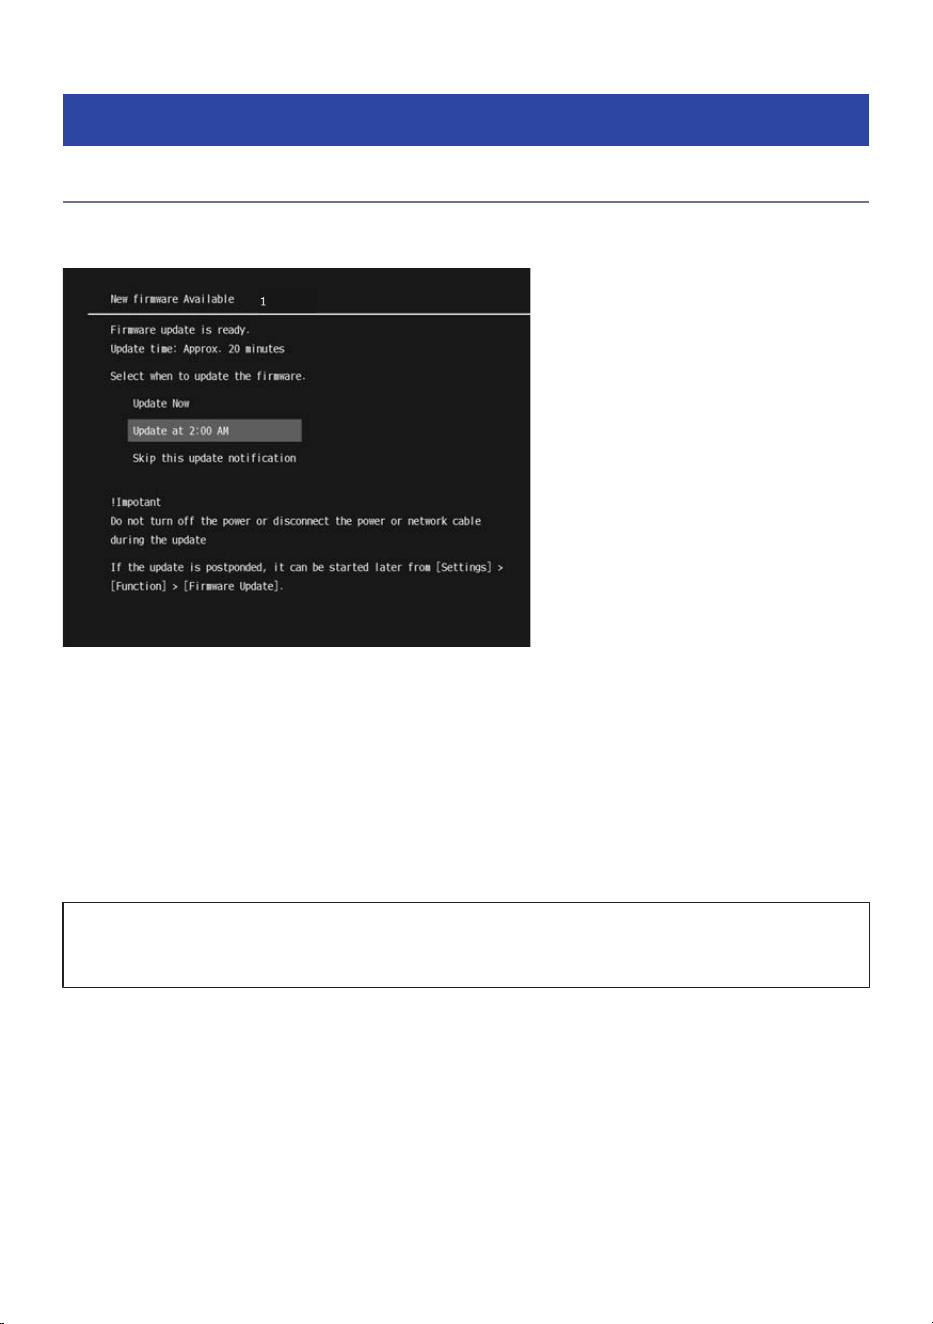
Updating the firmware
Updating the firmware via a network
If this product is connected to the Internet and it is ready for a new firmware update, the following message
appears on the TV screen when you turn on this product.
When this screen appears, follow the procedure below to update the firmware.
1 Select when to perform the firmware update.
Follow the on-screen instructions and select from “Update now”, “Update at 2:00 AM”, or
“Skip this update notification”. The default setting is “Update at 2:00 AM”.
The firmware update will be executed at the selected time. When the update process is
complete, the power of this product automatically turns off.
This completes the firmware update.
NOTICE
(
Do not operate the product or unplug its power cord or network cable during the firmware updating process. If the process is
interrupted, this product may become unusable. In that case, the product will require servicing.
NOTE
(
If your Internet connection is not fast enough or you are using a wireless network, you may not receive notice of a firmware update.
If this occurs, update the firmware using a USB flash drive instead.
(
Firmware updates via the network can also be performed in SETTINGS menu > “Function” > “Firmware” > “Network Update”.
Related links
“Configuring advanced function settings (Function)”(p.134)
145
UPDATING THE FIRMWARE > Updating the firmware
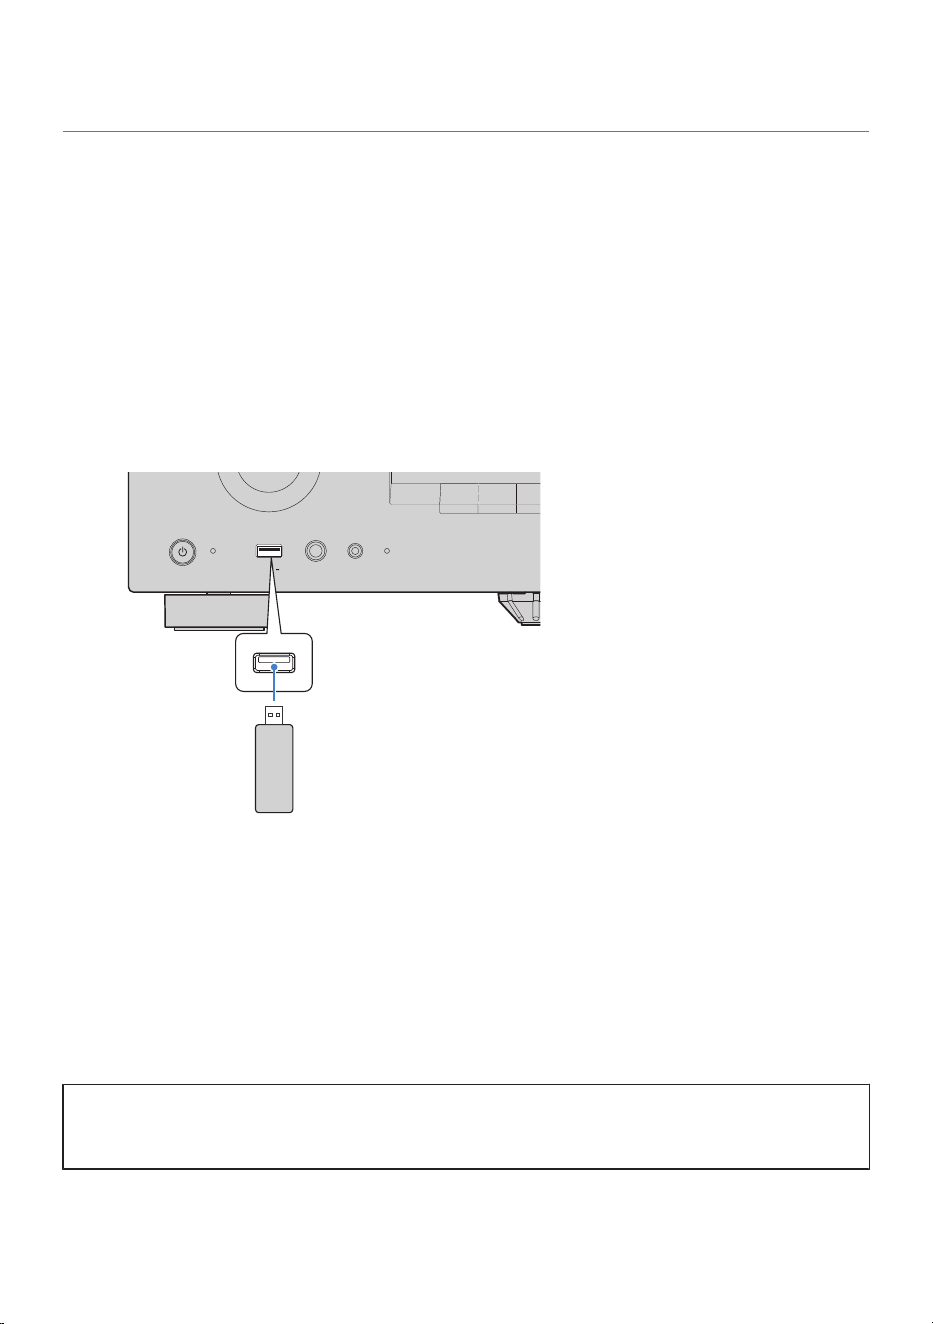
Updating the firmware using a USB flash drive
You can update the product’s firmware using a USB flash drive.
1 Download the latest version of the firmware for the product to your computer from
the Yamaha website.
For more information, visit the product information page on the Yamaha website at
“https://www.yamaha.com/”.
2 Extract the downloaded compressed file, and save the firmware data file to the
USB flash drive.
3 Connect the USB flash drive to the USB port on the front panel.
PHONES
INPUT
SETUP MIC
USB
5V 1A
PURE DIRECT
SCENE 1 SCENE 2 SCENE 3
Front of this product
USB flash drive containing the firmware
data file
4 In the SETTINGS menu, select “Function” > “Firmware” > “USB Update”.
5 Select “Execute”.
The firmware update will start. Never turn off the power while updating the firmware.
When the firmware update process is complete, the power of this product turns off
automatically.
6 Make sure that this product is turned off, and then remove the USB flash drive.
This completes the firmware update.
NOTICE
(
Do not operate the product or unplug the power cord while updating the firmware. If the process is interrupted, this product
may become unusable. In that case, the product will require servicing.
146
UPDATING THE FIRMWARE > Updating the firmware


TROUBLESHOOTING
Check the following first
If the product stops working normally while you are using it, check the following items first.
(
The power cords of this product, the TV, and the AV devices (BD/DVD players, etc.) are securely connected
to AC wall outlets.
(
This product, the subwoofer, the TV, and AV devices (BD/DVD players, etc.) are turned on.
(
The cables between devices are securely connected to the correct ports.
148
TROUBLESHOOTING > Check the following first

Problems with power, system, and/or remote control
Power fails to turn on
(
The protection circuitry has been activated three times consecutively.
If the Standby indicator on the front panel flashes when you attempt to turn the power on, the power
will no longer turn on in order to protect the product. Please contact an authorized Yamaha service
center to have it repaired.
149
TROUBLESHOOTING > Problems with power, system, and/or remote control

Power does not turn on in sync with the TV
(
The HDMI Control setting of this product is set to “Off”.
If neither power-on nor power-off synchronization works, check that SETTINGS menu > “HDMI Control”
is set to “On”. For more details, refer to the following section.
(
“Configuring HDMI settings”(p.127)
(
HDMI Control on the TV is turned off.
If only power-on syncing does not work, the TV’s HDMI Control setting may not be configured correctly,
or the TV may not support HDMI Control. Refer to the user's manual of the TV, and correctly configure the
HDMI Control function.
(
Synchronization became disabled due to a power failure, etc.
Unplug the HDMI cable and the power cable, wait about 5 minutes to discharge the product, then
reconnect the cables in the following order: playback device, this product, TV.
150
TROUBLESHOOTING > Problems with power, system, and/or remote control

Power does not turn off
(
The built-in microcontroller may have frozen due to an external electrical shock (such as from
lightning or excessive static electricity) or a sudden drop in electrical voltage.
Press and hold the z (Power) key on the front panel for 15 seconds or longer to restart the product. If
the problem is not resolved, unplug the power cord from the wall outlet, then plug it in again.
151
TROUBLESHOOTING > Problems with power, system, and/or remote control

Power turns off right away
(
You may be trying to turn on the power while the speaker cables are shorted.
Firmly twist the strands of each speaker cable and then reconnect them to this product and the
speakers. For more details, refer to the following section.
(
“Connecting the Speaker Cables”(p.42)
152
TROUBLESHOOTING > Problems with power, system, and/or remote control

Power switches to standby automatically
(
The sleep timer has activated.
Turn the power on again and start playback.
(
The auto power standby function was activated because no operations were performed for a
certain period of time.
To disable the auto power standby function, set SETTINGS menu > “Auto Power Standby” to “Off”. For
more details, refer to the following section.
(
“Configuring advanced function settings (Function)”(p.134)
(
The protective circuit was activated because the speaker cables short-circuited.
Firmly twist the strands of each speaker cable and then reconnect them to this product and the
speakers. For more details, refer to the following section.
(
“Connecting the Speaker Cables”(p.42)
(
The protective circuit was activated because the volume was set too high.
Lower the volume.
153
TROUBLESHOOTING > Problems with power, system, and/or remote control

The product does not respond to operations
(
The built-in microcontroller may have frozen due to an external electrical shock (such as from
lightning or excessive static electricity) or a sudden drop in electrical voltage.
Press and hold the z (Power) key on the front panel for 10 seconds or longer to restart the product.
If the problem is not resolved, unplug the power cord from the wall outlet, then plug it in again.
154
TROUBLESHOOTING > Problems with power, system, and/or remote control

This product cannot be operated from the remote control
(
It is outside the operating range.
Try using it within the operating range. For more details, refer to the following section.
(
“Names and functions of remote control parts”(p.16)
(
The batteries are dead.
Replace with new batteries.
(
Strong light or sunlight is hitting the remote control signal receiver on the front panel.
Change the orientation of the lighting or the product.
(
The remote control is set to operate a different zone.
Set the Zone switch on the remote control to the zone you want to operate. For more details, refer to the
following section.
(
“Names and functions of remote control parts”(p.16)
155
TROUBLESHOOTING > Problems with power, system, and/or remote control

Cannot select the desired input even when pressing the INPUT
keys
(
An input skip setting is enabled.
Set the corresponding input to “Off” in SETTINGS menu > “Input Skip”. For more details, refer to the
following section.
(
“Configuring advanced function settings (Function)”(p.134)
156
TROUBLESHOOTING > Problems with power, system, and/or remote control

Problems with the audio
No sound
(
A different input is selected.
Use the INPUT keys to select the correct input. For more details, refer to the following section.
(
“Basic operation”(p.63)
(
The product is receiving an input signal that it cannot play.
This product cannot play some digital audio formats. Make sure the signal is in a format that this product
can play. See the following section for the supported file formats, HDMI audio formats, and supported
codec formats.
(
“Specifications”(p.192)
(
The zone power is turned off.
Set the Zone switch to the desired zone, and turn the power on to the zone. For more details, refer to the
following section.
(
“Operating a zone”(p.98)
(
A cable connecting this product and an AV device is damaged.
Check the connections, and if no issues are found, replace the cable with another one.
(
The TV is not connected to this product correctly.
The connection method may vary depending on the TV. Check the connection between the TV and this
product. For more details, refer to the following section.
(
“Connecting a TV”(p.45)
157
TROUBLESHOOTING > Problems with the audio

Volume cannot be increased
(
The maximum volume is set too low.
Adjust the upper limit value in SETTINGS menu > “Max Volume”. For more details, refer to the following
section.
(
“Configuring audio settings”(p.130)
(
The power of the external device connected to the output jacks of this product is turned off.
Turn on all corresponding external devices.
158
TROUBLESHOOTING > Problems with the audio

No sound is output from a particular speaker
(
The playback source does not contain signal for that channel.
Press the INFO key on the remote control to check the number of input channels. For more details, refer
to the following section.
(
“Checking audio/video signal information”(p.64)
(
A sound program or decoder that does not use that speaker has been selected.
In the SETTINGS menu > “Test Tone” option, you can verify whether audio is output from the speaker.
For more details, refer to the following section.
(
“Configuring the speakers”(p.123)
(
Audio output for that speaker is disabled.
Run “Room Correction”, or set the speaker on/off setting in SETTINGS menu > “Configuration”. For more
details, refer to the following section.
(
“Configuring the speakers”(p.123)
(
The volume level for that speaker is extremely low.
Run “Room Correction”, or adjust the speaker volume level in SETTINGS menu > “Level”. For more
details, refer to the following section.
(
“Configuring the speakers”(p.123)
Depending on the source or the selected sound mode, loud sound may not be output from surround
speakers or other speakers in order to create a natural sound field.
(
A cable connecting this product and the corresponding speaker is damaged.
Check the terminals on both the speaker side and the amplifier side. If the connection is normal, the
cable may be broken. Replace the cable with a different one.
(
The corresponding speaker may be damaged.
You can check this by swapping it with a different speaker that you know is functioning normally. If no
sound comes from the swapped-in speaker either, this product may be faulty.
159
TROUBLESHOOTING > Problems with the audio

No sound is output from the subwoofer
(
The subwoofer power is not turned on.
Turn on the subwoofer power.
(
The playback source does not contain LFE or low-frequency signals.
To check this, set SETTINGS menu > “Extra Bass” to “On” so that low-frequency content from the front
channels is output through the subwoofer. For more details, refer to the following section.
(
“Configuring the speakers”(p.123)
(
Output to the subwoofer is disabled.
Either run “Room Correction”, or set “Configuration” > “Subwoofer” to “Use” in the SETTINGS menu. For
more details, refer to the following section.
(
“Configuring the speakers”(p.123)
(
The volume level of the subwoofer is extremely low.
Adjust the volume level of the subwoofer.
(
The auto standby function of the subwoofer (automatically turns off power) was activated.
Either disable the subwoofer auto standby function or adjust its activation sensitivity.
160
TROUBLESHOOTING > Problems with the audio

No sound is output from the AV device connected via HDMI
(
The TV does not support copyright protection (HDCP).
Refer to the user's manual of the TV to confirm its compatibility.
(
The number of devices connected to the HDMI OUT port exceeds the supported limit.
Disconnect any HDMI devices that are not in use.
(
HDMI audio output is set to “Off”.
Set “Audio Output” to “On” in SETTINGS menu > “HDMI”. For more details, refer to the following section.
(
“Configuring HDMI settings”(p.127)
161
TROUBLESHOOTING > Problems with the audio

When using HDMI Control, audio from the AV device is not
output from this product
(
The TV is configured to output audio from its own speakers.
Change the TV’s audio output settings so it outputs its audio from this product.
(
A TV audio input may be selected instead of the correct input.
Use the INPUT keys to select the correct input.
162
TROUBLESHOOTING > Problems with the audio

When using HDMI Control, audio from the TV is not output
from this product
(
The TV is configured to output audio from its own speakers.
Change the TV’s audio output settings so it outputs its audio from this product.
(
You are using only an HDMI cable with a TV that does not support eARC/ARC.
Connect the TV’s audio to this product using a digital optical cable. For more details, refer to the
following section.
(
“Connecting a TV”(p.45)
(
When connecting the TV to this product with an audio cable, the “TV Audio Input” setting does not
match the actual jack that is connected.
In the SETTINGS menu, select the correct audio input jack in “TV Audio Input”. For more details, refer to
the following section.
(
“Configuring advanced function settings (Function)”(p.134)
(
When using eARC/ARC to input TV audio, the eARC/ARC function is disabled on either this product
or the TV.
Set SETTINGS menu > “ARC” to “On”.
Also enable the TV’s eARC/ARC function. For more details, refer to the following section.
(
“Configuring HDMI settings”(p.127)
(
When using eARC/ARC to input TV audio, the HDMI cable is not connected to the TV’s eARC/ARC-
compatible HDMI port.
Connect the HDMI cable to the TV’s eARC/ARC-compatible HDMI port. Some TV HDMI ports do not
support eARC/ARC. For more details, refer to the user's manual for the TV.
163
TROUBLESHOOTING > Problems with the audio

When the input is set to “TV”, sound from another device is
heard
(
You are not using the eARC/ARC function.
Except when playing audio via the eARC/ARC function, the sound from the input terminal that was set in
SETTINGS menu > “TV Audio Input” will be played. This is not a malfunction.
164
TROUBLESHOOTING > Problems with the audio

Only the front speakers produce sound during multichannel
playback
(
You have selected the “2 CH STEREO” sound mode.
Select a sound mode other than “2 CH STEREO”. For more details, refer to the following section.
“Selecting your preferred sound (Sound modes)”(p.81)
165
TROUBLESHOOTING > Problems with the audio

Noise is being output
(
A digital device or high-frequency device is located near this product.
Increase the distance between this product and such devices.
(
A cable connecting this product and an AV device is damaged.
Check the connections, and if no issues are found, replace the cable with another one.
166
TROUBLESHOOTING > Problems with the audio

Sound is distorted
(
The external amplifier or other device connected to the audio output terminal of this product is
turned off.
Turn on all corresponding devices.
(
The volume is too loud.
Lower the volume.
167
TROUBLESHOOTING > Problems with the audio

Problems with video
Video does not appear
(
Another input is selected on this product.
Select the correct input (video source) using the INPUT keys.
(
A different input is selected on the TV.
Switch the TV’s input to the video signal coming from this product.
(
The video signal output from this product is not supported by the TV.
Check whether the video output settings of the connected AV device are appropriate.
(
A cable connecting this product, the TV, or the AV device is damaged.
Check the connections, and if no issues are found, replace the cable with another one.
168
TROUBLESHOOTING > Problems with video

When video from an AV device connected via HDMI does not
appear
(
This product is receiving an unsupported video signal (resolution).
For information on the video signals (resolutions) currently being input and the video signals supported
by this product, refer to the following section.
(
“Checking audio/video signal information”(p.64)
(
“Specifications”(p.192)
(
The TV does not support copyright protection (HDCP).
Refer to the user's manual of the TV to confirm its compatibility.
(
The number of devices connected to the HDMI OUT port exceeds the supported limit.
Disconnect any HDMI devices that are not in use.
(
The HDMI 4K/8K signal format settings are incorrect.
To input/output 8K video, you must select “8K Mode” under SETTINGS menu > “Video Format”.
Configure this setting for each input port that you intend to use.
(
“Configuring HDMI settings”(p.127)
(
You are attempting to play content that requires HDCP 1.4/2.3–compatible devices, but the TV
(HDMI input port) does not support HDCP 1.4/2.3.
Connect the HDMI cable to a TV (HDMI input port) that supports HDCP 1.4/2.3. (A warning message may
appear on the TV screen.)
169
TROUBLESHOOTING > Problems with video

SETTINGS menu and OPTION menu do not appear on the TV
(
A different input is selected on the TV.
Switch the TV’s input to the video signal coming from this product (HDMI OUT port).
(
Pure Direct is enabled.
Select a sound mode other than “PURE DIRECT”. For more details, refer to the following section.
(
“Selecting your preferred sound (Sound modes)”(p.81)
170
TROUBLESHOOTING > Problems with video

Problems with FM radio
Radio reception is poor or has noise
(
The product is receiving interference such as multipath interference (reflected signals).
Change the height, orientation, or installation location of the FM antenna.
(
The radio station is being received from a distant region.
(U.S.A. and Canada models)
Press the FM MODE key on the remote control to switch to monaural reception.
(U.K., Europe, and Australia models)
In the OPTION menu, select “FM Mode” > “Monaural” to switch to monaural reception.
171
TROUBLESHOOTING > Problems with FM radio

Unable to automatically select FM radio stations
(
The FM radio stations are being received from distant regions.
Manually select stations. For more details, refer to the following section.
(
“Listening to the radio”(p.68)
Also consider using a commercially available outdoor antenna.
172
TROUBLESHOOTING > Problems with FM radio

Cannot select a radio station using the PRESETS key
(
No radio stations are registered.
If no stations have been registered at all, pressing the PRESETS key will cause the front display to show
the message “No Presets”. Register radio stations to the preset numbers.
FM radio stations can also be registered using the auto preset function. If the signals are weak, the auto
preset function may not register any stations. In that case, register stations manually.
For more details, refer to the following section.
(
“Registering and deleting radio stations”(p.71)
173
TROUBLESHOOTING > Problems with FM radio


DAB radio cannot be received even after performing the initial
scan
(
The DAB reception signal is weak.
Run “Tune AID” in the OPTION menu and check the signal strength displayed on the TV screen. Adjust
the antenna height or direction, or change its installation location. For details, refer to the following
section.
(
“Checking the signal strength of each DAB channel”(p.111)
(
“Connecting a DAB/FM antenna”(p.62)
(
“DAB tuning”(p.110)
(
DAB broadcasts may not be available in your area.
For coverage information in your region, check with your dealer or visit the WorldDAB website at
“http://www.worlddab.org”.
175
TROUBLESHOOTING > Problems with DAB radio

DAB radio reception is poor or has noise
(
Multipath interference may be occurring.
Run “Tune AID” in the OPTION menu and check the signal strength displayed on the TV screen. Adjust
the antenna height or direction, or change its installation location. For details, refer to the following
section.
(
“Checking the signal strength of each DAB channel”(p.111)
(
“Connecting a DAB/FM antenna”(p.62)
(
“DAB tuning”(p.110)
(
Your location may be too far from the DAB transmitter.
Use an outdoor antenna. A high-sensitivity multi-element antenna is recommended.
176
TROUBLESHOOTING > Problems with DAB radio

DAB information is unavailable or displayed incorrectly
(
The selected DAB station may be temporarily out of service or may not be providing information.
Contact the DAB broadcaster for details.
177
TROUBLESHOOTING > Problems with DAB radio

No sound from DAB radio
(
The selected DAB station may be temporarily off the air.
Try the station again after waiting a while, or select a different station.
178
TROUBLESHOOTING > Problems with DAB radio

Problems with network
Network functions cannot be used
(
Network information (IP address) was not acquired properly.
Enable the DHCP server function of your router. Also, in the product’s SETTINGS menu, set “IP Address” >
“DHCP” to “On”. For more details, refer to the following section.
(
“Configuring the network settings”(p.138)
If you are not using a DHCP server and are setting network information manually, make sure that this
product’s IP address does not conflict with other devices on the network. For more details, refer to the
following section.
(
“Making a wireless connection manually”(p.204)
(
You are connected to an IPv6-type router.
Some of this product’s network features do not support IPv6 networks. Connect to an IPv4 network.
179
TROUBLESHOOTING > Problems with network

Cannot connect to the Internet via a wireless LAN router
(access point)
(
The power of the wireless LAN router (access point) is turned off.
Turn on the wireless LAN router (access point).
(
This product is too far from the wireless LAN router (access point).
Move the wireless LAN router (access point) and/or this product closer to each other.
(
There is an obstacle between this product and the wireless LAN router (access point).
Remove any obstacles between this product and the wireless LAN router (access point).
(
The wireless LAN router (access point) is configured to use Channel 14.
Change the wireless LAN router settings so it uses one of the channels between 1 and 13.
180
TROUBLESHOOTING > Problems with network

Cannot find the wireless network
(
Electromagnetic interference from a microwave oven or other wireless devices is disrupting
wireless communication.
Turn off those devices, or move them away from this product and the wireless LAN router. Also, if your
wireless LAN router supports the 5 GHz frequency band, switch the connection to the 5 GHz band.
(
Access to the network is restricted by the firewall settings of the wireless LAN router (access
point).
Check the firewall settings of your wireless LAN router (access point).
181
TROUBLESHOOTING > Problems with network

Cannot play Internet radio
(
Not connected to the Internet.
In order to use Internet radio, this product must be connected to the Internet. Check and make sure the
network information (IP address) was acquired properly. For more details, refer to the following section.
(
“Configuring the network settings”(p.138)
(
The selected Internet radio station service is currently out of service.
Reception may fail due to a network error on the station’s side or because the service is temporarily
unavailable. Wait a while and try again, or select a different station.
(
The selected Internet radio station is broadcasting silence.
Some stations broadcast silence depending on the time of day. In this case, even if reception is normal,
no sound will be heard. Wait a while and try again, or select a different station.
(
Access to the network is restricted by the firewall settings of the router or network devices.
Check the firewall settings. Note that Internet radio can only be played through the specific ports
designated by each radio station. The port number varies depending on the radio station.
182
TROUBLESHOOTING > Problems with network

When using AirPlay, this product is not detected by the
iPhone
(
You are using a router that supports multi-SSID.
The network isolating function of your wireless LAN router may be preventing access to this product.
When connecting your iPhone, use an SSID that allows access to this product (try connecting to the
primary SSID).
183
TROUBLESHOOTING > Problems with network

Music doesn’t play via AirPlay
(
You are trying to listen to music that cannot be played on your iPhone.
Check whether the file can be played directly on your iPhone. If you cannot play it even on your iPhone
itself, the music data and/or storage area may be damaged.
184
TROUBLESHOOTING > Problems with network


Problems with USB
The USB device is not recognized
(
The USB device is not plugged into the USB port correctly.
Turn off this product and then plug the USB device in again.
(
The USB device being used is in a format other than FAT16 or FAT32.
Use a USB device formatted in FAT16 or FAT32.
186
TROUBLESHOOTING > Problems with USB

USB drive folders and/or files are not displayed
(
The data on the USB device is protected by an encryption function.
Use a USB device that is not encrypted.
(
Unsupported content or folders are included.
For details on supported content and folders, refer to the following section.
(
“Playing music on a USB device”(p.75)
(
“Specifications”(p.192)
187
TROUBLESHOOTING > Problems with USB

Files on the USB device fail to play consecutively
(
The selected folder contains files that cannot be played on the product.
Do not include files that cannot be played on the product into the folder to be played.
(
The selected folder contains more than 1000 tracks.
Up to 999 items (folders and files combined playback device) can be displayed and played on the Browse
screen. Folders and file names that exceed this limit are not displayed. Up to 10 levels of folders are
supported, including the root level.
188
TROUBLESHOOTING > Problems with USB

Problems with Bluetooth® connection
Unable to connect with a Bluetooth® device
(
The Bluetooth function of this product is disabled.
Enable the Bluetooth function. For more details, refer to the following section.
(
“Configuring the Bluetooth® function”(p.141)
(
The Bluetooth function of the Bluetooth device is disabled.
Turn on the Bluetooth function of the Bluetooth device.
(
This product is connected to a different Bluetooth device.
Terminate the current Bluetooth connection and connect to the desired Bluetooth device. For more
details, refer to the following section.
(
“Playing back audio from a Bluetooth® device”(p.73)
(
This product and the Bluetooth device are too far apart.
Move this product and the Bluetooth device closer together.
(
Wireless communication is being interfered with by other devices that use the 2.4 GHz band (such
as microwave ovens or wireless LAN equipment).
Move this product and/or the Bluetooth device away from those devices. Also, if your wireless LAN router
supports the 5 GHz frequency band, switch the connection to the 5 GHz band.
(
The Bluetooth device you are using does not support the A2DP profile.
Use a Bluetooth device that supports the A2DP profile.
(
The connection information registered to the Bluetooth device is not functioning properly for
some reason.
Delete the connection information of the Bluetooth device and then reconnect this product to the
Bluetooth device. For more details, refer to the following section.
(
“Playing back audio from a Bluetooth® device”(p.73)
189
TROUBLESHOOTING > Problems with Bluetooth® connection

When connected via Bluetooth®, there is no sound, or there
are audio dropouts
(
The volume of the Bluetooth device is too low.
Turn up the volume of the Bluetooth device.
(
The Bluetooth device is not set to output audio to this product.
Configure the Bluetooth device so that its audio output is set to this product.
(
The Bluetooth connection was cut off.
Reconnect via Bluetooth. For more details, refer to the following section.
(
“Playing back audio from a Bluetooth® device”(p.73)
(
They are too far apart.
Move the Bluetooth device closer to this product.
(
Wireless communication is being interfered with by other devices that use the 2.4 GHz band (such
as microwave ovens or wireless LAN equipment).
Move this product and/or the Bluetooth device away from those devices. Also, if your wireless LAN router
supports the 5 GHz frequency band, switch the connection to the 5 GHz band.
190
TROUBLESHOOTING > Problems with Bluetooth® connection

Problems with dedicated app
The dedicated app cannot detect the product
(
You are using an app that is not compatible with this product.
This product only works with the dedicated app. MusicCast Controller cannot be used.
(
The product and the smartphone are not connected to the same network.
Check the network settings and/or the router settings, and connect to the same network.
(
The smartphone is not connected wirelessly (via Wi-Fi) to the wireless LAN router.
Connect the smartphone wirelessly (via Wi-Fi) to the wireless LAN router.
(
You are using a router that supports multi-SSID.
The network isolating function of your wireless LAN router may be preventing access to this product.
Connect both this product and the smartphone to a network with the same SSID. Try connecting to the
primary SSID first.
(
The product’s wireless (Wi-Fi) function is disabled.
If the product is connected to the network wirelessly (Wi-Fi), enable the wireless (Wi-Fi) function.
(
The LAN cable is not connected.
If you have a wired connection to the network, make sure the LAN cable is securely connected.
191
TROUBLESHOOTING > Problems with dedicated app

SPECIFICATIONS
Specifications
The main specifications of this product are provided below.
Input jacks
Analog Audio
(
Stereo x 2
Digital Audio
(
Optical x 1 (Supported frequencies: 32 kHz to 96 kHz)
(
Coaxial x 1 (Supported frequencies: 32 kHz to 192 kHz)
HDMI Input
(
HDMI x 4
Others
(
USB x 1 (USB2.0)
(
Network (Wired) x 1 (100Base-TX/10Base-T)
(
Setup Microphone x 1
Output jacks
Analog Audio
(
Speaker Out x 7 (Front L/R, Center, Surround L/R, Height L/R*)
* Assignment is possible [Surround back, Bi-amp (Front L/R), ZoneB]
(
Pre Out x 2 (Subwoofer [monaural] x 2)
(
Headphone x 1
HDMI Output
(
HDMI x 1
HDMI
HDMI Function
(
8K, 4K Ultra HD (include 8K/60 Hz, 4K/120 Hz), Audio Return Channel (ARC), enhanced Audio Return Channel (eARC), HDMI
Control (CEC), Auto Lip Sync, Deep Color, x. v. Color, HD audio playback, HDR Compatible, Dolby Vision, Hybrid Log-
Gamma
192
SPECIFICATIONS > Specifications

Video Format (Repeater Mode)
(
VGA
(
480i/60 Hz
(
576i/50 Hz
(
480p/60 Hz
(
576p/50 Hz
(
720p/60 Hz, 50 Hz
(
1080i/60 Hz, 50 Hz
(
1080p/120 Hz, 100 Hz, 60 Hz, 50 Hz, 30 Hz, 25 Hz, 24 Hz
(
4K/120 Hz, 100 Hz, 60 Hz, 50 Hz, 30 Hz, 25 Hz, 24 Hz
(
8K/60 Hz (8K60
B
)*, 50 Hz (8K50
B
)*, 30 Hz, 25 Hz, 24 Hz
* DSC (Display Stream Compression) only
Audio Format
(
Dolby Atmos
(
Dolby TrueHD
(
Dolby Digital Plus
(
Dolby Digital
(
DTS:X
(
DTS-HD Master Audio
(
DTS-HD High Resolution
(
DTS Express
(
DTS
(
PCM 2-ch to 8-ch (Max. 192 kHz/24-bit)
Content Protection: HDCP 1.4/2.3 compatible
Link Function: CEC supported
Tuner
Analog Tuner
(
[U.K. and Europe models]
DAB/FM with Radio Data System x 1 (Tuner)
(
[Australia model]
DAB/FM x 1 (Tuner)
(
[U.S.A. and Canada models]
FM x 1 (Tuner)
USB
Mass Storage Class USB Memory
Current Supply Capacity: 1.0 A
193
SPECIFICATIONS > Specifications

Bluetooth
Sink Function
(
Bluetooth device (ex. Smartphone/Tablet) receiving function
(
Supported profile
(
A2DP, AVRCP
(
Supported codec
(
SBC, AAC
Bluetooth Version
(
Ver.5.3
Wireless Output
(
Bluetooth Class 2
Maximum Communication Distance
(
10 m (without interference)
Network
AirPlay 2 supported
Internet Radio
Podcasts
Spotify Connect
TIDAL Connect
Google Cast for audio
Qobuz Connect
Wireless Network
(
Wireless LAN Standards: IEEE 802.11 a/b/g/n/ac
(
Radio Frequency: 2.4 GHz/5 GHz
(
WPS (Wi-Fi Protected Setup) (for the app only)
(
Push-Button-Method
(
PIN Method
(
Available Security
(
WPA2
(
WPA3
Compatible Decoding Formats
Decoding Format
(
Dolby Atmos
(
Dolby TrueHD, Dolby Digital Plus
(
Dolby Digital
(
DTS:X
(
DTS-HD Master Audio, DTS-HD High Resolution, DTS Express
(
DTS-ES Matrix 6.1, DTS-ES Discrete 6.1
(
DTS, DTS 96/24
194
SPECIFICATIONS > Specifications

Post Decoding Format
(
Dolby Surround
(
Neural:X
Audio Section
Rated Power Output (2 channels driven)
(
[U.K., Europe and Australia models] (20 Hz to 20 kHz, 0.09% THD, 6 Ω)
(
Front L/R 75 W/ch
(
[U.S.A. and Canada models] (20 Hz to 20 kHz, 0.09% THD, 8 Ω)
(
Front L/R 75 W/ch
(
[U.S.A. and Canada models] (1 kHz, 0.9% THD, 8 Ω)
(
Front L/R, Surround L/R, Height L/R 90 W/ch
(
Center 90 W
Power Output (1 channel driven)
(
[U.K., Europe and Australia models] (1 kHz, 0.9% THD, 6 Ω)
(
Front L/R, Center, Surround L/R, Height L/R 110 W
(
[U.S.A. and Canada models] (1 kHz, 0.9% THD, 8 Ω)
(
Front L/R, Center, Surround L/R, Height L/R 110 W
Maximum Effective Power Output (1 channel driven)
(
(1 kHz, 10%THD, 6 Ω)
(
Front L/R, Center, Surround L/R, Height L/R 145 W
(
[U.S.A. and Canada models] (1 kHz, 10% THD, 8 Ω)
(
Front L/R, Center, Surround L/R, Height L/R 130 W
Damping Factor
(
Front L/R (1 kHz, 8 Ω) 100 or more
Input Sensitivity / Input Impedance
(
RCA 1 etc. (1 kHz, Rated Power Output) 200 mV/47 kΩ
Maximum Input Signal
(
RCA 1 etc. (1 kHz, 0.5% THD) 2.3 V
Rated Output Level / Output Impedance
(
Pre Out
(
Subwoofer (50 Hz) 1.0 V/1.8 KΩ
Maximum Output Level
(
Pre Out
(
Subwoofer 4.5 V
Headphone Impedance 16 Ω or more
195
SPECIFICATIONS > Specifications

Frequency Response
(
RCA 1 etc. (Pure Direct) (10 Hz to 100 kHz) +0/-3 dB
Total Harmonic Distortion
(
RCA 1 etc. to Speaker Out (Pure Direct) (20 Hz to 20 kHz, 40 W, 6 Ω/8 Ω) 0.06% or less
Signal to Noise Ratio (IHF-A Network)
(
RCA 1 etc. to Speaker Out (Pure Direct) (Input 1 kΩ Shorted) 110 dB or more
Residual Noise (IHF-A Network)
(
Speaker Out 150 μV or less
Channel Separation
(
RCA 1 etc. (Input 1 kΩ Shorted, 1 kHz/10 kHz) 70 dB/50 dB or more
Volume Control
(
Main zone MUTE, -80 dB to +16.5 dB (0.5 dB Step)
(
ZoneB MUTE, -80 dB to +16.5 dB (0.5 dB Step)
Tone Control Characteristics
(
Main zone
(
Bass (Boost/Cut) ±6 dB/0.5 dB Step at 50 Hz
(
Bass (Turnover Frequency) 350 Hz
(
Treble (Boost/Cut) ±6 dB/0.5 dB Step at 20 kHz
(
Treble (Turnover Frequency) 3.5 kHz
(
Support Channel Front L/R
Bass Crossover Frequency (Cut Off Frequency: 40 Hz to 200 Hz (5 Hz Step))
(
H.P.F. (Front, Center, Surround, Height) 12 dB/oct.
(
L.P.F. (Subwoofer) 24 dB/oct.
FM Tuner Section
Tuning Range
(
[U.K., Europe and Australia models] 87.50 MHz to 108.00 MHz
(
[U.S.A. and Canada models] 87.5 MHz to 107.9 MHz
50 dB Quieting Sensitivity (IHF, 1 kHz, 100% MOD.)
(
Monaural 9 dBμV
Signal to Noise Ratio (IHF)
(
Monaural/Stereo 65 dB/64 dB
Harmonic Distortion
(
Monaural/Stereo 0.5%/0.6%
196
SPECIFICATIONS > Specifications

Antenna Input 75 Ω unbalanced
DAB Tuner Section (U.K., Europe and Australia models)
Tuning Range 174 MHz to 240 MHz (BAND Ⅲ)
Support Audio Format MPEG 1 Layer Ⅱ/MPEG-4 HE-AAC v2 (aacPlus v2)
Antenna Input 75 Ω unbalanced
General
Power Supply
(
[U.S.A. and Canada models] AC 120 V, 60 Hz
(
[Australia model] AC 230 to 240 V, 50 Hz
(
[U.K. and Europe models] AC 230 V, 50 Hz
Power Consumption 260 W
Standby Power Consumption*
(
HDMI Control Off, Standby through Off, Network Standby Off, Bluetooth Standby Off 0.3 W
(
HDMI Control On, Standby through On, Network Standby Off, Bluetooth Standby Off
(
Input: RCA 1 (HDMI no signal) 1.6 W
(
HDMI Control Off, Standby through Off, Network Standby On, Bluetooth Standby Off
(
Wired 1.2 W
(
Wi-Fi 1.2 W
(
HDMI Control Off, Standby through Off, Network Standby On, Bluetooth Standby On
(
Wired 1.2 W
(
HDMI Control On, Standby through On, Network Standby On, Bluetooth Standby On
(
Wi-Fi 1.6 W
* This product in the standby mode may download the new firmware via the network. In this case, the standby power
consumption is higher than the shown value.
Dimensions (W x H x D)
* Including legs and protrusions
434 x 157 x 319 mm
(17-1/8" x 6-1/8" x 12-1/2")
Weight 8.0 kg (17.6 lbs)
* This content is based on the latest specifications available at the time of publication. For the most up-to-date information,
please download the latest version from the Yamaha website.
197
SPECIFICATIONS > Specifications

Supported devices and formats
Supported Bluetooth devices
Refer to the following for Bluetooth devices supported by this product.
(
This product supports Bluetooth devices compatible with the A2DP profile.
(
Bluetooth connection and the functions/performance described in this guide are not guaranteed for all
Bluetooth devices.
198
SPECIFICATIONS > Supported devices and formats

Supported USB devices
Refer to the following for USB devices supported by this product.
(
USB flash drives formatted in FAT16 or FAT32 are supported.
Do not connect any other USB devices.
(
USB devices with encryption functions cannot be used.
(
Connection to all USB devices is not guaranteed.
199
SPECIFICATIONS > Supported devices and formats

Supported file formats
Refer to the following for file formats supported by this product.
File
Sampling frequency
(kHz)
Bit depth (bit) Bit rate (kbps)
Number of
channels
Gapless playback
supported
WAV*
32 / 44.1 / 48 / 88.2 / 96 /
176.4 / 192
16 / 24 / 32 - 2 )
MP3
32 / 44.1 / 48 - 8 to 320 2 -
WMA
32 / 44.1 / 48 - 8 to 320 2 -
MPEG-4 AAC
32 / 44.1 / 48 - 8 to 320 2 -
FLAC
32 / 44.1 / 48 / 88.2 / 96 /
176.4 / 192
16 / 24 - 2 )
ALAC
32 / 44.1 / 48 / 88.2 / 96 16 / 24 - 2 )
AIFF
32 / 44.1 / 48 / 88.2 / 96 /
176.4 / 192
16 / 24 / 32 - 2 )
* Linear PCM format only. 32-bit float files cannot be played.
(
Files protected by DRM (Digital Rights Management) cannot be played.
200
SPECIFICATIONS > Supported devices and formats

APPENDIX
Making a wireless connection to a network
Selecting a wireless connection method to a network
Select a wireless connection method that matches your network environment from the following options.
(
“Connecting to the network using the dedicated app”(p.58)
(
“Connecting wirelessly by selecting from the access point list”(p.203)
(
“Using iPhone to set up a wireless connection”(p.202)
(
“Making a wireless connection manually”(p.204)
NOTE
(
You can also configure the network settings using the dedicated app for this product. If you are using the dedicated app, this
method is recommended.
(
To stop the wireless network connection and switch to a wired connection, connect a LAN cable to the NETWORK jack.
201
APPENDIX > Making a wireless connection to a network

Using iPhone to set up a wireless connection
Apply the network settings of your iPhone to this product to set up a wireless connection.
Before starting setup, make sure your iPhone is connected to the wireless LAN router.
NOTE
An iPhone running iOS 11.4 or later is required.
SETTINGS menu
“Network” > “Wireless Connection”
1 Select “WAC(iOS)”.
2 Follow the instructions on the TV screen to set up a wireless connection.
After the sharing operation is complete, this product will connect automatically to the
selected wireless LAN router.
This completes the wireless connection process.
NOTE
Wireless LAN routers that use WEP as the encryption method cannot be connected using this procedure. If your router uses WEP,
please try another connection method.
Related links
“Selecting a wireless connection method to a network”(p.201)
202
APPENDIX > Making a wireless connection to a network

Connecting wirelessly by selecting from the access point list
You can set up the wireless connection by selecting the access point (wireless LAN router) from the list
detected by the product.
You will need to manually enter the security key.
SETTINGS menu
“Network” > “Wireless Connection”
1 Select “Network Scan”.
2 Follow the instructions on the TV screen to set up a wireless connection.
When the connection is completed, “Completed” will be displayed.
If the message “Not connected” is displayed, start over from step 1 or try a different
connection method.
This completes the wireless connection process.
Related links
“Selecting a wireless connection method to a network”(p.201)
203
APPENDIX > Making a wireless connection to a network

Making a wireless connection manually
You can set up the wireless connection by manually entering the required information. You must manually
specify the SSID (network name), encryption method, and security key.
SETTINGS menu
“Network” > “Wireless Connection”
1 Select “Manual Setting”.
2 Follow the instructions on the TV screen to set up a wireless connection.
When the connection is completed, “Completed” will be displayed.
If the message “Not connected” is displayed, start over or try a different connection method.
This completes the wireless connection process.
Related links
“Selecting a wireless connection method to a network”(p.201)
204
APPENDIX > Making a wireless connection to a network

About height speaker placement
Height speaker placement
There are three placement options for height speakers. Choose the one that best fits your listening
environment. Dolby Atmos and DTS:X can be enjoyed with any of these placement options.
(
Front Height
(
Top
(
Dolby Enabled Speakers
NOTE
When using height speakers, select the appropriate placement for your height speakers in “SETTINGS menu > “Speakers” >
“Configuration” > “Layout” before performing speaker setup (Room Correction) during initial setup.
Related links
“Configuring the speakers”(p.123)
205
APPENDIX > About height speaker placement
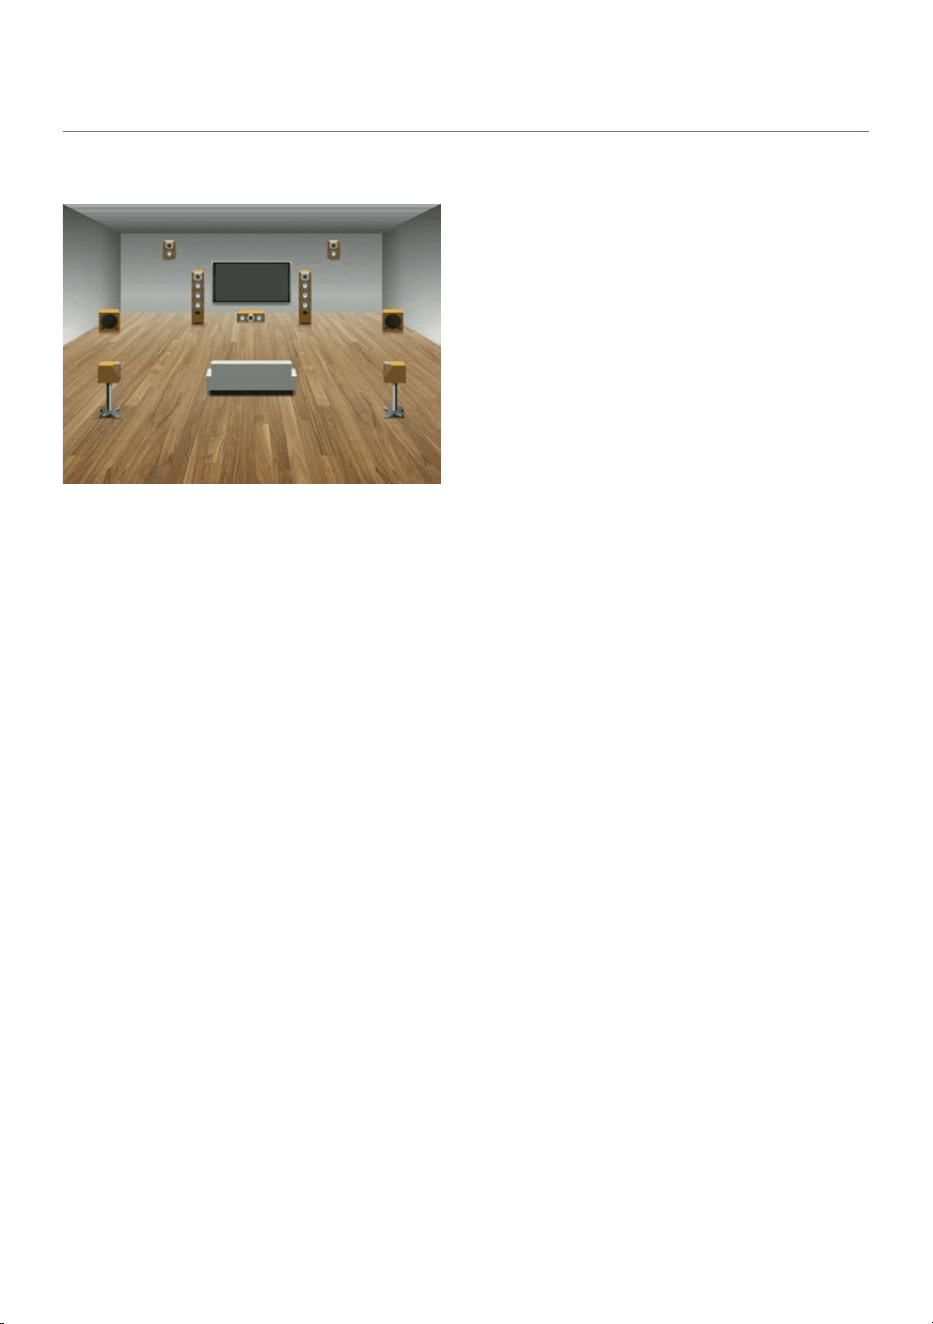
Installing height speakers as Front Height
Install the height speakers on the front wall of the room (Front Height). This placement effectively
reproduces a sense of connection and spaciousness in both the vertical and horizontal sound field.
206
APPENDIX > About height speaker placement
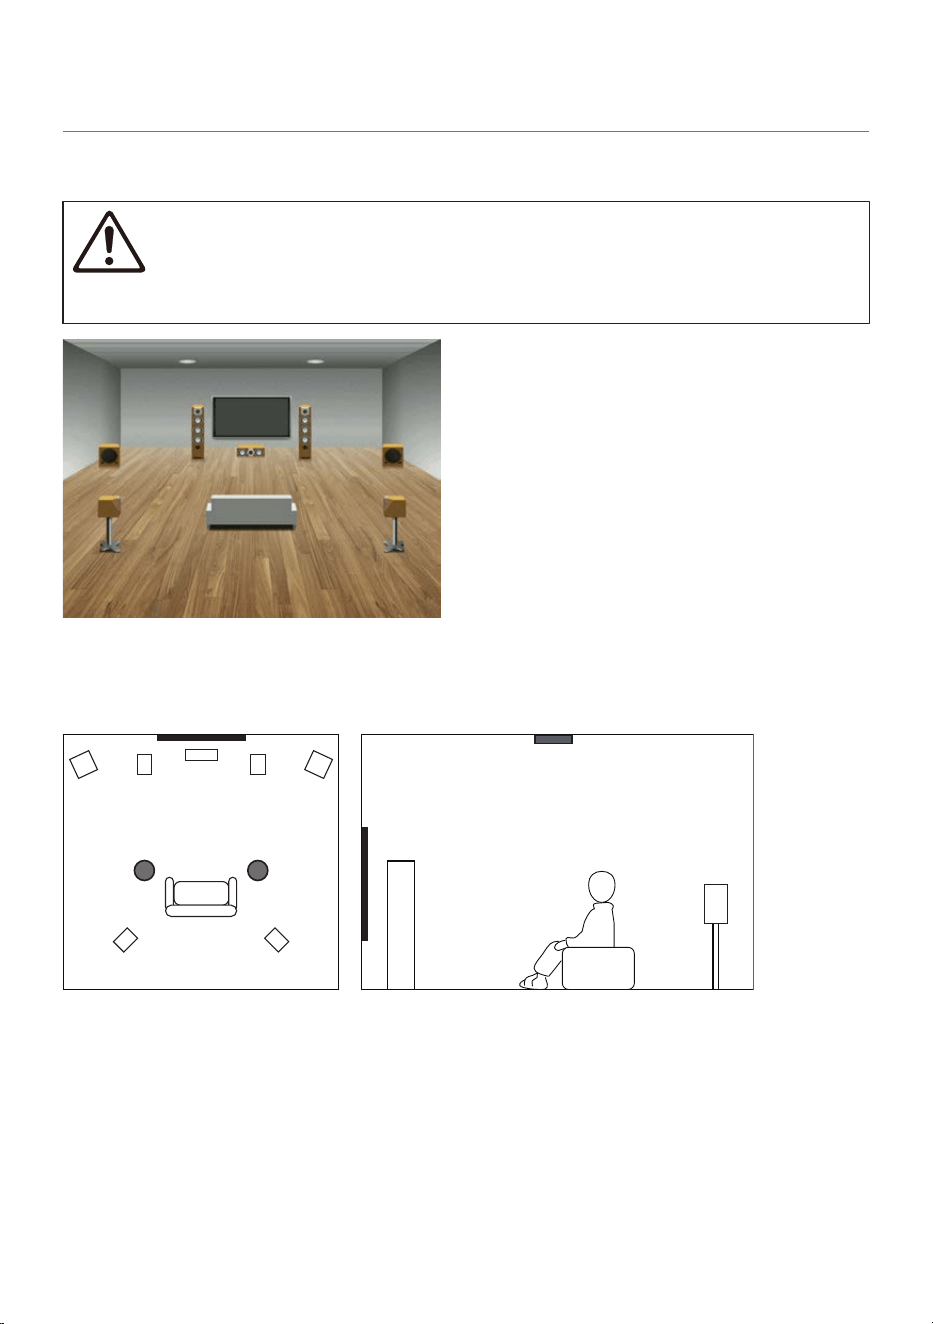
Installing height speakers as Top
Install the height speakers on the ceiling above the listening position (Top). This placement effectively
reproduces realistic overhead sound effects and a sense of continuity between front and rear.
CAUTION
(
Be sure to use speakers designed for ceiling mounting and take appropriate measures to prevent them from falling. Falling
speakers may cause damage or injury. Installation should be performed by your dealer or a qualified professional.
NOTE
When installing height speakers on the ceiling, place them either directly above the listening position or on the ceiling between the
listening position and the front speakers.
207
APPENDIX > About height speaker placement

Using Dolby Enabled Speakers as height speakers
Use Dolby Enabled Speakers as height speakers. By utilizing sound reflected off the ceiling, overhead sound
can be reproduced using only floor-standing speakers.
For details, refer to the instruction manual for your Dolby Enabled Speakers.
NOTE
(
Place Dolby Enabled Speakers on top of, or near, the front speakers.
(
Some speakers have Dolby Enabled Speakers built into a single unit.
208
APPENDIX > About height speaker placement
Subwoofer output conditions
This section explains the settings and sound mode conditions required for audio to be output from the
subwoofer.
To output audio from the subwoofer, be sure to set SETTINGS menu > “Configuration” > “Subwoofer” >
“Use” in advance (default: “Use”). In addition, the conditions in the following table apply.
Extra Bass Sound mode Input
Subwoofer audio
output
On (All) (All) Yes
Off
Other than PURE DIRECT (All) Yes
PURE DIRECT
Other than analog audio signal Yes
Analog audio signal No
NOTICE
(
If the playback content does not include LFE channel audio, in SETTINGS menu > “Speakers” > “Configuration”, the speakers
must be set to “Crossover” (default: “Crossover”). If all speakers are set to “Full Range”, audio will not be output from the
subwoofer.
(
If the playback content includes LFE channel audio, the audio can be output from the subwoofer by setting the sound mode to
something other than PURE DIRECT.
Related links
“Configuring the speakers”(p.123)
209
APPENDIX > Subwoofer output conditions

About the dedicated app
You can also connect this product to the network using the dedicated app “Audio Connect”. With “Audio
Connect”, you can also use network content. To use the Google Cast function, setup using this app is
required.
Search for “Audio Connect” on the App Store or Google Play and install it.
You can also install the app by scanning the QR code below.
210
APPENDIX > About the dedicated app

Support centers
If the problem cannot be resolved, please contact one of the following support centers.
Customers in Japan
Please contact the store where you purchased the product or the Product Support Center listed in the “Quick
Guide” included with this product.
Customers outside Japan
Please contact your nearest authorized Yamaha dealer or service center.
https://manual.yamaha.com/audio/address_list/
211
APPENDIX > Support centers

Trademarks
The following trademarks are used in this guide.
Dolby, Dolby Vision, Dolby Atmos, Dolby Audio, and the double-D symbol are trademarks of Dolby Laboratories Licensing
Corporation.
Manufactured under license from Dolby Laboratories. Confidential unpublished works.
Copyright © 2012–2025 Dolby Laboratories. All rights reserved.
Manufactured under license from DTS, Inc. and/or its affiliates.
For patents, see https://xperi.com/dts-patents/.
DTS, the DTS logo, DTS:X, the DTS:X logo, Virtual:X, and the DTS Virtual:X logo are trademarks or registered trademarks of
DTS, Inc. and/or its affiliates in the U.S. and/or other countries.
© DTS, Inc. and/or its affiliates. All rights reserved.
To use AirPlay with AV Receiver, the latest version of iOS, iPadOS, or macOS is recommended.
Use of the Works with Apple AirPlay badge means that an accessory has been designed to work specifically with the
technology identified in the badge and has been certified by the developer to meet Apple performance standards.
Apple, AirPlay, Apple TV, Apple Watch, iPad, iPad Air, iPad Pro, iPhone, Lightning, and iTunes are trademarks of Apple Inc.,
registered in the U.S. and other countries and regions.
The terms HDMI, HDMI High-Definition Multimedia Interface, HDMI Trade Dress and the HDMI Logos are trademarks or
registered trademarks of HDMI Licensing Administrator, Inc.
The Bluetooth® word mark and logos are registered trademarks owned by Bluetooth SIG, Inc. and any use of such marks by
Yamaha Corporation is under license. Other trademarks and trade names are those of their respective owners.
The Wi-Fi CERTIFIED™ Logo and Wi-Fi Protected Setup Logo are registered trademark of Wi-Fi Alliance®.
Wi-Fi, Wi-Fi CERTIFIED, Wi-Fi Protected Setup and WPA2 are trademarks or registered trademarks of Wi-Fi Alliance®.
212
APPENDIX > Trademarks

x.v.Color™
“x.v.Color” is a trademark of Sony Corporation.
App Store
App Store is a service mark of Apple Inc., registered in the U.S. and other countries.
Android™ Google Play
Android, Google Play and Google Cast are trademarks of Google LLC.
Use your phone, tablet or computer as a remote control for Spotify. Go to spotify.com/connect to learn how.
The Spotify Software is subject to third party licenses found here:
www.spotify.com/connect/third-party-licenses
Qobuz and its logo are registered trademarks of Xandrie S.A.
Control playback in the TIDAL Music app.
On the TIDAL Music app’s playback screen, select this unit as the playback device.
For details, visit https://tidal.com/connect.
Google Noto Fonts
This product uses the following fonts.
Copyright © June 2015, Google (https://www.google.com/get/noto/#sans-lgc), with Reserved Font Name Noto Sans.
Copyright © June 2015, Google (https://www.google.com/get/noto/help/cjk/), with Reserved Font Name Noto Sans CJK.
This Font Software is licensed under the SIL Open Font License, Version1.1. This license is available with a FAQ at:
http://scripts.sil.org/OFL
213
APPENDIX > Trademarks

About third-party software programs
This product uses the following third-party software programs:
(
Cortex M CMSIS
(
STM32H5xx CMSIS
(
STM32H5xx HAL
(
FatFS
(
STM32_USB_Device_Library
(
STM32_USB_Host_Library
(
FreeRTOS (Amazon FreeRTOS POSIX)
(
FreeRTOS
(
ARM CCM
(
ARM ECC
(
USBware
(
Newlib
(
Red Hat Incorporated
(
University of California, Berkeley
(
David M. Gay (AT&T, Lucent Technologies)
(
Advanced Micro Devices
(
Sun Microsystems
(
Hewlett‑Packard Company
(
Hans‑Peter Nilsson
(
Christopher G. Demetriou
(
SuperH, Inc.
(
Royal Institute of Technology
(
Alexey Zelkin
(
Andrey A. Chernov
(
FreeBSD Project
(
S. L. Moshier
(
Citrus Project
(
Todd C. Miller
(
DJ Delorie
(
Mike Barcroft
(
Konstantin Chuguev
(
Artem Bityuckiy
(
Alex Tatmanjants
(
M. Warner Losh
(
Daniel Eischen
(
Ed Schouten
(
DMDecode
(
picojpeg
214
APPENDIX > About third-party software programs

(
DejaVu Fonts
(
Bitstream Vera Fonts
(
Arev Fonts
For information on copyrights and license conditions of each software program, refer to the following.
NOTE
(
At the request of the respective rights holders, the original (English) text is provided.
(
For other third-party software license information not contained in this manual, refer to the corresponding app for this product.
n
Cortex M CMSIS
Copyright © 2009–2023 ARM Limited. All rights reserved.
Licensed under the Apache License, Version 2.0 (the "License");
you may not use this file except in compliance with the License.
You may obtain a copy of the License at
http://www.apache.org/licenses/LICENSE-2.0
Unless required by applicable law or agreed to in writing, software distributed under the License is
distributed on an "AS IS" BASIS, WITHOUT WARRANTIES OR CONDITIONS OF ANY KIND, either express or
implied.
See the License for the specific language governing permissions and limitations under the License.
n
STM32H5xx CMSIS
ARM Limited – STMicroelectronics
Licensed under the Apache License, Version 2.0 (the "License");
you may not use this file except in compliance with the License.
You may obtain a copy of the License at
http://www.apache.org/licenses/LICENSE-2.0
Unless required by applicable law or agreed to in writing, software distributed under the License is
distributed on an "AS IS" BASIS, WITHOUT WARRANTIES OR CONDITIONS OF ANY KIND, either express or
implied.
See the License for the specific language governing permissions and limitations under the License.
n
STM32H5xx HAL
Copyright © 2023 STMicroelectronics.
All rights reserved.
215
APPENDIX > About third-party software programs

This software component is licensed by ST under BSD 3-Clause license, the "License"; You may not use this
file except in compliance with the License. You may obtain a copy of the License at:
https://opensource.org/licenses/BSD-3-Clause
n
FatFS
Copyright © 2017, ChaN, all right reserved.
FatFs module is an open source software. Redistribution and use of FatFs in source and binary forms, with or
without modification, are permitted provided that the following condition is met:
1. Redistributions of source code must retain the above copyright notice, this condition and the following
disclaimer.
This software is provided by the copyright holder and contributors "AS IS" and any warranties related to this
software are DISCLAIMED.
The copyright owner or contributors be NOT LIABLE for any damages caused by use of this software.
n
STM32_USB_Device_Library
Copyright © 2015 STMicroelectronics.
All rights reserved.
This software component is licensed by ST under Ultimate Liberty license SLA0044, the "License"; You may
not use this file except in compliance with the License. You may obtain a copy of the License at:
http://www.st.com/SLA0044
n
STM32_USB_Host_Library
Copyright © 2015 STMicroelectronics.
All rights reserved.
This software component is licensed by ST under Ultimate Liberty license SLA0044, the "License"; You may
not use this file except in compliance with the License. You may obtain a copy of the License at:
http://www.st.com/SLA0044
n
FreeRTOS
Amazon FreeRTOS POSIX V1.1.0
Copyright © 2018 Amazon.com, Inc. or its affiliates.
All Rights Reserved.
216
APPENDIX > About third-party software programs

Permission is hereby granted, free of charge, to any person obtaining a copy of this software and associated
documentation files (the "Software"), to deal in the Software without restriction, including without
limitation the rights to use, copy, modify, merge, publish, distribute, sublicense, and/or sell copies of the
Software, and to permit persons to whom the Software is furnished to do so, subject to the following
conditions:
The above copyright notice and this permission notice shall be included in all copies or substantial portions
of the Software.
THE SOFTWARE IS PROVIDED "AS IS", WITHOUT WARRANTY OF ANY KIND, EXPRESS OR IMPLIED, INCLUDING
BUT NOT LIMITED TO THE WARRANTIES OF MERCHANTABILITY, FITNESS FOR A PARTICULAR PURPOSE AND
NONINFRINGEMENT. IN NO EVENT SHALL THE AUTHORS OR COPYRIGHT HOLDERS BE LIABLE FOR ANY
CLAIM, DAMAGES OR OTHER LIABILITY, WHETHER IN AN ACTION OF CONTRACT, TORT OR OTHERWISE,
ARISING FROM, OUT OF OR IN CONNECTION WITH THE SOFTWARE OR THE USE OR OTHER DEALINGS IN THE
SOFTWARE.
n
FreeRTOS
Copyright © 2020 Amazon.com, Inc. or its affiliates.
All Rights Reserved
Permission is hereby granted, free of charge, to any person obtaining a copy of this software and associated
documentation files (the "Software"), to deal in the Software without restriction, including without
limitation the rights to use, copy, modify, merge, publish, distribute, sublicense, and/or sell copies of the
Software, and to permit persons to whom the Software is furnished to do so, subject to the following
conditions:
The above copyright notice and this permission notice shall be included in all copies or substantial portions
of the Software.
THE SOFTWARE IS PROVIDED "AS IS", WITHOUT WARRANTY OF ANY KIND, EXPRESS OR IMPLIED, INCLUDING
BUT NOT LIMITED TO THE WARRANTIES OF MERCHANTABILITY, FITNESS FOR A PARTICULAR PURPOSE AND
NONINFRINGEMENT. IN NO EVENT SHALL THE AUTHORS OR COPYRIGHT HOLDERS BE LIABLE FOR ANY
CLAIM, DAMAGES OR OTHER LIABILITY, WHETHER IN AN ACTION OF CONTRACT, TORT OR OTHERWISE,
ARISING FROM, OUT OF OR IN CONNECTION WITH THE SOFTWARE OR THE USE OR OTHER DEALINGS IN THE
SOFTWARE.
n
ARM CCM
Copyright © 2006-2015, ARM Limited, All Rights Reserved
This component is licensed under the GNU General Public License version 2 (GPLv2). You may use, modify
and redistribute the software under the terms of GPLv2, provided that:
(
Source code of the modified program is made available under GPLv2;
(
Copyright and license notices are preserved.
https://tls.mbed.org
n
ARM ECC
Copyright © 2013, Kenneth MacKay
All rights reserved.
217
APPENDIX > About third-party software programs

Redistribution and use in source and binary forms, with or without modification, are permitted provided that
the following conditions are met:
(
Redistributions of source code must retain the above copyright notice, this list of conditions and the
following disclaimer.
(
Redistributions in binary form must reproduce the above copyright notice, this list of conditions and the
following disclaimer in the documentation and/or other materials provided with the distribution.
https://github.com/kmackay/micro-ecc/blob/old/ecc.h
n
USBware
USBware from Jungo Ltd.
“This product includes software developed by the NetBSD Foundation, Inc. and its contributors.”
Neither the name of The NetBSD Foundation nor the names of its contributors may be used to endorse or
promote products derived from this software without specific prior written permission.
THIS SOFTWARE IS PROVIDED BY THE NETBSD FOUNDATION, INC. AND CONTRIBUTORS “AS IS” AND ANY
EXPRESS OR IMPLIED WARRANTIES, INCLUDING, BUT NOT LIMITED TO, THE IMPLIED WARRANTIES OF
MERCHANTABILITY AND FITNESS FOR A PARTICULAR PURPOSE ARE DISCLAIMED. IN NO EVENT SHALL THE
FOUNDATION OR CONTRIBUTORS BE LIABLE FOR ANY DIRECT, INDIRECT, INCIDENTAL, SPECIAL, EXEMPLARY,
OR CONSEQUENTIAL DAMAGES (INCLUDING, BUT NOT LIMITED TO, PROCUREMENT OF SUBSTITUTE GOODS
OR SERVICES; LOSS OF USE, DATA, OR PROFITS; OR BUSINESS INTERRUPTION) HOWEVER CAUSED AND ON
ANY THEORY OF LIABILITY, WHETHER IN CONTRACT, STRICT LIABILITY, OR TORT (INCLUDING NEGLIGENCE
OR OTHERWISE) ARISING IN ANY WAY OUT OF THE USE OF THIS SOFTWARE, EVEN IF ADVISED OF THE *
POSSIBILITY OF SUCH DAMAGE.
n
Newlib
The newlib subdirectory is a collection of software from several sources.
Each file may have its own copyright/license that is embedded in the source file.
Unless otherwise noted in the body of the source file(s), the following copyright notices will apply to the
contents of the newlib subdirectory:
1. Red Hat Incorporated
Copyright © 1994-2009 Red Hat, Inc. All rights reserved.
This copyrighted material is made available to anyone wishing to use, modify, copy, or redistribute it subject
to the terms and conditions of the BSD License. This program is distributed in the hope that it will be useful,
but WITHOUT ANY WARRANTY expressed or implied, including the implied warranties of MERCHANTABILITY
or FITNESS FOR A PARTICULAR PURPOSE. A copy of this license is available at
http://www.opensource.org/licenses. Any Red Hat trademarks that are incorporated in the source code or
documentation are not subject to the BSD License and may only be used or replicated with the express
permission of Red Hat, Inc.
218
APPENDIX > About third-party software programs

2. University of California, Berkeley
Copyright © 1981-2000 The Regents of the University of California. All rights reserved. Redistribution and use
in source and binary forms, with or without modification, are permitted provided that the following
conditions are met:
Redistributions of source code must retain the above copyright notice, this list of conditions and the
following disclaimer.
Redistributions in binary form must reproduce the above copyright notice, this list of conditions and the
following disclaimer in the documentation and/or other materials provided with the distribution.
Neither the name of the University nor the names of its contributors may be used to endorse or promote
products derived from this software without specific prior written permission.
THIS SOFTWARE IS PROVIDED BY THE COPYRIGHT HOLDERS AND CONTRIBUTORS "AS IS" AND ANY EXPRESS
OR IMPLIED WARRANTIES, INCLUDING, BUT NOT LIMITED TO, THE IMPLIED WARRANTIES OF
MERCHANTABILITY AND FITNESS FOR A PARTICULAR PURPOSE ARE DISCLAIMED. IN NO EVENT SHALL THE
COPYRIGHT OWNER OR CONTRIBUTORS BE LIABLE FOR ANY DIRECT, INDIRECT, INCIDENTAL, SPECIAL,
EXEMPLARY, OR CONSEQUENTIAL DAMAGES (INCLUDING, BUT NOT LIMITED TO, PROCUREMENT OF
SUBSTITUTE GOODS OR SERVICES; LOSS OF USE, DATA, OR PROFITS; OR BUSINESS INTERRUPTION)
HOWEVER CAUSED AND ON ANY THEORY OF LIABILITY, WHETHER IN CONTRACT, STRICT LIABILITY, OR TORT
(INCLUDING NEGLIGENCE OR OTHERWISE) ARISING IN ANY WAY OUT OF THE USE OF THIS SOFTWARE, EVEN
IF ADVISED OF THE POSSIBILITY OF SUCH DAMAGE.
3. David M. Gay (AT&T 1991, Lucent 1998)
The author of this software is David M. Gay.
Copyright © 1991 by AT&T.
Permission to use, copy, modify, and distribute this software for any purpose without fee is hereby granted,
provided that this entire notice is included in all copies of any software which is or includes a copy or
modification of this software and in all copies of the supporting documentation for such software.
THIS SOFTWARE IS BEING PROVIDED "AS IS", WITHOUT ANY EXPRESS OR IMPLIED WARRANTY. IN
PARTICULAR, NEITHER THE AUTHOR NOR AT&T MAKES ANY REPRESENTATION OR WARRANTY OF ANY KIND
CONCERNING THE MERCHANTABILITY OF THIS SOFTWARE OR ITS FITNESS FOR ANY PARTICULAR PURPOSE.
-------------------------------------------------------------------
The author of this software is David M. Gay.
Copyright © 1998-2001 by Lucent Technologies All Rights Reserved
Permission to use, copy, modify, and distribute this software and its documentation for any purpose and
without fee is hereby granted, provided that the above copyright notice appear in all copies and that both
that the copyright notice and this permission notice and warranty disclaimer appear in supporting
documentation, and that the name of Lucent or any of its entities not be used in advertising or publicity
pertaining to distribution of the software without specific, written prior permission.
LUCENT DISCLAIMS ALL WARRANTIES WITH REGARD TO THIS SOFTWARE, INCLUDING ALL IMPLIED
WARRANTIES OF MERCHANTABILITY AND FITNESS. IN NO EVENT SHALL LUCENT OR ANY OF ITS ENTITIES BE
LIABLE FOR ANY SPECIAL, INDIRECT OR CONSEQUENTIAL DAMAGES OR ANY DAMAGES WHATSOEVER
RESULTING FROM LOSS OF USE, DATA OR PROFITS, WHETHER IN AN ACTION OF CONTRACT, NEGLIGENCE OR
OTHER TORTIOUS ACTION, ARISING OUT OF OR IN CONNECTION WITH THE USE OR PERFORMANCE OF THIS
SOFTWARE.
219
APPENDIX > About third-party software programs

4. Advanced Micro Devices
Copyright 1989, 1990 Advanced Micro Devices, Inc.
This software is the property of Advanced Micro Devices, Inc (AMD) which specifically grants the user the right
to modify, use and distribute this software provided this notice is not removed or altered. All other rights are
reserved by AMD.
AMD MAKES NO WARRANTY OF ANY KIND, EXPRESS OR IMPLIED, WITH REGARD TO THIS SOFTWARE. IN NO
EVENT SHALL AMD BE LIABLE FOR INCIDENTAL OR CONSEQUENTIAL DAMAGES IN CONNECTION WITH OR
ARISING FROM THE FURNISHING, PERFORMANCE, OR USE OF THIS SOFTWARE.
So that all may benefit from your experience, please report any problems or suggestions about this software
to the 29K Technical Support Center at 800-29-29-AMD (800-292-9263) in the USA, or 0800-89-1131 in the UK,
or 0031-11-1129 in Japan, toll free. The direct dial number is 512-462-4118.
Advanced Micro Devices, Inc.
29K Support Products
Mail Stop 573
5900 E. Ben White Blvd.
Austin, TX 78741
800-292-9263
5. Sun Microsystems
Copyright © 1993 by Sun Microsystems, Inc. All rights reserved.
Developed at SunPro, a Sun Microsystems, Inc. business.
Permission to use, copy, modify, and distribute this software is freely granted, provided that this notice is
preserved.
6. Hewlett-Packard
© Copyright 1986 HEWLETT-PACKARD COMPANY
To anyone who acknowledges that this file is provided "AS IS" without any express or implied warranty:
permission to use, copy, modify, and distribute this file for any purpose is hereby granted without fee,
provided that the above copyright notice and this notice appears in all copies, and that the name of Hewlett-
Packard Company not be used in advertising or publicity pertaining to distribution of the software without
specific, written prior permission. Hewlett-Packard Company makes no representations about the suitability
of this software for any purpose.
7. Hans Peter Nilsson
Copyright © 2001 Hans Peter Nilsson.
Permission to use, copy, modify, and distribute this software is freely granted, provided that the above
copyright notice, this notice and the following disclaimer are preserved with no changes.
THIS SOFTWARE IS PROVIDED “AS IS” AND WITHOUT ANY EXPRESS OR IMPLIED WARRANTIES, INCLUDING,
WITHOUT LIMITATION, THE IMPLIED WARRANTIES OF MERCHANTABILITY AND FITNESS FOR A PARTICULAR
PURPOSE.
8. Christopher G. Demetriou
Copyright © 2001 Christopher G. Demetriou
220
APPENDIX > About third-party software programs

All rights reserved.
Redistribution and use in source and binary forms, with or without modification, are permitted provided that
the following conditions are met:
1. Redistributions of source code must retain the above copyright notice, this list of conditions and the
following disclaimer.
2. Redistributions in binary form must reproduce the above copyright notice, this list of conditions and the
following disclaimer in the documentation and/or other materials provided with the distribution.
3. The name of the author may not be used to endorse or promote products derived from this software
without specific prior written permission.
THIS SOFTWARE IS PROVIDED BY THE AUTHOR “AS IS” AND ANY EXPRESS OR IMPLIED WARRANTIES,
INCLUDING, BUT NOT LIMITED TO, THE IMPLIED WARRANTIES OF MERCHANTABILITY AND FITNESS FOR A
PARTICULAR PURPOSE ARE DISCLAIMED. IN NO EVENT SHALL THE AUTHOR BE LIABLE FOR ANY DIRECT,
INDIRECT, INCIDENTAL, SPECIAL, EXEMPLARY, OR CONSEQUENTIAL DAMAGES (INCLUDING, BUT NOT
LIMITED TO, PROCUREMENT OF SUBSTITUTE GOODS OR SERVICES; LOSS OF USE, DATA, OR PROFITS; OR
BUSINESS INTERRUPTION) HOWEVER CAUSED AND ON ANY THEORY OF LIABILITY, WHETHER IN CONTRACT,
STRICT LIABILITY, OR TORT (INCLUDING NEGLIGENCE OR OTHERWISE) ARISING IN ANY WAY OUT OF THE USE
OF THIS SOFTWARE, EVEN IF ADVISED OF THE POSSIBILITY OF SUCH DAMAGE.
9. SuperH, Inc.
Copyright 2002 SuperH, Inc. All rights reserved
This software is the property of SuperH, Inc (SuperH) which specifically grants the user the right to modify,
use and distribute this software provided this notice is not removed or altered. All other rights are reserved
by SuperH.
SUPERH MAKES NO WARRANTY OF ANY KIND, EXPRESS OR IMPLIED, WITH REGARD TO THIS SOFTWARE. IN
NO EVENT SHALL SUPERH BE LIABLE FOR INDIRECT, SPECIAL, INCIDENTAL OR CONSEQUENTIAL DAMAGES IN
CONNECTION WITH OR ARISING FROM THE FURNISHING, PERFORMANCE, OR USE OF THIS SOFTWARE.
So that all may benefit from your experience, please report any problems or suggestions about this software
to the SuperH Support Center via e-mail at [email protected] .
SuperH, Inc. 405 River Oaks Parkway San Jose CA 95134 USA
10. Royal Institute of Technology
Copyright © 1999 Kungliga Tekniska Högskolan (Royal Institute of Technology, Stockholm, Sweden).
All rights reserved.
Redistribution and use in source and binary forms, with or without modification, are permitted provided that
the following conditions are met:
1. Redistributions of source code must retain the above copyright notice, this list of conditions and the
following disclaimer.
2. Redistributions in binary form must reproduce the above copyright notice, this list of conditions and the
following disclaimer in the documentation and/or other materials provided with the distribution.
3. Neither the name of KTH nor the names of its contributors may be used to endorse or promote products
derived from this software without specific prior written permission.
THIS SOFTWARE IS PROVIDED BY KTH AND ITS CONTRIBUTORS “AS IS” AND ANY EXPRESS OR IMPLIED
WARRANTIES, INCLUDING, BUT NOT LIMITED TO, THE IMPLIED WARRANTIES OF MERCHANTABILITY AND
FITNESS FOR A PARTICULAR PURPOSE ARE DISCLAIMED. IN NO EVENT SHALL KTH OR ITS CONTRIBUTORS BE
LIABLE FOR ANY DIRECT, INDIRECT, INCIDENTAL, SPECIAL, EXEMPLARY, OR CONSEQUENTIAL DAMAGES
221
APPENDIX > About third-party software programs

(INCLUDING, BUT NOT LIMITED TO, PROCUREMENT OF SUBSTITUTE GOODS OR SERVICES; LOSS OF USE,
DATA, OR PROFITS; OR BUSINESS INTERRUPTION) HOWEVER CAUSED AND ON ANY THEORY OF LIABILITY,
WHETHER IN CONTRACT, STRICT LIABILITY, OR TORT (INCLUDING NEGLIGENCE OR OTHERWISE) ARISING IN
ANY WAY OUT OF THE USE OF THIS SOFTWARE, EVEN IF ADVISED OF THE POSSIBILITY OF SUCH DAMAGE.
11. Alexey Zelkin
Copyright © 2000, 2001 Alexey Zelkin <[email protected]> All rights reserved.
Redistribution and use in source and binary forms, with or without modification, are permitted provided that
the following conditions are met:
1. Redistributions of source code must retain the above copyright notice, this list of conditions and the
following disclaimer.
2. Redistributions in binary form must reproduce the above copyright notice, this list of conditions and the
following disclaimer in the documentation and/or other materials provided with the distribution.
THIS SOFTWARE IS PROVIDED BY THE AUTHOR AND CONTRIBUTORS “AS IS” AND ANY EXPRESS OR IMPLIED
WARRANTIES, INCLUDING, BUT NOT LIMITED TO, THE IMPLIED WARRANTIES OF MERCHANTABILITY AND
FITNESS FOR A PARTICULAR PURPOSE ARE DISCLAIMED. IN NO EVENT SHALL THE AUTHOR OR
CONTRIBUTORS BE LIABLE FOR ANY DIRECT, INDIRECT, INCIDENTAL, SPECIAL, EXEMPLARY, OR
CONSEQUENTIAL DAMAGES (INCLUDING, BUT NOT LIMITED TO, PROCUREMENT OF SUBSTITUTE GOODS OR
SERVICES; LOSS OF USE, DATA, OR PROFITS; OR BUSINESS INTERRUPTION) HOWEVER CAUSED AND ON ANY
THEORY OF LIABILITY, WHETHER IN CONTRACT, STRICT LIABILITY, OR TORT (INCLUDING NEGLIGENCE OR
OTHERWISE) ARISING IN ANY WAY OUT OF THE USE OF THIS SOFTWARE, EVEN IF ADVISED OF THE
POSSIBILITY OF SUCH DAMAGE.
12. Andrey A. Chernov
Copyright © 1997 by Andrey A. Chernov, Moscow, Russia.
All rights reserved.
Redistribution and use in source and binary forms, with or without modification, are permitted provided that
the following conditions are met:
1. Redistributions of source code must retain the above copyright notice, this list of conditions and the
following disclaimer.
2. Redistributions in binary form must reproduce the above copyright notice, this list of conditions and the
following disclaimer in the documentation and/or other materials provided with the distribution.
THIS SOFTWARE IS PROVIDED BY THE AUTHOR “AS IS” AND ANY EXPRESS OR IMPLIED WARRANTIES,
INCLUDING, BUT NOT LIMITED TO, THE IMPLIED WARRANTIES OF MERCHANTABILITY AND FITNESS FOR A
PARTICULAR PURPOSE ARE DISCLAIMED. IN NO EVENT SHALL THE REGENTS OR CONTRIBUTORS BE LIABLE
FOR ANY DIRECT, INDIRECT, INCIDENTAL, SPECIAL, EXEMPLARY, OR CONSEQUENTIAL DAMAGES (INCLUDING,
BUT NOT LIMITED TO, PROCUREMENT OF SUBSTITUTE GOODS OR SERVICES; LOSS OF USE, DATA, OR
PROFITS; OR BUSINESS INTERRUPTION) HOWEVER CAUSED AND ON ANY THEORY OF LIABILITY, WHETHER IN
CONTRACT, STRICT LIABILITY, OR TORT (INCLUDING NEGLIGENCE OR OTHERWISE) ARISING IN ANY WAY OUT
OF THE USE OF THIS SOFTWARE, EVEN IF ADVISED OF THE POSSIBILITY OF SUCH DAMAGE.
13. FreeBSD
Copyright © 1997-2002 FreeBSD Project. All rights reserved.
Redistribution and use in source and binary forms, with or without modification, are permitted provided that
the following conditions are met:
222
APPENDIX > About third-party software programs

1. Redistributions of source code must retain the above copyright notice, this list of conditions and the
following disclaimer.
2. Redistributions in binary form must reproduce the above copyright notice, this list of conditions and the
following disclaimer in the documentation and/or other materials provided with the distribution.
THIS SOFTWARE IS PROVIDED BY THE AUTHOR AND CONTRIBUTORS ``AS IS'' AND ANY EXPRESS OR IMPLIED
WARRANTIES, INCLUDING, BUT NOT LIMITED TO, THE IMPLIED WARRANTIES OF MERCHANTABILITY AND
FITNESS FOR A PARTICULAR PURPOSE ARE DISCLAIMED. IN NO EVENT SHALL THE AUTHOR OR
CONTRIBUTORS BE LIABLE FOR ANY DIRECT, INDIRECT, INCIDENTAL, SPECIAL, EXEMPLARY, OR
CONSEQUENTIAL DAMAGES (INCLUDING, BUT NOT LIMITED TO, PROCUREMENT OF SUBSTITUTE GOODS OR
SERVICES; LOSS OF USE, DATA, OR PROFITS; OR BUSINESS INTERRUPTION) HOWEVER CAUSED AND ON ANY
THEORY OF LIABILITY, WHETHER IN CONTRACT, STRICT LIABILITY, OR TORT (INCLUDING NEGLIGENCE OR
OTHERWISE) ARISING IN ANY WAY OUT OF THE USE OF THIS SOFTWARE, EVEN IF ADVISED OF THE
POSSIBILITY OF SUCH DAMAGE.
14. S. L. Moshier
Author: S. L. Moshier.
Copyright © 1984,2000 S.L. Moshier
Permission to use, copy, modify, and distribute this software for any purpose without fee is hereby granted,
provided that this entire notice is included in all copies of any software which is or includes a copy or
modification of this software and in all copies of the supporting documentation for such software.
THIS SOFTWARE IS BEING PROVIDED "AS IS", WITHOUT ANY EXPRESS OR IMPLIED WARRANTY. IN
PARTICULAR, THE AUTHOR MAKES NO REPRESENTATION OR WARRANTY OF ANY KIND CONCERNING THE
MERCHANTABILITY OF THIS SOFTWARE OR ITS FITNESS FOR ANY PARTICULAR PURPOSE.
15. Citrus Project
Copyright ©1999 Citrus Project, All rights reserved.
Redistribution and use in source and binary forms, with or without modification, are permitted provided that
the following conditions are met:
1. Redistributions of source code must retain the above copyright notice, this list of conditions and the
following disclaimer.
2. Redistributions in binary form must reproduce the above copyright notice, this list of conditions and the
following disclaimer in the documentation and/or other materials provided with the distribution.
THIS SOFTWARE IS PROVIDED BY THE AUTHOR AND CONTRIBUTORS “AS IS” AND ANY EXPRESS OR IMPLIED
WARRANTIES, INCLUDING, BUT NOT LIMITED TO, THE IMPLIED WARRANTIES OF MERCHANTABILITY AND
FITNESS FOR A PARTICULAR PURPOSE ARE DISCLAIMED. IN NO EVENT SHALL THE AUTHOR OR
CONTRIBUTORS BE LIABLE FOR ANY DIRECT, INDIRECT, INCIDENTAL, SPECIAL, EXEMPLARY, OR
CONSEQUENTIAL DAMAGES (INCLUDING, BUT NOT LIMITED TO, PROCUREMENT OF SUBSTITUTE GOODS OR
SERVICES; LOSS OF USE, DATA, OR PROFITS; OR BUSINESS INTERRUPTION) HOWEVER CAUSED AND ON ANY
THEORY OF LIABILITY, WHETHER IN CONTRACT, STRICT LIABILITY, OR TORT (INCLUDING NEGLIGENCE OR
OTHERWISE) ARISING IN ANY WAY OUT OF THE USE OF THIS SOFTWARE, EVEN IF ADVISED OF THE
POSSIBILITY OF SUCH DAMAGE.
16. Todd C. Miller
Copyright © 1998 Todd C. Miller <[email protected]> All rights reserved.
223
APPENDIX > About third-party software programs

Redistribution and use in source and binary forms, with or without modification, are permitted provided that
the following conditions are met:
1. Redistributions of source code must retain the above copyright notice, this list of conditions and the
following disclaimer.
2. Redistributions in binary form must reproduce the above copyright notice, this list of conditions and the
following disclaimer in the documentation and/or other materials provided with the distribution.
3. The name of the author may not be used to endorse or promote products derived from this software
without specific prior written permission.
THIS SOFTWARE IS PROVIDED “AS IS” AND ANY EXPRESS OR IMPLIED WARRANTIES, INCLUDING, BUT NOT
LIMITED TO, THE IMPLIED WARRANTIES OF MERCHANTABILITY AND FITNESS FOR A PARTICULAR PURPOSE
ARE DISCLAIMED. IN NO EVENT SHALL THE AUTHOR BE LIABLE FOR ANY DIRECT, INDIRECT, INCIDENTAL,
SPECIAL, EXEMPLARY, OR CONSEQUENTIAL DAMAGES (INCLUDING, BUT NOT LIMITED TO, PROCUREMENT OF
SUBSTITUTE GOODS OR SERVICES; LOSS OF USE, DATA, OR PROFITS; OR BUSINESS INTERRUPTION)
HOWEVER CAUSED AND ON ANY THEORY OF LIABILITY, WHETHER IN CONTRACT, STRICT LIABILITY, OR TORT
(INCLUDING NEGLIGENCE OR OTHERWISE) ARISING IN ANY WAY OUT OF THE USE OF THIS SOFTWARE, EVEN
IF ADVISED OF THE POSSIBILITY OF SUCH DAMAGE.
17. DJ Delorie (i386)
Copyright © 1991 DJ Delorie All rights reserved.
Redistribution, modification, and use in source and binary forms is permitted provided that the above
copyright notice and following paragraph are duplicated in all such forms.
This file is distributed WITHOUT ANY WARRANTY; without even the implied warranty of MERCHANTABILITY or
FITNESS FOR A PARTICULAR PURPOSE.
18. Mike Barcroft
Copyright © 2001 Mike Barcroft <[email protected]>
All rights reserved.
Redistribution and use in source and binary forms, with or without modification, are permitted provided that
the following conditions are met:
1. Redistributions of source code must retain the above copyright notice, this list of conditions and the
following disclaimer.
2. Redistributions in binary form must reproduce the above copyright notice, this list of conditions and the
following disclaimer in the documentation and/or other materials provided with the distribution.
THIS SOFTWARE IS PROVIDED BY THE AUTHOR AND CONTRIBUTORS “AS IS” AND ANY EXPRESS OR IMPLIED
WARRANTIES, INCLUDING, BUT NOT LIMITED TO, THE IMPLIED WARRANTIES OF MERCHANTABILITY AND
FITNESS FOR A PARTICULAR PURPOSE ARE DISCLAIMED. IN NO EVENT SHALL THE AUTHOR OR
CONTRIBUTORS BE LIABLE FOR ANY DIRECT, INDIRECT, INCIDENTAL, SPECIAL, EXEMPLARY, OR
CONSEQUENTIAL DAMAGES (INCLUDING, BUT NOT LIMITED TO, PROCUREMENT OF SUBSTITUTE GOODS OR
SERVICES; LOSS OF USE, DATA, OR PROFITS; OR BUSINESS INTERRUPTION) HOWEVER CAUSED AND ON ANY
THEORY OF LIABILITY, WHETHER IN CONTRACT, STRICT LIABILITY, OR TORT (INCLUDING NEGLIGENCE OR
OTHERWISE) ARISING IN ANY WAY OUT OF THE USE OF THIS SOFTWARE, EVEN IF ADVISED OF THE
POSSIBILITY OF SUCH DAMAGE.
19. Konstantin Chuguev (--enable-newlib-iconv)
Copyright © 1999, 2000 Konstantin Chuguev. All rights reserved.
224
APPENDIX > About third-party software programs

Redistribution and use in source and binary forms, with or without modification, are permitted provided that
the following conditions are met:
1. Redistributions of source code must retain the above copyright notice, this list of conditions and the
following disclaimer.
2. Redistributions in binary form must reproduce the above copyright notice, this list of conditions and the
following disclaimer in the documentation and/or other materials provided with the distribution.
THIS SOFTWARE IS PROVIDED BY THE AUTHOR AND CONTRIBUTORS “AS IS” AND ANY EXPRESS OR IMPLIED
WARRANTIES, INCLUDING, BUT NOT LIMITED TO, THE IMPLIED WARRANTIES OF MERCHANTABILITY AND
FITNESS FOR A PARTICULAR PURPOSE ARE DISCLAIMED. IN NO EVENT SHALL THE AUTHOR OR
CONTRIBUTORS BE LIABLE FOR ANY DIRECT, INDIRECT, INCIDENTAL, SPECIAL, EXEMPLARY, OR
CONSEQUENTIAL DAMAGES (INCLUDING, BUT NOT LIMITED TO, PROCUREMENT OF SUBSTITUTE GOODS OR
SERVICES; LOSS OF USE, DATA, OR PROFITS; OR BUSINESS INTERRUPTION) HOWEVER CAUSED AND ON ANY
THEORY OF LIABILITY, WHETHER IN CONTRACT, STRICT LIABILITY, OR TORT (INCLUDING NEGLIGENCE OR
OTHERWISE) ARISING IN ANY WAY OUT OF THE USE OF THIS SOFTWARE, EVEN IF ADVISED OF THE
POSSIBILITY OF SUCH DAMAGE.
iconv (Charset Conversion Library) v2.0
20. Artem Bityuckiy (--enable-newlib-iconv)
Copyright © 2003, Artem B. Bityuckiy, SoftMine Corporation. Rights transferred to Franklin Electronic
Publishers.
Redistribution and use in source and binary forms, with or without modification, are permitted provided that
the following conditions are met:
1. Redistributions of source code must retain the above copyright notice, this list of conditions and the
following disclaimer.
2. Redistributions in binary form must reproduce the above copyright notice, this list of conditions and the
following disclaimer in the documentation and/or other materials provided with the distribution.
THIS SOFTWARE IS PROVIDED BY THE AUTHOR AND CONTRIBUTORS “AS IS” AND ANY EXPRESS OR IMPLIED
WARRANTIES, INCLUDING, BUT NOT LIMITED TO, THE IMPLIED WARRANTIES OF MERCHANTABILITY AND
FITNESS FOR A PARTICULAR PURPOSE ARE DISCLAIMED. IN NO EVENT SHALL THE AUTHOR OR
CONTRIBUTORS BE LIABLE FOR ANY DIRECT, INDIRECT, INCIDENTAL, SPECIAL, EXEMPLARY, OR
CONSEQUENTIAL DAMAGES (INCLUDING, BUT NOT LIMITED TO, PROCUREMENT OF SUBSTITUTE GOODS OR
SERVICES; LOSS OF USE, DATA, OR PROFITS; OR BUSINESS INTERRUPTION) HOWEVER CAUSED AND ON ANY
THEORY OF LIABILITY, WHETHER IN CONTRACT, STRICT LIABILITY, OR TORT (INCLUDING NEGLIGENCE OR
OTHERWISE) ARISING IN ANY WAY OUT OF THE USE OF THIS SOFTWARE, EVEN IF ADVISED OF THE
POSSIBILITY OF SUCH DAMAGE.
21. Alex Tatmanjants (targets using libc/posix)
Copyright © 1995 Alex Tatmanjants <[email protected]> at Electronni Visti IA, Kiev, Ukraine
All rights reserved.
Redistribution and use in source and binary forms, with or without modification, are permitted provided that
the following conditions are met:
1. Redistributions of source code must retain the above copyright notice, this list of conditions and the
following disclaimer.
2. Redistributions in binary form must reproduce the above copyright notice, this list of conditions and the
following disclaimer in the documentation and/or other materials provided with the distribution.
225
APPENDIX > About third-party software programs

THIS SOFTWARE IS PROVIDED BY THE AUTHOR “AS IS” AND ANY EXPRESS OR IMPLIED WARRANTIES,
INCLUDING, BUT NOT LIMITED TO, THE IMPLIED WARRANTIES OF MERCHANTABILITY AND FITNESS FOR A
PARTICULAR PURPOSE ARE DISCLAIMED. IN NO EVENT SHALL THE AUTHOR BE LIABLE FOR ANY DIRECT,
INDIRECT, INCIDENTAL, SPECIAL, EXEMPLARY, OR CONSEQUENTIAL DAMAGES (INCLUDING, BUT NOT
LIMITED TO, PROCUREMENT OF SUBSTITUTE GOODS OR SERVICES; LOSS OF USE, DATA, OR PROFITS; OR
BUSINESS INTERRUPTION) HOWEVER CAUSED AND ON ANY THEORY OF LIABILITY, WHETHER IN CONTRACT,
STRICT LIABILITY, OR TORT (INCLUDING NEGLIGENCE OR OTHERWISE) ARISING IN ANY WAY OUT OF THE USE
OF THIS SOFTWARE, EVEN IF ADVISED OF THE POSSIBILITY OF SUCH DAMAGE.
22. M. Warner Losh(targets using libc/posix)
Copyright © 1998, M. Warner Losh [email protected]
All rights reserved.
Redistribution and use in source and binary forms, with or without modification, are permitted provided that
the following conditions are met:
1. Redistributions of source code must retain the above copyright notice, this list of conditions and the
following disclaimer.
2. Redistributions in binary form must reproduce the above copyright notice, this list of conditions and the
following disclaimer in the documentation and/or other materials provided with the distribution.
THIS SOFTWARE IS PROVIDED BY THE AUTHOR AND CONTRIBUTORS ``AS IS'' AND ANY EXPRESS OR IMPLIED
WARRANTIES, INCLUDING, BUT NOT LIMITED TO, THE IMPLIED WARRANTIES OF MERCHANTABILITY AND
FITNESS FOR A PARTICULAR PURPOSE ARE DISCLAIMED. IN NO EVENT SHALL THE AUTHOR OR
CONTRIBUTORS BE LIABLE FOR ANY DIRECT, INDIRECT, INCIDENTAL, SPECIAL, EXEMPLARY, OR
CONSEQUENTIAL DAMAGES (INCLUDING, BUT NOT LIMITED TO, PROCUREMENT OF SUBSTITUTE GOODS OR
SERVICES; LOSS OF USE, DATA, OR PROFITS; OR BUSINESS INTERRUPTION) HOWEVER CAUSED AND ON ANY
THEORY OF LIABILITY, WHETHER IN CONTRACT, STRICT LIABILITY, OR TORT (INCLUDING NEGLIGENCE OR
OTHERWISE) ARISING IN ANY WAY OUT OF THE USE OF THIS SOFTWARE, EVEN IF ADVISED OF THE
POSSIBILITY OF SUCH DAMAGE.
23. Andrey A. Chernov (targets using libc/posix)
Copyright © 1996 by Andrey A. Chernov, Moscow, Russia.
All rights reserved.
Redistribution and use in source and binary forms, with or without modification, are permitted provided that
the following conditions are met:
1. Redistributions of source code must retain the above copyright notice, this list of conditions and the
following disclaimer.
2. Redistributions in binary form must reproduce the above copyright notice, this list of conditions and the
following disclaimer in the documentation and/or other materials provided with the distribution.
THIS SOFTWARE IS PROVIDED BY THE AUTHOR “AS IS” AND ANY EXPRESS OR IMPLIED WARRANTIES,
INCLUDING, BUT NOT LIMITED TO, THE IMPLIED WARRANTIES OF MERCHANTABILITY AND FITNESS FOR A
PARTICULAR PURPOSE ARE DISCLAIMED. IN NO EVENT SHALL THE REGENTS OR CONTRIBUTORS BE LIABLE
FOR ANY DIRECT, INDIRECT, INCIDENTAL, SPECIAL, EXEMPLARY, OR CONSEQUENTIAL DAMAGES (INCLUDING,
BUT NOT LIMITED TO, PROCUREMENT OF SUBSTITUTE GOODS OR SERVICES; LOSS OF USE, DATA, OR
PROFITS; OR BUSINESS INTERRUPTION) HOWEVER CAUSED AND ON ANY THEORY OF LIABILITY, WHETHER IN
CONTRACT, STRICT LIABILITY, OR TORT (INCLUDING NEGLIGENCE OR OTHERWISE) ARISING IN ANY WAY OUT
OF THE USE OF THIS SOFTWARE, EVEN IF ADVISED OF THE POSSIBILITY OF SUCH DAMAGE.
226
APPENDIX > About third-party software programs

24. Daniel Eischen (targets using libc/posix)
Copyright © 2001 Daniel Eischen <[email protected]>.
All rights reserved.
Redistribution and use in source and binary forms, with or without modification, are permitted provided that
the following conditions are met:
1. Redistributions of source code must retain the above copyright notice, this list of conditions and the
following disclaimer.
2. Redistributions in binary form must reproduce the above copyright notice, this list of conditions and the
following disclaimer in the documentation and/or other materials provided with the distribution.
THIS SOFTWARE IS PROVIDED BY THE AUTHOR AND CONTRIBUTORS “AS IS” AND ANY EXPRESS OR IMPLIED
WARRANTIES, INCLUDING, BUT NOT LIMITED TO, THE IMPLIED WARRANTIES OF MERCHANTABILITY AND
FITNESS FOR A PARTICULAR PURPOSE ARE DISCLAIMED. IN NO EVENT SHALL THE REGENTS OR
CONTRIBUTORS BE LIABLE FOR ANY DIRECT, INDIRECT, INCIDENTAL, SPECIAL, EXEMPLARY, OR
CONSEQUENTIAL DAMAGES (INCLUDING, BUT NOT LIMITED TO, PROCUREMENT OF SUBSTITUTE GOODS OR
SERVICES; LOSS OF USE, DATA, OR PROFITS; OR BUSINESS INTERRUPTION) HOWEVER CAUSED AND ON ANY
THEORY OF LIABILITY, WHETHER IN CONTRACT, STRICT LIABILITY, OR TORT (INCLUDING NEGLIGENCE OR
OTHERWISE) ARISING IN ANY WAY OUT OF THE USE OF THIS SOFTWARE, EVEN IF ADVISED OF THE
POSSIBILITY OF SUCH DAMAGE.
25. Ed Schouten - Free BSD
Copyright © 2008 Ed Schouten <[email protected]> All rights reserved.
Redistribution and use in source and binary forms, with or without modification, are permitted provided that
the following conditions are met:
1. Redistributions of source code must retain the above copyright notice, this list of conditions and the
following disclaimer.
2. Redistributions in binary form must reproduce the above copyright notice, this list of conditions and the
following disclaimer in the documentation and/or other materials provided with the distribution.
THIS SOFTWARE IS PROVIDED BY THE AUTHOR AND CONTRIBUTORS ``AS IS'' AND ANY EXPRESS OR IMPLIED
WARRANTIES, INCLUDING, BUT NOT LIMITED TO, THE IMPLIED WARRANTIES OF MERCHANTABILITY AND
FITNESS FOR A PARTICULAR PURPOSE ARE DISCLAIMED. IN NO EVENT SHALL THE AUTHOR OR
CONTRIBUTORS BE LIABLE FOR ANY DIRECT, INDIRECT, INCIDENTAL, SPECIAL, EXEMPLARY, OR
CONSEQUENTIAL DAMAGES (INCLUDING, BUT NOT LIMITED TO, PROCUREMENT OF SUBSTITUTE GOODS OR
SERVICES; LOSS OF USE, DATA, OR PROFITS; OR BUSINESS INTERRUPTION) HOWEVER CAUSED AND ON ANY
THEORY OF LIABILITY, WHETHER IN CONTRACT, STRICT LIABILITY, OR TORT (INCLUDING NEGLIGENCE OR
OTHERWISE) ARISING IN ANY WAY OUT OF THE USE OF THIS SOFTWARE, EVEN IF ADVISED OF THE
POSSIBILITY OF SUCH DAMAGE.
n
DMDecode
Simon Tatham
This software is copyright 2008 Simon Tatham.
Permission is hereby granted, free of charge, to any person obtaining a copy of this software and associated
documentation files (the "Software"), to deal in the Software without restriction, including without
limitation the rights to use, copy, modify, merge, publish, distribute, sublicense, and/or sell copies of the
Software, and to permit persons to whom the Software is furnished to do so, subject to the following
conditions:
227
APPENDIX > About third-party software programs

The above copyright notice and this permission notice shall be included in all copies or substantial portions
of the Software.
THE SOFTWARE IS PROVIDED "AS IS", WITHOUT WARRANTY OF ANY KIND, EXPRESS OR IMPLIED, INCLUDING
BUT NOT LIMITED TO THE WARRANTIES OF MERCHANTABILITY, FITNESS FOR A PARTICULAR PURPOSE AND
NONINFRINGEMENT. IN NO EVENT SHALL THE COPYRIGHT HOLDERS BE LIABLE FOR ANY CLAIM, DAMAGES
OR OTHER LIABILITY, WHETHER IN AN ACTION OF CONTRACT, TORT OR OTHERWISE, ARISING FROM, OUT OF
OR IN CONNECTION WITH THE SOFTWARE OR THE USE OR OTHER DEALINGS IN THE SOFTWARE.
n
picojpeg
Rich Geldreich
Picojpeg is a public domain JPEG decompressor (Used in DAB slideshow) picojpeg - Public domain, Rich
Geldreich <[email protected]>
THE FOLLOWING FILE IS PROVIDED "AS IS", WITHOUT WARRANTY OF ANY KIND, EXPRESS OR IMPLIED,
INCLUDING BUT NOT LIMITED TO THE WARRANTIESOF MERCHANTABILITY, FITNESS FOR A PARTICULAR
PURPOSE AND NONINFRINGEMENT.
n
DejaVu Fonts
DejaVu Fonts are used in the colour variant.
Fonts are © Bitstream (see below). DejaVu changes are in public domain. Explanation of copyright is on
Gnome page on Bitstream Vera fonts (http://gnome.org/fonts/). Glyphs imported from Arev (https://dejavu-
fonts.github.io/Bitstream_Vera_Derivatives.html) fonts are © Tavmjung Bah (see below)
Bitstream Vera Fonts Copyright
Copyright © 2003 by Bitstream, Inc. All Rights Reserved. Bitstream Vera is a trademark of Bitstream, Inc.
Permission is hereby granted, free of charge, to any person obtaining a copy of the fonts accompanying this
license ("Fonts") and associated documentation files (the "Font Software"), to reproduce and distribute the
Font Software, including without limitation the rights to use, copy, merge, publish, distribute, and/or sell
copies of the Font Software, and to permit persons to whom the Font Software is furnished to do so, subject
to the following conditions:
The above copyright and trademark notices and this permission notice shall be included in all copies of one
or more of the Font Software typefaces.
The Font Software may be modified, altered, or added to, and in particular the designs of glyphs or
characters in the Fonts may be modified and additional glyphs or characters may be added to the Fonts, only
if the fonts are renamed to names not containing either the words "Bitstream" or the word "Vera".
This License becomes null and void to the extent applicable to Fonts or Font Software that has been
modified and is distributed under the "Bitstream Vera" names.
The Font Software may be sold as part of a larger software package but no copy of one or more of the Font
Software typefaces may be sold by itself.
THE FONT SOFTWARE IS PROVIDED "AS IS", WITHOUT WARRANTY OF ANY KIND, EXPRESS OR IMPLIED,
INCLUDING BUT NOT LIMITED TO ANY WARRANTIES OF MERCHANTABILITY, FITNESS FOR A PARTICULAR
PURPOSE AND NONINFRINGEMENT OF COPYRIGHT, PATENT, TRADEMARK, OR OTHER RIGHT. IN NO EVENT
SHALL BITSTREAM OR THE GNOME FOUNDATION BE LIABLE FOR ANY CLAIM, DAMAGES OR OTHER LIABILITY,
228
APPENDIX > About third-party software programs

INCLUDING ANY GENERAL, SPECIAL, INDIRECT, INCIDENTAL, OR CONSEQUENTIAL DAMAGES, WHETHER IN AN
ACTION OF CONTRACT, TORT OR OTHERWISE, ARISING FROM, OUT OF THE USE OR INABILITY TO USE THE
FONT SOFTWARE OR FROM OTHER DEALINGS IN THE FONT SOFTWARE.
Except as contained in this notice, the names of Gnome, the Gnome Foundation, and Bitstream Inc., shall not
be used in advertising or otherwise to promote the sale, use or other dealings in this Font Software without
prior written authorization from the Gnome Foundation or Bitstream Inc., respectively. For further
information, contact: fonts at gnome dot org.
Arev Fonts Copyright
Copyright © 2006 by Tavmjong Bah. All Rights Reserved.
Permission is hereby granted, free of charge, to any person obtaining a copy of the fonts accompanying this
license ("Fonts") and associated documentation files (the "Font Software"), to reproduce and distribute the
modifications to the Bitstream Vera Font Software, including without limitation the rights to use, copy,
merge, publish, distribute, and/or sell copies of the Font Software, and to permit persons to whom the Font
Software is furnished to do so, subject to the following conditions:
The above copyright and trademark notices and this permission notice shall be included in all copies of one
or more of the Font Software typefaces.
The Font Software may be modified, altered, or added to, and in particular the designs of glyphs or
characters in the Fonts may be modified and additional glyphs or characters may be added to the Fonts, only
if the fonts are renamed to names not containing either the words "Tavmjong Bah" or the word "Arev".
This License becomes null and void to the extent applicable to Fonts or Font Software that has been
modified and is distributed under the "Tavmjong Bah Arev" names.
The Font Software may be sold as part of a larger software package but no copy of one or more of the Font
Software typefaces may be sold by itself.
THE FONT SOFTWARE IS PROVIDED "AS IS", WITHOUT WARRANTY OF ANY KIND, EXPRESS OR IMPLIED,
INCLUDING BUT NOT LIMITED TO ANY WARRANTIES OF MERCHANTABILITY, FITNESS FOR A PARTICULAR
PURPOSE AND NONINFRINGEMENT OF COPYRIGHT, PATENT, TRADEMARK, OR OTHER RIGHT. IN NO EVENT
SHALL TAVMJONG BAH BE LIABLE FOR ANY CLAIM, DAMAGES OR OTHER LIABILITY, INCLUDING ANY GENERAL,
SPECIAL, INDIRECT, INCIDENTAL, OR CONSEQUENTIAL DAMAGES, WHETHER IN AN ACTION OF CONTRACT,
TORT OR OTHERWISE, ARISING FROM, OUT OF THE USE OR INABILITY TO USE THE FONT SOFTWARE OR
FROM OTHER DEALINGS IN THE FONT SOFTWARE.
Except as contained in this notice, the name of Tavmjong Bah shall not be used in advertising or otherwise to
promote the sale, use or other dealings in this Font Software without prior written authorization from
Tavmjong Bah. For further information, contact: [email protected].
229
APPENDIX > About third-party software programs

Yamaha Global Site
https://www.yamaha.com/
Yamaha Downloads
https://download.yamaha.com/
© 2026 Yamaha Corporation
Published 05/2026 NV-A1
AV25-0016
Layout Folder: YMH_PDF_Manual_A5_AV
Stylesheet Name: 01_YMH_PDF_Manual_A5_AV_En-Multi
Stylesheet Version: 2026.4.8