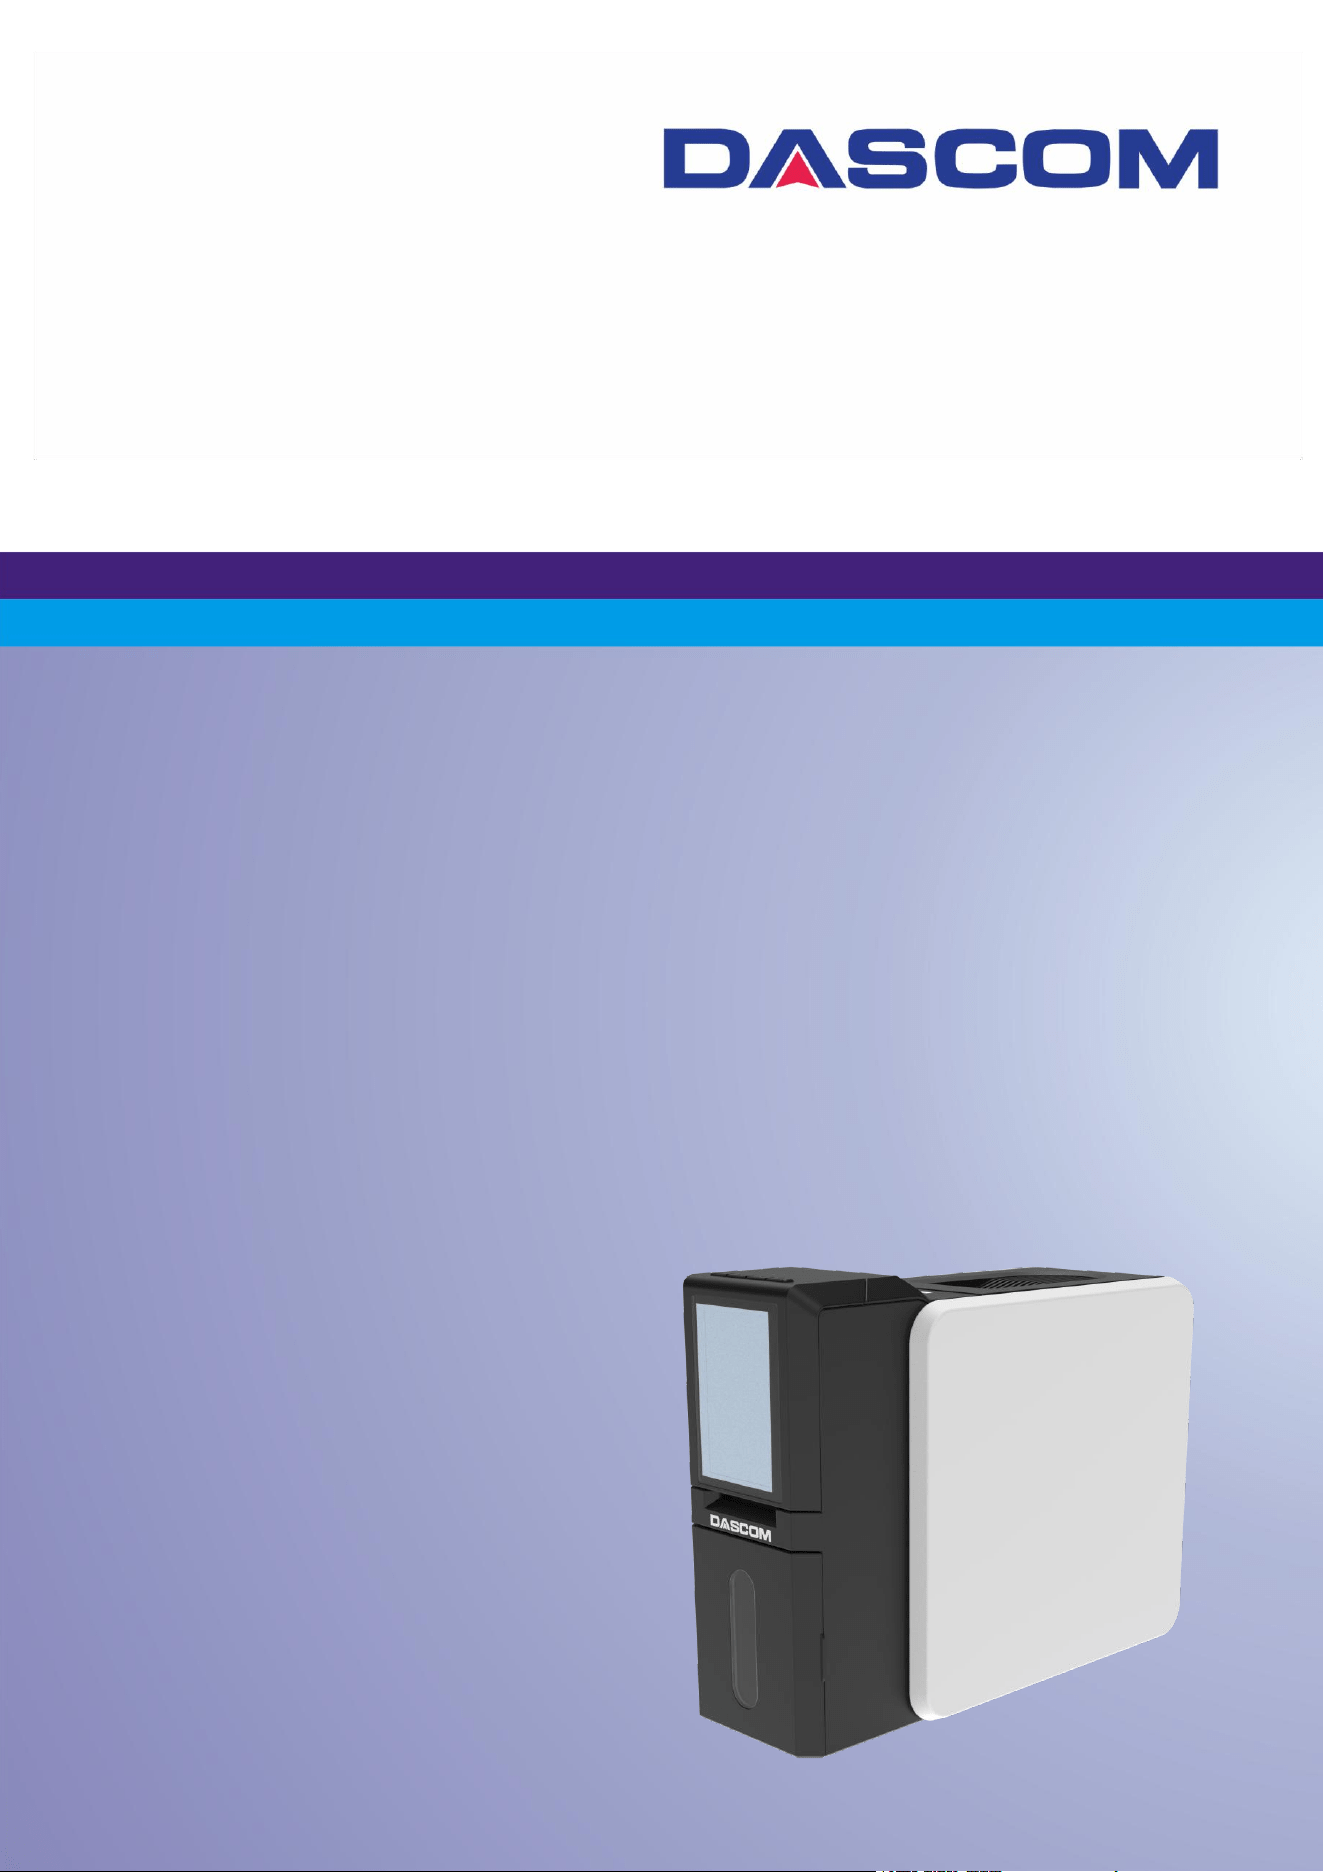
User Manual DC-4100 Card Printer

Dascom DC-4100 User Manual
I
Important Safety Instructions (English)
Read the following instructions thoroughly before starting up your printer.
The device and power supply must all times be easily accessible.
Never carry out maintenance or repair work yourself. Always contact a Dascom
qualified service technician.
Keep this User Manual in a place which is easily accessible at all times.
Place the printer on a solid and level base for reliable operation.
Never place the printer in the vicinity of inflammable gas or explosive substances.
Ensure the printer is connected to a socket with the correct voltage.
Always disconnect the printer from power source before opening the device to
perform maintenance work or remedy errors.
Do not expose the printer to high temperature, direct sunlight, or dust.
Keep all liquids away from the printer.
Protect the printer from shock, impact and vibration.
Make sure that both printer and computer are switched off before connecting the
data cable.
The print head will become very hot during printing; avoid contact with the print head
after printing has finished.
Do not perform any operation or action in any way other than those provided in this
manual. When in doubt, contact your Dascom dealer or customer support.

Dascom DC-4100 User Manual
II
Wichtige Sicherheitshinweise (German)
Lesen Sie bitte diese Sicherheitshinweise durch, bevor Sie den Drucker in Betrieb nehmen.
Das Gerät und die Netzsteckdose müssen jeder Zeit leicht zugänglich sein.
Führen Sie Wartungsarbeiten und Reparaturen keinesfalls selbst aus, sondern
verständigen Sie immer einen qualifizierten Servicetechniker.
Bewahren Sie diese Dokumentation an einem jederzeit zugänglichen Ort auf.
Den Drucker auf stabilem und ebenem Untergrund so aufstellen, dass er nicht zu
Boden fallen kann.
Stellen Sie den Drucker keinesfalls in der Nähe von leicht entzündlichen Gasen oder
explosiven Stoffen auf.
Den Drucker nur an eine Steckdose mit der richtigen Spannung anschließen.
Wenn Sie den Drucker vom Netz trennen wollen, den Drucker ausschalten und immer
den Netzstecker an der Steckdose ziehen.
Den Drucker weder hohen Temperaturen noch direktem Sonnenlicht und Staub
aussetzen.
Keine Flüssigkeiten mit dem Drucker in Berührung bringen.
Den Drucker keinen Erschütterungen, Stößen oder Vibrationen aussetzen.
Sicherstellen, dass der Drucker und der Computer ausgeschaltet sind, bevor das
Datenkabel angeschlossen wird.
Der Druckkopf wird während des Druckens heiß. Vor dem Berühren deshalb einige
Zeit abkühlen lassen.
Weichen Sie bei der Bedienung des Druckers nicht von den Anweisungen in der
Dokumentation ab. Bei Unklarheiten wenden Sie sich bitte an Ihren Händler oder
Ihren Kundendienst.

Dascom DC-4100 User Manual
III
Consignes importantes de sécurité (French)
Lire attentivement les instructions suivantes avant de mettre l’imprimante en service.
Le dispositif et la prise principale doivent toujours être accessibles facilement.
Ne jamais effectuer soi-même les travaux d’entretien et de réparations. Contacter
toujours un dépanneur qualifié.
Placer l’imprimante sur un support stable de façon à ce qu’elle ne puisse pas tomber.
Ne jamais placer l’imprimante à proximité de sources de gaz aisément inflammables
ou de substances explosives.
Ne connecter l’imprimante à une prise que lorsque la tension est correcte.
Pour déconnecter l’imprimante de l’alimentation principale, mettre l’imprimante hors
tension et toujours débrancher le connecteur secteur de la prise murale.
Ne pas exposer l’imprimante à des températures élevées, à la lumière directe du soleil
ou à la poussière.
Ne pas mettre l’imprimante en contact avec des liquides.
Ne pas exposer l’imprimante à des chocs, impacts ou vibrations.
S’assurer que l’imprimante et l’ordinateur sont hors tension avant de connecter le
câble de données.
La tête d’impression est brûlante pendant l’impression. C’est pourquoi laissez-la
refroidir quelques instants avant d’y toucher.
N'exécutez aucune opération ni action d'une autre manière que celle indiquée dans ce
manuel. En cas de doute, veuillez contacter votre distributeur ou service après-vente.

Dascom DC-4100 User Manual
IV
Indicazioni di sicurezza importanti (Italian)
Prima di mettere in funzione la stampante, leggere attentamente le seguenti indicazioni.
Il dispositivo e la presa di corrente devono essere sempre facilmente accessibili.
Non eseguire mai da sé gli interventi di manutenzione e riparazione, ma rivolgersi
sempre a un tecnico di assistenza qualificato.
Conservare le presenti istruzioni per l’uso in un luogo sempre accessibile.
Collocare la stampante su una superficie stabile, per evitare che cada a terra.
Non collocare la stampante in prossimità di gas facilmente infiammabili o di sostanze
esplosive.
Collegare la stampante a una presa di corrente con tensione adeguata.
Per scollegare la stampante dalla rete di alimentazione, spegnere la stampante e
disinserire sempre il connettore di rete dalla presa.
Non esporre la stampante ad elevate temperature né alla luce solare diretta e alla
polvere.
Evitare il contatto della stampante con liquidi.
Non esporre la stampante a colpi, scosse o vibrazioni.
Verificare che la stampante e il computer siano spenti prima di collegare il cavo di
trasmissione dati.
Durante la stampa, la testina si surriscal-da notevolmente. Prima di toccarla, se
necessario opportuno quindi lasciarla raffreddare qualche istante.
Non eseguire alcuna operazione o azione se non nella maniera descritta nel presente
manuale. In caso di dubbio, contattare il rivenditore o dalla società incaricata
dell’assistenza.

Dascom DC-4100 User Manual
V
Instrucciones de seguridad importantes(Spanish)
Lea las siguientes instrucciones con esmero antes de poner la impresora en servicio.
El dispositivo y la toma de corriente deben estar ubicados de forma que sea fácil
acceder a ellos.
Nunca lleve a cabo trabajos de mantenimiento o reparación Ud. mismo, sino consulte
a un técnico de servicio calificado.
Guarde las presentes instrucciones de servicio en un lugar de fácil acceso en cualquier
momento.
Ponga la impresora sobre un superficie estable de manera que no pueda caer al suelo.
Nunca coloque la impresora en la vecindad de gases inflamables o sunstancias
explosivas.
Asegure conectar la impresora sólo a un enchufe con un voltaje correcto.
Cuando quiera desconectar la impresora de la red, apague la impresora y siempre hale
de la clavija de alimentación del enchufe nunca del cable.
No exponga la impresora a temperaturas altas, a la luz solar directa y al polvo.
No ponga la impresora en contacto con fluidos.
Nunca exponga la impresora a sacudidas, choques o vibraciones.
Asegúrese de que la impresora y el ordenador estén apagdos antes de conectar el
cable de datos.
La cabeza de impresión se pone muy caliente durante la impresión. Por lo tanto,
Déjela enfriarse
algún tiempo antes de tocarla.
No permita que se realice cualquier operación o acción de una forma diferente a lo
que se señala en el manual. En caso de duda, póngase en contacto con su comerciante
o con su servicio post-venta.

Dascom DC-4100 User Manual
VI
Правила по технике безопасности. (Russian)
Прочитайте, пожалуйста, инструкцию по технике безопасности перед включением в
работу принтера.
Устройство и розетка должны быть всегда легко доступна.
Не выполняйте технические работы и ремонт техники самостоятельно, но
сообщайте о неисправностях квалифицированным сервиснымтехникам.
Данная инструкция должна быть всегда доступна каждому пользователю.
Установите принтер на ровном и стабильном месте так, чтобы он не смог упасть
напол.
Ни в коем случае не ставьте принтер вблизи легко воспламеняющихся газов и
взрывчатых веществ.
Включайте принтер в розетку только с соответствующим напряжением.
Если Вы хотите отключить принтер от напряжения, сначала выключите принтер
сам и затем выньте штекер из розетки.
Берегите принтер от нагревания, от попадания на него прямых солнечных
лучей и пыли.
Не допускайте попадания жидкости на принтер.
Нельзя подвергать принтер тряске, ударам ивибрации.
Убедитесь, что принтер и компьютер выключены, только после этого соедините
принтер с компьютером.
Печатающая головка нагревается во время работы принтера. Поэтому
подождите какое-то время, прежде чем дотронуться до нее.
Пользуйтесь принтером так, как это написано в документации. Если у Вас
возникают неясности, обращайтесь с вопросами к Вашим продавцам или в
сервисный центр.

Dascom DC-4100 User Manual
VII
Instruções Importantes sobre Segurança (Portuguese)
Leia as instruções de segurança antes de usar a impressora.
A impressora e a tomada devem ser facilmente em todos os momentos acessíveis.
Consulte sempre um técnico qualificado para executar uma reparação .
Coloque a impressora sobre uma base sólida e nivelada, para que ela não sofra quedas.
Jamais instale a impressora nas proximidades de lugares onde haja gás inflamável ou
substânciasexplosivas.
Assegure-se de conectar a impressora à tomada elétrica com a voltagem apro-priada.
Quando desligar a impressora da rede, desligue sempre a impressora e retire o cabo
da tomada.
Não exponha a impressora a temperaturas altas ou luz solar direta.
Não aproxime substâncias líquidas da impressora.
Proteja a impressora de choques, impactos e vibrações.
Desligue a impressora e o computador antes de conectar o cabo da rede.
A cabeça da impressora pode ficar muito quente . Portanto, espere algum tempo
antes de tocá-la.
Não faça nenhuma operação ou ação além das recomendadas neste manual. Em
caso de dúvida, contate seu revendedor ou companhia deserviço.

Dascom DC-4100 User Manual
VIII
Önemli Güvenlik Talimatları (Turkish)
Lütfen, yazıcıyı işletime geçirmeden önce bu güvenlik talimatlarını bütünüyle dikkatle okuyun.
Cihaz ve elektrik prizinin her zaman kolayca erişilebilir olması gerekir.
Bakım ve tamir çalışmalarını kesinlikle ve hiçbir surette kendi başınıza yapmayın; her
zaman kalifiye bir uzman servis-teknisyenine haberverin.
Yazıcıyı, üzerinden yere düşmesi mümkün olmayacak sabit ve düz bir zemine yerleştirin.
Yazıcıyı kesinlikle ve hiçbir surette kolayca yanabilecek gaz veya patlayıcı maddeler
içeren nesnelerin yakınına koymayın.
Yazıcı akım kablosunu sadece doğru gerilime sahip bir prizetakın.
Yazıcıyı şebeke ağından ayırmak istediğinizde, yazıcıyı kapatın ve ağ-fişini her zaman
prizden çıkartın.
Yazıcıyı ne yüksek ısılı ne de doğrudan güneş ışığına ve toza mâruz kalan mekânlarda
bulundurun.
Yazıcı hiçbir sıvı maddeyle temasta olmamalıdır.
Yazıcı hiçbir sarsıntıya, darbeye veya titreşime mâruz kalmamalıdır.
Veri kablosu bağlanmadan önce hem yazıcının hem de bilgisayarın kapalı
olduklarından emin olmalısınız.
Yazıcının başı basma esnasında yüksek ısıya ulaşıyor. Bu yüzden lütfen dokunmadan
önce kısa süre soğumasını bekleyin.
Yazıcının işletimi ve kullanımında bu dokümantasyondaki talimatların hiç dışına
çıkmayın. Sorunlu görünen hususlarda lütfen imâlatçınıza veya müşteri hizmetleri
servisinize başvurun.
Dascom DC-4100 User Manual
IX
TRADEMARK ACKNOWLEDGEMENTS
“Windows”, “Windows 7”, ”Windows 8”, “Windows 10”, “Windows XP” and “Windows Vista”
are trademarks of Microsoft Corporation.
All other product names and company names appearing in this manual are the registered
trademarks or trademarks of their respective holders.
Approvals
This device fulfils the European standards requirements by complying with the
Directive relating to electromagnetic compatibility and relating to low-voltage
electrical equipment. Furthermore, it fulfils the requirements for RoHS and RED if
applicable.
Conformity with the above-mentioned Directives is indicated by the CE symbol attached to the
device.
Note: Conformity may be affected by:
- using interface cables not complying with the specifications
- non-observance of important instructions in the operator´s manual
- installing components not approved for this device by the manufacturer
- unauthorized manipulation
Dieses Gerät erfüllt die Anforderungen der Europäischen Normen durch Einhaltung
der Richtlinien bezüglich der Elektromagnetischen Verträglichkeit sowie bezüglich
Elektrischer Betriebsmittel mit Niederspannung. Des Weiteren werden die
Anforderungen bezüglich RoHS und falls anwendbar RED erfüllt.
Die Konformität zu den oben angeführten Richtlinien ist durch das am Gerät angebrachte
CE-Zeichen gekennzeichnet.
Hinweis: Die Konformität kann beeinflusst werden durch:
- Benutzung von nicht spezifizierten Schnittstellen
- Nichtbeachtung wichtiger Hinweise der Bedienungsanleitung
- Ersetzen von Bauteilen, die nicht vom Hersteller für dieses Gerät freigegeben wurden
- Eingriffe durch Unbefugte
This device complies with the requirements of the United Kingdom (UK) legislation
of Electrical Safety Regulations, Electromagnetic Compatibility Regulations, if
applicable the Radio Regulations and the Restriction of the Hazardous Substances
in Electrical and Electronic Equipment Regulations.
Dascom DC-4100 User Manual
X
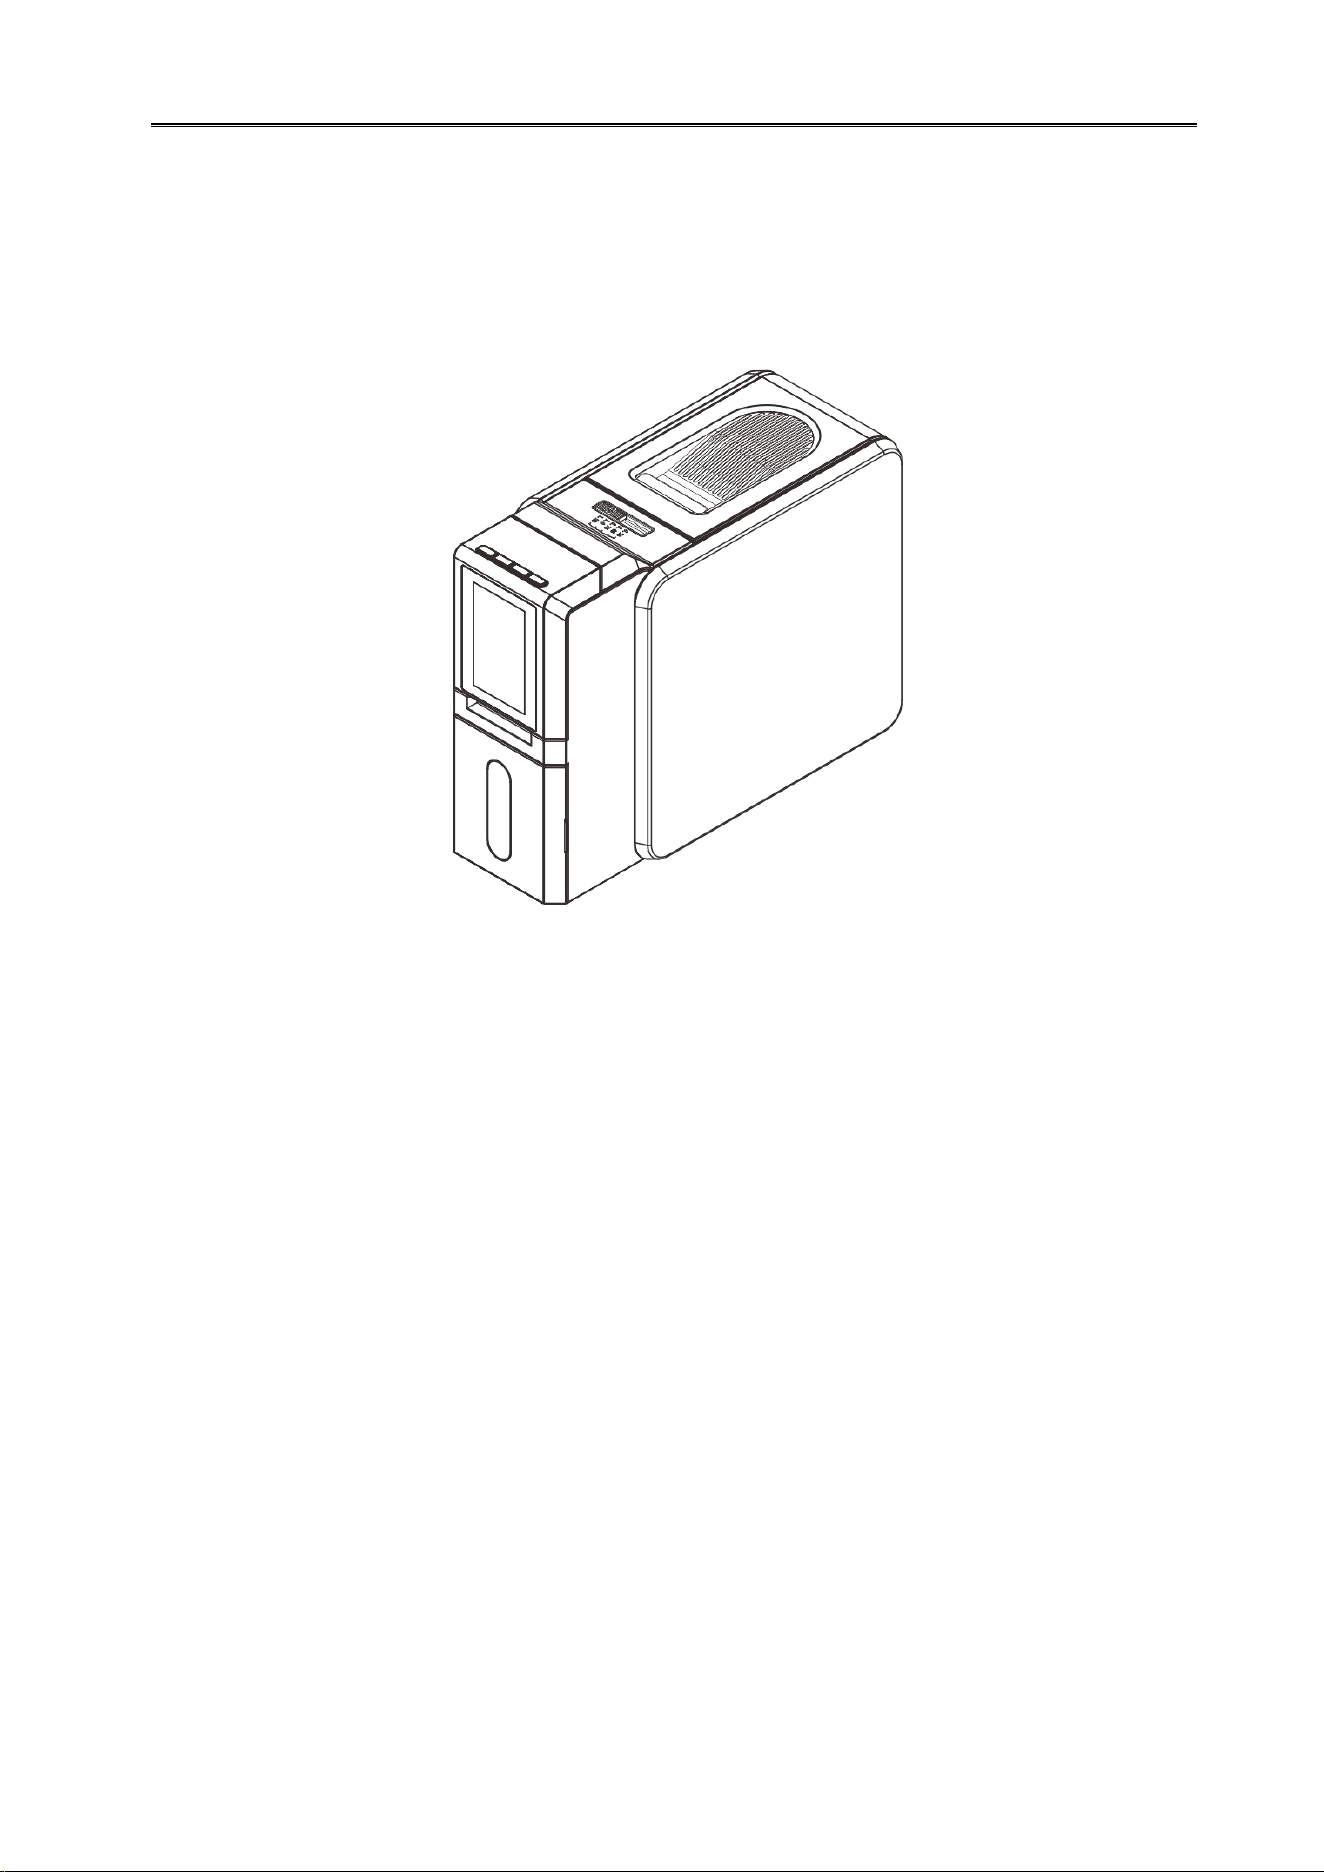
About This Manual
This manual provides information that describes the basic operation, enabling safe and
correct procedures to the operators of DC-4100 Printer.
Dascom DC-4100 User Manual
XI
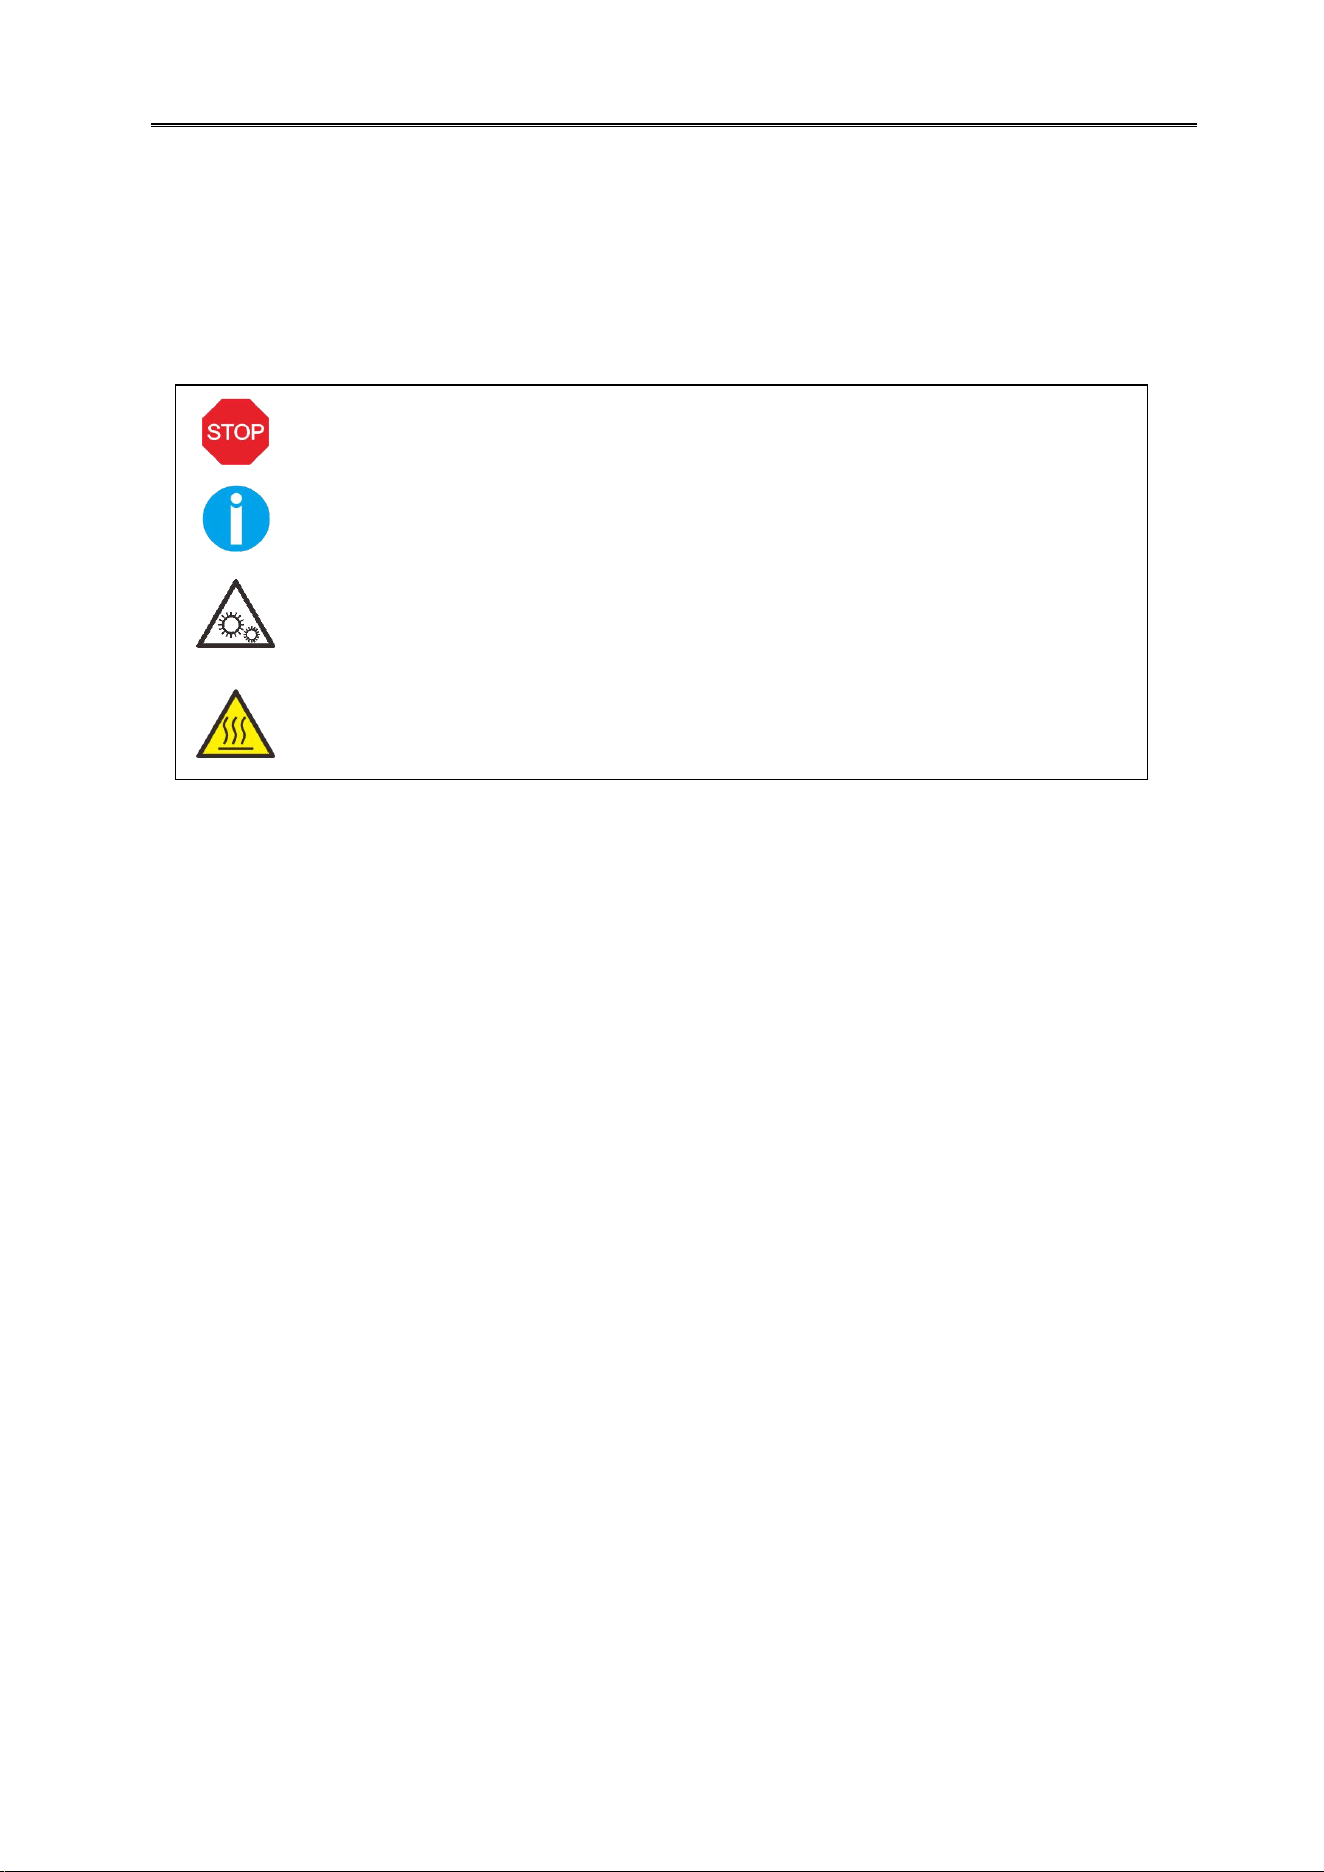
Symbol Description
The symbols in this manual are identified by their level of importance, as defined below.
Read the following carefully before handling the product.
CAUTION: Provides information that must be observed to prevent damage
to the equipment or data loss .
NOTE: Advises you of information that is essential to complete a task.
CAUTION: Keep your body away from moving part.
CAUTION: Hot ! Do not touch the parts till the printer has been switch off in
half hour, otherwise it will hurt your fingers.

Dascom DC-4100 User Manual
XII
TABLE OF CONTENTS
CHAPTER 1 INTRODUCTION
..............................................................................................................
1
1.1 Unpacking
................................................................................................................................
1
1.2 Operating the Printer Safely
....................................................................................................
3
1.3 Printer Components
................................................................................................................
5
1.3.1 Component and function
..................................................................................................
5
1.3.2 Control Panel
.....................................................................................................................
7
1.4 Attaching Power
......................................................................................................................
8
1.5 Connecting to Computer
.........................................................................................................
9
1.6 Installing Windows Driver
.....................................................................................................
10
1.6.1 Installing Windows Driver via USB
..................................................................................
10
1.6.2 Installing Windows Driver via Ethernet
..........................................................................
13
CHAPTER 2 INSTALLATION
............................................................................................................
19
2.1 Installing Cards
......................................................................................................................
19
2.1.1 Card Specifications
..........................................................................................................
19
2.1.2 Loading the cards
............................................................................................................
20
2.1.3 Take out the cards
...........................................................................................................
21
2.1.4 Adjusting the card inlet according to the thickness of the cards
...................................
22
2.1.5 Managing Rejected Cards
...............................................................................................
22
2.2 Replacing the Ribbon
.............................................................................................................
23
2.3 Printing Capacities
.................................................................................................................
25
2.4 Replacing the Cleaning Roller
................................................................................................
26
2.5 Printing card
..........................................................................................................................
27
2.5.1 Using CardEditor
.............................................................................................................
27
2.5.2 Using settings
..................................................................................................................
30
2.6 Updating Firmware
................................................................................................................
39
2.7 Using the Web Panel
.............................................................................................................
40
2.7.1 Operation
........................................................................................................................
40
2.7.2 System board information and configuration
.................................................................
41
2.7.3
802.1X Security
............................................................................................................
42
2.7.4 Printer Info
......................................................................................................................
42
2.7.5 User Mode
......................................................................................................................
42
2.7.6 Service Mode
..................................................................................................................
45
2.7.7 System Board Settings
....................................................................................................
48
CHAPTER 3 NORMAL MODE AND USER MODE
..................................................................................
49
3.1 Normal Mode
........................................................................................................................
49
3.2 Printer Setup
..........................................................................................................................
50
3.3 The major menus
...................................................................................................................
51
3.3.1 Local info
.........................................................................................................................
51
3.3.2 Basic mode
......................................................................................................................
52
3.3.3 Advanced mode
..............................................................................................................
56
3.3.4 Maintenance mode
.........................................................................................................
56

Dascom DC-4100 User Manual
XIII
CHAPTER 4 CLEANING
....................................................................................................................
57
4.1 Cleaning with a Cleaning Card
...............................................................................................
57
4.2 Maintaining the print head
...................................................................................................
57
CHAPTER 5 TROUBLESHOOTING
......................................................................................................
58
5.1 Warning Messages and Troubleshooting
..............................................................................
58
5.2 Valuable Help from You For Troubleshooting
........................................................................
59
5.3 Troubleshooting
.....................................................................................................................
60
5.3.1 Faults Related to Printing
................................................................................................
60
5.3.2 Clear Jammed Card
.........................................................................................................
63
5.3.3 Change the Print Head
....................................................................................................
63
5.4 Technical support
..................................................................................................................
64
5.4.1 DASCOM partner network
..............................................................................................
64
5.4.2 More information
...........................................................................................................
64
CHAPTER 6 SPECIFICATION
..........................................................................................................
65
APPENDIX I: WIRELESS COMMUNICATION (OPTIONAL)
..............................................................
67
APPENDIX II FCC STATEMENT
......................................................................................................
69
Dascom DC-4100 User Manual
1
CHAPTER 1 INTRODUCTION
Thank you for choosing Dascom DC-4100 card printer. You can print high-quality cards of different
colors and styles with this printer. The printer should use the consumables and accessories provided by
Dascom. For more details, please visit our website www.dascom.com.
1.1 Unpacking
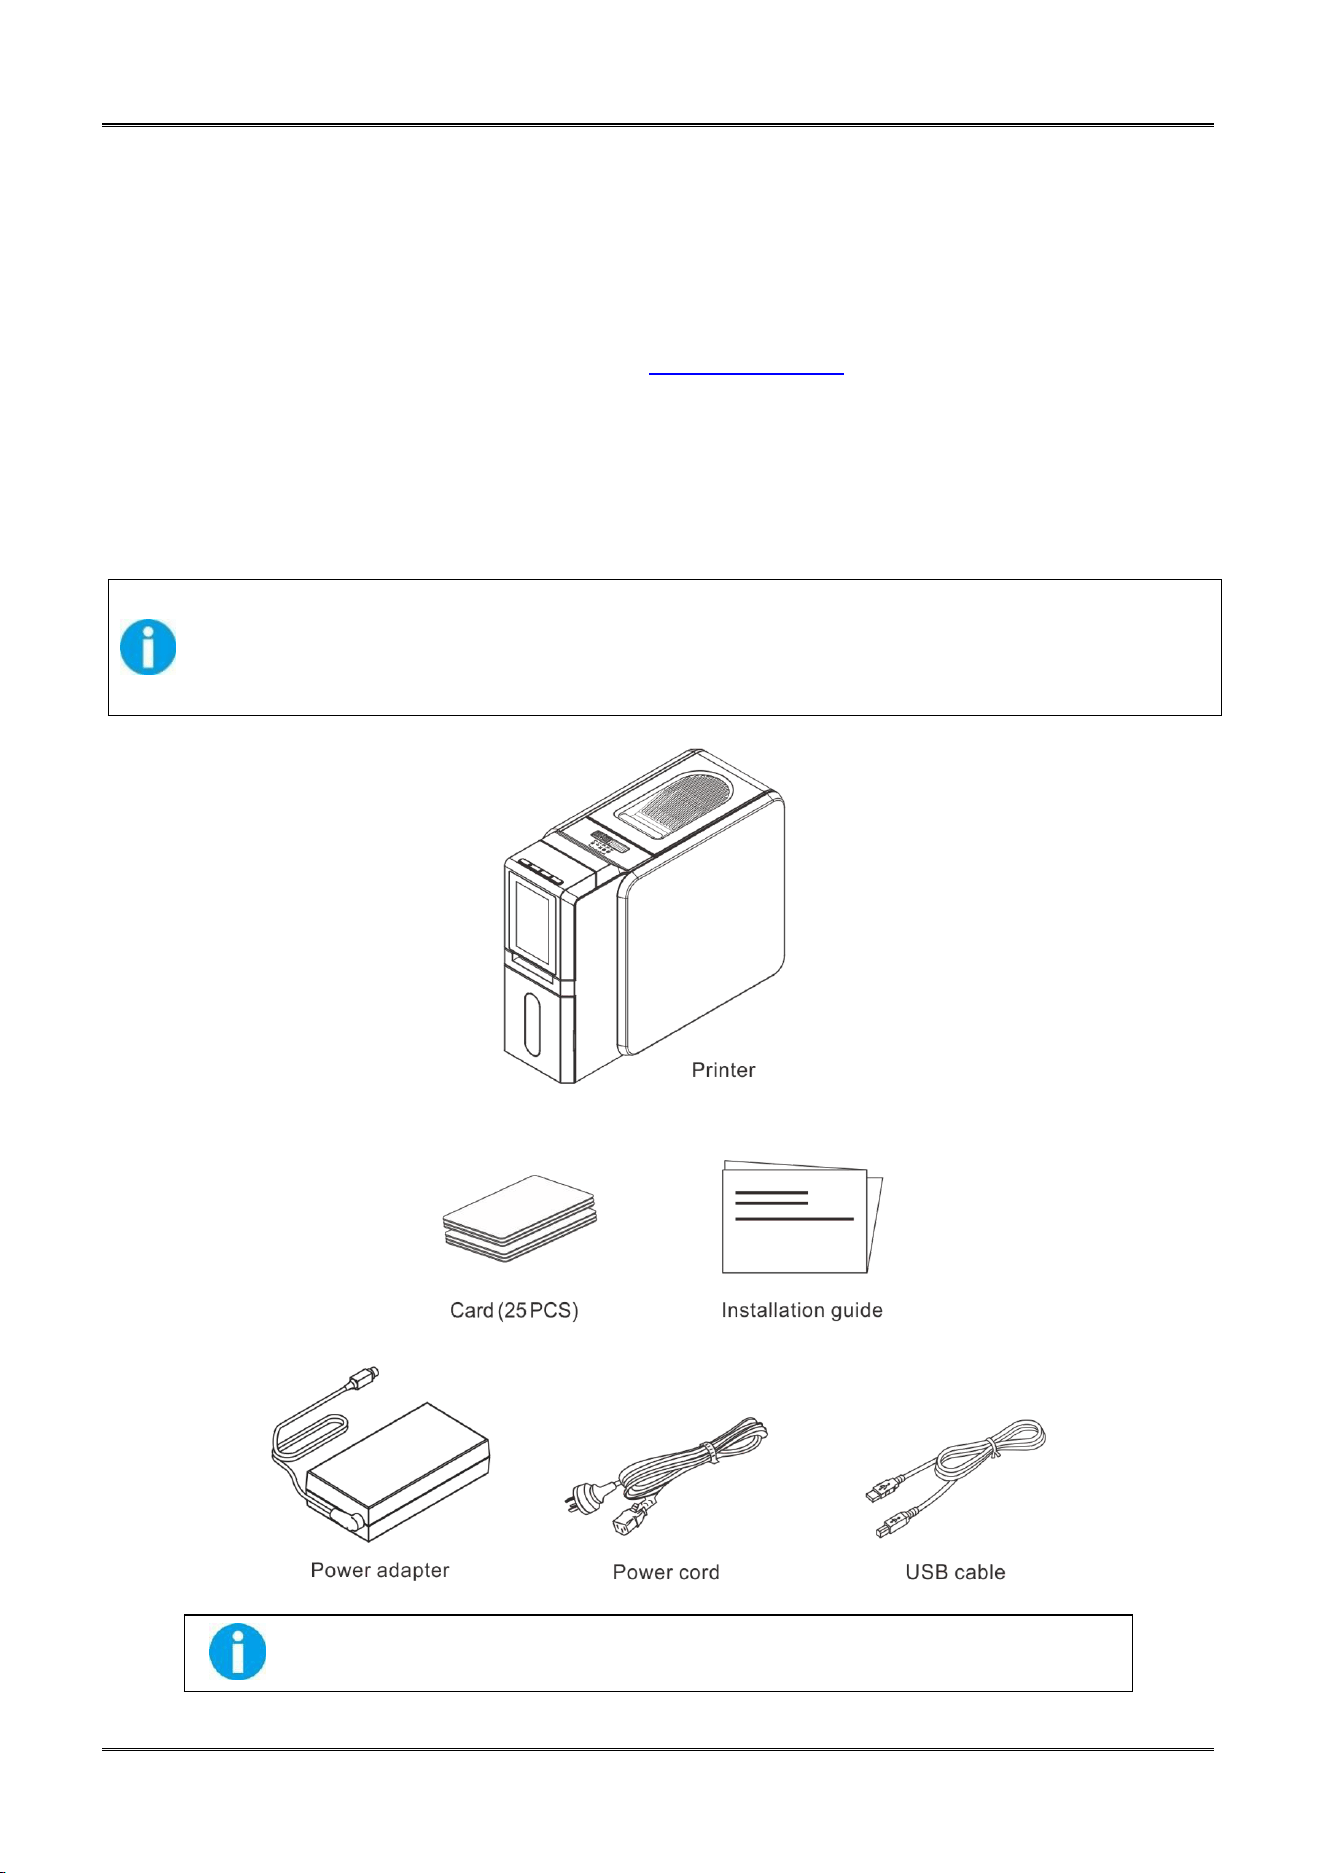
Open the package, take out the printer and remove the protect material. Check if the parts
and accessories in the box are complete as the following picture. If found any damage. Please
contact the carrier and notify your authorized Dascom reseller to realize the steps to be taken.
When repairing the printer, you must provide the complete original package (outer crate,
wedge and package). If send back the printer without original package, or the accessories are
damaged in transit, the warranty of accessories will be invalid. The new packing charge for the
printer will be charged by yourself.
The package contents vary with different customized order requirements.

Dascom DC-4100 User Manual
2
Package Contents:
Standard
Printer
1 unit
Power cord
1 piece
USB cable
1 piece
Power adapter
1 piece
Installation Guide
1 piece
Card
25 pieces
Dascom DC-4100 User Manual
3
1.2 Operating the Printer Safely
The following precautions must be observed to assure safe operation of your printer. Do not do
anything that is not described in this manual. Doing so could cause an unexpected failure. The
manufacturer is not responsible for any problems caused by incorrect operation of the printer.
Installation
location
Do not install the printer in a damp or dusty location.
Do not install the printer near flammable or explosive materials or a heater,
stove or any other device that produces heat. Do not place the printer near
volatile combustible materials such as combustible materials.
Place the printer away from walls to maintain air flow. Also, maintain at least
30 cm (12 inches) of open space above the printer.
Blocking vents may cause the printer to overheat and fail prematurely.
Do not install printer on an unstable table, on a slant, or any place where
there is excessive vibration.
Do not install the printer in a location susceptible to rapid fluctuations in
temperature.
Do not install the printer in a location exposed to direct sunlight.
Power supply
Use a dedicated power cable and do not use an extension cord with multiple
outlets.
Be sure to remove any dust from the plug and electrical outlet.
Humidity produces a micro-current on the surface causing overheating.
Do not damage or modify the Power Cable. Also, do not place heavy objects,
pull, or bend power cord excessively.
Do not plug in or unplug the Power Cable if your hands are wet.
Ensure a ground wire is connected.
When connecting the ground wire, note the following cautions.
Recommended connections for ground wires
Electrical outlet ground terminal
Ground terminals installed as type A, B, or C
A copper rod 65 cm (25.6 inches) or longer buried in the ground.
Not permitted for ground wires
Gas piping (risk of fire or explosion)
Water pipes or taps (water pipes that include plastic piping cannot act as a
ground However, if a water pipe is configured to act as a ground, then
connection of a ground wire ispermitted.)
Telephone line ground wires or lightning conductors (danger of high current
flow in the event of a lightning strike.)
Be sure to turn off power and unplug the plug from electrical outlet before
moving the printer.
Pull on the plug or cable when unplugging it from an electrical outlet.
Do not use an under-rated extension cord.
Handling
Do not use flammable sprays near the printer.
Do not touch anything inside the printer unless specified in this manual.
Do not place heavy items on the printer and do not lean on the printer.
While the printer is operating, do not turn off the power, unplug the power
cable, or look inside (open) the printer.
Dascom DC-4100 User Manual
4
WARNING
The lower part of the Top Access Cover, the printer internal heat roller section, and
the thermal head section become very hot. Ensure you do not touch these three
locations.
The cooling fan is always running for cooling inside the printer. This is not a
malfunction.
Contact your reseller if there is a current leak.
The printer may cause static, flickering or interrupt reception of televisions or
radios if they are too close to the printer.
The lower part of cover top, internal heating platen and printer head may
produce high temperature, please don’t touch these three parts.
Under the following conditions images on cards may deteriorate or cards may warp
afterprinting:
The surface of the card is in contact for an extended period with a vinyl card
holder or synthetic leather or other material that contains a plasticizer.
The surface of the card is exposed to direct sunlight for an extended period.
The card is repeatedly rubbed against a hardobject such as a key.
The faces of two cards are in contact for an extendedperiod.
The card is kept for an extended period in a very hot location such as a car
parked in the sun.
The card is bent, or used with excessiveforce.
If a card with a magnetic strip is placed near a magnetic source, the data on the
strip could become corrupted.
Additionally, if an IC chip card is bent, or used with excessive force, the IC chip may
be damaged.
Dascom DC-4100 User Manual
5
1.3 Printer Components
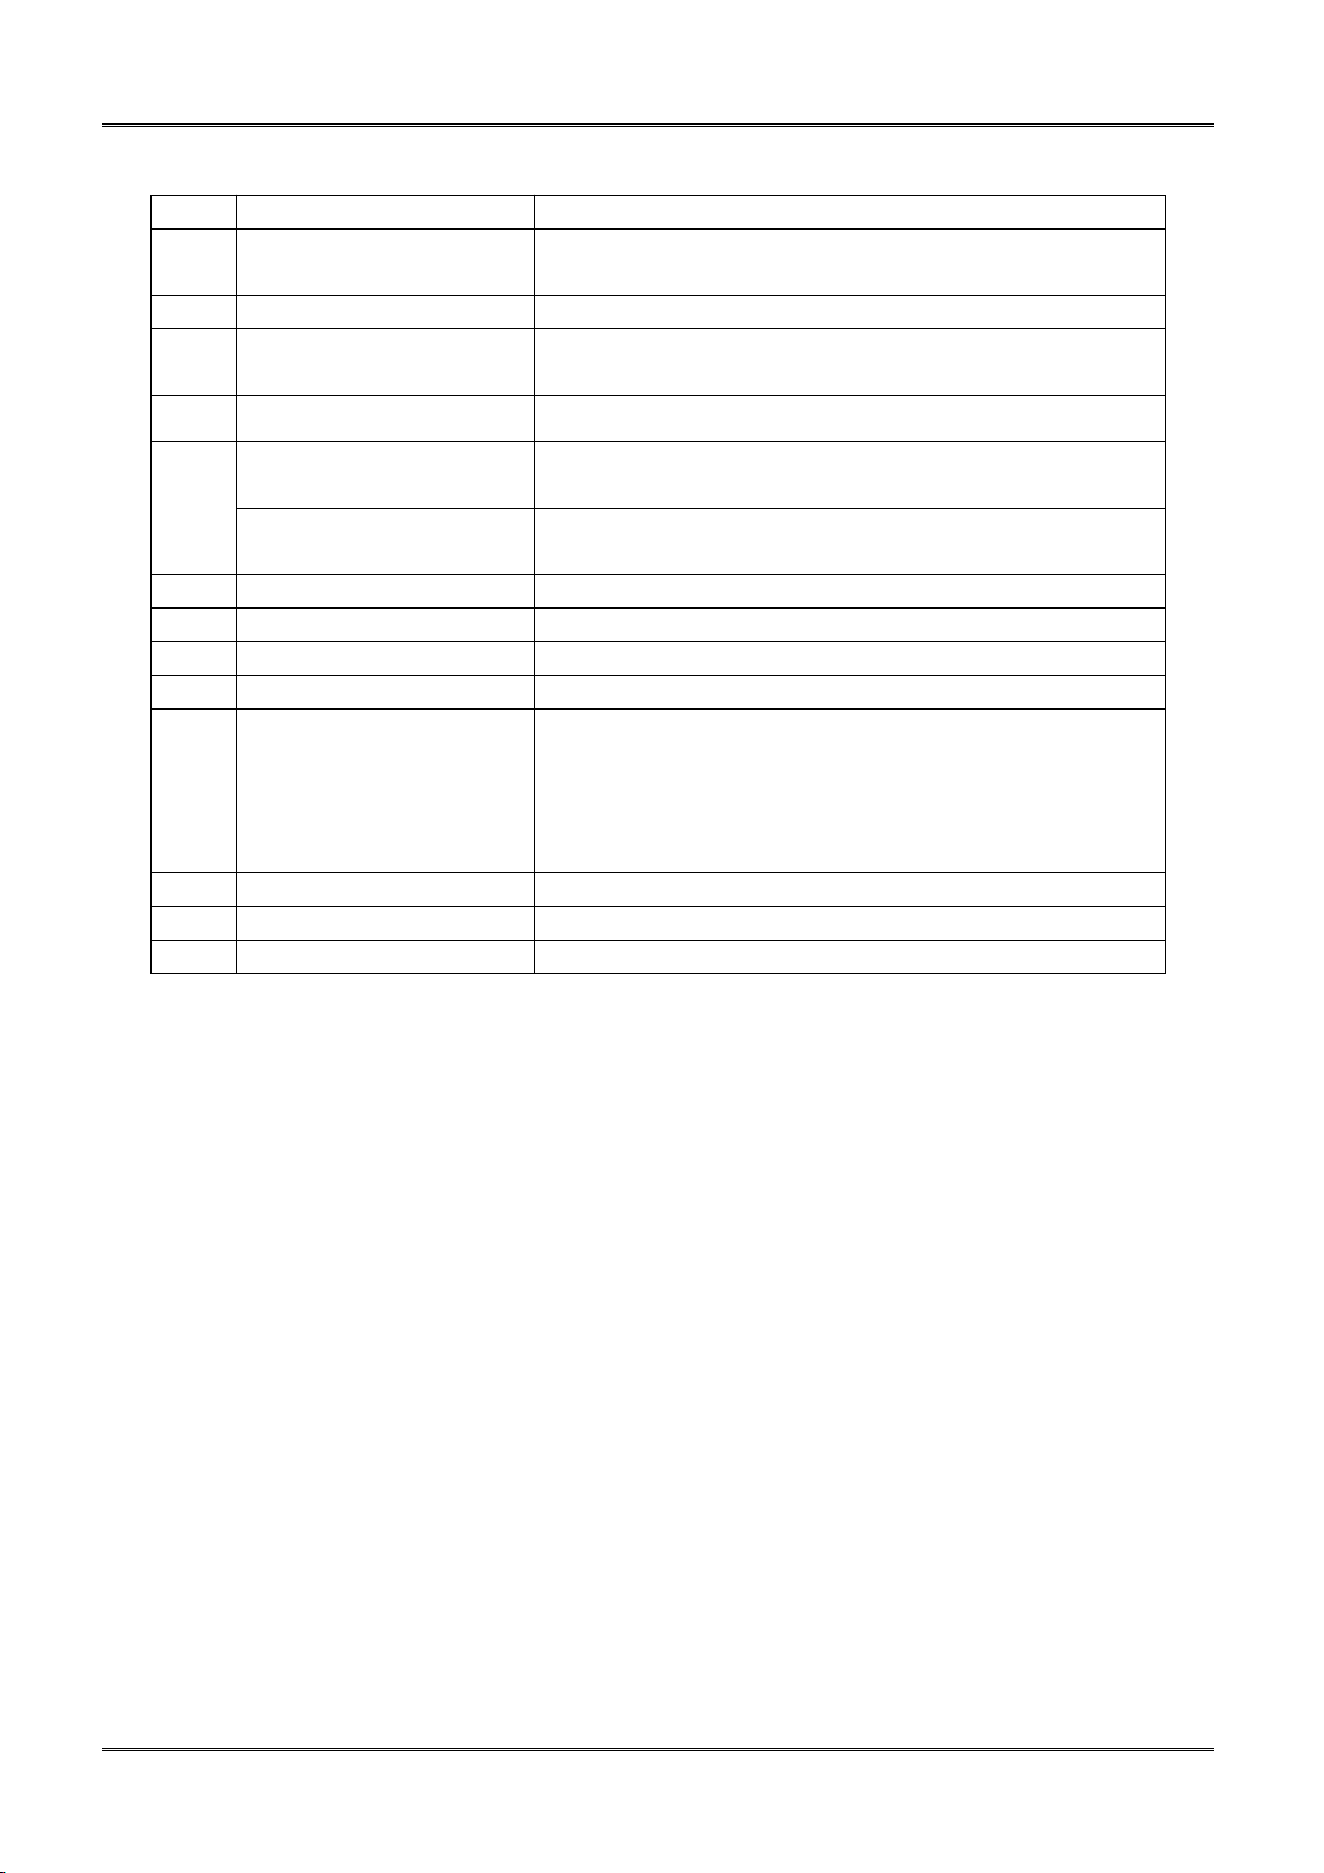
1.3.1 Component and function
Dascom DC-4100 User Manual
6
No.
Component Name
Function
1
Top cover
Protects the print head and the internal components,
and reduce noise. Open to replace the ribbon
2
Cover open button
Pull the button up to open the top cover
3
Gap slider
According to the card thickness, move the slider so that
its arrow points to the corresponding scale
4
Keys
Includes the
【
Menu/Exit
】
,
【
Up
】
,
【
Down
】
,
【
Set
】
5
Front cover
Opens to load cards. Max. 100 pieces of 0.76mm
thickness cards can be placed.
Display
Shows the printer status
Displays navigation messages in configuration
6
Lower cover
Open the cover to take out the finished cards
7
Thermal print head
Core component of the printer
8
Rear Card feed/eject slot
The cards Load or discharge from the slot
9
Ethernet port
Connect to the printer via Ethernet port
10
USB Hub port
Used to connect multiple peripherals: For example, it
can simultaneously connect devices such as USB drives,
external hard drives, USB mice, keyboards, or scanners,
enabling multifunctional operations
Input: DC 5V, 0.5A
11
Power socket
Used to connect Power Cable
12
USB port
Connect to the printer via USB port
13
Power switch
Turns power on and off
Dascom DC-4100 User Manual
7
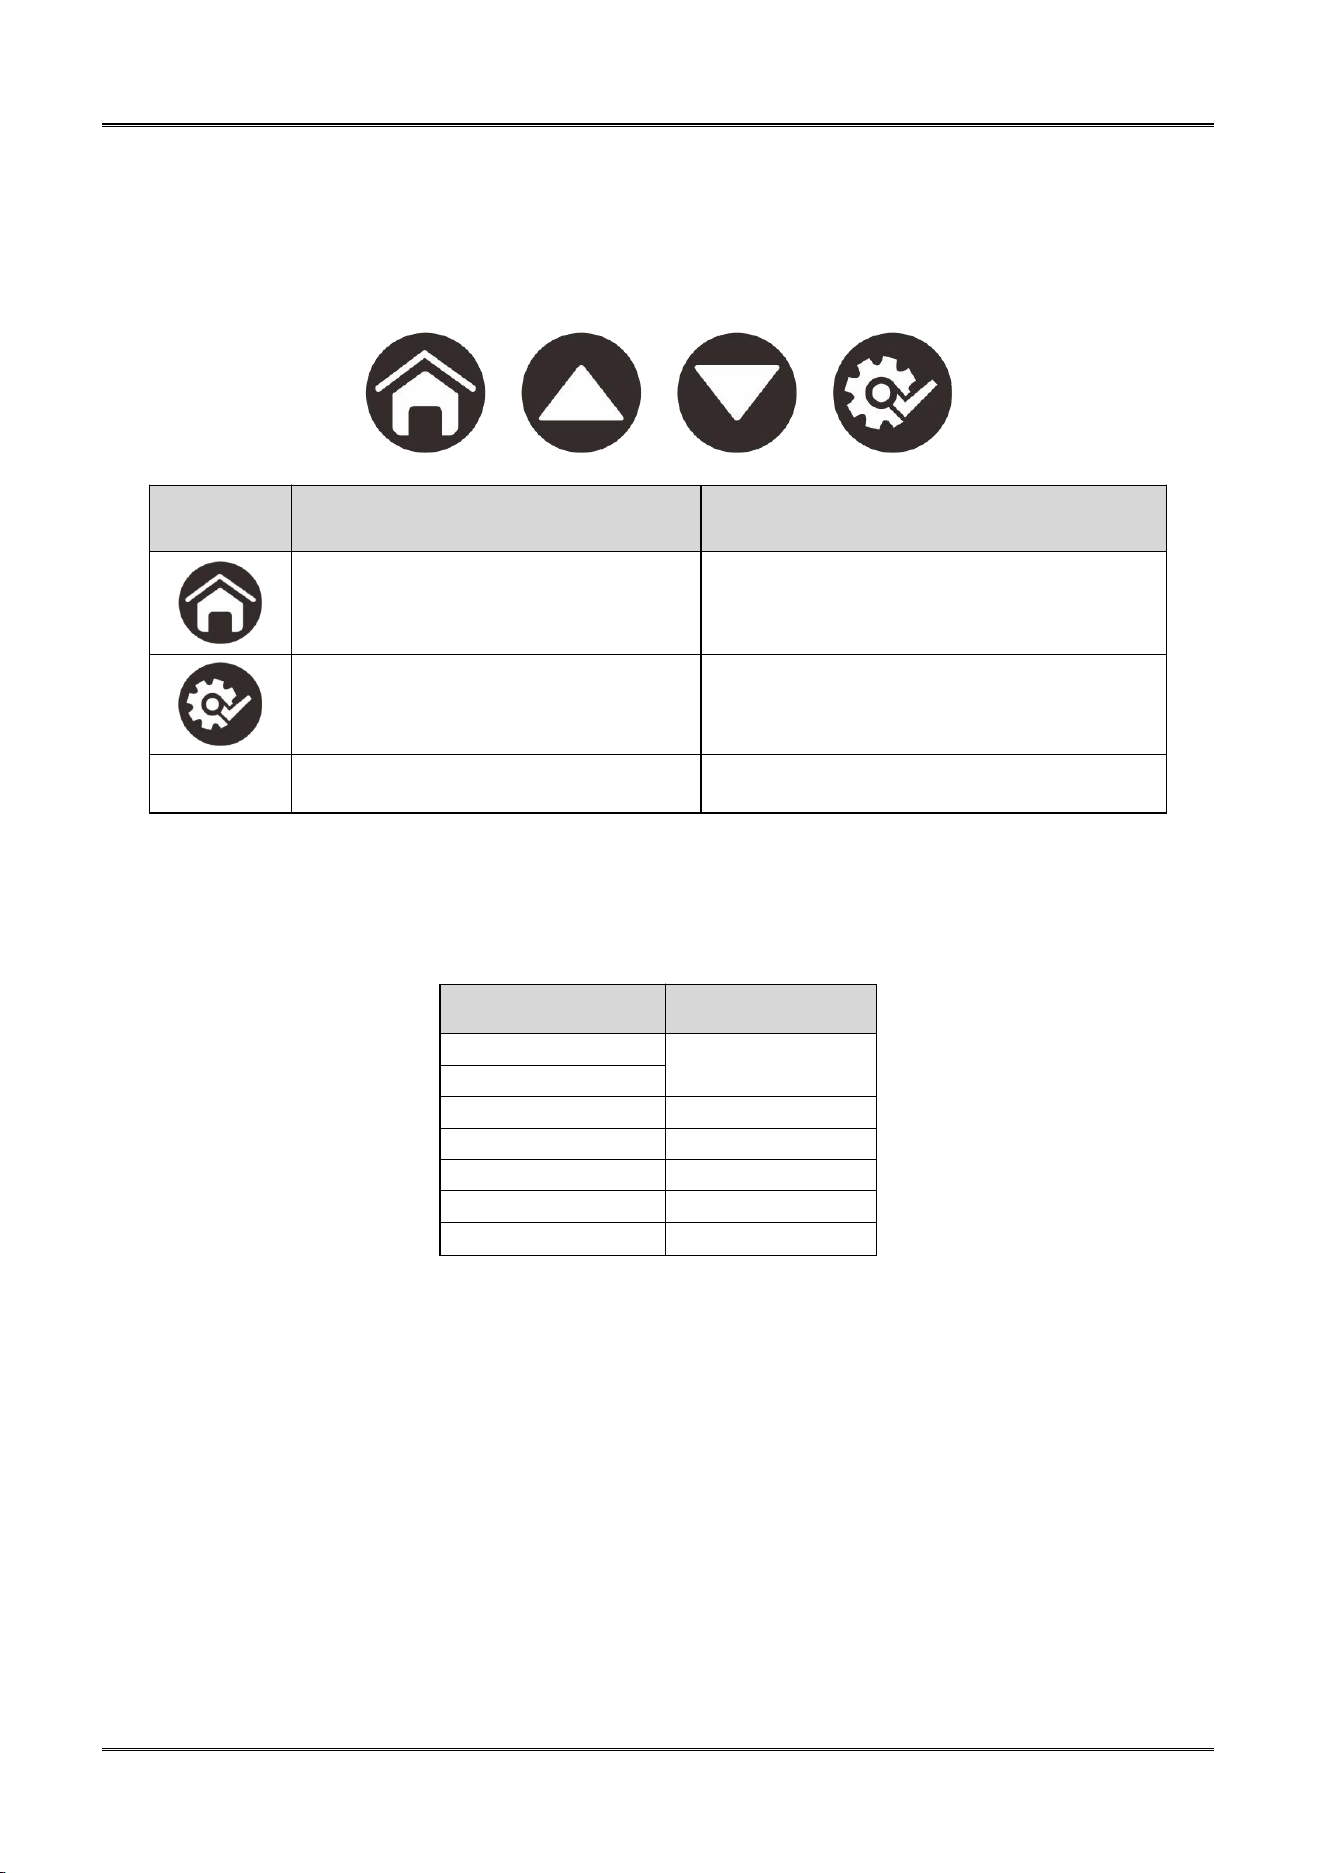
1.3.2 Control Panel
■ Buttons
There are four buttons:
Logo
Name
Function
【
Menu/Exit
】
key
Enter or exit current setup
【Set】 key
Confirm current setting
▲/▼
【
Up/Down
】
key
Choose between or navigate settings
■
Buzzer
The following combinations of buzzer show different statuses of the printer.
Printer Status
Buzzer
Initiating
/
Heating
Ready
/
Menu setup
/
Printing
/
Warning
Buzz constantly
Error
Buzz constantly
■
LCD Display
User can view the status of printer.
Dascom DC-4100 User Manual
8
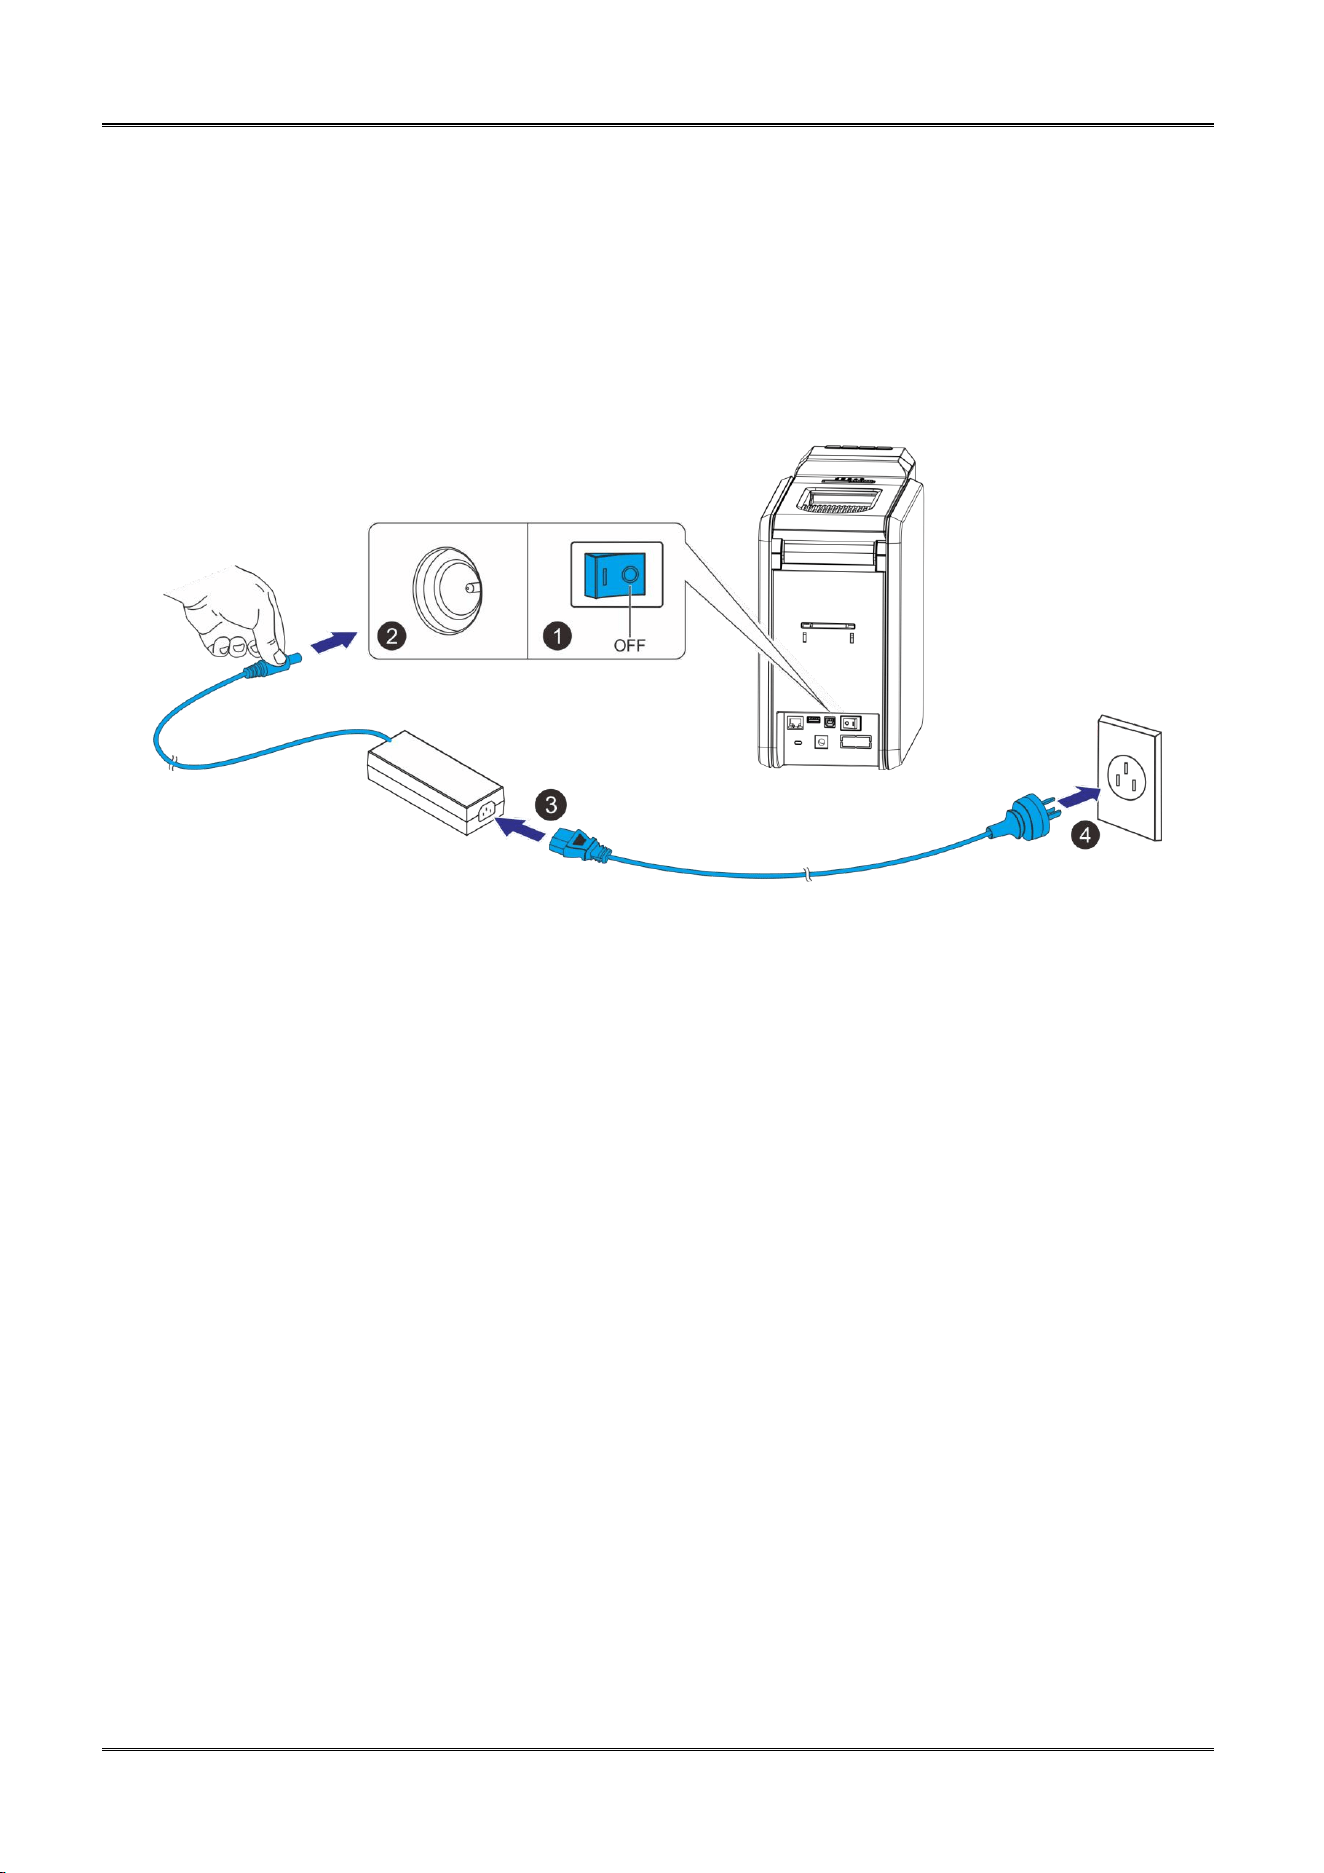
1.4 Attaching Power
(1) Make sure the printer and the computer are powered off.
(2) Connect the power adapter to the printer.
(3) Connect the power cord to the power adapter.
(4) Connect the power cord to the power socket.
■ Power on and power off
Press the power switch: “I”, provides power to the printer.
Press the power switch: “O”, turns the Printers power off.
Dascom DC-4100 User Manual
9
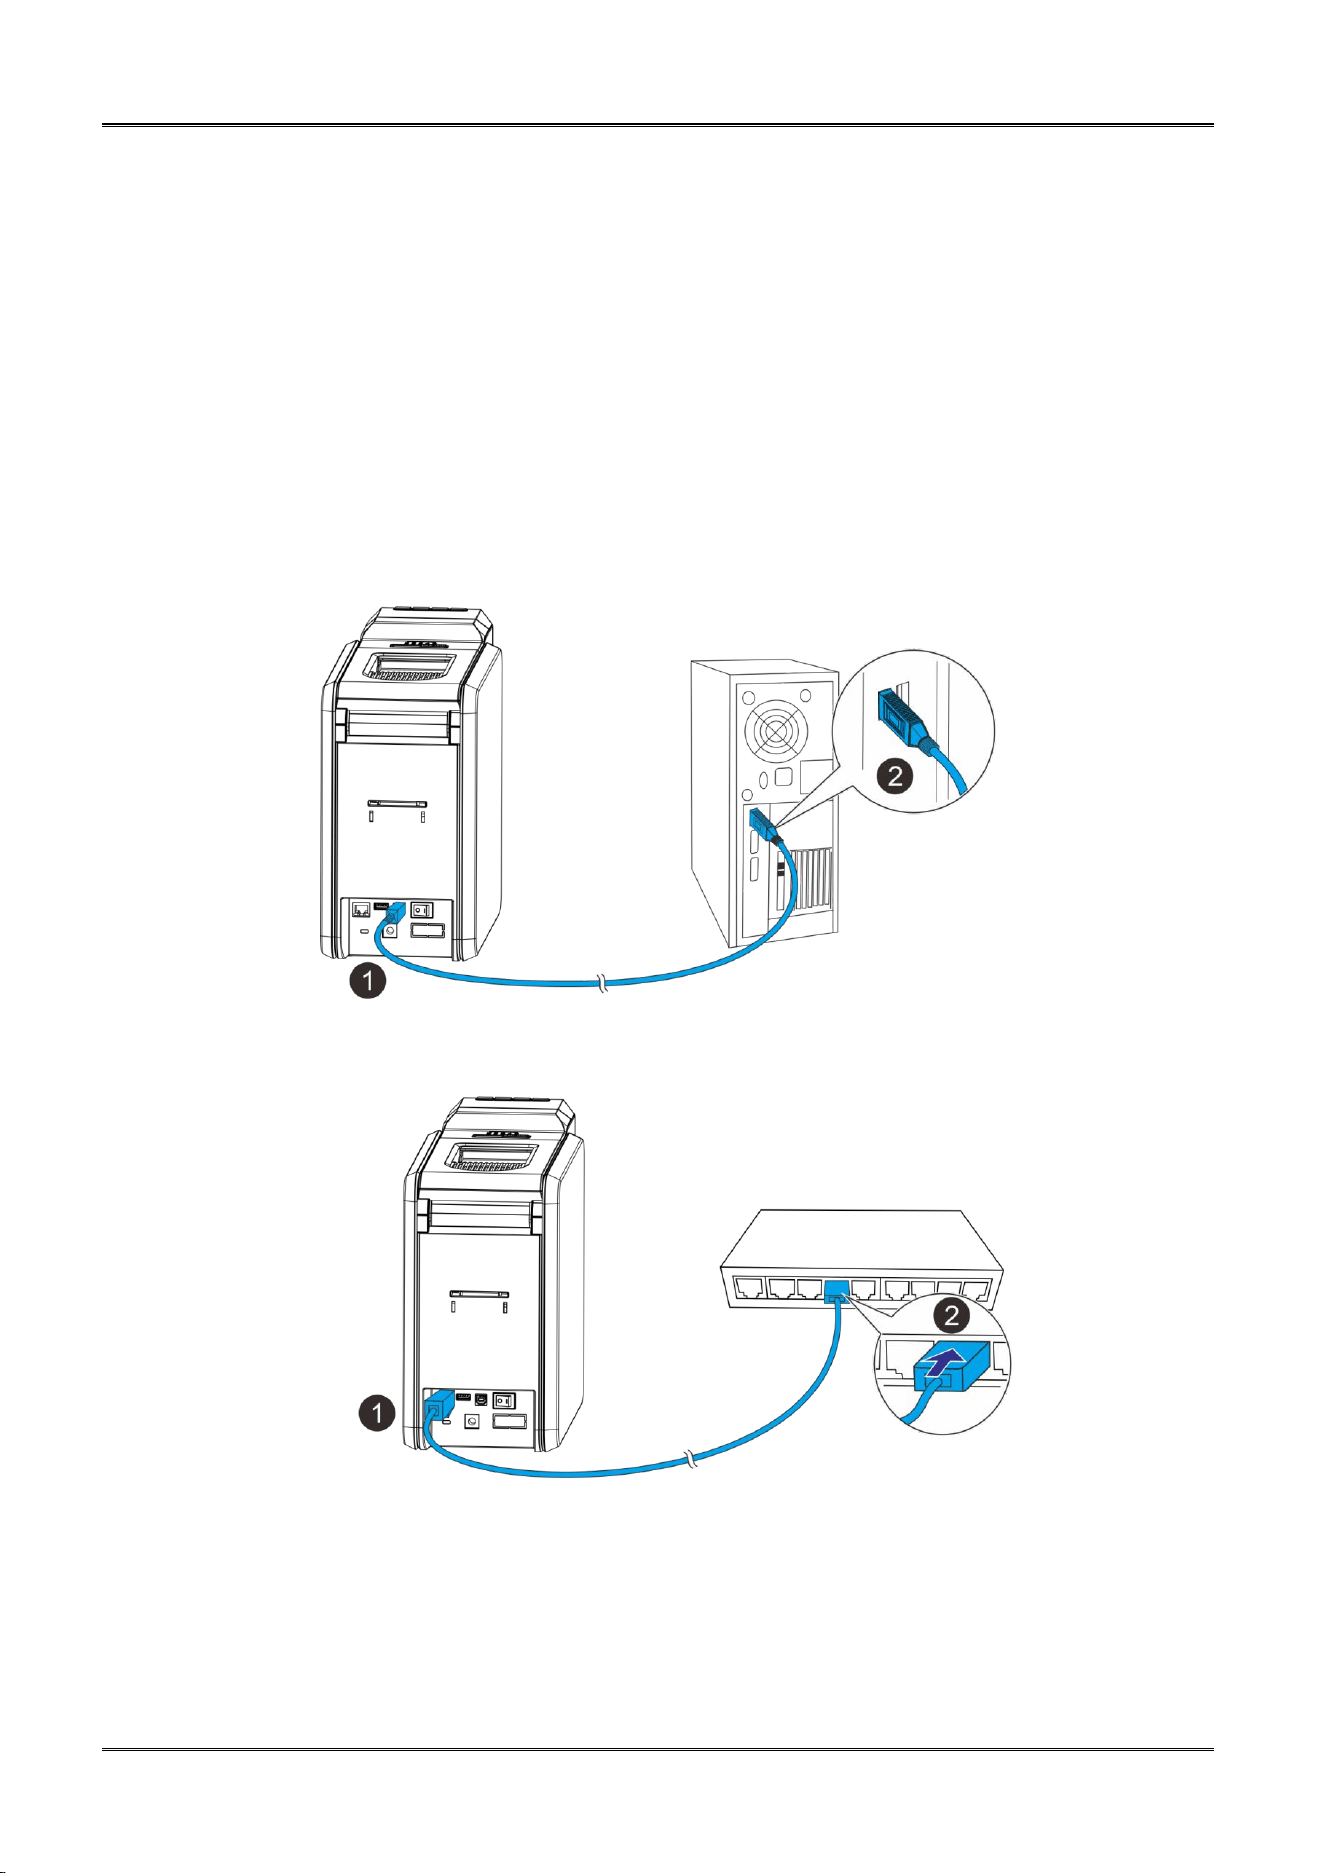
1.5 Connecting to Computer
The standard interfaces (connections) for this printer are USB and Ethernet. All connections
are located at the back of the printer.
(1) Ensure your printer is switch off.
(2) Insert the interface cable into the corresponding port.
(3) Connect the other end of the interface cable to the hostcomputer or route.
■ USB
■ Ethernet
Dascom DC-4100 User Manual
10
1.6 Installing Windows Driver
The driver is the connection and transformation platform between the printer and the computer
operating system to achieve the interactive processing of the information.User can set up relevant
settings, get print status and etc. via driver.
The latest Windows printer drivers can be downloaded from our web:
Https://www.dascom.com/downloads.html
1.6.1 Installing Windows Driver via USB
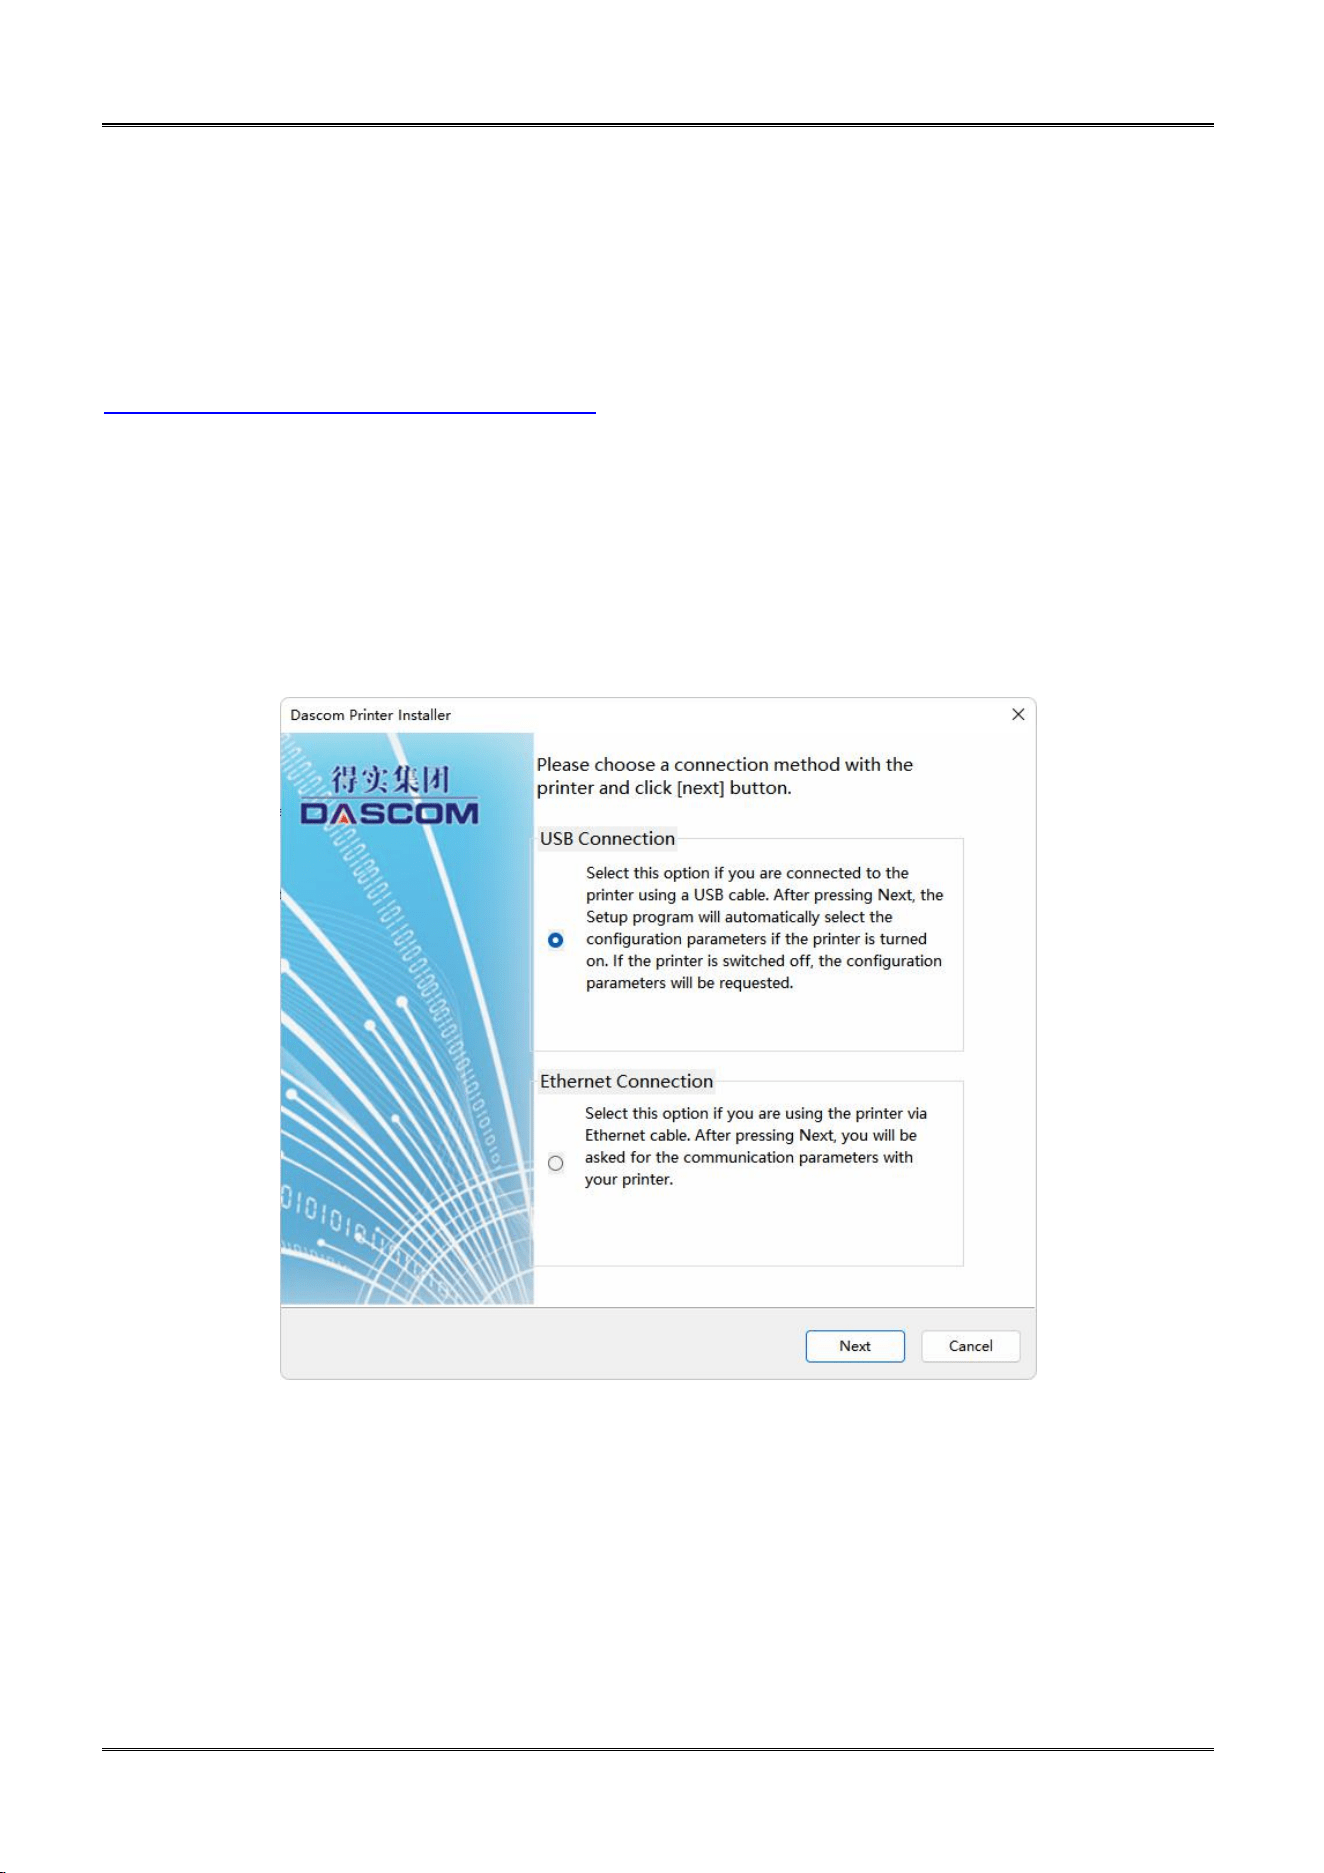
Connect the USB cable to the computer, from the folder that you unzipped the driver files to select
“install.exe”. The program will guide you to finish the whole installation.
(1) Select USB connection. Click “Next”.
Dascom DC-4100 User Manual
11
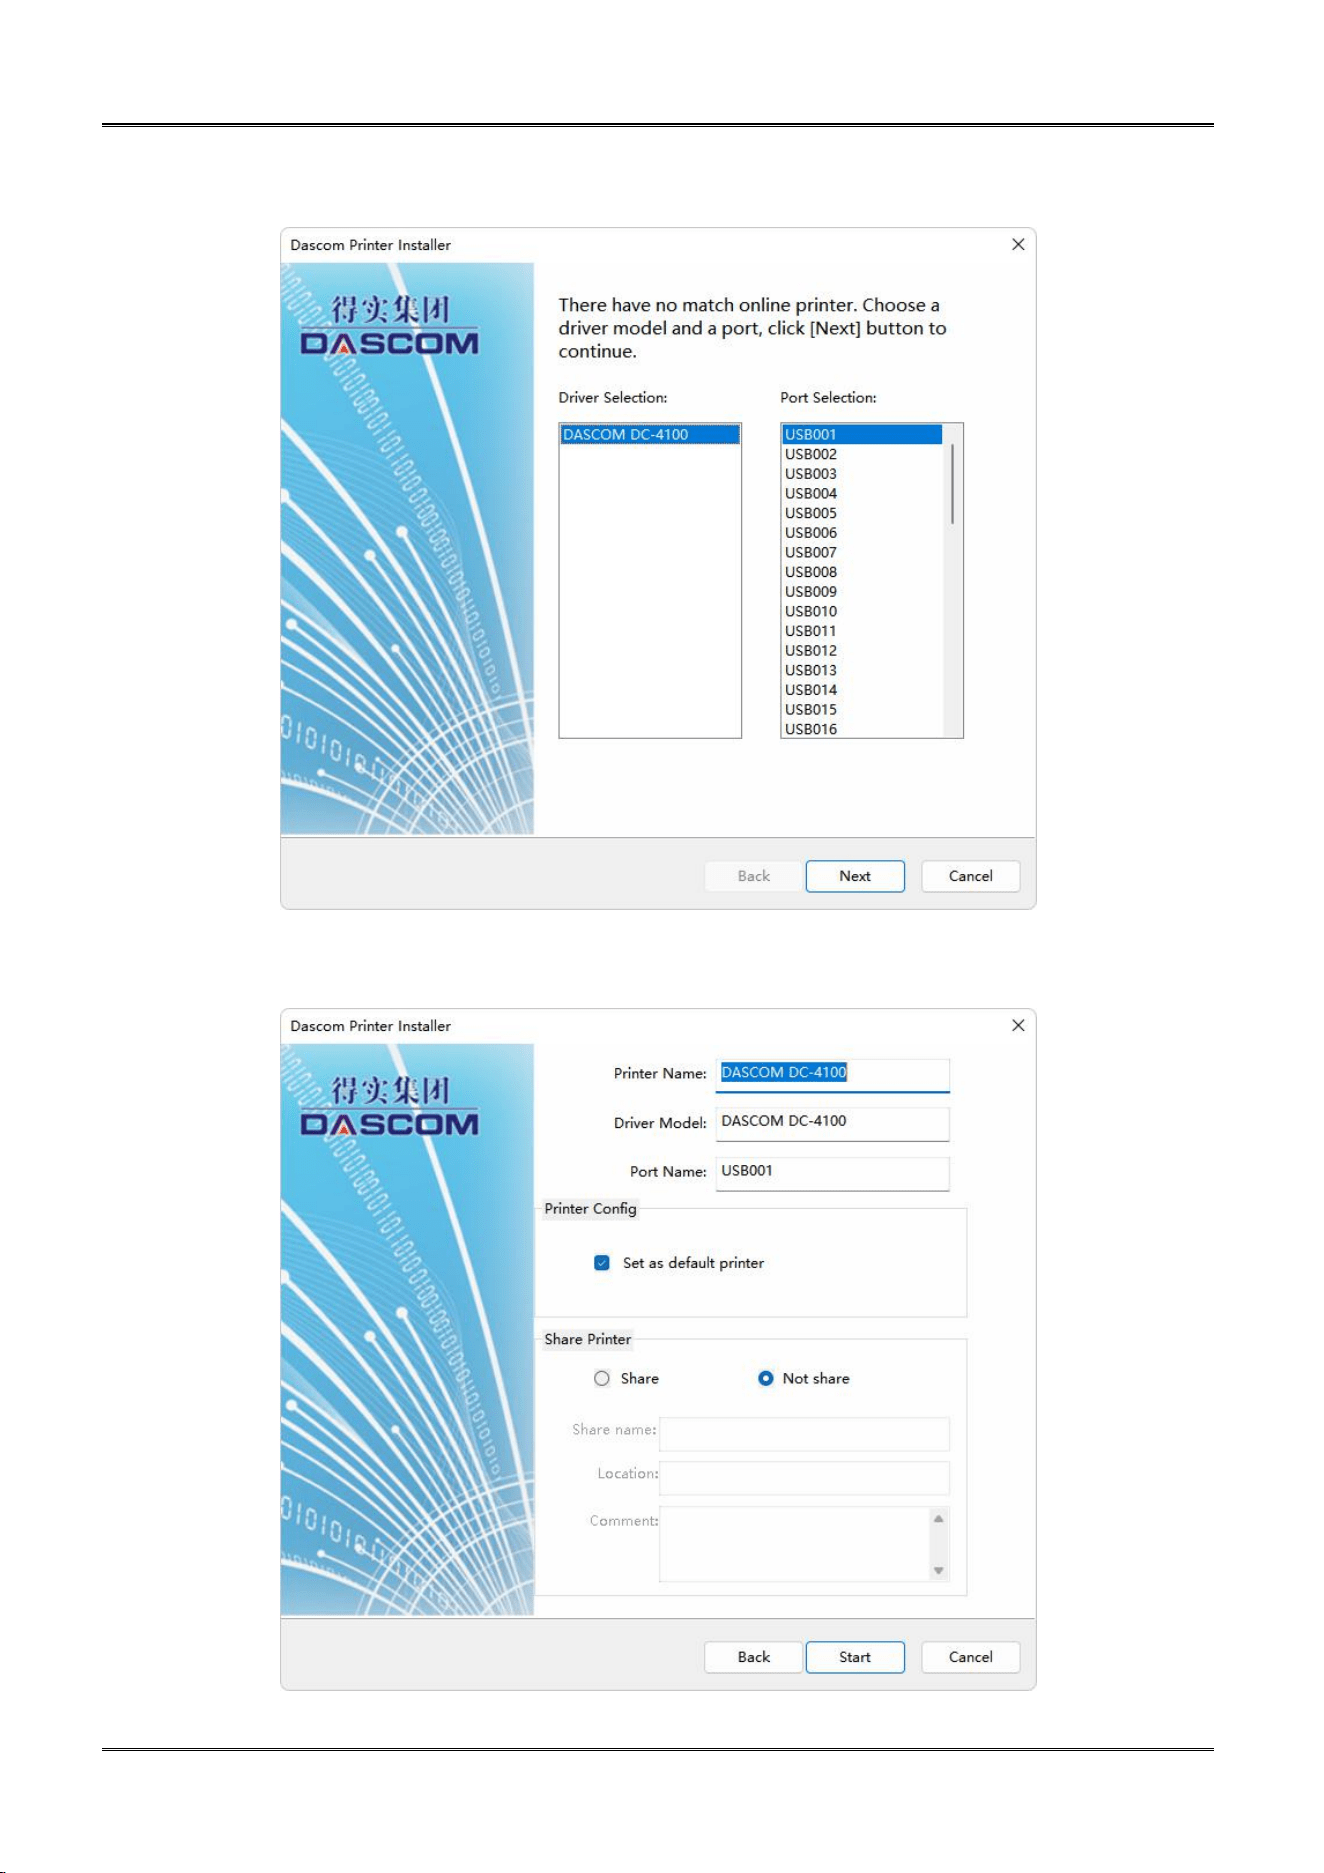
(2) Select the Driver Selection and appropriate Port Selection, click “Next”.
(3) Set up the Printer name or go with the default, click “Start” to begin the process.
Dascom DC-4100 User Manual
12
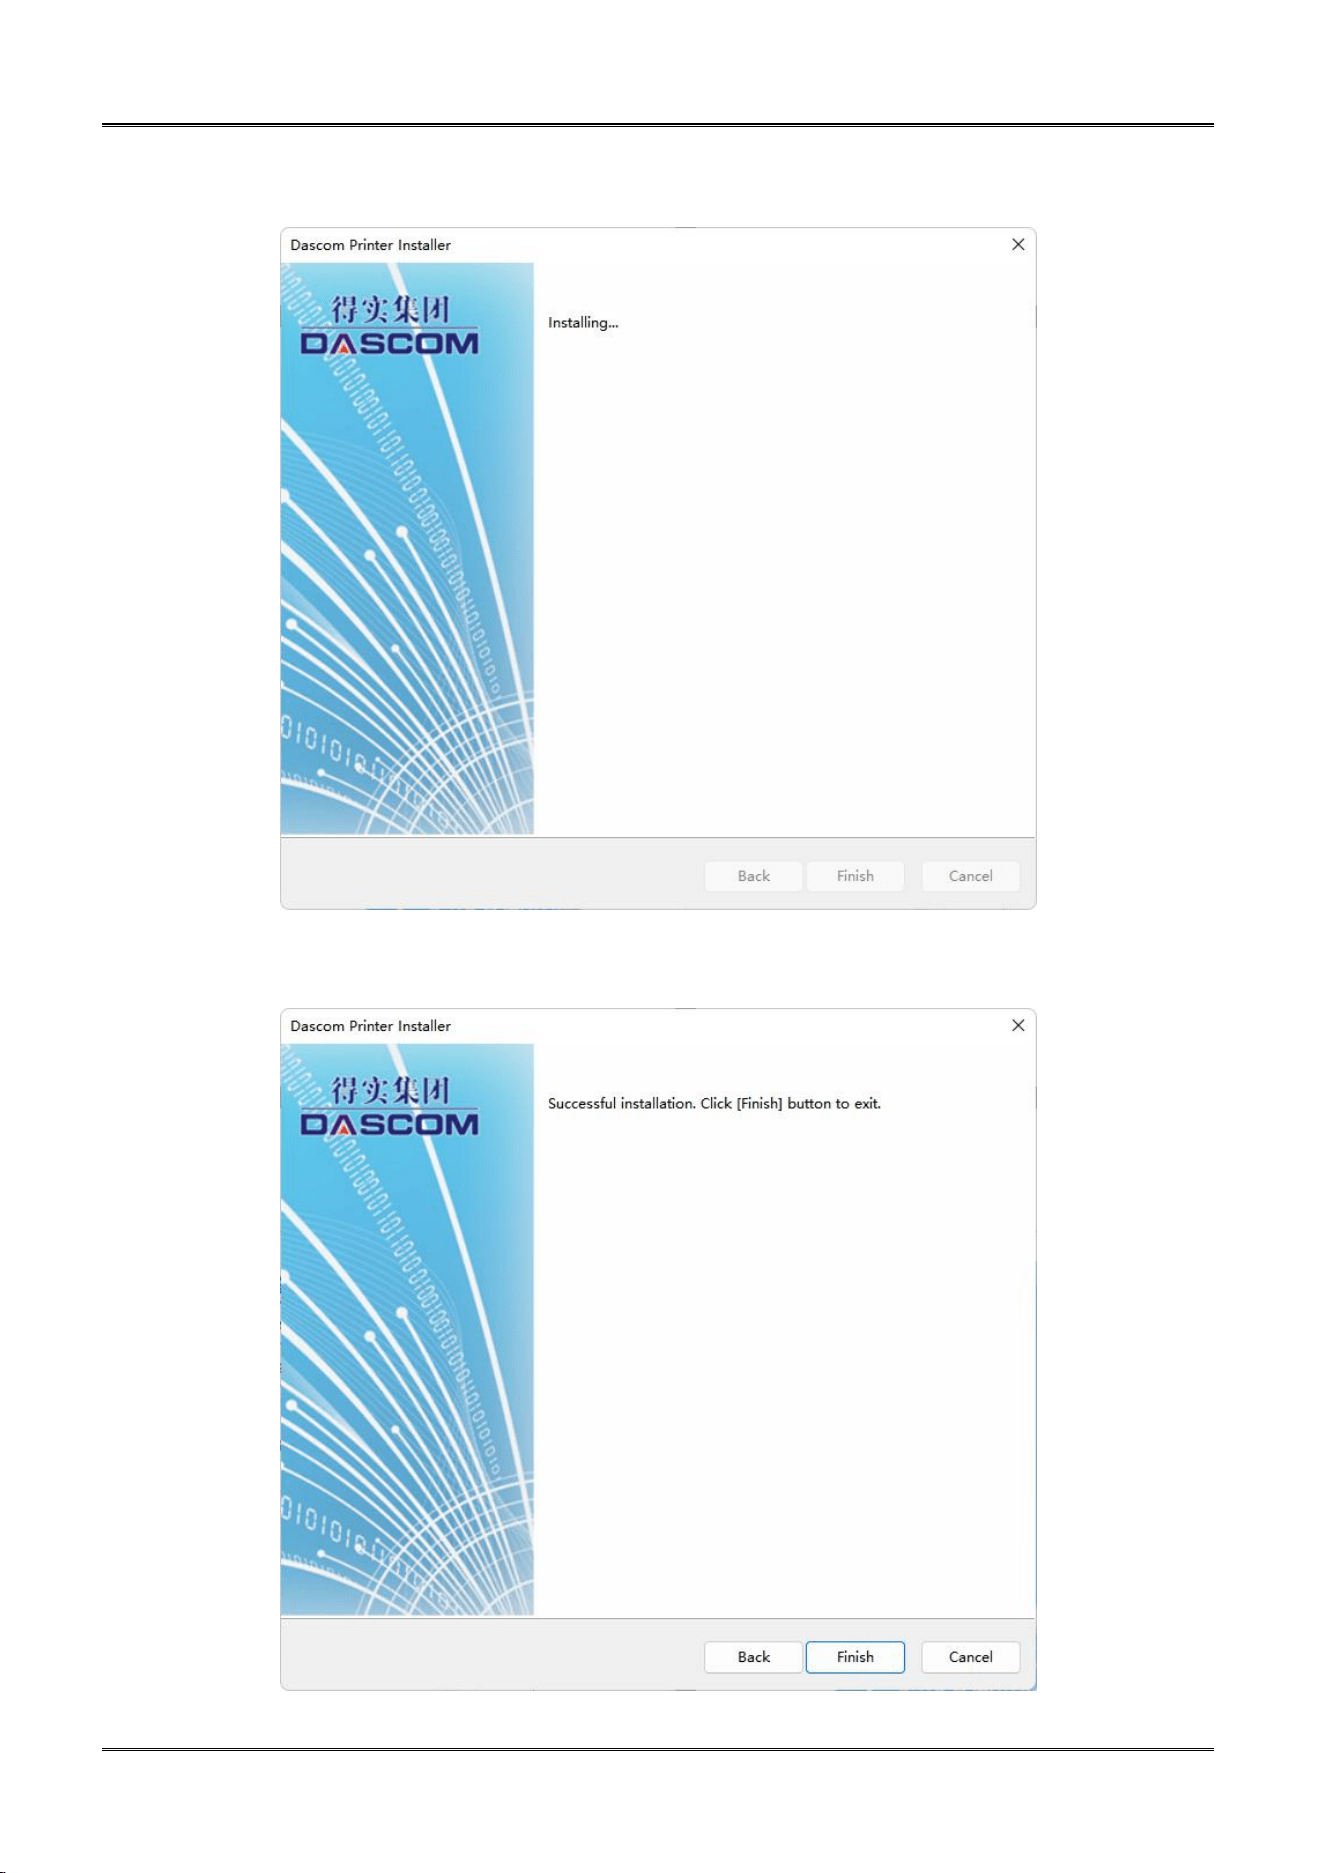
(4) Waiting for the installation.
(5) When the Driver has been successfully installed, click the “Finish” button.
Dascom DC-4100 User Manual
13
1.6.2 Installing Windows Driver via Ethernet
Connect the Ethernet cord from the Printer to an available port on a Ethernet Switch or Router. Turn
On the Printer, from the folder that you unzipped the driver files to select “install.exe”.
The Install program will guide you through the necessary steps to finish the whole installation.
Ensure the printer and the computer are on the same LAN before
installation. Switch on the printer. Please follow the installer carefully.
Some Windows versions require users to have administrator privileges to
install the driver.
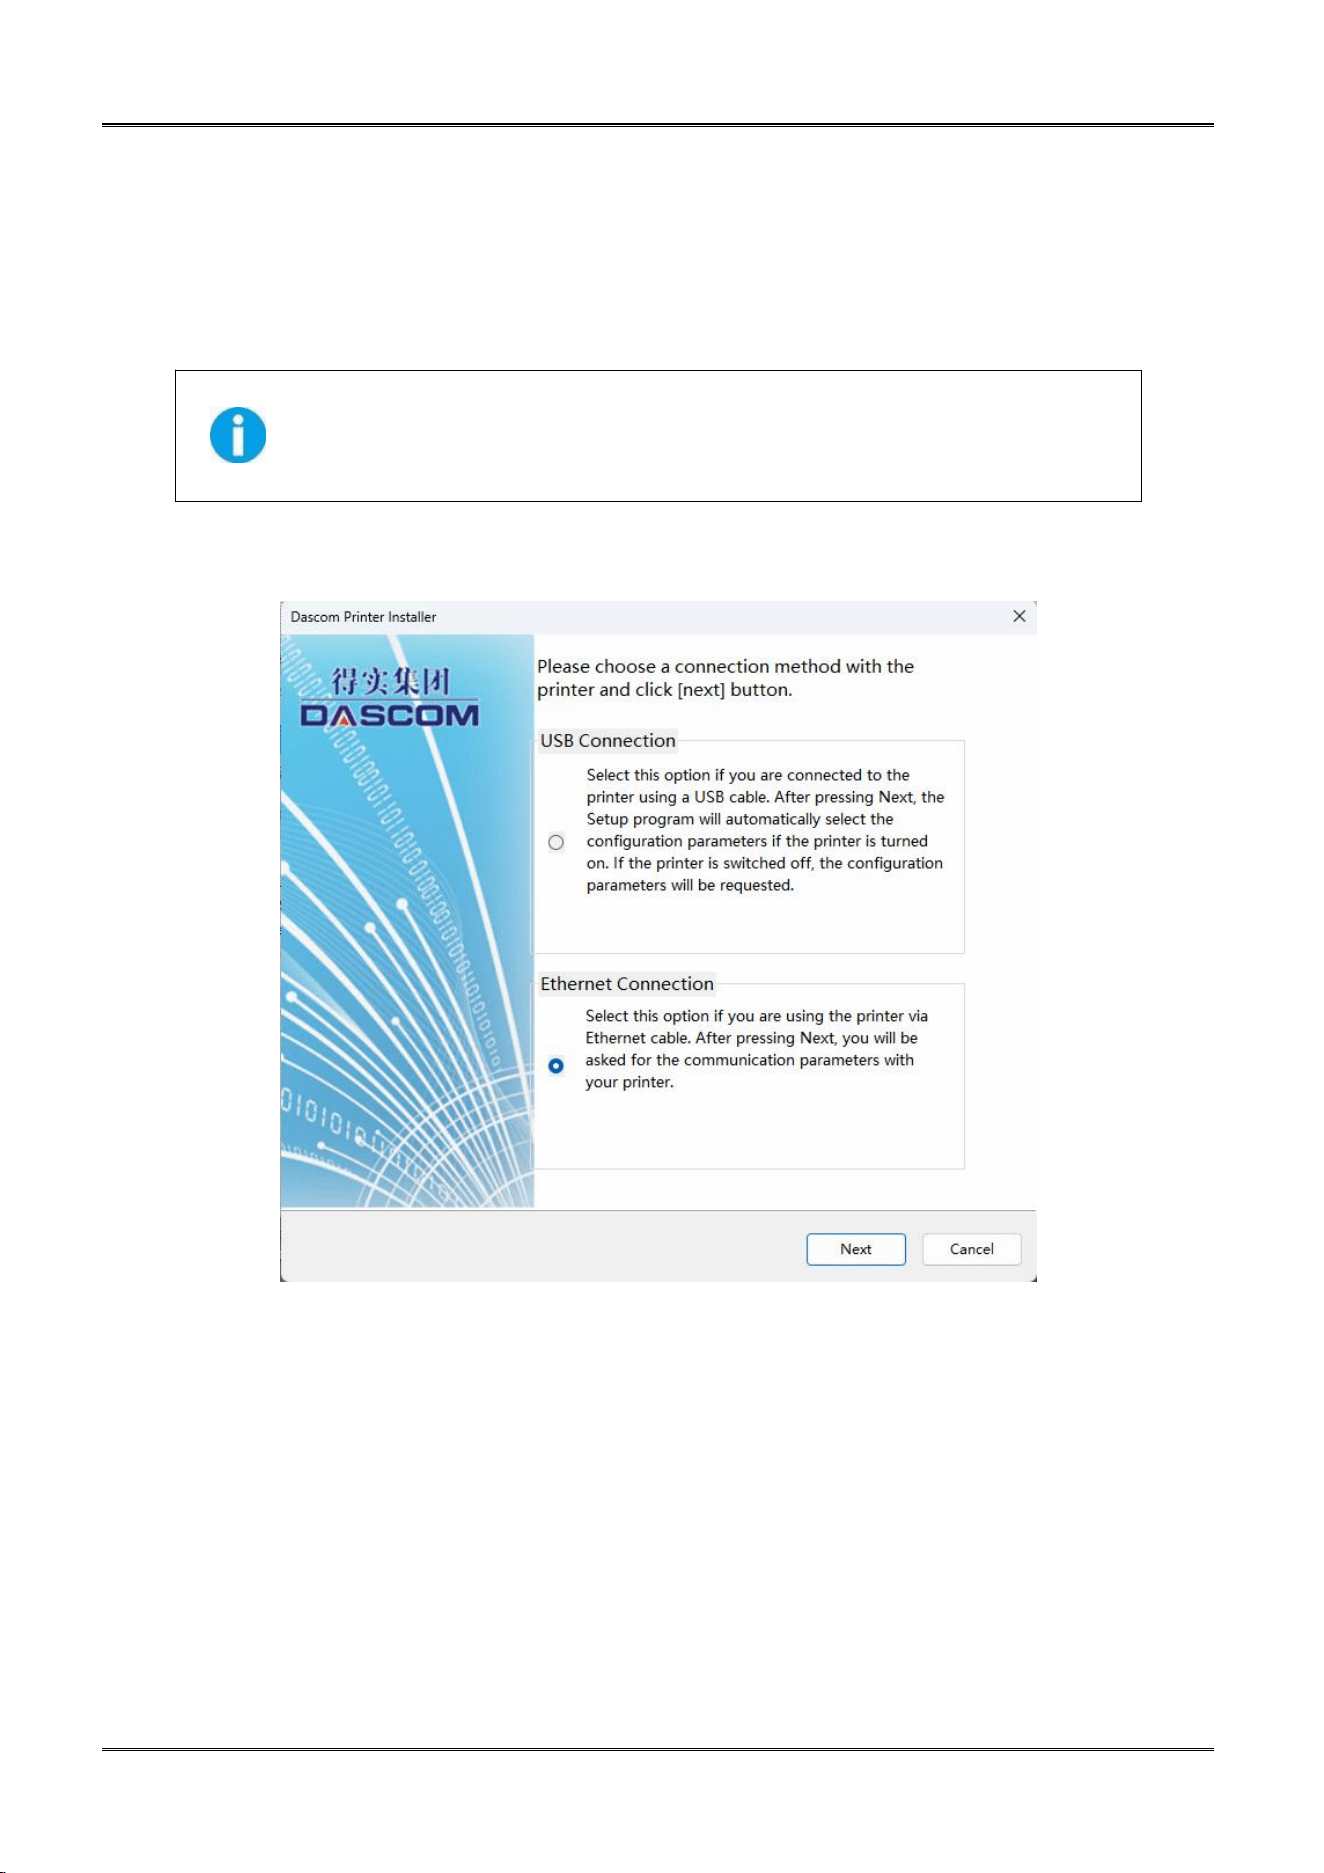
(1) Select Ethernet connection. Click “Next”.
Dascom DC-4100 User Manual
14
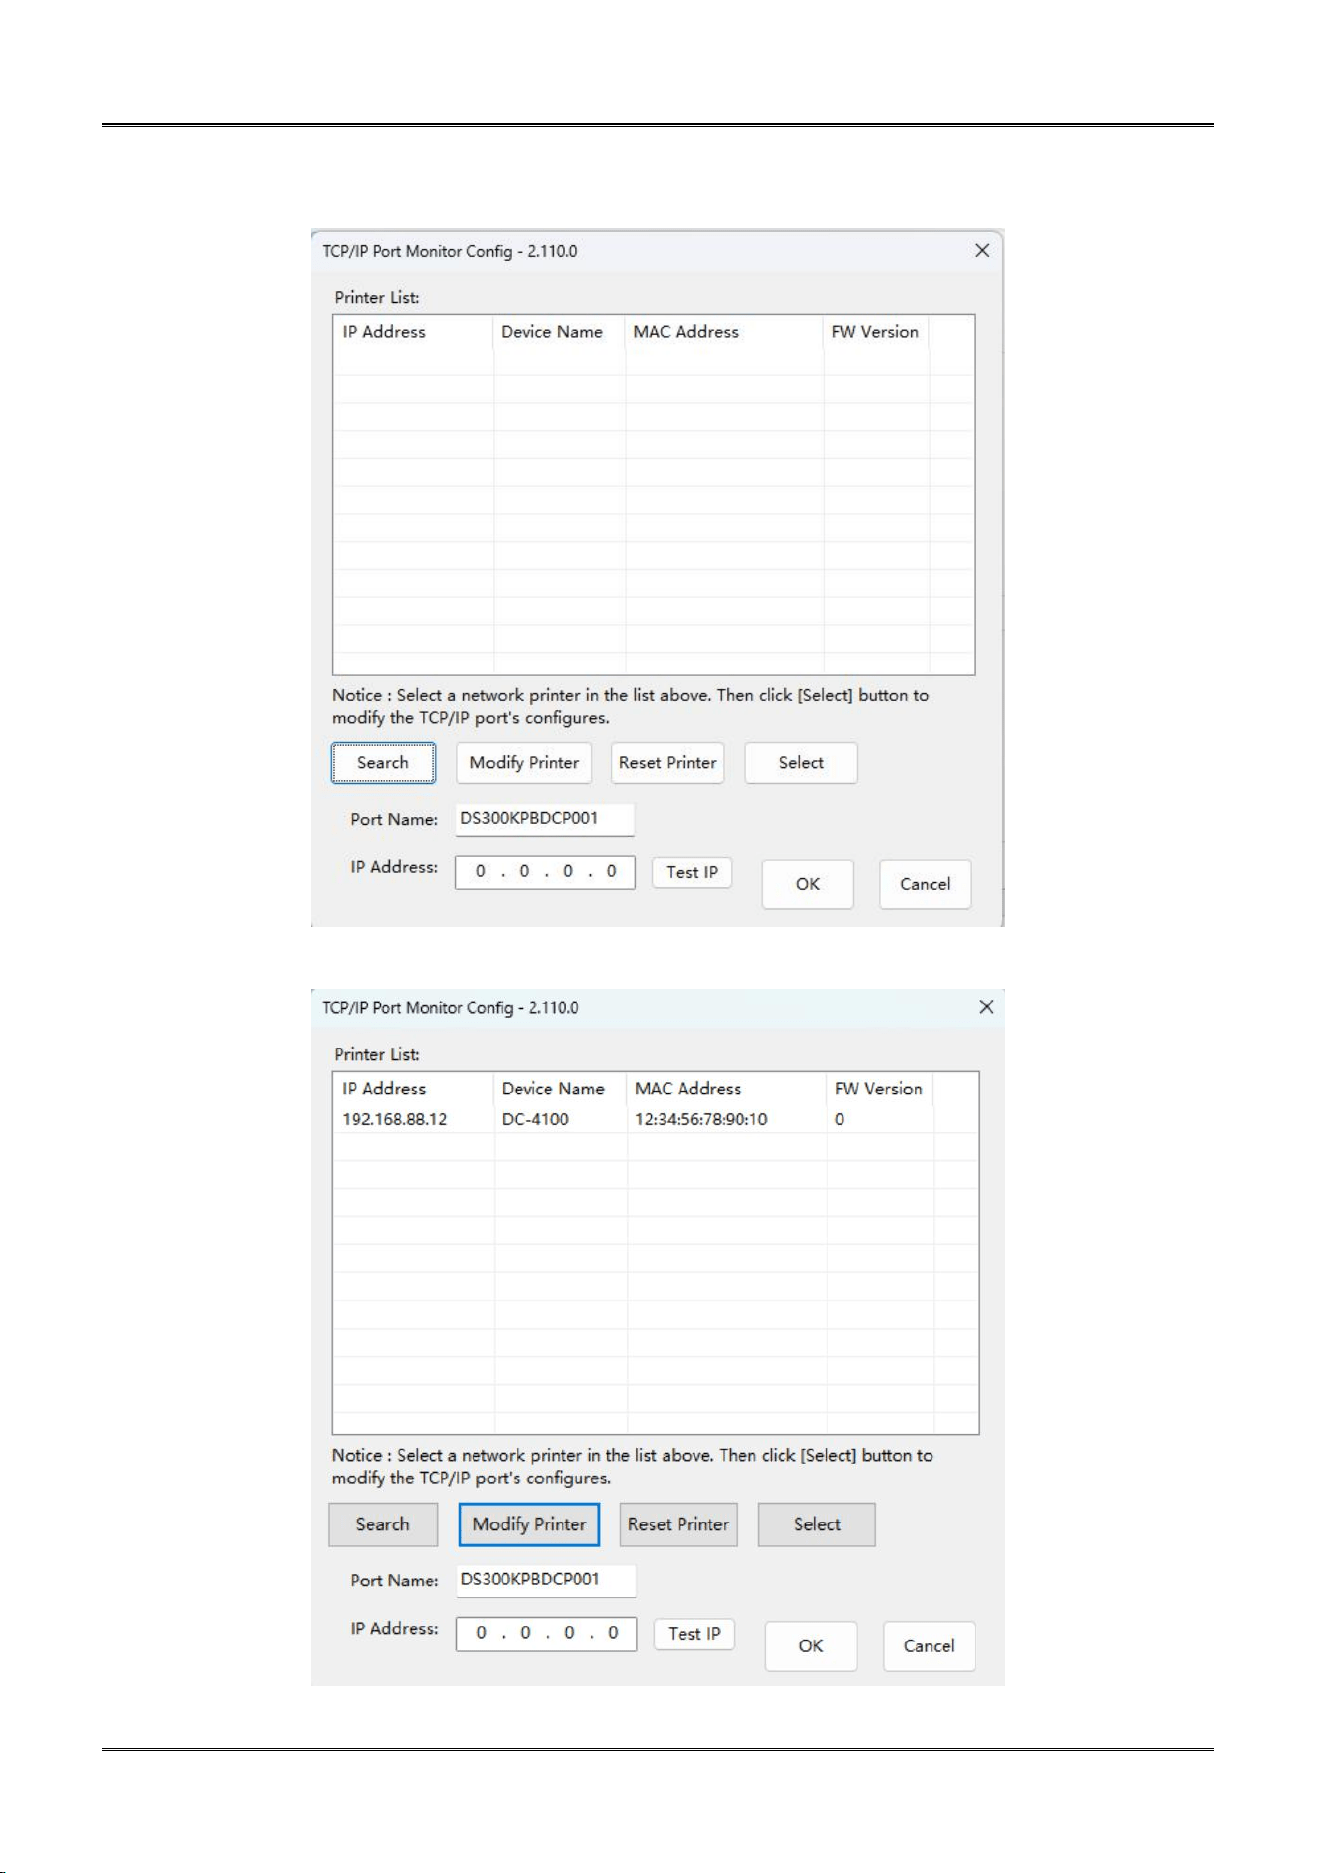
(2) To search for the network attached Printer, click “Search” button.
(3) Select your printer by clicking on it, then click on the “Modify Printer” button.
Dascom DC-4100 User Manual
15
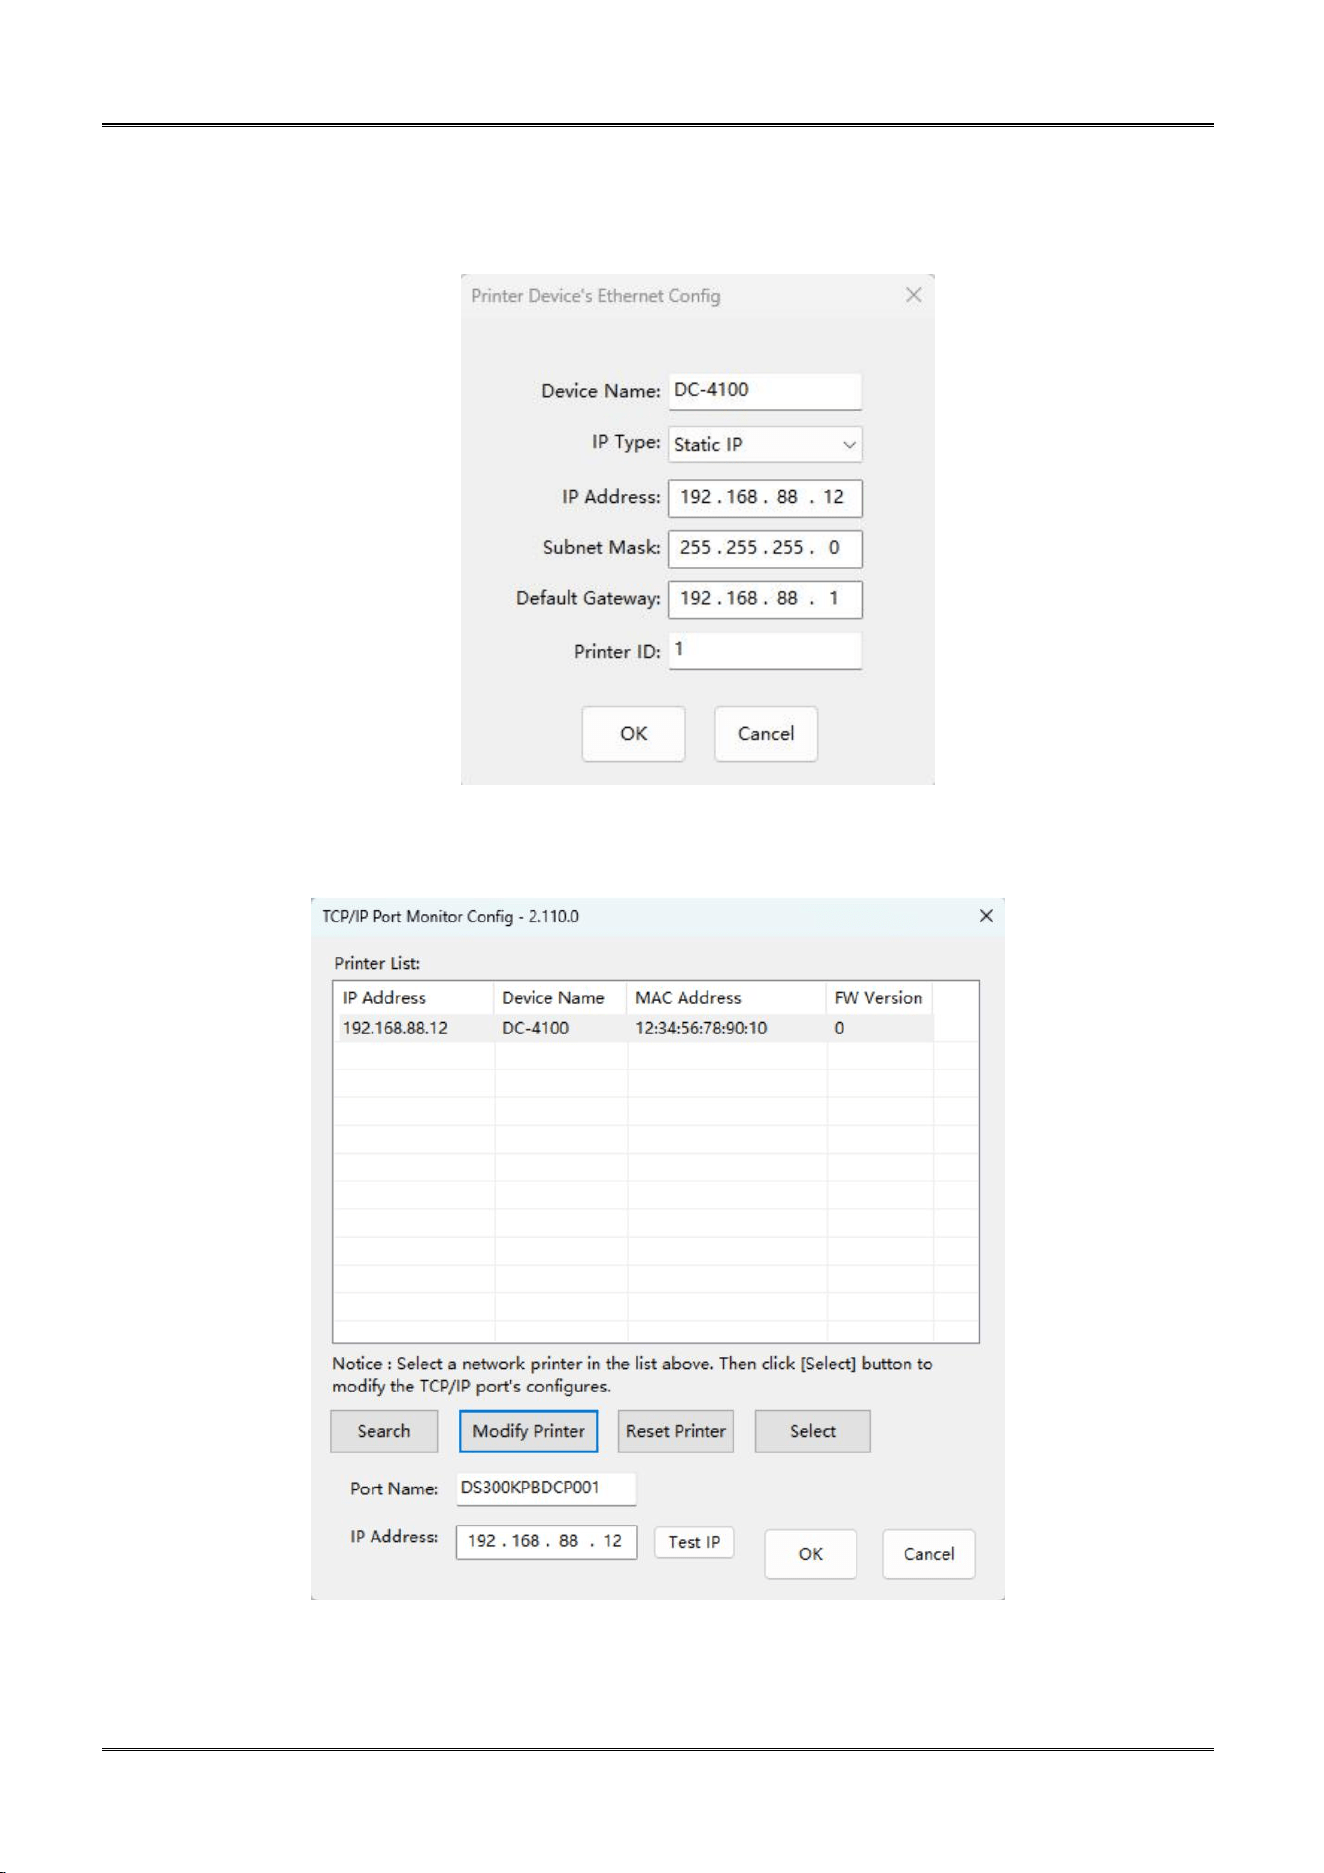
(4) You can modify the Printers name, IP address acquisition mode, IP address, Subnet mask,
Default Gateway. Click the “OK” when you finish.
(5) Return to the Ethernet port configuration page, wait for a few seconds, you can see the
updated Ethernet information.
Dascom DC-4100 User Manual
16
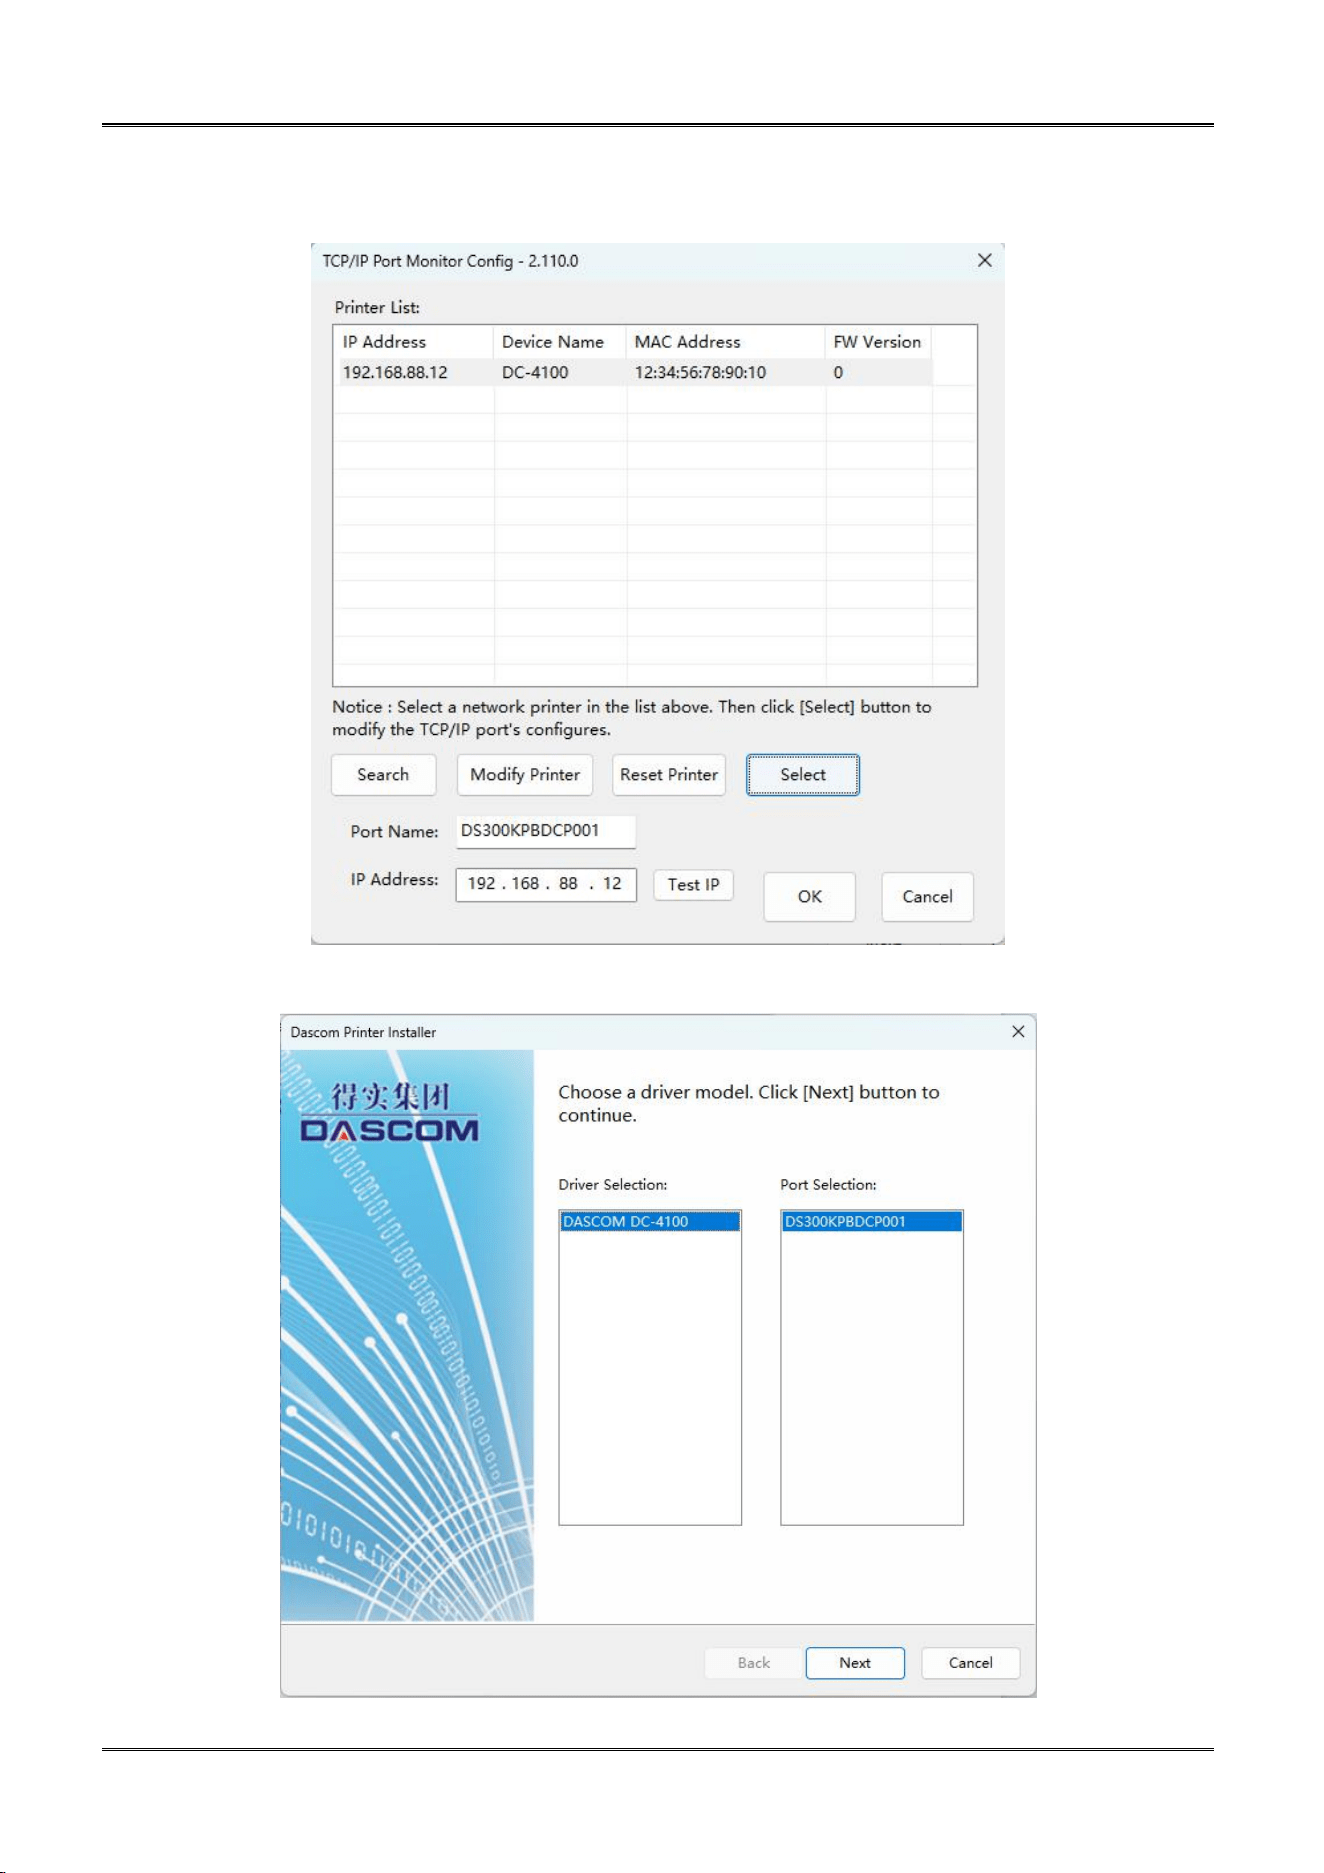
(6) Select your Printer, click “Select”. The corresponding IP address information is displayed at the
bottom left. The installation will start when you click on “OK”.
(7) Select the Driver Selection and appropriate Port Selection, click “Next”.
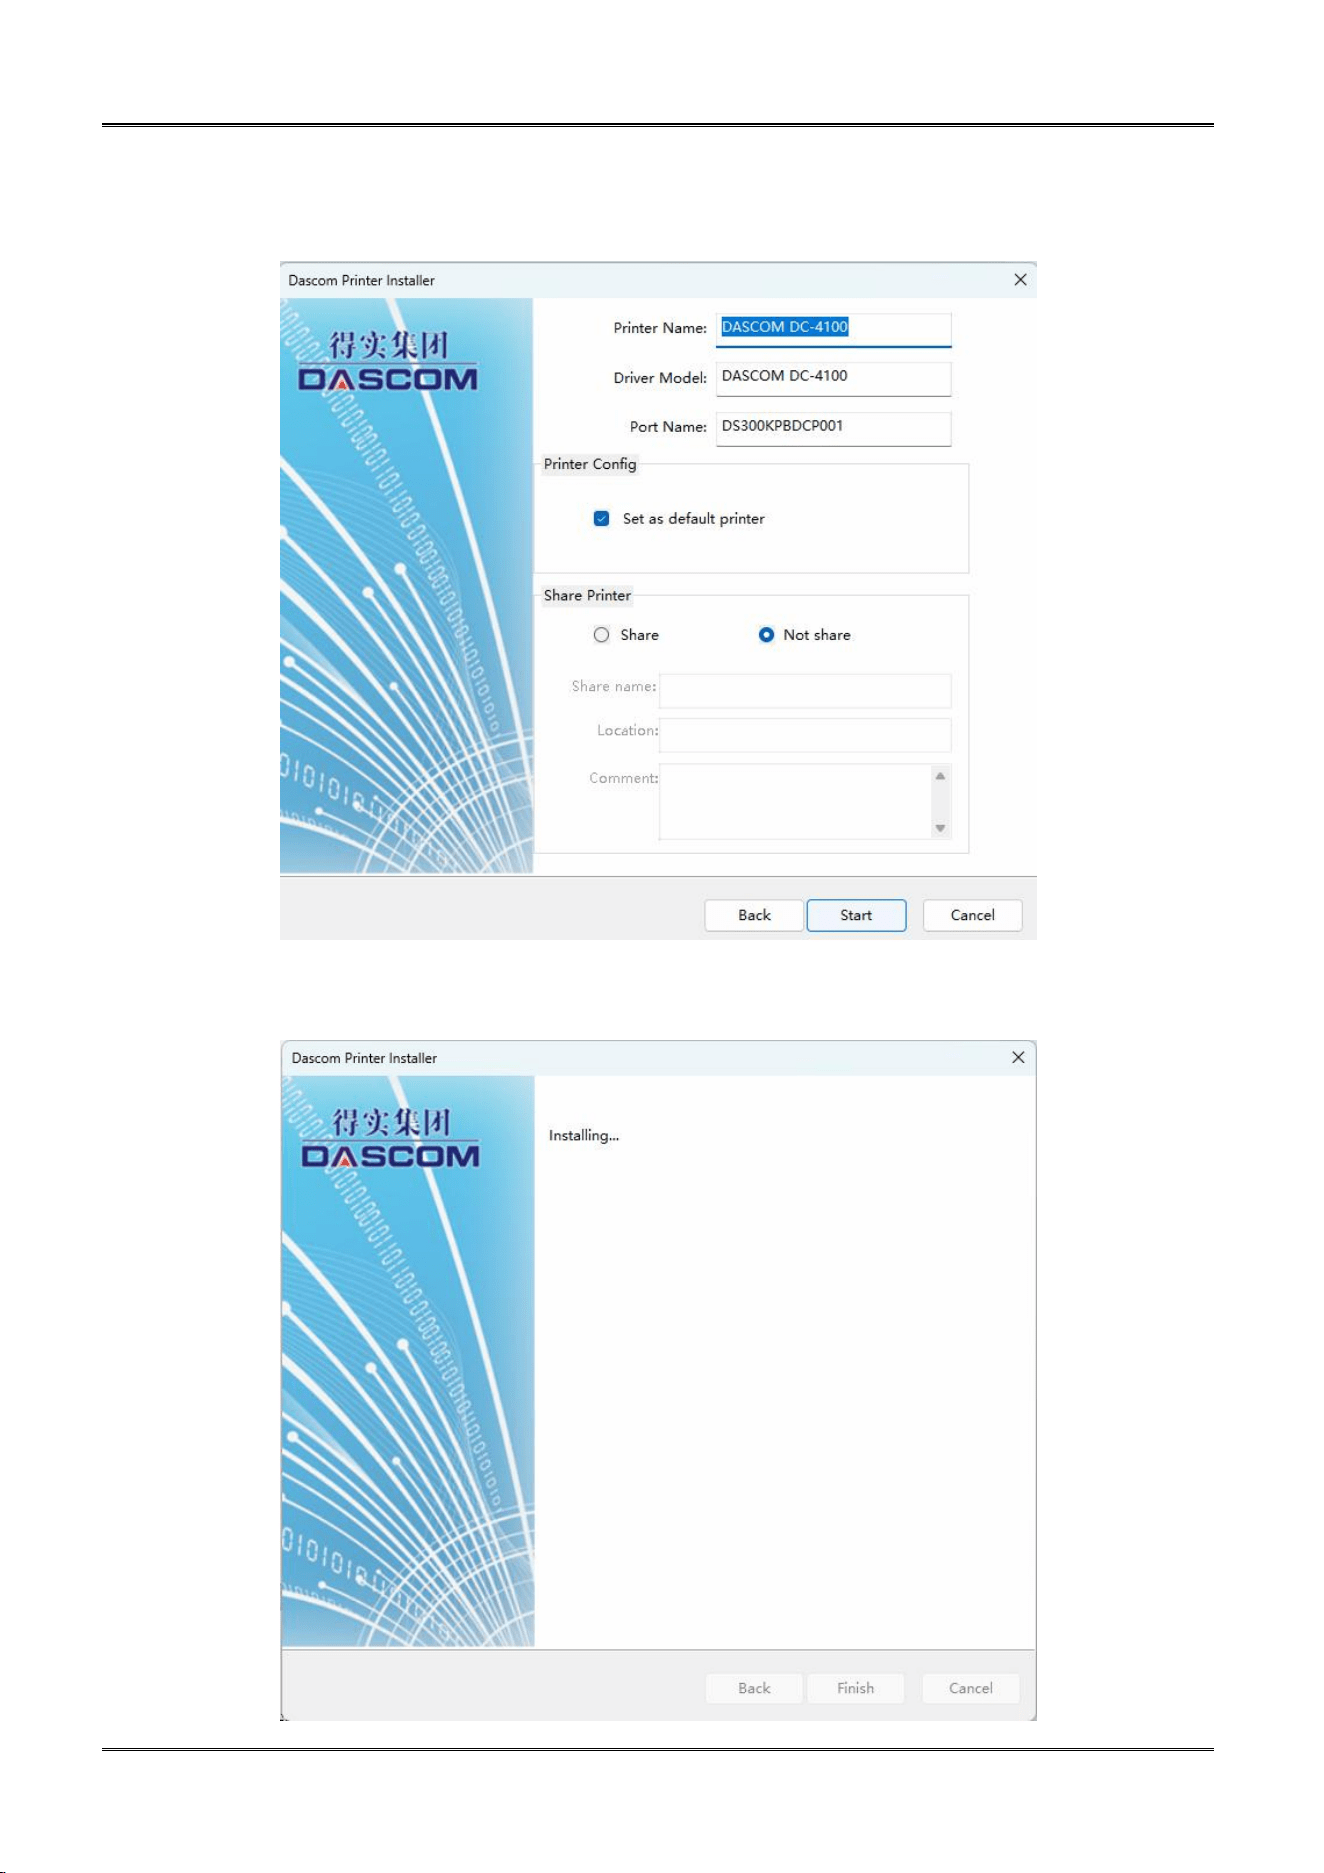
Dascom DC-4100 User Manual
17
(8) Set up the Printers name or go with the default, click “Start” to begin the process.
(9) Waiting for the installation.
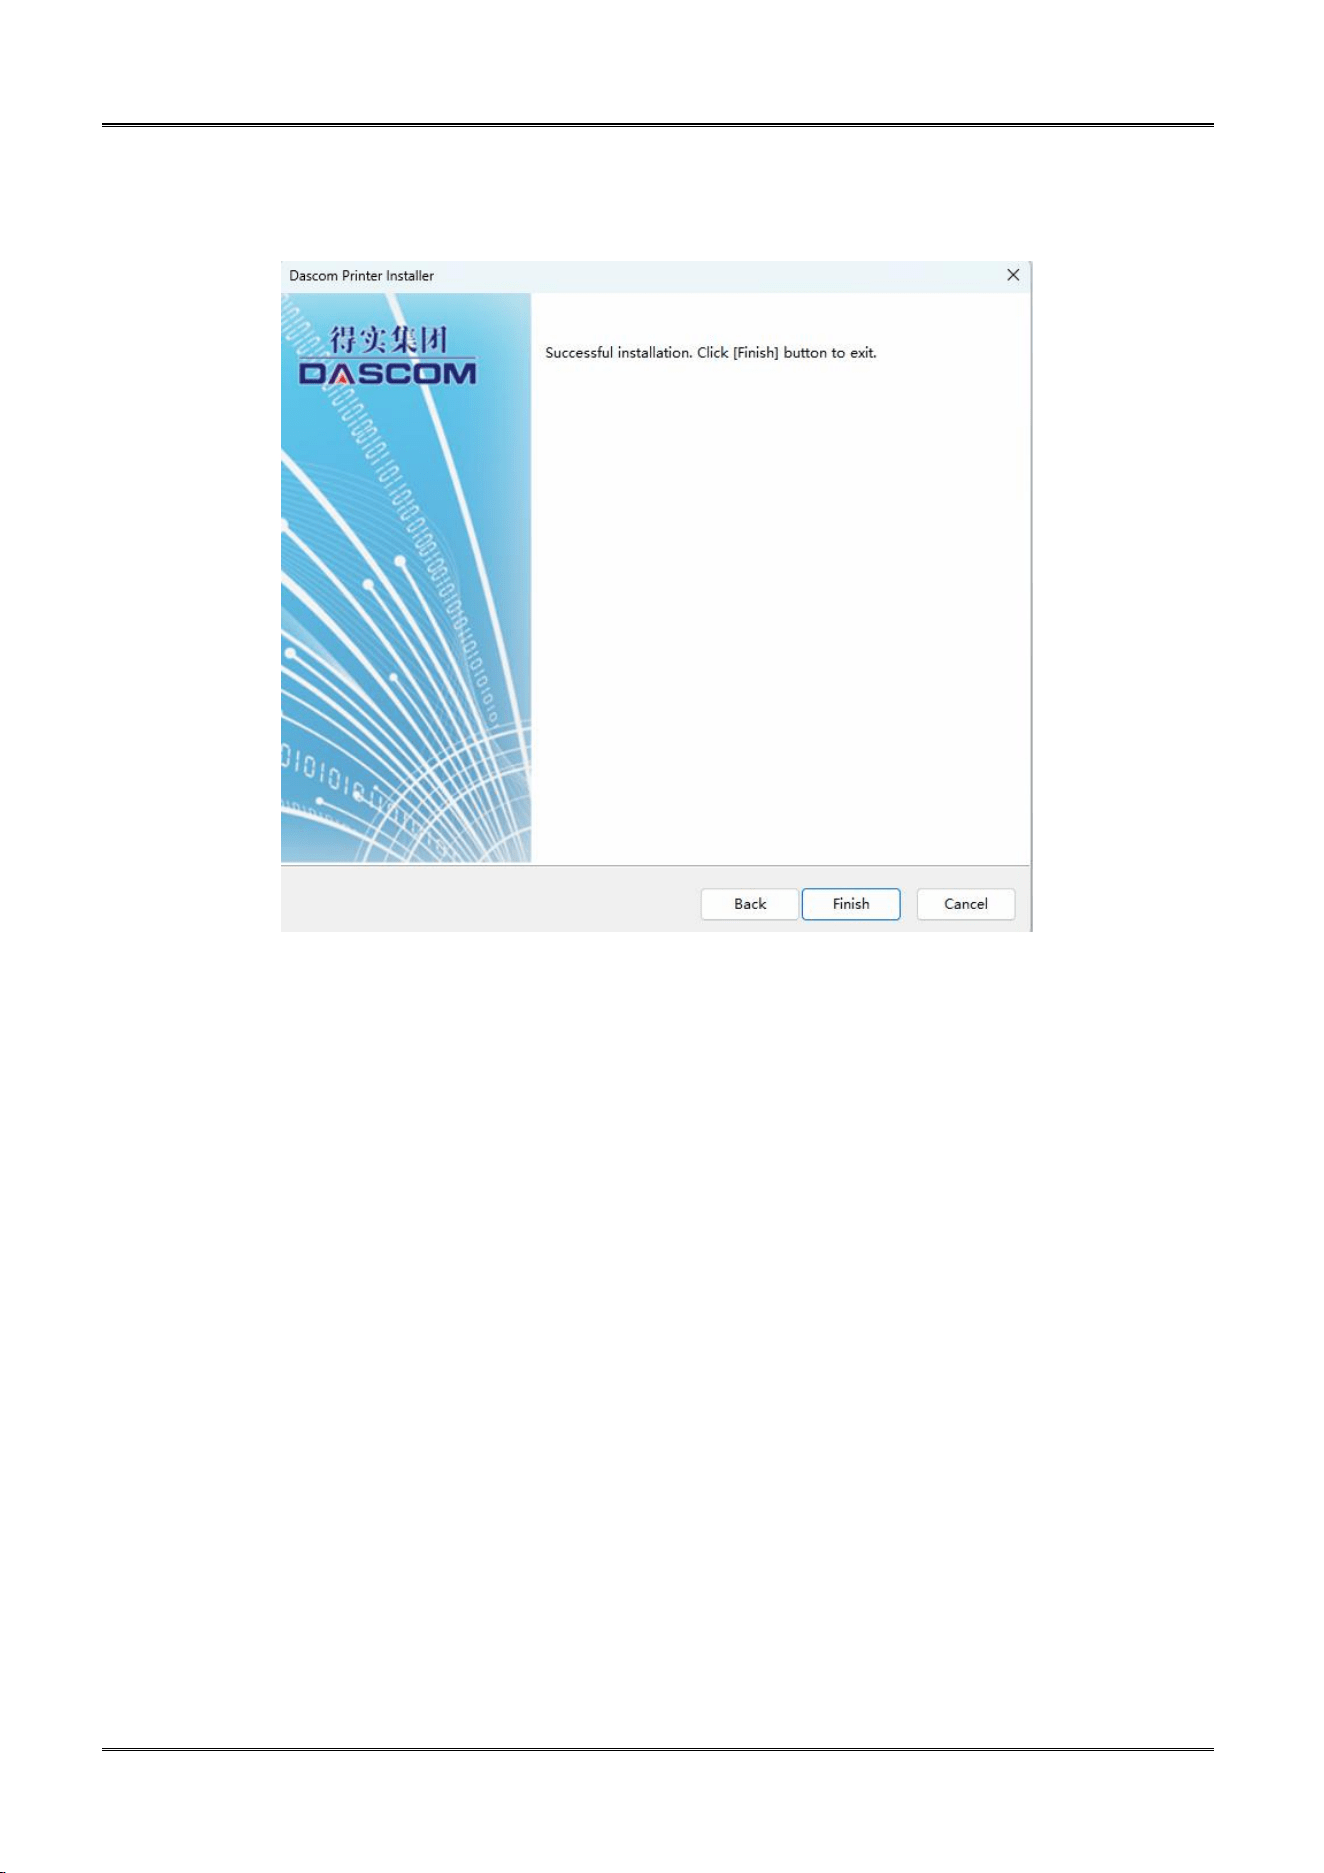
Dascom DC-4100 User Manual
18
(10) When the Driver has been successfully installed, click the “Finish” button.

Dascom DC-4100 User Manual
19
CHAPTER 2 INSTALLATION
2.1 Installing Cards
Cards can be loaded automatically from the card cassette, which can hold a large quantity of
cards making it convenient for mass or large-scale printing.
2.1.1 Card Specifications
This printer supports CR-80 cards.
Dimensions: 85.6mm × 54mm
Thickness: 0.25mm
~
1.25mm
Types: blank card.
Non CR-80 cards may cause defective print results or become stuck or lodged
in the printer requiring service.
Do not use the cards listed below:
- Previously printed cards by other card printers
- Damp cards
- Cards containing foreign particles, such as glass or metal
- Embossed cards
- Cards contaminated with oil, grease or dirt
- Defective cards with damages ,cracks, broken corners, or bends
- Transparent Cards
- Cards with odd shapes that are not CR80 size
Dascom DC-4100 User Manual
20
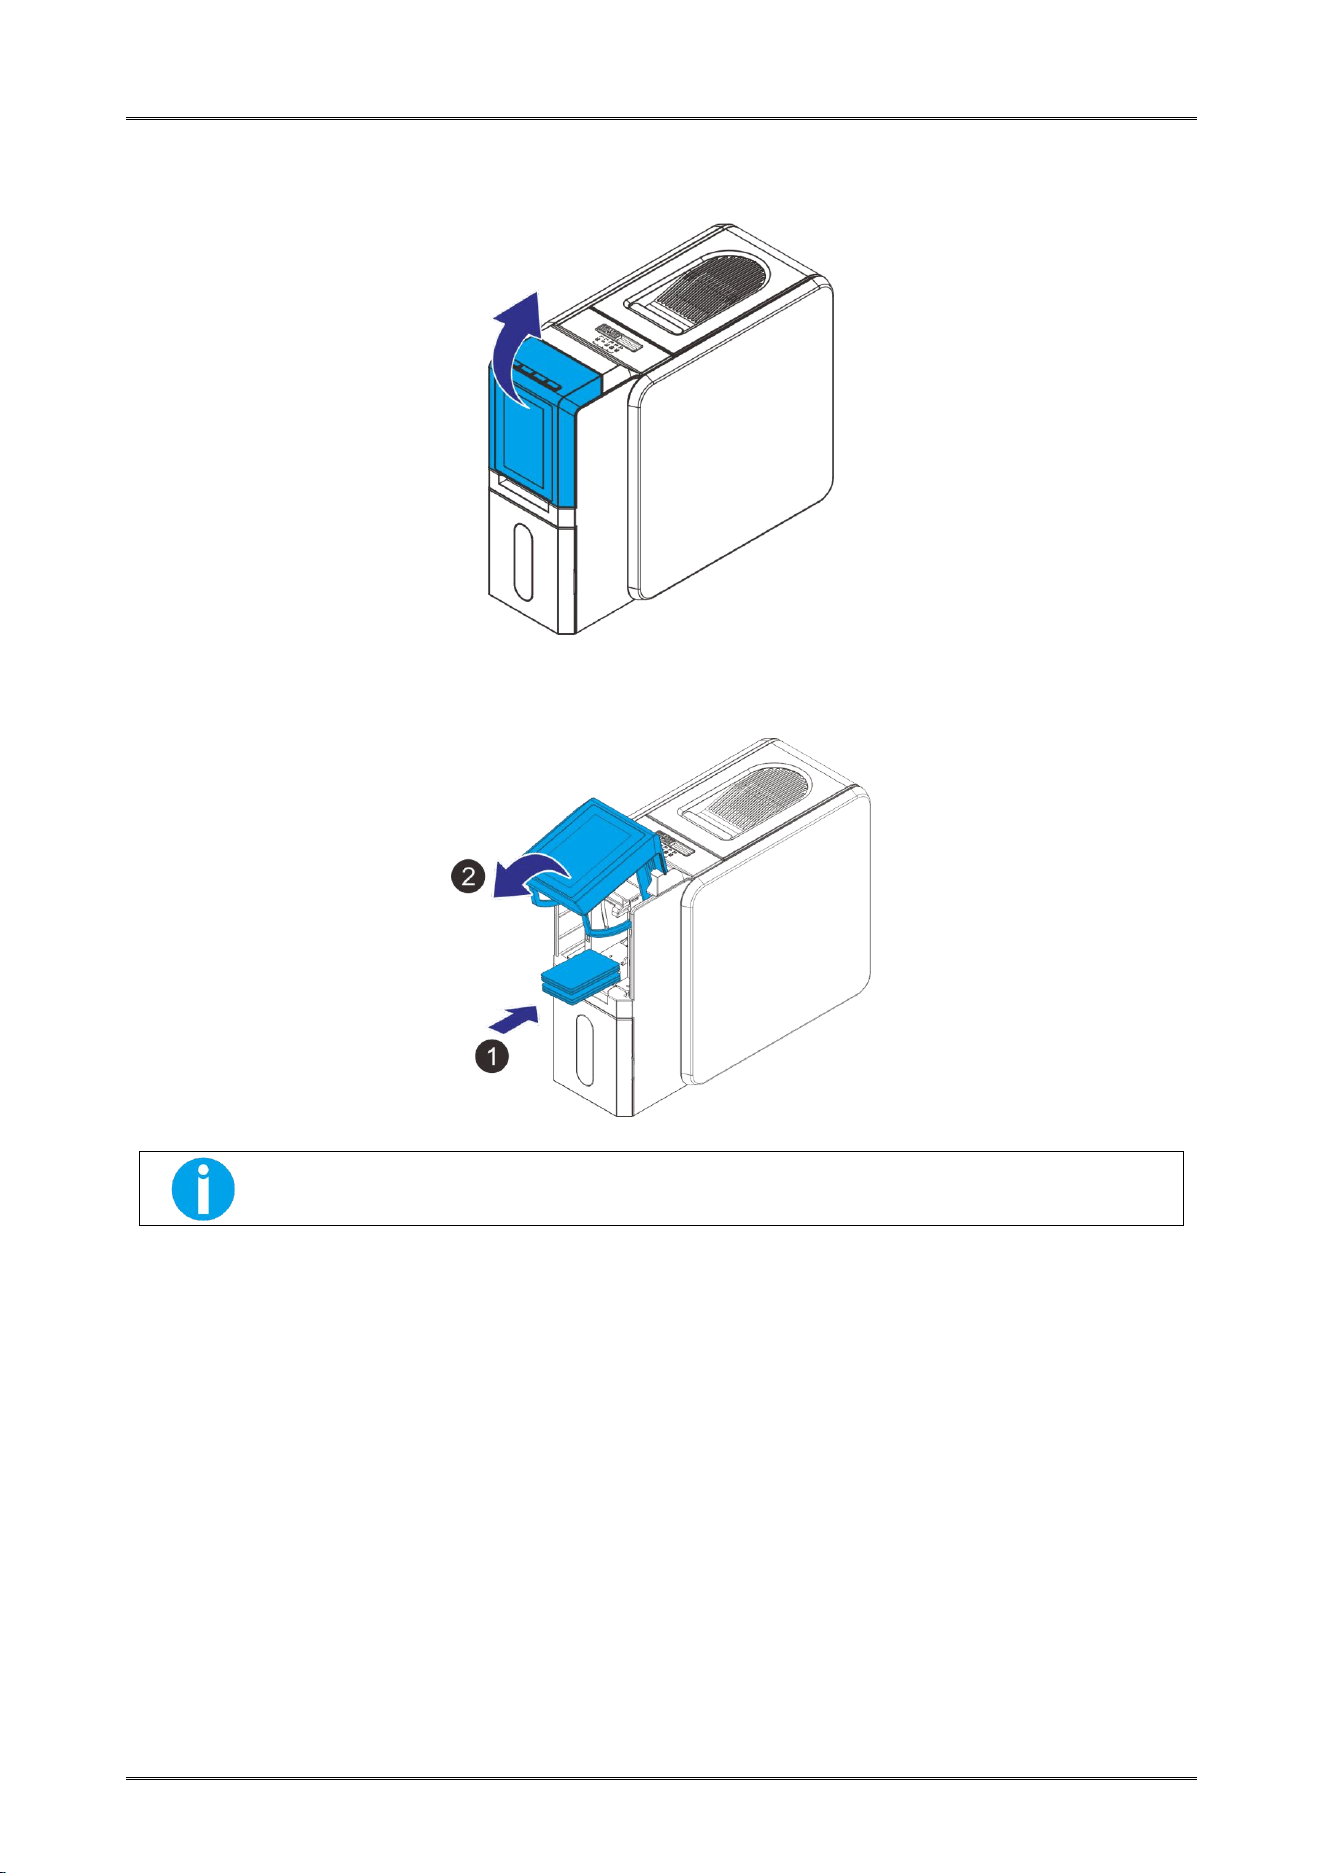
2.1.2 Loading the cards
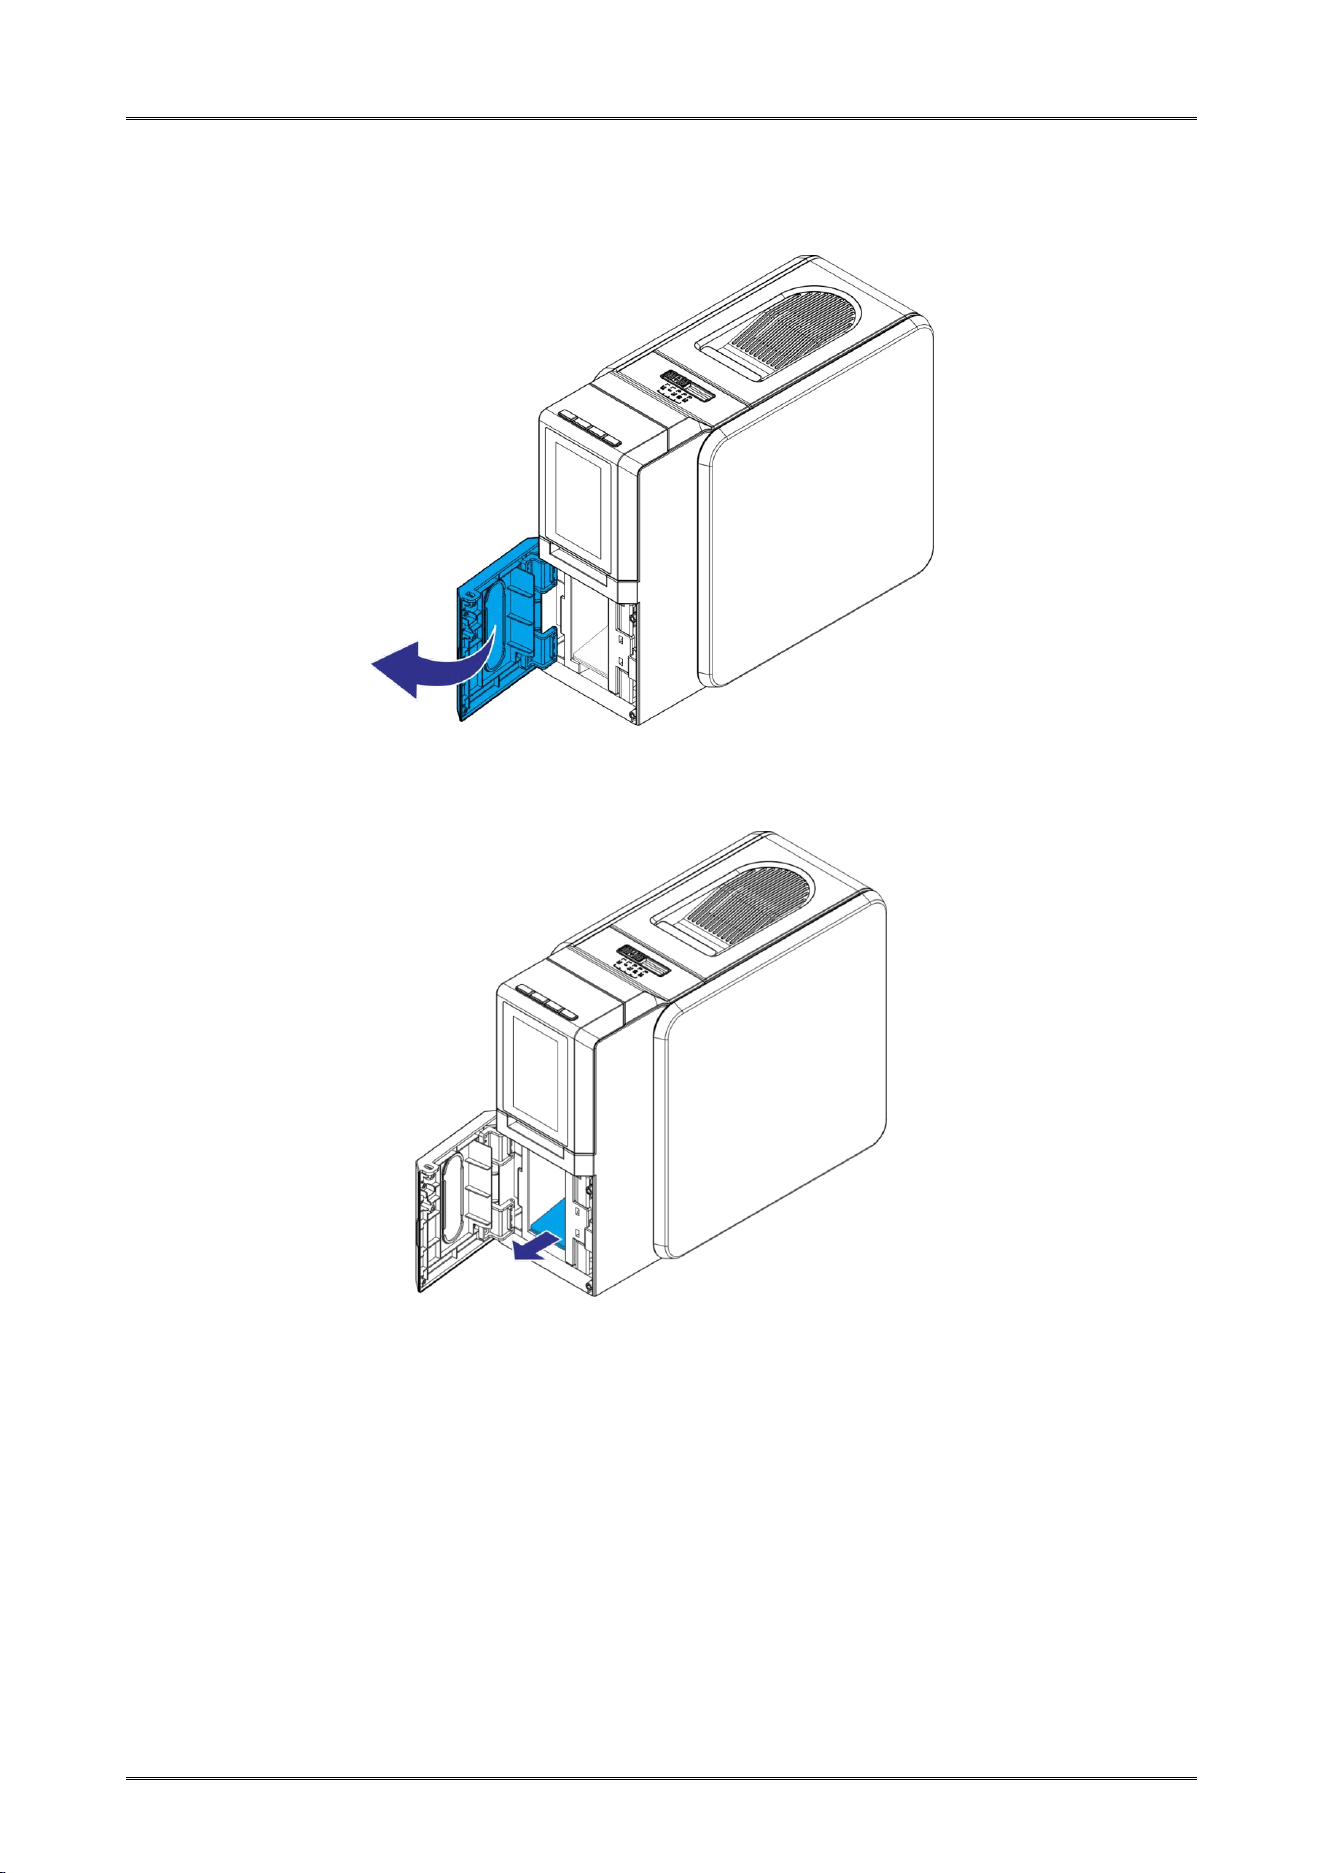
(1) Open the front cover.
(2) Load the cards neatly to the Card cassette (①) and then close the front cover to its original
position (②) .
Please load the cards carefully. If the card is inserted in the wrong direction, the
code selection may not work properly.
Dascom DC-4100 User Manual
21
2.1.3 Take out the cards
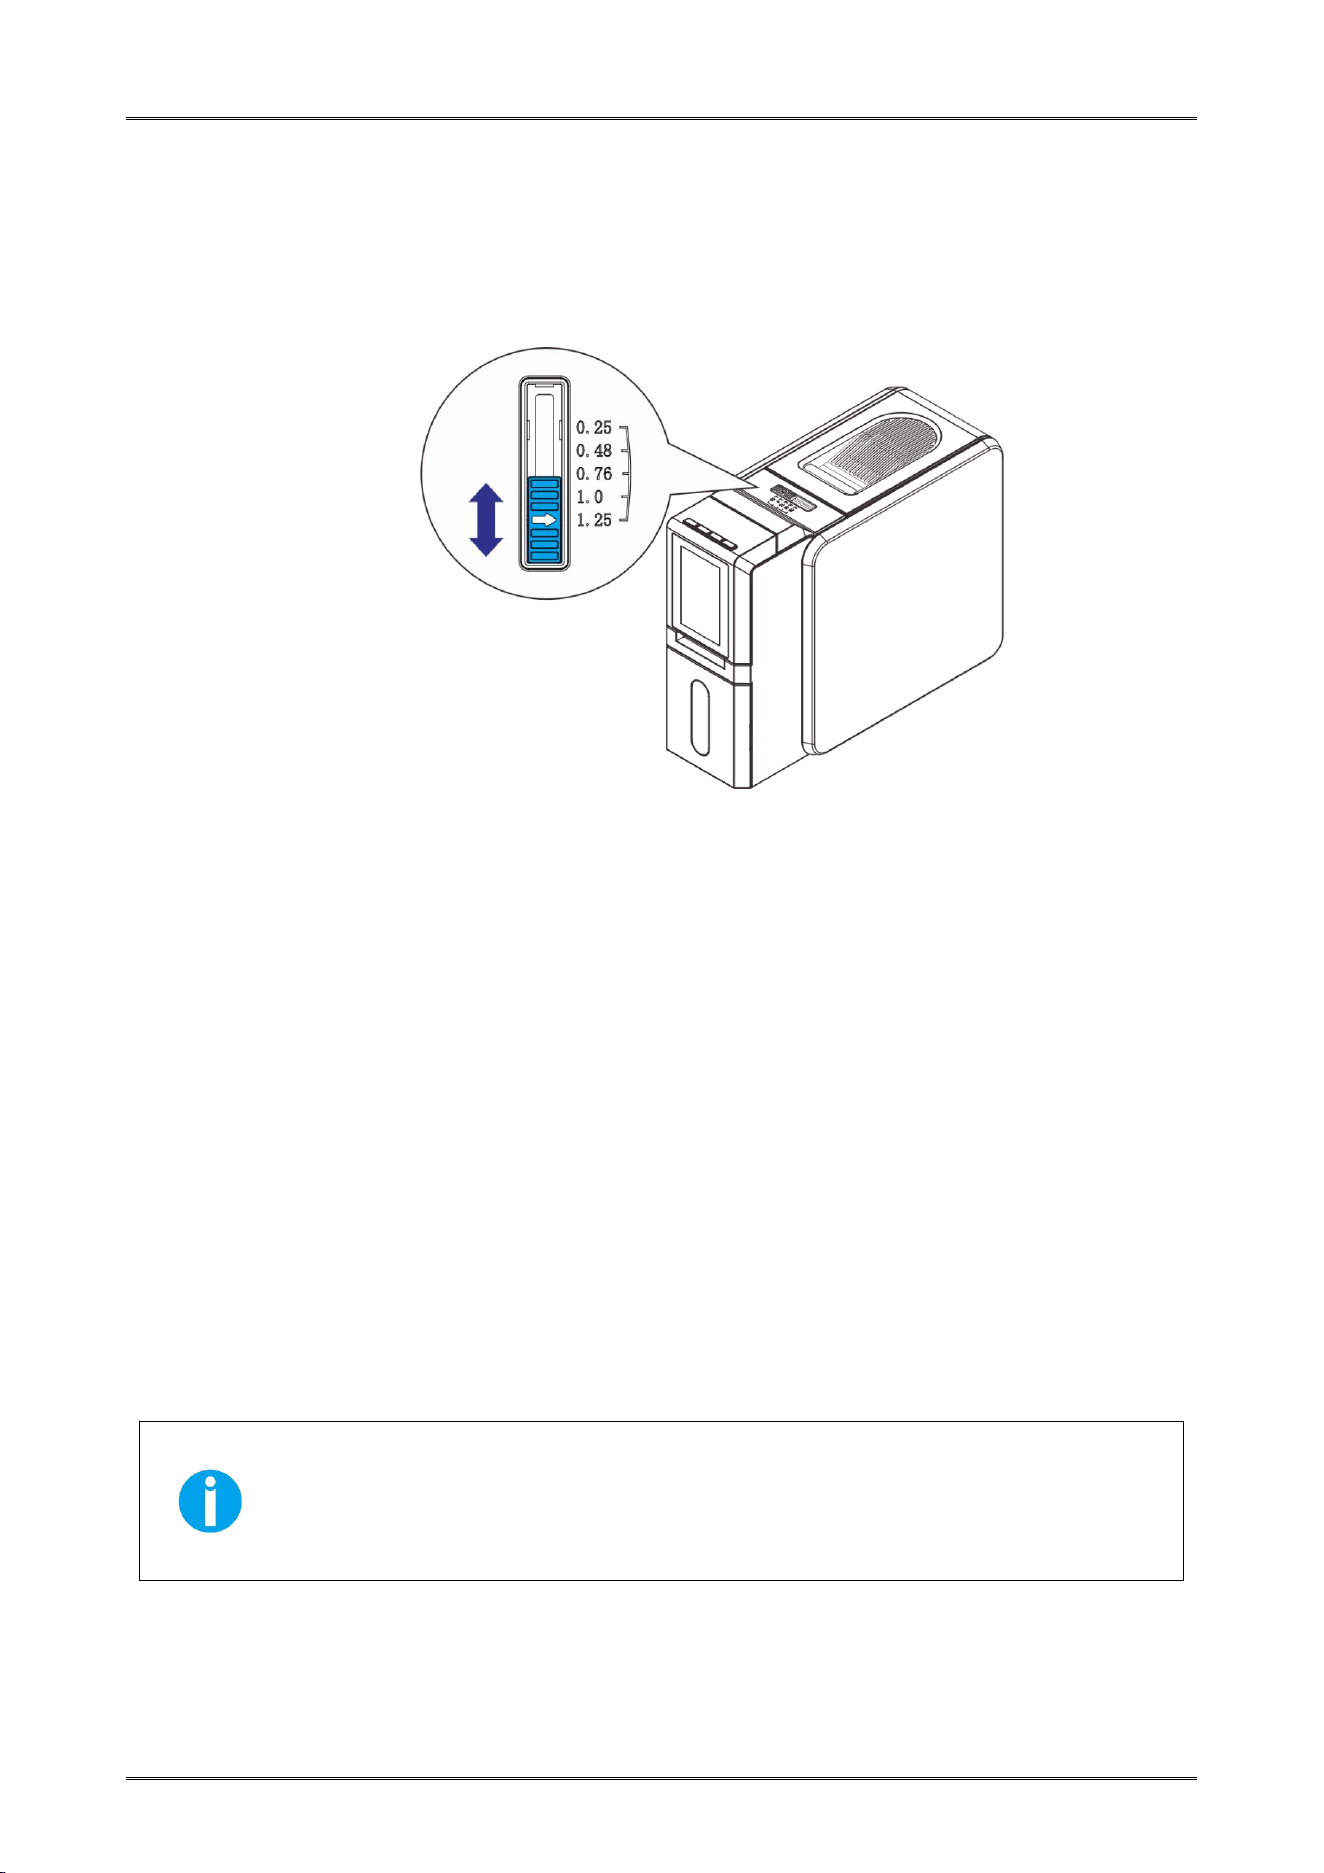
(1) Open the lower cover.
(2) Take the cards out of the printer .
Dascom DC-4100 User Manual
22
2.1.4 Adjusting the card inlet according to the thickness of the cards
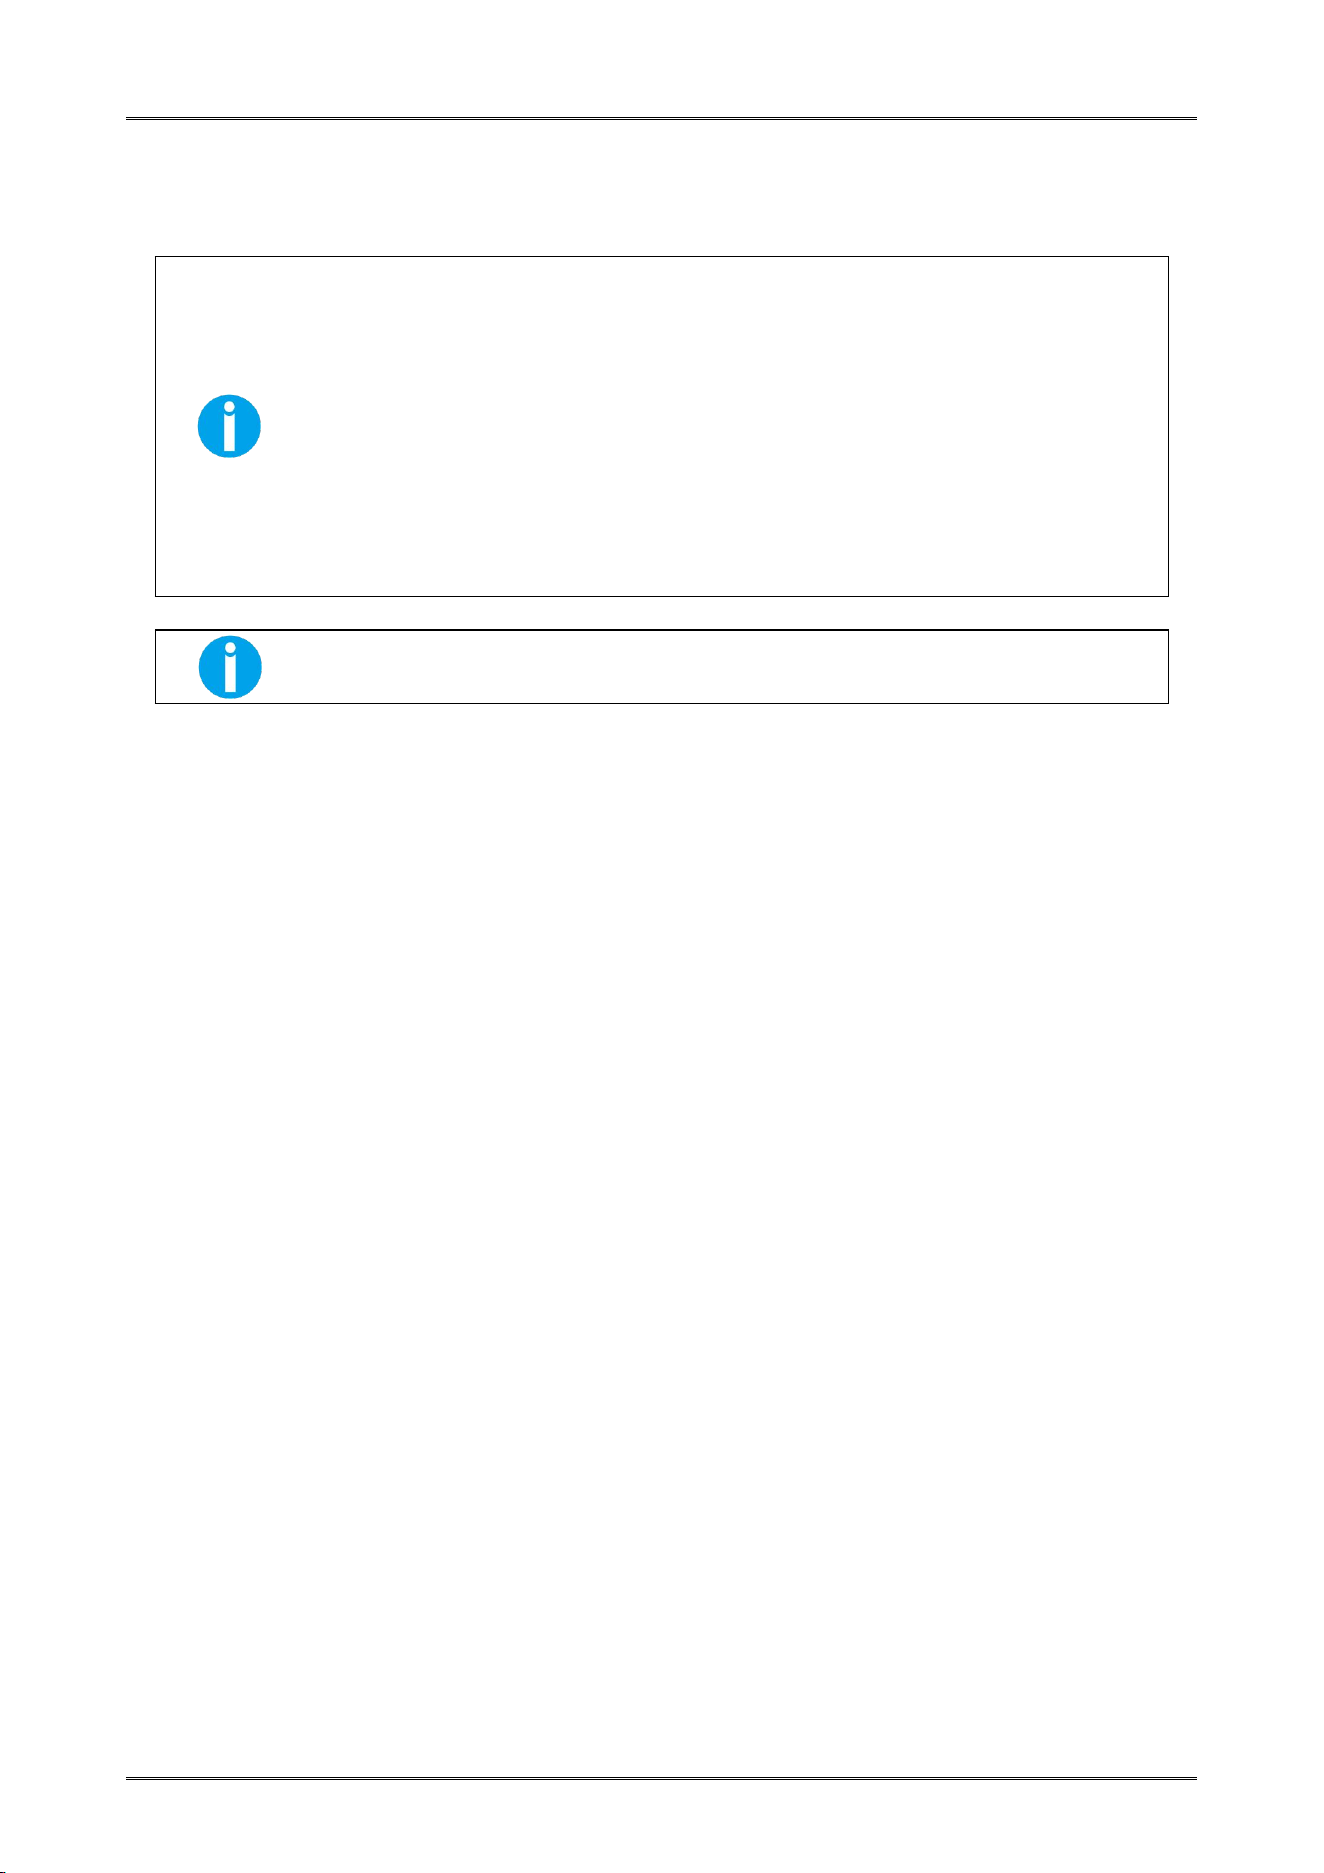
The factory default supports 0.76mm (30mil) card thickness. Confirm the correct thickness setting
before installing new cards to the card cassette. The printer configures with 0.25mm(10mil)~
0.76mm(30mil) and 0.76mm(30mil)~ 1.25mm (50mil) , 5 levels. Set the lever to the correct
position.
2.1.5 Managing Rejected Cards
Using duplex option, this Printer is equipped with front and rear slots to separate correctly
printed cards from rejected ones. By default, rejected cards are ejected out the rear slot.
However, the two slots are interchangeable for your preference.
Follow the below procedures to assign the location of the Reject Slot:
(1) In "Ready" state, Press the【Menu/Exit】button to switch the printer from Normal Mode to
User Mode.
(2) Press the 【▲】or【▼】to find the [Basic Mode].
(3) Press the 【SET】 button and press the 【▲】or【▼】to find the [Card Setup].
(4) Press the 【SET】 button and press the 【▲】or【▼】to find the [Error card exit].
(5) Press the 【SET】 button and press the 【▲】or【▼】to find the [Front] or [Back], press the
【SET】 button to confirm the settings.
By factory defaults, the Printer outputs correctly printed cards and rejected ones
to the front and rear slots, respectively. If configured with duplex option, the
rejected cards are ejected out the rear slot by default, while without duplex
option, the rejected cards are ejected out the front slot by default.
Dascom DC-4100 User Manual
23
2.2 Replacing the Ribbon
Change the ribbon when the LCD Display prompts [RIBBON END] message.
Direct touching contaminates the Ribbon and causes uneven print
quality.
Avoid excessive impact on the Ribbon when replacingthem.
Using non-genuine products may cause poor print quality and Printer
malfunction.
Quality and reliability of the non-genuine products are not guaranteed.
Even within the warranty period, fees may be charged on servicing the
printer using non-genuineproducts.
You can get the unused quantity of ribbon.
Refer Section 3.3 to get the unused amount of your ribbon.
Via the LCD Panel or through the Printers Driver, an estimation of the remaining Ribbon quantity
can be viewed if it is sufficient for your current print job. The LCD displays the [RIBBON END]
warning when ribbon is close to running out.
Consume the Ribbon as soon as possible after purchase.
Dascom DC-4100 User Manual
24
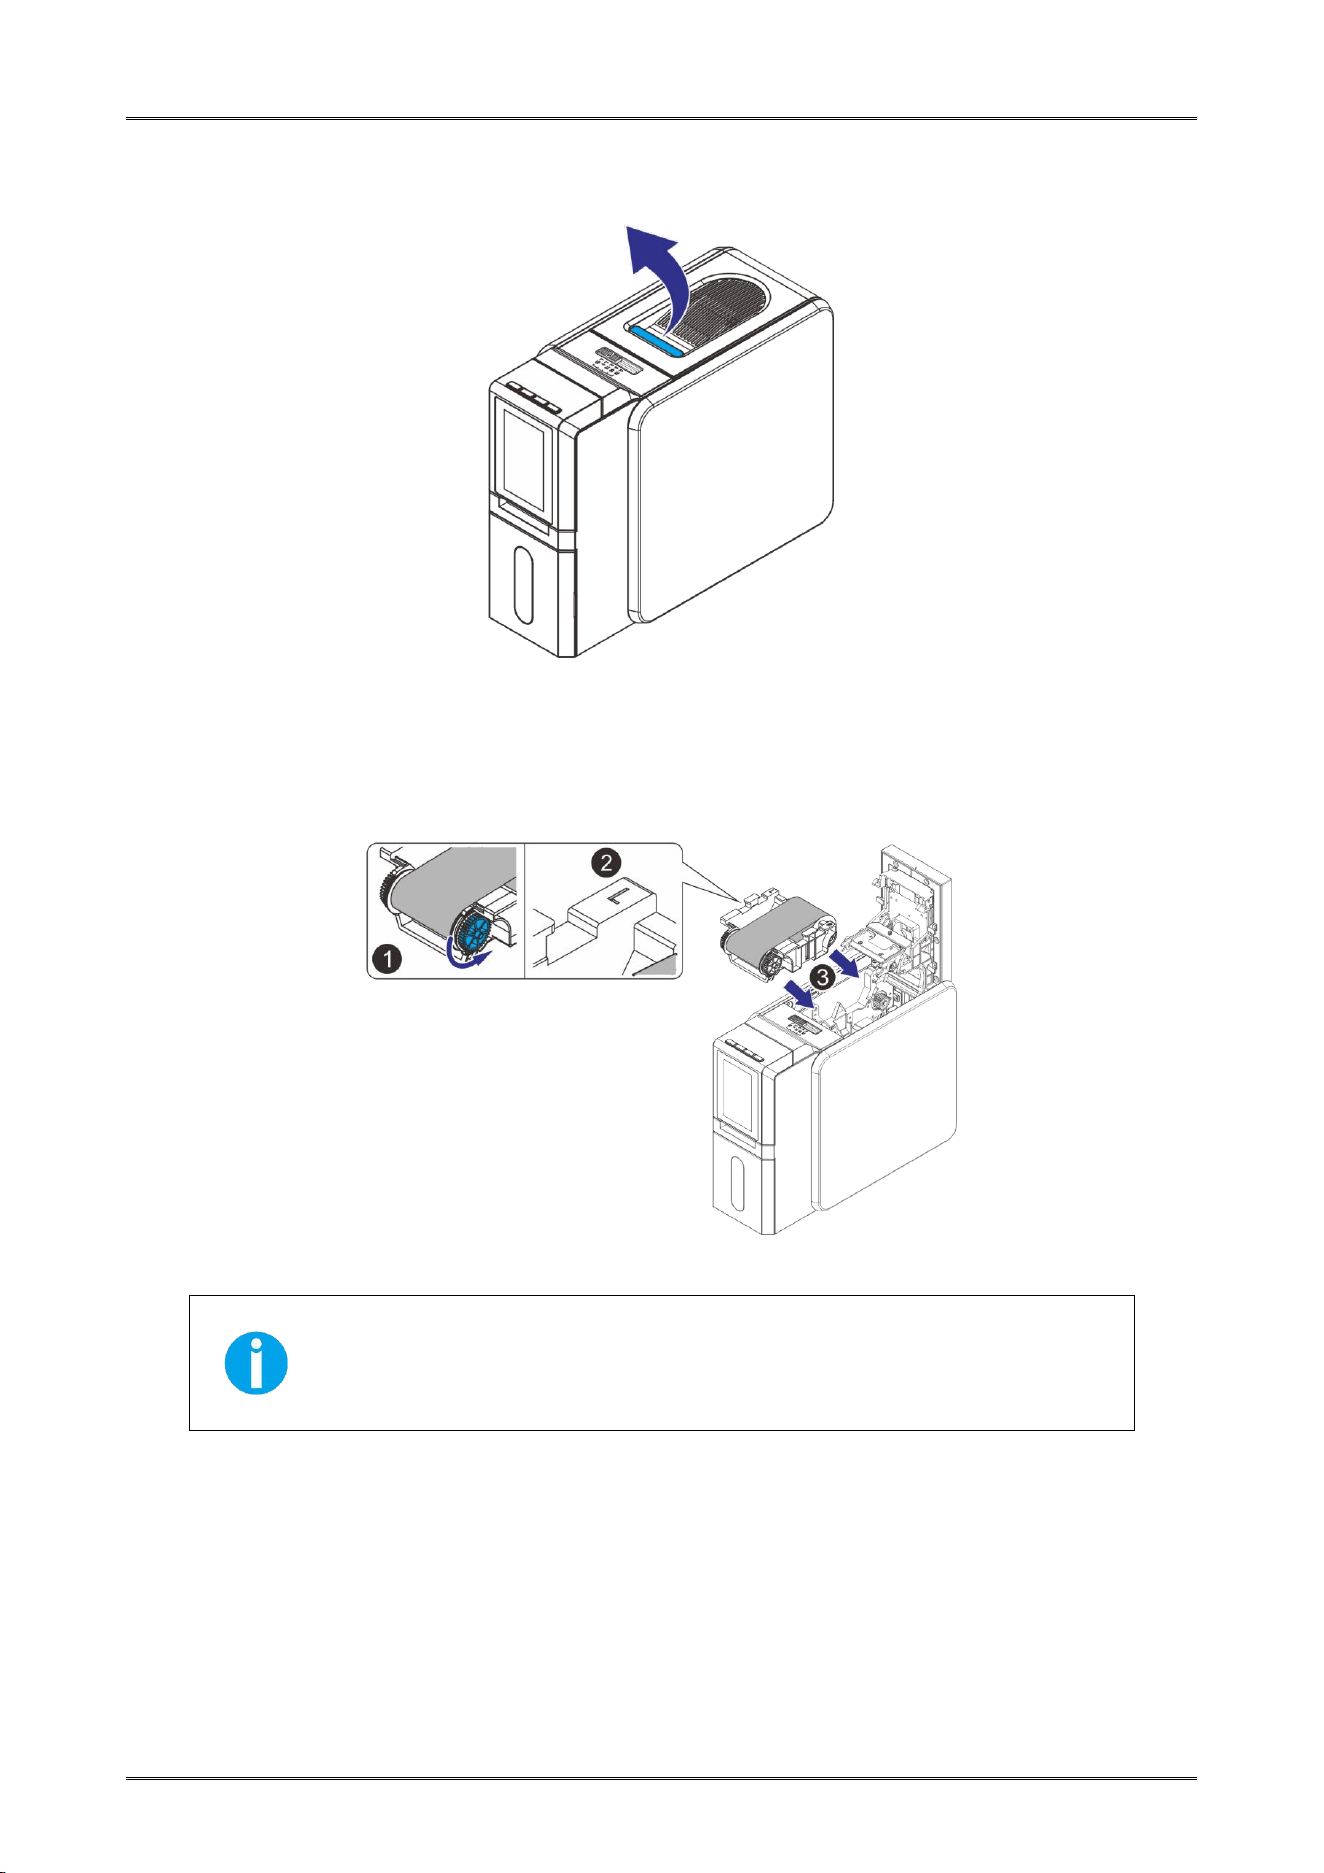
(1) Press the cover open button to open the top cover.
(2) Rotate the gear forward to flatten the ribbon film (①), confirm the direction of the ribbon (②),
place the ribbon into the ribbon guide slot (③), and close the top cover.
(1)When the Ribbon roller is mounted to the cartridge base, push it
down to the bottom with a little force.
(2)After installation, the Ribbon Film should be slightly tightened,
without any no skew.
Dascom DC-4100 User Manual
25
2.3 Printing Capacities
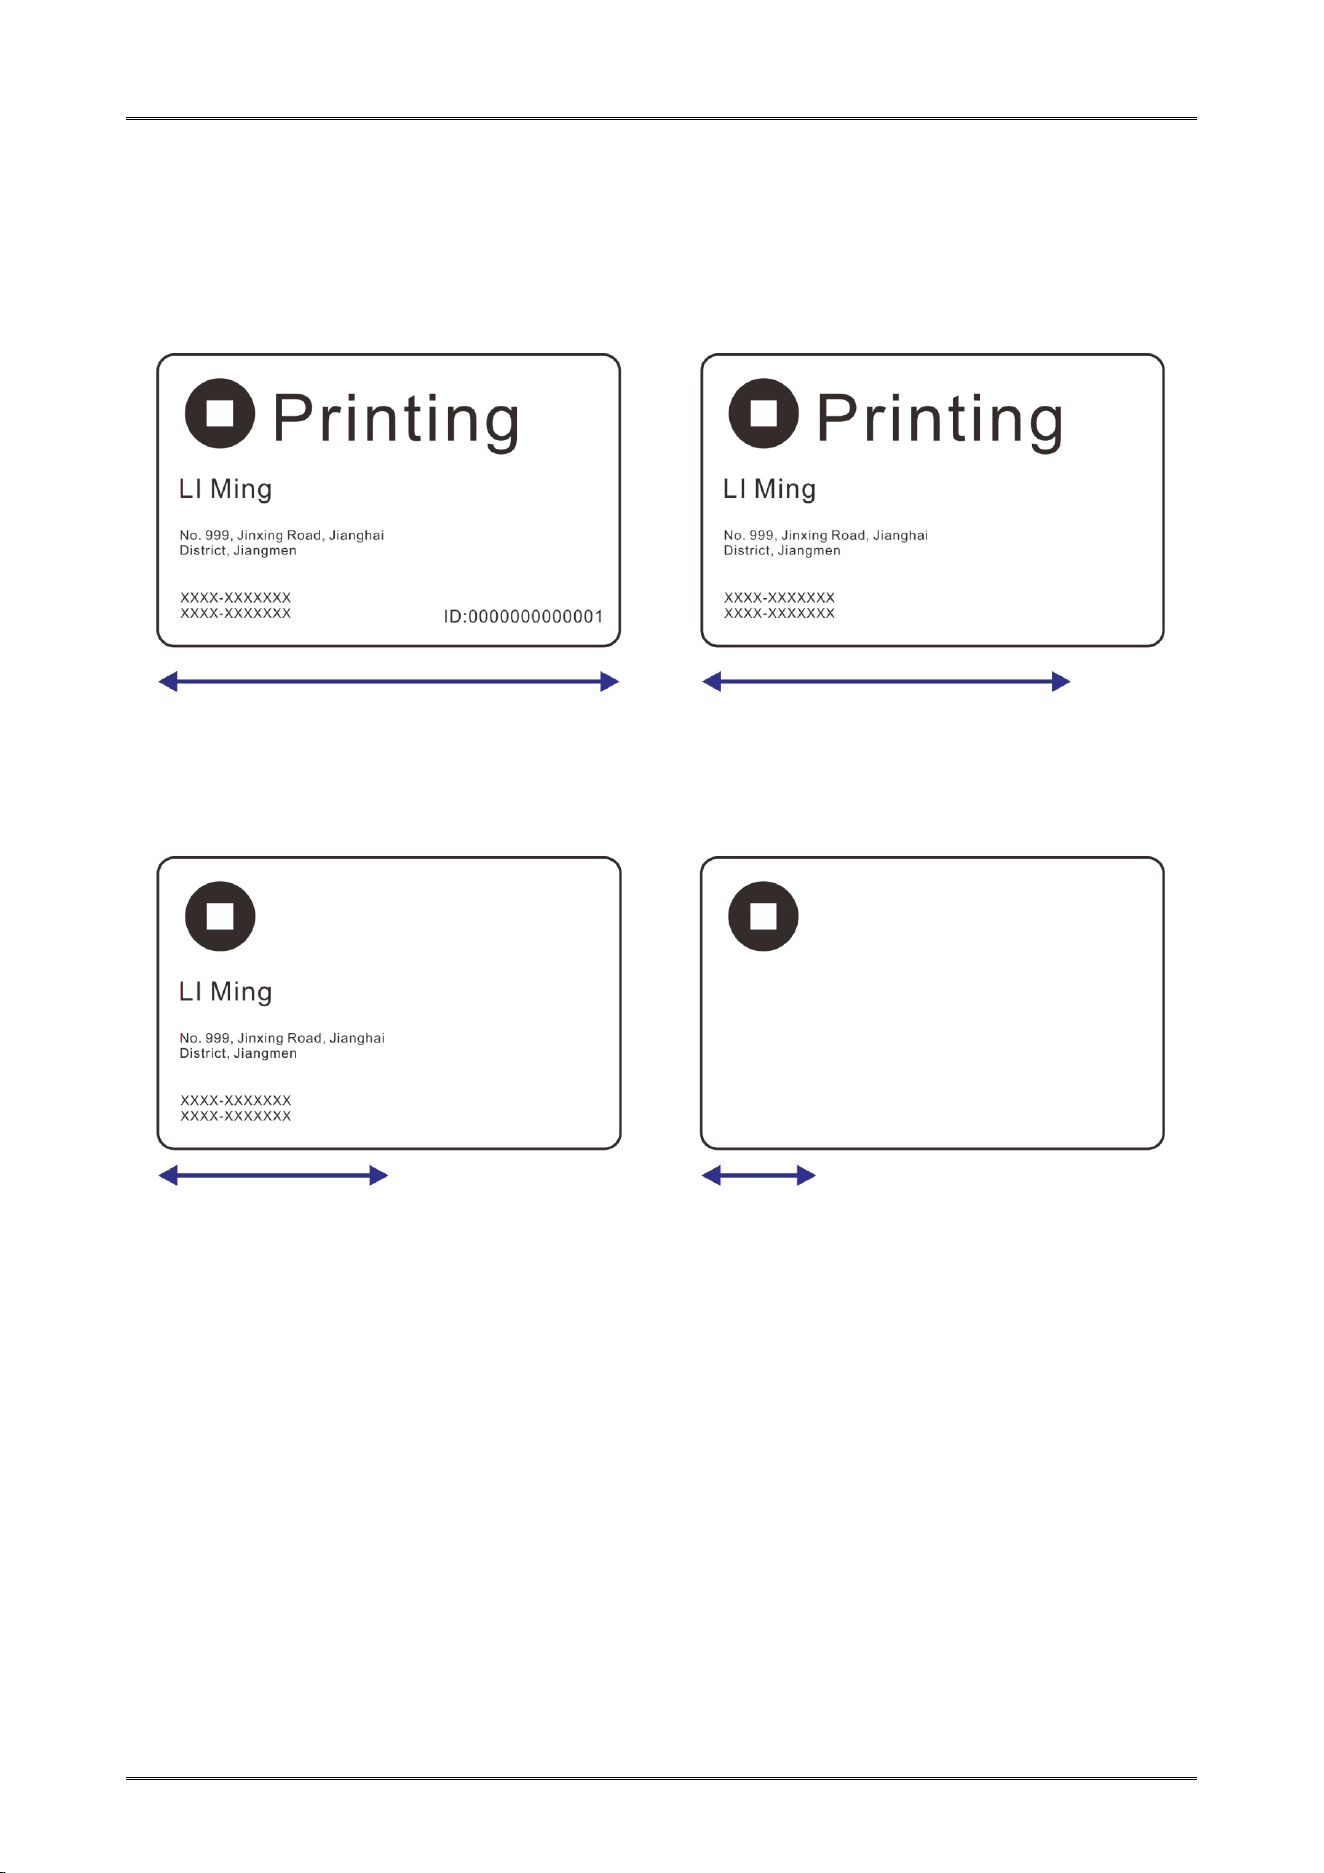
Most of the DASCOM K ribbons are given for an average of about 2,000 prints per roll. However,
depending on the layout, the ribbon achieves a different number of prints, as demonstrated
hereafter:
CR80 card 100% layout: CR80 card 80% layout:
approx 1600 cards/roll* approx 2000 cards/roll*
CR80 card 50% layout: CR80 card 25% layout:
approx 3100 cards/roll* approx 5600 cards/roll*
* Example based on K Ribbons(150m/roll).
Dascom DC-4100 User Manual
26
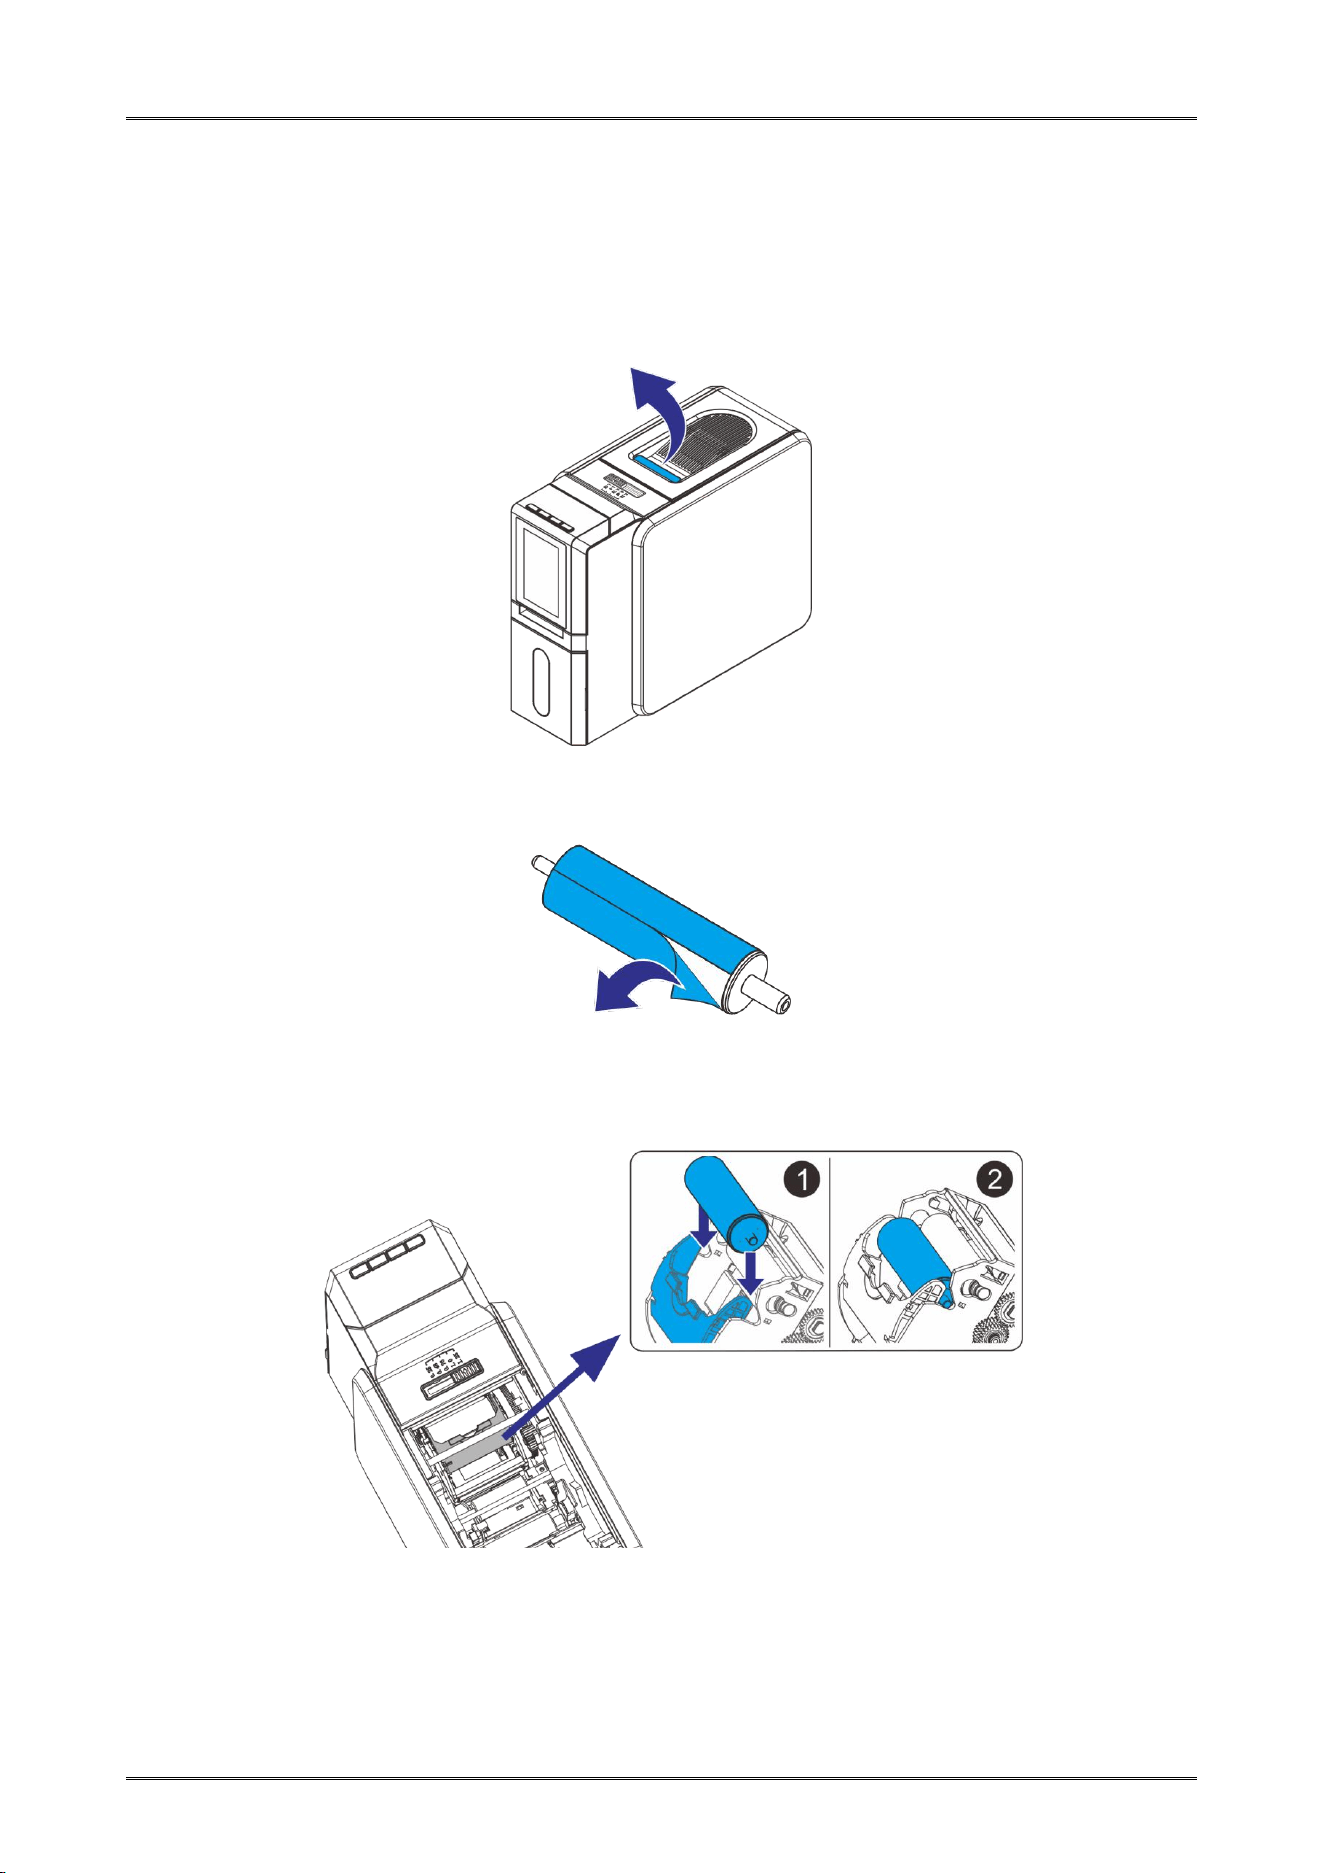
2.4 Replacing the Cleaning Roller
One Cleaning Roller is shipped with each Ribbon in a package.
IMPORTANT: Replace the cleaning roller each time you change the ribbon to guarantee the print
quality and protection of the Print Head.
(1) Press the cover open button to open the top cover.
(2) Tear off the protective film on the cleaning roller.
(3) Put the cleaning roller vertically into the slot, in front of the Ribbon cartridge slot(①), the
cleaning roller has been installed (②).
Dascom DC-4100 User Manual
27
2.5 Printing card
All kinds of Windows applications have document printing capabilities (such as Microsoft Office
suite MS-Word, MS-Access, MS-Excel, MS-PowerPoint, and the DASCOM self-designed card editing
software - CardEditor).
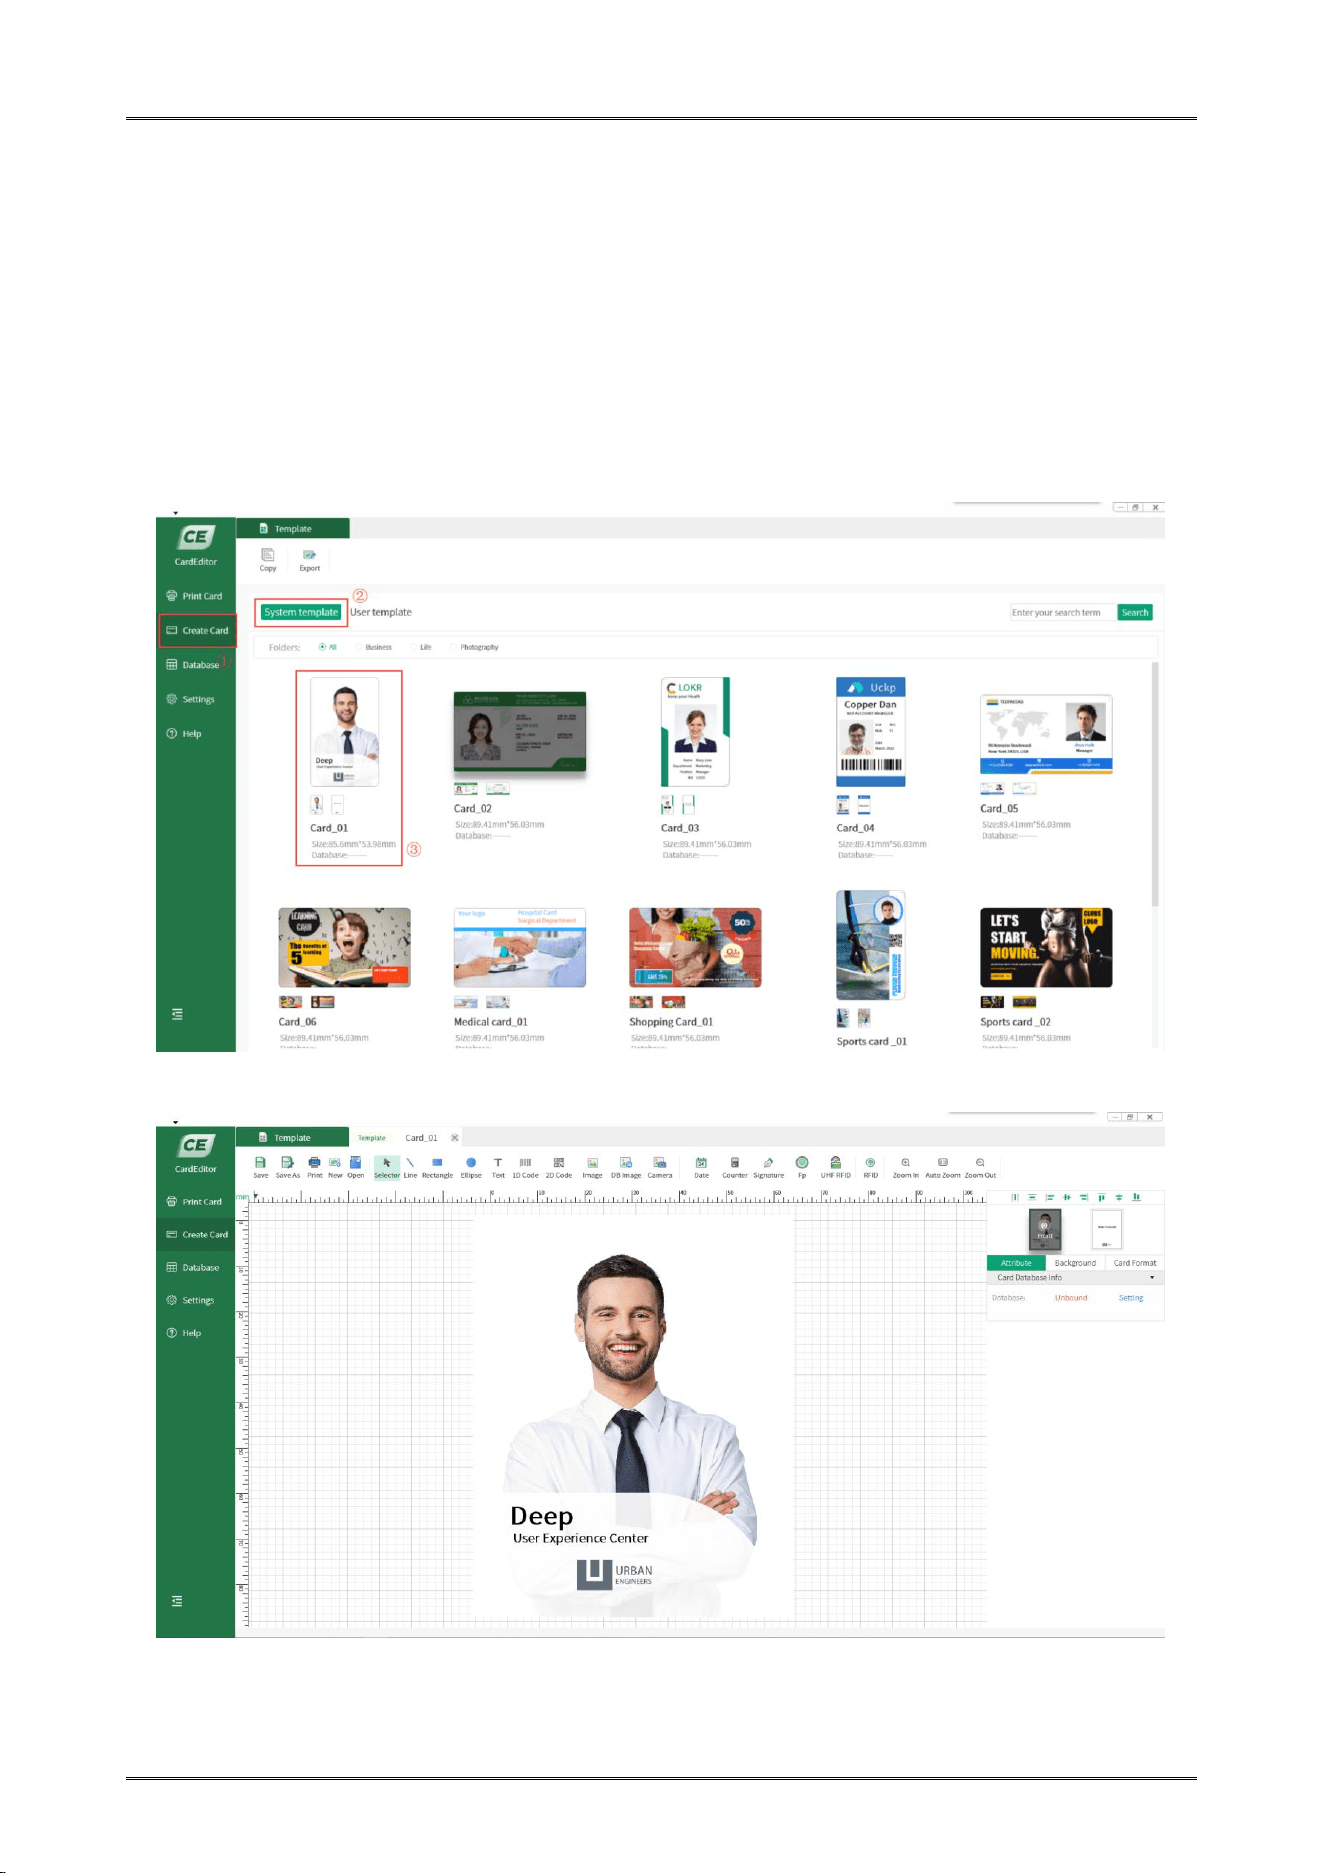
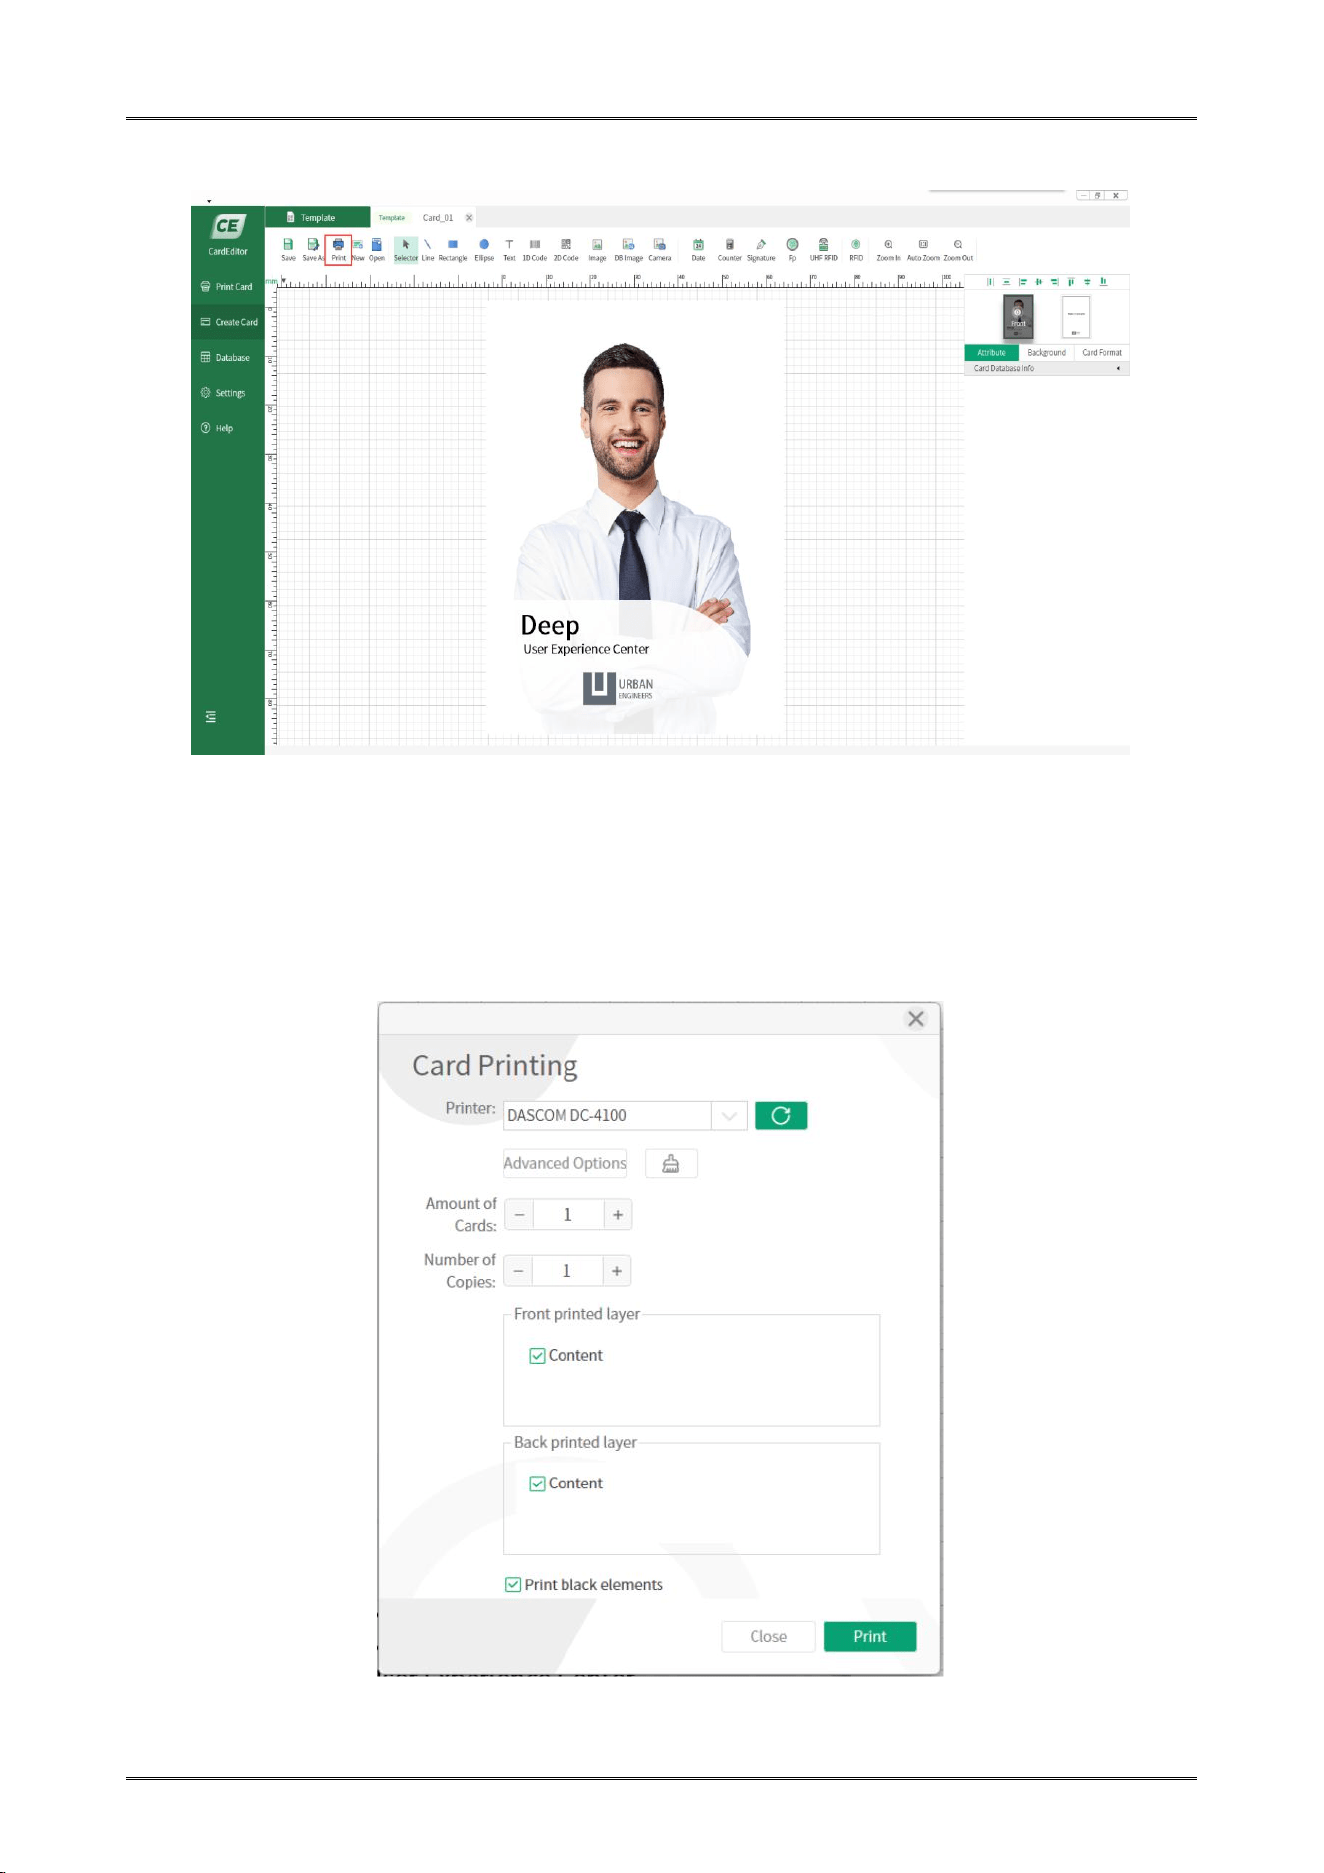
2.5.1 Using CardEditor
CardEditor is an editing software for Dascom smart card Printers. You can quickly create and edit
the content that needs to be printed with this software.
(1) Double click the
“
CardEditor” logo to open the software, choose “Create Card” ,then click
“System template”, you can select the template you want.
(2) Double click “Templates” to enter the design interface
:
Dascom DC-4100 User Manual
28
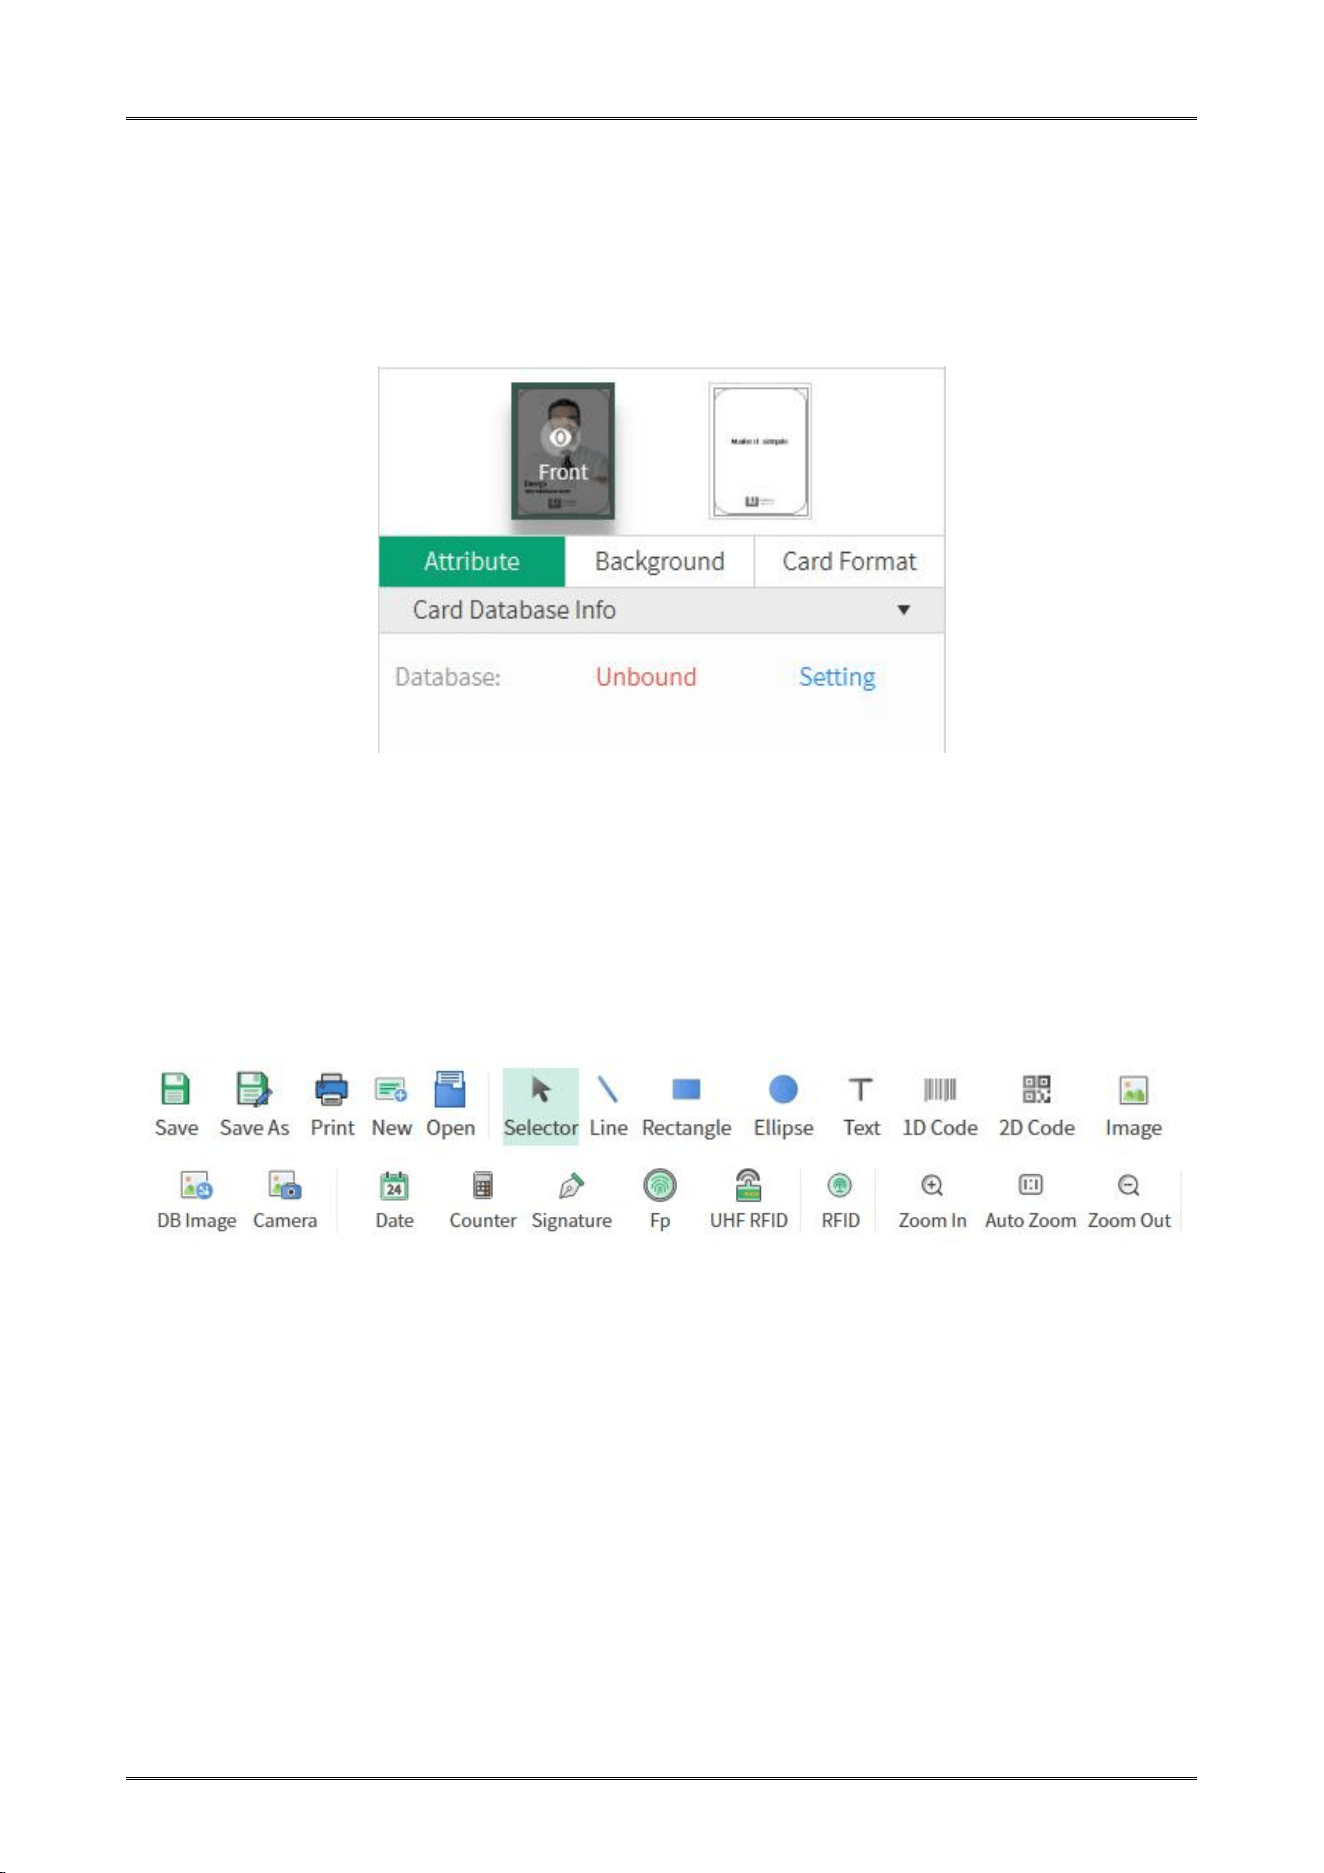
(3) On the right menu, you can see the items “Attribute”, “Background” and “Card Format”:
1) Choose “Attribute”, you can set the database.
2) Choose “Background”, you can change the background of the print content.
3) Choose “Card Format”, you can set the cards size,transverse/ longitudinal.
4) Click thumbnail of “Front” and “Back
”
, you can choose the different side to edit.
(4) The tool buttons above the working interface, as shown in the following figure, are divided into
two categories: "basic editing" and "Advanced tools". "Basic editing" includes line, rectangle,
ellipse, text, 1D code, 2D code and image.“Advanced tools”includes DB image, camera date,
counter, signature and so on. Each object has some attributes,such as
position,border,color,fill,rotate.You can choose them according to your need. You can select
the object you added, then adjust the position. You can also select the object you added, then
delete it.
Dascom DC-4100 User Manual
29
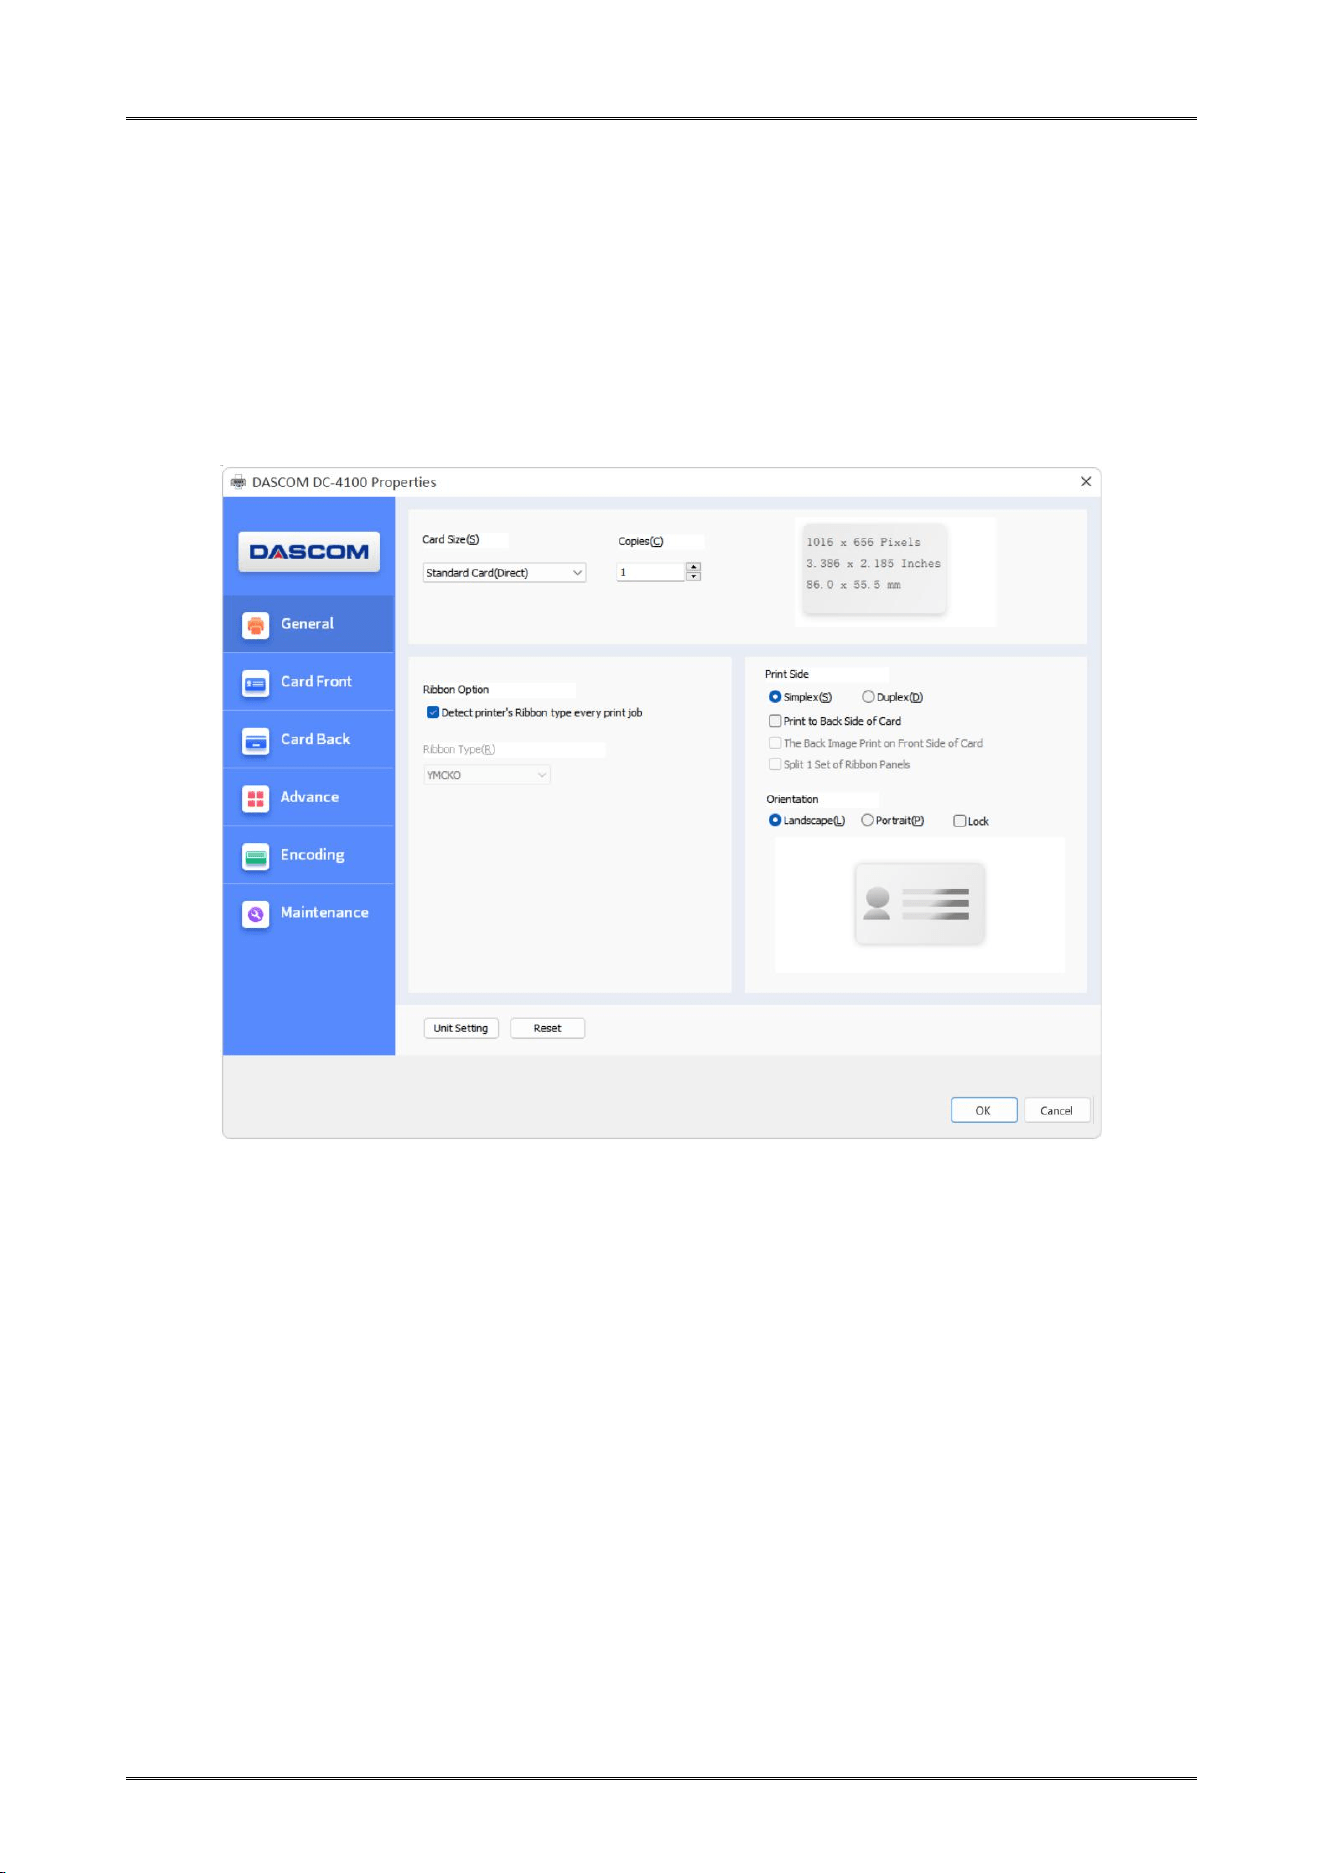
(5) Double click the template, you can edit the content, then click the “print” logo to print:
(6) You can set the amount of cards and number of copies before printing:
(Note: If "print black element" is selected, black objects will be printed with priority. This
means all the black objects on the card will be placed on top. As an example, there are two
objects on the template, one is a black rectangle and the other is text in other colors. When
these two objects overlap, even if the text object is above the rectangle object, the Printer
will only print out the card with black rectangle while no text on it.)
Dascom DC-4100 User Manual
30
2.5.2 Using settings
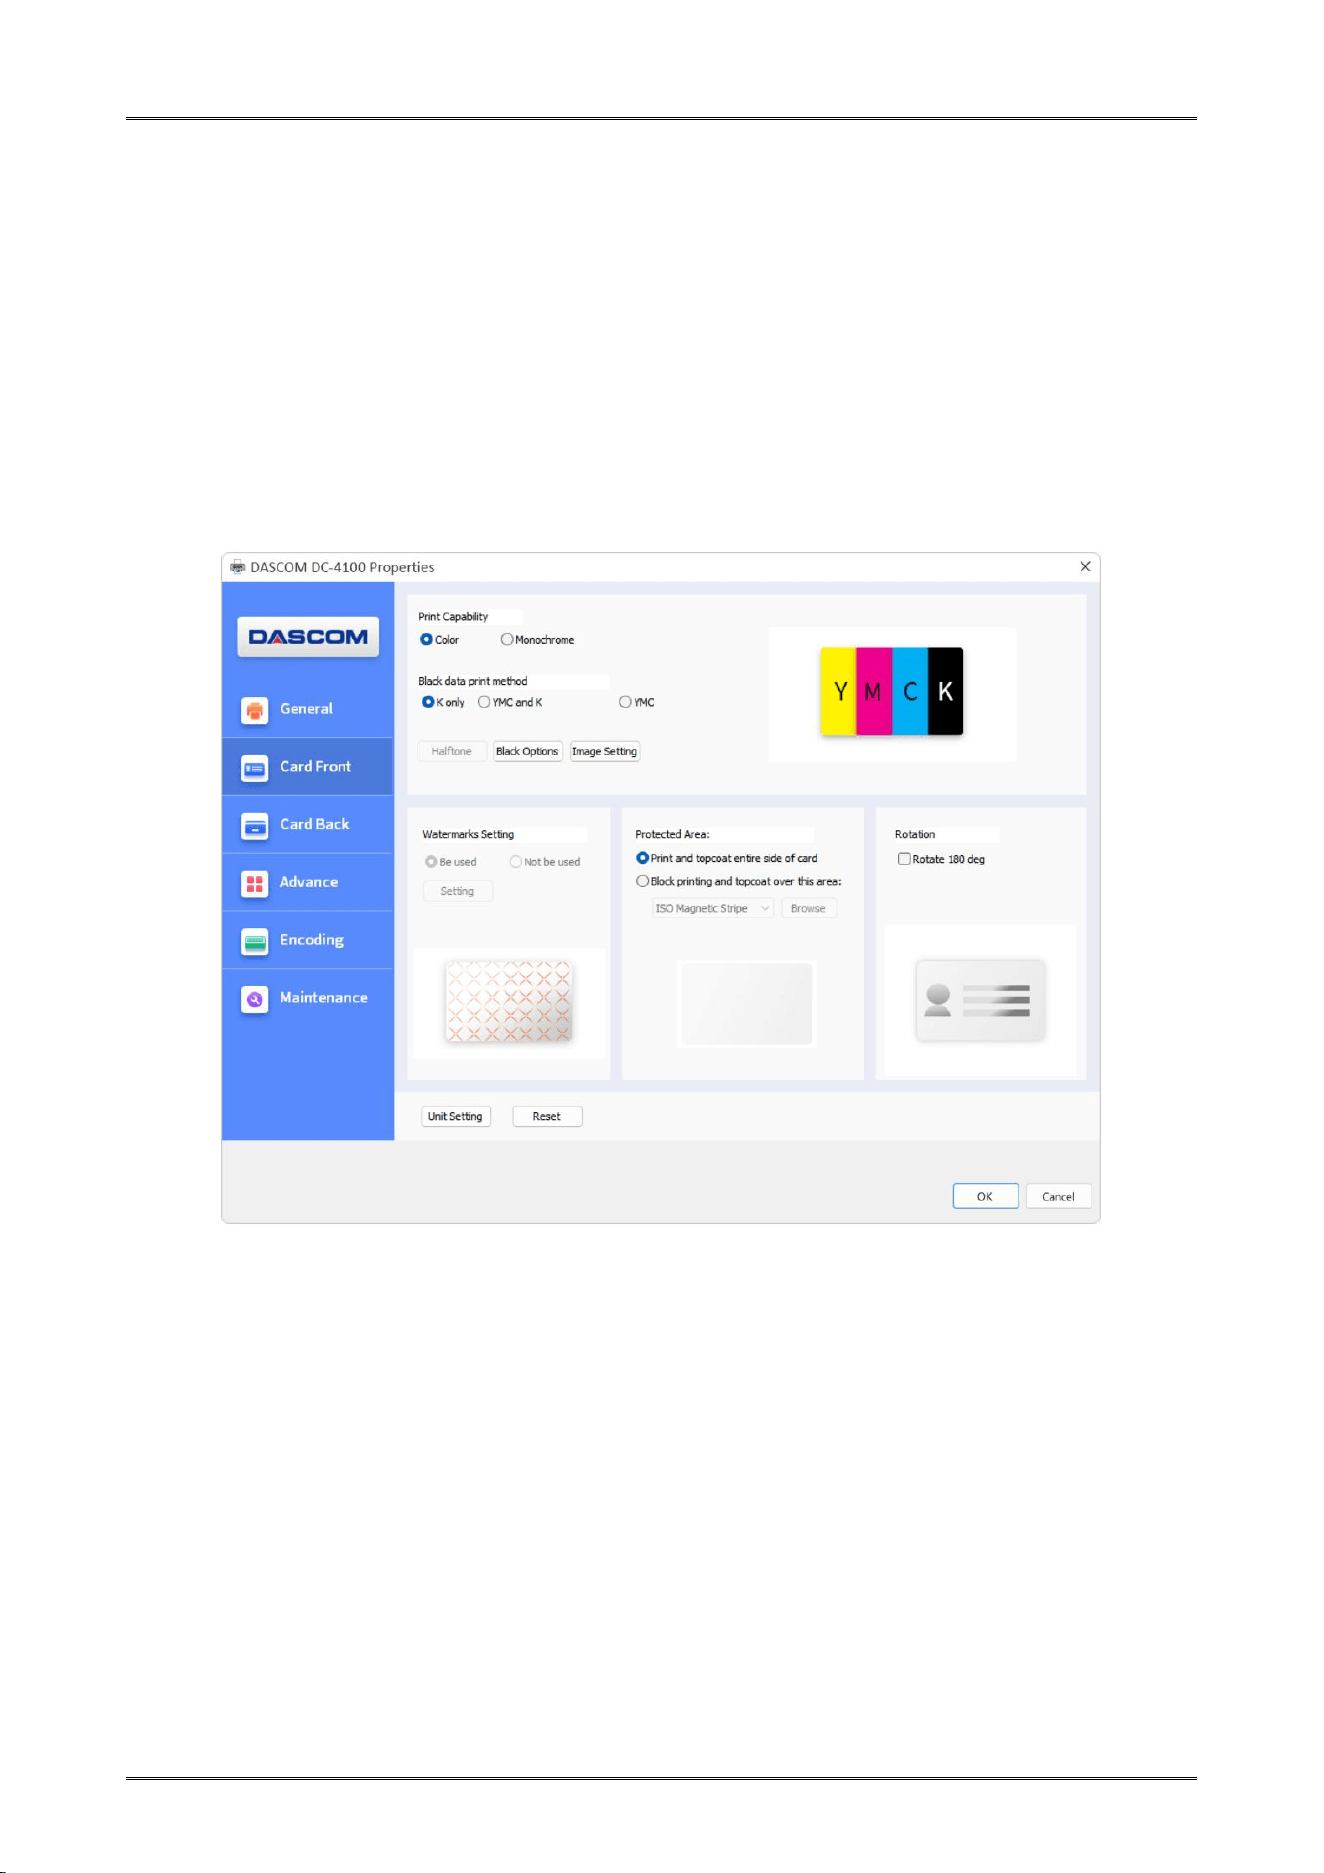
The main selections of the Printer Driver are “General”, “Card Front”, “Card Back”, “Advance”,
“Encoding” and “Maintenance”.
“Gerneral” Tab
Card Size
Copies (Print Quantity)
Ribbon Option (Automatic Ribbon Detection)
Card Orientation (Portrait or Landscape)
Dascom DC-4100 User Manual
31
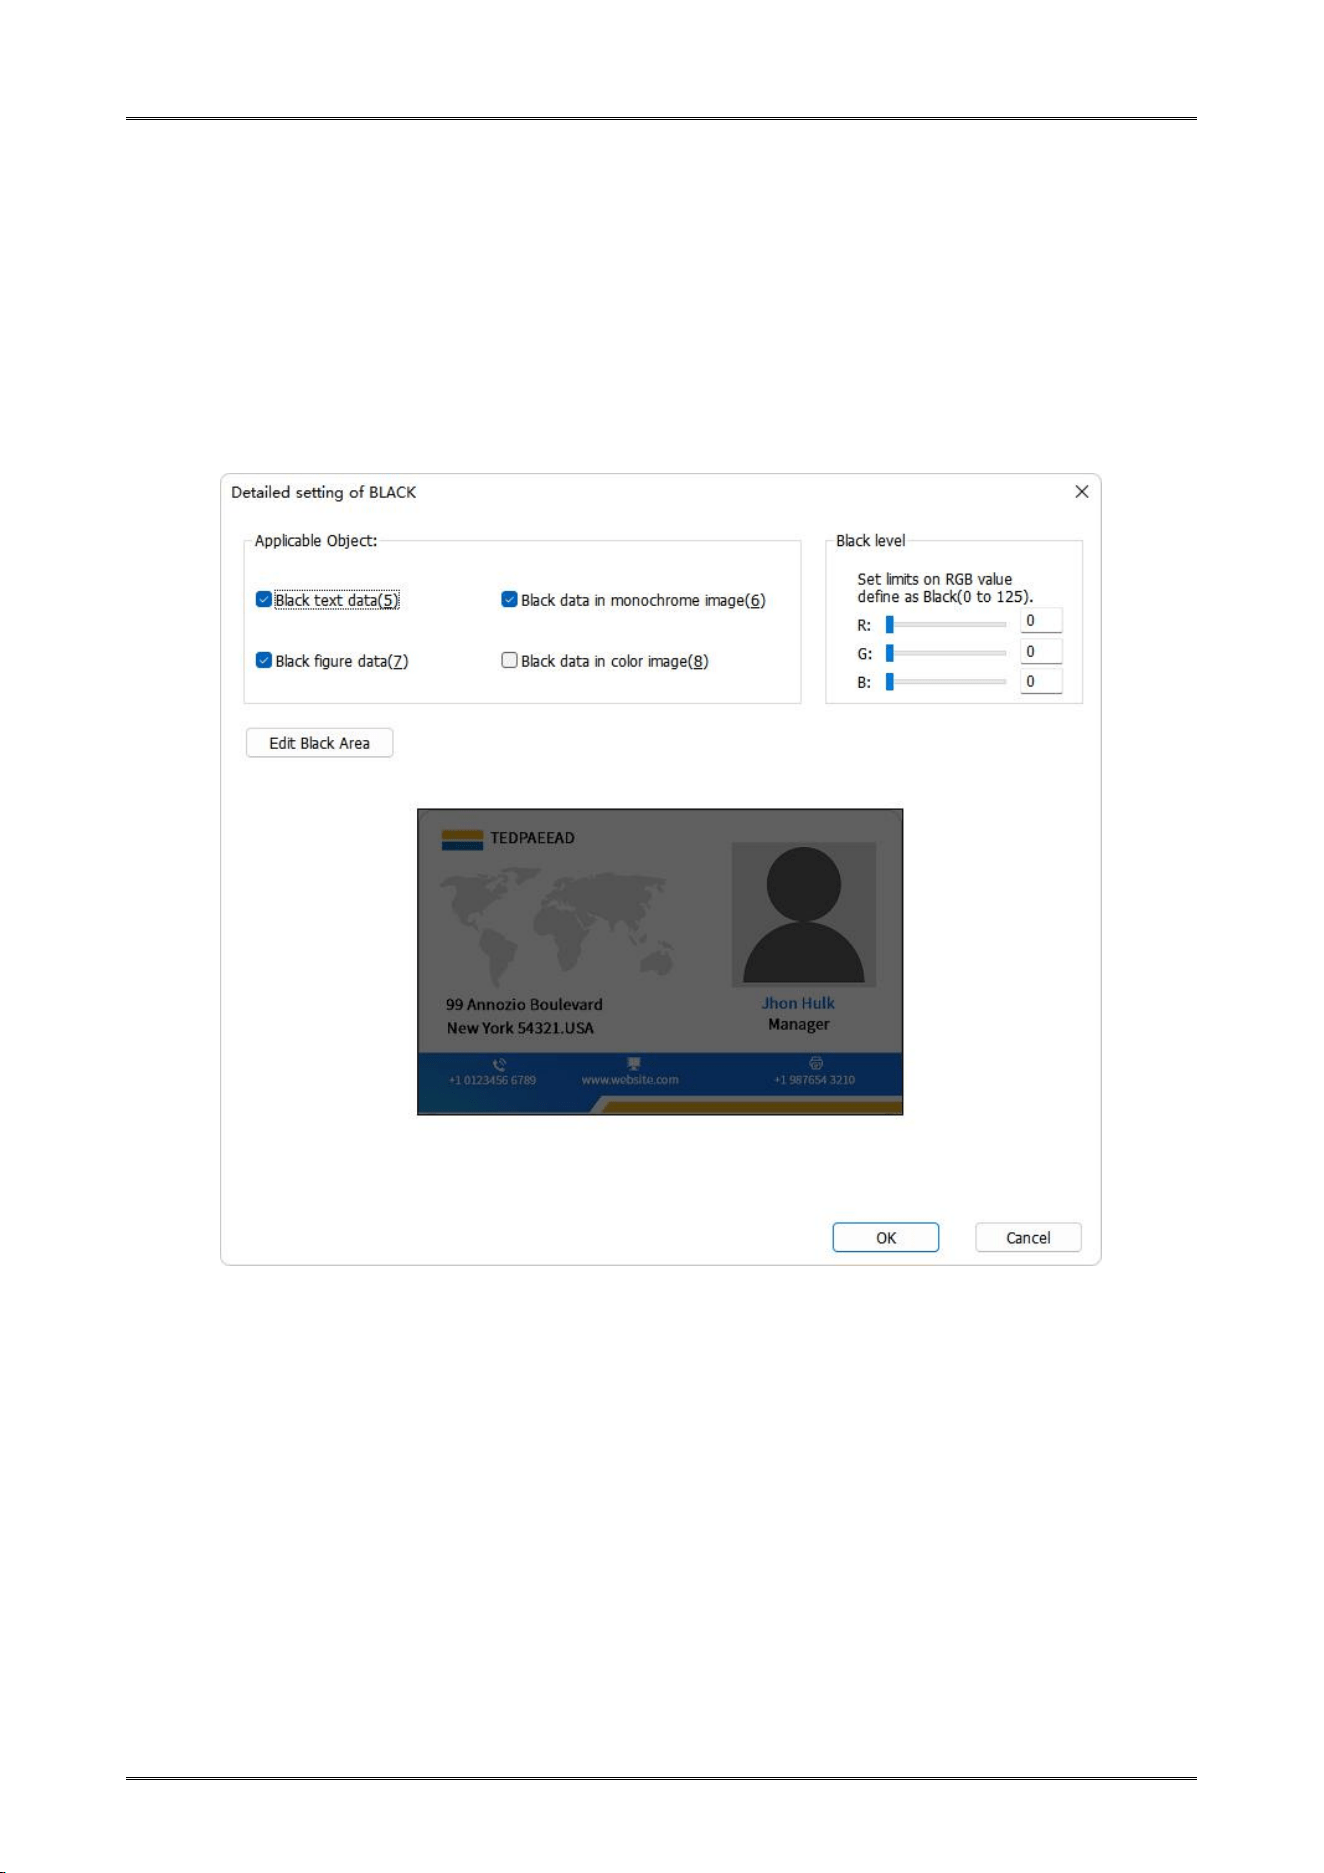
“Card Front” Tab
Printing Capability (selects printing in Color or Black only)
Black data print method (User can print black via print K color or YMC secondary colors and K
color or YMC colors. As well as, user can choose monochrome printing, color printing)
Image setting (The default sharpen contrast is 3, the adjustable range is 0-10.)
Protection Area (non-printing zone setting)
Rotation (Rotate the image 180° on the front side)
Watermarks Setting (Watermark is a type of graphic, text, or texture mark used to identify and
protect copyright. This printer can edit and print data at specific locations on the card, adding
specific identification or information.)
Dascom DC-4100 User Manual
32
Black Options
Black level
Set up the limits on RGB value defined as Black.
The applicable object in valid area of black printing
Set up the applicable object in valid area of black printing, includes black text data, black figure
data, black data in monochrome image and black data in color image.
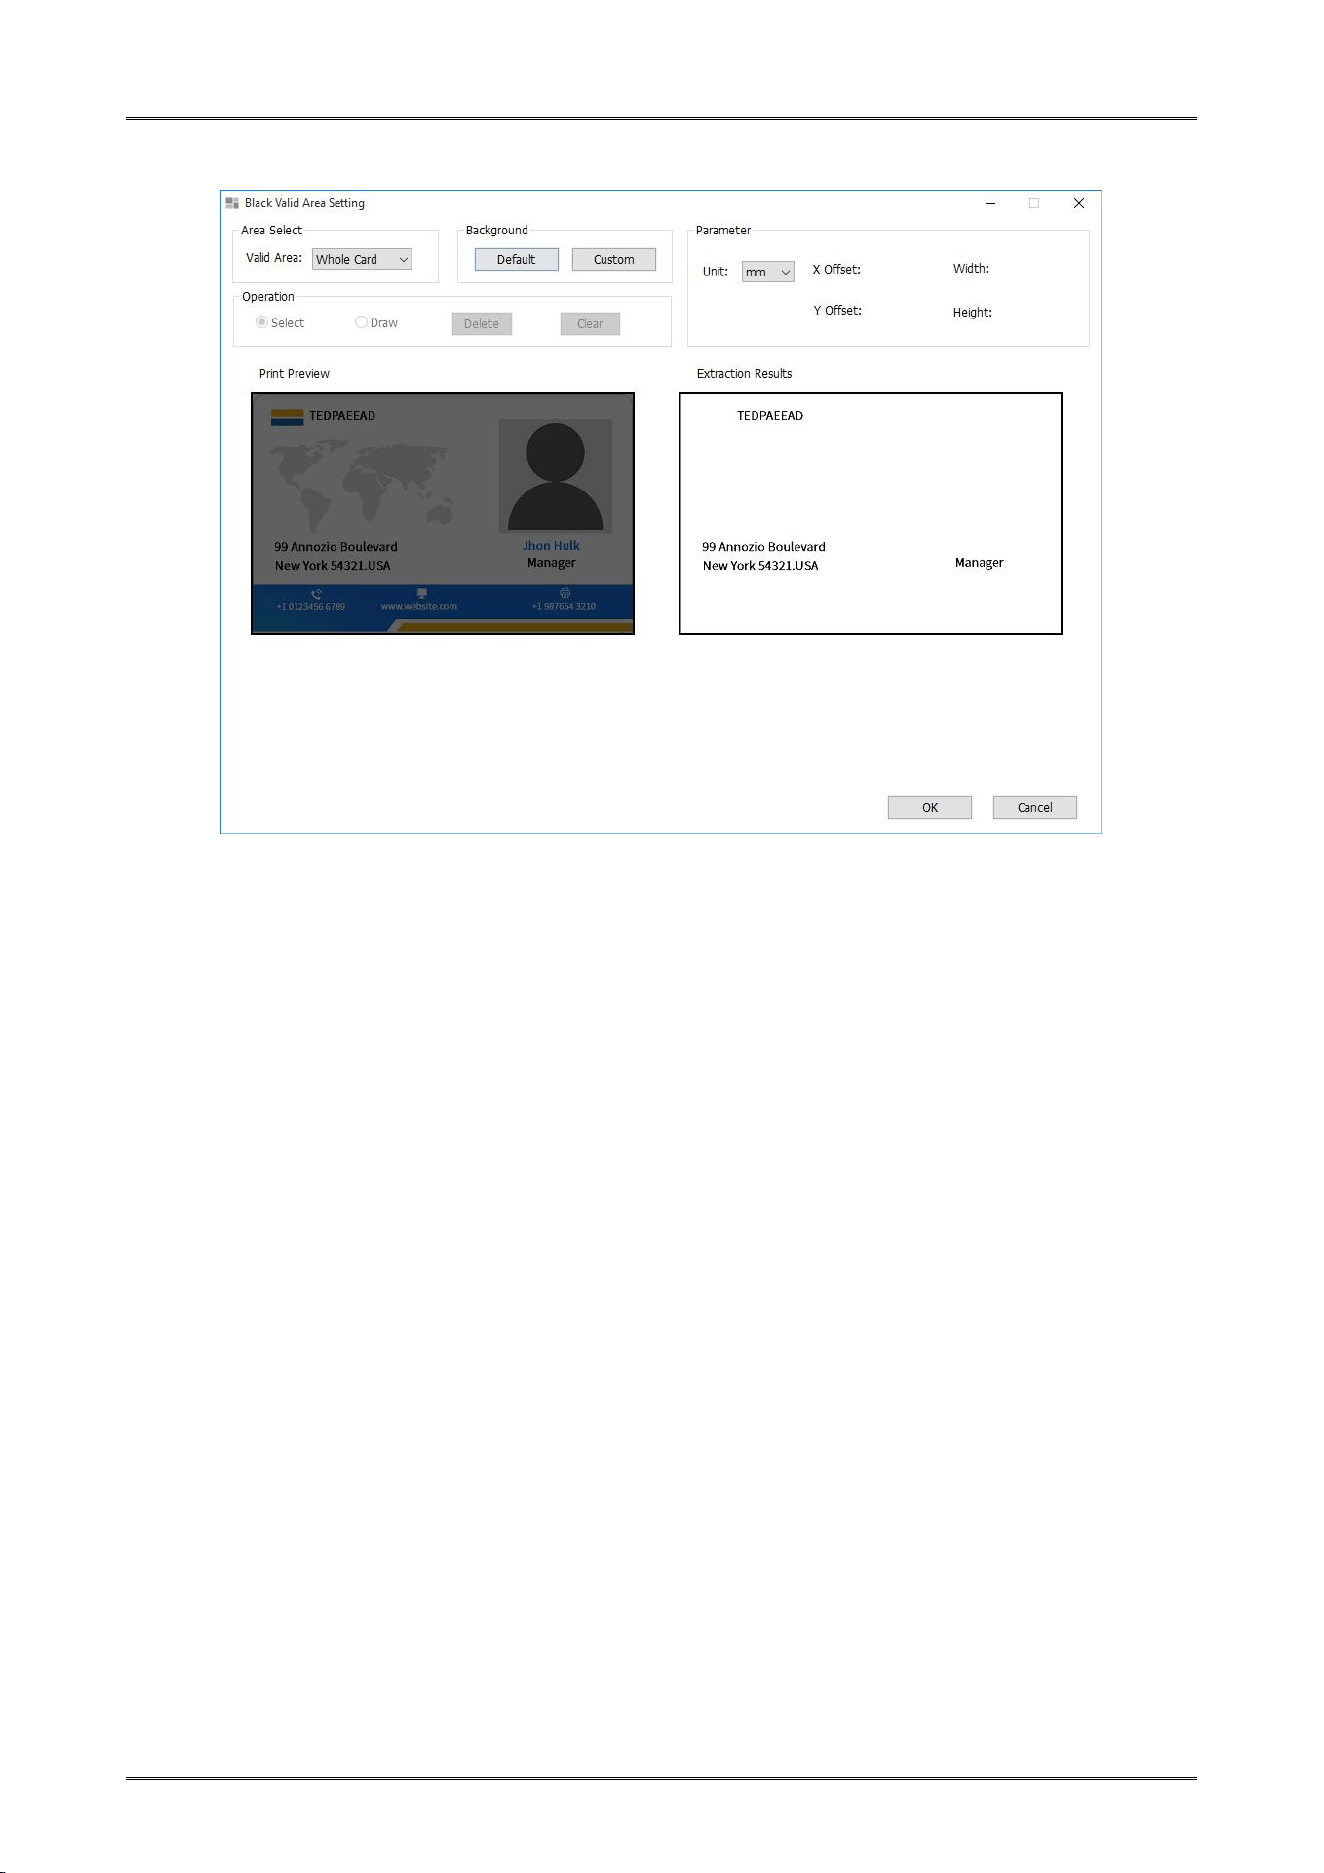
Edit Black Area
Set up the valid area of K color printing.
Dascom DC-4100 User Manual
33
Edit Black Area
Area Select->Valid Area:
Whole Card: All of the black content will be printed by K-Ribbon.
Defined: Define the area that black content will be printed by K-Ribbon.
Undefined: Define the area that black content will NOT be printed by K-Ribbon.
Parameter:
Unit: mm or inch
X Offset: X coordinates of selected area.
Y Offset: Y coordinates of selected area.
Width: Width of selected area.
Height: Height of selected area.
Operation:
Select: Select area. In this area content will be printed or NOT printed by K-Ribbon.(According to
Valid Area)
Draw: Draw area. In this area content will be printed or NOT printed by K-Ribbon.(According to
Valid Area)
Delete: Delete a selected area.
Clear: Delete all area that has been drawn.
Dascom DC-4100 User Manual
34
Watermarks Setting
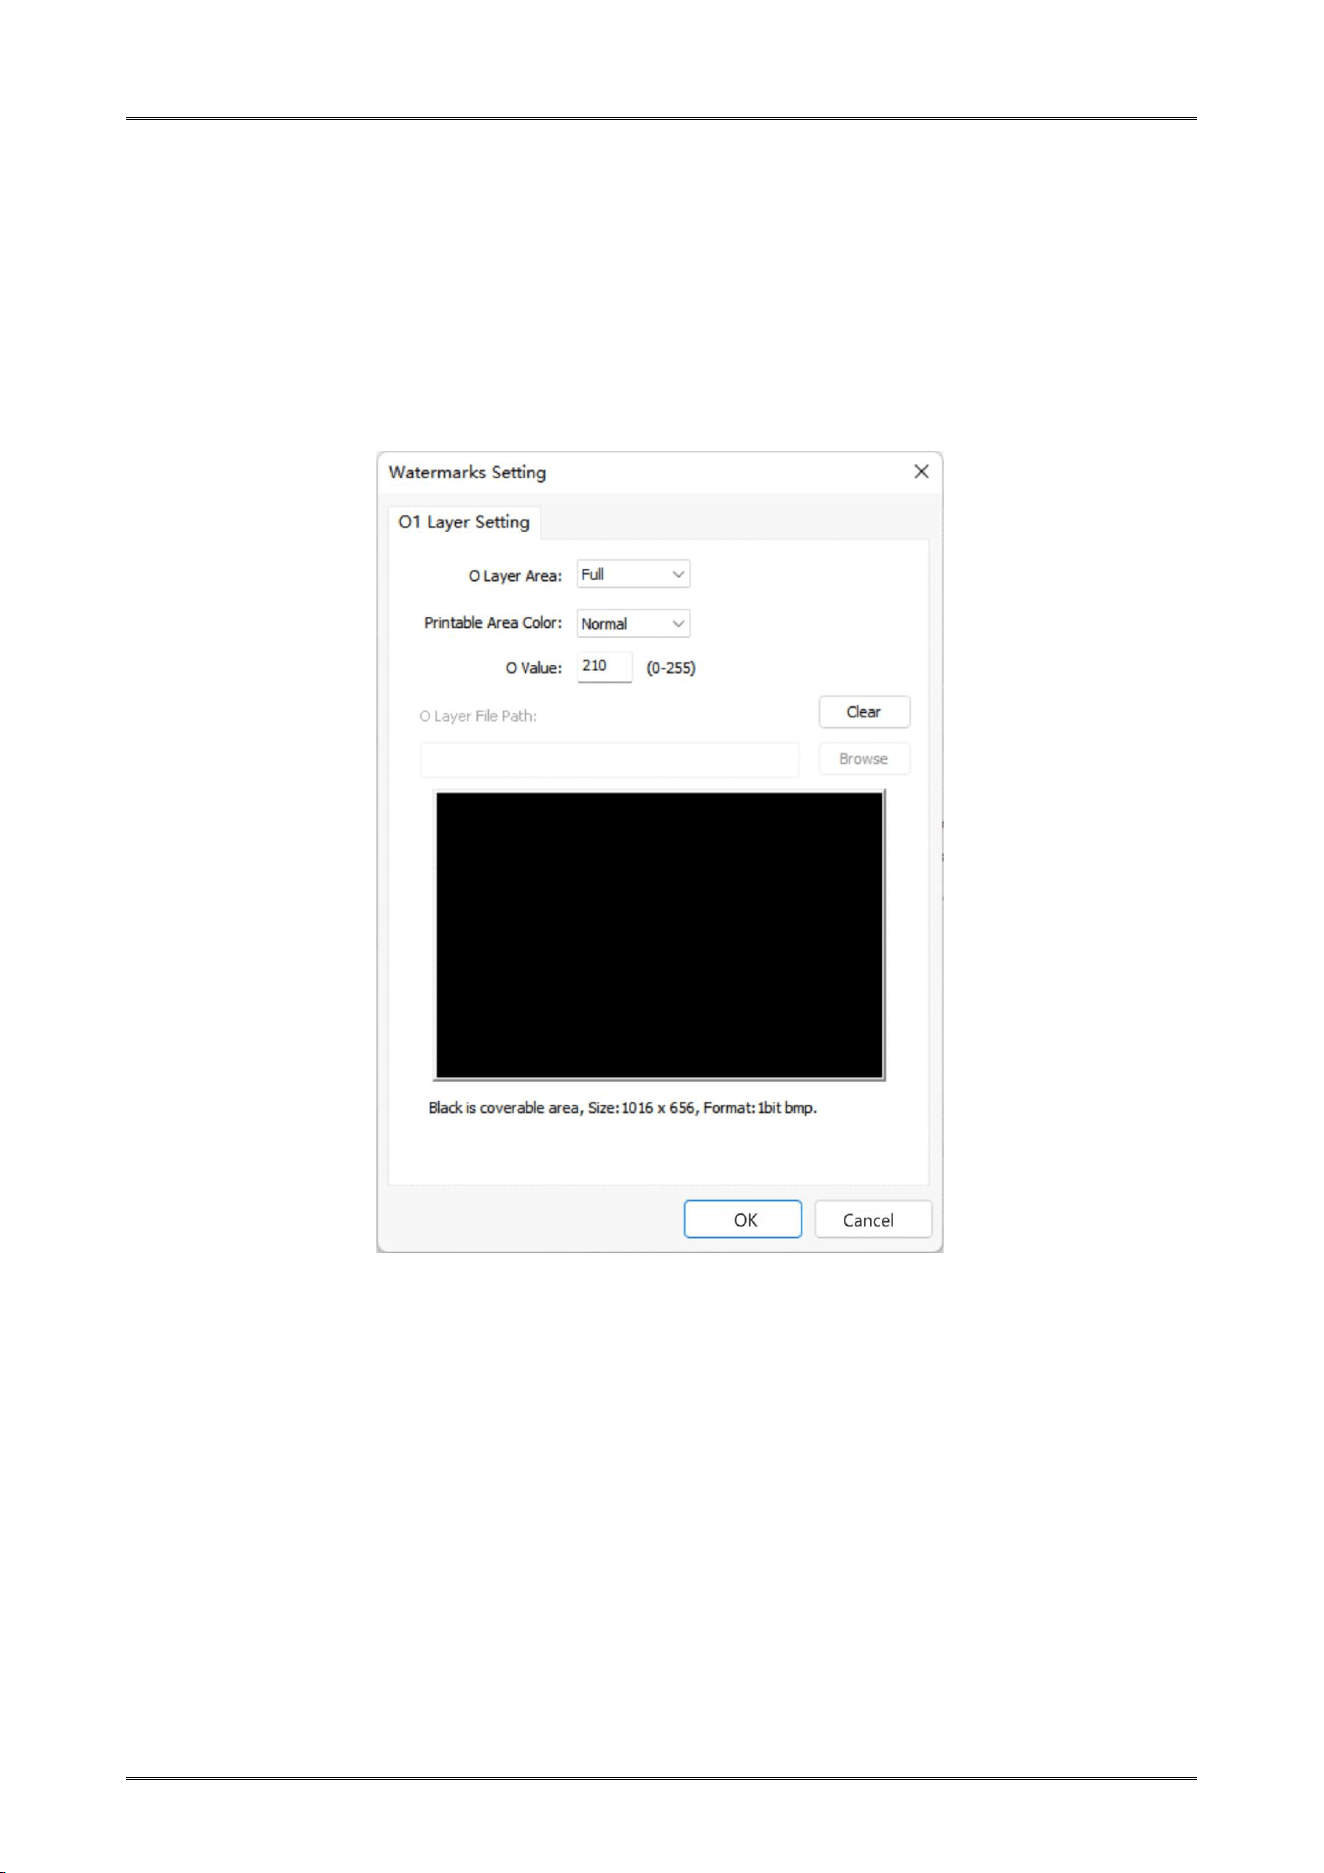
O Layer Area: Printing area and content of layer O,"None" , "Full Page" and "From Bitmap".
Coverage mode: Normal and reverse. O layer do not print when choosing” Full Page” in the O
Layer Area and choosing “Reverse in the Coverage mode.”
O Value: The threshold range is from 0 to 255, the large the value is, the more obvious the
printing effect of the layer is.
O Layer File Path: Choose “From Bitmap” in the O layer Area. Click "Browse” to select the
path to add a custom bitmap, which must be a monochromatic bitmap with1016 x 656 pixels.
Clicking the "clear" button will delete the added bitmap path.
Dascom DC-4100 User Manual
35
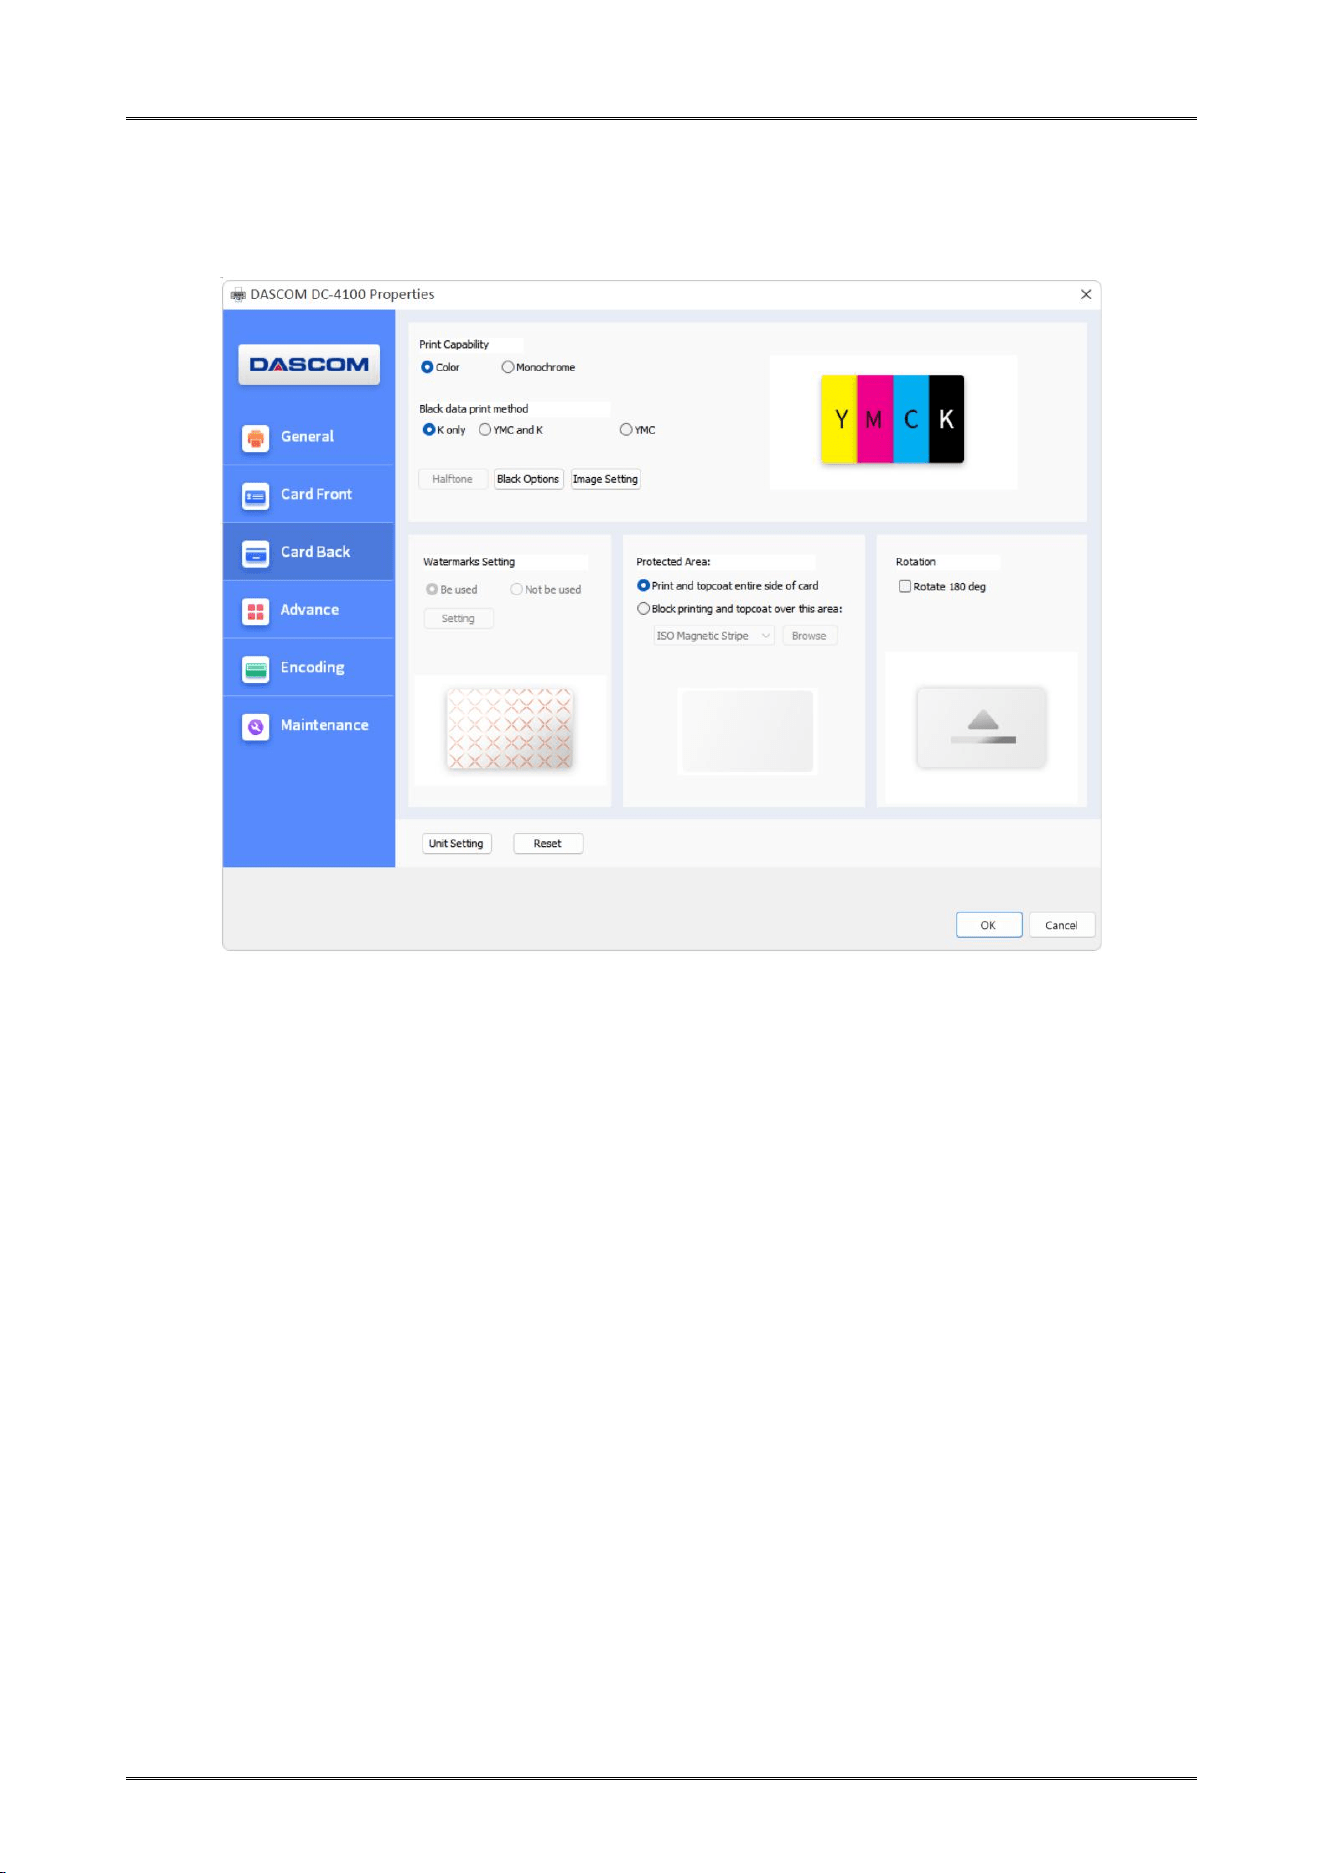
“Card Back” Tab
You need to first select "Duplex (D)" in the "Print Side" area of the "General" tab, and then click on
the "Card Back" tab to set it.
Note: The settings and parameter options for “Card Back” Tab and “Card front” Tab are consistent.
Dascom DC-4100 User Manual
36
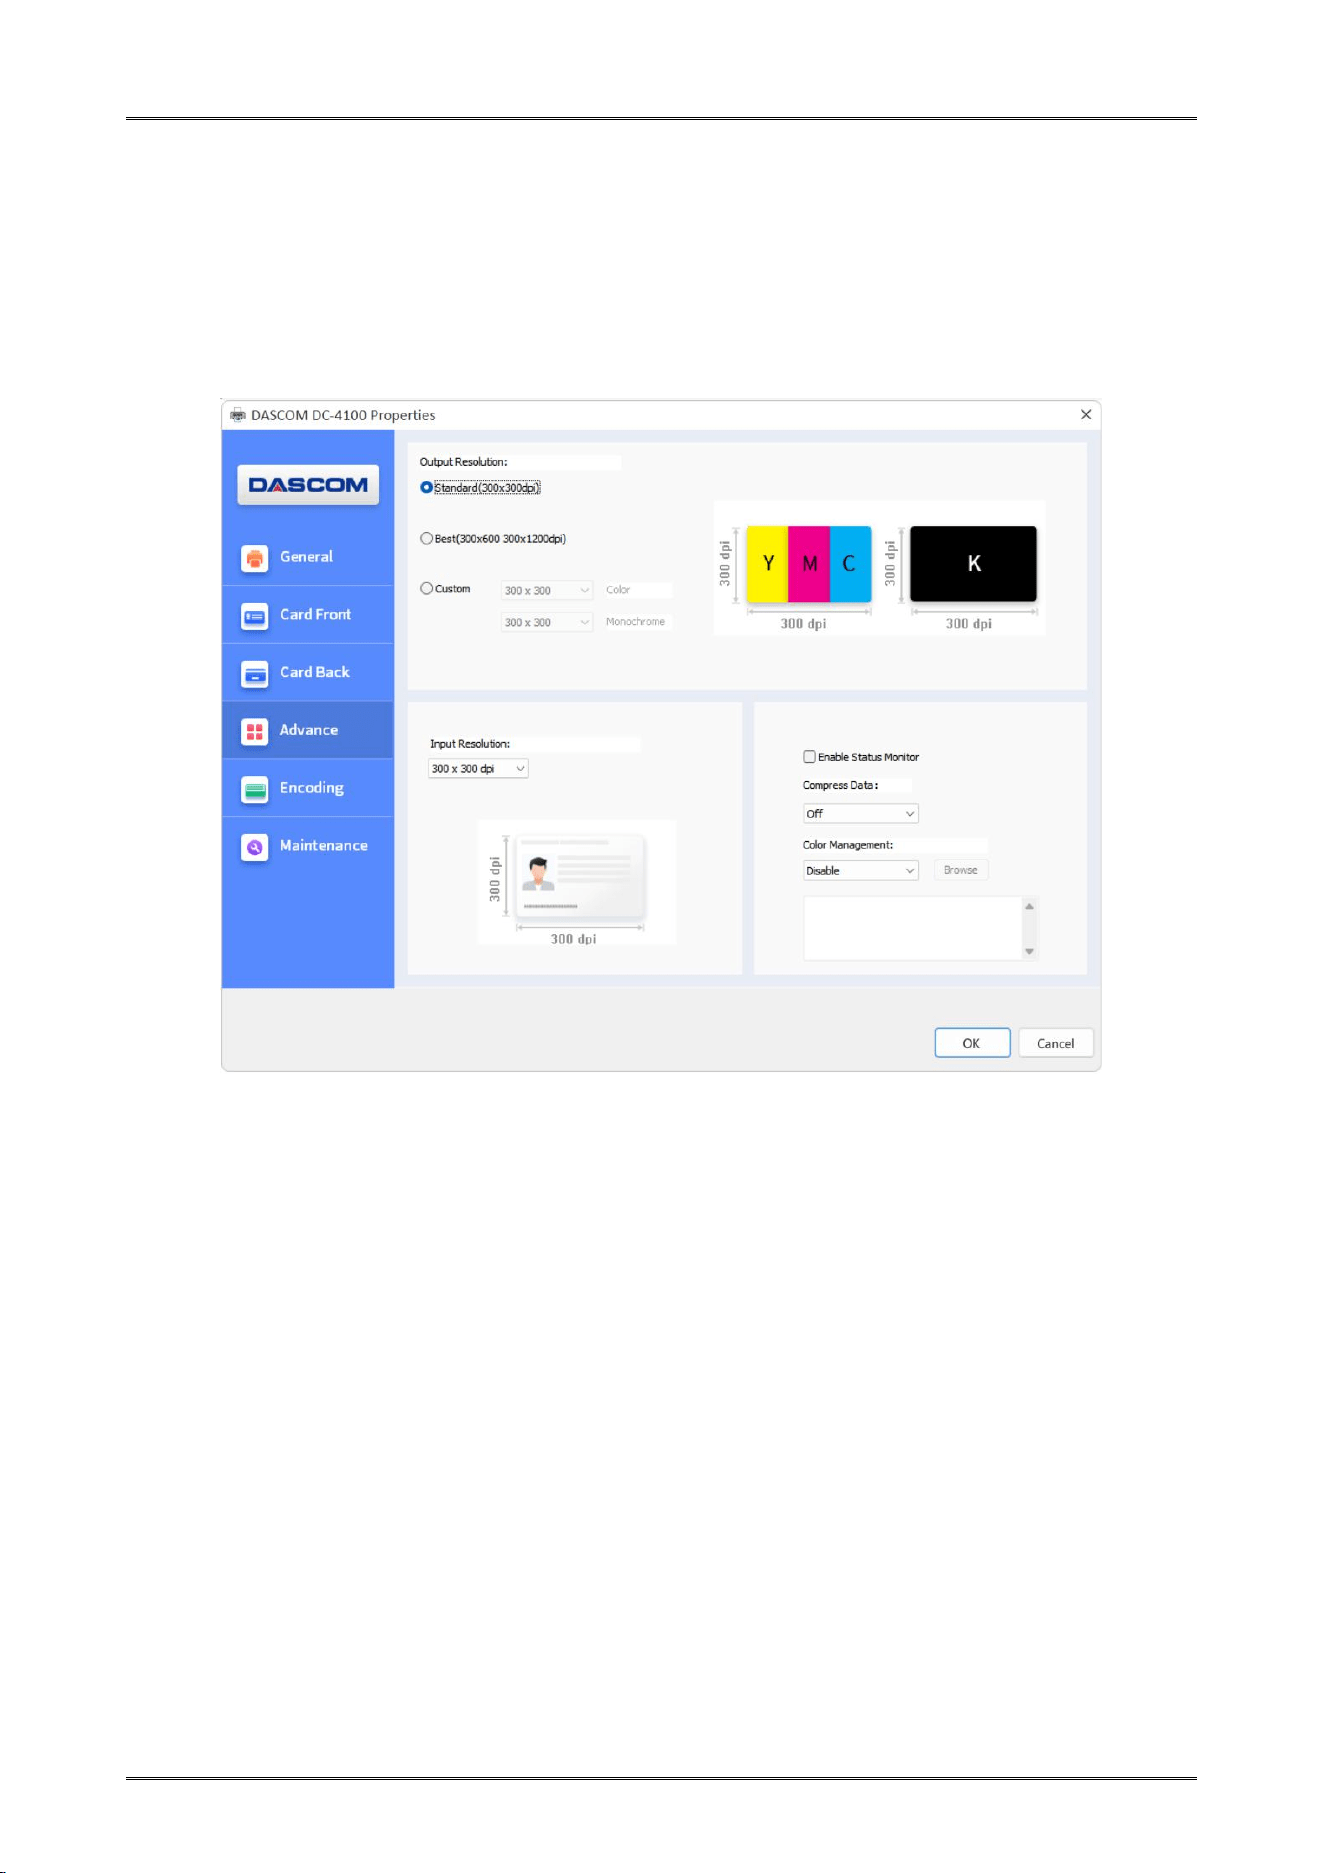
“Advance” Tab
Output Resolution-Standard ,Best and Custom
Input Resolution
Enable Status Monitor (Enable or Disables Printer Status Monitor utility)
Color Management (“Build-In” selects the System for color rendering or “Disable” to leave it
to the Printer or “Custom” )
Dascom DC-4100 User Manual
37
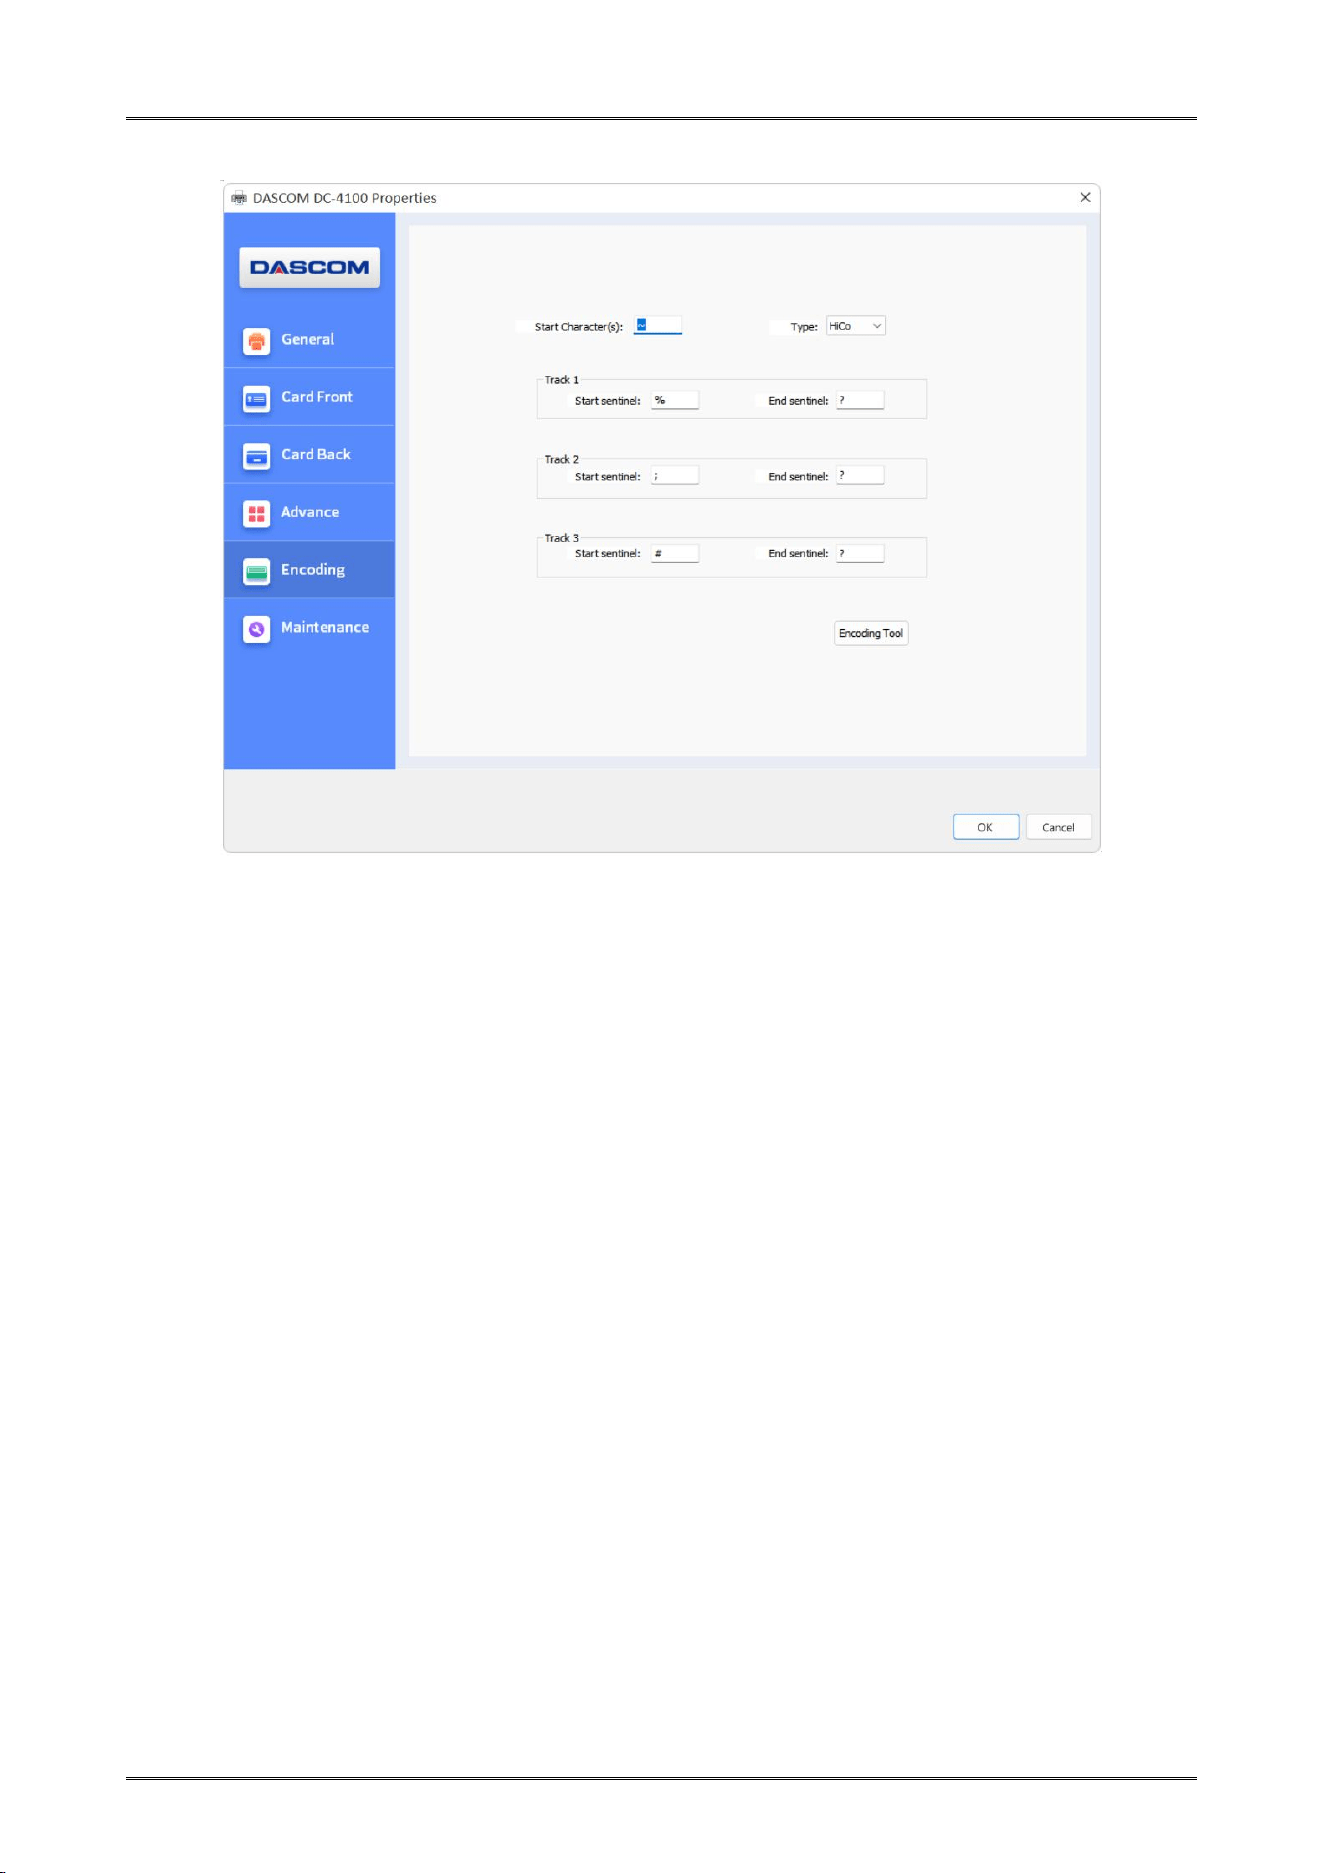
“Encoding” Tab
Encoding Page
Start Character(s): Magnetic encode data must start with this character(s).
Type -> Hico: Magnetic card whose type is high resistance.
Type -> Loco: Magnetic card whose type is low resistance.
Track 1: To define track 1 data in magnetic card.
Start sentinel: Data of track 1 must start with this character.
End sentinel: Data of track 1 must end with this character.
Example: ~%ABCDEDFG1234567890?
ABCDEDFG1234567890 is the data of track 1.
Track 2: To define track 2 data in magnetic card.
Start sentinel: Data of track 2 must start with this character.
End sentinel: Data of track 2 must end with this character.
Example: ~;1234567890?
1234567890 is the data of track 2.
Track 3: To define track 3 data in magnetic card.
Start sentinel: Data of track 3 must start with this character.
End sentinel: Data of track 3 must end with this character.
Example: ~#0987654321?
0987654321 is the data of track 3.
Dascom DC-4100 User Manual
38
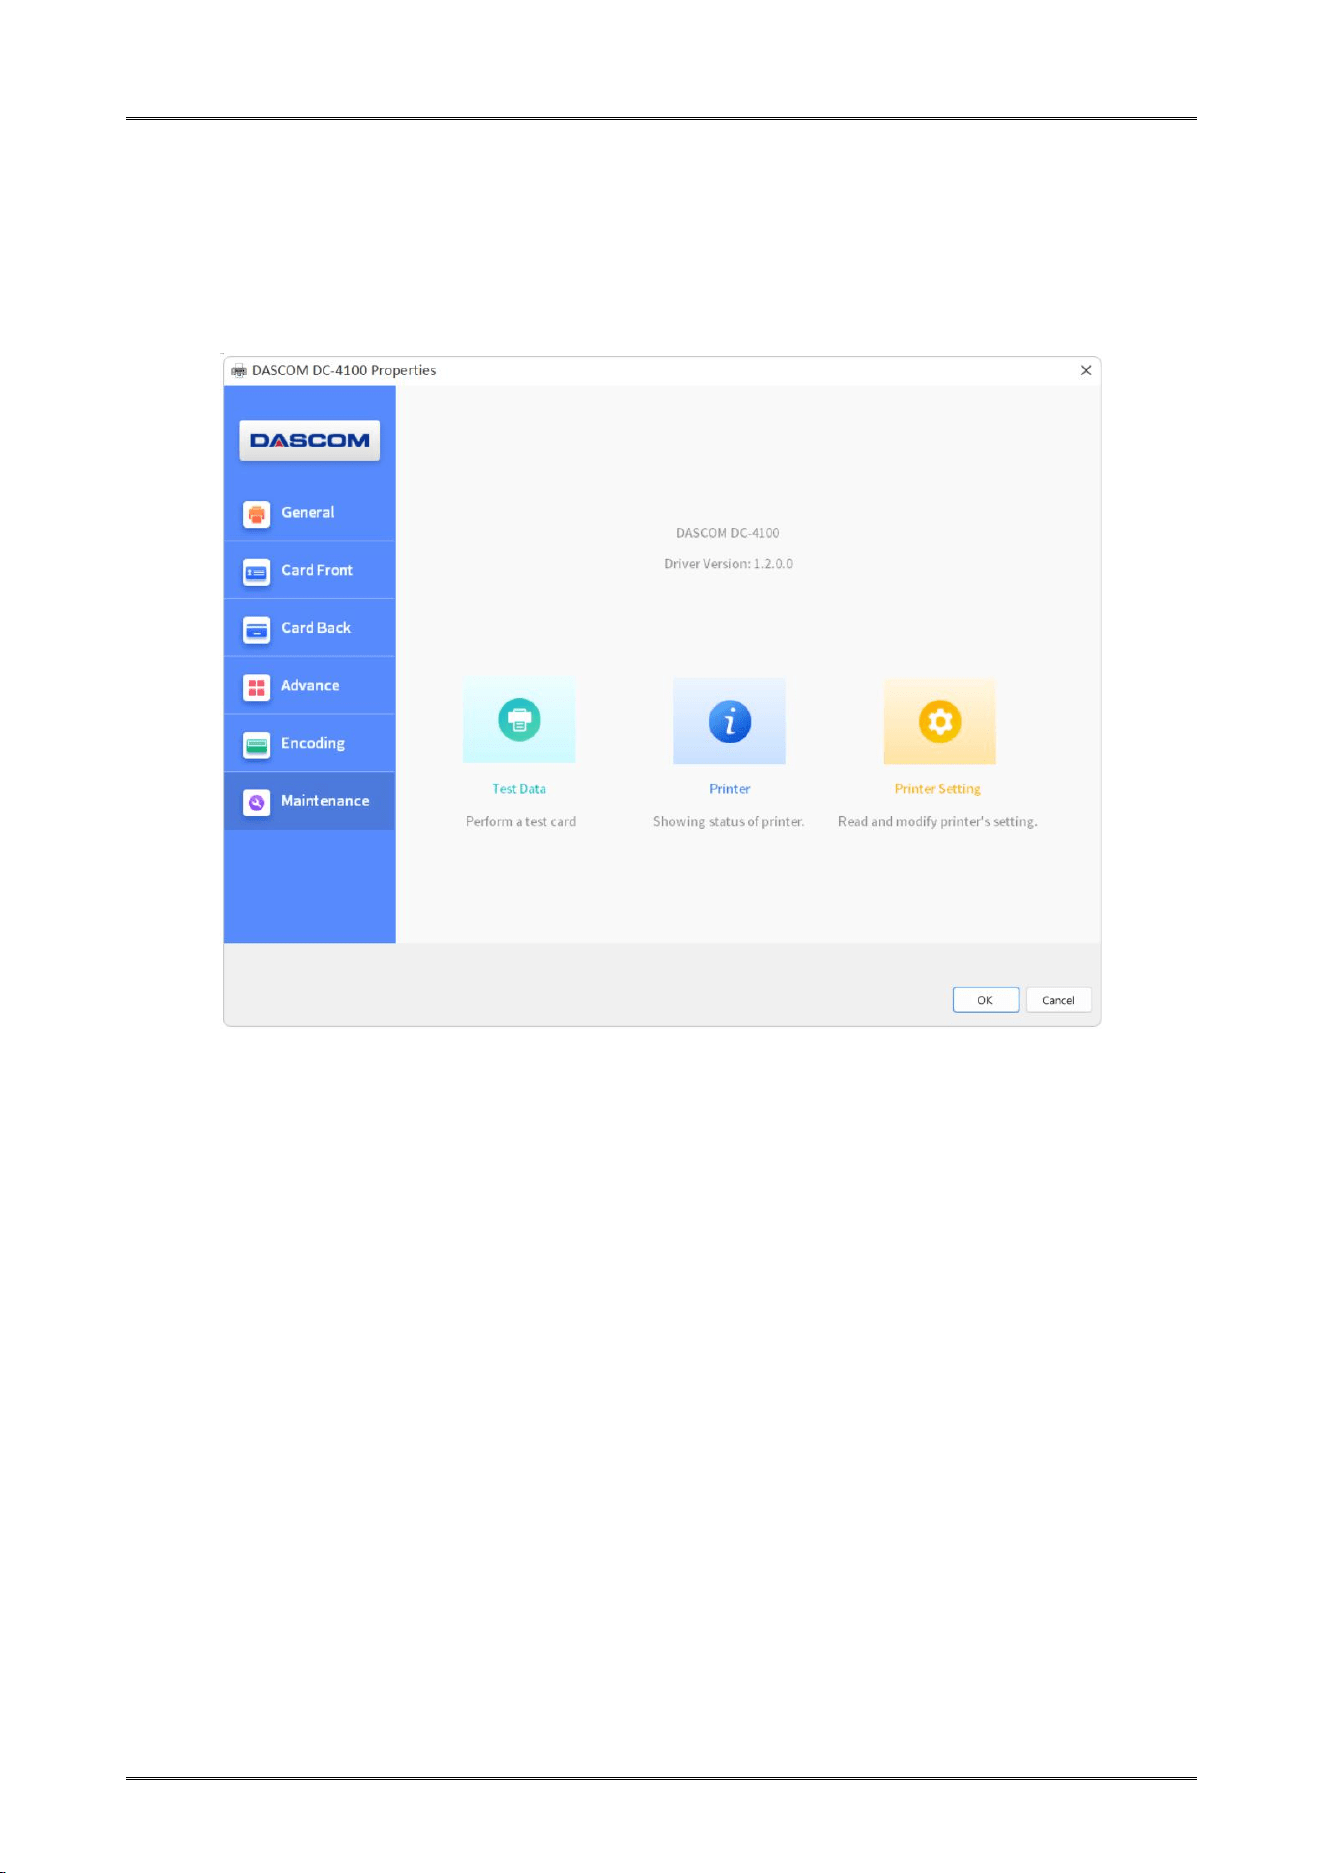
“Maintenance” Tab
Test Data (Print a Test Card with Serial #,Model #,Firmware level, MAC Address)
Printer (User can check the Printers DPI, the maximum printing area and minimum printing
area.)
Printer setting (Details of Printer parameters in User Mode or Service Mode.)
Dascom DC-4100 User Manual
39
2.6 Updating Firmware
It’s very easy to update the firmware, but if the installation of firmware is incorrect, the printer will
be damaged.
Before updating, please contact DASCOM dealer for advice on the implementation of the upgrade.
In general, updates are required only when a problem or failure is explicitly identified in DASCOM.
To download the update, please visit
www.dascom.com
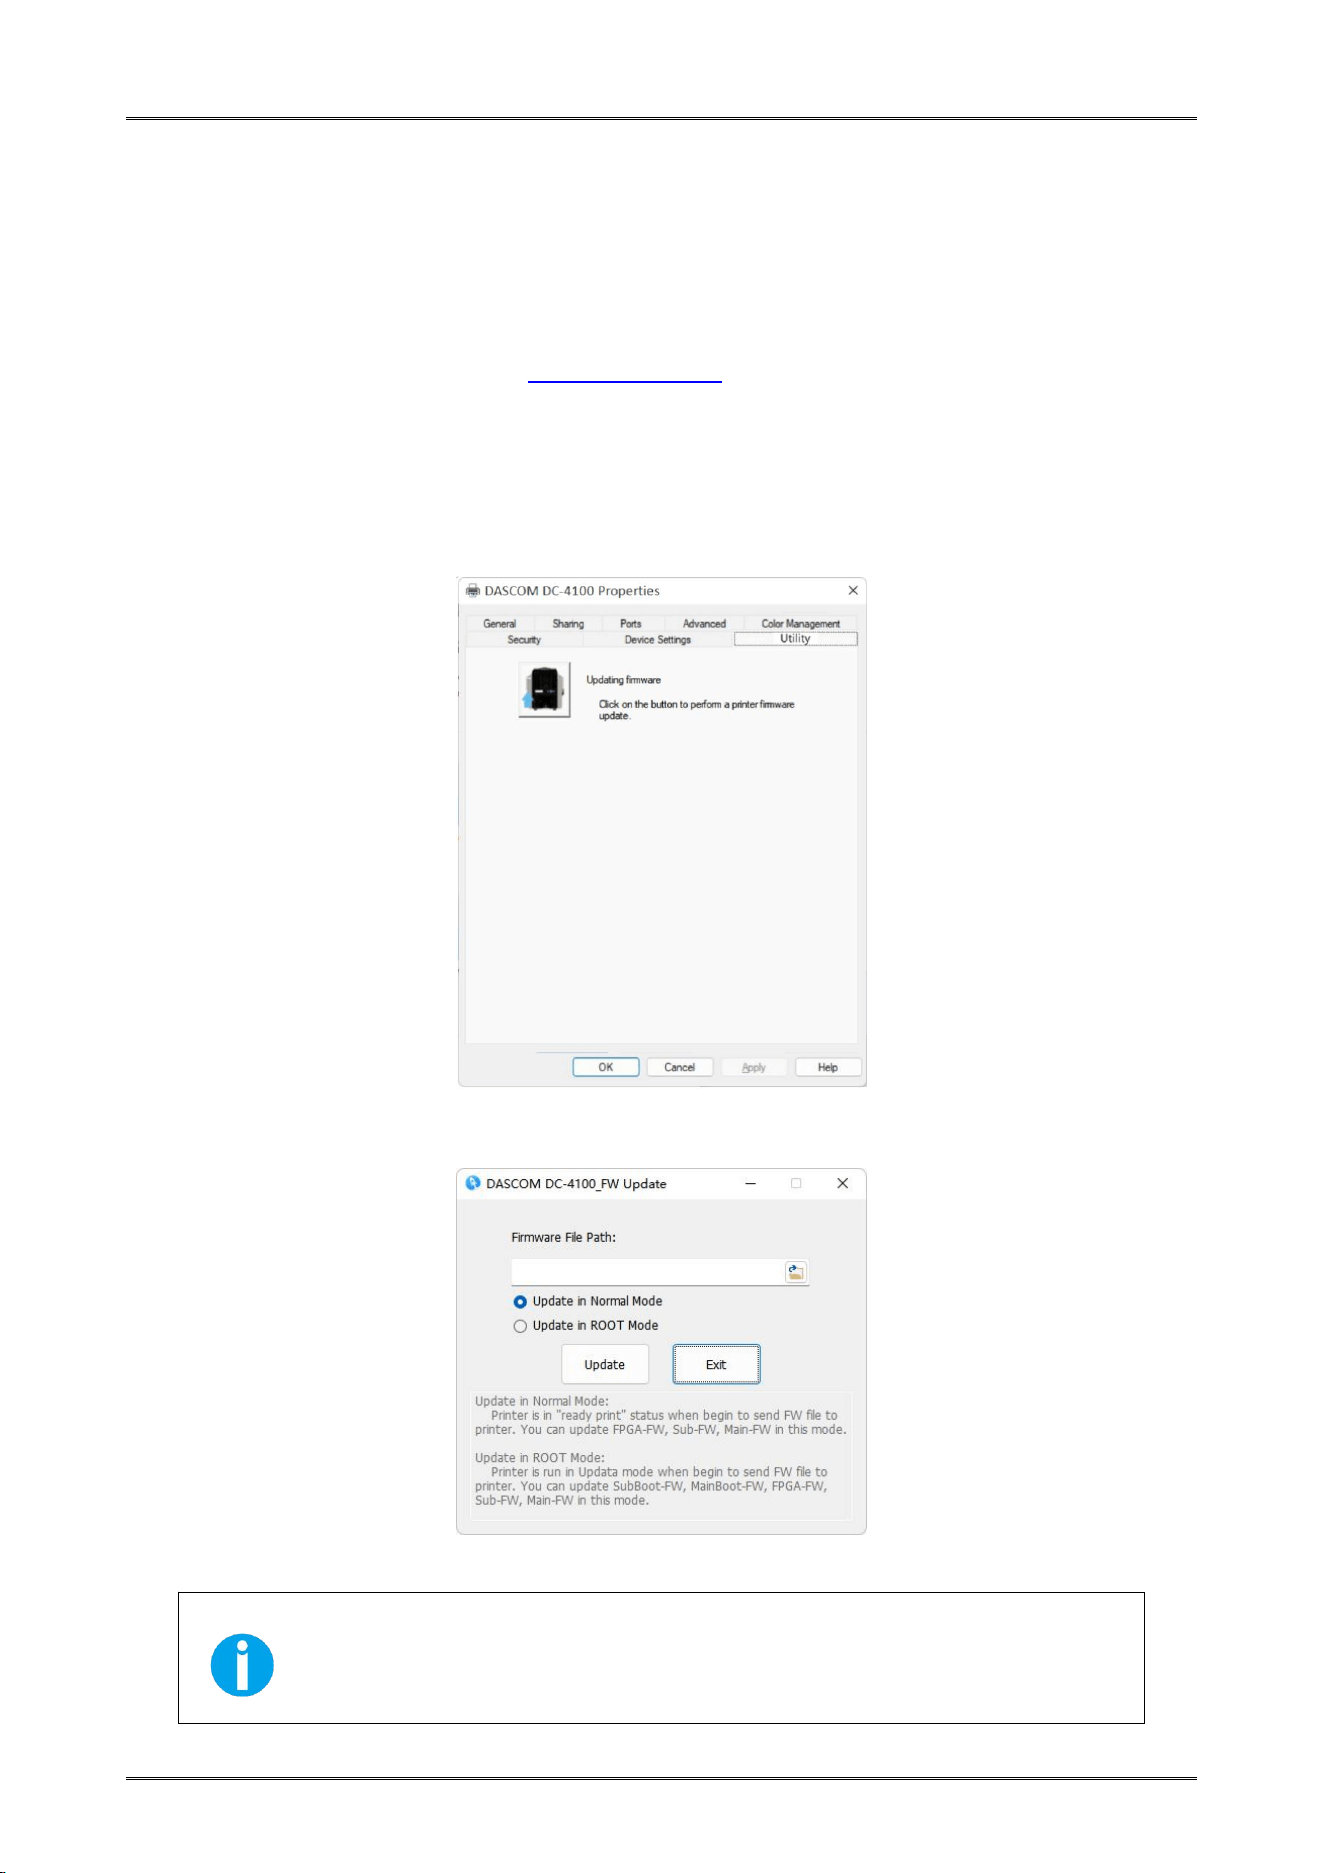
The steps to update firmware:
(1) Select the control panel on the start key in the lower left corner of the Windows taskbar.
(2) Select Devices and then Printers and Scanners, then click on the DC-4100 Driver.
(3) Choose Printer Property on the printer menu.
(4) Select the “Utility” tab and click the Printer icon.
(5) Click the Browse icon, go to and choose the update firmware, choose which Update Mode
then click the “Update” button. When the update is finished, click “Exit”.
(6) After the upgrade, you can create the personalized cards with this Printer.
Do not interrupt the transmission between the computer to the Printer
during the download. (Such as switch off the printer or computer power,
unplug the cable, etc.). Otherwise, Printer might not restart. In case of such
a failure, please contact your DASCOM dealer.
Dascom DC-4100 User Manual
40
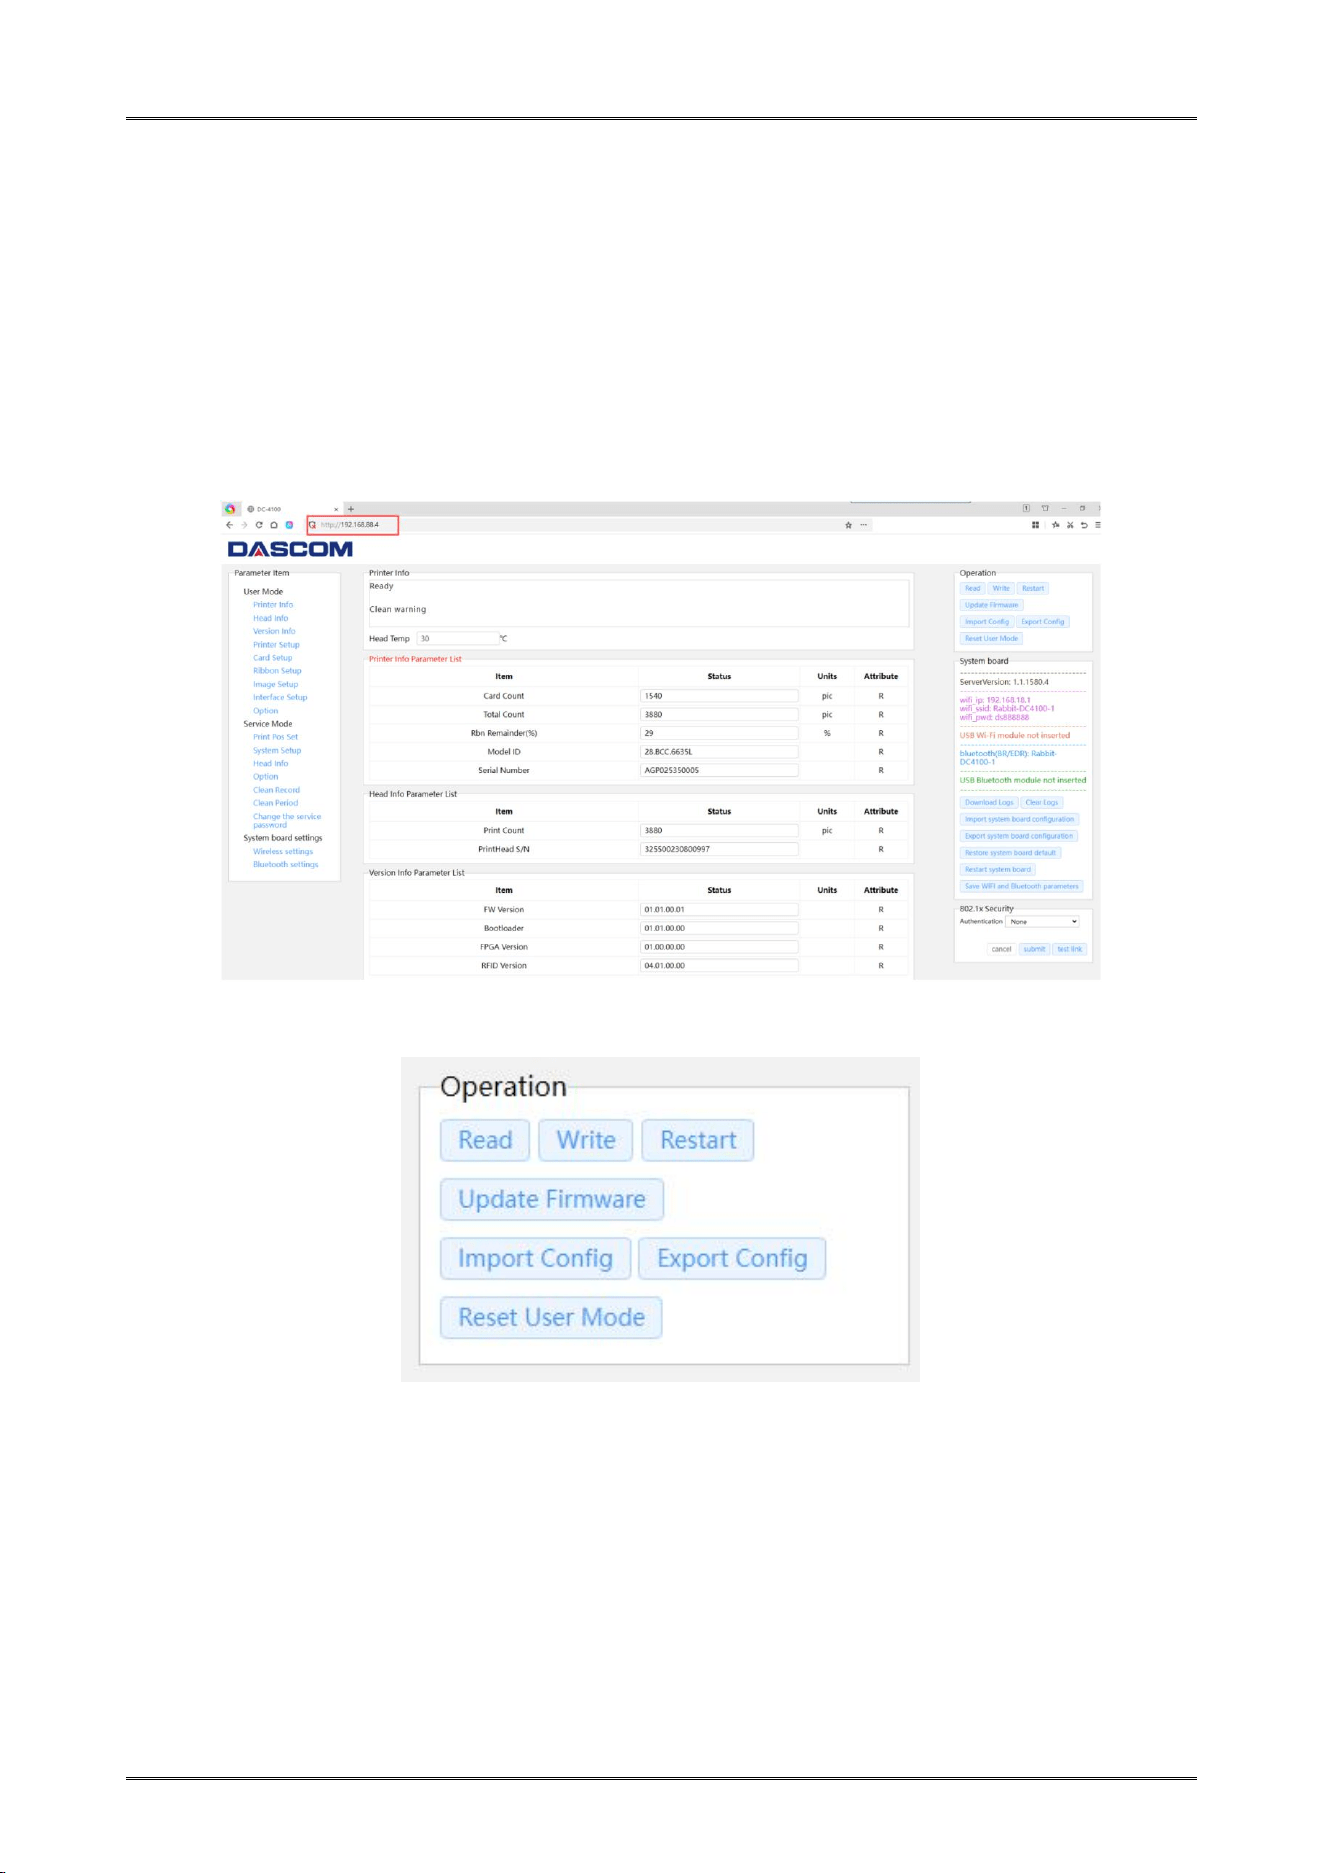
2.7 Using the Web Panel
You can configure the printer from any device that has a browser and is compatible with
your printer communication capabilities.
(1) Connect the printer via Ethernet.
(2) Modify the printer IP address to ensure that it belongs to the same network segment as
the PC IP address.
(3) Enter the IP address of the current printer in the browser to enter the Web Panel login
interface.
(4) On the page, you can view or modify printer information:
2.7.1 Operation
Read: After clicking, you can read the current settings of the printer.
Write: After modifying, click
"
Write
"
to modify printer settings (Note: Temporary
modifications only, the printer will revert to its previous state after restart).
Restart: After pressing, the printer will restart
Update Firmware: After clicking, you can select the printer firmware for updating.
Dascom DC-4100 User Manual
41
Import Config: To import a configuration file, you need to select the correct configuration file
in the pop-up window; otherwise, the import will fail.
Export Config:Export the configuration file, exporting the current printer's configuration into
a configuration file. Please note whether the file is blocked by the browser.
Restore User Model Settings: Press to reset the printer to its factory settings.
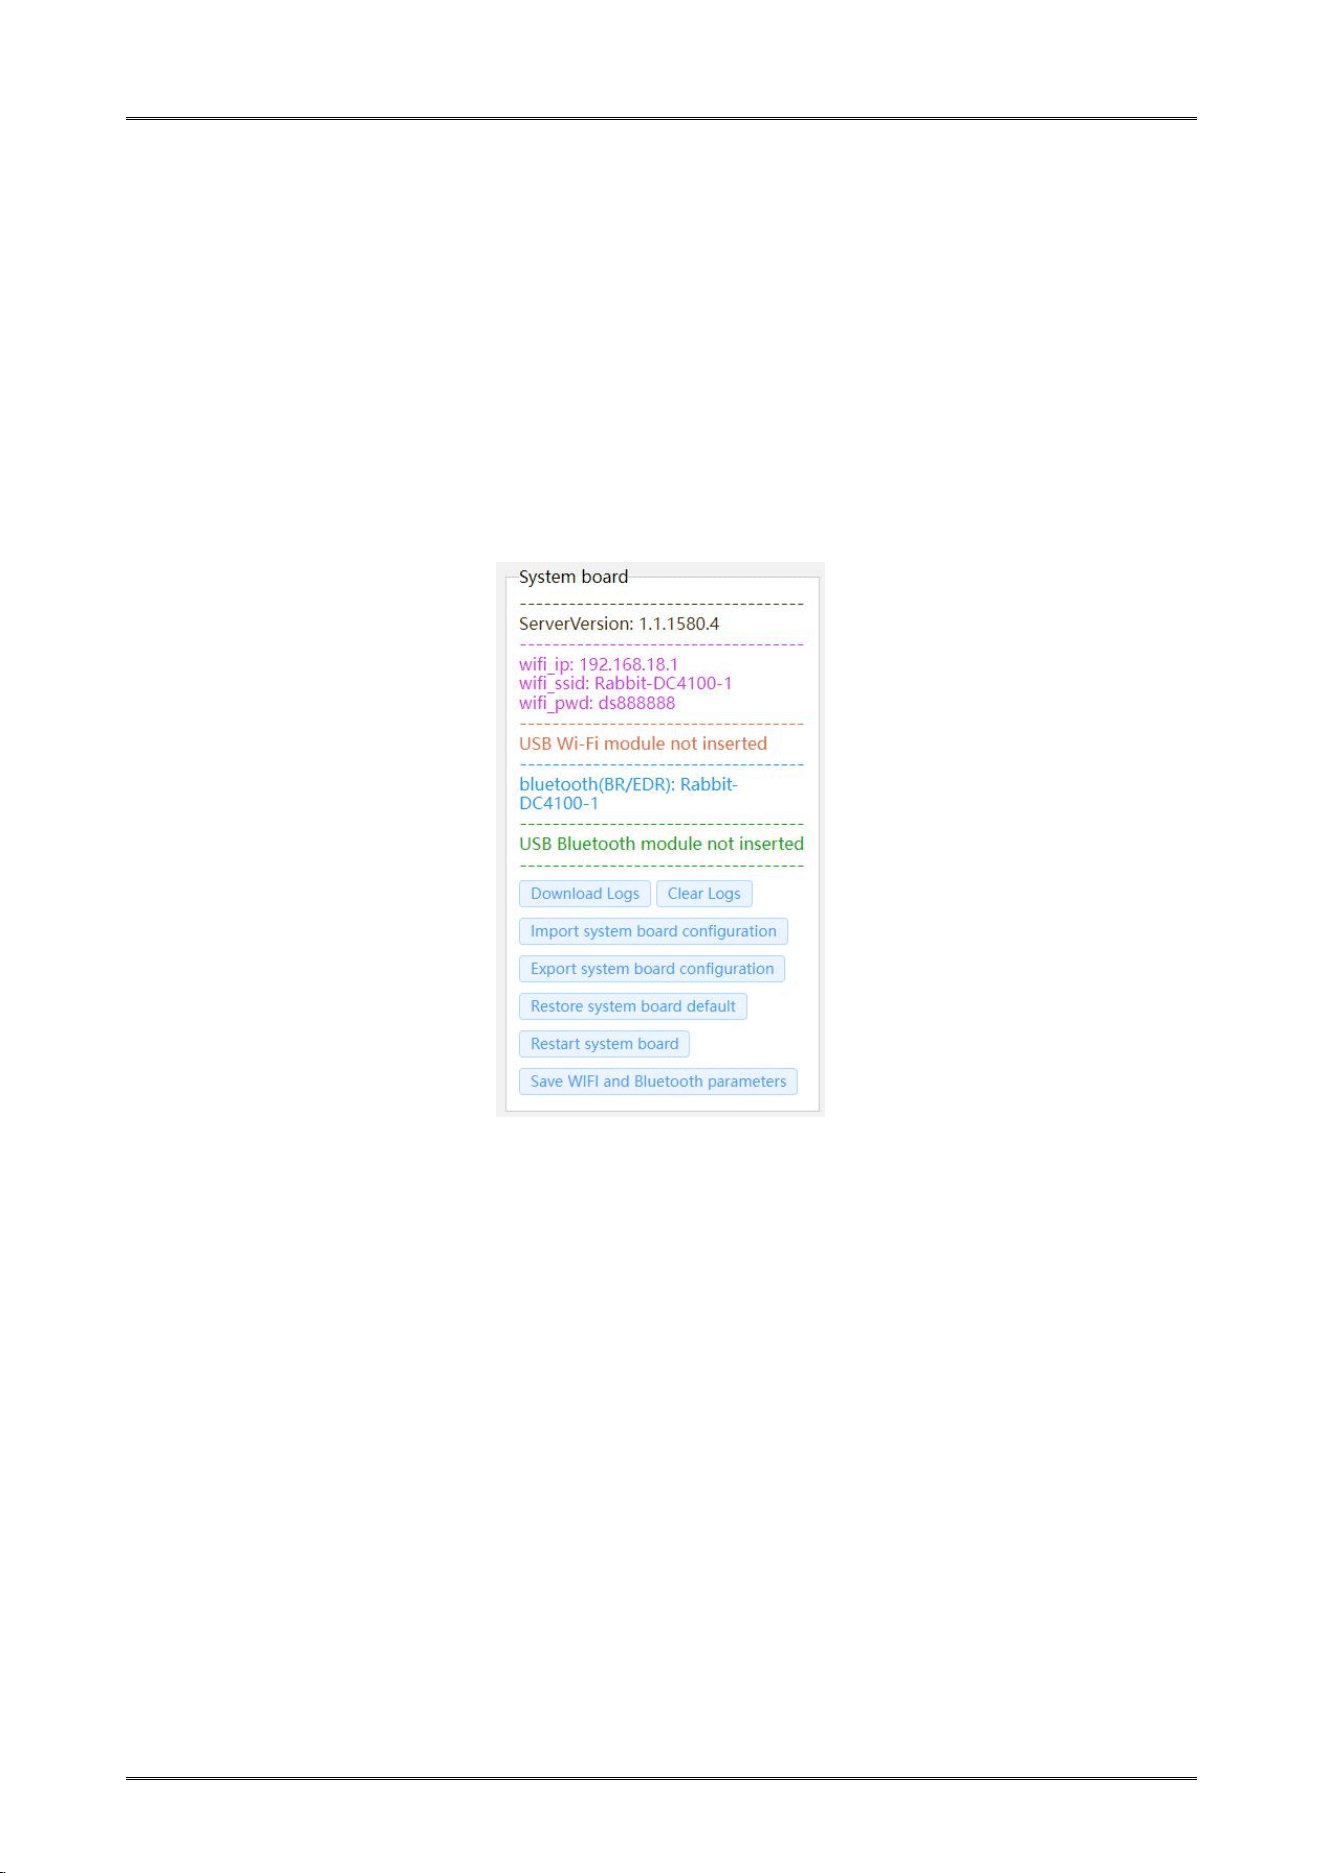
2.7.2 System board information and configuration
Download Logs: Download system board logs.
Clear Logs: Clear system board logs.
Import system board configuration: Import the system board configuration file.
Export system board configuration: Export system board configuration file.
Restore system board default: Restore the default configuration of the system board.
Restart system board: Restart the system board configuration.
Save parameters: Save Wireless Communication parameters.
Dascom DC-4100 User Manual
42
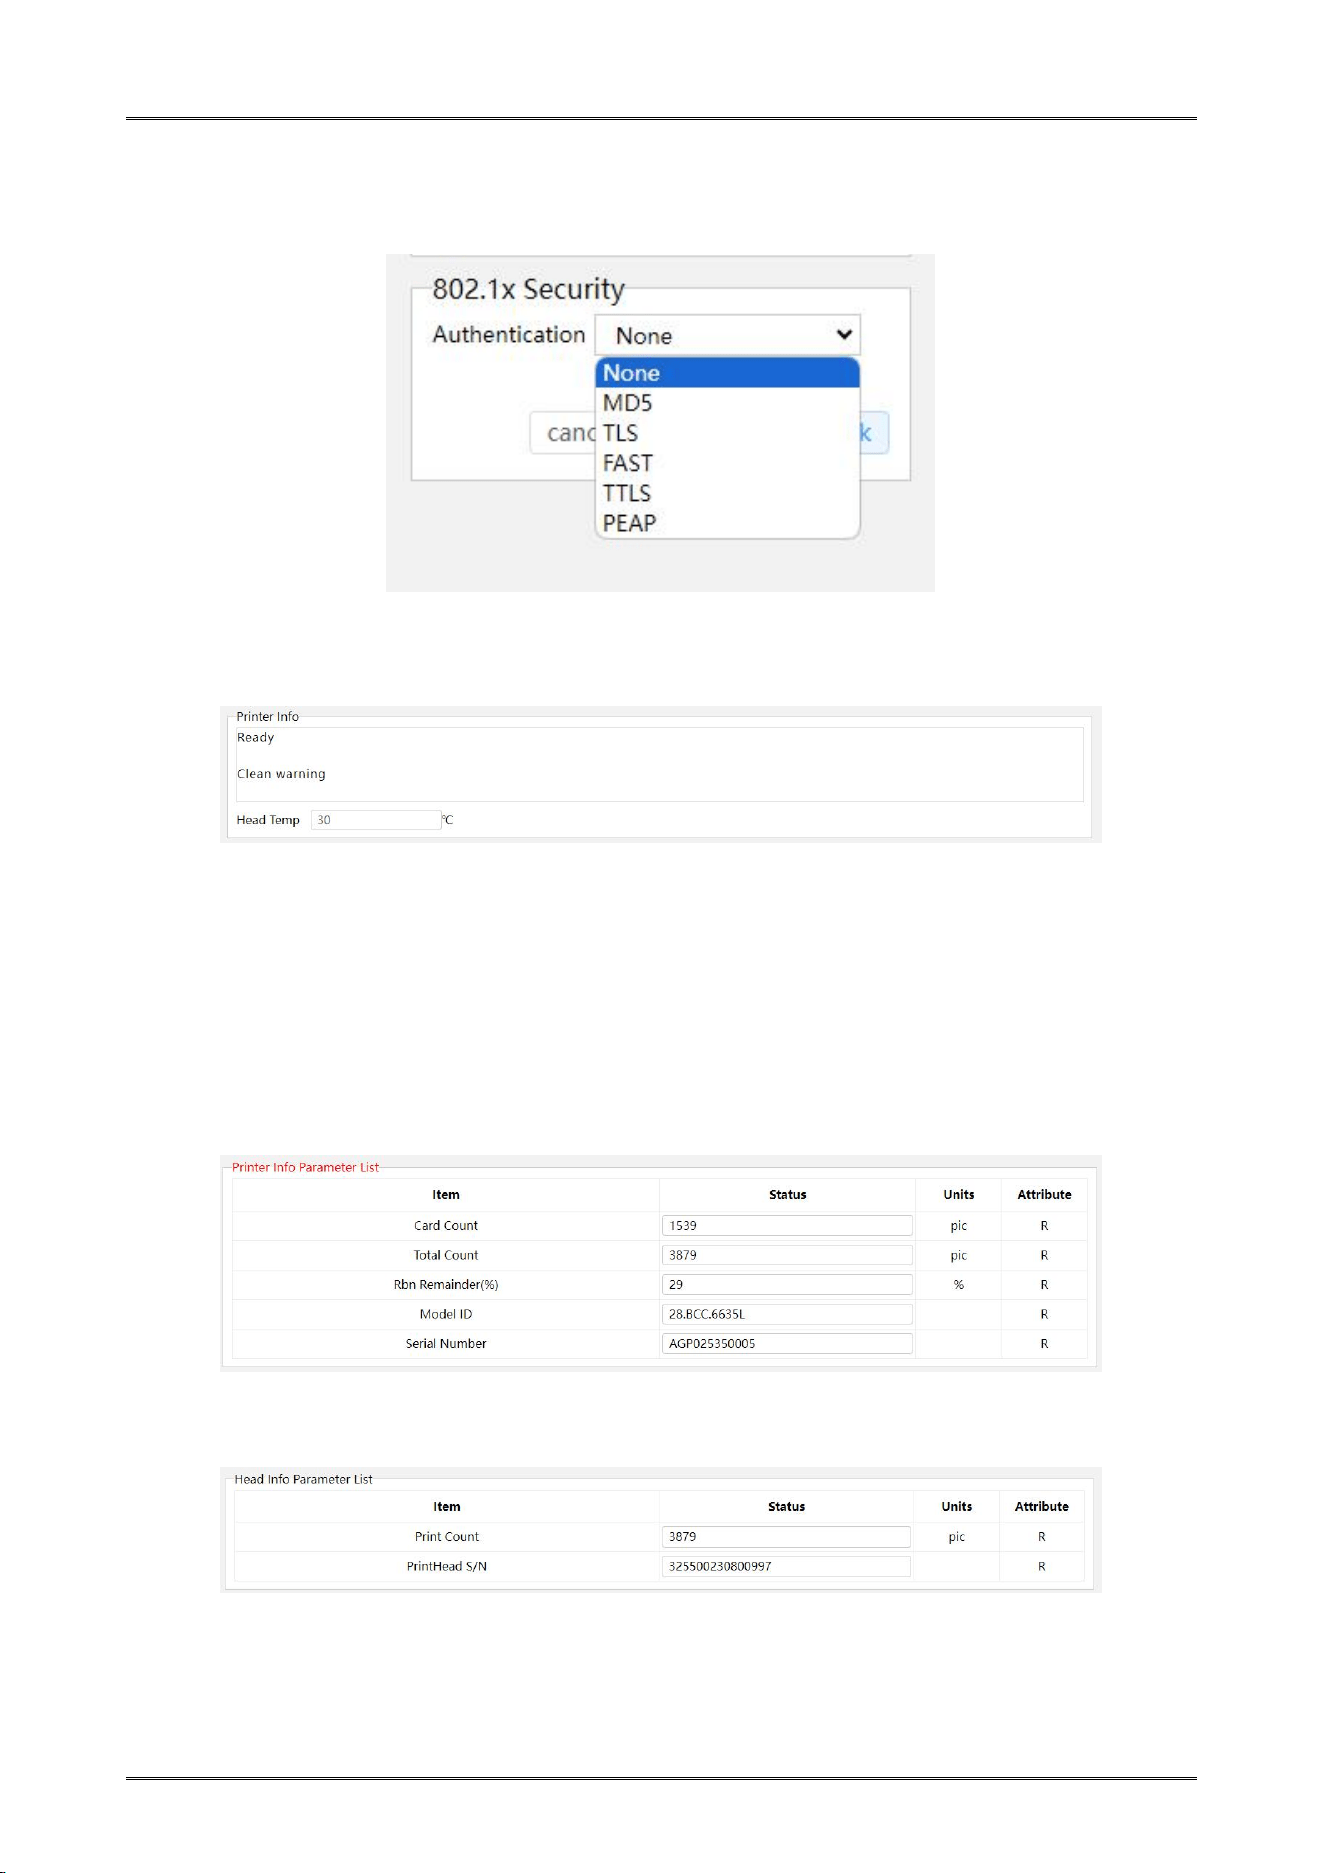
2.7.3 802.1X Security
802.1X network security authentication settings:
2.7.4 Printer Info
Displays the real-time status and temperatures of the Print Head and Heater Roller:
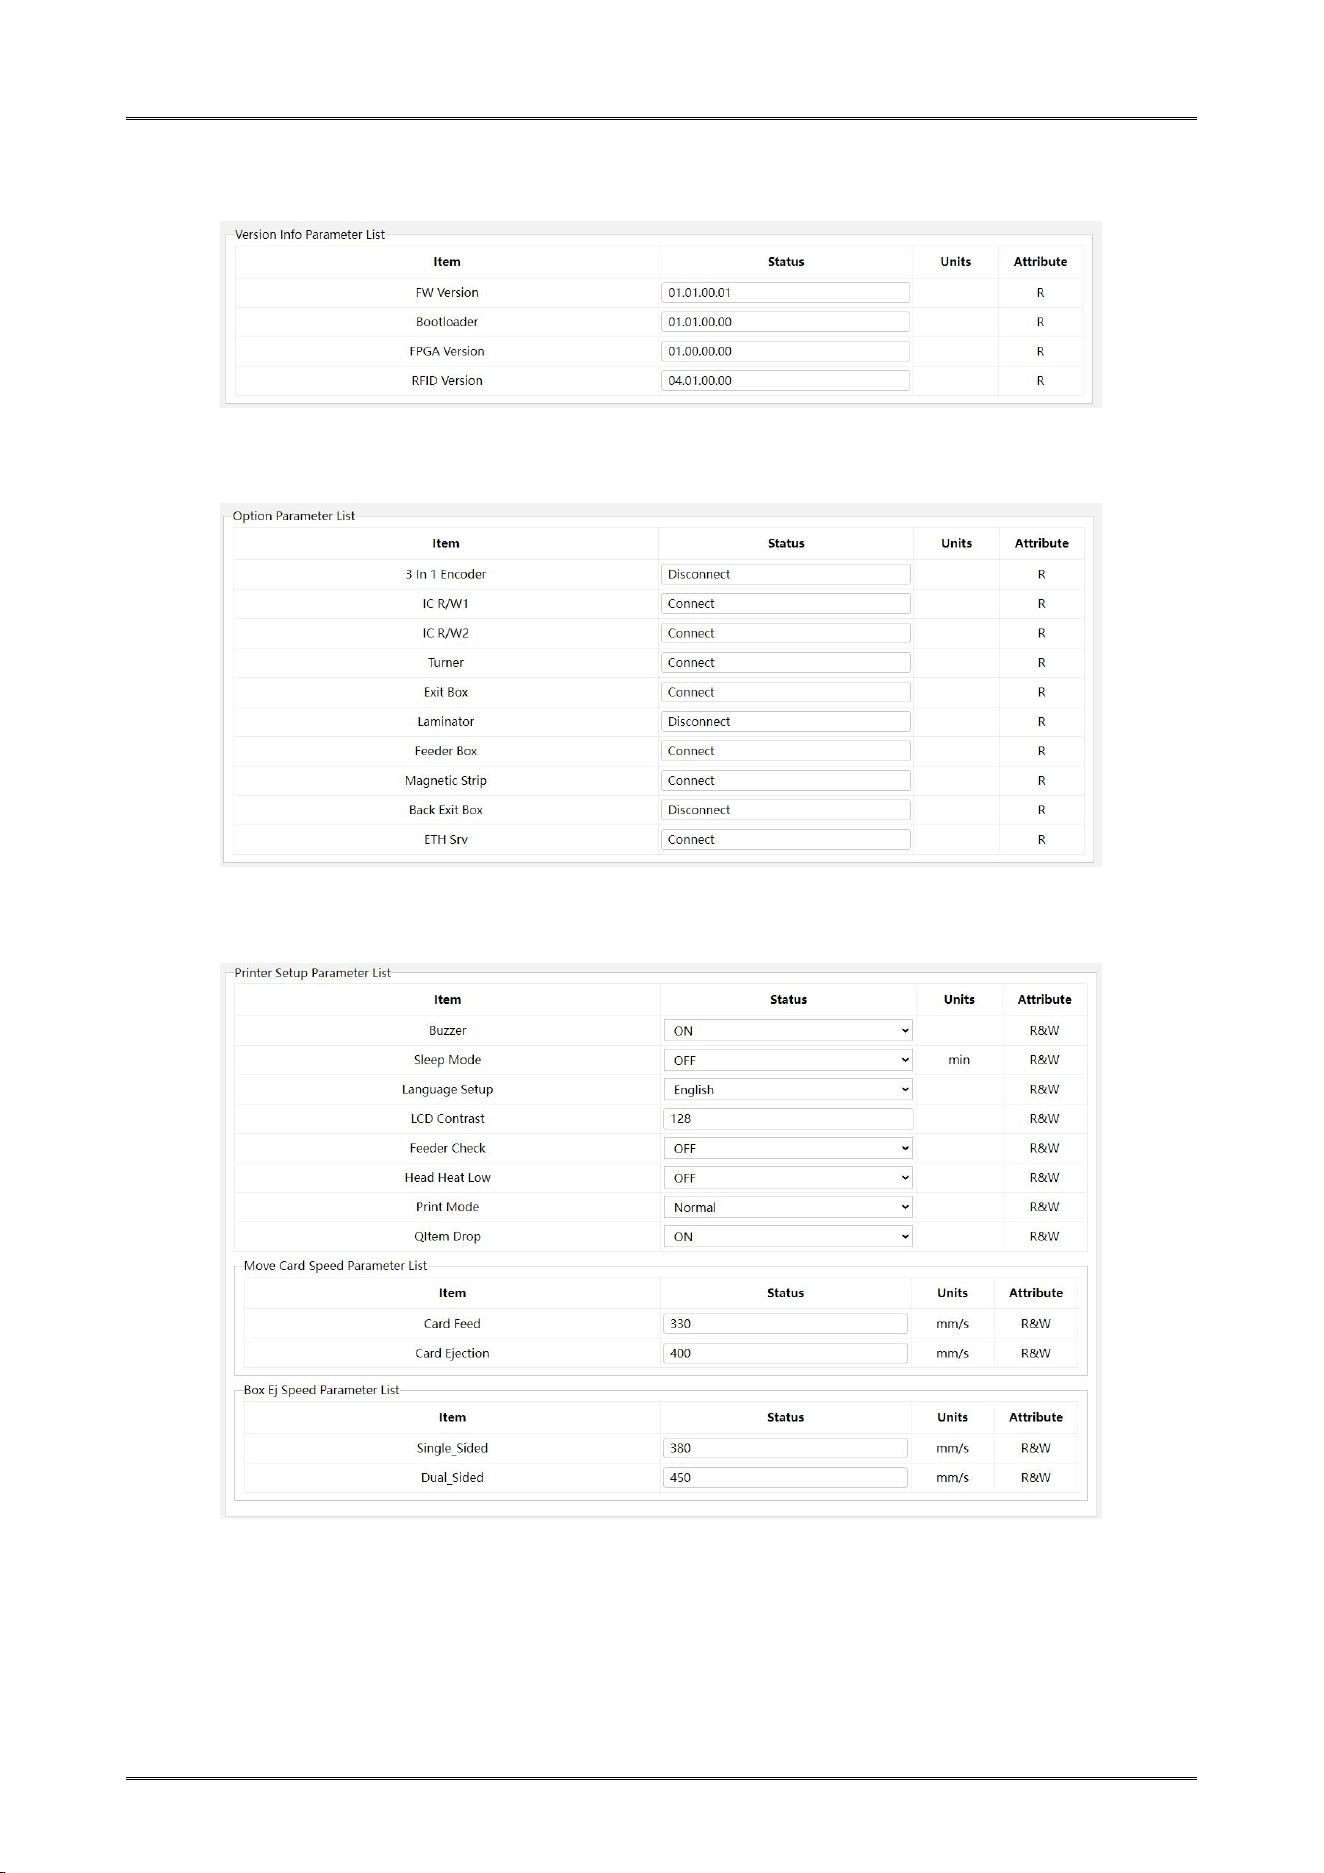
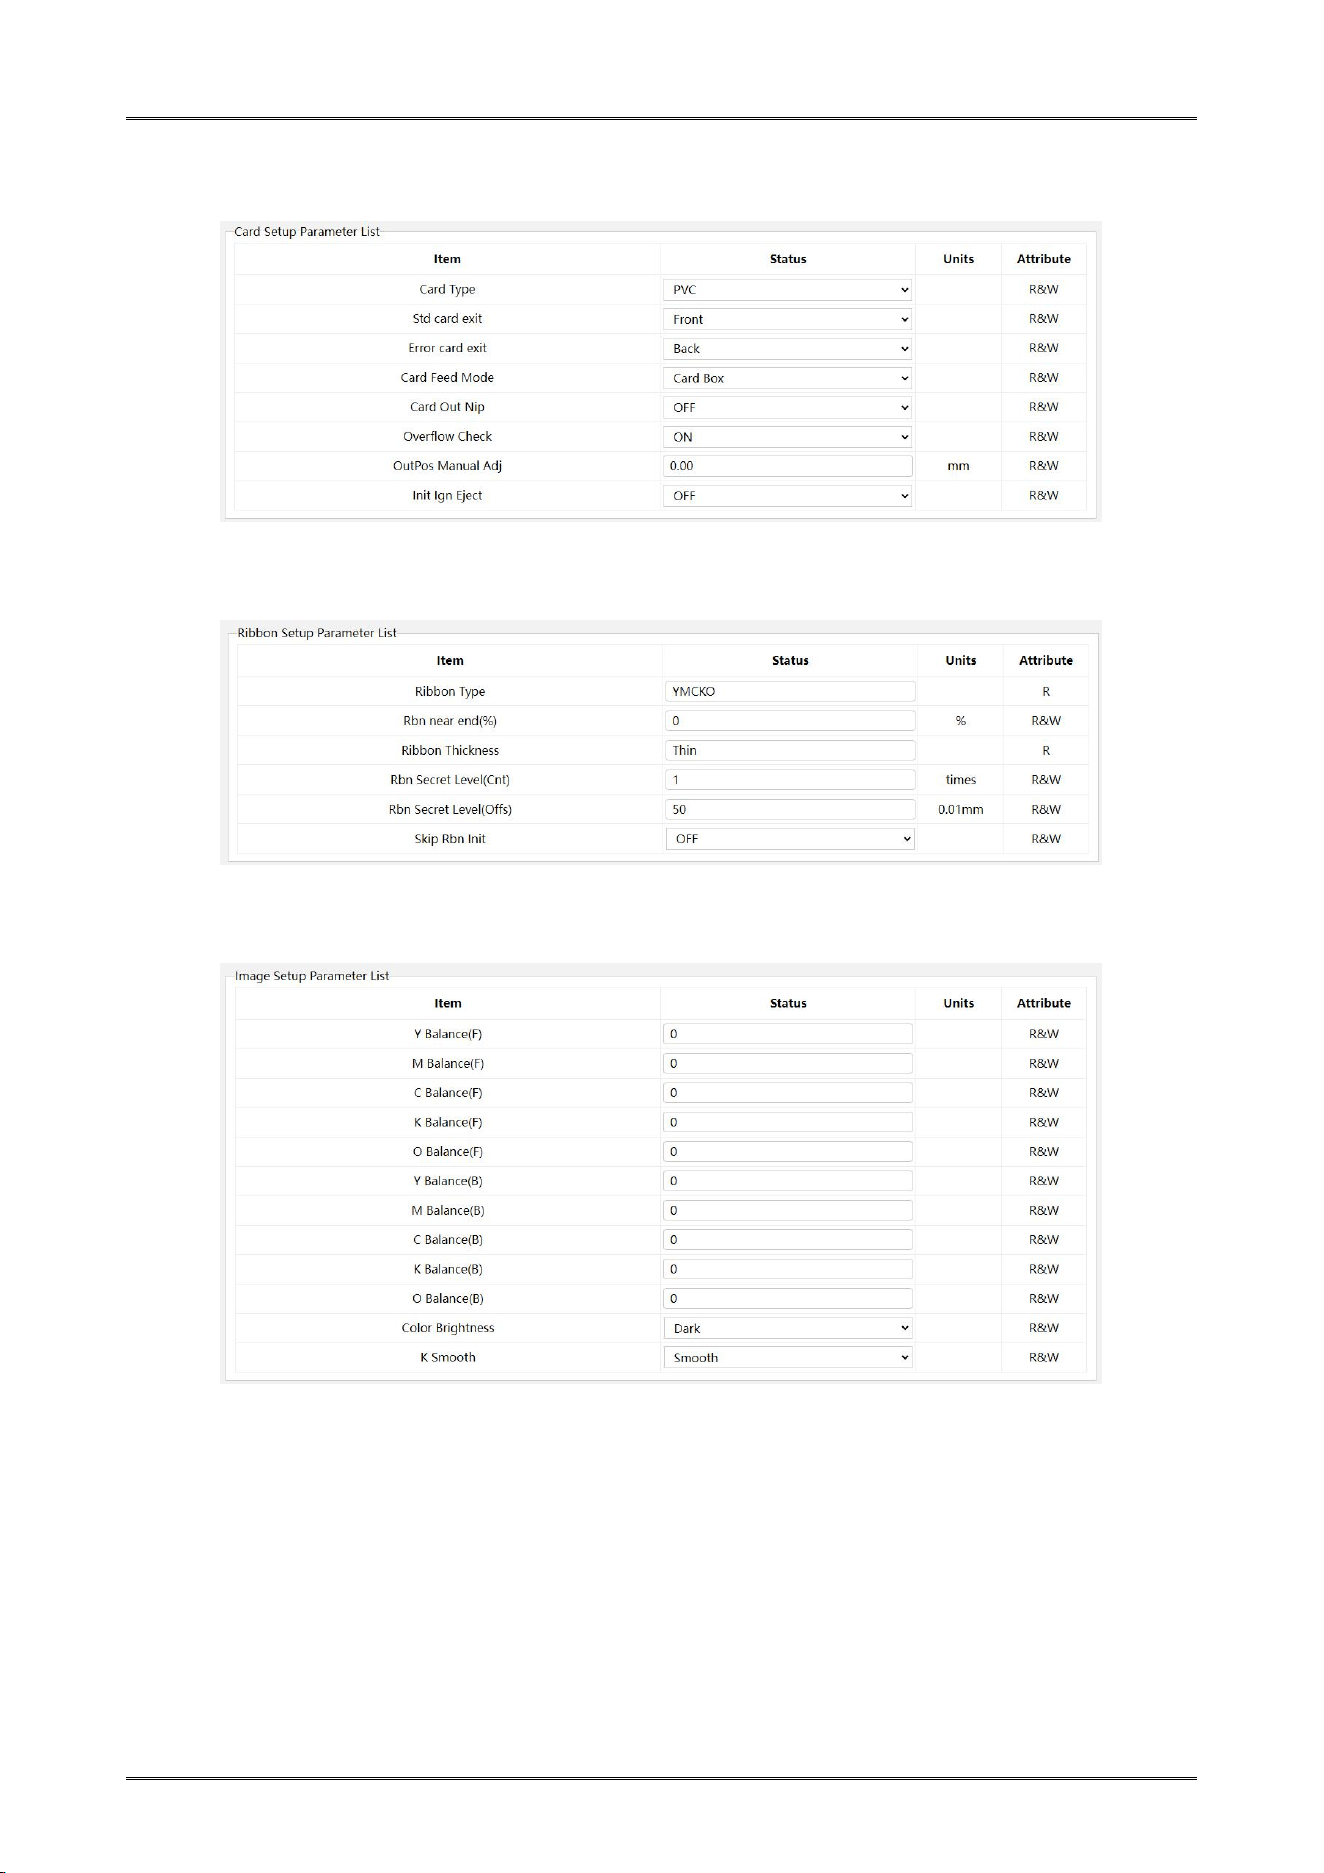
2.7.5 User Mode
You can view the basic information of the printer, such as device details, print head
information, version information, option information etc; or modify settings like printer setup,
card setup, ribbon setup, image setup, interface setup.
2.7.5.1 Printer Info Parameter List
2.7.5.2 Head Info Parameter List
Dascom DC-4100 User Manual
43
2.7.5.3 Version Info Parameter List
2.7.5.4 Option Parameter List
2.7.5.5 Printer Setup Parameter List
Dascom DC-4100 User Manual
44
2.7.5.6 Card Setup Parameter List
2.7.5.7 Ribbon Setup Parameter List
2.7.5.8 Image Setup Parameter List
Dascom DC-4100 User Manual
45
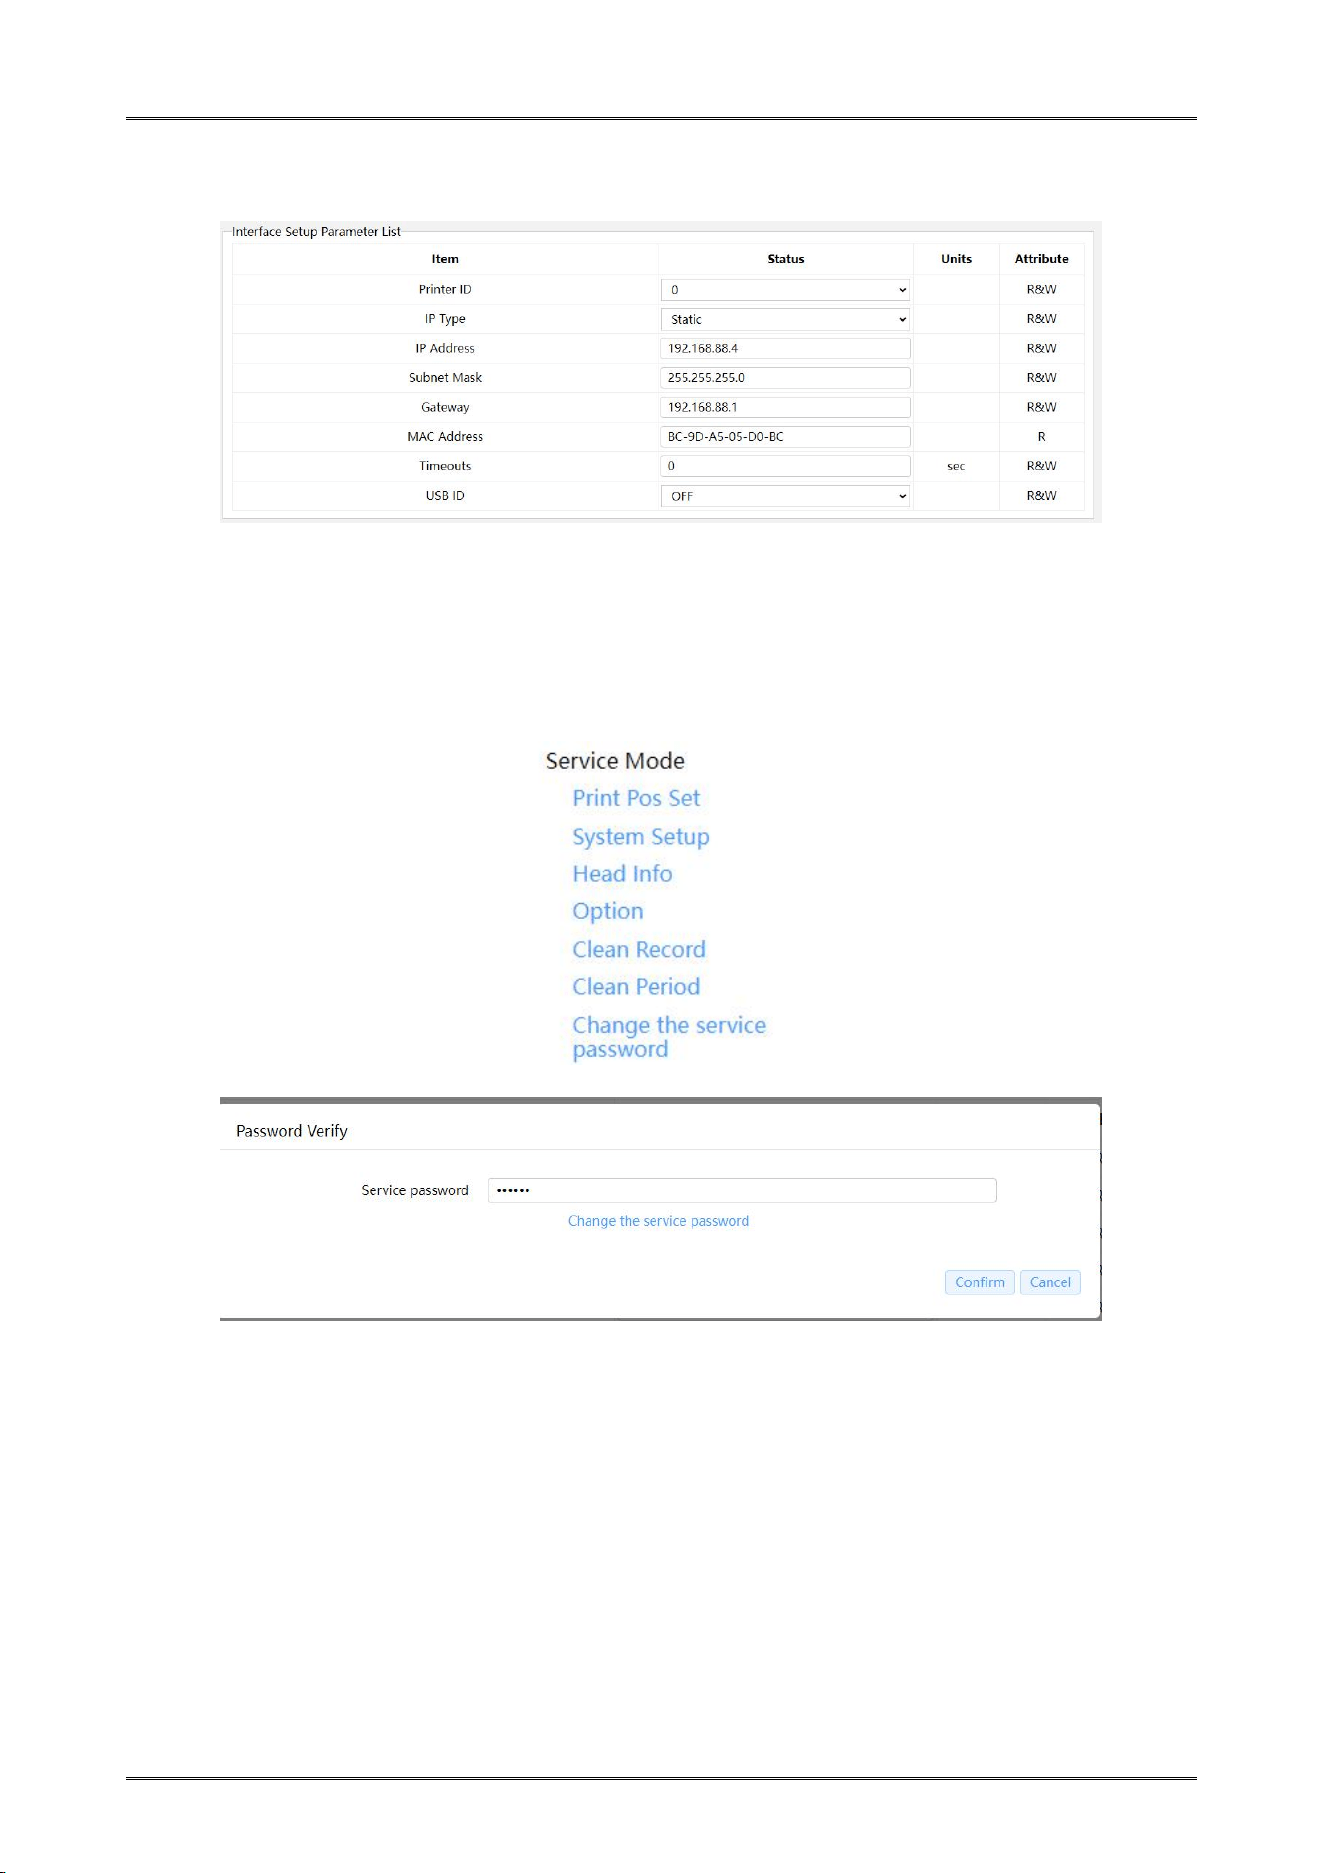
2.7.5.9 Interface Setup Parameter List
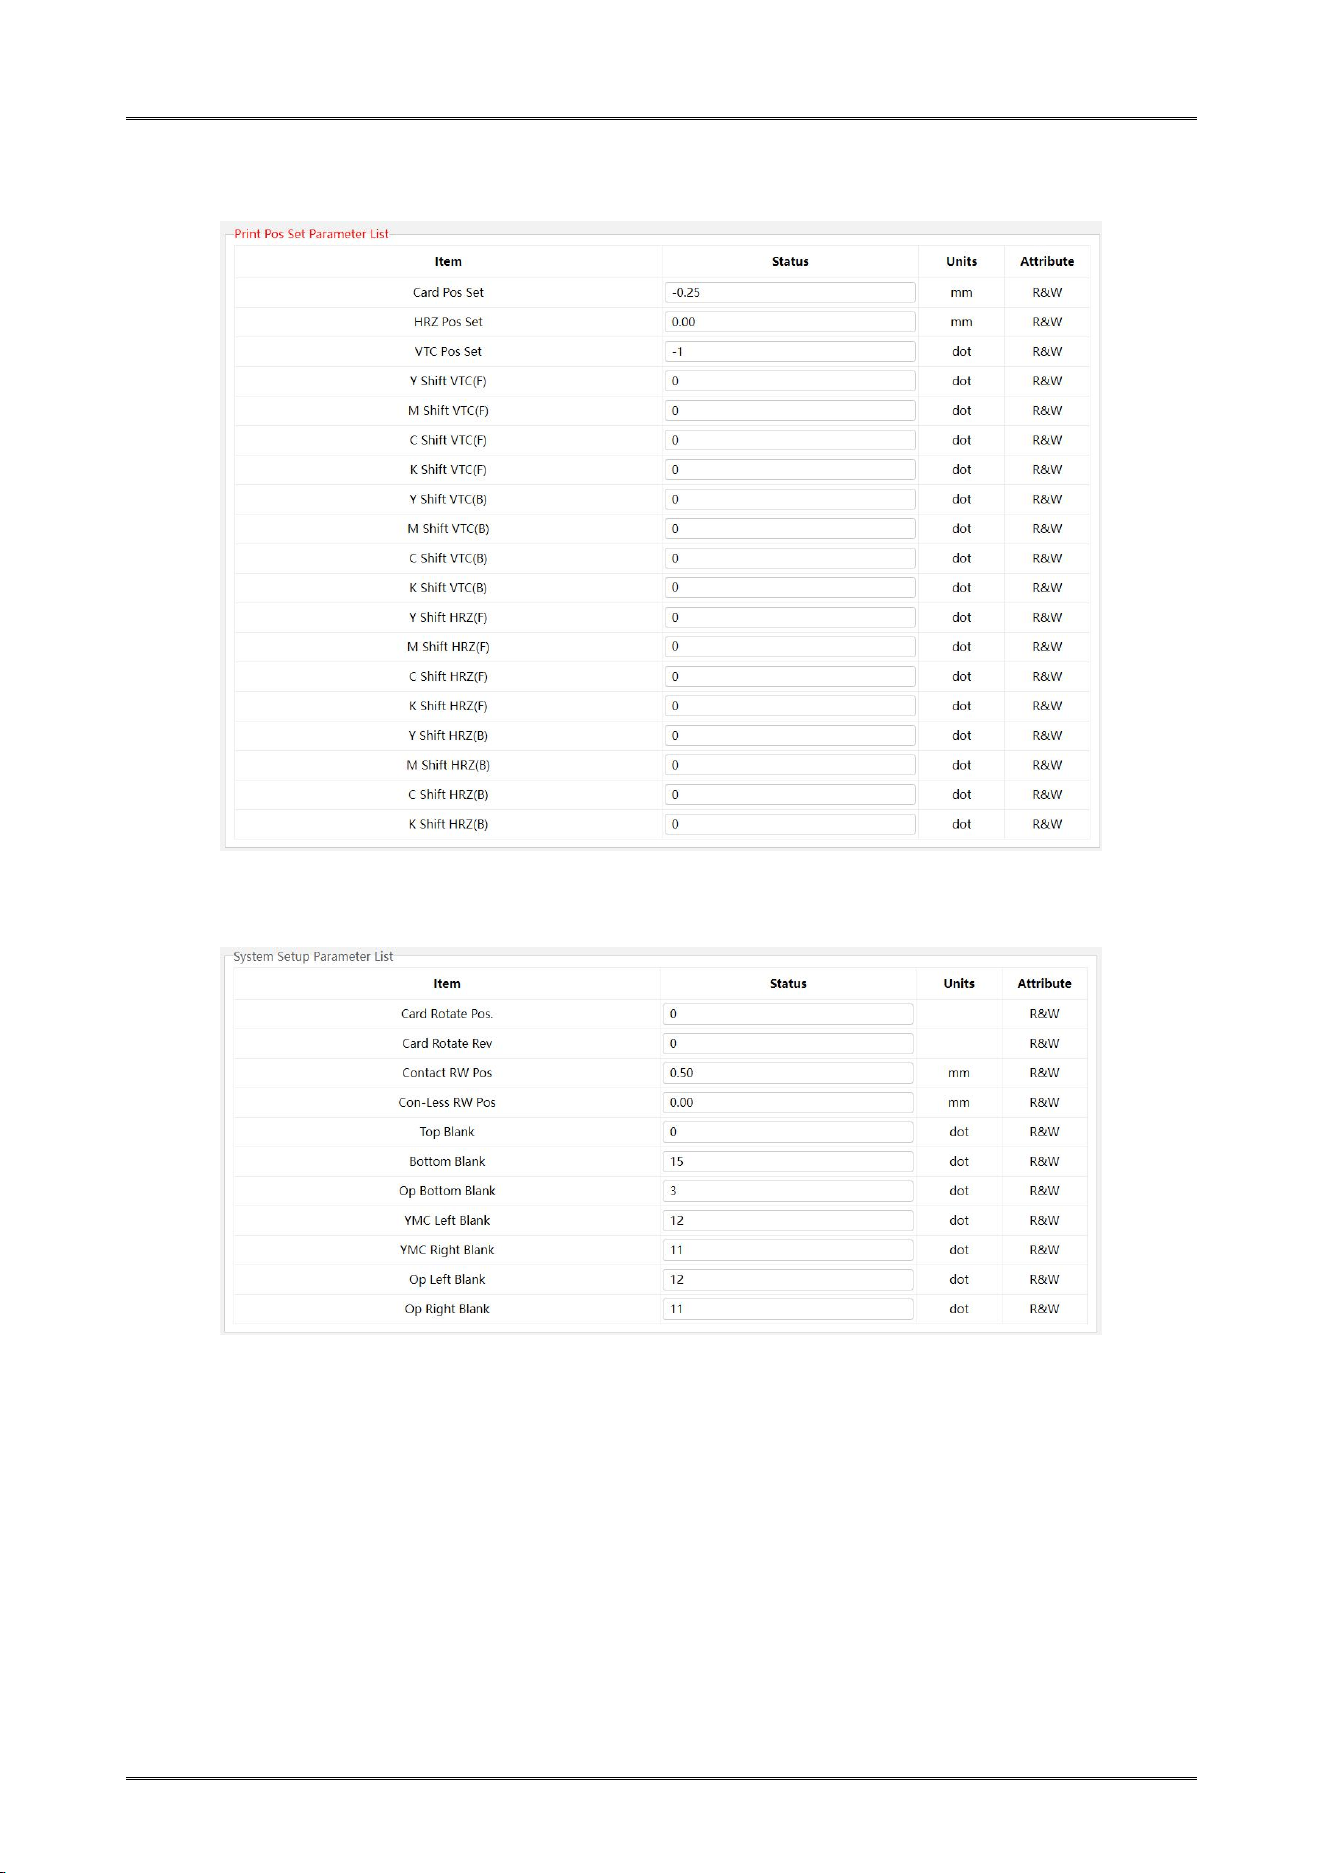
2.7.6 Service Mode
Click any setting item under "Service Mode" in the left navigation bar, enter the password in
the pop-up window, click "OK", enter service mode, and modify the advanced settings of
the printer. (The default password is 123456)
Dascom DC-4100 User Manual
46
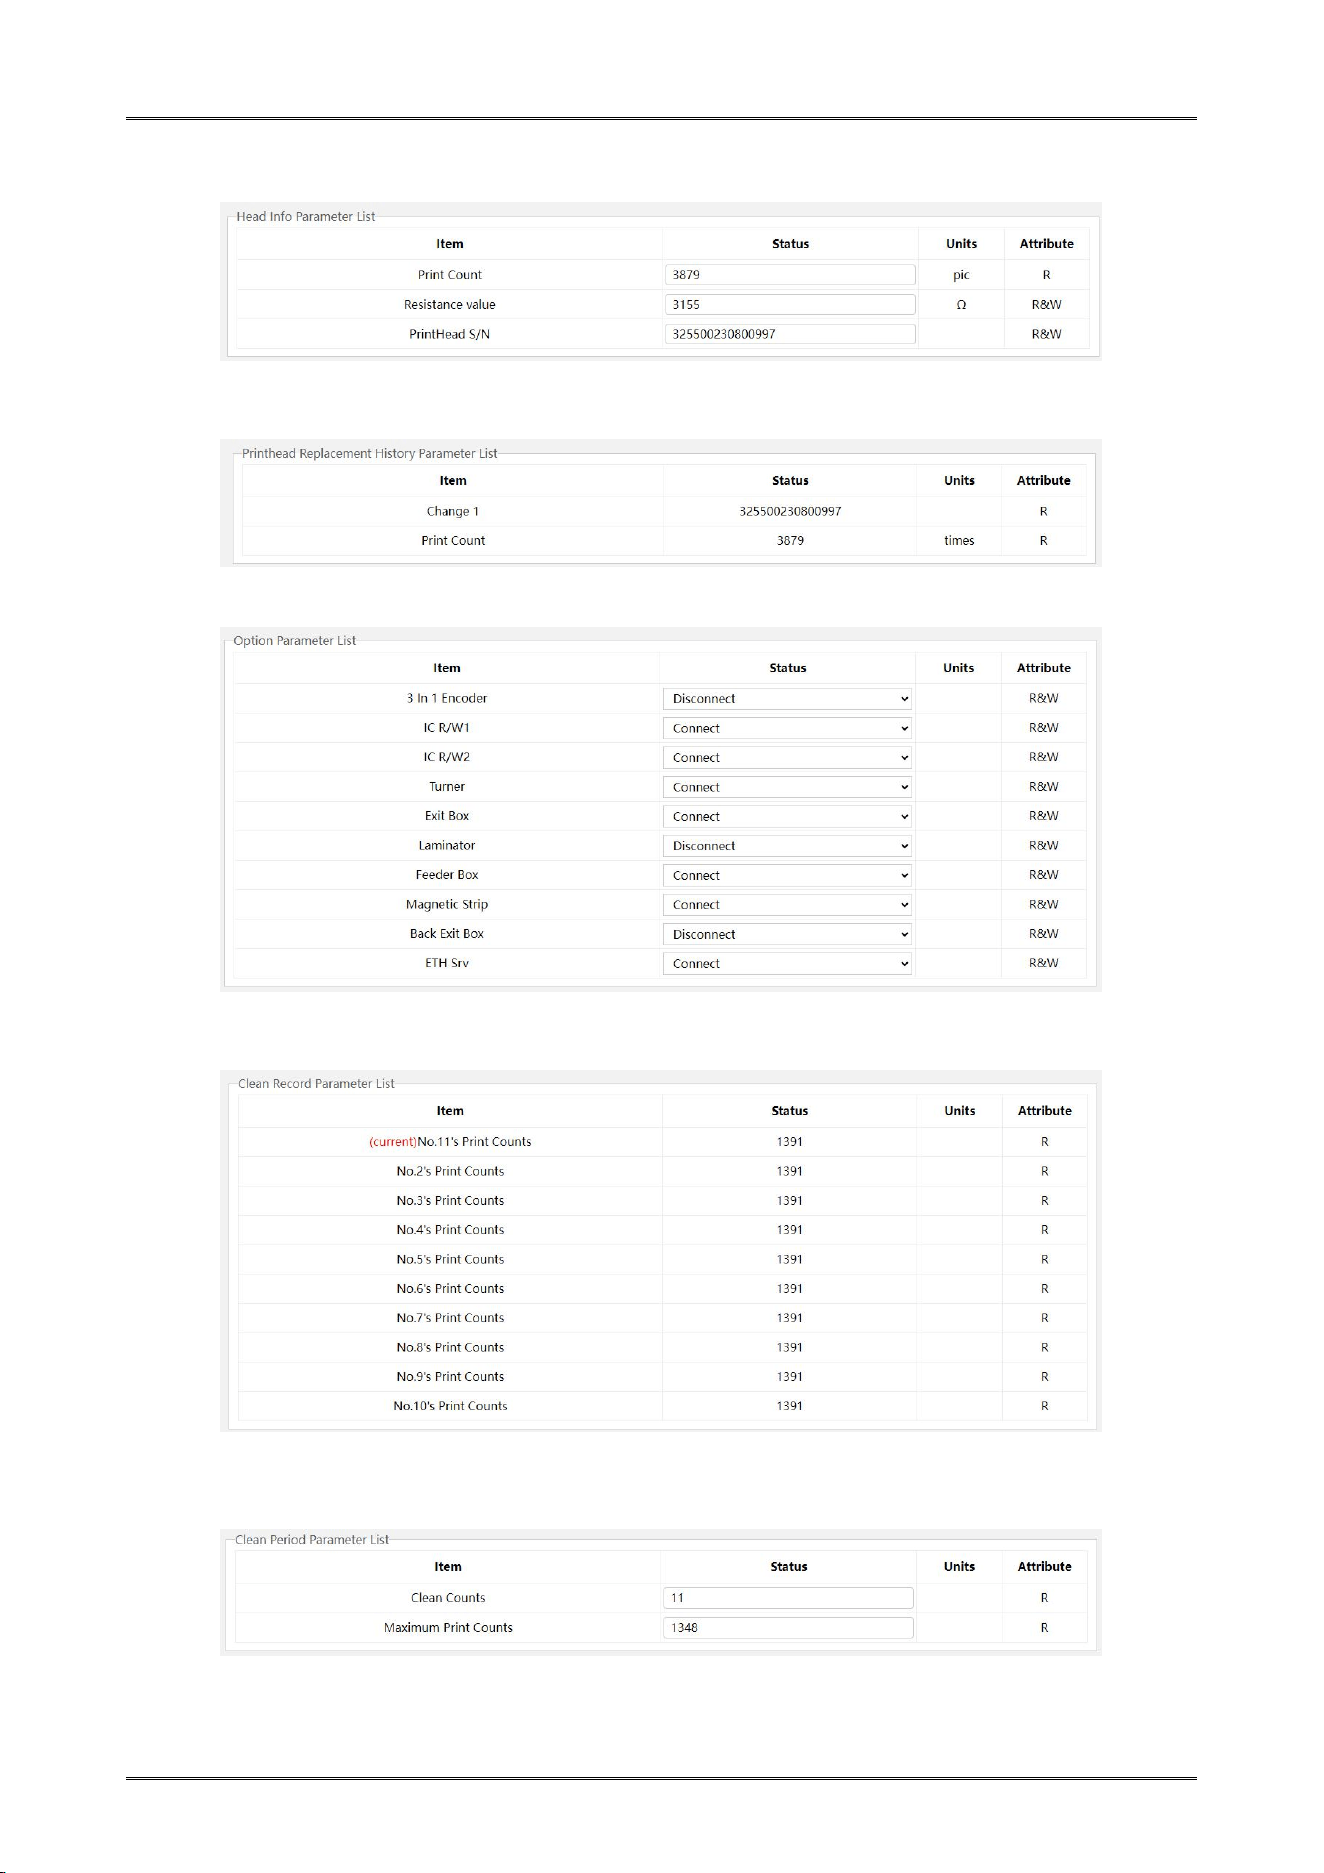
2.7.6.1 Print Pos Setup Parameter List
2.7.6.2 System Setup Parameter List
Dascom DC-4100 User Manual
47
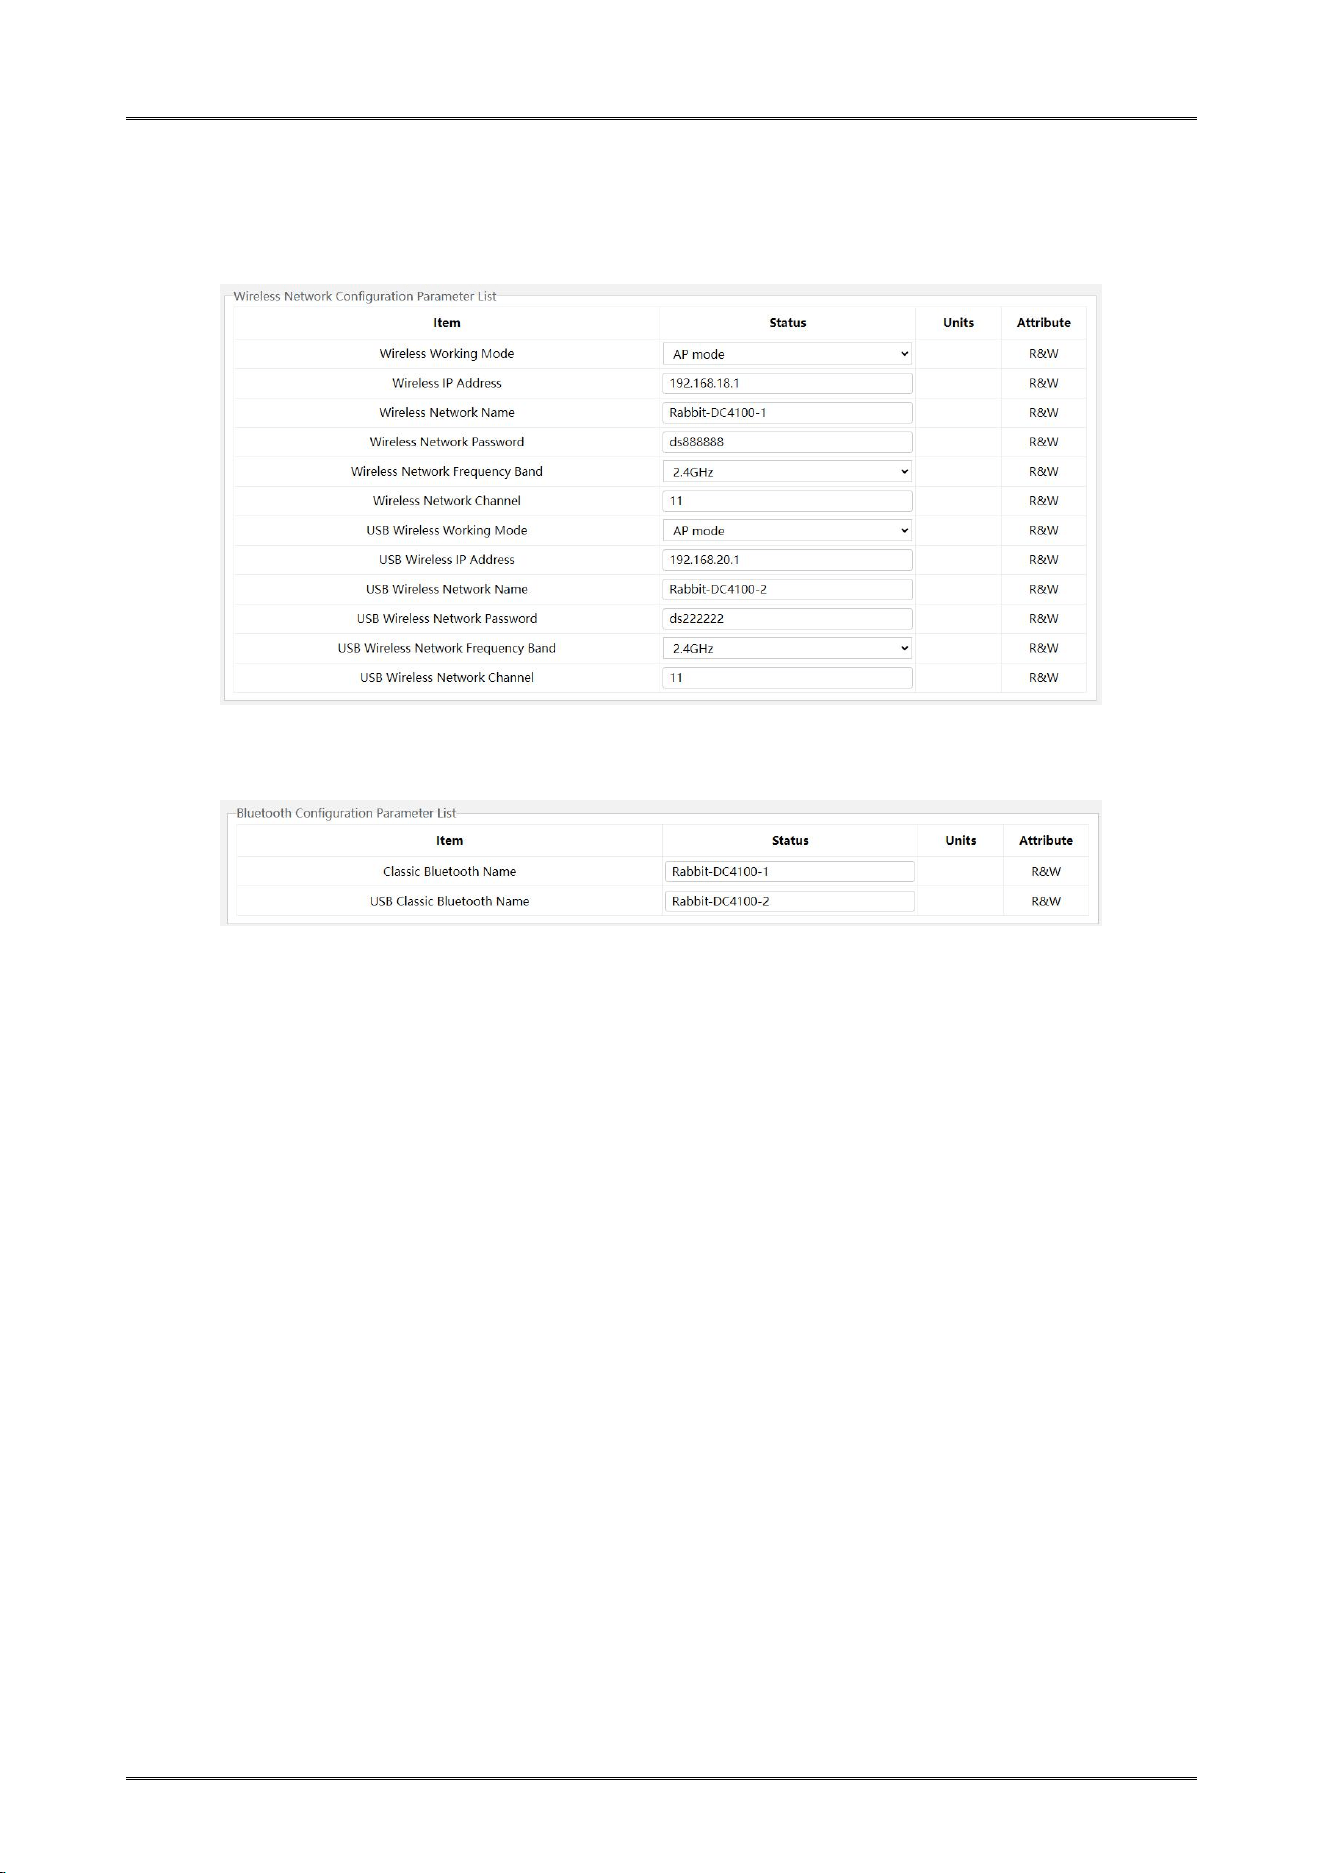
2.7.6.3 Head Info Parameter List
2.7.6.4 Print Head Replacement History Parameter List
2.7.6.5 Option Parameter List
2.7.6.6 Clean Record Parameter List
2.7.6.7 Clean Period Parameter List
Dascom DC-4100 User Manual
48
2.7.7 System Board Settings
2.7.7.1 Wireless network Configuration Parameter List
2.7.7.2 Wireless Communication Configuration Parameter List
Dascom DC-4100 User Manual
49
CHAPTER 3 NORMAL MODE AND USER MODE
You can change between Normal and User Modes when the Printer is operating.
This section outlines the differences between these two modes and how to switch from one to
the other.
3.1 Normal Mode
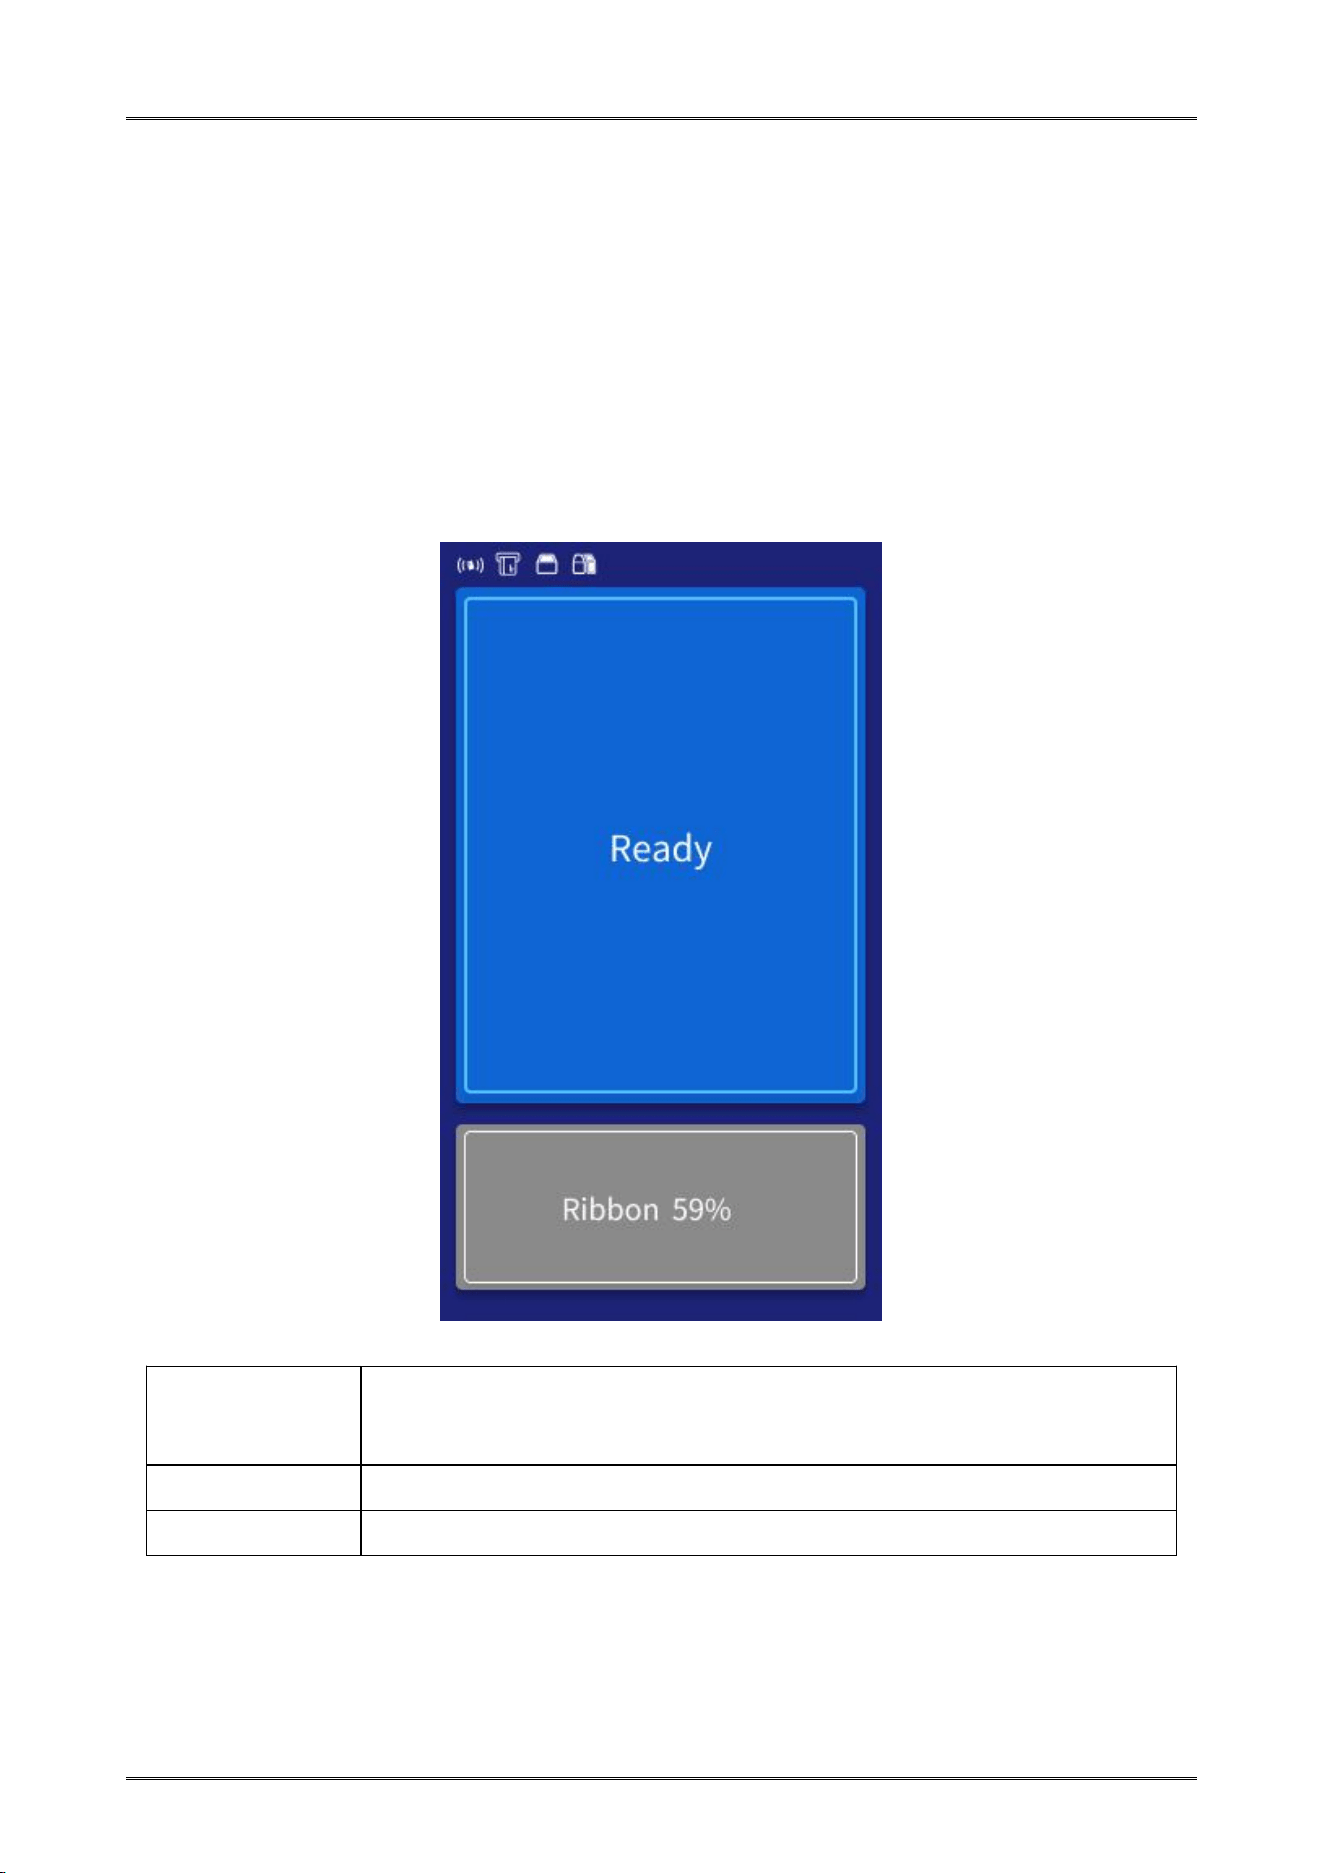
Normal mode: After start up, the printer goes into Normal Mode in which the printer can print
cards. In this mode, the LCD displays the unused ribbon.
Normal Mode Message List:
Initialize
The printer undergoes system diagnostic and initialization. Cards
remaining in Printer from a previous irregular session will be ejected.
Ready
The printer is awaiting host requests or commands.
Printing
Printing cards in progress.
Dascom DC-4100 User Manual
50
3.2 Printer Setup
Printer Setup allows changing the parameters and checking the status.
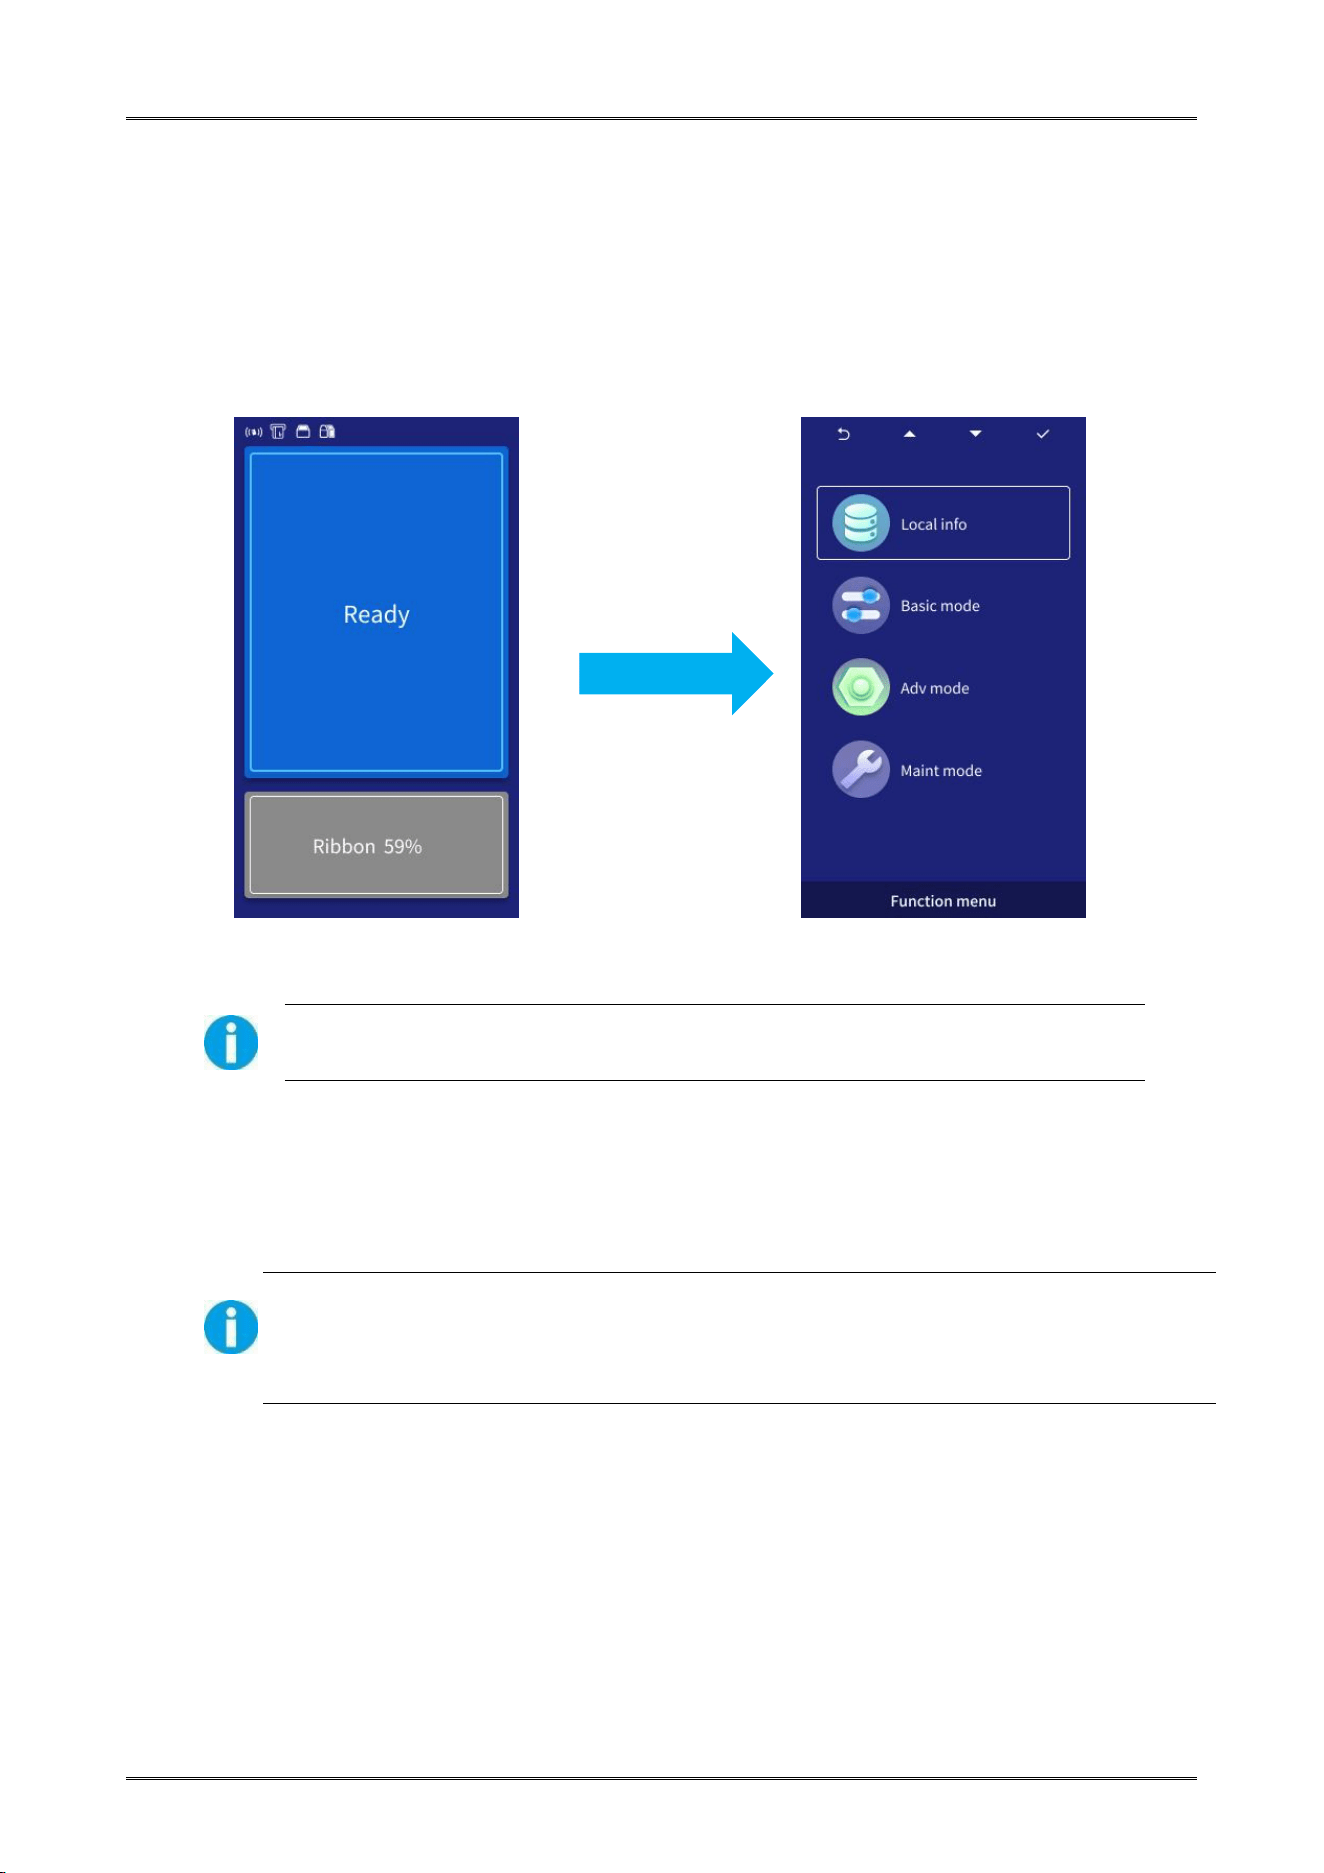
Steps to change from Normal Mode to Printer Setup:
In "Ready" state, Press the【Menu/Exit】button to switch the printer from Normal Mode to
User Mode.
Even when the printer is in an error state, you can change modes.
Click 【Menu/Exit】 key to return when entering a sub-menu
Must be pressed to return and save the newly changed value.
Switching off the printer will not save any newly changed value(s) if Normal mode is
not returned.
Dascom DC-4100 User Manual
51
3.3 The major menus
Local info
Basic mode
Adv mode
Maint mode
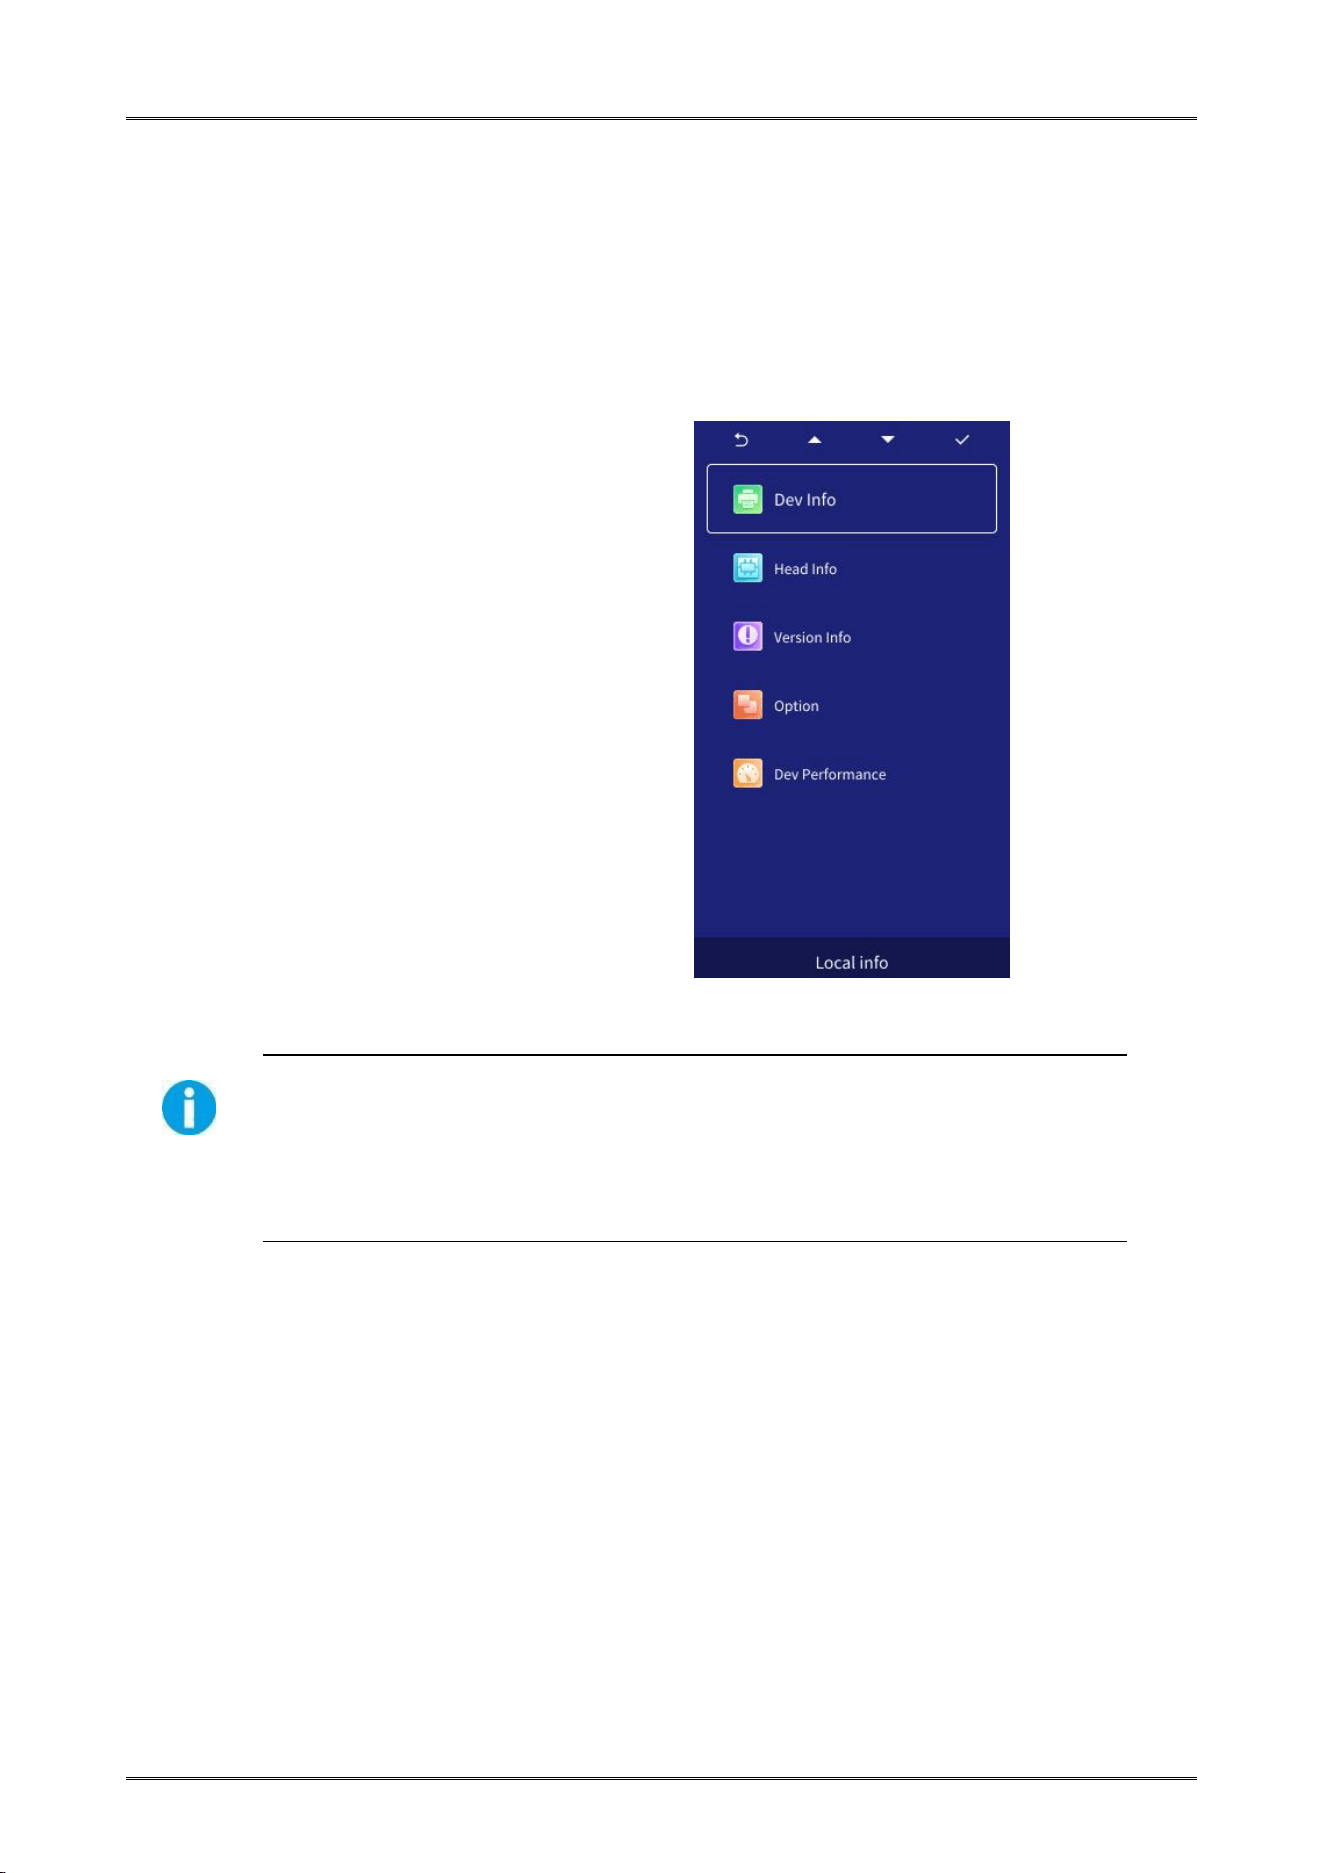
3.3.1 Local info
◆ Dev Info
◆ Head Info
◆ Version Info
◆ Option
◆ Dev Performance
For quality assurance at the factory, it is necessary to run various print tests on
the printer. A value of tens or more for Card Count is normal during
manufacturing of your printer. Record the new print head serial number after
replacement; otherwise, failure to do so affects print quality and voids the
warranty for this print head.
Dascom DC-4100 User Manual
52
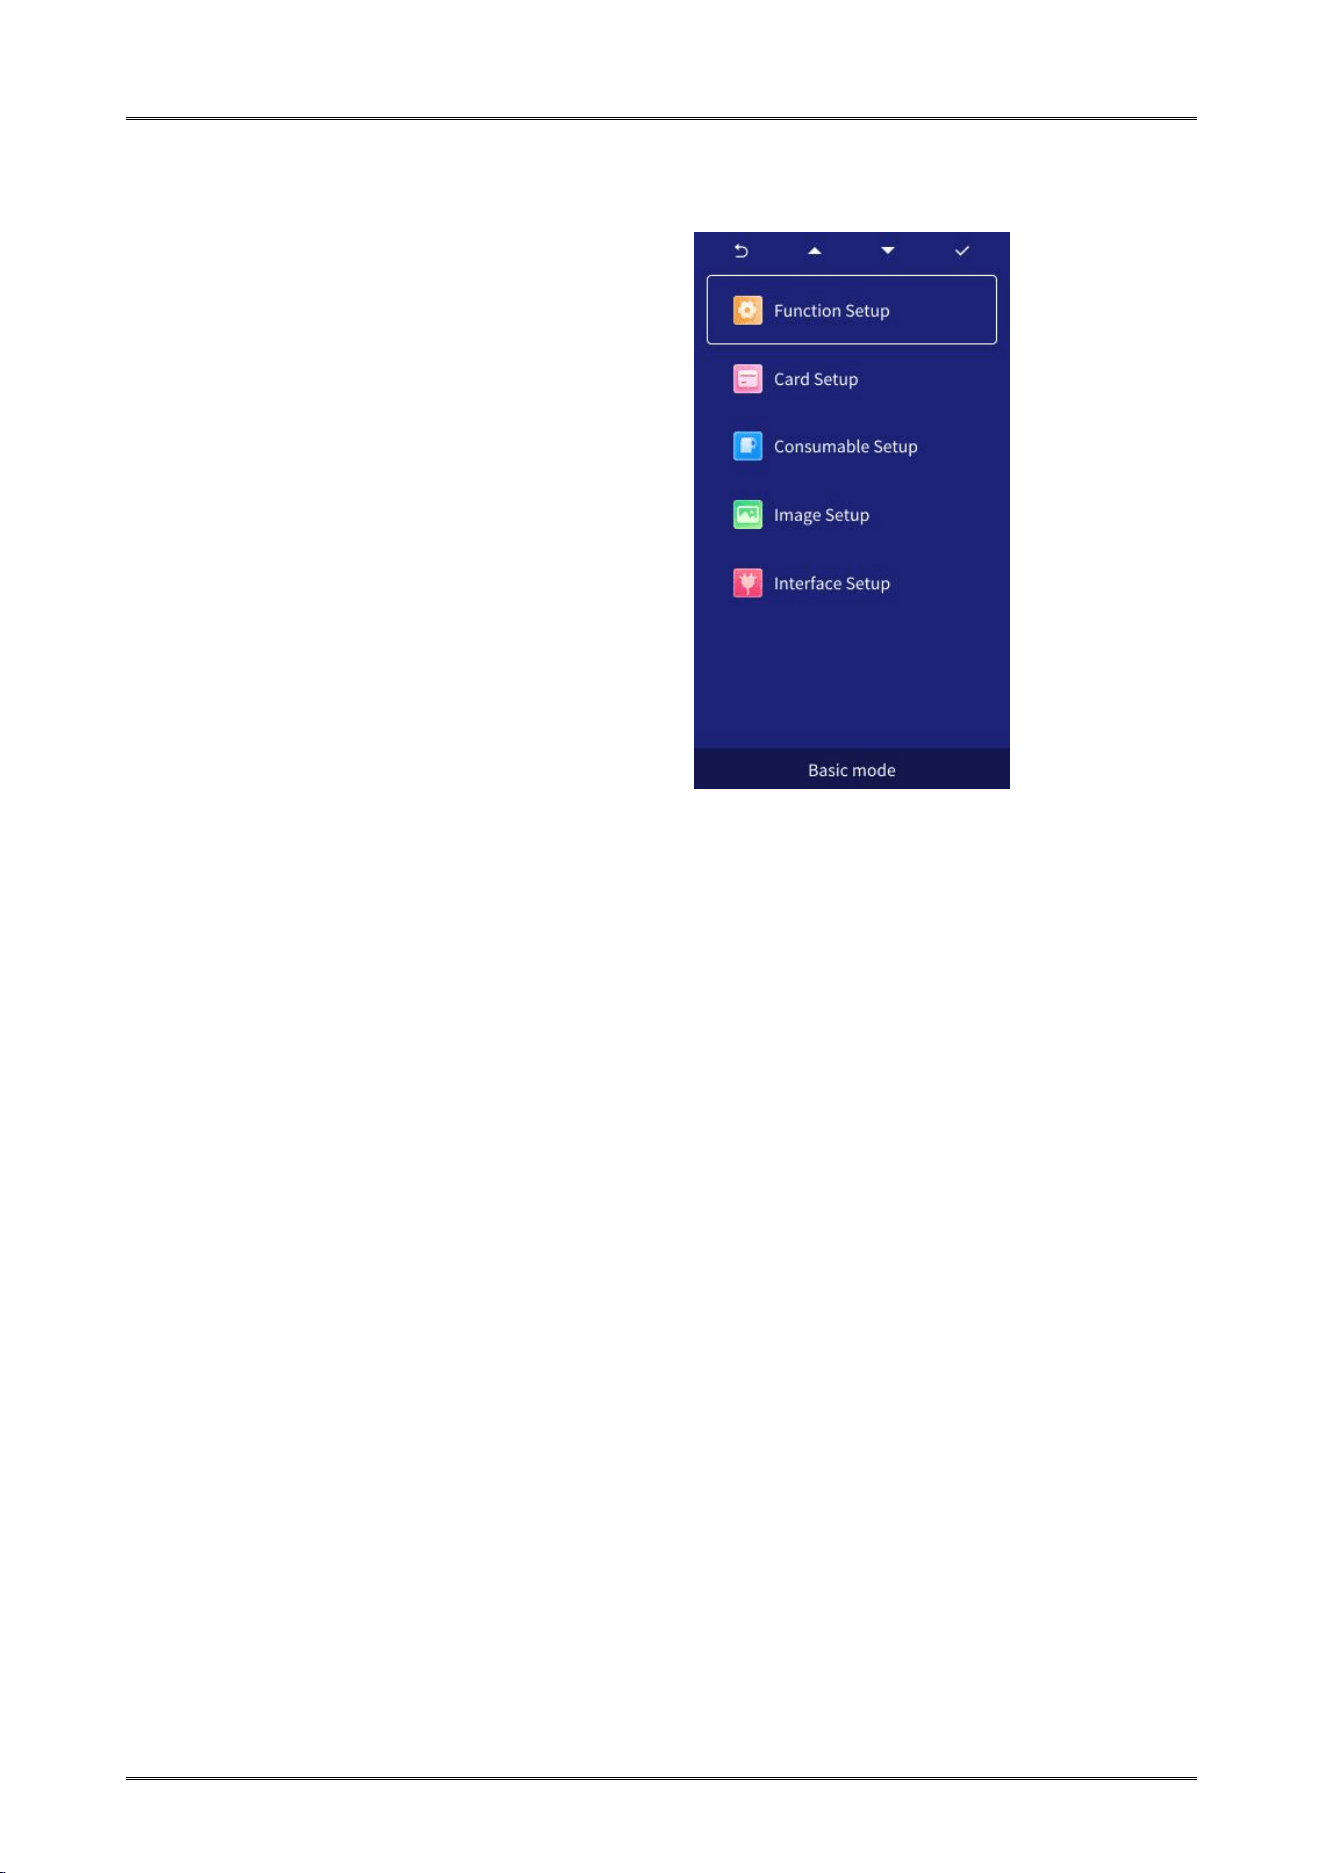
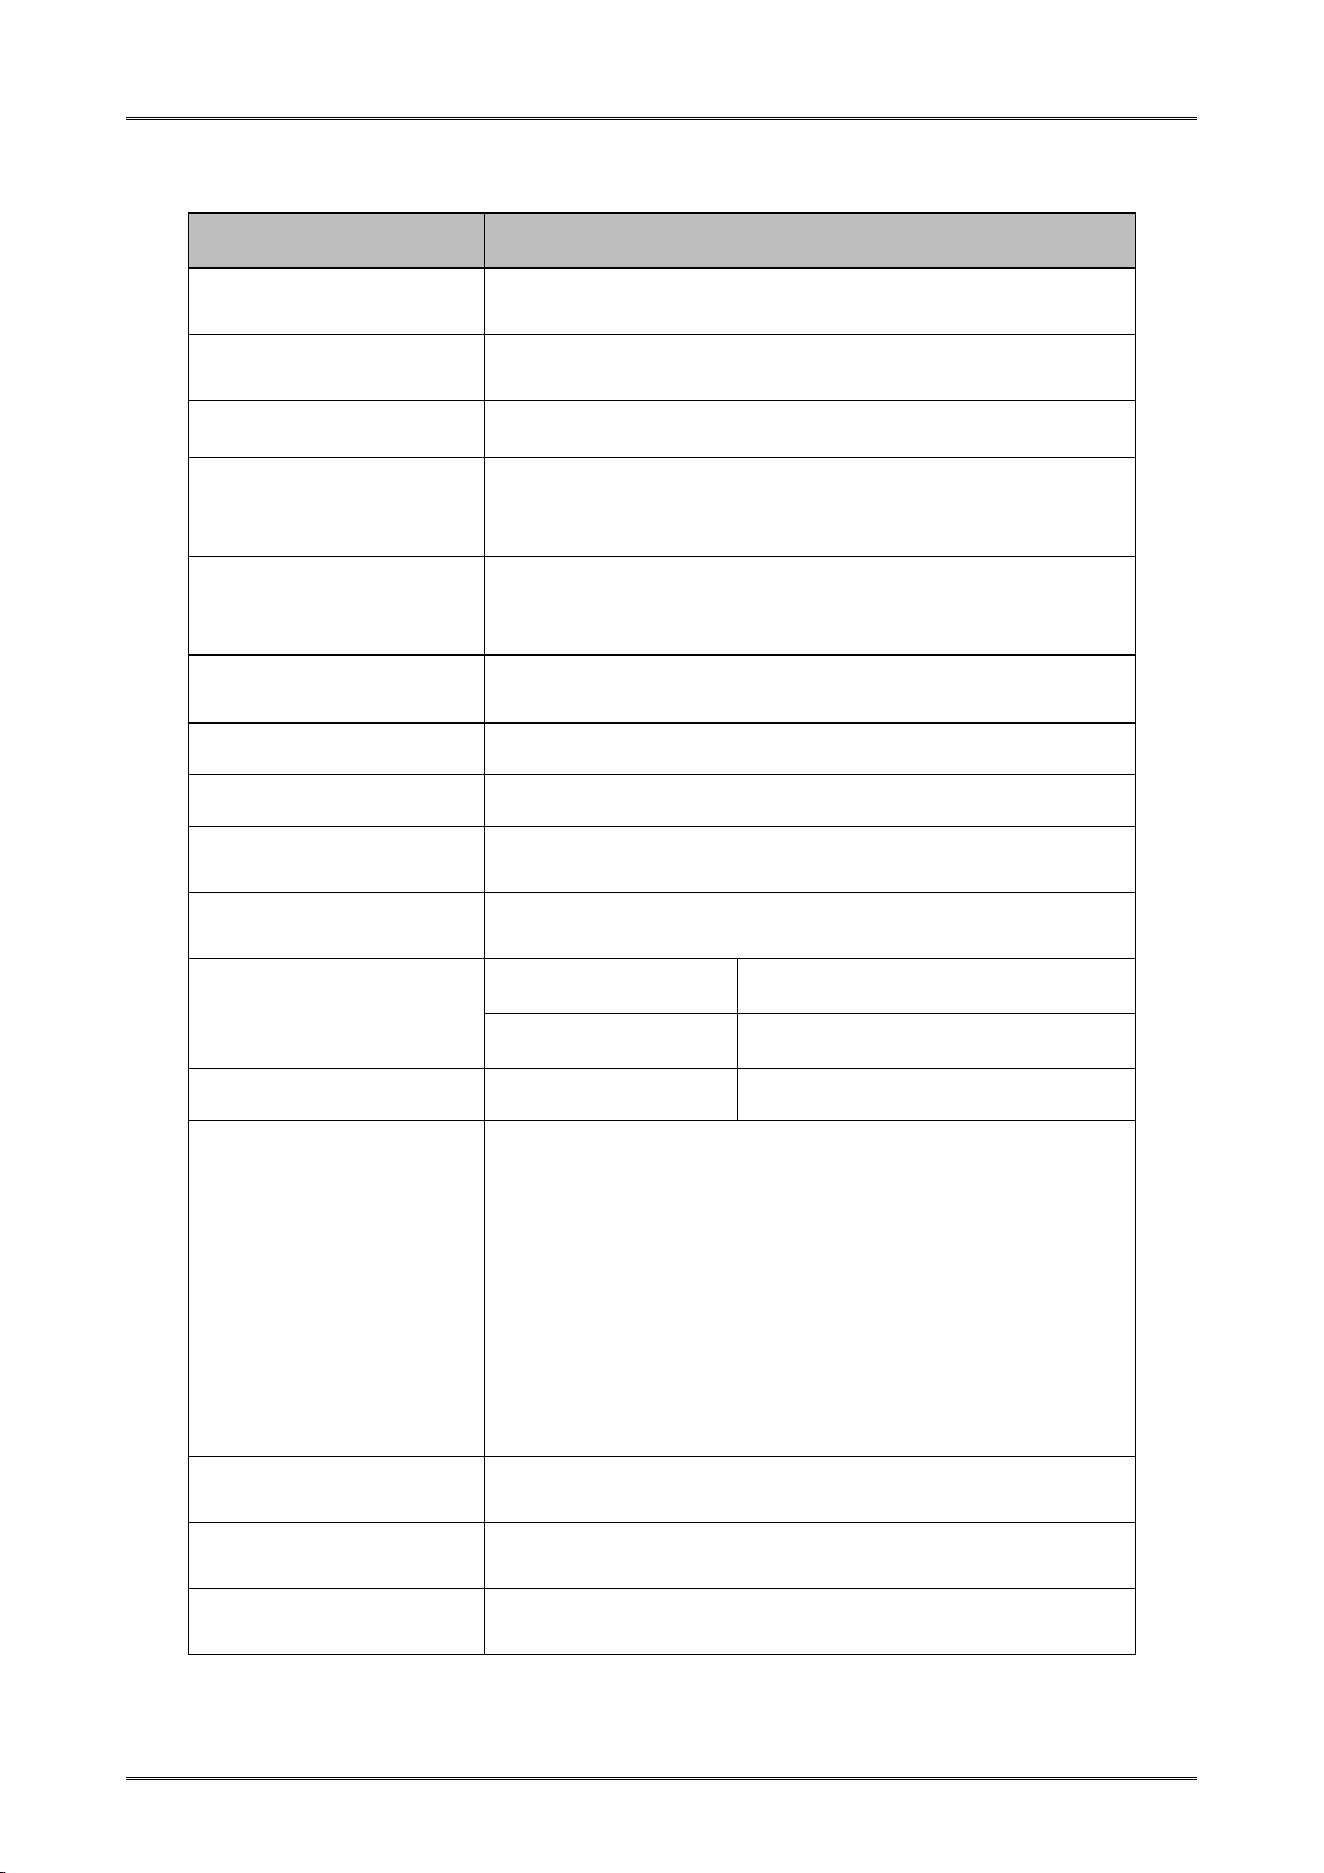
3.3.2 Basic mode
◆ Function Setup
◆ Card Setup
◆ Consumables Setup
◆ Image Setup
◆ Interface Setup
Dascom DC-4100 User Manual
53
Function Setup
Function
Options
Language
Chinese Japanese English Spanish
German French Russian
Buzzer
On
Off
Sleep Mode
Range: 0~120 minutes
Feeder Check
In "Ready" state to detect whether card slot is empty
On
Off
Overflow Check
Checks if the card cassette is full
On
Off
Head Heat Low
On
Off
PreHeat Start
Range: 10~25℃
PreHeat End
Range: 20~50℃
Print Mode
Normal
Fast
Prnq Empty
On
Off
Move Card Speed
Ins Spd
Range: 200~400mm/s
Out Spd
Range: 200~400mm/s
Box Ej Speed
Dual Box Ej Spd
Range: 200~450mm/s
Clean Period
Set the cleaning prompt parameters (when the set
number of prints is reached, a cleaning prompt will
appear on the screen):
Range: 100-2500 (default value: 500)
Note: It is recommended to set the number of printed
sheets based on the consumables used, such as setting
the number of sheets per roll of consumables to the
number of sheets for cleaning prompts
Clean Printer
Yes
No
Print Test Card
Yes
No
Reset Basic Default
Yes
No
Dascom DC-4100 User Manual
54
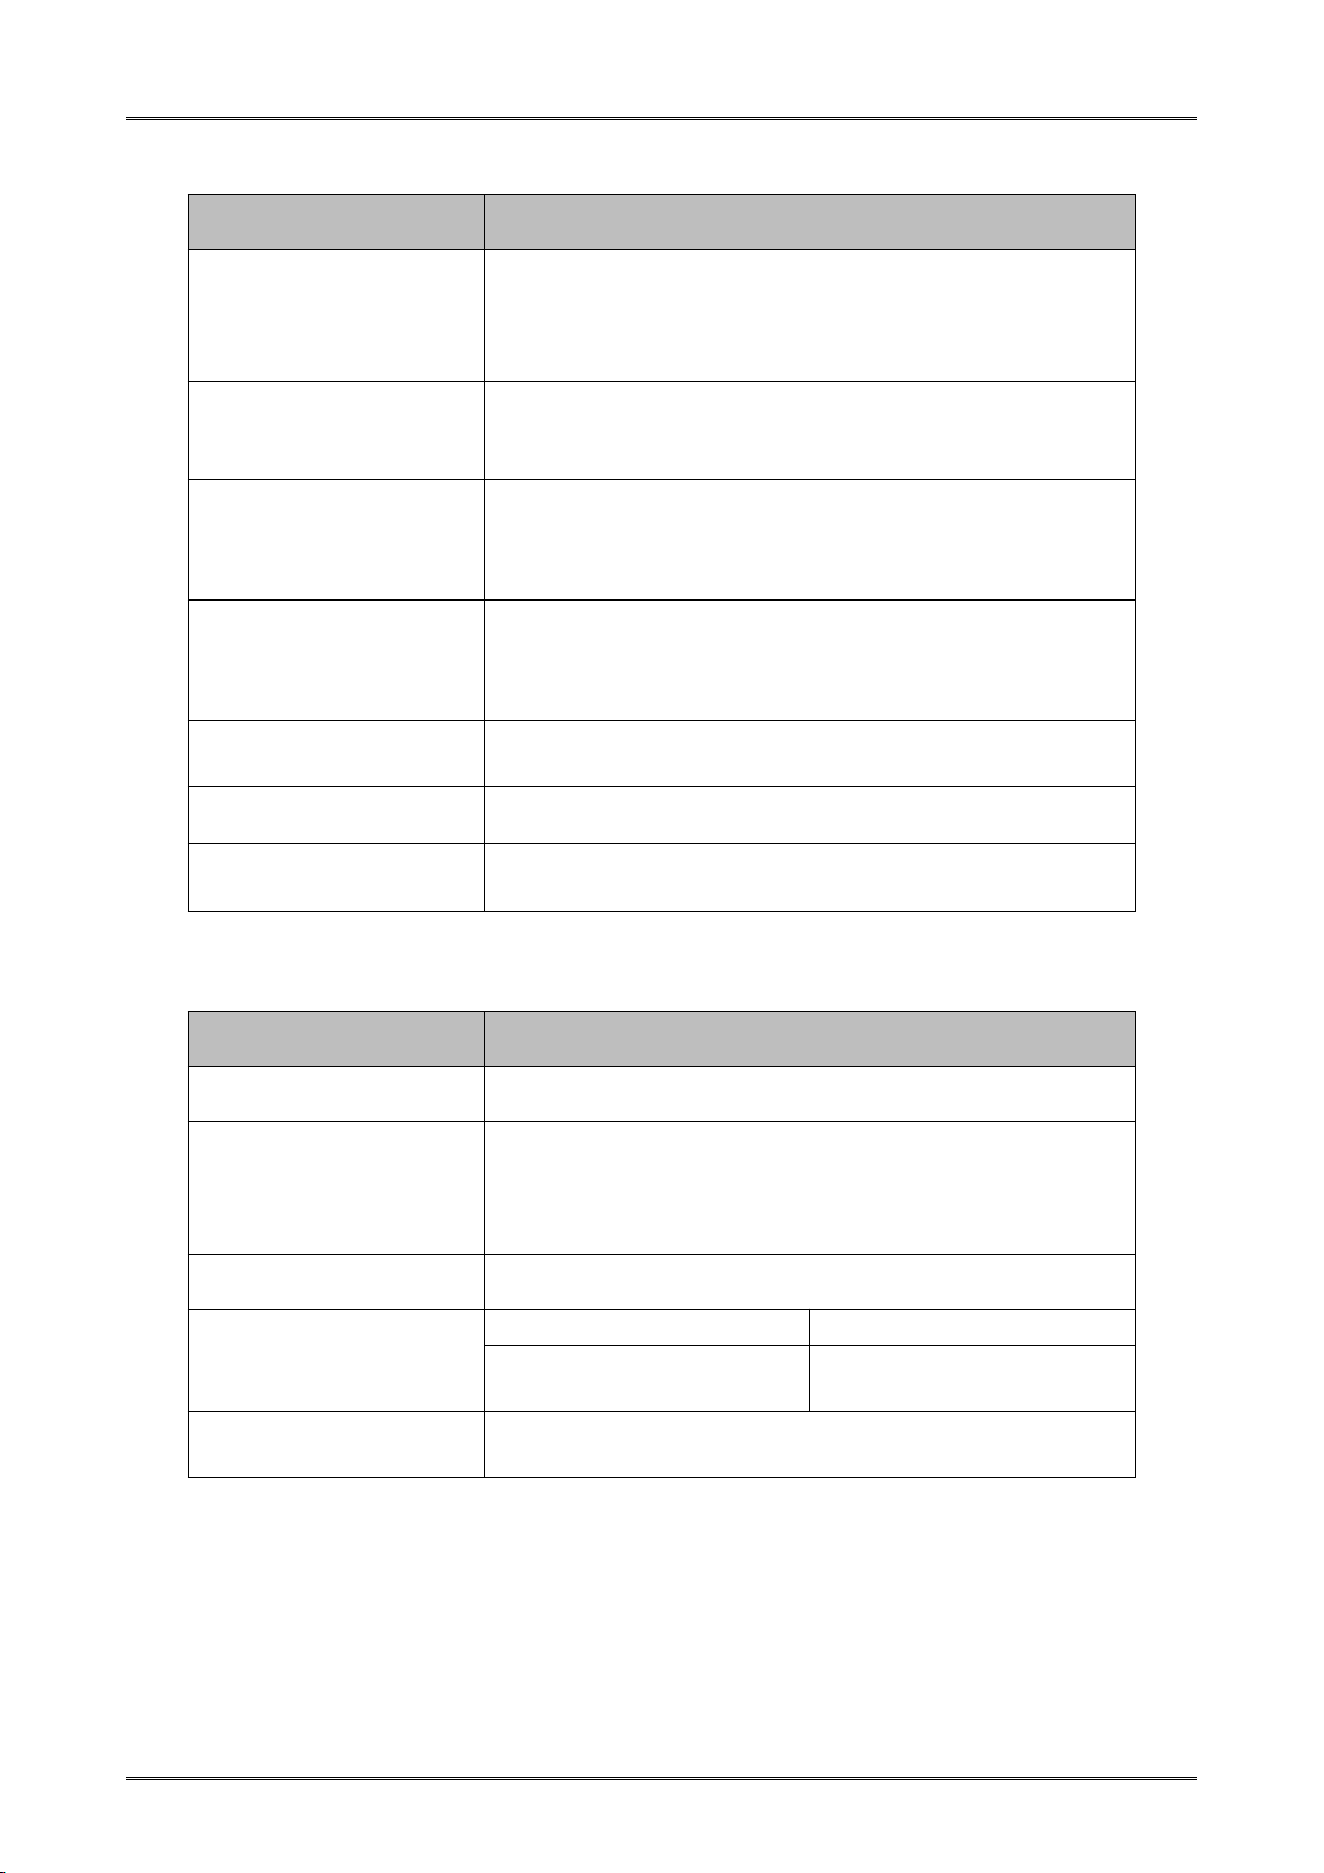
Card Setup
Function
Options
Card Type
PVC
PET
PET-G
PC
Card Feed Mode
Card box
Auto
Back In Cmd
Std card exit
Sets the port for normal card to eject from the printer
Front
Back
Error card exit
Sets the port for error card to eject from the printer
Front
Back
Card Out Nip
On
Off
Out Pos Manual Adj
Range: -20.00~20.00mm
Init Ign Eject
On
Off
Consumables Setup
Function
Options
Ribbon Type
Lists the available ribbon type.
Rbn near end(%)
When the ribbon margin is set to a certain value, the LCD
prompts "Check the ribbon margin".
Range: 0~100
Rbn Thickness
Default value: Thin
Rbn Secret Set
Rbn Secret Cnt
Range: 1~5
Rbn Secret Offs
50
100
Skip Rbn Init
On
Off
Dascom DC-4100 User Manual
55
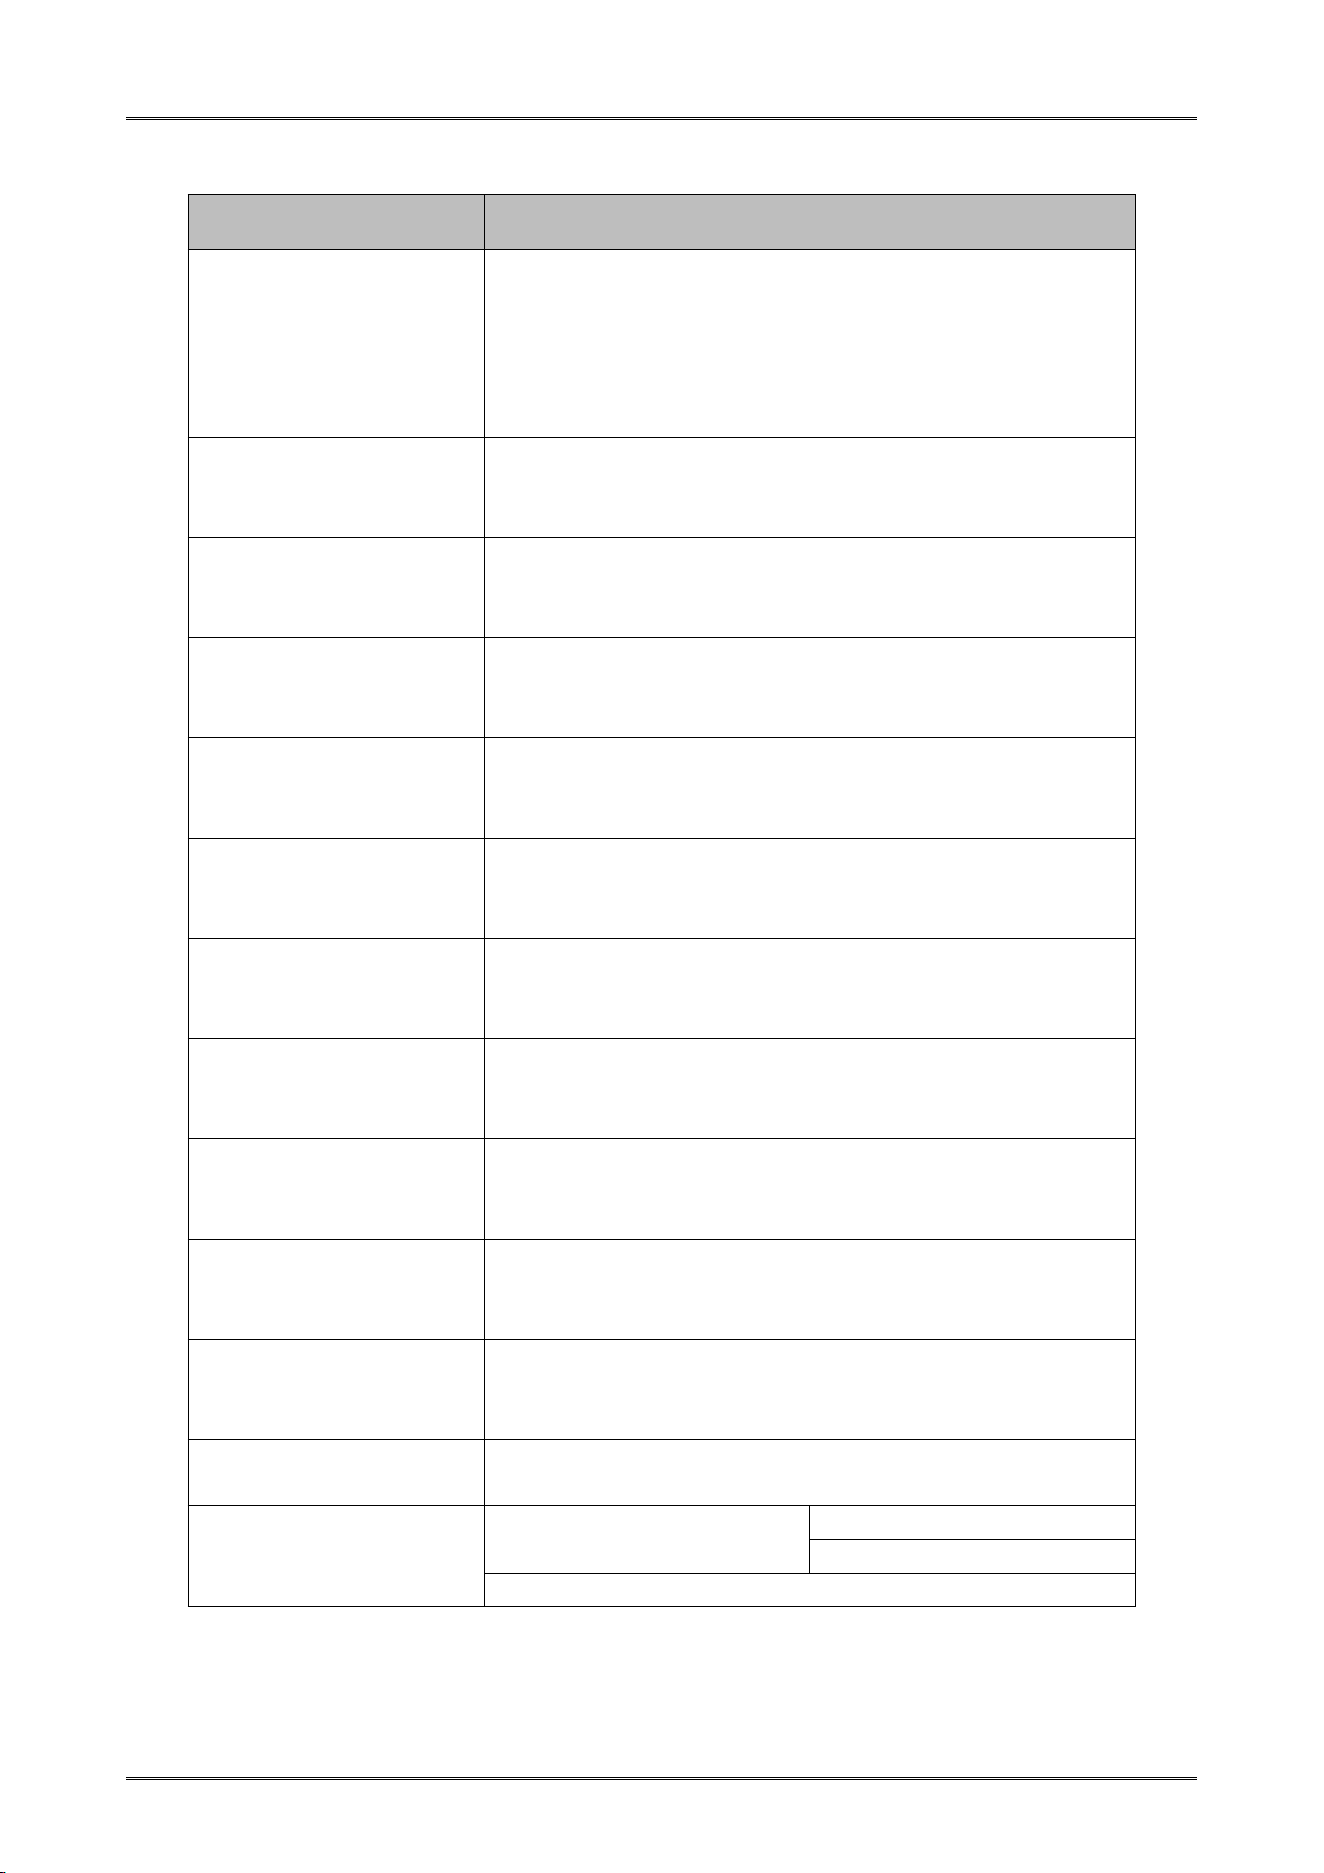
Image Setup
Function
Options
Color Brightness
Selects the brightness of the print out:
Light
Dark
User
Cold
Yellow Balance
Sets the concentration value of Yellow:
Range: -64~64
Magenta Balance
Sets the concentration value of Magenta:
Range: -64~64
Cyan Balance
Sets the concentration value of Cyan:
Range: -64~64
Black Balance
Sets the concentration value of Black:
Range: -32~32
0 Balance
Sets the concentration value of 0:
Range: -64~64
Yellow Balance(B)
Sets the concentration value of Yellow(B):
Range: -64~64
Magenta Balance(B)
Sets the concentration value of Magenta(B):
Range: -64~64
Cyan Balance(B)
Sets the concentration value of Cyan(B):
Range: -64~64
Black Balance(B)
Sets the concentration value of Black(B):
Range: -32~32
0 Balance(B)
Sets the concentration value of 0(B):
Range: -64~64
K Smooth
Standard
Smooth
User Defined
On
Yes
No
Off
Dascom DC-4100 User Manual
56
Interface Setup
Function
Options
USB Setup
Printer ID
Range: 0~15
USB ID
Off
On
Network Setup
IP Type
Static
Dynamic
IP Address
Range: 0~255
Subnet Mask
Range: 0~255
Default Gateway
Range: 0~255
MAC Address
Display current MAC Address
Timeout (s)
Range: 0~240s
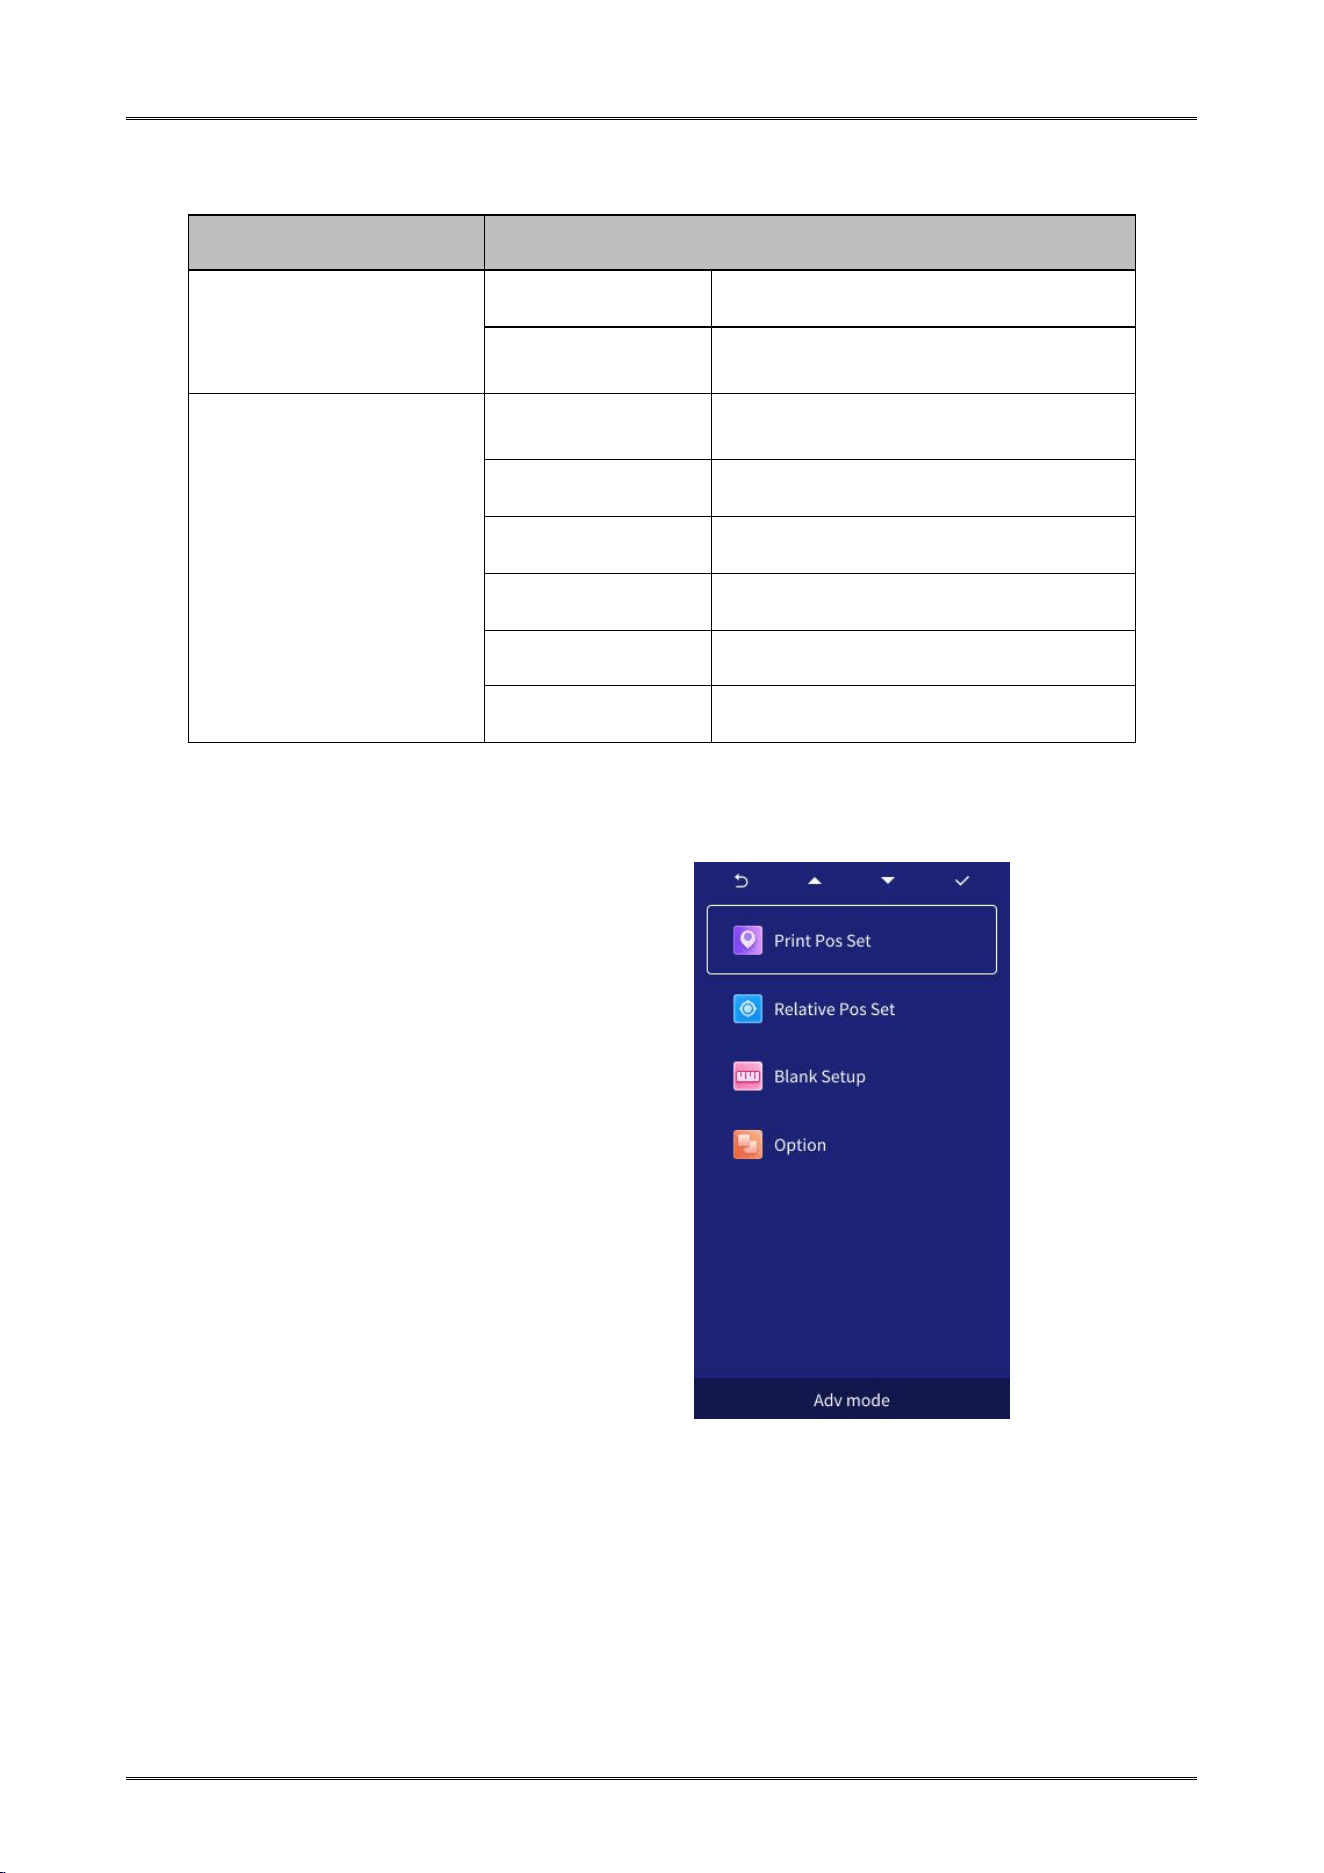
3.3.3 Advanced mode
◆ Print Pos Set
◆ Relative Pos Set
◆ Blank Setup
◆ Option
3.3.4 Maintenance mode
Maintenance mode is used for technical support and after-sales maintenance.
Dascom DC-4100 User Manual
57
CHAPTER 4 CLEANING
4.1 Cleaning with a Cleaning Card
Use the Cleaning Card provided to clean the Card Transport Roller if cards do not feed smoothly.
We recommend cleaning the rollers after printing 250 cards.
Cleaning Cards can only be used once and cannot be reused. Use a new
Cleaning Card with the adhesive side down every time you clean the rollers.
Do not touch the platen with hands.
1) Switch from Normal Mode to User Mode. Press the 【▲】or【▼】to find the [Basic Mode].
2) Press the 【SET】 button and press the 【▲】or【▼】to find the [Function Setup].
3) Press the 【SET】 button and press the 【▲】or【▼】to find the [Clean Printer].
4) Press the 【▲】or 【▼】to find the [Yes], then press the 【SET】 button, the screen displays
[Remove Rbn/sponge].
5) Open the top cover to remove the ribbon and sponge, then close the cover. [Remove cards] is
displayed. After taking out the cards, [Set cleaning card] is displayed.
6) Put the cleaning card in the card box, and press the 【SET】 button to start cleaning.
7) After cleaning, [Over, Put Rbn/Sponge Again] is displayed.
8) Open the top cover to put in the Ribbon, then close the cover. [SET key Init] is displayed.
9) When user presses the 【SET】 button, the Printer will be initialized. After initialization, the
Printer can continue printing.
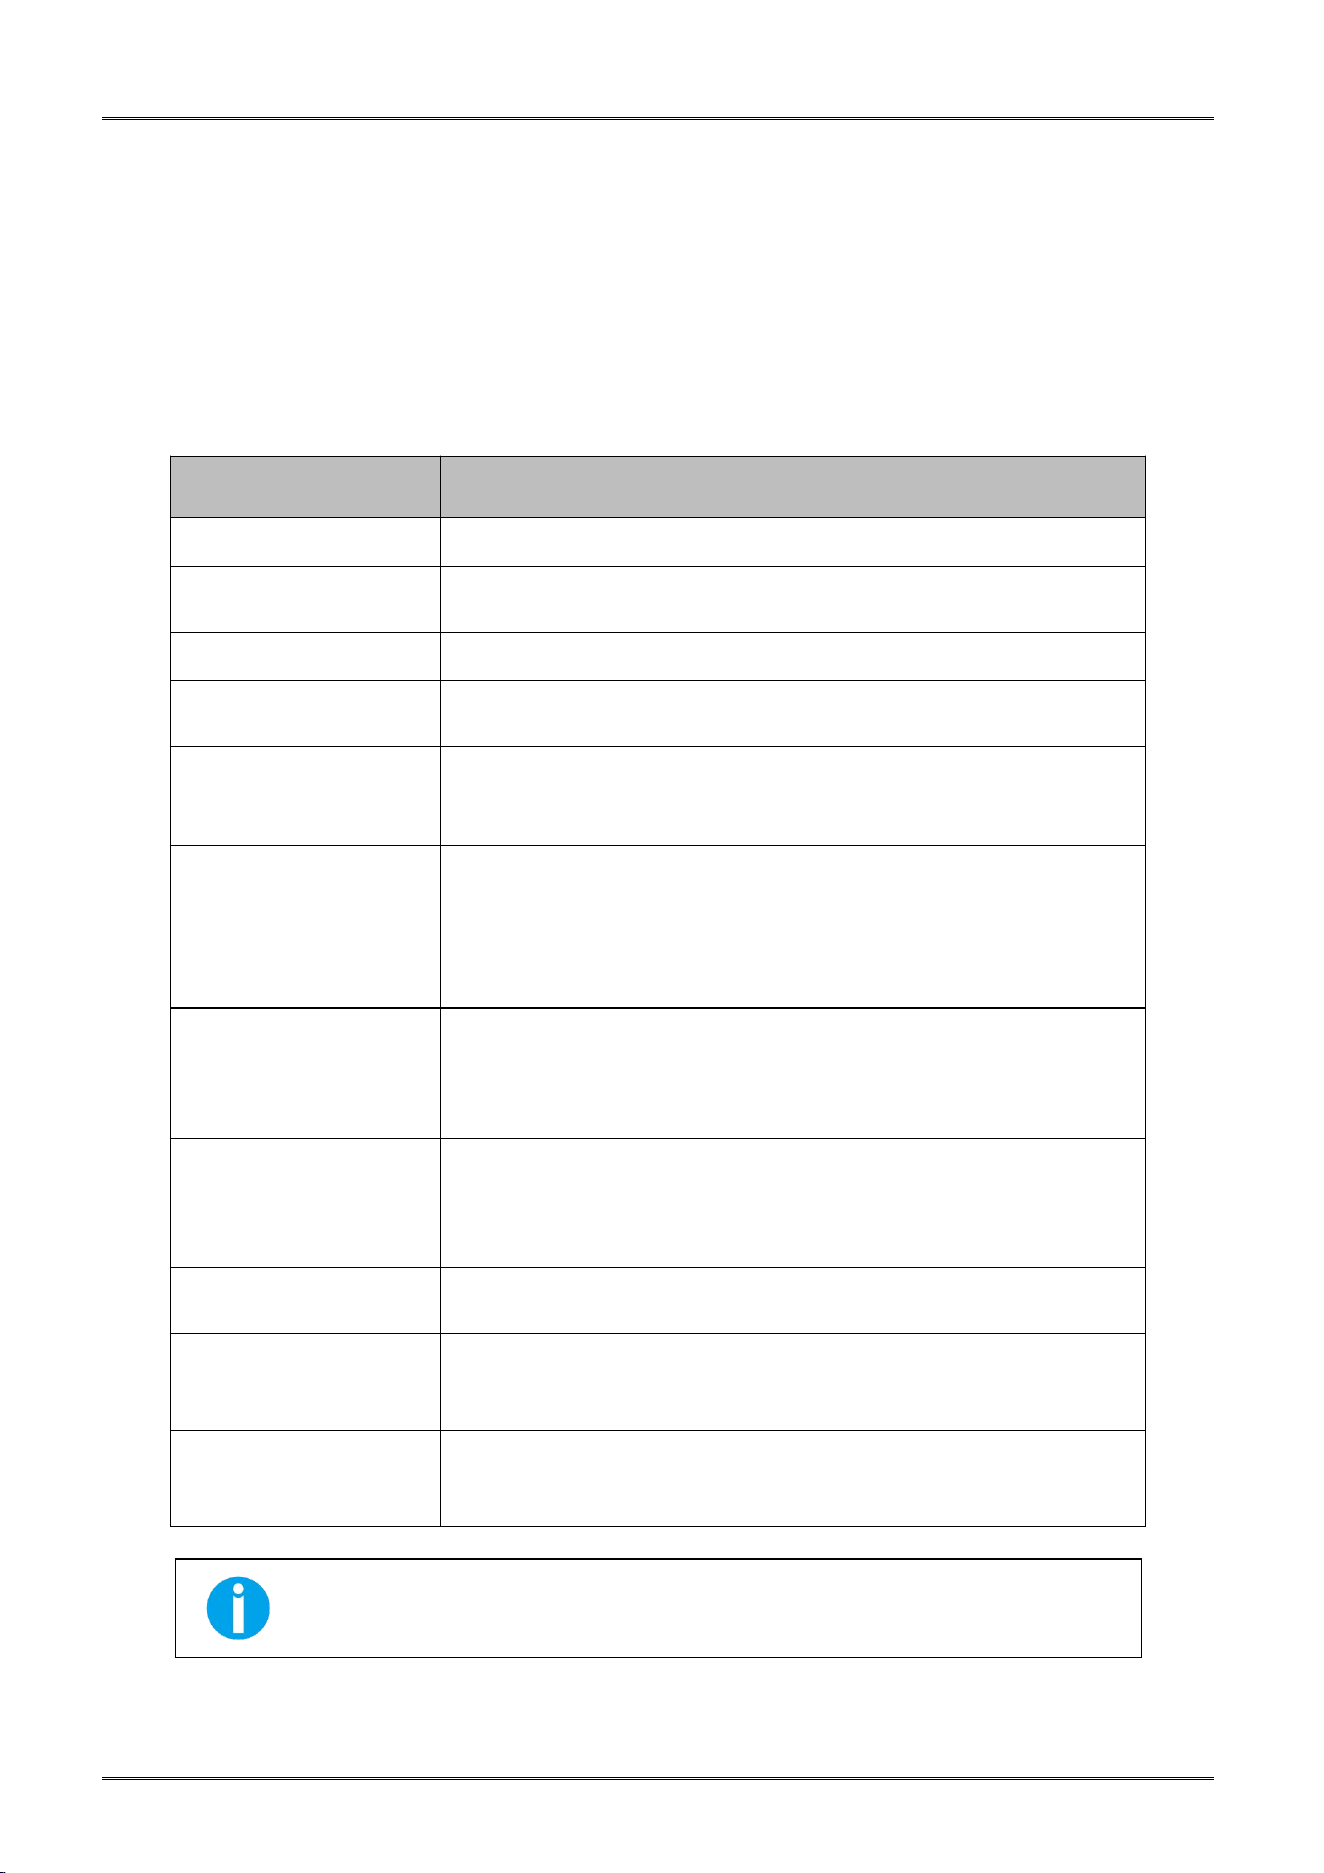
4.2 Maintaining the print head
Use a clean cotton swab or a soft cloth to remove any foreign material accumulated on the Print Head,
such as dust, sticky dirt, etc.
After long-term printing, it is particularly important to clean the printing head, which can guarantee
the print quality and extend the service life of the Print Head.
Dascom DC-4100 User Manual
58
CHAPTER 5 TROUBLESHOOTING
5.1 Warning Messages and Troubleshooting
This printer is designed for minimal user intervention. Occasionally, the LCD displays messages to
advise users to take corrective actions.
After clearing an error, press SET Key to initialize the printer and [Ready] will be displayed.
Warning/Error List
Display
Solution
Push Set Key
Push the SET Key once.
Feeder empty
Card cassette is empty. Refill cards to the feeder. Press SET
button to resume printing.
Cover Open
Close the front cover tightly.
Head heat high
When Print Head temperature is too high, the printer will stop
printing until the temperature drops.
Check Ribbon
Cause: The unused ribbon reached the levels set in “Ribbon
Near End”.
Action: Beware if unused ribbon is sufficient for your print job.
Invalid Ribbon
Probable Cause: Unrecognized ribbon.
Action: Do not turn off power. Refer to Section 2.2 to reload
the ribbon if ribbon is skewed. Or,check if ribbon type is YMCK.
Press SET button to clear this warning and the printer will
resume previous printing after initialization.
Ribbon Jam
Probable Cause: Ribbon winding problem.
Action: Do not turn off power. Refer to Section 2.2 to reload
the Ribbon. Press SET button to clear this warning and the
Printer will resume previous printing after initialization.
Feeder Card Jam
Pressing SET button as LCD display shown may eject jammed
card after initialization.
If the fault is not cleared after adjusting the lever, turn the
rollers manually to clear jammed card.
Printer Card Jam
Press SET button to clear this warning and the printer will
resume previous printing after initialization.
RFID_AUTH_ERROR
Check if genuine Ribbon is used. Next, check if the Ribbon has
an RFID tag. Press the SET button as the LCD shown to initialize
the Printer.
Call Support
Check if genuine Ribbon is used. Next, check if the ribbon has
an RFID tag. Press SET button as the LCD shown to initialize the
printer.
Contact your Reseller’s service support team if you find errors not listed
above. Please inform Error Code displayed on the lower right of the
Display.

Dascom DC-4100 User Manual
59
5.2 Valuable Help from You For Troubleshooting
Help us identify the following for us to resolve your problem(s):
The version number of the software installed.
You can confirm the Driver version number installed in your Microsoft Windows PC by the follow
steps:
○
1
Go to Settings, Devices, Printers and Scanners.
○
2
Select the printer, double click.
○
3
Select the Printing Preferences on the printer menu.
○
4
Go to the Maintenance tab to locate the Driver version

Dascom DC-4100 User Manual
60
5.3 Troubleshooting
Do not attempt to use any tool to fix any problem. This may cause serious damage to the
printer.
5.3.1 Faults Related to Printing
■ No print out?
① Check the printer driver
Check compatible printer driver for Microsoft Windows.
Check if this printer is the default driver in Microsoft Windows.
② Check if power is connected to the printer.
Check if the printer is connected correctly to power.
Check if the LCD Display shows: READY.
Confirm power accessories provided for this printer are correctly installed.
③ Check the USB cable
Check if the USB cable is connected to your printer and your host.
④ Check the Ribbon
Check if the Ribbon is properly installed.
⑤ Check card jam
Check if any card remains in transport area.
Check if any card jam.
○
6
Print the test card
You can realize the reverse steps refer to this section.
■ Blank card ejected?
① Check the Ribbon
Check if Ribbon has ran out or is damaged. Replace it if necessary.
② Check if Print Head is damaged. Print test pattern.
If failed to print the test pattern, contact local reseller for support, or visit website
www.dascom.com.
Dascom DC-4100 User Manual
61
■ Is the printing quality satisfactory?
Faults
Probable Cause
Corrective Actions
Defective Spots
Dirty Card Surface
Check that card surfaces are clean and
dust free.
Use new, clean cards.
Avoid using the printer in dusty or dirty
place.
Cleaning Roller
Use cleaning card to clean the transport
rollers
White Line
Ribbon not properly
installed
Check the proper installation of the
Ribbon.
Check if Ribbon is folded up.
Dirty or defective Print
Head
Please contact local reseller.
Vague or Light Image
Improper Ribbon
installation
Check the proper installation of the
Ribbon.
Check if Ribbon is folded up.
Ribbon not
synchronized
Open and close the front cover
to synchronize the ribbon.
Dirty printer or
cleaning rollers
Clean the printer.
Non-genuine cards
Check if your cards meet specifications.
Recommend that you purchase cards from
Dascom authorized reseller.
If the problem persists, please
contact your Dascomreseller.
Blank Cards
Improper ribbon
installation
Check that print ribbon is installed
properly.

Dascom DC-4100 User Manual
62
■ Incomplete printout?
① Check manual settings
Check card software design layout matches card dimensions.
Check the landscape/portrait orientation in the driver.
② Check interface cable
If the text is printed in strange colors, use the USB cable supplied with the
printer. Check secure and proper connection between printer and your
computer.
Try another cable.
③ Check if the printer is clean
See Section 2.3 to clean/replace cleaning rollers.
④ Check if cards are clean
Take precautions to keeps cards free from dust and contamination.
⑤ Check Ribbon
Check if ribbon is installed properly. Check that the ribbon is running smoothly.
⑥ Check Print Head
If a straight white line(s) travels across the length of your card, the Print Head may be
dirty or defective. If the problem persists after cleaning, please contact your Dascom
Reseller.

Dascom DC-4100 User Manual
63
5.3.2 Clear Jammed Card
Do not turn off the power. The print job will be lost.
Do not attempt to use any tool (screwdriver or sharp object) to remove a jammed card.
Sharp objects may damage the rollers and heating rollers. Damages caused by such
action may void the warranty
。
■ To reduce the chance of card jamming
① See Section 2.1.3 to set the proper card thickness dial.
② Use cards with thickness specified in the specifications.
③ Check that cards are not bent.
④ Before putting the cards to the card cassette, shuffle the cards by holding the
outside edges to prevent sticking cards.
■ To take out jammed card
When card jam occurs, the LCD display prompts "Printer Card Jam, press SET Key". The Printer
will initialize to eject the card.
5.3.3 Change the Print Head
The Print Head is a heating element and directly affects print quality. A dirty or dusty
environment seriously affects its life and can cause damage to the Print Head.
Consult your Dascom Reseller if print head replacement is necessary.
To meet DASCOM’s warranty policy for print head replacement, you must:
Use Dascom approved consumables, including cards, ribbons and serviceparts.
Maintain regular cleaning and maintenance of theprinter.
Install the printer in a dust free environment as detailed in the specifications
Use good well-conditioned cards: clean, without deterioration causing head damage.

Dascom DC-4100 User Manual
64
5.4 Technical support
If you have trouble configuring and using a printer, read this manual carefully.
If you still can't solve the problem, you can get detailed information and help via the DASCOM
partner network.
5.4.1 DASCOM partner network
If you have any problem can’t be solved, please contact the DASCOM dealer. If you don’t know
any DASCOM dealer, please visit www.dascom.com to tell us your problems.
DASCOM will inform you of the detailed contact of your local DASCOM dealer .When you call the
DASCOM dealer, you must provide the following information:
○1 The printer model and serial number.
○2
The current configuration and operating system.
○3 A description of what happened.
○4 A description of the steps taken to address this problem.
In addition, to help answer your questions around the clock, www.dascom.com provides a
variety of explanations for the daily use of printers.
5.4.2 More information
If additional technical assistance is required, you can visit DASCOM website
www.dascom.com
,
and find information about the use and troubleshooting of DASCOM printers in the driver and
support section.
You can download the latest version of firmware, print driver and use manual, DASCOM printer
usage and maintenance related video, and FAQ (FAQ) section.
Dascom DC-4100 User Manual
65
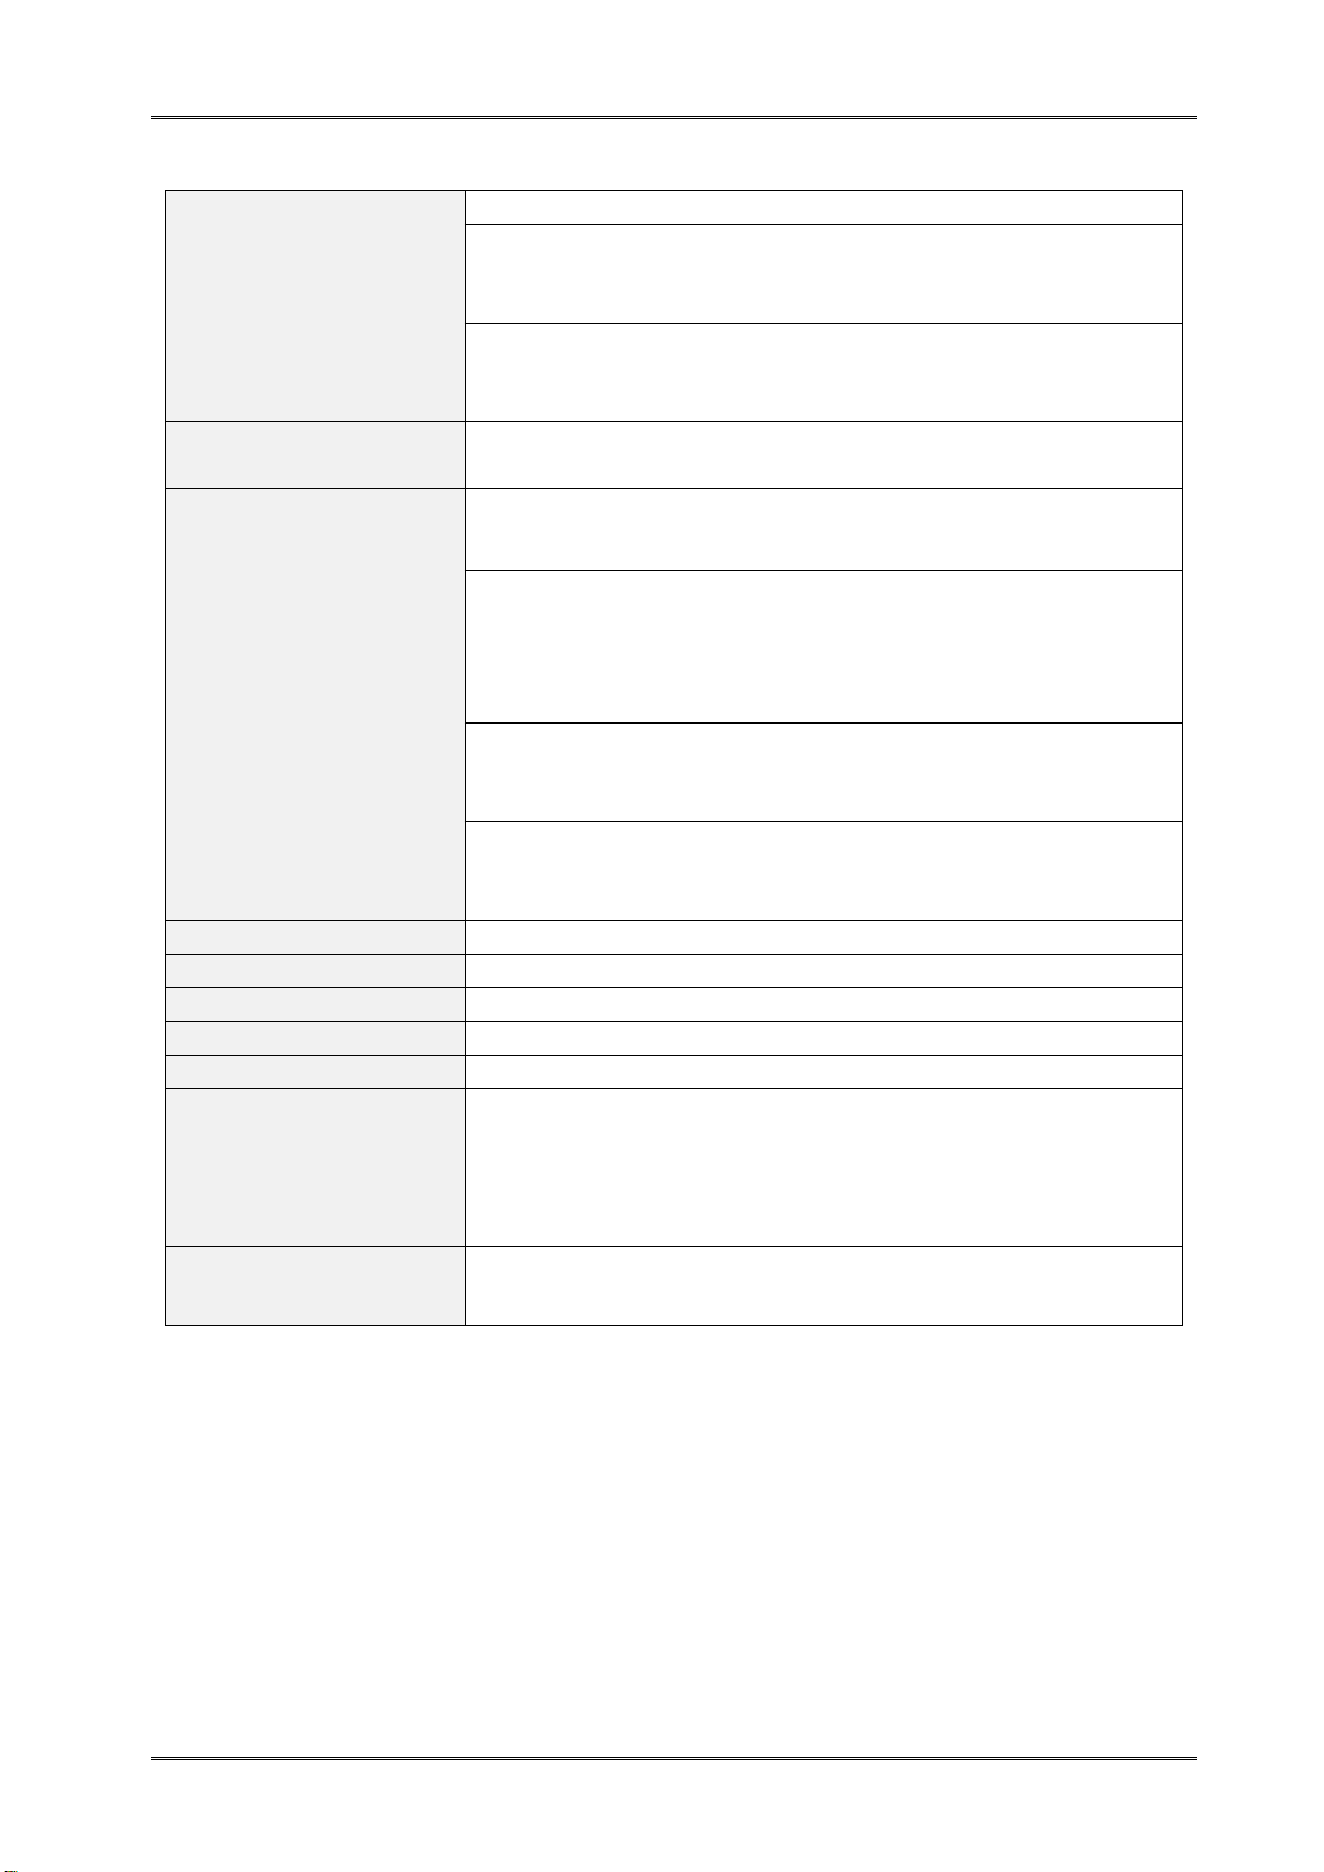
CHAPTER 6 SPECIFICATION
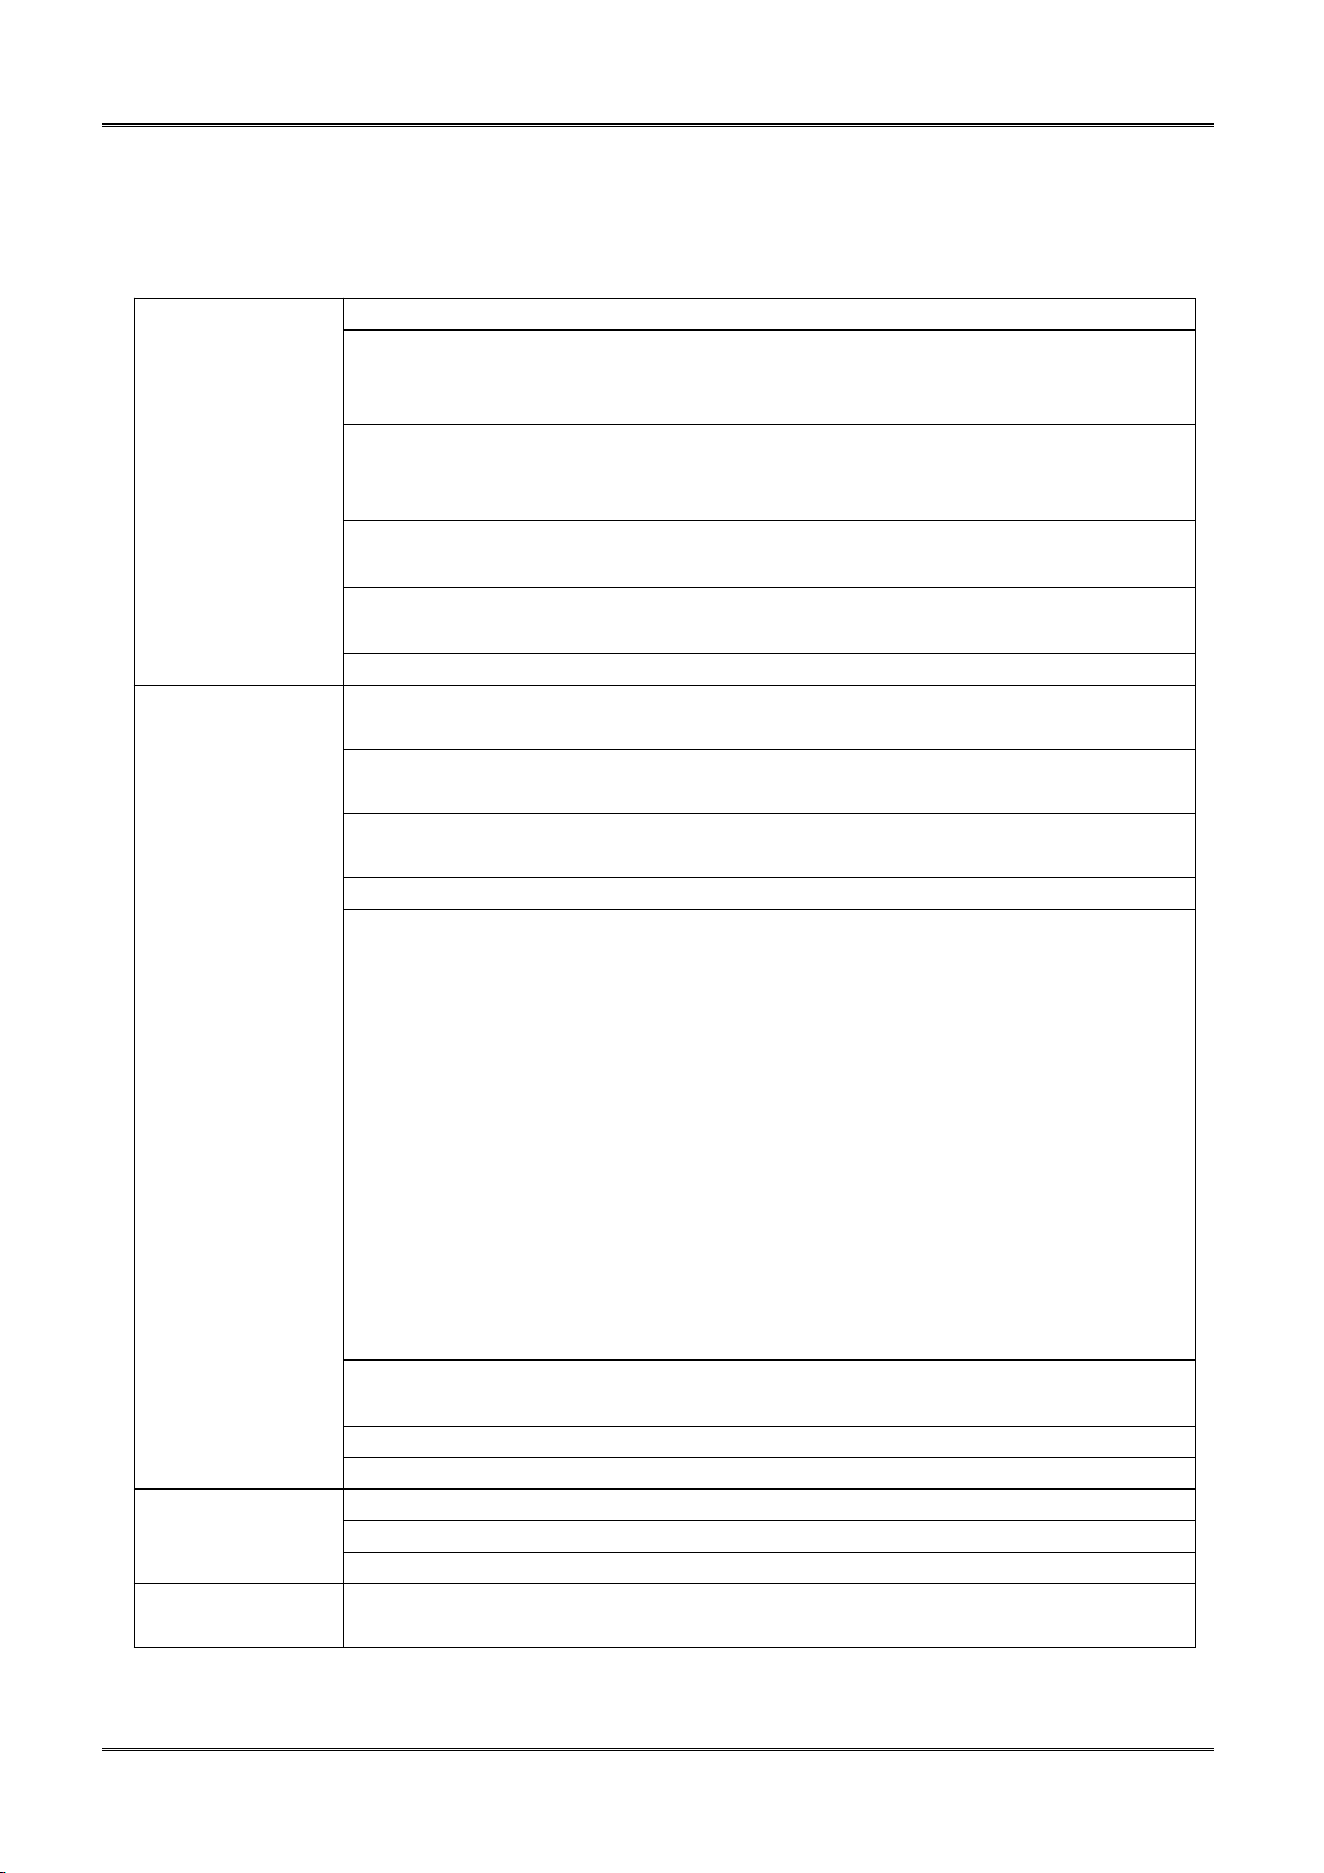
Model
DC-4100
Printing system
Direct thermal printing
Function
double-sided printing,
edge to edge printing,
Resolution
YMC: 300×300DPI, 300DPI × 600DPI
K: 300×300DPI, 300DPI × 600DPI, 300DPI × 1200DPI
Card thickness
0.25~1.25mm (10 - 40 mil)
Card type
PVC, ABS, PET, PET-G, TESLIN, Composite material,
85.6mm×53.98mm (ISO ID-1/CR-80)
83.8mm×51.8mm
Card feeding capacity
Automatic feed from Card Cassette:
100 pieces of 0.76mm thickness cards;
Manual card feed: single piece;
Front output: 100 pieces of 0.76mm thickness cards
Card feeding system
Automatic feed from Card Cassette
Manual feed, sing card (rear end)
Card ejecting
Front/Back
Ribbon
YMCKO Ribbon(300/400/500 Images per Roll)
1/2(YMC)KO Ribbon(500/600 Images per Roll)
1/2(YMC)KOKO Ribbon(350 Images per Roll)
YMCKOK Ribbon(400 Images per Roll)
YMCKOO Ribbon(400 Images per Roll)
KrO Ribbon(700 Images per Roll)
K-only/K2-PLASTIC/K3-PAPER/WHITE SPECIAL/W2 Ribbon(150m/roll)
CR80 card 100% layout: approx 1600 cards/roll
CR80 card 80% layout: approx 2000 cards/roll
CR80 card 50% layout: approx 3100 cards/roll
CR80 card 25% layout: approx 5600 cards/roll
Print speed
Single-sided:
color (YMCKO): 200 cards/hour, K-only: 590 cards/hour
Double-sided:
color (YMCKO): 100 cards/hour, color (YMCKOK): 140 cards/hour
Security feature
Ribbon encryption RFID
User friendly operation
interface (automatic
card entering function)
Easy to handle parts, include quick change of Ribbon. Automatic feed
from Card Cassette
Connection
USB (1.0, 1.1, 2.0)
Ethernet 10/100Base-T
USB-HUB
Dascom DC-4100 User Manual
66
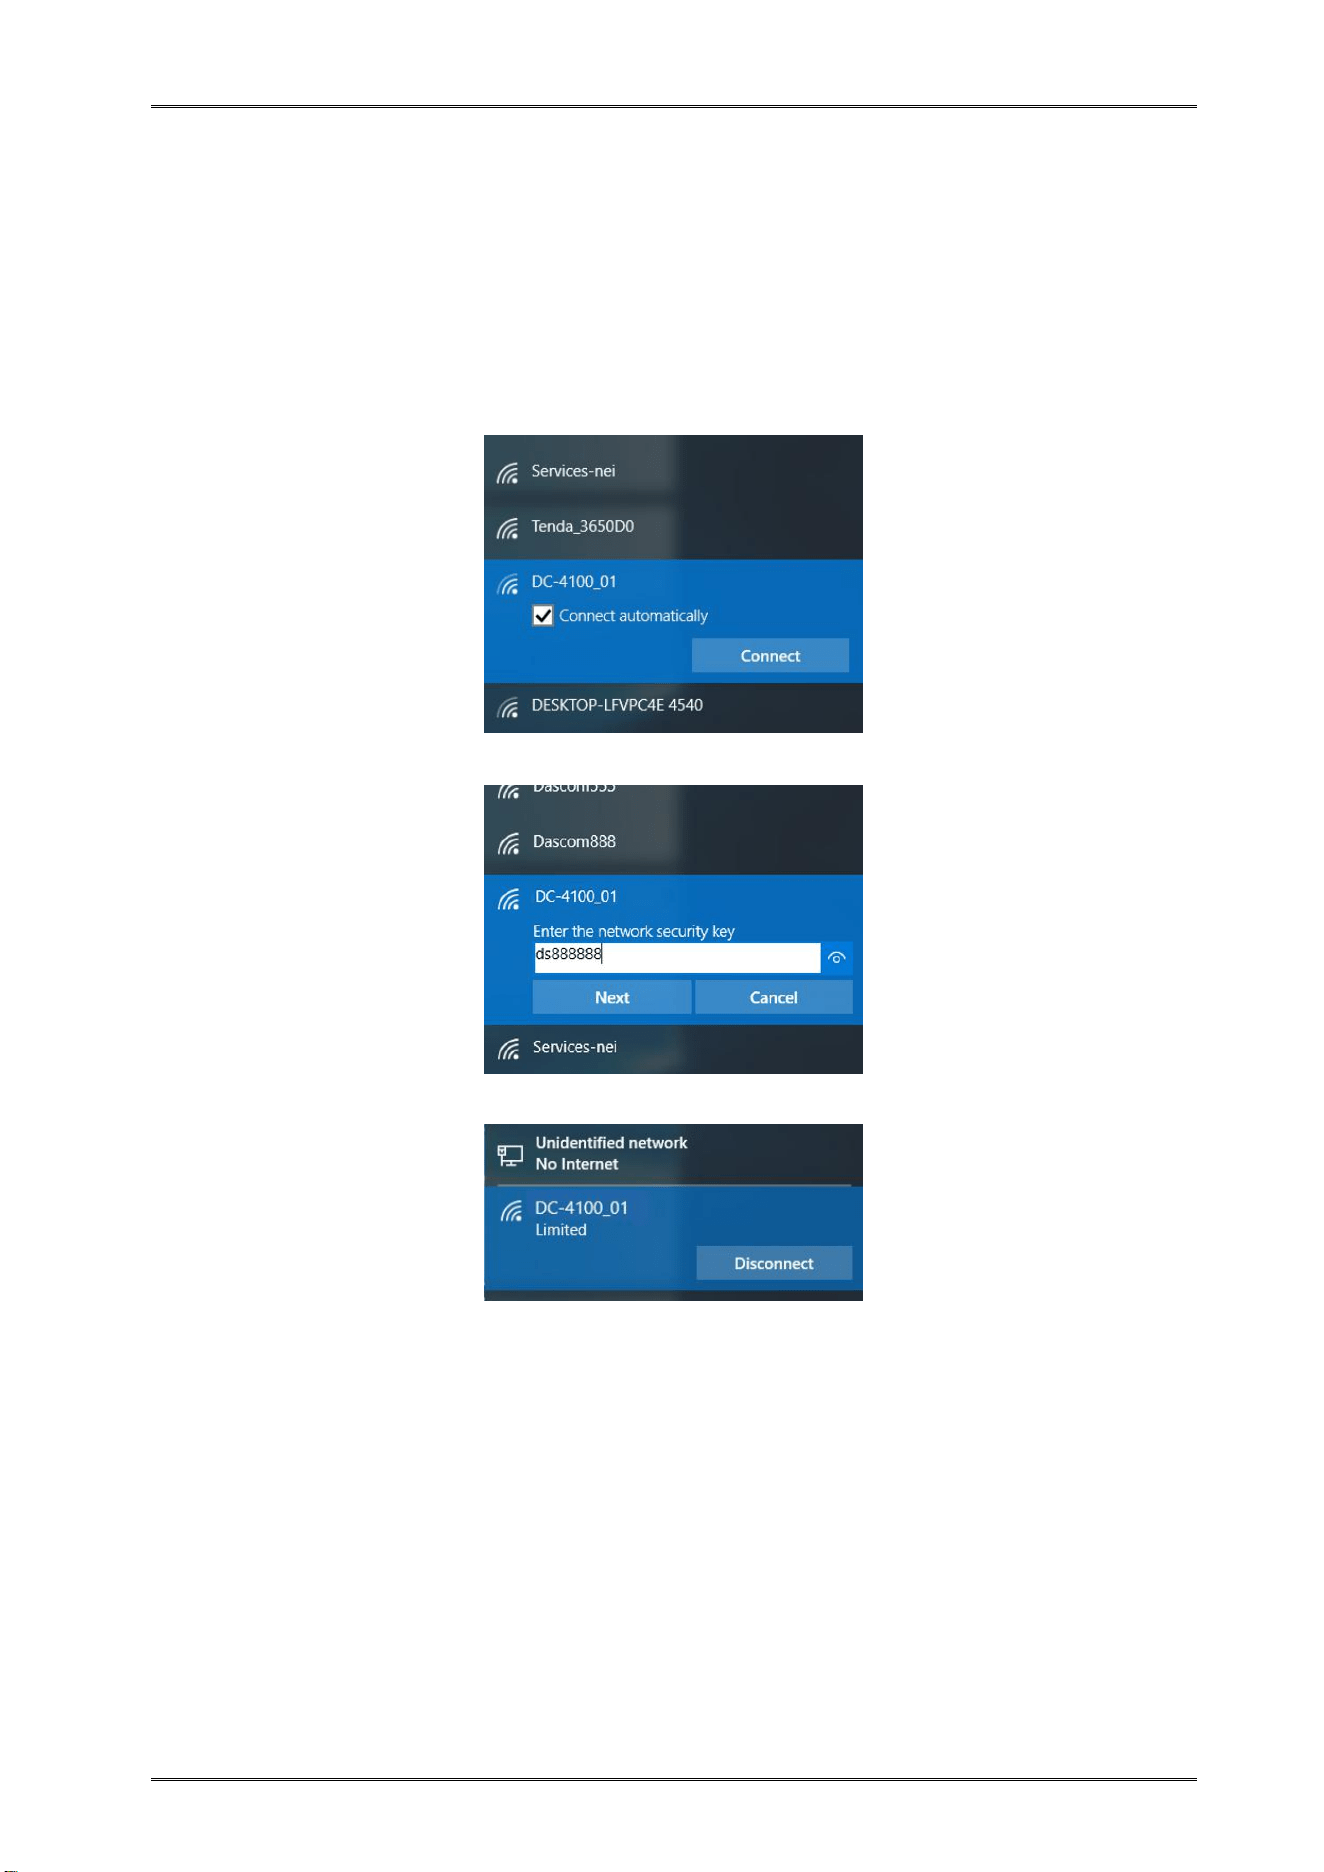
Built-in System Board
CPU: STM32MP131
Memory: DDR3L
Standard: 256MB
Optional: 512MB, 1GB
Storage: NAND
Standard: 256MB
Optional: eMMC 8GB, 32GB
System board
operating system
Linux System(Linux stm32mp157d-ev1 6.1.28)
Option
Wireless Communication 2.4G/5G
Version 5.0 low-power wireless protocol
CardEditor software
Duplex, Encoding - Mag stripe, Contact, Contactless smart card
Mechanical lock (consumables, card slot, card cassette),
Kensington lock
Consumable:
Dascom certified Ribbons with Intelligent Technology
Automatic printing settings and adjustment
Cleaning suit:
DASCOM cleaning kit;
(Cleaning card; Cleaning Roller with viscosity)
Supported OS
Windows XP / Vista / 7 / 8 / 10 / 11, 32&64bit OS
Power source
Adaptive AC 100~240V, 50/60Hz
Dimension(mm)
365×150×288.5
Weight
4.8Kg
Operation panel
LCD Display + button
Operating
environment
Std Temperature: 15℃-35℃, 59-95 F
Std Humidity: 20-65% RH
Lowest/Highest operating temperature and humidity:
0
℃
/40
℃
, 20%/65% RH
Storage
environment
Temperature: -5
℃
-70
℃
, 23-158 F
Humidity: 20-70% RH
Dascom DC-4100 User Manual
67
Appendix I: Wireless Communication (optional)
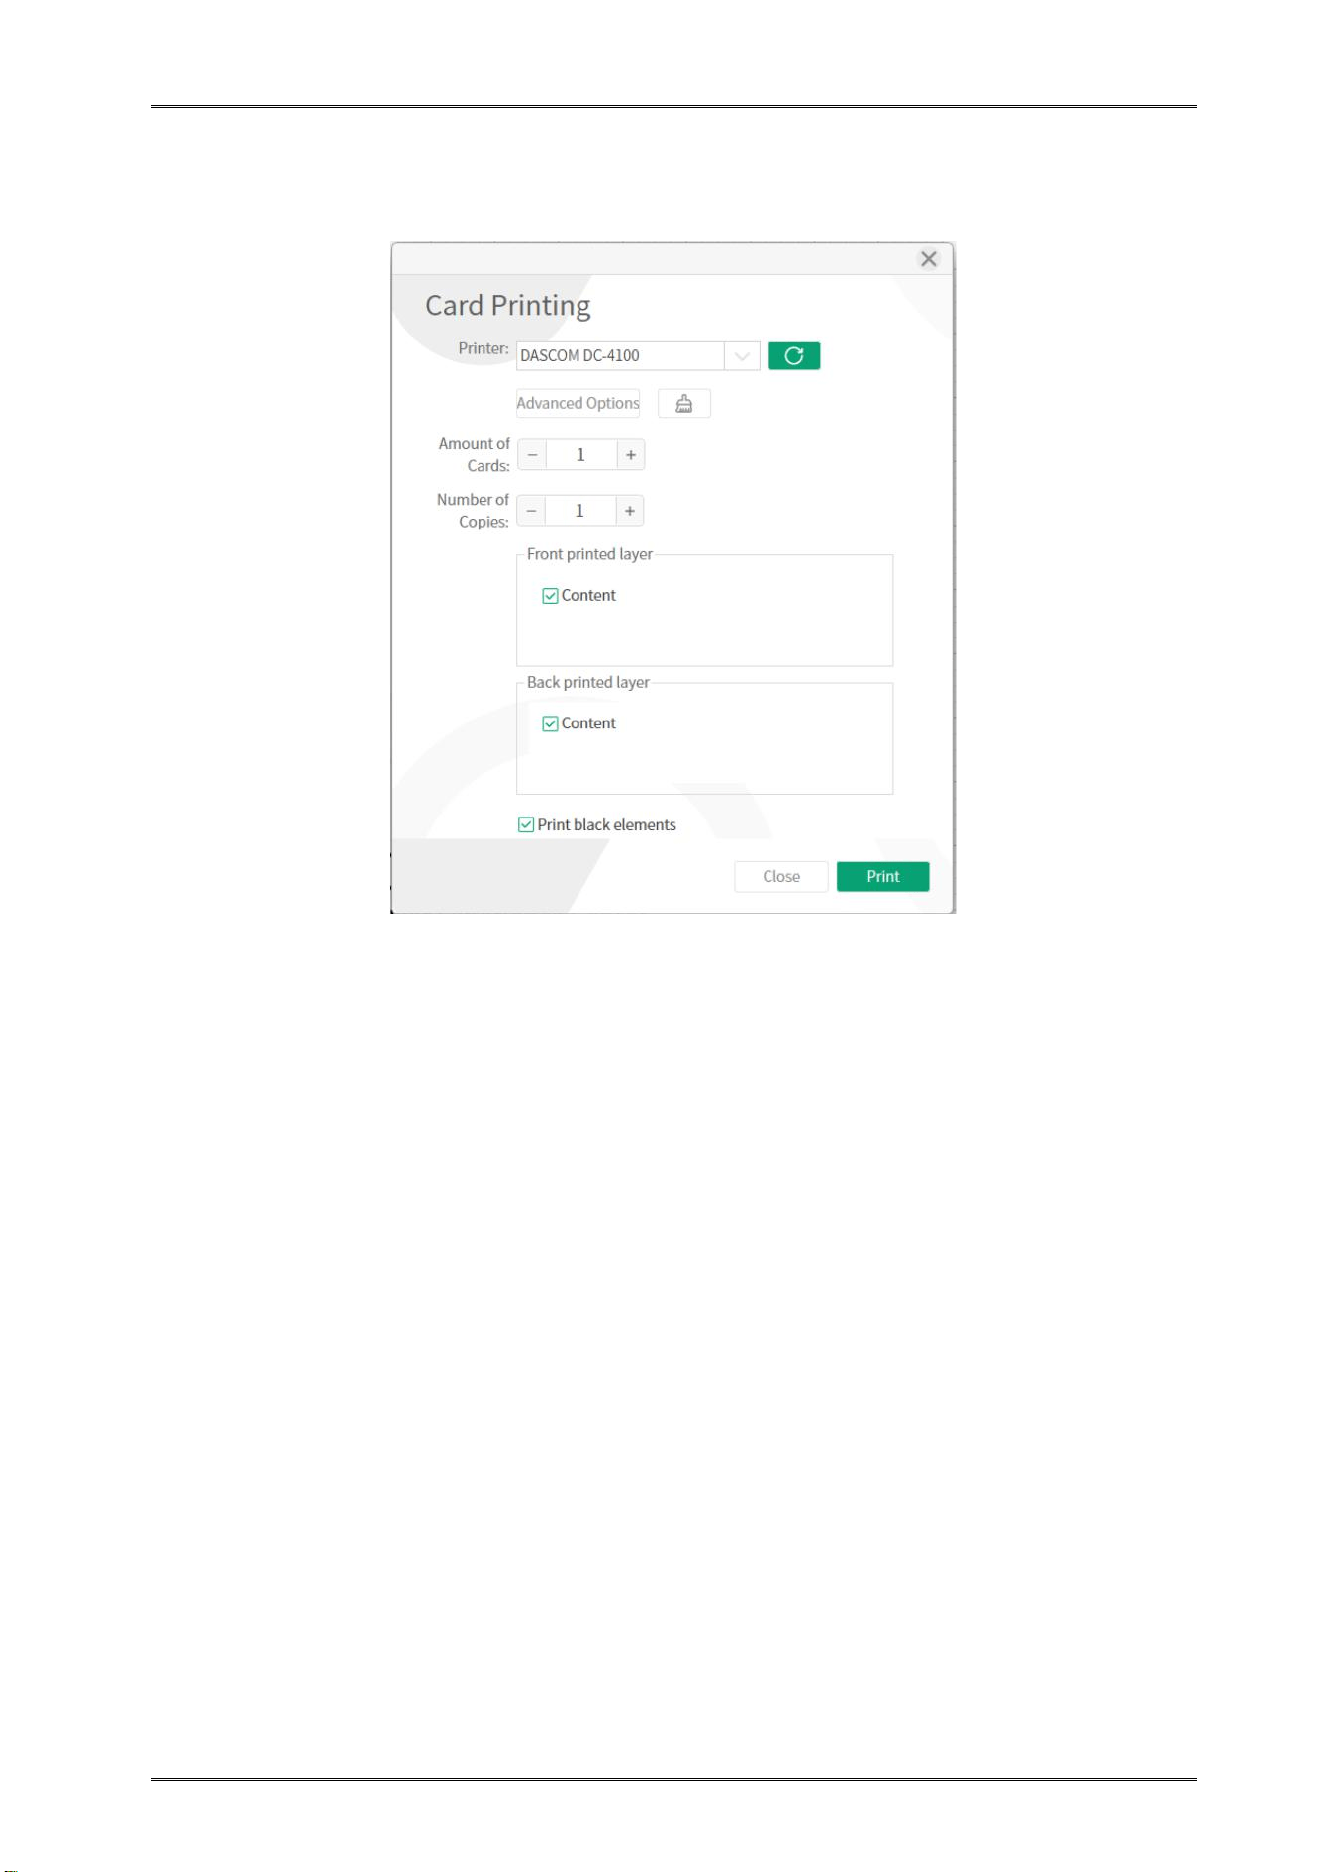
1. Connect the printer Wireless Communication (default name is "DC4100-01", default password
is "ds888888", default IP address is “192.168.18.1”)
1.1 Search for Wireless Communication name in network Settings, select "DC4100-01", and click
"Connect".
1.2 Enter password "ds888888" and click "Next".
1.3 If the following picture appears, the connection is successful.
2. After the connection is complete, install the network port driver by referring to the driver
description.
Dascom DC-4100 User Manual
68
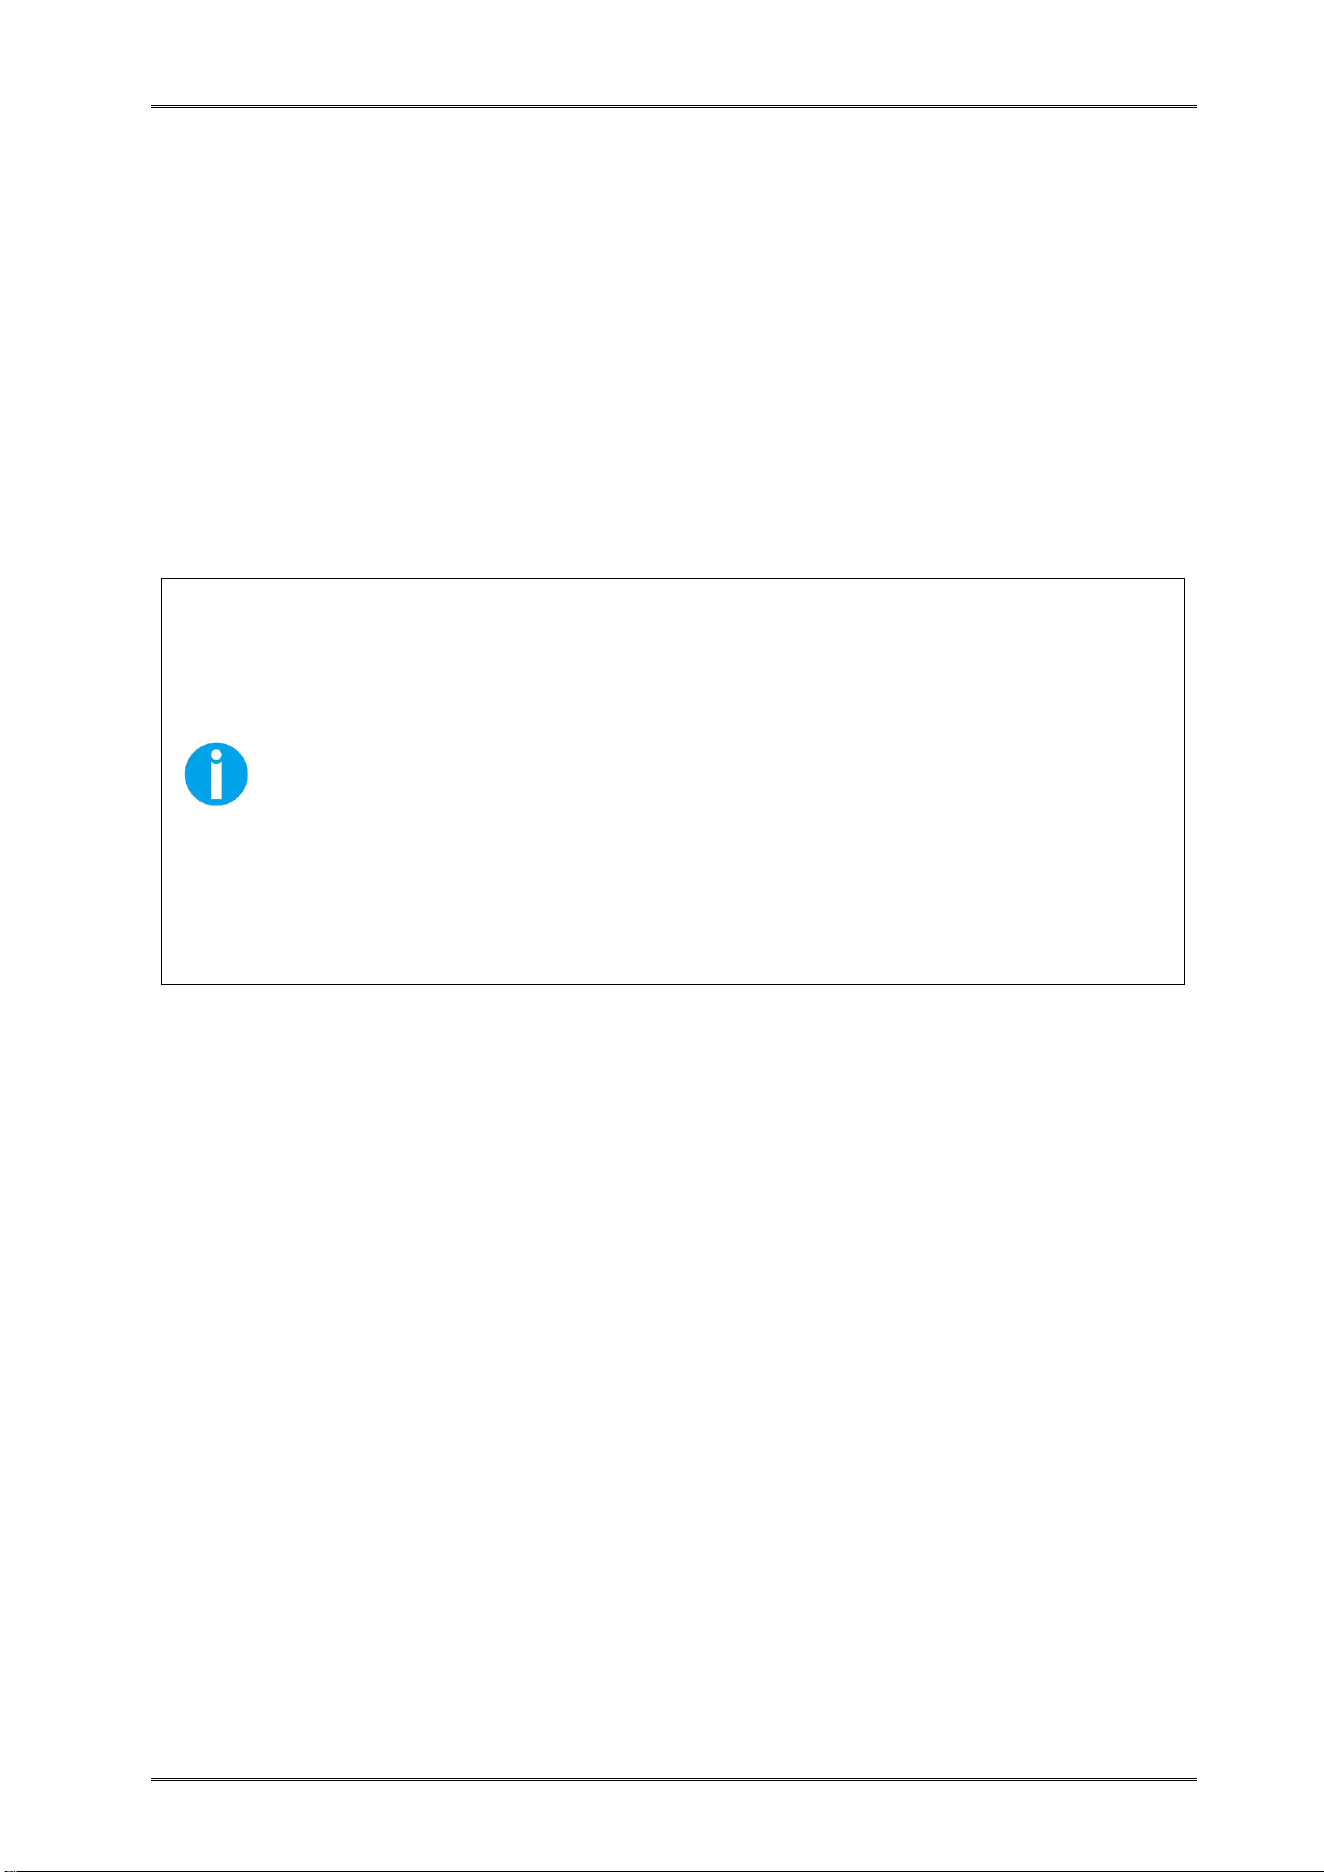
3. According to the CardEditor instructions, edit the data to send for printing.
Dascom DC-4100 User Manual
69
Appendix II FCC STATEMENT
1. This device complies with Part 15 of the FCC Rules. Operation is subject to the following
two conditions:
i. This device may not cause harmful interference.
ii. This device must accept any interference received, including interference that
may cause undesiredoperation.
2. Changes or modifications not expressly approved by the party responsible for compliance
could void the user's authority to operate theequipment.
For a Class A digital device or peripheral, the instructions furnished the user shall
include the following or similar statement, placed in a prominent location in the
text of the manual:
NOTE: This equipment has been tested and found to comply with the limits for a
Class A digital device, pursuant to part 15 of the FCC Rules. These limits are
designed to provide reasonable protection against harmful interference When the
equipment is operated in a commercial environment. This equipment generates,
uses, and can radiate radio frequency energy and, if not installed and used in
accordance with the instruction manual, may cause harmful interference to radio
communications. Operation of this equipment in a residential area is likely to
cause harmful interference in which case the user will be required to correct the
interference at his own expense.
FCC Radiation Exposure Statement
This equipment complies with FCC radiation exposure limits set forth for an uncontrolled
environment. This equipment should be installed and operated with minimum distance 20cm
between the radiator & your body.

DASCOM REPRESENTATIVES
GERMANY(EMEA)
DASCOM Europe GmbH
Heuweg 3
89079 Ulm
Germany
Tel.: +49 (0) 731 2075 0
Fax: +49 (0) 731 2075 100
www.dascom.com
SINGAPORE (ASIA PACIFIC)
DASCOMAP Pte Ltd
2 Jurong East Street 21
# 05-42, IMM Building
Singapore
609601
Phone:+65 6760 8833
Fax:+65 6760 1066
www.dascom.com
AMERICAS
DASCOM Americas Corporation
34 Lakeview Court
Verona, VA 24482, USA
Phone:+1
(877)
434 1377
Fax: +1 (877) 334 0549
www.dascom.com
CHINA
JIANGMEN DASCOM COMPUTER
PERIPHERALS CO., LTD
No.399, Jinxing Road,
Jianghai District Jiangmen,
P.R. China
www.dascom.com
“All rights reserved. Translations, reprinting or copying by any means of this manual complete or
in part or in any different form requires our explicit approval. We reserve the right to make
changes to this manual without notice. All care has been taken to ensure accuracy of
information contained in this manual. However, we cannot accept responsibility for any errors or
damages resulting from errors or inaccuracies of information herein.”
© 2026 DASCOM