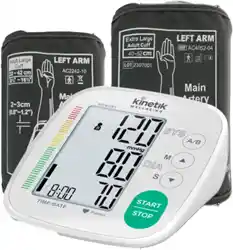
Thank you for selecting the Kinetik Wellbeing Smart Blood Pressure Monitor.
Please read the user manual carefully and thoroughly, this is to ensure the
safe usage of the product. Please keep the user manual for future
reference.
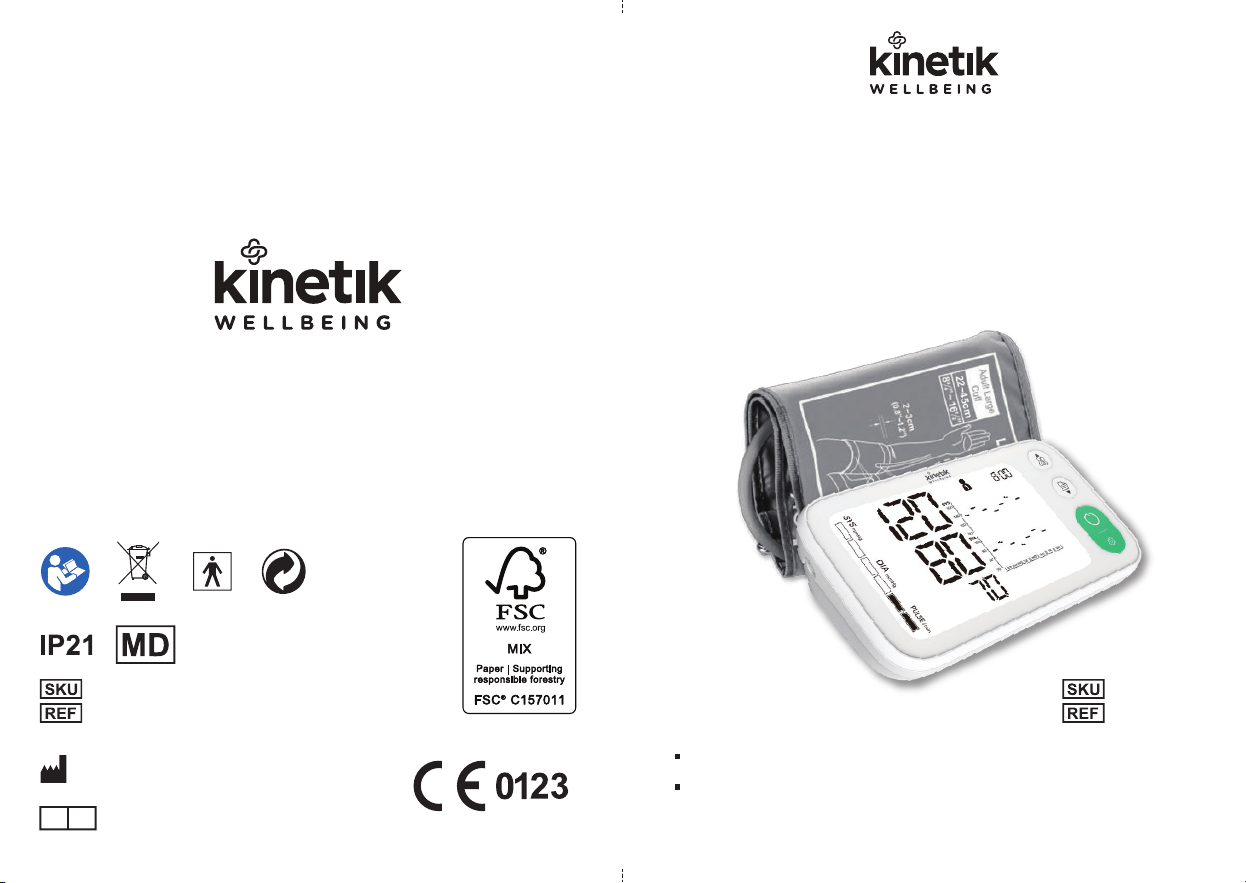
User Manual
Smart Blood Pressure Monitor
20240517-v6 TMB-2288-B UK
Guangdong Transtek Medical Electronics Co., Ltd.
Zone A, No.105, Dongli Road, Torch Development
District, 528437 Zhongshan, Guangdong, China
EC REP
MDSS GmbH
Schiffgraben 41, 30175 Hannover, Germany
TMB-2288-B
TMB-2088
TMB-2288-B
TMB-2088

1
Table of Contents
CATALOGUE
SUPPORT............................................................................................................................2
INTRODUCTION..................................................................................................................3
General Description
Indications for Use
Measurement Principle
Receiving and Inspecting your Monitor
Safety Information
Display and Symbols
Name of Each Part
Contents/Product Includes
BEFORE YOU START........................................................................................................10
Choice of Power Supply
Installing and Replacing the Batteries
Setting the Date and Time
Setting a user ID
Pair a smart device with the monitor
MEASUREMENT................................................................................................................17
Applying the cuff
Start a measurement
DATA MANAGEMENT........................................................................................................21
Recall the Records
Delete the Records
INFORMATION FOR USER................................................................................................26
Tips for measurement
Maintenances
ABOUT BLOOD PRESSURE.............................................................................................28
What are systolic pressure and diastolic pressure?
What is the standard blood pressure classification?
Irregular pulse rate detector
Why does my blood pressure fluctuate throughout the day?
Why do I get a different blood pressure at home compared to the hospital?
Is the result the same if measuring on the right arm?
TROUBLESHOOTING........................................................................................................31
SPECIFICATIONS..............................................................................................................32
AUTHORIZED COMPONENT ...........................................................................................33
EMC GUIDANCE................................................................................................................34

2 3
INTRODUCTION
Check that the device packaging has not been tampered with and make sure
that all contents are present. Before use, ensure that there is no visible
damage to the device or accessories and that all packaging material has
been removed. If you have any doubts, do not use the device and contact
Kinetik Wellbeing.
Receiving and Inspecting your Monitor
Indications for Use
The Kinetik Wellbeing SmartBlood Pressure Monitor is a digital monitor
intended for use in measuring blood pressure and pulse rate with arm
circumference ranging from 22cm to 32cm (about 8¾˝-12½˝) , 22cm to 42cm
(about 8¾˝-16½˝) or 22cm to 45cm (about 8¾˝-17¾˝).
It is intended for adult indoor use only.
Only the matched cuff of 22cm to 45cm (about 8¾˝-17¾˝) is applicable to
pregnant women (including pre-eclampsia patients) and diabetic patients.
General Description
FEATURES:
• 124 mm × 76 mm Digital LCD display
• Systolic, Diastolic Blood Pressure & Pulse Display
• Date / Time Indication
• Irregular pulse rate detection
• 2 × 250 memory storage, Guest mode available
• Up-to-date measuring-during-inflation technology
Thank you for selecting the Kinetik Wellbeing Smart Blood Pressure
Monitor. The monitor features blood pressure measurement, pulse
rate measurement and the result storage.
The blood pressure monitor provides you with two years of reliable service.
Measurement Principle
This product uses the Oscillometric Measuring method to detect blood
pressure. Before every measurement, the unit establishes a “zero
pressure” equivalent to the atmospheric pressure. Then it starts inflating
the arm cuff, meanwhile, the unit detects pressure oscillations generated
by beat-to-beat pulsatile, which is used to determine the systolic and
diastolic pressure, and also pulse rate.
Our manual should provide you with all the information you need
to set up and use this product.
If you have a question, have a look at our Troubleshooting page!
For further assistance, why not contact our Customer Care team
directly? We’re here to help!
Our Customer Care team are available from 9am-5pm, Monday to
Friday (excluding bank holidays).
We promise to respond to all queries and will ensure to resolve any
issue you may be having.
You can reach us by…
Live Chat:
Simply visit www.kinetikwellbeing.com and send us a message.
Email:
Support
SUPPORT
4 5
INTRODUCTIONINTRODUCTION
Precaution
* This device is intended for indoor, home use and is not intended for public use.
* This device is portable, but it is not intended for use during patient transport.
* This device is not suitable for continuous monitoring during medical emergencies or operations.
* This device is intended for non-invasive measuring and monitoring of arterial blood pressure.
It is not intended for use on extremities other than the arm, or for any purpose other than
obtaining a blood pressure measurement.
* This device is for adults. Do not use this device on neonates or infants. Do not use it on children
and adolescents unless otherwise instructed by a healthcare professional.
* Consult with a healthcare professional before using this monitor if you suffer from the
following conditions: common arrhythmias such as premature ventricular beats or atrial
fibrillation; peripheral arterial disease; implantation with electrical devices; undergoing
intravascular therapy; arteriovenous shunt or mastectomy.
Please note that any of these conditions may affect measurement readings,in addition to patient
motion, trembling or shivering.
* Do not use this device for diagnosis or treatment of any health problem or disease. Contact
a healthcare professional if you have or suspect any medical problem. Do not change your
medications without the advice of a healthcare professional.
* If you are taking medication, consult a healthcare professional to determine the proper time to
measure your blood pressure.
* This device may be used only for the intended use described in this manual, the manufacturer
shall have no liability for any incidental, consequential, or special damages caused by misuse
or abuse.
* Please use the device under the environment which is provided in the user manual. Otherwise,
the performance and lifetime of the device will be impacted and reduced.
* The device may require up to 30 minutes to warm up / cool down from the minimum/ maximum
storage temperature before it is ready for use.
* The blood pressure monitor, its adapter, and the cuff are suitable for use within the patient
environment.
* Do not wash the cuff in a washing machine or dishwasher.
* The device contains sensitive electronic components. To avoid measurement errors, avoid
taking blood pressure measurements near a strong electromagnetic field radiated interference
signal or electrical fast transient/burst signal.
* Wireless communication equipment, such as wireless home network devices, mobile phones,
cordless telephones and their base stations, walkie-talkies may cause interference that may
affect the accuracy of measurements. A minimum distance of 1 foot (30 cm) should be kept from
such devices during a measurement.
* This blood pressure monitor is intended for use by medical or non-medical staff. A patient can
also be the intended user or operator.
* Do not attempt to repair the unit yourself if it malfunctions. Only have repairs carried out
by authorised service centers.
* It is recommended that the performance should be checked after repair, maintenance, and every
two years of use, by retesting the requirements in limits of the error of the cuff pressure indication
and air leakage (testing at least at 50 mmHg and 200 mmHg). Please contact Kinetik Wellbeing
for authorised service personnel.
* Store your device, cuff and adapter in a clean and dry place, protect it against extreme moisture,
heat, lint, dust and direct sunlight. Never place any heavy objects on it.
* Make sure the rubber tube of the cuff is not squeezed, stretched, or kinked during storage.
* Dispose of accessories, detachable parts, and the device according to any local guidelines.
Caution
Safety Information
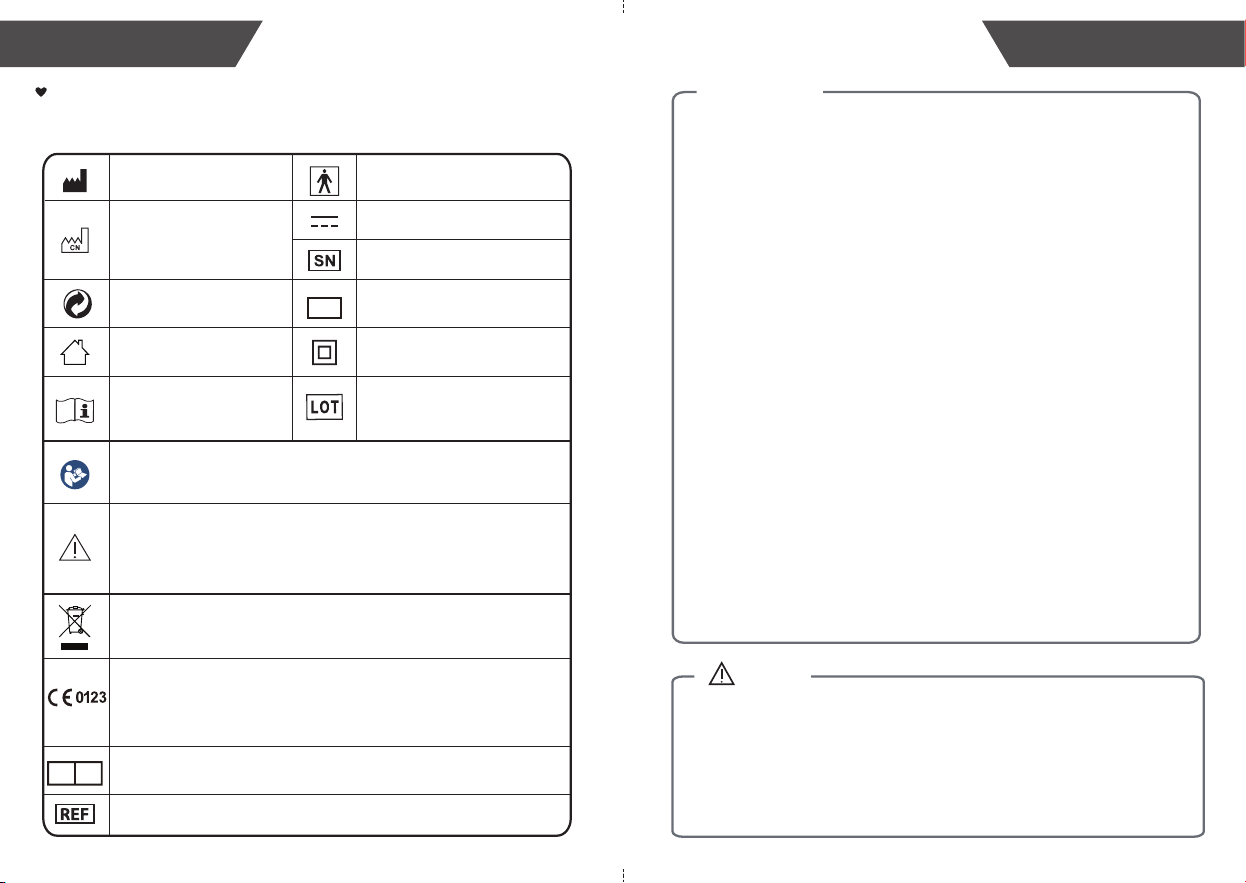
The symbols below might be in the user manual, labeling or other component.
They are the requirement of standard and using.
Manufacturer
Serial Number
Type BF applied part
Direct Current
The symbol indicates that the product should not be discarded as unsorted
waste but must be sent to separate collection facilities for recovery and
recycling.
Recyclable
Caution
Indicates that caution is necessary when operating the device or control
close to where the symbol is placed, or that the current situation needs
operator awareness or operator action in order to avoid undesirable
consequences.
Date of manufacture and
made in China
For indoor use only
Class II Equipment
MD
Medical Device
EC REP
Authorized representative in the European Community/
European Union
CE marking indicates that a product has been assessed by the
manufacturer and deemed to meet EU safety, health and
environmental protection requirements. It is required for products
manufactured anywhere in the world that are then marketed
in the EU.
Refer to instruction manual/booklet
To signify that the instruction manual/ booklet must be read.
Note: The background color of the symbol is blue.
Consult instructions for
use or consult electronic
instructions for use
Batch code
Catalogue Number / Model Number
7
6
INTRODUCTION INTRODUCTION
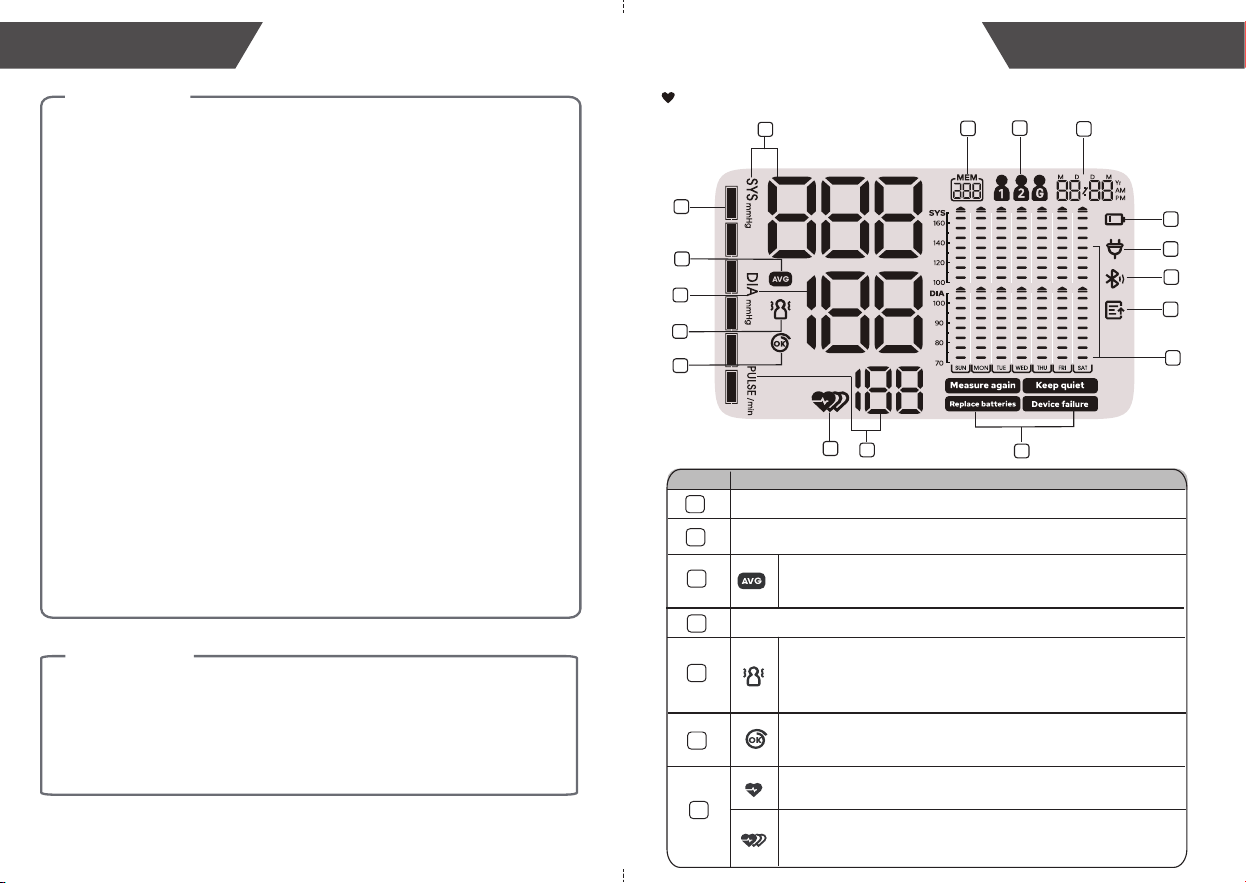
Display and Symbols
7
Systolic blood pressure reading
Blood pressure level
See the blood pressure classifcation on page 27-28.
Diastolic blood pressure reading
Pulse rate symbol
Flashes when decteted during a measurement.
Irregular pulse rate symbol
Appears when decteted during a measurement.
Refer to page 28 for more information.
Average value symbol
Appears when viewing the average value of the latest 7 days under
the memory mode.
1
2
3
4
5
6
SYMBOL EXPLANATION
Excessive body motion detector symbol
Appears when talking, moving, or shaking of the arm with the cuff on
is detected during a measurement.
NOTE: The measured blood pressure reading may not be accurate
when this symbol is displayed with the reading.
Cuff wearing OK symbol
Appears when the cuff is wrapped well.
2
3
1
7
8
4
5
6
9
10
11
12
13
14
15
16
17
* Do not apply the cuff on an arm that has an intravenous drip or a blood transfusion attached.
* Do not kink, fold, stretch, compress, or otherwise deform the tube during measuring, as the cuff
pressure might continuously increase, which could prevent blood flow and result injury.
* Taking blood pressure measurements too frequently could disrupt blood circulation and cause injuries.
* Do not apply cuff to areas on patient where skin is delicate or damaged. Check cuff site frequently
for irritation.
* Do not place the cuff on the arm of a person whose arteries or veins are undergoing medical
treatment, i.e. intra-vascular access or intra-vascular therapy or an arteriovenous (A-V) shunt,
which could disrupt blood circulation and cause injuries.
Warning
* Do not place the cuff on the arm on the same side of a mastectomy (especially when lymph nodes
have been removed), it is recommended to take measurements on the unaffected side.
* Do not wrap the cuff on the same arm to which another monitoring device is applied. One or both
devices could temporarily stop functioning if you try to use them at the same time.
* Please check (for example, by observation of the limb concerned) that the operation
of the device does not result in prolonged impairment of patient blood circulation.
* On the rare occasion of a fault causing the cuff to remain fully inflated during measurement, loosen
and remove the cuff immediately. Prolonged high pressure applied to the arm (cuff pressure
>300 mmHg or constant pressure >15 mmHg for more than 3 minutes) might lead to bruising and
discolored skin.
* Do not use this device with high-frequency (HF) surgical equipment at the same time.
* This device is not used in conjunction with oxygen rich environments, not intended for use with
flammable anaesthetics, not intended for use in conjunction with flammable agents.
* Do not touch output of the batteries/adapter and the user simultaneously.
* The power cord is considered the disconnect device for isolating this equipment from supply mains.
Do not position the equipment so that it is difficult to reach or disconnect.
* Do not use this device if you are allergic to polyester, nylon, or plastic.
* Only use accessories approved by manufacturer. Using unapproved accessories might cause
damage to the unit and injure users.
* If you experience discomfort during a measurement, such as pain in the arm or other complaints,
press the Power button immediately to release the air from the cuff.
* Do not use the device while under maintenance, or being serviced.
* The air tube poses a risk of strangulation. Furthermore, the small parts of product and batteries
present a choking hazard if swallowed. They should therefore always be kept away from
infants/children.
* Sensor degradation or looseness may reduce performance of device or cause other problems.
* You can use this device to take your own measurement, no third-party operator is required.
* Adapter is specified as a part of the ME (Medical Electrical) Equipment.
* At the request of authorised service personnel, circuit diagrams, component part lists, descriptions,
and calibration procedures will be made available by Kinetik Wellbeing.
* The expected lifetime of the cuff may vary by the frequency of washing, skin condition, and storage
state.
* Please report to the manufacturer and the competent authority of the country in which you are
established about any serious incident that has occurred in relation to this device.
Notice
9
8
INTRODUCTIONINTRODUCTION
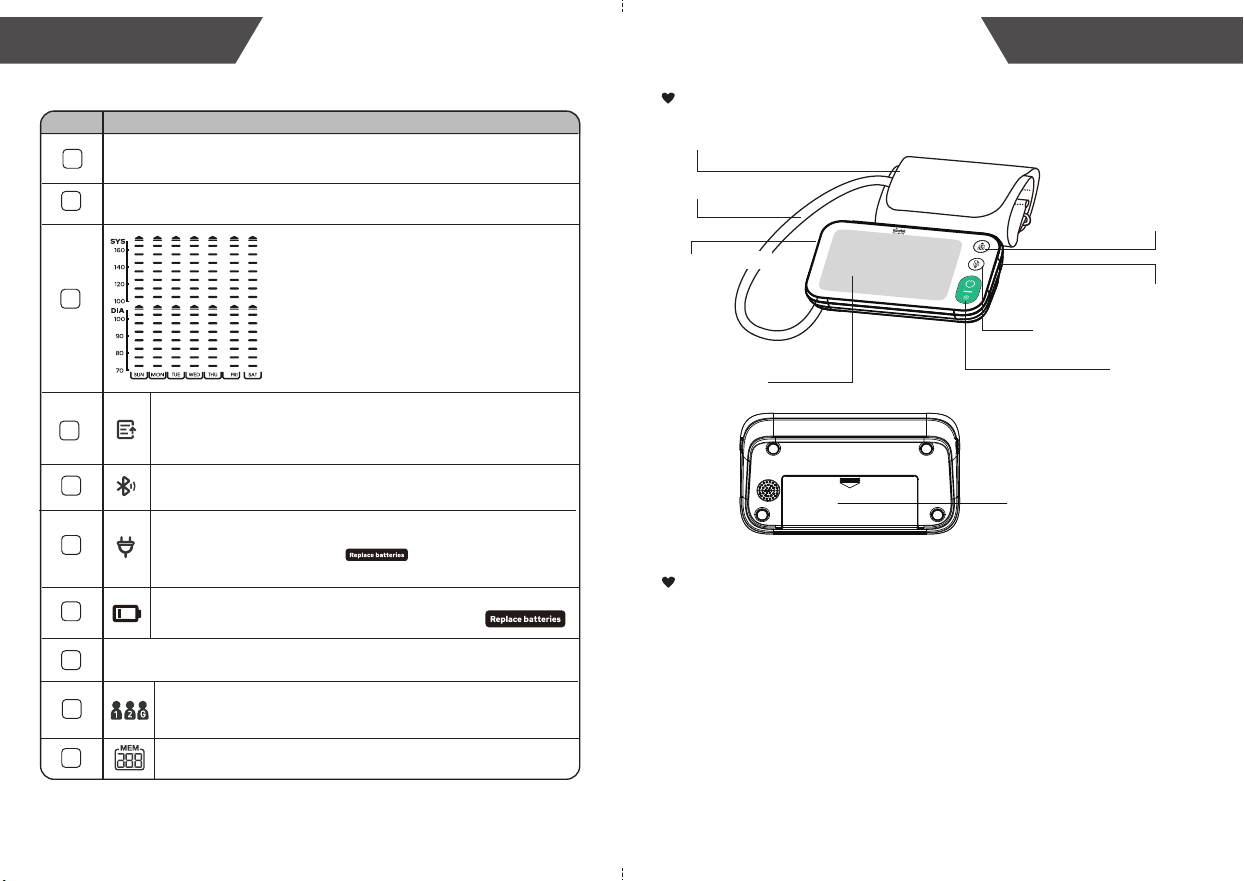
Data pending to transmit symbol
Displays when the data transmission failed. The measurements are
saved on the device and will be sent when a successful connection
is achieved.
Bluetooth symbol
Flashes when the Bluetooth is working.
User ID symbol
The user ID number appears when the monitor is operated by the
selected user.
Low Battery symbol
Indicate the battery is low when appears with "BAt Lo & ".
Date / Time display
Pulse display
Pulse rate appears after the measurement.
8
9
10
12
13
14
15
16
11
Blood Pressure Trends
Appears when viewing the blood pressure trends
of the specified period of the past 7 days under
the memory mode.
The X-axis of the histogram represent the time,
while the Y-axis represents the value of systolic
and diastolic pressure.
Refer to page 20 for more information.
SYMBOL EXPLANATION
Adapter power mode / Adapter error symbol
Appears when the power is supplied by AC adapter.
Or appears along with "
bAt H& " to indicate the
voltage of the blood pressure monitor is high.
17
Warning Messages
Refer to page 30 for more information.
Memory symbol
Indicate it is in the memory mode and which the group of memory it is.
Contents/Product Includes
• Blood Pressure Monitor (TMB-2288-B)
• Cuff (Type BF applied part)
Upper arm cuff:22-45cm.
• User manual
• 4x AA batteries
• Type-C cable (not included)
• AC Adapter (not included)
Reference model: BLJ06L050100U-B (with UK plug)
Name of Each Part
BATTERY COMPARTMENT
CUFF
AIR HOSE
AIR CONNECTOR
PLUG
LCD DISPLAY
Type-C port
[User/Forward]
button
[Memory/Pairing/Backward]
button
[Start/Stop/Set]
button
1110
BEFORE YOU START
BEFORE YOU START
1.
2.
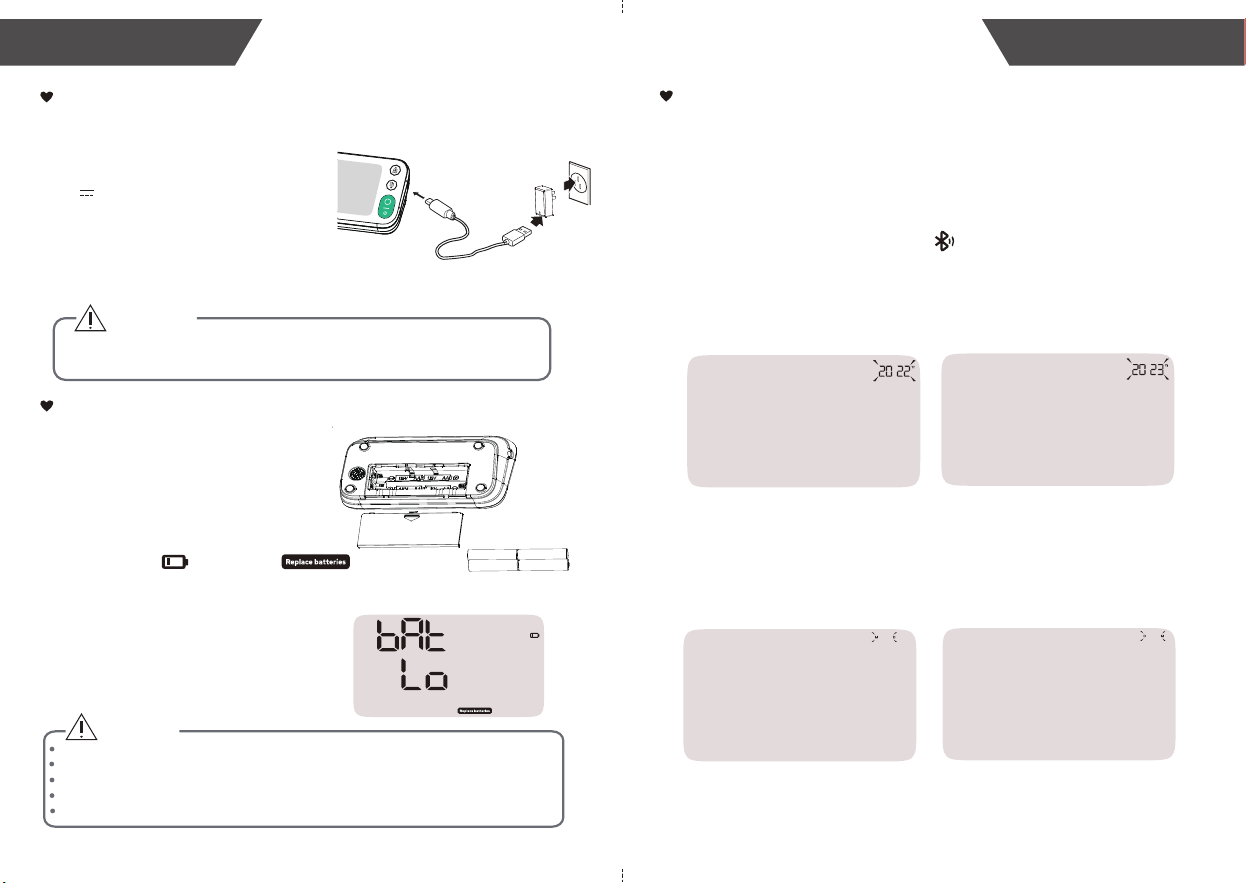
Setting the Date and Time
It is important to set the date and time before using your blood pressure
monitor for the first time, so that a correct time stamp can be assigned to
each record that is stored in the memory.
(The setting range of the year: 2022—2052, Time format: 24H/12H)
Press and hold the “USER” button to quickly advance the years.
Press and hold the “MEM” button to quickly go backwards through the years.
When the monitor is off, press and hold the “START/STOP” button,
it will display the bluetooth symbol first.
Press the “START/STOP” button again, it will enter the [Year] setting.
Press the “USER” or “MEM” button to change the year.
Press the “START/STOP” button to confirm the [Year], then the date
format will flash. Press the “USER” or “MEM” switch the date format
between [month/day] and [day/month].
Please use the correct batteries and approved power and approved
power adapter which complies with local safety standards.
Installing and Replacing the Batteries
CAUTION
CAUTION
Choice of Power Supply
New and used batteries, or different types of batteries shall not be used together.
Remove batteries if the device is not likely to be used for some time.
Do not heat or deform the batteries, or dispose of them in fire.
Batteries should not be disposed of with household waste.
Please check with your local authority for battery recycling advice.
•
Slide off the battery cover.
•
Install or replace 4 x AA size batteries
according to the polarity indications
inside the battery compartment.
• Place back the battery cover.
Any time the battery is low, the LCD will
display the icon , “ bAt Lo” &
and then power off automatically after
about 5 seconds.
Replace the batteries:
• When the low battery symbol appears.
(see the LCD display on the right picture)
• When any button is pressed and nothing
is displayed on the screen.
1.
2.
5V 1A
Battery powered mode:
6VDC 4×AA batteries
AC adaptor powered mode:
(Please only use AC adapter
authorized by manufacturer-AC
adapter is not included).
Please unplug the adapter to stop
using mains electricity.
AC adapter
Type-C cable

BEFORE YOU START
BEFORE YOU START
3.
Press the “START/STOP” button to confirm the date format, then the
[Month] will flash. Repeat the same steps to set the [Month] and [Day].
4.
Repeat the same steps to set the time formate between[24H] and [12H].
5.
Repeat the same steps to set the [Hour] and [Minute].
Note:
1. The date and time will automatically be set when the monitor is paired
with app. Refer to the section ”Pair a smart device with the monitor”.
2. The device can also enter the setup mode automatically when the battery
is installed for the first time.
6.
After confirming the [Minute], the LCD will display all the settings
you have done, and then it will display “do nE” and the device
will turn off automatically.
12 13
There are 3 user ID available. The user and , have 250
memories, so that 2 people can save their measured values separately. The
user , has no memory space, is reserved for guest.
BEFORE YOU START
BEFORE YOU START
14 15
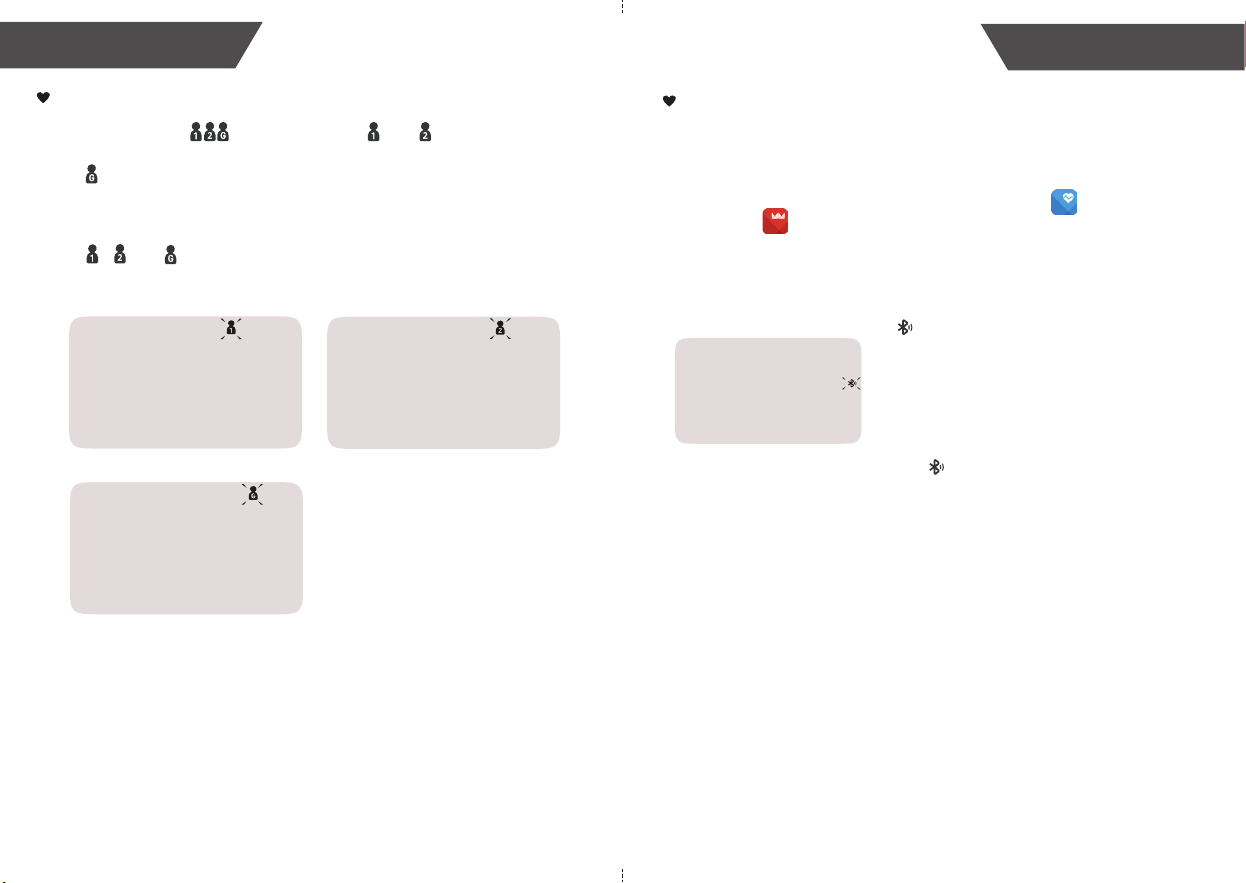
Setting a user ID
2.
1.
When the monitor is off, press the “USER” button to display the current
user ID. Press the “USER” button again to switch the user ID among the
user , and .
Press the “START/STOP” button to confirm the selected user ID, it
will enter the measurement automatically.
Press the “MEM” button to confirm the selected user ID,
it will enter
the memory query automatically.
User 1
User 2
Guest Mode
Pair a smart device with the monitor
You can measure your blood pressure and have the measurement data
automatically sent to a smart device (such as smartphone or tablet) with
Bluetooth wireless connectivity.
3.
When the monitor is off, press and hold the “MEM” button to start
pair-up, the bluetooth symbol will flash.
4.
If successful, the bluetooth symbol will not flash any more and the
monitor will automatically shut off after several seconds.
Note:
1. The date and time on your monitor will automatically be set after paired with
your smart device successfully.
2. The device can also enter the Bluetooth pairing automatically when the
battery is installed for the first time.
If unsuccessful within 60 seconds, it is judged timeout and the monitor will shut off.
2.
Enable Bluetooth and the MedM Health app on your smart device.
Make sure both Bluetooth and app are ON when pair-up is proceeding.
5.
In the app, select the menu in the top left corner of the screen. Then
select 'My Devices'.
7.
Once selected you will be asked if you would like to receive data
automatically. If no, you will need to manually input results. If yes, you
will then be asked if you want to receive data in the background.
6.
At the bottom of the screen select 'Add New'. This will automatically
start scanning for a new device.
When detected, select the TMB-2288-B.
1. Download the Blood Pressure Diary by MedM app or the MedM
Health app from the App store or Google Play.
1716
MEASUREMENT
BEFORE YOU START
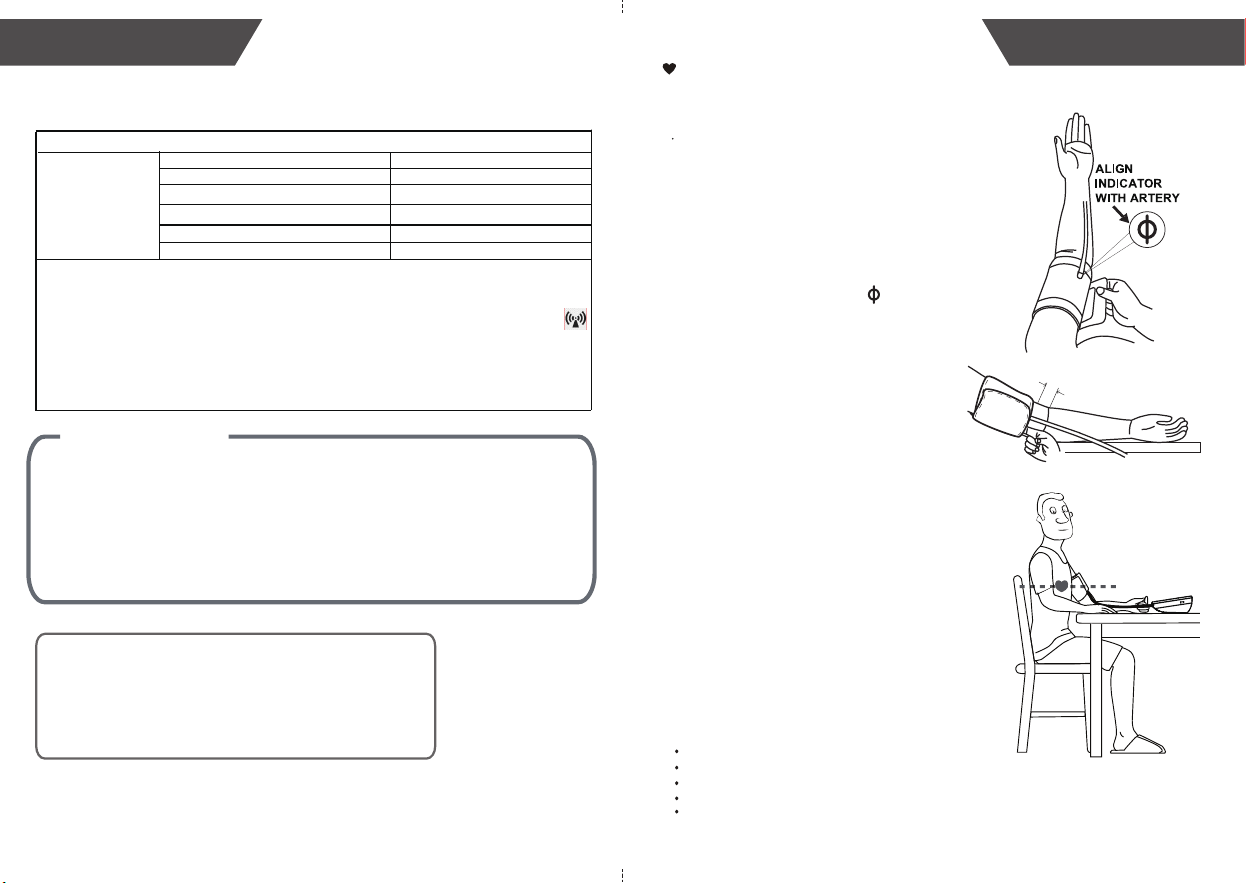
Applying the cuff
2~3cm
1.
Hold your arm with your palm facing
up and tie the cuff on your upper arm,
align the Artery indicator with the
main Artery (on the inside of your arm).
Note: Locate the main Artery by pressing with
2 fingers approximately 2 cm above the bend
of your elbow on the inside of your left arm.
Identify where the pulse can be felt the
strongest, that is your main Artery.
4.
Make sure the bottom edge of the
arm cuff 2 to 3 cm above the inside
elbow. Then wrap the cuff securely.
Note: The cuff should be snug but not too tight.
You should be able to insert one finger between
the cuff and your arm.
Remove all jewelery , such as watches
and bracelets from your left arm.
Note: If your doctor has diagnosed you with poor
circulation in your left arm, use your right arm.
Roll or push up your sleeve to expose
the skin. Make sure your sleeve is not
too tight.
2.
3.
5.
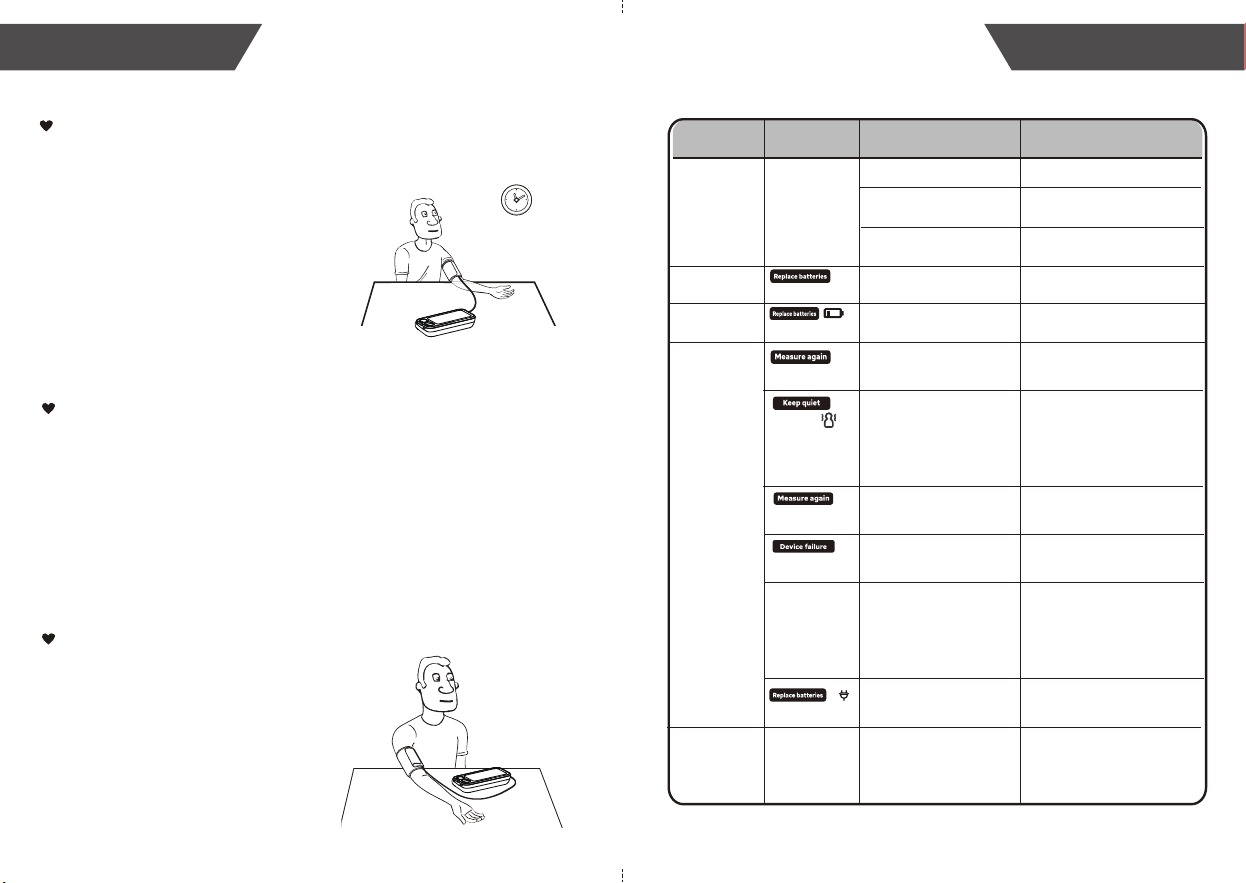
6.
Sit upright in a comfortable chair with
your back against the backrest of the
chair. Keep your feet flat and your legs
uncrossed.
Place your arm resting comfortably on
a flat table. The cuff worn on your arm
should be placed at the same level as
your right atrium of the heart.
Take 5-6 deep breaths and let's start
measuring!
Take the measurement in a silent room.
Wait at least 3 minutes before another measurement. This allows your blood circulation to recover.
Be relaxed and do not move and talk during the measurement procedure.
For a meaningful comparison, try to measure under similar conditions. For example, take daily
measurements at approximately the same time, on the same arm, or as directed by a healthcare
professional.
Rest for 5 minutes before a measurement.
Helpful tips:
Only use a cuff that has been approved by Kinetik Wellbeing for this device.
Before use, please confirm if it fits your arm circumference.
List of compatible devices:
For iOS devices:
The operating system must be iOS 13.0 or more.
The operating system must be Android 5.0 or more.
For Android devices:
About a wireless communication interference
The monitor operates in the unlicensed ISM band at 2.4 GHz. In case it is used
around the other wireless devices including microwave and wireless LAN, which
operate at the same frequency band as the monitor, there is a possibility that
interference occurs between the monitor and such other devices. If such
interference occurs, please stop the operation of other devices or relocate the
monitor before using it or do not use it around the other wireless devices.
Warning
Note:
1. The necessary Quality of Service (QoS) is fully considered here for wirelessly enabled
functions.
2. Interference may occur in the vicinity of equipment marked with the following symbol .
And TMB-2288-B may interfere the vicinal electrical equipment.
3. Keep the monitor at least 20 centimeters away from the human body (especially the
head) when data transmission is proceeding after measurement.
4. To enable the data transmission function, this device shall be paired to an appropriate
BT mobile terminal.
Specifications for Bluetooth Transmission
Bluetooth
Throughput
2.5K-5K
Latency
50ms
PER
<10%
Operating Frequency 2400-2480MHz
Transmission Power
0dBm
Transmission Distance
10m
1918
MEASUREMENT
MEASUREMENT
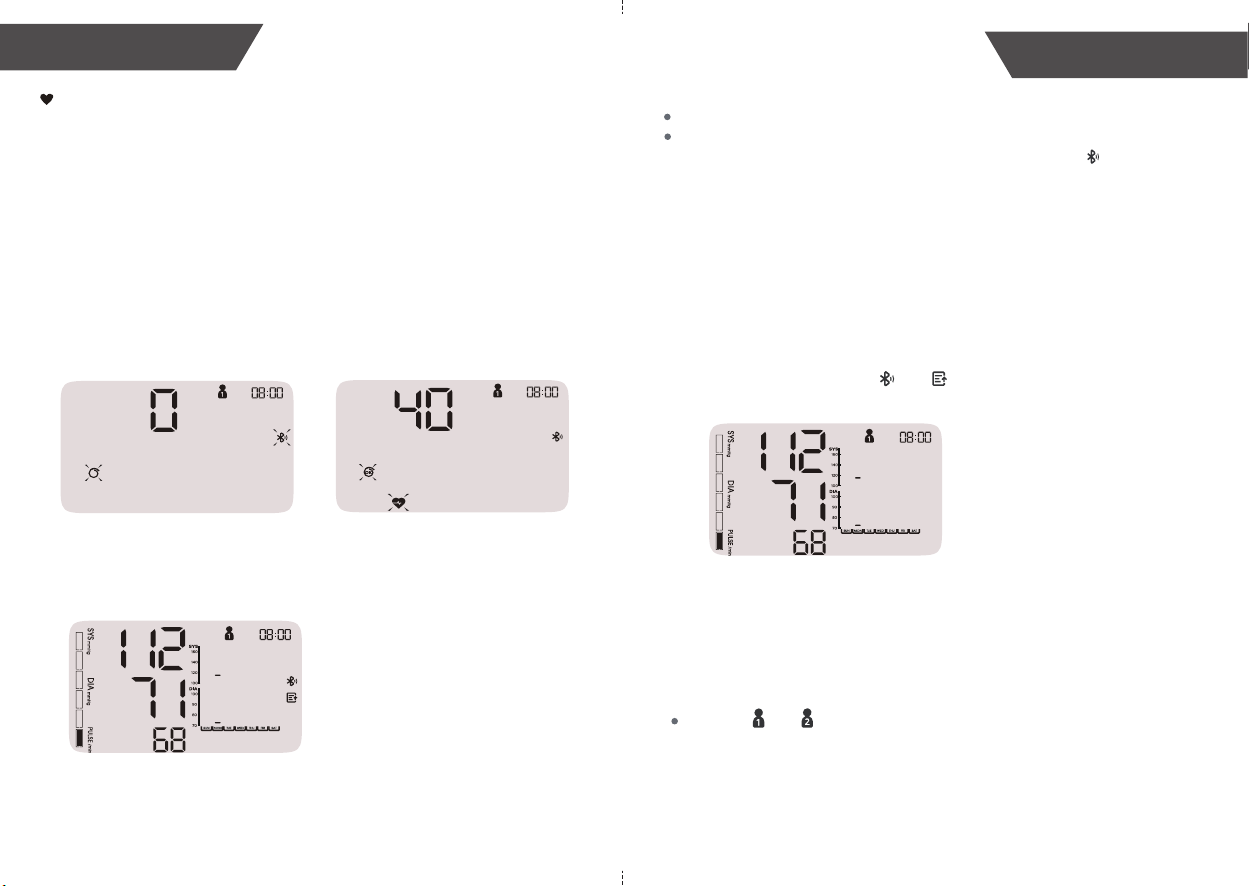
Start a measurement
You can use your monitor without pairing to a smart device. To pair your
monitor with a smart device refer to page 15.
1.
When the monitor is off, press the “START/STOP” button to turn on
the monitor, and it will finish the whole measurement. Remain still
and do not talk until the full measurement is complete.
(Take User 1 for example)
Cuff wrap detection
Inflating and measuring
(a pulse rate is detected)
Display and save
the measurement result
2.
Press the “START/STOP” button to turn off the monitor, or it will shut
off within 1 minute.
If unsuccessful within 60 seconds, the monitor will shut off. In the case of
a data transmission failure, up to 250 measurements are saved on the
device and will be sent when a successful connection is achieved.
If successful, both symbols and will disappear and the monitor will
automatically shut off.
3.
If your monitor is already paired with your smart device and both
Bluetooth and app are ON, when the measurement has completed,
the measurement result will start transmitting (only applicable to User
1 and User 2).
Note
Both user and can store maximum 250 groups of record. When you
pass that limit, every time you take a measurement, the monitor will prompt
“FULL” first and the oldest record will be deleted from the list after the
measurement.
Note
Any time, to stop the measurement, press the “START/STOP” button.
If you don’t pair the device with the MedM Blood Pressure Diary or MedM
Health app or don’t keep the app ON, the bluetooth symbol will still flash
during the measurement.

During a measurement, when there is excessive body motion, especially
on the arm the cuff is worn is detected, the symbol will flash about 5
seconds and detect again. If excessive body motion is no longer detected,
the symbol will disappear; if still detected, the symbol will appear in the
measurement result.
Note
The measured blood pressure reading may not be accurate if these
symbol are displayed.
20 21
DATA MANAGEMENTMEASUREMENT
4.
About the irregular pulse rate and excessive body motion during the
measurement.
During a measurement, If an irregular pulse rate is detected, the symbol
will display in the measurement result. See page 28 for more information.
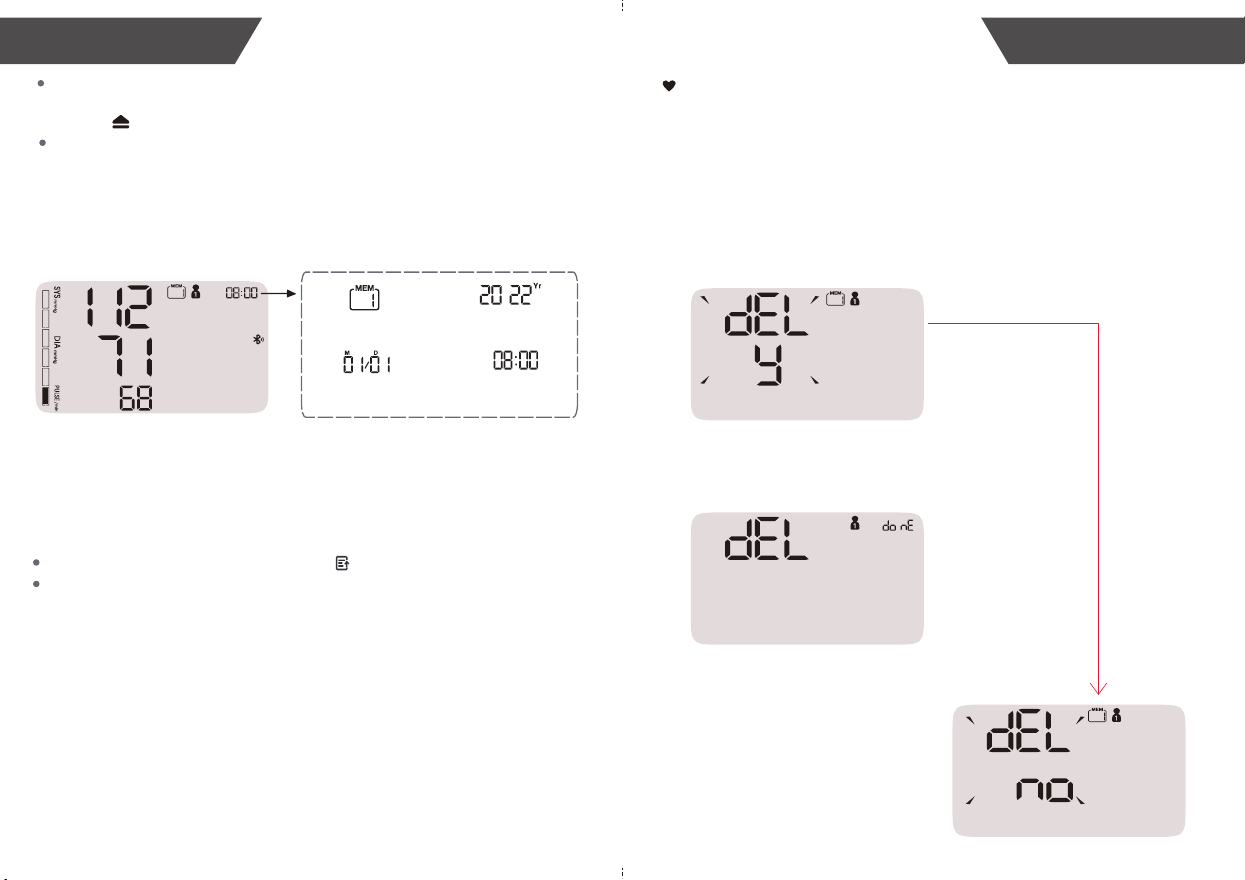
Recall the Records
2.
3.
Press the “USER” or “MEM” button to switch the user ID between user
and . Press the “START/STOP” button to confirm the selected user ID.
1.
When the monitor is off, press the “MEM” button, the LCD will display
the total groups of the memory records, with the user ID blinking.
Then the LCD will display the average value of all the records of last 7
days and BP Trends chart of a specified period of last 7 days. (Example
shown below for User 1)
Note
BP trends is a histogram, designed to display the average blood pressure
value of a specified period of last 7 days, to help the user to visually know
their blood pressure changes.
If there is no measurements for that period of time on a given day, the
histogram for that day will be blank.
For the BP trends chart, the X-axis of the histogram represent the time
(from left to right, from Sunday, Monday, Tuesday, Wednesday, Thursday,
Friday to Saturday), while the Y-axis of the histogram represents the
average value of systolic (high) pressure and diastolic (low) pressure of
the specified period each day.
The data displayed on the top left is the maximum average systolic
pressure value in the past 7 days, while the bottom left is the minimum
diastolic pressure value in the past 7 days.
DATA MANAGEMENT
DATA MANAGEMENT
22 23
The Time and Date will
display alternately.
4.
Press the “USER” or “MEM” button to display the next record.
When the maximum average systolic pressure is higher than 170mmHg or
the maximum average diastolic pressure is higher than 110mmHg, the
symbol“ ” will be displayed.
When the minimum average systolic pressure is lower than or equal to
100mmHg, the minimum average diastolic pressure is lower than or equal
to 70mmHg, the grid corresponding to 100mmHg or 70mmHg will be lit.
The current record
is Group 1.
The corresponding
time is 08:00 (a.m.).
The corresponding
date is January 1st.
The corresponding
year is 2022.
Note:
If there is untransmitted
data, the symbol displays on the record.
The latest record (1) is shown first. Each new measurement is
assigned to the first (1) record. All other records are pushed back one
digit (e.g., 2 becomes 3, and so on), and the last record (250) will be
dropped from the list.
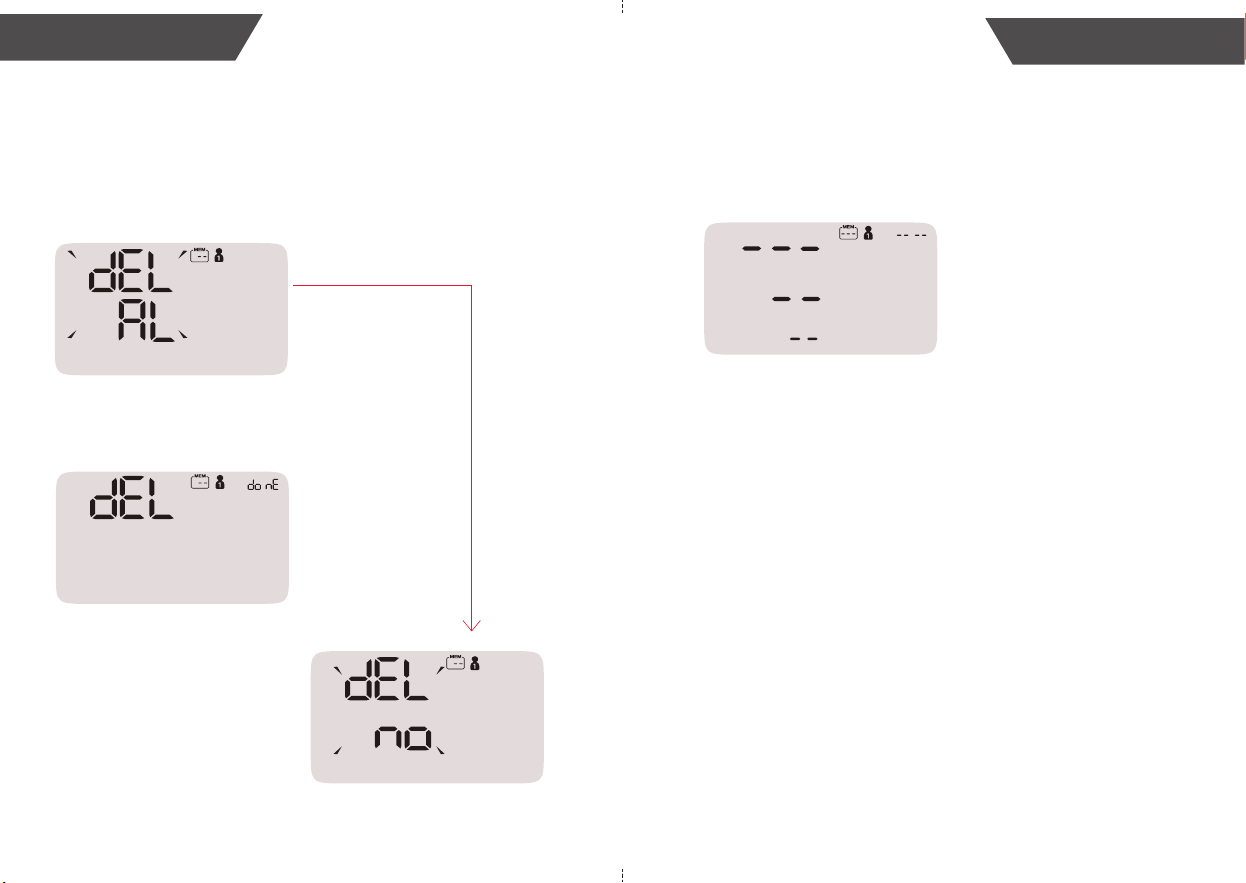
Delete the Records
2.
1.
Enter the memory recall mode as described in the previous section
"Recall the records", find out the record you want to delete.
Delete the records by following the steps below.
3.
Press the “START/STOP” button to confirm the deletion, the LCD will
display “dEL donE” and then the previous record will be displayed.
Note
Before you confirm the deletion,
you could press the “USER” or
“MEM” button to switch the LCD
display from “dEL y” to “dEL no”.
Then press the “START/STOP”
button, you could stop clearing
the memory.
A: Delete one record (Example shown below for User 1)
Press and hold the “MEM” button about 3 seconds, the LCD will
display “dEL y” and blink.
24 25
DATA MANAGEMENT DATA MANAGEMENT
2.
Press and hold the “USER” and “MEM” button for about 5 seconds,
the LCD will display “dEL AL”and blink.
1.
Enter the memory recall mode as described in the previous section
"Recall the records".
3.
Press the “START/STOP” button to confirm the deletion, the LCD will
display “dEL donE”.
B: Delete all records (Example shown below for User 1)
Note
Before you confirm the deletion,
you could press the “USER” and
“MEM” button to switch the LCD
display from “dEL AL” to “dEL no”.
Then press the “START/STOP”
button, you could stop clearing
the memory.
4.
Once deleted, your readings cannot be restored. The LCD will display
“---” like the following picture.
Press the “START/STOP” button to turn off the monitor, otherwise it
will power off automatically within 1 minute.
2726
INFORMATION FOR USER
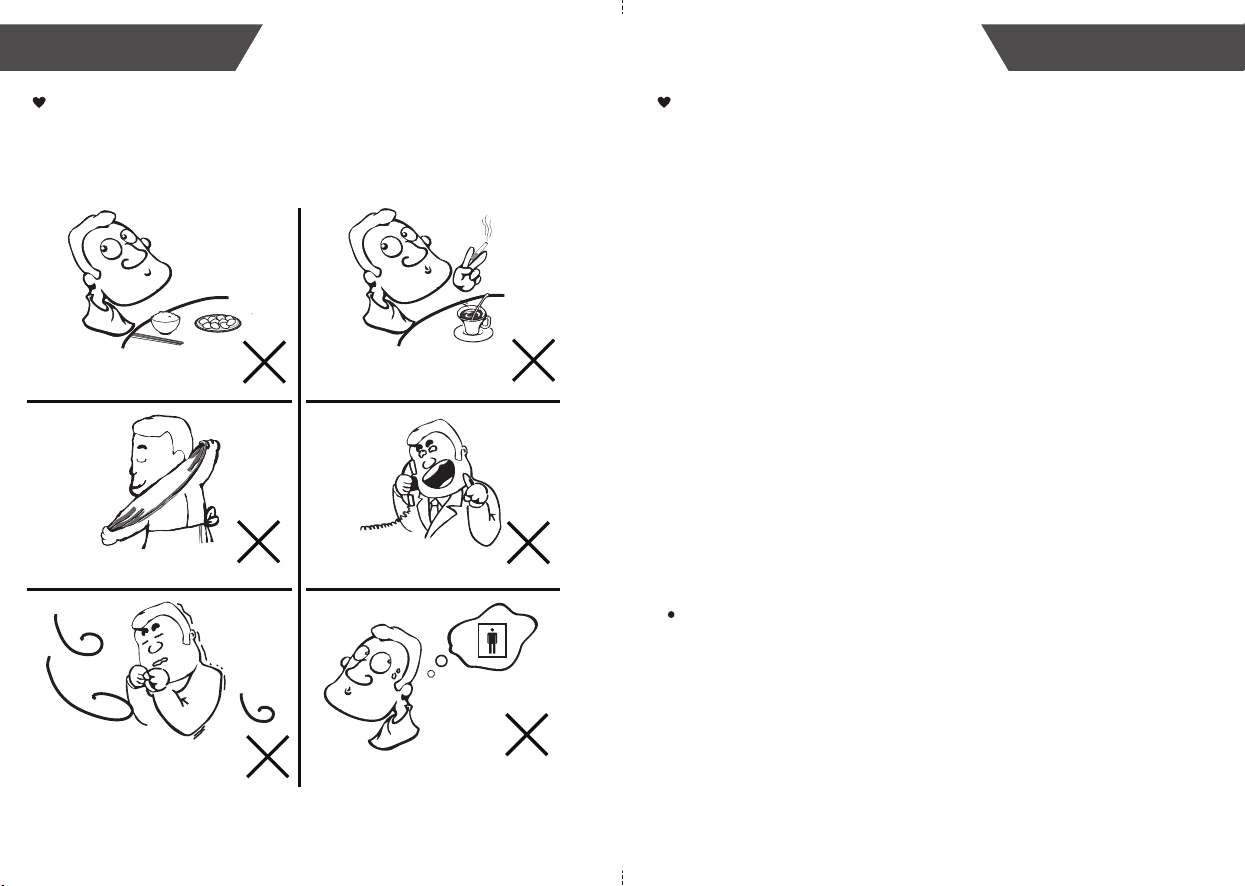
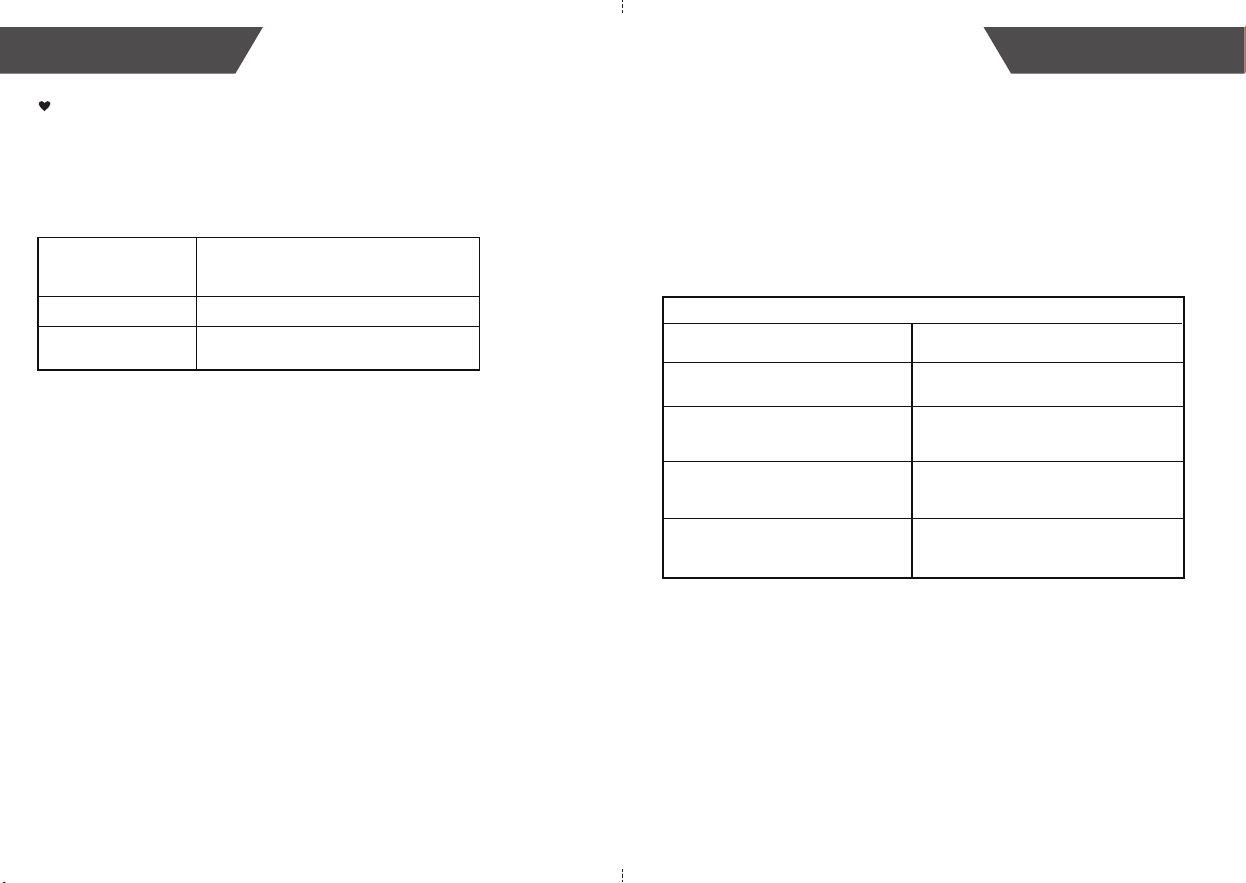
Tips for Measurement
Within 1 hour
after dinner or drinking
Within 20 minutes after taking a bath
In a very cold environment
Immediate measurement
after tea, coffee, smoking
When talking or moving your body
When you want to discharge urine
Measurements may be inaccurate if taken in the following
circumstances.
INFORMATION FOR USER
Maintenance
In order to get the best performance, please follow the instructions
below.
1. Cleaning Process:
Step 1: Make sure to switch off and unplug the device prior to cleaning.
Step 2: Use a soft cloth and dampen it with soapy water to clean the cuff
first, and then use a soft cloth and damped it with clear water to
remove residual soap until there is no visible residual
contaminants. Attention shall be paid to avoid liquid leaking into
the cuff.
Step 3: Use a dry soft cloth to wipe the cuff, in order to remove residual
moisture.
Step 4: Dry the cuff in a well-ventilated area after cleaning.
2. Disinfection Process:
Step 1: Make sure to switch off and unplug the device prior to disinfection.
Step 2: Use a soft cloth with 70% isopropanol to disinfect the cuff
for about 10 minutes. Attention shall be paid to avoid liquid leaking
into the cuff.
Step 3: Use a clean dry cloth or towel to wipe off the disinfectant until
there is no visible residue.
Step 4: Dry the cuff in a well-ventilated area after disinfection.
Suggestion:
Frequency of Cleaning and Disinfection:
For single patient multiple use, it’s recommended to clean the device
surface once a month or whenever it’s necessary.
For multiple patient multiple use, it’s recommended to clean the device
every time before and after usage. Maintenance procedures shall be
taken as per instruction.
The appearance of the icon indicates that a pulse irregularity consistent with an irregular
pulse rate was detected during measurement. Usually this is NOT a cause for concern.
However, if the symbol appears often, we recommend you seek medical advice. Please note
that the irregular pulse rate detector only serves as a non-medical feature, and the results
cannot be used directly for clinical judgement. Please seek medical advice from professionals
before making any medical decisions.
2928
ABOUT BLOOD PRESSUREABOUT BLOOD PRESSURE
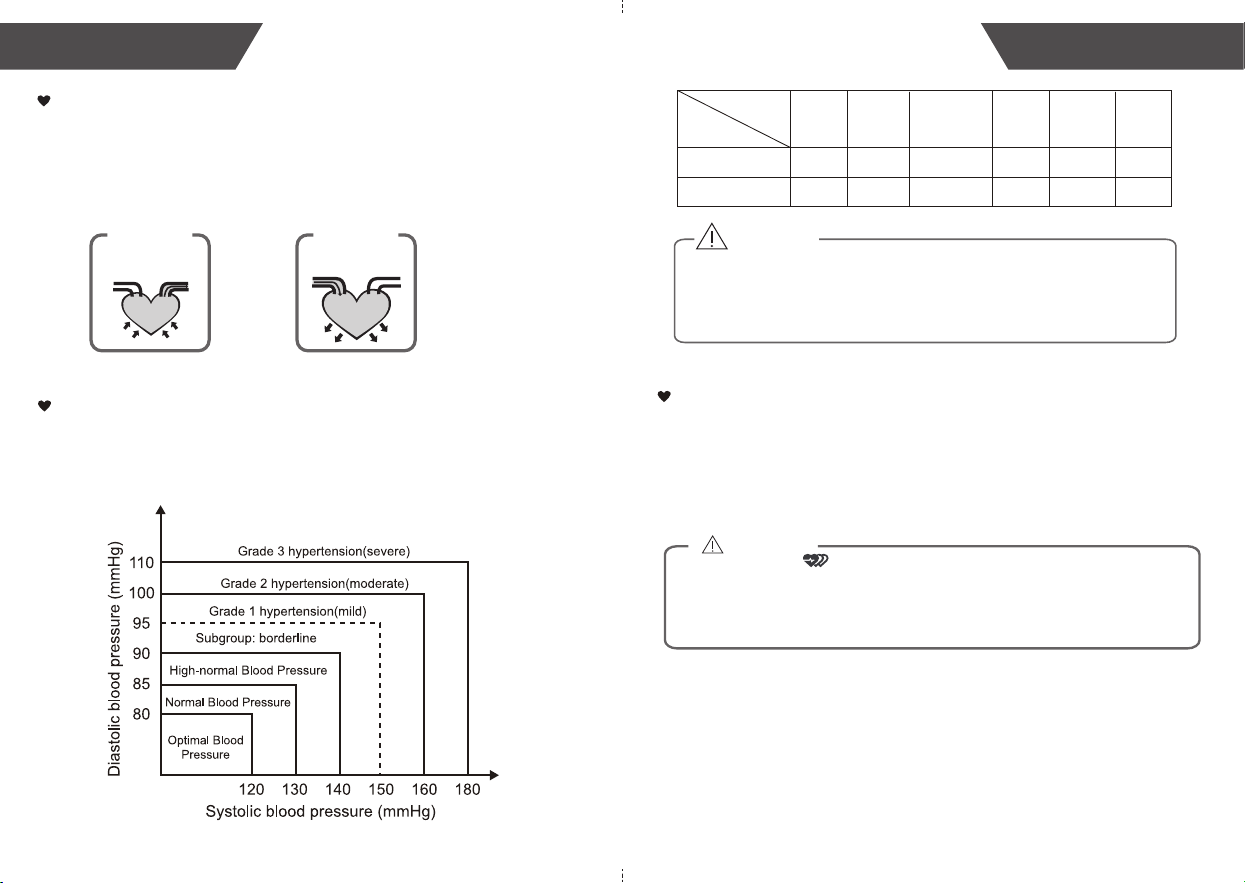
What are systolic pressure and diastolic pressure?
What is the standard blood pressure classification?
When ventricles contract and pump blood out of the heart, the blood
pressure reaches its maximum value in the cycle, which is called systolic
pressure. When the ventricles relax, the blood pressure reaches its
minimum value in the cycle, which is called diastolic pressure.
press
artery vein
blood discharging
Systolic
relax
blood entering
Diastolic
The blood pressure classification published by World Health Organization
(WHO) and International Society of Hypertension (ISH) in 1999 is as
follows:
CAUTION
SYS
DIA
<120
<80
120-129
80-84
130-139
85-89
140-159
90-99
160-179
100-109
≥180
≥110
Level
Blood
Pressure
(mmHg)
Optimal Normal High-normal Mild Moderate Severe
Only a healthcare professional can tell your normal BP range. Please contact a
healthcare professional if your measuring result falls out of the range. Please note
that only a healthcare professional can tell whether your blood pressure value has
reached a dangerous point.
Irregular Pulse Rate Detector
CAUTION
An irregular pulse rate will be detected if there is an irregular pulse rhythm while measuring
systolic and diastolic blood pressure. When measurements were performed, the monitor will
record all pulse intervals and calculate the average. If two or more pulse intervals were
recorded, and the difference between each interval and the average is larger than ±25% of
the average; or if four or more pulse intervals were recorded, and the difference between
each interval and the average is larger than ±15% of the average value, the irregular pulse
symbol will be displayed along with measurement results.
30
31
ABOUT BLOOD PRESSURE TROUBLESHOOTING
If any abnormality arises during use, please check the following points:
NOTE: If the product still does not work, contact Kinetik Wellbeing. Under no
circumstance should you disassemble or attempt to repair the unit by yourself.
PROBLEM SYMPTOM CHECK THIS REMEDY
No power
High Battery
Low Battery
Error
message
Display can
not light up.
Batteries are depleted.
Replace with new batteries.
Insert the batteries
correctly.
Replace with new batteries.
Batteries are inserted
incorrectly.
bAt Lo shows
The battery is too low.
E 01 shows
E 03 shows
E 04 shows
The measurement
failed.
Adapter is inserted
incorrectly.
Insert the AC adapter
correctly.
The cuff is loose.
Re-wear the cuff
before measurement.
Do not move during
measurement and
measure again.
Relax for 5 minutes and
measure again.
No pulse is detected.
Wear the cuff again
before measurement.
Warning
message
Relax for a moment and
then measure again. If the
problem persists, contact
your physician.
out shows
Out of measurement
range.
EExx shows
Hardware error
(XX can be some digital
symbol, such as 01, 02,
03, etc.)
Turn off monitor and
measure again. If EExx still
appears on the display,
please contact the retailer
or our customer service.
The voltage of the blood
pressure monitor is high.
&
The battery is too high. Replace with new batteries.
Replace with the authorized
adapter.
Excessive body motion
(such as shaking of the
arm with the cuff on
or weak Pulse is
detected.)
bAt H shows
E 02 or
shows
,
&
&
&
&
&
&
bAt H shows
Why does my blood pressure
fluctuate throughout the day?
Is the result the same
if measuring on the
right arm?
Why do I get a different
blood pressure at home
compared to the hospital?
1. Individual blood pressure varies multiple
times everyday. It is also affected by the
way you tie your cuff and your measurement
position, so please take the measurement
under the same conditions.
2.If the user takes medicine, the pressure
will vary more.
3.Wait at least 3 minutes for another
measurement.
The blood pressure is different even
throughout the day due to weather,
emotion, exercise etc. Also, there is
the “white coat” effect, which means
blood pressure usually increases in
clinical settings.
It is ok for both arms, but there will
be some different results for
different people. We suggest you
measure the same arm every time.
What you need to pay attention to
when you measure your blood
pressure at home:
If the cuff is tied properly.
If the cuff is too tight or too loose.
If the cuff is tied on the upper arm.
If you feel anxious.
Taking 2-3 deep breaths before
beginning will be better for
measuring.
Advice: Relax for 4-5 minutes
until you calm down.
32 33
SPECIFICATIONS AUTHORIZED COMPONENT
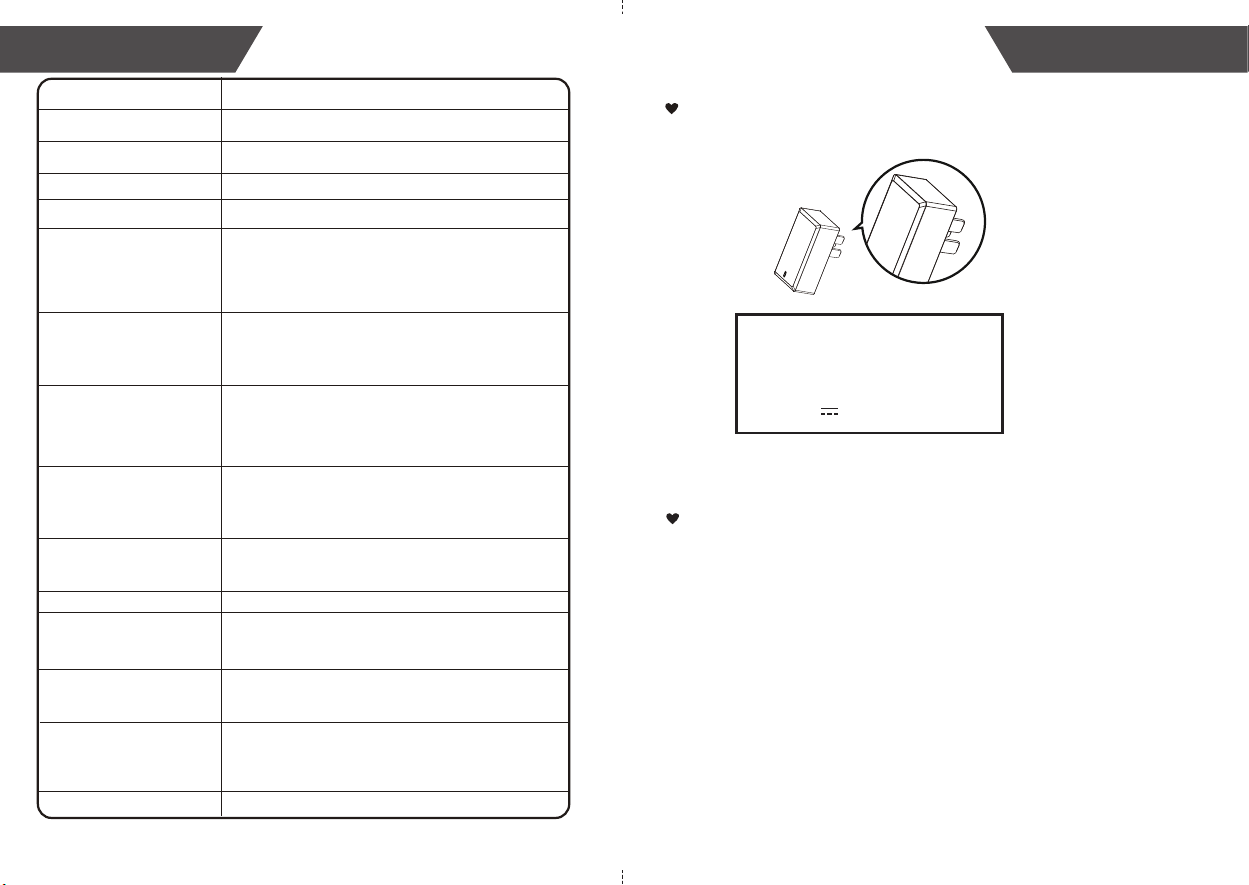
Authorized Component
Please use the authorised adapter (not included).
For more information about our products, please visit
www.kinetikwellbeing.com
Contact Information
Input: 100-240V, 50-60Hz, 0.2A max
5V 1000 mA
Adapter
Type: BLJ06L050100U-B
Output:
Type BF applied part
WARNING: No modification of this equipment is allowed.
Display mode
Measurement mode
Oscillographic testing mode
Measurement range
Measurement perimeter
of the upper arm
Weight
External dimensions
Mode of operation
Continuous operation
Degree of protection
Protection against
ingress of water
Accuracy
Normal working
condition
Storage & transportation
condition
Device Classification
Battery Powered Mode:
Internally Powered ME Equipment
AC Adapter Powered Mode: Class II ME Equipment
About 22-45cm
Cuff model AC2245-05 is intended for adul population
or those who are in pregnancy or suffer from diabetes.
IP21 It means the device could be protected against
solid foreign objects of 12,5mm Ф and greater, and
against vertically falling water drops.
Expected Lifetime
Types of use/reuse
Rated cuff pressure: 0 mmHg~299 mmHg
Measurement pressure:
SYS: 60 mmHg ~ 230 mmHg
DIA: 40 mmHg ~ 130 mmHg
Pulse value: (40-199) beat/minute
A temperature range of: +5°C to +40°C
A relative humidity range of 15% to 90%,
non-condensing, but not requiring a water vapour
partial pressure greater than 50 hPa
An atmospheric pressure range of 700 hPa to 1060 hPa
Temperature:-20°C to +60°C
A relative humidity range of ≤ 93%, non-condensing,
at a water vapour pressure up to 50 hPa
An atmospheric pressure range of 500 hPa to 1060 hPa
Device: 3 years or 30,000 measurements (may vary
based on usage conditions)
Cuff: 10000 times
Alkaline battery: About 200-300 times
Multiple patient multiple use
Approx.178 mm × 101 mm × 42.89 mm
Digital LCD V.A.124 mm × 76 mm
Approx.343 g (Excluding the batteries and cuff)
NOTE: This blood pressure monitor complies with ISO 81060-2: 2018
(including pregnant women and diabetics).
Static Pressure: 5℃-40℃ within ±3mmHg
Pulse value: ±5%
Clinical validation: Mean difference within ±5mmHg;
Standard deviation ≤8mmHg
34 35
EMC GUIDANCE EMC GUIDANCE
EMC Guidance
The ME EQUIPMENT or ME SYSTEM is suitable for home healthcare environ-
ments.
Essential performance:
Accuracy of measuring blood pressure and pulse rate
The Basis Safety of the Blood Pressure Monitor (TMB-2288-B) is as following:
Deviation from normal operation that poses an unacceptable risk to the patient or
operator.
Warning: Don’t be near the active HF surgical equipment and the RF shielded
room of an ME system for magnetic resonance imaging, where the intensity of EM
disturbances is high.
Warning: Use of this equipment adjacent to or stacked with other equipment
should be avoided because it could result in improper operation. If such use is
necessary, this equipment and the other equipment should be observed to verify
that they are operating normally.
Warning: Use of accessories, transducers and cables other than those specified
or provided by the manufacturer of this equipment could result in increased
electromagnetic emissions or decreased electromagnetic immunity of this
equipment and result in improper operation.
Warning: Portable RF communications equipment (including peripherals such as
antenna cables and external antennas) should be used no closer than 30 cm (12
inches) to any part of the equipment including cables specified by the
manufacturer. Otherwise, degradation of the performance of this equipment could
result.
Measurement Range
Systolic pressure: 60-230 mmHg
Diastolic pressure: 40-130 mmHg
Pulse: 40-199 beats/minute
Rated Cuff Pressure
0-299 mmHg (0-39.9 kPa)
Accuracy
Pressure: ±3 mmHg / 0.4 kPa
Pulse: ±5%
Technical description:
1. All necessary instructions for maintaining BASIC SAFETY and ESSENTIAL
PERFORMANCE with regard to electromagnetic disturbances for the expected
lifetime.
2. Guidance and manufacturer’s declaration-electromagnetic emissions and
Immunity.
Table 1
Guidance and manufacturer’s declaration - electromagnetic emissions
RF emissions
CISPR 11
RF emissions
CISPR 11
Group 1
Class [ B ]
Class A
Comply
Compliance
Harmonic emissions
IEC 61000-3-2
Voltage fluctuations /
flicker emissions
IEC 61000-3-3
Emissions test
EMC GUIDANCE
37
36
EMC GUIDANCE
Table 3
385 0.3 27
Service Modulation
380-390 1.8
450 430-470 2 0.3 28
710
704-787
745
780
0.2 0.3 9
810
870
930
800-960 2 0.3 28
2 0.3 28
2 0.3 28
0.2 0.3 9
1720
1845
1970
1700-
1990
2450
2400-
2570
5240
5500
5785
5100-
5800
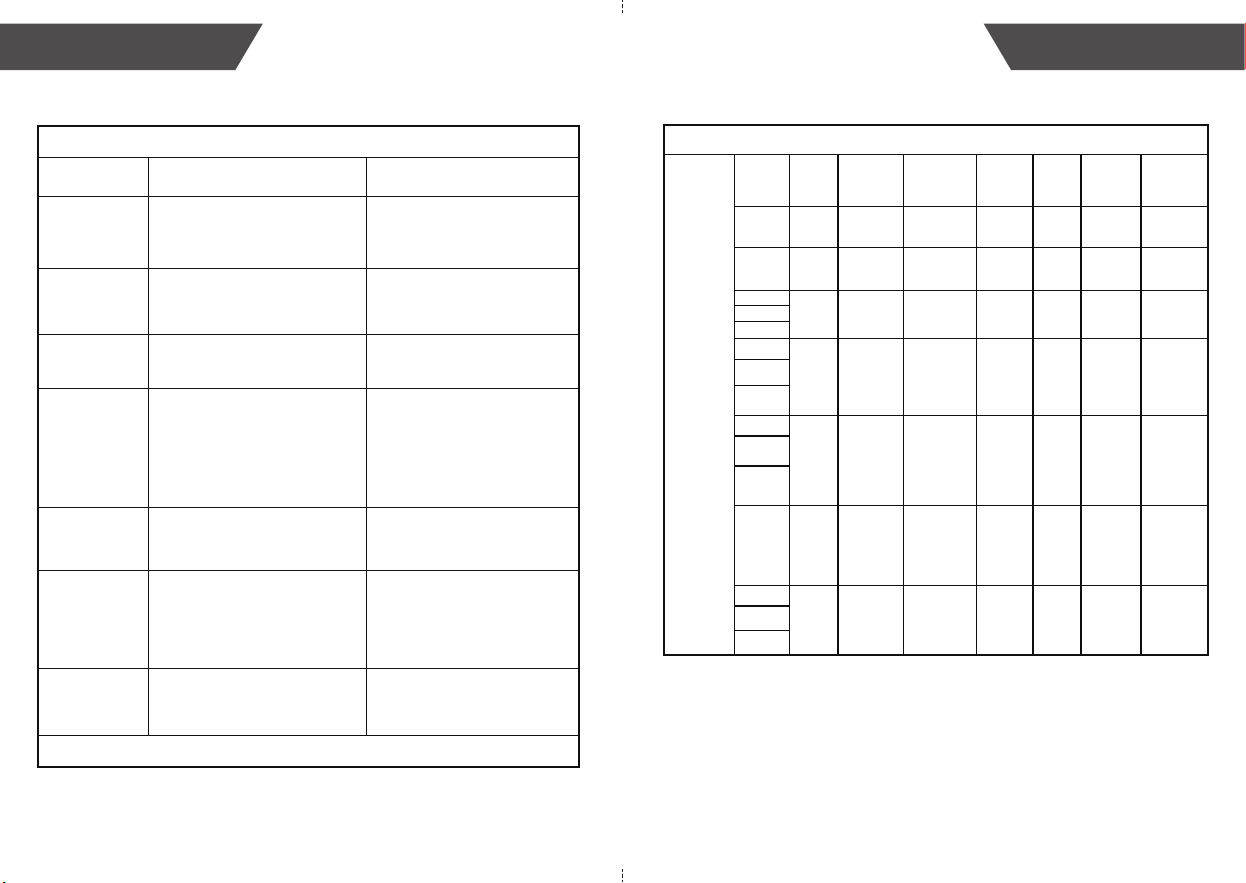
Guidance and manufacturer’s declaration - electromagnetic Immunity
Test
Frequency
(MHz)
Radiated RF
IEC61000-4-3
(Test
specifications
for
ENCLOSURE
PORT
IMMUNITY to
RF wireless
communicati-
ons
equipment)
Band
(MHz)
Distance
(m)
IEC
60601-1-2
Test Level
(V/m)
TETRA
400
Pulse
modulation
18 Hz
GMRS 460,
FRS 460
FM ± 5k Hz
deviation
1 kHz sine
LTE Band
13,
17
Pulse
modulation
217 Hz
GSM
800/900,
TETRA 800,
iDEN 820,
CDMA 850,
LTE Band 5
Pulse
modulation
18 Hz
GSM 1800;
CDMA 1900;
GSM 1900;
DECT;
LTE Band 1,
3, 4,25;
UMTS
Pulse
modulation
217 Hz
Bluetooth,
WLAN,
802.11
b/g/n, RFID
2450, LTE
Band 7
Pulse
modulation
217 Hz
WLAN
802.11
a/n
Pulse
modulation
217 Hz
Compliance
level
(V/m)
27
28
9
28
Maximum
Power
(W)
28
9
28
Table 2
Guidance and manufacturer’s declaration – electromagnetic Immunity
Immunity Test
±8 kV contact
±2 kV, ±4 kV, ±8 kV, ±15 kV air
±8 kV contact
±2 kV, ±4 kV, ±8 kV, ±15 kV air
±2 kV for power supply lines
±1 kV signal input/output
100 kHz repetition frequency
±2 kV for power supply lines
Not Applicable
100 kHz repetition frequency
±0.5 kV, ±1 kV differential mode
±0.5 kV, ±1 kV, ±2 kV common mode
±0.5 kV, ±1 kV differential mode
Not Applicable
30 A/m
50 Hz / 60 Hz
30 A/m
50 Hz / 60 Hz
NOTE U
T
is the a.c. mains voltage prior to application of the test level.
Compliance level
Electrostatic
discharge (ESD)
IEC 61000-4-2
Power frequency
magnetic field
IEC 61000-4-8
Voltage dips, short
interruptions and
voltage variations
on power supply
input lines
IEC 61000-4-11
Electrical fast
transient/burst
IEC 61000-4-4
Surge
IEC61000-4-5
IEC 60601-1-2
Test level
0% U
T
; 0,5 cycle. At 0°, 45°, 90°, 135°,
180°, 225°, 270° and 315°.
0% U
T
; 1 cycle and 70% U
T
;
25/30 cycles; Single phase: at 0°.
0% U
T
; 250 / 300 cycle
0% U
T
; 0,5 cycle. At 0°, 45°, 90°, 135°,
180°, 225°, 270° and 315°.
0% U
T
; 1 cycle and 70% U
T
;
25/30 cycles; Single phase: at 0°.
0% U
T
; 250 / 300 cycle
Conduced RF
IEC61000-4-6
3 V
0,15 MHz – 80 MHz
6 V in ISM and amateur radio bands
between 0,15 MHz and 80 MHz
80% AM at 1 kHz
3 V
0,15 MHz – 80 MHz
6 V in ISM and amateur radio bands
between 0,15 MHz and 80 MHz
80% AM at 1 kHz
10 V/m
80 MHz – 2,7 GHz
80% AM at 1 kHz
10 V/m
80 MHz – 2,7 GHz
80% AM at 1 kHz
Radiated RF
IEC61000-4-3