1
Instruction
& Recipe
Booklet
For your safety and continued enjoyment of this product, always
read the instruction book carefully before using.
Espresso Machine
EM-320 SERIES
ESPRESSO BAR™

2
Important
Safeguards
We at Cuisinart are very safety conscious. We design
and manufacture consumer products with the safety
of you, our valued customer, foremost in mind.
In addition we ask that you exercise a degree of care
when using electrical appliances and adhere to the
following precautions.
When using electrical appliances, basic safety
precautions should always be followed, including the
following:
1. CAREFULLY READ ALL INSTRUCTIONS BEFORE
OPERATING APPLIANCE AND SAVE FOR FUTURE
REFERENCE.
2. To protect against re, electrical shock, and injury
to persons, do not immerse the appliance, cord,
or plug in water or any other liquid.
3. This appliance is for household use only.
4. Do not use this appliance for anything other than
its intended use.
5. Do not leave the appliance unattended when
in use.
6. Do not touch hot surfaces. Use handles or knobs.
7. Always use the appliance on a dry, level surface.
8. To disconnect, turn all controls o, then remove
plug from power outlet.
9. Do not place this appliance on or near a hot gas or
electric burner, or where it could touch a heated
oven.
10. Do not let the cord hang over the edge of
a table or counter, touch hot surfaces, or become
knotted.
11. The use of accessory attachments not
recommended by Cuisinart may cause a risk
of injury to persons, re, or electrical shock.
12. Strictly follow cleaning and care instructions.
13. Do not use outdoors.
14. An extension cord is not recommended. However,
if one is needed, the extension cord should be a
grounded type and its electrical rating must be the
same or higher wattage as the appliance. Regularly
inspect the supply cord, plug, and actual appliance
for any damage. If damaged in any way,
immediately cease use of the appliance and call
Cuisinart Customer Service at 1-800-726-0190.
15. Refer servicing to qualied personnel.
16. Do not operate any appliance with a damaged
cord or plug, or after the appliance malfunctions
or has been damaged in any manner. Return
appliance to the nearest authorized service facility
for examination, repair, or adjustment.
17. Unplug from outlet when not in use and before
cleaning. Allow to cool before putting on or taking
o parts, and before cleaning the appliance.
18. Do not operate your appliance in an appliance
garage or under a wall cabinet. When storing in
an appliance garage, always unplug the unit from
the electrical outlet. Not doing so could create
a risk of re, especially if the appliance touches
the walls of the garage or the door touches the
unit as it closes.
19. This appliance is not intended for use by persons
(including children) with reduced physical, sensory,
or mental capabilities, or lack of experience and
knowledge, unless they have been given
supervision or instruction concerning use of the
appliance by a person responsible for their safety.
20. Children should be supervised to ensure that they
do not play with the appliance.
21. The heating element surface is subject to residual
heat after use.
22. User Maintenance instruction shall warn a user
that any other servicing should be performed by
an authorized service representative.
23. Scalding may occur if the lid is removed during
the brewing cycles.
24. WARNING: To avoid the risk of injury, do not open
the brew chamber during the brew process.
25. To unplug, grasp the plug and pull from the outlet.
Never pull from the power cord.
26. This appliance should not be used by or near
children or individuals with certain disabilities .

3
Save These
Instructions
For Household
Use Only
Warning: Risk of Fire
or Electric Shock
The lightning ash with arrowhead symbol
within an equilateral triangle is intended
to alert the user to the presence of
uninsulated dangerous voltage within the
product’s enclosure that may be of
sucient magnitude to constitute a risk
of re or electric shock to persons.
The exclamation point within an
equilateral triangle is intended to alert
the user to the presence of important
operating and maintenance (servicing)
instructions in the literature
accompanying the appliance.
Special Safety Instructions
1. Use only cold water in the water reservoir.
Do not use any other liquid.
2. Never use the machine without water in it.
3. Ensure the portalter holder is rmly secured when
using the machine.
4. Never remove the portalter holder during the
brewing operation as the machine is under pressure.
WARNING: To avoid the risk of injury, do not open the
brew chamber during the brew process.
NOTE: For safety reasons it is recommended you plug
your Cuisinart appliance directly into the power outlet.
Use in conjunction with a power strip or extension cord
is not recommended.
Special Cord Set
Instructions
A short power-supply cord is provided to reduce the
risks resulting from becoming entangled in or tripping
over a longer cord.
Longer extension cords are available and may be used
if care is exercised in their use.
If a long extension cord is used, the marked electrical
rating of the extension cord must be at least as great
as the electrical rating of the appliance, and the longer
cord should be arranged so that it will not drape over
the countertop or tabletop, where it can be pulled on
by children or tripped over.
Notice
This appliance has a polarized plug (one blade is wider
than the other). To reduce the risk of electric shock,
this plug will t in a polarized outlet only one way. If
the plug does not t fully in the outlet, reverse the
plug. If it still does not t, contact a qualied
electrician. Do not modify the plug in any way.
When brewing coee into a travel mug, you will need to
remove the drip tray.
NOTE: There may be water found in the drip tray as
a result from normal brewing.

4
Contents
Important Safeguards ........................ 2
Unpacking Instructions ....................... 4
The Quest for the Perfect Cup of Espresso ...... 5
Features and Benefits......................... 6
Getting to Know Your Control Panel............ 7
Accessories .................................. 8
Charcoal Water Filter ......................... 9
Preparing Your Espresso Machine.............. 9
Programming Your Espresso Machine ........ 10
Guide to the Perfect Espresso ................ 11
Cold Extraction ............................. 12
Guide to Milk Texturing ..................... 12
Using the Hot Water Function ................ 13
Cleaning and Maintenance ................... 14
Warranty ................................... 17
Recipes .................................... 18
Important Unpacking
Instructions
1. Place the box on a large, sturdy, at surface.
2. Remove literature.
3. Turn the box so that the back side of the box is
face down and slide the inner contents out on to a
at surface.
4. After the unit has been removed, place the box out
of the way and lift o the top polyfoam insert.
5. Remove the portalter and the white box labeled
Espresso Accessories Box from the polyfoam.
6. Unwrap the portalter and place to the side.
NOTE: The portalter is packed with the double
shot lter basket in place.
7. Open the Espresso Accessories Box and remove all
contents.
NOTE: Accessories packed inside the Frothing Pitcher,
Tamper Tool and Single shot Espresso Filter. Steam
Wand Cleaning Pin is packed inside the storage tray.
See page 8 of the instruction manual for reference
and integrated storage instructions.
8. Remove the espresso maker from the polyfoam
and remove the polybag covering the machine.
9. Place unit on a at surface and remove all other
packaging materials and tape.
NOTE: Charcoal Water Filter and Filter Holder are
stored inside the water tank.
10. Add the lters and coee scoop in storage tray
behind drip tray. See images on page 6 and 8
for reference.
We suggest you save all packing materials in the
event that future shipping of the machine is needed.
Keep all plastic bags away from children.
KEEP ALL PLASTIC BAGS AWAY FROM CHILDREN.

5
The Quest for The Perfect
Cup of Espresso
It is generally agreed that there are four basic
elements critical to the perfect cup:
Element 1: Water
When brewing espresso, make sure the water ows
through the lter at the correct pace. The water ow
can be adjusted by varying the pressure with which
the coee is tamped (pressed down) in the lter
or by altering the grind of the coee. If the speed
of the water ow is too slow, the coee will be
overextracted and will be very dark and bitter, with
a spotted and uneven crema (froth) on the top. If the
speed of the water ow is too fast, the coee will be
underextracted and the supreme avor will not
develop. The coee will be diluted and there will be
an inadequate amount of crema on the top.
Element 2: Coffee
While the bulk of the liquid is water, all of the avor
should be from the coee. To achieve the same great
quality of coee you receive at a café, you need to
use the same quality beans. If you choose to grind
your own beans, buy the beans fresh and whole, only
about a two-week supply at a time for maximum
freshness. Once the coee bean is broken, its avor
degrades very quickly. If it is not practical to buy
smaller supplies, we recommend you separate larger
amounts of beans and store them in airtight
containers in a cool, dry area. They should not be
kept for longer than 1 month as avor will diminish.
Do not refrigerate or freeze coee beans.
Element 3: Grind
The grind of the coee is critical for proper avor
extraction. If using a pre-ground coee, be sure to
purchase an espresso grind that is specically for
espresso/cappuccino machines. If the grind is too
ne, overextraction and bitterness will occur with a
spotted and uneven crema on the top. If the grind is
too coarse, the water will pass through too rapidly,
and there will be an inadequate amount of
crema on the top of the espresso.
Element 4: Tamping the Coffee
Grounds
If you choose to use ground espresso, tamping
the coee is a very important part of the coee
making process. Using the provided tamping tool,
tamp (press down) the grounds with moderate
pressure. Add more coee and tamp again if
necessary to bring coee to level. Do not overll
the lter basket. If the coee is not tamped securely,
there is a chance that the water will ow through
the coee too rapidly and the coee will be
underextracted. If the coee is tamped too rmly,
the water will ow through the coee too slowly
and the coee will be overextracted and may
overow through the portalter.
6
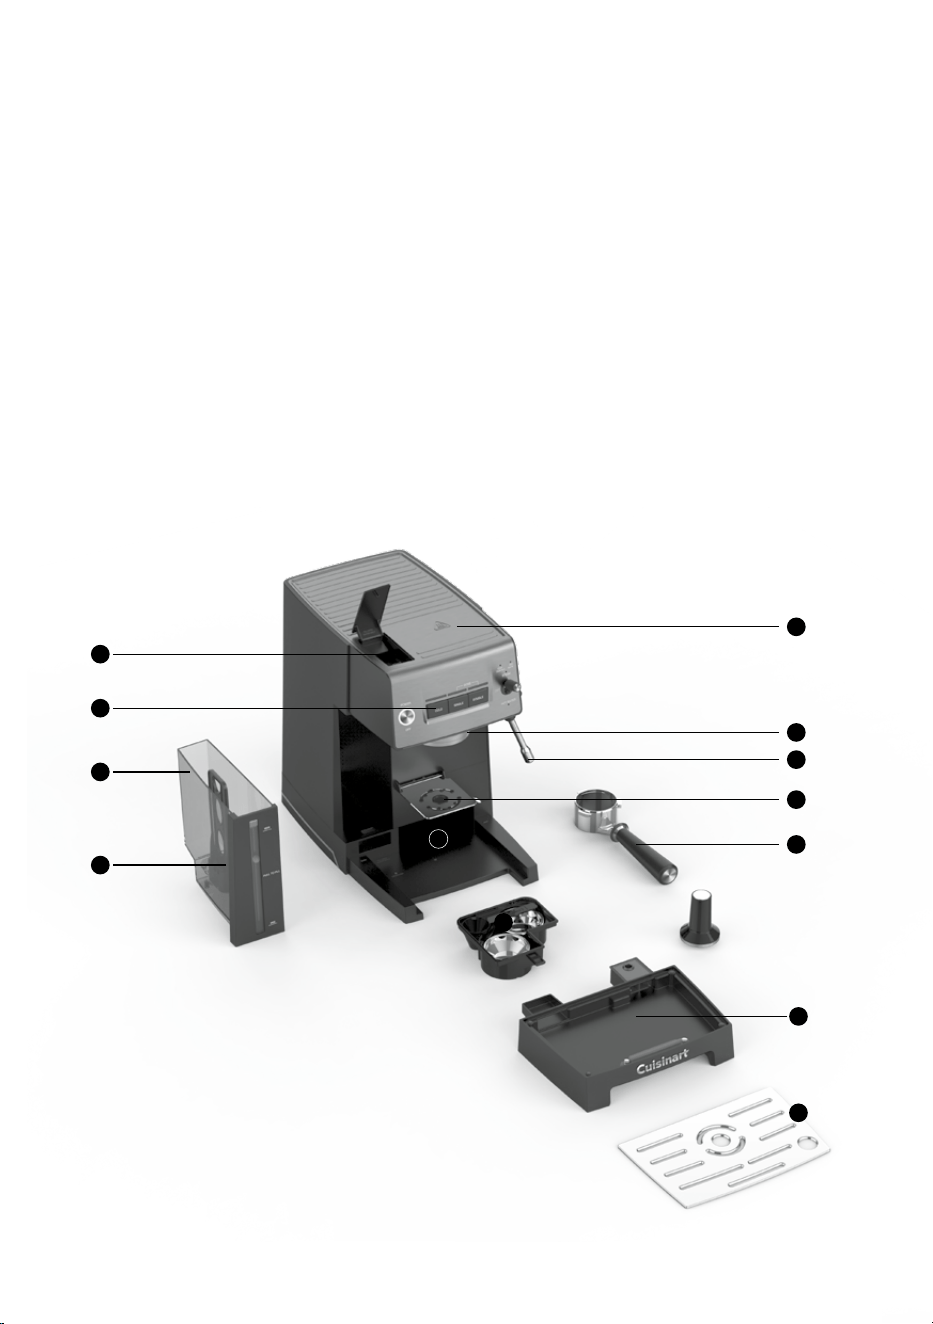
Features and Benefits
1. Water Reservoir Access Door
2. Removable 48-ounce Water Reservoir
Front-loaded for easy lling. Easy-view water
level window.
3. Charcoal Water Filter and Holder
4. Control Panel
See detailed illustration on next page.
5. Cup-Warming Plate
Used to warm the espresso cups.
6. Bottomless Portalter
54mm stainless steel bottomless portalter.
7. Steam & Hot Water Wand
Steams milk for cappuccinos and lattes
or dispenses hot water.
8. Group Head/Brew Head
For easy t of the portalter holder. Has two
positions, lock and unlock, for ease of cleaning.
9. Adjustable Shelf
Flip-down shelf to accommodate smaller cups.
10. Removable Drip Tray
Removes for easy cleaning and to accommodate
up to a 20 oz. travel mug.
11. Storage Compartment
Integrated tray holds accessories when not in use.
See next page for details.
12. Removable Drip Tray Plate
13. 20 Bar Pump (not shown)
20 bars of pressure for balanced extraction.
1
2
3
4
5
10
11
12
11
15
16
6
7
8
9
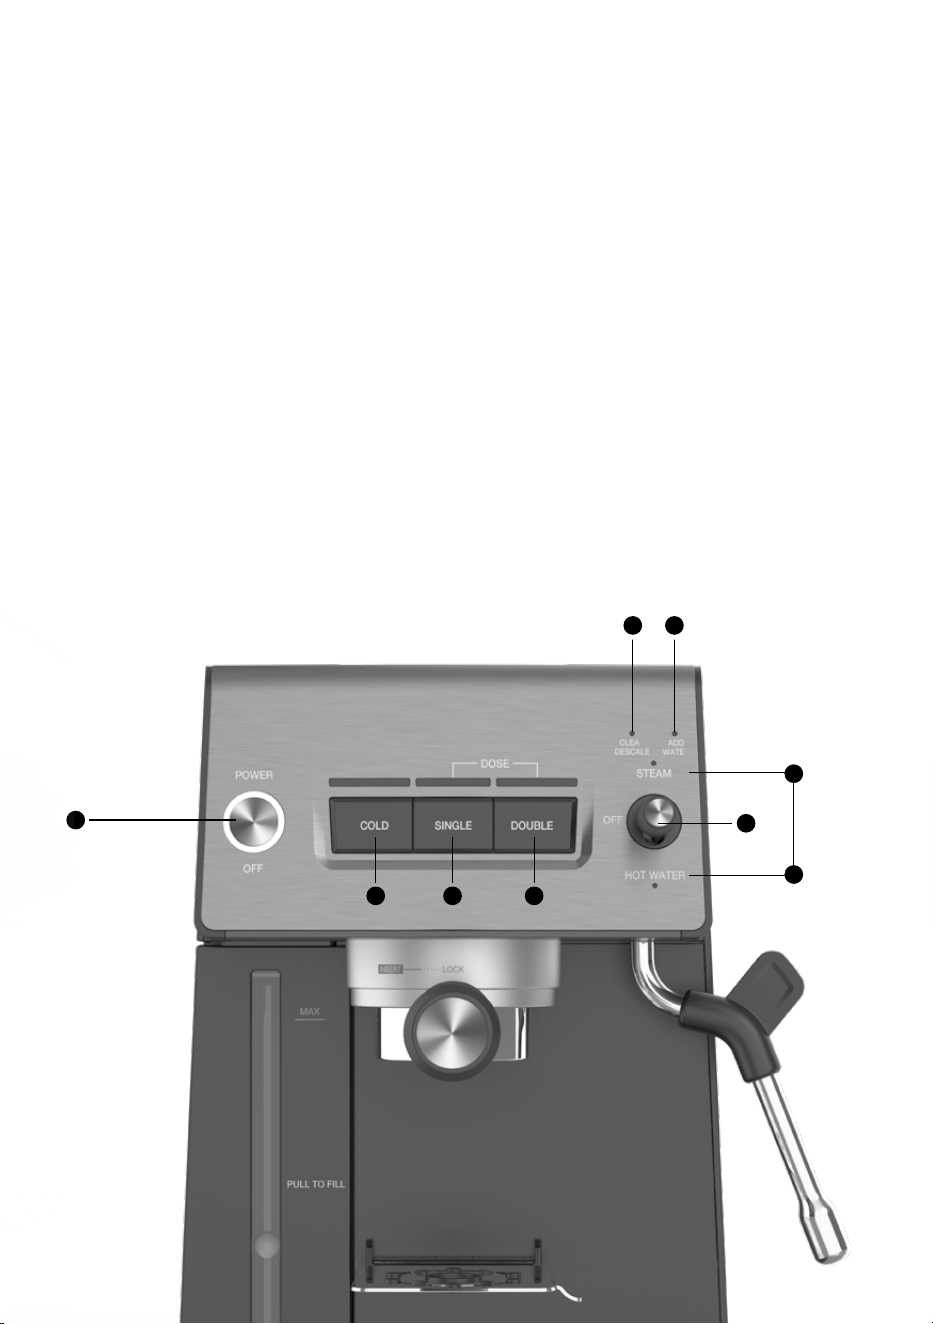
7
Getting to Know Your
Control Panel
1. Power/O Button
Use to turn the espresso maker on and o.
This button illuminates when pressed.
2. Cold Button
Used to activate cold extraction function.
3. Single Dose Button
Use for a single serving of espresso –
1.0 ounces.
4. Double Dose Button
Use for a double serving of espresso –
2.0 ounces.
5. Clean/Descale Indicator
6. Add Water Indicator
7. Steam or Hot Water Control Switch
Use to activate steam or hot water.
7A. Steam
Use when making cappuccinos and lattes.
Will breathe until ready for use.
7B. Hot Water
Use to dispense hot water.
1
2
5
7A
7B
3
4
6
7
8
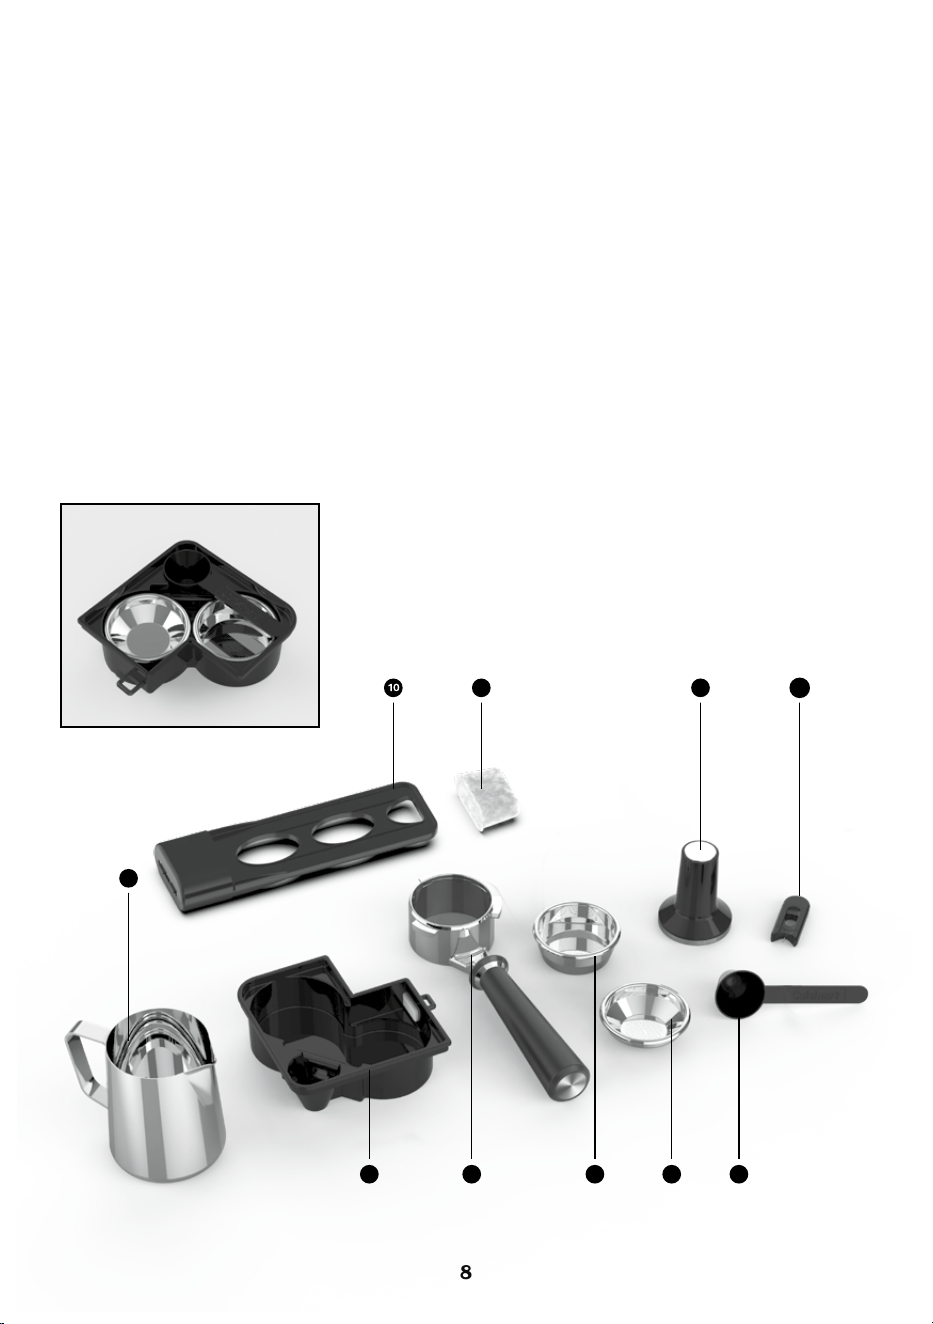
Accessories
1. Coee Scoop
2. Steam Wand Cleaning Pin
3. Tamping Tool
4. Single Shot Espresso Filter
Use the 1-cup lter basket
for a single espresso.
5. Double Shot Espresso Filter
Use the 2-cup lter basket
for a double espresso.
6. 54mm Bottomless Portalter
7. Accessory Storage Tray
8. Frothing Pitcher
9. Charcoal Water Filter
10. Charcoal Water Filter Holder
2
3
4 1
7
5
9
8
6
9
Preparing Your
Espresso Machine
Place the espresso machine on a dry, stable
countertop or other surface where you will be
using the machine.
IMPOR
TANT: For first-time use or if the machine has
not been used for some time, it is important that
the machine is rinsed. See instructions outlined
below.
Remove the red plug from the back of the water
reservoir.
Insert Drip Tray
1. To access the Accessories Storage Compartment,
slide the drip tray all the way out of the unit.
2. Remove the desired lter basket from the
compartment and replace back into position.
3. Slide drip tray back into position ensuring the drip
tray and drip tray plate are securely in place.
Add Water
To fill the espresso machine with water, simply
press the reservoir door at the top of the espresso
machine, and fill with fresh cold water or filtered
water or remove the reservoir by pulling it towards
you and replace back into the unit until the reservoir
is firmly in place.
NO
TE: The unit will not function unless the water
reservoir is properly in place and has water in the
reservoir.
Run a Rinse Cycle
1. Insert the plug into a power outlet. Press the
power button once to turn the espresso machine
on. The light around the power button is solid; this
is to indicate that your espresso machine is on.
The Dose buttons will breathe slowly to indicate
that your espresso maker is heating up.
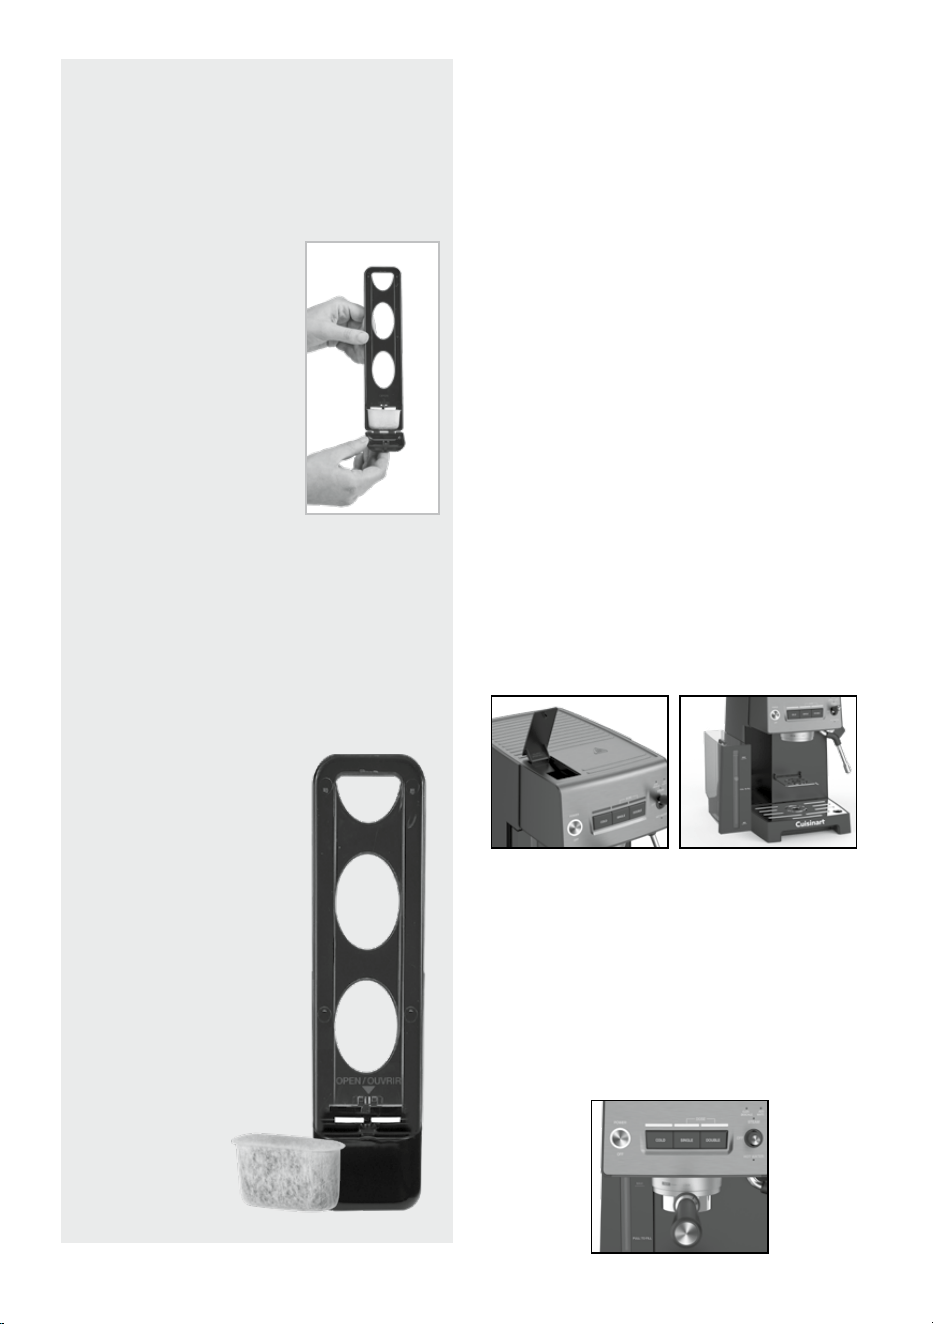
Charcoal Water Filter
Inserting the Water Filter
• Remove the filter from polybag and soak it,
fully immersed, in cold tap water for 15
minutes.
• Lift the water filter holder out of the water
reservoir.
• Press down on the filter
compartment and pull
toward you to open.
• Place filter into the holder
and snap it closed.
Be careful – improper
placemen
t can tear the filter
skin.
• Flush filter by running cold
tap water through holes in
bottom of compartment for
10 seconds.
• Allow the filter to drain completely.
• Slide the water filter holder back into the
channel in the water reservoir, pushing it down
to the base of the reservoir.
NOTE: We recommend changing the water filter
every 60 days or after 60 uses, and more often
if you have hard water.
R
eplacement filters can be purchased in stores,
by calling Cuisinart Customer Service, or at
www.cuisinart.com.
10
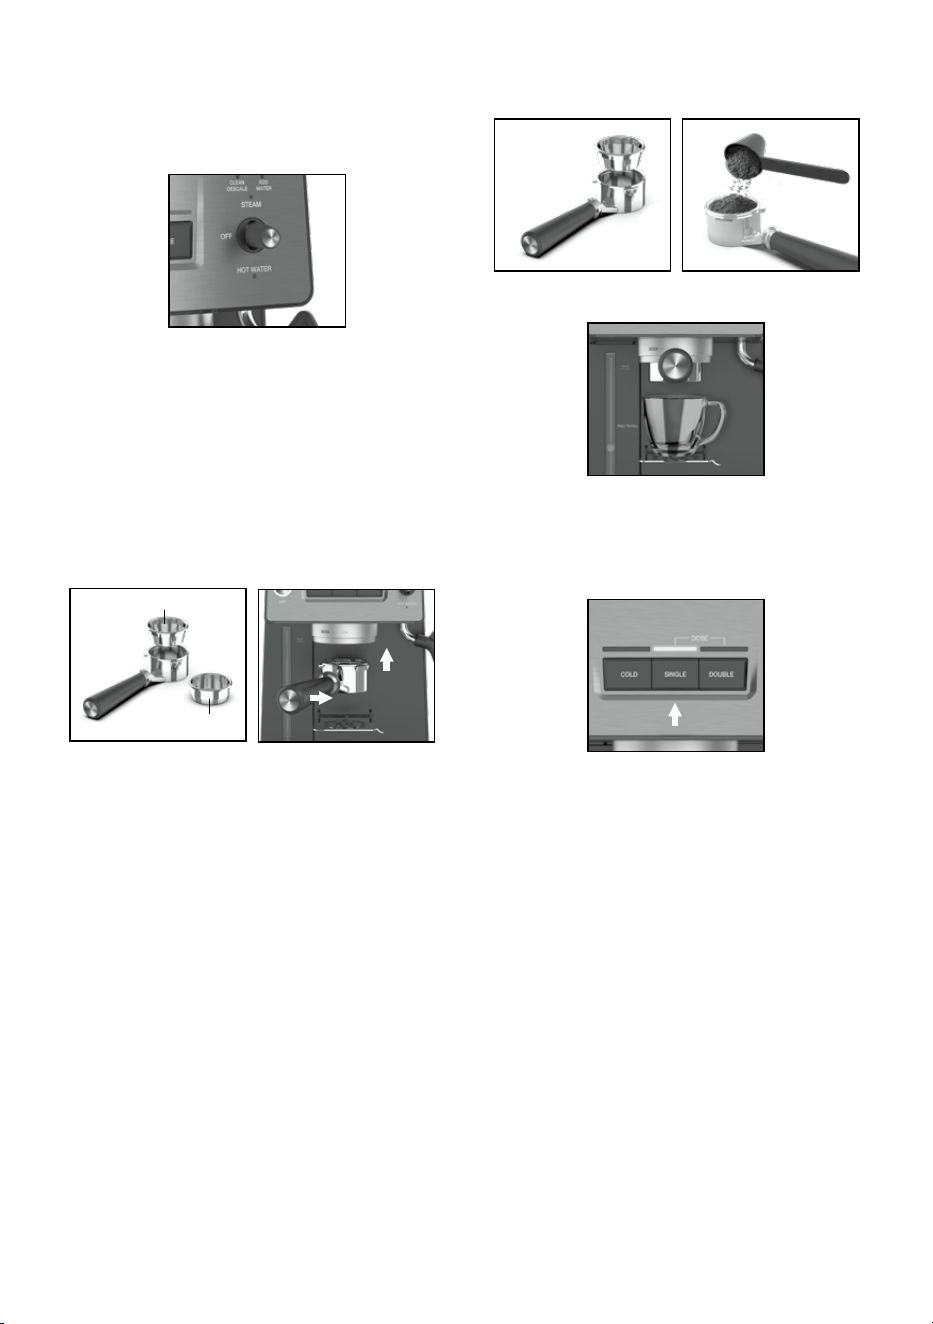
NOTE: Before turning on the espresso machine,
ensure that the Steam and Hot Water Control Switch
is in the OFF position. If not, the Steam light or Hot
Water light will flash until the switch is returned
back to the Off position.
2. Make sure the drip tray and drip tray plate are
in place.
3.
Make sure water has been added to the water
reservoir
.
NOTE: If the water reservoir is empty, the unit will
not function. The ADD WATER indicator will
illuminate until the reservoir is filled.
4. Fit the portafilter holder with either the Single
or Double Shot Espresso Filter Baskets. Secure
the por
tafilter handle to the brew head.
5. Place a sufficiently large container under the
bottomless portafilter.
6. Press the SINGLE DOSE button and allow the
water to run through for approximately 20 to 25
seconds.
Programming Your
Espresso Machine
The Cuisinart Espresso Bar™ Espresso Machine
has programming capabilities. Based on café
se
ttings, the Single and Double Dose Brew Start
Button espresso functions are set at 1.0 and 2.0 oz.
However, by following a few simple steps, you can
program your perfect serving size down to the
ounce. See Default/Programmable Setting chart
on page 11 for reference.
Programming Single Espresso
1. Prepare the portalter holder with the Single Shot
Espresso Filter basket and ll with nely ground
espresso. Using the tamping tool, tamp the coee
grounds. Secure the portalter holder to the brew
head.
2. Place a cup under the bottomless portalter.
3. To begin programming, press and hold the single
espresso button for 3 seconds, until the Single
Dose light is breathing. The espresso machine will
start the espresso pour.
4. Allow the espresso to pour until it reaches the
desired level. Once that is reached, stop the
espresso pour by releasing the single espresso
button. A beep will signify that the new setting
for the single espresso operation has been
programmed and stored in the machine’s memory.
5. The espresso machine will then return to normal
operation mode and is ready to make another
espresso at the push of a button.
Programming Double Espresso
1. Prepare the portalter holder with the Double
Shot Espresso Filter basket and ll with nely
ground coee. Using the tamping tool, tamp the
coee grounds. Secure the portalter holder to
the brew head.
2. Place a cup under the bottomless portalter.
3. To begin programming, press and hold the double
espresso button for 3 seconds, until the Double
Dose light is breathing. The espresso machine will
start the espresso pour.
Single
Double
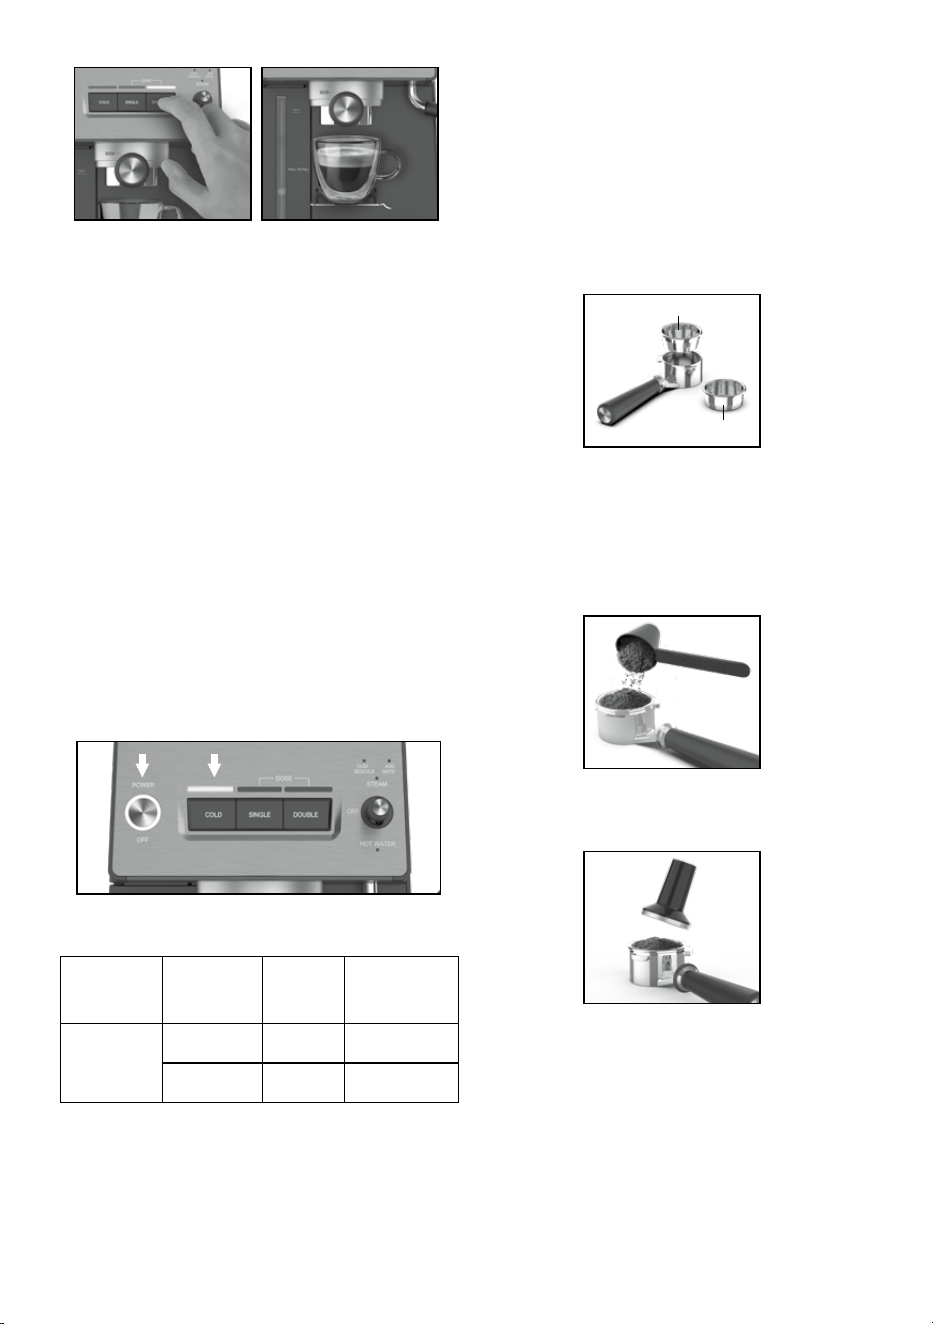
11
4. Allow the espresso to pour until it reaches the
desired level. Once that level is reached, stop the
espresso pour by releasing the double espresso
button. A beep will signify that the new setting for
the double espresso operation has been
programmed and stored into the machine’s
memory.
5. The espresso machine will then return to normal
operation mode and is ready to make another
espresso at the push of a button.
Resetting the Factory Settings
To revert to the original factory settings:
1. Press and hold down the POWER button and COLD
button for approximately 3 seconds or 1 beep
sound. The POWER light, COLD light, and DOSE
light will ash 1 time.
2. The espresso machine has now returned to the
original factory settings. The default programming
for each function will be used for the next brew.
See chart below for default settings by function
for reference.
Defaults for each function are as follows:
Default
Program
Settings
Amount
Programmable
Range
Brew
Volume
Single 1.0 oz.
1.0 oz. - 2.7 oz.
Double 2.0 oz.
1.7 oz. - 4.0 oz.
3. The espresso machine will then return to normal
operation mode and is ready to make another
espresso at the push of a button.
Guide to the Perfect
Espresso
1. Placing cups on the warming plate before brewing
will help preserve the crema of the espresso.
Remove cups when ready to brew.
2. Select the appropriate lter basket and insert it
into portalter.
Use the Single Shot lter
basket
for a single espresso, and
the Double Shot lter
basket for a double espresso.
3. Using the coee scoop, spoon nely ground coee
in the lter basket holder. Use 2 scoops for single
espresso cup and 3 scoops for double espresso.
TIP: If portalter seems to be getting overlled,
gently tap the portalter on counter to level the
grounds.
4. Using the tamping tool, apply a moderate packing
pressure.
IMPORTANT: Be sure not to overll the lter basket
with coee as this can cause the portalter holder
to overow.
Single Dose: recommended 9-11g (min. 6g)
Double Dose: recommended 17-19g (min. 12g)
NOTE: Check to see that the espresso machine is
ready for use. Remember that if the power light is
solid and the Cold, Single & Double LEDs
are solid, the espresso machine is on and is heating
up and ready to brew coee.
Single
Double
12
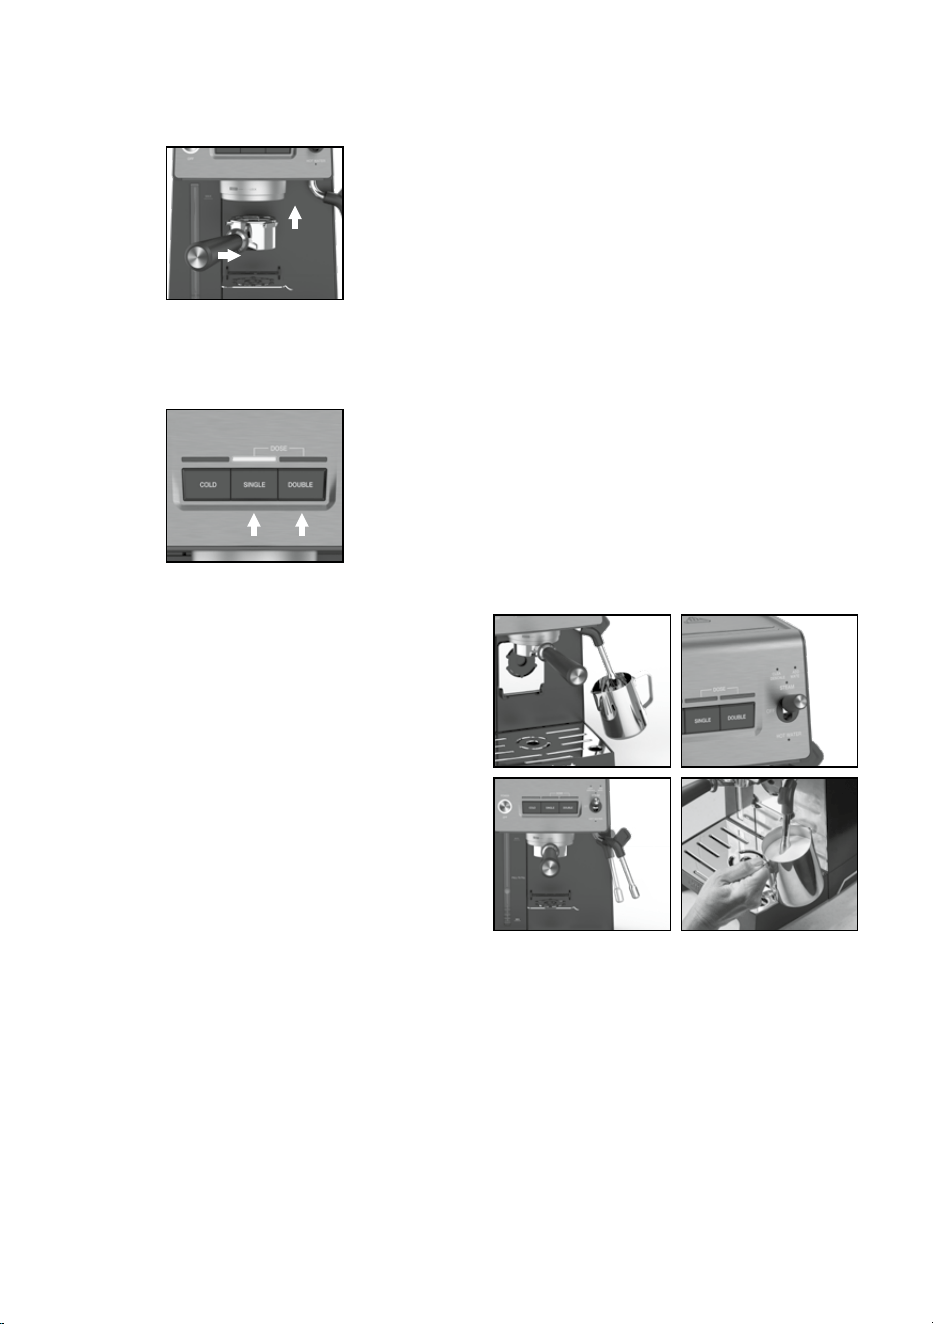
5. Brush any excess coee grounds from around
the edge of the lter basket.
6. Secure the portalter holder to the brew head.
7. Place a cup under the portalter.
8. Press the Single or Double Dose Brew Start button
to begin brewing.
9. Check the espresso pour. The ideal pour is dark
and caramel with reddish reections.
10. Serve espresso immediately.
11. Remove the portalter handle from the
brew head.
12. Discard the used coee grounds.
Cold Extraction
Cold extraction pulls a heatless shot that uses
ambient temperature water to extract the full avor
of the coee. Convenient for on-the-go lattes or cold
coee drinks.
1. Follow steps 3-7 under Guide to the Perfect
Espresso above on page 11.
2. Press Cold button then the Single and Double will
ash until desired size is chosen.
NOTE: Cold Single Brew is 3.45 ounces and Double
Brew is 5 ounces.
3. For on-the-go drinks, remove the drip tray and
place your travel mug under brew head instead
of the a cup.
Sleep Mode
After 30 minutes of nonuse, the espresso machine
will automatically power o.
Guide to Milk Texturing
Milk texturing is the steaming of milk. The steam
does two things: It heats the milk and mixes air with
the milk to form a foamy texture. As with learning to
make an espresso, perfecting the art of milk texturing
takes time and practice.
1. Determine how much milk is needed based on the
number of cups being made.
TIP: Keep in mind that the volume of milk will
increase during the texturing.
2. Pour cold refrigerated milk into the stainless
frothing pitcher, approximately half full, but not
over the MAX mark.
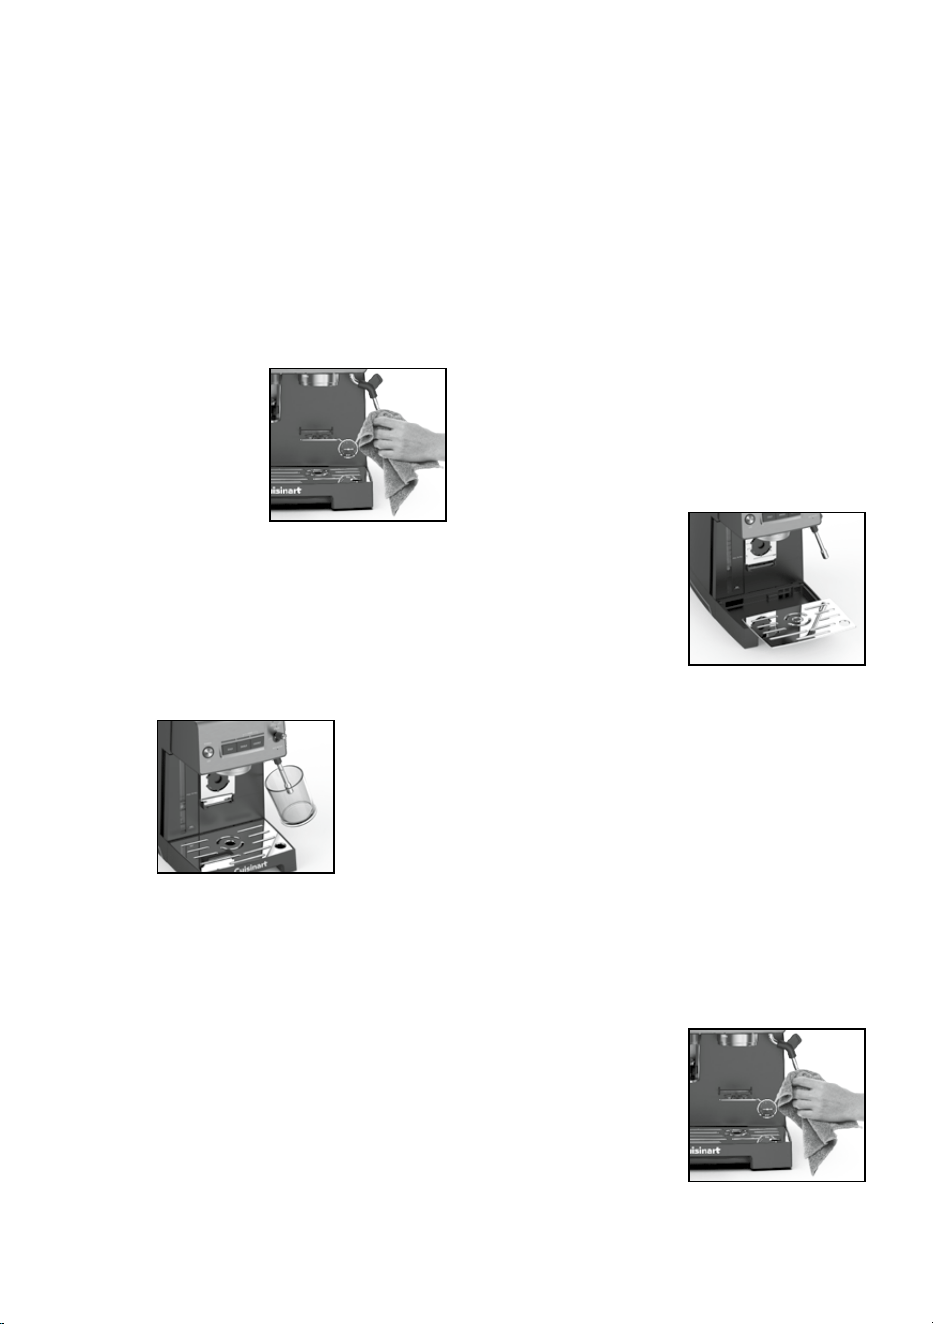
3. Move the Steam/Hot Water switch up to Steam
position. The Steam light will be breathing.
4. Purge the steam wand of any water with the steam
wand positioned over the drip tray.
5. When the Steam light becomes solid, the steam
function is activated. Once any water has been
purged, stop the steam by turning the Steam/Hot
Water switch to the OFF position.
6. Swing the steam wand to the side of the espresso
machine.
7. Place the steam wand into the milk so that the
nozzle is about a half-inch below the surface and
activate the steam function by turning the Steam/
Hot Water control switch to the Steam position.
8. Angle the pitcher so that the steam wand is resting
on the spout of the pitcher, and lower the pitcher
until the tip of the steam nozzle is just below the
surface of the milk. This will start to create a
whirlpool action in the milk.
NOTE: Do not allow the steam to spurt unevenly
or it will create aerated froth/large bubbles. If this is
happening, raise the pitcher so that the steam nozzle
is lowered farther into the milk.
13
9. As the steam heats and textures the milk, the
level of the milk in the pitcher will begin to rise. As
this happens, follow the level of the milk by
lowering the pitcher, always keeping the tip of the
steam nozzle just below the surface.
10. Once the foam is created, raise the pitcher until
the steam nozzle is in the center of the milk.
TIP: The amount of foam required will vary depending
on the drinks being made. For example, a cappuccino
requires more foam than a latte.
11. Stop the steam immediately by moving the
Steam/Hot Water control switch to the OFF
position.
IMPORTANT: Do not boil the milk.
12. Remove the pitcher,
immediately wipe the
steam nozzle and
wand with a clean
damp cloth, and purge
a small amount of
steam.
Using the Hot Water
Function
1. Place the cup or container under the steam/hot
water wand and activate the hot water function
by moving the Steam/Hot Water control switch
to the Hot Water position.
2. Once you have dispensed the required amount
of
hot
water into the cup or container, stop the hot water
by switching the Steam/Hot Water control switch
to the OFF position. The Hot Water feature will be
stopped after 1 minute.
3. Remove the cup or container and swing the
Steam/Hot Water wand over the drip tray to catch
any drips of water.
Cleaning and Maintenance
Always turn the espresso maker o and remove the
plug from the electrical outlet before cleaning.
Never immerse unit in water or other liquid. To clean,
simply wipe with a clean damp cloth and dry before
storing.
Cleaning the Filters, Portafilter
Holder, and Brew Head
• The stainless steel lters and portalter holder should
be rinsed under water immediately after use to remove
all coee particles. You may also use the gray cleaning
pin (smaller pin) to clear the opening.
• Periodically run water through the machine with the
portalter holder in place, but without any ground
coee, to rinse out any lingering coee particles.
• The inside of the brew head should be wiped
with a
damp cloth to remove any coee particles.
Cleaning the Outer Housing/Cup
Warming Plate
• The outer housing and cup warming plate can be
cleaned with a soft, damp cloth. Do not use any
scouring agents or harsh cleaners.
Cleaning the Drip Tray Plate
• The drip tray plate should
be removed, emptied,
and cleaned frequently,
particularly when the drip
tray is full.
• The drip tray plate can be
washed in warm soapy
water and rinsed
thoroughly. Use a nonabrasive washing liquid (do not
use abrasive cleaners, pads or cloths, which can
scratch the surface).
Cleaning the Drip Tray
• The drip tray can be removed after the drip tray
plate is removed and then cleaned with a soft,
damp cloth (do not use any scouring agents or
harsh cleaners).
NOTE: Do not clean any parts or accessories in
the dishwasher.
Cleaning the Steam Wand
• The steam wand should always be cleaned after
steaming milk.
• Wipe the steam wand
with a damp cloth,
then swing the steam
wand back into the drip
tray. Momentarily switch
the Steam/Hot Water
control switch to the hot
water position. This will
release any remaining
milk from inside the steam wand.
14
• Make sure the Steam/Hot Water control switch is in
the OFF position. Press the power button o,
unplug the power cord, and allow the machine to
cool.
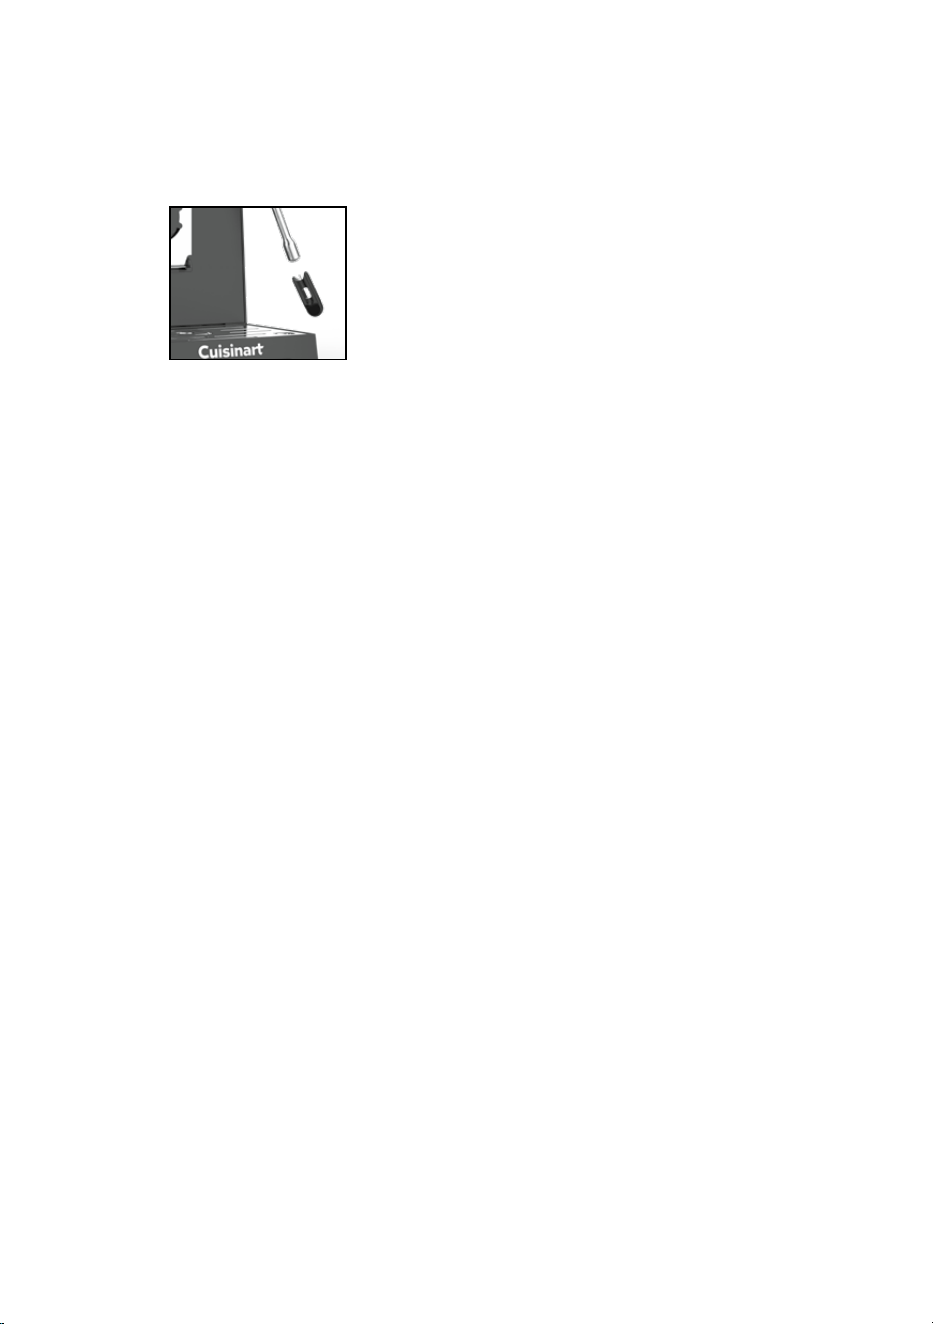
• If the steam wand remains blocked, use the Steam
Wand Cleaning Pin to clear the opening.
Decalcification
Decalcication refers to the removal of calcium
deposits that form over time on the metal parts of the
coeemaker.
For best performance from your espresso maker,
decalcify the unit from time to time.
The frequency depends on the hardness of your tap
w
ater and how often you use the coeemaker.
The machine will remind to clean by switching on the
DESCALE light,.
To run a Clean/Descale cycle, follow the instructions
below.
1. Place 2 large 1.5L (50 oz.) containers under the brew
head and steam wand.
2. Fill the water reservoir to capacity with a mixture of
one-third white vinegar and two-thirds water or with
the mixture of 1 descale tablet and water at max
level.
3. Press and hold COLD & SINGLE button for 3 seconds,
then the CLEAN DESCALE LED will ash.
4. Move the Steam/Hot Water switch down to the Hot
Water position. The CLEAN DESCALE light will be
breathe. The cleaning program has started.
• Descaling: Hot water will ow from the steam wand,
then switch to the brew head automatically.
When water tank is empty, the CLEAN DESCALE light
will
ash and ADD WATER light will go on. Fill the
water tank with water to max level. Empty the drip
tray and 2 large containers and replace them in the
unit. Move the Steam/Hot Water switch up to the
Steam position and the CLEAN DESCALE light will be
on.
• Cleaning: Hot water will ow from the brew head, then
switch to the steam wand automatically. When water
tank is empty, the CLEAN DESCALE light will turn o.
The ADD WATER light will go on, STEAM light will be
ashing, and the Descale is nished.
Maintenance: Any other servicing should be performed
by an authorized service representative.

15
Warranty
Subject to the exclusions and limitations contained
herein, Conair LLC dba Cuisinart (“Cuisinart”)
warrants that the Cuisinart Espresso Bar™ Espresso
Machine (“Product”) will be free from material
defects in materials and workmanship under normal
home use conditions for a period of three (3) years
beginning on the date the Product was purchased in
its original, sealed packaging, unless otherwise
specied in this Limited Warranty. This Limited
Warranty is only for U.S. consumers (dened herein
as purchasers at retail for personal, family, or
household use) who originally purchase the Product
from Cuisinart or an authorized Cuisinart
®
reseller (if
you are unsure whether a retailer or other point of
sale is an authorized or unauthorized Cuisinart
reseller, contact Cuisinart).
This Limited Warranty does NOT cover:
• Normal wear and tear;
• Any Product purchased by commercial purchasers
or for commercial or nonhousehold uses;
• Accessories, parts, or software added to the
Product after the system is shipped from Cuisinart;
• Any costs associated with the replacement or repair
of the Product, including labor, installation, or other
costs incurred by you without prior Cuisinart
approval;
• Damage to the Product, defective conditions, or
nonconformities due to: (1) external causes,
including shipping, accidents, problems with
electrical power (Product designed only for use with
120-volt outlets), abnormal conditions (such as
mechanical or environmental); (2) usage not in
accordance with Product instructions; (3) misuse,
neglect, unauthorized alteration, unauthorized
repair; and (4) acts of god or other events beyond
Cuisinart’s control;
• Though necessary repairs and maintenance might
be performed by any company, damage caused by
you or any nonauthorized third party may void this
Limited Warranty;
• Damage caused by accessories or replacement
parts not specically authorized by Cuisinart may
void this Limited Warranty; and
• Any Product where the original Product
identication markings (trademark or serial number)
have been removed, altered, or obliterated from the
Product.
It is recommended that you visit the website https://
cuisinart.registria.com for a fast, ecient way to
complete your product registration. However, product
registration does not eliminate the need for the
consumer to maintain the original proof of purchase
in order to obtain the warranty benets. In the event
that you do not have proof of purchase date, the
purchase date for purposes of this Limited Warranty
will be the date of manufacture.
HASSLE-FREE WARRANTY
If the Product that is the subject of this Limited
Warranty fails during the warranty period for reasons
covered by this Limited Warranty, Cuisinart will, at its
option, repair the Product, replace the Product with
another identical or reasonably equivalent product, or
if Cuisinart is unable to repair or replace the Product,
refund the purchase price, less the amount directly
attributable to the consumer’s prior usage of the
Product. To obtain a return shipping label, email us at
https://www.cuisinart.com/customer-care/product-
assistance/product-inquiry/, or call our Consumer
Service Center toll-free at 1-800-726-0190 to speak
with a representative.
Upon receipt of the Product, Cuisinart will inspect
the Product and, if required under this Limited
Warranty, attempt to repair, replace, or refund the
Product within thirty (30) days. However, there may
be delays beyond Cuisinart’s control, in which case
that time period may be extended as reasonably
necessary.
IMPORTANT: If the nonconforming Product is to be
serviced by someone other than Cuisinart’s
Authorized Service Center, please remind the servicer
to call our Consumer Service Center at 1-800-726-
0190 to ensure that the problem is properly
diagnosed, the Product is serviced with the correct
parts, and the product is still under warranty.
CALIFORNIA RESIDENTS ONLY
The three (3) year Limited Warranty period begins on
the date the Product was delivered, which may be
dierent than the date the Product was purchased.
California residents also have the option of obtaining
the benets of this Limited Warranty by bringing the
Product to (A) the store where it was purchased or
(B) another retail store that sells Cuisinart products
of the same type. The retail store shall then,
according to its preference, either repair the Product,
refer the consumer to an independent repair facility,
replace the Product with another identical or
reasonably equivalent product, or refund the
purchase price less the amount directly attributable
to the consumer’s prior usage of the Product.
California residents may also, according to their
preference, return nonconforming products directly
to Cuisinart for repair or, if necessary, replacement
with another identical or reasonably equivalent
product by calling our Consumer Service Center
toll-free at 1-800-726-0190. Cuisinart will be
responsible for the cost of such repair, replacement,
and/or shipping and handling for such nonconforming
products under warranty.

16
THIS LIMITED WARRANTY GIVES YOU SPECIFIC LEGAL
RIGHTS, AND YOU MAY ALSO HAVE OTHER RIGHTS
THAT VARY FROM STATE TO STATE OR BY
JURISDICTION. IN THE EVENT THIS LIMITED
WARRANTY IS BREACHED, YOU MAY HAVE CLAIMS
FOR REPLACEMENT, DAMAGES, OR OTHER
PENALTIES.
LIMITATIONS OF LIABILITY/ADDITIONAL LIMITATIONS
AND EXCLUSIONS
ALL EXPRESS AND IMPLIED WARRANTIES ARE
LIMITED IN DURATION TO THE LIMITED WARRANTY
PERIOD. NO WARRANTIES APPLY AFTER THAT PERIOD.
SOME STATES DO NOT ALLOW LIMITATIONS ON HOW
LONG AN IMPLIED WARRANTY LASTS, SO THIS
LIMITATION MAY NOT APPLY TO YOU. CUISINART’S
RESPONSIBILITY UNDER THIS OR ANY OTHER
WARRANTY, IMPLIED OR EXPRESS, IS LIMITED TO
REPAIR, REPLACEMENT, OR REFUND, AS SET FORTH
ABOVE. THESE REMEDIES ARE THE SOLE AND
EXCLUSIVE REMEDIES FOR ANY BREACH OF
WARRANTY. TO THE MAXIMUM EXTENT PERMITTED BY
LAW, CUISINART IS NOT RESPONSIBLE FOR ANY
DIRECT, INDIRECT, SPECIAL, INCIDENTAL, OR
CONSEQUENTIAL DAMAGES RESULTING FROM ANY
BREACH OF WARRANTY OR UNDER ANY OTHER
LEGAL THEORY (INCLUDING, BUT NOT LIMITED TO,
LOST PROFITS, DOWNTIME, GOODWILL, DAMAGE TO
OR REPLACEMENT OF EQUIPMENT AND PROPERTY,
AND ANY COSTS OF RECOVERING, REPROGRAMMING,
OR REPRODUCING ANY PROGRAM OR DATA STORED
IN OR USED WITH A SYSTEM CONTAINING THE
PRODUCT), EVEN IF CUISINART HAS BEEN ADVISED
OF THE POSSIBILITY OF SUCH DAMAGES. SOME
STATES DO NOT ALLOW THE EXCLUSION OR
LIMITATION OF INCIDENTAL OR CONSEQUENTIAL
DAMAGES, SO THE ABOVE LIMITATIONS OR
EXCLUSIONS MAY NOT APPLY TO YOU. ALL EXPRESS
AND IMPLIED WARRANTIES ARE LIMITED IN
DURATION TO THE LIMITED WARRANTY PERIOD. NO
WARRANTIES APPLY AFTER THAT PERIOD. SOME
STATES (OR JURISDICTIONS) DO NOT ALLOW
LIMITATIONS ON HOW LONG AN IMPLIED WARRANTY
LASTS, SO THIS LIMITATION MAY NOT APPLY TO YOU.
This Limited Warranty is issued by:
Conair LLC
1 Cummings Point Road
Stamford, CT 06902
1-800-726-0190

17
Recipes
Americano .......................................................... 17
Macchiato ........................................................... 17
Cappuccino ......................................................... 17
Café Latte ............................................................ 18
Flat White ............................................................18
Cortado.................................................................18
Café au Lait ........................................................18
Autumn Spice Latte ..........................................18
Salted Caramel Latte ......................................19
Golden Latte .......................................................19
Café con Leche ..................................................19
Hazelnut Mocha Latte .....................................20
Iced Brown Sugar & Oat
Shaken Espresso ..............................................20
Espresso Tonic .................................................. 20
Vietnamese Iced Latte .................................... 20
Mexican Espresso Martini ..............................20
Irish Espresso ..................................................... 21
Espresso Mudslide ............................................21
Affogato ................................................................21
Espresso Gelato ................................................. 21
Tiramisu ..............................................................22
Americano
Simply stated, an Americano is an espresso
with extra hot water. It’s a great halfway point
between the assertive avor of an espresso
and a full cup of coee.
Makes 1 serving
Ground espresso for a double shot
⅔ to ¾ cup hot water
1. Brew a double espresso into a heatproof mug.
2. Select Hot Water and, using the steam wand,
brew hot water on top of the espresso.
3. Serve immediately.
Macchiato
A macchiato is a smaller espresso drink topped
with a little bit of foamed milk. There are many
interpretations around the world, but here at
Cuisinart, we are staying traditional, starting
with the perfect espresso.
Makes 1 serving
Ground espresso for a single shot
¼ cup milk (dairy or nondairy)
1. Brew a single espresso into a heatproof —
preferably demitasse — cup.
2. Put the milk into the frothing pitcher. Using the
steaming wand, steam the milk until the foam
has formed and you can feel that the milk is quite
hot. Tap the pitcher a few times to remove any
larger bubbles.
3. Spoon 1 tablespoon of the frothed milk on the
espresso.
4. Serve immediately.
Cappuccino
Traditionally, a cappuccino is made by layering equal
parts espresso, steamed milk, and foam.
Makes 1 serving
Ground espresso for a single shot
⅓ cup milk (dairy or nondairy)
1. Brew a double espresso into a heatproof mug.
2. Put the milk into the frothing pitcher. Using the
steaming wand, steam the milk until the foam has
reached two-thirds of the way up the pitcher and
you can feel that the milk is quite hot. Tap the
pitcher a few times to remove any larger bubbles.

18
3. Slowly pour about 3 ounces of the steamed milk
into the mug with the espresso and then spoon 3
to 4 tablespoons of frothed milk on top.
4. Serve immediately.
Café Latte
The classic coee shop beverage made simple at
home — just steam your milk, pour over your freshly
brewed espresso, and top with a thin layer of foam.
Makes 1 serving
Ground espresso for a double shot
½ cup milk (dairy or nondairy)
1. Brew a double espresso into a heatproof mug.
2. Put the milk into the frothing pitcher. Using the
steaming wand, steam the milk until the foam has
almost reached the top of the pitcher and you can
feel that the milk is quite hot. Tap the pitcher a
few times to remove any larger bubbles.
3. Slowly pour the steamed milk into the mug with
the espresso.
4. Serve immediately.
Flat White
A simple way to describe this increasingly popular
coee shop drink would be “a small strong latte.”
It typically has a higher proportion of espresso
to milk and slightly less foam than a latte.
Makes 1 serving
Ground espresso for a double shot
¼ cup milk (dairy or nondairy)
1. Brew a double espresso into a heatproof mug.
2. Put the milk into the frothing pitcher. Using the
steaming wand, steam the milk until the foam has
reached two-thirds of the way up the pitcher and
you can feel that the milk is quite hot. Tap the
pitcher a few times to remove any larger bubbles.
3. Slowly pour a small amount of the steamed milk,
about half the volume of the espresso, into the
mug with the espresso, holding back the foam
with a spoon. Top with a very thin layer of foam.
4. Serve immediately.
Cortado
A cortado is similar to a latte, but instead of being
heavy on milk, it uses equal parts espresso and milk
and has no foam on top.
Makes 1 serving
Ground espresso for a single shot
¼ cup milk (dairy or nondairy)
1. Brew a single espresso into a small heatproof cup.
2. Put the milk into the frothing pitcher. Using the
steaming wand, steam the milk until the foam has
almost reached the top of the pitcher and you can
feel that the milk is quite hot. Tap the pitcher a
few times to remove any larger bubbles.
3. Slowly pour 1½ to 2 ounces of the steamed milk
into the mug with the espresso.
4. Serve immediately.
Café au Lait
Translated from French as “coee with milk,”
this simple beverage calls for equal parts coee
and steamed milk. Here, we use espresso in place
of drip coee to give some extra avor.
Makes 1 serving
Ground espresso for a double shot
½ cup milk
1. Brew a double espresso into a heatproof mug.
2. Put the milk into the frothing pitcher. Using the
steaming wand, steam the milk until the foam has
almost reached the top of the pitcher and you can
feel that the milk is quite hot. Tap the pitcher a
few times to remove any larger bubbles.
3. Slowly pour all of the milk, holding back the foam,
into the mug with the espresso.
4. Serve immediately.
Autumn Spice Latte
A warm cup of this latte will get you in the fall mood
any time of the year.
Makes 1 latte
Autumn Spice Simple Syrup:
2 cinnamon sticks
1 star anise pod
3 cardamom pods
½ teaspoon whole cloves
½ teaspoon black peppercorns
1 ½-inch piece fresh gingerroot, sliced

19
½ cup water
½ cup granulated sugar
Latte:
Ground espresso for a single shot
4 ounces milk
2 tablespoons Autumn Spice Simple Syrup
(see above)
1. Combine the syrup ingredients in a small
saucepan. Set over medium-low heat. Bring to a
slight simmer, and cook until the sugar has
dissolved. Remove from the heat and allow to
steep for 30 minutes. Strain the syrup through a
ne-mesh strainer into an airtight container;
discard the solids. Chill completely prior to using.
Note: This syrup can be prepared in advance and
stored in an airtight jar for up to 2 weeks.
2. Brew the espresso for a single shot.
3. Put the milk and the 2 tablespoons syrup into the
frothing pitcher. Using the steaming wand, steam
the milk mixture until the foam has almost
reached the top of the pitcher and you can feel
that the milk is quite hot. Tap the pitcher a few
times to remove any larger bubbles.
4. Slowly pour the steamed milk mixture into the
mug with the espresso.
5. Serve immediately.
Salted Caramel Latte
A sweet treat that tastes like it came from
the hands of a professional barista.
Makes 1 serving
1 tablespoon caramel sauce, plus more for
drizzling (optional)
Ground espresso for a single shot
Pinch sea salt
½ cup milk (dairy or nondairy)
1. Put 1 tablespoon of the caramel sauce into a
heatproof mug. Brew a single espresso into the
mug with the caramel. Sprinkle with sea salt.
2. Put the milk into the frothing pitcher. Using the
steaming wand, steam the milk until the foam has
almost reached the top of the pitcher and you can
feel that the milk is quite hot. Tap the pitcher a
few times to remove any larger bubbles.
3. Slowly pour the steamed milk into the mug with
the espresso.
4. Drizzle with additional caramel sauce, if desired.
5. Serve immediately.
Golden Milk Latte
There are many benets to turmeric, and there’s
no better way to have it than in a warm latte.
Makes 1 serving
Ground espresso for a single shot
½ cup milk (dairy or nondairy)
1 teaspoon honey
¼ teaspoon pure vanilla extract
½ teaspoon ground turmeric
¼ teaspoon ground cinnamon
¼ teaspoon ground ginger
Pinch ground cardamom
Pinch freshly ground black pepper
1. Brew a single espresso into a heatproof mug.
2. Put the milk, honey, vanilla, and spices into the
frothing pitcher. Using the steaming wand, steam
the milk until the foam has almost reached the
top of the pitcher and you can feel that the milk is
quite hot. Tap the pitcher a few times to remove
any larger bubbles.
3. Slowly pour the steamed milk mixture into the
mug with the espresso.
4. Serve immediately.
Café con Leche
Start your morning o right with this traditional
Spanish-style espresso drink.
Makes 1 serving
Ground espresso for a double shot
1/3 cup whole milk
1 teaspoon granulated sugar (optional or
to taste)
1. Brew a double espresso into a heatproof mug.
2. Put the milk into the frothing pitcher. Using the
steaming wand, steam the milk until the foam has
almost reached two-thirds of the way up the
pitcher and you can feel that the milk is quite hot.
Tap the pitcher a few times to remove any larger
bubbles.
3. Slowly pour the steamed milk, holding back the
foam, into the mug with the espresso. Sweeten to
taste.
4. Serve immediately.

20
Hazelnut Mocha Latte
Start your morning with a little indulgence.
Makes 1 latte
½ cup milk (dairy or nondairy)
1 tablespoon chocolate hazelnut spread
Ground espresso for a double shot
1. In a small bowl, whisk together the milk and
chocolate hazelnut spread. Set aside.
2. Brew a double espresso into a heatproof mug.
3. Put the chocolate hazelnut milk into the frothing
pitcher. Using the steaming wand, steam the milk
until the foam has almost reached the top of the
pitcher and you can feel that the milk is quite hot.
Tap the pitcher a few times to remove any larger
bubbles.
4. Slowly pour the steamed milk into the mug.
5. Serve immediately.
Iced Brown Sugar
& Oat Shaken Espresso
Shaking this nondairy iced espresso creates
a perfectly chilled and frothy refreshment.
Makes 1 serving
Brown Sugar Simple Syrup:
1 cup packed light brown sugar
1 cup (8 ounces) water
Shaken espresso:
Finely ground espresso for a double shot
1½ cups ice
½ cup unsweetened oat milk
2 tablespoons Brown Sugar Simple Syrup
1. To make the simple syrup, combine the sugar and
water in a small saucepan over medium heat. Heat
until the sugar has fully dissolved. Remove from
the heat and let cool completely before using.
2. To make the iced espresso, brew a double
espresso using the Cold Extraction setting.
3. Fill a mason jar or cocktail shaker with ice. Pour
the espresso, oat milk, and simple syrup over the
ice. Secure the lid of the mason jar or cocktail
shaker, and vigorously shake until the outside is
extremely cold, about 20 seconds.
4. To serve, pour over ice and nish with a pinch of
cinnamon.
5. Serve immediately.
Espresso Tonic
Swap out gin for espresso for a carbonated drink
that is both refreshing and buzzy. Experiment with
avored simple syrups and garnishes to mix it up!
Makes 1 serving
Ground espresso for a double shot
1 teaspoon simple syrup (optional or to
taste)
1 to 2 dashes aromatic bitters (such as
Angostura)
5 ounces tonic water
Orange or lemon twist, for garnish
1. Using the Cold Extraction setting, brew a double
espresso into a small cup.
2. Fill a highball glass with ice. Add the simple syrup
(if using), bitters, and tonic water, and stir. Gently
pour in the cooled espresso. Drop an orange or
lemon twist into the glass to garnish.
3. Serve immediately.
Vietnamese Iced Latte
Sweetened condensed milk provides a pleasant
sweetness to the espresso in this iced beverage.
Makes 1 iced latte
2 tablespoons sweetened condensed milk
Ground espresso for 2 double shots
2 cups ice
1. Put the sweetened condensed milk into a mug or
glass.
2. Brew two double espressos over the condensed
milk using the Cold Extraction setting. When
brewing is complete, stir until combined.
3. Fill a highball glass with ice. Pour the latte over
the ice.
4. Serve immediately.
Mexican Espresso Martini
Substituting a good-quality reposado tequila
for vodka supplies some caramel notes
to this buzzworthy drink.
Makes 2 servings
2 ounces brewed espresso
2 ounces reposado tequila
3 ounces rum-based coee liqueur
Ice
1. Put the espresso, tequila, and coee liqueur into a

21
cocktail shaker lled with ice.
2. Shake vigorously and pour through a strainer* over
two chilled martini glasses.
3. Serve immediately.
*A Hawthorne strainer is best if available.
Irish Espresso
With just the right amount of sweetness,
this classic hot cocktail is a nice substitute
for dessert at the end of a meal.
Makes 1 serving
1½ ounces heavy cream
1 tablespoon granulated sugar
½ teaspoon pure vanilla extract
Pinch kosher salt
1 ounce Irish whiskey
Ground espresso for a double shot
1. Put the cream, sugar, vanilla, and salt in a mixing
bowl and whisk to soft peaks by hand
with a whisk or with a hand mixer.
2. Put the whiskey into a mug, and then brew a
double shot of espresso into the whiskey.
3. Top with the whipped cream.
4. Serve immediately.
Espresso Mudslide
Espresso gives this sweet cocktail a nice jolt.
Blending this cocktail with vanilla ice cream makes
a decadent adult milkshake.
Makes 2 servings
Chocolate syrup, as needed
Ice
3 ounces brewed espresso
2 ounces Irish cream liqueur
1 ounce vodka
1 ounce coee liqueur
1. Drizzle chocolate syrup inside the walls of two
glasses and ll with ice.
2. Put the espresso, Irish cream, vodka, and coee
liqueur into a cocktail shaker lled with ice.
3. Shake vigorously and pour through a strainer* into
the prepared glasses.
4. Serve immediately.
*A Hawthorne strainer is best if available.
Affogato
Scoop your gelato in advance and save
in the freezer until ready to serve.
Makes 1 serving
Ground espresso for a double shot
1 scoop vanilla gelato or ice cream
1. Brew a single espresso into a small heatproof cup.
2. Put the gelato into a small serving dish, and then
pour the hot espresso over the gelato.
3. Serve immediately.
Espresso Gelato
For an extra jolt, add some chopped dark chocolate-
covered espresso beans toward the end of freezing.
Makes about 4 cups (eight ½-cup servings)
2 cups whole milk, divided
1 cup heavy cream
1 cup brewed espresso
1 cup granulated sugar
2 tablespoons cornstarch
Pinch sea salt
1 tablespoon liquid pectin
1. In a medium saucepan, combine 1½ cups of the
milk and the cream. Set over medium/medium-
low heat and bring to a simmer.
2. While the milk-cream mixture is heating, put the
espresso, the remaining ½ cup milk, the sugar,
cornstarch, and salt into a small or medium
mixing bowl. Whisk to combine.
3. When the milk-cream mixture comes to a simmer,
add the espresso mixture, and stir until combined.
While cooking over medium/medium-low heat, stir
continuously until the mixture comes to a boil and
thickens enough to coat the back of a spoon,
about 15 minutes.
4. Remove the pan from the heat, stir in the pectin,
strain, and then let cool to room temperature.
Cover and refrigerate for a minimum of 2 hours, or
overnight.
5. Whisk the gelato base, and then freeze in a
Cuisinart Ice Cream Maker. Churn until thickened,
about 40 minutes. The gelato will have a soft,
creamy texture. Serve or store in an airtight
container in the freezer.

22
Tiramisu
Whether you call it “classic” or “retro,” you can never
go wrong with tiramisu. It is creamy, deliciously
intense, and a great ending to a meal any time of
year. Here, we cut some corners so you can still
impress your guests with a bit less work!
Makes 9 servings
1 container (8 ounces) mascarpone cheese,
room temperature
1 cup heavy cream, chilled
¼ cup plus 2 tablespoons confectioners’
sugar
2 tablespoons plus 1 teaspoon dark rum,
divided
1½ cups brewed espresso
28 Savoirdi (crisp Italian ladyngers)
¼ cup unsweetened cocoa powder,
for garnish
1. Put the mascarpone into a medium bowl. Using a
hand mixer, beat until lightened and lightly
whipped.
2. In a separate bowl, whip the cream to soft peaks,
gradually adding the confectioners’ sugar while
whipping the cream. Add 1 teaspoon of the rum to
the whipped cream and whisk a few times to
incorporate.
3. Gently fold the whipped cream into the
mascarpone, one-third at a time, until completely
incorporated. Reserve.
4. Using the Cold Extraction setting, brew three
double espressos into a large liquid measuring
cup. Add the remaining 2 tablespoons of rum.
5. Working with one cookie at a time, dip the
ladyngers into the espresso mixture, soaking
each side for a few seconds, and then transfer to
a 9-inch square baking pan. Repeat with 13 more
of the ladyngers, arranging in the bottom of the
pan to cover the entire surface. It should be a
tight t.
6. Spread half of the mascarpone cream evenly over
the ladyngers, covering the entire surface. Dip
the remaining ladyngers and arrange in an even
layer over the cream. Spread the remaining
mascarpone mixture evenly over the ladyngers.
Cover with plastic wrap and chill for at least 6
hours.
7. Remove the plastic, and then sift the cocoa
powder over the top of the tiramisu. Serve
immediately.

23
Notes

©2025 Cuisinart
Glendale, AZ 85307
Printed in China
24CE93197
IB-18597