
EN
All customized settings mentioned below require holding the
Setting button while pressing the corresponding buttons.
When customized settings are configured, the indicator light
will turn blue. When no customized settings are configured, the
indicator light will remain white. When the battery is low, the
indicator light will flash, and the vibration function will
automatically turn off. Once the battery level is restored,
vibration will turn back on automatically.
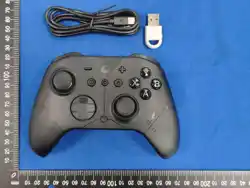
ES MAX Controller User Manual
For charging &
wired connection.
Orange - Charging
Green - Fully charged
Flashing light - Pairing mode
Solid White - No custom settings configured
Solid Blue - Custom settings configured
Press to power on
Press and hold to
power off
Pairing Button:
Slide switch
to change
controller
mode
The controller will automatically power off after 15 minutes of inactivity.
When connected via USB or Auto-Continuous Fire (Turbo) is active,
the controller will not power off.
This product contains small parts
(such as buttons, joystick caps, and screws)
that may pose a choking hazard if swallowed
by children.
CAUTION!
Long vibration:
Indicates that the reset process is complete and
the controller has been restored to its default settings.
Clear All Settings (Reset)
+
Joystick Dead Zone Setting
One vibration:
Long vibration:
Dead zone enabled on joysticks.
Dead zone disabled on joysticks (Default).
Continuous Fire
(Turbo) Setting
One vibration:
Two vibrations:
Long vibration:
Auto Turbo Mode - Press the button once to start
continuous fire, and press it again to stop.
Manual Turbo Mode - Continuous fire is activated
while holding the button and stops when released.
Disables both manual and auto turbo modes.
(Default)
+
A-B X-Y Button Swap
One vibration:
Swaps the input functions of the A-B and X-Y buttons.
Long vibration:
Restores the default button assignments. (Default)
+
Adjust Vibration Intensity
One vibration:
Two vibrations:
Three vibrations:
Long vibration:
Weak vibration.
Standard vibration.(Default)
Strong vibration.
Turn off vibration.
+
Adjust Joystick Sensitivity
One vibration:
Sensitivity 50%.
Home Button:
Setting Button
Press and hold
to enter pairing
mode
Power-Off Button:
Indicator Light:
USB-C Port:
Joysticks Calibration
While the controller is powered on, press and hold the “L,” “R,” “D-
pad Left,” and “B” buttons simultaneously for 6 seconds to enter
calibration mode.
During calibration, rotate both the left and right joysticks in full
circles 2 to 3 times.
Once calibration is complete, the controller will vibrate once to
indicate success and will automatically exit calibration mode.
Gyroscope Calibration
While the controller is powered on and placed on a flat surface, press
and hold the “+”, “–”, “D-pad Left”, and “B” buttons simultaneously
to initiate automatic gyroscope calibration.
*Note: Calibration is not necessary when the gyroscope is
functioning normally.
Once calibration is complete, the controller will vibrate once to
indicate success.
Pairing Methods with PC
1. Bluetooth Pairing - 730Hz Polling Rate:
(Requires the computer to have Bluetooth functionality)
a. Switch the controller to PC mode. Then press and hold the
pairing button for 2 seconds until the indicator light begins
flashing rapidly, indicating that pairing mode has started.
b. On your computer, open the Bluetooth settings, search for new
devices, and select "GuliKit XW Controller" to pair.
c. Once the interface displays "Connected", the pairing is complete.
2. Wired Connection - 1000Hz Polling Rate:
Set the controller to PC mode. Connect one end of the USB-C
to USB-A data cable to the controller, and insert the other end
into a USB-A port on your computer.
If you're using a desktop computer, it is recommended to use
one of the USB ports on the back of the computer case for a
more stable connection.
Wireless Pairing with
Android Devices
1. Set the controller to PC mode.
2. Press and hold the pairing button for 2 seconds until the
indicator light starts blinking quickly, indicating that pairing
mode has been activated.
3. On your phone, go to Bluetooth settings, search for new
devices, and select "GuliKit XW Controller".
4. The interface displays “Connected” to the new controller,
indicating that the pairing is complete.
Pairing Methods with
Switch / Switch 2
1. Set the controller to NS mode, turn it on, then press and hold the
pairing button for 2 seconds. The indicator light will blinking
quickly, indicating that pairing has started.
2. When the Switch / Switch 2 is on the black screen (sleep) state,
press the HOME button on the Joy-Con to wake it up. It will then
enter the controller pairing interface, as shown below.
3. Once the interface shows that a new controller is connected, the
pairing is complete.
Anti-Snapback mode (Dead zone ON).
Two Vibrations:
Trigger Mode Setting Method
Hall effect
analog trigger
Micro-switch
digital trigger
By toggling the switch on the back, you can easily switch
respectively for ZL and ZR triggers between the digital tactile
switch trigger mode and Hall effect analog trigger mode.
* Make sure the triggers are released before switching the
triggers mode.
Back Button Configuration Method
Back Button Mapping:
Hold the Setting button (Gear icon button) along with the back
button you want to map. You will feel a short vibration, indicating
that the mapping process has started.
Press the desired button that you want to assign to the back
button. You will feel a long vibration, indicating that the mapping
configuration is complete.
Back Button Mapping Cancellation:
Hold the Setting button (Gear icon button) along with the back
button you want to cancel mapping. You will feel a long vibration,
indicating that its mapping is cancelled.
* The back buttons can only map to have normal key function
and do not support Continuous Fire feature.
+
+
Two vibrations:
Three vibrations:
Sensitivity 100%.(Default)
Sensitivity 150%.
Note: “R3” and “L3” refer to pressing down on the right and left joysticks,
respectively. Each joystick can be configured individually.
+
Set 4-Direction Mode on D-Pad
One vibration:
Long vibration:
Switches the D-pad to 4-direction mode.
Restores the default 8-direction mode. (Default)
One vibration:
Two vibrations:
Three vibrations:
Long vibration:
Low-sensitivity aim assist.
Adjust Motion Aim Assist
for PC FPS Games
Medium-sensitivity aim assist.
High-sensitivity aim assist.
Motion aim assist disabled. (Default)
+ L: Motion assist activates while holding the L button in-game.
Button Activation Settings:
+ ZL: Motion assist activates while holding the ZL trigger in-game.
For more FAQs, please check the website - Technical
Support - Controller FAQs.
+
Model: ES MAX

FCC Warning
15.19 Labeling requirements.
This device complies with part 15 of the FCC Rules. Operation is subject to the
following two conditions: (1) This device may not cause harmful interference, and (2)
this device must accept any interference received, including interference that may
cause undesired operation.
15.21 Information to user.
Any Changes or modifications not expressly approved by the party responsible
for compliance could void the user's authority to operate the equipment.
15.105 Information to the user.
Note: This equipment has been tested and found to comply with the limits for a Class B
digital device, pursuant to part 15 of the FCC Rules. These limits are designed to
provide reasonable protection against harmful interference in a residential
installation. This equipment generates uses and can radiate radio frequency energy
and, if not installed and used in accordance with the instructions, may cause harmful
interference to radio communications. However, there is no guarantee that
interference will not occur in a particular installation. If this equipment does cause
harmful interference to radio or television reception, which can be determined by
turning the equipment off and on, the user is encouraged to try to correct the
interference by one or more of the following measures:
-Reorient or relocate the receiving antenna.
-Increase the separation between the equipment and receiver.
-Connect the equipment into an outlet on a circuit different from that to which the
receiver is connected.
-Consult the dealer or an experienced radio/TV technician for help.
FCC RF Exposure Warning Statement:
This equipment complies with FCC radiation exposure limits set forth for an
uncontrolled environment. This equipment can be used in portable exposure
condition without restriction