Multi-Platform Wireless Controller User Manual
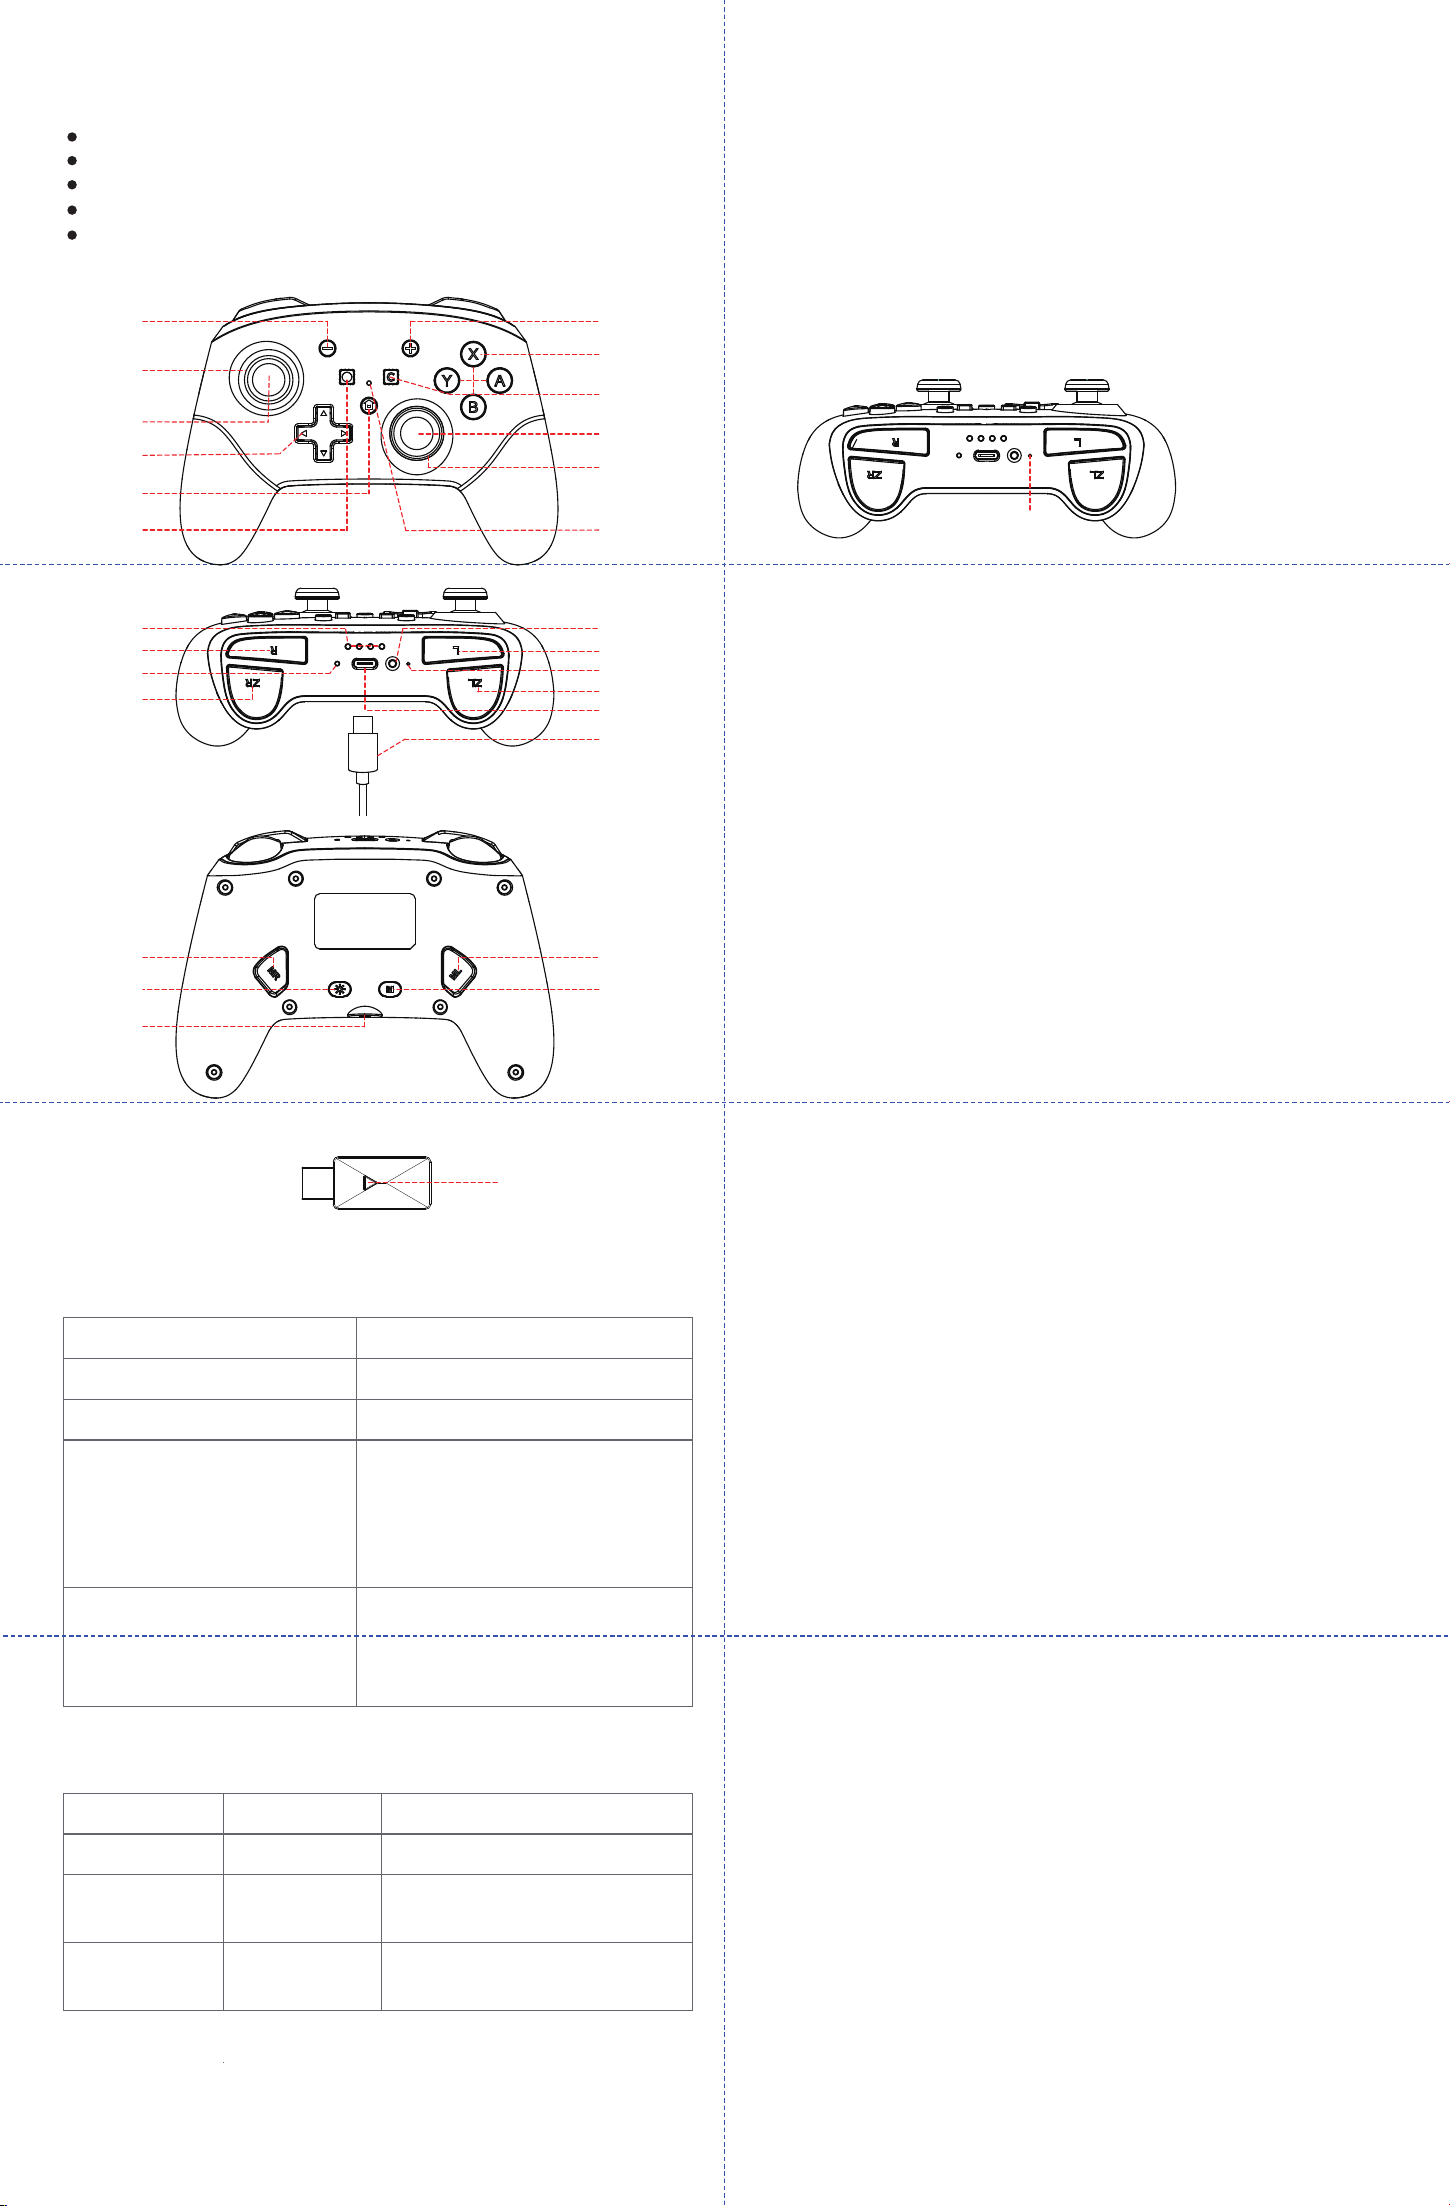
Controller Layout:
Powering On/Off,Charging and Auto Sleep:
Power On
Power Off
Low Battery Alert
Charging
Connect the controller via a USB cable for charging.
Auto Sleep
Idle in connected state: 5 minutes.
Unconnected in pairing mode: 1 minute.
Unconnected in reconnecting mode: 3 minutes.
Reset Button
3.5mm Audio Jack:
The controller supports wireless audio and microphone functions when connected via a USB cable or the
Wireless Receiver. Please note that the 3.5mm audio jack is not supported in other modes or on the PS3 console.
Combination Button Settings:
1. Vibration Intensity Adjustment
Combination: [M] + D-Pad Up / Down.
Description: Adjust the motor vibration intensity. There are 5 levels:
Level 1: Off, Level 2: 25%, Level 3: 50%, Level 4: 75% (Default), Level 5: 100%.
Memory Function: This setting will be saved even after the controller restarts.
2. Mode Switching
Combination: Press and hold [-] + [+] for 2 seconds.
Compatibility: Only supported in PC mode (Wired or Wireless Receiver).
Function: Manually cycle between XInput, NS (Switch), and DS4 (PS4) modes. The controller will remember
the selected mode for future connections.
Reset to Auto-Detection: Press and hold the [Home] button for 10 seconds to power off. Then, short press
[Home] to power on; the controller will return to Automatic Platform Identification.
3. No Deadzone Mode
Combination:
Press and hold [M] + [LS] / [RS] for 2 seconds.
Function: Enable or disable the No Deadzone Mode for the Left or Right joystick.
Memory Function: This setting will be saved even after the controller restarts.
4. Button Mapping Swap
Combination: Press and hold [M] + [A] for 2 seconds.
Function: Swap the values of [A] with [B], and [X] with [Y].
Usage: Use this if the button layout (A/B/X/Y) does not match your preference or platform.
Memory Function: This setting will be saved even after the controller restarts.
RGB Lighting Effects:
Switch Effects: Short press the RGB Light button to turn on the lighting or cycle through different effects.
Quick Turn-off: Press and hold the RGB Light button for 2 seconds to quickly turn off all RGB lights.
Customization:
[M] + Left Stick (Left/Right): Adjust the lighting modes.
[M] + Left Stick (Up/Down): Adjust the lighting brightness.
Back Button (ML/MR) Programming:
The back buttons can be programmed to a single button or a sequence of multiple buttons. Assignable buttons
include: A, B, X, Y, R, L, ZL, ZR, LSB, RSB, +, -, D-Pad, Left Stick, and Right Stick.
1. Setting ML/MR Values:
Press and hold the [M] button + [ML/MR] button simultaneously until the Home indicator flashes white slowly.
Press the button(s) you wish to program (supports both single buttons and combinations/macros).
Press the [ML/MR] button again to finish. The Home indicator will return to solid on, indicating the setup is
complete.
Note: For multi-button sequences (macros), the time intervals between each button press will be recorded and
triggered exactly as operated during programming.
2. Clearing ML/MR Values :
Press and hold the [M] button + [ML/MR] button simultaneously until the Home indicator flashes white slowly.
Press the [ML/MR] button again immediately. The Home indicator will return to solid on, and the programmed
value for ML/MR will be cleared.
Important Note:
If there is no operation for more than 10 seconds during the programming process, the controller will
automatically save and exit the programming mode.
Wireless Pairing Status:
Joystick Calibration:
1.Press the "Home" button to power on the controller. Then, press and hold the "-" button, "+" button,
and "Home" button simultaneously until the Home indicator flashes white slowly.
2.Keep both joysticks in their natural/centered position without any movement. Press the "A" button, and
the Home indicator will turn off.
3.Rotate both the left and right joysticks 3 times at their maximum angle. Press the "A" button, and the Home
indicator will return to solid on. The joystick calibration is now complete.
Clear Button
Home Indicator
A,B,X,Y
Buttons
Right Stick Button
(Push down)
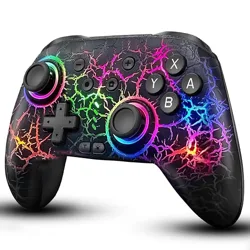
Anti-Friction Ring
with RGB fantasy
lighting effects
Directional Pad
Home Button
Capture Button
Left Stick Button
(Push down)
-
Button
Channel Indicator
4 3 2 1
R Button
ZR Button
Charge Indicator
L Button
ZL Button
Reset Button
Pairing Button
Type-C port
Type-C Cable
RGB Lighting Button
MR Button ML Button
M Button
3.5mm Audio Jack
Wireless Receiver:
Compatible Platforms:
Status
Channel Indicator
Description
Connected
Solid On
The device has been successfully connected.
Pairing Mode
Rapid Flash
In this mode, the controller can be searched for
and connected by new devices.
Reconnecting Mode
Slow Flash
In this mode, the controller will automatically
reconnect to the last paired device.
Reset:
If the controller functions abnormally, press the Reset button to restart the controller.
Switch 1 / 2
Windows 7 or later
Android 8.0 or later
iOS 13 or later
PlayStation 3
+
Button
Anti-Friction Ring
with RGB fantasy
lighting effects
Pairing Button &
Connection Indicator
Single-click the Home Button to power on.
Press and hold the Home Button for 5 seconds to
power off.
The Home Indicator light will flash twice every 10
seconds.
Charging Indicator Status:
Charging: Orange
Fully Charged: Green
6-Axis Gyroscope Calibration:
Press the "Home" button to power on the controller. Place the controller on a flat, level surface and keep it
still. Then, press and hold the "-", "+", and "C" buttons simultaneously for 3 seconds until the Home indicator
flashes red and blue alternately and rapidly. Once the Home indicator returns to solid on, the gyroscope
calibration is complete.
Turbo Function Settings:
There are 4 levels Turbo speed: Slow (8Hz), Medium (12Hz), Fast (20Hz), and Off. Programmable Buttons:
A, B, X, Y, R, L, ZL, ZR.
1. Setting the Turbo Function
Operation: Press and hold the button you want to set, then short press the [M] button to enable the Turbo function.
Cycling Levels: Repeat the above operation to cycle through the Turbo speeds: Slow → Medium → Fast → Off.
Status Indicator: When the Turbo function is active, the Home indicator will flash at a speed corresponding to the
selected Turbo level.
2. Clearing All Turbo Settings
Operation: Double-click the [M] button to clear the Turbo settings for all buttons.
Important Notes:
While a button is being triggered in Turbo mode, the Home indicator will flash at the corresponding speed.
Memory Function: These settings will be saved even after the controller restarts.
Clear All Programming & Turbo Settings:
Operation: Press and hold the [C] button on the front of the controller for 2 seconds.
Status Indicator: The Home indicator will flash white 3 times and then return to solid on.
Result: All ML/MR button programming and Turbo settings have been successfully cleared.
Note: This operation will reset all back button macros and Turbo functions to their factory defaults.
Factory Reset:
Operation: Press and hold the [HOME] button and the [+] button simultaneously for 5 seconds to restore the
controller to its factory settings.
Status
Channel Indicator Status
Description
Connected
Solid On
The device has been successfully connected.
Pairing Mode
Rapid Flash
The controller is searchable and ready to pair with
new devices.
Reconnecting
Slow Flash
Switch 1/2 Platform User Guide:
Bluetooth Connection Steps :
Step 1: Press the [Home] button to power on the controller. Then, press and hold [Pairing Button] + [Y]
simultaneously. Release them once the
Green channel indicator starts flashing.
Step 2: On the Switch 1/2 main menu, navigate to: "Controllers" → "Change Grip/Order" to enter the pairing screen.
Step 3: Once the Channel Indicator stays solid on, the connection is successful.
Important Notes :
If Pairing Fails: Press and hold [Pairing Button] + [Y] again to re-enter pairing mode.
Auto-Reconnect: After the first successful pairing, simply short press the [Home] button when the controller is
off to automatically reconnect.
Button Layout Fix: If the A, B, X, Y button values are incorrect after connecting, press and hold [M] + [A] for 2
seconds to swap the values of A/B and X/Y.
Automatically connecting to the last paired device.
Press and hold [Pairing Button] + [Y] for 3s to force
enter Pairing Mode.
Platforms and Modes:
Platform
Mode
Channel Indicator
Status
Min. System
Requirements
PC
Switch
PS3
Receiver
Mode
Pairing Button + X Button
iOS
PC
DS4 Mode
Red
Pairing Button + B Button
iOS13
Win10
Switch
Switch Mode
Pairing Button + Y Button
Switch 1/2
Android
Mode
Blue
Pairing Button + A Button
Android 9.0
Yellow
Android
Switching Method
Windows 7
Switch 1/2
PS3
Green
Status
Channel Indicator Status
Description
Connected
Solid On
The device has been successfully connected.
Pairing Mode
Rapid Flash
The controller is searchable and ready to pair with
new devices.
Reconnecting
Slow Flash
Automatically connecting to the last paired device.
Press and hold [Pairing Button] + [A] for 3s to force
enter Pairing Mode.
Android Platform User Guide:
Bluetooth Connection Steps:
Step 1: Press the [Home] button to power on the controller. Then, press and hold [Pairing Button] + [A]
simultaneously. Release them once the
Blue channel indicator starts flashing.
Step 2: Open the Bluetooth settings on your Android device. Search for and select "Wireless Controller" from the
list to pair.
Step 3: Once the Channel Indicator stays solid on, the connection is successful.
Important Notes :
If Pairing Fails: Press and hold [Pairing Button] + [A] for 3 seconds to re-enter pairing mode.
Auto-Reconnect: After the first successful pairing, simply press the [Home] button when the controller is off to
automatically reconnect to your device.
iOS Platform User Guide:
Bluetooth Connection Steps:
Step 1: Press the [Home] button to power on the controller. Then, press and hold [Pairing Button] + [B]
simultaneously. Release them once the
Red channel indicator starts flashing.
Step 2: Open the Bluetooth settings on your iOS device. Search for and select "DUALSHOCK 4 Wireless
Controller" from the list to pair.
Step 3: Once the Channel Indicator stays solid on, the connection is successful.
Important Notes :
If Pairing Fails: Press and hold [Pairing Button] + [B] for 3 seconds to re-enter pairing mode.
Auto-Reconnect: After the first successful pairing, simply press the [Home] button when the controller is off to
automatically reconnect.
Status
Channel Indicator Status
Description
Connected
Solid On
The device has been successfully connected.
Pairing Mode
Rapid Flash
The controller is searchable and ready to pair with
new devices.
Reconnecting
Slow Flash
Automatically connecting to the last paired device.
Press and hold [Pairing Button] + [B] for 3s to force
enter Pairing Mode.
Status
Channel Indicator Status
Description
Connected
Solid On
The device has been successfully connected.
Pairing Mode
Rapid Flash
The controller is searchable and ready to pair with
new devices.
Reconnecting
Slow Flash
Automatically connecting to the last paired device.
Press and hold [Pairing Button] + [X] for 3s to force
enter Pairing Mode.
Receiver Mode User Guide (PC/PS3/Switch):
Wireless Receiver Connection Steps:
Step 1: Plug the wireless receiver into the USB port of your PC, PS3, or Switch 1/2. Press the [Pairing button] on the
receiver; the receiver's indicator light will flash rapidly.
Step 2: Press the [Home] button to power on the controller. Then, press and hold [Pairing button] + [X];
the
Yellow channel indicator will start flashing.
Step 3: When both the receiver indicator and the controller's channel indicator stay solid on, the connection is
successful.
Important Notes:
Pairing Fail:
Controller: Press and hold [Pairing button] + [X] of the controller for 3 seconds to re-enter pairing mode.
Receiver: Press and hold [Pairing button] of the Receiver for 3 seconds to re-enter pairing mode.
Auto-Reconnect: Simply short press the [Home] button when the controller is off to automatically reconnect.
No Function After Connection: If the controller is connected but not working, press and hold the [Home] button
for 10 seconds to power off. Then, short press [Home] to restart; the controller will automatically identify the
platform.
Button Layout Fix: If A/B/X/Y values are incorrect, press and hold [M] + [A] for 2 seconds to swap the values of
A/B and X/Y.
Manual Mode Switch (PC Only): In PC mode, press and hold [-] + [+] for 2 seconds to manually cycle between
X-Input, NS (Switch), and DS4 modes.
Audio Support: The 3.5mm Audio jack is supported on PC and Switch when using the Receiver Mode.
Wired Mode User Guide (PC/PS3/Switch):
Wired Connection Steps:
Step 1: Connect the controller to the USB port of your PC, PS3, or Switch using a USB-C data cable.
Step 2: The White channel indicator will stay solid on, indicating a successful connection.
I
mportant Notes:
Plug and Play: In wired mode, the controller automatically identifies the platform for an instant plug-and-play
experience.
Button Layout Fix: If the A, B, X, Y button values are incorrect, press and hold [M] + [A] for 2 seconds to swap the
values of A/B and X/Y.
Manual Mode Switch (PC Only): While connected to a PC, press and hold [-] + [+] for 2 seconds to manually cycle
between X-Input, NS (Switch), and DS4 modes.
PC Platform User Guide
Bluetooth Connection Steps:
Step 1: Press the [Home] button to power on the controller. Then, press and hold [Pairing Button] + [B]
simultaneously. Release them once the
Red channel indicator starts flashing.
Step 2: Open the Bluetooth settings on your PC. Search for and select "Wireless Controller" from the device list
to pair.
Step 3: Once the Channel Indicator stays solid on, the connection is successful.
Important Notes :
Hardware Requirement: Ensure your PC has built-in Bluetooth or a compatible Bluetooth dongle.
Game Compatibility: Some games may require launching through Steam (Steam Input) to function correctly with
this controller.
If Pairing Fails: Press and hold [Pairing Button] + [B] for 3 seconds to re-enter pairing mode.
Auto-Reconnect: After the first successful pairing, simply short press the [Home] button when the controller is off
to automatically reconnect.
Button Layout Fix: If A/B/X/Y values are incorrect, press and hold [M] + [A] for 2 seconds to swap the values of
A/B and X/Y.
Status
Channel Indicator Status
Description
Connected
Solid On
The device has been successfully connected.
Pairing Mode
Rapid Flash
The controller is searchable and ready to pair with
new devices.
Reconnecting
Slow Flash
Automatically connecting to the last paired device.
Press and hold [Pairing Button] + [B] for 3s to force
enter Pairing Mode.
FCC Compliance Statement
FCC ID: 2BTJMJ33JT01
This device complies with Part 15 of the FCC Rules. Operation is subject to the following two
conditions: (1) This device may not cause harmful interference, and (2) this device must accept
any interference received, including interference that may cause undesired operation.
Warning: Changes or modifications to this unit not expressly approved by the party responsible f
or compliance could void the user’s authority to operate the equipment.
NOTE: This equipment has been tested and found to comply with the limits for a Class B digital
device, pursuant to Part 15 of the FCC Rules. These limits are designed to provide reasonable
protection against harmful interference in a residential installation. This equipment generates,
uses and can radiate radio frequency energy and, if not installed and used in accordance with
the instructions, may cause harmful interference to radio communications.
However, there is no guarantee that interference will not occur in a particular installation. If this
equipment does cause harmful interference to radio or television reception, which can be
determined by turning the equipment off and on, the user is encouraged to try to correct the
interference by one or more of the following measures:
Reorient or relocate the receiving antenna.
Increase the separation between the equipment and receiver.
Connect the equipment into an outlet on a circuit different from that to which the receiver is
connected.
Consult the dealer or an experienced radio/TV technician for help.
RF Warning Statement: The device has been evaluated to meet general RF exposure requirement.
The device can be used in portable exposure condition without restriction.
//jungletech.space/