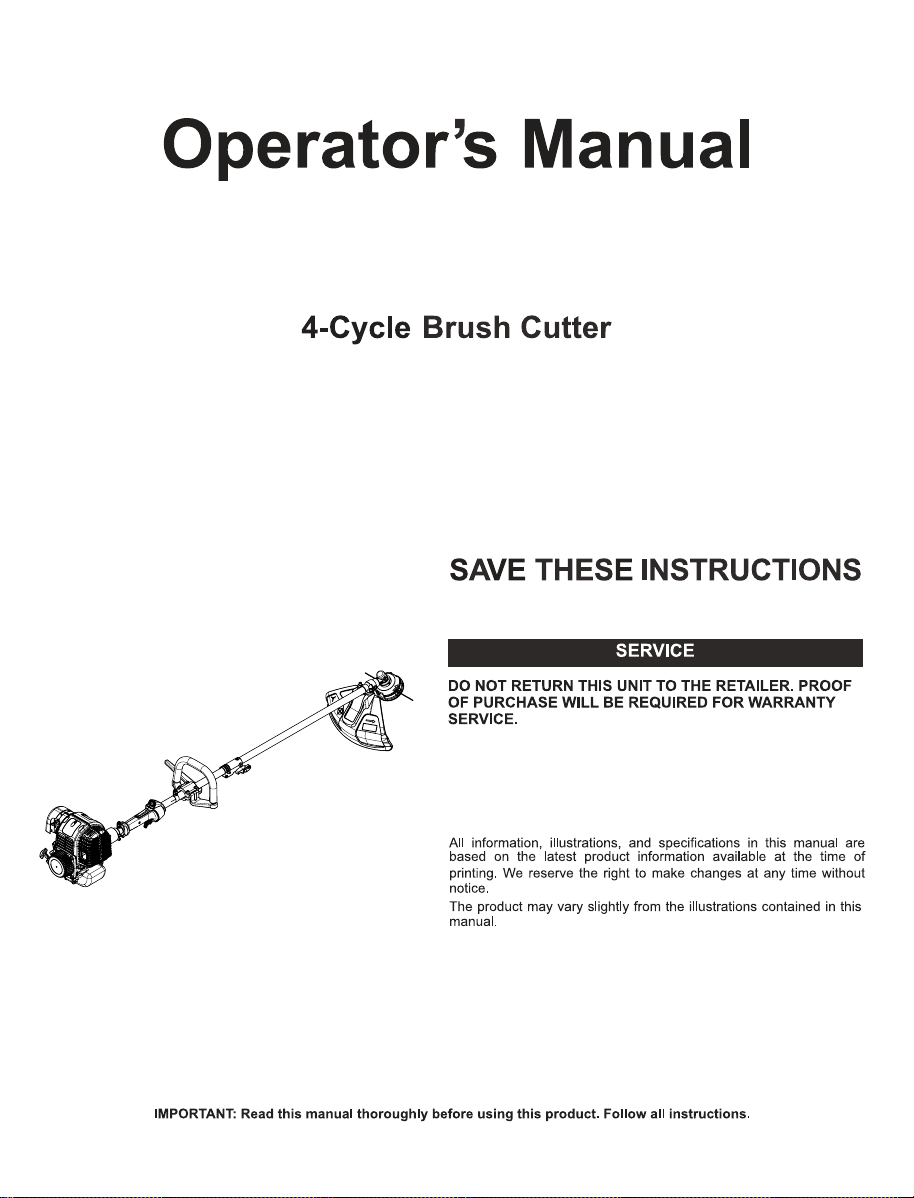
WBP31BCF / WBP31TS
2026/02
WBP31BCF / WBP31TS
For assistance regarding the assembly, operation or maintenance of
the unit, please call 1-844-786-7335 or 1-833-822-0145 (in the United
States) or contact email box
The purpose of safety symbols is to attract your attention to
possible dangers. The safety symbols, and their explanations,
deserve your careful attention and understanding. The safety
warnings do not by themselves eliminate any danger. The
instructions or warnings they give are not substitutes for proper
accident prevention measures.
SYMBOL MEANING
NOTE: Advises you of information or instructions vital to the
operation or maintenance of the equipment.
Read the operator’s manual and follow al
l warnings and safety
instructions. Failure to do so can result in serious injury to the
operator and/or bystanders.
•
IMPORTANT SAFETY INSTRUCTIONS •
READ ALL INSTRUCTIONS BEFORE OPERATING
Be aware of risk of injury to the head, hands and feet.
Carefully inspect the area before starting the unit. Remove
rocks, broken glass, nails, wire, string and other objects that
may be thrown or become entangled with the unit.
Clear the area of children, bystanders and pets; keep them
outside a 50-foot (15 m) radius, at a minimum. Even then, they
are s
till at risk from thrown objects. Encourage bystanders to
wear eye protection. If you are approached, stop the unit
immediately.
Squeeze the throttle control and check that it returns
automatically to the idle position. Make all adjustments or
repairs before using the unit.
Do not change the engine governor settings or overspeed the
engine.
This unit is intended for occasional, household use only.
Read the instructions carefully. Be familiar with the controls and
proper use of the unit.
Do not operate this unit when tired, ill or und
er the influence of
alcohol, drugs or medication.
Never allow children to operate the unit. Teens must be trained,
accompanied and supervised by an adult. Never allow adults to
operate the unit without proper instruction.
All guards and safety attachments must be installed properly
before operating the unit.
Inspect the unit before use. Replace damaged parts. Check for
fuel leaks. Make sure all fasteners are in place and secure.
Replace parts that are cracked, chipped, or damaged in any
way. Do not operate th
e unit with loose or damaged parts.
Only use the trimming line described in the Specifications
section of this manual. Never use metal-reinforced line, wire,
chain or rope. These can break off and become dangerous
projectiles.
2
SAFETY
WARNING: When using the unit, all safety
instructions must be followed. Please read these
instructions before operating the unit in order to ensure the
safety of the operator and any bystanders. Please keep
these instructions for later use.
CAUTION:
Signals a MODERATE hazard.
Failure to obey a safety CAUTION symbol MAY result in
property damage or injury to yourself or to others.
CALIFORNIA PROPOSITION 65
WARNING:
This product contains a chemical
known to the state of California to cause cancer, birth
defects or other reproductive harm.
DANGER: Signals an EXTREME hazard.
Failure to obey a safety DANGER symbol WILL result in
serious injury or death to yourself or to others.
WARNING: Signals a SERIOUS hazard.
Failure to obey a safety WARNING symbol CAN result in
serious injury to yourself or to others.
DO NOT SELL TO CALIFORNIA
3
Store fuel only in containers specifically designed and
approved for the storage of such materials.
Always stop the engine and allow it to cool before filling the
tank. Never remove the fuel tank cap or add fuel when the
engine is hot. Always loosen the fuel tank cap slowly to
relieve any pressure in the tank before fueling.
Always add fuel in clean, well-ventilated outdoor area where
there are no sparks or flames. DO NOT smoke.
Never operate the unit without the fuel cap securely in place.
Avoid creating a source of ignition for spille
d fuel. Wipe up any
spilled fuel from the unit immediately, before starting the unit.
Move the unit at least 30 ft. (9.1 m) from the fueling source and
site before starting the engine. DO NOT smoke.
Never start or run the unit inside a closed room or building.
Breathing exhaust fumes can kill. Operate this unit only in a
well ventilated outdoor area.
Never use mixture fuel, gasoline and oil should add separately
Use of any other parts or
accessories could lead to serious injury to the user, or damage to
the unit, and void the warranty.
• ON/OFF STOP CONTROL
ON / START / RUN
• ON/OFF STOP CONTROL
OFF or STOP
• PRIMER BULB
Push primer bulb, fully and slowly, 7 times.
• THROWN OBJECTS CAN CAUSE SEVERE INJURY
WARNING: Small objects can be
propelled at high speed, causing injury.
Min. 50
ft
15 m
• KEEP BYSTANDERS AWAY
WARNING:
Keep all bystanders,
especially children and pets, at least 50 feet (15 m)
from the operating area.
• HOT SURFACE
WARNING:
Do not touch a hot muffler
or cylinder. You may get burned. These parts get
extremely hot from operation. When turned off, they
remain hot for a short time.
• SHARP BLADE
WARNING:
There is a sharp blade on
the cutting head shield. To prevent serious injury, do
not touch the line cutting blade.
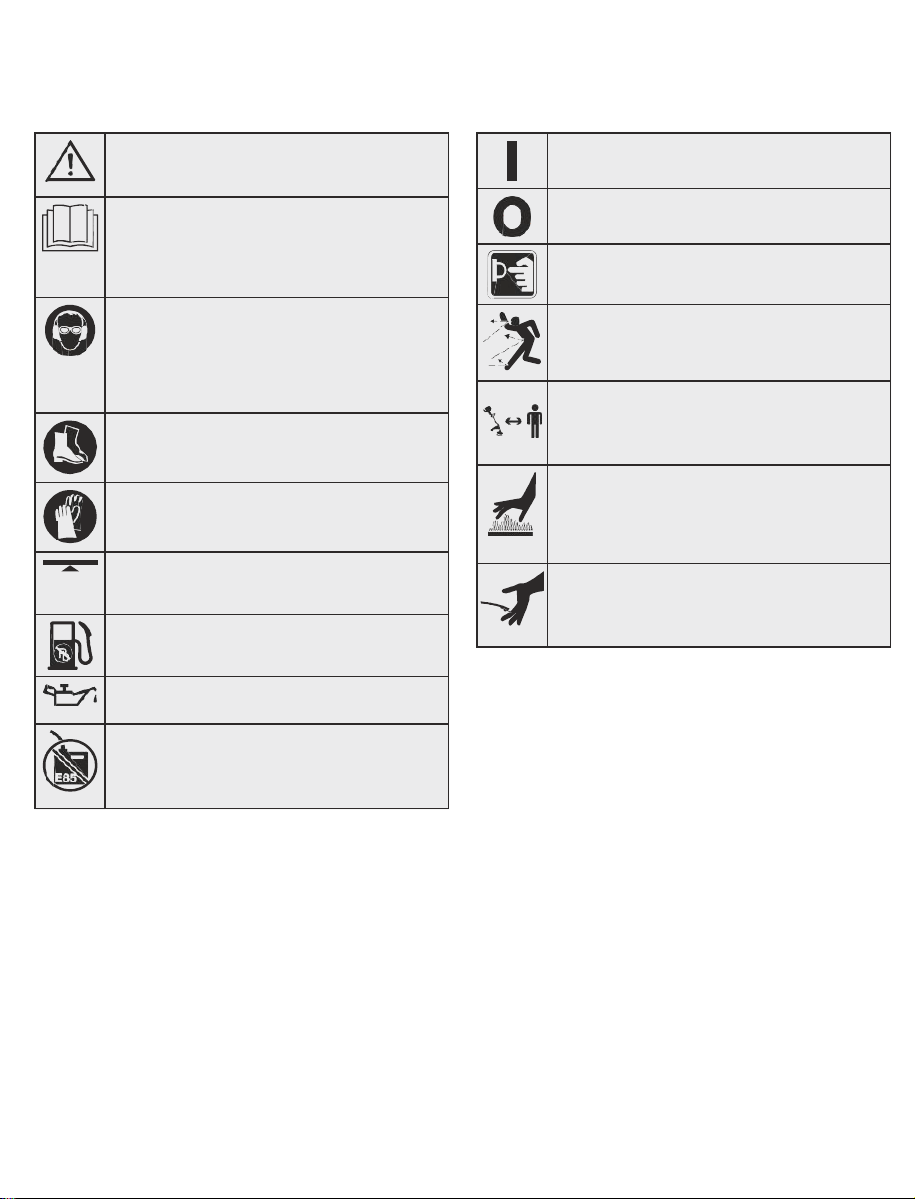
• SAFETY & INTERNATIONAL SYMBOLS •
This operator's manual describes safety and international symbols and pictographs that may appear on this product. Read the operator's
manual for complete safety, assembly, operating and maintenance and repair information.
SYMBOL
MEANING
SYMBOL
MEANING
4
• SAFETY ALERT SYMBOL
Indicates danger, warning or caution. May be used in
conjunction with other symbols or pictographs.
• READ OPERATOR'S MANUAL
WARNING:
Read the operator’s
manual(s) and follow all warnings and safety
instructions. Failure to do so can result in serious
injury to the operator and/or bystanders.
• WEAR EYE AND HEARING PROTECTION
WARNING: Thrown objects and loud
noise can cause severe eye injury and hearing loss.
Wear eye protection meeting current ANSI / ISEA
Z87.1 standards and ear protection when operating
this unit. Use a full face shield when needed.
• WEAR FOOT PROTECTION
Always wear heavy-duty, non-slip footwear when
operating this unit.
• WEAR HAND PROTECTION
Always wear heavy-duty, non-slip gloves when
handling this unit.
• HANDLE POSITION
Make sure the handle is positioned beyond the end of
the safety label.
• UNLEADED FUEL
Always use clean, fresh unleaded fuel.
• OIL
Refer to operator’s manual for the proper type of oil.
• DO NOT USE E85 FUEL IN THIS UNIT
WARNING: It has been proven that fuel
containing greater than 10% ethanol will likely
damage this engine and void the warranty.
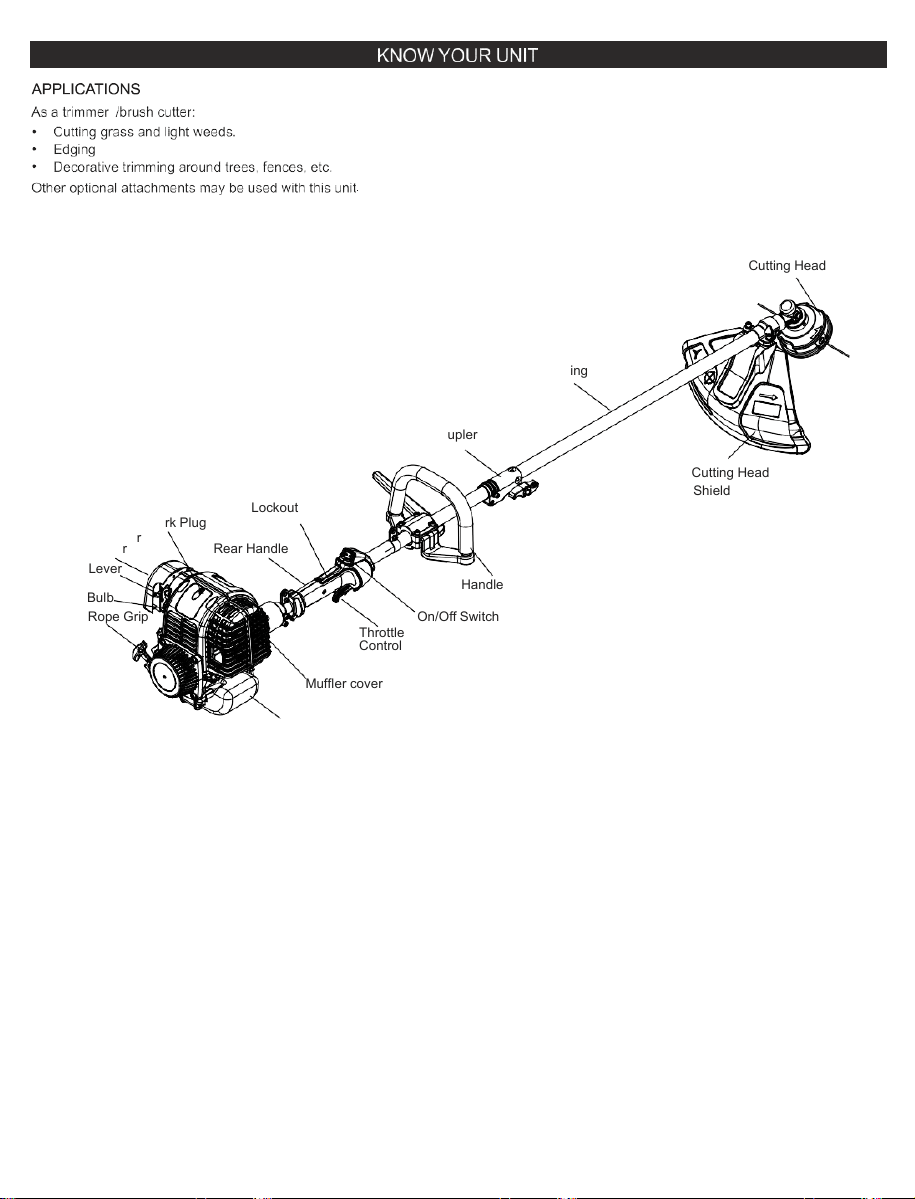
Cutting Head
Shaft Housing
Coupler
Cutting Head
Shield
Throttle Lockout
Spark Plug
Air Filter
Cover
Choke Lever
Rear Handle
Handle
Primer Bulb
Starter Rope Grip
On/Off Switch
Throttle
Control
Muffler cover
Fuel tank
5
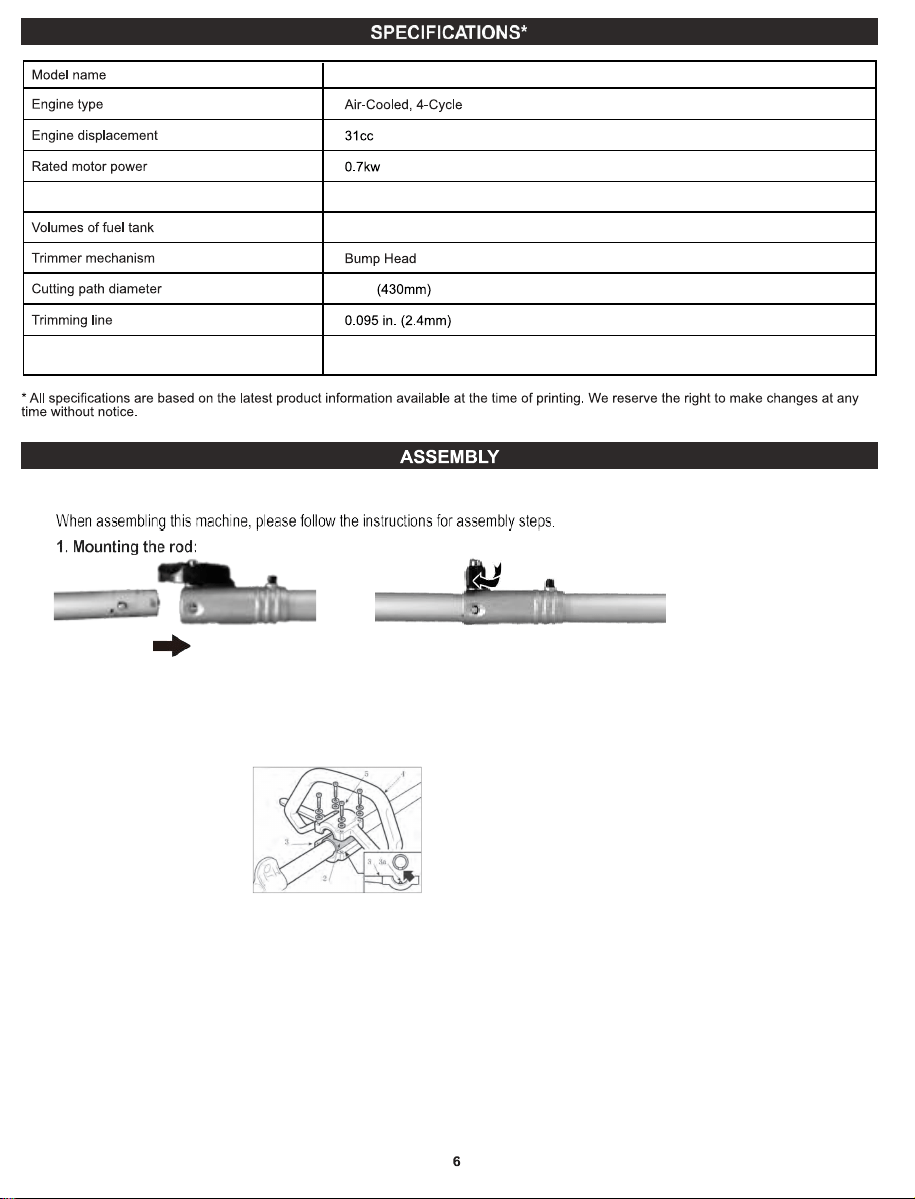
Loop handle: Mounting the Loop Handle
- Fit the sleeve (2) &lower part (3) with guard, placing the pin (3a) in one of the three holes on the drive tube.
- Fit the front handgrip (4) by using the screws (5).
- Before tightening the screw (4), align the handgrip correctly with respect to the drive tube.
- Fully tighten the screw (5).
Oil tank
Cutting with 3T blade 10” (255mm)
3.38 oz (100ml)
23.67 oz (700ml)
16.9”
WBP31BCF / WBP31TS
2.Assemble the handle on the machine.
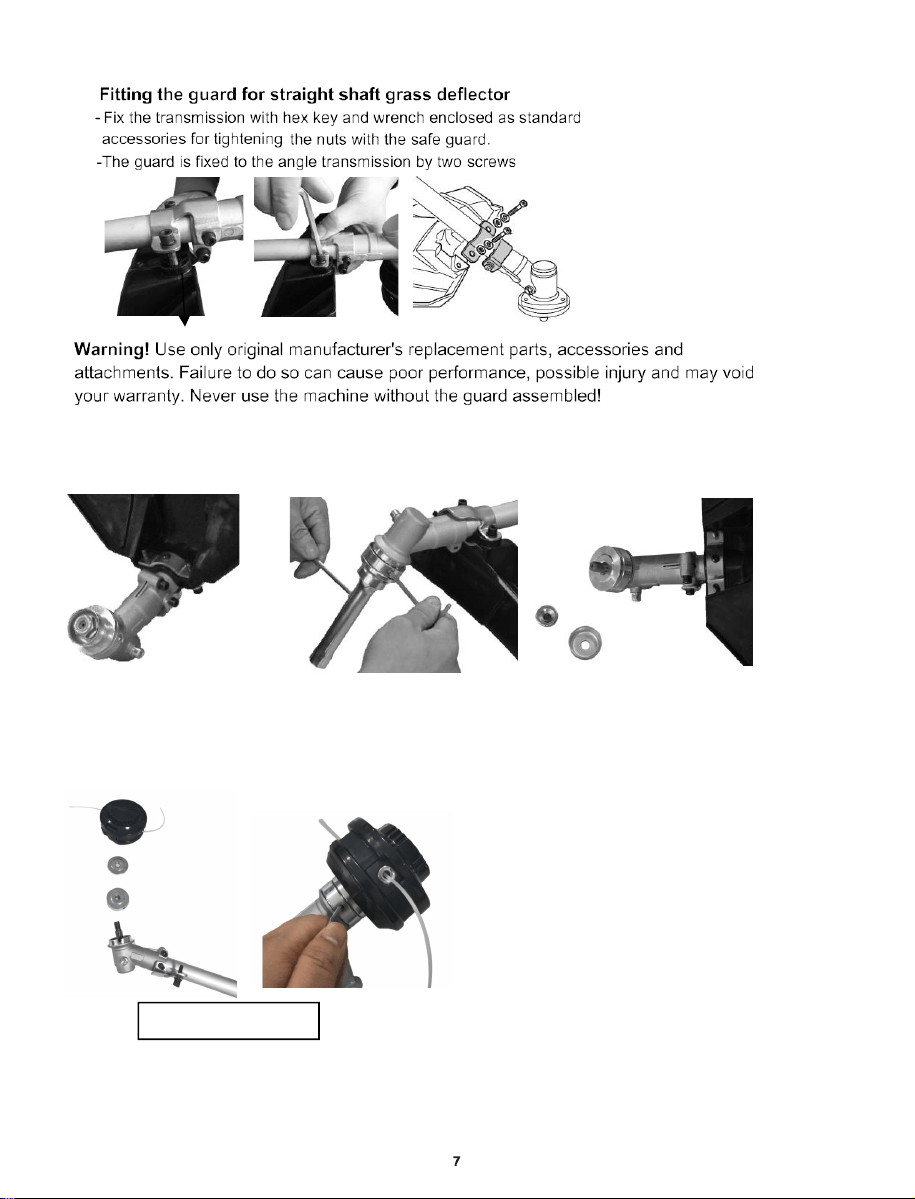
4.2 Assembly and disassembly of the cutting head for WB26BCI:
a) Release the nut. Line up the two holes of flange and shield, use one screw driver to hold the
flange as below and turn the socket wrench clockwise, the nut will be released.
Straight shaft
b) Fit the Nylon cutting head.
Straight shaft: Remove another shield after release the nut. Still hold the flange, take the Nylon cutting
head on the shaft and rotate counter-clockwise, the Nylon cutting head is fitted
3.1
8
c) Release the Nylon cutting head.
Straight shaft: Use screw driver to hold flange and then rotate the Nylon cutting head clockwise,
it will be replaced.
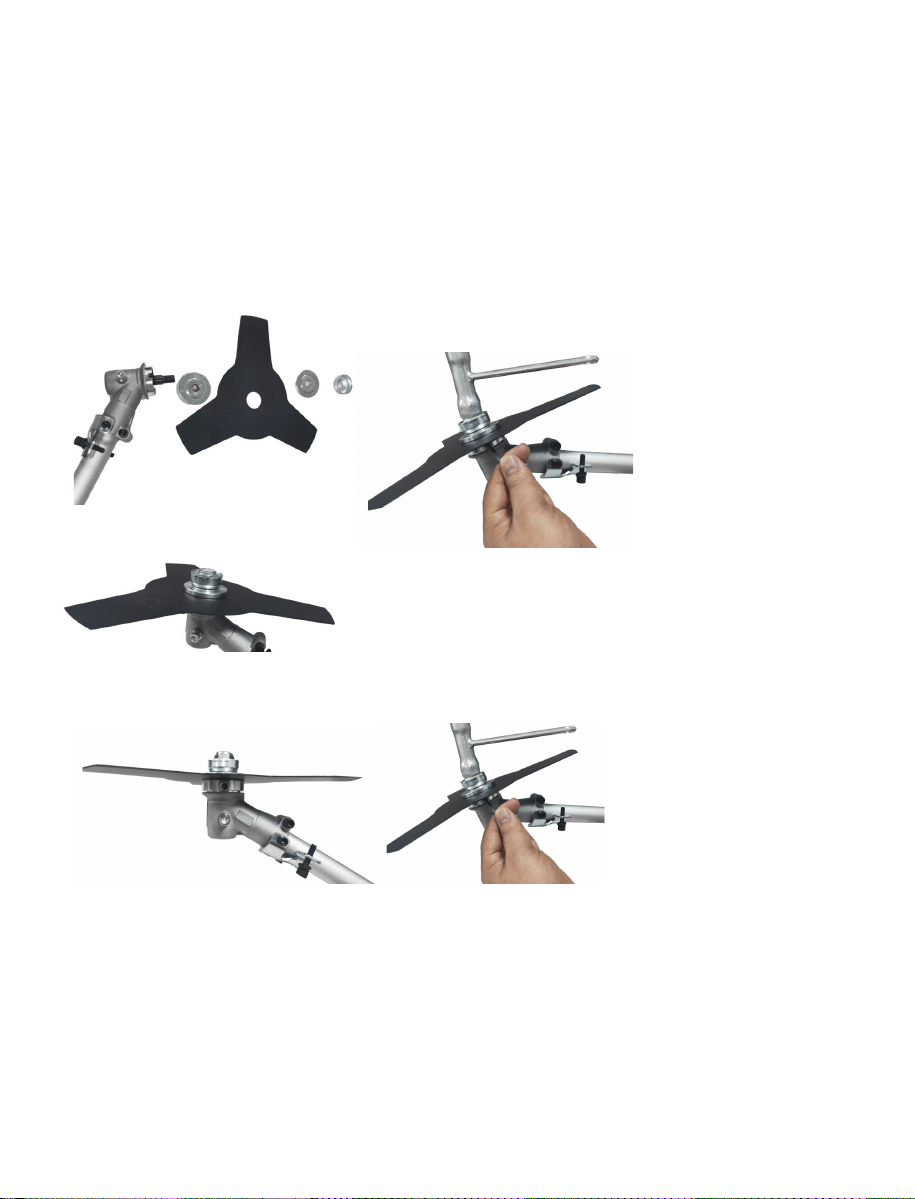
d) Fit the blade (Only for straight shaft, forbidden used in curved shaft ). Take the outer flange
off after release the nut, then put the blade, outer flange, shield and nut according to priority as
below picture. Note the blade rotation direction needs be same as below picture. Use screw driver
to hold flange and tighten nut counter-clockwise, ensure the nut is tightened enough
e) Release blade. Use screw driver to hold flange and release nut, the blade can be took off.
Warning!
Please make sure the cutting head has been assembled correctly before use!
Max.
OPERATION
When operating this machine, please follow the instructions for operations steps.
Before starting the equipment
Each time before use, check the following:
•
•
That there are no leaks in the fuel system.
That the equipment is in perfect condition and that
the safety devices and cutting devices are complete.
That all screws are securely fastened.
That all moving parts move smoothly.
•
•
CAUTION!
The engine does not come with oil in it. Therefore, ensure that you add 0,1 liters of oil
before starting it up. Use normal,multigrade oil (SAE30 / 10W30). The oil level in the
engine must be checked each time before mowing.
You will also need to fill in petrol, as this is also not supplied upon delivery
Max
Min
Oil
Recommended fuels.
Normal petrol / Lead free max. 5% bioethanol
Important:
Only use containers designed and approved for the purpose to transport and
store fuel.
WARMING: Mixture fuel is forbidden for 4-stroke device, the oil and gasoline should added
separately into oil tank and fuel tank.
9
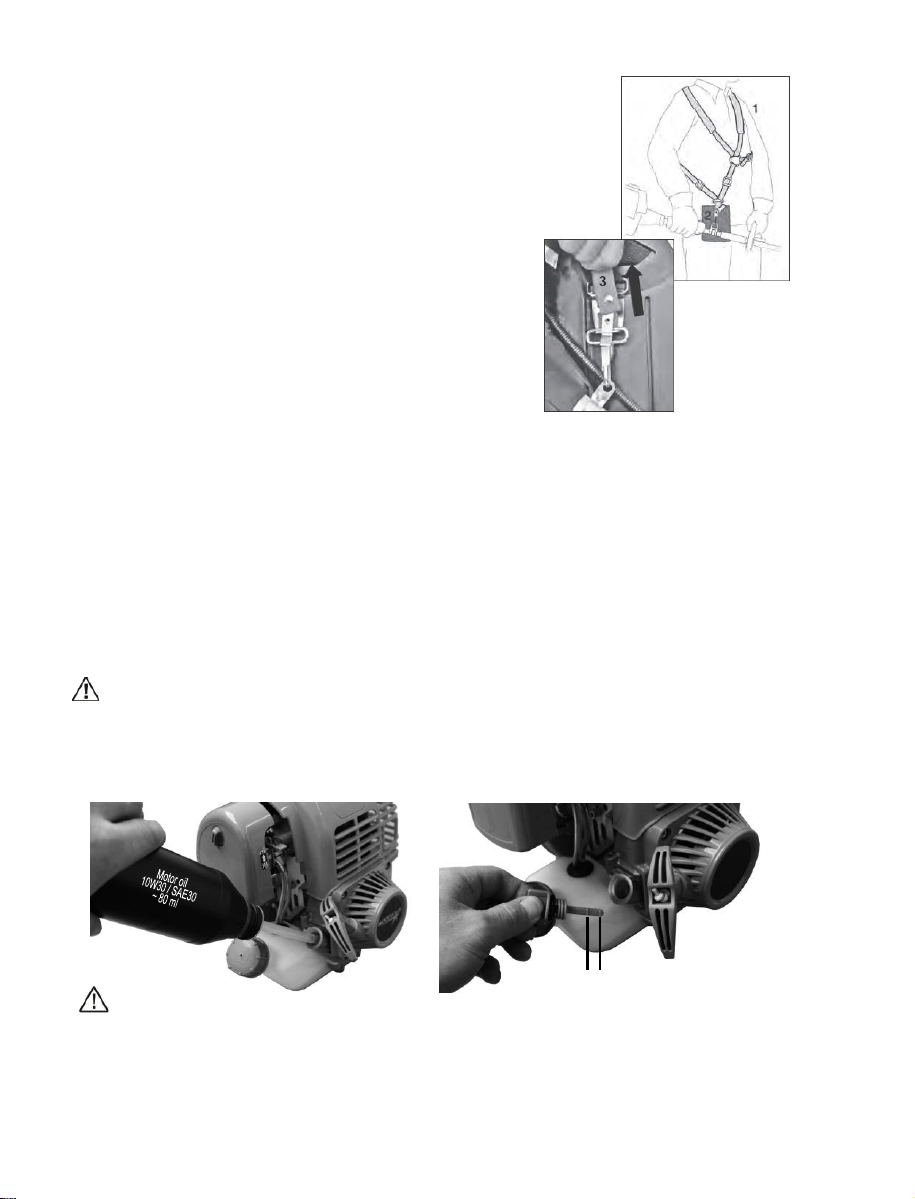
5. Fit and adjust the betl.
The design and type of carry
strap may vary. (depends on if it is deliveried)
• Put on the shoulder strap (1).
• Adjust the length of the belt so that the spring hook (2)
is roughly a hand’s width below your right hip.
PLEASE NOTE: This carry strap has a safety
device allowing you to immediately disconnect the
strap from the machine in an emergency. To do so,
pull forcefully on the red pull tab (3) on the strap.
This disconnects the strap from the holding fixture
immediately.
NOTE: Never start the motor with the carry strap
attached to the machine!
the belt well.
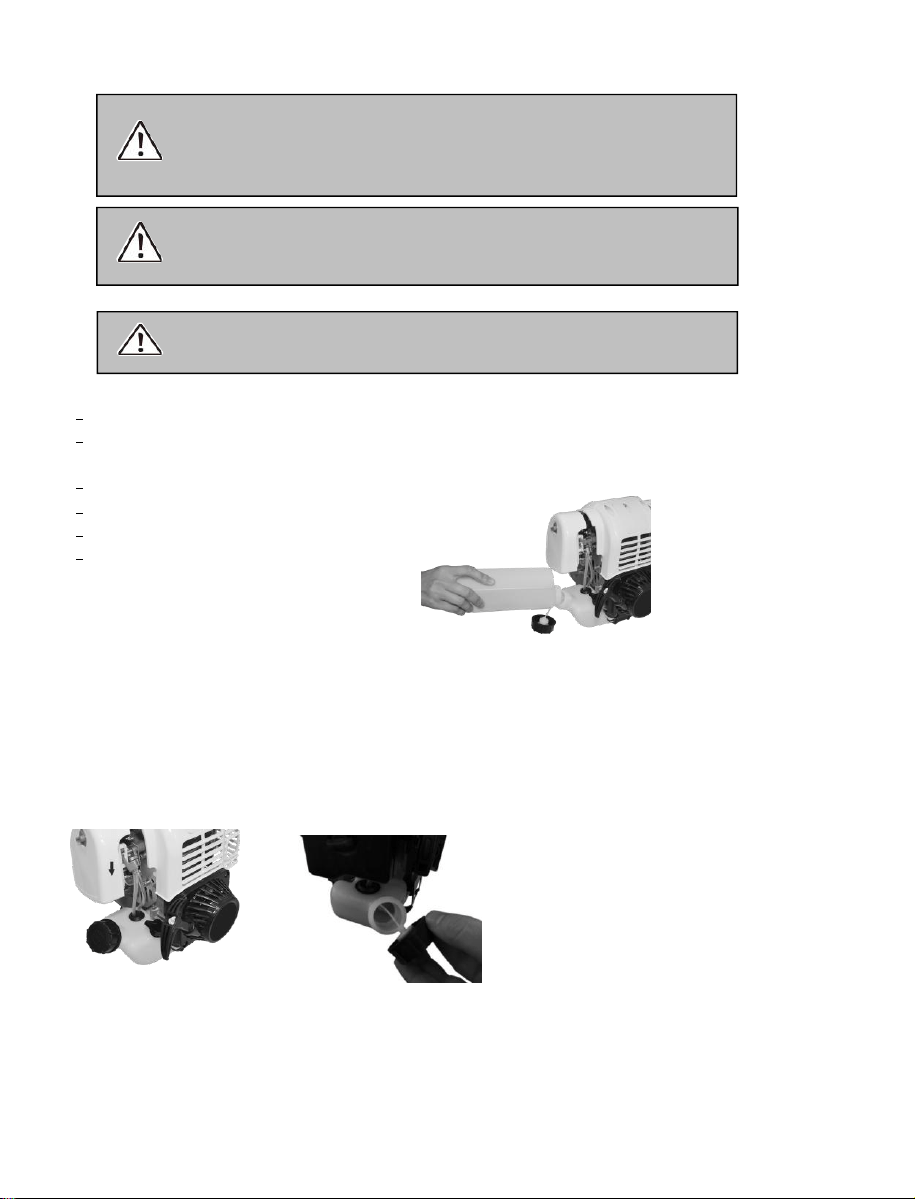
Filling with gasoline
Place the machine on a flat sta ble surface, with the fuel tank cap facing upwards.
Clean the fuel tank cap and the surrounding area to avoid any dirt from entering the
tank during refilling.
Carefully open the fuel tank cap to allow the pressure inside to d ecrease gradually.
Unscrew the tank cap and remove it.
Pour in the fuel carefully, avoid spilling.
Screw the tank cap on f irmly by hand.
WARNING! Be careful of the emission of exhaust gases. Always shut off engine
before fueling. Never add fuel with a running or hot engine. Take care of fire!
WARNING! Never smoke whilst refueling and avoid inhaling the petrol fumes.
WARNING! Carefully open the tank top as pressure could have formed inside.
Draining fuel
Hold a collection container beneath the fuel drain bolt.
Unscrew the tank cap and remove it.
- Allow the fuel to run out c ompletely.
- Screw the tank cap on firmly by hand.
WARNING! Always close the fuel tank cap firmly.
WARNING! Immediately clean all traces of fuel which may have dripped on the
machine or the ground and do not start the engi
ne until the petrol fumes have
dissipated.
10
Risk of device damage!
The device is supplied without motor or gearbox oil.
Before operating, you must fi ll it with fuel.
Danger of injury!
Fuel is explosive!
-
Turn off and cool the motor down before filling the tank with fuel.
-
You must observe all safety instructions relating to handing fuel.
DO NOT SELL TO CALIFORNIA
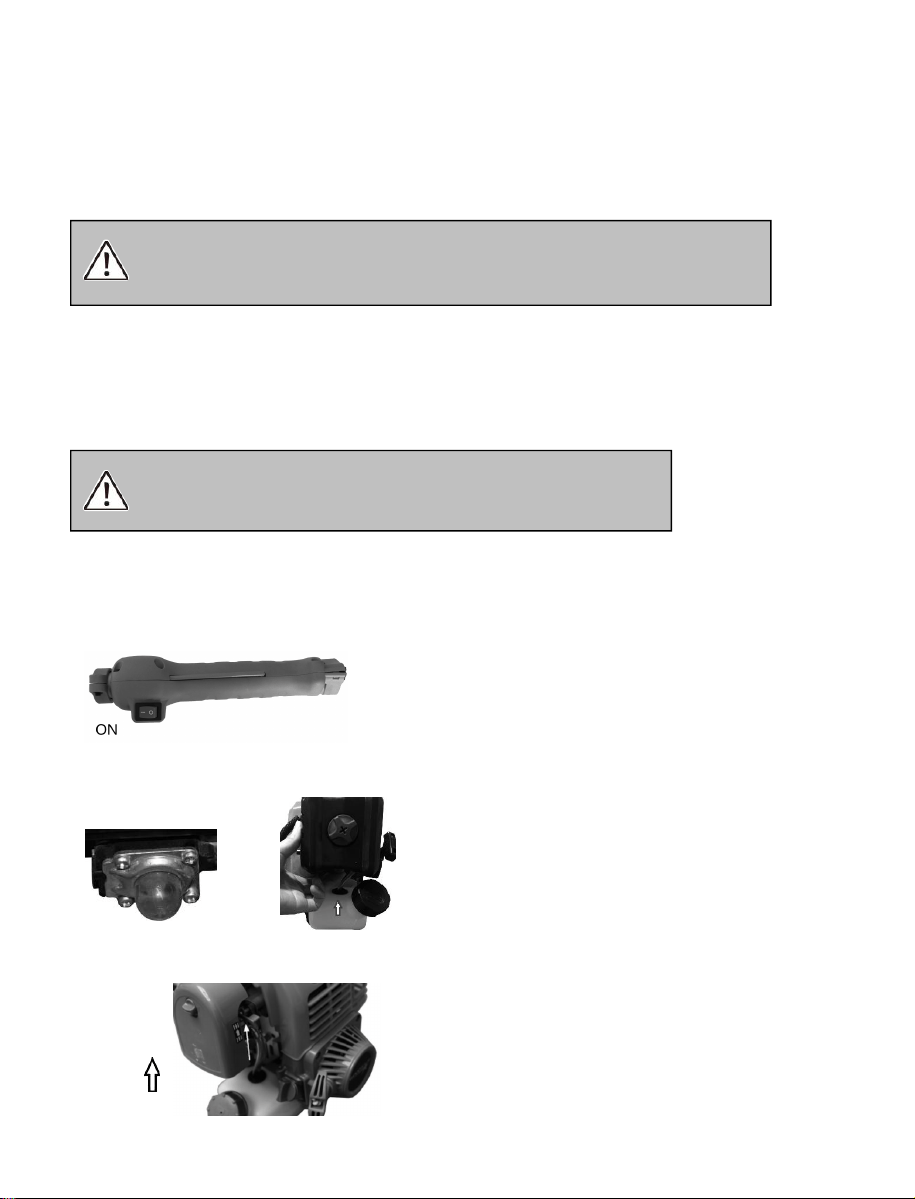
Start on the unit
Do not start the unit until it has been completely assembl ed. Before s wi tching o n the uni t,
always check the oil and ensure no flammab le items around.
Check before use!
Check the safe conditio n of the device:
– Check the device for leaks.
– Check the device for visual defects.
– Check that all par ts of the device have been securely fitted.
– Check that all safety devices are in proper condi tion.
Once the machine has be en set up properly, start the engine as follow:
2.
Press the fuel pump more than 7 times.
3. Put th e choke lever on the (START) position.
START
11
Danger of injury!
Before starting work, always check the ground and remove all objects
which could be thrown by the device.
Danger of injury!
Do not operate the device unless you did not find any faults. If a part has become
defective, make sure to replace it before you use the device again.
1. Press the switch to IN/ON position.
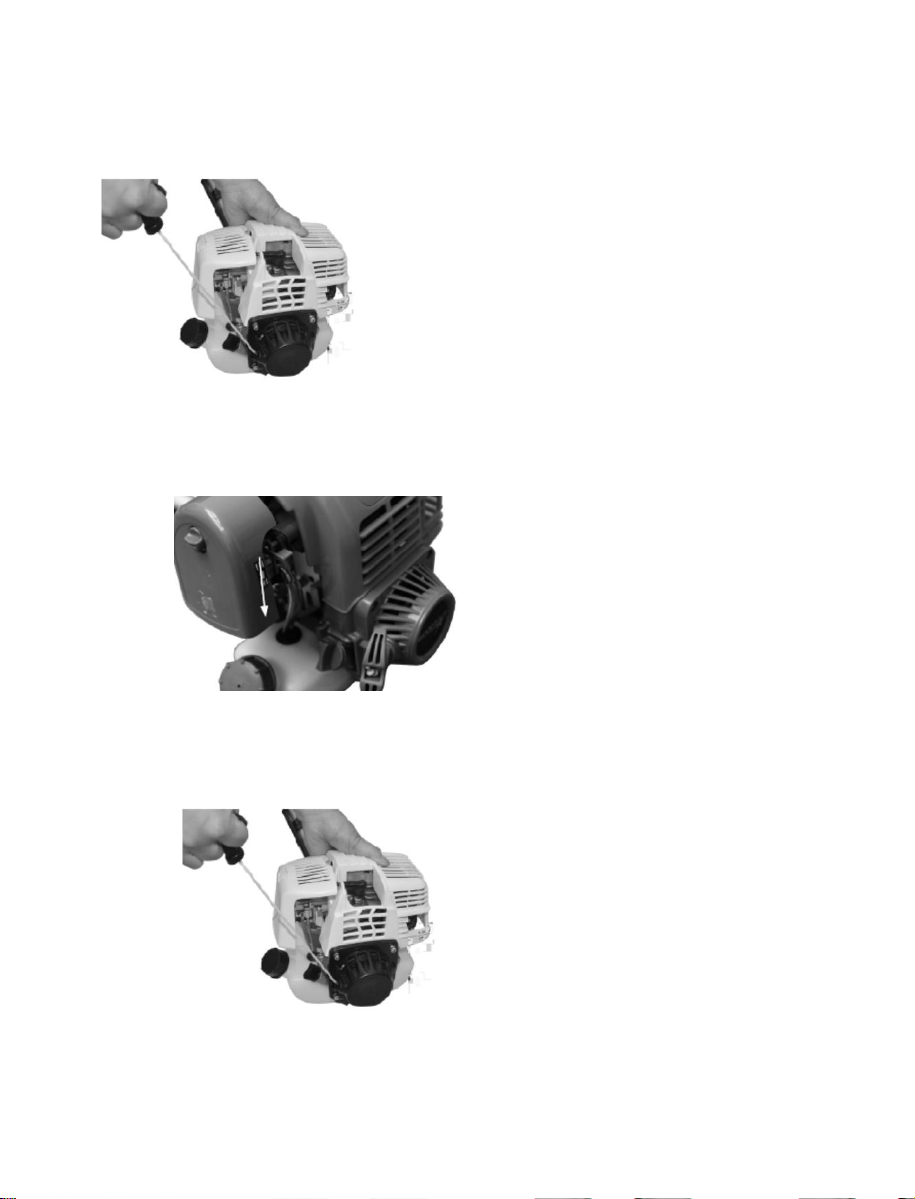
4. Pull the recoil starter handle 3-5 times to start the engine. Hold the machine firmly on the
ground with one hand on the power unit, in order not to lose control of the machine during
start up as following picture.
5. Pull the starter grip slowly for 10 - 15 cm until you feel some resistance, then tug it a few
times until you hear the engine turn over. Then adjust the choke lever to (RUN) position.
RUN
6. Pull the starter grip again until the engine starts as normal.
12
Attention: Allow the device to running at idling for 1 minutes to warm up before
start to work.
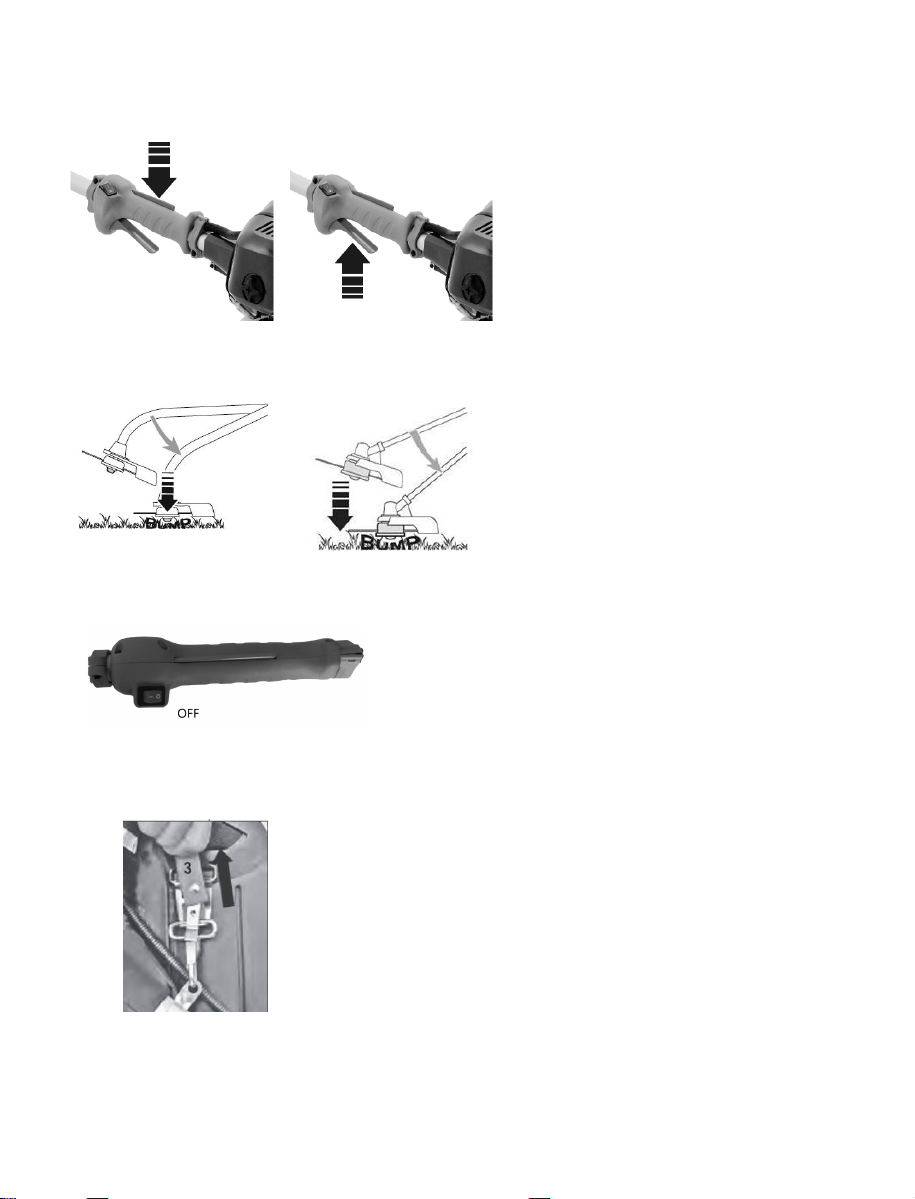
8. Adjusting line length when working: This machine is fitted with a “Tap & Go”head.To
release more line, tap the cutting line head against the round with engine at top speed: the
line will be released automatically and the knife cut off the excess length.
10. If any problem occurs, pull the pin of safety belt, then release the brush cutter
immediately.
11. Hot start: If the machine is hot, the throttle level can be adjusted to ON position directly when
restart the machine. Then repeat steps 1, 2,4,6
13
7. When the engine is running and idling, the throttle lever on handle is as below picture.
First press the lock off lever and then switch the throttle lever on, the machine will be working.
9. If any problem occurs, press the engine switch, the machine will stop running.
If you need stop cutting head working, release the throttle lever.
ATTENTION: The switch would always stays "ON" position, once press it to
"OFF" and release the switch, it returns to "OFF"
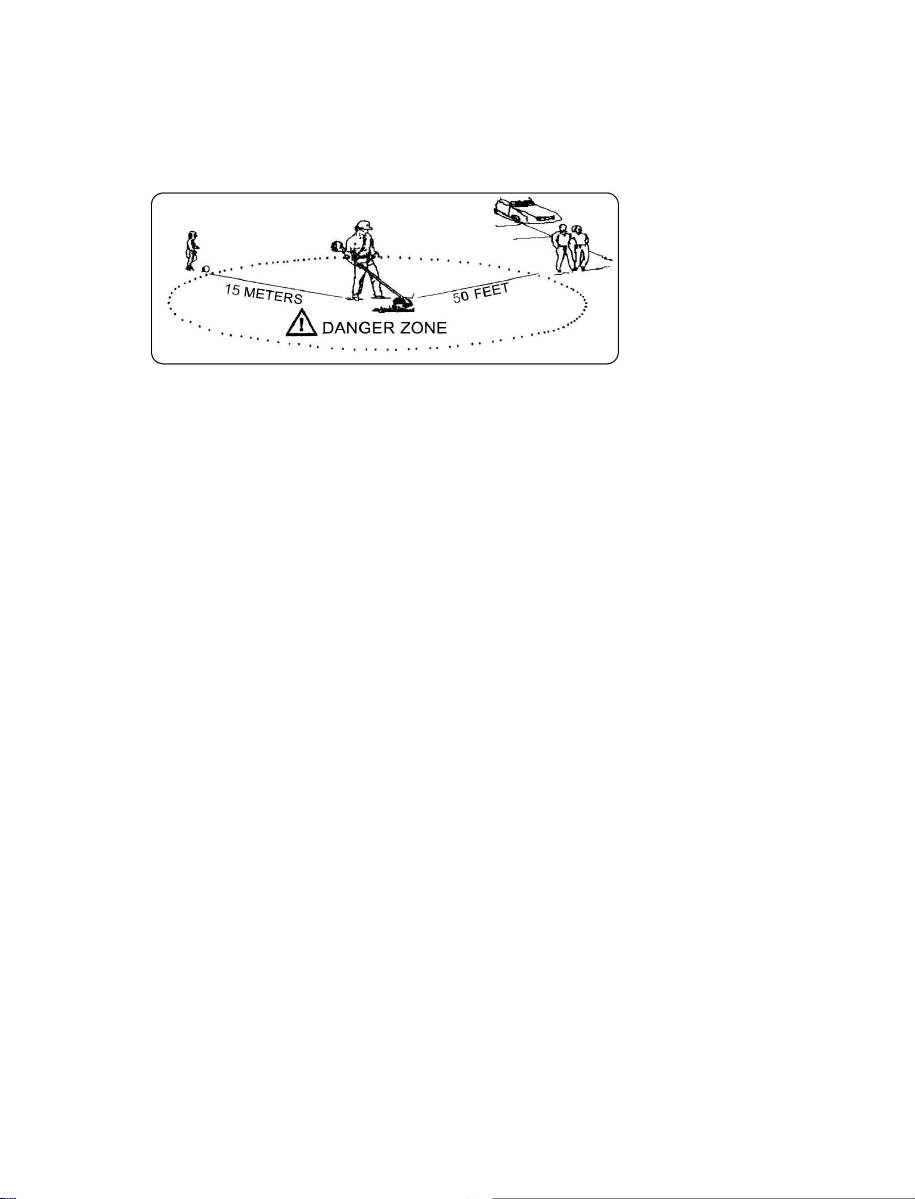
12.
WARNING!
Do not use the machine for sweeping, tilting the cutting line head. The
power of the engine could throw objects and small stones 15 metres or more, causing
damage or injuries to people.
Note:
1. Do not start the motor in tall grass
2. While mowing, lay the connection cable safely on footpaths and on areas which
have already been mown.
3. When the engine has been switched off, the cutter continues running for several
seconds therefore do not get close to the cutting head of the brush cutter until the
cutter has come to a standstill!
14

Before performing any maintenance or cleaning work, always turn off the engine.
1. Do not spray the unit with water. Ingress of water may damage the engine and electrical
connection.
2. Clean the unit with a cloth, hand brush, etc.
WARNING!
During maintenance operations:
– Remove the spark plug cap.
– Wait until the engine is sufficiently cold.
– Never dispose of oils, fuel or other polluting materials in unauthorized places.
Expert inspection is required:
a) If the grass trimmer strikes an object.
b) If the motor stops suddenly
c) If the nylon cutter is damaged
d) If the gears are damaged.
Replacing and recleaning the nylon spool at the end of the trimming season. Always
re-cleaned the nylon spool or, if required, replace the nylon spool with a new one. Always
have the nylon spool re-cleaned or replaced by a customer service centre.
STORAGE
At the end of each working session, carefully clean the machine of dust and debris, and
make sure that there are no damaged parts, replacing any faulty parts. The machine must
be stored in a dry place away from the elements and with the cover correctly fitted.
CLEANING THE ENGINE AND THE SILENCER
To reduce fire risks, periodically clean the cylinder fins with compressed air and clear the
silencer area to get rid of sawdust, branches, leaves or other debris.
STARTING UNIT
To avoid overheating and damage to the engine, always keep the cooling air vents clean
and free of sawdust and debris. If you notice signs of wear on the starter cable, contact
wildbadgerpower.com for a replacement.
NUTS AND SCREWS
Periodically check that all the nuts and screws are securely tightened and the handgrips are
tightly fastened.
15
Maintenance schedule
12 hours of use 24 hours of >50 hours of
Air filter
clean
clean
replace
Spark plug
check
clean
replace
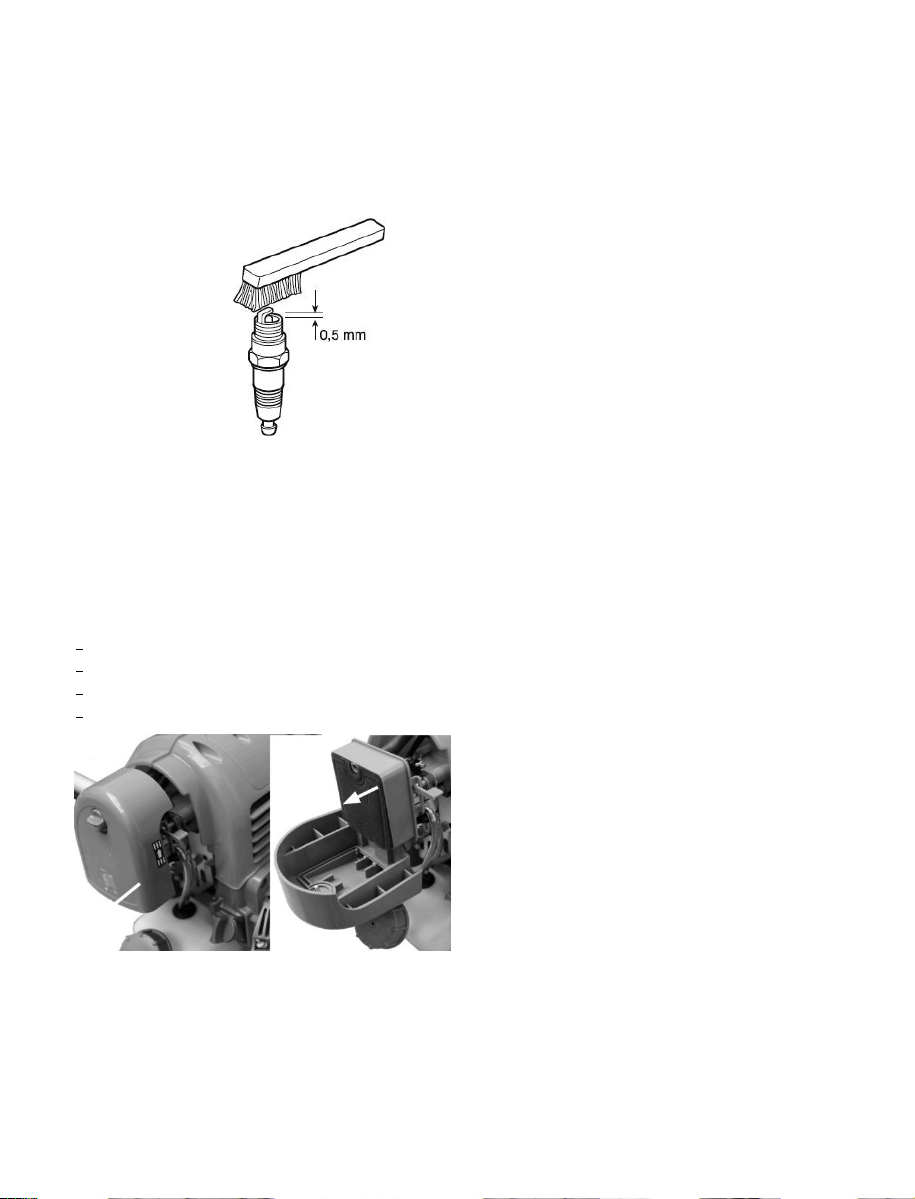
Change and clean the spark plug
-Periodically remove and clean the spark plug using a metal brush to get rid of any
deposits.
-Check and reset the correct distance between the electrodes.
-Replace the spark plug and fasten it firmly using the supplied wrench.
-The spark plug must be replaced with one with the same characteristics whenever the
electrodes have burnt or the insulation has worn, and in any case every 100 working hours.
Clean the air filter
IMPORTANT
Cleaning the air filter is essential to guarantee the efficiency and duration of
the machine. Do not work with a damaged filter or without a filter, as this could permanently
damage the engine. It must be cleaned after every 12 working hours.
Clean the filter as follows:
Loosen the knob, remove the cover and the filter element
Wash the filter element with soap and water. Do not use petrol or other solvents.
Leave the filter to dry in the open air.
Fit the filter element and the cover back on, tightening the knob again
.
Warning!
Never run the engine without the air filter element installed.
16
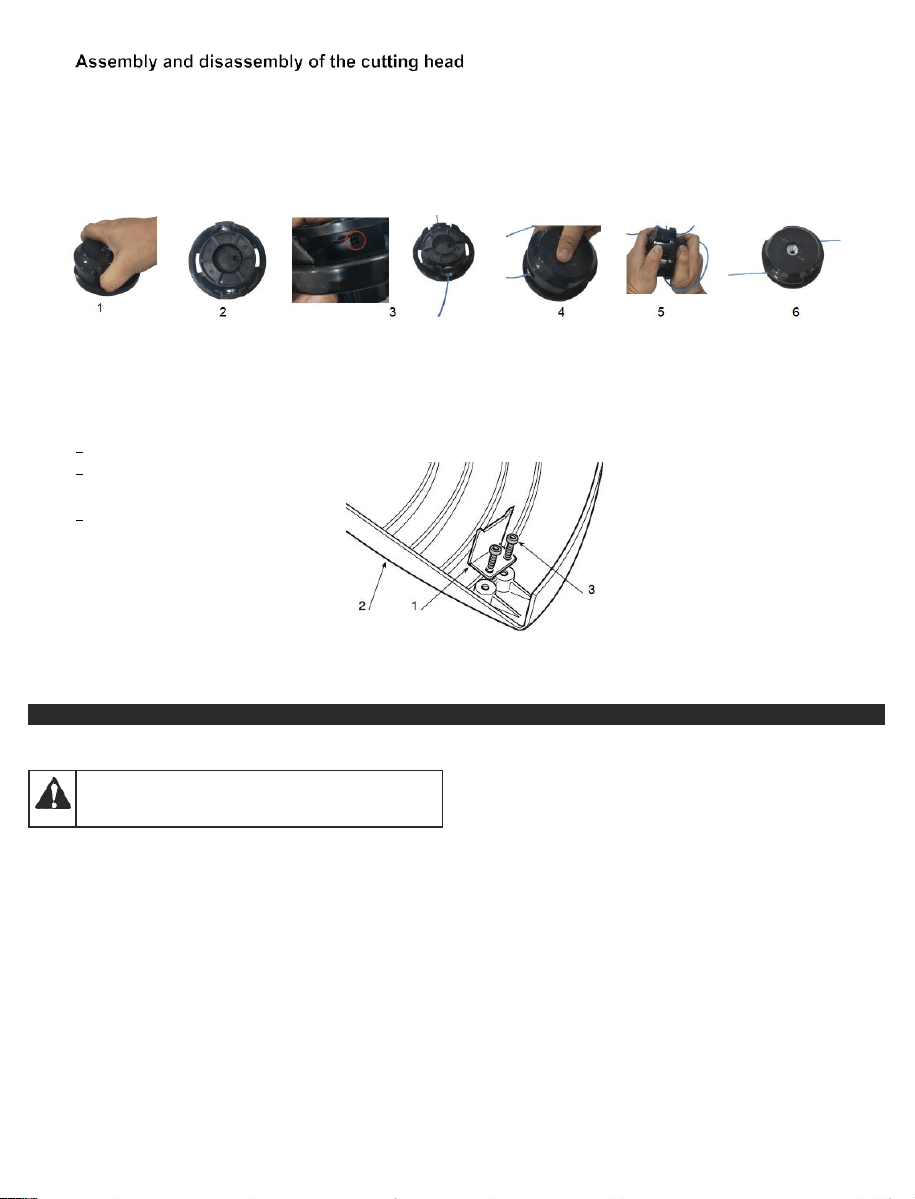
1. Open the nylon head lower housing by pressing the two clamps
2. Allign the spool arrows to the upper housing hole
3. Insert the line from the hole of back side of the spool and the hole pf upper housing,
stretch to the other side of the hole.
4. Refit the lower nylon head housing
5. Turn the tips clockwise till the line is suitable
SHARPENING THE LINE CUTTING KNIFE
Remove the line cutting knife (1) from the guard (2) by unscrewing the screws (3).
Fix the line cutting knife in a vice and sharpen it using a flat file, being careful to retain
the original cutting angle.
Refit the knife on the guard.
CLEANING AND STORAGE
CLEANING
Short-term Storage (1-2 weeks)
1. Store the unit in a horizontal position. If this is not possible, store
the unit vertically with the engine at the top.
Long-term Storage
1.
Remove the fuel cap, tip the unit and drain the fuel into an
approved container. Reinstall the fuel cap.
Start the engine and allow it to run until it stalls. This ensures
that all fuel has been drained from the carburetor.
Allow the engine to cool. Remove the spark plug and put 5
drops of any high-quality motor oil or 2-cycle oil into the
cylinder. Pull the starter rope slowly to distribute the oil. Reinstall
the spark plug.
Thoroughly clean the unit and inspect it for any loose or
damaged parts. Repair or replace damaged parts and tighten
loose screws, nuts or bolts.
Use a small brush to clean the outside of the unit. Do not use strong
detergents. Household cleaners that contain aromatic oils such as
pine and lemon, and solvents such as kerosene, can damage
plastic. Wipe off any moisture with a soft cloth.
STORAGE
2.
3.
Never store a fueled unit where fumes may reach an open flame
or spark.
Allow the engine to cool before storing.
Lock up the unit to prevent unauthorized use or damage.
Store the unit in a dry, well-ventilated area.
Store the unit out of the reach of children.
To suspend the attachment from a hook, install the hanger cap
onto the attachment. Make sure the release button is securely
locked into one of the holes on the hanger cap.
•
4.
•
•
•
•
•
Preparing the Unit for Use after Long-term Storage
1. Remove the spark plug. Tip the unit and drain all of the oil from
the cylinder into an approved container. Reinstall the spark plug.
NOTE: Do not use fuel that has been stored for more than 30 days.
Dispose of old fuel and oil according to federal, state and local
regulations.
17
WARNING: To avoid serious personal injury, always
stop the engine and allow it to cool before cleaning or
maintaining the unit.

TROUBLESHOOTING
If further assistance is required, contact wildbadgerpower.com.
18
THE ENGINE WILL NOT START
The fuel tank is empty Fill the fuel tank with gasoline and oil tank with oil separately
The primer bulb was not pressed enough
Press the primer bulb 7 times or until fuel is visible
The engine is flooded
Squeeze the throttle control and pull the starter rope until the
engine starts
The fuel is old (over 30 days)
Drain the fuel tank and add fresh oil and gasoline
The spark plug is fouled
Replace the spark plug
The choke lever was not flipped
Refer to Starting Instructions in the Starting and Stopping section
THE ENGINE WILL NOT IDLE
The air filter is dirty Clean or replace the air filter
The fuel is old (over 30 days)
Drain the fuel tank and add fresh gasoline and oil into different tank.
The idle speed is incorrect
Adjust the idle speed
THE ENGINE WILL NOT ACCELERATE
The fuel is old (over 30 days) Drain the fuel tank and add fresh gasoline and oil into different tanks.
The cutting head is bound with grass
Stop the engine and clean the cutting head
The air filter is dirty
Clean or replace the air filter
THE ENGINE LACKS POWER OR STALLS
The fuel is old (over 30 days) Drain the fuel tank and add fresh gasoline and oil into different tanks
The air filter is dirty
Clean or replace the air filter
The spark plug is fouled Replace the spark plug
THE CUTTING HEAD WILL NOT ADVANCE LINE
The cutting head is bound with grass Stop the engine and clean the cutting head
The cutting head is out of line
Refill the cutting head with new line
The inner reel is bound up
Rewind the line
The cutting head is dirty
Clean the inner reel and outer spool
The line is welded
Open the cutting head and remove the welded section
The line is twisted
Rewind the line
Not enough line is extended
Stop the unit, push the bump knob and pull the line until 16.9” inches
(430 mm) is outside of the cutting head
THE CUTTING LINE ADVANCES UNCONTROLLABLY
There is oil, cleaner or lubricant in the cutting head Clean and thoroughly dry the cutting head
PROBLEM
SOLUTION

19
NOTES

MANUFACTURER’S LIMITED WARRANTY
The limited warranty set forth below is given by Badger with respect to new merchandise purchased and used
in the United States, its possessions and territories .
HOW TO OBTAIN SERVICE: Warranty service is available,
WITH PROOF OF PURCHASE
To call 1-844-786-7335.
No product returned directly to the factory will be accepted unless prior written permission has been extended by the
Customer Service Department of Badger.
This limited warranty does not provide coverage in the following cases:
A. Tune-ups - Spark Plugs, Carburetor Adjustments, Filters
B. Wear items - B
ump Knobs, Outer Spools, Cutting Line, Inner Reels, Starter Pulley, Starter Ropes, Drive Belts,
Saw Chains, Guide Bars, Cultivator Tines, Blades.
C. Badger does not extend any warranty for pr
oducts sold or exported outside of the United States of America,
its possessions and territories, except those sold through Badger’s authorized channels of export distribution.
Badger reserves the right to change or improve the design of any Badger Product without assuming any
obligation to modify any product previously manufactured.
No implied
warranty, including any implied warranty of merchantability or fitness for a particular purpose,
applies after the applicable period of express written warranty above as to the parts as identified. No
other express warranty or guaranty, whether written or oral, except as mentioned above, given by any
person or entity, with respect to any product shall bind Badger. During the period of the Warranty, the
exclusive remedy is repair or replacement of the product as set forth above. (Some states do not allow
limitations on how long an implied warranty lasts, so t
he above limitation may not apply to you.)
The provisions as set forth in this Warranty provide the sole and exclusive remedy arising from the sales.
Badger shall not be liable for incidental or consequential loss or damages including, without
limitation, expenses in
curred for substitute or replacement lawn care services, for transportation or for
related expenses, or for rental expenses to temporarily replace a warranted product. (Some states do not
allow limitations on how long an implied warranty lasts, so the above limitation may not apply to yo
u.)
In no event shall recovery of any kind be greater than the amount of the purchase price of the product sold.
Alteration of the safety features of the product shall void this Warranty. You assume the risk and liability for loss,
damage, or injury to you and your property and/or to others and their property arising out of the use or misuse or
inability to use the product.
This limited warranty shall not extend to anyone other than the original purchaser, original lessee or the person
for whom it was purchased as a gift.
Badger warrants this product against defects in material and workmanship for a period of three (3) years for
home use and one (1) years for commercial use commencing on the date of original purchase and will, at its
option, repair or replace, free of charge, any part found to be defective in material or workmanship. This limited
warranty shall only apply if this product has been operated and maintained in accordance with the Operator’s
Manual furnished with the product, and has not been subject to misuse, abuse, commercial use, neglect, accident,
improper maintenance, alteration, vandalism, theft, fire, water or damage because of other peril or natural disaster.
Damage resulting from the installation or use of any accessory or attachment not approved by Badger for use with
the product(s) covered by this manual will void your warranty as to any resulting damage. This warranty is limited
to ninety (90) days from the date of original retail purchase for any Badger product that is used for rental or
commercial purposes, or any other income-producing purpose.
20