
1
ORIGINAL INSTRUCTION MANUAL
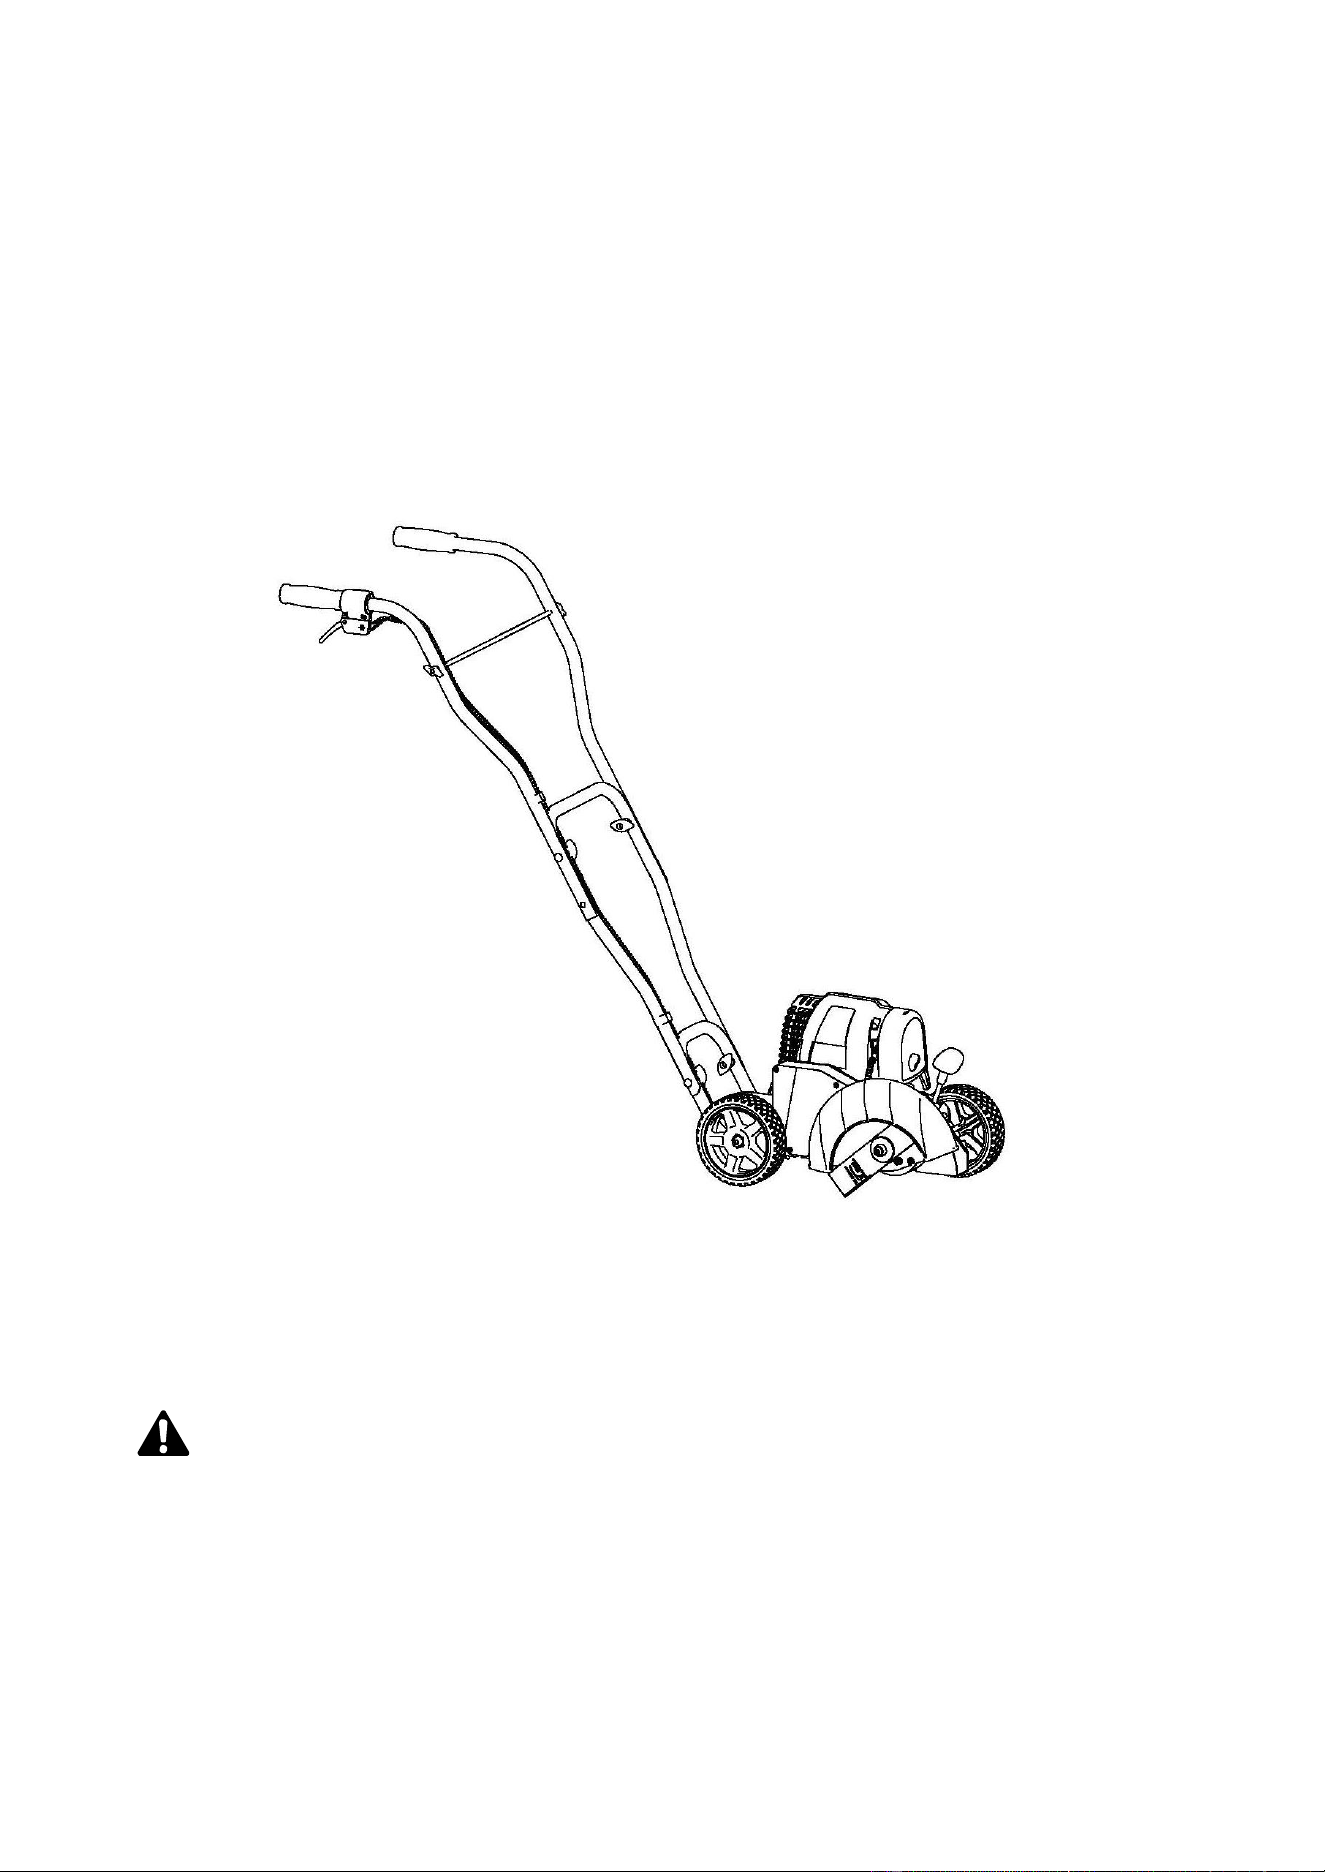
31cc 4-CYCLE WALK BEHIND EDGER
WB31CCED
WARNING: To reduce the risk of injury, the user must read and
understand the Operator’s Manual before using this product. Save
these instructions for future reference.
2
19
20
21
1
2
22
3
4
3
handle knob
lower handle
mid handle
mid handle
upper handle
handle knob
5
Height
adjustment
lever
7
8
6

4
Technical data
Description
Hand push edger
Engine
4-Stroke
Displacement
31cc
Engine power
0.7 kW (1HP)
Max engine speed
10500/min
Engine idling speed
3000±300/min
Cutting blade
2T, cutting dia.240mm
Cutting blade speed
Max. 2800/min
Cutting height positions
5 positions
Max. cutting height
34 mm
Tank capacity
720 mL
Oil tank capacity
100 mL
Fuel type
Petrol, unleaded
Oil
4-stroke
Wear ear-muffs.
The impact of noise can cause damage to hearing.
Keep the noise emissions and vibrations to a minimum.
⚫ Only use appliances which are in perfect working order.
⚫ Service and clean the appliance regularly.
⚫ Adapt your working style to suit the appliance.
⚫ Do not overload the appliance.
⚫ Have the appliance serviced whenever necessary.
⚫ Switch the appliance off when it is not in use.
⚫ Wear protective gloves.
Vibration
Vibration ahv
7.15 m/s²
Uncertainty Khv
1.5 m/s²

5
SAFETY INSTRUCTIONS
This page depicts and describes safety symbols that may appear on this
product. Read, understand, and follow all instructions on the machine before
attempting to assemble and operate it.
Read the complete user manual before using the appliance.
Wear eye protection.
Use hearing protection
Warning! Petrol is very flammable. Avoid smoking, flame or sparks near petrol.
Protect the machine from getting wet!
Pay attention! Hot surfaces.
Warning! Keep all children, bystanders and helpers 15 meters away from the tool!
Warning! Beware of thrown objects hit by cutting attachments.
Warning! Risk of injury! Do not let your feet come in contact with the blades when the
motor is running
Rotation direction of cutting blade.
Position of cutting blade.
Choke lever 'cold start'
Choke lever 'warm start and work'

6
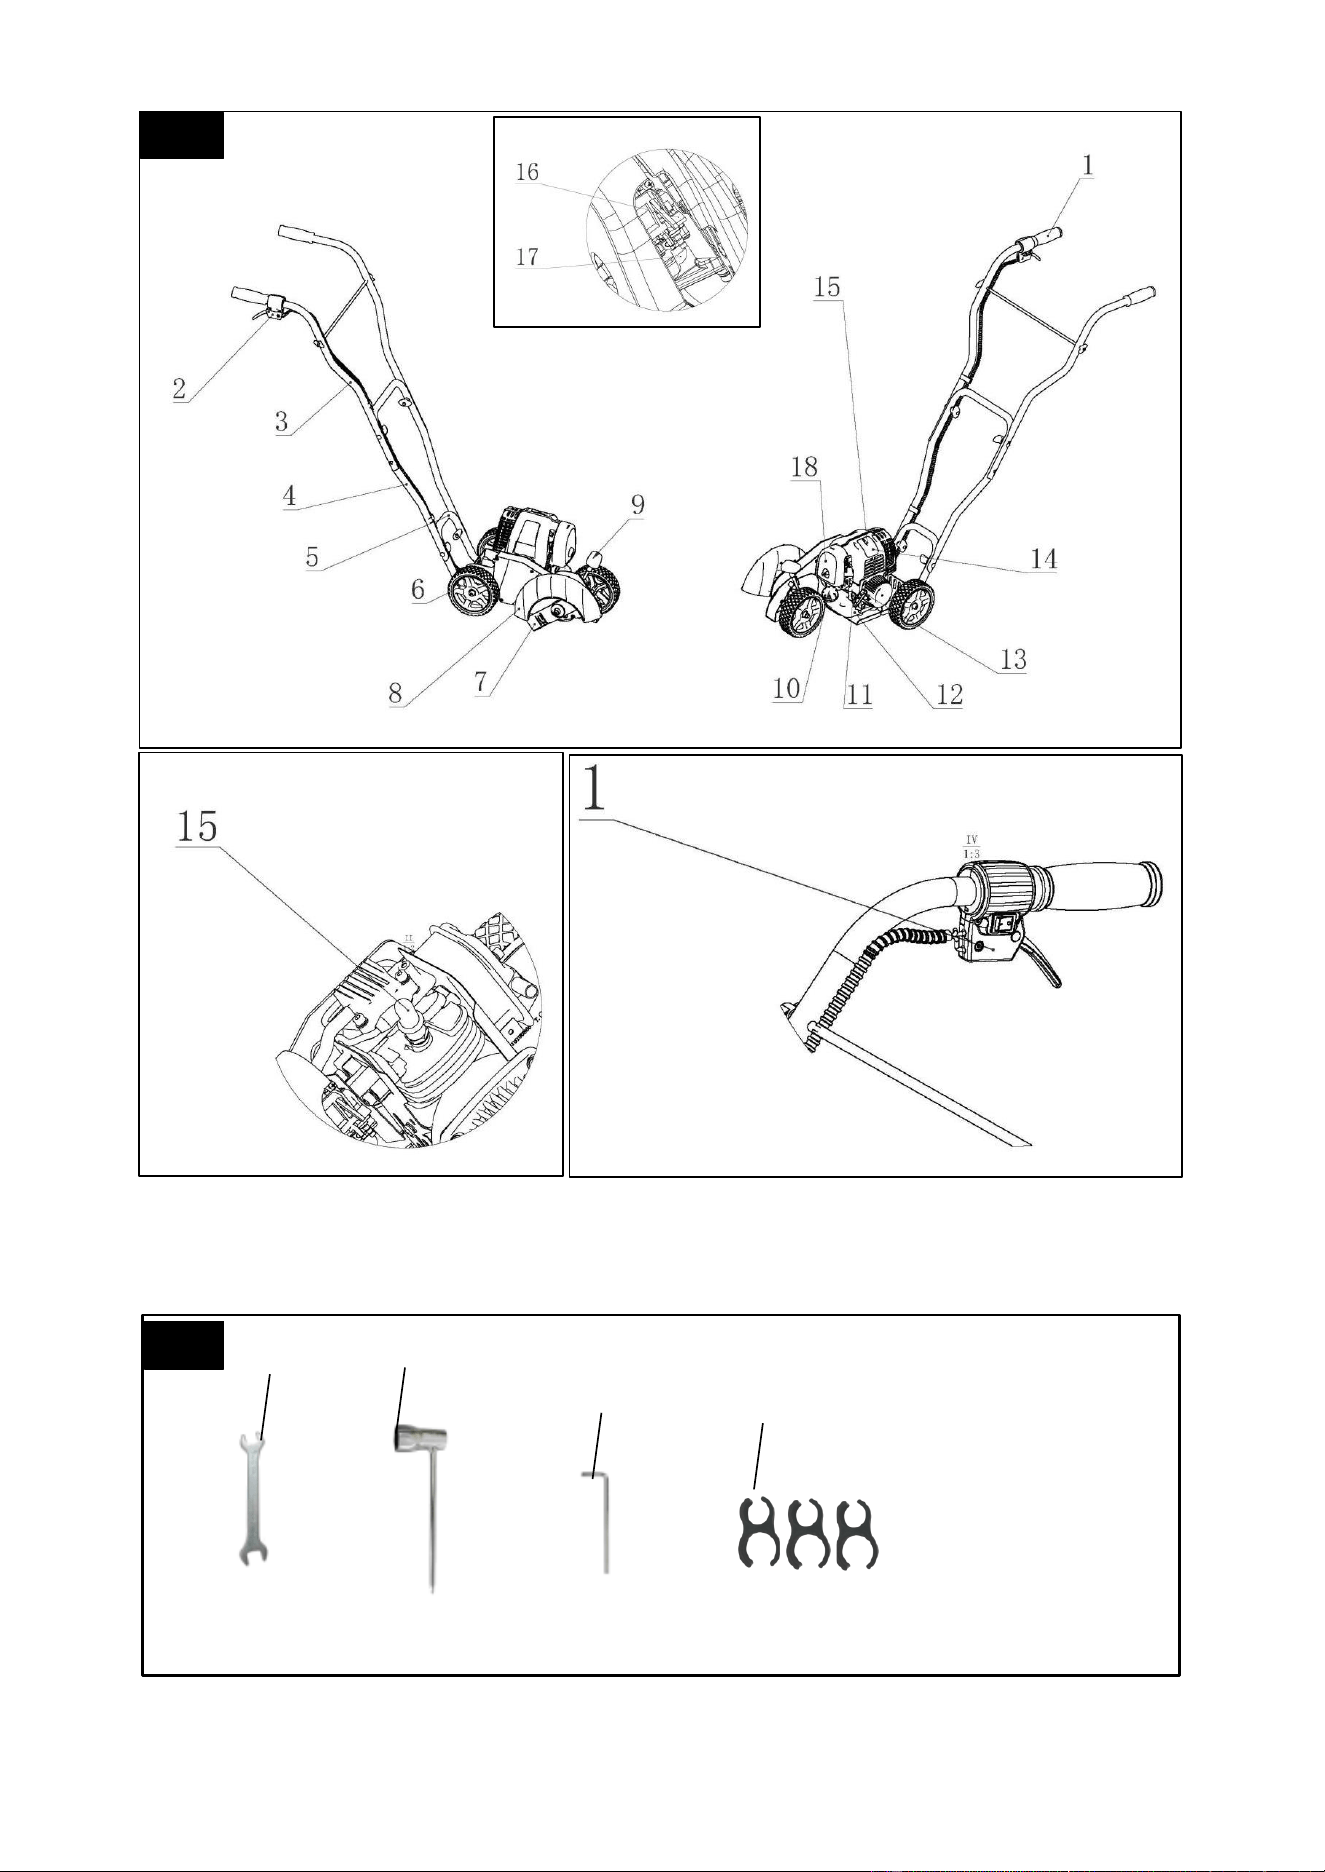
Main components list (Fig.1)
1 On/Off switch 2 Throttle lever 3 Upper handle
4 Mid handle 5 Lower handle 6 Wheel
7 Cutting blade 8 Blade guard 9 Height adjustment lever
10 Fuel tank cap 11 Oil tank cap 12 Fuel tank
13 Recoil starter 14 Cover 15 Spark plug cover
16 Choke lever 17 Primer bulb 18 Air filter cover
19 Wrench 20 Socket spanner 21 Allen key
22 Clip (3pcs)
1. INTRODUCTION
DEAR CUSTOMER, We hope your new tool brings you much enjoyment
and success.
NOTE:
According to the applicable product liability laws, the manufacturer of the
device does not assume liability for damages to the product or damages
caused by the product that occurs due to:
1) Improper handling,
2) Non-compliance of the operating instructions,
3) Repairs by third parties, not by authorized service technicians,
4) Installation and replacement of non-original spare parts,
5) Application other than specified.
WE RECOMMEND:
Read through the complete text in the operating instructions before installing
and commissioning the device. The operating instructions are intended to
help the user to become familiar with the machine and take advantage of its
application possibilities in accordance with the recommendations. The
operating instructions contain important information on how to operate the
machine safely, professionally and economically, how to avoid danger, costly
repairs, reduce down times and how to in-crease reliability and service life of
the machine.
In addition to the safety regulations in the operating instructions, you have to

7
meet the applicable regulations that apply for the operation of the machine in
your country. Keep the operating instructions package with the machine at all
times and store it in a plastic cover to protect it from dirt and moisture. Read
the instruction manual each time before operating the machine and carefully
follow its information. The machine can only be operated by persons who
were instructed concerning the operation of the machine and who are
informed about the associated dangers. The minimum age requirement must
be complied with.
2. Scope of delivery
Open the packaging and take out the equipment with care.
Remove the packaging material and any packaging and/or transportation
braces (if available).
Check to see if all items are present.
Inspect the equipment and accessories for transport damage. In case of
complaints the supplier is to be informed immediately. Complaints received
at a later date will not be acknowledged.
If possible, keep the packaging until the end of the guarantee period.
⚫ Read the operating instructions to make yourself familiar with the device
prior to using it.
⚫ After that, please dispose of it in an environmentally friendly way.
⚫ Only use original parts for accessories as well as for wearing and spare
parts. Spare parts are available from your specialized dealer.
ATTENTION!
The device and packaging materials are not toys!
Children must not be allowed to play with plastic bags, film and small
parts! There is a risk of swallowing and suffocation!

8
3. Intended use
⚫ The lawn edger is designed to take care of domestic areas of grass and
lawn. Due to the physical danger to the user and other persons, the
appliance may not be used for other purposes.
⚫ The machine has been designed to be operated by one person.
⚫ The machine must not be used for cutting bushes, hedges and thickets,
for cutting and mulching creepers or lawns on roofs or in balcony boxes.
The machine must also not be used as a crusher for mulching tree
cuttings and hedges or leveling any terrain roughness. Use the
appliance only outside, never use it in confined and bad ventilated
areas.
⚫ The machine is to be used only for its prescribed purpose. Any other use
is deemed to be a case of misuse. The user / operator and not the
manufacturer will be liable for any damage or injuries of any kind caused
as a result of this.
⚫ Please note that our machine has not been designed for use in
commercial, trade or industrial applications. Our warranty will be voided
if the machine is used in commercial, trade or industrial businesses or
for equivalent purposes.
⚫ The operating instructions as supplied by the manufacturer must be
followed at all times to ensure that the machine is used properly. Any
use which is not expressly permitted in the manual may result in
damage to the equipment and place the user in serious danger. Observe
the restrictions in the safety instructions.
Non-permitted users:
Persons who are not familiar with the operating manual, children, young
people under the age of 18 as well as persons under the influence of
alcohol, drugs or medication shall not be permitted to operate the unit.
WARNING! For your own safety, please thoroughly read this manual
and the general safety instructions before turning the machine on. If
you give the device to third parties, always include these instructions.

9
4. Important information
Working Safely
⚫ Before starting this device, read and keep to the following advice. Also
ob-serve the safety provisions applicable in the respective country, in
order to protect yourself and others from possible injury.
⚫ Repair works on the device must be carried out by the manufacturer or
by companies appointed by the manufacturer respectively.
Primary users
⚫ Persons working for the first time with the machine must obtain a
practical instruction to the use of the machine and the operator
protection equipment by an experienced operating person.
⚫ Be attentive. Be careful what you do. Behave sensibly when working. Do
not use the machine when you are tired or under the influence of drugs,
alcohol or medication. One moment of carelessness when using the
device can result in serious injuries.
⚫ Make yourself familiar with the machine before using it, by reading and
understanding the operating instructions. Insufficiently informed
operators may put at risk their own and the health of other persons.
⚫ Do not use the machine for unsuitable purposes (see 'Intended use').
⚫ Avoid abnormal posture. Provide a safe standing position and keep your
balance at all times.
⚫ Wear suitable work clothes:
⚫ Do not wear loose-fitting clothes or jewellery; they can catch in moving
parts.
⚫ Do not wear gloves and slip-proof shoes
⚫ Do not wear hairnet in case of long hair
⚫ Wear protective clothing: ear protection
⚫ Wear protective goggles or face protection
⚫ Wear protective gloves ,safety boots, certificated hardhat in situations
where injuries to the head might be expected.
⚫ We recommend to wear leg protection and a safety jacket.
⚫ Keep your workplace in an orderly condition! Untidiness can result in
accidents.
⚫ Take into consideration environmental influences:
⚫ Do not expose the machine to rain.
⚫ Do not use the machine in a damp or wet environment.
⚫ Delay the work in case of disadvantageous weather (rain, snow, ice,

10
wind) – increased risk of accidents!
⚫ Provide for good illumination.
⚫ Do not use the machine near inflammable liquids or gases.
⚫ Familiarize yourself with your environment and pay attention to possible
dangers such as wires and power lines. Remember, you may not be
able to hear because of the motor noise.
⚫ Never leave the machine unattended.
⚫ For breaks the machine has to be put down in such a manner that no
person will be endangered. Assure the machine against unauthorized
access.
⚫ Persons under the age of 18 must not operate the device.
⚫ Keep other persons away.
⚫ The operator is responsible for accidents or risks which occur to other
persons or their properties.
⚫ The operator is responsible to third persons within the area of
operations.
⚫ Keep children away.
⚫ Do not allow other persons, especially children, to touch the machine.
Keep them away from your working area.
⚫ Do not use a blunt, broken or otherwise damaged cutting device.
⚫ Be sure that the cutting device is moving before you start cutting.
⚫ Do not overload the machine! You work better and safer in the given
performance range.
⚫ Only operate the machine with complete and correctly attached safety
equipment and do not alter anything on the machine that could impair
the safety.
⚫ Do not modify the device or parts of the device respectively.
⚫ Do not use any blades which do not comply with the indicated
characteristics of this instruction manual.
Safe handling of fuels
⚫ Fuels and fuel vaporous are flammable and may cause serious injury on
the skin or when inhaled. Therefore be careful and provide sufficient
ventilation when handling with fuels.
⚫ Stop the engine and allow the device to cool down before fueling it.
⚫ Do not smoke and avoid open flames when fueling.
⚫ Wear gloves when fueling.

11
⚫ Never refuel or drain the tank indoors.
⚫ Avoid spilling of fuel or oil. Clean the machine immediately when you
have spilled fuel or oil. Change your clothes immediately when you have
spilled fuel or oil on them.
⚫ Make sure that no fuel can come into the soil.
⚫ Carefully close the tank cap after fueling and check that it does not get
loose during operation.
⚫ Check that there is no leakage on the tank cap and fuel lines. If there
are leaks this device may not be started. Go away at least 3 meters from
the fueling place to start the device.
⚫ Only transport and store fuels in containers approved and identified for
this.
⚫ Keep children away from fuels.
⚫ Never store the machine or fuel container inside where there is an open
flame, such as near a water heater.
⚫ To reduce the fire risk keep the motor and silencer free from cutting
remainders, leaves and lubricants.
Additional safety instructions for petrol edgers
⚫ Even when the machine is used as prescribed it is not possible to
eliminate all residual risk factors. The following hazards may arise in
connection with the machines construction and design:
1) Contact with the blade.
2) Kickback of the machine due to hidden solid objects.
3) Blade fracture.
4) Catapulting of blade pieces.
⚫ Damage to hearing if effective earmuffs are not worn.
⚫ Do not use blades that are deformed or cracked.
⚫ Do not operate in a hazardous location. Such areas include where there
is a risk of explosion of petrol fumes, leaking gas or explosive dust.
⚫ Do not operate in a confined area. Exhaust gases, smoke or fumes
could reach dangerous concentrations.
⚫ Protect your machine. This machine is NOT WEATHERPROOF and
should not be exposed to direct sunlight, high ambient temperature and
damp, wet or high humidity conditions.
⚫ Do not smoke while refueling. This is potentially dangerous as it may
⚫ ignite the fuel and cause an explosion.

12
⚫ Take care not to spill fuel. When refueling the machine ensure that the
motor has been switched off. Prevent the spilling of fuel as this may also
ignite with the hot motor. Never refuel whilst the engine running.
⚫ Be careful where you store the machine. Store the machine in a dry area
away from flammable liquids.
⚫ Keep your distance. The machine emits exhaust fumes. Ensure
bystanders keep a safe distance.
⚫ Never fill fuel tank indoors. Never fill fuel tank when engine is running or
hot. Do not smoke when filling fuel tank.
⚫ When making any adjustments to the machine always wait for the blade
to come to a complete stop and turn off the machine.
⚫ Never attempt to unclog the blade chamber by tapping the machine on
the ground, this can damage the unit.
⚫ Keep hands clear of edge guide and blade when cleaning as these wear
to a very sharp point during edging.
⚫ Before landscaping or trenching, inspect and ensure there are no
exposed or buried cables or pipes or other objects that may create a
hazard or interfere with operating the machine.
⚫ Set depth to only that required for the job, do not overload. If tool slows,
pull back slightly and wait until blade returns to normal speed.
⚫ Check damaged parts before further use of the machine, a guard or
other part that is damaged should be carefully checked to determine that
it will operate properly and perform it’s intended function. Check for
alignment of moving parts, binding of moving parts, mounting, and any
other conditions that may affect its operation.
⚫ Ensure guards are kept in place.
⚫ Always keep blade area clean.
⚫ When using the machine, stones, pieces of metal and other objects can
be thrown out at high speed by the blade. The tool and guard are
designed to reduce the danger. However, the following special
precautions should be taken:
1) Make sure that other people and pets are at least 5 meters away.
2) Always stand to left side of main handle.
3) Before landscaping or trenching, check for buried electrical cables.
4) To reduce the risk of injury, work going away from nearby solid objects
such as walls, steps, stones, trees etc. Use great care when working
close to solid objects, and where necessary, do edging or trimming by

13
hand.
⚫ Use only blades as recommended.
⚫ Do not attempt to free a jammed blade before first switching off the
machine.
⚫ Let the blade come to rest naturally.
⚫ Periodically check that all fixings are properly tightened.
⚫ In addition, in spite of all the precautionary measures taken, non-obvious
residual risks can still exist.
⚫ Store all safety notices and instructions for the future.
5. BEFORE STARTING
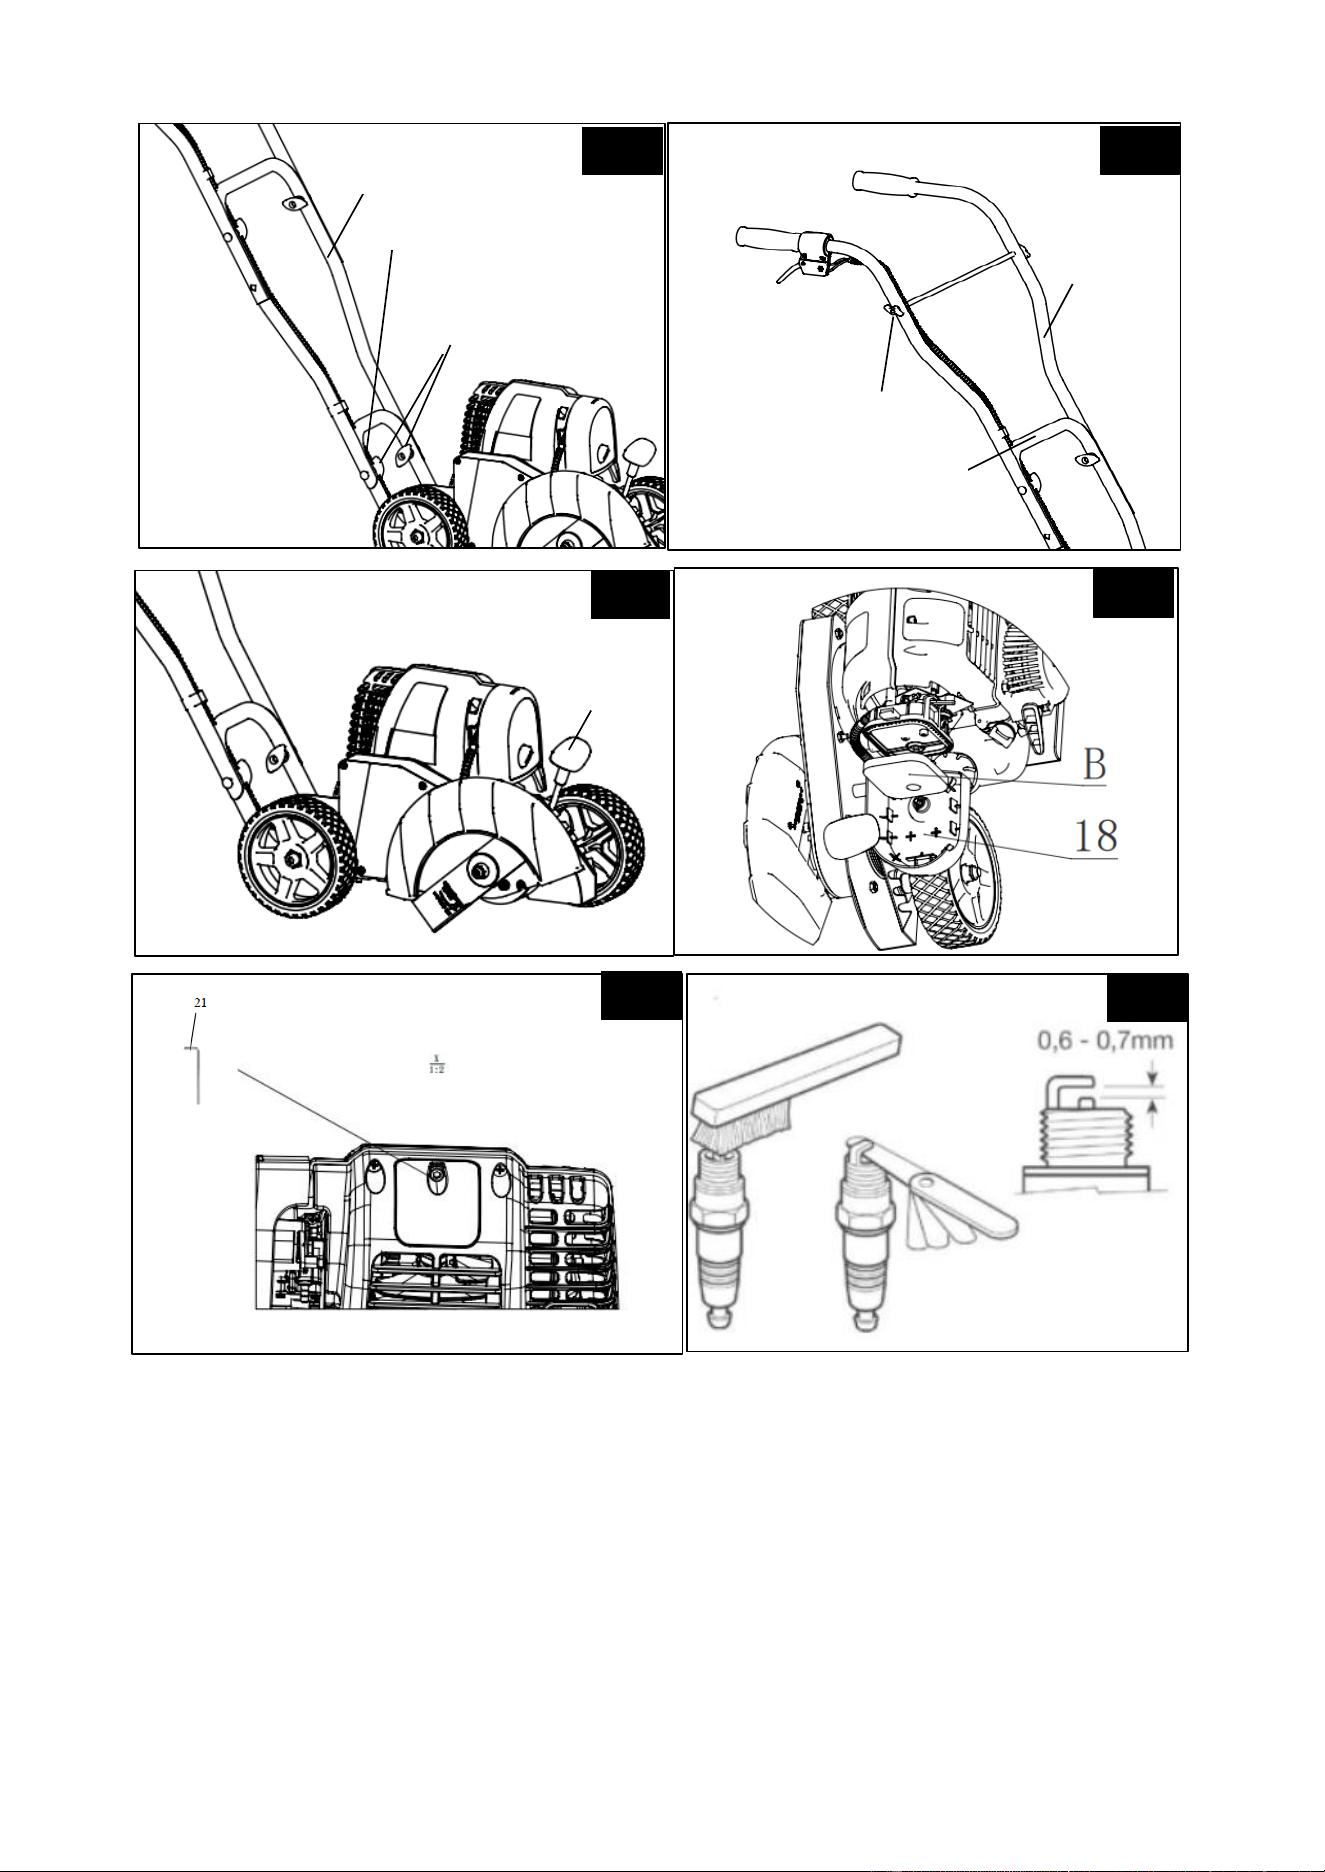
Mounting of the handles (Fig. 3, 4)
Place the mid handle (4) onto the lower handle (5). Ensure that the holes in
the bars of both handle frames are in alignment. Using two handle knobs,
fix both handle frames together. The handle knobs should be positioned on
the inside of the frame. Tighten them securely.
Attach the upper handle (3) to the mid handle (4) with the remaining two
handle knobs.
Attach the trigger cable with the clips (22) to the upper handle (3).
Filling the engine oil
WARNING! Engine oil has been drained for shipping. Failure to fill
engine sump with oil before starting the engine may result in permanent
damage and will void warranty.
1) Remove the oil tank cap (11).
2) Fill in 100 ml of SAE 10W-30 engine oil (not included).
3) Install and secure the oil tank cap (11) again.
Checking the oil level
WARNING! Please check the engine oil level before each use,
otherwise there is a risk that the engine can be damaged.
1) Remove the oil tank cap (11).
2) Clean the oil tank cap (11) with a cloth or rag.
3) Re-insert the oil tank cap (11) momentarily. Remove and look at the oil
tank cap (11) to determine oil level.

14
4) The engine oil level must be between the two marking lines at the oil
tank cap (11).
5) Refill the engine oil if necessary.
Filling the fuel
WARNING! Fuel has been drained for shipping. Failure to fill fuel
tank (12) with petrol before starting the engine may result in permanent
damage and will void warranty.
WARNING! Do not overfill the fuel tank (12).
WARNING! Do not smoke while re-fueling.
DO NOT USE FUEL WITH ETHANOL MIXTURE.
Use unleaded petrol with a minimum of Octane 91.
Use clean, fresh fuel; purchase fuel in quantities that can be used every 30
days, to prevent gum or foaming inside the container and/or fuel tank (12).
Remove the fuel tank cap (10).
Fill with 700 ml petrol.
Install and secure the fuel tank cap (10) again.
ATTENTION: DO NOT USE MIXTURE FUEL.
6. OPERATION
WARNING! You may not start to operate the machine until you have
read these operating instructions, observed all the instructions given and
completely and properly assembled the machine!
Adjusting the cutting depth (Fig. 5)
The machine has a height adjustment lever (9) with five different height
settings to easily adjust the cutting height.
To decrease the cutting height pull the height adjustment lever (9) out and
move it up a notch, towards the handle bar.
To increase the cutting height pull the height adjustment lever (9) out and
move it down a notch, towards the front of the unit.
NOTE: If you are unsure of which cutting height to use, begin with a high
setting and complete a trial cut on a small section of the lawns edge.
Readjust if necessary.
Starting and stopping (Fig. 1)

15
Starting
NOTE: Do not squeeze the throttle lever (2) before starting.
1. Press the On/Off switch (1) on the handle to the On (I) position.
2. Press the primer bulb (17) 7 times.
3. Push the choke lever (16) up to the start/ position .
4. Pull the recoil starter (13), till the engine starts pops.
5. Move the choke lever (16) to run/ position.
6. Pull starter grip till engine starts, allow the engine to running idling for 1
minute to warm up.
7. Tilt the machine backwards at the upper handle (3), so that the cutting
blade (7) is clear of the ground.
8. To move the cutting blade (7), squeeze the trigger (2), then the blade
would work and cut.
Attention: For warm machine start, repeat steps of 1, 2, 5, 6
Stopping
1. Release the throttle lever (2) so that the engine is idling and the cutting
blade (7) stops spinning.
2. Press the On/Off switch (1) on the handle to the Off (O) position.
Edging (Fig. 1)
WARNING! Before edging, check that the area is clear of any
obstacles and objects that could be thrown.
NOTE: If the cutting depth needs adjusting, this should be done
progressively until the desired depth is reached. Do not overload, keep
initial cutting depth at minimum. If the edger slows, pull back slightly and
wait until the cutting blade (8) returns to normal speed.
1. While the engine is idling, line up the lawn edger cutting blade (8) with
the edge to be cut. Use the line label on the blade guard (9) to assist in
guiding you where the cutting blade will cut.
2. Before beginning to edge, tilt the upper handle (3) down so the cutting
blade (8) is above ground level. This assists in the prevention of
kickback.
When starting to edge, pull the throttle lever (2). Run the engine at full
throttle and lower the cutting blade (8) gently into the ground. Be careful not
to hit concrete with the blade.

16
3. Walk forward slowly, keeping the cutting blade (8) aligned with the edge
to be cut. If the lawn edger begins to slow down due to a build up of
grass in the blade guard (9), walk back slightly to allow the grass to fall
out. Let the cutting blade (8) return to normal speed before continuing
forward.
NOTE: Some sparks may be generated from the cutting blade (8) while
pressed against a solid edge (eg; concrete) to be cut, simply align the
cutting blade (8) so no contact is made.
NOTE: If the blade guard (9) becomes clogged, tilt the upper handle (3) so
the cutting blade (8) is above ground level. This assists in clearing the
debris from the cutting blade (8) and blade guard (9). If the debris does not
fall out, stop the motor, wait for the cutting blade (8) to stop rotating and
remove debris from the blade guard (9).
WARNING! The motor housing may become very hot during use. Avoid
contact during and after operation.
7. MAINTENANCE, CLEANING AND SERVICING
Before each maintenance and cleaning work
1. Stop the engine.
2. Wait until the cutting device stops moving and machine has completely
cooled.
3. Remove the cover (14) with the Allen key (21).
4. Pull off the spark plug cover (15).
WARNING! Do not carry out maintenance work close to open flames.
Risk of fire!
Maintenance and repair work other than those described in this chapter is
only allowed to be carried out by service staff.
For maintaining and cleaning, removed security devices must
unconditionally be mounted properly and proved again.
Use only original parts. Other parts can result in unexpected damages and
injuries. In order to avoid possible injuries wear gloves.
To guarantee a long and reliable usage of the machine carry out the
following maintenance works regularly.

17
Check the machine for obvious defects such as
1) loose fastening elements.
2) worn or damaged components.
3) deformed, broken or damaged cutting blade (7).
4) leaks from the fuel tank cap or fuel lines.
Cleaning
1) Keep the ventilation vents of the machine clean at all times, if
possible, prevent foreign matter from entering the vents.
2) After each use, blow air through the motor housing to ensure it is free
from all dust particles which may build up. Build up of dust particles may
cause the unit to overheat and fail.
3) If the enclosure of the tool requires cleaning do not use solvents but
a moist soft cloth or soft brush only. Never let any liquid get inside the
machine; never immerse any part of the tool into a liquid.
Replace the oil
The first 10 hours replace the oil, then every 25 hours replace the oil.
Air filter maintenance (Fig. 6)
1) Open the air filter cover (18).
2) Remove the air filter (B), brush off any dry particles, or dislodge them
by tapping the air filter (B) on a hard surface; or sash the filter (B) with
soap water. Do not use petrol or other solvent, then leave the filter to
dry in the open air.
3) Mount the air filter (B) and close the air filter cover (18).
Checking / replacing the spark plug (Fig. 7)
⚫ Remove the cover (14) with the Allen key (21).
⚫ Do not touch the spark plug or the spark plug cover (15) when the engine
runs. High voltage!
⚫ Risk of burning on the hot engine. Wear protective gloves.
⚫ Check the spark plug and the spark gap on a regular basis:
1) Pull the spark plug cover (15) from the spark plug.
2) Remove the spark plug using the supplied Socket spanner (20).

18
The spark gap must be 0.6 to 0.7 mm. (Fig. 8)
Clean the spark plug when it is contaminated.
Replace the spark plug:
1) once a month if the device is often used
2) when the insulating body is damaged,
3) when the electrodes show excessive erosion,
4) when the electrodes show excessive dirt or oil.
Changing the cutting blade
1. Hold the cutting blade (7) in place with the Allan key (21), by putting it in
the hole of the spindle. Use the Socket spanner (20) to remove the flange
nut, by turning in an anti-clockwise direction.
2. Remove the flange nut, and cutting blade (7).
NOTE: Ensure that all parts are clean of any dirt or grass prior to fitting.
1. Fit the new cutting blade (7) over the inner flange.
2. Fit the flange nut and tighten firmly using the Socket spanner (20) supplied,
in a clockwise direction.
8. STORAGE
Caution! Never put the machine into storage for longer than 30 days
without carrying out the following steps.
If you intend to store the equipment for machine than 30 days, it must
be prepared accordingly. Otherwise the fuel still remaining in the
carburetor will evaporate and leave a rubbery sediment. This can cause
problems when starting up the machine and may require expensive repairs.
1. Slowly remove the fuel tank cap to release any pressure that may have
formed in the tank. Carefully empty the tank of fuel.
2. To remove the fuel from the carburetor, start the engine and let it run until
the machine stops.
3. Leave the engine to cool (approx. 5 minutes).
4. Store the machine in a dry, locked place out of the reach of children.
To extend the service life of the machine and guarantee smooth
operation, before storing for a longer period:

19
⚫ Thoroughly clean the machine.
⚫ Treat all movable parts with an environmentally friendly oil.
⚫ Never use any grease!
⚫ Remove the spark plug cover.
⚫ Empty the fuel tank completely.
⚫ Dispose of remaining fuel in an environmentally compatible manner.
⚫ Operate the engine until the carburetor is empty.
9. TRANSPORT
To transport the device stop the engine and wait until the cutting blade (7)
stops moving.
Tilt the machines backwards at the upper handle (3), so that the cutting
blade (7) is clear of the ground and you can move the machine on the two
back wheels (6).
10. DISPOSAL AND RECYCLING
The machine is supplied in packaging to prevent it from being damaged in
transit. The raw materials in this packaging can be reused or recycled. The
machine and its accessories are made of various types of material, such as
metal and plastic. Never place defective equipment in your household
refuse. The machine should be taken to a suitable collection center for
proper disposal. If you do not know the whereabouts of such a collection
point, you should ask in your local council offices.
11. TROUBLESHOOTING
The table below contains a list of fault symptoms and explains what you can
do to remedy the problem if your equipment fails to work properly. If the
problem still persists after working through the list, please contact your
nearest service workshop.
IMPORTANT!
Hint in case of sending the equipment to a service center:
Due to safety reasons please see to it that the equipment is sent back free
of oil and petrol!

20
Fault
Possible cause
Remedy
Machine
does not
work.
No fuel supply.
Fault in the fuel
line.
Spark plug
defective.
Carburetor
defective.
Internal fault.
Check the fuel quantity. DO NOT
USE FUEL WITH ETHANOL
MIXTURE.
Check the fuel line for kinks or
damages.
Replace the spark plug.
Responsible customer service must
be called.
Responsible customer service must
be called.
Machine
does not
switch off.
ON/OFF switch
defective.
Let the machine run, till the petrol is
exhausted. Manufacturer or
responsible customer service must
be called.
Machine
work with
interruptions
.
Internal fault.
ON/OFF switch
defective.
Manufacturer or responsible
customer service must be called.
Manufacturer or responsible
customer service must be called.
Engine is
running,
cutting blade
does not
move.
Cutting blade
blocked.
Internal fault.
Clutch defective.
Stop the engine and remove the
object.
Responsible customer service must
be called.
Responsible customer service must
be called.

MANUFACTURER’S LIMITED WARRANTY
The limited warranty set forth below is given by Badger with respect to new merchandise purchased and used
in the United States, its possessions and territories .
Badger warrants this product against defects in material and workmanship for a period
of three (3) years
commencing on the date of original purchase and will, at its option, repair or replace, free of charge, any part
found to be def
ective in material or workmanship. This limited warranty shall only apply if thi
s product has been
operated and maintained in accordance with the Operato
r’s Manual furnished with the product, and has not been
subject to misuse, abuse, commercial use, neglect, accident, improper maintenance, alte
ration, vandalism,
theft, fire, water or damage because of other peril or natural disaster. Damage resulting from the installation or
use of any ac
cessory or attachment not approved by Badger for use with the product(s) covered by this
manual will void your warranty as to any resulting d
amage. This warranty is limited to n
inety (90) days from the
date of original retail purchase for any Badger product that is used for rental o
r commercial purposes, or any
other income-producing purpose.
HOW TO OBTAIN SERVICE: Warranty service is available, WITH PROOF OF PURCHASE THROUGH YO
UR
LOCAL AUTHORIZED SERVICE DEALER. To locate the dealer in your area, call 1-844-786-7335. No product
returned directly to the factory will be accepte
d unless prior written permission has been extended by the
Customer Service Department of Badger.
This limited warranty does not provide coverage in the following cases:
A. Tune-ups - Spark Plugs, Carburetor Adjustments, Filters
B. Wear items - Bump Knobs, Outer Spools, Cutting Line, Inner Reels, Starter Pulley, Starter Ropes, Drive Belts,
Saw Chains, Guide Bars, Cultivator Tines, Blades.
C. Badger does not
extend any warranty for products sold or exported outside of the United States of America,
its possessions and territories, except th
ose sold through Badger’s authorized channels of export distribution.
Badger reserves the right to change or improve the design of any Badge
r Product without assuming any
obligation to modify any product previously manufactured.
No implied warranty, including any implied warranty of m
erchantability or fitness for a particular purpose
applies after the applicable period of express written warranty above as to the parts as identified. No
oth
er express warranty or guaranty, whether written or oral, except as mentioned above, given by any
person or entity, including a dealer or retailer,
with respect to any product shall bind Badger. During
the period of the Warranty, the exclusive remedy is repair or replacement of the product as set
forth
above. (Some states do not allow limitations on how long an implied warranty lasts, so the above limitation may
not apply to you.)
The provisions as s
et forth in this Warranty provide the sole and exclusive remedy arising from the sales.
Badger shall not be liable for incidental or consequential l
oss or damages including, without
limitation, expenses incurred for substitute or replacement lawn care services, for transportation or for
rela
ted expenses, or for rental expenses to temporarily replace a warranted product. (Some states do not
allow limitations on how long an implied warranty lasts
, so the above limitation may not apply to you.)
In no event shall recovery of any kind be greater than the amount of the purchase price of the product
sold.
Alteration of the safety features of the product shall voi
d this Warranty. You assume the risk and liability for loss,
damage, or injury to
you and your property and/or to others and their property arising out of the use or misuse or
inability to use the product.
This limited warranty shall n
ot extend to anyone other than the original purchaser, original lessee or the person
for whom it was purchased as a gift.
How State Law Relates to this Warr
anty: This
warranty gives you specific legal rights, and you may also have
other rights which vary from state to state.
To locate your nea
rest service deal
er, dial 1-844-786-7335 in the United States.
888
21