SCOUT MINI USER MANUAL
SCOUT MINI USER MANUAL
SCOUT MINI
AgileX Robotics Team
USER MANUAL V.2.0.1 2023.08
Document version
No.
Version
Date
Edited by
Reviewer
Notes
1
V2.0.0
2023/09/02
谢瑞亲
Update rendering
Update Contents
2
V2.0.4
2024/6/19
曾昱欣
Update protocol
Update Scout
Mini parameters
Add dimension of

metal sheet
This chapter contains important safety information, before the robot is powered on
for the first time, any individual or organization must read and understand this
information before using the device. If you have any questions about use, please
contact us at support@agilex.ai. Please follow and implement all assembly
instructions and guidelines in the chapters of this manual, which is very important.
Particular attention should be paid to the text related to the warning signs.
Safety Information
The information in this manual does not include the design, installation and
operation of a complete robot application, nor does it include all peripheral
equipment that may affect the safety of the complete system. The design and use of the
complete system need to comply with the safety requirements established in the
standards and regulations of the country where the robot is installed.
SCOUT MINI integrators and end customers have the responsibility to ensure compliance
with the applicable laws and regulations of relevant countries, and to ensure that
there are no major dangers in the complete robot application. This includes but is
not limited to the following:
Effectiveness and responsibility
• Make a risk assessment of the complete robot system.
• Connect the additional safety equipment of other machinery defined by the risk
assessment together.
• Confirm that the design and installation of the entire robot system's peripheral
equipment, including software and hardware systems, are correct.
• This robot does not have a complete autonomous mobile robot, including but not
limited to automatic anti-collision, anti-falling, biological approach warning and
other related safety functions. Related functions require integrators and end

customers to follow relevant regulations and feasible laws and regulations for
safety assessment. To ensure that the developed robot does not have any major
hazards and safety hazards in actual applications.
• Collect all the documents in the technical file: including risk assessment and this
manual.
• Know the possible safety risks before operating and using the equipment.
Environmental Considerations
• For the first use,please read this manual carefully to understand the basic
operating content and operating specification.
• For remote control operation, select a relatively open area to use SCOUT MINI,
because SCOUT MINI is not equipped with any automatic obstacle avoidance sensor.
• Use SCOUT MINI always under -10℃~45℃ ambient temperature.
• If SCOUT MINI is not configured with separate custom IP protection, its water and
dust protection will be IP22 ONLY.
Pre-work Checklist
• Make sure each device has sufficient power.
• Make sure Bunker does not have any obvious defects.
• Check if the remote controller battery has sufficient power.
Operation
• In remote control operation, make sure the area around is relatively spacious.
• Carry out remote control within the range of visibility.
• The maximum load of SCOUT MINI is 10KG. When in use, ensure that the payload does
not exceed 10KG.

• When installing an external extension on SCOUT MINI, confirm the position of the
center of mass of the extension and make sure it is at the center of rotation.
• Please charge in tine when the device is low battery alarm. When SCOUT MINI has a
defect, please immediately stop using it to avoid secondary damage.
• When SCOUT MINI has had a defect, please contact the relevant technical to deal
with it, do not handle the defect by yourself.
• Always use SCOUT MINI in the environment with the protection level requires for
the equipment.
• Do not push SCOUT MINI directly.
• When charging, make sure the ambient temperature is above 0℃.
Maintenance
• If the tire is severely worn or burst, please replace it in time.
• If the battery do not use for a long time, it need to charge the battery
periodically in 2 to 3 months.
Attention
This Section includes some precautions that should be paid attention to for SCOUT
MINI use and development.
Battery precautions
• The battery supplied with SCOUT MINI is not always fully charged in the factory
setting, but its specific power capacity can be displayed on the voltmeter at tail
end of SCOUT MINI chassis or read via CAN bus communication interface. Once the
green indicator light of charger is switched on, it means the battery recharging
is completed, but after this indicator light is on, the battery will still be
charged slowly with 0.1A current for possibility about 30 minutes;

• Please do not charge the battery after its power has been depleted, and please
charge the battery in time when low battery level alarm on SCOUT MINI is on;
• Static storage conditions: The best temperature for battery storage is -10℃ to
45℃; in case of storage for no use, the battery must be recharged and discharged
once about every 2 months, and then stored in full voltage state. Please do not
put the battery in fire or heat up the battery, and please do not store the battery
in high-temperature environment;
• Charging: The battery must be charged with a dedicated lithium battery charger;
please do not charge the battery below 0℃ and do no use non-originally standard
batteries, power supplies and chargers.
Application environment precautions
• The operating temperature of SCOUT MINI is -10℃ to 45℃; please do not use it
below -10℃ and above 45℃ ;
• The requirements for relative humidity in the use environment of SCOUT MINI are:
maximum 80%, minimum 30%;
• Please do not use it in the environment with corrosive and flammable gases or
closed to combustible substances;
• Do not place it near heaters or heating elements such as large coiled resistors,
etc.; Except for specially customized version (IP protection class customized),
SCOUT MINI is not water-proof, thus please do not use it in rainy, snowy or water-
accumulated environment;
• The elevation of recommended use environment should not exceed 1,000m;
• The temperature difference between day and night of recommend-ed use environment
should not exceed 25℃;
Precautions for electrical external extension
• For the extended power supply, the current should not exceed 5 A and the total
power should not exceed 120 W;

• When the system detects that the battery voltage is lower than the safe voltage
class, external power supply extensions will be actively switched to. Therefore,
users are suggested to notice if external extensions involve the storage of
important data and have no power-off protection.
Safety precautions
• In case of any doubts during use, please follow related instruction manual or
consult related technical personnel;
• Before use, pay attention to field condition, and avoid mis-operation that will
cause personnel
• Without technical support and permission, please do not personally modify the
internal equipment structure.
Other notes
• SCOUT MINI has plastic parts in front and rear, please do not directly hit those
parts with excessive force to avoid possible damages;
• When handling and setting up, please do not fall off or place the vehicle upside
down;
• For non-professionals, please do not disassemble the vehicle without permission.
Contents
1 Introduction to SCOUT MINI
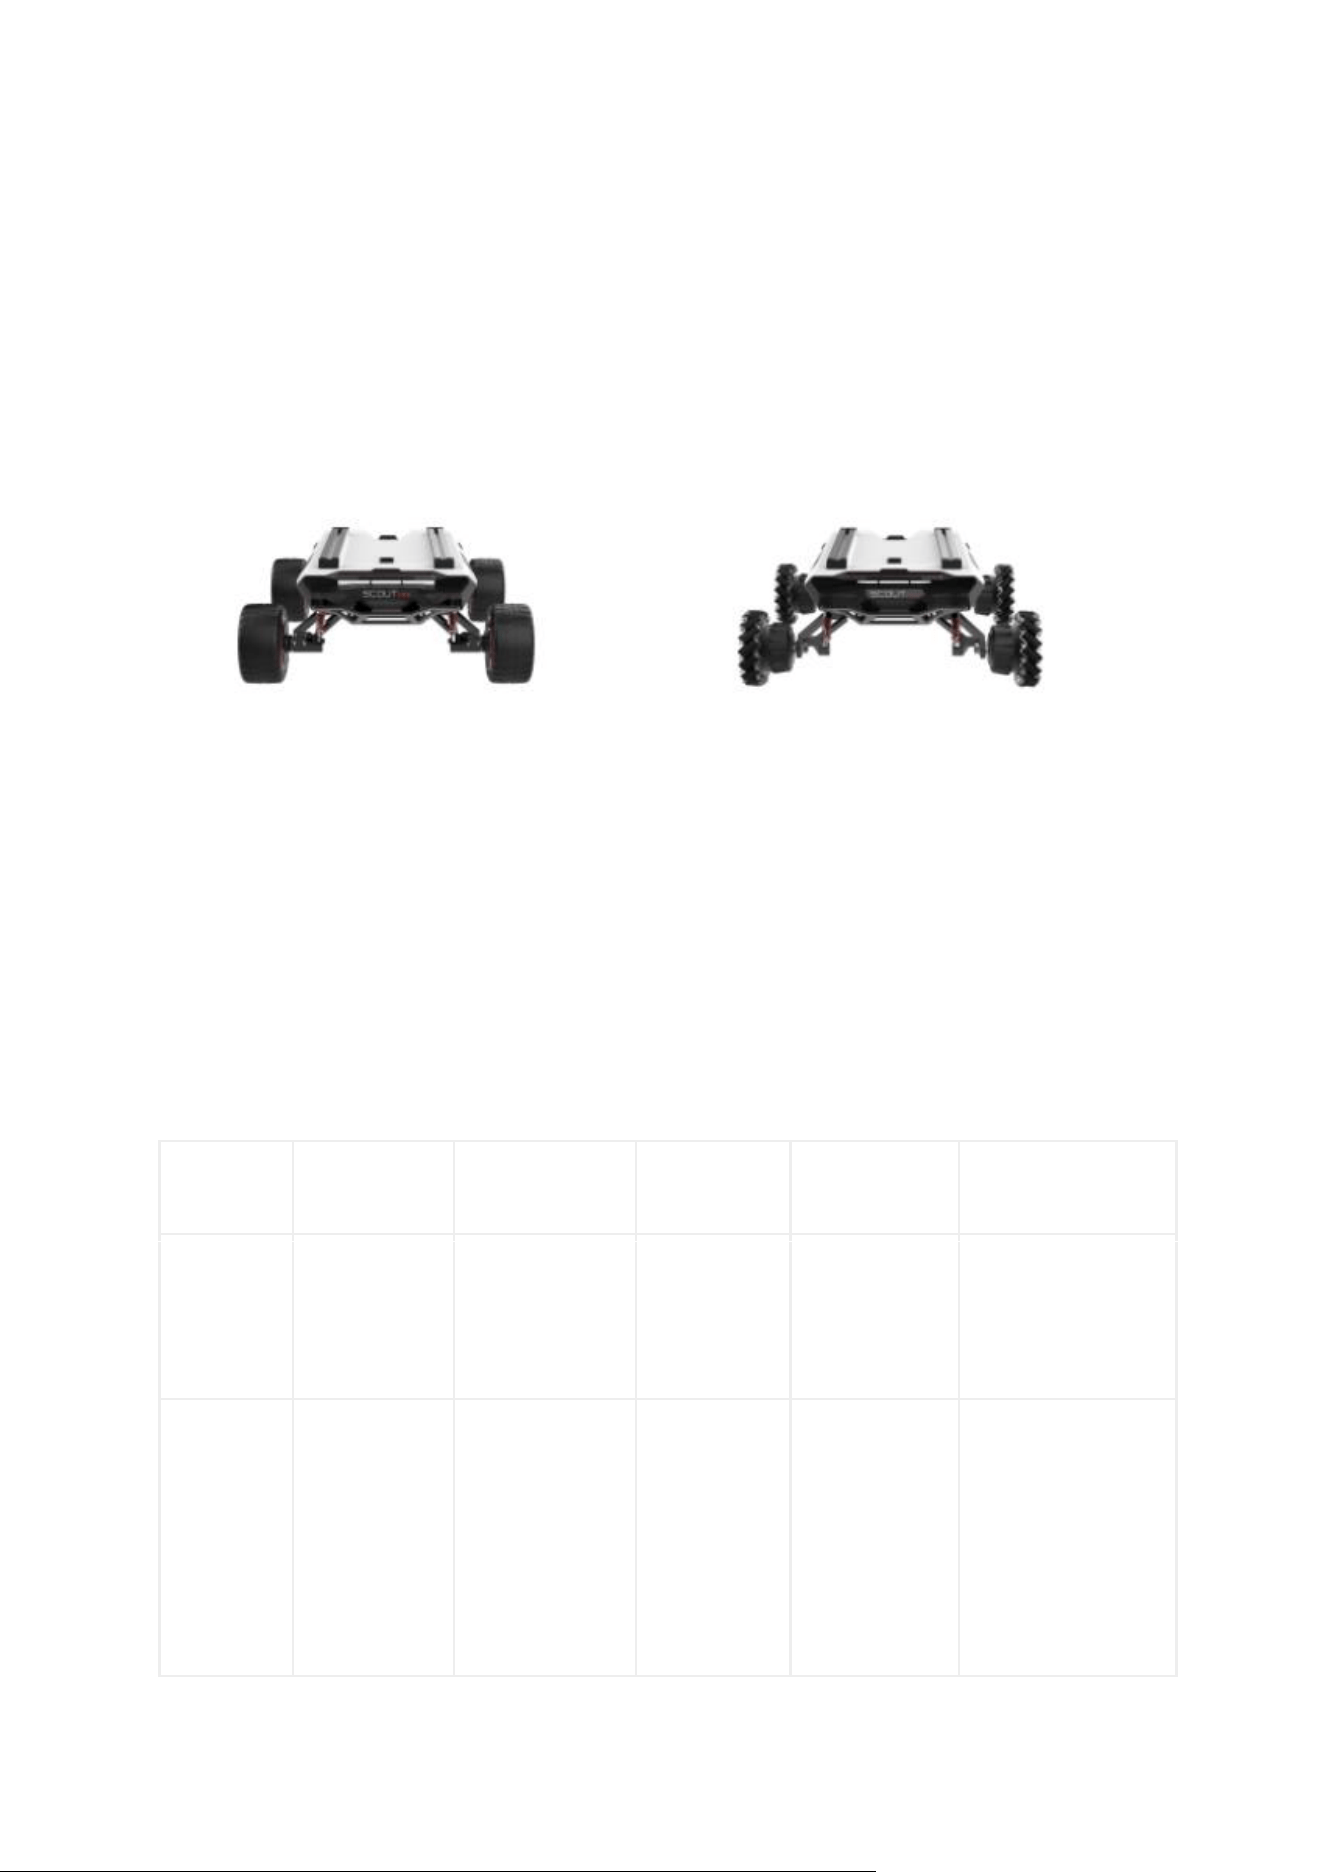
SCOUT MINI intelligent mobile chassis, with 4WD, strong off-road performance and
compact body shape, truly achieves "dexterous and flexible". SCOUTMINI inherits the
advantages of SCOUT four-wheel differential chassis family, i.e. four-wheel drive,
independent suspension, in-situ rotation and so on, and has made innovation in the
design of hub motor. The minimum turning radius of the chassis is 0 m, and the

climbing angle is close to 30 degrees. SCOUT MINI is still capable of excellent off-
road performance although it is only half of SCOUT in size. In addition, it has a
breakthrough high-speed, accurate, stable and controllable dynamic control system up
to 20 km/h. SCOUTMINI development platform with its own control core, supports
standard CAN bus communication, and can access to standard CAN bus communication, as
well as all kinds of external equipment. On such basis, it supports secondary
development such as ROS and more advanced access and the access of robot development
system. Equipped with standard RC transmitter, 24V 15Ah lithium battery power system,
its endurance mileage is up to 10 km. Additional components such as stereo camera,
laser radar, GPS, IMU, manipulator, etc. can be optionally installed on SCOUT MINI
for expanded applications. SCOUT MINI is frequently used for unattended inspection,
security, scientific research, prospecting, logistics, etc.
1.1 Product list
Name
Quantity
SCOUT MINI robot body
x1
Battery charger (AC 220V)
x1
Aviation male plug (4-Pin)
x1
USB to CAN
x1
RC transmitter
x1
USB to RS232
x1

1.2 Performance parameters
Type
Items
Parameters
Mechanical
Dimensions (mm)
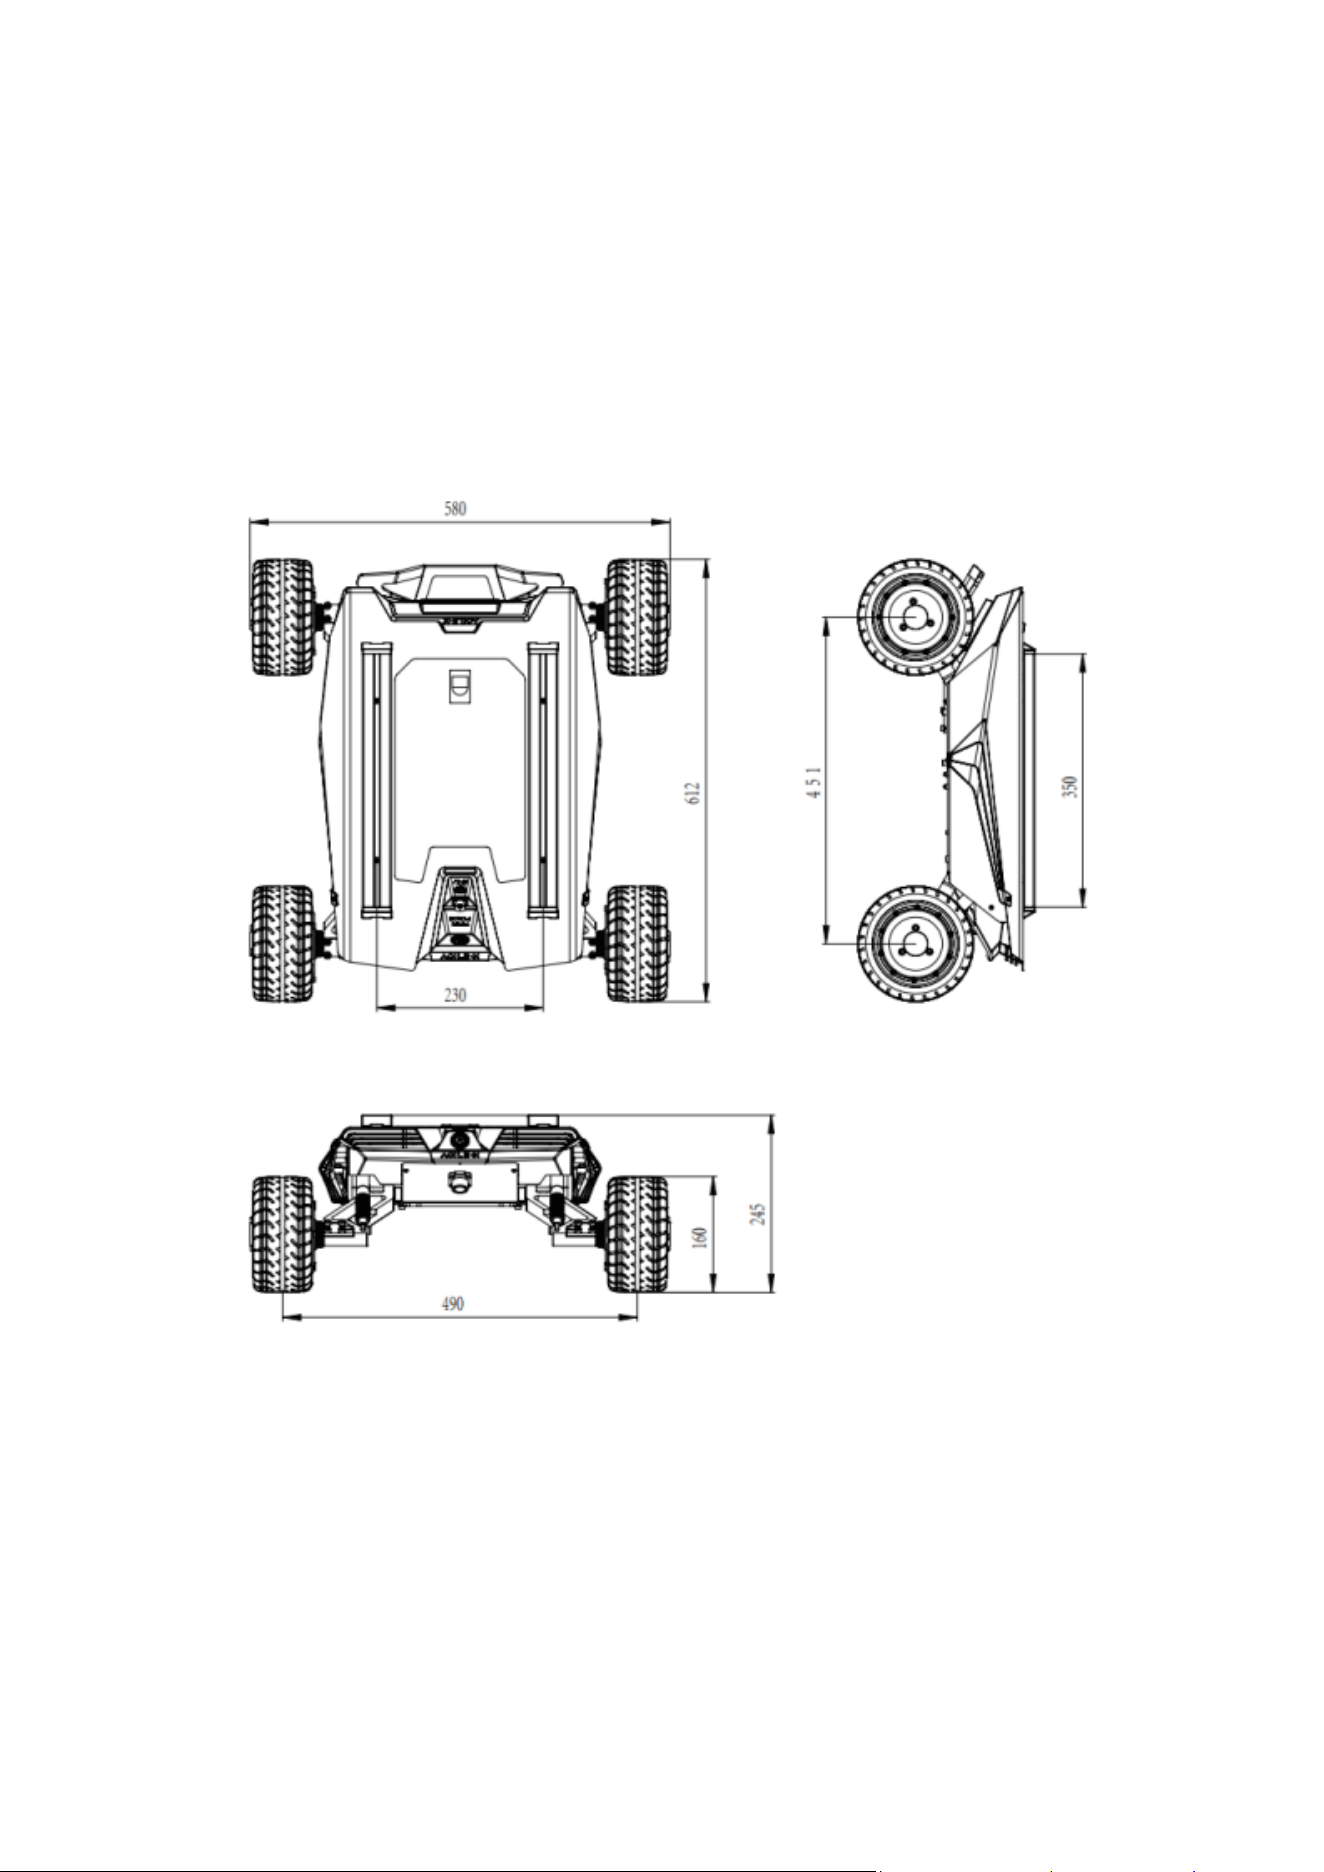
612x580x245
Axle Track (mm)
451
Front/rear track (mm)
490
Kerb weight (Kg)
23
Battery type
Lithium battery
Battery parameters
24V 15Ah
Power drive motor
DC brushless 4 X 250W
(Mecanum wheel 150W)
Drive type
Independent four-wheel drive
Steering drive motor
-
Parking type
Servo brake/anti-collision tube
Steering type
Four-wheel differential steering
Suspension
Independent suspension with rocker
arm
Steering motor reduction
-

ratio
Steering motor encoder
-
Drive motor reduction ratio
1:4.3
Drive motor sensor
Hall
Performation
IP grade
IP22
Maximum speed(m/s)
3
Minimum turning radius (mm)
0
Maximum gradeability (°)
30°
Ground clearance (mm)
115
Maximum endurance (h)
8
Maximum travel (km)
10KM
Charging time (h)
2H
Working temperature (℃)
-10C°~40C°
Control
Control mode
Remote control mode
Command control mode
Remote controller
2.4G/limit distance 100M
Communication Interface
CAN
1.3 Requirement for development
FS RC transmitter is provided optionally in the factory settings of SCOUT MINI and it
allows users to control the mobile chassis to move and turn; the CAN provided on
SCOUT MINI can be used for secondary development via the CAN interface.
2 The Basics
This Section will basically introduce the basic knowledge about SCOUT MINI mobile
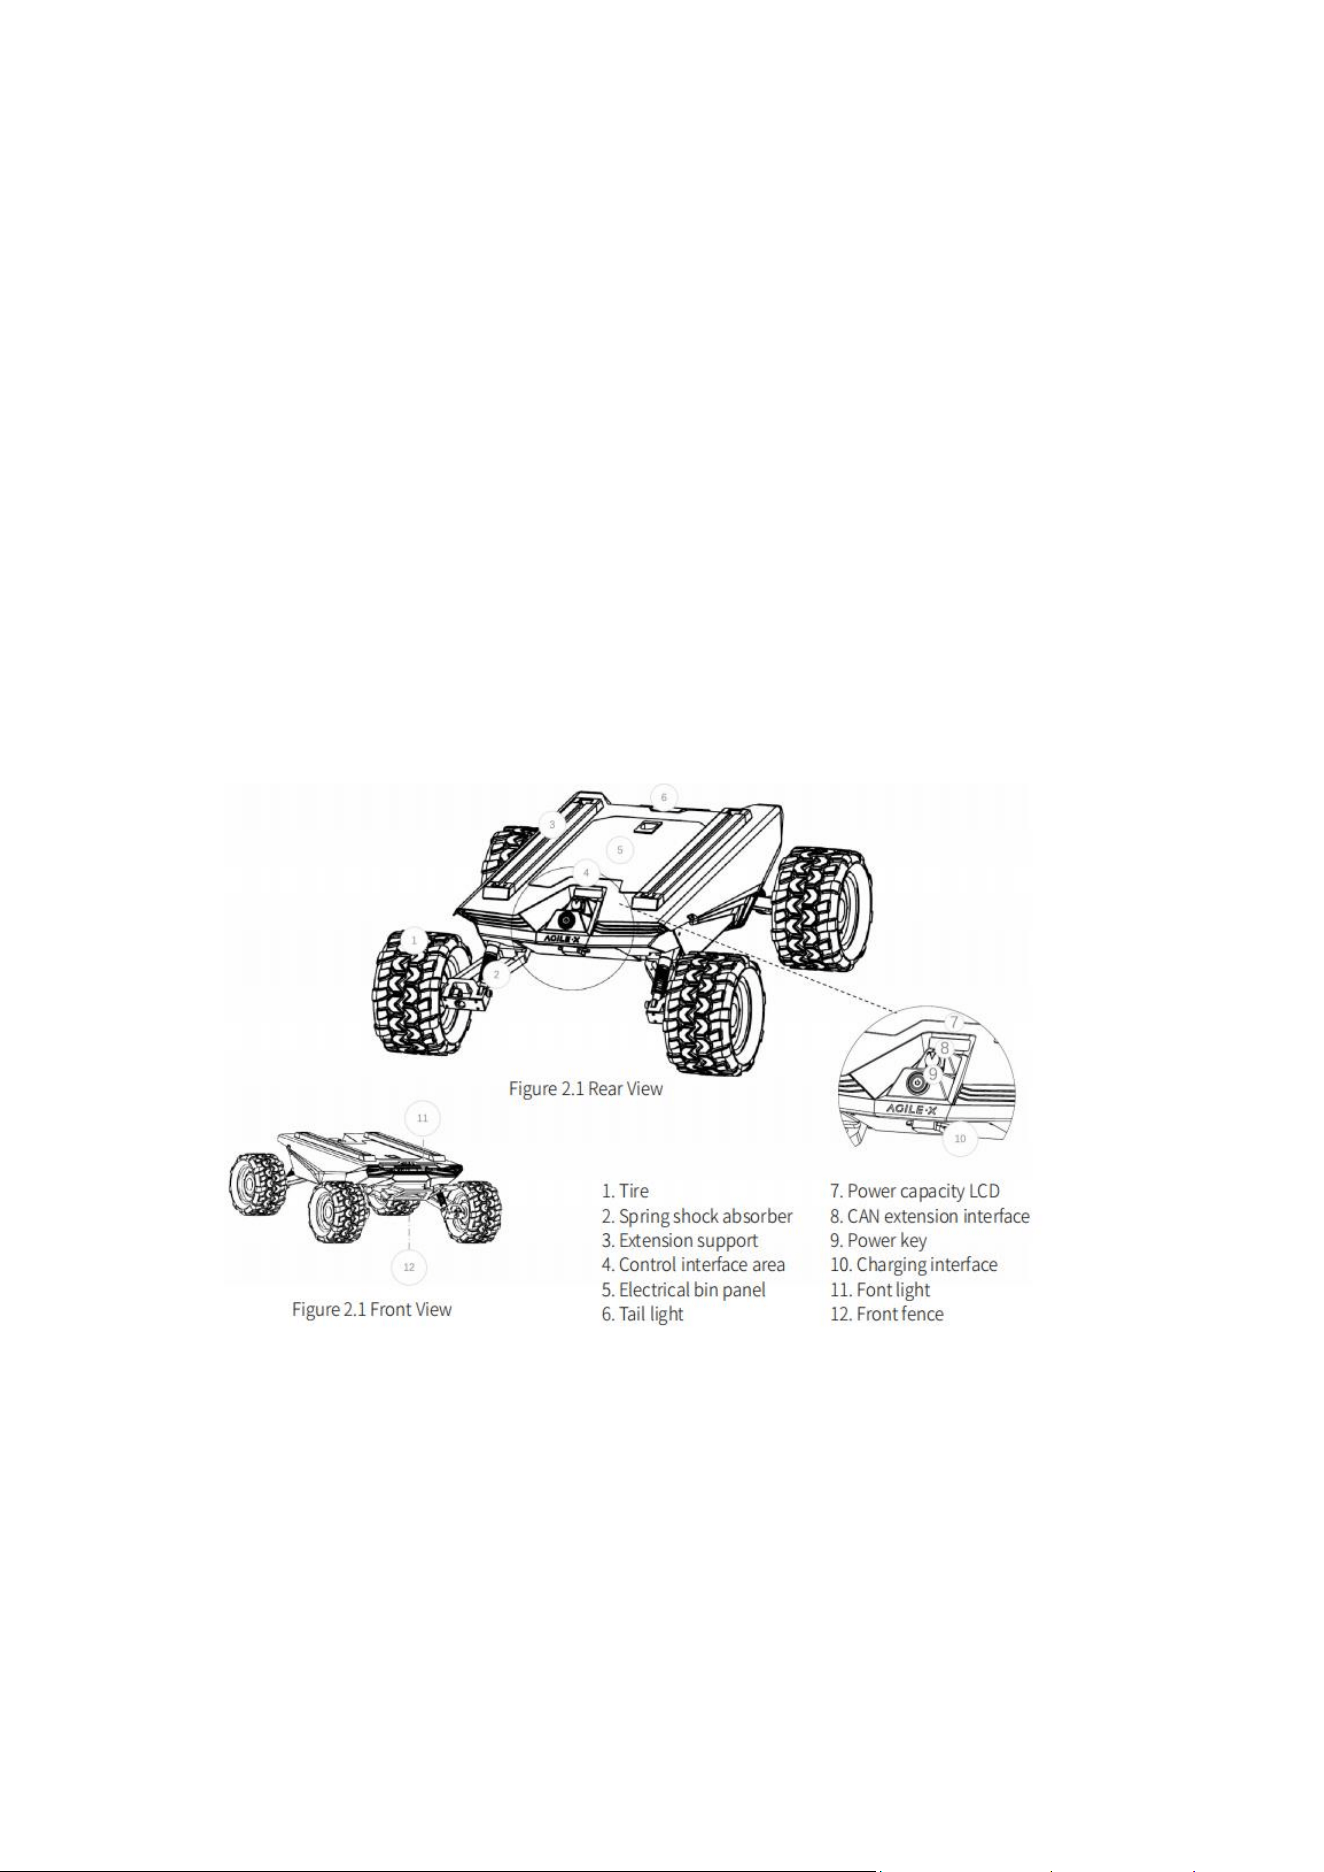
robot chassis to users and developers. The overview of an entire mobile robot chassis
is shown in Figure 2.1 and Figure 2.2 below.
Based on the concept of modular and intelligent design as a whole, SCOUT MINI
combines filled solid tires with independent suspension as its power module, which,
along with powerful hub motor, enables the development platform of SCOUT MINI robot
chassis to flexibly move on different ground surfaces with high passing ability and
ground adaptability. The hub motor saves the complex transmission structure design
and makes it possible for the model to become more compact.

Anti-collision fence is mounted in the front of the vehicle to protect the front and
reduce possible damages to the vehicle body during a collision. The front of the
vehicle is equipped with white lights, which can be illuminated.
Electrical interfaces for DC power and communication interfaces are provided at the
rear of the robot to facilitate secondary development. The electrical interfaces
adopt waterproof plug-in components, not only allowing flexible connection between the
robot and external components for customers but also allowing the use of the robot
even under severe operating conditions.
A standard aluminum extension support is installed at the top of the vehicle to
facilitate the use of external equipment extension.
2.1 Status indication
Users can identify the status of vehicle body through the voltmeter, the power supply
and lights mounted on SCOUT MINI.
• Tail power switch: When the power switch is pressed, the ring indicator light will
enter constant mode.
• Power indication: the tail power display module showing the information of the
power capacity and voltage of the current battery.
• Front light: Front width light, can be switched by RC transmitter and command.
2.2 Instructions on electrical interfaces
In the SCOUT MINI tail minimalist design, all electrical interfaces are in the tail.
The interfaces include voltage display interactive module, extension interface, power
switch and charging interface. The position of each module at the tail is as shown in
the figure.2.3.
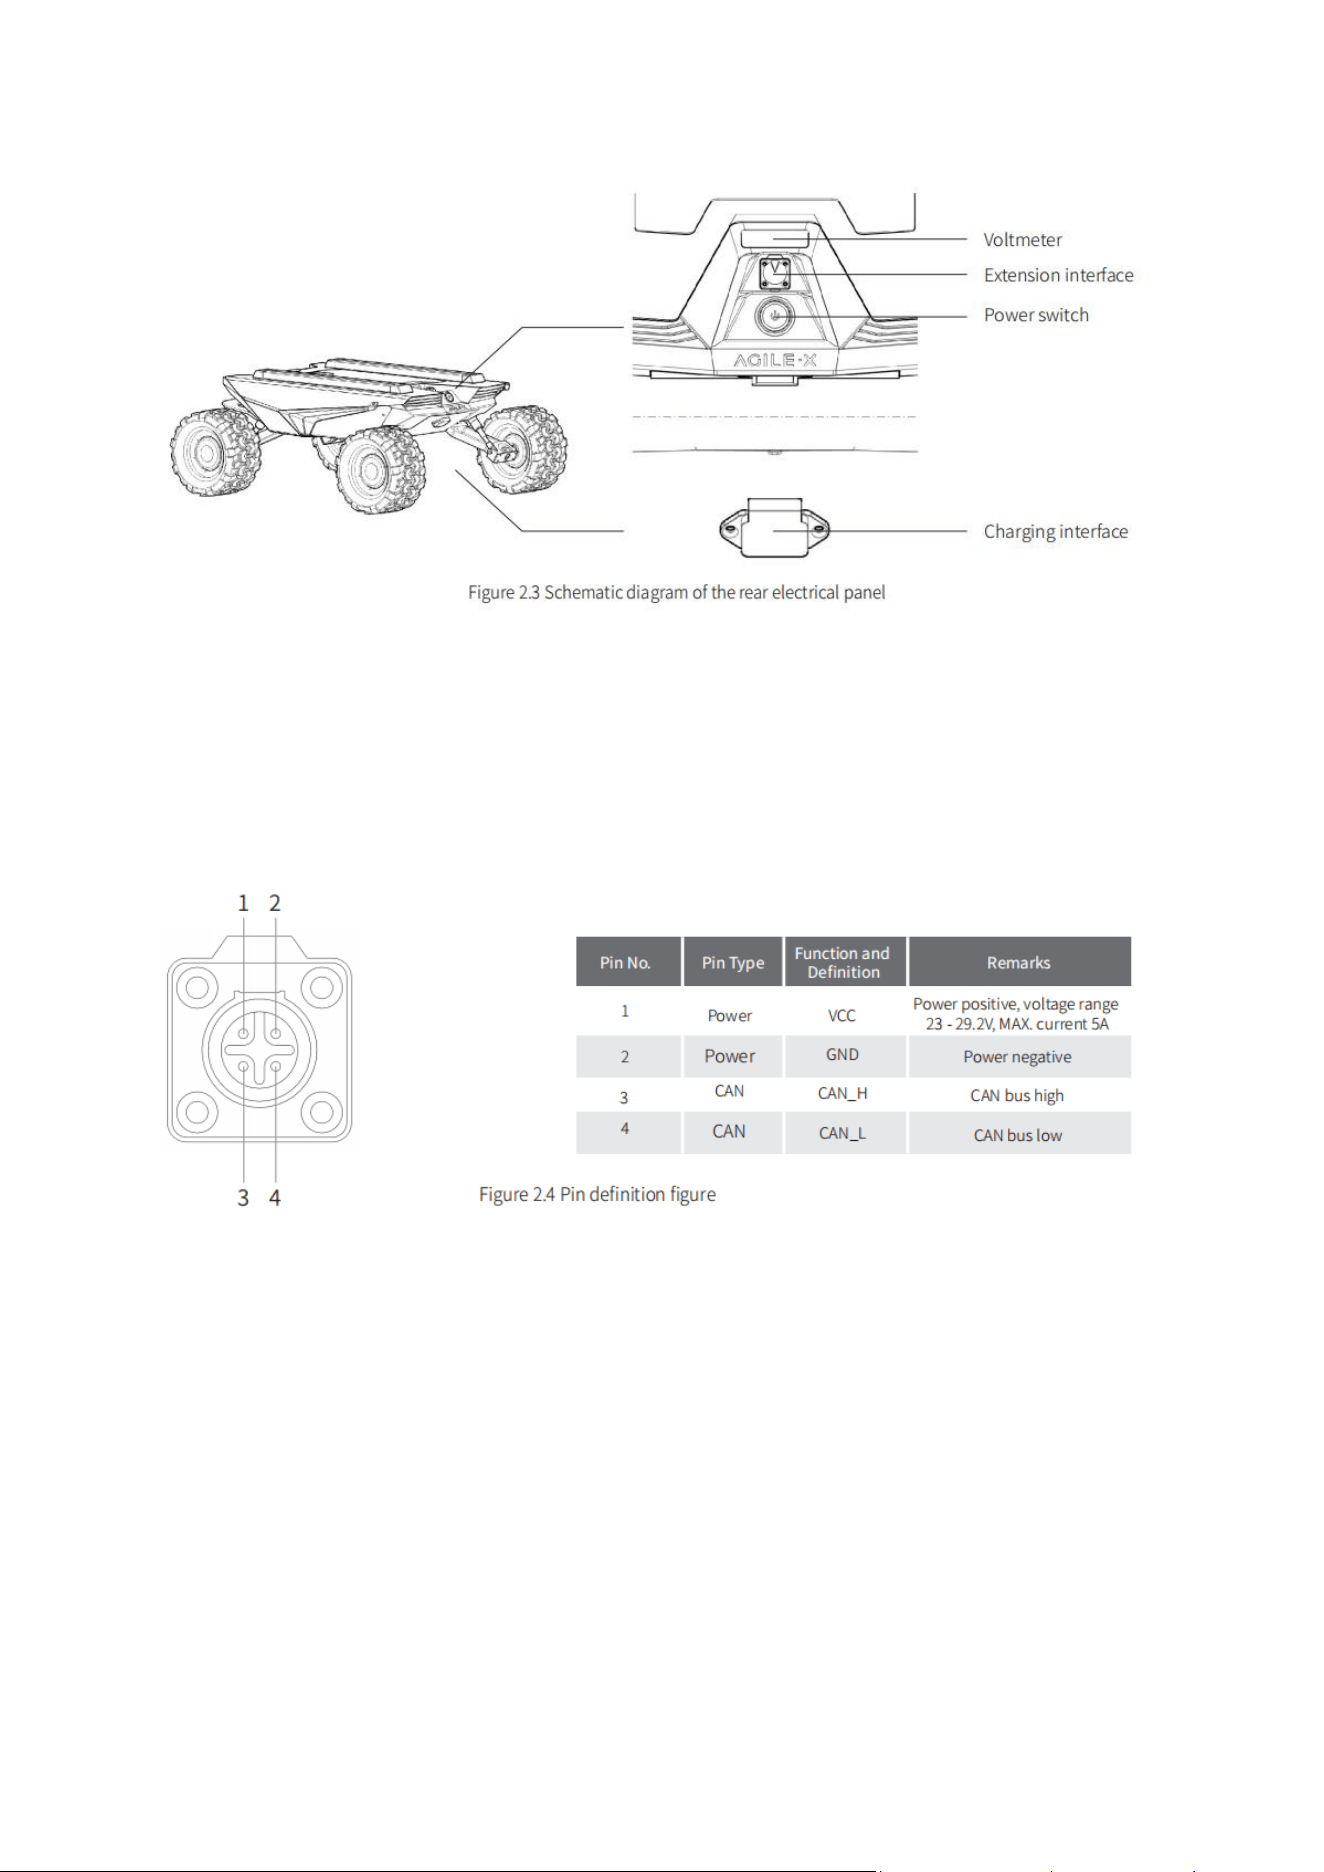
SCOUT MINI aviation extension interface is configured with both a set of power
supplies and a set of CAN communication interfaces. These interfaces can be used to
supply power to extended devices and establish communication. The specific definitions
of pins are shown in Figure 2.4.
2.3 Remote control instructions
FS RC transmitter is an optional feature of SCOUT MINI for users to choose as
actually required. With this RC transmitter designed on the left throttle in this
product, users can easily control SCOUT MINI universal robot chassis. Its definitions
and functions are shown in Figure 2.5 for reference.
The RC transmitter is preset the mapping of keys at factory. Do not arbitrarily
change the key mapping, otherwise normal control will be unavailable. The lever SWB
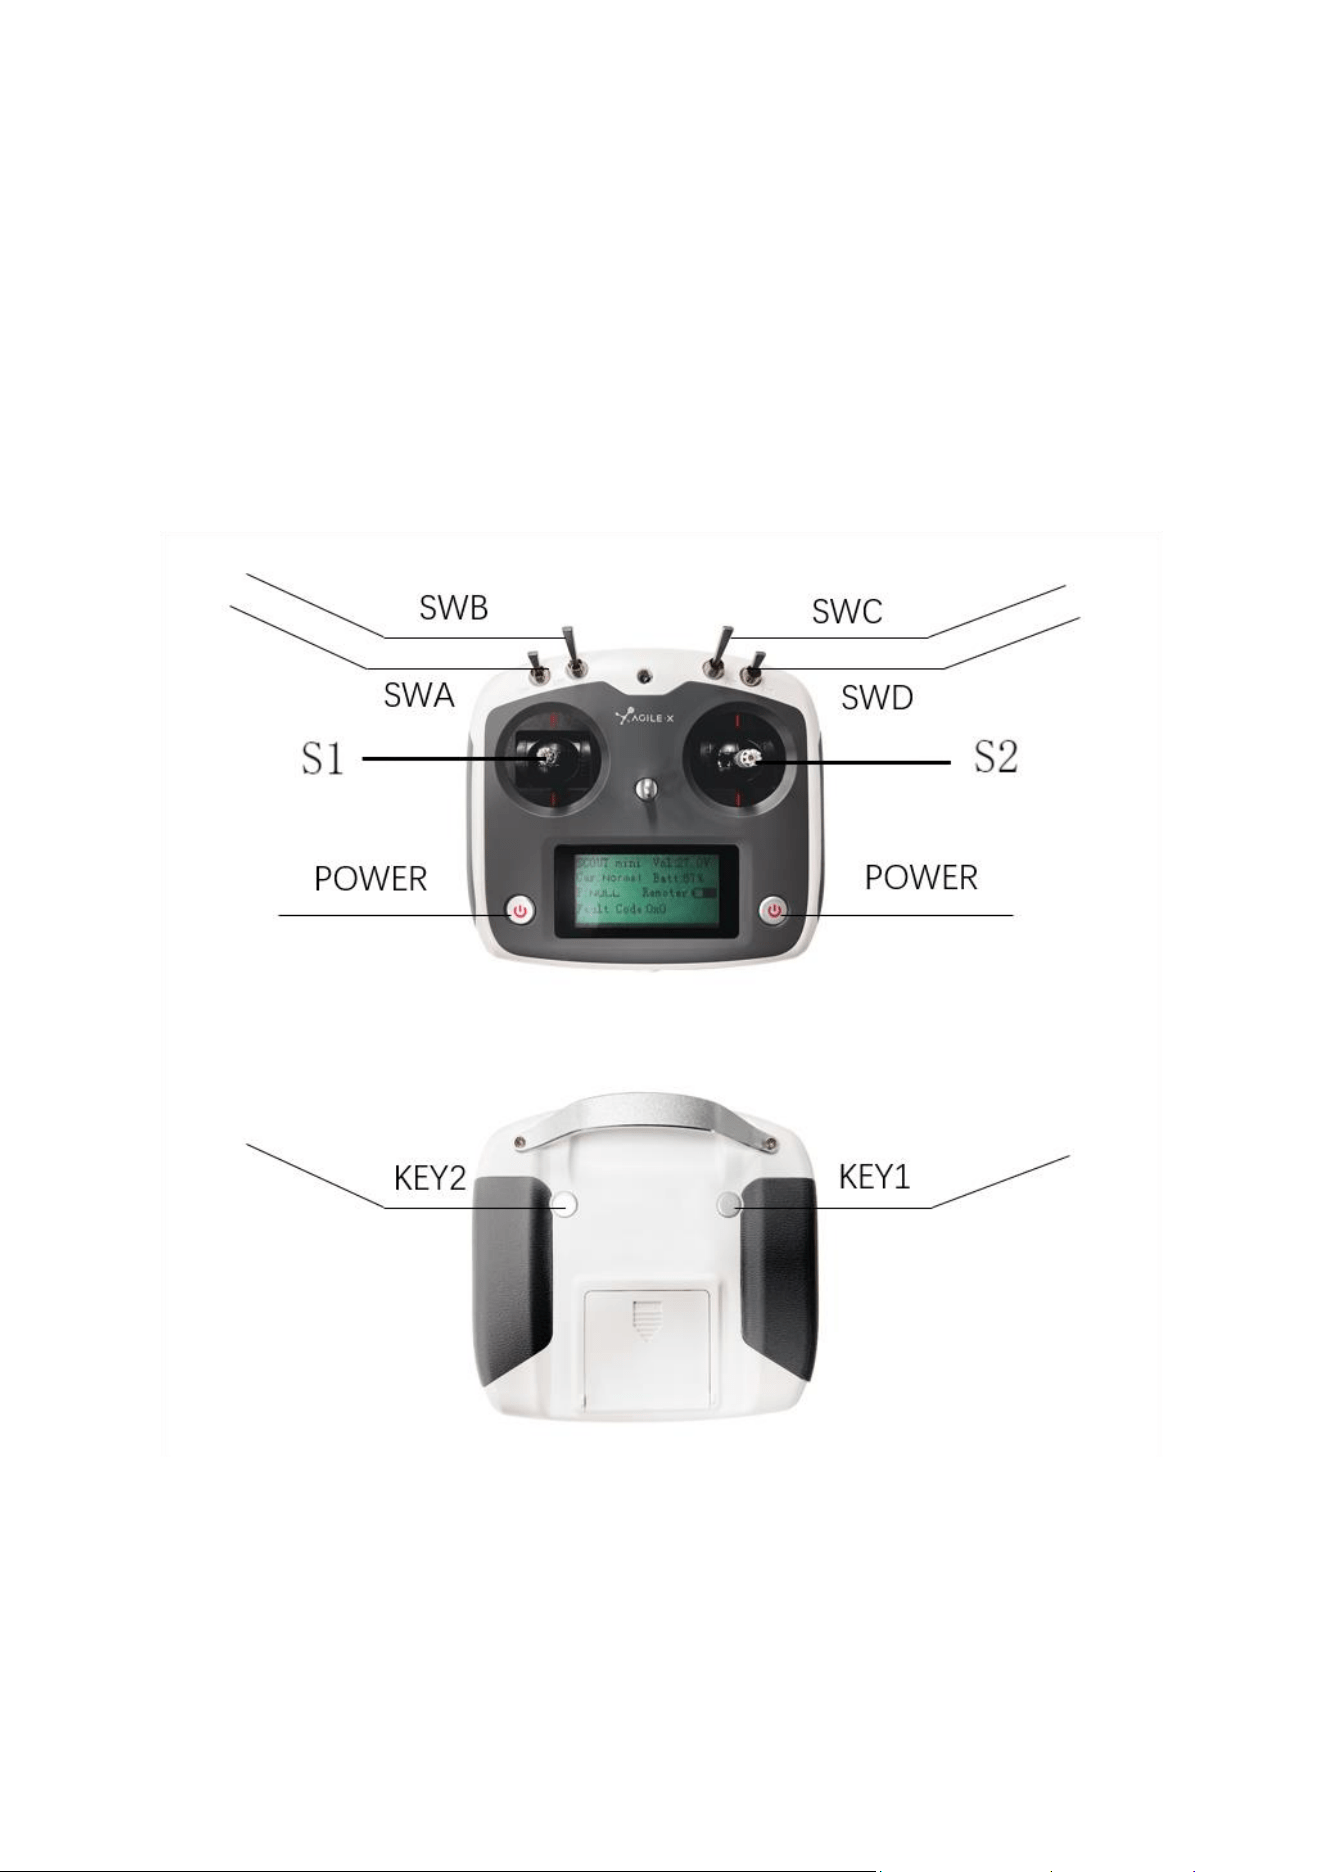
switches control mode; the SWC controls speed mode, SWD manual light control switch;
the left rocker controls forward and backward movement; the right rocker controls the
vehicle for left rotation and right rotation. It is worth noting that the mobile
chassis on the internal control is mapped by percentage, so the speed will be
constant when the lever is in the same position.
Key1 is used to clear the robot errors on the remote controller. Key2 is to enter
setting menu.
Figure 2.5 Schematic diagram of FS controller buttons
Remote control interface description:
Scout : model
Vol: battery voltage
Car: chassis status
Batt: Chassis power percentage
P:Park
Remoter: remote control battery level
Fault Code: Error information (refer to the fault information description table)
2.4 Description of movement by remote control
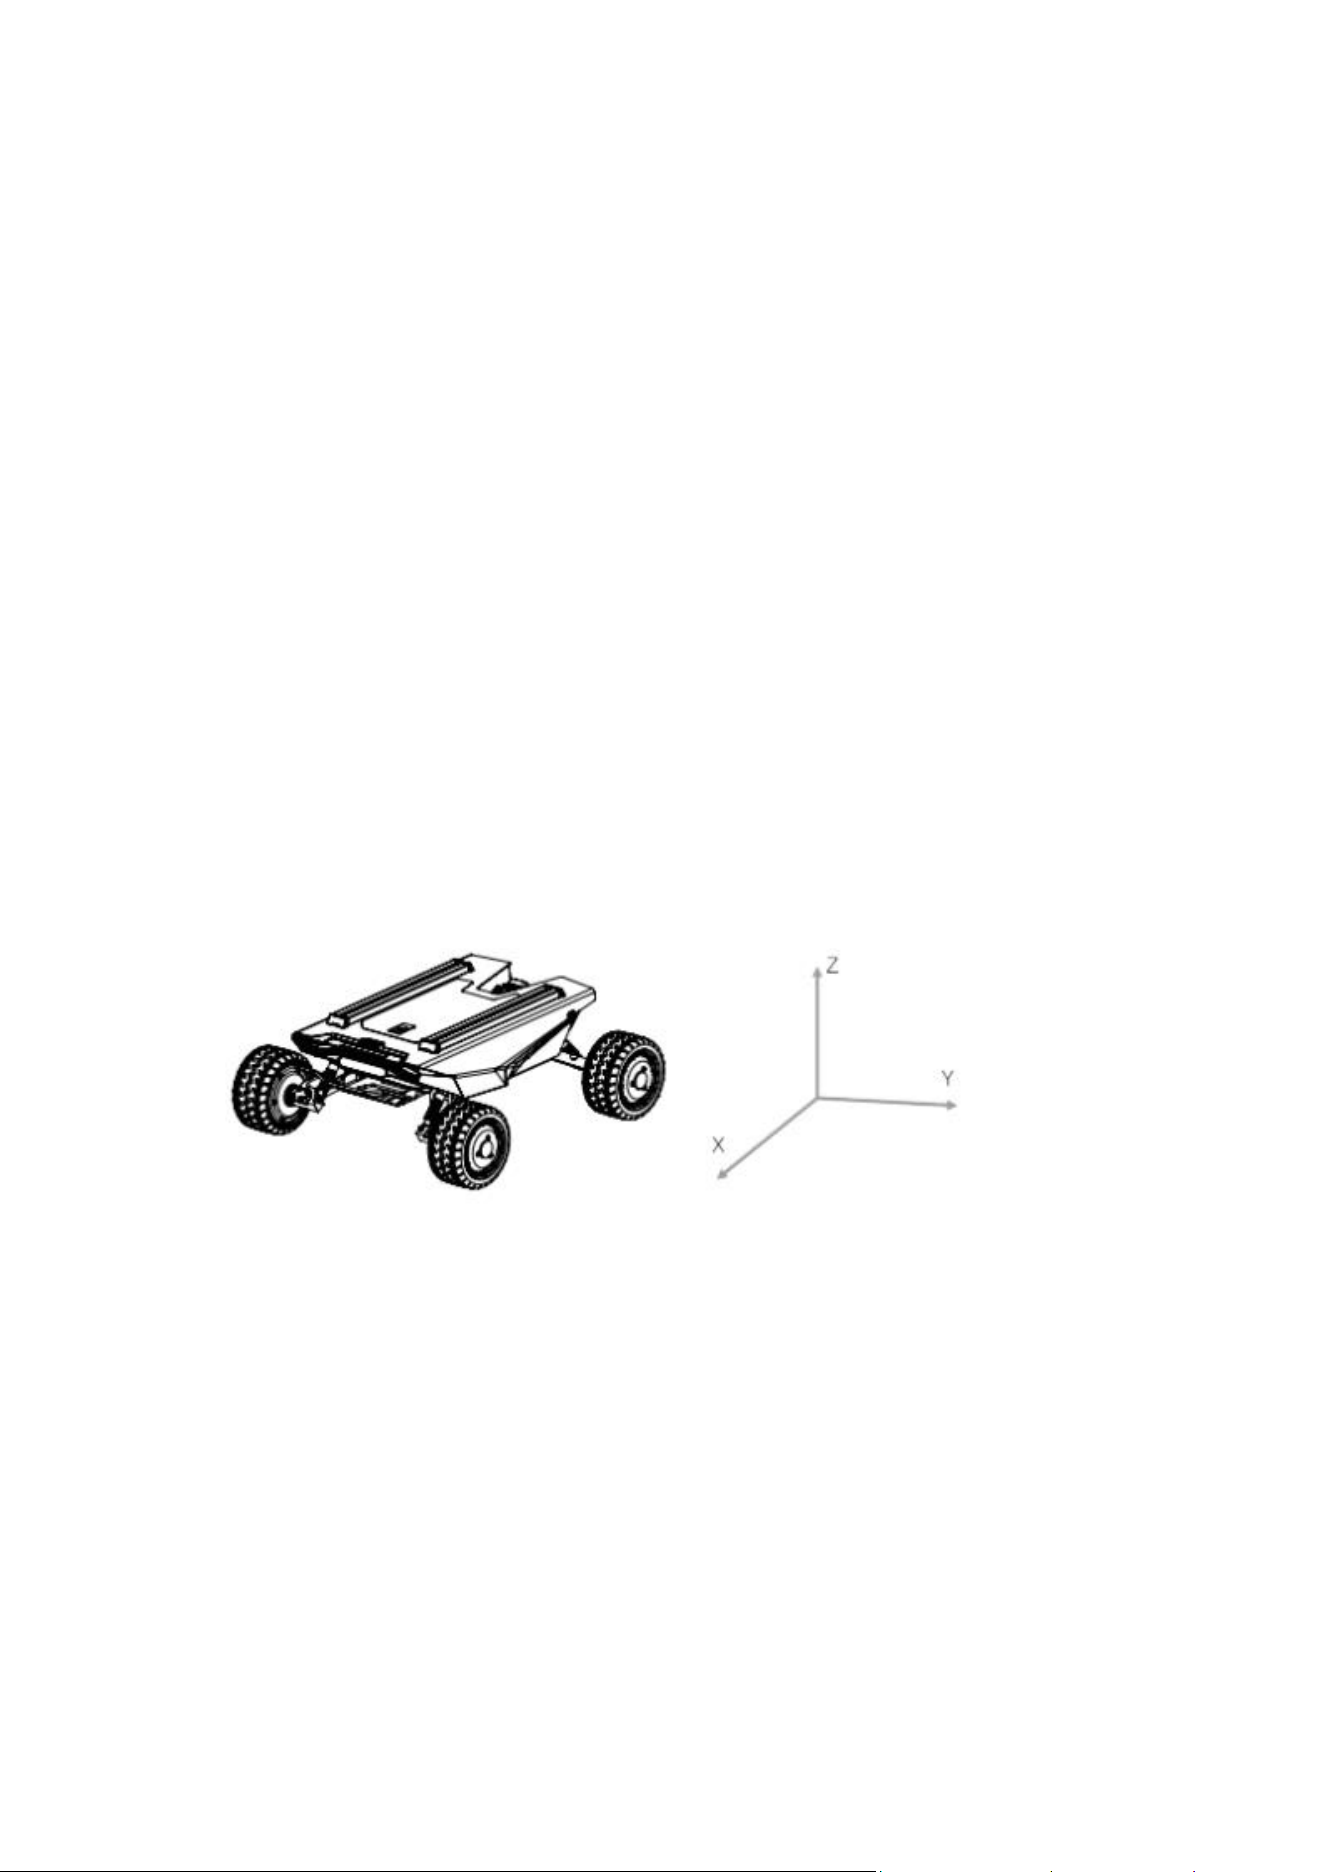
and control by command
A reference coordinate system shown in Figure 3.0 is established in accordance with
ISO 8855 standard for moving vehicles on ground.
Figure 3.0 Schematic Diagram of Reference Coordinate System for Vehicle Body
As shown in Figure 3.0, the vehicle body of SCOUT MINI is in parallel with X axis of
the established reference coordinate system.In the controller mode with RC
transmitter, pushing the left rocker of the RC transmitter forward and backward
respectively refers to the movement on the positive and negative directions of axis X;
when the left rocker of the RC transmitter is pushed to the maximum position, the
speed of movement towards the position direction of axis X reaches the maximum; when
the left rocker of the RC transmitter is pushed to the minimum position, the speed of
movement towards the negative direction of axis X reaches the maximum; the right
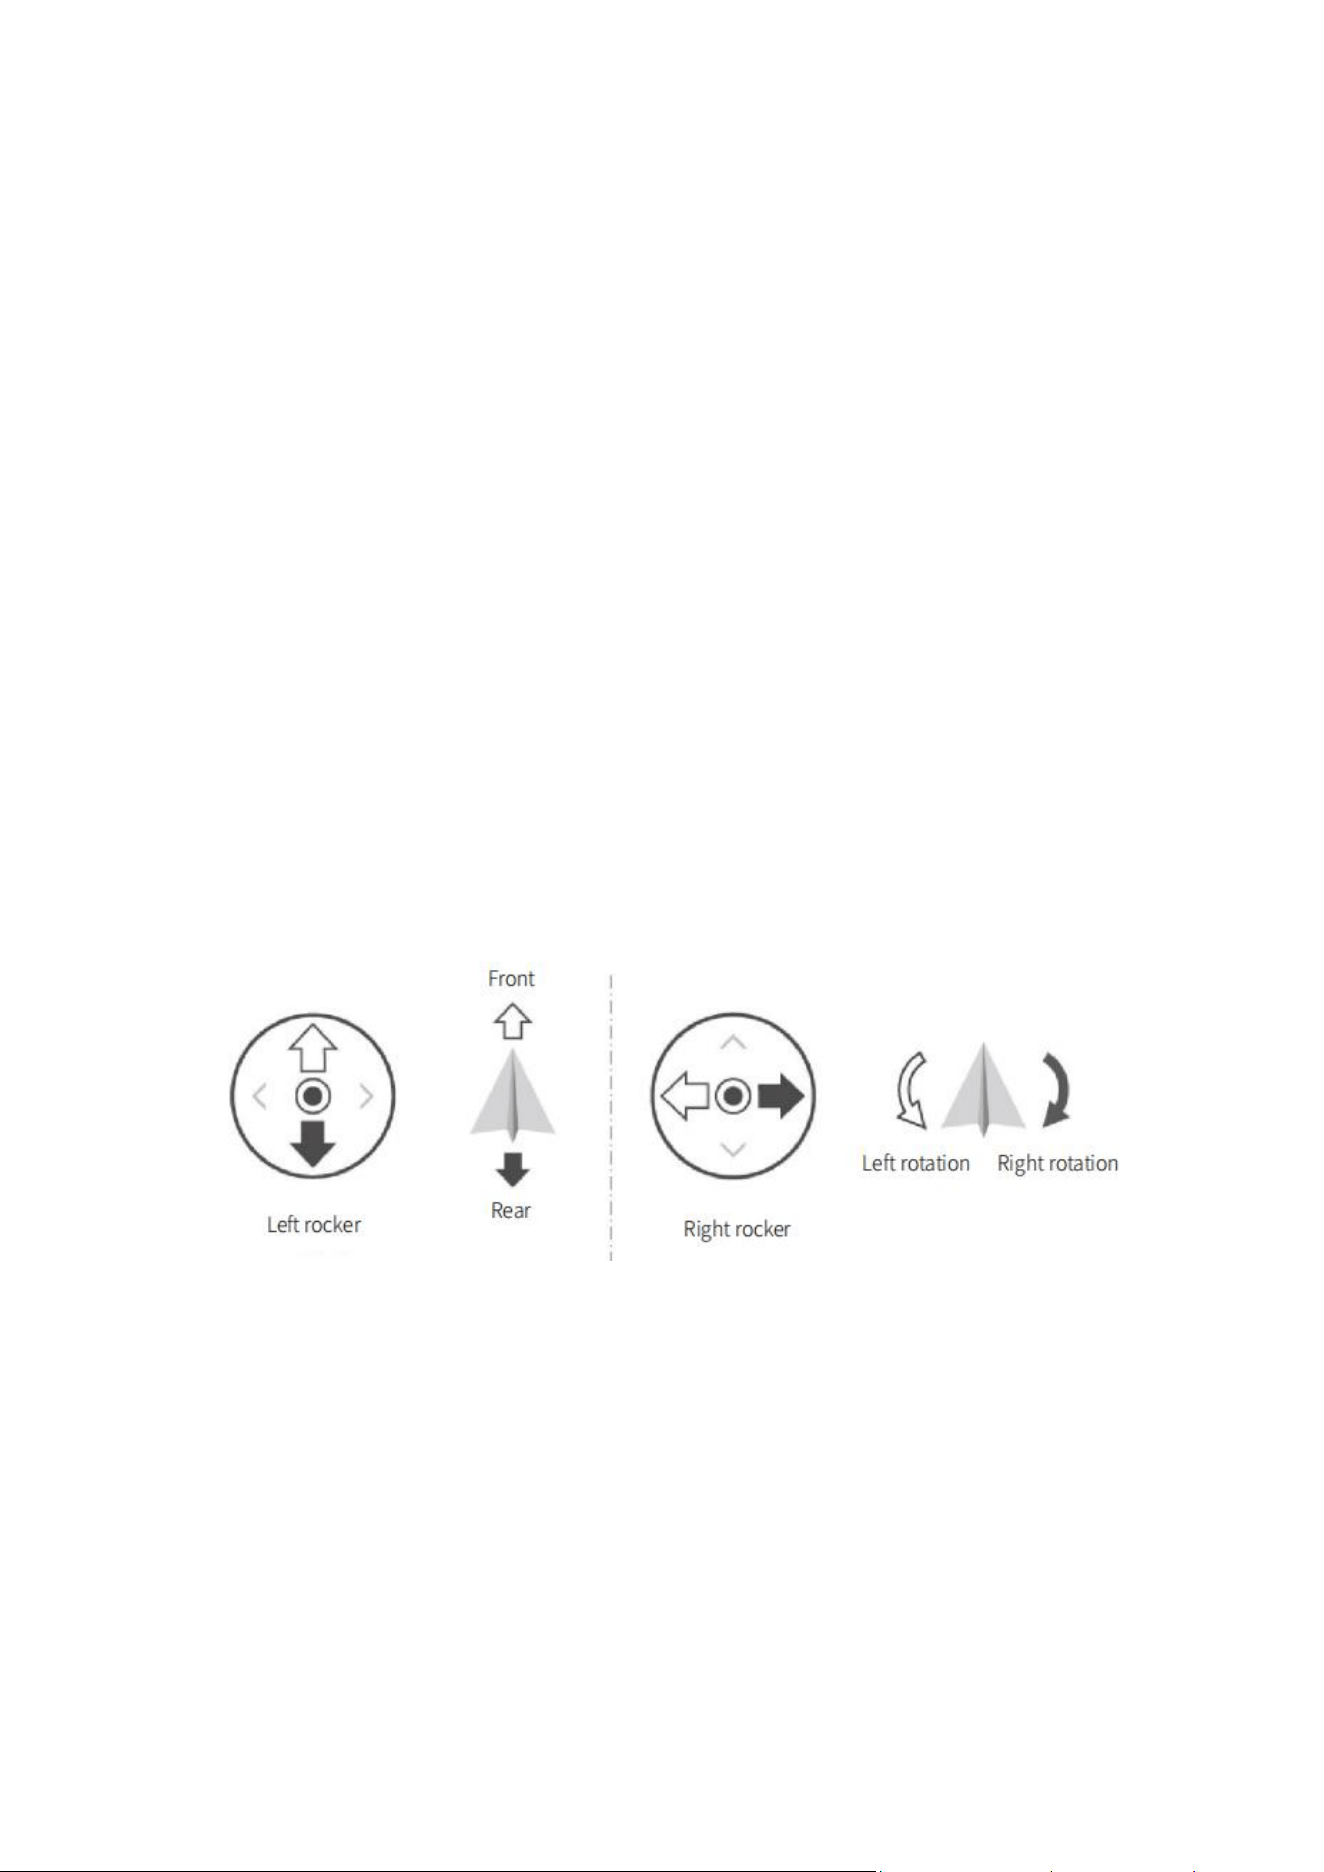
rocker of the RC transmitter controls the rotational movement of vehicle body to left
and right; pushing the right rocker of the RC transmitter to left and right
respectively refers to the rotational movement of vehicle body from the positive
direction of axis X to the positive direction of axis Y and from the positive
direction of axis X to the negative direction of axis Y; when the right rocker of the
RC transmitter is pushed to the maximum position on the left, the rotational linear
speed on anticlockwise direction reaches the maximum; when the right rocker of the RC
transmitter is pushed to the maximum position on the right, the rotational linear
speed on clockwise direction reaches the maximum.
In the control command mode, the positive value of linear speed refers to movement
towards the positive direction of axis X, and the negative value of linear speed
refers to movement towards the negative direction of axis X; the positive value of
angular speed refers to the rotational movement of vehicle body from the positive
direction of axis X to the positive direction of axis Y, and the negative value of
angular speed refers to the rotational movement of vehicle body from the positive
direction of axis X to the negative direction of axis Y.
2.5 Instructions on lighting control
The front and back of SCOUT MINI are equipped with lights. For the convenience of
users, SCOUT MINI opens the light control interface to the outside world. At the same
time, in order to save energy, a lighting control interface is reserved on the remote
control. At present, there are 2 light modes of the remote control, and the mode
switching can be switched through the SWD lever:

Mode control instructions: The SWD lever is turned to the bottom for the normally
closed mode, and the top is for the breathing light mode.
Normally closed mode: In the normally closed mode, if the chassis is stationary, the
lights will turn off; if the chassis is traveling at normal speed, the lights will
turn on;
Normally on mode: In the normally on mode, if the chassis is stationary, the lights
are always on; if in sports mode, the lights are on;
Breathing light mode: The light is in breathing light mode.
2.6 Speed mode description
For the convenience of users, SCOUT MINI has set 3 speed modes, which are low speed,
medium speed and high speed, which can be switched by the SWC lever on the remote
control.
Mode control instructions: the SWC lever is turned to the top for medium speed mode,
the middle is for low speed mode, and the bottom is for high speed mode.
Low speed mode: maximum speed is 0.5 m/s.
Medium speed mode: maximum speed is 1.5 m/s.
High speed mode: maximum speed is 3.0 m/s.
3 Getting Started
This Section mainly introduces the basic operation and use of the SCOUT MINI platform
and also introduces how to conduct secondary development of the vehicle body via the
external CAN ports and CAN bus protocol.

3.1 Use and operation
The basic operating procedure of startup is shown as follows:
Check
Check the condition of the vehicle body. Check whether there are significant anomalies;
if so, please contact the after-sale service personnel for support.
Startup
Press the SCOUT MINI power button and wait for a few seconds; Move SWB to the middle
and choose the position to be controlled;
You can try to manually switch the light mode and make sure that the mode selection
is correct;
Try to gently push the left rocker a little forward, then you can see the vehicle
moves forward slowly;
Try to gently push the left rocker a little backward, then you can see the vehicle
moves backward slowly;
Release the left rocker, then the vehicle will stop;
Try to gently push the right rocker a little leftward, then you can see the vehicle
rotates leftward slowly;
Try to gently push the right rocker a little rightward, then you can see the vehicle
rotates rightward slowly;
Release the right rocker, then the vehicle will stop;
Try to control freely in the relatively open area, and get familiarized with the
vehicle moving speed.
Shutdown
Press the SCOUT MINI power button to release.
Basic operating procedure of remote control
After SCOUT MINI mobile chassis is started correctly, turn on the RC transmitter and
select the remote-control mode. Then, the SCOUT MINI platform motion can be
controlled by the RC transmitter.
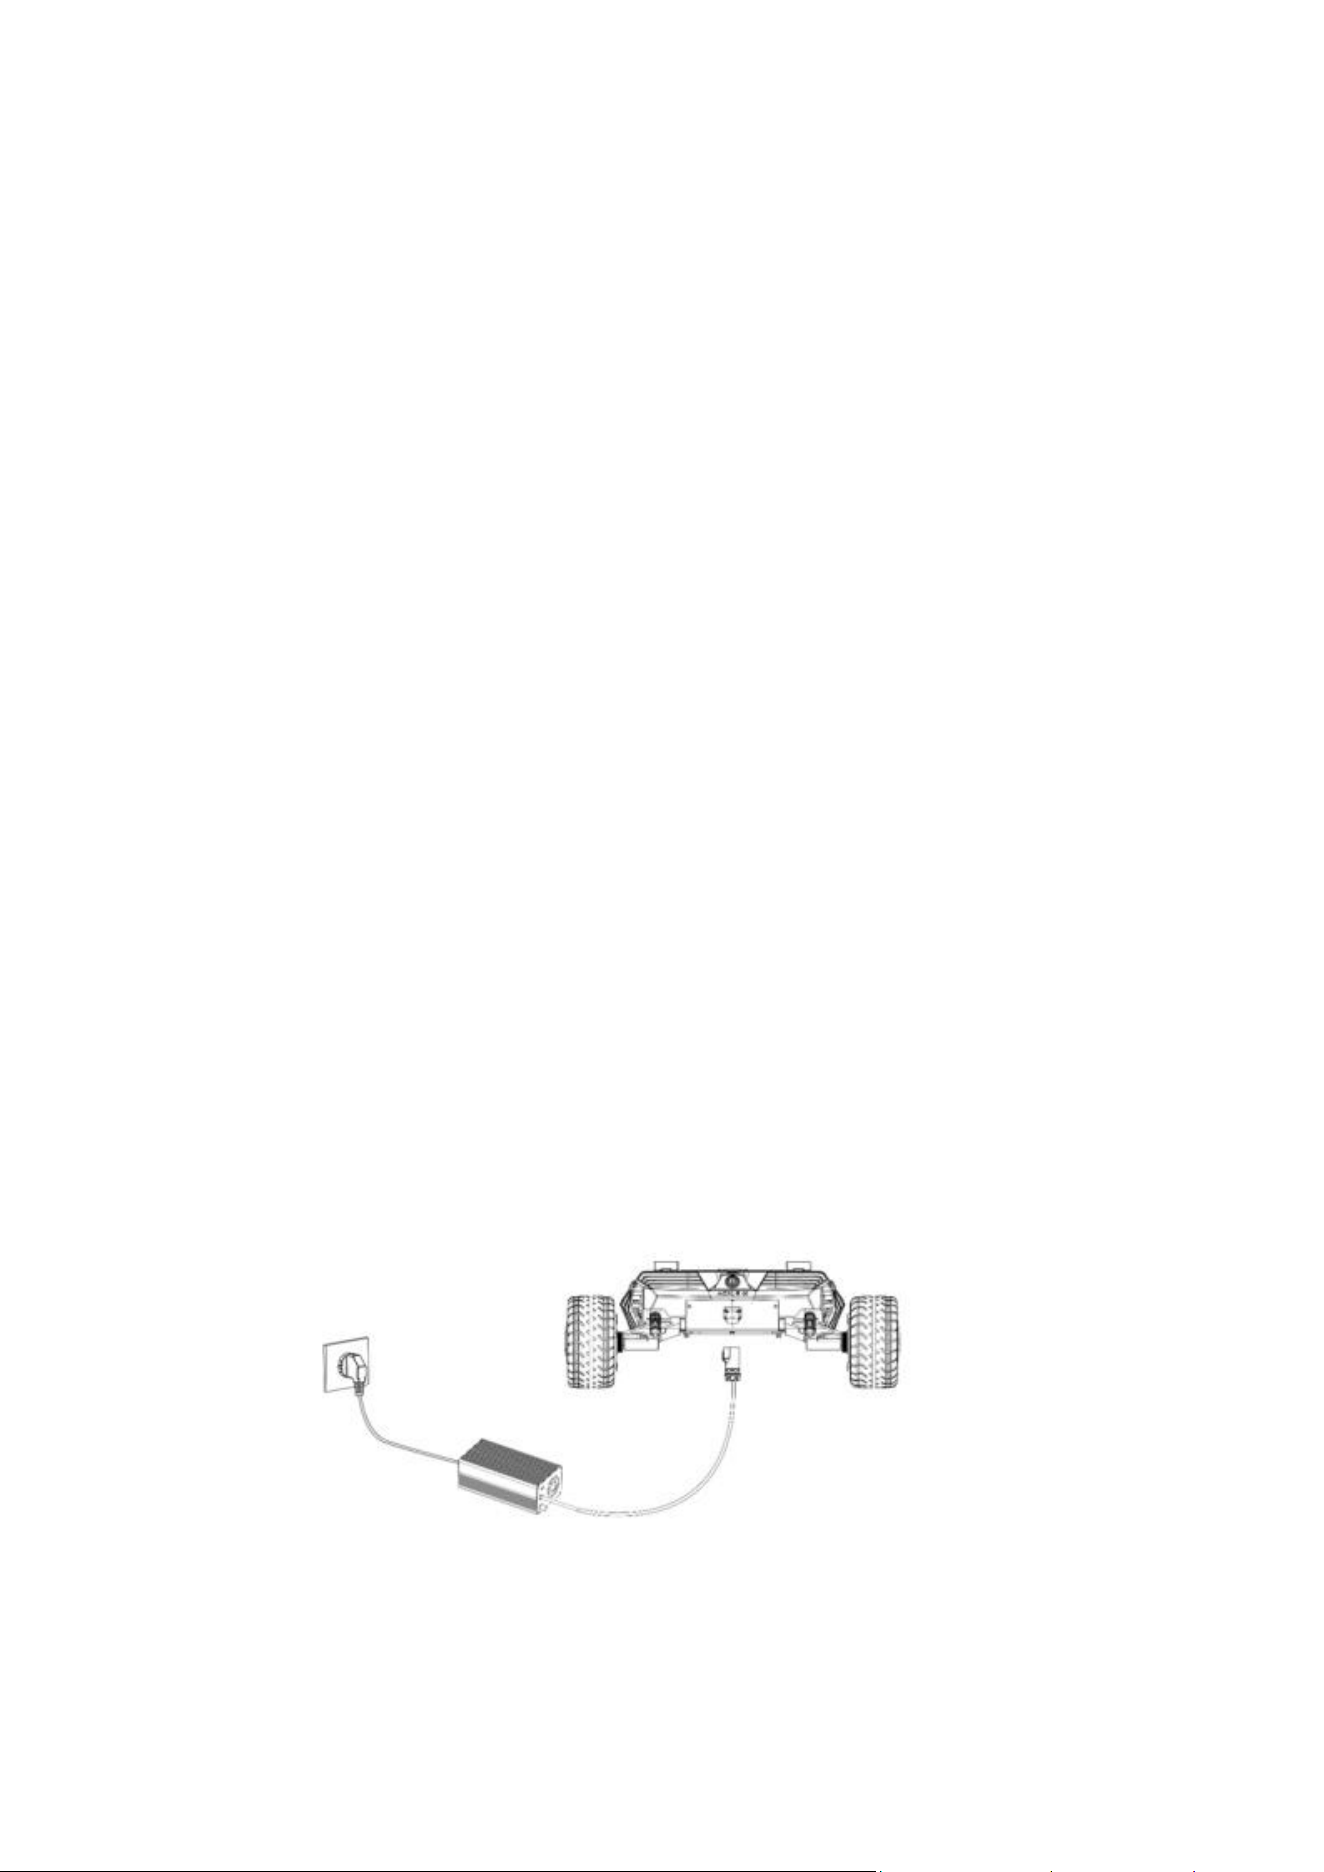
3.2 Charging
SCOUT MINI is equipped with a 10 A charger by default to meet customers' charging
demand. The detailed operating procedure of charging is shown as follows:
• Make sure SCOUT MINI chassis is in power-off state.
• Insert the charger plug into the charging interface on the rear of the vehicle;
• Connect the charger to power supply and turn on the switch in the charger. Then,
the robot enters the charging state.
Note: For now, the battery needs about 1.5 hours to be fully recharged from 22 V, and
the voltage of fully-recharged battery is about 29.2 V; the recharging duration is
calculated as 15 AH ÷ 10A = 1.5h.
3.3 Development
SCOUT MINI provides CAN interfaces for customization and development. Users can send
command to control the chassis through the CAN interface.
3.3.1 CAN cable connection
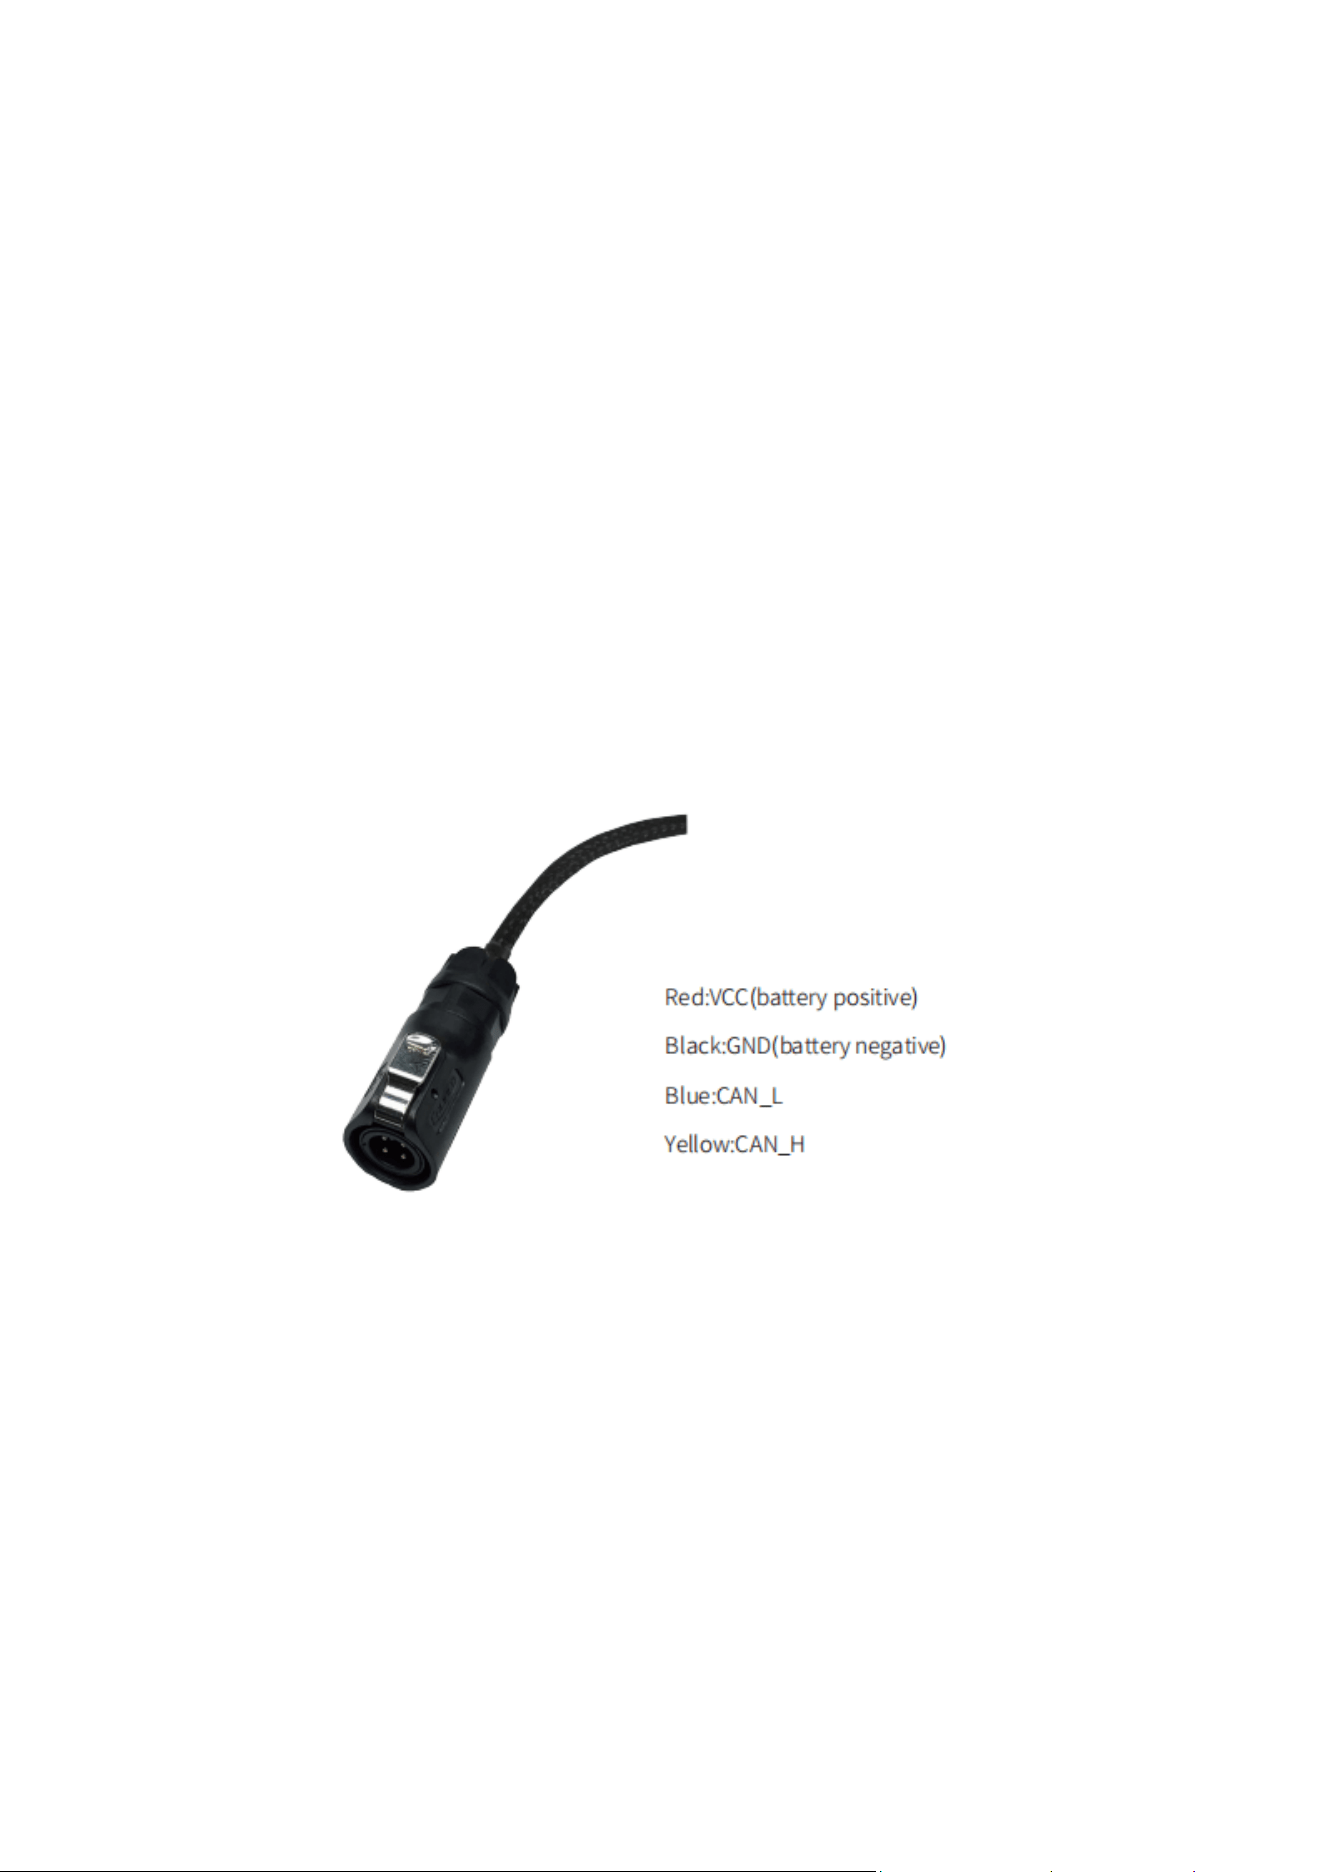
SCOUT MINI provides a aviation plug as shown in Picture 3.2, the definitions of the
wire are Yellow to CANH and Blue to CANL
Note: There is only the rear external extension interface available for the current
SCOUT MINI version and it is able to provide up to 5A current.
Figure 3.2 Schematic diagram of aviation plug male connector
3.3.2 Implementation of CAN command control
Power on SCOUT MINI and turn on the remote control, put the SWB switch to the top
position to enable command control mode, so that SCOUT MINI would receive the data
from the CAN interface, the host computer is able to receive the current status of
the chassis with the can interface, please refer to the CAN protocol as below for
detail.

3.3.3 CAN protocol
SCOUT MINI adopts CAN2.0B communication standard which has a communication baud rate
of 500K and Motorola message format. Via external CAN bus interface, the moving
linear speed and the rotational angular speed of chassis can be controlled; SCOUT
MINI will feedback the current motion status information, SCOUT MINI chassis status
information, etc. The protocol includes system status feedback frame, movement
control feedback frame and control frame, the contents are shown as follows:
The system status feedback command includes the feedback information about current
status of chassis, control mode status, battery voltage and system failure. The
description is given in Table 3.1.
Table 3.1 SCOUT MINI Chassis Status Feedback Frame
Command Name System Status Feedback Command
Sending no
de
Receiving node
ID
Cycle(ms)
Receive-
timeout(ms)
Steer-by-
wire chass
is
Key unit
0x211
200ms
None
Data
length
0x08
Location
Function
Data type
Description
byte [0]
Current status
ofChassis
unsigned int
8
0x00 Normal condition
0x02 System error
byte [1]
Control mode
unsigned int
0x00 Stand by

8
0x01 CAN command control
0x03 Remote control
byte [2]
byte [3]
Battery voltage upper 8
bits
Battery voltage lower 8
bits
unsigned int
16
Actual voltage × 10( Accuracy 0.1V )
byte [4]
Reserve
-
0x00
byte [5]
Failure Information
unsigned int
8
Refer to Table3.2 Failure Informatio
n Description
byte [6]
Reserve
-
0x00
byte [7]
Count Parity bit (Count
)
unsigned int
8
0~255 Loops counting. Count is incre
mented
once while single command sent each t
ime
Table 3.2 Description of Failure Information
Failure Information Description
Byte
Bit
Description
byte [5]
bit [0]
Low-voltage failure(0: Normal 1: Failure) Protection
Voltage is 20.5V
bit [1]
Low-voltage warning[2](0: Normal 1: Warning) Warning
voltage is 22.5V

bit [2]
Remote control signal lost protection(0: Normal 1:
Lost signal)
bit [3]
Drive NO.1 communication failure(0: Normal 1: Failure)
bit [4]
Drive NO.2 communication failure(0: Normal 1: Failure)
bit [5]
Drive NO.3 communication failure(0: Normal 1: Failure)
bit [6
Drive NO.4 communication failure(0: Normal 1: Failure)
bit [7
Reserved, default value 0
[1]:It is available for V1.2.8 version or later, firmware upgrade is necessary for
previous version.
[2]:The buzzer will sound when the battery low-voltage warning , but the chassis is
still controllable, and the power supply would be cut off when it comes to Low-voltage
failure.
The motion control feedback frame includes the feedback of moving and rotation speed
of chassis. Please refer to Table 3.3 for detail.
Table 3.3 Motion Control Feedback Frame
Command Name Motion Control Feedback Frame
Sending no
de
Receiving node
ID
Cycle(ms)
Receive-
timeout(ms)
Steer-by-
wire chass
is
Key unit
0x221
20ms
None

Data lengt
h
0x08
Position
Function
Data type
Description
byte [0]
byte [1]
Moving speed upper 8 bi
ts
Moving speed lower 8 bi
ts
signed int
16
Actual speed X 1000 (Accuracy 0.001m/s
)
byte [2]
byte [3]
Rotation speed upper 8
bits
Rotation speed lower 8
bits
signed int
16
Actual speed X 1000 (Accuracy 0.001rad/
s)
byte [4]
byte [5]
Lateral speed higher
8 bits
Lateral speed lower 8
bits
signed int
16
signed int
16
Actual speed X 1000 (Accuracy 0.001m/s
)(Only available in Mecanum mode)
byte [6]
Reserve
-
0x00
byte [7]
Reserve
-
0x00
The motion control frame includes the controlling of linear speed and angular speed .
Please refer to Table 3.4 for detail.
Table 3.4 Motion Command Control Frame
Command Name Motion Command Control Frame

Sending no
de
Receiving node
ID
Cycle(ms)
Receive-
timeout(ms)
Key Unit
Chassis node
0x111
20ms
500ms
Data lengt
h
0x08
Position
Function
Data type
Description
byte [0]
byte [1]
Linear velocity higher
8 bits
Linear velocity
lower 8 bits
signed int
16
Linear moving speed mm/s(unit)
Range[-3000,3000]
byte [2]
byte [3]
Angular velocity higher
8 bits
Angular velocity lower 8
bits
signed int
16
Rotation angular speed 0.001rad/s(u
nit)
Range [-2523,2523]
byte [4]
byte [5]
Lateral velocity higher
8 bits
Lateral velocity lower
8 bits
signed int
16
Linear moving speed mm/s(unit)
Range[-3000,3000](Only available
in Mecanum mode)
byte [6]
Reserve
—
0x00
byte [7]
Reserve
—
0x00
The control mode setting frame is used to set the terminal interface. Please refer to
Table 3.5 for detail.

Table 3.5 Control Mode Setting Frame
Command Name Control mode Frame
Sending node
Receiving node
ID
Cycle(ms)
Receive-
timeout(ms)
Key Unit
Chassis node
0x421
None
None
Data length
0x01
Location
Function
Data type
Description
byte [0]
CAN Command Mode
unsigned int8
0x00 Stand by 0x01 CAN Command mode
Description for control mode
If SCOUT MINI is power on without the connection with remote control, the default
control mode is stand by, the chassis would receive the control command only and not
respond to the speed command, enable the CAN control mode before using the CAN
control. If you power on the remote control, then the remote control has the highest
priority, the chassis would switch the control mode based on remote control only.
The status clear frame is used to clear the system failures, please refer to table
3.6 for detail.
Table 3.6 Status Clear Frame
Command Name
Control mode Frame
Sending node
Receiving node
ID
Cycle(ms)
Receive-
timeout(ms)
Key Unit
Chassis node
0x441
None
None

Data length
0x01
Location
Function
Data type
Description
byte [0]
Failures clear
command
unsigned
int8
0x00 Clear all failures
0x01 Clear motor1 failures
0x02 Clear motor2 failures
0x03 Clear motor3 failures
0x04 Clear motor4 failures
[Note] Sample data, the following data is only for testing
1.The chassis moves forward at 0.15m/s.
byte [0]
byte [1]
byte [2]
byte [3]
byte [4]
byte [5]
byte [6]
byte [7]
0x00
0x96
0x00
0x00
0x00
0x00
0x00
0x00
2.The chassis steering 0.2rad
byte [0]
byte [1]
byte [2]
byte [3]
byte [4]
byte [5]
byte [6]
byte [7]
0x00
0x00
0x00
0x00
0x00
0x00
0x00
0xC8
In addition to the feedback of chassis status, there are also feedback data of the
motor current information、encoder data and temperature. Please refer to the table
below for the frame detail.
The number of the motor is shown in the picture below:
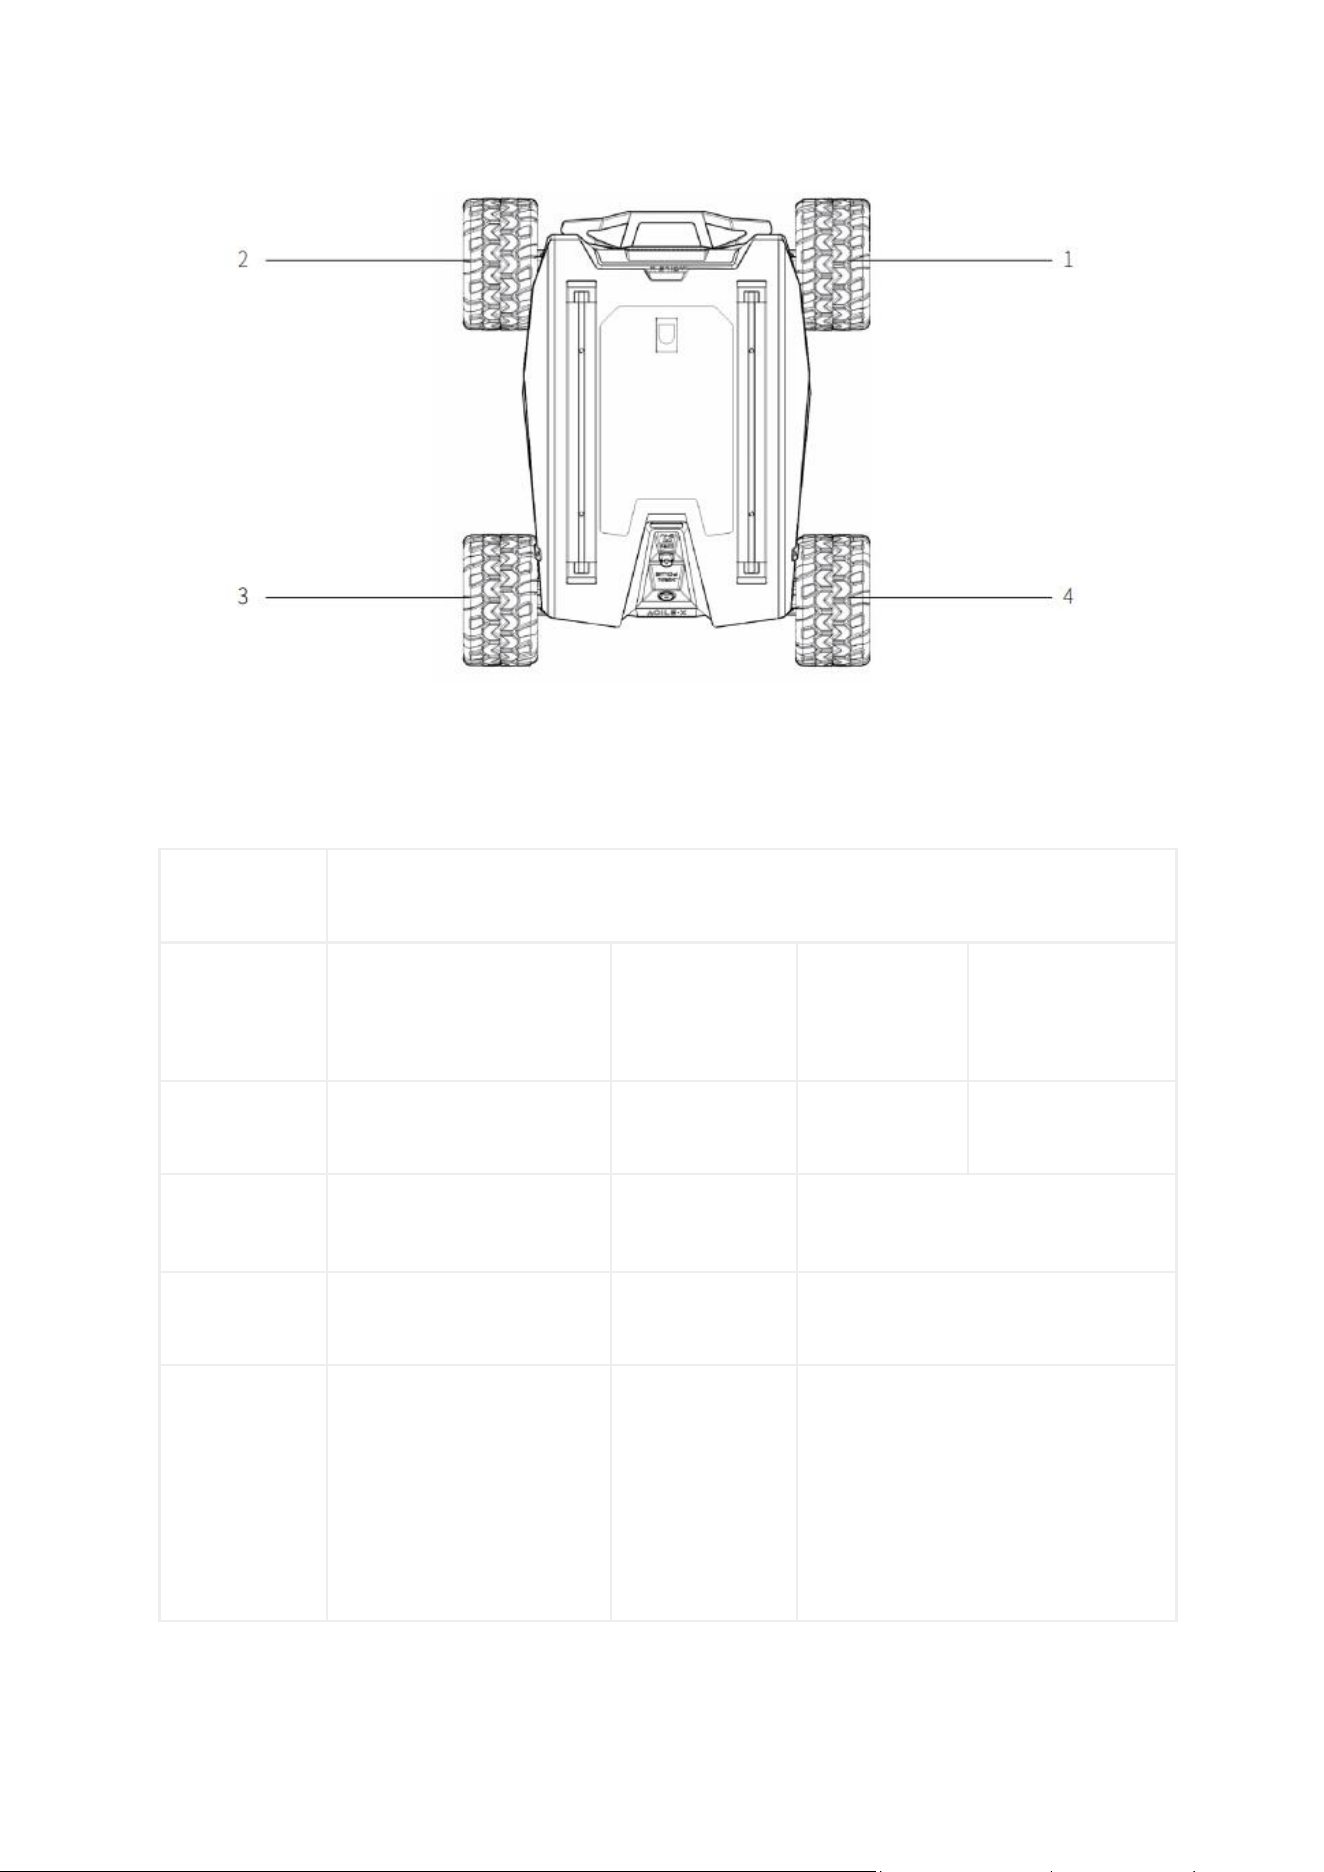
Picture3.0 Motor ID Feedback
Table 3.7 Motor Rotational Speed and Current Feedback Frame
Command Name
Motor driver high-speed information feedback frame
Sending node
Receiving node
ID
Cycle(ms)
Receive-
timeout(ms)
Key Unit
Chassis node
0x251~0x254
20ms
None
Data length
0x08
Location
Function
Data type
Description
byte [0]
byte [1]
Motor rotational speed
upper 8bits
Motor rotational speed
lower 8bits
signed int16
Motor rotational speed(RPM)

byte [2]
byte [3]
Motor current upper
8bits
Motor current lower
8bits
signed int16
Motor current (0.1A)
byte [4]
byte [5]
byte [6]
byte [7]
Reserved
Reserved
Reserved
Reserved
-
0x00
Table 3.8 Motor Drive Status Feedback Frame
Command Name
Motor driver low-speed information feedback frame
Sending node
Receiving node
ID
Cycle(ms)
Receive-
timeout(ms)
Steer-by-wire
chassis
Key unit
0x261~0x264
100ms
None
Data length
0x08
Location
Function
Data type
Description
byte [0]
byte [1]
Drive voltage upper
8 bit
Drive voltage lower
8 bit
unsigned
int16
Drive voltage (0.1V)

byte [2]
byte [3]
Drive temperature
upper 8 bit
Drive temperature
lower 8 bit
signed int16
Unit: 1℃
byte [4]
Motor temperature
signed int8
Unit: 1℃
byte [5]
Drive status
unsigned int8
Refer to Table 3.9 for detail
byte [6]
Reserved
-
0x00
byte [7]
Reserved
-
0x00
Table 3.9 Drive Status
Byte
Bit
Description
byte[5]
bit[0]
Power supply voltage (0: Normal 1: Low)
bit[1]
Motor over- temperature (0: Normal 1: Over-
temperature)
bit[2]
Motor over-current(0: Normal 1: Over-current)
bit[3]
Drive over-temperature(0: Normal 1: Over-
temperature)
bit[4]
Reserved
bit[5]
Reserved
bit[6]
Reserved

bit[7]
Reserved
The front and the external light are also controlled by command, please refer to the
Table3.10 below for detail.
Table3.10 Light Control Frame
Command Name Light control Frame
Sending
node
Receiving node
ID
Cycle(ms)
Receive-
timeout(ms)
Steer-by-
wire
chassis
Key unit
0x121
100ms
500ms
Data length
0x08
Location
Function
Data type
Description
byte [0]
Light control
enable sign
unsigned
int8
0x00 command invalid
0x01 Light control enable
byte [1]
Front light
unsigned
int8
0x00 Turn on
0x01 Turn off
0x02 Breathing
0x03 Customize brightness
byte [2]
Front light
brightness
unsigned
int8
Range[0,100] 100 is the brightest[5]

customization
byte [3]
Reserved
-
0x00
byte [4]
Reserved
-
0x00
byte [5]
Reserved
-
0x00
byte [6]
Reserved
-
0x00
byte [7]
Count Parity bit
(Count)
unsigned
int8
0once while single command sent each
time~255 Loops counting. Count is
incremented
Note[5] This value is only valid with customization mode
Table 3.11 Light Control Feedback Frame
Command Name Light control feedback Frame
Sending
node
Receiving node
ID
Cycle(ms)
Receive-
timeout(ms)
Steer-by-
wire
chassis
Key unit
0x231
500ms
None
Data length
0x08
Location
Function
Data type
Description
byte [0]
Light control
enable sign
unsigned
int8
0x00 command invalid

0x01 Light control enable
byte [1]
Front light
unsigned
int8
0x00 Turn on
0x01 Turn off
0x02 Breathing
0x03 Customize brightness
byte [2]
Front light
brightness
customization
unsigned
int8
Range[0,100] 100 is the brightest
byte [3]
Reserved
-
0x00
byte [4]
Reserved
-
0x00
byte [5]
Reserved
-
0x00
byte [6]
Reserved
-
0x00
byte [7]
Count Parity bit
(Count)
unsigned
int8
0once while single command sent each
time~255 Loops counting. Count is
incremented
Table 3.12 System Version Enquiry Frame
Command Name
System Version Enquiry Command
Sending node
Receiving node
ID
Cycle(ms)
Receive-
timeout(ms)
Key Unit
Chassis node
0x411
None
None

Data length
0x01
Location
Function
Data type
Description
byte [0]
System version
enquiry
unsigned
int8
0x01 Fixed value
Table 3.13 System Version feedback Frame
Command Name
System version information feedback frame
Sending node
Receiving node
ID
Cycle(ms)
Receive-
timeout(ms)
Steer-by-wire
chassis
Key unit
0x41A
None
None
Data length
0x08
Location
Function
Data type
Description
byte [0]
byte [1]
Main board hardware
version upper 8 bit
Main board hardware
version lower 8 bit
unsigned
int16
Upper 8 bit is main version
Lower 8 bit is second version
byte [2]
byte [3]
Drive hardware
version upper 8 bit
Drive hardware
version lower 8 bit
unsigned
int16
Upper 8 bit is main version
Lower 8 bit is second version

byte [4]
byte [5]
Main board software
version upper 8 bit
Main board software
version lower 8 bit
unsigned
int16
Upper 8 bit is main version
Lower 8 bit is second version
byte [6]
byte [7]
Drive software
version upper 8 bit
Drive software
version lower 8 bit
unsigned
int16
Upper 8 bit is main version
Lower 8 bit is second version
Table 3.14 Odometer Feedback Frame
Command Name
Odometer Feedback Frame
Sending node
Receiving node
ID
Cycle(ms)
Receive-
timeout(ms)
Steer-by-wire
chassis
Key unit
0x311
20ms
None
Data length
0x08
Location
Function
Data type
Description
byte [0]
byte [1]
byte [2]
byte [3]
Left wheel odometer
highest bit
Left wheel odometer
second highest bit
Left wheel odometer
second lowest bit
signed
int32
Left wheel odometer feedback
(Unit: mm)

Left wheel odometer
lowest bit
byte [4]
byte [5]
byte [6]
byte [7]
Right wheel odometer
highest bit
Right wheel odometer
second highest bit
Right wheel odometer
second lowest bit
Right wheel odometer
lowest bit
signed
int32
Right wheel odometer feedback
(Unit: mm)
Table 3.15 Remote Control Feedback Frame
Command Name
Remote Control Feedback Frame
Sending node
Receiving node
ID
Cycle(ms)
Receive-
timeout(ms)
Steer-by-wire
chassis
Key unit
0x241
20ms
None
Data length
0x08
Location
Function
Data type
Description
byte[0]
SW feedback
unsigned
int8
bit[0-1]: SWA :2- Up 3-Down
bit[2-3]: SWB : 2-Up 1-Middle 3-
Down
bit[4-5]: SWC : 2-Up 1-Middle 3-

Down
bit[6-7]: SWD:2-Up 3-Down
byte[1]
Right joystick
left and right
signed int8
Range[-100,100]
byte[2]
Right joystick up
and down
signed int8
Range[-100,100]
byte[3]
Left joystick up
and down
signed int8
Range[-100,100]
byte[4]
Left joystick left
and right
signed int8
Range[-100,100]
byte[5]
Left knob VRA
signed int8
Range[-100,100]
byte[6]
Reserved
--
0x00
byte [7]
Count Parity bit
Unsigned
int8
0~255 Loops counting
3.4 Firmware upgrade
To facilitate the customer's upgrading of the firmware version used by SCOUT MINI and
bring the customer a better experience, SCOUT MINI provides a hardware interface for
the firmware upgrading, and the corresponding client software as well.
Upgrade Preparation
• Agilex CAN debugging module X 1
• Micro USB cable X 1
• SCOUT MINI chassis X 1
• A computer (WINDOWS OS (Operating System)) X 1
Upgrade Process
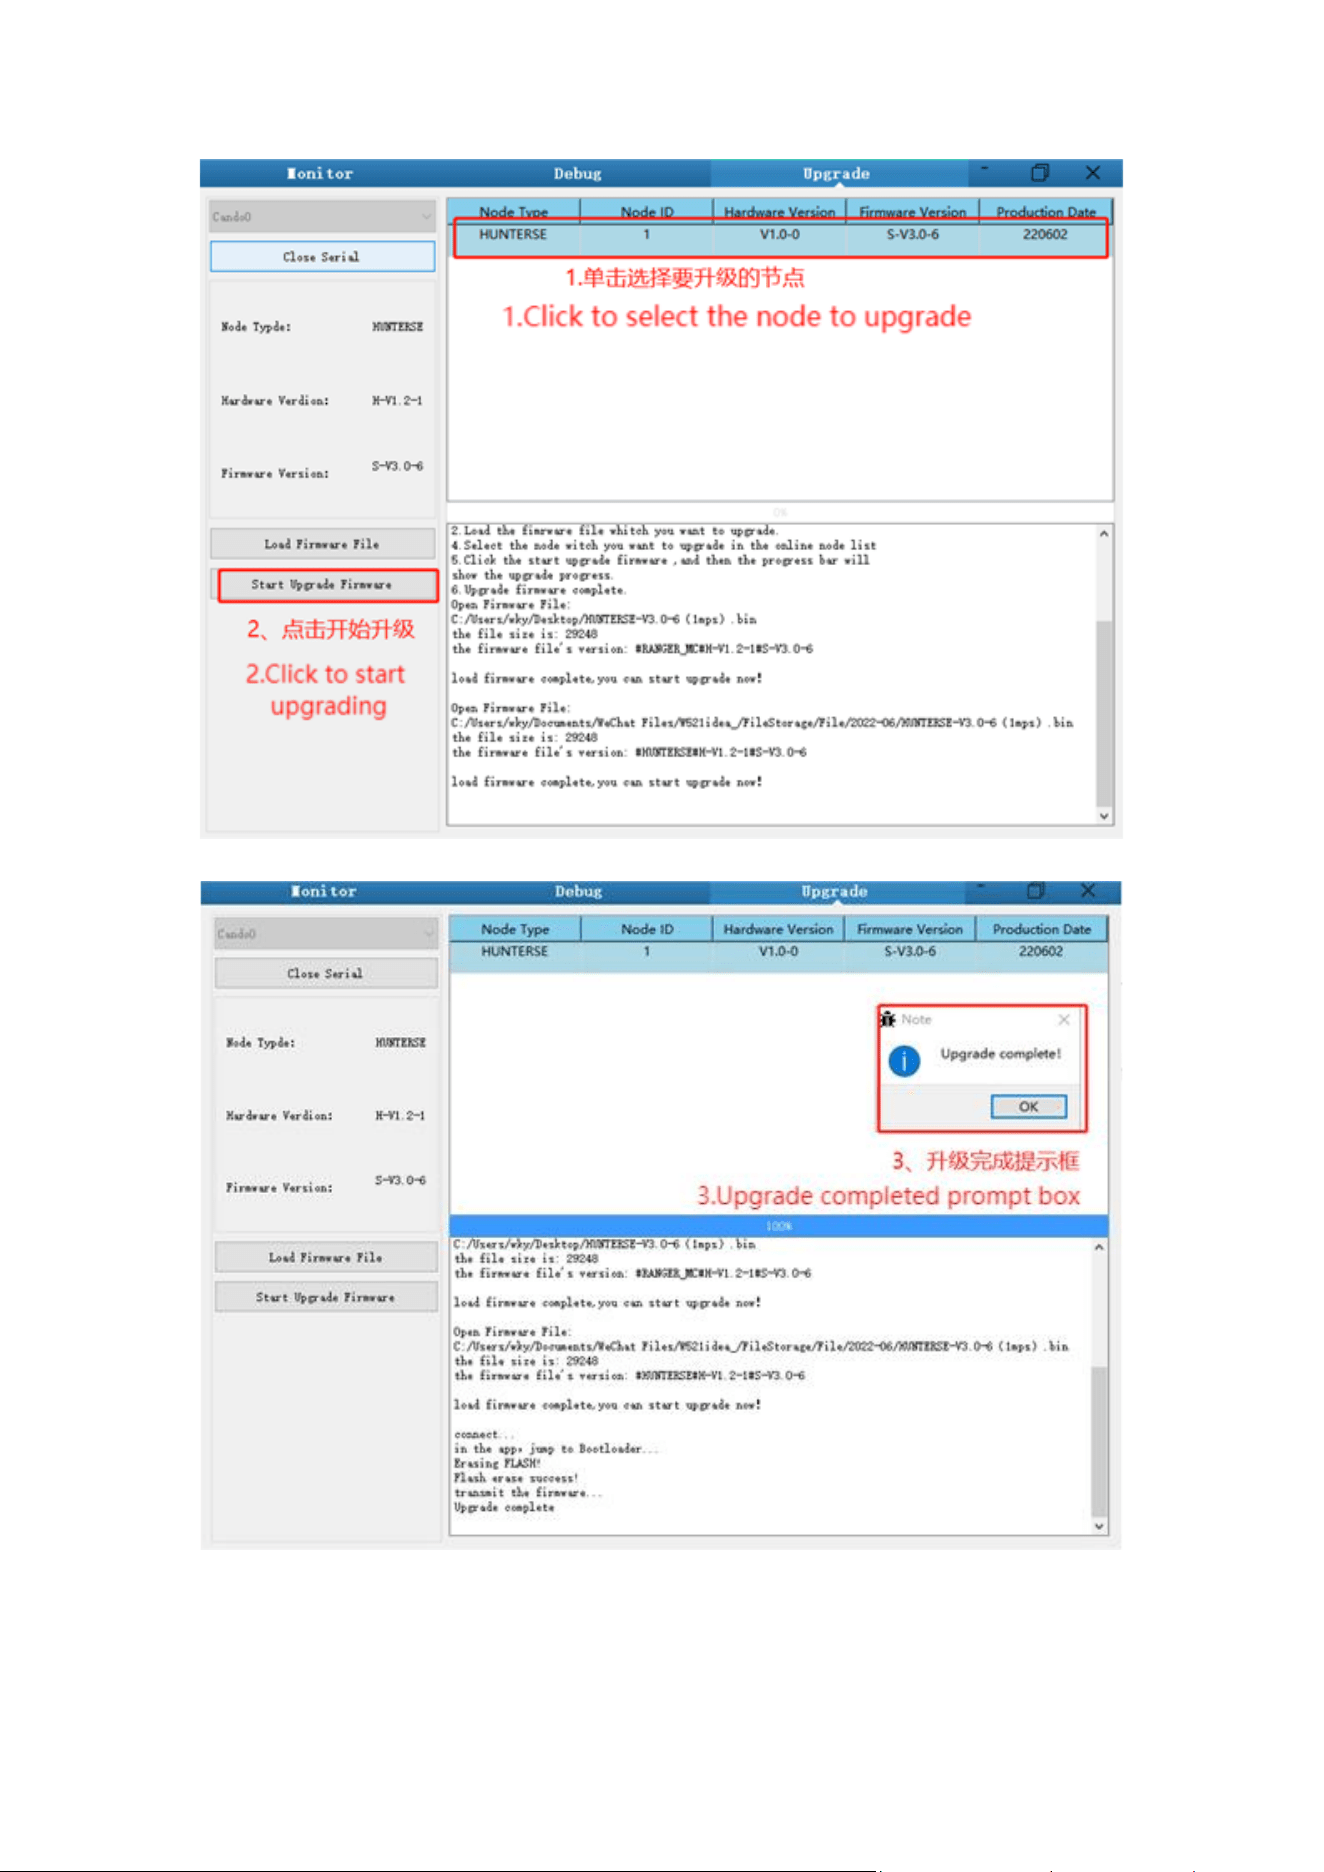
1.Plug in the USBTOCAN module on the computer, and then open the
AgxCandoUpgradeToolV1.3_boxed.exe software (the sequence cannot be wrong, first open
the software and then plug in the module, the device will not be recognized).
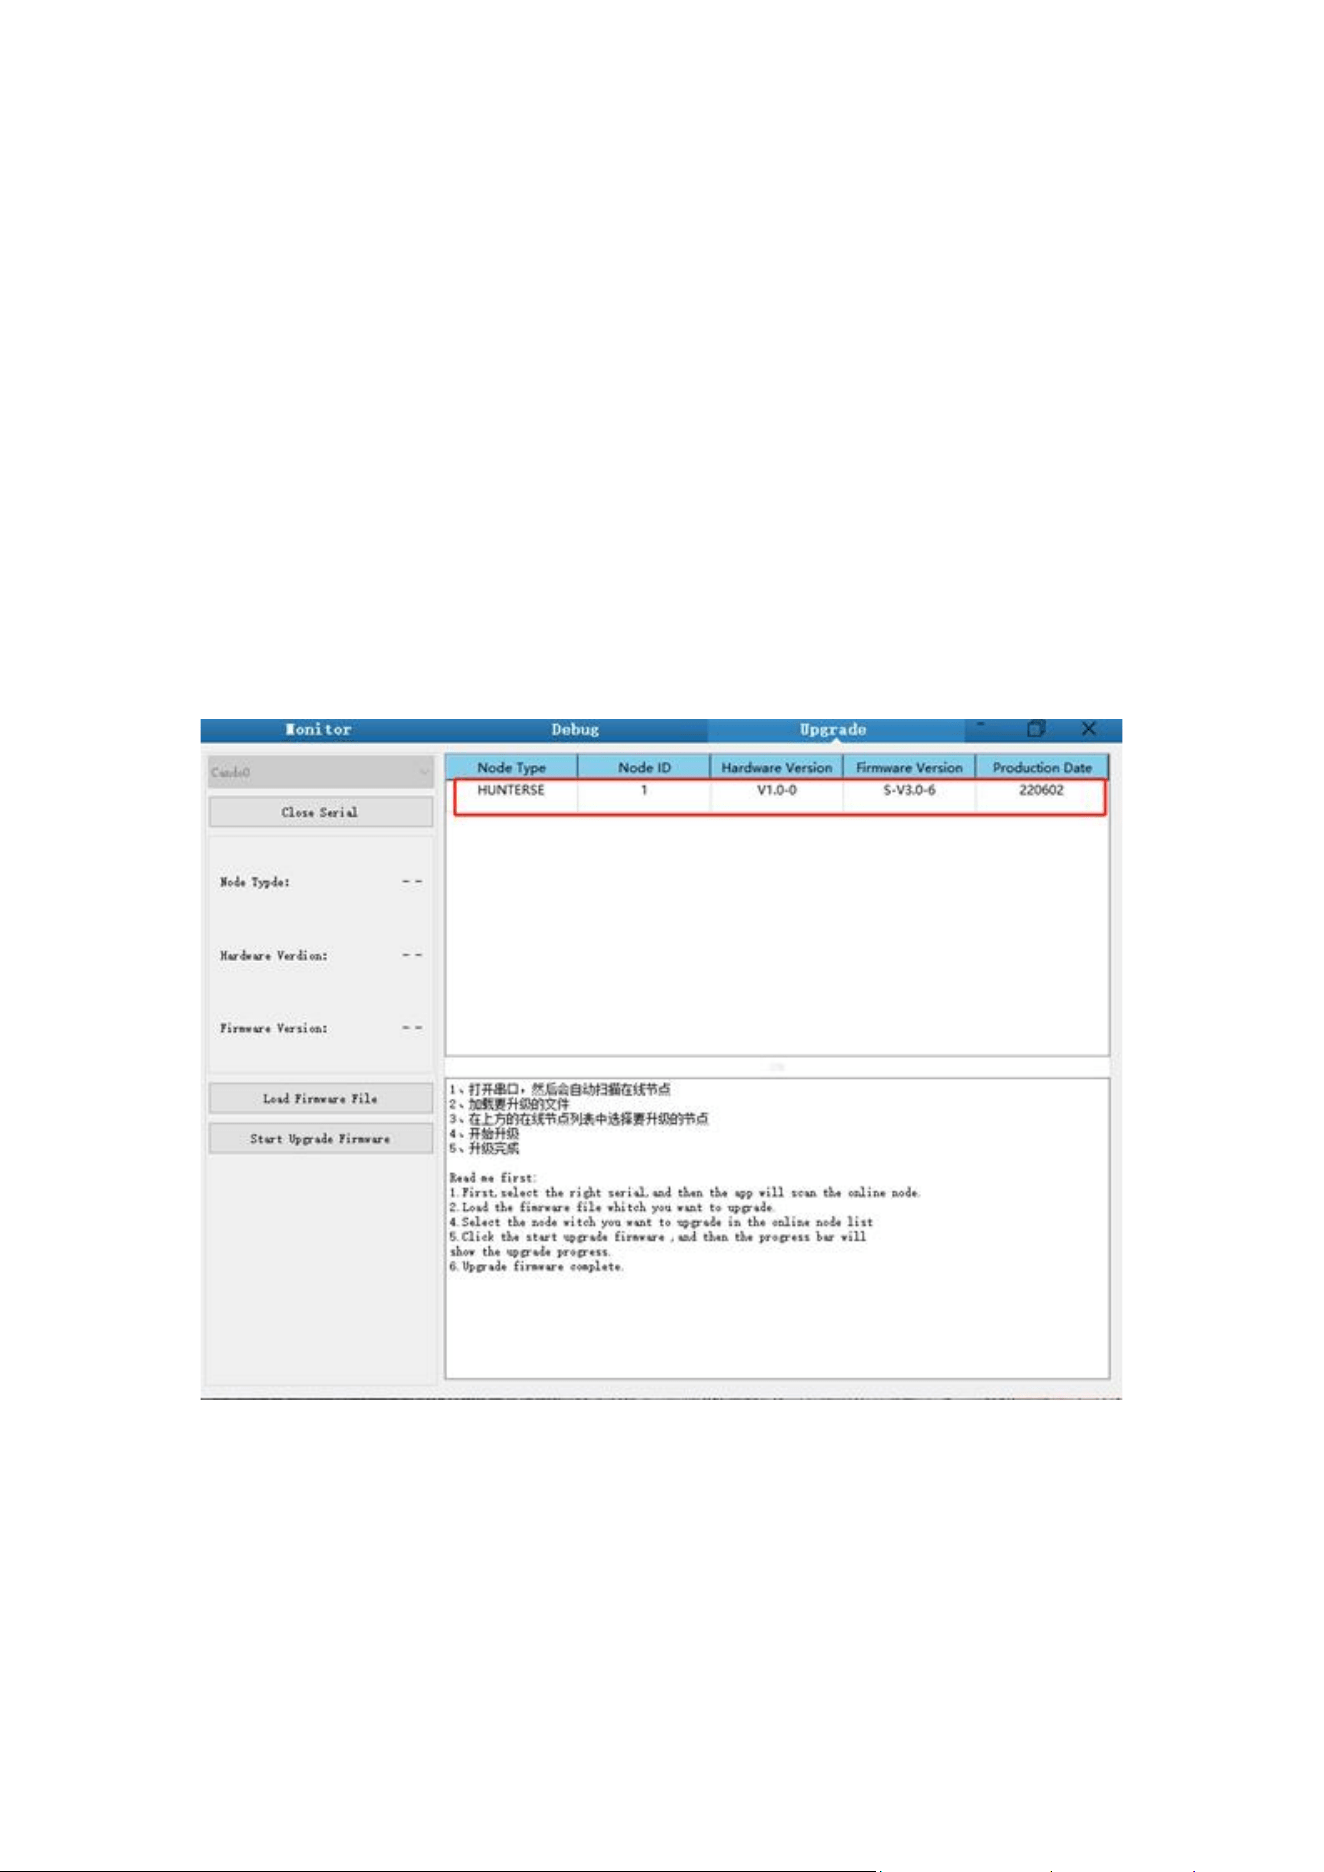
2.Click the Open Serial button, and then press the power button on the car body. If
the connection is successful, the version information of the main control will be
recognized, as shown in the figure.
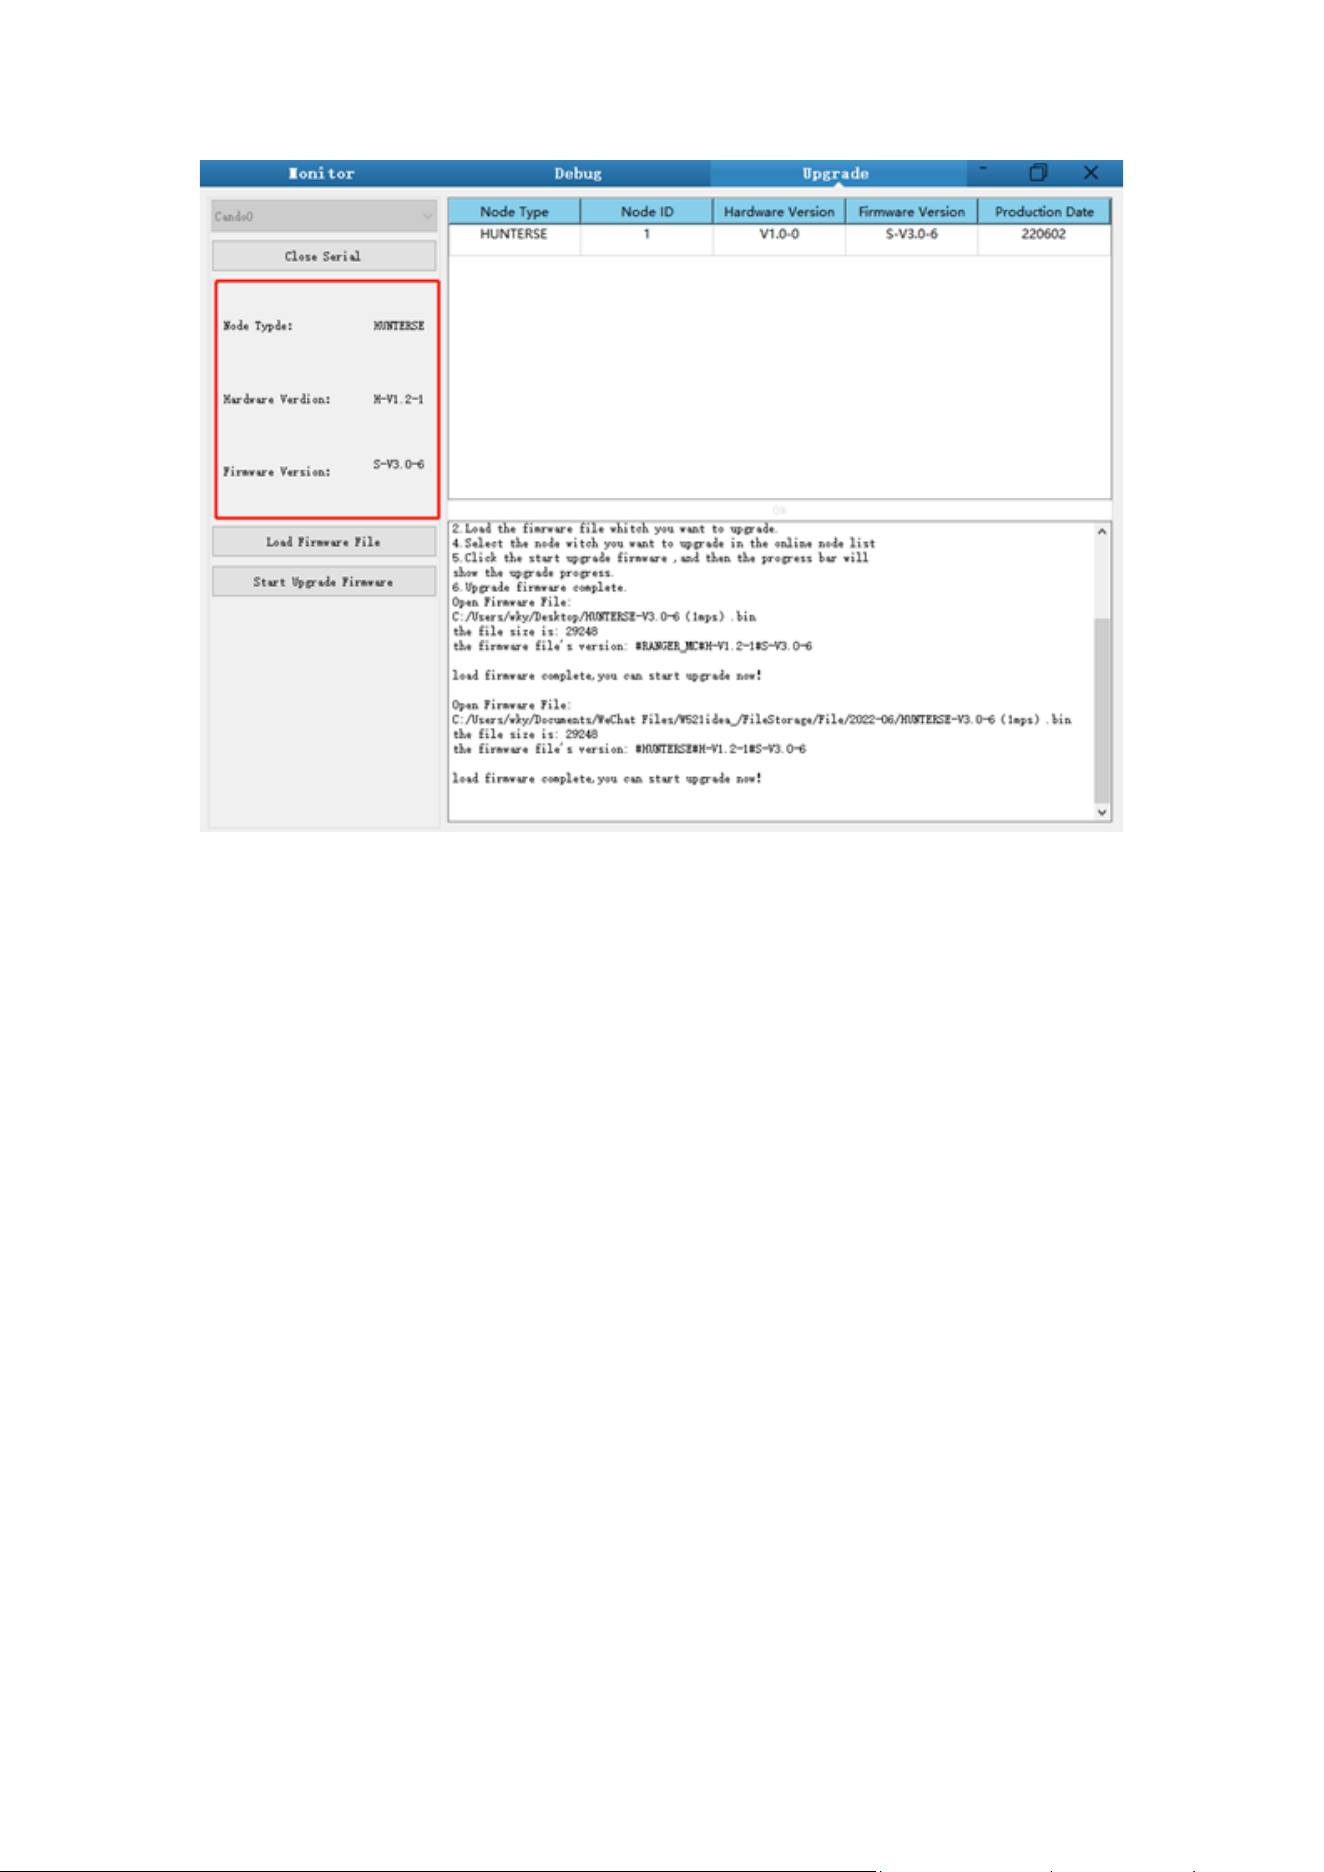
3.Click the Load Firmware File button to load the firmware to be upgraded. If the
loading is successful, the firmware information will be obtained, as shown in the
figure
4.Click the node to be upgraded in the node list box, and then click Start Upgrade
Firmware to start upgrading the firmware. After the upgrade is successful, a pop-up
box will prompt.

3.5 SCOUT MINI ROS Package
ROS provide some standard operating system services, such as hardware abstraction,
low-level device control, implementation of common function, interprocess message and
data packet management. ROS is based on a graph architecture, so that process of
different nodes can receive, and aggregate various information (such as sensing,
control, status, planning, etc.) Currently ROS mainly support UBUNTU.
Development Preparation
Hardware preparation
• CANlight can communication module ×1
• Thinkpad E470 notebook ×1
• SCOUT MINI mobile robot chassis ×1
• SCOUT MINI remote control FS-i6s ×1
• SCOUT MINI top aviation power socket ×1
Use example environment description
• Ubuntu 16.04 LTS (This is a test version, tasted on Ubuntu 18.04 LTS)
• ROS Kinetic (Subsequent versions are also tested)
• Git
Hardware connection and preparation
• Lead out the CAN wire of the SCOUT MINI top aviation plug or the tail plug, and
connect CAN_H and CAN_L in the CAN wire to the CAN_TO_USB adapter respectively;
• Turn on the knob switch on the SCOUT MINI mobile robot chassis, and check whether
the emergency stop switches on both sides are released;
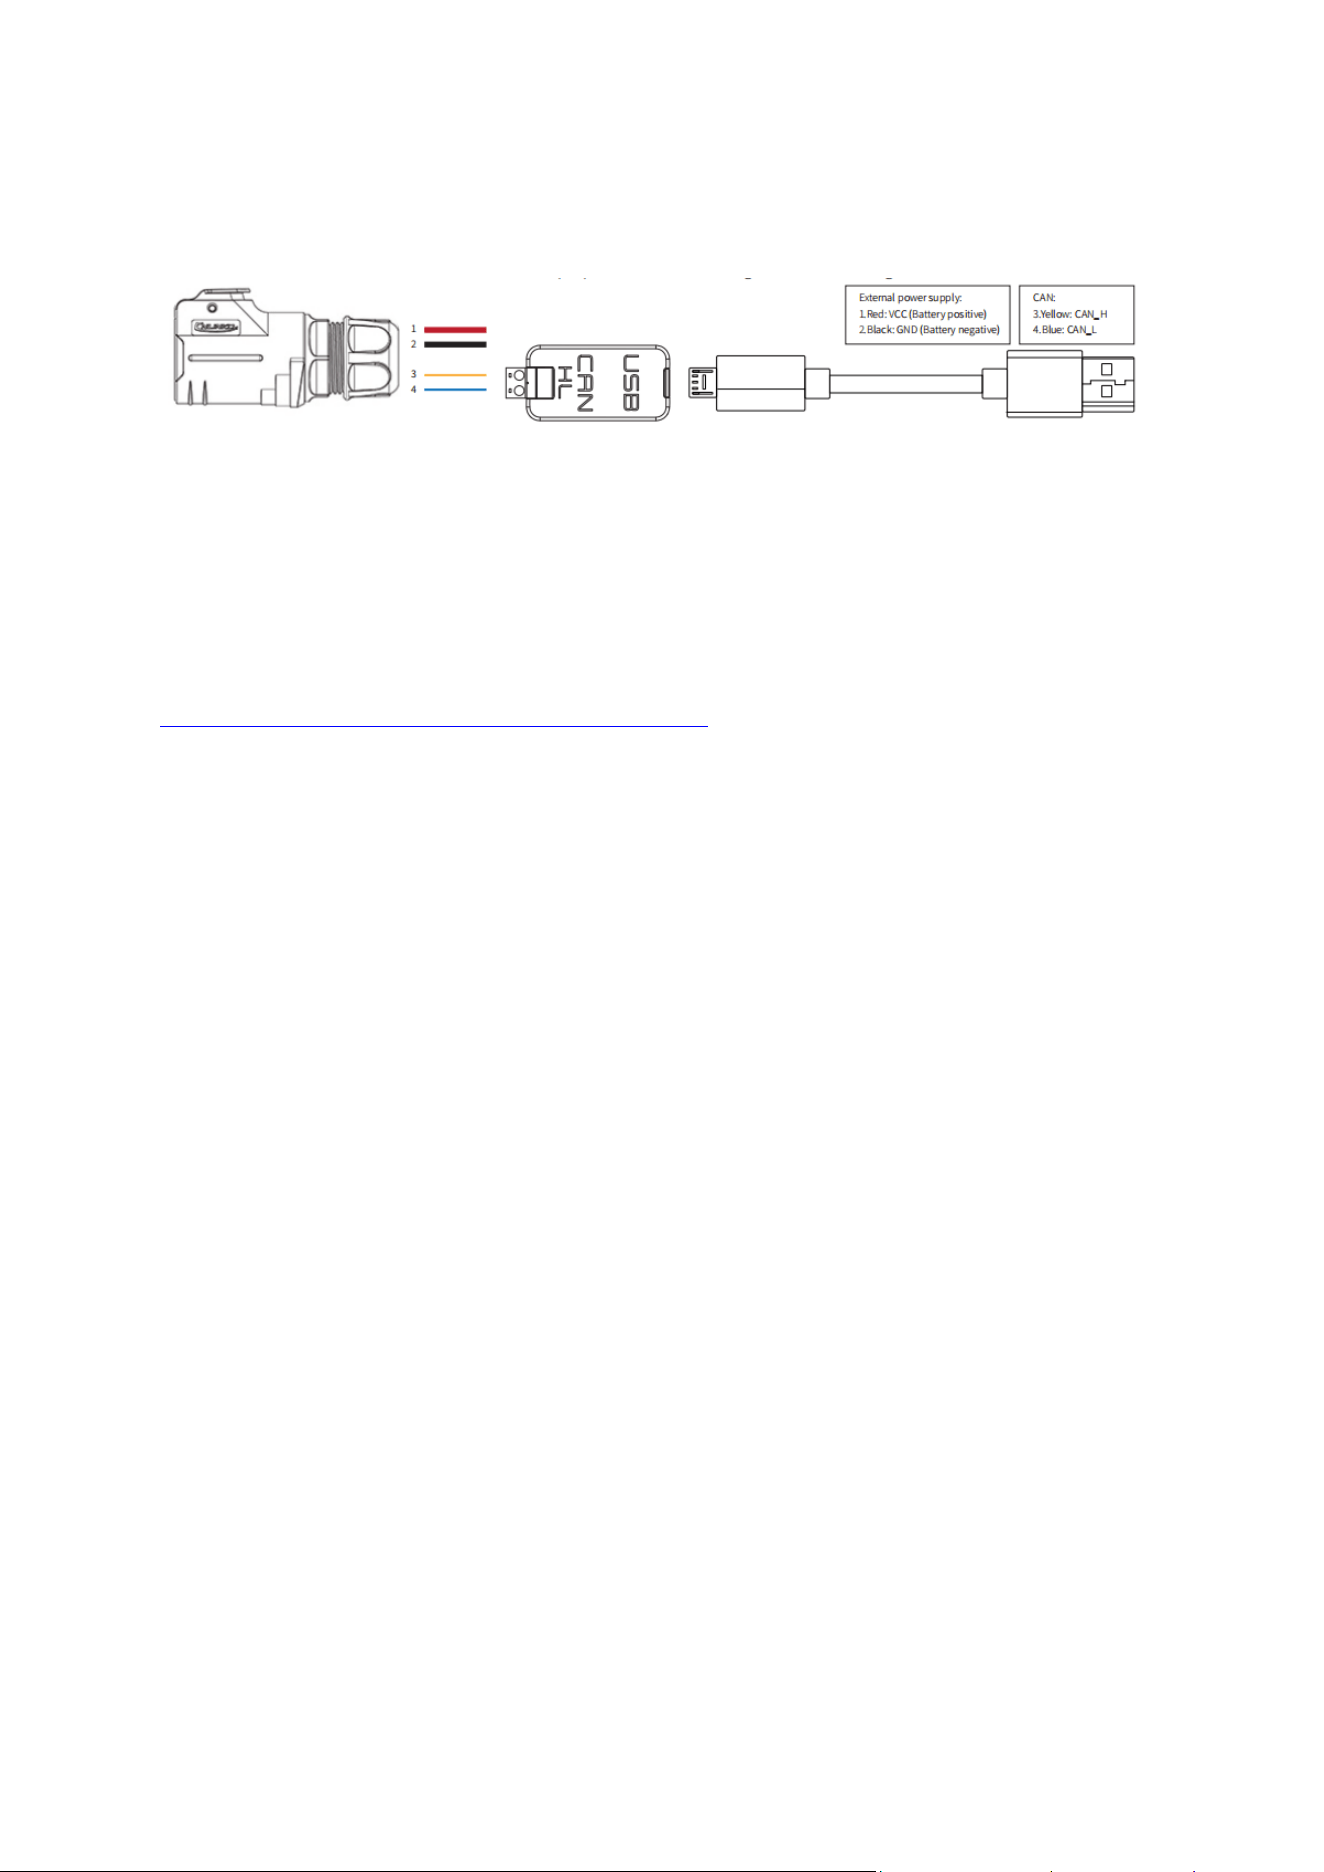
• Connect the CAN_TO_USB to the USB hub of the laptop. The connection diagram is
shown in Figure 3.4.
Figure 3.4 CAN Connection Diagram
ROS installation and environment setting
For installation details, please refer to
http://wiki.ros.org/kinetic/Installation/Ubuntu
Test CANABLE hardware and CAN communication
Setting CAN-TO-USB adaptor
• Enable gs_usb kernel module
$ sudo modprobe gs_usb
• Setting 500k Baud rate and enable can-to-usb adaptor
$ sudo ip link set can0 up type can bitrate 500000
• If no error occurred in the previous steps, you should be able to use the command
to view the can device immediately
$ ifconfifig -a
• Install and use can-utils to test hardware
$ sudo apt install can-utils
• If the can-to-usb has been connected to the SCOUT MINI robot this time, and the
car has been turned on, use the following commands to monitor the data from the
SCOUT MINI chassis

$ candump can0
Please refer to:
[1]https://github.com/agilexrobotics/agx_sdk
[2]https://wi-ki.rdu.im/_pages/Notes/Embedded-System/Linux/-can-bus-in-linux.html
AGILEX SCOUT MINI ROS PACKAGE download and compile
• Download ros package
$ sudo apt install -y libasio-dev$ sudo apt install -y ros-$ROS_DISTRO-
teleop-twist-keyboard
• Clone compile SCOUT MINI code
$ cd ~/catkin_ws/src$ git clone
https://github.com/agilexrobotics/ugv_sdk.git $ git clone
https://github.com/agilexrobotics/scout_ros.git$ cd ..$ catkin_make
Please refer to: https://github.com/agilexrobot-ics/scout_mini_ros
Start the ROS node
• Start the based node
$ roslaunch scout_bringup scout_mini_robot_base.launch
• Start the keyboard remote operation node
$ roslaunch scout_bringup scout_teleop_keyboard.launch
Github ROS development package directory and usage instructions
*_base:: The core node for the chassis to send and receive hierarchical CAN messages.
Based on the communication mechanism of ros, it can control the movement of the
chassis and read the status of the bunker through the topic.

*_msgs: Define the specific message format of the chassis status feedback topic.
*_bringup: startup files for chassis nodes and keyboard control nodes, and scripts to
enable the usb_to_can module.
4 Q&A
Q: SCOUT MINI is started up correctly, but why cannot the RC transmitter control the
vehicle body to move?
A: First, check whether the drive power supply is in normal condition, whether the
drive power switch is pressed down and whether E-stop switches are released; then,
check whether the control mode selected with the top left mode selection switch on
the RC transmitter is correct.
Q: SCOUT MINI RC transmitter is in normal condition, and the information about
chassis status and movement is all fed back correctly, but when the control frame
protocol is issued, why cannot the vehicle body control mode be switched and the
chassis respond to the control frame protocol?
A: Normally, if SCOUT MINI can be controlled by a RC transmitter, it means the
chassis movement is under proper control; if the chassis feedback frame can be
accepted, it means CAN extension link is in normal condition. Please check the CAN
control frame sent to see whether the data check is correct and whether the control
mode is command control mode. You can check the status of error flag from the error
bit in the chassis status feedback frame.
Q: SCOUT MINI gives "beep-beep-beep..." sound when running, how to deal with this
problem?
A: If SCOUT MINI give this "beep-beep-beep" sound continuously, it means the battery
is in the alarm voltage state. Please charge the battery in time. Once other related
sound occurs, there may be internal errors. You can check related error codes via the
CAN bus or communicate with related technical personnel.
Q: Is the tire wear of SCOUT MINI is normally seen when it is running?

A: The tire wear of SCOUT MINI is normally seen when it is running. As SCOUT MINI is
based on the four-wheel differential steering design, sliding friction and rolling
friction both occur when the vehicle body rotates. If the floor is not smooth but
rough, tire surfaces will be worn out. In order to reduce or slow down the wear,
small-angle turning can be conducted for less turning on a pivot.
Q: When communication is implemented via CAN bus, the chassis feedback command is
issued correctly, but why does not the vehicle respond to the control command?
A: There is a communication protection mechanism inside SCOUT MINI, which means the
chassis is provided with timeout protection when processing external CAN control
commands. Suppose the vehicle receives one frame of communication protocol, but it
does no receive the next frame of control command after 500 ms. In this case, it will
enter communication protection mode and set the speed to 0. Therefore, commands from
upper computer must be issued periodically.
5 Product Dimensions
5.1 Illustration diagram of product external
dimensions
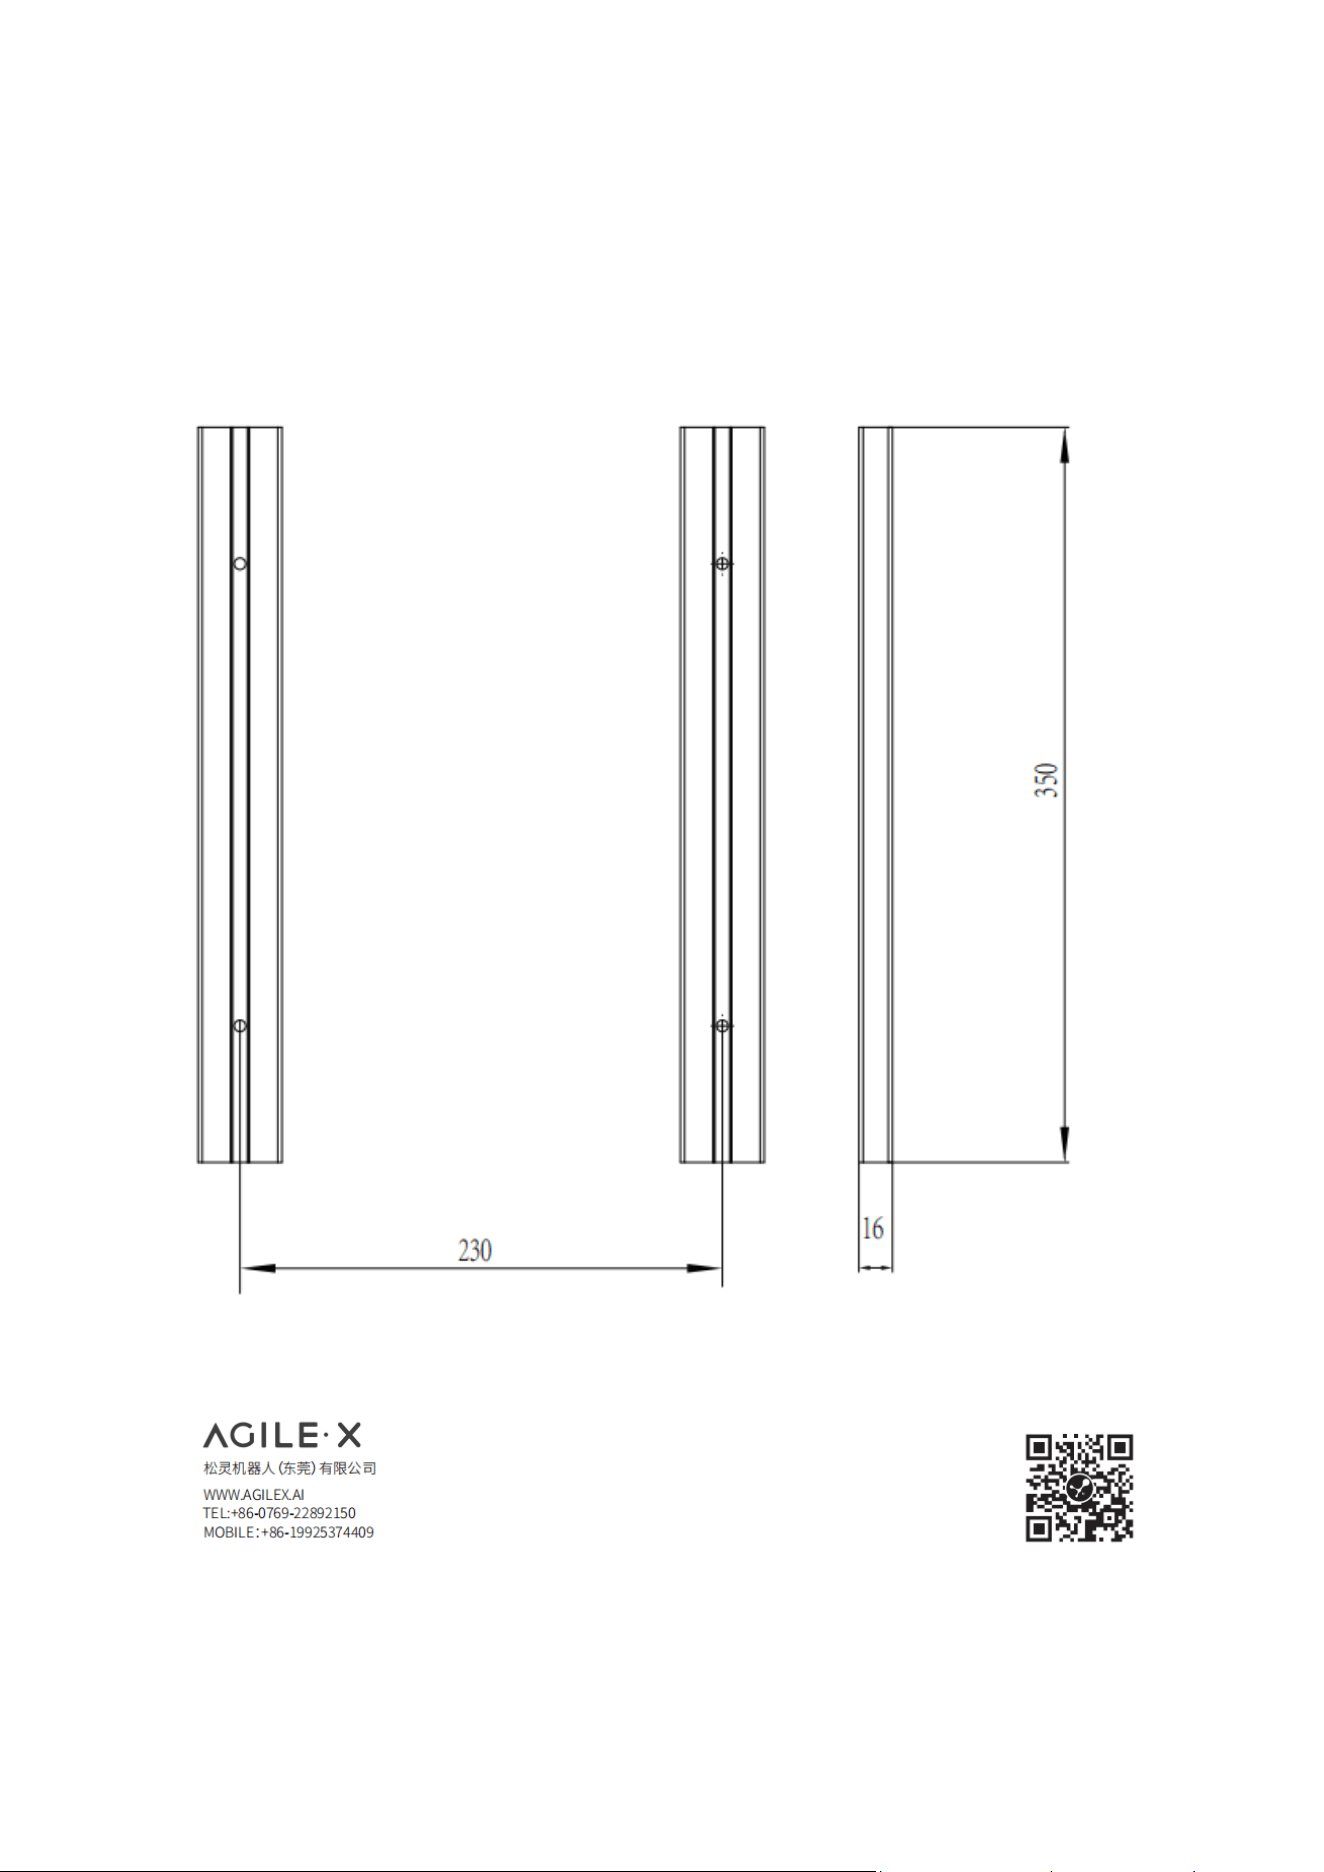
5.2 Illustration diagram of top extended
support dimensions

