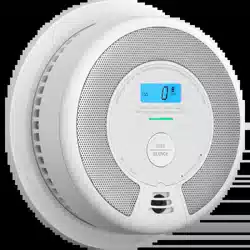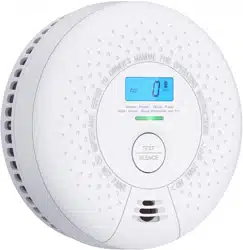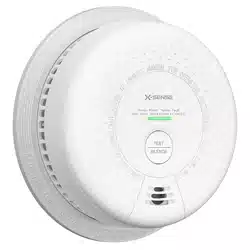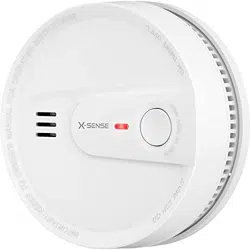
料号
品名
材质
工艺
尺寸
工差
F800004000260
SC01-W, SC03-W, SC06-W, SC07-W,
SC08-W, XP0H-WN, XP0P-WN, XP0Q-WN,
CB0U-2S, CB0V-2S, CB0X-2S, CB0Y-2S,
CB0Z-2S, L/N-SCA-0A, L/N-SCA-0B,
L/N-SCA-0C 说明书 _ 美规
70g 书纸
单黑印刷,骑马钉
110x110mm
±1mm
版本号
设计师
时间码
V1.1
柳圳
2026080301
Email: [email protected]
X-Sense Electronics Co., Ltd.
F800004000260 V1.1
SC01-W, SC03-W, SC06-W, SC07-W, SC08-W, XP0H-WN, XP0P-WN, XP0Q-WN, CB0U-2S,
CB0V-2S, CB0X-2S, CB0Y-2S, CB0Z-2S, L/N-SCA-0A, L/N-SCA-0B, L/N-SCA-0C

1 Introduction ................................................................................................................................ 01
2 Package Contents ........................................................................................................... 01
3 Technical Specifications ................................................................................................ 02
4 Product Overview ............................................................................................................. 02
5 How to Set Up and Interconnect Wireless Alarms ................................................................... 11
6 Alarm Mode .......................................................................................................................... 13
7 Alarm Test ....................................................................................................................................... 13
8 Safety Information ............................................................................................................................................ 15
9 Installation Instructions .................................................................................................................... 17
10 Recommended Placement ............................................................................................................................ 19
11 How to Install This Alarm .............................................................................................................................. 20
12 Mounting Steps .................................................................................................................................... 23
13 Deactivation of the Alarm ................................................................................................................................ 23
14 Maintenance ........................................................................................................................................... 24
15 Troubleshooting ..................................................................................................................................... 25
16 Environmental Protection ........................................................................................................................... 29
17 Manufacturer and Service Information .................................................................................................... 30
Contents

01 02
English
This user manual contains important information about your combination smoke and carbon monoxide alarm’s
operation. To ensure proper use and trouble-free operation, please read this manual carefully and store it in a safe
place for future reference.
1 Introduction
This X-SENSE combination smoke and carbon monoxide alarm detects both smoke and carbon monoxide, meeting
UL 217 Ed.9 (designed to reduce false alarms from cooking fumes) and UL 2034 Ed.5 standards.
This unit adopts photoelectric technology to detect smoke which is generally more sensitive than ionization
technology. It is effective at detecting large particles, which tend to be produced in greater amounts by smoldering
fires. These types of fires may smolder for hours before bursting into flame. Sources of these fires may include
cigarettes burning in couches or bedding.
Carbon monoxide (CO) is odorless, tasteless and invisible—it's a silent killer. Using electrochemical sensing
technology, this unit can detect increased levels of carbon monoxide early, protecting your family from the dangers
of carbon monoxide.
1. The installation of the apparatus should not be used as a substitute for proper installation, use and maintenance
of fuel-burning appliances including appropriate ventilation and exhaust systems.
2. This apparatus is to be installed by a competent person.
3. It is not tested for use in a caravan or boat.
Note: For maximum protection, use smoke and CO alarms on each level and in every bedroom of your home.
NEVER IGNORE THE SOUND OF THE ALARM!
Determining what type of alarm has sounded is easy with your X-SENSE combination smoke and carbon monoxide
alarm. The buzzer will inform you of the type of situation occurring.
2 Package Contents
1 × Alarm Unit
1 × Mounting Bracket
3 × Screws
3 × Anchor Plugs
1 × User Manual
1 × Warranty Card
2 × Carbon Monoxide Safety Stickers
3 Technical Specifications
Power Supply 3 V (
⎓
) CR123A lithium battery × 2 (non-replaceable)
Battery Life 10 years
Sensor Type
Smoke: Photoelectric
CO: Electrochemical
Product Lifespan 10 years from the date of manufacture
Safety Standard UL 217 9th Edition, UL 2034 5th Edition standards
Smoke sensitivity 0.78-1.88% obs/ft
CO Sensitivity
70 ppm for 60–240 minutes
150 ppm for 10–50 minutes
400 ppm for 4–15 minutes
Standby current < 25 μA (avg.)
Alarm current < 45 mA (avg.)
Operating Temperature 40-100°F (4.4–37.8°C)
Operating Relative Humidity 10%–85% RH (non-condensing)
Alarm Loudness ≥ 85 dB at 10 ft (3 m) @ 3.2 ± 0.3 kHz pulsing alarm
Silence Duration
Smoke: < 9 minutes
CO: < 6 minutes
Operating Frequency 902–928 MHz
Maximum Number of Interconnected Units
A maximum of 18 alarms may be interconnected in a multiple-
station arrangement: up to 12 CB0U-2S/CB0V-2S alarms, plus up
to 6 XP0H-WN smoke and CO alarms or SD19-W smoke alarms.
Transmission Range Over 820 ft (250 m) in open air
NOTES:
1. Battery life is calculated on the current ratings in the standby mode with weekly testings. If its operation mode
changes to an alarming condition, the battery life will be decreased accordingly.
2. This alarm functions between 40-100°F (4.4-37.8°C). Prolonged exposure to lower or higher temperatures
can reduce battery life and affect device performance. We do not recommend operating the device beyond its
temperature range.
4 Product Overview
CAUTION
THIS COMBINATION SMOKE AND CARBON MONOXIDE ALARM IS DESIGNED FOR INDOOR USE ONLY. DO NOT
EXPOSE TO RAIN OR MOISTURE. DO NOT KNOCK OR DROP THE ALARM. DO NOT OPEN OR TAMPER WITH THE
ALARM AS THIS COULD CAUSE MALFUNCTION.
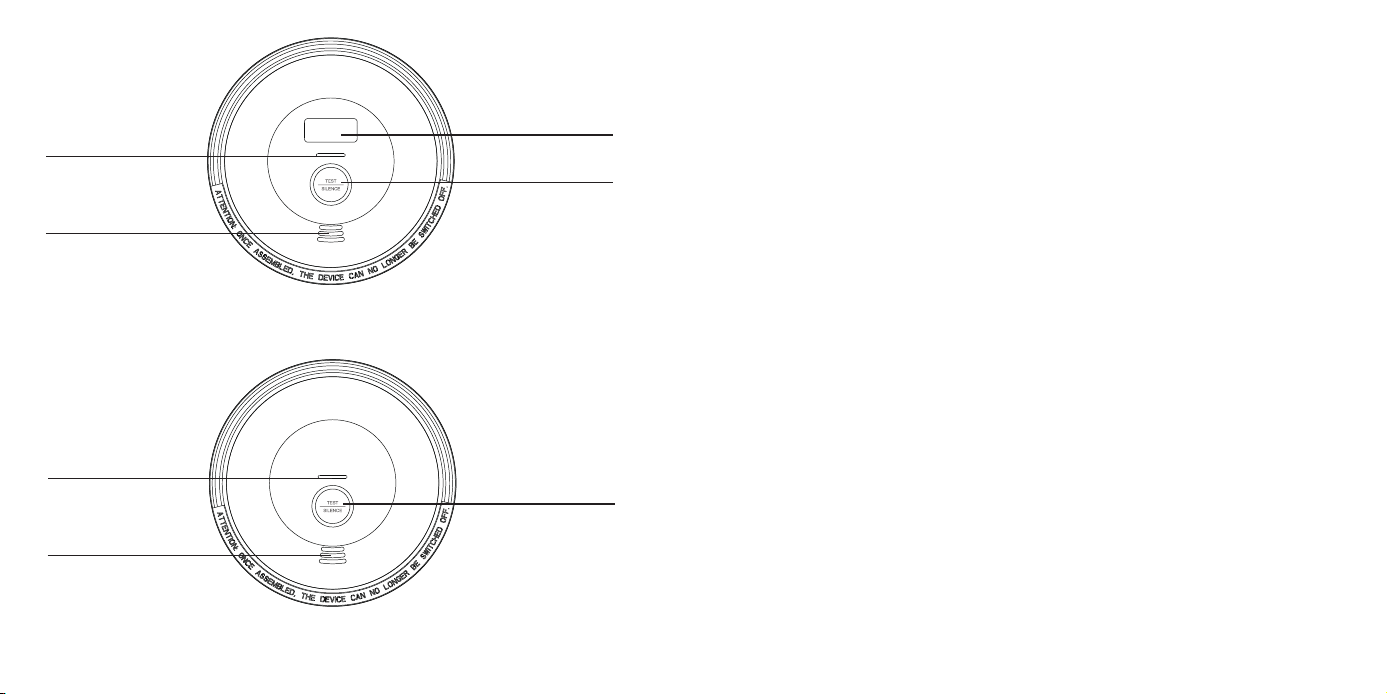
03 04
SC01-W, SC07-W, SC08-W, XP0H-WN, XP0P-WN, CB0U-2S,
CB0X-2S, CB0Z-2S, L/N-SCA-0A, L/N-SCA-0C
LED Indicator (Red/
Green/Yellow/Blue)
LCD Display
Test/Silence Button
Buzzer
SC03-W, SC06-W, XP0Q-WN, CB0V-2S, CB0Y-2S, L/N-SCA-0B
LED Indicator
(Red/Green/Yellow)
Test/Silence Button
Buzzer
RF
02
01
RF
03 04
10
6
5
6
5
6
5
25
Quickly press
4 times
Quickly press
twice
Quickly press
twice
Hold down
Quickly press
4 times
SC01-W, SC07-W, SC08-W, XP0H-WN, XP0P-WN, CB0U-2S,
CB0X-2S, CB0Z-2S, L/N-SCA-0A, L/N-SCA-0C
LED Indicator (Red/
Green/Yellow/Blue)
LCD Display
Test/Silence Button
Buzzer
SC03-W, SC06-W, XP0Q-WN, CB0V-2S, CB0Y-2S, L/N-SCA-0B
LED Indicator
(Red/Green/Yellow)
Test/Silence Button
Buzzer
RF
02
01
RF
03 04
10
6
5
6
5
6
5
25
Quickly press
4 times
Quickly press
twice
Quickly press
twice
Hold down
Quickly press
4 times
Test/Silence Button
The Test/Silence button is used to test the unit's electronics and to silence the unit during an alarm. When testing
the alarm weekly, you should first wake up your alarm by pressing the test button; once the alarm has woken up,
the LCD display will activate, then press and hold the test button again until you hear a short beep, indicating that
the alarm has entered the test mode. Please refer to the “Alarm Test” section for further information. The alarm goes
back to the standby mode after testing. To save power, the alarm is designed to automatically turn off the LCD
display if there has been no operation for 5 minutes.
NOTE: After a test has begun, the alarm will sound and the LED indicator will flash red. This does not indicate that
smoke/CO is present.
Silence Mode
Smoke Silence Mode: Press the test button during an alarm to have the unit enter silence mode for 9 minutes. If the
smoke concentration has reached an alarm level, after the silence time has expired, this unit will continue to alarm
until the smoke concentration decreases to a safe, low level. Otherwise, the alarm will enter the normal mode after
9 minutes.
NOTE: Before silencing a smoke alarm, check the surrounding area for smoke, flames, or any signs of fire. Only
silence the alarm after confirming there is no real danger.
CO Silence Mode: Press the test button during an alarm to have the unit enter silence mode. If the CO
concentration still exceeds the alarm threshold after 6 minutes, the unit will re-enter alarm state.
NOTE: When the CO alarm signal activates, move to fresh air immediately. Silence Mode only temporarily silences
the alarm and does not mean that the CO hazard has cleared.
NOTES:
1. If the smoke concentration is too high, silence mode cannot be enabled. This unit will continue to alarm until the
smoke concentration has decreased to a low level.
2. You can silence all interconnected units by pressing the Test/Silence button on one of the units. If one unit is still
alarming, it is the initiating unit (the unit that detected danger); to silence all interlinked units, you must also press
the Test/Silence button on the initiating unit.
3. The silence period will last 9 minutes unless the smoke level increases to unsafe levels.
Buzzer
The alarm will sound when there is smoke or CO present, when testing the alarm, when the battery is low, when
there is a fault, when the smoke chamber is contaminated, and when the end of life is reached.
LED Indicator
The LED indicator will flash in conjunction with the buzzer. Therefore, it will flash during the following states: when
powering on, in standby mode, during smoke or CO alarm states, when exiting an alarm state, during test mode,
when there is low battery, in silence mode, when there is a fault, when the smoke chamber is contaminated, and

05 06
when the unit is at the end of its life.
Low Battery
The LED indicator will flash yellow together with one beep every 60 seconds. The LCD displays the 'Lb' icon.
THE UNIT MUST BE DEACTIVATED (see "Deactivation of the Alarm" section) AND REPLACED AS SOON AS POSSIBLE.
If you press the test button when there is low battery, the low battery signal will temporarily cease for 10 hours.
Fault
If the core component of the product, the smoke sensor or CO sensor, fails, the product's LED will flash yellow twice
every 60 seconds, accompanied by two beeps every 60 seconds, and the screen will display Err/E03/E04. The fault
alarm cannot be silenced, and the product should be replaced immediately.
Smoke Chamber Contamination
If the core part of the smoke sensor, the smoke chamber, is contaminated by the surrounding environment,
causing abnormal operation, the product's LED will flash yellow 4 times every 60 seconds, accompanied by 4
beeps every 60 seconds, and the LCD screen will display E05. The smoke chamber contamination alarm cannot be
silenced. Please keep the area around the product clean, remove the product from the ceiling, vacuum the outside
of the device with a vacuum cleaner fitted with a soft brush attachment, and reinstall the product on the ceiling. If
the alarm persists, replace the product immediately.
End of Life
Once the maximum lifetime (10 years) is reached, the alarm will deliver 3 beeps and the LED indicator will flash
yellow 3 times every 60 seconds. This end-of-life signal can be temporarily silenced for 22 hours by pressing the test
button.
The end-of-life silence feature can only be used for a total of 30 days. After 30 days, the end-of-life signal cannot be
silenced.
NOTE: The replacement date shown on the device indicates the date when the device may no longer operate reliably.
Replace the device immediately when this date is reached. The 10-year lifetime of the alarm is based on the date of
manufacture.
CO Alarm Levels
This carbon monoxide alarm complies with UL 2034 standard: when CO concentration is below 30 PPM, the LCD
will not show the specific value; when CO concentration is between 30 and 70 PPM, the LCD will show the specific
value, but no audible or visual indicators will be triggered; when CO concentration reaches 70 PPM or above, the
device will emit audible and visual indicators within the standard-required time.
When CO concentration is below 30 PPM:
The LCD will show “CO P PM”.
NOTE: A CO concentration below 30 PPM is generally considered a normal daily fluctuation.
1. Ensure good ventilation.
2. Make sure to turn off all combustion appliances after use.
3. If the device continuously shows “CO PPM” but individuals feel unwell, everyone should immediately move
to fresh outdoor air and seek medical advice. Afterward, have a professional inspect the home’s combustion
appliances and ventilation system.
When CO concentration is between 30 and 70 PPM:
The LCD will show the CO concentration value, but no audible or visual alarm signal will be triggered.
NOTE: CO concentration has exceeded normal daily levels, and requires active investigation and reduction.
1. Immediately increase ventilation—open doors and windows, and turn on exhaust fans.
2. Check all potential sources of carbon monoxide. If it is safe to do so, turn off or temporarily stop using any fuel-
burning appliance or combustion equipment, including space heaters, furnaces, water heaters, stoves, cooktops,
ovens, dryers, kerosene heaters, gas fireplaces, and any internal combustion engines.
3. Monitor the concentration levels—if the concentration drops below 30 PPM after ventilation, normal activities
can resume, but it is recommended to maintain the related combustion equipment.
4. If the concentration remains above 30 PPM for over 30 minutes or if individuals feel unwell, everyone should
immediately move to fresh outdoor air and seek medical advice. Afterward, have a professional inspect the
home’s combustion appliances and ventilation system.
When CO concentration exceeds 70 PPM:
The LCD will show the CO concentration value, and the device will emit audible and visual indicators within the
standard-required time.
NOTE: Please refer to the section titled “If the CO Alarm Sounds”.
This device complies with UL 2034 standard and is programmed to sound an alarm at the following CO
concentrations within the periods listed:
70 ppm for 60–240 minutes,
150 ppm for 10–50 minutes,
and 400 ppm for 4–15 minutes.
When CO is detected and the alarm sounds, the CO concentration will be displayed on the LCD and a blue
backlight will be lit. The LED indicator will flash red and the alarm will issue 4 short beeps, repeating the cycle every
5.8 seconds.
WARNING
1. Any remote silencing function can only be used
within the line of sight of the alarm.
2. If there is any doubt about the cause of the alarm,
it should be assumed that the alarm was triggered
by dangerous levels of carbon monoxide, and the
07 08
residence should be evacuated.
CO Concentration and Symptoms
The following symptoms are related to CARBON MONOXIDE POISONING and are to be discussed
with ALL members of the household:
Levels of Exposure Symptoms
Mild Exposure Slight headache, nausea, vomiting, fatigue (often described as “flu-like” symptoms).
Medium Exposure Severe throbbing headache, drowsiness, confusion, fast heart rate.
Extreme Exposure Unconsciousness, convulsions, cardio-respiratory failure, death.
WARNING
1. THIS DEVICE IS DESIGNED TO PROTECT INDIVIDUALS
FROM ACUTE EFFECTS OF CARBON MONOXIDE
EXPOSURE. IT MAY NOT FULLY SAFEGUARD
INDIVIDUALS WITH SPECIFIC MEDICAL CONDITIONS.
IF IN DOUBT, CONSULT A MEDICAL PRACTITIONER.
2. DO NOT RULE OUT THE POSSIBILITY OF CARBON
MONOXIDE POISONING WHEN FLU-LIKE SYMPTOMS
OCCUR, EVEN IF FEVER IS PRESENT. MANY CASES
OF REPORTED CARBON MONOXIDE POISONING
INDICATE THAT WHILE VICTIMS ARE AWARE THAT
THEY ARE UNWELL, THEY BECOME SO DISORIENTED
THAT THEY ARE UNABLE TO SAVE THEMSELVES BY
EITHER EXITING THE BUILDING OR CALLING FOR
ASSISTANCE. YOUNG CHILDREN AND HOUSEHOLD
PETS ARE TYPICALLY THE FIRST AFFECTED.
3. INDIVIDUALS WITH MEDICAL PROBLEMS MAY
CONSIDER USING WARNING DEVICES WHICH
PROVIDE AUDIBLE AND VISUAL SIGNALS FOR
CARBON MONOXIDE CONCENTRATIONS UNDER
30 PPM.
LCD Display
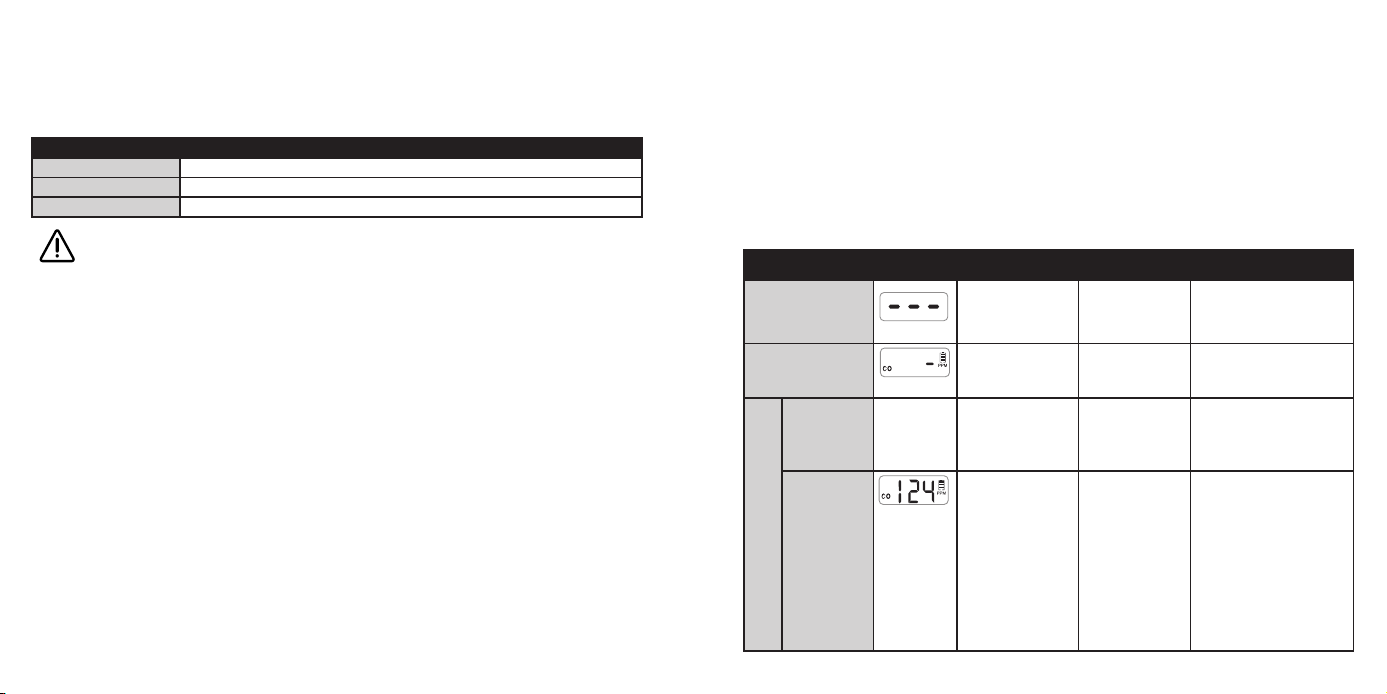
While detecting CO, the LCD will display different indications to help you understand what to do, as shown below:
NOTE: Some models do not have an LCD display. Models without an LCD display use the same LED indicator and
buzzer functions.
Mode LCD Display LED Indicator Audible Alarm Remarks
Powering On Runs through 8 cycles
(yellow/green/red/
blue) in sequence.
1 quick beep. Make sure the alarm is
properly attached to the
mounting bracket.
Standby Mode Flashes green once
every 60 seconds.
None. None.
Alarm
Mode
Unit detects
smoke and
initiates an
alarm.
- Flashes red 3 times
every 4 seconds.
3 long beeps every
4 seconds.
Dangerous smoke
concentration is detected.
Please evacuate immediately.
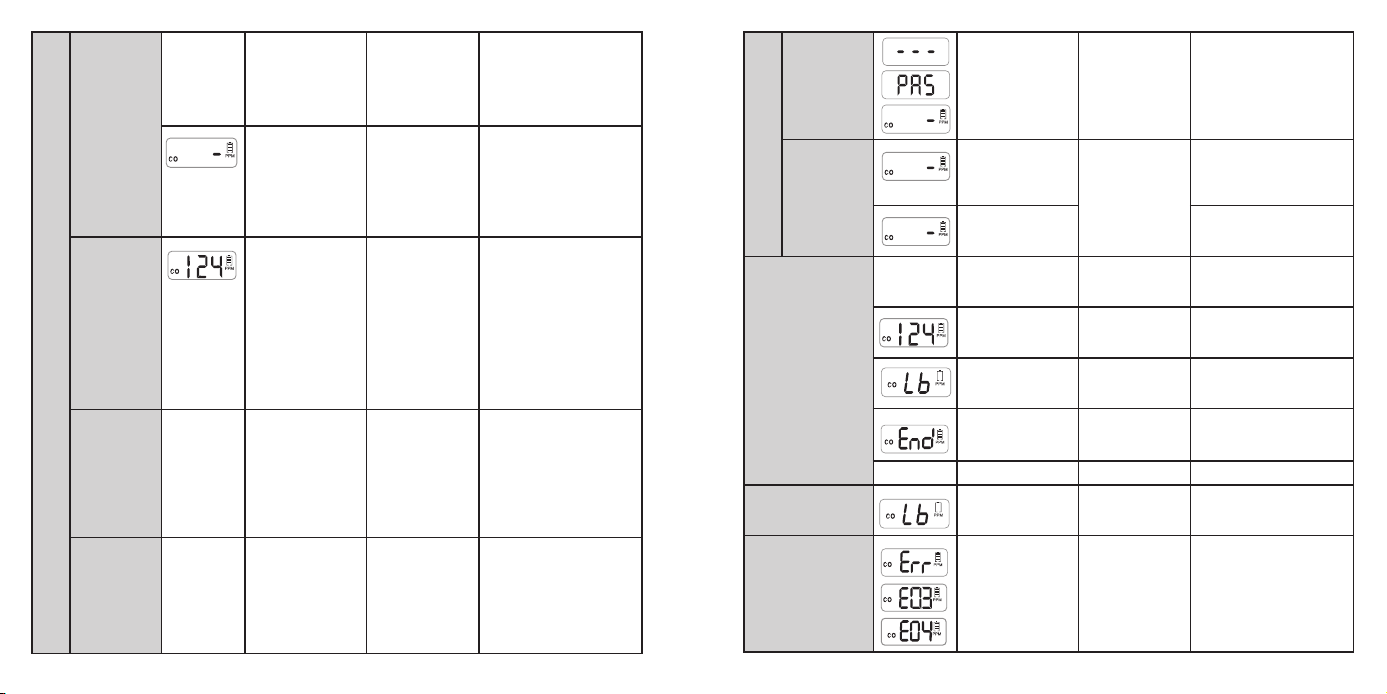
Unit detects CO
and initiates an
alarm.
When the CO
concentration
reaches the alarm
level and remains for
the required alarm
duration, the screen
will be backlit blue
and the LED indicator
will flash red 4 times
every 5.8 seconds.
First 4 minutes: 4
quick beeps every
5.8 seconds. After
4 minutes:
4 quick beeps every
60 seconds.
Dangerous CO concentration
is detected, and has reached
the alarm status. Please move
to fresh air immediately.
09 10
All other
interconnected
units in the
network.
- The LED flashes red
and green 3 times
sequentially every
4 seconds.
3 long beeps every
4 seconds.
Dangerous smoke
concentration is detected
by the initiating unit in the
network. Please evacuate
immediately.
The LED flashes red 4
times, then the green
LED flashes once
every 5.8 seconds.
First 4 minutes: 4
quick beeps every
5.8 seconds. After
4 minutes:
4 quick beeps every
60 seconds.
Dangerous CO concentration
is detected by the initiating
unit, and has reached the
alarm status.
Please move to fresh air
immediately.
Unit detects
CO (alarm not
initiated)
When the CO
concentration is
detected but does
not remain for the
required alarm
duration, the LED
indicator will flash
green once every 60
seconds.
None. Dangerous CO concentration
is detected, but has not
reached the alarm status.
Potentially dangerous CO
conditions exist.
Please search for the CO
source first. Open nearby
windows and doors, and
immediately move to fresh
air.
Unit detected
smoke and
initiated an
alarm.
- The LED indicator
flashes green once
every second for
5 seconds.
None. Alarm cancellation: when
the smoke concentration
level drops below the alarm
threshold, the alarm signal
will stop. Then, the alarm
goes back to the standby
mode after testing.
Unit detected
CO and initiated
an alarm.
- The LED indicator
flashes green once
every second for
5 seconds.
None. Alarm cancellation: when the
CO concentration level drops
below the alarm threshold,
the alarm signal will stop.
Then, the alarm goes back
to the standby mode after
testing.
Test
Mode
Test a single
unit.
2 sets of 3 red flashes
followed by 2 sets of
4 red flashes.
2 sets of
3 long beeps
followed by
2 sets of
4 quick beeps.
Press the Test/Silence button.
Test all
interconnected
units.
The LED indicator
flashes red rapidly.
Continuous
beeping until you
release the Test/
Silence button.
Initiating alarm.
Hold down the Test/Silence
button on one unit in the
network.
The LED flashes
red and green
sequentially.
Other interconnected alarms
in the network.
Silence Mode - Flashes red 3 times
every 4 seconds.
None. Smoke silence mode: After
9 minutes, the unit will exit
silence mode.
Flashes red 4 times
every 5.8 seconds.
None. CO silence mode: After 6
minutes, the unit will exit
silence mode.
Flashes yellow once
every 60 seconds.
None. Silence mode during low
battery: After 10 hours, the
unit will exit silence mode.
Flashes yellow
3 times every
60 seconds.
None. Silence mode during the end
of cycle: After 22 hours, the
unit will exit silence mode.
- Flashes green 3 times. None. Exiting silence mode.
Low Battery Flashes yellow once
every 60 seconds.
One beep every 60
seconds.
Replace the unit immediately.
Fault Flashes yellow
2 times every
60 seconds.
2 beeps every 60
seconds.
Replace the unit immediately.
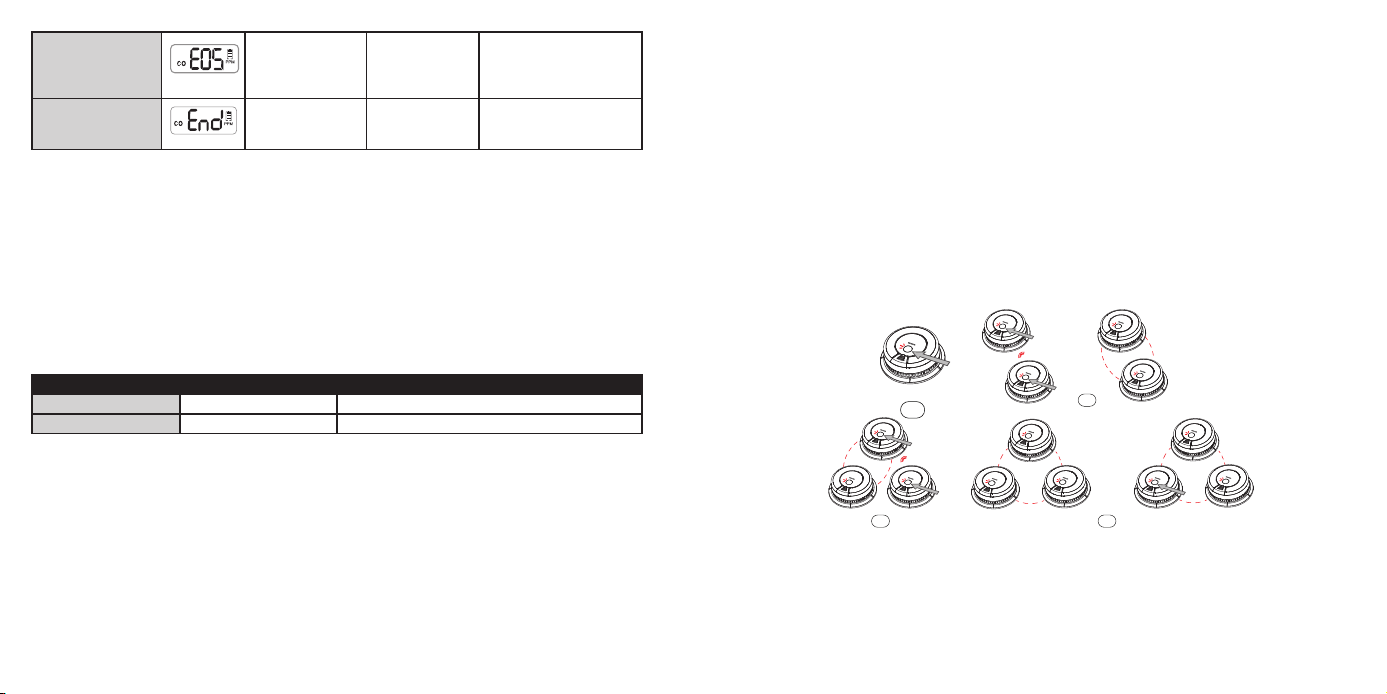
11 12
Smoke Chamber
Contamination
Flashes yellow
4 times every
60 seconds.
4 beeps every 60
seconds.
Refer to the Smoke Chamber
Contamination section in
the Product Overview for
handling.
End of Life Flashes yellow
3 times every
60 seconds.
3 beeps every 60
seconds.
Replace the unit immediately.
5 How to Set Up and Interconnect Wireless Alarms
All X-SENSE Link
+
wireless interlinked alarms contain a built-in RF module that enables you to wirelessly connect
2 or more interlinked alarms and create an interlinked network. When one unit is triggered, all interconnected
alarms will sound. The X-SENSE Link
+
series contain wireless interlinked smoke alarms, wireless interlinked carbon
monoxide alarms, and wireless interlinked smoke and carbon monoxide alarms. This model is designed to be
wirelessly interlinked with other X-SENSE Link
+
alarms, but is not designed to communicate with wireless interlinked
alarms from other manufacturers.
A maximum of 18 X-SENSE safety devices may be interconnected in a multiple station arrangement. The
interconnect system should not exceed the NFPA interconnect limit of 12 smoke alarms. This smoke/CO
combination alarm must be counted as a smoke alarm when determining the number of units on an interconnect
network. With 12 alarms interconnected, it is still possible to interconnect up to a total of 6 remote signaling
devices and/or relay modules.
List of Alarms with X-SENSE Link
+
Feature
Manufacturer Smoke Alarm Smoke & CO Alarm
X-SENSE SD19-W XP0H-WN
The X-SENSE Link
+
wireless interlinked alarms in one multi-pack have already been interconnected, and the alarms
in each multi-pack have their own independent interlinked network. If you have more than one multi-pack, you
will need to connect them all to the same network. Choose one multi-pack as your base network and connect the
other multi-packs to it.
NOTE: The following instructions regarding wireless interconnection are applicable to the X-SENSE Link
+
wireless
interlinked alarms only.
How to Interconnect
1. Make sure you only work with 2 units at a time, and make sure that they are both turned on to ensure successful
connection.
NOTE: To turn on the device, attach the alarm properly to the mounting bracket and turn clockwise to lock it. To
learn how to turn on different models of wireless interlinked alarms, please refer to their specific user manuals for
more details.
2. Press the test/silence button on one of the 2 units 4 times; it will beep once and the LED will flash blue slowly,
indicating it has entered pairing mode and is waiting for a new unit to be added. Quickly press the test/silence
button on the other unit twice; it will beep once and the LED will flash blue rapidly, indicating it is searching for a
device to connect to.
3. After the search is successful and an interconnected group is created, both units will beep once and
automatically exit the interconnection mode. At this point, both units will only flash once every 60 seconds,
indicating they are in normal standby mode.
4. If you want to connect a third alarm to this group, first activate a new device according to its operating
instructions, and then quickly press the test/silence button on either of the 2 previously interconnected units 4
times. This unit will beep once, and the LED will flash blue slowly, indicating it is ready to add a new device to the
network. Next, quickly press the test/silence button on the new unit twice, and the LED will flash blue rapidly as
it searches for a network to connect to. After the third unit successfully joins the interconnected network, both
units will beep once and automatically exit the interconnection mode.
5. If you want to connect more units, simply repeat step 4. Up to 18 alarms can be interconnected this way. To
ensure that all alarms enter the same interlinked network, make sure you only work with 2 units at a time—one
unit enters the pairing mode and the other unit enters the searching mode.
6. Test the alarms according to the steps in the section “Alarm Test.”
SC01-W, SC07-W, SC08-W, XP0H-WN, XP0P-WN, CB0U-2S,
CB0X-2S, CB0Z-2S, L/N-SCA-0A, L/N-SCA-0C
LED Indicator (Red/
Green/Yellow/Blue)
LCD Display
Test/Silence Button
Buzzer
SC03-W, SC06-W, XP0Q-WN, CB0V-2S, CB0Y-2S, L/N-SCA-0B
LED Indicator
(Red/Green/Yellow)
Test/Silence Button
Buzzer
RF
02
01
RF
03 04
10
6
5
6
5
6
5
25
Quickly press
4 times
Quickly press
twice
Quickly press
twice
Hold down
Quickly press
4 times
NOTES:
1. The alarm will enter the searching mode or the pairing mode for 60 seconds with the LED flashing blue. After
60 seconds, repeat step 2 to connect the alarms. If needed, press the test/silence button once while the alarm is in
the searching mode or the pairing mode, and the LED will stop flashing blue and the alarm will quit the pairing
mode to enter normal status.
2. Test all wireless alarms to ensure they are interconnected before installation.
3. A maximum of 18 wireless alarms can be interconnected on the same network.

13 14
4. The model can only be interconnected with other X-SENSE Link
+
wireless interlinked alarms.
How to Disconnect
Press the test/silence button 4 times; the alarm will beep once. Then, hold down the button until it beeps once
more to disconnect. After disconnecting, it can be reconnected to the same network, or added to a new network.
NOTE: The X-SENSE Link
+
wireless interlinked alarms in one multi-pack have already been interconnected. To create
a new network, you will first need to disconnect each alarm individually in this multi-pack to avoid having them all
join the same network.
6 Alarm Mode
X-SENSE Link
+
wireless interlinked alarms can be interconnected such that any unit that senses danger will cause all
other units in the interconnected network to alarm.
1. If the Initiating Unit Is Triggered by Smoke:
When one smoke alarm is triggered in the interconnected network, the unit will beep 3 times, paired with the LED
that flashes red every 4 seconds. Any other interconnected units will follow suit—they will beep 3 times every 4
seconds, paired with the LED flashing red and green in succession.
2. If the Initiating Unit Is Triggered by CO:
When one CO alarm is triggered in the interconnected network, the unit will beep 4 times every 5.8 seconds, paired
with the LED flashing red. Any other interconnected units in the network will follow suit—they will beep 4 times
every 5.8 seconds, paired with the LED that flashes red 4 times first, followed by the LED that flashes green once
with every beep. When the CO concentration level drops below the alarm threshold, the alarm will cease.
NOTES:
1. When one unit is triggered, other interconnected units will sound. If the smoke alarm and CO alarm are triggered
in the network at the same time, the alarm signal of the smoke alarm will take priority over that of the CO alarm.
2. This alarm has a relay function that extends the wireless interconnected network for wide detection coverage.
7 Alarm Test
Be sure to test your alarms when you turn them on for the first time, or when the group configuration has changed.
In addition to the weekly tests you should perform, it is recommended to test the alarm after returning from a long
trip or vacation.
If your X-SENSE Link
+
alarm is interconnected to other X-SENSE wireless alarms, we recommend that every
individual alarm is tested during the weekly test.
WARNING
1. NEVER USE AN OPEN FLAME OF ANY KIND TO TEST
THIS UNIT. YOU MIGHT ACCIDENTALLY DAMAGE OR
SET FIRE TO THE UNIT OR TO YOUR HOME.
2. NEVER USE A VEHICLE EXHAUST TO TEST THIS UNIT.
EXHAUST FUMES MAY CAUSE PERMANENT DAMAGE
AND VOID YOUR WARRANTY.
3. DO NOT STAND CLOSE TO THE ALARM WHEN THE
ALARM IS SOUNDING. EXPOSURE AT CLOSE RANGE
MAY BE HARMFUL TO YOUR HEARING. WHEN
TESTING, STEP AWAY WHEN THE ALARM BEGINS TO
SOUND.
Test a Single Alarm Test All Interconnected Alarms
Action Press the test/silence button. Hold down the test/silence button.
Indication 1. The alarm will emit 2 sets of 3 long
beeps followed by 2 sets of 4 quick
beeps.
2. The LED will flash red during the
audible signal.
3. You should first wake up your alarm by
pressing the test button. The LCD will
turn on and the backlight will be lit.
4. After testing, the alarm will
automatically enter standby mode.
1. The initiating unit will beep continuously with the
LED flashing red.
2. Other interconnected alarms in the network will
receive the signal after 5 seconds, then they will beep
continuously with the LED flashing red and green
successively. Release the test/silence button and all
the units will stop testing.
3. The units testing should be completed within 3
minutes.
4. After testing, the units will automatically enter
standby mode.
NOTES:
1. The test function accurately tests the alarm’s circuits without the need to test with smoke and CO. If your alarm
fails to give an audible test signal, please refer immediately to the troubleshooting guide at the end of this
manual.

15 16
2. Only use the Test/Silence button to test the alarm. Do not use any other device for testing.
8 Safety Information
DANGERS, WARNINGS, AND CAUTIONS ALERT YOU TO IMPORTANT INSTALLATION AND OPERATING INSTRUCTIONS,
OR POTENTIAL HAZARDS. PLEASE PAY ATTENTION TO THE SITUATIONS.
IMPORTANT
1.THIS DEVICE IS NOT DESIGNED FOR HEARING-IMPAIRED PEOPLE. USE OF ALCOHOL OR DRUGS MAY IMPAIR ONE’S
ABILITY TO HEAR THE ALARM.
2. FIRES IN CHIMNEYS, WALLS, ROOFS, OR BEHIND CLOSED DOORS MAY NOT BE DETECTED.
3. THIS CARBON MONOXIDE ALARM FUNCTION IS DESIGNED TO DETECT CARBON MONOXIDE GAS FROM ANY
SOURCE OF COMBUSTION. WHEN A CARBON MONOXIDE ALARM SIGNAL IS ISSUED, IT INDICATES THAT A
DANGEROUS LEVEL OF CARBON MONOXIDE GAS HAS BEEN DETECTED. A CARBON MONOXIDE ALARM SIGNAL
DOES NOT INDICATE THE PRESENCE OF SMOKE, FIRE, OR ANY OTHER GAS.
4. THIS DEVICE IS DESIGNED TO DETECT CARBON MONOXIDE GAS FROM ANY COMBUSTION SOURCE.
5. AN INDICATION CURRENT STUDIES HAVE SHOWN IS THAT SMOKE ALARMS MAY NOT AWAKEN ALL SLEEPING
INDIVIDUALS, AND THAT IT IS THE RESPONSIBILITY OF INDIVIDUALS IN THE HOUSEHOLD THAT ARE CAPABLE OF
ASSISTING OTHERS TO PROVIDE ASSISTANCE TO THOSE WHO MAY NOT BE AWAKENED BY THE ALARM SOUND, OR
TO THOSE WHO MAY BE INCAPABLE OF SAFELY EVACUATING THE AREA UNASSISTED.
CAUTION
THIS SMOKE & CARBON MONOXIDE ALARM HAS TWO SEPARATE ALARMS WHICH WORK INDEPENDENTLY. THE
CARBON MONOXIDE ALARM IS NOT DESIGNED TO DETECT FIRE OR ANY OTHER GAS. IT WILL ONLY INDICATE THE
PRESENCE OF CARBON MONOXIDE GAS AT THE SENSOR. CARBON MONOXIDE GAS MAY BE PRESENT IN OTHER
AREAS. THE SMOKE ALARM WILL ONLY INDICATE THE PRESENCE OF SMOKE THAT REACHES THE SENSOR. THE
SMOKE ALARM IS NOT DESIGNED TO DETECT GAS, HEAT OR FLAMES.
WARNING
1. NEVER IGNORE ANY ALARM. FAILURE TO RESPOND
CAN RESULT IN SERIOUS INJURY OR DEATH.
2. THE SILENCE FEATURE IS ONLY FOR YOUR
CONVENIENCE AND WILL NOT CORRECT A PROBLEM.
ALWAYS CHECK YOUR HOME FOR A POTENTIAL
PROBLEM AFTER ANY ALARM. FAILURE TO DO SO
CAN RESULT IN INJURY OR DEATH.
3. TEST THIS SMOKE/CO ALARM ONCE A WEEK. IF THE
ALARM EVER FAILS TO TEST CORRECTLY, REPLACE
IT IMMEDIATELY! IF THE ALARM CANNOT WORK
PROPERLY, IT WILL NOT ALERT YOU TO A PROBLEM.
4. THE REPLACEMENT DATE THAT APPEARS ON THE
DEVICE IS THE DATE BEYOND WHICH THE DEVICE
MAY NO LONGER DETECT CARBON MONOXIDE
ACCURATELY AND SHOULD BE IMMEDIATELY
REPLACED.
5. IT IS NOT TESTED FOR USE IN A CARAVAN OR BOAT.
6. DO NOT TAMPER WITH THE APPARATUS, AS THERE IS
A RISK OF ELECTRIC SHOCK OR MALFUNCTION.
7. IF THE DEVICE IS TAMPERED WITH, THERE MAY BE A
RISK OF ELECTRIC SHOCK OR MALFUNCTION.
8. THIS PRODUCT IS INTENDED FOR USE IN ORDINARY
INDOOR LOCATIONS OF FAMILY LIVING UNITS.
IT IS NOT DESIGNED TO MEASURE COMPLIANCE
WITH OCCUPATIONAL SAFETY AND HEALTH
ADMINISTRATION (OSHA) COMMERCIAL OR
INDUSTRIAL STANDARDS.
CAUTION
THIS ALARM WILL ONLY INDICATE THE PRESENCE OF CARBON MONOXIDE GAS AT THE SENSOR. CARBON
MONOXIDE GAS MAY BE PRESENT IN OTHER AREAS.
17 18
9 Installation Instructions
In USA: The National Fire Protection Association recommends:
*29.5.1 *Required Detection.
*29.5.1.1 Where required by applicable laws, codes, or standards for a specific type of occupancy, approved single-
and multiple-station smoke alarms shall be installed as follows:
(1)*In all sleeping rooms and guest rooms
(2)*Outside of each separate dwelling unit sleeping area, within 21 ft (6.4 m) of any door to a sleeping room, the
distance measured along a path of travel
(3) On every level of a dwelling unit, including basements
(4) On every level of a residential board and care occupancy (small facility), including basements and excluding
crawl spaces and unfinished attics
(5)*In the living area(s) of a guest suite
(6) In the living area(s) of a residential board and care occupancy (small facility)
In Canada: ULC 553 - Standard for Installation of Smoke Alarms (Recommends)
* Smoke alarms shall be installed in such a manner so as to ensure that the alarm signals are clearly audible in all
bedrooms of a dwelling unit, or in sleeping rooms not within a dwelling unit, over any high background noise levels
which may be normally encountered with all intervening doors closed.
* Smoke alarms installed in the vicinity of a bedroom of a dwelling unit, or in a sleeping room not within a dwelling
unit shall be located as close as possible to the room while avoiding possible nuisance alarms from, but not limited
to:
A Excess water vapour from a bathroom, sauna or laundry room, etc.;
B Cooking vapours from a kitchen; or
C Smoke from a fireplace or wood stove.
* Smoke alarms installed in a stairwell shall be located:
A So as to be easily accessible for maintenance; and
B To assure that smoke rising in the stairwell cannot be obstructed from reaching the device.
* Smoke alarms installed to detect a fire in a basement shall be located in close proximity to the stairs leading to the
level above.
* Smoke alarms shall not be located in garages, basements or storage spaces where temperatures may fall below
4 °C or exceed 38 °C except for smoke alarms specifically intended and designed for application in these areas.
STATEMENT:
Reproduced with permission from NFPA 72®-2016, National Fire Alarm and Signaling Code® Copyright © 2015,
National Fire Protection Association. This reprinted material is not the complete and official position of the NFPA on
the referenced subject, which is represented only by the standard in its entirety which may be obtained through the
NFPA website at www.nfpa.org.
NFPA 72® and National Fire Alarm and Signaling Code® are registered trademarks of the National Fire Protection
Association, Inc., Quincy, MA
NOTE: Before installation, it is recommended to test the interconnected alarms in the rooms where you intend
to install them to ensure that they are within transmission range and that nothing will interfere with their
communication.
Installation Locations
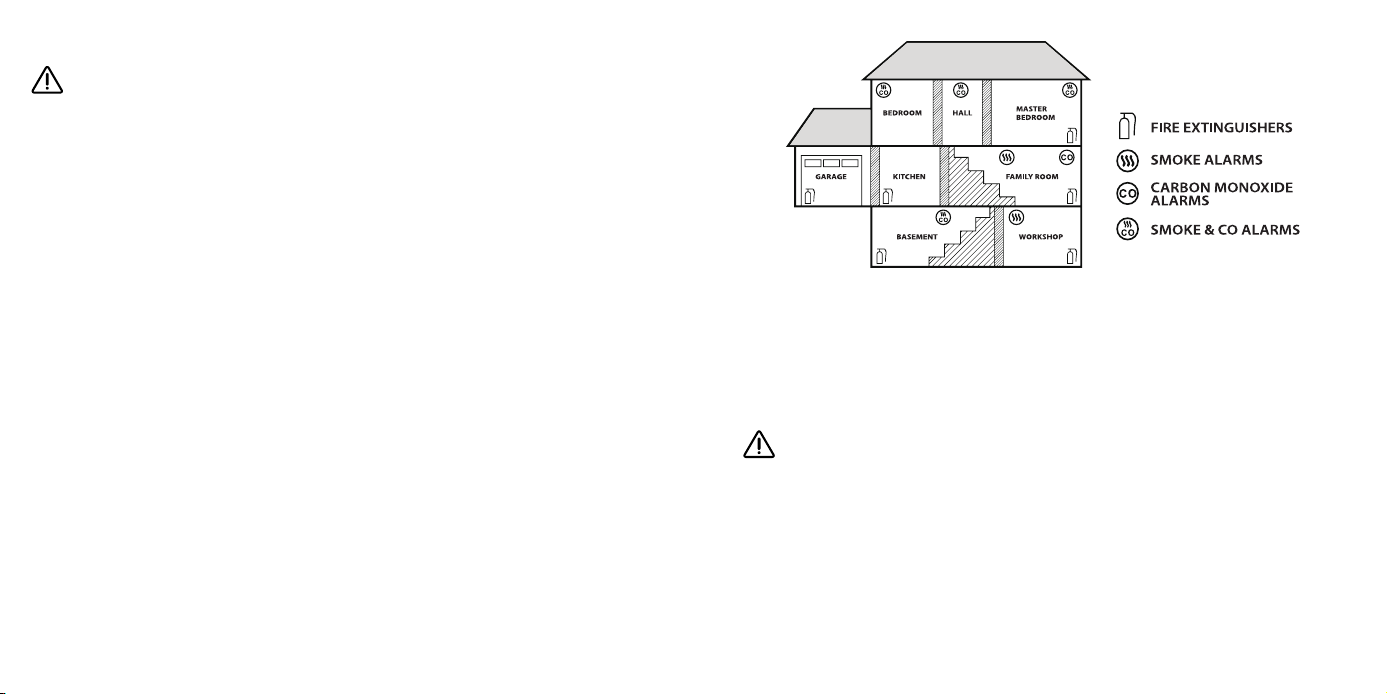
1. Prioritize the installation of a smoke/CO alarm in the bedroom and walkways, and make sure you can hear
the alarm from all sleeping areas. In a home with several bedrooms, install an alarm in every bedroom. If you
install only one smoke alarm in your home, install the alarm near to all bedrooms where possible, and not in a
basement or furnace room.
2. Install an alarm above the stairway and on every floor of the house.
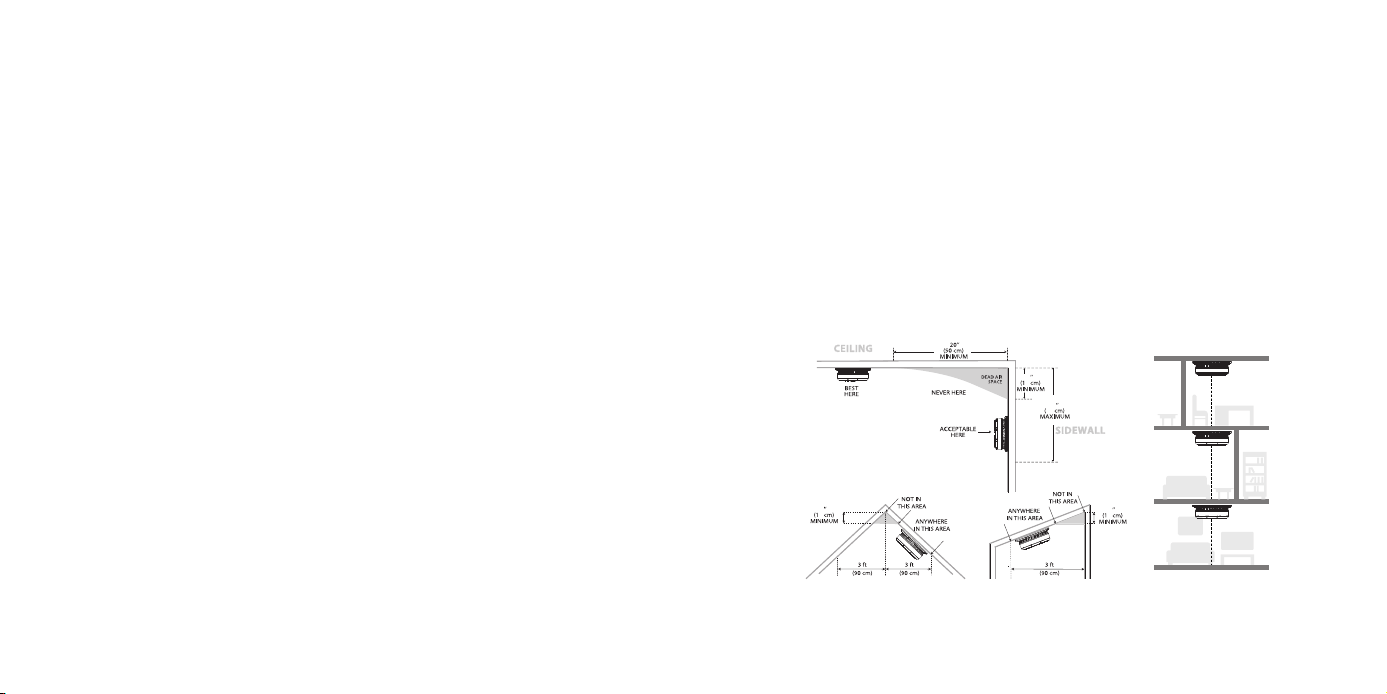
3. Smoke, heat and anything burning will spread horizontally after rising to the ceiling, so install the alarm in the
middle of the ceiling where possible. Ensure the alarm is within working distance of all corners of the room.
4. If an alarm cannot be installed in the middle of a ceiling, install at a distance of 20 inches (50 cm) away from the
corners of the room.
5. If an alarm is installed on a wall, it should be at a distance of 4–12 inches (10–30 cm) below the ceiling.
6. If the length of a room or hall is beyond 30 feet (900 cm), several alarms should be installed in the same room.
7. When the wall or ceiling is angled, the alarm needs to be installed within 3 feet (90 cm) of the highest wall or
ceiling point (measured horizontally) in the room.
8. In multi-level houses or apartments, install at least one wireless alarm on each level and keep them installed in a
straight vertical line (see diagram) with as few obstacles between each of the interconnected alarms as possible
to ensure optimal signal transmission.
SC01-W, SC07-W, SC08-W, XP0H-WN, XP0P-WN, CB0U-2S,
CB0X-2S, CB0Z-2S, L/N-SCA-0A, L/N-SCA-0C
LED Indicator (Red/
Green/Yellow/Blue)
LCD Display
Test/Silence Button
Buzzer
SC03-W, SC06-W, XP0Q-WN, CB0V-2S, CB0Y-2S, L/N-SCA-0B
LED Indicator
(Red/Green/Yellow)
Test/Silence Button
Buzzer
RF
02
01
RF
03 04
10
6
5
6
5
6
5
25
Quickly press
4 times
Quickly press
twice
Quickly press
twice
Hold down
Quickly press
4 times
Locations to Avoid:
1. Near large metal surfaces and/or bundles of wire.
2. Near fluorescent lights, amateur radios, electrical equipment, or other devices that may transmit an RF signal, as
electronic noise may cause nuisance alarms.
19 20
10 Recommended Placement
WARNING
1. THIS ALARM SHOULD BE INSTALLED BY A
COMPETENT PERSON.
2. INSTALLATION OF THE ALARM SHOULD NOT BE USED
AS A SUBSTITUTE FOR PROPER INSTALLATION, USE
AND MAINTENANCE OF FUEL BURNING APPLIANCES
INCLUDING APPROPRIATE VENTILATION AND
EXHAUST SYSTEMS.
3. TO PREVENT INJURY, THIS DEVICE SHOULD BE
SECURELY ATTACHED TO THE CEILING OR WALL
IN ACCORDANCE WITH THE INSTALLATION
INSTRUCTIONS.
4. BATTERIES SHOULD NOT BE EXPOSED TO EXCESSIVE
HEAT SUCH AS DIRECT SUNLIGHT, FIRE, ETC.
5. CONSTANT EXPOSURE TO HIGH OR LOW
TEMPERATURES OR HIGH HUMIDITY MAY REDUCE
THE BATTERY LIFE.
SC01-W, SC07-W, SC08-W, XP0H-WN, XP0P-WN, CB0U-2S,
CB0X-2S, CB0Z-2S, L/N-SCA-0A, L/N-SCA-0C
LED Indicator (Red/
Green/Yellow/Blue)
LCD Display
Test/Silence Button
Buzzer
SC03-W, SC06-W, XP0Q-WN, CB0V-2S, CB0Y-2S, L/N-SCA-0B
LED Indicator
(Red/Green/Yellow)
Test/Silence Button
Buzzer
RF
02
01
RF
03 04
10
6
5
6
5
6
5
25
Quickly press
4 times
Quickly press
twice
Quickly press
twice
Hold down
Quickly press
4 times
NOTE: The installation diagrams are for reference only. Alarm placement and installation methods must comply
with all applicable codes, including NFPA 70 and NFPA 72 in the U.S., and CSA C22.1 and ULC S553 in Canada.
Testing frequency must comply with NFPA 72 in the U.S. and ULC S552 in Canada, as applicable.
11 How to Install This Alarm
IMPORTANT
THIS ALARM IS DESIGNED TO BE MOUNTED ON THE CEILING OR WALL.
WARNING
FAILURE TO PROPERLY INSTALL AND ACTIVATE THIS
ALARM WILL PREVENT PROPER OPERATION OF THE
ALARM AND WILL PREVENT ITS RESPONSE TO FIRE
HAZARDS.

21 22
Locations to Avoid
WARNING
- This product is intended for use in
ordinary indoor locations of family living units. It is not
designed to measure CO levels in compliance with the
Occupational Safety and Health Administration (OSHA)
commercial or industrial standards.
1. Do not install in garages, kitchens, furnace rooms
or bathrooms! Do not install within 5 ft (1.5 m) of
cooking appliances.
2. Do not install within 3 ft (0.9 m) of the following: The
door to a kitchen, or a bathroom that contains a tub
or shower, forced air supply ducts used for heating
or cooling, ceiling or whole house ventilating fans,
or other high air ow areas. Avoid excessively dusty,
dirty or greasy areas. Dust, grease or household
chemicals can contaminate the alarm’s sensors,
causing the alarm to not operate properly.
3. Place the alarm where drapes or other objects will
not block the sensors. Smoke and CO must be able
to reach the sensors to accurately detect these
conditions. Do not install in peaks of vaulted ceilings,
“A” frame ceilings or gabled roofs. Keep out of damp
and humid areas.
4. Install at least 1 ft (30 cm) away from uorescent
lights, as electronic noise may cause nuisance alarms.
5. Do not place in direct sunlight and keep out of
insect-infested areas. Extreme temperatures will
aect the sensitivity of the smoke/CO alarm.
6. Do not install in areas where the temperature is
colder than 40°F (4.4°C) or hotter than 100°F (37.8°C),
such as garages and unnished attics.
7. Do not install in areas where the relative humidity
(RH) is above 85% or below 10%. Place away from
doors and windows that open to the outside.
8. Smoke alarms are not to be used with detector
guards unless the combination (alarm and guard)
has been evaluated and found suitable for that
purpose.
9. In areas that are not open or unobstructed, such as
behind furniture, drapes, or any other object that
may block the alarm from being seen or heard. The
alarm must be heard from all sleeping areas.
23 24
12 Mounting Steps
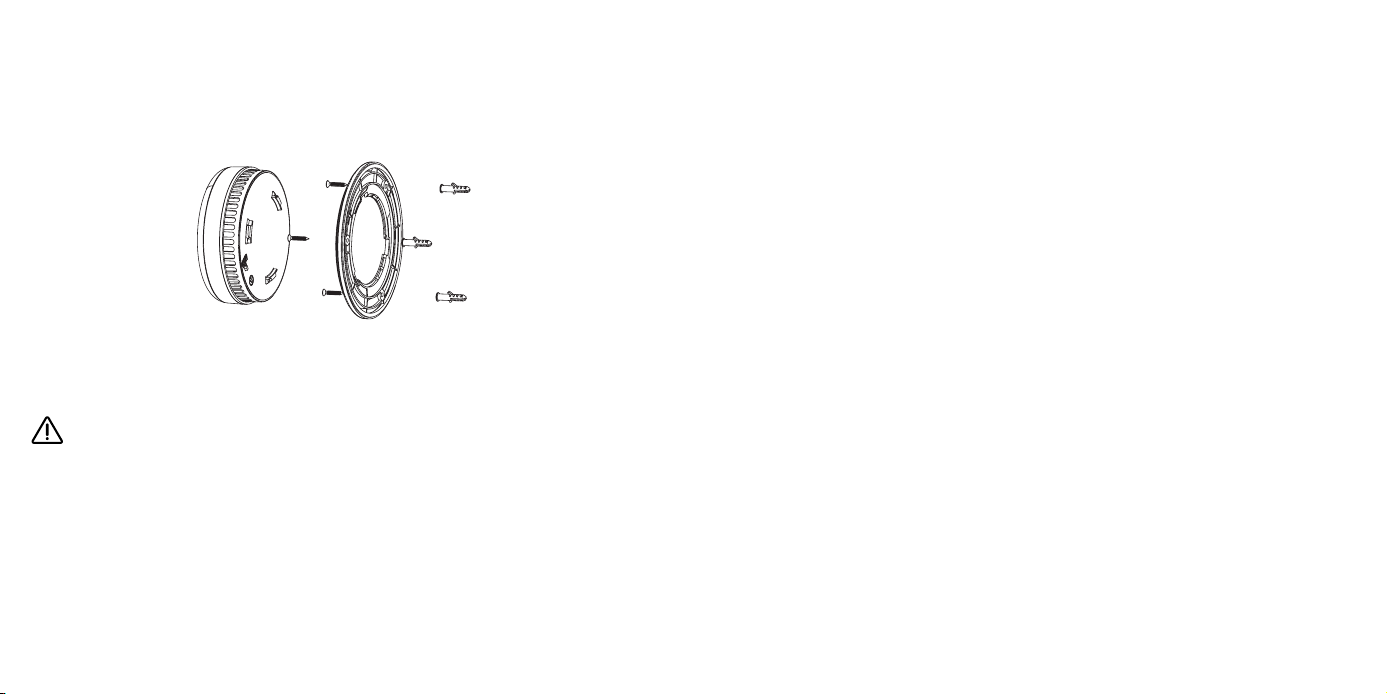
1. Mark three screw holes on the wall or ceiling according to the holes of the mounting bracket, and drill the screw
holes to a depth of 1.18 in (30 mm) using a Ø 1/4 in (6.0 mm) drill bit. Then insert three plastic anchor plugs into
the holes with a hammer.
2. Attach the mounting bracket to the surface of the wall or ceiling with three screws and mount the alarm into the
bracket by pushing them together and twisting the unit clockwise.
3. Test the unit by using the Test/Silence button. Ensure the unit sounds in an alarm pattern.
SC01-W, SC07-W, SC08-W, XP0H-WN, XP0P-WN, CB0U-2S,
CB0X-2S, CB0Z-2S, L/N-SCA-0A, L/N-SCA-0C
LED Indicator (Red/
Green/Yellow/Blue)
LCD Display
Test/Silence Button
Buzzer
SC03-W, SC06-W, XP0Q-WN, CB0V-2S, CB0Y-2S, L/N-SCA-0B
LED Indicator
(Red/Green/Yellow)
Test/Silence Button
Buzzer
RF
02
01
RF
03 04
10
6
5
6
5
6
5
25
Quickly press
4 times
Quickly press
twice
Quickly press
twice
Hold down
Quickly press
4 times
NOTE: This model is equipped with a feature that automatically activates the alarm when the alarm is attached to
the mounting bracket for the first time.
13 Deactivation of the Alarm
WARNING
1. DO NOT DEACTIVATE THE ALARM UNIT UNTIL THE
END-OF-LIFE SIGNAL HAS BEEN HEARD.
2. ONCE THE MAXIMUM LIFETIME (10 YEARS) IS
REACHED, THE ALARM WILL DELIVER 3 BEEPS EVERY
60 SECONDS.
3. ONCE THE ALARM IS DEACTIVATED, IT WILL NO
LONGER FUNCTION. IT CANNOT BE REACTIVATED
AND MUST BE REPLACED.
To Deactivate the Alarm
1. Pressing the Test/Silence button can silence the end-of-life signal for up to 22 hours.
Peel back the shaded label obstructing the “DIS” setting, and break the thin plastic guard, as below.
2. Twist the plastic pin upwards to the “DIS” position or insert a screwdriver into the slot and turn the dial clockwise
to the “DIS” position.
3. Dispose of the alarm.
4. Replace the alarm.
14 Maintenance
To keep your alarm in good working order, follow these simple steps:
1. Push the test/silence button to verify the unit’s alarm sound and indicator are working properly by testing the
unit once a week.
2. As a minimum your alarm should be cleaned once every 3 months: Remove the unit from the ceiling and clean
the alarm cover and vents with your vacuum cleaner fitted with the soft brush attachment to remove dust and
dirt.
3. Never use detergents or other solvents to clean the unit.
4. Avoid spraying air fresheners, hair spray or other aerosols near the alarm.
5. Do not paint the unit. Paint will seal the vents and interfere with the sensor’s ability to detect fire or CO.
6. Never attempt to disassemble the unit or clean inside. Doing so will void your warranty.
7. When removed, place the alarm back in its proper location as soon as possible, to assure continuous protection
from fire or carbon monoxide.
8. When household cleaning supplies or similar contaminants are used, the area should be ventilated.
NOTE: Nuisance alarms may occur in everyday environments when dust, steam, grease, or insects interfere with
the alarm’s sensing chamber. Always check the area first to confirm there is no real smoke, fire, or CO hazard. If no
hazard is found, clean and inspect the device as instructed, or contact the manufacturer for assistance.
1. WARNING: KEEP NEW OR OLD USED BATTERIES OUT
OF REACH OF CHILDREN.
2. In the event of a battery leaking, do not allow the
liquid to come into contact with the skin or eyes. If
contact has been made, wash the aected area with
copious amounts of water and seek medical advice
immediately.
25 26
3. WARNING: This smoke alarm is powered by a non-
replaceable 10-year battery and once deactivated
the smoke alarm is incapable of being reactivated
and must be replaced.
15 Troubleshooting
NOTE: Contact X-SENSE Customer Support at the address or contact information provided in this manual for
inspection, service, or replacement instructions.
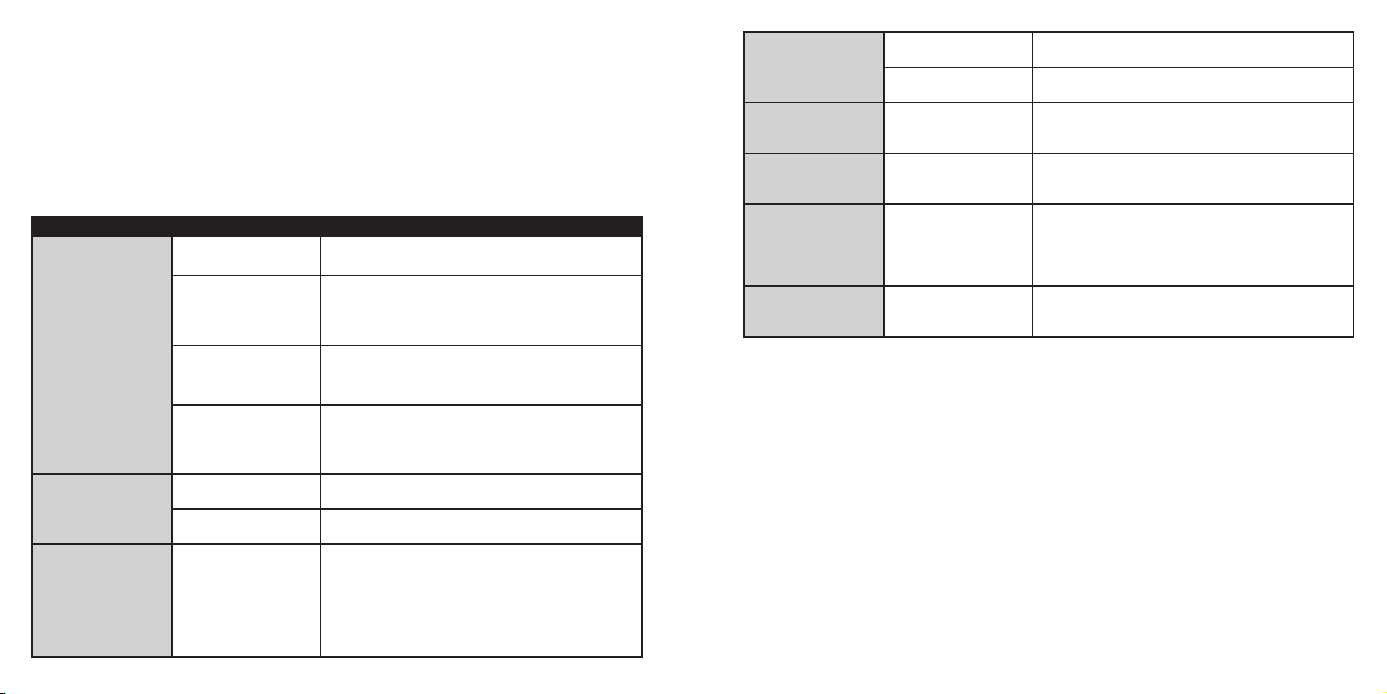
Problems Causes Solutions
The device is not
triggered when it is
tested with smoke.
The device is not turned
on.
Check and make sure that the device is correctly installed
on the mounting bracket.
The smoke is not reaching
the sensor properly.
Smoke must enter the smoke sensor through the side
openings to activate the device. Please be aware that the
top of the device features the buzzer and decorative metal
mesh.
The time duration is
insufficient for the device
to detect smoke.
Continuous smoke exposure is necessary for the device to
be triggered. When smoke reaches the smoke sensor, the
device will be activated within about 20 seconds.
Insufficient smoke
concentration.
This product utilizes a photoelectric sensor, requiring
sufficient smoke concentration for detection. Higher smoke
levels lead to faster alarm response. Avoid using an open
flame for testing.
The alarm does not
sound during a test.
The device is not turned
on.
Check and make sure that the device is correctly installed
on the mounting bracket.
You don’t push the test/
silence button firmly.
Make sure you push the test/silence button firmly.
When the test button
is held down, only one
alarm sounds and the
other interconnected
alarms do not respond.
1. When connected to a wireless interconnected network,
holding down the test button will test all devices in the
network.
2. When exited from the wireless interconnected network,
holding down the test button only tests a single device.
3. A short press on the test button will always test a single
device.
False alarms are triggered
intermittently when
residents are cooking,
taking showers, etc.
The device is improperly
installed.
Check the location of your alarm (see “Locations to
Avoid”).
The device is clogged by
dirt and dust.
Clean the alarm (see “Maintenance”).
LED flashes yellow once
every 60 seconds with
one beep.
Low battery warning. The battery is low. Push Test/Silence button once to silence
for 10 hours. Replace the device immediately.
LED flashes yellow
2 times every 60 seconds
with 2 beeps.
Malfunction. The alarm is malfunctioning. Replace the device
immediately.
LED flashes yellow
4 times every 60
seconds with 4 beeps.
The smoke chamber is
contaminated.
Please keep the area around the product clean, remove the
product from the ceiling, vacuum the outside of the device
with a vacuum cleaner fitted with a soft brush attachment,
and reinstall the product on the ceiling. If the alarm persists,
replace the product immediately.
LED flashes yellow
3 times every 60 seconds
with 3 beeps.
End-of-life warning. The maximum lifetime (10 years) is reached. Push the Test/
Silence button once to silence for 22 hours. Replace the
device immediately.
If the Smoke Alarm Sounds
1. Create a family escape plan, crawl low in the presence of smoke.
2. Don't panic; stay calm. Follow your family's escape plan.
3. Get out of the house as quickly as possible. Don't stop to get dressed or collect anything.
4. Feel doors with the back of your hand before opening them.
5. If a door is cool, open it slowly. Don't open a hot door. Keep doors and windows closed, unless you must escape
through them.
6. Cover your nose and mouth with a cloth (preferably damp).
7. Take short, shallow breaths.
8. Meet at your planned meeting place outside your home, and do a head count to make sure everybody got out
safely.
9. Call the Fire Department as soon as possible from outside. Give your address, then your name.
10. Never go back inside a burning building for any reason.
11. Contact your Fire Department for ideas on making your home safer.

27 28
If the CO Alarm Sounds
WARNING
Carbon monoxide (CO) is a colorless, odorless,
poisonous gas. You can't taste, see, or smell CO, but it
can kill in just minutes.
This alarm will sound in a 4-beep pattern if life
threatening levels of CO are detected.
If the alarm sounds:
1. Immediately evacuate all occupants from the space
and go outdoors to fresh air.
2. Call emergency responders (911 or re department)
for help; notify the building or vehicle owner, as
necessary.
More detailed information on conditions which can result in transient CO
situations, such as:
1. Excessive spillage or reverse venting of fuel burning appliances caused by:
a) Outdoor ambient conditions such as wind direction and/or velocity, including high gusts of wind; heavy air in
the vent pipes (cold/humid air with extended periods between cycles).
b) Negative pressure differential resulting from the use of exhaust fans.
c) Simultaneous operation of several fuel-burning appliances competing for limited internal air.
d) Vent pipe connection vibrating loose from clothes dryers, furnaces, or water heaters.
e) Obstructions in or unconventional vent pipe designs which amplify the above situations.
f ) Poorly designed or maintained chimneys and/or vents.
2. Extended operation of unvented fuel-burning devices (range, oven, fireplace, etc.).
3. Temperature inversions which can trap exhaust gasses near the ground.
4. Car idling in an open or closed attached garage, or near a home.
Limitations of CO Alarms
1. CO alarms may not wake up all individuals. If children or others do not readily awaken to the sound of the CO
alarm, or if there are infants or family members with mobility limitations, make sure that someone assists them in
the event of an emergency.
2. This CO alarm will not sense carbon monoxide that does not reach the sensor. This CO alarm will only detect CO
that reaches the sensor. CO may be present in other areas. Doors or other obstructions may affect the rate at
which CO reaches the CO alarm. For this reason, if bedroom doors are usually closed at night, it is recommended
that you install a CO alarm in each bedroom and in the hallway between them.
3. CO alarms may not sense CO on another level of the house. For example, a CO alarm on the second level, near
the bedrooms, may not sense CO in the basement. For this reason, one CO alarm may not give an adequate
warning. Complete coverage is recommended by placing CO alarms on each level of the house.
4. CO alarms may not be heard. The alarm buzzer noise level is over 85 dB at a distance of 10 feet (3 m). However,
if the CO alarm is installed outside the bedroom, it may not awaken a sound sleeper or one who has recently
used drugs or has been drinking alcohol. This is especially true if the door is closed or only partially open. Even
persons who are awake may not hear the alarm horn if the sound is blocked by distance or closed doors. Noise
from traffic, stereos, radios, televisions, air conditioners, or other appliances may even prevent alert persons from
hearing the alarm horn. This CO alarm is not intended for people who are hearing impaired.
5. CO alarms are not a substitute for a smoke alarm. Although fire is a source of carbon monoxide, this CO alarm
does not sense smoke or fire. This CO alarm senses CO that may be escaping unnoticed from malfunctioning
furnaces, appliances, or other possible sources of incomplete combustion. The installation of a smoke alarm is
required for an early warning of fire.
6. CO alarms are not a substitute for life insurance. Though these CO alarms warn against increasing CO levels, we
do not warrant or imply in any way that they will protect lives from CO poisoning. Homeowners and renters must
still insure their lives.
7. CO alarms have a limited life. Although the CO alarm and all of its parts have passed many stringent tests and
are designed to be as reliable as possible, any of these parts could fail at any time. Therefore, you are strongly
recommended to test your CO alarm weekly.
8. CO alarms are not foolproof. Like all other electronic devices, CO alarms have limitations. They can only detect CO
that reaches their sensors. They may not give early warning of rising CO levels if the CO is coming from a remote
part of the house, or is at some distance from the CO alarm.
Limitations of Smoke Alarms
1. Fires where the victim is intimate with a flaming initiated fire; for example, when a person's clothes catch fire
while cooking;
2. Fires where the smoke is prevented from reaching the smoke alarm due to a closed door or other obstruction;
3. Incendiary fires where the fire grows so rapidly that an occupant's egress is blocked even with properly located
smoke alarms.

29 30
16 Environmental Protection
The crossed-out wheeled-bin symbol on your product, literature, or packaging reminds you that all electrical and
electronic products, batteries, or accumulators must be taken to designated collection locations at the end of their
working life. Do not dispose of these products as unsorted municipal waste. Dispose of them according to the laws
and rules in your area.
ISED Statement
This device contains licence-exempt transmitter(s)/receiver(s) that comply with Innovation, Science and Economic
Development Canada’s licence-exempt RSS(s). Operation is subject to the following two conditions:
(1) This device may not cause interference.
(2) This device must accept any interference, including interference that may cause undesired operation of the
device.
Radiation Exposure Statement
This equipment complies with Canada radiation exposure limits set forth for an uncontrolled environment. This
equipment should be installed and operated with minimum distance 20 cm between the radiator & your body.
FCC Statement
1. This device complies with part 15 of the FCC Rules. Operation is subject to the following two conditions:
(1) This device may not cause harmful interference.
(2) This device must accept any interference received, including interference that may cause undesired operation.
2. Note: This equipment has been tested and found to comply with the limits for a Class B digital device. These
limits are designed to provide reasonable protection against harmful interference in a residential installation. This
equipment generates, uses and can radiate radio frequency energy and, if not installed and used in accordance
with the instructions, may cause harmful interference to radio communications. However, there is no guarantee
that interference will not occur in a particular installation. If this equipment does cause harmful interference
to radio or television reception, which can be determined by turning the equipment off and on, the user is
encouraged to try to correct the interference by one or more of the following measures:
—Reorient or relocate the receiving antenna.
—Increase the separation between the equipment and receiver.
—Connect the equipment into an outlet on a circuit different from that to which the receiver is connected.
—Consult the dealer or an experienced radio/TV technician for help.
3. Changes or modifications not expressly approved by the party responsible for compliance could void your
authority to operate the equipment.
4. The distance between user and products should be no less than 20 cm.
17 Manufacturer and Service Information
X-Sense Electronics Co., Ltd.
Address: Room 402, Building 4, No. 9, Jinshagang 1st Road, Shixia Village, Dalang Town, Dongguan City, 523750
Guangdong, P.R. China
Website: www.x-sense.com
Email: [email protected]