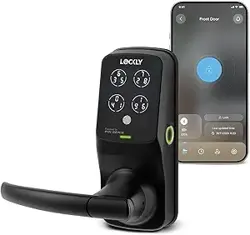
USER MANUAL
SECURE PLUS | SECURE PRO
LATCH EDITION
Section 1 - Product Highlights
Section 2 - Product Overview
Section 3 - Using Your Smart Lock
3.1 Configuring Access
3.2 Programming Mode
3.3 Adding an Access Code
3.4 Deleting an Access Code
3.5 Checking an Access Code
3.6 Adding a Fingerprint
3.7 Fingerprint Scanning Directions
3.8 Fingerprint Tips & Troubleshooting
3.9 Deleting Stored Fingerprints
Section 4 - Locking and Unlocking
1.1 Product Features
Section 5 - Advanced Features
Section 6 - Important Notes
Section 7 - Cleaning
Section 8 - Safety Precautions
8.1 Safety Precautions
1
2
3
4
5
6
5
7
8
9
10
11
13
15
16
19
21
22
23
24
25
26
27
29
30
31
32
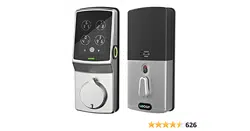
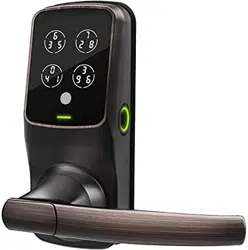
2.1 Product Overview - Outside
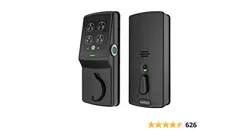
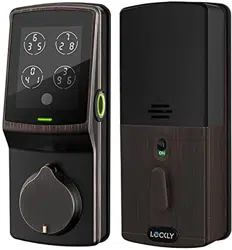
2.2 Product Overview - Inside
2.3 Understanding Your New Lock
2.4 Factory Reset
2.5 Keypad Display Switch
2.6 Rebooting Lockly™ Secure
2.7 Low Battery
2.8 Changing The Battery
4.1 Locking / Unlocking with Codes
4.2 Locking / Unlocking using Fingerprint
4.3 Locking / Unlocking using App
4.4 Locking / Unlocking using Physical Key
4.5 Safe Mode
5.1
Offline Access Code (OAC)
6.1 Important Notes
7.1 Cleaning
Table of Contents
TABLE OF CONTENTS
For additional support, visit http://lockly.com/help
or email help@Lockly.com

Patented Anti-Peep Keypad
Digits are randomly displayed on the key pad ensuring access codes to be undetectable to
intruders after repeated use. To experience the patented and innovative key pad software,
powered by PIN Genie™, please download the PIN Genie™ Vault App from iOS App Store or
Google Play.
Multiple Access Codes & Monitoring
Store up to 8 Access Codes for family, friends, and guests, as well as monitor entry and exit
records.
Advanced 3D Fingerprint Recognition (Secure Plus and Secure Pro Only)
Biometric Fingerprint Recognition protocol allows up to 99 registered fingerprints to be used
and accepts only actual fingerprints - preventing lifted prints from being used.
Complete Privacy
The exterior displayed keypad can be locked and switched off using the simple ON/OFF toggle
from the inside panel. The owner can prevent others trying to input the passcode from the
outside and entering the home
Offline Access Code (OAC)
The offline access code can allow owners to issue access codes, set the allowed access
duration, all without Lockly™ ever connecting to the internet, so in case of power outage, you
can still magically and remotely issue Access Codes without any connection to the web.
Automatic Lock
Owners no longer have to worry about forgetting to lock the door. With Auto Lock enabled,
Lockly™ Secure will automatically re-lock the door based on your customized timing set between
5-300 seconds.
Backup Keys and 9V Battery Socket
The door can be opened with physical backup keys. There is also a 9V battery connection socket
for emergency power backup to access the key pad in case your smart lock runs out of battery.
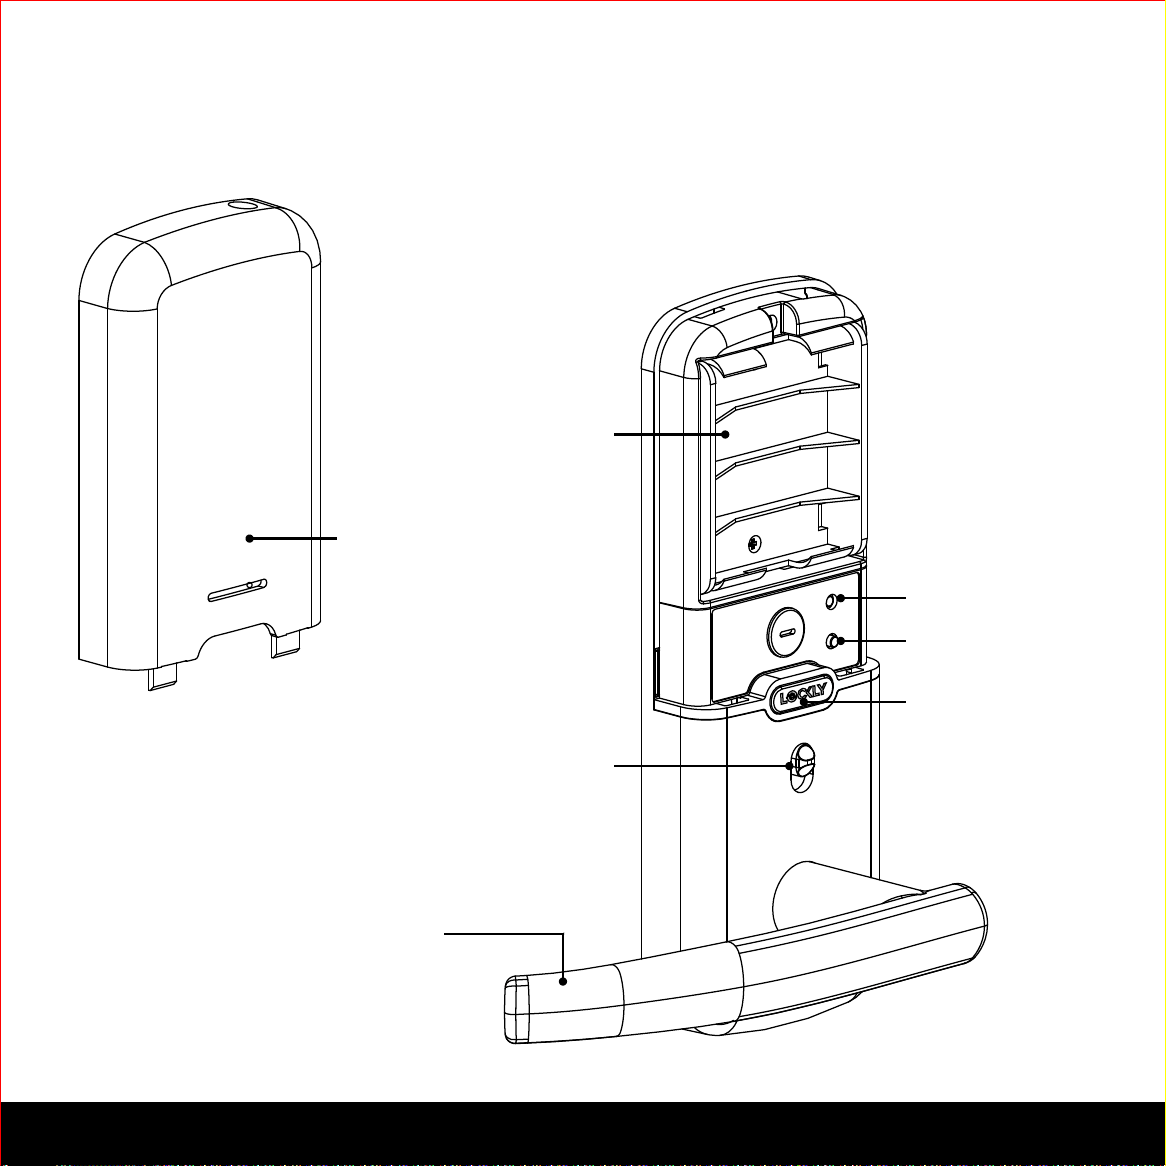
1.1 Product Features
1SECTION 1.1

Key Hole Cover
9V Battery Backup Socket
Key Hole
Touchscreen
Keypad Buttons
Bluetooth icon
Power Status
Lock Status icon
OK Button
Bluetooth light
Handle
2.1 Product Overview - Outside
2
SECTION 2.1
Inside Handle
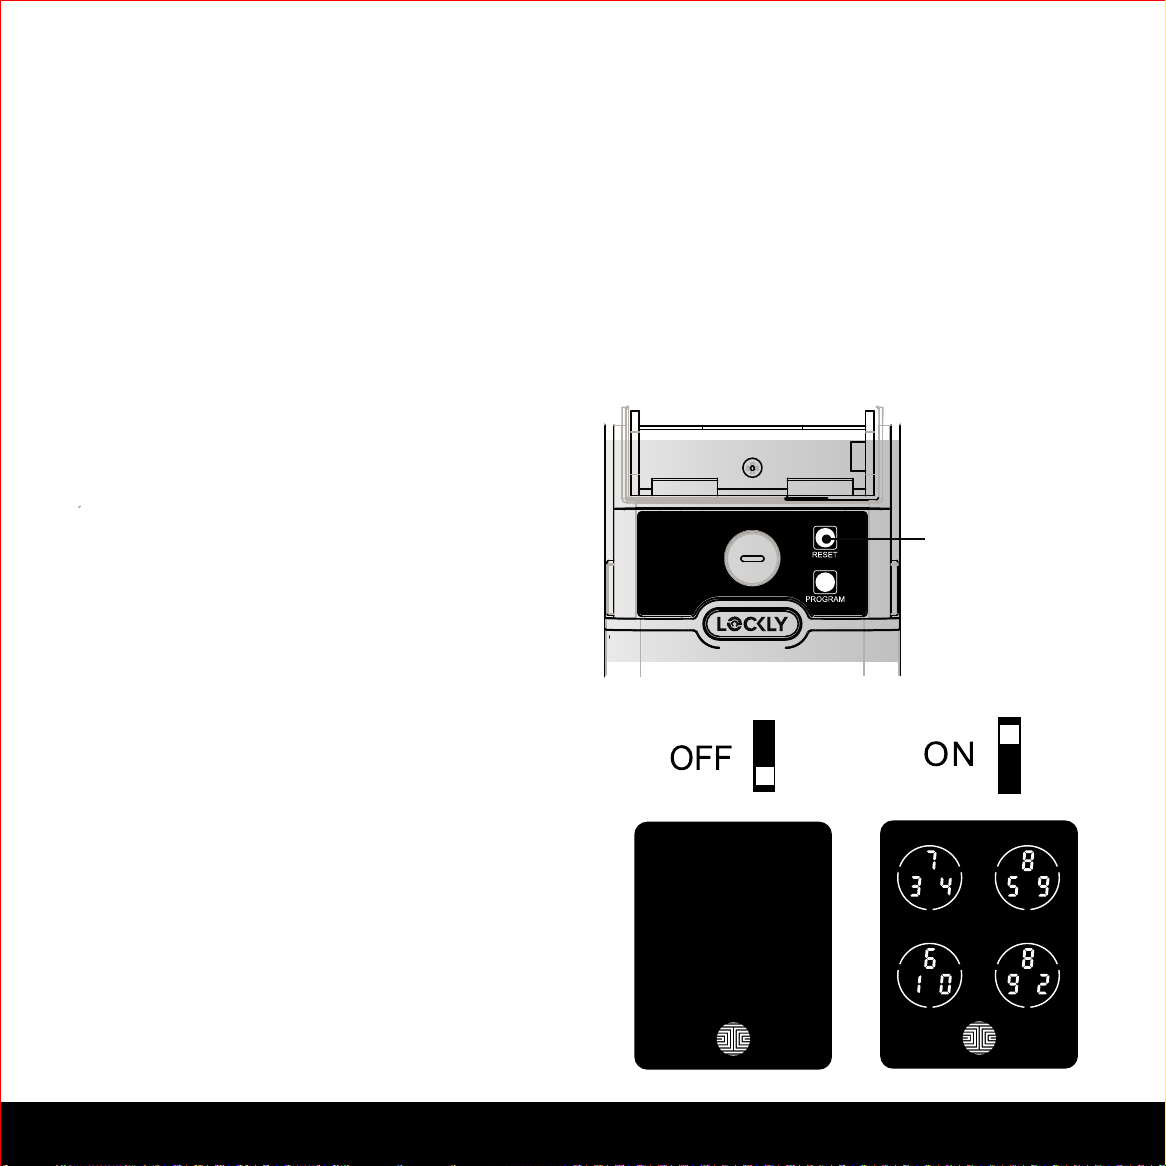
Reset Button
Program Button
Battery
Compartment Cover
Battery Compartment
4 x AA Alkaline
Batteries(Included)
Keypad Display Switch
Low Battery
Indicator
SECTION 2.2 3
2.2 Product Overview - Inside
2.3 Understanding Your New Lock
The Default Access Code is
NOTICE
1 2 3 4 5 6
After the installation of your new Lockly™, understanding some key functions of operating
your smart lock is important. The following guides will walk you through resetting a lock,
adding Access Codes, deleting Access Codes, adding and deleting fingerprints (Appli-
cable to Secure Plus and Secure Pro Only) and also how to configure your OAC(Offline
Access Code).
For any questions you can always visit http://lockly.com/help for assistance.
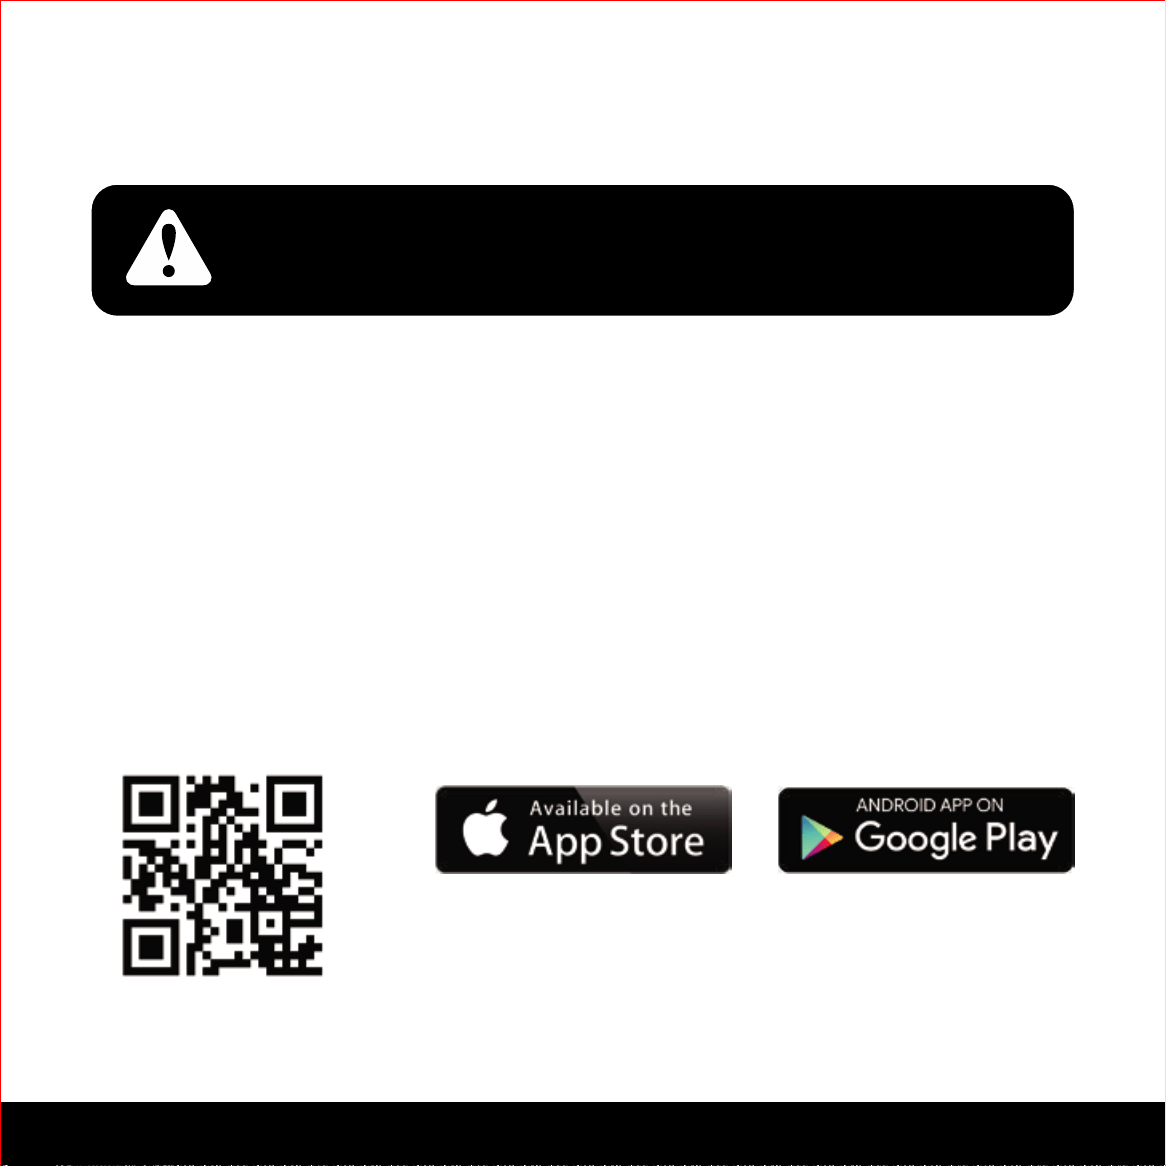
Don’t forget that Lockly™ Secure works best with our iOS and Android app. Please
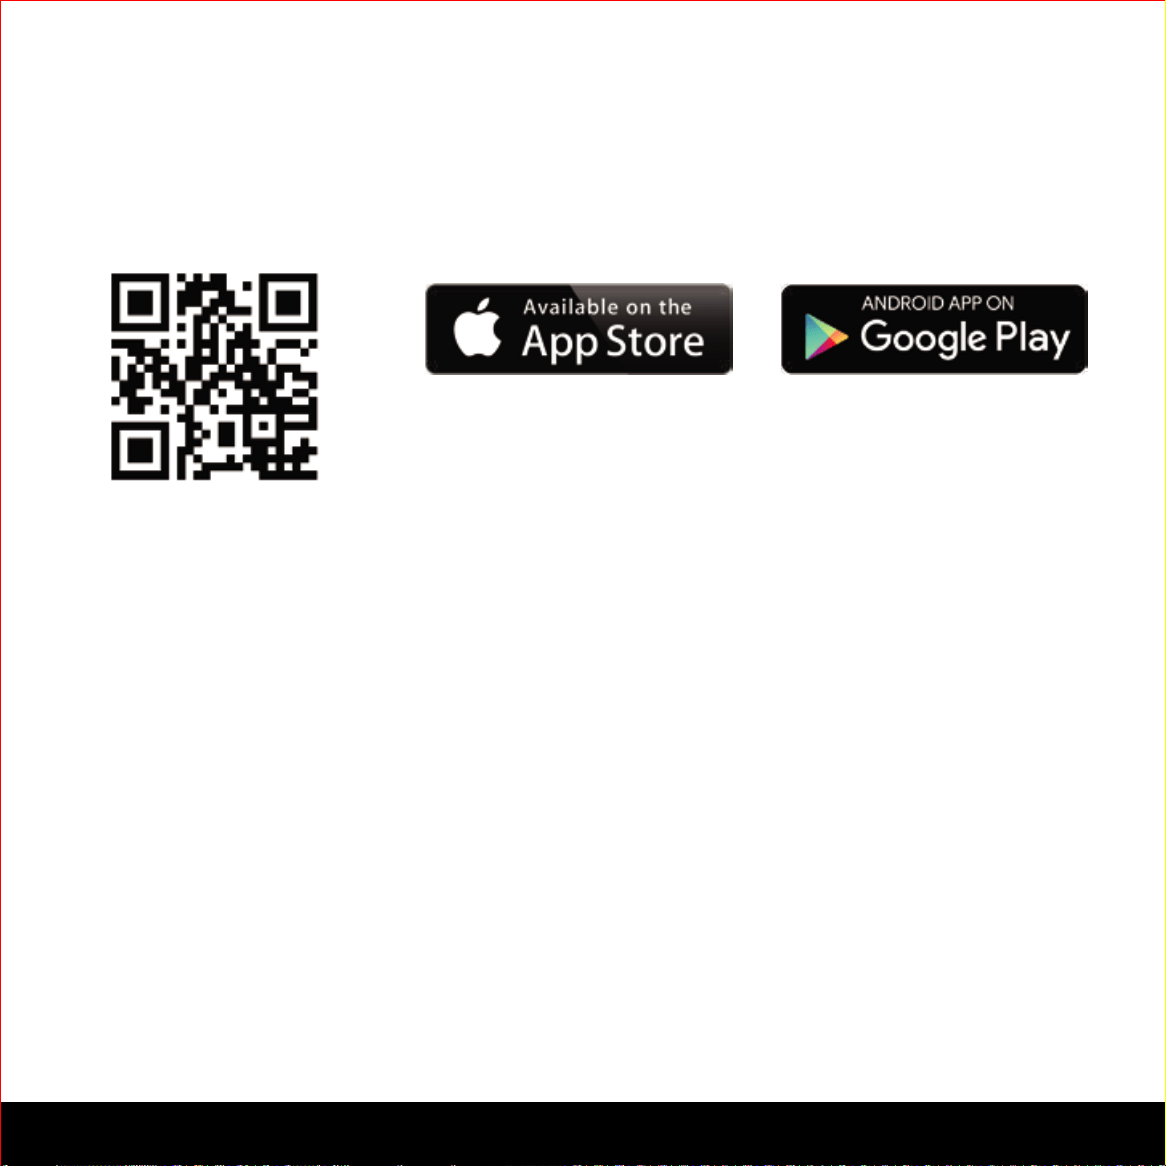
download the app by visiting the link below.
Scan or visit Lockly.com/app
4 SECTION 2.3
SECTION 2.4 5
2.4 Factory Reset
In order to restore the Lockly™ Secure to factory default settings, you must have your
“Initial Code” available. The Initial Code can be found on the VIP Card that came with
your smart lock.
After you have the Initial Code ready, push the reset button on the back panel of the
Lockly™ Secure to perform your reset. See below to see which Reset Process applies
for you. Once the smart lock has been reset, all the data previously stored will be deleted.
2.5 Keypad Display Switch
The exterior keypad screen can be locked
and turned off by using the ON/OFF switch
at the back panel (interior) of the smart lock.
When it is switched off, people who are
outside cannot enter any access codes to
unlock the door.
Reset Button
If Paired with App If Never Paired
Press Reset Button
for one (1) second
Open the Lockly™
smartphone app to
add your lock using
the Initial Code
Press Reset Button
for three (3) seconds
6
2.6 Rebooting Lockly™ Secure
Reboot Button
NOTICE
Reboot Lockly™ in case of dead battery or malfunction.
No settings will be changed and all Access Codes will
still be stored within Lockly™.
Press and release the reboot button when you want to reboot the lock. Your Lockly™ will
beep once after reboot. Only reboot when necessary.
To reboot, find the reboot button located on the bottom of the exterior side of Lockly™
Secure. The reboot button is located in the middle of the two 9V battery backup sockets.
You will need something small such as a paperclip, to press the reboot button. Insert the
paper clip and press down firmly.
SECTION 2.6
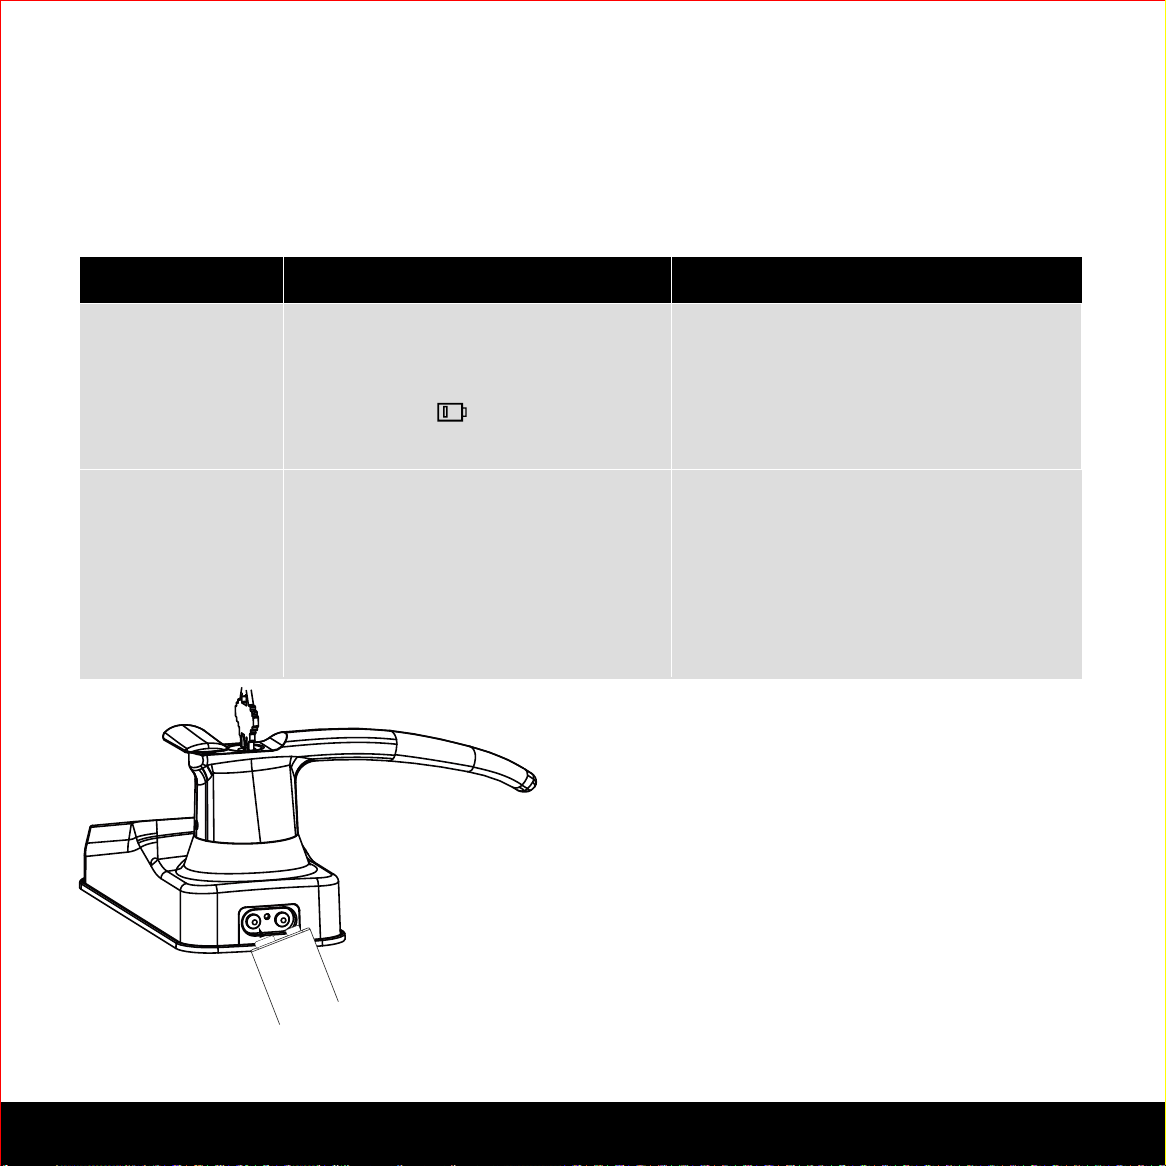
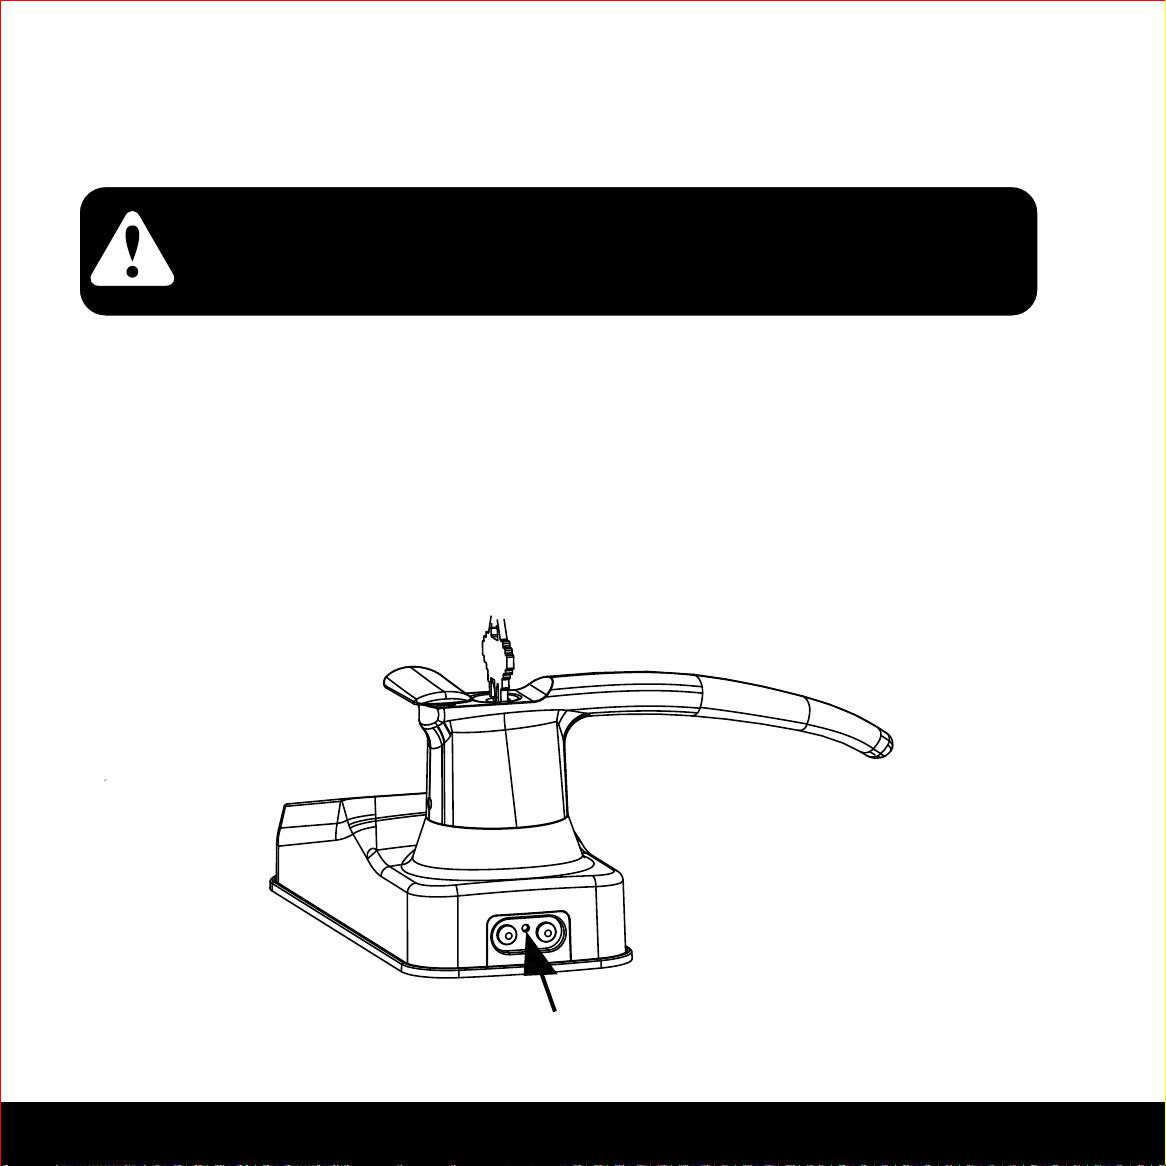
7SECTION 2.7
2.7 Low Battery
When the battery is in seriously low condition, Lockly™ Secure will make continuous
beeping sounds in addition to the flashing low battery icon on the touch screen. You
should replace batteries immediately to avoid your smart lock from shutting down.
Dead Battery
Condition Indicator Solution
Low Battery
.
Replace batteries immediately
to avoid battery failure. Lockly
™ Secure can still operate up
to 300 cycles in low battery
condition.
Battery Icon on the display
keypad will light up to indicate
low battery.
When there is no display and
sounds; and screen is non-func-
tional.
Replace batteries immediately.
Supplied physical backup keys
can be used to unlock the
door. Alternatively, use a 9V
battery as shown below to
temporarily activate the lock.
9V Battery
-
+
Your Lockly™ Secure will automatically
detect
the battery polarity, so just hold
and place your
9V battery leads in place
against bottom of the
Lockly™ Secure to
temporarily activate the
screen to enter your Access Code. Be sure to
hold the
9V battery against the contact points
located at the bottom of the lock until you
have successfully unlocked your
door with
your Access Code. Once
unlocked, batteries
should be replaced
immediately.
8
SECTION 2.8
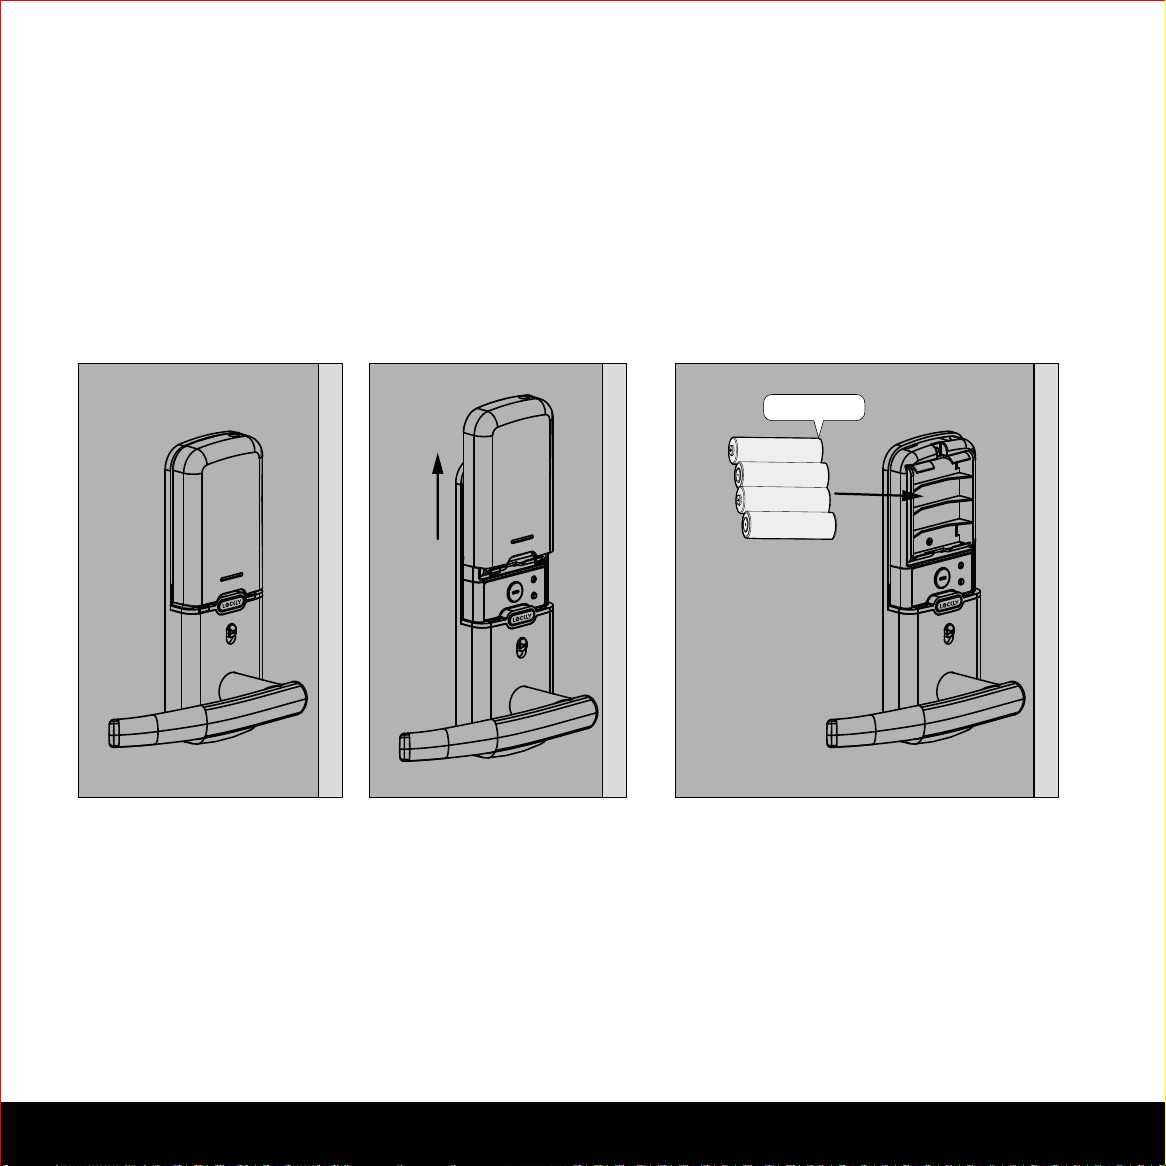
2.8 Changing The Battery
1
2
AA 1.5V X 4
3
Under normal use, the Lockly™ Secure’s battery will last up to a year. Please check
battery levels regularly and change your batteries when the low battery notification is
issued. For best practice, always use new batteries.
Open the battery compartment cover and insert four (4) new AA alkaline batteries
as shown.
- Make sure the batteries are oriented correctly.
- Replacing the batteries do not reset stored Access Codes.
+
+
-
+
-
-
+
-
SECTION 3.1 9
3.1 Configuring Access
The Default Access Code is
NOTICE
1 2 3 4 5 6
Your new Lockly™ Access Code can be any combination of 6 to 8 digits.
Once a new Access Code is entered, the Default Access Code of 123456 would be deleted.
A Maximum of 8 sets of Access Codes can be stored for use.
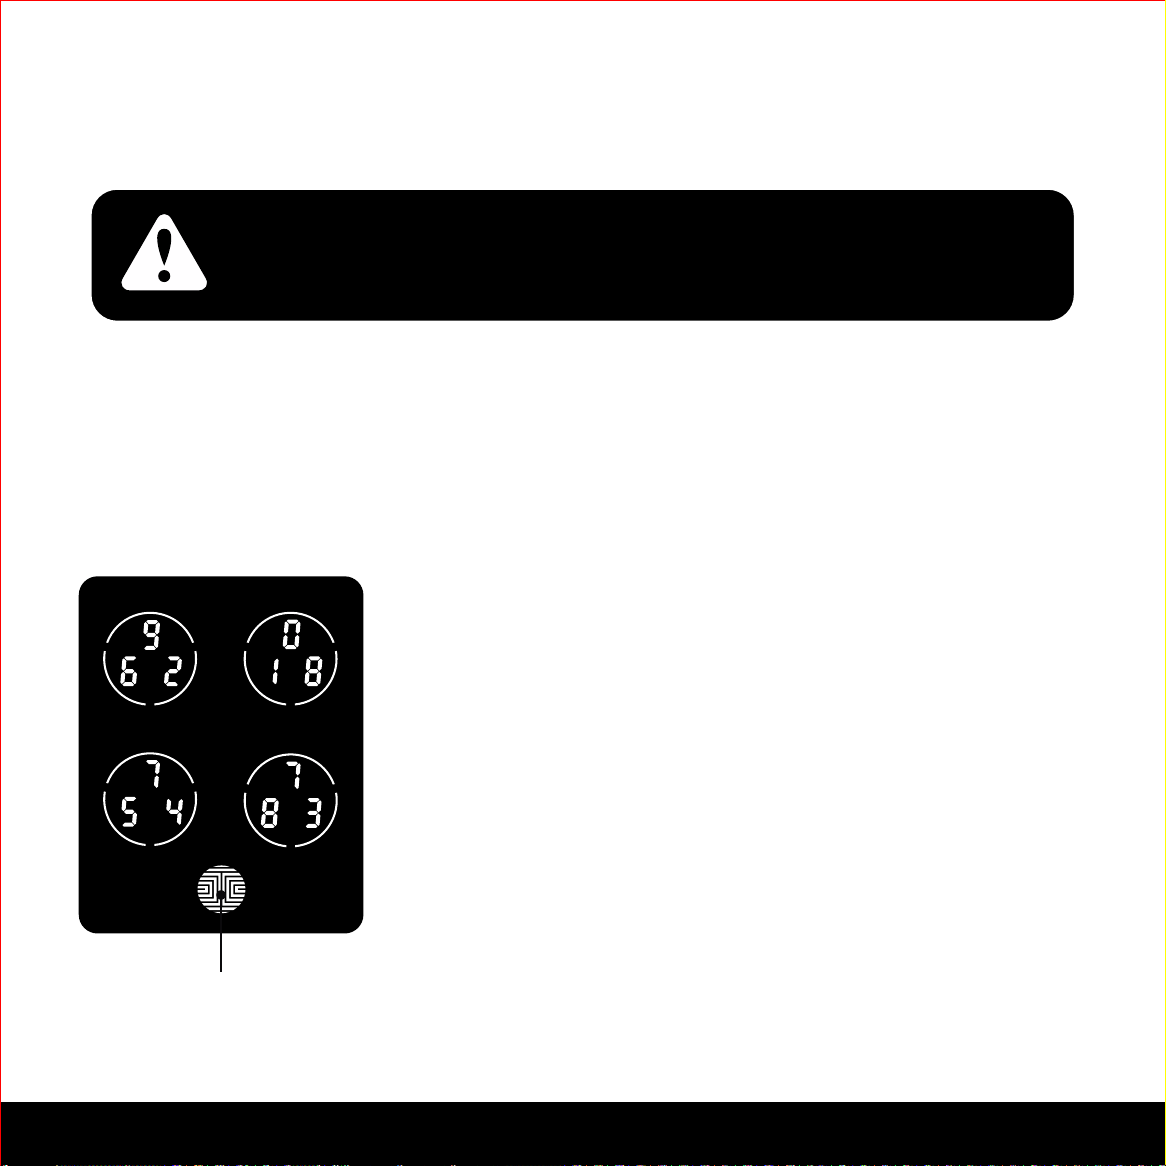
How to Use the Keypad
There are a total of five (5) buttons on the keypad as
shown in the example image to the left. The numbers in
each button may differ than what is shown on your
device than what is displayed here.
To enter your required digit, just simply press the circle
where your number is shown. You do not need to press
the actual number as anywhere within the circle will
suffice.
The button on the bottom is the OK button. You will be
pressing this button when you are done entering your
Access Code.
OK Button
10 SECTION 3.2
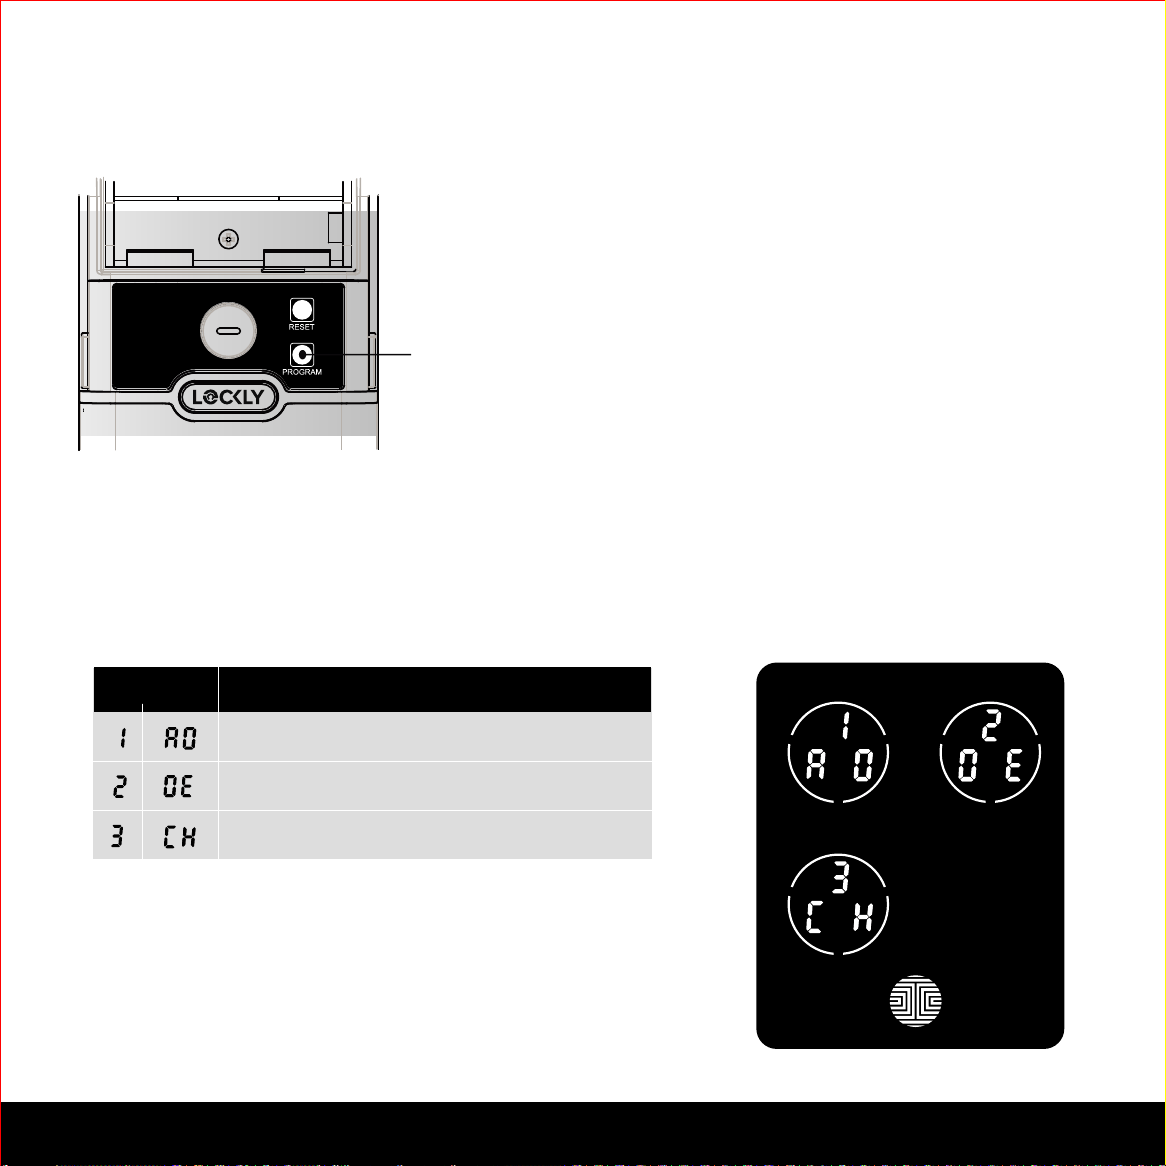
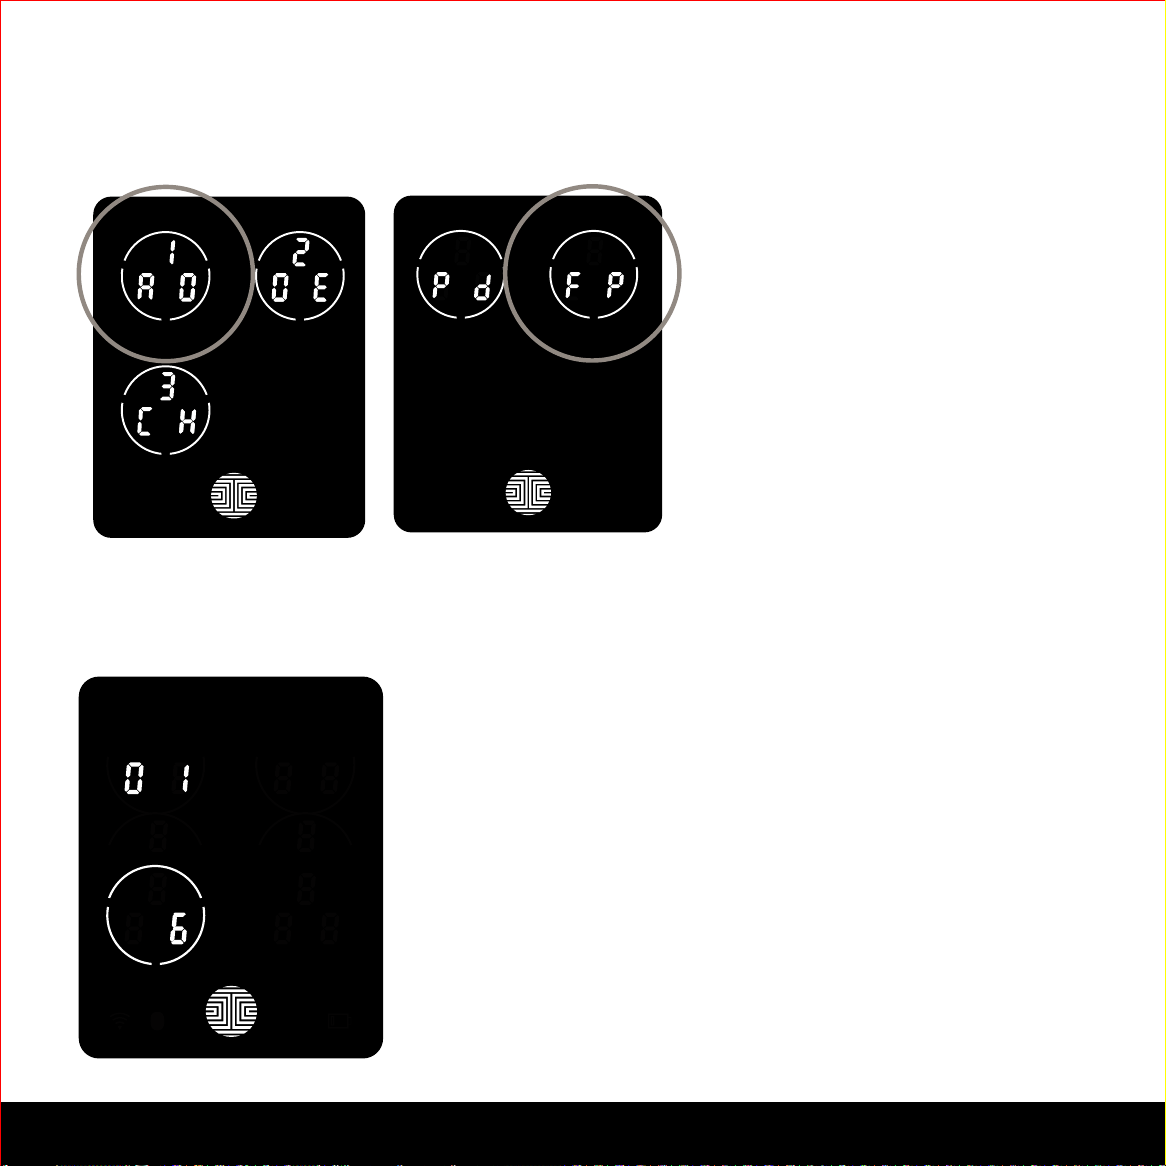
3.2 Entering Programming Mode
Add Access Code
ModeNumber
Delete Access Code
View Access Code
Program Button
To enter Programming Mode, remove
the battery compartment cover on the
interior side of the Secure to expose the
Reset and Program buttons.
Simply press the Program button to
enter programming mode.
Note: Program button will be disabled
once synced to a smart phone. Config-
ure all settings via synced smart phone.
To end Programming Mode, press the Program button anytime.
Programming Mode will automatically exit if the keypad is inactive for more than thirty
(30) seconds.
After entering Programming Mode, you should
see the screen as displayed to the right on your
Lockly™ keypad. Follow the following steps to
add, delete, or check your Access Codes.
SECTION 3.3 11
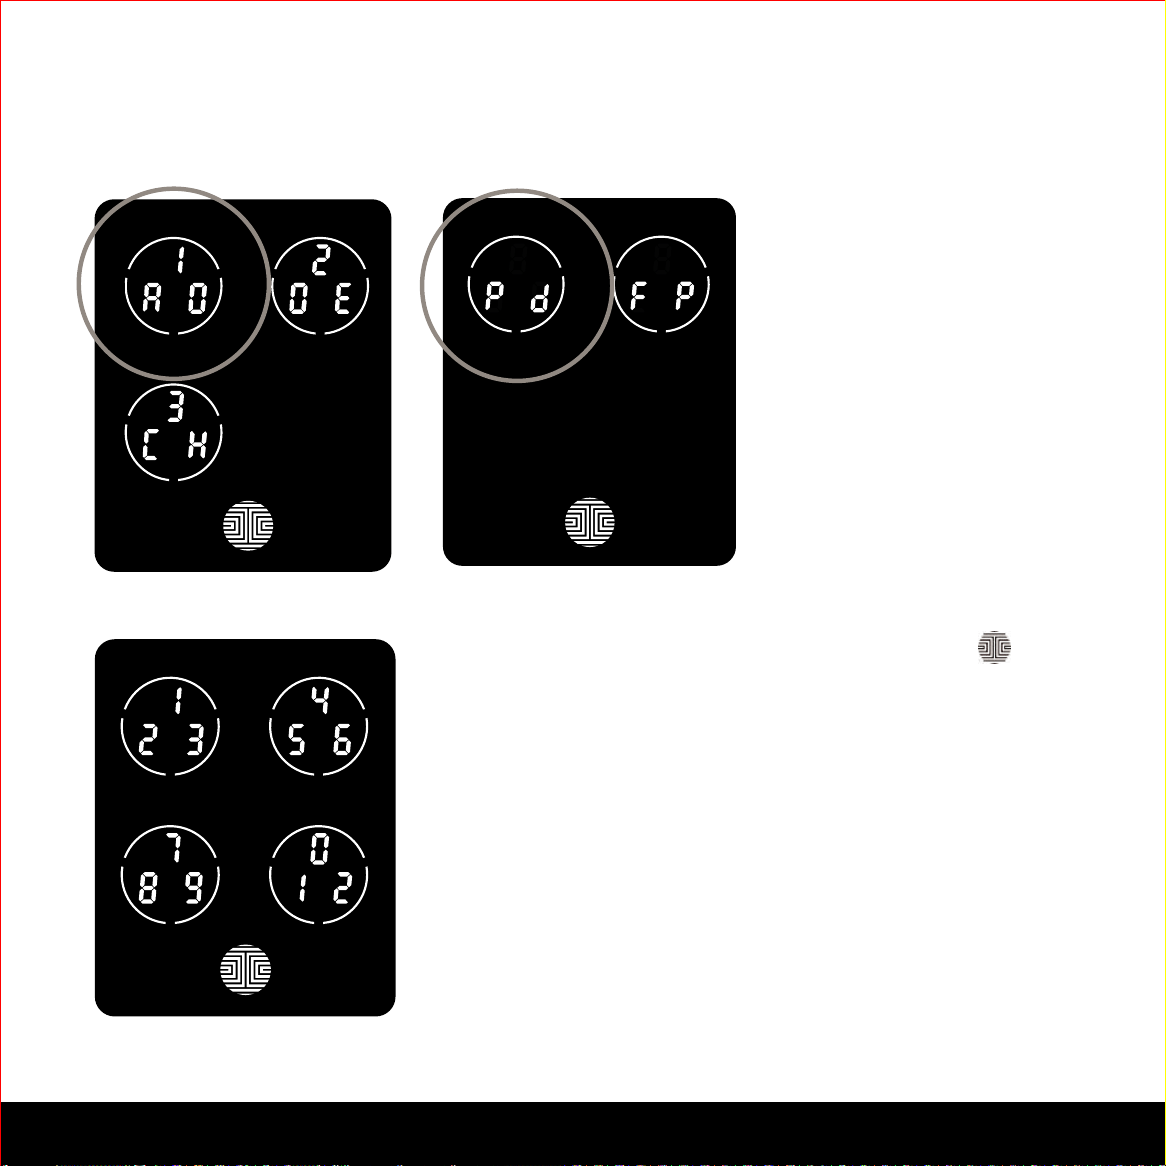
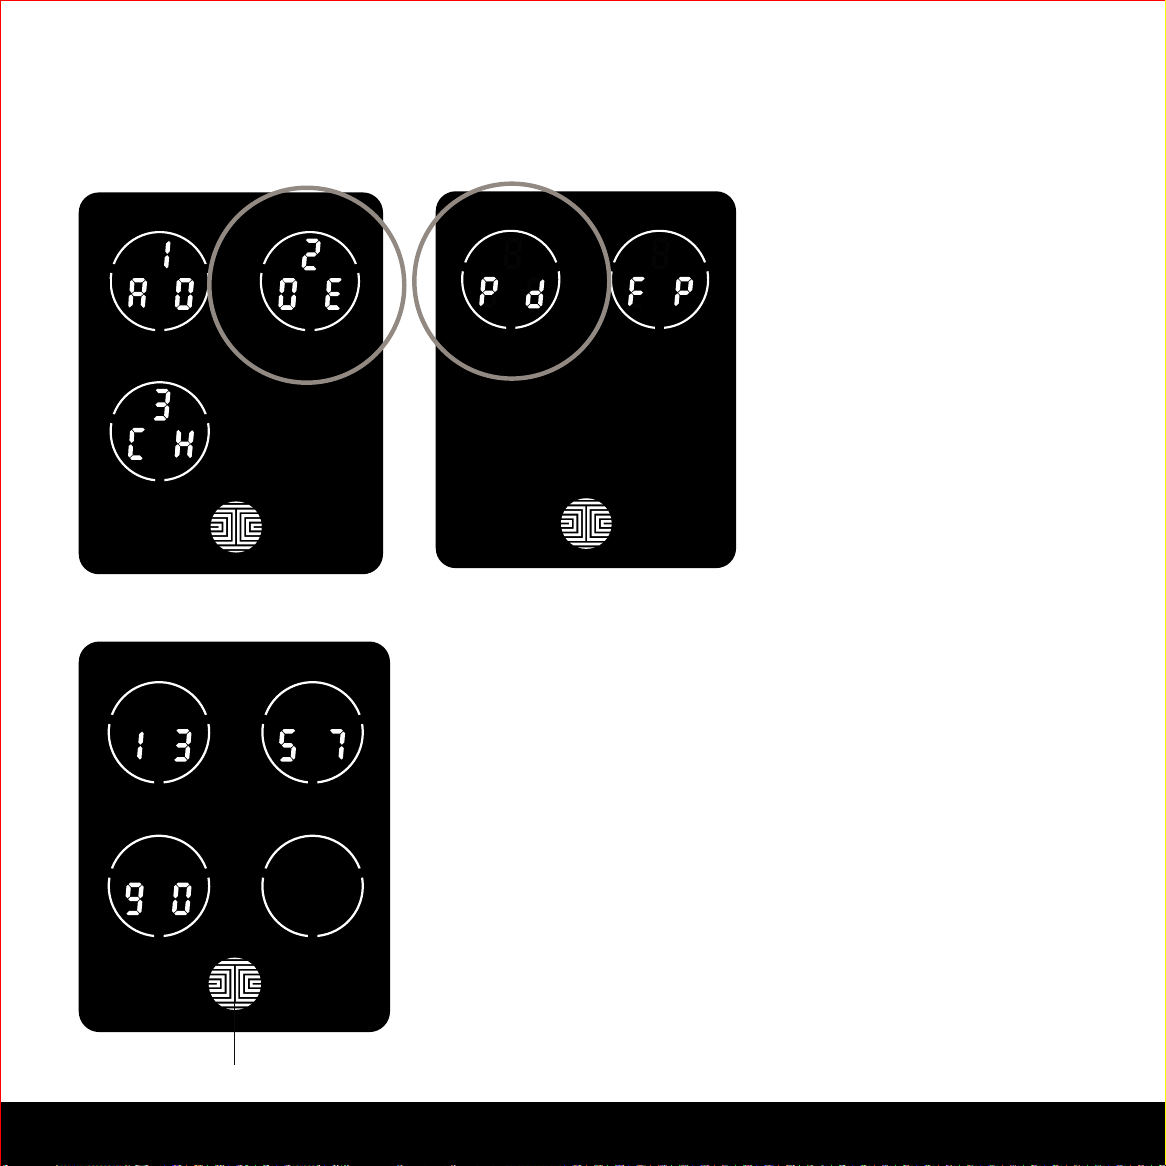
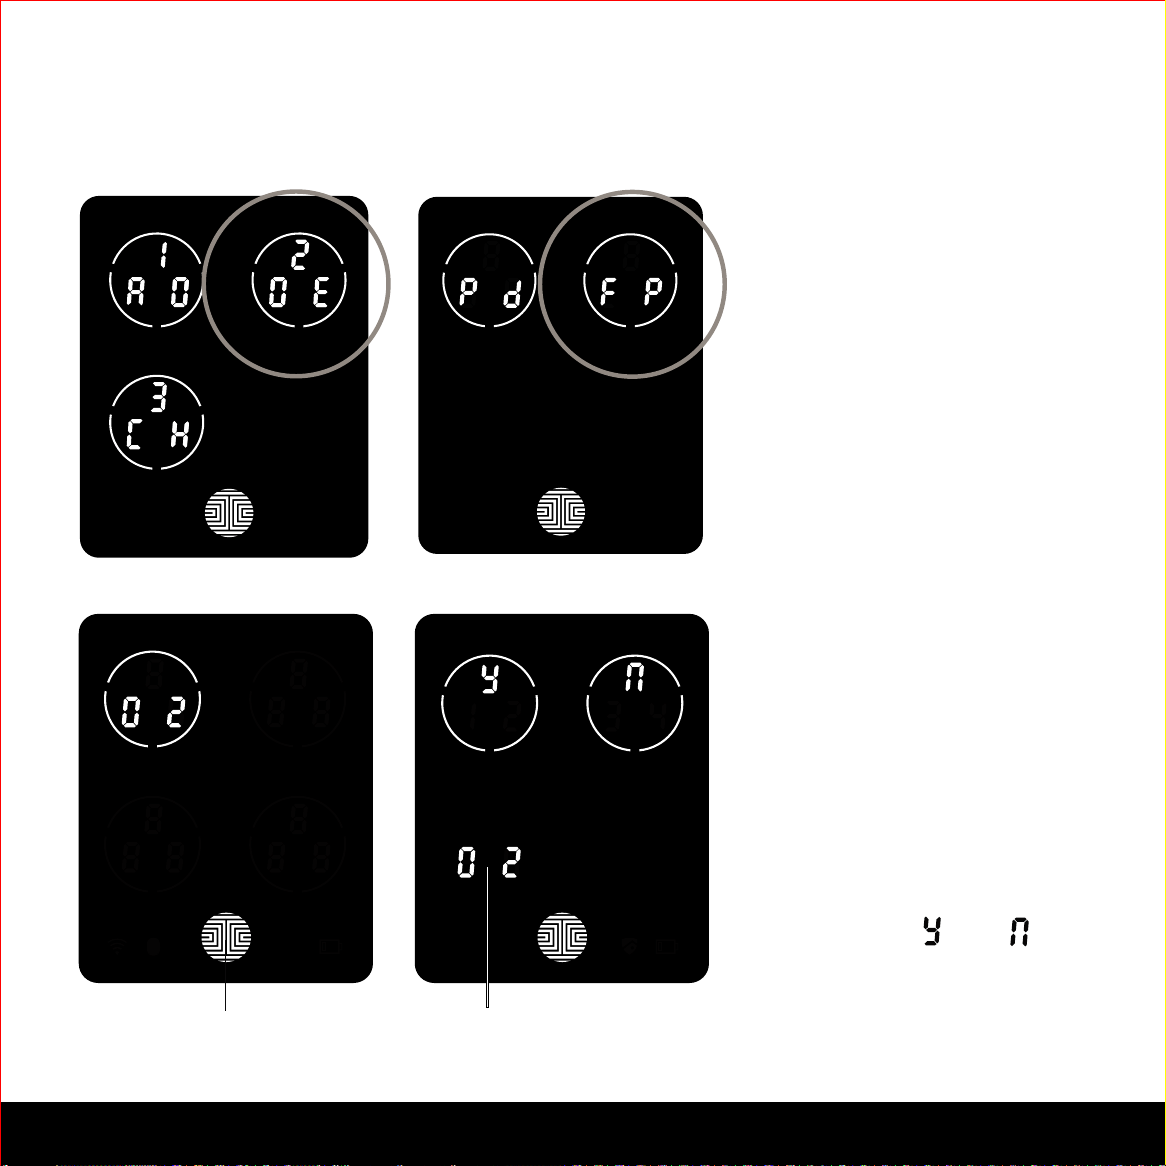
3.3 Adding an Access Code
While in Programming
Mode, select “1AD” to add
an Access Code. If you are
not in Programming Mode,
please see Section 3.2 to
enter Programming Mode.
After pressing “1AD” press
“Pd” to add an Access
Code.
Enter your new 6 - 8 digit Access Code and press
when you are finished. You will then re-enter the code
to confirm your new Access Code.
Remember, just touch the digit you need within the circle
around each 3 numbers. There is no need to touch the
exact location of the number. For example, based on the
example image to the left, if you need “1”, you can touch the
upper left button or the lower right button. For “6”, you
would touch the upper right button.
12
SECTION 3.3
3.3 Adding an Access Code (Continued)
If you have successfully entered your new Access Code
twice, you will see the new code displayed here. In this
example, we chose 654321. Press to Confirm or
to cancel.
To exit or cancel, you can always press or
If the two (2) Access Codes you entered does not match,
an error message will appear on the screen (As shown to
the left). Press OK to return to the Programming Screen
and try again. See Section 3.3
OK Button
13SECTION 3.4
3.4 Deleting an Access Code
While in Programming
Mode, select “2DE” to
delete an Access Code. If
you are not in Programming
Mode, please see Section
3.2 to enter Programming
Mode.
After pressing “2DE” press
“Pd” to delete an Access
Code.
OK Button
Example Only
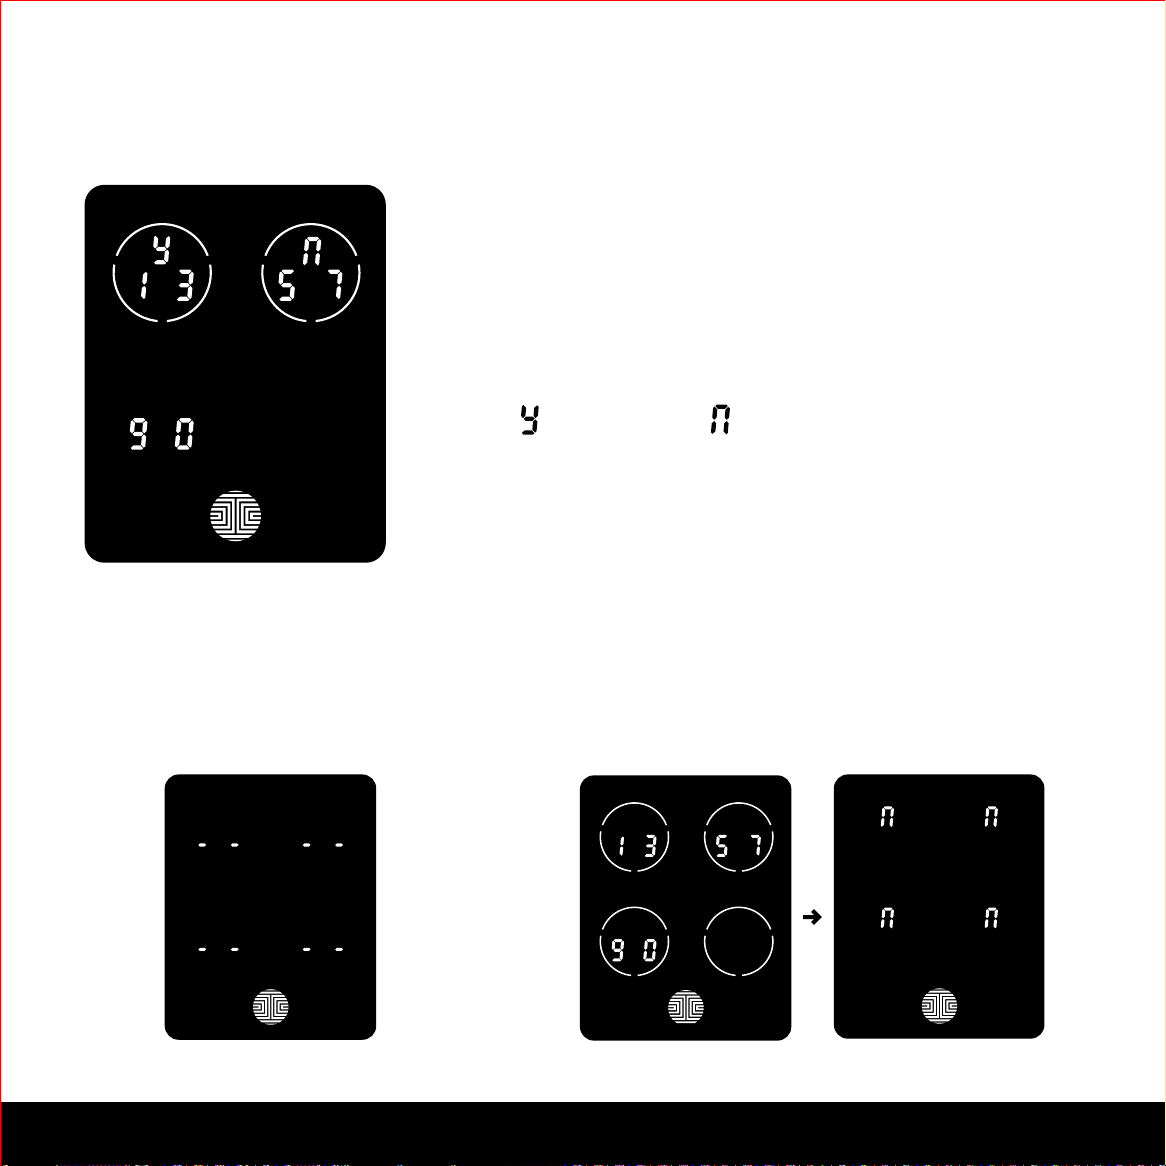
Active Access Codes will then be displayed on the screen
in sequence from left to right, top to bottom. In the
example shown on the left, the Access Code displayed is
1 3 5 7 9 0 .
Rotate through different Access Codes shown by touch-
ing any number on the screen. If you find the Access
Code you want to delete, simply hold the OK button for 2
seconds. (Continue on next page)
14
SECTION 3.4
3.4 Deleting an Access Code (Continued)
Once you have selected the Access Code you want to
delete, Lockly™ will ask you to confirm deletion by showing
you the Access Code you are deleting, in this example,1 3
5 7 9 0.
Press to delete, or to cancel.
There are two incidents where your Access Code cannot be deleted.
NOTE
Only one Active Access CodeNo Access Codes Set
There are no Access Codes set.
The factory default Access Code
cannot be deleted.
There is only one (1) Access Code saved in the
smart lock. At least one code must be registered.
Please add another Access Code before attempting
to delete the existing code.
SECTION 3.5 15
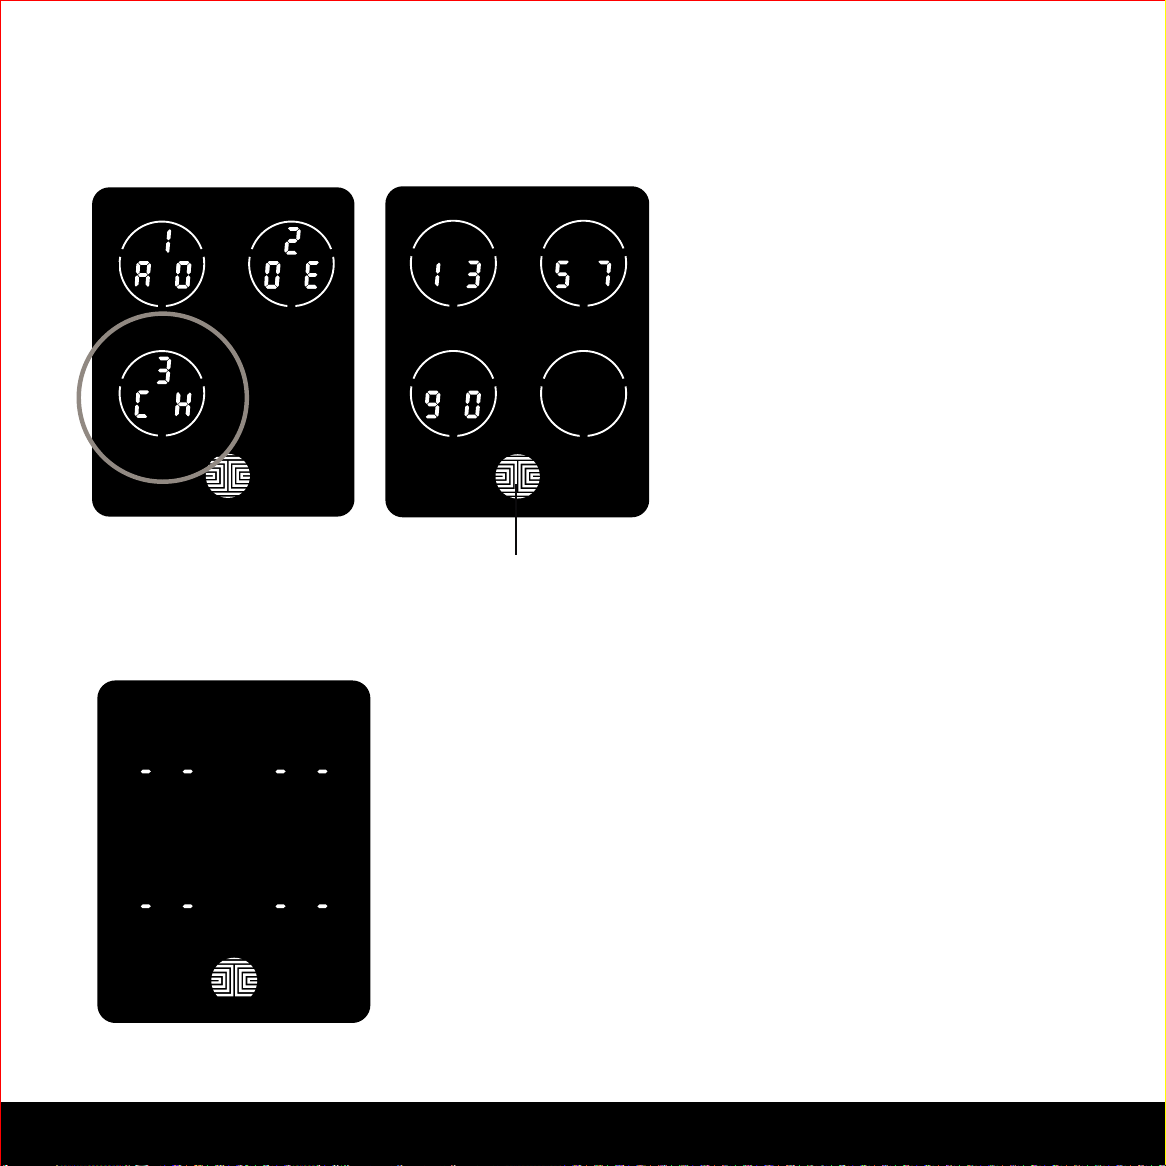
3.5 Checking the Access Codes
OK Button
While in Programming Mode,
select “3CH” to check registered
Access Codes. If you are not in
Programming Mode, please see
Section 3.2 to enter Programming
Mode.
Active Access Codes will then be
displayed on the screen in
sequence from left to right, top to
bottom. In the example shown on
the left, the Access Code
displayed is 1 3 5 7 9 0 .
Rotate through the different Access Codes by touching any number on the screen.
To exit Check Access Code screen, simply press the OK button.
If there are no Access Codes registered in your smart
lock, Check Access Code mode will be invalid. The
default Access Code will not be shown on the display
keypad, and you will see the following screen shown to the
left instead.
16 SECTION 3.6
3.6 Adding a Fingerprint (Secure Plus and Pro Only)
In this section, you will learn how to register a fingerprint to your new smart lock. Finger-
print registration is only available in the Lockly™ Secure Plus / Pro, and not available in
Secure models. If you have Secure you may skip to Section 4.1 to learn about locking and
unlocking your door with Lockly™.
We are using an advanced biometric sensor, providing the most secure fingerprint authenti-
cation. For security reasons, Lockly™ will only accept fingerprint patterns that consist of
cross intersection points. Patterns with no cross intersection points will not be acceptable.
Please check your fingers before registration to make sure the finger you want to register will be
acceptable by our system. Otherwise, use an alternative finger to ensure successful registration.
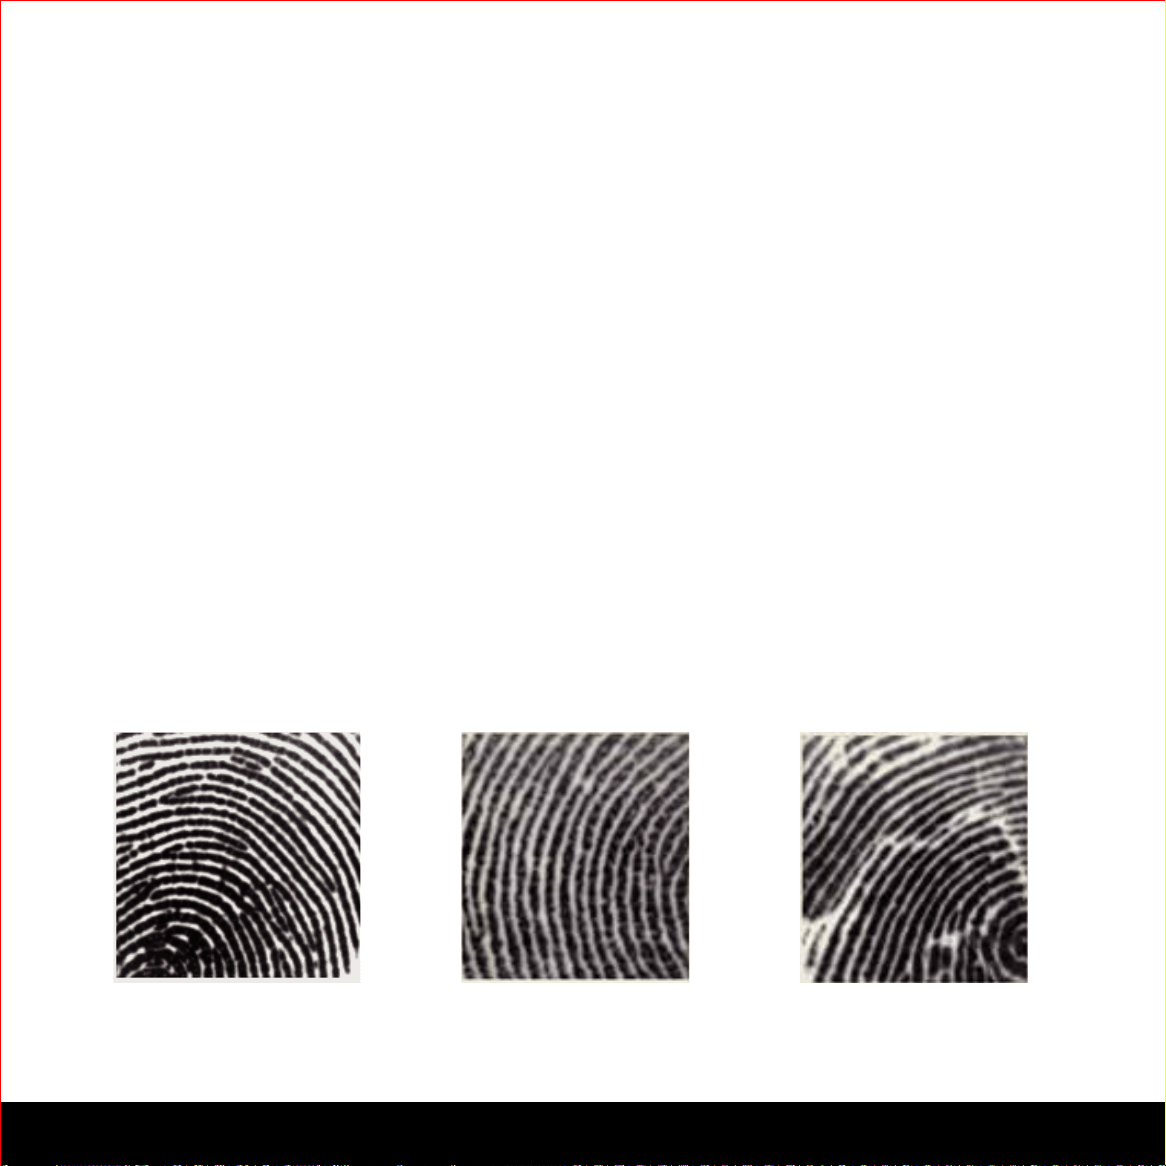
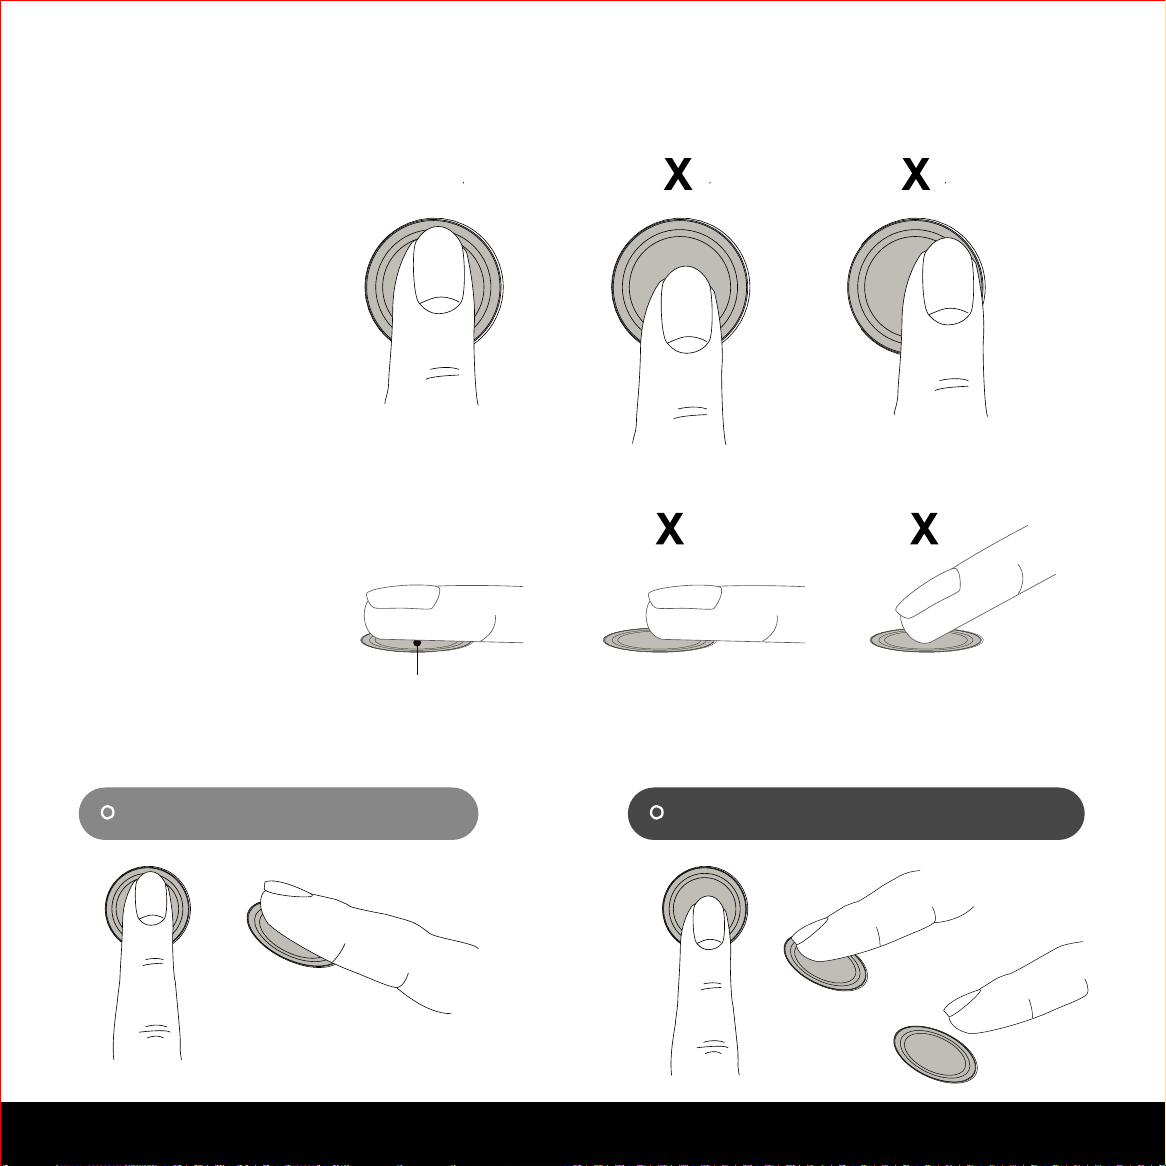
The following examples show which types of fingerprint patterns will be acceptable. It is
highly recommended to enroll at least one finger from each hand in case the hand you are
using is unavailable, such as, in instances like if you are holding items in that hand or have
sustained an injury.
The Secure Pro can register up to ninety-nine (99) fingerprints. Please read the following
sections if you want to add or delete fingerprints.
Fingerprint Pattern with
Cross Intersection Lines
Concentric or Parallel Pattern
with no Cross Intersection Lines
Fingerprint with Scars or
Worn Out Ridges
OK Not OK Not OK
SECTION 3.6 17
3.6 Adding a Fingerprint (Continued)
While in Programming Mode,
select “1AD” to add an Access
Code. If you are not in Program-
ming Mode, please see Section
3.2 to enter Programming Mode.
After pressing “1AD” press “FP”
to register a Fingerprint.
Upon pressing “FP”, you will enter Fingerprint Registration Mode and you will see a
green LED ring light up on the fingerprint panel on the exterior side of Lockly™ Secure
Plus / Pro.
Once you’re in Fingerprint Registration Mode you will see
two numbers displayed on keypad. The top number is your
Fingerprint Registration number, in this example to the
left, “1”. The bottom number will always start with a “6”.
You must successfully scan your fingerprint six (6) times for
it to properly register. Every time you scan your fingerprint,
the number on the bottom will change, starting from 6 - then
5, 4, 3, 2, 1, until the fingerprint is successfully registered.
Note: For reference, please keep a record of your finger-
print registration number to distinguish whom it was
registered to.
18
SECTION 3.6
3.6 Adding a Fingerprint (Continued)
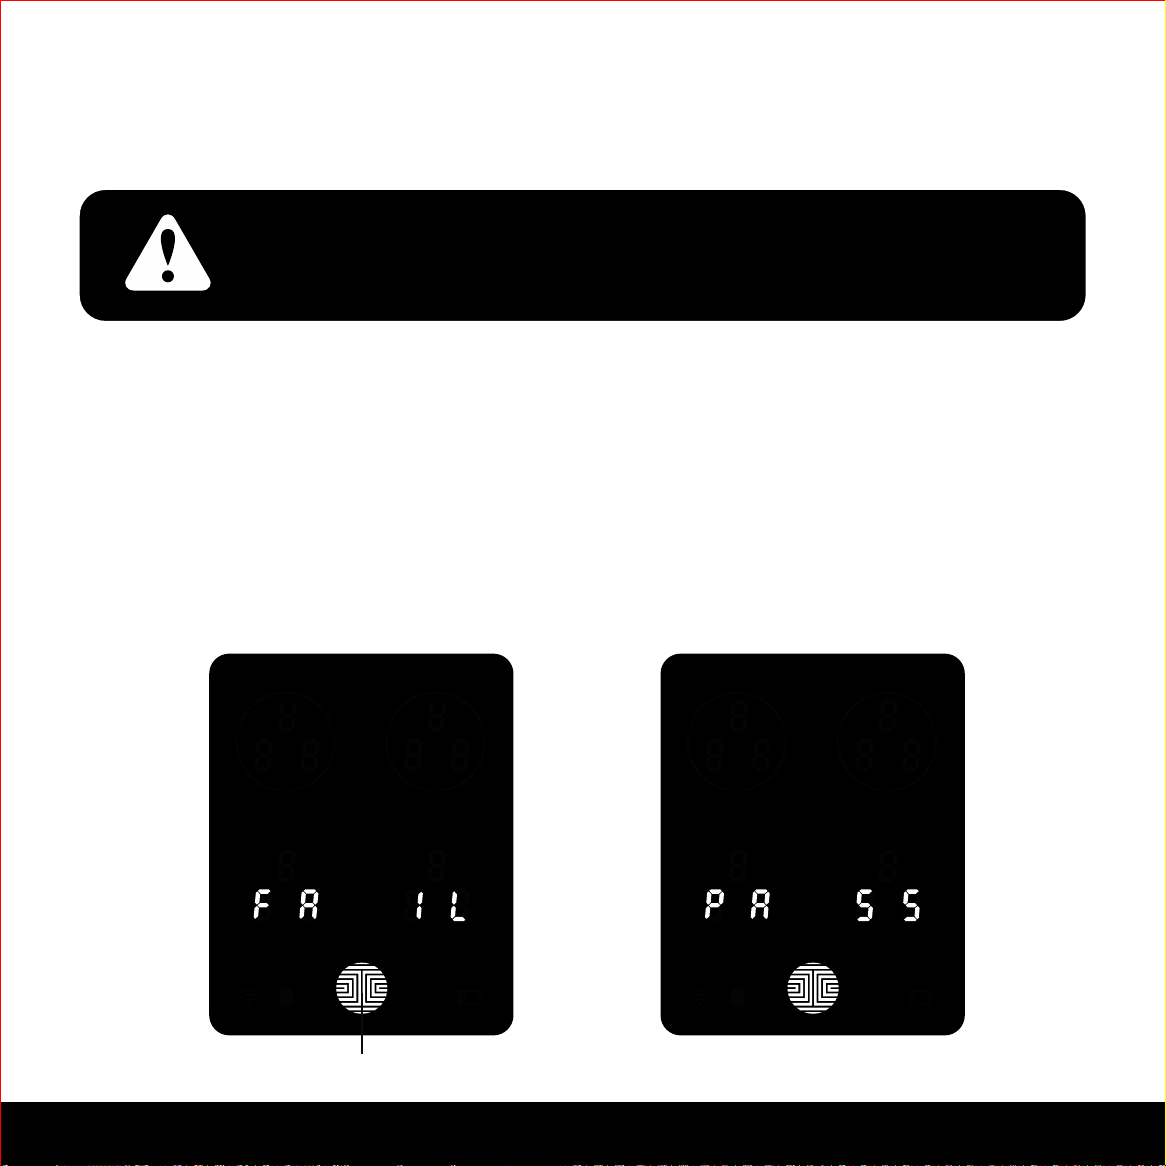
Scan your finger by lightly placing your designated finger on the sensor until you hear a
beep. Lift your finger and repeat the process slowly until the digit “6” shown on the
screen becomes “1”. If you have successfully scanned and registered your fingerprint,
you will hear a long beep, and the Bluetooth icon will flash green.
PASS will show on the keypad and press OK to exit. If you did not successfully register
your fingerprint, FAIL will show on the keypad. If FAIL is displayed, press OK to return to
the previous screen to rescan your finger.
For instructions on scanning an optimal fingerprint, please proceed to Section 3.7.
OK Button
NOTICE
Please make sure your fingers are clean from dirt and oils
before scanning your fingerprint. Make sure the sensor is
also clean by taking a soft cloth and wiping the surface.
19SECTION 3.7
3.7 Fingerprint Scanning Directions
The fingerprint sensor equipped in Lockly™ Secure Plus and Secure Pro is loaded with
powerful fingerprint algorithms to extract quality features from fingers, even in poor condi-
tions. Placing your finger on the sensor correctly helps consistency in fingerprint recogni-
tion. The following directions and tips will guide you on how to scan an optimal fingerprint
image.
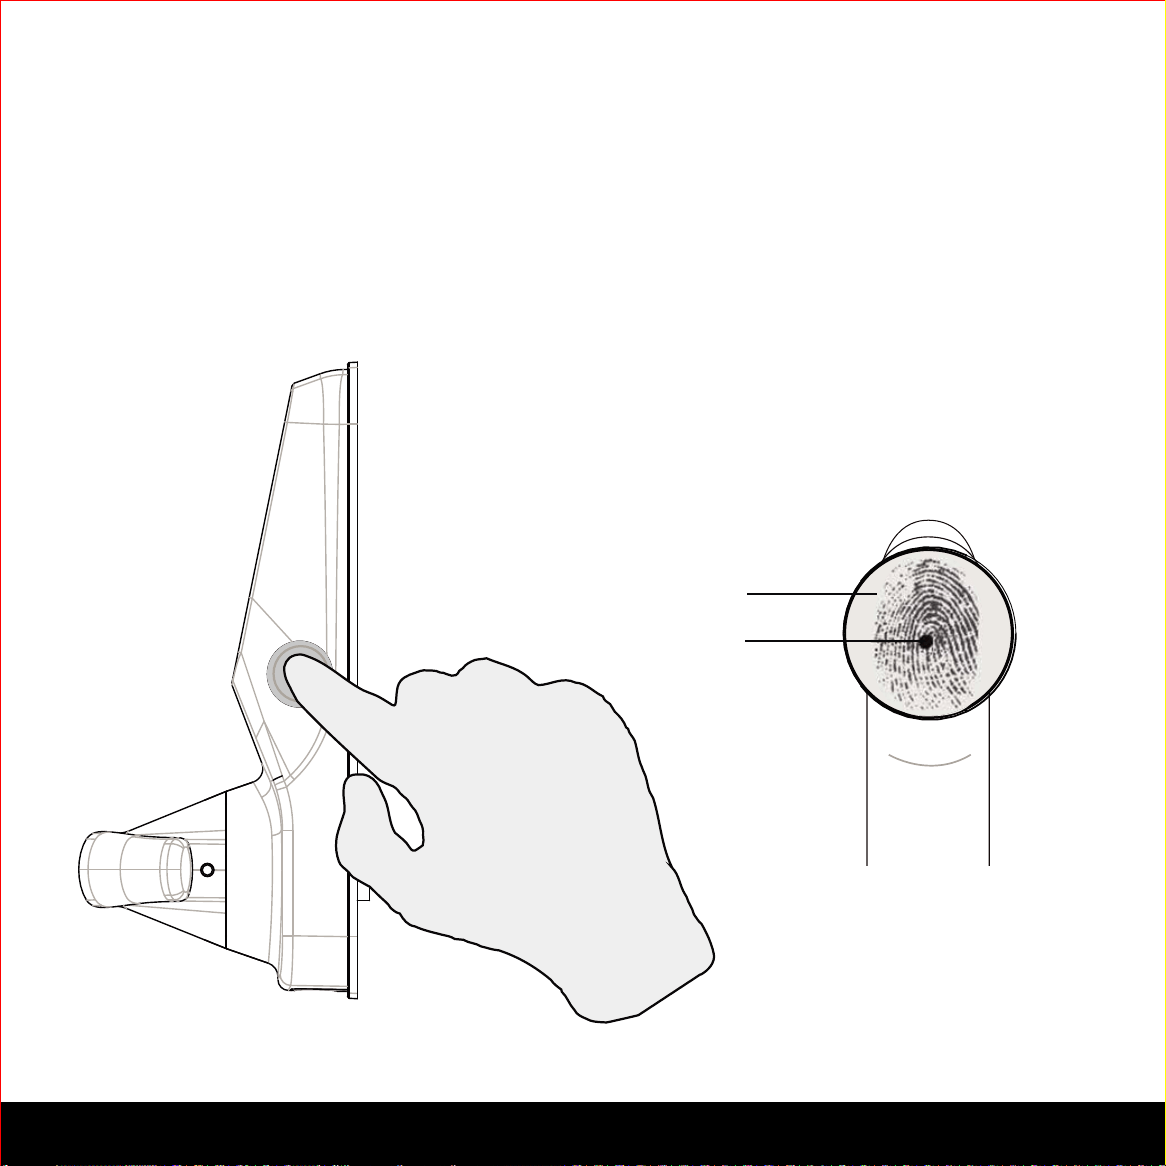
Sensor
Core
Position your finger on the
center of the sensor
20
SECTION 3.7
3.7 Fingerprint Scanning Directions (Continued)
Top View
Side View
OK
OK
Correct Incorrect

SECTION 3.8 21
3.8 Fingerprint Scanning Tips & Troubleshoot
Tips for Fingerprint Enrollment and Recognition
• Place your finger to completely cover the sensor with maximum contact surface.
• Position the center of your finger (core) to the center of the sensor.
• Hold your finger still for more than a second until you hear a beep.
• Scan a finger that is clean and free from dirt. If a finger is cracked and dry, lightly
moisten the finger to improve recognition.
• Children ages 12 and under are not recommended to use fingerprint access due to
the constant changes of their fingers during growth.
• Elderly with fading fingerprints may have difficulty in recognition.
• If your finger has a cut, scar, or cracked skin due to dryness, try another finger.
Troubleshooting Fingerprints
In case of poor fingerprint conditions
• If wet - wipe excess moisure from finger before scanning
• If dry - moisturize or blow warm breath over finger before scanning
• If dirty - wipe stains and dirt off from finger before scanning
• Make sure the sensor is clean from dirt or smudges - wipe sensor with soft cloth
regularly
For more troubleshooting help, visit http://lockly.com/help
22 SECTION 3.9
3.9 Deleting Stored Fingerprints
OK Button
Fingerprint ID Number
While in Programming Mode,
select “2DE” to delete a Finger-
print. If you are not in Program-
ming Mode, please see Section
3.2 to enter Programming
Mode.
After pressing “2DE” to delete,
press “FP” to delete a fingerprint.
Your registered fingerprint
numbers will be displayed on
the screen. Tap number to
rotate to the next registered
fingerprint. When you have
found the fingerprint ID you
want to delete, press and hold
the OK button for 2 seconds to
delete. (Example shown - “02”)
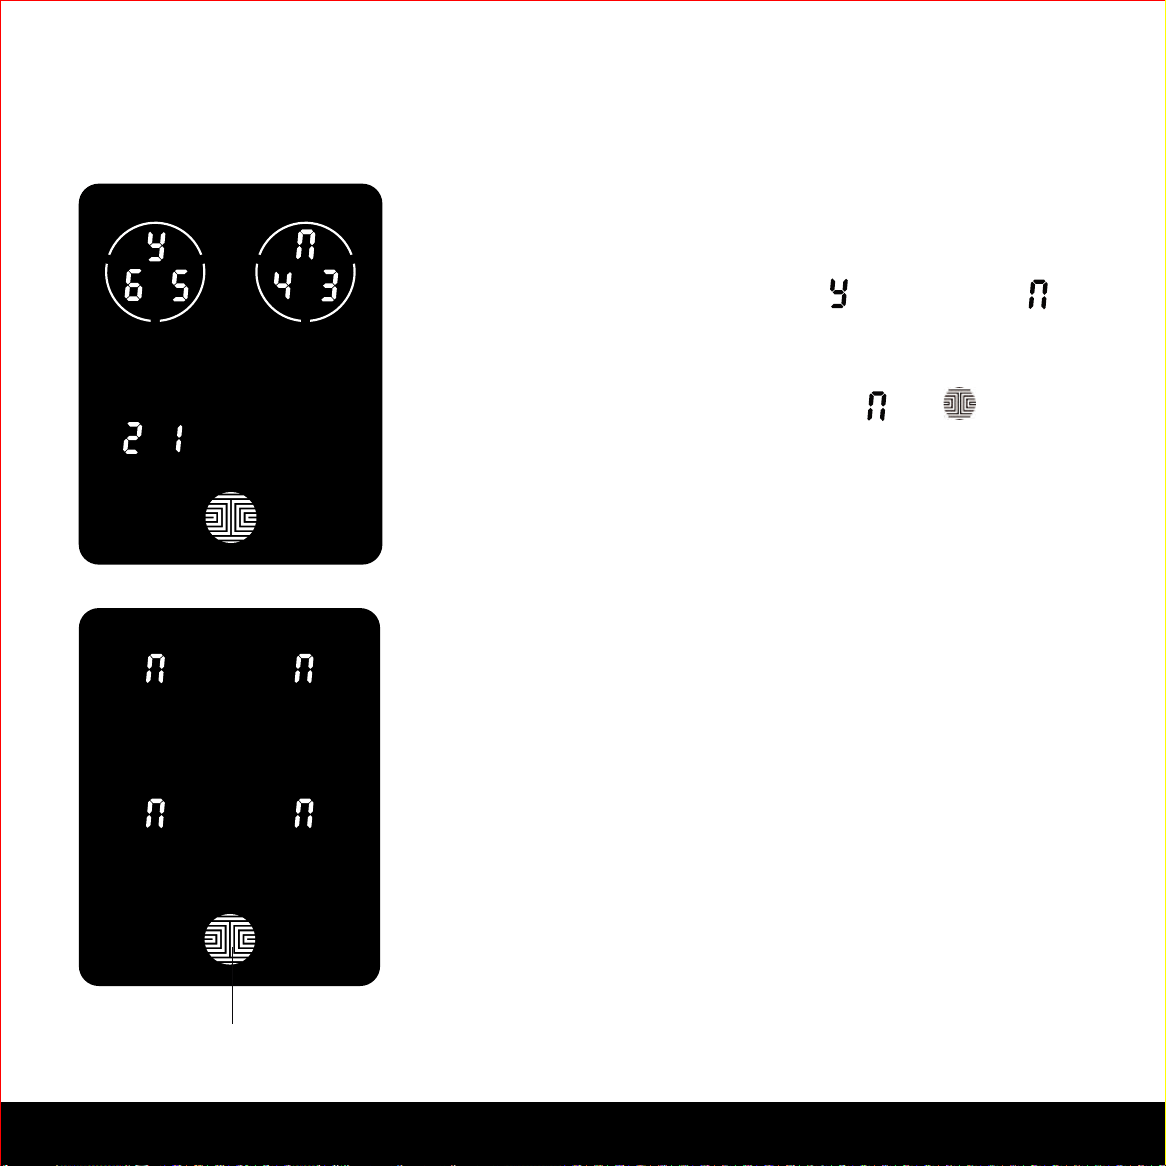
You will then see a confirmation
page displaying and with
the fingerprint number you are
deleting displayed in the lower
left. Select Y to delete or N to
cancel.
SECTION 4.1 23
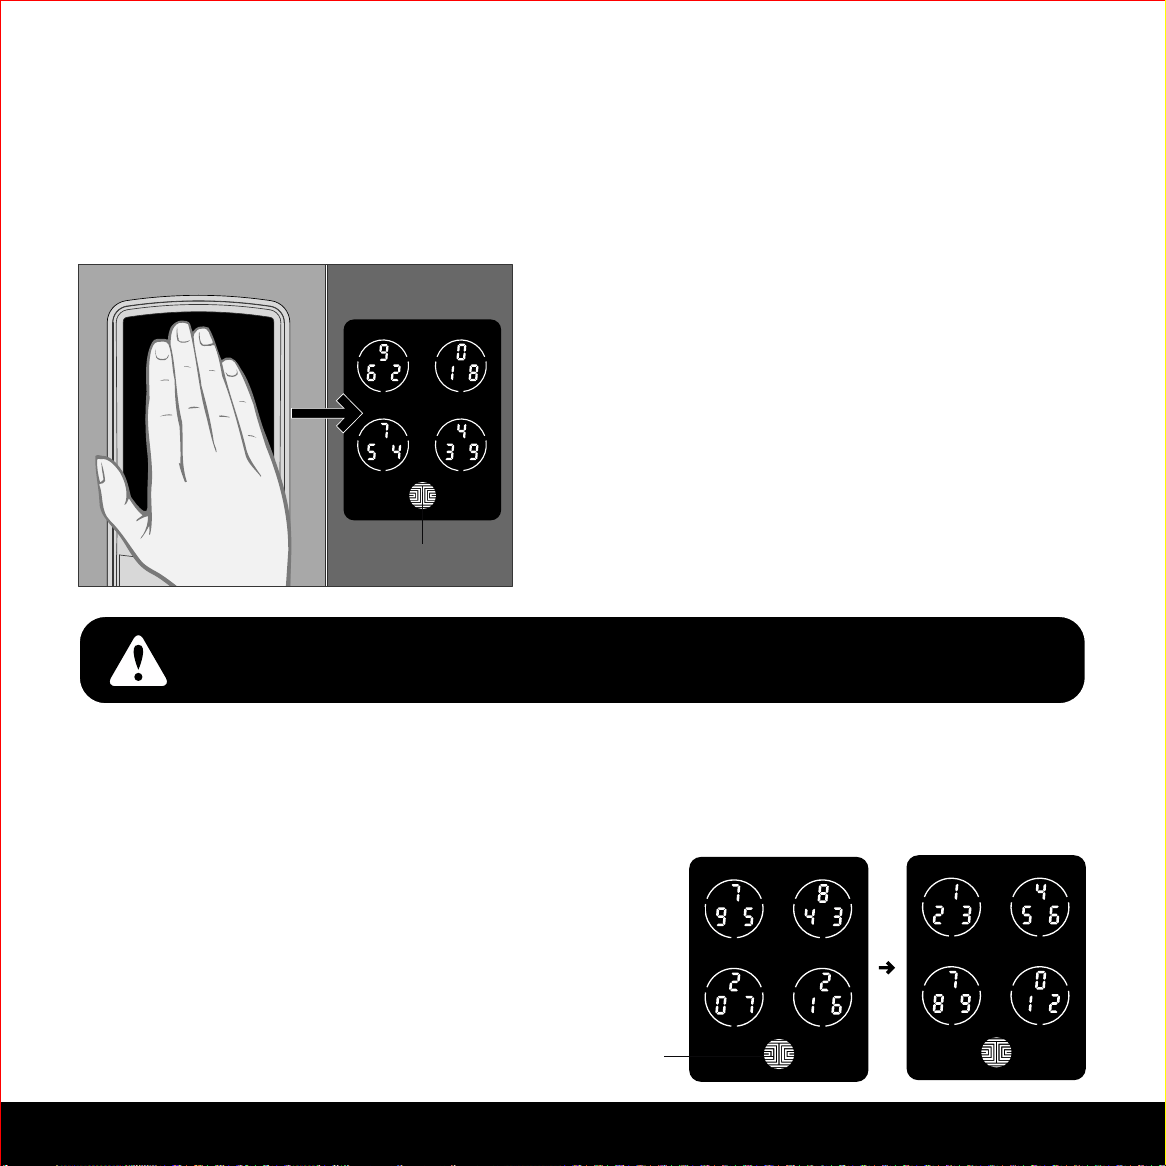
4.1 Locking/Unlocking Lockly™ with Access Codes
Lockly™ Secure series can be unlocked using 1 of 4 ways - via your stored Access
Code, registered fingerprint (Secure Plus and Secure Pro only), smartphone with
Bluetooth, or with the physical key supplied with your lock.
OK Button
Slide your hand across the screen to activate the
keypad.
Enter your 6 to 8 digit Access Code followed by
the OK button. Press OK anytime to reset if you
entered the wrong digit.
If the Access Code entered is correct, the door
will unlock. If the Access Code entered is incorrect,
Lockly™ will beep twice.
Three consecutive wrong attempts will put Lockly™ in “Safe Mode”.
(See Section 4.5)
Lock your Lockly™ Secure by pressing the OK Button anytime when the door is closed.
Lockly™ Secure will also auto-lock after five (5) seconds after unlocking and opening.
You may toggle between two types of keypad
displays to enter your Access Code. The fixed
digit version and the PIN Genie™ version (Recom-
mended). Press and hold the OK Button for 3
seconds to toggle back and forth between the two
keypads.
Hold OK Button (3 sec)
PIN Genie™
Fixed Digit
24
SECTION 4.2
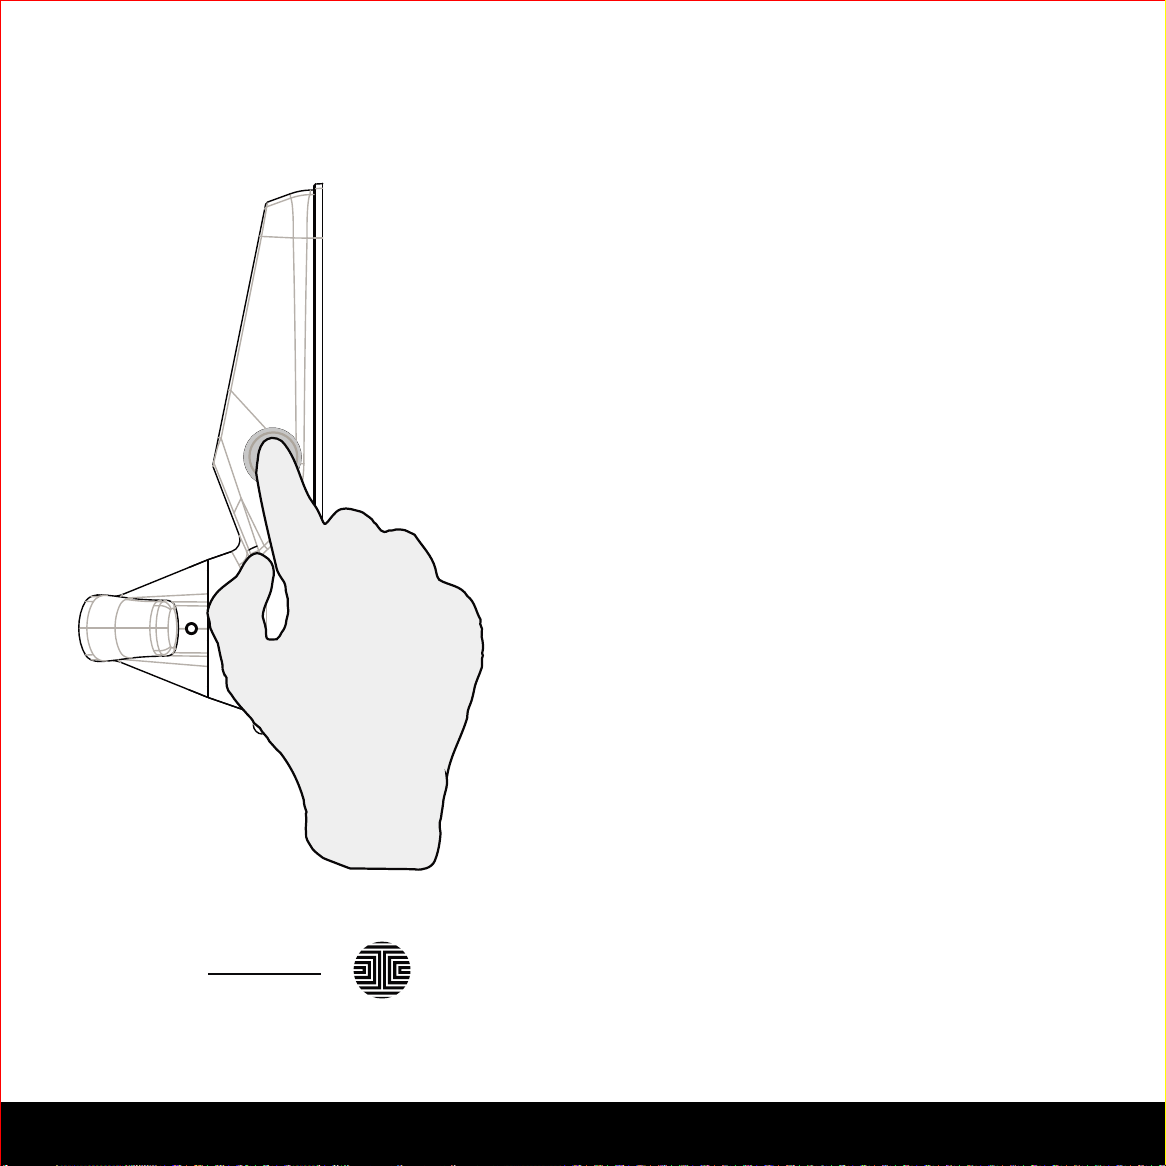
4.2 Locking/Unlocking Lockly™ with Fingerprints
Place a registered finger to the fingerprint
scanner located on the exterior side of the
lock to the right.
To register a fingerprint, please see Sec-
tion 3.6.
If your fingerprint is registered and
acknowledged, you will hear a “beep” sound
and a Green LED will light up on the finger-
print scanner. You can then push down the
handle and open the door.
If you see a Red LED, it means your finger-
print is not recognized. You must wait until
the red LED is off to try again.
For best fingerprint scanning practices, see
Section 3.7.
To lock the Lockly™ Secure, press the OK
Button anytime when the door is opened.
OK Button
Locking
Unlocking
25SECTION 4.3
4.3 Locking/Unlocking Lockly™ with App
Scan or visit Lockly.com/app
You must have the Lockly™ iOS or Android app installed in order to lock and unlock with
the smartphone app. Please first download the app from the correct store.
Please see the smartphone app manual to follow instructions on how to connect your
app to your lock via Bluetooth and learn how to lock / unlock the door using the app.
26
SECTION 4.4
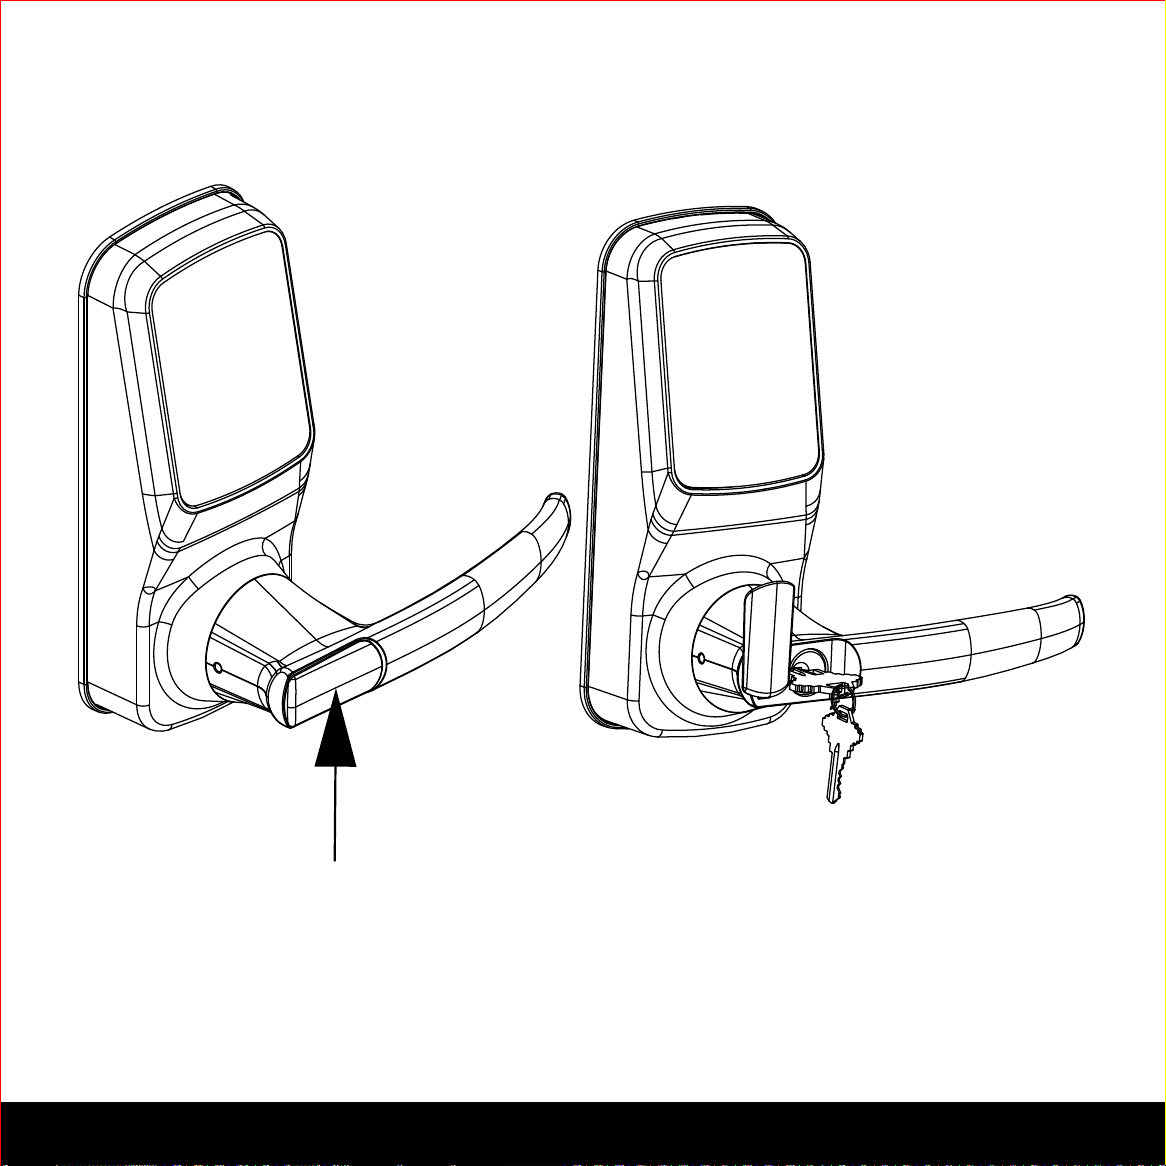
4.4 Locking/Unlocking Lockly™ with Physical Key
Exterior View
To unlock your Lockly™ using the physical key (supplied), open the key cover on the
handle by turning the cover counter clockwise 90 degrees to reveal the keyhole.
Insert your key and turn clockwise or counter clockwise to lock or unlock the door.
SECTION 4.5 27
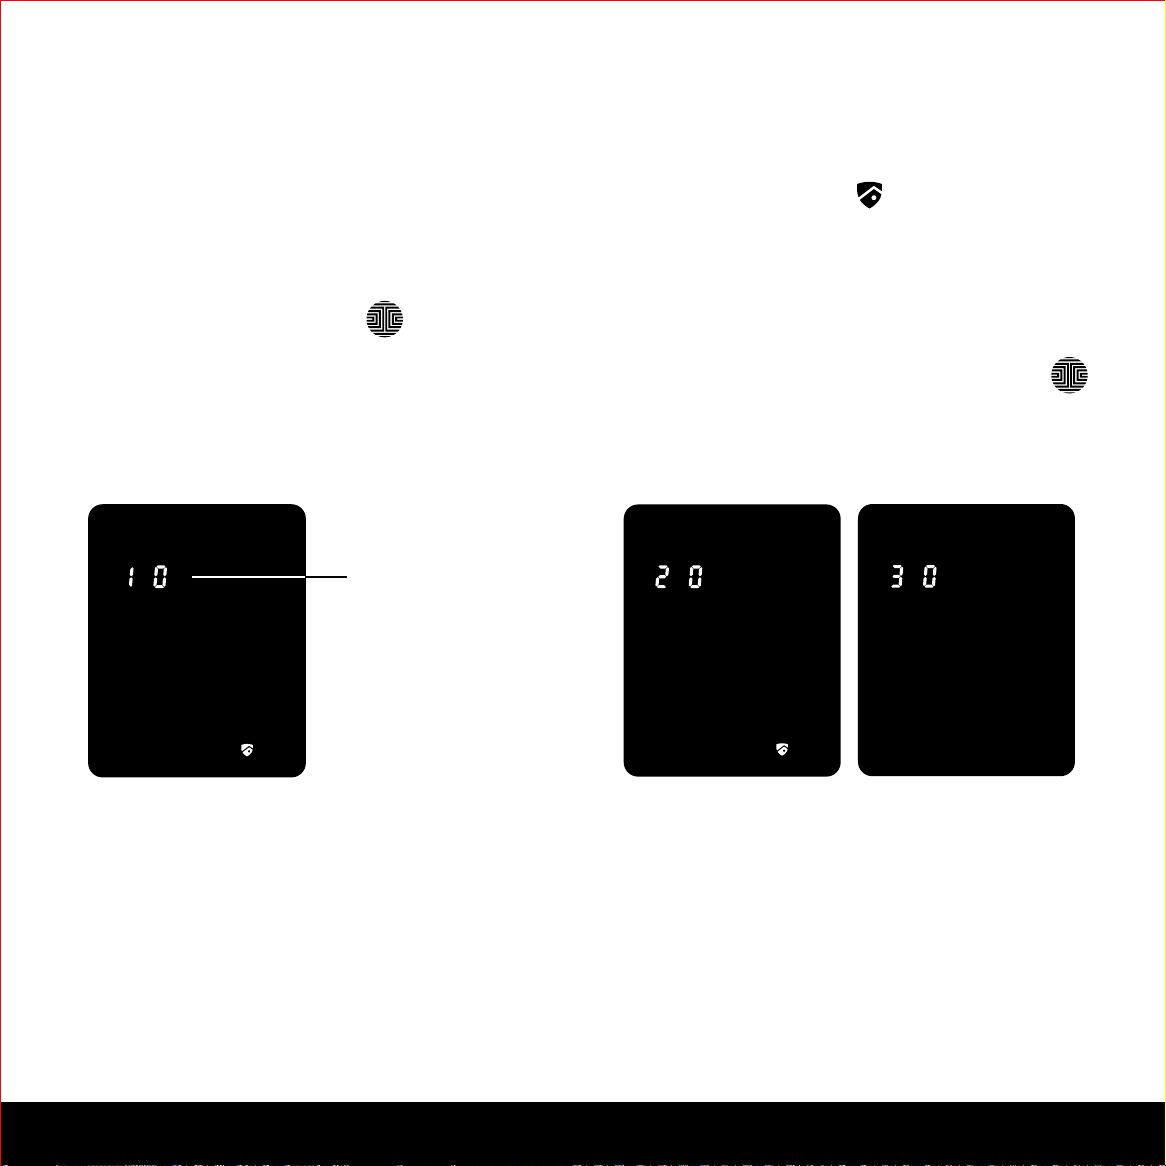
4.5 Safe Mode - Overview
Lockly™ will enter Safe Mode when three (3) consecutive wrong Access Codes are
entered within 5 minutes. When in Safe Mode, the lock status icon will start to flash.
To disable Safe Mode, you must unlock the door using the correct fingerprint (Secure
Plus / Secure Pro) or enter the correct Access Code twice in a row. Activate the keypad
by pressing and holding for 3 seconds.
Once the screen is activated, enter the correct Access Code carefully twice, pressing
after every time.
If you enter the wrong code, the keypad will then be disabled for 10 minutes.
You will see a “10” on the screen, notifying the number of minutes that the keypad is
disabled for. After 10 minutes, you may attempt to enter the correct Access Code to
unlock the door. After the second incorrect attempt to unlock the lock with the wrong
Access Code, Lockly™ will disable the keypad for 20 minutes, displaying a “20” on the
screen. After the third wrong attempt to unlock the door with the correct Access Code,
the screen will be disabled for 30 minutes. (Example A and Example B above).
Note: In order to conserve power, the countdown prompt will only be displayed for 3 seconds.
You can reactivate the screen by sliding your hand across the screen.
Countdown Prompt
(Displayed in Minutes)
Will start with 10 and
countdown until 0.
Example A Example B
28 SECTION 4.5
4.5 Disabling Safe Mode
There are three (3) ways to disable Safe Mode.
Option 1 - Entering Correct Access Code
Enter the correct Access Code twice (2) when the keypad is available, pressing
after every time the Access Code is entered.
Option 2 - Lockly™ Bluetooth App
Use the app that is synced to your Lockly™ to disable Safe Mode by unlocking the door.
If you have not downloaded the app to use with your smart lock, you won’t be able to
use this option to disable Safe Mode.
Option 3 - Screen ON/OFF Switch
The Safe Mode can be switched off using the screen on/off switch at the back on your
lock.
While in Safe Mode, the keypad will not be lit up when you are using your
Physical Key.

SECTION 5.1 29
5.1 Offline Access Code (OAC)
The Offline Access Code (OAC) is a unique feature to Lockly™ Secure Smart Locks. It
allows you to grant access to guests remotely without guests needing to download the app.
To use the OAC feature, make sure you download the Lockly™ app for iOS or Android first,
and sync your smart lock to your mobile device.
From there, you can then issue an Offline Access Code within the app.
Go to “Access Management” and choose “Add a New Offline Access Code (OAC)”
and follow on screen instructions to generate your Offline Access Code.
Understanding Offline Access Code (OAC)
Each lock can issue up to 50 OAC before you have to reset and reissue another set of 50
codes. Your app will generate some to follow directions automatically for your guests to use.
OAC are issued to the guest by asking them to enter a 6 digit number, followed by a 4-digit
number, followed again by a 4-digit number, entering in between every set of numbers.
See the following example.
234567+0987 0987
Guests’ Access Codes OAC Configuration Number
Sample OAC
Once a sequence like the one above is entered, it automatically activates an OAC to be used
for a specific duration of time. In the example above, the Guest’s Access Code will be
234567 to unlock the door. 0987 is the Configuration Number that sets the total duration of the
Access Code, whether it’s a 1 time use code, 1 hour duration code, or 30 days.

30
SECTION 6.1
6.1 Important Notes
Auto Lock Feature
Lockly™ Secure can be programmed to auto-lock between 5-300seconds, after the door
opens. You can always manually lock by pressing the button anytime located on
the bottom of the keypad.
9V Backup Access
When your Lockly™ Secure is out of power, you can temporarily activate the key pad by
using a 9V battery against the bottom of the exterior side of the smart lock. Please see
Section 2.6 for more info.
Physical Keys
Even though you have your fingerprints registered (Secure Plus and Secure Pro only)
and Access Codes stored, it’s always best practice to carry your physical keys with you
at all times in case for any reason, Lockly™ falls into Safe Mode.
Initial Code / VIP Card
You may find a VIP Card with an Initial Code included in your package. It is very crucial
that you do not lose this card. Please store this card safely as you will need the default
Initial Code on that card to master reset your lock in case, for any reason, you have
lost the phone paired to Lockly™ and also forgot your Access Code.

31SECTION 7.1
7.1 Cleaning
Making sure your Lockly™ is clean is best practice to ensure optimal product use. Follow the
DOs and DON’Ts below.
DON’TDO
• Rinse the touchscreen with warm
water prior to cleaning.
• Use the application of soap with
a damp, lukewarm cloth.
• Airdry or wipe dry with a soft
microfiber cloth to avoid scratches.
• Don’t use abrasives, high alkaline
cleaners, or gasoline to clean your
lock.
• Don’t apply cleaning detergent
directly in sunlight or at high tem-
peratures.
• Don’t leave cleaning detergent on
the display keypad for long periods
of time - wash immediately.
• Don’t use scrapers, squeegees,
or razors.
32
SECTION 8.1
8.1 Safety Precautions
Read the following instructions for your own safety
Do not attempt to disassemble the smart lock by yourself. It can cause
product damage, void warranty, and cause injuries.
Do not use any inappropriate tools that can cause damages or malfunction
to your lock.
Always make sure your door is securely closed and locked when you leave
your house to prevent unwanted entry.
Please keep your Access Codes safe. Restrict access to the back panel of
your smart lock and check your settings regularly to ensure Access Codes
have not been changed without your knowledge.
Always dispose of used batteries according to your local laws. DO NOT
BURN.
Please read all instructions carefully. Remind all Lockly™ users of the safety
precautions.
Unauthorized changes and modifications may void your product warranty.
If you have questions or any problems while using your Lockly™ Secure
Smart Lock, contact our customer service department at help@Lockly.com
or visit http://lockly.com/help for technical assistance.