Get Started!

PetSafe
®
brand is devoted to making sure you and your
pet have what you need to live your best life together. We
know that safe pets make happy people. Before getting
started, please take a moment to read through this
important safety information. If you have any questions,
please don’t hesitate to contact us.
Hereinafter Radio Systems Corporation and any other
affiliate or Brand of Radio Systems Corporation may be
referred to collectively as “We” or“Us”.
IMPORTANT SAFETY
INFORMATION
Explanation of attention words and
symbols used in this guide
This is the safety alert symbol. It is used to
alert you to potential personal injury hazards.
Obeyallsafety messages that follow this
symbol to avoid possible injury ordeath.
Welcome!
2
WARNING indicates a hazardous
situation which, if not avoided,
could result in death or
serious injury.
CAUTION, used with the safety
alert symbol, indicates a hazardous
situation which, ifnotavoided,
could result in minor or
moderate injury.
CAUTION, used without the safety
alert symbol, indicates a hazardous
situation which, ifnotavoided,
could result in harm to your pet.
• Do not use this product if your pet is aggressive or
is prone to aggressive behavior. Aggressive pets can
cause severe injury and even death to their owner
and others. If you are unsure whether this product
is appropriate for your pet, please consult your
veterinarian or a certified trainer.
3

• This device contains Lithium-Ion (Li-Ion) batteries;
never incinerate, puncture, deform, short circuit, or
charge with an inappropriate charger. Fire, explosion,
property damage, or bodily harm may occur if this
warning is not followed. To avoid electrical shock,
do not modify, disassemble, or use non-compatible
electrical components with this product.
• This product is not a toy. Keep it away from the reach
of children. Use it only as a bark deterrent.
• Proper fit of the collar is important. A collar worn for
too long or made too tight on the pet’s neck may
cause skin damage ranging from redness to pressure
ulcers. This condition is commonly known as bed
sores.
• Avoid leaving the collar on the dog for more than 12
hours per day.
• When possible, reposition the collar on the pet’s neck
every 1 to 2 hours.
• Regularly recheck the fit to prevent excessive pressure;
follow the instructions in this quick start guide.
4

• You may need to trim the hair in the area of the contact
points. However, never shave the dog’s neck; this may
lead to a rash or infection.
• Never connect a leash to a collar with contact points. It
will cause excessive pressure on the contact points.
• When connecting a leash to a separate collar, do not
allow it to put pressure on the bark collar.
• Wash the dog’s neck area and the contacts of the collar
weekly with a damp cloth.
• Examine the contact area daily for signs of a rash or a
sore.
• If a rash or sore is found, discontinue use of the collar
until the skin has healed.
• If the condition persists beyond 48 hours, see your
veterinarian.
• For additional information on bed sores and pressure
necrosis, please visit our website.
• This product is only for use with healthy pets. If
you’re not certain that your pet is in good health, we
recommend that you take your pet to a veterinarian
before using this product.
5
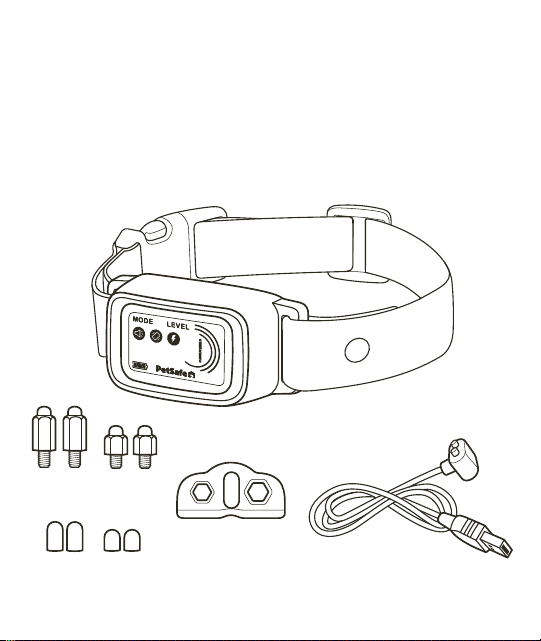
Magnetic charging cable
(with USB-A connector)
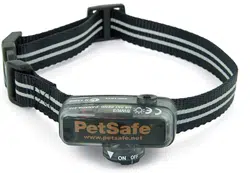
Core Bark Collar
with Digital Display
What you have:
Contact points
Test light tool
Silicone covers
Bark collar
6

How it works:
This bark collar has 7 levels of static or tone and vibration
correction. You can choose between two modes:
• Progressive: Starts with the lowest level correction
when your dog barks, then increases the intensity with
each subsequent bark. This is the default mode.
• Manual: Allows you to manually select the intensity
level you feel is appropriate for your dog. The intensity
will remain the same no matter how many times your
dog barks.
To ensure your dog’s safety, the collar automatically times
out for 30 seconds after delivering 7 consecutive static
corrections. The digital display will show a “P” when this
protection mode has been activated. To exit protection
mode, press any button or wait 30 seconds.
Important: Do not use the bark collar on dogs
younger than 6 months old. The bark collar may be
too large for dogs under 8 pounds.
7
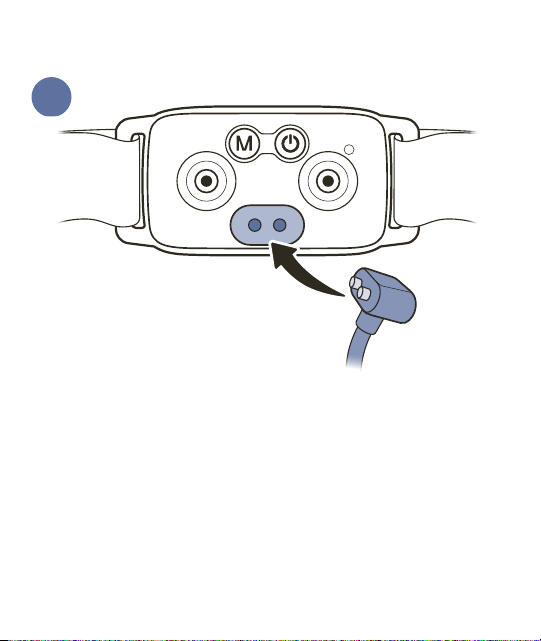
Connect the charging cable to the magnetic charging
port on the back of the collar and then plug it into a
USB-A power outlet or adaptor. Leave the collar plugged
in until fully charged; this will take about 2 hours.
The battery icon on the digital display will show three
solid bars when charging is complete.
Each charge can last up to 10 days, depending on
frequency of use.
1
Charge the bark collar
8
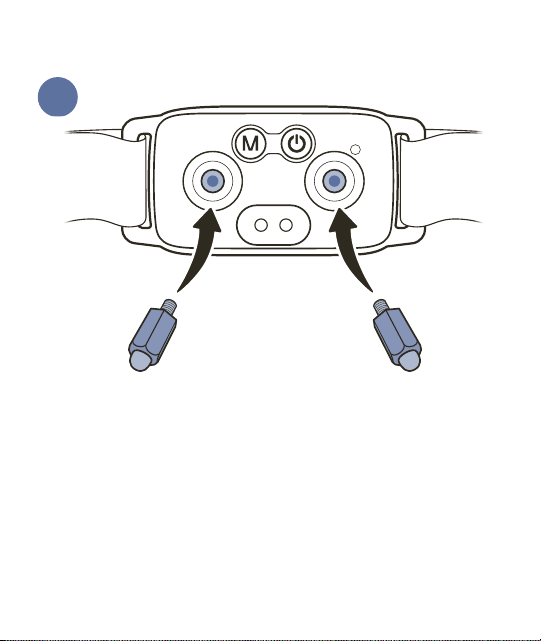
Select contact points and install them in the holes on the
back of the collar. Do not over-tighten.
If your dog is short-haired or very small, use the short
contact points. If your dog has long or thick hair, use the
long contact points.
If desired, cover the contact points with the provided
silicone covers. These are intended for dogs with sensitive
skin; the static correction will emit through the covers.
2
Install contact points
9
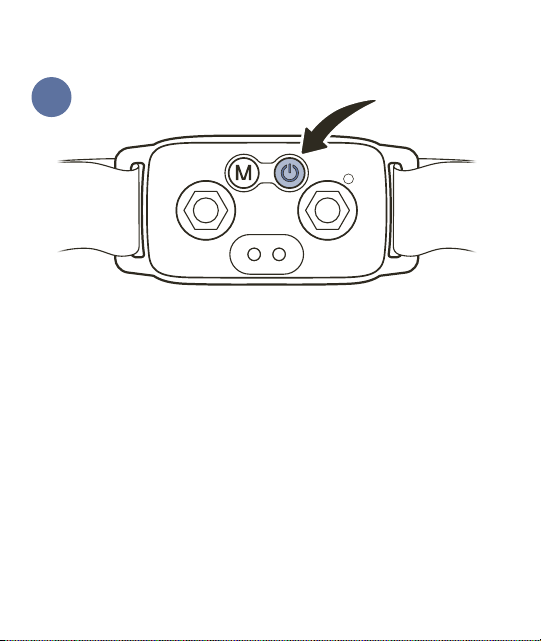
Press and hold the power button for 3 seconds to turn
the bark collar off. The collar will vibrate and the digital
display will turn off.
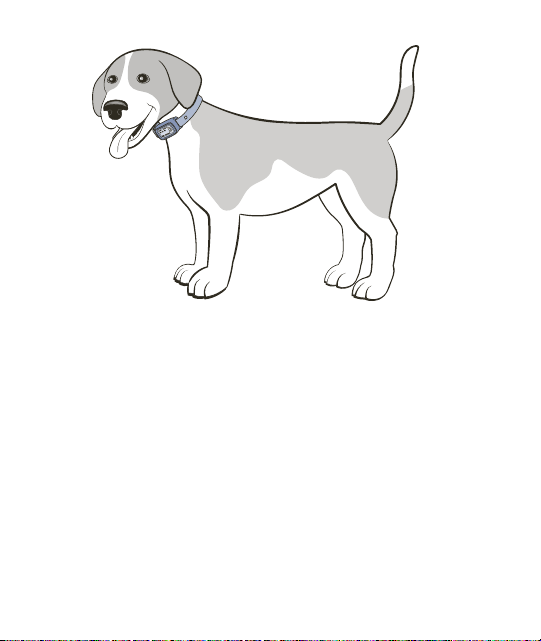
With your dog standing comfortably, place the collar
high around their neck, close to the ears. The contact
points should be centered directly under your dog’s chin,
touching the skin. If your dog has long or thick hair, it
may be necessary to trim (not shave) the hair around the
contact points to make sure that contact is consistent.
Important: Check the tightness of the bark collar by
inserting one finger between the end of a contact point
and your dog’s neck. The fit should be snug but not
3
Fit the bark collar
10
constricting. If your dog shakes their head after fitting,
the collar should not move. Recheck the fit of the collar
frequently as your dog becomes comfortable wearing it.
Once you are satisfied with the fit of the collar, remove it
from your dog and trim the excess strap, making sure to
allow room for growth or a thicker winter coat. Seal the
cut end of the strap with a lighter to prevent fraying.
Important: Do not leave the collar on your dog for more
than 12 hours a day, and never attach a leash to it — use a
separate collar or harness for that. See the customer care
guide for more important safety information about how
to fit and use the collar.
11
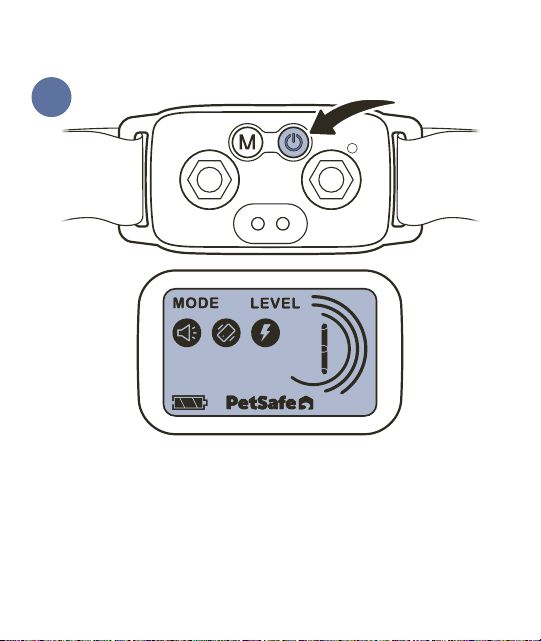
Turn the bark collar on by pressing and holding the power
button for 3 seconds. The collar will vibrate and the digital
display will illuminate.
The bark collar is set to Progressive mode (with static)
by default. To change collar settings, see the following
section.
4
Turn the bark collar on
12
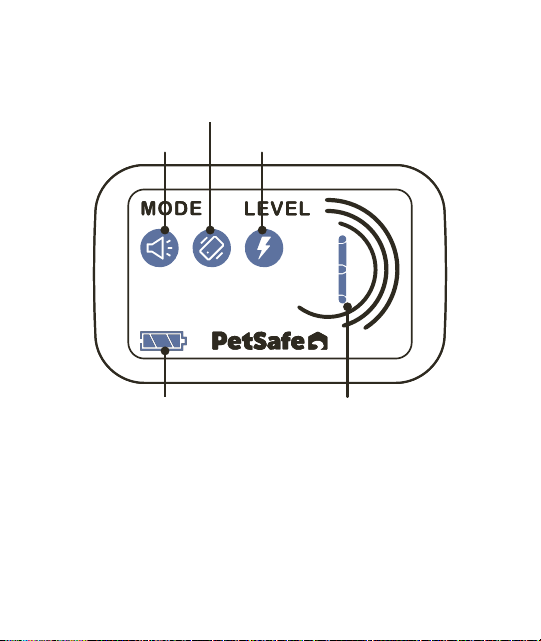
Icons on the digital display provide information about
battery power, mode, and correction level.
To save battery power, the digital display will darken after
15 seconds of inactivity. Press any button to wake the
digital display.
Change collar settings
Correction level
Tone
Vibration
Static
Battery indicator
13
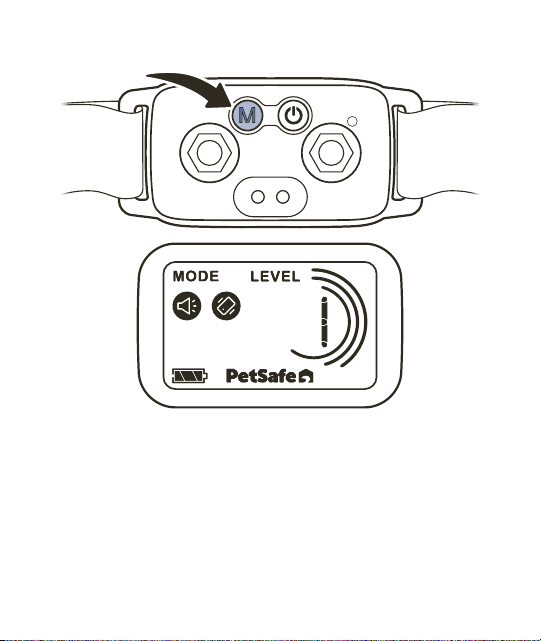
To turn static correction off, press and release the mode
button. The static icon on the digital display will turn off
to indicate static correction is disabled.
To turn static correction back on, press and release the
mode button again.
14
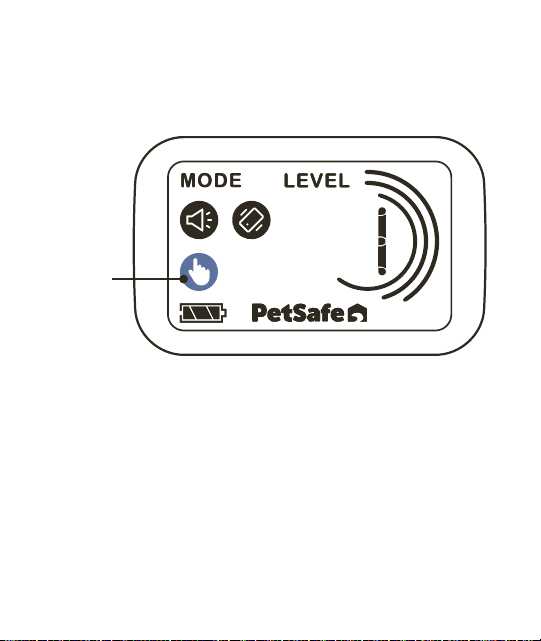
To place the bark collar in Manual mode, press and hold
the mode button for 3seconds. The digital display will
show the manual icon.
Manual
icon
15
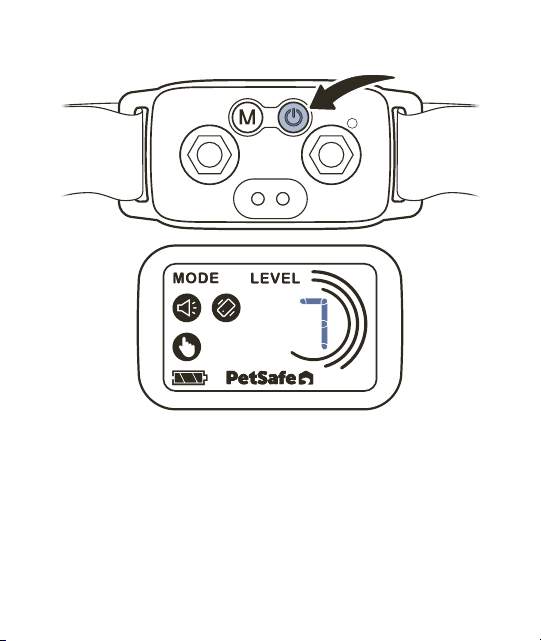
To change the correction level while in Manual mode,
press and release the power button. Each time you press
and release the power button, the correction level will
advance by 1.
To turn static correction on or off while in Manual mode,
press and release the mode button.
16

Turn the bark collar off
To turn the bark collar off, press and hold the power
button for 3seconds.
Test the bark collar
To test the bark collar:
1. Remove the collar from your dog.
2. Turn off static correction by pressing and releasing
the mode button.
3. Simultaneously shake the bark collar and speak loudly
into the microphone on the back of the collar. The
collar should tone and vibrate.
4. Turn on static correction by pressing and releasing
the mode button.
5. Hold the bottom of the test light tool against the
two contact points, ensuring the metal wires directly
touch the top of the contact points.
17

6. Simultaneously shake the bark collar and speak loudly
into the microphone on the back of the collar. The
test light tool should illuminate, indicating that a
static correction has been delivered.
Important: The test light can be hard to see in bright
daylight; shielding the test light tool with your hand
can make it easier to see. You may have to test the
bark collar a few times before seeing the test light.
7. After testing, return the bark collar to the desired
settings before placing it on your dog.
Reset the bark collar
To reset the bark collar to factory settings, press and hold
the mode button and power button simultaneously for
3seconds.
18

Terms of Use and Limitation of Liability
1. Terms of Use
The use of this product is subject to your acceptance without
modification of the terms, conditions and notices contained with
this product. Use of this product implies acceptance of all such
terms, conditions, and notices. If you do not wish to accept these
terms, conditions, and notices, please return the product, unused, in
its original packaging and at your own cost and risk to the relevant
Customer Care location together with proof of purchase for a full
refund.
2. Proper Use
Proper Use includes, without limitation, reviewing the entire Product
Manual and any specific safety information statements. The specific
temperament or size/weight of your pet may not be suitable for this
product. If you are unsure whether this product is appropriate for
your pet, please consult your veterinarian or certified trainer prior
to use. For products used with pets where training is desired, Radio
Systems Corporation recommends that these training products
are not used if your pet is aggressive and accepts no liability for
determining suitability in individual cases.
3. No Unlawful or Prohibited Use
This product is designed for use with pets only. This product is not
intended to harm, injure or provoke. Using this product in a way that
is not intended could result in violation of Federal, State or local
laws.
19

4. Limitation of Liability
In no event shall Radio Systems Corporation or any of its associated
companies be liable for (i) any direct, indirect, punitive, incidental,
special or consequential damage and/or (ii) any loss or damages
whatsoever arising out of or connected with the use or misuse of this
product. The Purchaser assumes all risks and liability from the use of
this product to the fullest extent permissible by law.
5. Modification of Terms and Conditions
Radio Systems Corporation reserves the right to change the terms,
conditions and notices governing this product from time to time.
If such changes have been notified to you prior to your use of this
product, they shall be binding on you as if incorporated herein.
6. Limited Warranty
This product has the benefit of a one-year limited manufacturer’s
warranty. Complete details of the warranty applicable to this
product can be found online at https://www.petsafe.net/support/
policies-and-terms/return-and-warranty-information and/or by
contacting your local Customer Care Center at +1 (800) 732-2677,
Radio Systems Corporation, 10427 PetSafe Way, Knoxville, TN
37932. Radio Systems Corporation disclaims all other express or
implied warranties, including merchantability and fitness for a
particular purpose.
20

Important Recycling Advice
Please respect the Waste Electrical and Electronic
Equipment regulations in your country. This
equipment must be recycled. At the end of the
product life, do not place it in the normal municipal
waste system. Please check the regulations in your area
or return it to where it was purchased so that it can be
placed in our recycling system.
Compliance
FCC
This device complies with part 15 of the FCC Rules.
Operation is subject to the following two conditions:
(1) This device may not cause harmful interference, and
(2) this device must accept any interference received,
including interference that may cause undesired
operation.
NOTE: This equipment has been tested and found
to comply with the limits for a Class B digital device,
pursuant to part 15 of the FCC Rules. These limits are
designed to provide reasonable protection against
harmful interference in a residential installation. This
equipment generates, uses, and can radiate radio
frequency energy and, if not installed and used in
21

accordance with the instructions, may cause harmful
interference to radio communications. However, there
is no guarantee that interference will not occur in a
specific installation. If interference does occur to radio
or television reception, which can be determined by
turning the equipment off and on, the user is encouraged
to try to correct the interference by one or more of the
following measures:
• Reorient or relocate the receiving antenna.
• Increase the separation between the equipment and
the receiver.
• Connect the equipment to an outlet on a circuit
different from that to which the receiver is connected.
• Consult customer care, the dealer, or an experienced
radio/TV technician for help.
CAUTION: Modification or changes to this equipment not
expressly approved by Radio Systems Corporation may
void the user’s authority to operate the equipment.
22

23

1-Year Limited Warranty
©2025 Radio Systems Corporation | Model: PBC00-18184 | 400-2689
Core Bark Collar
with Digital Display
For questions or additional tips:
support.petsafe.com
We’re here to help!