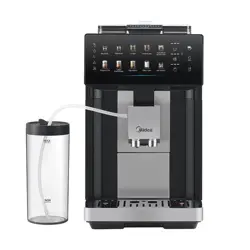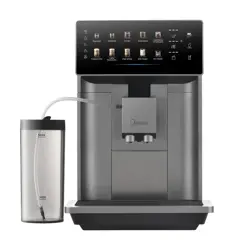
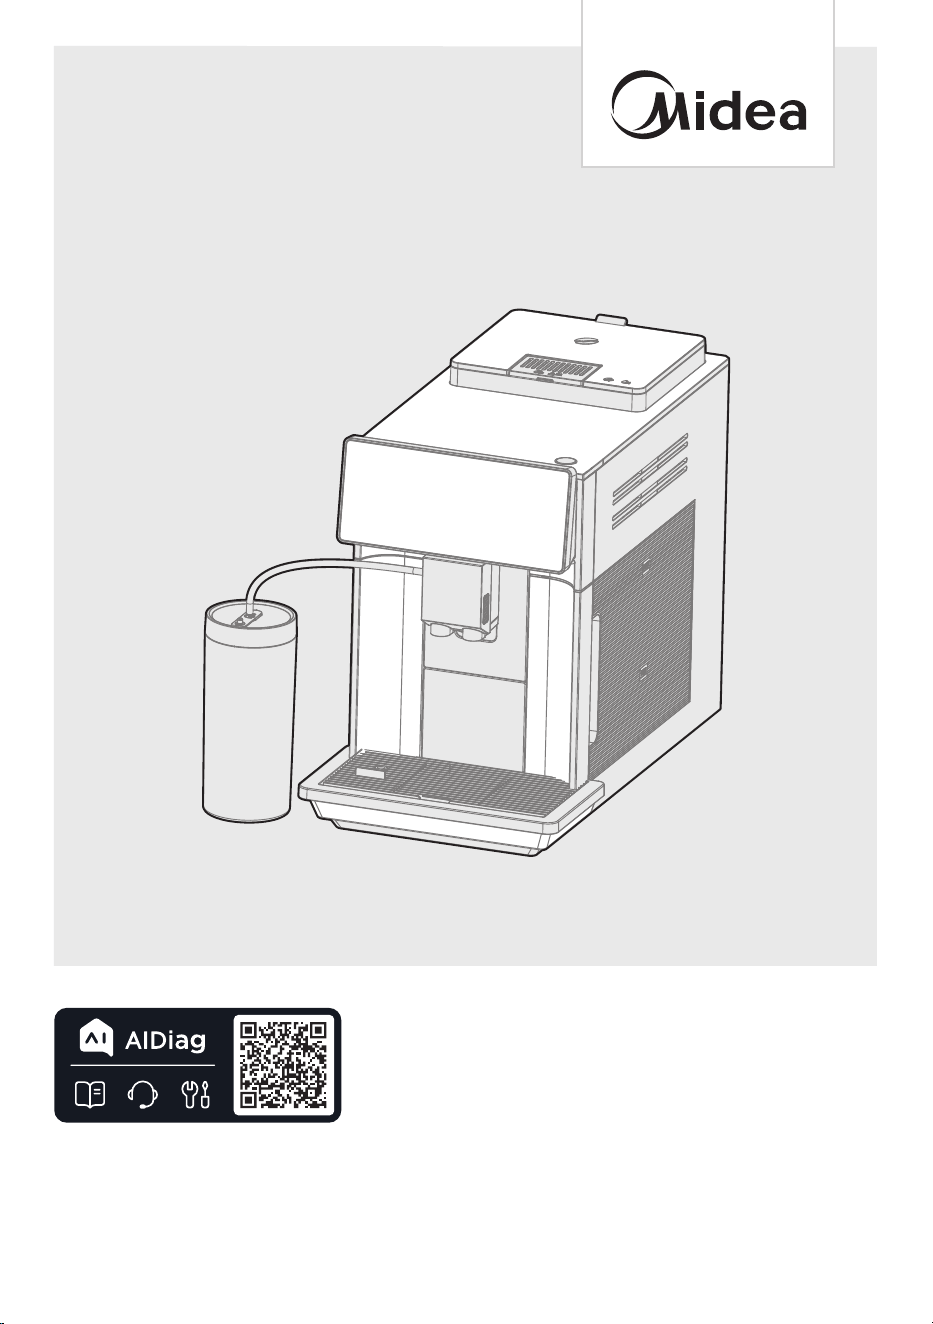
MCM100FACPS
USER MANUAL
COFFEE MACHINE
Warning notices: Before using this product, please read this manual carefully and keep it for future reference.
The design and specifications are subject to change without prior notice for product improvement.
Consult with your dealer or manufacturer for details.
The diagram above is just for reference. Please take the appearance of the actual product as the standard.
THANK YOU LETTER
Thank you for choosing Midea! Before using your new Midea product, please read
this manual thoroughly to ensure that you know how to operate the features and
functions that your new appliance offers in a safe way.
CONTENTS
0 1
06
1 4
20
29
37
38
05
0 2
T
H
ANK YOU LETTER
SAFETY INSTRUCTIONS
SPEC
I
FICATIONS
PRODUCT OVERVIEW
OPERATING INSTRUCTIONS
CLEANING AND MAINTENANCE
TROUBLESHOOTING
TRADEMARKS, COPYRIGHTS AND LEGAL STATEMENT
DATA PROTECTION NOTICE
39
01
WARRANTY CARD
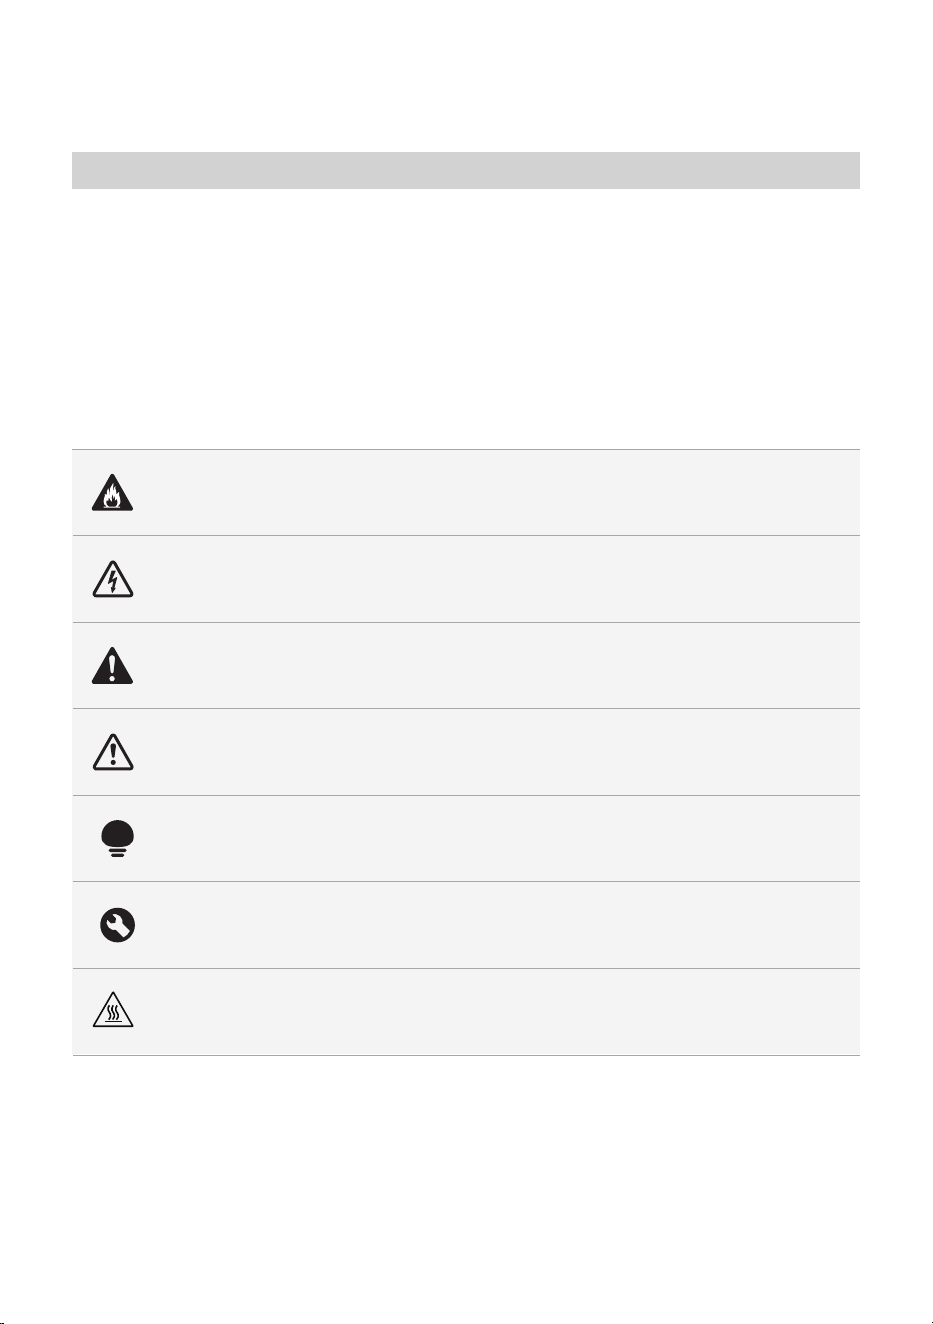
Danger
This symbol indicates that there are dangers to the life and health of
persons due to extremely flammable gas.
Warning of electrical voltage
This symbol indicates that there is a danger to life and health of
persons due to voltage.
Warning
The signal word indicates a hazard with a medium level of risk which, if
not avoided, may result in death or serious injury.
Caution
The signal word indicates a hazard with a low degree of risk which, if
not avoided, may result in minor or moderate injury.
Attention
The signal word indicates important information (e.g. damage to
property), but not danger.
Observe instructions
This symbol indicates that a service technician should only operate and
maintain this appliance in accordance with the operating instructions.
Read these operating instructions carefully and attentively before using/commissioning the
unit and keep them in the immediate vicinity of the installation site or unit for later use!
Intended Use
The following safety guidelines are intended to prevent unforeseen risks or damage from
unsafe or incorrect operation of the appliance. Please check the packaging and appliance
on arrival to make sure everything is intact to ensure safe operation. If you find any
damage, please contact the retailer or dealer. Please note modifications or alterations to
the appliance are not allowed for your safety. Unintended use may cause hazards and
loss of warranty.
Explanation of Symbols
SAFETY INSTRUCTIONS
Anti-scalding sign
The surface is liable to get hot during use.
02

03
• Read all instructions
• Do not operate any appliance with a damaged cord or
plug or after the appliance malfunctions or has been
damaged in any manner. Return appliance to the nearest
authorized service facility for examination, repair, or
adjustment.
• To protect against fire, electrical shock and injury to
persons do not immerse cord, plugs, or other live parts in
water or other liquid.
• Do not touch hot surfaces. Use handles or knobs.
• Scalding may occur if the lid is removed during the
brewing cycles.
• Do not use outdoor. Household use only.
• Close supervision is necessary when any appliance is
used by or near children.
• Do not use appliance for other than intended use.
• Unplug from outlet when not in use and before cleaning.
Allow to cool before putting on or taking o parts, and
before cleaning the appliance.
• The use of accessory attachments not recommended by
the appliance manufacturer may cause injuries.
• Do not let cord hang over edge of table or counter, or
touch hot surfaces.
• Do not place on or near a hot gas or electric burner, or
in a heated oven.
• To disconnect, turn any control to “o”, then remove
plug from wall outlet.
• To reduce the risk of injury, do not drape cord over the
counter top or table top where it can be pulled on by
children or tripped over unintentionally.
When using electrical appliances, basic safety precautions
should always be followed including the following:
IMPORTANT SAFEGUARDS

Save these Instructions
• A short power-supply cord is provided to reduce the
risk resulting from becoming entangled in or tripping
over a longer cord.
• This appliance is not intended for use by persons
(including children) with reduced physical, sensory or
mental capabilities, or lack of experience and knowledge,
unless they have been given supervision or instruction
concerning use of the appliance by a person responsible
for their safety. Children should be supervised to ensure
that they do not play with the appliance.
• Turn the appliance OFF, then unplug from the outlet
when not in use, before assembling or disassembling
parts and before cleaning. To unplug, grasp the plug and
pull from the outlet. Never pull from the power cord.
• Avoid contacting moving parts. Do not attempt to
defeat any safety interlock mechanisms.
• Check hopper for presence of foreign objects before
using.
a) Short power-supply cord is provided to reduce risks
resulting from becoming entangled in or tripping over a
longer cord.
b) Extension cords are available and may be used if care
is exercised in their use.
c) If a long extension cord is used:
1) The marked electrical rating of the extension cord
should be at least as great as the electrical rating of the
appliance;
2) the extension cord should be a grounding-type 3-wire
cord;
3) The longer cord should be arranged so that it will not
drape over the counter top or table top where it can be
pulled on by children or tripped over.
04

SPECIFICATIONS
Voltage
Frequency
Rated Power
120V~
60Hz
1400W
Max. amount of water 1.8L
MCM100FACPS
Product Model
05
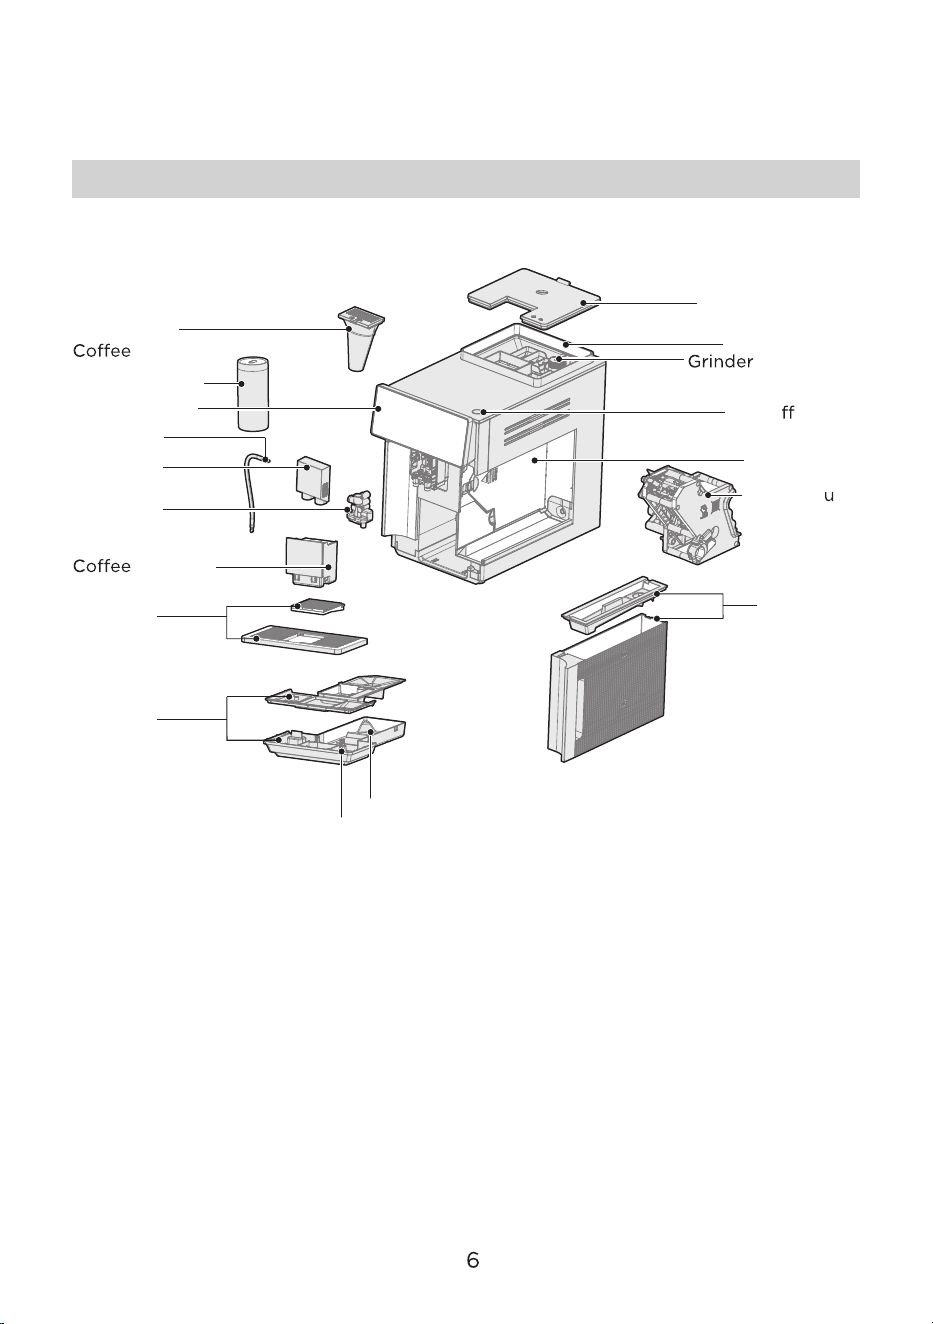
Overview of the appliance and its components:
Bean container lid
On/O button
Water tank
Brewing nit
Service door
Bean container
dial
Pre-ground
chute
Control panel
Milk Tube
Beverage
outlet cover
Beverage
outlet
grounds
container
Drip tray
Cup tray
"Drip tray
full" indicator
Milk container
PRODUCT OVERVIEW
Part Names
0
Drip tray container
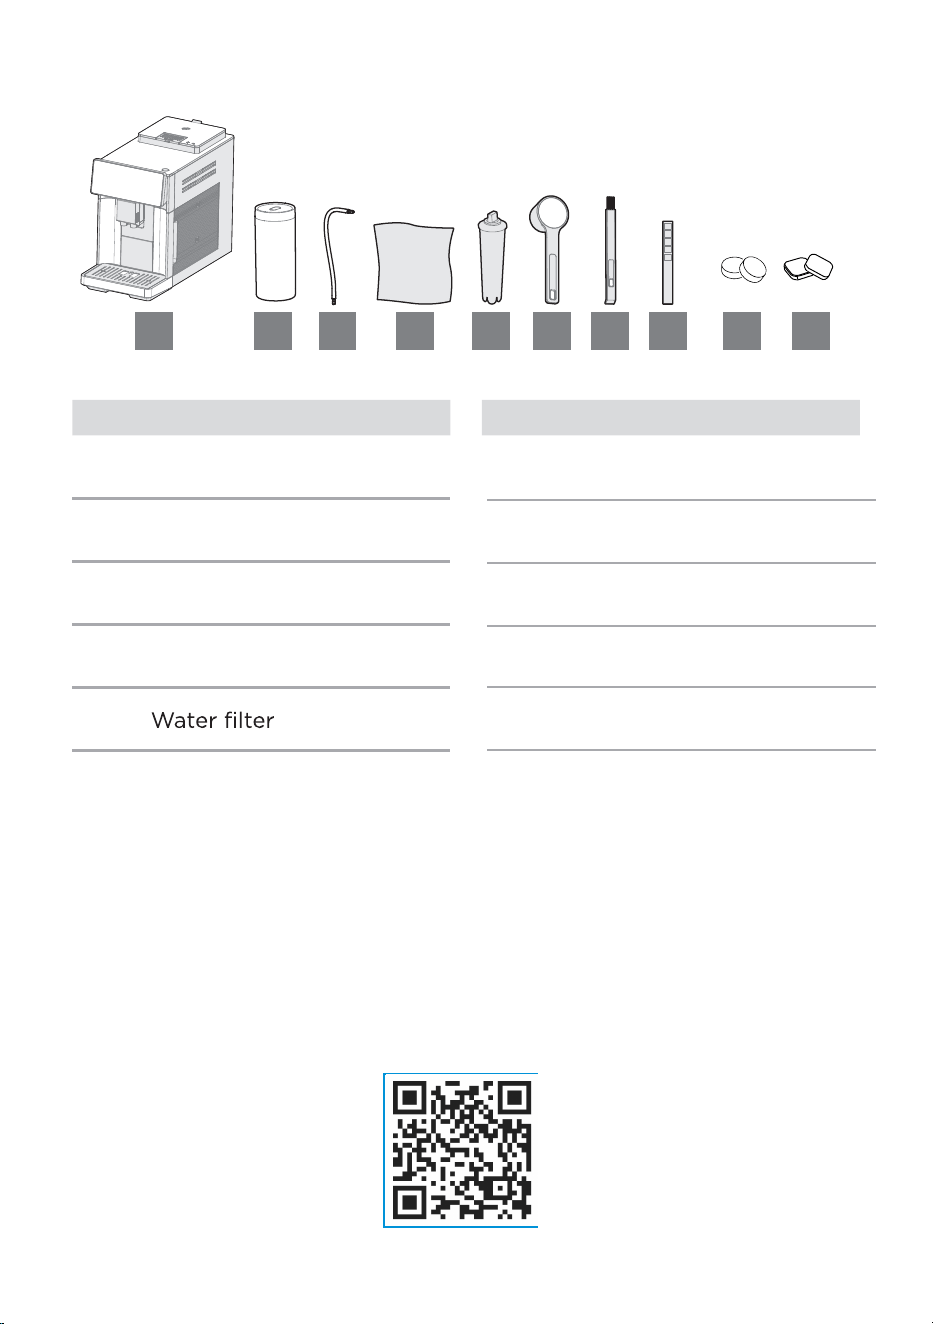
2.1 Scope of delivery
Pos. ItemPos. Item
1 Appliance
2 Milk container
3 Milk tube
4 Cleaning cloth
5
6 Measuring scoop
7 Cleaning brush
8 Test strip
1 2 3 4 5 6 7 8
0
7
9
Cleaning Tablets
10
Descaling Tablets
9 10
Ordering Maintenance Products & Accessories
We recommend using Midea maintenance products to clean and
descale your machine. You can purchase them online at https://
www.midea.com/us .
Recommended Maintenance Products:
Descaling Tablets
:MA-FACM1001_CALC
Water Filter
:MA-FACM1001_86
Cleaning Tablets (Coffee Oil Remover): MA-FACM1001_CT
Please scan the QR code for more detailed cleaning instructions.
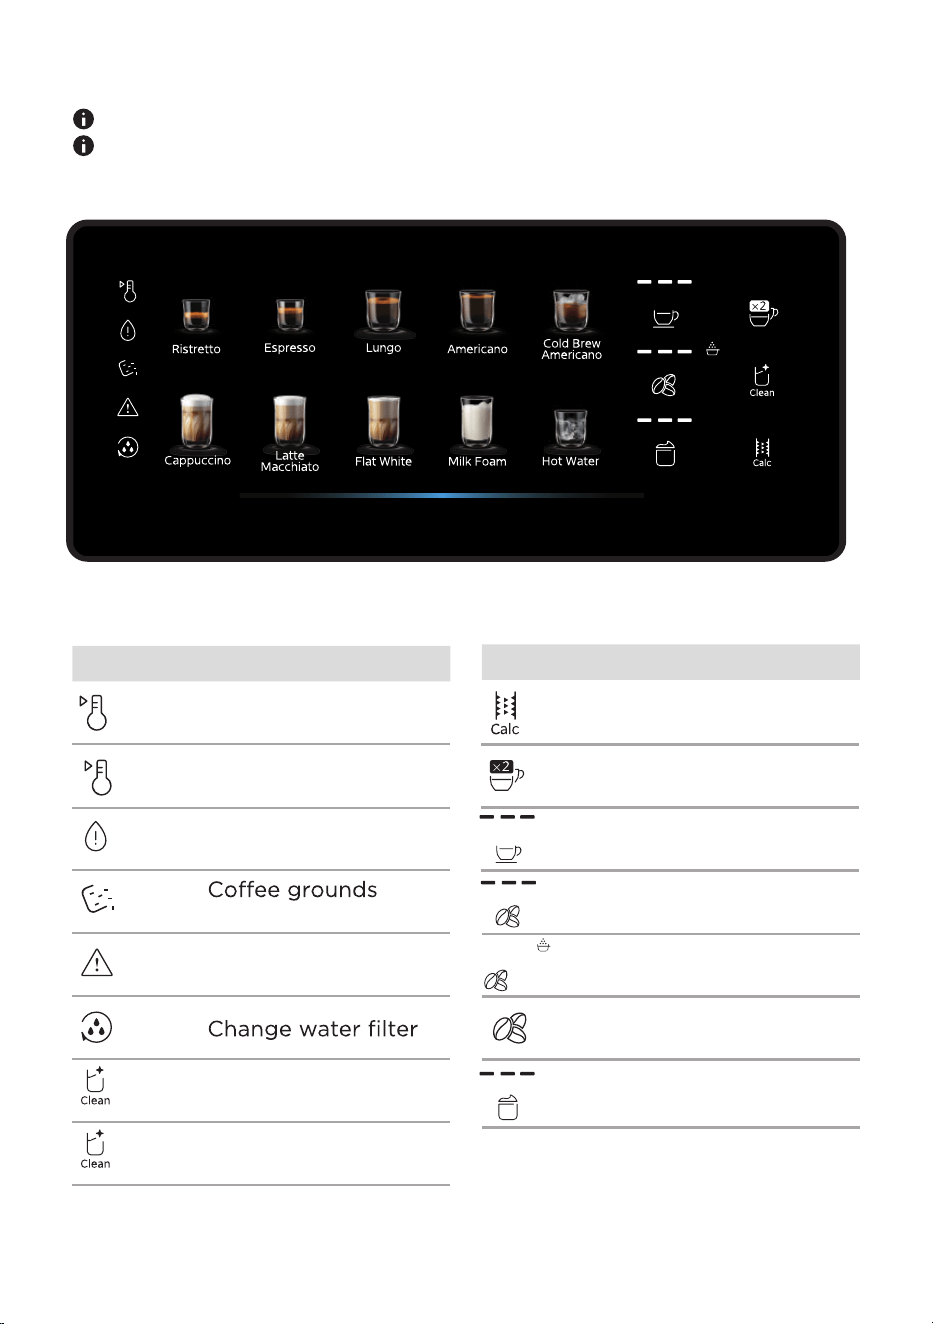
Symbol Meaning
Appliance is cooling
down
Water tank is empty
*White
light
*White
light
*Red
light
*Red
light
container is full
Appliance has an
error
Clean the coffee system
Clean the milk system
Descale appliance
Press to dispense
2 cups
Press to adjust cup
volume
Symbol Meaning
Press to adjust
coffee strength
Flashes when coffee
bean container is empty
Adjust milk f
oam
quantity
2.2 Control panel
Make sure the controls are always clean and dry.
Do not cover the control panel with objects.
Appliance is heating
up
0
8
Appliance is set to
use coffee powder
Clean the appliance and its
components. Prepare the
appliance for use.
See also the enclosed quick
start guide.
3.1 Set up the appliance
ATTENTION
Improper initial setup can
damage the appliance.
Only use the appliance in a
frost-free room.
If the appliance has been
transported or stored at
temperatures below 0°C, wait
3 hours at room temperature
before using.
1. Place the appliance on a
waterproof, level and
sufficiently stable
surface.
2. Make sure that the ventilation
slots of the appliance are not
covered.
3.
and stickers.
3.2 Connect the appliance
Insert the main plug of the
appliance into a socket near
the appliance.
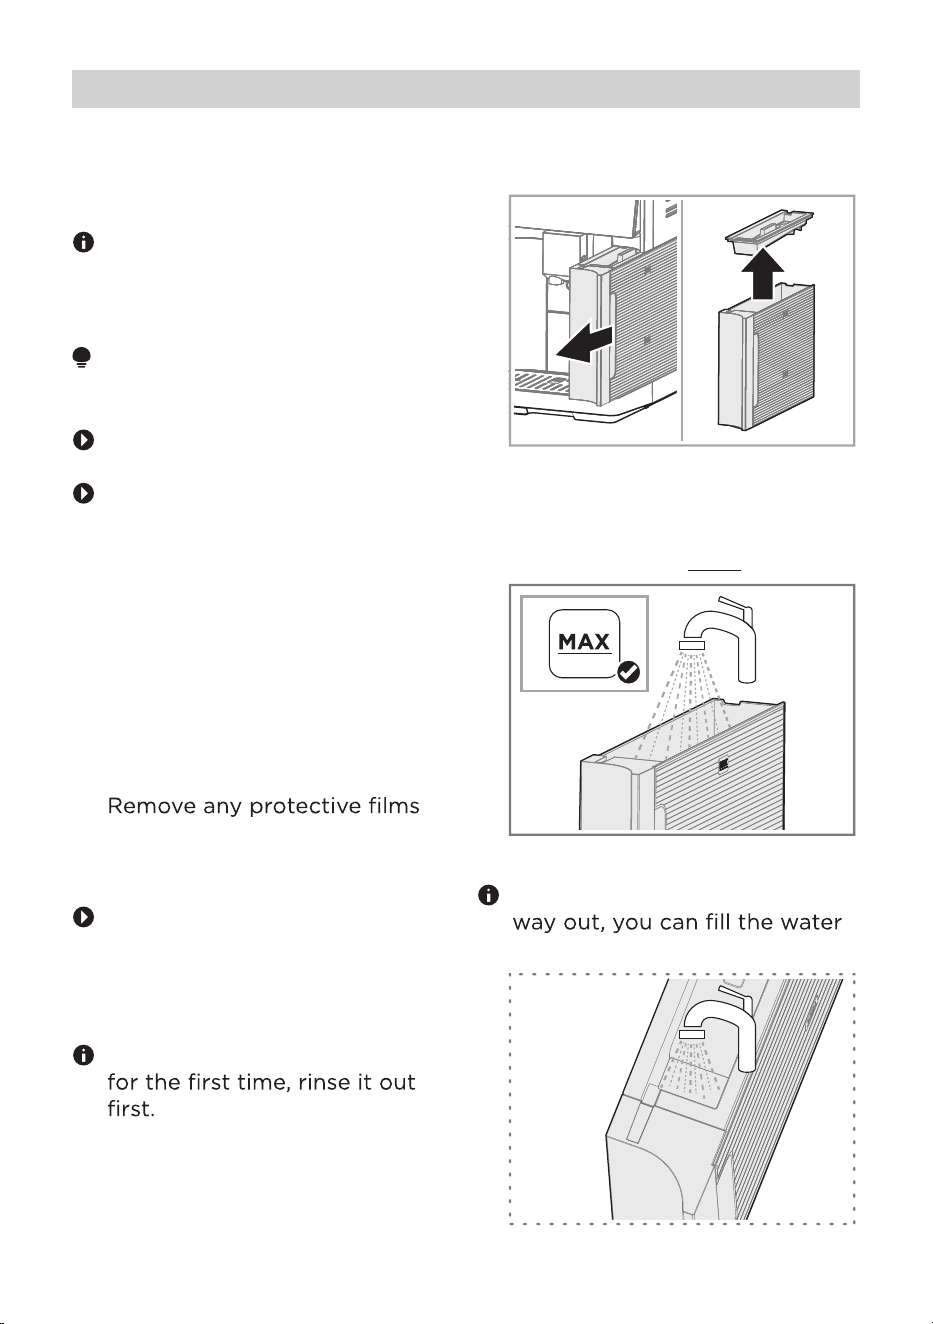
3.3 Filling the water tank
If you are using the water tank
1. Pull out the water tank by the
handle and remove the lid.
2. Fill the water tank with cold,
fresh, non-carbonated drinking
water up to the MAX mark.
If you pull the water tank half-
tank through the inlet.
Before First Use
0
9
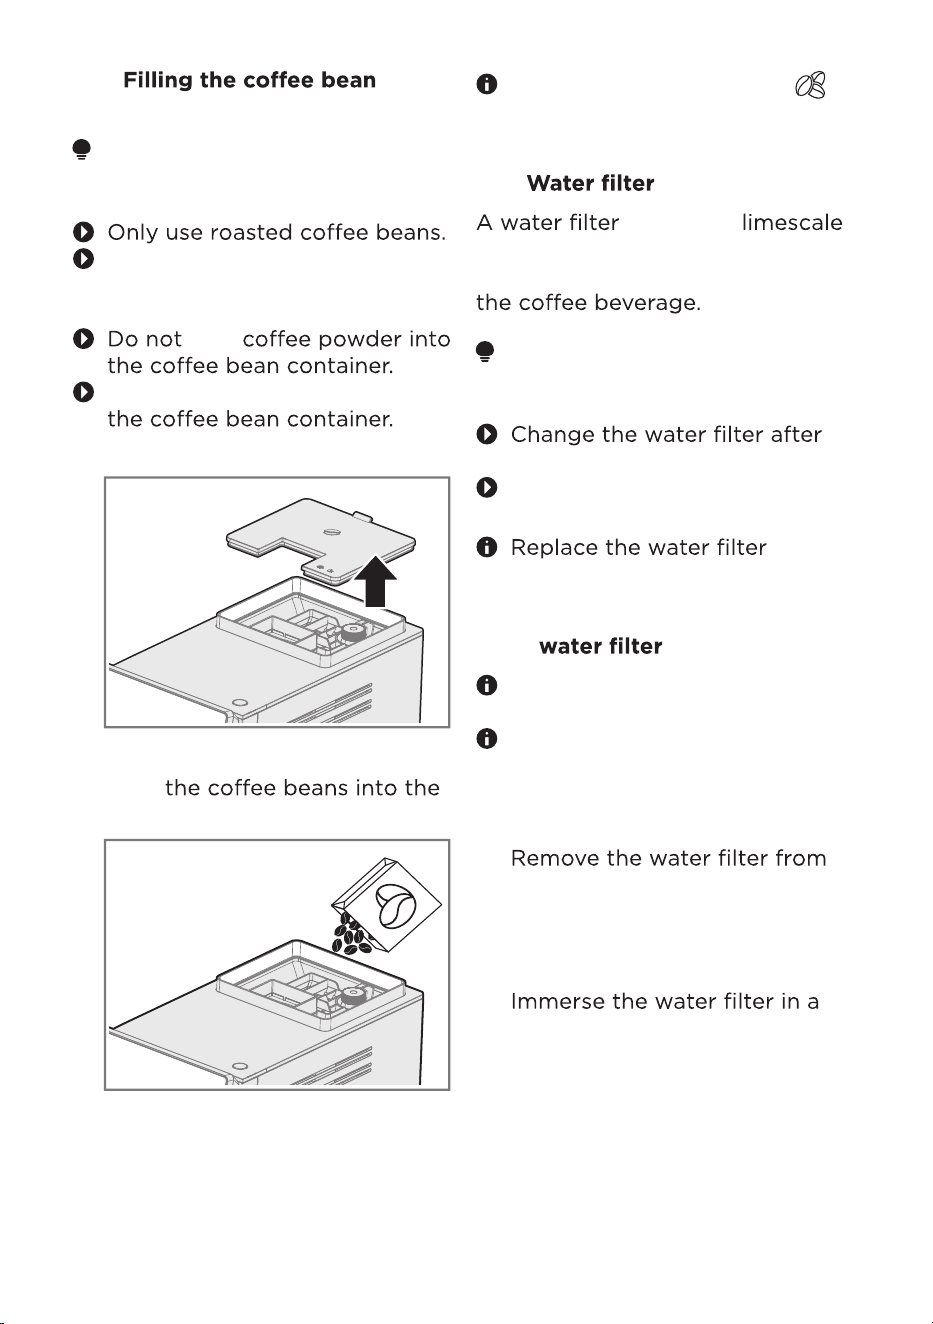
3.4
container
ATTENTION
Improper use can damage the
grinder.
Do not use coffee beans that
have been treated with
additives or caramelised.
Do not pour any liquids into
1. Open the bean container lid.
2.
bean container.
3. Close the bean container lid.
The control panel shows [
when the coffee bean container
needs to be refilled.
]
3.5
deposits,
minimizes impurities in the
water and improves the taste of
ATTENTION
Limescale deposits can damage
the appliance.
2 months at the latest.
Observe the symbols on the
control panel.
3.5.1 Preparing and inserting the
You can also operate the
appliance without a water filter.
1.
2.
3.
the packaging and turn
the date indicator on
top of the filter to the
next 2 months.
container of water.
Before activating the water
filter, it has to be prepared first.
Shake the water filter for about
5 seconds.
10
pour
minimizes
Pour
maintain appliance hygiene.
to
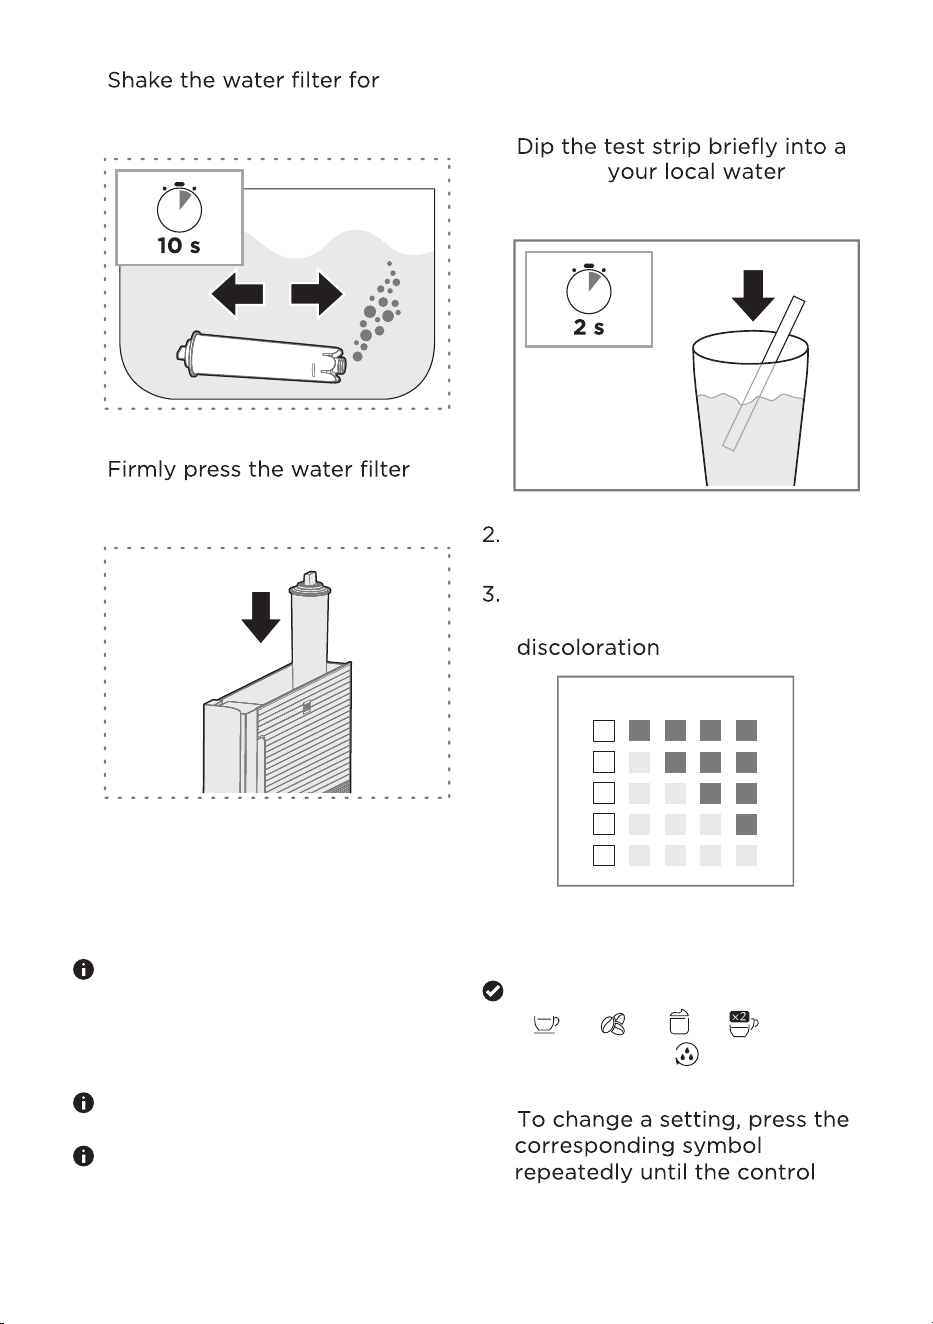
4.
10 seconds until no more water
bubbles escape.
5.
straight down into the water
tank connection.
6. Insert the water tank back into
the appliance.
3.6 Checking the water hardness
It is important to set the water
hardness correctly to enable
the appliance to accurately
indicate when the descaling
programme should be run.
Use cold, fresh,
non-carbonated drinking water.
You can ask your local water
supplier for the local water
1.
hardness or check it with the
enclosed test strip.
glass of
for 2
seconds.
Allow the test strip to dry for
10 seconds.
Check the degree of water
hardness from the
of the test strip.
°dh > 21
°dh > 14
°dh > 7
°dh > 4
°dh < 3
11
3.7 Initial settings
[Espresso], [Americano],
[ ], [
in 50% brightness.
], [ ],[ ]
light up and [ ] light up
2.
1. Press the On/Off button.
<3°
>4°° >7°° >14°° >21°°
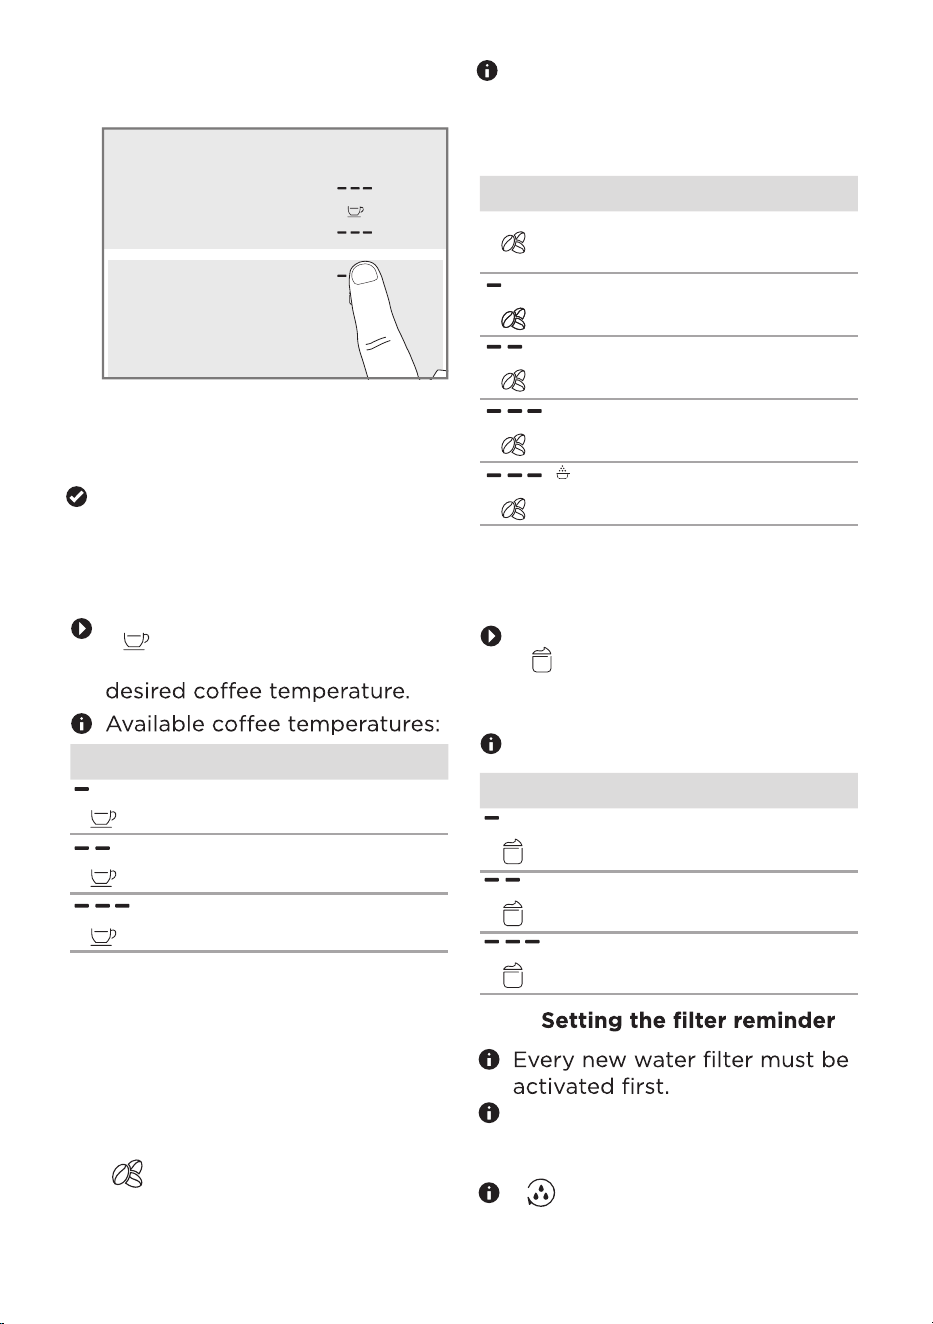
panel shows the
required
settings.
3.7.1
temperature
While in Settings Mode, press
[ ] repeatedly until the
control panel shows the
LED Temperature
normal
high
max
3.7.2 Setting the water hardness
1. Check the degree of water
hardness from the
discoloration of the test
strip. See the Checking the
Water Hardness section.
2. While in Settings Mode, press
[
] repeatedly until the control
panel shows the required water
hardness degree.
The table shows the allocation
of levels 1 (soft) to 5 (very
hard) to the different degrees
of water hardness:
Symbol Level °dh
1 < 3
2 > 4
3 > 7
4 > 14
5* > 21
* Factory setting
3.7.3 Setting the hot water
temperature
While in Settings Mode, press
[ ] repeatedly until the
control panel shows the desired
hot water temperature.
Available water temperatures:
LED Temperature
normal
high
max
Setting the coffee
3.To save the settings
, press the
[Espresso] and [Americano] symbols
simultaneously for 3 seconds.
The appliance saves the setting
and runs a rinsing cycle.
12
3.7.4
If you are not using a water
filter, you do not need to
activate the filter reminder.
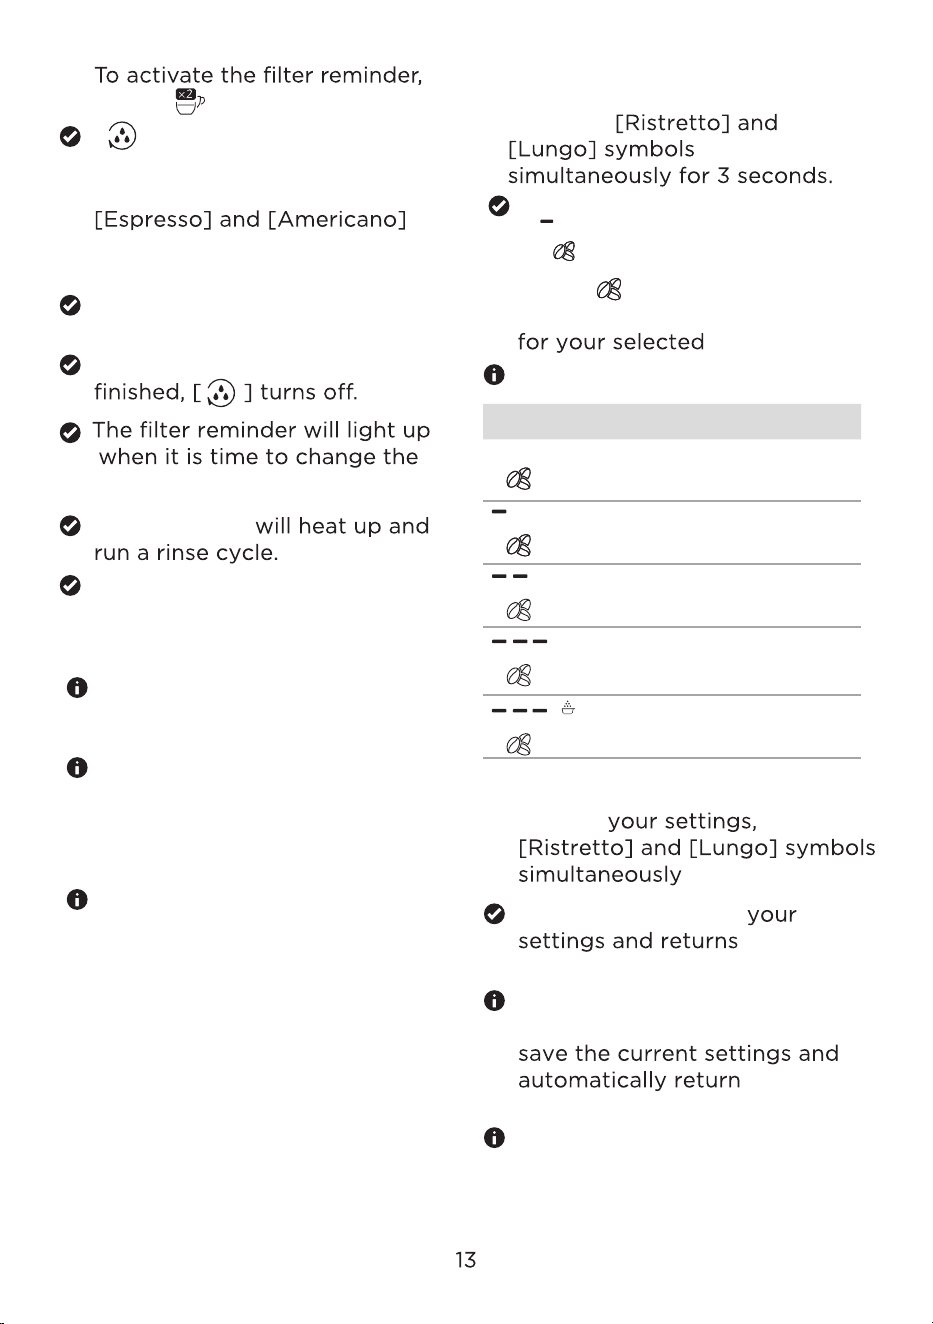
[
] lights up in 50%
brightness.
3.7.5 General operating instruc-
tions
For technical reasons, steam
may escape from the appliance
during operation.
During operation,water
droplets may form at the
ventilation slits and on the lid
of the pre-ground coffee
chute.
When the appliance is used for
the first time after running a
cleaning or descaling
programme, or if it has not
been operated for a long time,
the first beverage will not have
the full aroma and should not
be consumed.
1.
press [ ].
2. To save the setting, press the
symbols simultaneously for 3
seconds.
The appliance saves the
settings.
When the activation process is
The appliance
The appliance is ready to use.
[ ] lights up in 100%
brightness.
waterfilter.
2.
Press [ ] repeatedly until the
control panel shows the symbol
standby time.
Available standby settings:
Symbol Standby time
15 min
30 min
1 h
2 h*
3 h
3. To save press the
* Factory Setting
[Ristretto], [Lungo] and
[ ] will light up.
for 3 seconds.
The appliance saves
to the main
menu.
After 30 seconds without user
interaction, the appliance will
to the main
menu.
The power consumption increases
if the standby time is set to over
30 minutes.
1. Press the
3.7.6 Setting the standby time
Thestandbytimeisthetimebefore
theapplianceentersstandbymode.
Instandbymode,thecontrolpanel
displayscreenwillremaindarkto
savepower.
4.1 Switch the appliance on
To switch the appliance on,
press the [On/Off] button.
The appliance starts to heat up
and rinses.
When all beverage symbols
light up, the appliance is ready
for operation.
4.2
The appliance rinses and
switches off automatically 30
minutes after the last
beverage has been prepared.
The appliance rinses and shuts
down.
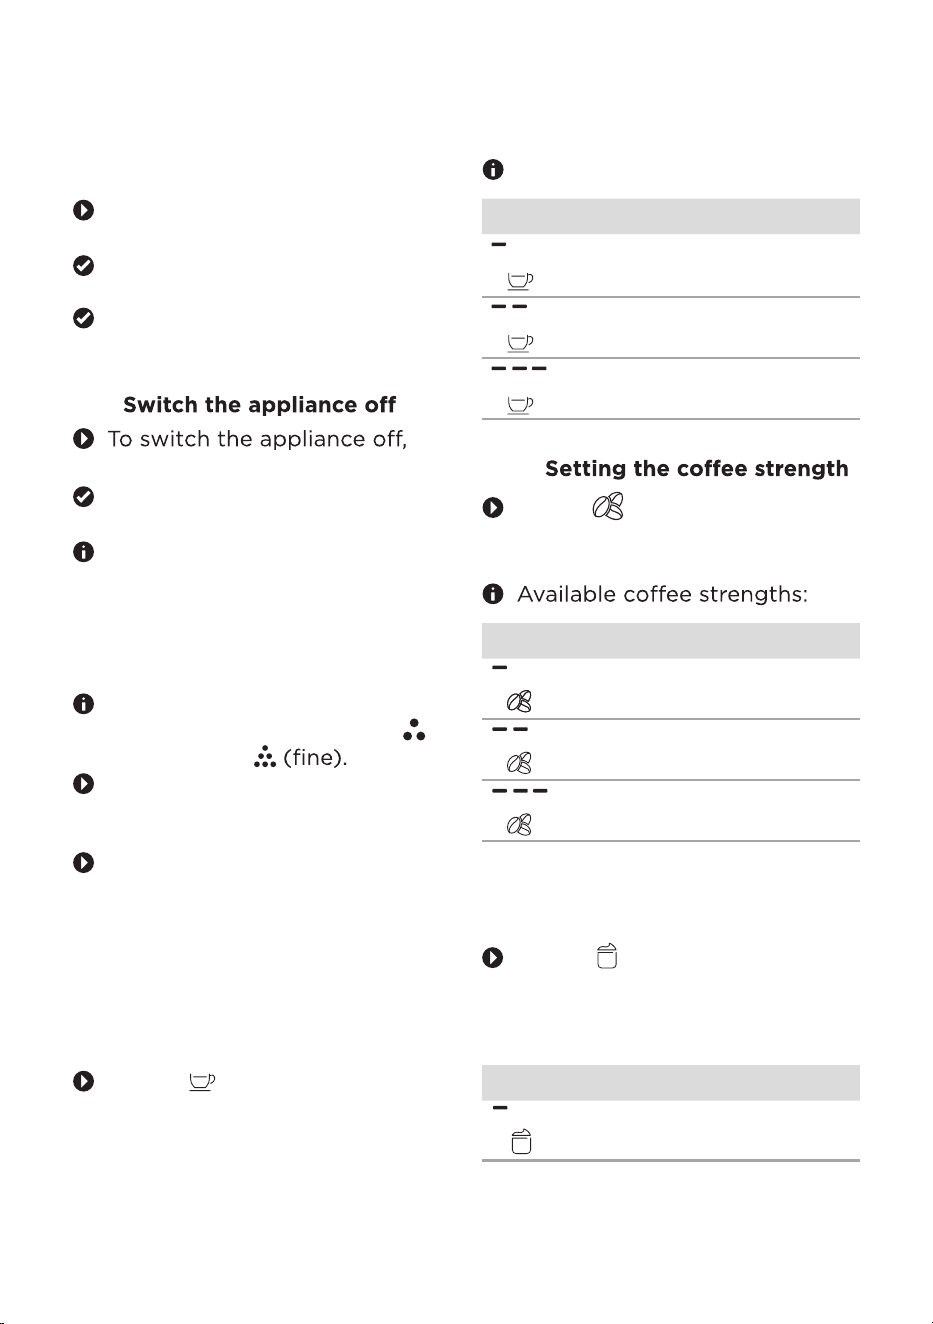
4.3 Setting the grinding degree
You can set the grinding
degree in half steps from 1
(coarse) to 7
turn the grinder dial to
the left.
For a coarser grind, turn the
grinder dial to the
right.
4.4 Beverage customisation
Before preparation, you can
customise your drink to your taste.
4.4.1
Setting the beverage quantity
Press [ ] repeatedly until the
control panel shows the desired
quantity.
LED Quantity
Small
Medium
Large
4.4.2
Press [ ] repeatedly until the
con
trol panel shows the
de
sired coffee strength.
LED Strengths
Mild
Medium
Strong
4.4.3 Setting the amount of milk
foam
Press [ ] repeatedly until the
control panel shows the
desired amount of milk foam.
Available milk foam quantities:
LED Quantity
Small
pressthe[On/Off]button.
OPERATING INSTRUSCTIONS
14
Forafinergrind,
Available beverage quantities:
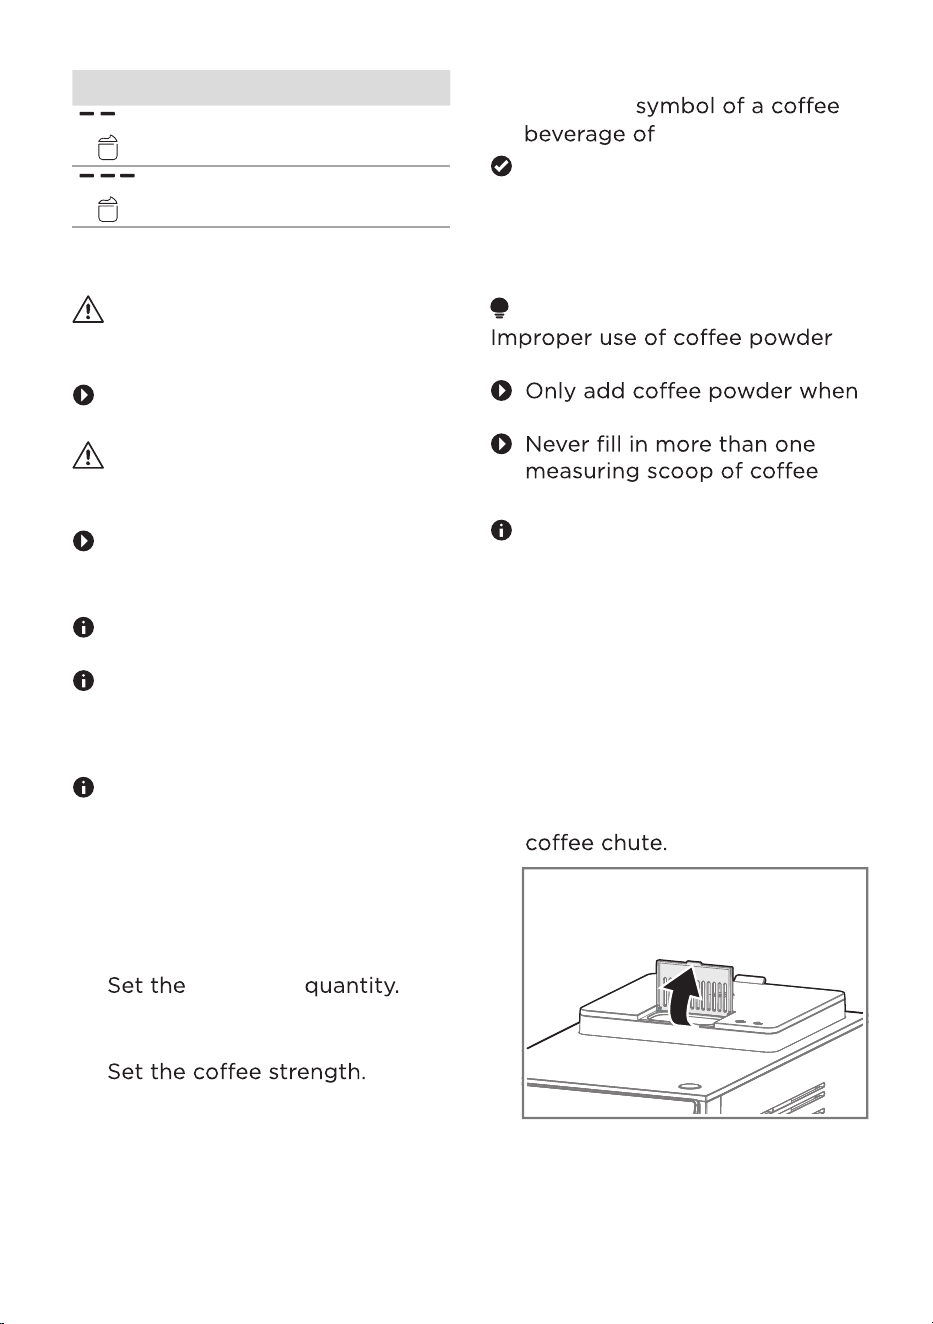
LED Quantity
Medium
Large
4.5 Preparing beverages
Warning - Risk of scalding
Hot liquids and steam can cause
scalding.
Do not hold any parts of your
body under the outlet.
Warning - Risk of burns
Some parts of the appliance
become hot during operation.
Do not touch any parts of
the appliance before allowing
them to cool down.
Some beverages are prepared
in 2 steps.
If you want to cancel beverage
dispensing prematurely, press
the selected beverage symbol
again.
The beverage outlet is
height-adjustable.
4.5.1
1. Place a glass or cup under the
2.
outlet.
Please see the Setting the
beverage quantity section.
3.
See the Setting the coffee
strength section.
4. To start preparing the beverage,
press the
your choice.
4.5.2
ATTENTION
can damage the appliance.
the appliance is switched on.
powder.
The function for preparing
2 cups is not available for
drinks made from coffee
powder.
Preparing a coffee beverage
from coffee beans
The coffee beverage is
prepared and dispensed.
Preparing a coffee beverage
from coffee powder
15
1. To switch the appliance on,
press the [On/Off] button.
SeetheSwitchtheapplianceon
section.
2. Place a glass or cup under the
outlet.
3. Open the lid of the pre-ground
beverage
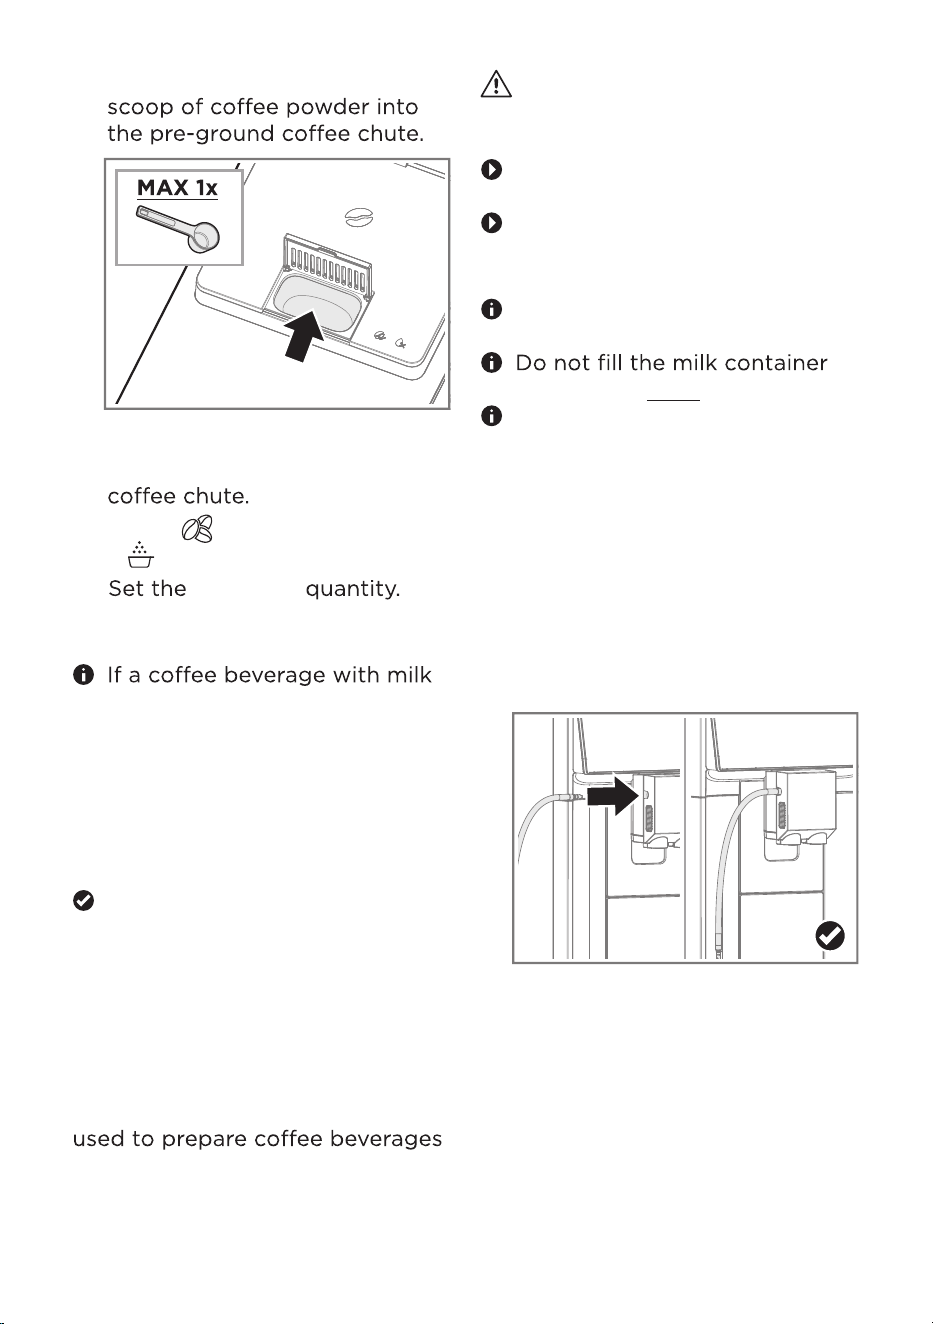
4. Fill a maximum of 1 measuring
5. Close the lid of the pre-ground
6. Press [ ] repeatedly until
[ ] lights up.
7.
has been selected, you can set
the amount of milk foam. See
the Setting the amount of milk
foam section.
8. To start preparation, press the
4.6 Beverage preparation with
milk
Your appliance has an integrated
beverage dispenser. It can be
with milk and milk foam.
Warning - Risk of burns
The beverage dispenser can
become very hot.
Never touch the beverage
dispenser while it is hot.
Allow the hot beverage
dispenser to cool down before
touching it.
Use cold milk directly from the
fridge for optimal results.
beyond the MAX mark.
Clean the beverage dispenser
every time after you have
prepared a coffee beverage
with milk or milk foam. Dried
milk residue is difficult to
remove.
4.6.1
1. Connect the milk tube to the
beverage dispenser.
Preparing a coffee
beverage with milk
16
symbolforthecoffee
beverage of your choice.
Your appliance will use the
ground coffee to prepare and
dispense the selected coffee
beverage.
beverage
See the Setting the beverage
quantity section.
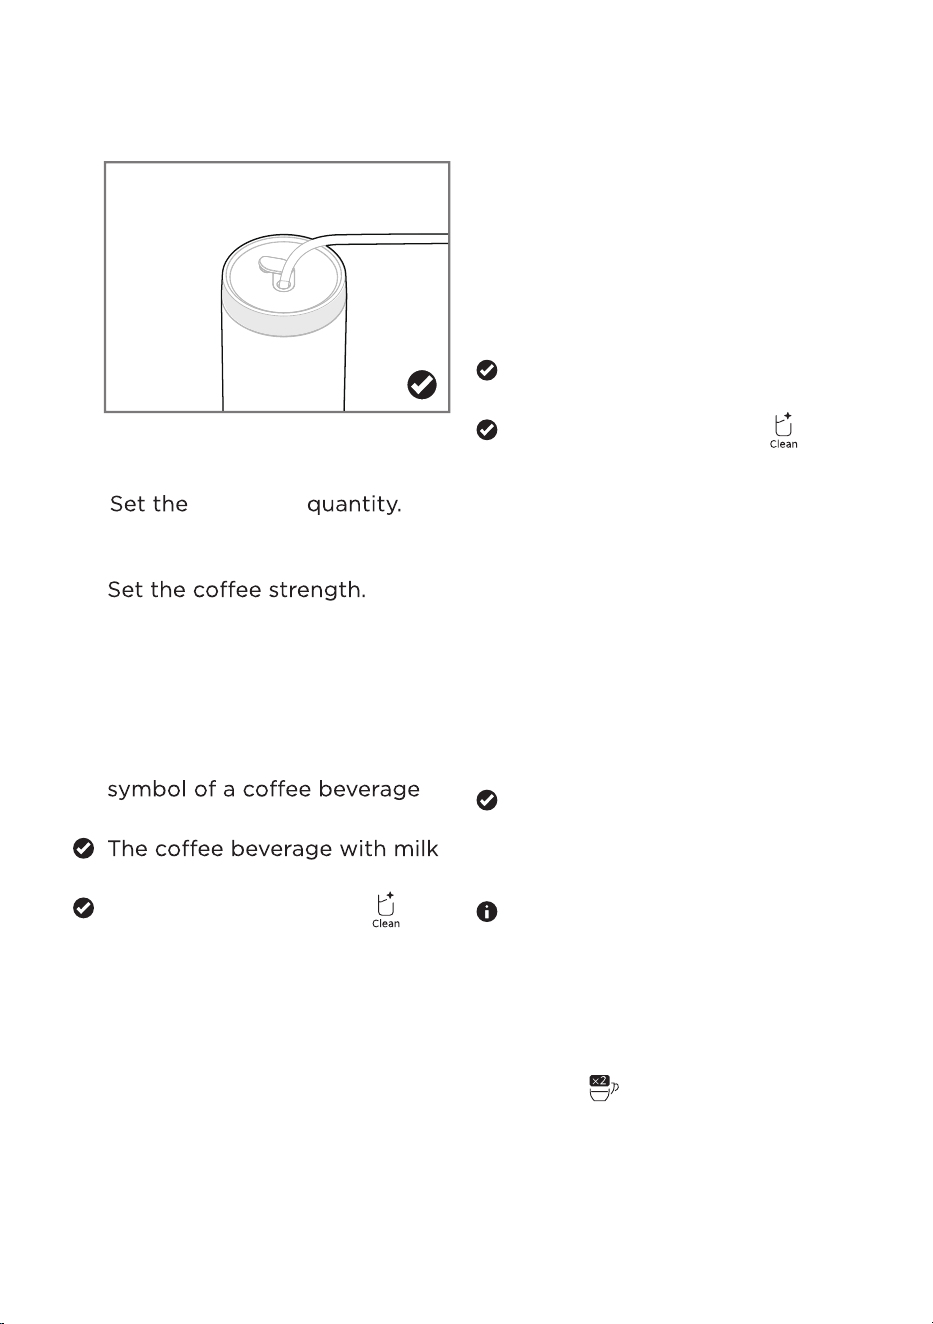
2. Insert the other end of the milk
tube into the filled milk
container or milk carton.
3. Place a glass or cup under the
outlet.
4. Set the amount of milk foam.
See the Setting the amount of
milk foam section.
5. To start preparation, press
[Milk Foam].
Milk foam is prepared and
dispensed.
The cleaning re
minder [ ]
is flashing in white.
See the Cleaning the milk
system section.
4.7 Preparing hot water
1. Place a glass or cup under the
outlet.
2.
See the Setting the beverage
quantity section.
3. To start preparation, press
[Hot Water].
Hot water is prepared and
dispensed.
4.8 Preparing 2 cups
2. Insert the other end of the milk
3. Place a glass or cup under the
outlet.
4.
See the Setting the beverage
quantity section.
5.
See
the Setting the coffee
strength section.
6. Set the amount of milk foam.
7. To start preparation, press the
with milk of your choice.
is prepared and dispensed.
4.6.2 Preparing milk foam
1. Connect the milk tube to the
beverage dispenser.
See the Setting the
amount
of milk foam
section.
The cleaning reminder [ ]
is flashing in white.
See the Cleaning the milk
system section.
This function is not available for
[Hot Water], [Americano] and
for beverages made of coffee
powder.
1. Place 2 glasses or cups under
the outlet.
2. Press [ ].
17
tube into the filled milk
container or a milk carton.
Set the beverage quantity.
beverage
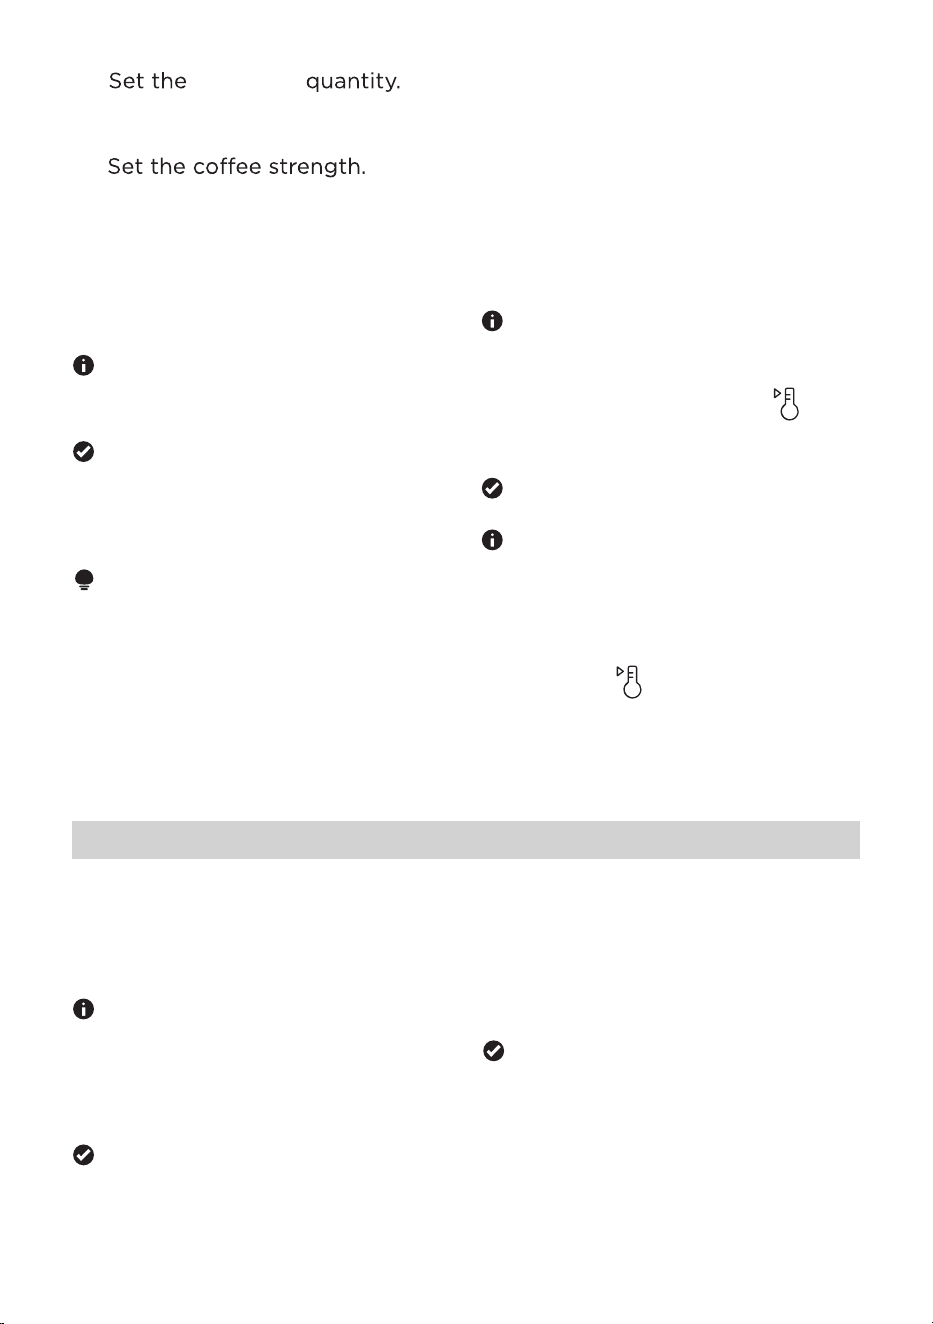
3.
See the Setting the
beverage quantity section.
4.
See
the Setting the coffee
strength section.
5. To start preparation, press
the symbol for the beverage
of your choice.
The preparation of the
beverages takes place in 2
steps. Wait until it is
complete.
2 cups are prepared and
dispensed.
You can adjust various settings
according to your
requirements.
5.1
Readjusting the settings
The appliance must be ready
to use.
1. Press the [Espresso] and
[Americano] simultaneously
for 3 seconds.
The appliance will enter
settings mode.
2. Adjust the desired settings.
Please see Initial settings in
the Setup section for more
information.
3. To save your settings, press the
symbols [Espresso] and
[Americano] simultaneously
for 3 seconds.
The appliance saves the
setting and goes back to the
main menu.
Settings
2. Set the beverage quantity.See the
Setting the beverage
quantity
section.
3. Set the coffee strength.
See the Setting the coffee strength
section.
4. To start preparing the beverage,
press the [Cold Brew Americano]
symbol.
The appliance will recommend a
cold rinse to optimize the
temperature of the beverage after
preparing hot beverages. [ ] will
light up in white during the cold
rinse.
Th e
.
coff
ee beverage is
prepared and dispensed.
When making hot drinks after
cold
preparations, the machine
will heat up to a higher
temperature to reach a suitable
temperature for
hot drinks. [ ] lights up in red
during the heating process.
4.9 Preparing a Cold Brew
Americano
ATTENTION
Cold brew technology is different
from traditional espresso brewing.
You will need to wait for some
time for the beverage to be
prepared.
1. Place a glass or cup under the
outlet. Add your desired quantity
of ice cubes in the glass.
18
beverage
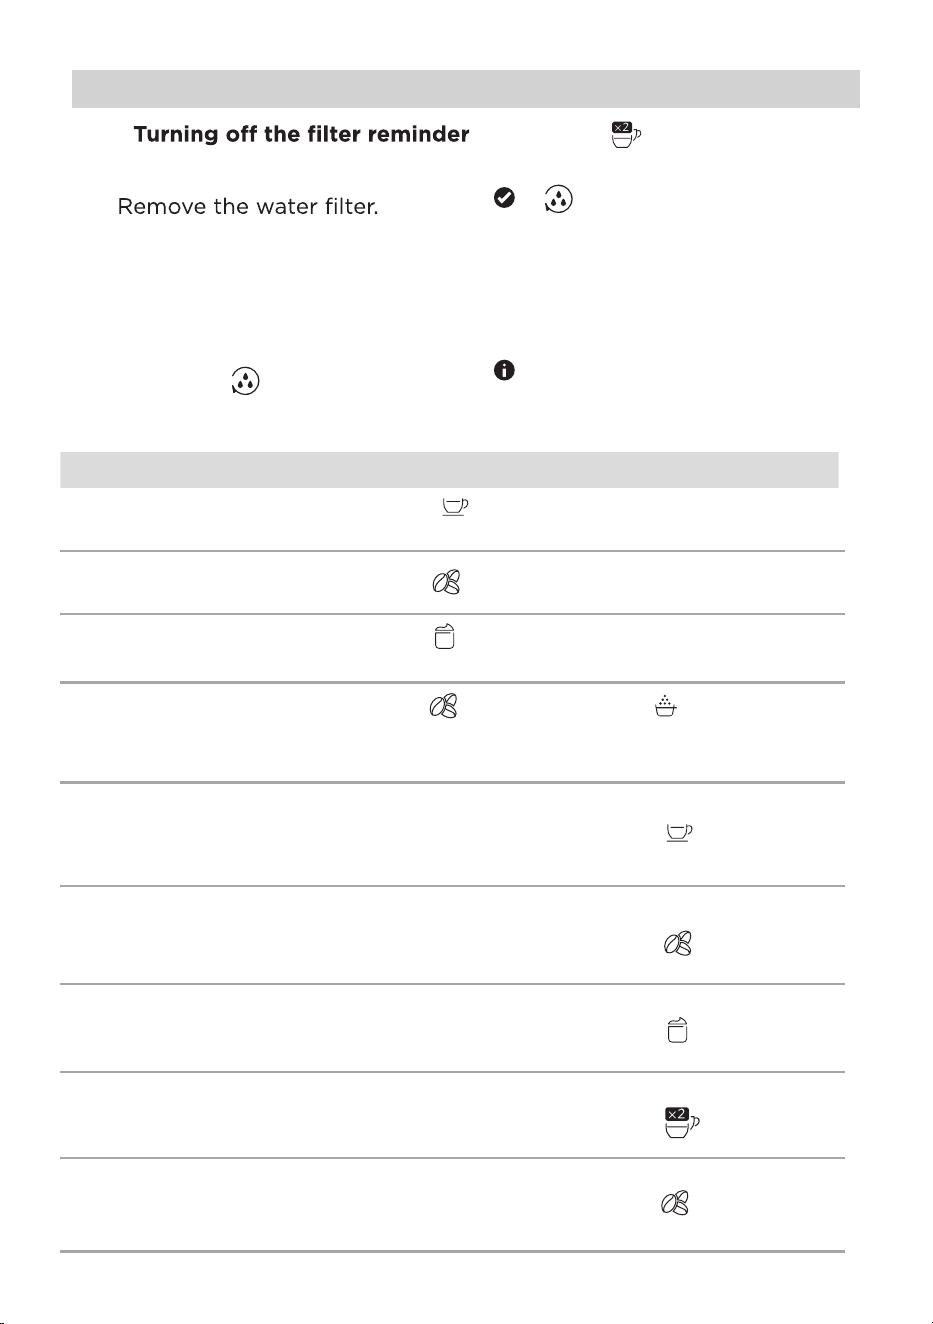
Settings
5.2
1. Remove the water tank.
2.
3. Insert the water tank back into
the appliance.
4. Press the [Espresso] and
[Americano] symbols
simultaneously for three
seconds.
[
] lights up.
5.
Pre
ss [ ]
[
] lights up in 50 %
brightness.
6. To save your settings, press
to turn off the
f
ilter reminder.
the [Espresso] and
[Americano]
symbols
simultaneously for 3 seconds.
SeeReplacingthewaterfilter
for moreinformationonusing
anew
waterfilter.
19
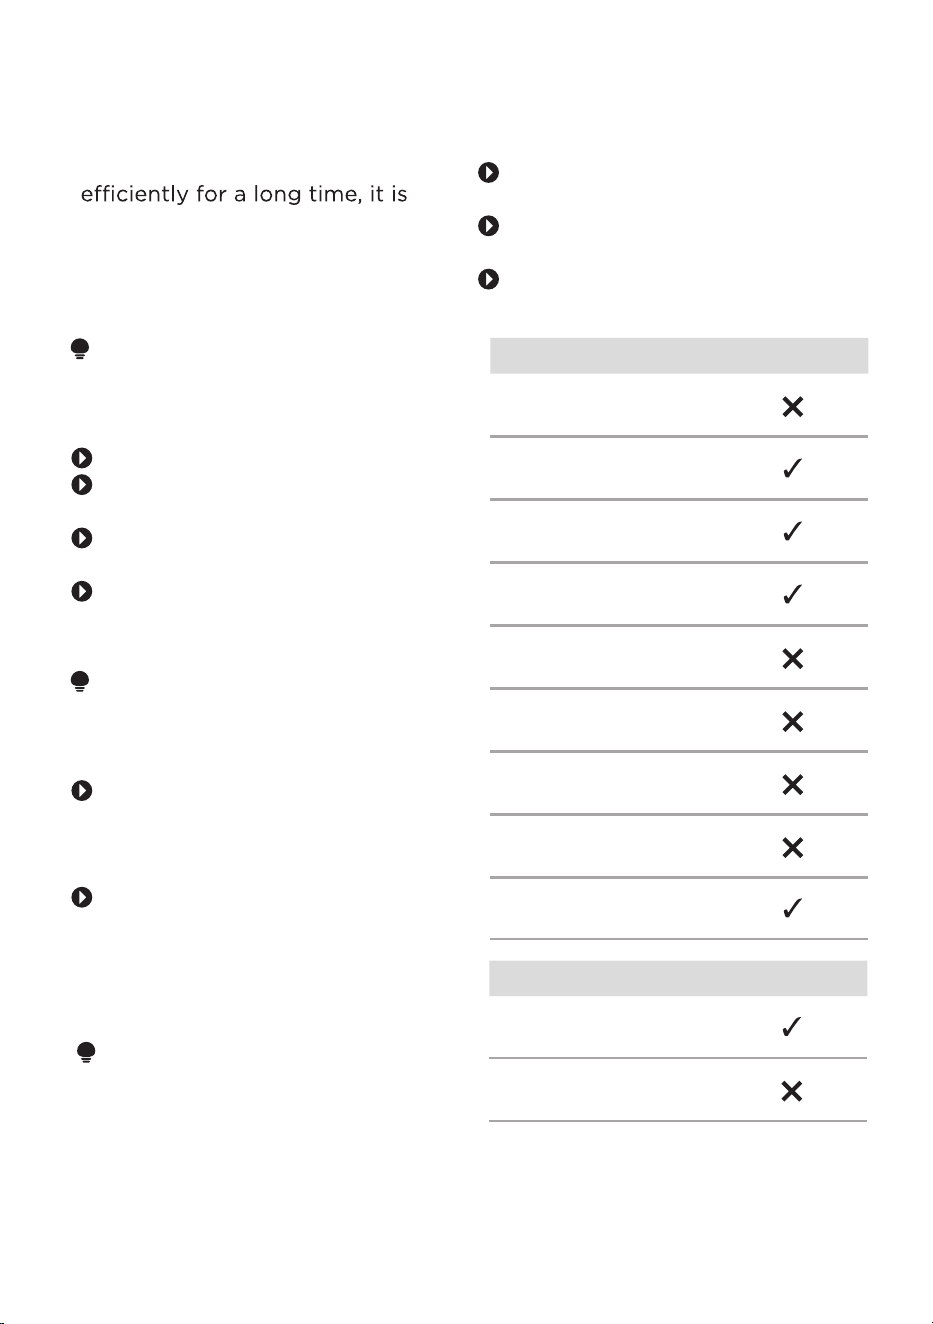
Adjustable Settings
Beverage Quantity
Coffee Strength
Milk Foam Quantity
Coffee Temperature
Water Hardness
Water Temperature
Filter Reminder
Standby Time
Pre-Ground Coffee
Powder Usage
Press to adjust the beverage
quantity.
Press to adjust the coffee strength.
Press to adjust the amount of milk
foam.
Press [Espresso] and [Americano]
simultaneously, then press to
adjust the coffee temperature.
Press [Espresso] and [Americano]
simultaneously, then press to adjust
the water hardness.
Press [Espresso] and [Americano]
simultaneously, then press to adjust
the hot water temperature.
Press [Espresso] and [Americano]
simultaneously, then press to
activate the filter reminder.
Press and hold [Ristretto] and [Lungo] for
three seconds, then press to adjust
the time before entering standby mode.
Press repeatedly until lights up
to activate the pre-ground coffee
powder setting.
20
Component Dishwasher
"Drip tray full"
indicator
Beverage outlet
cover
6.1 Cleaning advice
ATTENTION
Unsuitable cleaning products may
damage the surfaces of the
appliance.
Do not use abrasive sponges.
Do not use harsh or abrasive
cleaning agents.
Do not use cleaning agents
that contain alcohol.
Always read the label to check
whether your cleaner or
scouring pad is suitable.
ATTENTION
Unsuitable cleaning and descaling
agents may damage the
appliance.
Do not use pure citric acid,
vinegar or any vinegar-based
agents to descale the
appliance.
Always read the label to check
whether your cleaning or
descaling agent is suitable.
To keep your appliance working
important t
o clean and maintain it
carefully.
6.2 Dishwasher cleaning
ATTENTION
Improper cleaning in the
dishwasher can damage the
components.
F
ollow the user manual for the
dishwasher.
Only use dishwasher cycles
below 60 °C/140 °F.
Only clean suitable
components in the dishwasher.
Component Dishwasher
Appliance
Drip tray
Drip container
Milk container
Bean container lid
Water tank
Brewing unit
Coff
ee grounds
container
CLEANING AND MAINTENANCE
Beverage dispenser
Moisture in the appliance can
lead to electric shock.
Protect the appliance from
extreme heat, moisture and
splashing water.
Never use a steam cleaner for
cleaning.
Never immerse the appliance,
the main plug or the main
cable in water.
Disconnect the appliance from
the power supply before
carrying out any cleaning or
maintenance work.
Warning - Risk of burns
Some parts of the appliance
become hot during operation.
Do not touch any parts of
the appliance before allowing
them to cool down.
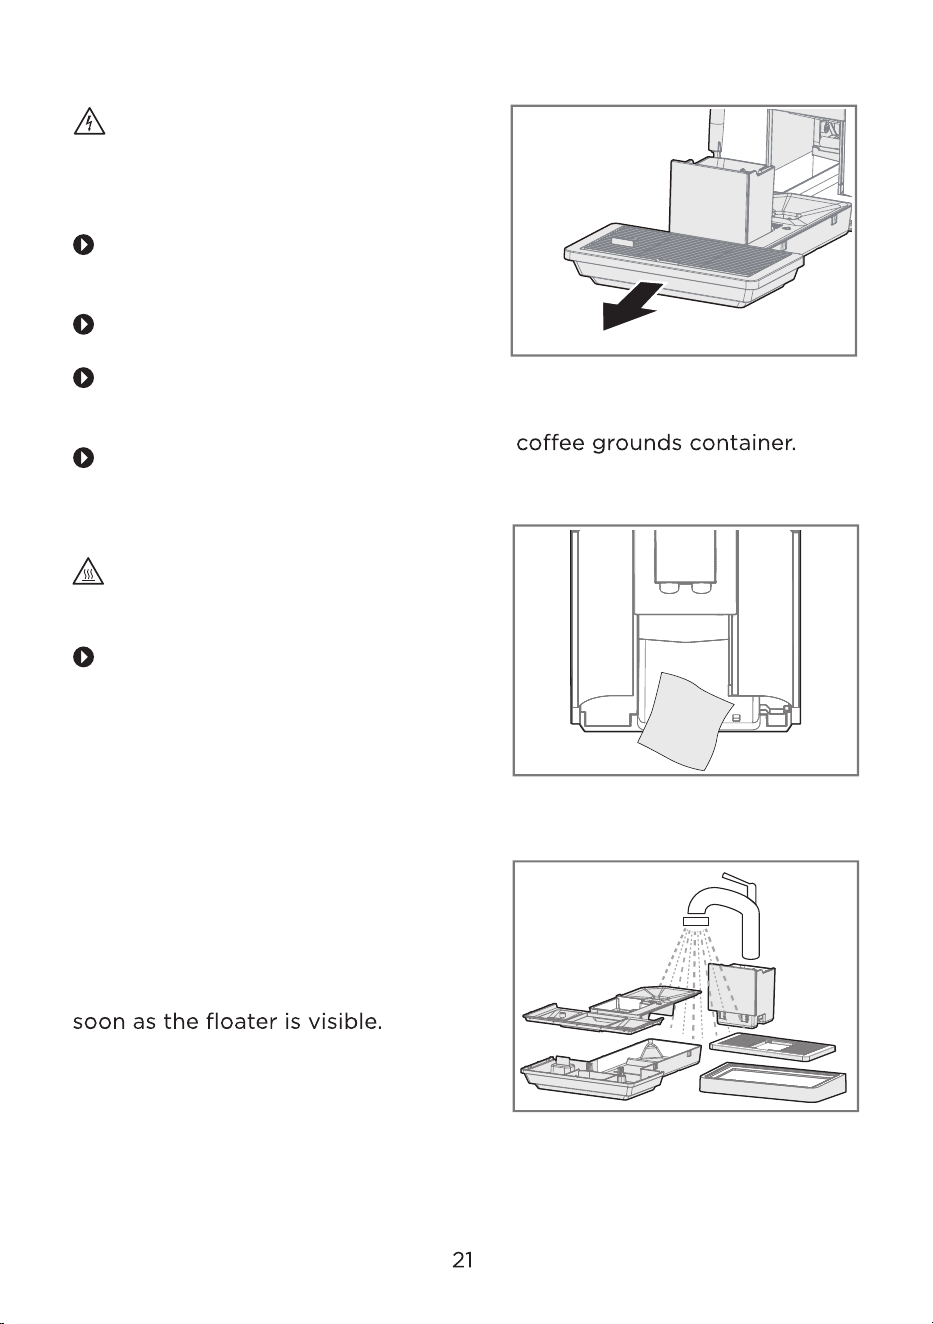
1.
2.
6.3.1 Cleaning the drip tray and
the coee grounds
container
Empty the drip tray daily or as
1. Remove the drip tray.
2. Empty the drip tray and the
3. Clean the inside of the
appliance with a soft cloth.
4. Clean all components.
Clean the surfaces with a
microfiber cloth.
Clean the coffee bean
container compartment
with a damp cloth.
6.3 Cleaning the appliance
Warning - Risk of electric
shock
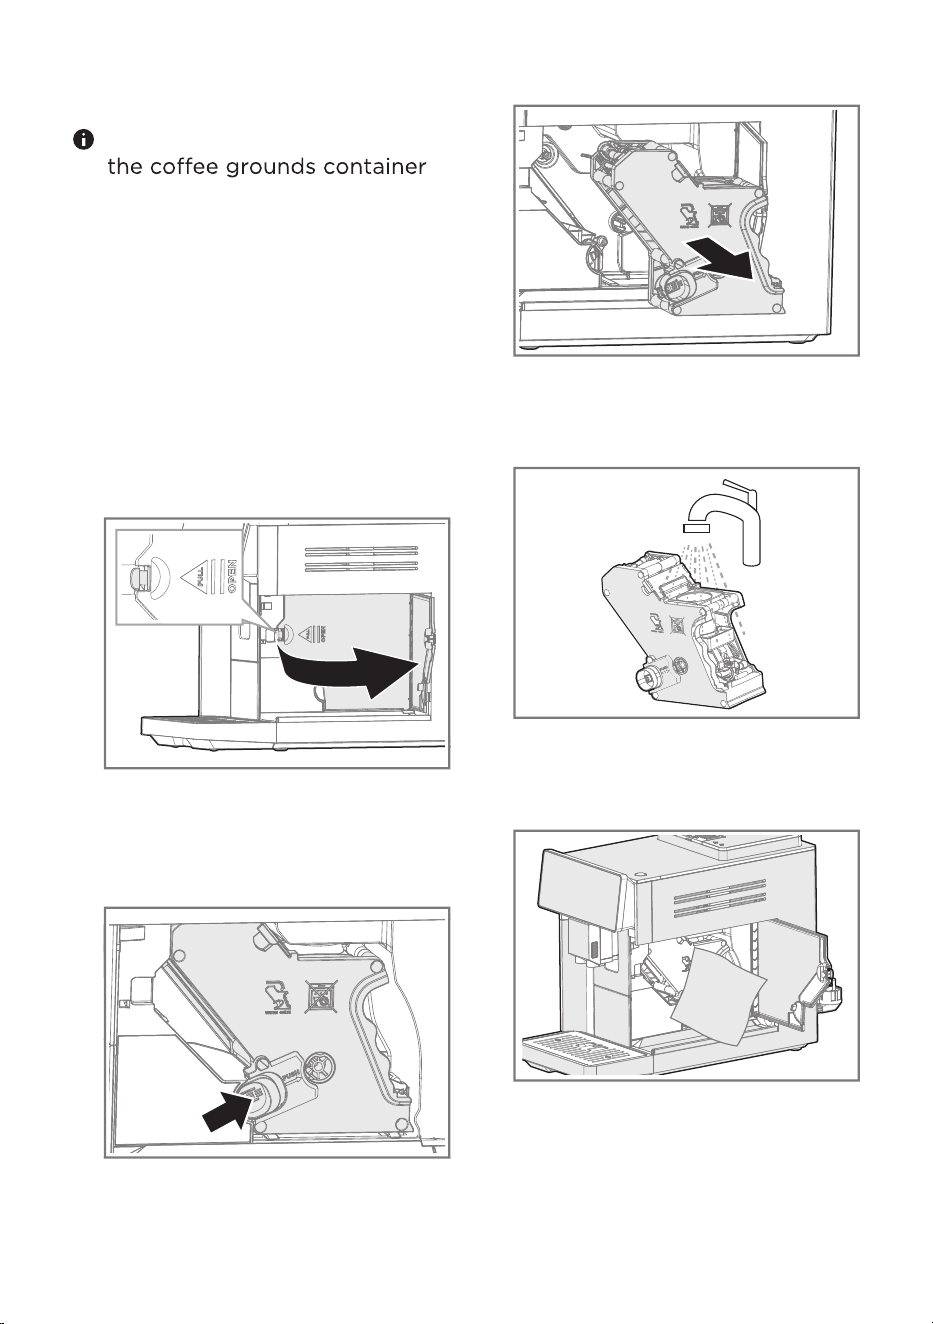
3. Open the service door.
4. Press the orange locking
mechanism to the right to
unlock the brewing unit.
5. Remove the brewing unit.5. Insert the components into the
appliance.
You can clean the drip tray and
in the dishwasher.
6.3.2 Cleaning the brewing unit
In addition to automatic rinsing,
the brewing unit should be
removed weekly for cleaning.
1. Disconnect the appliance from
the power supply.
2. Pull out the water tank by the
handle.
6. Clean the brewing unit under
running water.
7. Clean the inside of the brewing
chamber with a damp cloth.
22
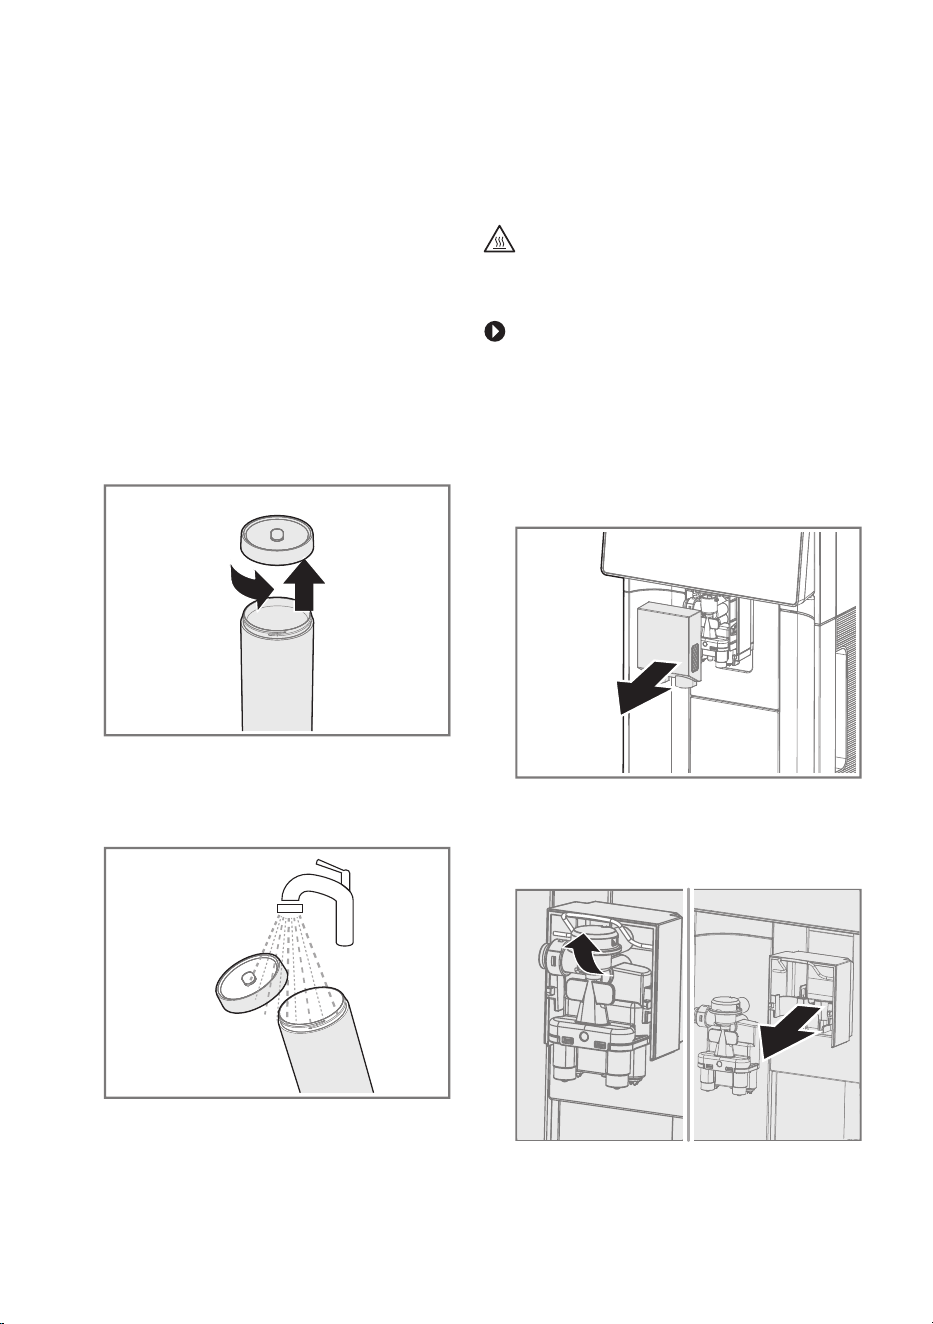
8. Allow the brewing unit and the
inside of the appliance to dry.
9. Insert the brewing unit into the
brewing chamber.
10. Close the service door.
11. Insert the water tank into the
appliance.
6.3.3 Cleaning the milk container
1. Unplug the milk tube from the
beverage dispenser.
2. Remove the milk tube from the
milk container.
3. Unscrew the lid.
4. Clean the components under
running water.
5. Dry all components
thoroughly.
6.3.4 Cleaning the beverage
Warning - Risk of burns
The beverage dispenser becomes
very hot during operation.
Do not touch any parts of
the appliance before allowing
them to cool down.
1. Unplug the milk tube from the
beverage dispenser.
2. Remove the beverage outlet
cover.
3. Open the metal bracket and
remove the beverage
dispenser.
23
dispenser
Clean the beverage dispenser
every 3-5 days.
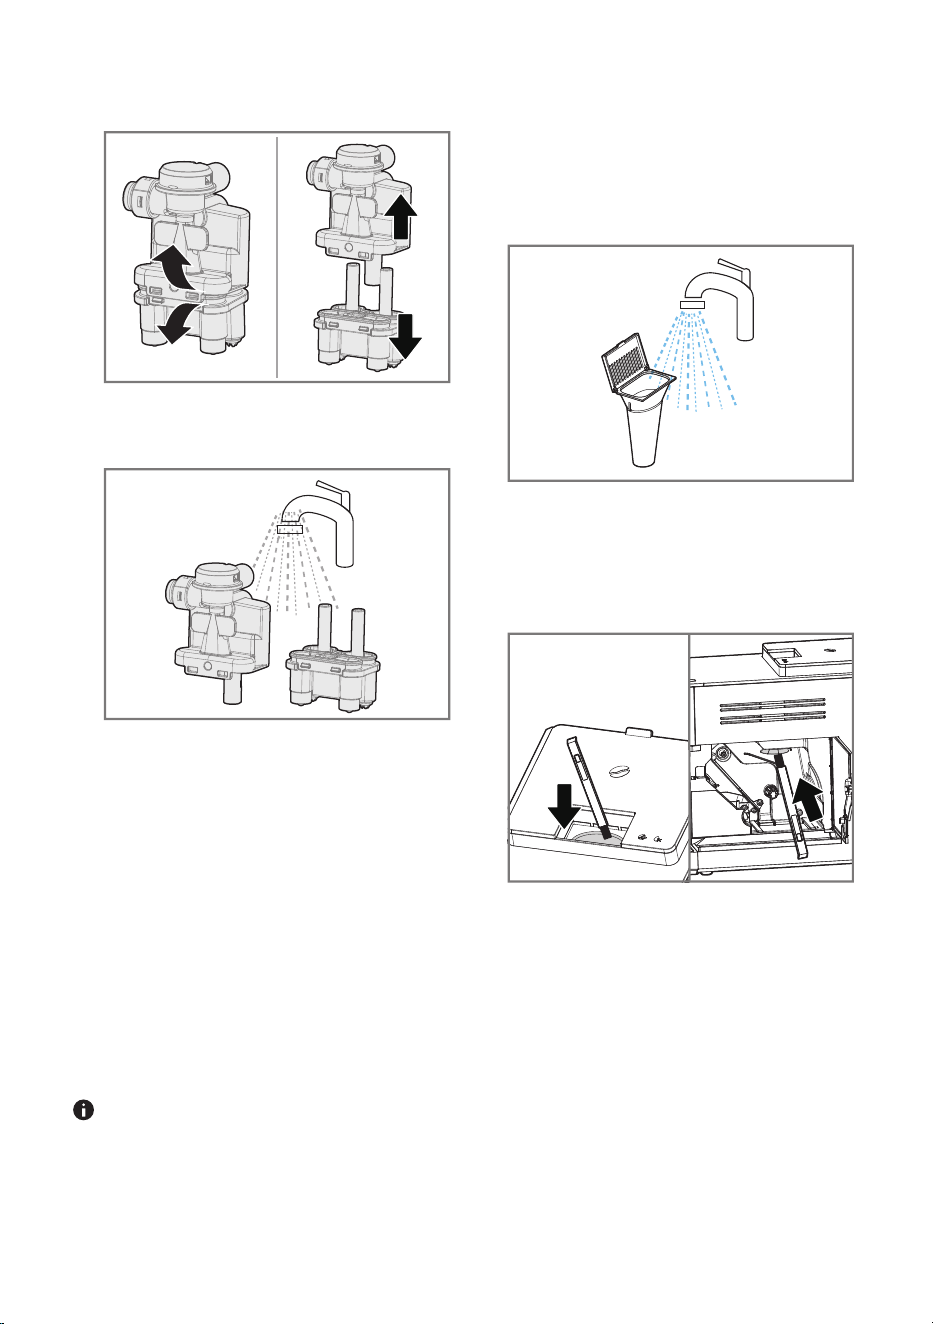
4. Dismantle the beverage
dispenser.
5. Clean the beverage dispenser
under running water.
6. Dry the beverage dispenser
thoroughly.
7. Reassemble the individual
parts.
8. Insert the beverage dispenser
into the beverage dispenser
holder.
9. Close the metal bracket.
10. Place the beverage outlet
cover on the beverage outlet.
11. Connect the milk tube to the
beverage dispenser.
You can clean the beverage
dispenser in the dishwasher.
6.3.5
Cleaning the pre-ground
coffee chute
6. Insert the brewing unit into the
brewing chamber.
7. Close the service door.
8.
9.
10.
Insert the water tank into the
appliance.
Dry the pre-ground coffee chute
thoroughly.
Insert the pre-ground coffee
chute into the pre-ground coffee
chute chamber.
The pre-ground coffee chute
must be cleaned every 3-5 days.
1. Remove the pre-ground coffee
chute.
2. Clean the pre-ground coffee
chute under running water.
3.
4.
5. Clean the inside of the brewing
chamber with a damp cloth.
Pull out the water tank and remove
the brewing unit.
Use the cleaning brush to dislodge
the pre-ground coffee powder
remaining in the chamber.
24
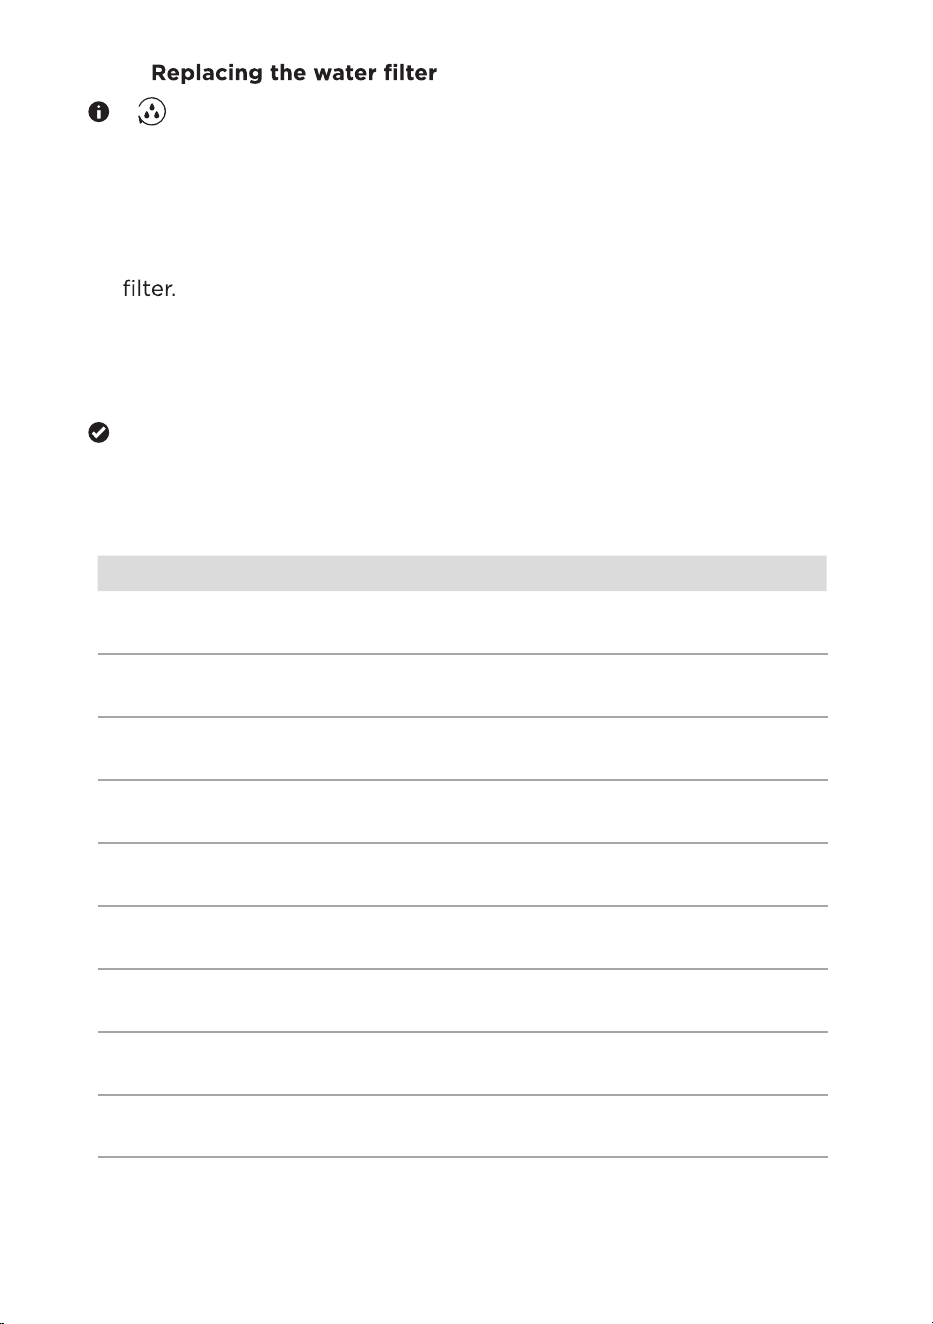
6.3.5
[
1. Pull out the water tank and
remove the old water filter.
2. Prepare and insert the new water
3. Press the
See Prepare and insert the
water filter in the Setup
section.
[Espresso] and
[Americano] symbols
simultaneously for 3 seconds.
Press the[Espresso]and[America
no]symbols to enter Settings
Mode.
wil
lflash everytwo
mont
h
sasaremindertoclean
thewaterfilter.
]
25
Recommended Cleaning Schedule
Drip Tray
Coffee Grounds Container
everage Dispenser
Brewing Unit
Milk Container
Milk System Cleaning Program
Coffee System Cleaning Program
Descaling Program
Pre-Ground Coffee Chute
Daily, or as soon as the
floater is visible.
Daily
Every 3-5 days
Weekly
After every use
After using the milk system
As needed
When the descaling
indicator lights up
Every 3-5 days
3.
with lukewarm water up to the
MAX mark.
4. Insert the water tank.
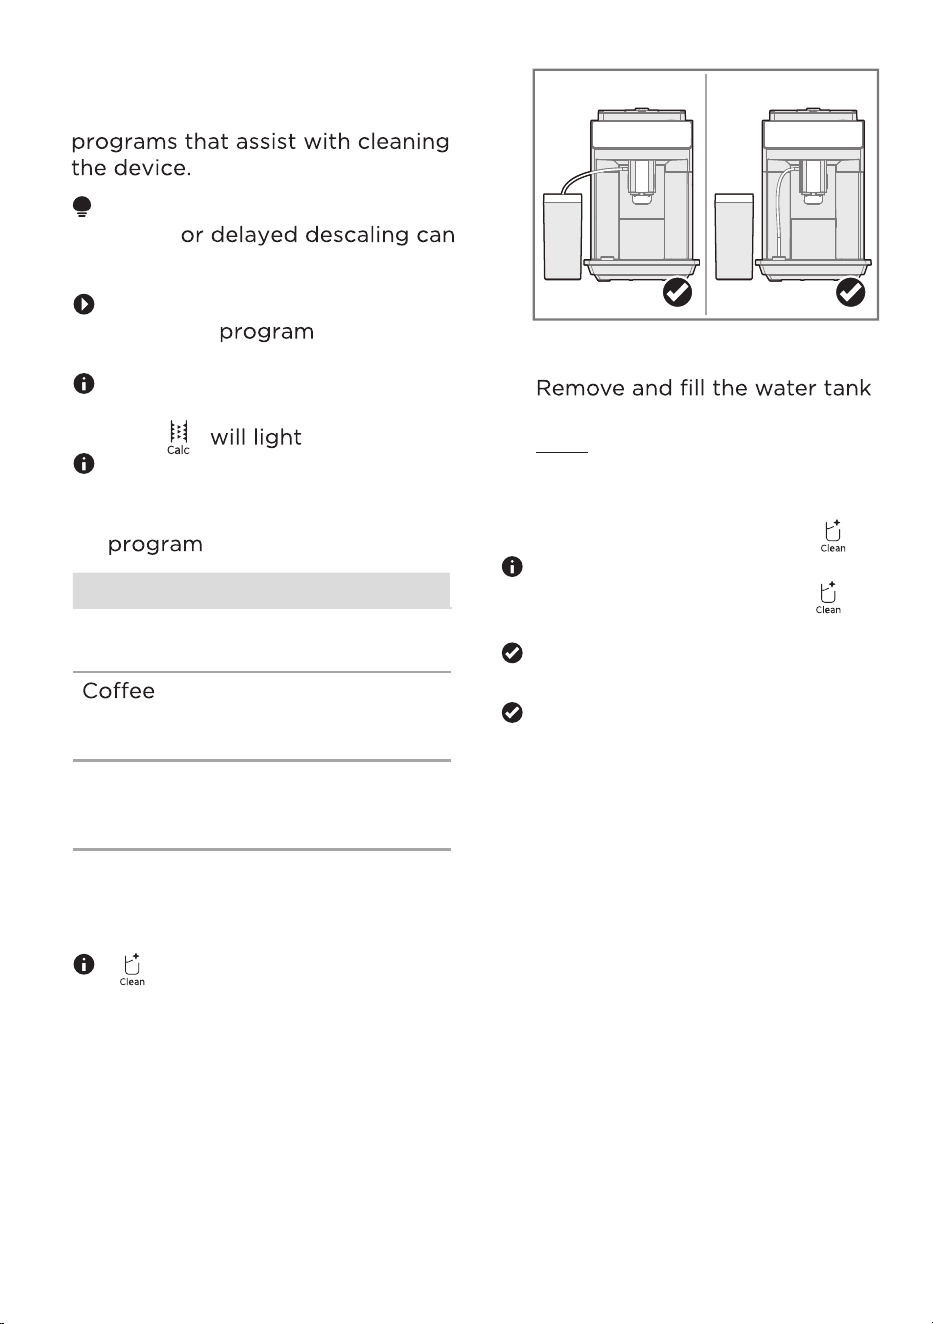
5. To start the milk system
cleaning program, press [ ].
To cancel the milk system
again.
The milk system cleaning
program starts.
When the milk system cleaning
program is finished, the
appliance returns to the main
menu.
6.4 Service programs
Your device has various service
ATTENTION
Improper
damage the appliance.
Immediately perform the
descaling
in accordance
with the instructions. If the
appliance is not descaled in good
time, it will be locked
and [ ]
up.
If your appliance has been
locked, you can only operate it
again once the descaling
has been carried out.
Program Usage
Milk system
cleaning
Cleaning the milk
system
Cleaning the
appliance with a
cleaning tablet
Descaling Descaling the
appliance with
descaling agent
6.4.1 Using the milk system
cleaning program
[ ] is flashing in white.
1. Remove the milk tube and
clean it.
2. Insert one end of the milk tube
into the beverage dispenser
and the other end into the
opening for the milk tube.
cleaning
[ ] cleaning program, press
26
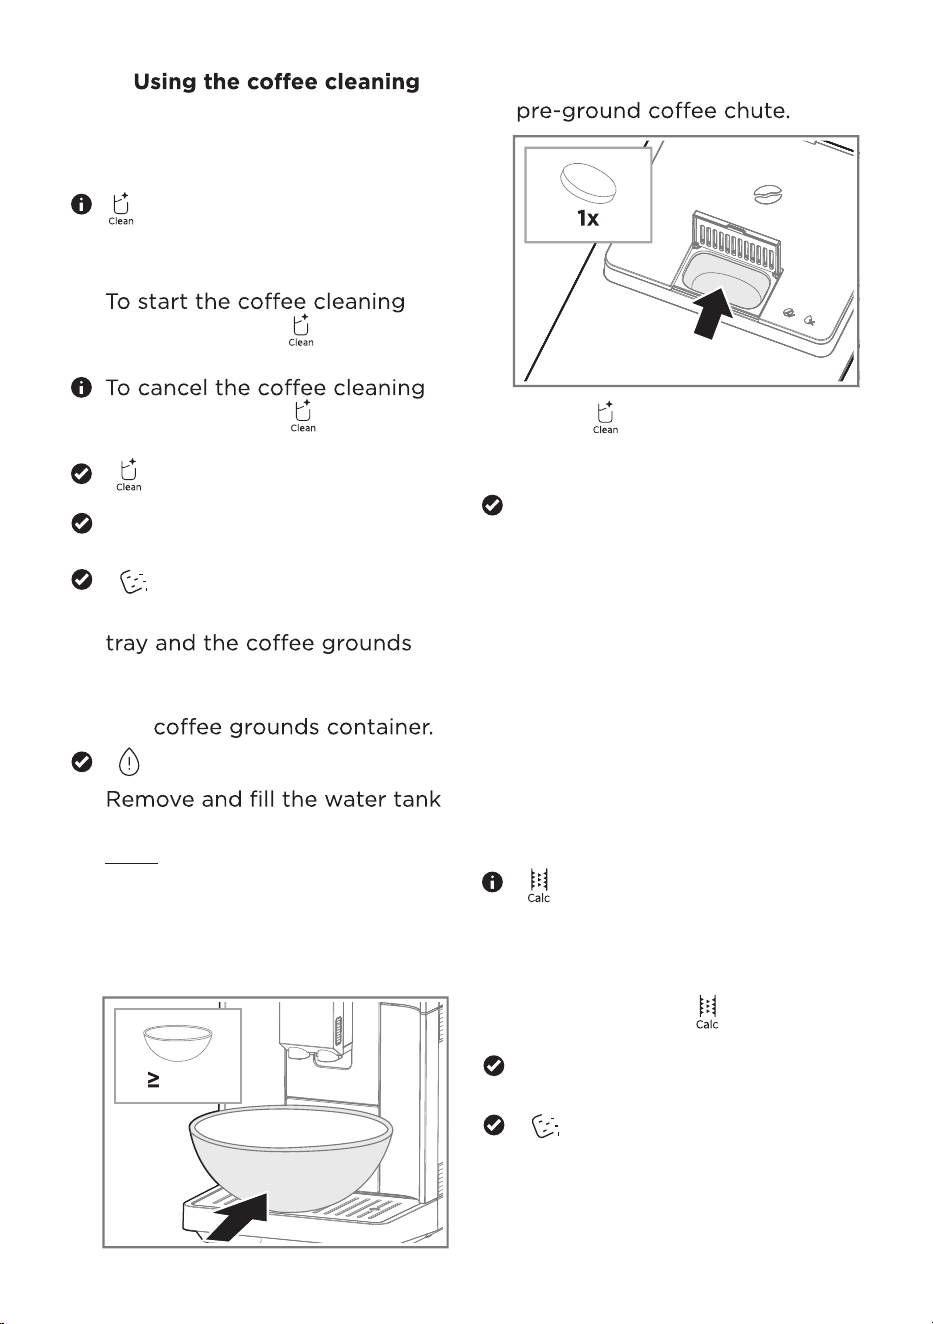
5.
with lukewarm water up to the
MAX mark.
6. Insert the water tank.
7. Place a container with a
capacity of at least 51 oz (1.5 liters).
under the beverage outlet.
6.4.3 Using the descaling
program
The program runs for about
40 minutes.
[
] lights up.
1. Remove the milk tube and
clean it.
2. To resume the descaling
program, press [ ] for 3
sec. onds.
The descaling program
starts.
[ ] is flashing..
[ ] lights up.
1. Remove the milk tube and
clean it.
2.
program, press [ ] for
3 seconds.
program, press [ ] again
within 3 seconds.
[
] lights up in red.
3.
Remove and empty the drip
container.
4. Reinsert the emptied
drip tray
and
[
[ ]
will flash.
The coffee cleaning program
6.4.2
program
The program runs for about
20 minutes.
starts.
8. Put a cleaning tablet into the
27
will flash.
]
51oz
9. Press [ ]
to start the coffee
cleaning program. The program
will run for 20 minutes.
10. When the coffee cleaning
program is finished, the
appliance returns to the main
menu.
11. Remove and fill the water tank
with cold, fresh, non-
carbonated drinking water, then
reinsert it.
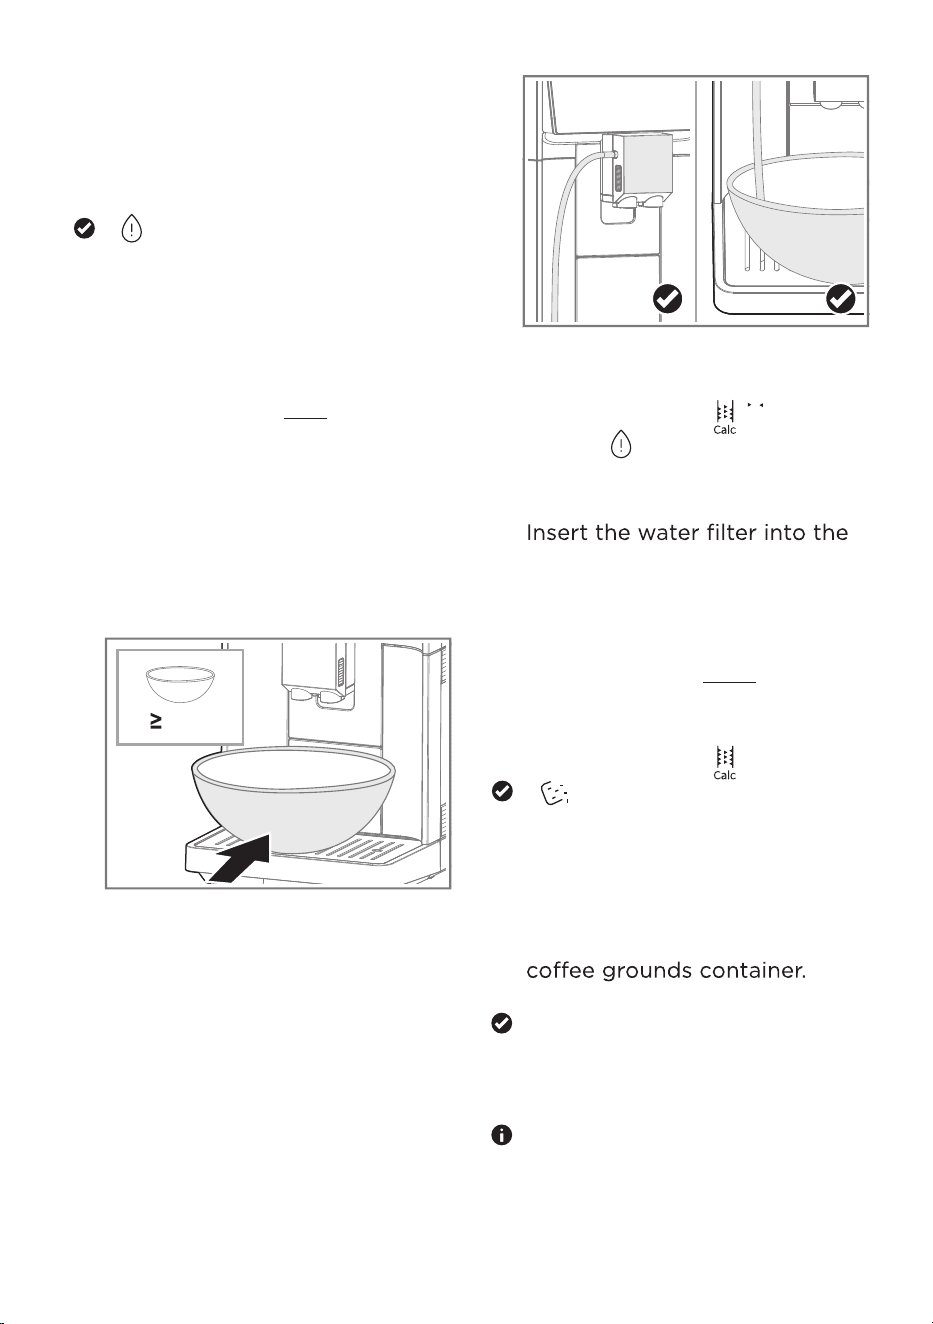
3. Remove and empty the drip tray
and the coffee grounds
container.
4. Insert the drip tray and the
coffee grounds container.
[ ] is flashing.
5. Remove the water tank and
empty it.
6.
Removethewaterfilter(ifyou
are using one).
7. Fill the water tank with lukewarm
water up to the 1 L mark.
8. Fill the descaler into the water
tank according to the
instructions on the packaging.
9. Insert the water tank.
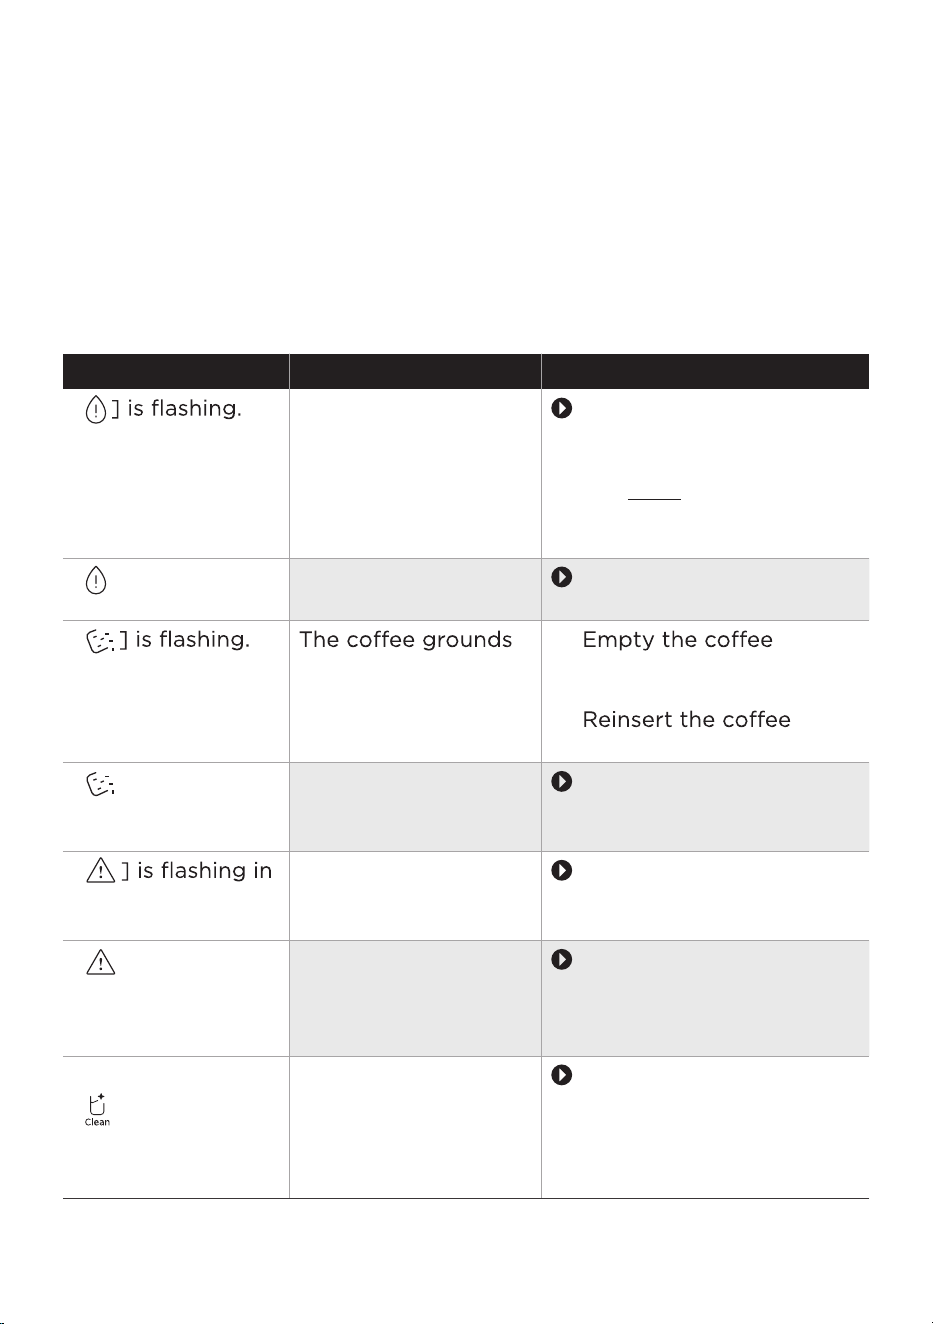
10. Place a container with a
capacity of at least 51 oz (1.5 liters).
under the beverage outlet.
11. Insert one end of the milk tube
into the beverage dispenser
and the other end into the
container.
12. To resume the descaling
program , press [ ].
13.
14.
When [ ] is flashing, empty
and rinse the water tank
thorou
ghly.
.
water tank (if you are using a
filter).
15. Fill the water tank with cold,
fresh, non-carbonated drinking
water up to the MAX mark and
reinsert it.
16. To resume the descaling
program , press [ ].
[ ] will flash.
17. Remove and empty the
container.
18. Remove and empty the drip
tray.
19. Insert the drip tray and the
When the descaling
program is finished, the
appliance returns to the main
menu.
Do not remove the container
under the dispenser during
the descaling process.
28
51oz
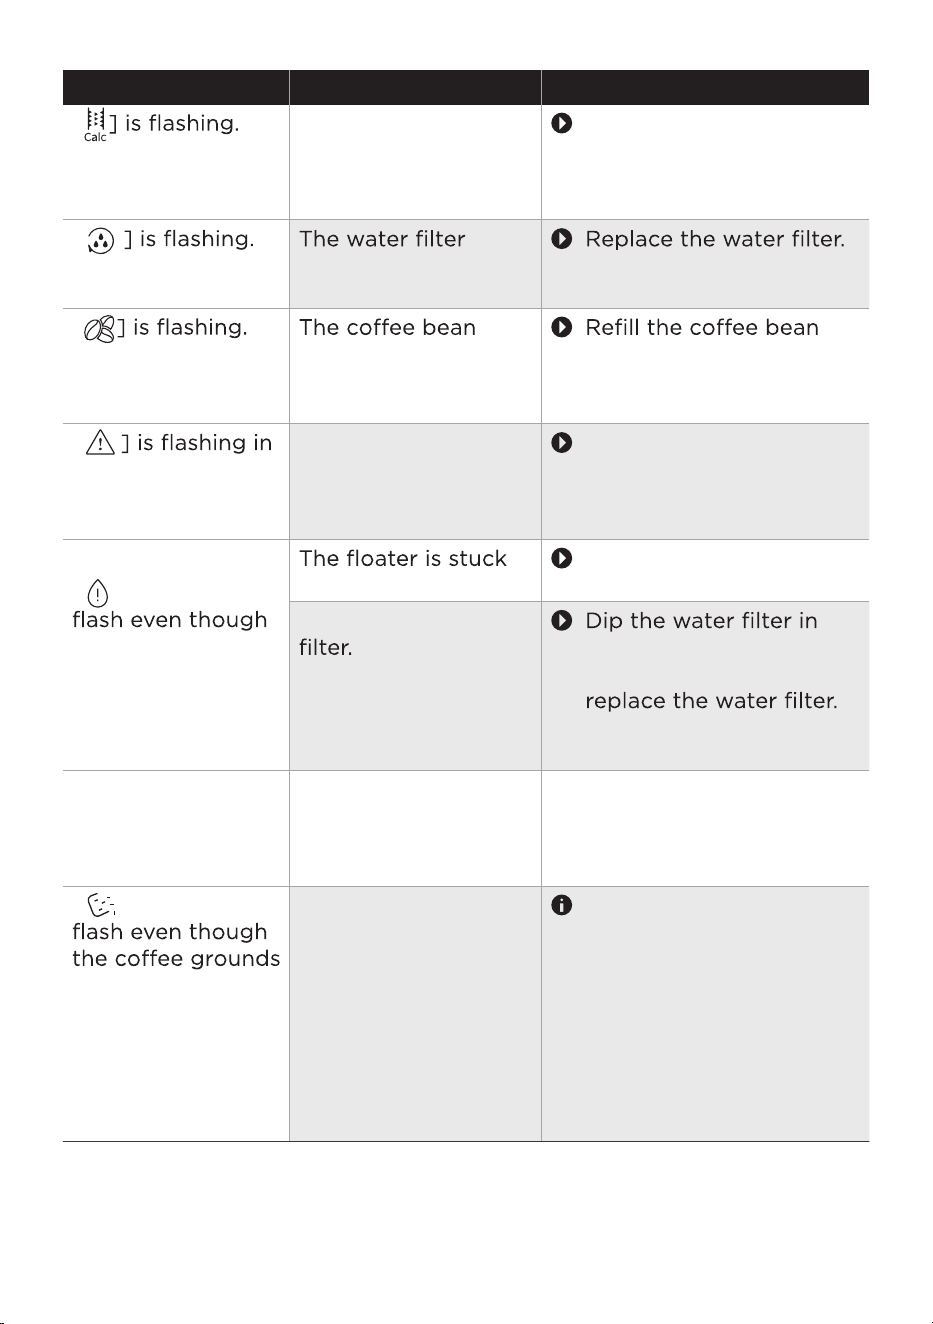
TROUBLESHOOTING
Operation of your appliance can lead to errors and malfunctions. The
following tables contain possible causes and notes for resolving an
error message or malfunction. To save your time and money, read the
table below before calling the service center.
Please check the following points before arranging for service.
Problem Possible causes Solution
[
The water tank is
almost empty.
Fill the water tank with
fresh, non-carbonated
drinking water up to
the MAX mark. See the
Checking the water
hardness
section.
[ ] lights up.
The water tank is not
inserted correctly.
Insert the water tank
correctly.
[
container is full.
1.
grounds container.
2. Wait at least 5 seconds.
3.
grounds container.
[ ] lights up.
[
white.
Clean the brewing unit.
See the Cleaning the
brewing unit section.
[ ] lights up in
white.
white.
The brewing unit is
not inserted
correctly.
Insert the brewing
unit correctly. See the
Cleaning the brewing
unit section.
[ ] lights up in
The beverage
dispenser needs to be
cleaned.
Use the milk system
cleaning program.
See the Using the milk
system cleaning
program section.
The
coffee grounds
container is not
inserted correctly.
Too muc
h or too
little coffee was
used.
Insert the coffee
grounds container
correctly.
29
Problem Possible causes Solution
[
The appliance needs
to be descaled.
Use the descaling
program. See the
Using the descaling
program section.
[
needs to be
replaced.
See the Replacing the
water filter section.
[
container is almost
empty.
container. See the Filling
the coffee bean container
section.
[
red and the
beverage symbol
lights up.
The appliance has an
error.
Unplug the appliance
from the main socket
and
contact customer
service.
[ ] continues to
the water level is
above the
minimum quantity.
in the water tank.
Remove the water tank
and clean it thoroughly.
Air is in the water
water until no more air
bubbles escape, then
See the Replacing the
water filter section.
The appliance no
longer responds.
The appliance has a
fault.
1. Pull out the main plug
and wait 1 minute.
2. Re-insert the main
plug.
3.
[ ] continues to
container is empty.
1.
2.
If
the appliance is
switched off, it will
not register that the
coffee grounds
container was
emptied.
Alway
s empty the coffee
grounds container while
the appliance is
switched on.
Re
move the empty
coffee grounds container
and wait for 5 seconds.
Re-insert the coffee
grounds container.
30
Press the [On/Off] button.
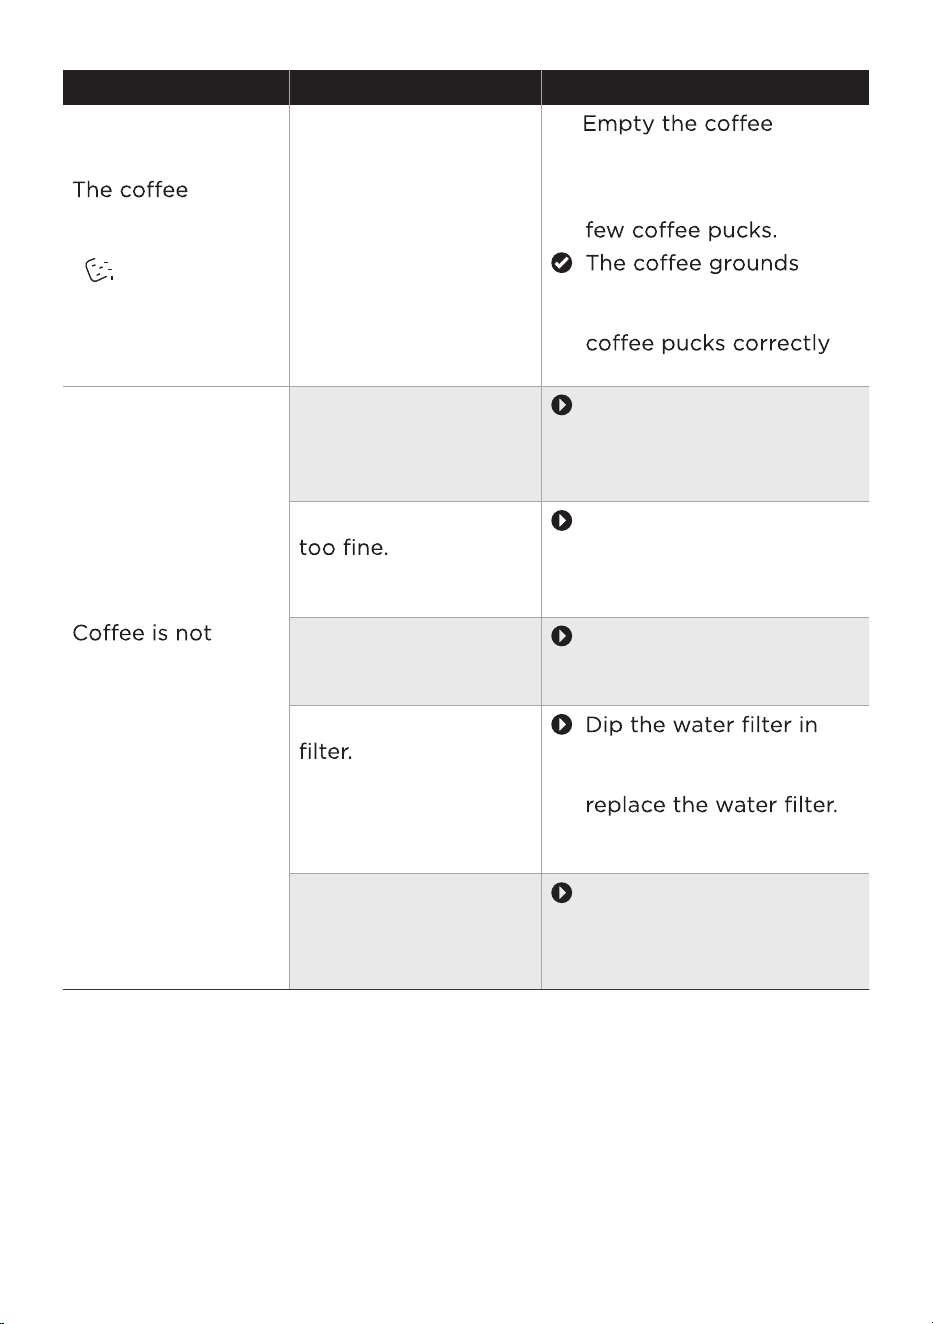
Problem Possible causes Solution
grounds container
is full, but
[ ] does not
flash.
The d
rip tray was
removed for more
than 5 seconds
without the coffee
grounds container
being emptied.
1.
grounds container when
you remove the drip tray,
even if it only contains a
counter will reset to 0
and start counting the
again.
dispensed or only
dispenses in drips.
The beverage
dispenser or the
beverage dispenser
holder is blocked.
Clean the beverage
dispenser manually. See
the Cleaning the beverage
dispenser chapter.
Grinding level is set
Adjust the grinder to a
coarser grinding level.
See the Setting the
grinding degree section.
The brewing unit is
dirty.
Clean the brewing unit.
See the Cleaning the
brewing unit section.
Air is in the water
water until no more air
bubbles escape, then
See the Replacing the
water filter section.
Build-up of lime
scale in the
appliance.
Use the descaling
program. See the
Using the descaling
program section.
31
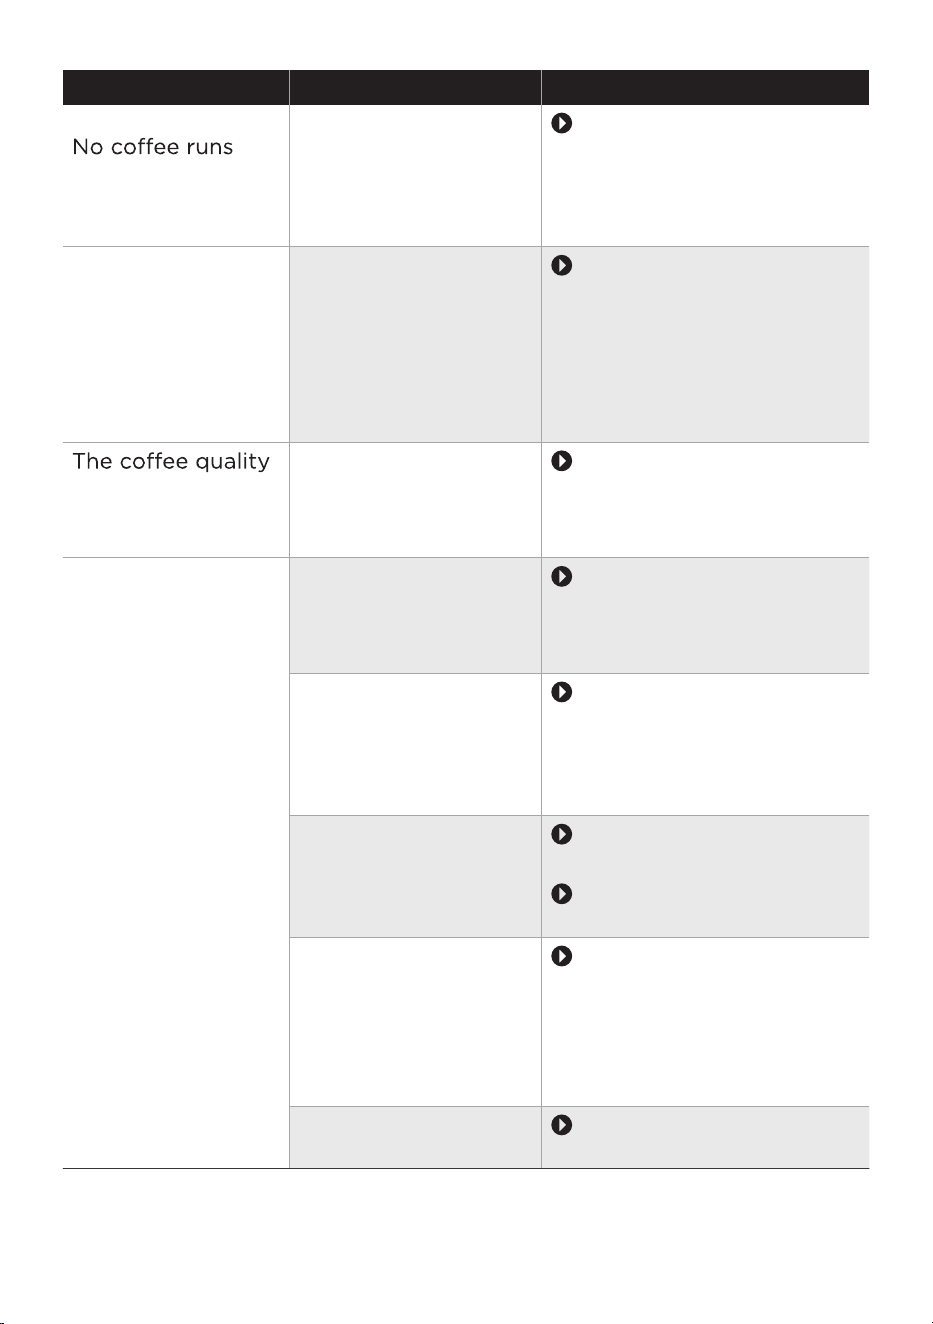
Problem Possible causes Solution
out of one or both
spouts.
The beverage
dispenser is blocked.
Clean the beverage
dispenser manually. See
the Cleaning the
beverage dispenser
section.
When dispensing
the beverage, liquid
escapes from the
beverage dispenser
and sprays all over
the beverage
dispenser.
The lower part of
beverage dispenser
is not properly
assembled.
Assemble the beverage
dispenser correctly.
See the Cleaning the
beverage dispenser
section.
varies widely.
Set quantity is not
reached.
Build-up of lime
scale in the
appliance.
Use the descaling
program. See the
Using the descaling
program section.
The milk foam
quality varies
widely.
Set quantity is not
reached or no milk
is taken in at all.
Build-up of lime
scale in the
appliance.
Use the descaling
program. See the
Using the descaling
program section.
The beverage
dispenser or the
beverage dispenser
holder is dirty.
Clean the beverage
dispenser manually. See
the Cleaning the beverage
dispenser section.
The type of milk
used is not suitable
for preparing milk
foam.
Do not use milk that has
already been boiled.
Use cold milk with a fat
content of at least 1.5 %.
The beverage
dispenser or the milk
tube is not properly
assembled.
Check the assembly of
the beverage dispenser
and the milk tube. See
the Cleaning the
beverage dispenser
section.
The milk tube is
blocked.
Clean the milk tube.
32
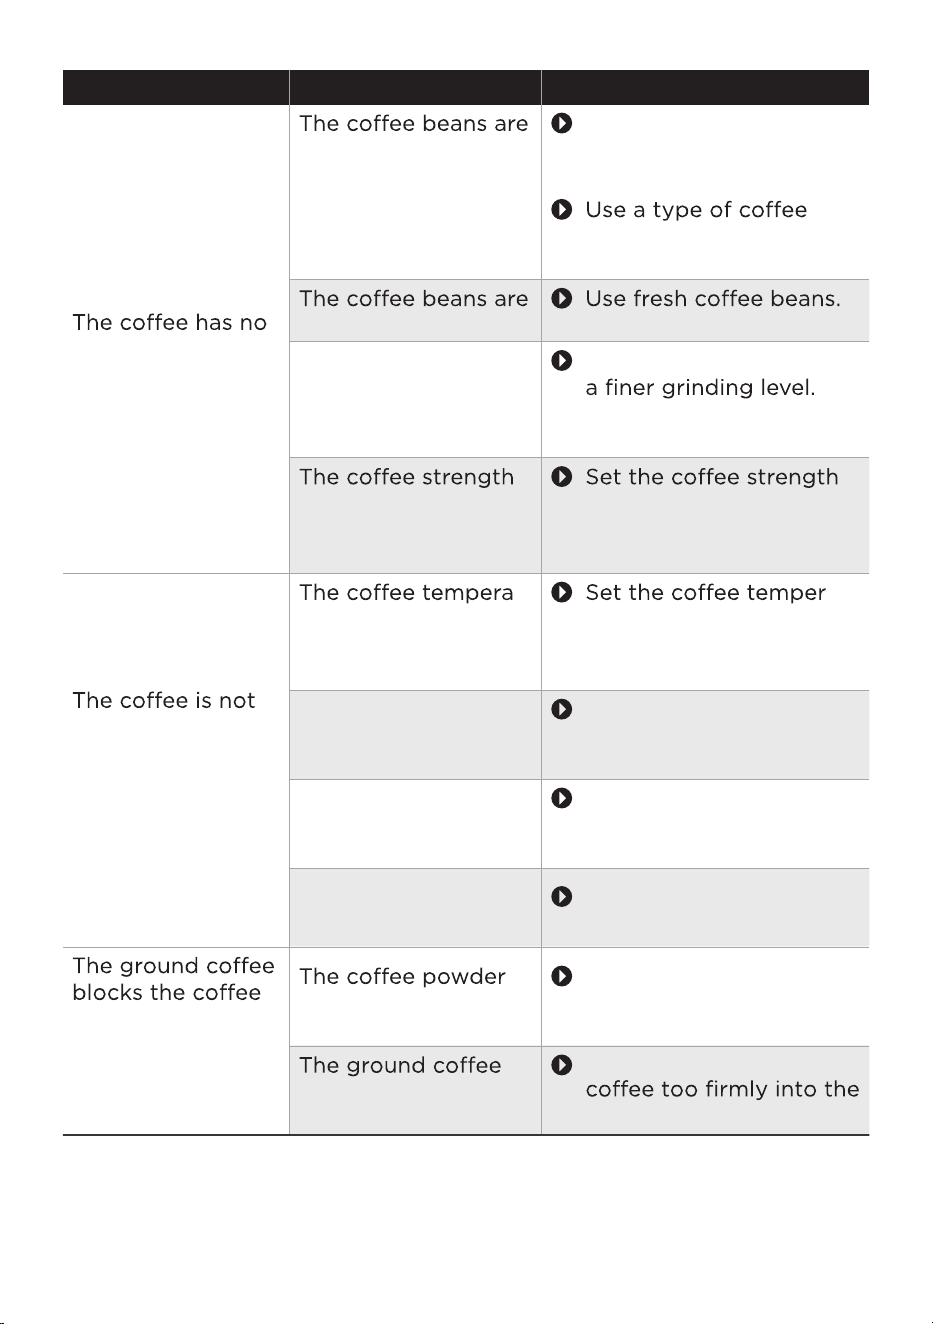
Problem Possible causes Solution
foam or is
too weak.
unsuitable.
Use coffee beans
suitable for espresso
machines.
with a higher proportion
of robusta beans.
no longer fresh.
The grinding level is
set too coarse.
Adjust the grinder to
See the Setting the
grinding degree section.
is set too low.
to a higher value. See
the Setting the coffee
strength section.
hot enough.
-
ture is set too low.
-
ature to a higher value.
See the Adjusting the
coffee temperature
section.
The cup is cold. To preheat the cups,
rinse them with hot
water.
Milk reduces the
temperature of the
beverage.
To preheat the cups,
rinse them with hot
water.
powder chute.
chute is damp.
A cold brew drink
was prepared.
Prepare a second
cup of hot drink.
is compressed too
much.
Do not press the ground
measuring spoon.
Remove the coffee powder
chute, then clean and dry it
thoroughly.
33
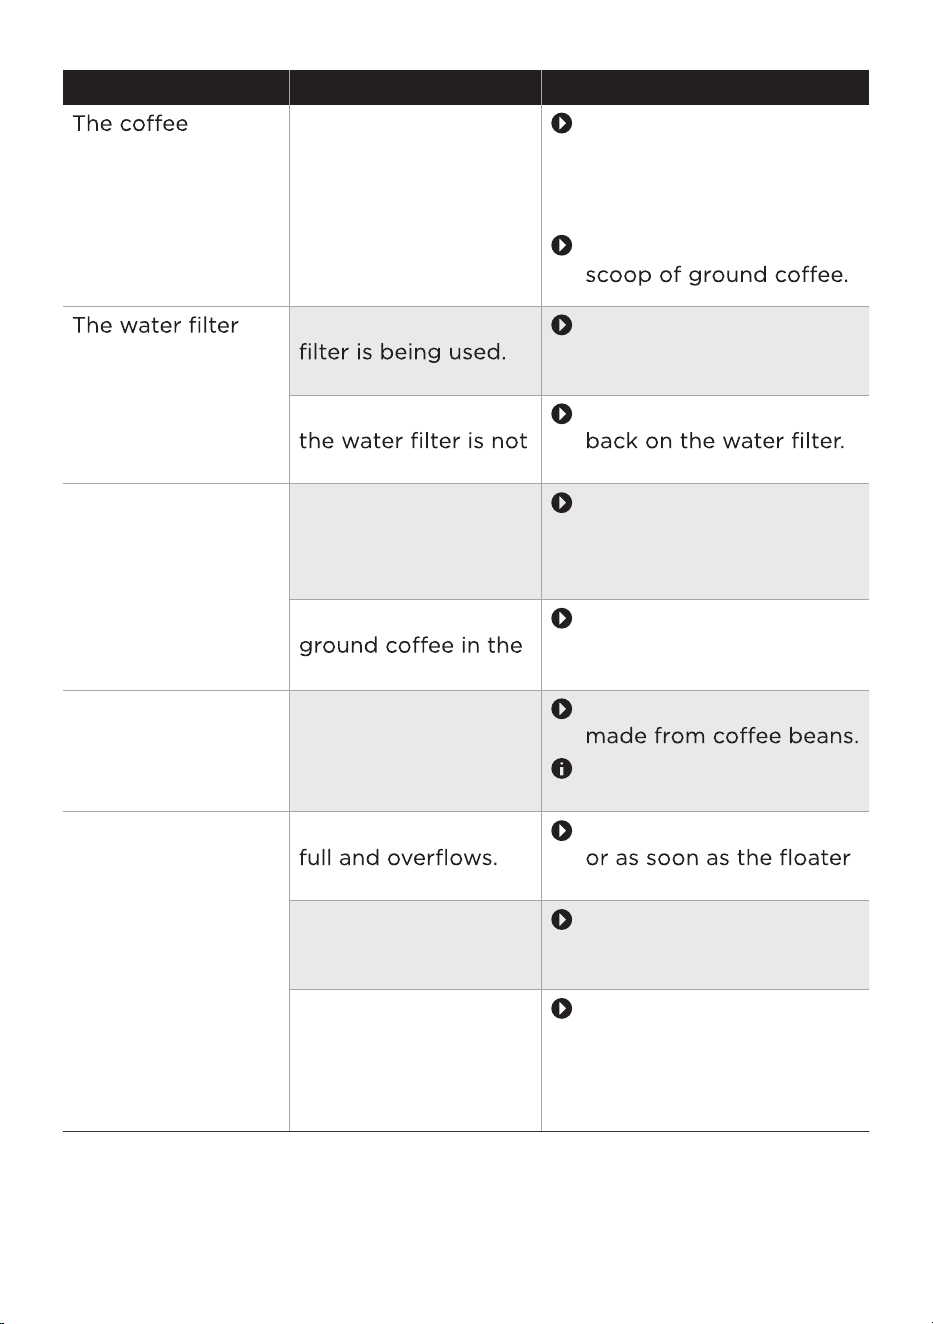
Problem Possible causes Solution
grounds are not
compact and are
too wet.
The grindin
g setting
is too fine or too
coarse, or not
enough ground
coffee has been
used.
Adjust the grinding degree
to a finer or coarser setting.
See the Setting the
grinding degree chapter.
Use a full measuring
does not stay in
position in the
water tank.
The wrong water Use original spare
parts only. See the
Accessories section.
The rubber ring on
in place.
Place the rubber ring
The service door
does not close
properly.
The brewing unit is
not inserted
correctly.
Insert the brewing
unit correctly. See the
Cleaning the brewing
unit section.
There is too much
brewing chamber.
Clean the brewing unit.
See the Cleaning the
brewing unit section.
The g
rind setting
is difficult to
adjust.
There are too many
beans in the grinder.
Dispense a beverage
Only adjust the grinding
degree slightly.
The appliance
seems to be
leaking.
The drip tray is too
Empty the drip tray daily
is visible.
The water tank is not
inserted correctly.
Make sure the water
tank is inserted
correctly.
The appliance is not
placed on a level
surface.
Place the appliance on a
waterproof, level and
sufficiently stable
surface. See the Set up
the appliance section.
34
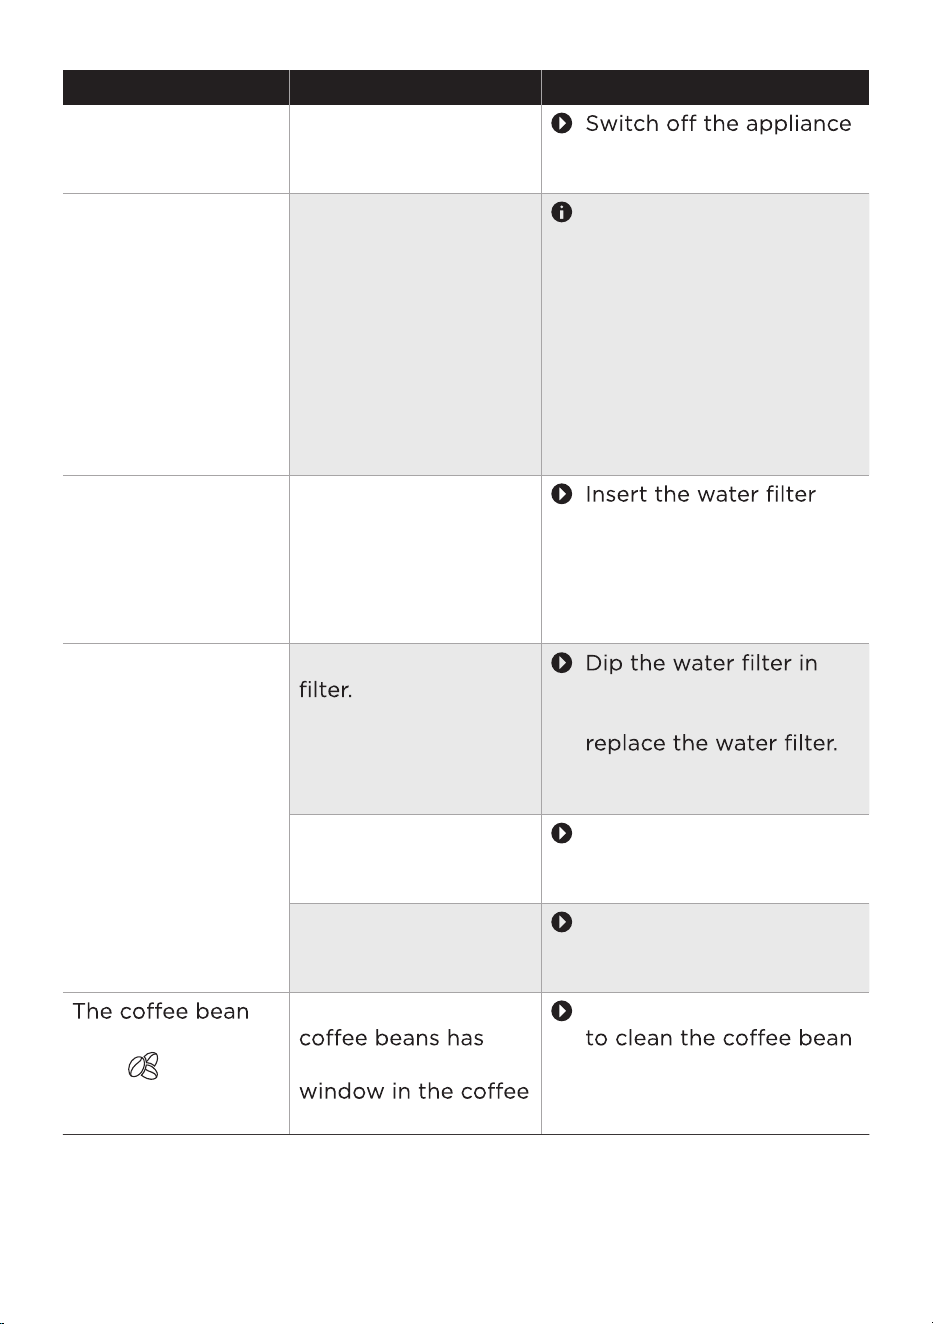
Problem Possible causes Solution
The appliance
suddenly goes back
to the main menu.
The appliance is too
hot. for 30 minutes.
The beverage
symbols light up
suddenly and go
out slowly one
after another while
the beverage is
being prepared.
Th
e drip tray or
water tank was
removed during
preparation.
Do not remove the drip
tray or the water tank
while the beverage is
being prepared.
1. Put the drip tray and the
water tank back into the
appliance.
2. Wait until the appliance
returns to the main
menu.
Very frequent
display that
descaling is
necessary.
The water hardness
setting is too hard.
and adjust the water
hardness setting as
described. See the
Checking the water
hardness section.
The appliance
makes unusually
loud noises.
Air is in the water
water until no more air
bubbles escape, then
See the Replacing the
water filter section.
The water tank is not
inserted correctly.
Make sure the water
tank is inserted
correctly.
There is not enough
milk in the milk
container.
Pour more milk into
the milk container.
container is empty
but [ ] did not
flash.
The oil from the
soiled the detection
bean container.
Use the cleaning brush
container detection
window regularly.
35
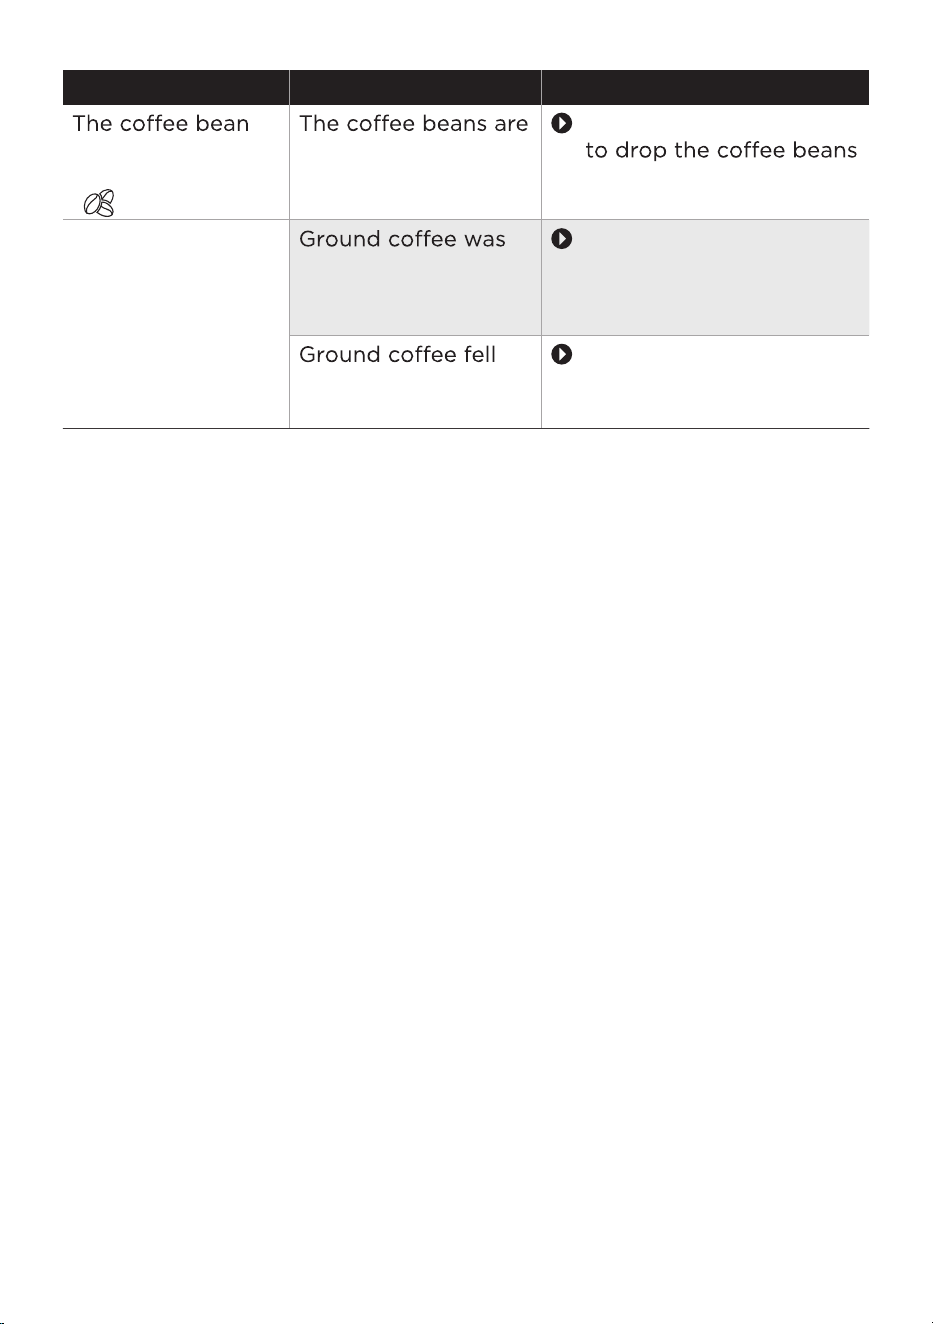
Problem Possible causes Solution
container still
contains beans but
[ ] is flashing.
not falling into the
grinder.
Use the cleaning brush
into the grinder.
The appliance
dispensed coffee
liquid during the
automatic rinsing
cycle.
added before the
appliance was
switched on.
into the brewing
unit.
Clean the brewing unit.
See the Cleaning the
brewing unit section.
Only add ground coffee
when the appliance is
switched on.
36
TRADEMARKS
, COPYRIGHTS
AND LEGAL STATEMENT
logo, word marks, trade name, trade dress and all versions thereof are
valuable assets of Midea Group and/or its affiliates(“Midea”), to which Midea owns
trademarks, copyrights and other intellectual property rights, and all goodwill derived
from using any part of an Midea trademark. Use of the Midea trademark for
commercial purposes without the prior written consent of Midea may constitute
trademark infringement or unfair competition in violation of relevant laws.
This manual is created by Midea and Midea reserves all copyrights thereof. No entity or
individual may use, duplicate, modify, distribute in whole or in part this manual, or
bundle or sell with other products without the prior written consent of Midea.
All the described functions and instructions were up to date at the time of printing this
manual. However, the actual product may vary due to improved functions and designs.
3
7
Th
e

DATA PROTECTION NOTICE
For the provision of the services agreed with the customer,
we agree to comply without restriction with all stipulations of applicable data protection
law, in line with agreed countries within which services to the customer will be delivered,
as well as, where applicable, the EU General Data Protection Regulation (GDPR).
Generally, our data processing is to fulfil our obligation under contract with you and for
product safety reasons, to safeguard your rights in connection with warranty and
product registration questions. In some cases, but only if appropriate data protection is
ensured, personal data might be transferred to recipients located outside of the
European Economic Area.
Further information are provided on request. You can contact our Data Protection
O˛cer via [email protected]. To exercise your rights such as right to object your
personal date being processed for direct marketing purposes, please contact us via
38

WARRANTY CARD
IF YOU NEED SERVICE
1.Before contacting us to arrange service, please determine whether your product requires
repair. Some questions can be addressed without service. Please take a few minutes to
review the Troubleshooting section of the User Manual or visit https://www.midea.com/
us/support.
2.All warranty service is provided exclusively by our Midea-authorized service providers in
the U.S. and Canada.
In the U.S.A. or Canada, call 1-866-646-4332.
This warranty gives you specific legal rights, and you also may have other rights that vary
from state to state or province to province. If outside the 50 States of the United States or
Canada, contact your authorized Midea dealer to determine whether another warranty
applies.
LIMITED WARRANTY
WHAT IS COVERED
FIRST YEAR LIMITED WARRANTY (PARTS AND LABOR)
For one year from the date of delivery, if this appliance is installed, operated and
maintained according to instructions attached to or furnished with the product, Midea
America Corporation (hereafter "Midea") will pay for factory-specified replacement parts
and repair labor to correct defects in materials or workmanship that existed when this
major appliance was purchased, or at its sole discretion replace the product; however, you
are responsible for all costs associated with returning the product to Midea. In the event of
product replacement, your appliance will be warranted for the remaining term of the
original unit's warranty period.
YOUR SOLE AND EXCLUSIVE REMEDY UNDER THIS LIMITED WARRANTY SHALL BE
PRODUCT REPAIR OR REPLACEMENT AS PROVIDED HEREIN.
Service must be provided by a Midea-authorized service provider.
This limited warranty is
valid only in the 50 States of the United States or Canada and applies only when the major
appliance is used in the country in which it was purchased. This limited warranty is
effective from the date of original consumer delivery. Proof of purchase is required to
obtain service under this limited warranty. Should service be required, the date of delivery
establishes the warranty period.
LIMITED WARRANTY
WHAT IS NOT COVERED
1. Commercial, non-residential or multiple-family use, or use inconsistent with published
user, operator or installation instructions.
2.ln-home instruction on how to use your product.
3.Service to correct improper product maintenance or installation, such as installation not
in accordance with electrical codes or correction of household electrical system (i.e. house
wiring, fuses, etc.).
39

9.Routine maintenance of the product.
10.Products that were purchased "as is" or as refurbished products.
11.Products that have been transferred from its original owner.
12.Discoloration, rust or oxidation of surfaces resulting from caustic or corrosive
environments including but not limited to high salt concentrations, high moisture or
humidity or exposure to chemicals.
13.Service or parts for appliances with original model/serial numbers removed, altered
or not easily identified.
The cost of repair or replacement under these excluded circumstances shall be borne
by the customer.
DISCLAIMER OF IMPLIED WARRANTIES
IMPLIED WARRANTIES, INCLUDING ANY IMPLIED WARRANTY OF
MERCHANTABILITY OR IMPLIED WARRANTY OF FITNESS FOR A PARTICULAR
PURPOSE, ARE LIMITED TO ONE YEAR OR THE SHORTEST PERIOD ALLOWED BY
LAW. Some states and provinces do not allow limitations on the duration of implied
warranties of merchantability or fitness, so this limitation may not apply to you. This
warranty gives you specific legal rights, and you also may have other rights that vary
from state to state or province to province.
DISCLAIMER OF REPRESENTATIONS OUTSIDE OF WARRANTY
Midea makes no representations about the quality, durability, or need for service or
repair of this appliance other than the representations contained in this warranty. If
you want a longer or more comprehensive warranty than the limited warranty that
comes with this appliance, ask Midea or your retailer about buying an extended
warranty.
LIMITATION OF REMEDIES; EXCLUSION OF INCIDENTAL AND CONSEQUENTIAL
DAMAGES
YOUR SOLE AND EXCLUSIVE REMEDY UNDER THIS LIMITED WARRANTY SHALL BE
PRODUCT REPAIR AS PROVIDED HEREIN. MIDEA SHALL NOT BE LIABLE FOR
INCIDENTAL OR CONSEQUENTIAL DAMAGES. Some states and provinces do not
allow the exclusion or limitation of incidental or consequential damages, so these
limitations and exclusions may not apply to you. This warranty gives you specific legal
rights, and you also may have other rights that vary from state to state or province to
province.
COMPANY HEADQUARTERS; DO NOT SHIP TO ADDRESS
Midea Customer Service
300 Kimball Drive, Suite 201, Parsippany, NJ 07054
40
4.Consumable parts (i.e. light bulbs, batteries, air or water filters, etc.).
5.Defects or damage caused by the use of non-genuine Midea parts or accessories.
6.Damage from accident, misuse, abuse, fire, floods, electrical issues, acts of God or use
with products not approved by Midea.
7.Repairs to parts or systems to correct product damage or defects caused by
unauthorized service, alteration or modification of the appliance.
8.Cosmetic damage, including scratches, dents, chips, and other damage to appliance
finishes, unless such damage results from defects in materials and workmanship and is
reported to Midea within 30 days.