MCM151FACDK
USER MANUAL
COFFEE MACHINE
Warning notices: Before using this product, please read this manual carefully and keep itforfuturereference.
The design and specifications are subject to change without prior notice for product improvement.
Consult with your dealer or manufacturer for details.
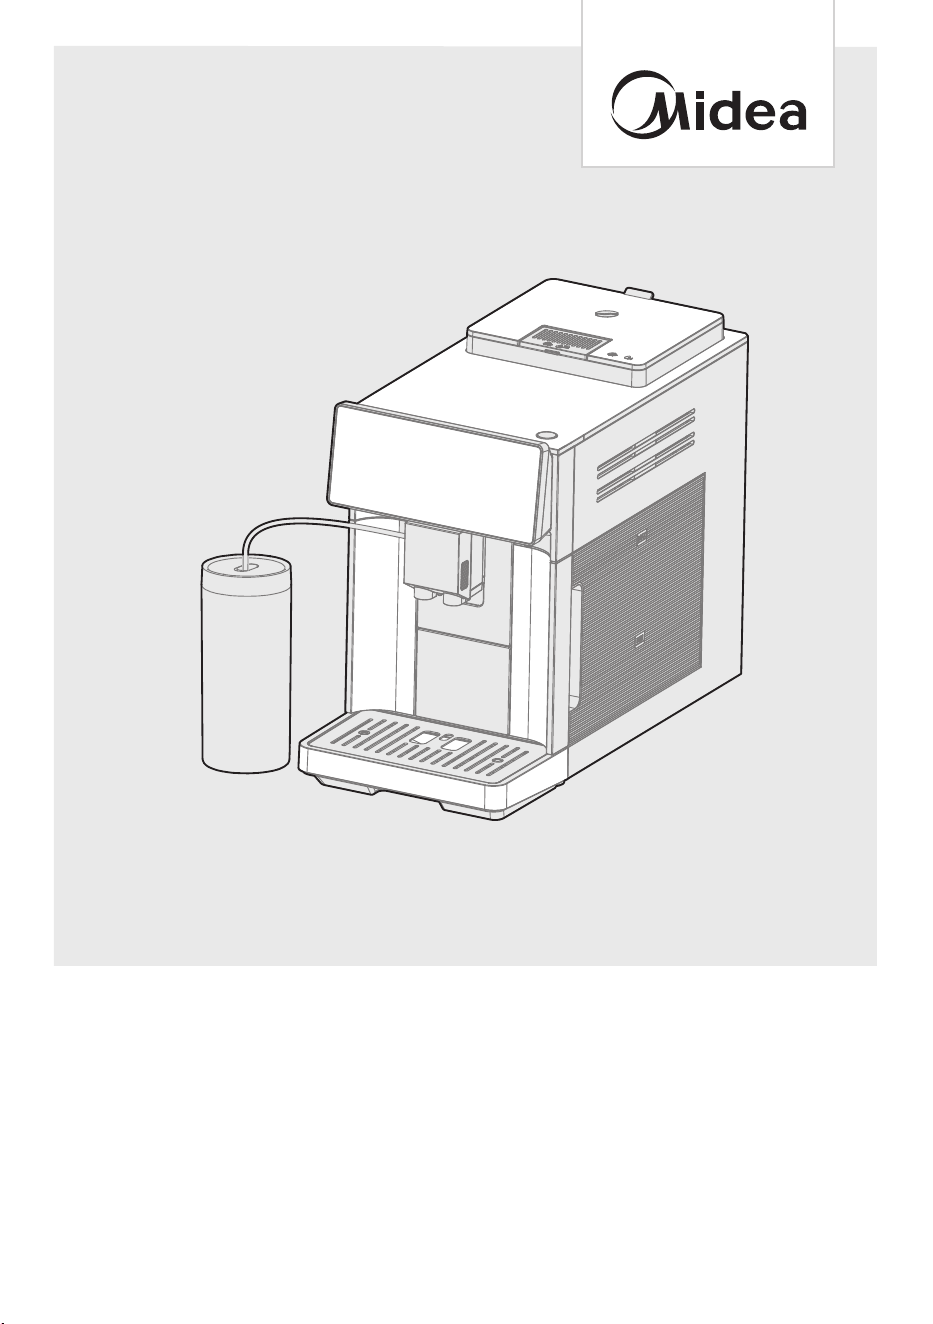
The diagram above is just for reference. Please take the appearance of the actual product as the standard.

THANK YOU LETTER
Thank you for choosing Midea! Before using your new Midea product, please read
this manual thoroughly to ensure that you know how to operate the features and
functions that your new appliance offers in a safe way.
CONTENTS
01
05
13
19
28
36
37
04
02
T
H
ANK YOU LETTER
SAFETY INSTRUCTIONS
SPEC
IFICATIONS
PRODUCT OVERVIEW
A INSTRUCTIONS
CLEANING AND MAINTENANCE
TROUBLESHOOTING
TRADEMARKS, COPYRIGHTS AND LEGAL STATEMENT
DISPOSAL AND RECYCLING
DATA PROTECTION NOTICE
38
01
AACAD
3
Danger
This symbol indicates that there are dangers to the life and health of
persons due to extremely flammable gas.
Warning of electrical voltage
This symbol indicates that there is a danger to life and health of
persons due to voltage.
Warning
The signal word indicates a hazard with a medium level of risk which, if
not avoided, may result in death or serious injury.
Caution
The signal word indicates a hazard with a low degree of risk which, if
not avoided, may result in minor or moderate injury.
Attention
The signal word indicates important information (e.g. damage to
property), but not danger.
Observe instructions
This symbol indicates that a service technician should only operate and
maintain this appliance in accordance with the operating instructions.
Read these operating instructions carefully and attentively before using/commissioning the
unit and keep them in the immediate vicinity of the installation site or unit for later use!
Intended Use
The following safety guidelines are intended to prevent unforeseen risks or damage from
unsafe or incorrect operation of the appliance. Please check the packaging and appliance
on arrival to make sure everything is intact to ensure safe operation. If you find any
damage, please contact the retailer or dealer. Please note modifications or alterations to
the appliance are not allowed Unintended use may cause hazards and
loss of
Explanation of Symbols
SAFETY INSTRUCTIONS
Anti-scalding sign
The surface hot during use.
02

●
●
●
●
●
●
●
●
●
●
●
If the supply cord is damaged, it
must be replaced by the
manufacturer, its service agent or similarly qualified
persons in order to avoid a hazard.
The appliance must not be
WARNING: Do not use the appliance if the surface is
cracked.
The heating element surface is subject to residual heat
after use.
D
o not use outdoors.
The appliance is intended to be used in household and
similar applications such as:
-staff kitchen areas in offices and other
workingenvironments;
-farm houses;
-by clients in hotels, motels and other
environments;
-bed and environments.
The coffee-maker shall not be placed in a cabinet when in use
This appliance can be used by children aged from 8 years
and above and persons with reduced physical, sensory or
mental capabilities or lack of experience and knowledge
if they have been given supervision or instruction
concerning use of the appliance in a safe way and
understand the hazards involved. Children shall not play
with the appliance. Cleaning and user maintenance shall
not be by children unless they are older than 8
and supervised. Keep the appliance and its cord out of
reach of children aged less than 8 years.
WARNING: Misuse may cause potential injury.
: Avoid spillage on the connector.
0
0
CAUTION
03

SPECIFICATIONS
Voltage
Frequency
Rated Power
120V~
60Hz
1400W
Max. amount of water 1.8L
MCM151FACDK
Product Model
04
Overview of the appliance and its components:
Bean container lid
On/Off button
Water tank
Brewing nit
Service door
Bean container
rer dial
Pre-ground
offee
chute
Control panel
Milk Tube
Beverage
outlet cover
Beverage
outlet
offee
grounds
container
Drip tray
Cup tray
"Drip tray
full" indicator
Milk ontainer
PRODUCT OVERVIEW
Part as
05
rroer

2.1 Scope of delivery
Pos. ItemPos. Item
1 Appliance
2 Milk container
3 Milk tube
4 Cleaning cloth
5
6 Measuring scoop
7 Cleaning brush
8 Test strip
1 2 3 4 5 6 7 8
06
9
ees
10
eses
9 10
Ordering Maintenance Products & Accessories
We recommend using Midea maintenance products to clean and
descale your machine. You can purchase them online at https://
www.midea.com/us .
Recommended Maintenance Products:
Descaling Tablets:
MA-FACM1001_CALC
Water Filter:MA-FACM1001_86
Cleaning Tablets (Coffee Oil Remover): MA-FACM1001_CT
Please scan the QR code for more detailed cleaning instructions.
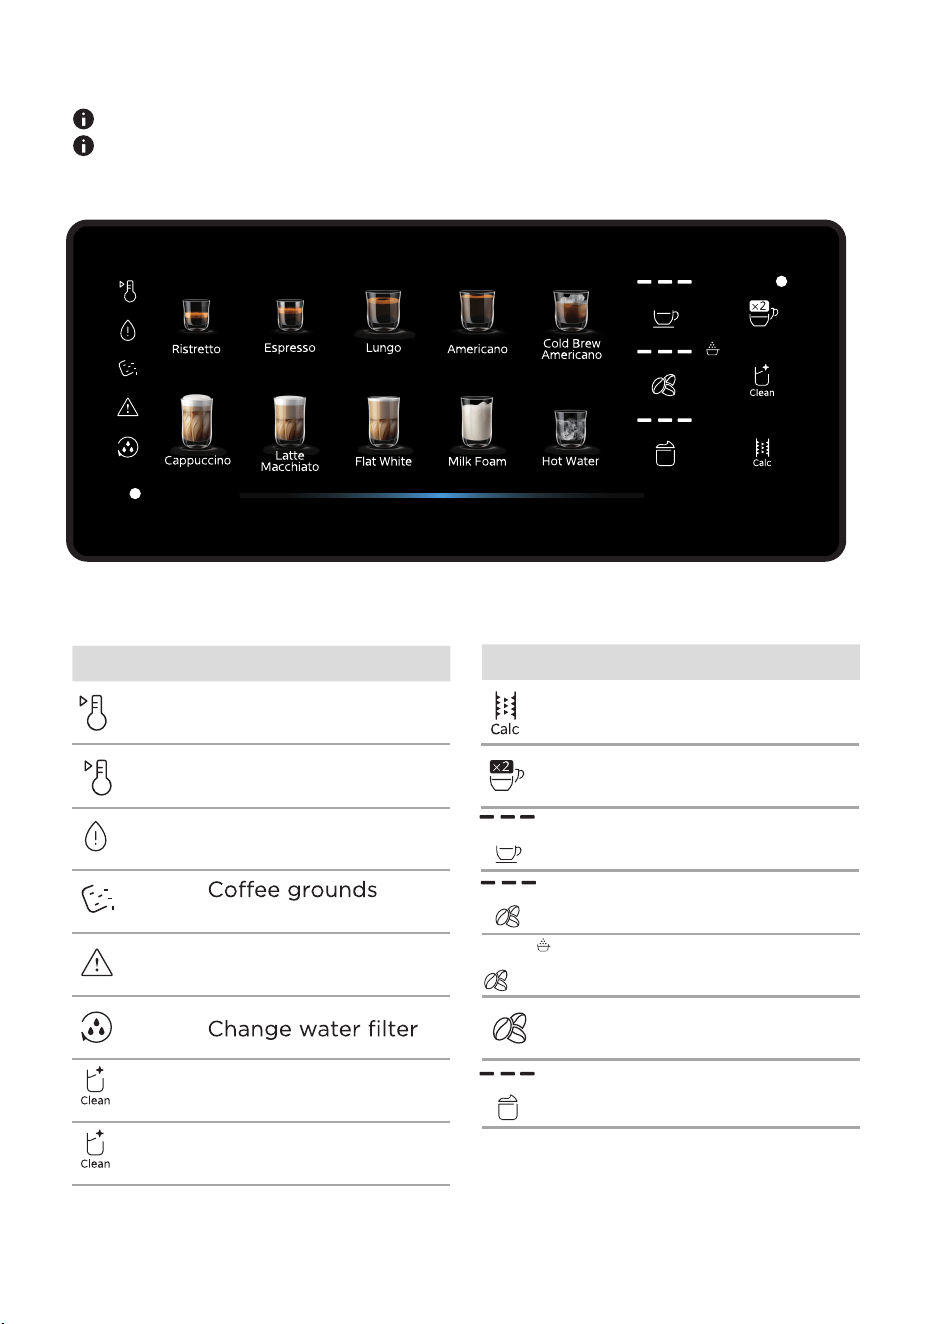
Symbol Meaning
Appliance is cooling
down
Water tank is empty
*White
light
*White
light
*Red
light
*Red
light
container is full
Appliance has an
error
eeoffeesse
eesse
Descale appliance
ressosese
2 cups
ressos
oe
Symbol Meaning
ressos
offeesre
seseoffee
eoerse
Adjust milk f
oam
quantity
2.2 Control panel
Make sure the controls are always clean and dry.
Do not cover the control panel with objects.
Appliance is heating
up
07
esseo
seoffeeoer
Clean the appliance and its
components. Prepare the
appliance for use.
See also the enclosed quick
start guide.
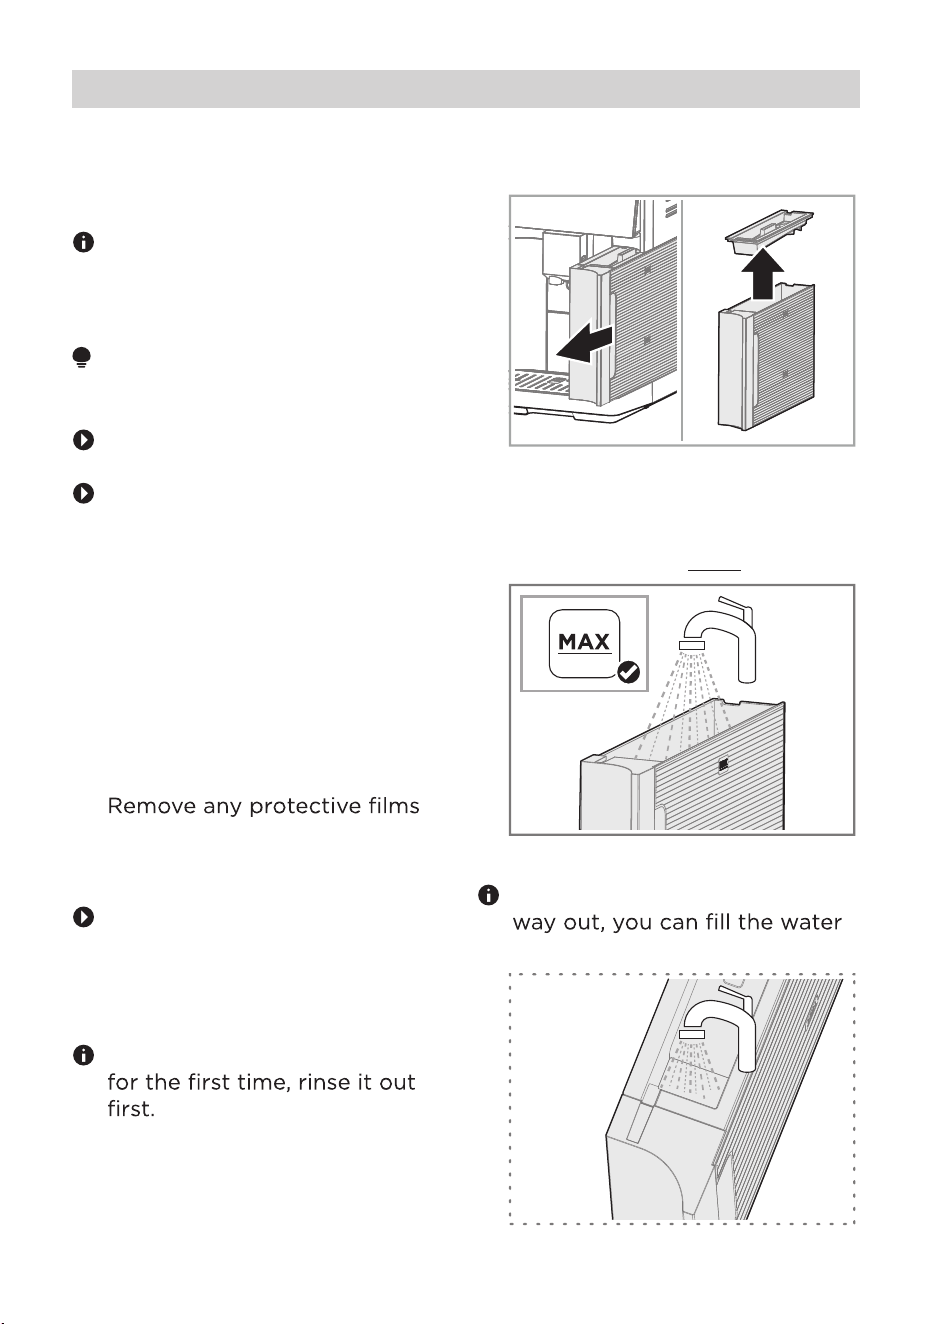
3.1 Set up the appliance
ATTENTION
Improper initial setup can
damage the appliance.
Only use the appliance in a
frost-free room.
If the appliance has been
transported or stored at
temperatures below 0°C, wait
3hours at room temperature
before s
1. Place the appliance on a
waterproof, level and
sffe stable
surface.
2. Make sure that the ventilation
slots of the appliance are not
covered.
3.
and stickers.
3.2 Connect the appliance
Insert the main plug of the
appliance into a socket near
the appliance.
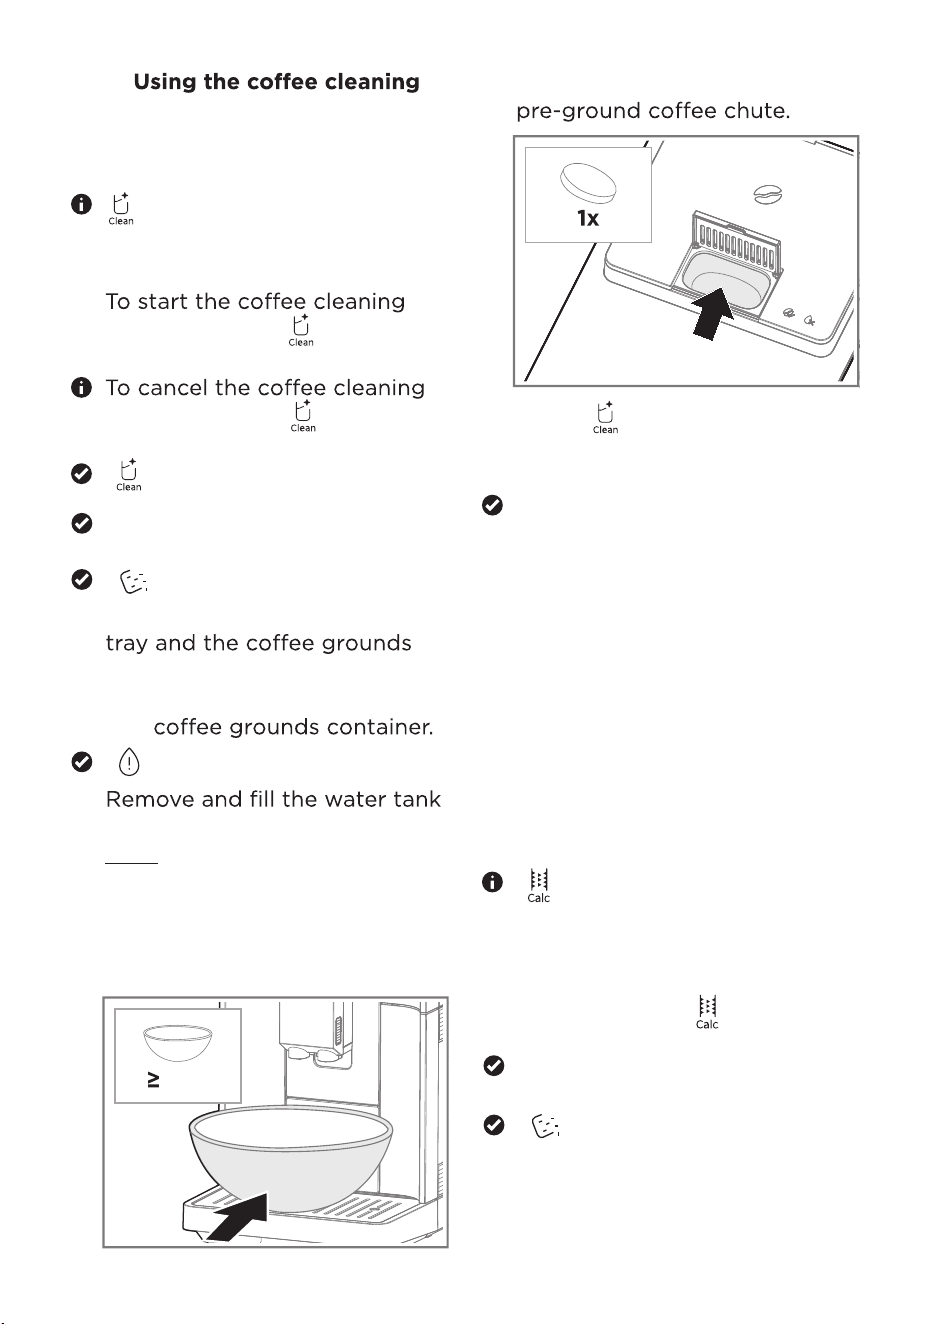
3.3 Filling the water tank
If you are using the water tank
1. Pull out the water tank by the
handle and remove the lid.
2. Fill the water tank with cold,
fresh, non-carbonated drinking
water up to the MAX mark.
If you pull the water tank half-
tank through the inlet.
Before First Use
08
3.4
container
ATTENTION
Improper use can damage the
grinder.
Do not use coffee beans that
have been treated with
additives or caramelised.
Do not pour any liquids into
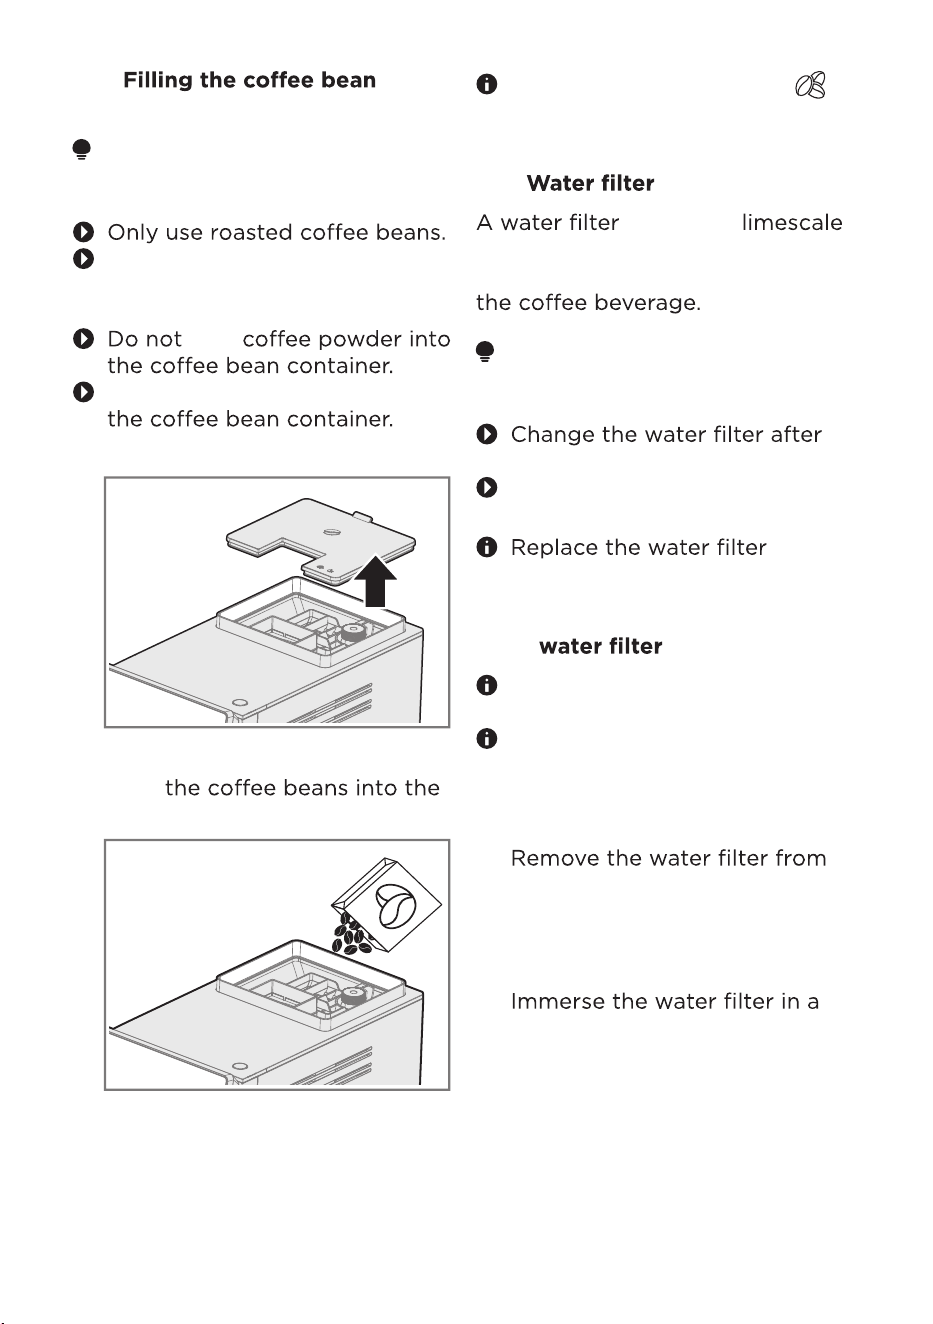
1. Open the bean container lid.
2.
bean container.
3. Close the bean container lid.
The control panel shows [
when the coffee bean container
needs to be refilled.
]
3.5
deposits, es impurities in the
water and improves the taste of
ATTENTION
Limescale deposits can damage
the appliance.
2 months at the latest.
Observe the symbols on the
control panel.
3.5.1 Preparing and inserting the
You can also operate the
appliance without a water filter.
1.
2.
3.
the packaging and turn
the date oro
oofeferto the
next 2months.
container of water.
Before activating the water
filter, it has to be prepared first.
Shake the water filter for about
5 seconds.
09
or
es
or
eee
o
4.
10 seconds until no more water
bubbles escape.
5.
straight down into the water
tank connection.
6. Insert the water tank back into
the appliance.
3.6 Checking the water hardness
It is important to set the water
hardness correctly to enable
the appliance to accurately
indicate when the descaling
programme should be run.
Use cold, fresh,
non-carbonated drinking water.
You can ask your local water
supplier for the local water
1.
hardness or check it with the
enclosed test strip.
glass of oroer for 2
seconds.
Allow the test strip to dry for
10 seconds.
Check the degree of water
hardness from the
sooro of the test strip.
°dh > 21
°dh > 14
°dh > 7
°dh > 4
°dh < 3
3.7 settings
[Espresso], [Americano],
[ ], [
in 50% brightness.
], [ ],[ ]
light up and [ ] light up
2. oeseresse
orresoso
reeeeoro
10
resseffo

panel shows the rere
ses
3.7.1
temperature
eesoeress
[ ] repeatedly until the
control panel shows the
LED Temperature
normal
high
max
3.7.2 Setting the water hardness
1. Check the degree of water
hardness from the
discoloration of the test
strip. See the Checking the
Water Hardness section.
2. eesoeress
reeeecontrol
panel shows the
required water
hardness degree.
The table shows the allocation
of levels 1 (soft) to 5 (very
hard) to the different degrees
of water hardness:
Symbol Level °dh
1 < 3
2>4
3>7
4 > 14
5* > 21
* Factory setting
3.7.3 Setting the hot water
temperature
eesoeress
[ ] repeatedly until the
control panel shows the desired
hot water temperature.
Available water temperatures:
LED Temperature
normal
high
max
Setting the coffee
3.To save the
ses, press the
sressoerosos
simultaneously for 3 seconds.
The appliance saves the setting
and runs a rinsing cycle.
11
3.7.4
If you are not using a water
filter, you do not need to
activate the filter reminder.
[
] lights up in 50%
brightness.
3.7.5 General operating instruc-
tions
For technical resos steam
may escape from the appliance
during operation.
During oerowater
droplets may form at the
ventilation slits and on the lid
of the pre-ground offee
chute.
When the appliance is used for
the first efer running a
cleaning or descaling
programme, or if it has not
been operated for a long e,
the first beverage will not have
the full aroma and should not
be consumed.
1.
press [ ].
2. To save the setting, press the
sressoero
sos
simultaneously for3
seconds.
The appliance saves the
settings.
When the activation process is
The appliance e
rrsee
The appliance is ready to use.
[ ] lights up in 100%
brightness.
12
eferreer
eseoee
erfer
2.
Press [ ]
repeatedly until the
control panel shows eso
fororseee standby time.
Available standby settings:
Symbol Standby time
15 min
30 min*
1 h
2 h
3 h
3. To save orses press the
*Factory Setting
[Ristretto], [Lungo] and
[ ] will light up.
sreoosos
seos
for 3 seconds.
The appliance saves or
sesrers
to the main
menu.
After 30 seconds without user
interaction, the appliance
seerreses
orer to the main
menu.
The power consumption increases
if the standby time is set to over
30 minutes.
1. Press the sreo
osos
seos
forseos
3.7.6 Setting the standby time
eseseeefore
eeeerssoe
soeeoroe
ssreerero
seoer
4.1 Switch the appliance on
To switch the appliance on,
resseffo.
The appliance starts to heat up
and rinses.
When all beverage symbols
light up, the appliance is ready
for operation.
4.2
The appliance rinses and
switches off automatically 30
minutes after the last
beverage has been prepared.
The appliance rinses and shuts
down.
4.3 Setting the grinding degree
You can set the grinding
degree in half steps from 1
(coarse) to 7
turn the grinder dial to
the left.
For a coarser grind, turn the
grinder dial to the
right.
4.4 Beverage customisation
Before preparation, you can
customise your drink to your taste.
4.4.1
Press [ ] repeatedly until the
control panel shows the desired
quantity.
LED Quantity
e
re
4.4.2
Press [ ] repeatedly until the
co
ntrol panel shows the
d
esired offee strength.
LED Strengths
e
ro
4.4.3 Setting the amount of milk
foam
Press [ ] repeatedly until the
control panel shows the
desired amount of milk foam.
Available milk foam quantities:
LED Quantity
resseffo
OPERATING INSTRUSCTIONS
13
orferr
e eerees:
LED Quantity
e
re
4.5
Warning - Risk of scalding
Hot liquids and steam can cause
scalding.
Do not hold any parts of your
body under the outlet.
Warning - Risk of burns
Some parts of the appliance
become hot during operation.
Do not touch any parts of
the appliance before allowing
them to cool down.
Some beverages are prepared
in 2 steps.
If you want to cancel beverage
dispensing prematurely, press
the selected beverage symbol
again.
The beverage outlet is
height-adjustable.
4.5.1
1. Place a glass or cup under the
2.
outlet.
ease see the etting the
eerage antit section.
3.
See the etting the cee
strength section.
4. osrrereeere,
press the
your choice.
4.5.2
ATTENTION
can damage the appliance.
the appliance is switched on.
powder.
The function for preparing
2 cups is not available for
drinks made from coffee
powder.
Preparing a coffee beverage
from coffee beans
The coffee beverage is
prepared and dispensed.
Preparing a coffee beverage
from coffee powder
14
To switch the appliance on,
resseffo
Seetheitchtheaiancen
section.
Place a glass or cup under the
outlet.
Open the lid of the pre-ground
eere
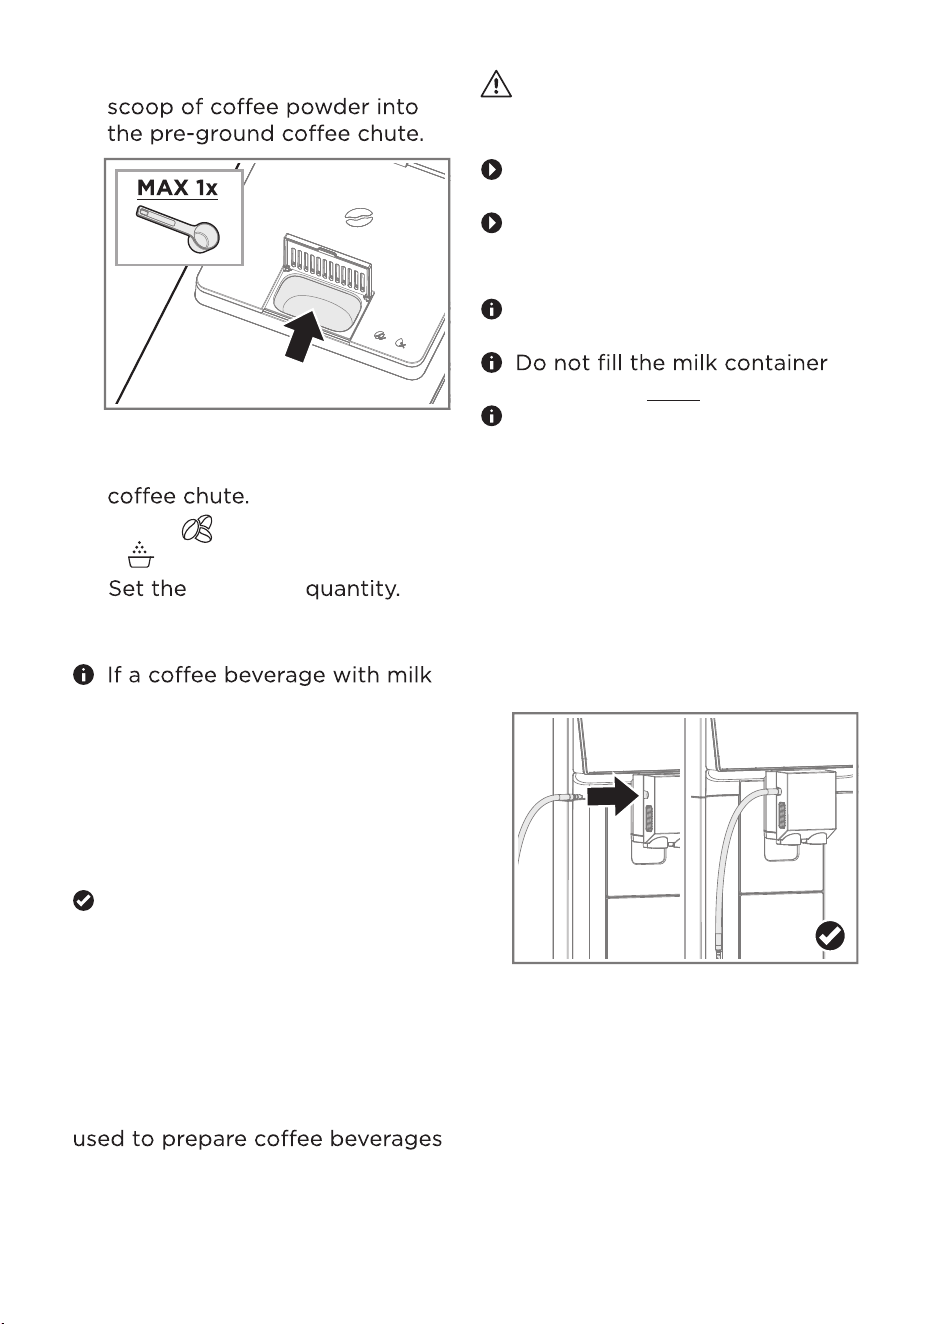
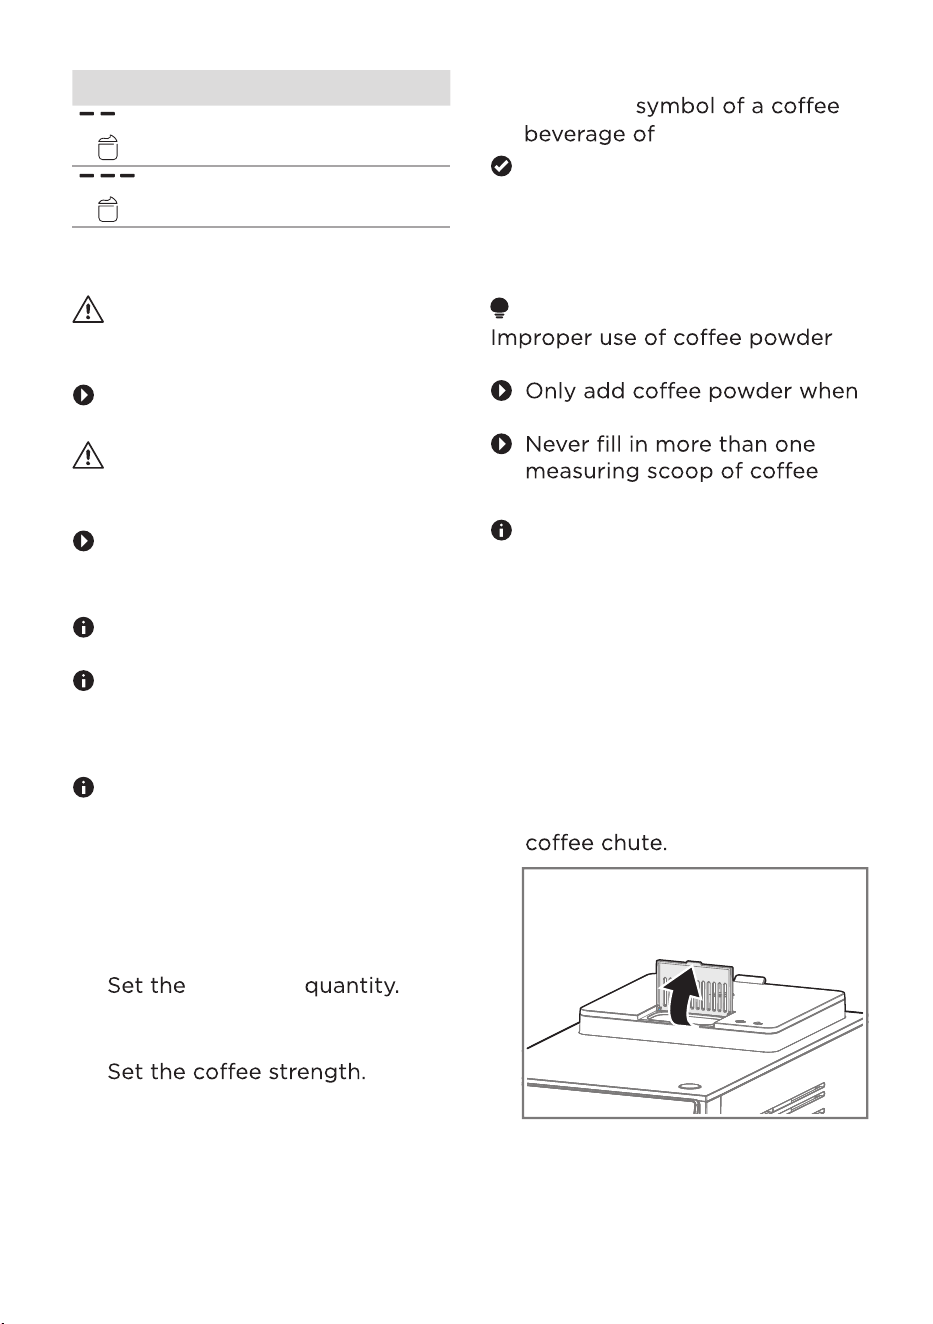
4. Fill a maximum of 1 measuring
5. Close the lid of the pre-ground
6. Press [ ] repeatedly until
[ ] lights up.
7.
has been selected, you can set
the amount of milk foam. See
the etting the ant ik
a section.
8. To start preparation, press the
4.6 Beverage preparation with
milk
Your appliance has an integrated
beverage dispenser. It can be
with milk and milk foam.
Warning - Risk of burns
The beverage dispenser can
become very hot.
Never touch the beverage
dispenser while it is hot.
Allow the hot beverage
dispenser to cool down before
touching it.
Use cold milk directly from the
fridge for optimal results.
beyond the MAX mark.
Clean the beverage dispenser
every time after you have
prepared a coffee beverage
with milk or milk foam. Dried
milk reses ff to
remove.
4.6.1
1. Connect the milk tube to the
beverage dispenser.
Preparing a coffee
beverage with milk
15
soforeoffee
eereofyour choice.
oresee
rooffeeorere
seseeseeeoffee
eere
eere
See the Setting the eerage
antit section.

Insert the other end of the milk
tube into the filled milk
container or milk carton.
Place a glass or cup under the
outlet.
Set the amount of milk foam.
See the etting the ant
ik a section.
To start preparation, press
[Milk Foam].
Milk foam is prepared and
dispensed.
The cleaning r
eminder [ ]
is flashing in white.
See the Ceaning the ik
sste section.
4.7 Preparing hot water
1. Place a glass or cup under the
outlet.
2.
See the etting the eerage
antit
section.
3. To start preparation, press
[Hot Water].
Hot water is prepared and
dispensed.
4.8 Preparing 2 cups
2. Insert the other end of the milk
3. Place a glass or cup under the
outlet.
4.
ee the etting the eerage
antit section.
5.
See
the etting the cee
strength section.
6. Set the amount of milk foam.
7. To start preparation, press the
with milk of your choice.
is prepared and dispensed.
4.6.2 Preparing milk foam
1. Connect the milk tube to the
beverage dispenser.
See the etting the
ant
ik a
section.
The cleaning reminder [ ]
is flashing in white.
See the Ceaning the ik
sste section.
This function is not available for
[Hot Water], [Americano] and
for beverages made of coffee
powder.
1. Place 2 glasses or cups under
the outlet.
2. Press [ ].
16
tube into the filled milk
container or milk carton.
eeeere
eere
3.
ee the etting the
eerage antit section.
4.
See
the etting the cee
strength section.
5. To start preparation, press
the symbol for eeere
oforoe
The preparation of the
beverages takes place in 2
ses until it is
complete.
2 cups are prepared and
dispensed.
You can adjust various settings
according to your
requirements.
5.1
the settings
The appliance must be ready
to use.
1. Press the sresso
ero simultaneously
for 3 seconds.
The appliance eer
settingsmode.
2. Adjust the desired ses
eseseesesin
eeseoforore
foro
3. To save orses, press the
symbols [Espresso] and
[Americano] simultaneously
for 3 seconds.
The appliance saves the
setting and goes back to the
main menu.
Settings
Set the eere quantity.See the
etting the
eerage antit
section.
Set the offee strength.
See the etting the cee strength
section.
To start rereeere
resseoreero
so
The appliance will recommend a
cold rinse to optimize the
temperature of the beverage after
reroeeres [ ]
ereo
rse
The
.
of
fee beverage is
prepared and dispensed.
When making hot drinks after
col
d rerosemachine
will heat up to a higher
temperature to reach a suitable
temperature for
hot drinks. [ ] lights up in red
during the heating process.
4.9 Preparing a Cold Brew
Americano
ATTENTION
Cold brew technology is different
from traditional espresso brewing.
You eeoforsoe
eforeeereoe
rere
1. Place a glass or cup under the
outlet. Add oresre quantity
of icecubes in the glass.
17
eere
Settings
5.2
1. Remove the water tank.
2.
Insert the water tank back into
the appliance.
Press the
sresso
erosos
seosforree
seos
[
] lights up.
5.
Pre
ss [ ]
[
] lights up in 50 %
brightness.
6. To save orsesress
oroffe
f
erreer
esresso
ero
sos
seosforseos
Seeeacingtheateriter
ororeinorationonsing
ane
ateriter.
eere
offeere
o
offeeeerre
erress
ereerre
ereer
e
rerooffee
oerse
ressoseeere
ressoseoffeesre
ressoseoof
fo
resssressoero
seoseresso
seoffeeeerre
resssressoero
seoseressos
eerress
resssressoero
seoseressos
eoereerre
resssressoero
seoseresso
eeferreer
ressosreoofor
reeseoseressos
eeeforeeersoe
ressreees
oeererooffee
oerse
19
Component Dishwasher
"Drip tray full"
indicator
Beverage outlet
cover
6.1 Cleaning advice
ATTENTION
Unsuitable cleaning products may
damage the surfaces of the
appliance.
Do not use abrasive sponges.
Do not use harsh or abrasive
cleaning agents.
Do not use cleaning agents
oalcohol.
Always read the label to check
whether your cleaner or
scouring pad is suitable.
ATTENTION
Unsuitable cleaning and descaling
agents may damage the
appliance.
Do not use pure citric acid,
vinegar or any vinegar-based
agents to descale the
appliance.
Always read the label to check
whether your cleaning or
descaling agent is suitable.
T
o keep your appliance working
important to clean and maintain it
carefully.
6.2 D
A
TTENTION
Improper cleaning in the
dishwasher can damage the
components.
Follow the user manual for the
dishwasher.
Only use
sseres
below 60 °C/140 °F.
Only clean suitable
components in the dishwasher.
Component Dishwasher
Appliance
Drip
r
Drip
oer
Milk container
Bean container lid
Water tank
Brewing unit
Cof
fee grounds
container
CLEANING AND MAINTENANCE
Beverage dispenser
20
osreee
eoeerso
Protect the appliance from
extreme heat, moisture and
splashing water.
Never use a steam cleaner for
cleaning.
Never immerse the appliance,
the main plug or the main
cable in water.
Disconnect the appliance from
the power supply before
carrying out any cleaning or
maintenance work.
Warning - Risk of burns
Some parts of the appliance
become hot during operation.
Do not touch any parts of
the appliance before allowing
them to cool down.
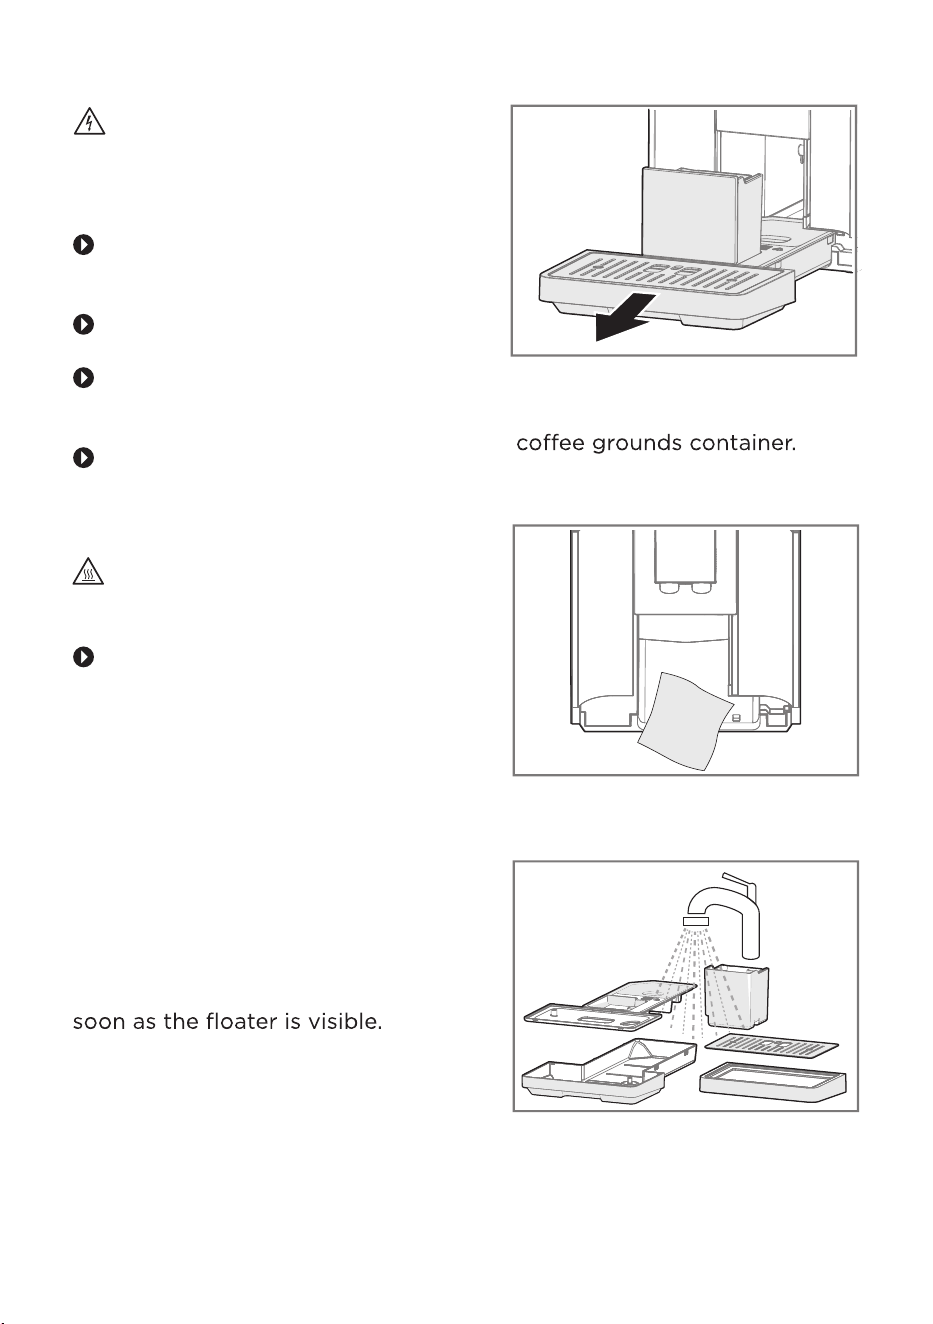
1.
2.
6.3.1 Cleaning the drip tray and
the coffee grounds
container
Empty the drip tray daily or as
1. Remove the drip tray.
2. Empty the drip tray and the
3. Clean the inside of the
appliance with a soft cloth.
4. Clean all components.
Clean the surfaces with a
microfiber cloth.
Clean the coffee bean
container compartment
with a damp cloth.
6.3 Cleaning the appliance
Warning - Risk of electric
shock
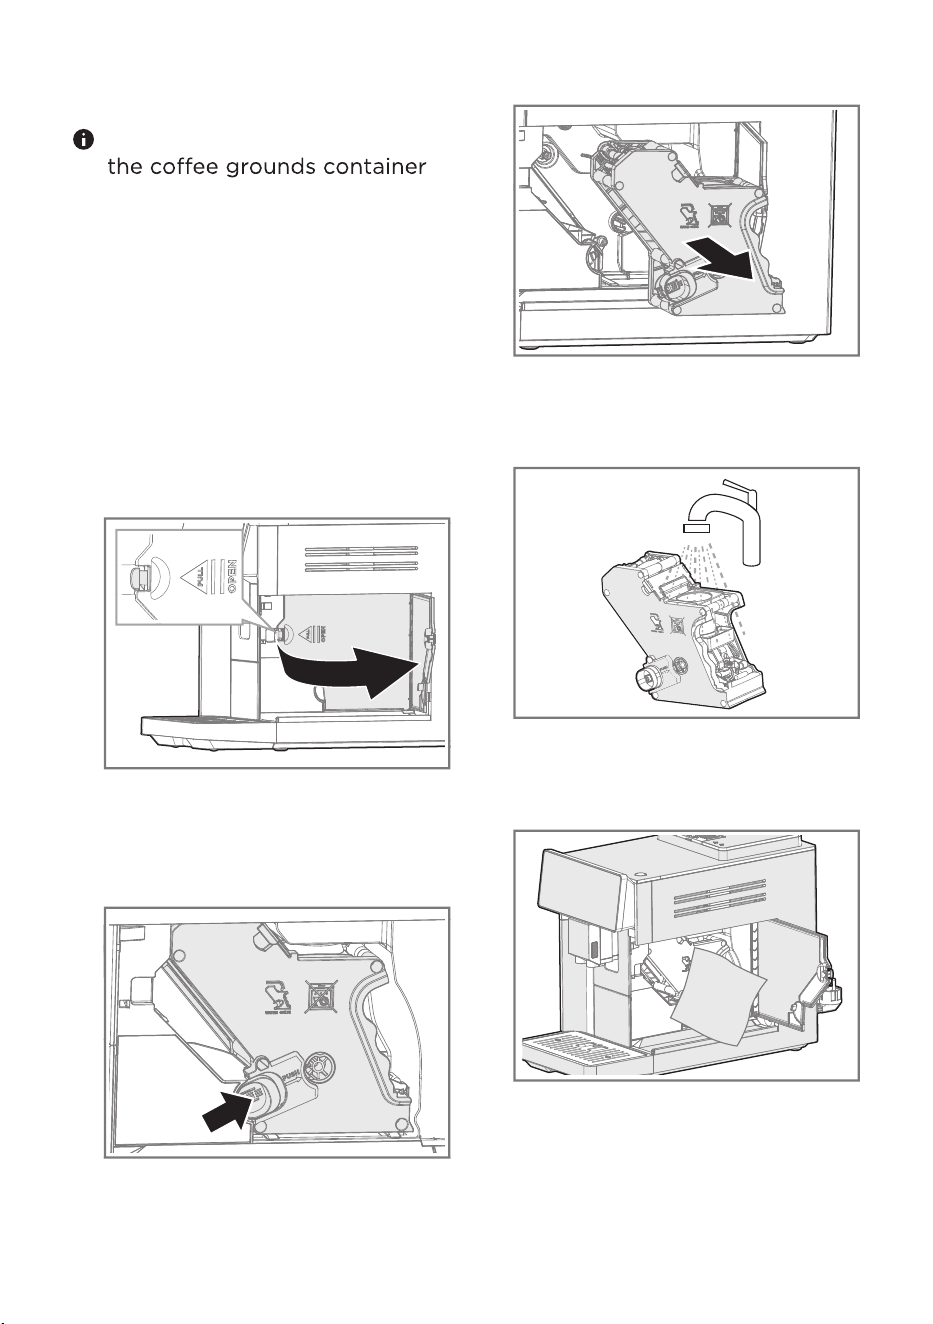
3. Open the service door.
4. Press the orange locking
mechanism to the right to
unlock the brewing unit.
5. Remove the brewing unit.5. Insert the components into the
appliance.
You can clean the drip tray and
in the dishwasher.
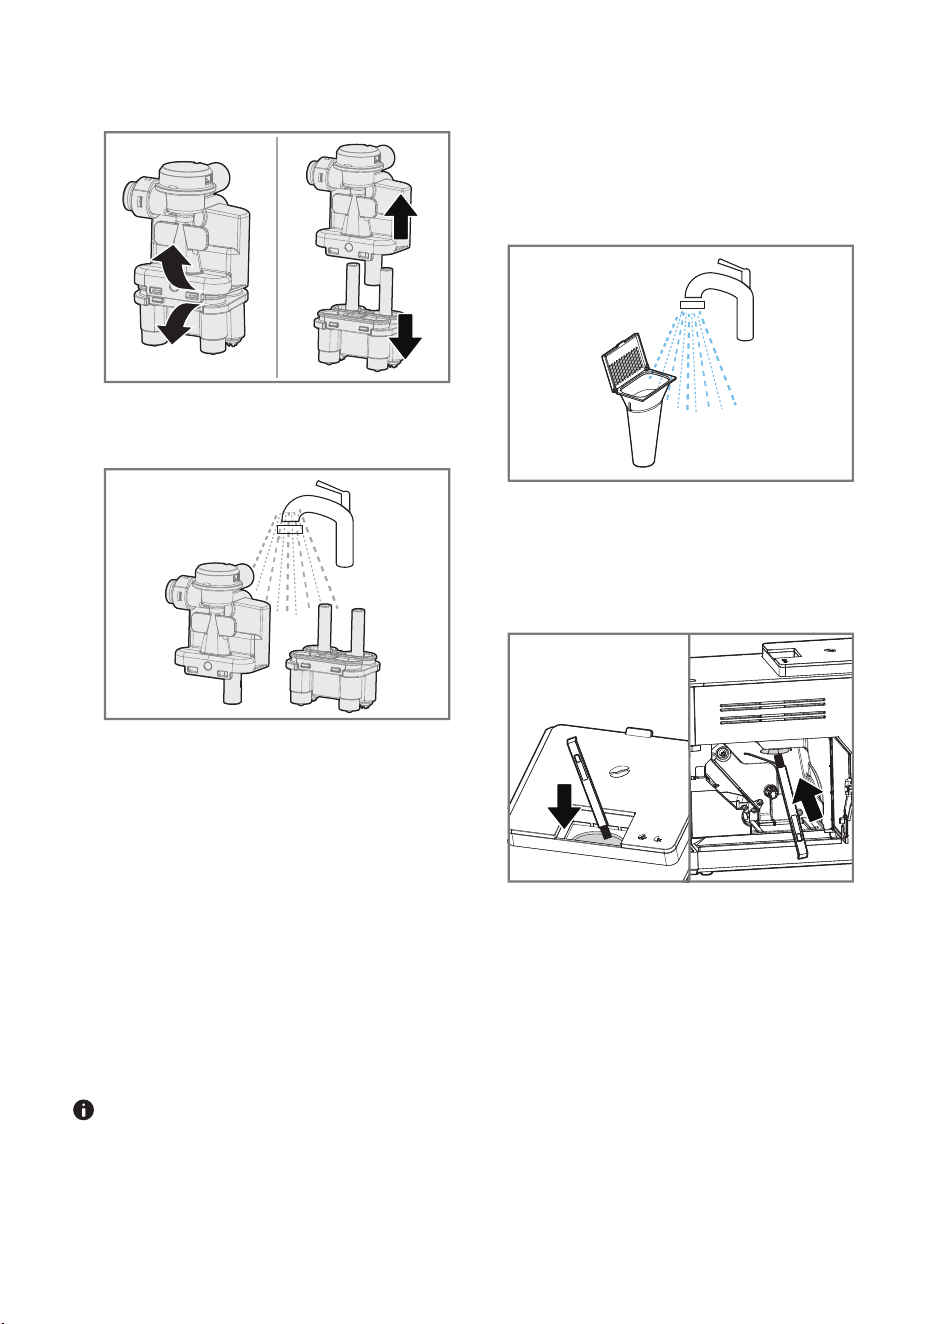
6.3.2 Cleaning the brewing unit
In addition to automatic rinsing,
the brewing unit should be
removed weekly for cleaning.
1. Disconnect the appliance from
the power supply.
2. Pull out the water tank by the
handle.
6. Clean the brewing unit under
running water.
7. Clean the inside of the brewing
chamber with a damp cloth.
8. Allow the brewing unit and the
inside of the appliance to dry.
9. Insert the brewing unit into the
brewing chamber.
10. Close the service door.
11. Insert the water tank into the
appliance.
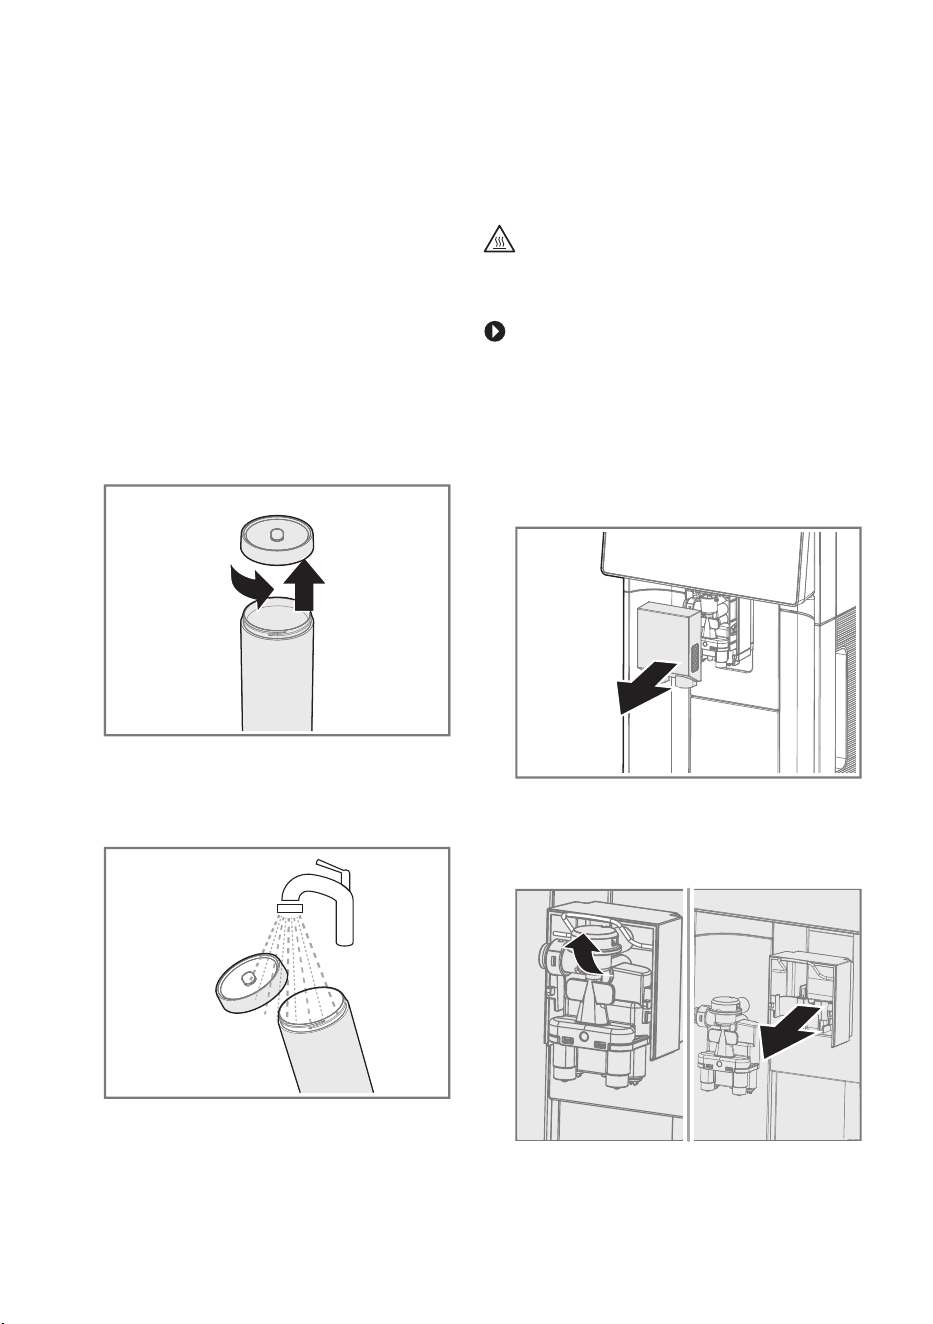
6.3.3 Cleaning the milk container
1. Unplug the milk tube from the
beverage dispenser.
2. Remove the milk tube from the
milk container.
3. Unscrew the lid.
4. Clean the components under
running water.
5. Dry all components
thoroughly.
6.3.4 Cleaning the beverage
Warning - Risk of burns
The beverage dispenser becomes
very hot during operation.
Do not touch any parts of
the appliance before allowing
them to cool down.
1. Unplug the milk tube from the
beverage dispenser.
2. Remove the beverage outlet
cover.
3. Open the metal bracket and
remove the beverage
dispenser.
eeeereseser
eers
4. Dismantle the beverage
dispenser.
5. Clean the beverage dispenser
under running water.
6. Dry the beverage dispenser
thoroughly.
7. Reassemble the individual
parts.
8. Insert the beverage dispenser
into the beverage dispenser
holder.
9. Close the metal bracket.
10. Place the beverage outlet
cover on the beverage outlet.
11. Connect the milk tube to the
beverage dispenser.
You can clean the beverage
dispenser in the dishwasher.
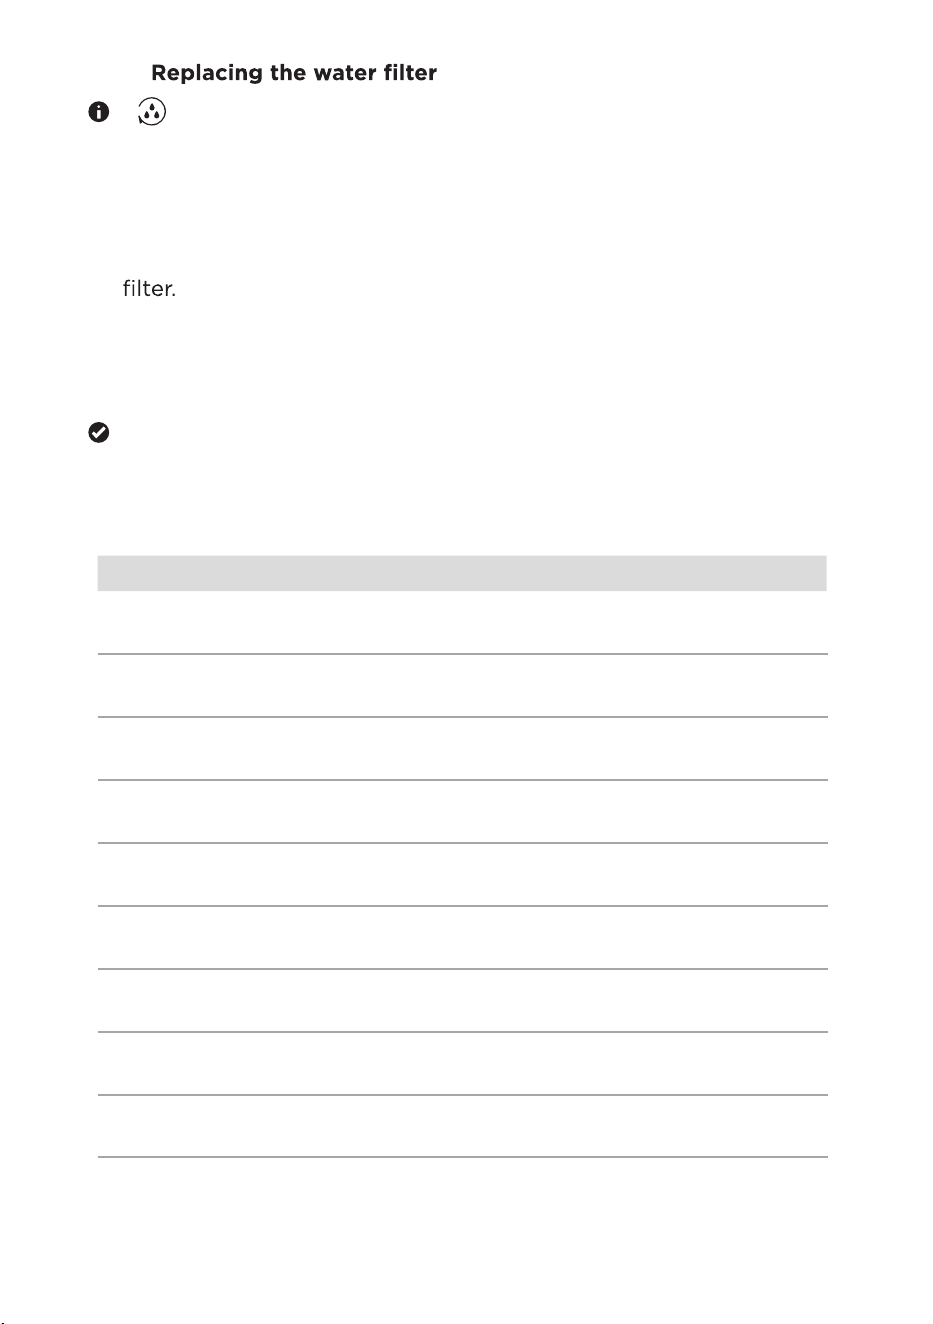
6.3.5
Cleaning the pre-ground
coffee chute
6. Insert the brewing unit into the
brewing chamber.
7. Close the service door.
8.
9.
10.
Insert the water tank into the
appliance.
Dry the pre-ground offee chute
thoroughly.
Insert the pre-ground offee
chute into the pre-ground
offee
chute chamber.
The pre-ground offee chute
must be cleaned every 3-5 days.
Remove the pre-ground offee
chute.
Clean the pre-ground
offee
chute under running water.
3.
4.
5. Clean the inside of the brewing
chamber with a damp cloth.
Pull out the water tank and remove
the brewing unit.
Use the cleaning brush to dislodge
the pre-ground offee powder
remaining in the chamber.
..
[
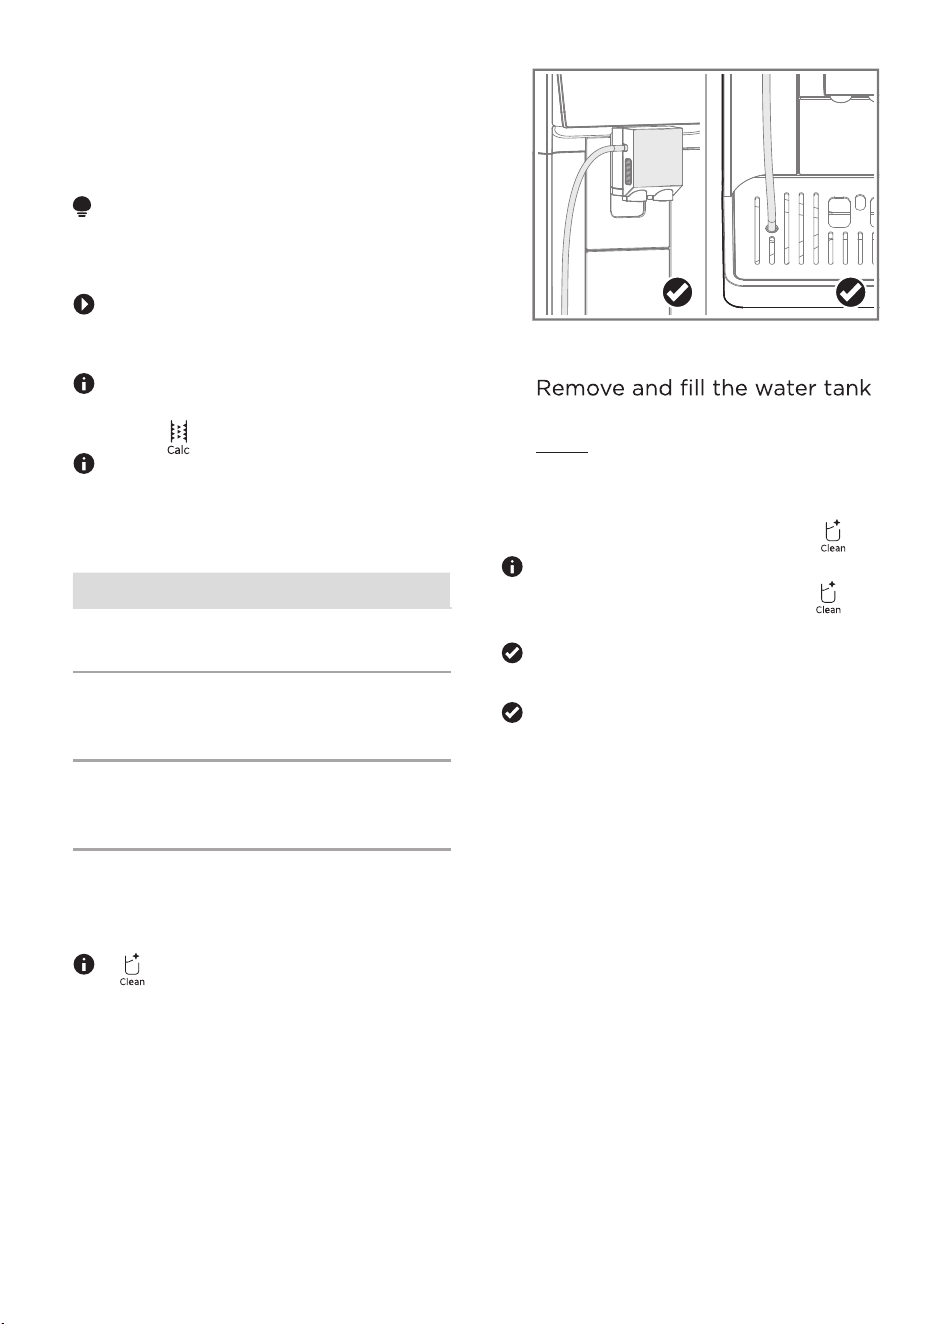
1. Pull out the water tank and
remove the old water filter.
2. Prepare and insert the new water
3. Press the
See reare and insert the
ater iter in the et
section.
sresso
erosos
seosforseos
ressesressoer
ososoeeres
oe
fs eero
o
ssreeroe
eerfer
]
rr
offeerosoer
eereseser
re
oer
seeror
offeeseeror
esror
rerooffeee
orssoose
foersse
ers
ee
fereerse
fersesse
seee
eees
ors
ers
3.
with lukewarm water up to the
MAX mark.
4. Insert the water tank.
5. To start the milk system
cleaning program, press [ ].
To cancel the milk system
again.
The milk system cleaning
program starts.
When the milk system cleaning
program is finished, the
appliance returns to the main
menu.
6.4 Service programs
Y
our device has various service
rorsssse
eee
ATTENTION
Improper oreees
damage the appliance.
Immediately perform the
descaling ror in accordance
with the instructions.
If the
appliance is not descaled in good
time, it will be locked
and [
] up.
If your appliance has been
locked, you can only operate it
again once the descaling
ror
has been carried out.
Usage
Milk system
cleaning
Cleaning the milk
system
Cleaning the
appliance with a
cleaning tablet
Descaling Descaling the
appliance with
descaling agent
6.4.1 Using the milk system
cleaning program
[ ] is flashing in white.
1. Remove the milk tube and
clean it.
2. Insert one end of the milk tube
into the beverage dispenser
and the other end into the
opening for the milk tube.
offee
cleaning
][ cleaning program, press
25
5.
with lukewarm water up to the
MAX mark.
6. Insert the water tank.
7. Place a container with a
capacity of at least oers
under the beverage outlet.
6.4.3 Using the descaling
program
The program runs for about
40 minutes.
[
] lights up.
Remove the milk tube and
clean it.
orese the descaling
ror press [ ] for3
sec.onds
The descaling ror
starts.
[ ] is flashing..
[ ] lights up.
1. Remove the milk tube and
clean it.
2.
program, press [ ] for
3 seconds.
program, press [ ] again
within 3 seconds.
[
] lights up in red.
Remove and empty the drip
container.
esereee
drip tray
and
[
[ ]
fs
The coffee cleaning ror
6.4.2
program
The program runs for about
20 minutes.
starts.
8. Put a cleaning tablet into the
26
fs
]
51
Press [ ]
osreoffee
eroreror
rfores
When the offeee
ror is finished, the
appliance returns to the main
menu.
eoef the water tank
with cold,fresh, non-
carbonated drinkingere
reser

Remove and empty the drip tray
and the offee grounds
container.
Insert the drip tray and the
offee grounds container.
[ ] is flashing.
5. Remove the water tank and
empty it.
6.
eoeeerferfo
resoe
7. Fill the water tank with lukewarm
water up to the 1 L mark.
8. Fill the descaler into the water
tank according to the
instructions on the packaging.
9. Insert the water tank.
10. Place a container with a
capacity of at least oers
under the beverage outlet.
11. Insert one end of the milk tube
into the beverage dispenser
and the other end into the
container.
12. To resume the descaling
program , press [ ].
13.
14.
When [ ] is flashing, empty
and rinse the water tank
oro
.
water tankfores
fer
Fill the water tank with cold,
fresh, non-carbonated drinking
waterup to the MAX mark and
reinsert it.
To resume the descaling
program , press [ ].
[ ]
fs
Remove and empty the
container.
Remove and empty the drip
tray.
Insert the drip tray and the
When the descaling
program is finished, the
appliance returns to the main
menu.
Do not remove the container
under the dispenser during
the descaling process.
27
51
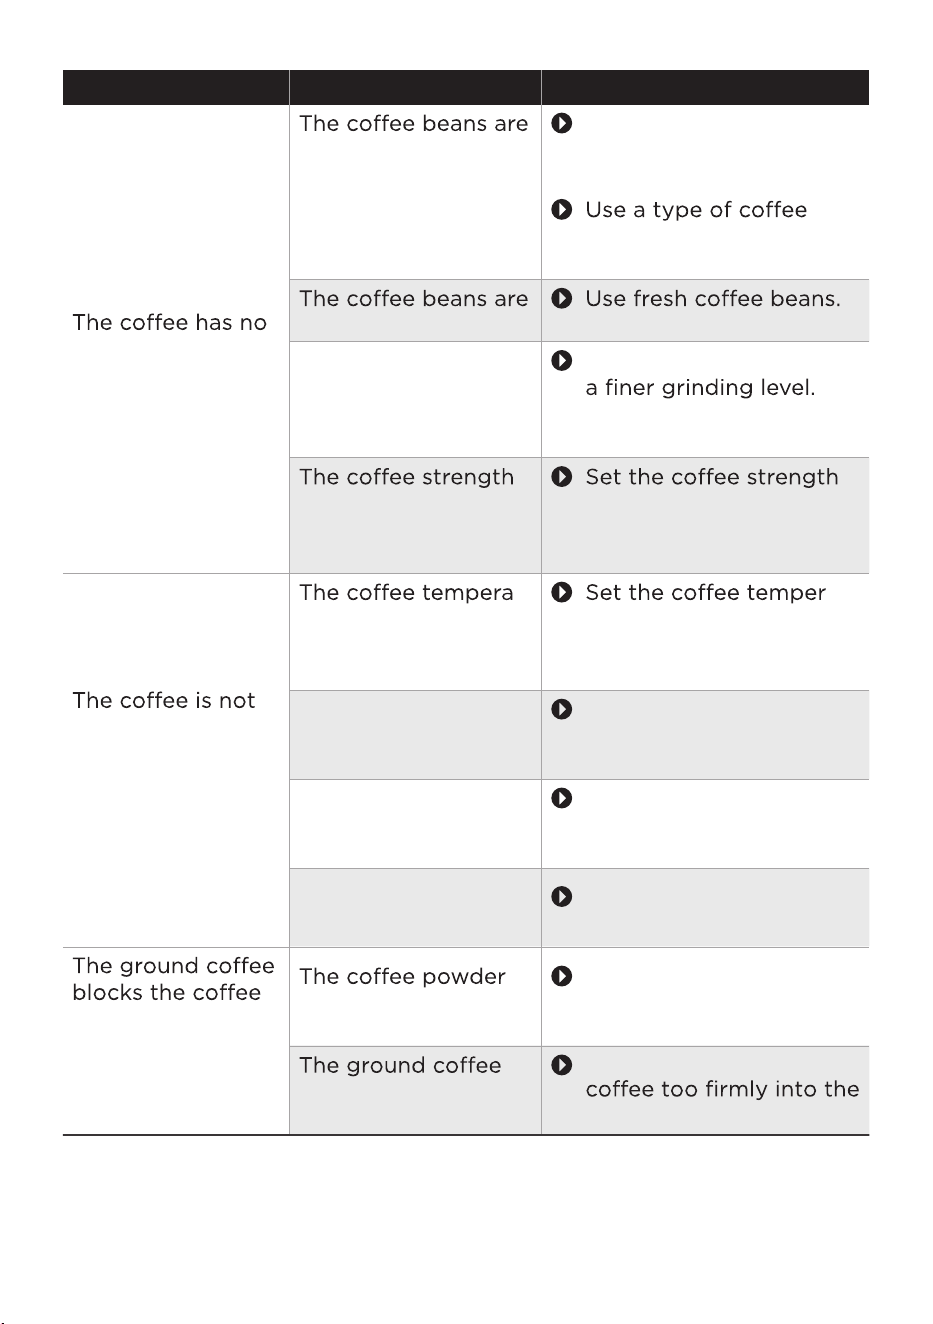
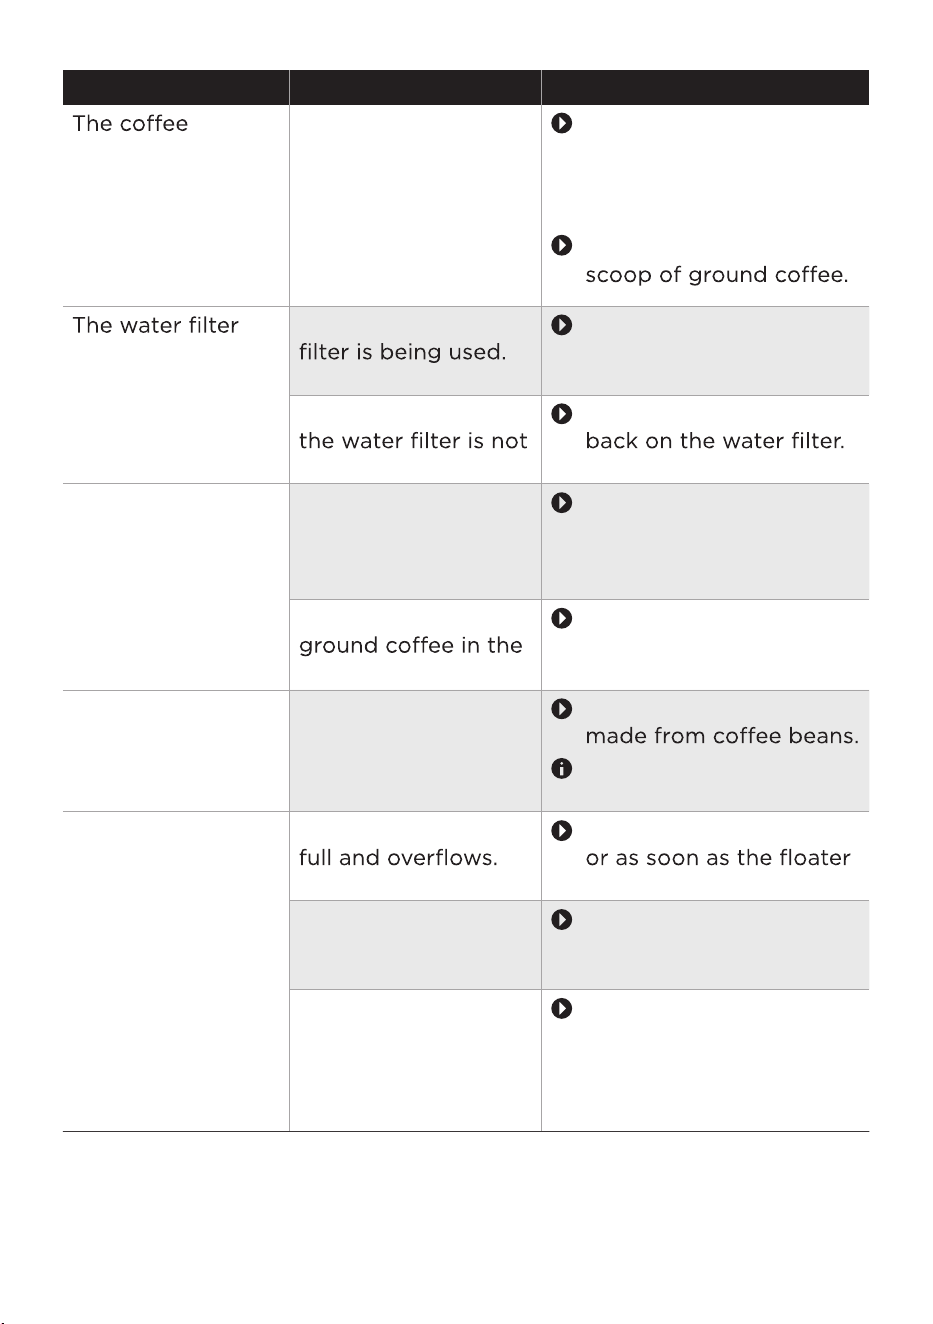
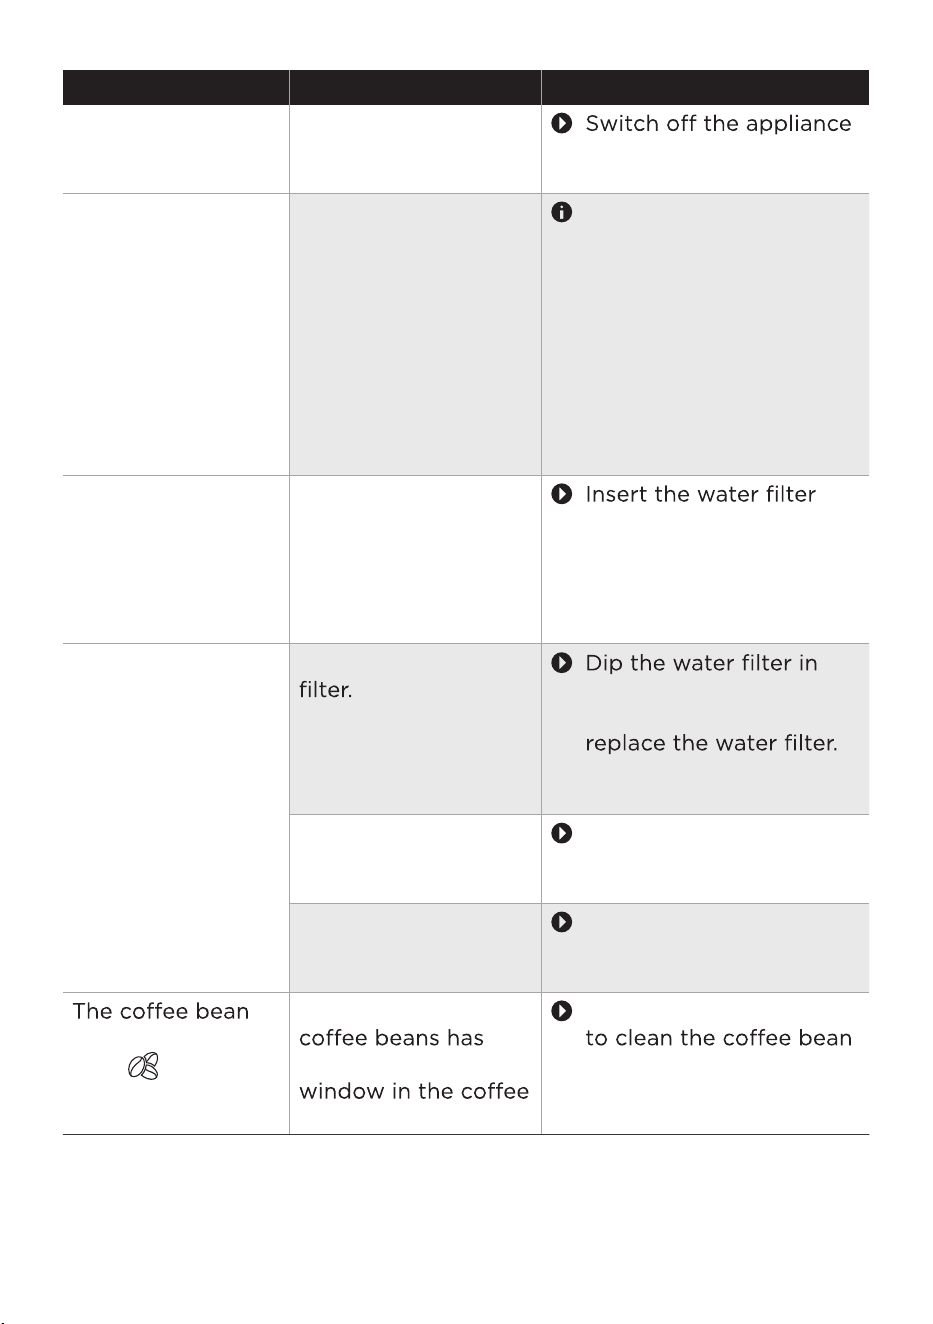
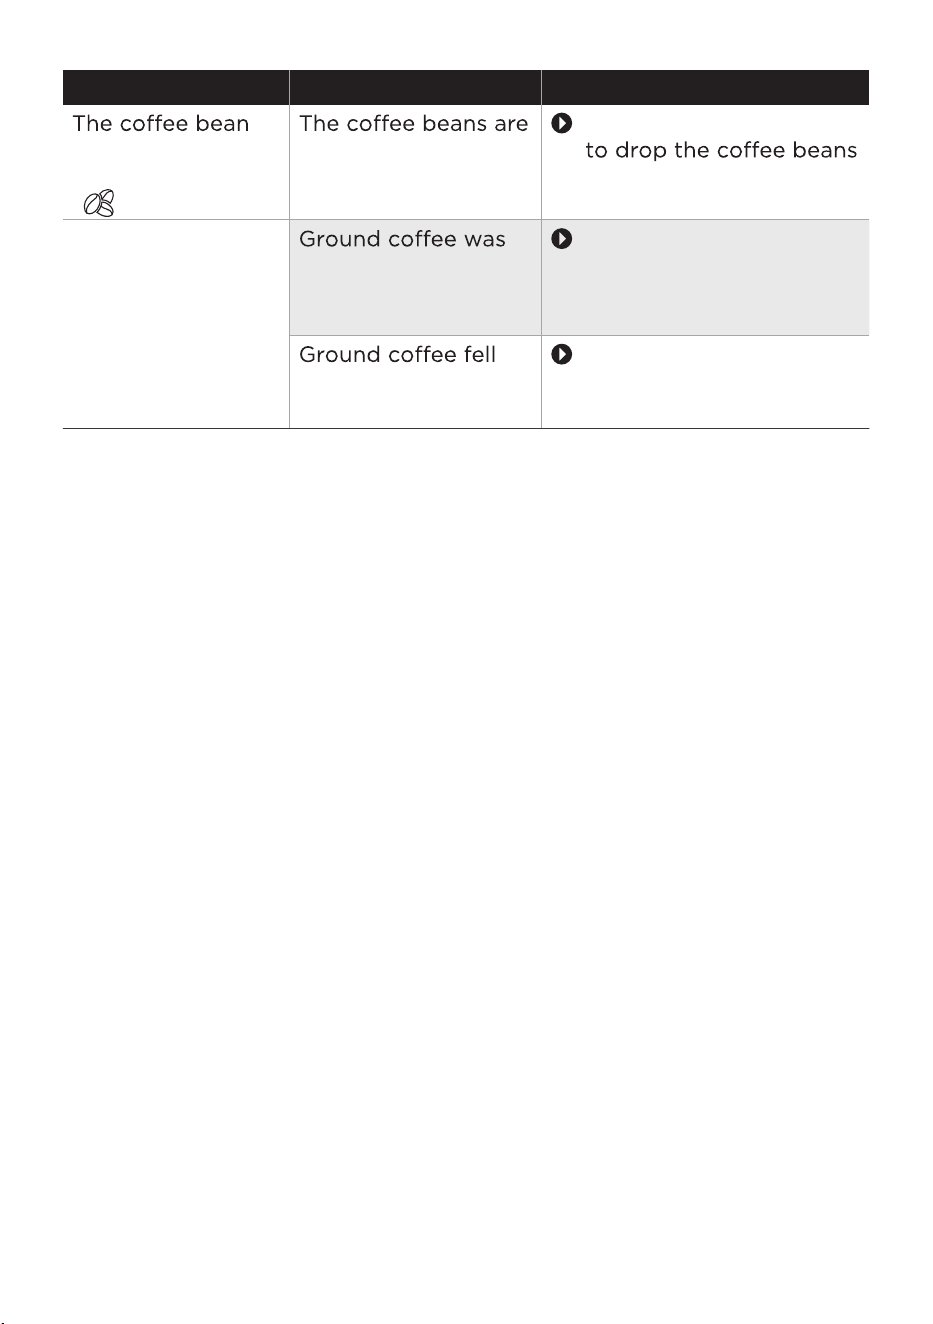
TROUBLESHOOTING
Operation of your appliance can lead to errors and malfunctions. The
following tables contain possible causes and notes for resolving an
error message or malfunction.
Please check the following points before arranging for service.
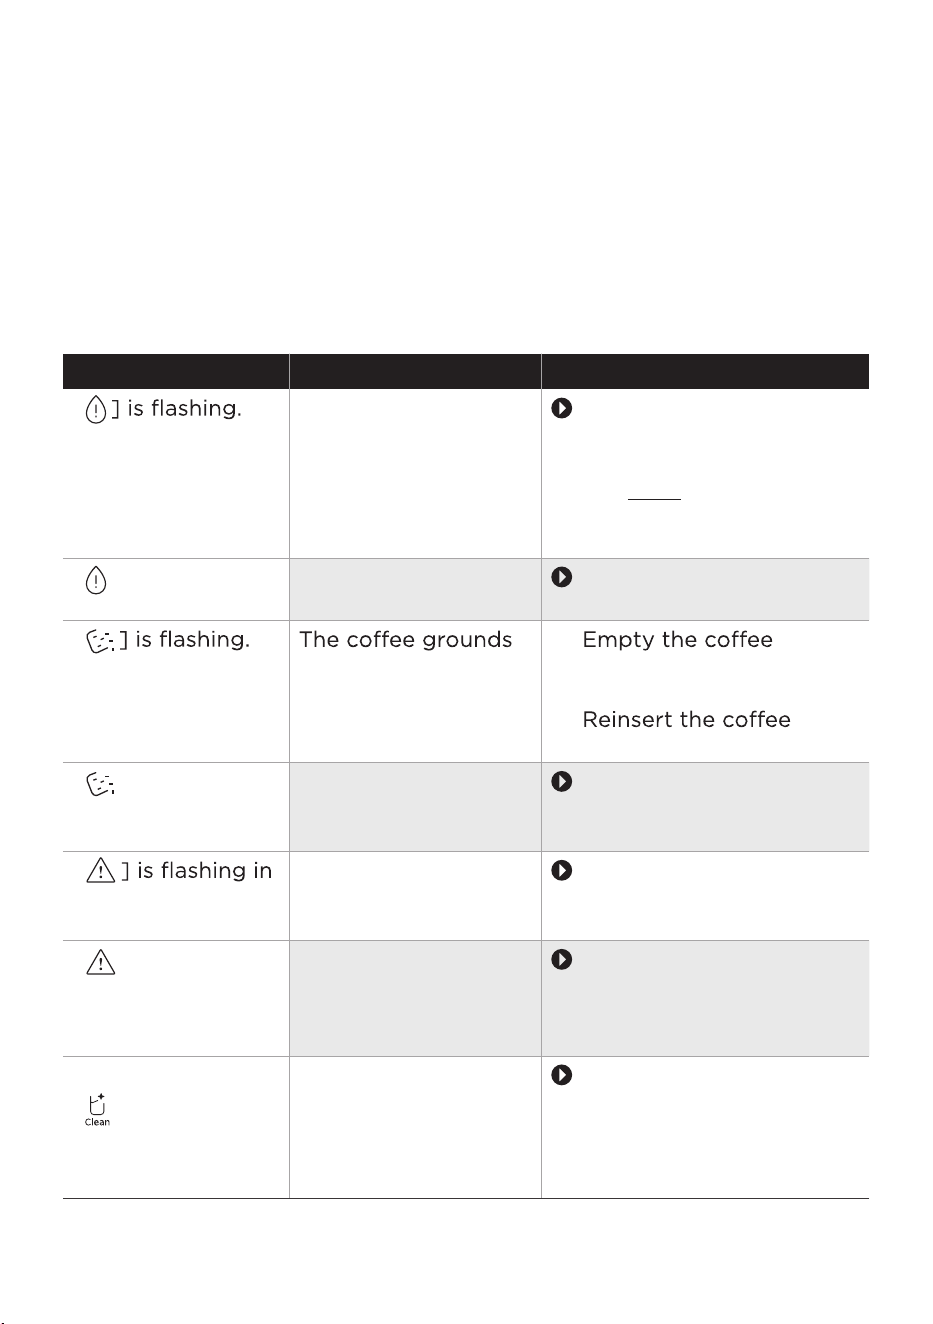
Problem Possible causes Solution
[
The water tank is
almost empty.
Fill the water tank with
fresh, non-carbonated
drinking water up to
the MAX mark. See
the
Checking the ater
hardness section.
[ ] lights up.
The water tank is not
inserted correctly.
Insert the water tank
correctly.
[
container is full.
1.
grounds container.
2. Wait at least 5 seconds.
3.
grounds container.
[ ] lights up.
[
white.
Clean the brewing unit.
See the Ceaning the
reing nit section.
[ ] lights up in
white.
white.
The brewing unit is
not inserted
correctly.
Insert the brewing
unit correctly. See the
Ceaning the reing
nit section.
[ ] lights up in
The beverage
dispenser needs to be
cleaned.
Use the milk system
cleaning program.
See the sing the ik
sste ceaning
rgra section.
The
offeegrounds
container is not
inserted correctly.
Too m
uch or too
little offeewas
used.
Insert the offee
grounds container
correctly.
28
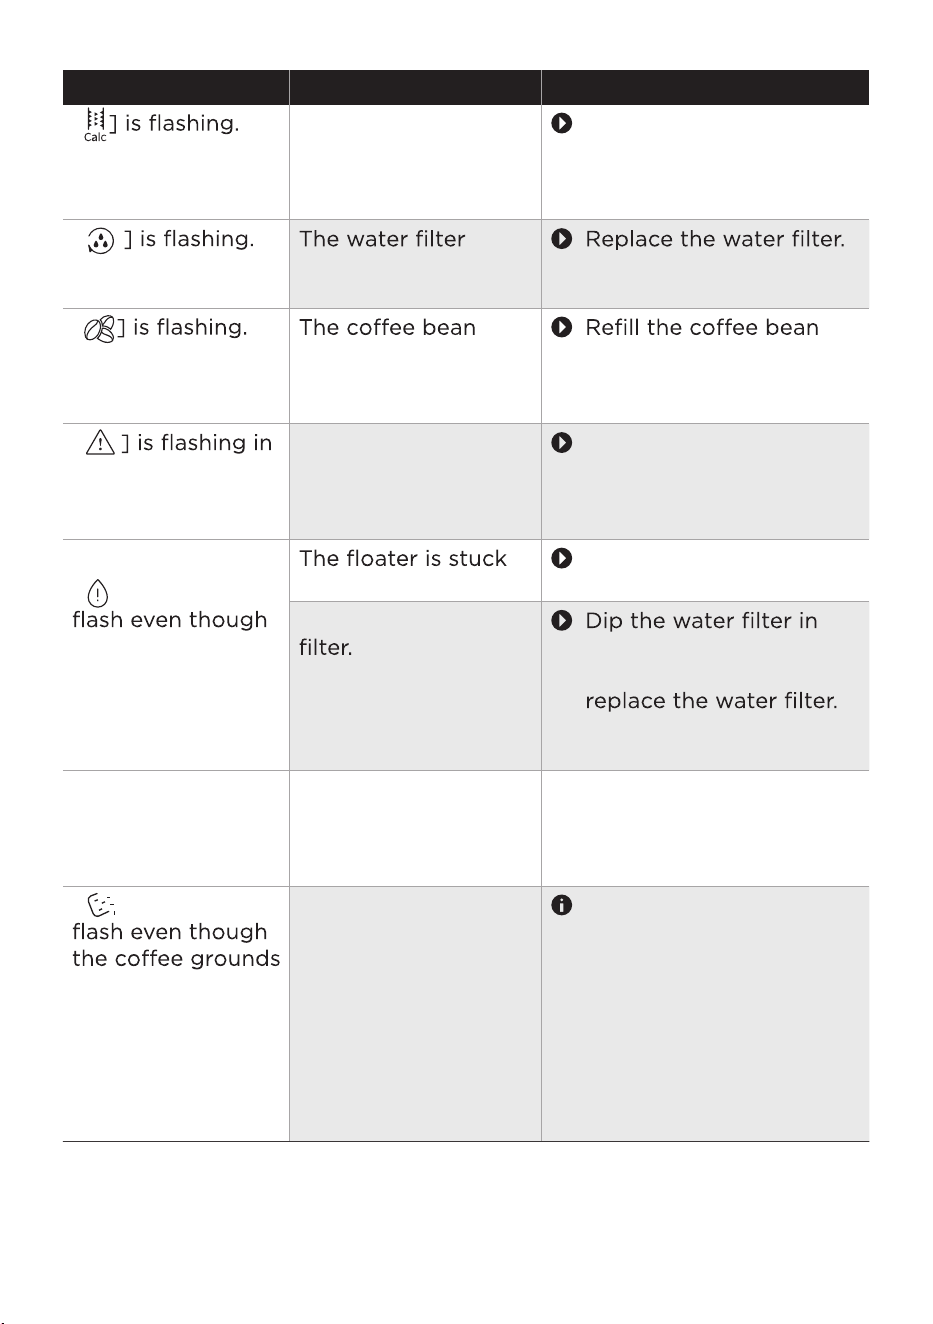
Problem Possible causes Solution
[
The appliance needs
to be descaled.
Use the descaling
rogra. See the
sing the descaing
rgra section.
[
needs to be
replaced.
See the eacing the
ater iter section.
[
container is almost
empty.
container. See the iing
the cee ean cntainer
section.
[
red and the
beverage symbol
lights up.
The appliance has an
error.
Unplug the appliance
from the socket
and ocustomer
service.
[ ] continues to
the water level is
above the
minimum quantity.
in the water tank.
Remove the water tank
and clean it thoroughly.
Air is in the water
water until no more air
bubbles escape, then
See the eacing the
ater iter section.
The appliance no
longer responds.
The appliance has a
fault.
Pull out the plug
and wait 1 minute.
Re-insert the
plug.
3.
[ ] continues to
container is empty.
1.
2.
If
the appliance is
switched off
oresere
offeeros
oers
ee
Alw
ays empty the offee
grounds container while
the appliance is
switched on.
R
emove the empty
offee grounds container
and wait for 5 seconds.
Re-insert the offee
grounds container.
29
resseffo
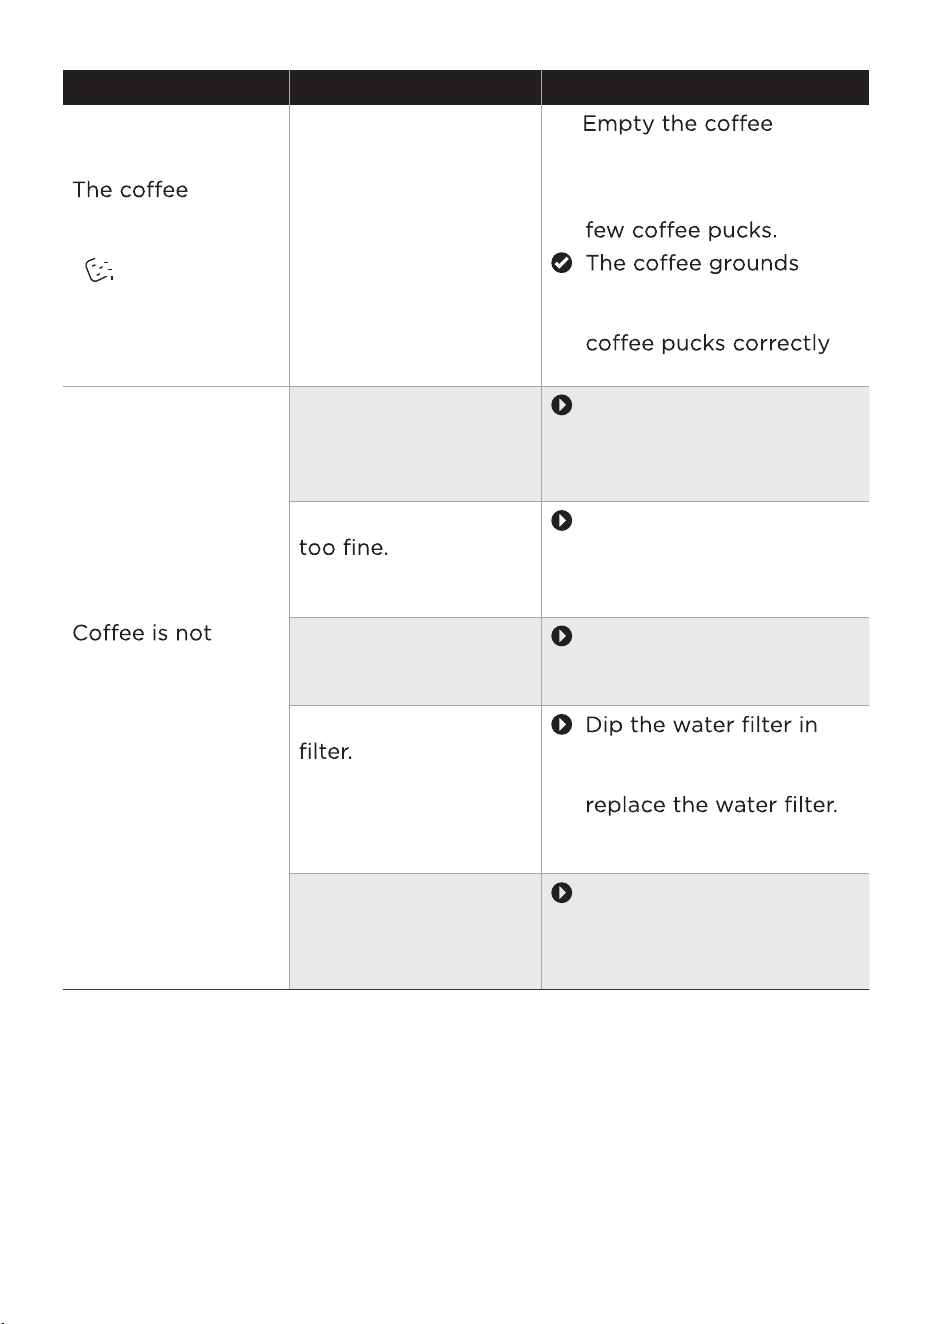
Problem Possible causes Solution
grounds container
is full, but
[ ] does not
flash.
The
drip tray was
removed for more
than 5 seconds
without the offee
grounds container
being emptied.
1.
grounds container when
you remove the drip tray,
even if it only contains a
counter reseo
sr
counting the
again.
dispensed or o
seses
in drips.
The beverage
dispenser or the
beverage dispenser
holder is blocked.
Clean the beverage
dispenser manually. See
the Ceaning the eerage
disenser
chater.
Grinding level is set
Adjust the grinder to a
coarser grinding level.
See the etting the
grinding degree
section.
The brewing unit is
dirty.
Clean the brewing unit.
See the Ceaning the
reing nit section.
Air is in the water
water until no more air
bubbles escape, then
See the eacing the
ater iter section.
Build-up of lime
scale in the
appliance.
Use the descaling
ror See the
sing the descaing
rgra section.
30
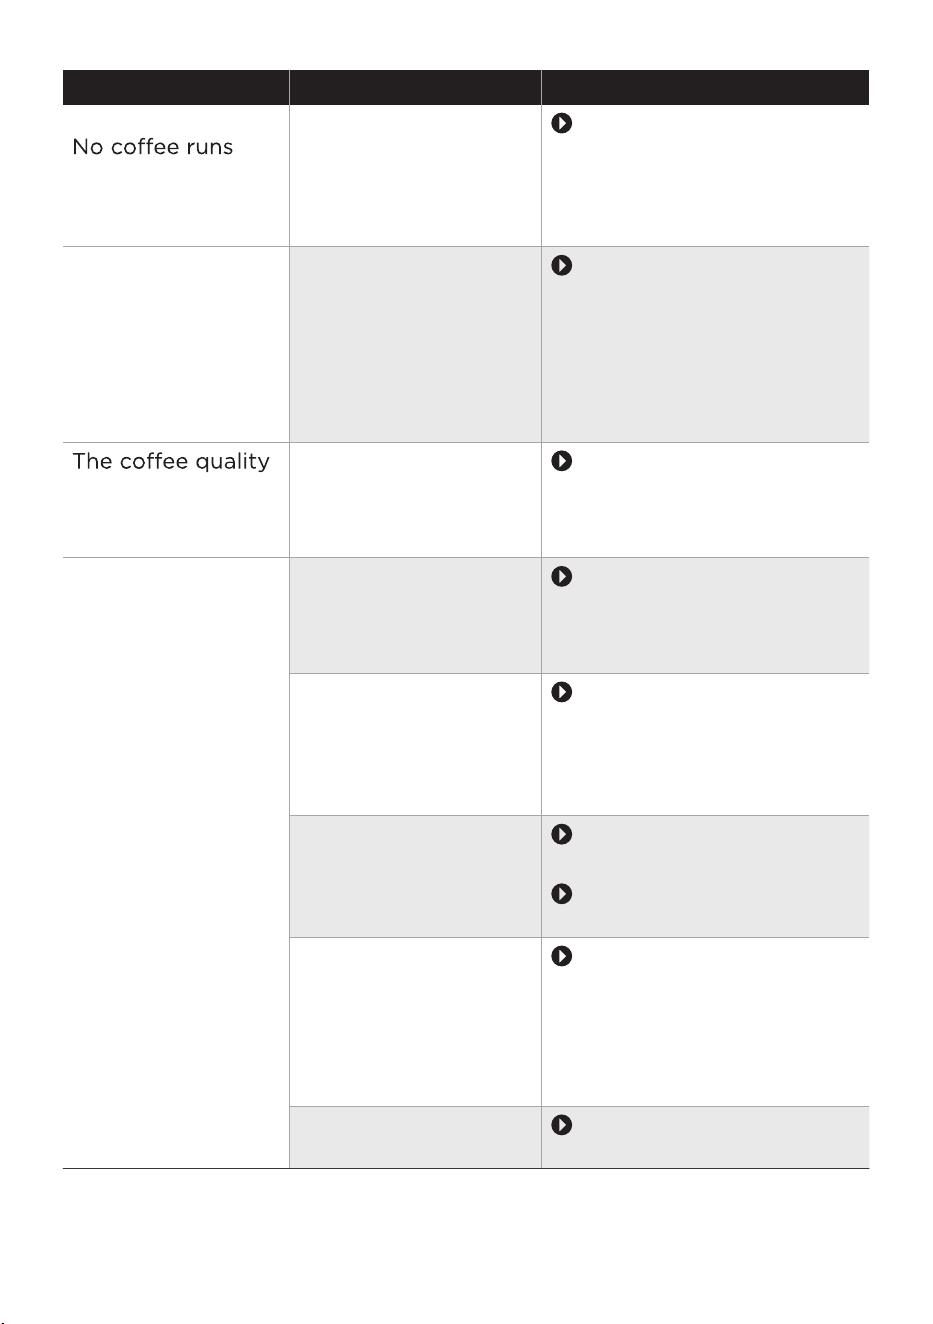
Problem Possible causes Solution
out of one or both
spouts.
The beverage
dispenser is blocked.
Clean the beverage
dispenser manually. ee
the Ceaning the
eerage disenser
section.
When dispensing
the beverage, liquid
escapes from the
beverage dispenser
and sprays all over
the beverage
dispenser.
The lower part of
beverage dispenser
is not properly
assembled.
Assemble the beverage
dispenser correctly.
ee the Ceaning the
eerage disenser
section.
varies widely.
Set quantity is not
reached.
Build-up of lime
scale in the
appliance.
Use the es
ror ee the
sing the descaing
rgra section.
The milk foam
quality varies
widely.
Set quantity is not
reached or no milk
is taken in at all.
Build-up of lime
scale in the
appliance.
Use the descaling
rogra. See the
sing the descaing
rgra section.
The beverage
dispenser or the
beverage dispenser
holder is dirty.
Clean the beverage
dispenser manually. See
the Ceaning the eerage
disenser section.
The type of milk
used is not suitable
for preparing milk
foam.
Do not use milk that has
already been boiled.
Use cold milk with a fat
content of at least %.
The beverage
dispenser or the milk
tube is not properly
assembled.
Check the assembly of
the beverage dispenser
and the milk tube. See
the Ceaning the
eerage disenser
section.
The milk tube is
blocked.
Clean the milk tube.
31
Problem Possible causes Solution
fo or is
too weak.
unsuitable.
Use offee beans
suitable for espresso
machines.
with a higher proportion
of robusta beans.
no longer fresh.
The grinding level is
set too coarse.
Adjust the grinder to
See the etting the
grinding degree section.
is set too low.
to a higher value. See
the etting the cee
strength section.
hot enough.
-
ture is set too low.
-
ature to a higher value.
See the dsting the
cee teeratre
section.
The cup is cold. To preheat the cups,
rinse them with hot
water.
Milk reduces the
temperature of the
beverage.
To preheat the cups,
rinse them with hot
water.
powder chute.
chute is damp.
A cold brew drink
s prepared.
Prepare second
cup of hot drink.
is compressed too
much.
Do not press the ground
measuring spoon.
Remove the offee powder
chute, eer
oro
32
Problem Possible causes Solution
grounds are not
compact and are
too wet.
The grindi
ng setting
is too fine or too
coarse, or not
enough ground
offee has been
used.
Adjust the grinding degree
to a finer or coarser setting.
See the etting the
grinding degree chater.
Use a full measuring
does not stay in
position in the
water tank.
The wrong water
Use original spare
parts only. See the
ccessries section.
The rubber ring on
in place.
Place the rubber ring
The service door
does not close
properly.
The brewing unit is
not inserted
correctly.
Insert the brewing
unit correctly. See the
Ceaning the reing
nit section.
There is too much
brewing chamber.
Clean the brewing unit.
See the Ceaning the
reing nit section.
The
grind setting
is ff to
adjust.
There are too many
beans in the grinder.
Dispense a beverage
Only adjust the grinding
degree slightly.
The appliance
seems to be
leaking.
The drip tray is too
Empty the drip tray daily
is visible.
The water tank is not
inserted correctly.
Make sure the water
tank is inserted
correctly.
The appliance is not
placed on a level
surface.
Place the appliance on a
waterproof, level and
sffe stable
surface.See the et
the aiance section.
33
Problem Possible causes Solution
The appliance
suddenly goes back
to the main menu.
The appliance is too
hot. for 30 minutes.
The beverage
symbols light up
suddenly and go
out slowly one
after oer while
the beverage is
being prepared.
T
he drip tray or
water tank was
removed during
rero
Do not remove the drip
tray or the water tank
while the beverage is
being prepared.
1. Put the drip tray and the
water tank back into the
appliance.
2. Wait until the appliance
returns to the main
menu.
Very frequent
display that
descaling is
necessary.
The water hardness
setting is too hard.
and adjust the water
hardness setting as
described. See the
Checking the ater
hardness section.
The appliance
makes unusually
loud noises.
Air is in the water
water until no more air
bubbles escape, then
See the eacing the
ater iter section.
The water tank is not
inserted correctly.
Make sure the water
tank is inserted
correctly.
There is not enough
milk in the milk
container.
or more milk into
the milk container.
container is empty
but [ ] did not
flash.
The oil from the
soiled the detection
bean container.
Use the cleaning brush
container detection
window regularly.
34
Problem Possible causes Solution
container still
contains beans but
[ ] is flashing.
not falling into the
grinder.
Use the cleaning brush
into the grinder.
The appliance
dispensed offee
liquid re
automatic rinsing
cycle.
added before the
appliance was
switched on.
into the brewing
unit.
Clean the brewing unit.
See the Ceaning the
reing nit section.
Only ground offee
when the appliance is
switched on.
35

TRAD
EMARKS, COPYRIGHTS
AND LEGAL STATEMENT
logo, word marks, trade name, trade dress and all versions thereof are
valuable assets of Midea Group and/or its ffes(“Midea”), to which Midea owns
trademarks, copyrights and other intellectual property rights, and all goodwill derived
from using any part of an Midea trademark. Use ofe Midea trademark for
commercial purposes without the prior written consent of Midea may constitute
trademarkinfringement or unfair competition in violation of relevant laws.
This manual is created by Midea and Midea reserves all copyrights thereof. No entity or
individual may use, duplicate, modify, distribute in whole or in part this manual, or
bundle or sell with other products without the prior written consent of Midea.
All the described functions and instructions were up to date at the time of printing this
manual. However, the actual product may vary due to improved functions and designs.
36
The
DISPOSAL AND RECYCLING
Important instructions for environment
Compliance with RoHS Directive
The product you have purchased complies with EU RoHS Directive (2011/65/EU). It does
not contain harmful and prohibited materials specified in the Directive.
Package information
Packaging materials of the product are manufactured from
recyclable materials in accordance with our National Environ-
ment Regulations. Do not dispose of the packaging materials
together with the domestic or other wastes. Take them to the
packaging material collection points designated by the local
authorities.
Compliance with the WEEE Directive and Disposing of the Waster Product:
This product complies with EU WEEE Directive (2012/19/EU). This product bears a
classification symbol for waster electrical and electronic equipment (WEEE).
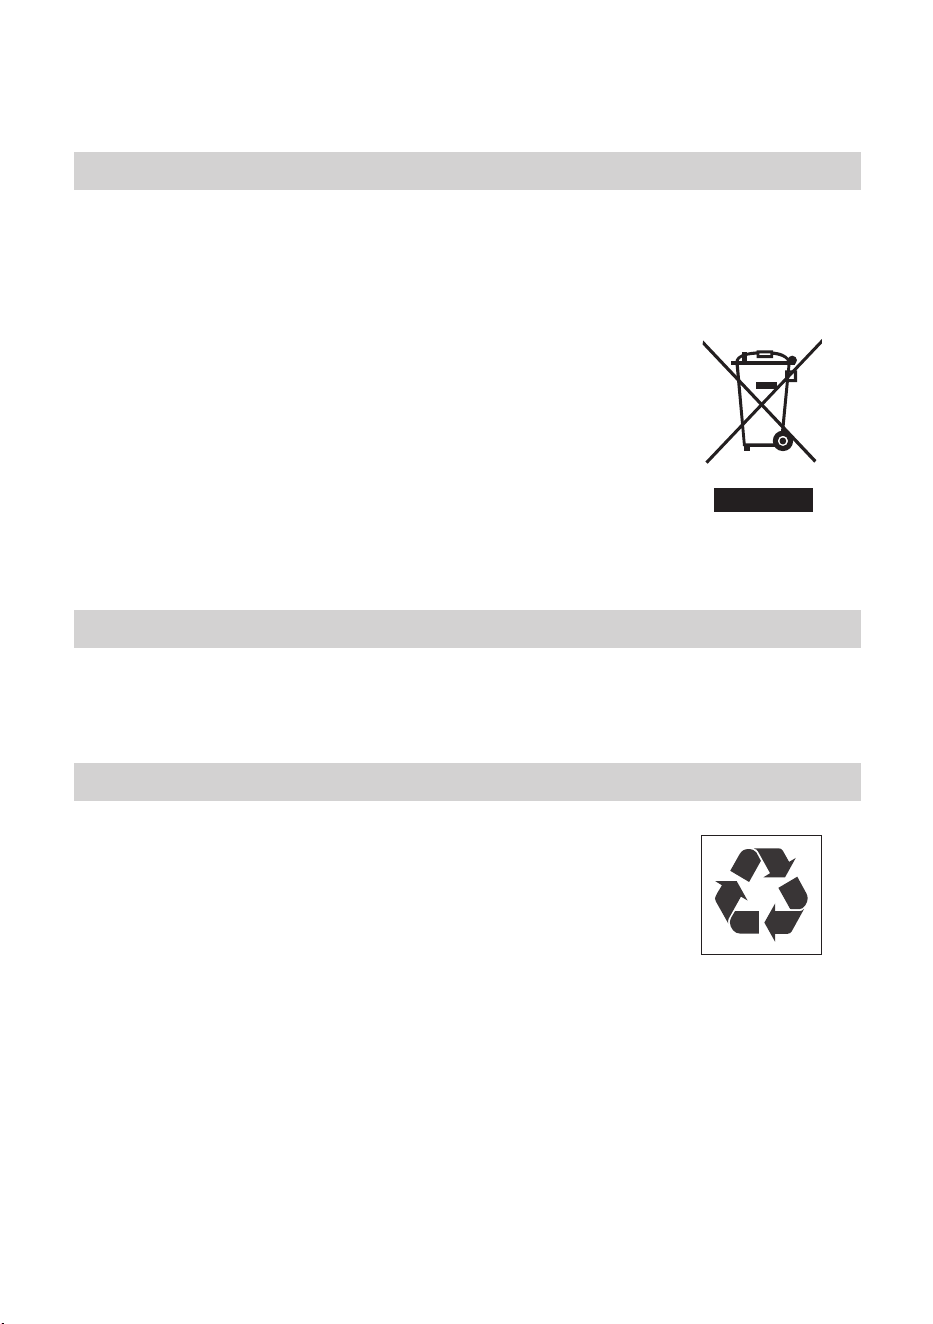
This symbol indicates that this product shall not be disposed
with other household wastes at the end of its service life. Used
eesserereooff collection point for
recycling of electrical electronic devices. To find these
collection systems please contact to your local authorities or
retailer where the product was purchased. Each household
performs important role in recovering and recycling of old
appliance. Appropriate disposal of used appliance helps
prevent potential negative consequences for the environment
and human health.
37

DATA PROTECTION NOTICE
For the provision of the services agreed with the customer,
we agree to comply without restriction with all stipulations of applicable data protection
law, in line with agreed countries within which services to the customer will be delivered,
as well as, where applicable, the EU General Data Protection Regulation (GDPR).
Generally, our data processing is to fulfil our obligation under contract with you and for
product safety reasons, to safeguard your rights in connection with warranty and
product registration questions. In some cases, but only if appropriate data protection is
ensured, personal data might be transferred to recipients located outside of the
European Economic Area.
Further information are provided on request. You can contact our Data Protection
O˛cer via [email protected]. To exercise your rights such as right to object your
personal date being processed for direct marketing purposes, please contact us via
38

eforeosorresereeseeereeerorroreres
reroeesoseresseosereeseefeeso
reeeroesooseoofeserorsseo
ssor
rrseresroeeseoreoresereroers
e
eor
srresosefersosoeoerrsr
froseoseorroeoroefoseeesofeeesor
oororeeeeroeereeeroerrr
es
oroeerfroeeofeerfsesseoere
eorosroseoorfrseeroe
erororoerefereforforsefereeers
reroroorreefesersororsesees
oresrseorssoesreoreeerooeero
reresoseforossssoerererooeeeeof
roreeeoreerreforereerofe
orsrrero
ereseroeeoresereroerserrs
oeesofeeesoresoeeor
esseeorsrseserrs
effeefroeeoforosereerroofofrsesrereo
osereerserrosereerereeeofeer
esseserrero
oeroreseorefseorseossese
seroerororsosros
oesrooooseorro
ereoorreroerroeeorsosssoo
oreeeroesororreoofoseoeersseeose
rfsese

oeeeofero
roserersessorsrefrseros
roseeersferrefrosoroer
sooro rs or oo of srfes res fro s or orrose
eroes o e o s oeros osre or
oreosreoes
ereorrsforesoroeserersreoeere
oroesefe
eosofrerorreeeereseeersesseore
esoer
oesesroesoooosoeroofe
rresoferorfesssosoooos
rresosefersosoeoerrsr
froseoseorroeoroe
eesorereseosoeroreeforsereor
rerofseoererereseosoesrrf
ooerororeoreeserreerr
oesseseororreeroeee
rr
oesesroesoo
oeesooroofeoroseeessoese
osesosooosrresosefe
rsosoeoerrsrfroseoseorroeo
roe
esoerere
reers
oserseseresrorerferse
efesoreseeseofoeeersoressores
efroessesefrefooseerssessofoorse
rosoroee
ersorsorssesoorreroeorefesse
oresereeroorofoofee
oseesresessoereoe
fsesessseressfroefesersorss
reoreoes