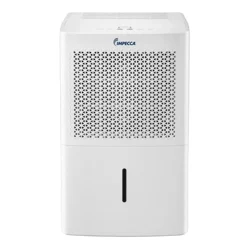
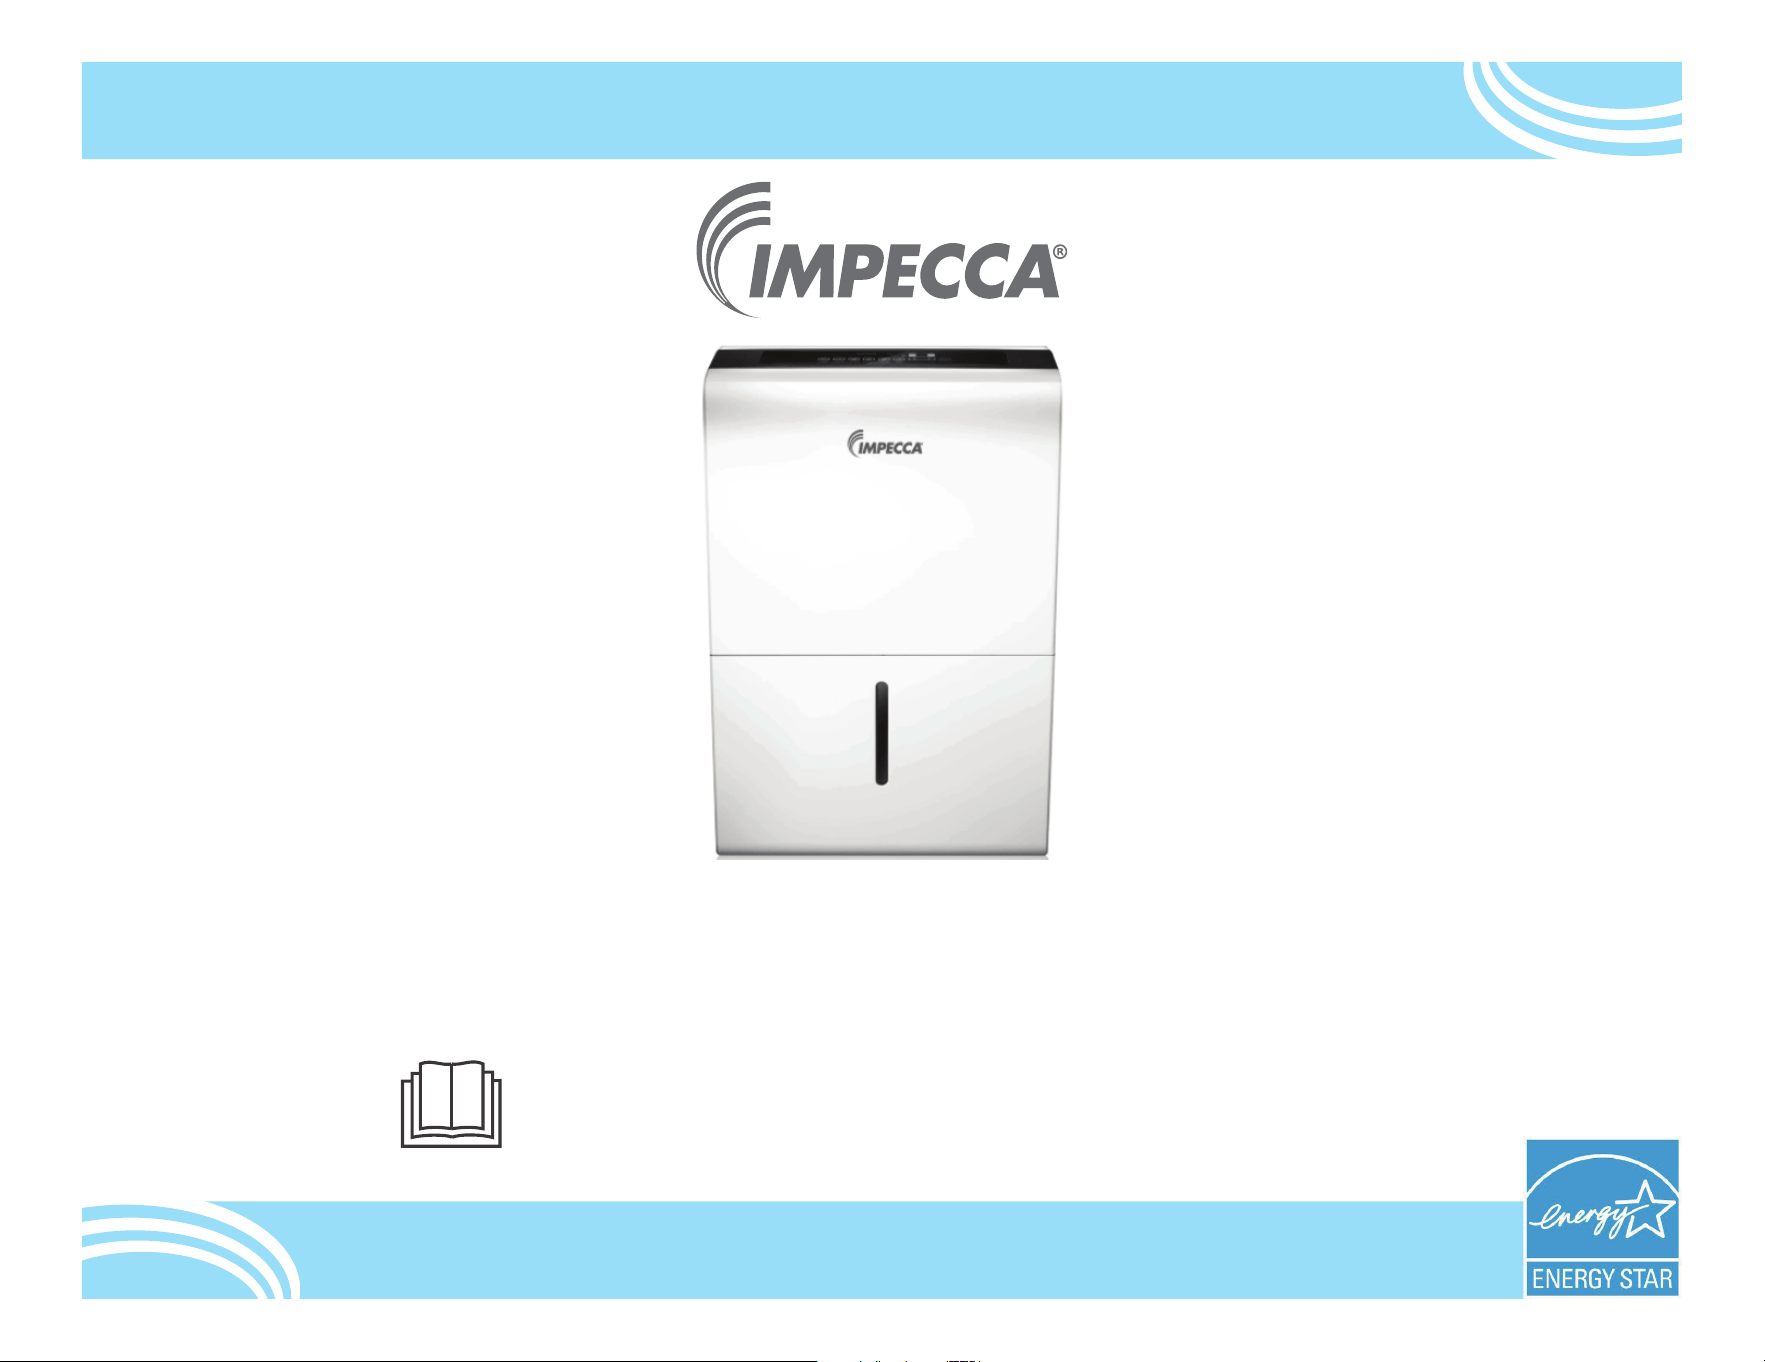
Dehumidifier — User’s Guide
Model: IDM50-SE22 - 50 Pints
IDM50-SE26-P - 50 Pints
v.1.0
IMPORTANT NOTE:
Before using your air conditioner, please read this manual carefully and keep it for future reference.

Troubleshooting
01
04
10
16
CONTENTS
Safety precautions
07
Dump the collected water
Get to know your product
Dump the collected water
Get to know your product
Get to know your features
Care and Maintenance
15
Safety Precautions
Warning
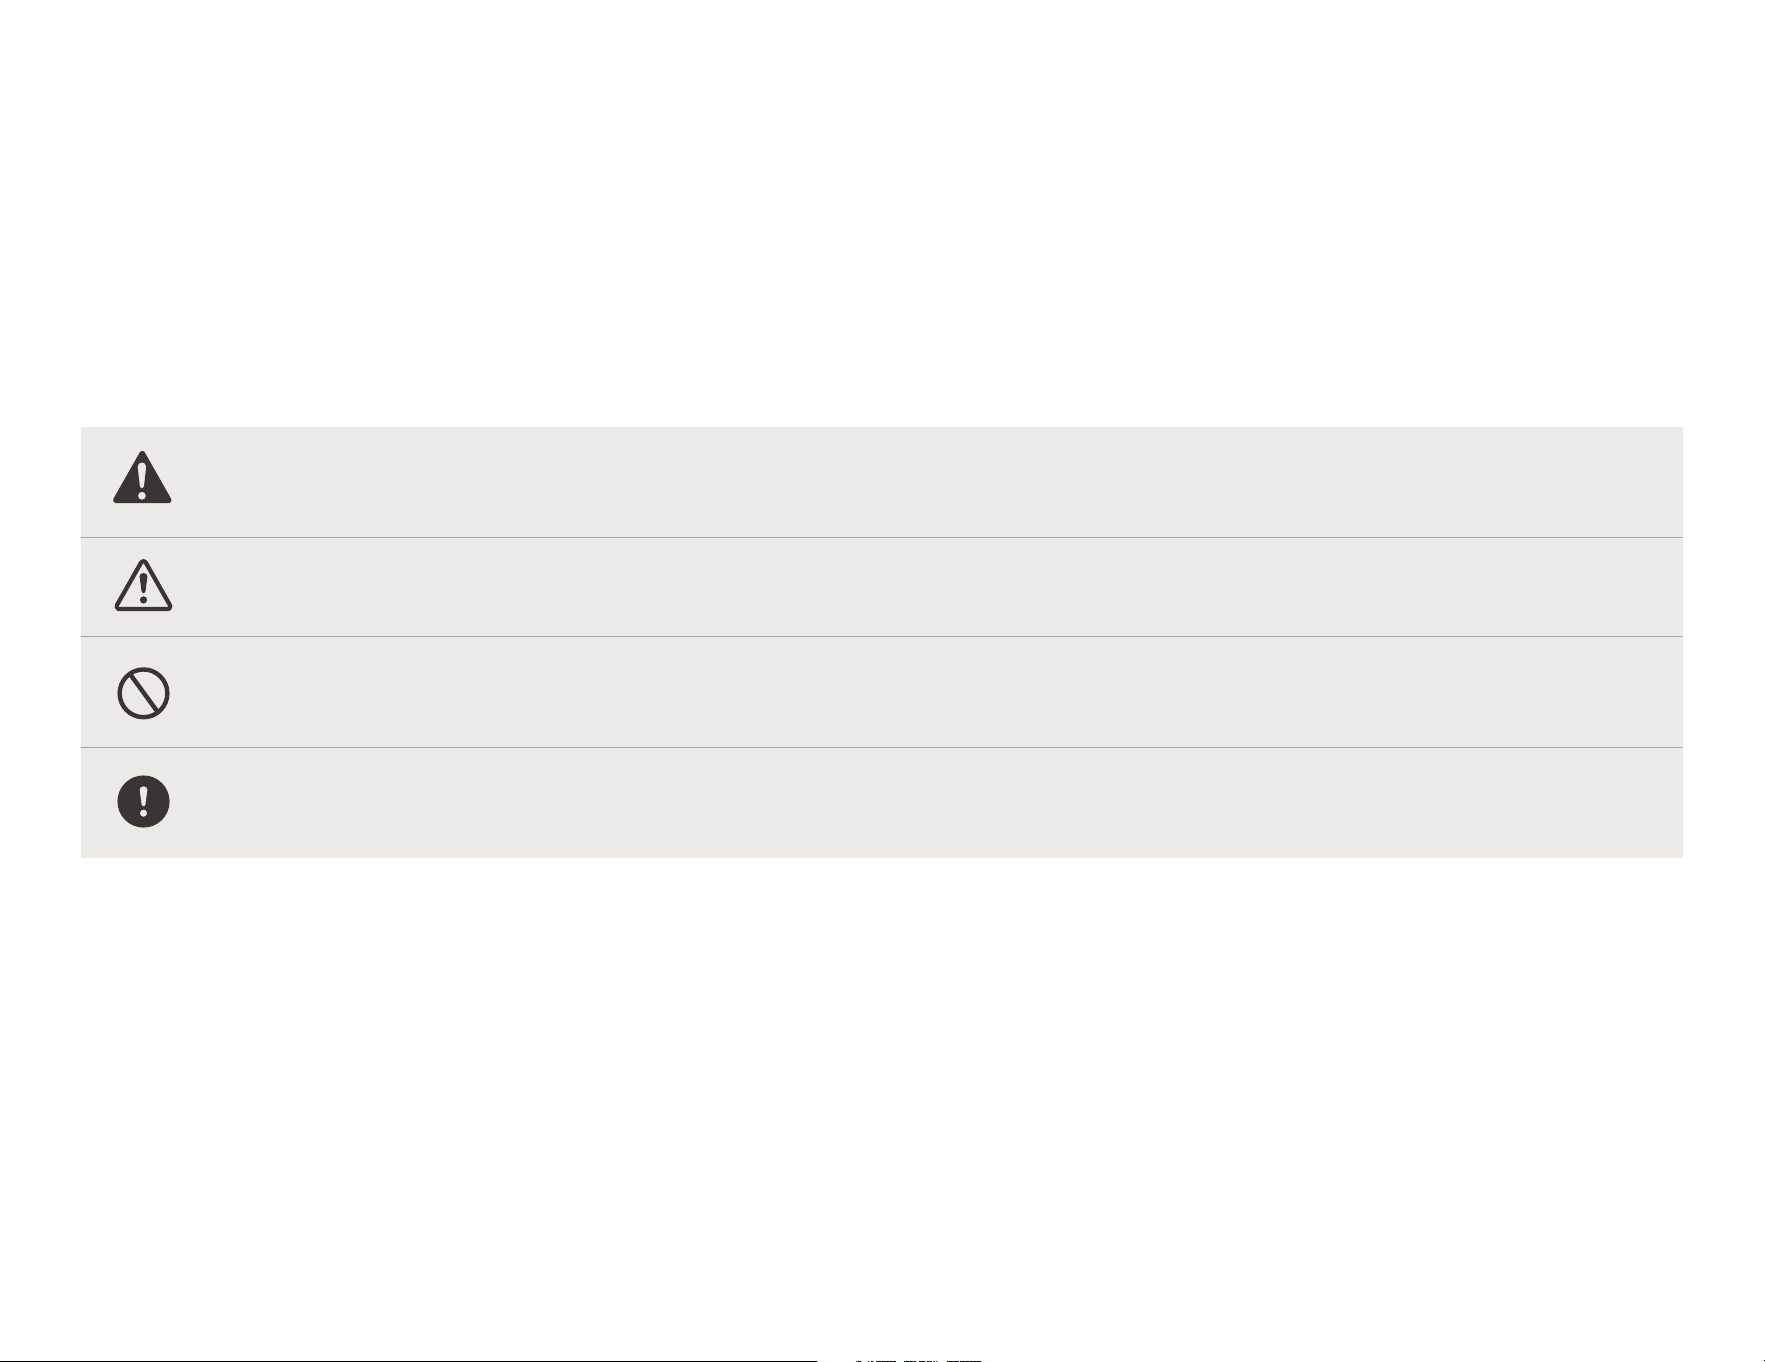
The signal word indicates a hazard with a medium level of risk which, if not avoided, may result in death or serious injury.
Always do this
This signal means that the operation can be performed.
Caution
The signal word indicates a hazard with a low degree of risk which, if not avoided, may result in minor or moderate injury.
Explanation of Symbols
Never do this
This signal indicates the prompt operation is prohibited., if not avoided, may result in Product damaged or injury.
Must read the warning message.
01
Read Safety Precautions Before Operation and Installation To prevent death or injury to the user or other people and property damage,
the following instructions must be followed. Incorrect operation due to ignoring of instructions may cause death, harm or damage.
WARNING
CAUTION
02
Do not exceed the rating of the power outlet or connection device.
Do not operate or stop the unit by switching on or o the power.
Do not damage or use an unspecified power cord.
Do not modify power cord length or share the outlet with other appliances.
Do not insert or pull out plug with wet hands.
Do not install the appliance in a location that may be exposed to
combustible gas.
Do not place the unit near a heat source.
Disconnect the power if strange sounds, smell, or smoke comes from it.
You should never try to take apart or repair the unit by yourself.
Before cleaning, turn o the power and unplug the unit.
Do not use the machine near flammable gas or combustibles, such as
gasoline, benzene, thinner, etc.
Do not drink or use the water drained from the unit.
Do not take the water bucket out during operation.
Do not use the unit in small spaces.
Do not put in places where water may splash onto the unit.
Place the unit on a level, sturdy section of the floor.
Do not cover the intake or exhaust openings with cloths or towels.
Care should be taken when using the unit in a room with the
following persons: infants, children, elderly people,and people not
senstive to humidity.
Do not use in areas where chemicals are handled.
Never insert your finger or other foreign objects into grills or
openings. Take special care to warn children of these dangers.
Do not place heavy object on the power cord and take care so
that the cord is not compressed.
Do not climb up on or sit on the unit.
Always insert the filters securely. Clean filter once every two weeks.
If water enters the unit, turn the unit o and disconnect the power ,
contact a qualified service technician.
Do not place flower vases or other water container on top of
the unit.
Do not use extension cords.
Do not install the appliance in a location that may be exposed
to combustible gas. If combustible gas accumulates around the
unit, it may cause fire.
If the appliance is knocked over during use, turn o the unit and
unplug it from the main power supply immediately. Visually
inspect the unit to ensure there is no damage. If you suspect the
unit has been damaged, contact a technician or customer
service for assistance.
If the supply cord is damaged, it must be replaced by the manufacturer, its
service agent or similarly qualified persons in order to avoid a hazard.
Prior to cleaning or other maintenance, the appliance must be
disconnected from the supply mains.
This appliance is not intended for use by persons (including childern) with
reduced physical, sensory or mental capabilities or lack of experience and
knowledge, unless they have been given supervision or instruction
concerning use of the appliance by a person responsible for their safety.
Children should be supervised to ensure that they do not play with the
appliance.
CAUTION
03
In a thunderstorm, the power must be cut o to avoid damage
to the machine due to lightning.
Do not run cord under carpeting. Do not cover cord with throw
rugs, runners, or similar coverings. Do not route cord under
furniture or appliances. Arrange cord away from trac area
and where it will not be tripped over.
Do not operate unit with a damaged cord or plug. Discard
unit or return to an authorized service facility for examination
and/or repair.
To reduce the risk of fire or electric shock, do not use this fan
with any solid-state speed control device.
The appliance shall be installed in accordance with national
wiring regulations.
Contact the authorised service technician for repair or
maintenance of this unit.
Turn o the product when not in use.
Your unit must be used in a properly grounded wall receptacle. If the
wall receptacle you intend to use is not adequately grounded or
protected by a time delay fuse or circuit breaker(please refer to the
nameplate for the electrical data), have a qualified electrician install
the proper receptacle.
Do not operate your air conditioner in a wet room such as a
bathroom or laundry room.
The unit s circuit board(PCB) is designed with a fuse to provide
overcurrent protection.specifications of the fuse are printed on the
circuit board, such as:T 3.15A/250V (or 350V), etc.
The manufactures nameplate is located on the rear panel of
the unit and contains electrical and other technical data s
pecific to this unit.
Be sure the unit is properly grounded. To minimize shock and
fire hazards, proper grounding is important. The power cord
is equipped with a three-prong grounding plug for protection
against shock hazards.
Electronic Work
WARNING:
BEFORE PERFORMING ANY ELECTRICAL OR WIRING WORK, TURN OFF THE MAIN POWER TO THE SYSTEM.
NOTE:
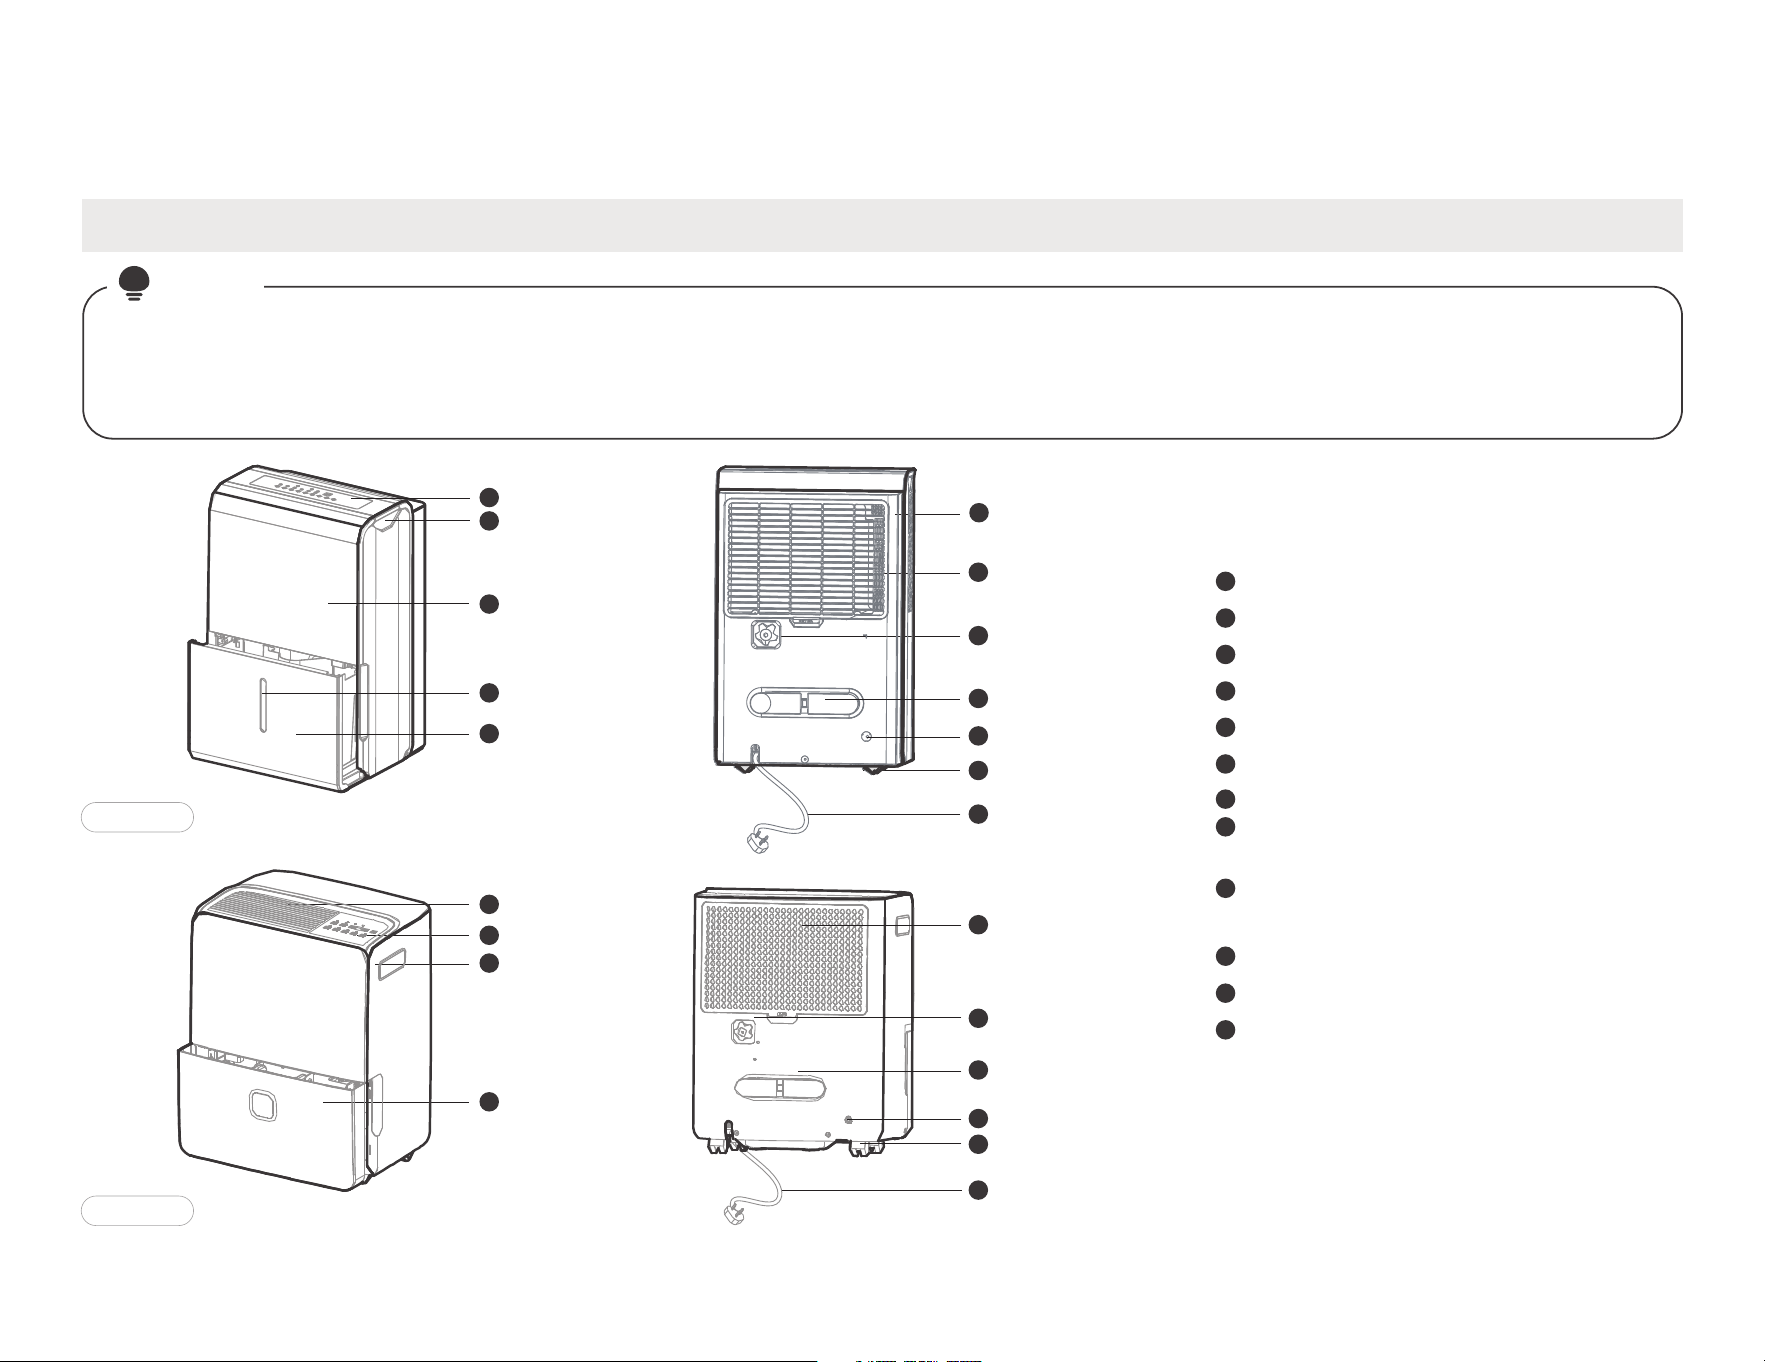
Please strictly follow the wiring label attached to the
machine for all wiring connections. The wiring diagram may
vary for dierent unit. Please refer to the wiring diagram on
the machine you have purchased. The above wiring diagram
is a simplified version for preliminary illustration purposes only.
Main Control
Compressor
Fan Motor
Display
Power
Supply
L/AC L/L1/L-IN
N/AC N/L2/N-IN
Other
Electronic Type
04
NOTE
All the illustrations in the manual are for explanation purpose only. Your machine may be slightly dierent. The actual shape shall
prevail. The unit can be controlled by the unit control panel alone or with the remote controller. This manual does not include
Remote Controller Operations, see the <<Remote Controller Instruction>> packed with the unit for details.
1
2
3
4
5
1
2
1
2
3
4
5
5
6
6
6
7
8
9
10
11
7
8
9
10
11
7
8
9
10
11
12
12
12
Control panel
Panel
Water level window
Water bucket
Handle(both sides)
Air outlet grille
Continuous drain hose outlet
Power cord buckle(placed in the water
bucket,used only when storing the unit)
Pump drain hose outlet
(For models with pump draining feature)
Caster
Power cord and plug
Air filter
Identification of parts
Get to know your product
Name of each component of the product
Type A
Type B
05
Positioning the unit
Casters(At four points on the bottom of unit)
Casters can move freely.
Do not force casters to move over carpet, nor move the unit with water in the bucket. (The unit may tip over and spill water.)
A dehumidifier operating in a basement will have little or no eect
in drying an adjacent enclosed storage area, such as a closet, unless
there is adequate circulation of air in and out of the area.
Do not use outdoors.
This dehumidifer is intended for indoor residential applications only.
This dehumidifer should not be used for commercial or industrial
applications.
Place the dehumidifier on a smooth, level floor strong enough to
support the unit with a full bucket of water.
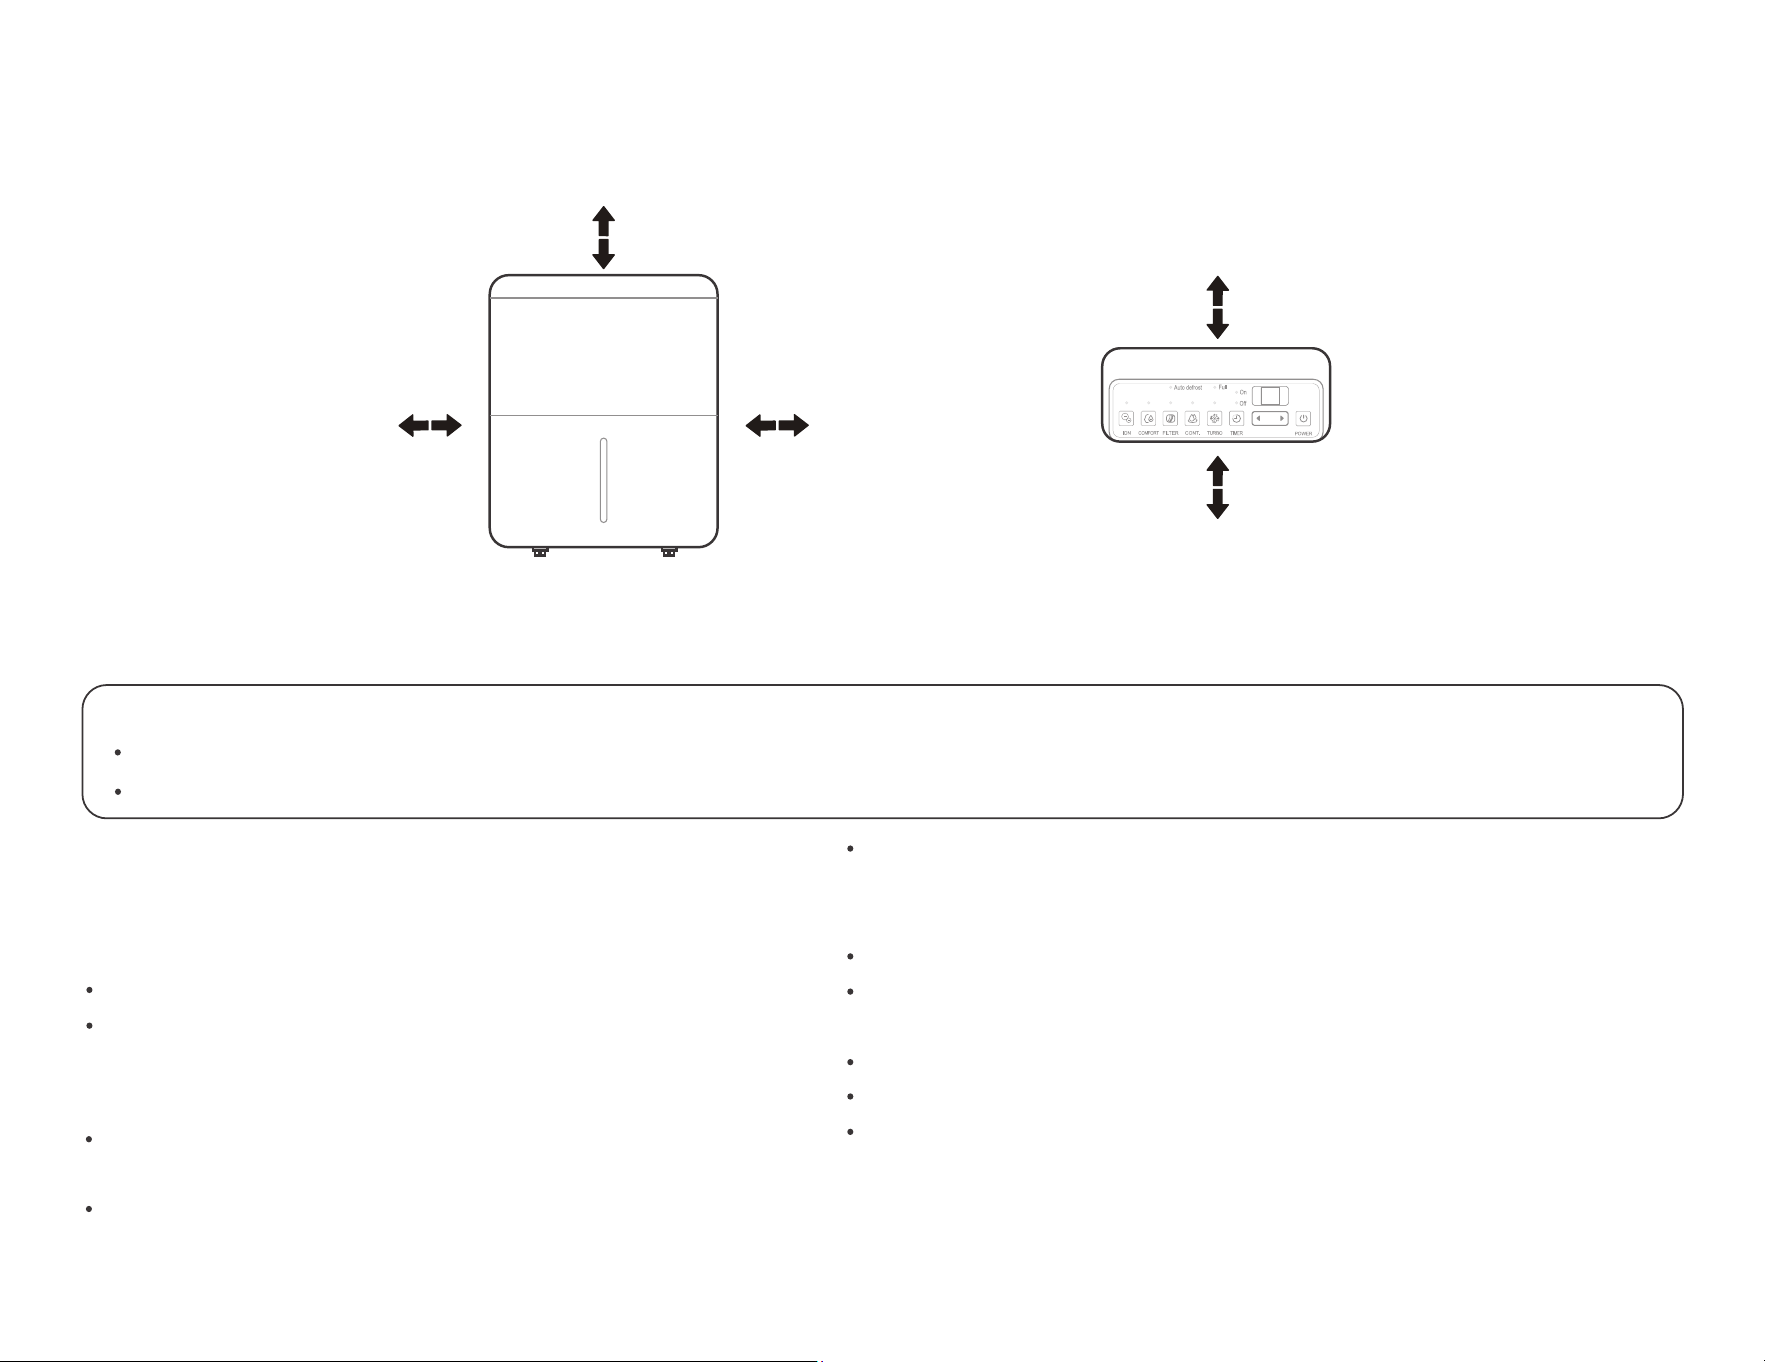
Allow at least 20cm of air space on all sides of the unit for good air
circulation (at least 40cm of air space on air outlet).
Place the unit in an area where the temperature will not fall below
5° C(41° F). The coils can become covered with frost at temperatures below
5° C(41° F), which may reduce performance.
Place the unit away from the clothes dryer, heater or radiator.
Use the unit to prevent moisture damage anywhere books or valuables are
stored.
Use the dehumidifier in a basement to help prevent moisture damage.
The dehumidifier must be operated in an enclosed area to be most eective.
Close all doors, windows and other outside openings to the room.
20cm
or more
20cm
or more
Front view
Top view
40cm
or more
40cm
or more
40cm
or more
Safe distance requirements
06
When first using the dehumidifier, operate the unit continuously 24 hours. Make sure the plastic cover onthe continuous drain hose outlet install
stightly properly so there are no leaks.
This unit is designed to operate with a working environment between tween 5°C/41°F and 32°C/90°F,and between 30%(RH) and 80%(RH).
If the unit has been switched o and needs to be switched on again quickly , allow approximately three minutes for the correct operation to resume.
Do not connect the dehumidifier to a multiple socket outlet, which is also being used for other electrical appliances.
Select a suitable location, making sure you have easy access to an electrical outlet.
Plug the unit into a electrical socket-outlet with earthconnection.
Make sure the Water bucket is correctly fitted otherwise the unit will not operate properly.
NOTE
When the water in the bucket reaches to a certain level,please be careful to move the machine to avoid it falling down.
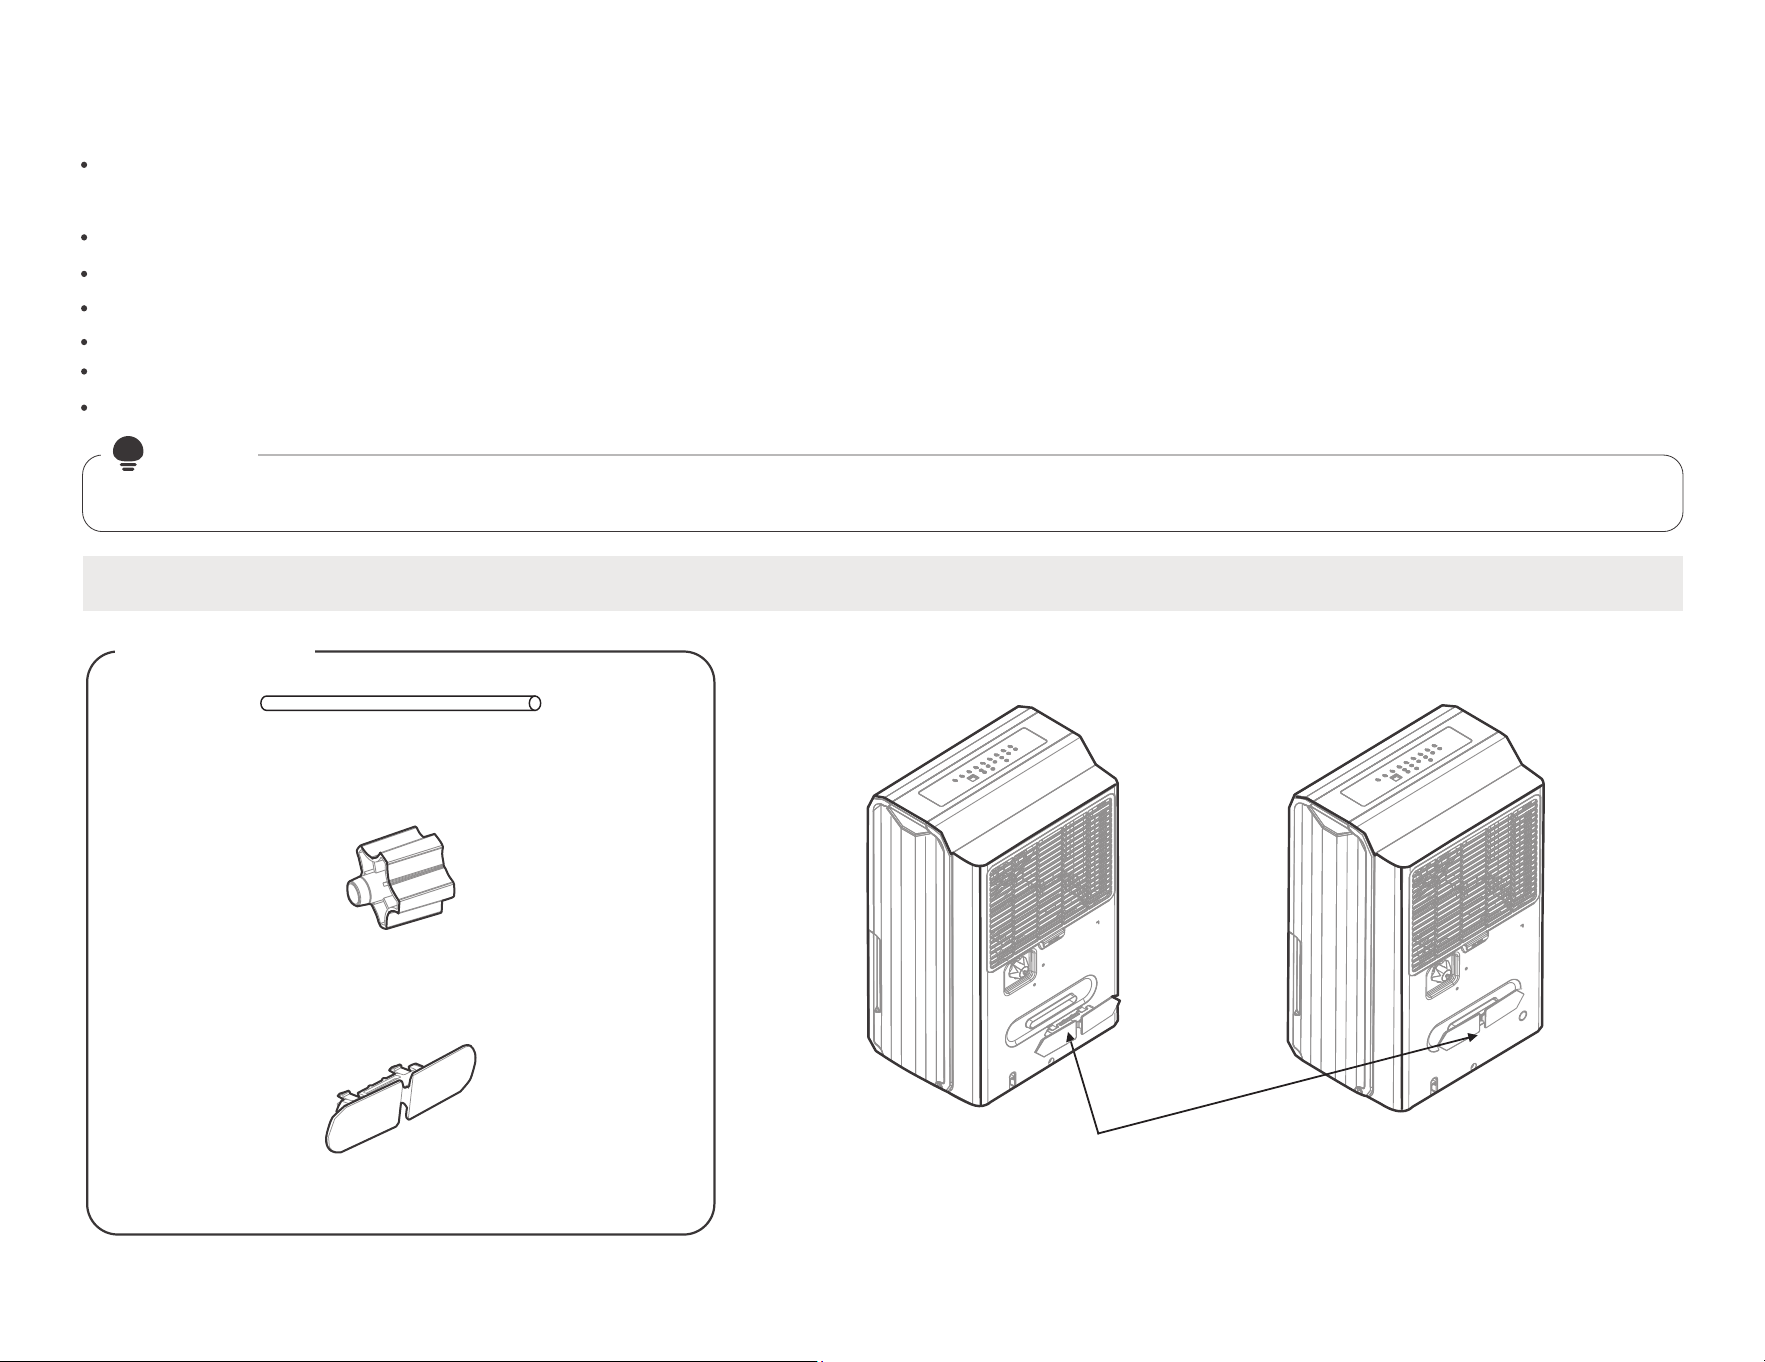
pump drain hose*1 pc
(For the unit with pump feature)
power cord bucket(1 pc)
female threaded end*1 pc
(on some models)
installation of the power cord bucket
Insert the power cord buckle
into the unit.
When using your product
Preparations for product use.
Accessories and power cord buckle installation
Accessories
07
Get to know your features
Operation Display
NOTE
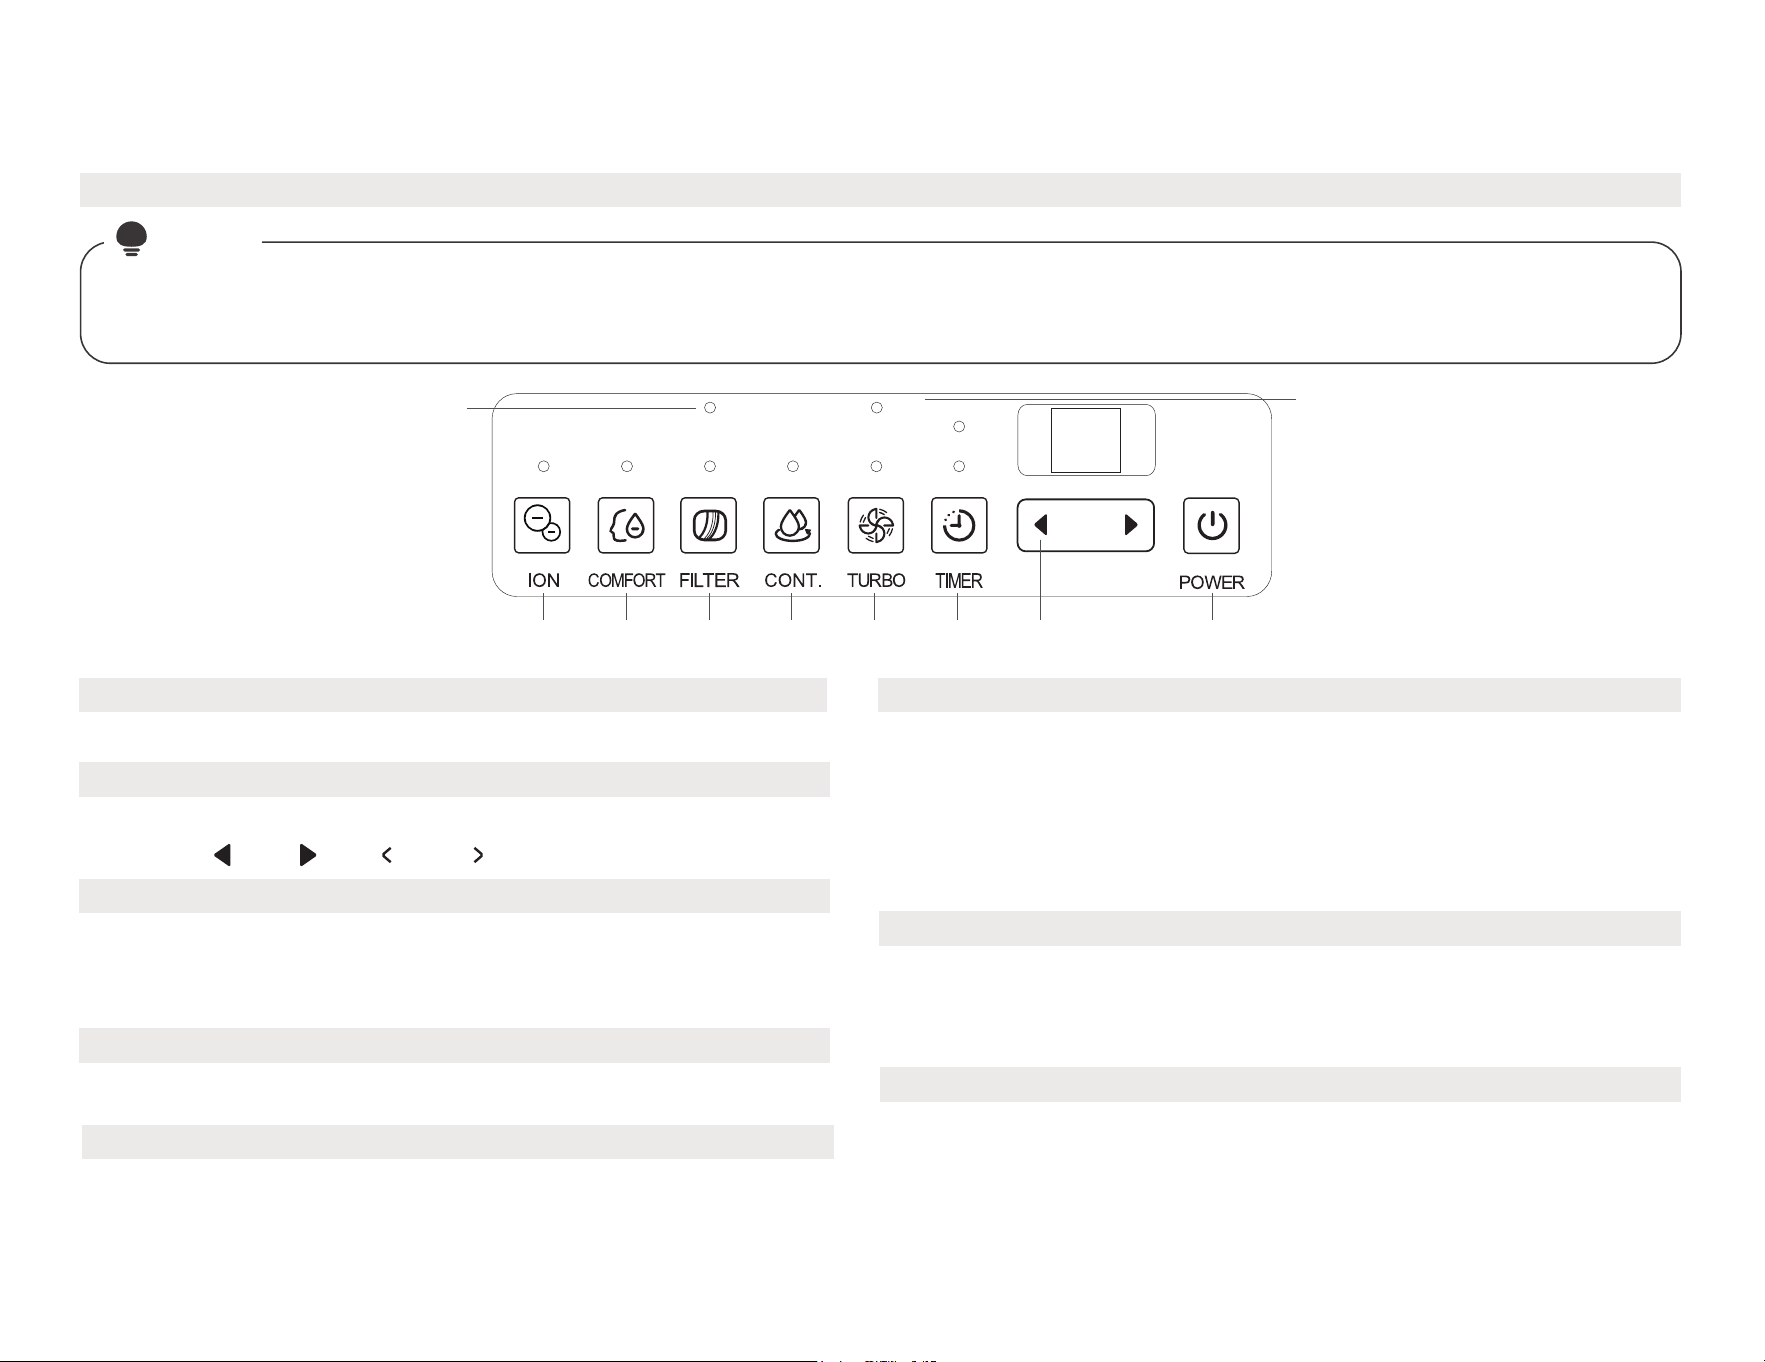
Control Panel Features
The following control panels are for explanation purpose only. The control panel of the unit you purchased may be slightly
dierent according to the models. Your machine may not contain some indicators or buttons. The actual shape shall prevail.
Press to activate the continuous dehumidifying operation.
4.CONTINUE button
Press to initiate the Auto start and Auto stop feature, in conjuction
with the and (or and ) buttons.
2.Timer button
1.POWER button
Press to turn the dehumidifier on and o.
5.FILTER button
6.WIRELESS button
Press the filter button for 3 seconds when the unit is on or o to initiate
the Wireless connection mode. The LED DISPLAY shows ‘AP’ to indicate
you can set Wireless connection and the compressor is forced o. If
connection (router) is successful within 8 minutes, the unit will exit Wire-
less connection mode automatically and the Wireless indicator illuminates
and the compressor reverts previous state. If connection is failure within 8
minutes, the unit exits the Wireless connection mode automatically.
The check filter feature is a reminder to clean the Air Filter for
more ecient operation. The Filter light(Clean filter light) will
illuminate after 250 hours of operation.To reset after cleaning the
filter, press the Filter button and the light will go o.
3.TURBO Pad
Control the fan speed. Press to select either High or Normal fan
speed. Set the fan control to High for maximum moisture removal.
When the humidity has been reduced and quiet operation is
preferred, set the fan control to Normal.
Note:
On this operation,the unit can not be set humidity level.For some
models, under comfortdehumidifying operation, press Up/Down button
will cancel this feature.
7.COMFORT button
Press to activate the comfort dehumidifying operation.
Press to activate the ionizer. Anions ar automatically generated by
ionization. The anions deactive the airborne chemical vapors and dust
particles. Press it again to stop the function.
8.ION button
On
Off
Full
Auto defrost
145/678 2 123
11
10
08
Note:
When one of the above malfunctions occurs, turn o the unit,
and check for any obstructions. Restart the unit, if the malfunction is
still present, turn o the unit and unplug the power cord. Contact the
manufacturer or its service agents or a similar qualified person for
service.
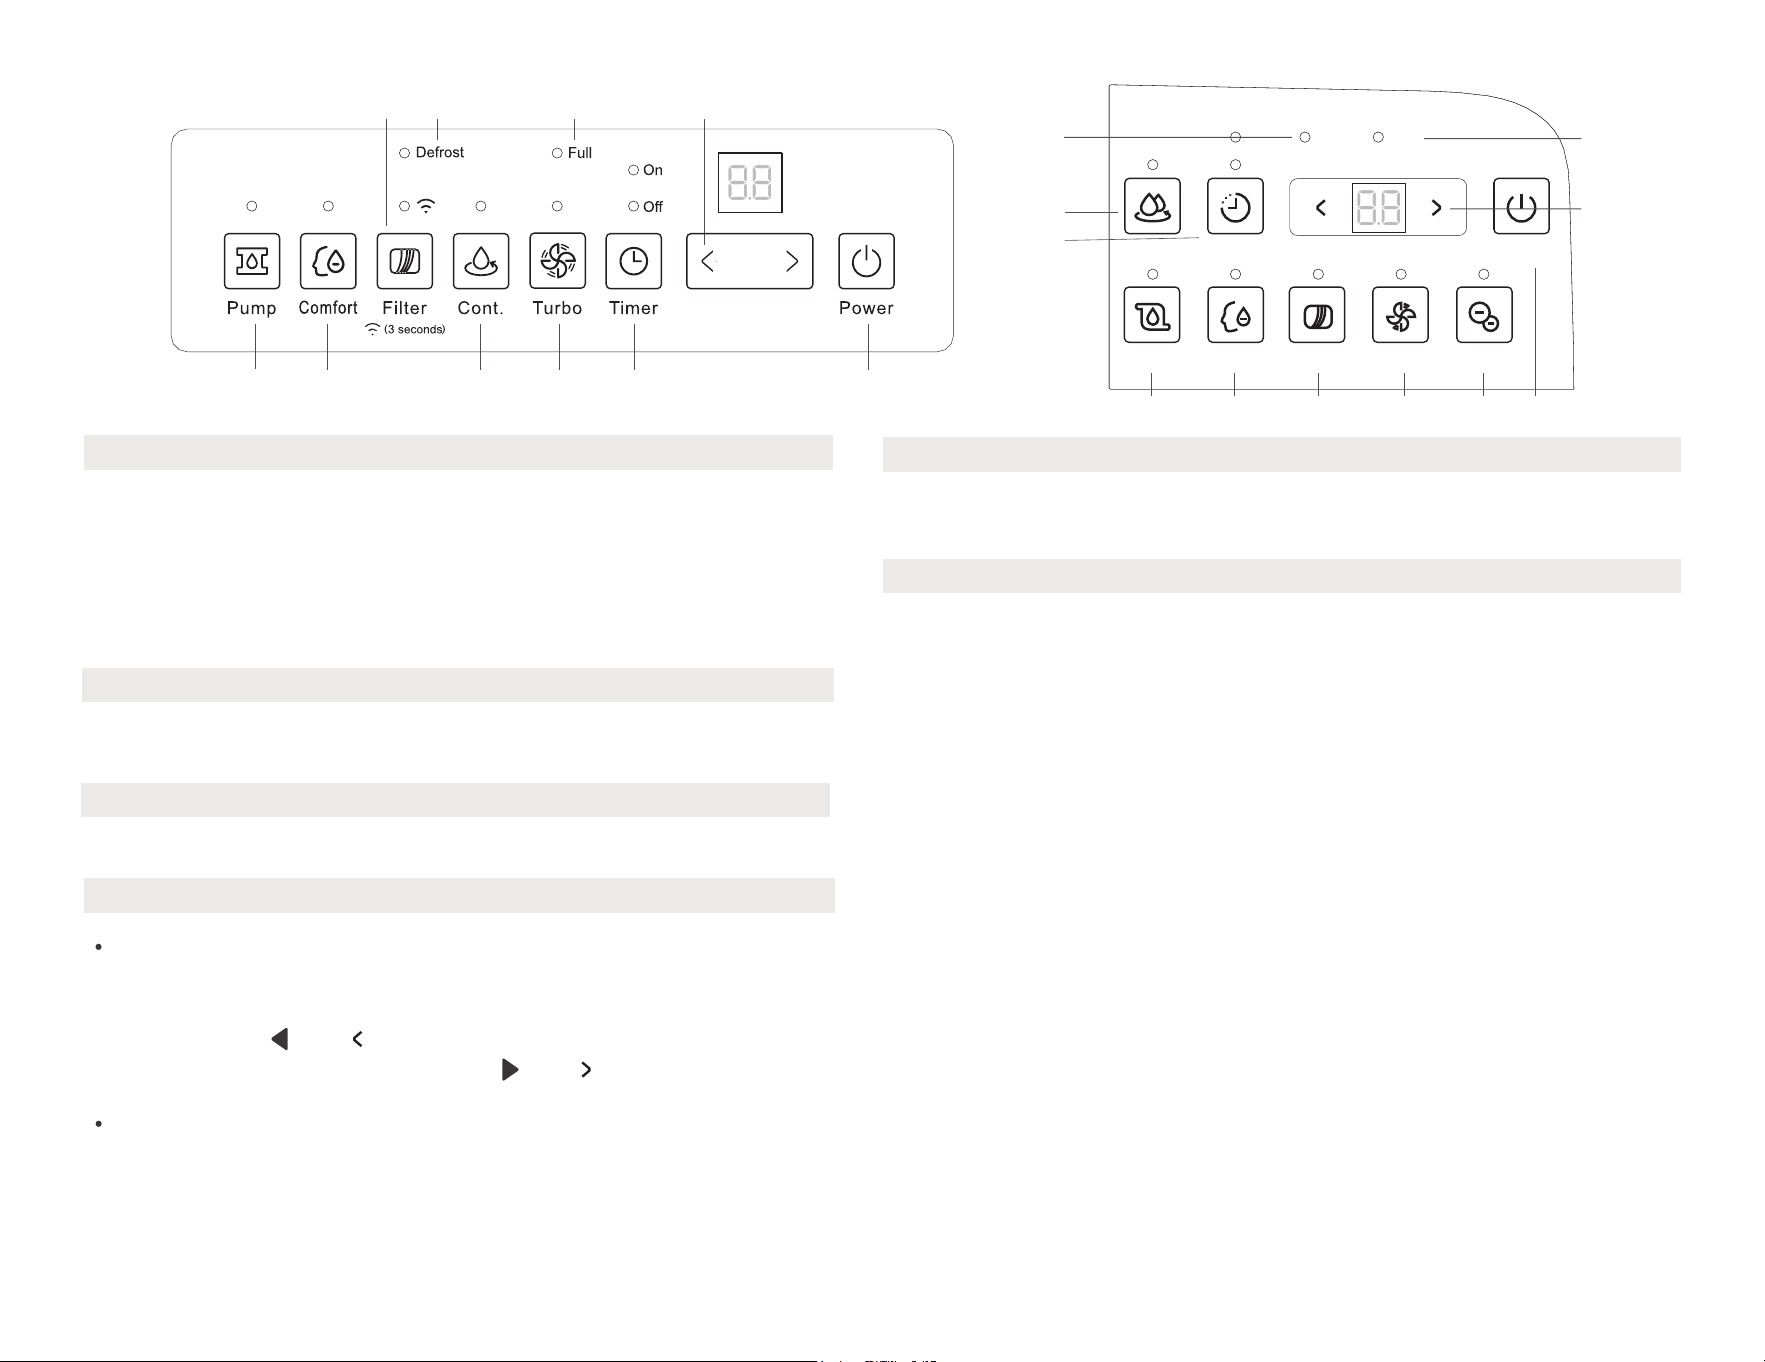
Glows when the bucket is ready to be emptied.
11.Bucket Full Light
When forst builds up on the evaporator coils, thecompressor will
cycle o and the fan will continue to run until the frost disappears.
10.Auto Defrost
The humidity level can be set within a range of 35% RH(Relative
Humidity) to 85%RH(Relative Humidity) in 5% increments. For drier
air , press the (or ) button and set to a lower percent
value(%). For damper air, press the (or ) button and set a
higher percent value(%).
12.UP/DOWN buttons
Humidity Set Control buttons
TIMER Set Control buttons
Use the Up/Down buttons to set the Auto start and Auto stop time
from 0.0 to 24.
9.PUMP button
NOTE:
Make sure the pump drain hose is installed into the unit and
the continuous drain hose is removed from the unit before the
pump operation is activated.When the bucket is full,the pump
starts to work.Refer to the next pages for removing the collected
water. Do not use this operation when the outdoor temperatureis
equel to or less than 0° C (32° F).
Press to activate the pump operation.
Shows the set % humidity level from 35% to 85% or auto start/stop time
(0~24) while setting, then shows the actual(±5% accuracy) room %
humidity level in a range of 30% RH(Relative Humidity) to 90%RH
(Relative Humidity).
Error Codes and Protection Code:
AS-Humidity sensor error--Unplug the unit and plug it back in. If error
repeats, call for service.
ES-Tube Temperature sensor of the evaporator error-- Unplug the unit
and plug it back in. If error repeats, call for service.
P2-Bucket is full or bucket is not in right position-- Empty the bucket
and replaceit in the right position.(only available for the unit with no
pump feature.)
P2-Bucket is full -- Empty the bucket.
(only available for the unit with pump feature.)
Eb-Bucket is removed or not in right position-- Replace the bucket in
the right position.(only available for the unit with pump feature.)
Press to activate the dryer operation. Press it again to stop the
function.
Display
DRYER button
TIMER
On
Off
Defrost
Full
CONT.
POWER
PUMP
COMFORT FILTER TURBO ION
10
11
11 1210
12
8
9 1
1
4
5/6
7 2
3
35/679
4
2

09
The system starts to count the time once the fan motor operates. The check filter feature can be only activated when the accumulated
operation time achieves 250 hours or more. The Reset light(Clean filter indicator light) flashes at one time per second, after finishing
clean the air filter, press the Filter button and the Reset light(Clean filter indicator light) goes o.
The dehumidifier shuts o when the bucket is full, or when the bucket is removed or not replaced in theproper position.
For some models, the fan motor will continue to run for 30 seconds.
Wait 3 minutes before resuming operation After the unit has stopped, it can not be restart operation in the first 3
minutes.This is to protect the unit. Operation will automatically start after 3 minutes.
Auto Shut O
Check filter feature
If the unit breaks o unexpectedly due to the power cut, it will restart with the previous function setting automatically when the power resumes.
Auto-Restart
When the unit is on, first press the Timer button, the Timer O indicator light illuminates. It indicates the Auto Stop program is initiated. Press it
again the Timer On indicator light illuminates. It indicates the Auto Start is initiated.
When the unit is o, first press the Timer button, theTimer On indicator light illuminates. It indicates the Auto Start program is initiated. Press it
again the
Timer O indicator light illuminates. It indicates the Auto Stop is initiated.
Press or hold the UP or DOWN button to change the Auto time by 0.5 hour increments, up to 10 hours, then at 1 hour increments up to 24 hours.
The control will count down the time remaining until start.
The selected time will register in 5 seconds and the system will automatically revert back to display the previous humidity setting.
When the Auto Start & Auto Stop times are set, within the same program sequence, Timer On O indicator lights illuminate identifying both On
and O times are now programmed.
Turning the unit On or O at any time or adjusting the timer setting to 0.0 will cancel the Auto Start/Stop function.
When LED display window displays the code of P2, the Auto Start/Stop function will also be cancelled.
Setting the Timer
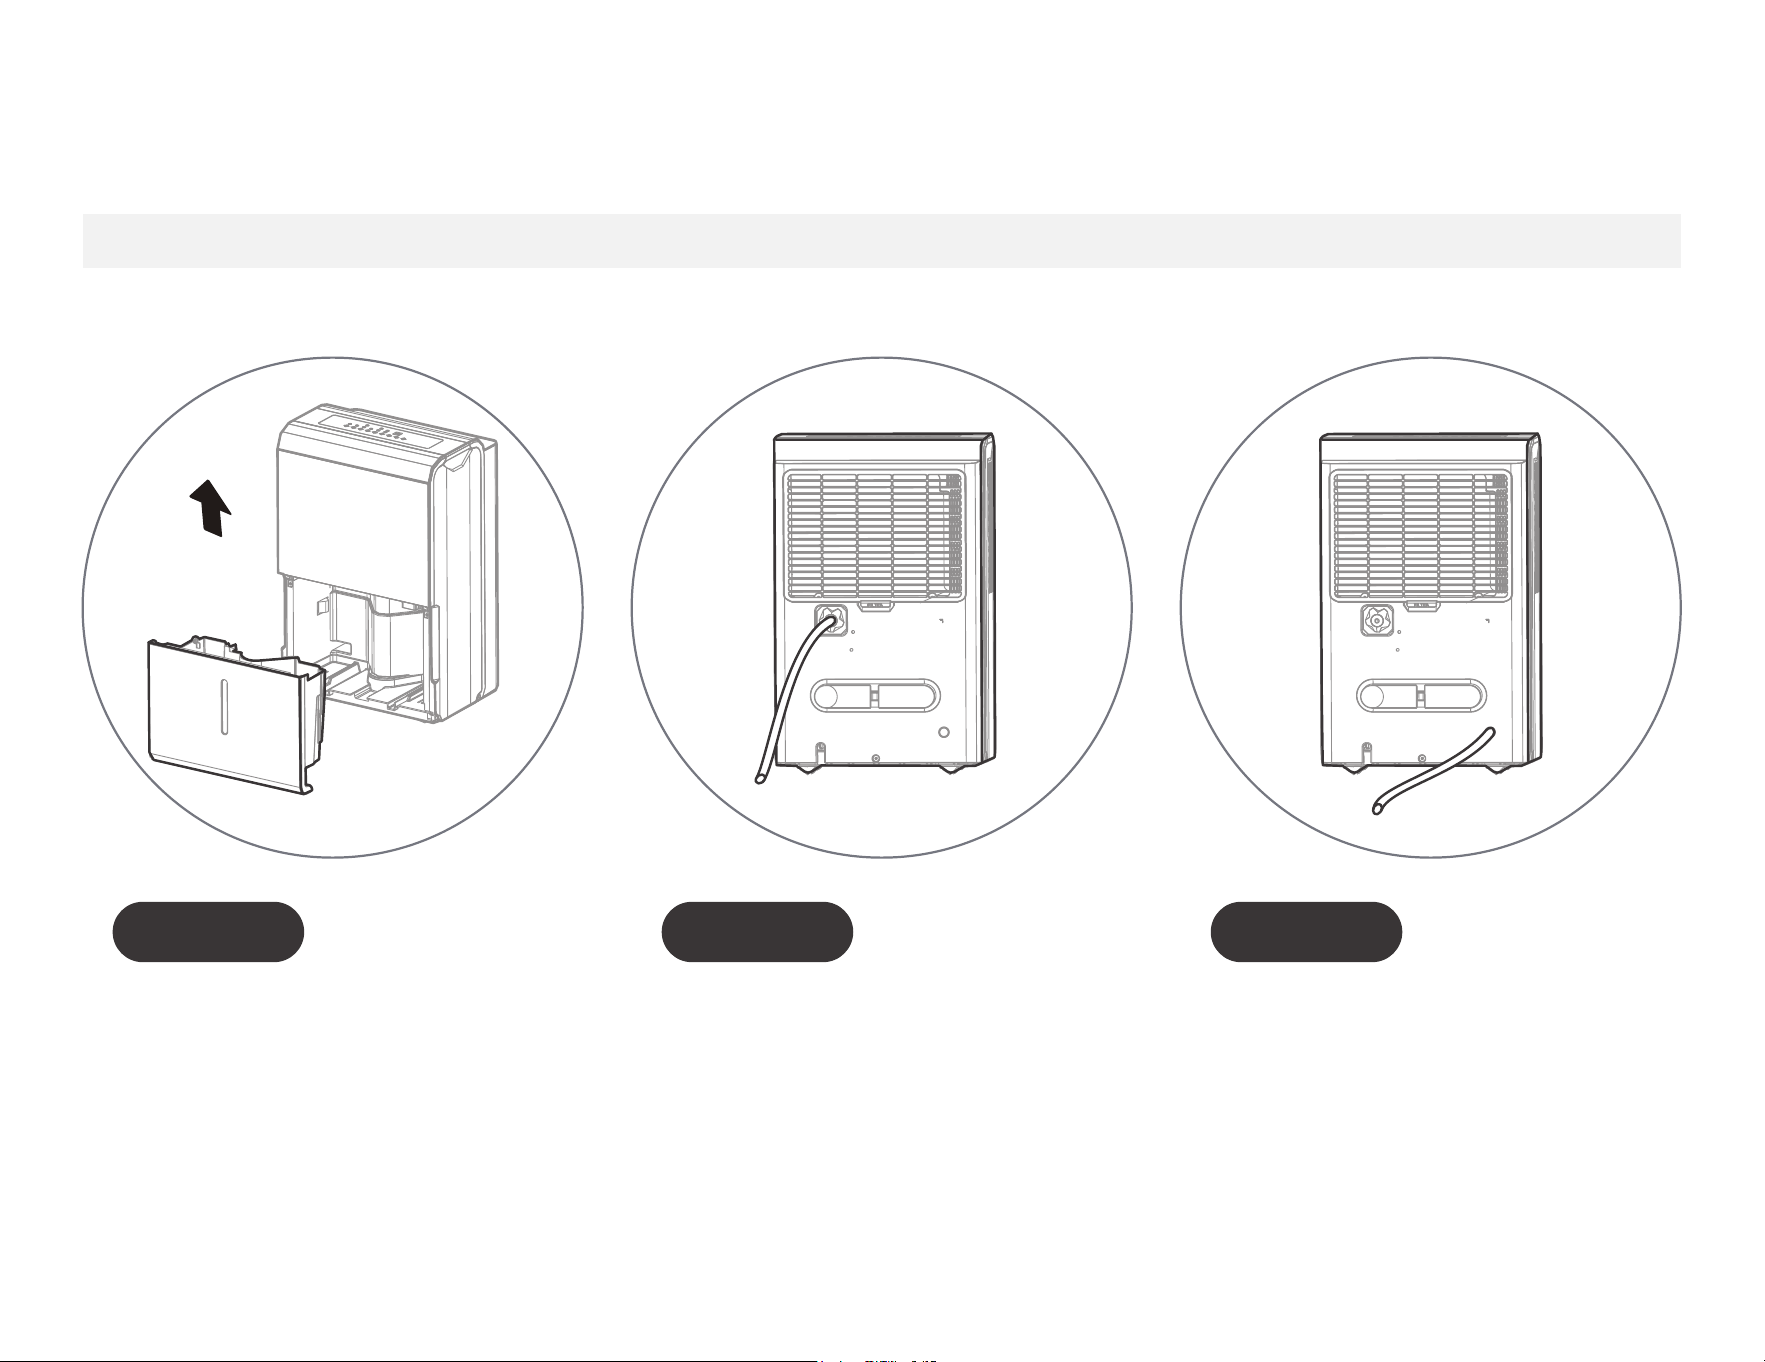
Dump the collected water
When your product has been
in use for a while.
There are three ways to remove collected water.
Bucket drainage
Type 1: Type 2: Type 3:
water hose drainage
(continuous)
Pump drainage
(Pump model only)
10
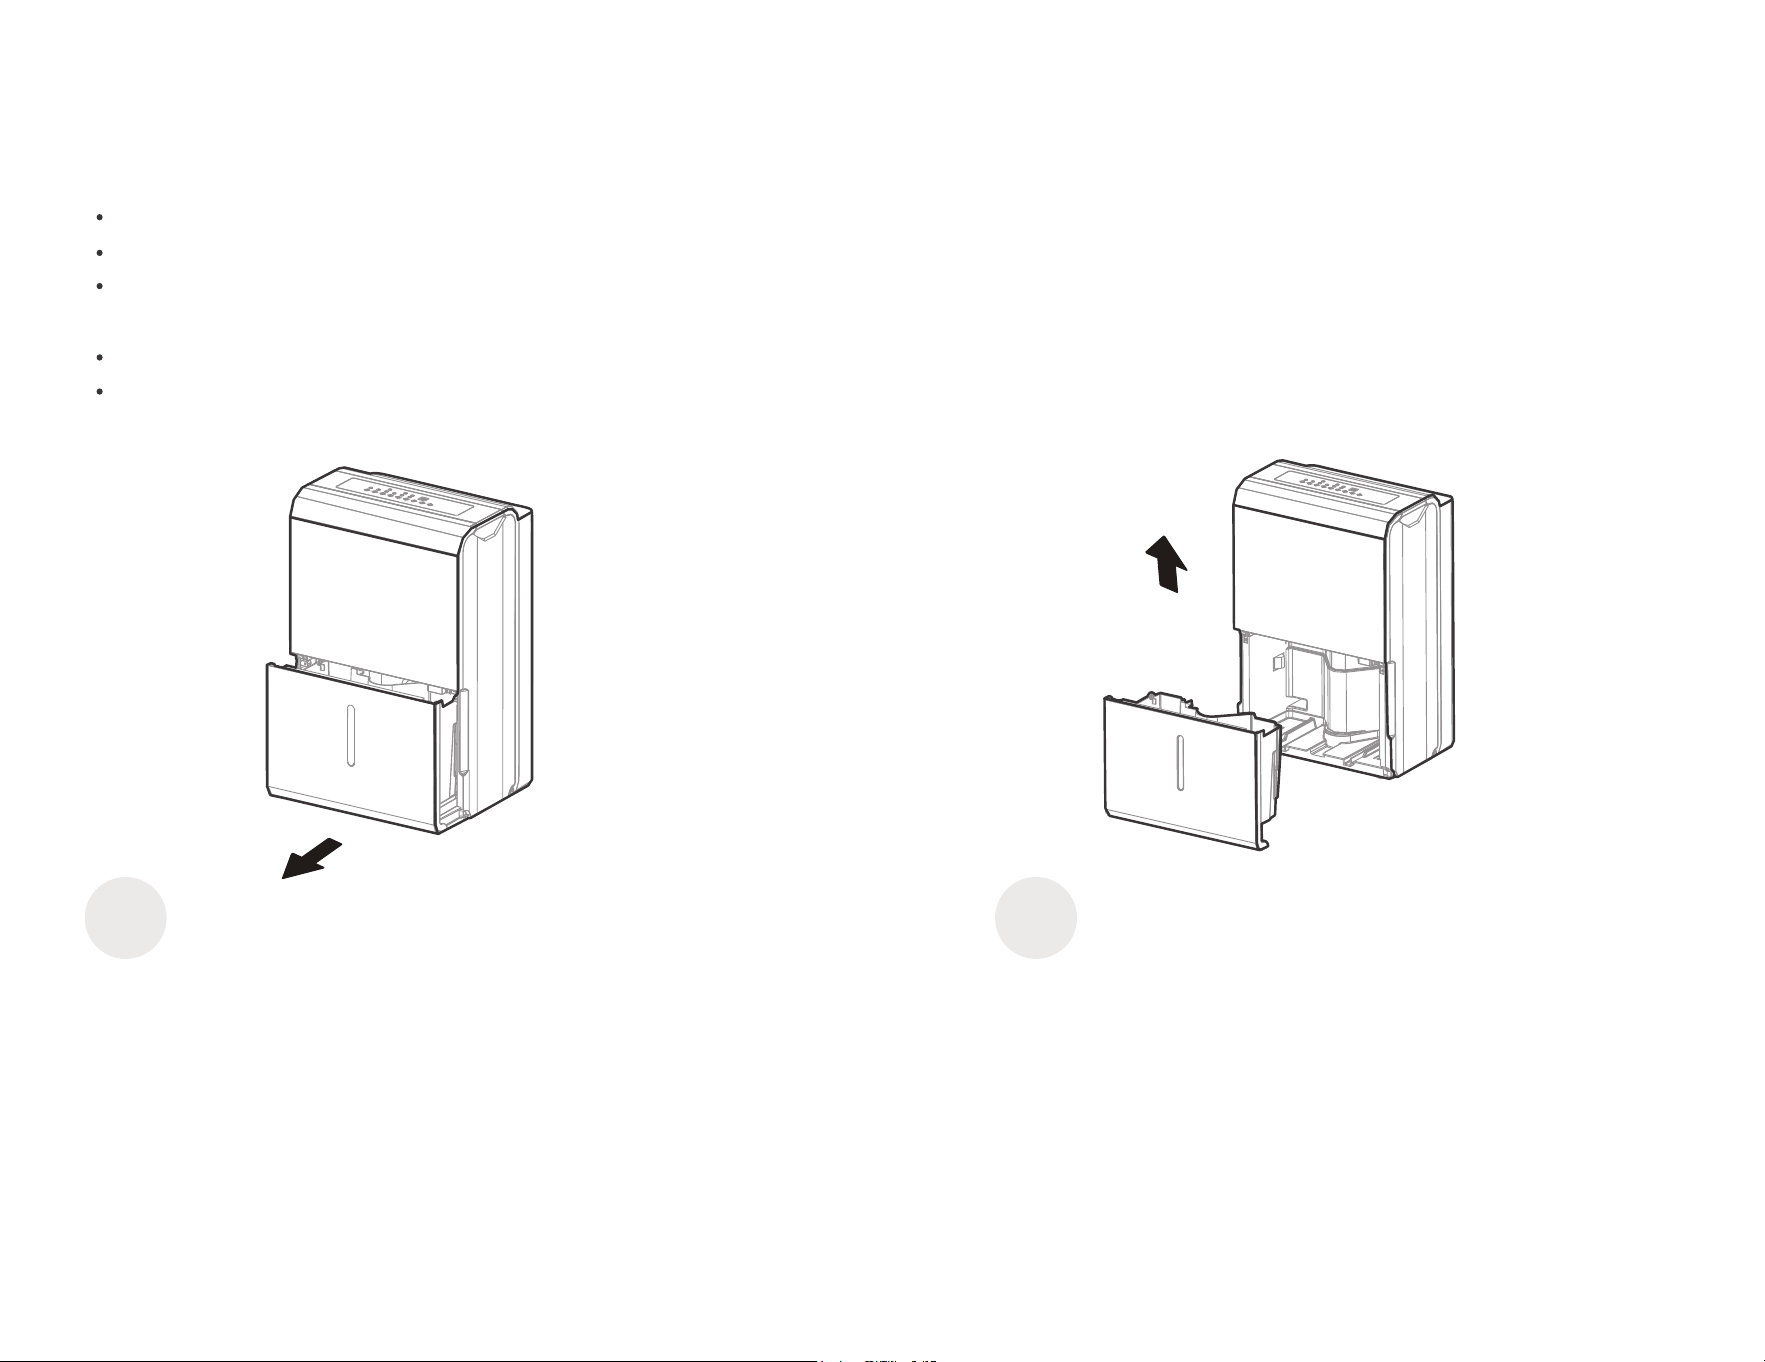
11
When the unit is o, if the bucket is full, the Full indicator light will light.
When the unit is on,if the bucket is full, the compressor and the fan turn o, and the Full indicator light will light, the digital display shows P2.
Slowly pull out the bucket. Grip the left and right handles securely, and carefully pull out straight so water does not spill. Do not put the bucket
on the floor because the bottom of the bucket is uneven. Otherwise the bucket will fall and cause the water to spill.
Throw away the water and replace the bucket. The bucket must be in right place and securely seated for the dehumidifier to operate.
The machine will re-start when the bucket is restored in its correct position.
Pull out the bucket a little. Hold both sides of the bucket
with even strength, and pull it
out from the unit.
Type 1
1
2
Bucket drainage
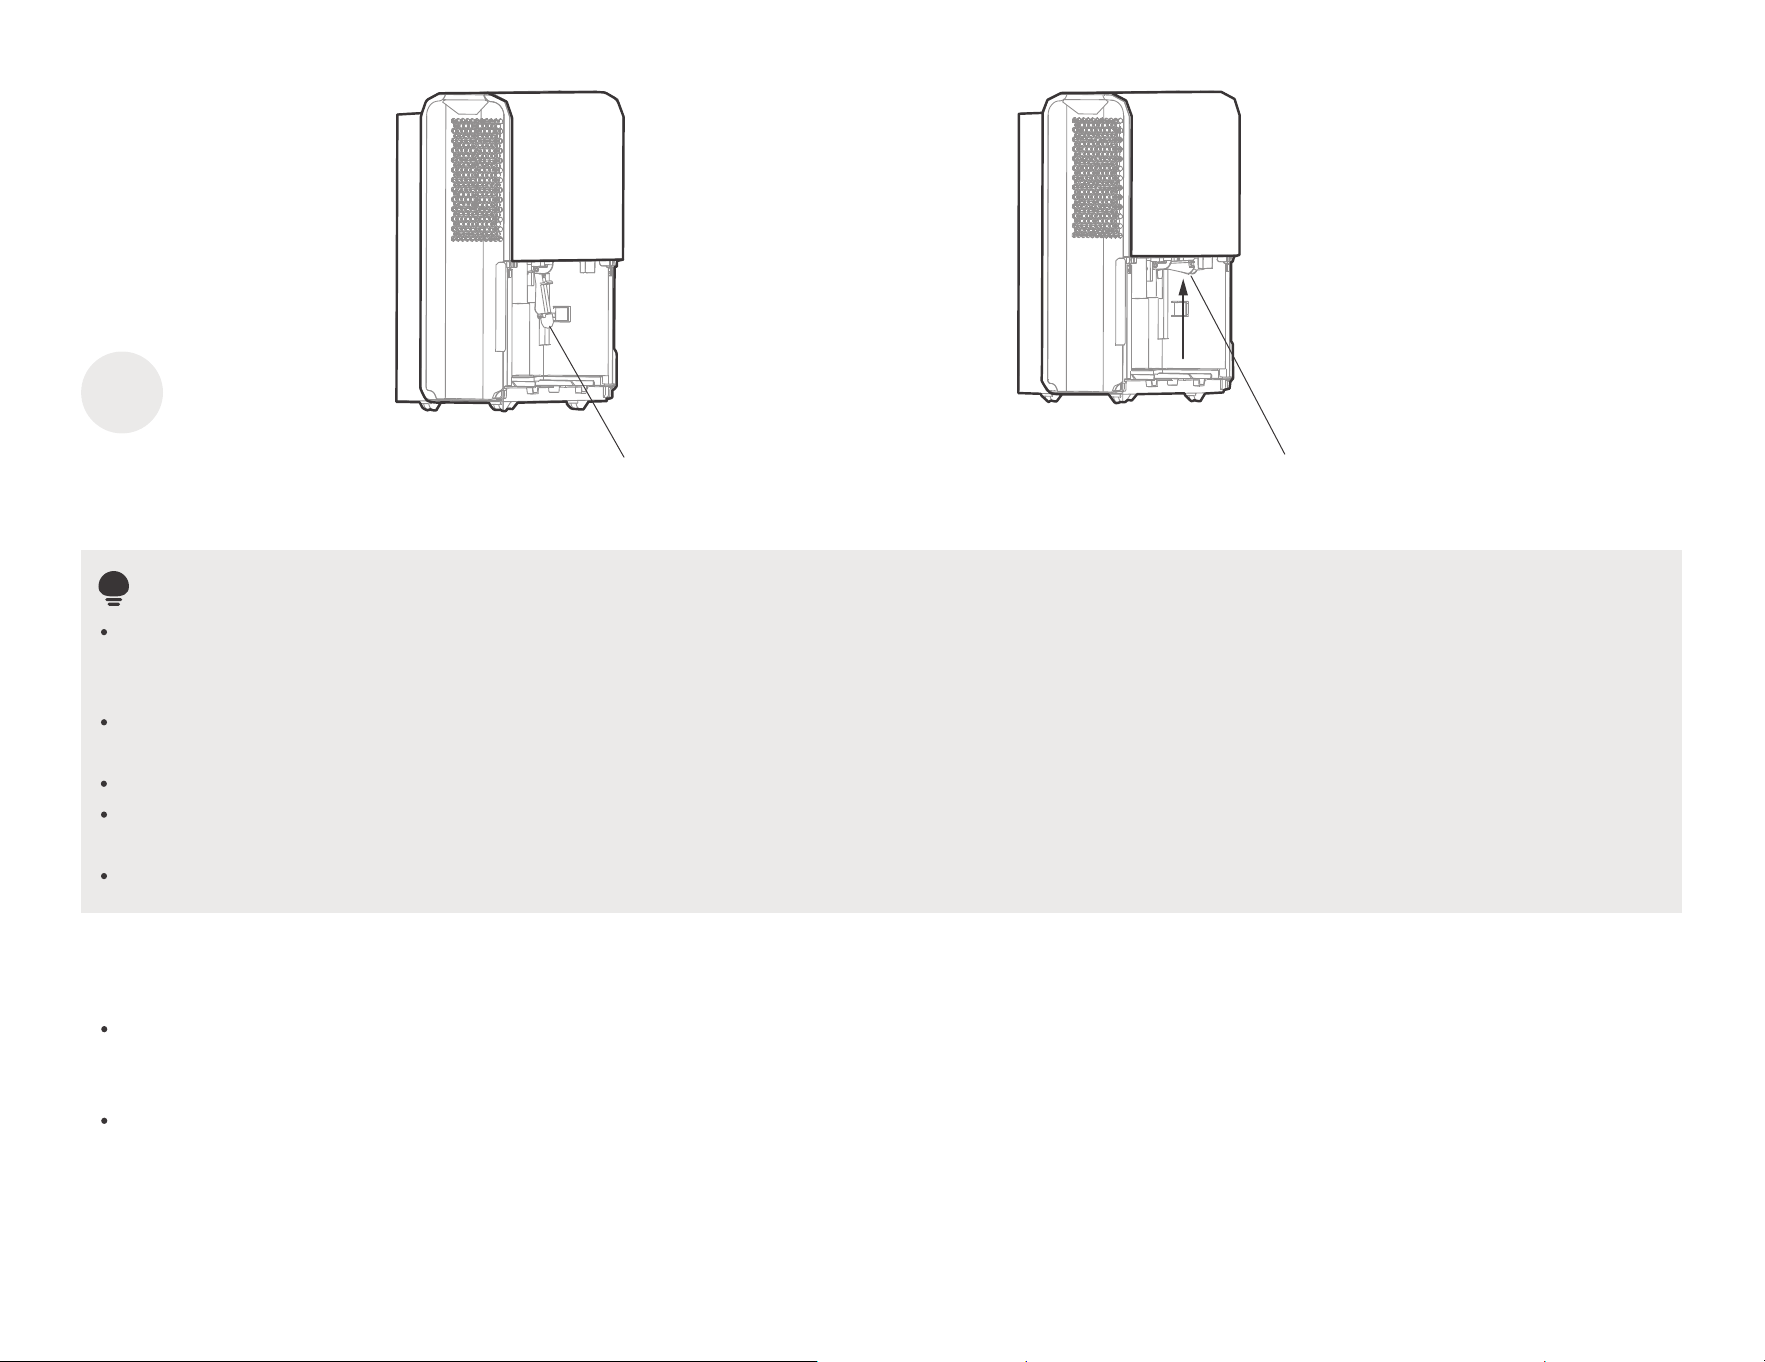
12
Pour the water out.
Pump the hose drops.
Reinstall pump
hose properly
When you remove the bucket, do not touch any parts inside of the unit. Doing so may damage the product.
Be sure to push the bucket gently all the way into the unit. Banging the bucket against anything or failing to push it in securely may cause the
unit not to operate.
If the pump hose drops when you remove the bucket, you must reinstall the pump hose properly to the unit before replace the bucket into
the unit.
When you remove the bucket,if there is some water in the unit you must dry it.
When the unit is on, if the bucket is removed, the compressor and the fan turn o, then the unit will beep 8 times and the digital display
shows Eb.
When the unit is o, if the bucket is removed, the unit will beep 8 times and the digital display shows Eb.
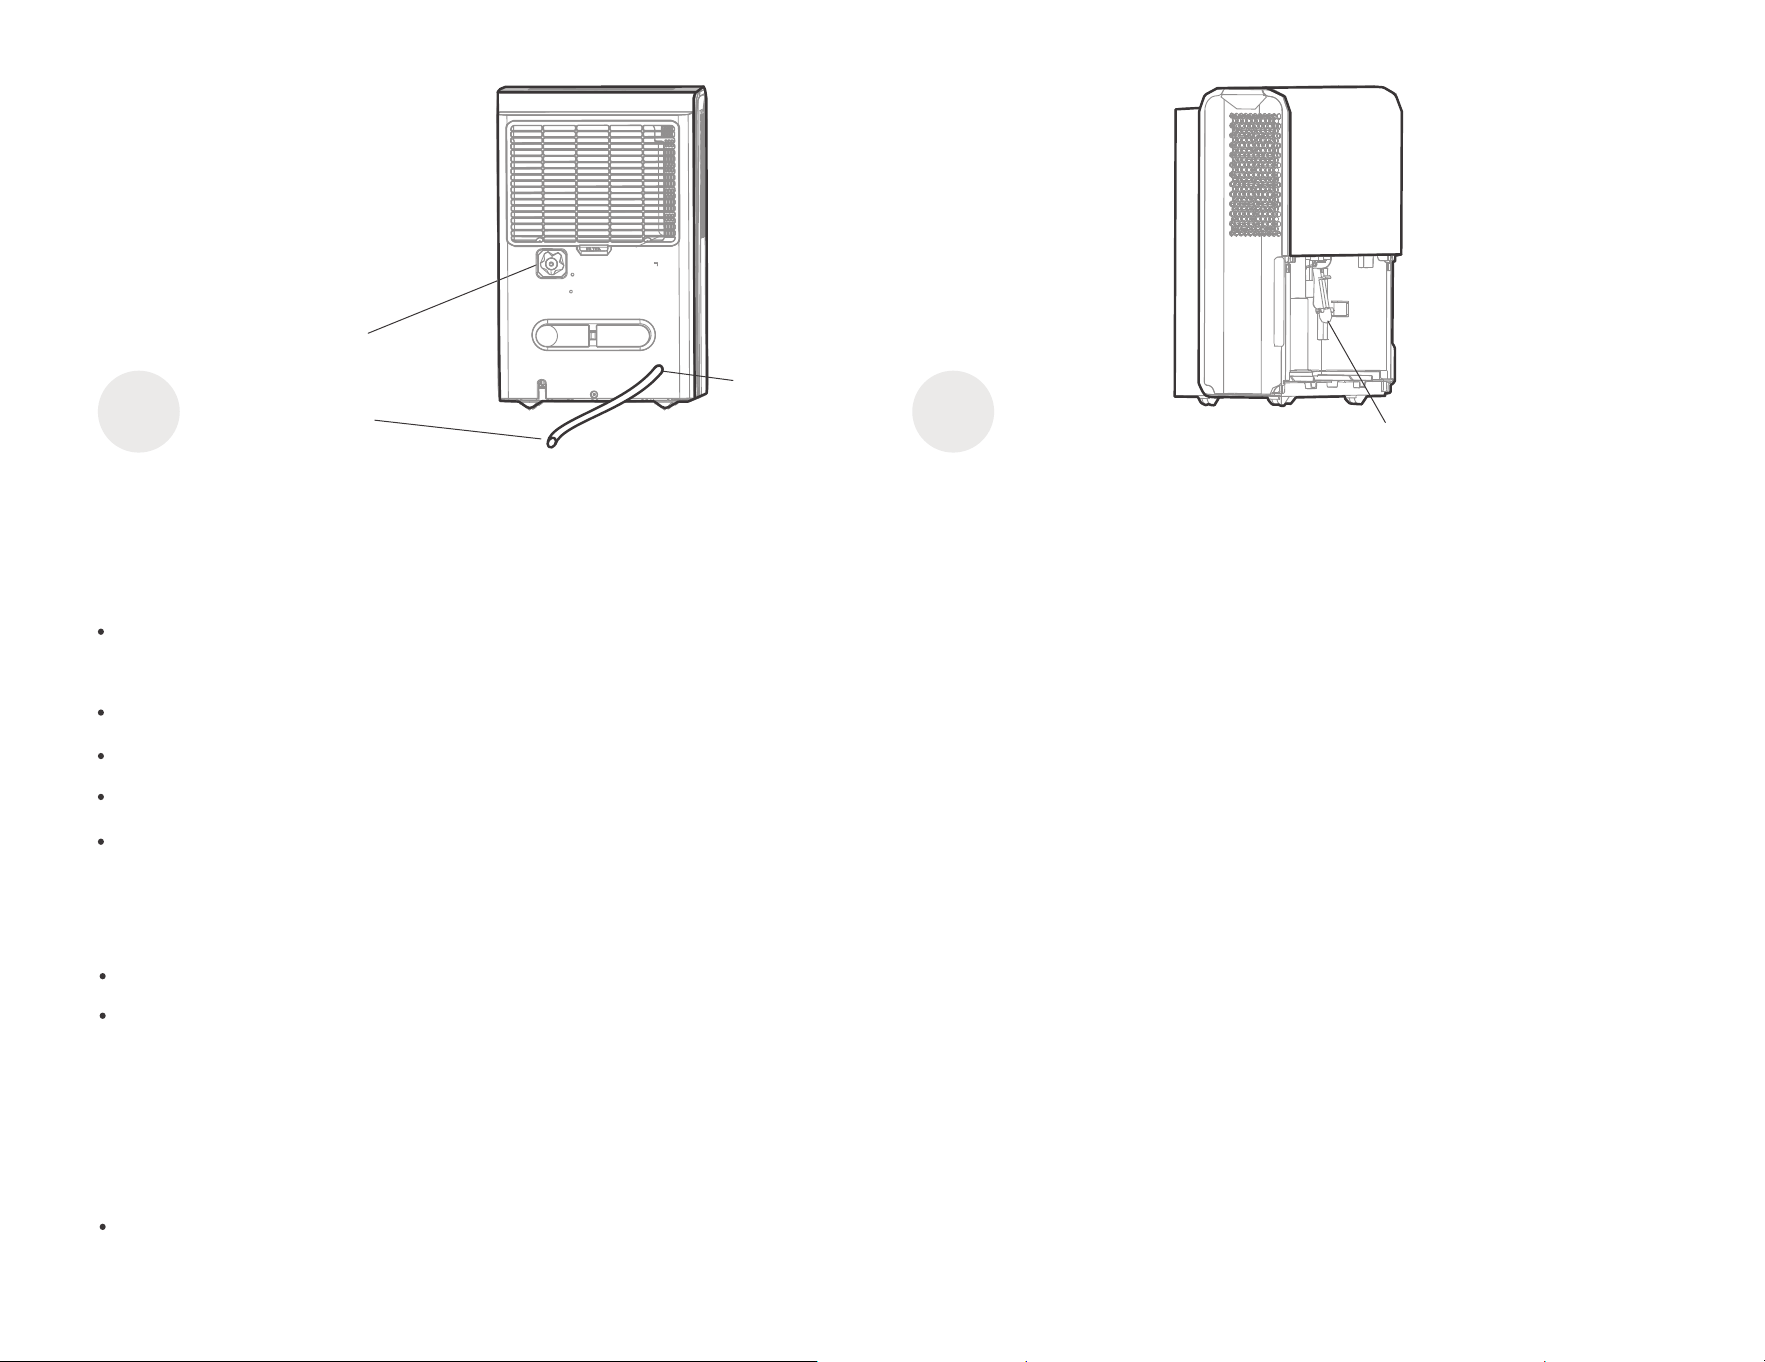
Water can be automatically emptied into a floor drain by attaching the unit with a water hose(ld≥Φ5/16", not included) with a female threaded
end(ID:M=1",not included)
Note: On some models, the female threaded end isinclude.
Remove the plastic cover from the back drain outlet of the unit and set aside, then insert the drain hose through the drain outlet of the unit and
lead the drain hose to the floor drain or a suitable drainage facility.
NOTE
3
Type 2
The dumping of waste water.
water hose drainage (continuous)
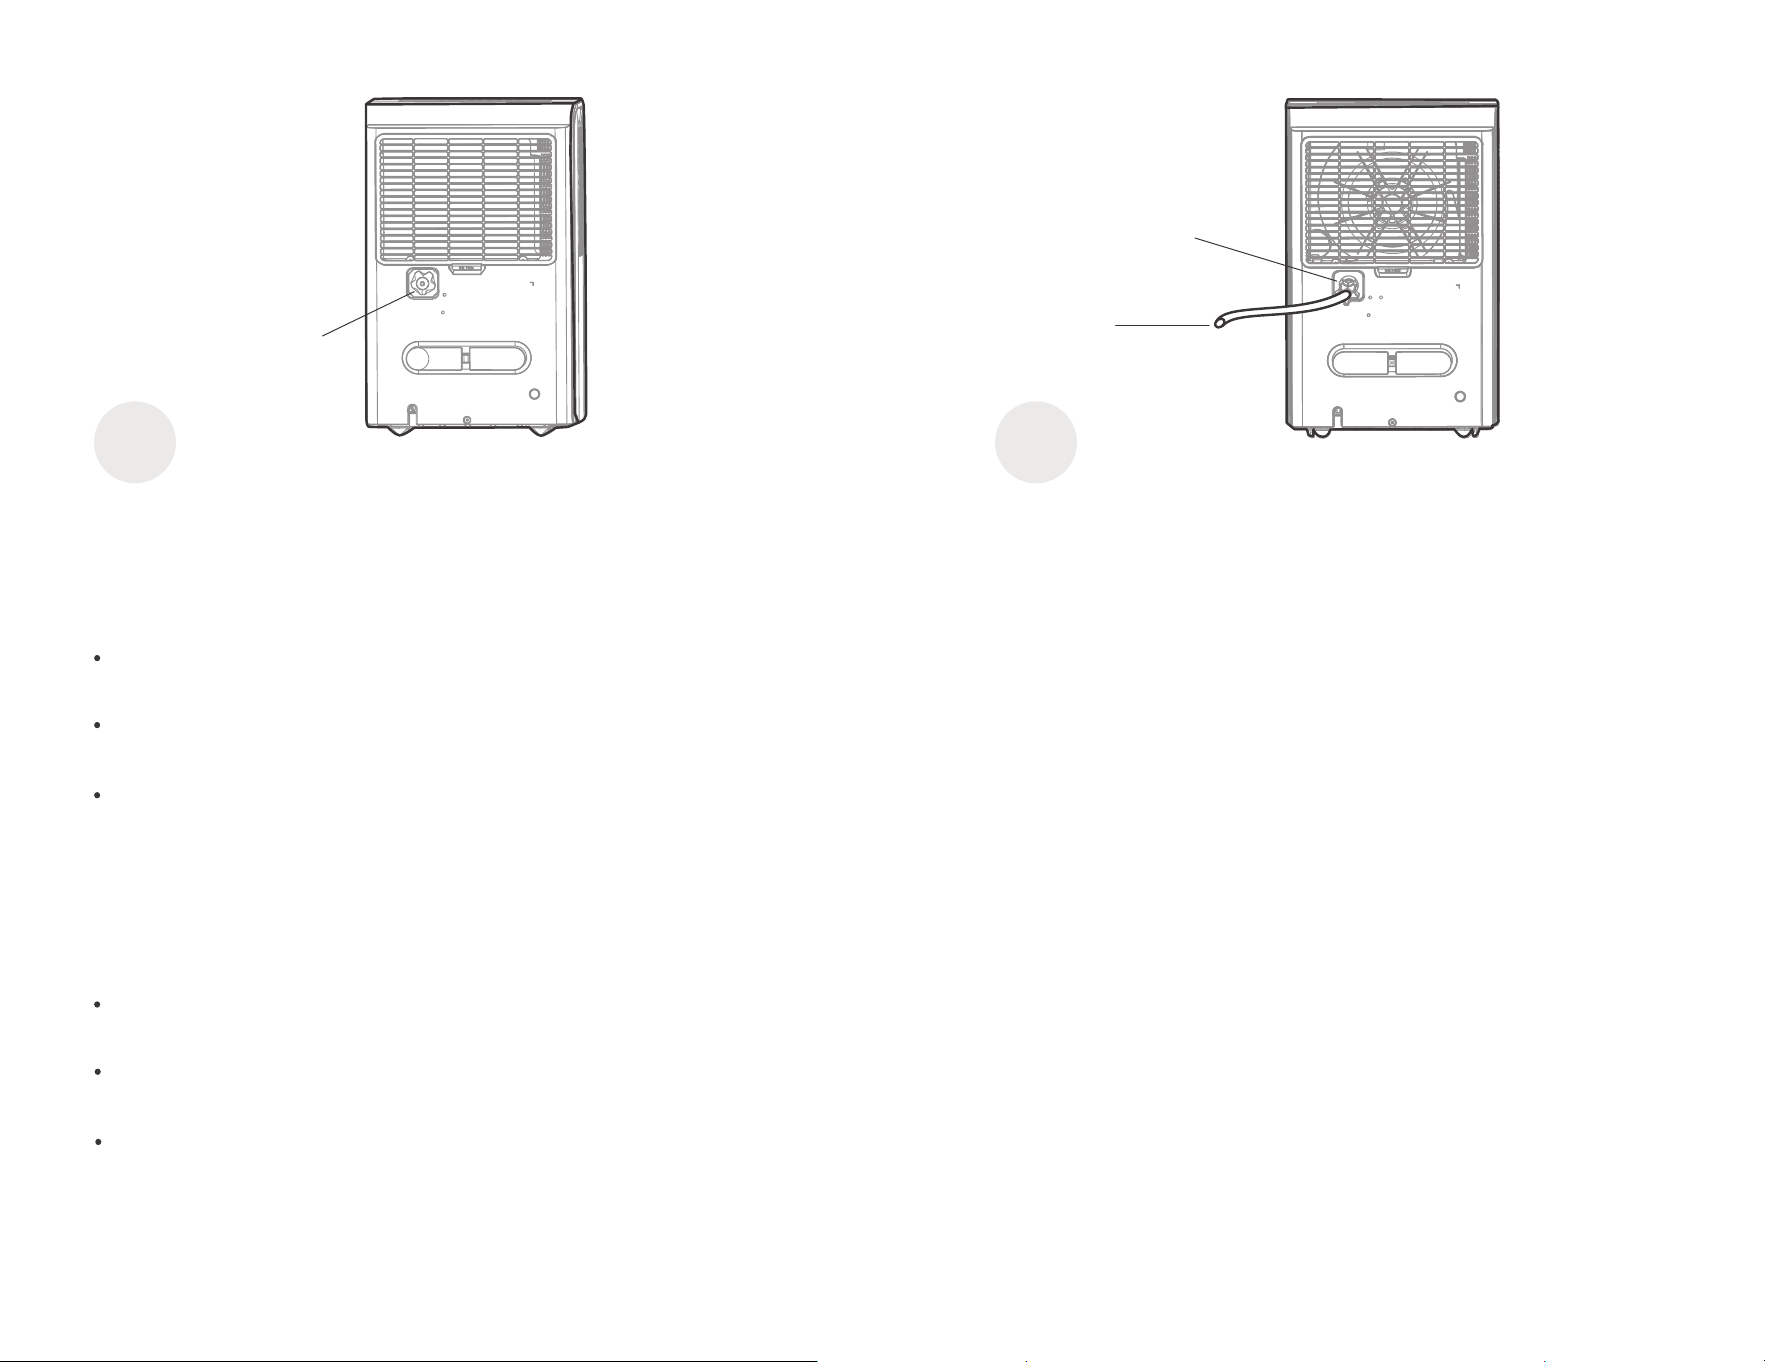
13
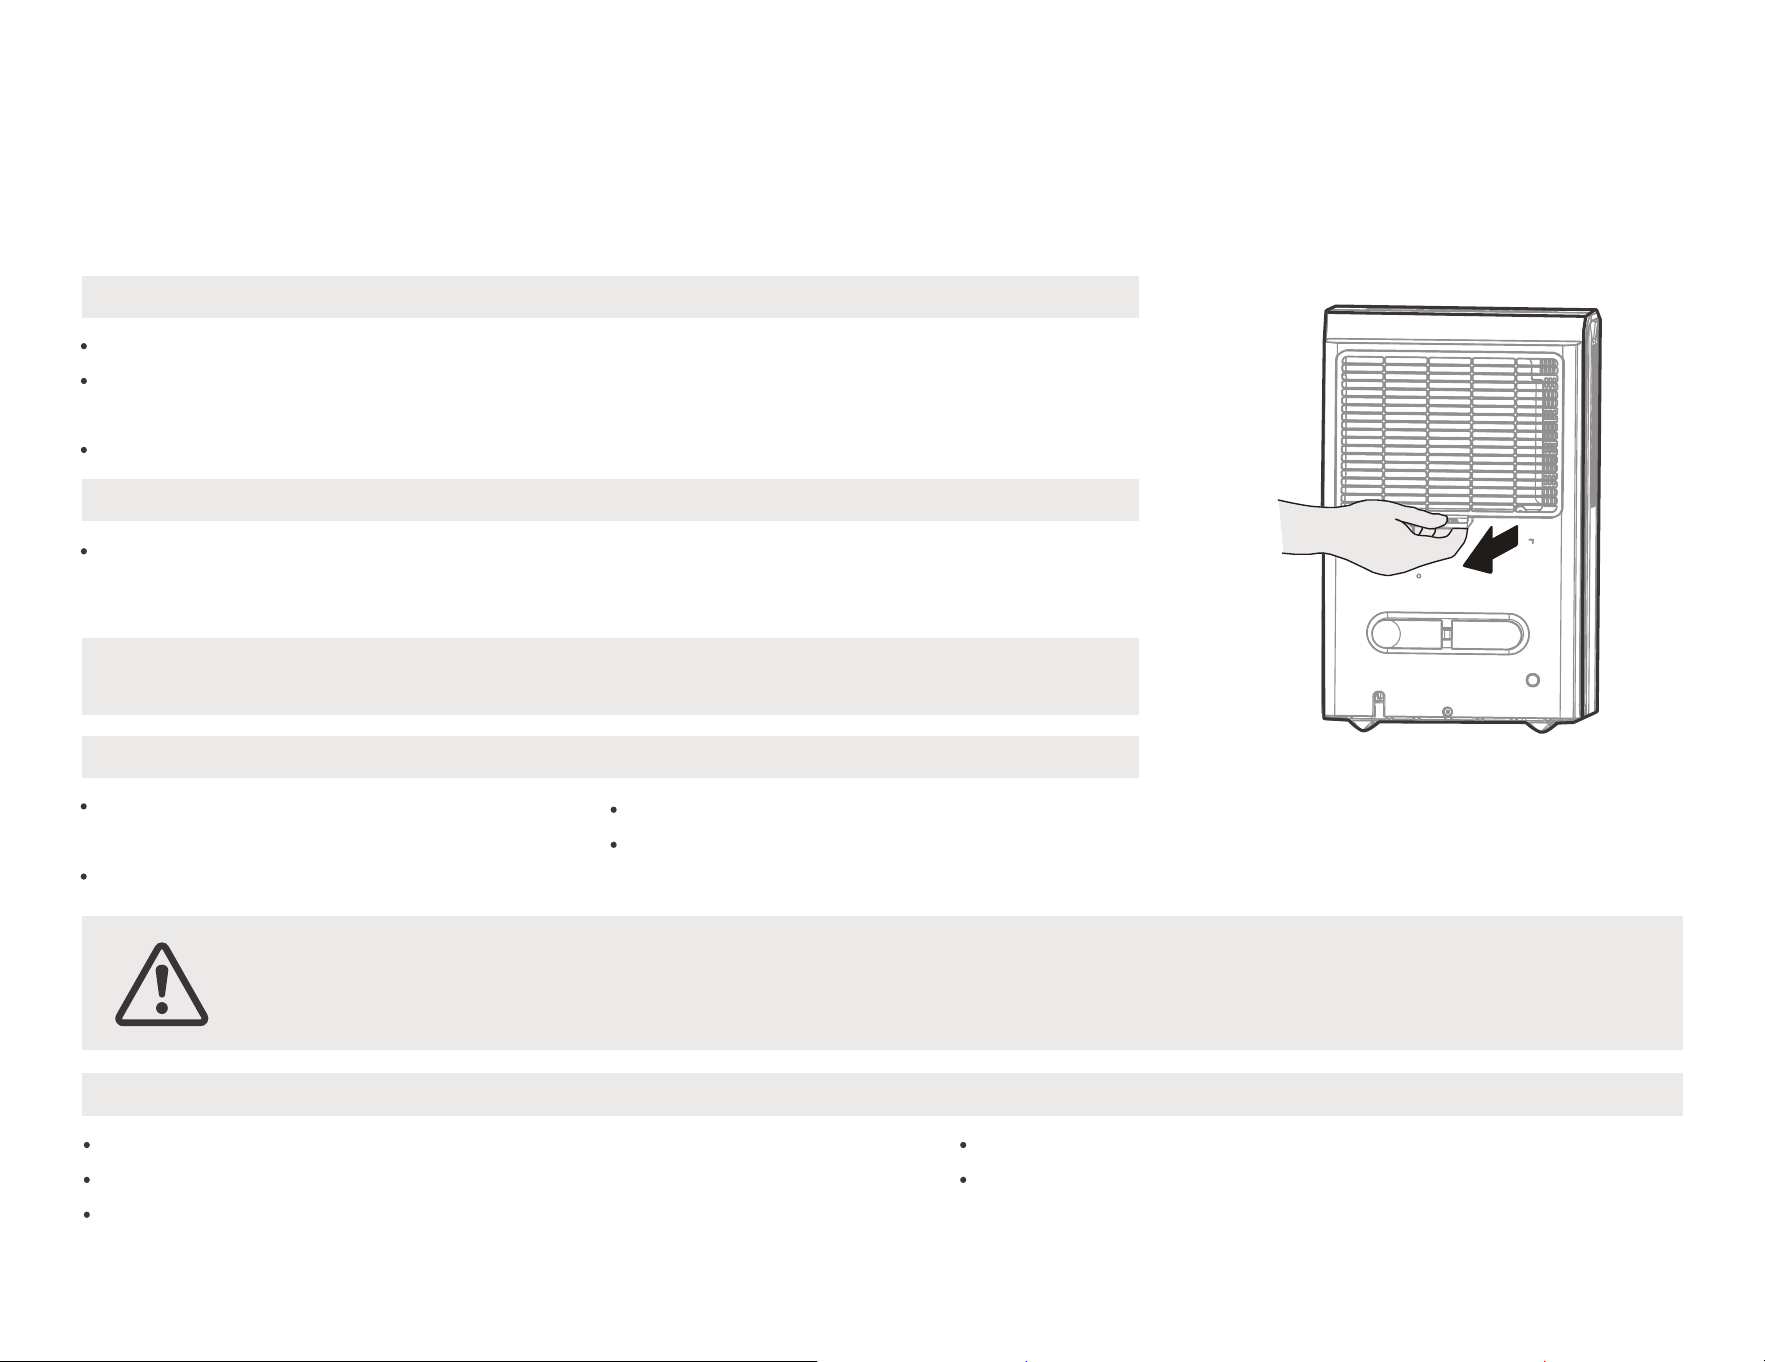
Water can be automatically emptied into a floor drain or a suitable drainage facility by attaching the pump drain outlet with a
pump drain hose(Φod=1/4", supplied).
Remove the continuous drain hose from the unit and install the plastic cover to the continuous drain hose outlet of the unit by
clockwise rotation.
Resert the pump drain hose into the pump drain hose outlet for depth of 15mm at least, then lead the water hose to the floor drain
or a suitable drainage facility.
plastic cover
Drain hose
Female threaded end
When you remove the plastic cover, if there is some water in the back drain outlet of the unit you must dry it. Make sure the hose is
secure so there are no leaks and the end of the hose is level or down to let the water flow smoothely.
Direct the hose toward the drain, making sure that there are no kinks that will stop the water flowing. Make sure the water hose is
lower than the drain hose outlet of the unit.
Select the desired humidity setting and fan speed on the unit for continuous draining to start.
Remove the plastic cover
by couter-clockwise rotation.
Install the Female threaded end
and connect the drain hose.
Note: When the continuous draining feature is not being used, remove the drain hose from the outlet, and dry the water in the
continuous drain hose outlet.
1
2
Type 3
Pump drainage (Pump model only)
14
Press the pump pad of the unit to activated the pump operation. When the bucket is full the pump starts to work.
Note:
The pump may cause big noise when it starts to work for 3~5 minutes. It is a normal phenomenon.
Make sure the hose is secure so there are no leaks.
Direct the hose toward the drain, making sure that there are no kinks that will stop the water flowing.
Place the end of the hose into the drain and make sure the end of the hose is level or down to let the water flow smoothly. Do never let it up.
select the desired humidity setting and fan speed on the unit for pump draining to start.
Note:
The pump operation on light blinks at 1Hz when the pump is operational failure. Please turn o the unit and plug the power cord out. Check the
following things: Cleaning the filter of the pump.-Remove the bucket from the unit, take down the pump and clean the filter of the pump.
Check that the pump drain hose does not link or back.
Empty the water of the bucket.
Reinstall the pump hose if it drops and reinstall the bucket properly. Turn on the unit. If the error repeats, call for service.
Note:
Do not use this operation when the outdoor temperature is equal to or less than 0 °C (32°F),
otherwise water is become ice that will cause the water hose blocked up and the unit failure. Make sure to empty the bucket once a week when using the
pump draining feature. When the pump draining feature is not being used, remove the pump drain hose from the outlet.
Press the pump drain hose outlet in and take the pump drain hose out from it. Make sure do not let the water in the pump hose drip to the floor.
Pump
drain hose
Pump drain
hose outlet
Reinstall the
plastic cover
Filter of the pump
Reinstall the plastic cover and
install the pump drain hose.
Clean the filter pump after you have
used the pump function several times.
1
2
15
Clean the Grille and Case
Care and Maintenance
Use water and a mild detergent. Do not use bleach or abrasives.
Do not splash water directly onto the main unit. Doing so may cause an electrical shock,
cause the insulation to deteriorate, or cause the unit to rust.
The air intake and outlet grilles get soiled easily, so use a vacuum attachment or brush to clean.
Care and cleaning of the dehumidifier Turn the dehumidifier o and remove the plug
from the wall outlet before cleaning.
Every few weeks, clean the bucket to prevent growth of mold, mildew and bacteria.
Partially fill the bucket with clean water and add a little mild detergent. Swish it around in the
bucket, empty and rinse.
Note: Do not use a dishwasher to clean the bucket. After clean, the bucket must be in place
and securely seated for the dehumidifier to operate.
Cover the unit with a plastic bag.
Store the unit upright in a dry, well-ventilated place.
CAUTION
DO NOT operate the dehumidifier without a filter because dirt and lint will clog it and reduce performance.
Clean the bucket
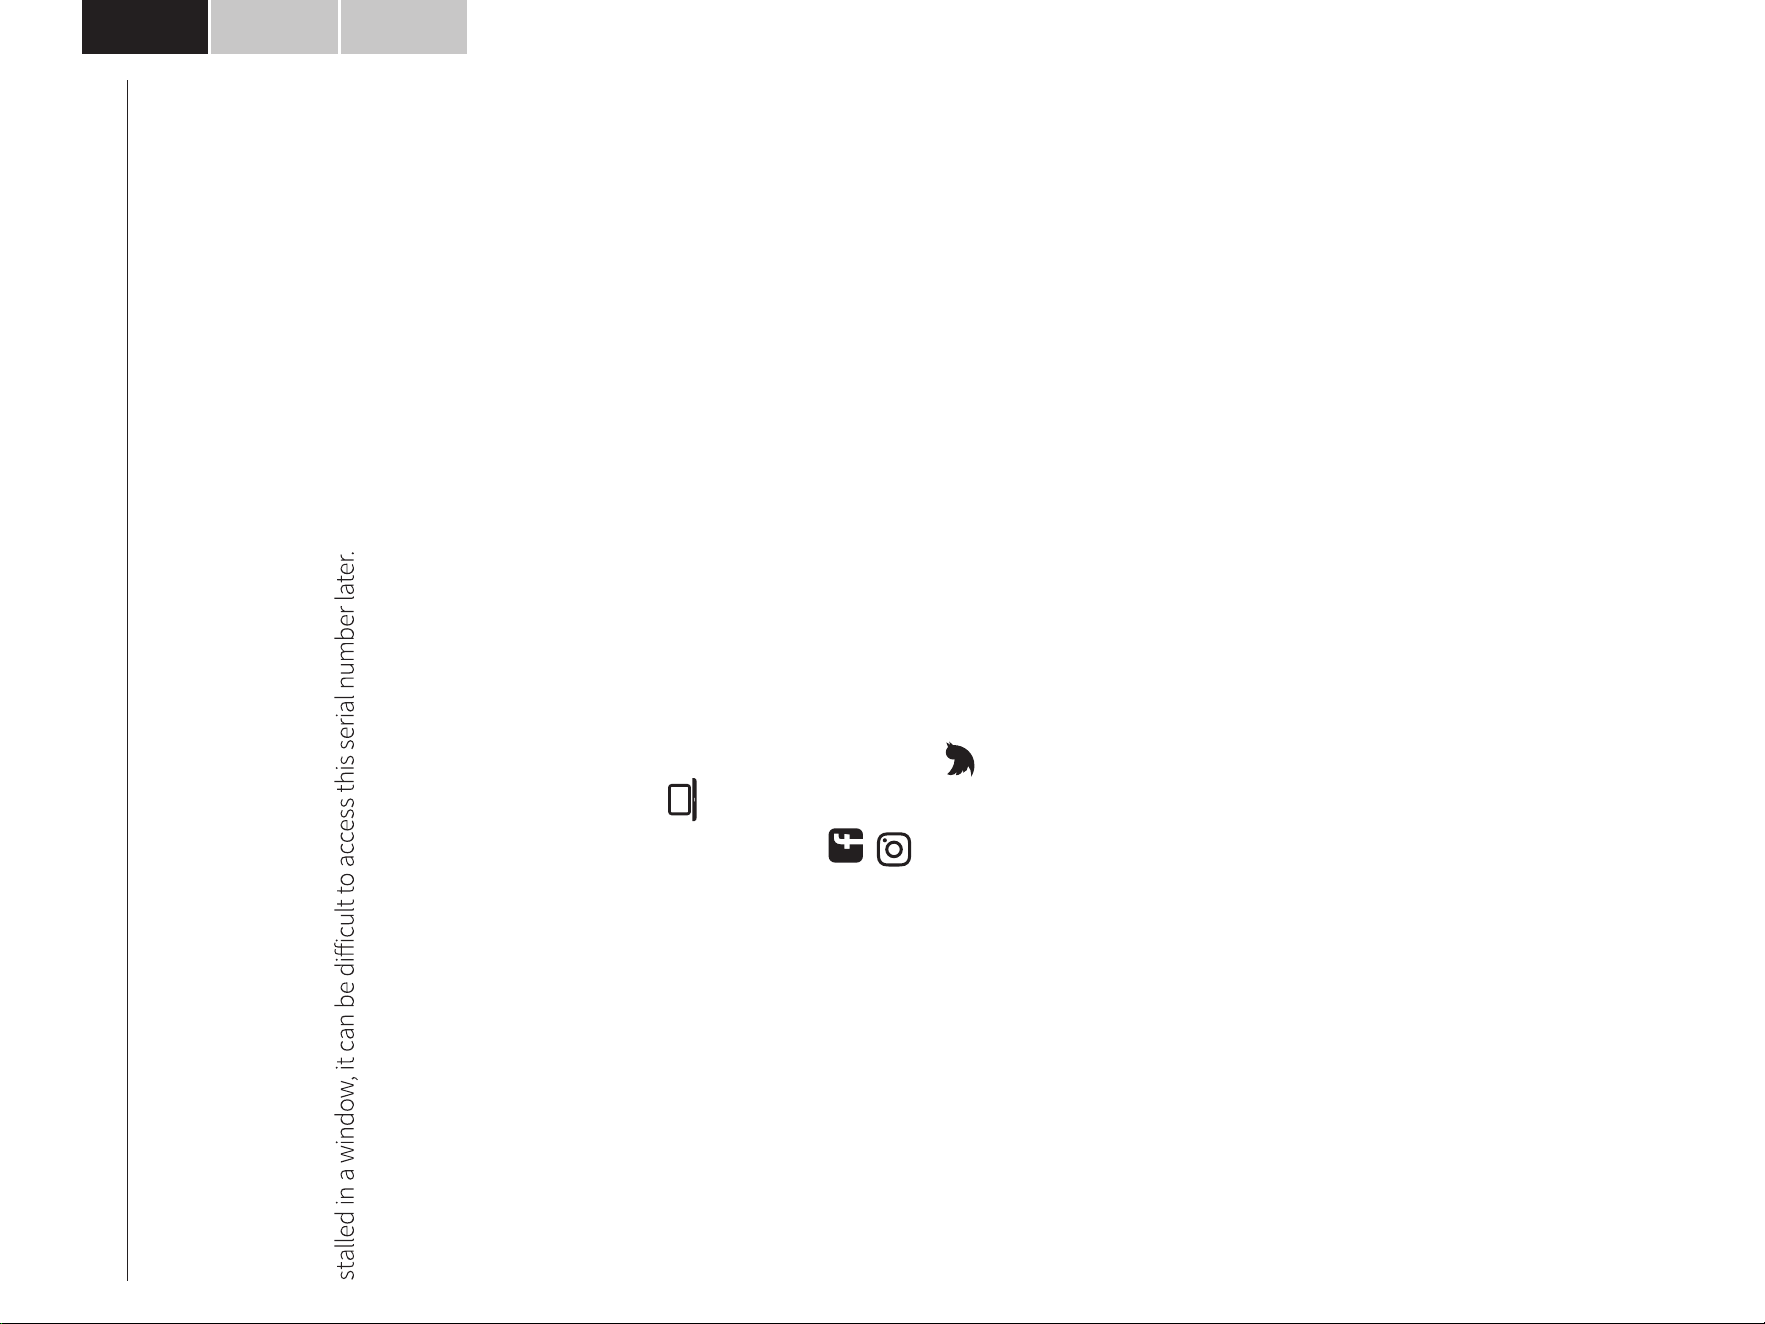
Remove the filter every two weeks based
on normal operating conditions.
To remove the filter, pull filter outwards.
Wash the filter with clean water then dry.
Re-install the filter, replace Bucket.
Clean the air filter
After turning o the unit, wait one day before emptying the bucket.
Clean the main unit, water bucket and air filter.
Wrap the cord with the power cord buckle.
When not using the unit for long time periods
How to clean & maintenance your product.

16
Problem What to check
Before calling for service, review the chart below first yourself.
Unit does not start
Make sure the dehumidifier s plug is pushed completely into the outlet.
Check the house fuse/circuit breaker box.
Dehumidifier has reached its preset level or bucket is full.
Water bucket is not in the proper position.
The air filter is clogged.
The unit is tilted instead of upright as it should be.
The floor surface is not level.
Clean the filter of the pump.
Check the pump hose does not link or block.
Empty the water of the bucket.
Hose to connector or hose connection may be loose.
Intend to use the bucket to collect water, but the back drain plug is removed.
This is normal. The dehumidifier has Auto defrost feature.
These are error codes and protection codes. See the CONTROL PANEL FEATURES section.
Did not allow enough time to remove the moisture.
Make sure there are no curtains, blinds or furniture blocking the front or back of the dehumidifier.
The humidity control may not be set low enough.
Check that all doors, windows and other openings are securely closed.
Room temperature is too low , below 5°C(41°F).
There is a kerosene heater or something giving o water vapor in the room.
Dehumidifier does not
dry the air as it should
The unit makes a loud
noise when operating
Frost appears on the coils
Water on floor
ES, AS,P2,Eb appear in
the display
The pump operation on
light blinks at 1Hz
Troubleshooting

The design and specifications are subject to change without prior notice for product improvement. Consult with the sales agency or manufacturer
for details. Any updates to the manual will be uploaded to the service website, please check for the latest version.
24
ENGLISHESPAÑOLFRANÇAIS
CUSTOMER SUPPORT
Before contacting customer support, please see the troubleshooting guide above.
Upon unpacking your air conditioner, please be sure to write down the model and serial number of your unit. This
will be needed should your unit require servicing in the future. The number is found on a barcode on the right side
of the air conditioner and on a similar barcode on the outside of the box the unit came in.
We recommend holding onto the box, but as many people do throw it away, and the air conditioner itself gets in -
Model number: __________________ (One of the numbers mentioned on the cover of this manual). Your exact
number is found on your box or on the rating label sticker on the right side of the unit.
Serial number (11 digits) __________________
Please keep this manual for your records!
Visit our website to contact us, find answers to Frequently Asked Questions, and for other resources which may
include an updated version of this userʼs guide.
WWW.IMPECCA.COM
If you wish to contact us by phone, please be sure to have your model number and serial number ready and call us
between 9:00am and 5:00pm ET, at +1 866-954-4440.
Keep tabs on Impeccaʼs newest innovations & enter contests via our social network feeds:
www.facebook.com/Impecca/
www.instagram.com/impecca/
@impeccausa
© 2017 Impecca, a division of LT Inc., Wilkes Barre, PA
25
ENGLISH ESPAÑOL FRANÇAIS
Impecca™ warrants this product against defects in materi-
al and workmanship to the original purchaser as specified
below.
PARTS AND LABOR– if the product is determined to
have a manufacturing defect, within a period of one
year from the date of the original purchase, Impec-
ca™, at its own discretion, will repair or replace the
product parts at no charge to you in the U.S.A.
To obtain warranty service by an authorized Impecca™ ser-
vice center, please email us at: service@impecca.com to ob -
tain a Repair and Maintenance Authorization (RMA) number
and received instructions on how the repair and/or replace-
ment procedure will take place.
Any glass materials included with the appliance will
be covered for a period of 60 days from purchase.
Impecca™ specifically excludes from
this warranty any
non-electric/mechanical attachments, accessories and
disposable parts including but not limited to outside case,
connecting cables, batteries and AC adapters. Impecca™ re-
serves the right to repair or replace defective products with
the same, equivalent or newer models.
We reserve the right to either repair or replace product at our
discretion. Replacement may be either new or refurbished
and while every endeavor will be made to ensure it is the
same model, if not possible it will be equal or higher spec-
ification.
Normal “Wear and Tear” is not covered by this warranty. Fur-
ther, Impecca™ hereby reserves the right to determine “Wear
and Tear” on
any and all products. Tampering or opening the
product casting or shell will void this warranty in its entirety.
Exclusions: This warranty does not cover the following:
1. Any product that has a defaced or covered serial num-
ber.
2. Products that have been transferred to a second owner.
3. Rust on the interior or exterior of the unit.
4. Products listed as “As-Is” or “Refurbished.”
5. Food loss due to any product failure.
6. Window air conditioners installed in a wall.
7. The product if used in a commercial setting.
8. Service calls that do not involve product malfunction.
9. Service calls for a product ruined by not following the
provided instructions.
10. Service calls to correct improper installation.
11. Costs associated with making the product accessible
for servicing (including but not limited to removal of
trim/molding/cabinetry, etc.)
12. Service calls to replace any consumables such as light
bulbs, filters, etc.
13.
Surcharges that may apply to service calls on weekends,
nights, holidays. Damages to the finish of appliance or
household furnishings due to installation of appliance.
14. Damages caused by any of the following: Acts of God;
fires; misuse; accidents; incorrect power supply; service
performed by unauthorized persons; use of non-genu-
ine Impecca parts, etc.
ALL IMPLIED WARRANTIES, INCLUDING IMPLIED WARRAN-
TIES OF MERCHANTABILITY AND FITNESS FOR A PARTICULAR
PURPOSE ARE LIMITED IN DURATION TO 1 YEAR FROM THE
DATE OF THE ORIGINAL RETAIL PURCHASE OF THIS PROD-
UCT.
THESE WARRANTIES AND REMEDIES ARE THE SOLE AND EX-
CLUSIVE WARRANTIES AND REMEDIES IN CONNECTION WITH
THE SALE AND USE OF THE PRODUCT. NO OTHER WARRAN-
TIES, ORAL OR WRITTEN, EXPRESSED OR IMPLIED, ARE GIV-
EN.
IMPECCA™ IS NOT RESPONSIBLE OR LIABLE FOR ANY DAM-
AGE, WHETHER SPECIAL, INCIDENTAL,
CONSEQUENTIAL,
DIRECT OR OTHERWISE, OR WHETHER KNOWN OR SHOULD
HAVE BEEN KNOWN TO IMPECCA™, INCLUDING LOST PROF-
ITS, GOODWILL, AND PROPERTY AND PERSONAL INJURY RE-
SULTING FROM ANY BREACH OF WARRANTY, THE INABILITY
TO USE THE PRODUCT OR UNDER ANY LEGAL THEORY IN
CONTRACT OR TORT. IMPECCA LIABILITY IS LIMITED TO THE
ACTUAL PURCHASE PRICE PAID TO THE RETAIL SELLER OF
THE DEFECTIVE PRODUCT.
No Impecca™ dealer, agent or employee is authorized to
make any modification, extension, change or amendment to
this warranty without the written consent and authorization
from Impecca™.
Some states do not allow the exclusion or limitation of im-
plied warranties or liability for incidental or consequential
damages, or do not allow a limitation on how long an im-
plied warranty lasts, so the
above limitations or exclusions
may not apply to you. This warranty gives you specific legal
rights, and you have other rights, which vary from state to
state.
Note: Our Warranty center services only to Continental U.S.A.
ONE-YEAR LIMITED APPLIANCE WARRANTY (US)
26
ENGLISHESPAÑOLFRANÇAIS
Impecca™ garantiza al comprador original este producto contra
defectos en su material y mano de obra como se especifica a con-
tinuación.
PARTES Y MANO DE OBRA– Si se determina que el pro-
ducto tiene defectos de fabricación, dentro del periodo
de un (1) año a partir de la fecha de compra original,
Impecca™, a su discreción, reparará o reemplazara las
partes del producto sin ningún costo para usted en los
Estados Unidos.
Para obtener el servicio de garantía de un distribuidor autorizado
de Impecca™ envíenos un correo electrónico a: ser
vice@impecca.
com para obtener un número de Autorización de Reparación y
Mantenimiento (RAM) y recibir las instrucciones de cómo se llevará
a cabo el procedimiento de reparación o reemplazo.
Cualquier material de vidrio incluido en el electrodomés-
tico estará cubierto por un periodo de sesenta (60) días a
partir de la fecha de compra.
Impecca™ excluye de esta garantía accesorios no eléctricos o
mecánicos, accesorios y partes desechables incluyendo, pero no
limitado, a la carcaza, cables de conexión, baterías, adaptadores
A/C. Impecca
™ se reserva el derecho de reparar o reemplazar un
producto defectuoso con un modelo igual, equivalente o nuevo
modelo.
Nos reservamos el derecho ya sea de reparar o reemplazar el
producto a nuestra discreción. El reemplazo puede ser nuevo o
reacondicionado tratando de asegurar de que se trate del mismo
modelo, si el mismo modelo no está disponible, se reemplazará
con un modelo de especificaciones iguales o superiores.
El “desgaste” normal no está cubierto por esta ni por ninguna
otra garantía. Adicionalment
e, Impecca™ se reserva el derecho de
determinar el “desgaste” de cualquiera o todos los productos. El
violar o abrir el chasis del producto invalidará esta garantía por
completo.
Excepciones: Esta garantía no cubre lo siguiente:
1. Cualquier producto que tenga un número de serie defectuo-
sos o cubierto
2. Productos que han sido transferidos a un segundo propieta-
rio
3. Óxido en la parte interna o externa de la unidad
4. Los productos listados como “Tal cual” o “Reformados”
5. Pérdida de alimentos debido a la falla del producto
6. Aires acondicionados que han sido instalados en un muro.
7. El producto si este ha sido utilizado en una ubicación comer-
cial
8. Llamadas de servicio que no involucren el mal funciona-
miento del producto
9. Llamadas de servicio de un producto estropeado por no se-
guir las instrucciones proporcionadas
10. Llamadas de servicio para corregir una instalación incorrecta
11. Costos asociados por hacer el producto accesible al servicio
(incluido pero no limitado a la remoción de ajustes/moldeo/
gabinete, etc.)
12. Llamadas de servicio para reemplazar consumibles como
bombillas, filtros, etc.
13. Recargos que pueden
aplicar a llamadas de servicio los fines
de semana, por las noches, o durante las festividades. Daños
al acabado del electrodoméstico o muebles de la casa debi-
do a la instalación del electrodoméstico.
14. Daños causados por cualquiera de las siguientes causas:
Actos de Dios, incendios, mal uso. accidentes, suministro de
energía incorrecto, servicio realizado por personal no autori-
zado, el uso de partes no originales Impecca.
TODAS LAS GARANTÍAS IMPLÍCITAS, INCLUYENDO LAS GARANTÍAS
IMPLÍCITAS DE MERCADOTECNIA E IDONEIDAD PARA UN PROPÓ
-
SITO EN PARTICULAR ESTÁN LIMITADAS A UNA DURACIÓN DE (1)
AÑO EN PARTES Y NOVENTA (90) DÍAS EN MANO DE OBRA DESDE
LA FECHA ORIGINAL DE COMPRA DEL PRODUCTO.
ESTAS GARANTÍAS Y MEDIDAS SON ÚNICAS Y EXCLUSIVAS EN RE-
LACIÓN CON LA VENTA Y USO DEL PRODUCTO. NO SE OTORGA
NINGUNA OTRA GARANTÍA, ORAL O ESCRITA, EN FORMA EXPRESA
O IMPLÍCITA.
IMPECCA™ NO SE HACE RESPONSABLE DE NINGÚN DAÑO, YA
SEA ESPECIAL, INCIDENTAL, CONSECUENTE, DIRECTO O DE
CUALQUIER OTRA NATURALEZA, YA SEA CONOCIDO O POR DAR
A CONOCER A IMPECCA™, INCLUYENDO LA PÉRDIDA DE GANAN-
CIAS,
PLUSVALÍA, DAÑOS PERSONALES O EN LA PROPIEDAD RE-
SULTANTES DE CUALQUIER INCUMPLIMIENTO DE LA GARANTÍA,
LA INCAPACIDAD DE UTILIZAR EL PRODUCTO O BAJO NINGUNA
TEORÍA LEGAL EN CONTRATO O AGRAVIO. LA RESPONSABILIDAD
DE IMPECCA SE LIMITA AL PRECIO ACTUAL DE COMPRA PAGADO AL
VENDEDOR DEL PRODUCTO DEFECTUOSO.
Ningún distribuidor, agente o empleado de Impecca™ está au-
torizado para hacer ninguna modificación, extensión, cambio o
enmienda de esta garantía sin el consentimiento y autorización
escrita de Impecca™.
Algunos estados no permiten la exclusión o
limitación de garan-
tías implícitas o la responsabilidad por daños incidentales o con-
secuentes, y no permiten una limitación en la duración de una
garantía implícita, de modo que las anteriores limitaciones o ex-
clusiones pueden no aplicarse a usted. Esta garantía le otorga de-
rechos específicos, y puede usted tener otros derechos, los cuales
varían de estado a estado.
Nota: El Centro de Servicio de Garantía hace envíos solo dentro del
territorio continental de E.U.
GARANTÍA LIMITADA POR UN AÑO
27
ENGLISH ESPAÑOL FRANÇAIS
Impecca™ garantie auprès de lʼacheteur original cet appareil
contre toutes défectuosités liées au matériel et à la fabrication
tel que spécifié ci-dessous.
PIÈCES ET MAIN DʼŒUVRE- Sʼil est déterminé que lʼappa-
reil a un problème lié à la fabrication, à lʼintérieur dʼune
période dʼun an de la date dʼachat originale, Impecca™,
à sa discrétion, pourra remplacer ou réparer les pièces
de lʼappareil sans frais pour vous aux États-Unis.
Afin dʼobtenir des services sous garantie par un fournisseur auto-
risé par le centre de service dʼImpecca™, veuillez nous rejoindre
par courri
el : service@impecca.com afin dʼobtenir un numéro
dʼautorisation dʼentretien et réparation (Repair and Maintenance
Authorization – RMA). Vous recevrez également des détails liés au
processus de réparation et/ou remplacement.
Tout matériau en vitre inclus avec lʼappareil est cou-
vert par une garantie de 60 jours à compter de la date
dʼachat (lorsque applicable).
Impecca™ exclus spécifiquement de cette garantie tout attache-
ment non électrique / mécanique, accessoires ou pièce jetable
incluant, mais non limité au boîtier externe, les câbles connec-
teurs, les piles et les adaptateurs secteurs
. Impecca™ se réserve
le droit de réparer ou remplacer les appareils défectueux par un
modèle pareil, équivalent ou plus récent.
Nous nous réservons le droit de réparer ou de remplacer lʼap-
pareil à notre discrétion. Le remplacement pourrait être par un
mis de lʼavant pour assurer quʼil sʼagisse du même modèle, sʼil
sʼavère impossible, le remplacement sera de qualité similaire ou
supérieure.
Lʼusure normale de lʼappareil nʼest pas couverte par cette garan-
tie. Impecca™ se réserve le droit de déterminer le niveau dʼusure
sur lʼensemble de ses appareils. Ouvrir le boîtier ou modifier
lʼappareil annule dans son entièreté la présente garantie.
Exclusions : la garantie présente exclut les points suivants :
1.
illisible.
2. Tout appareil transféré à un second propriétaire.
3. La rouille formée à lʼintérieur ou à lʼextérieur de lʼunité.
4. Les appareils marqués « Tel quel » ou « Remis à neuf ».
5. Pertes dʼaliments dus à un mauvais fonctionnement de
lʼappareil.
6. Climatiseur à fenêtre installés au mur.
7. Si lʼappareil est utilisé à des fins commerciales.
8. Appels de service qui ne sont pas en lien avec un mal fonc-
tionnement de lʼappareil.
9. Appels de service pour un appareil endommagé suite au
non-respect des instructions fournies.
10. Appels de service liés à une installation défectueuse.
11. Coûts entraînés à rendr
e lʼappareil accessible pour lʼentre-
tien (incluant, mais non limité à lʼenlèvement de moulures,
plinthes, armoires, etc.)
12. Appels de service pour le remplacement de pièces consom-
mables tels que des ampoules, filtres, etc.
13. Des frais additionnels peuvent sʼappliquer aux appels de
service en soirée, en fin de semaine, les jours fériés. Des
dommages à la finition de lʼappareil ou à des ameublements
suite à lʼinstallation de lʼappareil.
14. Dommages causés par : des circonstances exceptionnelles;
incendie; mauvaise utilisation; accident; alimentation
non autorisée; utilisation de pièces non dʼorigine dʼImpecca,
etc.
TOUTE GARANTIE IMPLICITE, Y COMPRIS LES GARANTIES DE QUA-
LITÉ MARCHANDE ET DʼADAPTATION À UN USAGE PARTICULIER
EST LIMITÉ POUR UNE DURÉE DE 1 AN À COMPTER DE LA DATE DE
LʼACHAT ORIGINAL DE CE PRODUIT.
CES GARANTIES ET RECOURS DEMEURENT EXCLUSIFS À LA
VENTE ET LʼUTILISATION DE CE PRODUIT. AUCUNE AUTRE GARAN-
TIE, ORALE OU ÉCRITE, EXPLICITE OU IMPLICITE, NE SERA ÉMISE.
IMPECCA™ NE PEUT PAS ÊTRE TENU RESPONSABLE POUR DES
DOMMAGES SPÉCIAUX, ACCIDENTELS, CONSÉQUENTS, DIRECTS
OU AUTRES CONNUS OU QUI AURAIENT PU ÊTRE COMMUNIQUÉS
À IMPECCA™, Y COMPRIS LA PERTE DE PROFITS, DE BIENVEIL-
LANCE, DE BIENS ET DE BLESSURES RÉSULTANT DʼUNE VIOLA-
TION DE LA GARANTIE, LʼINCAPACITÉ DʼUTILISER LE PRODUIT OU
EN VERTU DE TOUTE THÉORIE JURIDIQUE EN CONTRAT OU DÉLIT.
LA RESPONSABILITÉ DʼIMPECCA EST LIMITÉE AU PR
IX DʼACHAT
PAYÉ AU VENDEUR EN DÉTAIL DU PRODUIT DÉFECTUEUX.
Aucun revendeur, agent ou employé dʼImpecca™ nʼest autorisé
un amendement de cette garantie sans le consentement écrit et
lʼautorisation dʼImpecca™.
Certains états ne permettent pas lʼexclusion ou la limitation
des garanties implicites ou de responsabilité en lien avec des
dommages accidentels or des dommages conséquents ou ne
permettent pas une limitation sur la durée de la garantie impli-
cite. Donc, les limitations ou exclusions ci-dessus peuvent ne pas
sʼappliquer à vous. Cette garantie vous donne des droits légaux
spécifiques et vous détenez dʼautres droits, qui peuvent varier
dʼétat en état.
-
ment quʼaux États-Unis continentaux.
GARANTIE LIMITÉE DʼUN AN