Operating / Safety Instructions
Consignes d’utilisation / de sécurité
Instrucciones de funcionamiento y seguridad
Call Toll Free for Consumer Information & Service Locations
Pour obtenir des informations et les adresses de nos centres de service après-vente, appelez ce numéro gratuit
Llame gratis para obtener información para el consumidor y ubicaciones de servicio
For English Version
See page 2
●
Version française
Voir page 16
●
Versión en español
Ver la página 30
IMPORTANT
Read Before Using
●
IMPORTANT
Lire avant usage
●
IMPORTANTE
Leer antes de usar
1-877-BOSCH99 (1-877-267-2499) www.boschtools.com
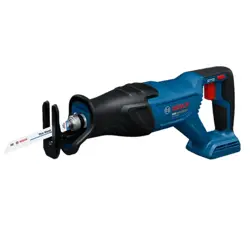
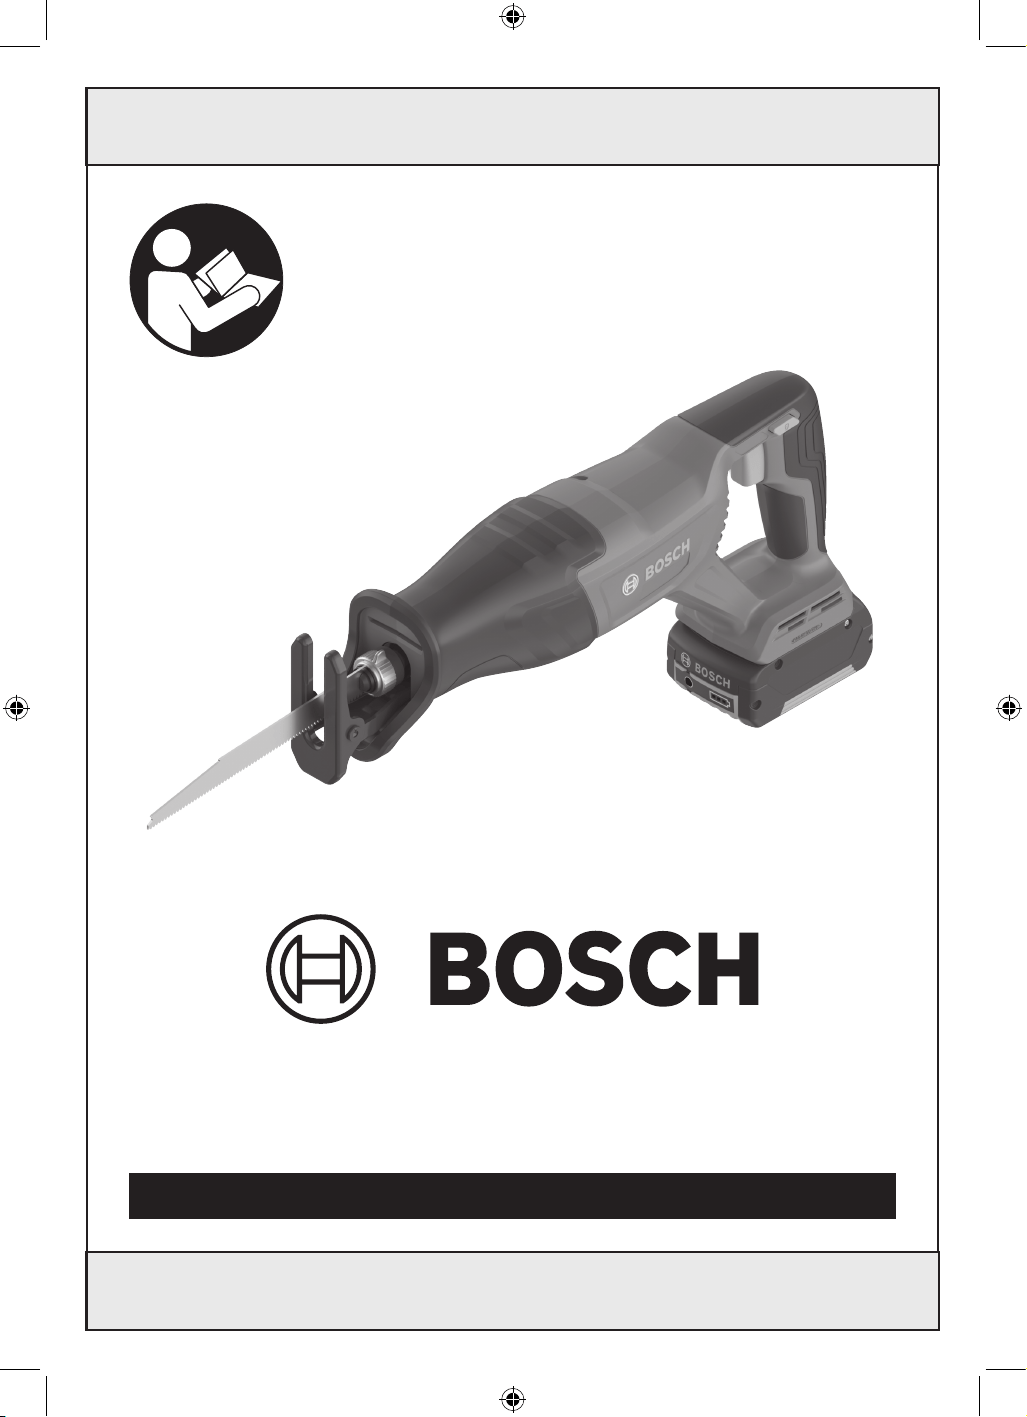
GSA18V-280
GSA18V-280.indd 1GSA18V-280.indd 1 11/13/2025 2:11:43 PM11/13/2025 2:11:43 PM
2
Safety Symbols
The definitions below describe the level of severity for each signal word.
Please read the manual and pay attention to these symbols.
This is the safety alert symbol. It is used to alert you to potential
personal injury hazards. Obey all safety messages that follow this
symbol to avoid possible injury or death.
DANGER indicates a hazardous situation which, if not avoided, will
result in death or serious injury.
WARNING indicates a hazardous situation which, if not avoided,
could result in death or serious injury.
CAUTION indicates a hazardous situation which, if not avoided,
could result in minor or moderate injury.
Table of Contents
SAVE THESE INSTRUCTIONS
General Power Tool Safety Warnings ......3
Safety instructions for
Reciprocating Saws ................5
Additional Safety Warnings .............5
Disposal.........................6
Intended Use ........................7
Specications .......................7
Symbols............................8
Getting to Know Your GSA18V-280
Reciprocating Saw .................9
Assembly ..........................10
Blade Selection .................. 10
Installing and Removing a Blade ...... 10
Inserting and Releasing
the Battery Pack ...............11
Operation .........................12
Protection Against Deep
Discharging ................... 12
Trigger Switch Lock................12
Variable Speed Trigger Switch........12
Using the Saw ...................12
Sawing Tips .....................13
Pocket/Plunge Cuts ...............14
Maintenance .......................15
General Maintenance ..............15
Cleaning........................ 15
Service ......................... 15
Tool Lubrication.................. 15
Motors . . . . . . . . . . . . . . . . . . . . . . . . . 15
Batteries........................15
Blade Holder Maintenance .......... 15
Accessories ........................ 15
GSA18V-280.indd 2GSA18V-280.indd 2 11/13/2025 2:11:44 PM11/13/2025 2:11:44 PM
3
General Power Tool Safety Warnings
Read all safety warnings, instructions, illustrations and specications pro-
vided with this power tool. Failure to follow all instructions listed below may
result in electric shock, re and/or serious injury.
SAVE ALL WARNINGS AND INSTRUCTIONS FOR FUTURE REFERENCE.
The term "power tool" in the warnings refers to your mains-operated (corded) power tool or bat-
tery operated (cordless) power tool
1. Work area safety
a. Keep work area clean and well lit. Clut-
tered or dark areas invite accidents.
b. Do not operate power tools in explosive
atmospheres, such as in the presence of
ammable liquids, gases or dust. Power
tools create sparks which may ignite the
dust or fumes.
c. Keep children and bystanders away while
operating a power tool. Distractions can
cause you to lose control.
2. Electrical safety
a. Power tool plugs must match the outlet.
Never modify the plug in any way. Do
not use any adapter plugs with earthed
(grounded) power tools. Unmodied plugs
and matching outlets will reduce risk of
electric shock.
b. Avoid body contact with earthed or
grounded surfaces, such as pipes, radia-
tors, ranges and refrigerators. There is an
increased risk of electric shock if your body
is earthed or grounded.
c. Do not expose power tools to rain or wet
conditions. Water entering a power tool
will increase the risk of electric shock.
d. Do not abuse the cord. Never use the cord
for carrying, pulling or unplugging the
power tool. Keep cord away from heat,
oil, sharp edges or moving parts. Dam-
aged or entangled cords increase the risk of
electric shock.
e. When operating a power tool outdoors,
use an extension cord suitable for outdoor
use. Use of a cord suitable for outdoor use
reduces the risk of electric shock.
f. If operating a power tool in a damp loca-
tion is unavoidable, use a Ground Fault
Circuit Interrupter (GFCI) protected
supply. Use of an GFCI reduces the risk of
electric shock.
3. Personal safety
a. Stay alert, watch what you are doing and
use common sense when operating a
power tool. Do not use a power tool while
you are tired or under the inuence of
drugs, alcohol or medication. A moment
of inattention while operating power tools
may result in serious personal injury.
b. Use personal protective equipment.
Always wear eye protection. Protective
equipment such as a dust mask, non-skid
safety shoes, hard hat or hearing protection
used for appropriate conditions will reduce
personal injuries.
c. Prevent unintentional starting. Ensure the
switch is in the off-position before con-
necting to power source and/or battery
pack, picking up or carrying the tool. Car-
rying power tools with your nger on the
switch or energising power tools that have
the switch on invites accidents.
d. Remove any adjusting key or wrench be-
fore turning the power tool on. A wrench
or a key left attached to a rotating part
of the power tool may result in personal
injury.
e. Do not overreach. Keep proper footing
and balance at all times. This enables bet-
ter control of the power tool in unexpected
situations.
f. Dress properly. Do not wear loose cloth-
ing or jewellery. Keep your hair and
clothing away from moving parts. Loose
clothes, jewellery or long hair can be
caught in moving parts.
SAVE THESE INSTRUCTIONS
GSA18V-280.indd 3GSA18V-280.indd 3 11/13/2025 2:11:44 PM11/13/2025 2:11:44 PM

4
SAVE THESE INSTRUCTIONS
General Power Tool Safety Warnings
g. If devices are provided for the connec-
tion of dust extraction and collection
facilities, ensure these are connected and
properly used. Use of dust collection can
reduce dust-related hazards.
h. Do not let familiarity gained from fre-
quent use of tools allow you to become
complacent and ignore tool safety prin-
ciples. A careless action can cause severe
injury within a fraction of a second.
4. Power tool use and care
a. Do not force the power tool. Use the
correct power tool for your application.
The correct power tool will do the job bet-
ter and safer at the rate for which it was
designed.
b. Do not use the power tool if the switch
does not turn it on and off. Any power tool
that cannot be controlled with the switch is
dangerous and must be repaired.
c. Disconnect the plug from the power
source and/or remove the BATTERY pack,
if detachable, from the power tool before
making any adjustments, changing ac-
cessories, or storing power tools. Such
preventive safety measures reduce the risk
of starting the power tool accidentally.
d. Store idle power tools out of the reach
of children and do not allow persons
unfamiliar with the power tool or these
instructions to operate the power tool.
Power tools are dangerous in the hands of
untrained users.
e. Maintain power tools and accessories.
Check for misalignment or binding of
moving parts, breakage of parts and any
other condition that may affect the power
tool's operation. If damaged, have the
power tool repaired before use. Many
accidents are caused by poorly maintained
power tools.
f. Keep cutting tools sharp and clean. Prop-
erly maintained cutting tools with sharp
cutting edges are less likely to bind and are
easier to control.
g. Use the power tool, accessories and tool
bits etc. in accordance with these instruc-
tions, taking into account the working
conditions and the work to be performed.
Use of the power tool for operations differ-
ent from those intended could result in a
hazardous situation.
h. Keep handles and grasping surfaces dry,
clean and free from oil and grease. Slip-
pery handles and grasping surfaces do not
allow for safe handling and control of the
tool in unexpected situations.
5. Battery tool use and care
a. Recharge only with the charger specied
by the manufacturer. A charger that is
suitable for one type of battery pack may
create a risk of re when used with another
battery pack.
b. Use power tools only with specically
designated battery packs. Use of any other
battery packs may create a risk of injury
and re.
c. When battery pack is not in use, keep it
away from other metal objects like paper
clips, coins, keys, nails, screws, or other
small metal objects that can make a
connection from one terminal to another.
Shorting the battery terminals together may
cause burns or a re.
d. Under abusive conditions, liquid may be
ejected from the battery, avoid contact.
If contact accidentally occurs, ush with
water. If liquid contacts eyes, additionally
seek medical help. Liquid ejected from the
battery may cause irritation or burns.
e. Do not use a battery pack or tool that is
damaged or modied. Damaged or modi-
ed batteries may exhibit unpredictable
behavior resulting in re, explosion or risk
of injury.
f. Do not expose a battery pack or tool to
re or excessive temperature. Exposure to
re or temperature above 265 °F (130 °C)
may cause explosion.
GSA18V-280.indd 4GSA18V-280.indd 4 11/13/2025 2:11:44 PM11/13/2025 2:11:44 PM
5
SAVE THESE INSTRUCTIONS
General Power Tool Safety Warnings
Safety instructions for Reciprocating Saws
g. Follow all charging instructions and do
not charge the battery pack or tool out-
side the temperature range specied in
the instructions. Charging improperly or at
temperatures outside the specied range
may damage the battery and increase the
risk of re.
6. Service
a. Have your power tool serviced by a quali-
ed repair person using only identical
replacement parts. This will ensure that
the safety of the power tool is maintained.
b. Never service damaged battery packs.
Service of battery packs should only be per-
formed by the manufacturer or authorized
service providers.
a. Hold the power tool by insulated gripping
surfaces, when performing an operation
where the cutting accessory may contact
hidden wiring. Cutting accessory contact-
ing a ”live" wire may make exposed metal
parts of the power tool "live" and could
give the operator an electric shock.
Additional Safety Warnings
Do not drill, fasten or break into existing
walls or other blind areas where electrical
wiring may exist. If this situation is unavoid-
able, disconnect all fuses or circuit breakers
feeding this worksite.
Keep hands away from cutting area. Do not
reach under the material being cut. The prox-
imity of the blade to your hand is hidden from
your sight.
Keep hands away from the area between the
gear housing and saw blade clamp (plunger).
The reciprocating blade clamp (blade plunger)
can pinch your ngers.
Do not use dull or damaged blades. Bent
blades can break easily or cause kickback.
Make sure that the front end of the blade
extends through the footplate for the entire
stroke length. Do not use specialty blades that
are very short or those with a signicant bend.
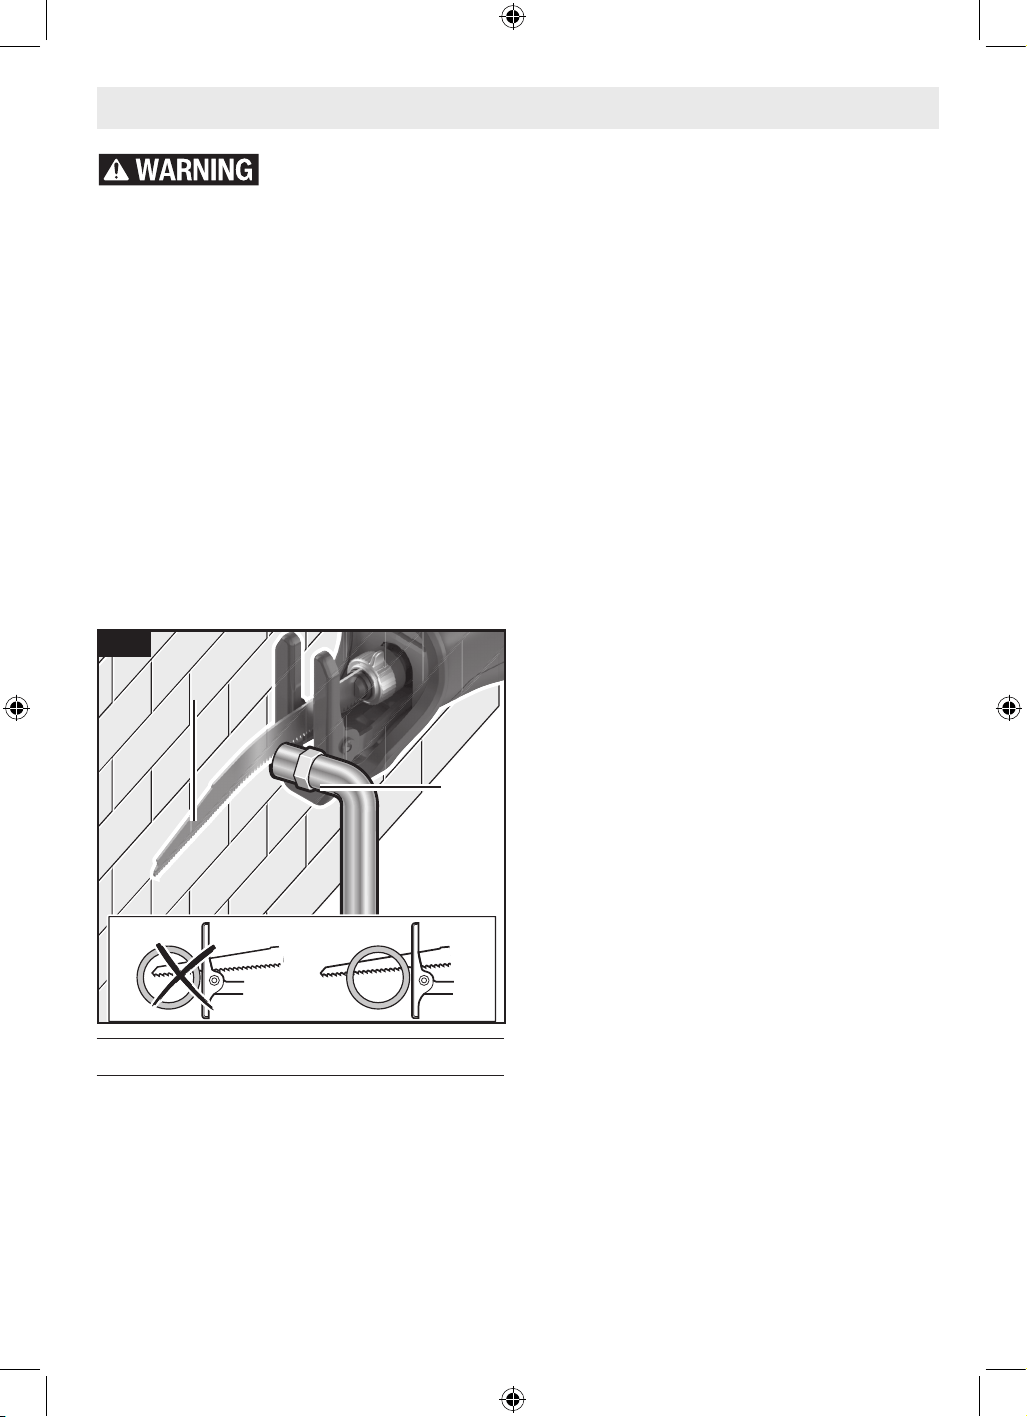
Blade must not contact footplate. A blade
which is too short or tilted could jam inside the
foot and snap.
Before starting to cut, turn tool “ON” and al-
low the blade to come to full desired speed.
Tool can chatter or vibrate if blade speed is too
slow at beginning of cut and possibly kickback.
Always wear safety goggles or eye protection
when using this tool. Use a dust mask or res-
pirator for applications which generate dust.
Secure material before cutting. Never hold it
in your hand or across legs. Small or thin ma-
terial may ex or vibrate with the blade, caus-
ing loss of control.
Make certain all adjusting screws (knobs) and
the blade clamp are tight before making a cut.
Loose adjusting screws and clamps can cause
the tool or blade to slip and loss of control may
result.
When removing the blade from the tool avoid
contact with skin and use proper protective
gloves when grasping the blade or accessory.
Accessories may be hot after prolonged use.
When using the utility hook always be aware
that the blade is exposed. Always hang the
tool in area where you or bystanders cannot ac-
cidentally make contact with the blade.
b. Use clamps or another practical way to
secure and support the workpiece to a
stable platform. Holding the workpiece
by hand or against your body leaves it un-
stable and may lead to loss of control
GSA18V-280.indd 5GSA18V-280.indd 5 11/13/2025 2:11:44 PM11/13/2025 2:11:44 PM
6
SAVE THESE INSTRUCTIONS
Additional Safety Warnings
When operating the saw continuously and for
prolonged periods of time, the gearbox may
become hot to touch. To reduce the risk of inju-
ry, wear protective gloves during saw operation.
GFCI and personal protection devices like
electrician’s rubber gloves and footwear will
further enhance your personal safety.
Develop a periodic maintenance schedule for
your tool. When cleaning a tool be careful not
to disassemble any portion of the tool since
internal wires may be misplaced or pinched
or safety guard return springs may be improp-
erly mounted. Certain cleaning agents such as
gasoline, carbon tetrachloride, ammonia, etc.
may damage plastic parts.
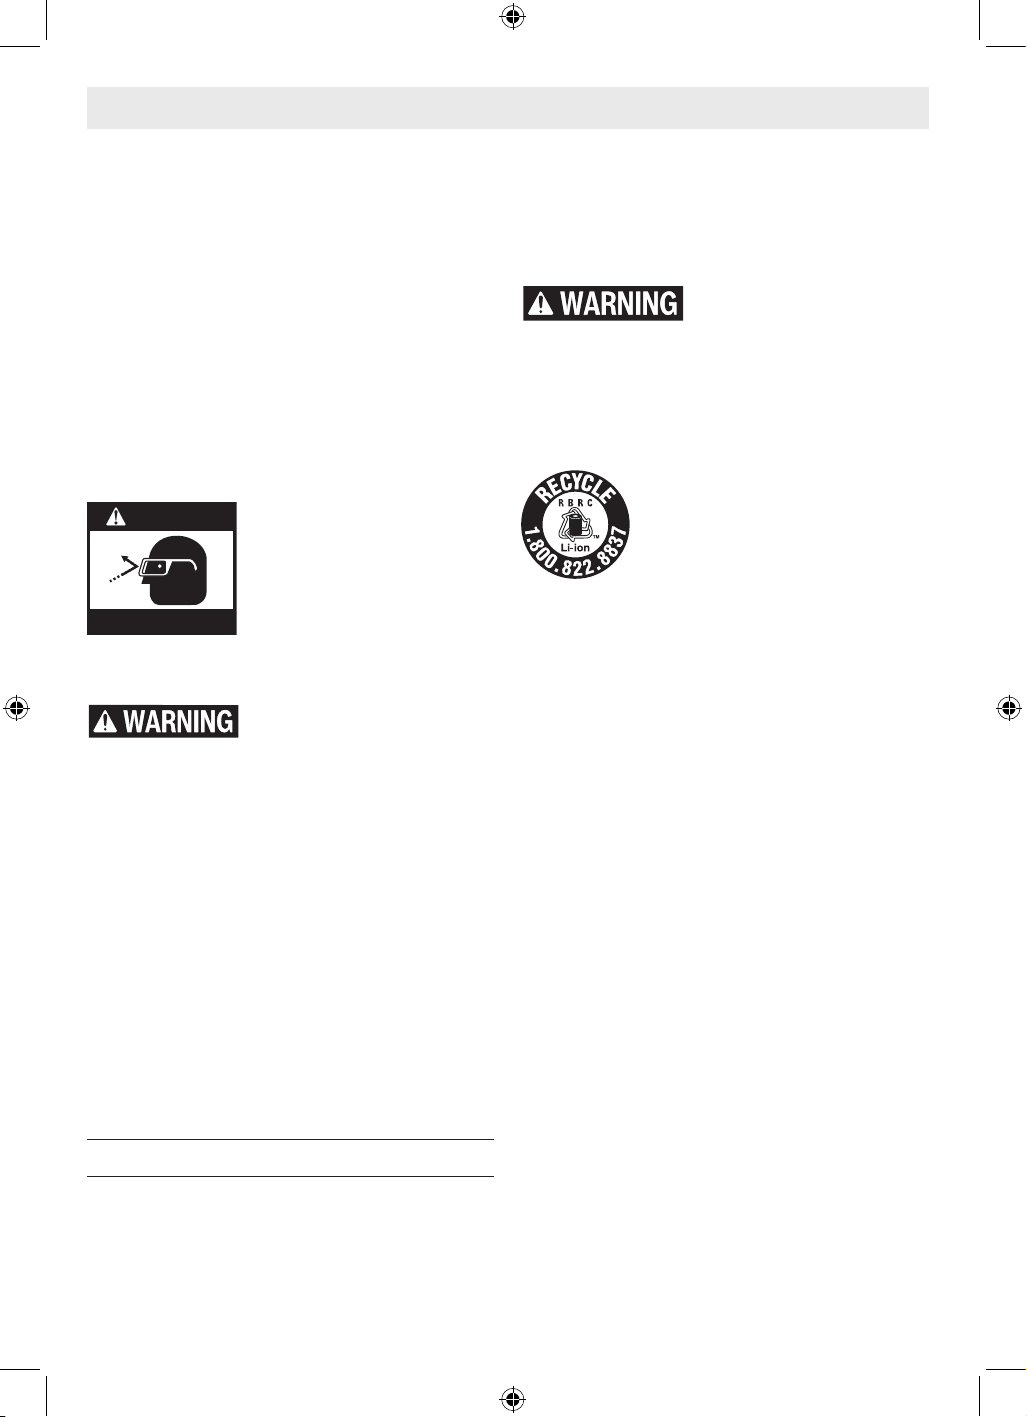
Wear Eye Protection
WARNING
Always wear safety goggles
that comply with ANSI
Z87.1 (shown on package)
before commencing power
tool operation. The opera-
tion of any power tool can
result in foreign objects be-
ing thrown into the eyes, which can result in
severe eye damage.
Some dust created by pow-
er sanding, sawing, grind-
ing, drilling, and other construction activities
contains chemicals known to cause cancer,
birth defects or other reproductive harm.
Some examples of these chemicals are:
• Lead from lead-based paints,
• Crystalline silica from bricks and cement and
other masonry products, and
• Arsenic and chromium from chemically-treat-
ed lumber.
Your risk from these exposures varies, depend-
ing on how often you do this type of work. To
reduce your exposure to these chemicals: work
in a well ventilated area, and work with ap-
proved safety equipment, such as those dust
masks that are specially designed to lter out
microscopic particles.
Disposal
This section is part of Robert Bosch Tool Cor-
poration’s commitment to preserving our envi-
ronment and conserving our natural resources.
Tool Disposal
Do not dispose of power tools and batteries/
rechargeable batteries into household waste!
Battery Disposal
Do not attempt to disas-
semble the battery or re-
move any components projecting from the
battery terminals. Fire or injury may result.
Prior to disposal, protect exposed terminals
with heavy insulating tape to prevent shorting.
Lithium-Ion Batteries
If equipped with a lithium-ion bat-
tery, the battery must be collect-
ed, recycled, or disposed of in an
environmentally sound manner.
The EPA certied RBRC Battery
Recycling Seal on the lithium-ion (Li-ion) bat-
tery indicates Robert Bosch Tool Corporation is
voluntarily participating in an industry program
to collect and recycle these batteries at the end
of their useful life, when taken out of service
in the United States or Canada. The RBRC pro-
gram provides a convenient alternative to plac-
ing used Li-ion batteries into the trash or the
municipal waste stream, which may be illegal
in your area.
Please call 1-800-8-BATTERY for information
on Li-ion battery recycling and disposal bans/
restrictions in your area or return your batteries
to a Bosch/Dremel Service Center for recycling.
Robert Bosch Tool Corporation’s involvement
in this program is part of our commitment to
preserving our environment and conserving our
natural resources.
GSA18V-280.indd 6GSA18V-280.indd 6 11/13/2025 2:11:45 PM11/13/2025 2:11:45 PM
7
Intended Use
SAVE THESE INSTRUCTIONS
Use this reciprocating saw only as intended. Unintended use may result in
personal injury and property damage.
The power tool is suitable for sawing wood, plastic, metal and building materials on a rm surface.
It is suitable for straight and curved cuts. When using designated suitable bimetal saw blades,
ush cutting is also possible. The saw blade’s recommendations are to be observed.
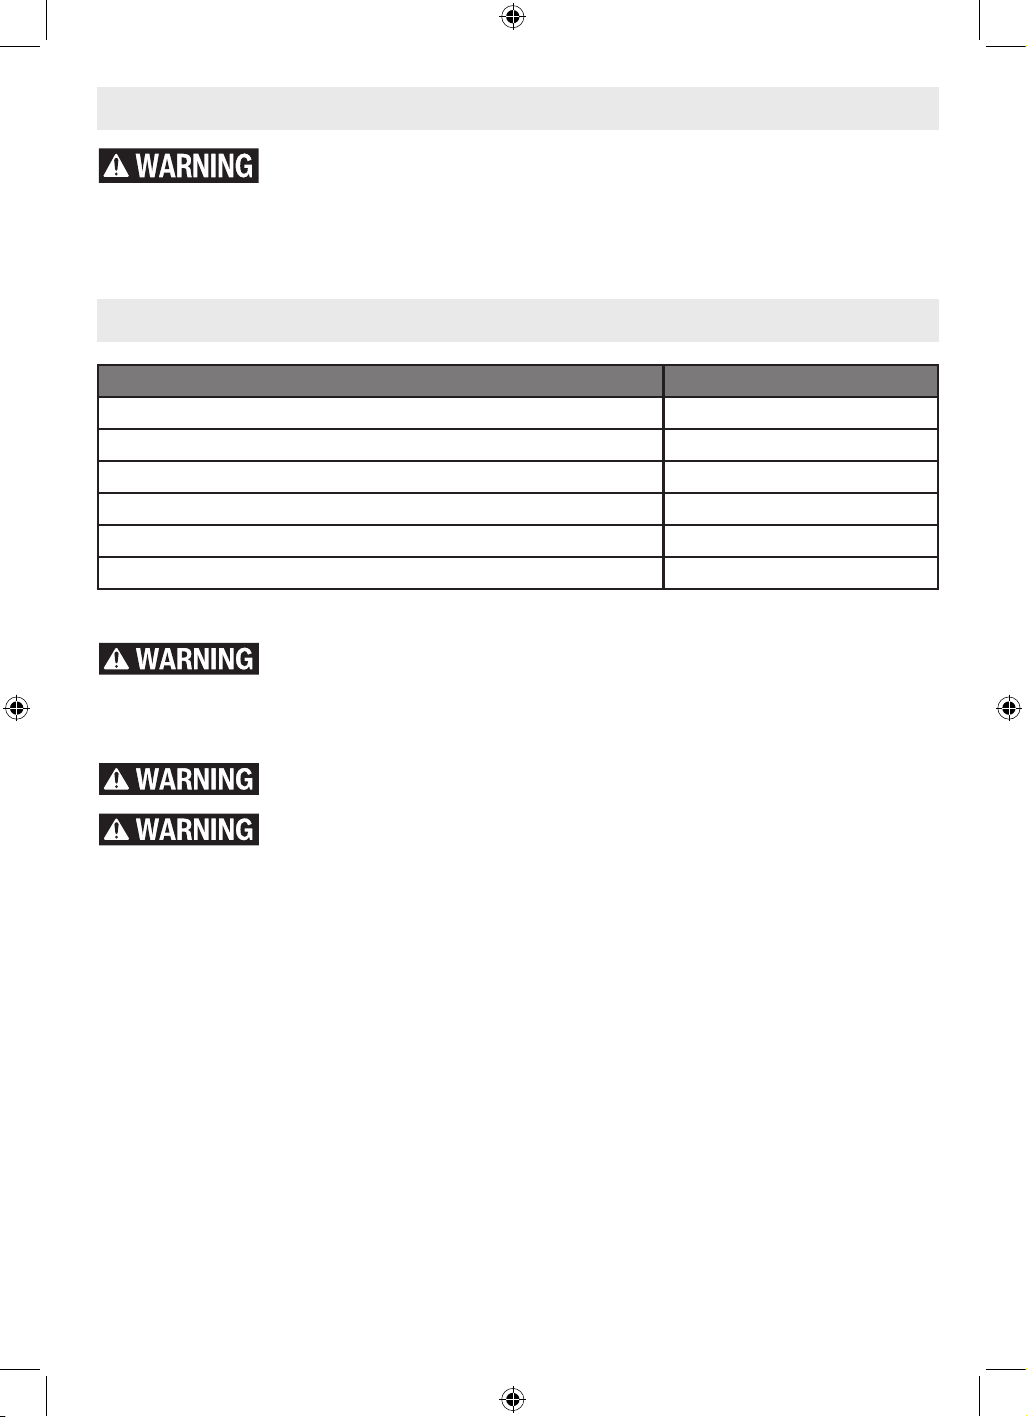
Specifications
Model Number GSA18V-280
Voltage rating 18 V
No load strokes per minute (SPM) 0-3,100
Stroke length 1.1” (28 mm)
Permitted battery temperature during charging +32…+113°F (0…+45°C)
Permitted ambient temperature during operation and storage -4…+122°F (-20…+50°C)
Recommended ambient temperature during charging +32…+95°F (0...+35°C)
Battery Packs/Chargers
Read all safety warnings, instructions, illustrations and specications pro-
vided with this power tool and charger. Failure to follow all instructions listed
below may result in electric shock, re and/or serious injury.
SAVE ALL WARNINGS AND INSTRUCTIONS FOR FUTURE REFERENCE
Use only Bosch or AMPShare 18V Li-ion battery packs listed below. Use of
any other battery packs may create a risk of injury and re.
Use only Bosch or AMPShare 18V chargers listed below. Use of any other
chargers may create a risk of injury and re.
Battery Packs*
BAT000 to BAT999, GBA18V000 to GBA18V999, EXBA18V-000 to EXBA18V-999
Chargers*
BC1880, GAL12V/18V-80, GAL18V6-80, GAX1218V-30, GAL18V-000 to GAL18V-999
*For most up to date battery compatibility, please refer to www.boschtools.com.
GSA18V-280.indd 7GSA18V-280.indd 7 11/13/2025 2:11:45 PM11/13/2025 2:11:45 PM
8
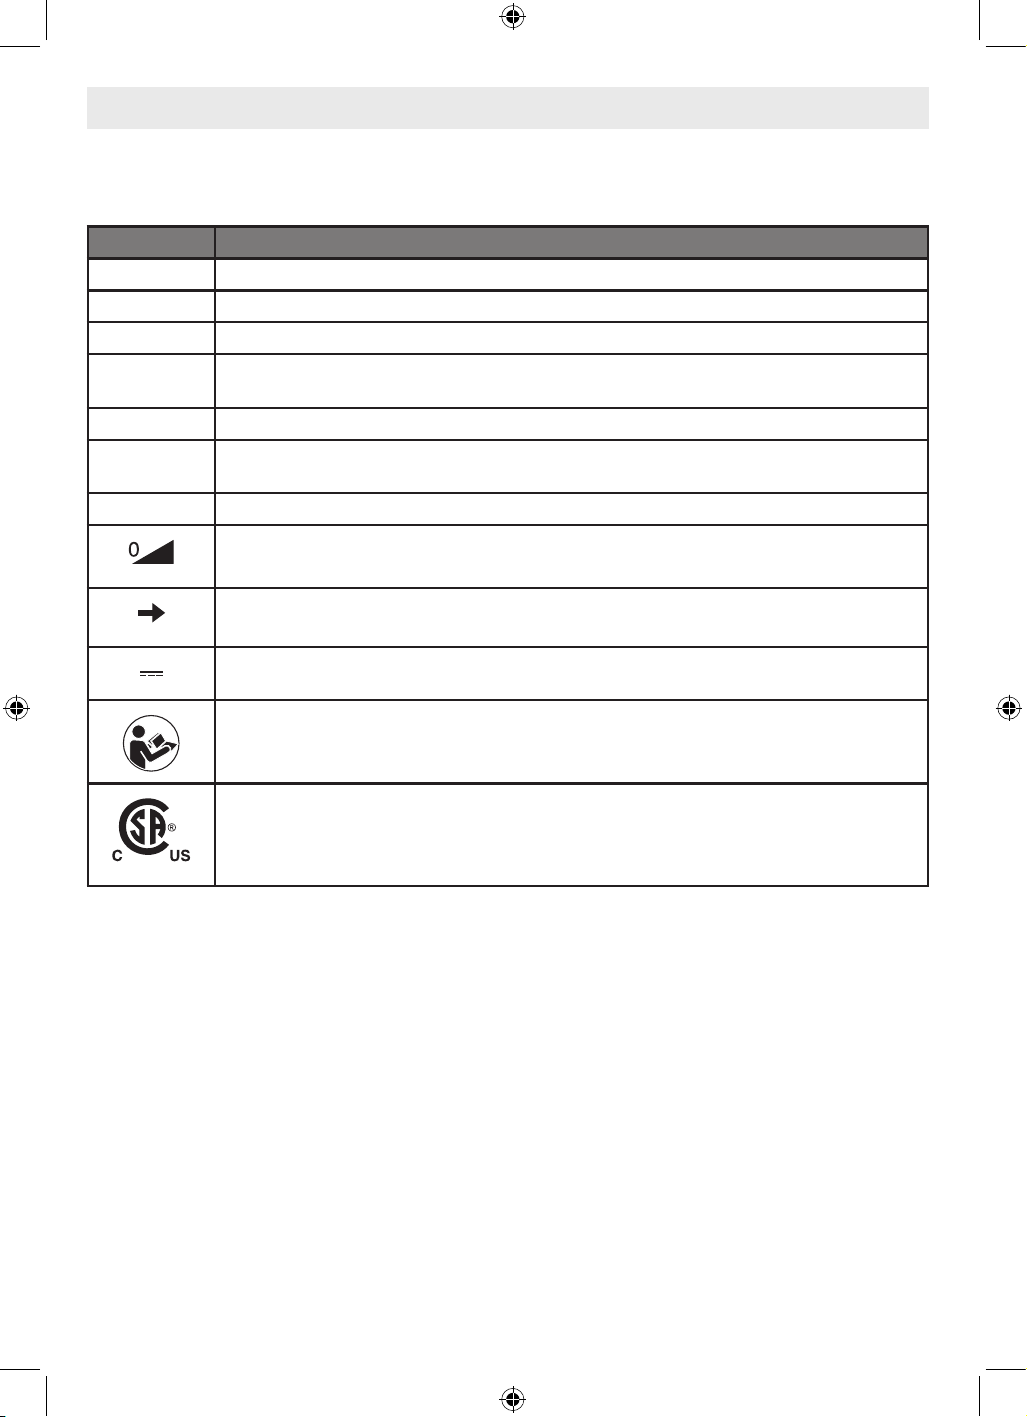
Symbols
Important: Some of the following symbols may be used on your tool. Please study them and
learn their meaning. Proper interpretation of these symbols will allow you to operate the tool
better and safer.
Symbol Designation/Explanation
V Volts (voltage)
min Minutes (time)
n
0
No load speed (rotational speed, at no load)
.../min
Revolutions or reciprocation per minute (revolutions, strokes, surface speed,
orbits etc. per minute)
SPM Strokes per minute (speed)
1, 2, 3, ...
I, II, III,
Selector settings (speed, torque or position settings. Higher number means
greater speed)
mm Millimeters (dimension)
Innitely variable selector with off (speed is increasing from 0 setting)
Arrow (action in the direction of arrow)
Direct current (type or characteristic of current)
Alerts user to read manual.
This symbol designates that this tool is listed by the Canadian Standards
Association, to United States and Canadian Standards.
GSA18V-280.indd 8GSA18V-280.indd 8 11/13/2025 2:11:45 PM11/13/2025 2:11:45 PM
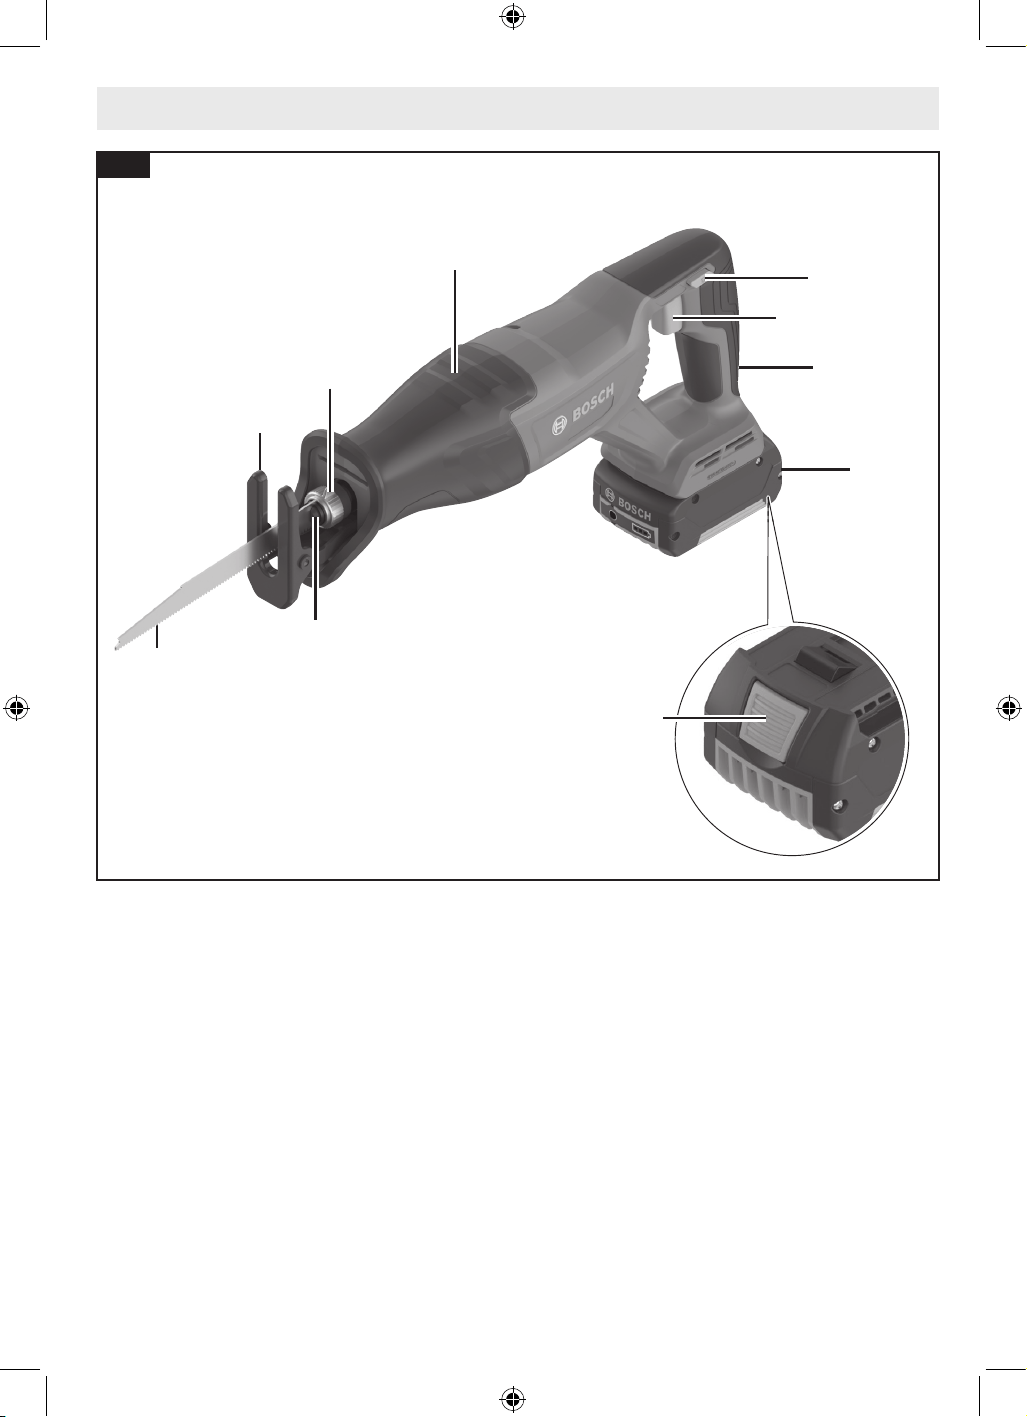
9
Getting to Know Your GSA18V-280 Reciprocating Saw
1 Saw Blade*
2 Footplate
3 Saw Blade Release Lever
4 Saw Blade Holder
5 Handle (insulated gripping surface)
6 Trigger Switch Lock
7 Variable Speed Trigger Switch
8 Rechargeable Battery*
9 Battery Release Button*
* Sold Separately
1
4
3
5
5
6
7
9
8
2
Fig. 1
GSA18V-280.indd 9GSA18V-280.indd 9 11/13/2025 2:11:47 PM11/13/2025 2:11:47 PM
10
Assembly
Disconnect battery pack from tool before making any assembly, adjust-
ments or changing accessories. Such preventive safety measures reduce the
risk of starting the tool accidentally, which may result in personal injury.
Blade Selection
No one blade can be efcient on all cutting
jobs. Different materials require specially de-
signed blades. Since your reciprocating saw
can cut so many materials, many types of Bosch
blades are available. Be sure to use the proper
blade to ensure proper cutting performance.
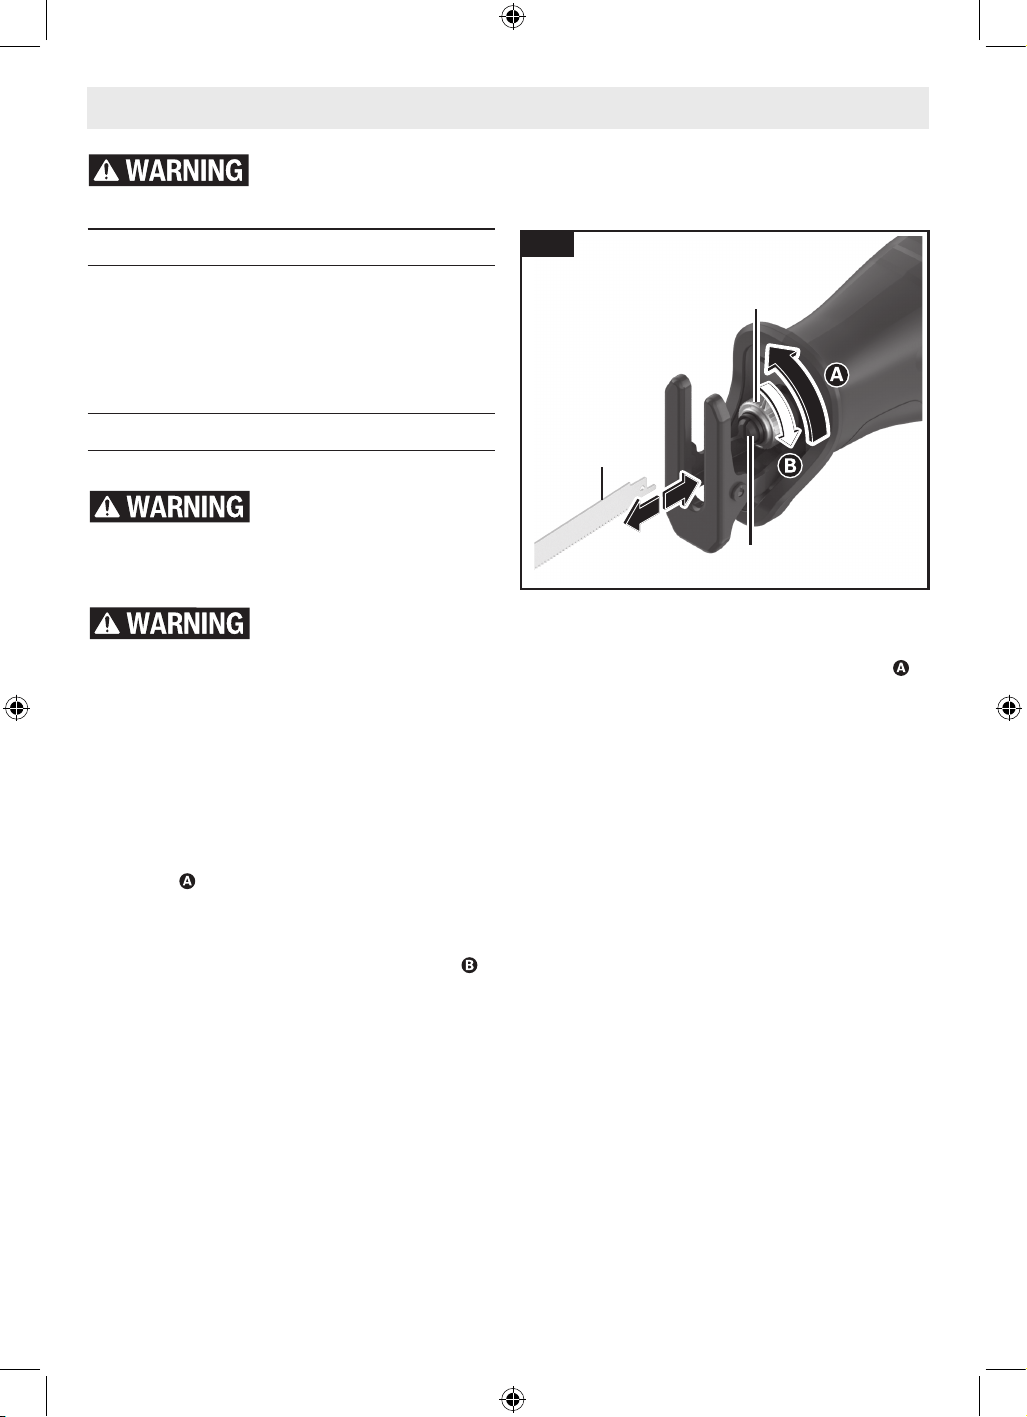
Installing and Removing a Blade
(Fig. 2)
When removing the blade
from the tool avoid con-
tact with skin and use proper protective
gloves when grasping the blade or accessory.
Accessories may be hot after prolonged use.
Make sure that the front
end of the blade extends
through the footplate for the entire stroke
length. Do not use specialty blades that are
very short or those with a signicant bend.
Blade must not contact footplate. A blade
which is too short or tilted could jam inside the
foot and snap.
To Install the Saw Blade
1. Turn the Saw Blade Release Lever 3 ap-
proximately 90° to the stop in the direction
shown and hold it in place.
2. Slide the Saw Blade 1 into the Saw Blade
Holder 4.
3. Release the Saw Blade Release Lever 3
to lock in the Saw Blade 1. Make sure the
Saw Blade 1 is securely locked in place.
Note: Most blades can be installed with teeth
pointing either up or down, as desired for the
application.
To Remove the Saw Blade
1. Turn the Saw Blade Release Lever 3 ap-
proximately 90° in the direction shown .
2. Pull the Saw Blade 1 out of the Saw Blade
Holder 4.
3. Release the Saw Blade Release Lever 3.
1
3
4
Fig. 2
GSA18V-280.indd 10GSA18V-280.indd 10 11/13/2025 2:11:49 PM11/13/2025 2:11:49 PM
11
Assembly
Fig. 3
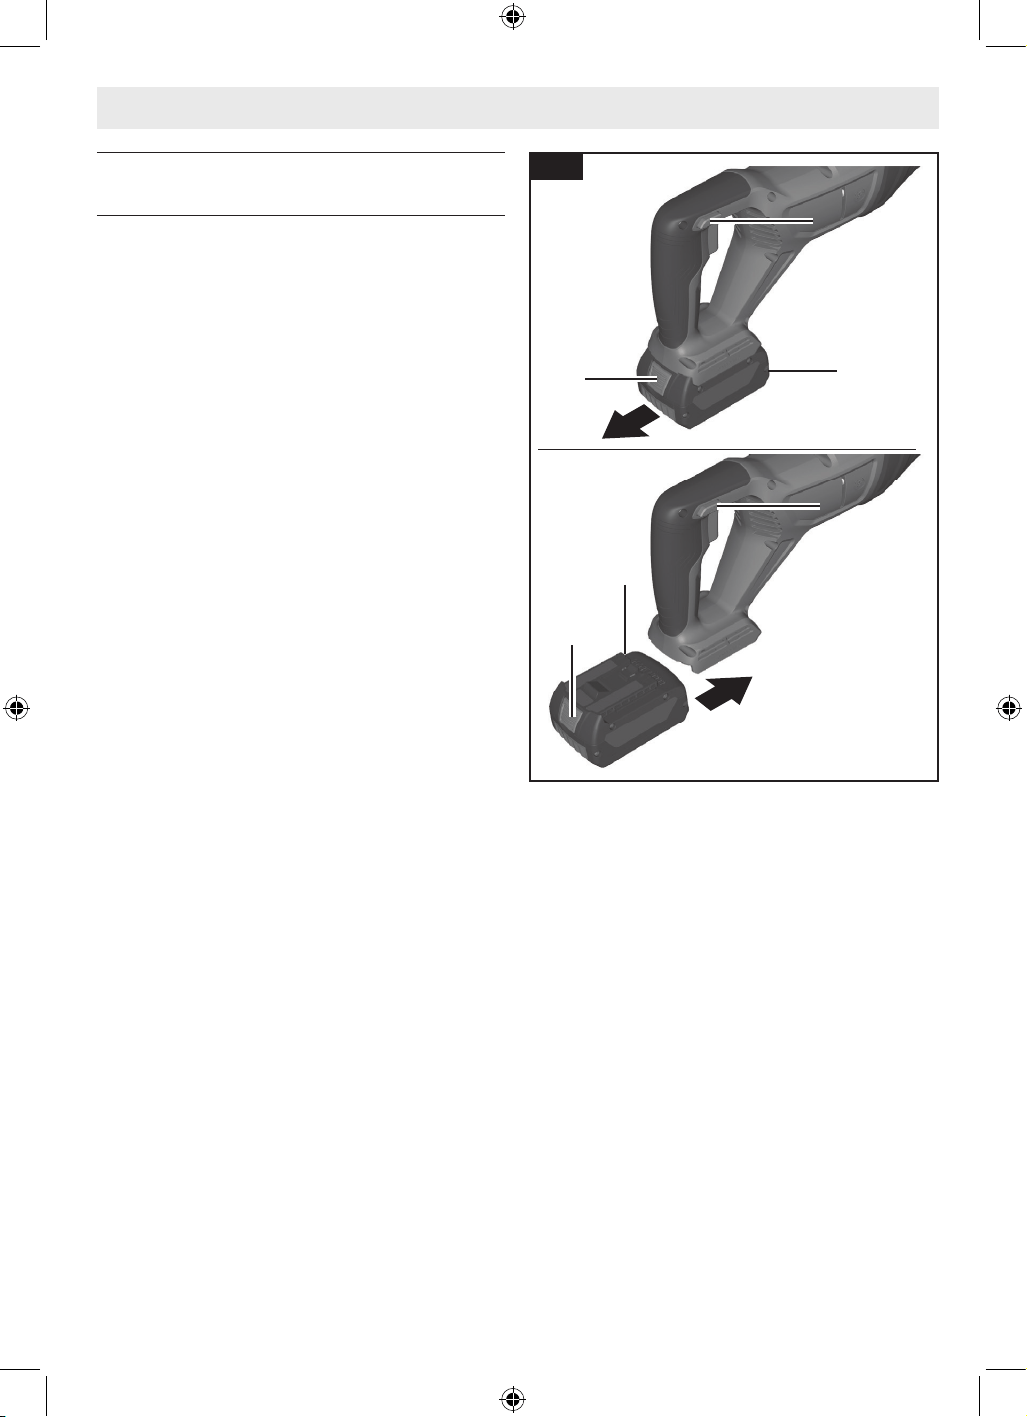
Inserting and Releasing the Battery
Pack
(Fig. 3)
To Insert the Battery Pack
1. Set Trigger Switch Lock 6 to the locked
position.
2. Slide charged Battery Pack 8 into the
housing until the battery pack 8 locks into
position.
Your tool is equipped with a secondary lock-
ing latch to prevent the battery pack from com-
pletely falling out of the handle, should it be-
come loose due to vibration.
To Remove the Battery Pack
1. Press the Battery Pack Release Button 9
and slide the Battery Pack 8 from the hous-
ing.
2. Press the Battery Pack Release Button 9
again and slide the Battery Pack 8 com-
pletely out of tool housing.
9
9
8
8
6
6
6
6
GSA18V-280.indd 11GSA18V-280.indd 11 11/13/2025 2:11:50 PM11/13/2025 2:11:50 PM
12
UNLOCK
LOCK
Operation
Always observe the following safety precautions in addition to the safety
instructions on pages 3 through 6. Failure to do so may result in equipment
damage, property damage, or personal injury.
Disconnect battery pack from tool before assembly, adjustments, trouble-
shooting or changing accessories. Such preventive safety measures reduce
the risk of starting the tool accidentally, which may result in personal injury.
Protection Against Deep
Discharging
The lithium ion battery is protected against
deep discharging by the “Electronic Cell Protec-
tion (ECP)”. When the battery is empty, the tool
is switched off by means of a protective circuit.
Do not continue to press
the trigger switch after the
tool has been automatically switched off. The
battery can be damaged.
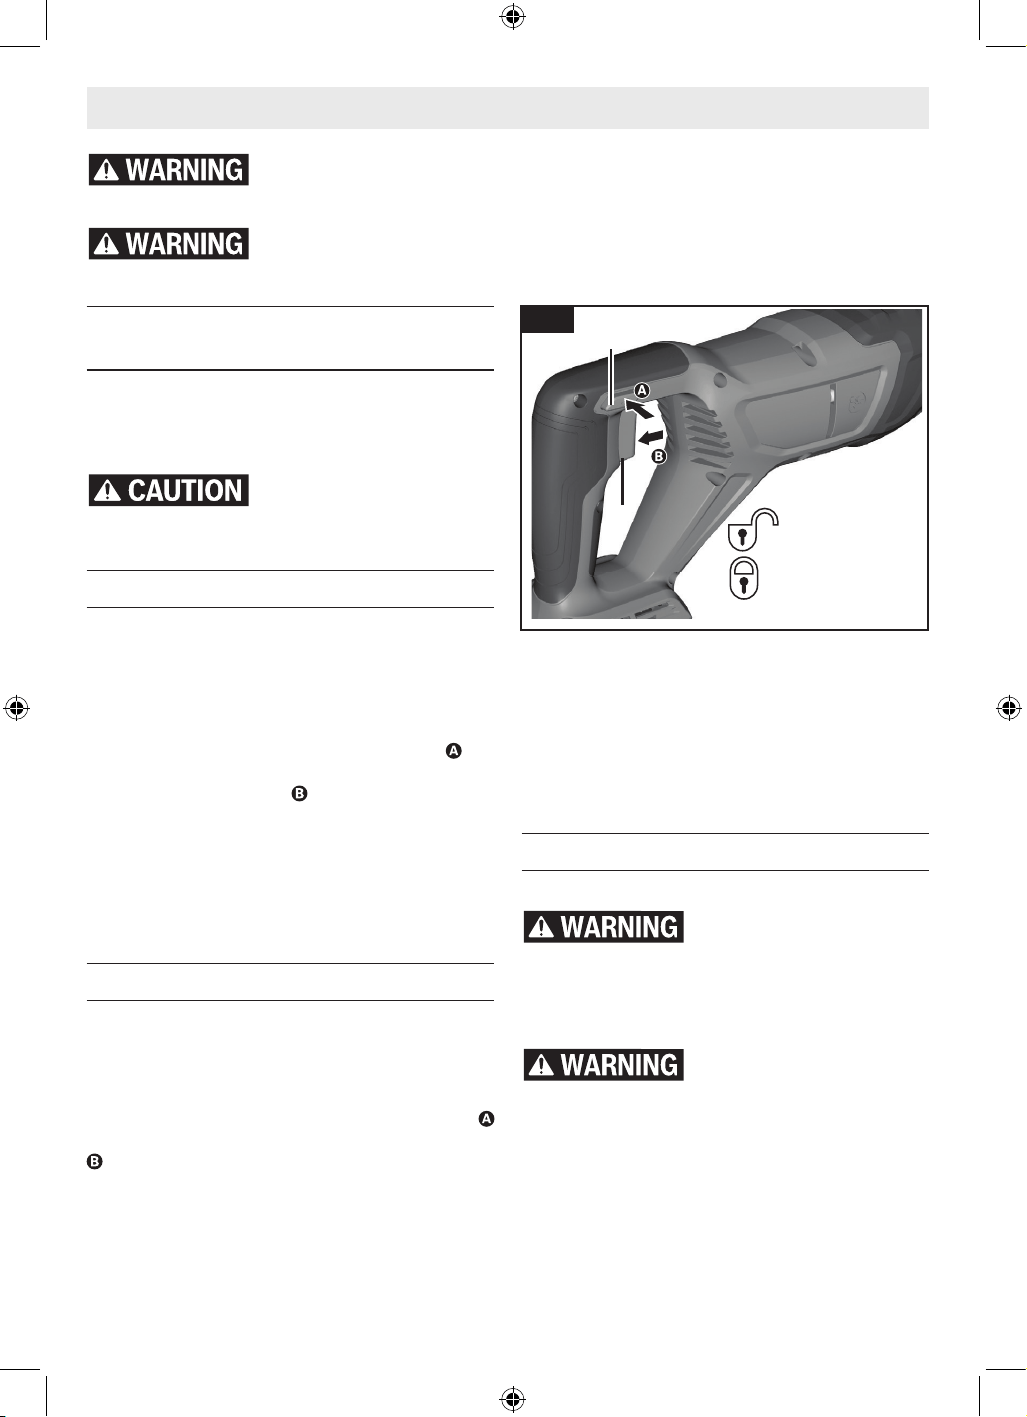
Trigger Switch Lock
(Fig. 4)
The Trigger Switch Lock 6 is designed to pre-
vent accidental trigger activation.
To Unlock the Trigger Switch:
Fully press the Trigger Switch Lock 6 on
the unlock symbol side to unlock the Variable
Speed Trigger Switch 7 .
To Lock the Trigger Switch:
Release the Variable Speed Trigger Switch 7
and fully press the Trigger Switch Lock 6 on
the lock symbol side to lock the Variable Speed
Trigger Switch 7.
Variable Speed Trigger Switch
(Fig. 4)
Your tool is equipped with a Variable Speed
Trigger Switch 7.
To turn the tool on, push the Trigger Switch
Lock 6 on the side with the unlock symbol
and press the Variable Speed Trigger Switch 7
. The tool will turn itself off as soon as you
release the trigger.
Fig. 4
The blade stroke rate can be adjusted from the
minimum to maximum stroke rate by the pres
sure you apply to the trigger. Apply more pres-
sure to increase the speed and release pressure
to decrease speed.
The required stroke rate is dependent on the
material and the working conditions and can be
determined by a practical trial.
Using the Saw
(Fig. 5)
Use clamps or another
practical way to secure
and support the workpiece to a stable plat-
form. Holding the workpiece by hand or against
your body leaves it unstable and may lead to
loss of control.
Hold the power tool by in-
sulated gripping surfaces,
when performing an operation where the cut-
ting accessory may contact hidden wiring.
Cutting accessory contacting a “live” wire may
make exposed metal parts of the power tool
“live” and could give the operator an electric
shock.
7
6
GSA18V-280.indd 12GSA18V-280.indd 12 11/13/2025 2:11:52 PM11/13/2025 2:11:52 PM
13
Before starting to cut, turn
tool “ON” and allow the
blade to come to full desired speed. Tool can
chatter or vibrate if blade speed is too slow at
beginning of cut and possibly kickback.
1. Securely clamp the work.
2. Position to the line of cut and grasp the
tool with one hand on the Handle 5 and
the other placed on the insulated rubber
boot over the front housing.
3. Keep the Footplate 2 rmly against the
work to minimize counter-force (jumping)
and vibration.
4. Push the Trigger Switch Lock 6 on the side
with the unlock symbol and squeeze the
Variable Speed Trigger Switch 7 to start the
tool. Let the saw reach full desired speed
before starting the cut. Guide the saw so
that the Saw Blade 1 will move along the
marked line.
Sawing Tips
Following a few simple tips will reduce the
wear on the workpiece, the tool and the opera-
tor.
1. Blades cut on the draw or back stroke. On
ne work, such as paneling, berglass, etc.,
place the good side of workpiece facing
down.
2. Use the correct saw blade for the material
being cut and keep extra blades on hand
Operation
Fig. 5
to use when others become dull. Replace
cracked or bent blades immediately.
3. Select the appropriate cutting speed.
4. To reduce the risk of injury, be sure the
blade always extends beyond the footplate
and work throughout the stroke. Blades
may shatter if the front on the blade hits
the work and/or the footplate.
5. When cutting metal:
• Apply a lubricant for easier, smoother,
faster cutting and longer blade life.
• For non-ferrous metals, aluminum,
bronze or brass, use a stick wax on the
blade.
• For ferrous metals, iron and steel, use
machine or cutting oil along the surface
to be cut.
6. When cutting thin metal, “sandwich” the
material between two pieces of scrap
wood. Clamp or put in a bench vise. One
piece of lumber on top of the metal can be
used with adequate clamping. Place your
cut lines or design on the wood.
7. Don’t force the cutting. Let the saw and
blade do the work.
2
1
1
GSA18V-280.indd 13GSA18V-280.indd 13 11/13/2025 2:11:54 PM11/13/2025 2:11:54 PM
14
Operation
Pocket/Plunge Cuts
(Fig. 6)
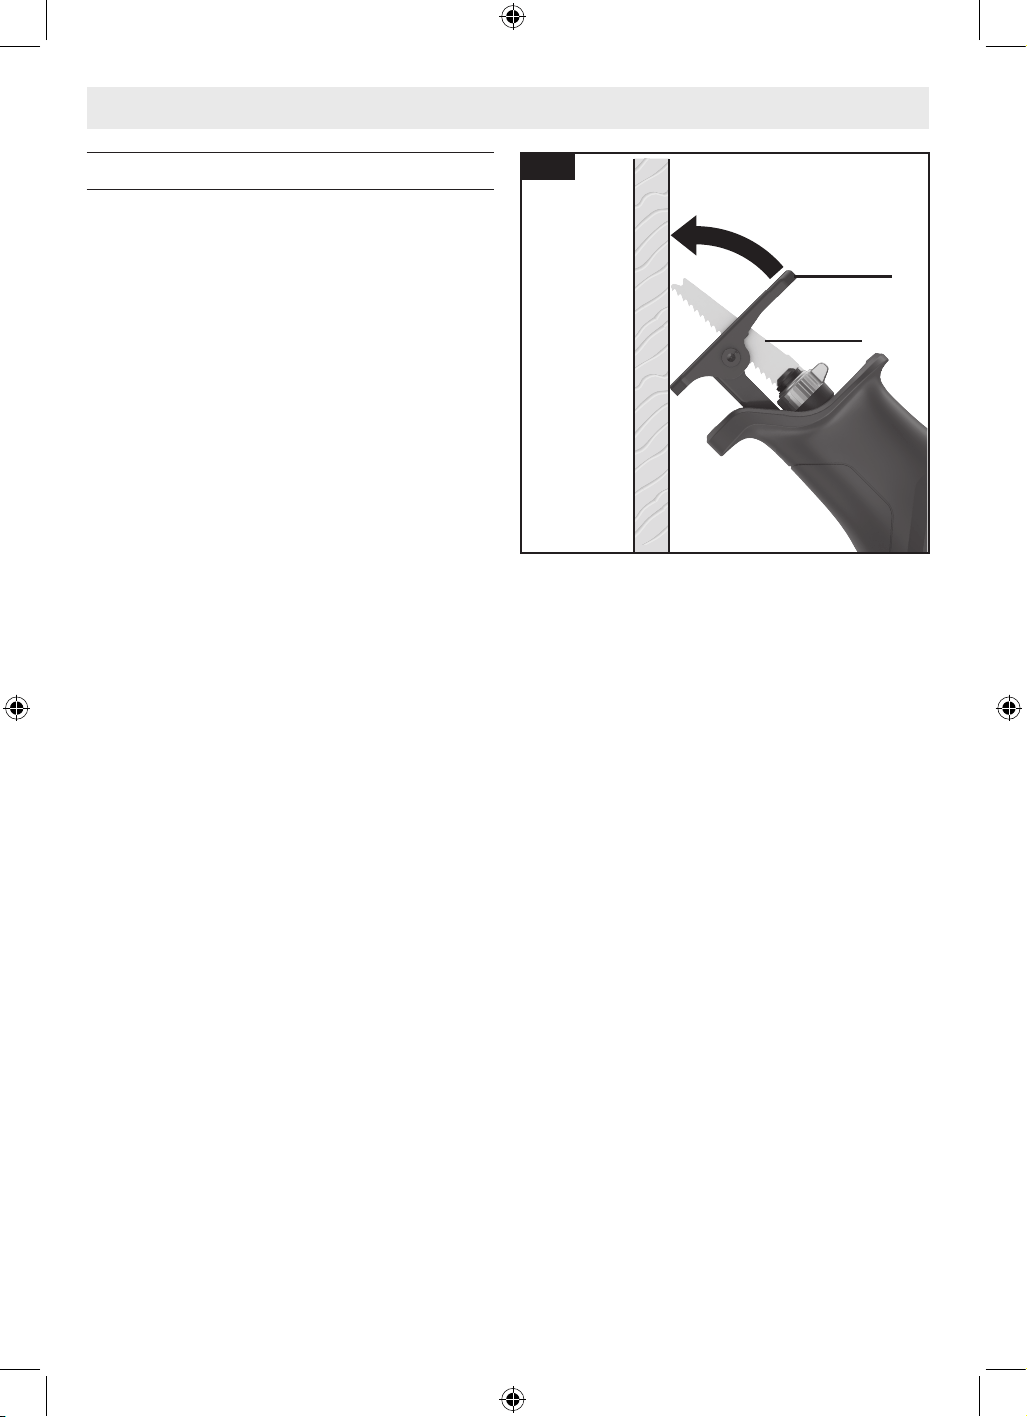
The reciprocating saw can be used to make
plunge cuts into softer material, (for example,
wood or light building materials for walls),
without a starting hole.
1. Mark the line to be cut clearly on the work.
2. Set the tool with one edge of the Footplate
2 rmly against the material.
3. Place the tip of the Saw Blade 1 (not run-
ning) on the line to be cut.
4. Squeeze the Variable Speed Trigger Switch
7 and carefully engage the moving Saw
Blade 1 into the material.
5. Tilt the saw so that the Saw Blade 1 clears
the work.
6. After the Saw Blade 1 penetrates through
the work, continue sawing along the
marked outline.
Notes:
To make plunge cutting easier, use a heavy
gauge blade, install the blade with the teeth
facing upward, and hold the saw upside down.
Do not plunge cut in metal surfaces.
In thick materials and in harder materials, such
as metal, plunge cutting should not be at-
tempted. Such materials can be cut with the
reciprocating saw only by starting the cut from
the edge of the material or from a hole drilled
all the way through the material that is large
enough to t the saw blade.
Fig. 6
2
1
GSA18V-280.indd 14GSA18V-280.indd 14 11/13/2025 2:11:55 PM11/13/2025 2:11:55 PM
15
Maintenance
To avoid accidents, always disconnect the battery pack from the tool before
cleaning or performing any maintenance.
General Maintenance
Keep your tool, battery pack and charger in
good working order by adopting a regular main-
tenance program. Inspect your tools for issues
such as undue noise, misalignment or binding
of moving parts, breakage of parts, or any other
condition that may affect the tool operation.
If the tool does not start or operate at full pow-
er with a fully charged battery pack, clean the
contacts on the battery pack. If the tool still
does not work properly, return the tool, charger
and battery pack, to a BOSCH service facility
for repairs.
Cleaning
Certain cleaning agents and
solvents damage plastic parts.
Some of these are: gasoline, carbon tetrachlo ride,
chlorinated cleaning solvents, ammonia and house
hold detergents that contain ammonia.
Ventilation openings and switch levers must be
kept clean and free of foreign matter. Do not
at tempt to clean by inserting pointed objects
through openings.
Service
Have your tool serviced by
a qualied repair person us-
ing only identical replacement parts. This will
ensure that the safety of the tool is maintained.
Tool Lubrication
Your Bosch tool has been properly lubricated
and is ready to use. It is recommended that
tools with gears be regreased with a special
gear lubricant at every brush change.
Motors
The motor in your tool has been engineered for
many hours of dependable service. To maintain
peak efciency of the motor, we recommend it
be examined every six months. Only a genuine
Bosch replacement motor specially designed
for your tool should be used.
Batteries
Be alert for battery packs
that are nearing their end
of life. If you notice decreased tool perfor-
mance or signicantly shorter running time be-
tween charges then it is time to replace the bat-
tery pack. Failure to do so can cause the tool to
operate improperly or damage the charger.
Blade Holder Maintenance
Periodically lubricate blade holder with a dry
lubricant such as graphite.
Accessories
Do not use attachments/accessories other than those specied by Bosch.
Use of attachments/accessories not specied for use with the tool described
in this manual may result in damage to tool, property damage, and or personal injury.
Standard equipment
Optional accessories
and attachments
Bosch Reciprocating Saw Blades Carrying Bag
GSA18V-280.indd 15GSA18V-280.indd 15 11/13/2025 2:11:56 PM11/13/2025 2:11:56 PM
16
Table des matières
Symboles relatifs à la sécurité
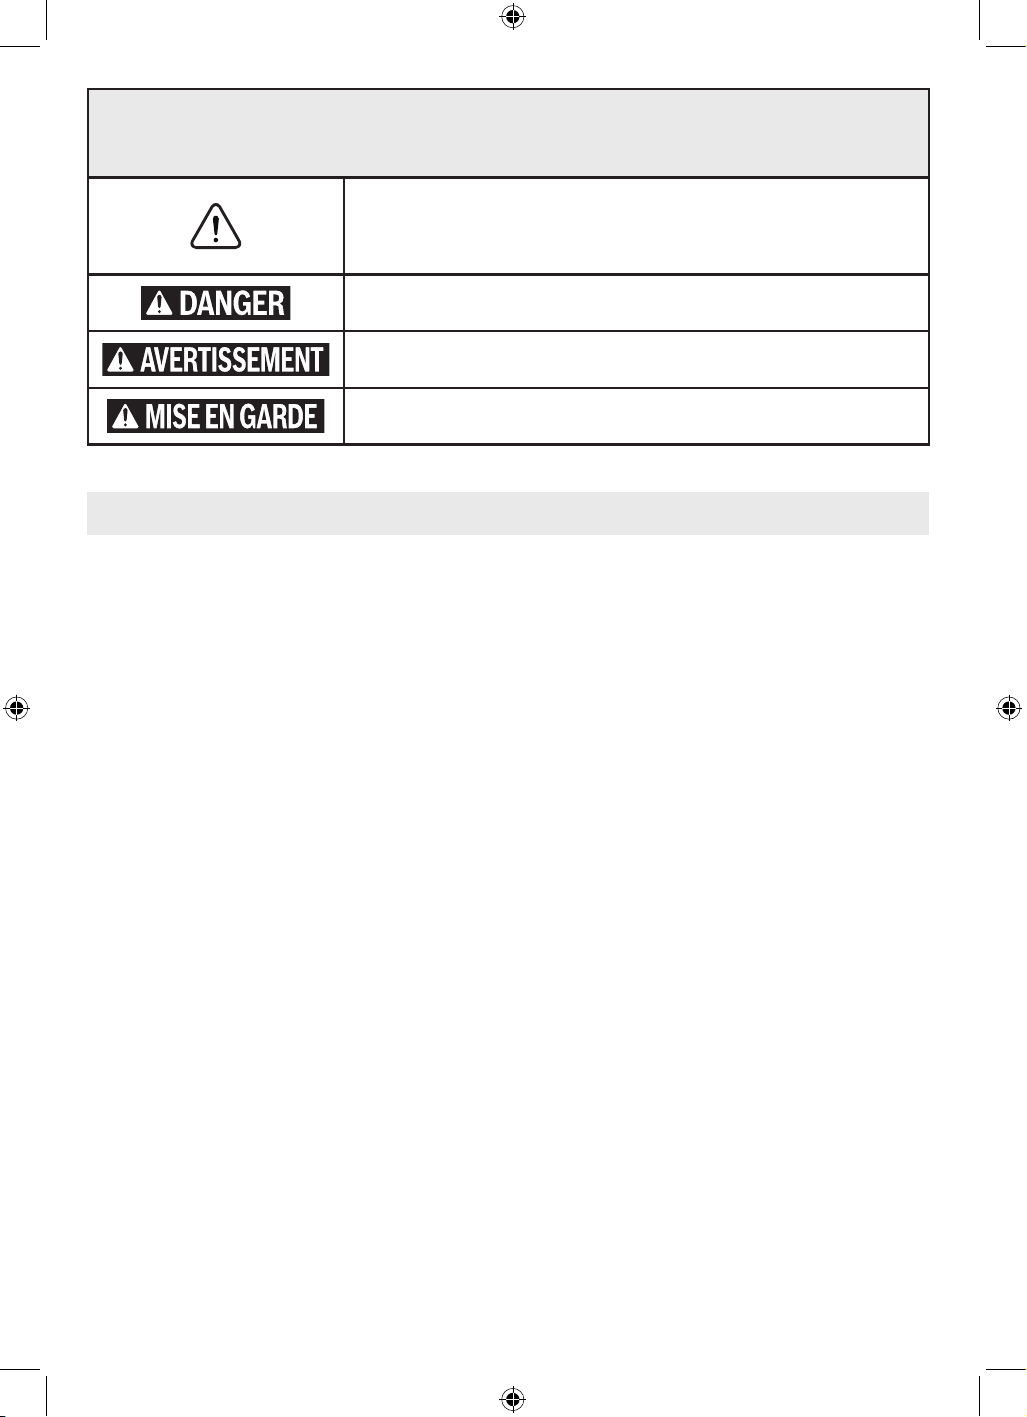
Les définitions ci-dessous décrivent le niveau de gravité pour chaque terme concernant des précautions à prendre.
Veuillez lire le mode d’emploi et lire la signification de ces symboles.
C’est le symbole d’alerte relatif à la sécurité. Il est utilisé pour vous avertir de
l’existence possible d’un risque de blessure. Obéissez à tous les messages relatifs à la
sécurité qui suivent ce symbole pour éviter tout risque de blessure ou même de mort.
DANGER indique une situation dangereuse qui, si elle n’est pas évitée, causera la
mort d’une personne ou une blessure grave.
AVERTISSEMENT indique une situation dangereuse qui, si elle n’est pas évitée,
pourrait causera la mort d’une personne ou une blessure grave.
MISE EN GARDE indique une situation dangereuse qui, si elle n’est pas évitée,
pourrait causer une blessure légère ou modérée.
Avertissements généraux relatifs à la sécurité
pour les outils électriques...................17
Règles de sécurité pour les scies
alternatives sans l ........................ 19
Avertissements supplémentaires
concernant la sécurité......................19
Mise au rebut .............................20
Utilisation prévue ............................. 21
Spécications ................................21
Symboles....................................22
Familiarisez-vous avec votre scie
alternative GSA18V-280.................... 23
Assemblage..................................24
Choix de lame ............................ 24
Installation et retrait d’une lame..............24
Insertion et retrait du bloc-piles ..............25
Opération ................................... 26
Protection contre les décharges profondes..... 26
Loquet de verrouillage de l’interrupteur
à gâchette............................26
Commutateur à gâchette contrôlé
à vitesse variable ...................... 26
Utilisation de la scie........................ 26
Conseils pour le sciages .................... 27
Coupes de cavités/en plongée ............... 28
Entretien .................................... 29
Entretien général..........................29
Nettoyage................................29
Service..................................29
Lubrication de l’outil ...................... 29
Moteurs ................................. 29
Piles .................................... 29
Entretien du porte-lame .................... 29
Accessoires ..................................29
GSA18V-280.indd 16GSA18V-280.indd 16 11/13/2025 2:11:57 PM11/13/2025 2:11:57 PM

17
Avertissements généraux relatifs à la sécurité pour les outils électriques
Lisez toutes les consignes de sécurité, instructions, illustrations et spécications
fournies avec cet outil électrique. Le non-respect de toutes les instructions gurant ci-
après pourrait causer un choc électrique, un incendie et/ou des blessures graves.
CONSERVEZ TOUS LES AVERTISSEMENTS ET TOUTES LES INSTRUCTIONS POUR RÉFÉRENCE FUTURE.
Le terme « outil électrique » dans les avertissements fait référence à votre outil électrique à cordon d’alimentation électrique
branché dans une prise secteur ou à votre outil électrique à piles (sans l).
1. Sécurité de la zone de travall
a. Gardez votre zone de travail propre et bien éclairée.
Des zones encombrées ou sombres sont propices aux
accidents.
b. N’utilisez pas des outils électriques dans une
atmosphère explosive, par exemple en présence de
liquides, de gaz ou de poussières inammables. Les
outils électriques produisent des étincelles qui risquent
de mettre feu aux poussières ou émanations de fumée.
c. Gardez les enfants et les autres personnes présentes
àune distance susante lorsque vous utilisez un outil
électrique. Des distractions risqueraient de vous faire
perdre le contrôle.
2. Sécurité électrique
a. La che de l’outil électrique doit correspondre à la
prise decourant. Ne modiez jamais une che de
quelque façon que ce soit N’utilisez pas d’adaptateurs
de ches avec des outils électriques mis à la terre/à
la masse. L’emploi de ches non modiées et de prises
de courant correspondant naturellement aux ches
réduira le risque de choc électrique.
b. Évitez tout contact de votre corps avec des surfaces
mises à la terre ou à la masse telles que des
surfaces de tuyaux, de radiateurs, de cuisinières
et de réfrigérateurs. Il existe un risque accru de choc
électrique si votre corps est en contact avec la terre ou
la masse.
c. N’exposez pas d’outils électriques à la pluie ou à un
environnement humide. La pénétration d’eau dans un
outil électrique augmentera le risque de choc électrique.
d. N’utilisez pas le cordon de façon abusive. N’utilisez
pas le cordon pour porter, tirer ou débrancher l’outil
électrique Tenez le cordon à distance de toute source
de chaleur, d’huile, de bords tranchants ou de pièces
mobiles. Des cordons endommagés ou entortillés
augmentent le risque de choc électrique.
e. Lorsque vous utilisez un outil électrique à l’extérieur,
employez un cordon de rallonge approprié pour un
emploi à l’extérieur. L’utilisation d’un cordon approprié
pour une utilisation à l’extérieur réduit le risque de choc
électrique.
f. Si l’utilisation d’un outil électrique dans un endroit
humide est inévitable, utilisez une alimentation
protégée par un disjoncteur de fuite à la terre.
L’utilisation d’un tel circuit réduit le risque de choc
électrique.
3. Sécurité personnelle
a. preuve de vigilance et de bon sens, et observez
attentivement ce que vous faites lorsque vous
utilisez un outil électrique. N’utilisez pas un outil
électrique si vous êtes fatigué(e) ou sous l’inuence
de drogues, d’alcool ou de médicaments. Un simple
moment d’inattention pendant que vous utilisez un outil
électrique pourrait causer une blessure grave.
b. Utilisez des équipements de protection individuelle.
Portez toujours des équipements de protection des
yeux. Des équipements de protection tels qu’un masque
de protection contre la poussière, des chaussures de
sécurité antidérapantes, un casque ou un dispositif de
protection de l’ouïe utilisés en fonction des conditions
réduiront le nombre des blessures.
c. Prévenez tout risque de mise en marche accidentelle.
Assurez-vous que l’interrupteur est dans la position
d’arrêt (OFF) avant de connecter l’appareil à une
source d’alimentation et/ou à un bloc-piles, de le
soulever ou de le transporter. Le fait de transporter
des outils électriques avec le doigt sur l’interrupteur
ou de mettre sous tension des outils électriques avec
l’interrupteur en position de marche invite les accidents.
d. Retirez toute clé de réglage pouvant être attachée à
l’outil avant de mettre l’outil électrique sous tension.
Une clé laissée attachée à une pièce en rotation de l’outil
électrique pourrait causer une blessure.
e. Ne vous penchez pas excessivement au-dessus de
l’outil. Veillez à toujours garder un bon équilibre et
un appui stable Ceci permet de mieux contrôler l’outil
électrique dans des situations inattendues.
GSA18V-280.indd 17GSA18V-280.indd 17 11/13/2025 2:11:57 PM11/13/2025 2:11:57 PM

18
f. Portez des vêtements appropriés. Ne portez pas de
bijoux ou de vêtements amples. Gardez vos cheveux
et vos vêtements à une distance susante des pièces
mobiles. Vêtements amples, bijoux ou cheveux longs
pourraient être attrapés par des pièces mobiles.
g. Si des dispositifs sont fournis pour le raccordement
d’accessoires d’extraction et de collecte de la
poussière, assurez-vous qu’ils sont connectés et
utilisés de façon appropriée. L’emploi correct des
accessoires de collecte de la poussière peut réduire les
dangers associés à la poussière.
h. Ne laissez pas la familiarité résultant de l’utilisation
fréquente des outils vous inciter à devenir
complaisant(e) et à ignorer les principes de sécurité
relatifs aux outils. Une action négligente pourrait
causer des blessures graves en une fraction de seconde.
4. Utilisation et entretien de l’outil électrique
a. N’imposez pas de contraintes excessives à l’outil
électrique. Utilisez l’outil électrique approprié pour
votre application. L’outil électrique correct fera le travail
plus ecacement et avec plus de sécurité à la vitesse à
laquelle il a été conçu pour fonctionner.
b. N’utilisez pas l’outil électrique si l’interrupteur
de marche/arrêt ne permet pas de le mettre sous
tension/hors tension. Tout outil électrique qui ne peut
pas être contrôlé par son interrupteur est dangereux et
doit être réparé.
c. Débranchez la che de la source d’alimentation
électrique et/ou retirez le bloc-piles de l’outil
électrique (s’il est amovible) avant d’y apporter de
quelconques modications, de changer d’accessoire
ou de ranger l’outil électrique. De telles mesures
de sécurité préventives réduisent le risque de
déclenchement accidentel de l’outil électrique.
d. Rangez les outils électriques qui ne sont pas utilisés
activement hors de portée des enfants, et ne laissez
aucune personne n’ayant pas lu ces instructions et ne
sachant pas comment utiliser un tel outil électrique
se servir de cet outil. Les outils électriques sont
dangereux quand ils sont entre les mains d’utilisateurs
n’ayant pas reçu la formation nécessaire à leur utilization.
e. Entretenez de façon appropriée les outils électriques
et les accessoires. Assurez-vous que les pièces en
mouvement sont bien alignées et qu’elles ne se
coincent pas, qu’il n’y a pas de pièces cassées ou
qu’il n’existe aucune situation pouvant aecter
le fonctionnement de l’outil électrique. Si l’outil
électrique est endommagé, faites-le réparer avant de
vous en servir à nouveau. De nombreux accidents sont
causés par des outils électriques mal entretenus.
f. Gardez les outils de coupe tranchants et propres. Des
outils de coupe entretenus de façon adéquate avec des
bords de coupe tranchants sont moins susceptibles de
se coincer et sont plus faciles à controller.
g. Utilisez l’outil électrique, les accessoires, les
embouts de l’outil, etc. conformément à ces
instructions, en tenant compte des conditions de
travail et de la tâche à accomplir. L’utilisation de l’outil
électrique pour des opérations diérentes de celles
pour lesquelles il est conçu pourrait causer une situation
dangereuse.
h. Gardez les poignées et les surfaces de préhension
propres, sèches et exemptes de toute trace d’huile ou
de graisse. Les poignées et les surfaces de préhension
glissantes ne permettent pas une manipulation et un
contrôle sûrs de l’outil dans des situations inattendues.
5. Utilisation et entretien de l’outil électrique
à pile
a. Ne rechargez l’outil qu’avec le chargeur indiqué par
le fabricant. Un chargeur qui est approprié pour un type
de bloc-piles pourrait créer un risque d’incendie quand il
est utilisé avec un autre bloc-piles.
b. Utilisez votre outil exclusivement avec des blocs-piles
conçus spéciquement pour celui-ci. L’emploi de tout
autre bloc-piles risquerait de causer des blessures et un
incendie.
c. Lorsque le bloc-piles n’est pas utilisé, gardez-le
à une distance susante des autres objets en
métal, comme des trombones, pièces de monnaie,
clés, clous, vis ou autres petits objets en métal qui
pourraient faire une connexion entre une borne et
une autre. Le court-circuitage des bornes d’une pile
pourrait causer des brûlures ou un incendie.
d. Dans des conditions d’utilisation abusives, du liquide
pourrait être éjecté de la pile, évitez tout contact
avec celui-ci. En cas de contact accidentel, lavez avec
de l’eau. En cas de contact de liquide avec les yeux,
consultez un professionnel de santé. Tout liquide éjecté
d’une pile peut causer de l’irritation ou des brûlures.
Avertissements généraux relatifs à la sécurité pour les outils électriques
GSA18V-280.indd 18GSA18V-280.indd 18 11/13/2025 2:11:57 PM11/13/2025 2:11:57 PM

19
Avertissements généraux relatifs à la sécurité pour les outils électriques
e. N’utilisez pas un bloc-piles ou un outil qui est
endommagé ou a été modié. Des piles endommagées
ou modiées peuvent se comporter de façon
imprévisible et causer un incendie ou une explosion, ou
entraîner des blessures.
f. N’exposez pas un bloc-piles ou un outil à un incendie
ou à une température excessive. L’exposition à un
incendie ou à une température supérieure à 130° C /
265° F pourrait causer une explosion.
g. Suivez toutes les instructions relatives à la charge et
ne chargez pas le bloc-piles ou l’outil en dehors de la
plage de température indiquée dans les instructions.
Une charge dans des conditions appropriées ou à des
températures en dehors de la plage spéciée pourrait
endommager les piles et augmenter le risque d’incendie.
6. Service après-vente
a. Faites entretenir votre outil électrique par un
réparateur compétent n’utilisant que des pièces de
rechange identiques. Ceci assurera le maintien de la
sécurité de l’outil électrique.
b. Ne tentez jamais de réparer des blocs-piles
endommagés. La réparation de blocs-piles ne doit
être eectuée que par le fabricant ou un prestataire de
services agréé.
Règles de sécurité pour les scies alternatives sans fil
a. Tenez l’outil électrique par ses surfaces de
préhension isolées lorsque vous eectuez une
opération dans le cadre de laquelle l’accessoire de
coupe risque d’entrer en contact avec un l caché.
L’entrée en contact d’un accessoire de coupe avec un l
sous tension pourrait rendre conductrices des parties
en métal exposées de l’outil électrique et causer un choc
électrique à l’opérateur.
b. Utilisez des brides ou d’autres moyens pratiques de
brider ou de supporter la pièce sur une plate-forme
stable. Tenir la pièce à la main ou contre le corps est
instable et risque de résulter en une perte de contrôle.
Avertissements supplémentaires concernant la sécurité
Ne percez, xez et ne rentrez pas dans des murs existants
ou autres endroits aveugles pouvant abriter des ls
électriques. Si cette situation est inévitable, débranchez tous
les fusibles ou les disjoncteurs alimentant ce site.
Éloignez les mains de la zone de coupe. Ne passez pas le
bras sous la pièce que vous êtes en train de scier. Vous ne
pourriez pas voir quand votre main s’approche trop près de
la lame.
Éloignez les mains de la zone située entre le boîtier
d’engrenages et le porte-lame (poussoir). Le porte-lame
(poussoir de lame) oscille d’avant en arrière et risque de vous
pincer les doigts
N’utilisez pas de lames émoussées ou abîmées. Les lames
pliées cassent facilement et risquent de provoquer des
soubresauts.
Assurez-vous que l’extrémité avant de la lame dépasse
du sabot sur toute la course de la lame. N’utilisez pas de
lames spéciales très courtes ou de lames qui sont tordues de
manière signicative. La lame ne doit pas toucher le sabot.
Les lames trop courtes ou tordues risquent de se coincer à
l’intérieur du sabot et de casser.
Avant de commencer à scier, mettez la machine en marche
et attendez qu’elle atteigne son plein régime. La machine
risque de brouter, de vibrer ou même de reculer violemment si
la vitesse de la lame est trop faible au début du sciage.
Portez toujours des lunettes de sécurité ou une protection
oculaire quand vous utilisez cette machine. Utilisez
un masque à poussière ou un masque à gaz pour les
applications qui produisent de la poussière.
Bridez la pièce avant de la scier. Ne la tenez jamais à
la main ou sur vos genoux. Les pièces petites ou minces
risquent de échir ou de vibrer, résultant en une perte de
contrôle de la machine.
Assurez-vous que toutes les vis de réglage (boutons) et le
porte-lame sont serrés avant de commencer à scier. Des
vis de réglage ou un porte-lame mal serrés peuvent provoquer
un patinage de la machine ou de la lame qui pourrait résulter
en une perte de contrôle.
GSA18V-280.indd 19GSA18V-280.indd 19 11/13/2025 2:11:57 PM11/13/2025 2:11:57 PM
20
Avertissements supplémentaires concernant la sécurité
Quand vous enlevez la lame de la machine, évitez de
la mettre en contact avec la peau et utilisez des gants
de protection appropriés pour saisir la lame ou tout
accessoire. Après un usage prolongé, il se peut que les
accessoires soient chauds.
Lorsque vous utilisez le crochet pour suspendre la scie,
n’oubliez jamais que la lame est exposée. Suspendez
toujours l’outil à un endroit où vous ne risquez pas, et où de
quelconques autres personnes présentes ne risquent pas,
d’entrer accidentellement en contact avec la lame.
Lorsque vous vous servez de la scie continuellement
pendant une période de temps prolongée, la boîte
d’engrenages peut devenir trop chaude pour qu’il soit
possible de la toucher en toute sécurité. Pour réduire le
risque de blessure, portez des gants de protection pendant le
fonctionnement de la scie.
L’emploi d’un GFCI et de dispositifs de protection
personnelle tels que gants et chaussures d’électricien en
caoutchouc améliorent votre sécurité personnelle.
Créez un agenda d’entretien périodique pour votre outil.
Quand vous nettoyez un outil, faites attention de n’en
démonter aucune pièce car il est toujours possible de mal
remonter ou de pincer les ls internes ou de remonter
incorrectement les ressorts de rappel des capots de
protection. Certains agents de nettoyage tels que l’essence,
le tétrachlorure de carbone, l’ammoniaque, etc. risquent
d’abîmer les plastiques.
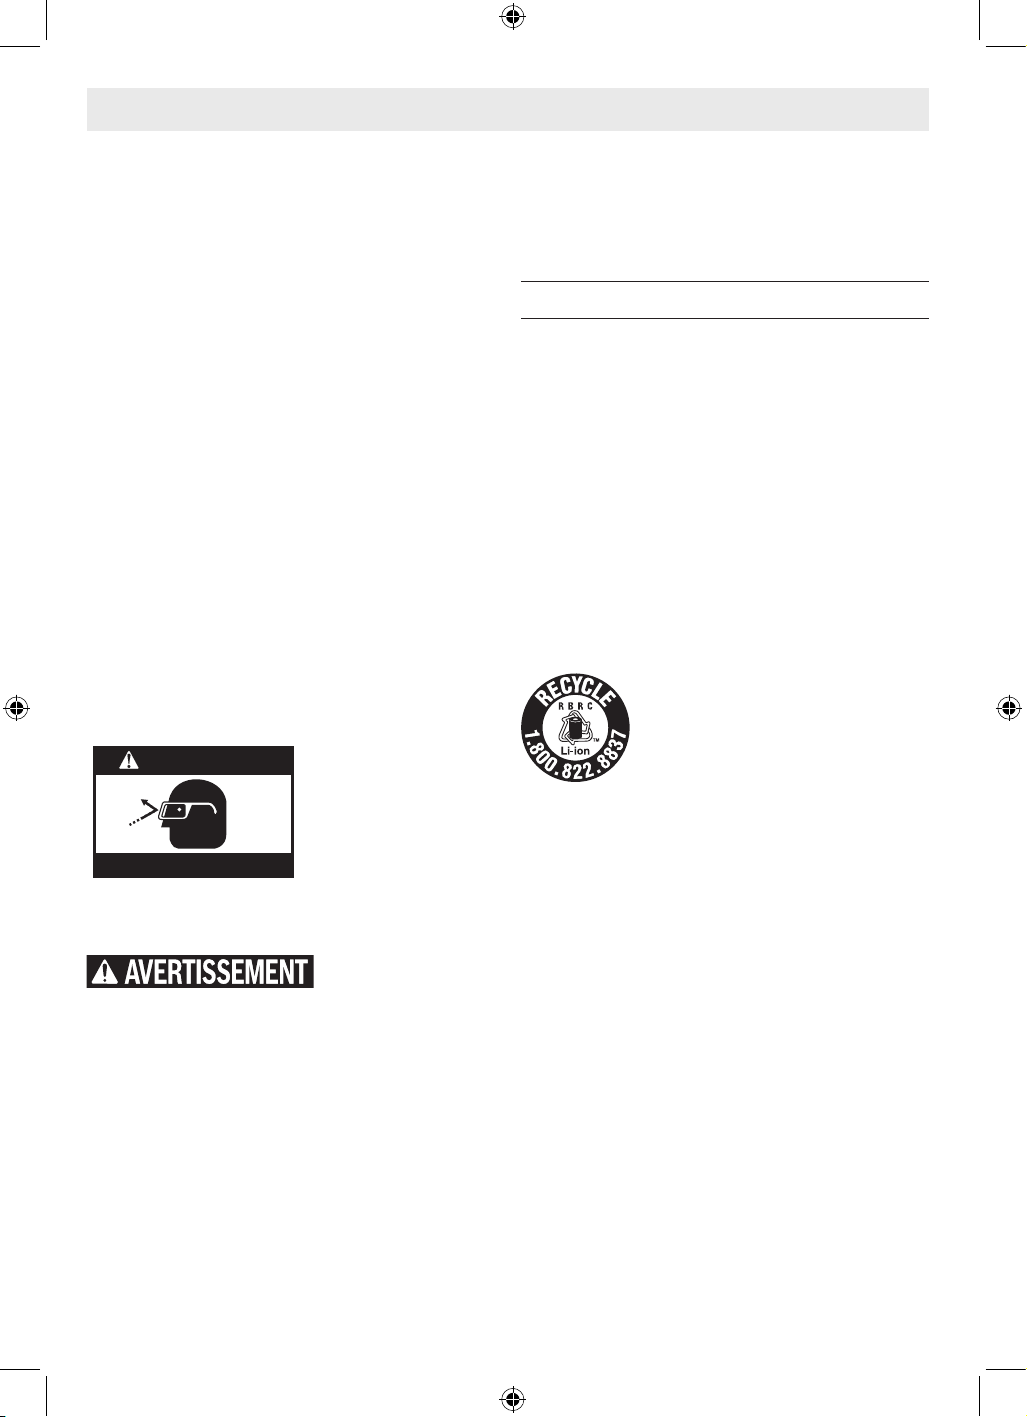
Portez des lunettes de protection
AVERTISSEMENT
Portez toujours des lu-
nettes de sécurité répon-
dant à la norme ANSI
Z87.1 (tel qu’indiqué sur
l’emballage) avant de com-
mencer à utiliser un outil
électrique. Pendant leur
fonctionnement, les outils électriques peuvent projeter des
corps étrangers dans les yeux de leur utilisateur et lui iniger
de graves blessures aux yeux.
Les travaux à la machine
tel que ponçage, sciage,
meulage, perçage et autres travaux du bâtiment peuvent
créer des poussières contenant des produits chimiques
qui sont des causes reconnues de cancer, de malformation
congénitale ou d’autres problèmes reproductifs. Ces
produits chimiques sont, par exemple :
• Le plomb provenant des peintures à base de plomb,
• Les cristaux de silices provenant des briques et du ciment
et d’autres produits de maçonnerie, et
• L’arsenic et le chrome provenant des bois traités
chimiquement.
Le niveau de risque dû à cette exposition varie avec la
fréquence de ces types de travaux. Pour réduire l’exposition
à ces produits chimiques, il faut travailler dans un lieu bien
ventilé et porter un équipement de sécurité approprié tel
que certains masques à poussière conçus spécialement pour
ltrer les particules microscopiques.
Mise au rebut
Cette section fait partie de l’engagement de Robert Bosch
Tool Corporation à préserver notre environnement et à
conserver nos ressources naturelles.
Mise au rebut de outil
Ne jetez pas les outils électriques et les piles/batteries
rechargeables avec les ordures ménagères !
Mise au rebut des piles
Ne tentez pas de désas-sembler le bloc-piles ou d’enlever
tout composant faisant saillie des bornes de piles, ce qui
peut provoquer un incendie ou des blessures. Avant la mise
au rebut, protégez les bornes exposées à l’aide d’un ruban
isolant épais pour prévenir le court-circuitage.
Piles lithium-ion
Si le produit est équipé d’une pile lithium-
ion, la pile doit être ramassée, recyclée ou
mise au rebut d’une manière qui ne soit pas
nocive pour l’environnement.
Le sceau RBRC de recyclage des piles,
homologué par l’EPA (Agence pour la
protection de l’environnement des États-Unis), qui se trouve
sur les piles au lithium-ion (Liion) indique que Robert Bosch
Tool Corporation participe volontairement à un programme
industriel de ramassage et de recyclage de ces piles au terme
de leur vie utile, pourvu qu’elles soient mises hors service aux
États-Unis ou au Canada. Le programme du RBRC ore une
alternative pratique à la mise des piles au Li-ion usées au rebut
ou au ramassage d’ordures municipal, ce qui pourrait être
interdit dans votre région.
Veuillez appeler le 1-800-8-BATTERY pour obtenir de plus
amples renseignements sur le recyclage des piles au Li-ion
et sur les restrictions ou interdictions de mise au rebut qui
s’appliquent à votre région ou renvoyez vos piles à un Centre
de Service Bosch/Dremel pour recyclage. La participation
de Robert Bosch Tool Corporation à ce programme s’insère
dans le contexte de notre engagement à préserver notre
environnement et à conserver nos ressources naturelles.
GSA18V-280.indd 20GSA18V-280.indd 20 11/13/2025 2:11:58 PM11/13/2025 2:11:58 PM
21
Utilisation prévue
Utilisez cette scie alternative uniquement comme prévu. Une utilisation inappropriée
pourrait causer des blessures et des dommages matériels.
Cet outil électrique est adapté au sciage du bois, du plastique, du métal et des matériaux de construction sur une surface ferme.
Il convient aux coupes à la fois droites et courbes. Lorsque vous utilisez des lames de scie bimétalliques appropriées désignées,
il est également possible de réaliser des coupes aeurantes. Les recommandations relatives à la lame de la scie doivent être
respectées.
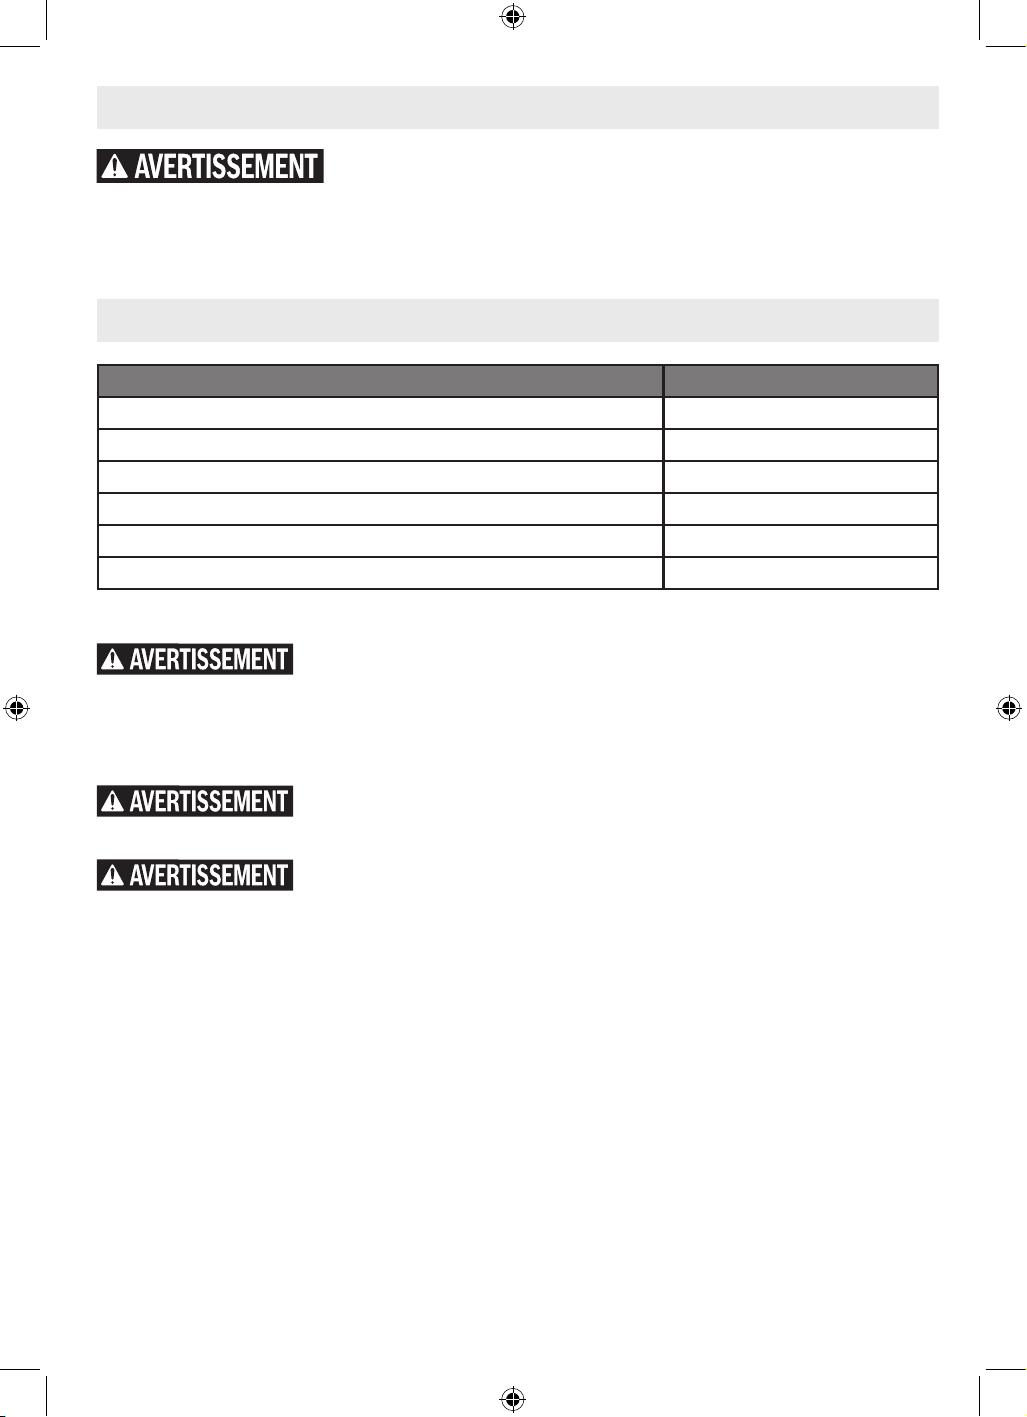
Spécifications
Numéro de modèle GSA18V-280
Tension nominale 18 V
Coups par minute (CPM) à vide 0-3,100
Longueur de la course 1.1 po (28 mm)
Température admissible des piles pendant la charge +32…+113°F (0…+45°C)
Température ambiante admissible pendant le fonctionnement et le stockage -4…+122°F (-20…+50°C)
Température ambiante recommandée pendant la charge +32…+95°F (0...+35°C)
Blocs-piles/chargeurs
Lisez toutes les consignes de sécurité, instructions, illustrations et spéci-cations fournies
avec cet outil électrique et ce chargeur. Le non-respect de toutes les instructions gurant ci-
après pourrait causer un choc électrique, un incendie et/ou des blessures graves.
CONSERVEZ TOUS LES AVERTISSEMENTS ET TOUTES
LES CONSIGNES DE SÉCURITÉ POUR RÉFÉRENCE FUTURE.
Utilisez uniquement avec les blocs-piles au lithium-ion Bosch ou AMPShare de 18 V
indiqués ci-dessous. L’emploi de tout autre bloc-piles risquerait de causer des blessures et un
incendie.
Utilisez uniquement avec les chargeurs Bosch ou AMPShare de 18 V indiqués ci-dessous.
L’emploi de tous autres chargeur risquerait de causer des blessures et un incendie.
Blocs-piles *
BAT000 à BAT999, GBA18V000 à GBA18V999, EXBA18V-000 à EXBA18V-999
Chargeurs*
BC1880, GAL12V/18V-80, GAL18V6-80, GAX1218V-30, GAL18V-000 à GAL18V-999
* Pour les toutes dernières informations sur la compatibilité des piles, veuillez vous référer à www.boschtools.com.
GSA18V-280.indd 21GSA18V-280.indd 21 11/13/2025 2:11:58 PM11/13/2025 2:11:58 PM
22
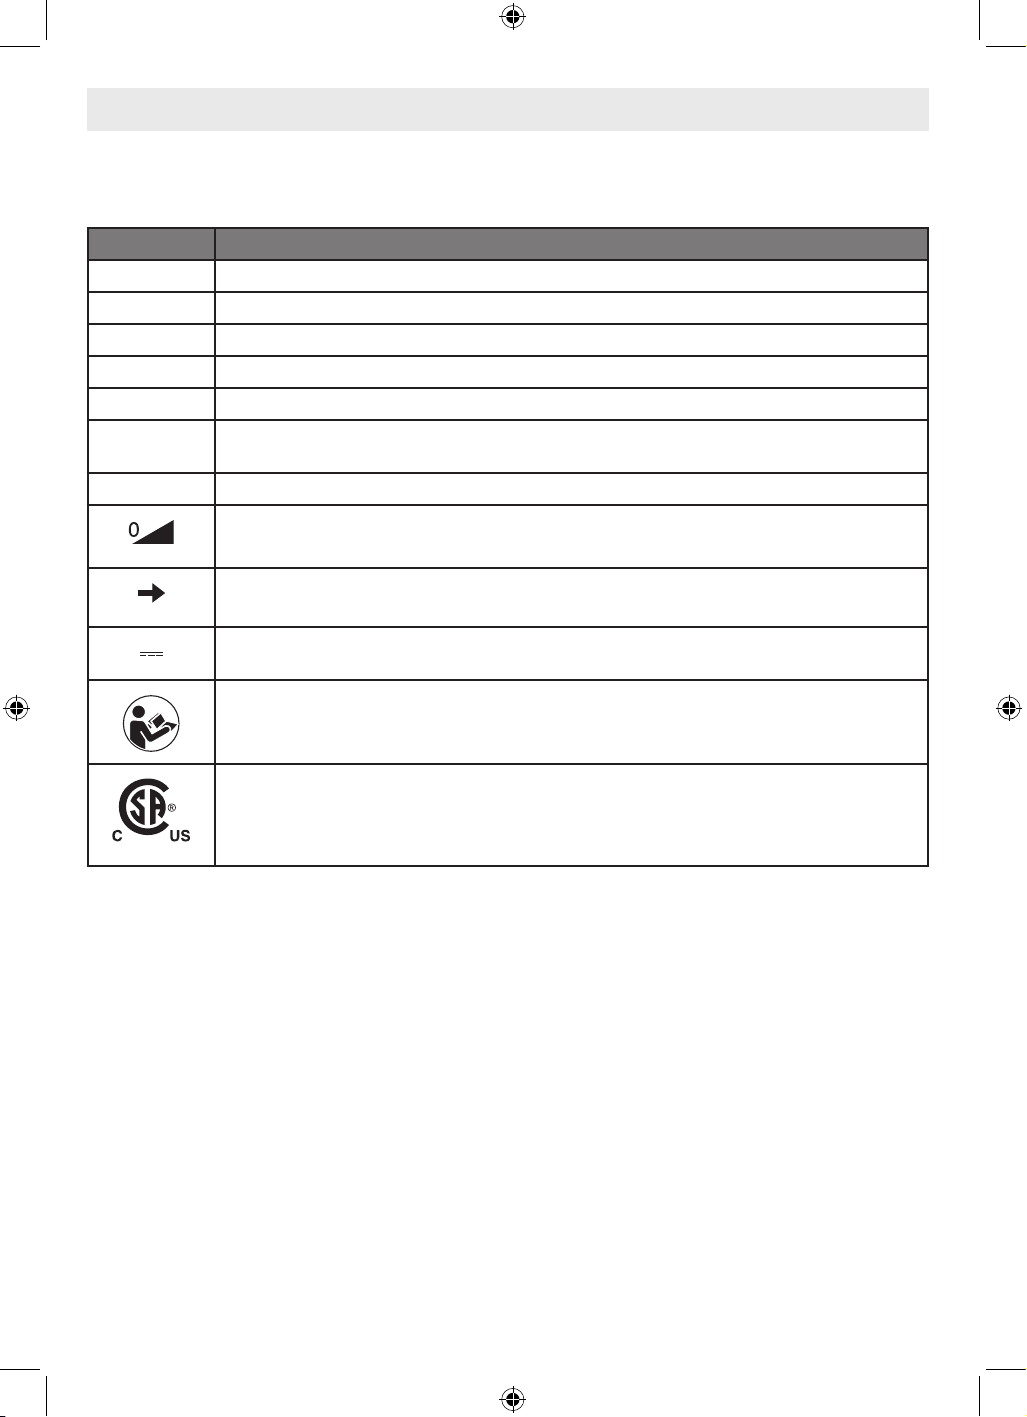
Symboles
Important : Certains des symboles suivants peuvent être utilisés sur votre outil. Veuillez les étudier et apprendre leur
signication. L’interprétation correcte de ces symboles vous aidera à mieux utiliser votre outil et à vous en servir plus
ecacement et en toute sécurité.
Symbole Désignation/Explication
V Volts (voltage)
min Minutes (temps)
n
0
Vitesse à vide (vitesse de rotation, à vide)
.../min Tours ou mouvement alternatif par minute (tours, coups, vitesse en surface, orbites, etc., par minute)
CPM Coups par minute (vitesse)
1, 2, 3, ...
I, II, III,
Réglages du sélecteur (Réglages de vitesse, de couple ou de position. Un nombre plus élevé signie une
vitesse plus grande)
mm Millimètres (dimension)
Sélecteur variable à l’inni avec arrêt (La vitesse augmente depuis le réglage 0)
Flèche (action dans la direction de la èche)
Courant continu (type ou caractéristique du courant)
Alerte l’utilisateur pour lire le mode d’emploi.
Ce symbole signie que cet outil est approuvé par l’Association canadienne de normalisation selon les
normes des États-Unis et du Canada.
GSA18V-280.indd 22GSA18V-280.indd 22 11/13/2025 2:11:59 PM11/13/2025 2:11:59 PM
23
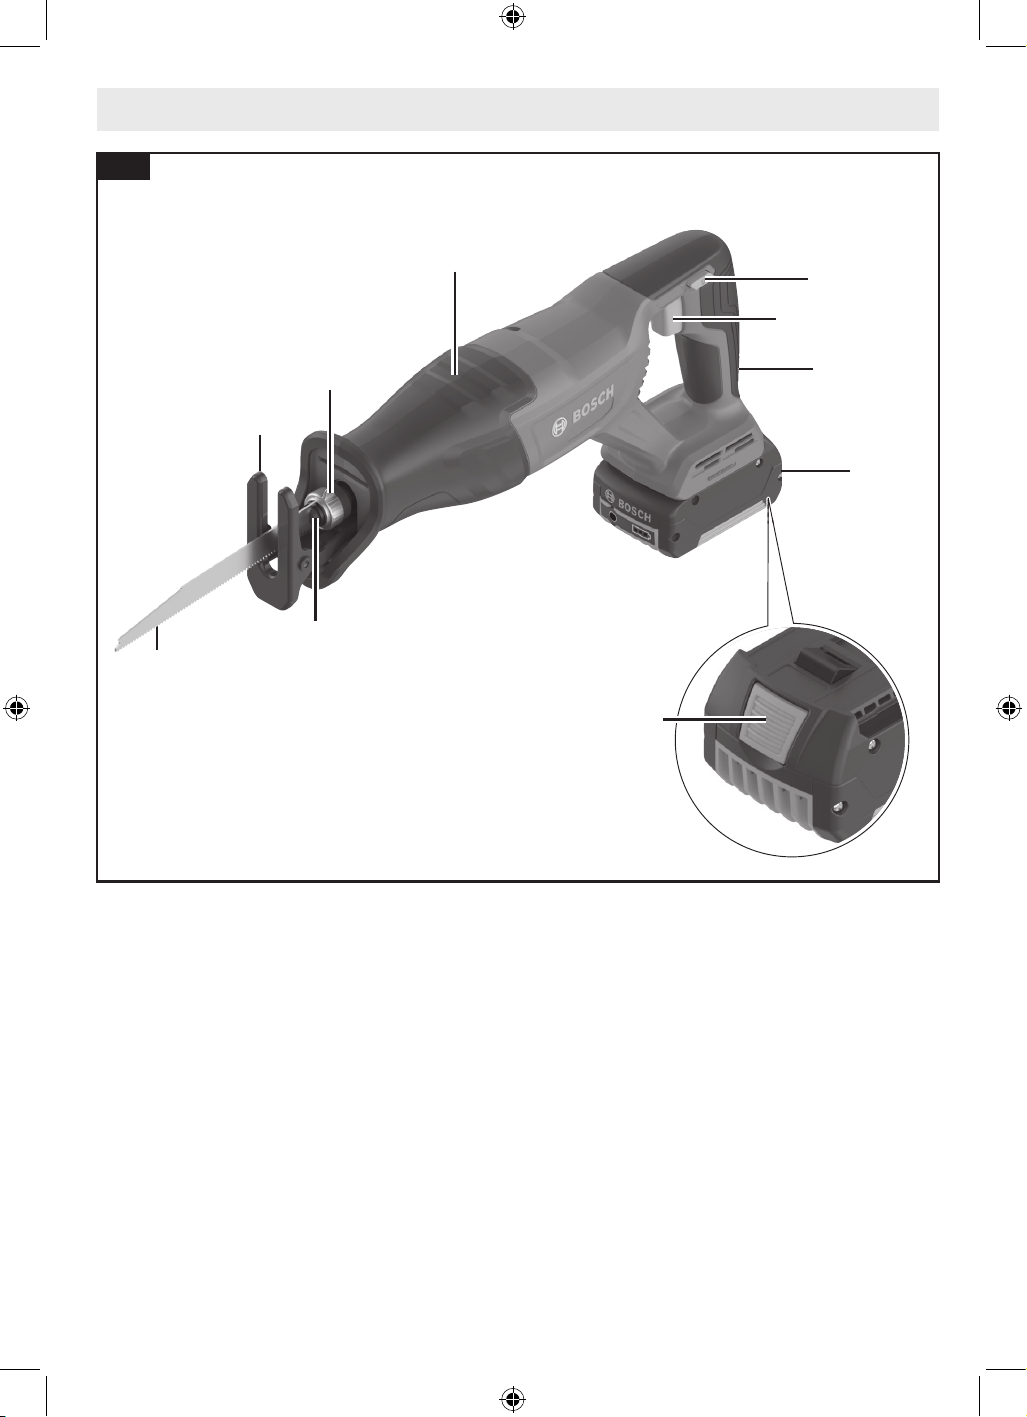
Familiarisez-vous avec votre scie alternative GSA18V-280
1 Lame de scie*
2 Plaque d’assise
3 Levier d’éjection de la lame de scie
4 Porte-lame
5 Poignée (surface de préhension isolée)
6 verrouillage de l’interrupteur à gâchette
7 Commutateur à gâchette à vitesse variable
8 Bloc-piles*
9 Bouton de libération du bloc-piles*
* Vendu séparément
1
4
3
5
5
6
7
9
8
2
Fig. 1
GSA18V-280.indd 23GSA18V-280.indd 23 11/13/2025 2:12:00 PM11/13/2025 2:12:00 PM
24
Assemblage
Débranchez le bloc-piles de l’outil avant de procéder à un assemblage, à des réglages,
à la recherche de la cause de problèmes ou à des changements d’accessoires. De telles
mesures de sécurité préventives réduisent le risque de démarrage accidentel de l’outil, qui pourrait causer des blessures.
Choix de lame
Aucune lame ne peut sure adéquatement à toutes les tâches.
Certains matériaux requièrent des lames spéciales. Étant
donné que votre scie va-et-vient peut tailler tant de matériaux,
Bosch met plusieurs types de lames à votre disposition. Pour
de meilleurs résultats, prenez soin de choisir la lame qui
convient.
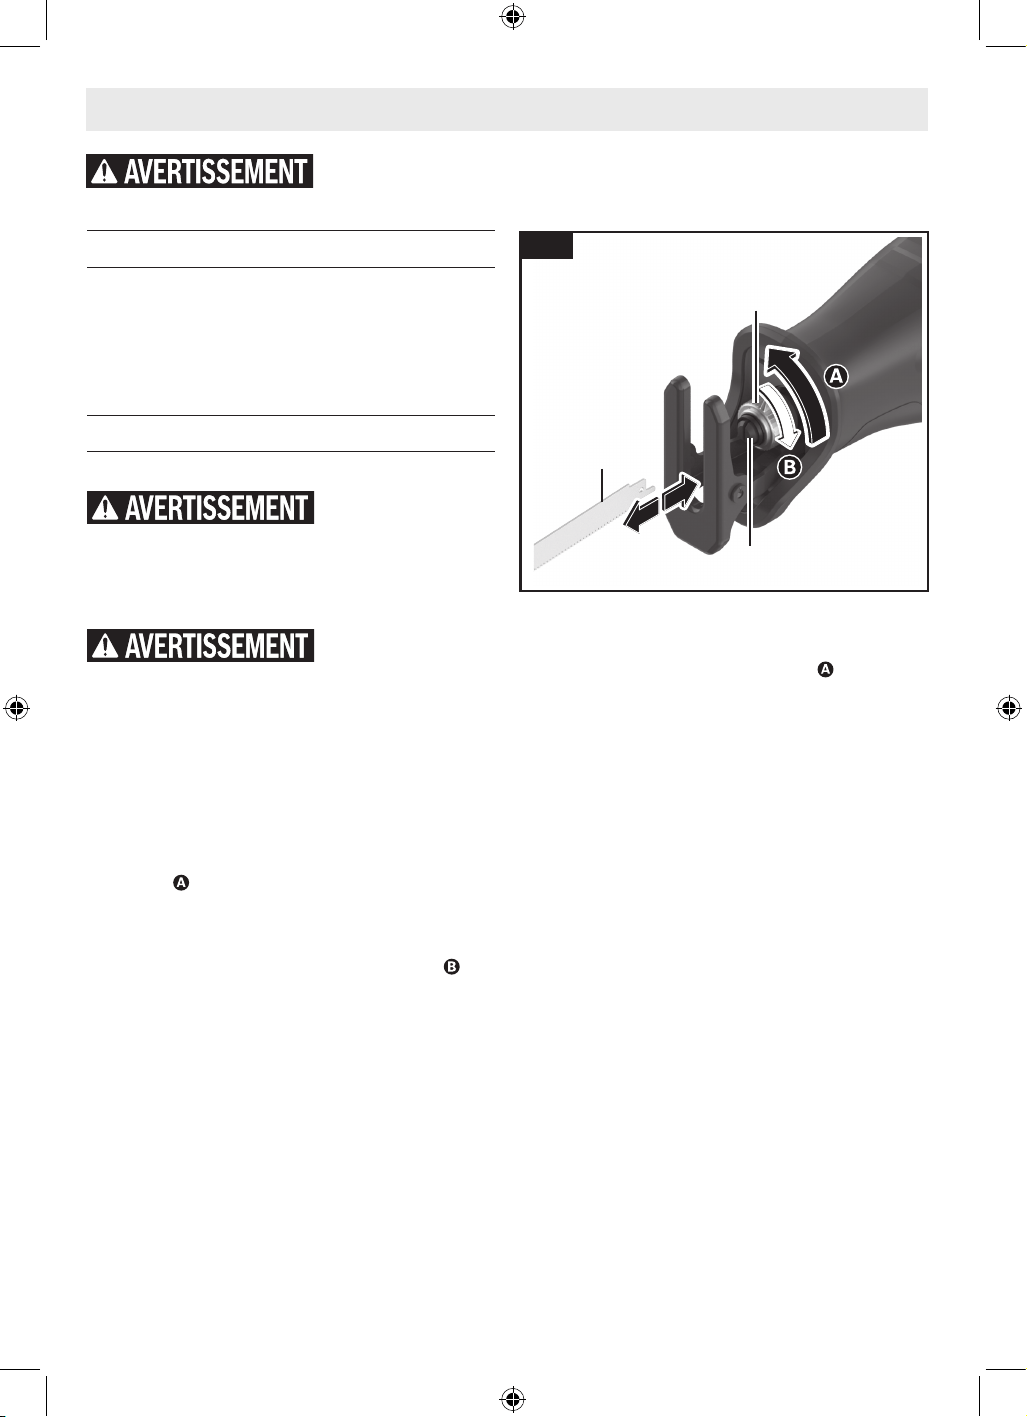
Installation et retrait d’une lame
(Fig. 2)
Lorsque vous retirez la
lame de l’outil, évitez
tout contact avec la peau et utilisez des gants de
protection appropriés pour saisir la lame ou l’accessoire.
Les accessoires peuvent être très chauds après une utilisation
prolongée.
Assurez-vous que
l’extrémité avant de la
lame dépasse du sabot sur toute la course de la lame.
N’utilisez pas de lames spéciales très courtes ou de lames qui
sont tordues de manière signicative. La lame ne doit pas
toucher le sabot. Les lames trop courtes ou tordues risquent
de se coincer à l’intérieur du sabot et de casser.
Pour installer la lame
1. Faites tourner le levier d’éjection de la lame de scie 3
d’environ 90° en direction de la butée, dans le sens
indiqué , et maintenez-le en place.
2. Faites glisser la lame de scie 1 dans la fente du support
de la lame de scie 4.
3. Relâchez le levier d’éjection de la lame de scie 3 pour
verrouiller la lame de scie 1. en place. Assurez-vous que
la lame de scie 1 est verrouillée solidement en place.
Remarque : La plupart des lames peuvent être installées avec
les dents orientées vers le haut ou le bas, selon ce que l’on
désire en fonction de l’application.
Pour retirer la lame
1. Faites tourner le levier d’éjection de la lame de scie 3
d’environ 90° dans la direction montrée .
2. Retirez la lame de scie 1 du support de la lame de scie 4.
3. Relâchez le levier d’éjection de la lame de scie 3.
1
3
4
Fig. 2
GSA18V-280.indd 24GSA18V-280.indd 24 11/13/2025 2:12:00 PM11/13/2025 2:12:00 PM
25
Assemblage
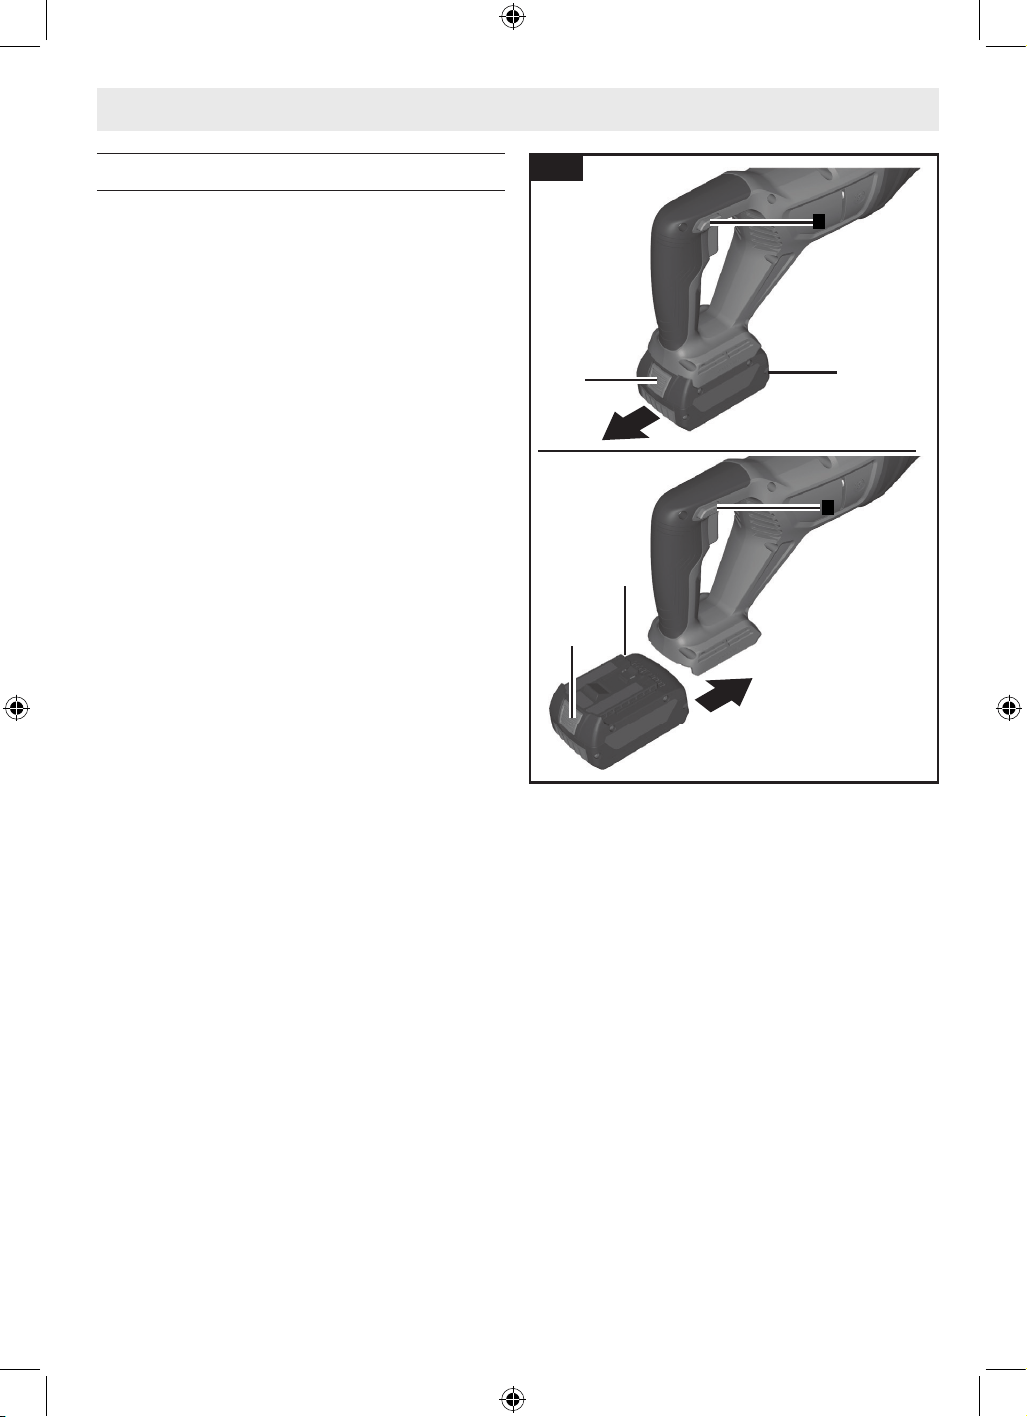
Fig. 3
Insertion et retrait du bloc-piles
(Fig. 3)
Pour insérer le bloc-piles
1. Placez le loquet de verrouillage de l’interrupteur à
gâchette 6 en position verrouillée.
2. Faites glisser le bloc-piles 8 dûment chargé dans le boîtier
jusqu’à ce que le bloc-piles 8 se verrouille en place.
Votre outil est muni d’un mécanisme de verrouillage
secondaire pour empêcher le bloc-piles de tomber
complètement du boîtier de l’outil au cas il s’en détacherait en
conséquence des vibrations.
Pour retirer le bloc-piles
1. Appuyez sur le bouton de déclenchement du bloc-piles 9
et faites glisser le bloc-piles 8 vers l’avant.
2. Appuyez à nouveau sur le bouton de libération du
bloc-piles 9 et faites glisser le bloc-piles 8 complètement
en dehors du boîtier de l’outil.
9
9
8
8
6
6
6
6
GSA18V-280.indd 25GSA18V-280.indd 25 11/13/2025 2:12:00 PM11/13/2025 2:12:00 PM
26
DÉVERROUILLAGE
VERROUILLAGE
Opération
Pour votre sécurité, prenez toujours les précautions suivantes et conformez-vous
également aux consignes de sécurité gurant aux pages 17 à 20. Sinon, vous risqueriez
de causer des dommages aux équipements, des dommages aux biens, ou des blessures.
Débranchez le bloc-piles de l’outil avant de procéder à un assemblage, à des réglages,
à la recherche de la cause de problèmes ou à des changements d’accessoires. De telles
mesures de sécurité préventives réduisent le risque de démarrage accidentel de l’outil, qui pourrait causer des blessures.
Protection contre les décharges profondes
La pile lithium-ion est protégée contre les décharges
profondes par un système ECP (Electronic Cell Protection).
Lorsque la pile est vide, l’outil est mis automatiquement hors
service au moyen d’un circuit de protection.
Ne continuez pas à
appuyer sur
l’interrupteur à gâchette après la mise hors tension
automatique de l’outil. Ceci pourrait endommager les piles.
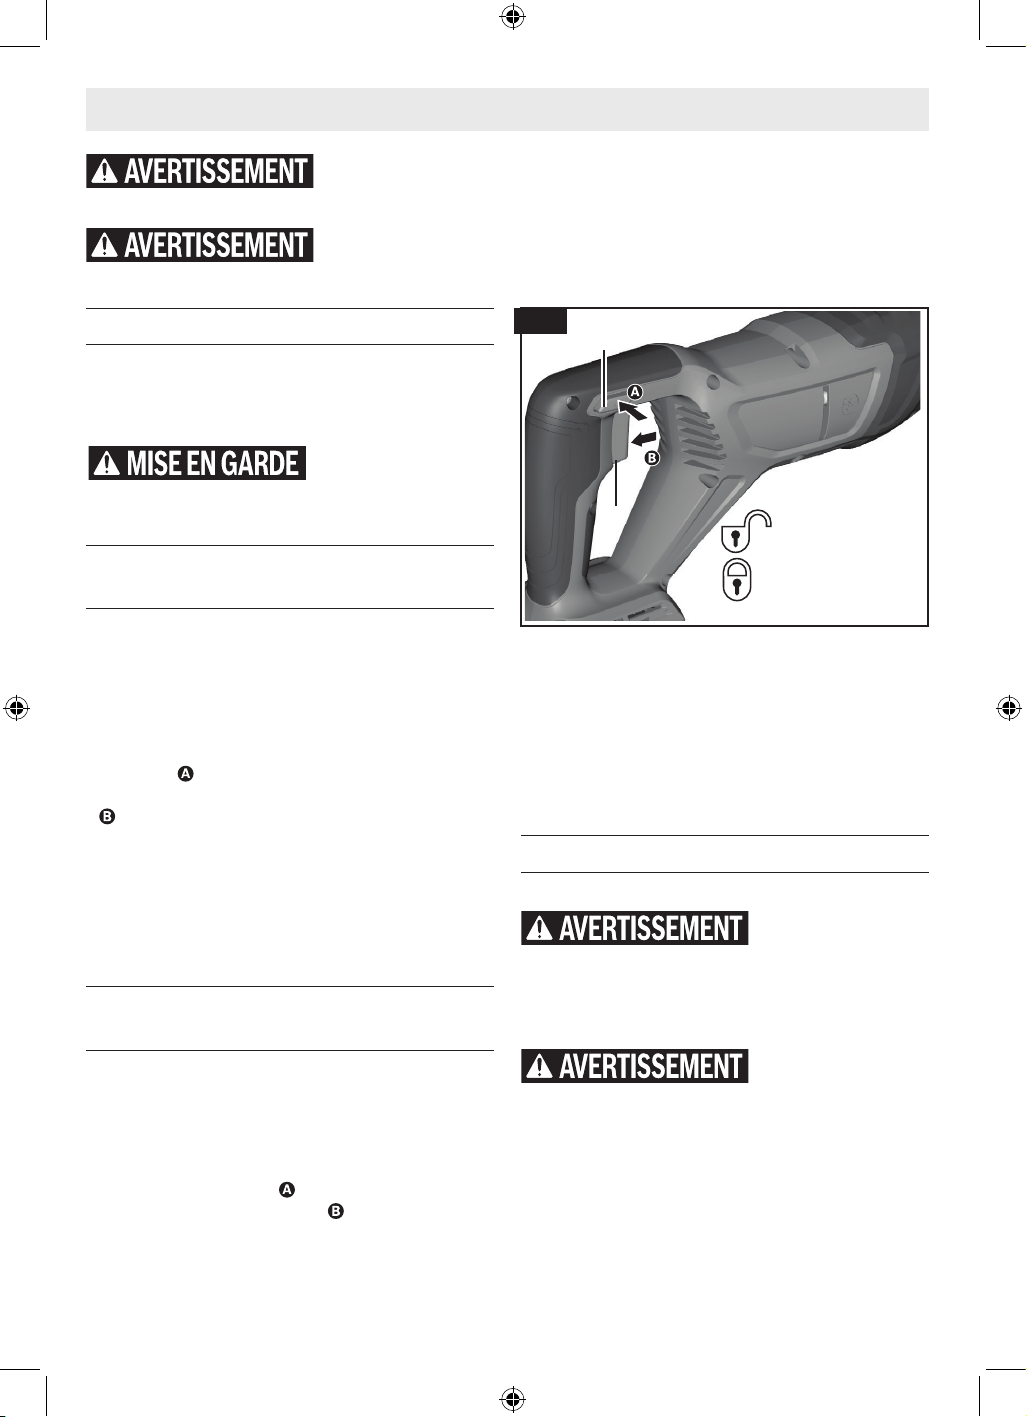
Loquet de verrouillage de l’interrupteur à
gâchette
(Fig. 4)
Le loquet de verrouillage de l’interrupteur à gâchette 6 est
conçu pour empêcher l’activation accidentelle de la gâchette.
Pour déverrouiller l’interrupteur à gâchette :
Appuyez à fond sur le loquet de verrouillage de l’interrupteur
à gâchette 6 du côté du symbole de déverrouillage pour
déverrouiller l’interrupteur à gâchette de réglage de la vitesse
7 .
Pour verrouiller l’interrupteur à gâchette :
Relâchez l’interrupteur à gâchette de réglage de la vitesse 7 et
appuyez à fond sur le loquet de verrouillage de l’interrupteur à
gâchette 6 du côté du symbole de verrouillage pour verrouiller
l’interrupteur à gâchette de réglage de la vitesse 7.
Commutateur à gâchette contrôlé à vitesse
variable
(Fig. 4)
Votre outil est muni d’un interrupteur à gâchette contrôlé à
vitesse variable 7.
Pour mettre l’outil en marche, poussez le loquet de
verrouillage de l’interrupteur à gâchette 6 du côté du
symbole de déverrouillage et tirez sur l’interrupteur à
gâchette de réglage de la vitesse 7 . L’outil se désactivera
automatiquement dès que vous cesserez d’appuyer sur la
gâchette.
Fig. 4
La fréquence de frappe de la lame peut être ajustée de la
fréquence minimum à la fréquence maximum par la pression
que vous appliquez sur la gâchette. Appliquez plus de
pression pour augmenter la vitesse et relâchez la pression an
de réduire la vitesse.
La fréquence de frappe requise dépend du matériau que vous
coupez et des conditions de travail; elle peut être déterminée
par un essai de coupe initial.
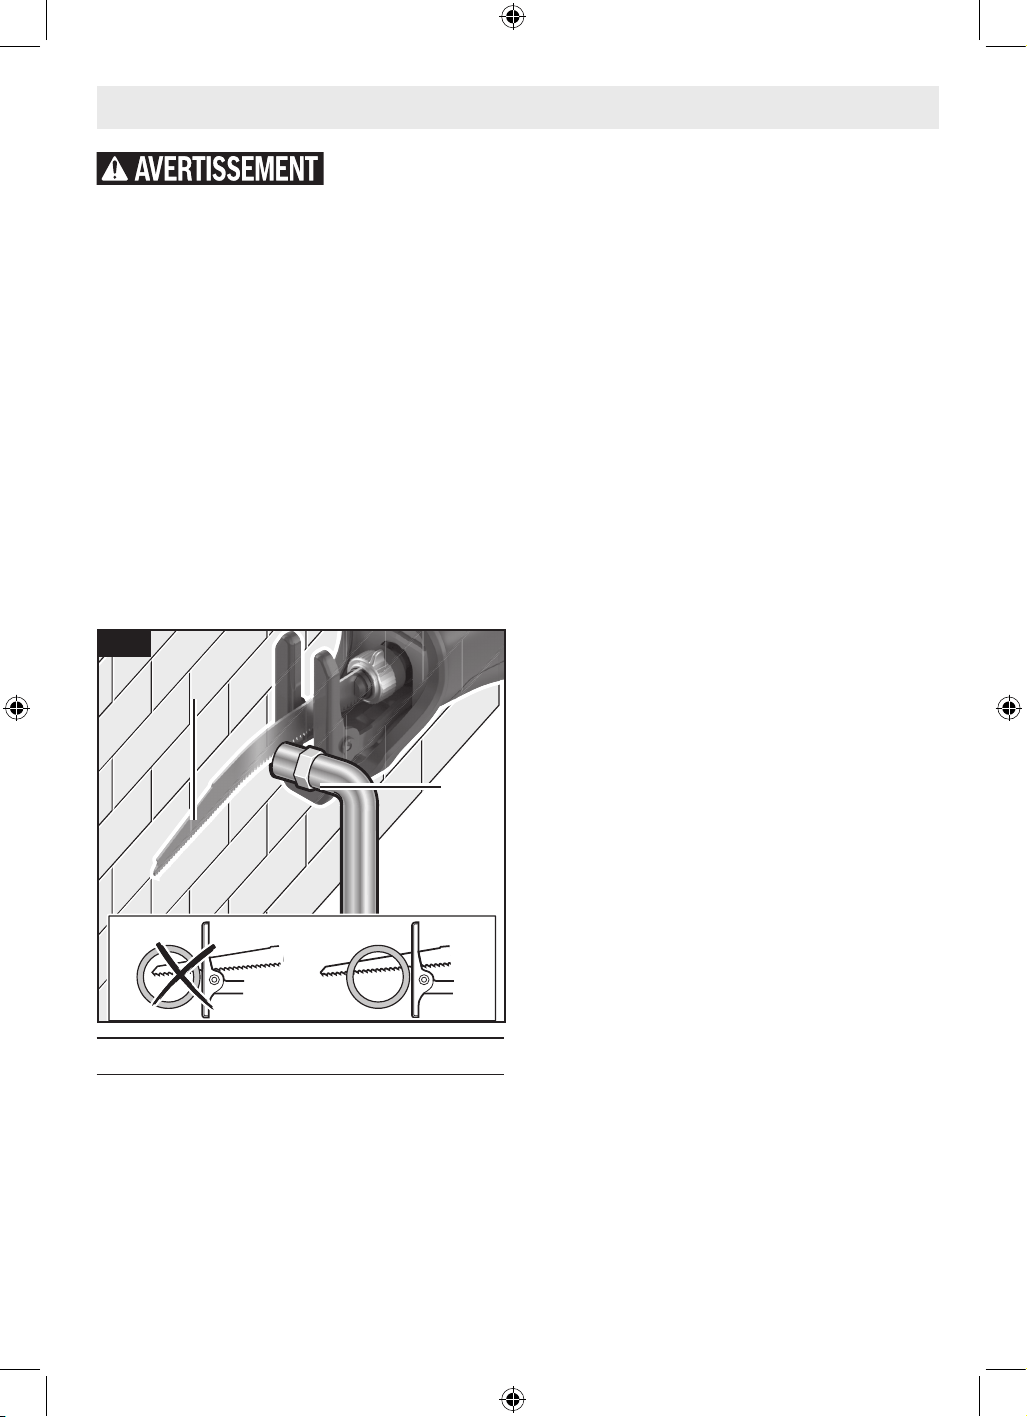
Utilisation de la scie
(Fig. 5)
Utilisez des brides de
xation ou un autre
moyen pratique de sécuriser et de supporter la pièce à
travailler sur une plateforme stable. Si vous tenez la pièce à
travailler à la main ou ou contre votre corps, ceci la rendra
instable et pourrait causer une perte de contrôle de l’outil
Tenez toujours l’outil
électrique par ses
surfaces de préhension isolées lorsque vous eectuez une
opération au cours de laquelle l’accessoire de coupe
pourrait entrer en contact avec des ls cachés. L’entrée en
contact de l’accessoire de coupe avec un l sous tension
pourrait rendre conductrices des parties en métal exposées
de l’outil électrique et causer un choc électrique à l’opérateur.
7
6
GSA18V-280.indd 26GSA18V-280.indd 26 11/13/2025 2:12:02 PM11/13/2025 2:12:02 PM
27
Avant de commencer à
couper, mettez l’outil en
marche et attendez que la lame atteigne la vitesse
maximale souhaitée. L’outil peut « brouter » ou vibrer si la
vitesse de la lame est trop lente au début de la coupe, ce qui
peut entraîner un choc en retour.
1. Brider fermement la pièce.
2. Faire un trait de scie et saisir l’outil en mettant une main
sur la poignée 5 et l’autre sur le manchon en caoutchouc
recouvrant le boîtier avant.
3. Appuyez fermement le sabot 2 contre la pièce pour
minimiser la force de réaction (soubresauts) et les
vibrations.
4. Pour mettre l’outil en marche, poussez le loquet de
verrouillage de l’interrupteur à gâchette 6 du côté du
symbole de déverrouillage et tirez sur l’interrupteur
à gâchette de réglage de la vitesse 7 Laissez la scie
atteindre la vitesse souhaitée avant de commencer la
coupe. Guidez la scie de manière à ce que la lame de la
scie 1 se déplace le long de la ligne marquée.
Conseils pour le sciages
Suivez ces quelques conseils simples pour réduire l’usure de
la pièce et de l’outil et la fatigue de l’utilisateur
1. Les lames scient en tirant lors de la course de retour. Pour
les travaux ns tels que les panneaux ou la bre de verre,
mettez le côté vu du panneau en dessous (et sciez sur
l’envers).
Opération
Fig. 5
2. Utilisez une lame qui convient au matériau à scier et ayez
des lames de rechange à portée de main pour remplacer
les lames émoussées. Remplacez immédiatement les
lames ssurées ou tordues.
3. Choisissez la vitesse de coupe qui convient.
4. Pour réduire le risque de blessures, assurez-vous que la
lame dépasse toujours du sabot et de la pièce sur toute sa
course. Si l’avant de la lame heurte le sabot ou la pièce, la
lame risque de se fracasser.
5. Lorsqu’on scie du métal :
• Lubriez pour scier plus facilement, plus régulièrement
et plus rapidement et pour allonger la durée de vie de la
lame.
• Pour les métaux non ferreux, l’aluminium, le bronze ou le
laiton mettez de la cire en bâton sur la lame.
• Pour les métaux ferreux, le fer et l’acier mettez de l’huile
à machine ou de l’huile de coupe sur la surface à scier.
6. Pour scier des métaux ns, mettez la pièce en sandwich
entre deux chutes de bois. Bridez l’ensemble ou mettez-le
dans un étau. Si le bridage est susant, une seule chute
de bois sur le dessus sut. Faites votre tracé sur la chute
de bois.
7. Ne forcez pas sur la scie. Laissez la lame et la scie faire
le travail.
2
1
1
GSA18V-280.indd 27GSA18V-280.indd 27 11/13/2025 2:12:02 PM11/13/2025 2:12:02 PM
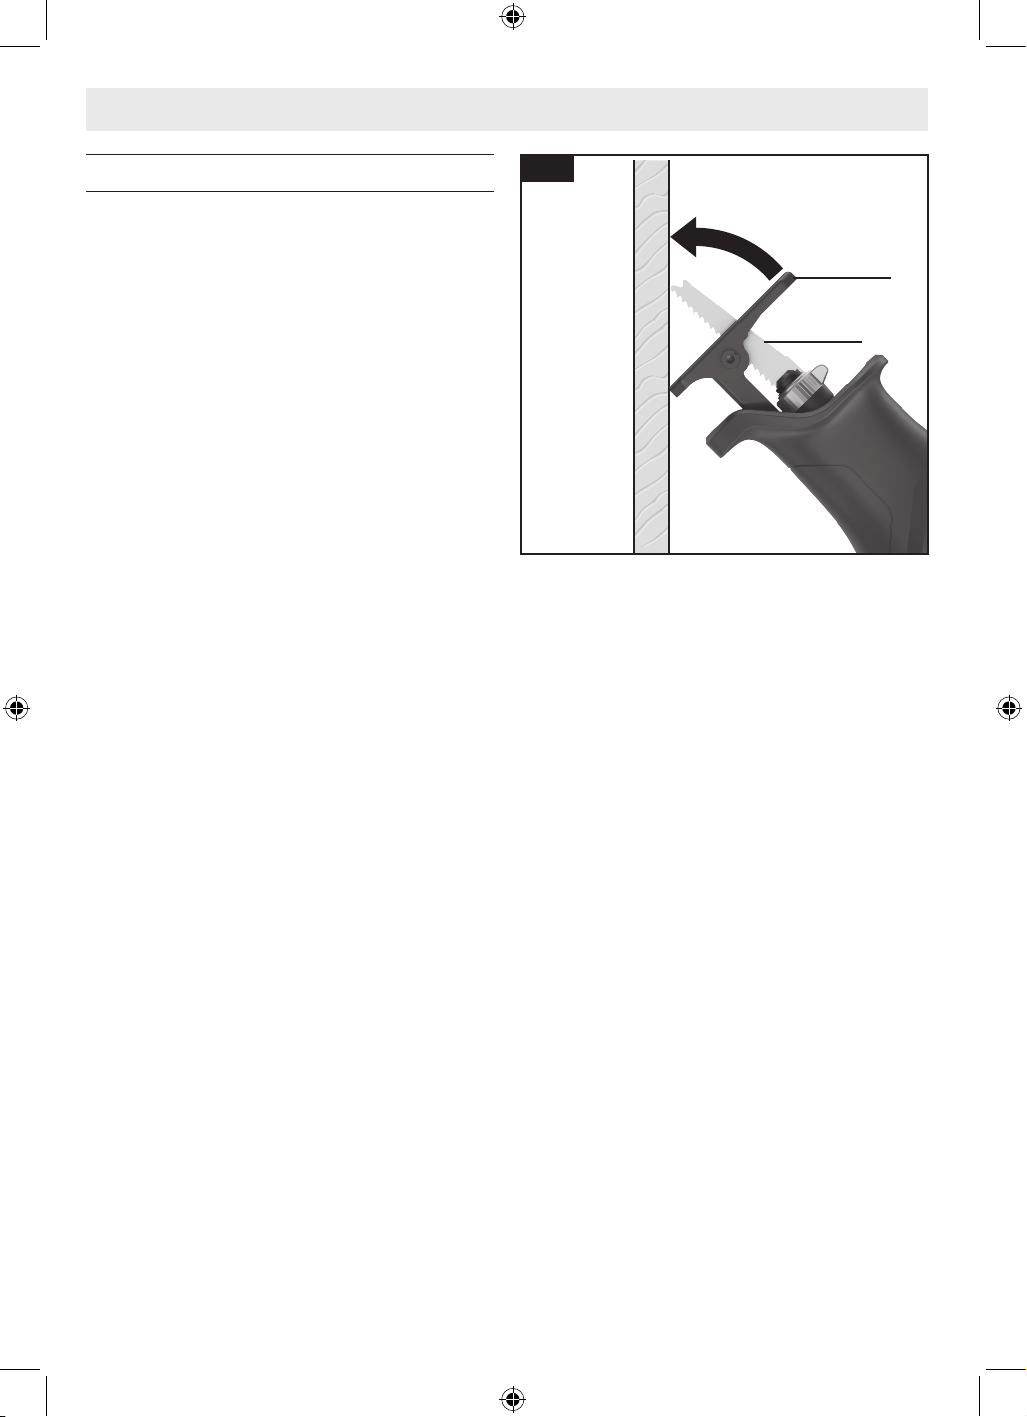
28
Opération
Coupes de cavités/en plongée
(Fig. 6)
La scie alternative peut être utilisée pour eectuer des coupes
en plongée dans un matériau tendre (par exemple, du bois ou
des matériaux de construction légers pour des parois) sans
nécessiter de trou initial.
1. Marquez clairement la ligne à couper sur l’ouvrage.
2. Placez l’outil avec un bord de la plaque d’assise 2
reposant fermement contre le matériau.
3. Placez la pointe de la lame 1 (sans que la scie ne soit en
marche) sur le trait à couper.
4. Comprimez l’interrupteur à gâchette 7 et engagez
délicatement la lame 1 de scie en mouvement dans le
matériau.
5. Inclinez la scie pour que la lame 1 dépasse l’ouvrage.
6. Après que la lame 1 aura pénétré dans le matériau à
couper, continuez à scier le long du trait ayant été tracé
précédemment.
Remarques :
Pour faciliter les coupes en plongée, utilisez une lame épaisse,
installez la lame avec les dents orientées vers le haut et tenez
la scie sens dessus dessous comme illustré.
Ne réalisez pas de coupe en plongée dans des surfaces en
métal.
Il ne faut pas tenter de réaliser des coupes en plongée dans
les matériaux épais et dans les matériaux durs, comme le
métal. De tels matériaux ne peuvent être coupés avec la scie
alternative qu’en commençant la coupe depuis le bord du
matériau ou à partir d’un trou percé à travers toute la surface
du matériau qui serait assez grand pour permettre d’y engager
complètement la lame de la scie.
Fig. 6
2
1
GSA18V-280.indd 28GSA18V-280.indd 28 11/13/2025 2:12:02 PM11/13/2025 2:12:02 PM
29
Entretien
Pour éviter les accidents, débranchez toujours le bloc-piles de l’outil avant de le net-
toyer ou d’eectuer une opération de maintenance.
Entretien général
Maintenez votre outil, votre bloc-piles et votre chargeur en
bon état de fonctionnement en adoptant un programme
d’entretien régulier. Inspectez vos outils pour vous assurer
qu’ils ne font pas un bruit inhabituel, que les pièces en
mouvement sont bien alignées et qu’elles ne se coincent
pas, qu’il n’y a pas de pièces cassées ou qu’il n’existe aucune
situation pouvant aecter le fonctionnement de l’outil.
Si l’outil ne démarre pas ou ne fonctionne pas à pleine
puissance avec un bloc-piles entièrement chargé, nettoyez
les contacts du bloc-piles. Si l’outil ne fonctionne toujours pas
correctement, renvoyez l’outil, le chargeur et le bloc-piles à un
centre de service après-vente BOSCH pour les y faire réparer.
Nettoyage
Certains produits de
nettoyage et solvants
endommagent les pièces en plastique. En voici quelques
exemples : l’essence, le tétrachlorure de carbone, les solvants
de nettoyage au chlore, l’ammoniac et les détergents
domestiques contenant de l’ammoniac.
Les ouïes de ventilation et les leviers de l’interrupteur doivent
rester propres et exempts de corps étrangers. Ne tentez pas
de les nettoyer en enfonçant des objets pointus dans les
orices.
Service
Faites réparer votre outil
électrique par un agent
de service qualié n’utilisant que des pièces de rechange
identiques. Ceci assure que la sécurité de l’outil électrique
est préservée.
Lubrication de l’outil
Votre outil Bosch a été lubrié correctement en usine et il est
prêt à l’utilisation. Nous vous conseillons de re-graisser les
outils qui comportent des engrenages avec un lubriant à
engrenages spécial à chaque fois que vous changez les balais.
Moteurs
Le moteur de votre outil a été conçu pour de nombreuses
heures d’utilisation able. Pour maintenir l’ecacité maximale
du moteur, nous recommandons de l’examiner tous les six
mois. Seul un moteur de remplacement Bosch authentique,
conçu spécialement pour votre outil, doit être utilisé.
Piles
Vériez régulièrement
les blocs-piles pour vous
assurer qu’ils n’approchent pas de la n de leur durée de
vie. Si vous constatez une réduction de la performance de
l’outil ou de l’autonomie de fonctionnement entre deux
charges, cela signie que le moment est venu de remplacer le
bloc-piles. Si vous ne le remplacez pas, l’outil risquerait de
fonctionner de façon inappropriée ou le chargeur risquerait
d’être endommagé.
Entretien du porte-lame
Lubriez périodiquement le porte-lame avec un lubriant sec
tel que le graphite.
Accessoires
N’utilisez pas d’attachements/d’accessoires autres que ceux qui sont spéciés par
Bosch. L’utilisation d’attachements/d’accessoires non spéciés pour une utilisation avec
l’outil décrit dans ce mode d’emploi peut entraîner des dommages à l’outil, des dommages matériels et/ou des blessures.
Équipement standard
Accessoires et attache-
ments en option
Lames de scies alternatives Bosch Sac de transport
GSA18V-280.indd 29GSA18V-280.indd 29 11/13/2025 2:12:03 PM11/13/2025 2:12:03 PM
30
Tabla de contenido
Símbolos de seguridad
Las definiciones que aparecen a continuación describen el nivel de gravedad de cada palabra de aviso.
Por favor, lea el manual y preste atención a estos símbolos.
Este es el símbolo de alerta de seguridad. Se utiliza para alertarle a usted de posibles
peligros de lesiones corporales. Obedezca todos los mensajes de seguridad que sigan a
este símbolo para evitar posibles lesiones o la muerte.
PELIGRO indica una situación peligrosa que, si no se evita, causará la muerte o lesiones
graves.
ADVERTENCIA indica una situación peligrosa que, si no se evita, podría causar la muerte
o lesiones graves.
PRECAUCIÓN indica una situación peligrosa que, si no se evita, podría causar lesiones
leves o moderadas.
Advertencias generales de seguridad para
herramientas eléctricas .................... 31
Normas de seguridad para sierras alternativas
sin cordón ............................... 33
Advertencias de seguridad adicionales............33
Eliminación .............................. 34
Uso previsto..................................35
Especicaciones ..............................35
Símbolos .................................... 36
Familiarización con su sierra
alternativa GSA18V-280....................37
Ensamblaje .................................. 38
Selección de hojas......................... 38
Instalación y remoción de una hoja ........... 38
Introducción y suelta del paquete de baterías...39
Instrucciones de funcionamiento................. 40
Protección contra la descarga profunda ....... 40
Cierre del interruptor gatillo .................40
Interruptor gatillo de velocidad
variable controlada .................... 40
Uso de la sierra ........................... 40
Consejos para aserrar ......................41
Cortes de bolsillo/por inmersión ............. 42
Mantenimiento ............................... 43
Mantenimiento general .....................43
Limpieza ................................ 43
Servicio ................................. 43
Lubricacion de las herramientas..............43
Motores ................................. 43
Baterías ................................. 43
Mantenimiento del portahoja ................43
Accesorios................................... 43
GSA18V-280.indd 30GSA18V-280.indd 30 11/13/2025 2:12:04 PM11/13/2025 2:12:04 PM

31
Advertencias generales de seguridad para herramientas eléctricas
Lea todas las advertencias de seguridad, instrucciones, ilustraciones y especicaciones
suministradas con esta herramienta eléctrica. Si no se siguen todas las instrucciones que se
indican a continuación, es posible que el resultado sea descargas eléctricas, incendio y/o lesiones graves.
GUARDE TODAS LAS ADVERTENCIAS E INSTRUCCIONES PARA REFERENCIA FUTURA.
La expresión “herramienta eléctrica” que se incluye en las advertencias se reere a su herramienta eléctrica alimentada por la
red eléctrica (alámbrica) o su herramienta eléctrica alimentada por baterías (inalámbrica).
1. Seguridad en el área de trabajo
a. Mantenga el área de trabajo limpia y bien iluminada.
Las áreas desordenadas u oscuras invitan a que se
produzcan accidentes.
b. No utilice herramientas eléctricas en atmósferas
explosivas, tales como las existentes en presencia de
líquidos, gases o polvos inamables. Las herramientas
eléctricas generan chispas, las cuales es posible que
incendien los polvos o los vapores.
c. Mantenga alejados a los niños y a los curiosos
mientras esté utilizando una herramienta eléctrica.
Las distracciones pueden hacerle perder el control de la
herramienta.
2. Seguridad eléctrica
a. Los enchufes de las herramientas eléctricas deben
coincidir con el tomacorriente. No modique nunca
el enchufe de ninguna manera. No utilice enchufes
adaptadores con herramientas eléctricas conectadas
a tierra (puestas a masa). Los enchufes sin modicar
y los tomacorrientes coincidentes reducirán el riesgo de
descargas eléctricas.
b. Evite el contacto del cuerpo con supercies
conectadas a tierra o puestas a masa, tales
como tuberías, radiadores, estufas de cocina y
refrigeradores. Hay un mayor riesgo de descargas
eléctricas si el cuerpo del operador está conectado a
tierra o puesto a masa.
c. No exponga las herramientas eléctricas a la lluvia
ni a condiciones mojadas. La entrada de agua en una
herramienta eléctrica aumentará el riesgo de descargas
eléctricas.
d. No maltrate el cable. No use nunca el cable para
transportar, jalar o desenchufar la herramienta
eléctrica. Mantenga el cable alejado del calor, el
aceite, los bordes alados o las piezas móviles. Los
cables dañados o enredados aumentan el riesgo de
descargas eléctricas.
e. Cuando utilice una herramienta eléctrica a la
intemperie, utilice un cable de extensión adecuado
para uso a la intemperie. La utilización de un cable
adecuado para uso a la intemperie reduce el riesgo de
descargas eléctricas.
f. Si es inevitable utilizar una herramienta eléctrica en
un lugar húmedo, utilice una fuente de alimentación
protegida por un interruptor de circuito accionado
por corriente de pérdida a tierra (GFCI, por sus
siglas en inglés). El uso de un GFCI reduce el riesgo de
descargas eléctricas.
3. Seguridad personal
a. Manténgase alerta, fíjese en lo que está haciendo y
use el sentido común cuando utilice una herramienta
eléctrica. No utilice una herramienta eléctrica
mientras esté cansado o bajo la inuencia de
drogas, alcohol o medicamentos. Es posible que un
momento de desatención mientras se estén utilizando
herramientas eléctricas cause lesiones corporales
graves.
b. Utilice equipo de protección personal. Use siempre
protección ocular. Los equipos protectores, tales
como una máscara antipolvo, calzado de seguridad
antideslizante, casco o protección de la audición,
utilizados según lo requieran las condiciones, reducirán
las lesiones corporals.
c. Prevenga los arranques accidentales. Asegúrese de
que el interruptor esté en la posición de apagado
antes de conectar la herramienta eléctrica a la
fuente de alimentación y/o al paquete de batería,
levantar la herramienta eléctrica o transportarla. Si
se transportan herramientas eléctricas con el dedo en
el interruptor o si se suministra corriente a herramientas
eléctricas que tengan el interruptor en la posición de
encendido se invita a que se produzcan accidents.
d. Retire todas las llaves de ajuste o de tuerca antes
de encender la herramienta eléctrica. Es posible que
una llave de tuerca o de ajuste que se deje sujeta a una
pieza rotativa de la herramienta eléctrica cause lesiones
corporales.
GSA18V-280.indd 31GSA18V-280.indd 31 11/13/2025 2:12:04 PM11/13/2025 2:12:04 PM

32
e. No intente alcanzar demasiado lejos. Mantenga
un apoyo de los pies y un equilibrio adecuados en
todo momento. Esto permite un mejor control de la
herramienta eléctrica en situaciones inesperadas.
f. Vístase adecuadamente. No se ponga ropa holgada
ni joyas. Mantenga el pelo y la ropa alejados de las
piezas móviles. La ropa holgada, las joyas o el pelo largo
pueden quedar atrapados en las piezas móviles.
g. Si se proporcionan dispositivos para la conexión de
instalaciones de extracción y recolección de polvo,
asegúrese de que estas estén conectadas y se utilicen
correctamente. El uso de recolección de polvo puede
reducir los peligros relacionados con el polvo.
h. No deje que la familiaridad obtenida con el uso
frecuente de las herramientas le haga volverse
complaciente e ignorar los principios de seguridad de
las herramientas. Una acción descuidada puede causar
lesiones graves en una fracción de Segundo.
4. Uso y cuidado de la herramienta eléctrica
a. No fuerce la herramienta eléctrica. Utilice la
herramienta eléctrica correcta para la aplicación
que vaya a realizar. La herramienta eléctrica correcta
hará el trabajo mejor y con más seguridad a la capacidad
nominal para la que fue diseñada.
b. No utilice la herramienta eléctrica si el interruptor no
la enciende y apaga. Cualquier herramienta eléctrica
que no se pueda controlar con el interruptor es peligrosa
y debe ser reparada.
c. Desconecte el enchufe de la fuente de alimentación
y/o retire el paquete de batería de la herramienta
eléctrica, si es retirable, antes de hacer cualquier
ajuste, cambiar accesorios o almacenar herramientas
eléctricas. Dichas medidas preventivas de seguridad
reducen el riesgo de arrancar accidentalmente la
herramienta eléctrica.
d. Guarde las herramientas eléctricas que no esté
usando fuera del alcance de los niños y no deje que
las personas que no estén familiarizadas con la
herramienta eléctrica o estas instrucciones utilicen la
herramienta eléctrica. Las herramientas eléctricas son
peligrosas en las manos de los usuarios no capacitados.
e. Realice mantenimiento de las herramientas
eléctricas y los accesorios. Compruebe si hay
desalineación o atoramiento de las piezas móviles,
rotura de piezas y cualquier otra situación que
pueda afectar al funcionamiento de la herramienta
eléctrica. Si la herramienta eléctrica está dañada,
haga que la reparen antes de utilizarla. Muchos
accidentes son causados por herramientas eléctricas
que reciben un mantenimiento deciente
f. Mantenga las herramientas de corte aladas y
limpias. Las herramientas de corte mantenidas
adecuadamente, con bordes de corte alados, tienen
menos probabilidades de atorarse y son más fáciles de
controlar.
g. Utilice la herramienta eléctrica, los accesorios y las
brocas de la herramienta, etc., de acuerdo con estas
instrucciones, teniendo en cuenta las condiciones de
trabajo y el trabajo que se vaya a realizar. El uso de la
herramienta eléctrica para operaciones distintas a las
previstas podría causar una situación peligrosa.
h. Mantenga los mangos y las supercies de agarre
secos, limpios y libres de aceite y grasa. Los mangos
resbalosos y las supercies de agarre resbalosas
no permiten un manejo y un control seguros de la
herramienta en situaciones inesperadas.
5. Uso y cuidado de las herramientas a
batería
a. Recargue el paquete de batería solo con el cargador
especicado por el fabricante. Es posible que un
cargador que sea adecuado para un tipo de paquete de
batería cree un riesgo de incendio cuando se utilice con
otro paquete de batería.
b. Utilice las herramientas eléctricas solo con paquetes
de batería designados especícamente. Es posible
que el uso de cualquier otro paquete de batería cree un
riesgo de lesiones e incendio.
c. Cuando el paquete de batería no se esté utilizando,
manténgalo alejado de otros objetos metálicos, tales
como clips sujetapapeles, monedas, llaves, clavos,
tornillos u otros objetos metálicos pequeños, que
puedan hacer una conexión de un terminal al otro. Si
se cortocircuitan juntos los terminales de la batería, es
posible que se causen quemaduras o un incendio.
d. En condiciones abusivas es posible que se expulse
líquido de la batería; evite el contacto. Si se produce
contacto accidentalmente, enjuáguese con agua. Si el
líquido entra en contacto con los ojos, obtenga además
ayuda médica. Es posible que el líquido expulsado de la
batería cause irritación o quemaduras.
Advertencias generales de seguridad para herramientas eléctricas
GSA18V-280.indd 32GSA18V-280.indd 32 11/13/2025 2:12:04 PM11/13/2025 2:12:04 PM

33
Normas de seguridad para sierras alternativas sin cordón
Advertencias generales de seguridad para herramientas eléctricas
e. No utilice un paquete de batería o una herramienta
que estén dañados o modicados. Es posible
que las baterías dañadas o modicadas exhiban un
comportamiento imprevisible que cause incendio,
explosión o riesgo de lesiones.
f. No exponga un paquete de batería o una herramienta
a un fuego o a una temperatura excesiva. Es posible
que la exposición a un fuego o a una temperatura
superior a 130 °C (265 °F) cause una explosión.
g. Siga todas las instrucciones de carga y no cargue
el paquete de batería ni la herramienta fuera del
intervalo de temperatura especicado en las
instrucciones. Es posible que la realización de la carga
de manera inadecuada o a temperaturas que estén fuera
del intervalo especicado dañe la batería y aumente el
riesgo de incendio.
6. Servicio de ajustes y reparaciones
a. Haga que su herramienta eléctrica reciba servicio
de ajustes y reparaciones por un técnico de
reparaciones calicado que utilice únicamente
piezas de repuesto idénticas. Esto garantizará que se
mantenga la seguridad de la herramienta eléctrica.
b. No haga nunca servicio de ajustes y reparaciones de
paquetes de batería dañados. El servicio de ajustes
y reparaciones de los paquetes de batería deberá ser
realizado solo por el fabricante o por proveedores de
servicio autorizados.
a. Agarre la herramienta eléctrica por las supercies de
agarre con aislamiento cuando realice una operación
en la que el accesorio de corte pueda entrar en
contacto con cableado oculto. Si el accesorio de corte
entra en contacto con un cable con corriente, puede
que eso haga que las partes metálicas de la herramienta
eléctrica que están al descubierto lleven corriente, lo
cual podría causar una descarga eléctrica al operador.
b. Use abrazaderas u otro modo práctico de sujetar
y soportar la pieza de trabajo en una plataforma
estable. Si se sujeta la pieza de trabajo con la mano o
contra el cuerpo, se crea una situación inestable que
podría causar pérdida de control.
Advertencias de seguridad adicionales
No taladre, rompa, ni haga trabajo de sujeción en paredes
existentes ni en otras áreas ciegas donde pueda haber
cables eléctricos. Si esta situación es inevitable, desconecte
todos los fusibles o cortacircuitos que alimentan este sitio de
trabajo.
Mantenga las manos alejadas del área de corte. No ponga
las manos debajo del material que se esté cortando. La
proximidad de la hoja a las manos queda oculta a la vista.
Mantenga las manos alejadas de la posición entre la
caja de engranajes y la abrazadera de la hoja de sierra
(émbolo). La abrazadera de la hoja alternativa (émbolo de la
hoja) puede pellizcarle los dedos.
No utilice hojas desaladas o dañadas. Las hojas dobladas
pueden romperse fácilmente o causar retroceso.
Asegúrese de que el extremo delantero de la hoja se
extienda a través de la placa-base a lo largo de toda la
longitud de la carrera. No utilice hojas especiales que sean
muy cortas o que tengan una oblicuidad signicativa. Lahoja
no debe hacer contacto con la placa-base. Una hoja que sea
demasiado corta u oblicua podría atascarse dentro de la
placa-base y romperse bruscamente.
Antes de comenzar a cortar, encienda la herramienta y
deje que la hoja alcance toda su velocidad. La herramienta
puede rechinar o vibrar si la velocidad de la hoja es demasiado
baja al comienzo del corte y posiblemente experimentar
retroceso.
Use siempre anteojos de seguridad o protección de los
ojos cuando utilice esta herramienta. Use una máscara
antipolvo o un respirador cuando realice aplicaciones que
generen polvo.
Sujete rmemente el material antes de cortarlo. Nunca
lo sostenga en la mano o sobre las piernas. El material
pequeño o delgado puede exionarse o vibrar con la hoja,
causando pérdida de control.
Asegúrese de que todos los tornillos (pomos) de ajuste y
la abrazadera de la hoja estén apretados antes de hacer
un corte. Los tornillos de ajuste ojos y las abrazaderas
ojas pueden hacer que la herramienta o la hoja resbalen y el
resultado podría ser pérdida de control.
GSA18V-280.indd 33GSA18V-280.indd 33 11/13/2025 2:12:04 PM11/13/2025 2:12:04 PM
34
Advertencias de seguridad adicionales
Al quitar la hoja de la herramienta, evite el contacto con
la piel y utilice guantes de protección adecuados cuando
agarre la hoja o el accesorio. Los accesorios pueden estar
calientes después de un uso prolongado.
Cuando utilice el gancho utilitario, tenga siempre
presente que la hoja está al descubierto. Cuelgue siempre
la herramienta en un área en la que usted o las personas
que se encuentren presentes no puedan entrar en contacto
accidentalmente con la hoja.
Cuando utilice la sierra continuamente y por períodos de
tiempo prolongados, es posible que la caja de engranajes
se ponga caliente al tacto. Para reducir el riesgo de lesiones,
use guantes protectores durante la utilización de la sierra.
Un GFCI y los dispositivos de protección personal, como
guantes de goma y calzado de goma de electricista,
mejorarán más su seguridad personal.
Desarrolle un programa de mantenimiento periódico de
la herramienta. Cuando limpie una herramienta, tenga
cuidado de no desmontar ninguna de sus partes, ya que
los cables internos podrían reubicarse incorrectamente
o pellizcarse, o los resortes de retorno de los protectores
de seguridad podrían montarse incorrectamente. Ciertos
agentes de limpieza, tales como gasolina, tetracloruro de
carbono, amoníaco, etc., podrían dañar las piezas de plástico.
Use protección ocular
ADVERTENCIA
Use siempre anteojos de seguri-
dad que cumplan con la norma
ANSI Z87.1 (mostrados en el pa-
quete) antes de comenzar a utili-
zar la herramienta eléctrica. La uti-
lización de cualquier herramienta
eléctrica puede tener como resulta-
do que se arrojen objetos extraños
hacia los ojos del operador, lo cual puede causar lesiones
oculares graves.
Cierto polvo generado por el
lijado, aserrado, amolado y
taladrado mecánicos, y por otras actividades de
construcción, contiene agentes químicos que se sabe que
causan cáncer, defectos de nacimiento u otros daños
sobre la reproducción. Algunos ejemplos de estos agentes
químicos son:
• Plomo de pinturas a base de plomo
• Sílice cristalina de ladrillos y cemento y otros productos
de mampostería, y
• Arsénico y cromo de madera tratada químicamente.
Su riesgo por causa de estas exposiciones varía, dependiendo
de con cuánta frecuencia realice este tipo de trabajo. Para
reducir su exposición a estos agentes químicos: trabaje en
un área bien ventilada y trabaje con equipo de seguridad
aprobado, como por ejemplo máscaras antipolvo que estén
diseñadas especialmente para impedir mediante ltración el
paso de partículas microscópicas.
Eliminación
Esta sección es parte del compromiso de Robert Bosch
Tool Corporation de preservar nuestro medio ambiente y
conservar nuestros recursos naturales.
Eliminación de herramientas
¡No deseche las herramientas eléctricas y las baterías/
baterías recargables en la basura doméstica!
Eliminación de las baterías
No intente desarmar la bat-ería ni quitar ninguno de
los com ponentes que sobresalen de los terminales de
la batería. Se pueden producir lesiones o un incendio.
Antes de desecharla, proteja los terminales que están al
descubierto con cinta adhesiva aislante gruesa para prevenir
cortocircuitos.
Baterías de iones de litio
Si este producto está equipado con una
batería de iones de litio, dicha batería debe
recogerse, reciclarse o eliminarse de
manera segura para el medio ambiente.
El sello de reciclaje de baterías RBRC
certicado por la EPA que se encuentra en la batería de iones
de litio (ion Li) indica que Robert Bosch Tool Corporation está
participando voluntariamente en un programa de la industria
para recoger y reciclar estas baterías al nal de su vida útil,
cuando se retiran de servicio en los Estados Unidos y Canadá.
El programa RBRC proporciona una alternativa conveniente a
tirar las baterías de ion Li usadas a la basura o a la corriente
municipal de aguas residuales, lo cual quizás sea ilegal en su
área.
Tenga la amabilidad de llamar al 1-800-8-BATTERY
para obtener información acerca de las prohibiciones/
restricciones sobre el reciclaje y la eliminación de baterías
de ion Li en su lugar o devuelva las baterías a un Centro de
servicio Bosch/Dremel para reciclarlas. La participación de
Robert Bosch Tool Corporation en este programa es parte de
nuestro compromiso hacia preservar nuestro medio ambiente
y conservar nuestros recursos naturales.
GSA18V-280.indd 34GSA18V-280.indd 34 11/13/2025 2:12:05 PM11/13/2025 2:12:05 PM
35
Uso previsto
Utilice esta sierra alternativa solo tal y como está previsto. Es posible que un uso no previsto
cause lesiones corporales y daños materiales.
La herramienta eléctrica es adecuada para aserrar madera, plástico, metal y materiales de construcción sobre una supercie
rme. Es adecuada para realizar cortes rectos y curvos. Cuando utilice hojas de sierra bimetálicas adecuadas designadas,
también es posible cortar al ras. Se deberán seguir las recomendaciones para la hoja de sierra.
Especificaciones
Número de modelo GSA18V-280
Tensión nominal 18 V
Carreras sin carga por minuto (CPM) 0-3,100
Longitud de carrera 1.1pulgadas (28 mm)
Temperatura permitida de la batería durante el proceso de carga +32…+113°F (0…+45°C)
Temperatura ambiente permitida durante la utilización y el almacenamiento -4…+122°F (-20…+50°C)
Temperatura ambiente recomendada durante el proceso de carga +32…+95°F (0...+35°C)
Paquetes de batería/cargadores
Lea todas las advertencias de seguridad, instrucciones, ilustraciones y especi-caciones
suministradas con esta herramienta eléctrica y este cargador. Si no se siguen todas las
instrucciones que se indican a continuación, es posible que el resultado sea descargas eléctricas, incendio y/o lesiones graves.
GUARDE TODAS LAS ADVERTENCIAS E INSTRUCCIONES PARA REFERENCIA FUTURA
Utilice únicamente los paquetes de batería de ion Li Bosch o AMPShare de 18 V que se
indican a continuación. Es posible que el uso de cualquier otro paquete de batería cree un riesgo
de lesiones e incendio.
Utilice únicamente los cargadores Bosch o AMPShare de 18 V que se indican a continuación.
Es posible que el uso de cualquier otro cargador cree un riesgo de lesiones e incendio.
Paquetes de batería*
BAT000 a BAT999, GBA18V000 a GBA18V999, EXBA18V-000 a EXBA18V-999
Cargadores*
BC1880, GAL12V/18V-80, GAL18V6-80, GAX1218V-30, GAL18V-000 a GAL18V-999
* Para informarse sobre la compatibilidad de baterías más actualizada, sírvase visitar www.boschtools.com.
GSA18V-280.indd 35GSA18V-280.indd 35 11/13/2025 2:12:05 PM11/13/2025 2:12:05 PM
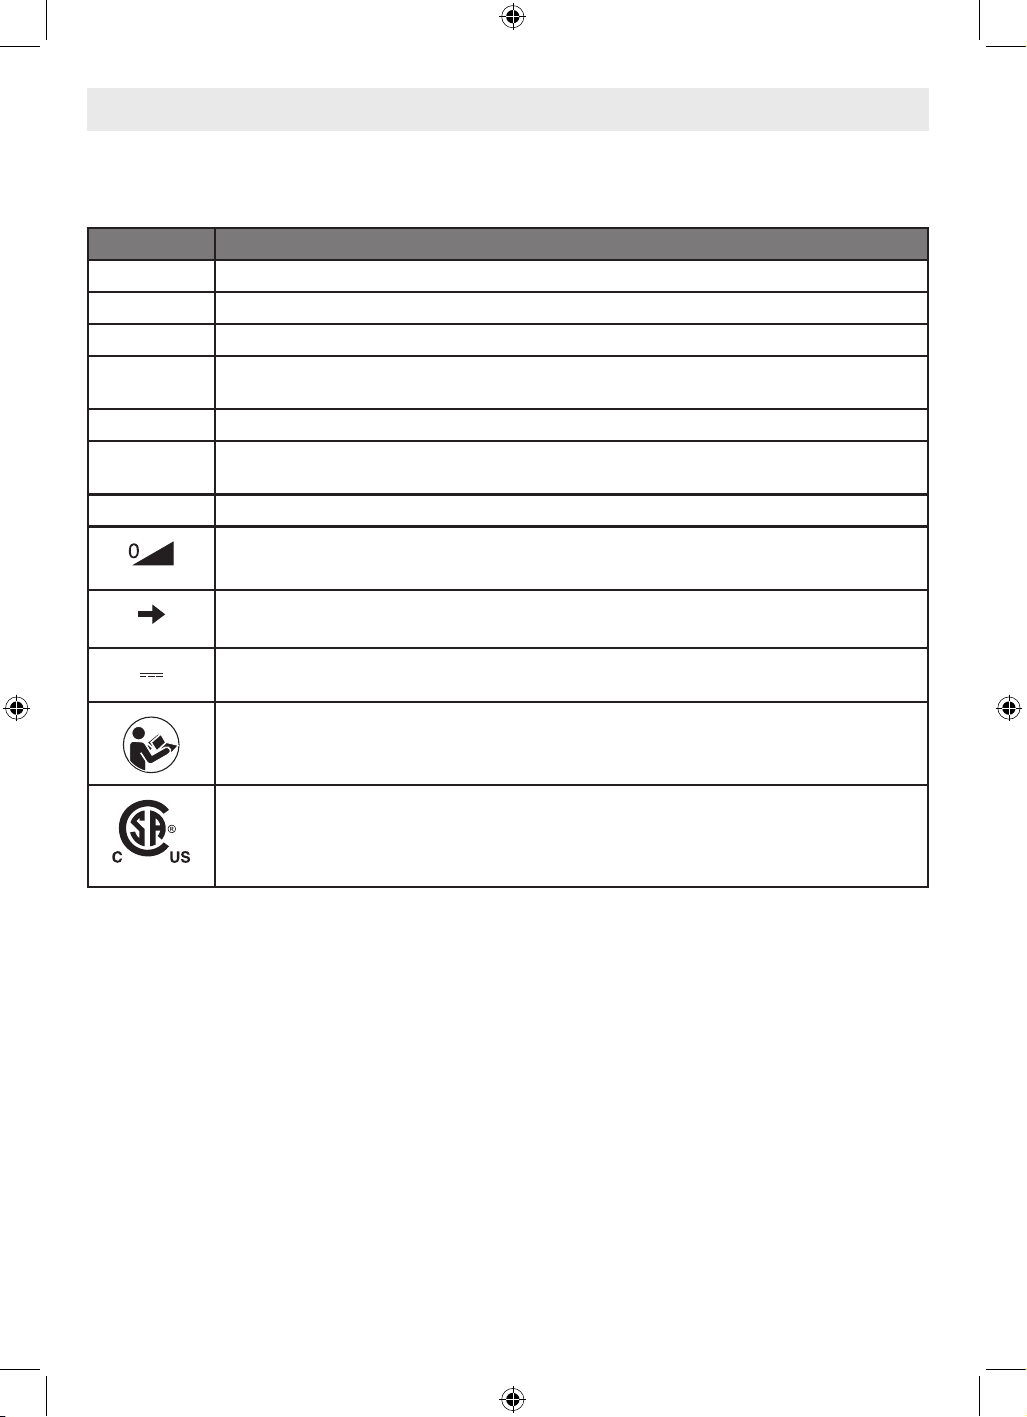
36
Símbolos
Importante: Es posible que se utilicen algunos de los siguientes símbolos en esta herramienta. Por favor, estúdielos y
aprenda su signicado. La interpretación correcta de estos símbolos le permitirá utilizar la herramienta mejor y de manera
más segura.
Símbolo Désignación / Explicación
V Volt (tensión)
min Minuto (tiempo)
n
0
Velocidad sin carga (velocidad rotacional sin carga)
.../min
Revoluciones o alternación por minuto (revoluciones, golpes, velocidad de supercie,
órbitas, etc., por minuto)
CPM Carreras por minuto (velocidad)
1, 2, 3, ...
I, II, III,
Graduaciones del selector (graduaciones de velocidad, par motor o posición. Un número
más alto signica mayor velocidad)
mm Milímetros (dimensión)
Selector innitamente variable con apagado (la velocidad aumenta desde la graduación de 0)
Flecha (Acción en la dirección de la echa)
Corriente continua (tipo o una característica de corriente)
Alerta al usuario para que lea el manual.
Este símbolo indica que la Canadian Standards Association ha catalogado esta herramienta indicando
que cumple con las normas estadounidenses y canadienses.
GSA18V-280.indd 36GSA18V-280.indd 36 11/13/2025 2:12:05 PM11/13/2025 2:12:05 PM
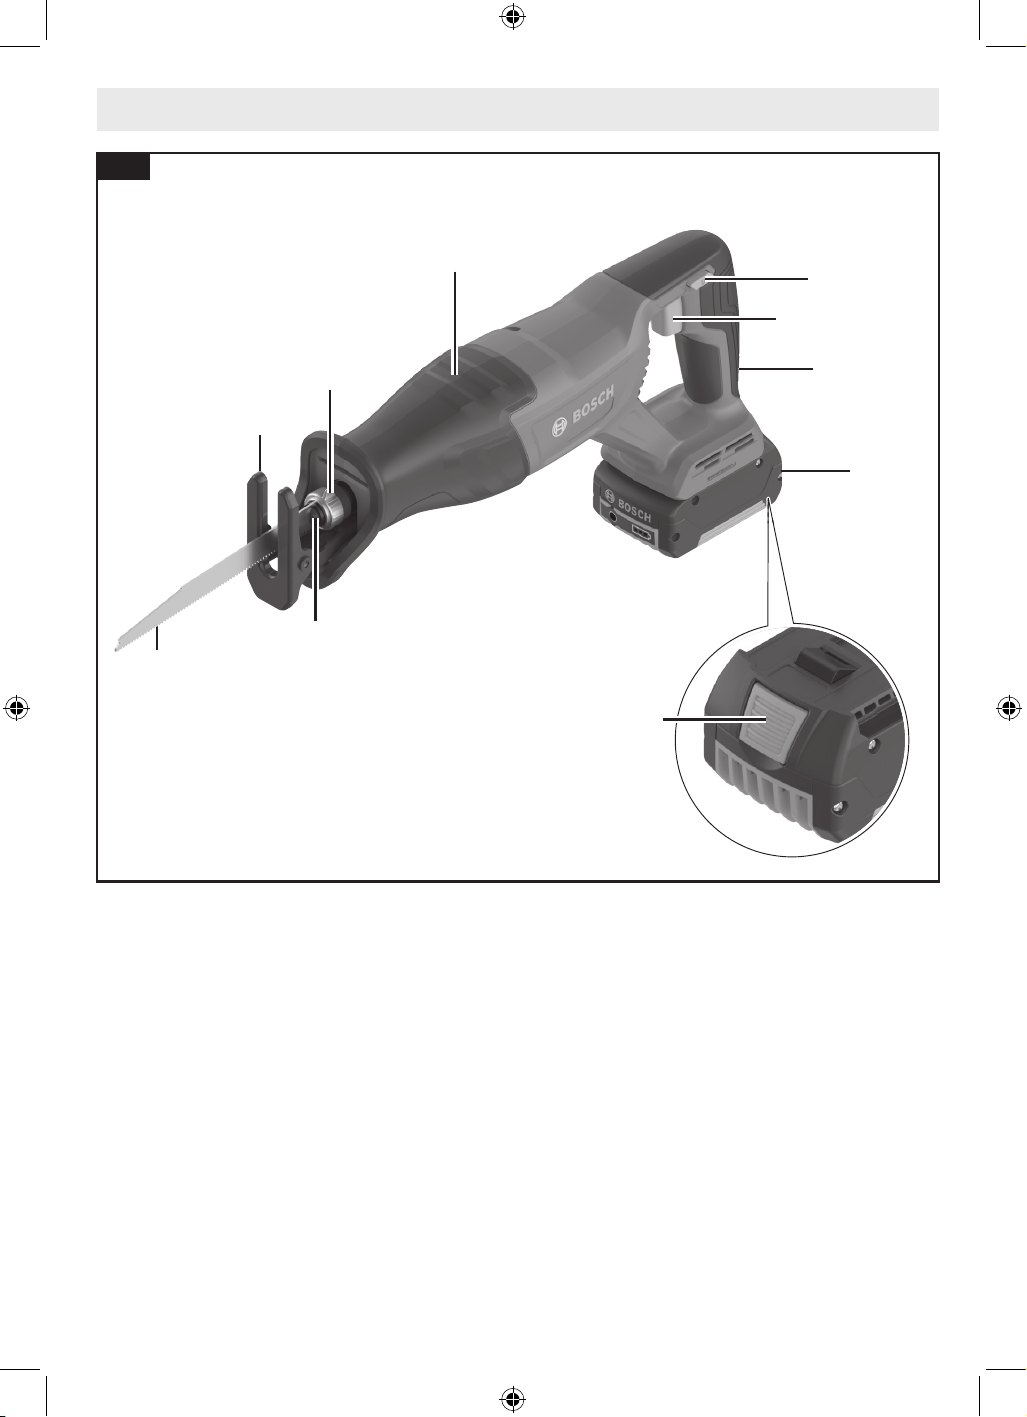
37
Familiarización con su sierra alternativa GSA18V-280
1 Hoja de la sierra*
2 Placa-base
3 Palanca de liberación de la hoja de sierra
4 Portahoja
5 Mango (supercie de agarre con aislamiento)
6 Botón de liberación de jación en apagado
7 Interruptor gatillo de velocidad variable
8 Paquete de batería*
9 Botón de liberación del paquete de batería*
* Se vende por separado
1
4
3
5
5
6
7
9
8
2
Fig. 7
GSA18V-280.indd 37GSA18V-280.indd 37 11/13/2025 2:12:06 PM11/13/2025 2:12:06 PM
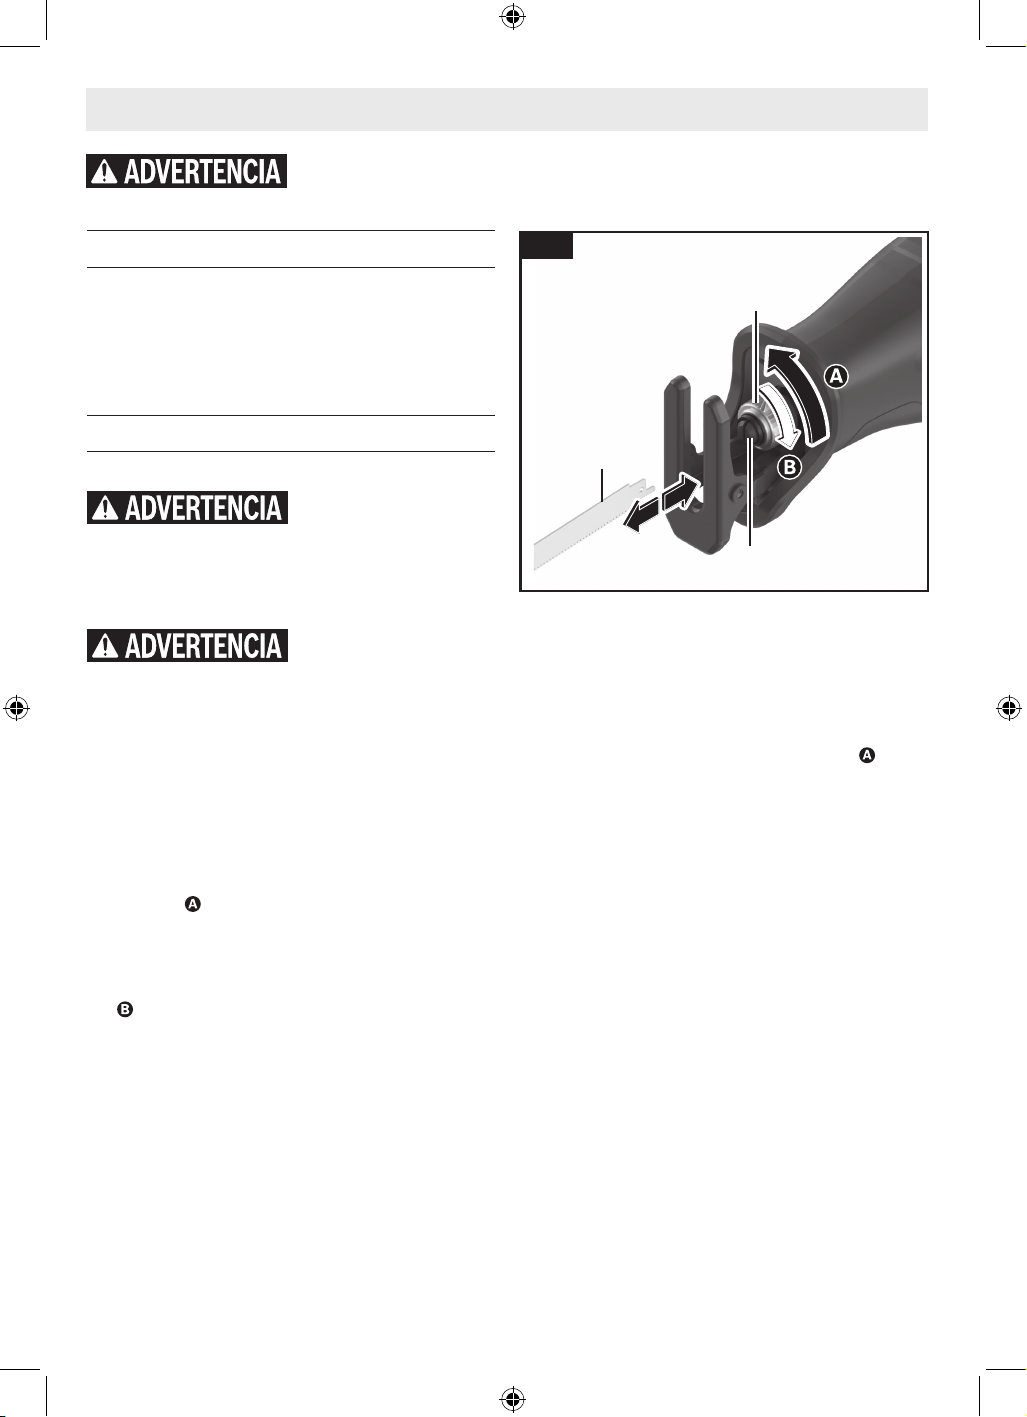
38
Ensamblaje
Desconecte el paquete de batería de la herramienta antes de realizar ensamblaje, ajustes
o resolución de problemas, o cambiar accesorios. Dichas medidas preventivas de seguridad
reducen el riesgo de arrancar accidentalmente la herramienta, lo cual es posible que tenga como resultado lesiones corporales
Selección de hojas
Ninguna hoja puede ser ecaz en todos los trabajos de
corte. Materiales diferentes requieren hojas diseñadas
especialmente. Como la sierra alternativa puede cortar tantos
materiales, hay muchos tipos de hojas Bosch disponibles.
Asegúrese de utilizar la hoja adecuada para asegurar un
rendimiento de corte adecuado.
Instalación y remoción de una hoja
(Fig. 2)
Cuando retire la hoja de la
herramienta, evite el
contacto con la piel y utilice guantes protectores
adecuados cuando agarre la hoja o el accesorio. Es posible
que los accesorios estén calientes después de un uso
prolongado.
Asegúrese de que el
extremo delantero de la hoja
se extienda a través de la placa-base a lo largo de toda la
longitud de la carrera. No utilice hojas especiales que sean
muy cortas o que tengan una oblicuidad signicativa. La hoja
no debe hacer contacto con la placa-base. Una hoja que sea
demasiado corta u oblicua podría atascarse dentro de la
placa-base y romperse bruscamente.
Para instalar la hoja
1. Gire la palanca de liberación de la hoja de sierra 3
aproximadamente 90° hasta el tope en el sentido
mostrado y manténgala en esa posición.
2. Deslice la hoja de sierra 1 hacia el interior del portahoja
de sierra 4.
3. Suelte la palanca de liberación de la hoja de sierra 3
para bloquear la hoja de sierra 1. Asegúrese de que
la hoja de sierra 1 esté rmemente bloqueada en la
posición correcta.
Nota: La mayoría de las hojas se pueden instalar con los
dientes apuntando ya sea hacia arriba o hacia abajo, según se
desee para la aplicación.
Para desinstalar la hoja
1. Gire la palanca de liberación de la hoja de sierra 3
aproximadamente 90° en el sentido mostrado .
2. Jale la hoja de sierra 1 hacia fuera del portahoja de sierra
4.
3. Suelte la palanca de liberación de la hoja de sierra 3.
1
3
4
Fig. 8
GSA18V-280.indd 38GSA18V-280.indd 38 11/13/2025 2:12:06 PM11/13/2025 2:12:06 PM
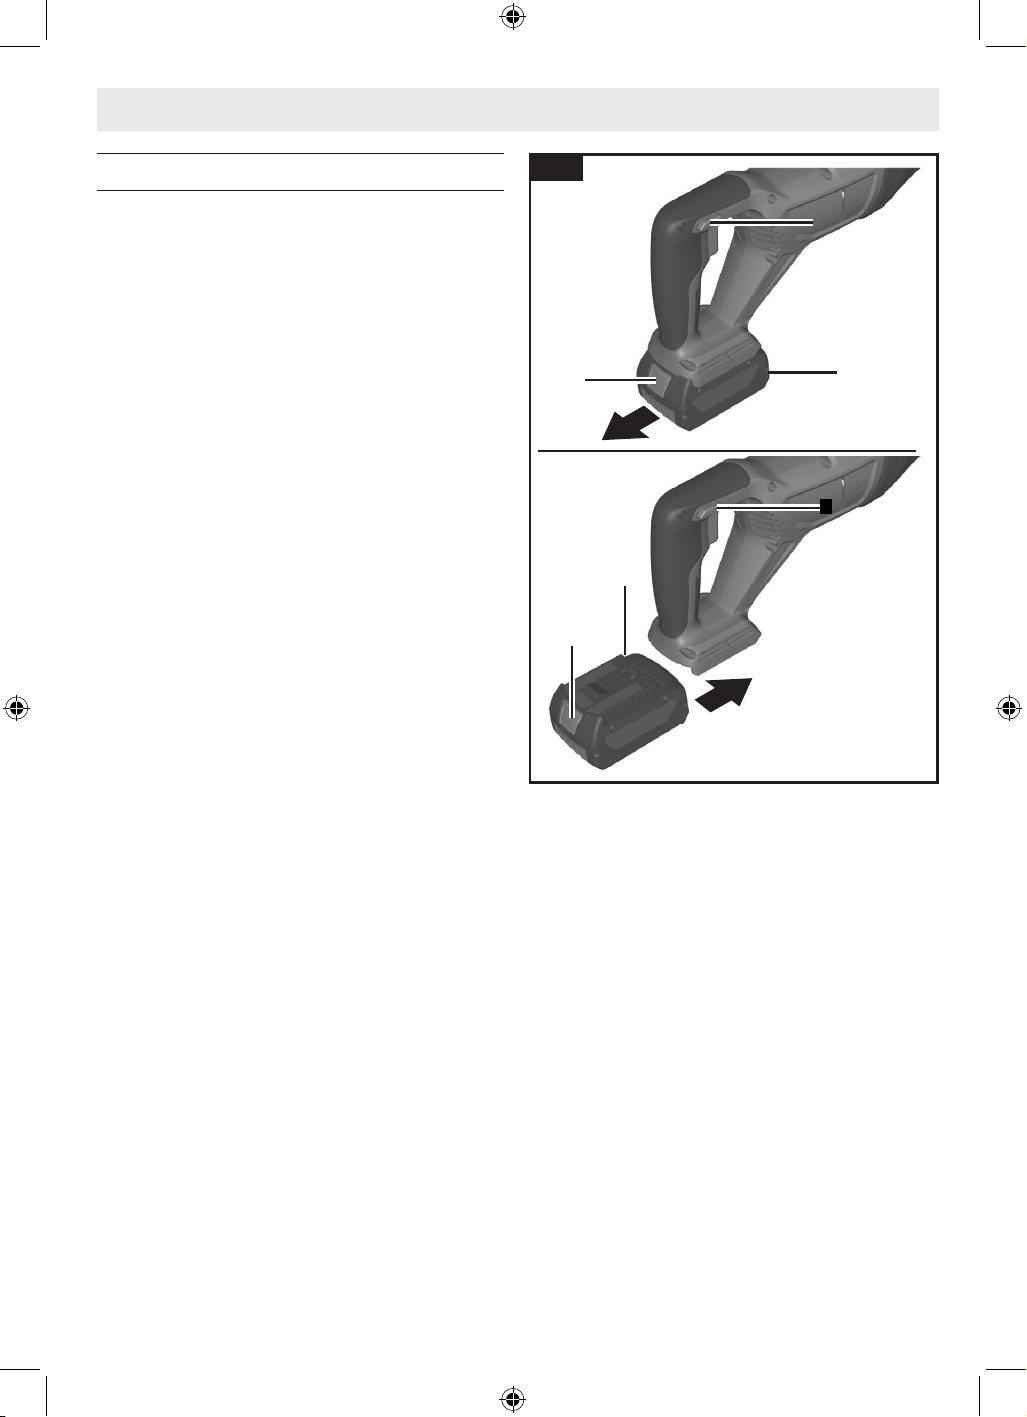
39
Ensamblaje
Fig. 9
Introducción y suelta del paquete de baterías
(Fig. 3)
Para insertar la batería
1. Ponga el cierre del interruptor gatillo 6 en la posición
bloqueada.
2. Deslice el paquete de batería 8 cargado dentro de la
carcasa hasta que el paquete de batería 8 encaje en su
posición.
Su herramienta está equipada con un pestillo de jación
secundario para impedir que el paquete de batería se caiga
por completo de la carcasa de la herramienta, en caso de que
se aoje debido a las vibraciones.
Para quitar el paquete de baterías
1. Oprima el botón de liberación del paquete de baterías 9 y
deslice dicho paquete 8 hacia delante.
2. Oprima de nuevo el botón de liberación del paquete de
baterías 9 y deslice dicho paquete 8 completamente
hacia afuera hasta sacarlo de la carcasa de la herramienta.
9
9
8
8
6
6
6
6
GSA18V-280.indd 39GSA18V-280.indd 39 11/13/2025 2:12:07 PM11/13/2025 2:12:07 PM
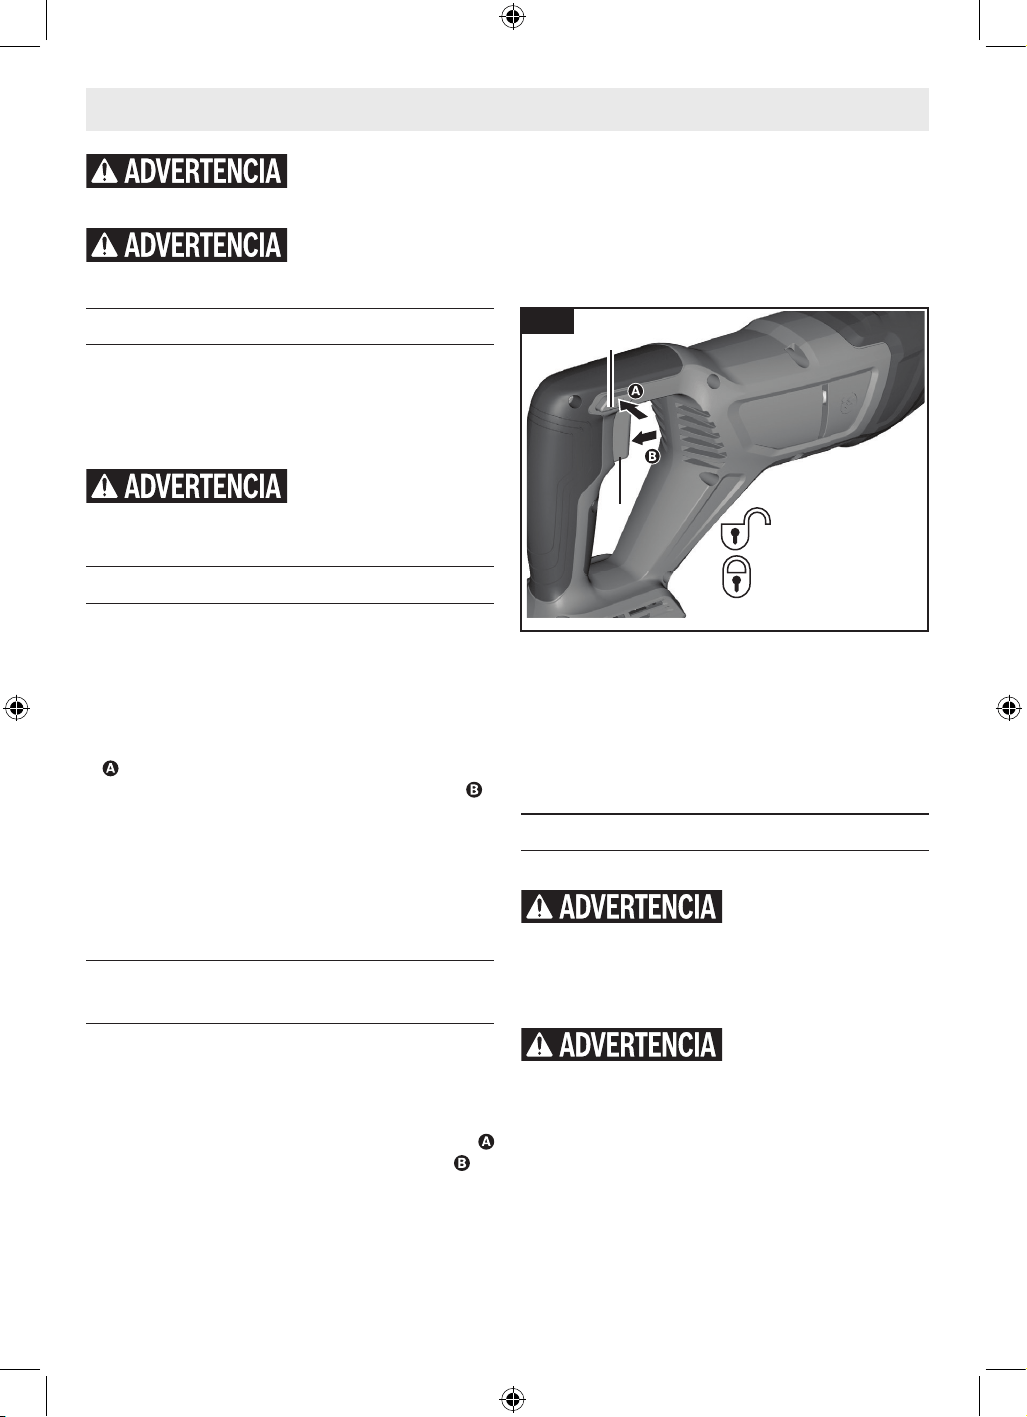
40
DESBLOQUEAR
BLOQUEAR
Instrucciones de funcionamiento
Haga caso siempre de las siguientes precauciones de seguridad, además de las
instrucciones de seguridad que se encuentran en las páginas 27 a 31. Si no lo hace así, es
posible que el resultado sea daños al equipo, daños materiales o lesiones corporales.
Desconecte el paquete de batería de la herramienta antes de realizar ensamblaje, ajustes
o resolución de problemas, o cambiar accesorios. Dichas medidas preventivas de seguridad
reducen el riesgo de arrancar accidentalmente la herramienta, lo cual es posible que tenga como resultado lesiones corporales.
Protección contra la descarga profunda
La batería de iones de litio está protegida contra la descarga
profunda por la “protección con células electrónicas”
(Electronic Cell Protection, ECP). Cuando la batería esté
vacía, la herramienta se apagará por medio de un circuito
protector.
No continúe presionando el
interruptor gatillo después
de que la herramienta se haya apagado automáticamente.
La batería se puede dañar.
Cierre del interruptor gatillo
(Fig. 4)
El cierre del interruptor gatillo 6 está diseñado para prevenir
la activación accidental del gatillo.
Para desbloquear el interruptor gatillo:
Presione completamente el cierre del interruptor gatillo
6 ubicado en el lado del símbolo de desbloqueo, para
desbloquear el interruptor gatillo de velocidad variable 7 .
Para bloquear el interruptor gatillo:
Suelte el interruptor gatillo de velocidad variable 7 y presione
completamente el cierre del interruptor gatillo 6 ubicado en
el lado del símbolo de bloqueo, para bloquear el interruptor
gatillo de velocidad variable 7.
Interruptor gatillo de velocidad variable
controlada
(Fig. 4)
Su herramienta está equipada con un interruptor gatillo de
velocidad variable controlada 7.
Para encender la herramienta, empuje el cierre del interruptor
gatillo 6 ubicado en el lado con el símbolo de desbloqueo
y presione el interruptor gatillo de velocidad variable 7 . La
herramienta se apagará en cuanto usted suelte el gatillo.
Fig. 10
La velocidad de carrera de la hoja se puede ajustar desde su
valor mínimo hasta su valor máximo mediante la presión que
usted aplique al gatillo. Aplique más presión para aumentar
la velocidad y disminuya la presión para reducir la velocidad.
La velocidad de carrera requerida depende del material y de
las condiciones de trabajo, y se puede determinar por medio
de un ensayo práctico.
Uso de la sierra
(Fig. 5)
Utilice abrazaderas u otra
manera práctica de sujetar
rmemente y soportar la pieza de trabajo en una
plataforma estable. Si la pieza de trabajo se sujeta con la
mano o contra el cuerpo, dicha pieza se deja inestable y es
posible que cause pérdida de control
Agarre la herramienta
eléctrica solo por las
supercies de agarre con aislamiento cuando realice una
operación en la que el accesorio de corte pueda entrar en
contacto con cables ocultos. Es posible que el contacto de
un accesorio de corte con un cable con corriente haga que las
partes metálicas de la herramienta eléctrica que estén al
descubierto tengan corriente, lo cual podría causar una
descarga eléctrica al operador
7
6
GSA18V-280.indd 40GSA18V-280.indd 40 11/13/2025 2:12:08 PM11/13/2025 2:12:08 PM
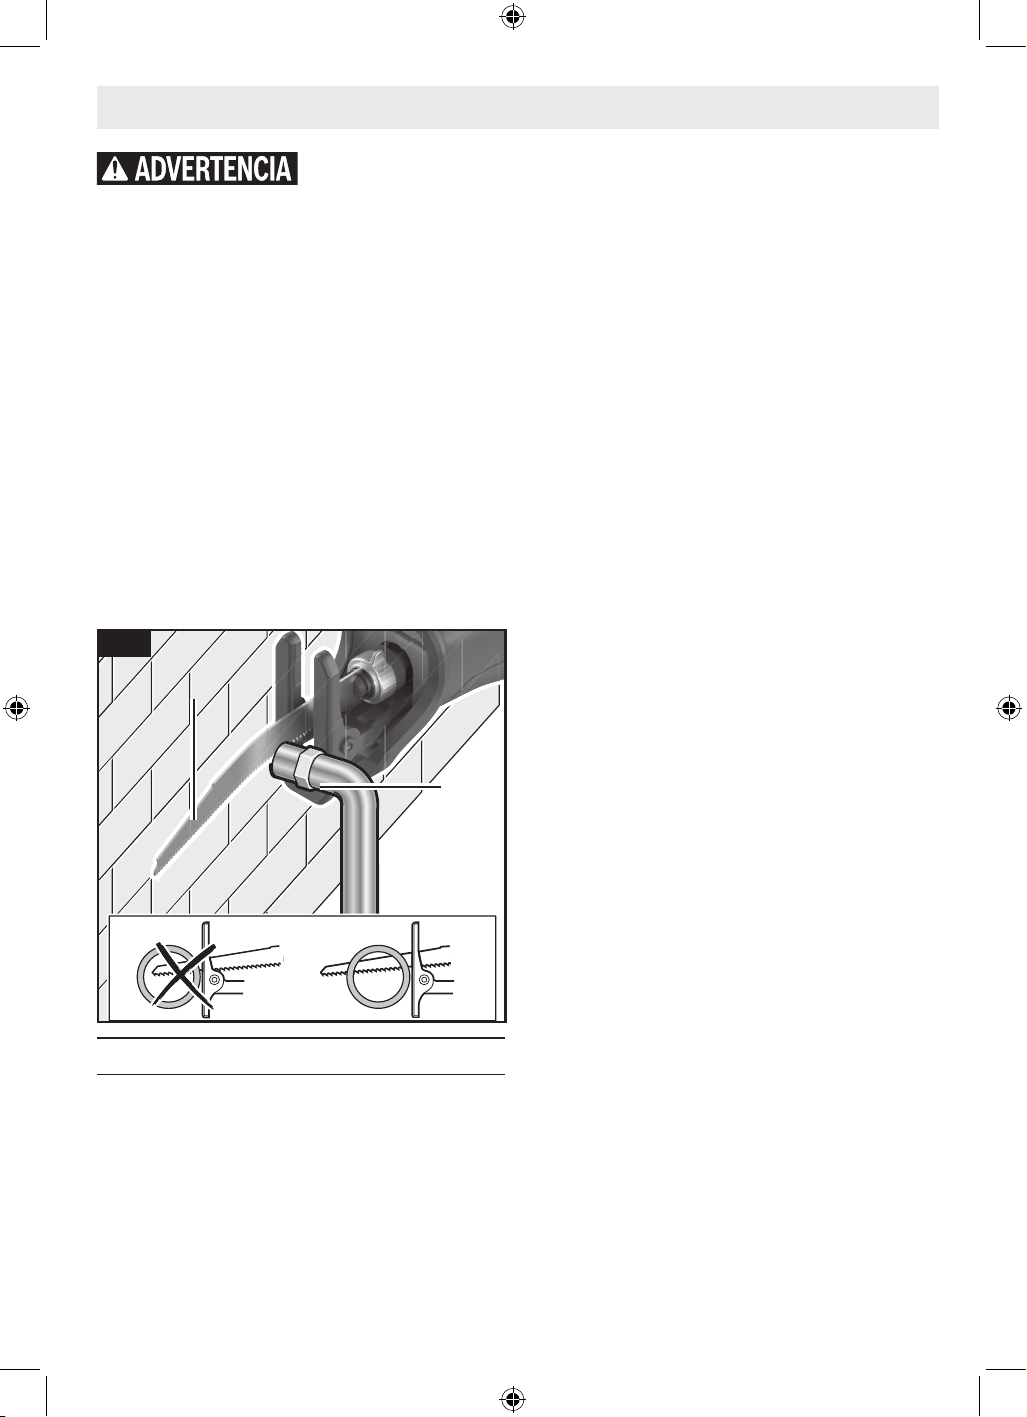
41
Antes de comenzar a cortar,
“ENCIENDA” la herramienta
y deje que hoja alcance la velocidad completa deseada. La
herramienta puede chirriar o vibrar si la velocidad de la hoja
es demasiado lenta al comienzo del corte y posiblemente
experimentar retroceso.
1. Fije la pieza de trabajo rmemente con abrazaderas.
2. Marque la línea de corte y agarre la herramienta con una
mano en el mango 5 y la otra mano ubicada en la funda de
goma asilada que está sobre la carcasa delantera.
3. Mantenga la placa-base de la sierra 2 rmemente contra
la pieza de trabajo para minimizar la contrafuerza (salto)
y la vibración.
4. Empuje el cierre del interruptor gatillo 6 ubicado
en el lado con el símbolo de desbloqueo y apriete el
interruptor gatillo de velocidad variable 7 para arrancar
la herramienta. Deje que la sierra alcance la velocidad
máxima deseada antes de comenzar el corte. Guíe la
sierra de manera que la hoja de sierra 1 se mueva a lo
largo de la línea marcada.
5.
Consejos para aserrar
A continuación se dan unos sencillos consejos que reducirán
el desgaste de la pieza de trabajo y la herramienta, y harán
que el operador se canse menos.
1. Las hojas cortan en la carrera de retorno o regreso. En
piezas de trabajo nas, como paneles, bra de vidrio,
etc., coloque el lado bueno de la pieza de trabajo
orientado hacia abajo.
Instrucciones de funcionamiento
Fig. 11
2. Utilice la hoja de sierra correcta para el material que se
esté cortando y tenga a mano hojas adicionales para
utilizarlas cuando las otras hojas se desalen. Reemplace
inmediatamente las hojas agrietadas o dobladas.
3. Seleccione la velocidad de corte apropiada.
4. Para reducir el riesgo de lesiones, asegúrese de que la
hoja se extienda siempre más allá de la placa-base y la
pieza de trabajo a lo largo de toda la ca rera. Las hojas
pueden hacerse pedazos si su parte delantera golpea la
pieza de trabajo y/o la placa-base.
5. Al cortar metal:
• Aplique un lubricante para realizar cortes más fáciles,
suaves y rápidos, así como para prolongar la duración de
la hoja.
• Para metales no ferrosos, aluminio, bronce o latón, utilice
una barra de cera en la hoja.
• Para metales ferrosos, hierro y acero, utilice un aceite
para maquinaria o de corte a lo largo de la supercie que
se vaya a cortar.
6. Cuando corte metal delgado, ponga el material entre dos
pedazos de madera de desecho. Fíjelo con abrazaderas
o póngalo en un tornillo de carpintero de banco. Puede
utilizarse una pieza de madera en la parte superior del
metal con sujeción adecuada con abrazaderas. Coloque
las líneas de corte o el diseño de corte sobre la madera.
7. No fuerce el corte. Deje que la sierra y la hoja hagan el
trabajo.
2
1
1
GSA18V-280.indd 41GSA18V-280.indd 41 11/13/2025 2:12:08 PM11/13/2025 2:12:08 PM
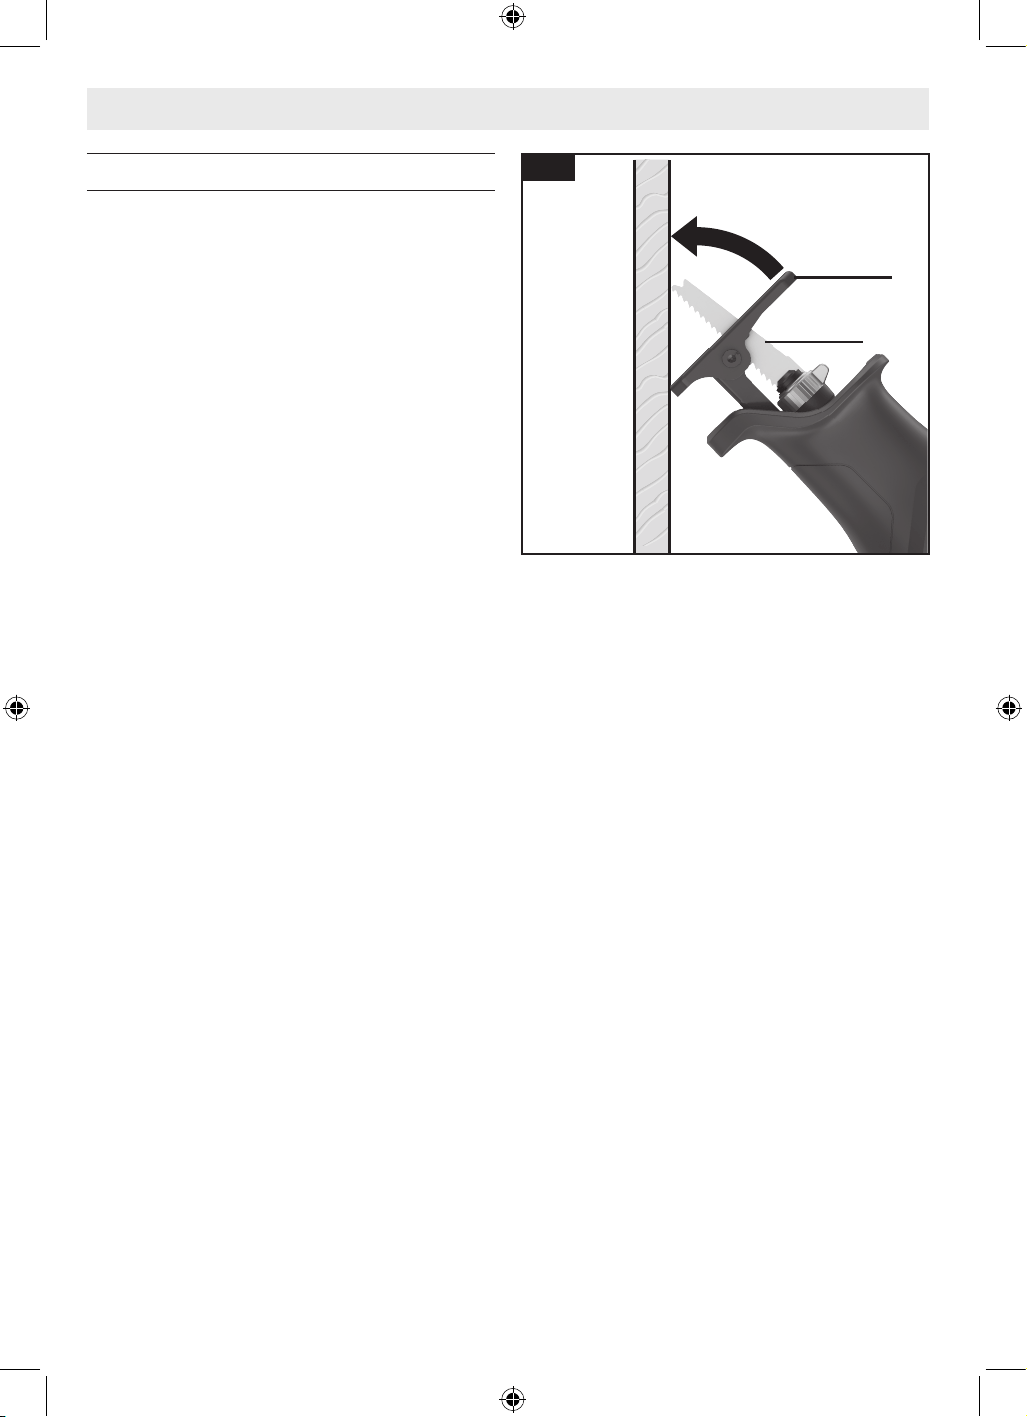
42
Instrucciones de funcionamiento
Cortes de bolsillo/por inmersión
(Fig. 6)
La sierra alternativa se puede usar para hacer cortes por
inmersión en material más blando (por ejemplo, madera
o materiales de construcción ligeros para paredes) sin un
agujero de inicio.
1. Marque claramente la línea que se vaya a cortar en la
pieza de trabajo.
2. Coloque la herramienta con un borde de la placa-base 2
rmemente contra el material.
3. Coloque la punta de la hoja 1 (sin que la herramienta esté
en marcha) sobre la línea que se vaya a cortar.
4. Apriete el interruptor gatillo 7 e introduzca
cuidadosamente en el material la hoja 1 de la sierra en
movimiento.
5. Incline la sierra de manera que la hoja 1 no toque la pieza
de trabajo.
6. Después de que la hoja 1 penetre a través de la pieza de
trabajo, continúe aserrando a lo largo del perl marcado.
Notas:
Para facilitar las operaciones de corte por inmersión, utilice
una hoja de calibre pesado, instale la hoja con los dientes
orientados hacia arriba y sostenga la sierra en posición
invertida de la manera que se muestra en la ilustración.
No corte por inmersión en supercies metálicas.
En materiales gruesos y en materiales más duros, tales como
metal, no se deberá intentar realizar cortes por inmersión.
Dichos materiales se pueden cortar con la sierra alternativa
sólo comenzando el corte desde el borde del material o desde
un agujero taladrado de manera que atraviese completamente
el material y que sea lo sucientemente grande para que
quepa en él la hoja de la sierra.
Fig. 12
2
1
GSA18V-280.indd 42GSA18V-280.indd 42 11/13/2025 2:12:08 PM11/13/2025 2:12:08 PM
43
Mantenimiento
Para evitar accidentes, desconecte siempre el paquete de batería de la herramienta antes
de limpiar o realizar cualquier mantenimiento.
Mantenimiento general
Mantenga la herramienta, la batería y el cargador en buenas
condiciones de funcionamiento adoptando un programa
de mantenimiento regular. Inspeccione sus herramientas
para determinar si hay problemas como uso indebido,
desalineación o atoramiento de piezas móviles, rotura
de piezas o cualquier otra situación que pueda afectar al
funcionamiento de la herramienta.
Si la herramienta no arranca ni funciona a la potencia máxima
con un paquete de batería completamente cargado, limpie los
contactos del paquete de batería. Si la herramienta sigue sin
funcionar adecuadamente, devuelva la herramienta, el car-
gador y el paquete de batería a un centro de servicio BOSCH
para hacer reparaciones.
Limpieza
Ciertos agentes de limpieza
y disolventes dañan las pie-
zas de plástico. Algunos de es tos son: gasolina, tetracloruro
de carbono, disolventes de limpie za clorados, amoníaco y
detergentes domésticos que contienen amoníaco.
Retire primero la cubierta lateral y luego, utilizando un cepillo
suave, elimine el polvo y los residuos de la cadena, la espada,
todas las supercies y las aberturas de ventilación. Mantenga
el cuerpo de la sierra de pértiga limpio, seco y libre de aceite o
grasa. No utilice nunca solventes inamables ni combustibles
cerca de las herramientas.
Servicio
Haga que su herramienta
mecánica reciba servicio de
un técnico de reparaciones calicado, utilizando única-
mente piezas de repuesto idénticas. Esto asegurará que se
mantenga la seguridad de la herramienta mecánica.
Lubricacion de las herramientas
Su herramienta Bosch ha sido lubricada adecuadamente y
está lista para la utilización. Se recomienda que las herra-
mientas con engranajes se vuelvan a engrasar con un lubri-
cante especial para engranajes en cada cambio de escobillas.
Motores
El motor de la herramienta ha sido diseñado
para muchas horas de servicio able. Para man-
tener un rendimiento óptimo del motor, reco-
mendamos que éste sea examinado cada seis
meses. Sólo se debe usar un motor de repuesto
Bosch genuino diseñado especialmente para la
herramienta.
Baterías
Esté alerta a paquetes de
batería que se estén
acercando al nal de su vida útil. Si observa una disminución
del rendimiento de la herramienta o un tiempo de
funcionamiento signicativamente más corto entre cargas,
entonces es momento de reemplazar el paquete de batería. Si
no se hace así, el resultado puede ser que la herramienta
funcione incorrectamente o que se causen daños al cargador.
Mantenimiento del portahoja
Lubrique periódicamente el portahoja con un lubricante seco,
como por ejemplo grato.
Accesorios
No utilice aditamentos/accesorios que no sean los especicados por Bosch. Es posible que
el uso de aditamentos/accesorios no especicados para utilizarse con la herramienta descrita en
este manual cause daños a la herramienta, daños materiales y/o lesiones corporales.
Equipo estándar
Accesorios y aditamentos
opcionales
Hojas de sierra alternativa Bosch Bolsa de transporte
GSA18V-280.indd 43GSA18V-280.indd 43 11/13/2025 2:12:09 PM11/13/2025 2:12:09 PM
44
Licenses
LEGAL INFORMATION AND LICENSES
1- Open Source Components
1.1 - BSD-3-Clause
Copyright (c) 2015-2017, Inneon Technologies AG.
All rights reserved.
Redistribution and use in source and binary forms,
with or without modication, are permitted pro-
vided that the
following conditions are met:
Redistributions of source code must retain the
above copyright notice, this list of conditions and
the following disclaimer.
Redistributions in binary form must reproduce the
above copyright notice, this list of conditions and
the following disclaimer in the documentation and/
or other materials provided with the distribution.
Neither the name of the copyright holders nor the
names of its contributors may be used to endorse
or promote products derived from this software
without specic prior written permission.
THIS SOFTWARE IS PROVIDED BY THE COPYRIGHT
HOLDERS AND CONTRIBUTORS "AS IS" AND ANY
EXPRESS OR IMPLIED WARRANTIES, INCLUDING,
BUT NOT LIMITED TO, THE IMPLIED WARRANTIES
OF MERCHANTABILITY AND FITNESS FOR A PAR-
TICULAR PURPOSE ARE DISCLAIMED. IN NO EVENT
SHALL THE COPYRIGHT HOLDER OR CONTRIBU-
TORS BE LIABLE FOR ANY DIRECT, INDIRECT, INCI-
DENTAL, SPECIAL, EXEMPLARY, OR CONSEQUEN-
TIAL DAMAGES (INCLUDING, BUT NOT LIMITED
TO, PROCUREMENT OF SUBSTITUTE GOODS OR
SERVICES; LOSS OF USE, DATA, OR PROFITS; OR
BUSINESS INTERRUPTION) HOWEVER CAUSED AND
ON ANY THEORY OF LIABILITY, WHETHER IN CON-
TRACT, STRICT LIABILITY,OR TORT (INCLUDING
NEGLIGENCE OR OTHERWISE) ARISING IN ANY WAY
OUT OF THE USE OF THIS SOFTWARE, EVEN IF
ADVISED OF THE POSSIBILITY OF SUCH DAMAGE.
1.2 - CMSIS_5 - Apache-2.0
Copyright 2009-2020 Arm Limited. All rights
reserved.
Licensed under the Apache License, Version 2.0
(the "License");you may not use this le except in
compliance with the License.
You may obtain a copy of the License at
http://www.apache.org/licenses/LICENSE-2.0
Unless required by applicable law or agreed to in
writing, software distributed under the License is
distributed on an "AS IS" BASIS, WITHOUT WAR-
RANTIES OR CONDITIONS OF ANY KIND, either
express or implied. See the License for the specic
language governing permissions and limitations
under the License.
1.3 - Libxmath - MIT
Copyright (c) 2011-2021 Flatmush <Flatmush@
gmail.com>, Petteri Aimonen <Petteri.Aimonen@
gmail.com>, & libxmath AUTHORS libxmath is
Copyright (c) 2011-2021 Flatmush <Flatmush@
gmail.com>, Petteri Aimonen <Petteri.Aimonen@
gmail.com>, & libxmath AUTHORS
Permission is hereby granted, free of charge, to any
person obtaining a copy of this software and associ-
ated documentation les (the Software), to deal in
the Software without restriction, including without
limitation the rights to use, copy, modify, merge,
publish, distribute, sublicense, and/or sell copies
of the Software, and to permit persons to whom
the Software is furnished to do so, subject to the
following conditions:
The above copyright notice and this permission
notice shall be included in all copies or substantial
portions of the Software.
THE SOFTWARE IS PROVIDED AS IS, WITHOUT
WARRANTY OF ANY KIND, EXPRESS OR IMPLIED,
INCLUDING BUT NOT LIMITED TO THE WARRAN-
TIES OF MERCHANTABILITY, FITNESS FOR A
PARTICULAR PURPOSE AND NONINFRINGEMENT.
IN NO EVENT SHALL THE AUTHORS OR COPYRIGHT
HOLDERS BE LIABLE FOR ANY CLAIM, DAMAGES
OR OTHER LIABILITY, WHETHER IN AN ACTION OF
CONTRACT, TORT OR OTHERWISE, ARISING FROM,
OUT OF OR IN CONNECTION WITH THE SOFT-
WARE OR THE USE OR OTHER DEALINGS IN THE
SOFTWARE.
1.4 - MFixedPoint - MIT
Copyright 2018 Geoffrey Hunter
Permission is hereby granted, free of charge, to
any person obtaining a copy of this software and
associated documentation les (the "Software"), to
deal in the Software without restriction, including
without limitation the rights to use, copy, modify,
merge, publish, distribute, sublicense, and/or sell
copies of the Software, and to permit persons to
whom the Software is furnished to do so, subject to
the following conditions:
GSA18V-280.indd 44GSA18V-280.indd 44 11/13/2025 2:12:09 PM11/13/2025 2:12:09 PM
45
The above copyright notice and this permission
notice shall be included in all copies or substantial
portions of the Software.
THE SOFTWARE IS PROVIDED "AS IS", WITHOUT
WARRANTY OF ANY KIND, EXPRESS OR IMPLIED,
INCLUDING BUT NOT LIMITED TO THE WARRAN-
TIES OF MERCHANTABILITY, FITNESS FOR A
PARTICULAR PURPOSE AND NONINFRINGEMENT.
IN NO EVENT SHALL THE AUTHORS OR COPYRIGHT
HOLDERS BE LIABLE FOR ANY CLAIM, DAMAGES
OR OTHER LIABILITY, WHETHER IN AN ACTION OF
CONTRACT, TORT OR OTHERWISE, ARISING FROM,
OUT OF OR IN CONNECTION WITH THE SOFT-
WARE OR THE USE OR OTHER DEALINGS IN THE
SOFTWARE.
1.5 - GCE-Math - Apache-2.0
Copyright 2016-2023 Keith O'Hara
Permission is hereby granted, free of charge, to any
person obtaining a copy of this software and associ-
ated documentation les (the Software), to deal in
the Software without restriction, including without
limitation the rights to use, copy, modify, merge,
publish, distribute, sublicense, and/or sell copies
of the Software, and to permit persons to whom
the Software is furnished to do so, subject to the
following conditions:
The above copyright notice and this permission
notice shall be included in all copies or substantial
portions of the Software.
THE SOFTWARE IS PROVIDED AS IS, WITHOUT
WARRANTY OF ANY KIND, EXPRESS OR IMPLIED,
INCLUDING BUT NOT LIMITED TO THE WARRAN-
TIES OF MERCHANTABILITY, FITNESS FOR A
PARTICULAR PURPOSE AND NONINFRINGEMENT.
IN NO EVENT SHALL THE AUTHORS OR COPYRIGHT
HOLDERS BE LIABLE FOR ANY CLAIM, DAMAGES
OR OTHER LIABILITY, WHETHER IN AN ACTION OF
CONTRACT, TORT OR OTHERWISE, ARISING FROM,
OUT OF OR IN CONNECTION WITH THE SOFT-
WARE OR THE USE OR OTHER DEALINGS IN THE
SOFTWARE.
1.7 - picolibc 1.8.8
(1) Copyright (c) 2001 Mike Barcroft <mike@Free-
BSD.org> All rights reserved.
(2) Copyright 2002 Jeff Johnston <jjohnstn@
redhat.com>
Redistribution and use in source and binary forms,
with or without modication, are permitted pro-
vided that the following conditions
Licenses
are met:
1. Redistributions of source code must retain the
above copyright notice, this list of conditions and
the following disclaimer.
2. Redistributions in binary form must reproduce
the above copyright notice, this list of conditions
and the following disclaimer in the documentation
and/or other materials provided with the distribu-
tion.
THIS SOFTWARE IS PROVIDED BY THE AUTHOR
AND CONTRIBUTORS ``AS IS'' AND ANY EXPRESS
OR IMPLIED WARRANTIES, INCLUDING, BUT NOT
LIMITED TO, THE IMPLIED WARRANTIES OF MER-
CHANTABILITY AND FITNESS FOR A PARTICULAR
PURPOSE ARE DISCLAIMED. IN NO EVENT SHALL
THE AUTHOR OR CONTRIBUTORS BE LIABLE FOR
ANY DIRECT, INDIRECT, INCIDENTAL, SPECIAL,
EXEMPLARY, OR CONSEQUENTIAL DAMAGES (IN-
CLUDING, BUT NOT LIMITED TO, PROCUREMENT
OF SUBSTITUTE GOODS OR SERVICES; LOSS OF
USE, DATA, OR PROFITS; OR BUSINESS INTERRUP-
TION) HOWEVER CAUSED AND ON ANY THEORY
OF LIABILITY, WHETHER IN CONTRACT, STRICT
LIABILITY, OR TORT (INCLUDING NEGLIGENCE OR
OTHERWISE) ARISING IN ANY WAY OUT OF THE
USE OF THIS SOFTWARE, EVEN IF ADVISED OF THE
POSSIBILITY OF SUCH DAMAGE.
(3) Copyright 2019, 2020, 2021, 2024 Keith Pack-
ard Stephen Street
(4) Copyright 1997 Nick Clifton, Cygnus Solutions
Redistribution and use in source and binary forms,
with or without modication, are permitted pro-
vided that the following conditions
are met:
1. Redistributions of source code must retain the
above copyright notice, this list of conditions and
the following disclaimer.
2. Redistributions in binary form must reproduce
the above copyright notice, this list of conditions
and the following disclaimer in the documentation
and/or other materials provided with the distribu-
tion.
3. Neither the name of the copyright holder nor the
names of its contributors may be used to endorse
or promote products derived from this software
without specic prior written permission.
GSA18V-280.indd 45GSA18V-280.indd 45 11/13/2025 2:12:09 PM11/13/2025 2:12:09 PM
46
Licenses
THIS SOFTWARE IS PROVIDED BY THE COPYRIGHT
HOLDERS AND CONTRIBUTORS "AS IS" AND ANY
EXPRESS OR IMPLIED WARRANTIES, INCLUDING,
BUT NOT LIMITED TO, THE IMPLIED WARRAN-
TIES OF MERCHANTABILITY AND FITNESS FOR
A PARTICULAR PURPOSE ARE DISCLAIMED. IN
NO EVENT SHALL THE COPYRIGHT HOLDER OR
CONTRIBUTORS BE LIABLE FOR ANY DIRECT,
INDIRECT, INCIDENTAL, SPECIAL, EXEMPLARY,
OR CONSEQUENTIAL DAMAGES INCLUDING, BUT
NOT LIMITED TO, PROCUREMENT OF SUBSTITUTE
GOODS OR SERVICES; LOSS OF USE, DATA, OR
PROFITS; OR BUSINESS INTERRUPTION) HOW-
EVER CAUSED AND ON ANY THEORY OF LIABILITY,
WHETHER IN CONTRACT, STRICT LIABILITY, OR
TORT (INCLUDING NEGLIGENCE OR OTHERWISE)
ARISING IN ANY WAY OUT OF THE USE OF THIS
SOFTWARE, EVEN IF ADVISED OF THE POSSIBILITY
OF SUCH DAMAGE.
(5) Copyright 2024, Synopsys, Inc.
Redistribution and use in source and binary forms,
with or without modication, are permitted pro-
vided that the following conditions are met:
1) Redistributions of source code must retain the
above copyright notice, this list of conditions and
the following disclaimer.
2) Redistributions in binary form must reproduce
the above copyright notice, this list of conditions
and the following disclaimer in the documentation
and/or other materials provided with the distribu-
tion.
3) Neither the name of the Synopsys, Inc., nor the
names of its contributors may be used to endorse
or promote products derived from this software
without specic prior written permission.
THIS SOFTWARE IS PROVIDED BY THE COPYRIGHT
HOLDERS AND CONTRIBUTORS "AS IS" AND ANY
EXPRESS OR IMPLIED WARRANTIES, INCLUDING,
BUT NOT LIMITED TO, THE IMPLIED WARRAN-
TIES OF MERCHANTABILITY AND FITNESS FOR
A PARTICULAR PURPOSE ARE DISCLAIMED. IN
NO EVENT SHALL THE COPYRIGHT HOLDER OR
CONTRIBUTORS BE LIABLE FOR ANY DIRECT,
INDIRECT, INCIDENTAL, SPECIAL, EXEMPLARY,
OR CONSEQUENTIAL DAMAGES (INCLUDING, BUT
NOT LIMITED TO, PROCUREMENT OF SUBSTITUTE
GOODS OR SERVICES; LOSS OF USE, DATA, OR
PROFITS; OR BUSINESS INTERRUPTION) HOW-
EVER CAUSED AND ON ANY THEORY OF LIABILITY,
WHETHER IN CONTRACT, STRICT LIABILITY, OR
TORT (INCLU ING NEGLIGENCE OR OTHERWISE)
ARISING IN ANY WAY OUT OF THE USE OF THIS
SOFTWARE, EVEN IF ADVISED OF THE POSSIBILITY
OF SUCH DAMAGE.
(6) Copyright (c) 1983, 1993 The Regents of the
University of California. All rights reserved.
Redistribution and use in source and binary forms,
with or without modication, are permitted pro-
vided that the following conditions are met:
1. Redistributions of source code must retain the
above copyright notice, this list of conditions and
the following disclaimer.
2. Redistributions in binary form must reproduce
the above copyright notice, this list of conditions
and the following disclaimer in the documentation
and/or other materials provided with the distribu-
tion.
3. Neither the name of the University nor the names
of its contributors may be used to endorse or pro-
mote products derived from this software without
specic prior written permission.
THIS SOFTWARE IS PROVIDED BY THE REGENTS
AND CONTRIBUTORS ``AS IS'' AND ANY EXPRESS
OR IMPLIED WARRANTIES, INCLUDING, BUT NOT
LIMITED TO, THE IMPLIED WARRANTIES OF MER-
CHANTABILITY AND FITNESS FOR A PARTICULAR
PURPOSE ARE DISCLAIMED. IN NO EVENT SHALL
THE REGENTS OR CONTRIBUTORS BE LIABLE FOR
ANY DIRECT, INDIRECT, INCIDENTAL, SPECIAL,
EXEMPLARY, OR CONSEQUENTIAL DAMAGES (IN-
CLUDING, BUT NOT LIMITED TO, PROCUREMENT
OF SUBSTITUTE GOODS OR SERVICES; LOSS OF
USE, DATA, OR PROFITS; OR BUSINESS INTERRUP-
TION) HOWEVER CAUSED AND ON ANY THEORY
OF LIABILITY, WHETHER IN CONTRACT, STRICT
LIABILITY, OR TORT (INCLUDING NEGLIGENCE OR
OTHERWISE) ARISING IN ANY WAY OUT OF THE
USE OF THIS SOFTWARE, EVEN IF ADVISED OF THE
POSSIBILITY OF SUCH DAMAGE.
(7) Copyright 2009-2015 ARM Ltd
Redistribution and use in source and binary forms,
with or without modication, are permitted pro-
vided that the following conditions are met:
1. Redistributions of source code must retain the
above copyright notice, this list of conditions and
the following disclaimer.
2. Redistributions in binary form must reproduce
the above copyright notice, this list of conditions
GSA18V-280.indd 46GSA18V-280.indd 46 11/13/2025 2:12:09 PM11/13/2025 2:12:09 PM
47
Licenses
and the following disclaimer in the documentation
and/or other materials provided with the distribu-
tion.
3. The name of the company may not be used to
endorse or promote products derived from this soft-
ware without specic prior written permission.
THIS SOFTWARE IS PROVIDED BY ARM LTD ``AS
IS'' AND ANY EXPRESS OR IMPLIED WARRANTIES,
INCLUDING, BUT NOT LIMITED TO, THE IMPLIED
WARRANTIES OF MERCHANTABILITY AND FITNESS
FOR A PARTICULAR PURPOSE ARE DISCLAIMED
IN NO EVENT SHALL ARM LTD BE LIABLE FOR
ANY DIRECT, INDIRECT, INCIDENTAL, SPECIAL,
EXEMPLARY, OR CONSEQUENTIAL DAMAGES (IN-
CLUDING, BUT NOT LIMITED TO, PROCUREMENT
OF SUBSTITUTE GOODS OR SERVICES; LOSS OF
USE, DATA, OR PROFITS; OR BUSINESS INTERRUP-
TION) HOWEVER CAUSED AND ON ANY THEORY
OF LIABILITY, WHETHER IN CONTRACT, STRICT
LIABILITY, OR TORT (INCLUDING NEGLIGENCE OR
OTHERWISE) ARISING IN ANY WAY OUT OF THE
USE OF THIS SOFTWARE, EVEN IF ADVISED OF THE
POSSIBILITY OF SUCH DAMAGE.
(8) Copyright 2009-2015 Linaro Limited
Redistribution and use in source and binary forms,
with or without modication, are permitted pro-
vided that the following conditions are met:
Redistributions of source code must retain the
above copyright notice, this list of conditions and
the following disclaimer. Redistributions in binary
form must reproduce the above copyright notice,
this list of conditions and the following disclaimer
in the documentation and/or other materials
provided with the distribution. Neither the name
of Linaro Limited nor the names of its contribu-
tors may be used to endorse or promote products
derived from this software without specic prior
written permission.
THIS SOFTWARE IS PROVIDED BY THE COPYRIGHT
HOLDERS AND CONTRIBUTORS AS IS AND ANY
EXPRESS OR IMPLIED WARRANTIES, INCLUDING,
BUT NOT LIMITED TO, THE IMPLIED WARRAN-
TIES OF MERCHANTABILITY AND FITNESS FOR
A PARTICULAR PURPOSE ARE DISCLAIMED. IN
NO EVENT SHALL THE COPYRIGHT HOLDER OR
CONTRIBUTORS BE LIABLE FOR ANY DIRECT,
INDIRECT, INCIDENTAL, SPECIAL, EXEMPLARY,
OR CONSEQUENTIAL DAMAGES (INCLUDING, BUT
NOT LIMITED TO, PROCUREMENT OF SUBSTITUTE
GOODS OR SERVICES; LOSS OF USE, DATA, OR
PROFITS; OR BUSINESS INTERRUPTION) HOW-
EVER CAUSED AND ON ANY THEORY OF LIABILITY,
WHETHER IN CONTRACT, STRICT LIABILITY, OR
TORT INCLUDING NEGLIGENCE OR OTHERWISE)
ARISING IN ANY WAY OUT OF THE USE OF THIS
SOFTWARE, EVEN IF ADVISED OF THE POSSIBILITY
OF SUCH DAMAGE.
(9) Copyright 1994 Cygnus Support
Redistribution and use in source and binary forms
are permitted provided that the above copyright
notice and this paragraph are duplicated in all
such forms and that any documentation, and/or
other materials related to such distribution and use
acknowledge that the software was developed at
Cygnus Support, Inc. Cygnus Support, Inc. may not
be used to endorse or promote products derived
from this software without specic prior written
permission.
THIS SOFTWARE IS PROVIDED "AS IS" AND WITH-
OUT ANY EXPRESS OR IMPLIED WARRANTIES,
INCLUDING, WITHOUT LIMITATION, THE IMPLIED
WARRANTIES OF MERCHANTABILITY AND FITNESS
FOR A PARTICULAR PURPOSE.
2. Common Licenses
2.1 Apache License 2.0 (Apache-2.0)
Apache-2.0
Apache License
Version 2.0, January 2004
http://www.apache.org/licenses/
TERMS AND CONDITIONS FOR USE, REPRODUC-
TION, AND DISTRIBUTION
1. Denitions.
"License" shall mean the terms and conditions for
use, reproduction, and distribution as dened by
Sections 1 through 9 of this document.
"Licensor" shall mean the copyright owner or entity
authorized by the copyright owner that is granting
the License.
"Legal Entity" shall mean the union of the acting
entity and all other entities that control, are con-
trolled by, or are under common control with that
entity. For the purposes of this denition, "control"
GSA18V-280.indd 47GSA18V-280.indd 47 11/13/2025 2:12:09 PM11/13/2025 2:12:09 PM
48
Licenses
means (i) the power, direct or indirect, to cause the
direction or management of such entity, whether
by contract or otherwise, or (ii) ownership of fty
percent (50%) or more of the outstanding shares,
or (iii) benecial ownership of such entity.
"You" (or "Your") shall mean an individual or Legal
Entity exercising permissions granted by this
License.
"Source" form shall mean the preferred form for
making modications, including but not limited to
software source code, documentation source, and
conguration les.
"Object" form shall mean any form resulting from
mechanical transformation or translation of a
Source form, including but not limited to compiled
object code, generated documentation, and conver-
sions to other media types.
"Work" shall mean the work of authorship, whether
in Source or Object form, made available under the
License, as indicated by a copyright notice that is
included in or attached to the work (an example is
provided in the Appendix below).
"Derivative Works" shall mean any work, whether
in Source or Object form, that is based on (or
derived from) the Work and for which the edito-
rial revisions, annotations, elaborations, or other
modications represent, as a whole, an original
work of authorship. For the purposes of this Li-
cense, Derivative Works shall not include works that
remain separable from, or merely link (or bind by
name) to the interfaces of, the Work and Derivative
Works thereof.
"Contribution" shall mean any work of authorship,
including the original version of the Work and any
modications or additions to that Work or Deriva-
tive Works thereof, that is intentionally submitted to
Licensor for inclusion in the Work by the copyright
owner or by an individual or Legal Entity authorized
to submit on behalf of the copyright owner. For the
purposes of this denition, "submitted" means any
form of electronic, verbal, or written communication
sent to the Licensor or its representatives, including
but not limited to communication on electronic
mailing lists, source code control systems, and
issue tracking systems that are managed by, or on
behalf of, the Licensor for the purpose of discussing
and improving the Work, but excluding communi-
cation that is conspicuously marked or otherwise
designated in writing by the copyright owner as
"Not a Contribution."
"Contributor" shall mean Licensor and any individu-
al or Legal Entity on behalf of whom a Contribution
has been received by Licensor and subsequently
incorporated within the Work.
2. Grant of Copyright License. Subject to the terms
and conditions of this License, each Contributor
hereby grants to You a perpetual, worldwide, non-
exclusive, no-charge, royalty-free, irrevocable copy-
right license to reproduce, prepare Derivative Works
of, publicly display, publicly perform, sublicense,
and distribute the Work and such Derivative Works
in Source or Object form.
3. Grant of Patent License. Subject to the terms
and conditions of this License, each Contribu-
tor hereby grants to You a perpetual, worldwide,
non-exclusive, no-charge, royalty-free, irrevocable
(except as stated in this section) patent license to
make, have made, use, offer to sell, sell, import,
and otherwise transfer the Work, where such li-
cense applies only to those patent claims licensable
by such Contributor that are necessarily infringed
by their Contribution(s) alone or by combination
of their Contribution(s) with the Work to which
such Contribution(s) was submitted. If You institute
patent litigation against any entity (including a
cross-claim or counterclaim in a lawsuit) alleging
that the Work or a Contribution incorporated within
the Work constitutes direct or contributory patent
infringement, then any patent licenses granted to
You under this License for that Work shall terminate
as of the date such litigation is led.
4. Redistribution. You may reproduce and distribute
copies of the Work or Derivative Works thereof in
any medium, with or without modications, and in
Source or Object form, provided that You meet the
following conditions:
(a) You must give any other recipients of the
Work or Derivative Works a copy of this License; and
(b) You must cause any modied les to carry
prominent notices stating that You changed the
les; and
(c) You must retain, in the Source form of any
Derivative Works that You distribute, all copyright,
patent, trademark, and attribution notices from the
GSA18V-280.indd 48GSA18V-280.indd 48 11/13/2025 2:12:09 PM11/13/2025 2:12:09 PM
49
Licenses
Source form of the Work, excluding those notices
that do not pertain to any part of the Derivative
Works; and
(d) If the Work includes a "NOTICE" text le as
part of its distribution, then any Derivative Works
that You distribute must include a readable copy
of the attribution notices contained within such
NOTICE le, excluding those notices that do not
pertain to any part of the Derivative Works, in at
least one of the following places: within a NO-
TICE text le distributed as part of the Derivative
Works; within the Source form or documentation, if
provided along with the Derivative Works; or, within
a display generated by the Derivative Works, if and
wherever such third-party notices normally appear.
The contents of the NOTICE le are for informa-
tional purposes only and do not modify the License.
You may add Your own attribution notices within
Derivative Works that You distribute, alongside or
as an addendum to the NOTICE text from the Work,
provided that such additional attribution notices
cannot be construed as modifying the License.
You may add Your own copyright statement to
Your modications and may provide additional or
different license terms and conditions for use, re-
production, or distribution of Your modications, or
for any such Derivative Works as a whole, provided
Your use, reproduction, and distribution of the Work
otherwise complies with the conditions stated in
this License.
5. Submission of Contributions. Unless You explic-
itly state otherwise, any Contribution intentionally
submitted for inclusion in the Work by You to the
Licensor shall be under the terms and conditions of
this License, without any additional terms or condi-
tions. Notwithstanding the above, nothing herein
shall supersede or modify the terms of any separate
license agreement you may have executed with
Licensor regarding such Contributions.
6. Trademarks. This License does not grant permis-
sion to use the trade names, trademarks, service
marks, or product names of the Licensor, except
as required for reasonable and customary use in
describing the origin of the Work and reproducing
the content of the NOTICE le.
7. Disclaimer of Warranty. Unless required by
applicable law or agreed to in writing, Licensor
provides the Work (and each Contributor provides
its Contributions) on an "AS IS" BASIS, WITHOUT
WARRANTIES OR CONDITIONS OF ANY KIND, either
express or implied, including, without limitation,
any warranties or conditions of TITLE, NON-IN-
FRINGEMENT, MERCHANTABILITY, or FITNESS FOR
A PARTICULAR PURPOSE. You are solely respon-
sible for determining the appropriateness of using
or redistributing the Work and assume any risks
associated with Your exercise of permissions under
this License.
8. Limitation of Liability. In no event and under no
legal theory, whether in tort (including negligence),
contract, or otherwise, unless required by appli-
cable law (such as deliberate and grossly negligent
acts) or agreed to in writing, shall any Contributor
be liable to You for damages, including any direct,
indirect, special, incidental, or consequential
damages of any character arising as a result of this
License or out of the use or inability to use the
Work (including but not limited to damages for loss
of goodwill, work stoppage, computer failure or
malfunction, or any and all other commercial dam-
ages or losses), even if such Contributor has been
advised of the possibility of such damages.
9. Accepting Warranty or Additional Liability. While
redistributing the Work or Derivative Works thereof,
You may choose to offer, and charge a fee for, ac-
ceptance of support, warranty, indemnity, or other
liability obligations and/or rights consistent with
this License. However, in accepting such obliga-
tions, You may act only on Your own behalf and on
Your sole responsibility, not on behalf of any other
Contributor, and only if You agree to indemnify,
defend, and hold each Contributor harmless for
any liability incurred by, or claims asserted against,
such Contributor by reason of your accepting any
such warranty or additional liability.
END OF TERMS AND CONDITIONS
3- WARRANTY DISCLAIMER
This product contains Open Source Software
components which underlie Open Source Software
Licenses. Please note that Open Source Licenses
contain disclaimer clauses.
The text of the Open Source Licenses that apply are
included in this manual under "Legal Information
and Licenses".
GSA18V-280.indd 49GSA18V-280.indd 49 11/13/2025 2:12:09 PM11/13/2025 2:12:09 PM
50
Notes / Remarques / Notas
This page was intentionally left blank
Cette page a été laissée vierge intentionnellement.
Esta página se dejó intencionalmente en blanco
GSA18V-280.indd 50GSA18V-280.indd 50 11/13/2025 2:12:09 PM11/13/2025 2:12:09 PM
51
Notes / Remarques / Notas
This page was intentionally left blank
Cette page a été laissée vierge intentionnellement.
Esta página se dejó intencionalmente en blanco
GSA18V-280.indd 51GSA18V-280.indd 51 11/13/2025 2:12:09 PM11/13/2025 2:12:09 PM
160992AD62 09/2025
© Robert Bosch Tool Corporation
1800 W. Central Road
Mt. Prospect, IL 60056-2230
!160992AD62!
LIMITED WARRANTY
For details on the terms of the limited warranty for this product, go to https://rb-pt.io/PowerToolWarranty or
call 1-877-BOSCH99.
GARANTIE LIMITÉE
Pour tous détails sur les conditions de la garantie limitée pour ce produit, allez sur le site https://rb-pt.io/PowerToolWarranty ou téléphonez au
1-877-BOSCH99.
GARANTÍA LIMITADA
Para obtener detalles sobre los términos de la garantía limitada de este producto, visite https://rb-pt.io/PowerToolWarranty o llame al
1-877-BOSCH99.
GSA18V-280.indd 52GSA18V-280.indd 52 11/13/2025 2:12:09 PM11/13/2025 2:12:09 PM

