
ALLmeter
Smart Automotive Battery Charger & Trickle Maintainer
USER GUIDE
Models: ALL-series | ALL-series | ALL-series
Thank you for purchasing the ALLmeter Smart Battery Charger and Trickle Maintainer. Please read this guide
carefully before use and keep it for future reference. This guide covers all three models in the series: ALL-series.
Table of Contents
1. Important Safety Instructions 2
2. Package Contents 2
3. Product Overview & Features 2
4. Technical Specifications 3
5. Parts & Controls 3
6. Connection Instructions 4
7. Operating Instructions 4
8. Charging Stages Explained 5
9. Display & Indicator Guide 5
1
0.
Maintenance & Storage 6
1
1.
Troubleshooting 6
1
2.
FAQ 7
1
3.
Warranty & Support 7

1. Important Safety Instructions
WARNING: Read all safety instructions before operating this charger. Failure to follow these instructions
may result in electric shock, fire, or personal injury.
■ Electrical Safety: Connect the charger to a properly grounded 100–240V AC outlet only. Do not use extension
cords unless rated for the charger's power requirements. Ensure the outlet and cord are dry before use.
■ Explosion / Fire Risk: Charging batteries can produce hydrogen gas. Always charge in a well-ventilated area.
Keep sparks, open flames, and smoking materials away from the battery and charger during charging.
■ Correct Polarity: Always connect the RED (positive) clamp to the battery POSITIVE terminal (+) first, then the
BLACK (negative) clamp to the battery NEGATIVE terminal (−). Reverse connections will trigger the protection
circuit and may damage the battery.
■ Do Not Charge Non-Compatible Batteries: The ALL-series models are designed for lead-acid batteries ONLY
(AGM, Gel, Flooded/STD). The ALL-series also supports Lithium LiFePO4. Do not attempt to charge lithium
batteries with ALL-series.
■ Unattended Charging: The float maintenance mode allows long-term unattended charging once the battery is
full. However, inspect connections periodically and never leave a visibly damaged or leaking battery on charge.
■ Children & Pets: Keep this charger out of reach of children and pets. The clamps and cables can pose a
strangulation or shock hazard.
■ Damage: Do not use the charger if the power cord, plug, enclosure, or clamps are visibly damaged. Contact
ALLmeter support before using a damaged unit.
■ Temperature: Do not operate outside the specified ambient temperature range of 14°F – 104°F (−10°C – 40°C).
Do not place the charger on or near heat sources.
2. Package Contents
● 1 × Smart Battery Charger (ALL-series — as ordered)
● 1 × Battery Charging Clamps (RED positive clamp + BLACK negative clamp, pre-attached cable)
● 1 × AC Power Cord (pre-attached)
● 1 × User Guide (this document)
If any component is missing or damaged upon receipt, please contact ALLmeter customer support within 30 days of delivery.
3. Product Overview & Features
The ALLmeter ALL-series smart battery chargers are fully automatic multi-voltage chargers engineered for charging
and long-term maintenance of automotive and powersport batteries. An advanced microprocessor continuously
monitors battery voltage, automatically selects the optimal charging profile, and switches to float maintenance mode
once a full charge is reached — protecting your battery from overcharging and extending its service life.
Key Features
● Multi-Voltage Compatibility: Supports 6V, 8V, 12V, 14V, 16V, and 24V DC battery systems in a single unit.
● Wide Battery Type Support: Charges AGM, Gel, and Standard flooded lead-acid batteries (ALL-series). The
ALL-series additionally supports Lithium LiFePO4 chemistry.

● Smart Multi-Stage Charging: Automatically progresses through up to 7 intelligent charging stages including
desulfation, soft start, bulk, absorption, testing, reconditioning, and float.
● Adjustable Current Output: User-selectable charging current (0–10A on ALL-series; 0–14A on ALL-series;
0–12A on ALL-series) for flexible use with small and large battery banks.
● LCD Display: Real-time voltage, current, and charging stage readout (ALL-series and ALL-series). LED indicators
on ALL-series.
● Automatic Power-Off: Built-in auto shut-off prevents overcharging once the battery reaches full capacity.
● Comprehensive Safety Protection: Overcharge, over-voltage, over-temperature, over-time, short-circuit, and
reverse-polarity protection built in.
● Desulfation & Reconditioning: Recovers and extends the life of sulfated or partially discharged batteries.
● Trickle Maintenance Mode: Maintains a fully charged battery indefinitely — ideal for seasonal storage of cars,
motorcycles, boats, RVs, and lawn equipment.
● Portable Design: Compact housing with carrying handle and extended cable for convenient positioning.
● Wide Application: Suitable for cars, trucks, SUVs, motorcycles, ATVs, golf carts, boats, RVs, lawn mowers, and
other 6–24V lead-acid battery applications.

4. Technical Specifications
Parameter ALL-series ALL-series ALL-series
Input Voltage AC 100–240V, 50/60Hz AC 100–240V, 50/60Hz AC 100–240V, 50/60Hz
Output Voltage 6 / 8 / 12 / 14 / 16 / 24V DC 6 / 8 / 12 / 14 / 16 / 24V DC 6 / 8 / 12 / 14 / 16 / 24V DC
Max Charge Current 0 – 10A (adjustable) 0 – 14A (adjustable) 0 – 12A (adjustable)
Battery Types
Lead-Acid: AGM, Gel,
Flooded
Lead-Acid: AGM, Gel,
Flooded
Lead-Acid & Lithium
LiFePO4, AGM, Gel
Display LED Indicator LCD Display LCD Display
Charging Stages 7-Stage (12V) / 3-Stage (6V) 7-Stage (12V) / 3-Stage (6V) Multi-Stage Smart Charging
Safety Protection
Overcharge, Over-voltage,
Overheat, Short Circuit
Overcharge, Over-voltage,
Overheat, Short Circuit
Overcharge, Over-voltage,
Overheat, Short Circuit
Operating Temp.
14°F – 104°F (−10°C –
40°C)
14°F – 104°F (−10°C –
40°C)
14°F – 104°F (−10°C –
40°C)
Warranty 18 Months 18 Months 18 Months
* Specifications subject to change without notice. Always refer to the label on the charger unit for the most accurate specification data.
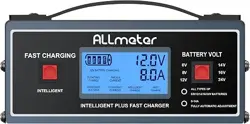
5. Parts & Controls
# Part Description
1 AC Power Cord Connects charger to a standard 100–240V AC wall outlet.
2 Power / Mode Button Turns the unit on/off and cycles through voltage and current settings.
3 LCD Display / LED Indicators Shows charging status, battery voltage, current, and active stage.
4 Positive Output Cable (RED)
Connects to the positive (+) battery terminal. RED clamp or ring terminal
attached.
5
Negative Output Cable
(BLACK)
Connects to the negative (−) battery terminal. BLACK clamp or ring terminal
attached.
6 Battery Clamps Heavy-duty spring-loaded clamps for direct battery terminal connection.
7 Ring Terminal Harness
Allows permanent connection to battery terminals for maintenance charging
without clamping.
8 Carrying Handle Integrated top handle for portability (ALL-series / ALL-series models).
9 Ventilation Slots
Allow airflow to cool internal components. Do not block these slots during
operation.
6. Connection Instructions

Connecting with Clamps (Standard Method)
Step 1. Ensure the charger is unplugged from the AC outlet before making any connections.
Step 2. Identify the positive (+) and negative (−) terminals on your battery.
Step 3. Attach the RED clamp to the battery positive (+) terminal.
Step 4. Attach the BLACK clamp to the battery negative (−) terminal, OR to a solid unpainted metal ground point
on the vehicle chassis at least 12 inches away from the battery.
Step 5. Verify all connections are secure and that the clamps are not touching each other or any other metal.
Step 6. Plug the AC power cord into a 100–240V grounded outlet.
Step 7. Power on the charger and select the appropriate voltage and current settings (see Section 7).
Connecting with Ring Terminal Harness (Permanent Installation)
The included ring terminal harness allows you to leave a permanent connection on your battery terminals, making it
easy to connect the charger without clamping each time — ideal for seasonal storage applications.
● Securely bolt the RED ring terminal to the battery positive (+) post.
● Securely bolt the BLACK ring terminal to the battery negative (−) post.
● When charging, plug the harness connector into the charger output connector.
● Ensure the harness is disconnected or the charger is unplugged when the vehicle is in use.
CAUTION — Polarity: Incorrect clamp connection (reverse polarity) will trigger the protection circuit and prevent charging.
The error indicator will flash red. Disconnect immediately, verify polarity, and reconnect correctly.
7. Operating Instructions
Initial Setup
After making battery connections per Section 6, power on the charger. On the ALL-series and ALL-series models, the
LCD will display the current battery voltage. Use the Mode button to select the correct output voltage matching your
battery system (e.g., 12V for most automotive batteries, 24V for trucks and dual-battery systems).
Selecting Charge Current
Press the Mode/Current button to cycle through available current levels. As a general guideline, set the charge
current to approximately 10–20% of the battery's rated capacity in amp-hours (Ah). For example, a 50Ah battery is
best charged at 5–10A. A lower current setting is gentler on the battery and recommended for maintenance charging.
Automatic Charging Cycle
Once settings are confirmed, the charger automatically progresses through its multi-stage charging program (see
Section 8). No further user input is required. The charger will automatically transition to Float/Trickle maintenance
mode once the battery is fully charged.

Disconnecting After Charging
Step 1. Unplug the AC power cord from the wall outlet first.
Step 2. Remove the BLACK (negative) clamp or ring terminal.
Step 3. Remove the RED (positive) clamp or ring terminal.
Long-Term Storage / Maintenance Mode
To keep a battery fully charged during vehicle storage (winter, off-season), simply leave the charger connected and
plugged in after the full charge cycle completes. The charger will automatically maintain the battery in Float mode
indefinitely, preventing sulfation and self-discharge without overcharging.

8. Charging Stages Explained
The ALL-series chargers employ an intelligent multi-stage charging algorithm to maximize battery capacity, health,
and longevity. The following table describes each stage:
Stage Name Description
1 Desulfation Applies short high-voltage pulses to dissolve lead sulfate crystals on battery plates, recovering
capacity in deeply discharged or sulfated batteries.
2 Soft Start Gradually increases charging current to safely initiate charging on deeply discharged
batteries, preventing voltage spikes.
3 Bulk Charge Delivers maximum constant current to rapidly charge the battery up to approximately 80%
capacity.
4 Absorption Switches to constant voltage, tapering the current as the battery approaches full charge,
ensuring complete charging without overcharging.
5 Battery Test Analyzes battery condition and capacity to determine whether additional reconditioning is
needed.
6 Recondition Applies a controlled overcharge cycle to equalize cell voltages and restore battery capacity
where possible.
7 Float / Trickle Maintains the fully charged battery at a safe float voltage indefinitely, preventing
self-discharge during storage.
Note: The 6V charging profile uses a simplified 3-stage process (Bulk Charge, Absorption, Float). The full 7-stage program applies
to 12V and higher battery systems. The ALL-series applies an adapted multi-stage profile for Lithium LiFePO4 batteries.
9. Display & Indicator Guide
Display / Indicator Meaning
Power LED – Solid Green Charger is connected and powered on.
Charging LED – Flashing Orange Active charging in progress.
Full LED – Solid Green Battery is fully charged; float maintenance mode active.
Error LED – Flashing Red Fault detected. Check connections and battery condition.
LCD: Voltage Reading Displays real-time battery voltage (ALL-series / ALL-series).
LCD: Current Reading Displays real-time charging current (ALL-series / ALL-series).
LCD: Stage Icon Shows current charging stage (ALL-series / ALL-series).
10. Maintenance & Storage
● Keep the charger clean and dry. Wipe with a dry cloth only. Do not use solvents or water.

● Periodically inspect the power cord, clamps, and cable for cracks, fraying, or corrosion. Replace damaged
components before use.
● Clean battery terminal connections if corrosion is present. A baking soda and water solution neutralizes terminal
corrosion effectively.
● Store the charger indoors in a cool, dry location when not in use. Avoid storage temperatures below −22°F
(−30°C) or above 140°F (60°C).
● Coil the cables loosely when storing to prevent internal wire damage.
● Do not store the charger with the clamps touching each other or any conductive surface.
11. Troubleshooting
Symptom Possible Cause Solution
No power / no display No AC power supply Check outlet and power cord connection. Try a different
outlet.
Error indicator flashing Reverse polarity or disconnected
clamp
Turn off charger, verify RED clamp to (+) and BLACK
clamp to (−), then restart.
Battery not charging Battery voltage too low (<1V) or
battery is defective
Allow Desulfation stage to run. If no improvement, the
battery may be unrecoverable.
Charger gets hot High ambient temperature or
maximum load
Ensure adequate ventilation. Charging in temperatures
above 104°F is not recommended.
Charger stuck on one
stage
Severely sulfated or deeply
discharged battery
Allow extra time for Desulfation. If the battery does not
respond, it may need replacement.
Charging takes
unusually long
Large battery bank or low initial
charge
Normal for large-capacity batteries. Ensure current setting
matches battery requirements.
Float stage not reached Battery has a high self-discharge
rate
Check for parasitic loads on the vehicle. Disconnect
accessories before charging.
12. Frequently Asked Questions
Q: Can I leave the charger connected to my battery indefinitely?
A: Yes. Once the battery is fully charged, the charger automatically switches to Float/Trickle maintenance mode,
which safely maintains the battery at full charge without overcharging. This is suitable for long-term storage.
Q: Can I charge a battery while it is still connected to the vehicle?
A: Yes, for most vehicles. However, for sensitive electronics or newer vehicles with complex electrical systems, we
recommend disconnecting the battery negative terminal before charging, or consulting your vehicle owner's
manual.
Q: What battery types are compatible with the ALL-series?
A: These models support lead-acid batteries only, including AGM (Absorbent Glass Mat), Gel, and Standard
flooded (wet cell) batteries in 6V, 8V, 12V, 14V, 16V, and 24V configurations. Do NOT use these models with
Lithium batteries.

Q: Does the ALL-series support Lithium batteries?
A: Yes. The ALL-series supports both lead-acid (AGM, Gel, Flooded) and Lithium LiFePO4 battery chemistries.
Always select the correct battery type mode before charging.
Q: What is desulfation and how does it help my battery?
A: Sulfation is the build-up of lead sulfate crystals on battery plates, which reduces capacity and is a leading cause
of battery failure. The desulfation stage applies high-frequency pulses to break down these crystals, potentially
restoring lost capacity and extending battery life.
Q: The charger has been on for over 24 hours and the battery still is not showing full. Is this normal?
A: For large-capacity or deeply discharged batteries, a full charge cycle may take 24–48+ hours. If charging
appears stuck at one stage indefinitely, see the Troubleshooting section. A battery that cannot complete a charge
cycle may be defective and should be tested by a professional.
Q: Can I use this charger for motorcycle or lawn mower batteries?
A: Yes. The ALL-series chargers are suitable for any lead-acid battery application including cars, trucks,
motorcycles, ATVs, golf carts, boats, RVs, and lawn mowers, provided the battery voltage matches a supported
output setting.
Q: What should I do if the error indicator lights up?
A: Turn off and unplug the charger immediately. Verify that the RED clamp is on the positive (+) terminal and the
BLACK clamp is on the negative (−) terminal. Check for any loose or corroded connections. If the error persists
after reconnecting correctly, the battery may be defective or completely discharged below recoverable levels.
Contact ALLmeter support if needed.
13. Warranty & Customer Support
18-Month Limited Warranty
ALLmeter warrants this product against defects in materials and workmanship for 18 months from the original
date of purchase. This warranty covers manufacturing defects under normal use conditions. It does not cover
damage resulting from misuse, abuse, accidents, unauthorized modifications, or use outside the specifications in
this guide.
How to Obtain Warranty Service
● Contact ALLmeter customer support via your Amazon order page.
● Provide your order number, model number (ALL-series), and a description of the issue.
● Do not return the product to Amazon without first contacting ALLmeter support.
Contact Information
● Brand: ALLmeter
● Amazon Storefront: Search "ALLmeter" on Amazon.com
● Support: Use the "Contact Seller" link on your Amazon order
● Response time: Within 24 hours on business days

ALLmeter Smart Battery Charger & Trickle Maintainer — User Guide | Models: ALL-series | Version 1.0 — 2025 | All rights reserved.
Specifications subject to change without notice.