
G
e
n
e
r
a
l
E
q
u
i
p
m
e
n
t
A
d
v
i
c
e
Thank you for purchasing this BodyPower TITAN product. This specific BodyPower Product has been designed for Full
Commercial use and has been tested and certified according to European Norm EN 957-1.
Warranty
BodyPower products are warranted to the original purchaser only, against possible defects in material and workmanship.
E
x
c
l
u
d
e
d
f
r
o
m
y
o
u
r
w
a
r
r
a
n
t
y
a
r
e
w
e
a
r
i
n
g
p
a
r
t
s
a
n
d
d
a
m
a
g
e
c
a
u
s
e
d
b
y
m
i
s
u
s
e
o
f
t
h
e
p
r
o
d
u
c
t
.
I
n
t
h
e
c
a
s
e
o
f
a
c
l
a
i
m
p
l
e
a
s
e
contact your local technical service support team to organize a repair. The warranty period starts from the date the product
w
a
s
d
e
l
i
v
e
r
e
d
s
o
p
l
e
a
s
e
c
a
r
e
f
u
l
l
y
r
e
t
a
i
n
y
o
u
r
s
a
l
e
s
r
e
c
e
i
p
t
.
P
l
e
a
s
e
n
o
t
e
t
h
e
s
a
l
e
s
r
e
c
e
i
p
t
w
i
l
l
b
e
r
e
q
u
i
r
e
d
t
o
p
r
o
c
e
s
s
a
w
a
r
r
a
n
t
y
c
l
a
i
m
.
T
h
i
s
w
a
r
r
a
n
t
y
e
x
t
e
n
d
s
o
n
l
y
t
o
t
h
e
o
r
i
g
i
n
a
l
p
u
r
c
h
a
s
e
r
.
W
A
R
N
I
N
G
T
h
i
s
e
q
u
i
p
m
e
n
t
i
s
m
a
d
e
f
o
r
F
u
l
l
C
o
m
m
e
r
c
i
a
l
u
s
e
a
n
d
t
e
s
t
e
d
u
p
t
o
a
m
a
x
i
m
u
m
b
o
d
y
w
e
i
g
h
t
d
e
p
e
n
d
i
n
g
o
n
t
h
e
t
y
p
e
o
f
equipment. The maximum user weight for each product can be located on its serial sticker which will be on the main body of
t
h
e
m
a
c
h
i
n
e
.
B
o
d
y
P
o
w
e
r
S
p
o
r
t
s
L
i
m
i
t
e
d
a
n
d
i
t
s
s
u
b
s
i
d
i
a
r
i
e
s
a
s
s
u
m
e
n
o
r
e
s
p
o
n
s
i
b
i
l
i
t
y
f
o
r
p
e
r
s
o
n
a
l
i
n
j
u
r
y
o
r
p
r
o
p
e
r
t
y
d
a
m
a
g
e
s
u
s
t
a
i
n
e
d
b
y
o
r
t
h
r
o
u
g
h
t
h
e
u
s
e
o
f
t
h
i
s
e
q
u
i
p
m
e
n
t
.
I
t
i
s
t
h
e
r
e
s
p
o
n
s
i
b
i
l
i
t
y
o
f
t
h
e
o
w
n
e
r
t
o
e
n
s
u
r
e
t
h
a
t
a
l
l
u
s
e
r
s
o
f
t
h
i
s
equipment are adequately informed of all warnings and precautions.
R
e
p
o
r
t
i
n
g
a
f
a
u
l
t
B
e
f
o
r
e
c
o
n
t
a
c
t
i
n
g
u
s
,
p
l
e
a
s
e
c
o
n
s
u
l
t
t
h
e
g
u
i
d
e
s
w
i
t
h
i
n
t
h
i
s
b
o
o
k
l
e
t
.
T
h
e
u
s
e
r
c
a
n
r
e
c
t
i
f
y
m
o
s
t
f
a
u
l
t
s
w
i
t
h
o
u
t
t
h
e
n
e
e
d
t
o
c
o
n
t
a
c
t
o
u
r
s
e
r
v
i
c
e
t
e
a
m
.
I
f
y
o
u
d
o
n
e
e
d
t
o
c
o
n
t
a
c
t
u
s
t
o
a
l
l
o
w
u
s
t
o
s
u
p
p
o
r
t
y
o
u
r
e
q
u
i
p
m
e
n
t
t
o
t
h
e
h
i
g
h
e
s
t
s
t
a
n
d
a
r
d
,
p
l
e
a
s
e
q
u
o
t
e
t
h
e
p
r
o
d
u
c
t
M
o
d
e
l
N
a
m
e
a
n
d
S
e
r
i
a
l
N
u
m
b
e
r
o
n
a
l
l
c
o
r
r
e
s
p
o
n
d
e
n
c
e
.
T
h
e
s
e
c
a
n
u
s
u
a
l
l
y
b
e
f
o
u
n
d
o
n
a
s
t
i
c
k
e
r
l
o
c
a
t
e
d
o
n
t
h
e
b
o
d
y
o
f
t
h
e
p
r
o
d
u
c
t
b
u
t
c
a
n
b
e
i
n
s
l
i
g
h
t
l
y
d
i
f
f
e
r
e
n
t
p
l
a
c
e
s
d
e
p
e
n
d
i
n
g
o
n
t
h
e
t
y
p
e
o
f
e
q
u
i
p
m
e
n
t
.
2

Details should be noted here for easy future reference:
W
e
r
e
c
o
m
m
e
n
d
n
o
t
i
n
g
d
o
w
n
t
h
e
b
e
l
o
w
i
n
f
o
r
m
a
t
i
o
n
f
o
r
e
a
s
y
r
e
f
e
r
e
n
c
i
n
g
s
h
o
u
l
d
y
o
u
r
e
q
u
i
r
e
h
e
l
p
i
n
t
h
e
f
u
t
u
r
e
Model Name:
Serial Number:
Date of Purchase:
O
r
d
e
r
r
e
f
e
r
e
n
c
e
n
u
m
b
e
r
:
To request parts please ensure you have quoted the correct part number from your assembly manual. If your warranty has
a
l
r
e
a
d
y
e
x
p
i
r
e
d
,
w
e
c
a
n
s
t
i
l
l
h
e
l
p
.
W
e
c
a
n
p
r
o
v
i
d
e
y
o
u
w
i
t
h
t
h
e
n
e
c
e
s
s
a
r
y
r
e
p
l
a
c
e
m
e
n
t
p
a
r
t
s
o
r
a
s
s
i
s
t
a
n
c
e
w
h
e
r
e
r
e
q
u
i
r
e
d
.
F
o
r
a
s
e
r
v
i
c
e
r
e
q
u
e
s
t
p
l
e
a
s
e
m
a
k
e
s
u
r
e
y
o
u
f
i
l
l
o
u
t
t
h
e
f
o
r
m
i
n
t
h
e
U
R
L
b
e
l
o
w
b
e
f
o
r
e
c
a
l
l
i
n
g
u
s
:
h
t
t
p
s
:
/
/
w
w
w
.
f
i
t
n
e
s
s
-
s
u
p
e
r
s
t
o
r
e
.
c
o
.
u
k
/
s
e
r
v
i
c
e
f
o
r
m
Once you filled out a service request form, you can initiate further contact by phone or E-Mail using the details below:
B
o
d
y
P
o
w
e
r
S
p
o
r
t
s
L
t
d
T
e
l
N
o
:
o
0
1
6
0
4
6
7
3
0
0
0
E
m
a
i
l
:
o
S
e
r
v
i
c
e
1
@
f
i
t
n
e
s
s
-
s
u
p
e
r
s
t
o
r
e
.
c
o
.
u
k
3

IMPORTANT PRECAUTIONS
WARNING: To reduce the risk of serious injury, read all important precautions and instructions in this manual and all warnings
o
n
y
o
u
r
p
r
o
d
u
c
t
b
e
f
o
r
e
u
s
e
.
B
o
d
y
P
o
w
e
r
S
p
o
r
t
s
a
s
s
u
m
e
s
n
o
r
e
s
p
o
n
s
i
b
i
l
i
t
y
f
o
r
p
e
r
s
o
n
a
l
i
n
j
u
r
y
o
r
p
r
o
p
e
r
t
y
d
a
m
a
g
e
s
u
s
t
a
i
n
e
d
b
y
o
r
t
h
r
o
u
g
h
t
h
e
u
s
e
o
f
t
h
i
s
p
r
o
d
u
c
t
.
B
e
f
o
r
e
b
e
g
i
n
n
i
n
g
a
n
y
e
x
e
r
c
i
s
e
p
r
o
g
r
a
m
,
c
o
n
s
u
l
t
y
o
u
r
p
h
y
s
i
c
i
a
n
.
Use the product only as described in this manual.
It is the responsibility of the owner to ensure that all users of this product are adequately informed of all precautions.
K
e
e
p
t
h
e
p
r
o
d
u
c
t
i
n
d
o
o
r
s
,
a
w
a
y
f
r
o
m
m
o
i
s
t
u
r
e
a
n
d
d
u
s
t
.
D
o
n
o
t
p
u
t
t
h
e
p
r
o
d
u
c
t
i
n
a
g
a
r
a
g
e
,
c
o
v
e
r
e
d
p
a
t
i
o
,
o
r
n
e
a
r
w
a
t
e
r
.
P
l
a
c
e
t
h
e
p
r
o
d
u
c
t
o
n
a
l
e
v
e
l
s
u
r
f
a
c
e
w
i
t
h
a
t
l
e
a
s
t
2
f
t
.
(
0
.
6
m
)
o
f
c
l
e
a
r
a
n
c
e
o
n
e
i
t
h
e
r
s
i
d
e
o
f
t
h
e
m
a
c
h
i
n
e
a
n
d
i
n
t
h
e
c
a
s
e
o
f
a
t
r
e
a
d
m
i
l
l
,
a
1
m
x
2
m
s
p
a
c
e
b
e
h
i
n
d
t
h
e
m
a
c
h
i
n
e
.
T
o
p
r
o
t
e
c
t
t
h
e
f
l
o
o
r
o
r
c
a
r
p
e
t
f
r
o
m
d
a
m
a
g
e
,
p
l
a
c
e
a
f
l
o
o
r
p
r
o
t
e
c
t
o
r
m
a
t
u
n
d
e
r
t
h
e
e
x
e
r
c
i
s
e
e
q
u
i
p
m
e
n
t
.
I
n
s
p
e
c
t
a
n
d
p
r
o
p
e
r
l
y
t
i
g
h
t
e
n
a
l
l
p
a
r
t
s
r
e
g
u
l
a
r
l
y
.
R
e
p
l
a
c
e
a
n
y
w
o
r
n
p
a
r
t
s
i
m
m
e
d
i
a
t
e
l
y
.
K
e
e
p
c
h
i
l
d
r
e
n
u
n
d
e
r
a
g
e
1
4
a
n
d
p
e
t
s
a
w
a
y
f
r
o
m
t
h
e
e
q
u
i
p
m
e
n
t
a
t
a
l
l
t
i
m
e
s
.
W
e
a
r
a
p
p
r
o
p
r
i
a
t
e
c
l
o
t
h
e
s
w
h
i
l
e
e
x
e
r
c
i
s
i
n
g
;
d
o
n
o
t
w
e
a
r
l
o
o
s
e
c
l
o
t
h
e
s
t
h
a
t
c
o
u
l
d
b
e
c
o
m
e
c
a
u
g
h
t
o
n
o
r
i
n
t
h
e
equipment. Always wear athletic shoes for foot protection.
The equipment should not be used by persons weighing more than 150 kg.
T
h
e
h
e
a
r
t
r
a
t
e
m
o
n
i
t
o
r
i
s
n
o
t
a
m
e
d
i
c
a
l
d
e
v
i
c
e
.
V
a
r
i
o
u
s
f
a
c
t
o
r
s
,
i
n
c
l
u
d
i
n
g
t
h
e
u
s
e
r
'
s
m
o
v
e
m
e
n
t
,
m
a
y
a
f
f
e
c
t
t
h
e
a
c
c
u
r
a
c
y
o
f
h
e
a
r
t
r
a
t
e
r
e
a
d
i
n
g
s
.
T
h
e
h
e
a
r
t
r
a
t
e
m
o
n
i
t
o
r
i
s
i
n
t
e
n
d
e
d
o
n
l
y
a
s
a
n
e
x
e
r
c
i
s
e
a
i
d
i
n
d
e
t
e
r
m
i
n
i
n
g
h
e
a
r
t
r
a
t
e
t
r
e
n
d
s
i
n
g
e
n
e
r
a
l
.
O
v
e
r
-
e
x
e
r
c
i
s
i
n
g
m
a
y
r
e
s
u
l
t
i
n
s
e
r
i
o
u
s
i
n
j
u
r
y
o
r
d
e
a
t
h
.
I
f
y
o
u
f
e
e
l
f
a
i
n
t
o
r
i
f
y
o
u
e
x
p
e
r
i
e
n
c
e
p
a
i
n
w
h
i
l
e
e
x
e
r
c
i
s
i
n
g
,
s
t
o
p
i
m
m
e
d
i
a
t
e
l
y
a
n
d
c
o
o
l
d
o
w
n
.
4

Introduction
This user's manual contains assembly, operation, maintenance and safety information.
P
l
e
a
s
e
r
e
a
d
a
n
d
r
e
t
a
i
n
t
h
i
s
m
a
n
u
a
l
f
o
r
f
u
t
u
r
e
r
e
f
e
r
e
n
c
e
.
S
a
f
e
t
y
g
u
i
d
e
l
i
n
e
s
• Read the user's manual and all accompanying literature. Follow it carefully before using your machine.
•
T
h
i
s
m
a
c
h
i
n
e
i
s
i
n
t
e
n
d
e
d
f
o
r
i
n
d
o
o
r
H
o
m
e
,
S
e
m
i
/
L
i
g
h
t
a
n
d
F
u
l
l
C
o
m
m
e
r
c
i
a
l
u
s
e
.
•
I
n
s
p
e
c
t
y
o
u
r
e
x
e
r
c
i
s
e
m
a
c
h
i
n
e
b
e
f
o
r
e
e
x
e
r
c
i
s
i
n
g
t
o
e
n
s
u
r
e
t
h
a
t
a
l
l
n
u
t
s
a
n
d
b
o
l
t
s
a
r
e
f
u
l
l
y
t
i
g
h
t
e
n
e
d
.
•
M
a
k
e
s
u
r
e
t
h
e
m
a
c
h
i
n
e
i
s
s
t
a
b
l
e
o
n
t
h
e
f
l
o
o
r
.
A
v
o
i
d
u
n
e
v
e
n
s
u
r
f
a
c
e
s
.
• Nearly all forms of Exercise equipment have moving parts. Keep others, especially children, at a safe distance while
e
x
e
r
c
i
s
i
n
g
• Make sure all parts of the machine are fully adjusted before use to avoid injury.
• Remove all jewellery, including rings, chains and pins before exercising
•
A
l
w
a
y
s
w
e
a
r
s
u
i
t
a
b
l
e
c
l
o
t
h
i
n
g
a
n
d
f
o
o
t
w
e
a
r
d
u
r
i
n
g
e
x
e
r
c
i
s
e
.
D
o
n
o
t
w
e
a
r
l
o
o
s
e
-
f
i
t
t
i
n
g
c
l
o
t
h
i
n
g
t
h
a
t
c
o
u
l
d
b
e
c
o
m
e
c
a
u
g
h
t
i
n
the moving parts of your exercise machine.
•
W
a
r
m
u
p
5
t
o
1
0
m
i
n
u
t
e
s
b
e
f
o
r
e
e
a
c
h
w
o
r
k
o
u
t
a
n
d
c
o
o
l
d
o
w
n
5
t
o
1
0
m
i
n
u
t
e
s
a
f
t
e
r
w
a
r
d
s
.
T
h
i
s
a
l
l
o
w
s
y
o
u
r
h
e
a
r
t
r
a
t
e
t
o
g
r
a
d
u
a
l
l
y
i
n
c
r
e
a
s
e
a
n
d
d
e
c
r
e
a
s
e
a
n
d
w
i
l
l
h
e
l
p
p
r
e
v
e
n
t
m
u
s
c
l
e
s
t
r
a
i
n
.
•
N
e
v
e
r
h
o
l
d
y
o
u
r
b
r
e
a
t
h
w
h
i
l
e
e
x
e
r
c
i
s
i
n
g
.
Y
o
u
s
h
o
u
l
d
b
r
e
a
t
h
e
a
t
a
n
o
r
m
a
l
r
a
t
e
i
n
c
o
n
j
u
n
c
t
i
o
n
w
i
t
h
t
h
e
l
e
v
e
l
o
f
e
x
e
r
c
i
s
e
b
e
i
n
g
p
e
r
f
o
r
m
e
d
.
•
R
e
s
t
a
d
e
q
u
a
t
e
l
y
b
e
t
w
e
e
n
w
o
r
k
o
u
t
s
.
THE MAXIMUM WEIGHT CAPACITY FOR THIS EQUIPMENT IS 150 KG.
W
A
R
N
I
N
G
:
B
e
f
o
r
e
c
o
m
m
e
n
c
i
n
g
a
n
y
e
x
e
r
c
i
s
e
p
r
o
g
r
a
m
,
p
l
e
a
s
e
c
o
n
s
u
l
t
y
o
u
r
P
h
y
s
i
c
i
a
n
.
I
f
a
t
a
n
y
t
i
m
e
d
u
r
i
n
g
e
x
e
r
c
i
s
e
y
o
u
f
e
e
l
f
a
i
n
t
,
d
i
z
z
y
o
r
e
x
p
e
r
i
e
n
c
e
p
a
i
n
,
s
t
o
p
a
n
d
c
o
n
s
u
l
t
y
o
u
r
p
h
y
s
i
c
i
a
n
.
T
h
e
s
a
f
e
t
y
l
e
v
e
l
o
f
t
h
e
e
q
u
i
p
m
e
n
t
c
a
n
b
e
m
a
i
n
t
a
i
n
e
d
o
n
l
y
i
f
i
t
i
s
e
x
a
m
i
n
e
d
r
e
g
u
l
a
r
l
y
f
o
r
d
a
m
a
g
e
a
n
d
w
e
a
r
.
I
M
P
O
R
T
A
N
T
:
R
e
a
d
a
l
l
i
n
s
t
r
u
c
t
i
o
n
s
c
a
r
e
f
u
l
l
y
.
A
s
s
e
m
b
l
e
t
h
e
u
n
i
t
a
s
p
e
r
t
h
e
s
t
e
p
s
i
n
t
h
e
m
a
n
u
a
l
.
L
a
y
o
u
t
a
l
l
p
a
r
t
s
o
n
t
h
e
f
l
o
o
r
a
n
d
c
h
e
c
k
i
f
y
o
u
h
a
v
e
a
l
l
t
h
e
p
a
r
t
s
n
e
e
d
e
d
f
o
r
a
s
s
e
m
b
l
y
t
o
h
a
n
d
b
e
f
o
r
e
b
e
g
i
n
n
i
n
g
a
s
s
e
m
b
l
y
.
I
f
t
h
e
r
e
a
r
e
a
n
y
d
i
s
c
r
e
p
a
n
c
i
e
s
,
p
l
e
a
s
e
c
o
n
t
a
c
t
t
h
e
c
u
s
t
o
m
e
r
s
e
r
v
i
c
e
d
e
p
a
r
t
m
e
n
t
.
W
A
R
N
I
N
G
:
T
h
i
s
a
p
p
l
i
a
n
c
e
i
s
n
o
t
i
n
t
e
n
d
e
d
f
o
r
u
s
e
b
y
p
e
r
s
o
n
s
(
i
n
c
l
u
d
i
n
g
c
h
i
l
d
r
e
n
)
w
i
t
h
r
e
d
u
c
e
d
p
h
y
s
i
c
a
l
,
s
e
n
s
o
r
y
o
r
m
e
n
t
a
l
c
a
p
a
b
i
l
i
t
i
e
s
5

Assembly
Before starting with the assembly of this fitness device carefully read through the assembly guide. We also recommend that
you view the assembly drawing before assembly.
R
e
m
o
v
e
a
l
l
p
a
c
k
a
g
i
n
g
m
a
t
e
r
i
a
l
a
n
d
p
l
a
c
e
t
h
e
i
n
d
i
v
i
d
u
a
l
p
a
r
t
s
o
n
a
c
l
e
a
r
a
n
d
c
l
e
a
n
s
u
r
f
a
c
e
.
T
h
i
s
w
i
l
l
p
r
o
v
i
d
e
y
o
u
w
i
t
h
a
n
overview and will simplify assembly.
P
l
e
a
s
e
c
o
n
s
i
d
e
r
t
h
a
t
t
h
e
r
e
i
s
a
l
w
a
y
s
t
h
e
r
i
s
k
o
f
i
n
j
u
r
y
w
h
e
n
u
s
i
n
g
t
o
o
l
s
a
n
d
c
a
r
r
y
i
n
g
o
u
t
t
e
c
h
n
i
c
a
l
a
c
t
i
v
i
t
i
e
s
.
P
l
e
a
s
e
p
r
o
c
e
e
d
with care when assembling the device.
Make sure you have a hazard-free working environment and do not, for example, leave tools lying around. Deposit the
p
a
c
k
a
g
i
n
g
m
a
t
e
r
i
a
l
i
n
s
u
c
h
a
w
a
y
t
h
a
t
i
t
d
o
e
s
n
o
t
p
o
s
e
a
d
a
n
g
e
r
.
F
o
i
l
/
p
l
a
s
t
i
c
b
a
g
s
a
r
e
a
p
o
t
e
n
t
i
a
l
r
i
s
k
o
f
s
u
f
f
o
c
a
t
i
o
n
f
o
r
children!
Take your time when viewing the drawings and then assemble the device according to the series of illustrations.
A
n
a
d
u
l
t
p
e
r
s
o
n
m
u
s
t
c
a
r
e
f
u
l
l
y
a
s
s
e
m
b
l
e
t
h
e
d
e
v
i
c
e
.
I
f
n
e
c
e
s
s
a
r
y
,
r
e
q
u
e
s
t
a
i
d
f
r
o
m
a
n
o
t
h
e
r
t
e
c
h
n
i
c
a
l
l
y
t
a
l
e
n
t
e
d
p
e
r
s
o
n
.
Unpacking & Assembly
W
A
R
N
I
N
G
:
Use extreme caution when assembling this treadmill. Failure to do so could result in injury.
NOTE:
E
a
c
h
s
t
e
p
n
u
m
b
e
r
i
n
t
h
e
a
s
s
e
m
b
l
y
i
n
s
t
r
u
c
t
i
o
n
s
t
e
l
l
s
y
o
u
w
h
a
t
y
o
u
w
i
l
l
b
e
d
o
i
n
g
.
R
e
a
d
a
n
d
u
n
d
e
r
s
t
a
n
d
a
l
l
i
n
s
t
r
u
c
t
i
o
n
s
t
h
o
r
o
u
g
h
l
y
b
e
f
o
r
e
a
s
s
e
m
b
l
i
n
g
t
h
e
t
r
e
a
d
m
i
l
l
.
U
n
p
a
c
k
a
n
d
V
e
r
i
f
y
t
h
e
c
o
n
t
e
n
t
s
o
f
t
h
e
b
o
x
:
●
L
i
f
t
a
n
d
r
e
m
o
v
e
t
h
e
b
o
x
t
h
a
t
s
u
r
r
o
u
n
d
s
t
h
e
T
r
e
a
d
m
i
l
l
.
●
C
h
e
c
k
t
h
e
f
o
l
l
o
w
i
n
g
i
t
e
m
s
a
r
e
p
r
e
s
e
n
t
.
I
f
a
n
y
o
f
t
h
e
p
a
r
t
s
a
r
e
m
i
s
s
i
n
g
,
c
o
n
t
a
c
t
t
h
e
d
e
a
l
e
r
.
6
Product Overview
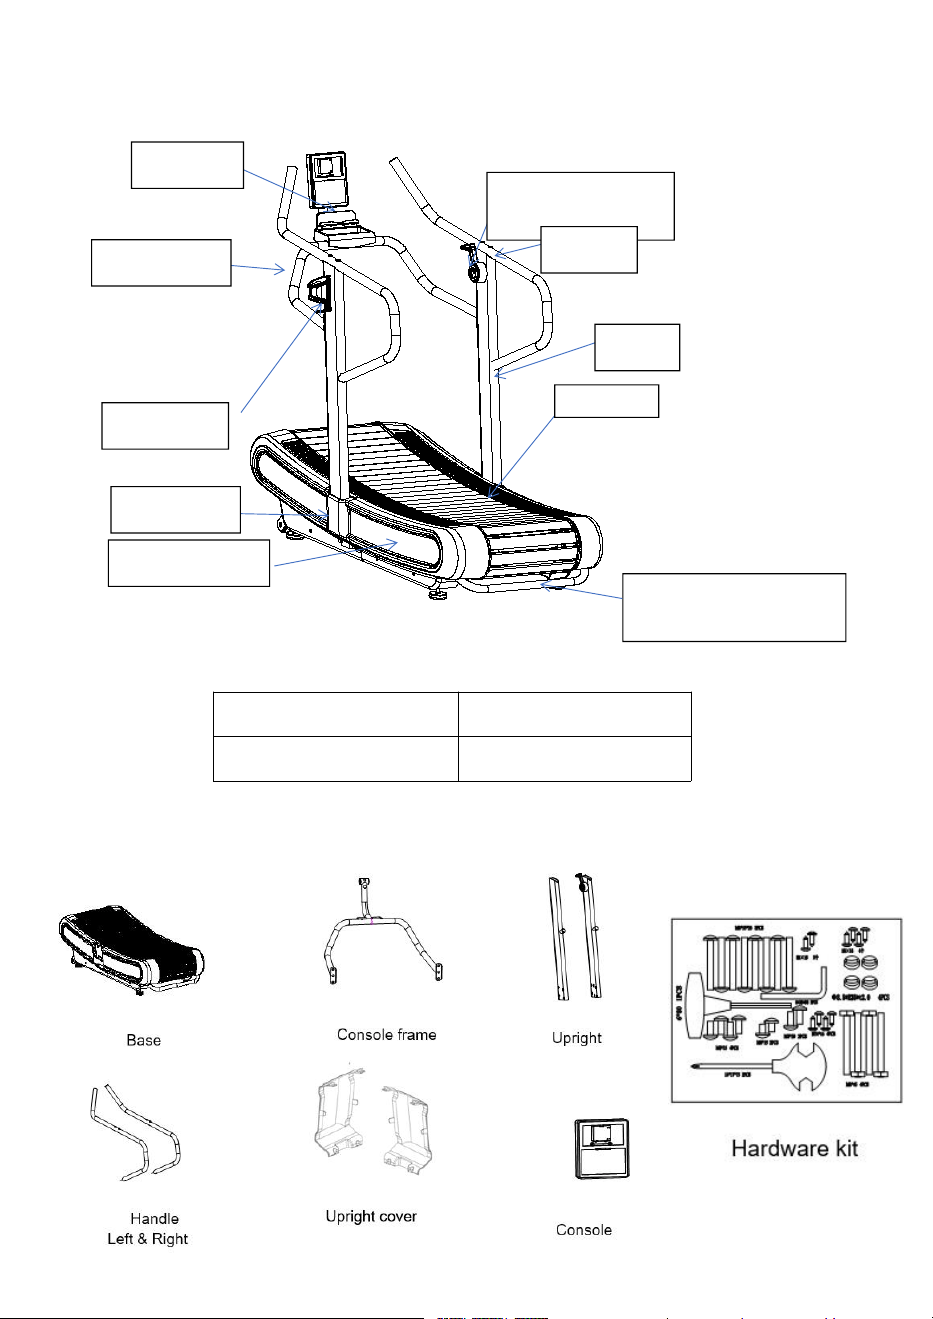
Packing List
D
i
m
e
n
s
i
o
n
(
U
n
f
o
l
d
)
1
8
4
5
*
8
1
0
*
1
5
7
5
R
u
n
n
i
n
g
s
u
r
f
a
c
e
1
6
0
0
*
4
4
0
m
m
C
o
n
s
o
l
e
C
o
n
s
o
l
e
f
r
a
m
e
R
e
s
i
s
t
a
n
c
e
h
a
n
d
l
e
b
a
r
Handrail
U
p
r
i
g
h
t
S
l
a
t
b
e
l
t
U
p
r
i
g
h
t
c
o
v
e
r
P
l
a
s
t
i
c
s
i
d
e
c
o
v
e
r
Rear main frame lifting
h
a
n
d
l
e
Bottle holder
7
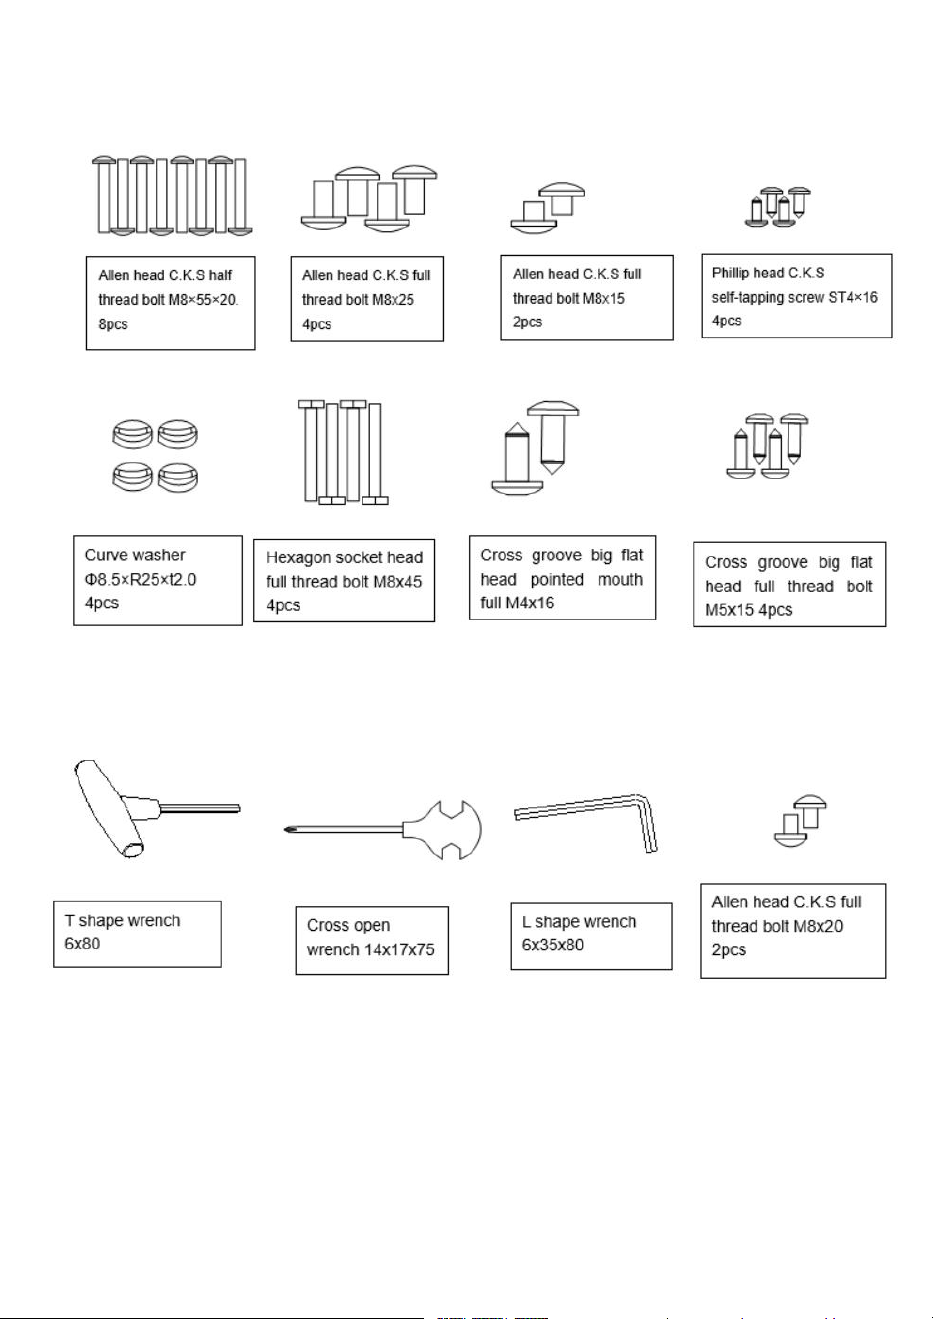
Hardware Kit List
8
Assembly
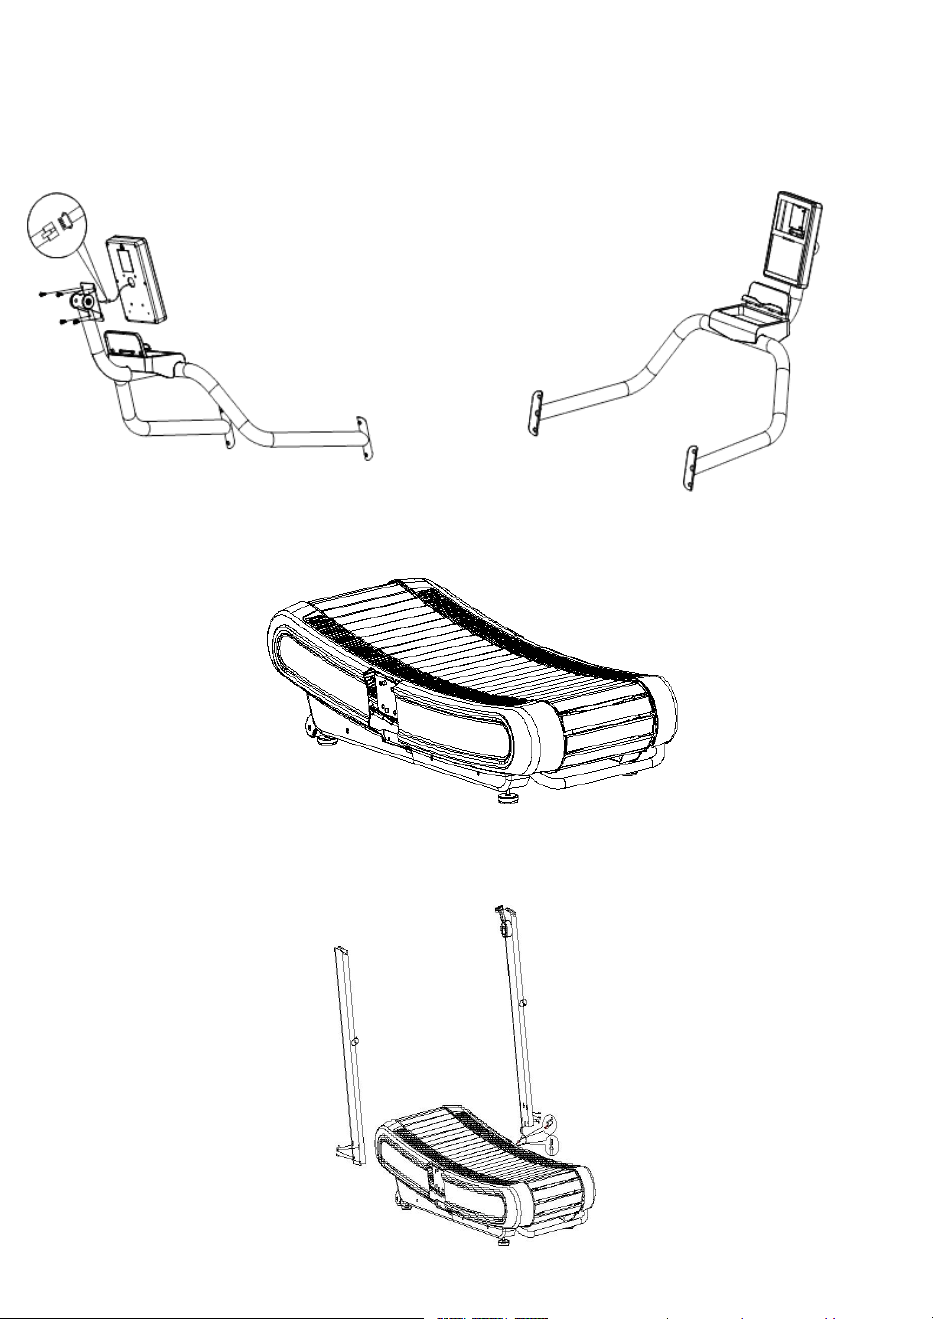
1.
Take out the console frame and console from the carton, When assembling the console, use four M5*15
screws to fix the console to the console board on to the console frame, and finally connect the
c
o
m
m
u
n
i
c
a
t
i
o
n
c
a
b
l
e
,
a
n
d
f
e
e
d
t
h
e
e
x
c
e
s
s
w
i
r
e
b
a
c
k
i
n
t
o
t
h
e
c
o
n
s
o
l
e
f
r
a
m
e
t
u
b
i
n
g
.
2
.
Take out the base from the carton. The Base is very heavy, we suggest 2 or more people to remove the
b
a
s
e
f
r
o
m
t
h
e
c
a
r
t
o
n
,
u
s
i
n
g
c
o
r
r
e
c
t
f
o
r
m
a
n
d
t
e
c
h
n
i
q
u
e
.
3
.
C
o
n
n
e
c
t
t
h
e
r
i
g
h
t
u
p
r
i
g
h
t
s
c
a
b
l
e
s
t
o
t
h
e
c
a
b
l
e
s
o
n
t
h
e
b
a
s
e
.
O
n
c
e
a
t
t
a
c
h
e
d
,
t
i
d
y
u
p
a
n
d
i
n
s
e
r
t
t
h
e
s
e
w
i
r
e
s
i
n
t
o
t
h
e
u
p
r
i
g
h
t
.
p
u
t
t
h
e
r
i
g
h
t
u
p
r
i
g
h
t
o
n
t
h
e
b
r
a
c
k
e
t
a
n
d
f
i
x
i
t
w
i
t
h
4
x
M
8
×
5
5
×
2
0
s
c
r
e
w
s
.
T
h
e
S
a
m
e
a
s
s
e
m
b
l
y
p
r
o
c
e
s
s
i
s
p
e
r
f
o
r
m
e
d
f
o
r
t
h
e
l
e
f
t
u
p
r
i
g
h
t
.
(
N
o
n
e
e
d
t
o
c
o
n
n
e
c
t
w
i
r
e
s
)
9
4.
Attach the right handrail to the right upright, then fix the upper holes with 2 pcs M8x45
screws, then fix the bottom hole with 1 pcs M8x15 screw. Once these screws are
fastened perform the same steps on the left side. Now tighten the riser bolts.
5
.
C
o
n
n
e
c
t
t
h
e
w
i
r
e
s
f
r
o
m
r
i
g
h
t
u
p
r
i
g
h
t
t
o
t
h
e
c
o
n
s
o
l
e
f
r
a
m
e
,
t
h
e
n
f
i
x
t
h
e
m
w
i
t
h
4
p
c
s
M
8
x
2
5
s
c
r
e
w
s
t
h
r
o
u
g
h
4
p
c
s
w
a
s
h
e
r
.
10
6.
. As shown in the figure, first connect the left and right upright cover with the base cover, and
then fix the left and right upright cover with 4 ST4x16 screws. Fix the bottle holder to the left
u
p
r
i
g
h
t
w
i
t
h
2
c
r
o
s
s
g
r
o
o
v
e
d
f
l
a
t
h
e
a
d
t
a
p
e
r
e
d
f
u
l
l
t
o
o
t
h
b
o
l
t
s
M
4
x
1
6
7
.
I
n
s
t
a
l
l
a
t
i
o
n
C
o
m
p
l
e
t
e
11
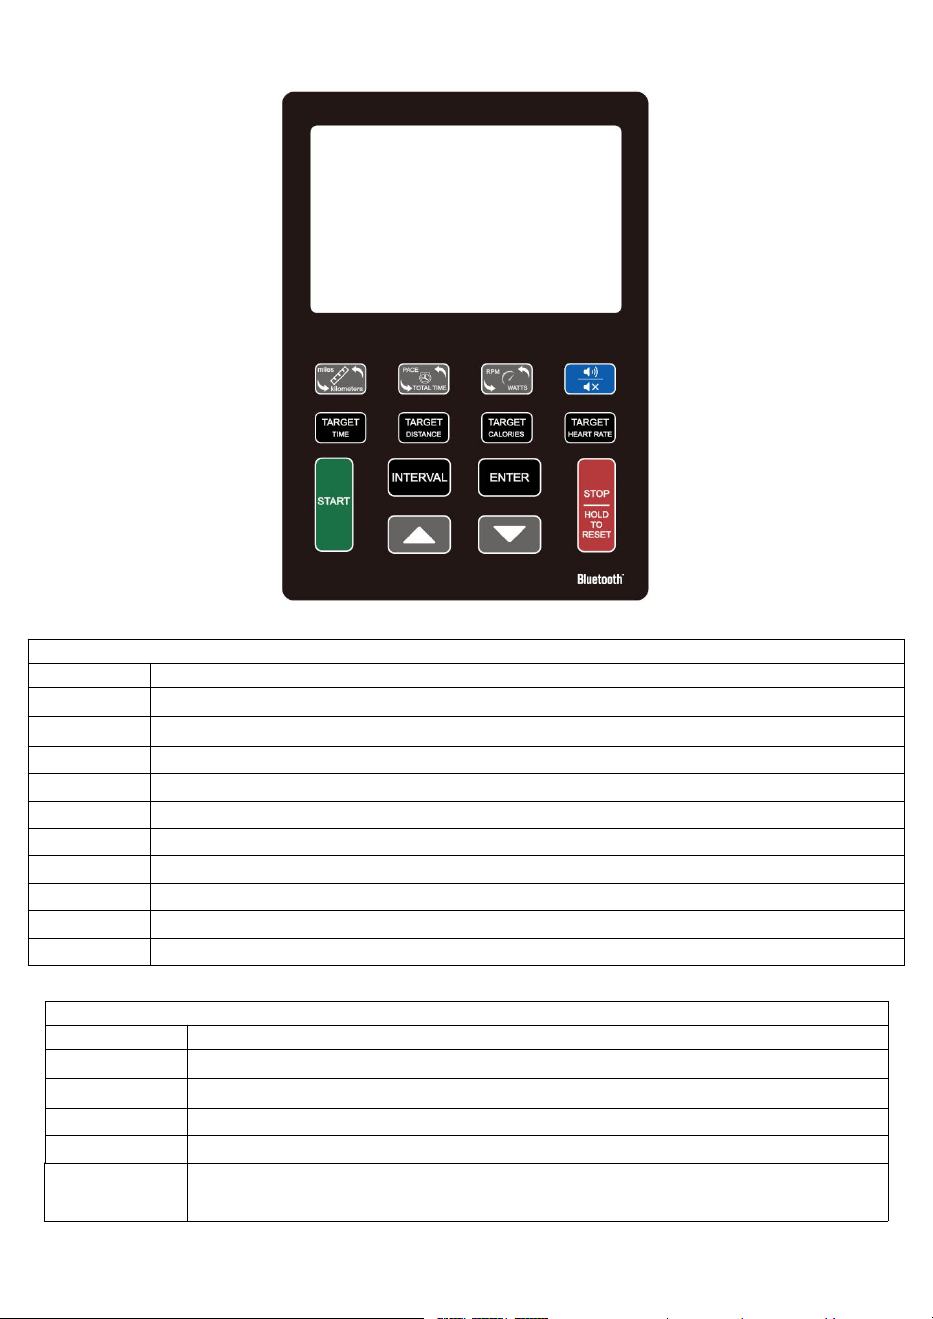
Console Functionality
D
i
s
p
l
a
y
F
u
n
c
t
i
o
n
a
l
i
t
y
I
t
e
m
D
e
s
c
r
i
p
t
i
o
n
T
O
T
A
L
T
I
M
E
D
i
s
p
l
a
y
u
s
e
r
s
T
o
t
a
l
W
o
r
k
o
u
t
t
i
m
e
.
D
i
s
p
l
a
y
r
a
n
g
e
0
0
:
0
0
~
9
9
:
5
9
T
I
M
E
D
i
s
p
l
a
y
s
a
S
i
n
g
l
e
E
x
e
r
c
i
s
e
s
o
r
R
e
s
t
P
e
r
i
o
d
d
u
r
a
t
i
o
n
(
i
f
I
n
t
e
r
v
a
l
m
o
d
e
)
.
D
i
s
p
l
a
y
r
a
n
g
e
0
0
:
0
0
~
9
9
:
5
9
D
I
S
T
A
N
C
E
D
i
s
p
l
a
y
u
s
e
r
w
o
r
k
o
u
t
d
i
s
t
a
n
c
e
.
D
i
s
p
l
a
y
r
a
n
g
e
0
.
0
~
9
9
.
9
C
A
L
O
R
I
E
S
Display calories consumption during workout. Display range 0 ~ 999
HEART RATE
D
i
s
p
l
a
y
H
e
a
r
t
R
a
t
e
d
u
r
i
n
g
W
o
r
k
o
u
t
.
D
i
s
p
l
a
y
R
a
n
g
e
0
~
2
2
0
W
A
T
T
/
R
P
M
D
i
s
p
l
a
y
t
h
e
p
o
w
e
r
c
o
n
s
u
m
p
t
i
o
n
d
u
r
i
n
g
t
r
a
i
n
i
n
g
S
P
E
E
D
D
i
s
p
l
a
y
c
u
r
r
e
n
t
t
r
a
i
n
i
n
g
s
p
e
e
d
P
A
C
E
S
e
t
t
h
e
t
i
m
e
t
o
r
e
a
c
h
t
h
e
t
a
r
g
e
t
d
i
s
t
a
n
c
e
R
E
S
I
S
T
A
N
C
E
D
i
s
p
l
a
y
s
t
h
e
r
e
s
i
s
t
a
n
c
e
i
n
t
h
e
W
A
T
T
w
i
n
d
o
w
.
D
i
s
p
l
a
y
R
a
n
g
e
1
~
8
M
E
T
D
i
s
p
l
a
y
s
y
o
u
r
M
E
T
s
S
c
o
r
e
.
D
i
s
p
l
a
y
R
a
n
g
e
1
.
0
~
1
0
B
u
t
t
o
n
F
u
n
c
t
i
o
n
a
l
i
t
y
I
t
e
m
D
e
s
c
r
i
p
t
i
o
n
U
p
A
d
j
u
s
t
f
u
n
c
t
i
o
n
v
a
l
u
e
u
p
.
D
o
w
n
A
d
j
u
s
t
f
u
n
c
t
i
o
n
v
a
l
u
e
d
o
w
n
.
E
n
t
e
r
C
o
n
f
i
r
m
s
e
t
t
i
n
g
o
r
s
e
l
e
c
t
i
o
n
.
S
t
a
r
t
Q
u
i
c
k
S
t
a
r
t
a
w
o
r
k
o
u
t
o
r
r
e
s
u
m
e
w
o
r
k
o
u
t
t
h
a
t
’
s
i
n
S
t
o
p
m
o
d
e
.
S
t
o
p
H
O
L
D
T
O
R
E
S
E
T
To stop/pause workout.
Press and Hold this button to clear all data and return to the standby screen.
12
Interval
There are 3 programs: INTERVAL 10/20, INTERVAL 20/10, Custom Interval.
Target Distance
Fast access to Target Distance training mode.
Target Calories
F
a
s
t
a
c
c
e
s
s
t
o
T
a
r
g
e
t
C
a
l
o
r
i
e
s
t
r
a
i
n
i
n
g
m
o
d
e
.
T
a
r
g
e
t
T
i
m
e
Fast access to Target Time training mode.
M
I
L
E
/
K
I
L
O
M
E
T
E
R
S
Unit Switch key
PACE/TOTAL TIME
Switch between pace and total time. This automatically changes every 3 seconds.
R
P
M
/
W
A
T
T
S
w
i
t
c
h
b
e
t
w
e
e
n
R
P
M
a
n
d
W
a
t
t
s
.
T
h
i
s
a
u
t
o
m
a
t
i
c
a
l
l
y
c
h
a
n
g
e
s
e
v
e
r
y
3
s
e
c
o
n
d
s
.
Sound on/off
I
t
’
s
u
s
e
d
t
o
m
u
t
e
t
h
e
b
e
e
p
i
n
g
s
o
u
n
d
,
c
l
i
c
k
t
o
m
u
t
e
t
h
e
b
e
e
p
i
n
g
;
c
l
i
c
k
a
g
a
i
n
t
o
t
u
r
n
o
n
t
h
e
b
e
e
p
i
n
g
.
O
p
e
r
a
t
i
n
g
t
h
e
C
o
n
s
o
l
e
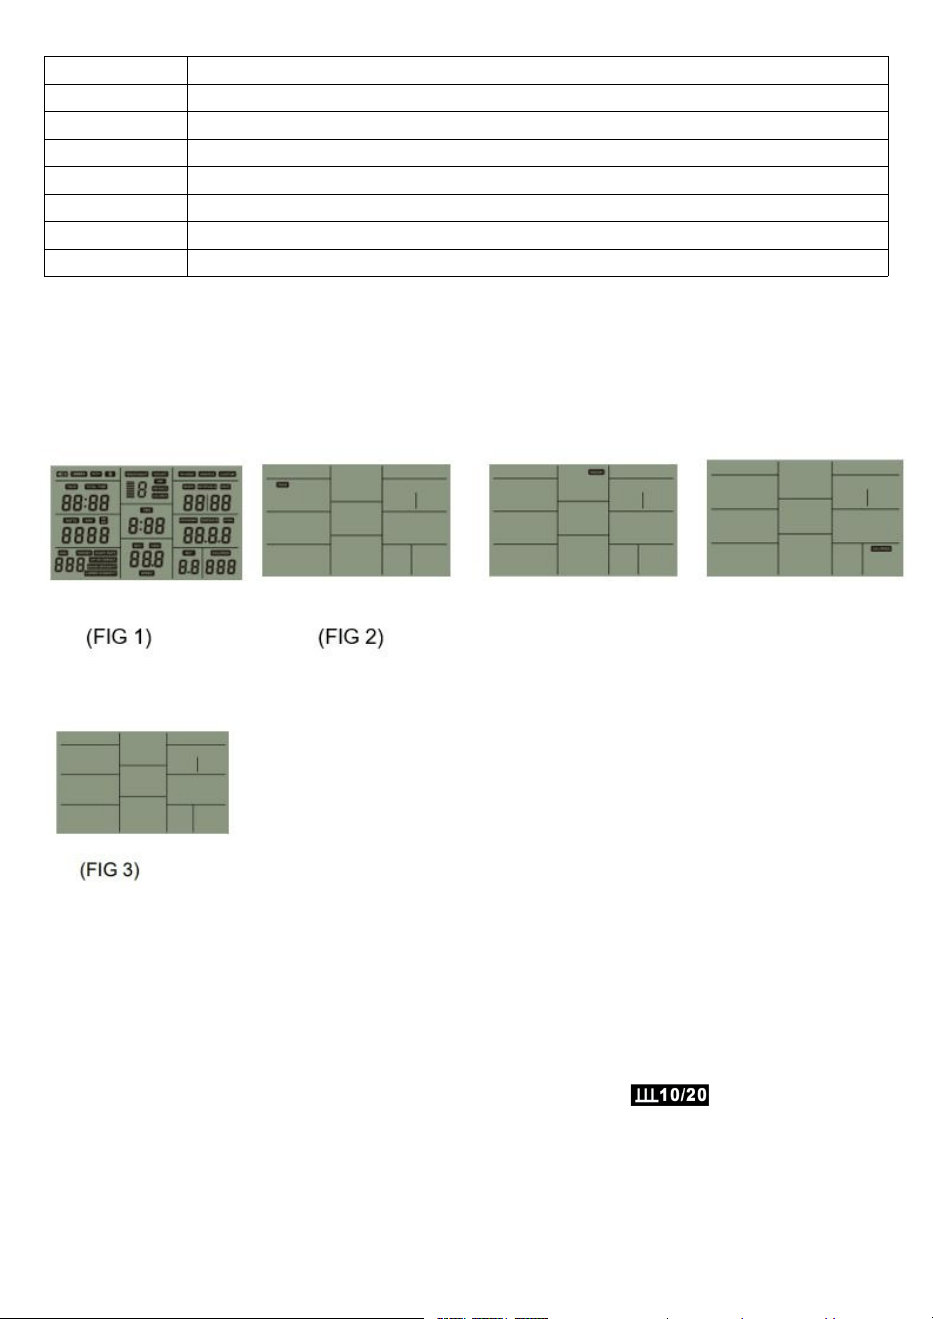
1
.
W
h
e
n
t
h
e
c
o
n
s
o
l
e
h
a
s
t
u
r
n
e
d
o
n
,
t
h
e
L
C
D
d
i
s
p
l
a
y
w
i
l
l
s
h
o
w
i
t
s
f
u
l
l
d
i
s
p
l
a
y
f
o
r
1
s
(
F
i
g
u
r
e
1
)
a
l
o
n
g
w
i
t
h
a
l
o
n
g
b
e
e
p
s
o
u
n
d
.
I
t
w
i
l
l
t
h
e
n
e
n
t
e
r
i
n
t
o
“
d
i
s
p
l
a
y
s
t
a
n
d
b
y
m
o
d
e
”
(
F
I
G
2
)
.
T
h
e
p
i
c
t
u
r
e
s
w
i
l
l
b
e
d
i
s
p
l
a
y
e
d
f
r
o
m
t
o
p
t
o
b
o
t
t
o
m
i
n
s
e
q
u
e
n
c
e
.
P
r
e
s
s
t
h
e
S
T
O
P
b
u
t
t
o
n
f
o
r
2
s
t
o
e
n
t
e
r
i
n
t
o
s
t
a
n
d
b
y
mode.
2.
If there is no input from the machine or console for more than 4min, the console will go into
Sleep mode (FIG 3).
3.
STOP MODE
During a workout, pressing the “Stop” button will make the console enter “Stop mode”. If the
console stays in “Stop mode” for 4 and a half minutes, the workout will end and the console will
enter into standby mode. If the console is in “Stop Mode” still, Pressing ”START“ again will resume
the workout which was paused.
4.
INTERVAL10/20:
• Press the ”INTERVAL10/20” button to begin set up. The console will Display
• If there is no console input for 30s during setup, the console will return to standby mode.
• Press ENTER or START to start. The console will display 01/08 and the WORK symbol will show on
the console, this indicates the time you’ll be working for.
• After Working for 10s, the “REST” icon will begin flashing, the buzzer will ring every 1s and the TIME
portion of the console will count down from 20s to 0s.
13

• Work & REST display in cycles with each cycle increasing by 1 until it has reached 08/08 (8 Total).
Once the workout is complete, the buzzer indicates this with one sound. The current/total
parameters are then displayed. Hold down the stop key to clear data..
•
I
f
t
h
e
r
e
i
s
n
o
s
i
g
n
a
l
i
n
p
u
t
f
o
r
m
o
r
e
t
h
a
n
5
m
i
n
,
t
h
e
c
o
n
s
o
l
e
w
i
l
l
e
n
t
e
r
t
h
e
s
t
a
n
d
b
y
m
o
d
e
a
f
t
e
r
0
.
5
seconds.
•
I
f
y
o
u
h
o
l
d
d
o
w
n
t
h
e
S
T
O
P
k
e
y
,
T
h
e
b
u
z
z
e
r
r
i
n
g
s
f
o
r
0
.
5
s
e
c
o
n
d
s
t
o
e
n
d
t
h
e
w
o
r
k
o
u
t
a
n
d
e
n
t
e
r
S
t
a
n
d
b
y
m
o
d
e
.
5.
INTERVAL 20/10
:
Interval 20/10 is identical to the previous “4. Interval 10/20” workout, except the Work Period is for 20
s
e
c
o
n
d
s
i
n
s
t
e
a
d
o
f
1
0
s
e
c
o
n
d
s
a
n
d
t
h
e
R
e
s
t
P
e
r
i
o
d
i
s
f
o
r
1
0
S
e
c
o
n
d
s
i
n
s
t
e
a
d
o
f
2
0
s
e
c
o
n
d
s
.
T
h
e
C
o
n
s
o
l
e
will display
. All other functionality is identical.
6
.
I
N
T
E
R
V
A
L
C
U
S
T
O
M
:
•
P
r
e
s
s
t
h
e
“
I
N
T
E
R
V
A
L
C
U
S
T
O
M
”
b
u
t
t
o
n
t
o
e
n
t
e
r
i
n
t
o
t
h
i
s
m
o
d
e
,
t
h
e
c
o
n
s
o
l
e
w
i
l
l
d
i
s
p
l
a
y
•
T
h
e
c
o
n
s
o
l
e
d
i
s
p
l
a
y
s
t
h
e
p
r
e
s
e
t
v
a
l
u
e
o
f
0
.
5
s
e
c
o
n
d
s
,
p
r
e
s
s
i
n
g
t
h
e
“
U
P
/
D
O
W
N
”
b
u
t
t
o
n
w
i
l
l
a
l
l
o
w
y
o
u
t
o
a
m
e
n
d
t
h
e
v
a
l
u
e
(
s
e
t
t
i
n
g
r
a
n
g
e
0
.
5
~
9
9
)
.
P
l
e
a
s
e
n
o
t
e
t
h
a
t
w
h
e
n
a
d
j
u
s
t
i
n
g
w
i
t
h
“
U
P
/
D
O
W
N
”
y
o
u
c
a
n
o
n
l
y
g
o
U
P
n
o
t
D
O
W
N
.
I
t
w
i
l
l
r
e
v
e
r
t
b
a
c
k
t
o
0
.
5
o
n
c
e
y
o
u
r
e
a
c
h
e
d
t
h
e
m
a
x
i
m
u
m
r
a
n
g
e
.
•
O
n
c
e
y
o
u
h
a
v
e
r
e
a
c
h
e
d
y
o
u
r
d
e
s
i
r
e
d
v
a
l
u
e
,
p
r
e
s
s
“
E
N
T
E
R
”
t
o
c
o
n
f
i
r
m
y
o
u
r
v
a
l
u
e
.
T
h
e
“
W
O
R
K
”
i
c
o
n
s
h
o
u
l
d
b
e
g
i
n
f
l
a
s
h
i
n
g
.
O
n
t
h
e
c
o
n
s
o
l
e
,
t
h
e
“
T
O
T
A
L
T
I
M
E
“
w
i
l
l
d
i
s
p
l
a
y
t
h
e
c
u
r
r
e
n
t
v
a
l
u
e
0
:
0
5
.
P
r
e
s
s
“
U
P
/
D
O
W
N
”
a
g
a
i
n
t
o
a
d
j
u
s
t
t
o
y
o
u
r
d
e
s
i
r
e
d
s
e
t
t
i
n
g
(
s
e
t
t
i
n
g
r
a
n
g
e
:
0
:
0
5
~
9
:
5
9
)
.
•
O
n
c
e
a
g
a
i
n
,
o
n
c
e
y
o
u
h
a
v
e
r
e
a
c
h
e
d
y
o
u
r
d
e
s
i
r
e
d
v
a
l
u
e
,
p
r
e
s
s
“
E
N
T
E
R
”
t
o
c
o
n
f
i
r
m
y
o
u
r
v
a
l
u
e
.
T
h
e
“
R
E
S
T
”
i
c
o
n
s
h
o
u
l
d
n
o
w
b
e
g
i
n
f
l
a
s
h
i
n
g
.
L
i
k
e
b
e
f
o
r
e
,
t
h
e
“
T
O
T
A
L
T
I
M
E
“
d
i
s
p
l
a
y
s
t
h
e
c
u
r
r
e
n
t
v
a
l
u
e
o
f
0
:
0
5
.
P
r
e
s
s
“
U
P
/
D
O
W
N
”
a
g
a
i
n
t
o
a
d
j
u
s
t
t
o
y
o
u
r
d
e
s
i
r
e
d
s
e
t
t
i
n
g
(
s
e
t
t
i
n
g
r
a
n
g
e
:
0
:
0
5
~
9
:
5
9
)
.
•
P
r
e
s
s
“
E
N
T
E
R
”
t
o
c
o
n
f
i
r
m
y
o
u
r
f
i
n
a
l
e
n
t
r
y
,
a
s
h
o
r
t
b
u
z
z
e
r
s
h
o
u
l
d
s
o
u
n
d
f
o
r
0
.
5
s
a
n
d
t
h
e
c
o
n
s
o
l
e
w
i
l
l
d
i
s
p
l
a
y
“
0
1
/
X
X
”
a
n
d
d
i
s
p
l
a
y
”
W
O
R
K
”
o
n
t
h
e
d
i
s
p
l
a
y
.
•
D
u
r
i
n
g
t
h
e
R
E
S
T
p
e
r
i
o
d
o
f
y
o
u
r
w
o
r
k
o
u
t
,
t
h
e
c
o
n
s
o
l
e
w
i
l
l
d
i
s
p
l
a
y
0
1
/
X
X
a
n
d
d
i
s
p
l
a
y
t
h
e
“
R
E
S
T
”
i
c
o
n
.
T
h
e
b
u
z
z
e
r
will also sound off once per second.
•
“
W
O
R
K
”
&
“
R
E
S
T
“
d
i
s
p
l
a
y
s
i
n
c
y
c
l
e
s
.
E
a
c
h
c
y
c
l
e
i
n
c
r
e
a
s
e
s
b
y
1
u
n
t
i
l
t
h
e
y
h
a
v
e
b
o
t
h
r
e
a
c
h
e
d
0
8
/
0
8
(
T
o
t
a
l
C
y
c
l
e
s
=
8
)
.
O
n
c
e
t
h
e
C
y
c
l
e
s
h
a
v
e
c
o
m
p
l
e
t
e
d
,
t
h
e
c
o
n
s
o
l
e
w
i
l
l
e
n
t
e
r
i
n
t
o
S
t
o
p
M
o
d
e
.
•
O
n
c
e
i
n
S
t
o
p
M
o
d
e
,
I
f
t
h
e
r
e
i
s
n
o
i
n
p
u
t
f
o
r
4
m
i
n
3
0
s
,
i
t
w
i
l
l
a
u
t
o
m
a
t
i
c
a
l
l
y
e
n
t
e
r
S
l
e
e
p
M
o
d
e
.
•
P
r
e
s
s
i
n
g
t
h
e
“
S
T
O
P
”
b
u
t
t
o
n
w
i
l
l
s
t
o
p
t
h
e
c
u
r
r
e
n
t
m
o
d
e
a
n
d
r
e
t
u
r
n
t
h
e
c
o
n
s
o
l
e
t
o
t
h
e
s
t
a
n
d
b
y
s
c
r
e
e
n
7
.
T
A
R
G
E
T
T
I
M
E
:
P
r
e
s
s
t
h
e
”
T
A
R
G
E
T
T
I
M
E
”
b
u
t
t
o
n
t
o
e
n
t
e
r
i
n
t
o
t
h
i
s
m
o
d
e
,
t
h
e
c
o
n
s
o
l
e
f
l
a
s
h
e
s
a
n
d
d
i
s
p
l
a
y
T
A
R
G
E
T
&
T
I
M
E
.
The Consoles “TOTAL TIME” window will display the preset value of 1:00. Press the “UP/DOWN” to adjust to
y
o
u
r
d
e
s
i
r
e
d
s
e
t
t
i
n
g
(
s
e
t
t
i
n
g
r
a
n
g
e
1
:
0
0
~
5
9
:
0
0
)
,
y
o
u
c
a
n
o
n
l
y
g
o
U
P
,
n
o
t
D
O
W
N
.
I
t
w
i
l
l
r
e
v
e
r
t
b
a
c
k
t
o
1
:
0
0
o
n
c
e
y
o
u
r
e
a
c
h
e
d
t
h
e
m
a
x
i
m
u
m
r
a
n
g
e
.
A
f
t
e
r
y
o
u
’
v
e
r
e
a
c
h
e
d
y
o
u
r
d
e
s
i
r
e
d
s
e
t
t
i
n
g
,
p
r
e
s
s
”
E
N
T
E
R
”
o
r
“
S
T
A
R
T
”
t
o
b
e
g
i
n
y
o
u
r
w
o
r
k
o
u
t
.
T
A
R
G
E
T
&
T
I
M
E
i
c
o
n
w
i
l
l
c
o
n
t
i
n
u
a
l
l
y
f
l
a
s
h
a
n
d
s
t
a
r
t
a
c
o
u
n
t
d
o
w
n
f
r
o
m
t
h
e
v
a
l
u
e
t
h
e
u
s
e
r
h
a
s
s
e
t
.
P
r
e
s
s
i
n
g
t
h
e
“
S
T
O
P
”
b
u
t
t
o
n
w
i
l
l
s
t
o
p
t
h
e
c
u
r
r
e
n
t
m
o
d
e
a
n
d
r
e
t
u
r
n
t
h
e
c
o
n
s
o
l
e
t
o
t
h
e
s
t
a
n
d
b
y
s
c
r
e
e
n
If there is no input for 30s, the console will automatically enter Sleep Mode
14

8.TARGET DISTANCE:
Press the ”TARGET/DISTANCE” button to enter into this mode, the console flashes and display TARGET &
DISTANCE.
The Consoles “DISTANCE” window will display the preset value of 1 Press the “UP/DOWN” to adjust to your
d
e
s
i
r
e
d
s
e
t
t
i
n
g
(
s
e
t
t
i
n
g
r
a
n
g
e
1
.
0
~
9
9
)
,
y
o
u
c
a
n
o
n
l
y
g
o
U
P
,
n
o
t
D
O
W
N
.
I
t
w
i
l
l
r
e
v
e
r
t
b
a
c
k
t
o
1
o
n
c
e
y
o
u
r
e
a
c
h
e
d
t
h
e
m
a
x
i
m
u
m
r
a
n
g
e
.
A
f
t
e
r
y
o
u
’
v
e
r
e
a
c
h
e
d
y
o
u
r
d
e
s
i
r
e
d
s
e
t
t
i
n
g
,
p
r
e
s
s
”
E
N
T
E
R
”
o
r
“
S
T
A
R
T
”
t
o
b
e
g
i
n
y
o
u
r
w
o
r
k
o
u
t
.
T
A
R
G
E
T
&
D
I
S
T
A
N
C
E
i
c
o
n
w
i
l
l
c
o
n
t
i
n
u
a
l
l
y
f
l
a
s
h
a
n
d
s
t
a
r
t
a
c
o
u
n
t
d
o
w
n
f
r
o
m
t
h
e
v
a
l
u
e
t
h
e
u
s
e
r
h
a
s
s
e
t
.
P
r
e
s
s
i
n
g
t
h
e
“
S
T
O
P
”
b
u
t
t
o
n
w
i
l
l
s
t
o
p
t
h
e
c
u
r
r
e
n
t
m
o
d
e
a
n
d
r
e
t
u
r
n
t
h
e
c
o
n
s
o
l
e
t
o
t
h
e
s
t
a
n
d
b
y
s
c
r
e
e
n
I
f
t
h
e
r
e
i
s
n
o
i
n
p
u
t
f
o
r
3
0
s
,
t
h
e
c
o
n
s
o
l
e
w
i
l
l
a
u
t
o
m
a
t
i
c
a
l
l
y
e
n
t
e
r
S
l
e
e
p
M
o
d
e
9
.
T
A
R
G
E
T
C
A
L
O
R
I
E
S
:
P
r
e
s
s
t
h
e
”
T
A
R
G
E
T
/
C
A
L
O
R
I
E
”
b
u
t
t
o
n
t
o
e
n
t
e
r
i
n
t
o
t
h
i
s
m
o
d
e
,
t
h
e
c
o
n
s
o
l
e
f
l
a
s
h
e
s
a
n
d
d
i
s
p
l
a
y
T
A
R
G
E
T
&
C
A
L
O
R
I
E
.
T
h
e
C
o
n
s
o
l
e
s
“
C
A
L
O
R
I
E
”
w
i
n
d
o
w
w
i
l
l
d
i
s
p
l
a
y
t
h
e
p
r
e
s
e
t
v
a
l
u
e
o
f
1
0
.
P
r
e
s
s
t
h
e
“
U
P
/
D
O
W
N
”
t
o
a
d
j
u
s
t
t
o
y
o
u
r
d
e
s
i
r
e
d
s
e
t
t
i
n
g
(
s
e
t
t
i
n
g
r
a
n
g
e
1
0
~
9
9
0
)
,
y
o
u
c
a
n
o
n
l
y
g
o
U
P
,
n
o
t
D
O
W
N
.
I
t
w
i
l
l
r
e
v
e
r
t
b
a
c
k
t
o
1
0
o
n
c
e
y
o
u
reached the maximum range.
A
f
t
e
r
y
o
u
’
v
e
r
e
a
c
h
e
d
y
o
u
r
d
e
s
i
r
e
d
s
e
t
t
i
n
g
,
p
r
e
s
s
”
E
N
T
E
R
”
o
r
“
S
T
A
R
T
”
t
o
b
e
g
i
n
y
o
u
r
w
o
r
k
o
u
t
.
T
A
R
G
E
T
&
C
A
L
O
R
I
E
i
c
o
n
w
i
l
l
c
o
n
t
i
n
u
a
l
l
y
f
l
a
s
h
a
n
d
s
t
a
r
t
a
c
o
u
n
t
d
o
w
n
f
r
o
m
t
h
e
v
a
l
u
e
t
h
e
u
s
e
r
h
a
s
s
e
t
.
P
r
e
s
s
i
n
g
t
h
e
“
S
T
O
P
”
b
u
t
t
o
n
w
i
l
l
s
t
o
p
t
h
e
c
u
r
r
e
n
t
m
o
d
e
a
n
d
r
e
t
u
r
n
t
h
e
c
o
n
s
o
l
e
t
o
t
h
e
s
t
a
n
d
b
y
s
c
r
e
e
n
I
f
t
h
e
r
e
i
s
n
o
i
n
p
u
t
f
o
r
3
0
s
,
t
h
e
c
o
n
s
o
l
e
w
i
l
l
a
u
t
o
m
a
t
i
c
a
l
l
y
e
n
t
e
r
S
l
e
e
p
M
o
d
e
1
0
.
T
A
R
G
E
T
H
E
A
R
T
R
A
T
E
:
P
r
e
s
s
t
h
e
”
T
A
R
G
E
T
H
E
A
R
T
R
A
T
E
”
b
u
t
t
o
n
t
o
e
n
t
e
r
i
n
t
o
t
h
i
s
m
o
d
e
,
t
h
e
c
o
n
s
o
l
e
w
i
l
l
f
l
a
s
h
a
n
d
d
i
s
p
l
a
y
s
t
h
e
p
r
e
s
e
t
v
a
l
u
e
o
f
8
0
B
P
M
.
P
r
e
s
s
t
h
e
“
U
P
/
D
O
W
N
”
t
o
a
d
j
u
s
t
t
o
y
o
u
r
d
e
s
i
r
e
d
s
e
t
t
i
n
g
(
s
e
t
t
i
n
g
r
a
n
g
e
3
0
~
1
8
0
)
,
y
o
u
c
a
n
o
n
l
y
g
o
U
P
,
n
o
t
D
O
W
N
.
I
t
w
i
l
l
r
e
v
e
r
t
b
a
c
k
t
o
3
0
o
n
c
e
y
o
u
r
e
a
c
h
e
d
t
h
e
m
a
x
i
m
u
m
r
a
n
g
e
.
O
n
c
e
y
o
u
’
v
e
e
n
t
e
r
e
d
y
o
u
r
d
e
s
i
r
e
d
H
e
a
r
t
R
a
t
e
,
P
r
e
s
s
t
h
e
”
E
N
T
E
R
”
b
u
t
t
o
n
t
o
e
n
t
e
r
i
n
t
o
t
h
e
A
G
E
s
e
t
t
i
n
g
.
T
h
e
c
o
n
s
o
l
e
f
l
a
s
h
e
s
A
G
E
a
n
d
a
l
l
o
w
s
y
o
u
t
o
e
n
t
e
r
t
h
e
u
s
e
r
s
A
g
e
b
y
p
r
e
s
s
i
n
g
t
h
e
“
U
P
/
D
O
W
N
”
t
o
a
d
j
u
s
t
t
o
y
o
u
r
desired setting. The same rules apply regarding reverting back once you’ve reached the max
W
h
e
n
t
h
e
B
P
M
v
a
l
u
e
i
s
b
e
l
o
w
t
h
e
s
e
t
v
a
l
u
e
,
b
y
-
1
0
%
,
t
h
e
h
e
a
r
t
r
a
t
e
w
i
n
d
o
w
f
l
a
s
h
e
s
a
n
d
d
i
s
p
l
a
y
s
R
A
I
S
E
INTENSITY, encouraging the user to increase the RPM or Intensity of their workout.
W
h
e
n
t
h
e
B
P
M
v
a
l
u
e
i
s
h
i
g
h
e
r
t
h
e
s
e
t
v
a
l
u
e
,
b
y
+
1
0
%
,
t
h
e
h
e
a
r
t
r
a
t
e
w
i
n
d
o
w
f
l
a
s
h
e
s
a
n
d
d
i
s
p
l
a
y
s
L
O
W
E
R
I
N
T
E
N
S
I
T
Y
,
e
n
c
o
u
r
a
g
i
n
g
t
h
e
u
s
e
r
t
o
d
e
c
r
e
a
s
e
t
h
e
R
P
M
o
r
I
n
t
e
n
s
i
t
y
o
f
t
h
e
i
r
w
o
r
k
o
u
t
.
W
h
e
n
t
h
e
h
e
a
r
t
b
e
a
t
v
a
l
u
e
i
s
c
l
o
s
e
t
o
t
h
e
s
e
t
v
a
l
u
e
(
>
1
0
%
)
,
t
h
e
h
e
a
r
t
r
a
t
e
w
i
n
d
o
w
f
l
a
s
h
e
s
“
H
R
O
N
T
A
R
G
E
T
”
,
e
n
c
o
u
r
a
g
i
n
g
t
h
e
u
s
e
r
t
o
m
a
i
n
t
a
i
n
t
h
e
i
r
c
u
r
r
e
n
t
i
n
t
e
n
s
i
t
y
.
P
r
e
s
s
i
n
g
t
h
e
“
S
T
O
P
”
b
u
t
t
o
n
w
i
l
l
s
t
o
p
t
h
e
c
u
r
r
e
n
t
m
o
d
e
a
n
d
r
e
t
u
r
n
t
h
e
c
o
n
s
o
l
e
t
o
t
h
e
s
t
a
n
d
b
y
s
c
r
e
e
n
I
f
t
h
e
r
e
i
s
n
o
i
n
p
u
t
f
o
r
3
0
s
,
t
h
e
c
o
n
s
o
l
e
w
i
l
l
a
u
t
o
m
a
t
i
c
a
l
l
y
e
n
t
e
r
S
l
e
e
p
M
o
d
e
1
1
.
R
e
s
i
s
t
a
n
c
e
l
e
v
e
l
c
a
l
i
b
r
a
t
i
o
n
W
h
i
l
e
i
n
S
t
a
n
d
b
y
,
p
r
e
s
s
a
n
d
h
o
l
d
T
h
e
“
U
p
,
D
o
w
n
a
n
d
S
t
o
p
”
k
e
y
a
l
l
t
o
g
e
t
h
e
r
f
o
r
6
s
e
c
o
n
d
s
.
T
h
e
c
o
n
s
o
l
e
w
i
l
l
n
o
w
e
n
t
e
r
i
n
t
o
i
t
s
e
n
g
i
n
e
e
r
i
n
g
p
a
g
e
,
t
h
e
r
e
s
i
s
t
a
n
c
e
l
e
v
e
l
w
i
n
d
o
w
w
i
l
l
d
i
s
p
l
a
y
a
n
d
n
o
o
t
h
e
r
w
i
n
d
o
w
s
w
i
l
l
s
h
o
w
.
P
r
e
s
s
u
p
a
n
d
d
o
w
n
k
e
y
t
o
s
e
l
e
c
t
r
e
s
i
s
t
a
n
c
e
l
e
v
e
l
1
/
2
/
3
/
4
,
a
n
d
p
r
e
s
s
E
N
T
E
R
k
e
y
t
o
c
o
n
f
i
r
m
e
a
c
h
l
e
v
e
l
,
p
r
e
s
s
s
t
o
p
t
o
e
x
i
t
c
a
l
i
b
r
a
t
i
o
n
p
a
g
e
.
15

12. Bluetooth APPs
This Machines console allows the use of 3rd Party Bluetooth apps. To be able to connect to those apps on your
device, begin moving the running belt so that the consoles lights, this will trigger the Bluetooth signal. You can
n
o
w
f
o
l
l
o
w
t
h
e
B
l
u
e
t
o
o
t
h
I
D
t
h
a
t
a
p
p
e
a
r
s
o
n
t
h
e
c
o
n
s
o
l
e
t
o
c
o
m
p
l
e
t
e
t
h
e
c
o
n
n
e
c
t
i
o
n
b
e
t
w
e
e
n
y
o
u
r
d
e
v
i
c
e
a
n
d
t
h
e
c
o
n
s
o
l
e
.
If the running belt stops moving, the console will turn off after a short delay and the connection will cut out.
1
2
.
1
H
o
w
t
o
c
o
n
n
e
c
t
K
i
n
o
m
a
p
R
e
g
i
s
t
e
r
a
n
d
l
o
g
i
n
t
o
y
o
u
r
K
i
n
o
m
a
p
.
F
i
r
s
t
o
f
a
l
l
,
g
o
t
o
t
h
e
“
P
r
o
f
i
l
e
m
e
n
u
”
a
n
d
p
r
e
s
s
t
h
e
“
S
e
t
t
i
n
g
s
”
b
u
t
t
o
n
i
n
t
h
e
t
o
p
r
i
g
h
t
h
a
n
d
c
o
r
n
e
r
.
N
o
w
s
e
l
e
c
t
“
E
q
u
i
p
m
e
n
t
M
a
n
a
g
e
m
e
n
t
”
a
n
d
p
r
e
s
s
"
A
d
d
n
e
w
e
q
u
i
p
m
e
n
t
"
o
r
t
h
e
"
+
"
b
u
t
t
o
n
i
n
t
h
e
t
o
p
r
i
g
h
t
-
h
a
n
d
c
o
r
n
e
r
:
S
e
l
e
c
t
t
h
e
e
q
u
i
p
m
e
n
t
t
y
p
e
T
R
E
A
D
M
I
L
L
a
n
d
t
h
e
n
c
l
i
c
k
"
N
e
x
t
"
a
t
t
h
e
b
o
t
t
o
m
o
f
t
h
e
s
c
r
e
e
n
.
N
o
w
s
c
r
o
l
l
d
o
w
n
t
o
s
e
l
e
c
t
F
T
M
S
;
C
h
o
o
s
e
t
h
e
d
e
t
e
c
t
e
d
e
q
u
i
p
m
e
n
t
w
h
i
c
h
h
a
s
s
a
m
e
B
l
u
e
t
o
o
t
h
I
D
a
s
t
h
e
L
C
D
c
o
n
s
o
l
e
,
p
r
e
s
s
“
N
e
x
t
”
;
A
c
o
n
n
e
c
t
i
o
n
t
e
s
t
w
i
l
l
s
t
a
r
t
t
o
c
h
e
c
k
i
f
K
i
n
o
m
a
p
i
s
r
e
c
e
i
v
i
n
g
d
a
t
a
f
r
o
m
y
o
u
r
e
q
u
i
p
m
e
n
t
.
O
n
c
e
t
h
e
c
o
n
n
e
c
t
i
o
n
h
a
s
b
e
e
n
c
o
n
f
i
r
m
e
d
,
s
i
m
p
l
y
p
r
e
s
s
"
N
e
x
t
"
o
n
e
l
a
s
t
t
i
m
e
,
a
n
d
y
o
u
r
e
q
u
i
p
m
e
n
t
i
s
c
o
n
n
e
c
t
e
d
.
16

12.2 How to connect Zwift
Register and login to Zwift. You will come to the PAIRED DEVICES page. Tap/Click on the RUN SPEED icon and
select the detected equipment which has same Bluetooth ID as tag on LCD console, it will show connected.
17
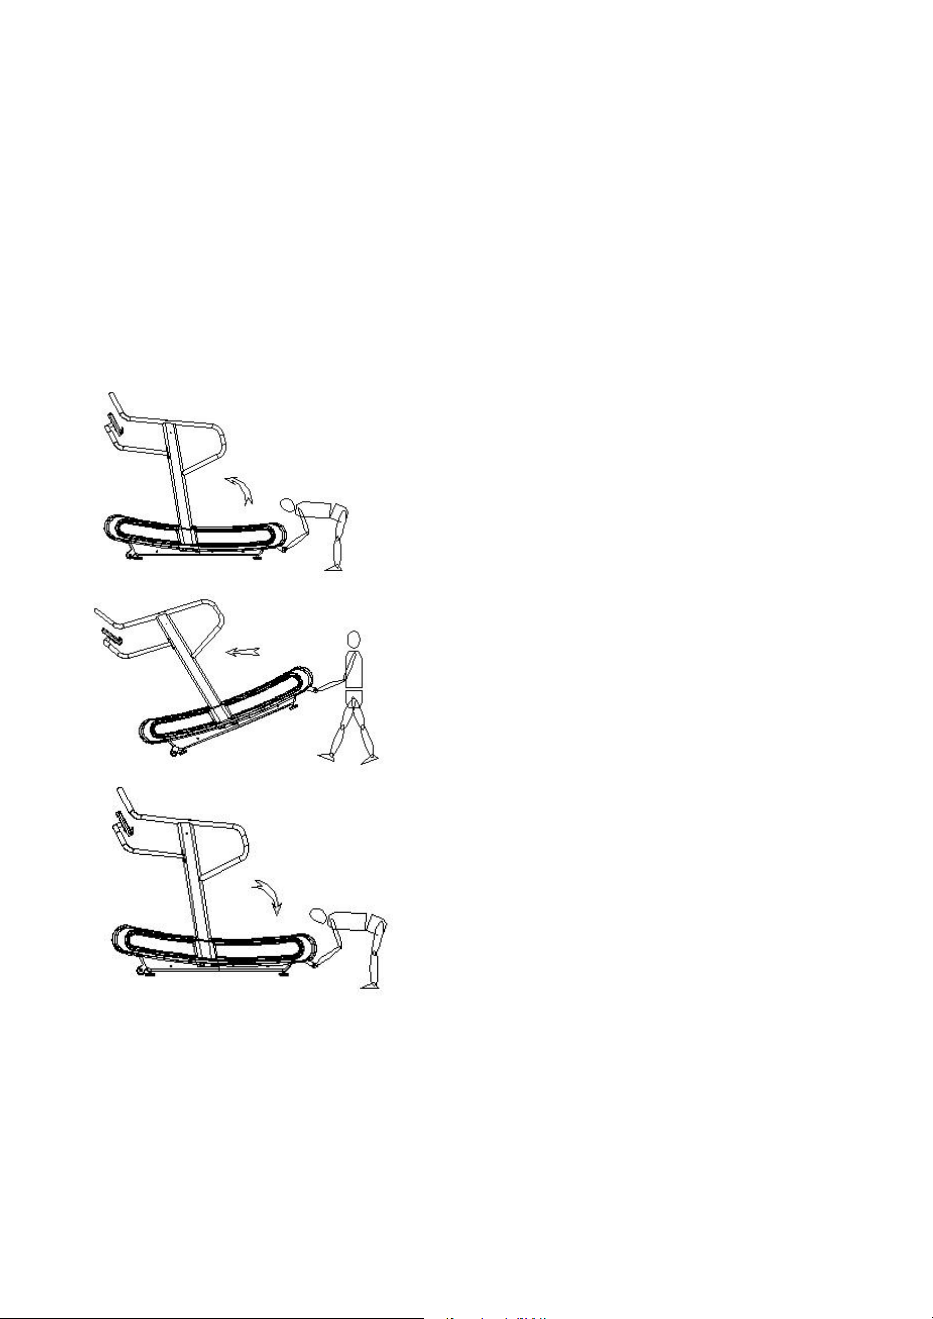
Moving the Treadmill
When moving the machine, make sure that:
1.
The main frame has dropped to the lowest point and is stationary
2
.
T
h
e
P
o
w
e
r
i
s
o
f
f
/
C
o
n
s
o
l
e
i
s
o
f
f
3
.
No parts of the machine are moving
A
f
t
e
r
t
h
e
a
b
o
v
e
p
o
i
n
t
s
a
r
e
c
l
e
a
r
,
g
r
a
b
t
h
e
r
e
a
r
f
r
a
m
e
h
a
n
d
l
e
w
i
t
h
b
o
t
h
h
a
n
d
s
.
L
i
f
t
t
h
e
m
a
c
h
i
n
e
u
p
f
r
o
m
t
h
e
e
n
d
,
s
t
a
n
d
u
p
s
t
r
a
i
g
h
t
,
T
h
e
m
a
c
h
i
n
e
c
a
n
b
e
m
o
v
e
d
s
l
o
w
l
y
f
o
r
w
a
r
d
o
r
b
a
c
k
w
a
r
d
.
O
n
c
e
y
o
u
h
a
v
e
r
e
a
c
h
e
d
y
o
u
r
c
h
o
s
e
n
d
e
s
t
i
n
a
t
i
o
n
f
o
r
t
h
e
T
r
e
a
d
m
i
l
l
,
s
l
o
w
l
y
a
n
d
w
i
t
h
f
u
l
l
c
o
n
t
r
o
l
,
l
a
y
f
l
a
t
t
h
e
m
a
c
h
i
n
e
i
n
your desired location.
18

Parts List
No.
Description
Q'ty
No.
Description
Q'ty
1
Main frame
1
58
Communication wire 2P L-950mm
1
2
Upright - right side
1
59
VR communication wire 3P L-950mm
1
3
Upright - left side
1
60
Communication wire 3P L-200mm
1
4
Console frame
1
61
Magnet sensor 2P L-900mm mm900mmmL-
1000mm
1
5
Rear main frame lifting handle
1
62
Resistor VR
1
6
Handrail - right side
1
63
Screw fixing buckle
4
7
Curve cover fixing support - right side
1
64
Screw fixing plate
10
8
Curve cover fixing support - left side
1
65
T shape siderail guider
6
9
Front foot- right side
1
66
Allen head C.K.S full thread bolt - M8x15
12
10
Front foot- left side
1
67
Allen head C.K.S full thread bolt - M8x20
26
11
Rear foot- right side
1
68
Hexagon head half thread bolt - M8x65x20
98
12
Rear foot- left side
1
69
Hexagon socket head full thread bolt - M8x65
12
13
Magnet bracket
1
70
Bearing 608ZZ
124
14
Adjustable resistor fixing bracket
1
71
Sleeveφ12xφ8.1x18.4
98
15
Rear roller adjustable bracket
2
72
Sleeveφ12xφ8.1x14
12
17
Curve cover reinforcement plate - right side
1
73
Guiding pulley wheel
12
18
Curve cover reinforcement plate - left side
1
74
Flat washer φ8
110
19
Adjustable resistor fixing plate
2
75
Internal Circlip φ23
12
20
Curve cover fixing bracket
2
76
Deep groove ball bearing 6201ZZ
4
21
Magnet covered plate
2
77
One way bearing CSK12P
1
22
Pulley wheel axle weldment
1
78
Allen head C.K.S half thread bolt M8×55×20
9
23
Driving wheel axle weldment
1
79
Allen head C.K.S full thread bolt M8×25
4
24
Front roller
1
80
Curve washer Φ8.5×R25×t2.0
4
25
Rear roller
1
81
Phillip countersunk head self-tapping screw ST4×35
24
26
Motor belt - 380PJ6
1
82
Phillip countersunk head self-tapping screw ST4x15
20
27
Motor belt - 250PJ6
1
83
Phillip head C.K.S full thread screw M5×10
4
28
Moving wheels
2
85
Hexagon socket head full thread bolt M8×75
2
29
Wheel and axle
2
86
Allen head C.K.S half thread bolt M8×30×20
2
30
Driving pulley wheel -front
1
87
Hex head locknut M8
3
31
Driving wheel axle
1
88
Flat washer Φ8
3
32
Driving wheel plate
1
89
Allen head C.K.S half thread bolt M10×25×15
4
33
Lateral belt
2
90
Hex head locknut M10
4
34
EVA mat - t2.0×50×3600
2
91
Flat washer Φ10
4
35
Front plastic side cover - right side
1
92
Allen countersunk head full thread screw M6×15
4
36
Front plastic side cover - left side
1
93
Hexagon head full thread bolt M8×30
2
37
Rear plastic side cover - right side
1
94
Hexagon nut M8
2
38
Rear plastic side cover - left side
1
95
Allen head C.K.S step bolt M6×50×36
1
39
Upright side cover - right side
1
96
Phillip pan head self-tapping screw ST3×10
2
40
Upright side cover - left side
1
97
Phillip head C.K.S self-tapping screw ST4×16
30
41
Foot pad
4
98
Phillip pan head full thread bolt M5x15
240
42
EVA mat - t5.0×70×3000
1
99
Phillip head C.K.S full thread screw M4×10
3
43
Top section resistance cable L - 1150mm
1
100
Hex head locknut M4
3
44
Top section resistance cable L - 450
1
101
Hexagon socket head full thread bolt M8×45
4
45
Round magnet
4
102
Flat plug Φ38×t1.5
2
46
Brake tension spring
1
103
Hexagon socket head full thread bolt M8×15
4
47
Slat
60
104
Hex head locknut M8
110
48
Double hole Washer - t1.5x20x10
120
105
Handrail - left side
1
49
Resistance handlebar
1
106
End cover t1.2×φ31
4
50
Resistance adjustment assembly
1
107
Hexagon lock nylon nut M6
1
51
Resistance handlebar cover
1
108
Flat washer Φ6
1
52
Resistance handlebar side cover
1
109
Spring washer φ6
240
19

53
Resistance bushing
2
110
Console fixing plate
1
54
Ordinary cylindrical spring
1
111
Bushing
2
55
Console
1
112
Phone holder
1
5
6
c
o
m
m
u
n
i
c
a
t
i
o
n
w
i
r
e
1
1
1
3
T
r
a
y
h
o
l
d
e
r
1
5
7
V
R
c
o
m
m
u
n
i
c
a
t
i
o
n
w
i
r
e
1
1
1
4
P
h
o
n
e
h
o
l
d
e
r
f
i
x
e
d
p
l
a
t
e
1
115
Console rotation axis
1
20
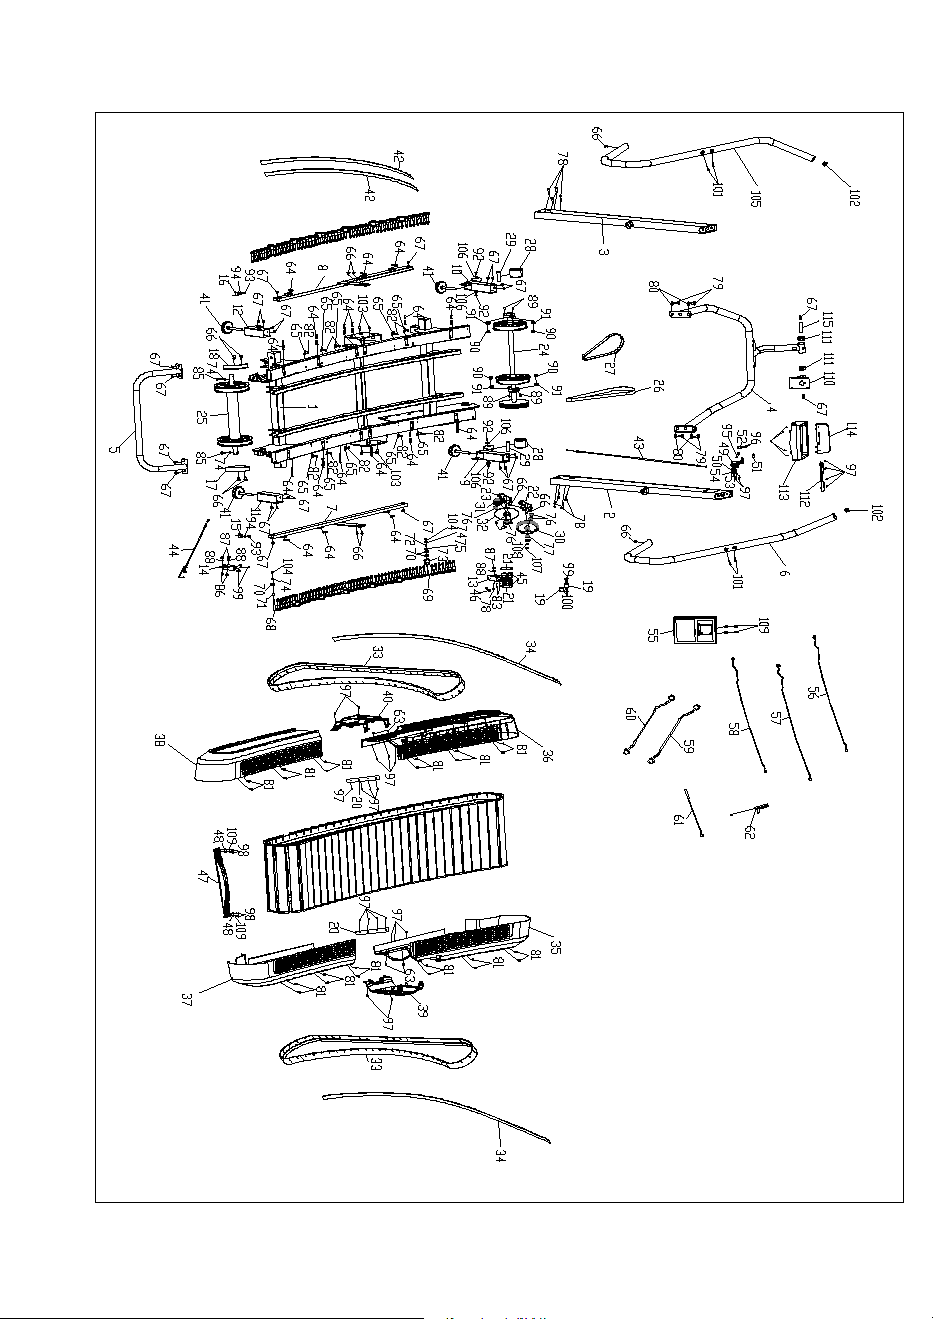
Exploded Diagram
21

D
i
s
t
r
i
b
u
t
e
d
i
n
t
h
e
U
K
b
y
:
B
O
D
Y
P
O
W
E
R
S
P
O
R
T
S