07/2024
Read these instructions carefully before using your microwave, and keep it carefully.
If you follow the instructions, your microwave will provide you with many years of good service.
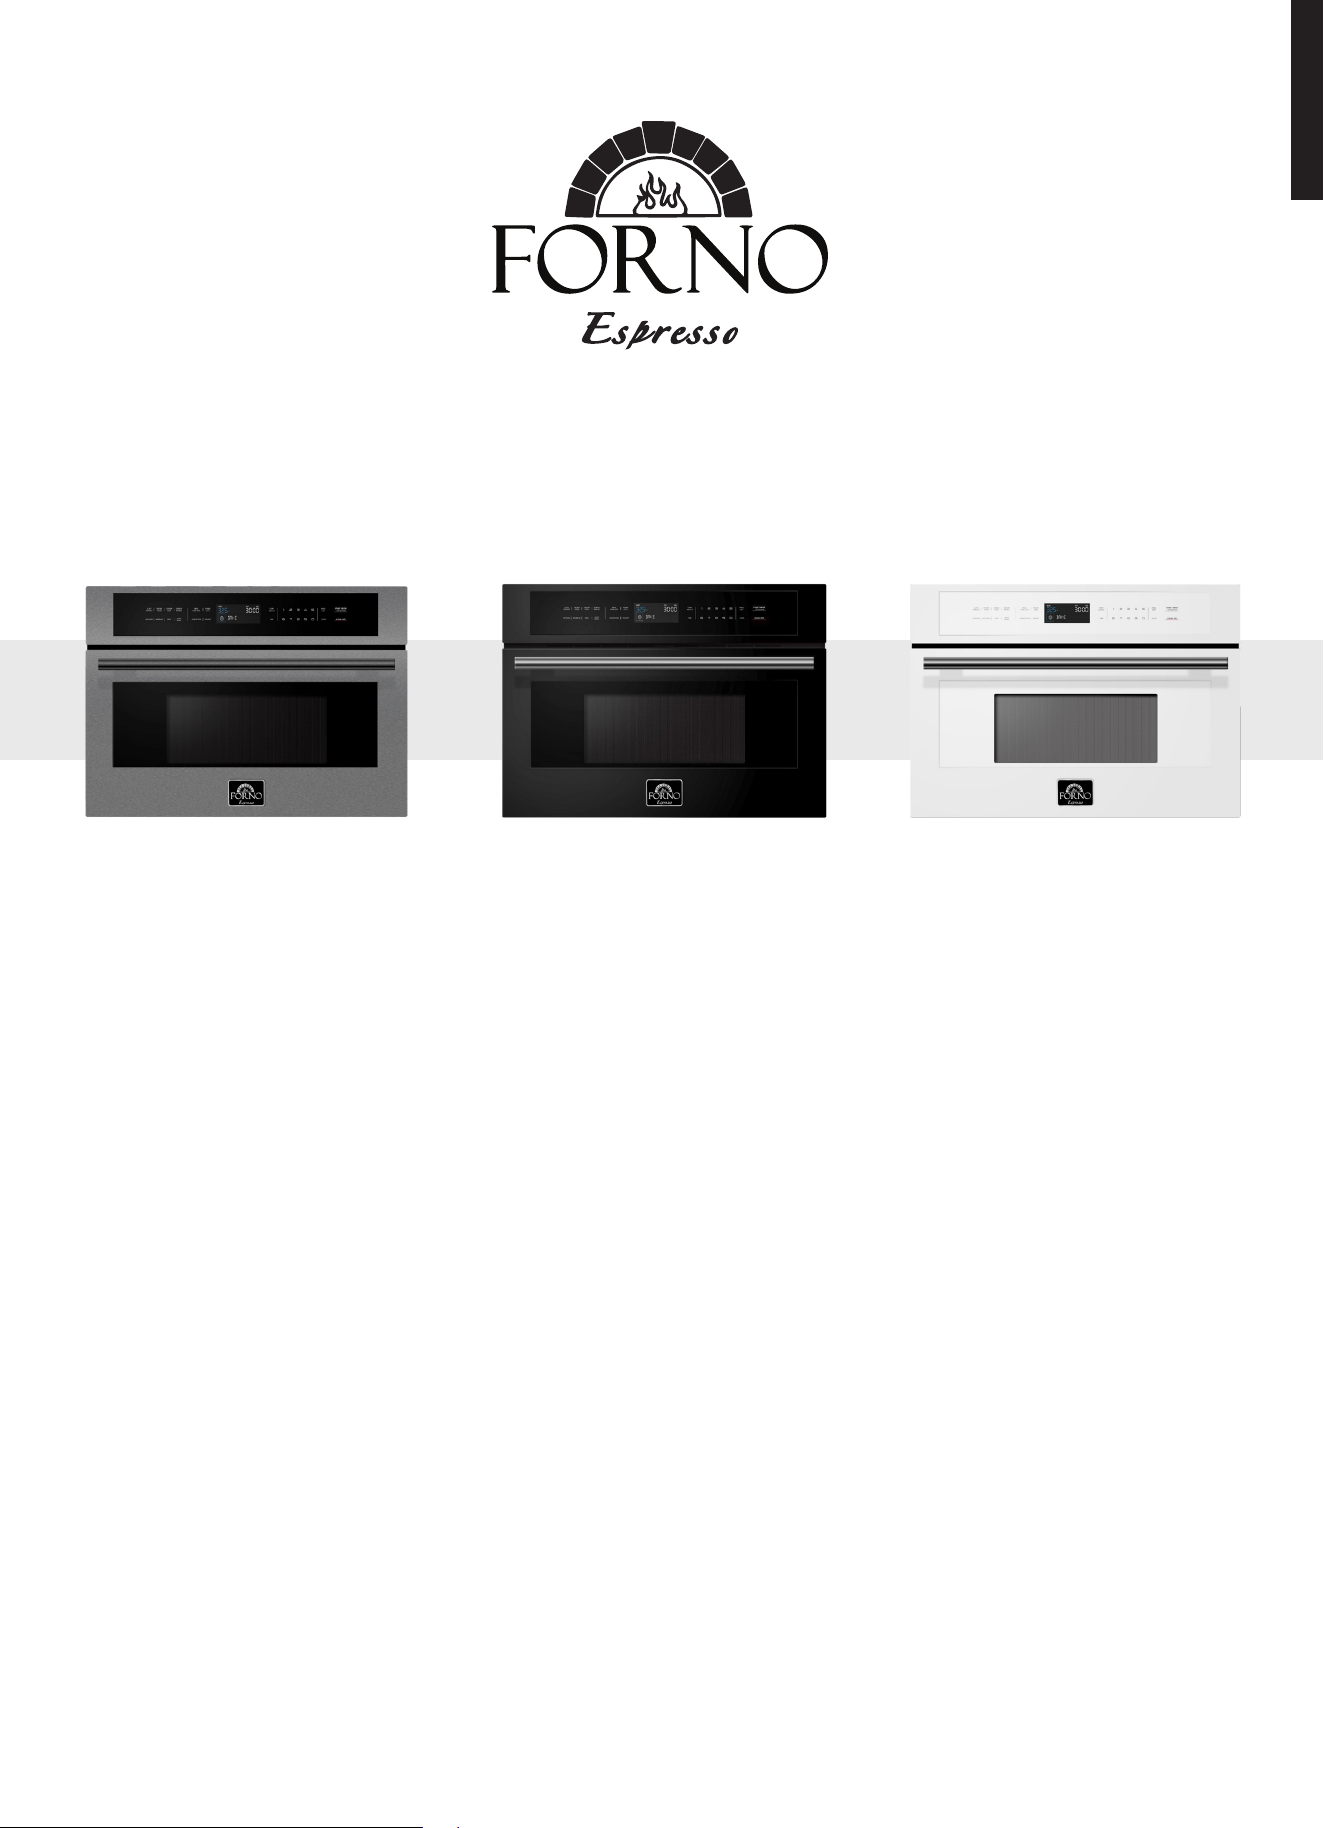
MODEL NUMBER SERIES
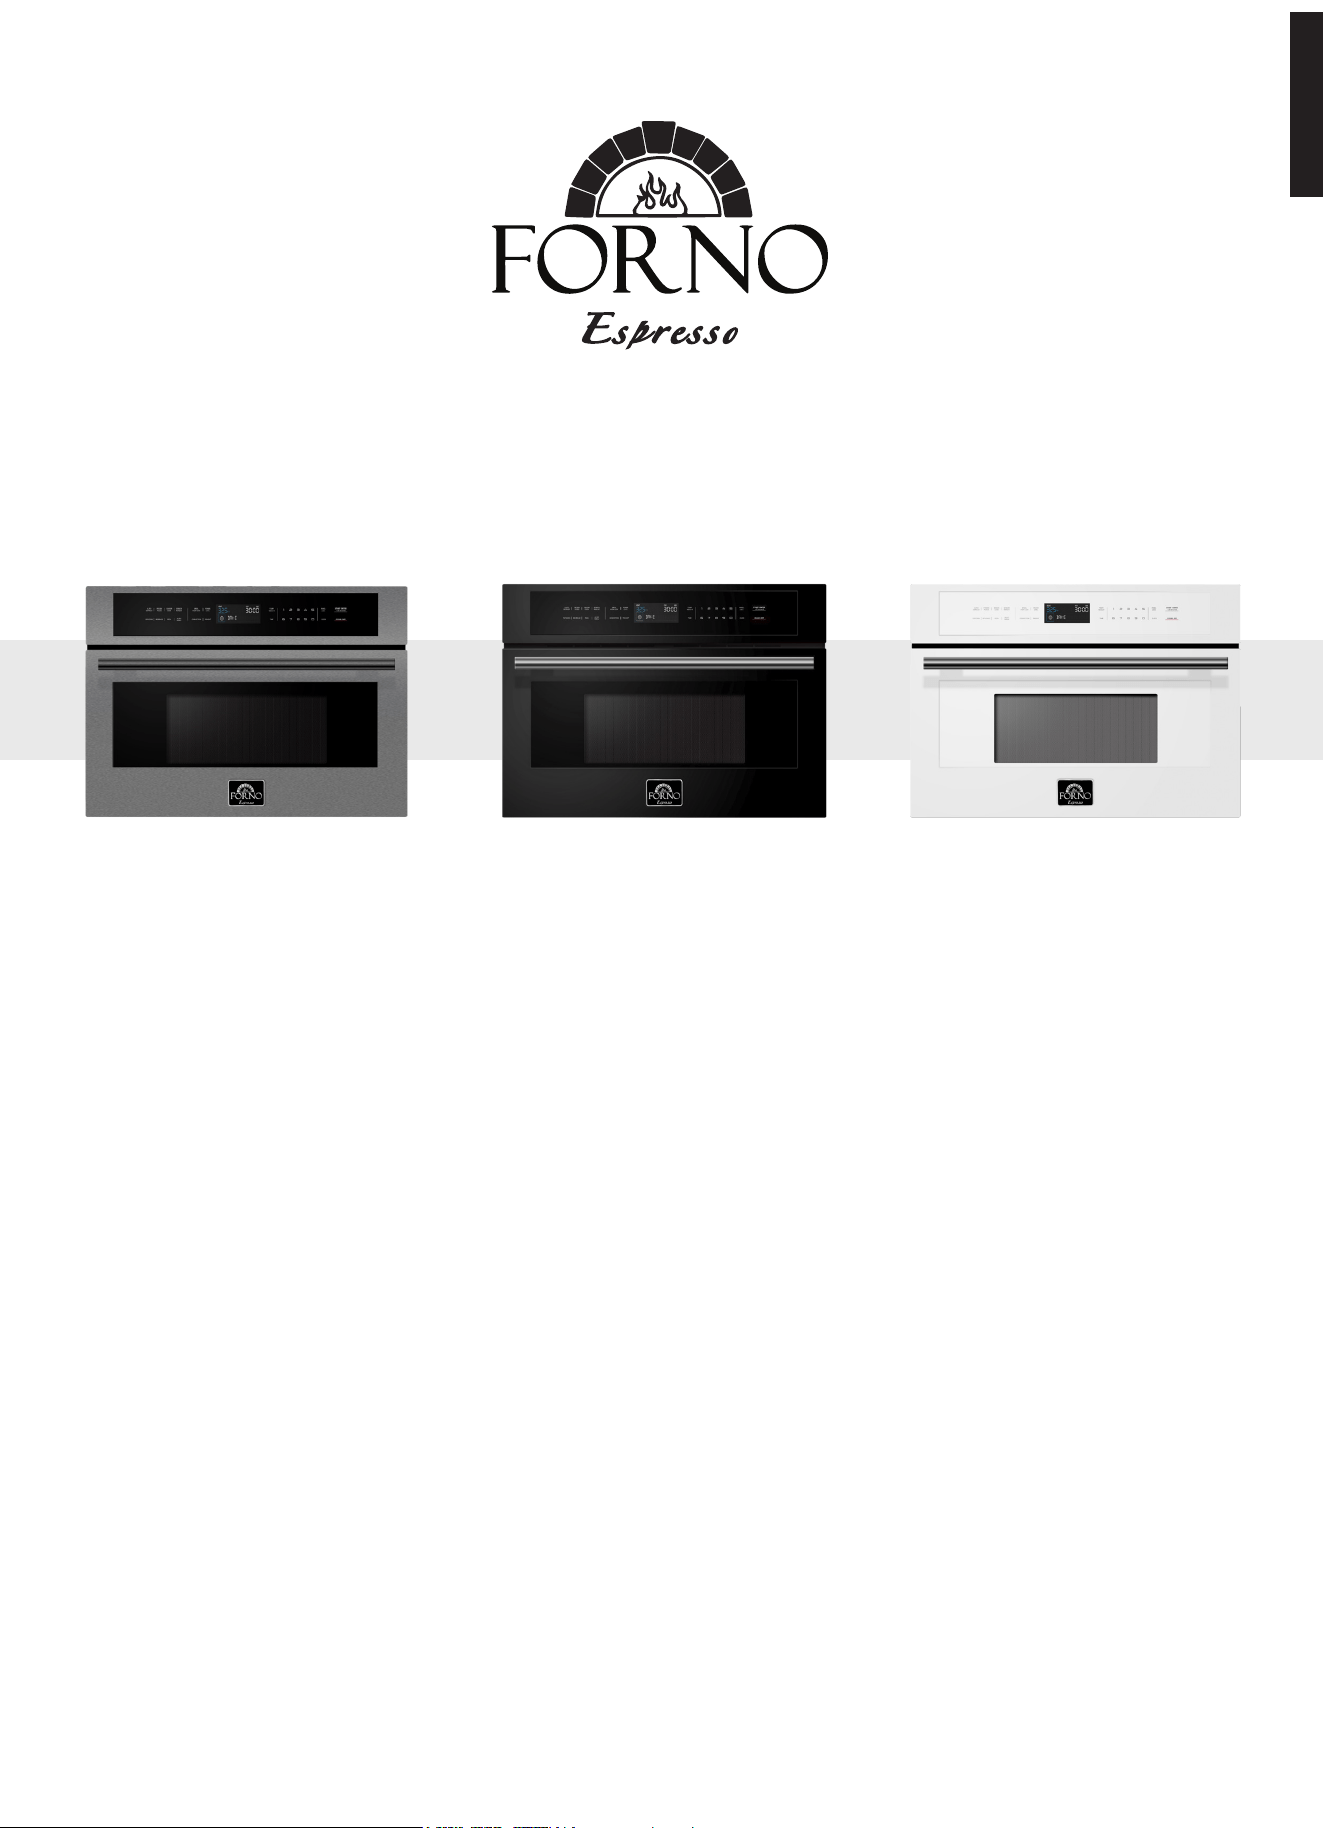
FMWDR3093-30 | FMWDR3093-30BLK | FMWDR3093-30WHT
INSTRUCTION MANUAL
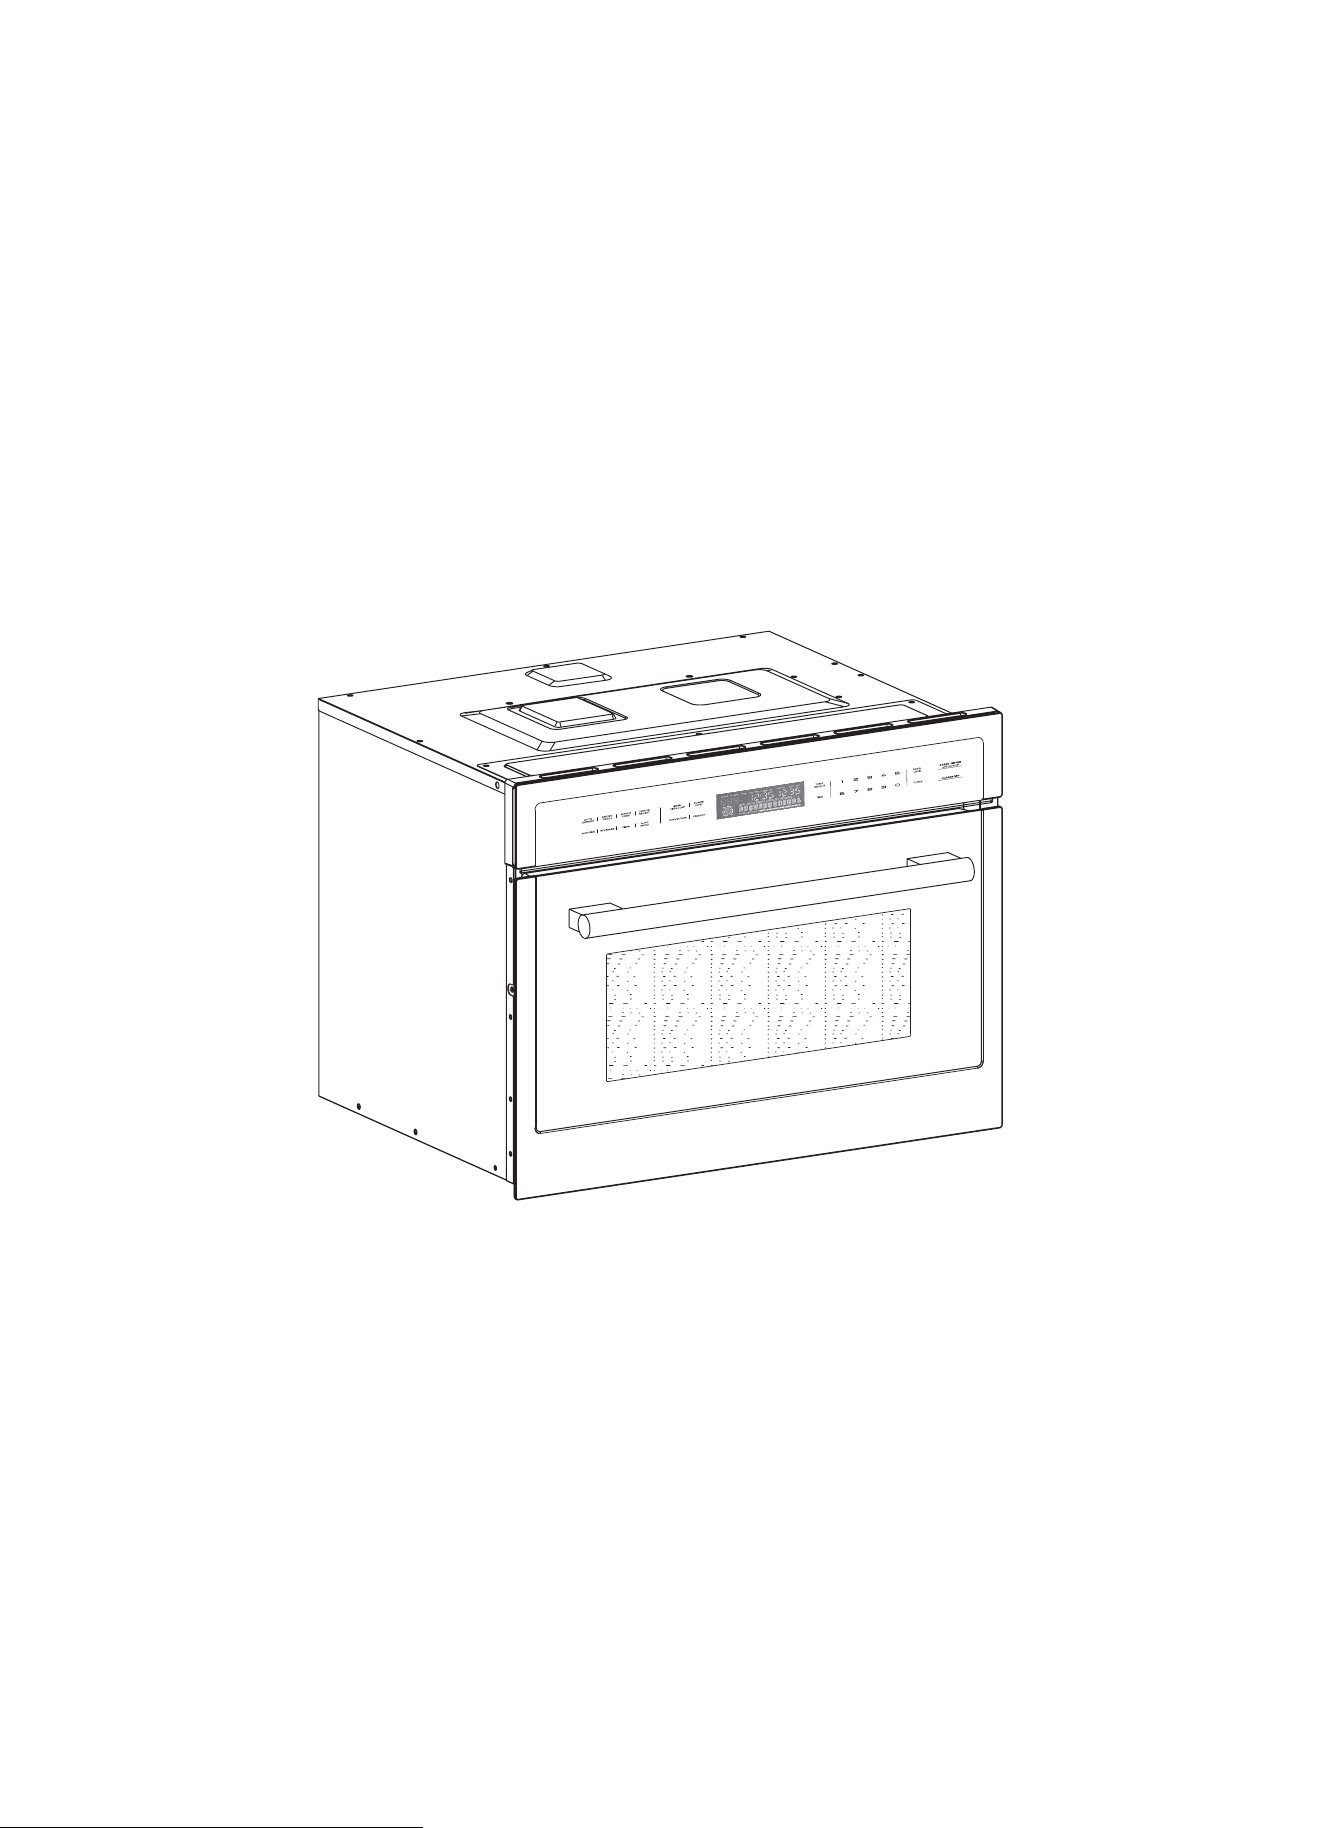
BUILT-IN MICROWAVE - CONVECTION OVEN
ENGLISH
TABLE OF CONTENTS
Customer Care 4
Warning 5
Important Safety Instructions 6
Name Of Parts and Accessories 7
Ground Instruction
Radio Interference 8
Kitchen Utensils: ........................................????????????????????????????.............
•
Materials You Can Use In Microwave....................
•
Materials To Avoided In Microwave.......................
8
9
9
..................................................
10
Operation: .................................................................
• Clock Setting..........................................................
•
•
•
•
•
•
•
•
•
•
•
•
14
14
14
14
15
15
15
15
15
16
16
16
17
17
18
19
Warranty
•
17
EN-2
8
Causes of Damage
10
..........
Dimensions and installation Requuirements
.......................................................... 13Key Functions
Settion the oven.....................................................
Rreheation.............................................................
Power Level...........................................................
Setting the microwave...........................................
E x press Cooking...................................................
Canceling operation ...............................................
Speedy microwave cooking...................................
Multi-stage cooking................................................
Automatic programs..............................................
Defrosting programs..............................................
Popcorn.................................................................
Beverage...............................................................
)UR]HQIRRGV
Pizza......................................................................
Sensor cooking......................................................
Childproof lock..................................................................
22
Care and cleaning
23
Malfunction table 24
Acrylamide in foodstuffs 24
Energy and environment tips 25
Expert Cooking Guide 25
21
Broil......................................................................
21
Setting the time-setting options..............................
11
12
26Cleaning and Maintenance
28
Electrical connection ............................................
Pack ing List..........................................................
•
•
•
•
•
•
•
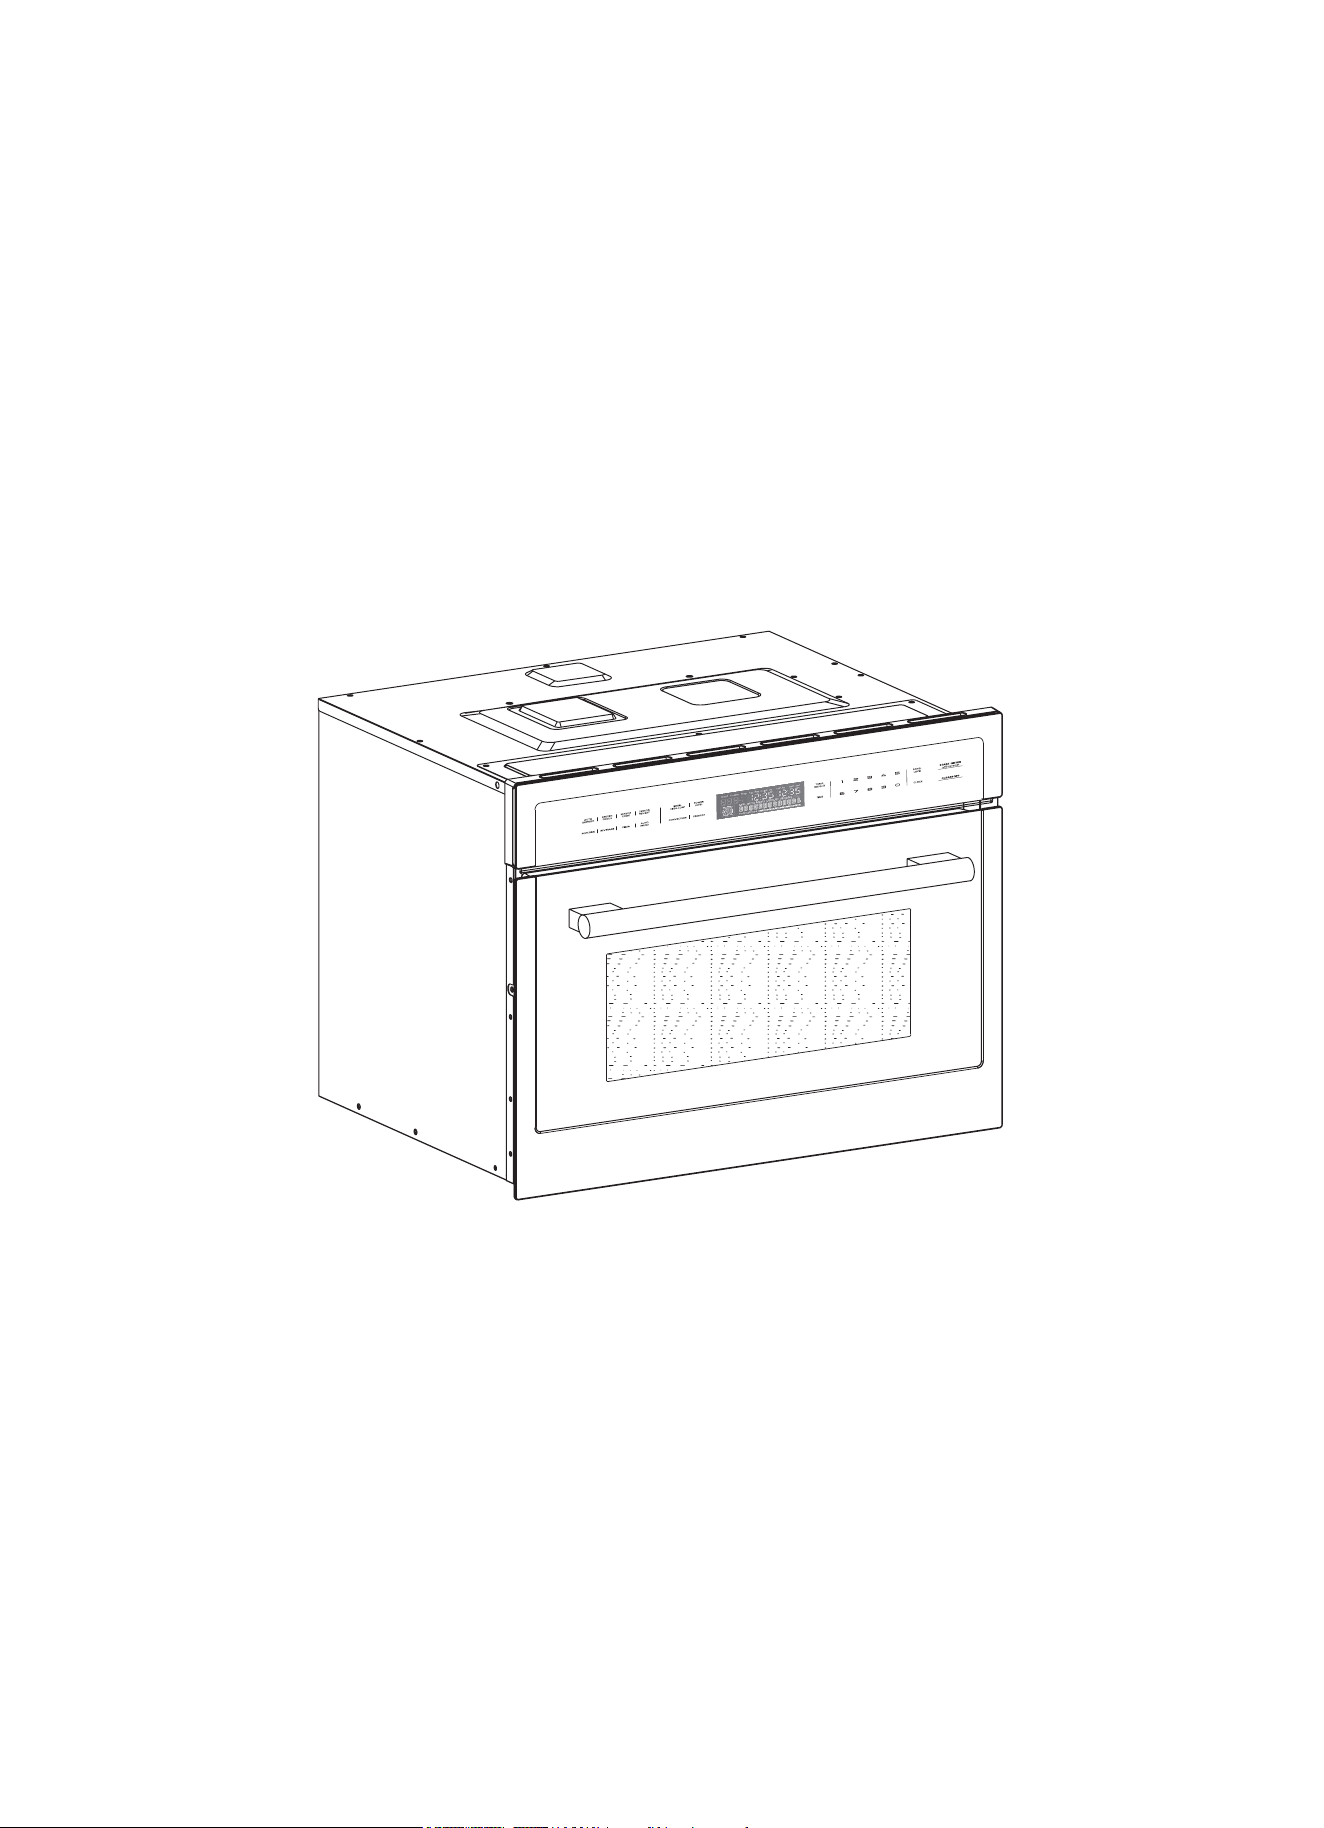
BUILT-IN MICROWAVE - CONVECTION OVEN
MODEL NUMBER SERIES
FMWDR3093-30 | FMWDR3093-30BLK | FMWDR3093-30WHT
EN-3
EN-4
Thank you for purchasing a Frono product. Please read the entire instruction manual before operating your new
appliance for the first time. Whether you are an occasional user or an expert, it will be beneficial to familiarize yourself
with the safety practices, features, operation and care recommendations of your appliance.
Both the model and serial number are listed inside the product. For warranty purposes, you will also need the date of
purchase .
Services in Canada and Untied States
Keep the instruction manual handy to answer your questions. If you don’t understand something or need more
assistance, please visit our website for fast support. Please provide us your name, number, address,serial number
of the product that troubleshooting, proof of purchase, and a short description of the issue. A customer service
representative will contact you as soon as possible. All warranty work needs to be authorized by FORNO customer
service. All our authorized service providers are carefully selected and rigorously trained by us.
Product Information Service Information
Model Number : _________________________________________
Use these numbers in any
correspondence or services calls
concerning your product.
If you received a damaged product,
immediately contact Forno.
To save time and money, before
you call for serviced, check the
troubleshooting guide. It listed the
causes of minor operation problems
that you can correct yourself.
Serial Number : __________________________________________
Date of Purchase :________________________________________
Purchase Address And Phone : _____________________________
_______________________________________________________
_______________________________________________________
Customer Care
“Need some quick help? Simply scan the qr code and get access
to our fast support form. We’re always here to assist you with any
questions or concerns you may have. So, don’t hesitate to reach out!”
WARNING
)25<2856$)(7<
35(&$87,21672$92,'3266,%/((;32685(72(;&(66,9(
0,&52:$9((1(5*<
(a) DO NOTDWWHPSWWRRSHUDWHWKLVPLFURZDYHZLWKWKHGRRURSHQVLQFHRSHUDWLRQFDQUHVXOWLQKDUPIXOH[SRVXUHWR
microwave energy. It is important not to defeat or tamper with the safety interlocks.
(b) DO NOT place any object between the microwave front face and the door or allows soil or cleaner residue to
accumulate on sealing surfaces.
(c) DO NOT operate the microwave if it is damaged. It is particular important that the microwave door close properly and
that there is no damage to the:
'225EHQW
+,1*(6$1'/$7&+(6EURNHQRUORRVHQHG
'2256($/6$1'6($/,1*685)$&(
G7KHPLFURZDYHVKRXOGQRWEHDGMXVWHGRUUHSDLUHGE\DQ\RQHH[FHSWSURSHUO\TXDOL¿HGVHUYLFHSHUVRQQHO
63(&,),&$7,216
Model
FMWDR3093-30
FMWDR3093-30BLK
FMWDR3093-30WHT
5DWHG9ROWDJH 9$&+]
Microwave Input :
0LFURZDYH2XWSXW :
*ULOO :
Convection :
WARNING 7KLVSURGXFWFDQH[SRVH\RXWRFKHPLFDOVLQFOXGLQJ>/HDGOHDG
DQGOHDGFRPSRXQGZKLFKLV>DUH@NQRZQWRWKHVWDWHRI&DOLIRUQLDWRFDXVH
cancer and birth defects or other reproductive harm. For more information go
WRZZZ3:DUQLQJFDJRY
EN-5

:KHQXVLQJHOHFWULFDODSSOLDQFHVEDVLFVDIHW\SUHFDXWLRQVVKRXOGEHIROORZHGWRUHGXFHWKHULVNRIEXUQVHOHFWULFVKRFN
¿UHLQMXU\WRSHUVRQVRUH[SRVXUHWRH[FHVVLYHPLFURZDYHHQHUJ\
1. Read all instructions before using the appliance.
2. 5HDGDQGIROORZWKHVSHFL¿F³35(&$87,21672
$92,'3266,%/((;32685(72(;&(66,9(
0,&52:$9((1(5*<´
3. This appliance must be grounded. Connect only
WRSURSHUO\JURXQGHGRXWOHW6HH³*5281',1*
,16758&7,216´
4. Install or locate this appliance only in accordance with
the provided installation instructions.
5. Some products such as whole eggs and sealed
FRQWDLQHUVIRUH[DPSOHFORVHGJODVVMDUVDUHDEOHWR
H[SORGHDQGVKRXOGQRWEHKHDWHGLQWKLVPLFURZDYH
Use this appliance only for its intended use as
described in the manual. DO NOT use corrosive
chemicals or vapors in this appliance. This type of
PLFURZDYHLVVSHFL¿FDOO\GHVLJQHGWRKHDWFRRNRUGU\
food. It is not designed for industrial or laboratory use.
8. DO NOT operate this appliance if it has a damaged
cord or plug, if it is not working or if it has been
damaged or dropped.
9. 7KLVDSSOLDQFHVKRXOGEHVHUYLFHGRQO\E\TXDOL¿HG
service personnel. Contact [email protected] for
H[DPLQDWLRQUHSDLURUDGMXVWPHQW
10. DO NOT cover or block any openings on the
appliance.
11. DO NOT store this appliance outdoors. DO NOT use
WKLVSURGXFWQHDUZDWHUIRUH[DPSOHQHDUDNLWFKHQ
sink, in a wet basement, near a swimming pool, or
similar location.
12. :KHQFOHDQLQJVXUIDFHVRIGRRUDQGPLFURZDYHWKDW
comes together on closing the door,use only mild,
nonabrasive soaps, or detergent applied with a sponge
or soft cloth.
13. 7RUHGXFHWKHULVNRI¿UHLQWKHPLFURZDYHFDYLW\
1). DO NOT overcook food. Carefully attend appliance
when paper, plastic, or other combustible materials are
placed inside the microwave to facilitate cooking.
2). Remove wire twist-ties from paper or plastic bag
before placing bag in microwave.
3). If material inside of the microwave ignite, keep
PLFURZDYHGRRUFORVHGWXUQPLFURZDYHRႇDQG
GLVFRQQHFWWKHSRZHUFRUGRUVKXWRႇSRZHUDWWKH
fuse or circuit breaker panel.
4). DO NOT use the cavity for storage purposes. DO
NOT leave paper products, cooking utensils, or food in
the cavity when not in use.
14. /LTXLGVVXFKDVZDWHUFRႇHHRUWHDDUHDEOHWR
be overheated beyond the boiling point without
DSSHDULQJWREHERLOLQJ9LVLEOHEXEEOLQJRUERLOLQJ
when the container is removed from the microwaves
QRWDOZD\VSUHVHQW7+,6&28/'5(68/7,19(5<
+27/,48,'68''(1/<%2,/,1*29(5:+(1
7+(&217$,1(5,6',6785%('25$87(16,/,6
,16(57(',1727+(/,48,'
To reduce the risk of injury to persons:
1) DO NOT overheat the liquid.
2) Stir the liquid both before and halfway through
heating it.
3) DO NOT use straight-sided containers with narrow
necks.
4) After heating, allow the container to stand in
the microwave for a short time before removing the
container.
8VHH[WUHPHFDUHZKHQLQVHUWLQJDVSRRQRURWKHU
utensil into the container.
15. DO NOT operate any heating or cooking appliance
beneath the appliance.
16. DO NOT mount unit over or near any portion of
heating or cooking appliance.
17. 2YHUVL]HGIRRGRURYHUVL]HGPHWDOXWHQVLOVVKRXOGQRW
be inserted in a microwave / toaster oven as they may
FUHDWHD¿UHRUULVNRIHOHFWULFVKRFN
18. Do not clean with metal scouring pads. Pieces can
EXUQRႇWKHSDGDQGWRXFKHOHFWULFDOSDUWVLQYROYLQJD
risk of electric shock.
19. Do not use paper products when appliance is operated
in the toaster mode.
20. Do not store any materials, other than manufacturer’s
recommended accessories, in this oven when not in
use.
21. Do not cover racks or any other part of the oven with
metal foil. This will cause over heating of the oven.
22. Do not immerse cord or plug in water.
23. Keep cord away from heated surface.
24. Do not let cord hang over edge of table or counter.
25. Do not mount over sink.
Do not store anything directly on top of the appliance
surface when the appliance is in operation.
6$9(7+(6(,16758&7,216
!
Liquids and other foods must not be
heated in sealed containers since they
are liable to explode.
7. HOT CONTENTS CAN CAUSE SEVERE BURNS.
DO NOT ALLOW CHILDREN TO USE THE
MICROWAVE. Use caution when removing
hot items.
EN-6
Important Safety Instructions
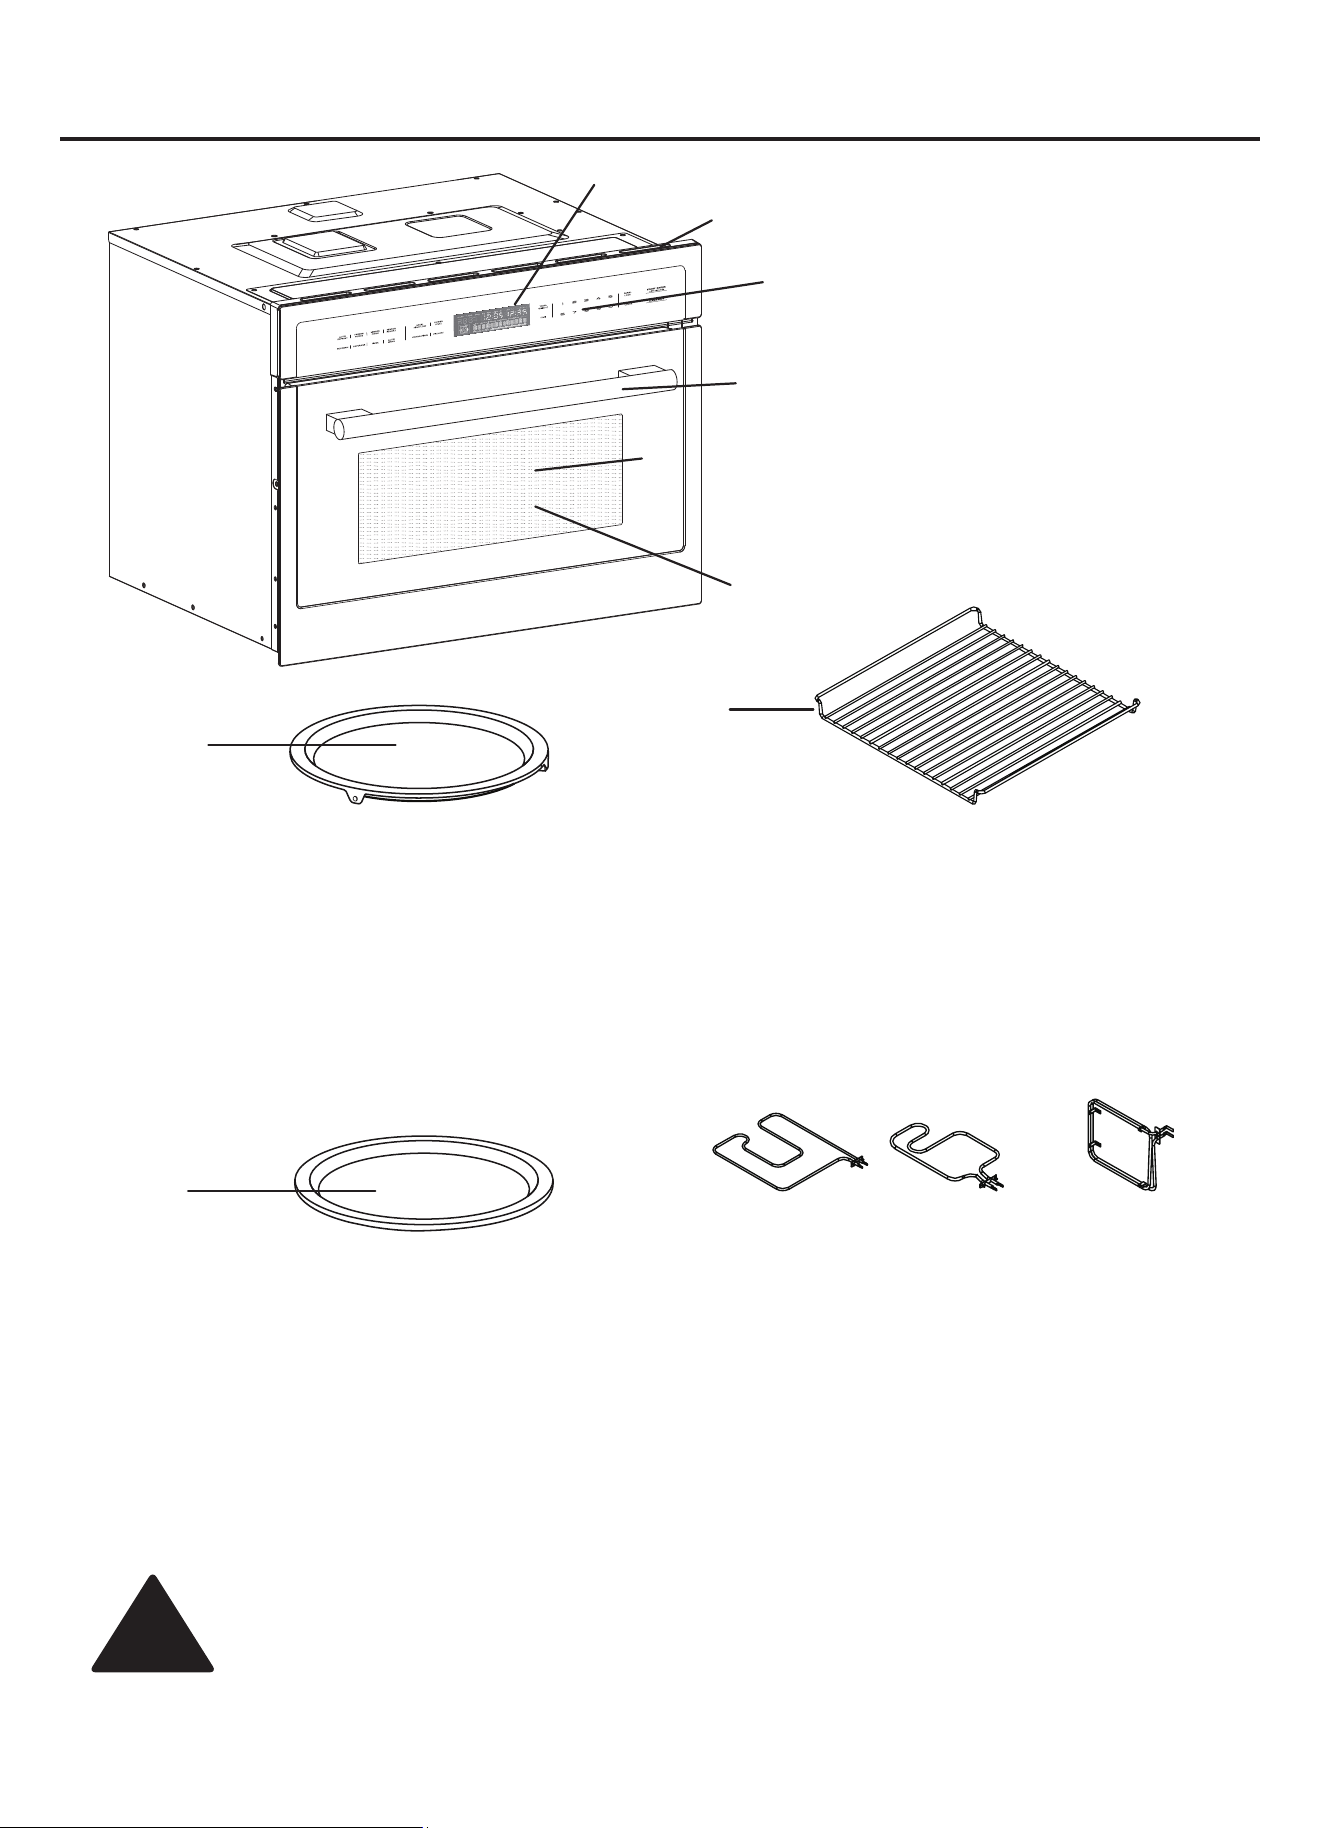
Names of Parts and Accessories
A. Display
B. Air vent
C. Control panel
D. Handle
( :LQGRZ
F. Frame
* Metal turntable
H. *OLGLQJUDFN
I. Ceramic turntable
!
The rack can remain inside the microwave during the microwave function as long as it is
placed properly in the rack holders.
A
B
C
D
(
F
I
• The turntable can turn clockwise or counterclockwise.
• Place the turntable on the drive in the center of the
FRRNLQJFRPSDUWPHQW(QVXUHWKDWLWLVSURSHUO\¿WWHG
• Never use the microwave without the turntable.
• The turntable can withstand up to 11 pounds.
• The turntable must turn when using all types of
heating.
• The turntable is made out of metal with porcelain
coating.
• $UHYHUVLEOHZLUHJULOOUDFNLVLQFOXGHGIRUPD[LPXP
convection performance. For best results for baking or
roasting, place rack face down for baking. For grilling,
place the rack face up.
• The appliance also comes with a cordiertie ceramic
plate that can be placed on the turntable for stabler
cooking.
• The appliance has 3 heating elements.
*
H
%HIRUHXVLQJWKHDFFHVVRULHVIRUWKH¿UVWWLPHFOHDQWKHPWKRURXJKO\ZLWKKRWVRDS\ZDWHUDQGDVRIWGLVKFORWK
Top Bottom True Convection
EN-7

Radio Interference
1. 2SHUDWLRQRIWKHPLFURZDYHPD\FDXVHLQWHUIHUHQFHWR\RXUUDGLR79RUVLPLODUHTXLSPHQW
2. :KHQWKHUHLVLQWHUIHUHQFHLWPD\EHUHGXFHGRUHOLPLQDWHGE\WDNLQJWKHIROORZLQJPHDVXUHV
1) Clean door and sealing surface of the microwave
2) Reorient the receiving antenna of radio or television.
3) Relocate the microwave with respect to the receiver.
4) Move the microwave away from the receiver.
3OXJWKHPLFURZDYHLQWRDGLႇHUHQWRXWOHWVRWKDWPLFURZDYHDQGUHFHLYHUDUHRQGLႇHUHQWEUDQFKFLUFXLWV
7KLVGHYLFHFRPSOLHVZLWKSDUWRIWKH)&&5XOHV)&&KDVWKHDXWKRULW\WRUHJXODWHLQGXVWULDOVFLHQWL¿FDQG
medical equipment (ISM) that emits electromagnetic energy on frequencies within the radio frequency spectrum to
SUHYHQWKDUPIXOLQWHUIHUHQFHWRDXWKRUL]HGUDGLRFRPPXQLFDWLRQVHUYLFHV
Kitchen Utensils
CAUTION - Personal Injury Hazard
7LJKWO\FORVHGFRQWDLQHUVFRXOGH[SORGH&ORVHGFRQWDLQHUVVKRXOGEHRSHQHGDQGSODVWLFSRXFKHVVKRXOGEHSLHUFHG
EHIRUHFRRNLQJ6HHWKHLQVWUXFWLRQVRQ³0DWHULDOV\RXFDQXVHLQPLFURZDYHDQGPDWHULDOVWRDYRLGHGLQPLFURZDYH´
There may be certain non-metallic kitchen utensils that are not safe to use for microwaving. If in doubt, you can test the
kitchen utensil in question following the procedure below.
Kitchen Utensil Test:
1. Fill a microwave-safe container with 1 cup of cold water (250ml) along with the utensil in question.
&RRNRQPD[LPXPSRZHUIRUPLQXWH
3. Carefully feel the utensil. If the empty utensil is warm, do not use it for microwave cooking.
'RQRWH[FHHGPLQXWHFRRNLQJWLPH
Grounding Instructions
This appliance must be grounded. In the event of an electrical short circuit, grounding reduces the risk of electric shock
by providing an escape wire for the appliance is equipped with a cord having a grounding wire with a grounding plug. The
plug must be plugged into an outlet that is properly installed and grounded.
:$51,1*,PSURSHUXVHRIWKHJURXQGLQJFDQUHVXOWLQDULVNRIHOHFWULFVKRFN
&RQVXOWDTXDOL¿HGHOHFWULFLDQRUVHUYLFHPDQLIWKHJURXQGLQJLQVWUXFWLRQVDUHQRWFRPSOHWHO\XQGHUVWRRGRULIGRXEWH[LVWV
DVWRZKHWKHUWKHDSSOLDQFHLVSURSHUO\JURXQGHG,ILWLVQHFHVVDU\WRXVHDQH[WHQVLRQFRUGXVHRQO\DZLUHH[WHQVLRQ
cord that has a 3-blade grounded plug, and 3-slot receptacle that will accept the plug on the appliance. The marked rating
RIWKHH[WHQVLRQFRUGVKDOOEHHTXDOWRRUJUHDWHUWKDQWKHHOHFWULFDOUDWLQJRIWKHDSSOLDQFH
DANGER - Electric Shock Hazard
Touching some of the internal components can cause serious personal injury or death. Do not disassemble this appliance.
WARNING - Electric Shock Hazard
Improper use of the grounding can result in electric shock. Do not plug into an outlet until appliance is properly installed
and grounded.
1. A short power-supply cord is provided to reduce the risks resulting from becoming entangled in or tripping over a
longer cord.
2. /RQJHUFRUGVHWVRUH[WHQVLRQFRUGVDUHDYDLODEOHDQGPD\EHXVHGLIFDUHLVH[HUFLVHGLQWKHLUXVH
3. ,IDORQJFRUGRUH[WHQVLRQFRUGLVXVHG
7KHPDUNHGHOHFWULFDOUDWLQJRIWKHFRUGVHWRUH[WHQVLRQFRUGVKRXOGEHDWOHDVWDVJUHDWDVWKHHOHFWULFDOUDWLQJRI
the appliance.
7KHH[WHQVLRQFRUGPXVWEHDJURXQGLQJW\SHZLUHFRUG
3) The longer cord should be arranged so that it will not drape over the counter top or tabletop where it can be pulled
on by children or tripped over unintentionally.
**7+,6'(9,&(&203/,(6:,7+3$572)7+()&&58/(6
21/<)2586$
EN-8
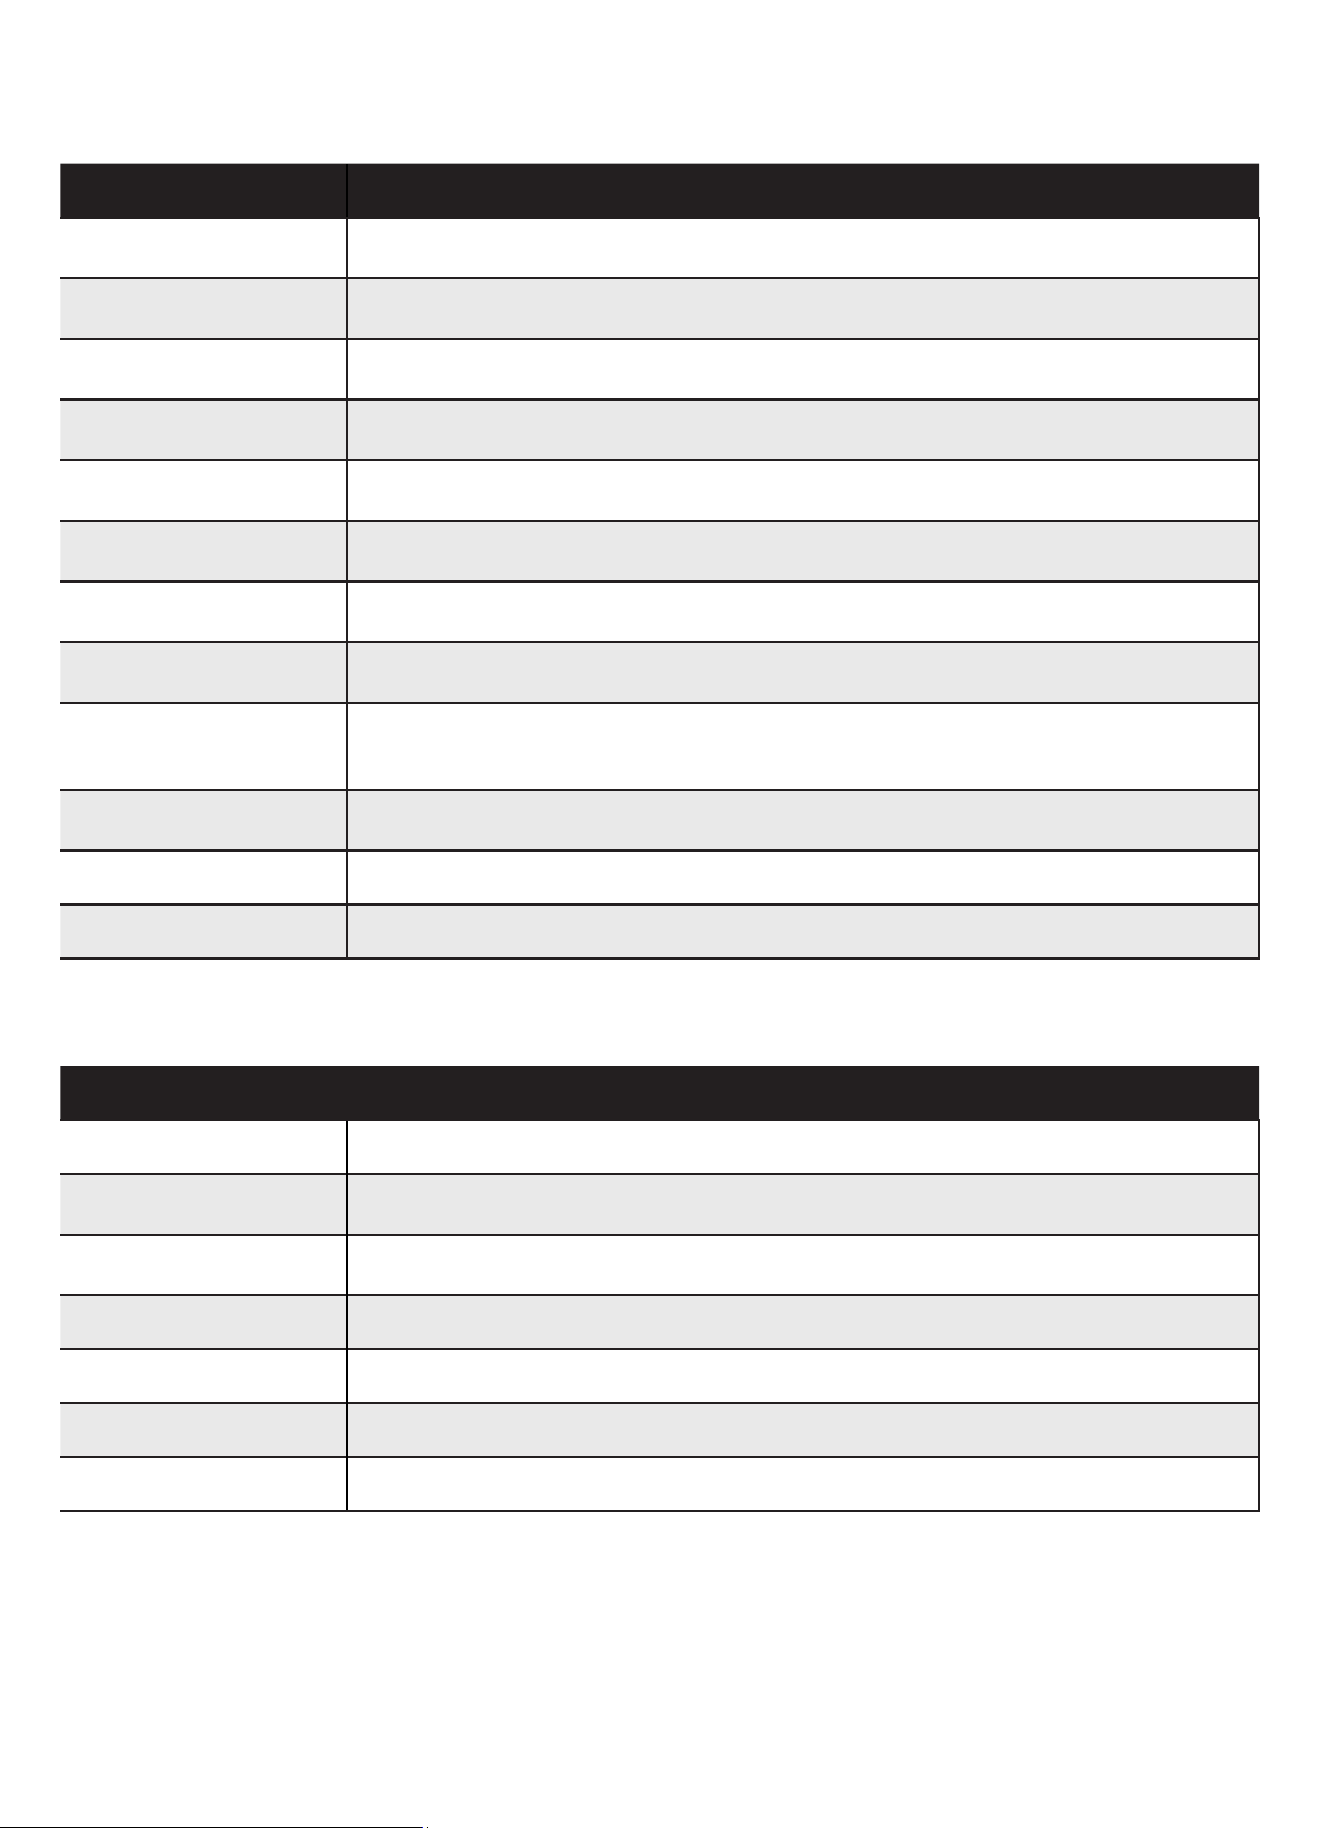
0$7(5,$/672$92,'(',10,&52:$9(
Material
Instructions
Aluminum tray May cause arcing. Transfer food into microwave-safe dish.
Food carton with metal
handle
May cause arcing. Transfer food into microwave-safe dish.
Metal or metal-trimmed
utensils
Metal shields the food from microwave energy. Metal trim may cause arcing.
Metal twist ties 0D\FDXVHDUFLQJDQGFRXOGFDXVHD¿UHLQWKHPLFURZDYH
Paper bags 0D\FDXVHD¿UHLQWKHPLFURZDYH
Plastic foam 3ODVWLFIRDPPD\PHOWRUFRQWDPLQDWHWKHOLTXLGLQVLGHZKHQH[SRVHGWRKLJKWHPSHUDWXUH
:RRG :RRGZLOOGU\RXWZKHQXVHGLQWKHPLFURZDYHDQGPD\VSOLWRUFUDFN
0$7(5,$/6<28&$186(,10,&52:$9(
Material
Instructions
Browning dish
)ROORZPDQXIDFWXUHULQVWUXFWLRQV7KHERWWRPRIEURZQLQJGLVKPXVWEHDWOHDVWLQFK
(5mm) above the turntable. Incorrect usage may cause the turntable to break.
Dinnerware
Microwave-safe only. Follow manufacturer’s instructions. Do not use cracked or chipped
dishes
*ODVVMDUV
Always remove lid. Use only to heat food until just warm. Most glass jars are not heat
resistant and may break.
*ODVVZDUH
Heat-resistant glassware only. Make sure there is no metallic trim. Do not use cracked or
chipped dishes.
Cooking bags
)ROORZPDQXIDFWXUHULQVWUXFWLRQV'RQRWFORVHZLWKPHWDOWLH0DNHVOLWVWRDOORZVWHDPWR
escape.
Paper plates and cups
Use for short-term cooking/warming only. Do not leave microwave unattended while
cooking.
Paper towels
Use for short-term cooking/warming only. Do not leave microwave unattended while
cooking.
Parchment paper
Use for short-term cooking/warming only. Do not leave microwave unattended while
cooking.
Plastic
0LFURZDYHVDIHRQO\)ROORZWKHPDQXIDFWXUHULQVWUXFWLRQV6KRXOGEHODEHOHG³0LFURZDYH
6DIH´6RPHSODVWLFFRQWDLQHUVVRIWHQDVWKHIRRGLQVLGHJHWVKRW³%RLOLQJEDJV´DQG
tightly closed plastic bags should be slit, pierced or vented as directed by package.
Plastic wrap
Microwave-safe only. Use to cover food during cooking to retain moisture. Do not allow
plastic wrap to touch food.
Thermometers Microwave-safe only (meat and candy thermometers).
:D[SDSHU Use as a cover to prevent splattering and retain moisture.
EN-9

CAUTION!
•
Creation of sparks: Metal e.g. a spoon in a glass must
be kept at least 2 cm from the oven walls and the
inside of the door. Sparks could irreparably damage
the glass on the inside of the door.
•
:DWHULQWKHKRWFRRNLQJFRPSDUWPHQW1HYHUSRXU
water into the hot cooking compartment. This will
cause steam. The temperature change can cause
damage.
•
Moist food: Do not store moist food in the closed
cooking compartment for long periods. Do not use the
appliance to store food. This can lead to corrosion.
•
&RROLQJZLWKWKHDSSOLDQFHGRRURSHQ2QO\OHDYHWKH
cooking compartment to cool with the door closed. Do
QRWWUDSDQ\WKLQJLQWKHDSSOLDQFHGRRU(YHQLIWKH
door is only slightly ajar, the fronts of adjacent units
may be damaged over time.
•
Heavily soiled seal: If the seal is very dirty, the
appliance door will no longer close properly during
operation. The fronts of adjacent units could be
damaged. Always keep the seal clean.
•
2SHUDWLQJWKHPLFURZDYHZLWKRXWIRRG2SHUDWLQJWKH
appliance without food in the cooking compartment
may lead to overloading. Never switch on the
appliance unless there is food in the cooking
FRPSDUWPHQW$QH[FHSWLRQWRWKLVUXOHLVDVKRUW
Use this checklist to verify that you have completed each
step of the installation process. This can help you avoid
mistakes.
Refer to detailed instructions for each step in the sections
following this checklist.
1. Before installing the appliance, be sure to verify the
cabinet dimensions are correct for your appliance and
that the required electrical connections are present.
Make sure the electrical conduit provided on the
appliance is able to reach to the point of connection.
Section: Dimensions and Cabinet Requirements
2. Move the appliance into place in front of the cabinet
opening. Section: Removing Packaging
3. Remove packaging materials, leaving the bottom
packaging on the appliance to avoid damage to the
ÀRRU6HFWLRQ5HPRYLQJ3DFNDJLQJ
4. Team-lift the appliance directly into the cabinet cutout.
6HFWLRQ,QVWDOO$SSOLDQFH³0RXQWWR&DELQHW´
5. Slide the appliance all the way into place. Section:
,QVWDOO$SSOLDQFH³0RXQWWR&DELQHW´
Fasten the appliance to the cabinet opening with the
VFUHZVVXSSOLHG6HFWLRQ,QVWDOO$SSOLDQFH³0RXQWWR
&DELQHW´
Always read and follow the complete installation
instructions contained in this manual.
•
$VSDFHRIó´PPLVUHTXLUHGEHWZHHQWKHVLGH
of the appliance and an adjacent wall or cabinet door
Causes of Damage
Dimensions and Installation Requirements
FURFNHU\WHVWVHHWKHVHFWLRQ³0LFURZDYHVXLWDEOH
FURFNHU\´
•
Using the appliance door for standing on or placing
objects on: Do not stand or place anything on the open
appliance door. Do not place ovenware or accessories
on the appliance door.
•
Transporting the appliance: Do not carry or hold the
appliance by the door handle. The door handle cannot
support the weight of the appliance and could break.
•
Microwave popcorn: Never set the microwave power
WRRKLJK8VHDSRZHUVHWWLQJQRKLJKHUWKDQ
watts. Always place the popcorn bag on a glass plate.
The disc may jump if overloaded.
•
Liquid that has boiled over must not be allowed to
run through the turntable drive into the interior of the
appliance. Monitor the cooking process. Choose a
shorter cooking time initially, and increase the cooking
time as required.
•
The oven should be cleaned regularly and any food
GHSRVLWVUHPRYHGVLQFHWKH\PD\H[SORGHHYHQDIWHU
microwave heating.
•
Failure to maintain the oven in a clean condition
could lead to deterioration of the surface that could
DGYHUVHO\DႇHFWWKHOLIHRIWKHDSSOLDQFHDQGSRVVLEO\
UHVXOWLQDKD]DUGRXVVLWXDWLRQ
when installed at the end of a cabinet run. The cabinet
EDVHPXVWEHÀDWDQGFDSDEOHRIVXSSRUWLQJWKHZHLJKW
of your appliance when in use. For combination units
consult the section Cabinet Dimension Requirements
in the installation manual of your combination
appliance.
• The appliance door will overlap the furniture below by
DSSUR[´PPZKHQRSHQHG,IQHFHVVDU\\RX
can elevate the appliance position by adding a panel in
the required thickness on top of the supporting base.
7KHVXSSRUWLQJEDVHPXVWEHOHYHODQGVHFXUHO\¿[HG
to the cabinet.
EN-10
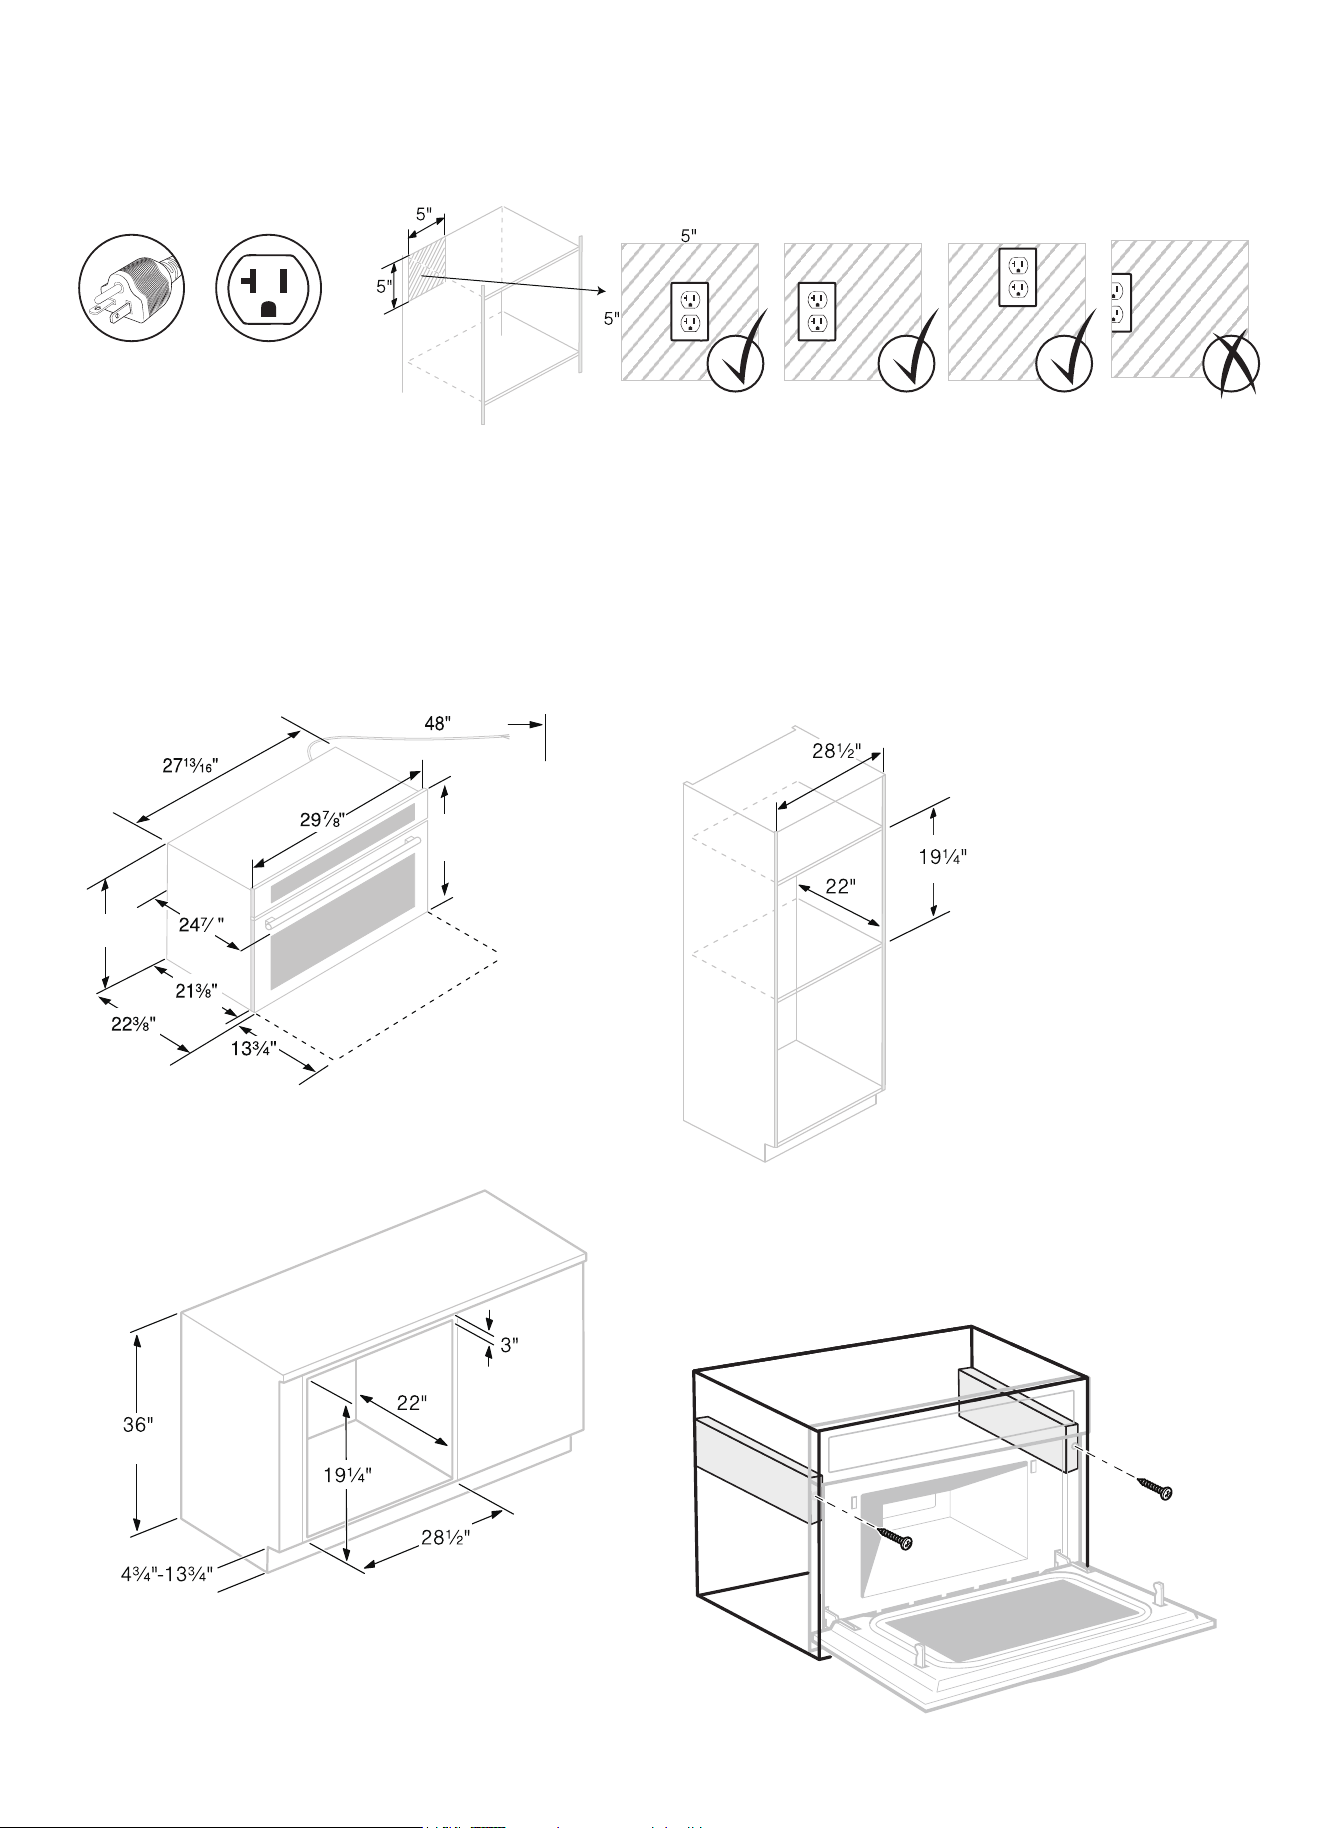
2XWOHWDUHDIRUERWKZDOODQGFRXQWHULQVWDOODWLRQ
• 7KHXQLWFRPHVZLWKDNEMA 5-20 plug. Make sure the outlet has the NEMA 5-20 receptacle.
• 7KHRXWOHWFDQEHORFDWHGDQ\ZKHUHZLWKLQWKHVKDGHGDUHD
(OHFWULFDOFRQQHFWLRQ
7KHDSSOLDQFHLV¿WWHGZLWKDSOXJDQGPXVWRQO\EHFRQQHFWHGWRDSURSHUO\LQVWDOOHGJURXQGHGVRFNHW
2QO\DTXDOL¿HGHOHFWULFLDQZKRWDNHVWKHDSSURSULDWHUHJXODWLRQVLQWRDFFRXQWPD\LQVWDOOWKHVRFNHWRUUHSODFHWKH
connecting cable. If the plug is no longer accessible following installation, an all-pole isolating switch must be present
on the installation side with a contact gap of at least 3 mm. Contact protection must be ensured by the installation. Fuse
protection: see instructions for use-technical data.
1(0$
Receptacle
1(0$
Plug
*
**
16
19”
18 ñ»”
Appliance Dimensions
Notice: The cabinet base
EHÀDWDQGFDSDEOHRI
supporting a weight of
DWOEVNJ
&XW2XW
)RU:DOO,QVWDOODWLRQ
• Screw in the ³/´ZRRGFOHDWVLQWRWRWKHFRXQWHURU
cabinet frame.
• 3ODFHD๛´EDVHSODWHXQGHUQHDWKWKHXQLWERG\
Flush InstallationUnder Counter Installation
Cleats
Cleats
Baseplate
19ï»”
opening
cut-out
height
20ï»”
flush
cut-out
height
»๛”
1”
EN-11
Cleats
Cleats
Baseplate
”
opening
cut-out
height
20ï»”
flush
cut-out
height
»๛”
1”
Note: The appliance is heavy. It best to install
it with a second person. Before installing
the appliance, be sure to verify the cabinet
dimensions and electrical connections. Do not
kink the electrical cable.
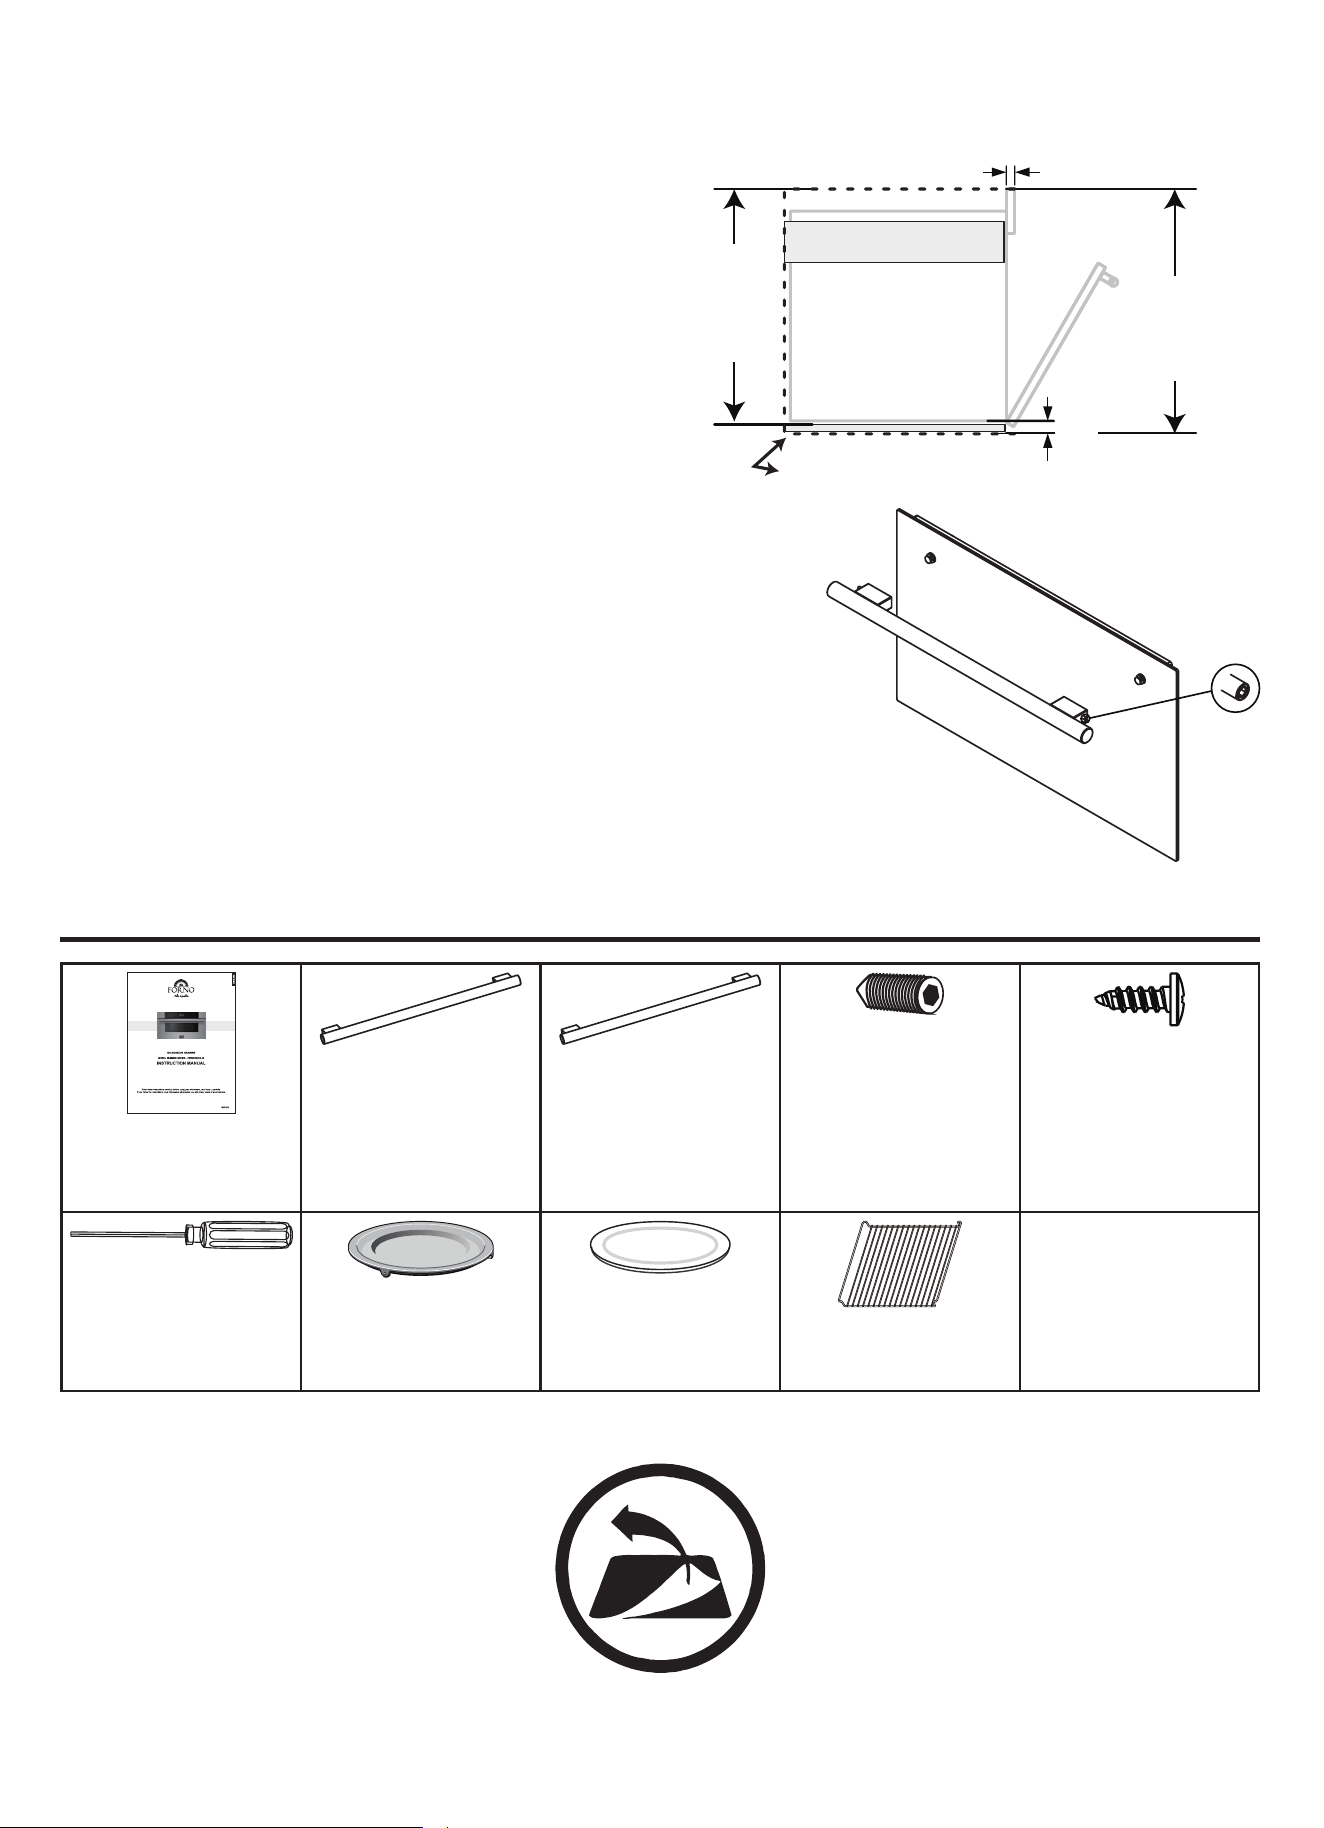
3((/2))$//PROTECTION FILM AND TAPES BEFORE USE.
HANDLE INSTALLATION
1.
Locate the holes on the underside of each handle base.
2.
8VLQJD$OOHQKH[NH\WXUQFRXQWHUFORFNZLVHWRORRVHQERWKWKHOHIW
and right set screws.
3.
Carefully remove the handle. If installing an handle, carefully place
WKHQHZKDQGOHRQWKHPRXQWLQJVWXGV7KHQXVLQJWKH$OOHQKH[NH\
tighten the left and right set screws in a clockwise motion until the
KDQGOHLV¿UPO\LQSODFH
Packing List
Instruction Manual
[
Antique Brass Handle
[
Stainless Steel
Handle
[
Screws (Handle)
[
Screws
[
$OOHQKH[NH\
[
Metal Turntable
[
Ceramic Turntable
[
2YHQ5DFN
EN-12
18
15
16
/
Antique brass Handle/ Screws(handle) only for the White And Black Units
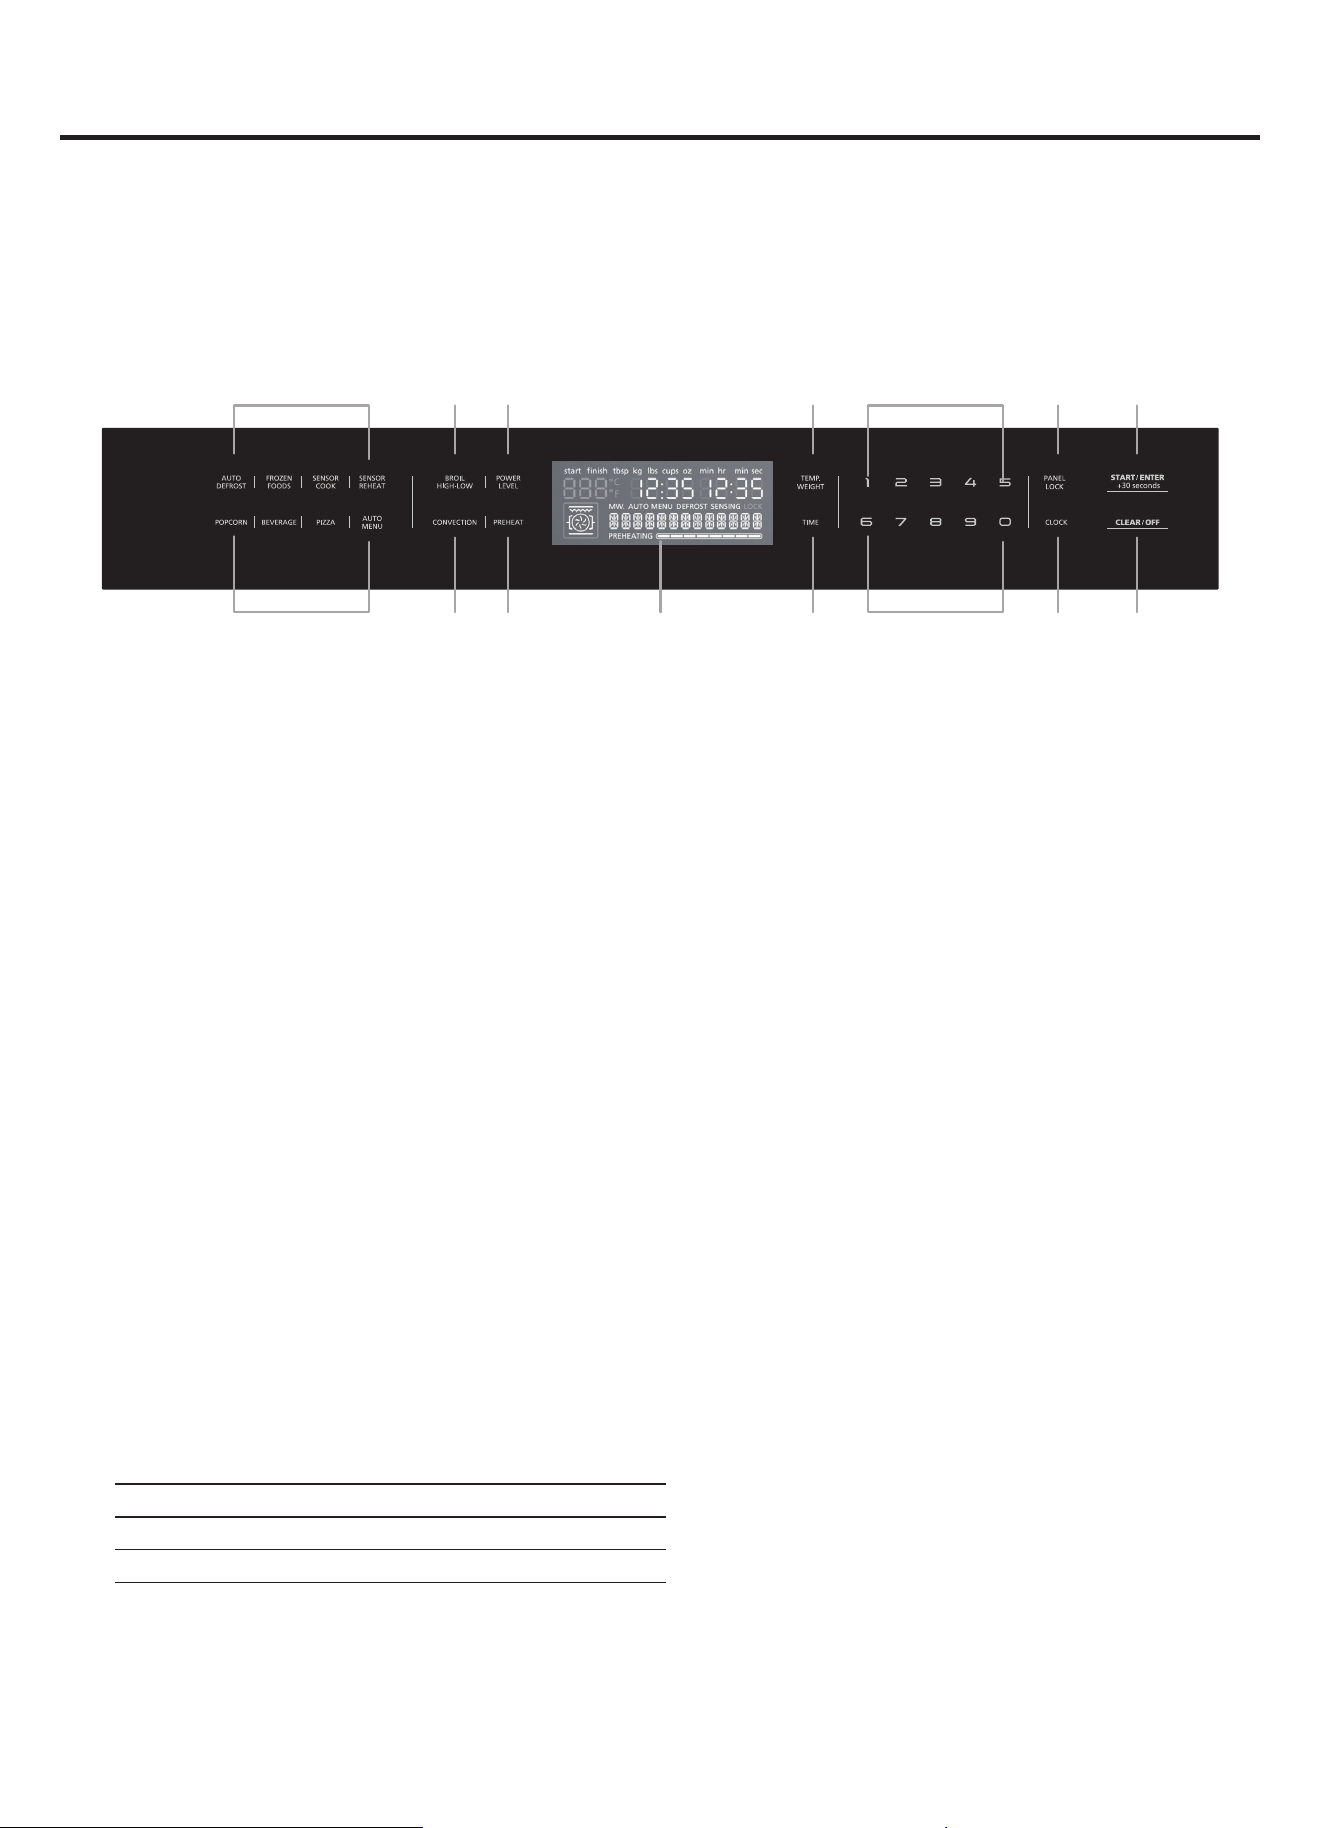
Key Functions
Symbol Function
Auto Defrost Select auto defrost programs
)UR]HQ)RRGV 6HOHFWFRRNLQJSURJUDPVIRUIUR]HQFRQYHQLHQFHIRRGV
Sensor Cook Select sensor cook programs
Sensor Reheat Select sensor reheat programs
Popcorn Cook popcorn
Beverages Heat beverages
3L]]D 6HOHFWSL]]DSURJUDPV
Auto Menu Select auto menu programs
Parameter Function
Auto menu Selecting 8 preset programs
:HLJKW Set the weight for cooking or defrosting
Time Set the time for cooking
7KHWRXFKNH\VDUHXVHGWRVHWWKHYDULRXVDGGLWLRQDOIXQFWLRQV2QWKHGLVSOD\\RXFDQUHDGWKHYDOXHVWKDW\RXKDYHVHW
Use the adjusting keys to set the parameters.
Symbol Function
Broil Set broil modes (high or low)
Power Level Set power level for microwave operation
Convection
Select Bake Cook programs
Select Roast Cook programs
Preheat Select preheat programs
Temperature weight Set temperature or weight of cooking
Time Set a cooking time
Panel Lock Activate / deactivate child lock
Clock Set time of day
0-9 8VHWKHQXPEHUNH\VWRHQWHUFXVWRPL]HGYDOXHV
Start / enter +30 seconds
&RQ¿UPHQWHUHGYDOXHV6WDUWFRRNLQJPRGH
Add 30 seconds
&OHDU2ႇ &OHDUHQWHUHGYDOXHWXUQDSSOLDQFHRႇ
EN-13
<RXUDSSOLDQFHKDVDFRROLQJIDQ7KHFRROLQJIDQVZLWFKHVRQGXULQJRSHUDWLRQ7KHKRWDLUHVFDSHVDERYHWKHGRRU7KH
cooling fan continues to run for a certain time after operation.
Caution!
'RQRWFRYHUWKHYHQWLODWLRQVORWV2WKHUZLVHWKHDSSOLDQFHZLOORYHUKHDW
Notes
•
The fan may still run even when microwave operation has ended.
•
&RQGHQVDWLRQPD\DSSHDURQWKHGRRUZLQGRZLQWHULRUZDOOVDQGÀRRU7KLVLVQRUPDODQGGRHVQRWDGYHUVHO\DႇHFW
PLFURZDYHRSHUDWLRQ:LSHDZD\WKHFRQGHQVDWLRQDIWHUFRRNLQJ
Operation
1.
Preset
2.
Broil ( high or low)
3.
Power level
4.
Temperature weight
5.
Number keys
Panel lock
7.
Start / enter +30sec.
8.
Convection.
9.
Preheat
(1)
(1)
(2)
(8)
(3)
(9) (10)
(4)
(11)
(5)
(5)
(12)
(7)
(13)
10.
Display
11.
Time
12.
Clock
13.
&OHDURႇ
1. Clock setting:
2QFHWKHDSSOLDQFHLVFRQQHFWHGWRWKHSRZHU³´ZLOOEHGLVSOD\HGDVWKHWLPHRIGD\7RVHWWKHFRUUHFWWLPH
proceed as follows:
(a) Press Clock
E(QWHUWKHFRUUHFWWLPHXVLQJWKHQXPEHUNH\V([DPSOHWRWKHWLPHWRW\SH
F3UHVV6WDUW(QWHUVHFRQGVWRFRQ¿UP
1RWH7RUHPRYHWKHQHZRYHQVPHOOKHDWXSWKHDSSOLDQFHZKHQLWLVHPSW\DQGFORVHG2QHKRXU&RQYHFWLRQDW
350ºF (180ºC) is ideal. Please ensure there is no packaging remnants have been left in the oven cavity.
(1) Press Convection once to enter bake mode.
(QWHUWKHQXPEHUVZLWKWKHQXPEHUNH\V
7RXFK7,0(WRDGMXVWFRRNLQJWLPH
(QWHUWKHQXPEHUVZLWKWKHQXPEHUNH\V
7RXFK6WDUW(QWHU6HFRQGVWRVWDUWFRRNLQJ
The oven light turns on and the appliance starts heating.
2. Setting the oven:
7KHUHDUHYDULRXVZD\VLQZKLFK\RXFDQXVH\RXURYHQ+HUHZHZLOOH[SODLQKRZ\RXFDQVHOHFWWKHGHVLUHGW\SHRI
KHDWLQJDQGWHPSHUDWXUHRUJULOOVHWWLQJ<RXFDQDOVRVHOHFWWKHRYHQFRRNLQJWLPHIRU\RXUGLVK3OHDVHUHIHUWRWKH
section on setting the time setting options.
Setting Convection mode: (Example: roast 350° F for 20 minutes)
(1) Press Convection twice to enter roast mode.
(QWHUWKHQXPEHUVZLWKWKHQXPEHUNH\V
7RXFK7,0(WRDGMXVWFRRNLQJWLPH
(QWHUWKHQXPEHUVZLWKWKHQXPEHUNH\V
7RXFK6WDUW(QWHU6HFRQGVWRVWDUWFRRNLQJ
Preheating :
:LWKWKHSUHKHDWLQJ\RXURYHQZLOOUHDFKWKHVHWWHPSHUDWXUHSDUWLFXODUO\TXLFNO\7RHQVXUHDQRYHQFRRNLQJUHVXOW
only put your food in the cooking compartment when the preheating phase is complete.
EN-14
Program Touch Convection key Temperature range
Bake once 250~400
300~450twiceRoast
Note: If you do not need to adjust the time, skip Step 3-4.
ƈ
ƈ
(1) Press the Preheat key
(QWHUWKHWHPSHUDWXUHVHWWLQJZLWKWKHQXPEHUNH\
The input temperature should be within 100-450ºF
3UHVVWKH6WDUW(QWHUVHFRQGVNH\
7KHRYHQZLOOEHJLQWRKHDWXS2QFHWKHSUHKHDWLQJ
process is complete, a beep sound will notify you that
you can place your food in the oven. Set the cooking
mode you need.
To cancel the preheating, there are two ways to
cancel.
3UHVVFOHDURႇNH\WRFDQFHO
<RXFDQRSHQWKHGRRUWRFDQFHOWKHRSHUDWLRQ
1RWH2QO\ZKHQ\RXFDQKHDU$OHUWDODUPDQG
preheating icon is blinking you can open the door and
put food inside.
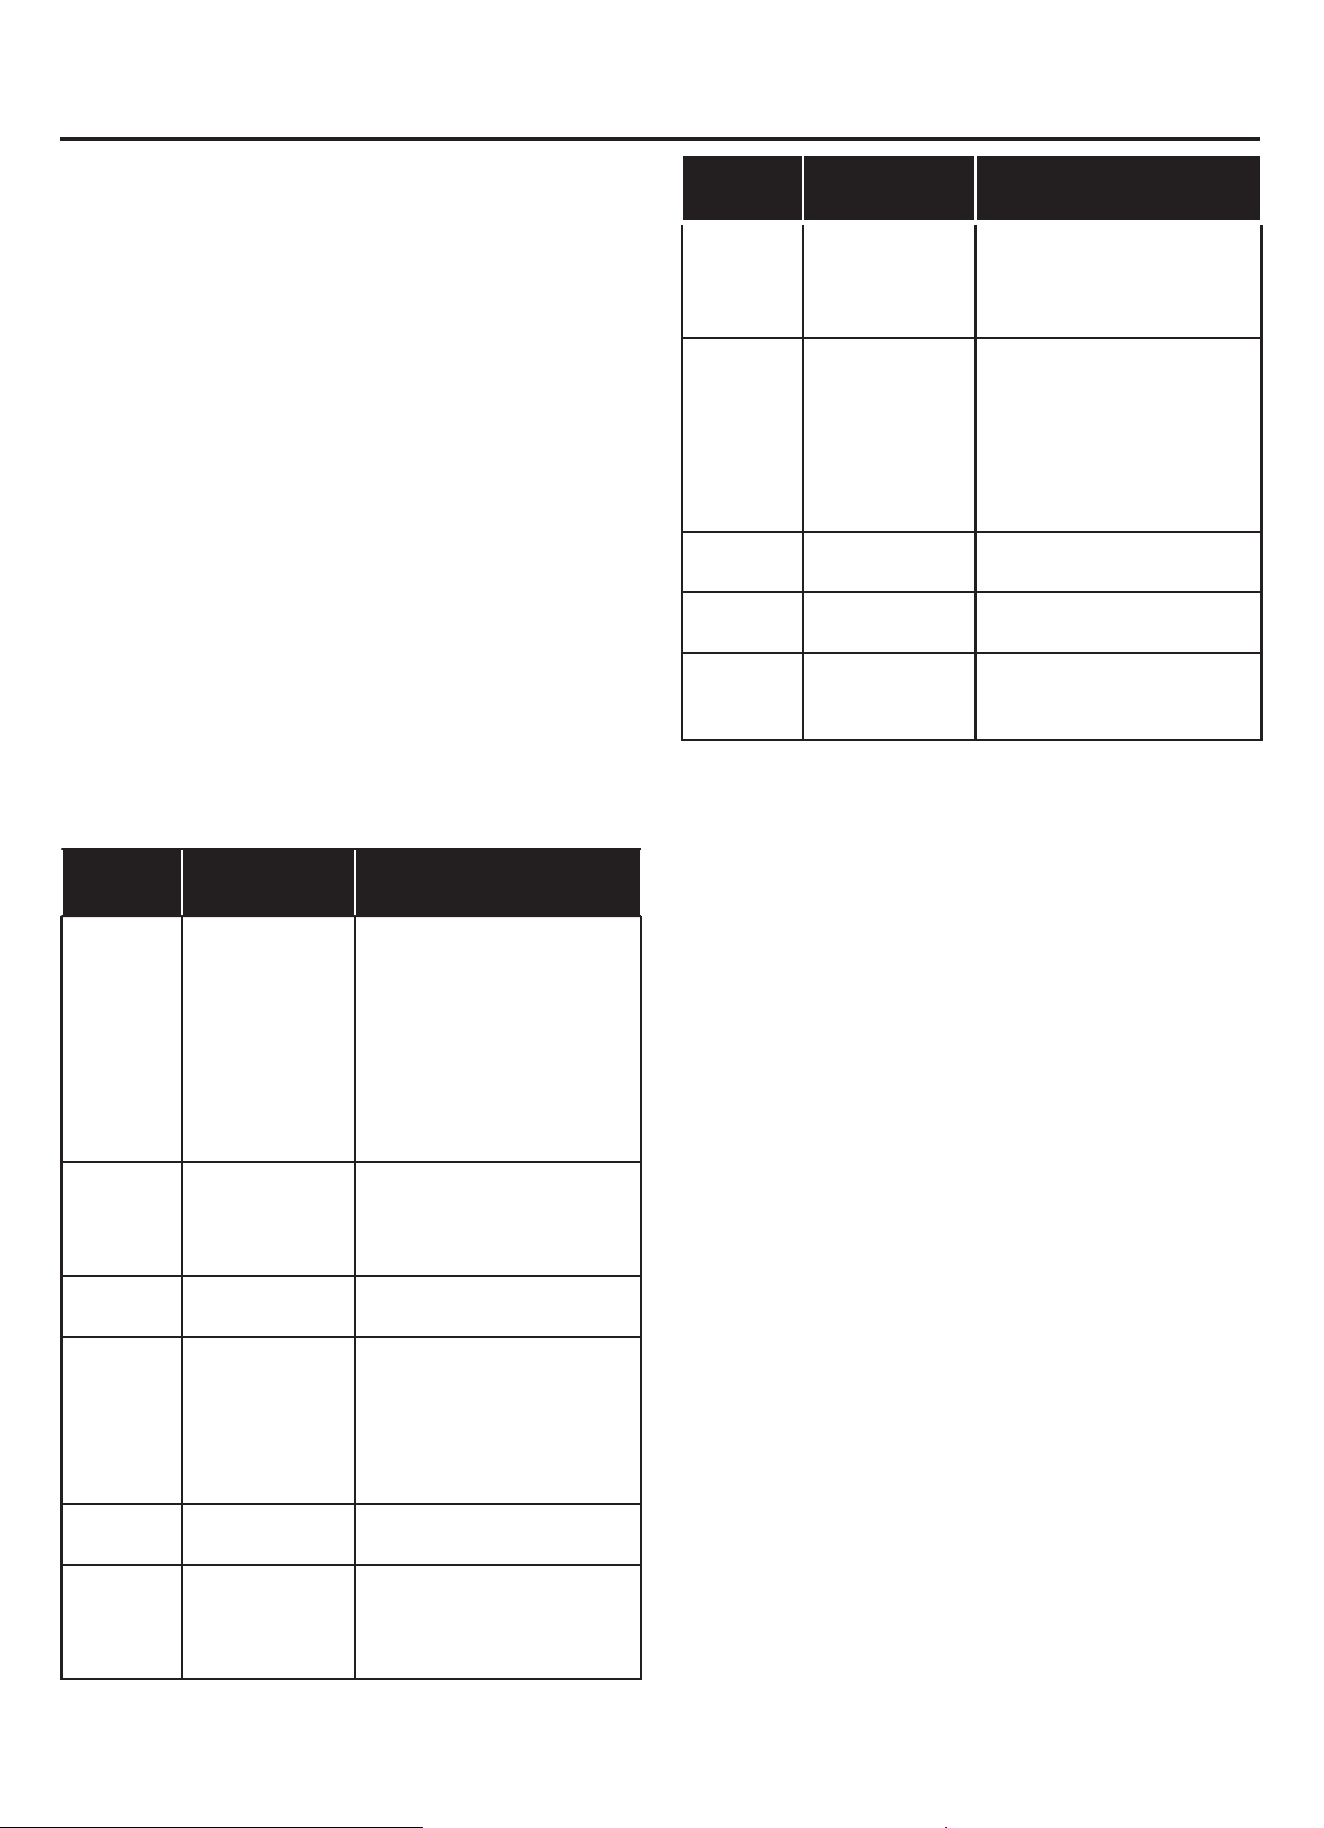
3. Power Level:
<RXFDQVHOHFWIURPGLႇHUHQWPLFURZDYHSRZHU
levels. If you do not set a power level, the microwave
will automatically operate at the highest power level.
The table below provides suggested power levels
for various types of food that can be prepared in the
microwave.
Operation (Continued)
Power
Level
Microwave
Output
Function
3:5
100%
Boiling water
Cooking ground meat
Making candy
Cooking fresh fruit &
vegetables
&RRNLQJ¿VKSRXOWU\
Preheating browning dish
Reheating beverages
Cooking bacon slices
3:5 90%
Reheating meat slices
quickly
Saute onions, celery &
green peppers
3:5 80%
All reheating
Cooking scrambled eggs
3:5 70%
Cooking breads & cereal
products
Cooking cheese dishes
&RRNLQJPXႈQVEURZQLHV
& cupcakes
Cooking whole poultry
3:5 Cooking pasta
3:5 50%
Cooking meat
Cooking custard
Cooking spare ribs,rib
roast & sirloin roast
Setting the microwave:
(QWHUWKHGHVLUHGFRRNWLPHZLWKWKHQXPEHUNH\V
7KHWLPHUGLVSOD\ZLOO¿OOLQIURPULJKWWROHIW([DPSOH
To set a microwave time of 20 minutes and 30
seconds, enter the numbers 2 0 3 0.
<RXFDQVWDUWPLFURZDYHRSHUDWLRQZLWKWKHGHIDXOW
SRZHUOHYHO3:5E\WRXFKLQJ6WDUW(QWHUVHFRQGV
RU\RXFDQVHWDGLႇHUHQWSRZHUOHYHO7RXFK3RZHU
Level.
(QWHUWKHGHVLUHGSRZHUOHYHOXVLQJWKHQXPEHU
keys.
3UHVV6WDUW(QWHUVHFRQGVWRVWDUWPLFURZDYH
operation. The microwave timer will start to count
down.
4. Express Cooking:
(1) In standby, press number keys 1 to 9 to start 100%
microwave cooking in 1 to 9 minutes.
(2). If the door is closed, the oven will start to cook
automatically after 2 seconds.
Power
Level
Microwave
Output
Function
3:5 40%
Cooking less tender cuts
of meat
5HKHDWLQJIUR]HQ
packaged foods
3:5 30%
Thawing meat, poultry &
seafood
Cooking small quantities
of food
Finish cooking casseroles,
stew & some sauces
Melting chocolate
3:5 20%
Softening butter & cream
cheese
3:5 10%
Softening ice cream
Raise yeast dough
3:5 0%
:RUNZLWKIDQIRUQRSRZHU
Remove the odour of the
oven
EN-15
Speedy microwave cooking:
(1) Use the key to quick-start your microwave at the
KLJKHVWSRZHUOHYHO<RXFDQWRXFKWKHNH\UHSHDWHGO\
to increase the microwave time in increments of 30
seconds.
(2) Pressing this key during microwave operation
will add 30 seconds to the remaining microwave time.
The cooking time has elapsed.
(3) A beep sound will notify you that the
microwave operation has ended.
5. Multi-stage cooking:
(QWHUWKHGHVLUHGFRRNWLPHZLWKWKHQXPEHUNH\V7KHWLPHUGLVSOD\ZLOO¿OOLQIURPULJKWWROHIW
(2) Press Power Level.
(QWHUWKHGHVLUHGSRZHUOHYHOXVLQJWKHQXPEHUNH\V
(4) Press Power Level.
(QWHUWKHGHVLUHGSRZHUOHYHOXVLQJWKHQXPEHUNH\.
3UHVV6WDUW(QWHUVHFRQGV
(QWHUWKHGHVLUHGFRRNWLPHZLWKWKHQXPEHUNH\V
3UHVV6WDUW(QWHUVHFRQGVWRVWDUWWKHPLFURZDYHRSHUDWLRQ
<RXZLOOEHDOHUWE\VRXQGWLPHVZKHQWKH¿UVWFRRNLQJVWDJHLV¿QLVKHGDQGHQWHUWKHVHFRQGVWDJH
(1) Press uto menu A
(2) Press repeatedly to scroll through all Auto menu
(3) Touch number keys to adjust the weight of food.
3UHVV6WDUW(QWHUVHFRQGVWRVWDUWFRRNLQJ
1RWH2SHQLQJWKHDSSOLDQFHGRRUGXULQJRSHUDWLRQZLOOLQWHUUXSWWKHFXUUHQWPRGH&ORVHWKHDSSOLDQFHGRRUDQGSUHVV
6WDUW(QWHUVHFRQGVWRUHVXPHRSHUDWLRQ
Cancel operation:
7RXFK&OHDU2ႇWRFDQFHOWKHRSHUDWLRQ
7KHFRROLQJIDQVPD\FRQWLQXHWRUXQIRUDZKLOHDQGWKHQVZLWFKRႇDXWRPDWLFDOO\
<RXFDQXVHWKHGHIURVWLQJSURJUDPVWRGHIURVWJURXQGPHDWDQGPHDWSLHFHV
3UHVV$XWR'HIURVWRQFHRUWZLFHWRFKRRVH³*5281'0($7´RU³0($73,(&(6´
(QWHUWKHZHLJKWRIWKHIRRG\RXZDQWWRGHIURVWXVLQJWKHQXPEHUNH\V
3UHVV6WDUW(QWHUVHFRQGVWRVWDUWGHIURVWLQJ
Ŷ3UHSDULQJIRRG
7DNHWKHIRRG\RXZLVKWRGHIURVWIURPWKHIUHH]HUDQGUHPRYHDOOSDFNDJLQJ3ODFHWKHIRRGRQWRWKHVFDOHDQGZHLJK
LWRUUHDGODEHORQSDFNDJH.QRZLQJWKHZHLJKWRI\RXUIUR]HQIRRGZLOOKHOS\RXVHWWKHSURJUDPDQGFRRNLQJPHWKRG
\RXQHHG2QFHWKHGHIURVWKDVEHHQFRPSOHWHGWKHUHZLOOEHOLTXLGLQWKHWUD\0DNHVXUHWRGUDLQRXWWKHOLTXLG'2
127DOORZWKHOLTXLGWRFRPHLQWRFRQWDFWZLWKRWKHUIRRGV
EN-16
Program Weight range Cooking method
1- Chicken breasts 0.5 - 3.0 Ibs Wire rack facing down
2- Chicken thigh 0.5 - 3.0 Ibs Wire rack facing down
3- Whole poultry 1.5 - 4.5 Ibs Turntable
4- Beef roast 0.5 - 3.25 Ibs Turntable
5- Pork tenderloin 1.0 - 3.0 Ibs Wire rack facing down
6- Pork chops 0.5 - 3.0 Ibs Wire rack facing down
7- Meatloaf 1.0 - 3.25 Ibs Turntable
8- Fish Fillets 0.5 - 2.0 Ibs Wire rack facing down
7. Defrosting programs:
6. Automatic programs:
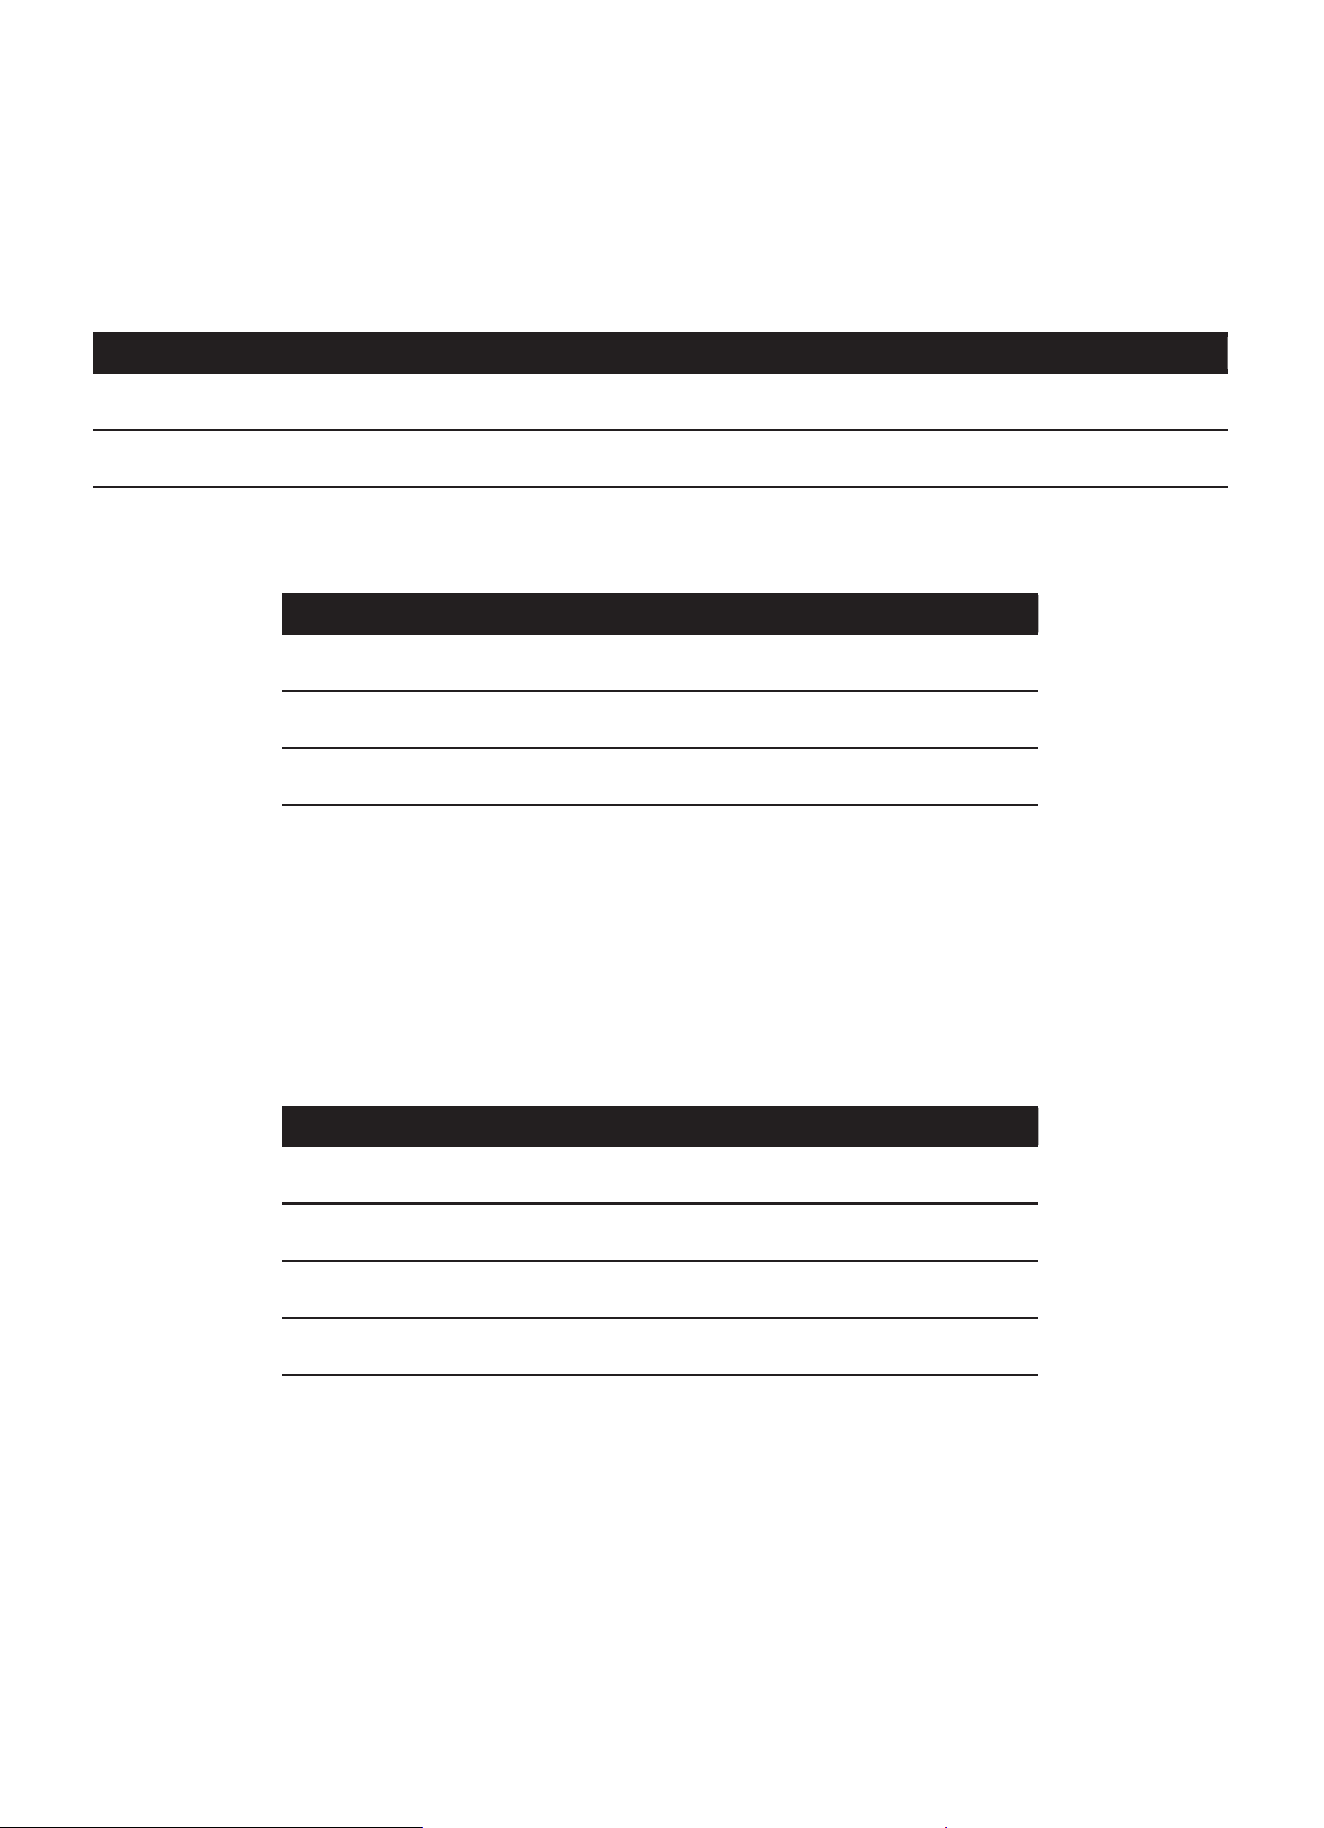
Program Defrost Weight range
1 *URXQGPHDW aOEV
2 Meat pieces
Bag Size Popcorn key
R]J Press 1x
R]J Press 2x
R]J 3UHVV[
Amount Beverage key
FXSVDERXWR]_/ Press 1x
FXSDERXWR]_/ Press 2x
FXSVDERXWR]_/ 3UHVV[
FXSVDERXWR]_/ 3UHVV[
Ŷ2YHQZDUH
3ODFHWKHIRRGLQDPLFURZDYHDEOHVKDOORZGLVK8VHDFHUDPLFRUJODVVSODWH'2127DWWDFKWKHFRYHU'XULQJ
GHIURVWLQJ\RXZLOOJHWDQDXGLRQRWL¿FDWLRQRQWZRRFFDVLRQVWRLQGLFDWHWKDWWKHIRRGQHHGVWREHWXUQHG
Ŷ5HVWLQJWLPH
2QFHWKHIRRGLVGHIURVWHGOHWLWVLWIRUDQDGGLWLRQDOWRPLQXWHVXQWLOLWUHDFKHVURRPWHPSHUDWXUH7KH/DUJHU
the portions of meat are, the longer the standing time will be. Meats that are minced or in pieces should be separated
apart to allow the meat to reach room temperature faster. Keep in mind, the thicker the piece of meat is, it may still be
IUR]HQLQWKHPLGGOH
8. Popcorn
7KHSRSFRUQIHDWXUHOHWV\RXSRSGLႇHUHQWEDJVL]HVRIFRPPHUFLDOO\SDFNDJHGPLFURZDYHSRSFRUQ8VHWKH
following table to determine the setting to use: Setting Popcorn mode
(1) Press Popcorn key
(2) Then press the number of times (1-3) to choose the desired weigh
3UHVV6WDUW(QWHUVHFRQGV
7KHPLFURZDYHWLPHUVWDUWVFRXQWLQJGRZQ:KHQWKHPLFURZDYHWLPHKDVHODSVHGDEHHSZLOOVRXQG
CAUTION Do notOHDYHWKHRYHQXQDWWHQGHGZKLOHLW¶VLQSURFHVV3RSFRUQPD\LJQLWHDQGFDXVH¿UH
9. Beverage
The beverage feature heats 0.5 to 2 cups of a beverage. Use the table below to determine the setting to use.
Setting Beverage mode
(1) Press Beverage key
(2) Then press the number of times (1-4) to choose the desired weigh
3UHVV6WDUW(QWHUVHFRQGV
7KHPLFURZDYHWLPHUVWDUWVFRXQWLQJGRZQ:KHQWKHPLFURZDYHWLPHKDVHODSVHGDEHHSZLOOVRXQG7KHDSSOLDQFH
WXUQVRႇDQGWKHFORFNZLOOUHDSSHDU
10. Frozen foods
8VHWKH)UR]HQ)RRGVIHDWXUHWRSUHSDUHIUR]HQFRQYHQLHQFHIRRGVOLNHFKLFNHQQXJJHWV)UHQFKIULHV¿VKVWLFNV
XVLQJERWWRPKHDWDQG&RQYHFWLRQ3ODFHWKHIRRG\RXZDQWWRFRRNGLUHFWO\RQWKHPHWDOWUD\WXUQWDEOH<RXFDQVHWD
temperature range from 200 to 450° F (100 to 230°C).
EN-17
aOEV

11. Pizza
You can use the Pizza mode to bake three different types
of pizza:
Mode no. Pizza type Bake on
1 Frozen pizza Metal tray
2 Fresh pizza Metal tray
3 Microwave pizza Ceramic tray
Pizza tips
Check pizza before minimum time, pizza may cook
faster compared to a traditional oven.
For fresh pizza use a pizza paddle for sliding the pizza
on and from the metal turntable.
If using a pizza paddle, sprinkle the paddle liberally
with cornmeal for ease in transferring the dough to the
metal turntable.
Maximum size is 12 inches for fresh and frozen pizzas.
Avoid using a pizza stone as it can damage the oven.
The metal turntable can be used for cutting pizza into
slices. Remove the turntable from the oven after the
pizza is baked.
Setting Pizza mode for fresh or frozen pizza
You can set a temperature range from 375 to 450° F
(190 to 230°C) for fresh and frozen pizza modes.
You can bake fresh or frozen pizza directly on the metal
tray turntable.
1.
Touch Pizza.
2.
Touch Pizza repeatedly to scroll through all pizza
modes.
3.
Touch .
The appliance starts preheating.
The set temperature is reached once the preheat bar has
filled up completely and a beep sounds.
Opening appliance door during operation
Opening the appliance door during operation will
interrupt the current mode. Close the appliance door and
then touch to resume operation.
4. You can change the temperature by using the number
keys. And you also can change the cooking time by
touching TIME and then touching number keys.
5. Touch to confirm.
Setting Pizza mode for microwave pizza
Place the microwave pizza on the ceramic tray and put it
in the oven following package directions.
Note: Do not open the door during the sensing
process, or the program will be cancelled.
Once the calculated cook time is displayed, you can
open the door to stir, turn or rearrange the food. Touch
to resume operation.
Opening appliance door during operation
Opening the appliance door during operation will
interrupt the current mode. Close the appliance door and
then touch to resume operation.
1.
Touch Pizza.
2.
Touch Pizza repeatedly until “MICROWAVE PIZZA”
is displayed.
3.
Touch
The appliance starts
When sensing is complete, a beep will sound and the
calculated cook time will start to count down.
4.
EN-18
Start/Enter +30 Seconds
Start/Enter +30 Seconds
Start/Enter +30 Seconds
Start/Enter +30 Seconds
Start/Enter +30 Seconds
sensing.
Start/Enter +30 Seconds
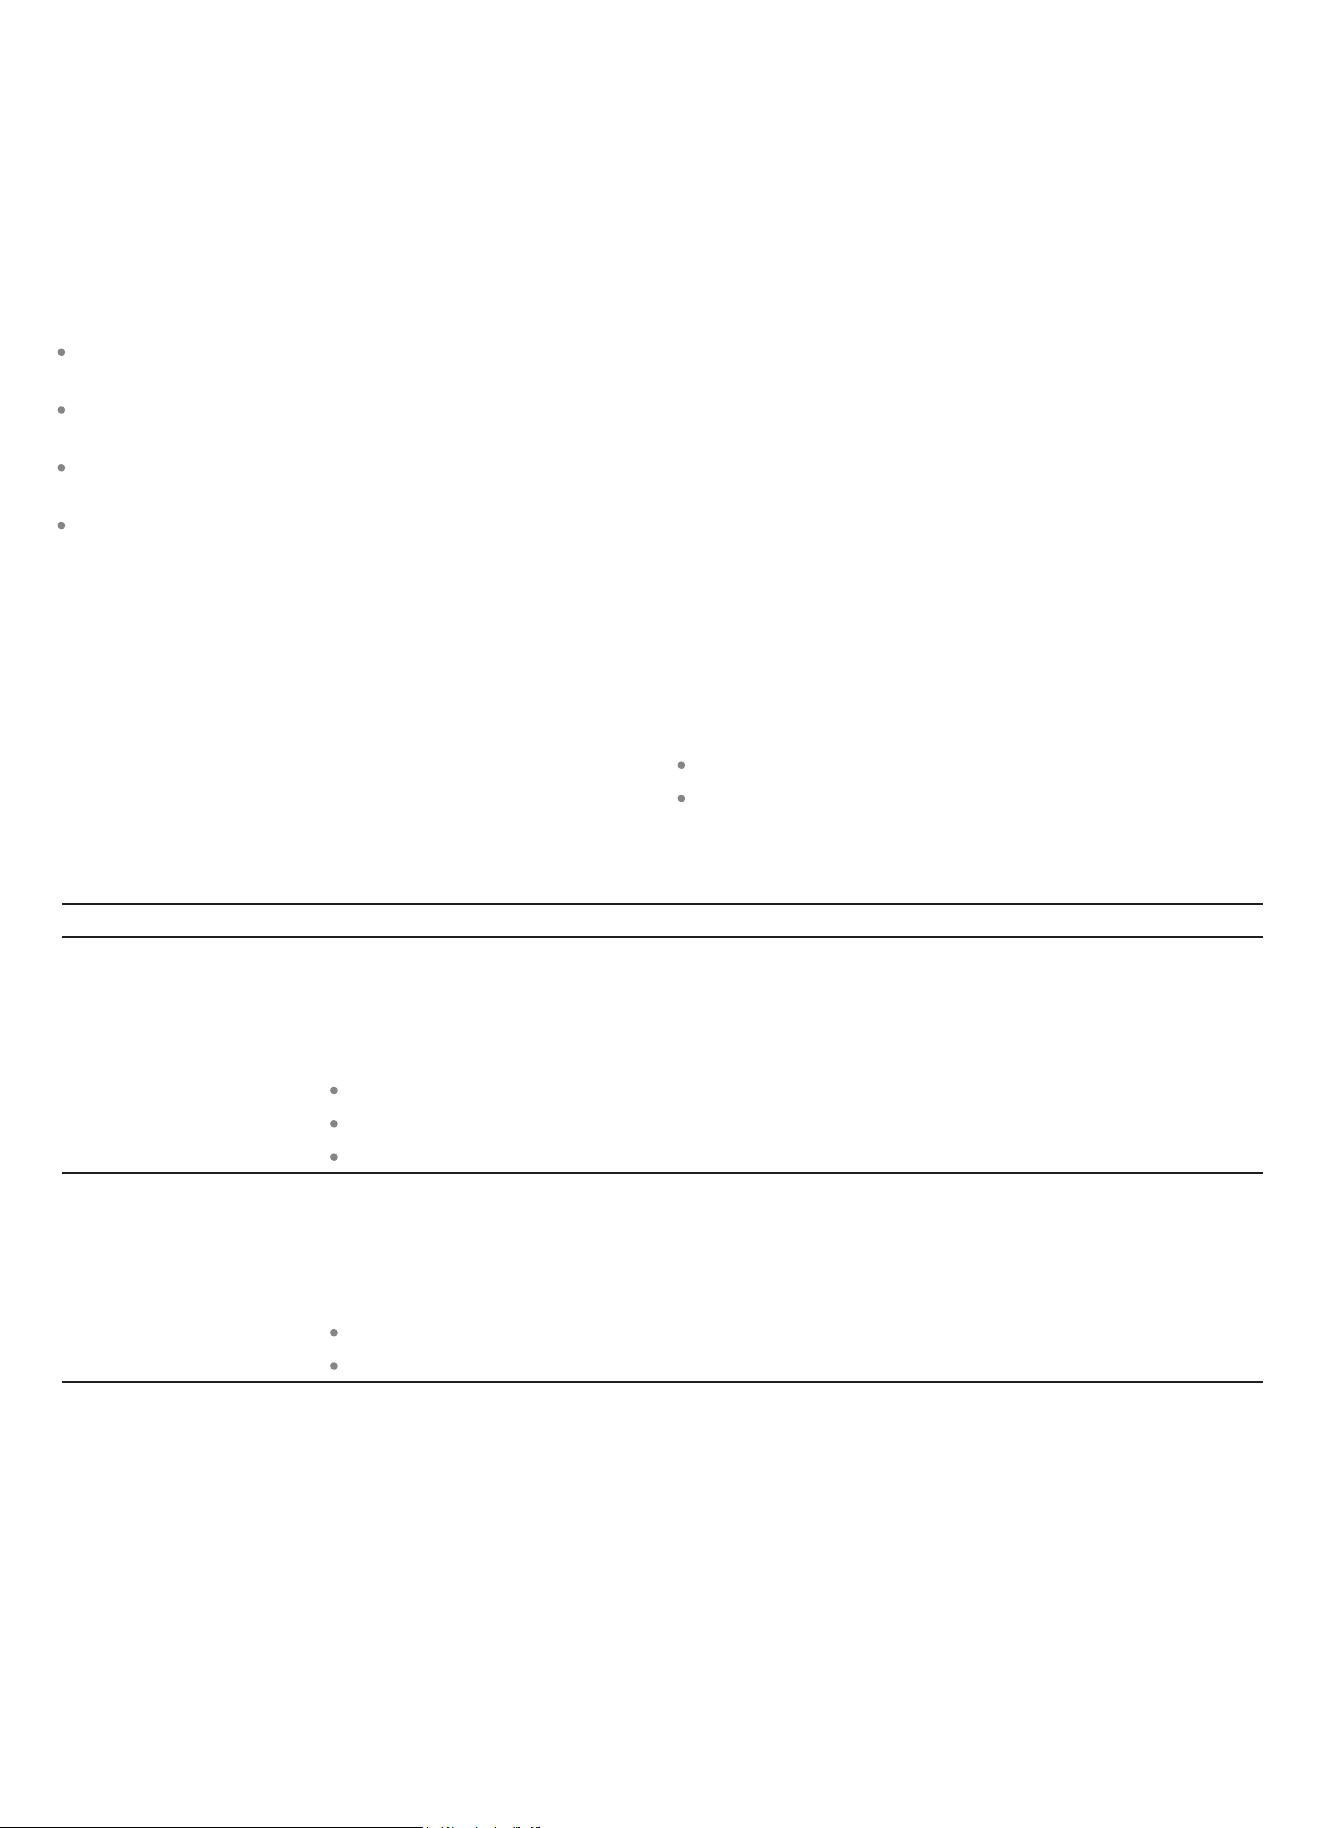
12. Sensor cooking
You can select two sensor cooking modes. Sensor
cooking allows you to cook many of your favorite foods
without selecting cooking times and power levels. The
microwave oven automatically determines the required
cooking time for each food item.
For best results for cooking by sensor, follow these
recommendations:
Food cooked with the sensor system should start from
normal storage temperature.
Turntable tray, ceramic tray and outside of container
should be dry.
Foods should always be covered loosely with
microwavable plastic wrap, wax paper or lid.
Do not open the door or touch Clear/Off key during
sensing time. When sensing time is over, the oven
beeps once and the remaining cooking time will
appear in the display. At this time you can open the
door to stir, turn or rearrange the food.
Sensor Reheat
The Sensor Reheat feature lets you reheat dinner plates
or casseroles (8-16 oz.) for your cooking convenience.
Setting Sensor Reheat
1.
Touch Sensor Reheat.
2.
Touch .
sensing is displayed. The microwave operates during
sensing.
3.
When sensing is complete, a beep will sound and the
calculated cook time will start to count down.
Note: Do not open the door during the sensing
process, or the program will be cancelled.
Once the calculated cook time is displayed, you can
open the door to stir, turn or rearrange the food. Touch
to resume operation.
When sensor reheat is finished, a beep will sound.
Notes
Cover with vented plastic wrap or wax paper.
Reheat food on a microwaveable dinner plate.
EN-19
Start/Enter +30 Seconds
Start/Enter +30 Seconds
Reheat cooking suggestions
y t i t nauQsnoi tcer iDdooF
Dinner plate Use only pre-cooked, refrigerated foods. Cover plate with vented
plastic wrap or waxed paper, tucked under plate. If food is not hot
enough after heating with the Reheat feature, continue heating using
manual time and power level setting.
Contents:
3-4 oz. meat, poultry or fish (up to 6 oz. with bone)
1/2 cup starch (potatoes, pasta, rice, etc.)
1/2 cup of vegetables (about 3-4 oz.)
1 serving (1 plate)
Casserole, Pasta Cover plate with lid or vented plastic wrap. If food is not hot enough
after heating with the Reheat feature, continue heating using manual
time and power level setting.
Stir foods once before serving.
Contents:
Casserole: refrigerated foods (such as beef stew or lasagna)
Pasta: Canned spaghetti and ravioli, refrigerated foods
1 to 4 servings
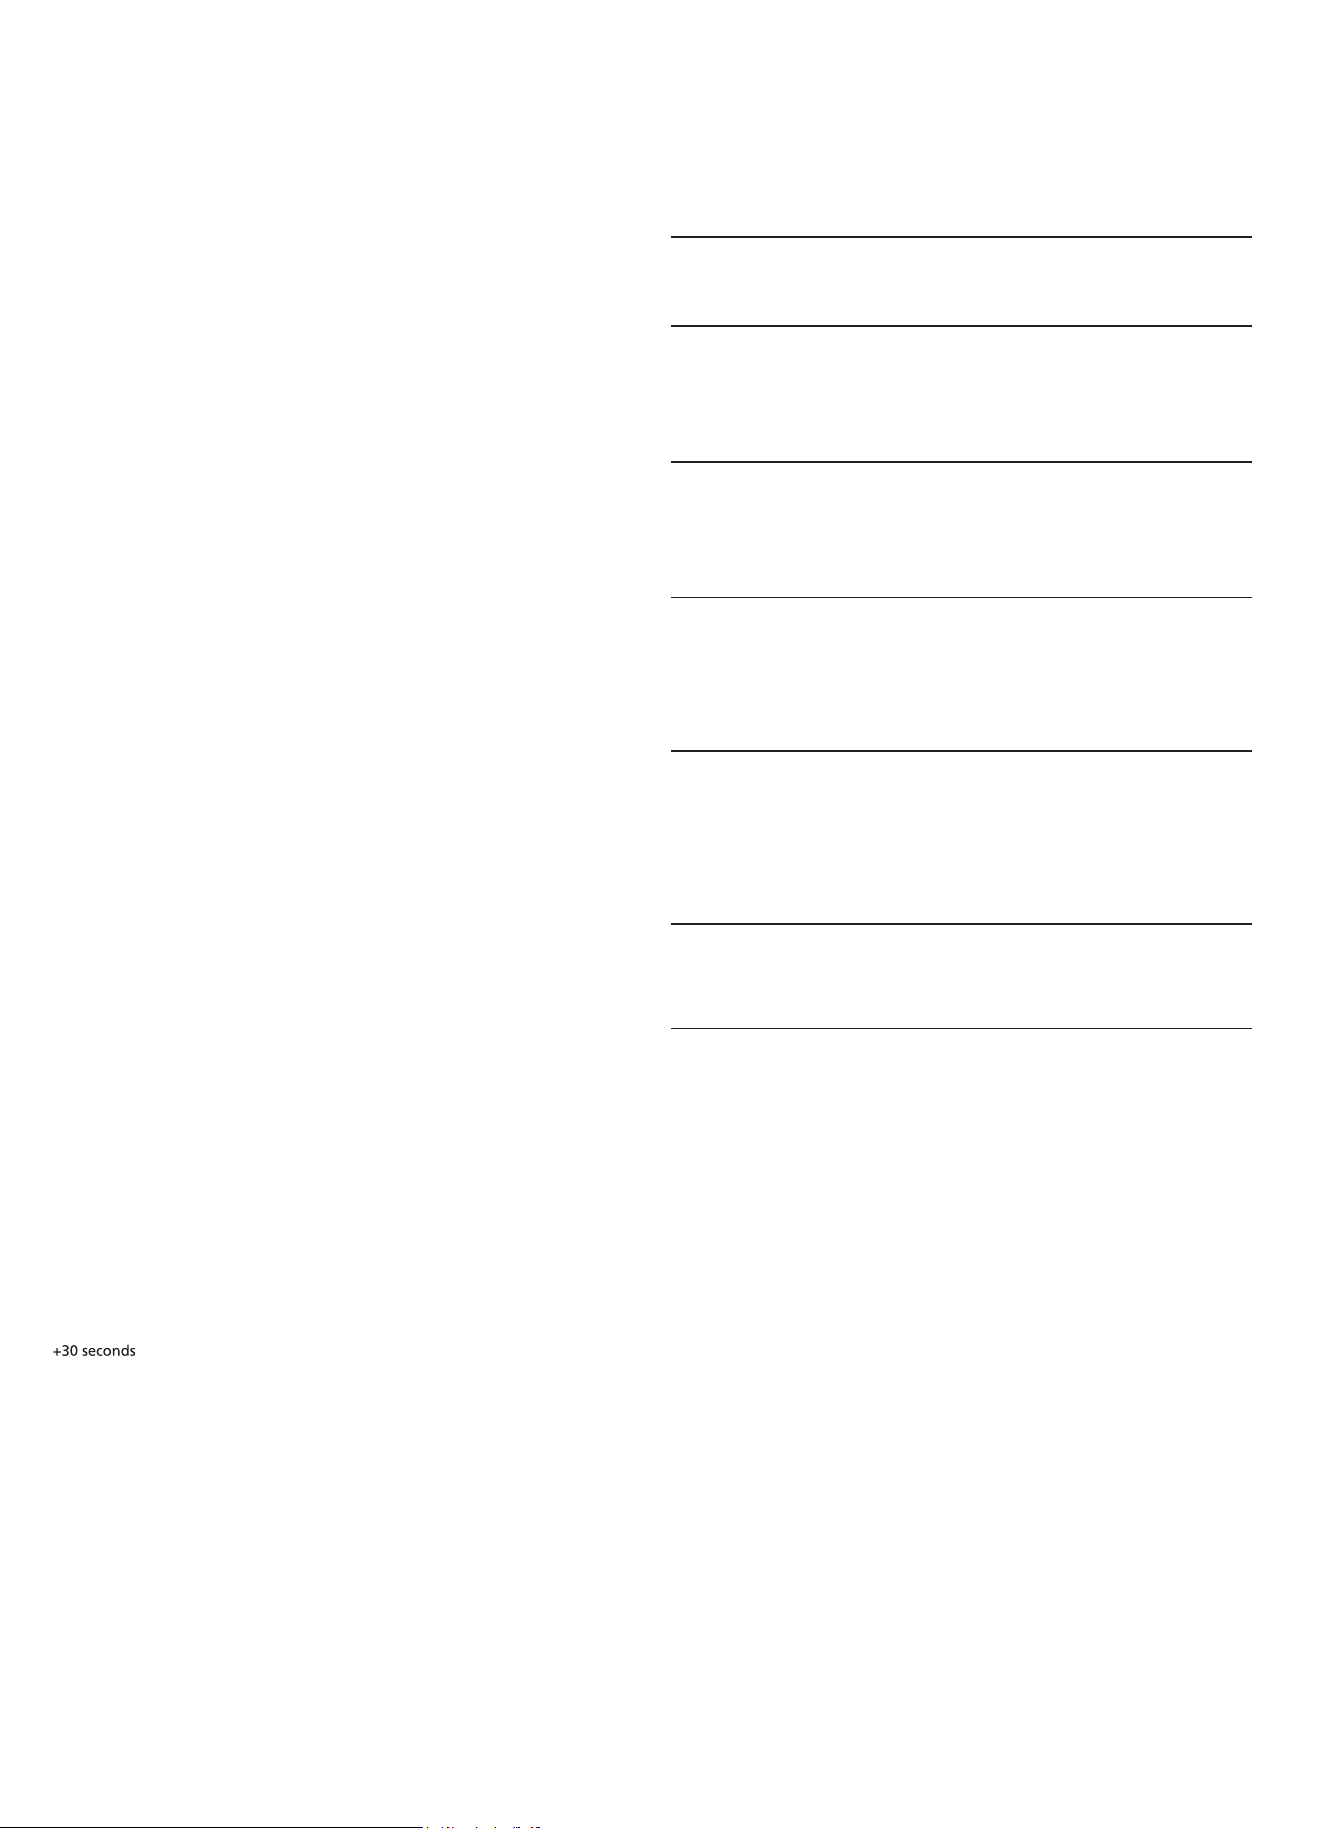
2.
Touch Sensor Cook repeatedly to select Ground Meat.
Sensor Cook
Sensor Cook allows you to cook many of your favorite
foods without selecting cooking times and power levels.
The microwave oven automatically determines the
required cooking time for each food item.
Sensor Cook programs
Sensor Cook
Program
Quantity Cooking tips
1 - Baked
Potato
1 - 4 potatoes
(8 - 32 oz.)
Pierce skin with a fork.
Do not cover.
After cooking, allow to
stand wrapped in foil
for 5 minutes.
3 - Fresh
Vegetables
4 - 16 oz.
(0.25 - 1 lbs)
No water is needed if
vegetables have just
been washed. Add
2 tablespoons water
per 8 ounces of fresh
vegetables.
Meat
8 - 24 oz.
(0.5 - 1.5 lbs)
After cooking, allow to
stand, covered,
for 3 - 4 minutes.
Seafood
8 - 20 oz.
(0.5 -
1.25 lbs)
Roll thin edges
underneath. Arrange in
a ring around micro-
waveable dish.
Entrees
10 - 20 oz. Follow package
instructions for venting,
cutting plastic film, etc.
2 - Ground
4 - Fish/
5 - Frozen
Setting Sensor Cook
Example: Set Sensor Cook for Ground Meat.
1.
Touch Sensor Cook.
3.
Touch .
The program will start sensing with the microwave
operating.
EN-20
Start/Enter +30 Seconds
When sensing is complete, a beep will sound and the
calculated cook time will start to count down.
Note: Do not open the door during the sensing
process, or the program will be cancelled.
Once the calculated cook time is displayed, you can
open the door to stir, turn or rearrange the food. Touch
Start/Enter to resume operation.
When sensor cook is finished a beep will sound.
Opening appliance door during operation
Opening the appliance door during operation will
interrupt the current mode. Close the appliance door and
then touch to resume operation.
Cancel operation
Touch Clear/Off to cancel the active oven mode.
The cooling fans may continue to run for awhile and then
switch off automatically.
Start/Enter +30 Seconds

Opening the appliance door during operation will
interrupt the current mode. Close the appliance door and
then touch to resume operation.
13. Broil
The Broil feature uses intense heat radiated from the
upper element.
You can set two intensity levels:
Broil high
Broil low
Setting Broil mode
The appliance must turned off.
1.
Touch
2.
Touch
Broil low mode.
Broil HIGH-LOW again , to change
to
Touch to start operation.
Note: Always use a broil pan when cooking in Broil
mode (see optional accessories).
Opening appliance door during operation
Cancel operation
Touch Clear/Off to cancel the operation.
The cooling fans may continue to run for awhile and then
switch off automatically.
.
Broil HIGH-LOW
Enter the desired cooking time with the number keys.
3.
4.
Setting the cooking time
The cooking time for your meal can be set on the oven. When the
cooking time has elapsed, the oven switches itself off
automatically. This means that you do not have to interrupt other
work to switch off the oven. The cooking time cannot be
accidentally exceeded.
The oven starts. The cooking time counts down in the display.
The cooking time has elapsed
An aud
i
ble signal sounds. The oven stops heating.
Setting the clock
Changing the clock
1.
Touch
in standby mode.
14. Setting the time-setting options
Your oven has various time-setting options. You can use the
witch between the
1.
Touch Clock.
2.
Enter the correct time using the number keys.
Example: To set the clock to 12:41 type in 1 2 4 1.
3.
Touch to confirm.
Clock
key to call up the menu and s
individal functions.
Clock
2.
Enter the correct time using the number keys.
3.
Touch to confirm.
EN-21
Start/Enter +30 Seconds
Start/Enter +30 Seconds
Start/Enter +30 Seconds
Start/Enter +30 Seconds

15. Childproof lock
The oven has a childproof lock to prevent children switching it on
accidentally.
The oven will not react to any settings. The timer and clock can
also be set when the childproof lock has been switched on.
Switching on the childproof lock
Requirement: No cooking time should be set .
The
activated.
Switching off the childproof lock
The t. The childproof lock is
deactivated.
Childproof lock with other cooking operations
When other cooking programmes have been set, the childproof lock
is not operational.
key for approx. 3 seconds.Touch and hold the
Touch and hold the
Panel lock
key for approx. 3 seconds.
lock symbol appears in the display. The childproof lock is
Panel lock
lock symbol on the display goes ou
EN-22
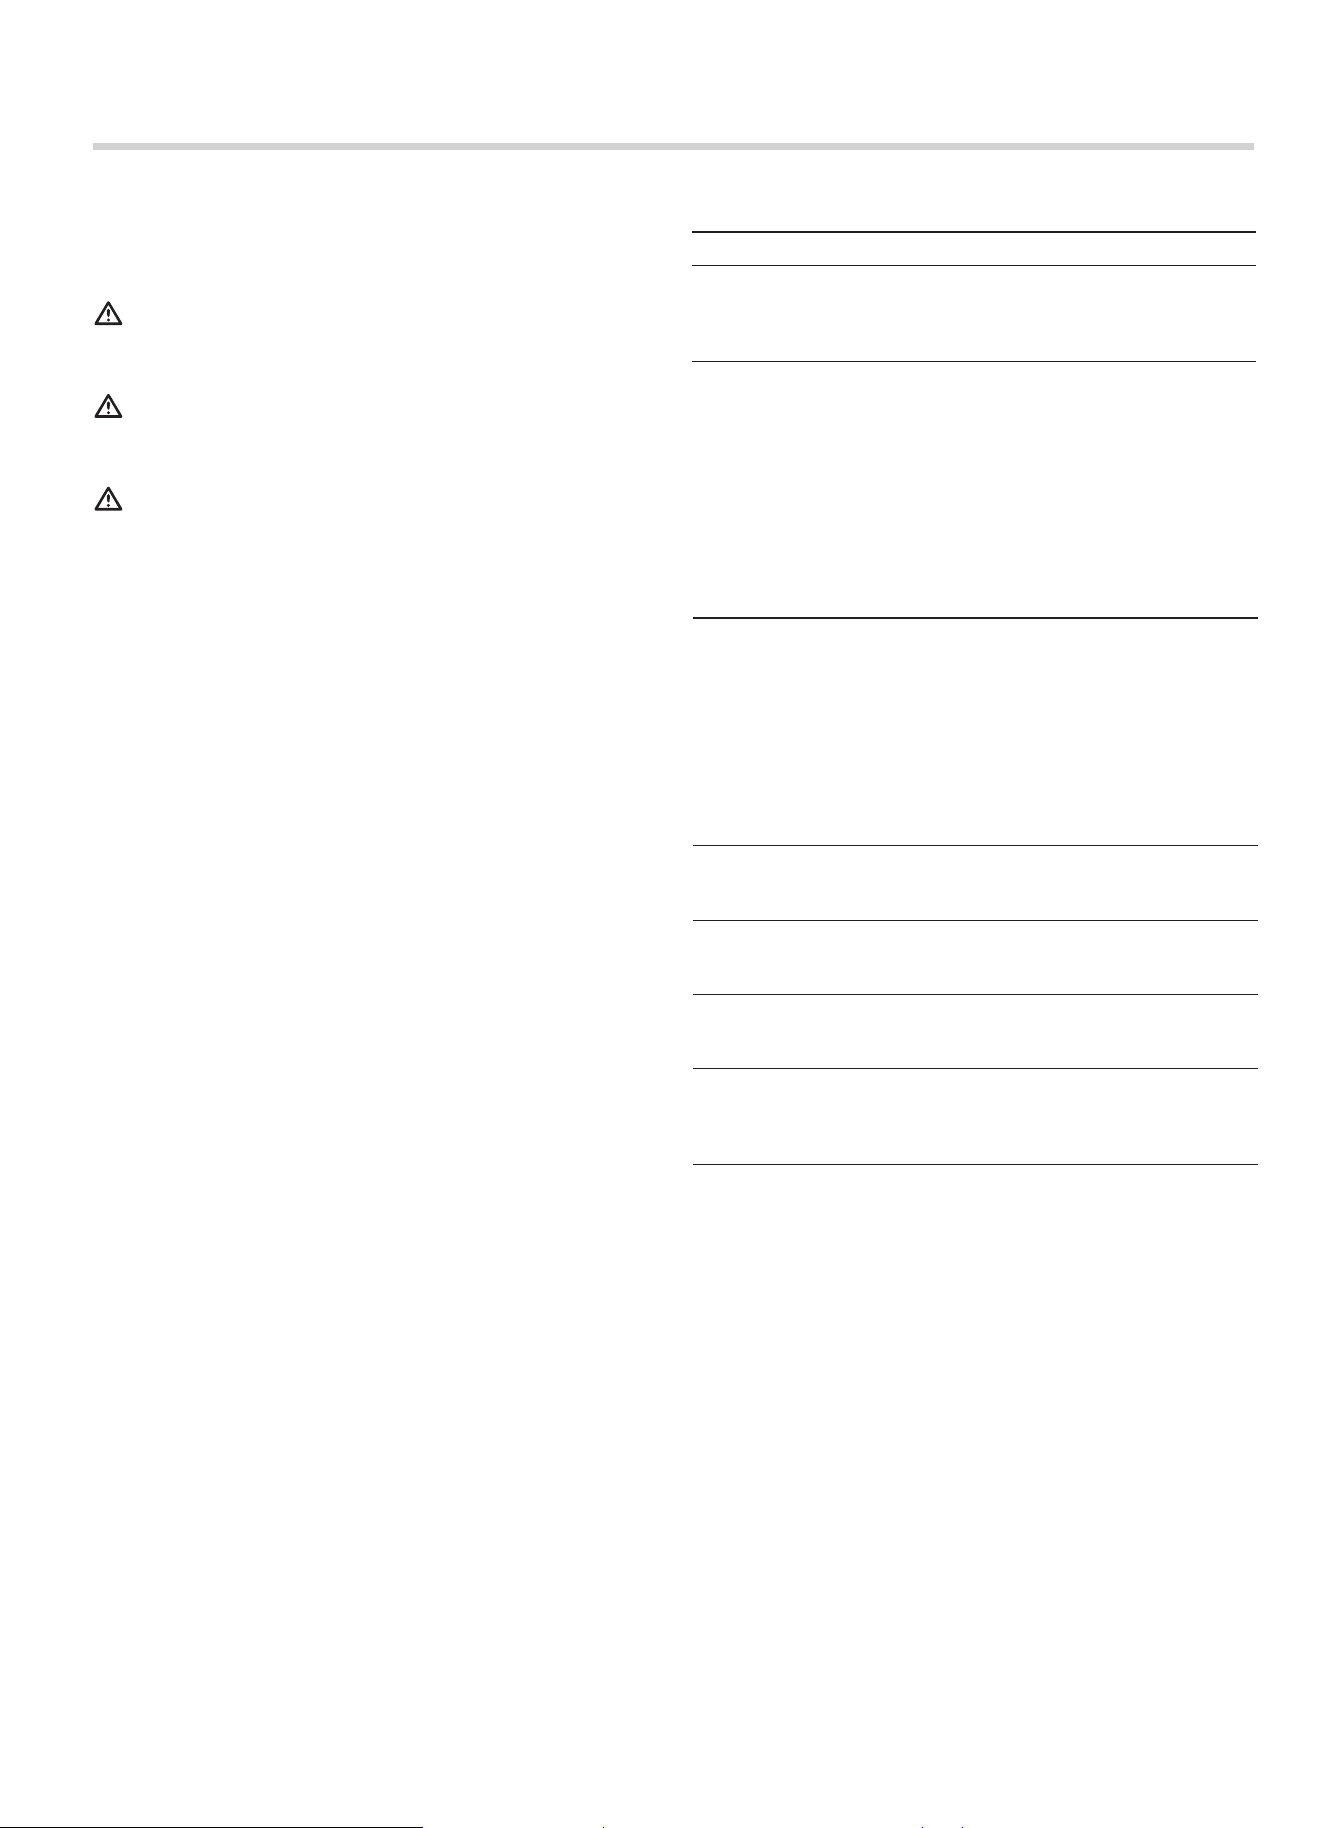
Care and cleaning
With careful care and cleaning your microwave oven will retain its
looks and remain good order. We will explain here how you
should care for and clean your appliance correctly.
Risk of electric shock.!
Penetrating moisture may cause an electric shock. Do not use
any high-pressure cleaners or steam cleaners.
Risk of burns!
Never clean the appliance immediately after switching off. Let the
appliance cool down.
Risk of serious damage to health!
Microwave energy may escape if the cooking compartment door
or the door seal is damaged. Never use the appliance if the
cooking compartment door or the door seal is damaged. Contact
the after-sales service.
Notes
Ŷ Slight differences in colour on the front of the appliance are
caused by the use of different materials, such as glass, plastic
and metal.
Ŷ Shadows on the door panel which look like streaks, are caused
by reflections made by the oven light.
Ŷ Unpleasant odours, e.g. after fish has been prepared, can be
removed very easily. Add a few drops of lemon juice to a cup of
water. Place a spoon into the container as well, to prevent
delayed boiling. Heat the water for 1 to 2 minutes at maximum
microwave power.
Cleaning agents
To ensure that the different surfaces are not damaged by using
the wrong cleaning agent, observe the information in the table. Do
not use
Ŷ sharp or abrasive cleaning agents,
Ŷ metal or glass scrapers to clean the glass in the appliance door.
Ŷ metal or glass scrapers to clean the door seal,
Ŷ hard scouring pads and sponges,
Ŷ cleaning agents with high concentrations of alcohol.
Wash new sponge cloths thoroughly before use.
Allow all surfaces to dry thoroughly before using the appliance
again.
Area Cleaning agents
Appliance front Hot soapy water:
Clean with a dish cloth and dry with a soft
cloth. Do not use glass cleaners or metal
or glass scrapers for cleaning.
Appliance front with
stainless steel
Hot soapy water:
Clean with a dish cloth and dry with a soft
cloth. Remove flecks of limescale,
grease, starch and albumin (e.g. egg
white) immediately. Corrosion can form
under such residues. Special stainless
steel cleaning agents can be obtained
from the after-sales service or from
specialist shops. Do not use glass
cleaners or metal or glass scrapers for
cleaning.
Cooking
compartment
Hot soapy water or a vinegar solution:
Clean with a dish cloth and dry with a soft
cloth.
If the oven is very dirty: Do not use oven
spray or other aggressive oven cleaners
or abrasive materials. Scouring pads,
rough sponges and pan cleaners are also
unsuitable. These items scratch the
surface. Allow the interior surfaces to dry
thoroughly.
Recess in cooking
compartment
Damp cloth:
Ensure that no water seeps through the
turntable drive into the appliance interior.
Wire racks Hot soapy water:
Clean using stainless steel cleaning
agent or in the dishwasher.
Door panels Glass cleaner:
Clean with a dish cloth. Do not use a
glass scraper.
Seal Hot soapy water:
Clean with a dish cloth, do not scour. Do
not use a metal or glass scraper for
cleaning.
EN-23
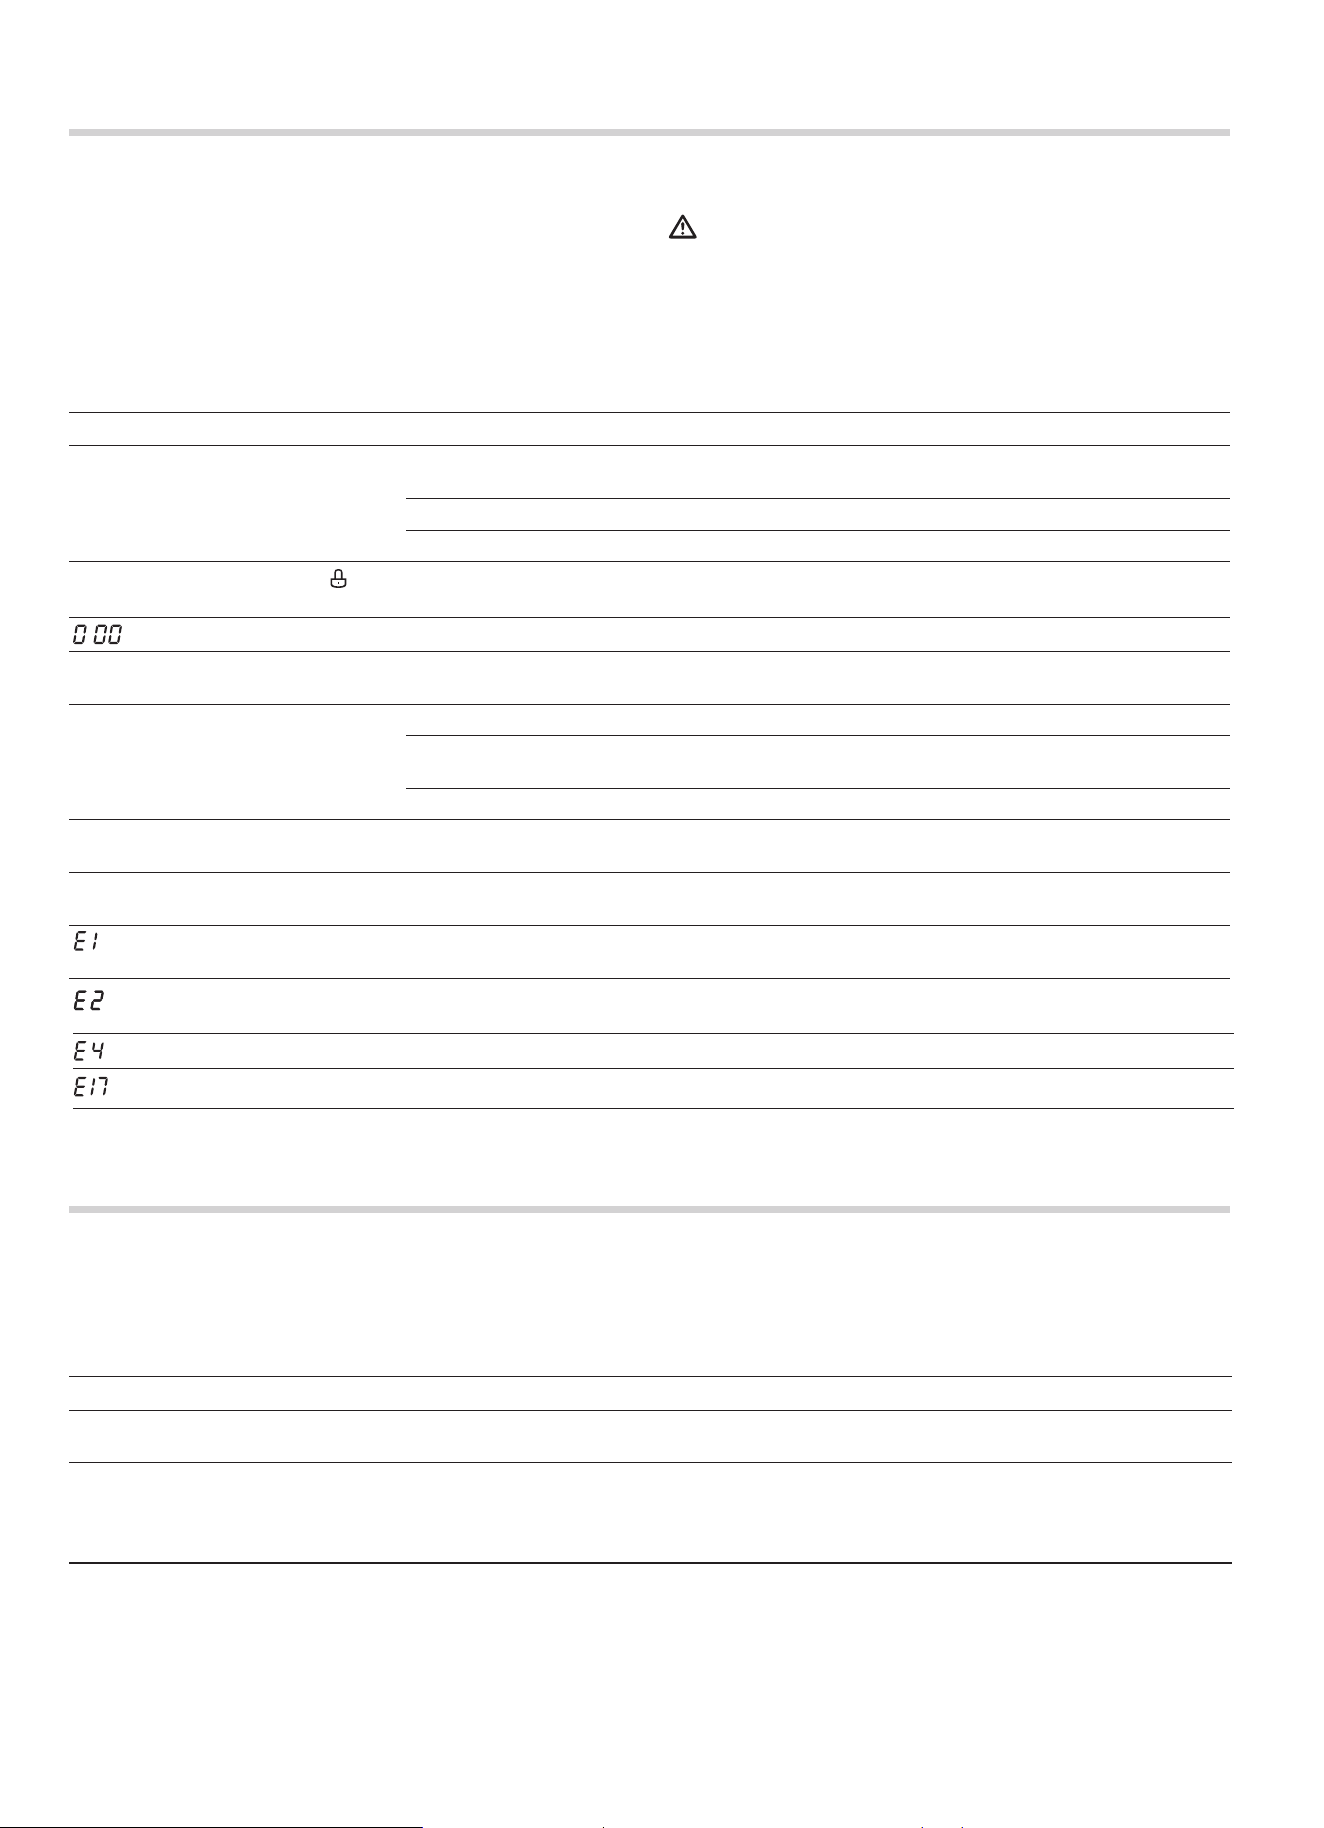
Malfunction table
Malfunctions often have simple explanations. Please refer to the
malfunction table before calling the after-sales service.
If a meal does not turn out exactly as you wanted, refer to the
plenty of cooking tips and tricks.
Risk of electric shock!
Incorrect repairs are dangerous. Repairs may only be carried out
by one of our trained after-sales engineers.
Malfunction table
Problem Possible cause Remedy/information
The appliance does not work. Faulty circuit breaker. Look in the fuse box and check that the circuit
breaker for the appliance is in working order.
Plug not plugged in. Plug in the plug.
Power cut Check whether the kitchen light works.
The appliance does not work.
appears in the display panel.
Childproof lock is active. Deactivate the childproof lock (see section:
Childproof lock).
is in the display panel. Power cut Reset the clock.
The microwave does not switch on. Door not fully closed. Check whether food residue or debris is
trapped in the door.
It takes longer than before for the food
to heat up in the microwave
The selected microwave power level is too low. Select a higher power level.
A larger amount than usual has been placed in
the appliance.
Double the amount = almost double the
cooking time.
The food was colder than usual. Stir or turn the food during cooking.
Turntable grates or grinds. Dirt or debris in the area around the turntable
drive.
Clean the rollers under the turntable and the
recess in the oven floor thoroughly.
A particular operating mode or power
level cannot be set.
The temperature, power level or combined
setting is not possible for this operating mode.
Choose permitted settings.
appears in the display panel. The thermal safety switch-off function has been
activated.
Call the after-sales service.
appears in the display panel. The thermal safety switch-off function has been
activated.
Call the after-sales service.
appears in the display panel. Moisture in the control panel. Allow the control panel to dry.
appears in the display panel. Rapid heating has failed. Call the after-sales service.
Acrylamide in foodstuffs
Which foods are affected?
Acrylamide is mainly produced in grain and potato products that
are heated to high temperatures, such as potato crisps, chips,
toast, bread rolls, bread, fine baked goods (biscuits, gingerbread,
cookies).
Tips for keeping acrylamide to a minimum when preparing food
General Keep cooking times to a minimum. Cook meals until they are golden brown, but not too
dark. Large, thick pieces of food contain less acrylamide.
Baking biscuits
Oven chips
Max. 200 °C in Top/bottom heating or max. 180 °C in 3D hot air or hot air mode. Max.
190° C in Top/bottom heating or ma x. 170 °C in 3D hot air or hot air mode. Egg white
and egg yolk reduce the formation of acrylamide. Distribute thinly and evenly over the
baking tray. Cook at least 400 g at once on a baking tray so that the chips do not dry out.
Expert Cooking Guide
section, where you will find
:
EN-24
Energy and environment tips
Here you can find tips on how to save energy when baking and
roasting and how to dispose of your appliance properly.
Saving energy
Ŷ Only preheat the oven if this is specified in the recipe or in the
operating instruction tables.
Ŷ Use dark, black lacquered or enamelled baking tins. They
absorb the heat particularly well.
Ŷ Open the oven door as infrequently as possible while you are
cooking, baking or roasting.
Ŷ It is best to bake several cakes one after the other. The oven is
still warm. This reduces the baking time for the second cake.
You can also place two loaf tins next to each other.
Ŷ For longer cooking times, you can switch the oven off
10 minutes before the end of the cooking time and use the
residual heat to finish cooking.
Environmentally-friendly disposal
Dispose of packaging in an environmentally-friendly manner.
This appliance complies with European Directive 2002/
96/EC on Waste Electrical and Electronic Equipment
(WEEE). The directive gives a framework for the
collection and recycling of old appliances, which is valid
across the EU.
Expert Cooking Guide
The charts can be used as a guide. Follow package or recipe directions.
Broil
Place pan of food on the wire rack with the recess facing
up.
Food Oven tem-
perature
Cooking time
(minutes)
Internal tem-
perature
Cooking tip / Procedure
Hamburgers,
" to 1", medium
High Side 1: 9 - 11
Side 2: 10 - 12
160°F
(71°C)
Use pan that allows fat to drain away from the
food.
High fat meat causes more spattering.
Lamb chops,
1", medium
High Side 1: 9 - 11
Side 2: 10 - 12
160°F
(71°C)
Use pan that allows fat to drain away from the
food.
Slit fat to prevent curling.
Sausage, fresh High Side 1: 9 - 11
Side 2: 8 - 10
160°F
(71°C)
Use pan that allows fat to drain away from the
food.
Steaks, " to 1",
medium rare
High Side 1: 9 - 11
Side 2: 10 - 12
145°F
(63°C)
Use pan that allows fat to drain away from the
food.
Slit fat to prevent curling.
Steaks, " to 1",
medium
High Side 1: 9 - 11
Side 2: 10 - 12
160°F
(71°C)
Use pan that allows fat to drain away from the
food.
Slit fat to prevent curling.
Toasting bread Low 3 - 5 - Check at minimum time.
Top browning cas-
seroles
Low 3 - 5 - Use only metal or glass ceramic dishes such as
Corning Ware®
Convection Broil
Place pans of food on the wire rack with the recess
facing up.
Food Oven
temperature
Cooking time
(minutes)
Internal
temperature
Cooking tip / Procedure
Chicken breasts,
bone-in
Low Side 1: 9 - 11
Side 2: 10 - 12
170°F
(76°C)
Start breast side down.
Fish filets,
" to 1"
Low 11 - 15 145°F
(63°C)
No turning of fish.
Turn thin ends under.
Brush with olive oil or butter to prevent sticking.
3
4
/
3
4
/
3
4
/
3
4
/
EN-25
Heating food
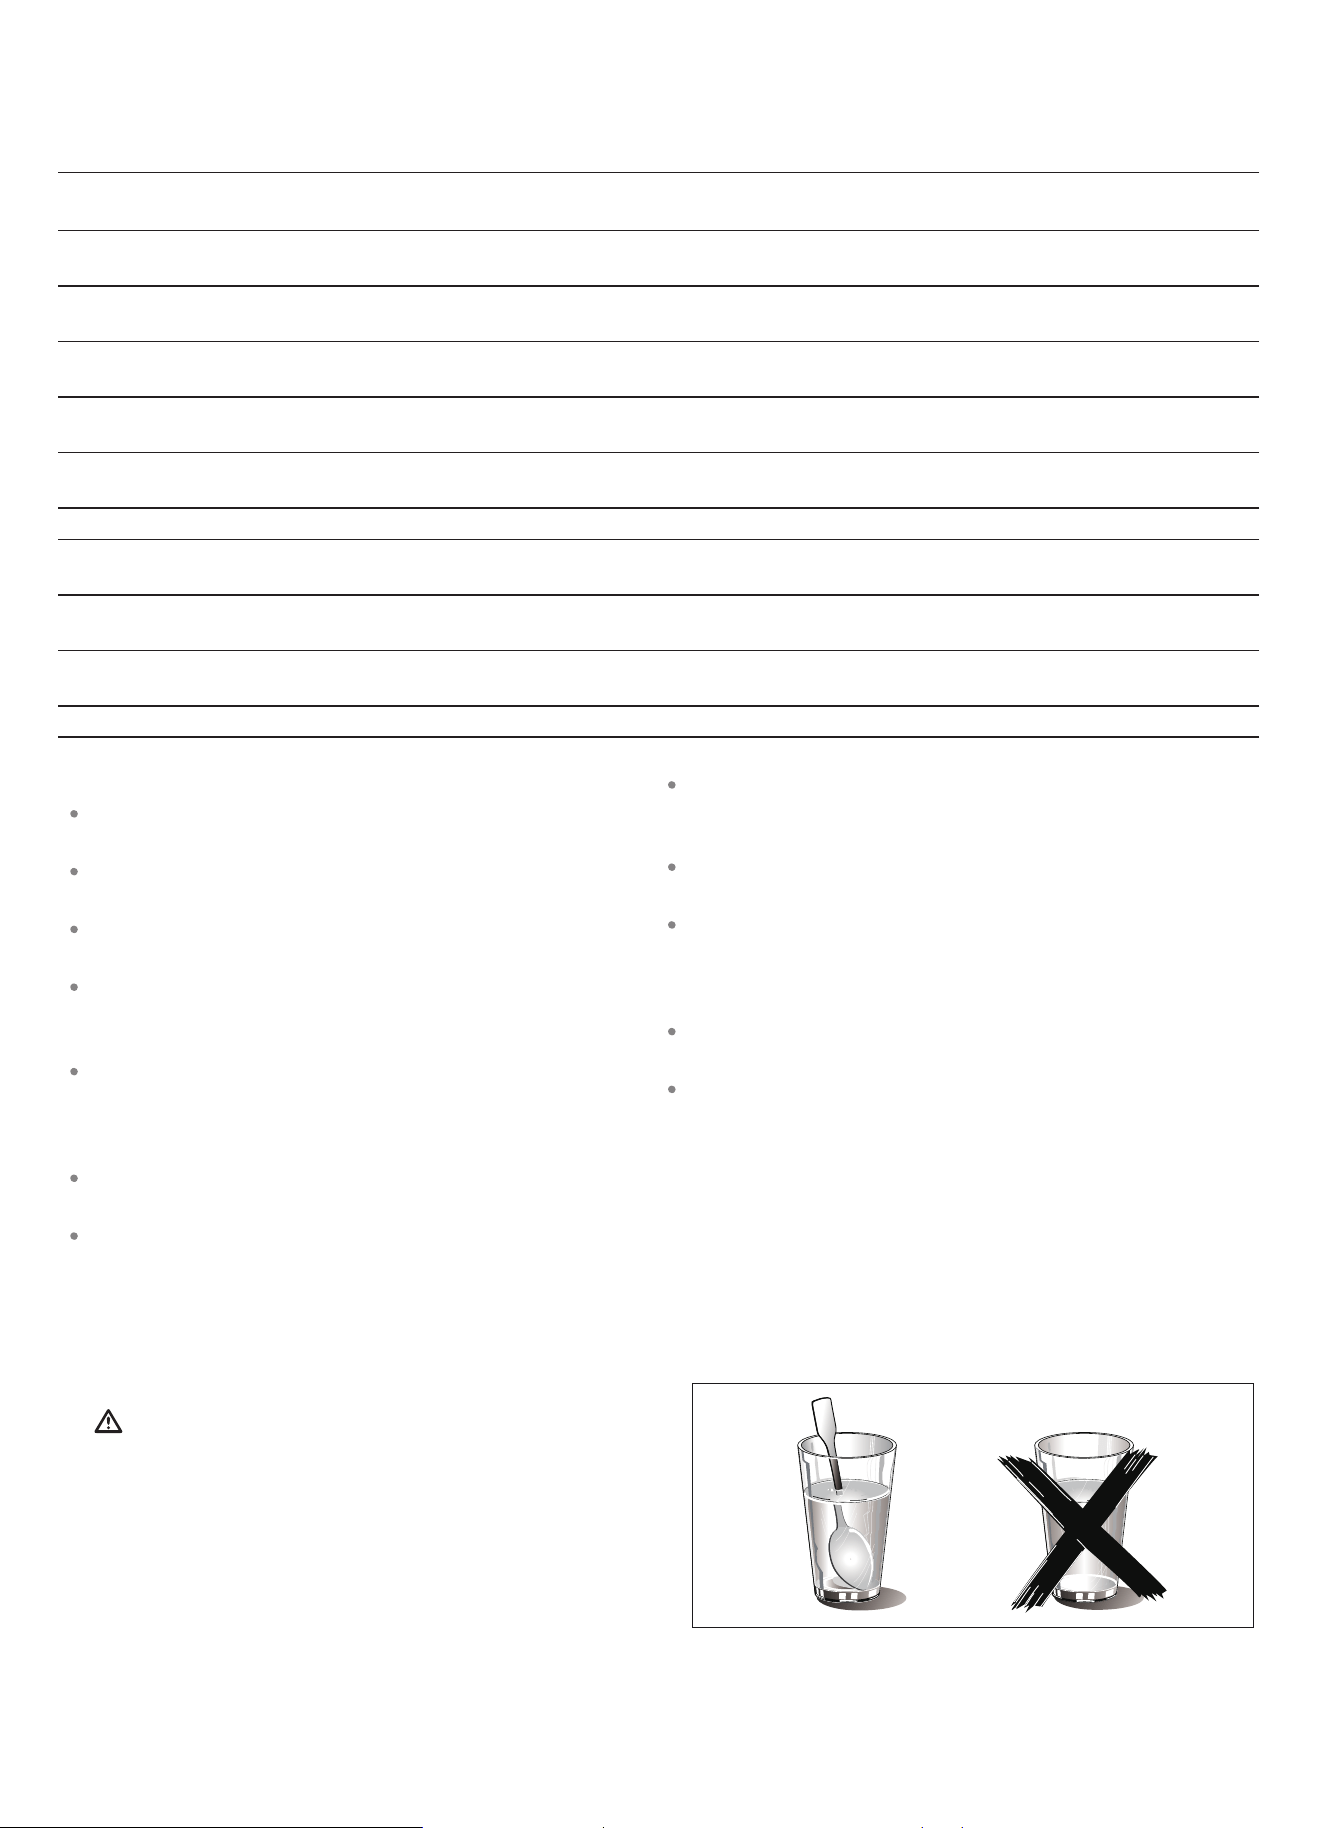
Risk of scalding!
There is a possibility of delayed boiling when a liquid is heated.
This means that the liquid reaches boiling temperature without the
usual steam bubbles rising to the surface. Even if the container
only moves a little, the hot liquid can suddenly boil over and
spatter. When heating liquids, always place a spoon in the
container. This will prevent delayed boiling.
Convection
Preheat the oven before adding foods. Once the oven is
preheated, place the food in the oven quickly to minimize
loss of heat. Place pans of food on the wire rack with the
recess facing down.
Food Oven
temperature
Cooking time
(minutes)
Cooking tip / Procedure
Biscuits 350°F (175°C) 13 - 20 A dark or dull baking sheet will result in a browner,
crisper crust.
Cake, 13"x9" 350°F (175°C) 23 - 28 For a tender, light golden brown crust, use light, shiny
metal bakeware.
Cookies 350 - 375°F
(175 - 190°C)
8 - 14 A dark or dull baking sheet will result in a browner,
crisper crust.
Cornbread 425 - 450°F
(220 - 230°C)
25 - 30 Use a square baking pan.
Cupcakes 350°F (175°C) 18 - 21 Ideal for ready-made mixes. Prepare according to
package directions.
Dinner rolls 400°F (205°C) 12 - 18 Use with fresh or frozen dinner rolls.
Fresh fruit pie 375°F (190°C) 50 - 60 A dark or dull baking pie pan will result in a browner,
crisper crust.
Muffins 400°F (205°C) 10 - 18 Ideal for ready-made mixes. Prepare according
to package directions.
Roasted vegetables 425 - 450°F
(220 - 230°C)
15 - 20 Use dark or dull metal pan. Stir once.
Shortcakes 450°F (230°C) 10 - 18 Best for individual shortcakes. Use dark coated pan.
Cooking eggs in your microwave
Never cook eggs in the shell and never warm hard-
cooked eggs in the shell; they can explode.
Always pierce yolk on whole eggs to keep them from
bursting.
Cook eggs just until set; they will become tough if
overcooked.
Cooking scrambled eggs is safe.
Cooking vegetables in your microwave
Vegetables should be washed just before cooking.
Rarely is extra water needed. If dense vegetables such
as potatoes or carrots are being cooked, add about
¼ cup of water.
Small vegetables (sliced carrots, peas, lima beans,
etc.) will cook faster than larger vegetables.
Whole vegetables, such as potatoes, acorn squash or
corn on the cob, should be arranged in a circle on the
turntable before cooking. They will cook more evenly if
turned over halfway through cooking.
Always place vegetables like asparagus and broccoli
with the stem ends pointing towards the edge of the
dish and the tips toward the center.
When cooking cut vegetables, always cover the dish
with a lid or vented microwavable plastic wrap.
Whole, unpeeled vegetables such as potatoes, sweet
potatoes, squash, eggplant, etc., should have their
skin pricked in several locations before cooking to
prevent them from bursting.
For more even cooking, stir or rearrange whole
vegetables halfway through the cook time.
Most of the time, the denser the food, the longer the
required standing time. For example, a baked potato
should stand for 5 minutes before serving, while a dish
of peas may be served immediately.
EN-26
Cooking seafood in your microwave
Be sure to place fish on a microwave-safe roasting rack
in a microwave-safe dish. Be sure to always cook fish
until it flakes easily with a fork. Use a tight cover to steam
fish; a lighter cover of wax paper or paper towel provides
less steaming. And be sure not to overcook fish; check it
for doneness at a minimum cooking time before cooking
longer.
Cleaning and Maintenance
9 WARNING
Be sure the entire appliance has cooled and grease
has solidified before attempting to clean any part of
the appliance.
Cleaning Guide
For best performance and for safety reasons, keep the
oven clean inside and outside. Take special care to
keep the inner door panel and oven front frame free of
food and grease build–up.
Never use abrasive scouring powder or pads on the
microwave. Wipe the microwave oven inside and out
with a soft cloth and warm (not hot) mild detergent
solution. Then rinse and wipe completely dry.
Wipe spatters immediately with a wet paper towel,
especially after cooking greasy foods like chicken or
bacon.
Clean your microwave oven weekly or more often, if
needed.
Never operate the microwave oven without food in the
oven cavity, unless pre-heating with Convection, Pizza,
Frozen Foods and Keep Warm mode; this can
damage the magnetron tube or ceramic tray. You may
wish to leave a cup of water standing inside the oven
when it is not in use to prevent damage if the oven is
accidentally turned on.
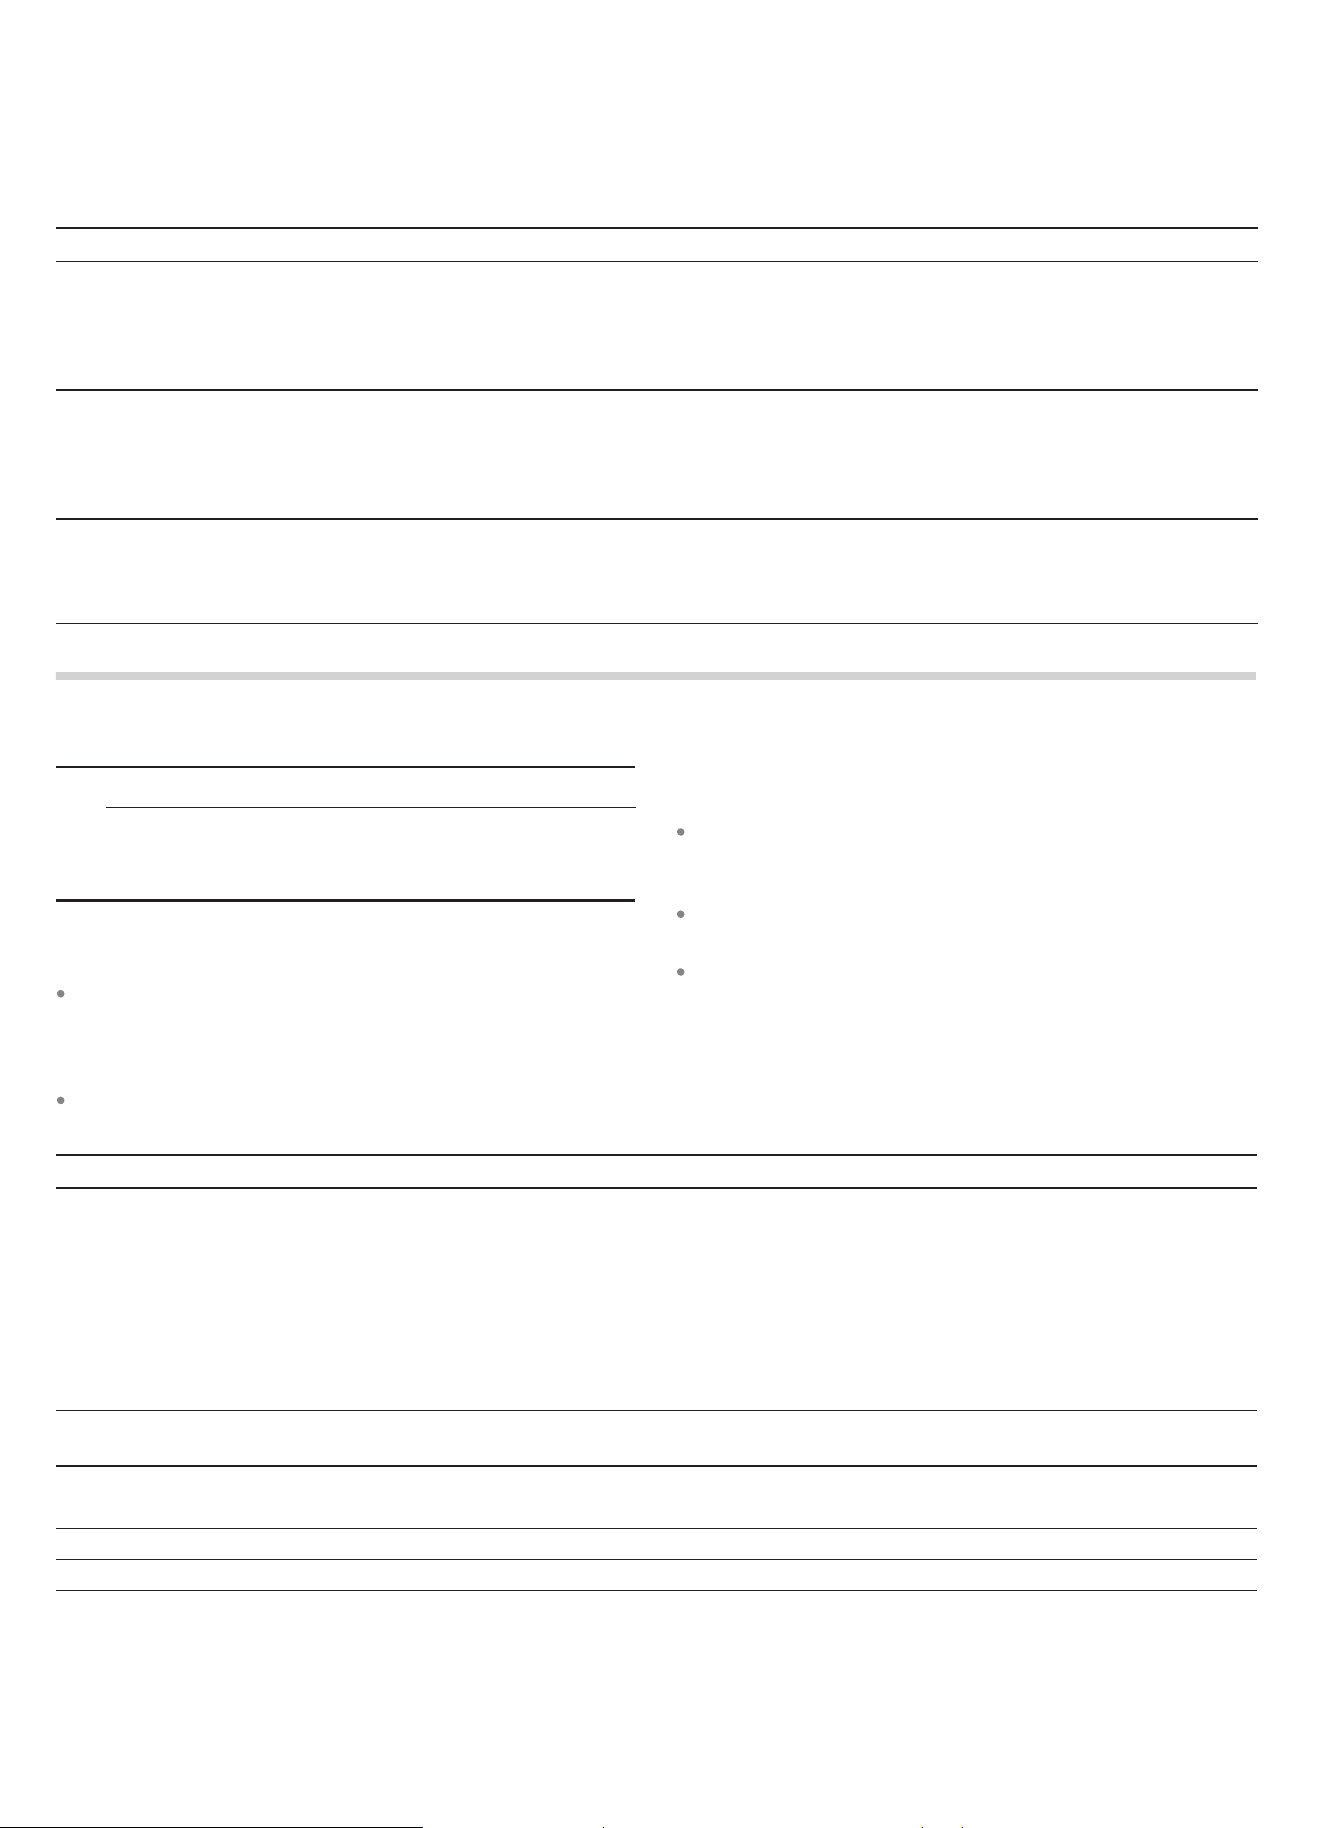
Seafood Power level Cook time Directions
Fish steaks up to
1½ lbs
medium high (7) 7–11 min. /lb Arrange fish on roasting rack with meaty portions
towards the outside of rack. Cover with wax paper.
Turn over and rearrange halfway through cook time.
Cook until fish flakes easily with fork.
Let stand 3–5 mins.
Fish fillets up to
1½ lbs.
medium high (7) 7–11 min. /lb Arrange fillets in a baking dish, turning any thin pieces
under. Cover with wax paper. If over ½ inch thick, turn
over and rearrange halfway through cook time. Cook
until fish flakes easily with fork.
Let stand 2–3 mins.
Shrimp up to
1½ lbs.
medium high (7) 7–11 min. /lb Arrange shrimp in a baking dish without overlapping or
layering. Cover with wax paper. Cook until firm and
opaque, stirring 2 or 3 times.
Let stand 5 mins.
Part Recommendations
Oven cavity Keep inside (cavity) of the oven clean. Food particles and spilled liquids can stick to the oven
walls, causing the oven to work less efficiently.
Wipe up spills immediately. Use a damp, clean cloth and mild soap. DO NOT use harsh deter-
gents or abrasive cleaners.
To help loosen baked–on food particles or liquids, heat 2 cups of water (add the juice of
1 lemon if you desire to keep the oven fresh smelling) in a 4 cup measuring glass at High
power for 5 minutes or until boiling. Let stand in oven cavity for 1 or 2 minutes.
For baked-on grease spatters, wash with hot, soapy water, rinse and dry.
Wire rack Wash with soapy water. Rinse thoroughly and dry, or gently rub with cleansing powder or soap-
filled pads as directed. The wire rack can also be washed in the dishwasher.
Metal turntable tray Remove metal turntable tray from the oven when cleaning the oven cavity and tray.
Wash the metal turntable tray in warm sudsy water or in the dishwasher.
Ceramic tray Clean with warm, soapy water or in the dishwasher.
Door seal Wipe with damp cloth.
EN-27

Door glass Wash with soap and water or glass cleaner. Apply Fantastik® or Formula 409® to a clean
sponge or paper towel and wipe clean. Avoid using powder cleaning agents, steel wool pads
and oven cleaners.
If steam accumulates inside or outside the oven door, wipe with a soft cloth. Steam can accu-
mulate when operating the oven in high humidity and in no way indicates microwave leakage.
Painted surfaces Clean with hot soapy water or apply Fantastik® or Formula 409® to a clean sponge or paper
towel and wipe clean. Avoid using powder cleaning agents, steel wool pads and oven cleaners.
Stainless steel sur-
faces/exterior sur-
faces
Always wipe or rub in the direction of the grain. Clean with a soapy sponge, then rinse and dry,
or wipe with Fantastik® or Formula 409® spray on a paper towel. Protect and polish with Stain-
less Steel Magic® and a soft cloth. Remove water spots with a cloth dampened with white vine-
gar.
Plastic & Controls When cool, clean with soapy water, rinse and dry.
Printed areas
(words & numbers)
Do not use abrasive cleaners or petroleum based solvents.
Part Recommendations
EN-28

Warranty
What this limited warranty covers:
7KH:DUUDQW\FRYHUDJHSURYLGHGE\)RUQR$SSOLDQFHVLQWKLVVWDWHPHQWDSSOLHVH[FOXVLYHO\WRWKHRULJLQDO)RUQRDSSOLDQFH
³3URGXFW´VROGWRWKHFRQVXPHU³3XUFKDVHU´E\DQDXWKRUL]HG)RUQRGHDOHUGLVWULEXWRUUHWDLOHUSXUFKDVHGDQGLQVWDOOHG
in the United States or Canada, and which has always remained within the original country of purchase (the United States
RU&DQDGD:DUUDQW\FRYHUDJHLVDFWLYDWHGRQWKHGDWHRIWKH3URGXFW¶VRULJLQDOUHWDLOSXUFKDVHDQGKDVDGXUDWLRQRIWZR
(2) years.
:DUUDQW\FRYHUDJHLVQRQWUDQVIHUDEOH,QWKHHYHQWRIUHSODFHPHQWRISDUWVRURIWKHHQWLUHSURGXFWWKHUHSODFHPHQW
3URGXFWRUSDUWVVKDOODVVXPHWKHUHPDLQLQJRULJLQDO:DUUDQW\DFWLYDWHGZLWKWKHRULJLQDOUHWDLOSXUFKDVHGRFXPHQW7KLV
:DUUDQW\VKDOOQRWEHH[WHQGHGZLWKUHVSHFWWRVXFKUHSODFHPHQW)RUQR$SSOLDQFHVZLOOUHSDLURUUHSODFHDQ\FRPSRQHQW
part which fails or proves defective due to materials and/or workmanship within 2 years of the date of the original retail
purchase and under conditions of ordinary residential, non-commercial use. Repair or replacement will be free of charge,
LQFOXGLQJODERUDWVWDQGDUGUDWHVDQGVKLSSLQJH[SHQVHV3XUFKDVHULVUHVSRQVLEOHIRUPDNLQJWKH3URGXFWUHDVRQDEO\
DFFHVVLEOHIRUVHUYLFH5HSDLUVHUYLFHPXVWEHSHUIRUPHGE\D)RUQR$XWKRUL]HG6HUYLFHFRPSDQ\GXULQJQRUPDOZRUNLQJ
hours.
Important
Retain proof of original purchase to establish warranty period. Forno’s liability on any claim of any kind, with respect to
WKHJRRGVDQGRUVHUYLFHVSURYLGHGVKDOOLQQRHYHQWH[FHHGWKHYDOXHRIWKHJRRGVRUVHUYLFHRUSDUWWKHUHRIZKLFKKDV
given rise to the claim.
30-Day Cosmetic Warranty
The Purchaser must inspect the product at the time of delivery. Forno warrants that the Product is free from manufacturing
defects in materials and workmanship for a period of thirty (30) days from date of the original retail purchase of the
Product.
This coverage includes:
• Paint blemishes
• Chips
• 0DFURVFRSLF¿QLVKGHIHFWV
Cosmetic warranty does NOT cover:
• Issues resulting from incorrect transport, handling and/or installation (e.g.: dents, broken, warped or deformed
structures or components, cracked or otherwise damaged glass components);
• Slight color variations on painted/enameled components;
• 'LႇHUHQFHVFDXVHGE\QDWXUDORUDUWL¿FLDOOLJKWLQJORFDWLRQRURWKHUDQDORJRXVIDFWRUV!VWDLQVFRUURVLRQGLVFRORUDWLRQ
FDXVHGE\H[WHUQDOVXEVWDQFHVDQGRUHQYLURQPHQWDOIDFWRUV!ODERUFRVWVGLVSOD\ÀRRU%VWRFNRXWRIER[³DVLV´
appliances and demo units.
How to receive service
To receive warranty services, the Purchaser must contact the Forno Support department in order to determine the
problem and the required service procedures. Troubleshooting with a customer service representative will be necessary
before moving forward with the service. Model number, serial number and date of original retail purchase will be
requested.
EN-29

Warranty (Continued)
Warranty Exclusions: What Is Not Covered.
• Use of the Product in any non-residential, commercial
application.
• Use of the Product for anything other than its intended
purpose.
• Repair services provided by anyone other than a
)RUQR$XWKRUL]HG6HUYLFHDJHQF\
• Damages or repair services to correct services
SURYLGHGE\XQDXWKRUL]HGSDUWLHVRUWKHXVHRI
XQDXWKRUL]HGSDUWV
• Installation not in accordance with local/state/city/
FRXQW\¿UHFRGHVHOHFWULFDOFRGHVJDVFRGHV
plumbing codes, building codes, laws or regulations.
• Defects or damage due to improper storage of the
Product.
• Defects, damage or missing parts on products sold
out of the original factory packaging or from displays.
!6HUYLFHFDOOVRUUHSDLUVWRFRUUHFWDQLQFRUUHFW
installation of the Product and/or related accessories.
• Replacement of parts/service calls to connect, convert
or otherwise repair the electrical wiring and/or gas line
in order to properly use the product.
• Replacement of parts/service calls to provide
instructions and information on the use of the Product.
• Replacement of parts/service calls to correct issues
arising from the product being used in a manner other
than what is normal and customary for residential use.
• Replacement of parts/service calls due to wear
and tear of components such as seals, knobs, pan
supports, shelving, cutlery baskets, buttons, touch
displays, scratched or broken ceramic-glass tops.
• Replacement of parts/service calls for lack of/improper
maintenance, including but not limited to: build up of
residues, stains, scratches, discoloration, corrosion.
• Defects and damages arising from accidents,
alteration, misuse, abuse or improper installation.
• Defects and damages arising from Product transport,
logistics and handling. Inspection of the product
must be made at time of delivery. Following receipt
and inspection, the selling dealer/delivery company
PXVWEHQRWL¿HGRIDQ\LVVXHVDULVLQJIURPKDQGOLQJ
transport and logistics.
• 'HIHFWVDQGGDPDJHVDULVLQJIURPH[WHUQDOIRUFHV
beyond the control of Forno Appliances, including
THERE ARE NO EXPRESS WARRANTIES OTHER THAN THOSE LISTED AND DESCRIBED ABOVE, AND NO WARRANTIES, EITHER EXPRESS OR IMPLIED,
INCLUDING, BUT NOT LIMITED TO, ANY IMPLIED WARRANTIES OF MERCHANTABILITY OR FITNESS FOR A PARTICULAR PURPOSE THAT SHALL APPLY
AFTER THE EXPRESS WARRANTY PERIODS STATED ABOVE, AND NO OTHER EXPRESS WARRANTY OR GUARANTEE GIVEN BY ANY PERSON, FIRM
OR CORPORATION WITH RESPECT TO THIS PRODUCT SHALL BE BINDING ON FORNO. FORNO SHALL NOT BE LIABLE FOR LOSS OF REVENUE OR
PROFITS, FAILURE TO REALIZE SAVINGS OR OTHER BENEFITS, TIME AWAY FROM WORK, MEALS, LOSS OF FOOD OR BEVERAGES, TRAVELING OR
HOTEL EXPENSES, EXPENSES TO RENT OR PURCHASE APPLIANCES, REMODELING/CONSTRUCTION EXPENSES IN EXCESS OF DIRECT DAMAGES
WHICH ARE UNDENIABLY CAUSED EXCLUSIVELY BY FORNO OR ANY OTHER SPECIAL, INCIDENTAL OR CONSEQUENTIAL DAMAGES CAUSED BY THE
USE, MISUSE OR INABILITY TO USE THIS PRODUCT, REGARDLESS OF THE LEGAL THEORY ON WHICH THE CLAIM IS BASED, AND EVEN IF FORNO
HAS BEEN ADVISED OF THE POSSIBILITY OF SUCH DAMAGES. NOR SHALL RECOVERY OF ANY KIND AGAINST FORNO BE GREATER IN AMOUNT
THAN THE PURCHASE PRICE OF THE PRODUCT SOLD BY FORNO AND CAUSING THE ALLEGED DAMAGE. WITHOUT PREJUDICE TO THE FOREGOING,
PURCHASER ASSUMES ALL RISK AND LIABILITY FOR LOSS, DAMAGE OR INJURY TO PURCHASER AND PURCHASER’S PROPERTY AND TO OTHERS
AND THEIR PROPERTY ARISING FROM THE USE, MISUSE, OR INABILITY TO USE THIS PRODUCT SOLD BY FORNO THAT IS NOT A DIRECT RESULT OF
NEGLIGENCE ON THE PART OF FORNO THIS LIMITED WARRANTY SHALL NOT EXTEND TO ANYONE OTHER THAN THE ORIGINAL PURCHASER OF THIS
PRODUCT, IS NON-TRANSFERABLE, AND STATES YOUR EXCLUSIVE REMEDY.
EXWQRWOLPLWHGWRZLQGUDLQVDQG¿UHVÀRRGV
PXGVOLGHVIUHH]LQJWHPSHUDWXUHVH[FHVVLYHPRLVWXUH
RUH[WHQGHGH[SRVXUHWRKXPLGLW\SRZHUVXUJHV
lightning, structural failures surrounding the appliance
DQGRWKHUDFWVRI*RG
• Products whose serial number has been altered/
damaged/tampered with. In no case shall Forno be
held liable or responsible for damage to surrounding
SURSHUW\LQFOXGLQJIXUQLWXUHFDELQHWU\ÀRRULQJSDQHOV
and other structures surrounding the Product. Forno
is neither liable nor responsible for the Product if it is
ORFDWHGLQDUHPRWHDUHDRUDQDUHDZKHUHFHUWL¿HG
trained technicians are not reasonably available.
Purchaser must bear any transportation and delivery
FRVWVRIWKH3URGXFWWRWKHQHDUHVW$XWKRUL]HG6HUYLFH
&HQWHURUWKHDGGLWLRQDOWUDYHOH[SHQVHVRIDFHUWL¿HG
trained technician
EN-30
&XVWRPHU6XSSRUW&DOORUHPDLOLQIR#IRUQRFD
www.forno.ca
07/2024
Lisez attentivement ces instructions avant d'utiliser votre micro-ondes et conservez-les
VRLJQHXVHPHQW6LYRXVVXLYH]OHVLQVWUXFWLRQVYRWUHPLFURRQGHVYRXVRႇULUDGHQRPEUHXVHV
DQQpHVGHERQVHUYLFH
NUMÉRO DE MODÈLE SÉRIE
FMWDR3093-30 | FMWDR3093-30BLK | FMWDR3093-30WHT
MANUEL D'INSTRUCTIONS
MICRO-ONDES ENCASTRÉES - FOUR À CONVECTION
FRANÇAIS
FR-2
TABLE DES MATIÈRES
Service clientèle 4
Avertissement 5
Consignes de sécurité importantes 6
Noms des pièces et accessoires 7
Instructions de mise à la terre
Causes des dommages 10
Cause du dommage, dimensions et conditions
d'installation
Interférences radio 8
Ustensiles de cuisine : ................................................
Matériaux Utilisables Au Micro-ondes .....................
Matériaux À Éviter Dans Les Micro-ondes ...............
8
9
9
Opération : .................................................................
Réglage de l'horloge................................................
Réglage du four.......................................................
Préchauffage...........................................................
Niveau de puissance...............................................
Réglage du micro-ondes.........................................
Cuisson express .....................................................
Annulation de l'opération.........................................
Cuisson rapide au micro-ondes...............................
Cuisson en plusieurs étapes....................................
Programmes automatiques......................................
Programmes de décongélation................................
Popcorn...................................................................
Pizza........................................................................
Entretien et nettoyage
14
10
14
14
14
15
15
15
16
16
16
16
16
17
17
18
Cuisson par capteur ...............................................
19
Griller (Broil) ...........................................................
21
Verrouillage pour la sécurité des enfants................
22
Réglage des options de réglage de l'heure.............
21
23
Acrylamide dans les aliments
24
Tableau des pannes
24
Conseils énergétiques et environnementaux
25
Guide expert de cuisson
25
Nettoyage et maintenance
27
Garantie
30
13
Boisson ...................................................................
Aliments surgelés Utilisez .......................................
17
Connexion électrique .............................................
11
12
Liste de colisage.....................................................
8
Fonctions principales
MICRO-ONDES ENCASTRÉES - FOUR À CONVECTION
NUMÉRO DE MODÈLE SÉRIE
FMWDR3093-30 | FMWDR3093-30BLK | FMWDR3093-30WHT
FR-3
FR-4
Merci d'avoir acheté un produit Frono. Veuillez lire l'intégralité du manuel d'instructions avant d'utiliser votre nouvel
appareil pour la première fois. Que vous soyez un utilisateur occasionnel ou un expert, il vous sera utile de vous
familiariser avec les pratiques de sécurité, les caractéristiques, le fonctionnement et les recommandations d'entretien
de votre appareil.
Le modèle et le numéro de série sont indiqués à l'intérieur du produit. Pour les besoins de la garantie, vous aurez
également besoin de la date d'achat.
Services au Canada et aux États-Unis
Gardez le manuel d'instructions à portée de main pour répondre à vos questions. Si vous ne comprenez pas quelque
chose ou si vous avez besoin de plus d'aide, veuillez consulter notre site web pour une assistance rapide. Veuillez
nous fournir vos nom, numéro, adresse, numéro de série du produit en panne, la preuve d'achat et une brève
description du problème. Un représentant du service clientèle vous contactera dès que possible. Toute intervention
sous garantie doit être autorisée par le service clientèle de FORNO. Tous nos prestataires de services agréés sont
soigneusement sélectionnés et rigoureusement formés par nos soins.
Informations sur le produit Informations sur les services
Numéro de modèle : ______________________________________
Utilisez ces numéros dans toute
correspondance ou appel de
service concernant votre produit.
Si vous avez reçu un produit
endommagé, contactez
immédiatement Forno.
Pour gagner du temps et de
l'argent, consultez le guide de
dépannage avant de faire appel à
un service d'entretien. Il énumère
les causes des problèmes mineurs
de fonctionnement que vous
pouvez corriger vous-même.
Numéro de série : _______________________________________
Date d'achat :________________________________________
Adresse et numéro de téléphone pour l'achat : _________________
_______________________________________________________
_______________________________________________________
Service clientèle
"Besoin d'une aide rapide ? Il sut de scanner le code qr pour accéder
à notre formulaire d'assistance rapide. Nous sommes toujours à votre
disposition pour répondre à vos questions ou à vos préoccupations.
N'hésitez donc pas à nous contacter !"
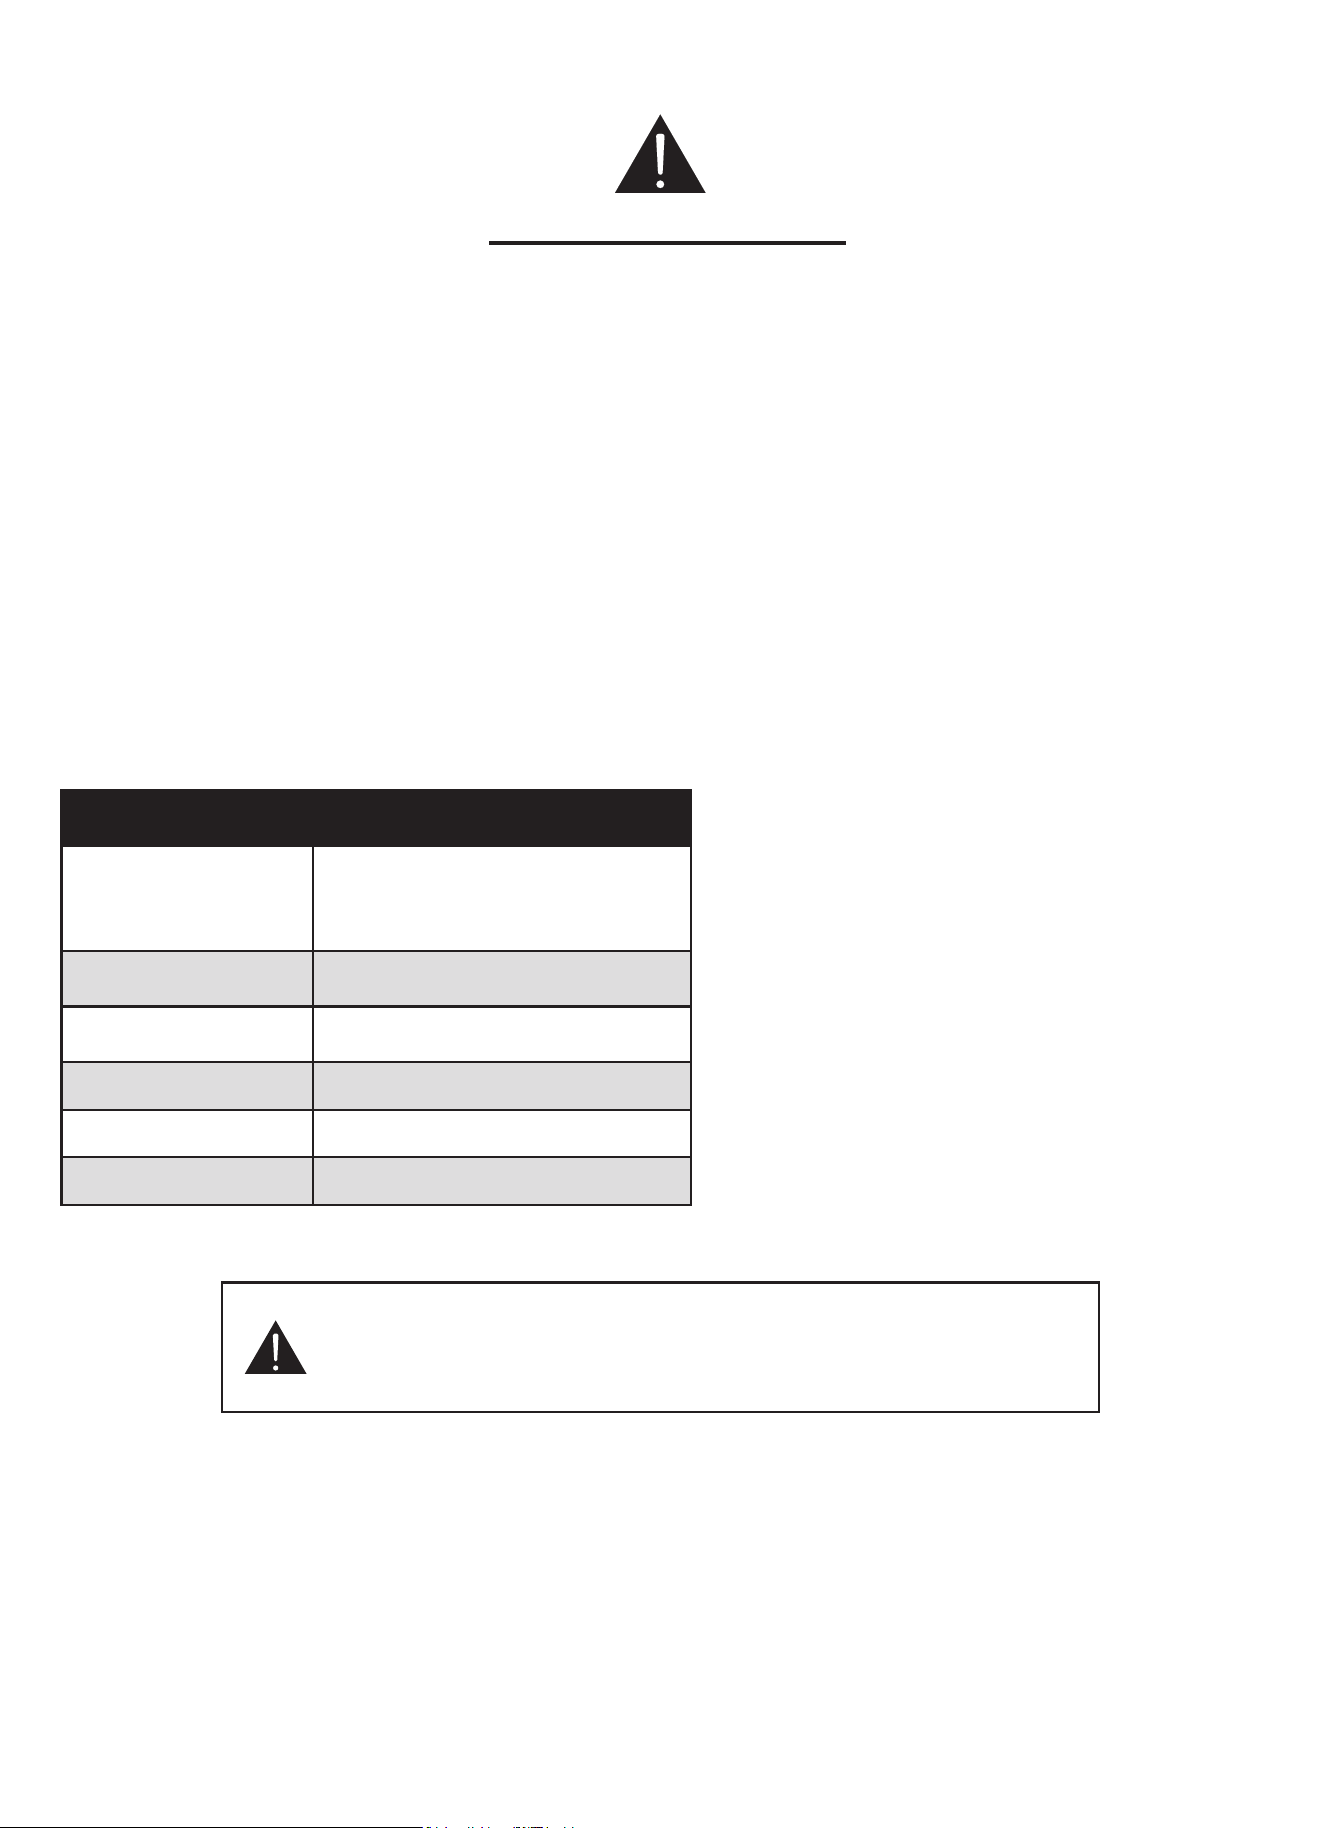
35e&$87,216¬35(1'5(3285e9,7(581(e9(178(//(
(;326,7,21¬81(e1(5*,(+<3(5)5e48(1&((;&(66,9(
(a) N ' essayez PAS de faire fonctionner ce four à micro-ondes avec la porte ouverte, car l'opération peut entraîner
une exposition nocive à l'énergie des micro-ondes. Il est important de ne pas neutraliser ou altérer les verrouillages de
sécurité.
ENE PASSODFHUGREMHWHQWUHODIDFHDYDQWGXPLFURRQGHVHWODSRUWHRXSHUPHWWUHODFFXPXODWLRQGHVDOLVVXUHVRXGH
résidus de nettoyant sur les surfaces d'étanchéité.
(c) Ne pas faire fonctionner le micro-ondes s'il est endommagé. Il est particulièrement important que la porte du four à
micro-ondes se ferme correctement et qu'elle ne soit pas endommagée :
3257(SOLpH
+,1*(6(7/248(76FDVVpVRXGHVVHUUpV
-2,176'(3257((7685)$&('e7$1&+e,7e
G/HIRXUjPLFURRQGHVQHGRLWSDVrWUHUpJOpRXUpSDUpSDUXQHSHUVRQQHDXWUHTXXQWHFKQLFLHQTXDOL¿p
63e&,),&$7,216
Modèle
FMWDR3093-30
FMWDR3093-30BLK
FMWDR3093-30WHT
7HQVLRQQRPLQDOH 9$&+]
Entrée micro-ondes 1750W
Sortie micro-ondes 1000W
Gril 1750W
Convection 1700W
AVERTISSEMENT : Ce produit peut vous exposer à des produits chimiques,
QRWDPPHQW>OHSORPEOHSORPEHWOHFRPSRVpGHSORPETXLVRQWFRQQXV
de l'État de Californie pour provoquer des cancers et des malformations
FRQJpQLWDOHVRXGDXWUHVWURXEOHVGHODUHSURGXFWLRQ3RXUSOXVGLQIRUPDWLRQV
FRQVXOWH]OHVLWHZZZ3:DUQLQJFDJRY
AVERTISSEMENT
32859275(6e&85,7e
FR-5

/RUVGHOXWLOLVDWLRQGDSSDUHLOVpOHFWULTXHVGHVSUpFDXWLRQVGHEDVHGRLYHQWrWUHSULVHVD¿QGHUpGXLUHOHVULVTXHVGH
EUOXUHVGpOHFWURFXWLRQGLQFHQGLHGHEOHVVXUHVRXGH[SRVLWLRQjXQHpQHUJLHPLFURRQGHH[FHVVLYH
1. Lisez toutes les instructions avant d'utiliser l'appareil.
2. /LVH]HWVXLYH]OHVLQVWUXFWLRQVVSpFL¿TXHV
35e&$87,2163285e9,7(581((;326,7,21
3266,%/(¬/e1(5*,((;&(66,9('(60,&52
ONDES"
3. &HWDSSDUHLOGRLWrWUHPLVjODWHUUH1HEUDQFKHUTXH
sur une prise de courant correctement mise à la terre.
9RLU,16758&7,216'(0,6($/$7(55(
4. N'installez ou ne placez cet appareil que
conformément aux instructions d'installation fournies.
5. Certains produits tels que les œufs entiers et les
UpFLSLHQWVKHUPpWLTXHVSDUH[HPSOHOHVERFDX[
HQYHUUHIHUPpVVRQWVXVFHSWLEOHVGH[SORVHUHWQH
GRLYHQWSDVrWUHFKDXႇpVGDQVFHIRXUjPLFURRQGHV
6. N'utilisez cet appareil que pour l'usage auquel il
est destiné, tel qu'il est décrit dans le manuel. NE
PAS utiliser des produits chimiques ou des vapeurs
corrosives dans cet appareil. Ce type de micro-
RQGHVHVWVSpFL¿TXHPHQWFRQoXSRXUFKDXႇHUFXLUH
ou sécher les aliments. Il n'est pas conçu pour une
XWLOLVDWLRQLQGXVWULHOOHRXHQODERUDWRLUH
8. NE PASXWLOLVHUFHWDSSDUHLOVLOHFRUGRQRXOD¿FKH
est endommagé, s'il ne fonctionne pas, s'il a été
HQGRPPDJpRXVLOHVWWRPEp
9. Cet appareil ne doit être réparé que par un personnel
TXDOL¿p&RQWDFWH]P\VXSSRUW#IRUQRFDSRXUXQ
examen, une réparation ou un réglage.
10. NE PASFRXYULURXEORTXHUOHVRXYHUWXUHVGH
l'appareil.
11. NE PAS stocker cet appareil à l'extérieur. NE PAS
utiliser ce produit à proximité de l'eau - par exemple,
près d'un évier de cuisine, dans un sous-sol humide,
près d'une piscine ou dans un endroit similaire.
12. Pour nettoyer les surfaces de la porte et du four à
PLFURRQGHVTXLVDVVHPEOHQWORUVGHODIHUPHWXUH
de la porte, utilisez uniquement des savons doux et
QRQDEUDVLIVRXXQGpWHUJHQWDSSOLTXpjODLGHGXQH
pSRQJHRXGXQFKLႇRQGRX[
13. Pour réduire le risque d'incendie dans la cavité du
four à micro-ondes 1). NE PAS ne pas trop cuire
les aliments. Surveillez attentivement l'appareil
lorsque du papier, du plastique ou d'autres matériaux
FRPEXVWLEOHVVRQWSODFpVjOLQWpULHXUGXIRXUjPLFUR
ondes pour faciliter la cuisson. 2). Retirer les attaches
HQ¿OGHIHUGXVDFHQSDSLHURXHQSODVWLTXHDYDQW
de le placer dans le four à micro-ondes. 3). Si des
PDWpULDX[jOLQWpULHXUGXPLFURRQGHVVHQÀDPPHQW
garder la porte du micro-ondes fermée, éteindre le
PLFURRQGHVHWGpEUDQFKHUOHFRUGRQGDOLPHQWDWLRQ
ou couper l'alimentation au niveau du panneau des
IXVLEOHVRXGHVGLVMRQFWHXUVNE PAS utiliser la
FDYLWpjGHV¿QVGHVWRFNDJHNE PAS laisser des
produits en papier, des ustensiles de cuisine ou de la
nourriture dans la cavité lorsqu'elle n'est pas utilisée.
14. Les liquides, tels que l'eau, le café ou le thé, peuvent
rWUHVXUFKDXႇpVDXGHOjGXSRLQWGpEXOOLWLRQVDQV
DYRLUODLUGHERXLOOLU,OQ\DSDVWRXMRXUVGHEXOOHVRX
GpEXOOLWLRQYLVLEOHVORUVTXHOHUpFLSLHQWHVWUHWLUpGX
IRXUjPLFURRQGHV&(/$32855$,7(175$Ì1(5
/('e%25'(0(17628'$,1'81/,48,'(75Ê6
&+$8'/25648(/(5e&,3,(17(67'e5$1*e
284881867(16,/((67,16e5e'$16/(
/,48,'(3RXUUpGXLUHOHVULVTXHVGHEOHVVXUHVDX[
personnes : 1) NE PASVXUFKDXႇHUOHOLTXLGH
5HPXHUOHOLTXLGHDYDQWHWjPLFKHPLQGXFKDXႇDJH
3) NE PASXWLOLVHUGHVUpFLSLHQWVjERUGVGURLWVHWj
FROVpWURLWV $SUqVOHFKDXႇDJHODLVVH]OH
récipient reposer dans le four à micro-ondes pendant
une courte période avant de le retirer. 5) Soyez
extrêmement prudent lorsque vous introduisez une
cuillère ou un autre ustensile dans le récipient.
15. NE PASIDLUHIRQFWLRQQHUXQDSSDUHLOGHFKDXႇDJHRX
de cuisson sous l'appareil.
16. NE PAS monter l'appareil au-dessus ou à proximité
GXQHSDUWLHGXQDSSDUHLOGHFKDXႇDJHRXGHFXLVVRQ
17. Les aliments ou ustensiles métalliques
surdimensionnés ne doivent pas être insérés dans un
four à micro-ondes ou un grille-pain, car ils peuvent
provoquer un incendie ou un risque d'électrocution.
18. Ne pas nettoyer avec des tampons à récurer
PpWDOOLTXHV/HVPRUFHDX[SHXYHQWEUOHUOHWDPSRQ
et toucher des pièces électriques, ce qui entraîne un
risque d'électrocution.
19. Ne pas utiliser de produits en papier lorsque l'appareil
fonctionne en mode grille-pain.
20. Ne rangez aucun matériel, autre que les accessoires
UHFRPPDQGpVSDUOHIDEULFDQWGDQVFHIRXUORUVTXLO
n'est pas utilisé.
21. Ne recouvrez pas les grilles ou toute autre partie du
four d'une feuille métallique. Cela entraînerait une
VXUFKDXႇHGXIRXU
22. 1HSDVLPPHUJHUOHFRUGRQRXOD¿FKHGDQVOHDX
23. 7HQLUOHFRUGRQjOpFDUWGHODVXUIDFHFKDXႇpH
24. 1HODLVVH]SDVOHFRUGRQSHQGUHVXUOHERUGGXQH
WDEOHRXGXQFRPSWRLU
25. Ne pas monter au-dessus d'un évier.
26. Ne posez rien directement sur la surface de l'appareil
lorsque celui-ci est en fonctionnement.
&216(59(5&(6,16758&7,216
Consignes de sécurité importantes
!
Les liquides et autres aliments ne doivent
SDVrWUHFKDXႇpVGDQVGHVUpFLSLHQWV
hermétiques, car ils risquent d'exploser.
7. LES CONTENUS CHAUDS PEUVENT
PROVOQUER DES BRÛLURES GRAVES.
NE LAISSEZ PAS LES ENFANTS UTILISER
LE MICRO-ONDES. Soyez prudent lorsque vous
retirez des objets chauds.
FR-6
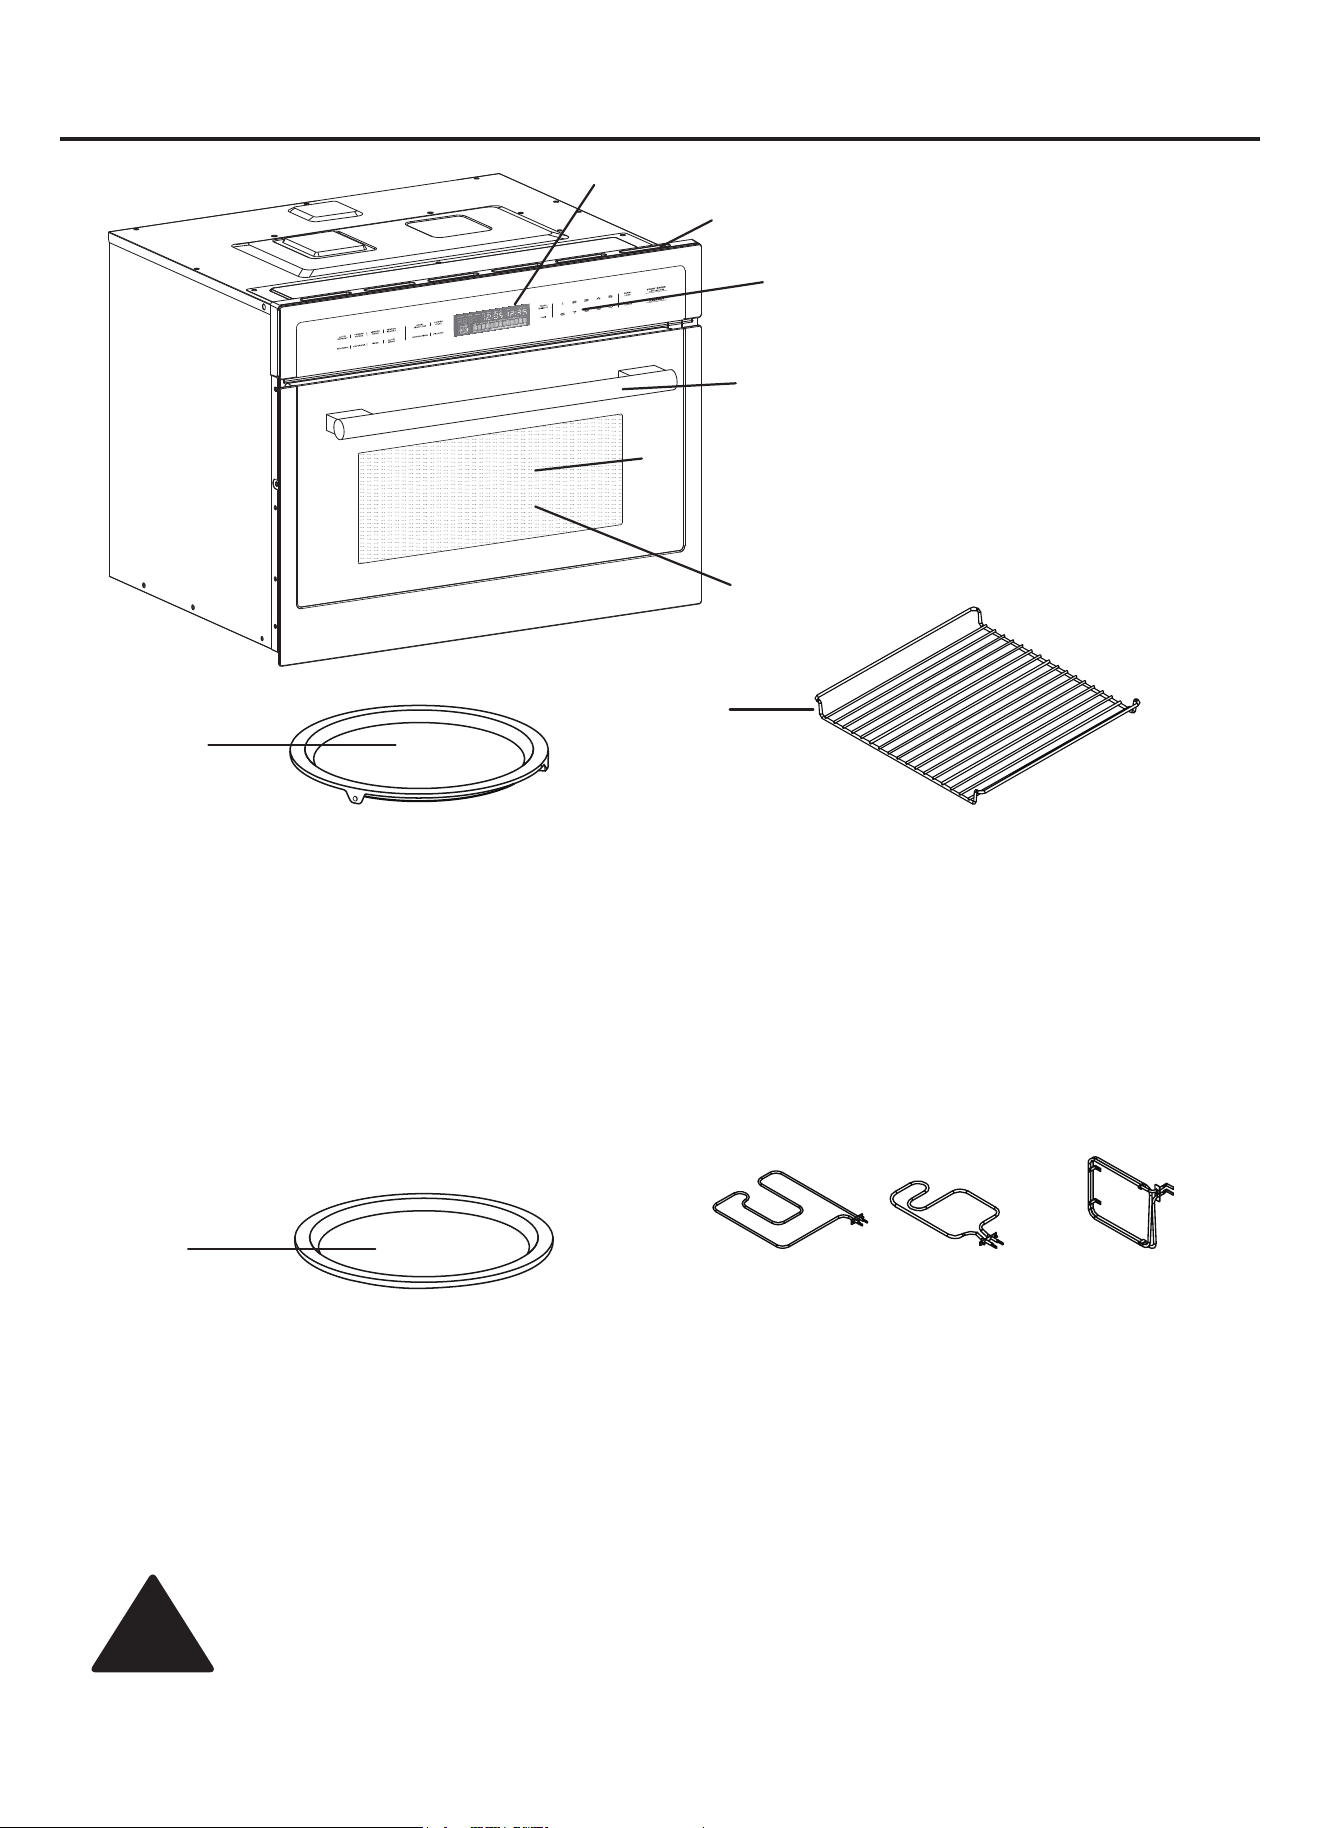
Noms des pièces et accessoires
A. $ႈFKHU
B. Ventilation de l'air
C. Panneau de contrôle
D. Poignée
E. Fenêtre
F. Cadre
G. Plaque tournante en
métal
+ Crémaillère coulissante
I. Plaque tournante en
céramique
!
La grille peut rester à l'intérieur du four à micro-ondes pendant la fonction micro-ondes, à
condition qu'elle soit placée correctement dans les supports de grille.
A
B
C
D
E
F
I
• Le plateau tournant peut tourner dans le sens des
aiguilles d'une montre ou dans le sens inverse.
• Placez le plateau tournant sur l'entraînement au centre
du compartiment de cuisson. Veillez à ce qu'il soit
correctement installé.
• 1XWLOLVH]MDPDLVOHPLFURRQGHVVDQVOHSODWHDX
tournant.
• /HSODWHDXWRXUQDQWSHXWVXSSRUWHUMXVTXjOLYUHV
• Le plateau tournant doit tourner lors de l'utilisation de
WRXVOHVW\SHVGHFKDXႇDJH
• Le plateau est en métal avec un revêtement en
porcelaine.
• 8QHJULOOHPpWDOOLTXHUpYHUVLEOHHVWLQFOXVHSRXUXQH
FRQYHFWLRQPD[LPDOH3RXUREWHQLUOHVPHLOOHXUV
résultats lors de la cuisson ou du rôtissage, placez
ODJULOOHIDFHYHUVOHEDVSRXUODFXLVVRQ3RXUOHJULO
placez la grille face vers le haut.
• L'appareil est également équipé d'une plaque en
céramique cordiertie qui peut être placée sur le
SODWHDXWRXUQDQWSRXUXQHFXLVVRQSOXVVWDEOH
• /DSSDUHLOHVWpTXLSpGHpOpPHQWVFKDXႇDQWV
G
+
Avant d'utiliser les accessoires pour la première fois, nettoyez-les soigneusement avec de l'eau chaude savonneuse et un
FKLႇRQjYDLVVHOOHGRX[
7RS (QEDV Convection réelle
FR-7
Interférences radio
1. L'utilisation du four à micro-ondes peut provoquer des interférences avec votre radio, votre télévision ou tout autre
équipement similaire.
2. En cas d'interférences, celles-ci peuvent être réduites ou éliminées en prenant les mesures suivantes : 1)
Nettoyer la porte et la surface d'étanchéité du micro-ondes 2) Réorienter l'antenne de réception de la radio
ou de la télévision. 3) Déplacer le micro-ondes par rapport au récepteur. 4) Éloigner le micro-ondes du
récepteur. 5) Branchez le four à micro-ondes sur une autre prise de manière à ce que le four à micro-ondes et le
services de communication radio autorisés.
Ustensiles de cuisine
ATTENTION - Risque de blessure corporelle
Les récipients fermés hermétiquement peuvent exploser. Les récipients fermés doivent être ouverts et les sachets en
plastique doivent être percés avant la cuisson. Voir les instructions sur les "Matériaux utilisables au micro-ondes et
matériaux à éviter au micro-ondes"
Certains ustensiles de cuisine non métalliques ne peuvent pas être utilisés en toute sécurité au micro-ondes. En cas de
doute, vous pouvez tester l'ustensile de cuisine en question en suivant la procédure ci-dessous.
Test d'ustensiles de cuisine :
1. Remplissez un récipient adapté aux micro-ondes avec une tasse d'eau froide (250 ml) et l'ustensile en question.
2. Cuire à puissance maximale pendant 1 minute.
3. Touchez soigneusement l'ustensile. Si l'ustensile vide est chaud, ne l'utilisez pas pour la cuisson au micro-ondes.
4. Ne pas dépasser 1 minute de cuisson.
Instructions de mise à la terre
Cet appareil doit être mis à la terre. En cas de court-circuit électrique, la mise à la terre réduit le risque de choc électrique
AVERTISSEMENT - Une mauvaise utilisation de la mise à la terre peut entraîner un risque d'électrocution.
ou si vous avez des doutes quant à la mise à la terre de l'appareil. S'il est nécessaire d'utiliser une rallonge, n'utilisez
l'appareil.
DANGER - Risque de choc électrique
Le fait de toucher certains composants internes peut entraîner des blessures graves, voire mortelles. Ne pas démonter
l'appareil.
AVERTISSEMENT - Risque de choc électrique
Une mauvaise utilisation de la mise à la terre peut entraîner un choc électrique. Ne pas brancher l'appareil dans une prise
de courant tant qu'il n'est pas correctement installé et mis à la terre.
1. Un cordon d'alimentation court est prévu pour réduire les risques d'enchevêtrement ou de trébuchement sur un
cordon plus long.
2. Des cordons plus longs ou des rallonges sont disponibles et peuvent être utilisés à condition d'être utilisés avec
précaution.
3. En cas d'utilisation d'un long cordon ou d'une rallonge : 1) La puissance électrique indiquée sur le cordon ou la
rallonge doit être au moins égale à la puissance électrique de l'appareil. 2) La rallonge doit être un cordon à trois
Le cordon le plus long doit être disposé de manière à ce qu'il ne tombe pas sur le plan de
travail ou la table, où les enfants pourraient tirer dessus ou trébucher involontairement.
**CET APPAREIL EST CONFORME À LA PARTIE 18 DES RÈGLES DE LA FCC.**
(UNIQUEMENT POUR LES ETATS-UNIS)
FR-8
0$7e5,$8;¬e9,7(5'$16/(60,&5221'(6
Matériau
Instructions
Plateau en aluminium
3HXWSURYRTXHUGHVDUFVpOHFWULTXHV7UDQVIpUHUOHVDOLPHQWVGDQVXQSODWDOODQWDXPLFUR
ondes.
Carton alimentaire avec
poignée métallique
3HXWSURYRTXHUGHVDUFVpOHFWULTXHV7UDQVIpUHUOHVDOLPHQWVGDQVXQSODWDOODQWDXPLFUR
ondes.
Ustensiles en métal ou
garnis de métal
Le métal protège les aliments de l'énergie des micro-ondes. Les garnitures métalliques
peuvent provoquer des arcs électriques.
Attaches torsadées en
métal
Peut provoquer un arc électrique et un incendie dans le four à micro-ondes.
Sacs en papier Peut provoquer un incendie dans le four à micro-ondes.
Mousse plastique
La mousse plastique peut fondre ou contaminer le liquide qu'elle contient lorsqu'elle est
exposée à des températures élevées.
Bois
/HERLVVHGHVVqFKHORUVTXLOHVWXWLOLVpGDQVOHIRXUjPLFURRQGHVHWSHXWVHIHQGUHRXVH
craqueler.
0$7e5,$8;87,/,6$%/(6$80,&5221'(6
Matériau
Instructions
3ODWjEUXQLU
6XLYUHOHVLQVWUXFWLRQVGXIDEULFDQW/HIRQGGXSODWjEUXQLUGRLWVHWURXYHUjDXPRLQV
mm au-dessus du plateau tournant. Une utilisation incorrecte peut entraîner la rupture de
la platine.
Vaisselle
3DVVHDXIRXUjPLFURRQGHVXQLTXHPHQW6XLYUHOHVLQVWUXFWLRQVGXIDEULFDQW1HSDV
XWLOLVHUGHYDLVVHOOH¿VVXUpHRXpEUpFKpH
Bocaux en verre
5HWLUH]WRXMRXUVOHFRXYHUFOH8WLOLVHUXQLTXHPHQWSRXUFKDXႇHUOHVDOLPHQWVMXVTXjFH
TXLOVVRLHQWWRXWMXVWHFKDXGV/DSOXSDUWGHVERFDX[HQYHUUHQHVRQWSDVUpVLVWDQWVjOD
FKDOHXUHWSHXYHQWVHEULVHU
Verrerie
Verrerie résistante à la chaleur uniquement. Assurez-vous qu'il n'y a pas de garniture
PpWDOOLTXH1HSDVXWLOLVHUGHYDLVVHOOH¿VVXUpHRXpEUpFKpH
Sacs de cuisson
6XLYUHOHVLQVWUXFWLRQVGXIDEULFDQW1HSDVIHUPHUDYHFXQOLHQPpWDOOLTXH)DLUHGHV
fentes pour permettre à la vapeur de s'échapper.
$VVLHWWHVHWJREHOHWVHQ
papier
$XWLOLVHUXQLTXHPHQWSRXUODFXLVVRQOHUpFKDXႇDJHGHFRXUWHGXUpH1HODLVVH]SDVOH
micro-ondes sans surveillance pendant la cuisson.
Serviettes en papier
$XWLOLVHUXQLTXHPHQWSRXUODFXLVVRQOHUpFKDXႇDJHGHFRXUWHGXUpH1HODLVVH]SDVOH
micro-ondes sans surveillance pendant la cuisson.
Papier sulfurisé
$XWLOLVHUXQLTXHPHQWSRXUODFXLVVRQOHUpFKDXႇDJHGHFRXUWHGXUpH1HODLVVH]SDVOH
micro-ondes sans surveillance pendant la cuisson.
Plastique
3DVVHDXIRXUjPLFURRQGHVXQLTXHPHQW6XLYH]OHVLQVWUXFWLRQVGXIDEULFDQW/pWLTXHWWH
GRLWSRUWHUODPHQWLRQ0LFURZDYH6DIHVDQVGDQJHUSRXUOHVPLFURRQGHV&HUWDLQV
récipients en plastique se ramollissent lorsque les aliments qu'ils contiennent se
UpFKDXႇHQWOHVVDFVjERXLOOLUHWOHVVDFVHQSODVWLTXHIHUPpVKHUPpWLTXHPHQWGRLYHQW
rWUHIHQGXVSHUFpVRXYHQWLOpVFRPPHLQGLTXpVXUOHPEDOODJH
Film plastique
Passe au four à micro-ondes uniquement. A utiliser pour couvrir les aliments pendant la
FXLVVRQD¿QGHFRQVHUYHUOKXPLGLWp/H¿OPSODVWLTXHQHGRLWSDVWRXFKHUOHVDOLPHQWV
7KHUPRPqWUHV 8QLTXHPHQWSRXUOHPLFURRQGHVWKHUPRPqWUHVjYLDQGHHWjERQERQV
Papier ciré 8WLOLVHUFRPPHFRXYHUWXUHSRXUpYLWHUOHVpFODERXVVXUHVHWFRQVHUYHUOKXPLGLWp
FR-9

ATTENTION !
•
Création d'étincelles : Le métal, par exemple une
cuillère dans un verre, doit être placé à au moins 2
cm des parois du four et de l'intérieur de la porte. Les
pWLQFHOOHVSHXYHQWHQGRPPDJHULUUpPpGLDEOHPHQWOH
verre à l'intérieur de la porte.
•
(DXGDQVOHVSDFHGHFXLVVRQFKDXG1HMDPDLV
verser d'eau dans le compartiment de cuisson chaud.
Cela provoquera de la vapeur. Le changement de
température peut causer des dommages.
•
Aliments humides : Ne conservez pas d'aliments
humides dans le compartiment de cuisson fermé
pendant de longues périodes. Ne pas utiliser l'appareil
pour conserver des aliments. Cela peut conduire à la
corrosion.
•
Refroidissement avec la porte de l'appareil ouverte :
Ne laissez refroidir le compartiment de cuisson que
lorsque la porte est fermée. Ne coincez rien dans
la porte de l'appareil. Même si la porte n'est que
légèrement entrouverte, les façades des logements
DGMDFHQWVSHXYHQWrWUHHQGRPPDJpHVDX¿OGXWHPSV
•
-RLQWWUqVHQFUDVVp6LOHMRLQWHVWWUqVVDOHODSRUWH
de l'appareil ne se fermera plus correctement pendant
OHIRQFWLRQQHPHQW/HVIDoDGHVGHVXQLWpVDGMDFHQWHV
SRXUUDLHQWrWUHHQGRPPDJpHV9HLOOH]jFHTXHOHMRLQW
VRLWWRXMRXUVSURSUH
•
Faire fonctionner le micro-ondes sans aliments
: Faire fonctionner l'appareil sans aliments dans
le compartiment de cuisson peut entraîner une
8WLOLVH]FHWWHOLVWHGHFRQWU{OHSRXUYpUL¿HUTXHYRXVDYH]
HႇHFWXpFKDTXHpWDSHGXSURFHVVXVGLQVWDOODWLRQ&HOD
peut vous aider à éviter les erreurs.
Reportez-vous aux instructions détaillées pour chaque
étape dans les sections qui suivent cette liste de contrôle.
1. $YDQWGLQVWDOOHUODSSDUHLOYpUL¿H]TXHOHVGLPHQVLRQV
GXPHXEOHVRQWDGDSWpHVjODSSDUHLOHWTXHOHV
raccordements électriques nécessaires sont présents.
Assurez-vous que le conduit électrique prévu sur
l'appareil peut atteindre le point de connexion. Section
: Dimensions et exigences en matière d'armoires
2. Mettez l'appareil en place devant l'ouverture du
PHXEOH6HFWLRQ5HWUDLWGHOHPEDOODJH
3. 5HWLUH]OHVPDWpULDX[GHPEDOODJHHQODLVVDQW
OHPEDOODJHLQIpULHXUVXUODSSDUHLOSRXUpYLWHU
GHQGRPPDJHUOHVRO6HFWLRQ5HWUDLWGHOHPEDOODJH
4.
Levez l'appareil en équipe directement dans
l'ouverture de l'armoire. Section : Installation de
l'appareil, "Montage sur l'armoire"
5.
)DLWHVJOLVVHUODSSDUHLOMXVTXjVDSRVLWLRQ6HFWLRQ
Installation de l'appareil, "Montage sur l'armoire"
Causes des dommages
dimensions et conditions d'installation
VXUFKDUJH1DOOXPH]MDPDLVODSSDUHLOVLOQ\DSDV
d'aliments dans le compartiment de cuisson. Une
exception à cette règle est le test de la vaisselle courte
(voir la section "Micro-ondes, vaisselle adaptée").
•
8WLOLVDWLRQGHODSRUWHGHODSSDUHLOSRXUVHWHQLUGHERXW
RXSODFHUGHVREMHWV1HYRXVWHQH]SDVGHERXWHW
ne placez rien sur la porte ouverte de l'appareil. Ne
placez pas d'ustensiles de cuisine ou d'accessoires
sur la porte de l'appareil.
•
7UDQVSRUWGHODSSDUHLO1HSDVSRUWHURXWHQLU
l'appareil par la poignée de la porte. La poignée de la
porte ne peut pas supporter le poids de l'appareil et
risque de se casser.
•
0DwVVRXႉpDXPLFURRQGHV1HMDPDLVUpJOHUOD
puissance du four à micro-ondes à un niveau trop
pOHYp8WLOLVH]XQHSXLVVDQFHPD[LPDOHGHZDWWV
3ODFH]WRXMRXUVOHVDFGHSRSFRUQVXUXQHDVVLHWWHHQ
verre. Le disque peut sauter en cas de surcharge.
•
/HOLTXLGHTXLDERXLOOLQHGRLWSDVVpFRXOHUjOLQWpULHXU
de l'appareil par l'intermédiaire de l'entraînement du
plateau tournant. Surveiller le processus de cuisson.
Choisissez un temps de cuisson plus court au départ,
puis augmentez le temps de cuisson si nécessaire.
•
Le four doit être nettoyé régulièrement et les dépôts
d'aliments doivent être enlevés car ils peuvent
H[SORVHUPrPHDSUqVDYRLUpWpFKDXႇpVDXPLFUR
ondes.
•
Le fait de ne pas maintenir le four propre peut
entraîner une détérioration de la surface qui pourrait
nuire à la durée de vie de l'appareil et entraîner une
situation dangereuse.
6. )L[H]ODSSDUHLOjORXYHUWXUHGXPHXEOHjODLGHGHVYLV
fournies. Section : Installation de l'appareil, "Montage
sur l'armoire"
/LVH]HWVXLYH]WRXMRXUVOHVLQVWUXFWLRQVGLQVWDOODWLRQ
complètes contenues dans ce manuel.
• Un espace de ¼" (6,4 mm) est nécessaire entre le
F{WpGHODSSDUHLOHWXQPXUDGMDFHQWRXXQHSRUWH
GDUPRLUHORUVTXLOHVWLQVWDOOpjOD¿QGXQHUDQJpH
GDUPRLUHV/DEDVHGXPHXEOHGRLWrWUHSODWHHW
FDSDEOHGHVXSSRUWHUOHSRLGVGHODSSDUHLOORUVTXLO
HVWXWLOLVp3RXUOHVDSSDUHLOVFRPELQpVFRQVXOWH]OD
section relative aux dimensions de l'armoire dans le
PDQXHOGLQVWDOODWLRQGHYRWUHDSSDUHLOFRPELQp
• Lors de l'ouverture, la porte de l'appareil chevauche
OHPHXEOHVLWXpHQGHVVRXVGHQYLURQPP6L
nécessaire, vous pouvez surélever la position de
ODSSDUHLOHQDMRXWDQWXQSDQQHDXGHOpSDLVVHXU
UHTXLVHDXGHVVXVGHODEDVHGHVRXWLHQ/DEDVH
GDSSXLGRLWrWUHGHQLYHDXHWVROLGHPHQW¿[pHj
l'armoire.
FR-10
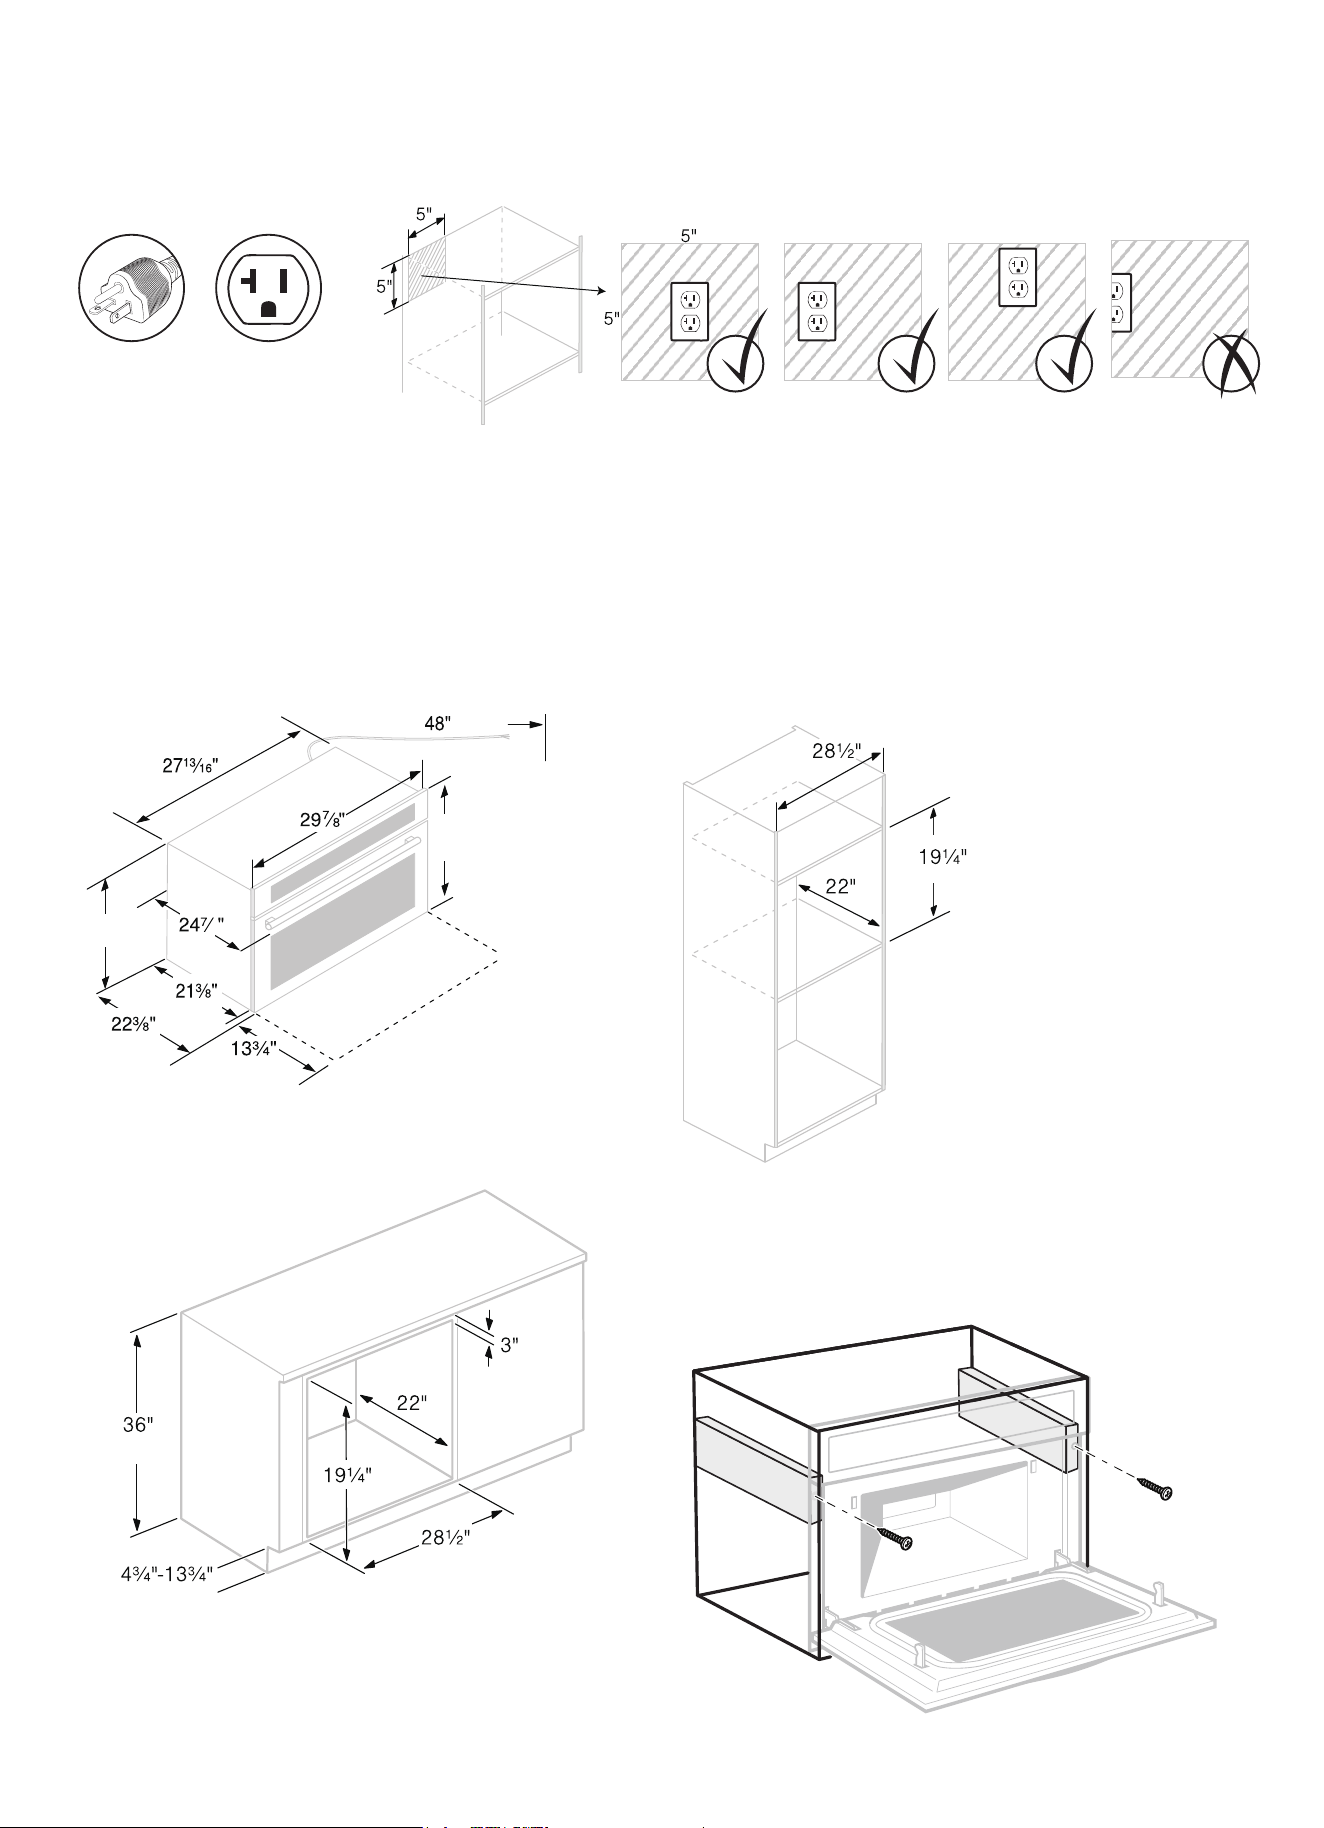
Zone de sortie pour une installation murale ou sur un comptoir.
• /DSSDUHLOHVWpTXLSpGXQHprise NEMA 5-20. Assurez-vous que la prise de courant est équipée d'un réceptacle
NEMA 5-20.
• /DSULVHSHXWrWUHVLWXpHQLPSRUWHRGDQVOD]RQHRPEUpH
Connexion électrique
/DSSDUHLOHVWpTXLSpGXQH¿FKHHWQHGRLWrWUHEUDQFKpTXHVXUXQHSULVHGHFRXUDQWFRUUHFWHPHQWLQVWDOOpHHWPLVHjOD
terre.
6HXOXQpOHFWULFLHQTXDOL¿pTXLWLHQWFRPSWHGHVUpJOHPHQWDWLRQVHQYLJXHXUSHXWLQVWDOOHUODSULVHRXUHPSODFHUOHFkEOHGH
UDFFRUGHPHQW6LOD¿FKHQHVWSOXVDFFHVVLEOHDSUqVOLQVWDOODWLRQXQLQWHUUXSWHXUGLVROHPHQWRPQLSRODLUHGRLWrWUHSUpVHQW
du côté de l'installation avec un espace de contact d'au moins 3 mm. La protection contre les contacts doit être assurée
SDUOLQVWDOODWLRQ3URWHFWLRQSDUIXVLEOHYRLUOHPRGHGHPSORLGRQQpHVWHFKQLTXHV
NEMA 5-20
Réceptacle
NEMA 5-20
Fiche
*
**
16
19”
18 ñ»”
Dimensions de l'appareil
5HPDUTXH/DEDVHGH
l'armoire doit être plate et
FDSDEOHGHVXSSRUWHUXQ
poids de 142 livres (64,1
kg)
Découpage
Pour l'installation au mur
• 9LVVH]OHVWDTXHWVHQERLVñ" dans le cadre du
comptoir ou de l'armoire.
• 3ODFHUXQHSODTXHGHEDVHGH๛" sous le corps de
l'appareil.
,QVWDOODWLRQDႉHXUDQWHInstallation sous le comptoir
Cleats
Cleats
Baseplate
19ï»”
opening
cut-out
height
20ï»”
flush
cut-out
height
»๛”
1”
FR-11
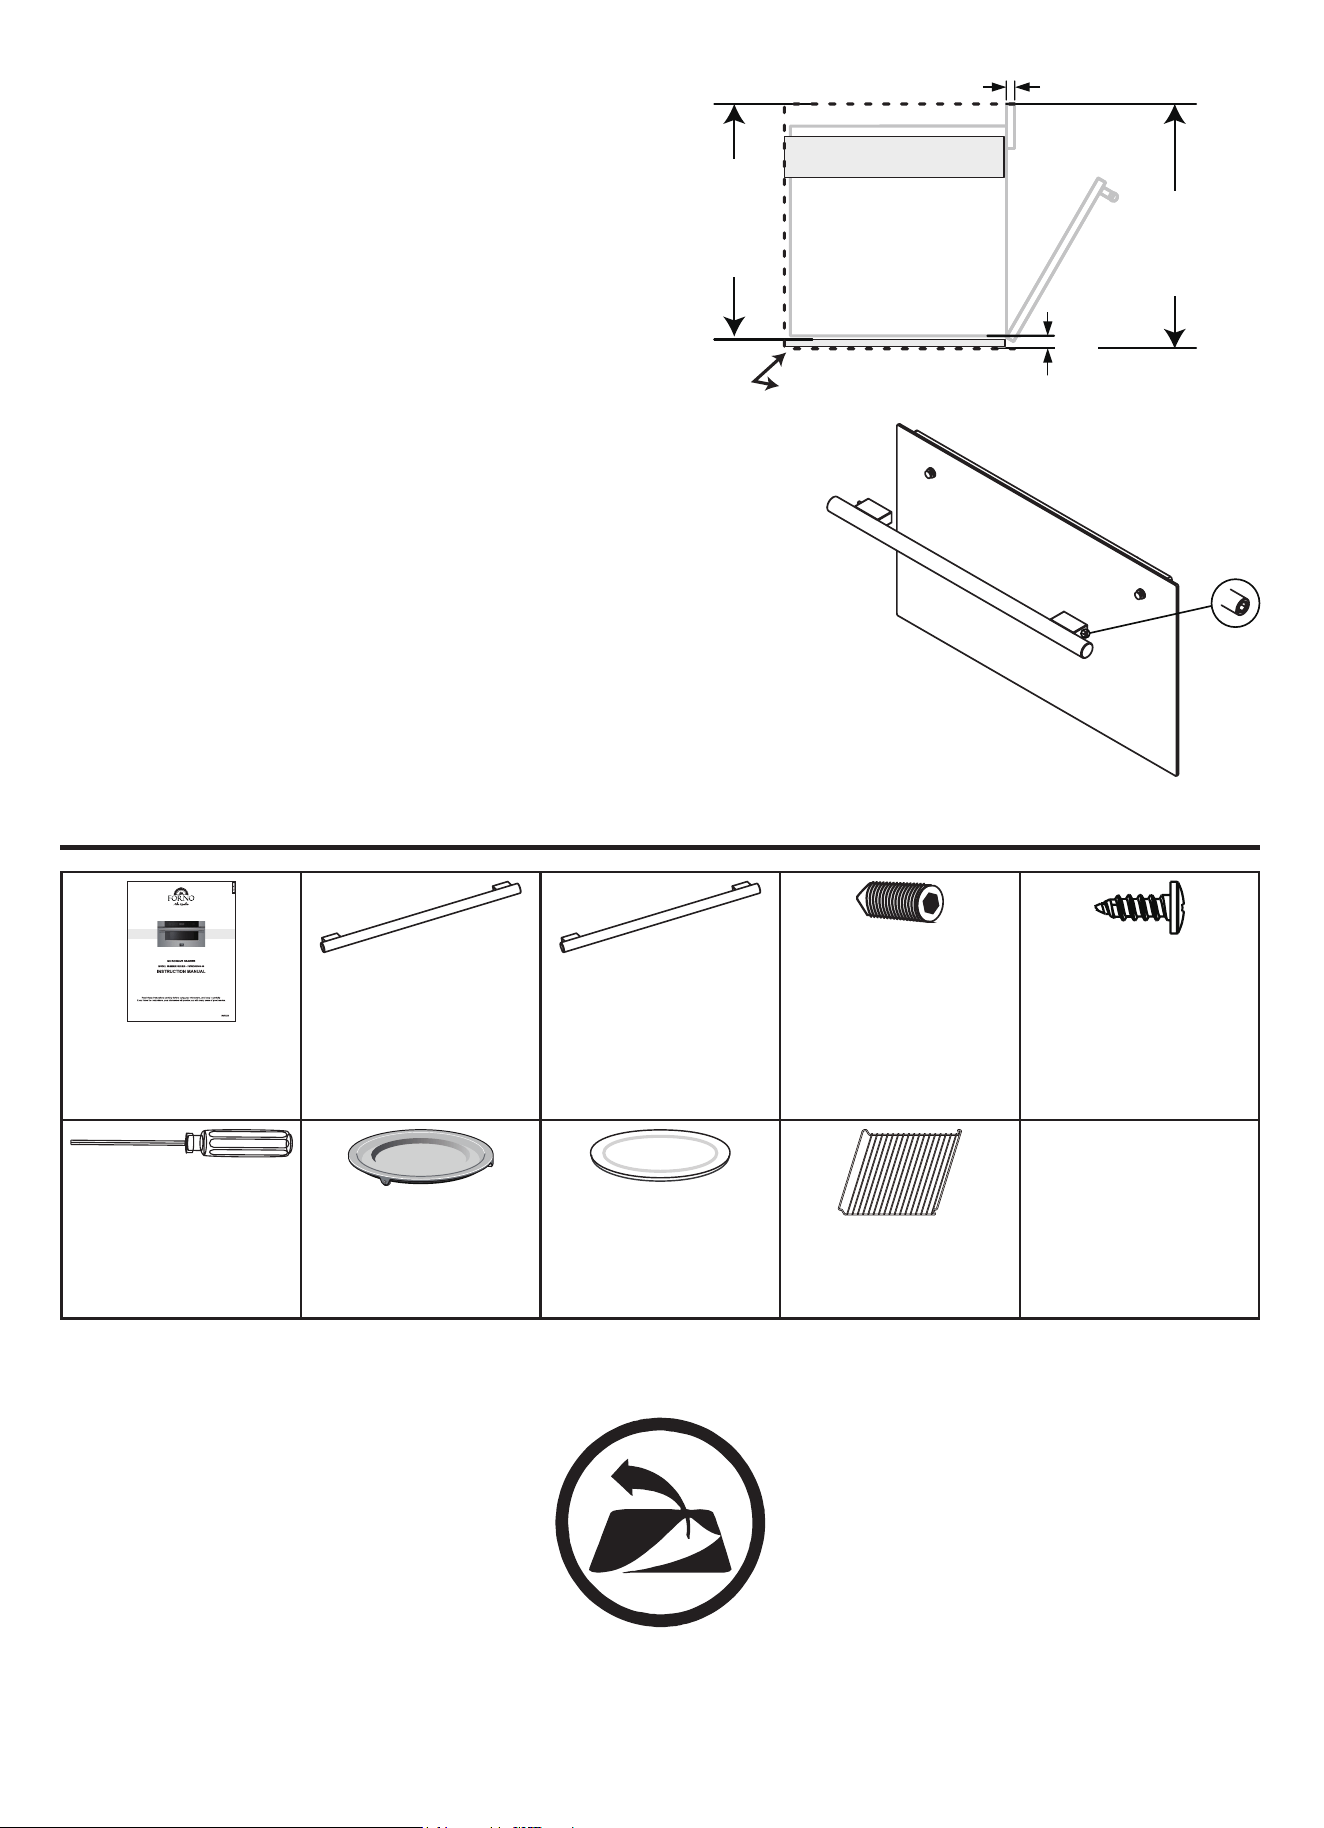
Cleats
Cleats
Baseplate
opening
cut-out
height
20ï»”
flush
cut-out
height
»๛”
1”
Remarque : l'appareil est lourd. Il est
SUpIpUDEOHGHOLQVWDOOHUDYHFXQHGHX[LqPH
personne. Avant d'installer l'appareil,
YpUL¿H]OHVGLPHQVLRQVGXPHXEOHHWOHV
raccordements électriques. Ne pas plier le
FkEOHpOHFWULTXH
5(7,5(57286/(6),/06(758%$16'(3527(&7,21LES FILMS DE
PROTECTION ET LES RUBANS AVANT L'UTILISATION.
INSTALLATION DE LA POIGNÉE
1.
5HSpUH]OHVWURXVVXUODIDFHLQIpULHXUHGHFKDTXHEDVHGHSRLJQpH
2.
¬ODLGHGXQHFOp$OOHQKH[WRXUQHUGDQVOHVHQVLQYHUVHGHVDLJXLOOHV
d'une montre pour desserrer les vis de réglage gauche et droite.
3.
Retirer la poignée avec précaution. Si vous installez une poignée,
SODFH]VRLJQHXVHPHQWODQRXYHOOHSRLJQpHVXUOHVJRXMRQVGHPRQWDJH
Ensuite, à l'aide de la clé Allen/hex, serrez les vis de réglage gauche
HWGURLWHGDQVOHVHQVGHVDLJXLOOHVGXQHPRQWUHMXVTXjFHTXHOD
poignée soit fermement en place.
Liste de colisage
Manuel d'instruction
1x
Poignée en laiton
antique
1x
Poignée en acier
LQR[\GDEOH
1x
Vis (poignée)
2x
Vis
2x
Clé Allen / hexagonale
1x
Plateau tournant en
métal
1x
Plateau tournant en
céramique
1x
Grille de four
FR-12
”
18
15
16
/
Poignée en laiton antique / Vis (poignée) uniquement pour les unités blanches et noires.
Fonctions principales
Symbole Fonction
Dégivrage automatique Sélection des programmes de décongélation automatique
Aliments surgelés Sélectionner les programmes de cuisson pour les plats cuisinés surgelés
Cuisson au capteur Sélectionner les programmes de cuisson des capteurs
5pFKDXႇDJHGXFDSWHXU 6pOHFWLRQGHVSURJUDPPHVGHUpFKDXႇDJHGHVFDSWHXUV
0DwVVRXႉp Cuire le pop-corn
Boissons &KDXႇHUOHVERLVVRQV
Pizza Sélectionner les programmes de pizza
Menu auto Sélectionner les programmes du menu automatique
Paramètre Fonction
Menu auto Sélection de 8 programmes préréglés
Poids Régler le poids pour la cuisson ou la décongélation
7HPSV Régler le temps de cuisson
/HVWRXFKHVWDFWLOHVSHUPHWWHQWGHUpJOHUOHVGLႇpUHQWHVIRQFWLRQVVXSSOpPHQWDLUHV6XUOpFUDQYRXVSRXYH]OLUHOHV
valeurs que vous avez réglées.
8WLOLVH]OHVWRXFKHVGHUpJODJHSRXUGp¿QLUOHVSDUDPqWUHV
Symbole Fonction
Griller 5pJODJHGHVPRGHVGHFXLVVRQKDXWRXEDV
Niveau de puissance Régler le niveau de puissance pour le fonctionnement des micro-ondes
Convection
Sélectionner les programmes de cuisson Bake Cook
Sélectionner les programmes de cuisson du rôti
3UpFKDXႇDJH 6pOHFWLRQGHVSURJUDPPHVGHSUpFKDXႇDJH
Poids de la température Régler la température ou le poids de la cuisson
7HPSV Régler le temps de cuisson
Verrouillage du panneau Activer / désactiver la sécurité enfant
+RUORJH 5pJOHUOKHXUHGHODMRXUQpH
0-9 Utilisez les touches numériques pour entrer les valeurs personnalisées
Démarrage / entrée +30 secondes
&RQ¿UPHUOHVYDOHXUVVDLVLHV'pPDUUHUOHPRGHGHFXLVVRQ
$MRXWHUVHFRQGHV
(ႇDFHU'pVDFWLYHU (ႇDFHUODYDOHXUVDLVLHpWHLQGUHODSSDUHLO
FR-13
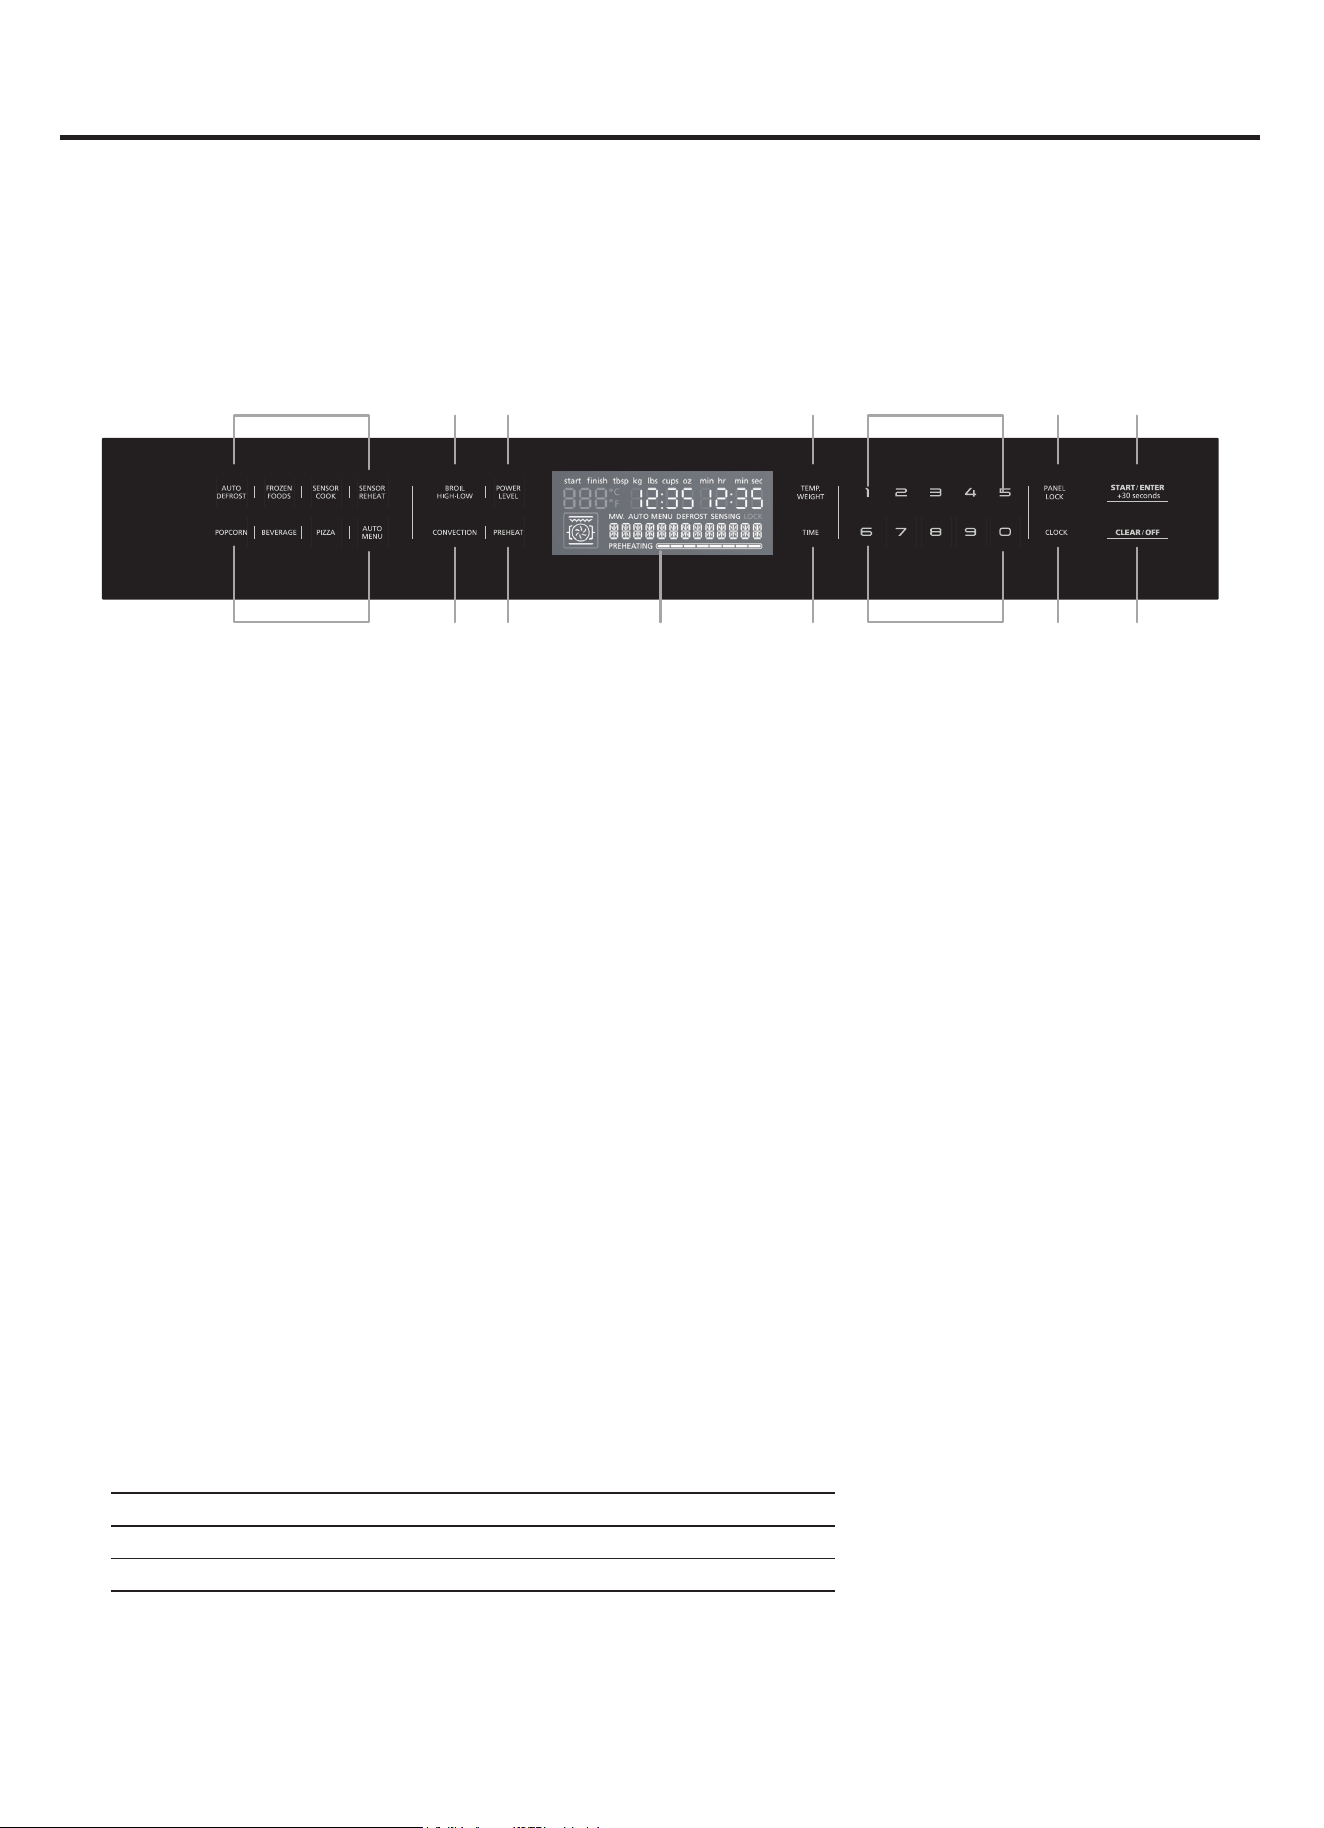
Votre appareil est équipé d'un ventilateur de refroidissement. Le ventilateur de refroidissement se met en marche pendant
le fonctionnement. L'air chaud s'échappe au-dessus de la porte. Le ventilateur de refroidissement continue de fonctionner
pendant un certain temps après l'opération.
Attention !1HSDVFRXYULUOHVIHQWHVGDpUDWLRQ'DQVOHFDVFRQWUDLUHODSSDUHLOVXUFKDXႇHUD
Notes
•
Le ventilateur peut continuer à fonctionner même si l'opération de micro-ondes est terminée.
•
De la condensation peut apparaître sur la fenêtre de la porte, les murs intérieurs et le sol. Ce phénomène est normal
HWQDႇHFWHSDVOHIRQFWLRQQHPHQWGHVPLFURRQGHV(VVX\H]ODFRQGHQVDWLRQDSUqVODFXLVVRQ
Opération
(1)
(1)
(2)
(8)
(3)
(9) (10)
(4)
(11)
(5)
(5)
(6)
(12)
(7)
(13)
1.
3UpGp¿QL
2.
*ULOOHUKDXWRXEDV
3.
Niveau de puissance
4.
Poids de la température
5.
7RXFKHVQXPpULTXHV
6.
Verrouillage du panneau
7.
Démarrer / entrer +30sec.
8.
Convection.
9.
3UpFKDXႇDJH
10.
$ႈFKHU
11.
7HPSV
12.
+RUORJH
13.
(ႇDFHUpWHLQGUH
1. Réglage de l'horloge :
8QHIRLVODSSDUHLOEUDQFKpVXUOHVHFWHXUVDႈFKHFRPPHKHXUHGXMRXU3RXUUpJOHUOKHXUHFRUUHFWH
procédez comme suit :
D$SSX\H]VXU&ORFN
E(QWUH]OKHXUHFRUUHFWHjODLGHGHVWRXFKHVQXPpULTXHV([HPSOHSRXUUpJOHUOKHXUHVXUWDSH]
F$SSX\HUVXU6WDUW(QWHUVHFRQGVSRXUFRQ¿UPHU
5HPDUTXH3RXUpOLPLQHUORGHXUGXIRXUQHXIFKDXႇH]ODSSDUHLOORUVTXLOHVWYLGHHWIHUPp8QHKHXUH/DFXLVVRQSDU
FRQYHFWLRQj)&HVWLGpDOH9HLOOH]jFHTXDXFXQUHVWHGHPEDOODJHQHVRLWODLVVpGDQVODFDYLWpGXIRXU
(1) Appuyez une fois sur Convection pour passer en mode cuisson.
(QWUH]OHVFKLႇUHVjODLGHGHVWRXFKHVQXPpULTXHV
7RXFKH]7,0(SRXUUpJOHUOHWHPSVGHFXLVVRQ
(QWUH]OHVFKLႇUHVjODLGHGHVWRXFKHVQXPpULTXHV
(5) Appuyez sur Start/Enter +30 seconds pour démarrer la cuisson. Le voyant du four s'allume et l'appareil
FRPPHQFHjFKDXႇHU
2. Réglage du four :
9RXVSRXYH]XWLOLVHUYRWUHIRXUGHGLႇpUHQWHVPDQLqUHV1RXVYRXVH[SOLTXRQVLFLFRPPHQWVpOHFWLRQQHUOHW\SHGH
FKDXႇDJHHWODWHPSpUDWXUHVRXKDLWpVRXOHUpJODJHGXJULO9RXVSRXYH]pJDOHPHQWVpOHFWLRQQHUOHWHPSVGHFXLVVRQ
de votre plat. Veuillez vous reporter à la section relative au UpJODJHGHVRSWLRQVGHUpJODJHGHOKHXUH.
Réglage du mode convection : ([HPSOHU{WLUj)SHQGDQWPLQXWHV
(1) Appuyez deux fois sur Convection pour passer en mode rôti.
(QWUH]OHVFKLႇUHVjODLGHGHVWRXFKHVQXPpULTXHV
7RXFKH]7,0(SRXUUpJOHUOHWHPSVGHFXLVVRQ
(QWUH]OHVFKLႇUHVjODLGHGHVWRXFKHVQXPpULTXHV
(5) Appuyez sur Start/Enter +30 seconds pour démarrer la cuisson.
3UpFKDXႇDJH
$YHFOHSUpFKDXႇDJHYRWUHIRXUDWWHLQGUDODWHPSpUDWXUHGHFRQVLJQHSDUWLFXOLqUHPHQWUDSLGHPHQW3RXUJDUDQWLUXQH
FXLVVRQDXIRXUQLQWURGXLVH]YRVDOLPHQWVGDQVOHFRPSDUWLPHQWGHFXLVVRQTXHORUVTXHODSKDVHGHSUpFKDXႇDJH
est terminée.
FR-14
Programme Appuyer sur la touche Convection Gamme de température
Cuisson fois 250~400ƈ
300~450 ƈdeux foisRôti
Note : Si vous n'avez pas besoin d'ajuster la durée, sautez l'étape 3-4.
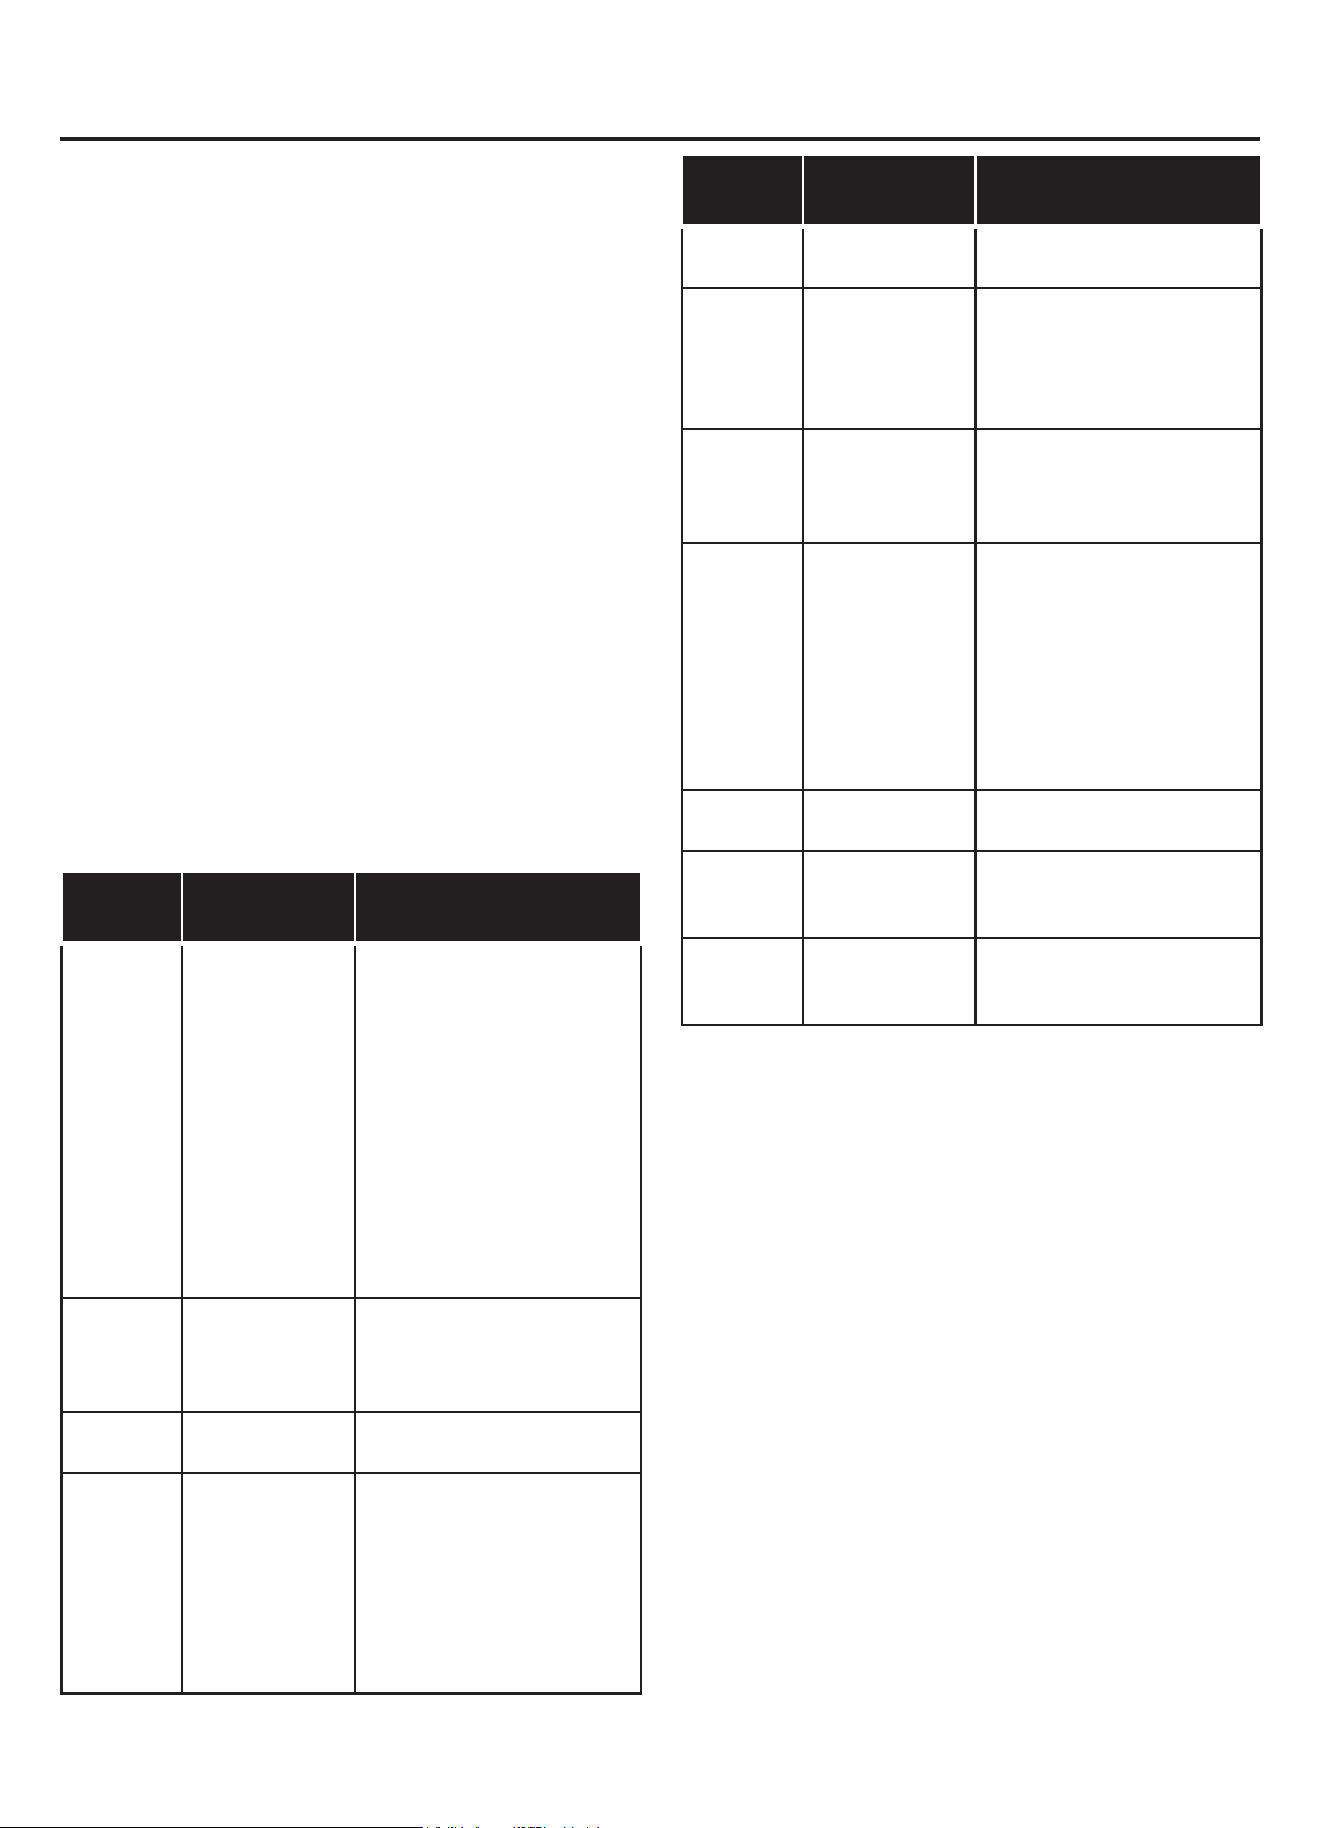
$SSX\HUVXUODWRXFKH3UpFKDXႇDJH
(2) Entrer le réglage de la température à l'aide de la
touche numérique. La température d'entrée doit être
comprise entre 100 et 450ºF
(3) Appuyer sur la touche Start / Enter +30 seconds.
/HIRXUFRPPHQFHjFKDXႇHU
8QHIRLVOHSURFHVVXVGHSUpFKDXႇDJHWHUPLQpXQ
signal sonore vous informe que vous pouvez placer
vos aliments dans le four. Réglez le mode de cuisson
GRQWYRXVDYH]EHVRLQ
,OH[LVWHGHX[IDoRQVGDQQXOHUOHSUpFKDXႇDJH
$SSX\HUVXUODWRXFKHFOHDURႇSRXUDQQXOHU
(2) Vous pouvez ouvrir la porte pour annuler
l'opération.
Remarque : Ce n'est que lorsque vous entendez
ODODUPHGDOHUWHHWTXHOLF{QHGHSUpFKDXႇDJH
clignote que vous pouvez ouvrir la porte et placer des
aliments à l'intérieur.
3. Niveau de puissance :
Vous pouvez choisir parmi 11 niveaux de puissance
GHPLFURRQGHVGLႇpUHQWV6LYRXVQHGp¿QLVVH]
pas de niveau de puissance, le four à micro-
ondes fonctionnera automatiquement au niveau de
SXLVVDQFHOHSOXVpOHYp/HWDEOHDXFLGHVVRXVLQGLTXH
OHVQLYHDX[GHSXLVVDQFHVXJJpUpVSRXUOHVGLႇpUHQWV
types d'aliments pouvant être préparés au micro-
ondes.
Fonctionnement (suite)
Niveau de
puissance
Sortie
micro-ondes
Fonction
PWR100
100%
(DXERXLOODQWH
Cuisson de la viande
hachée
)DEULFDWLRQGHERQERQV
Cuisiner des fruits et
légumes frais
Cuisson du poisson et de
la volaille
3UpFKDXႇDJHGXSODWj
EUXQLU
5pFKDXႇHUGHVERLVVRQV
Cuisson des tranches de
EDFRQ
PWR90 90%
5pFKDXႇHUUDSLGHPHQWGHV
tranches de viande
Faire sauter les oignons, le
céleri et les poivrons verts
PWR80 80%
7RXVOHVUpFKDXႇDJHV
&XLVVRQGHV°XIVEURXLOOpV
PWR70 70%
Cuisson de pains et de
produits céréaliers
Cuisiner des plats au
fromage
&XLVLQHUGHVPXႈQVGHV
EURZQLHVHWGHVFXSFDNHV
Cuisson de la volaille
entière
Réglage du micro-ondes :
(1) Entrez le temps de cuisson souhaité à l'aide des
WRXFKHVQXPpULTXHV/DႈFKDJHGHODPLQXWHULHVH
remplit de droite à gauche. Exemple : Pour régler une
durée de micro-ondes de 20 minutes et 30 secondes,
HQWUH]OHVFKLႇUHV
(2) Vous pouvez démarrer le fonctionnement du four à
micro-ondes avec le niveau de puissance par défaut
PWR100 en appuyant sur Start / Enter +30 seconds, - ou
YRXVSRXYH]UpJOHUXQQLYHDXGHSXLVVDQFHGLႇpUHQW
Niveau de puissance tactile.
(3)Entrez le niveau de puissance souhaité à l'aide des
touches numériques.
(4) Appuyez sur Start / Enter +30 seconds pour
lancer le fonctionnement du four à micro-ondes.
La minuterie du four à micro-ondes commence à
décompter.
Niveau de
puissance
Sortie
micro-ondes
Fonction
PWR60 60% &XLVVRQGHVSkWHV
PWR50 50%
Cuisson de la viande
Cuisson de la crème
SkWLVVLqUH
&XLVVRQGHVVSDUHULEVULE
roast et sirloin roast
PWR40 40%
Cuisson de morceaux de
viande moins tendres
5pFKDXႇHUGHVDOLPHQWV
FRQJHOpVHPEDOOpV
PWR30 30%
Décongélation de la
viande, de la volaille et des
fruits de mer
Cuisiner de petites
quantités d'aliments
7HUPLQHUODFXLVVRQGHV
UDJRWVGHVSODWVPLMRWpV
et de certaines sauces
Chocolat fondant
PWR20 20%
5DPROOLUOHEHXUUHHWOH
fromage frais
PWR10 10%
Ramollissement de la
crème glacée
)DLUHOHYHUODSkWHjOHYXUH
PWR0 0%
7UDYDLOOHUDYHFXQ
ventilateur sans puissance
Supprimer l'odeur du four
FR-15
(1) Utilisez la touche pour démarrer rapidement votre micro-ondes au niveau de puissance le plus élevé. Vous pouvez
appuyer plusieurs fois sur la touche pour augmenter le temps de cuisson au micro-ondes par incréments de 30
secondes.
(QDSSX\DQWVXUFHWWHWRXFKHSHQGDQWOHIRQFWLRQQHPHQWGXIRXUjPLFURRQGHVYRXVDMRXWH]VHFRQGHVDX
temps de cuisson restant. Le temps de cuisson est écoulé.
8QELSVRQRUHYRXVDYHUWLWTXHORSpUDWLRQPLFURRQGHVHVWWHUPLQpH
5. Cuisson en plusieurs étapes :
(QWUH]OHWHPSVGHFXLVVRQVRXKDLWpjODLGHGHVWRXFKHVQXPpULTXHV/DႈFKDJHGHODPLQXWHULHVHUHPSOLWGH
droite à gauche.
(2) Appuyez sur Pow er Level.
(3) Entrez le niveau de puissance souhaité à l'aide des touches numériques.
(4) Appuyez sur Pow er Level.
(5) Entrer le niveau de puissance souhaité à l'aide de la touche numérique
(6) Appuyer sur Start /Enter +30 secondes.
(7). Entrez le temps de cuisson souhaité à l'aide des touches numériques.
(8) Appuyez sur Start/Enter +30 seconds pour lancer le fonctionnement du micro-ondes... Vous serez alerté par un
son à 3 reprises lorsque la première phase de cuisson sera terminée et que vous passerez à la deuxième phase.
6. Programmes automatiques :
(1) Appuyer sur Auto menu.
$SSX\HUSOXVLHXUVIRLVSRXUIDLUHGp¿OHUWRXVOHV$XWRPHQX
7RXFKHUOHVWRXFKHVQXPpULTXHVSRXUDMXVWHUOHSRLGVGHVDOLPHQWV
(4) Appuyez sur Start / Enter +30 seconds pour démarrer la cuisson.
Remarque : L'ouverture de la porte de l'appareil pendant le fonctionnement interrompt le mode en cours. Fermez la
porte de l'appareil et appuyez sur Start / Enter +30 seconds pour reprendre le fonctionnement.
$QQXOHUORSpUDWLRQ7RXFKH]&OHDU2ႇSRXUDQQXOHUOHRSpUDWLRQ
Les ventilateurs de refroidissement peuvent continuer à fonctionner pendant un certain temps, puis s'éteindre
automatiquement.
FR-16
4. Cuisson express :
(1) En mode veille, appuyez sur les touches numériques 1 à 9 pour lancer une cuisson à 100 % au
micro-ondes en 1 à 9 minutes.
(2). Si la porte est fermée, le four commence à cuire automatiquement après 2 secondes.
Cuisson rapide au micro-ondes :
GpFRQJpODWLRQWHUPLQpHLO\DGXOLTXLGHGDQVOHEDF9HLOOH]jpJRXWWHUOHOLTXLGH1(3$6ODLVVHUOHOLTXLGHHQWUHUHQ
DOLPHQWVVXUJHOpVYRXVDLGHUDjGp¿QLUOHSURJUDPPHHWODPpWKRGHGHFXLVVRQGRQWYRXVDYH]EHVRLQ8QHIRLVOD
HPEDOODJHV3ODFH]ODOLPHQWVXUODEDODQFHHWSHVH]OHRXOLVH]OpWLTXHWWHVXUOHPEDOODJH&RQQDvWUHOHSRLGVGHYRV
Ŷ 3UpSDUDWLRQGHVDOLPHQWV6RUWH]OHVDOLPHQWVTXHYRXVVRXKDLWH]GpFRQJHOHUGXFRQJpODWHXUHWUHWLUH]WRXVOHV
(3) Appuyez sur Start / Enter +30 seconds pour lancer la décongélation.
(2) Entrez le poids de l'aliment à décongeler à l'aide des touches numériques.
$SSX\H]XQHRXGHX[IRLVVXU$XWR'HIURVWSRXUVpOHFWLRQQHU9,$1'(+$&+e(RX3,Ê&(6'(9,$1'(
Les 2 programmes de décongélation permettent de décongeler la viande hachée et les morceaux de viande.
7. Programmes de décongélation :
Programme Échelle de poids 0pWKRGHGHFXLVVRQ
1- Blancs de poulet 0.5 - 3.0 Ibs Grille vers le bas
2- Cuisse de poulet 0.5 - 3.0 Ibs Grille vers le bas
3- Volaille entière 1.5 - 4.5 Ibs Plaque tournante
4- Rôti de boeuf 0.5 - 3.25 Ibs Plaque tournante
5- Filet de porc 1.0 - 3.0 Ibs Grille vers le bas
6- Côtelettes de porc 0.5 - 3.0 Ibs Grille vers le bas
7- Pain de Viande 1.0 - 3.25 Ibs Plaque tournante
8- Filets de Poisson 0.5 - 2.0 Ibs Grille vers le bas
Programme Dégivrage Gamme de poids
1 Viande hachée
2 Morceaux de viande
Taille du sac Clé de pop-corn
1.2 oz / 34g
2.5 oz / 71g
3.5 oz / 99g
Montant Clé pour les boissons
0.5 tasses (environ 4 oz | 0,11L)
1 tasse (environ 8 oz | 0,23L)
1.5 tasses (environ 12 oz | 0,35L)
2 tasses (environ 16 oz | 0,47L) Appuyer sur 4x
contact avec d'autres aliments.
Ŷ 9DLVVHOOHSRXUOHIRXU3ODFHUOHVDOLPHQWVGDQVXQSODWFUHX[DOODQWDXIRXUjPLFURRQGHV8WLOLVHUXQHSODTXHGH
FpUDPLTXHRXGHYHUUH1(3$6¿[HUOHFRXYHUFOH3HQGDQWODGpFRQJpODWLRQYRXVUHFHYUH]XQHQRWL¿FDWLRQDXGLRj
deux reprises pour vous indiquer que les aliments doivent être retournés.
Ŷ 7HPSVGHUHSRV8QHIRLVOHVDOLPHQWVGpFRQJHOpVODLVVH]OHVUHSRVHUSHQGDQWjPLQXWHVVXSSOpPHQWDLUHV
MXVTXjFHTXLOVDWWHLJQHQWODWHPSpUDWXUHDPELDQWH3OXVOHVSRUWLRQVGHYLDQGHVRQWJUDQGHVSOXVOHWHPSVGHUHSRV
HVWORQJ/HVYLDQGHVKDFKpHVRXHQPRUFHDX[GRLYHQWrWUHVpSDUpHVD¿QTXHOOHVDWWHLJQHQWSOXVUDSLGHPHQWOD
WHPSpUDWXUHDPELDQWH1RXEOLH]SDVTXHSOXVOHPRUFHDXGHYLDQGHHVWpSDLVSOXVLOSHXWrWUHFRQJHOpDXPLOLHX
/DIRQFWLRQSRSFRUQYRXVSHUPHWGHIDLUHpFODWHUWDLOOHVGLႇpUHQWHVGHVDFVGHSRSFRUQPLFURRQGHV
HPEDOOpVGDQVOHFRPPHUFH8WLOLVH]OHWDEOHDXVXLYDQWSRXUGpWHUPLQHUOHUpJODJHjXWLOLVHU5pJODJHGXPRGH3RSFRUQ
8. Popcorn
(1) Appuyez sur la touche Popcorn
3XLVDSSX\H]VXUOHQRPEUHGHIRLVSRXUFKRLVLUOHSRLGVVRXKDLWp
(3) Appuyez sur Start / Enter +30 seconds La minuterie du four à micro-ondes commence à décompter. Lorsque le
temps de cuisson au micro-ondes est écoulé, un signal sonore retentit.
ATTENTION Ne laissezpasOHIRXUVDQVVXUYHLOODQFHORUVTXLOHVWHQFRXUVGXWLOLVDWLRQ/HSRSFRUQSHXWVHQÀDPPHU
et provoquer un incendie.
9. Boisson
/DIRQFWLRQERLVVRQSHUPHWGHFKDXႇHUjWDVVHVGHERLVVRQ/HWDEOHDXFLGHVVRXVSHUPHWGH
déterminer le réglage à utiliser. Réglage du mode Boisson
(1) Appuyer sur la touche Boisson
3XLVDSSX\HUVXUOHQRPEUHGHIRLVSRXUFKRLVLUOHSRLGVGpVLUp
(3) Appuyer sur Start / Enter +30 seconds La minuterie du four à micro-ondes commence à décompter. Lorsque le
temps de cuisson au micro-ondes est écoulé, un signal sonore retentit. L'appareil s'éteint et l'horloge réapparaît.
10. Aliments surgelés
Utilisez la fonction Aliments surgelés pour préparer des plats cuisinés surgelés, comme des
QXJJHWVGHSRXOHWGHVIULWHVGHVEkWRQQHWVGHSRLVVRQHQXWLOLVDQWODFKDOHXUGXEDVHWODFRQYHFWLRQ3ODFH]OHV
aliments à cuire directement sur le plateau tournant en métal. Vous pouvez régler une plage de température allant de
200 à 450° F (100 à 230°C).
FR-17
aOEV
aOEV
Appuyer sur 3x
Appuyer sur 2x
Appuyer sur 1x
Appuyer sur 3x
Appuyer sur 2x
Appuyer sur 1x

11. Pizza
Le mode Pizza permet de cuire trois types de pizzas différents :
Mode no. Type de pizza Cuisson au four
1 Pizza surgelée Plateau en métal
2 Pizza fraîche Plateau en métal
3 Pizza au micro-
ondes
Plateau en céramique
Conseils pour les pizzas
Vérifiez la pizza avant le temps minimum, la pizza peut cuire plus rapidement qu'avec un four traditionnel.
Pour les pizzas fraîches, utilisez une palette à pizza pour faire glisser la pizza sur le plateau métallique.
Si vous utilisez une plaque à pizza, saupoudrez-la généreusement de farine de maïs pour faciliter le transfert de la pâte
sur le plateau métallique.
La taille maximale est de 12 pouces pour les pizzas fraîches et surgelées. Évitez d'utiliser une pierre à pizza, car elle
peut endommager le four.
Le plateau tournant en métal peut être utilisé pour couper la pizza en tranches. Retirez le plateau tournant du four après la
cuisson de la pizza.
Réglage du mode Pizza pour les pizzas fraîches ou surgelées
Vous pouvez régler une plage de température de 375 à 450° F (190 à 230°C) pour les modes pizza fraîche et congelée.
Vous pouvez cuire des pizzas fraîches ou surgelées directement sur le plateau tournant en métal.
1.
Touché Pizza.
2.
Effleurer Pizza à plusieurs reprises pour faire défiler tous les modes pizza.
3.
Touchez .
4.
Vous pouvez modifier la température à l'aide des touches numériques. Vous pouvez également modifier le temps de
cuisson en touchant TIME puis en appuyant sur les touches numériques.
5.
Appuyez sur pour confirmer. L'appareil commence à préchauffer.
La température réglée est atteinte lorsque la barre de préchauffage s'est complètement remplie et qu'un signal sonore
retentit.
Réglage du mode Pizza pour la pizza au micro-ondes
Placez la pizza micro-ondes sur le plateau en céramique et mettez-la au four en suivant les instructions de l'emballage.
1.
Touchez Pizza.
2.
Touchez Pizza de manière répétée jusqu'à ce que MICROWAVE PIZZA" soit affiché.
3.
Appuyez sur . L'appareil commence à détecter.
4.
Lorsque la détection est terminée, un signal sonore retentit et le temps de cuisson calculé commence à décompter.
Remarque : N'ouvrez pas la porte pendant le processus de détection, sinon le programme sera annulé.
Une fois que le temps de cuisson calculé est affiché, vous pouvez ouvrir la porte pour remuer, tourner ou réarranger les
aliments. Touchez pour reprendre l'opération.
Ouverture de la porte de l'appareil en cours de fonctionnement
L'ouverture de la porte de l'appareil pendant le fonctionnement interrompt le mode en cours. Fermez la porte de l'appareil
et touchez pour reprendre le fonctionnement.
FR-18
Start/Enter +30 Seconds
Start/Enter +30 Seconds
Start/Enter +30 Seconds
Start/Enter +30 Seconds
Start/Enter +30 Seconds
Cuisson par capteur
Vous pouvez sélectionner deux modes de cuisson par
capteur. La cuisson par détection vous permet de cuire
un grand nombre de vos aliments préférés sans avoir à
sélectionner les temps de cuisson et les niveaux de
puissance. Le four à micro-ondes détermine
automatiquement le temps de cuisson nécessaire pour
chaque aliment.
Pour obtenir les meilleurs résultats lors de la cuisson par
capteur, suivez les recommandations suivantes :
Les aliments cuits à l'aide du système de sonde
doivent être préparés à partir de la température de
stockage normale.
Le plateau de la table tournante, le plateau en
céramique et l'extérieur du conteneur doivent être
secs.
Les aliments doivent toujours être recouverts d'une
pellicule plastique, de papier ciré ou d'un couvercle.
N'ouvrez pas la porte et ne touchez pas la touche
« Clear/Off » pendant le temps de détection. Lorsque
le temps de détection est terminé, le four émet un bip
et le temps de cuisson restant s'affiche à l'écran. À ce
moment-là, vous pouvez ouvrir la porte pour
remuer, retourner ou réarranger les aliments.
Réchauffage par capteur (Sensor Reheat)
La fonction « Sensor Reheat » vous permet de réchauffer
des assiettes ou des plats (8-16 oz) pour faciliter la
cuisson.
Réglage du réchauffage par capteur
1.
Touchez la commande tactile « Sensor Reheat ».
2.
Touchez . « Sensing » s’affiche.
Le four à
micro-on
des fonctionne pendant la détection
.
3.
Lorsque la détection est terminée, un signal sonore
retentit et le temps de cuisson calculé commence à
décompter.
Remarque : N'ouvrez pas la porte pendant le processus
de détection, sinon le programme sera annulé.
Une fois que le temps de cuisson calculé est affiché, vous
pouvez ouvrir la porte pour remuer, tourner ou réarranger les
aliments. Touchez pour reprendre
Lorsque le réchauffage du capteur est terminé, un signal
sonore retentit.
Notes
Couvrir d'un film plastique aéré ou de papier ciré.
Réchauffer les aliments dans une assiette allant au
micro-ondes.
FR-19
Start/Enter +30 Seconds
l'opération.
Start/Enter +30 Seconds
12.
Suggestions de cuisson pour le réchauffage
Alimentation Directions Quantité
Assiette plate Utilisez uniquement des aliments précuits et réfrigérés. Couvrez
l'assiette avec un film plastique ventilé ou du papier ciré, en le
glissant sous l'assiette. Si les aliments ne sont pas assez chauds
après avoir été réchauffés à l'aide de la fonction Réchauffer,
continuez à les réchauffer en utilisant le réglage manuel de la
durée et du niveau de puissance.
Contenu :
3-4 oz de viande, volaille ou poisson (jusqu'à 6 oz avec os)
1/2 tasse de féculents (pommes de terre, pâtes, riz, etc.)
1/2 tasse de légumes (environ 3-4 oz)
Casserole, pâtes Couvrir l'assiette d'un couvercle ou d'un film plastique ventilé. Si les
aliments ne sont pas assez chauds après avoir été réchauffés à
l'aide de la fonction Réchauffer, continuez à les réchauffer en
utilisant le réglage manuel de la durée et du niveau de puissance.
Remuer les aliments une fois avant de les servir.
Contenu :
Casserole : aliments réfrigérés (comme le ragoût de bœuf ou
les lasagnes)
Pâtes : Spaghetti et ravioli en conserve, aliments réfrigérés
1 portion (1 assiette)
1 à 4 portions

Cuisson au capteur (Sensor Cook)
La fonction « Sensor Cook » vous permet de cuire
un grand nombre de vos aliments préférés sans
avoir à sélectionner les temps de cuisson et les
niveaux de puissance. Le four à micro-ondes
détermine automatiquement le temps de cuisson
nécessaire pour chaque aliment.
Réglage de la cuisson par sonde
Exemple : Régler la cuisson par capteur pour la
viande hachée (Ground Meat).
1.
Touchez la commande tactile « Sensor Cook ».
2.
Touchez la commande « Sensor Cook » à
plusieurs reprises pour sélectionner viande
hachée (Ground Meat).
3.
Touchez .
Le programme commencera à détecter les
micro-ondes en fonctionnement.
Programmes de cuisson par capteur
Programme de
cuisson par
capteur
Quantité
Conseils de cuisson
1 – Pommes de
terre cuitent
(Baked Potato)
1 - 4
pommes de
terre
(8 - 32 oz.)
Piquer la peau à l'aide
d'une fourchette.
Ne pas couvrir.
Après la cuisson, laisser
reposer pendant 5
minutes, enveloppé dans
du papier d'aluminium.
2 – Viande hachée
(Ground Meat)
8 - 24 oz.
(0,5 - 1,5 lbs)
Après la cuisson, laisser
reposer couvert, pendant
3 à 4 minutes.
3 – Légumes frais
(Fresh Vegetables)
4 - 16 oz.
(0.25 - 1 lbs)
Il n'y a pas besoin d'eau
si les légumes viennent
d'être lavés. Ajouter 2
cuillères à soupe d'eau
pour 8 onces de légumes
frais.
4 - Poisson/ Fruits
de mer
(Fish/Seafood)
8 - 20 oz.
(0.5 -1.25 lbs)
Rouler des bords fins en
dessous. Disposer en
anneau autour du plat
micro-ondable.
5 - Entrées
surgelées
(Frozen Entrees)
10 - 20 oz. Suivre les instructions de
l'emballage
pour la
ventilation, la découpe du
film plastique, etc.
FR-20
Start/Enter +30 Seconds
Lorsque la détection est terminée, un signal sonore
retentit et le temps de cuisson calculé commence à
décompter.
Remarque : N'ouvrez pas la porte pendant le
processus de détection, sinon le programme sera
annulé
.
Une fois que le temps de cuisson calculé est affiché,
vous pouvez ouvrir la porte pour remuer, tourner ou
réarranger les aliments. Touchez
pour reprendre l'opération.
Lorsque la cuisson du capteur est terminée, un signal
sonore retentit.
Ouverture de la porte de l'appareil en cours de
fonctionnement
L'ouverture de la porte de l'appareil pendant le
fonctionnement interrompt le mode en cours. Fermez la
porte de l'appareil et touchez
pour reprendre le fonctionnement.
Annuler l'opération
Touchez Clear/Off pour annuler le mode four actif.
L'appareil s'éteint et l'horloge s'affiche.
Les ventilateurs de refroidissement peuvent continuer à
fonctionner pendant un certain temps, puis s'éteindre
automatiquement.
Start/Enter +30 Seconds
Start/Enter +30 Seconds

Griller (Broil)
La fonction « Broil » utilise la chaleur intense émise par
l'élément supérieur.
Vous pouvez régler deux niveaux d'intensité :
Griller à feu vif
Griller à feu doux
Réglage du mode gril
L'appareil doit être éteint.
1.
Touchez « Broil HIGH-LOW ».
2.
Touchez à nouveau la touche « Broil HIGH-LOW » pour
passer au mode « Broil LOW ».
3.
Entrez le temps de cuisson souhaité à l'aide des touches
numériques.
4.
Touchez pour démarrer
l'opération.
Réglage des options de
réglage de l'heure
Votre four dispose de plusieurs possibilités de réglage
de l'heure. La
touche
Horloge « Clock »
permet
d'appeler le menu et de passer d'une
fonction à
l'autre.
Réglage du temps de cuisson
Le temps de cuisson de votre repas peut être réglé sur
le four. Lorsque le temps de cuisson est écoulé, le four
s'éteint automatiquement. Vous ne devez donc pas
interrompre votre travail pour éteindre le four. Le
temps de cuisson ne peut pas être dépassé
accidentellement
.
Le four se met en marche.
Le temps de cuisson est décompté sur l'écran
.
Remarque : Utilisez toujours une lèchefrite lorsque vous
cuisinez en mode gril (voir accessoires en option).
Ouverture de la porte de l'appareil en cours de
fonctionnement
L'ouverture de la porte de l'appareil pendant le
fonctionnement interrompt le mode en cours. Fermez la
porte de l'appareil et touchez
pour reprendre le fonctionnement.
Annuler l'opération
Touchez Clear/Off pour annuler l'opération.
Les ventilateurs de refroidissement peuvent continuer à
fonctionner pendant un certain temps, puis s'éteindre
automatiquement.
Réglage de l'horloge
1.
Touchez Clock .
2.
Entrez l'heure correcte à l'aide des touches numériques.
Exemple : Pour régler l'horloge sur 12:41, tapez 1 2 4 1.
3.
Touchez pour confirmer.
Modification de l'horloge
1. Touchez la commande tactile Clock en
mode veille
.
2. Entrez l'heure correcte à l'aide des touches numériques.
3. Touchez pour confirmer.
Le temps de cuisson est écoulé
Un signal sonore retentit. Le four s'arrête de chauffer.
FR-21
Start/Enter +30 Seconds
Start/Enter +30 Seconds
Start/Enter +30 Seconds
Start/Enter +30 Seconds
13.
14.

Verrouillage pour la sécurité des enfants
Le four est équipé d'un verrouillage de sécurité pour éviter
que les enfants ne l'allument accidentellement.
Le four ne réagit à aucun réglage. La minuterie et
l'horloge peuvent également être réglées lorsque la
sécurité enfants est activée.
Activation de la sécurité enfants
Exigence : Aucun temps de cuisson ne doit être défini.
Appuyez sur la
touche de verrouillage du panneau
« Panel Lock »
et maintenez-la enfoncée
pendant
environ 3 secondes
.
Le symbole du verrou apparaît sur l'écran. La sécurité
enfants est activée.
Désactivation de la sécurité enfants
Appuyez sur la touche de verrouillage du panneau
« Panel Lock » et maintenez-la enfoncée pendant
environ 3 secondes.
Le symbole de verrouillage s'éteint sur l'écran. La sécurité
enfants est désactivée.
Verrouillage de sécurité pour les enfants avec
d'autres opérations de cuisson
Lorsque d'autres programmes de cuisson ont été réglés,
la sécurité enfants n'est pas opérationnelle
.
FR-22
15.
Entretien et nettoyage
Avec un entretien et un nettoyage régulier, votre four à micro-ondes
conserve son apparence et reste en bon état. Nous allons vous
expliquer ici comment entretenir et nettoyer correctement votre
appareil.
Risque d’électrocution !
Une humidité pénétrante peut provoquer un choc électrique.
N’utilisez pas de nettoyeur haute pression ou à vapeur.
Risque de brûlures !
Ne nettoyez jamais l’appareil immédiatement après l’avoir éteint.
Laissez le four refroidir.
Risque de graves atteintes à la santé !
L’énergie micro-ondes peut s’échapper si la porte de l’espace de
cuisson ou le joint de la porte est endommagé. N’utilisez jamais
l’appareil si la porte de l’espace de cuisson ou le joint de la porte
est endommagé. Contactez le service après-vente.
Remarques
Ŷ De légères différences de couleur à l’avant de l’appareil sont
causées par l’utilisation de différents matériaux, tels que verre,
plastique et métal.
Ŷ Les ombres sur le panneau de porte, qui ressemblent à des
stries, sont causées par les reflets de la lumière du four.
Ŷ Des odeurs désagréables, par ex. une fois le poisson préparé,
peuvent être éliminés très facilement. Mettez quelques gouttes de
jus de citron dans un verre d’eau. Placez également une cuillère
dans le récipient pour retarder l’ébullition. Faites chauffer l’eau
pendant 1 à 2 minutes à la puissance maximale de micro-onde.
Produits de nettoyage
Pour avoir les différentes surfaces non endommagées par
l’utilisation d’un mauvais produit de nettoyage, respectez les
informations du tableau suivant. N’utilisez pas de
Ŷ produits de nettoyage tranchants ou abrasifs,
Ŷ grattoirs en métal ou en verre pour nettoyer la vitre de la porte de
l’appareil,
Ŷ grattoirs en métal ou en verre pour nettoyer le joint de la porte,
Ŷ tampons et éponges à récurer durs,
Ŷ produits de nettoyage à forte concentration d’alcool.
Lavez soigneusement les nouveaux chiffons éponge avant
utilisation.
Laisser toutes les surfaces sécher complètement avant de réutiliser
l’appareil.
Zone Produits de nettoyage
Avant de l'appareil Eau chaude savonneuse :
À nettoyer avec un torchon et à sécher avec
un chiffon doux. Pour le nettoyage, n’utilisez
pas de produits nettoyants pour vitres ou de
raclette pour vitre ou en métal.
Avant de l'appareil
avec inox
Eau chaude savonneuse :
À nettoyer avec un torchon et à sécher
avec un chiffon doux. Enlevez sans trop
tarder les taches de calcaire, de graisse,
d’amidon et d’albumine (ex. blanc d’œuf).
De la corrosion peut se former sous de tels
résidus. Des produits de nettoyage spéciaux
pour inox peuvent être procurés auprès du
service après-vente ou auprès de magasins
spécialisés. Pour le nettoyage, n’utilisez
pas de produits nettoyants pour vitres ou de
raclette pour vitre ou en métal.
Espace de cuisson Eau savonneuse chaude ou une solution de
vinaigre :
À nettoyer avec un torchon et à sécher avec
un chiffon doux.
Si le four est très sale : N’utilisez pas
d’aérosol ou d’autres nettoyants agressifs ou
abrasifs pour four. Les tampons à récurer,
les éponges rugueuses et les nettoyants
pour casseroles ne sont pas appropriés. Ces
produits laissent des rayures sur la surface.
Laisser les surfaces intérieures sécher
complètement.
Creux dans l’espace
de cuisson
Chiffon humide :
Veillez à ce qu’il n’y ait aucune infiltration
d’eau à travers l’axe d’entraînement du
plateau tournant à l’intérieur de l’appareil.
Étagère grillagée Eau chaude savonneuse :
À nettoyer avec un produit de nettoyage
pour inox ou au lave-vaisselle.
Panneaux de la
porte
Nettoyants pour vitres :
À nettoyer avec un torchon. N’utilisez pas de
raclette pour vitre.
Joint Eau chaude savonneuse :
À nettoyer avec un torchon, ne pas récurer.
N’utilisez pas de raclette pour vitre ou en
métal.
FR-23
Tableau des pannes
Les pannes ont souvent des explications simples. Reportez-vous
au tableau des pannes avant d’appeler le service après-vente.
Si un repas ne se déroule pas exactement comme vous le
souhaitiez, reportez-vous à la section Guide de cuisine expert,
où vous trouverez de nombreux trucs et astuces.
Risque d’électrocution !
Les réparations incorrectes sont dangereuses. Les réparations
ne doivent être effectuées que par l’un de nos agents après-vente
qualifiés.
Tableau des pannes
Problème Causes possibles Remèdes/informations
L’appareil ne fonctionne pas. Disjoncteur défectueux Regardez dans la boîte à fusibles et vérifiez que le
disjoncteur de l’appareil est en état de marche.
Fiche non branchée. Branchez la fiche.
Coupure de courant Vérifiez si la lumière de la cuisine marche.
L’appareil ne fonctionne pas.
apparaît sur
le panneau d’affichage.
Le verrouillage de sécurité enfants est
activé.
Désactivez le verrouillage de sécurité enfants
(voir section : Sécurité enfants).
apparaît sur le panneau d’affichage.
Coupure de courant Réinitialisez l’horloge.
Le micro-onde ne s’allume pas. La porte est entre-ouverte. Vérifiez si des résidus d’aliments ou des débris
sont coincés dans la porte.
Les aliments prennent plus de temps pour se
réchauffer au micro-onde
La puissance micro-onde sélectionnée
est trop faible.
Sélectionnez une puissance plus élevée.
Une plus grande quantité a été placée
dans l’appareil.
Quantité double = temps de cuisson presque
double.
Les aliments étaient plus froids que
d’habitude.
Remuez ou retournez les aliments pendant la
cuisson.
Le plateau tournant grince ou tourne
difficilement.
De la saleté ou des débris autour
de l’axe d’entraînement du plateau
tournant.
Nettoyez soigneusement les roues du plateau
tournant et le creux au fond du four.
Nettoyez soigneusement les roues sous le
plateau tournant et le creux en bas du four.
La température, le niveau de
puissance ou le réglage combiné
n’est pas possible pour ce mode de
fonctionnement.
Choisissez des réglages autorisés.
apparaît sur le panneau d’affichage.
La fonction de coupure de sécurité
thermique a été activée.
Appelez le service après-vente.
apparaît sur le panneau d’affichage.
La fonction de coupure de sécurité
thermique a été activée.
Appelez le service après-vente.
apparaît sur le panneau d’affichage.
Humidité dans le panneau de
commande.
Laissez sécher le panneau de commande.
apparaît sur le panneau d’affichage.
Le chauffage rapide n’a pas marché. Appelez le service après-vente.
Acrylamide dans les aliments
Quels aliments sont concernés ?
L’acrylamide est principalement générée dans les produits
céréaliers et à base de pommes de terre qui sont chauffés à des
températures élevées, tels que chips de pomme de terre, chips,
toasts, petits pains, pain, produits de boulangerie fine (biscuits,
pain d’épices, biscuits).
Conseils pour garder l’acrylamide au minimum lors de préparation d’aliments
Général Réglez les temps de cuisson au minimum. Faites cuire les aliments jusqu’à ce qu’ils soient
dorés, mais pas trop. Les gros morceaux épais d’aliments contiennent moins d’acrylamide.
Biscuits au four
Frites au four
Max. 200°C en chauffage haut/bas ou max. 180°C en mode air chaud 3D ou air chaud. Max.
190°C en chauffage haut/bas ou max. 170°C en mode air chaud 3D ou air chaud. Le blanc et
le jaune d’œuf réduisent la formation d’acrylamide. À répartir finement et uniformément sur le
plateau de cuisson. Faites cuire au moins 400 g à la fois sur un plateau de cuisson afin que
les frites ne sèchent pas
FR-24
Conseils énergétiques et environnementaux
Vous trouverez ici des conseils pour économiser de l’énergie lors
de la cuisson et du rôti et pour mettre votre appareil au rebut de
façon appropriée.
Économie d’énergie
Ŷ Préchauffez le four uniquement si cela est spécifié dans la
recette ou dans les tableaux d’instructions d’utilisation.
Ŷ Utilisez des moules à pâtisserie foncés, laqués noirs ou émaillés.
Ils absorbent la chaleur de façon optimale.
Ŷ Ouvrez la porte du four aussi rarement que possible pendant la
cuisson, la préparation du pain ou le rôtissage.
Ŷ Il est préférable de faire cuire plusieurs gâteaux l’un après
l’autre. Tant que le four est encore chaud. Cela réduit le temps de
cuisson pour le second gâteau. Vous pouvez également placer
deux moules à pain l’un à côté de l’autre.
Ŷ Pour des temps de cuisson plus longs, vous pouvez éteindre le
four 10 minutes avant la fin de la cuisson et utiliser la chaleur
résiduelle pour terminer la cuisson.
Mise au rebut avec respect de l’environnement
Jetez l’emballage dans le respect de l'environnement.
Cet appareil est conforme à la directive européenne
2002/96/CE relative aux déchets d'équipements
électriques et électroniques (DEEE). La directive
fournit un cadre pour la collecte et le recyclage des
vieux appareils, qui est valable dans toute l'Union
Européenne.
Guide expert de cuisson
Les graphiques peuvent être utilisés comme guide.
Suivez les instructions sur l’emballage ou la recette.
Grillade
Placez le plat d’aliments sur la grille avec le creux vers le haut.
Aliment Température
du four
Temps de cuisson
(minutes)
Température
interne
Astuces/procédés de cuisson
Hamburgers,
¾” à 1”, moyens
Haut Côté 1 : 9 - 11
Côté 2 : 10 - 12
160°F
(71°C)
Utilisez un plateau qui permet à la graisse
de s’écouler des aliments.
La viande riche en matières grasses
provoque plus de projections.
Côtelettes d’agneau,
1 pouce, moyennes
Haut Côté 1 : 9 - 11
Côté 2 : 10 - 12
160°F
(71°C)
Utilisez un plateau qui permet à la graisse
de s’écouler des aliments.
Fente de graisse pour éviter la stagnation.
Saucisses, fraîches Haut Côté 1 : 9 - 11
Côté 2 : 8 - 10
160°F
(71°C)
Utilisez un plateau qui permet à la graisse
de s’écouler des aliments.
Steaks, ¾” à 1”,
mi-saignants
Haut Côté 1 : 9 - 11
Côté 2 : 10 - 12
145°F
(63°C)
Utilisez un plateau qui permet à la graisse
de s’écouler des aliments.
Fente de graisse pour éviter la stagnation.
Steaks, ¾” à 1”,
moyens
Haut Côté 1 : 9 - 11
Côté 2 : 10 - 12
160°F
(71°C)
Utilisez un plateau qui permet à la graisse
de s’écouler des aliments.
Fente de graisse pour éviter la stagnation.
Pain grillé Bas 3 - 5 - Vérifiez à temps minimum.
Top des casseroles
à brunir
Bas 3 - 5 - Utilisez uniquement des plats en métal ou
en vitrocéramique comme le Corning Ware®
Grillade à convection
Placez le plat de nourriture sur la grille avec le creux vers
le haut.
Aliment Température
du four
Temps de cuisson
(minutes)
Température
interne
Astuces/procédés de cuisson
Poitrine de poulet,
avec os
Bas Côté 1 : 9 - 11
Côté 2 : 10 - 12
170°F
(76°C)
Commencez par la poitrine orientée vers
le bas.
Filets de poisson,
¾” à 1”
Bas 11 - 15 145°F
(63°C)
Il ne faut pas retourner les poissons.
Retournez les extrémités minces.
Badigeonner d’huile d’olive ou de beurre
pour éviter qu’il ne colle.
FR-25
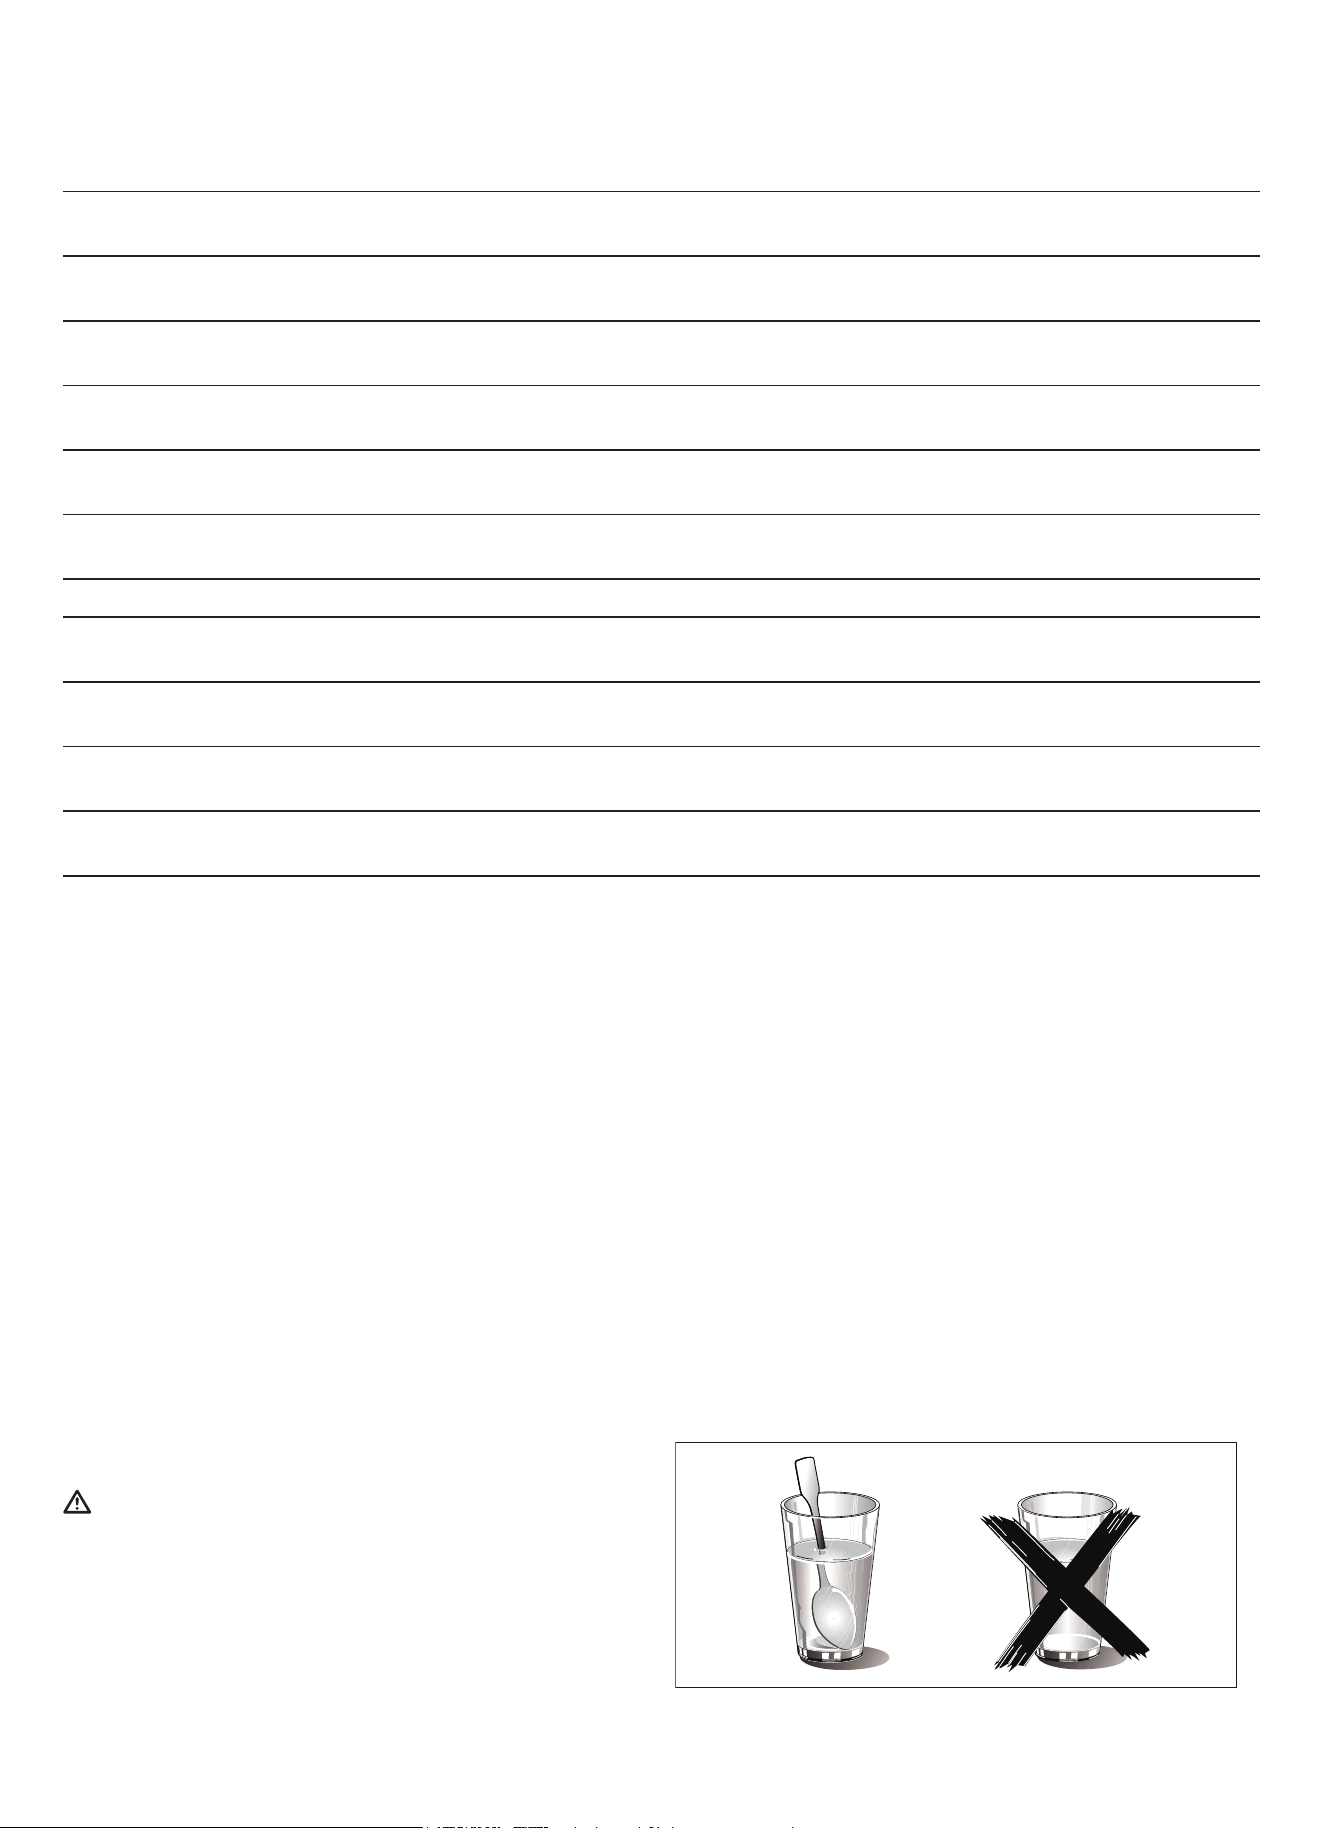
Convection
Préchauffez le four avant d’ajouter des aliments. Une
fois le four préchauffé, placez les aliments dans le four
rapidement pour minimiser la perte de chaleur. Placez le
plat de nourriture sur la grille avec le creux vers le bas.
Aliment Température
du four
Temps de cuisson
(minutes)
Astuces/procédés de cuisson
Biscuits 350°F (175°C) 13 - 20 Un moule à pâtisserie foncé ou terne donne une croûte plus
brune et plus croustillante.
Gâteau, 13”x9” 350°F (175°C) 23 - 28 Pour une croûte tendre et légèrement dorée, utilisez des
ustensiles de cuisson en métal léger et brillant.
Petits gâteaux 350 - 375°F
(175 - 190°C)
8 - 14 Un moule à pâtisserie foncé ou terne donne une croûte plus
brune et plus croustillante.
Pain au maïs 425 - 450°F
(220 - 230°C)
25 - 30 Utilisez un moule carré.
Cupcakes 350°F (175°C) 18 - 21 Idéal pour les mélanges prêts à l’emploi. Préparez selon les
instructions sur l’emballage.
Petit pains 400°F (205°C) 12 - 18 Utilisez avec des petits pains frais ou surgelés.
Tarte aux fruits frais 375°F (190°C) 50 - 60 Un moule à tarte foncé ou terne donne une croûte plus
brune et plus croustillante.
Muffins 400°F (205°C) 10 - 18 Idéal pour les mélanges prêts à l’emploi. Préparez selon les
instructions sur l’emballage.
Légumes grillés 425 - 450°F
(220 - 230°C)
15 - 20 Utilisez une casserole en métal sombre ou terne. Remuez
une fois.
Sablés 450°F (230°C) 10 - 18 Idéal pour différents sablés. Utilisez une poêle à revêtement
sombre.
Cuisson d'œufs au micro-onde
Ɣ Ne faites jamais cuire ou réchauffez les œufs avec la
coquille ; ils peuvent exploser.
Ɣ Percez toujours les œufs entiers pour les empêcher
d’éclater.
Ɣ Ne dépassez jamais le temps de cuisson indiqué, car
vos œufs durcissent lorsqu’ils sont trop cuits.
Ɣ La cuisson des œufs brouillés est sans danger.
Cuisson de légumes au micro-onde
Ɣ Les légumes doivent être lavés juste avant la cuisson.
L'ajout d’eau est rarement nécessaire. Ajoutez environ
¼ de verre d’eau pour les légumes denses tels que
pommes de terre ou carottes.
Ɣ Les petits légumes (carottes, pois, haricots de Lima,
etc.) cuisent plus vite que les gros légumes.
Ɣ Les légumes entiers, tels que pommes de terre, courge
poivrée ou maïs en épi, doivent être disposés en cercle
sur le plateau tournant avant la cuisson. Ils cuisent plus
uniformément s’ils sont retournés à mi-cuisson.
Ɣ Placez toujours les légumes tels qu’asperges et brocoli,
avec les extrémités de la tige dirigées vers le bord du
plat et les pointes vers le centre.
Ɣ Lors de la cuisson de légumes coupés, couvrez toujours
le plat avec un couvercle ou un film plastique ventilé
pour micro-onde.
Ɣ Les légumes entiers non pelés tels que pommes de
terre, patates douces, courges, aubergines, etc., doivent
avoir la peau piquée à plusieurs endroits avant la
cuisson pour éviter qu’ils n’éclatent.
Ɣ Pour une cuisson plus uniforme, remuez ou réarrangez
les légumes entiers à mi-cuisson.
Ɣ La plupart du temps, plus les aliments sont denses, plus
le temps de repos requis est long. Par exemple, une
pomme de terre au four doit reposer pendant 5 minutes
avant de servir, tandis qu’un plat de petits pois peut être
servi immédiatement.
Réchauffe d’aliments
Risque de brûlure !
Il y a toujours une possibilité d'ébullition retardée quand un liquide
est chauffé. Cela signifie que le liquide atteint la température
d’ébullition sans que des bulles de vapeur habituelles ne remontent
à la surface. Même si le récipient ne bouge qu'un tout petit peu, le
liquide chaud peut soudainement déborder et éclabousser. Lorsque
vous chauffez des liquides, placez toujours une cuillère dans le
récipient. Cela empêche l’ébullition retardée.
FR-26
Cuisson de fruits de mer au micro-onde
Veillez à placer le poisson sur une grille à rôtir pour
micro-onde dans un plat pour micro-onde. Assurez-vous
de toujours cuire le poisson jusqu’à ce qu’il s'émiette
facilement avec une fourchette. Utilisez une couverture
étanche pour cuire le poisson à la vapeur ; une couverture
plus légère de papier ciré ou de serviette en papier fournit
moins de vapeur. Et assurez-vous de ne pas trop cuire
le poisson ; vérifiez sa cuisson à un temps de cuisson
minimum avant continuer plus longtemps.
Fruits de mer Niveau de
puissance
Temps de cuisson Consignes
Steaks de poisson
jusqu’à 1 ½ livre
Moyen-élevé (7) 7–11 min. /livre Disposez les poissons sur une grille à rôtir avec les
portions de viande vers l’extérieur de la grille.
Couvriez de papier ciré.
Retournez et réorganisez à mi-cuisson.
Faites cuire jusqu’à ce que le poisson s’émiette
facilement à la fourchette.
Laissez reposer 3 à 5 minutes.
Filets de poisson
jusqu’à 1 ½ livre
Moyen-élevé (7) 7–11 min. /livre Disposez les filets dans un plat pour four, en retournant
les morceaux fins. Couvriez de papier ciré. Si supérieure
à ½ pouce d’épaisseur, retournez et réarrangez à
mi-cuisson. Faites cuire jusqu’à ce que le poisson
s’émiette facilement à la fourchette.
Laissez reposer 2 à 3 minutes.
Crevettes
jusqu’à 1 ½ livre
Moyen-élevé (7) 7–11 min. /livre Disposez les crevettes dans un plat pour four sans
chevauchement ni superposition. Couvriez de papier ciré.
Faites-les cuire jusqu’à ce qu’elles deviennent fermes et
opaques, en remuant 2 ou 3 fois.
Laissez reposer 5 minutes.
Nettoyage et maintenance
ATTENTION
Assurez-vous que l’appareil a refroidi et que la graisse
s’est solidifiée avant d’essayer de nettoyer toute partie
de l’appareil.
Guide de nettoyage
Ɣ Pour de meilleures performances et pour des raisons
de sécurité, gardez le four propre à l’intérieur et à
l’extérieur. Veillez tout particulièrement à ce que le
panneau intérieur de la porte et le cadre avant du four
soient exempts de nourriture et d’accumulation de
graisse.
Ɣ N’utilisez jamais de poudre à récurer ou de tampons
abrasifs avec le micro-onde. Essuyez l’intérieur et
l’extérieur du four à micro-ondes avec un chiffon doux et
une solution détergente douce tiède (pas chaude). Puis
rincez et essuyez complètement.
Ɣ Essuyez immédiatement les éclaboussures avec une
serviette en papier humide, surtout après la cuisson
d’aliments gras comme le poulet ou le bacon.
Ɣ Nettoyez votre four à micro-ondes une fois par semaine
ou plus souvent, si nécessaire.
Ɣ Ne faites jamais fonctionner le four à micro-ondes sans
aliments dans la cavité, sauf si le préchauffage avec le
mode Convection, Pizza, Aliments congelés et Maintenir
au chaud ; cela peut endommager le tube magnétron ou
le plateau en céramique. Il vaut mieux laisser un verre
d’eau dans le four lorsqu’il n’est pas utilisé pour éviter
tout dommage s’il est allumé accidentellement.
Partie Recommandations
Cavité du four Gardez l’intérieur (cavité) du four propre. Les particules de nourriture et les liquides renversés
peuvent coller aux parois du four qui risque de ne pas fonctionner efficacement.
Essuyez immédiatement les éclaboussures. Utilisez un chiffon propre et humide et un savon
doux. N’UTILISEZ PAS de détergents agressifs ou de nettoyants abrasifs.
Pour faciliter l’élimination de particules d’aliments ou de liquides cuits au four, faites chauffer
2 verres d’eau (ajoutez le jus d’un citron si vous souhaitez que le four conserve une odeur
fraîche) dans un verre doseur de 4 tasses à puissance élevée pendant 5 minutes ou jusqu’à
ébullition. Laissez reposer dans la cavité du four pendant 1 ou 2 minutes.
Pour les éclaboussures de graisse cuite au four, lavez à l’eau chaude savonneuse, rincez et
séchez.
FR-27
Partie Recommandations
Étagère grillagée Lavez à l’eau savonneuse. Rincez abondamment et séchez ou frottez doucement avec
de la poudre nettoyante ou des tampons remplis de savon comme indiqué. La grille peut
également être lavée au lave-vaisselle.
Plateau tournant en métal Retirez le plateau tournant en métal du four lors du nettoyage de la cavité et du plateau du
four.
Nettoyez le plateau tournant en métal à l'eau savonneuse tiède ou au lave-vaisselle.
Plateau en céramique Nettoyez à l’eau tiède savonneuse ou au lave-vaisselle.
Joint de porte Essuyez avec un chiffon humide.
Vitre de porte Lavez avec du savon et de l’eau ou un nettoyant pour vitres. Appliquez Fantastik® ou Formula
409® sur une éponge ou une serviette en papier propre et essuyez. Évitez d’utiliser des
produits de nettoyage en poudre, des tampons en laine d’acier et des nettoyants pour four.
Si de la vapeur s’accumule à l’intérieur ou à l’extérieur de la porte du four, l'essuyer avec un
chiffon doux. La vapeur peut s’accumuler lors du fonctionnement du four dans une humidité
élevée et n’indique en aucun cas une fuite de micro-ondes.
Surfaces peintes Nettoyez à l’eau chaude savonneuse ou appliquez Fantastik® ou Formula 409® sur une
éponge ou une serviette en papier propre et essuyez. Évitez d’utiliser des produits de
nettoyage en poudre, des tampons en laine d’acier et des nettoyants pour four.
Surfaces en
inox/extérieures
Essuyez ou frottez toujours dans le sens des grains. Nettoyez avec une éponge savonneuse,
puis rincez et séchez, ou essuyez avec Fantastik® ou Formula 409® sur une serviette en
papier. Protégez et polissez avec de l’acier inoxydable Magic® et un chiffon doux. Éliminez
les taches d’eau avec un chiffon imbibé de vinaigre blanc.
Plastique et commandes Une fois refroidi, nettoyez à l’eau savonneuse, rincez et séchez.
Zones imprimées
(texte et chiffres)
N’utilisez pas de nettoyants abrasifs ou de solvants à base de pétrole.
FR-28

Garantie
Ce que couvre cette garantie limitée :
La couverture de la garantie fournie par Forno Appliances dans cette déclaration s'applique exclusivement à l'appareil
)RUQRRULJLQDO3URGXLWYHQGXDXFRQVRPPDWHXU$FKHWHXUSDUXQFRQFHVVLRQQDLUHGLVWULEXWHXUGpWDLOODQW)RUQR
DJUppDFKHWpHWLQVWDOOpDX[eWDWV8QLVRXDX&DQDGDHWTXLHVWWRXMRXUVUHVWpGDQVOHSD\VGDFKDWGRULJLQHOHVeWDWV
Unis ou le Canada). La couverture de la garantie est activée à la date de l'achat initial du produit au détail et a une durée
de deux (2) ans.
/DFRXYHUWXUHGHODJDUDQWLHQHVWSDVWUDQVIpUDEOH(QFDVGHUHPSODFHPHQWGHSLqFHVRXGHOHQVHPEOHGXSURGXLWOH
SURGXLWGHUHPSODFHPHQWRXOHVSLqFHVEpQp¿FLHUDGHODJDUDQWLHGRULJLQHUHVWDQWHDFWLYpHDYHFOHGRFXPHQWGDFKDW
au détail d'origine. La présente garantie n'est pas étendue à ce remplacement. Forno Appliances réparera ou remplacera
WRXWFRPSRVDQWSDUWLHTXLWRPEHHQSDQQHRXVDYqUHGpIHFWXHX[HQUDLVRQGHVPDWpULDX[HWRXGHODIDEULFDWLRQGDQV
les deux ans suivant la date de l'achat au détail d'origine et dans des conditions d'utilisation résidentielle ordinaire et
non commerciale. La réparation ou le remplacement sera gratuit, y compris la main-d'œuvre aux taux standard et les
IUDLVGH[SpGLWLRQ,OLQFRPEHjODFKHWHXUGHUHQGUHOHSURGXLWUDLVRQQDEOHPHQWDFFHVVLEOHSRXUOHQWUHWLHQ/HVHUYLFHGH
UpSDUDWLRQGRLWrWUHHႇHFWXpSDUXQHVRFLpWpGHVHUYLFHDJUppHSDU)RUQRSHQGDQWOHVKHXUHVQRUPDOHVGHWUDYDLO
Important
&RQVHUYHUODSUHXYHGHODFKDWRULJLQDOSRXUpWDEOLUODSpULRGHGHJDUDQWLH/DUHVSRQVDELOLWpGH)RUQRSRXUWRXWH
réclamation de quelque nature que ce soit, concernant les marchandises et/ou les services fournis, ne dépassera en
aucun cas la valeur des marchandises ou des services ou d'une partie de ceux-ci qui ont donné lieu à la réclamation.
garantie cosmétique de 30 jours
L'acheteur doit inspecter le produit au moment de la livraison. Forno garantit que le produit est exempt de défauts de
IDEULFDWLRQHWGHPDLQG°XYUHSHQGDQWXQHSpULRGHGHWUHQWHMRXUVjFRPSWHUGHODGDWHGDFKDWDXGpWDLOGXSURGXLW
Cette couverture comprend :
• Défauts de peinture
• Chips
• 'pIDXWVGH¿QLWLRQPDFURVFRSLTXHV
La garantie cosmétique ne couvre PAS :
• 3UREOqPHVUpVXOWDQWGXQWUDQVSRUWGXQHPDQLSXODWLRQHWRXGXQHLQVWDOODWLRQLQFRUUHFWVSDUH[HPSOHERVVHV
VWUXFWXUHVRXFRPSRVDQWVFDVVpVJDXFKLVRXGpIRUPpVFRPSRVDQWVHQYHUUH¿VVXUpVRXDXWUHPHQWHQGRPPDJpV
• /pJqUHVYDULDWLRQVGHFRXOHXUVXUOHVFRPSRVDQWVSHLQWVpPDLOOpV
• /HVGLႇpUHQFHVGXHVjOpFODLUDJHQDWXUHORXDUWL¿FLHOjOHPSODFHPHQWRXjGDXWUHVIDFWHXUVDQDORJXHV!OHVWDFKHV
FRUURVLRQGpFRORUDWLRQGXHVjGHVVXEVWDQFHVH[WHUQHVHWRXjGHVIDFWHXUVHQYLURQQHPHQWDX[!OHVFRWVGHPDLQ
G°XYUHOHVDSSDUHLOVGH[SRVLWLRQGpWDJHGHVWRFN%KRUVERvWHHQOpWDWHWOHVDSSDUHLOVGHGpPRQVWUDWLRQ
Comment recevoir un service
3RXUEpQp¿FLHUGHVVHUYLFHVGHJDUDQWLHODFKHWHXUGRLWFRQWDFWHUOHVHUYLFHGDVVLVWDQFHGH)RUQRD¿QGHGpWHUPLQHUOH
SUREOqPHHWOHVSURFpGXUHVGHVHUYLFHUHTXLVHV8QGpSDQQDJHDYHFXQUHSUpVHQWDQWGXVHUYLFHFOLHQWqOHVHUDQpFHVVDLUH
avant de poursuivre le service. Le numéro de modèle, le numéro de série et la date d'achat au détail seront demandés.
FR-29

Garantie (suite)
Exclusions de la garantie : Ce qui n'est pas couvert.
• L'utilisation du produit dans une application
commerciale non résidentielle.
• /XWLOLVDWLRQGXSURGXLWjGDXWUHV¿QVTXHFHOOHV
prévues.
• Les services de réparation fournis par toute personne
autre qu'une agence de service agréée par Forno.
• Les dommages ou les services de réparation pour
corriger des services fournis par des parties non
autorisées ou l'utilisation de pièces non autorisées.
• L'installation n'est pas conforme aux codes du feu,
aux codes électriques, aux codes du gaz, aux codes
GHSORPEHULHDX[FRGHVGXEkWLPHQWDX[ORLVRXDX[
réglementations locales/de l'État/de la ville/du comté.
• Défauts ou dommages dus à un stockage inadéquat
du produit.
• Défauts, dommages ou pièces manquantes sur les
SURGXLWVYHQGXVKRUVGHOHPEDOODJHGRULJLQHRXGHV
SUpVHQWRLUV!/HVDSSHOVGHVHUYLFHRXOHVUpSDUDWLRQV
visant à corriger une installation incorrecte du produit
et/ou des accessoires connexes.
• Remplacement de pièces/appels de service pour
FRQQHFWHUFRQYHUWLURXUpSDUHUOHFkEODJHpOHFWULTXH
HWRXODFRQGXLWHGHJD]D¿QGXWLOLVHUFRUUHFWHPHQWOH
produit.
• Remplacement de pièces/appels de service pour
fournir des instructions et des informations sur
l'utilisation du produit.
• Remplacement de pièces/appels de service pour
FRUULJHUGHVSUREOqPHVUpVXOWDQWGHOXWLOLVDWLRQGX
produit d'une manière autre que celle qui est normale
HWKDELWXHOOHSRXUXQXVDJHUpVLGHQWLHO
• Remplacement de pièces/appels de service en raison
GHOXVXUHGHVFRPSRVDQWVWHOVTXHOHVMRLQWVOHV
ERXWRQVOHVVXSSRUWVGHFDVVHUROHVOHVpWDJqUHVOHV
SDQLHUVjFRXYHUWVOHVERXWRQVOHVpFUDQVWDFWLOHVOHV
plateaux en vitrocéramique rayés ou cassés.
• Remplacement des pièces/appels de service en
cas de manque d'entretien ou d'entretien inadéquat,
y compris, mais sans s'y limiter, l'accumulation de
résidus, de taches, de rayures, de décoloration et de
corrosion.
• Défauts et dommages résultant d'accidents, de
PRGL¿FDWLRQVGXQHPDXYDLVHXWLOLVDWLRQGXQDEXVRX
IL N'EXISTE AUCUNE GARANTIE EXPRESSE AUTRE QUE CELLES ÉNUMÉRÉES ET DÉCRITES CI-DESSUS, ET AUCUNE GARANTIE, EXPRESSE OU
IMPLICITE, Y COMPRIS, MAIS SANS S'Y LIMITER, TOUTE GARANTIE IMPLICITE DE QUALITÉ MARCHANDE OU D'ADÉQUATION À UN USAGE PARTICULIER
QUI S'APPLIQUERAIT APRÈS LES PÉRIODES DE GARANTIE EXPRESSE INDIQUÉES CI-DESSUS, ET AUCUNE AUTRE GARANTIE EXPRESSE OU
GARANTIE DONNÉE PAR UNE PERSONNE, UNE ENTREPRISE OU UNE SOCIÉTÉ CONCERNANT CE PRODUIT NE SERA CONTRAIGNANTE POUR FORNO.
FORNO N'EST PAS RESPONSABLE DES PERTES DE REVENUS OU DE PROFITS, DE LA NON-RÉALISATION D'ÉCONOMIES OU D'AUTRES AVANTAGES, DE
L'ABSENCE AU TRAVAIL, DES REPAS, DE LA PERTE DE NOURRITURE OU DE BOISSONS, DES FRAIS DE VOYAGE OU D'HÔTEL, DES FRAIS DE LOCATION
OU D'ACHAT D'APPAREILS, DES FRAIS DE RÉNOVATION/CONSTRUCTION DÉPASSANT LES DOMMAGES DIRECTS INDÉNIABLEMENT CAUSÉS
EXCLUSIVEMENT PAR FORNO OU DE TOUT AUTRE DOMMAGE SPÉCIAL, ACCESSOIRE OU CONSÉCUTIF CAUSÉ PAR L'UTILISATION, LA MAUVAISE
UTILISATION OU L'INCAPACITÉ D'UTILISER CE PRODUIT, QUELLE QUE SOIT LA THÉORIE JURIDIQUE SUR LAQUELLE REPOSE LA RÉCLAMATION, ET
MÊME SI FORNO A ÉTÉ INFORMÉE DE LA POSSIBILITÉ DE TELS DOMMAGES. DE MÊME, LE MONTANT DE TOUT RECOUVREMENT À L'ENCONTRE
DE FORNO NE POURRA ÊTRE SUPÉRIEUR AU PRIX D'ACHAT DU PRODUIT VENDU PAR FORNO ET À L'ORIGINE DU DOMMAGE ALLÉGUÉ. SANS
PRÉJUDICE DE CE QUI PRÉCÈDE, L'ACHETEUR ASSUME TOUS LES RISQUES ET TOUTES LES RESPONSABILITÉS EN CAS DE PERTE, DE DOMMAGE
OU DE BLESSURE DE L'ACHETEUR ET DE SES BIENS, AINSI QUE D'AUTRES PERSONNES ET DE LEURS BIENS, RÉSULTANT DE L'UTILISATION, DE LA
MAUVAISE UTILISATION OU DE L'INCAPACITÉ D'UTILISER CE PRODUIT VENDU PAR FORNO ET NE RÉSULTANT PAS DIRECTEMENT D'UNE NÉGLIGENCE
DE LA PART DE FORNO CETTE GARANTIE LIMITÉE NE S'ÉTEND À PERSONNE D'AUTRE QUE L'ACHETEUR D'ORIGINE DE CE PRODUIT, N'EST PAS
TRANSFÉRABLE ET CONSTITUE VOTRE SEUL ET UNIQUE RECOURS.
d'une installation incorrecte.
• Défauts et dommages résultant du transport, de
la logistique et de la manutention des produits.
/LQVSHFWLRQGXSURGXLWGRLWrWUHHႇHFWXpHDXPRPHQW
de la livraison. Après réception et inspection, le
UHYHQGHXUOLYUHXUGRLWrWUHLQIRUPpGHWRXWSUREOqPHOLp
à la manutention, au transport et à la logistique.
• Défauts et dommages résultant de forces extérieures
échappant au contrôle de Forno Appliances, y
compris, mais sans s'y limiter, le vent, la pluie, le
VDEOHOHVLQFHQGLHVOHVLQRQGDWLRQVOHVFRXOpHVGH
ERXHOHVWHPSpUDWXUHVJODFLDOHVOKXPLGLWpH[FHVVLYH
ou l'exposition prolongée à l'humidité, les surtensions,
la foudre, les défaillances structurelles entourant
ODSSDUHLOHWGDXWUHVFDVGHIRUFHPDMHXUH
• 3URGXLWVGRQWOHQXPpURGHVpULHDpWpPRGL¿p
endommagé ou altéré. En aucun cas Forno ne sera
WHQXSRXUUHVSRQVDEOHGHVGRPPDJHVFDXVpVDX[
ELHQVHQYLURQQDQWV\FRPSULVOHVPHXEOHVOHV
armoires, les revêtements de sol, les panneaux et
autres structures entourant le produit. Forno n'est pas
UHVSRQVDEOHGXSURGXLWVLOHVWVLWXpGDQVXQHUpJLRQ
pORLJQpHRXGDQVXQHUpJLRQRGHVWHFKQLFLHQV
FHUWL¿pVHWIRUPpVQHVRQWSDVUDLVRQQDEOHPHQW
GLVSRQLEOHV/DFKHWHXUGRLWSUHQGUHHQFKDUJHOHV
IUDLVGHWUDQVSRUWHWGHOLYUDLVRQGXSURGXLWMXVTXDX
centre de service agréé le plus proche ou les frais de
GpSODFHPHQWVXSSOpPHQWDLUHVGXQWHFKQLFLHQFHUWL¿p
et formé
FR-30


6RXWLHQjODFOLHQWqOH$SSHOH]OHRXHQYR\H]XQFRXUULHOLQIR#IRUQRFD
ZZZIRUQRFD
PN:16170000B01340