ARC PRO 5V Zero Li-ion
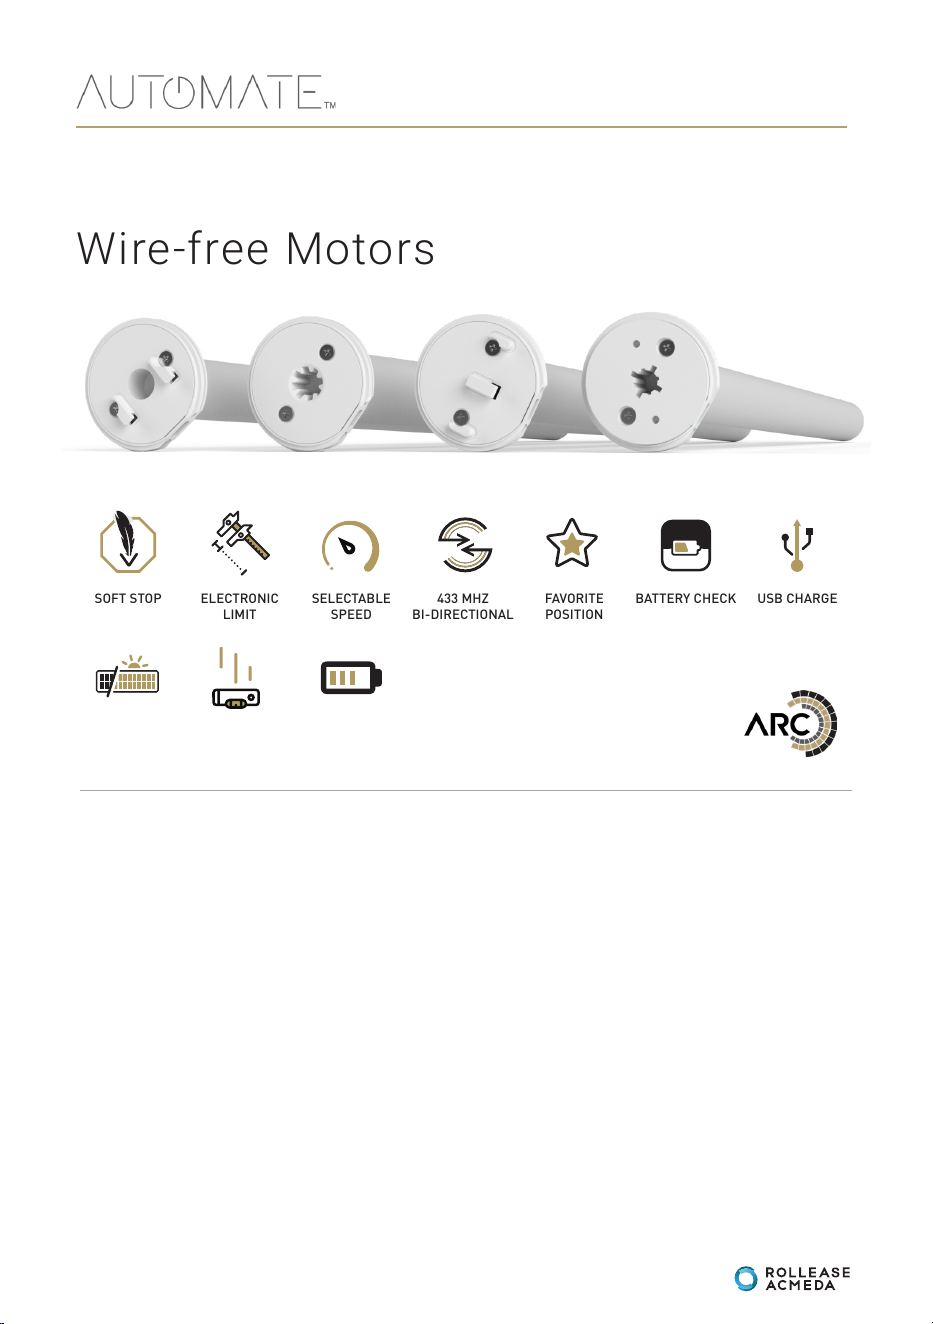
Wire-free Motors
MOTOR PROGRAMMING INSTRUCTIONS
SOFT STOP
SOLAR OPTION
FAVORITE
POSITION
SELECTABLE
SPEED
BATTERY
POWERED
USB CHARGEELECTRONIC
LIMIT
LEVEL CONTROL
BATTERY CHECK433 MHZ
BI-DIRECTIONAL
Automate_ARC_PRO_5V_Zero_Li-ion_Wire-free_Motors_ProgrammingManual_v1.1_May_2026
Fav Position
Live Feedback
Energy ecient
2 | Automate® Programming Instructions | ARC PRO 5V Zero Li-ion Wire-free Motors ROLLEASE ACMEDA
SAFETY INSTRUCTIONS
COMPLIANCE STATEMENT
WARNING: Important safety instructions to be read before installation.
Incorrect installation can lead to serious injury and will void manufacturer’s liability and warranty.
WARNING: Important safety instructions to be read before installation and use.
Incorrect installation or use can lead to serious injury and will void manufacturer’s liability and warranty.
It is important for the safety of persons to follow the enclosed instructions. Save these instructions for future reference.
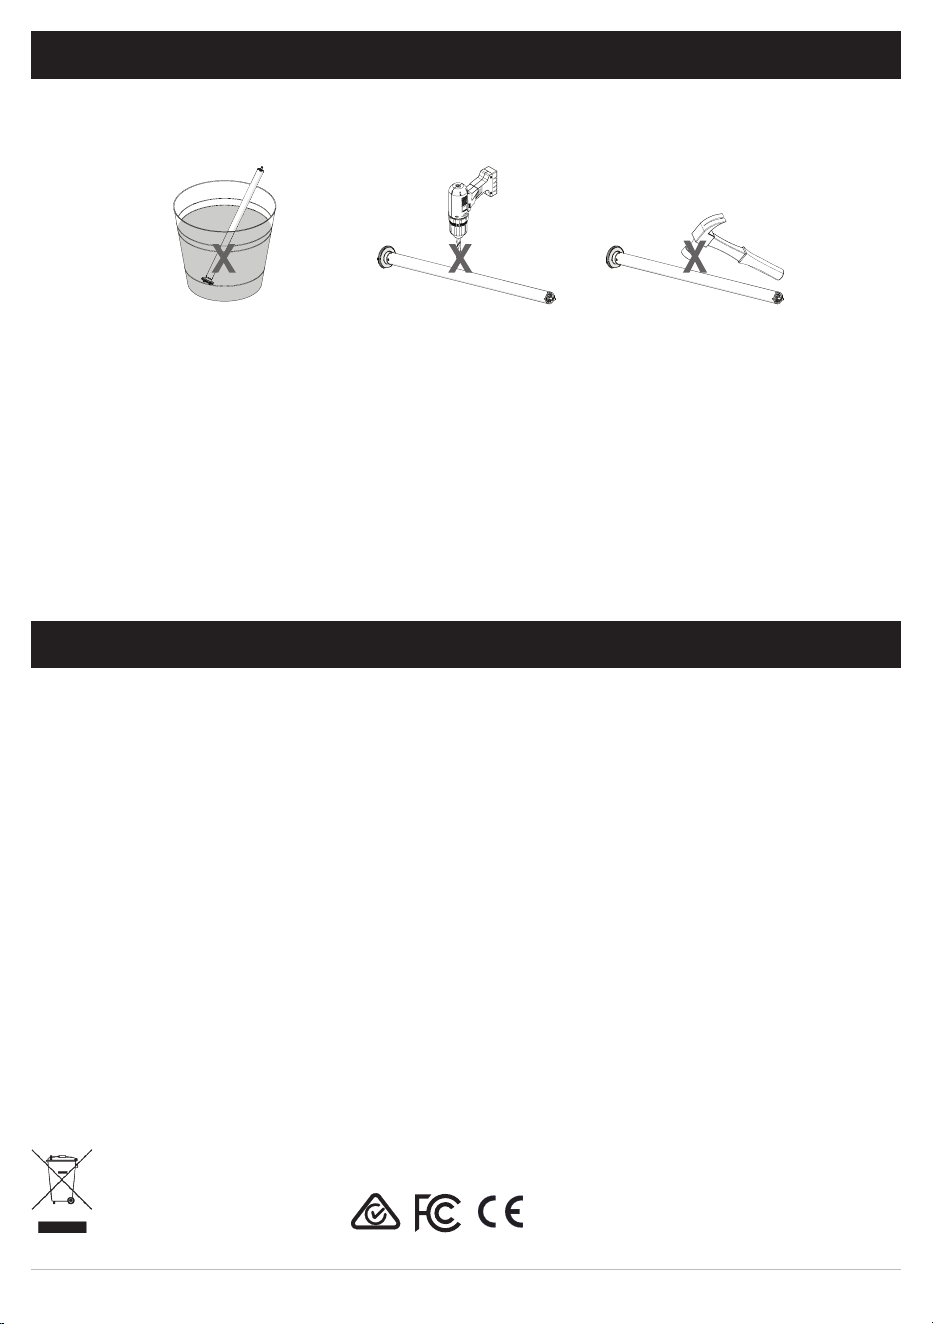
• Do not expose to water, moisture, humid and damp environments or extreme temperatures.
• Persons (including children) with reduced physical, sensory or mental capabilities, or lack of experience and knowledge should not be
allowed to use this product.
• Use or modification outside the scope of this instruction manual will void warranty.
• Installation and programming to be performed by a suitably qualified installer.
• Follow installation instructions.
• For use with motorized shading devices.
• Keep away from children.
• Frequently inspect for improper operation. Do not use if repair or adjustment is necessary.
• Keep clear when in operation.
• Replace battery with correctly specified type.
This device complies with Part 15 of the FCC Rules / Industry Canada
licence-exempt RSS standard(s). Operation is subject to the following
two conditions:
(1) this device may not cause harmful interference, and
(2) this device must accept any interference received, including
interference that may cause undesired operation.
Le présent appareil est conforme aux CNR d’Industrie Canada
applicables aux appareils radio exempts de licence. L’exploitation est
autorisée aux deux conditions suivantes:
(1) l’appareil ne doit pas produire de brouillage, et
(2) l’utilisateur de l’appareil doit accepter tout brouillage
radioélectrique subi, même si le brouillage est susceptible d’en
compromettre le fonctionnement.
Changes or modifications not expressly approved by the party
responsible for compliance could void the user’s authority to operate
the equipment.
This equipment has been tested and found to comply with the limits for
a Class B digital device, pursuant to part 15 of the FCC Rules. These
limits are designed to provide reasonable protection against harmful
interference in a residential installation.
This equipment generates uses and can radiate radio frequency energy
and, if not installed and used in accordance with the instructions,
may cause harmful interference to radio communications. However,
there is no guarantee that interference will not occur in a particular
installation.
If this equipment does cause harmful interference to radio or television
reception, which can be determined by turning the equipment off and
on, the user is encouraged to try to correct the interference by one or
more of the following measures:
- Reorient or relocate the receiving antenna.
- Increase the separation between the equipment and receiver.
- Connect the equipment into an outlet on a circuit different from that
to which the receiver is connected.
- Consult the dealer or an experienced radio/TV technician for help.
To satisfy FCC / IC RF exposure requirements, a separation distance of
20 cm or more should be maintained
between the antenna of this device and persons during device
operation.
To ensure compliance, operations at closer than this distance is not
recommended.
Les antennes installées doivent être situées de facon à ce que la
population ne puisse y être exposée à une distance de moin de 20
cm. Installer les antennes de facon à ce que le personnel ne puisse
approcher à 20 cm ou moins de la position centrale de l’ antenne.
La FCC des éltats-unis stipule que cet appareil doit être en tout temps
éloigné d’au moins 20 cm des personnes pendant son functionnement.
Do not dispose of in general waste.
Please recycle batteries and damaged
electrical products appropriately.

ROLLEASE ACMEDA Automate® Programming Instructions | ARC PRO 5V Zero Li-ion Wire-free Motors | 3
CONTENTS
1 ASSEMBLY 4
2 RETROFIT INSTALLATION 5
3 CHARGING 5
4 P1 BUTTON FUNCTIONS 6
4.1 Motor state test 6
4.2 Motor configuration options 6
5 INITIAL SET UP 7
5.1 Pair motor with controller 7
5.2 Check motor direction 7
5.3 Set Limits 8
6 ADJUSTING LIMITS 9
6.1 Adjust upper limit 9
6.2 Adjust lower limit 9
7 CONTROLLERS AND CHANNELS 10
7.1 Using P2 Button on existing controller to add a
new controller or channel 10
7.2 Using a pre-existing controller to add or delete
a controller or channel 10
8 FAVORITE POSITIONING 11
8.1 Set favorite position 11
8.2 Send shade to favorite position 11
8.3 Delete favorite position 11
9 ADJUSTING SPEED 12
9.1 Increase Motor Speed 12
9.2 Decrease Motor Speed 12
10 SOFT STOP CONFIGURATION 13
10.1 Turn Soft Stop OFF 13
10.2 Turn Soft Stop ON 13
11 BATTERY CHECK FUNCTION 14
11.1 Send Shade to battery charge level 14
12 CHARGING LED 14
12.1 Turn Charging LED ON/OFF 14
13 SLEEP MODE 15
14 TROUBLE SHOOTING 15
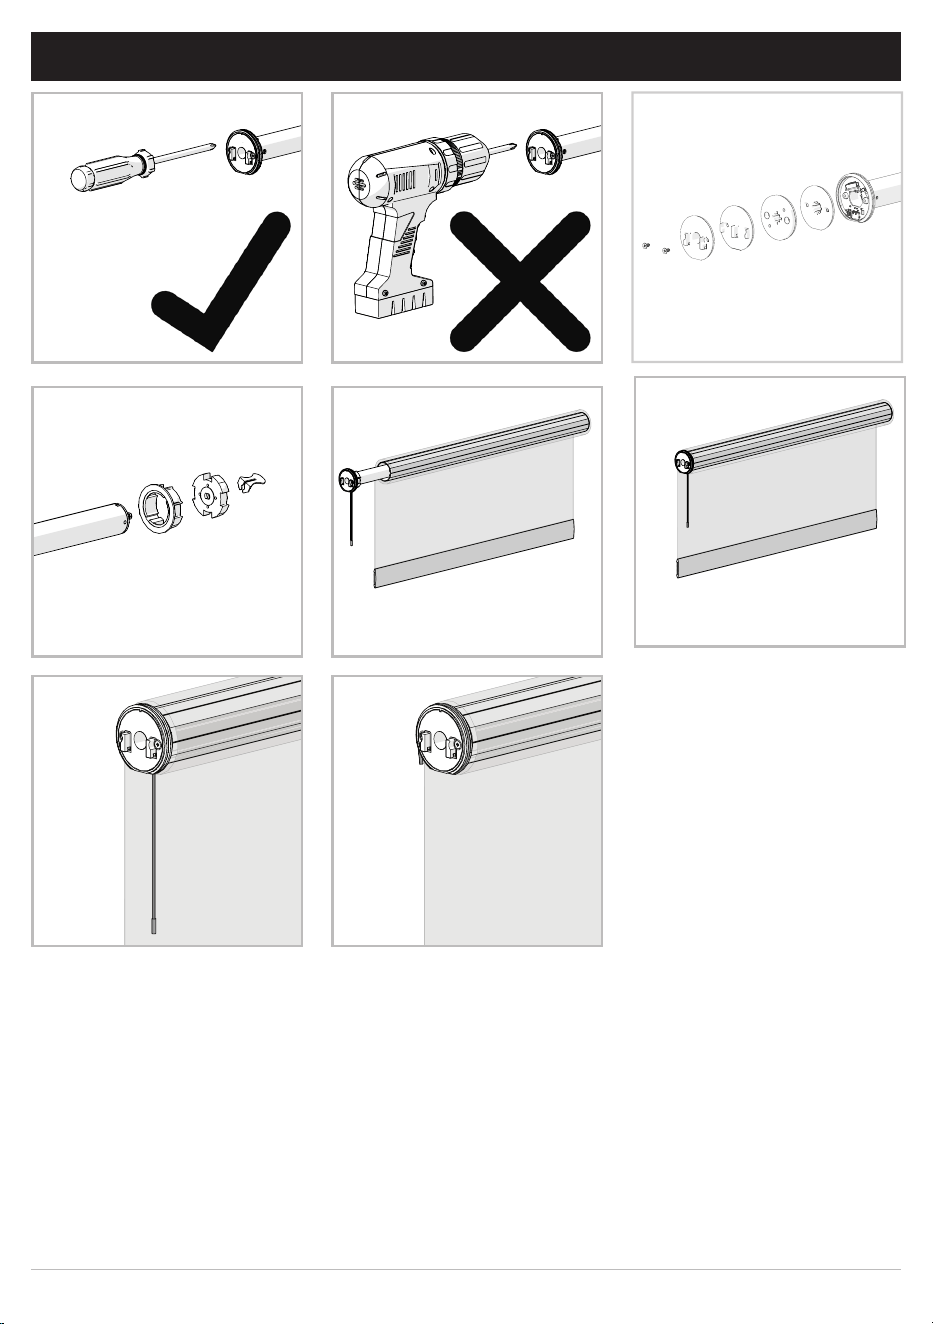
4 | Automate® Programming Instructions | ARC PRO 5V Zero Li-ion Wire-free Motors ROLLEASE ACMEDA
1 ASSEMBLY
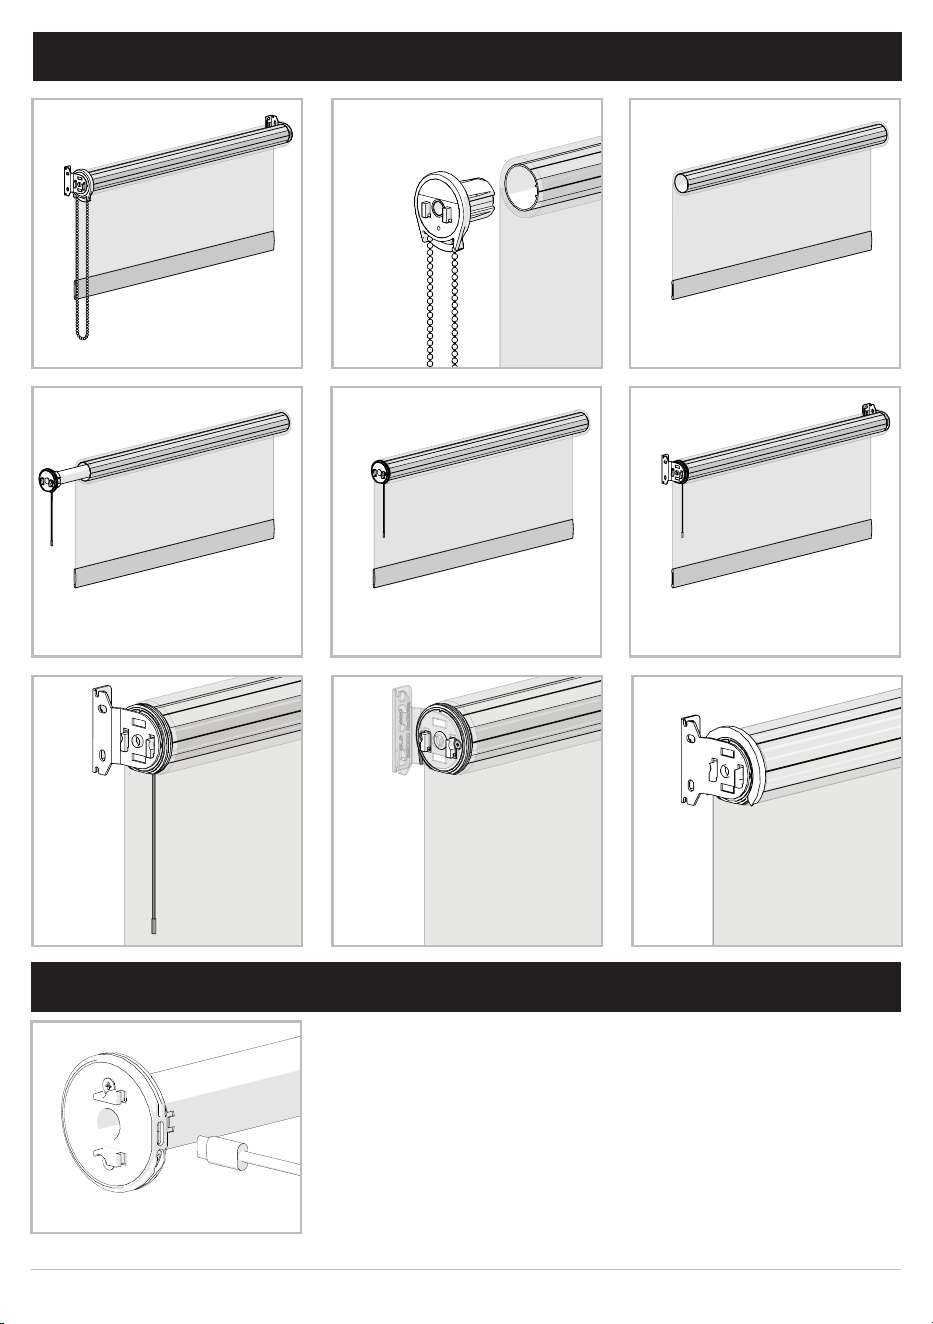
ROLLEASE ACMEDA Automate® Programming Instructions | ARC PRO 5V Zero Li-ion Wire-free Motors | 5
3 CHARGING
2 RETROFIT INSTALLATION
6 | Automate
™
Programming Instructions | 5V Li-ion Tubular Motors ROLLEASE ACMEDA
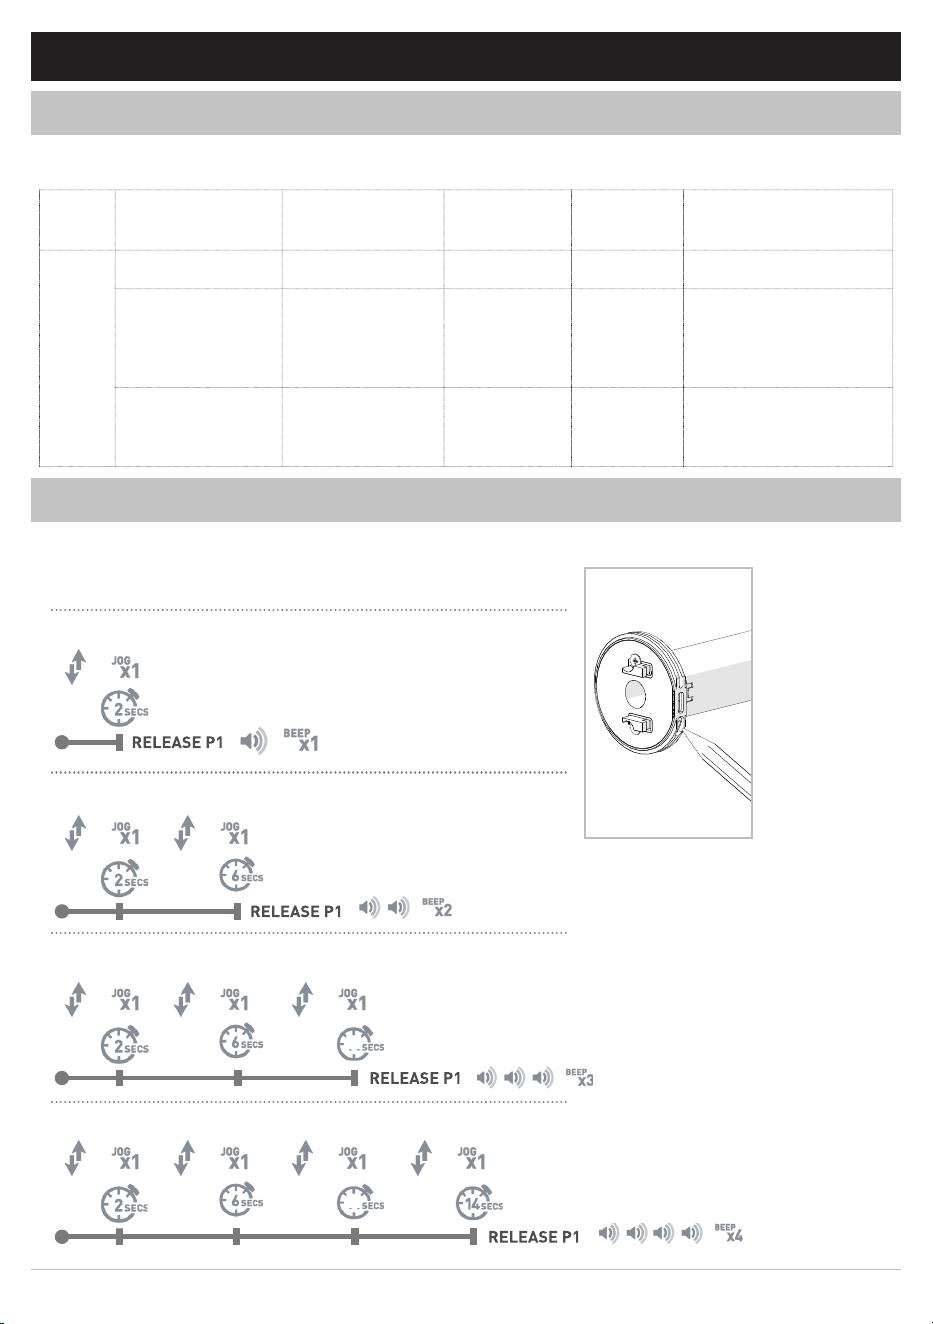
4.1 Motor state test
4.2 Motor configuration options
This table describes the function of a short P1 Button press/release (<2 seconds) depending on current motor
configuration.
The P1 Button is utilized to administer motor configurations as described below.
Activate Pairing Mode
Approx.
Approx.
Approx.
Sleep Mode
Reverse Direction
Approx.
Reset To Factory Settings
Approx.
Approx.
4 P1 BUTTON FUNCTIONS
P1
Press
Condition
Function
Achieved
Visual
Feedback
Audible
Feedback
Function Described
Short
Press
If limit is NOT set None No Action None No Action
If limits are set
Operational
control of motor,
run to limit. Stop
if running
Motor Runs None
Operational control
of motor after pairing
and limit setting is
completed first time
If motor is in
“Sleep Mode” &
limits are set
Wake and control None
Short
Beep
Motor is restored from
Sleep Mode and RF
control is active
Hold P1 button on motor head.
P1 button on motor head.
10
10
Approx.
Approx.
Approx.
Approx.
ROLLEASE ACMEDA Automate® Programming Instructions | ARC PRO 5V Zero Li-ion Wire-free Motors | 7
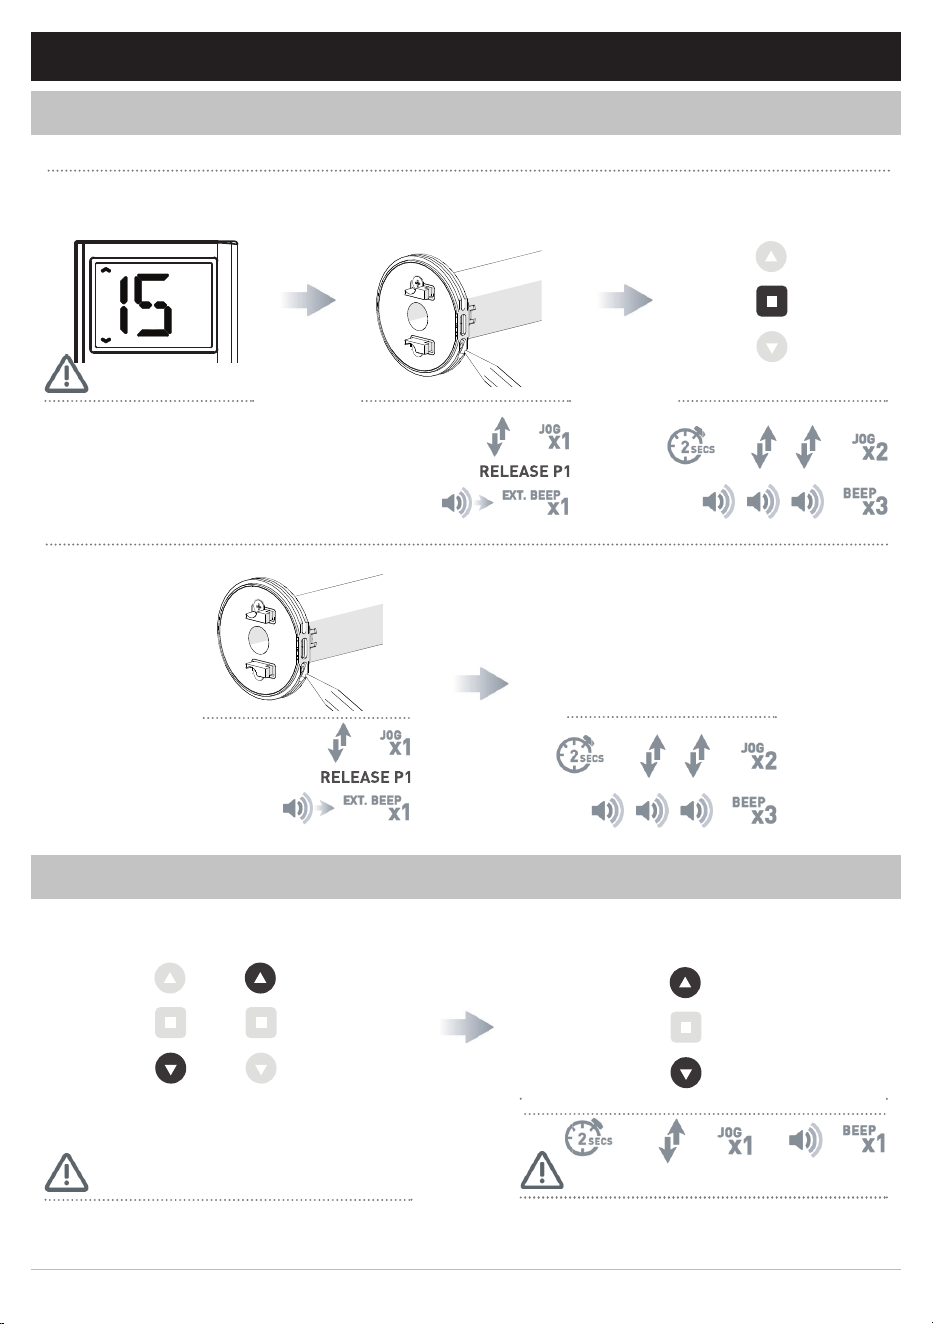
5.1 Pair motor with controller
5.2 Check motor direction
.
Consult user manual for your
controller for information on
selecting channel.
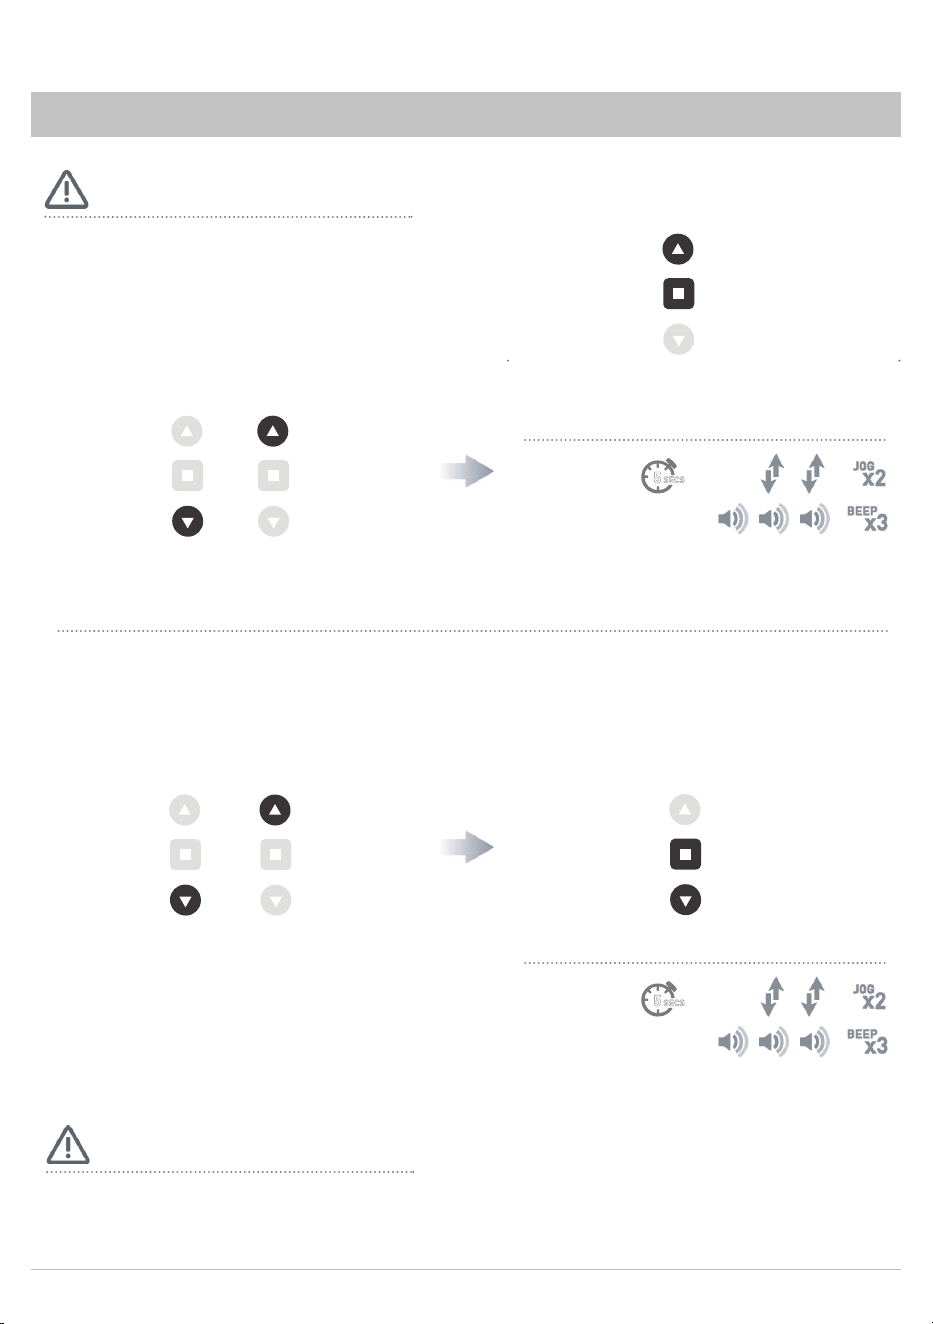
Damage to shade may occur when operating motor prior to
setting limits. Attention should be given.
Reversing motor direction using this method is only possible
during initial set-up
Hold P1 button on
motor head.
Hold P1 button on
motor head.
To check travel direction of shade, press UP or
DOWN on controller.
Quick Press = Step
Long Press = Continuous Travel
To reverse shade direction, hold both UP and
DOWN.
Until the motor responds.
Select channel on
controller.
Hold STOP on
controller.
Approx.
Approx.
Approx.
Motor Response
Motor Response
Motor Response
Motor Response
Motor Response
IMPORTANT
IMPORTANT
IMPORTANT
5 INITIAL SET UP
OR
ARC PRO is an improved communication protocol unlocking advanced smart home features.
ARC is a propriety radio communication that brings your motorised system together.
To Complete ARC PRO pairing and setup process
please refer to the manual of Compatible ARC PRO
controllers.
Pair motor with ARC PRO
Pair motor with ARC
8 | Automate® Programming Instructions | ARC PRO 5V Zero Li-ion Wire-free Motors ROLLEASE ACMEDA
SEC
SEC
S
S
5
5
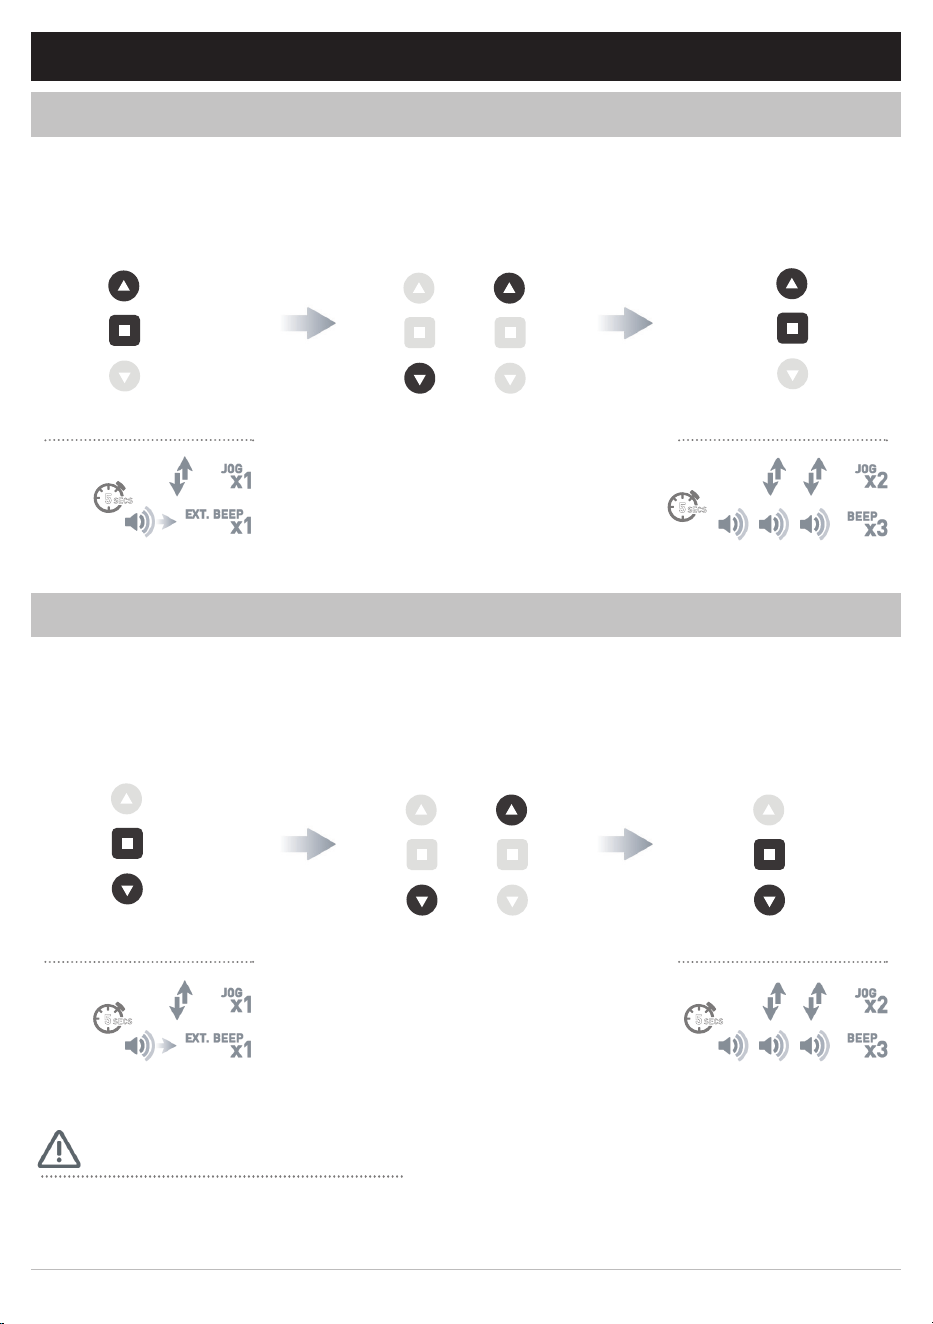
Cycle shade up and down prior to setting limits to settle fabric
After setting limits, motor will automatically exit from initial
set-up mode.
Move shade to the desired highest or lowest
position by pressing the UP or DOWN buttons
on controller.
Move shade to the desired highest or lowest
position by pressing the UP or DOWN buttons
on controller.
To save upper limit, hold UP and STOP.
To save lower limit, hold DOWN and STOP.
Motor Response
Motor Response
IMPORTANT
IMPORTANT
Approx.
Approx.
OR
OR
5.3 Set Limits
ROLLEASE ACMEDA Automate® Programming Instructions | ARC PRO 5V Zero Li-ion Wire-free Motors | 9
SEC
SEC
S
S
5
5
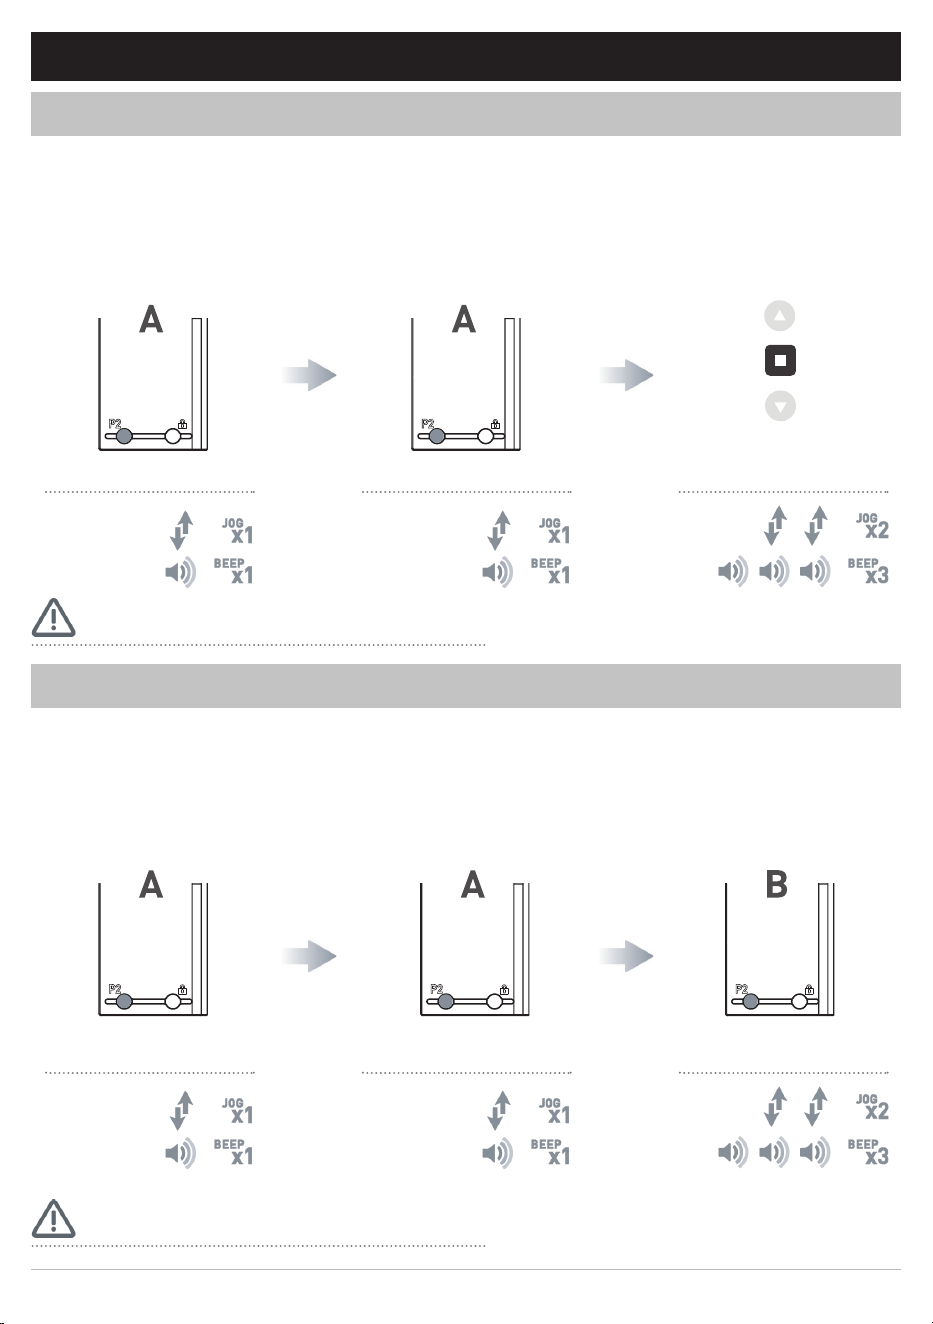
Hold UP and STOP on
controller.
Hold DOWN and STOP
on controller.
Move shade to the desired
lowest position by pressing
the UP or DOWN button.
Move shade to the desired
highest position by pressing
the UP or DOWN button.
To save upper limit, hold UP
and STOP.
To save lower limit, hold
DOWN and STOP.
Approx.
Approx.
Motor Response
Motor Response Motor Response
Motor Response
6 ADJUSTING LIMITS
SEC SECS S
5 5
Approx. Approx.
The bottom limit should be set ~ 1.38 in. (35mm) below the Ultra-Lock to disengage the auto lock mechanism when the shade is raised.
IMPORTANT
OR
OR
6.1 Adjust upper limit
6.2 Adjust lower limit
10 | Automate® Programming Instructions | ARC PRO 5V Zero Li-ion Wire-free Motors ROLLEASE ACMEDA
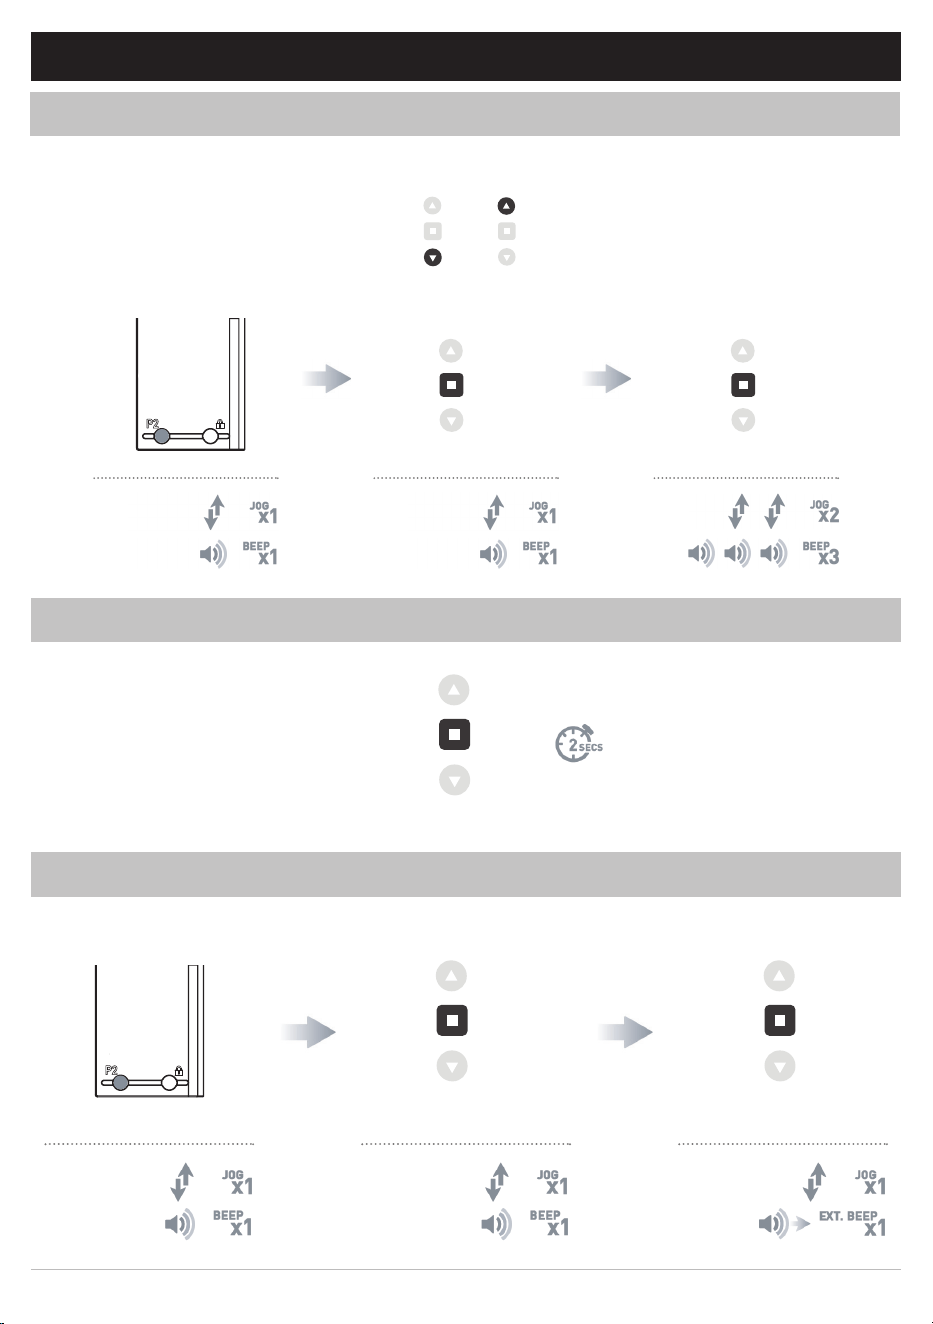
A = Existing controller or channel (to keep)
B = Controller or channel to add or remove
A = Existing controller or channel (to keep)
B = Controller or channel to add or remove
Press P2 on
controller A.
Press P2 on
controller A.
Press P2 on
controller A.
Press P2 on
controller A.
Press P2 on the
controller B to remove
it.
Press STOP on an new
controller to add it.
Motor Response
Motor Response
Motor Response
Motor Response
Motor Response
Motor Response
7 CONTROLLERS AND CHANNELS
Consult user manual for your controller or sensor
Consult user manual for your controller or sensor
IMPORTANT
IMPORTANT
7.1
Using P2 Button on existing controller to add a new controller or channel
7.2
Using a pre-existing controller to add or delete a controller or channel
ROLLEASE ACMEDA Automate® Programming Instructions | ARC PRO 5V Zero Li-ion Wire-free Motors | 11
Press P2 on controller. Press STOP on controller. Press STOP on controller.
Move shade to the desired position by pressing the UP or DOWN button on the controller.
Press P2 on controller. Press STOP on controller. Press STOP on controller.
Approx.
Motor Response
Motor Response
Motor Response
Motor Response
Motor Response
Motor Response
8 FAVORITE POSITIONING
OR
8.1
Set favorite position
8.2
Send shade to favorite position
8.3
Delete favorite position
12 | Automate® Programming Instructions | ARC PRO 5V Zero Li-ion Wire-free Motors ROLLEASE ACMEDA
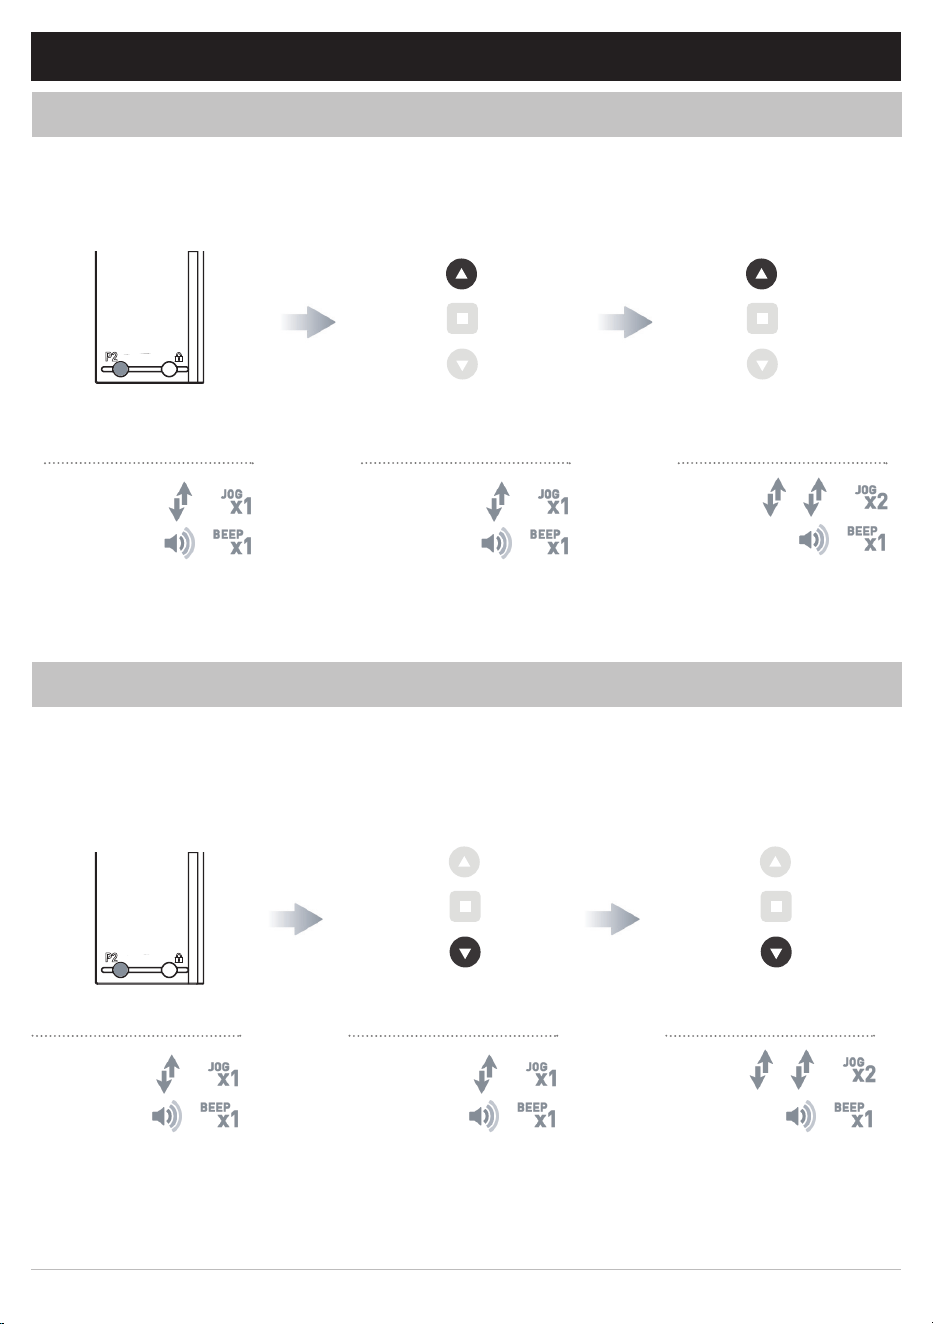
9 ADJUSTING SPEED
Press P2 Press DOWN Press DOWN
Motor Response Motor Response Motor Response
Press P2 Press UP Press UP
Motor Response Motor Response Motor Response
Default motor mode is the slowest speed.
9.1
Increase Motor Speed
9.2
Decrease Motor Speed
ROLLEASE ACMEDA Automate® Programming Instructions | ARC PRO 5V Zero Li-ion Wire-free Motors | 13
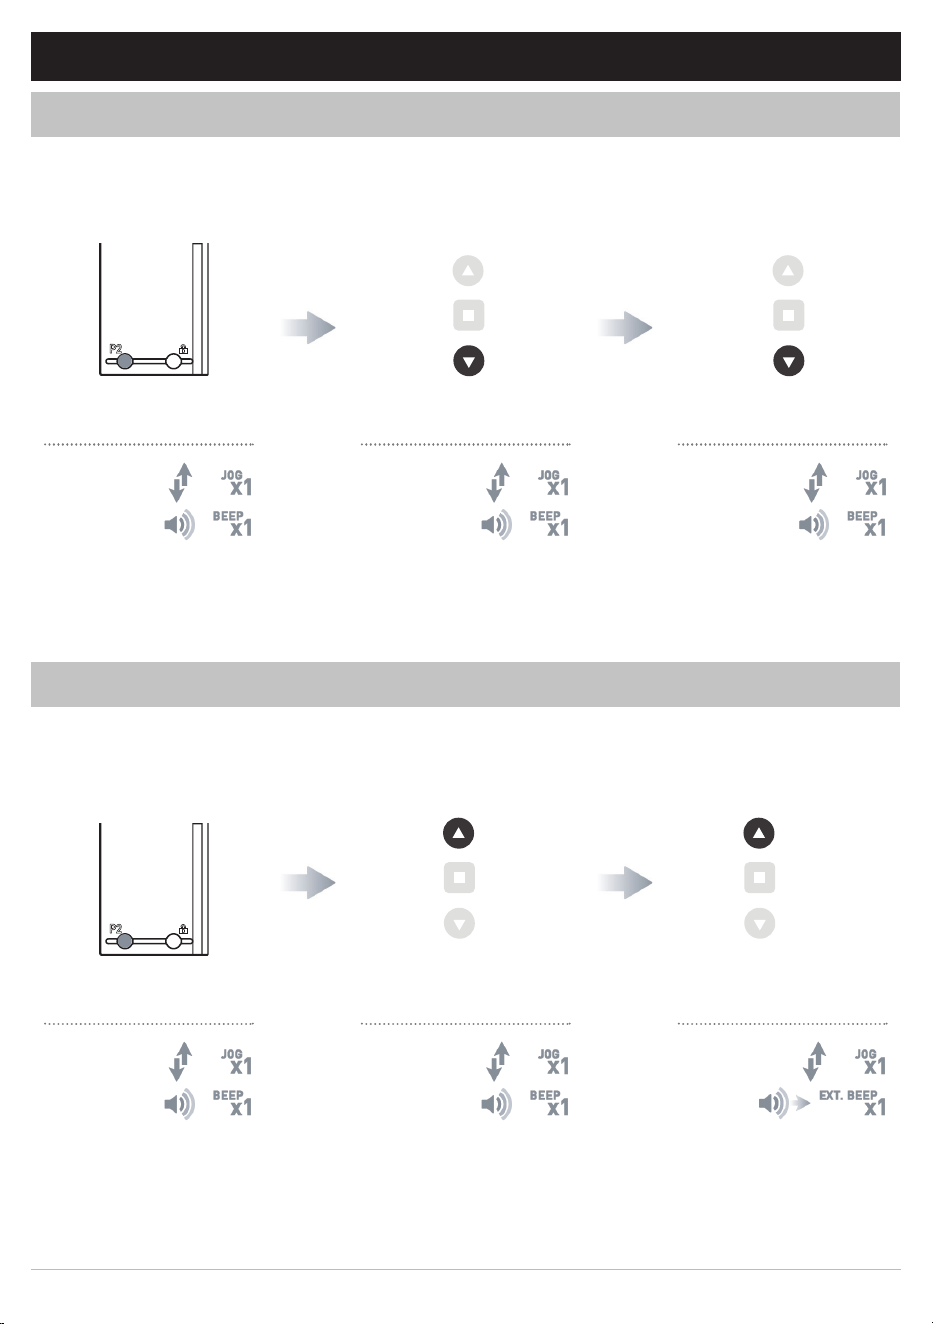
10 SOFT STOP CONFIGURATION
Press P2 Press DOWN Press DOWN
Motor Response Motor Response Motor Response
Press P2 Press UP Press UP
Motor Response Motor Response Motor Response
Motor must be in slowest speed to turn Soft Stop OFF.
Motor must be in fastest speed to turn Soft Stop ON.
10.1
Turn Soft Stop OFF
10.2
Turn Soft Stop ON
14 | Automate® Programming Instructions | ARC PRO 5V Zero Li-ion Wire-free Motors ROLLEASE ACMEDA
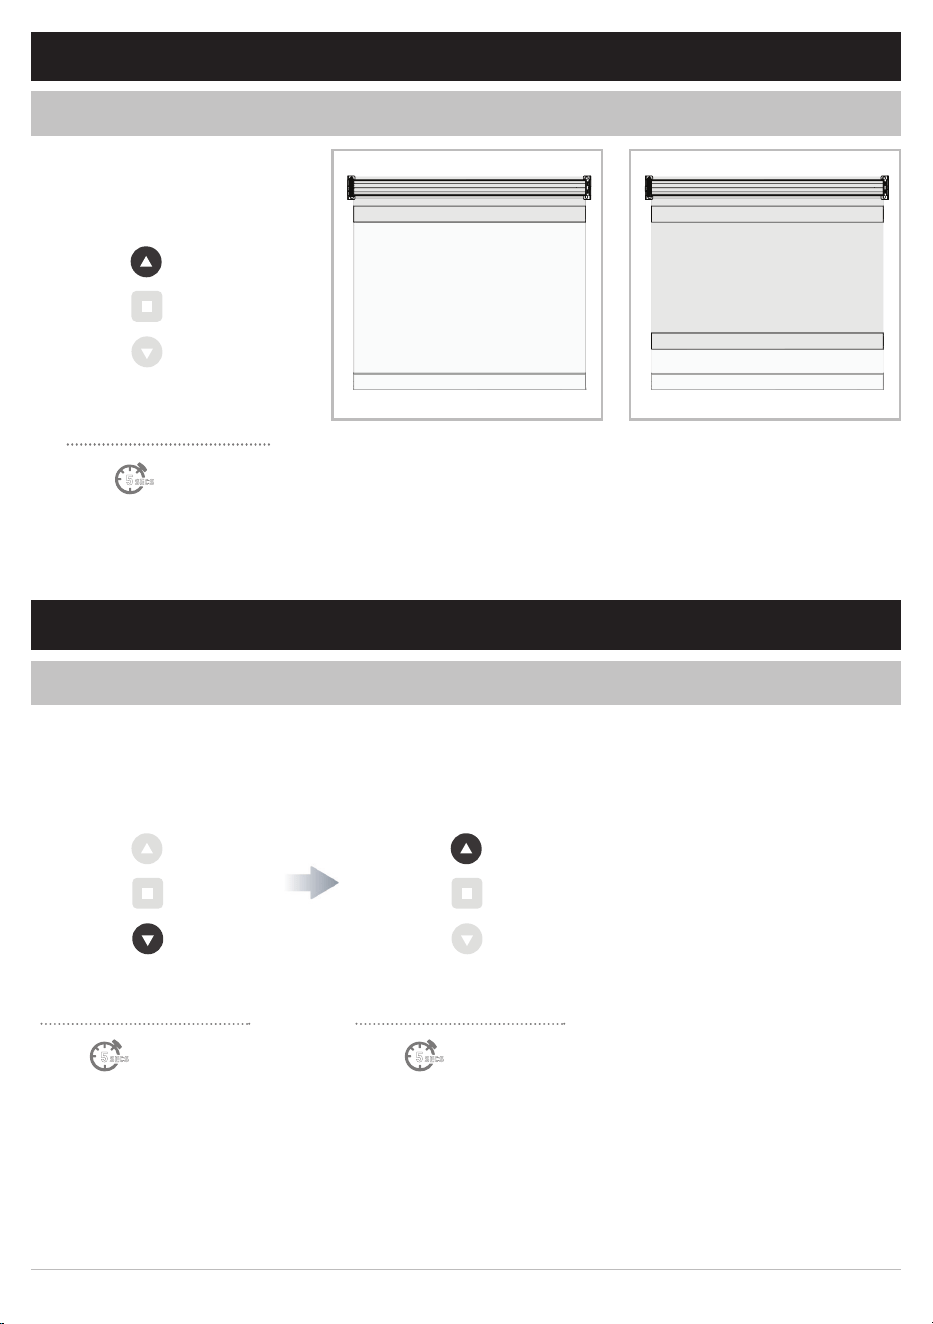
11 BATTERY CHECK FUNCTION
Hold UP
Motor Response
Shade must be at Upper Limit
Hold UP for Approx. 5s
Shade must be at Upper Limit.
Shade moves to percentage of
battery charge remaining
SEC
5
Approx.
12 CHARGING LED
Hold DOWN to toggle off
Red LED flashes x3 Red LED flashes x3
Hold DOWN to toggle on
Motor Response Motor Response
SEC SEC
5 5
Approx. Approx.
Motor must be at Lower Limit.
Upper Limit
Percentage of
Battery Charge
Remaining
Percentage Depleted
Lower Limit
S
S
11.1 Send Shade to battery charge level
12.1 Turn Charging LED ON/OFF
ROLLEASE ACMEDA Automate® Programming Instructions | ARC PRO 5V Zero Li-ion Wire-free Motors | 15
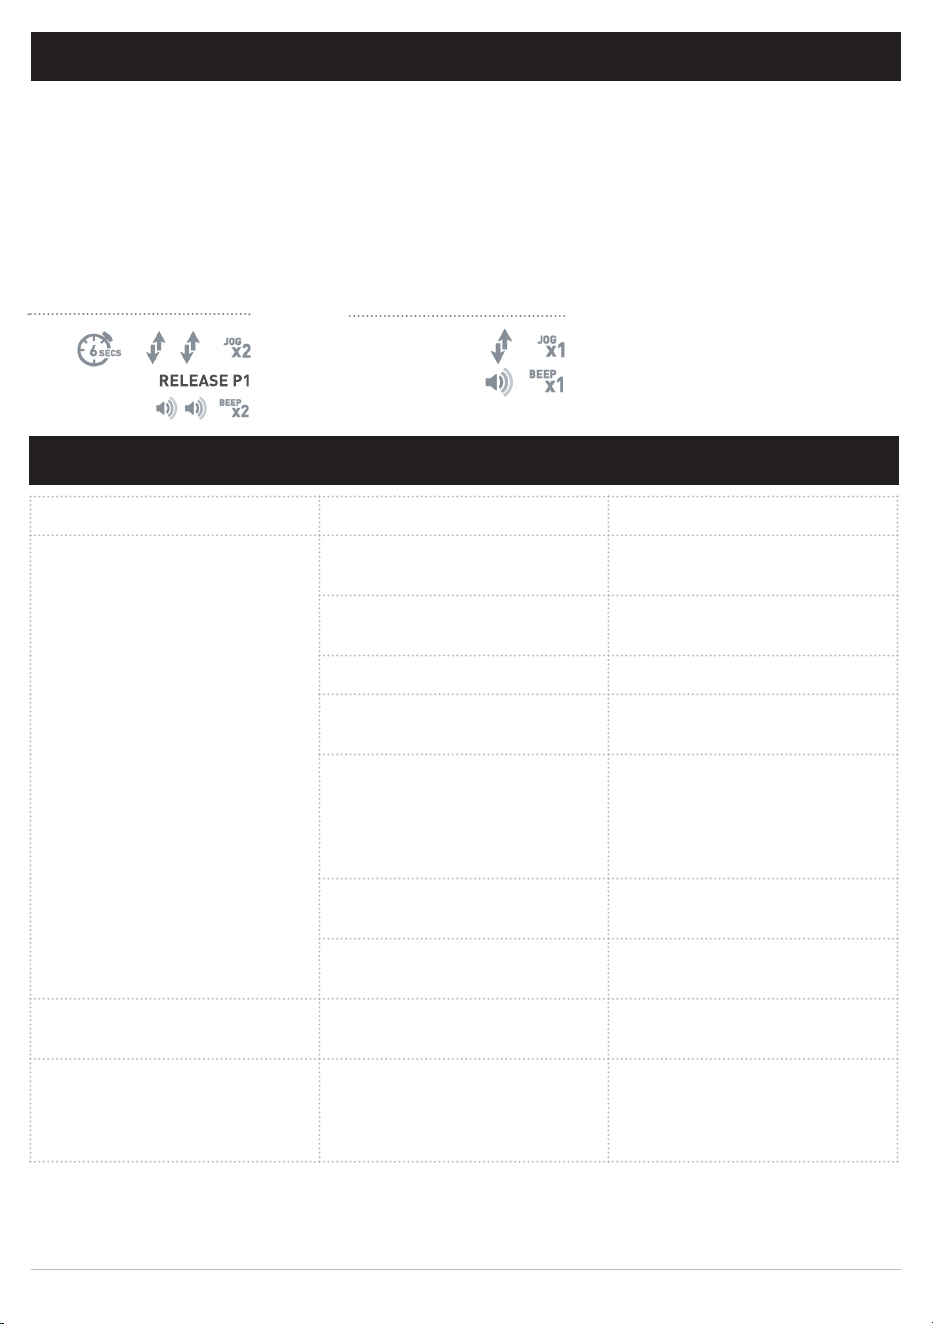
9 SLEEP MODE
Enter Sleep Mode
Sleep mode is utilized to
prevent a motor from incorrect
configuration during other
motor setup.
Hold P1 button on the motor
head
If multiple motors are grouped on a single channel, Sleep Mode may be used to put all but 1 motor to sleep,
allowing programming of just the one motor that remains “Awake”. See page 6 for detailed P1 functions.
Exit Sleep Mode: Method 1
Exit sleep mode once the shade
is ready.
Press and release P1 button on
the motor head
Exit Sleep Mode: Method 2
Remove power and then
re-power the motor.
Motor Response
Motor Response
13 SLEEP MODE
Approx.
G
14 TROUBLE SHOOTING
Problem Cause Remedy
Motor is not responding Battery in motor is depleted Recharge with a compatible
charger
Insufficient charging from solar
PV panel
Check connection and orientation
of PV panel
Transmitter battery is discharged Replace battery
Battery is inserted incorrectly
into transmitter
Check battery polarity
Radio interference/shielding Ensure transmitter is positioned
away from metal objects and
the aerial on motor or receiver
is kept straight and away from
metal
Receiver distance is too far from
transmitter
Move transmitter to a closer
position
Charging failure Check power supply to motor is
connected and active
Motor beeps x10 when in use Battery voltage is low Recharge with a compatible
charger
Cannot program a single motor
(multiple motors respond)
Multiple motors are paired to the
same channel
Always reserve an individual
channel for programming
functions. Use Sleep Mode to
program individual motors.
automateshades.com

16 | Automate® Programming Instructions | ARC PRO 5V Zero Li-ion Wire-free Motors
ROLLEASE ACMEDA | AUSTRALIA
110 Northcorp Boulevard,
Broadmeadows VIC 3047, AUS
T +61 3 9355 0100 | F +61 3 9355 0110
ROLLEASE ACMEDA | USA
750 East Main Street | 7th Floor
Stamford, CT 06902, USA
T +1 800 552 5100 | F +1 203 964 0513