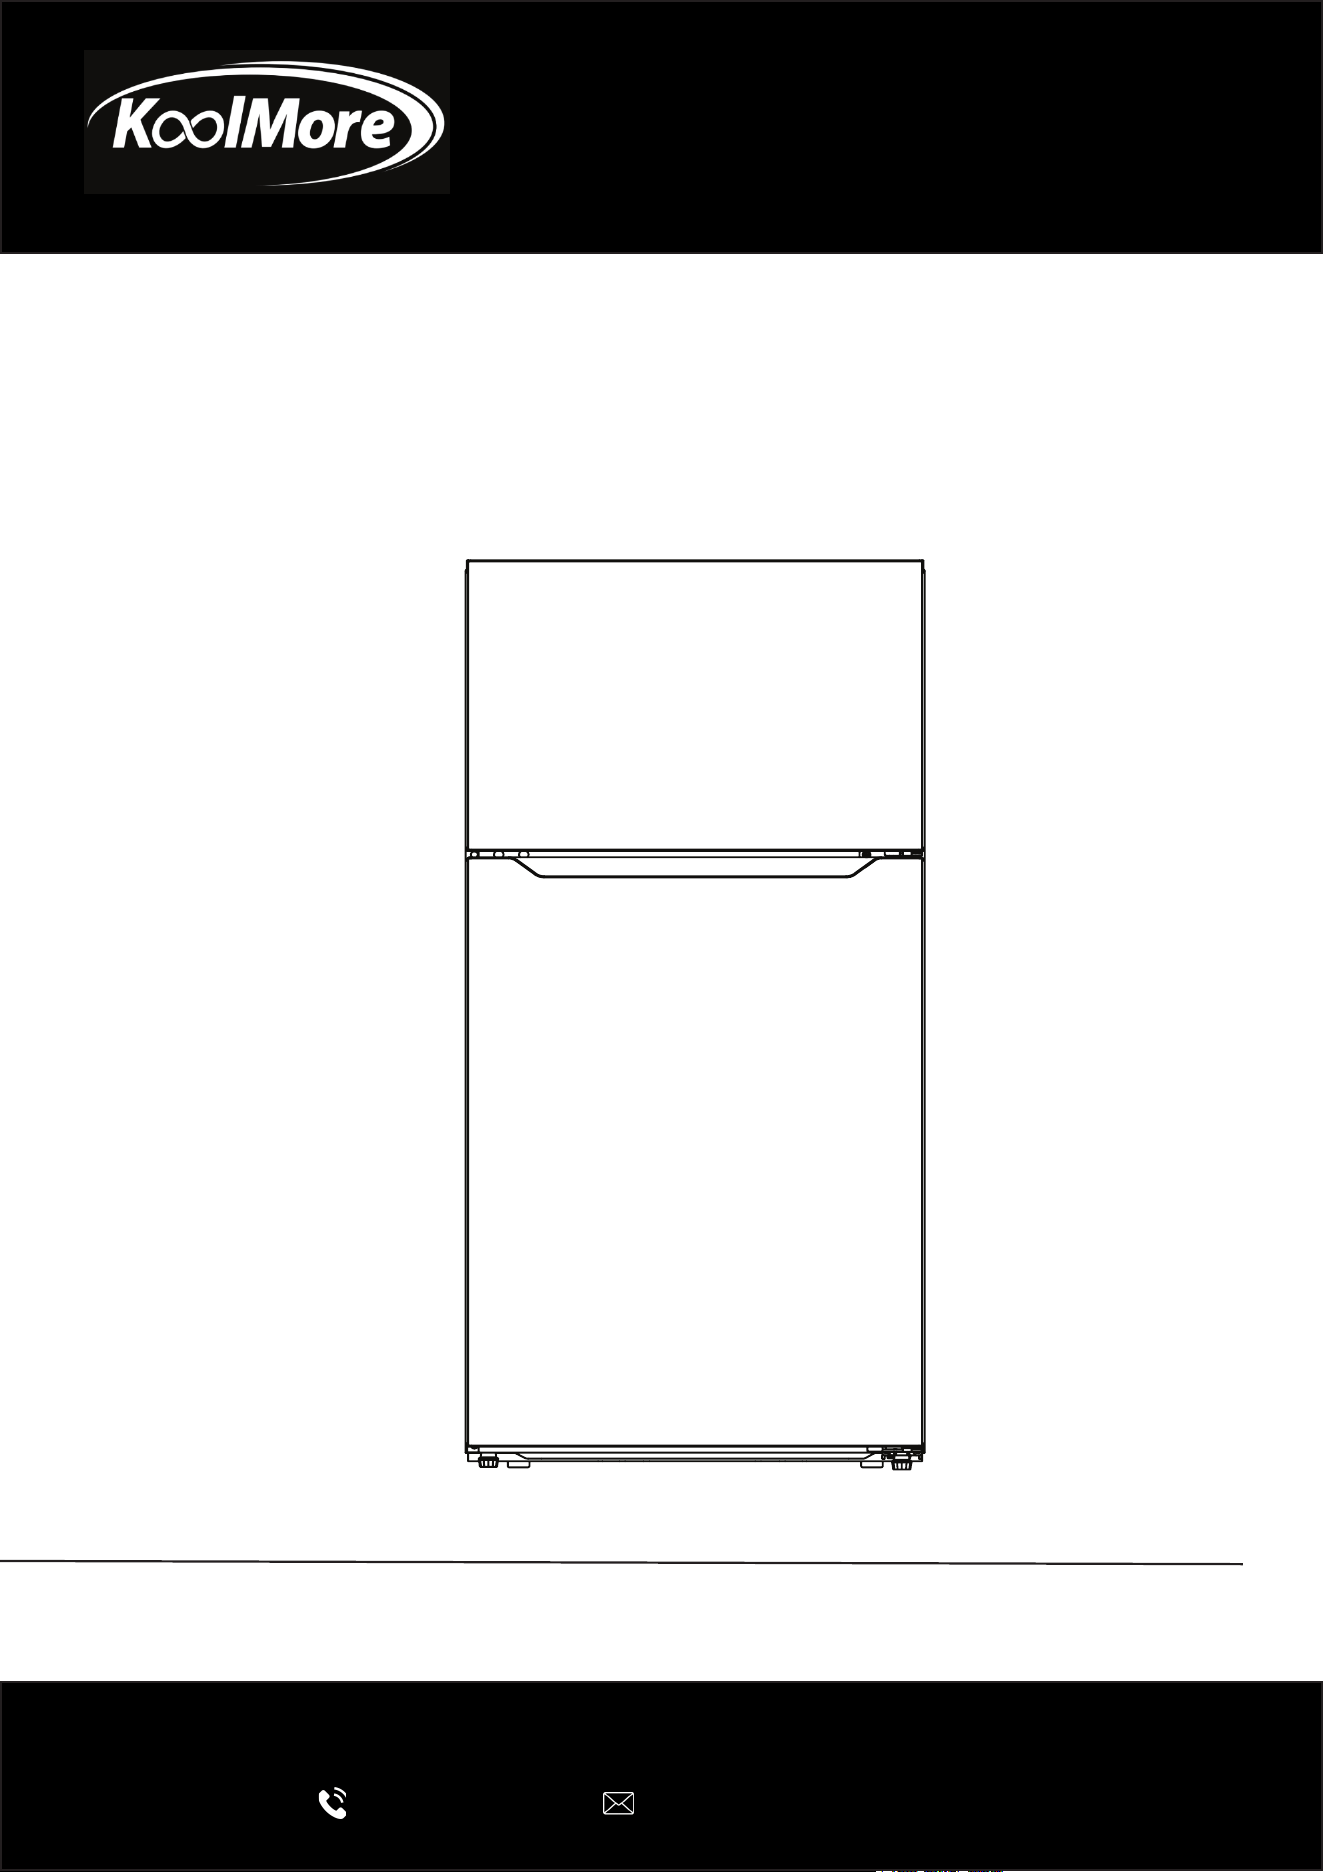
REFRIGERATOR/FREEZER
Top Mount Apartment Refrigerator
USER MANUAL
Before using, please read the operating instructions carefully to
ensure proper application and achieve satisfactory results.
For any service related issues, please contact us:
718-576-6342
support@koolmore.com
Model: KM-TMR-14-SS, KM-TMR-14-W, KM-TMR-18-SS, KM-
TMR-18-W, KM-TMR-20-SS, KM-TMR-20-W
Stay informed with the latest information for your
KoolMore Appliance.
Scan the QR code below to access the most recent user manual
on our website, which is constantly being updated and improved.
If you need any assistance or have questions, our customer support
team is here to help.
Phone- 718-576-6342 Email- support@koolmore.com
Please write down the model number and serial number below for future reference. Both numbers are located on the
rating label on the back of your unit or inside of the unit and are needed to obtain warranty service. You may also
want to staple your receipt to this manual as it is your proof of purchase and may also be needed for service
under warranty.
Model Number:
Serial Number:
Date of Purchase:
To better serve you, please do the following before contacting customer service:
If you received a damaged product, immediately contact the retailer or dealer that sold you the product.
Read and follow this User Manual carefully to help you install, use, and maintain your unit.
Refer to the Troubleshooting section of this manual as it will help you diagnose and solve many common issues.

Contents
Safety ............................................................................................. 4
Installation ..................................................................................... 8
Product Overview ........................................................................... 11
Operation ....................................................................................... 15
Maintenance .................................................................................. 24
Troubleshooting ............................................................................. 26
Appendix ........................................................................................ 27
Warranty ......................................................................................... 29
YOUR SAFETY AND THE SAFETY OF OTHERS ARE VERY IMPORTANT.
To prevent injury to the user or other persons and property damage, these instructions must be
followed. Incorrect operation due to ignoring instructions may cause harm or damage, leading to
serious injuries or death.
The level of risk is shown by the following indications.
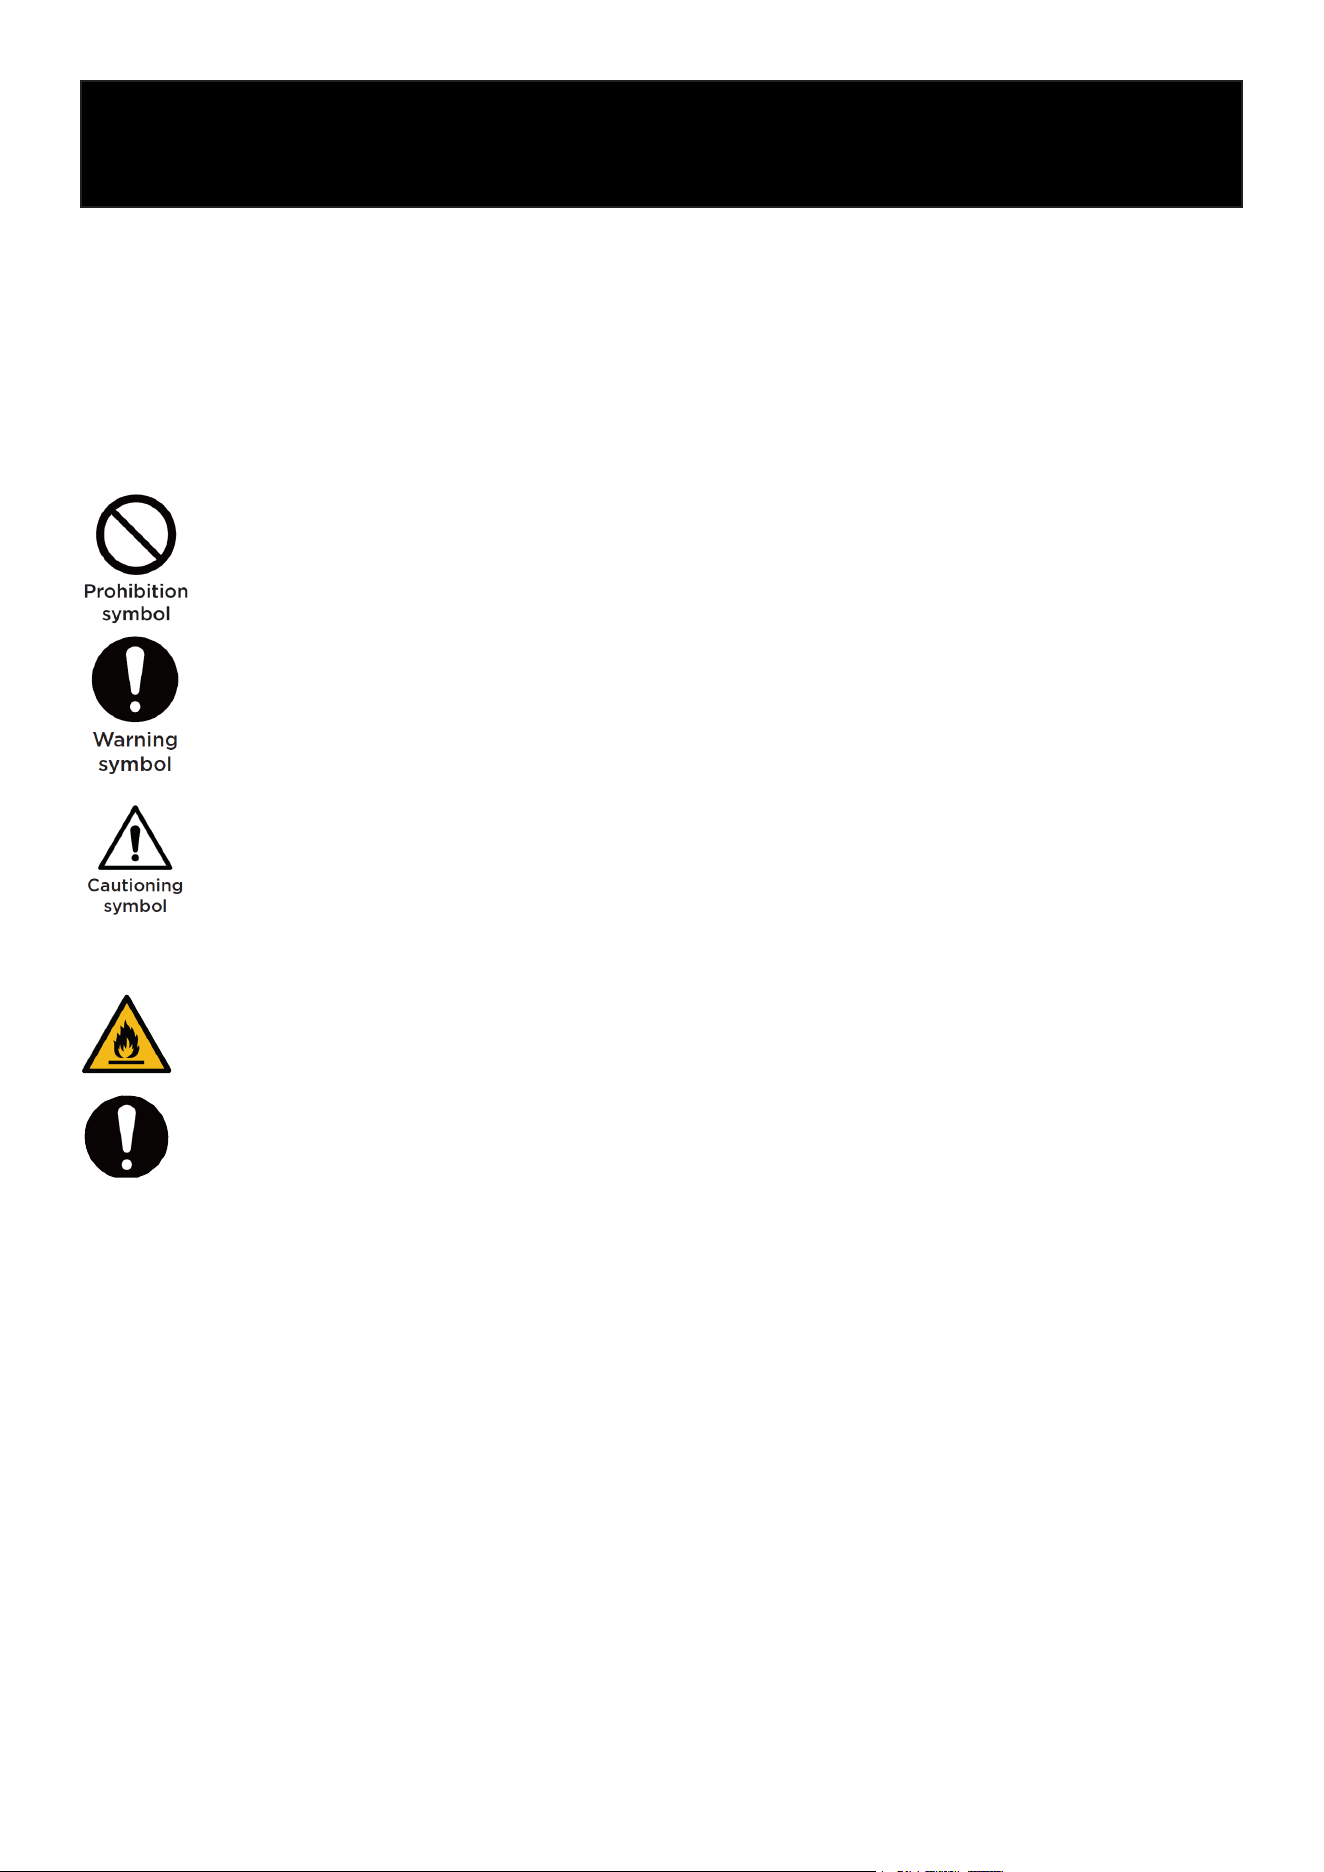
This is a prohibition symbol.
Any incompliance with instructions marked with this symbol may result in damage to
the product or endanger the personal safety of the user.
This is a warning symbol.
It is required to operate in strict observance of instructions marked with this symbol;
otherwise damage to the product or personal injury may be caused.
This is a caution symbol.
Instructions marked with this symbol require special caution. Insufficient caution may
result in slight or moderate injury or damage to the product.
Important Safety Instructions
Risk of fire / Flammable materials
WARNING
• This appliance is intended for use in households and similar environments, including staff
kitchen areas in shops, offices, and other workplaces; farmhouses; hotel and motel guest ar-
eas; bed-and-breakfast establishments; and catering or other non-retail settings.
• This appliance is not intended for use by persons (including children) with reduced physical,
sensory or mental capabilities, or lack of experience and knowledge, unless they have been
given supervision or instruction concerning use of the appliance by a person responsible for
their safety.
• Children should be supervised to ensure that they do not play with the appliance.
• If the power cord is damaged, it must be replaced by the manufacturer, service agent, or anoth-
er qualified person in order to avoid a hazard.
• Do not store explosive substances such as aerosol cans with a flammable propellant in this
appliance.
• Always unplug the appliance when it is not in use and before carrying out any cleaning or main-
tenance.
• WARNING: Keep ventilation openings in the appliance enclosure or in the built-in structure
clear of obstructions.

• WARNING: Do not use mechanical devices or other means to accelerate the defrosting pro-
cess, other than those recommended by the manufacturer.
• WARNING: Do not damage the refrigerant circuit.
• WARNING: Do not use electrical appliances inside the food storage compartments of the appli-
ance, unless they are recommended by the manufacturer.
• WARNING: Dispose of the refrigerator according to local regulations, as it contains flammable
insulation materials and refrigerant.
• WARNING: When positioning the appliance, ensure the power cord is not trapped or damaged.
• WARNING: Do not place multiple power strips or portable power supplies behind the appliance.
• WARNING: Do not use extension cords or ungrounded (two prong) adapters.
• WARNING: To avoid a hazard due to instability of the appliance, it must be installed in accor-
dance with the instructions.
• WARNING: Risk of Child Entrapment
Before disposing of your old refrigerator:
• Remove the doors.
• Leave the shelves in place to prevent children from climbing inside.
DANGER
• The refrigerator must be disconnected from the main power supply before installing any acces-
sories.
• Refrigerant and cyclopentane foam used in this appliance are flammable. When the appliance
is scrapped, keep it away from all fire sources. It must be recycled by a qualified recycling
facility and must not be disposed of by incineration. Proper recycling prevents environmental
damage and other safety hazards.
• For doors or lids fitted with locks, the keys must be kept out of reach of children and not in the
vicinity of the refrigerating appliance, in order to prevent children from being locked inside.
WARNING
To avoid food contamination, follow these guidelines:
• Avoid keeping the door open for extended periods, as this will cause temperatures to rise in-
side the appliance.
• Regularly clean any surfaces that come into contact with food, including accessible drains or
water channels.
• If the appliance includes a water tank that has not been used for 48 hours, clean it before use.
Flush any connected water system if water has not been drawn for 5 days.
• Store raw meat and fish in sealed or suitable containers to prevent them from touching or drip-
ping onto other foods.
• If the appliance will not be used for an extended period, switch it off, defrost if necessary, clean
and dry the interior, and leave the door slightly open to prevent mold growth.
• For freestanding models: This refrigerator is not designed for built-in installation.
• Any replacement or maintenance of the LED light must be performed by the manufacturer, a
service agent, or other qualified personnel.

SAVE THESE INSTRUCTIONS
THIS APPLIANCE IS FOR HOUSEHOLD USE ONLY
State of California Proposition 65 Warnings:
WARNING: Cancer and Reproductive Harm - www.P65Warnings.ca.gov.
IMPORTANT:
Flammable gas and refrigerant are used. It is the consumer’s responsibility to comply with Fed-
eral and Local regulations when disposing of this product. Refrigerants must be disposed of a
licensed, EPA-certified refrigerant technician in accordance with established procedures.
Electricity-Related Warnings
• Do not pull the power cord when pulling the power plug of the refrigerator. Firmly grasp the plug
and pull out from the socket.
• To ensure safe use, do not damage the power cord or use the power cord when it is damaged
or worn.
• Use a dedicated power socket; the power socket should not be shared with other electrical
appliances.
• The power cord must be fully and securely inserted into the outlet to prevent a potential fire
hazard.
• Ensure that the power outlet has a proper grounding connection.
• If you smell gas or detect leaking flammable substances, turn off the gas valve immediately
and ventilate the area by opening doors and windows. Do not unplug the refrigerator or operate
any electrical switches, as doing so may create a spark and cause a fire.
• Do not use electrical appliances on top of the appliance, unless recommended by the manufac-
turer.
Warnings Related to Placing Items
• Do not place flammable, explosive, volatile or highly corrosive items in the refrigerator to pre-
vent damage to the product and fire accidents.
• To avoid the risk of fire, do not place flammable items near the refrigerator.
• This product is a household refrigerator and is only suitable for the storage of food. According
to national standards, a household refrigerator should not be used for other purposes, such as
the storage of blood, drugs or biological products.
• Do not store beer, beverages, or other liquids in bottles or sealed containers in the freezer com-
partment. The liquid may expand as it freezes, causing the container to crack and potentially
damage the appliance.
Warnings for Use
• Do not arbitrarily disassemble or reconstruct the refrigerator, nor damage the refrigerant circuit;
maintenance of the appliance must be conducted by a specialist.
• If the power cord is damaged, it must be replaced by a manufacturer, service agent, or another
qualified in order to avoid a hazard.
• The gaps between refrigerator door and body are small. Do not place your hands in these areas
to prevent squeezing your fingers. Be careful when opening the refrigerator door to avoid ob-
jects from falling out.

• Do not handle food or containers with wet hands in the freezer compartment while the refrig-
erator is operating. Contact with cold surfaces—especially metal containers—may cause frost-
bite.
• Do not allow children to enter or climb inside the refrigerator. This can lead to entrapment, suf-
focation, or injury if the refrigerator tips over.
• Do not spray or wash the refrigerator with water. Do not place the appliance in damp areas
where it may be exposed to splashing water, as this can damage the electrical insulation and
create a safety hazard.
• Do not place heavy objects on top of the refrigerator. Items may fall when the door is opened
and could cause injury.
• Unplug the refrigerator during a power outage or before cleaning. After unplugging, wait at
least five minutes before reconnecting the unit to prevent compressor damage from rapid,
repeated starts.
Safe Refrigeration & Storage Practices
1. Refrigerators may not operate consistently—and freezer temperatures may rise or cause partial
defrosting—if the appliance is set for extended periods below the lower limit of its designed
temperature range.
2. Do not store sparkling beverages in the freezer or in compartments intended for very low tem-
peratures, as the containers may burst. Certain drinks, such as ice water, should also not be
consumed when excessively cold.
3. Follow the storage times recommended by food manufacturers for all types of food, especially
commercially quick-frozen products kept in freezer compartments.
4. During defrosting, prevent frozen food from warming too quickly by placing it in an insulated
container or covering it with towels to maintain its temperature.
5. Any rise in the temperature of frozen food during manual defrosting, maintenance, or cleaning
may reduce its storage life.
Disposal
Refrigerant and cyclopentane foaming material used for the refrigerator are flamma-
ble. Therefore, when the refrigerator is done with, it should be kept away from any fire
source and be recycled by a special recycling company with corresponding qualifica-
tions other than be disposed by combustion, so as to prevent damage to the environ-
ment or any other harm.
When the refrigerator is disposed, disassemble the doors, remove gaskets of door
and shelves. Place the doors and shelves in a proper place to prevent trapping chil-
dren.
Correct Disposal of this product:
This marking indicates that this product should not be disposed with other house-
hold waste. To prevent possible harm to the environment or human health from
uncontrolled waste disposal, recycle it responsibly to promote the sustainable reuse
of material resources.
Placement
• Before use, remove all packing materials,
including bottom pads, foam inserts, and
any tape inside the refrigerator. Peel off the
protective film from the doors and the exteri-
or surfaces of the refrigerator.
• Keep the refrigerator away from heat sourc-
es and direct sunlight. Do not place it in
damp or wet locations, as moisture can
cause rust and reduce the unit’s insulating
performance.
• Do not spray or wash the refrigerator with
water, and avoid installing it where it may be
exposed to splashing. Water exposure can
damage the electrical insulation and create
a safety hazard.
• Place the refrigerator in a well-ventilated
indoor location. The floor must be flat and
sturdy; adjust the leveling feet as needed to
stabilize the unit.
• Allow at least 12 inches (30 cm) of clear-
ance above the refrigerator and at least 4
inches (10 cm) between the back of the unit
and the wall to ensure proper heat dissipa-
tion.
• Provide adequate space around the refrig-
erator so the doors and drawers can open
fully, following the installation guidance
provided by the distributor.
Note
This refrigerator is designed for freestanding
use only and must not be installed inside cabi-
netry or used as a built-in appliance. Enclosing
the unit can obstruct ventilation, leading to
poor performance, overheating, and reduced
product lifespan.
Model Length Width Height
Depth with Doors
Open 135°
Width with Doors
Open 135°
KM-TMR-14 28.78 27.56 60.63 51.57 56.07
KM-TMR-18 30.7 29.72 66.61 52.83 57.5
KM-TMR-20
32.68 29.72 66.61 54.9 59.47
All units are in inches.
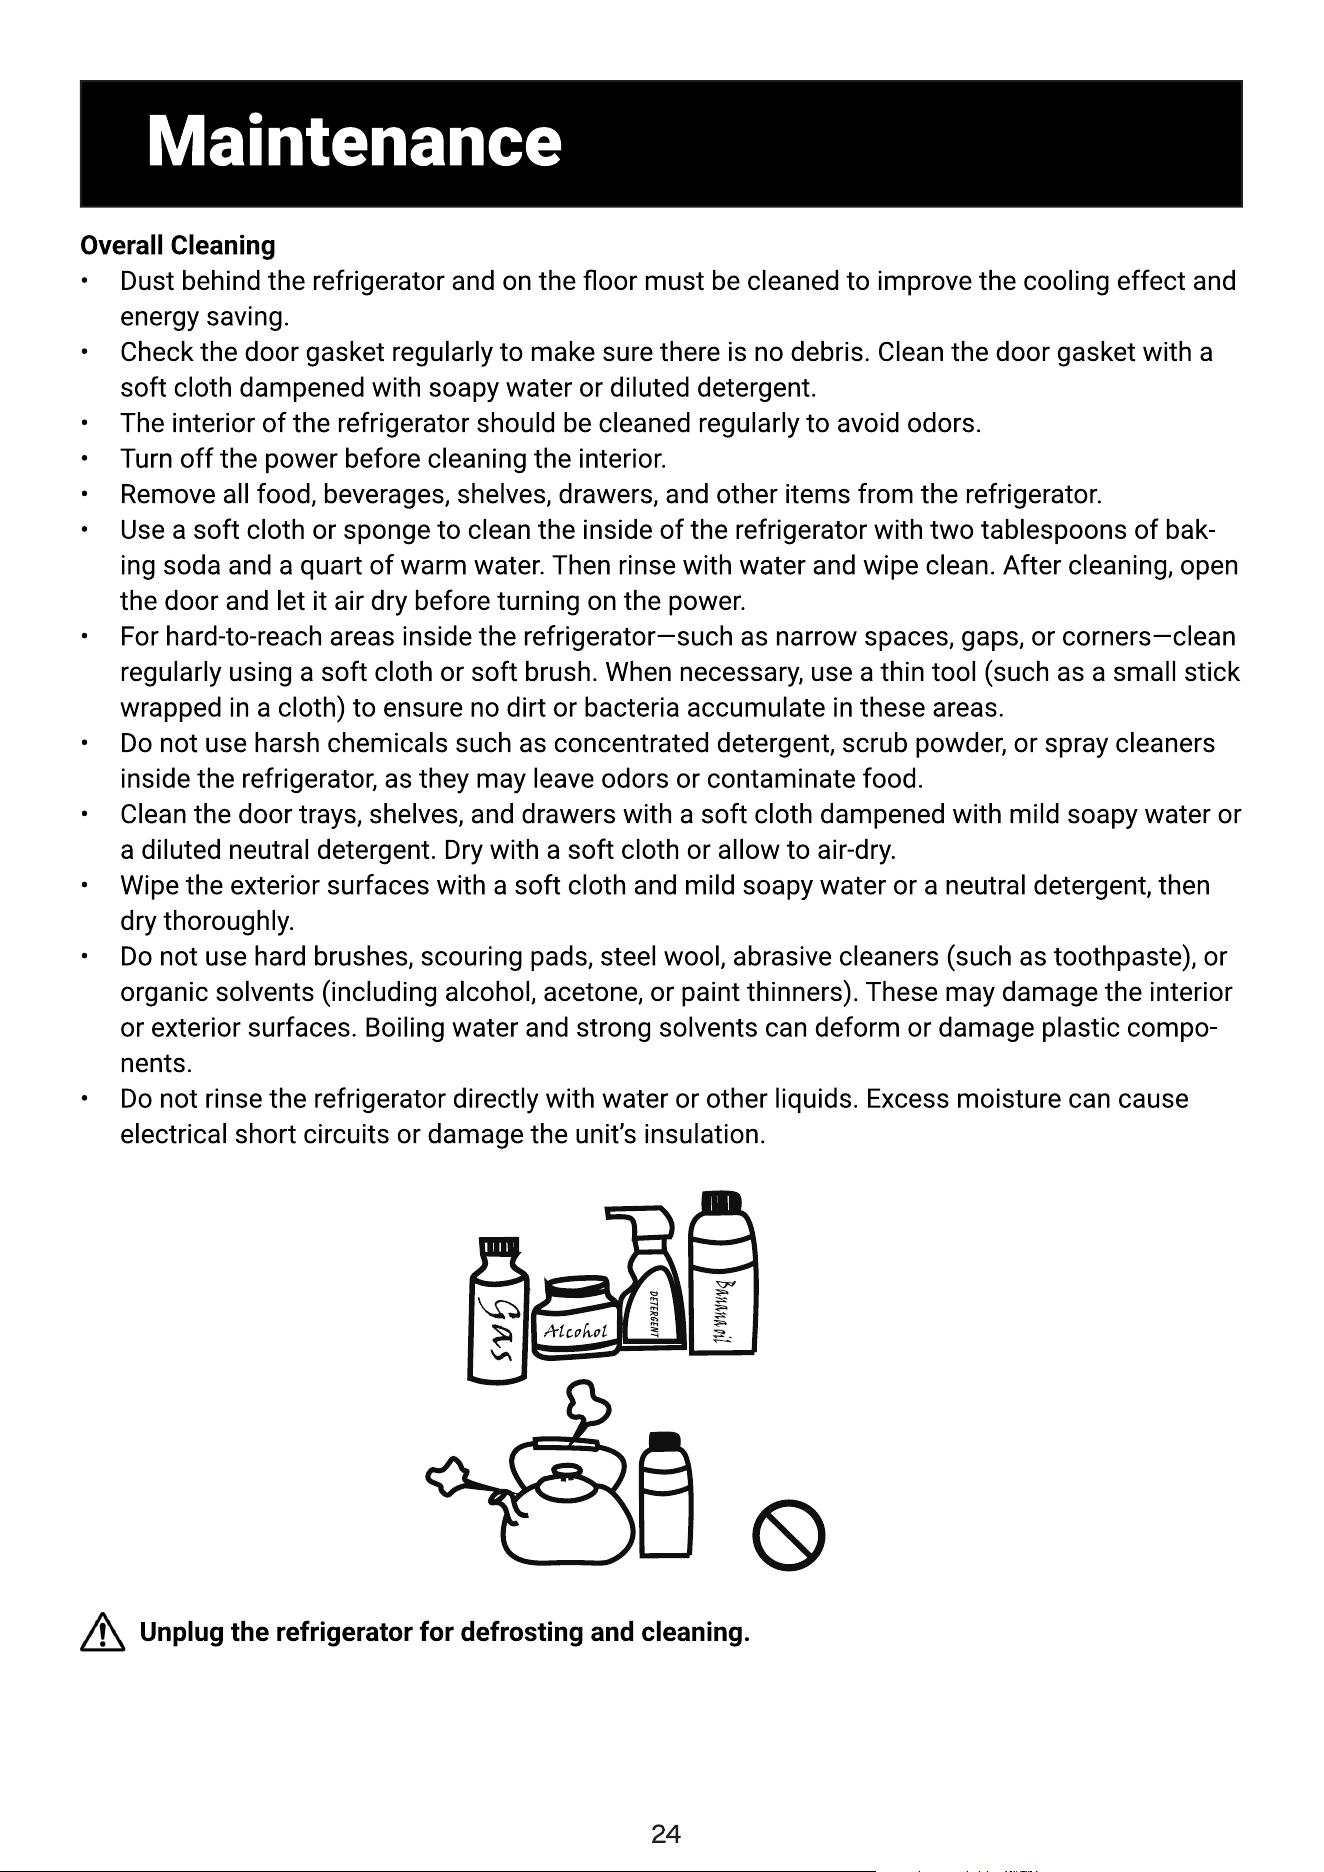
Energy Saving Tips
• The appliance should be located in the coolest area of the room, away from heat producing
appliances or heating ducts, and out of direct sunlight.
• Let hot food cool down to room temperature before placing it in the appliance. Overloading the
appliance forces the compressor to run longer. Food that freezes too slow may lose its quality,
or spoil.
• Be sure to wrap food properly, and wipe containers dry before placing them in the appliance.
This cuts down on frost build-up inside the appliance.
• Appliance storage bins should not be lined with tin foil, wax paper, or paper toweling. Liners
interfere with the cold air circulation, making the appliance less efficient.
• Organize and label food to reduce door openings and extended searches. Remove as many
items as needed at one time, and close the door as soon as possible.
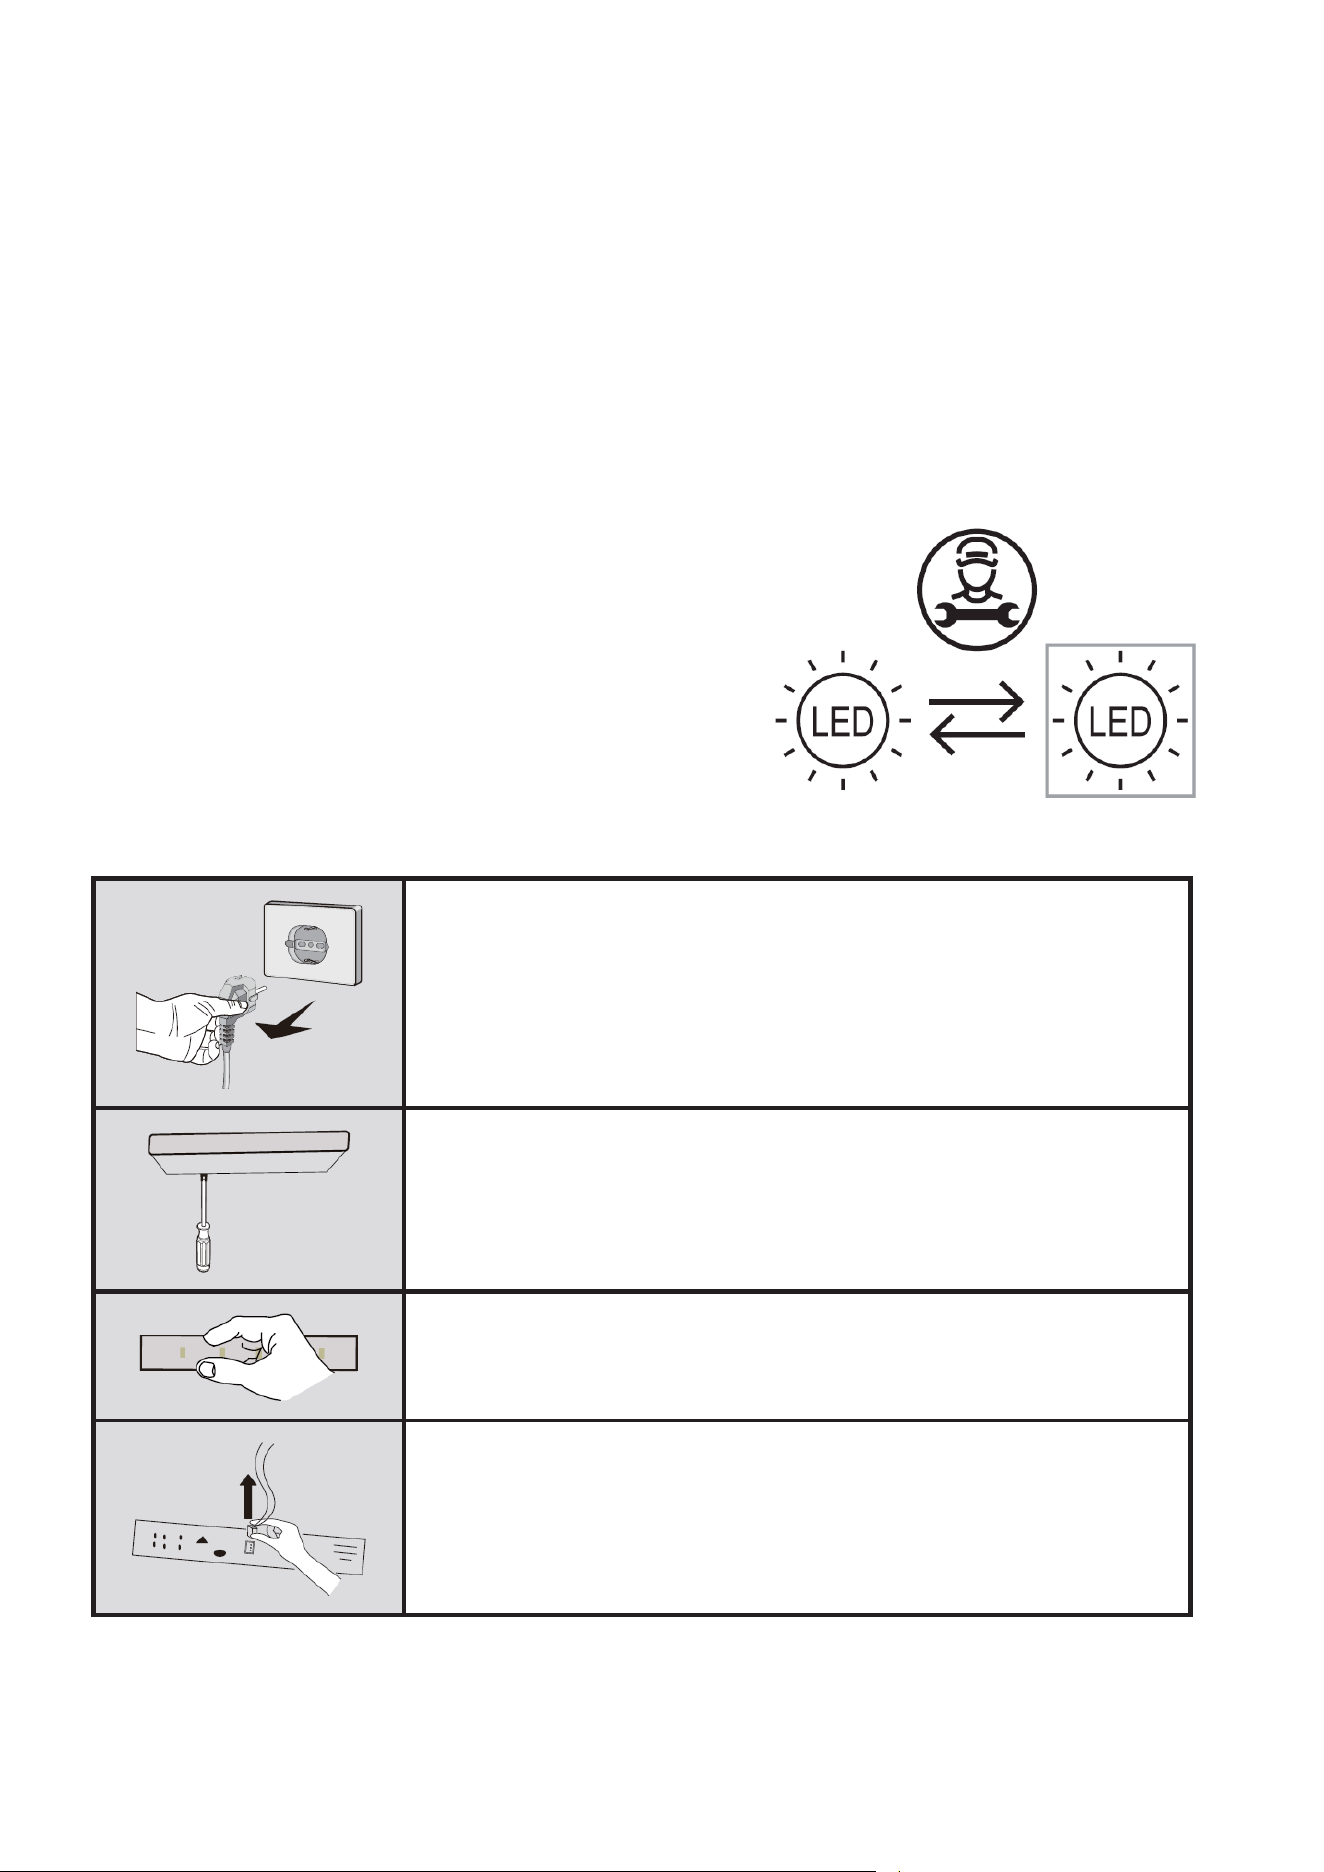
Changing the Light
Any replacement or maintenance of the LED
lights is intended to be made by the manufacturer,
service agents or another qualified person.
The light source in this product is only to be
replaced by qualified engineers.
Light Replacement Instructions:
1. Unplug the refrigerator.
2. Remove the light cover using a screwdriver.
3. Take out the light panel.
4. Disconnect the wiring connector.
Start-Up Instructions
• Before using the refrigerator for the first time, let it stand upright for at least 2 hours before
connecting it to the power supply.
• Allow the refrigerator to run for 2–3 hours before placing any fresh or frozen food inside. In hot
weather or during summer months, let it run for 4 hours or more to ensure proper cooling.
Climate Class Information
Refrigerators are designed to operate within specific ambient temperature ranges, determined by
their climate class. The climate class for your appliance can be found on the rating label inside the
refrigerator.
This appliance may not perform properly if used in temperatures outside the range specified for its
climate class.
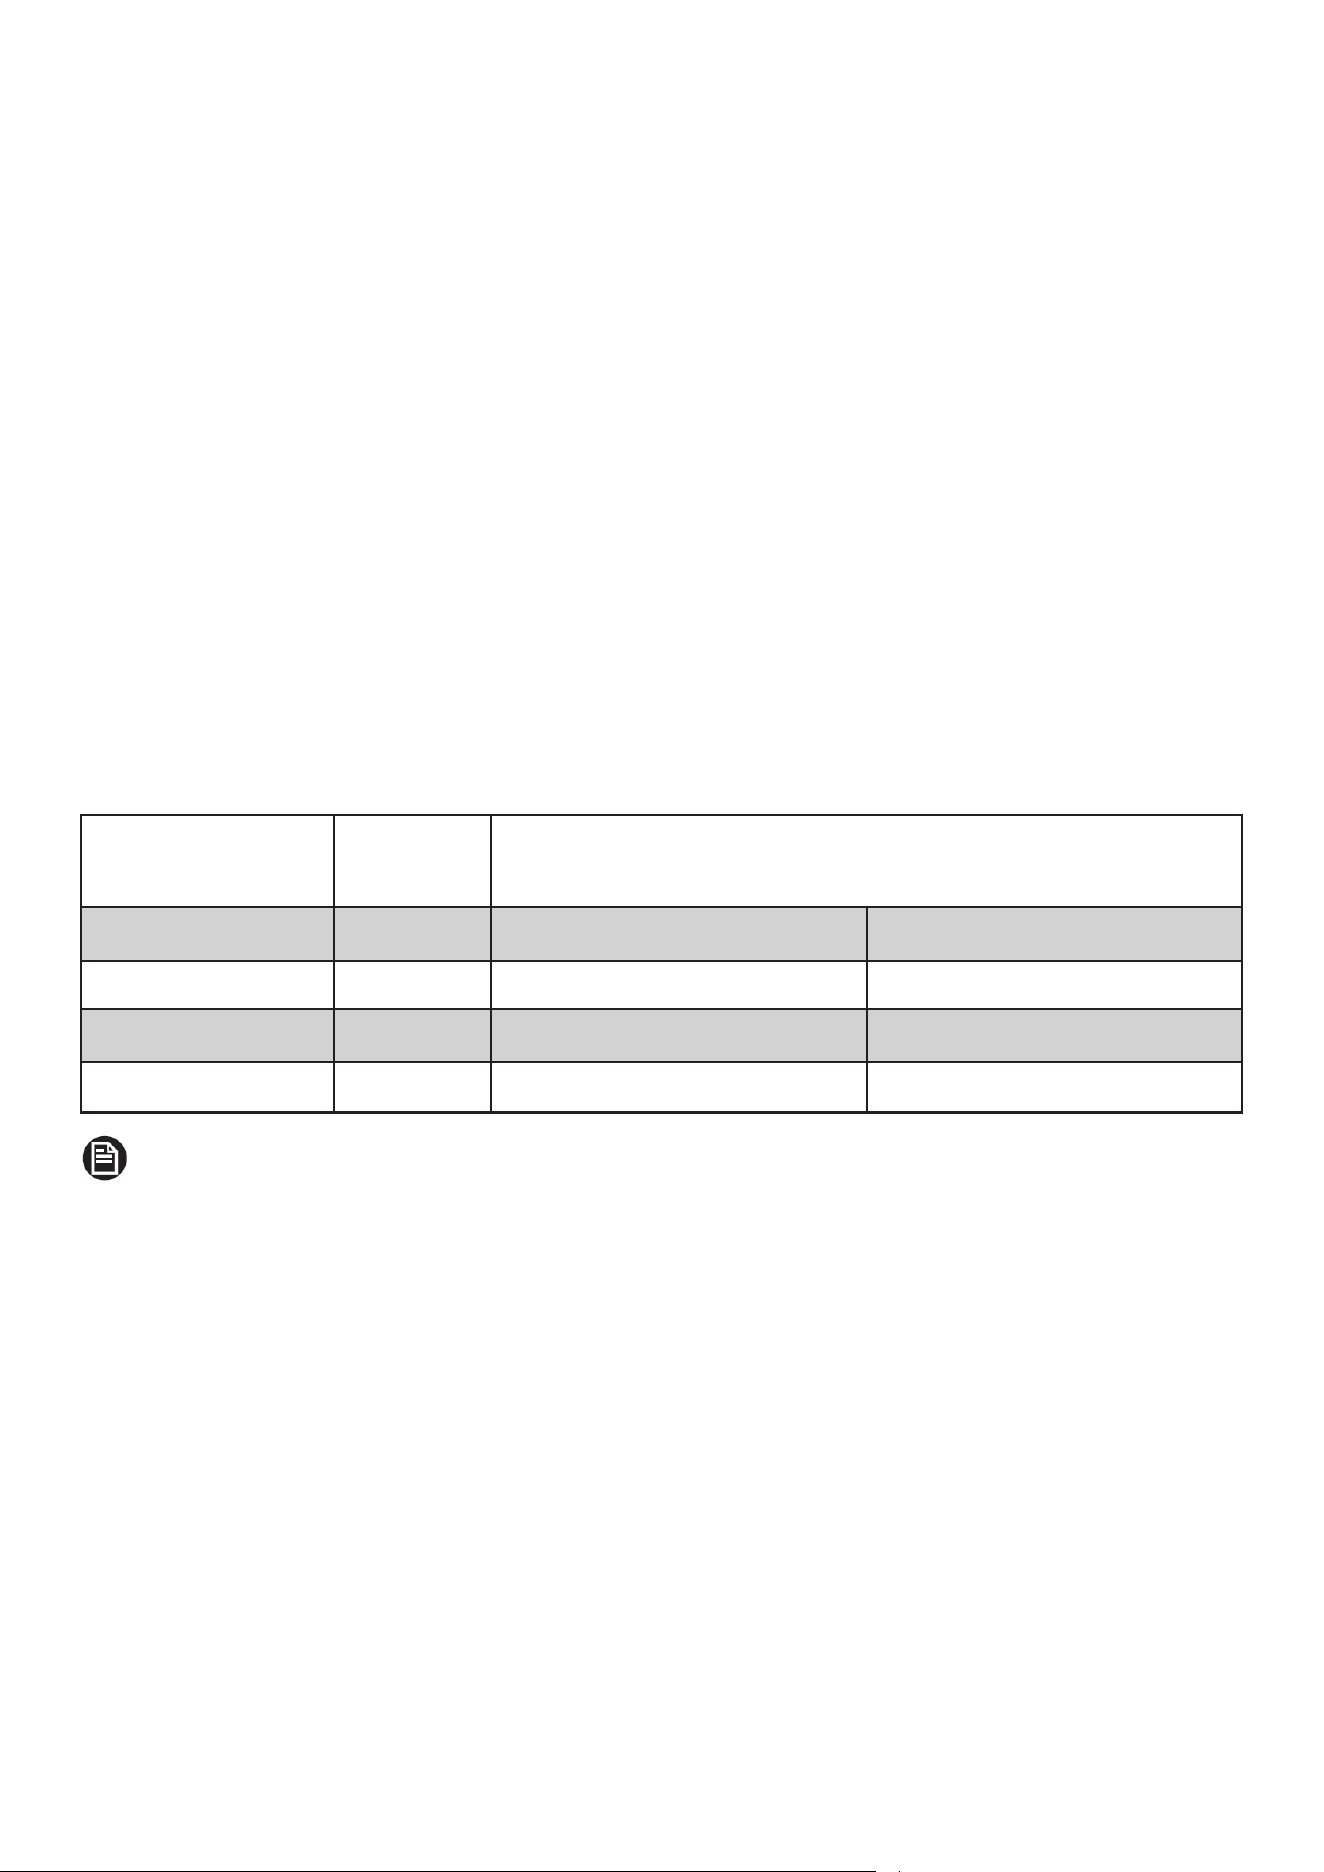
Effective Temperature Range
Your refrigerator will function optimally only within the ambient temperature range defined by its
climate class. Refer to the climate class table below for the appropriate operating temperatures.
Class Symbol
Extended Temperature SN +50°F to +89.6°F +50°F to +89.6°F
Temperature N +60.8°F to +89.6°F +60.8°F to +89.6°F
Subtropical ST +60.8°F to +100.4°F +60.8°F to +100.4°F
Tropical T +60.8°F to +109.4°F +60.8°F to +109.4°F
Ambient Temperature Range °F
IEC 62552 (ISO 15502)
ISO 8561
Note: The cooling performance and power consumption of the refrigerator may be affected
by the ambient temperature, the door-opening frequency, and the location of the refrigerator. We
recommend adjusting the temperature settings as appropriate.
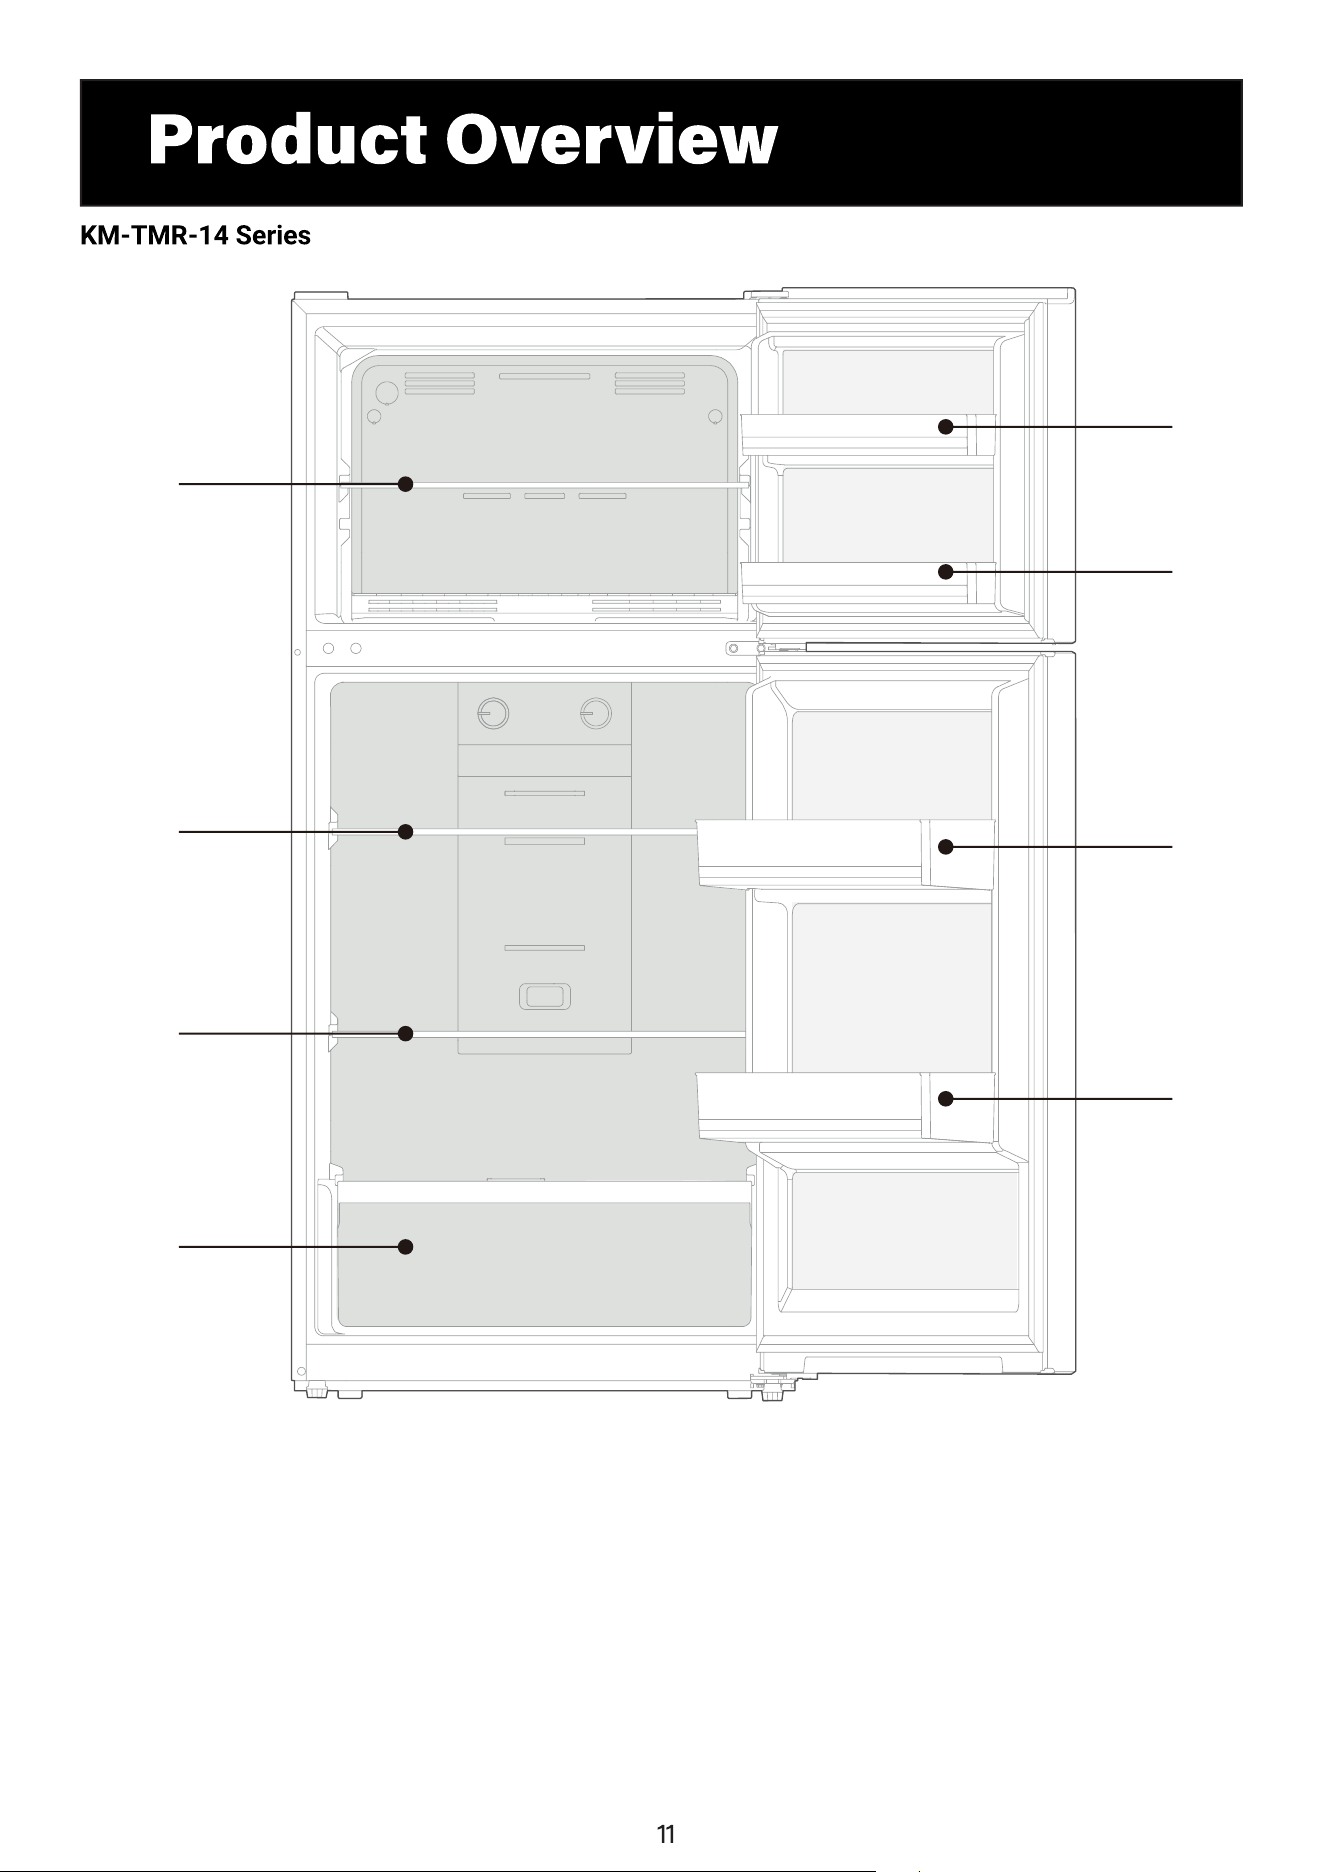
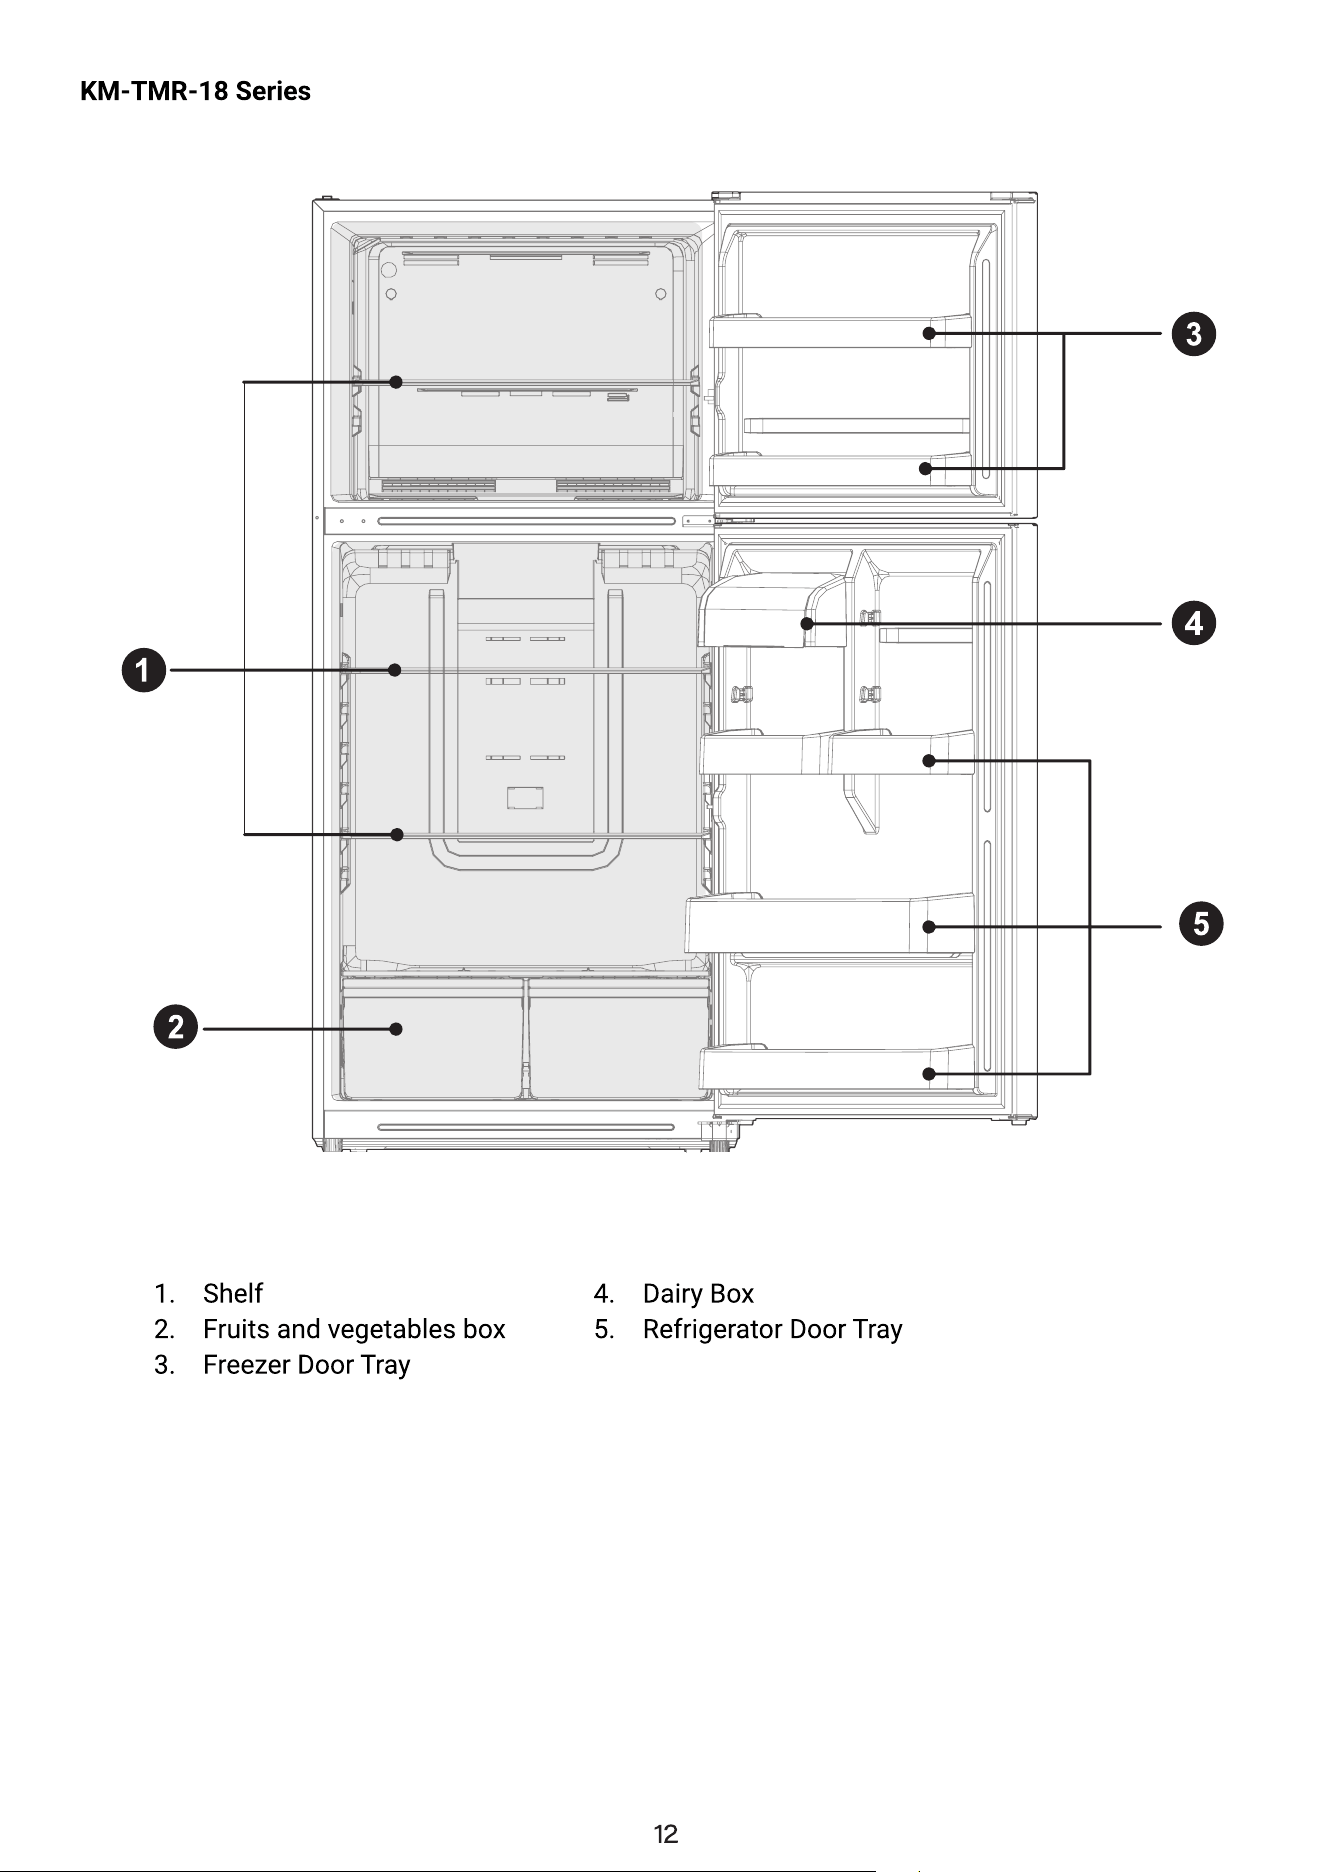
Shelf
Shelf
Shelf
Fruits and
vegetables box
Door tray
Door tray
Door tray
Door tray
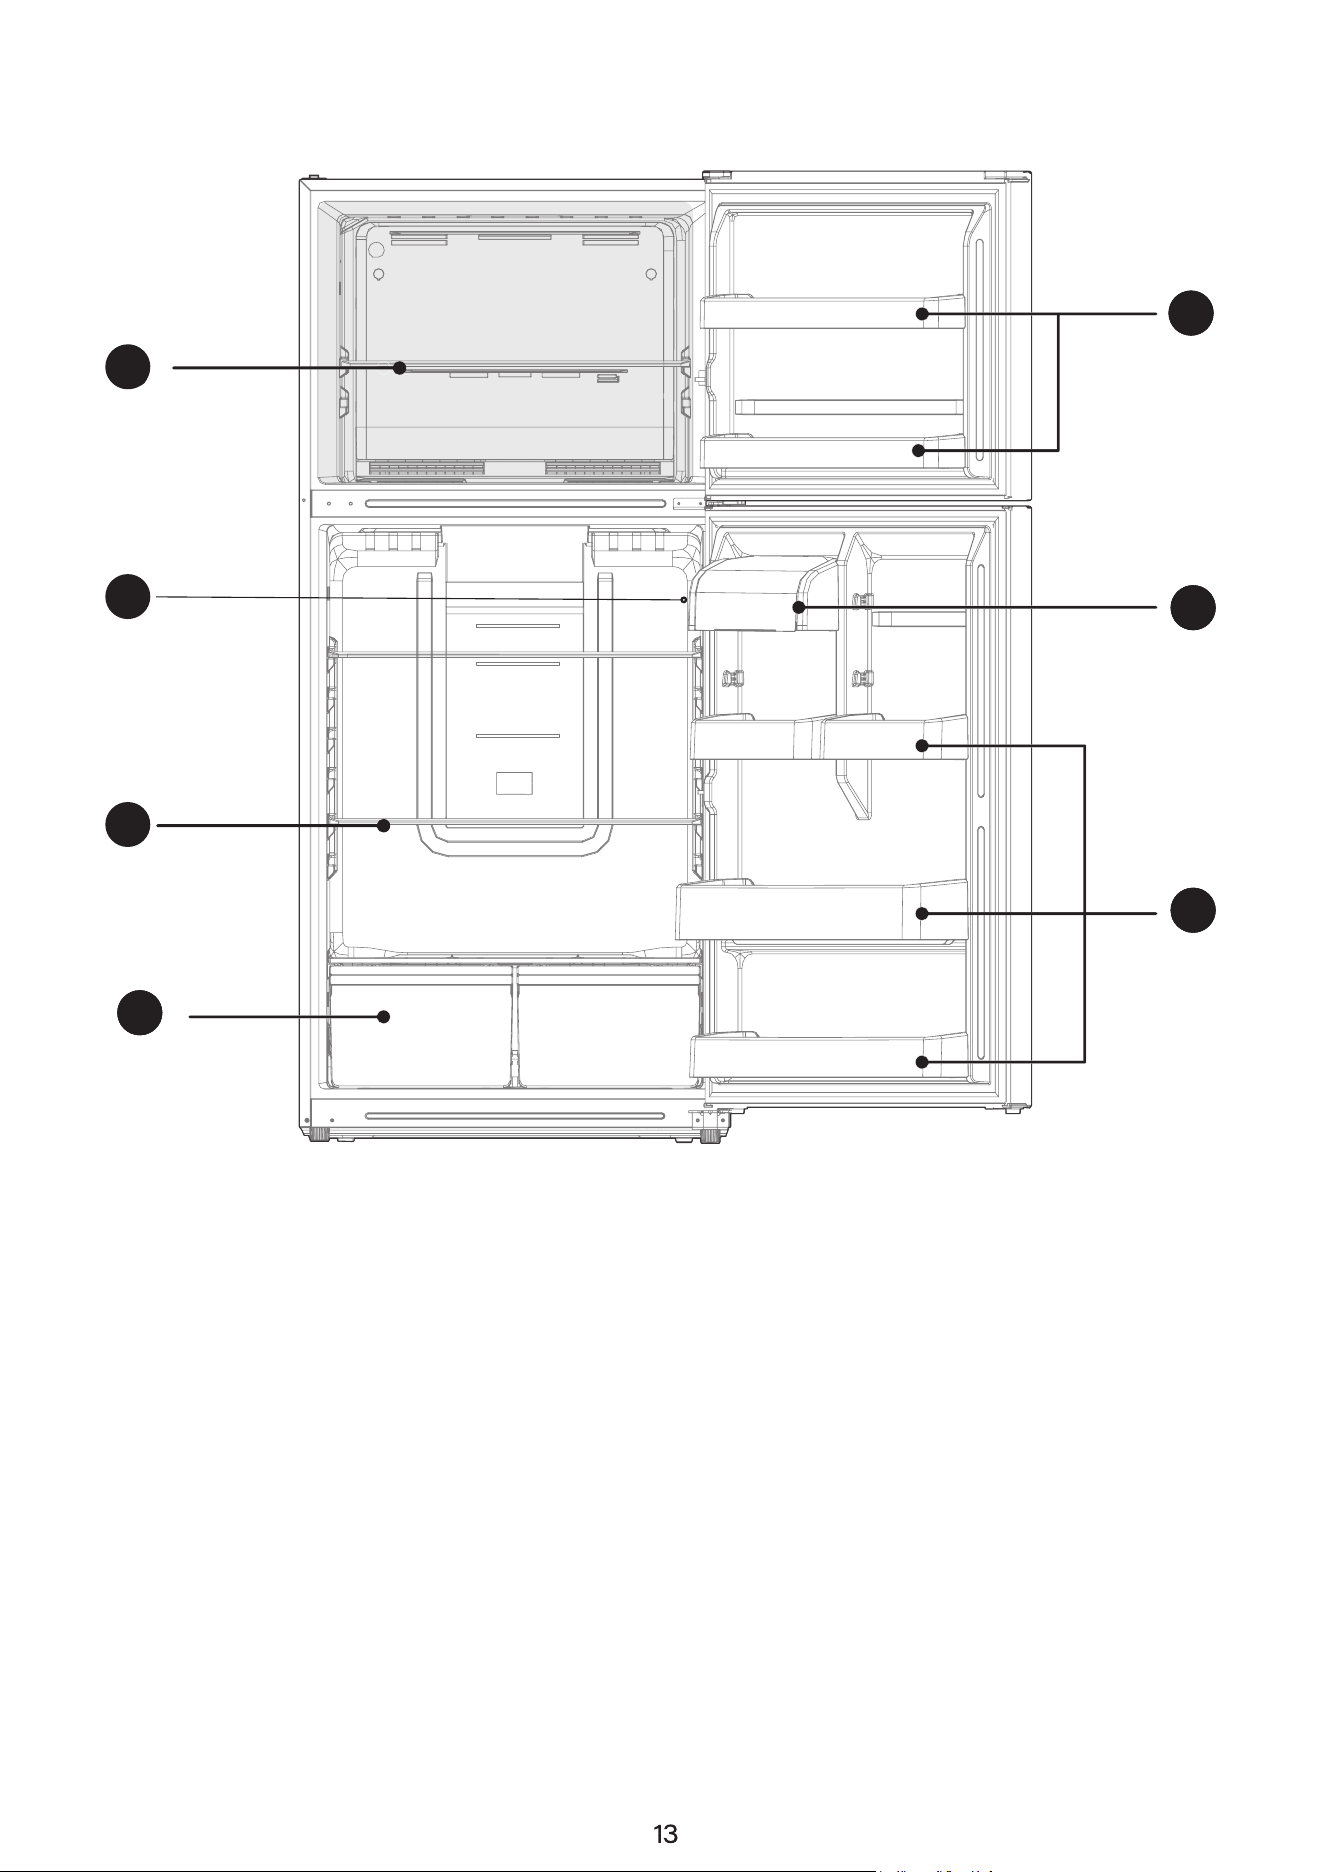
KM-TMR-20 Series
1. Freezer Glass Shelf
2. Control Panel
3. Refrigerator Shelf
4. Fruits and Vegetables Crisper
5. Freezer Door Tray
6. Dairy Box
7. Refrigerator Door Tray
1
2
3
22
4
22
5
22
6
22
7

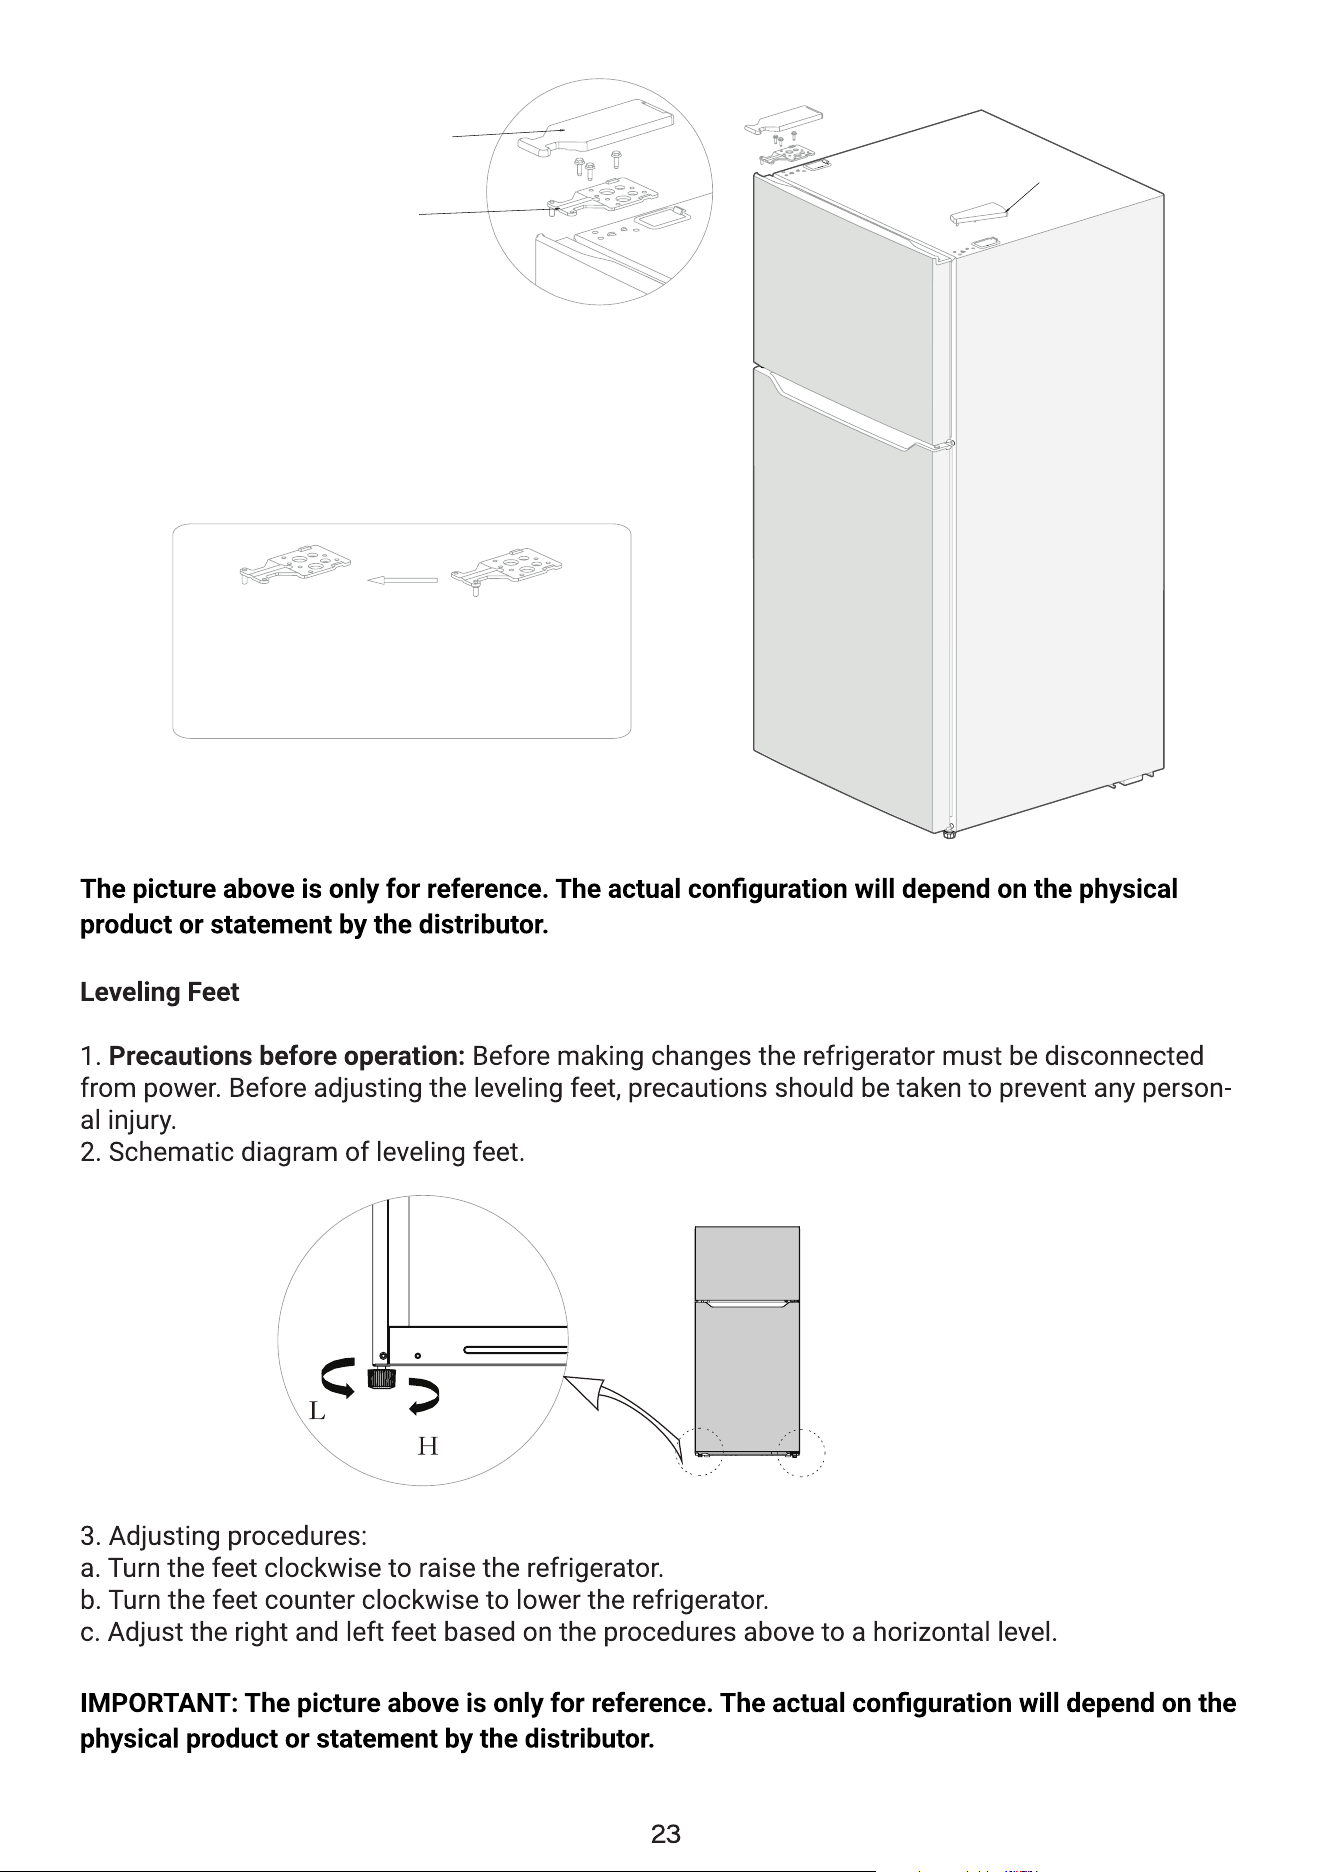
The pictures above are only for reference. The actual configuration will depend on the physical
product or statement by the distributor.
Refrigerator Compartment
• The refrigerator compartment is suitable for storing fruits, vegetables, beverages, and other
short-term foods. Keep vegetables away from the cold-air outlet to prevent freezing.
• Allow hot food to cool to room temperature before placing it in the refrigerator.
• It is recommended to store all food in sealed containers before placing it inside the appliance.
• The glass shelves can be adjusted up or down to provide flexible storage space and easier
access.
Freezer Compartment
• The low-temperature freezer compartment is designed for long-term food preservation and is
mainly used for storing frozen foods.
• It is suitable for storing meat, fish, and other items that are not intended to be consumed in the
near term.
• For best results, divide meat into smaller portions before freezing to speed up the freezing pro-
cess and make it easier to access later. Always consume food within its recommended storage
period.
IMPORTANT:
For best energy efficiency, keep drawers, food bins, shelves, and other components arranged in
the positions shown in the illustration.
Note
Storing too much food immediately after first connecting the refrigerator to power may reduce
cooling performance. Do not block the air outlet with food items, as this will also affect the freez-
er’s ability to cool properly.
When the temperature is set to the coldest level for storing beverages, fruits and vegetables may
freeze. If this occurs, adjust the temperature to a slightly warmer setting.
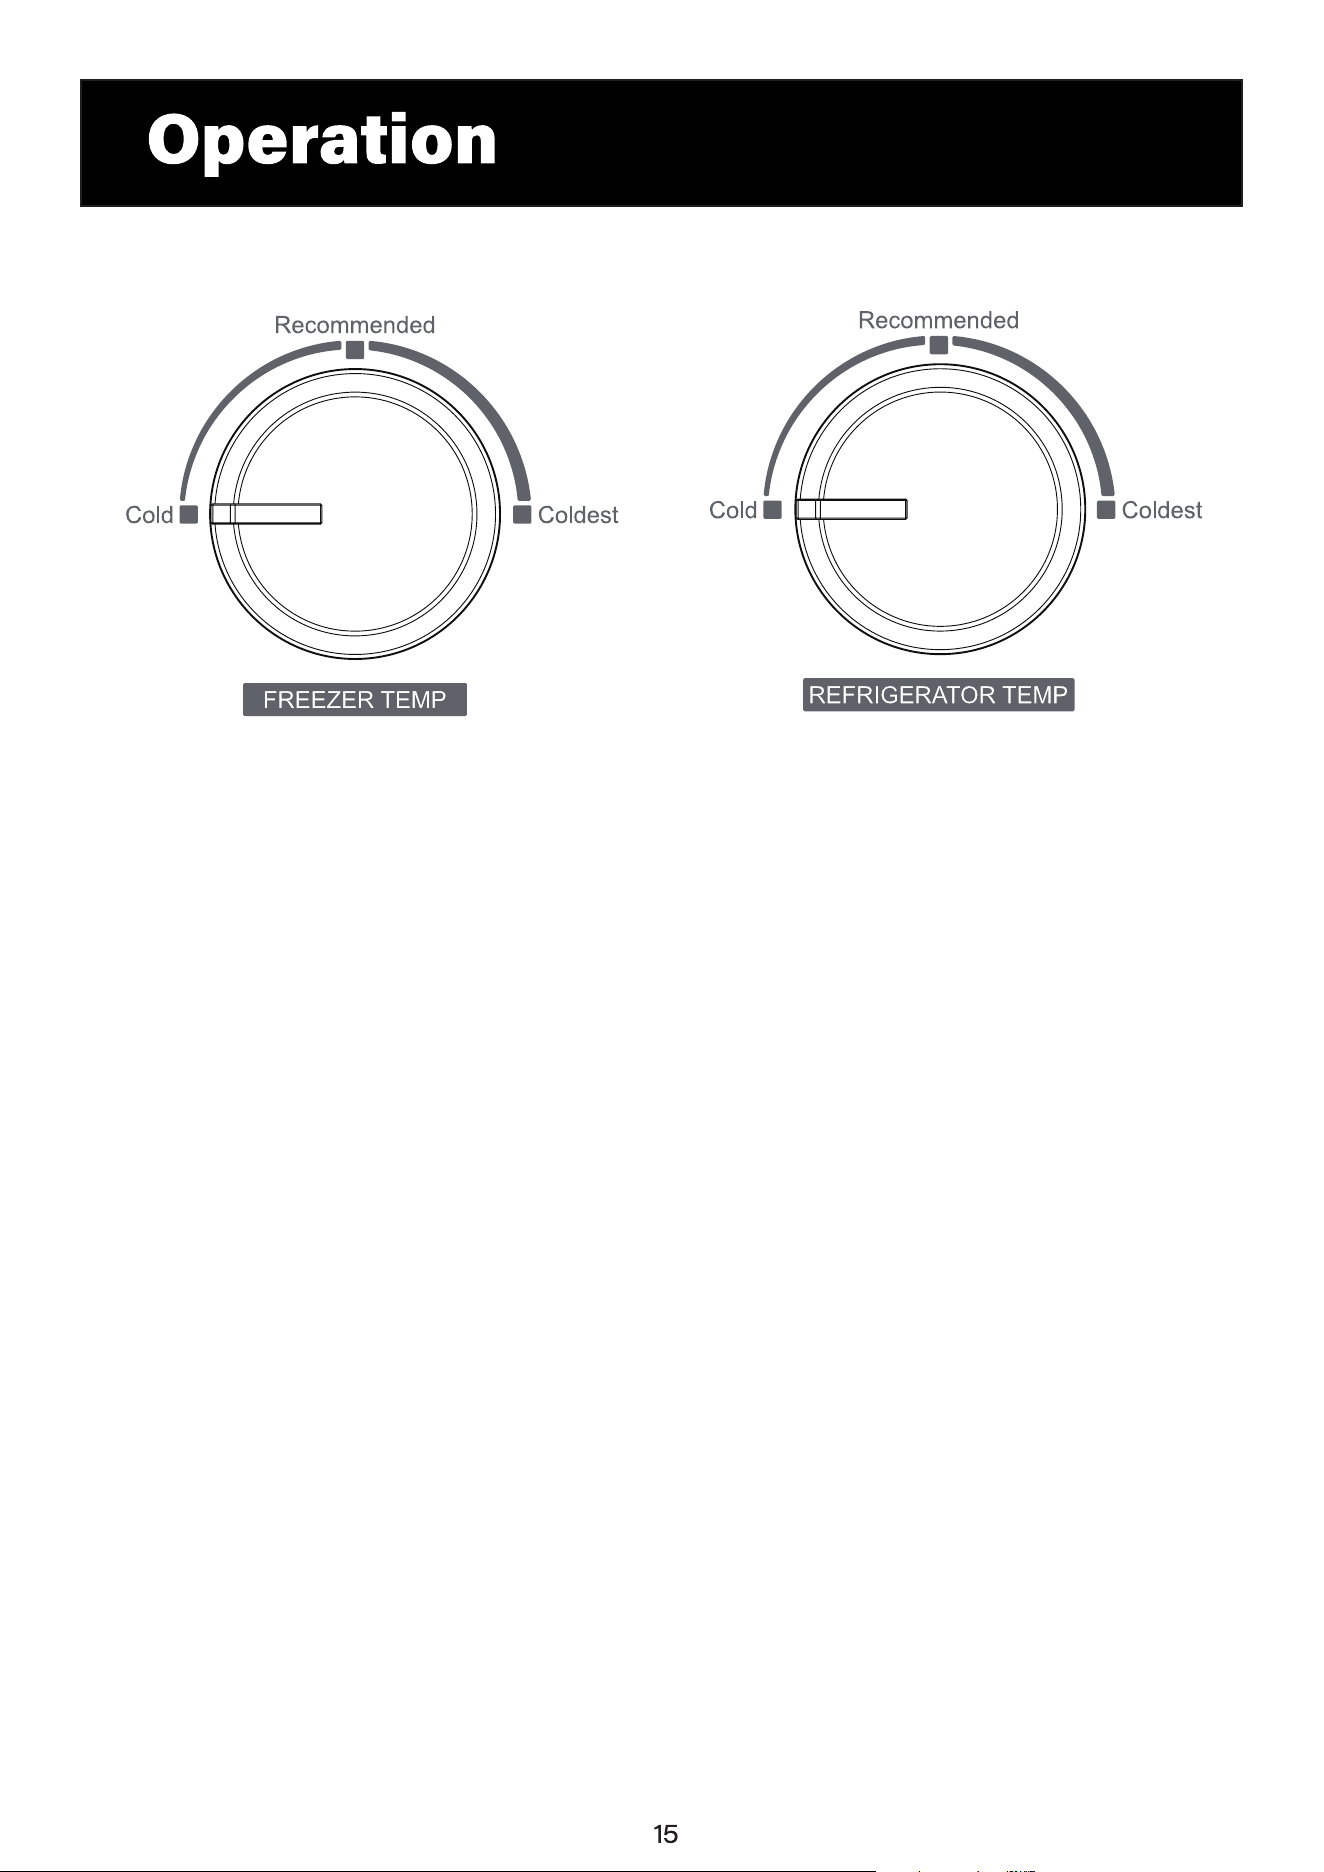
KM-TMR-14 Series
Temperature Controlling Knob
The picture above is only for reference. The actual configuration will depend on the physical prod-
uct or statement by the distributor.
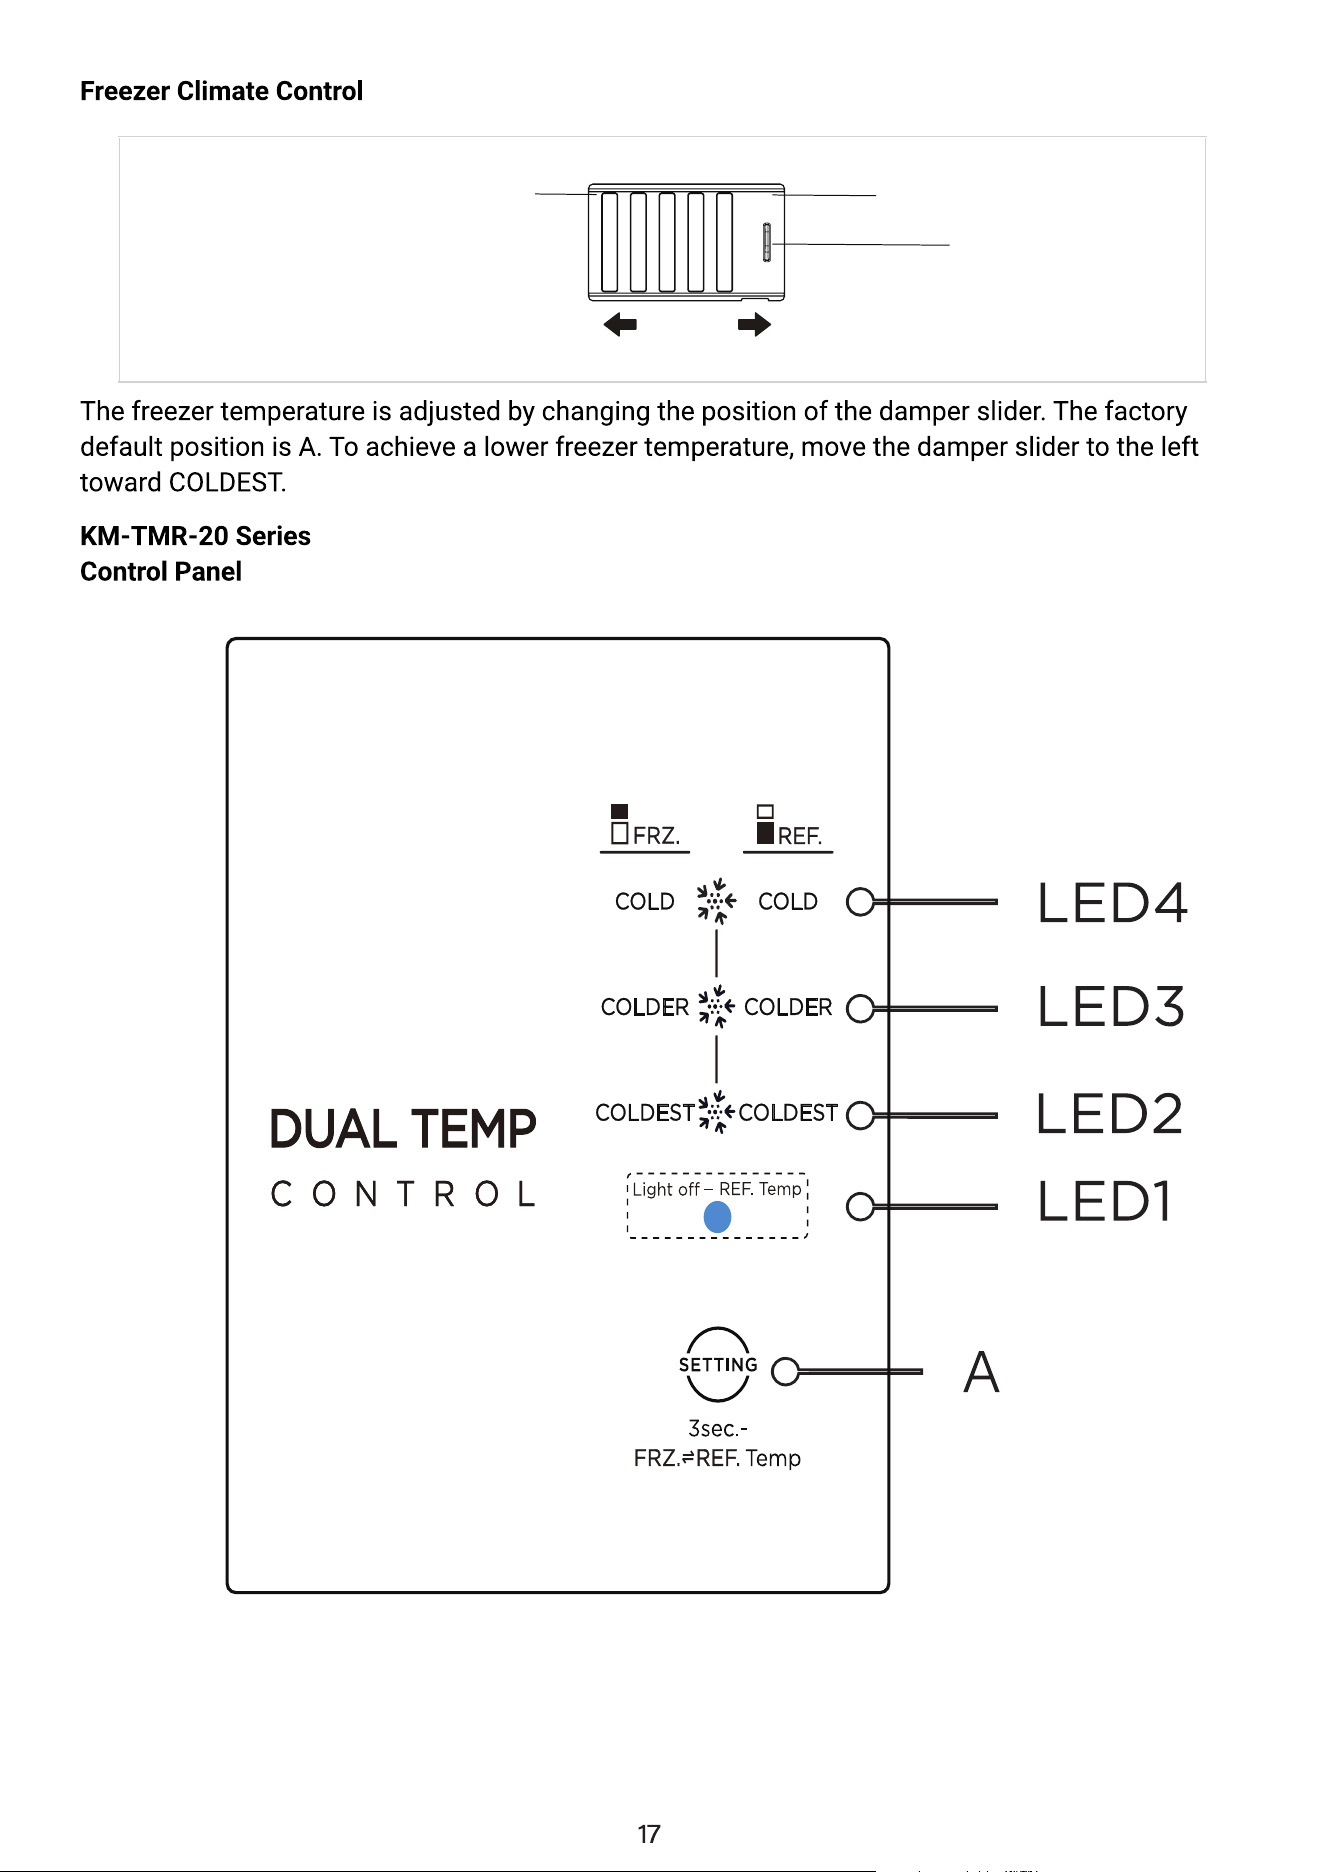
Freezer Temperature Adjustment
1. Turning the temperature control knob toward Cold will raise the internal temperature (warmer
setting).
2. Turning the knob toward Coldest will lower the internal temperature (colder setting).
3. The labels on the temperature control knob indicate setting levels, not specific temperatures.
4. For general use, the Recommended setting is suggested for optimal performance.
Refrigerator Temperature Adjustment
1. Turning the temperature control knob toward Cold will increase the internal temperature (warm-
er setting).
2. Turning the knob toward Coldest will decrease the internal temperature (colder setting).
3. The labels on the temperature control knob indicate setting levels, not specific temperature
values.
4. For everyday use, the Recommended setting provides the best overall performance.
Installing an Optional Ice Maker
Compatible Ice Maker:
• This refrigerator is compatible with the Element™ ice maker model EAIMM19.
Installation:
• If your refrigerator supports an optional ice maker, please follow the installation instructions
included with the ice maker.
• The ice maker is customer-installed and must be installed according to the separate instruc-
tions provided by the manufacturer.
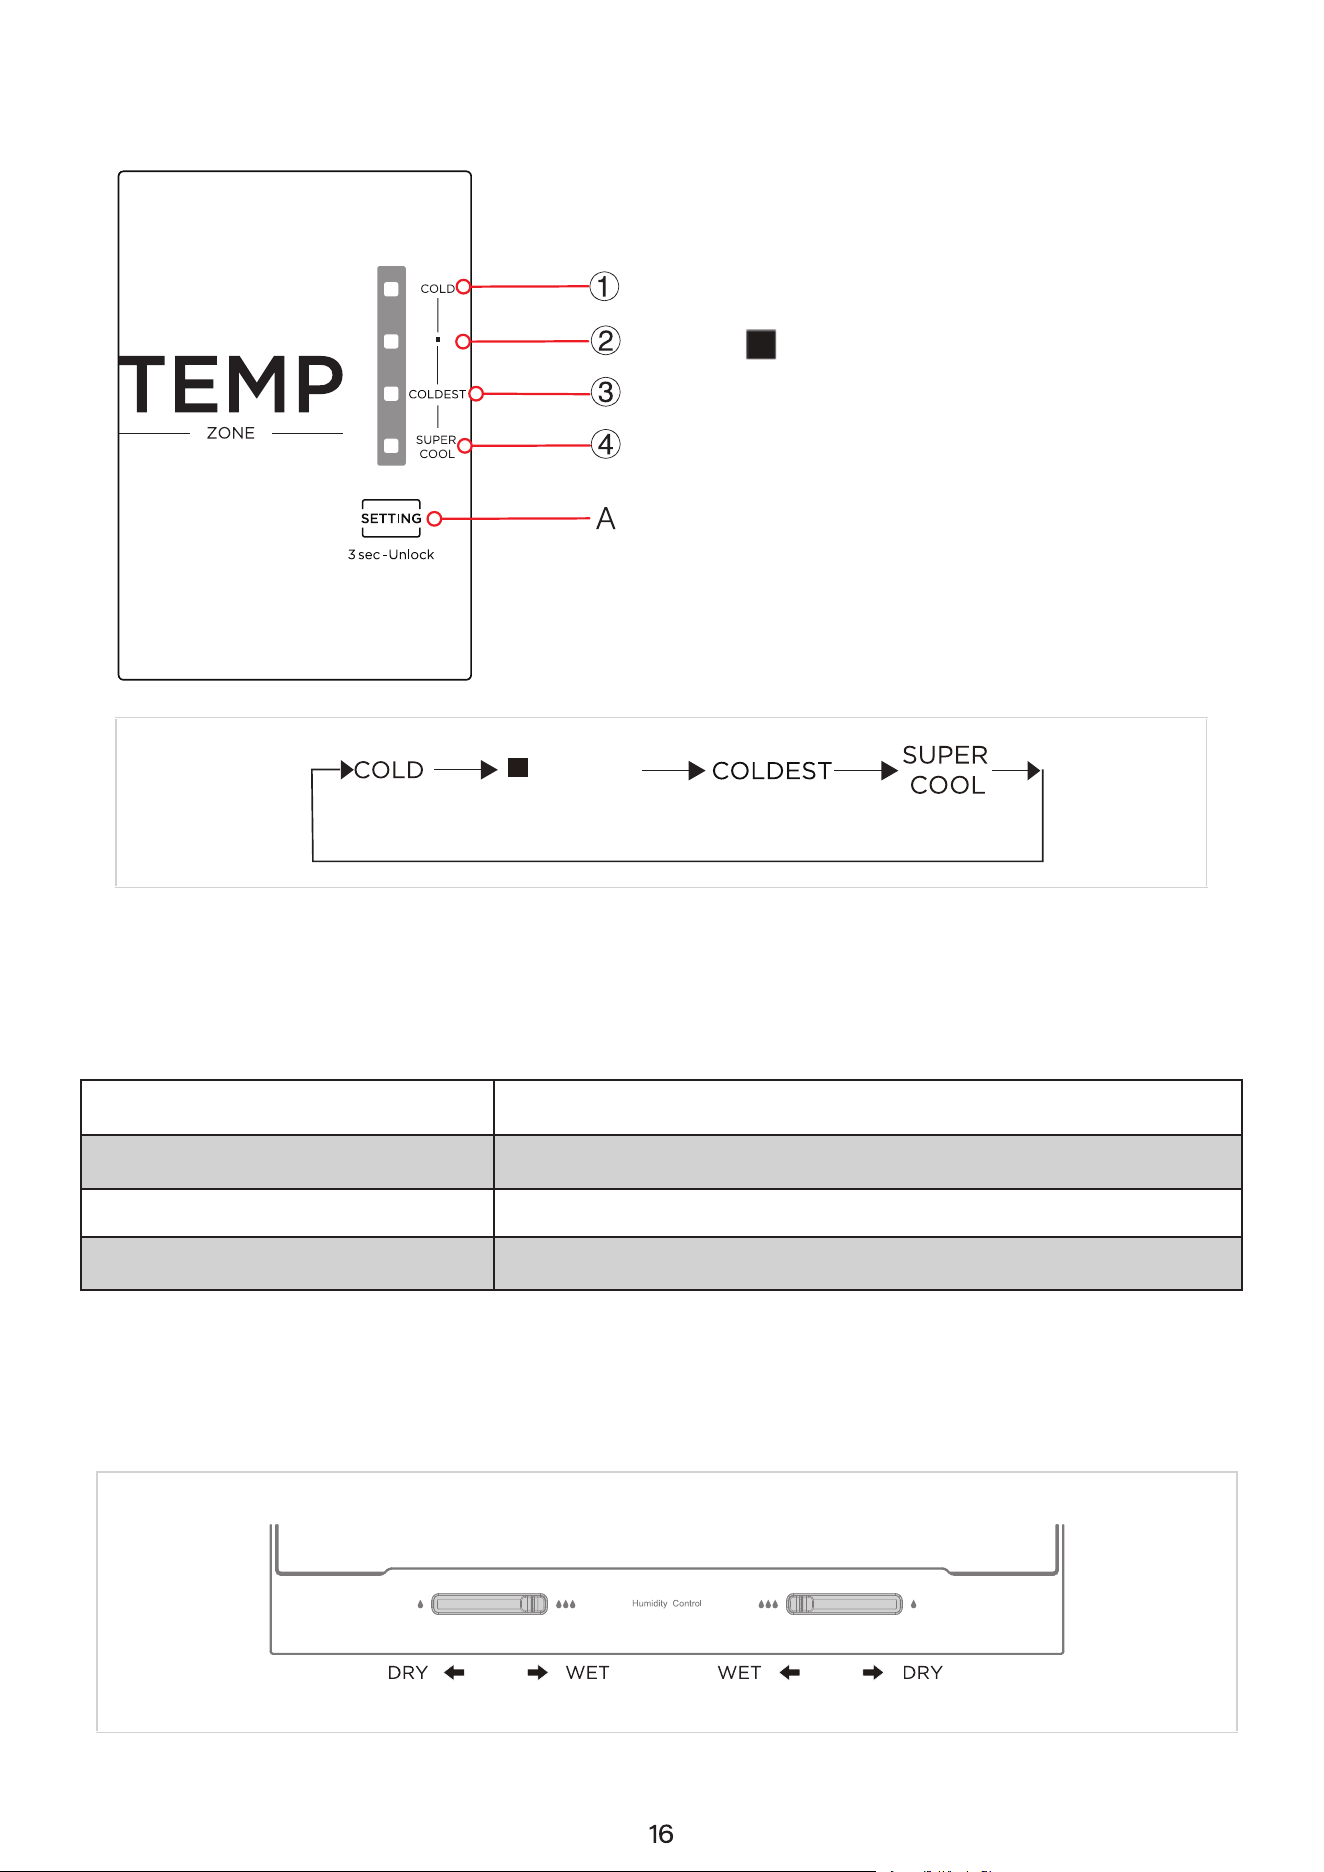
KM-TMR-18 Series
Control Panel
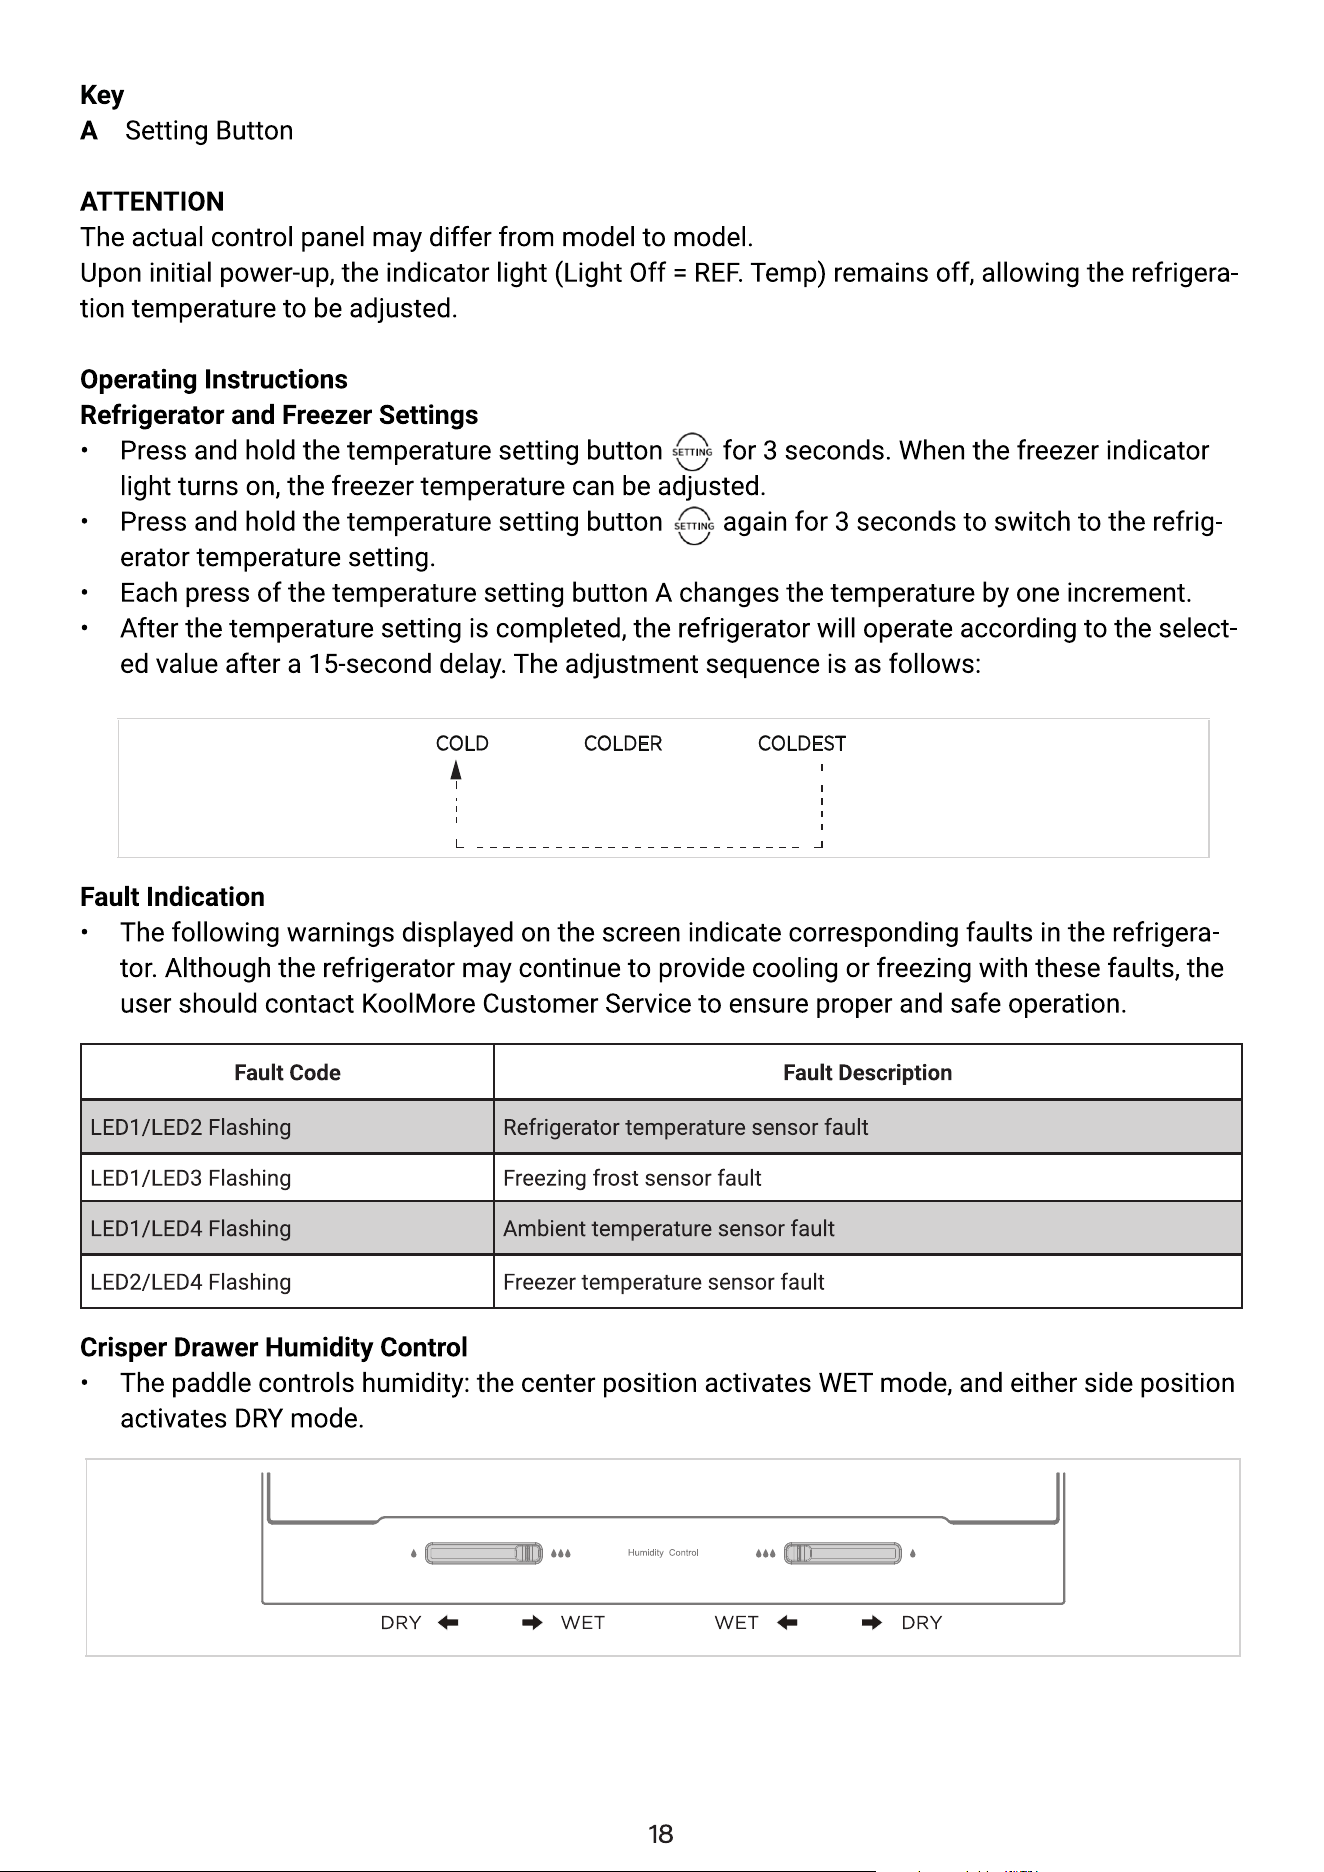
1. Button
A. Setting button
2. Display Screen
LED1: COLD
LED2:
LED3: COLDEST
LED4: SUPER COOL
3. Display
• Each time the temperature setting button A is
pressed, the temperature setting changes by
one increment. After the setting is complet-
ed, the refrigerator will operate according to
the selected value after a 15-second delay.
Fault Indicator
• The following warnings displayed on the screen indicate corresponding faults in the refrigera-
tor. Although the refrigerator may continue to provide cooling or freezing with these faults, the
user should contact KoolMore Customer Service to ensure proper and safe operation.
Fault Code Fault Description
LED3/LED4 Flashing Refrigerator temperature sensor fault
LED2/LED4 Flashing Freezing frost sensor fault
LED1/LED4 Flashing Ambient temperature sensor fault
Crisper Drawer Humidity Control
• The paddle controls humidity: the center position activates WET mode, and either side position
activates DRY mode.
(normal)
COLDEST
Damper Slider
Max setting position
A
COLD
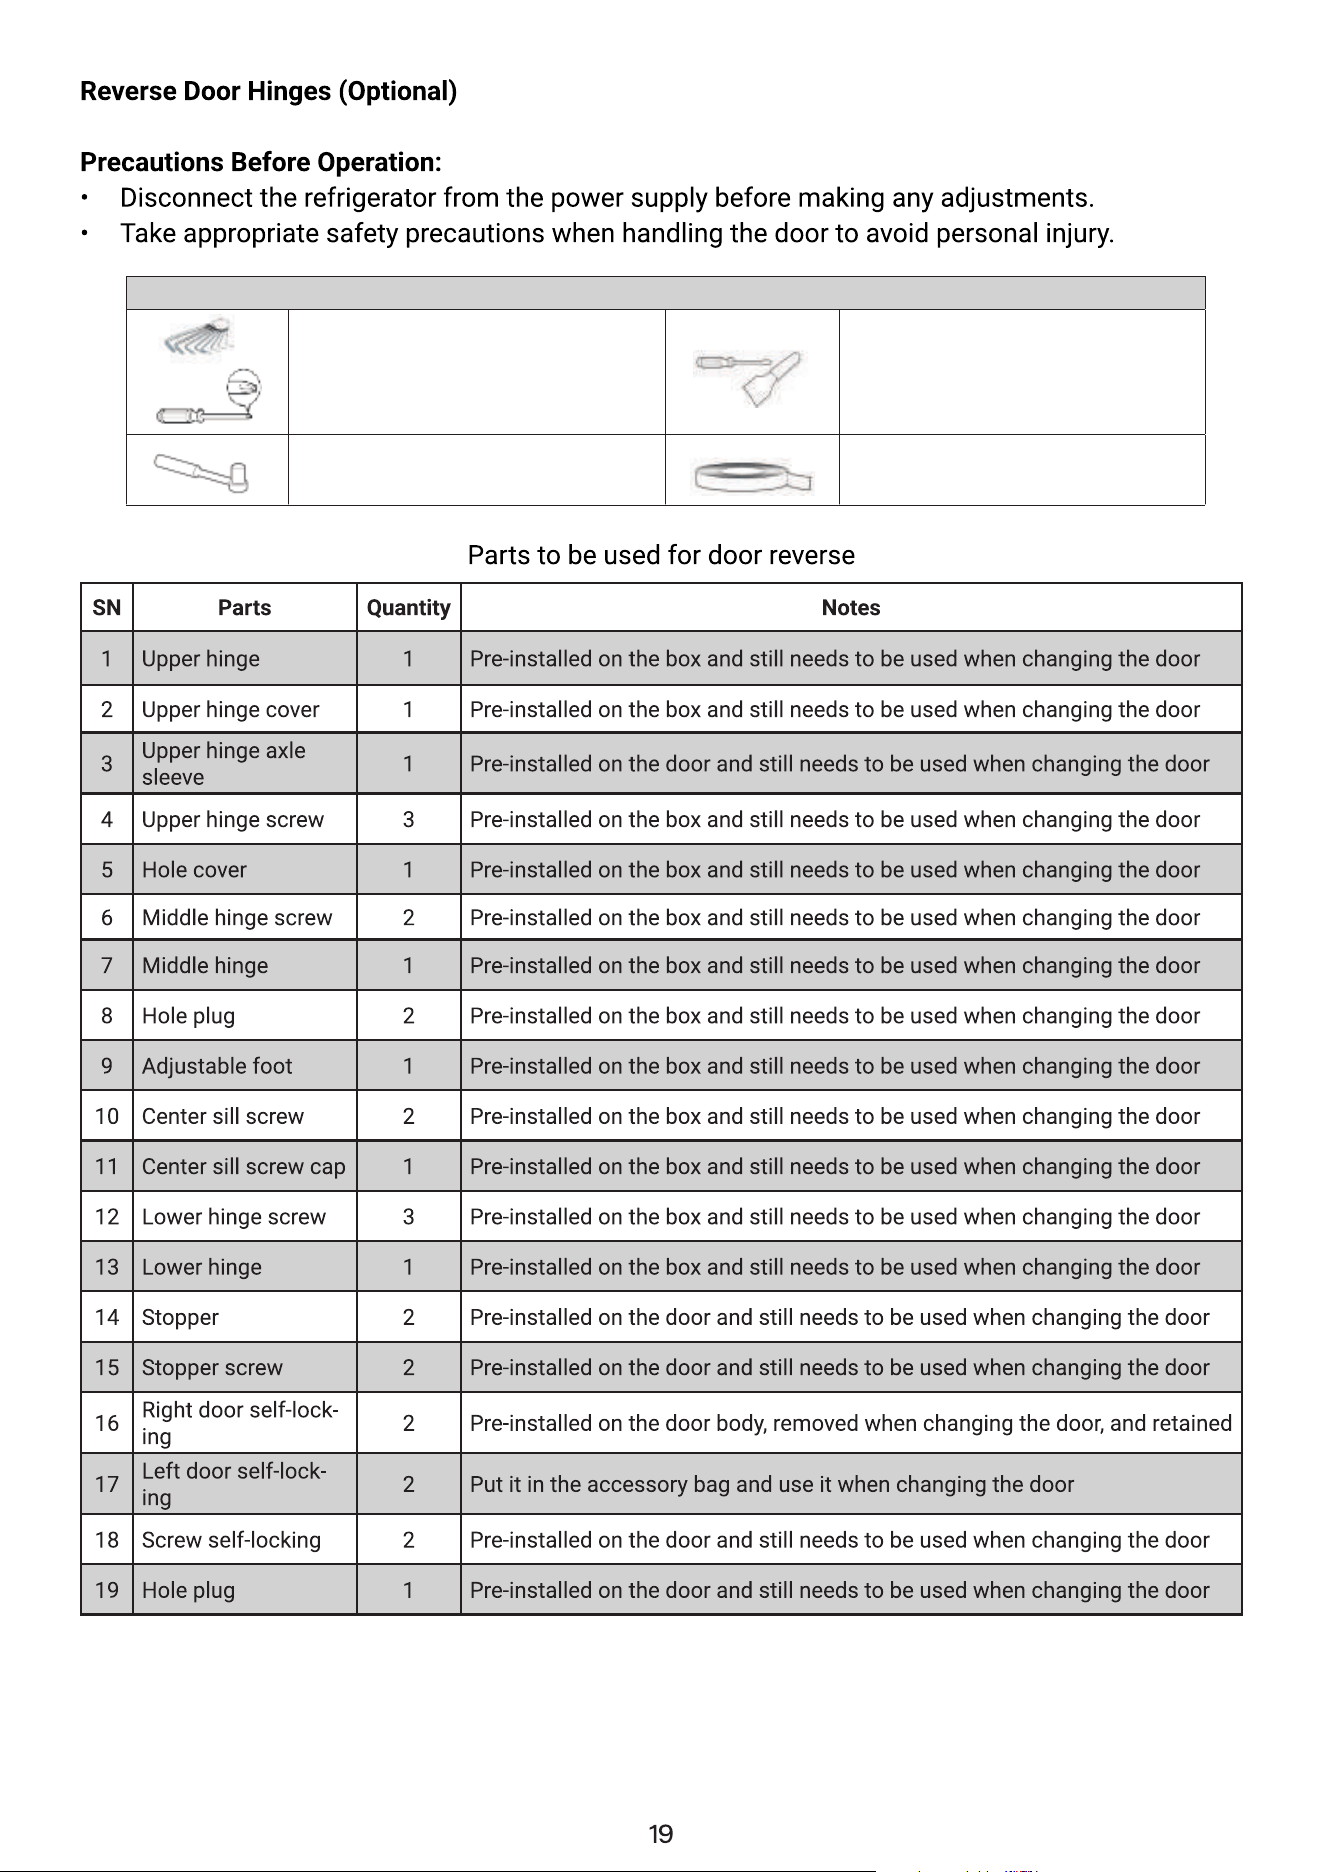
List of tools to be provided to the user
Phillips screwdriver
Putty knife, thin-blade
screwdriver
5/16” socket and ratchet Masking tape
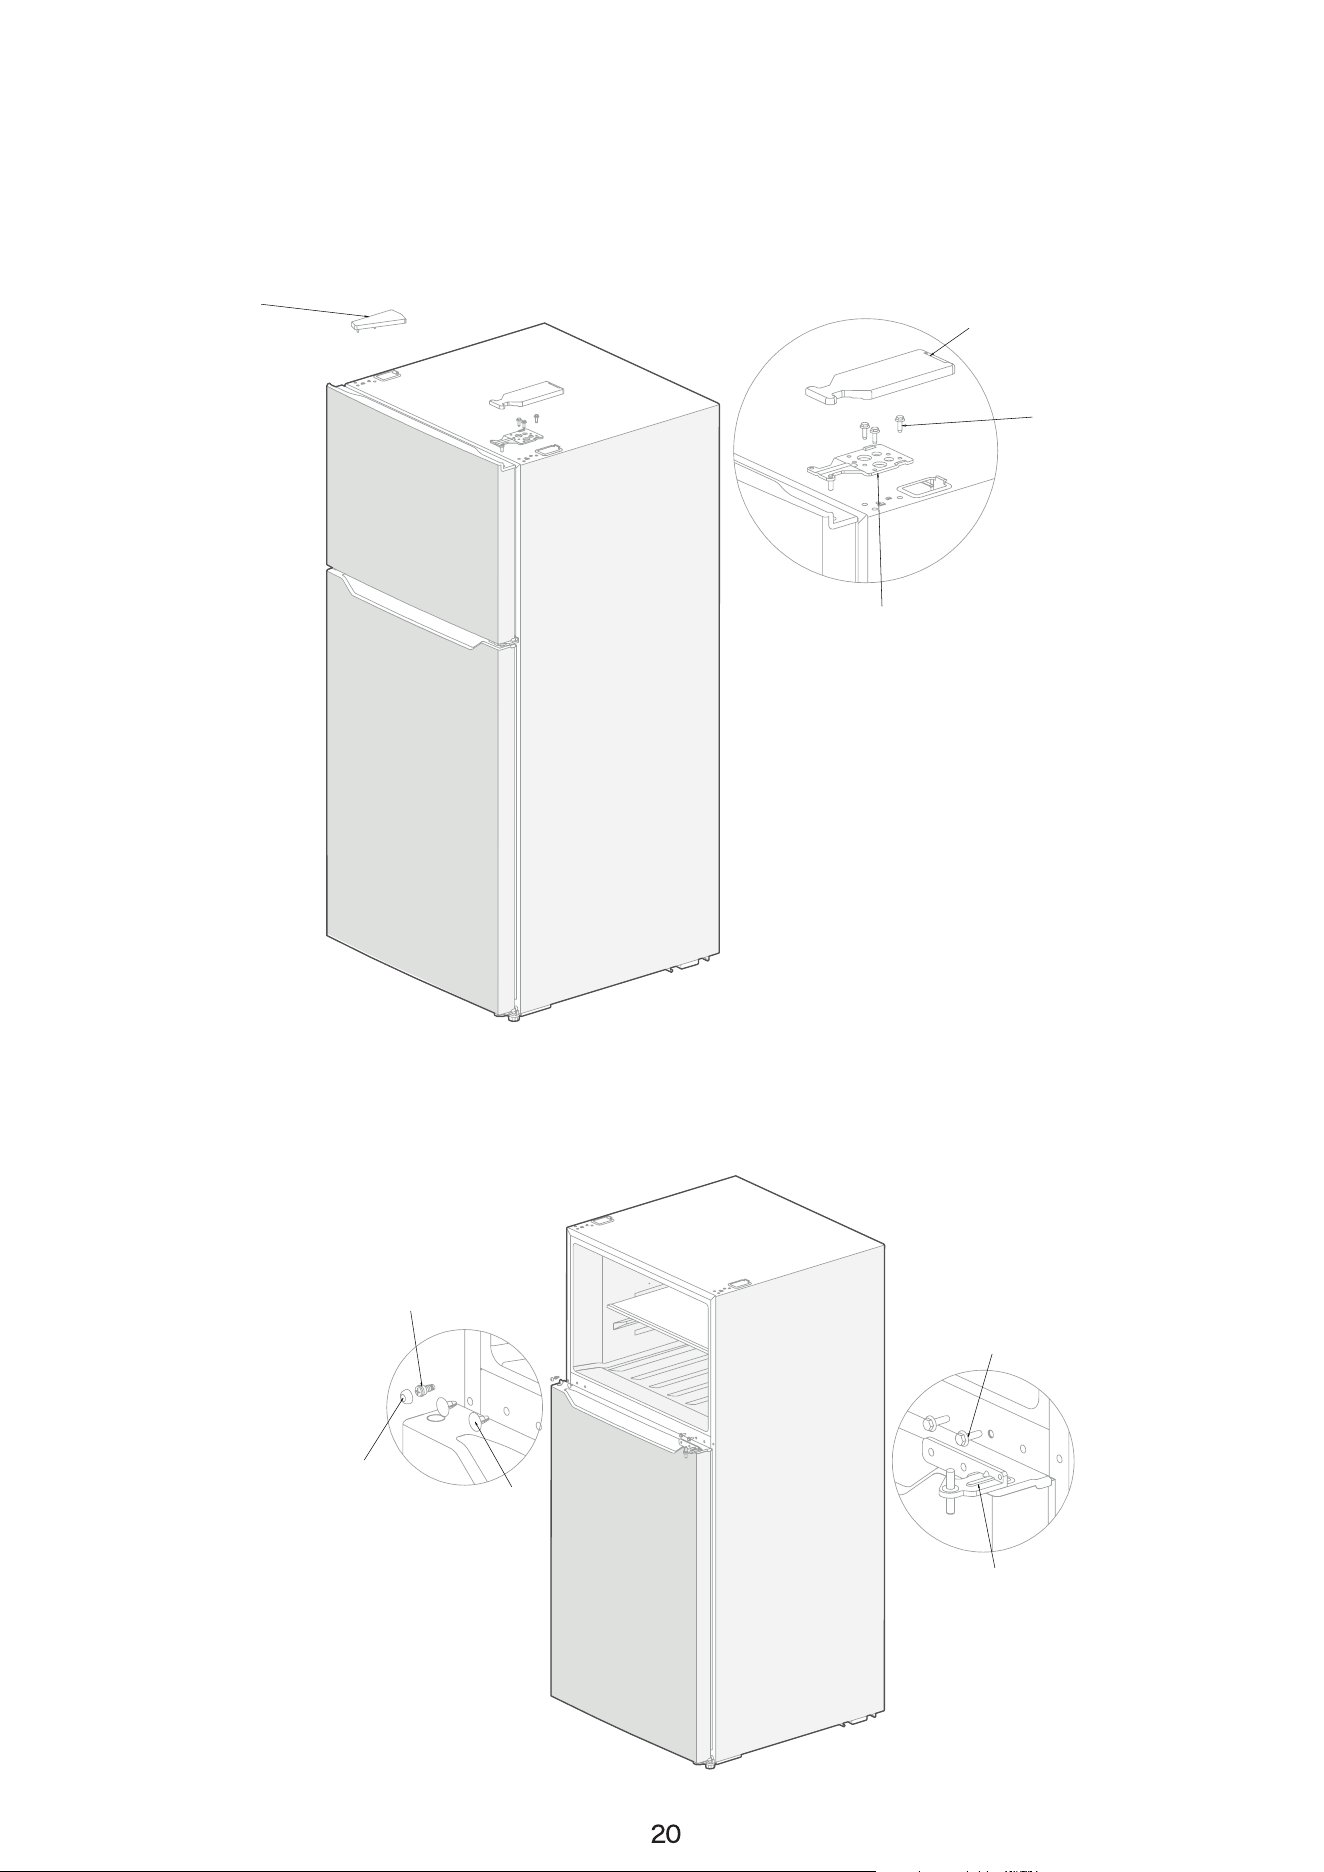
1. Unplug the refrigerator and remove all food from the unit.
2. Remove the right hinge cover, the screws, and the upper hinge from the top of the cabinet.
3. Remove the hinge hole cover from the left side as well.
4. Lift the freezer door straight up to remove it.
5. Unscrew the hinge screws and remove the middle hinge. Remove the hinge hole cover (plug
screw), the screw cap, and the middle beam screw from the center beam. Lift the refrigerator
(fresh food compartment) door straight up to remove it.
Screw
Upper hinge
Hinge cover
Hole cover
Screw
Center sill screw
Middle hinge
Plug pins
Center sill screw cap
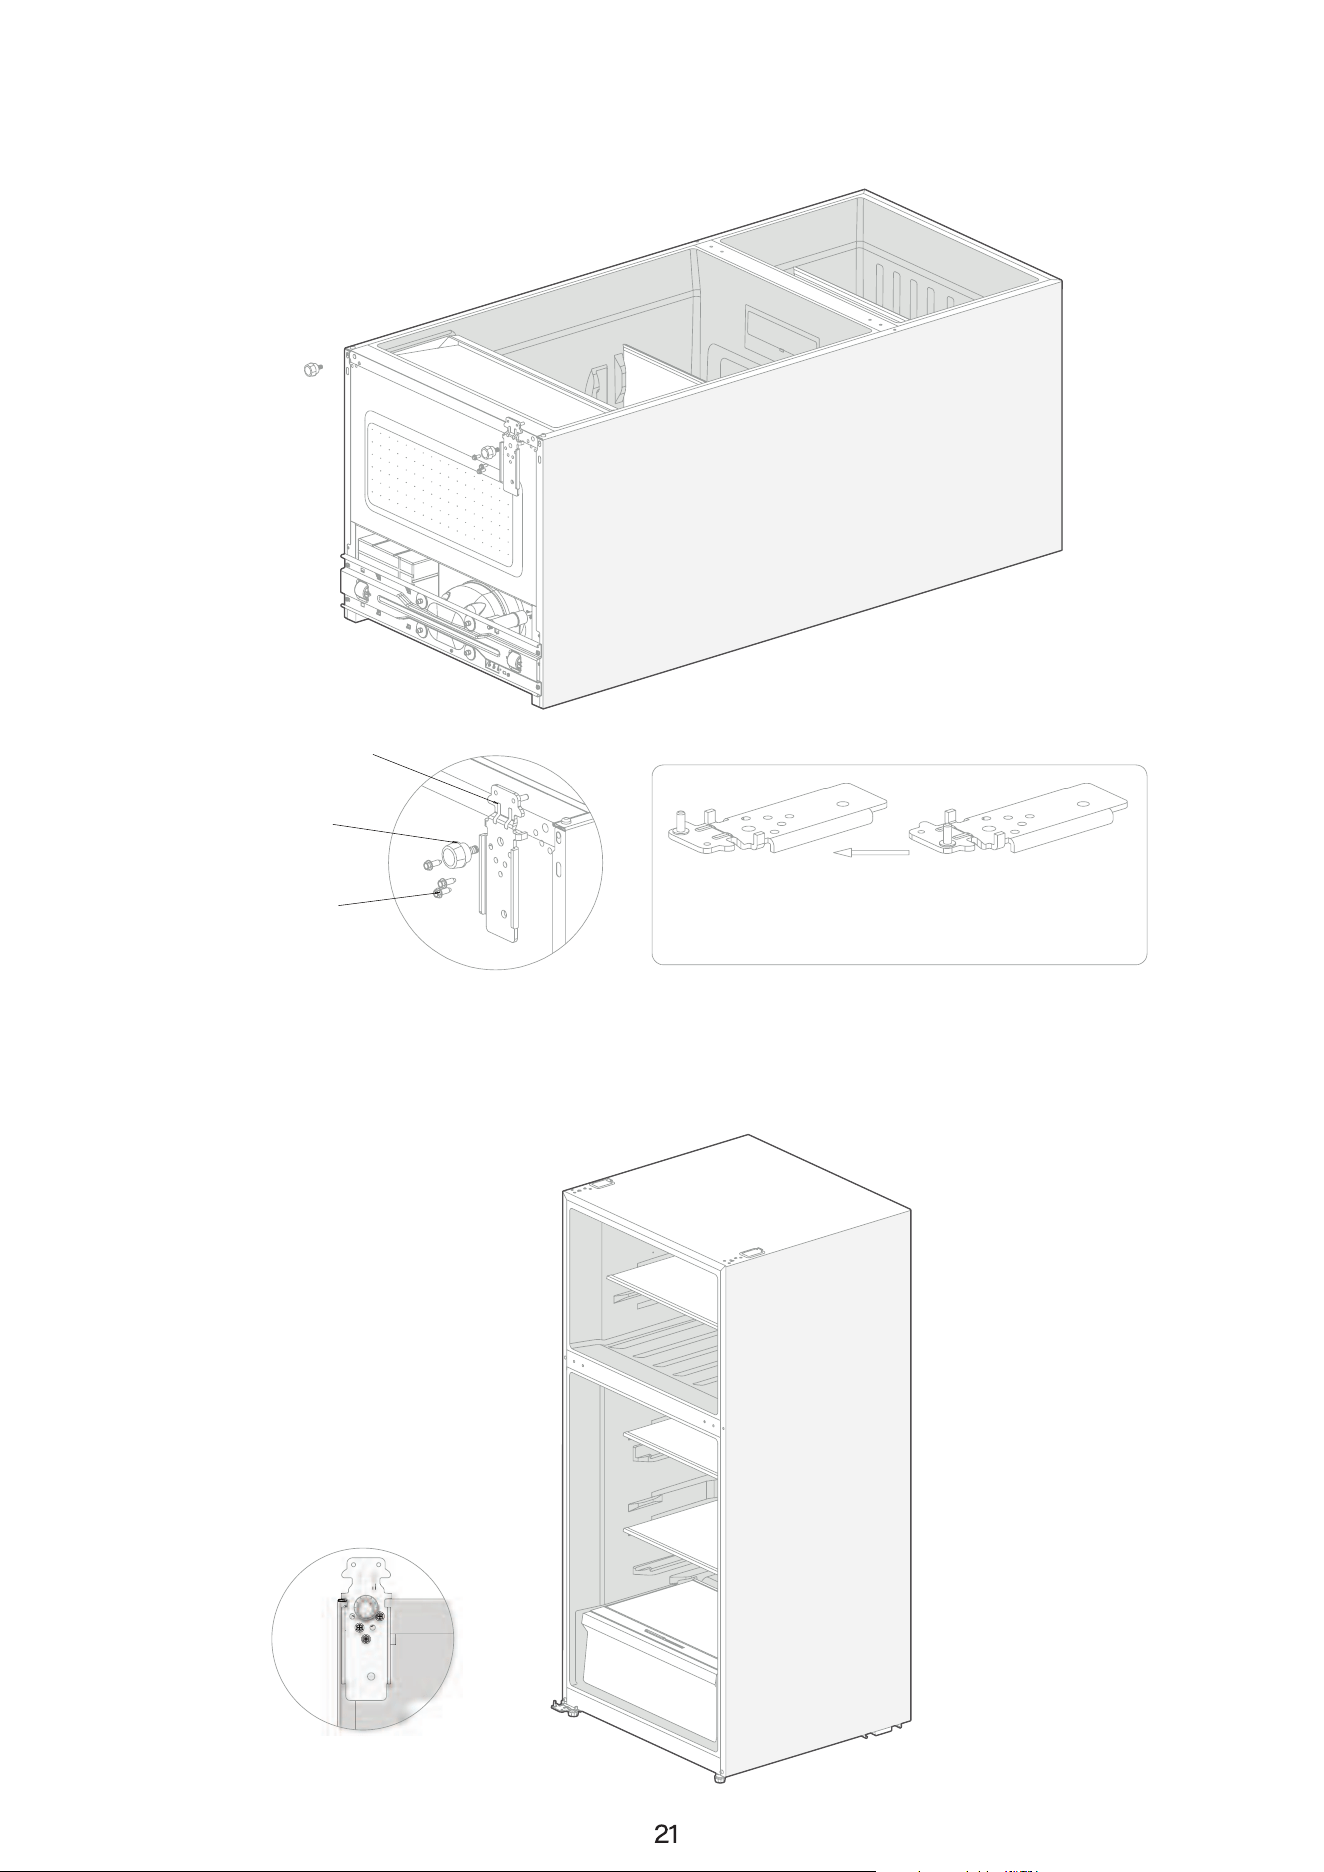
6. Lay the refrigerator on its back carefully. Unscrew the lower hinge screw and remove the leveling
foot, then remove the lower hinge. Take out the lower hinge pin and reinstall it into the hinge hole
on the opposite side.
7. Install the lower hinge on the left side of the refrigerator and tighten the screws. Reinstall both
leveling feet, then carefully return the refrigerator to an upright position.
Remove and install the lower
hinge shaft into the shaft hole
on the other side of the hinge
Screw
Lower hinge
Leveling foot
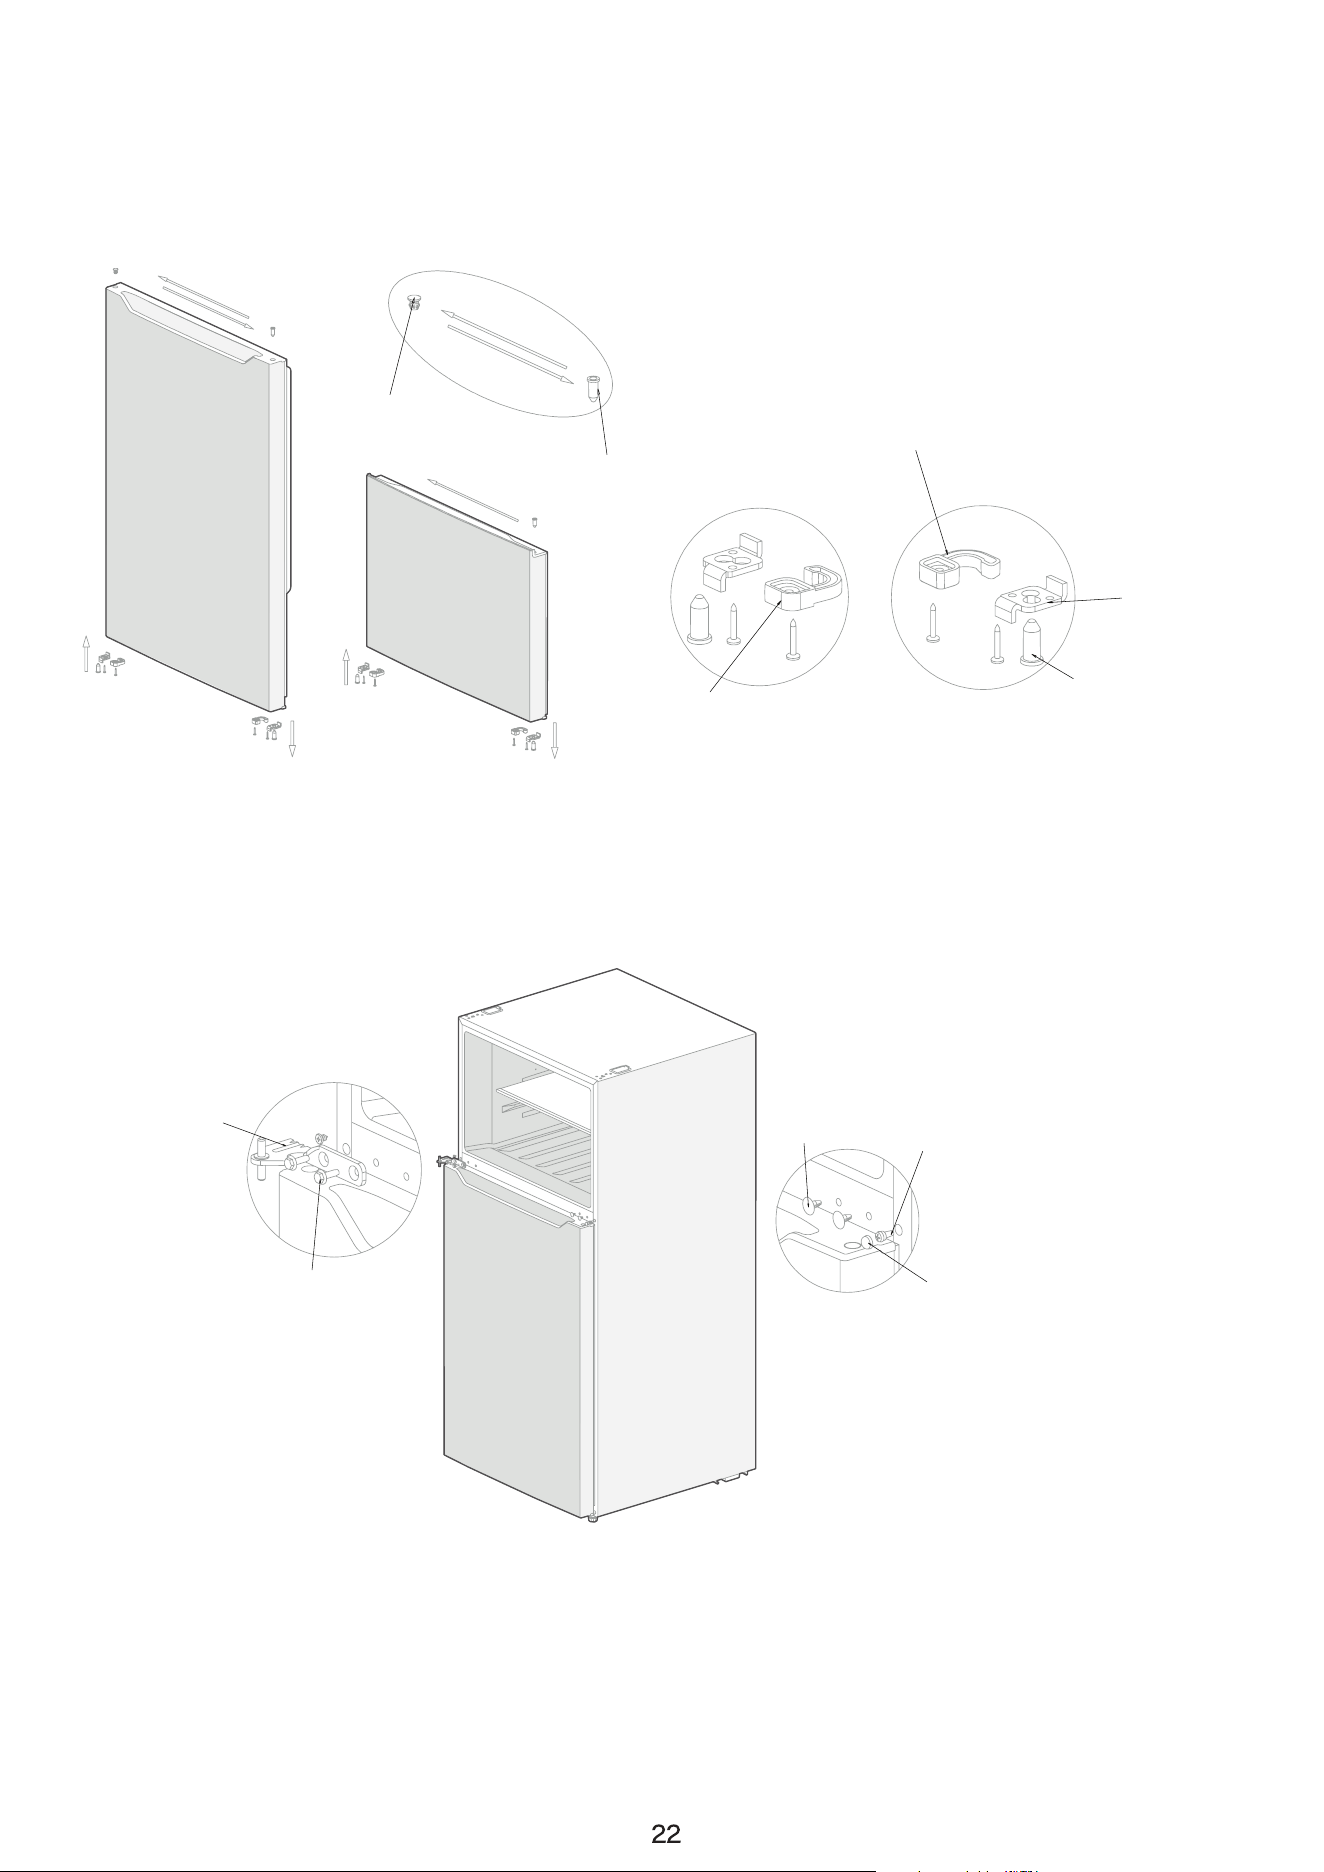
8. Remove the shaft sleeves, door stops, and right-side self-locking screws from both doors.
Take the left-side self-locking piece from the accessory bag and install it on the upper-left corner
of each door along with the door stops and shaft sleeves.
Remove the hole plug and shaft sleeve from the top of the refrigerator (fresh food) door and repo-
sition them as needed before reinstalling the door.
9. Install the refrigerator (fresh food) door onto the lower hinge.
Install the center beam screw and the middle hinge on the left side, then tighten all screws secure-
ly.
On the right side, reinstall the hole cover (plug screw), center beam screw, and screw cap.
10. Install the freezer door onto the middle hinge.
Remove the upper hinge pin and reinstall it into the hinge hole on the opposite side.
Attach the upper hinge, tighten all screws, and then install the upper hinge cover along with the
right-side hole cover.
Right door
self-locking
Sleeve
Sleeve
Hole plug
Stopper
Left door
self-locking
Screw
Middle hinge
Center sill screw
Plug pins
Center sill screw cap
Hinge cover
Hole cover
Upper hinge
Remove and install the up
hinge shaft into the shaft hole
on the other side of the hinge

Defrosting
• Frost that forms due to seasonal or temperature changes can be removed manually. Discon-
nect the appliance from the power supply and allow the frost to melt, or wipe it away gently
with a dry cloth.
Out Of Operation
Power Failure
• During a power outage, food can generally remain safe for several hours, even in warm weath-
er.
• Keep the doors closed as much as possible to maintain the internal temperature.
• Do not add fresh food to the appliance during a power failure.
Long-Term Non-Use
• Unplug the appliance, clean it thoroughly, and leave the doors slightly open to prevent odors
and mold.
Moving the Appliance
• Remove all items from the refrigerator and secure shelves, drawers, and glass parts with tape.
• Tighten the leveling feet, close the doors, and tape them shut before moving.
• Do not lay the appliance on its side or upside down, and avoid excessive vibration. The appli-
ance should not be tilted more than 45° during transport.
IMPORTANT:
• Once the appliance is turned on, it should operate continuously. Frequent or prolonged interrup-
tions may reduce its service life.
Troubleshooting
The following common issues can typically be resolved by the user. If the problem persists after
troubleshooting, please contact KoolMore Customer Service.
Malfunction
• Confirm the appliance is properly plugged in.
• Check whether the voltage is too low.
• Ensure there is no power outage and the circuit breaker has not tripped.
Odor
• Wrap odorous foods tightly.
• Check for spoiled or rotten food.
• Clean the inside of the refrigerator.
Compressor Runs for a
Long Time
• Extended run time is normal in summer or when the ambient temperature is high.
• Avoid placing too much food in the appliance at once.
• Do not place hot food inside; allow it to cool first.
• Reduce the frequency of door openings.
Light Fails to Turn On
• Check whether the refrigerator is connected to power and whether the light switch
area is obstructed.
• The LED light may be damaged; replacement must be performed by a qualified
technician.
Door Cannot Close Properly
• Food packages may be blocking the door.
• The refrigerator may be tilted—re-level the unit.
Loud Noises
• Ensure the refrigerator is level and placed on a stable surface.
• Verify that accessories and internal components are properly positioned.
Door Seal Is Not Tight
• Remove any debris or foreign matter from the door gasket.
• Warm the gasket with a hair dryer or warm towel, then allow it to cool so it can
reshape and seal properly.
Water Pan Overflows
• Excessive food or high-moisture items may cause heavy frost buildup, resulting in
increased defrost water.
• Doors may not be closing properly, allowing moist air to enter the refrigerator.
Hot Housing
• Heat from the built-in condenser may warm the exterior housing; this is normal.
• High ambient temperatures, excessive food storage, or compressor shutdown
may increase surface heat.
• Ensure good ventilation around the unit for proper heat dissipation.
Surface Condensation
• Condensation on the exterior or door seals is normal when humidity is high. Wipe
dry with a clean towel.
Abnormal Noise
• Buzz: The compressor may buzz during operation, especially at startup or shut-
down—this is normal.
• Creak: The flow of refrigerant can produce a creaking sound—this is also normal.

How to Store For Best Preservation (applicable models only)
Cover food to retain moisture and prevent it from picking up odors from other food. A large pot of
food, like soup or stew, should be divided into small portions and put in shallow containers before
being refrigerated. A large cut of meat or whole poultry should be divided into smaller pieces or
placed in shallow containers before being refrigerated.
Placement of Foods
Shelves • Shelves are adjustable to accommodate a variety of packages.
Specialized compart-
ment (applicable mod-
els only)
• Sealed crisper drawers provide an optimal storage environment for fruit and vegeta-
bles. Vegetables require higher humidity while fruit requires lower humidity.
• Crispers are equipped with control devices to control the humidity level (*depending
on model and options).
• An adjustable temperature meat drawer maximizes the storage time of meat and
cheese.
Storage in the door
• Do not store perishable food in the door. Eggs should be stored in the carton on a
shelf. The temperature of the storage bins in the door fluctuates more than the tem-
perature inside the cabinet. Keep the door closed as much as possible.
Freezer compartment • You can store frozen food and freeze fresh food in the freezer compartment.
Note: Freeze fresh, undamaged food only. Keep food which is to be frozen away from food
which is already frozen. To prevent food from losing its flavor or drying out, place in airtight con-
tainers.
Refrigerator & Freezer Storage Chart
Storage life varies based on temperature, packaging, and exposure to moisture. Because date la-
bels are not always a reliable indicator of food safety, use this chart as a general guide and follow
proper storage practices.
Product Refrigerator Freezer
Milk 1 week 1 month
Butter 2 weeks 12 months
Ice Cream - 2 - 3 weeks
Natural Cheese 1 month 4 - 6 months
Cream Cheese 2 weeks Not recommended
Yogurt 1 month
-
Milk Products
Meat
Product Refrigerator Freezer
Fresh Roasts, Steaks,
Chops
3 - 4 days 2 - 3 months
Fresh Ground Meat, Stew
Meat
1 - 2 days 3 - 4 months
Bacon 7 days 1 month
Sausage, Raw From Pork,
Beef, Turkey
1 - 2 days 1 - 2 months
Poultry / Eggs
Product Refrigerator Freezer
Fresh Poultry 2 days 6 - 8 months
Poultry Salad 1 day -
Eggs, Fresh in Shell 2 - 4 weeks Not recommended
Fish / Seafood
Product Refrigerator Freezer
Fresh Fish 1 - 2 days 3 - 6 months
Cooked Fish 3 - 4 days 1 month
Fish Salad 1 day Not recommended
Dried or Pickled Fish 3 - 4 weeks -
Fruit
Product Refrigerator Freezer
Apples 1 month -
Peaches 2 - 3 weeks -
Pineapple 1 week -
Other Fresh Fruit 3 - 5 days 9 - 12 months
Vegetables
Product Refrigerator Freezer
Asparagus 2 - 3 days -
Broccoli, Brussels Sprouts,
Green Peas, Mushrooms
3 - 5 days -
Cabbage, Cauliflower, Cel-
ery, Cucumbers, Lettuce
1 week -
Carrots, Beets, Radishes 2 weeks -

LIMITED WARRANTY
KoolMore Supply Inc. extends a limited warranty to the original purchaser, guaranteeing that this KoolMore product is
free from manufacturing defects in material or workmanship for one year from the date of purchase.
Should you discover any such defect within the warranty period, KoolMore Supply Inc. reserves the right to repair or re-
place the product without charge, or to cover the cost of replacement parts and repair labor needed to correct defects
present at the time of purchase or resulting from regular usage, when the appliance has been installed, operated, and
maintained as per the instructions provided.
At its sole discretion, KoolMore Supply Inc. may decide to replace the product. In such an event, your replacement
appliance will carry the warranty for the remaining term of the original unit’s warranty period.
This warranty is valid exclusively to the original purchaser of the product and only applicable within the United States.
The warranty commences from the date of original consumer purchase. Proof of the original purchase date will be
required to obtain service under this warranty.
Under this limited warranty, your sole and exclusive remedy will be product repair, as outlined above. All services must
be provided by a KoolMore designated service company.
To claim warranty or request repair service:
Email [email protected]. Please include your name, address, phone number, warranty repair request, and a copy
of your proof of purchase receipt. Alternatively, visit koolmore.com and use the Contact Us page. A KoolMore custom-
er service representative will promptly arrange service for your appliance.
We thank you for choosing KoolMore.
WARRANTY EXCLUSIONS
This limited warranty will not cover:
1. Failure of the product to perform during power failures or interruptions,
or due to inadequate electrical service.
2. Damage incurred during transportation or handling.
3. Damage caused by accidents, vermin, lightning, winds, fire, floods, or acts of God.
4. Damage resulting from accidents, alterations, misuse, abuse, improper installation, repair, or maintenance. This
includes using any external device that alters or converts the voltage or frequency of electricity.
5. Unauthorized product modifications, repairs by unauthorized centers, or use of non-approved replacement parts.
6. Abnormal cleaning and maintenance not aligned with the user’s manual.
7. Use of incompatible accessories or components.
8. Any costs associated with repairs or replacements under these excluded circumstances shall be the responsibility
of the consumer.
WARRANTY