
SBU 9878BK
EN
UNIVERSAL 5-IN-1 FOOD
PROCESSOR
Translation of the original manual
SBU 9878BK
A
1
5
4
2
3
B
2
3
4
1
12
14
13
5 6 7 8 9 10 11
C
mL
1800
1600
1400
1200
1000
800
600
400
200
1
2
mL
1800
1600
1400
1200
1000
800
600
400
200
D
mL
1750
1600
1400
1200
1000
800
200
400
600
mL
1750
1600
1400
1200
1000
800
200
400
600
6
2
3
4
5
1
mL
1750
1600
1400
1200
1000
800
200
400
600
mL
1750
1600
1400
1200
1000
800
200
400
600
E
1
2
3

F3
mL
1800
1600
1400
1200
1000
800
600
400
200
F4
F1 F2
mL
1750
1600
1400
1200
1000
800
200
400
600
G3 G4
G1 G2
G5 G6
H3
mL
1750
1600
1400
1200
1000
800
200
400
600
H4
mL
1750
1600
1400
1200
1000
800
200
400
600
H1 H2
mL
1750
1600
1400
1200
1000
800
200
400
600
I3 I4
mL
1800
1600
1400
1200
1000
800
600
400
200
I1 I2
I5
mL
1800
1600
1400
1200
1000
800
600
400
200
I6
mL
1800
1600
1400
1200
1000
800
600
400
200
J3 J4
J1 J2
J5


- 1 -
11/2025
2025, .
EN
Universal 5-in-1 Food Processor
User Manual
IMPORTANT SAFETY INSTRUCTIONS
READ CAREFULLY AND STORE FOR FUTURE USE.
• This appliance must not be used by children. Keep this
appliance and its power cable out of the reach of children.
• The appliance may be used by persons with reduced
physical, sensory or mental abilities or lack of experience
and knowledge, provided they are supervised or have
been instructed on the safe use of the appliance and
understand the potential hazards.
• Children must not play with the appliance.
• Cleaning and maintenance must not be carried out by
children.
• If the power cord is damaged, have it replaced in
aprofessional service centre in order to prevent
adangerous situation. Never use the appliance if the
power cord is damaged.
WARNING:
There is arisk of injury if used incorrectly.
• Pay attention when handling the chopping blades,
especially when removing the blades from the container,
emptying the container and during cleaning.
• Clean the parts of the appliance that come into contact
withfood after each use with warm water, kitchen
detergent and asoft sponge. Follow the instructions in the
“CLEANING AND MAINTENANCE” section.
UNIVERSAL 5-IN-1 FOOD PROCESSOR

- 2 -
11/2025
2025, .
• Always disconnect the appliance from the power supply
when leaving it unattended and before assembly,
disassembly or cleaning.
• Before replacing the accessories or accessible movable
parts, please turn the appliance off and disconnect it from
the power supply.
• Stick to individual preparation times and speed settings
mentioned in this manual for the appliances.
. . . . . . . . . . . . . . . . . . . . . . . . . . . . . . . . . . . . . . . . . . . . . . . . . . . . . . . . . . . . . . . . . . . . . . . . . . . . . . . . . . . . . . . . . . . . . . . . . . . . . . . . . . . . . . . . . . . . . . . . . . . . . . . . . . . . . . . . . . . .
Electrical Safety
• Before connecting the appliance to the mains socket, ensure that the voltage stated on its rating plate matches the voltage in the socket.
• Connect the appliance only to aproperly earthed socket. Do not use an extension cord.
• Do not connect or disconnect the appliance power cord to or from the mains socket with wet hands.
• Ensure that the plug of the power cord does not come into contact with water or moisture.
• Do not disconnect the appliance from the mains socket by pulling on the power cord. This could damage the power cord or the mains socket.
Disconnect the cable from the socket by pulling on the plug of the power cord.
• Do not place heavy objects on the power cord. Ensure that the power cord does not hang over the edge of the table or touch hot surfaces or sharp
objects.
• To avoid the danger of injury by electrical shock, do not repair the appliance yourself or make any adjustments to it. Have all repairs or adjustments
of the appliance performed at an authorised service centre. Tampering with the appliance during the warranty period may void the warranty.
• Do not spray the appliance with water or any other liquid. Never wash it under running water or submerge it in water or another liquid.
• Always switch off the appliance and disconnect it from the mains socket when you have finished using it.
• This appliance is not designed to be controlled using aprogrammed device, external timer switch or remote control.
Proper Use of the Appliance
• The appliance is intended and designed for processing astandard amount of food in the household.
• Do not use the appliance for any purpose other than that for which it is intended.
• This appliance is designed for use in indoor areas only. Never use it in outdoor or industrial environment.
• This appliance must only be used inaccordance with the instructions provided inthis user'smanual.
• Use the appliance only with the original accessories supplied with it.
Caution:
The use of non-original accessories can lead to adangerous situation.
• Do not use sprays, explosive, toxic or flammable substances in the vicinity of the appliance.
• Only place the appliance on an even, dry surface. Do not place the appliance on window sills or on unstable surfaces. Also, do not place it on an
electric or gas stove or in its vicinity, do not place it in the vicinity of an open fire or an appliance that is asource of heat.
• Do not use the appliance if it malfunctions, has been dropped on the floor, immersed in water or damaged in any way. Take it to an authorised
service centre for inspection or repair.
• It is forbidden to modify the surface of the appliance in any way, e.g. using self-adhesive wallpaper, foil, etc.
• Make sure that the appliance is correctly assembled before putting it into operation. The appliance will not start unless it is assembled correctly.
• Do not disassemble the appliance while powered and in operation.
• Do not handle the appliance if your hands are wet or damp, particularly when inserting the plug into the mains socket and when removing it.
• Do not cover the appliance ventilation openings.
• Do not turn on the appliance when it is empty. Incorrect use of the appliance may negatively affect its lifetime.
• Avoid contact with rotating parts of the appliance.
• Ensure that hair, clothing or other objects do not come into contact with the rotating press cone during operation of the citrus juicer.
• Only place ingredients that are to be processed into the filling opening of the food processor container.
• Never use your fingers or other items topush ingredients through the filling opening. For this purpose there is apusher included as an accessory.
• Do not attempt to disassemble the appliance during operation.
• No accessories are designed to process boiling ingredients.
• Hot liquids with atemperature of up to 55 °C can be processed in the blender container. Take extra care when handling hot liquids and food. Hot
steam or splashing hot liquids andfood may cause scalding. Never start the appliance with the blender container attached without the lid properly
- 3 -
11/2025
2025, .
secured. If you are processing hot liquids, do not remove the inner lid during operation. Do not touch the hot surface. Use the handle for carrying the
heated blender container.
• If you have been processing hot foods, the removable parts may become warm after use.
• Do not process hot or warm ingredients in the food processor container or in the smoothie bottle. Allow these to cool completely before processing.
• The smoothie blender is not designed tocrush ice or to process frozen food itself.
• Before attaching attachments to the appliance, removing or replacing them, ensure that the appliance is turned off and disconnected from the mains
socket.
• When handling the chopping knife, the blender container with the built-in blade unit, and the smoothie blender blade unit, take extra care to avoid
injury from the blades. Particular care must be taken when emptying the blender container, removing the blade unit from the container, removing the
grinding blade from the chamber, and cleaning.
• Do not attempt to process bones, nut shells, or other hard ingredients.
• When processing ingredients, follow the recommended usage times for individual accessories listed in this manual. After processing ingredients for
the recommended time, allow the appliance to cool down for at least 10 minutes.
• The appliance is equipped with safety fuses that increase safety when using it. If the appliance is not correctly assembled, it will not start. Do not
disable safety fuses or attempt to block or intentionally destroy them. There is arisk of serious injury and irreversible damage to the appliance.
Safety During Maintenance
• Always allow the appliance to cool completely before cleaning.
• Clean the appliance regularly after each use according to the instructions in the CLEANING AND MAINTENANCE section. Do not perform any
maintenance on the appliance other than the cleaning described in the Maintenance and Cleaning chapter.
• Do not wash the base with the motor unit under running water or immerse it in water or other liquids. This appliance and its parts are not dishwasher
safe.
• The removable attachments are intended for short term contact with food (including beverages), i.e. max. 4 hours. Do not leave them submerged, for
example in water, for along time to avoid damaging their finish.
Prevention of Household Accidents
• Hot or boiling liquids pose asignificant risk to children, and even minor burns can be serious. Observe basic household injury prevention rules and
exercise increased caution when children are near hot or boiling liquids. If necessary, explain to children the risks associated with hot or boiling
liquids.
• In the event of burns or scalds, immediately rinse the affected area under astream of cold water and seek medical assistance if required.
. . . . . . . . . . . . . . . . . . . . . . . . . . . . . . . . . . . . . . . . . . . . . . . . . . . . . . . . . . . . . . . . . . . . . . . . . . . . . . . . . . . . . . . . . . . . . . . . . . . . . . . . . . . . . . . . . . . . . . . . . . . . . . . . . . . . . . . . . . . .
EXPLANATION OF SYMBOLS PLACED ON THE PRODUCT OR INTHE ACCOMPANYING DOCUMENTATION
The product meets all the basic requirements of the applicable EU directives.
This symbol on products or accompanying documents means that used electric or electronic products must not be added to ordinary
municipal waste.
Product with protection class II
Electric shock protection is provided by double or heavy-duty insulation.
. . . . . . . . . . . . . . . . . . . . . . . . . . . . . . . . . . . . . . . . . . . . . . . . . . . . . . . . . . . . . . . . . . . . . . . . . . . . . . . . . . . . . . . . . . . . . . . . . . . . . . . . . . . . . . . . . . . . . . . . . . . . . . . . . . . . . . . . . . . .

- 4 -
11/2025
2025, .
• Thank you for purchasing our SENCOR product; we hope it will serve
to your satisfaction.
• Prior to using this appliance, please read the user manual thoroughly,
even in cases when you are already familiar with the use of similar
types of appliances. Use the appliance only as described in this
user manual. Keep the manual for future reference. If you pass the
appliance on to another person, ensure that this user manual is
included.
• Carefully unpack the appliance and make sure not to discard any part
of the packaging material until you have removed all its components.
It is recommended that you keep the original packaging, packing
material, receipt and confirmation of the extent of the seller'sliability
or warranty certificate at least for the duration of the legal right to
file adefect claim or the quality warranty. When transporting the
appliance, we recommend repackaging it in the original box provided
by the manufacturer.
. . . . . . . . . . . . . . . . . . . . . . . . . . . . . . . . . . . . . . . . . . . . . . . . . . . . . . . . . . . . . . . . . . . .
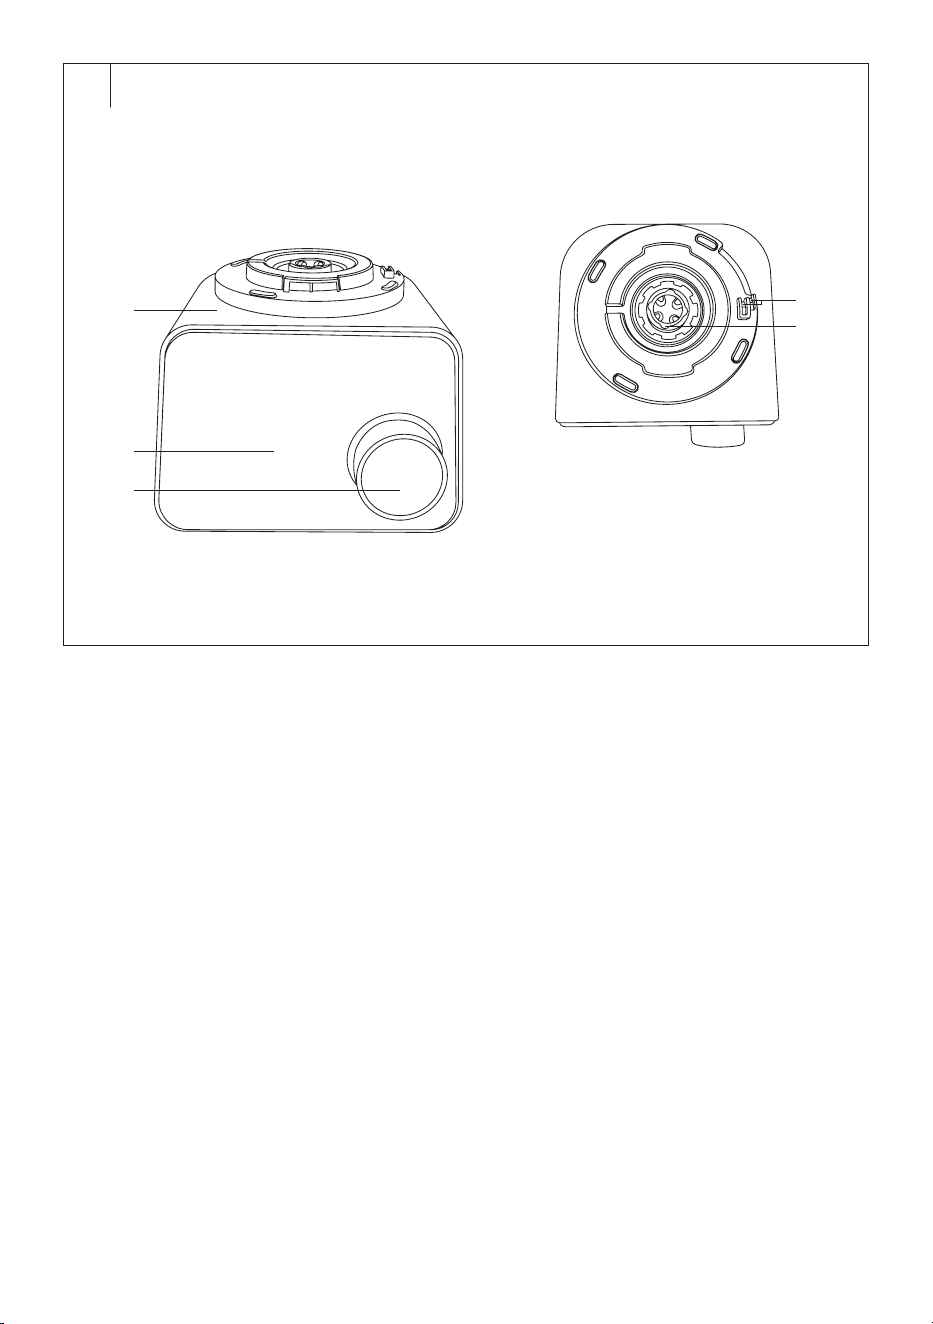
DESCRIPTION OF THE BASE (Fig.A)
A1 Base with motor unit
A2 Control panel with preset
programs
A3 Rotary knob with display
A4 Connector forattaching
accessories
A5 Switching fuses
. . . . . . . . . . . . . . . . . . . . . . . . . . . . . . . . . . . . . . . . . . . . . . . . . . . . . . . . . . . . . . . . . . . .
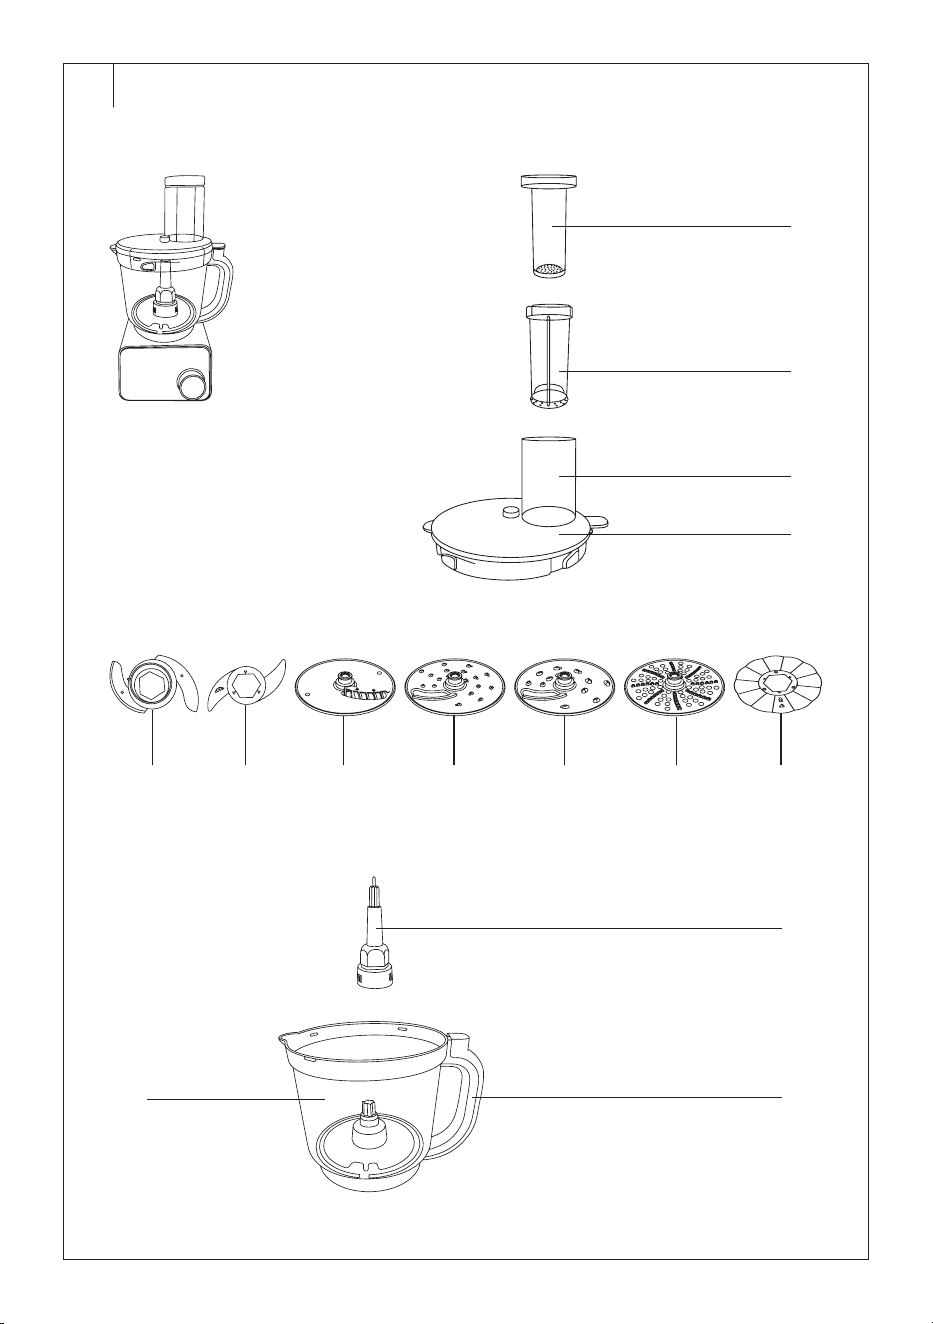
DESCRIPTION OF THE FOOD PROCESSOR (Fig.B)
B1 Measuring cup
B2 Pusher
B3 Filling opening
B4 Food processor container lid
B5 Chopping knife
B6 Dough knife
B7 Fries disc
B8 Reversible disc for
slicing/fine shredding
B9 Reversible disc for
slicing/coarse shredding
B10 Puree disc
B11 Mayonnaise maker
B12 Shaft
B13 2.0l food processor container
B14 Food processor container
handle
. . . . . . . . . . . . . . . . . . . . . . . . . . . . . . . . . . . . . . . . . . . . . . . . . . . . . . . . . . . . . . . . . . . .
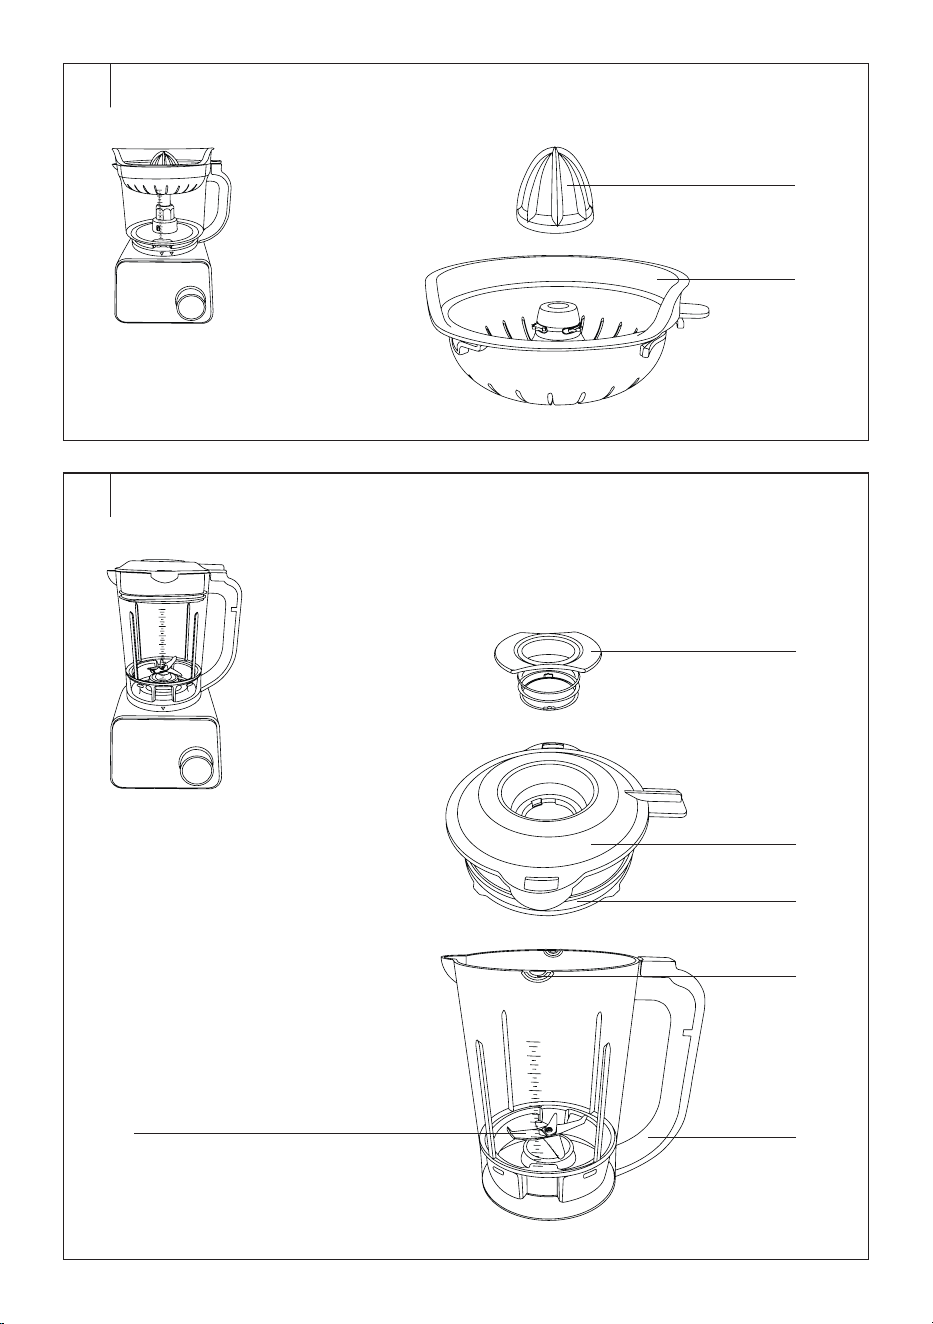
DESCRIPTION OF THE CITRUS JUICER (Fig.C)
C1 Press cone C2 Flesh collection bowl
. . . . . . . . . . . . . . . . . . . . . . . . . . . . . . . . . . . . . . . . . . . . . . . . . . . . . . . . . . . . . . . . . . . .
DESCRIPTION OF THE BLENDER (Fig.D)
D1 Inner lid
D2 Blender container lid
D3 Gasket seal
D4 1.75l blender container
D5 Blender container handle
D6 Blade unit
. . . . . . . . . . . . . . . . . . . . . . . . . . . . . . . . . . . . . . . . . . . . . . . . . . . . . . . . . . . . . . . . . . . .
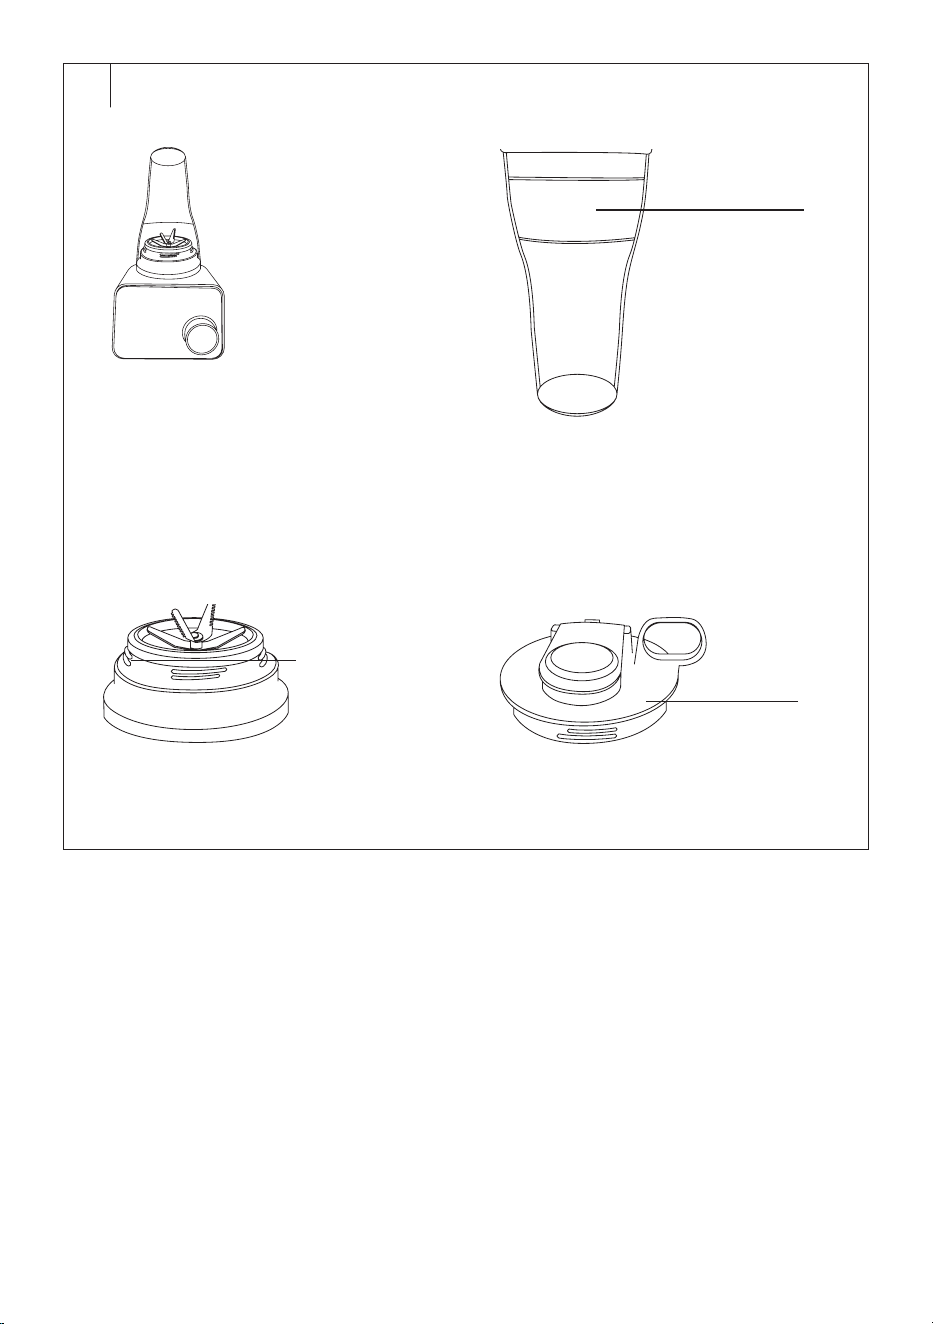
DESCRIPTION OF THE SMOOTHIE BLENDER (Fig.E)
E1 600ml smoothie bottle
E2 Smoothie blender blade unit
E3 Smoothie bottle lid
. . . . . . . . . . . . . . . . . . . . . . . . . . . . . . . . . . . . . . . . . . . . . . . . . . . . . . . . . . . . . . . . . . . .
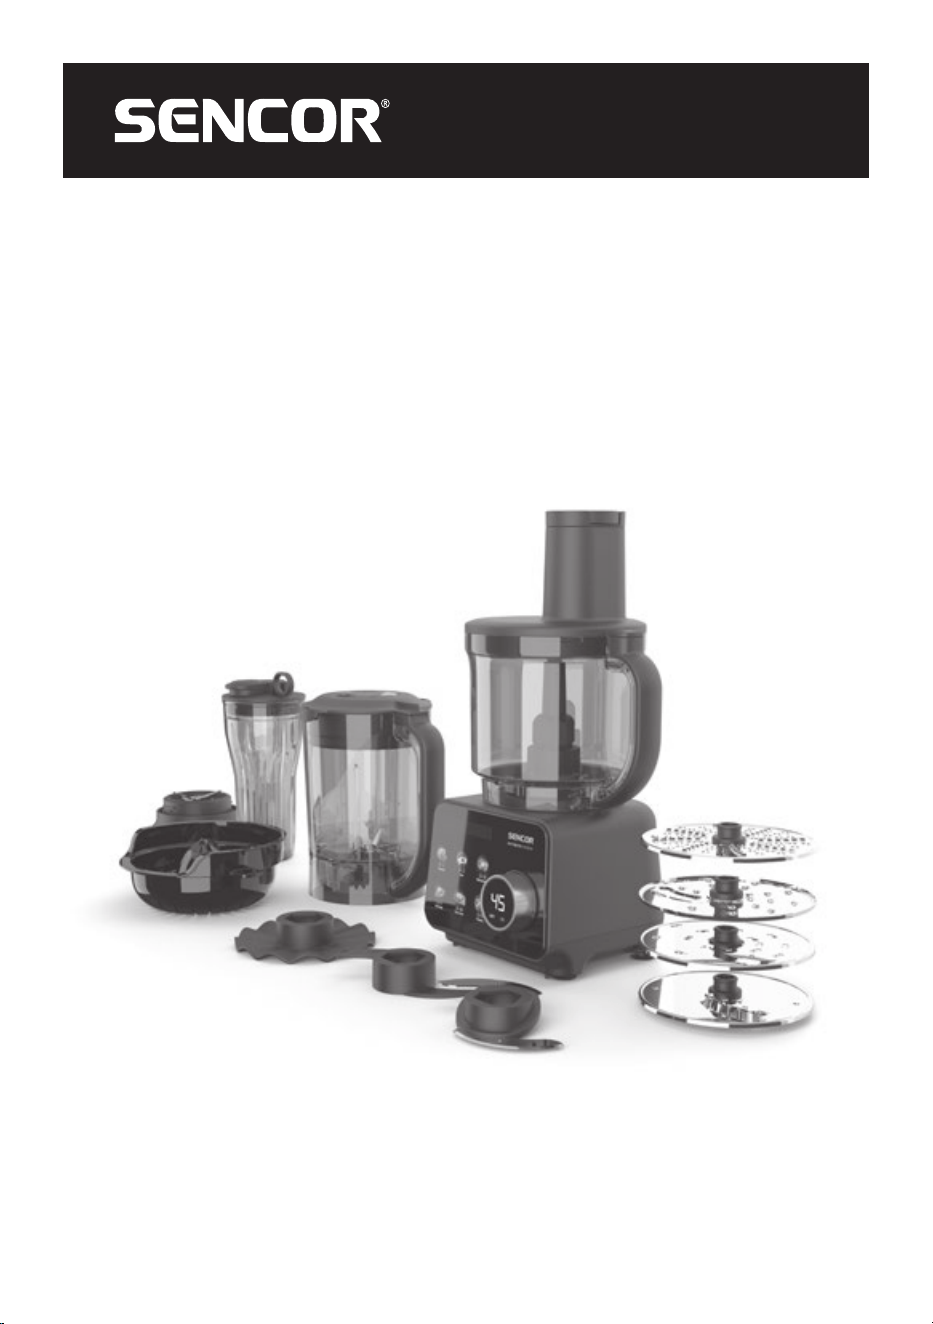
THE PURPOSE OF USING THE APPLIANCE
• The Sencor SBU 9878BK multifunctional blender is auniversal
helper for the kitchen, which thanks to its rich accessories will facilitate
the preparation of awide range of meals anddrinks.
• The food processor is designed forquick andefficient preparation
of ingredients. The chopping knife is ideal for quickly andevenly
chopping vegetables, herbs or nuts, while the special dough
knife makes it easy to knead andprepare light doughs. Four
interchangeable discs allow you to cut into slices andshredding
ingredients as needed.
• The citrus juicer provides freshly squeezed juice; the blender container
is suitable for preparing soups, sauces or cocktails, and the smoothie
bottle is designed for quick preparation of delicious smoothies that you
can take with you for training or atrip to the countryside.
• Thanks to the combination of these functions, the blender can handle
the work of several appliances, saving time andspace in thekitchen.
. . . . . . . . . . . . . . . . . . . . . . . . . . . . . . . . . . . . . . . . . . . . . . . . . . . . . . . . . . . . . . . . . . . .
QUICK GUIDE AND BASIC CONTROLS (Fig.F)
Your multifunctional blender is supplied with rich accessories for various
purposes of use. Always use only one accessory. Accessories cannot be
combined and used simultaneously.
Food Processor (Fig.F1)
• The food processor with achopping knife is suitable forchopping
vegetables, herbs or nuts.
• The food processor withadough knife is suitable for processing
various fine or light doughs.
• Thanks to the reversible discs, you can cut the ingredients into slices
or grate them according to the required roughness.
• Thanks to the mayonnaise maker, you can easily make your own
homemade mayonnaise.
• Assemble the appliance with the food processor andthe selected
accessories.
• Select one of thepreset programs or manually select the processing
speed.
• For more information, see the FOOD PROCESSOR section of the
manual.
Blender (Fig.F2)
• The blender is suitable for quick and effective blending, crushing,
mixing and emulsifying various ingredients and preparing dishes
and drinks, such as soups, sauces, spreads, dressings or iced drinks.
Thanks to powerful blades and high speed, the blender can easily
handle fruit, vegetables and ice.
• Assemble the appliance with the blender.
• Select one of thepreset programs or manually select the processing
speed.
• For more information, see the BLENDER section later in the manual.
Citrus Juicer (Fig.F3)
• The citrus juicer is specially designed for juicing oranges, lemons,
grapes andother citrus fruits. Just press the fruit on the press cone
andyou get fresh juice effortlessly. Ideal for quick preparation of
vitamin drinks without the use of other appliances.
• Assemble the appliance with the citrus juicer.
• Select one of thepreset programs or manually select the processing
speed.
• For more information, see the CITRUS JUICER section later in the
manual.
Smoothie Blender (Fig.F4)
• The smoothie blender is suitable for preparing delicate drinks
fromfresh fruits, vegetables, dairy products or ice, such as smoothies,
cocktails or milkshakes. Thanks to the practical container, which
can also be used as atravel bottle, it is ideal for preparing adrink for
journeys, to the fitness centres or to work.
• Assemble the appliance with the smoothie blender.
• Select apreset Smoothie program.
• For more information, see the SMOOTHIE BLENDER section of the
manual.
EN
Universal 5-in-1 Food Processor
User Manual
- 5 -
11/2025
2025, .
Pre-set Programs
The SBU 9878BK multifunction blender is equipped with the following preset programs.
PROGRAM COOKING TIME PRESET SPEED DESCRIPTION ACCESSORIES
Smoothie
Spring Visibility Preview
2/2
60seconds 10
Suitable for preparing delicate
drinks fromfresh fruit,
vegetables, dairy products or ice,
such as smoothies, cocktails or
milkshakes
Smoothie blender
Blender
Soup
Spring Visibility Preview
2/2
70seconds 10
Suitable for making delicate
soups, sauces or baby food
Smoothie blender
Blender
Slicing and Shredding
of Ingredients
Spring Visibility Preview
2/2
60seconds 1
Suitable for cutting
andshredding according to the
required roughness of various
ingredients
Food processor
Fries disc
Reversible disc for slicing/fine
shredding
Reversible disc for
slicing/coarse shredding
Puree disc
Preparing the Dough
Spring Visibility Preview
2/2
150seconds 1
Suitable forpreparing fine
andlight doughs
Food processor
Dough knife
Citrus Juicer
Spring Visibility Preview
2/2
99seconds 1
Suitable forjuicing oranges,
lemons, grapes andother citrus
fruits
Citrus Juicer
Chopping
Spring Visibility Preview
2/2
30seconds 10
Suitable forchopping various
ingredients, vegetables, fruits,
herbs or nuts
Food processor
Chopping knife
- 6 -
11/2025
2025, .
Rotary knob
• The rotary knob is used forcontinuous adjustment of the speed level
from 1 to 10, where 1 represents the lowest speed, while 10 represents
the highest speed.
Turning on the Appliance
• After plugging the power cord plug into the mains socket, turn the
control once to the right so that the display shows "- -" andON and the
control panel lights up.
• Either press the icon to select one of the preset programs, or turn the
control clockwise to manually adjust the speed from 1 to 10.
Turning off the Appliance
• If you have selected apreset program, the appliance will stop
automatically after the preset time. If you need to interrupt it earlier,
press the icon of the selected program.
• If you have set the speed manually, turn the knob to the left until “- -”
andON are shown on the display.
• Now turn the knob to the left again until OFF shows and the display
andcontrol panel turn off.
• Disconnect the power cord from the mains socket.
Safety Fuses
• The appliance is equipped with safety fuses that increase safety when
using it. If the appliance is not correctly assembled, it will not start.
• Conversely, if the safety fuse is released during operation, the
appliance will stop running immediately.
• Safety fuses are located at the base in the form of switching fuses (see
Fig.A, number5). If the food processor container, blender container
or smoothie bottle is not correctly placed in thebase, the appliance
will not turn on.
• Additional safety fuses are located in thefood processor container
handle andin theblender container handle. If the food processor
container lid, the flesh collection bowl or the blender container lid is
not properly secured, the appliance will not turn on. Andeven if these
parts arereleased, the appliance will stop running immediately.
Caution:
Do not disable safety fuses or attempt to block or
intentionally destroy them. There is arisk of serious
injury and irreversible damage to the appliance.
. . . . . . . . . . . . . . . . . . . . . . . . . . . . . . . . . . . . . . . . . . . . . . . . . . . . . . . . . . . . . . . . . . . .
BEFORE FIRST USE
• Remove the base and all accessories from the packaging material.
Remove any promotional labels or tags. Make sure that no parts are
damaged.
• Before storing or disposing of the packaging material, check that
you have removed all parts and accessories from the packaging
compartments and packaging material.
• Wipe the base with aslightly moistened soft cloth. Wipe with adry
cloth.
• Thoroughly wash the accessories and parts that come into contact
with food (see the list below) with warm water using aneutral kitchen
detergent and soft sponge or soft brush. Then rinse everything with
clean water and allow to dry freely, or wipe dry with asoft cloth.
Accessories and parts suitable for hand washing:
• All food processor parts (Fig.B)
• All parts of the citrus juicer (Fig.C)
• All parts of the blender (Fig.D)
• All parts of the smoothie blender (Fig.E)
Caution:
No part of this appliance is designed to be washed in
adishwasher.
Caution:
Take extra care when handling the chopping knife,
discs, the blade unit of the blender container (not
removable), the blade unit of the smoothie blender to
avoid injury.
Caution:
Do not rinse the base of the appliance, power cord or
plug under water or immerse them in water.
Note:
You may notice aslight odour on first use. This is anormal
occurrence which disappears with use.
. . . . . . . . . . . . . . . . . . . . . . . . . . . . . . . . . . . . . . . . . . . . . . . . . . . . . . . . . . . . . . . . . . . .
FOOD PROCESSOR
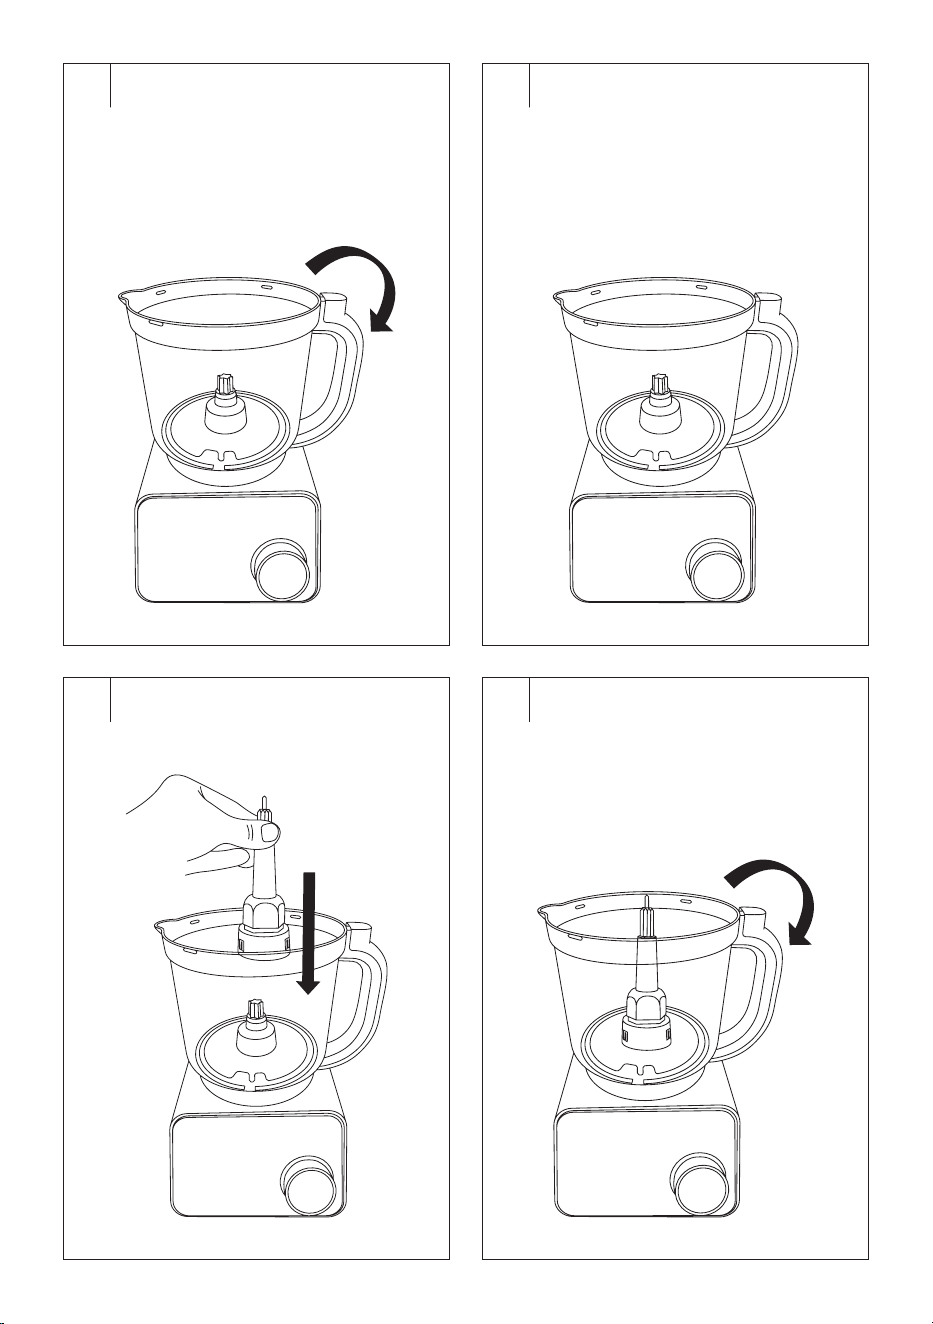
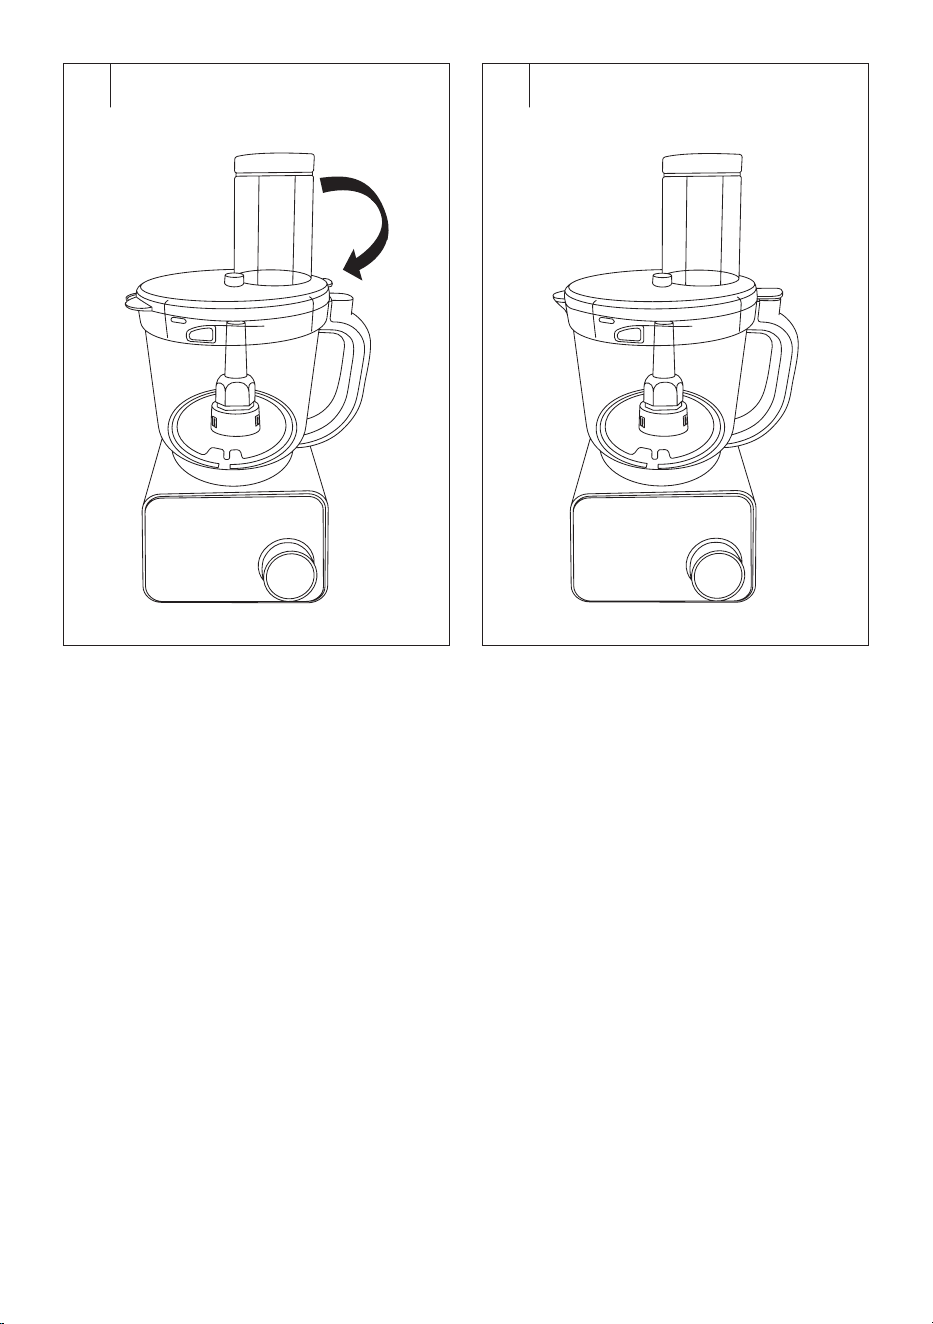
Assembly (Fig.G1–G6)
Caution:
Before assembling or disassembling the food
processor, make sure that the appliance is switched
off and unplugged from the mains socket. Always
wait until the rotating accessories have come to
acomplete stop.
1. Place the base on aflat, dry, and stable surface, such as akitchen
unit.
2. Place the food processor container on the base andturn the container
clockwise so that the handle points to the right.
3. Fit the shaft onto the tip in the centre of the container. Make sure that
nothing prevents it from turning.
4. Attach the selected accessories (chopping knife, kneading blade,
mayonnaise maker or one of the discs, partsB5toB11) to the shaft.
The chopping knife and dough knife must sit on the bottom of the food
processor container. The discs are put on the metal tip of the shaft. If
you are going to use adouble-sided disc, put it on the side that you
are going to use, i.e. if you want to slice, the side of the slicer blade will
point upwards.
5. Place the lid on the container and turn it clockwise until you feel
resistance. The lid can only be placed on in one way. The protrusion
on the lid must fit into the fuse in thehandle.
6. Insert the pusher into the filling opening and insert the measuring cup
into the pusher.
Caution:
When handling the chopping knife or discs, exercise
extreme caution to avoid injury.
Note:
When using achopping knife or dough knife, first attach the
knife to the shaft andthen insert the ingredients.
- 7 -
11/2025
2025, .
Selecting the food processor attachment
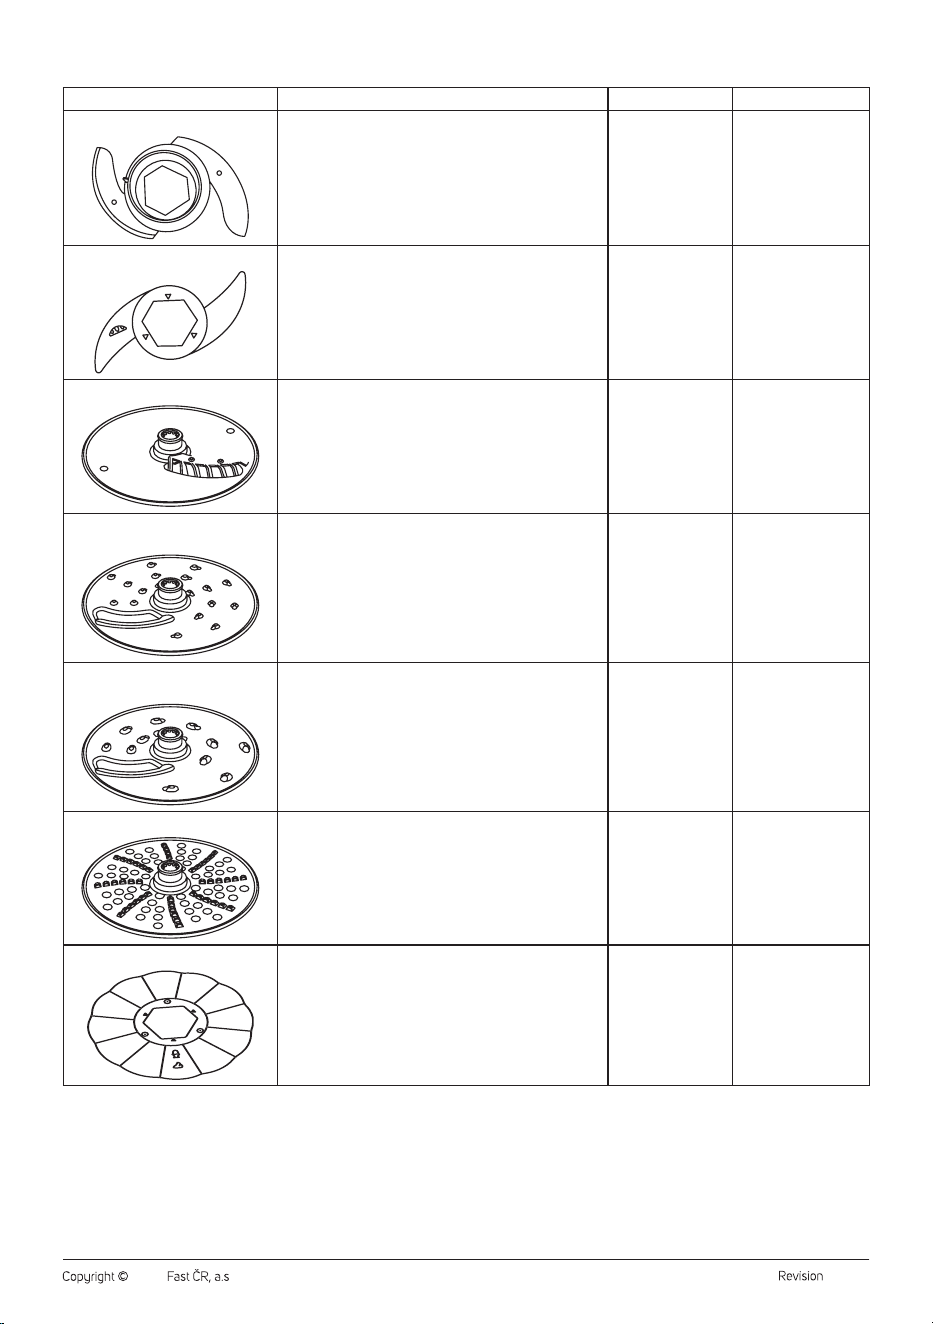
ATTACHMENT INTENDED USE SPEED OPERATING TIME
Chopping Knife
Suitable forchopping various ingredients, vegetables, fruits,
herbs or nuts
10 30seconds
Dough Knife
Suitable forpreparing fine andlight doughs 1 150seconds
Fries Disc
Suitable forpreparing potato or vegetable fries 1 60seconds
Reversible Disc for Slicing/Fine
Shredding
Suitable for slicing or grating into thin strips 1 60seconds
Reversible Disc for Slicing/Coarse
Shredding
Suitable for slicing or grating into thicker strips 1 60seconds
Puree Disc
Suitable forpreparing purees 10 60seconds
Mayonnaise maker
Suitable for homemade mayonnaise 10 60seconds

- 8 -
11/2025
2025, .
Usage
• Unwind the power cord completely and plug the power cord into
aproperly grounded mains outlet.
• The display will light up briefly and show OFF.
• Turn the knob to the right once to show "- -" andON on the display
and the control panel lights up.
• Either select one of thepreset programs, or turn the knob clockwise to
manually set the speed from1 to10.
• The appliance will start.
• If you going to use achopping knife or dough knife, put all the
ingredients in the container before turning on the food processor.
• If you are going to use discs to process ingredients, carefully
remove the pusher after turning on the food processor andinsert the
ingredients into the filling opening. Using the pusher, slowly push the
ingredients through the filling opening.
• Check the condition of the ingredients being processed during
preparation.
Caution:
Do not use your fingers or other objects to press
the food. Always use the pusher intended for this
purpose. Do not insert your fingers or foreign objects
into the filling opening.
Tip:
After removing the measuring cup, you will be able to add
liquids or add smaller pieces of ingredients directly to the
dough. We do not recommend using the opening after
removing the measuring cup when using achopping knife
or discs.
Caution:
The food processor container is not intended for
processing hot or warm ingredients. Allow them to
cool before processing.
Stopping the Operation
• If you have selected apreset program, the appliance will stop
automatically after the preset time. If you need to interrupt it earlier,
press the icon of the selected program.
• If you have set the speed manually, turn the knob to the left until “- -”
andON are shown on the display.
• Now turn the knob to the left again until OFF shows and the display
andcontrol panel turn off.
• Disconnect the power cord from the mains socket.
• Before disassembling the appliance, make sure that the rotating parts
have stopped completely.
Interrupting the Operation
• If you need to interrupt the processing of ingredients, e.g. due to
the addition or removal of already processed ingredients or there is
ablockage of knives/discs, turn off the appliance anddisconnect the
plug of the power cord from the mains socket. Wait until the rotating
parts come to acomplete stop.
• Now you will be able to release the lid and mix the ingredients,
remove the already processed ones, or add others that did not fit into
the filling opening. You will also be able to remove the ingredients that
caused the knives/discs to block.
• To continue operation, fit the lid andinsert the power cord plug into
amains socket. Select apreset program or set the speed.
Disassembly
1. If possible, move the appliance closer to the kitchen sink or the place
where you will clean it.
2. Carefully turn the lid counterclockwise to loosen it. Remove it from the
container.
3. Carefully remove the selected accessories (chopping knife, kneading
blade, mayonnaise maker or one of the discs, parts B5 to B11) from the
metal tip of the shaft.
4. Remove the shaft from thecontainer by pulling it upwards.
5. Turn the food processor container counterclockwise to release it and
remove it from the base.
6. After each use, clean the base and parts of the food processor
according to the instructions in the CLEANING AND MAINTENANCE
section.
Caution:
When handling the chopping knife or discs, exercise
extreme caution to avoid injury.
. . . . . . . . . . . . . . . . . . . . . . . . . . . . . . . . . . . . . . . . . . . . . . . . . . . . . . . . . . . . . . . . . . . .
BLENDER
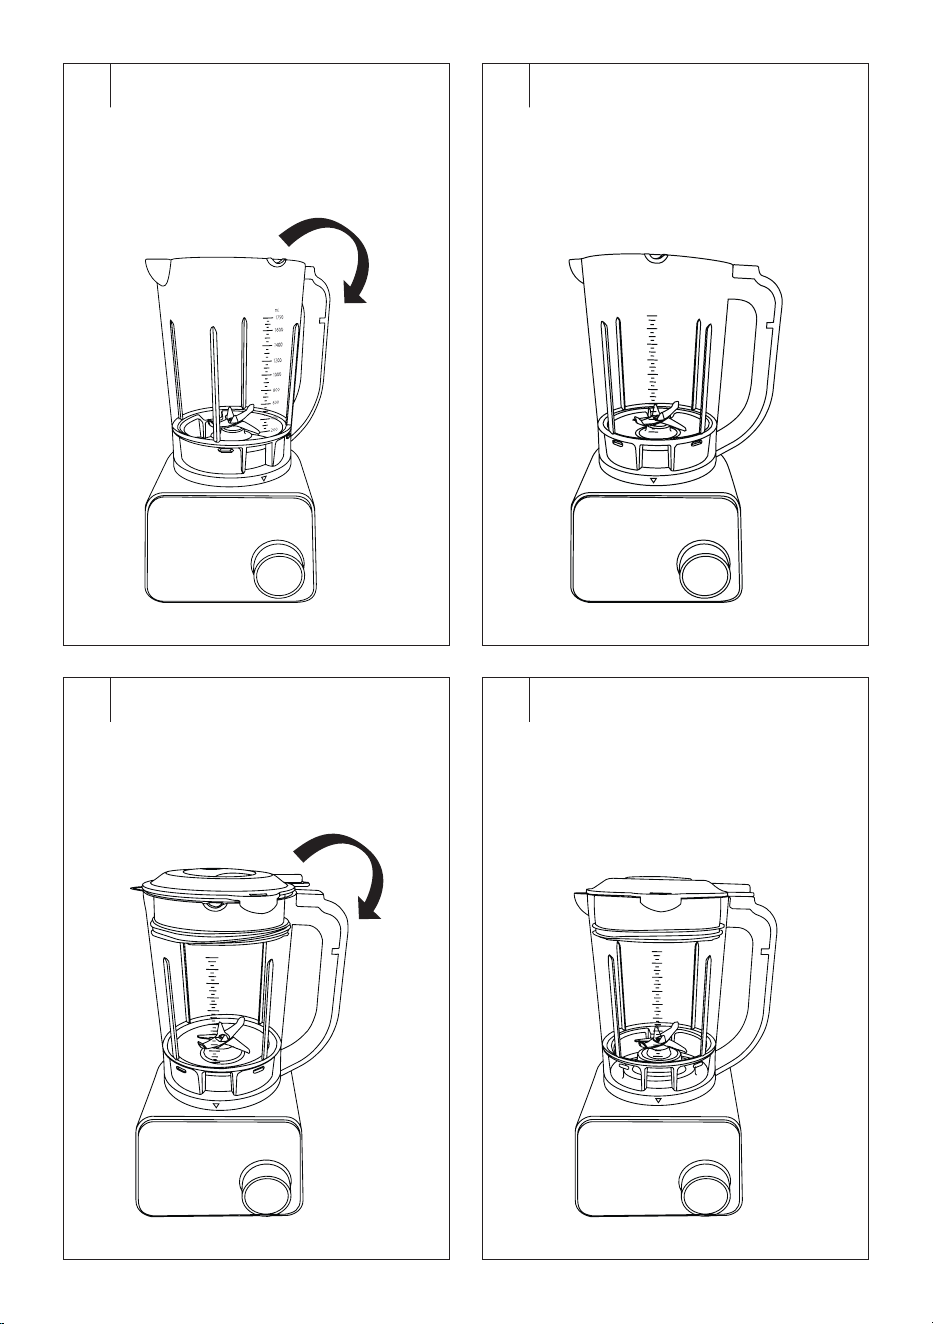
Assembly (Fig.H1–H4)
Caution:
Before assembling or disassembling the blender,
make sure that the appliance is switched off and
disconnected from the mains socket. Always
wait until the rotating accessories have come to
acomplete stop.
1. Place the base on aflat, dry, and stable surface, such as akitchen
unit.
2. Place the blender container on the base andturn the container
clockwise so that the handle points to the right.
3. Put the ingredients into the blender container. We recommend cutting
larger foods into smaller pieces beforehand.
4. Place the lid on the container and turn it clockwise until you feel
resistance. The lid can only be placed on in one way. The protrusion
on the lid must fit into the fuse in thehandle.
Note:
The maximum capacity of the blender container is
1.75 l. Never fill it above the maximum mark. When
processing hot liquids or liquids that increase in volume
during blending, we recommend filling the container to
amaximum of 2/3 of its maximum capacity.
Usage
• Unwind the power cord completely and plug the power cord into
aproperly grounded mains outlet.
• The display will light up briefly and show OFF.
• Turn the knob to the right once to show "- -" andON on the display
and the control panel lights up.
• Either select one of thepreset programs, or turn the knob clockwise to
manually set the speed from1 to10.
• The appliance will start.
• Check the condition of the ingredients being processed during
preparation.
Tip:
The inner lid can be removed during operation and the
ingredients can be added through the lid opening. We
recommend lowering the speed before removing the
inner lid. Carefully rotate the lid to release it andinsert the
ingredients through the opening in the inner lid into the
container. Put the inner lid back on and turn it until you
feel resistance. Now you can increase the speed of the
appliance again.
Quick Guide to Processing Ingredients
INGREDIENCES
SPEED
SELECTION
RECOMMENDED
BLENDING TIME
Fruit, vegetables cut into smaller
pieces
8–10 40–50 s
Baby food, side dishes 8–10 30–40 s
Spreads, dressings, marinades 8–10 30–40 s
Smoothies andcocktails 8–10 Max. 60 s
Soups 6–8 Max. 70 s
- 9 -
11/2025
2025, .
Note:
The above food processing times are indicative only. The
actual blending time depends on the size of the food, its
quantity and the required final consistency.
Stopping the Operation
• If you have selected apreset program, the appliance will stop
automatically after the preset time. If you need to interrupt it earlier,
press the icon of the selected program.
• If you have set the speed manually, turn the knob to the left until “- -”
andON are shown on the display.
• Now turn the knob to the left again until OFF shows and the display
andcontrol panel turn off.
• Disconnect the power cord from the mains socket.
• Before disassembling the appliance, make sure that the rotating parts
have stopped completely.
• Take the processed ingredients out of thebowl using aspatula or
aspoon. Never use your fingers. The knife blade is at risk of serious
injury.
Interrupting the Operation
• If you need to interrupt the processing of ingredients, e.g. to check
the ingredients or wipe them from the walls of the blender container,
switch off the appliance and disconnect the power cord plug from the
mains socket. Wait until the rotating parts come to acomplete stop.
• You can now release the lid. Check the ingredients or use aspatula to
wipe the inside walls of the container. Replace the lid.
• Connect the plug of the power cord to aproperly earthed mains socket
andturn the appliance on to continue processing.
Disassembly
• If possible, move the appliance closer to the kitchen sink or the place
where you will clean it.
• Carefully turn the lid counterclockwise to loosen it. Remove it from
the container.
• Turn the blender container counterclockwise to release it and remove
it from the base.
• After each use, clean the base and parts of the blender according to
the instructions in the CLEANING AND MAINTENANCE section.
Caution:
Keep hands and fingers away from the blade unit.
The knife blade is at risk of serious injury.
. . . . . . . . . . . . . . . . . . . . . . . . . . . . . . . . . . . . . . . . . . . . . . . . . . . . . . . . . . . . . . . . . . . .
CITRUS JUICER
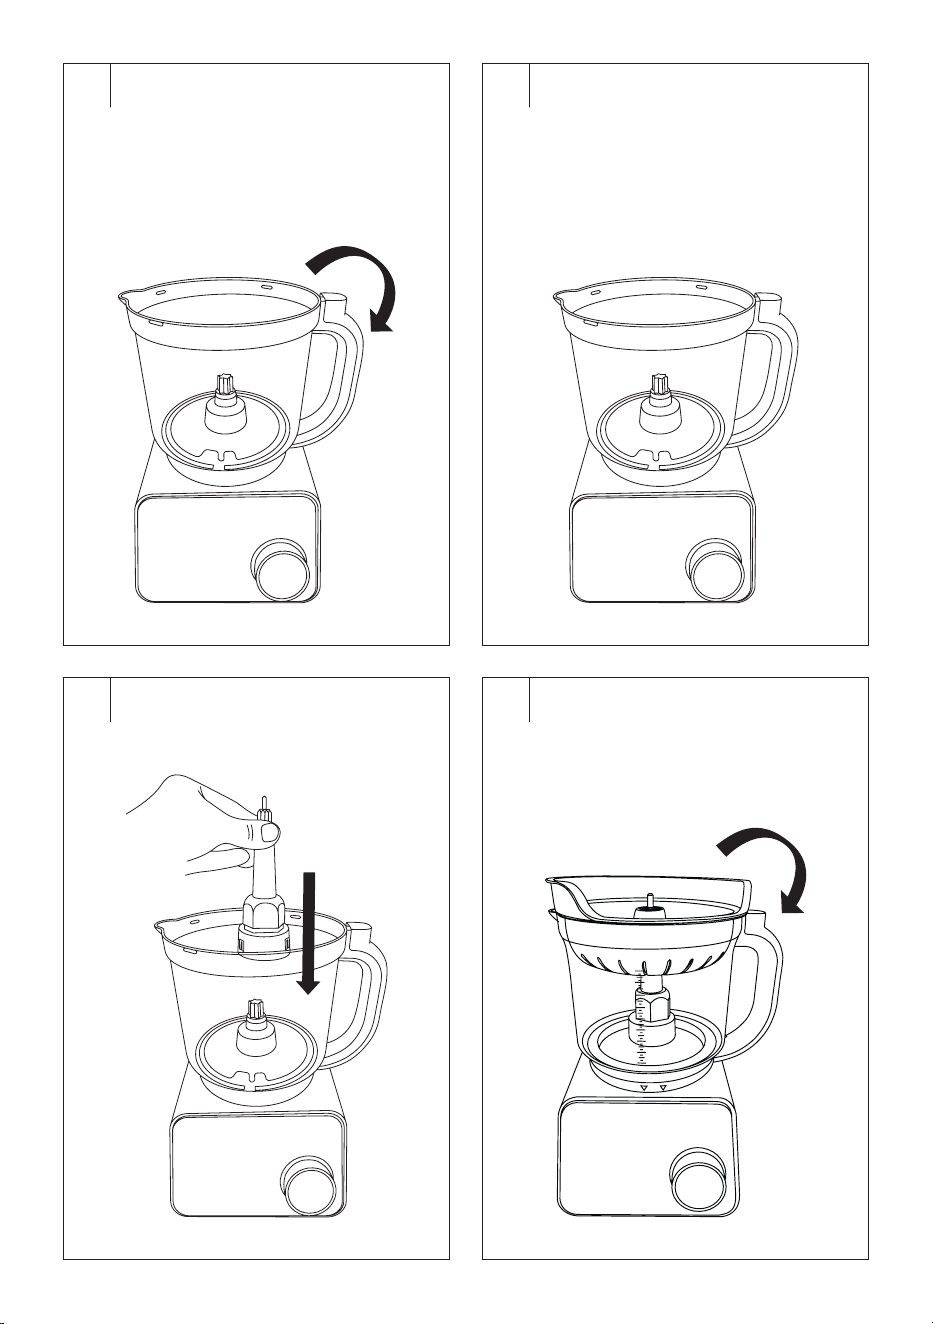
Assembly (Fig.I1–I6)
Caution:
Before assembling or disassembling the citrus juicer,
make sure that the appliance is switched off and
unplugged from the mains socket. Always wait until
the rotating accessories have come to acomplete
stop.
1. Place the base on aflat, dry, and stable surface, such as akitchen
unit.
2. Place the food processor container on the base andturn the container
clockwise so that the handle points to the right.
3. Fit the shaft onto the tip in the centre of the container. Make sure that
nothing prevents it from turning.
4. Place the flesh collection bowl on the container and turn the bowl
clockwise until you feel resistance. The bowl can only be attached
in one way. The protrusion on the bowl must fit into the fuse in
thehandle.
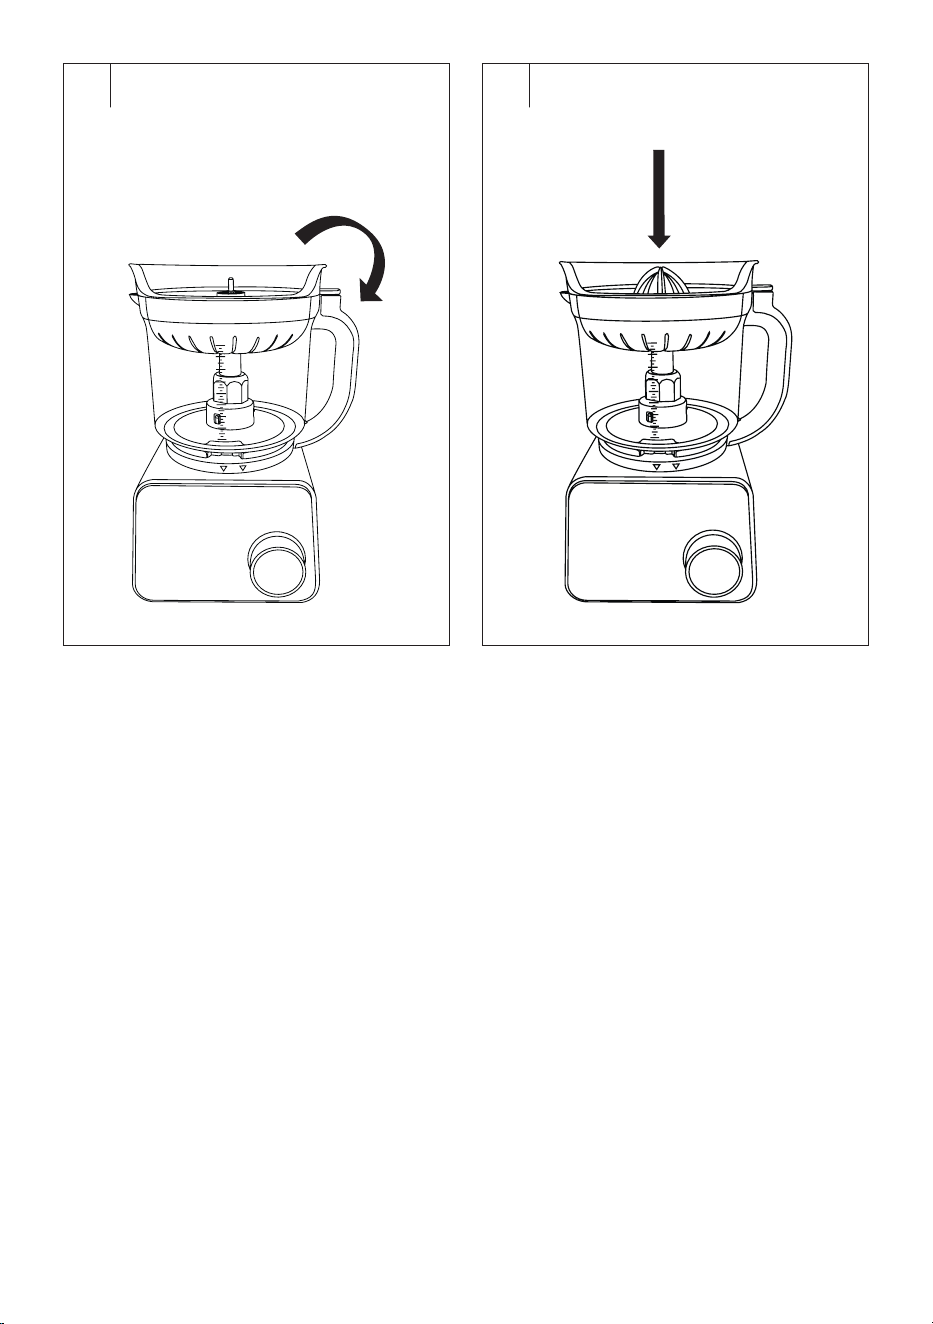
5. Fit the press cone on the metal tip of the shaft. Turn it slightly when
deploying to make sure it is properly deployed and rotates without
problems.
Usage
• Unwind the power cord completely and plug the power cord into
aproperly grounded mains outlet.
• The display will light up briefly and show OFF.
• Turn the knob to the right once to show "- -" andON on the display
and the control panel lights up.
• Place the split citrus fruit on the press cone and hold it slightly with
one hand.
• Either select one of thepreset programs, or turn the knob clockwise
to manually set the speed1. When using the citrus juicer, it is
recommended to use the maximum speed2.
• The appliance will start.
• With your hand, hold the citrus fruit on the press cone andat the same
time gently press the fruit downwards. The juice will drain into the
bowl while the flesh andseeds remain in thebowl.
• Interrupt the operation of the appliance, remove the processed citrus
fruit from the press cone, put on another citrus fruit andrepeat the
procedure.
Caution:
To avoid blockage, do not use excessive force when
squeezing the citrus fruit on the press cone. Insuch
an event, turn off the appliance immediately.
Caution:
Keep your fingers, hands, hair, jewellery and loose
clothing away from the rotating press cone. Serious
injury or damage to the appliance may occur if
caught.
Stopping the Operation
• If you have selected apreset program, the appliance will stop
automatically after the preset time. If you need to interrupt it earlier,
press the icon of the selected program.
• If you have set the speed manually, turn the control to the left until
“- -” andON are shown on the display.
• Now turn the knob to the left again until OFF shows and the display
andcontrol panel turn off.
• Disconnect the power cord from the mains socket.
• Before disassembling the appliance, make sure that the rotating parts
have stopped completely.
Interrupting the Operation
• If you need to interrupt the pressing process, turn off the appliance
anddisconnect the power cord plug from the mains socket. Wait until
the rotating parts come to acomplete stop.
• Now you will be able to loosen the bowl, remove excess flesh or pour
the juice into the cups.
• To continue operation, fit the bowl andinsert the power cord fork into
the mains socket. Select apreset program or set the speed.
Disassembly
1. If possible, move the appliance closer to the kitchen sink or the place
where you will clean it.
2. Remove the press cone fromthe shaft tip by pulling upwards. If
necessary, carefully rotate the cone to release it.
3. Carefully turn the bowl counterclockwise to loosen it. Remove it from
the container.
4. Remove the shaft from thecontainer by pulling it upwards.
5. Turn the food processor container counterclockwise to release it and
remove it from the base.
6. After each use, clean the base and parts of the citrus juicer according
to the instructions in the CLEANING AND MAINTENANCE section.
. . . . . . . . . . . . . . . . . . . . . . . . . . . . . . . . . . . . . . . . . . . . . . . . . . . . . . . . . . . . . . . . . . . .
SMOOTHIE BLENDER
Assembly (Fig.J1–J5)
Caution:
Before assembling or disassembling the smoothie
blender, make sure that the appliance is switched
off and disconnected from the mains socket. Always
wait until the rotating accessories have come to
acomplete stop.
- 10 -
11/2025
2025, .
1. Place the base on aflat, dry, and stable surface, such as akitchen
unit.
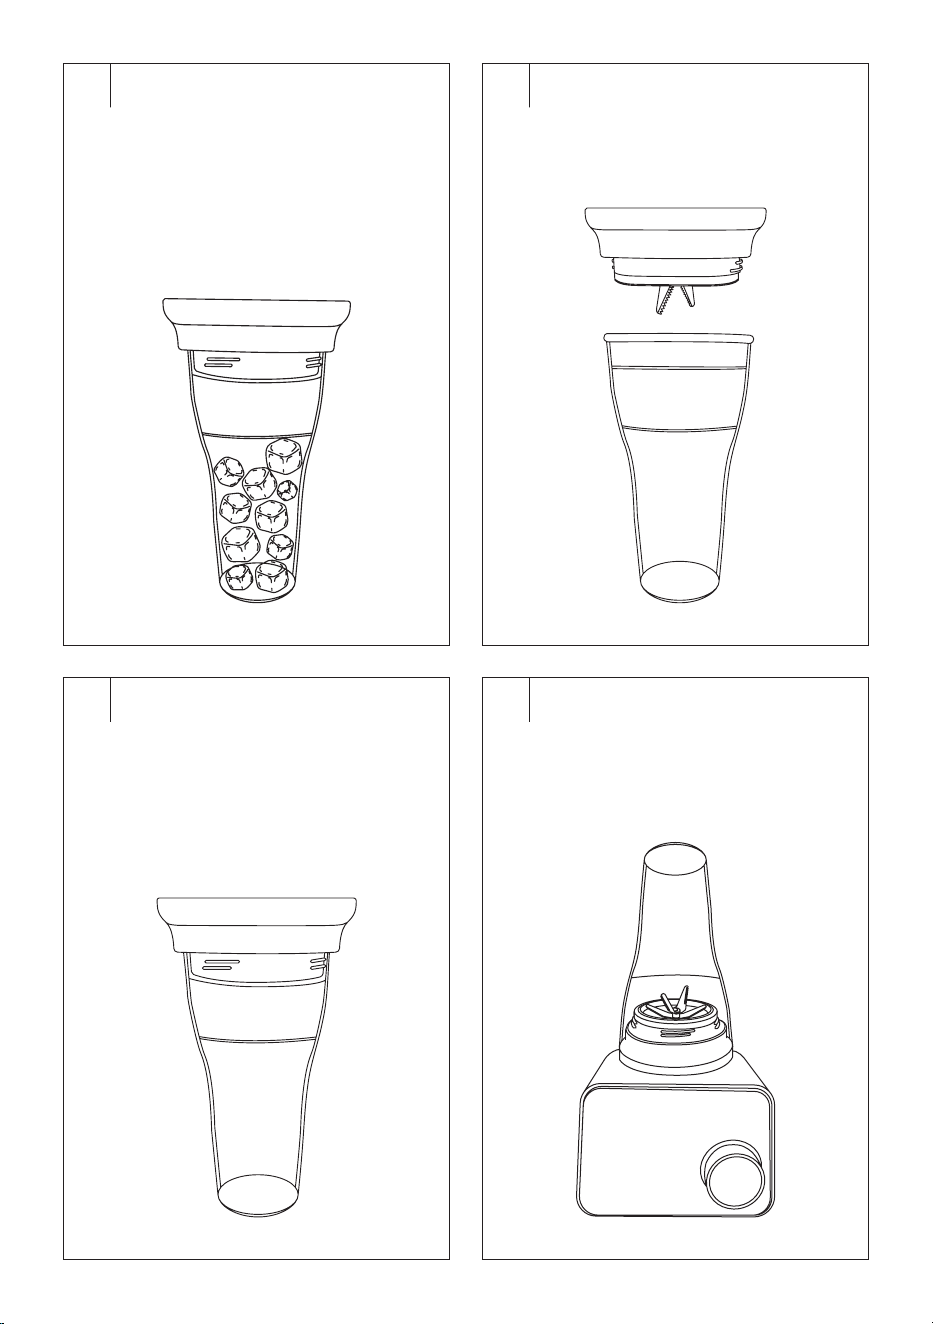
2. Place the ingredients that you wish to process into the smoothie
bottle.
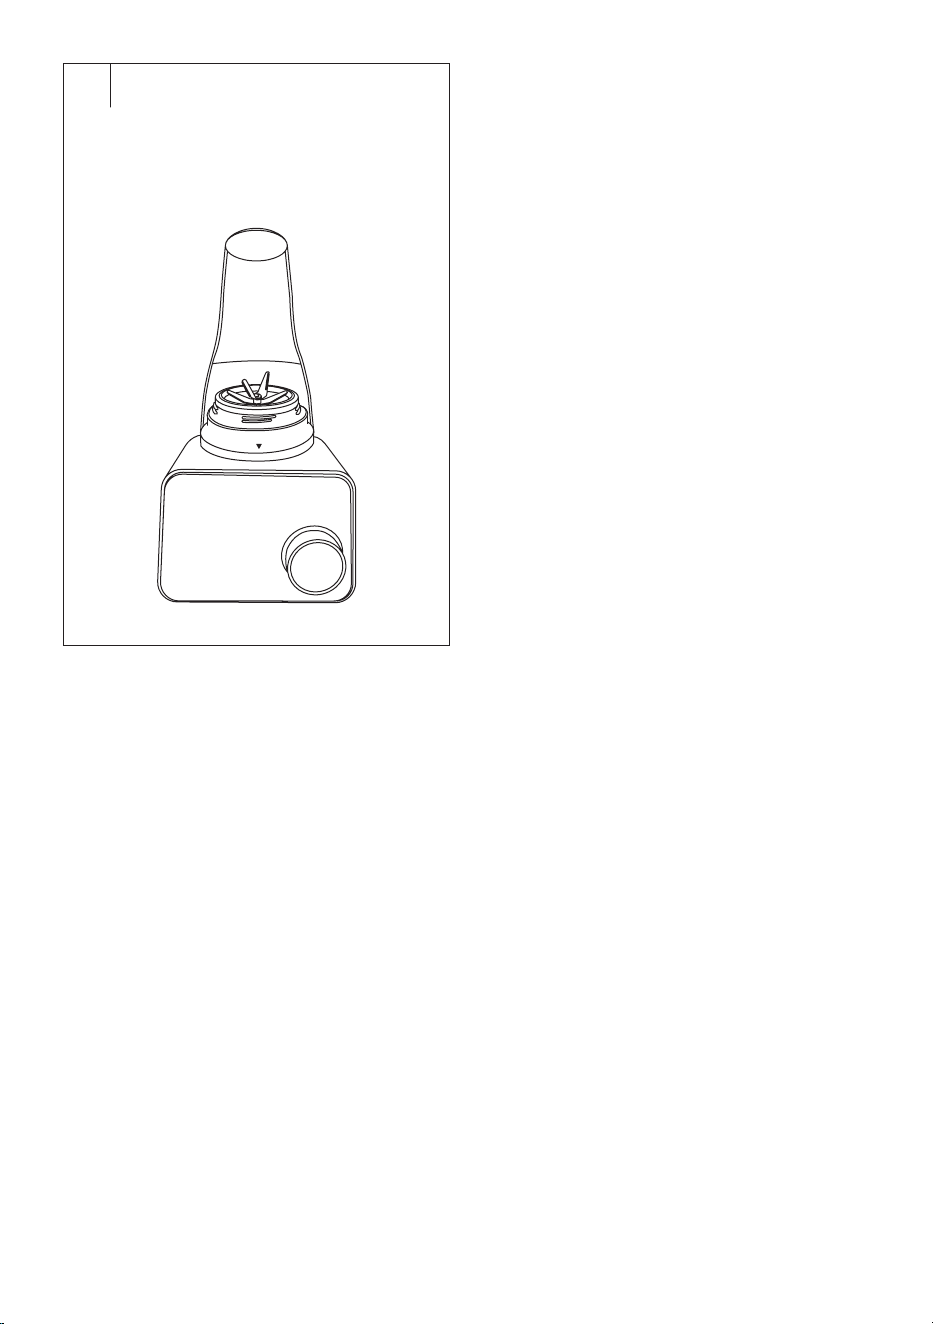
3. Place the blade unit on the neck of the smoothie bottle androtate
the blade unit clockwise until you feel resistance (the grooves
andprotrusions on the blade unit and the neck of the smoothie bottle
fit together).
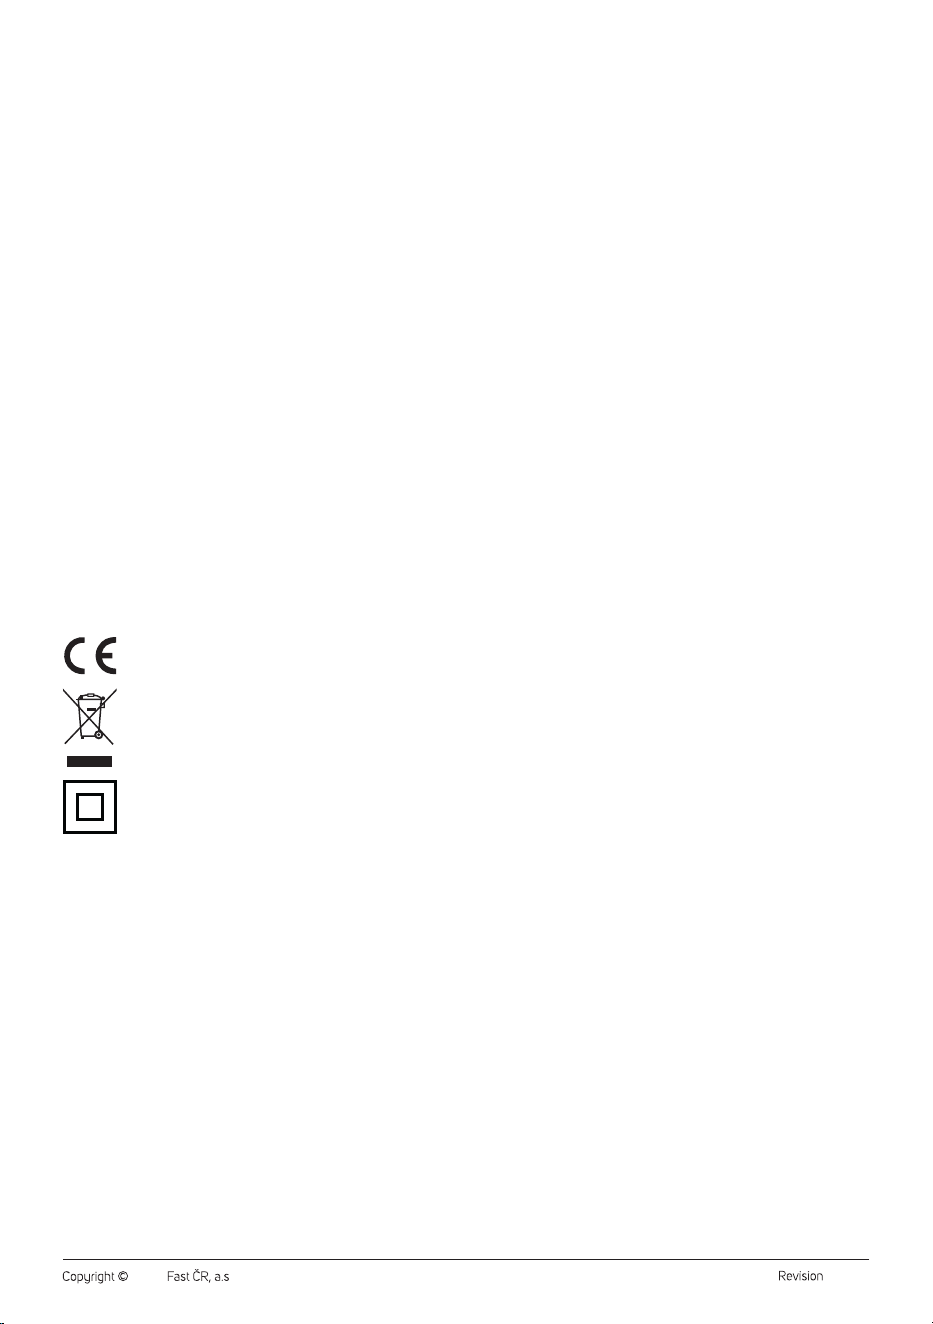
4. Turn the smoothie bottle upside down andmake sure that no liquid is
leaking from the smoothie bottle. If yes, the blade unit is not properly
fitted. Release it andput it back on the neck of the smoothie bottle.
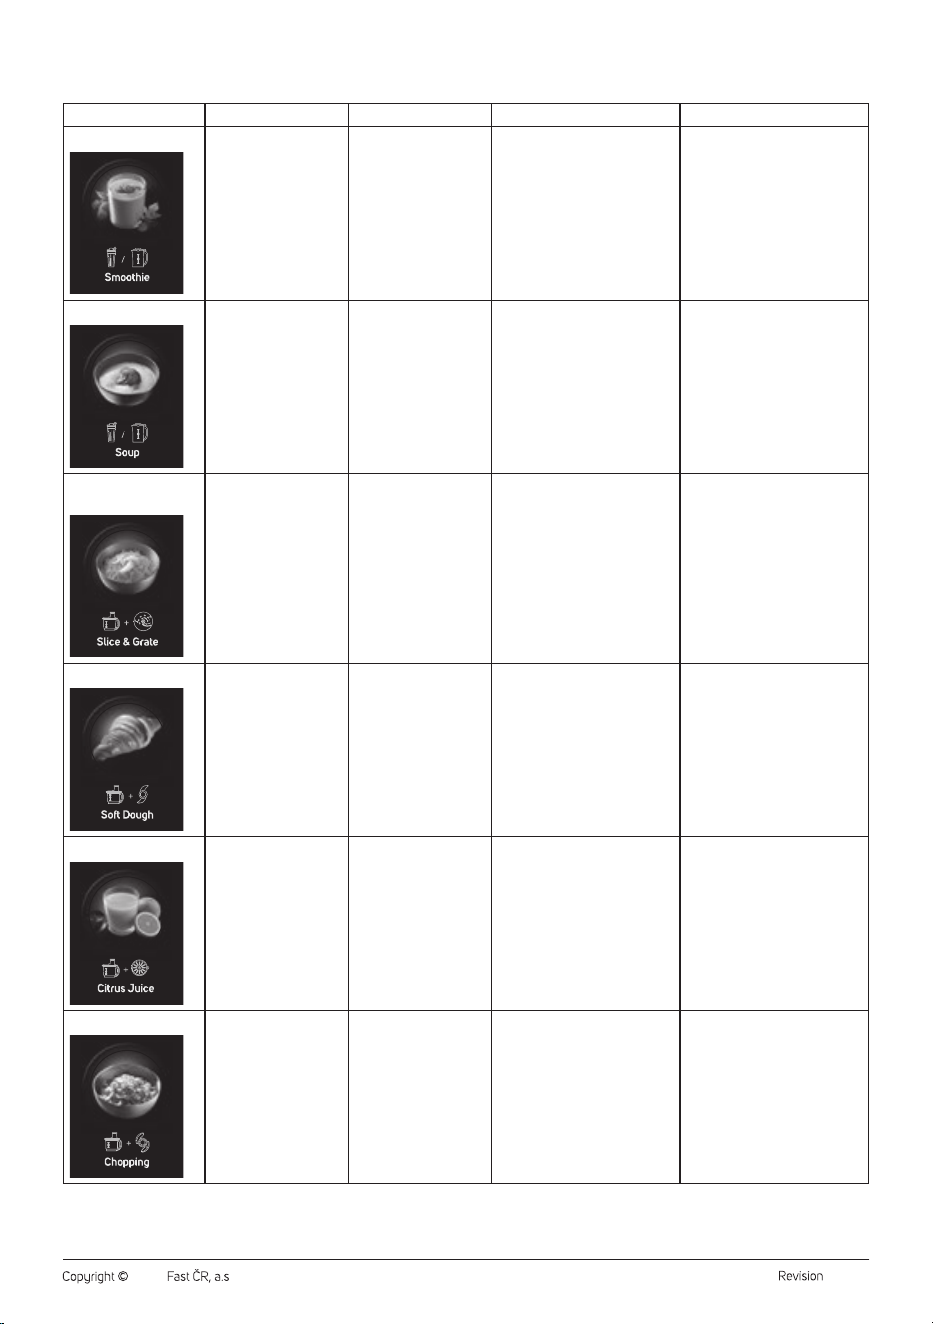
5. Attach the smoothie bottle to the base andturn the bottle clockwise
until you feel resistance (the arrow symbol will point forward).
Caution:
Be extra careful when handling the blade unit to
avoid injury.
Note:
The maximum capacity of the smoothie bottle is 0.6 l.
Never fill it above the maximum mark. Do not process hot
or warm liquids.
Usage
• Unwind the power cord completely and plug the power cord into
aproperly grounded mains outlet.
• The display will light up briefly and show OFF.
• Turn the control to the right once to show "- -" andON on the display
and the control panel lights up.
• Select apreset Smoothie program.
• The appliance will start.
Note:
The speed can also be set manually. The recommended
speed is 10 and the maximum operating time is
60seconds.
Note:
The smoothie blender is not designed tocrush ice or to
process frozen food itself.
Stopping the Operation
• The appliance will stop automatically after the preset time. If you need
to interrupt it earlier, press the icon of the selected program.
• Now turn the knob once to the left until OFF shows and the display
andcontrol panel turn off.
• Disconnect the power cord from the mains socket.
• Before disassembling the appliance, make sure that the rotating parts
have stopped completely.
• Remove the smoothie bottle from the base, turn the smoothie bottle
upside down andremove the blade unit. Replace the lid so you can
take your smoothie withyou to work, on atrip or for training.
Disassembly
1. If possible, move the appliance closer to the kitchen sink or the place
where you will clean it.
2. Turn the smoothie bottle counterclockwise to loosen it and remove it
from the base.
3. Turn the smoothie bottle upside down.
4. Turn the blade unit counterclockwise to loosen it and remove it from
the bottle neck.
5. After each use, clean the base and parts of the smoothie blender
according to the instructions in the CLEANING AND MAINTENANCE
section.
Caution:
Be extra careful when handling the blade unit to
avoid injury.
. . . . . . . . . . . . . . . . . . . . . . . . . . . . . . . . . . . . . . . . . . . . . . . . . . . . . . . . . . . . . . . . . . . .
TIPS AND ADVICE
Preparation of Ingredients for Processing
• Meat: Bone the meat, remove tendons, cartilage andcut it into pieces
ofapprox. 2×2×6cm.
• Fruit and Vegetables: Always wash fruit and vegetables thoroughly.
If necessary, peel, remove the peels andcut into such pieces that will
pass through the filling opening. Remove hard stones or seeds from
fruit such as apricots, peaches, mangoes, etc. Remove the cores and
stems from apples, pears, etc. Remove the stems and leaves from the
strawberries. Clean the fries thoroughly, wash and peel as needed.
• Remove the shell from the coconut. Only the flesh andwater can be
processed.
• Soft and juicy fruits such as oranges, mandarins, kiwis, blueberries,
tomatoes, etc. can be processed separately in the blender. It depends
on the ripeness and juiciness of the fruit.
• Sufficient fluids should be added to less juicy or harder fruits or
vegetables. This group includes bananas, apricots, strawberries,
mangoes, pineapples, apples, cucumbers, beetroot, etc. Hard
vegetables such as carrots can be processed in smaller quantities in
combination with softer and juicier fruits or vegetables and sufficient
liquids.
• Frozen foods and ice cubes should only be processed with asufficient
amount of liquids. For better results, it is advisable to add even softer
ingredients.
• Before inserting into the smoothie blender, cut the ingredients into
evenly sized pieces of approx. 1.5−2cm. If you want to process frozen
fruit, slice it before freezing.
• Herbs: Separate the leaves from the stems and wash as needed.
• Nuts: Use only nut kernels. Nuts must not be processed in their shell.
• Cheeses: Cut the hard cheeses into smaller pieces. We recommend
that the softer cheeses are cooled down thoroughly before processing.
• Ingredients for the Dough: Always measure according to the recipe.
We recommend pouring liquids gradually through the opening in
thepusher after removing the measuring cup. Add the seeds, raisins,
chocolate chips, etc. only at the end of the kneading. If the dough is
too sticky on the walls of the bowl, add alittle flour, while if it is too stiff,
add asmall amount of liquids (water, milk or oil).
Tips and Advice for Blending
• Foods with asolid consistency, such as fruit or vegetables, should first
be cut into smaller pieces about 3cm in size before blending them.
• First blend asmaller amount of ingredients and gradually add more
ingredients through the opening in the lid during blending. This will
achieve better results than if you put all the ingredients into the
blender container at once.
• If you need to process solid consistency foods at the same time as
liquids, we recommend first blending the solid consistency foods and
some of the liquids. Then gradually add the rest of the liquids through
the opening in the lid during blending.
• For blending very thick liquids, we recommend running the blender
repeatedly atshort intervals.
• Ice cubes need to be processed immediately after removal from the
freezer. Once the ice starts to melt, the cubes will join together and it
will not be possible to blend them.
Tips and Advice for Juicing Fruit
• Choose ripe juicy fruits. The heavier fruit usually contains more juice.
• Thoroughly wash chemically treated fruits before use.
• Keep citrus fruits at room temperature. Less juice can flow out of the
chilled fruit.
• Roll them on the table with your hand before pressing. This will disrupt
the flesh and make the juice easier to release.
• Always cut the citrus fruits across (not longitudinally).
• Remove the stones, if possible.
• Press the citrus fruits just before consumption. Fresh juice quickly
oxidises andloses vitaminC.
• When pressing, do not apply excessive force on the press cone.
Excessive squeezing may cause the peel of the citrus fruit to break
and the bitter essential oils to get into the fresh juice.
. . . . . . . . . . . . . . . . . . . . . . . . . . . . . . . . . . . . . . . . . . . . . . . . . . . . . . . . . . . . . . . . . . . .
- 11 -
11/2025
2025, .
CLEANING AND MAINTENANCE
• Before cleaning, switch off the appliance and unplug the power cord
from the mains socket. Allow the appliance to cool down.
• Clean the base andused accessories immediately after use. Do not
allow food residues to dry out.
Caution:
To prevent the risk of electric shock, do not immerse
the appliance, power cable, or plug into water or any
other liquid.
Caution:
Do not use abrasive cleaning agents, solvents, etc.
to clean any parts of the appliance, as these could
damage the surface. None of the components of this
appliance are dishwasher safe.
Caution:
Do not use scouring pads (metal or plastic) to clean
any parts of the appliance. They can scratch the
surface and damage its finish.
Base
• Wipe the base with aslightly moistened soft cloth. Wipe with adry
cloth.
Accessories
• Thoroughly wash the accessories and parts that come into contact
with food (see the list below) with warm water using aneutral kitchen
detergent and soft sponge or soft brush. Then rinse everything with
clean water and allow to dry freely, or wipe dry with asoft cloth.
Accessories and parts suitable for hand washing:
• All food processor parts (Fig.B)
• All parts of the citrus juicer (Fig.C)
• All parts of the blender (Fig.D)
• All parts of the smoothie blender (Fig.E)
Caution:
No part of this appliance is designed to be washed in
adishwasher.
Caution:
Take extra care when handling the chopping knife,
discs, the blade unit of the blender container (not
removable), the blade unit of the smoothie blender to
avoid injury.
Tips and Advice for Cleaning and Maintaining Accessories
• You can also use abrush with soft bristles to clean and remove food
residues.
• You can easily clean the blender container or smoothie bottle by filling
it with 0.5l of clean water with afew drops of dishwashing detergent,
then assembling the appliance and running it for 10 to 15seconds.
Then turn off the appliance, unplug it from the mains, and remove
the accessories once the rotating parts have stopped. Pour out the
contents of the container or bottle, then rinse the container/bottle
thoroughly with clean water and wipe dry. Use abrush with along
handle to remove any food residue under the blades of the blade unit.
• Rinse the discs for fries, grating, or slicing, and the puree disc under
running water using abrush.
. . . . . . . . . . . . . . . . . . . . . . . . . . . . . . . . . . . . . . . . . . . . . . . . . . . . . . . . . . . . . . . . . . . .
STORAGE
• Before storage, the appliance and its accessories must be completely
cool, switched off and disconnected from the power supply, clean
and dry.
• Store the base and all accessories in aclean, dry place out of the
reach of children. Do not store the appliance folded. Do not place any
accessories or foreign objects on the base.
. . . . . . . . . . . . . . . . . . . . . . . . . . . . . . . . . . . . . . . . . . . . . . . . . . . . . . . . . . . . . . . . . . . .
TECHNICAL SPECIFICATIONS
Rated voltage range ..............................................................................220–240V~
Rated frequency ...........................................................................................50/60Hz
Rated input ........................................................................................................ 1,500W
Food processor container capacity ................................................................... 2.0l
Blender container capacity ................................................................................. 1.75l
Smoothie bottle capacity ......................................................................................0.6l
Noise level ........................................................................................................ 85dB(A)
Values Provided according to Commission Regulation EU
2023/826
Off Mode
Power consumption in off mode 0.5W
Time needed for the equipment to automatically reach
off mode
0min
Standby Mode
Power consumption in Standby mode –
Time needed for the equipment to automatically reach
standby mode
–
Networked Standby Mode (Wi-Fi)
Power consumption in networked standby –
Time needed for the equipment to automatically reach
networked standby mode
–
. . . . . . . . . . . . . . . . . . . . . . . . . . . . . . . . . . . . . . . . . . . . . . . . . . . . . . . . . . . . . . . . . . . .
INSTRUCTIONS AND INFORMATION ON DISPOSAL
OF USED PACKAGING MATERIAL
Dispose of used packaging material at the designated municipal waste
disposal site.
. . . . . . . . . . . . . . . . . . . . . . . . . . . . . . . . . . . . . . . . . . . . . . . . . . . . . . . . . . . . . . . . . . . .
DISPOSAL OF USED ELECTRICAL AND ELECTRONIC
EQUIPMENT
Used electrical andelectronic products must not be disposed of in
ordinary municipal waste. To enable the proper disposal, renewal and
recycling of these products, deliver them to the designated collection
points. Alternatively, in some European Union states or other European
countries the products can be returned to the local retailer when buying
an equivalent new product. By disposing of this product correctly, you
help to conserve valuable natural resources and prevent any potential
adverse impact on the environment and human health that could result
from improper waste disposal. For more details, contact your local
authority or nearest collection point. Fines may be imposed for the
improper disposal of this type of waste as per national regulations.
For business entities in European Union States
If you wish to dispose of electrical and electronic equipment, please
request the necessary information from your retailer or supplier.
Disposal in other countries outside the European Union
To dispose of this product elsewhere, request the necessary information
on the correct disposal method from local authorities or your retailer.
. . . . . . . . . . . . . . . . . . . . . . . . . . . . . . . . . . . . . . . . . . . . . . . . . . . . . . . . . . . . . . . . . . . .
Changes to text and technical parameters are reserved.

- 12 -
11/2025
2025, .