
User Stories
Smart Cap
Smart Cap User Stories | 1. Production | 1.1 Pre-Registering Smart Cap
1. Production
1.1 Pre-Registering Smart Cap
(Alternative to Install new smart cap)
1. Fully assembled Smart Cap fitted into
production jig.
2. Command sent to open registration
through production interface.
3. Registration successful indicated by
Command response.
| 01
SMART CAP
REGISTRATION ALERT
OPEN REGISTRATION
Help
REGISTRATION
SUCCESSFUL
MODEL
03A01YYMMDDXXXXX
Help
Smart Cap User Stories | 2. Installation | 2.1 Install New Smart Cap
2. Installation
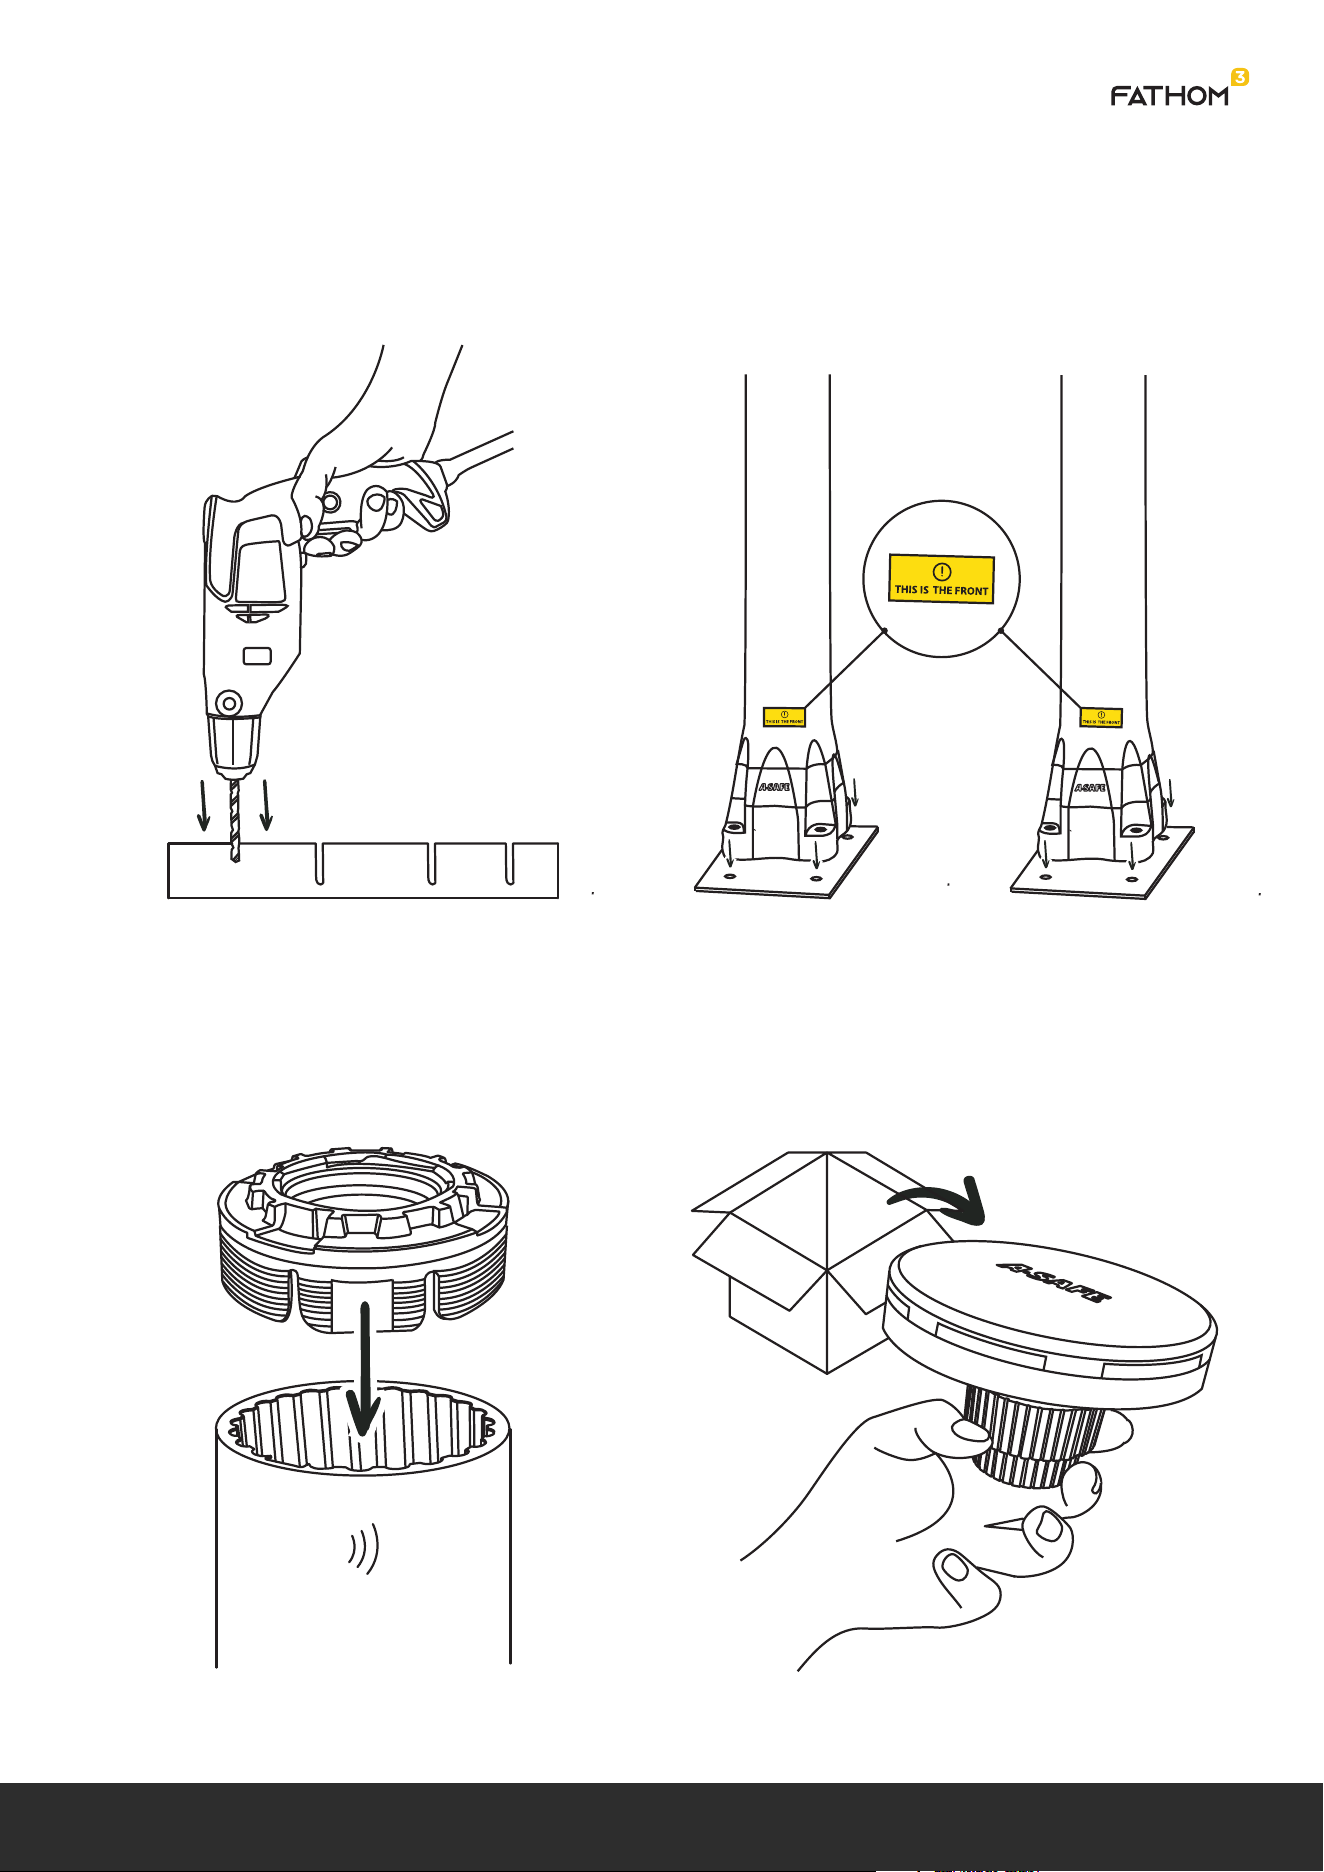
2.1 Install New Smart Cap
1. Holes drilled in floor for post and
anchors to be fitted.
2. Post bolted to anchors. All posts must
be fitted with Stripe Label facing same
direction.
3. Universal Frame fitted to post.
4. Unpack Smart cap from packaging.
| 02
Smart Cap User Stories | 2. Installation | 2.1 Install New Smart Cap
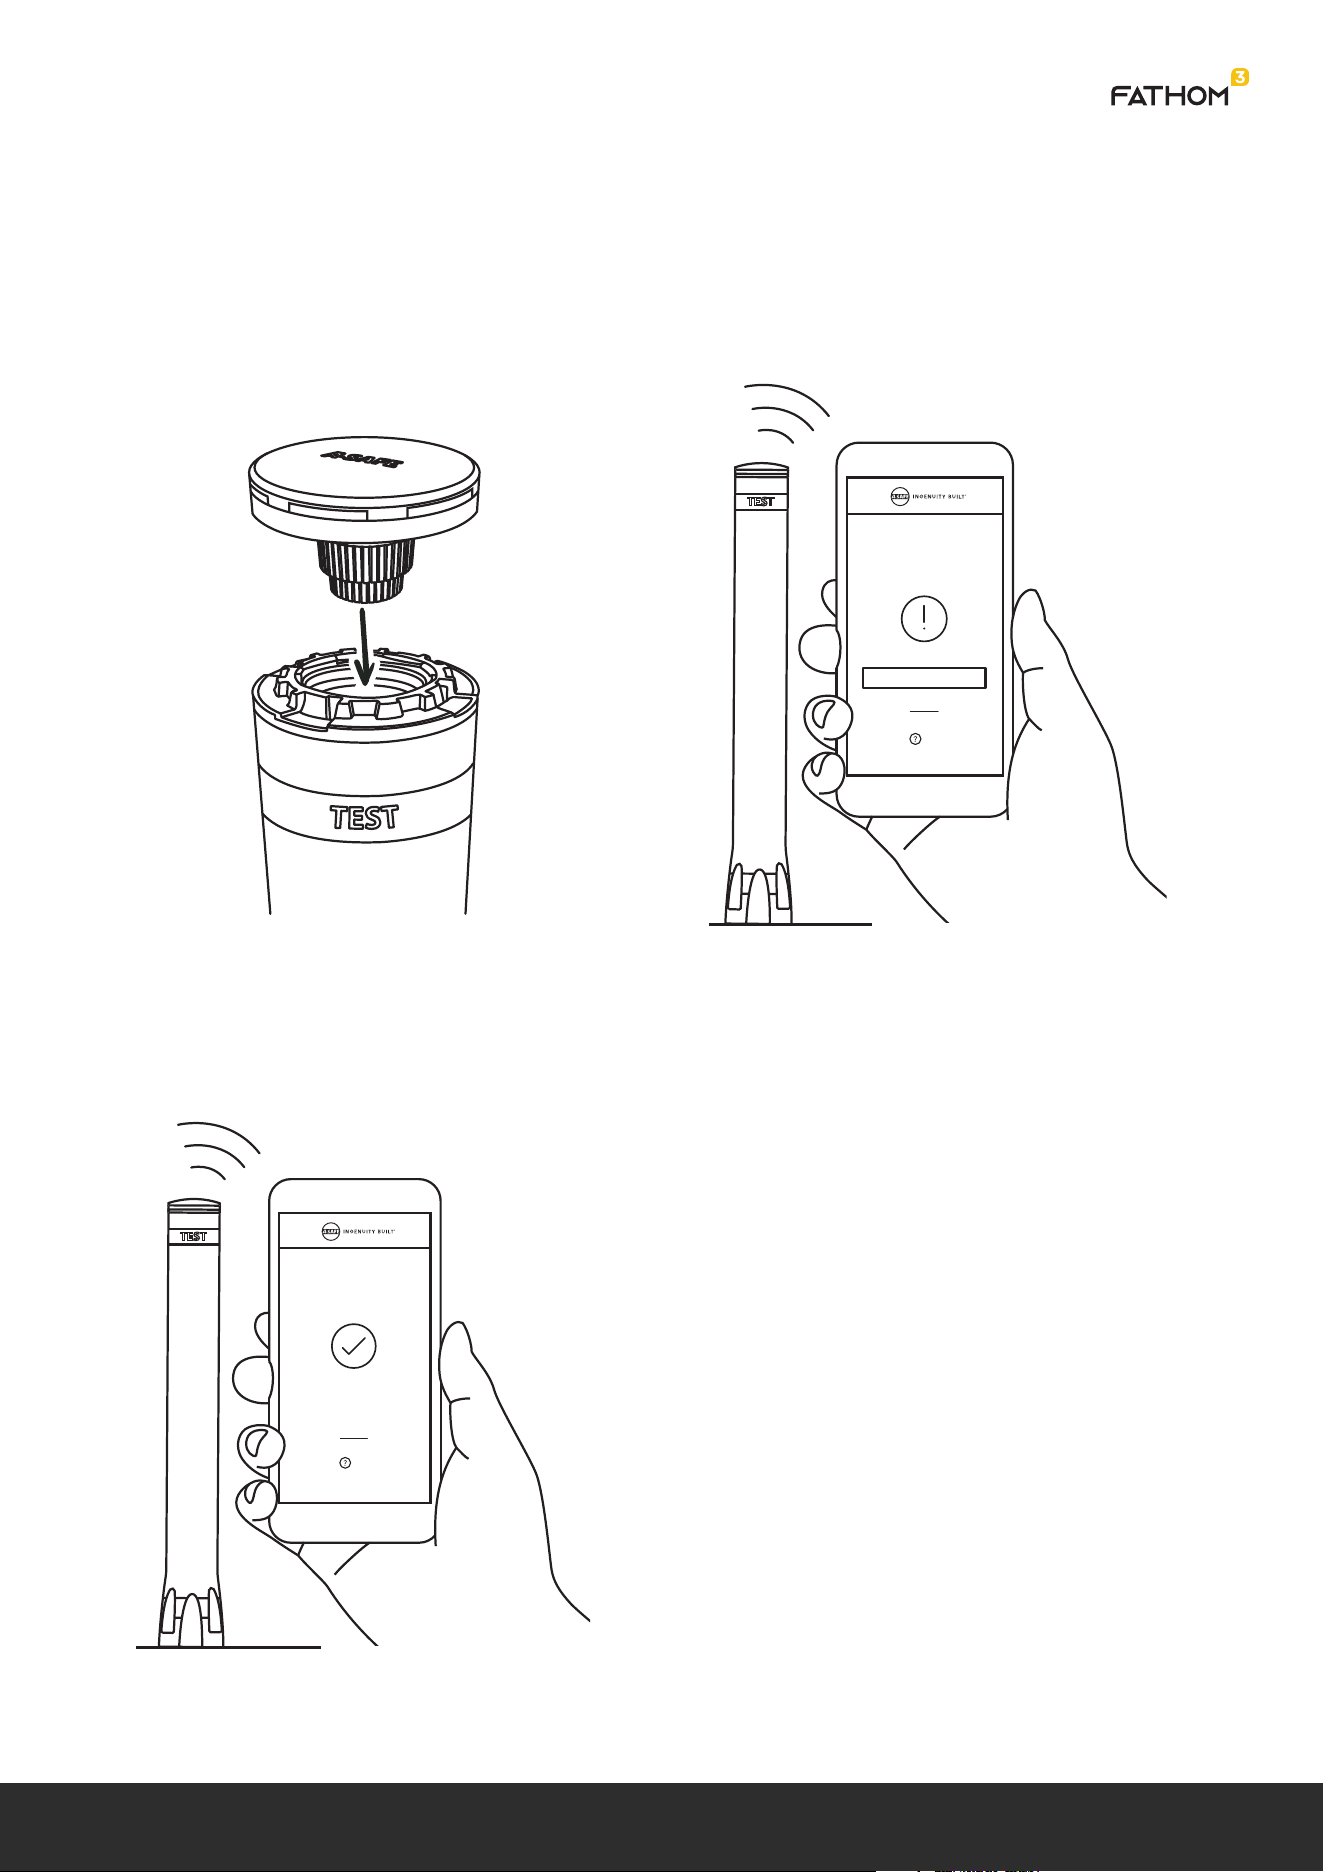
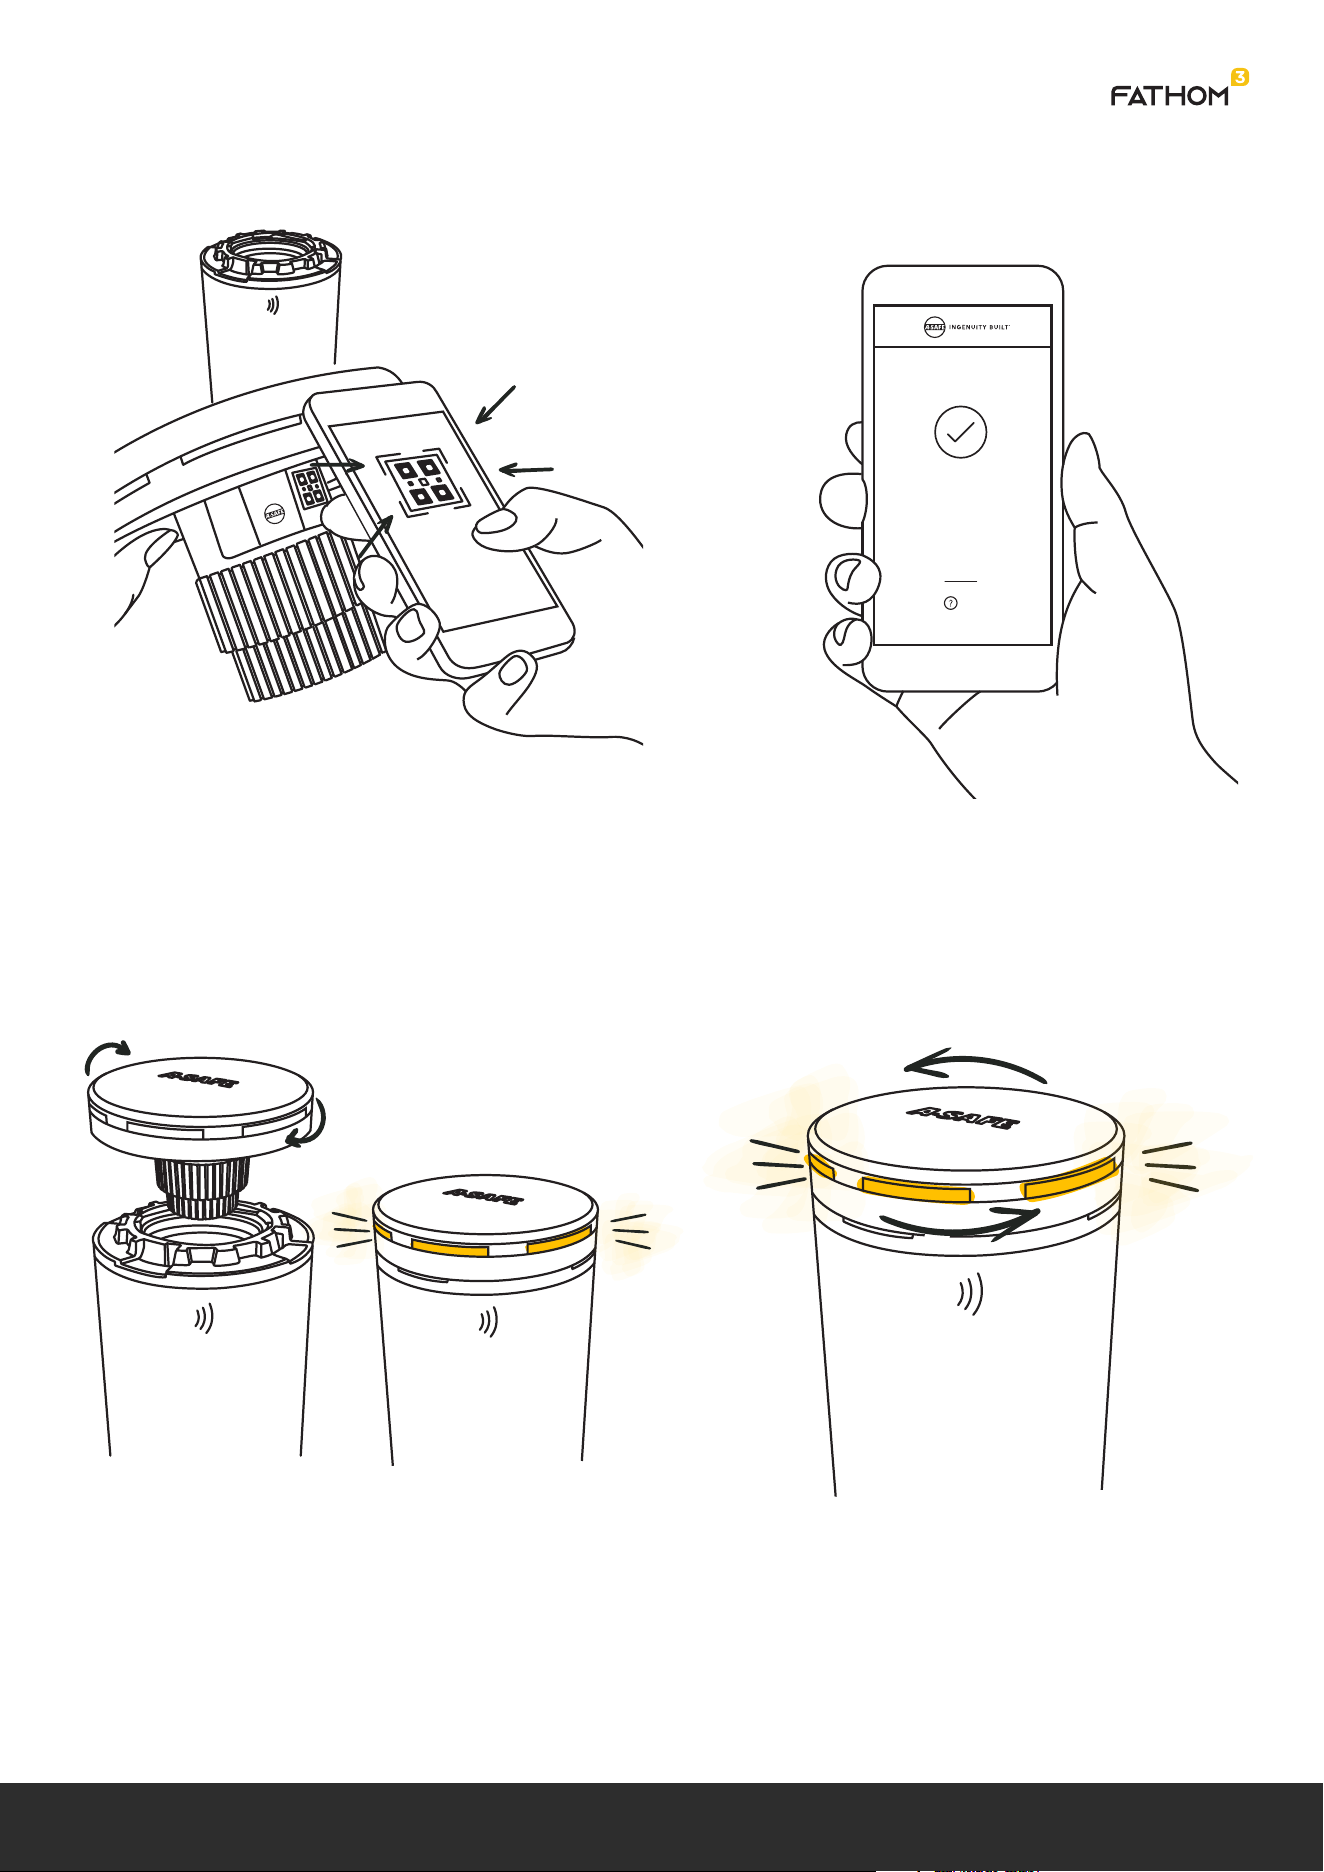
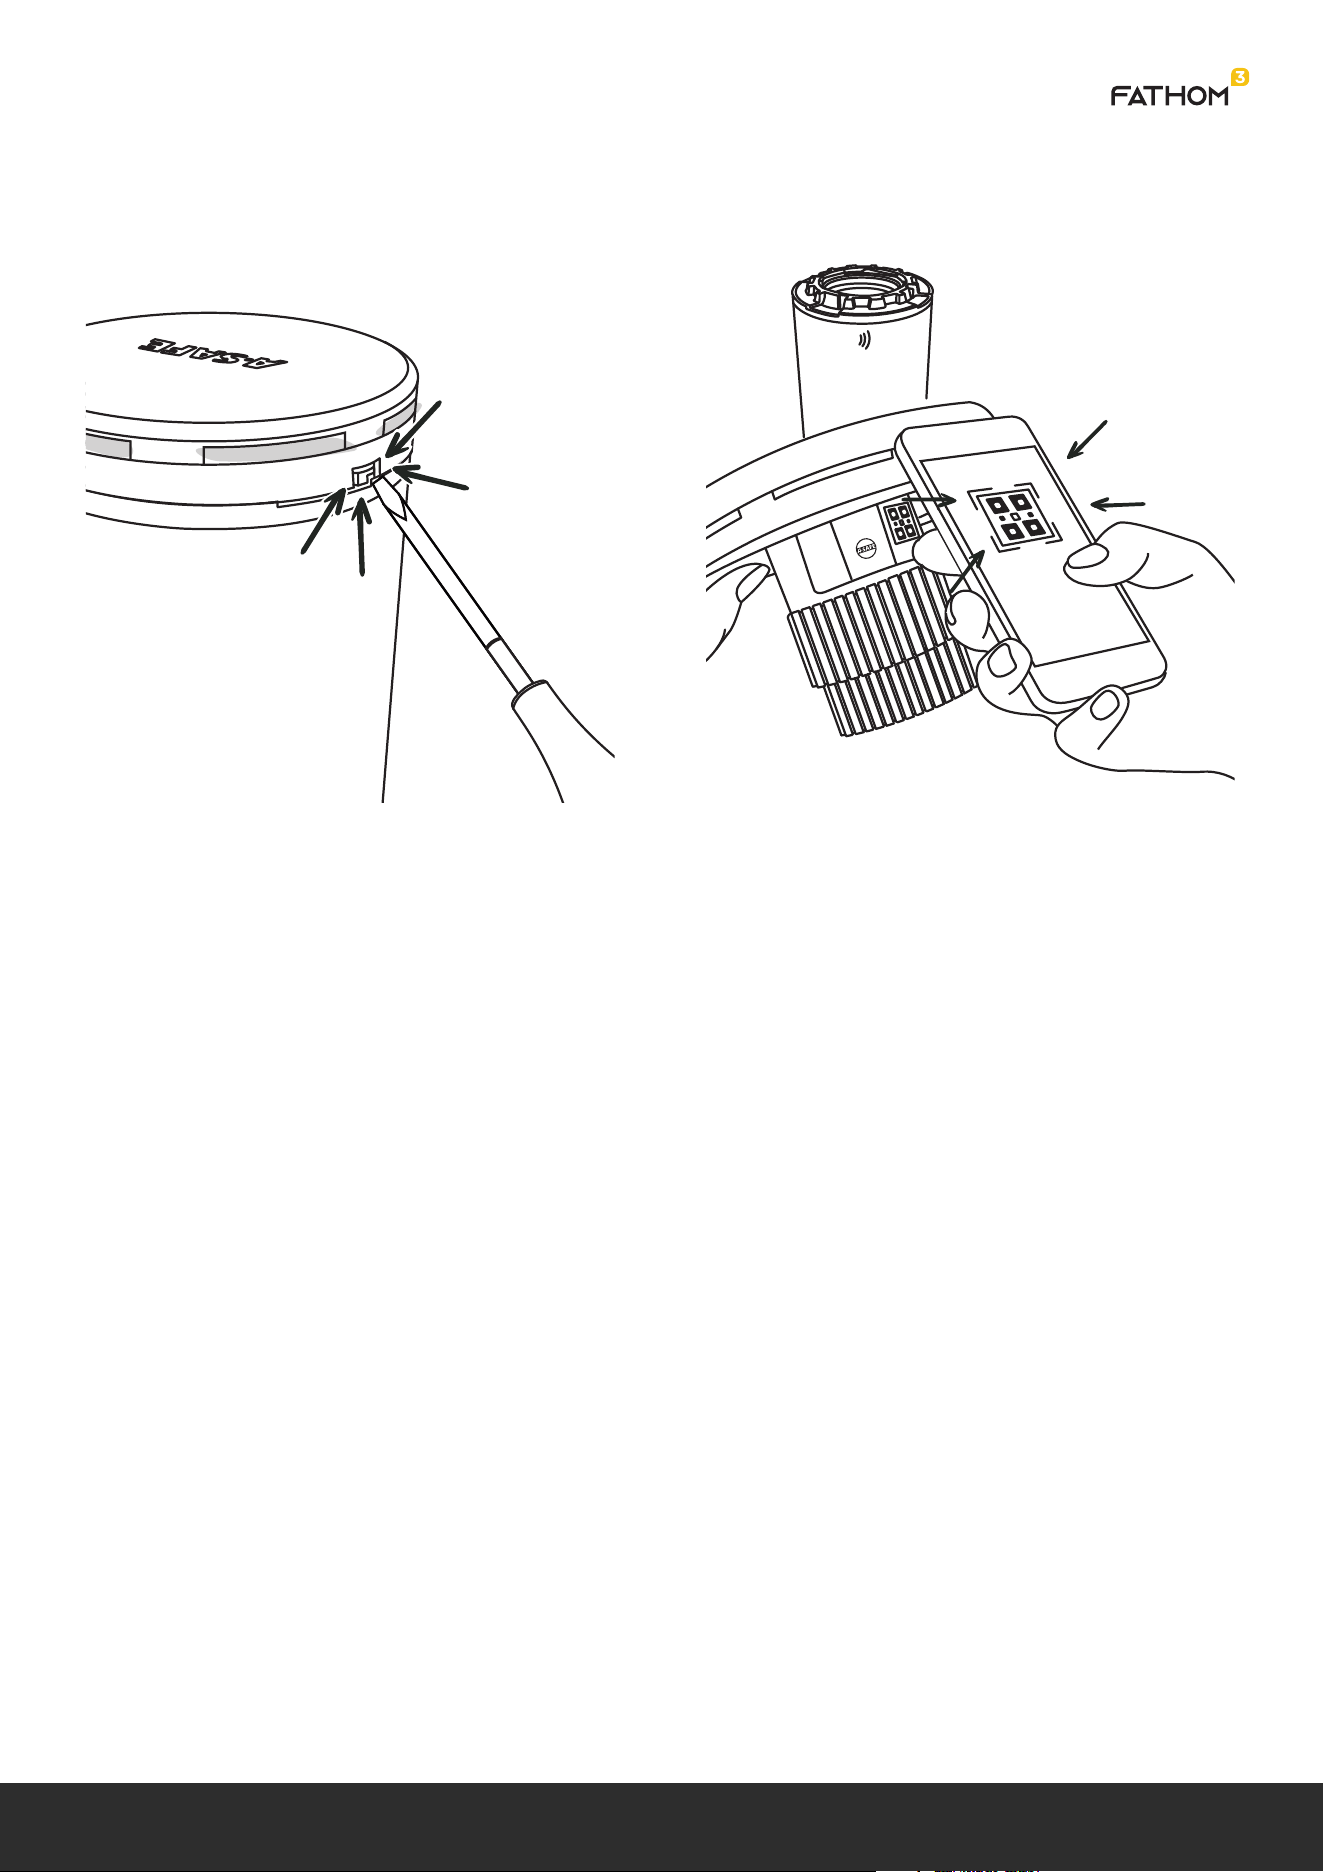
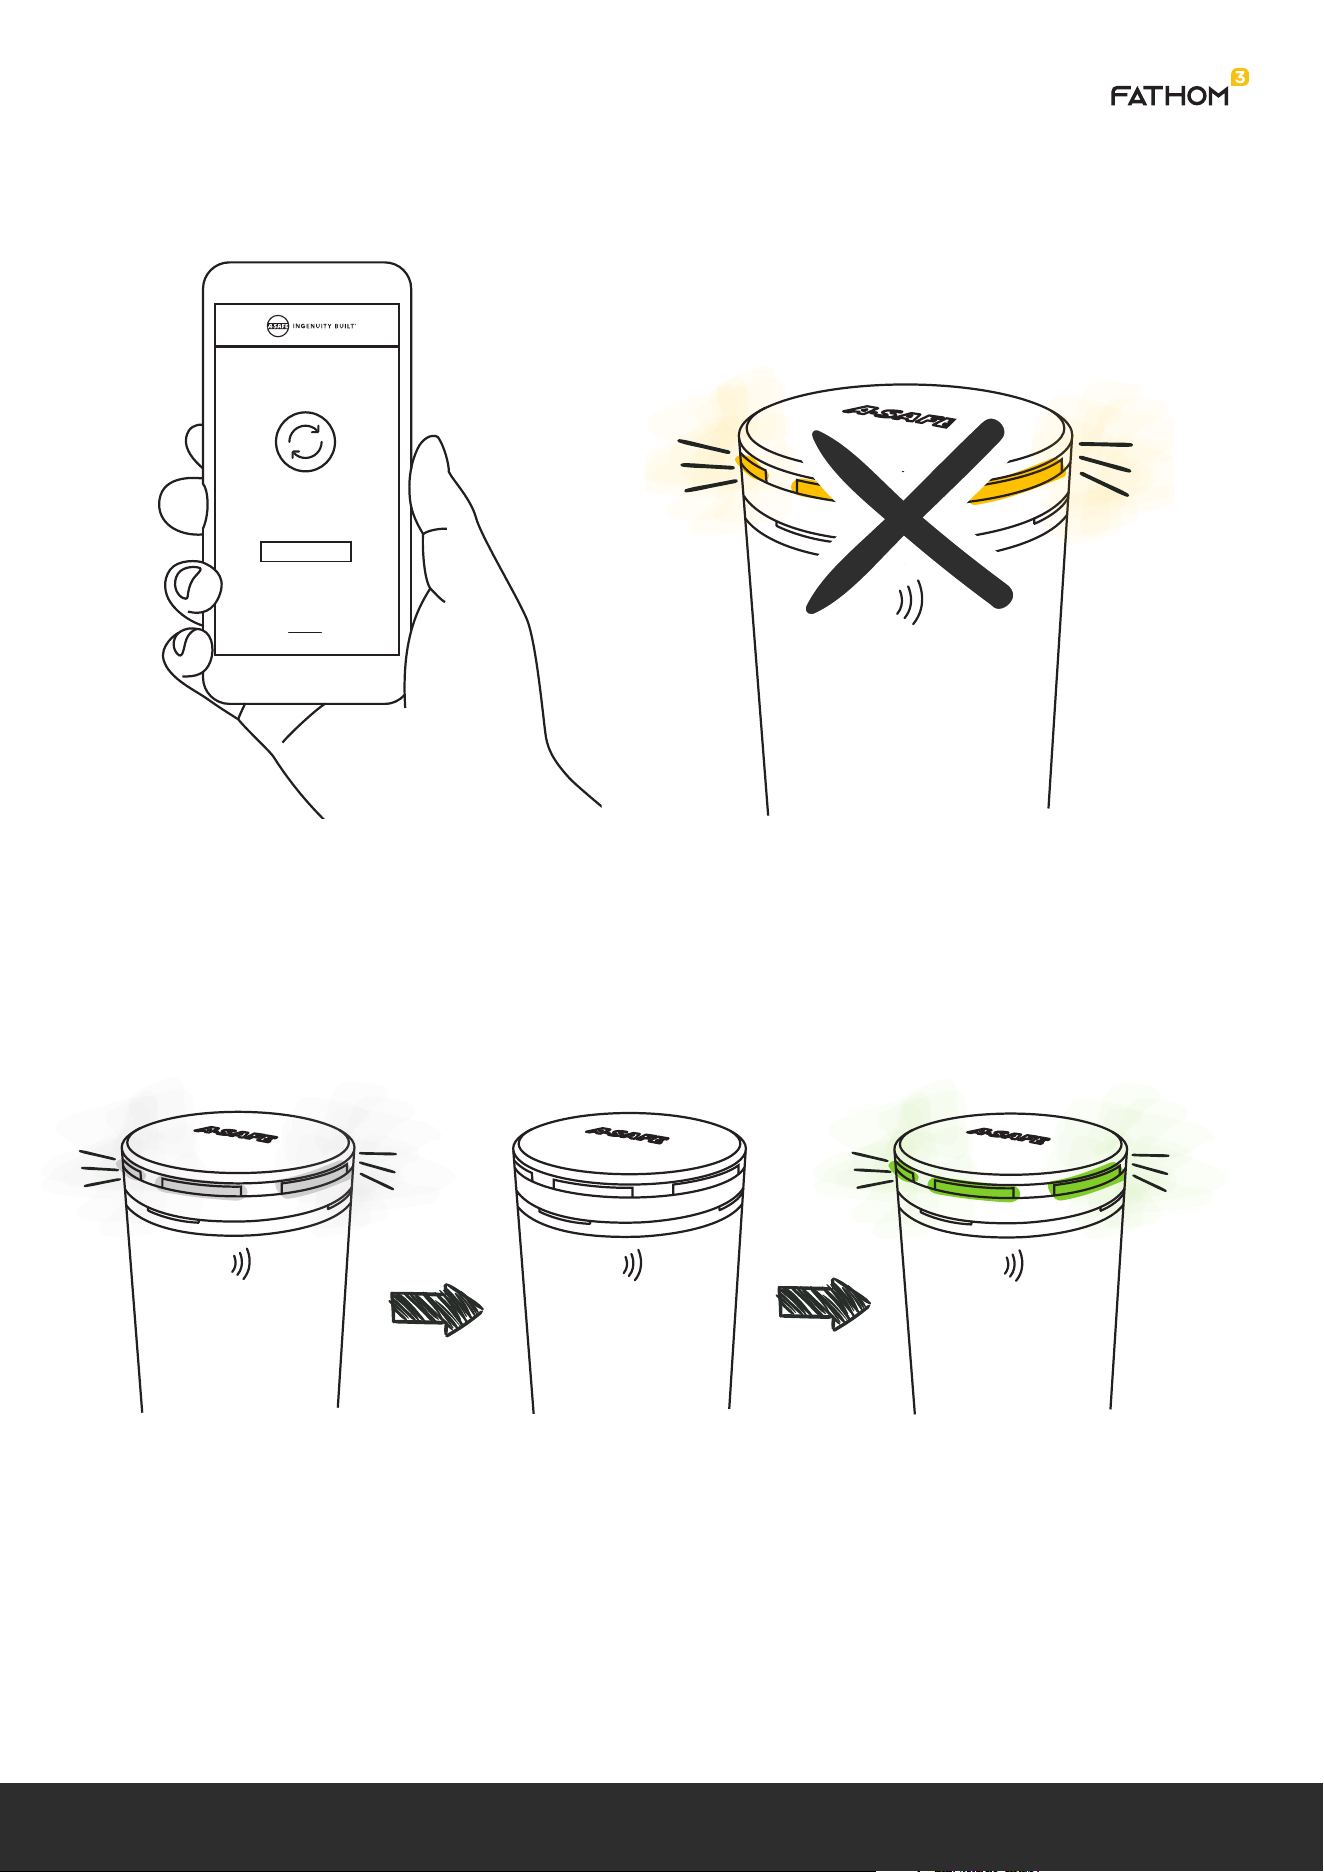
5. Smart Cap paired to post by scanning
RFID tag on post and QR code on smart
cap with App (smart cap in hand).
6. App indicates successful Pairing.
7. Smart Cap installed into frame with
quarter turn feature. This automatically
powers on the smart cap which will
indicate power on using the LED Halo.
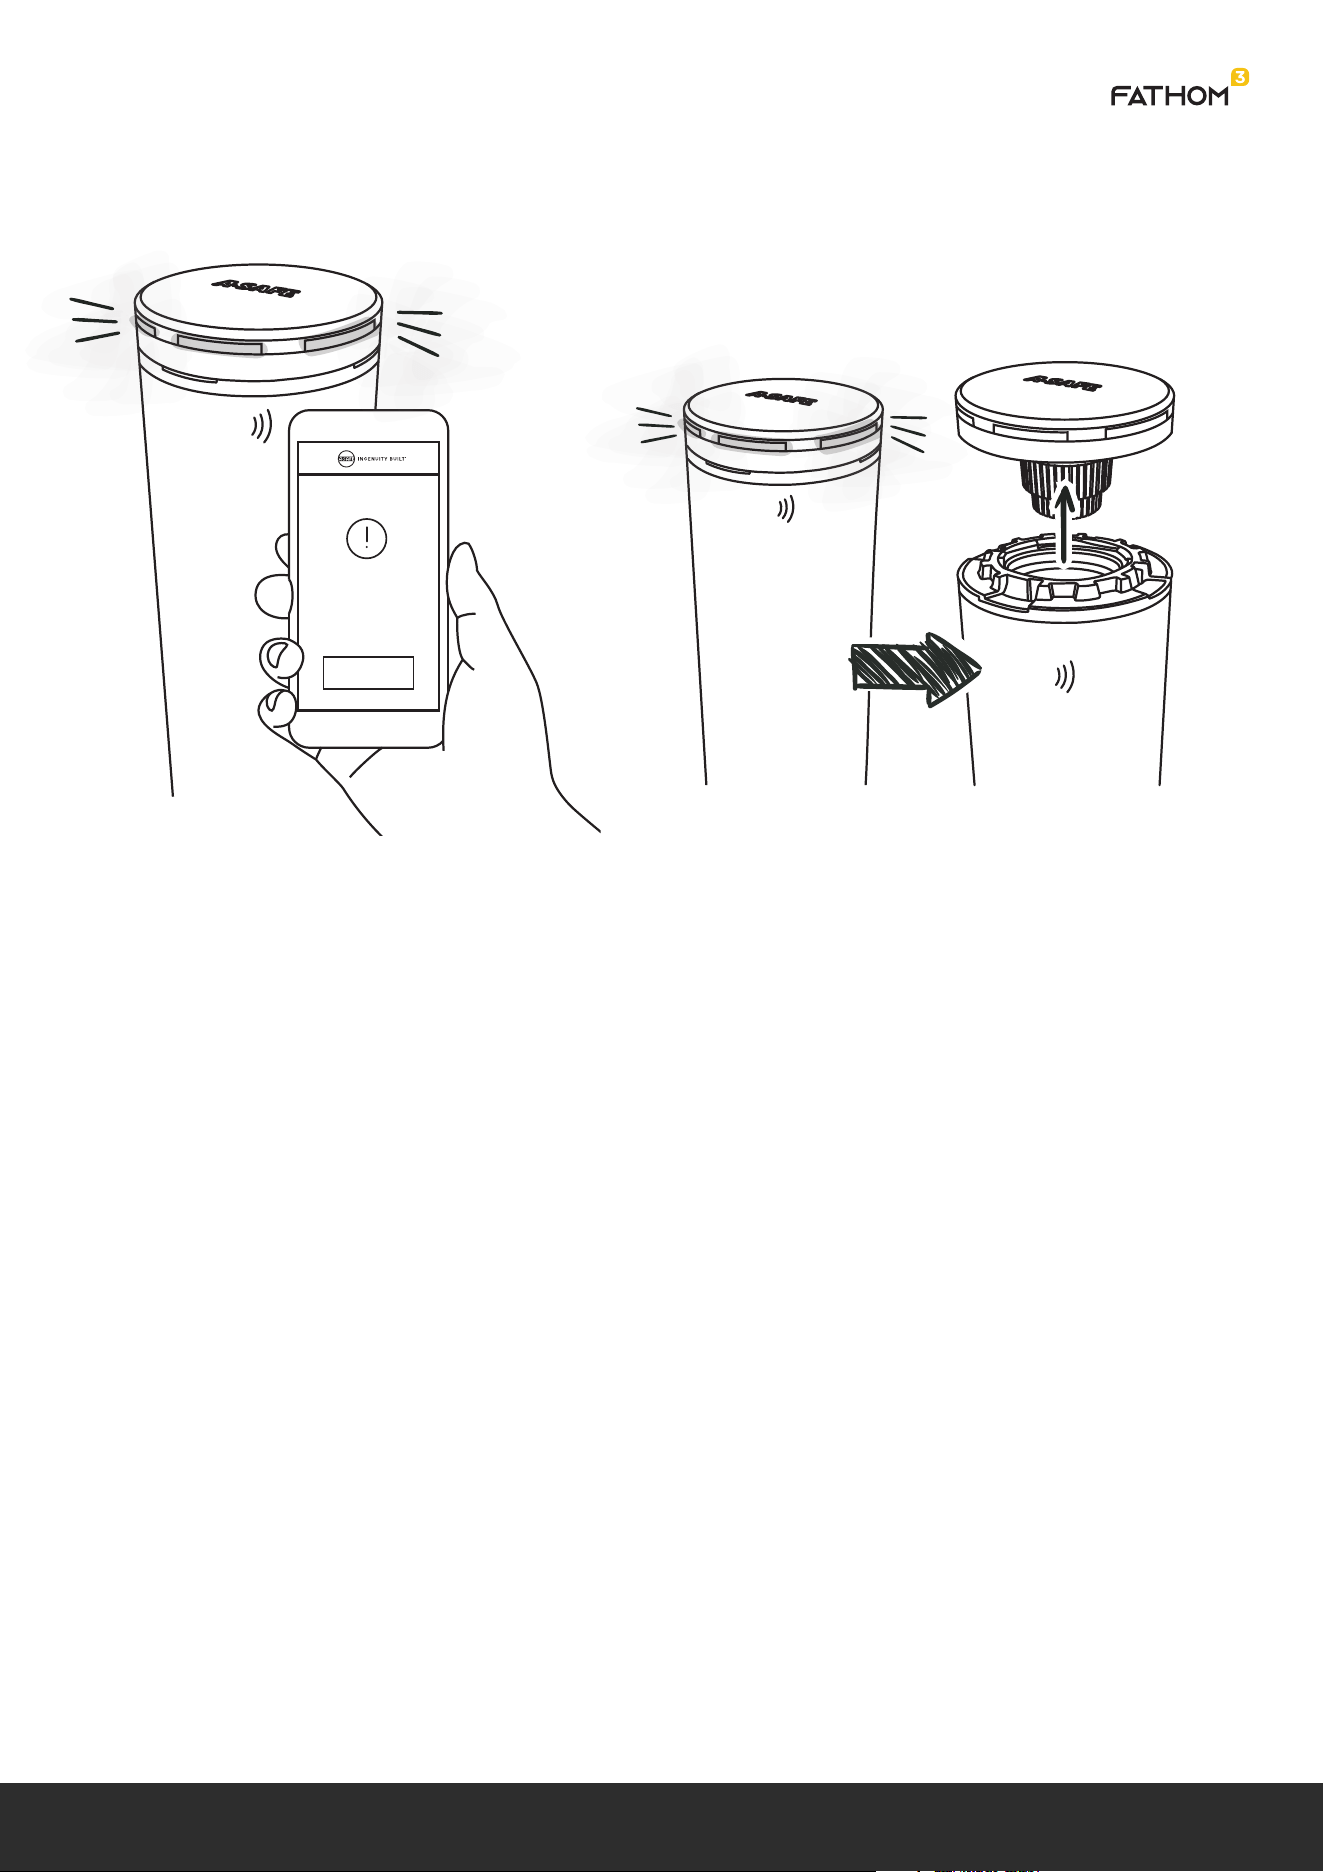
8. Smart Cap opens for DECT registration
automatically if not already registered.
This is indicated on the Halo.
Skip to step 10 if already registered.
SMART CAP
SUCCESSFULLY PAIRED
MODEL
03A01YYMMDDXXXXX
Help
SMART CAP
EUROPE
03A01YYMMDDXXXXX
03A01YYMMDDXXXXX
| 03
Smart Cap User Stories | 2. Installation | 2.1 Install New Smart Cap
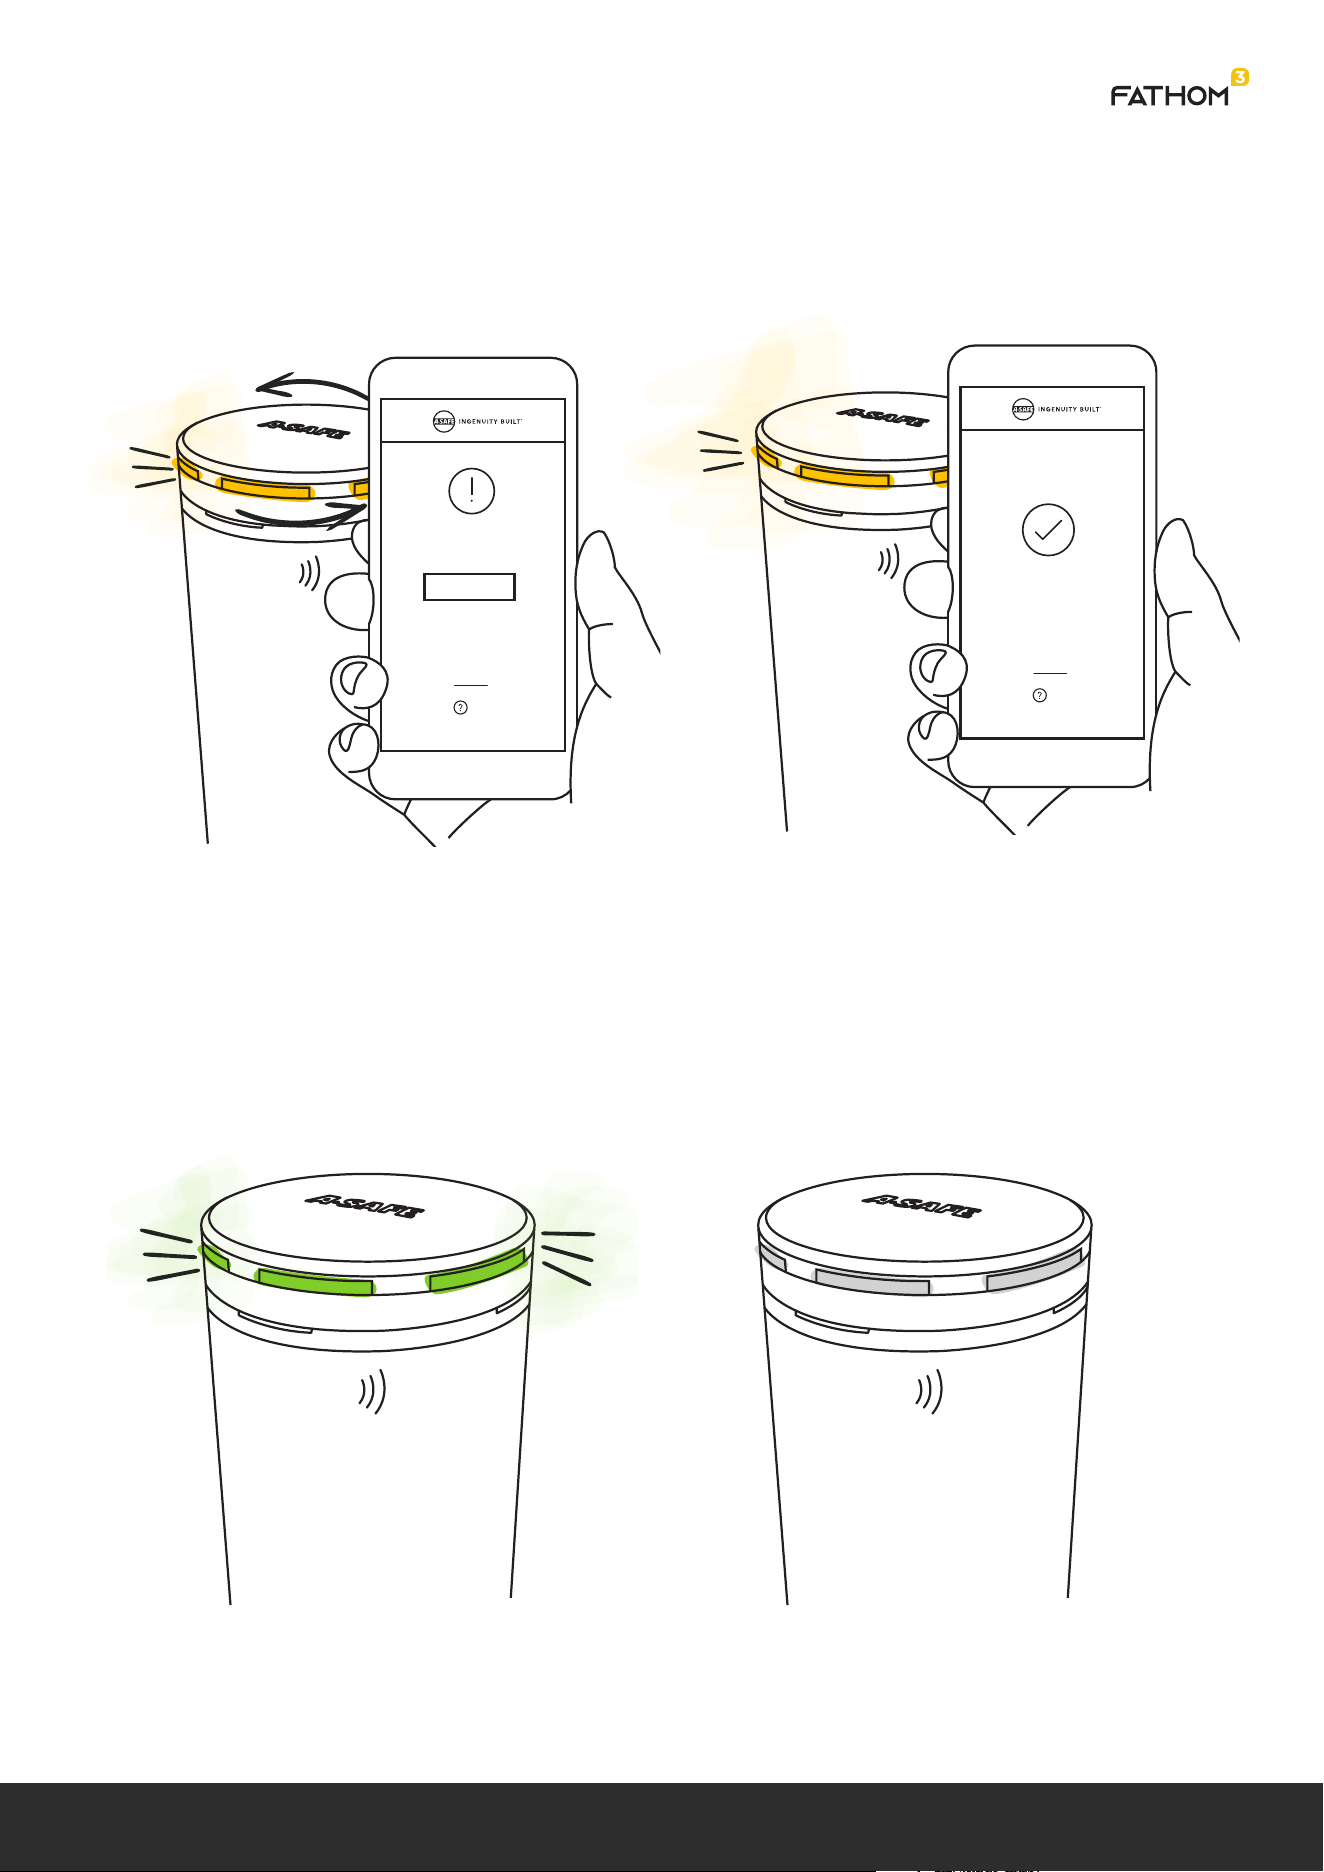
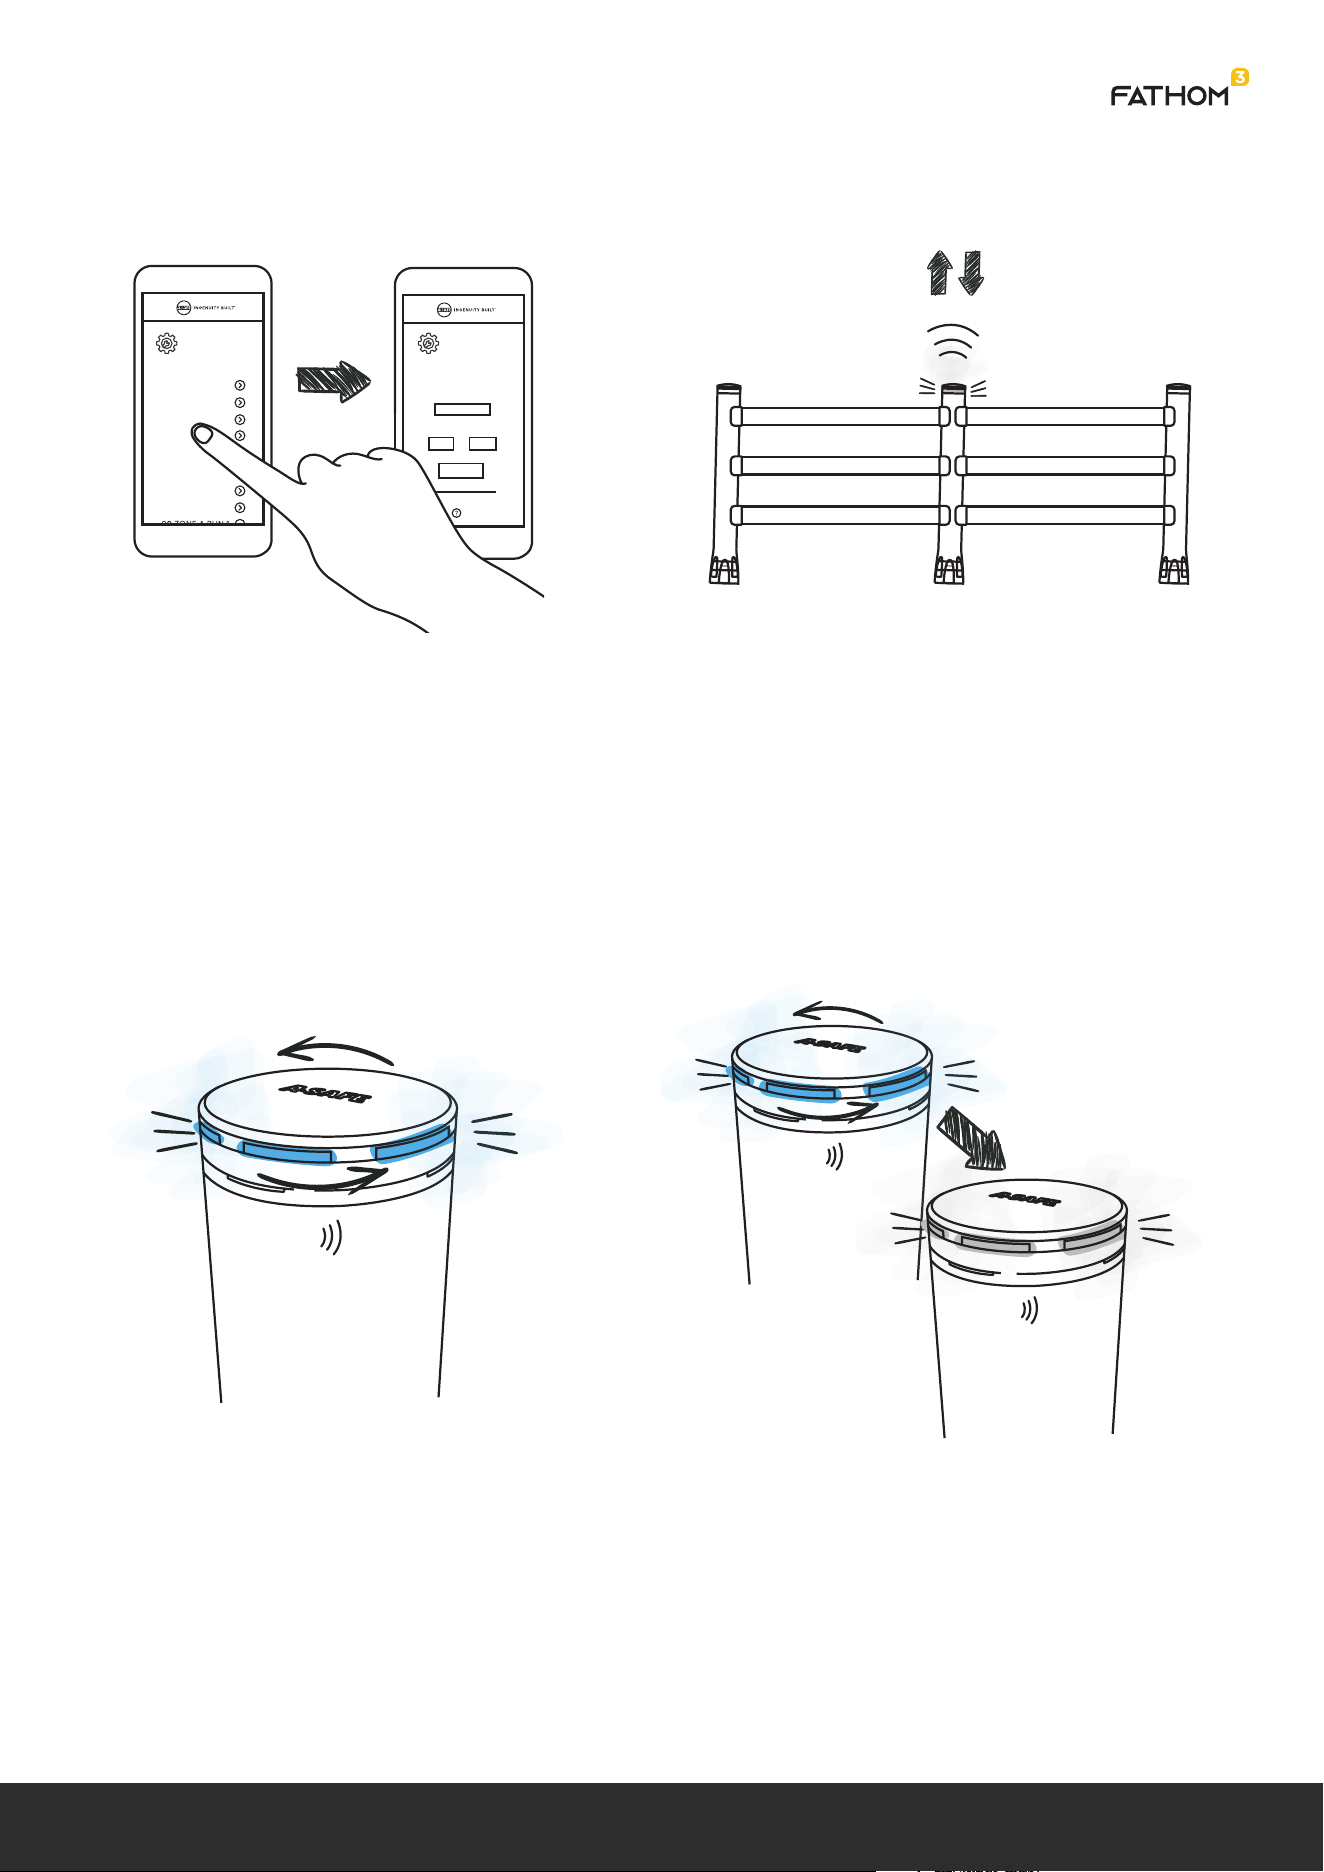
9. Gateway opens for registration based
on app navigation.
10. Successful registration indicated on
Halo and app.
11. Successful boot up indicated on Halo. 12. Smart cap activated (armed) ready for
impact (halo lights off).
DECT REGISTRATION
MODEL
REGISTER
03A01YYMMDDXXXXX
Help
DECT REGISTRATION
MODEL
03A01YYMMDDXXXXX
Help
SUCCESSFULLY REGISTERED
| 04
Smart Cap User Stories | 2. Installation | 2.2 Remove Smart Cap
2.2 Remove Smart Cap
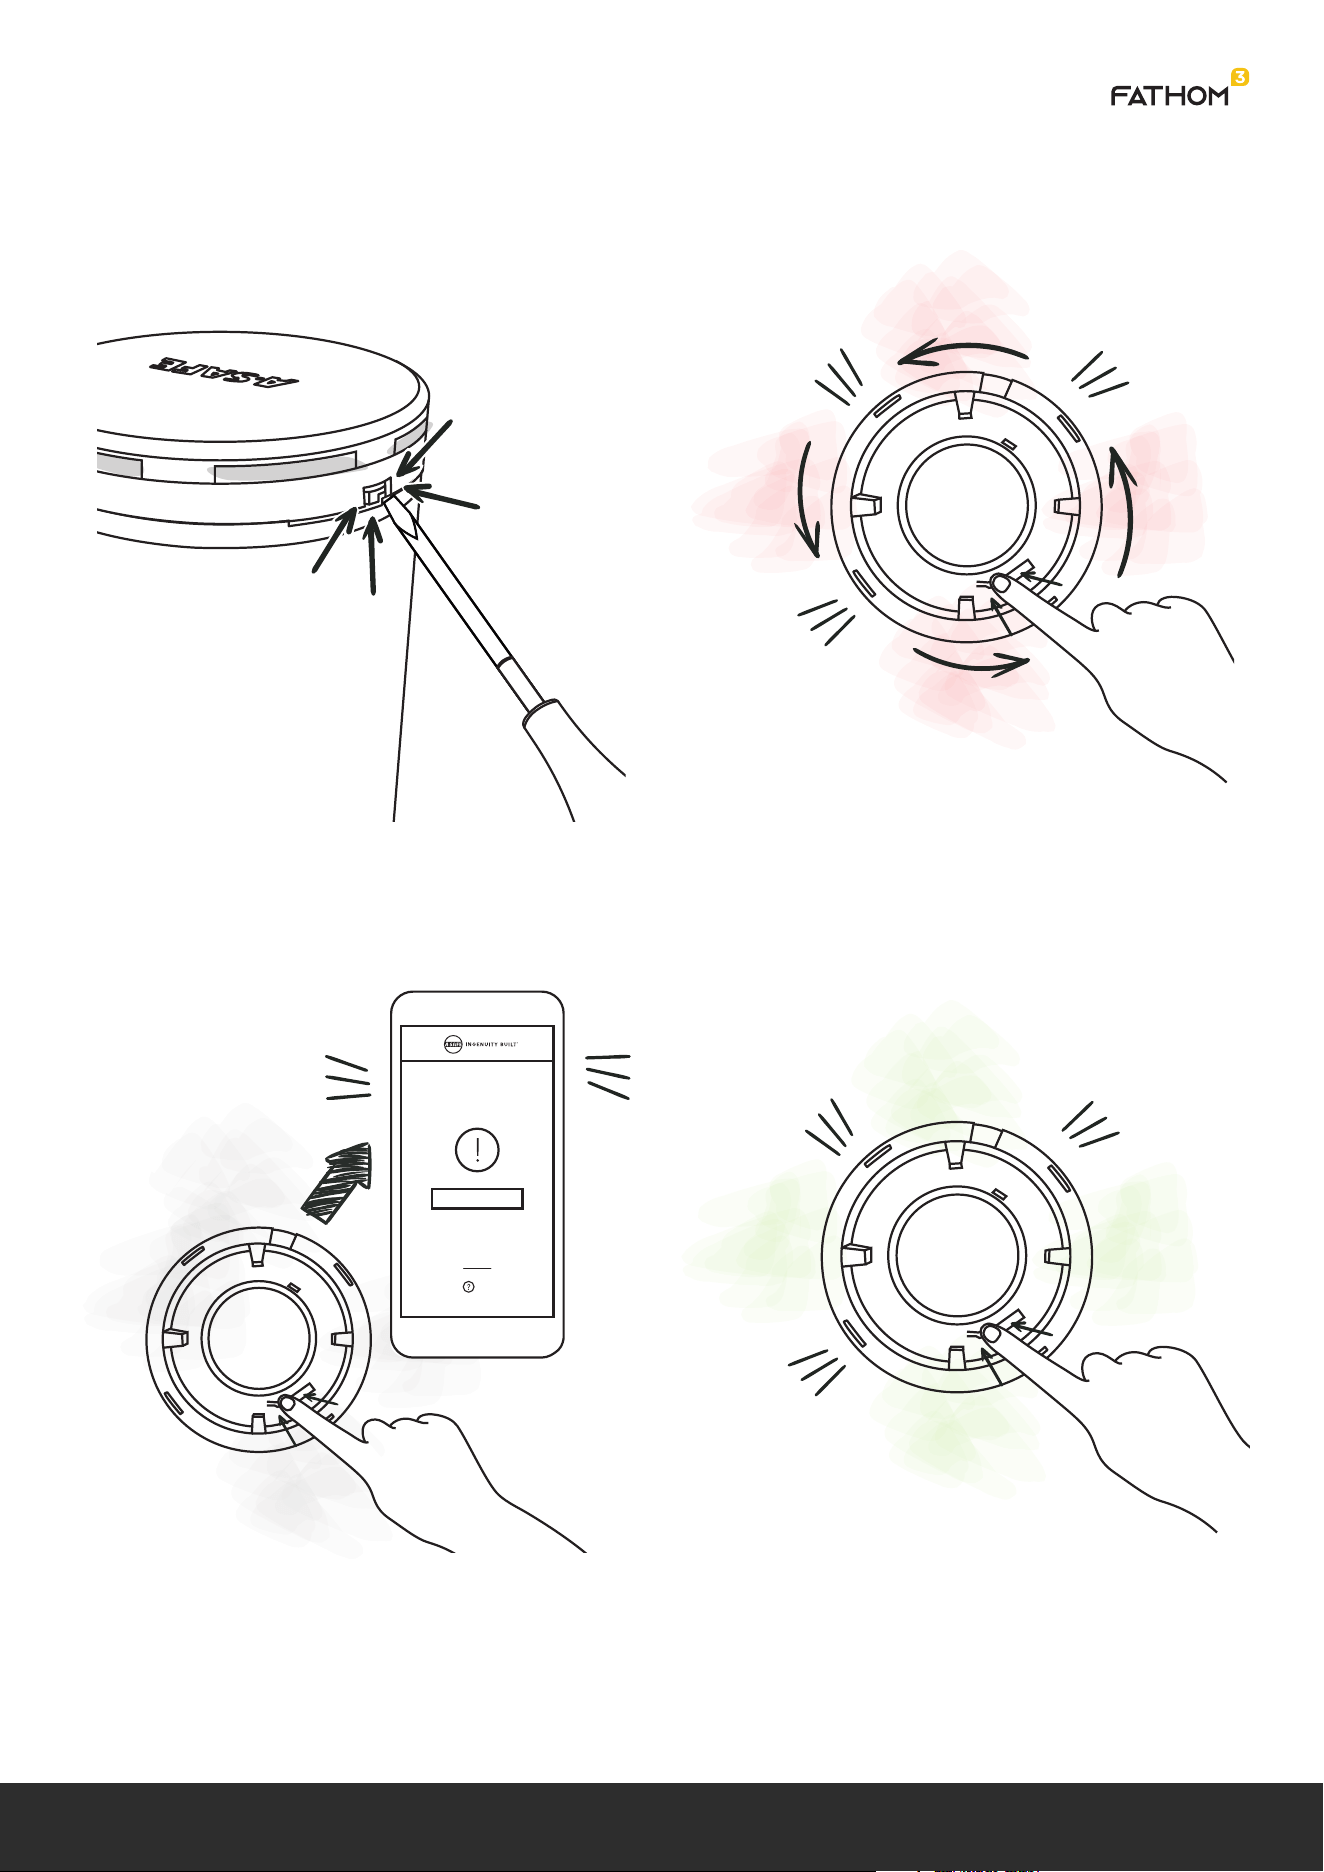
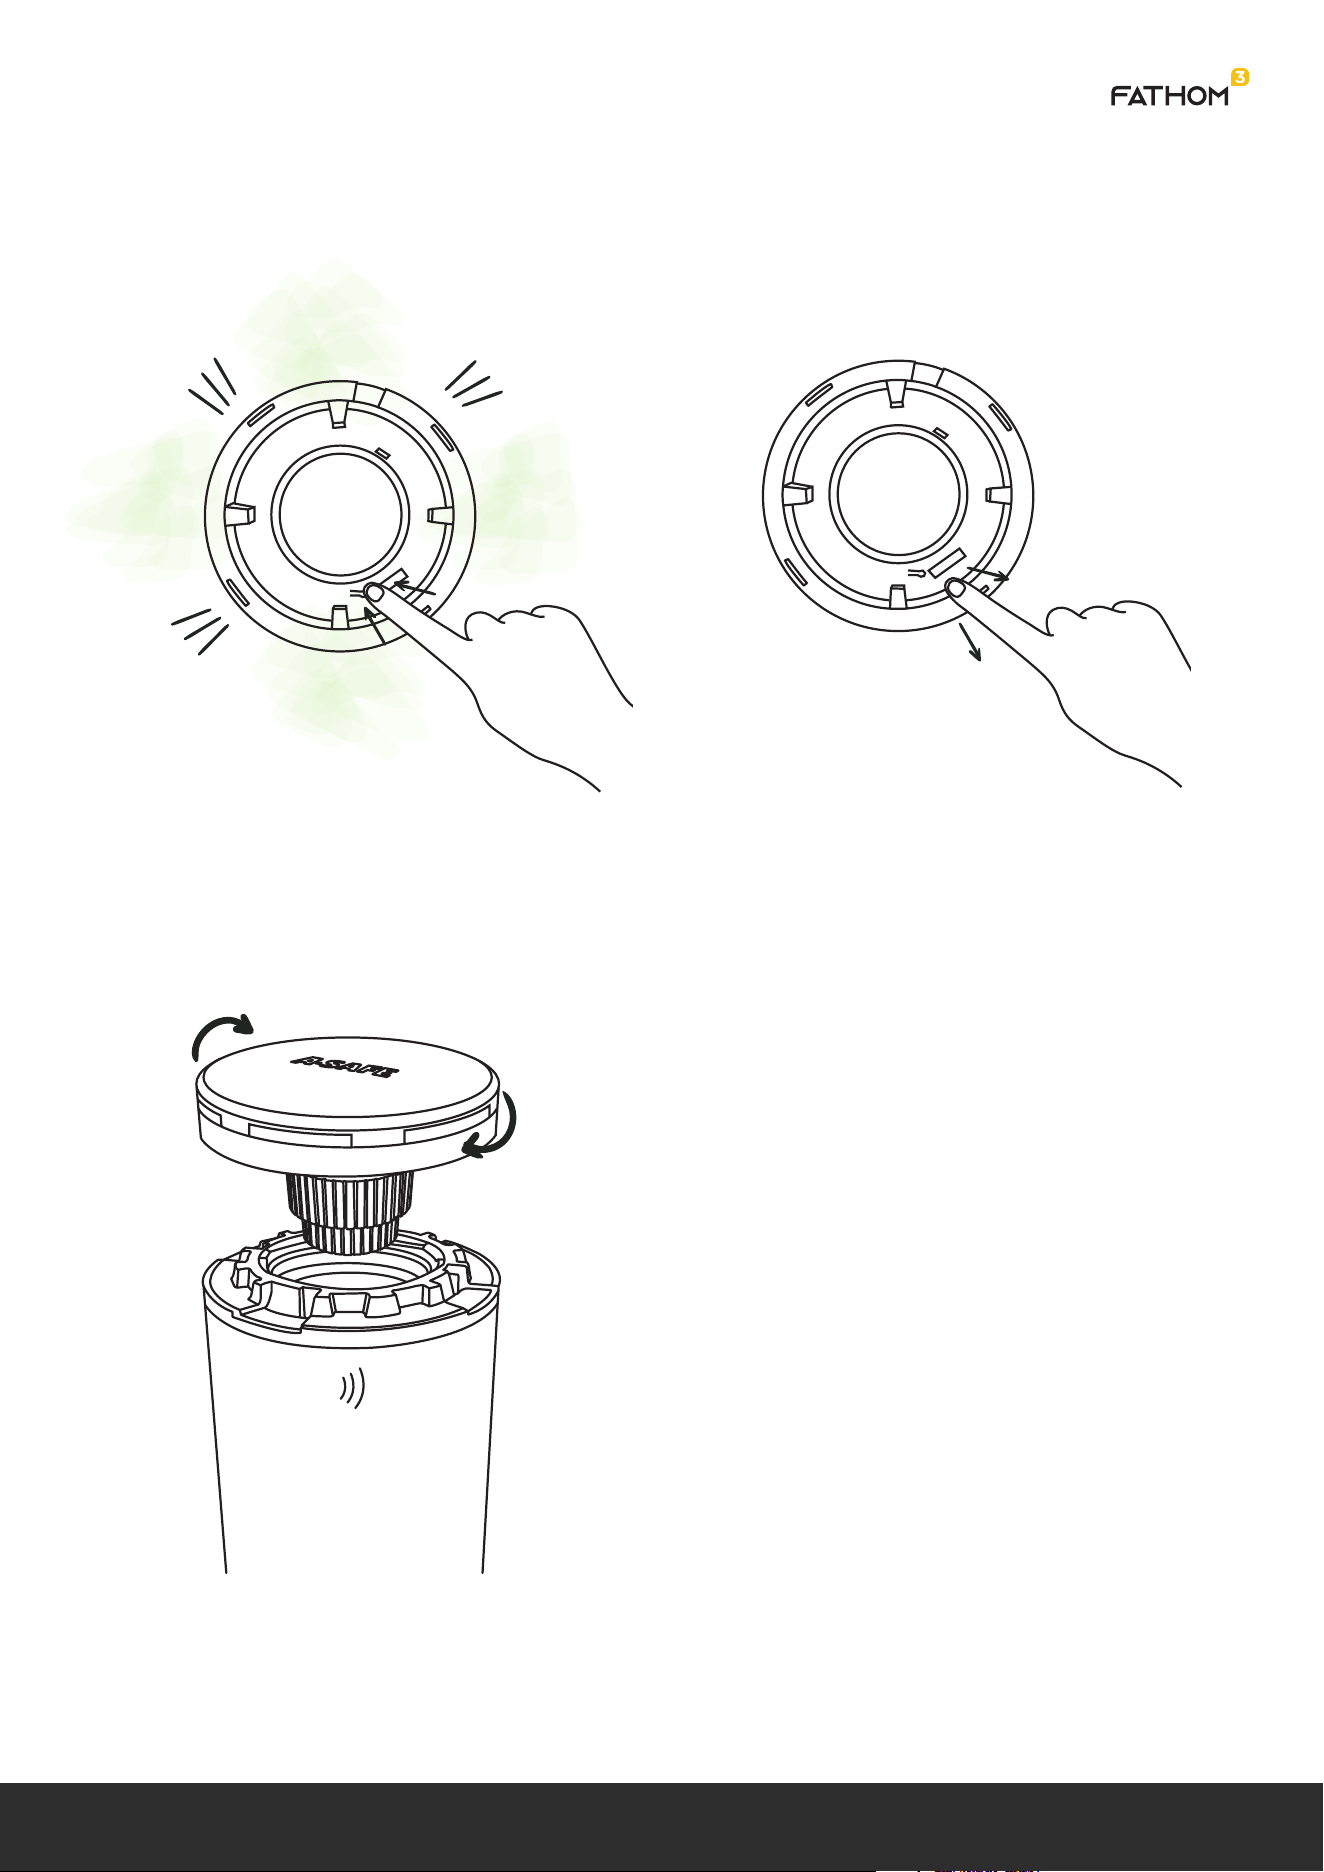
1. Smart Cap removed from post using
tool to overcome anti tamper latch.
2. Press and hold de-register button until
indicated in step 6.
3. Smart cap powers on while de-register
button is being pressed and sends a
“De-register me” message to the cloud
to initiate the cloud life cycle routines.
4. If there is no gateway connection
then the smart cap completes a local
de-registration.
ATTENTION
MODEL
03A01YYMMDDXXXXX
Help
DE-REGISTRATION
DEREGISTER ME
| 05
Smart Cap User Stories | 2. Installation | 2.2 Remove Smart Cap
5. Halo indicates completion.
6. Release De-Registration button to power
down smart cap.
7. Replace with new Smart cap as per
Install process.
| 06
Smart Cap User Stories | 2. Installation | 2.3 Replace Smart Cap
2.3 Replace Smart Cap
1. Follow Remove Smart Cap Process.
2. Follow Install Smart Cap Process
SMART CAP
EUROPE
03A01YYMMDDXXXXX
03A01YYMMDDXXXXX
| 07
Smart Cap User Stories | 2. Installation | 2.4 Change Batteries
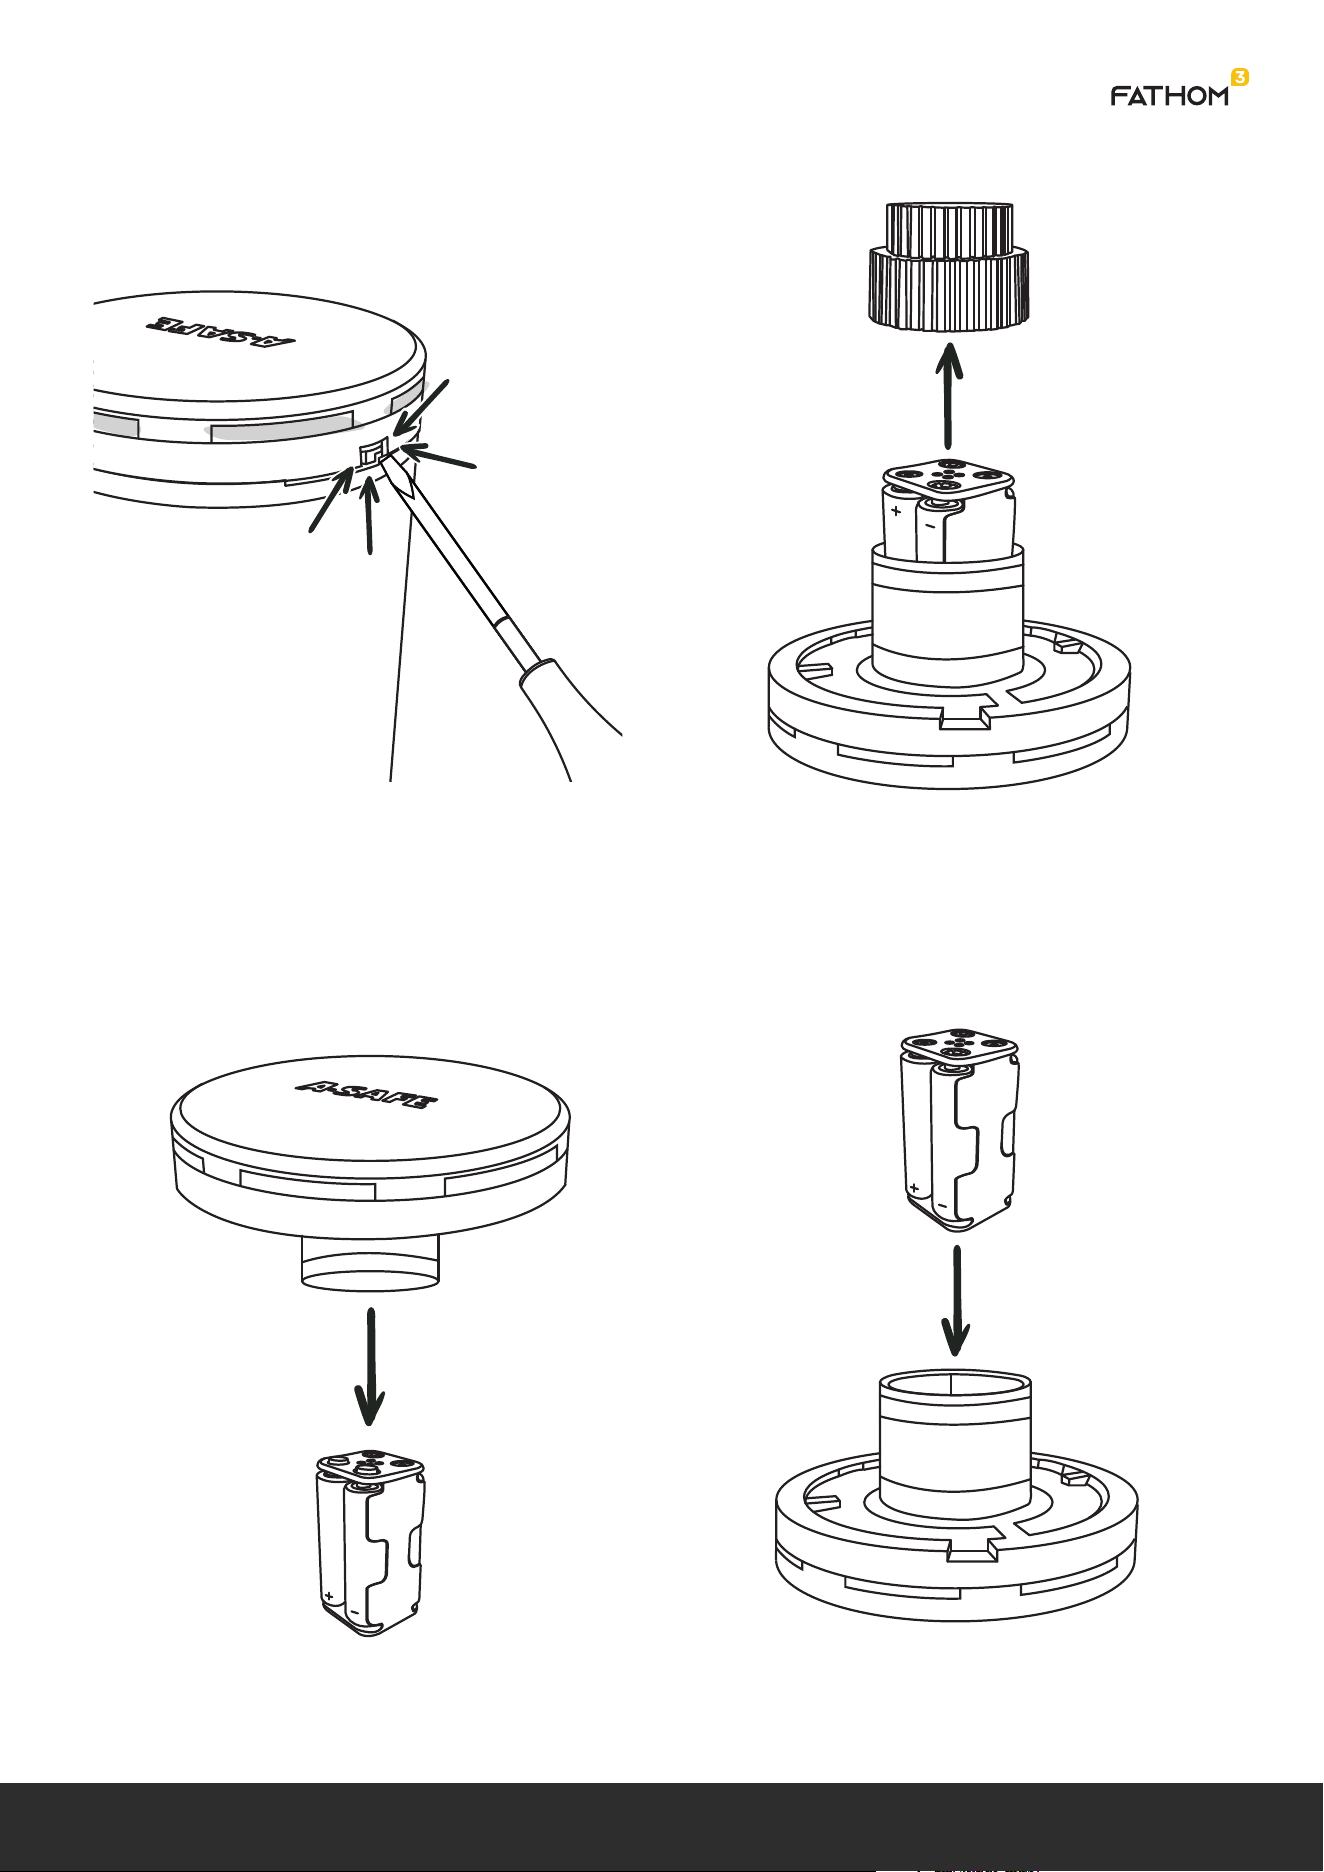
3. Drop whole battery cartridge out of
smart cap into used battery container.
4. Insert new battery cartridge, pre-loaded
with new batteries.
2.4 Change Batteries
1. Smart cap removed from universal frame
using tool to overcome anti tamper latch.
Smart cap automatically powers down and
should not send any impact waveforms.
2. Battery cap removed from bottom of
smart cap.
| 08
Smart Cap User Stories | 2. Installation | 2.4 Change Batteries
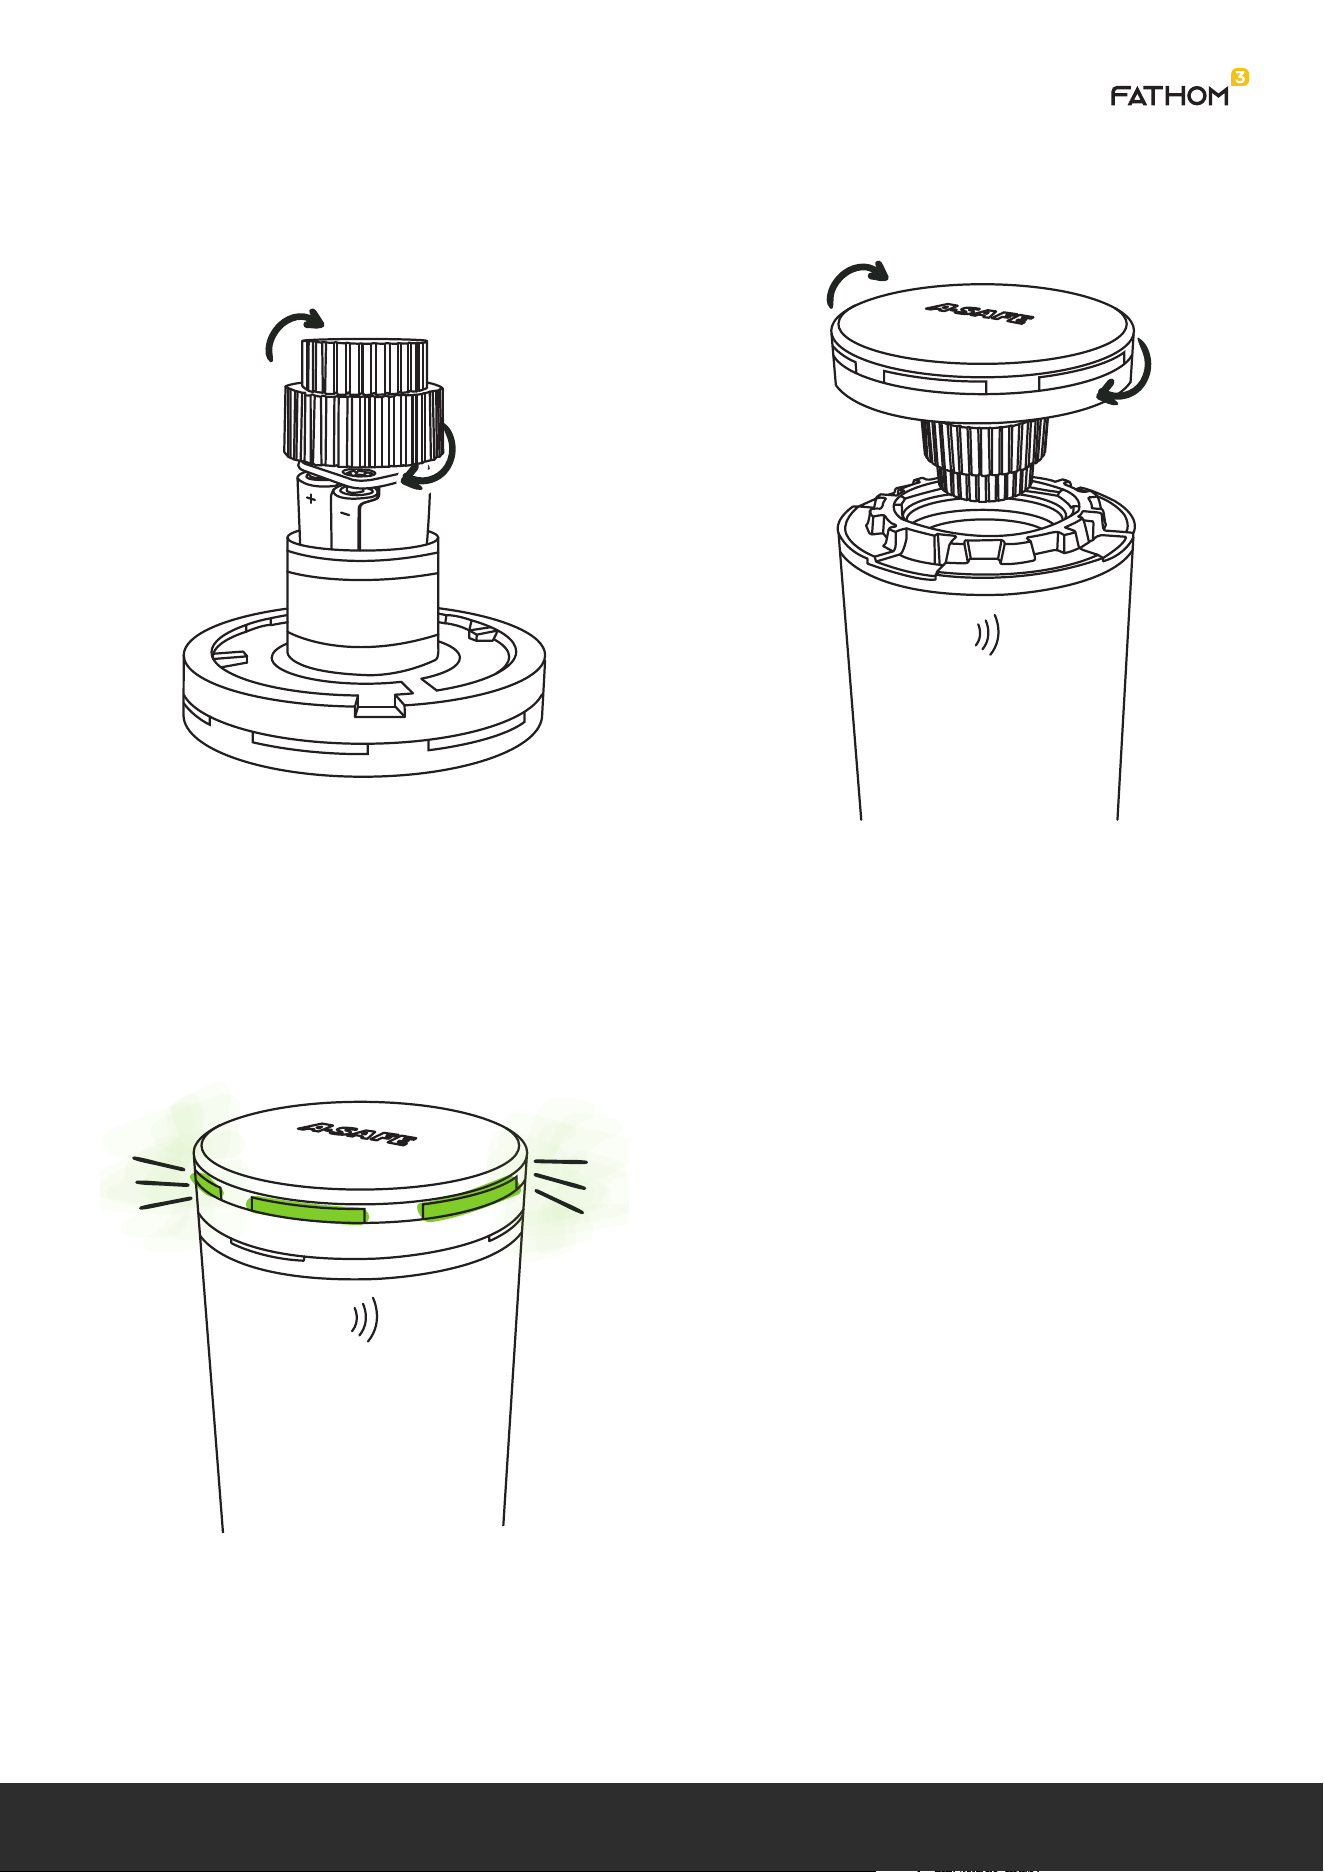
7. Halo indicates normal boot up. Device
activated (armed).
5. Replace battery cap. 6. Reinsert cap into post.
| 09
Smart Cap User Stories | 2. Installation | 2.5 Software Update
2.5 Software Update
3. Smart cap reboots on completion and will run through the normal boot up indication.
1. Smart Caps software update is initiated
from the cloud service by an authorized
user.
2. Smart Caps do not indicate the
software update process on the LED halo.
ATTENTION
MODEL
03A01YYMMDDXXXXX
UPDATE REQUIRED
VERSION 1.2.3
UPDATE NOW
| 10
Smart Cap User Stories | 3. Inspection | 3.1 Barrier Impact
3. Inspection
3.1 Barrier Impact
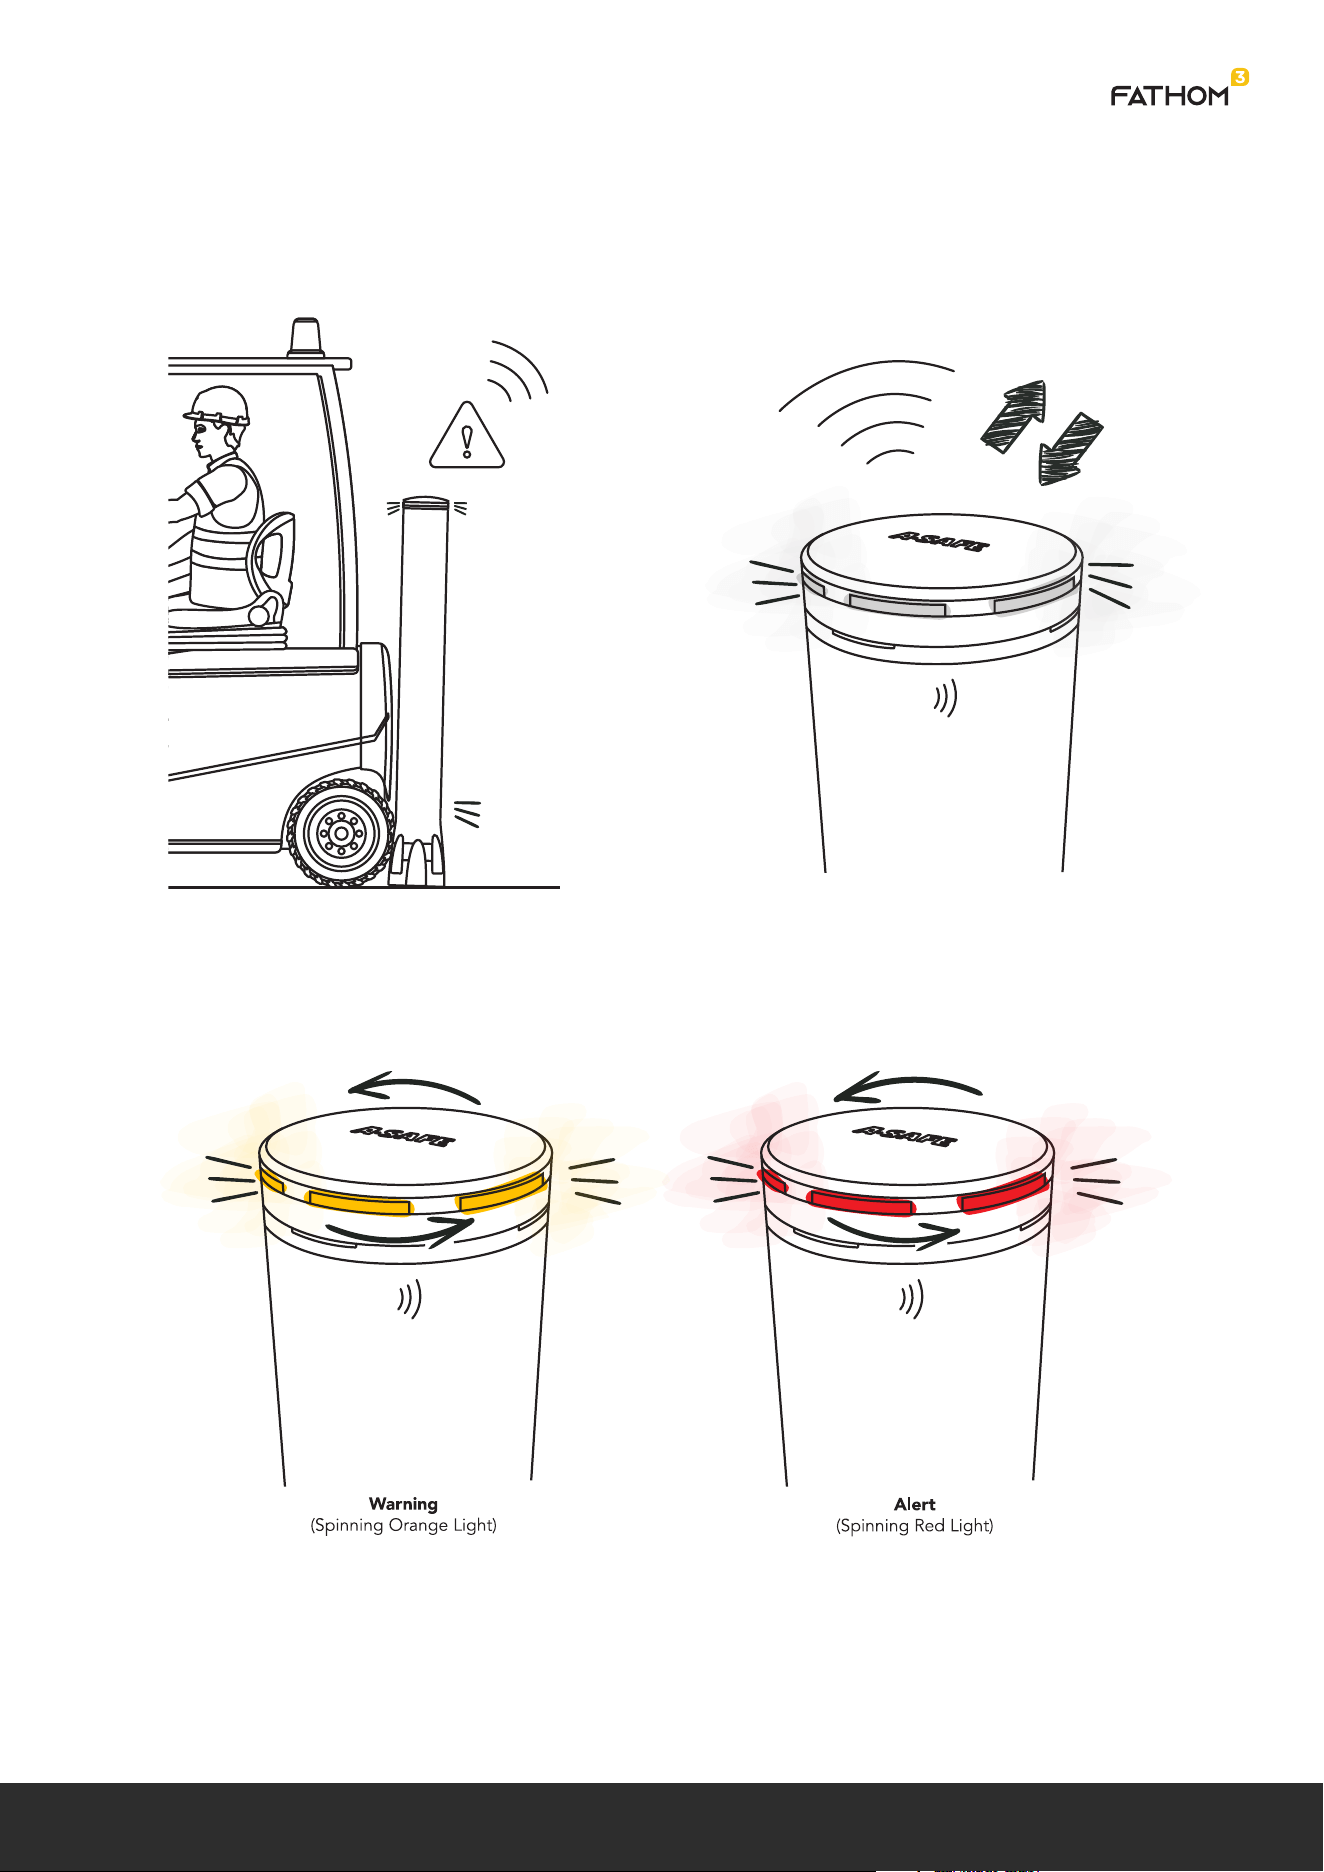
1. Vehicle impacts the barrier triggering
the smart cap to record an acceleration
waveform.
2. Waveform is sent up to the cloud for
analysis.
3. Event Response is returned with event classification. Either Alert, Warning, or Null.
If the event was not null then the smart cap will indicate with the halo indefinitely.
The standard usage model indicates this will be on average 8 hours but this is
dependent on regular attention by the customer. If not inspected with 8 hours this
could be detrimental to the expected battery life.
| 11
Smart Cap User Stories | 3. Inspection | 3.1 Barrier Impact
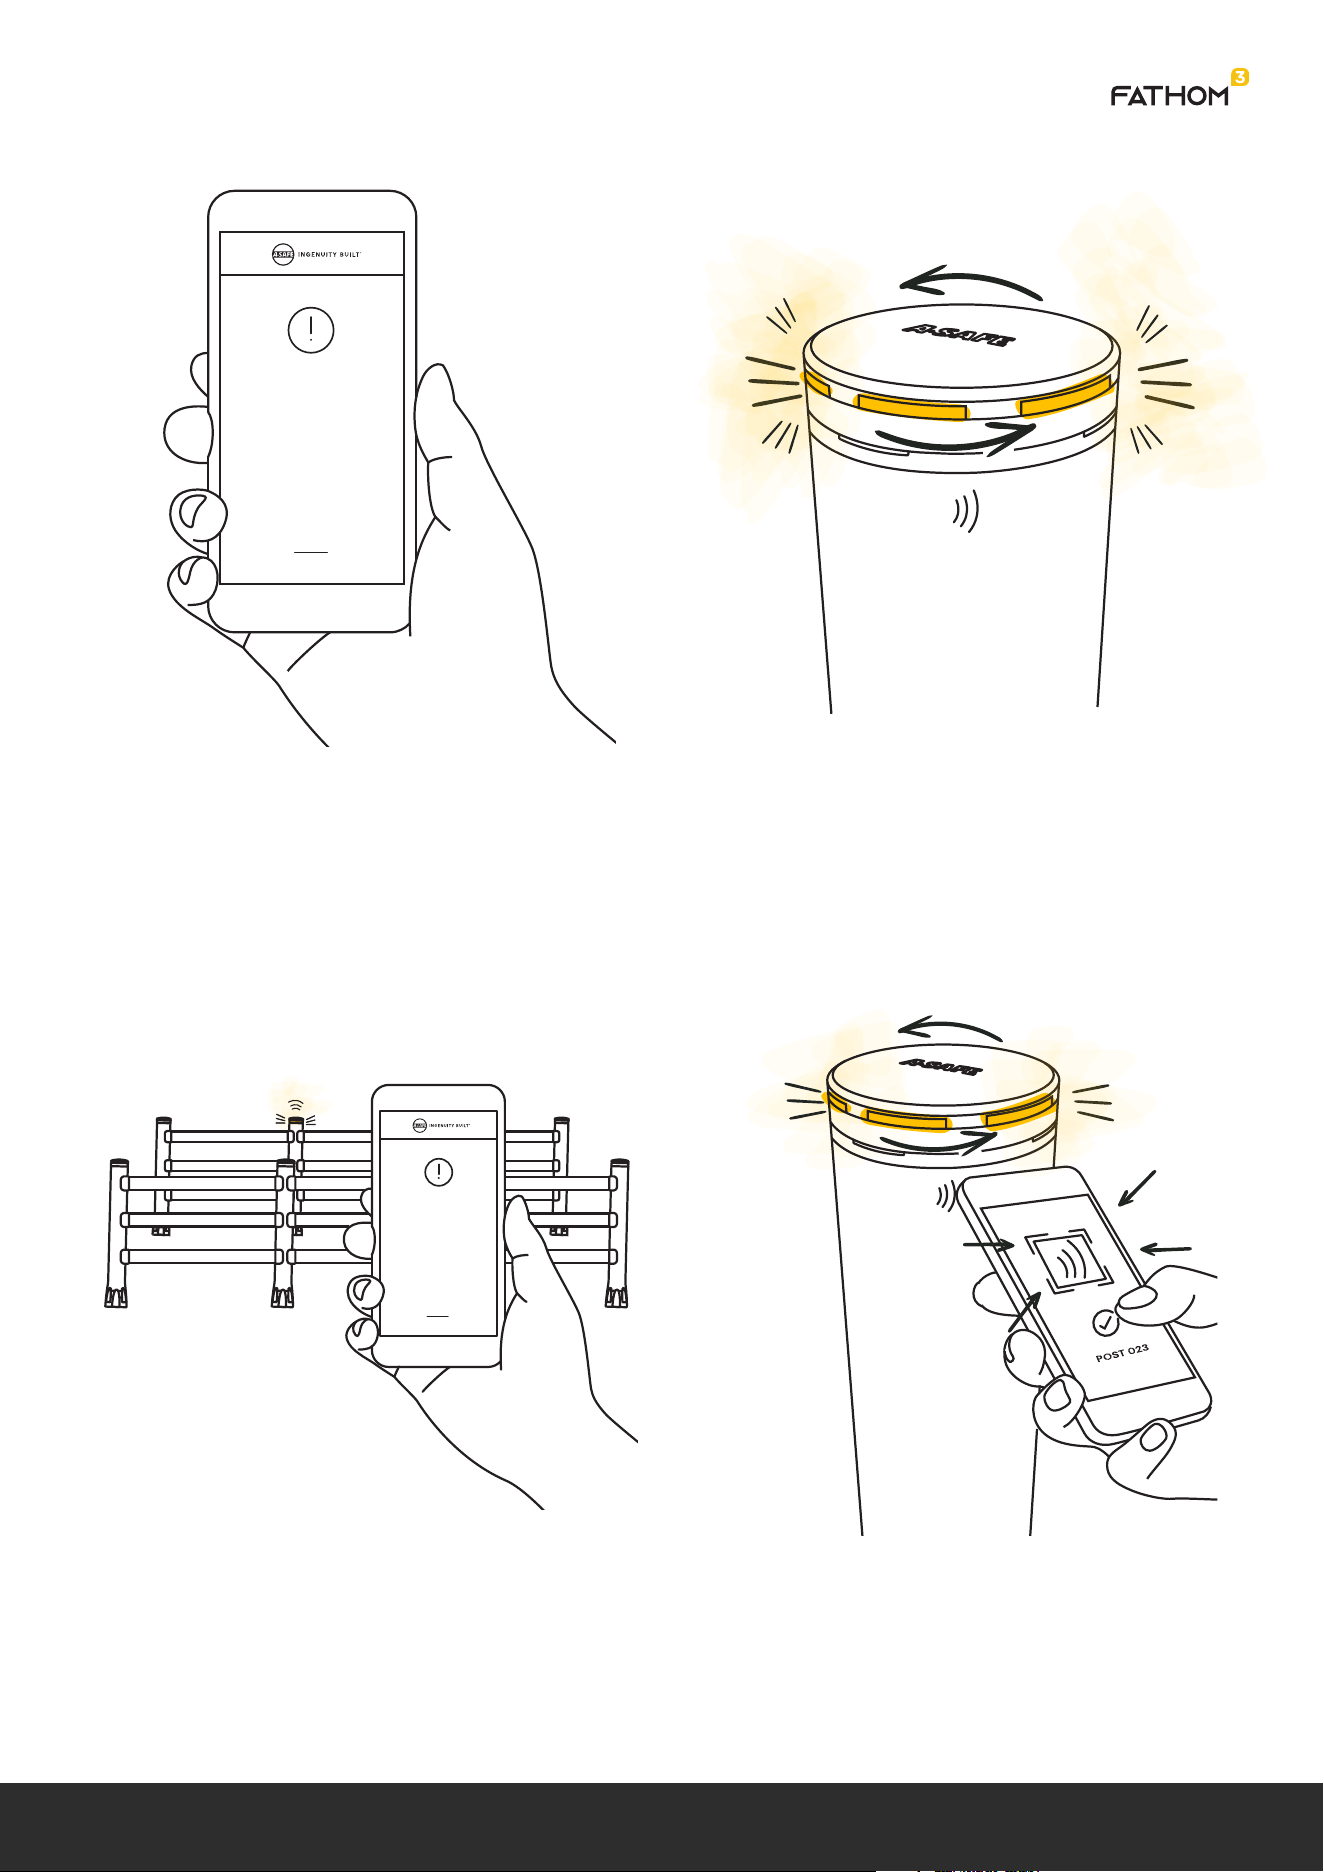
5. Warehouse inspector arrives at impact
site guided by the flashing halo, and
location information received via cloud
service/app.
6. The inspector scans the RFID tag of the
post to verify location.
4A. Notifications will have been sent to the
relevant personnel stating that this barrier
requires inspection.
4B. The Ping timing when the Halo is
flashing should be increased.
IMPACT NOTIFICATION
Our system has detected an Impact.
There could be damage, please inspect
this as soon as possible.
Time: 13:01
Date: 12/01/2021
Site: A-SAFE UK Ltd
Zone: Zone B
Run: Run 21
Post: 023
IMPACT NOTIFICATION
Our system has detected an Impact.
There could be damage, please inspect
this as soon as possible.
Time: 13:01
Date: 12/01/2021
Site: A-SAFE UK Ltd
Zone: Zone B
Run: Run 21
Post: 023
| 12
7. An inspection is completed and the
impact event is marked with a resolution
status.
8. The Halo indicator turns off. Irrespective
of the resolution status.
Smart Cap User Stories | 3. Inspection | 3.1 Barrier Impact
FULL INSPECTION
Is there any damage to X?
Yes
No
| 13
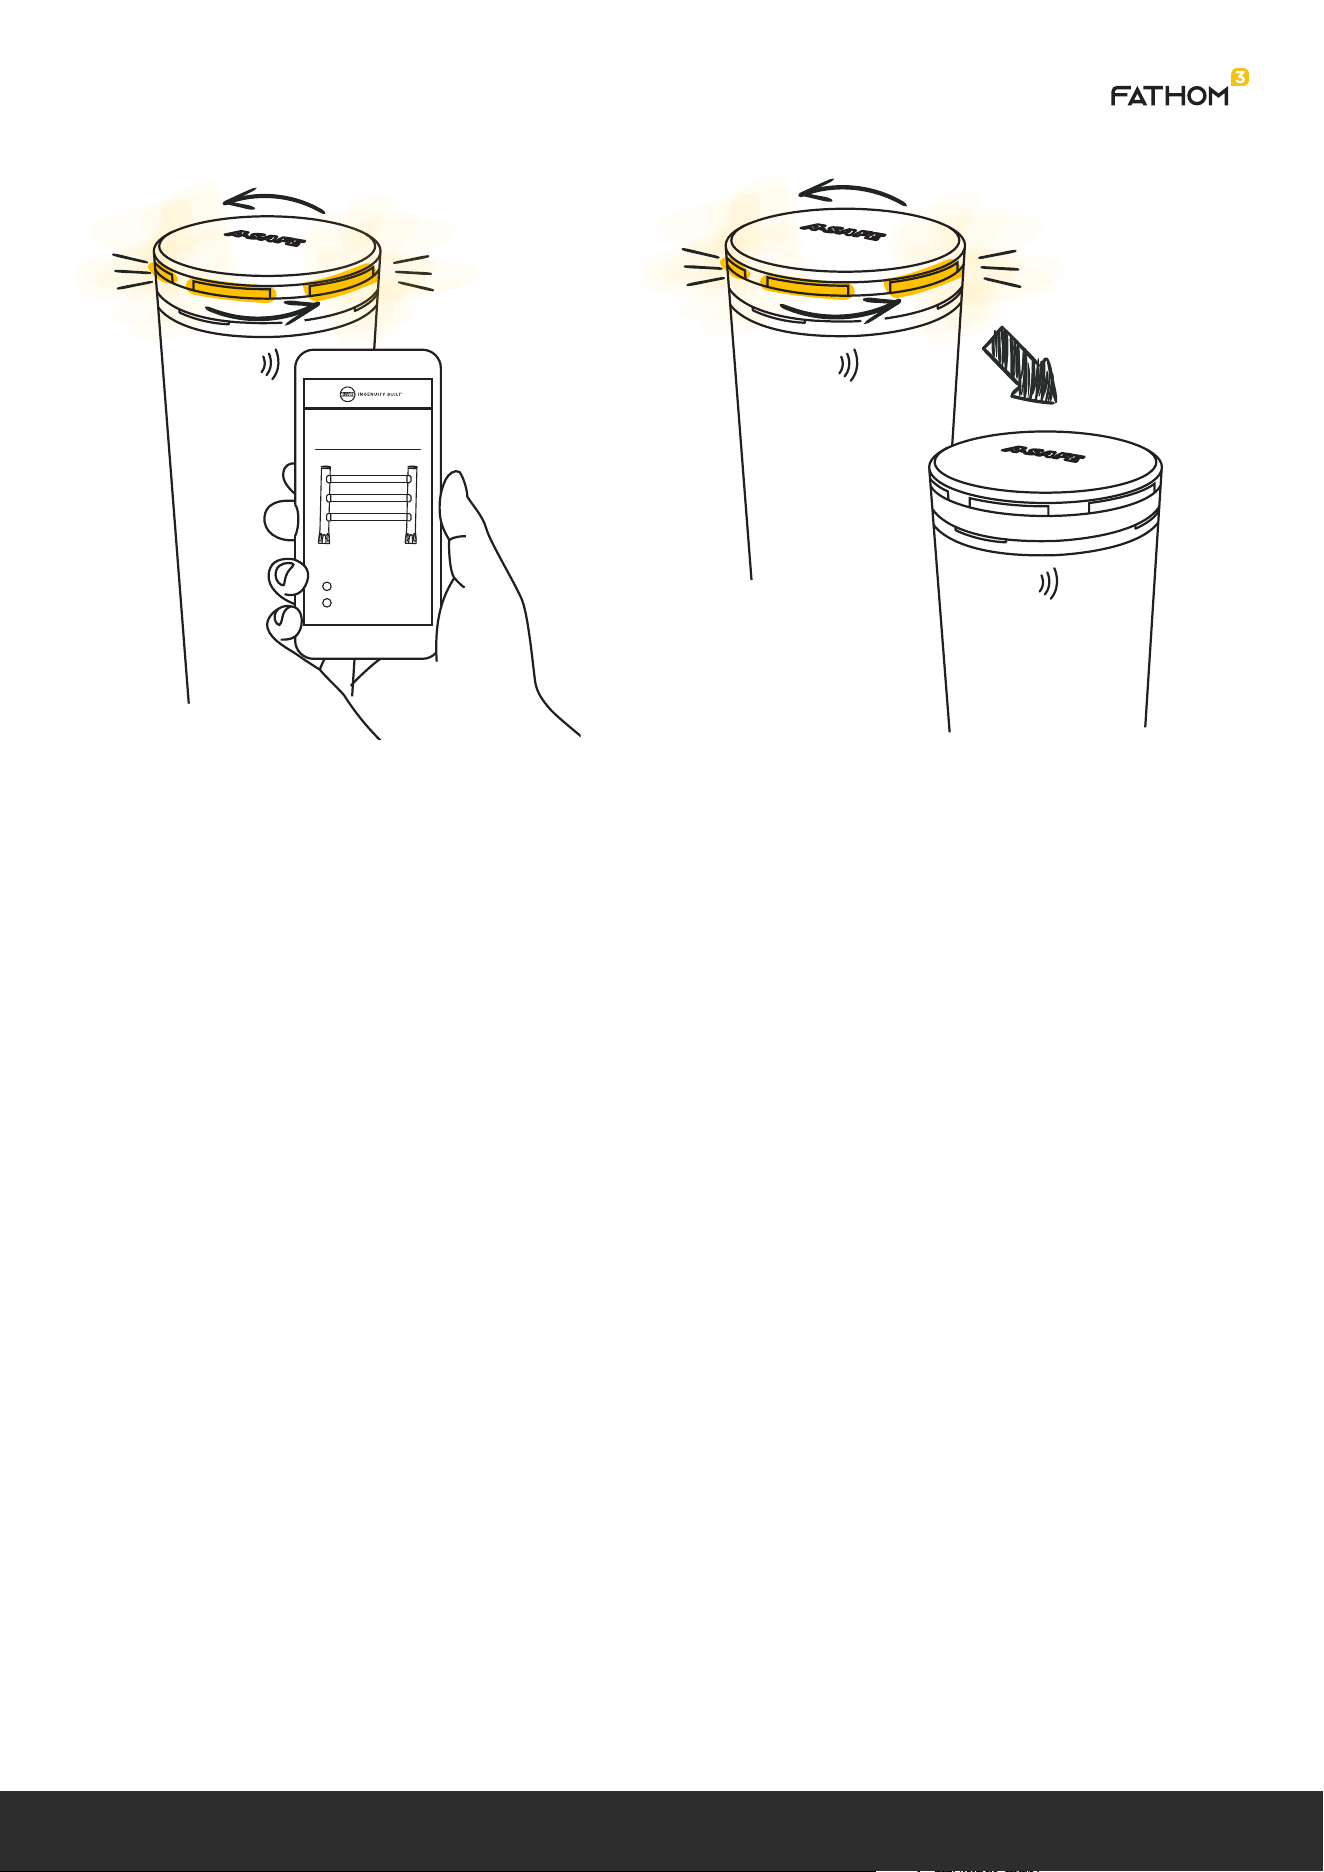
1. If the resolution of an impact event
requires removal or replacement of the
barrier then this will be indicated and
tracked on the cloud service/app.
2. When the maintenance is taking place
the smart caps should be removed from
the posts thus deactivating them, or a
scheduled maintenance should have been
created. (See next section).
3.2 Barrier Impact Resolution
Smart Cap User Stories | 3. Inspection | 3.2 Barrier Impact Resolution
INSPECTION RESULT
Due to the impact event
we have evaluated that
X needs to be replaced.
This has been tracked on
your cloud tracking for
future reference.
BEGIN
MAINTENANCE
| 14
1. User selects in the cloud service or app
which devices to schedule for
maintenance and a time period for which
the devices will be in maintenance mode.
This must be done at least 1 ping period
before maintenance is due to start to
ensure all devices receive the message.
2. The Smart Cap will receive the
schedule on its next ping exchange and
will schedule itself to enter maintenance
mode at the given time.
3. When the maintenance time is
reached the Smart Cap will disable its
accelerometer and begin to indicate
maintenance mode on its LED halo.
If the smart cap is restarted during
maintenance mode it should restart back
into its maintenance mode.
4. When the scheduled time is over, the
accelerometer will be enabled and the
halo indication will stop.
Or if a message is received to cancel
maintenance mode.
3.3 Scheduled Maintenance
Smart Cap User Stories | 3. Inspection | 3.3 Scheduled Maintenance
POST / ZONE / AISLE
SCHEDULE FOR
MAINTENANCE
01 ZONE A RUN 1
02 ZONE A RUN 1
03 ZONE A RUN 1
04 ZONE A RUN 1
05 ZONE A RUN 1
06 ZONE A RUN 1
07 ZONE A RUN 1
08 ZONE A RUN 1
Help
SCHEDULE FOR
MAINTENANCE
03 ZONE B RUN 21
Date
21 - 01 - 2021
Time
APPLY
11:00 13:00
to
| 15