WIRELESS AIR
CONTROLLER KIT
USER MANUAL
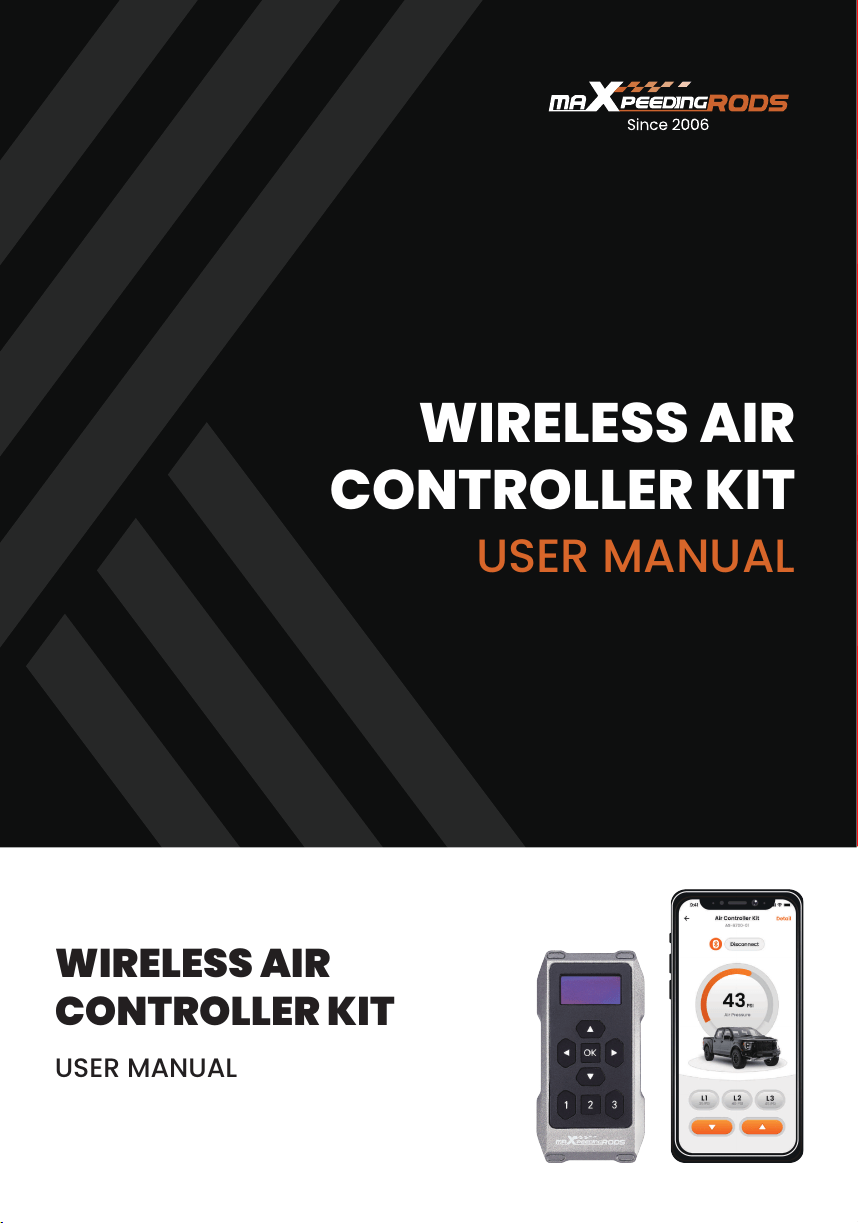
WIRELESS AIR
CONTROLLER KIT
USER MANUAL
01
INTRODUCTION
SYSTEM FUNCTION DESCRIPTION
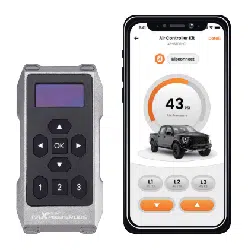
The wireless controller kit, which operates both with a remote controller
and through a free App for iOS and Android. The electronic control kit
has a single-path controller that can control two air springs at the
same time. The remote controller and App allow you to adjust the air
pressure with one button, which is more convenient while meeting your
needs.
• This is a single-channel product that can increase or decrease the
left and right air pressure at the same time.
• Before the system is working, both the wireless remote controller and
the App display the target value. After the system is completed, the
actual value is displayed.
• The wireless remote controller and App can see the changes in the
system's air pressure at the same time. The App needs to be
matched before it can be controlled. The wireless remote controller
does not need to be paired.
• In order to prevent the compressor from continuing to work due to air
leakage, if the air pressure value does not rise by 10 psi within 30
seconds compared with before, the air pump will stop working and
the ignition switch will be turned back on to resume normal function.
• The system can ensure that the actual inflation pressure is not lower
than the target setting value by 4 PSI (.28 BAR), but will never deflate
when the actual value is higher than the target value.
• Each time you open the App and wireless remote controller, the air
pressure value of the last operation is displayed.
• The compressor duty cycle limits the compressor's operating time to
ensure the compressor's service life. When the compressor runs
overtime, the system will not inflate, and you will need to wait about
15 minutes before the compressor can run again.
• To avoid signal interruption, please do not operate the remote
controller or mobile phone App when there are obvious obstructions
(such as direct blocking walls, large corners, large vehicles, or
multiple vehicles).
WIRELESS REMOTE CONTROLLER OPERATION
GUIDE
BUTTON AND SCREEN INSTRUCTION
Before using the remote controller, be sure to install the batteries,
which are included in the accessories.
Press the up and down arrows to adjust the air pressure directly. Or
press Preset 1/2/3 to adjust the pressure.
Press any button to activate the remote controller, and the screen
displays the last operating pressure.
The remote controller backlight remains on for about 30 seconds.
The compressor will continue to work after the display goes dark and
can be activated by pressing any key.
1 32
ok
20 20
PS11
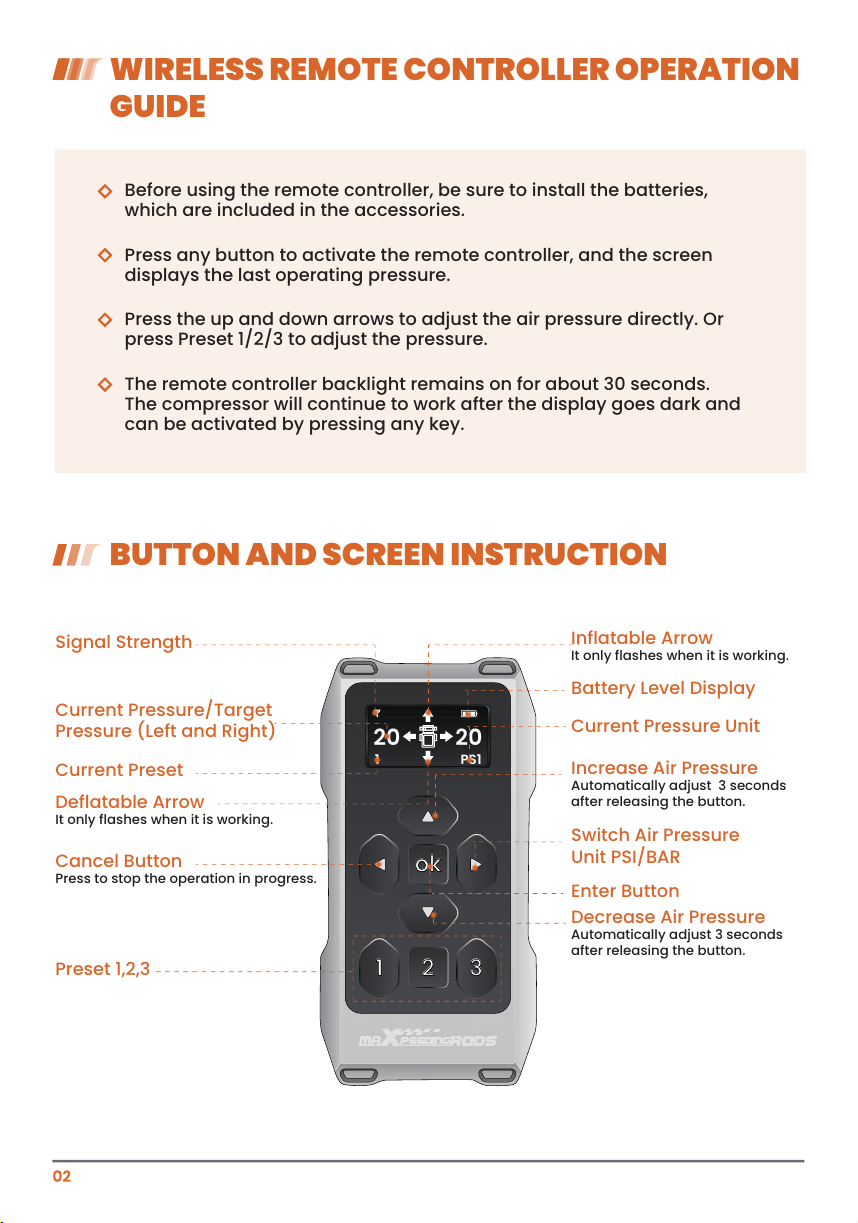
Signal Strength
Preset 1,2,3
Current Preset
Deflatable Arrow
It only flashes when it is working.
Inflatable Arrow
It only flashes when it is working.
Increase Air Pressure
Automatically adjust 3 seconds
after releasing the button.
Decrease Air Pressure
Automatically adjust 3 seconds
after releasing the button.
Switch Air Pressure
Unit PSI/BAR
Enter Button
Battery Level Display
Current Pressure Unit
Cancel Button
Press to stop the operation in progress.
Current Pressure/Target
Pressure (Left and Right)
PRESET PRESSURE OPERATION
MAXIMUM AIR PRESSURE SELECTION
PAIRING THE REMOTE CONTROLLER
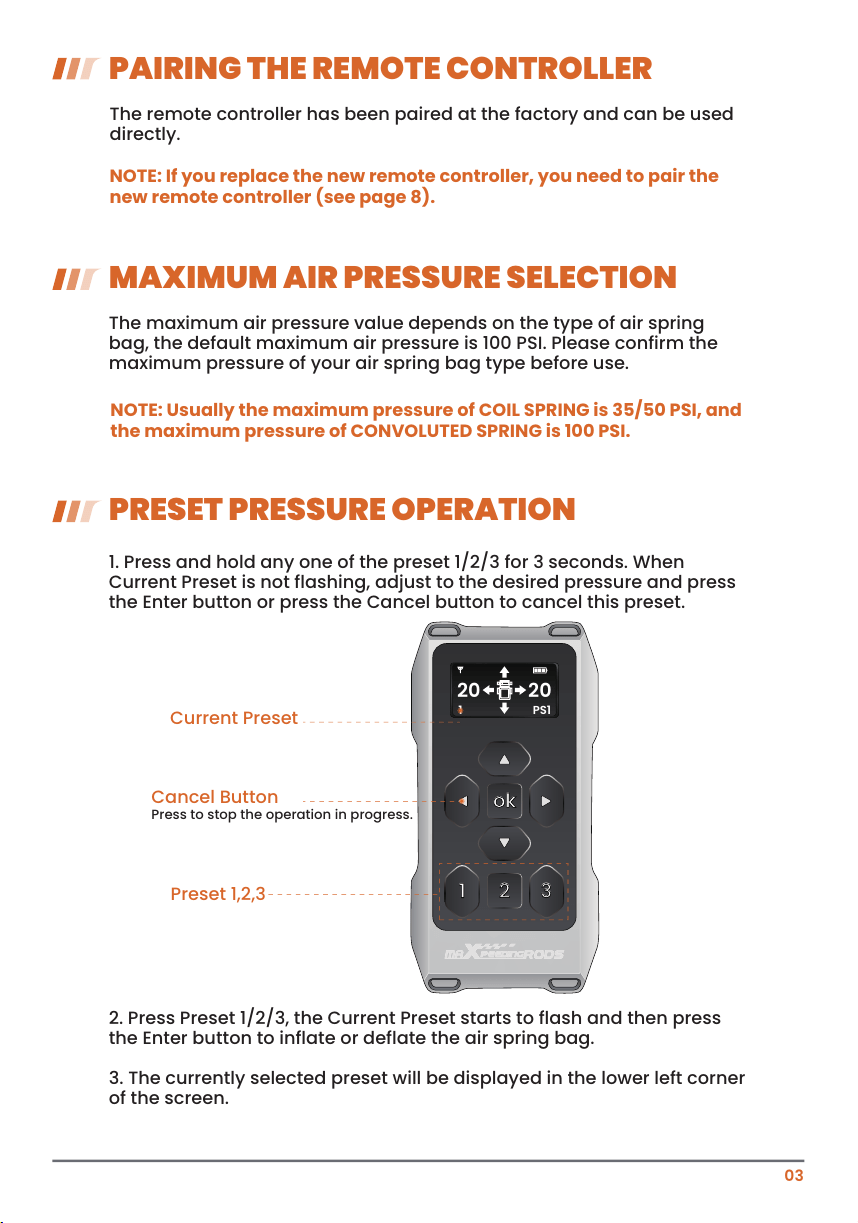
1. Press and hold any one of the preset 1/2/3 for 3 seconds. When
Current Preset is not flashing, adjust to the desired pressure and press
the Enter button or press the Cancel button to cancel this preset.
2. Press Preset 1/2/3, the Current Preset starts to flash and then press
the Enter button to inflate or deflate the air spring bag.
3. The currently selected preset will be displayed in the lower left corner
of the screen.
The remote controller has been paired at the factory and can be used
directly.
The maximum air pressure value depends on the type of air spring
bag, the default maximum air pressure is 100 PSI. Please confirm the
maximum pressure of your air spring bag type before use.
NOTE: If you replace the new remote controller, you need to pair the
new remote controller (see page 8).
NOTE: Usually the maximum pressure of COIL SPRING is 35/50 PSI, and
the maximum pressure of CONVOLUTED SPRING is 100 PSI.
03
1 32
ok
20 20
PS11
Preset 1,2,3
Current Preset
Cancel Button
Press to stop the operation in progress.
MOBILE APP OPERATION GUIDE
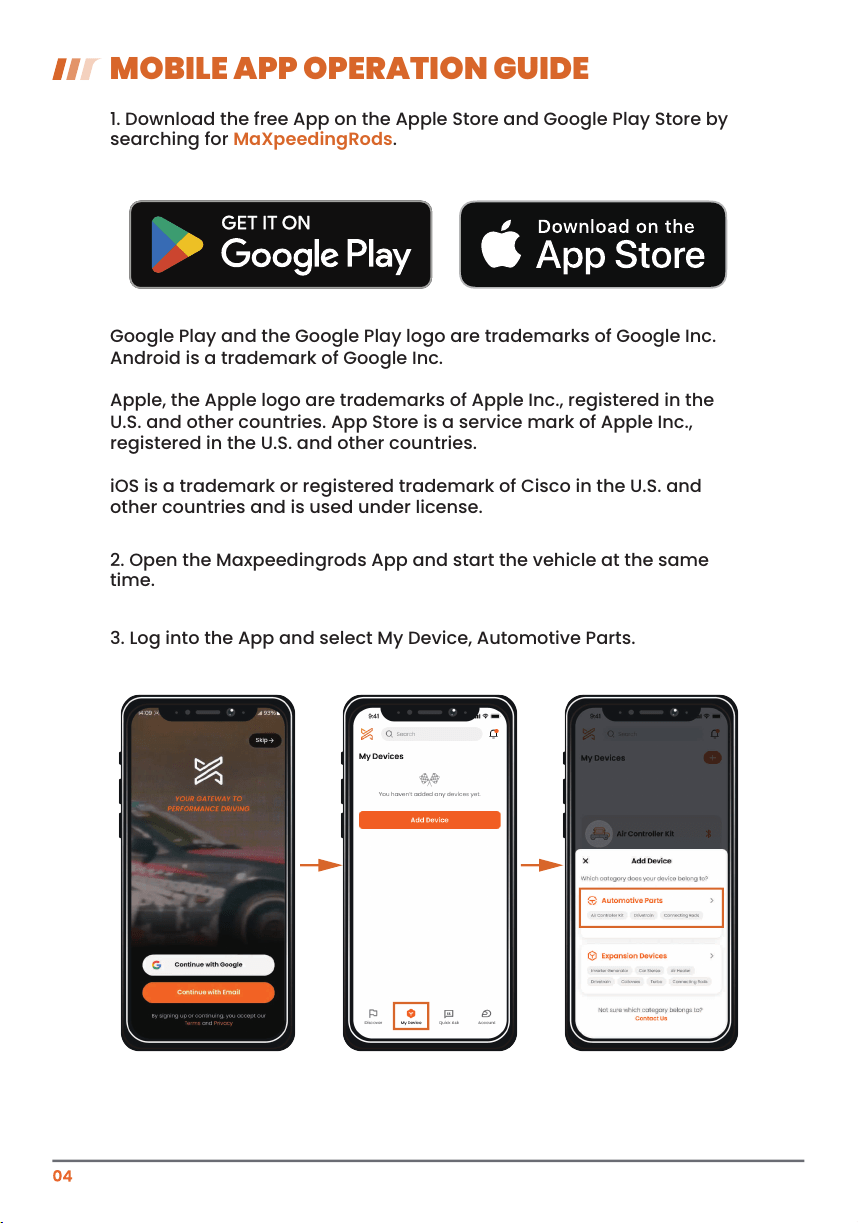
1. Download the free App on the Apple Store and Google Play Store by
searching for MaXpeedingRods.
Google Play and the Google Play logo are trademarks of Google Inc.
Android is a trademark of Google Inc.
Apple, the Apple logo are trademarks of Apple Inc., registered in the
U.S. and other countries. App Store is a service mark of Apple Inc.,
registered in the U.S. and other countries.
iOS is a trademark or registered trademark of Cisco in the U.S. and
other countries and is used under license.
2. Open the Maxpeedingrods App and start the vehicle at the same
time.
3. Log into the App and select My Device, Automotive Parts.
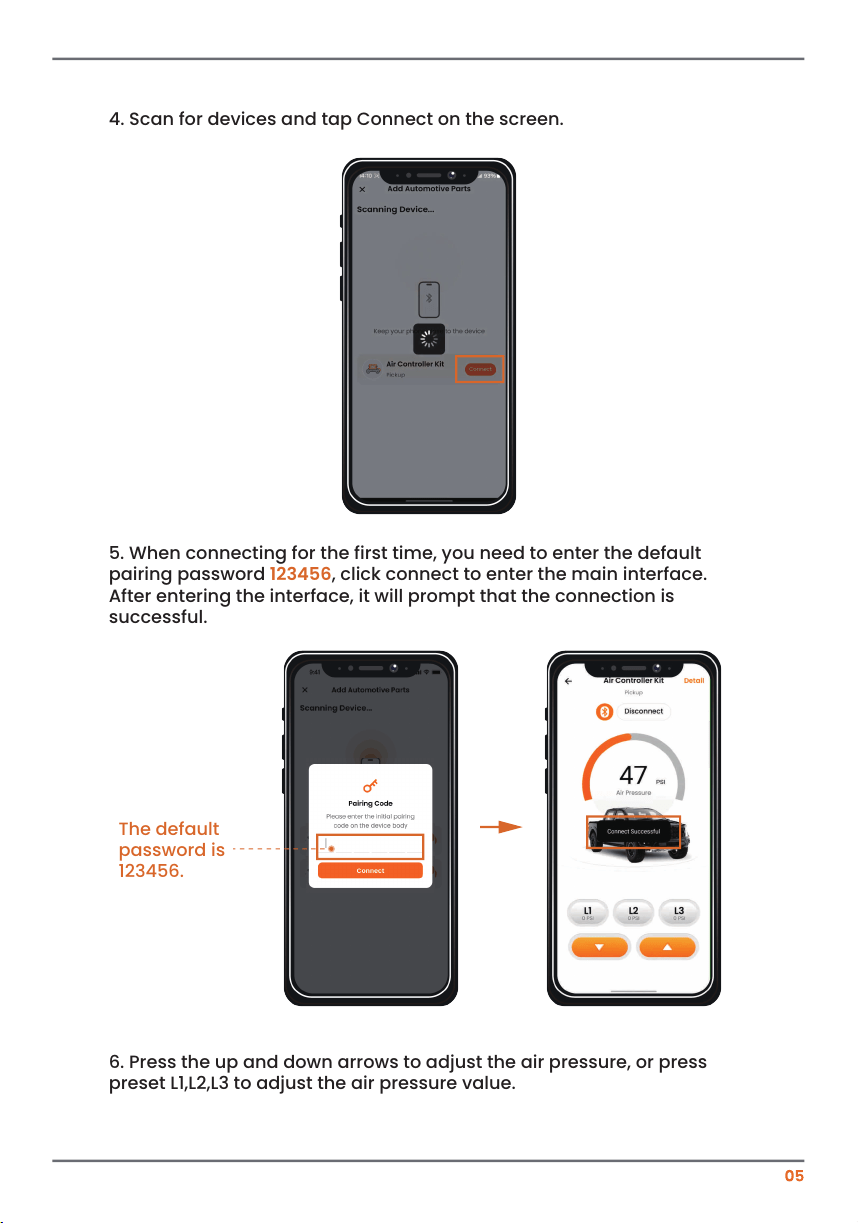
5. When connecting for the first time, you need to enter the default
pairing password 123456, click connect to enter the main interface.
After entering the interface, it will prompt that the connection is
successful.
6. Press the up and down arrows to adjust the air pressure, or press
preset L1,L2,L3 to adjust the air pressure value.
The default
password is
123456.
4. Scan for devices and tap Connect on the screen.
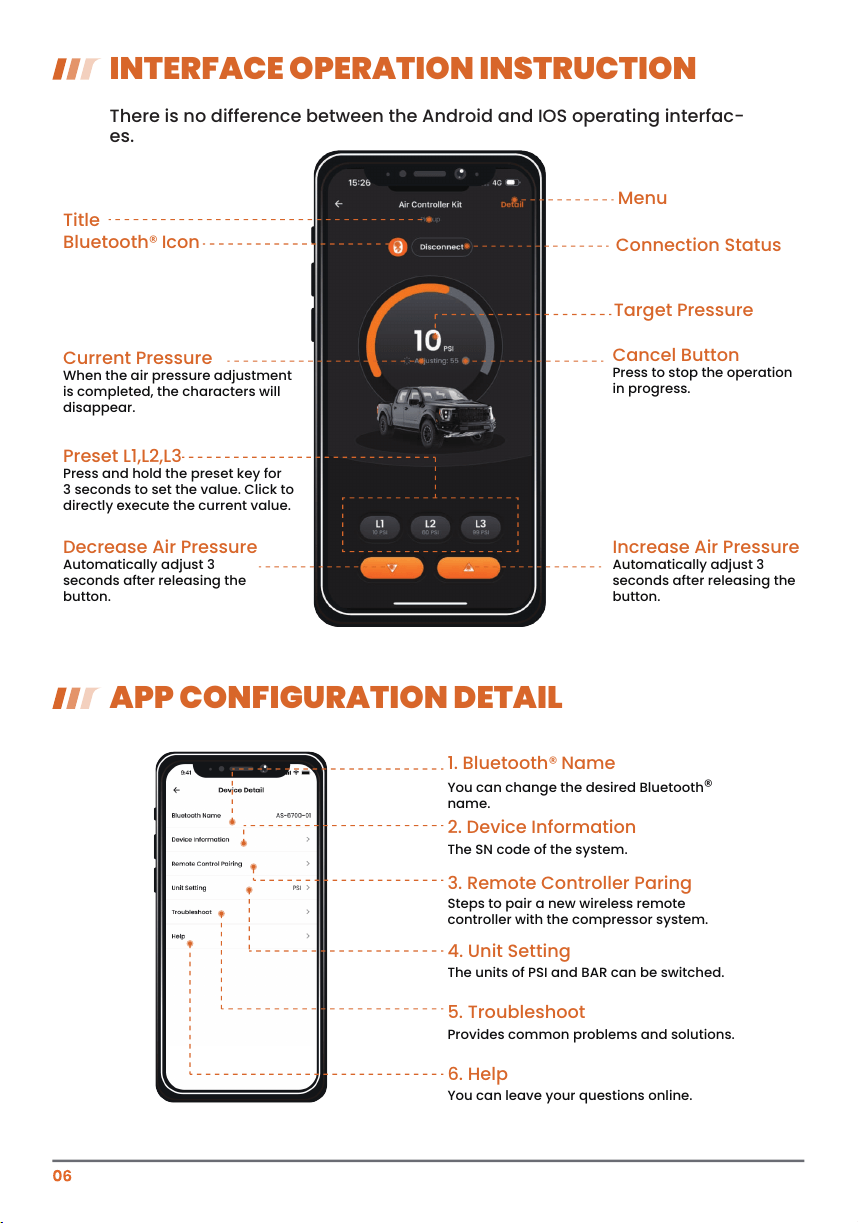
There is no difference between the Android and IOS operating interfac-
es.
1. Bluetooth® Name
You can change the desired Bluetooth®
name.
2. Device Information
The SN code of the system.
3. Remote Controller Paring
Steps to pair a new wireless remote
controller with the compressor system.
4. Unit Setting
The units of PSI and BAR can be switched.
5. Troubleshoot
Provides common problems and solutions.
6. Help
You can leave your questions online.
INTERFACE OPERATION INSTRUCTION
APP CONFIGURATION DETAIL
Title
Bluetooth® Icon
Target Pressure
Connection Status
Menu
Current Pressure
When the air pressure adjustment
is completed, the characters will
disappear.
Decrease Air Pressure
Automatically adjust 3
seconds after releasing the
button.
Preset L1,L2,L3
Press and hold the preset key for
3 seconds to set the value. Click to
directly execute the current value.
Increase Air Pressure
Automatically adjust 3
seconds after releasing the
button.
Cancel Button
Press to stop the operation
in progress.
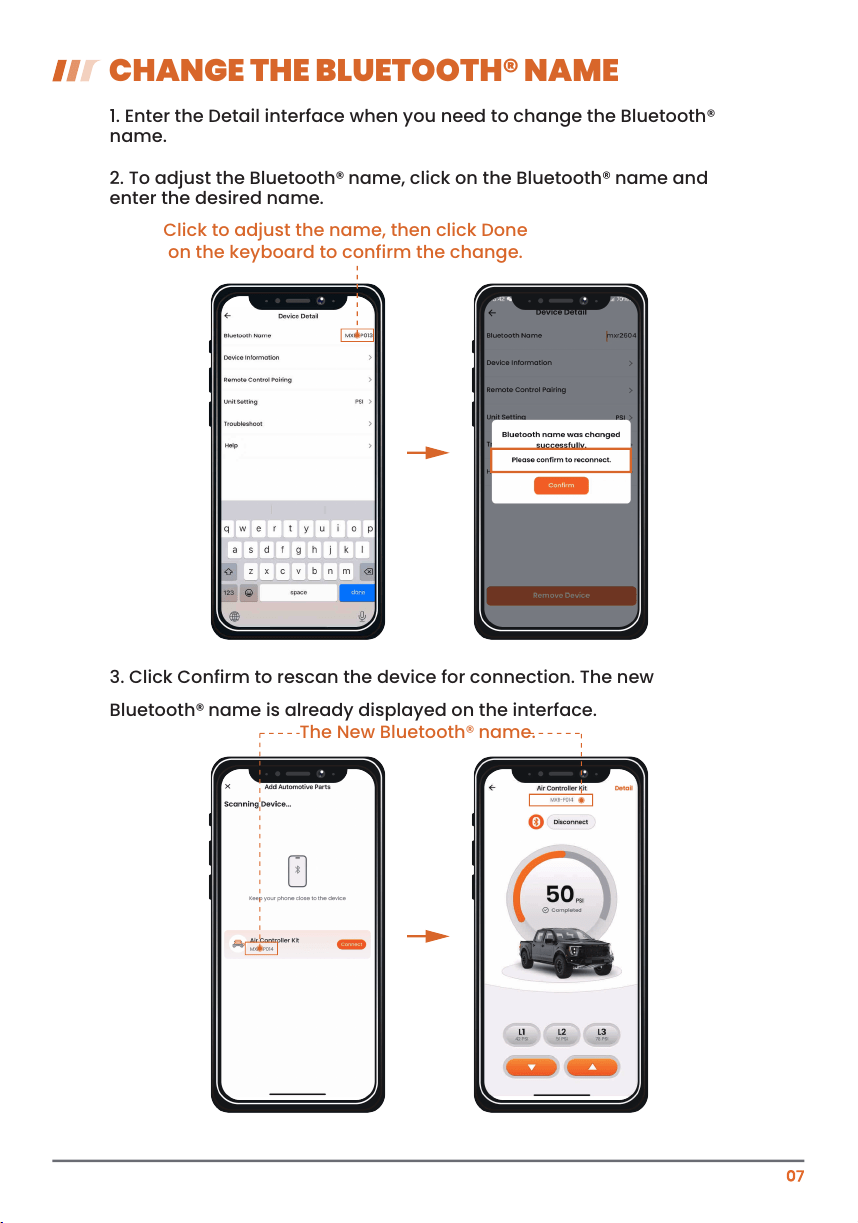
CHANGE THE BLUETOOTH® NAME
1. Enter the Detail interface when you need to change the Bluetooth®
name.
2. To adjust the Bluetooth
® name, click on the Bluetooth® name and
enter the desired name.
3. Click Confirm to rescan the device for connection. The new
Bluetooth® name is already displayed on the interface.
Click to adjust the name, then click Done
on the keyboard to confirm the change.
The New Bluetooth® name.
08
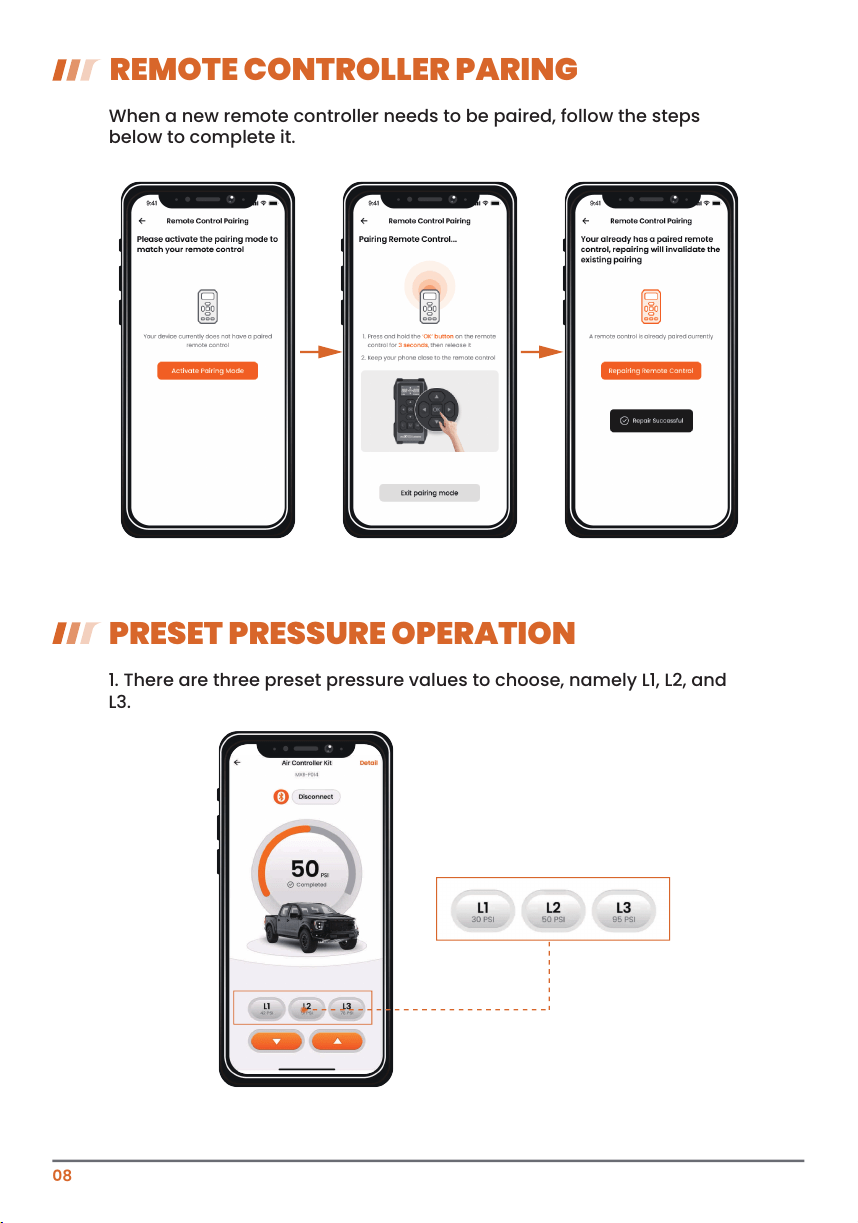
REMOTE CONTROLLER PARING
When a new remote controller needs to be paired, follow the steps
below to complete it.
1. There are three preset pressure values to choose, namely L1, L2, and
L3.
PRESET PRESSURE OPERATION
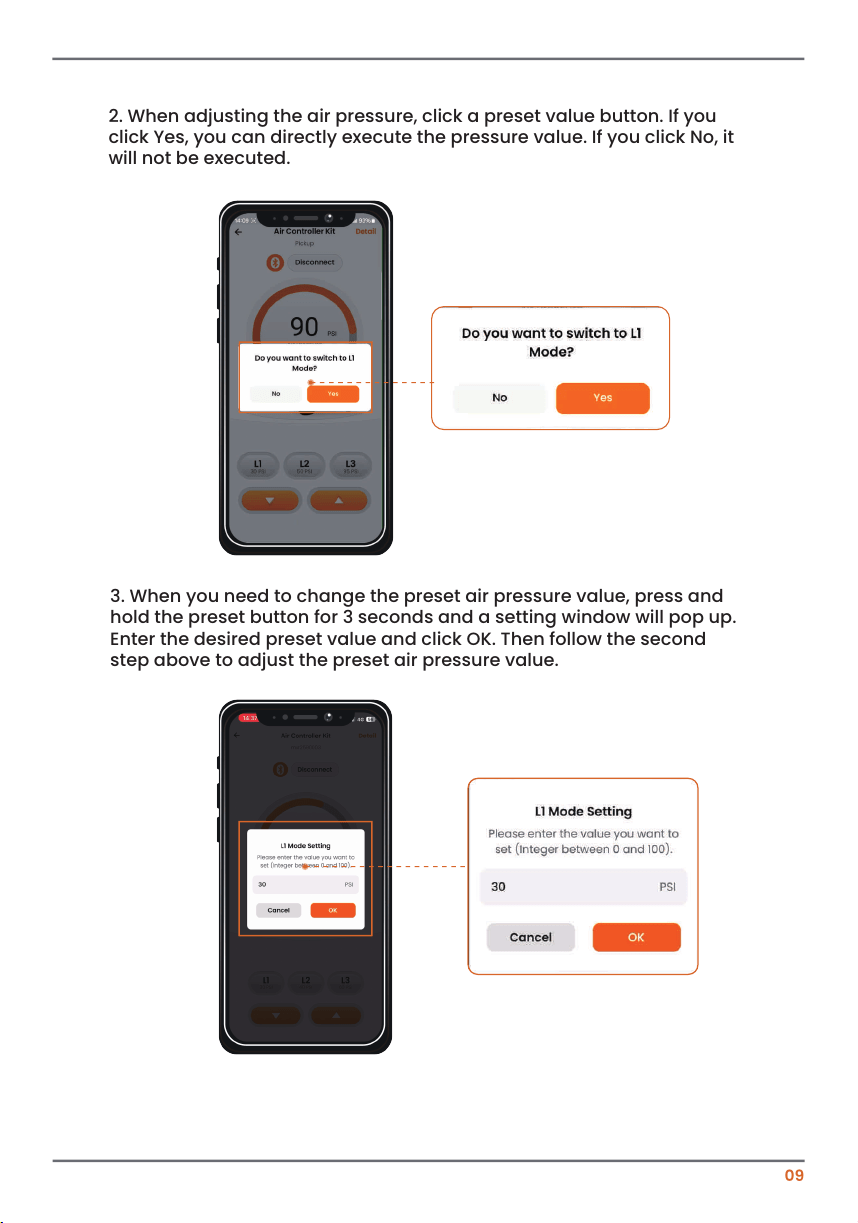
2. When adjusting the air pressure, click a preset value button. If you
click Yes, you can directly execute the pressure value. If you click No, it
will not be executed.
09
3. When you need to change the preset air pressure value, press and
hold the preset button for 3 seconds and a setting window will pop up.
Enter the desired preset value and click OK. Then follow the second
step above to adjust the preset air pressure value.
10
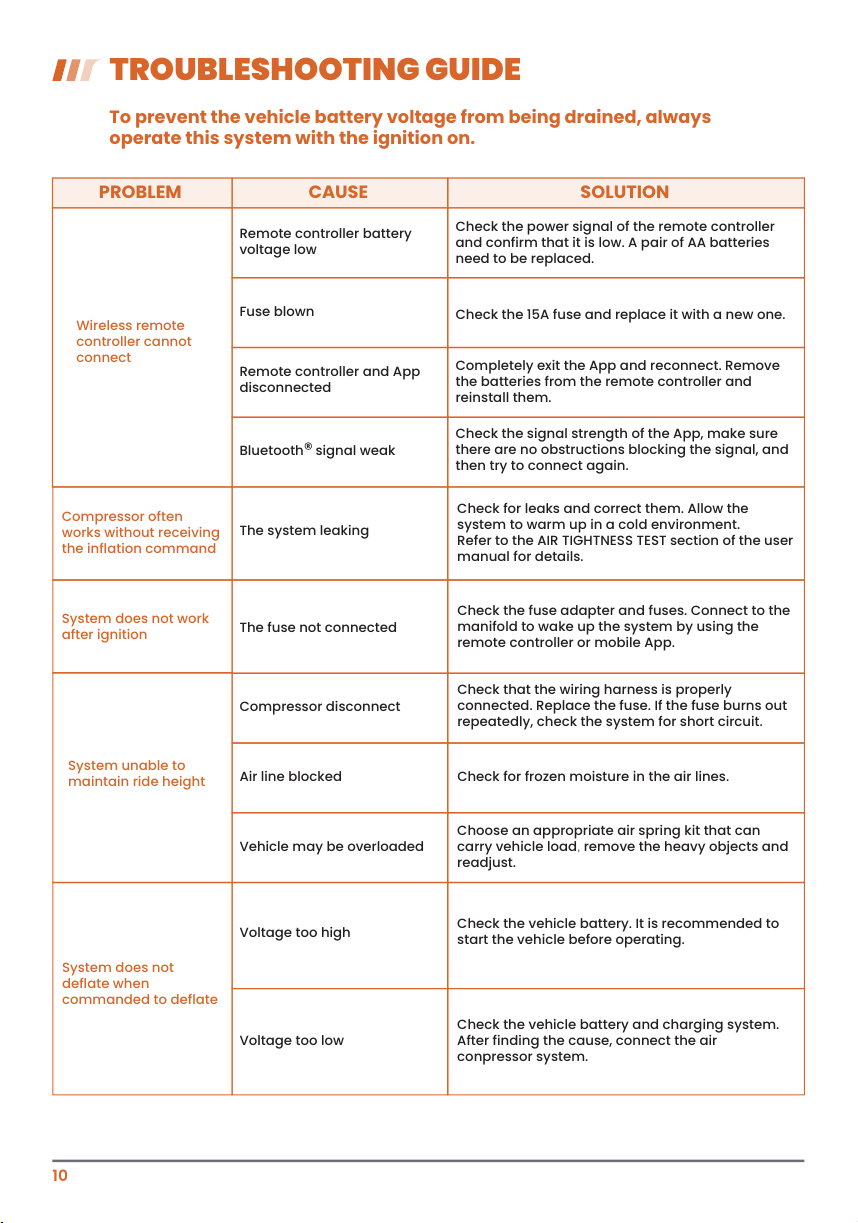
TROUBLESHOOTING GUIDE
Wireless remote
controller cannot
connect
PROBLEM CAUSE SOLUTION
Remote controller battery
voltage low
Fuse blown
Remote controller and App
disconnected
Check the 15A fuse and replace it with a new one.
Completely exit the App and reconnect. Remove
the batteries from the remote controller and
reinstall them.
Bluetooth
® signal weak
Check the signal strength of the App, make sure
there are no obstructions blocking the signal, and
then try to connect again.
Check the power signal of the remote controller
and confirm that it is low. A pair of AA batteries
need to be replaced.
To prevent the vehicle battery voltage from being drained, always
operate this system with the ignition on.
Compressor often
works without receiving
the inflation command
System does not work
after ignition
System unable to
maintain ride height
The system leaking
The fuse not connected
Compressor disconnect
Check the fuse adapter and fuses. Connect to the
manifold to wake up the system by using the
remote controller or mobile App.
Check that the wiring harness is properly
connected. Replace the fuse. If the fuse burns out
repeatedly, check the system for short circuit.
Air line blocked Check for frozen moisture in the air lines.
Vehicle may be overloaded
Choose an appropriate air spring kit that can
carry vehicle load, remove the heavy objects and
readjust.
Voltage too high
Check the vehicle battery. It is recommended to
start the vehicle before operating.
Check the vehicle battery and charging system.
After finding the cause, connect the air
conpressor system.
Voltage too low
Check for leaks and correct them. Allow the
system to warm up in a cold environment.
Refer to the AIR TIGHTNESS TEST section of the user
manual for details.
System does not
deflate when
commanded to deflate
11
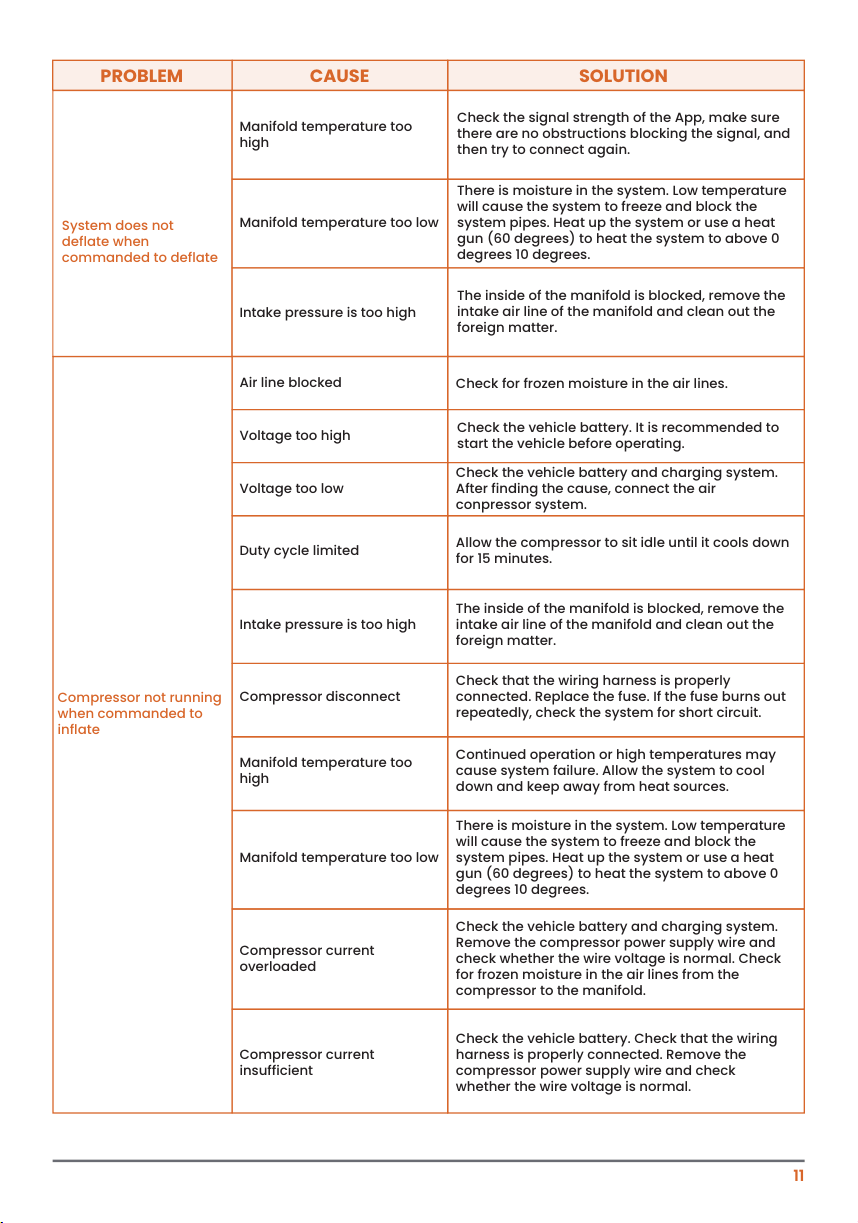
System does not
deflate when
commanded to deflate
PROBLEM CAUSE SOLUTION
Manifold temperature too
high
Manifold temperature too low
Intake pressure is too high
Check the signal strength of the App, make sure
there are no obstructions blocking the signal, and
then try to connect again.
There is moisture in the system. Low temperature
will cause the system to freeze and block the
system pipes. Heat up the system or use a heat
gun (60 degrees) to heat the system to above 0
degrees 10 degrees.
The inside of the manifold is blocked, remove the
intake air line of the manifold and clean out the
foreign matter.
Compressor not running
when commanded to
inflate
Manifold temperature too
high
Continued operation or high temperatures may
cause system failure. Allow the system to cool
down and keep away from heat sources.
Manifold temperature too low
There is moisture in the system. Low temperature
will cause the system to freeze and block the
system pipes. Heat up the system or use a heat
gun (60 degrees) to heat the system to above 0
degrees 10 degrees.
Voltage too high
Check the vehicle battery. It is recommended to
start the vehicle before operating.
Voltage too low
Check the vehicle battery and charging system.
After finding the cause, connect the air
conpressor system.
Compressor current
insufficient
Check the vehicle battery. Check that the wiring
harness is properly connected. Remove the
compressor power supply wire and check
whether the wire voltage is normal.
Compressor current
overloaded
Check the vehicle battery and charging system.
Remove the compressor power supply wire and
check whether the wire voltage is normal. Check
for frozen moisture in the air lines from the
compressor to the manifold.
Duty cycle limited
Allow the compressor to sit idle until it cools down
for 15 minutes.
Intake pressure is too high
The inside of the manifold is blocked, remove the
intake air line of the manifold and clean out the
foreign matter.
Compressor disconnect
Check that the wiring harness is properly
connected. Replace the fuse. If the fuse burns out
repeatedly, check the system for short circuit.
Air line blocked
Check for frozen moisture in the air lines.

12
REGULATORY INFORMATION
AIR TIGHTNESS TEST
• Once the air spring bag has been inflated, check all air line fittings for
air leaks. Spray the soapy water on the air fittings. If there is a leak,
you'll see the expanding bubbles around the leaking area.
• If leaking is at the tubing connection, check that you have a square
cut and that the tube is fully inserted into the air fitting.
• If you find a leak where the air fitting screws into the spring, tighten
the fitting another quarter turn and spray again.
Product Name: Air controller kit
Model: PIC-001
Manufacturer:MaXpeedingRods
Rated Voltage:
FCC ID: 2AC7Z-ESP32WROOM32E
IC ID: 21098-ESPWROOM32E
1. North American
FCC Compliance Statement:
This device complies with Part 15 of the FCC Rules. Operation is subject
to the following two conditions:
1) This device may not cause harmful interference, and
2)This device must accept any interference received, including
interference that may cause undesired operation
Before driving, make sure the system has no leaks and can hold air,
and the air lines and wiring harnesses are tied tightly.
NO leak Leak
Expanding bubbles
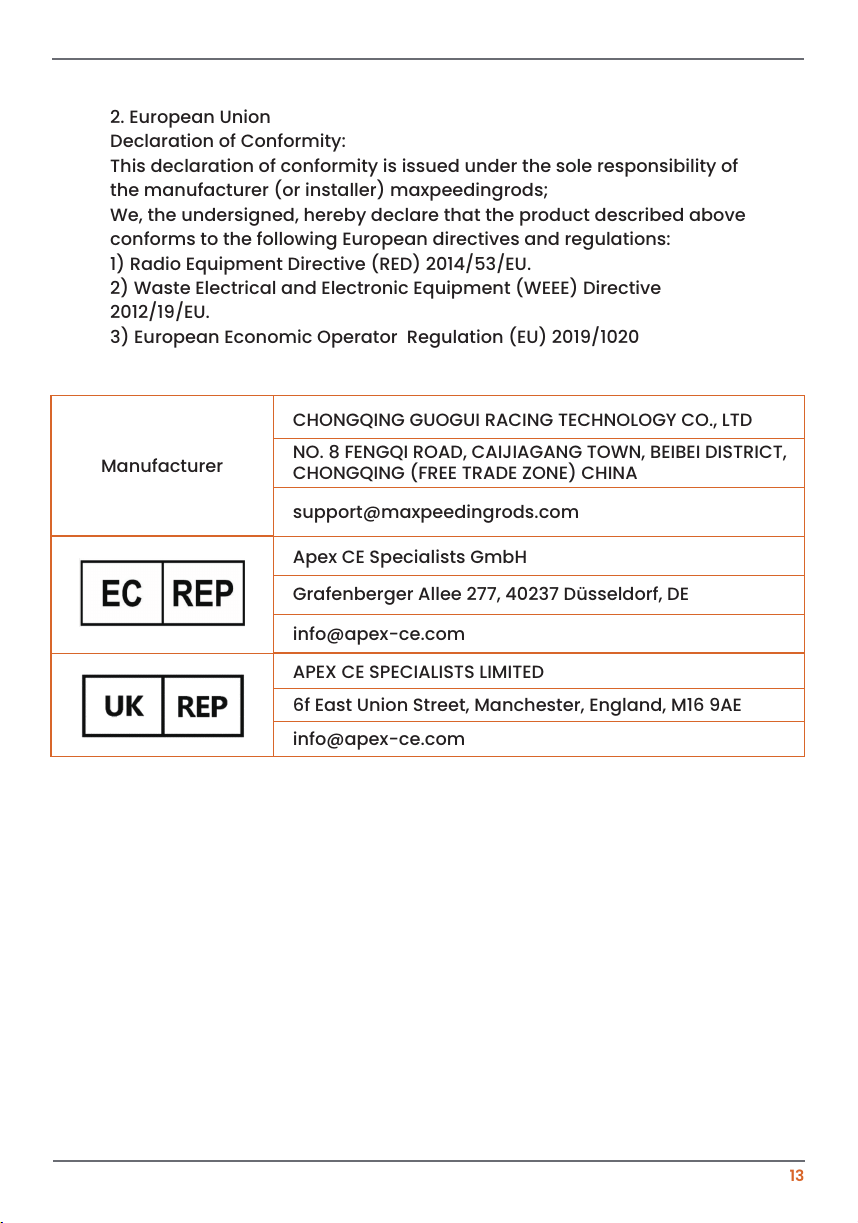
2. European Union
Declaration of Conformity:
This declaration of conformity is issued under the sole responsibility of
the manufacturer (or installer) maxpeedingrods;
We, the undersigned, hereby declare that the product described above
conforms to the following European directives and regulations:
1) Radio Equipment Directive (RED) 2014/53/EU.
2) Waste Electrical and Electronic Equipment (WEEE) Directive
2012/19/EU.
3) European Economic Operator Regulation (EU) 2019/1020
13
Manufacturer
CHONGQING GUOGUI RACING TECHNOLOGY CO., LTD
NO. 8 FENGQI ROAD, CAIJIAGANG TOWN, BEIBEI DISTRICT,
CHONGQING (FREE TRADE ZONE) CHINA
Grafenberger Allee 277, 40237 Düsseldorf, DE
Apex CE Specialists GmbH
6f East Union Street, Manchester, England, M16 9AE
APEX CE SPECIALISTS LIMITED

ABK-AAPGAOPEI-VLC-B