Installation & User Guide
Water Depth Sensor
YS7905-UC
Revision Jun. 29, 2023

. WELCOME!
. BEFORE YOU BEGIN
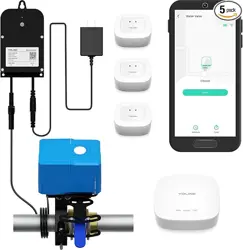
. WHAT’S INCLUDED
. REQUIRED ITEMS
. GET TO KNOW YOUR SENSOR
. POWER UP
. INSTALL THE APP
. ADD YOUR SENSOR TO THE APP
. INSTALLATION
. APP SETTINGS
. ALERTS
. TESTING
. APP & 3RD-PARTY SERVICES
. FACTORY RESET
. FIRMWARE UPDATE
. TROUBLESHOOTING
. BATTERY REPLACEMENT
. WARNINGS
. WARRANTY
. FCC STATEMENT
. IC STATEMENT
. CONTACT US
A
B
C
D
E
F
G
H
I
J
K
L
M
N
O
P
Q
R
S
T
U
V
01
02
04
05
06
07
08
09
11
15
18
19
21
21
22
23
24
26
28
29
31
32
TABLE OF CONTENTS
01
Welcome!
Thank you for purchasing YoLink products! We
appreciate you trusting YoLink for your smart
home & automation needs. Your 100%
satisfaction is our goal. If you experience any
problems with your installation, with our
products or if you have any questions that this
manual does not answer, please contact us right
away. See the Contact Us section for more info.
Thank you!
Eric Vanzo
Customer Experience Manager
A
User Guide Conventions
The following icons are used in this guide to
convey specific types of information:
Very important information
(can save you time!)
Good to know info but may not
apply to you
02
Download the most current version of the user
guide by scanning the QR code:
Before You Begin
Visit our Water Depth Sensor support page on
our website, for the latest installation guides,
additional resources, information and videos by
visiting:
https://shop.yosmart.com/pages/water-depth-
sensor-product-support
Or by scanning the QR code:
B
03
Your Water Depth Sensor connects to the
internet via a YoLink hub (SpeakerHub or the
original YoLink Hub), and it does not connect
directly to your WiFi or local network. In order
for remote access to the device from the app,
and for full functionality, a hub is required.
This guide assumes the YoLink app has been
installed on your smartphone, and a YoLink hub
is installed and online (or your location,
apartment, condo, etcetera, is already served by
a YoLink wireless network).
Before You Begin
B
04
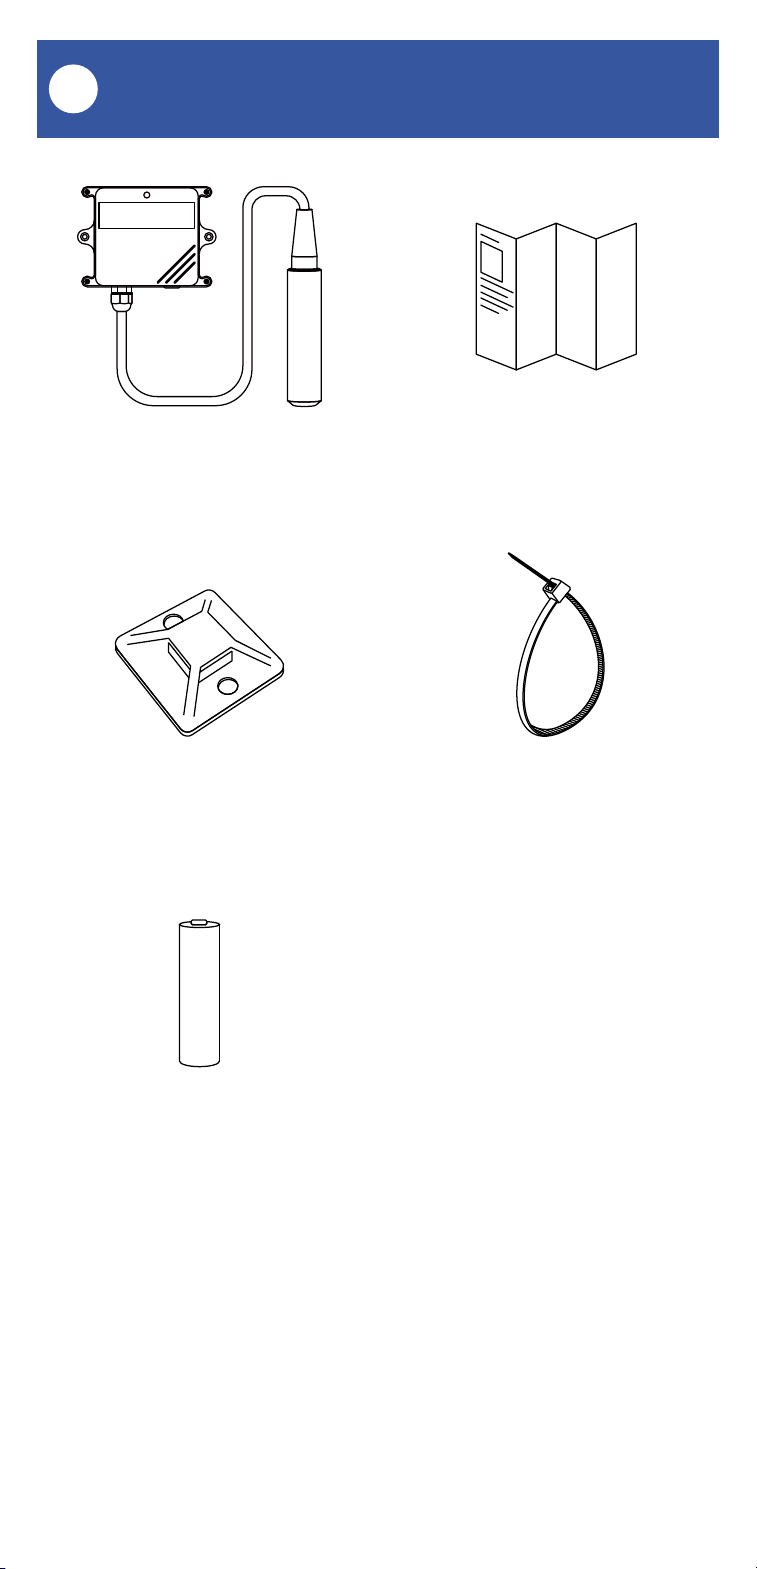
What's Included
C
Water Depth Sensor
Quick Start Guide
4 x Cable Tie Mount 8 x Cable Tie
1 x G.34615 Battery
Pre-Installed
05
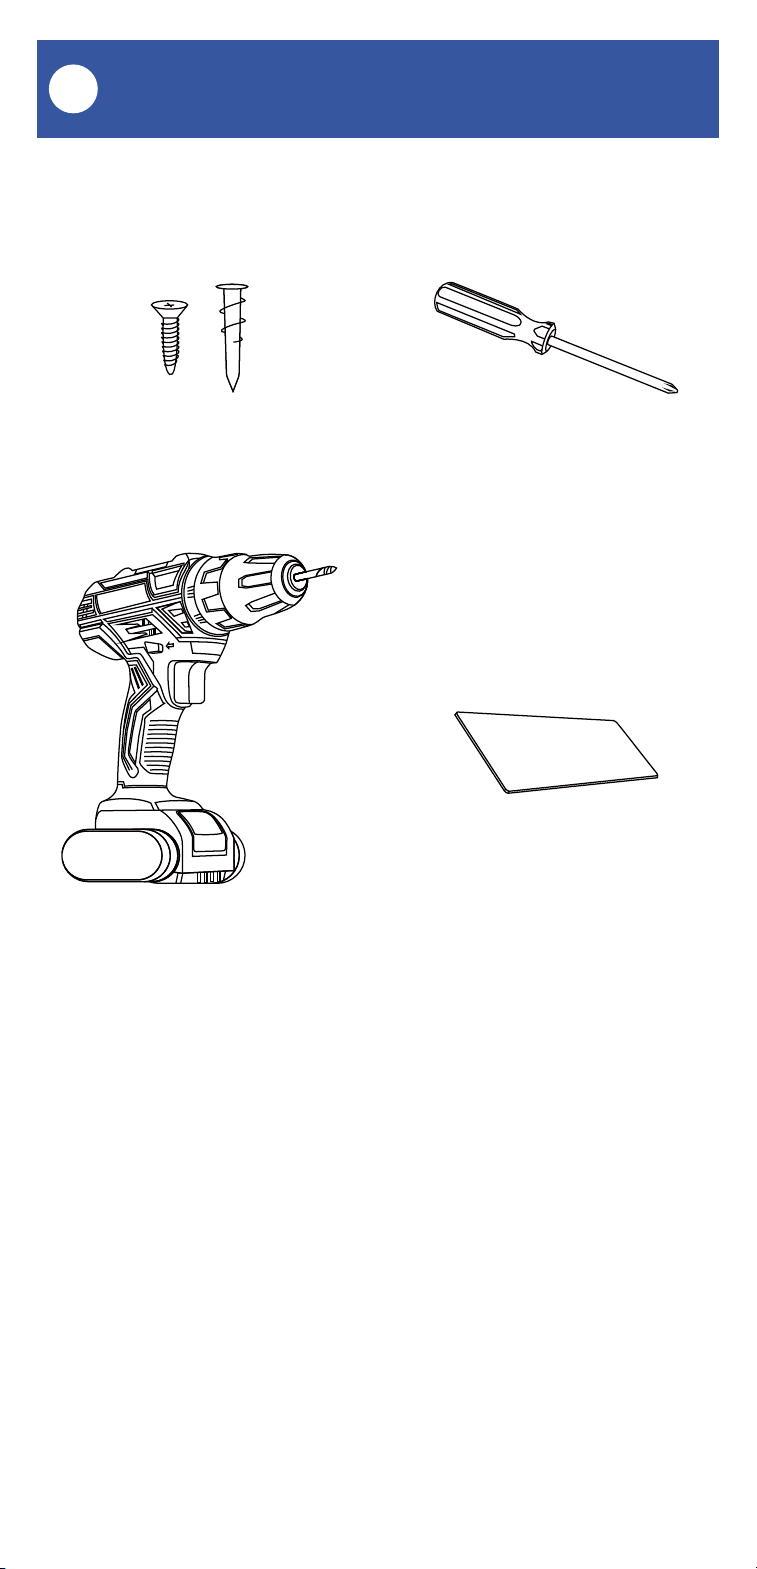
The following items may be required:
Required Items
D
Screws and Anchors
Drill with Drill Bits
Medium Phillips Screwdriver
Double-sided Mounting Tape
06
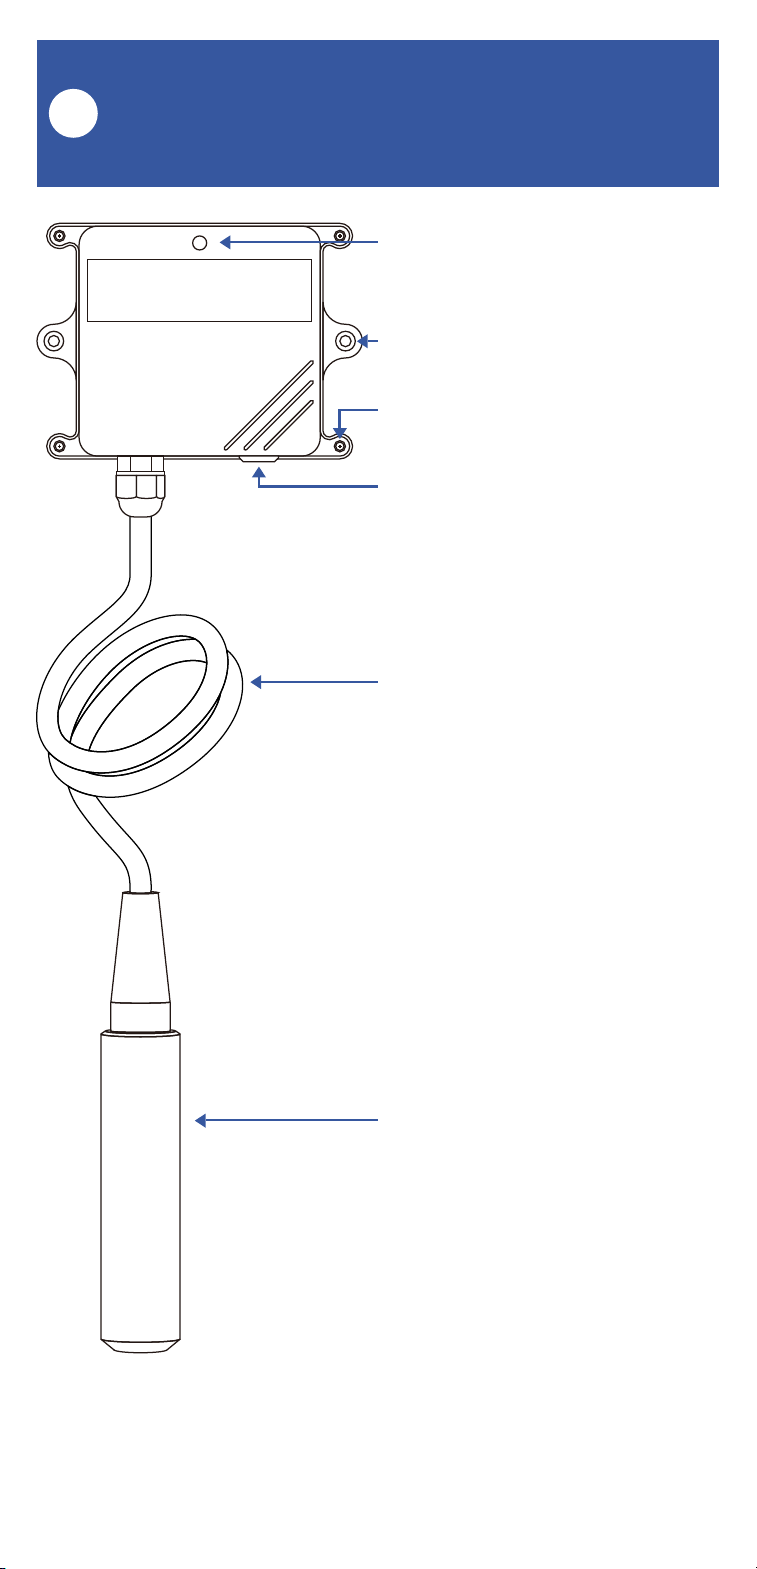
Status LED
Wall-mounting Holes (2)
Enclosure screws (4)
SET Button
(Press to refresh water depth
measurement)
Sensor Cable
Length: 16.4 feet (5 meters)
Pressure-Sensing Probe
Get to Know Your Water Depth
Sensor
E
07
Power Up
F
To power up the sensor for the first time, press
the SET button briefly, until the LED flashes red,
then green.
Status LED
SET button
Get to Know Your Water Depth
Sensor, Continued
E
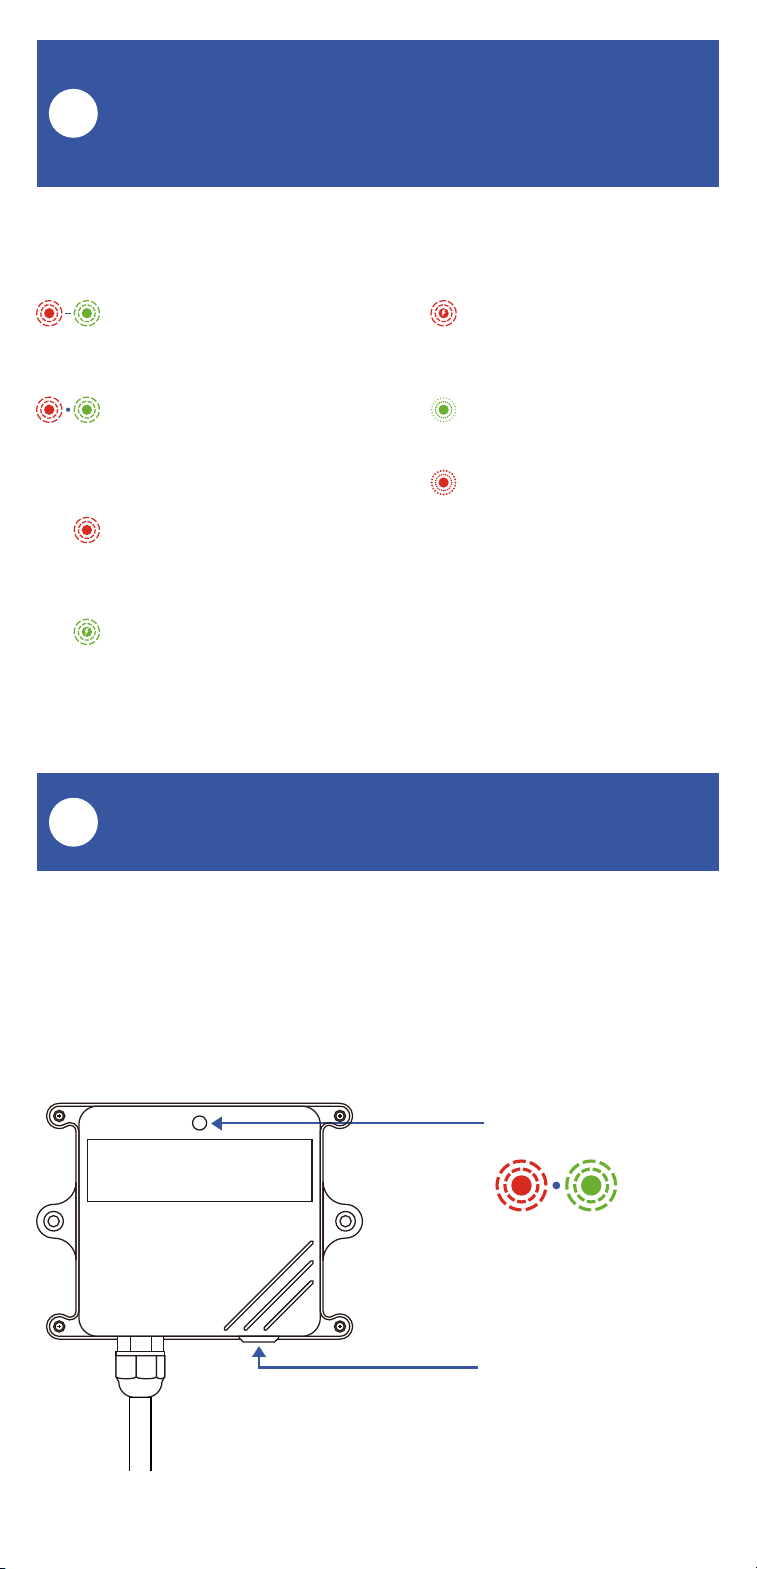
LED Behaviors
Blinking Red Once,
Then Green Once
Device Start-Up
Blinking Red And Green
Alternately
Restoring to Factory
Defaults
Blinking Red Once
Updating Water Depth
Measurement
Quick Blinking Green
Control-D2D Pairing in
Progress
Quick Blinking Red
Control-D2D Unpairing
in Progress
Slow Blinking Green
Updating
Fast Blinking Red Once
Every 30 Seconds
Low Battery, Replace
Batteries Soon

08
Install the App
G
Open the app and tap Sign up for an account.
You will be required to provide a username and a
password. Follow the instructions, to set up a
new account. Allow notifications, when
prompted.
You will immediately receive a welcome email
from no-r[email protected] with some helpful
information. Please mark the yosmart.com
domain as safe, to ensure you receive important
messages in the future.
Log in to the app using your new username and
password.
The app opens to the Favorite screen. This is
where your favorite devices and scenes will be
shown. You can organize your devices by room,
in the Rooms screen, later.
If you are new to YoLink, please install the app
on your phone or tablet, if you have not already.
Otherwise, please proceed to the next section.
Scan the appropriate QR code below or find the
“YoLink app” on the appropriate app store.
Apple phone/tablet
iOS 9.0 or higher
Android phone/tablet
4.4 or higher
09
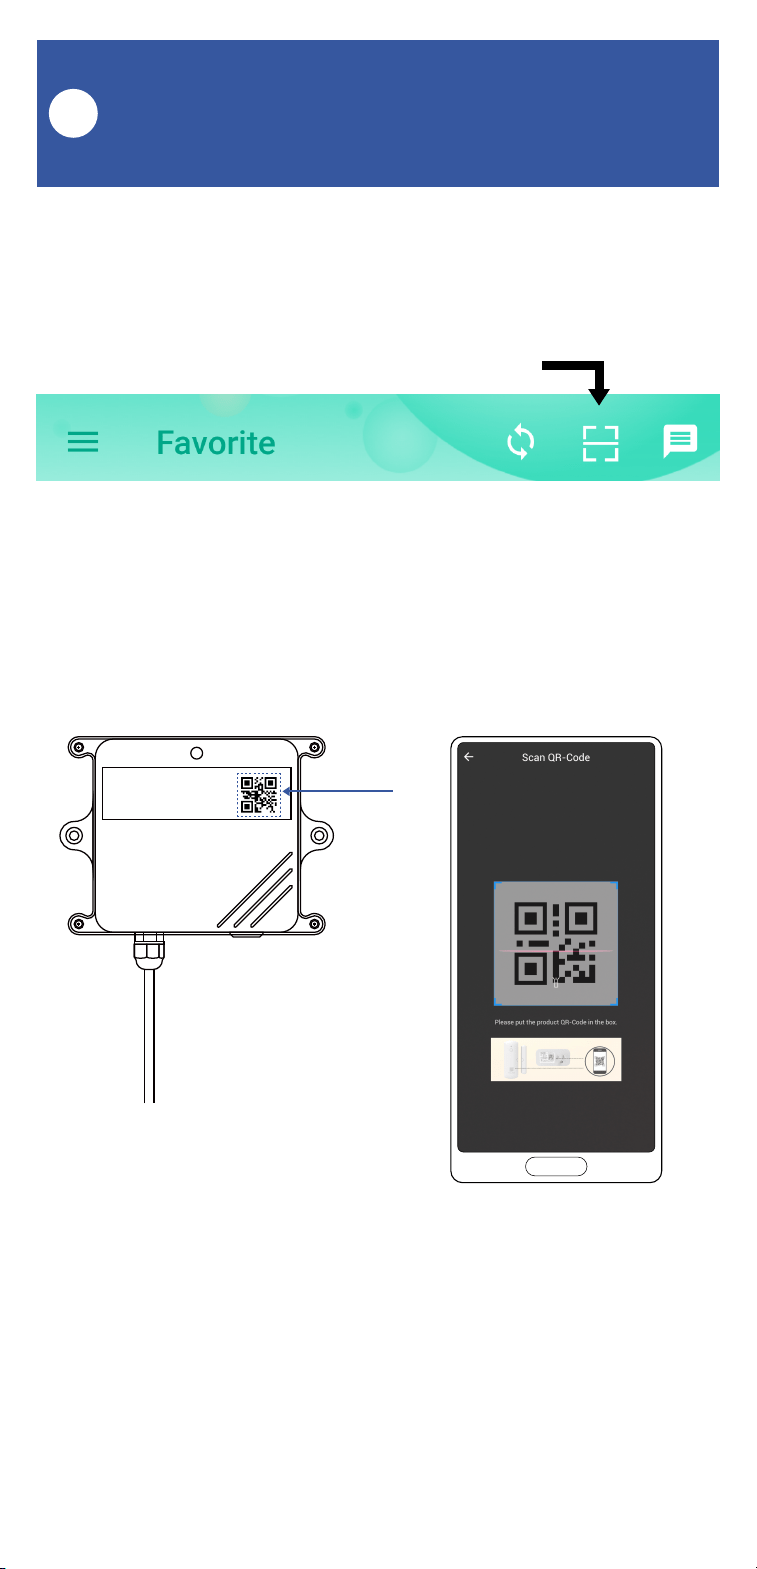
1. Tap Add Device (if shown) or tap the scanner
icon:
Scanner icon
2. Approve access to your phone’s camera, if
requested. A viewfinder will be shown on the
app.
3. Hold the phone over the QR code so that the
code appears in the viewfinder. If successful, the
Add Device screen will be displayed.
Add Your Water Depth Sensor
to the App
H
10
Add Your Water Depth Sensor
to the App, Continued
H
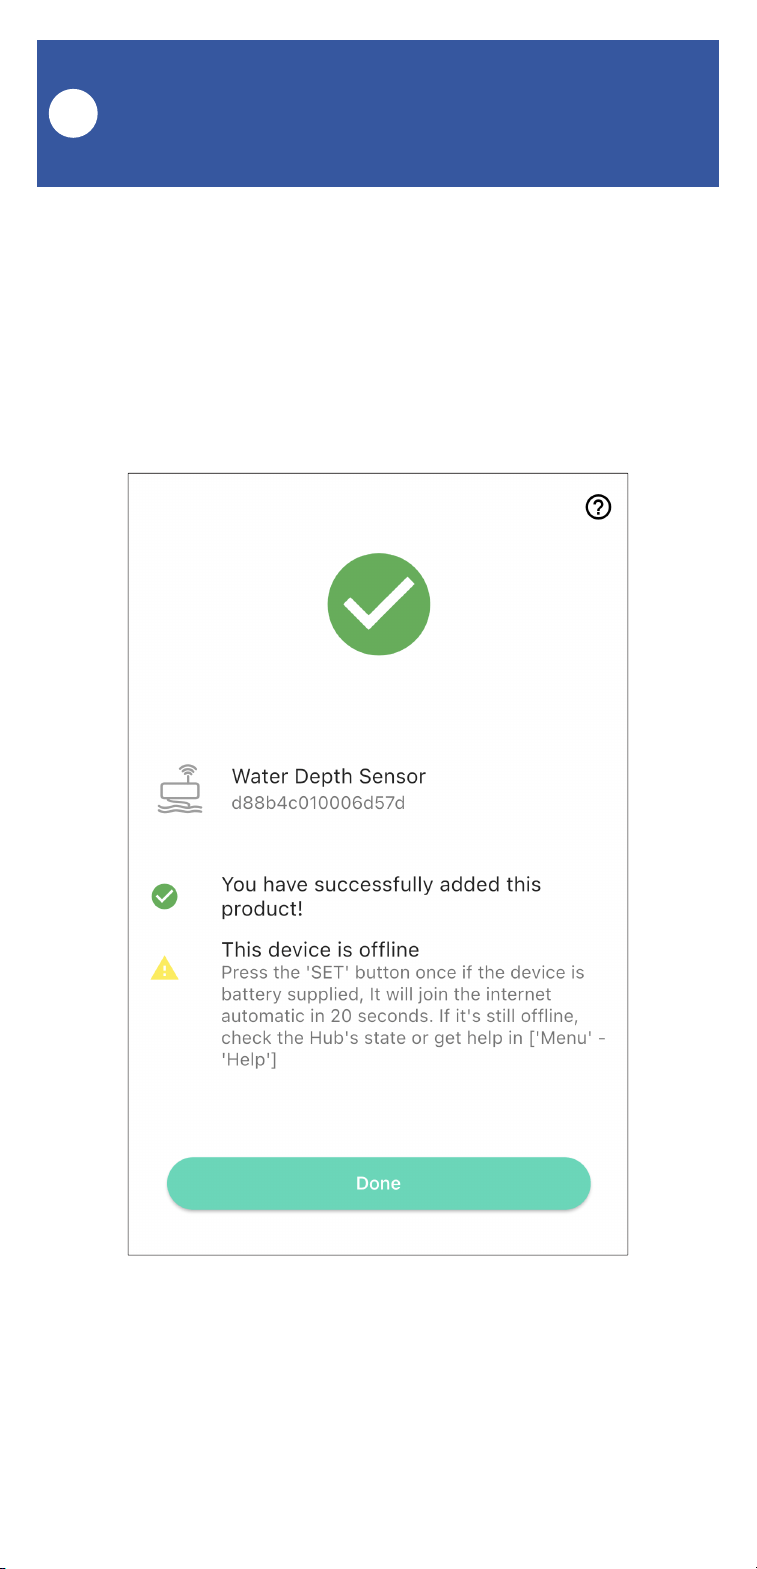
4. You can change the device name and assign it
to a room later. Tap Bind device.
5. If successful, the screen will appear as shown.
Tap Done.

11
Installation
I
Sensor use considerations:
The Water Depth Sensor measures the depth of
water in a tank or container using a pressure
sensor in the probe. The weight of the water is
sensed by the probe, and this data is converted
to water depth in the app. The probe is ideally
placed at the bottom of the tank or container.
If not placed at the bottom, the sensor will
indicate the depth of the water from the top of
the water to the probe location.
Sensor location considerations:
Before installing your Water Depth Sensor,
consider the following important factors:
1. The sensor body is designed for outdoor use,
but it must not be submerged; do not install the
sensor where it can possibly be submerged later.
Internal water damage to the sensor is not
covered by the warranty.
2. The sensor has a SET button and LED
indicator that should be accessible; install the
sensor at an accessible location.
12
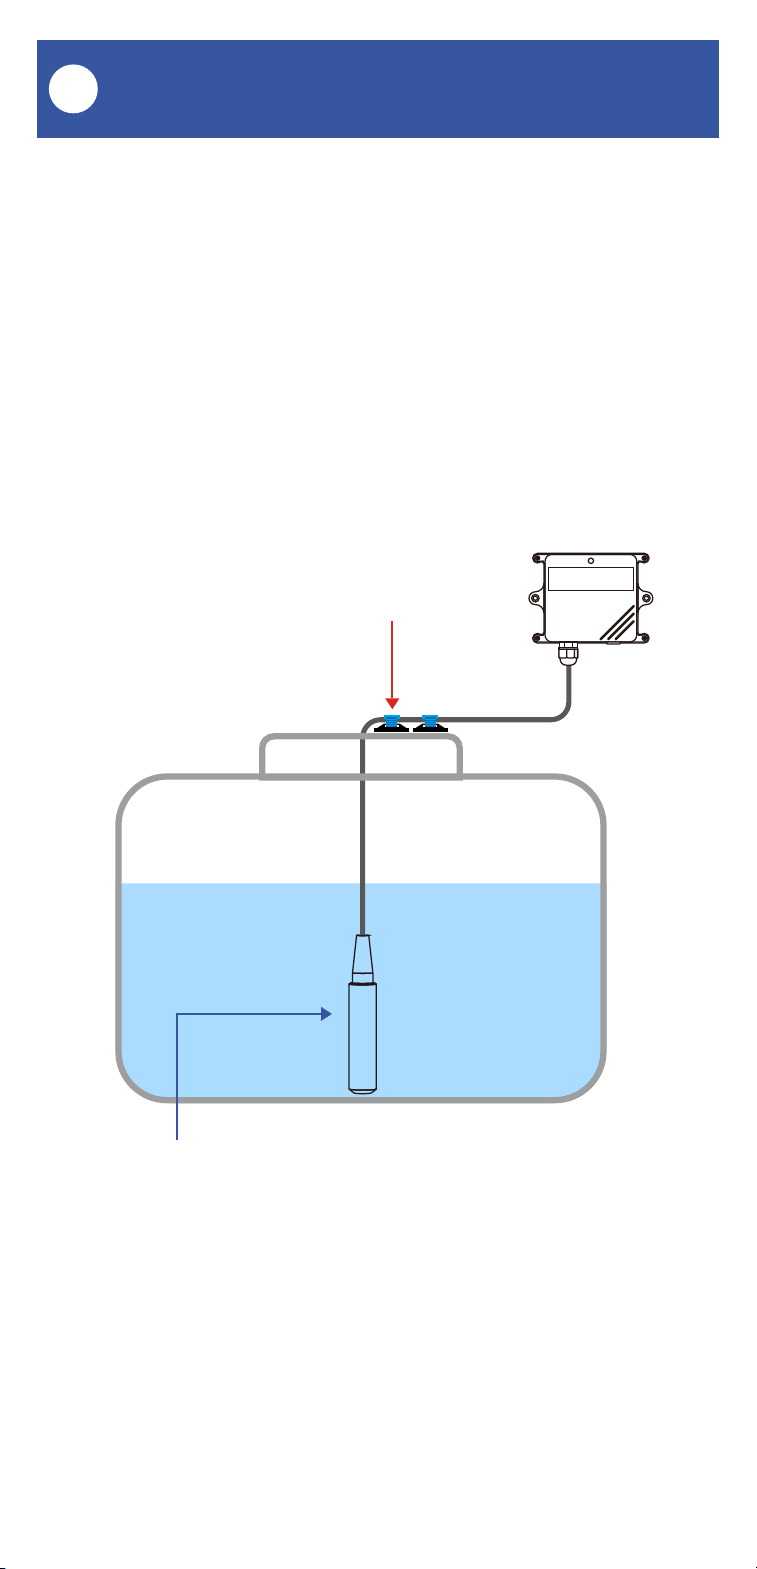
Install the Water Depth Sensor’s probe
1. Uncoil and suspend the probe into the water
container. The probe should sit on the bottom of
the container, in a vertical orientation as shown
in the diagram.
Cable Tie & Cable
Tie Mount
Probe should be placed at the bottom of the
tank/well/container, in a vertical orientation, as
shown.
Installation, Continued
I
13
Installation, Continued
I
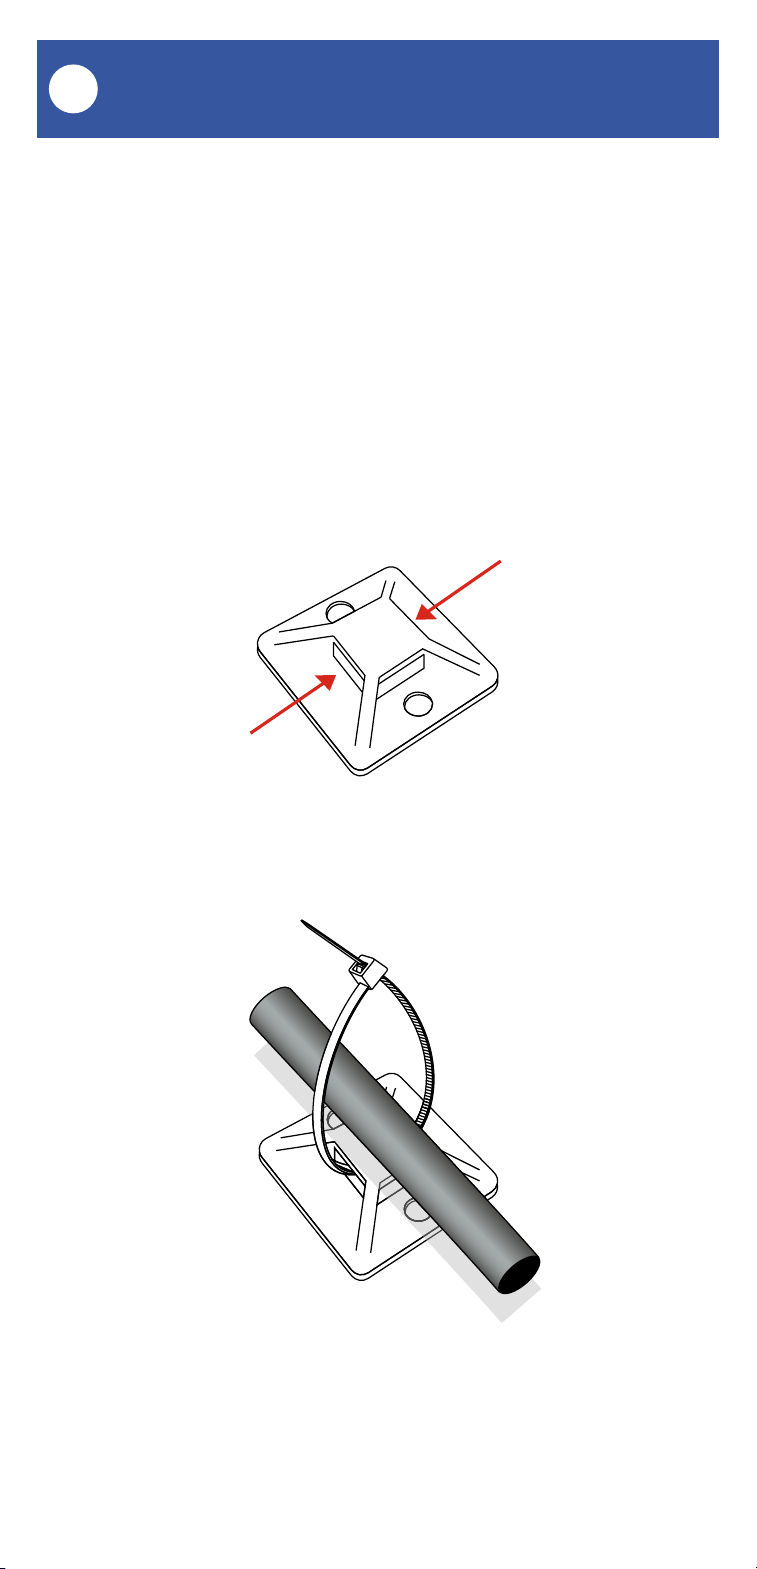
2. When the correct position is attained, secure
the probe cable to the container sidewall, lid, or
other fixed and stable surface, so that the probe
position does not change. You can use cable ties
and mounts to secure the probe cable, but to
avoid damaging the cable, do not overtighten the
ties or otherwise pinch or crimp the cable.

14
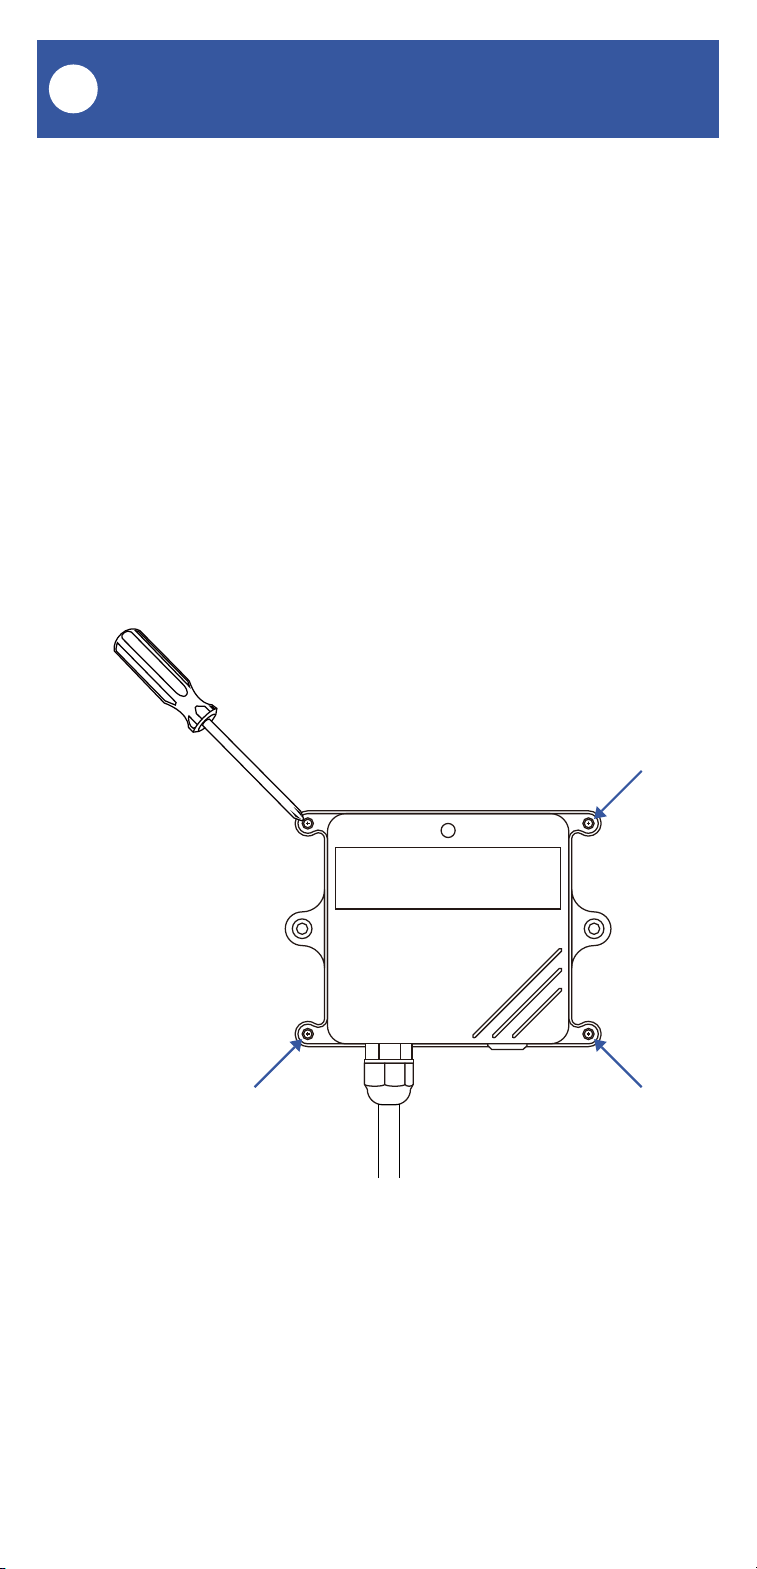
Install the Water Depth Sensor (main assembly)
Determine how you will mount the sensor to the
wall or surface, and have hardware and anchors
appropriate for the wall surface on hand.
The sensor is intended to be wall-mounted,
using screws. It can be placed in another
enclosure. If using alternative methods, such as
mounting tape, ensure the sensor is securely
installed, so as to not fall off the wall later
(physical damage is not covered by the
warranty).
1. Holding the sensor in position, mark the
location of the sensor’s four mounting holes to
the wall surface.
2. If using anchors, install them, per the
manufacturer’s instructions.
3. Insert and tighten one screw in each of the
sensor’s mounting holes, ensuring the sensor is
secured to the wall or mounting surface.
Installation, Continued
I
15
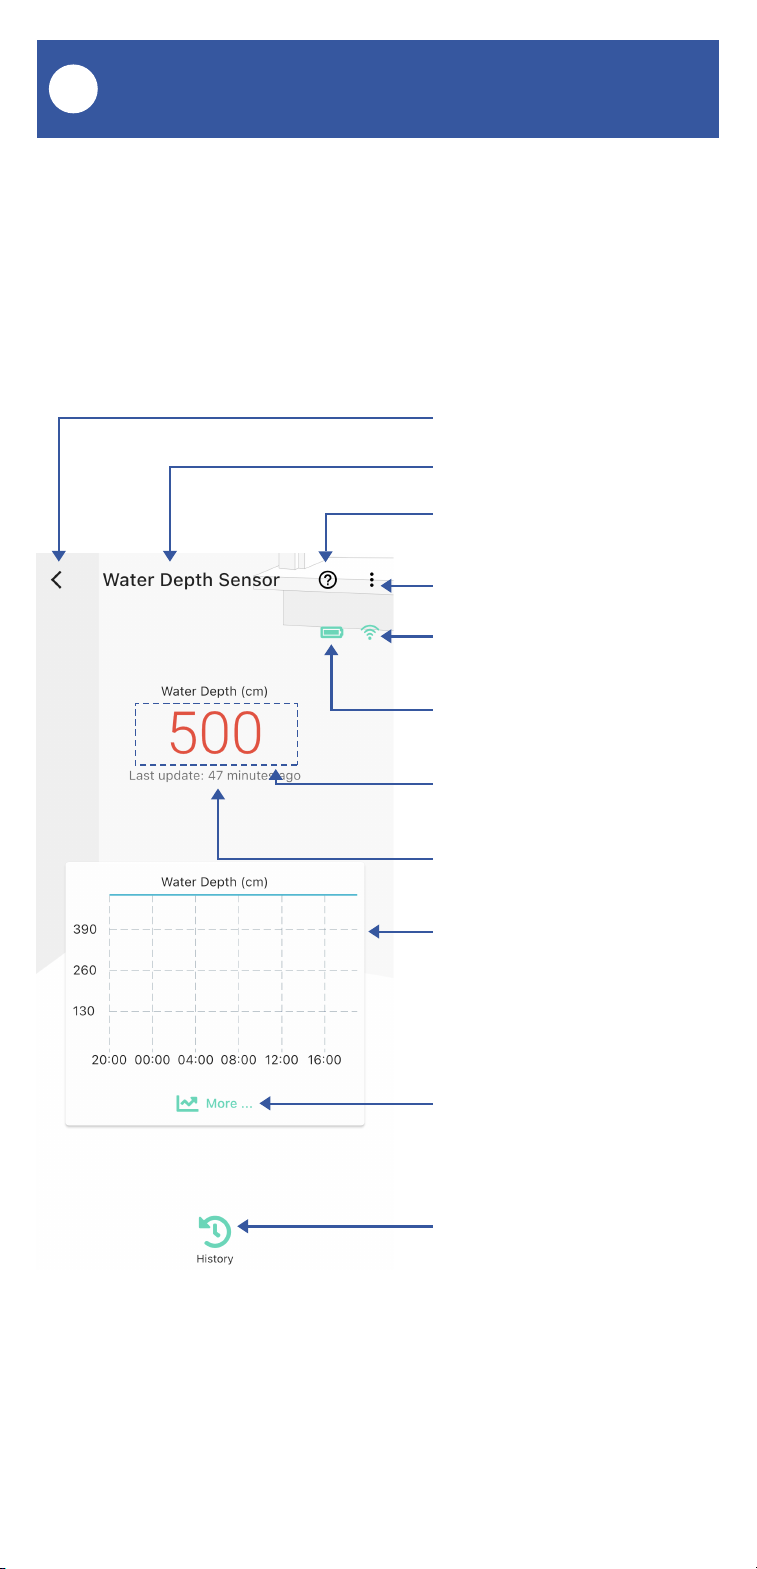
App Settings
J
In the app, tap on your Water Depth Sensor icon.
Your main screen should be similar to the one
shown below.
Tap to exit this screen
Device name
Tap for contact & support
resources
Tap for device Detail Screen
Connection status of sensor
and hub
Device battery level
indicator
Water depth (in centime-
ters)
Last update time
Water level historical chart
Tap for additional charts
and to export data
Tap for historical logs of
water level alerts
16
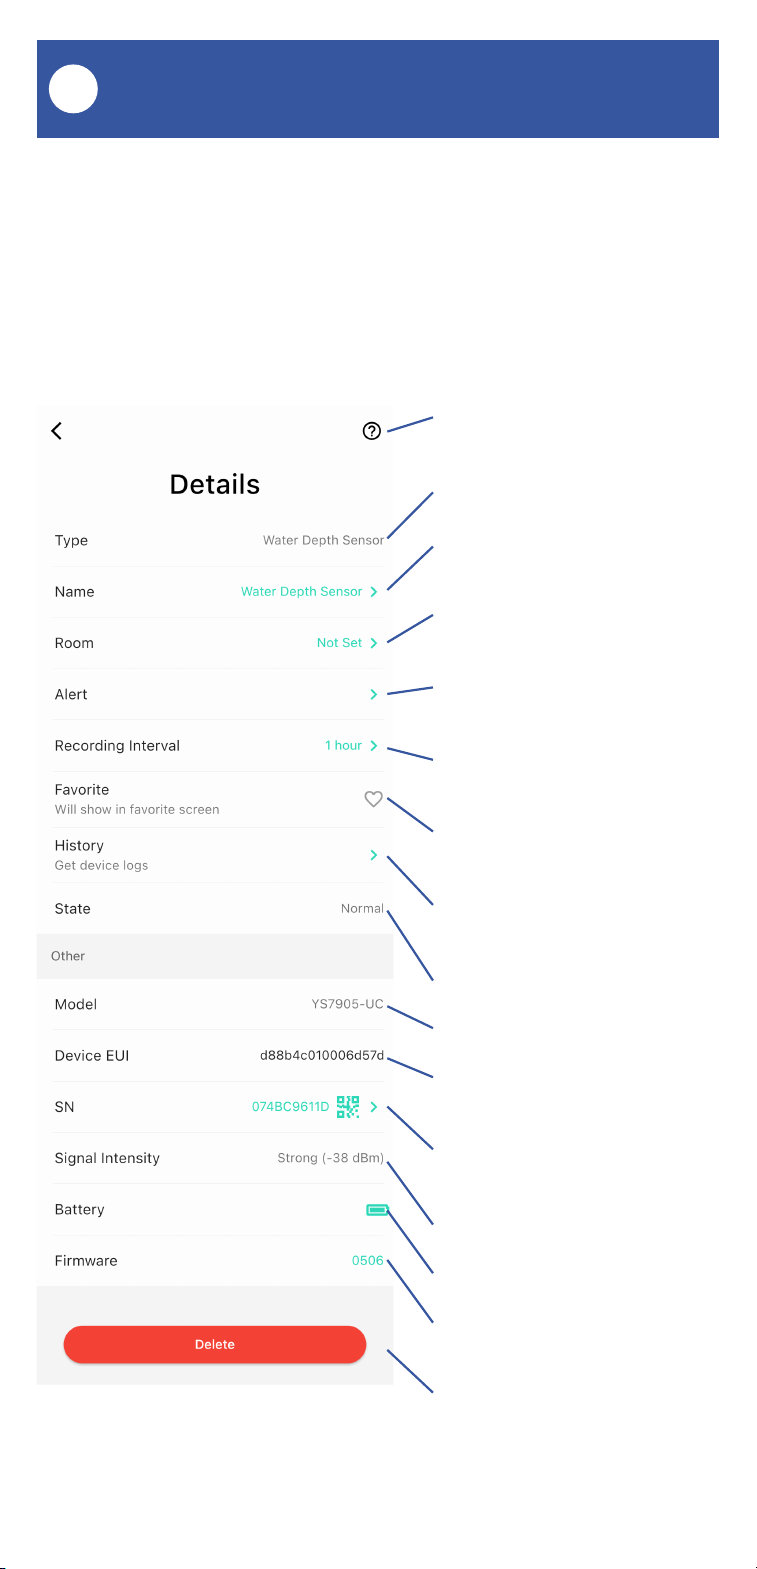
App Settings, Continued
J
Tap for contact & support
resources
Device type
Device name/label
Tap to edit
Device Room
Tap to edit
Tap to edit alerts
(see next page)
Recording interval
Tap to edit
Favorite status
Tap to edit
Alert history
Tap to view
Device state
Model number
Device Equipment
Unique Identifier
Device serial number
Tap to view QR code
Signal intensity
Battery level
Firmware version
See page 22
Tap to delete this device
From the device main screen shown on the
previous page, tap the 3 vertical dots in the
upper right corner, to go to the device details
screen, as shown below.

17
Tap to save your settings
Alarm Strategy assigned
to this device.
Tap to edit
Tap to see your alarm
strategies
Tap to edit your high and
low water level alerts via
roller wheels
Tap to edit your high and
low water level alerts on
the slider bar
Tap to enable/disable Alert
Reminders
Tap to edit Alert Reminders
(from O to 60 minutes)
Tap to enable/disable Alert
Interval
Tap to edit Alert Interval
(from O to 60 minutes)
From the device main screen shown on the
previous page, tap the 3 vertical dots in the
upper right corner, to go to the device details
screen, as shown below.
App Settings, Continued
J

18
About Alerts: an alert is the state or status of a
device when it detects an abnormal condition,
such as high water level. Alert also refers to the
notifications that you or other recipients can
receive to notify you of the device's abnormal
condition, for example to receive an alert about
low water for a storage tank. Finally, "alert" is a
verb, such as "the water depth sensor alerted at
seven this morning". General alert/notification
settings are found in the Alarm Strategy section
of the app - this is where you determine if you
would prefer to receive, for example, an email or
a SMS message when one of your sensors
alerts. But a device can have its own specific
alert settings, such as for the Water Depth
Sensor:
Alert Reminder: the Alert Reminder duration
defines the duration between the first alert and
the first reminder of the alert. If you want to be
reminded of an alert 10 minutes after the first
alert, set this duration to 10 minutes. Leave or
set this duration to 0 or move the disable/enable
switch to the disabled position if you do not wish
to be reminded.
Alert Interval: the Alert Interval duration defines
the duration of additional Alert Reminders. This
duration would apply to the second reminder,
and any subsequent alert reminders. If you
would like to be reminded at one hour intervals
after the first reminder, set this duration to 60
minutes. If you do not want additional reminders
after the first reminder, set the duration to 0 or
slide the enable/disable switch to disabled.
Alerts
K

19
We recommend testing your new sensor before
leaving it in operation, to confirm it is working
correctly, and the device settings are correct:
1. Test the sensor for accuracy. After placing the
sensor and securing the cable, press the
sensor's SET button to refresh the depth reading.
Then, check the water depth as indicated in the
app. Next the depth reported should be
compared to a measurement method or tool that
you consider accurate. This method could be as
simple as using a weighted string or fishing line,
marked with distance intervals. Compare the
depth indicated by the sensor to the depth
indicated by your alternative measuring method.
Confirm the two figures are the same or within a
tolerable distance of accuracy. If they are not,
double-check your measurements and verify the
sensor probe is placed at the bottom of the tank
or container. Make the necessary adjustments or
corrections, then repeat this testing step.
2. After testing for accuracy, test the sensor for
response to one or both of your high or low
water alerts. You will need to set low water level
alert for this test. In the app, set a low water alert
slightly lower than the current water level. For a
low-water level test, pull on the probe cable and
lift the sensor probe up higher in the water, so
that it responds to the new, "lower", water level.
(Since the probe reports the pressure of the
water on it, and this data is converted to water
depth, if it is raised higher the pressure will be
reduced, indicating a drop in water level.)
Testing
L

20
3. Simulating a high water level may require the
addition of water to the tank or container. After
setting a high-water alert level just above the
current water level, add water to the tank or
container, to the high-water alert level. Verify the
sensor alerts accordingly.
Testing, Continued
L

21
Please visit our website’s Support page for the
YoLink app guide and for product-specific app
settings and instructions:
www.yosmart.com/support-and-service
App & 3rd-Party Services
M
Factory reset will erase device settings and
restore it to factory default settings. Doing a
factory reset will not remove the device from
your account and it will not harm the device, or
lose any data or require you to redo your
automations, etc.
Instructions:
Hold the SET button down for 20-30 seconds,
until the LED blinks red and green alternately.
Then, release the button. (Holding the button
down longer than 30 seconds will abort the
factory reset operation)
Factory reset will be complete when the LED
stops blinking.
Only deleting a device from the app will remove
it from your account. Factory reset will not
delete the device from the app.
Factory Reset
N

22
Your YoLink products are constantly being
improved, with new features added. It is
periodically necessary to make changes to your
device's firmware. For optimal performance of
your system, and to give you access to all
available features for your devices, these
firmware updates should be installed when they
become available.
In the Detail screen of each device, at the
bottom, you will see the Firmware section, as
shown in the image below. A firmware update is
available for your device if it says "#### ready
now"
Tap in this area to start the update.
The device will update automatically, indicating
progress by percentage-complete. You may use
your device during the update, as the update is
performed "in the background". The LED will
slowly blink green during the update, and the
update may continue for several minutes beyond
the LED turning off.
Firmware Update
O

23
Troubleshooting
P
Problem:
The Water Depth Sensor is offline
Possible Solutions:
1) The Water Depth Sensor may be off. Repeat
the Power up steps, if needed.
2) If this did not resolve the problem, replace
the battery.
Problem:
The Water Depth Sensor is not reporting the
correct depth
Possible Solutions:
1) The probe is not at the bottom of the tank or
container
2) The liquid being monitored is not water. The
sensor is optimized for freshwater.
Saltwater, septic tank water, etcetera,
requires adjusting the specific gravity valve
for the liquid. As of the printing of this user
guide, the specific gravity value can not be
edited.
Other issues:
Please contact us via the info on the last page of
this guide.
24
2. Open the sensor enclosure by pulling the two
pieces apart. The two pieces are joined by wiring;
use care to not damage the wiring.
3. Pull the battery assembly free from the
mounting tape by using a gentle prying motion
with your fingers.
The preinstalled battery in your Water Depth
Sensor should give you upwards of 10 years
between battery changes. When it is time to
replace the battery, please replace it using only a
part number G.34615 battery, available on our
website, and follow these instructions:
1. Using a small or medium Phillips screwdriver,
remove the four screws on the front of the
enclosure as shown. Carefully set them to the
side.
Battery Replacement
Q
25
4. Disconnect the battery assembly cable and
remove the old battery.
5. Connect the new battery assembly cable to
the sensor, and seat the battery assembly in the
cut-out section of the PC board.
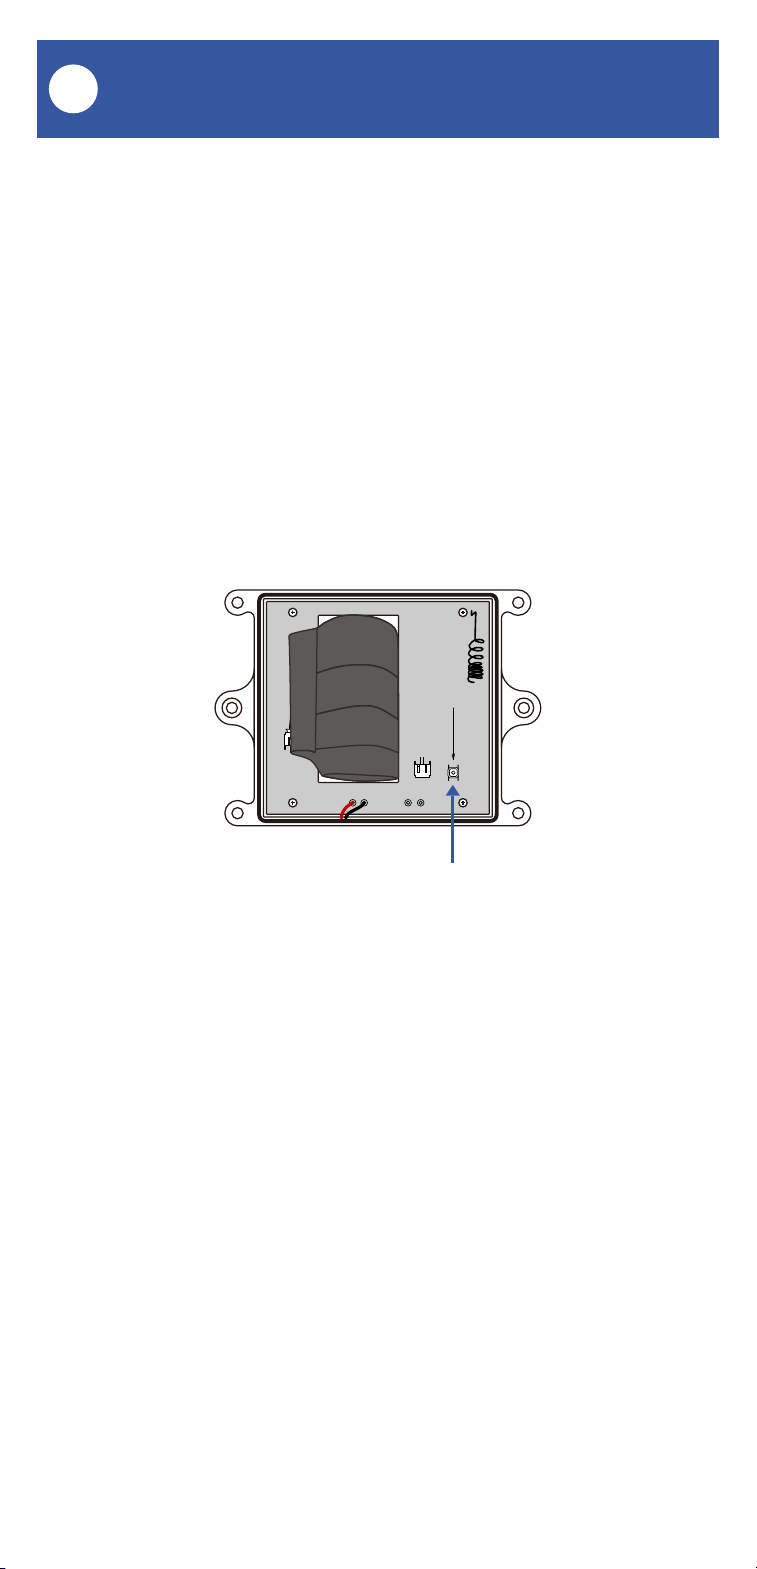
6. Press the button, as shown, to reset the
sensor's battery life meter.
7. Check the sensor in the app, to confirm it is
online and the battery level icon indicates a full
battery.
8. Reassemble the two parts of the enclosure.
Reinsert the four housing screws, and tighten
them firmly to close the enclosure. To ensure the
waterproof characteristics of the enclosure,
examine the enclosure and check for uneven
gaps between the two parts, that might allow
water in.
Battery Replacement, Continued
Q
Press this button after replacing the battery

26
Please install, operate and maintain the
Water Depth Sensor only as outlined in this
manual. Improper installation or use may
damage the unit and/or void the warranty.
Do not install or use the device outside of
the temperature and humidity range listed in
the environmental specifications.
If used outdoors, for the maximum life of the
device, provide overhead cover or a
protective enclosure. This can protect it
from the damaging effects of intense direct
sunlight and/or rain over a period of years.
Do not immerse or allow the devices to be
immersed or submerged in water.
Avoid placing the devices in extremely dirty
or dusty environments.
If the device does get dirty, please clean it
by wiping it down with a clean dry cloth. Do
not use strong chemicals or detergents,
which may damage or discolor the exterior
and/or damage the electronics, voiding the
warranty.
Do not install the device where it may be
subjected to vandalism, abuse, physical
impacts or strong vibrations. Physical
damage is not covered by the warranty.
Warnings
R

27
Power the controller only with new part
number G.34615 lithium battery assembly.
Do not use rechargeable battery, do not use
other type battery (e.g. zinc blend).
If storing the controller for extended periods,
remove the battery.
Replace the battery only with one new part
number G.34615 lithium battery assembly.
Do not use other types of batteries, such as
zinc blend or rechargeable batteries.
The G.34515 lithium battery assembly is
available for purchase on our website
Warnings, Continued
R

28
Warranty
2 Year Limited Electrical Device Warranty
YoSmart warrants to the original user of this
product that it will be free from defects in
materials and manufacturing workmanship,
under normal use, for 2 years from the date of
purchase for the Water Depth Sensor.
The warranty does not cover abuse or misused
products, nor does this warranty apply to
products that have been improperly installed,
were modified, or put to a use other than
designed. This warranty does not cover products
subjected to acts of God (such as floods,
lightning strike or electrical surge, or
earthquakes, etc.).
This warranty is limited to repair or replacement
of the product only at YoSmart’s sole discretion.
YoSmart will NOT be liable for any costs
associated with removing or reinstalling the
product. YoSmart will NOT be liable for direct or
indirect or consequential damages to persons or
property resulting from the use of this product.
The warranty only covers the cost of
replacement products or parts. It does not cover
shipping and handling charges or fees.
To implement this warranty, please refer to the
Contact Us section of this guide.
S

29
This equipment has been tested and found to
comply with the limits for a Class B digital device,
pursuant to part 15 of the FCC Rules. These
limits are designed to provide reasonable
protection against harmful interference in a
residential installation. This equipment
generates, uses and can radiate radio frequency
energy and, if not installed and used in
accordance with the instructions, may cause
harmful interference to radio communications.
However, there is no guarantee that interference
will not occur in a particular installation. If this
equipment does cause harmful interference to
radio or television reception, which can be
determined by turning the equipment off and on,
the user is encouraged to try to correct the
interference by one or more of the following
measures: Reorient or relocate the receiving
antenna, connect the equipment into an outlet on
a circuit different from that to which the receiver
is connected, increase the separation between
the equipment and receiver, consult the dealer or
an experienced radio/TV technician for help.
This device complies with part 15 of the FCC
Rules. Operation is subject to the following two
conditions:
1) This device may not cause harmful
interference
2) This device must accept any interference
received, including interference that may cause
undesired operation. Any changes or
modifications not expressly approved by the
party responsible for compliance could void the
user's authority to operate the equipment.
FCC Statement
T

30
FCC Statement, Continued
PRODUCT NAME:
WATER DEPTH SENSOR
PARTY:
YOSMART, INC.
TELEPHONE:
831-292-4831
MODEL NUMBER:
YS7905-UC
ADDRESS:
15375 BARRANCA PKWY SUITE J-107, IRVINE,
CA 92618 USA
EMAIL:
SERVICE@YOSMART.COM
T

31
IC Caution
-English:
This device complies with Industry Canada
licence-exempt RSS standard(s). Operation is
subject to the following two conditions:
(1) This device may not cause interference, and
(2) This device must accept any interference,
including interference that may cause undesired
operation of the device.
To maintain compliance with RSS-102 RF
Exposure guidelines, This equipment should be
installed and operated with minimum 20cm
distance between the radiator and your body:
Use only the supplied antenna.
-French:
Le présentappareilestconf orme aux CNR d'
Industrie Canada applicables aux appareils radio
exempts de licence. L'exploitationestautorisée
aux deux conditions suivantes:
(1) l'appareil ne doit pas produire de brouillage,
et
(2) I' utilisateur de l'appareildoit accepter tout
brouillageradioélectriquesubi, mêmesi le
brouillageest susceptible d'encompromettre le
fonctionnement.
Pour être conforme aux lignes directrices
d'exposition RF RSS-102, cet équipement doit
être installé et exploité à une distance minimale
de 20cm entre le radiateur et votre corps:
n'utilisez que l'antenne fournie.
U

32
We are here for you, if you ever need any
assistance installing, setting up or using a
YoLink app or product!
Need help? For fastest service, please email us
24/7 at [email protected]
Or call us at 831-292-4831 (US phone support
hours: Monday - Friday, 9AM to 5PM Pacific)
You can also find additional support and ways to
contact us at:
www.yosmart.com/support-and-service
Or scan the QR code:
Finally, if you have any feedback or suggestions
for us, please email us at
Thank you for trusting YoLink!
Eric Vanzo
Customer Experience Manager
Support Home Page
15375 Barranca Parkway Ste. J-107 | Irvine, California 92618
© 2023 YOSMART, INC IRVINE, CALIFORNIA
Contact Us
V