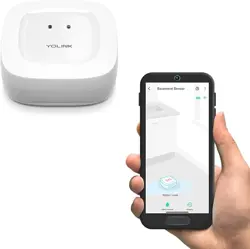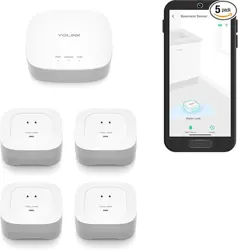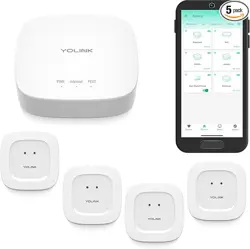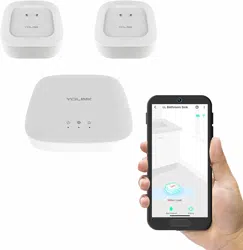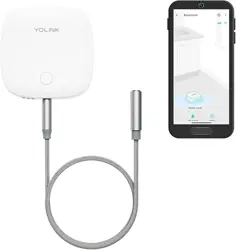

Water Leak Sensor 2
YS7904-UC
Installaon & User Guide
Rev 1.0

Contents
In the Box ·············································································1
Introducon ·········································································2
Set Up ··················································································5
Installaon ···········································································7
Using the YoLink App ···························································14
················About YoLink Control ······························ ············23
·27Maintenance ···················· ················································
Specificaons ········································ ·····30························
Troubleshoong ·································································31
Warning ·············································································32
Customer Service & Warranty ··············································34
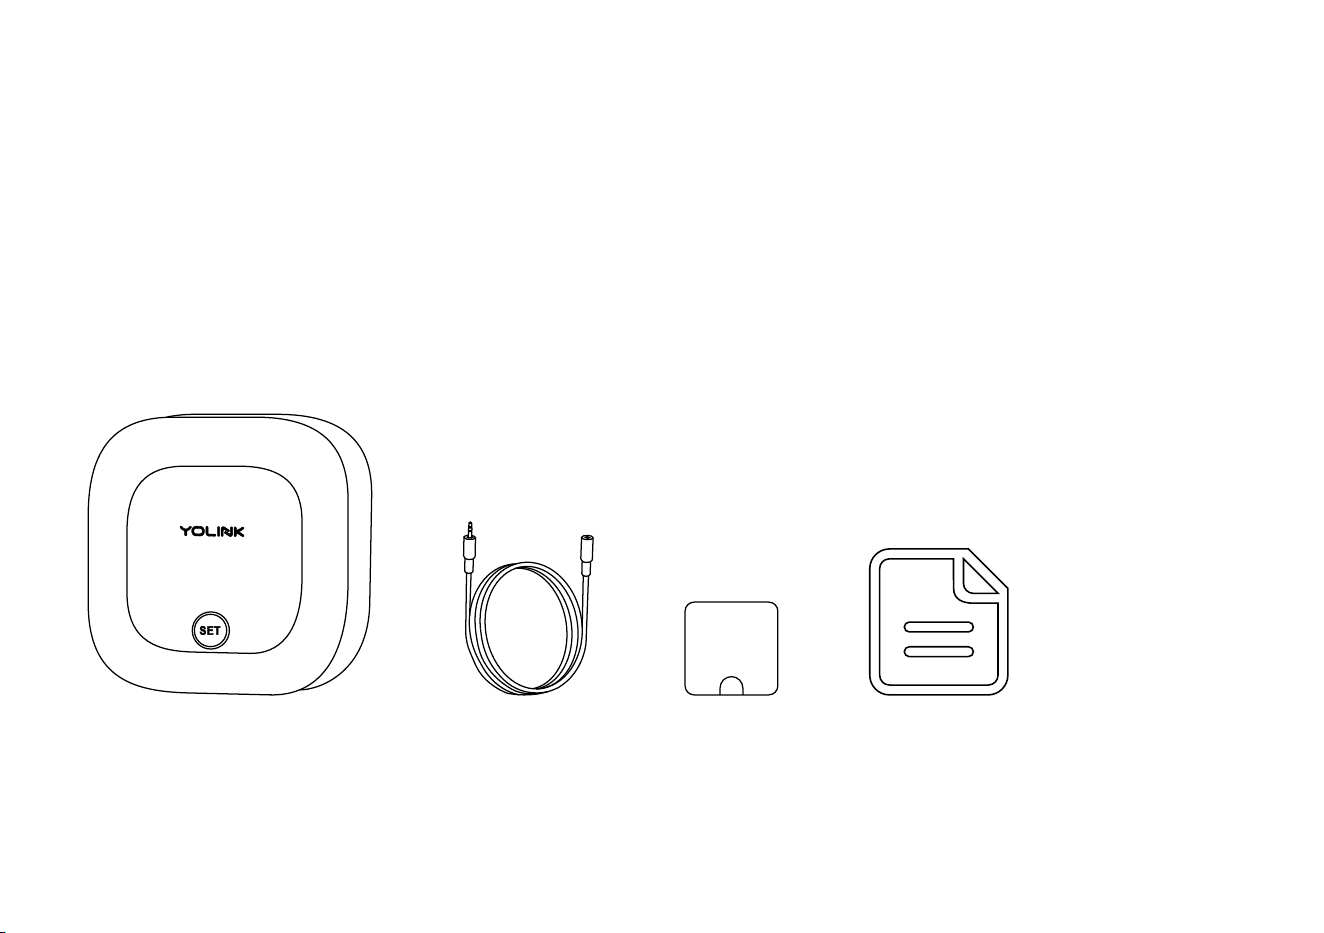
In the Box
1
A. Water Leak Sensor
B. Sensor Cable
C. Mounng Hook
D. Quick Start Guide
C.
A.
D.
B.

Introducon
The YoLink Water Leak Sensor 2 is a smart water detector, that can detect the presence or absence
of water, and can either
2
In water le ak dete c on m od e, pro v id e e a r l y wa rn in g o f wate r le aks or flo od in g b e fo re
cos t ly pro pe r t y d a ma ge o cc urs
In water level detecon mode, provide nofica on of no water, for super vision of water
supplies for pets, house plants, greenhouses, horculture/agricult ure, and so on
Depending on your applicaon for the sensor, a choice of cable is required. The sensor cable
(included) can be used for both detecon modes, but it is ideal for water leak detecon mode.
The water sensor probe (sold separately) is ideal for water level detecon mode
Cable Types: (see illustraons, next page)
The sensor cable detects water along the length of the cable, while the water sensor probe
detects water only at the probe at the end of the cable
Depending on the water leak or level detecon mode, the sensor LED will blink red and the
sensor sounder will emit loud alarm tones. Noficaons will be sent to you via the YoLink app
(available noficaons types are: email, text/SMS and push/banner noficaons on your Apple
or Android smartphone, each configurable in app sengs)
Operaon & Noficaons:
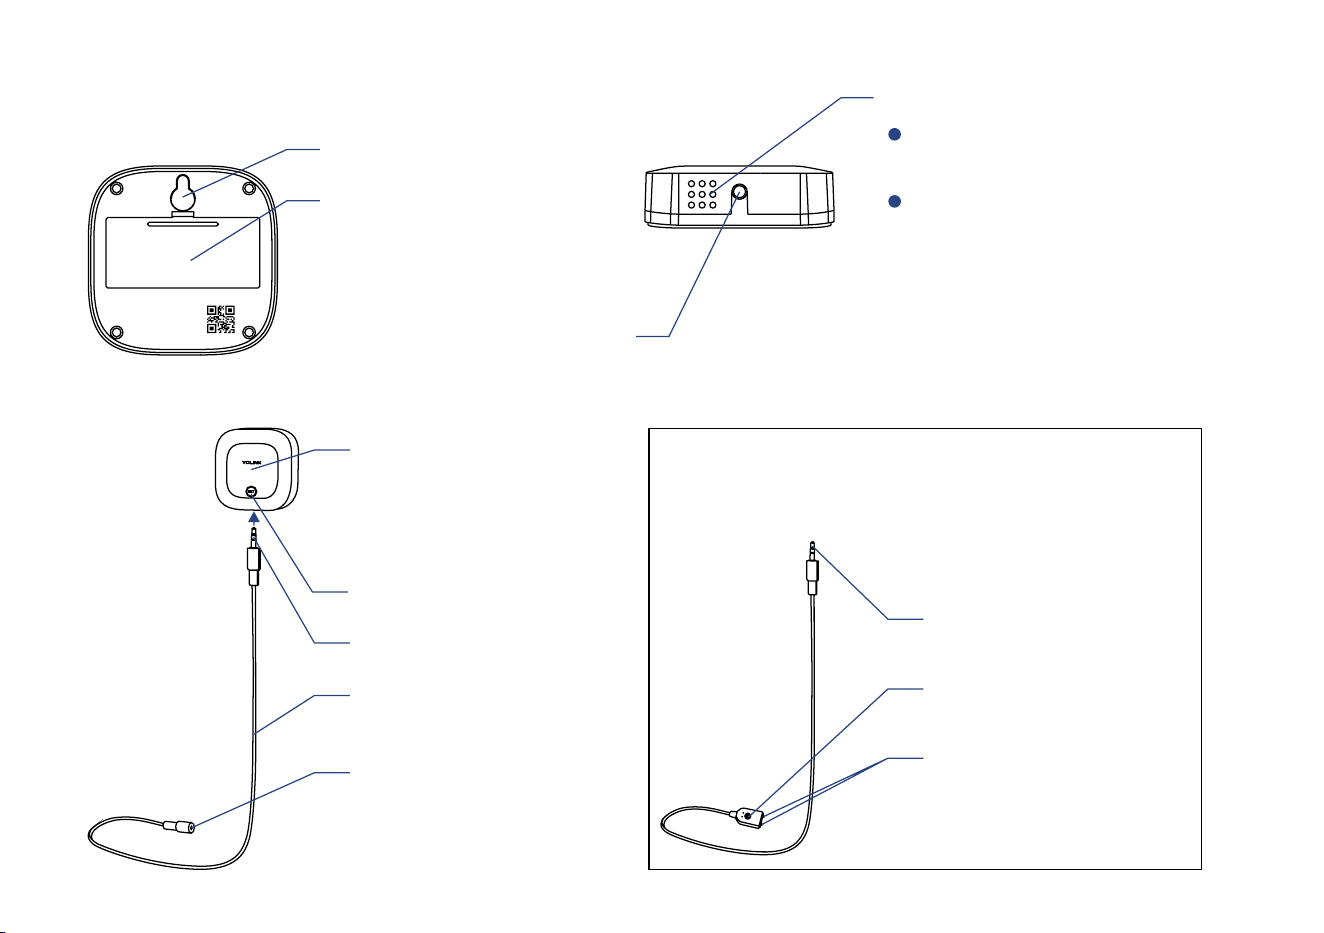
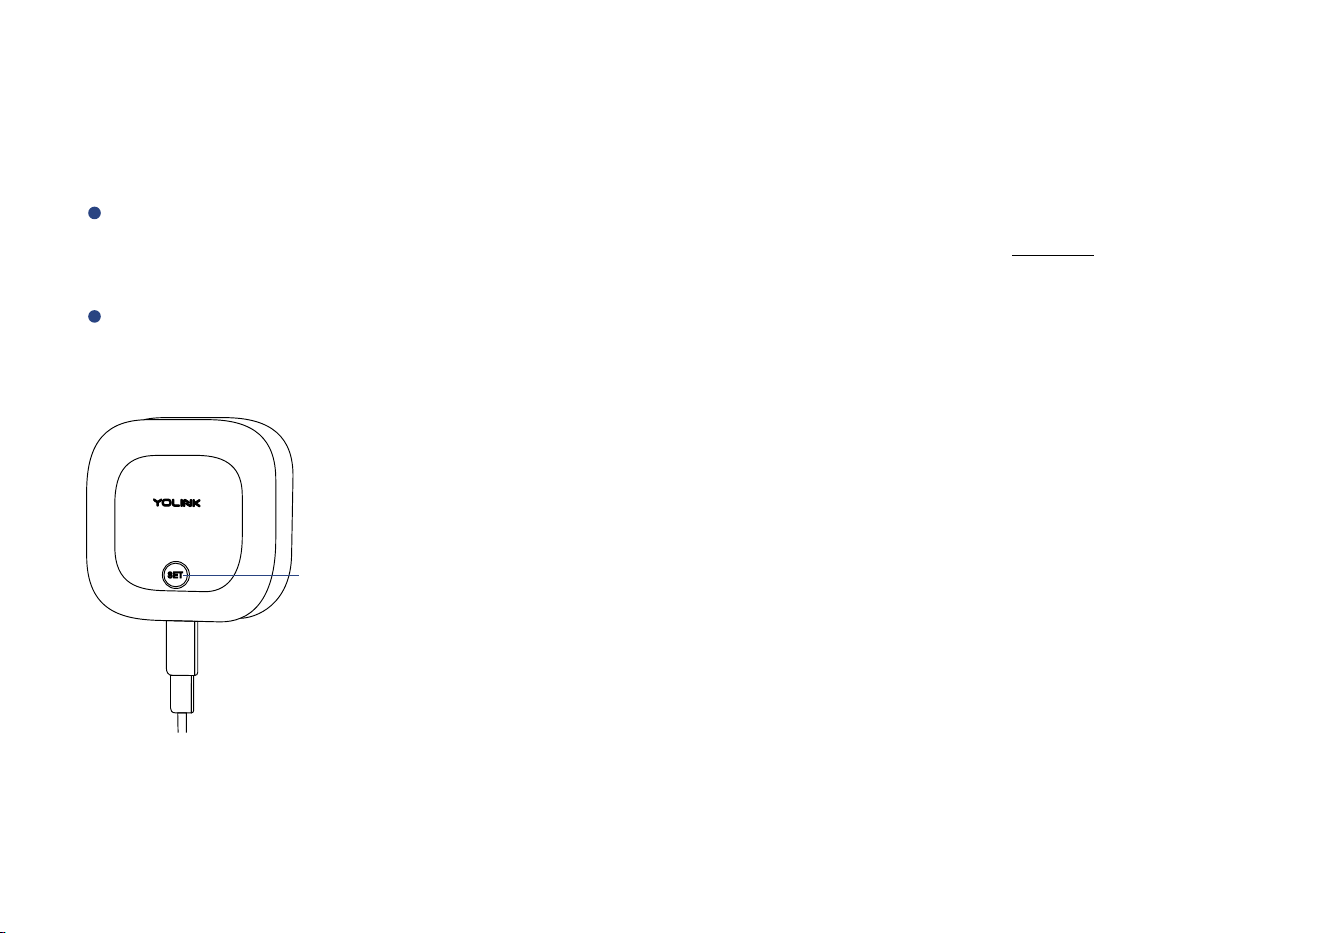
3
Phono Jack
Used for extending sensor
cable
Status LED
* Not visible while there is no
operaon with the SET buon
or while device is in normal
monitoring status
Sensor Cable
Used for water detecon
SET Buon
Phono Plug
Detector Probe
Used for water detecon
or low water level warning
Phono Plug
Mounng Hole
OR You can Replace the Sensor Cable with a
Water Sensor Probe Instead
(Oponal, Sold Separately)
Alarm Tones
One Beep
Device power-up / buon pressed
Two Beeps
Warning
(Two beeps every 2 seconds for
the first minute. Two beeps every
5 seconds for the next 12 hours.
Sustaining two beeps once a
minute aer 12 hours)
Phono Jack
Used for sensor cable
extension
Wall-Mounng Slot
Baery Compartment
Includes two AAA
non-rechargeable
baeries
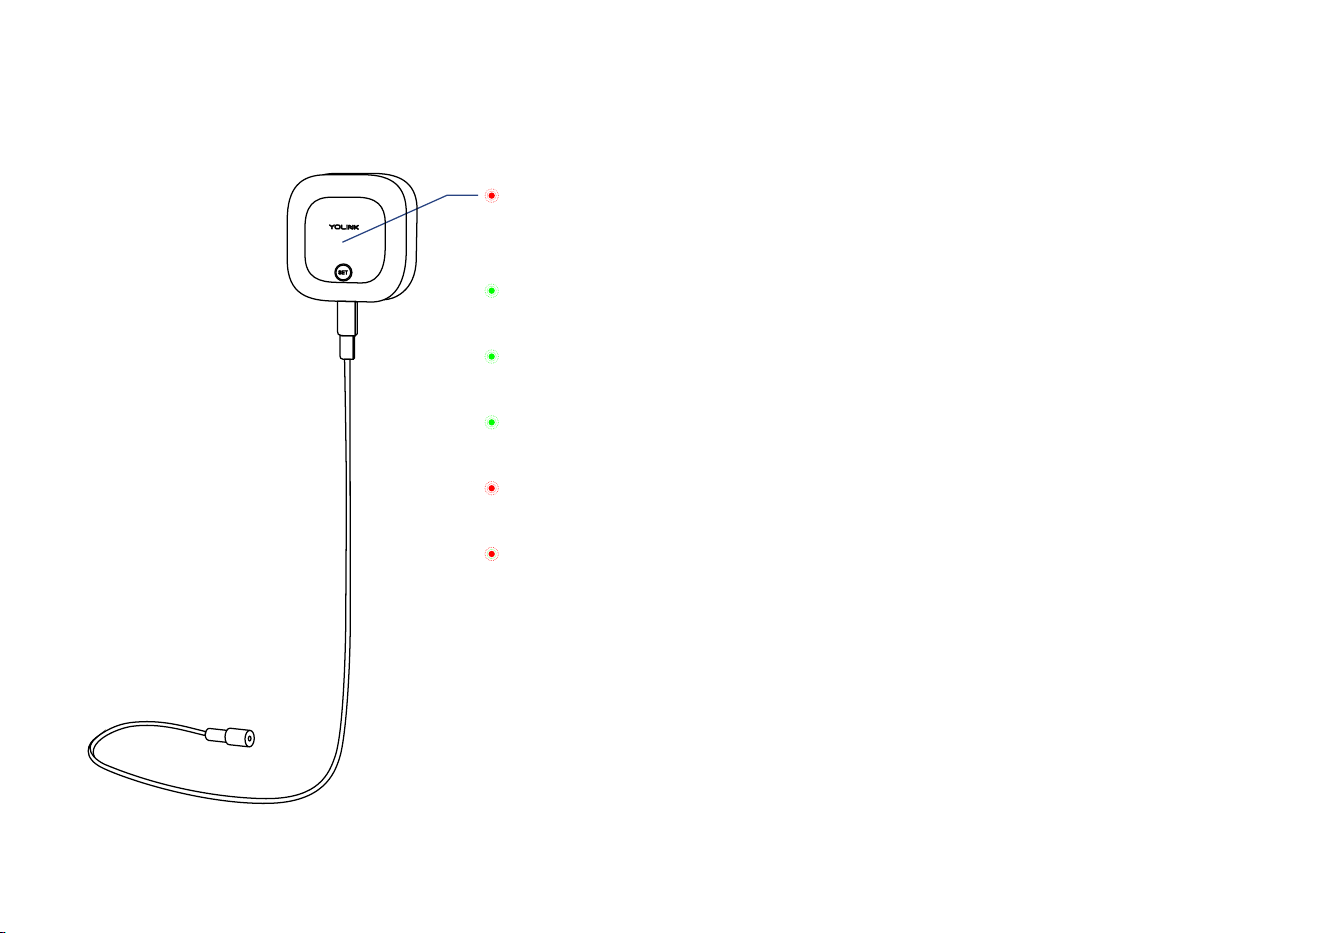
The LED light indicates the current status of the sensor:
4
Blinking Green
Connecng to Cloud
Fast Blinking Green
Establishing Connecon with YoLink System (YoLink Control)
Slow Blinking Green
Updang
Fast Blinking Red
Removing Connecon to YoLink System (YoLink Control)
Blinking Red Once
Leak or Flooding Warning (water leak detecon mode)
Water Exhausted Warning (water level detecon mode)
Blinking Red And Green Alternately
to Factory DefaultRestoring
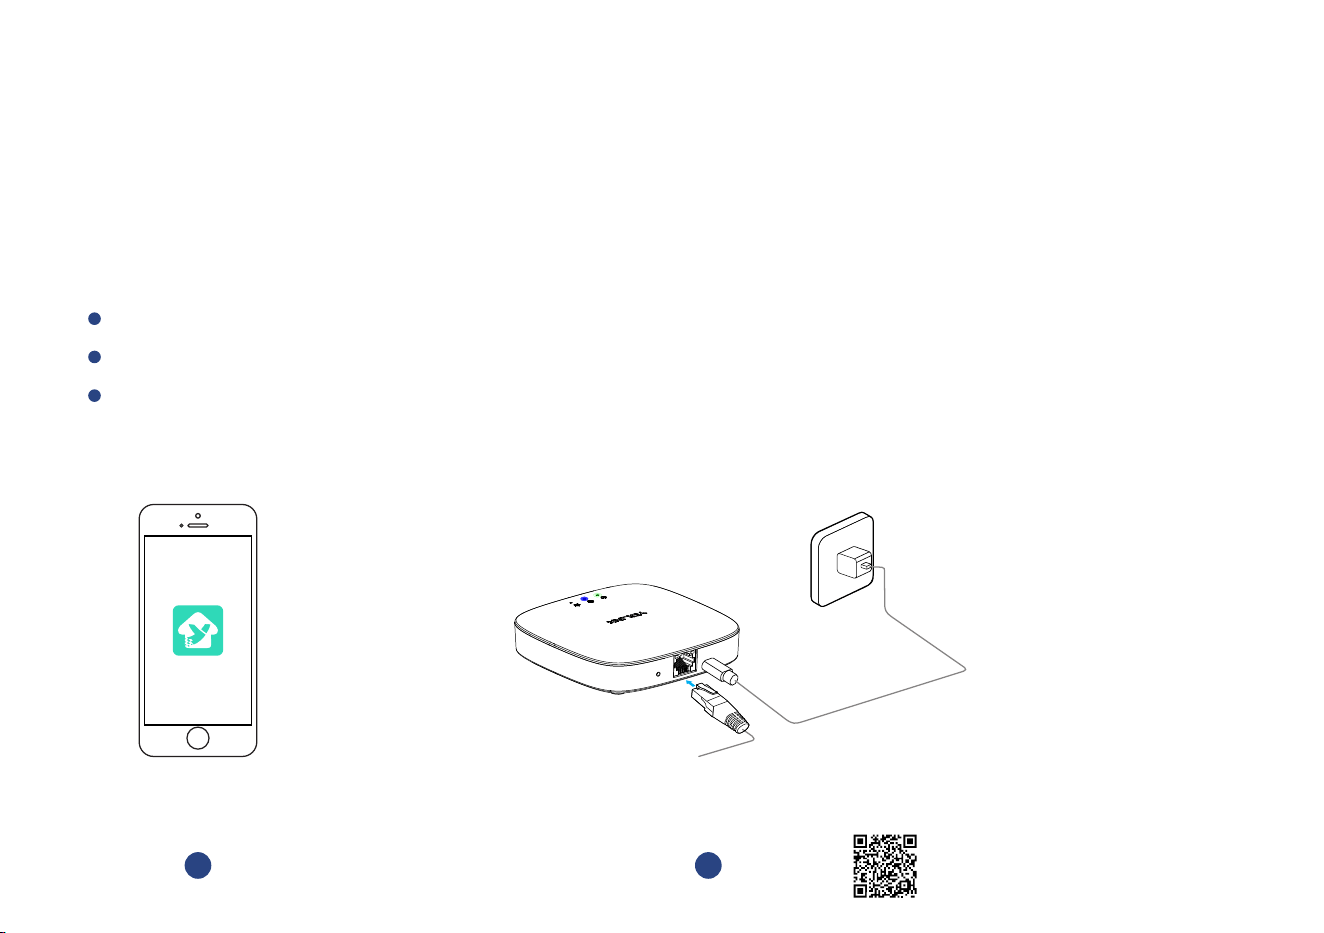
Set Up
Set Up - First-Time YoLink Users (Exisng users proceed to Add Device, next page)
* Get ready: your W LeakTo set up and use ater Sensor 2, you will need an Apple iPhone or tablet that is iOS 9.0 or higher, or an Android phone
or tablet that is Android 4.4 or higher
Follow the steps below to set up your Water Leak Sensor 2 via the YoLink app
Download YoLink app through Apple App Store or Google Play Store
Log in or create a new account if required
Download, and log
in to YoLink app
1
* Make sure your hub is connected to the
internet (green LED indicator is
blinking, blue LED indicator is
always on)
Set up YoLink Hub
2
YoLink Hub is required to set up your Water Leak Sensor 2. Please set up your YoLink Hub first
(refer to YoLink Hub manual)
* Ethernet patch cable (included) to your network
(router, switch, etc.), recommended, but oponal.
Otherwise connect your Hub to your home Wi-Fi
network. Refer to the Hub set up manual for more
informaon:
YS1603-UC_User Guide
5
Power
Adapter
Hub
S
ET
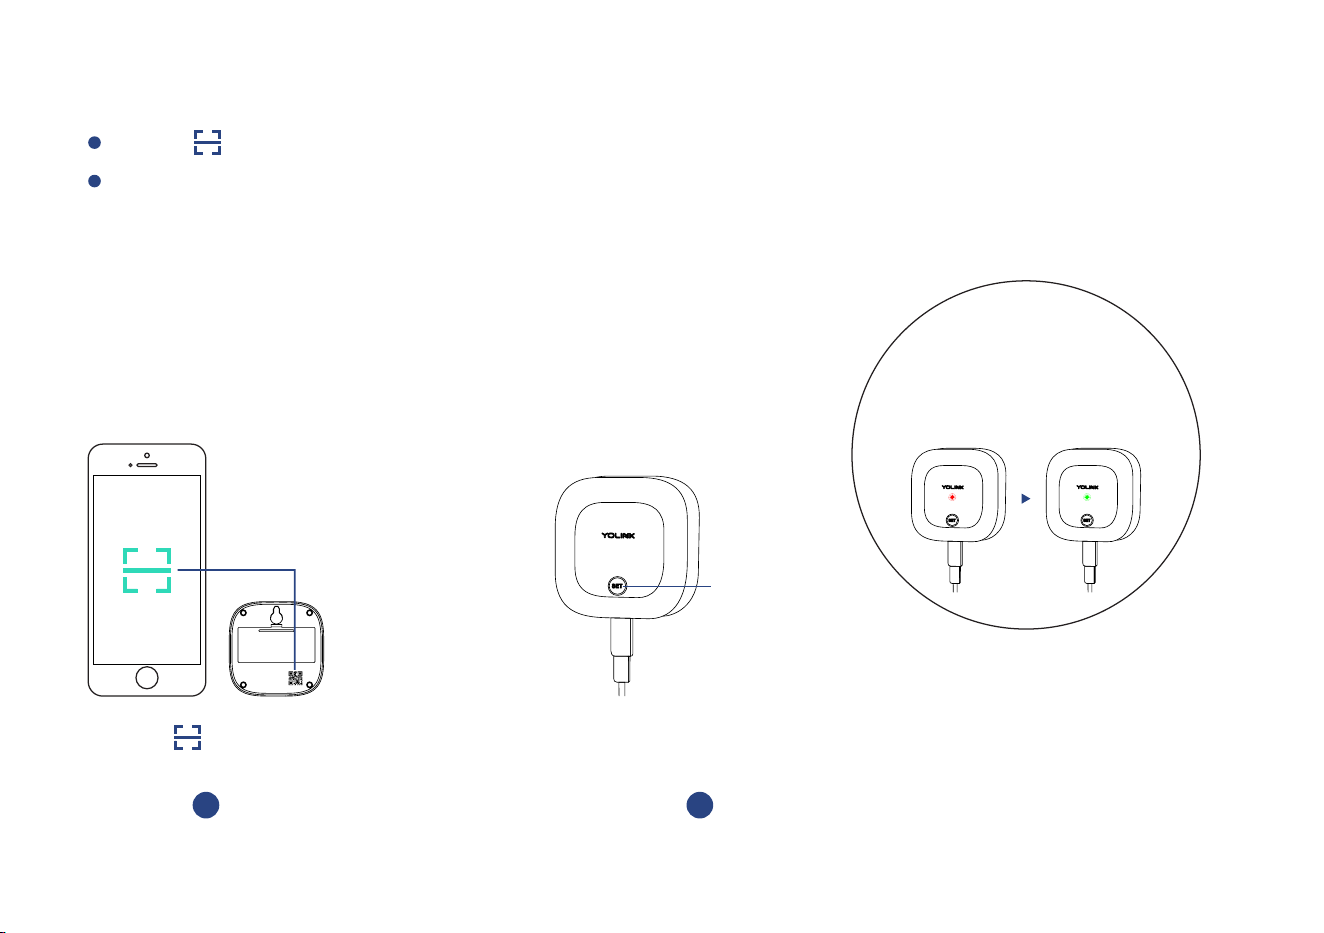
Add Device
Press the SET buon (on front of sensor) once, the Status LED will blink several mes (red,
then green). The green LED indicates the device is online and ready to use
Tap “ ” buon, then scan QR Code on the device
Press the SET buon
(on front of sensor) once
2
SET Buon
* Status LED will blink
red once, then green several
mes(If device is working well
with connecon to the cloud, it will
blink red once only)
Tap “ ” buon
to add devices
1
6
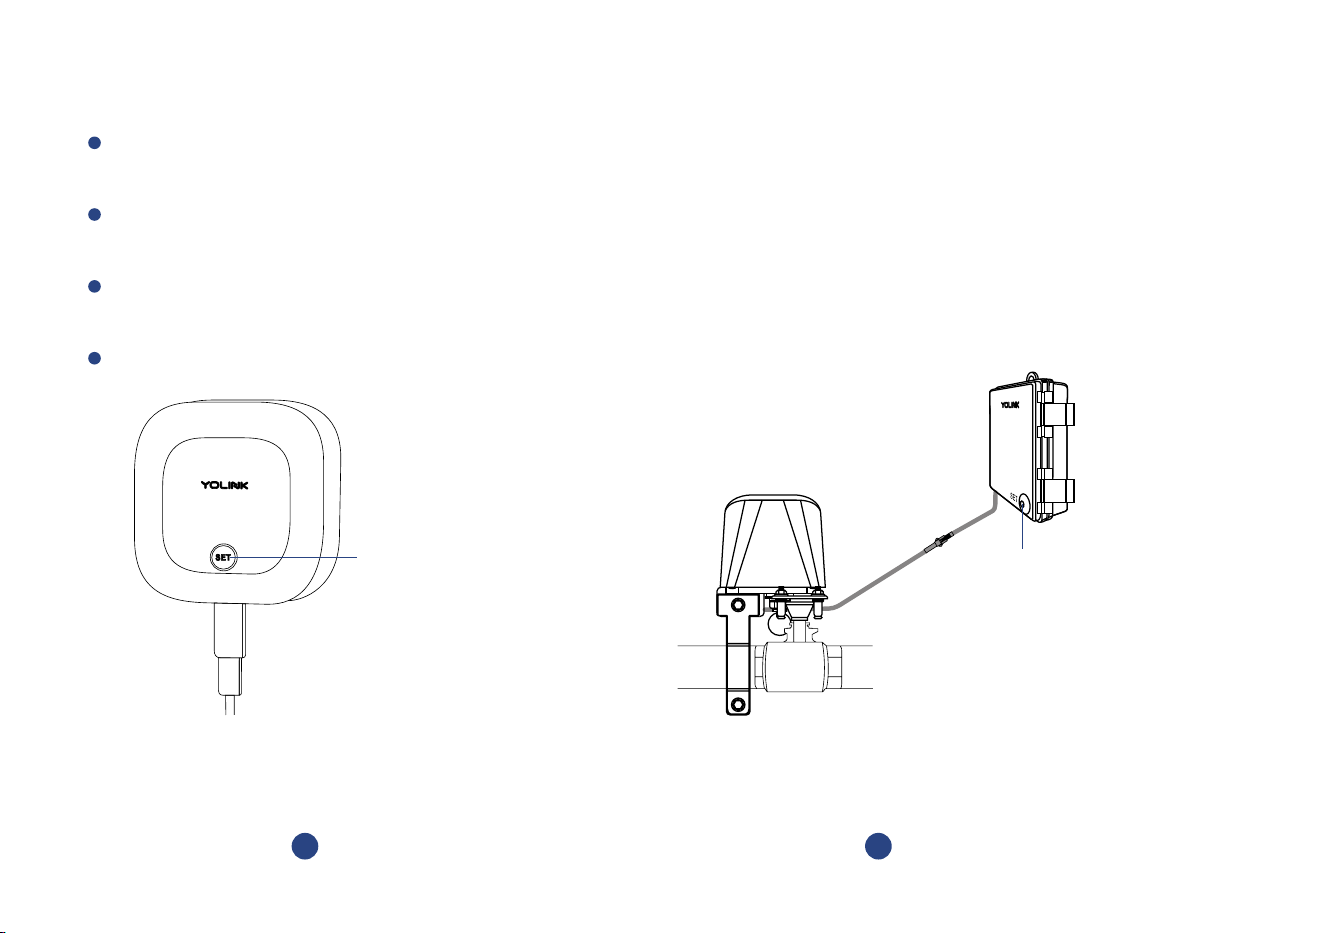
Installaon
The mounng hook is very difficult to relocate aer being affixed to the mounng surface. Test
your locaon before affixing the mounng hook to the surface. Use masking or painters sensor
tape to secure the mounng hook to the surface. Once you have the mounng hook temporarily
mounted then hang the sensor on the hook, test out the sensor. With the app in hand, follow the
Device Alerts secon on page to test water warning and warning removed using the app and 17
observing the status of the sensor as shown on the app (Water Warning or Water Warning
Removed). Oponally, you may set up your automaon (e.g. turn off a valve when water is
detected) to funconally test the alert of the sensor - proceed to the following steps for
informaon on creang automaons, then return to this step
Test the Sensor Locaon Before Installaon
This sensor is not waterproof and is designed and intended only for indoor use. Subjecng this
device to outdoor environment condions such as direct sunlight, extreme hot or cold
temperatures, rain, water and/or condensaon can damage the device and will void the warranty
If flooding is a risk mount the sensor at a higher locaon, where it is less likely to get wet (which
may render it non-funconal)
Please refer to device environmental operaon range on page 30. Use this device outside the
recommended ranges at your own risk
7
Avoid allowing the Water Leak Sensor 2 to be exposed to strong impacts or vibraon
Please add the Water Leak Sensor 2 to the YoLink app before installaon
Depending on your applicaon for the sensor, determine the opmal locaon for the sensor
cable (recommended) or water leak probe:
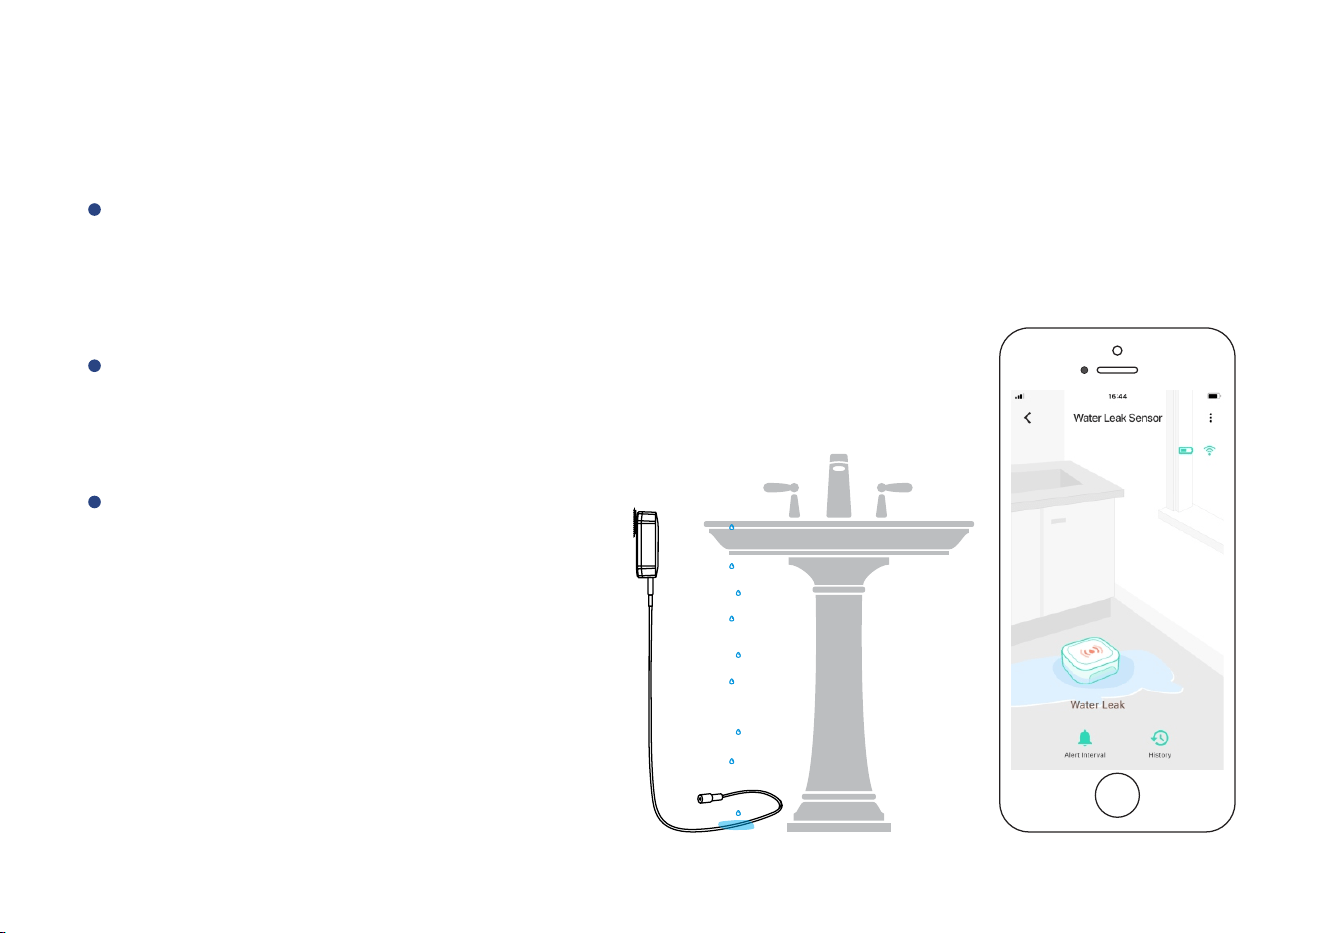
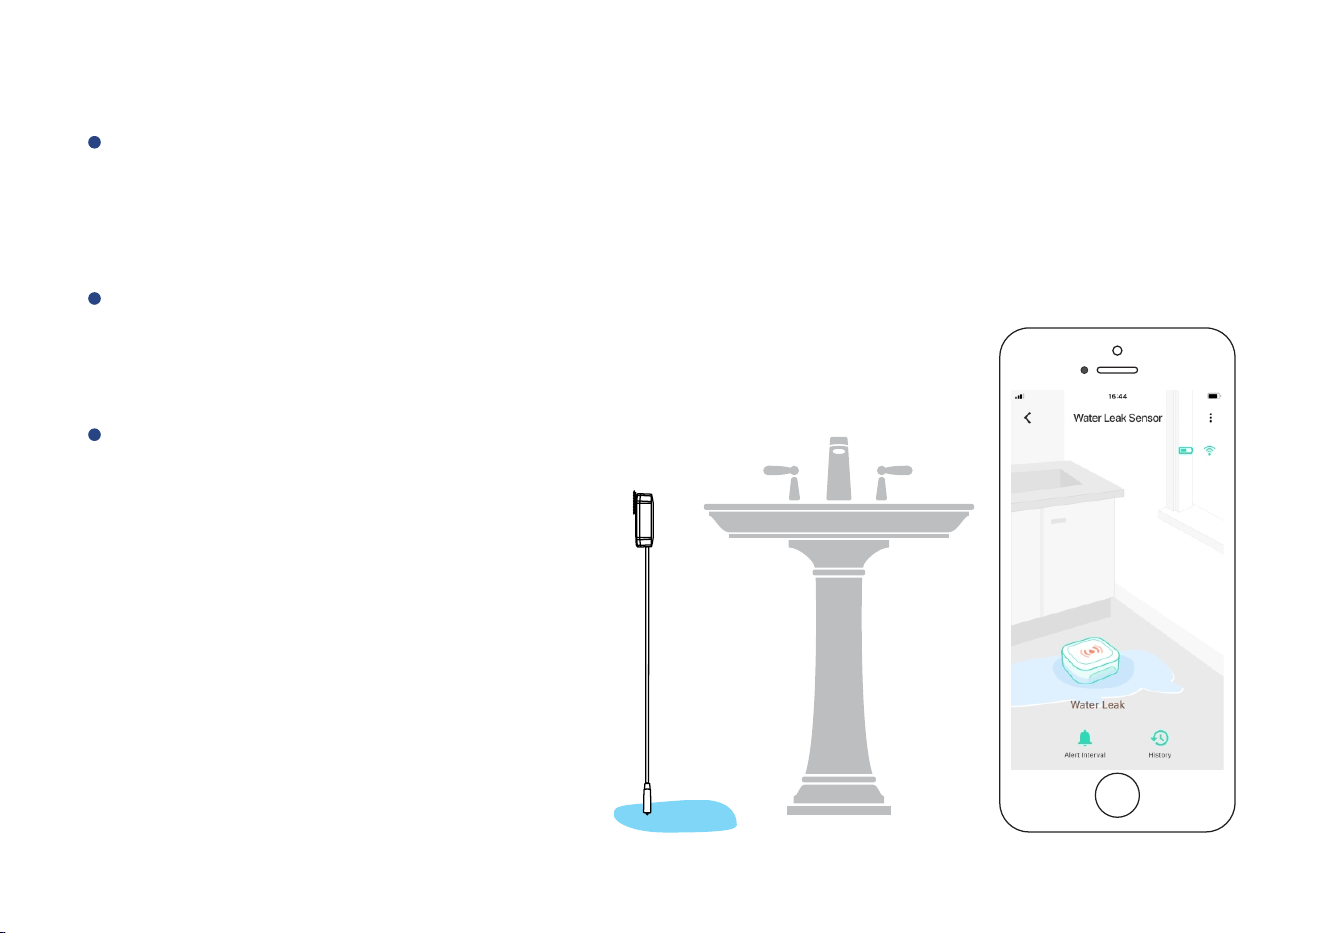
Select Your Sensor Locaon (Water Leak Detecon Mode):
8
Pl a c e t h e ca bl e di rec tl y u n de r t h e p o t en al s o u rc e of a wate r l ea k (for exa m p l e , un de r a d i s hwa sh er o r
water h eate r)
Place th e cable on t h e flo o r at a locaon w here floodin g is possibl e (for example, nex t to a sump p ump o r
sub-gra de d o or in a b a sement)
If pos sible, locate the cable where it will not be disturbe d by foot traffic or pets
As basement floors may be sloped to allow
for drainage of water, for earliest warning
select a locaon that is at a lower point
rather than a higher point on the floor
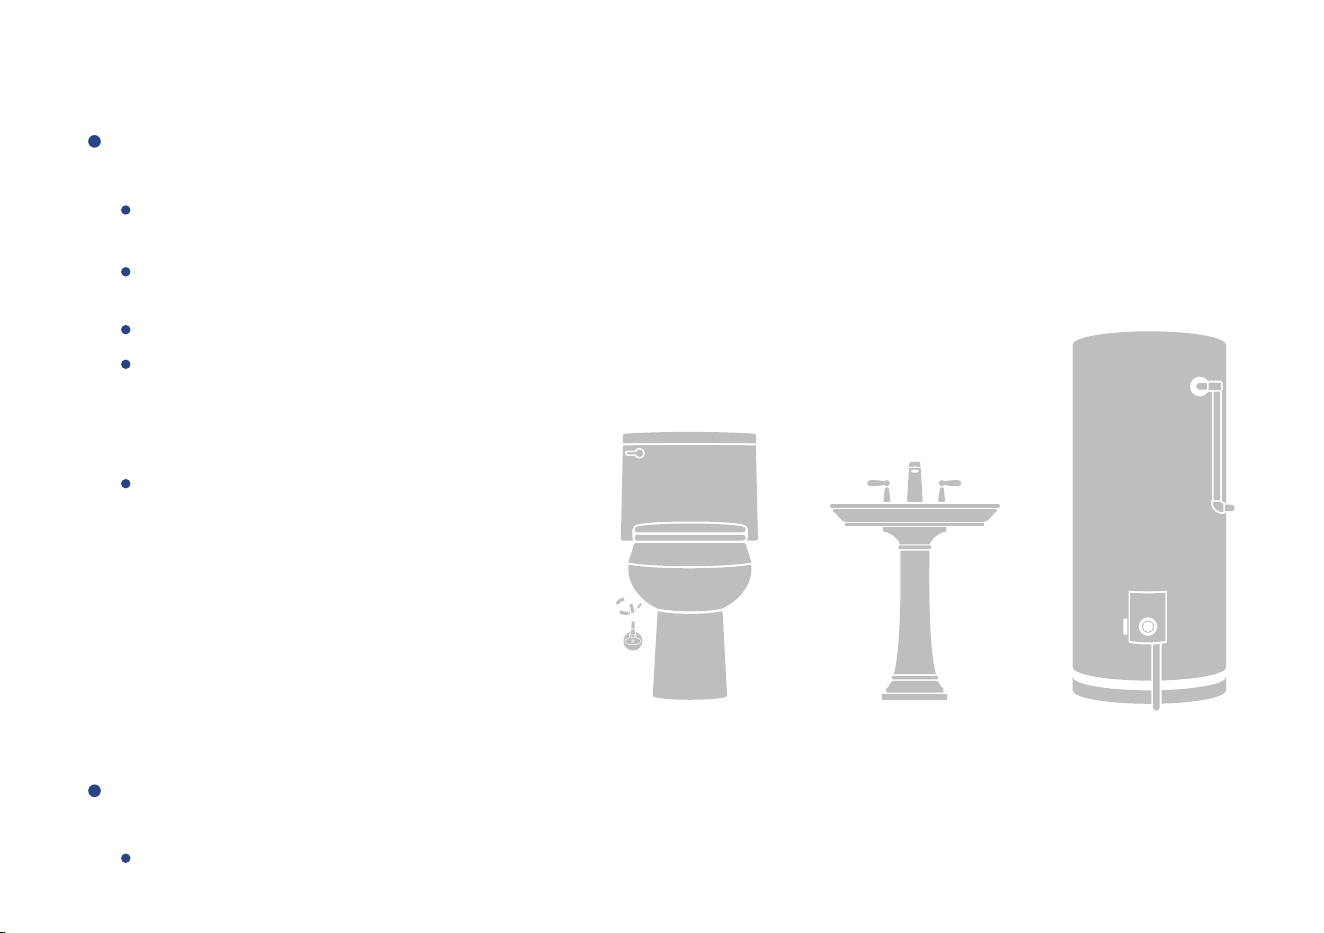
Suggested Addional Applicaons:
Basement Floors
Under Laundry Machines
Under Dishwashers
Under Refrigerators (w/Ice Machines)
Near Sump Pumps
Under Fish Tanks/Aquariums
Inside Hot Tubs*
Locaons Subject to Freezing Pipes*
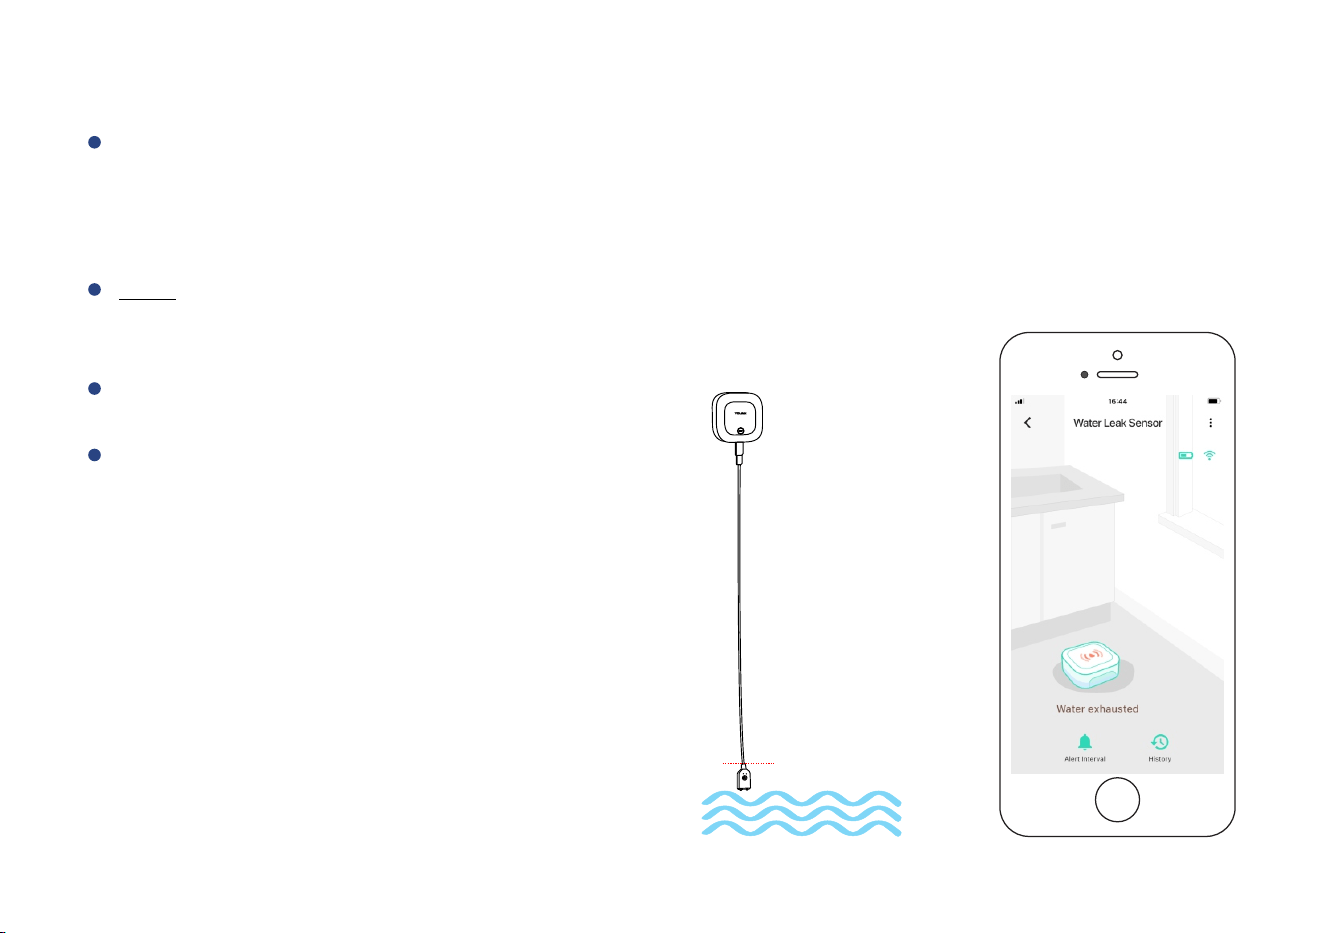
Depending on your applicaon for the sensor, determine the opmal locaon for the water
leak probe (recommended) or sensor cable:
Select Your Sensor Locaon (Water Level Detecon Mode):
Place the water le a k probe cable wi t h the probe in t h e wate r, posioned j u st b e l ow the accepta b l e water
level (so that when the water level recedes, an al e r t will be sent)
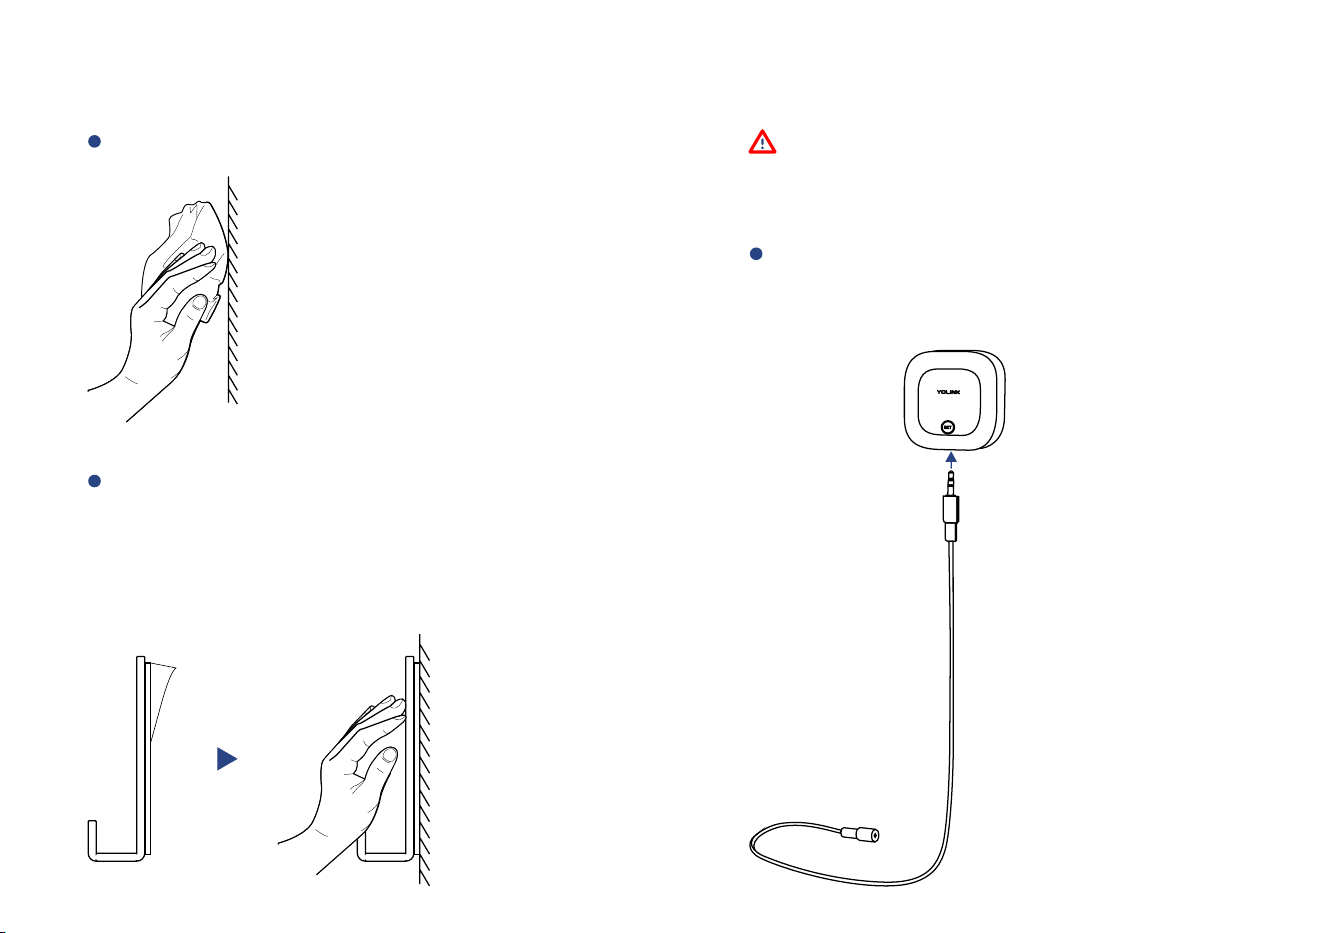
Clean the installaon area
Remove t h e pro tecve layer on th e
double-sided tape on t h e boo m of
th e ho ok , ho ok Pl ac e th e at t h e
pre-determ i n e d loca o n t h e n p ress
it fir m l y fo r at least 5 seconds
Begin Installaon
Skip to page 12 if you are using a water
sensor probe instead of a sensor cable
Method A: Sensor Cable Installaon
Insert the sensor cable’s phono plug
into the water leak sensor ’s phono
jack as shown
9
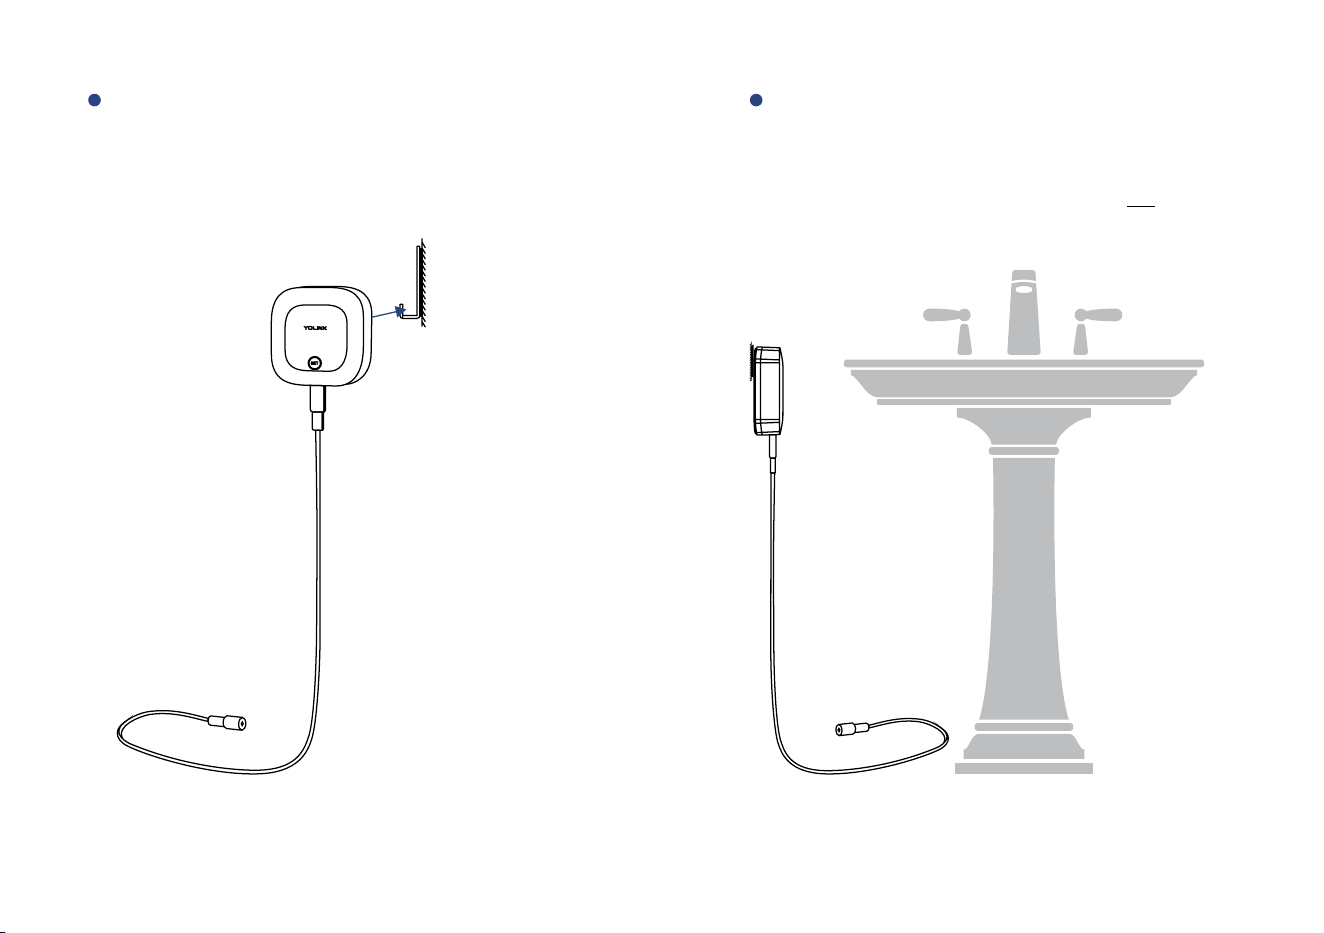
Hang the sensor on the hook through
the wall-mounng slot
Adjust the sensor cable, place it where
a leak or flooding may occur, or where
the water level will drop
* F o r w a t e r l ev e l mo n i to r i n g , p l e a s e d o n o t b e n d t h e
s e n s o r c a b l e i n th e d ete c o n ar e a
10
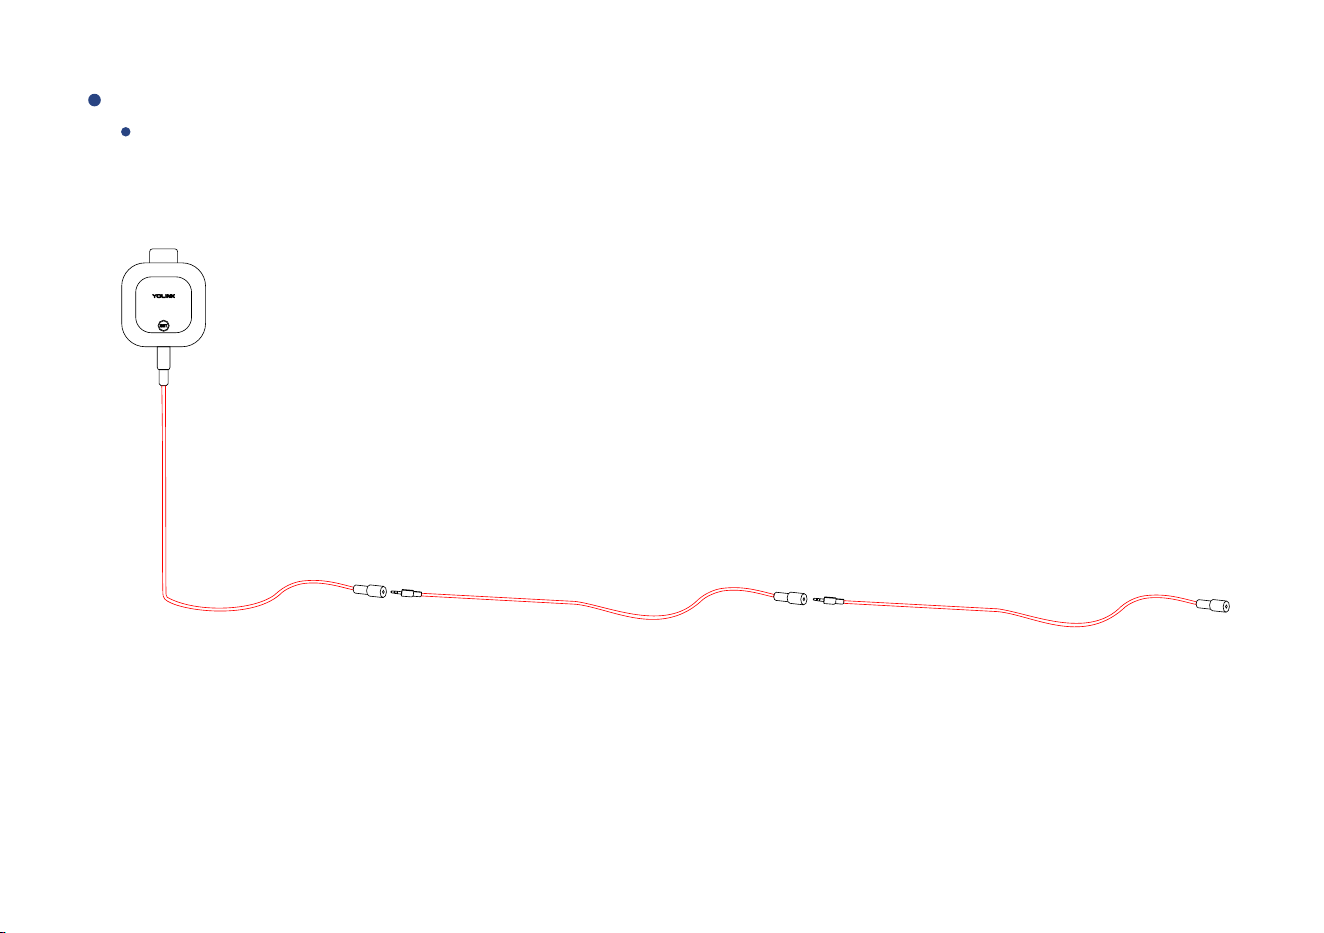
Sensor cable extension
Ins ert add io nal se nso r ca ble s a s s how n ( red high lig hted por on s of th e s ens or ca bl e are the dete c o n
areas ), if need ed (refer to page 30 for th e exten sio n c a ble sp eci ficao n s)
11
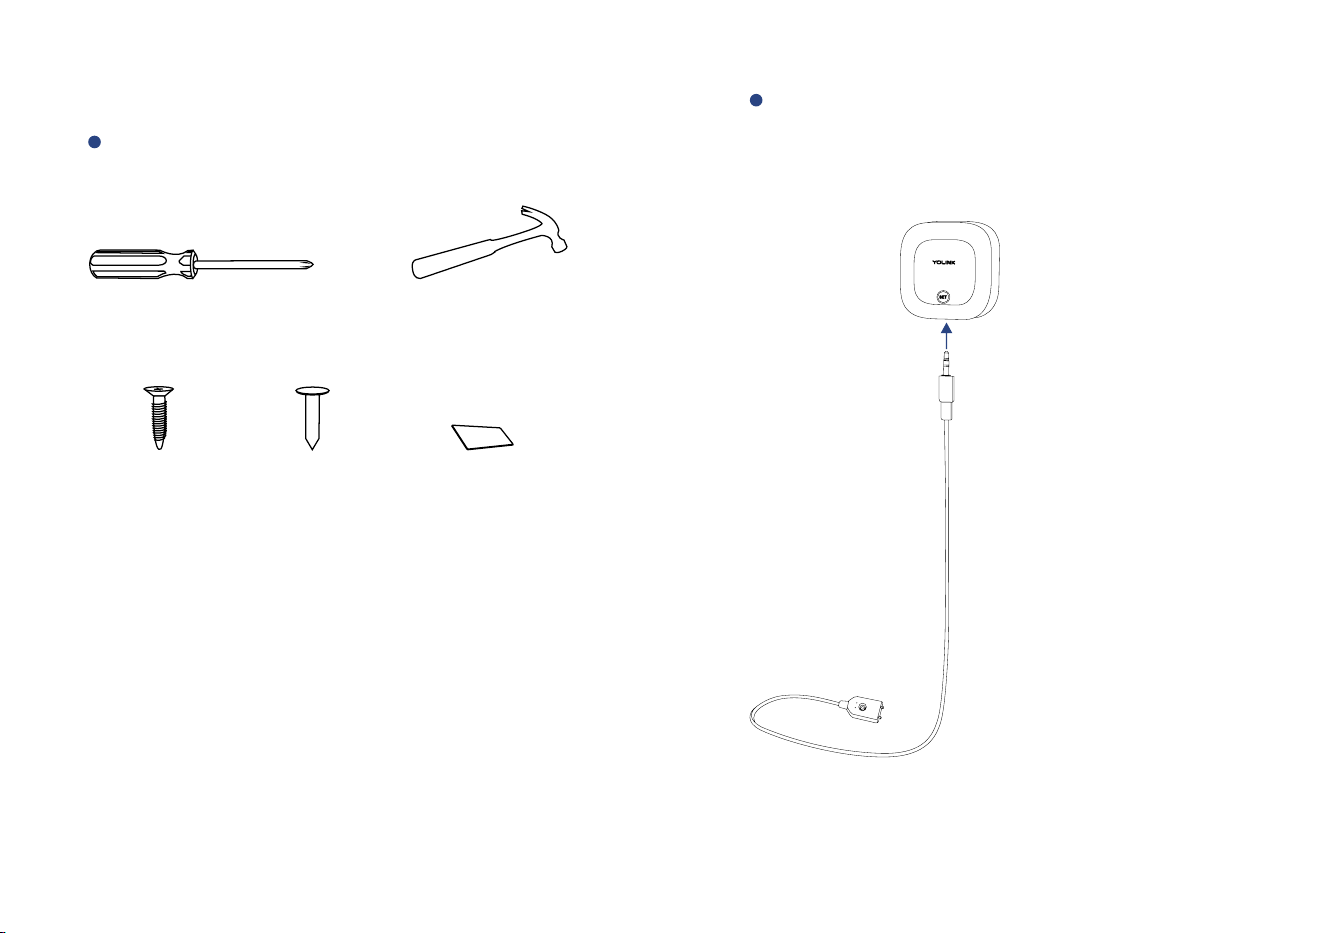
These Tools may be Required
Method B: Water Sensor Probe Installaon
Insert the water sensor probe’s phono
plug into the water leak sensor’s phono
jack as shown
12
Double-sided
Mounng Tape
Self-tapping
Screw
OR
Nail
OR
Phillips Screwdriver
Hammer
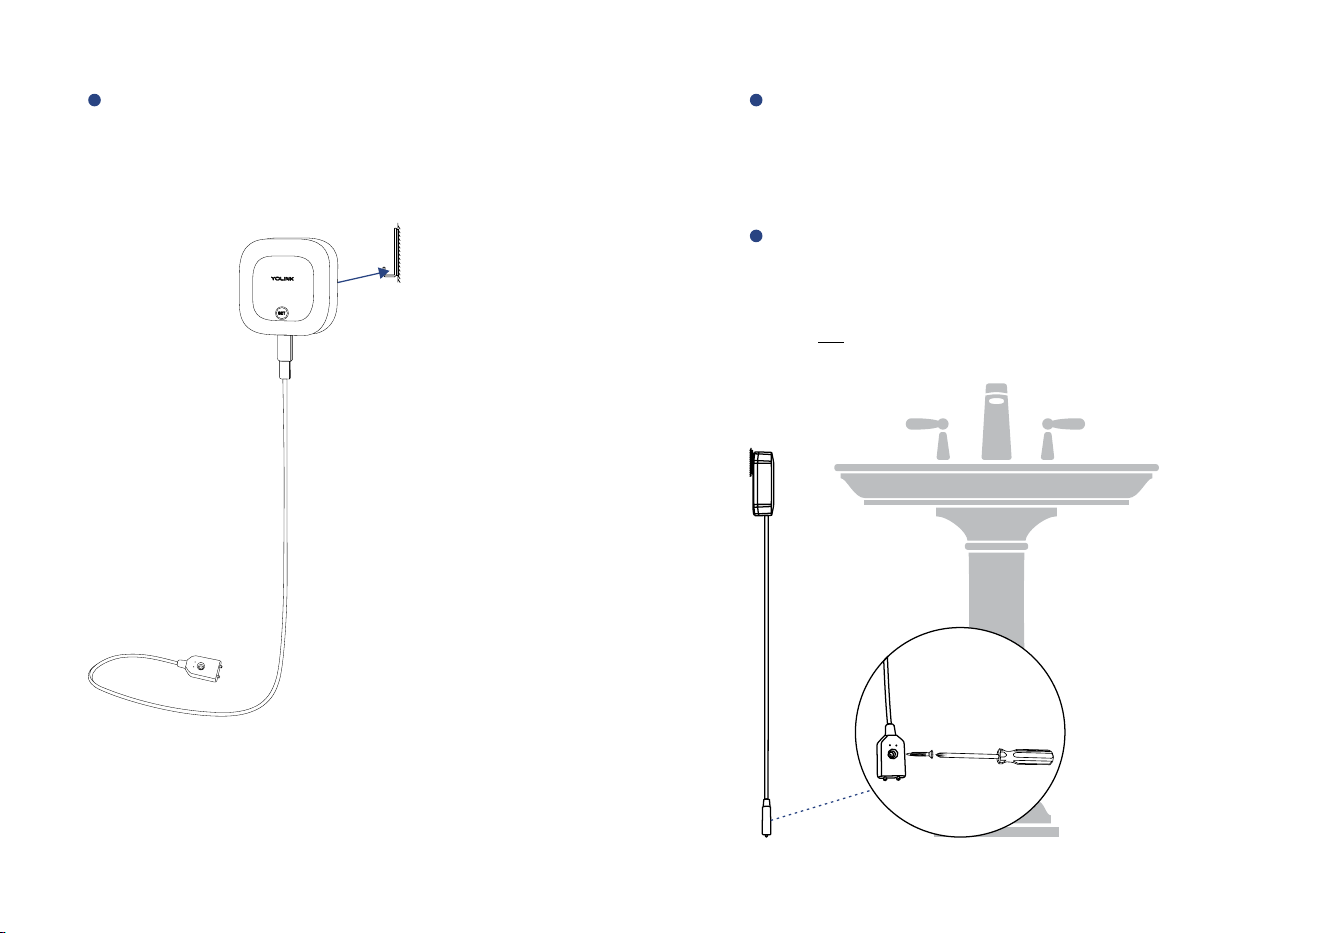
A d j u s t t h e wa t e r s e n s o r p r o b e ,
placing it where a leak or flooding
may occur, or w h ere the water leve l
will drop
* Do not bend the water sensor probe in the detecon area
You can use a screw or nail or double-sided
mounng tape to mount the detector
probe
Hang the sensor on the hook through
the wall-mounng slot
13
Using the YoLink App
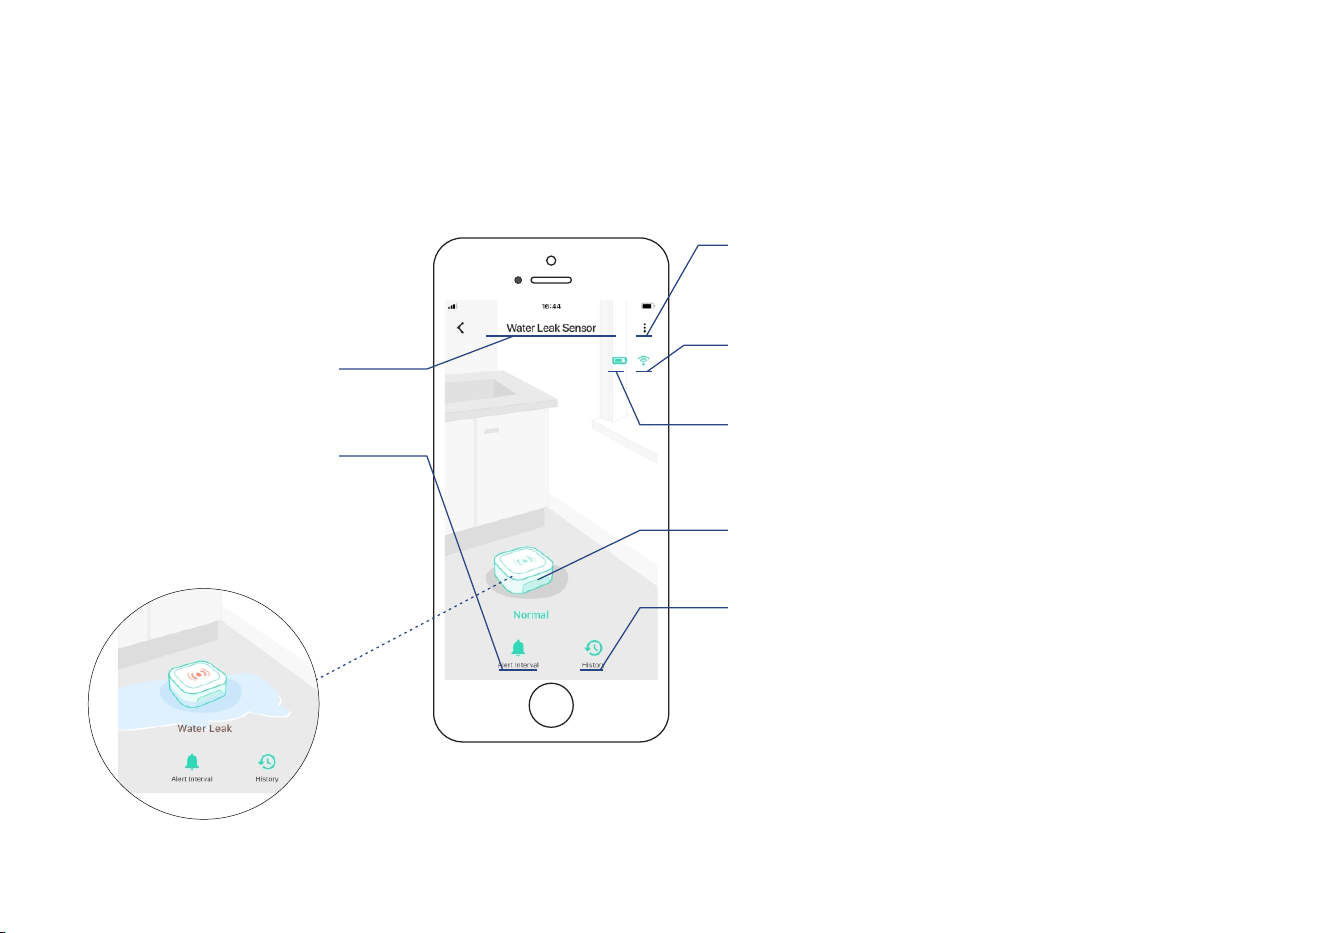
Device page (Water Leak Detecon Mode)
Alert interval
* Set re-noficaon interval
aer a leak or flooding warning
Default is 5 minutes
Device name
* Edit name on Details page
* Water detected
14
Device history
Water detected and cleared
events, logged with date & me
Connecon status
of sensor and Hub
Details
* Tap to go to Details page
(refer to page 16)
Baery level
current baery level
* Shown red if replacement is required
Real-me status:
Normal or water-detected
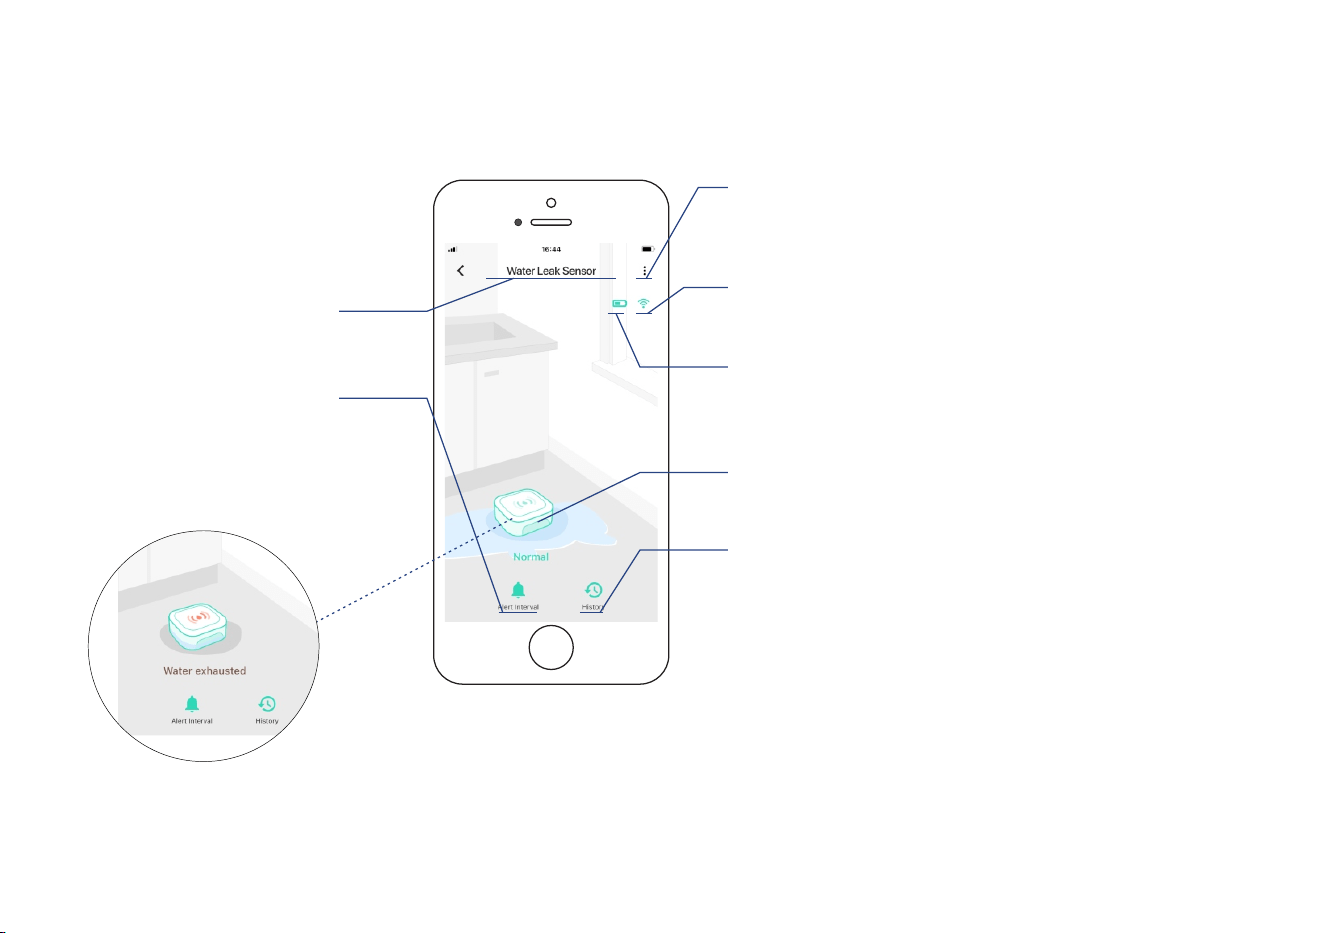
Device page (Water Level Detecon Mode)
15
Alert interval
* Set re-noficaon interval
aer the water exhausted
warning
Default is 5 minutes
Device history
Water detected and cleared
events, logged with date & me
Connecon status
of sensor and Hub
Details
* Tap to go to Details page
(refer to page 16)
Baery level
current baery level
* Shown red if replacement is required
Device name
* Edit name on Details page
Real-me status:
Normal or water-exhausted
* Water exhausted

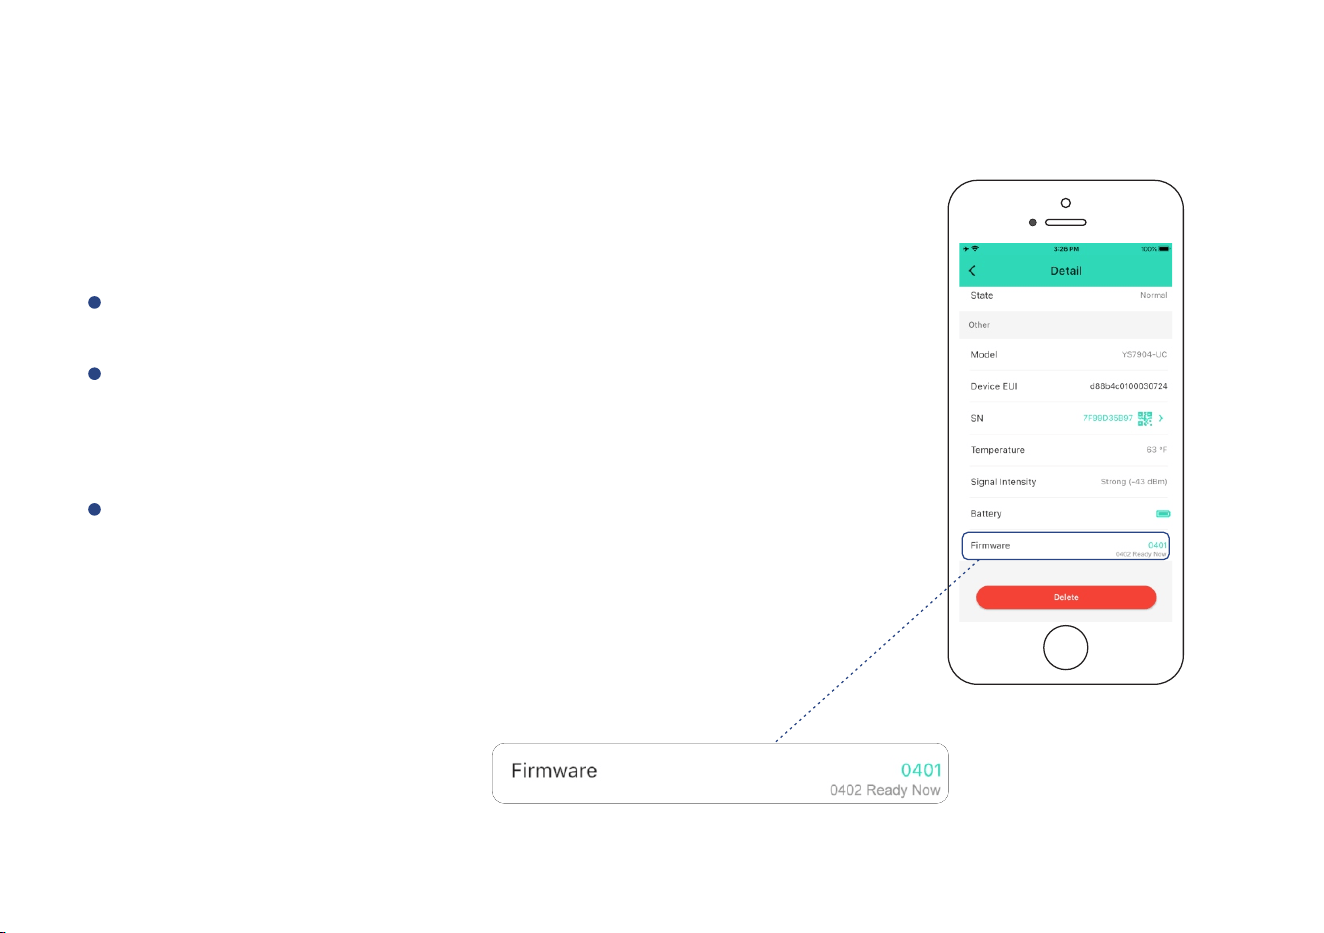
Details page
* Aer changing “Alert Interval” and / or “Device Mode” and / or “Beep” sengs, press the device’s SET buon
once, to sync the new sengs to the device. Otherwise, the device will automacally update within 4 hours
(maximum)
16
Beep sound
aer a leak or flooding warning
or water exhausted warning
Rename the device
Choose a room
for device
Device type
Alert sengs
* Enable or disable alerts
Alert interval
* Set re-noficaon interval
aer a leak or flooding warning
or water exhausted warning
Default is 5 minutes
Add / remove
from favorites
Device history
Water detected and
cleared events, logged
with date & me
Device status
* Normal, Warning
Device EUI (unique)
Device SN (unique)
Temperature value
* Updates when:
1. SET buon pressed
2. On a device alert
3. Baeries are replaced
4. Automacally within 4 hours
maximum
Connecon status
of sensor and Hub
Baery level
current baery level
* Shown red if replacement is
required
Firmware version
* ” indicates a “#### ready now
new update is available (refer
to page 27)
Device model
* Tap to delete the device from
your YoLink account
Device mode sengs
* Water Leak Monitor:
water leak detecon mode.
Water Exhausted Monitor:
water level detecon mode
Device Alerts
17
Method A: Sensor Cable
Water Leak Detecon Mode
When a ny po i nt o f sens or ca ble d e te c ts water, an al e rt no fica on wil l be se nt , and t h e
sens or statu s wil l b e show n on you r Yo Link a pp (se e page 2 for mo re i n form a on abo ut
no fi cao ns)
Note
The default re-noficaon interval aer
a leak or flooding alert is 5 minutes. This
interval may be adjusted in the Details
page (refer to page 16)
Aer a leak or flooding event, please
remove the sensor cable from the sensor
and do not reconnect it unl both the
sensor cable and locaon is dry
Method B: Water Leak Probe
When both ps of the water leak probe are immersed in water, an alert noficaon will be
sent, and the sensor status will be shown on your YoLink app (see page 2 for more informaon
about noficaons)
Note
The default re-noficaon interval aer
a leak or flooding alert is 5 minutes. This
interval may be adjusted in the Details
page (refer to page 16)
Aer a leak or flooding event, please
remove the water sensor probe from
the sensor and do not reconnect it unl
both the water sensor probe and
locaon is dry
18

Water Level Detecon Mode
Note
When no point on the sensor cable detects water, an alert noficaon will be sent, and the
sensor status will be shown on your YoLink app (see page 2 for more informaon about
noficaons)
Sloshing of water may affect the status
of sensor
Only when no point on the sensor cable
is wet will the device alert
The default re-noficaon interval aer
a low water level alert is 5 minutes. This
interval may be adjusted in the Details
page (refer to page 16)
Method A: Sensor Cable
19
Method B: Water Sensor Probe
Note
When both ps of the water leak probe are touched without water, an alert noficaon will
be sent, and the sensor status will be shown on your YoLink app (see page 2 for more
informaon about noficaons)
Sloshing of water may affect the status
of sensor
Only when both ps of the water leak
probe are not wet, then the device
will alert
The default re-noficaon interval aer
a low water level alert is 5 minutes. This
interval may be adjusted in the Details
page (refer to page 16)
20
Automaon
Easily set up rules for “if this then do that” funcons
Edit trigger
Edit behavior
* You must have at least one
acon device, or you cannot set
a behavior
Edit when
* Set a me range for the
automaon (always or during
specific days / mes)
Tap to save the sengs
Tap to add an
automaon
Tap “ ” buon
to enable or disable
the automaon
* Click to edit the automaon.
Swipe le to view the history
logs and to edit or delete the
automaon
Go to “Smart”, tap “Automaon” followed by the “ ” icon to add an automaon
Fill in details followed by the “ ” icon
Edit name
for the automaon
* Water Leak Sensor 2 can be set as a trigger only
21

Voice Assistants
Connect YoLink with third-party voice assistants service to monitor the status of your devices
through voice commands
Go to Sengs > Voice Assistants for the applicable voice assistant integraon guide
Tap “ ” in the upper le corner to go to My Profile
* Water Leak Sensor 2 is integrated with Alexa, and is also integrated with IFTTT .com, works as trigger event pipelines using IFTTT
22

About YoLink Control
YoLink Control is our unique device-to-device control technology. Using YoLink Control, YoLink
devices can be controlled without the Hub or an internet connecon. (Use of YoLink Control is
oponal; you can use the Automaon feature in the app OR use YoLink Control, but YoLink
Control offers the benefit of operaon without the Hub or internet connecon.)
One device controls another, directly. A device that sends out commands is called the controller. A
device that receives the commands is called the responder. Examples of a controller are a Water
Leak Sensor, while examples of a responder are a Siren or a Gas/Water Valve (Controller)
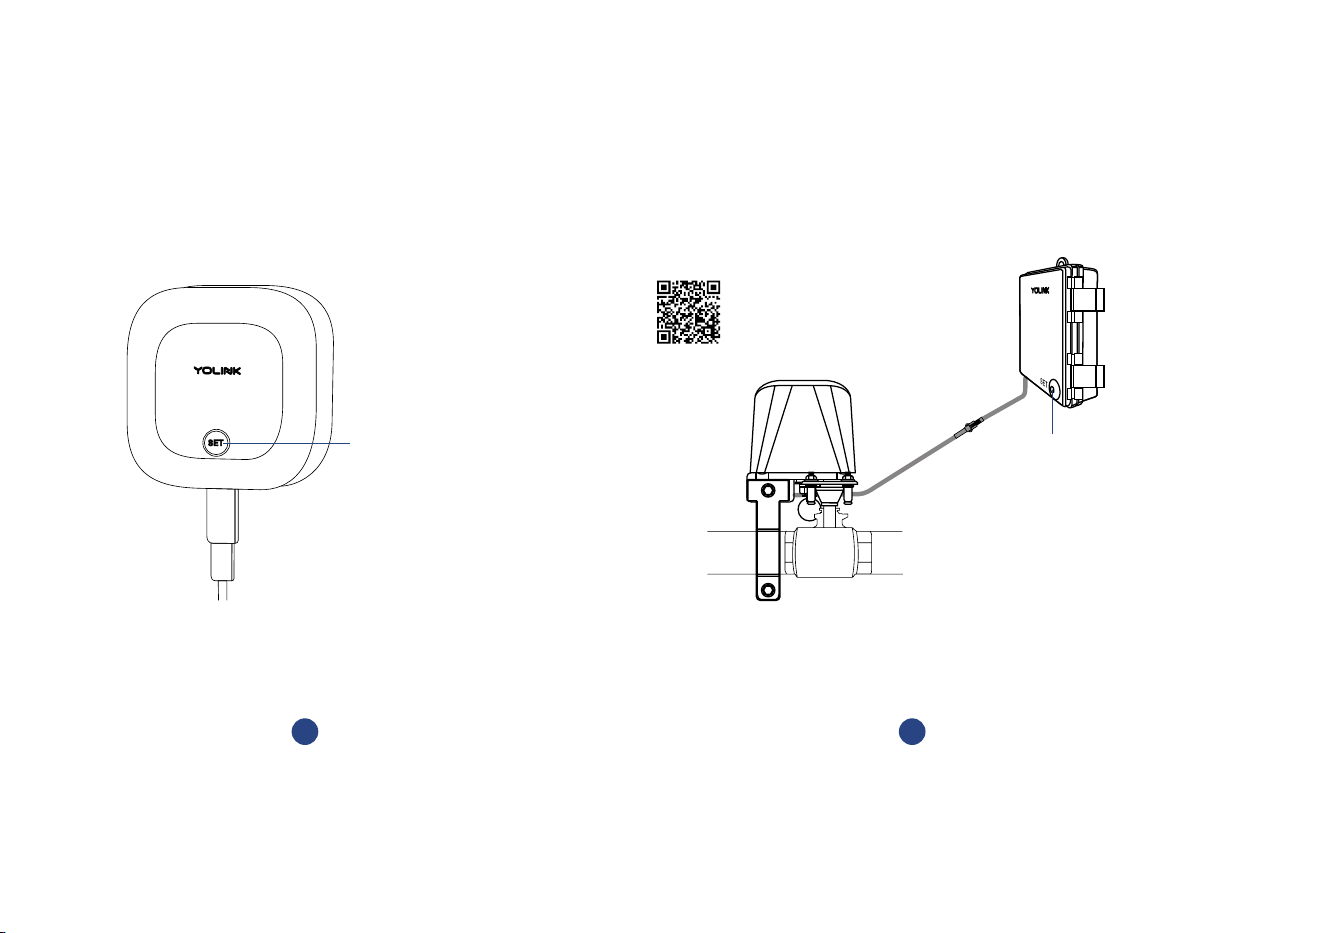
To configure your Water Leak Sensor 2 as a controller, press and hold the SET buon for 5-10
seconds unl the LED quickly blinks green
Upon pairing, the LED will stop blinking (this may happen aer only blinking two or three mes)
To configure a Valve as the responder, ensure the Valve Gas/Water Controller Gas/Water
Controller Gas/Water Valve Controller manual) (refer to has already been bound to the YoLink
app. Using the app, close the valve (verify the valve is shown to be Closed on the app, or press
the Close buon if it is shown as Open). Press and hold the SET buon for 5-10 seconds unl
the LED quickly blinks green
Pairing
The Water Leak Sensor 2 can only work as the controller in YoLink Control
23
2
Hold the SET button on the Gas/Water
Valve Controller for 5-10 seconds, until
the green light blinks quickly
Close the valve
* Verify the valve is shown to be Closed
on the YoLink app, or press the SET buon
on the controller if it is shown as Open
Hold the SET button for 5-10 seconds,
until the green light blinks quickly
1
SET Buon
* Refer to the Gas/Water Valve Controller
manual for more informaon:
YS4909-UC_Gas/Water
Valve Controller
SET Buon
* If you want to open the valve when the gas/water
sensor alerts (either water detected warning or low water
level warning), open the valve first, and let the gas/water
controller enter pairing mode
24

Either the Water Leak Sensor 2 detects water or detects the absence of water (depending
on the alert mode set in Details page in YoLink app), the YoLink Gas/Water Valve will now
immediately close. The valve will remain closed unl opened via the app; the restoral of the
Water Leak Sensor to normal (no water detected) does not open the valve
More advanced sequences, controlling mulple outputs (e.g. close valve and acvate siren)
are available via the YoLink app
Operaon
ClosedOpened
Water Pipe
25
OR
OR
OR
Unpairing
At the Water Leak Sens o r 2 (controlle r), press and hold the SET buon for 10- 15 seconds
unl the LED quick ly blinks green, th en red
Upon un-pairing, either the Water Leak Sensor 2 LED or the Gas/Water Valve Controller LED will
stop blinking and turn off
At the Ga s /Water Valve Controll e r (re spond e r), press a n d hold t h e SET bu o n for 10 - 15
second s , un l the LE D quic k ly blin ks g reen , then red
The Gas/Water Valve Controller will no longer respond to the Water Leak Sensor 2
Hold the SET button for 10-15 seconds,
until the red light blinks quickly
1
2
Hold the SET button on the Gas/Water
Valve Controller for 10-15 seconds,
until the red light blinks quickly
* Valve is either opened or closed
SET Buon
SET Buon
26
Maintenance
Firmware Update
To ensure our customers have the best user experience,
we highly recommend you update to the newest version
firmware when an update is available
The device's firmware will be updated automacally
within 4 hours (maximum). To force an immediate update,
press the SET buon on the device once to make the device
enter update mode
In “Firmware”, if a new version is listed as available (####
ready now), click it to start the firmware update process
You may use your device during the update as it is
performed in the background. The LED light will slowly
blink green during the update and the process will be
complete within 2 minutes aer the light stops blinking
27
Factory Reset
Factory reset will erase all of your sengs and restore it to factory defaults. Aer the factory reset,
your device will remain in your Yolink account
SET Buon
28
Factory reset will be complete when the status light stops blinking
Hold the SET buon for 20-25 seconds unl the status light blinks red and green alternately,
then, release the buon (Hold the SET buon longer than 25 seconds will ABORT the factory
reset operaon)
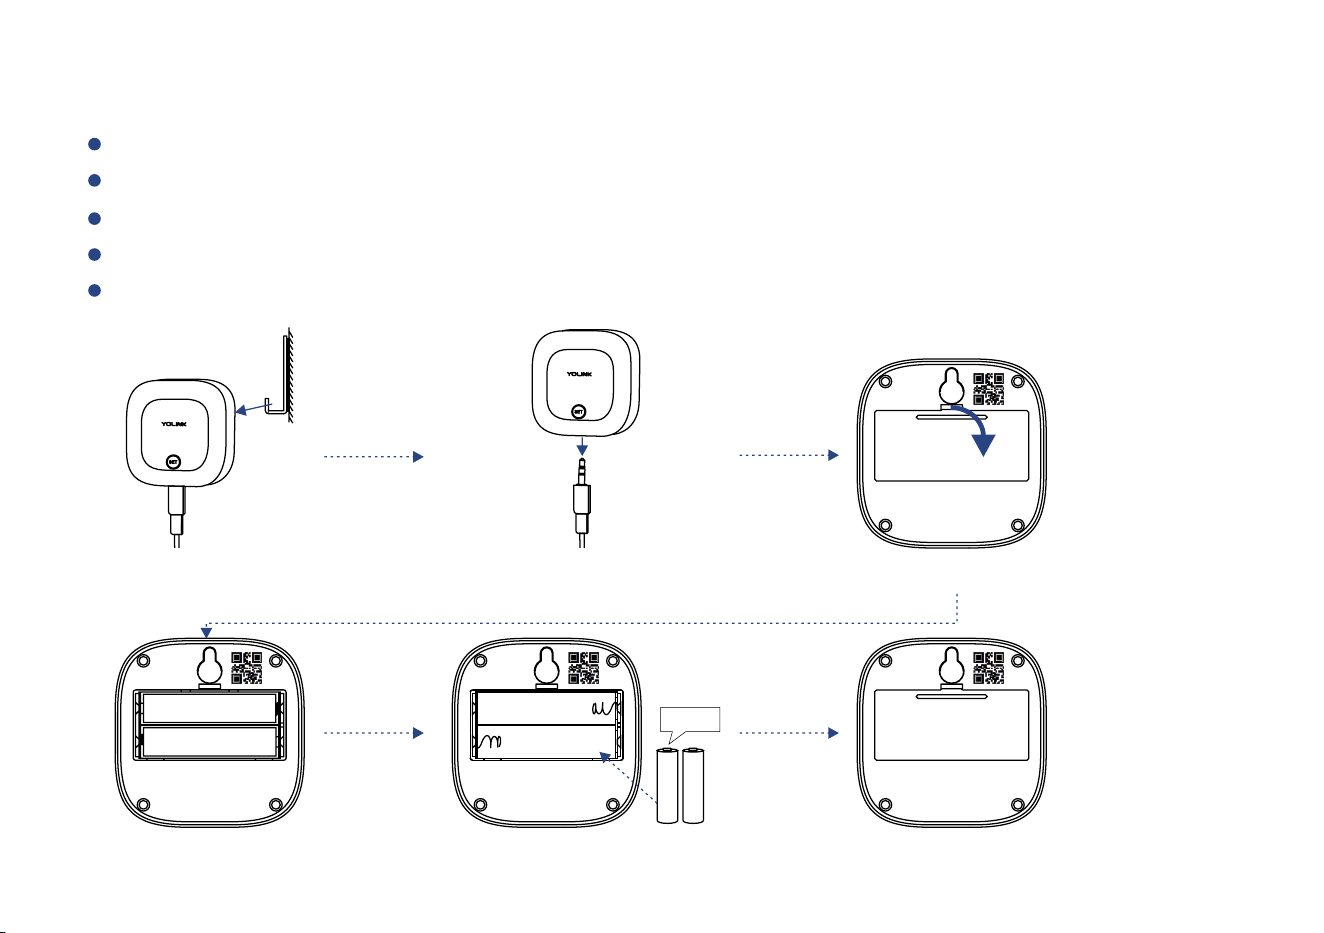
Replacing the Baeries
Remove the sensor from its mounng locaon
Oponal cablely, remove the sensor
Open the baery cover and remove the old baeries
Observing polarity, insert two new AAA baeries and close the baery cover
Please note: do not mix old and new baeries
Take down sensor
Remove old baeries
Remove the sensor cable
(oponal)
Install two new AAA baeries
2 x AAA
Close baery cover
Open baery cover
29

Specificaons
Voltage:
3V DC (2 - ies) Alkaline Non-Rechargeable AAA Baer
Dimensions:
2.44 x 2.44 x 0.80 inches (L x W x D)
Alert Sounder Volume:
Sensor Cable:
4.2 feet (1.2 meters), can be extended up to at least 55 feet
(16.8 meters)
Environment:
Working Temperature: 32°F - 122°F (0°C - 50°C)
Working Humidity: ≤95%RH non-condensing
30
95-105 dB (@10cm)

Troubleshoong
Hardware:
1. Baeries: Baeries should be brand new, name brand “AAA” alkaline type. Refer to “Warnings”
Secon on page 32
2. Status LED blink red every 30 seconds: the condion of the baeries is in queson, replace the
baeries with 2 premium “AAA” alkaline baeries
Symptoms:
1. Device is offline
- If sensor is not connected to the cloud, press the SET buon on water leak sensor once
- If Hub is offline, reconnect the Hub to the Internet and press the SET buon on water leak
sensor once
- If Hub is not on, power on the Hub again and press the SET buon on water leak sensor once
- If sensor is out of range with Hub, relocang the sensor or Hub may be required
- For a device with low-baery indicators or alerts or if the condion of the baeries is in
queson, replace the baeries with 2 premium “AAA” alkaline baeries
2. Other issues, contact customer service, 1-949-825-5958 (M-F 9am - 5pm PST)
31

Warning
Please install, operate and maintain the Water Leak Sensor 2 only as outlined in this manual.
Improper use may damage the unit and/or void the warranty
Use only new, n ame brand , a l kaline n o n -rech a rge ab le A A A baeries
Do not use recharge a bl e b aeries
Do not use zi n c b le nd b aeries
Do not mix new an d o ld b aeries
Do not puncture or damage baeries. Leakage can cause harm on skin contact, and is toxic
if ingested
Do not dispose of baeries in fire as they may explode! Please follow local baery disposal
procedures
To avo i d da mag ing t he d e vic e , if sto rin g th e dev i ce for a n ex te nd e d pe r io d , re move t he
baer i es
Do not install or u s e t h is d e v i c e o ut si d e o f t he tempe ratu re and humid i t y range l i ste d i n
the Environmental se c on i n S pe c ifi caons, o n p a ge 3 0
Do n o t in sta l l or u s e th i s dev i ce w h ere it w ill b e su b jec t e d to hi g h te mpe ratures a nd/or
ope n flam e
This device is not waterproof and is designed and intended only for indoor use. Subjecng
this device to outdoor environment condions such as direct sunlight, extreme hot or cold
temperatures, rain, water and/or condensaon can damage the device and will void the
warranty
32

In stal l o r u s e t hi s d evi ce on ly i n c le an env i ron me nts . D ust y o r d i r t y e nv iro n m e nt s m ay
pre v e nt t h e p ro pe r o p e ra on of th is de v i c e , a n d w il l vo i d t he war ra nty
If your Water Leak Se nsor 2 does get dirty, please cle a n it by wiping it down wit h a clean,
dr y cloth. Do not use strong c hemica l s or d ete rgent s , which may discolor or damage the
exterior an d /o r damage the elec t ro n ics, voiding the warranty
Do not install or use this device where it will be subjected to physical impacts and/or strong
vibraon. Physical damage is not covered by the warranty
Pl e ase conta c t Customer Ser vic e before aemp ng to repair, disassemble or modif y the
device, any of which ca n void th e warra nty and pe r manently damage th e device
33

Warranty 2 Year Limited Electrical Warranty
YoSmart warrants to the original residenal user of this product that it will be free from defects in
materials and workmanship, under normal use, for 2 years from the date of purchase. User must
provide a copy of original purchase receipt. This warranty does not cover abuse or misused products
or products used in commercial applicaons. This warranty does not apply to water leak sensor2s
that have been improperly installed, modified, put to a use other than designed, or subjected to acts
of God (such as floods, lightning, earthquakes, etc.). This warranty is limited to repair or replacement
of the water leak sensor 2 only at YoSmart's sole discreon. YoSmart will NOT be liable for the cost of
installing, removing, nor reinstalling this product, nor direct, indirect, or consequenal damages to
persons or property resulng from the use of this product. This warranty only covers the cost of
replacement parts or replacement units, it does not cover shipping & handling fees
To implement this warranty please give us a call during business hours at 1-949-825-5958, or visit
www.yolink.net
Copyright 2021. YoSmart, Inc. All rights reserved
If you have any difficules installing or using your Water Leak Sensor 2, please
contact our Customer Service department during business hours:
US Live Tech Support: 1-949-825-5958 M-F 9am - 5pm PST
Email: service@yosmart.com
YoSmart Inc. 17165 Von Karman Avenue, Suite 105, Irvine, CA 92614
34

FCC statement
This equipment has been tested and found to comply with the limits for a Class B digital device,
pursuant to part 15 of the FCC Rules. These limits are designed to provide reasonable protecon
against harmful interference in a residenal installaon. This equipment generates, uses and can
radiate radio frequency energy and, if not installed and used in accordance with the instrucons,
may cause harmful interference to radio communicaons. However, there is no guarantee that
interference will not occur in a parcular installaon. If this equipment does cause harmful
interference to radio or television recepon, which can be determined by turning the equipment
off and on, the user is encouraged to try to correct the interference by one or more of the following
measures:
Reorient or relocate the receiving antenna
Connect the equipment into an outlet on a circuit different from that to which the receiver is
connected
Increase the separaon between the equipment and receiver
Consult the dealer or an experienced radio / TV technician for help
This device complies with part 15 of the FCC Rules. Operaon is subject to the following two
condions:
1) This device may not cause harmful interference
2) This device must accept any interference received, including interference that may cause
undesired operaon. Any changes or modificaons not expressly approved by the party
responsible for compliance could void the user’s authority to operate the equipment

This equipment complies with FCC RF radiaon exposure limits set forth for an uncontrolled
environment. This device and its antenna must not be co-located or operang in conjuncon with
any other antenna or transmier.
“To comply with FCC RF exposure compliance requirements, this grant is applicable to only Mobile
Configuraons. The antennas used for this transmier must be installed to provide a separaon
distance of at least 20 cm from all persons and must not be co-located or operang in conjuncon
with any other antenna or transmier.”
FCC RF radiaon exposure statement
Note: The manufacturer is not responsible for any radio or TV interference caused by unauthorized
modificaons to this equipment. Such modificaons could void the user’s authority to operate the
equipment.