SENIXTOOLS.COM Englishv. 1.1
Instruction Manual
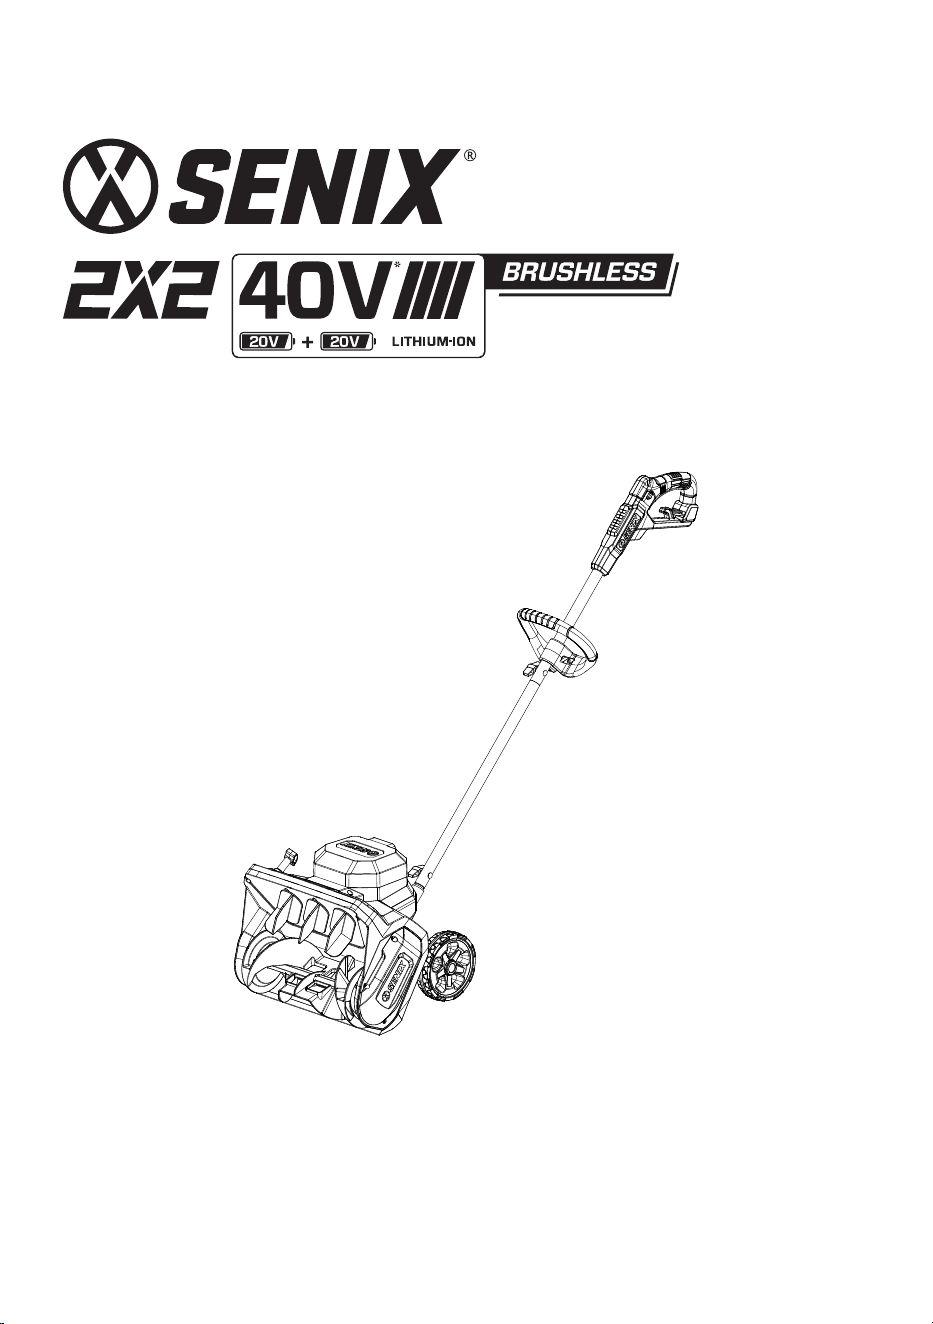
Model: STX2-M2
15” CORDLESS SNOW SHOVEL
CAUTION: Before using this tool, please read this manual completely,
and follow all operating safety measures.
• SAFETY
• ASSEMBLY
• OPERATION
• MAINTENANCE
• WARRANTY
YAT USA INC. 10506 Bryton Corporate Center Dr, #500 Huntersville, NC 28078
For customer support, please call 1-800-261-3981 or email us at [email protected]
EN - 2
SENIXTOOLS.COM
SAFETY &
INTERNATIONAL
SYMBOLS
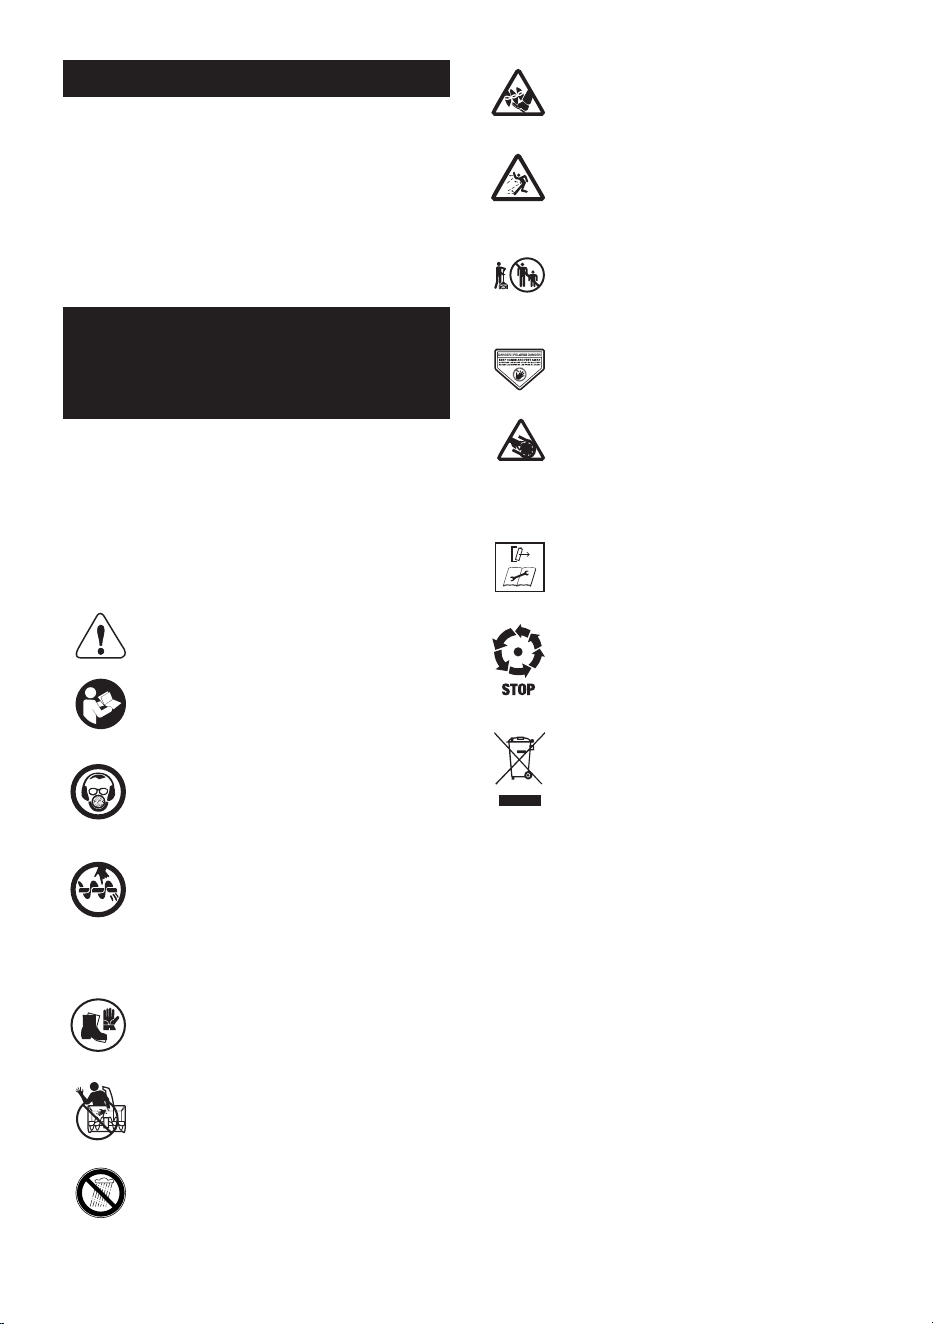
The following table depicts and describes
safety and international symbols and
pictographs that may appear on this product.
Read, understand, and follow all instructions
on the machine and in the instruction manual
for complete safety, assembly, operating,
maintenance, and repair information before
attempting to assemble and operate.
Caution / Warning.
To reduce the risk of injury, user
must read instruction manual.
Wear hearing protection. Wear
eye protection. Wear breathing
protection.
DANGER - Do not use hands to
unclog chute. Stop motor before
removing debris. Do not walk in
front of running machine. Do not
direct discharge at bystander.
Wear protective gloves and non-slip
footwear when using the machine
and handling debris.
Do not use hands to unclog rotor
housing.
Do not use in rain or wet conditions.
TABLE OF CONTENTS
SAFETY & INTERNATIONAL SYMBOLS ..............2
SAFETY INSTRUCTIONS .........................................3
KNOW YOUR UNIT .....................................................6
SPECIFICATIONS .......................................................7
ASSEMBLY ................................................................... 7
OPERATION ..................................................................8
MAINTENANCE ...........................................................9
TROUBLE SHOOTING .............................................13
WARRANTY ................................................................14
DANGER! Cutting/dismemberment
hazard - Keep feet away from the
rotating auger.
CAUTION! Beware of stones and
other foreign objects that could be
thrown from the equipment.
Keep bystanders and children a
safe distance (at least 33 ft/10 m)
away from the work area.
Keep hands and feet away.
DANGER! Cutting/dismemberment
hazard – Keep hands away from the
rotating auger. Do not use hands to
unclog rotor housing. Stop motor
before removing debris.
WARNING – Disconnect battery
before maintenance.
The rotating part will continuously
run for several seconds after you
turn off the machine.
Waste electrical products should
not be disposed of with household
waste. Please recycle where
facilities exist. Check with your
Local Authority or local store for
recycle.

SENIXTOOLS.COM
3 - EN
SAFETY INSTRUCTIONS
IMPORTANT SAFETY
INSTRUCTIONS
WARNING!
Read all safety warnings, instructions,
illustrations and specifications, provided
with this equipment. Failure to follow all
instructions listed below may result in electric
shock, fire and/or serious injury.
READ ALL INSTRUCTIONS
a. Do not use on graveled surface unless the
snow blower is adjusted for such a surface
in accordance with the operator's manual.
b. Keep Children Away – All visitors should be
kept a safe distance from work area.
c. Dress Properly – Do not wear loose cloth-
ing or jewelry. They can be caught in mov-
ing parts.
d. Wear rubber boots when operating the
snow blower.
e. Operation of the snow blower in the
hand-held position is unsafe, except in
accordance with the special instructions
for such use provided in the operator's
manual.
f. Keep hands away from moving parts.
g. Keep guards in place and in working order.
h. Don't Force Snow Blower – It will perform
better and safer at the rate for which it
was designed.
i. Don't Overreach – Keep proper footing and
balance at all times.
j. If the snow blower strikes a foreign object
follow these steps:
• Stop snow blower. Release the switch.
• Remove the battery pack.
• Inspect for damage.
• Repair any damage before restarting
and operating the snow blower.
k. Power off the tool –remove the battery
packs when it is not in use, before ser-
vicing it, when changing accessories and
when performing any other maintenance
task.
l. Store Idle Snow Blowers Indoors – When
not in use, snow blowers should be stored
indoors in dry, locked-up place – out of
reach of children.
m. Maintain Snow Blowers With Care – Follow
instructions for lubricating and changing
accessories.
SAFE OPERATION
PRACTICES
WARNING!
This snow blower is capable of amputating
hands and feet and throwing objects. Failure
to observe the following safety instructions
could result in serious injury.
1. Training
a. Read, understand and follow all instruc-
tions on the machine and in the manual(s)
before operating this unit. Be thoroughly
familiar with the controls and the proper
use of the machine. Know how to stop the
unit and disengage the controls quickly.
b. Never allow children to operate the ma-
chine. Never allow adults to operate the
machine without proper instruction.
c. Keep the area of operation clear of all per-
sons, particularly small children.
d. Exercise caution to avoid slipping or falling,
especially when operating the machine in
reverse.
2. Preparation
a. Thoroughly inspect the area where the
machine is to be used and remove all
doormats, sleds, boards, wires and other
foreign objects.
b. Disengage all clutches and shift into neu-
tral before starting the motor.
c. Do not operate the machine without wear-
ing adequate winter garments. Avoid loose
fitting clothing that can get caught in mov-
ing parts. Wear footwear that will improve
footing on slippery surfaces.
d. Always wear safety glasses or eye shields
during operation or while performing an
adjustment or repair to protect eyes from
foreign objects that may be thrown from
the machine.
e. Adjust the collector housing height to
clear gravel or crushed rock surface.
f. Never attempt to make any adjustments
while the motor is running (except when
specifically recommended by manufac-
turer).
3. Operation

EN - 4
SENIXTOOLS.COM
a. Do not put hands or feet near or under
rotating parts. Keep clear of the discharge
opening at all times.
b. Exercise extreme caution when operating
on or crossing gravel drives or walks. Stay
alert for hidden hazards or operating near
public roads.
c. After striking a foreign object, stop the mo-
tor, remove the battery packs, thoroughly
inspect the snow blower for any damage,
and repair the damage before restarting
and operating the snow blower.
d. If the machine should start to vibrate ab-
normally, stop the motor and check imme-
diately for the cause. Vibration is generally
a warning of trouble.
e. Stop the motor whenever you leave the
operating position, before unclogging the
collector/impeller housing or discharge
chute, and when making any repairs, ad-
justments or inspections.
f. Do not run the engine indoors, except
when starting the engine and for trans-
porting the snow blower in or out of the
building. Open the outside doors; exhaust
fumes are dangerous.
g. Exercise extreme caution when operating
on slopes.
h. Never operate the machine without proper
guards and other safety protective devic-
es in place and working.
i. Never direct the discharge toward people
or areas where property damage can oc-
cur. Keep children and others away.
j. Do not overload the machine capacity by
attempting to clear snow at too fast a rate.
k. Never operate the machine at high trans-
port speeds on slippery surfaces. Look
behind and use care when operating in
reverse.
l. Disengage power to the collector/impeller
when the machine is transported or not in
use.
m. Use only attachments and accessories
approved by the manufacturer of the
machine (such as wheel weights, counter-
weights or cabs).
n. Never operate the machine without good
visibility or light. Always be sure of your
footing, and keep a firm hold on the han-
dles. Walk; never run.
o. Never touch a hot engine or muffler.
4. Clearing a Clogged Discharge Chute
a. Hand contact with the rotating impeller in-
side the discharge chute is the most com-
mon cause of injury associated with snow
blowers. Never use your hand to clean out
the discharge chute.
b. To clear the chute:
• SHUT THE MOTOR OFF!
• Wait 10 s to be sure the impeller
blades have stopped rotating.
• Always use a clean-out tool, not your
hands.
5. Maintenance and Storage
a. Check shear bolts and other bolts at fre-
quent intervals for proper tightness to
be sure the equipment is in safe working
condition.
b. Always refer to instruction handbook for
important details if the snow blower is to
be stored for an extended period.
c. Maintain or replace safety labels, as nec-
essary.
d. Run the machine a few minutes after
throwing snow to prevent freeze-up of the
collector/impeller.
e. When cleaning, repairing or inspecting
the snow blower, stop the engine and
make certain the collector/impeller and all
moving parts have stopped. Remove the
battery packs to prevent someone from
accidentally starting the engine.
BATTERY EQUIPMENT USE
AND CARE
a. Prevent unintentional starting. Ensure
the switch is in the off-position before
connecting to battery pack, picking up
or carrying the appliance. Carrying the
appliance with your finger on the switch or
energizing appliance that have the switch
on invites accidents.
b. Disconnect the battery pack from the
appliance before making any adjust-
ments, changing accessories, or storing
appliance. Such preventive safety mea-
sures reduce the risk of starting the appli-
ance accidentally.
c. Recharge only with the charger speci-
fied by the manufacturer. A charger that
is suitable for one type of battery pack may
create a risk of fire when used with another
battery pack.
d. Use power equipment only with specif-
ically designated battery packs. Use of

SENIXTOOLS.COM
5 - EN
any other battery packs may create a risk of
injury and fire.
e. When battery pack is not in use, keep
it away from other metal objects, like
paper clips, coins, keys, nails, screws
or other small metal objects, that can
make a connection from one terminal
to another. Shorting the battery terminals
together may cause burns or a fire.
f. Under abusive conditions, liquid may be
ejected from the battery; avoid contact.
If contact accidentally occurs, flush with
water. If liquid contacts eyes, additionally
seek medical help. Liquid ejected from the
battery may cause irritation or burns.
g. Do not use a battery pack or equipment
that is damaged or modified. Damaged
or modified batteries may exhibit unpredict-
able behavior resulting in fire, explosion or
risk of injury.
h. Do not expose a battery pack or equip-
ment to fire or excessive temperature.
Exposure to fire or temperature above 265
°F (130 °C) may cause explosion.
i. Follow all charging instructions and do
not charge the battery pack or equip-
ment outside the temperature range
specified in the instructions. Charging
improperly or at temperatures outside the
specified range may damage the battery
and increase the risk of fire.
SAVE THESE
INSTRUCTIONS
INTENDED USE
This cordless snow shovel is intended for
removing and clearing away snow from
sidewalks, decks, driveways and other flat
paved surfaces. Do not use it for other
purposes.
EN - 6
SENIXTOOLS.COM
KNOW YOUR UNIT
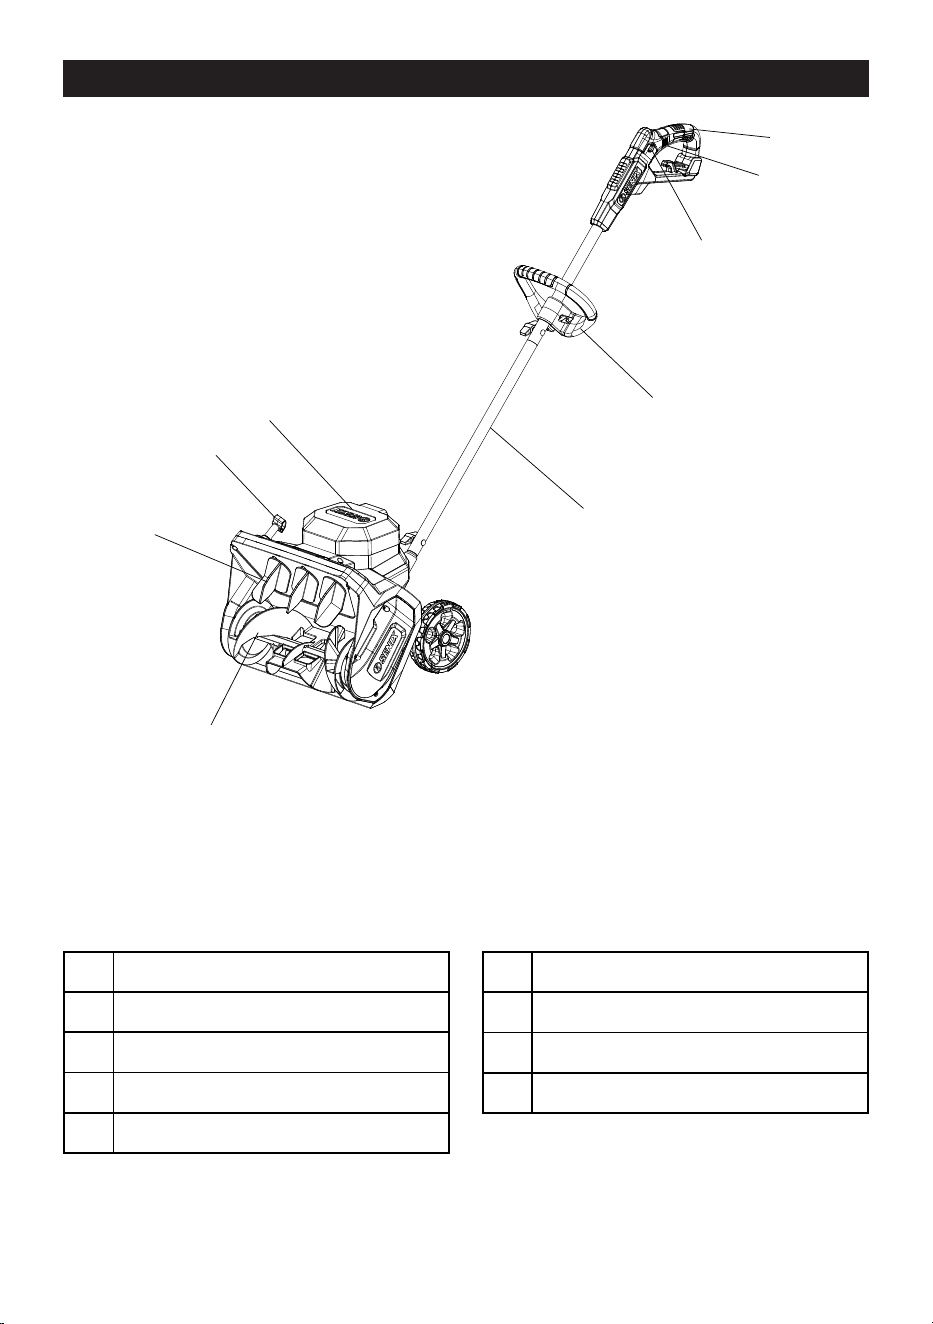
1
2
3
4
5
6
7
8
9
APPLICATIONS
Model: STX2-M2
As a snow shovel:
Removing and clearing away snow from paved
surfaces.
1 Rear Handle
2 Switch Trigger
3 Safety Button
4 Front Handle
5 Shaft
6 Battery Compartment Cover
7 Louver Control Handle
8 Louvers
9 Auger Assembly
SENIXTOOLS.COM
7 - EN
SPECIFICATIONS
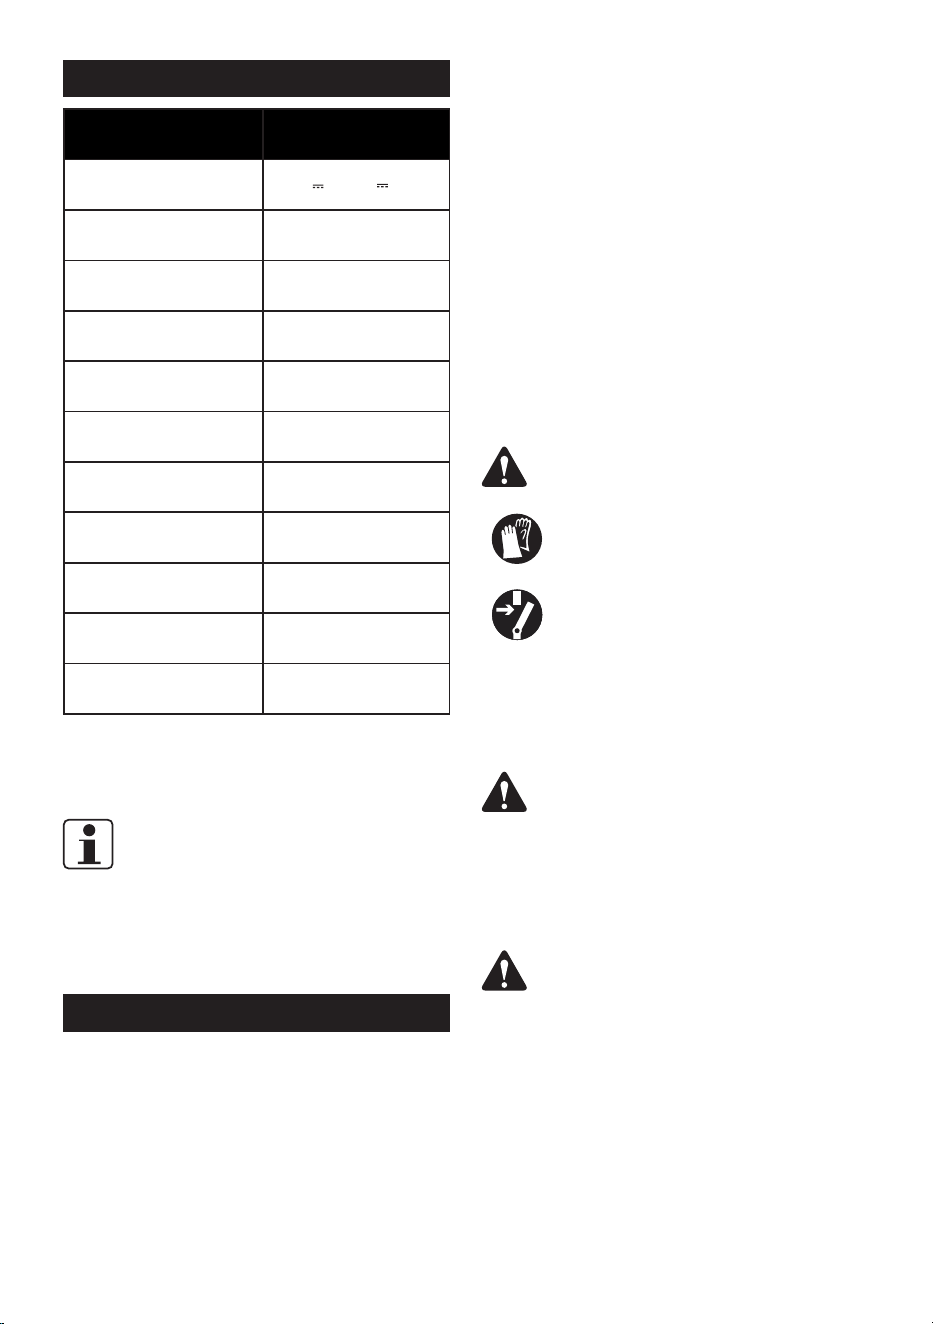
Model STX2-M2
Input Voltage 36 V (40 V Max*)
Rated Output Power 1000 W
No-Load Speed 2200 RPM
Clearing Width 15’’
Throw Distance 20-33 ft
Plow Depth 6’’
Max. Clearing Capacity 600 lb /min
Wheel Size 6’’
Recommended
Operating Temperature
-4°F - 50°F
Recommended Storage
Temperature
-4°F - 158°F
Weight (Tool Only) 16.6 lb
*40V Max battery, maximum initial battery
voltage (measured without a workload) is 40V.
The nominal voltage is 36V.
NOTE:
Only use the following batteries: B20X2,
B25X2, B40X2, B50X2 and chargers:
CHX2-L1, CHX2-L2, CHX2, CHQX2, CHQX2-M,
CHDX2-M.
ASSEMBLY
1. Unpack all parts and lay them on a flat,
stable surface:
2. Remove all packing materials and shipping
devices, if applicable.
3. The scope of delivery varies depending on
the country and purchased variant.
• Snow shovel x1
• Upper shaft x1
• Middle shaft x1
• Shaft bolt x2
• Shaft knob x2
• Flat washer x2
• Auxiliary handle x1
• Handle knob x1
• Handle bolt x1
• Instruction manual x1
4. If you find that parts are missing or show
damage do not use the product but con-
tact your dealer. Using an incomplete or
damaged product represents a hazard to
people and property.
5. Ensure that you have all the accessories
and tools needed for assembly and oper-
ation. This also includes suitable personal
protective equipment.
WARNING!
Wear protective gloves for this
assembly work and always lay the
product on a flat and stable surface
while assembling.
Follow the assembly instructions
step-by-step and use the pictures
provided as a visual guide to easily
assemble the product!
Do not insert the battery pack
before the power tool is completely
assembled or adjusted!
WARNING!
To avoid product damage or personal injury,
the equipment should be assembled indoors
at an ambient temperature above 23°F (-5°C).
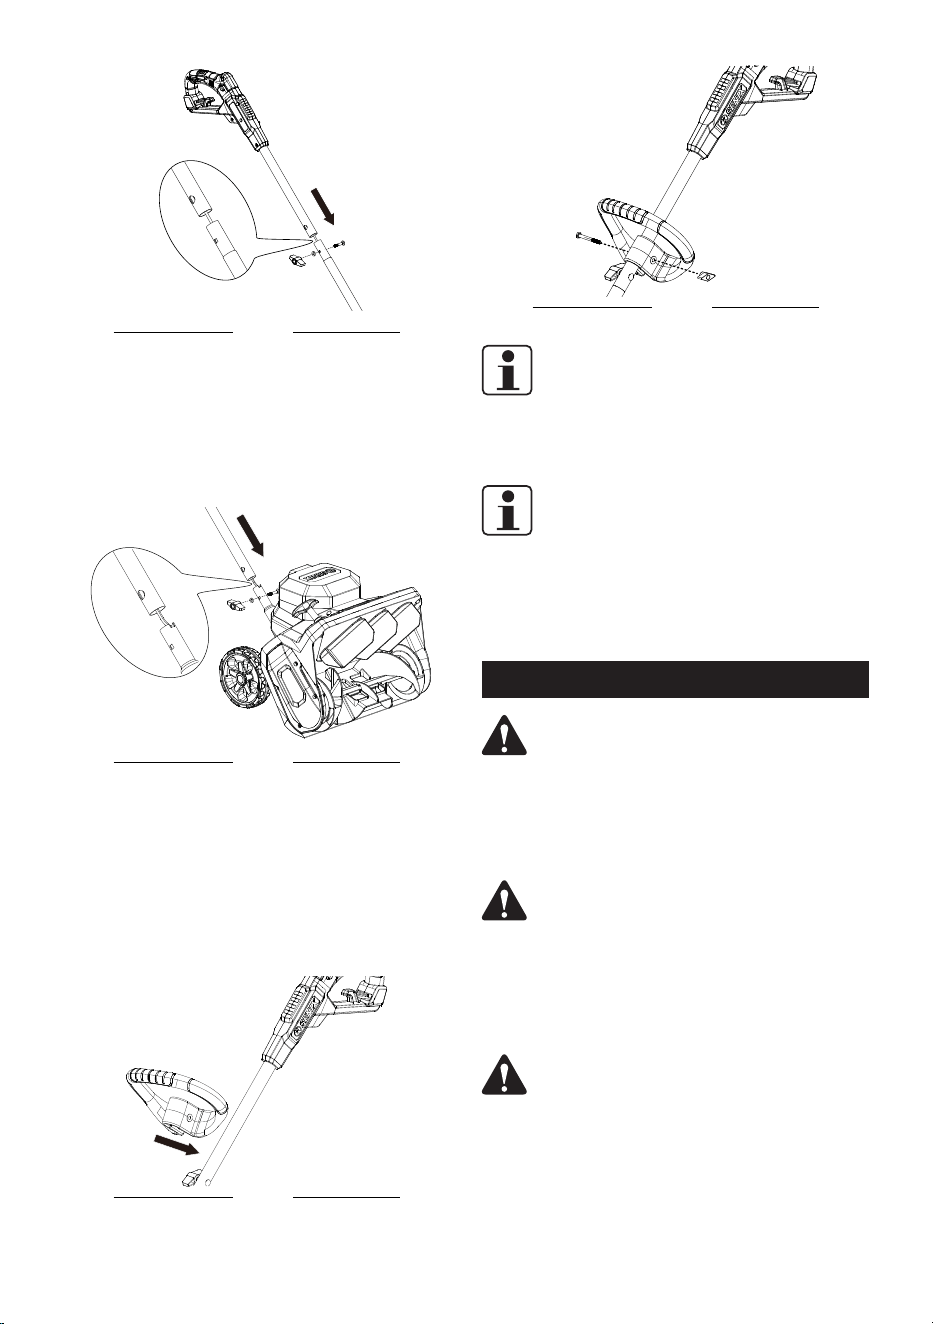
CONNECTING THE SHAFT
WARNING!
Make sure the internal cable does not obstruct
the mounting holes.
1. Connect the upper shaft assembly with
the middle shaft assembly by aligning the
holes.
2. Insert a bolt through the aligned holes on
one side. Put on a flat washer and a shaft
knob on the opposite side and then tighten
the knob to secure the shafts.
EN - 8
SENIXTOOLS.COM
Fig. 4
NOTE:
In order to prevent the front handle from
moving around or sliding on the shaft, be sure
to tighten it securely.
NOTE:
Ensure the handle is oriented according to
the diagram. Incorrect installation may cause
malfunction.
OPERATION
WARNING!
Never operate a snow shovel that is damaged
or improperly adjusted or that is not
completely and securely assembled. Be sure
that the snow shovel stops moving when the
trigger is released.
WARNING!
To prevent accidental starting that could
cause serious personal injury, always remove
the battery pack from the machine when
assembling parts, making adjustments,
cleaning, or when not in use.
WARNING!
Do not use any attachments or accessories
not recommended by the manufacturer of
this product. The use of attachments or
accessories not recommended can result in
serious personal injury.
➁
➀
Fig. 1
3. Connect the assembled shaft assembly
with the lower shaft assembly on the back
of the snow shovel, by aligning the holes.
4. Insert a bolt through the aligned holes on
one side. Put on a flat washer and a shaft
knob on the opposite side and then tighten
the knob to secure the shafts.
➀
➁
Fig. 2
INSTALLING THE AUXILIARY
HANDLE
1. Clamp the front handle to the shaft.
2. Move the handle to a safe and comfortable
working position and use a knob and a bolt
to secure it.
Fig. 3
SENIXTOOLS.COM
9 - EN
WARNING!
Keep the area to be cleared free of stones,
toys or other foreign objects that the auger
might pick up and throw. Such items could be
covered by snow and are easy to overlook, so
be sure to conduct a thorough inspection of
the area before beginning work.
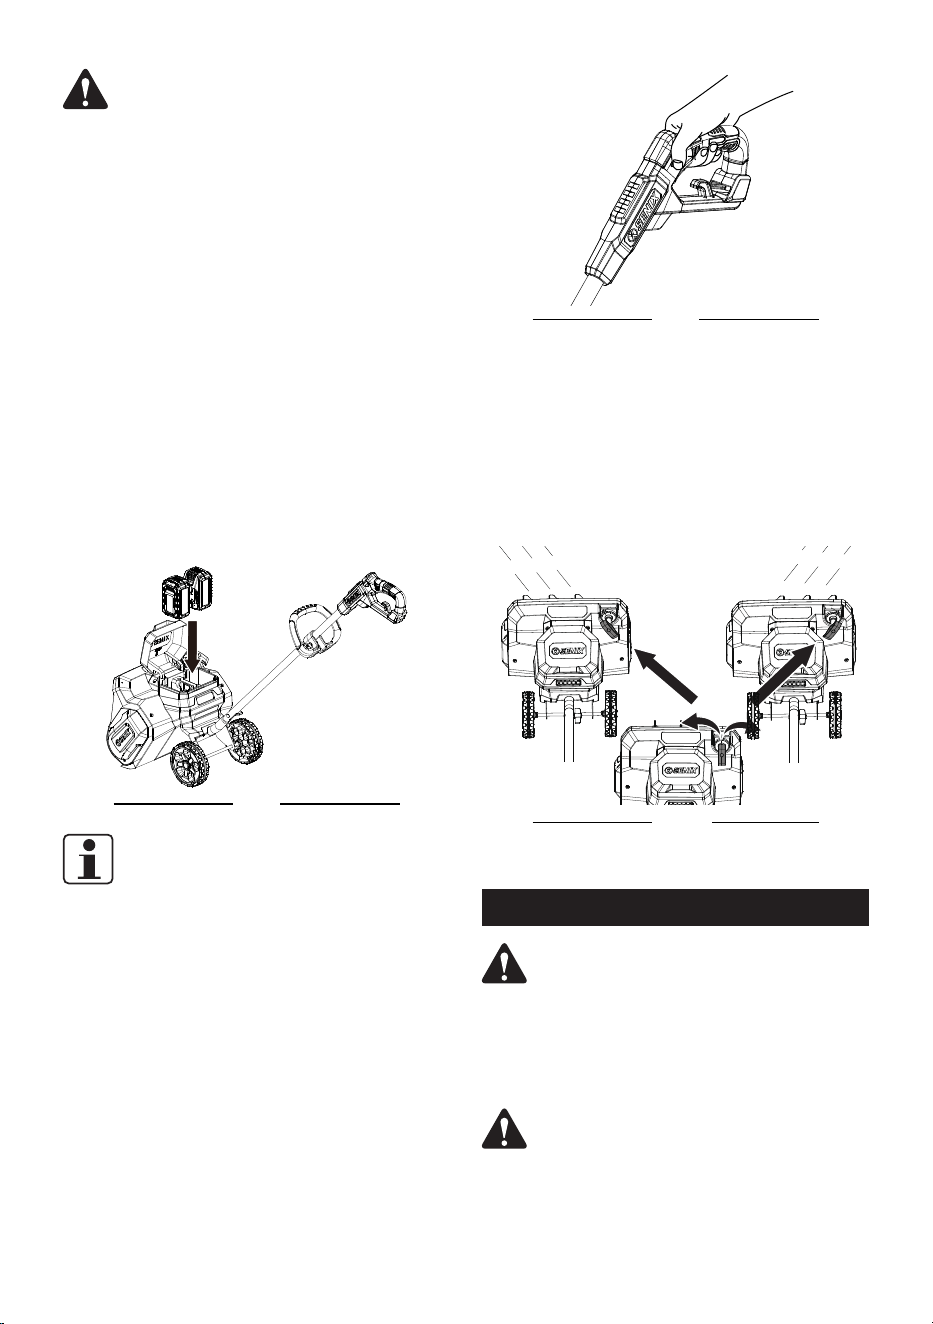
INSTALLING/REMOVING
THE BATTERY PACK
1. Raise the battery cover by lifting the front
of the cover.
2. Align the grooves in the battery pack with
the raised ribs in the battery compartment
and then insert the battery pack into the
compartment until you hear a “click”.
3. To detach the battery pack, depress the
battery-release button to release the bat-
tery pack, and then lift it out of the com-
partment.
4. Close the battery cover.
Fig. 5
NOTE:
Refer to the manuals for the charger and
battery pack for more details.
STARTING/STOPPING THE
SNOW SHOVEL
1. To start the snow shovel, push and hold
the safety button on the top of the main
handle grip with your thumb and then
squeeze the trigger with your fingers.
Once the machine is powered on, you can
release the safety button and continue the
operation.
Fig. 6
2. To stop the snow shovel, release the trig-
ger.
CHUTE DIRECTION
The chute direction can be controlled by the
louver control handle.
Lift up the control handle slightly and then
turn it left or right. The louvers will turn with it.
Fig. 7
MAINTENANCE
WARNING!
Remove and pull out the battery pack before
maintenance! Maintain this product regularly
and carefully! If the product is improperly
maintained, it may fail at its intended task,
which may produce fatal consequences.
WARNING!
Wear heavy duty gloves when performing any
maintenance or service to this unit.
EN - 10
SENIXTOOLS.COM
Fig. 10
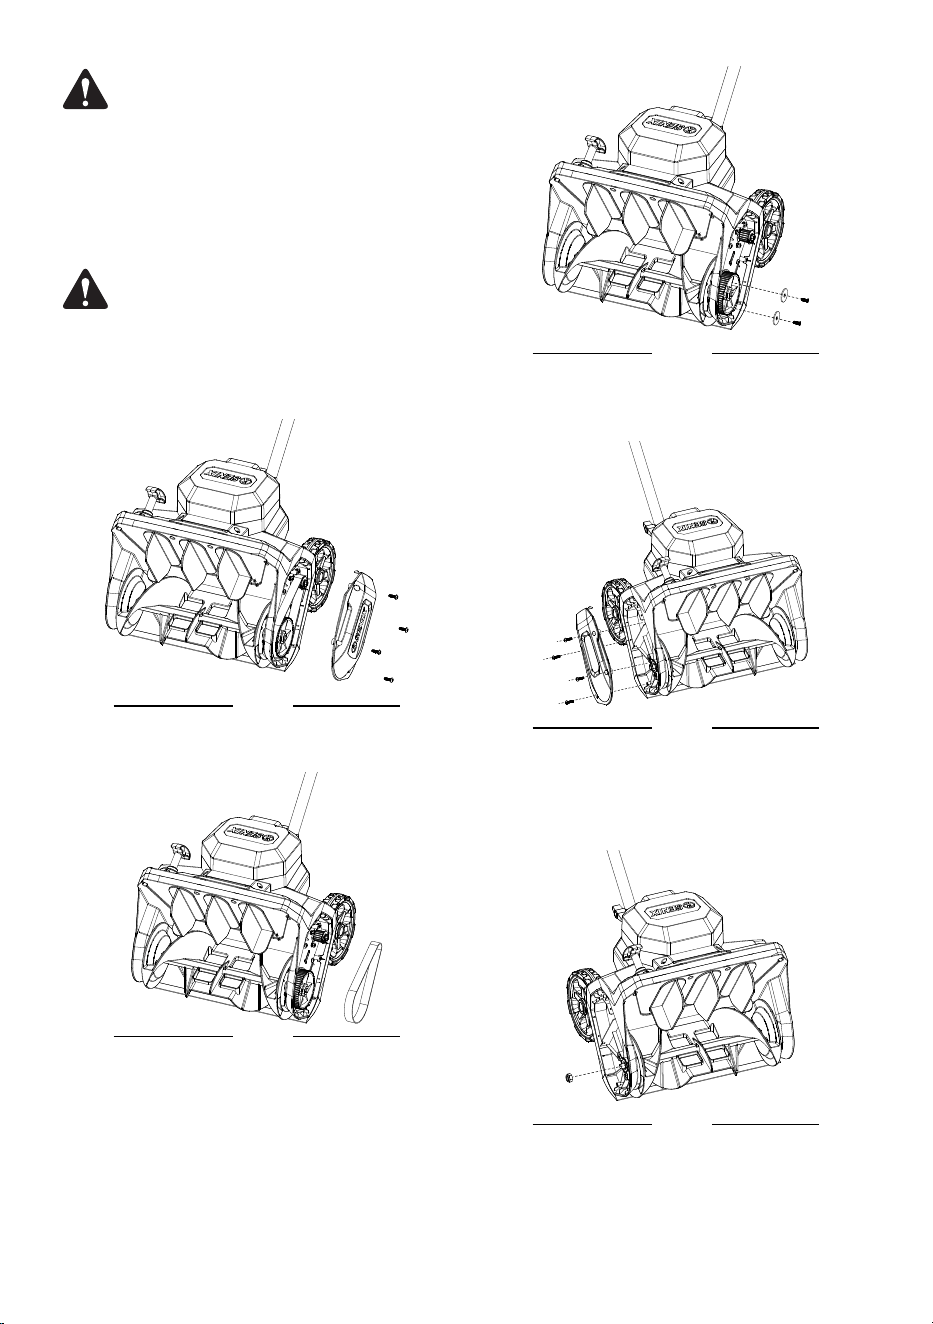
4. Remove the four screws to disassemble
the right side cover.
Fig. 11
5. Use one hand to secure the auger while
use the other hand to remove the nut on
the right side.
Fig. 12
6. Remove the auger axle set from the left
side and remove the old auger from the
housing.
WARNING!
Only perform cleaning and maintenance work
according to these instructions! All further
works must be performed by a qualified
specialist!
REPLACING THE AUGER
WARNING!
Switch o the product and remove the battery
from the machine before replacing the auger.
1. Remove the four screws to disassemble
the left side cover.
Fig. 8
2. Remove the belt from the driven wheel.
Fig. 9
3. Remove the screws and washers from the
driven wheel.
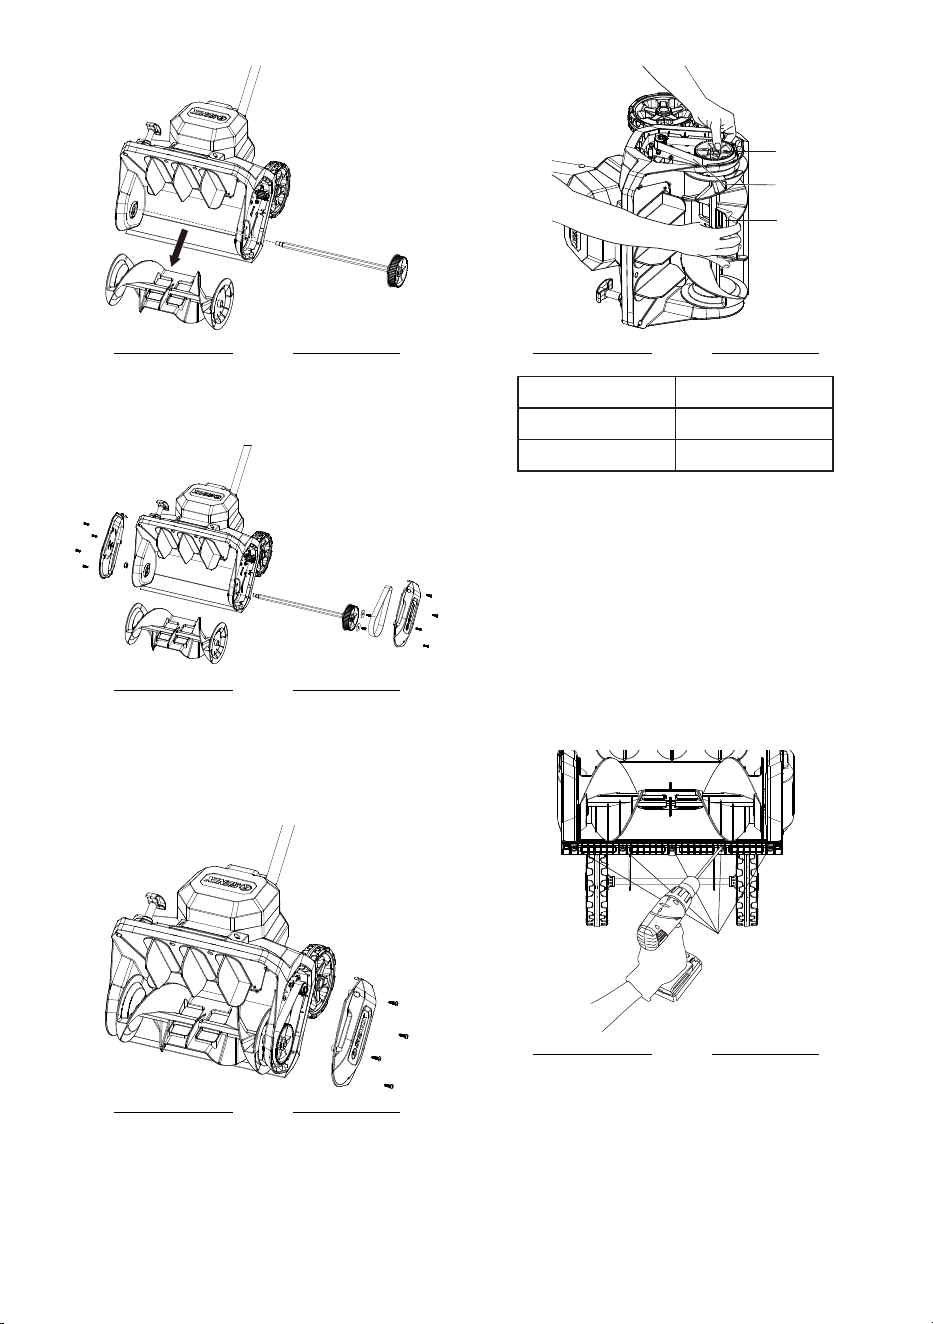
SENIXTOOLS.COM
11 - EN
Fig. 13
7. Install the replacement auger by following
the above steps in reverse order.
Fig. 14
REPLACING THE BELT
1. Remove the four screws to disassemble
the left side cover.
Fig. 15
2. To remove the old belt from the driven
wheel, use one hand to slowly turn the au-
ger while use the other hand to lift the belt.
B
A
C
Fig. 16
A Driven wheel
B Belt
C Auger
3. Replace a new belt in place. Place the left
side cover back into position and refasten
the four screws.
REPLACING THE SCRAPER
BAR
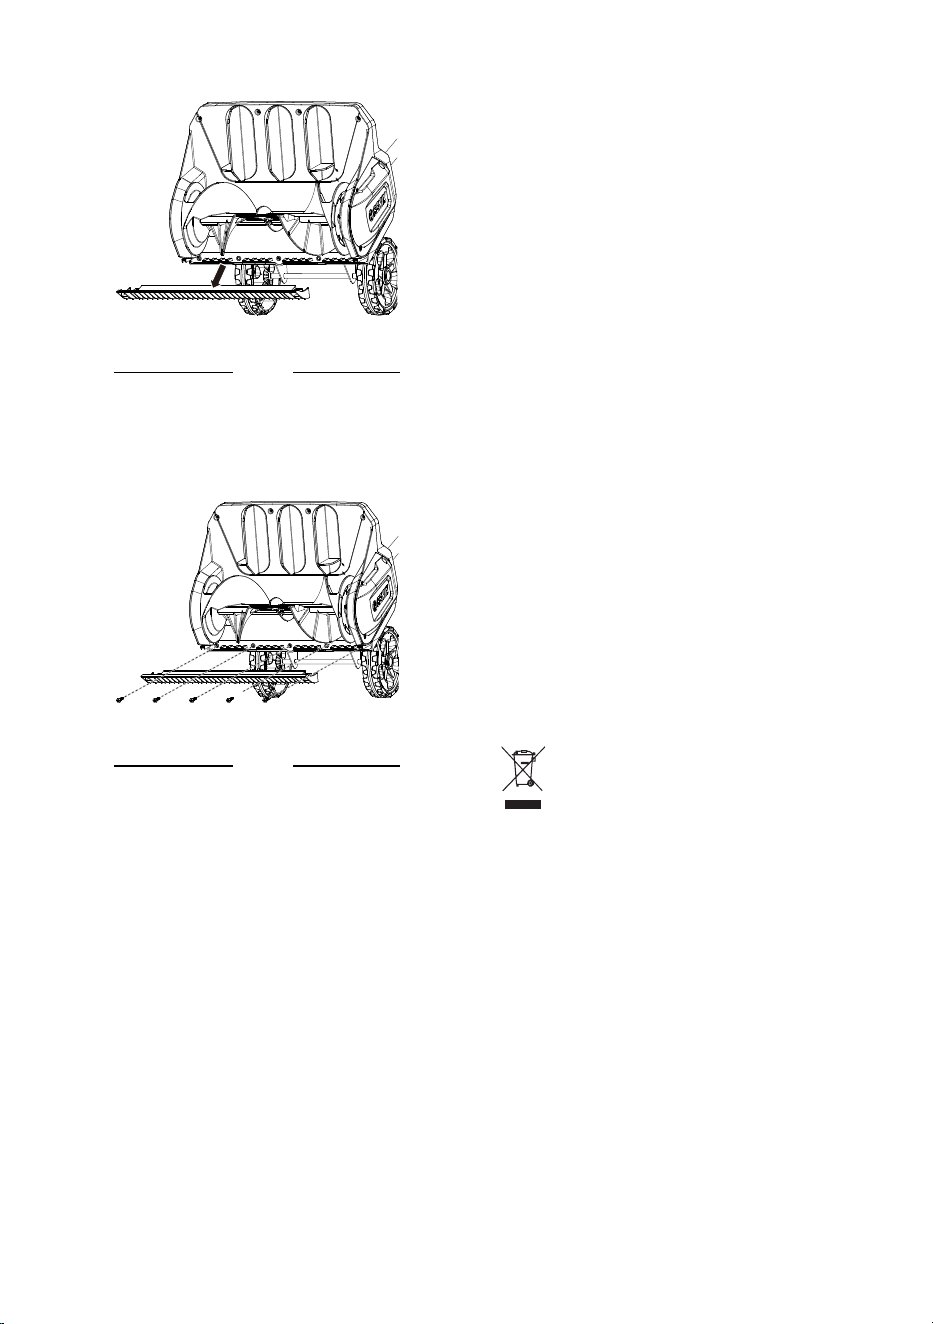
1. Turn over the snow shovel. Use a drill to
remove the five screws that secure the
scraper bar to the base of the unit.
Fig. 17
2. Remove the old scraper bar.
EN - 12
SENIXTOOLS.COM
STORAGE
• Carefully inspect all parts for signs of wear,
looseness, or damage. If any repair or re-
placement is needed, contact customer
service for assistance.
• Thoroughly clean the snow shovel before
storing. Allow the unit to dry completely to
prevent rust or corrosion.
• For long-term storage, apply a light coat of
oil to metal surfaces to prevent rust.Store
the unit indoors in a locked, dry, well-venti-
lated area, out of reach of children.
TRANSPORTATION
• Clean the product as described above.
• Only carry by its handle/grip area.
• Protect from any heavy impact.
• Secure the product properly to prevent it
from falling or coming into contact with
people or property during transport.
DISPOSAL
Waste product should not be disposed of
with household waste. Please recycle where
facilities exist. Check with your local authority
or retailer for recycling advice. Users should
clean up dust generated during operation to
protect environment.
Electrical products should not be
discarded with household products.
Used electrical products must be
collected separately and disposed
of at collection points provided for
this purpose. Talk with your local
authorities or dealer for advice on
recycling.
Fig. 18
3. Install a new scraper bar and secure it to
the housing with the five screws.
Fig. 19
CLEANING
• Always turn off the product and remove
the battery packs before cleaning.
• After each use, disassemble (if applicable)
and clean out any ice or debris that may
have accumulated. Pay particular atten-
tion to the air vent and its slots, the auger,
and the scraper bar.
• No regular lubrication is needed for normal
operation.
• To clean, use a soft damp cloth and a soft
brush. Gently wipe away any dirt, grime, or
residue. Do not spray water directly onto
the machine or immerse it in water, as this
may cause damage.
SENIXTOOLS.COM
13 - EN
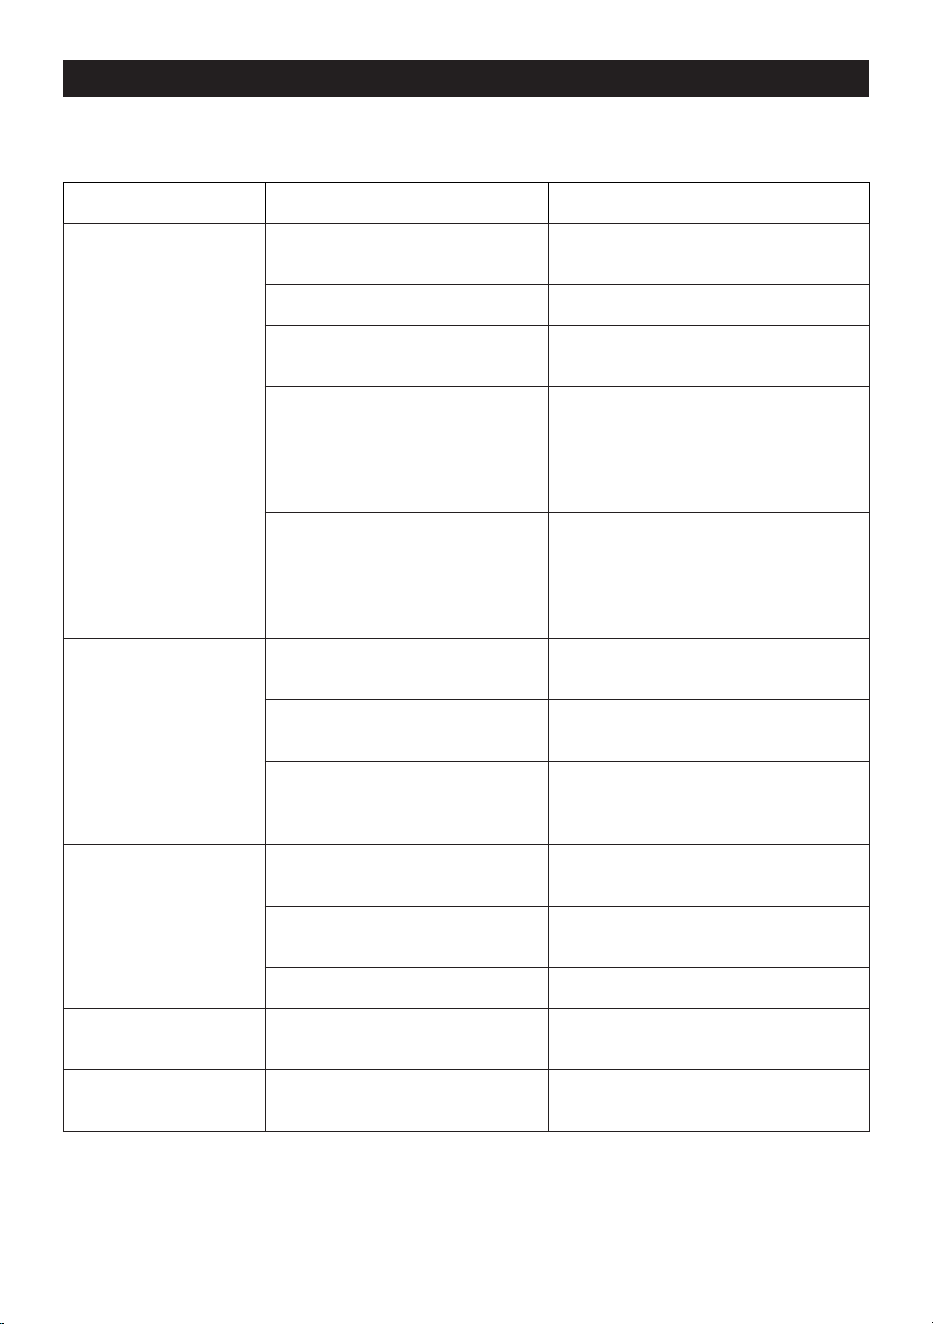
TROUBLE SHOOTING
Suspected malfunctions are often due to causes that can be addressed by the user. Therefore,
troubleshoot the product using this section. In most cases the problem can be solved quickly.
PROBLEM POSSIBLE CAUSE SOLUTION
Product does not
start
Battery not installed well
Make sure the battery is fully in-
serted.
Battery depleted Charge the battery.
Safety button not depressed
Depress the safety button fully and
then squeeze the switch trigger.
Battery too cold
Remove battery from snow shovel.
Place battery on charger and allow
to charge for 10 minutes. Remove
from charger and install in snow
shovel for use.
The auger is jammed
Unplug from power supply, inspect
auger, remove debris.
Poor performance
Drive belt worn or damaged
Contact the service center for re-
placing.
Auger worn or damaged
Contact the service center for re-
placing.
Discharge chute blocked
Switch o the snow shovel, remove
the battery pack, and clean the
discharge chute.
Abnormal vibrations
Drive belt worn or damaged
Contact the service center for re-
placing.
Auger worn or damaged
Contact the service center for re-
placing.
Scraper bar worn Replace the scraper bar.
Motor is on but au-
ger does not turn.
Drive belt damaged
Contact the service center for re-
placing.
Snow shovel leaves a
thin layer of snow.
Scraper bar worn Replace the scraper bar.

SENIXTOOLS.COM Englishv. 1.1
WARRANTY
WARRANTY
SENIX TOOLS LIMITED WARRANTY
FOR FIVE YEARS from the date of original purchase this product is warranted against defects in material or
workmanship. WITH PROOF OF ORIGINAL PURCHASE a defective product will receive free repair. If the product
cannot be repaired it will be replaced free of charge.
For details to obtain warranty coverage, visit senixtools.com, email senix.support@yatusa.com
or call 1-800-261-3981.
• This warranty does not cover repairs necessary due to product accident or abuse, or failure to operate or
maintain the product according to all supplied instructions.
• This warranty does not cover an included battery pack or charger, which offer three-year, replacement-only
coverage. See battery pack or charger instruction manuals for complete warranty details.
• This warranty does not cover expendable items that can wear out from normal use within the warranty
period, including but not limited to drill bits, cutting blades and trimmer spool or line.
• This warranty does not apply to damage resulting from repairs to the product made or attempted by other
than SENIX authorized agents.
• This warranty does not cover the cost of mailing or transporting the power tool to receive warranty
coverage.
• The warranty is void if the product has been used for commercial, professional, or rental service purposes.
• The warranty applies to the original retail purchaser and is not transferable.
• Proof of purchase is required to obtain warranty coverage.
THIS WARRANTY IS GIVEN IN LIEU OF ALL OTHERS, INCLUDING THE IMPLIED WARRANTY OF MERCHANTABILITY
AND FITNESS FOR A PARTICULAR PURPOSE, AND EXCLUDES ALL INCIDENTAL OR CONSEQUENTIAL DAMAGE.
Some states do not allow limitations on how long an implied warranty lasts or the exclusion or limitation of incidental
or consequential damages, so these limitations may not apply to you. This warranty gives you specific legal rights
and you may have other rights which vary in certain states or provinces.
NOTE: Battery pack warranty voided if the battery pack is tampered with in any way. SENIX is not responsible for
any injury caused by tampering and may prosecute warranty fraud to the fullest extent permitted by law.
Latin America: This warranty does not apply to products sold in Latin America. For products sold in Latin America,
see the country-specific warranty information contained in the packaging, call the retailer from which it was
purchased, or visit the website for warranty information.
Free warning label replacement: If your warning labels become illegible or are missing, call 1-800-261-3981 for
a free replacement.
REGISTER ONLINE - senixtools.com/pages/product-registration
Thank you for your purchase! Register your product now for:
Warranty Service: Registering your product will help you obtain more efficient warranty service in case of a problem
with your product.
Confirmation of Ownership: In case of an insurance loss, such as fire, flood, or theft, your ownership registration
will serve as proof of purchase.
For your safety: Registering your product will allow us to contact you in the unlikely event a safety notification is
required under the Federal Consumer Safety Act.
YAT USA INC. 10506 Bryton Corporate Center Dr, #500 Huntersville, NC 28078
For customer support, please call 1-800-261-3981 or email us at senix.support@yatusa.com