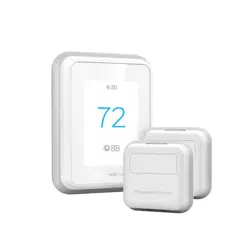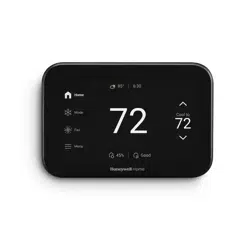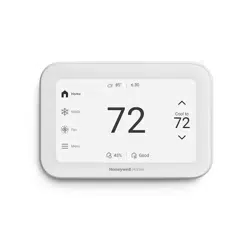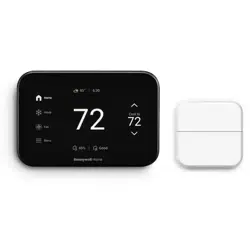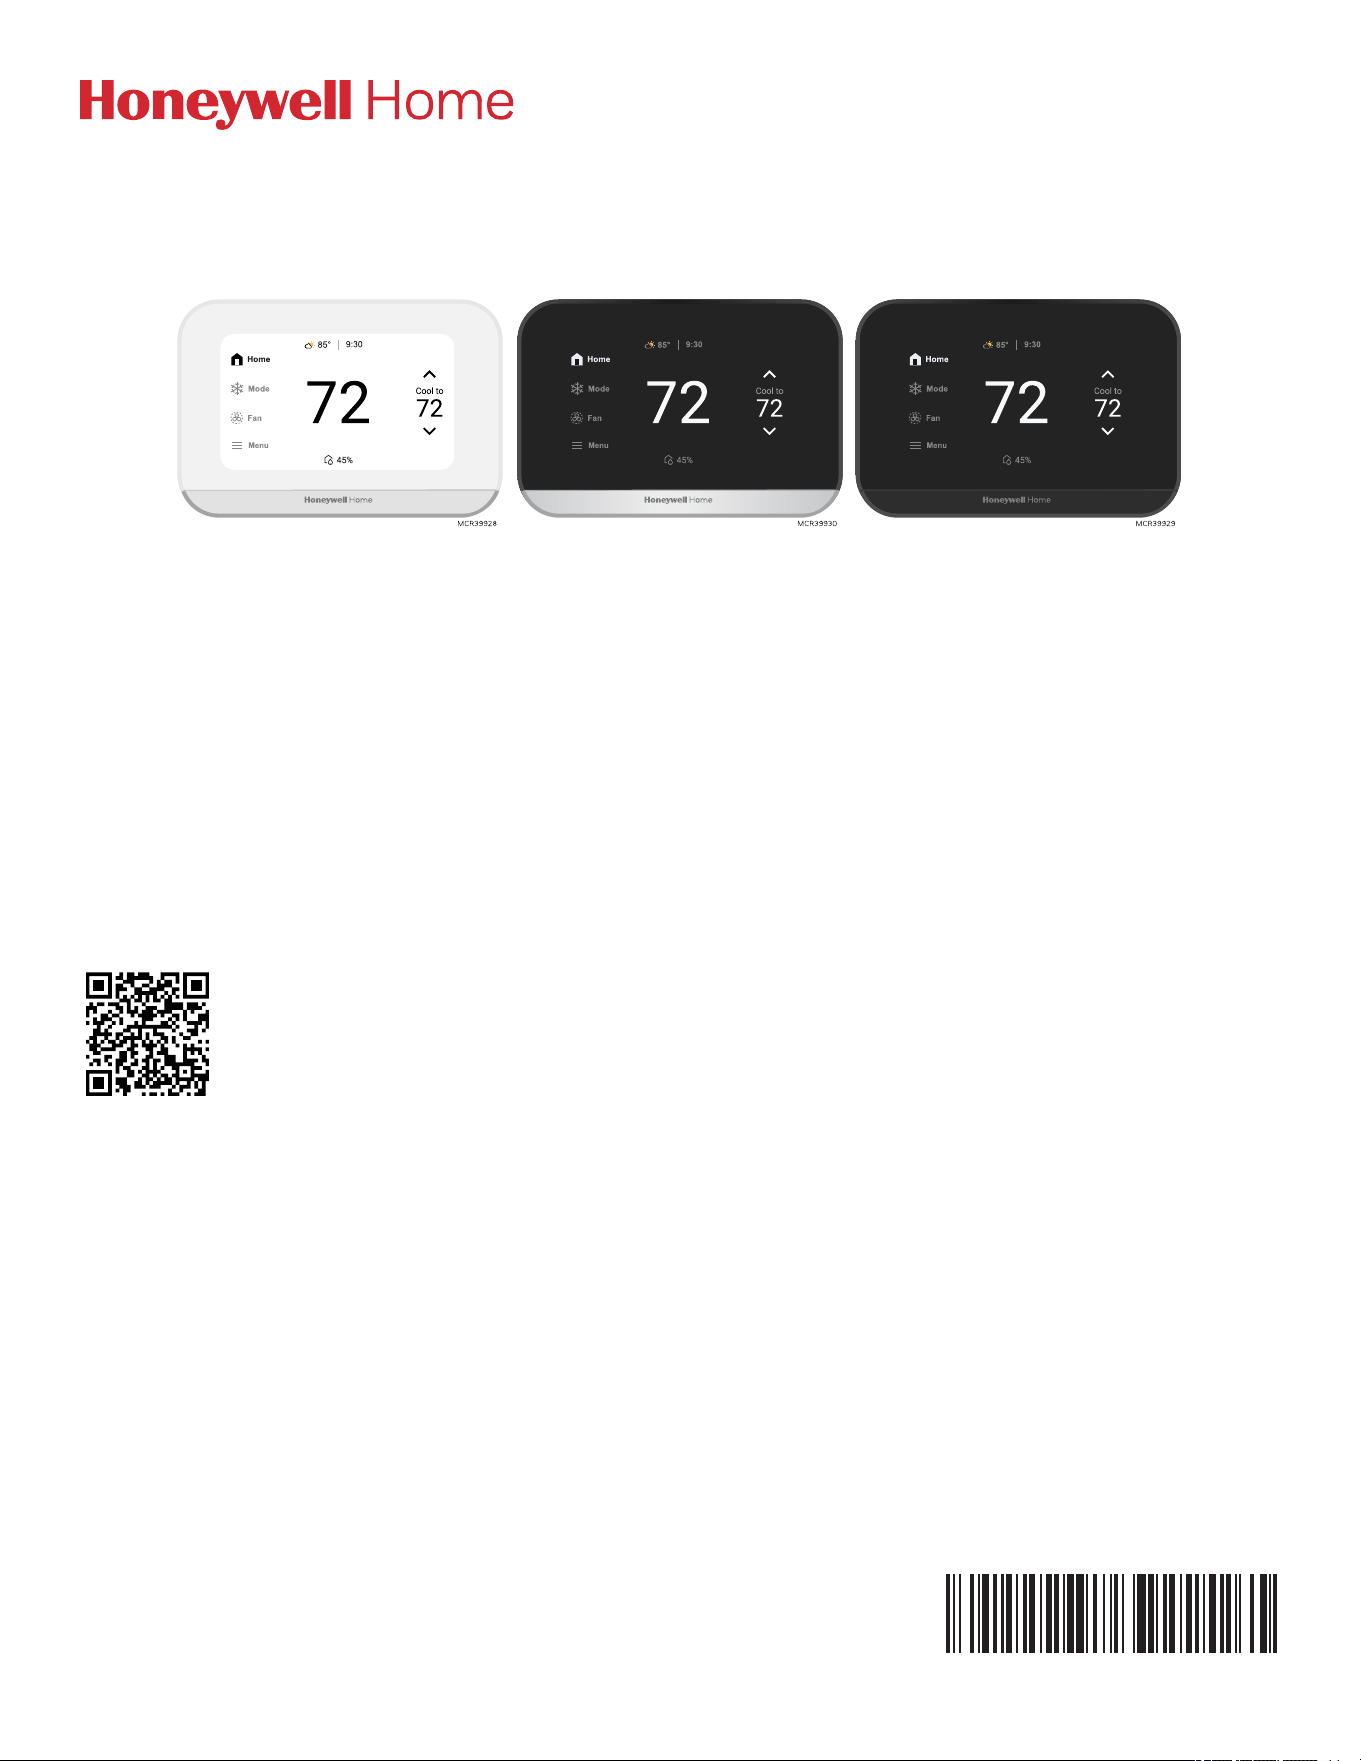
X7S & X7B Smart Thermostats
Installation and User Manual
Models
X7SWF3W, X7SWF4WC, X7SMC4B, X7SMC4BC, X7BMC2B.
See "X7S & X7B Smart Thermostats and Accessories" on page6 for detailed model information.
Package Includes:
l
X7S & X7B Smart Thermostat
l
UWP Wall Plate
l
Screws and Anchors
l
Thermostat Literature
l
NOTE:Kits may include other accessories.
Access the latest version of this documentation online by scanning the QR code
or by visiting the following link:
info.honeywellhome.com/x7-im
33-00769-01 5/26

Table of Contents
Table of Contents 2
Compatibility 3
Features 4
Model Numbers 6
Dimensions 7
Specifications 8
Getting Started With Installation 10
Setup 20
Sensor Installation (X7S models only) 27
Advanced Setup Options 28
WiFi Setup and Troubleshooting 29
Main Menu 32
Set Time and Date 36
System Mode and Fan Settings 36
Alerts and Reminders 37
Scheduling and Auto-Away 39
Getting the Most from the X7S & X7B Smart Thermostats 44
Waiting for Equipment 48
Battery Replacement 49
Using the First Alert App 50
Advanced Features 51
FAQ's 53
Troubleshooting and Support 56
Regulatory 60
2

Compatibility
The X7S & X7B Smart Thermostats feature effortless, 7-Day programming on an easy-to-use touchscreen.
l
For indoor use only
l
Required: 24 VAC power (“C” wire)
l
Compatible with 24 VAC systems including:
l
Up to 3 Heat/2 Cool heat pump systems with electric backup heat
l
Up to 2 Heat/2 Cool gas or oil force air and air-conditioning
l
Radiant hot water systems
l
X7 models can not control a humidifier, dehumidifier, or ventilator. X8 models can support these systems.
Learn more about X8 thermostats.
l
Does not work with electric baseboard heat (120-240V).
l
Does not support input (S terminals) for indoor and outdoor sensors.
l
Android or iOS smartphone, tablet, or device.
l
Compatible with a 2.4 GHz or 5 GHz WiFi network.
3
Features
ENERGY STAR®
l
This ENERGY STAR® certified WiFi thermostat features flexible scheduling and
auto-away functionality.
l
Get Rewarded
Search for energy providers near you who offer thermostat incentives and rebates
at: resideo.info/utility-savings-programs
Capabilities
l
XRSENSOR Indoor Sensor compatible. (Up to 20 sensors per thermostat). Used with X7S only.
Optional wireless indoor temperature, humidity, and motion sensors can enhance comfort and convenience
needs. They can be used in combination for temperature averaging or individually. These devices also sense
motion and you can select priority zones based on where motion is detected or by scheduling.
l
Flexible scheduling allows you to choose location-based temperature control (Auto Away technology),
program a set schedule or use a combination of both to make sure your home is always comfortable. Refer to
"Scheduling and Auto-Away" on page39 for more information.
l
Built-in radar sensor can be used with wireless sensors as part of the priority comfort settings and can
transition from idle to active screen on approach (X7S only).
l
Tip: The First Alert App can be used to manage multiple thermostats and multiple users in a household.
l
Smart Alerts: The X7S & X7B Smart Thermostat can send alerts for occurrences such as extreme indoor
temperatures and reminders for filter changes and other required maintenance.
l
Auto change from Heat to Cool: When Auto mode is selected, the X7S & X7B Smart Thermostat can
automatically determine whether your home needs heating or cooling to reach the desired temperature.
l
Adaptive Recovery: The X7S & X7B Smart Thermostat learns your heating and cooling cycle times to make
sure the system delivers the temperature you want, when you want it. See "Adaptive Recovery (Sometimes
called “Adaptive Intelligent Recovery”)" on page52 to learn more.
Heating and Cooling Status Display
Calling for heat
When the thermostat is calling for heat, there will be a sun icon behind the room temperature reading on the
display and the thermostat will show “Heating to” (rather than “heat to”) above the heat setpoint.
4
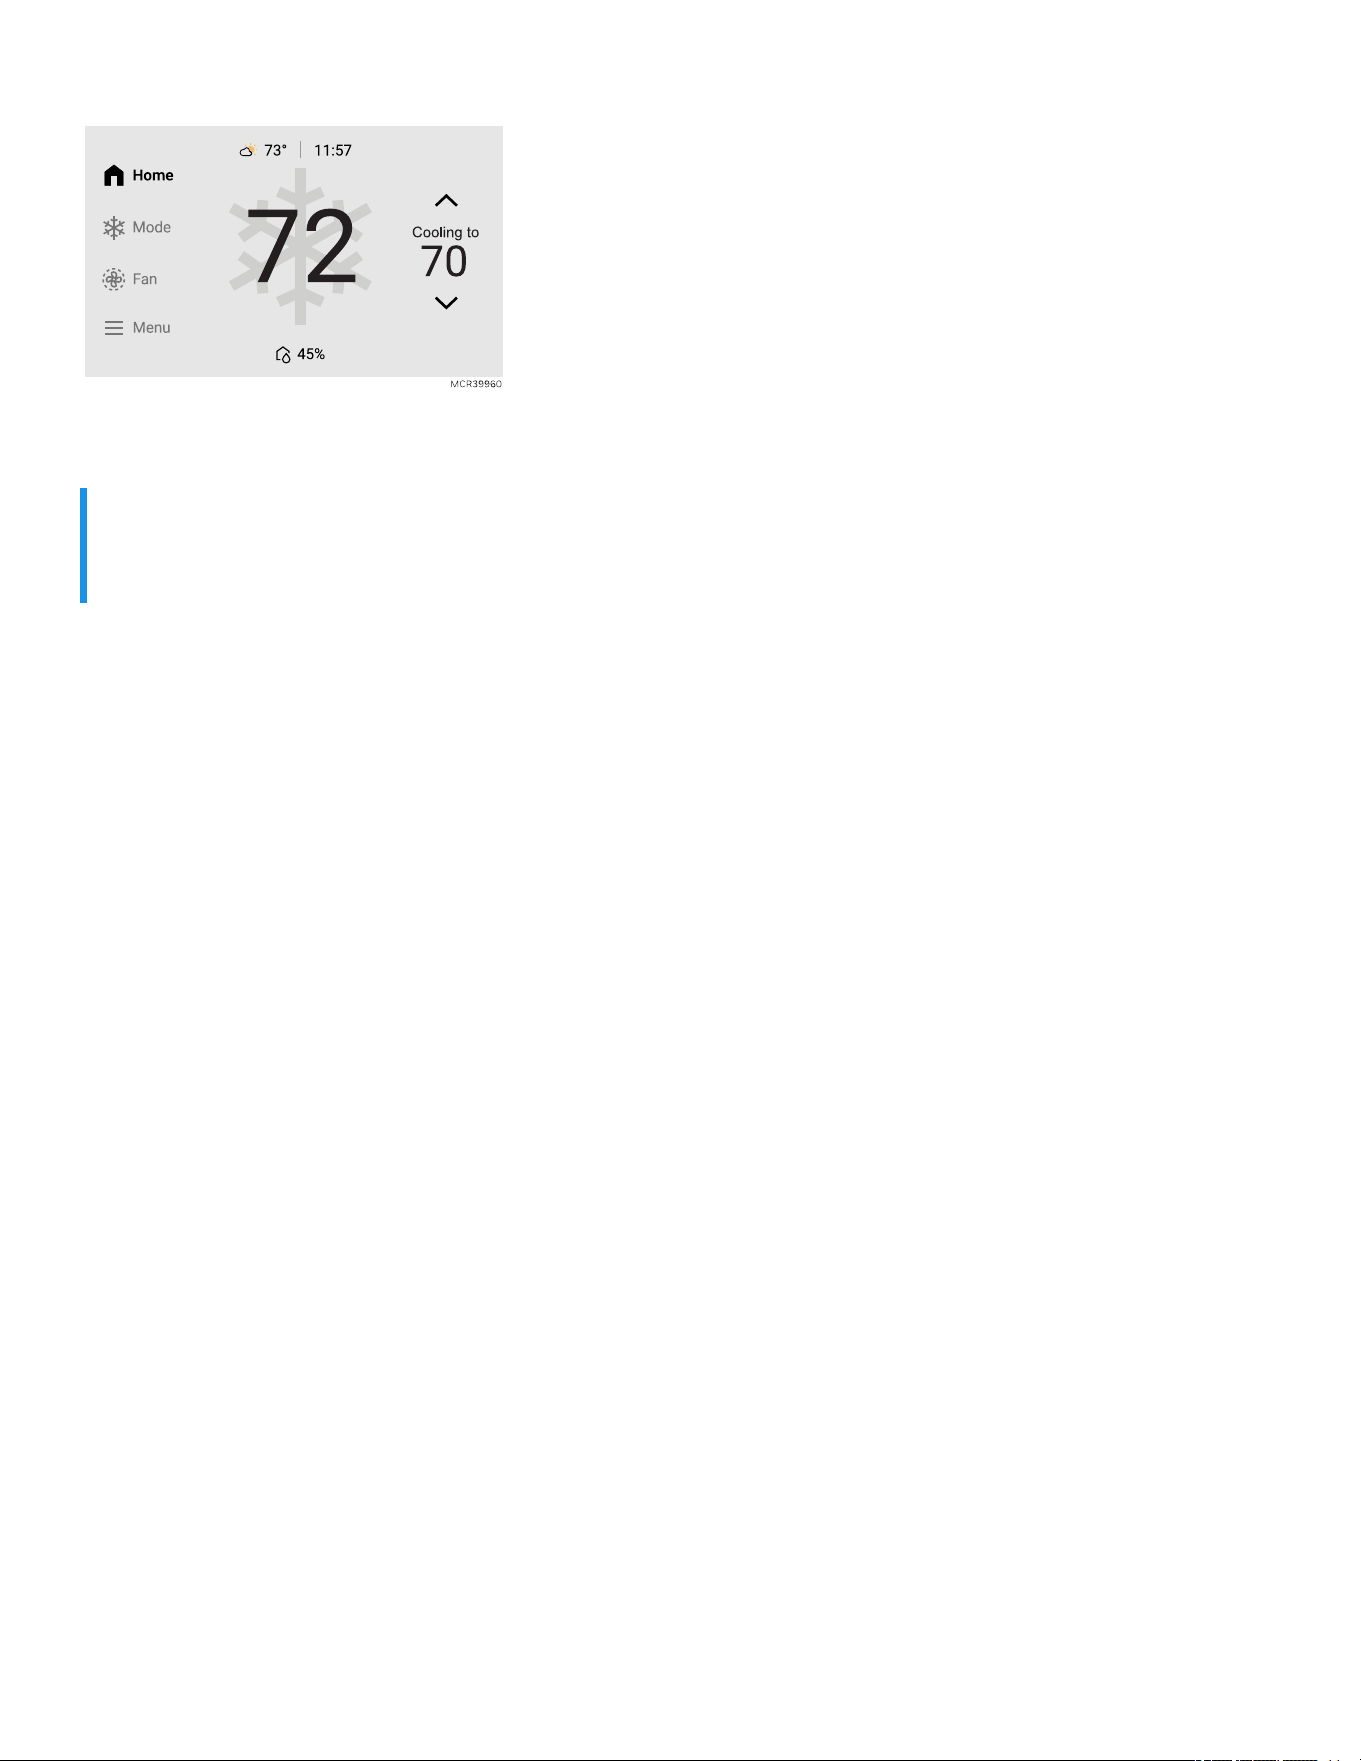
Calling for Cool
When the thermostat is calling for cooling, there will be a snowflake icon behind the room temperature reading
on the display and the thermostat will show “Cooling to” (rather than “Cool to”) above the cool setpoint.
NOTE:
If “WAITING FOR EQUIPMENT” is shown in the display, the thermostat is delaying the heat or cool call to
protect the equipment from short cycling. The delay should not last more than 5 minutes.
AUX Heat Indication:
Display shows “Using Auxiliary heat” above the room temperature.
Matter Setup
The X7S & X7B Smart Thermostat supports Matter. At thermostat, select the Menu icon. Then choose Matter
and follow the instructions (refer to "Getting the Most from the X7S & X7B Smart Thermostats" on page44 for
more information).
5
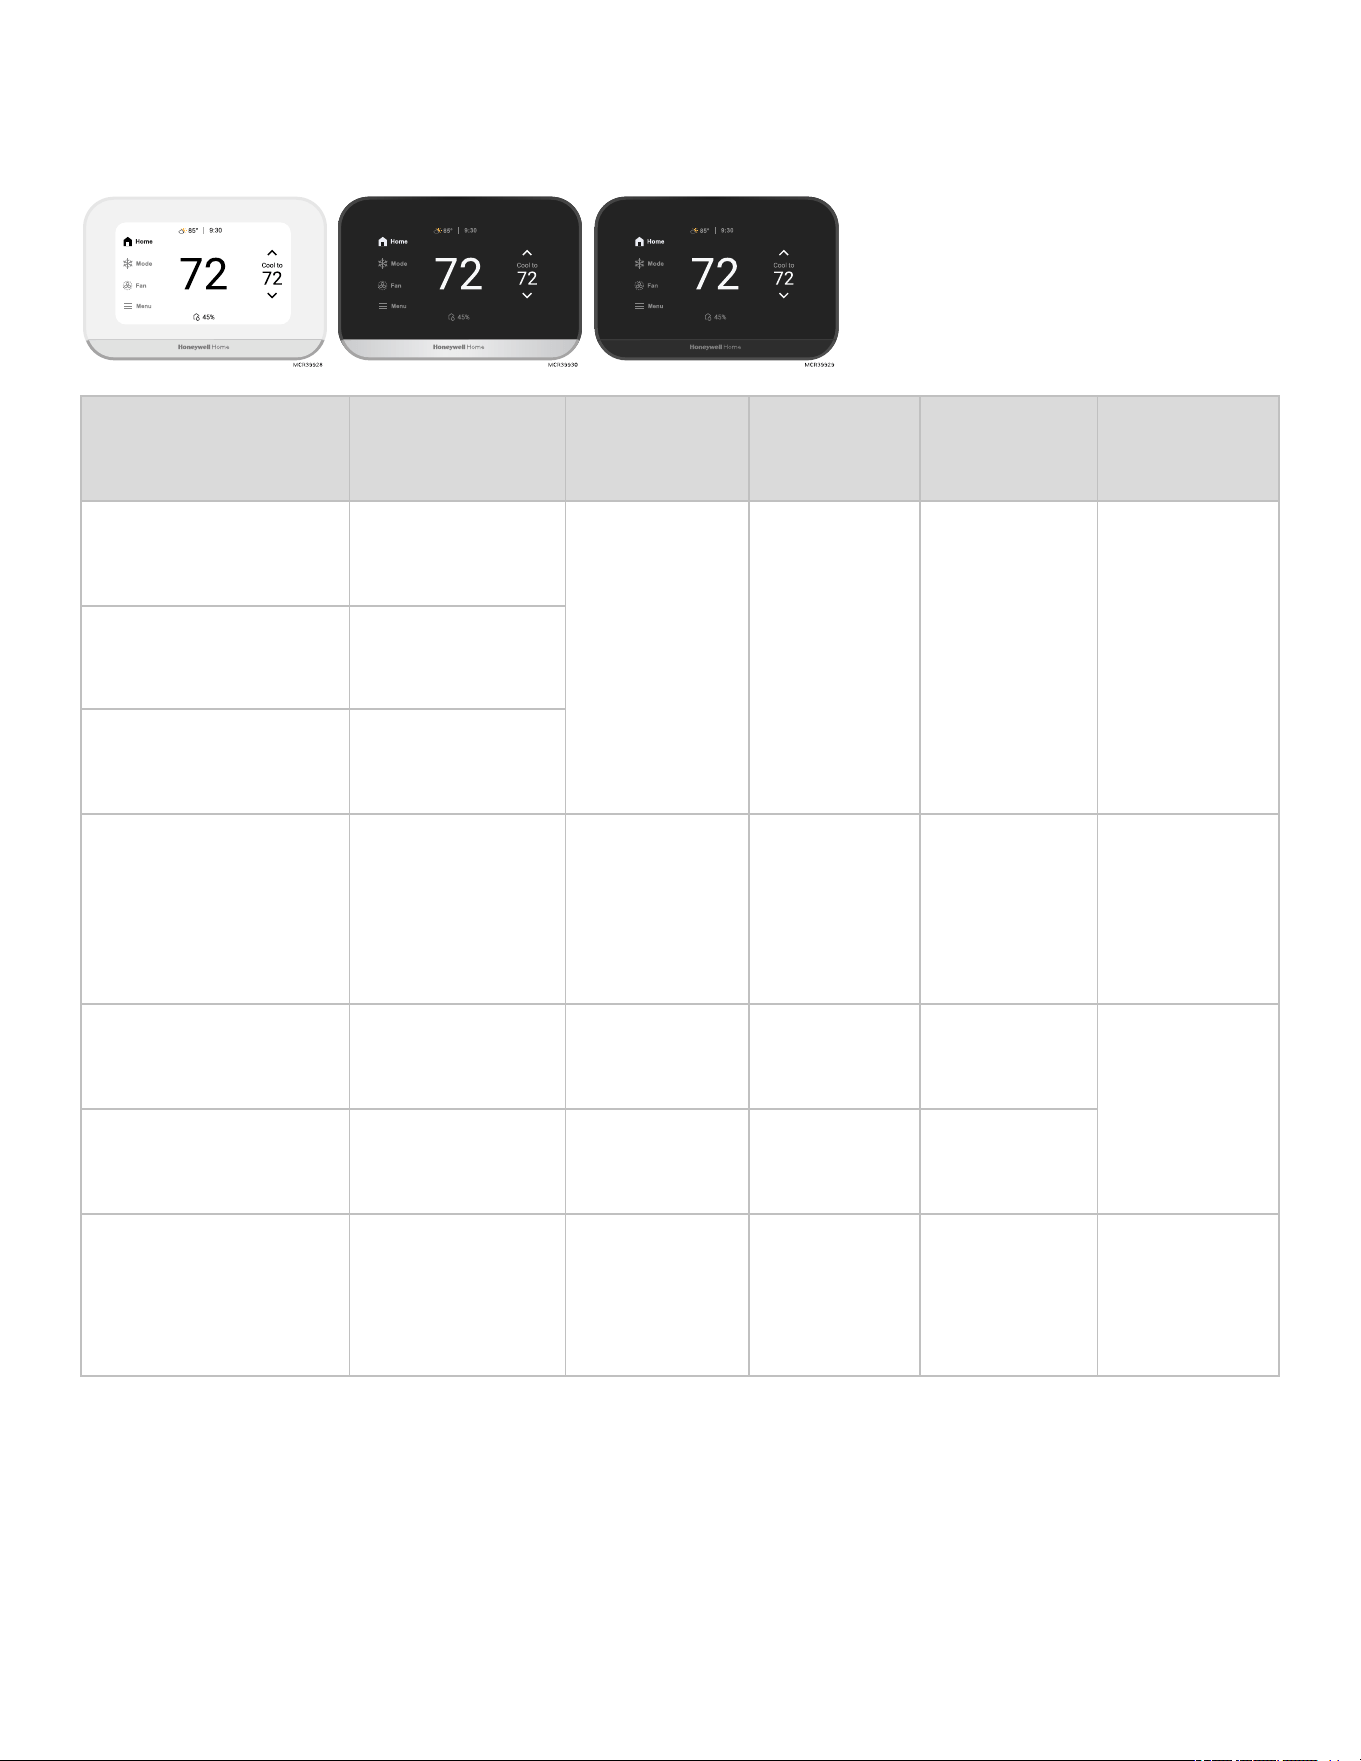
Model Numbers
X7S & X7B Smart Thermostats and Accessories
Product Part Number Operating
Ambient
Temperature
Operating
Relative
Humidity
Shipping
Temperature
Dimensions in
inches (mm)
X7S White
Thermostat with
Silver accent
US: X7SWF3W
Canada:
X7SWF4WC
Thermostat:
37 to 102 °F
(2.8° to 38.9°
C)
5% to 90%
Non
Condensing
-20 to 120 °F
28.9 to 48.9
°C)
Thermostat:
3-9/19"H x 5-
1/4"W x
14/16"D
(90mm H x
133mm W x
24mm D)
Display size:
4.3 inches
X7S Black Thermostat
with Silver accent
US: X7SMC4B
Canada:
X7SMC4BC
X7S Black
Thermostat, No
occupancy sensor
US & Canada:
X7BMC2B
X7BWF1W
Wireless indoor
temperature,
humidity, & motion
sensor. Up to 20 per
thermostat (Used
with X7S only).
XRSENSOR-1PK,
XRSENSOR-2PK
*0 to 120 °F
(-17.8° to
48.9°C)
5% to 90%
Non-
Condensing
-20 to 120 °F
(-28.9 to 48.9
°C)
2.4" W x 2.4" H
x 0.77" D (61
mm W x 61
mm H x 19.6
mm D)
White cover plate.
(Optional. Ordered
separately)
THP2400WH — — — 4-19/32" H x
6-1/16" W
(117 mm x
154 mm)
Black cover plate.
(Optional. Ordered
separately)
THP2400BL — — —
C-wire adapter for
systems without a
dedicated C-wire
(Optional. Ordered
separately)
THP9045A2098 — — — —
* For optimal battery life, operating temperature range of 35 to 114 °F (1.7 to 45.6 °C) is recommended.
6
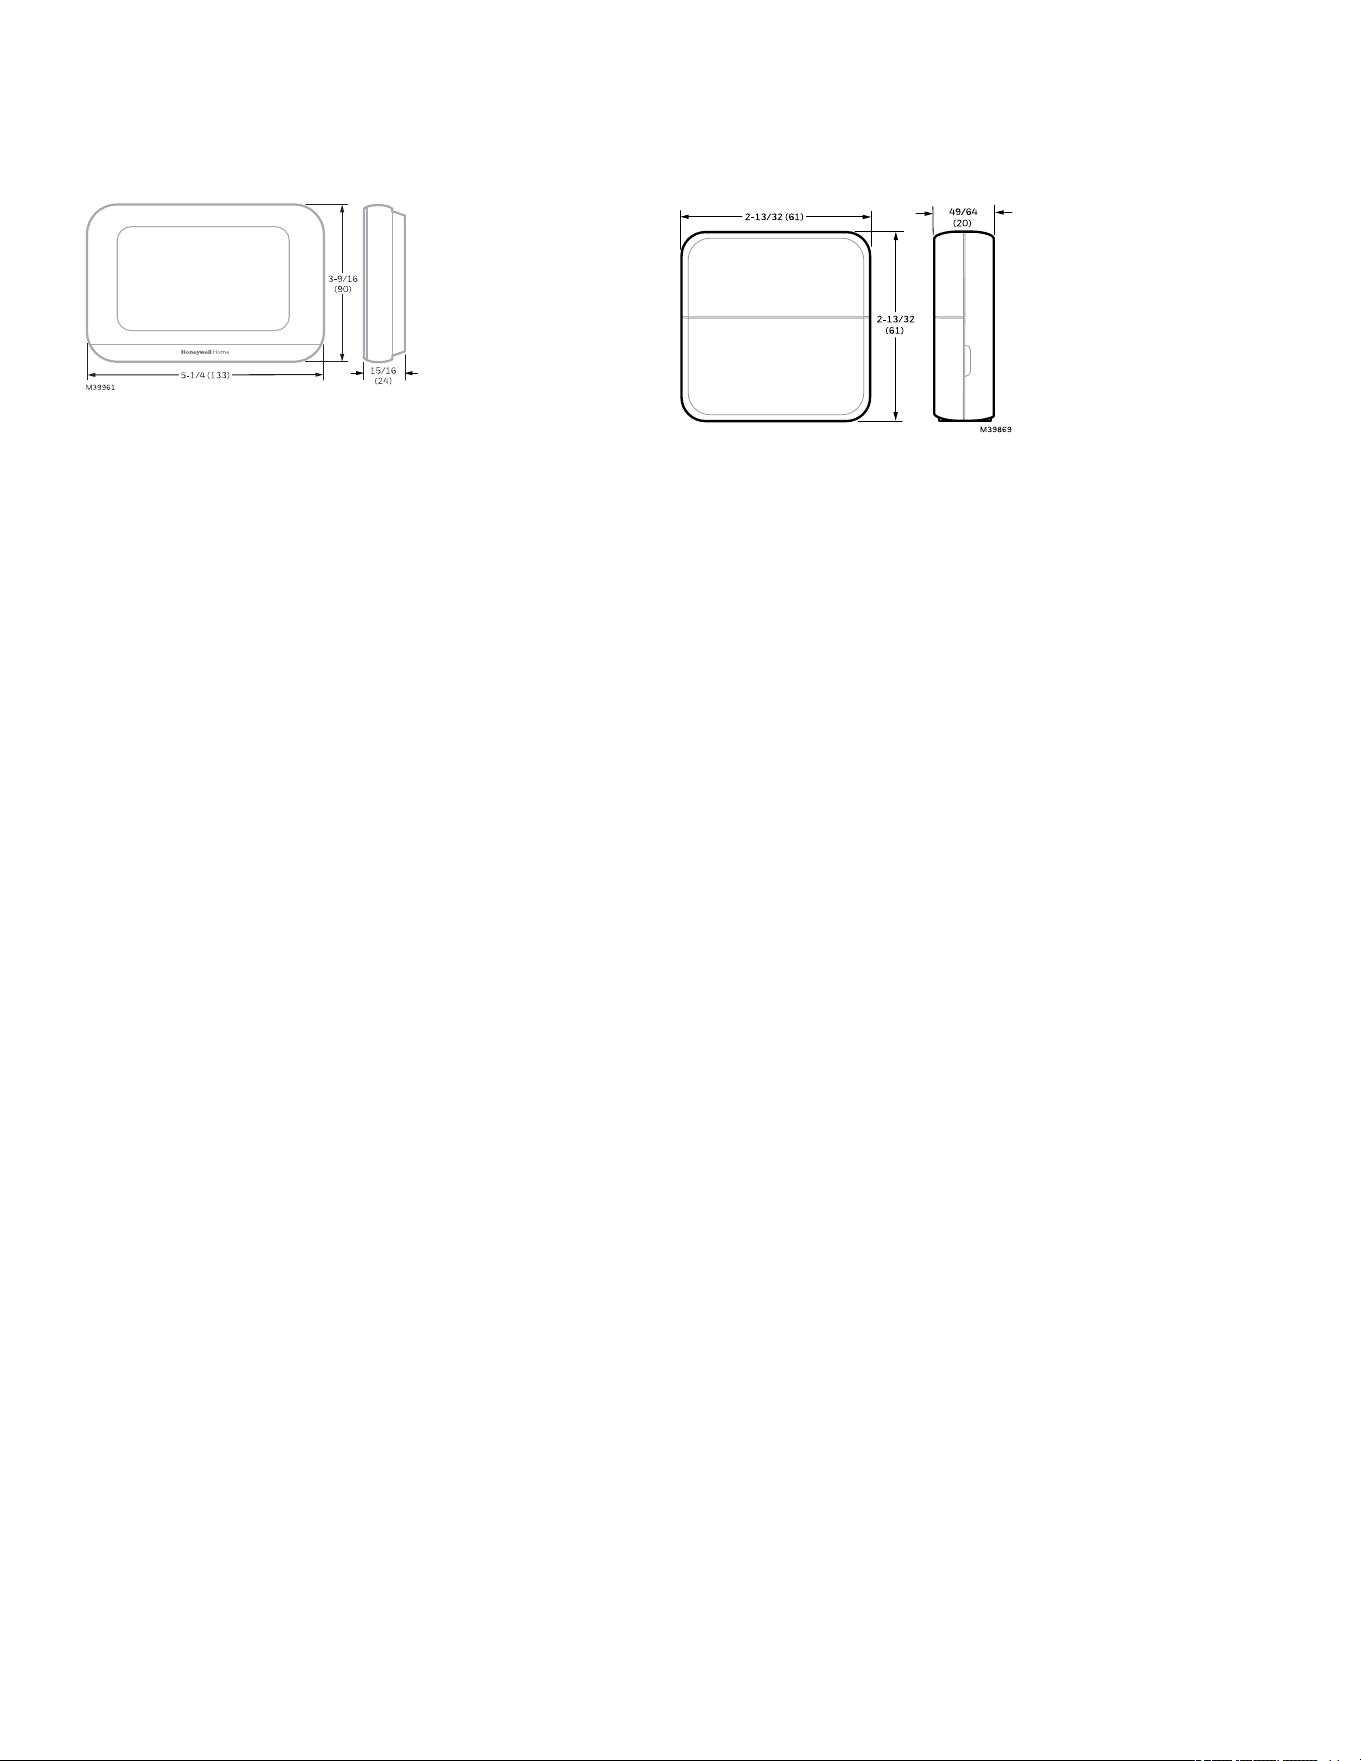
Dimensions
Dimensions of X7S & X7B Smart Thermostat
in inches (mm)
Dimensions of XRSENSOR sensors
in inches (mm)
7
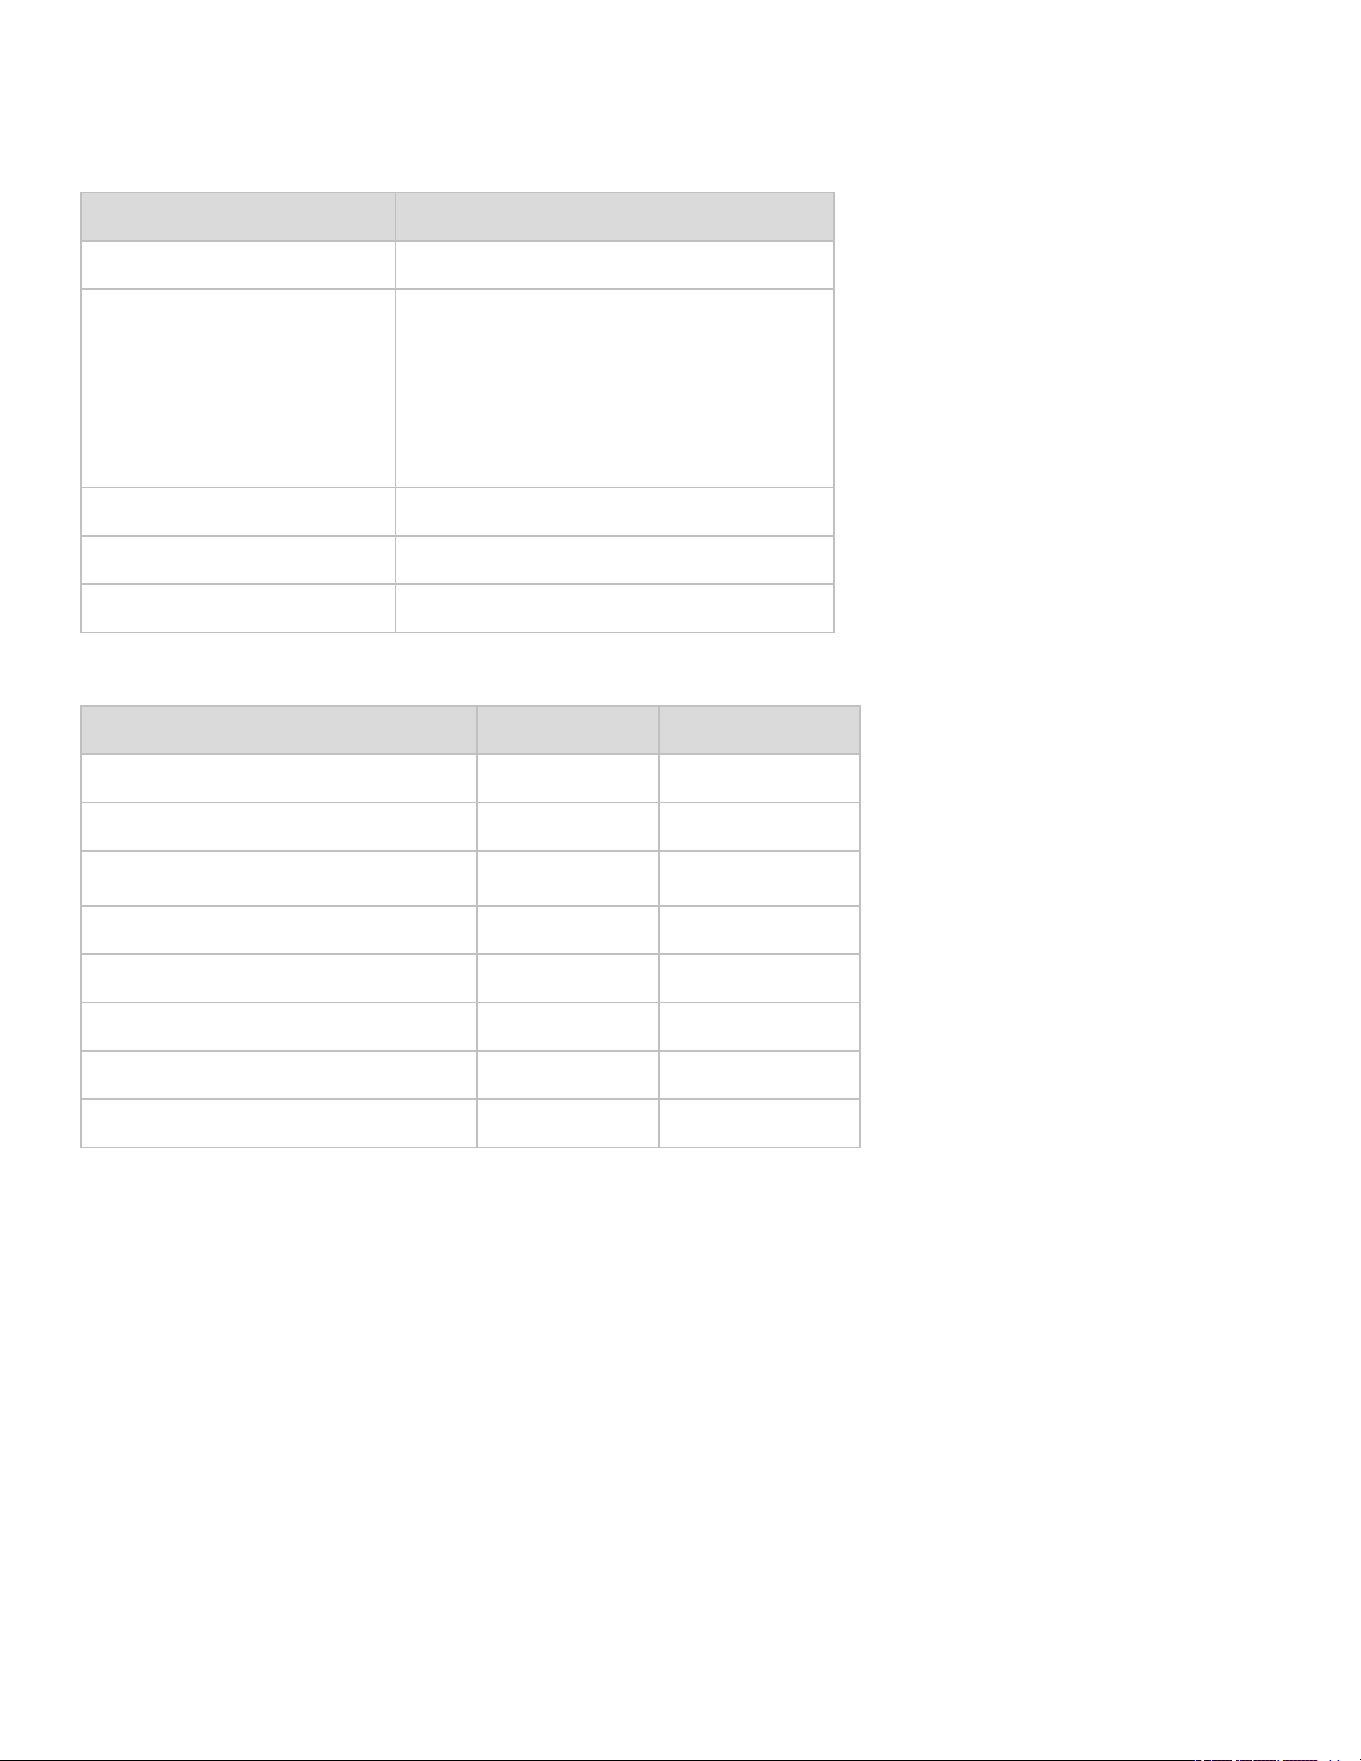
Specifications
X7S & X7B Smart Thermostat Description
Feature Description
Powering Method Common wire required
Stages:
Up to 3H/2C Heat pump
Up to 2H/2C conventional
Equipment type:
l
Hot water or steam.
l
Gas or oil furnace
l
High-efficiency or mid-efficiency
l
Cool only
Changeover Manual or Auto Changeover Selectable
System Setting Em Heat-Heat-Off-Cool-Auto
Fan Setting Auto-On-Circ
Electrical ratings of X7S & X7B Smart Thermostat
Terminal Voltage (60Hz) Running Current
W (Heat) 20-30 VAC 0.02-1.0 A
W2 (Aux) Heat 20-30 VAC 0.02-1.0 A
E (Not Used)
Y (Compressor Stage 1) 20-30 VAC 0.02-1.0 A
Y2 (Compressor Stage 2) 20-30 VAC 0.02-1.0 A
G (Fan) 20-30 VAC 0.02-0.5 A
O/B (Changeover) 20-30 VAC 0.02-0.5 A
L/A (Fault input from heat pump) 20-30 VAC 0.02-0.5 A
Power Consumption: 2.2 VA MAX
Wireless Communication:
Bluetooth: BLE 2.4 GHz
Dual-Band Wi-Fi: 2.4 & 5GHz
Wireless Communication to XRSENSOR Indoor air sensors: 900 MHz (Re-sync time: Wireless sensors re-
establish communication within 6 minutes after AC power resumes.)
Radar (X7S only): 61.5 GHZ.
8
Temperature Setting Range:
Heating: 40 to 90 °F (4.5 to 32 °C).
Cooling: 50 to 99 °F (10 to 37n °C).
NOTE:
Adjustable high and low range-stop settings in Menu-preferences-Temperature Limits.
Humidity Sensor Accuracy:
± 5% RH from 30% to 50% RH at 75 F.
Clock Accuracy:
1 minute per month at 77 °F (25 °C). ± 2 minutes per month over the operating ambient temperature range.
Automatically updates when connected to WiFi router and registered to account.
Terminal Designations
Terminals on X7S & X7B Smart Thermostat
Conventional Systems Heat Pump Systems
Terminal Description Terminal Description
S/S Not used by this thermostat. S/S No used by this thermostat.
Y Compressor Stage 1 Y Compressor Stage 1
Y2 Compressor Stage 2 Y2 Compressor Stage 2
G Fan Relay G Fan Relay
C 24VAC Common wire from secondary side
of cooling transformer (if 2 transformers)
C 24VAC Common wire from secondary
side of cooling transformer
K* Connect to K on C-wire adapter
Not used by this thermostat
K* Connect to K on C-wire adapter
Not used by this thermostat
U/U Not used by this thermostat. U/U Not used by this thermostat.
L/A Not used by this thermostat. L/A Heat pump fault
W Heat Stage 1 O/B Changeover valve for heat pumps
W2 Heat Stage 2 AUX
E E not used by this thermostat.
Auxiliary / emergency heat wire should
go to AUX.
R 24 VAC Heating transformer R 24 VAC Heating transformer
Rc 24 VAC Cooling transformer Rc 24 VAC Cooling transformer
* The THP9045A C-wire adapter is used on heat/cool systems when you only have four wires at the thermostat
and you need an extra wire for a common wire. Use the K terminal in place of the Y and G terminals on
conventional or heat pump systems to provide control of the fan and the compressor through a single wire the
unused wire then becomes the common wire. See THP9045A instructions for more information.
9
Getting Started With Installation
WARNING
IMPROPER WIRING OR CONFIGURING OF YOUR THERMOSTAT CAN CAUSE UNINTENDED OPERATION OF
YOUR HVAC SYSTEM WHICH COULD LEAD TO PROPERTY DAMAGE, INJURY, INCLUDING DEATH. IF YOU
ARE UNSURE OF WHAT TYPE OF SYSTEM YOU HAVE, REFER TO YOUR HEATING/COOLING SYSTEM
EQUIPMENT LITERATURE OR CALL AN HVAC PROFESSIONAL.
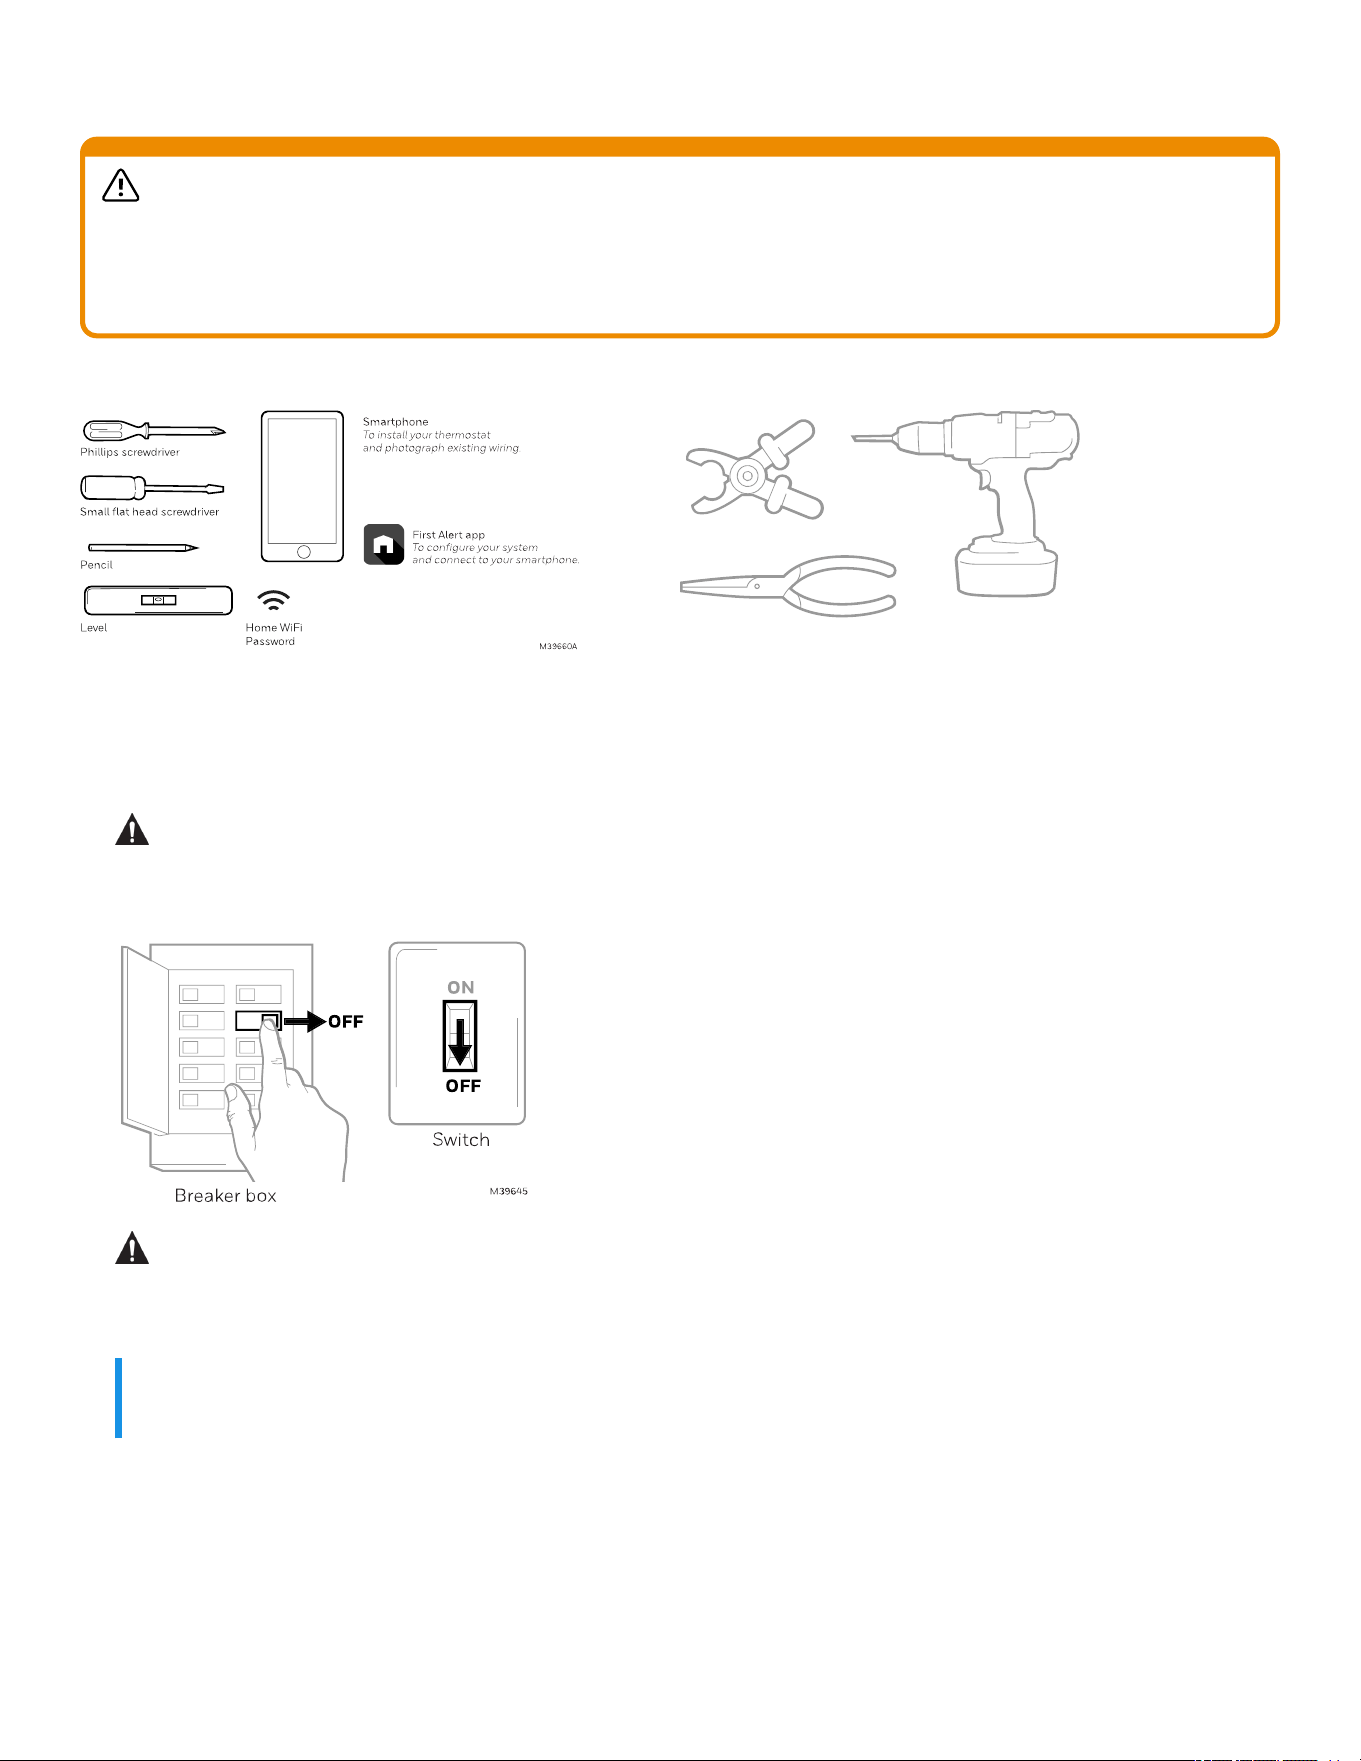
Tools Needed for Installation
Tools you will need
Wire stripper
Needle-nose pliers
Drill and drill
bit (3/16 in)
M39661
Tools you may need
Removing the old thermostat
1.
Turn power OFF.
To protect yourself and your equipment, turn off the power at the breaker box or switch that controls your
heating/cooling system. Some systems may have separate heating and cooling breakers.
2.
Check that your system is off.
Change the temperature on your old thermostat to be above room temperature in heat mode or below it in
cool mode. If you don’t hear the system turn on within 5 minutes, the power is off.
NOTE:
If you have a digital thermostat that has a blank display, skip this step.
10
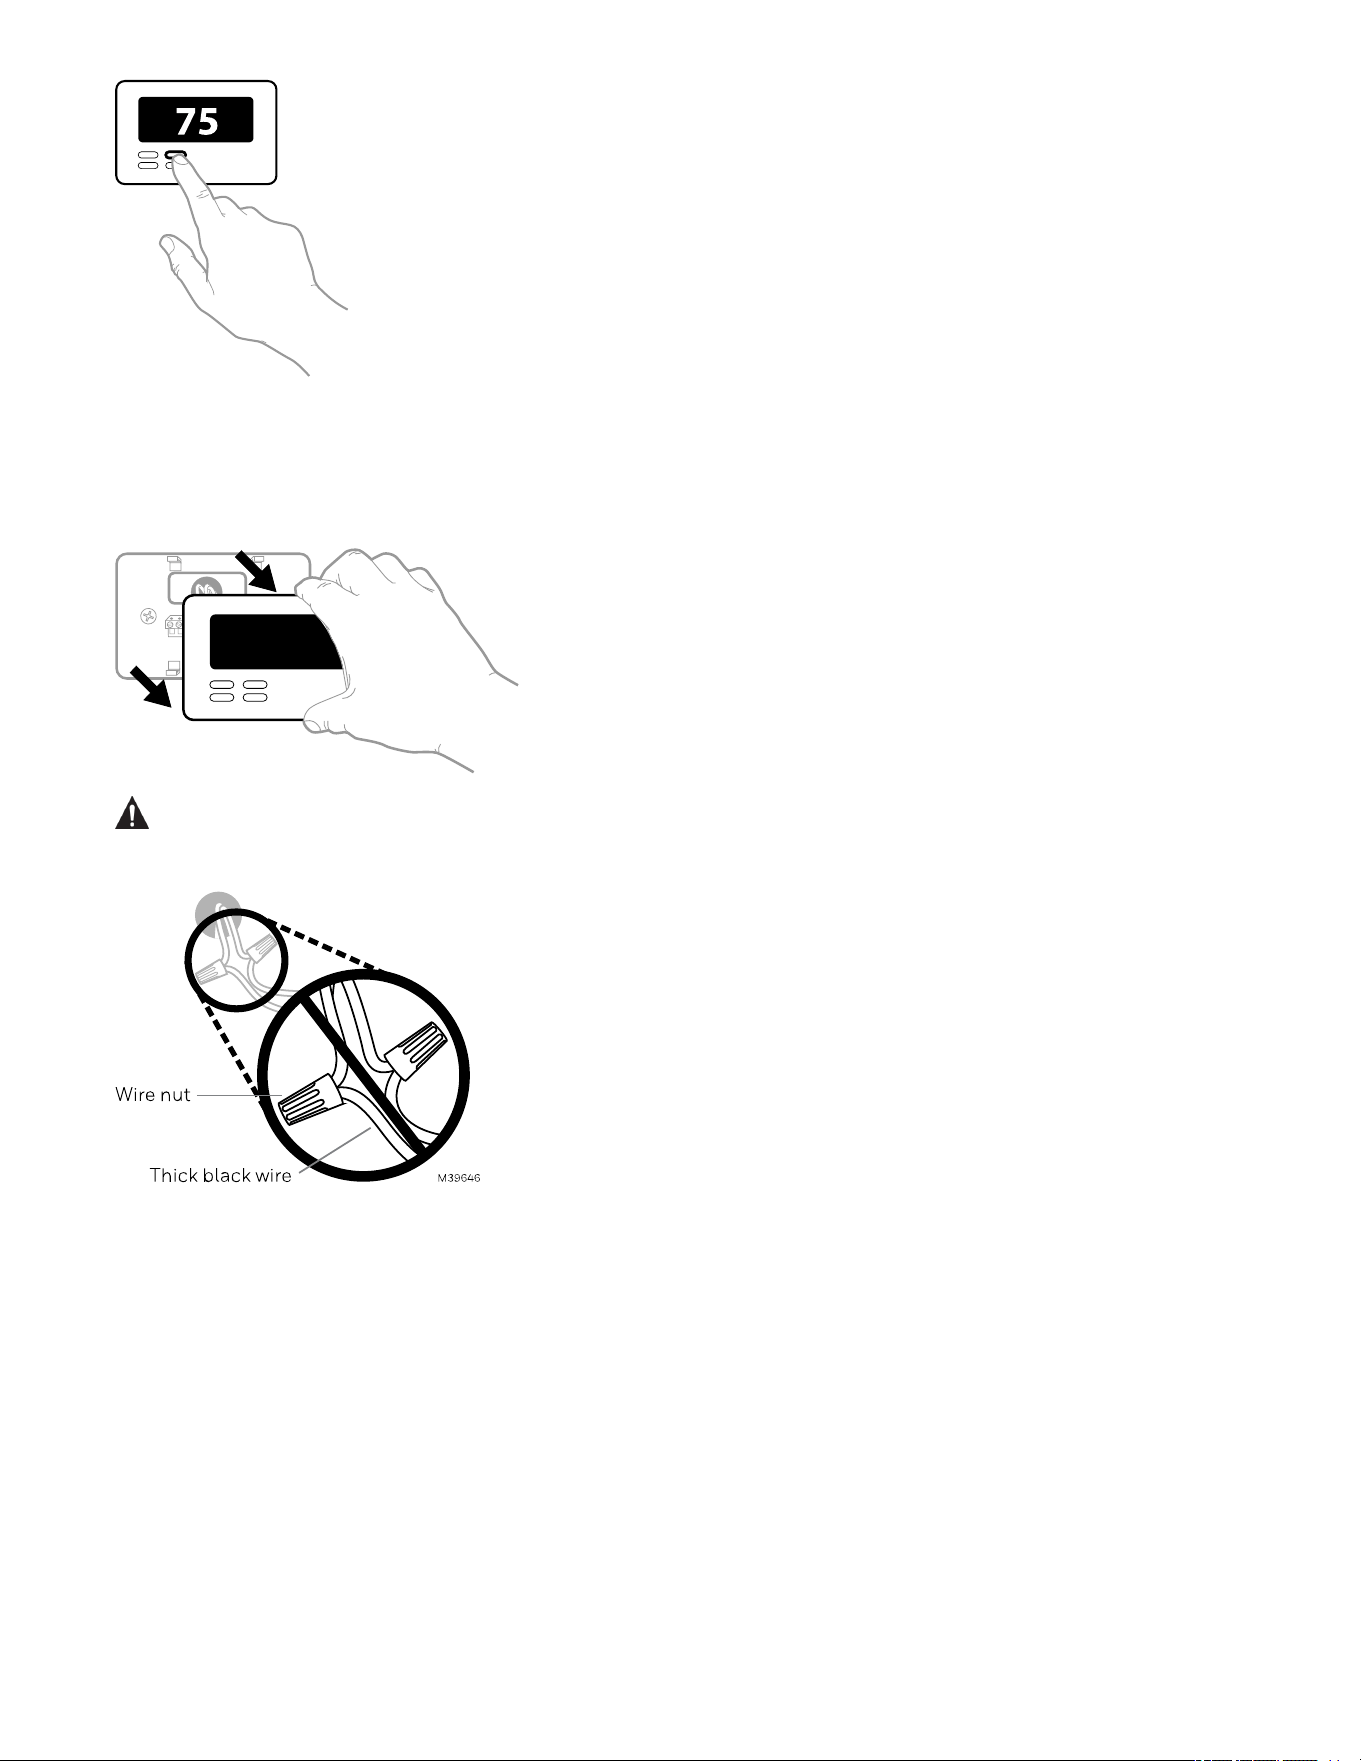
3. Remove the old thermostat’s faceplate.
On most thermostats, you can take off the faceplate by grasping and gently pulling. Some thermostats may
have screws, buttons, or clasps.
Do not remove any wires from your thermostat at this time!
4.
Make sure there are no 120/240V wires.
Do you have thick black wires with wire nuts?
Is your thermostat 120V or higher? If you answered Yes to either of these questions, you have a line voltage
system and the thermostat will not work.
5. Take a picture of how your wiring looks like right now.
Be sure to include the letters next to the terminals where the wires are inserted. This will be a helpful
reference when wiring your thermostat.
11
NOTE:
Tip: If the color of your wires has faded or if 2 terminals have the same wire color, use the wire labels
provided in the package to label each wire.
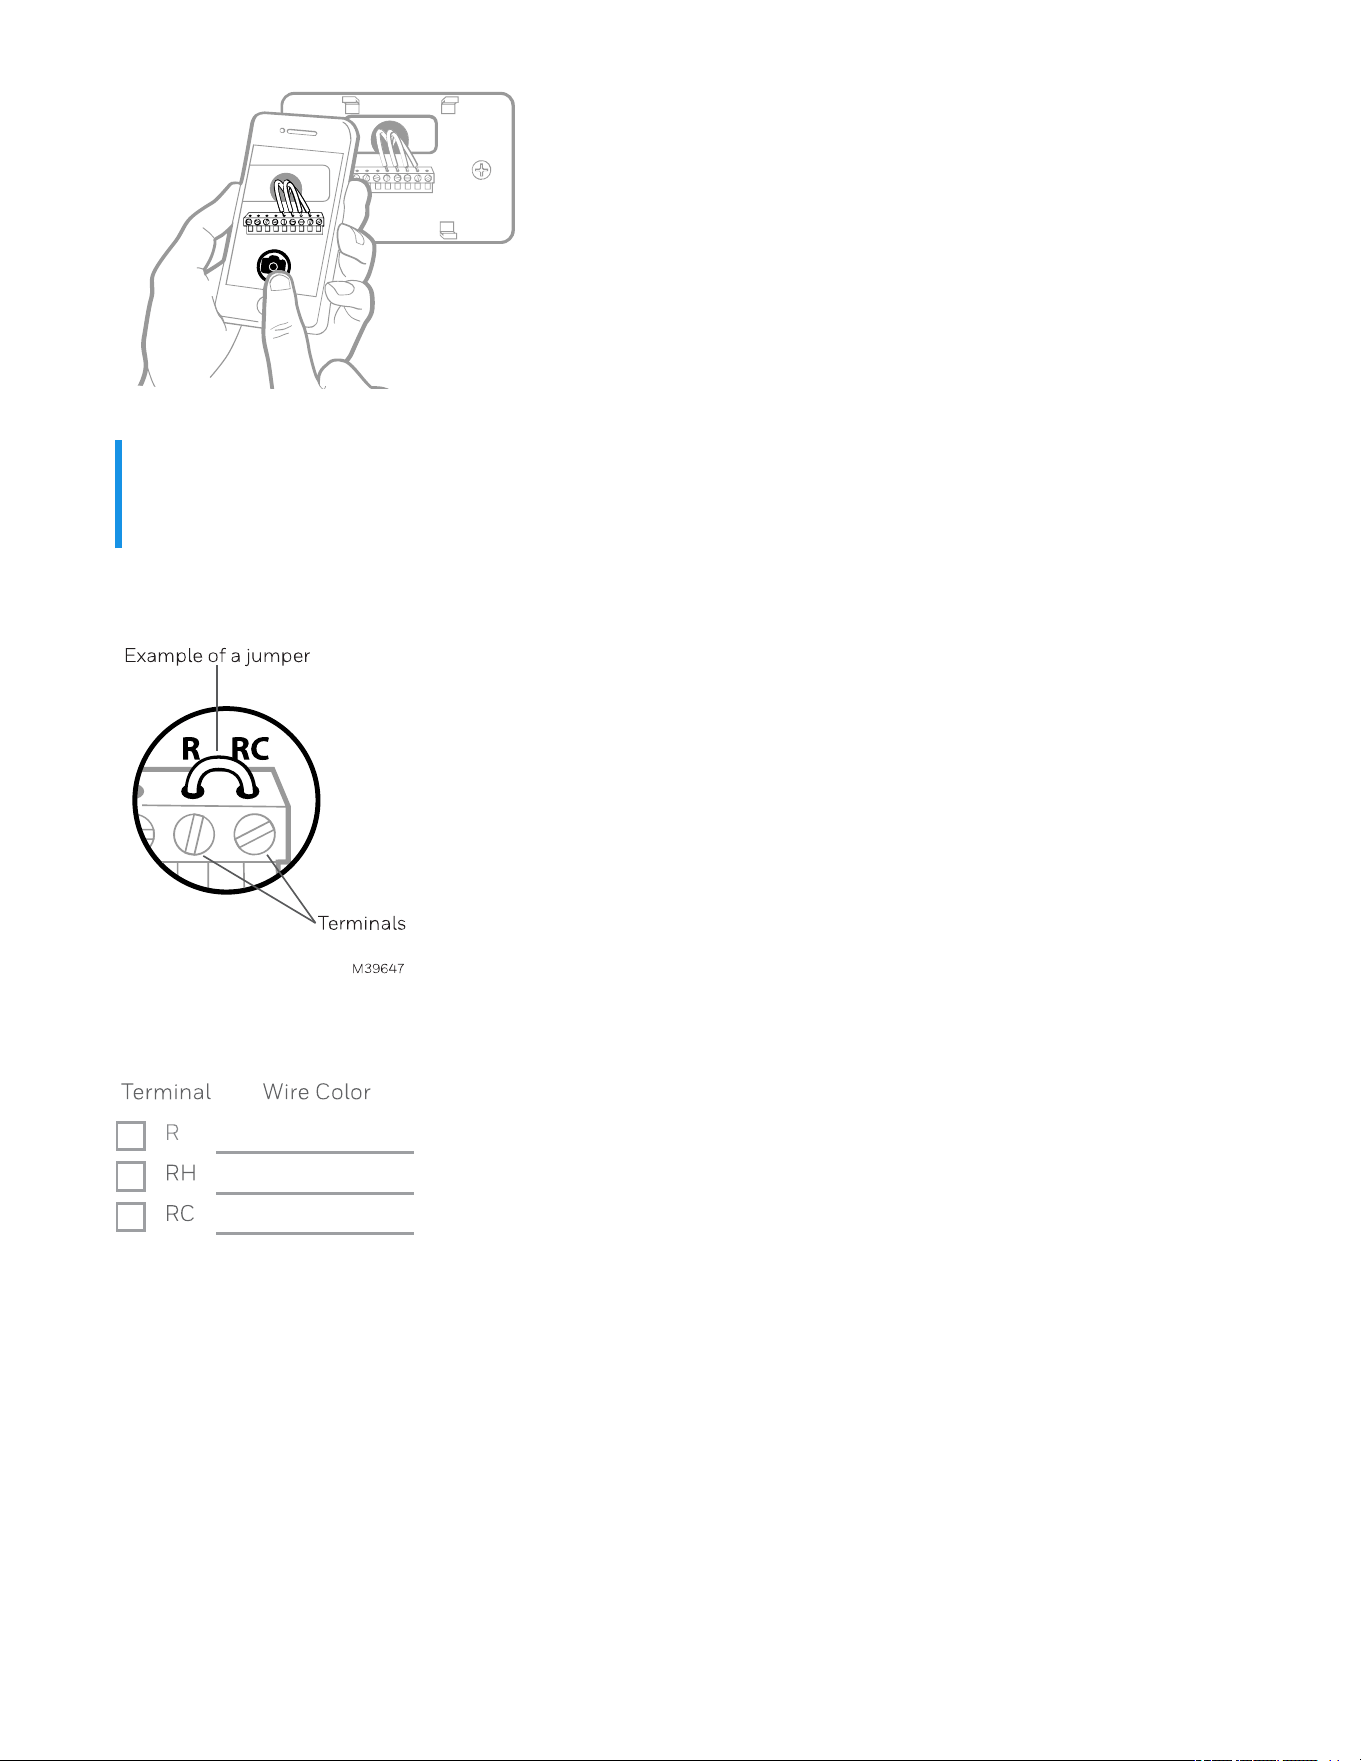
6. Make note of any jumpers
A jumper connects one terminal to another terminal. It may look like a small staple or even a colored wire.
7. Record whether you have wires in the following terminals.
Do not include jumpers as a part of your count. This thermostat does not need jumpers.
8. Write down the color of the wires.
Check mark the wires that are connected to terminals. Next to the check mark, write down the color of the
wire. Do not include jumpers as a part of your count.
Check all that apply (Not all will apply):
12
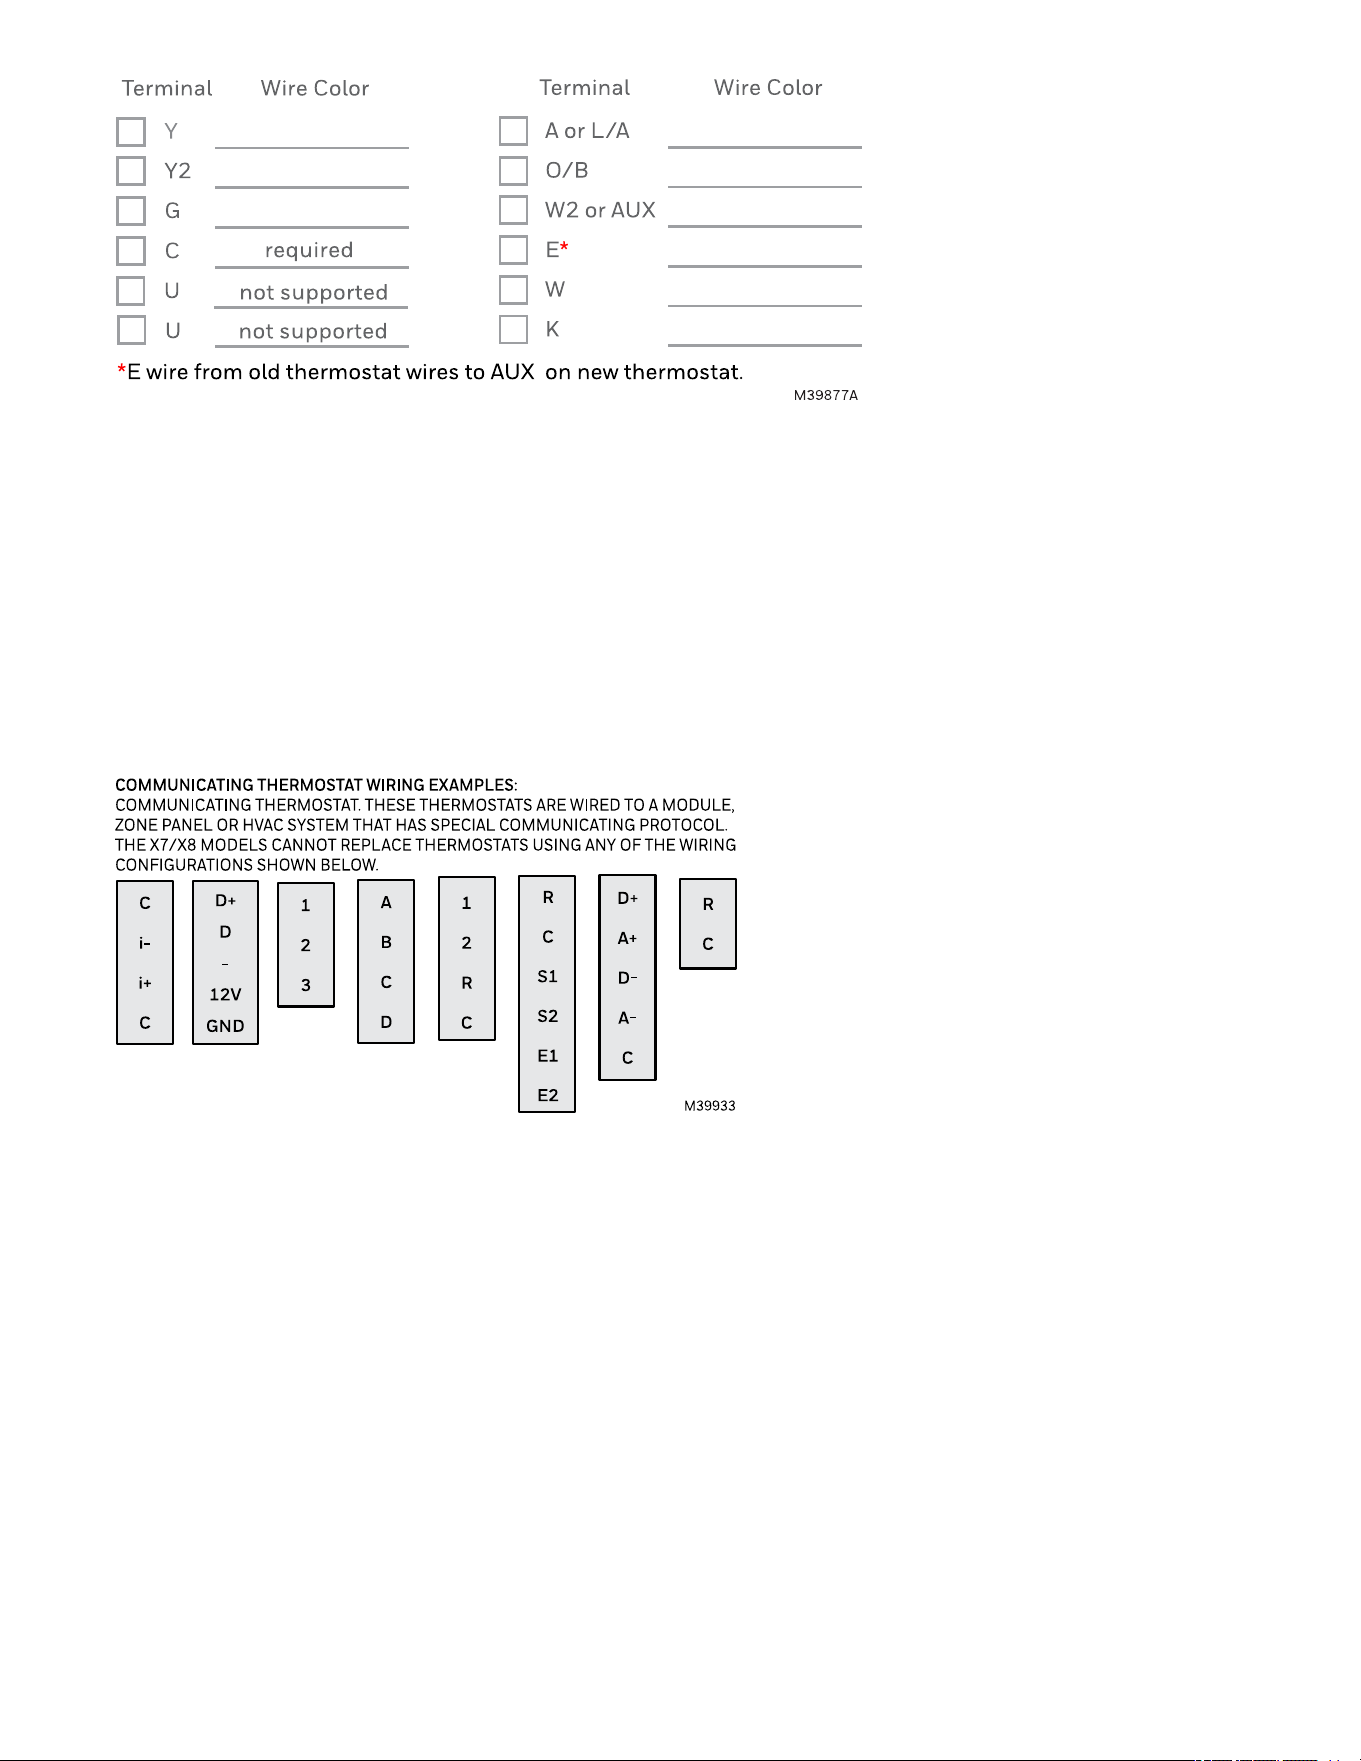
If there are wires in terminals that are not listed, you will need additional wiring support. See "Additional
wiring help" below for more information.
Additional wiring help
There is not a standard color-code for thermostat wiring. That is why it is critical to note where each wire was
attached before removing the wire. Taking a photo of the wiring with your phone and using the included
wire-labels is important before disconnecting wires from the old thermostat.
In most cases the wires will match the same from the old thermostat to the new. However in some cases they
do not. Below can provide some additional wiring assistance.
13
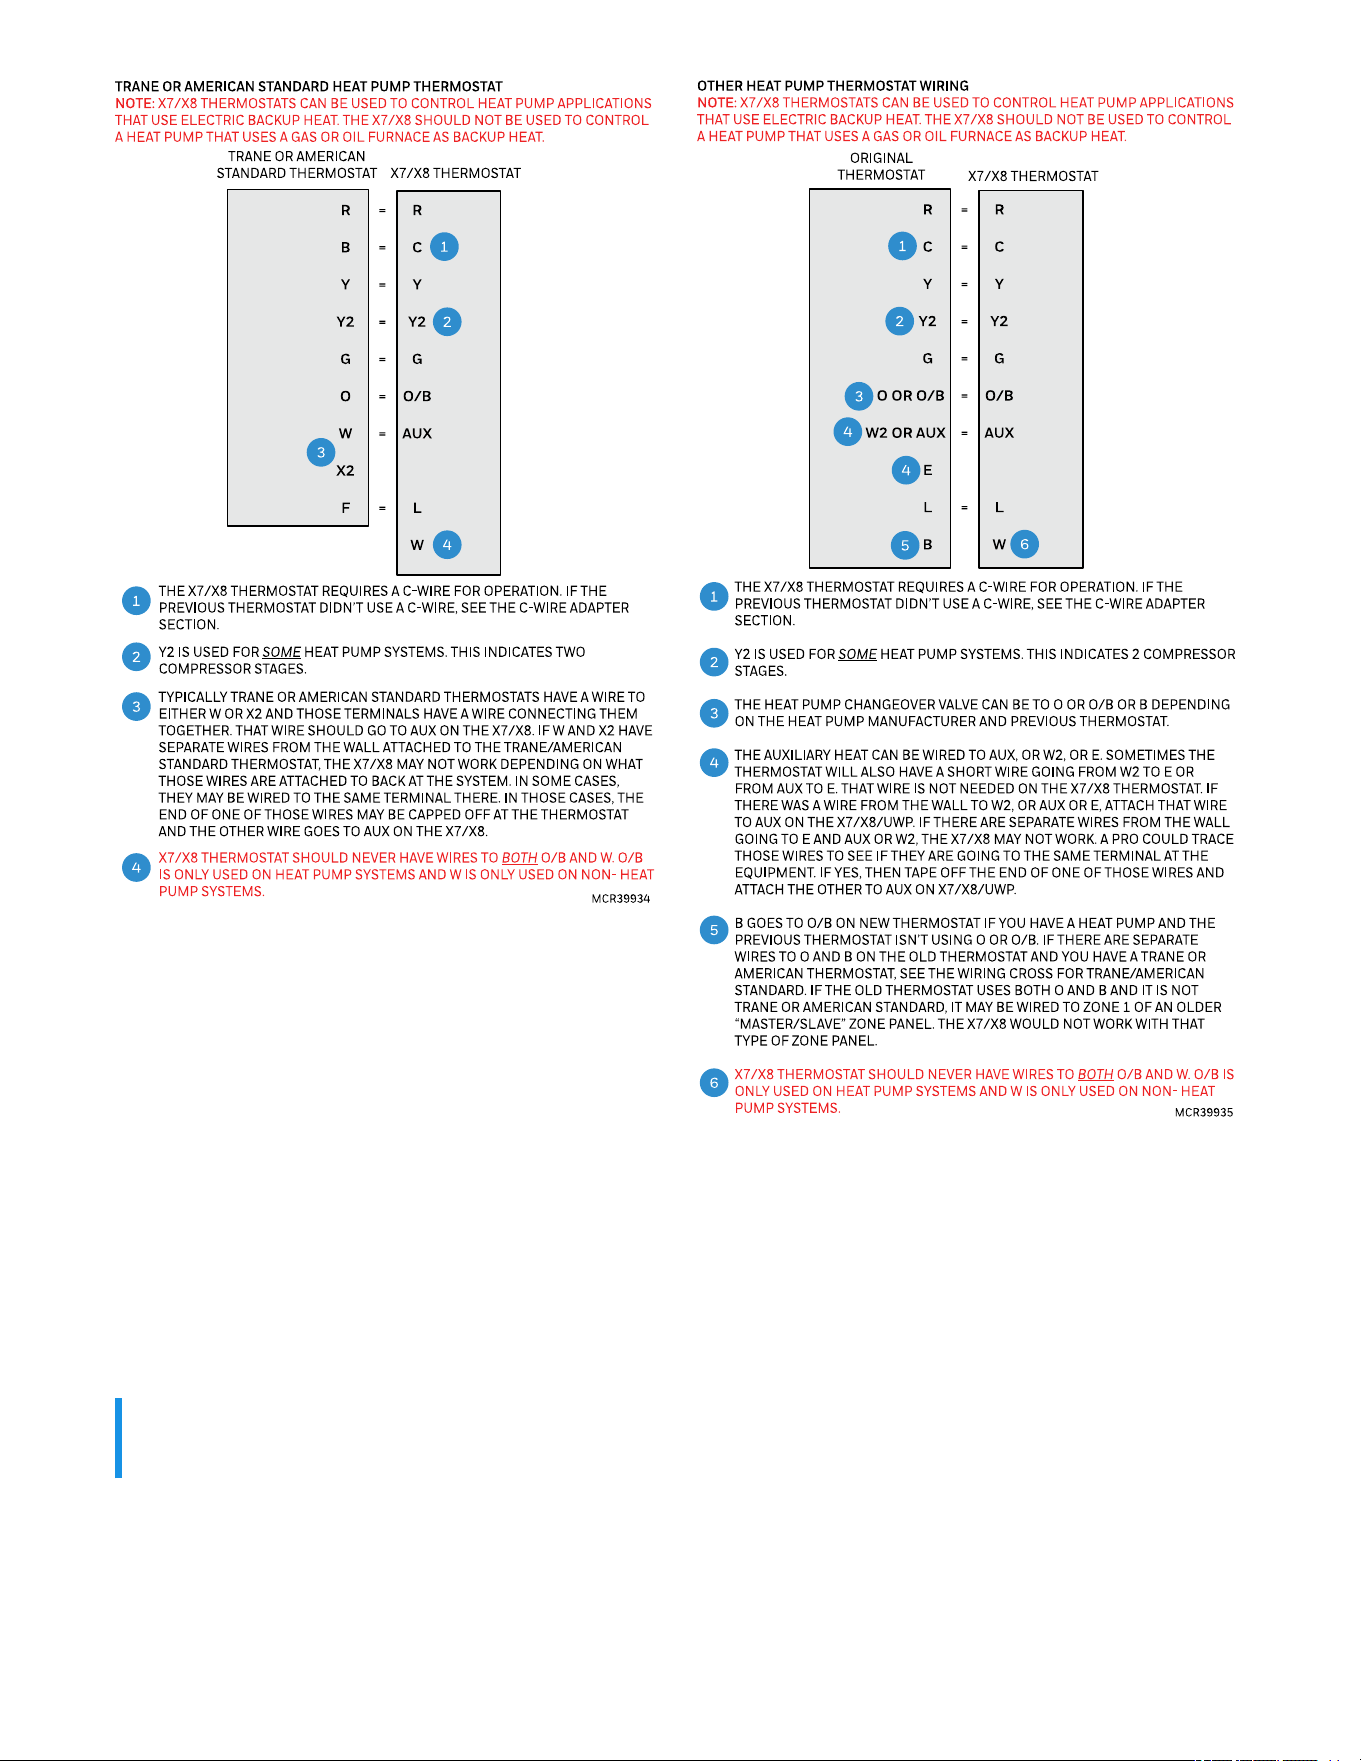
C-Wire Adapter
Resideo Wi-Fi thermostats requires a C-wire to power the display. If the previous thermostat did not have a
wire connected to the C terminal but there is an extra wire in the bundle, that wire can be connected to the C
terminal at both the thermostat and the furnace or air handler.
If there is no extra wire available and both the Y and G wires were connected on the previous thermostat, you
can use a THP9045A C-wire adapter.
NOTE:
For more information on the THP9045A C-wire adapter, go to: C-WIRE Adapter Installation Guide
9. Disconnect the wires and remove the old wall plate.
Use a screwdriver to release wires from terminals. Then, use a wire label to identify each wire as it's
disconnected. The letter on the wire label should match the letter on the terminal.
14
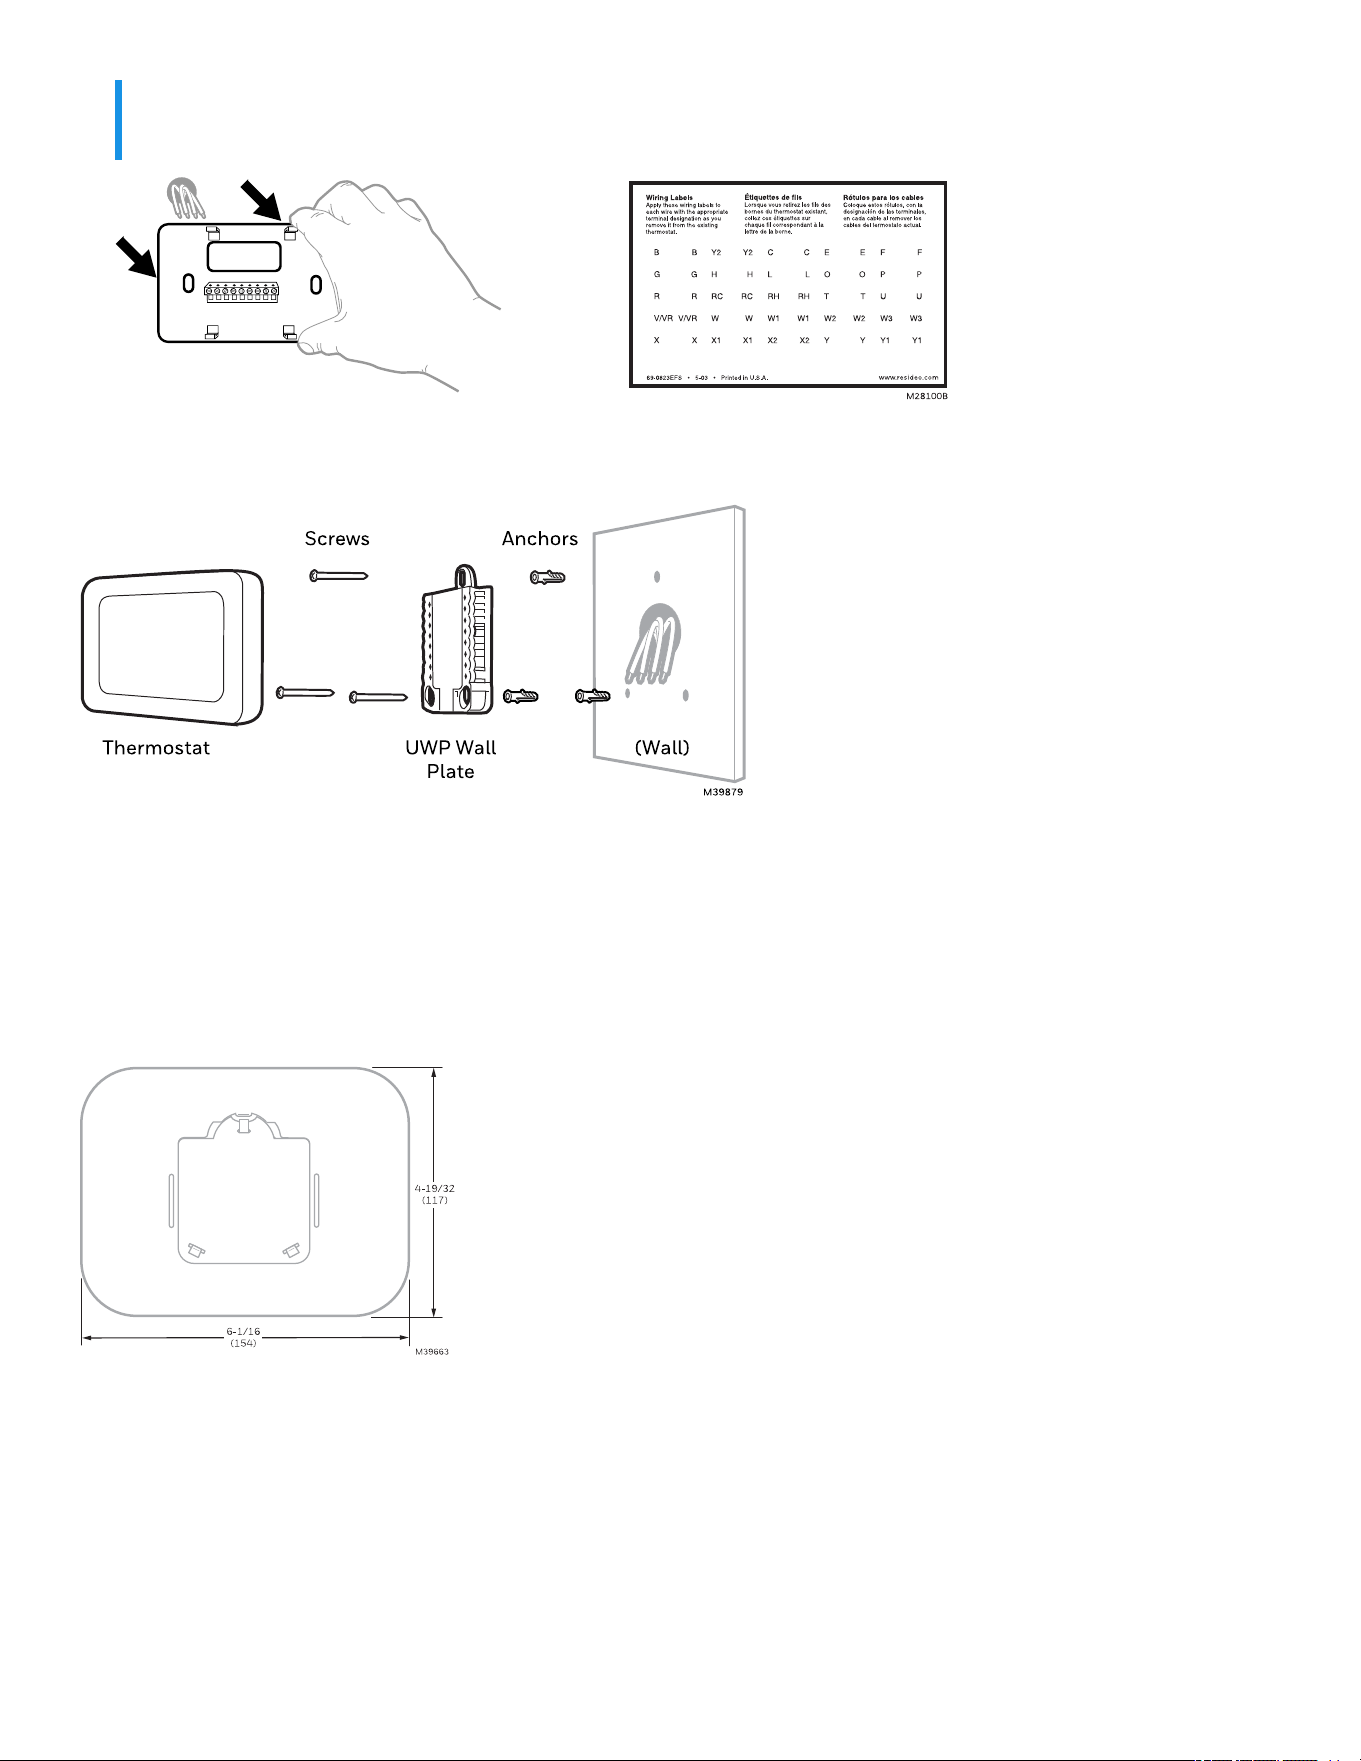
NOTE:
Tip: To prevent wires from falling back into the wall, wrap the wires around a pencil.
Installing Your X7S & X7B Smart Thermostat
Hold the thermostat over the part of the wall it will mount to. Verify the thermostat covers any marks left by the
previous thermostat. If not, patch and touch-up that area. Alternately, there are optional black or white cover
plates available for purchase. If using a cover plate, that will mount to the wall differently than the UWP, so do
not drill holes until the cover plate arrives.
Optional Cover Plate
THP2400WH (White cover plate)
THP2400BL (Black cover plate)
1. Bundle and insert wires through the UWP.
Pull open the UWP and insert the bundle of wires through the back of the UWP. Make sure at least 1/4-inch
of each wire is exposed for easy insertion into the wire terminals.
15
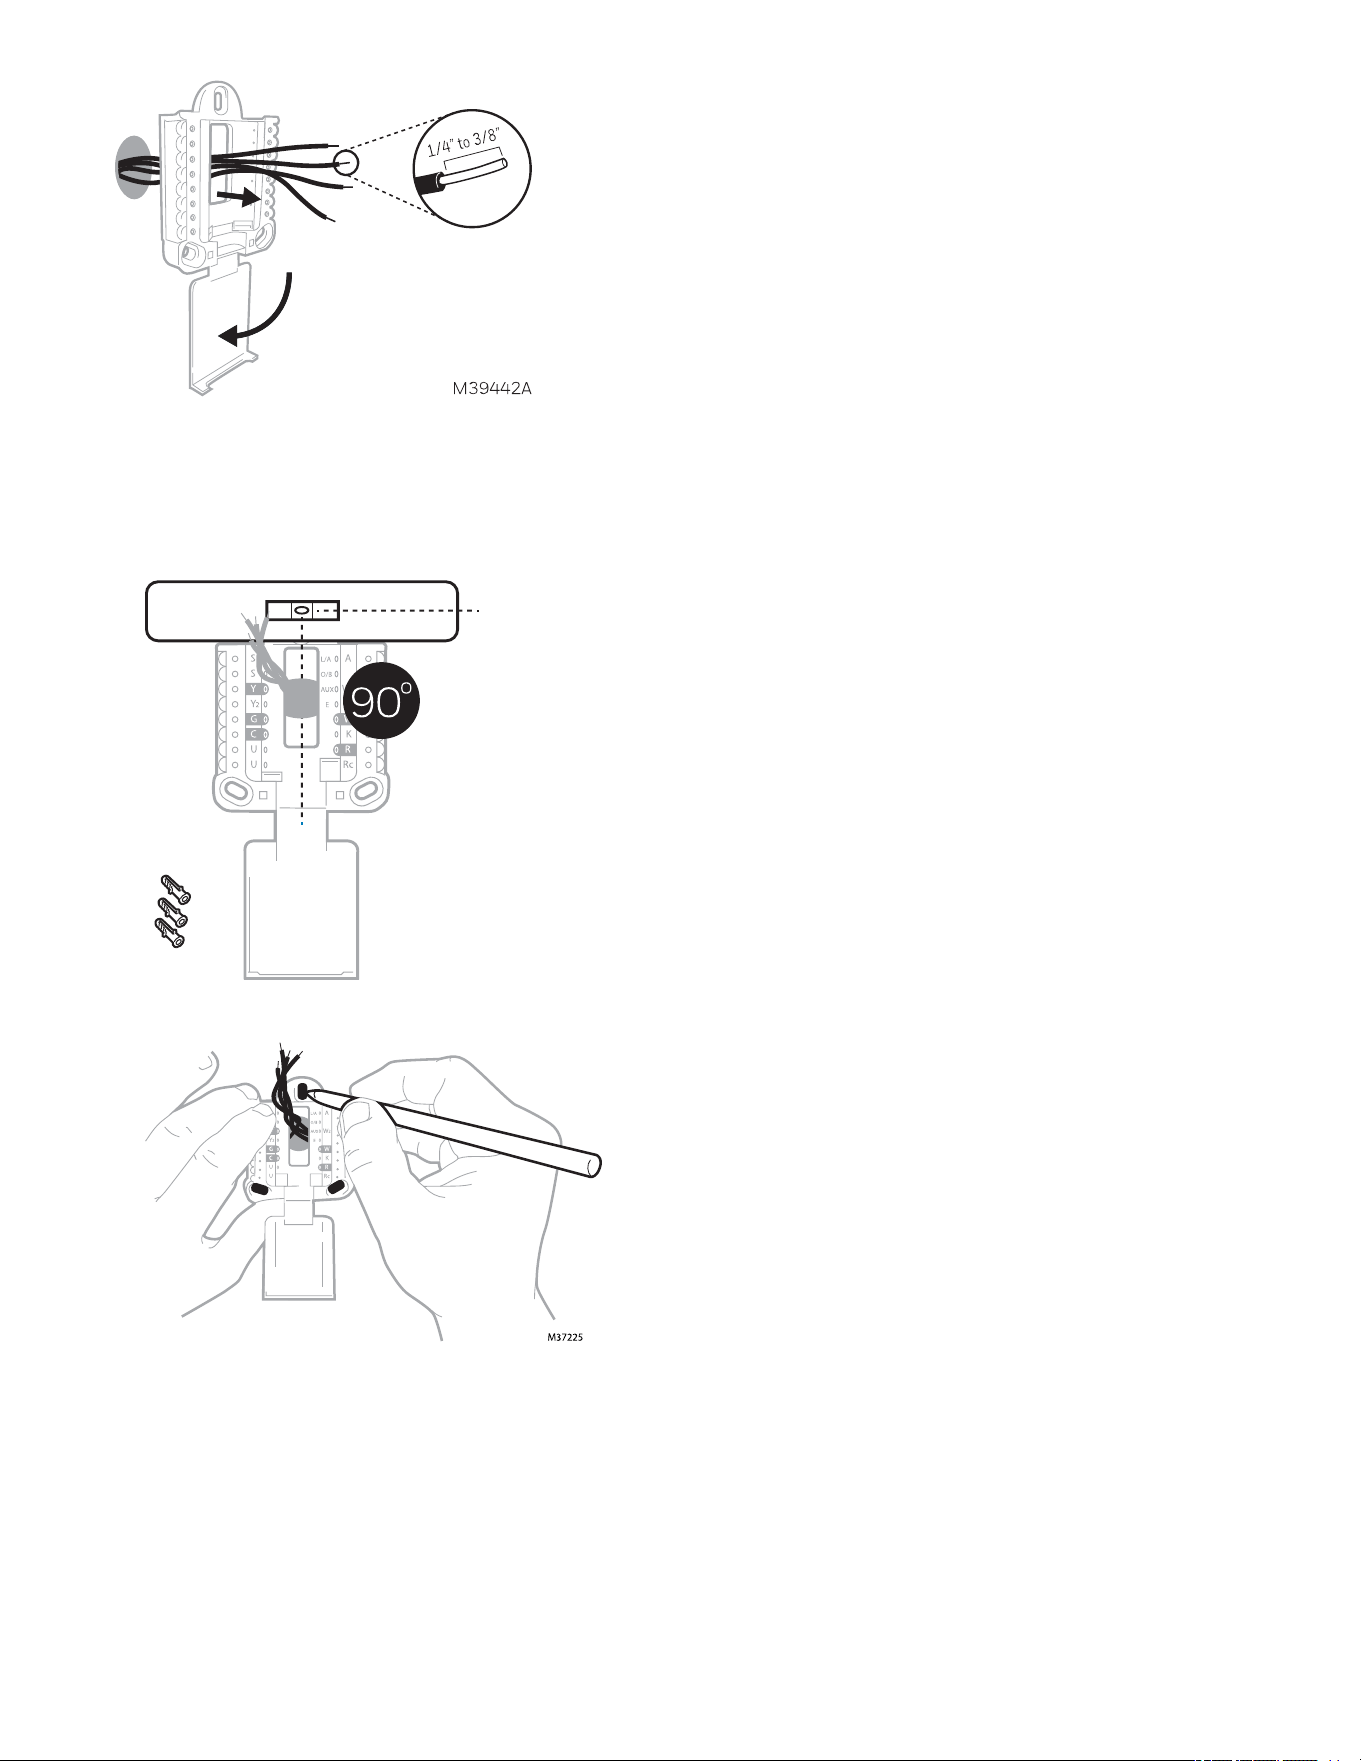
2. Insert the wall anchors.
It is recommended that you use the wall anchors included in the box to mount your thermostat.
You can use the UWP to mark where you want to place the wall anchors.
a. Level the wall plate.
b. Mark the location of the wall anchors using a pencil.
c. Using a 3/16” bit, drill the holes.
d. Insert wall anchors.
e. Make sure anchors are flush with wall.
3. Set R-switch position and insert R-wire or wires.
Set the R-switch up or down based on your wiring notes in "Record whether you have wires in the following
terminals. " on page12
16
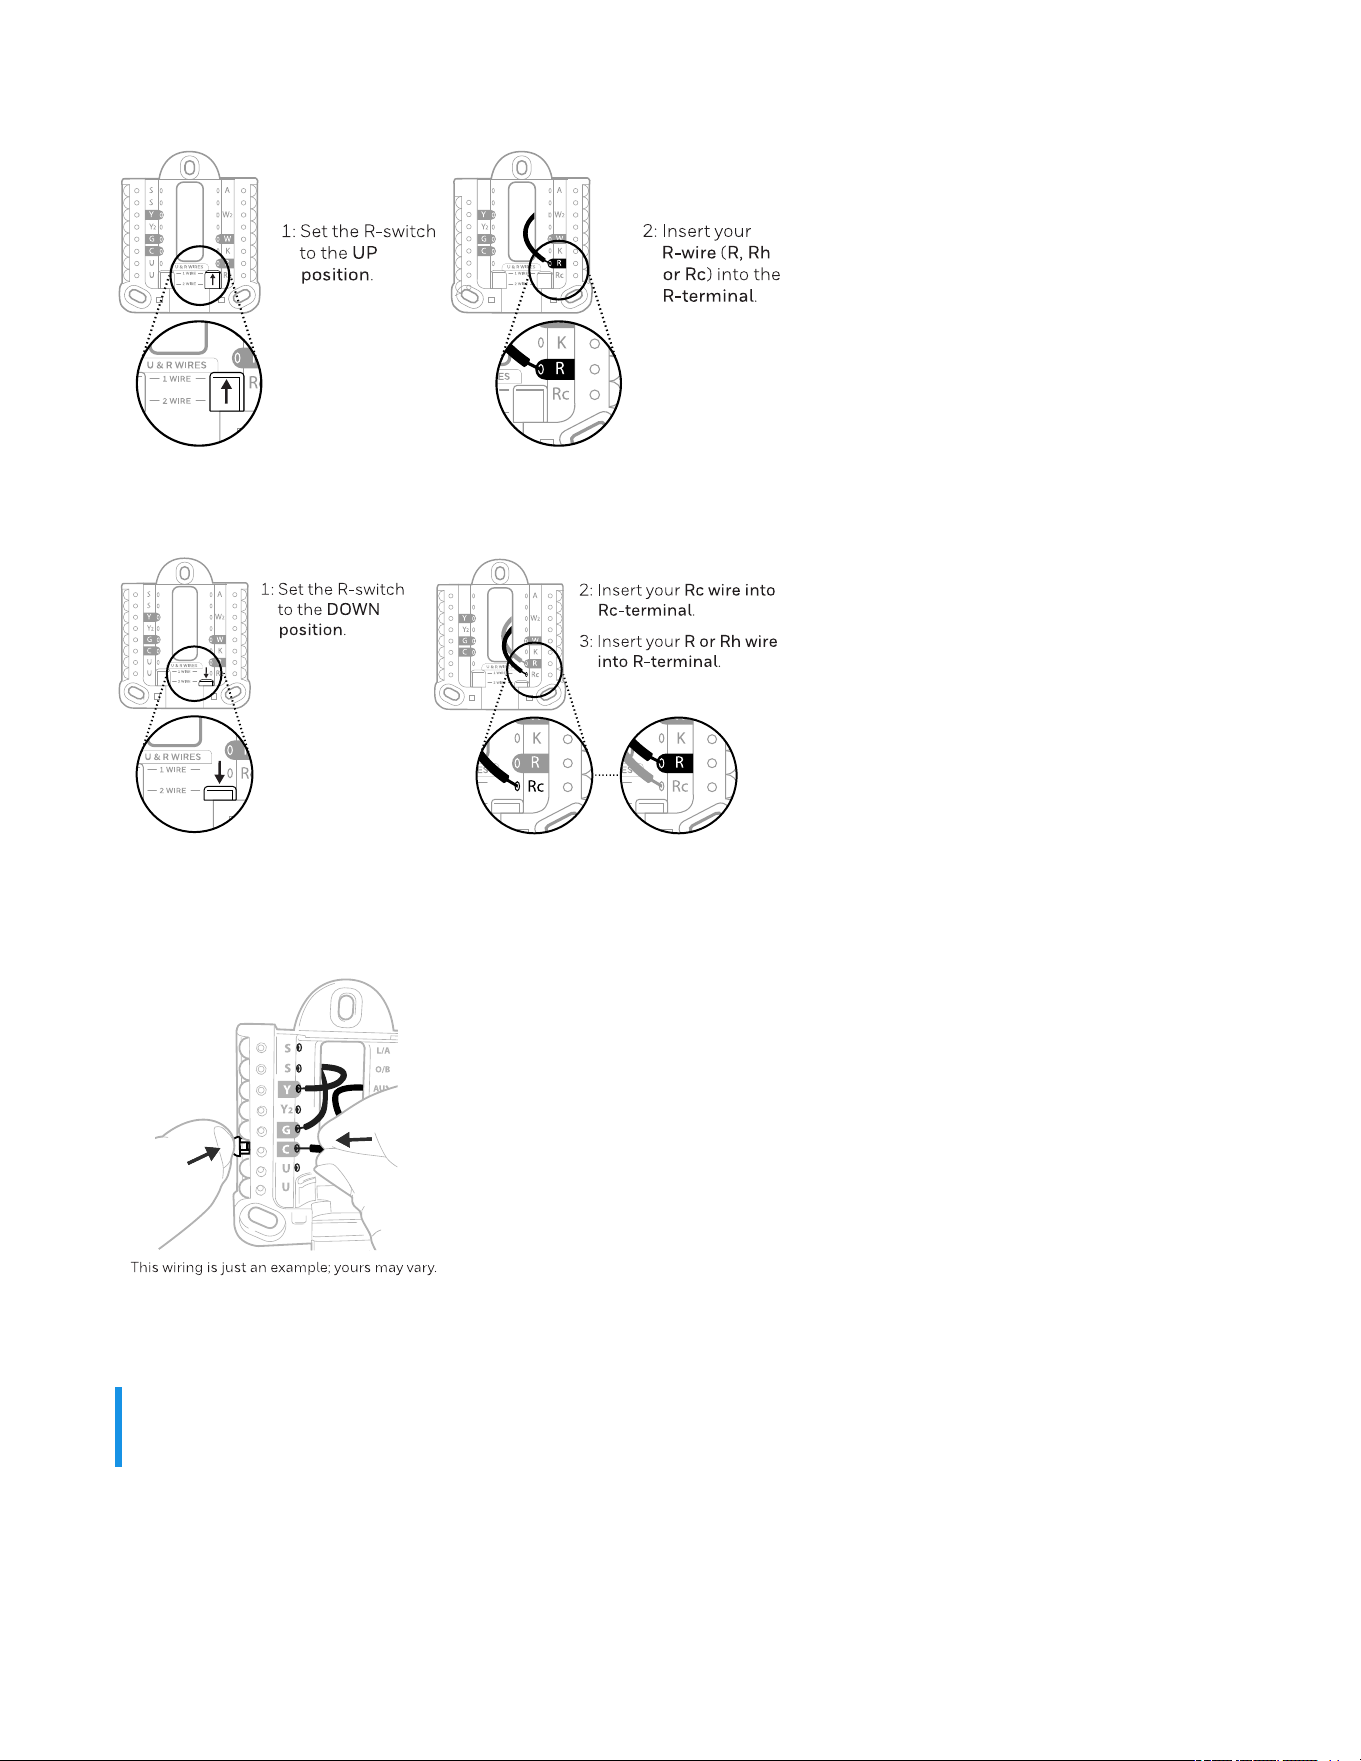
If you have 1 R-wire (R, Rh or Rc):
or
If you have 2 R-wires (R or Rh, and Rc):
4. Connect wires to the UWP.
Refer to the notes you recorded on the chart during removal. Depress the tabs to put the wires into the inner
holes of their corresponding terminals on the UWP (one wire per terminal) until it is firmly in place.
5. Confirm wiring matches snapshot.
Confirm that the wiring matches the terminals in the photo you took during removal.
NOTE:
If E was used, that wire should be connected to AUX on the UWP.
CONVENTIONAL SYSTEMS
Alternate wiring (for conventional systems)
If labels do not match terminals, connect wires as shown below:
17
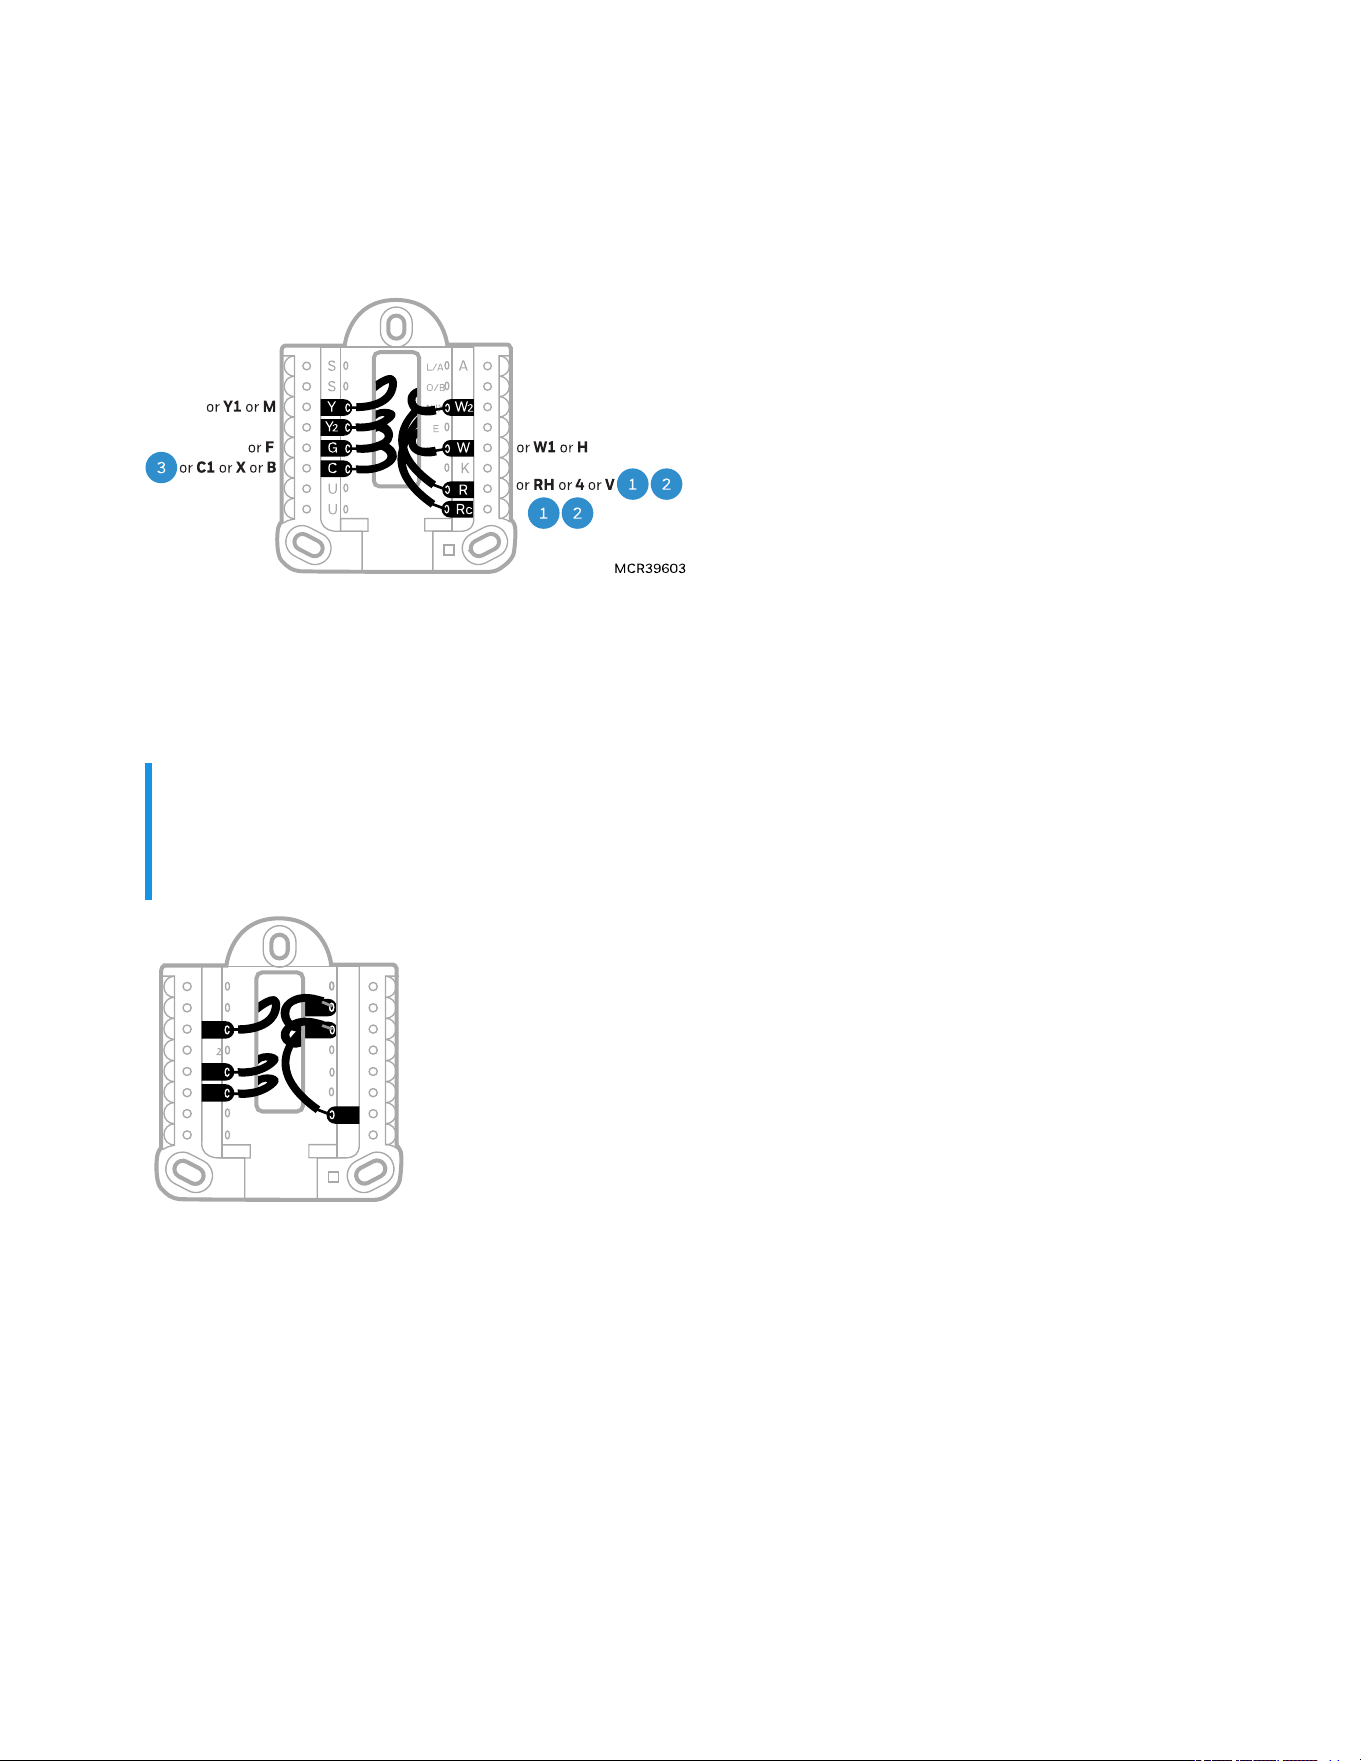
Wiring Notes:
1. If you must connect both R and Rc wires, set the R Slider Tab to the down position (2 wires).
2. If your old thermostat had both R and Rh wires, set the R Slider Tab to the down position (2 wires). Then
connect the R wire to the Rc terminal, and the Rh wire to the R terminal.
3. If your old thermostat had only one C or C1 wire, connect it to the C terminal. If your old thermostat had
two C or C1 wires, call Honeywell Home support or a qualified contractor for help.
HEAT PUMP
Wiring Notes:
1. Match each labeled wire with same letter on new thermostat.
2. Insert the wires into the matching terminal.
NOTE:
If you have difficulty inserting wires, you may have to press down the terminal push button next to the
corresponding terminal. If the labels do not match the letters on the thermostat, see the diagram
above.
AUX
M39605
Y
G
C
Y
A
Rc
W
K
W2
R
L/A
O/B
E
C
Alternate wiring (for heat pumps only)
Wiring Notes:
1. Keep R Slider Tab in the up position (1 wire).
2. If your old thermostat had both V and VR wires, stop now and contact a qualified contractor for help.
3. If your old thermostat had separate O and B wires, attach the B wire to the C terminal. If another wire is
attached to the C terminal, stop now and contact contact a qualified contractor for help.
4. If your old thermostat had Y1, W1 and W2 wires, stop now and call Honeywell Home support or contact
a qualified contractor for help.
18
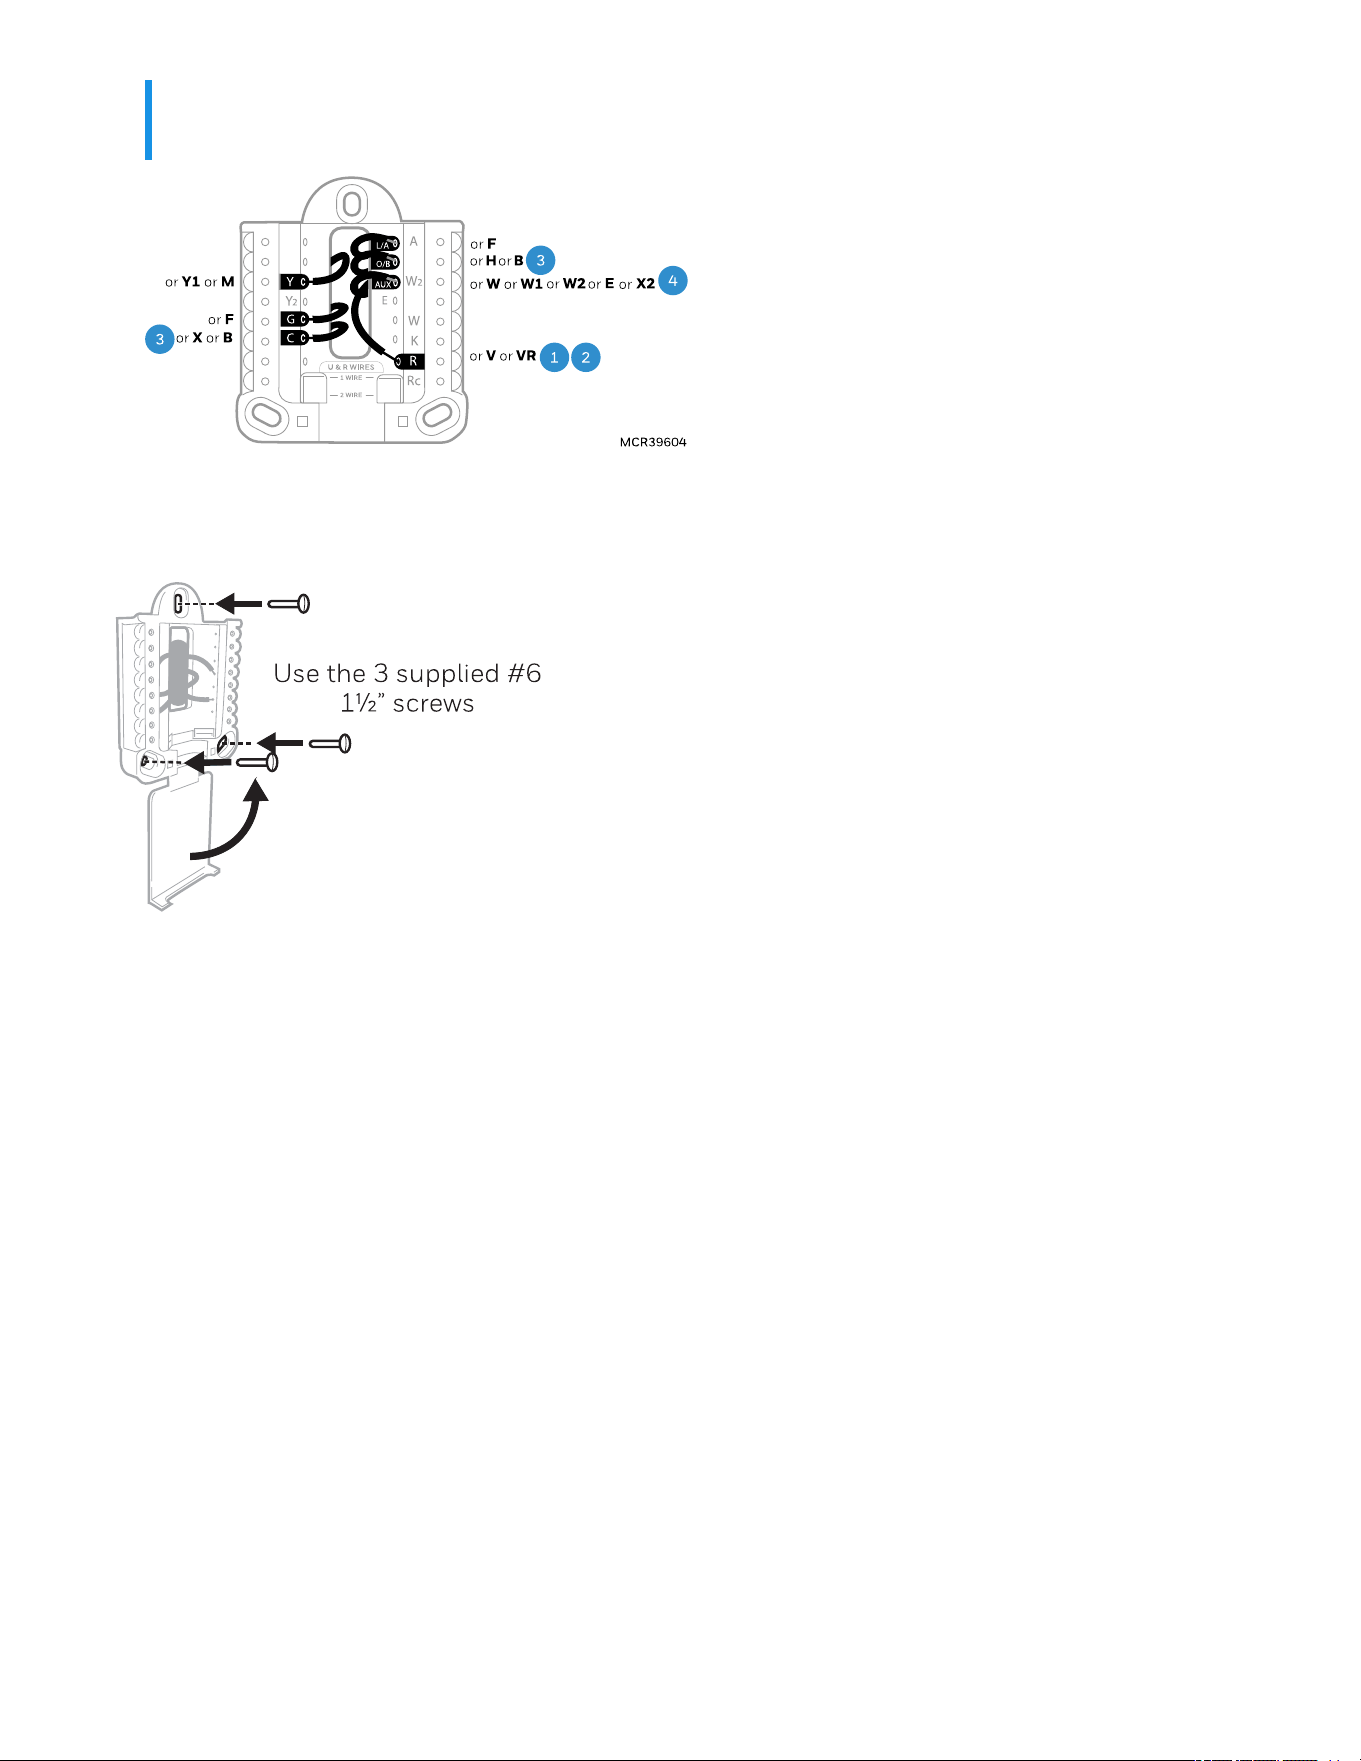
IMPORTANT:
Do NOT use W for heat pump applications. Auxiliary heat must wire to AUX.
6. Mount the UWP and close the door.
Mount the UWP using the provided screws. Install all three screws for a secure fit on your wall. Close the
door after you’re finished.
19
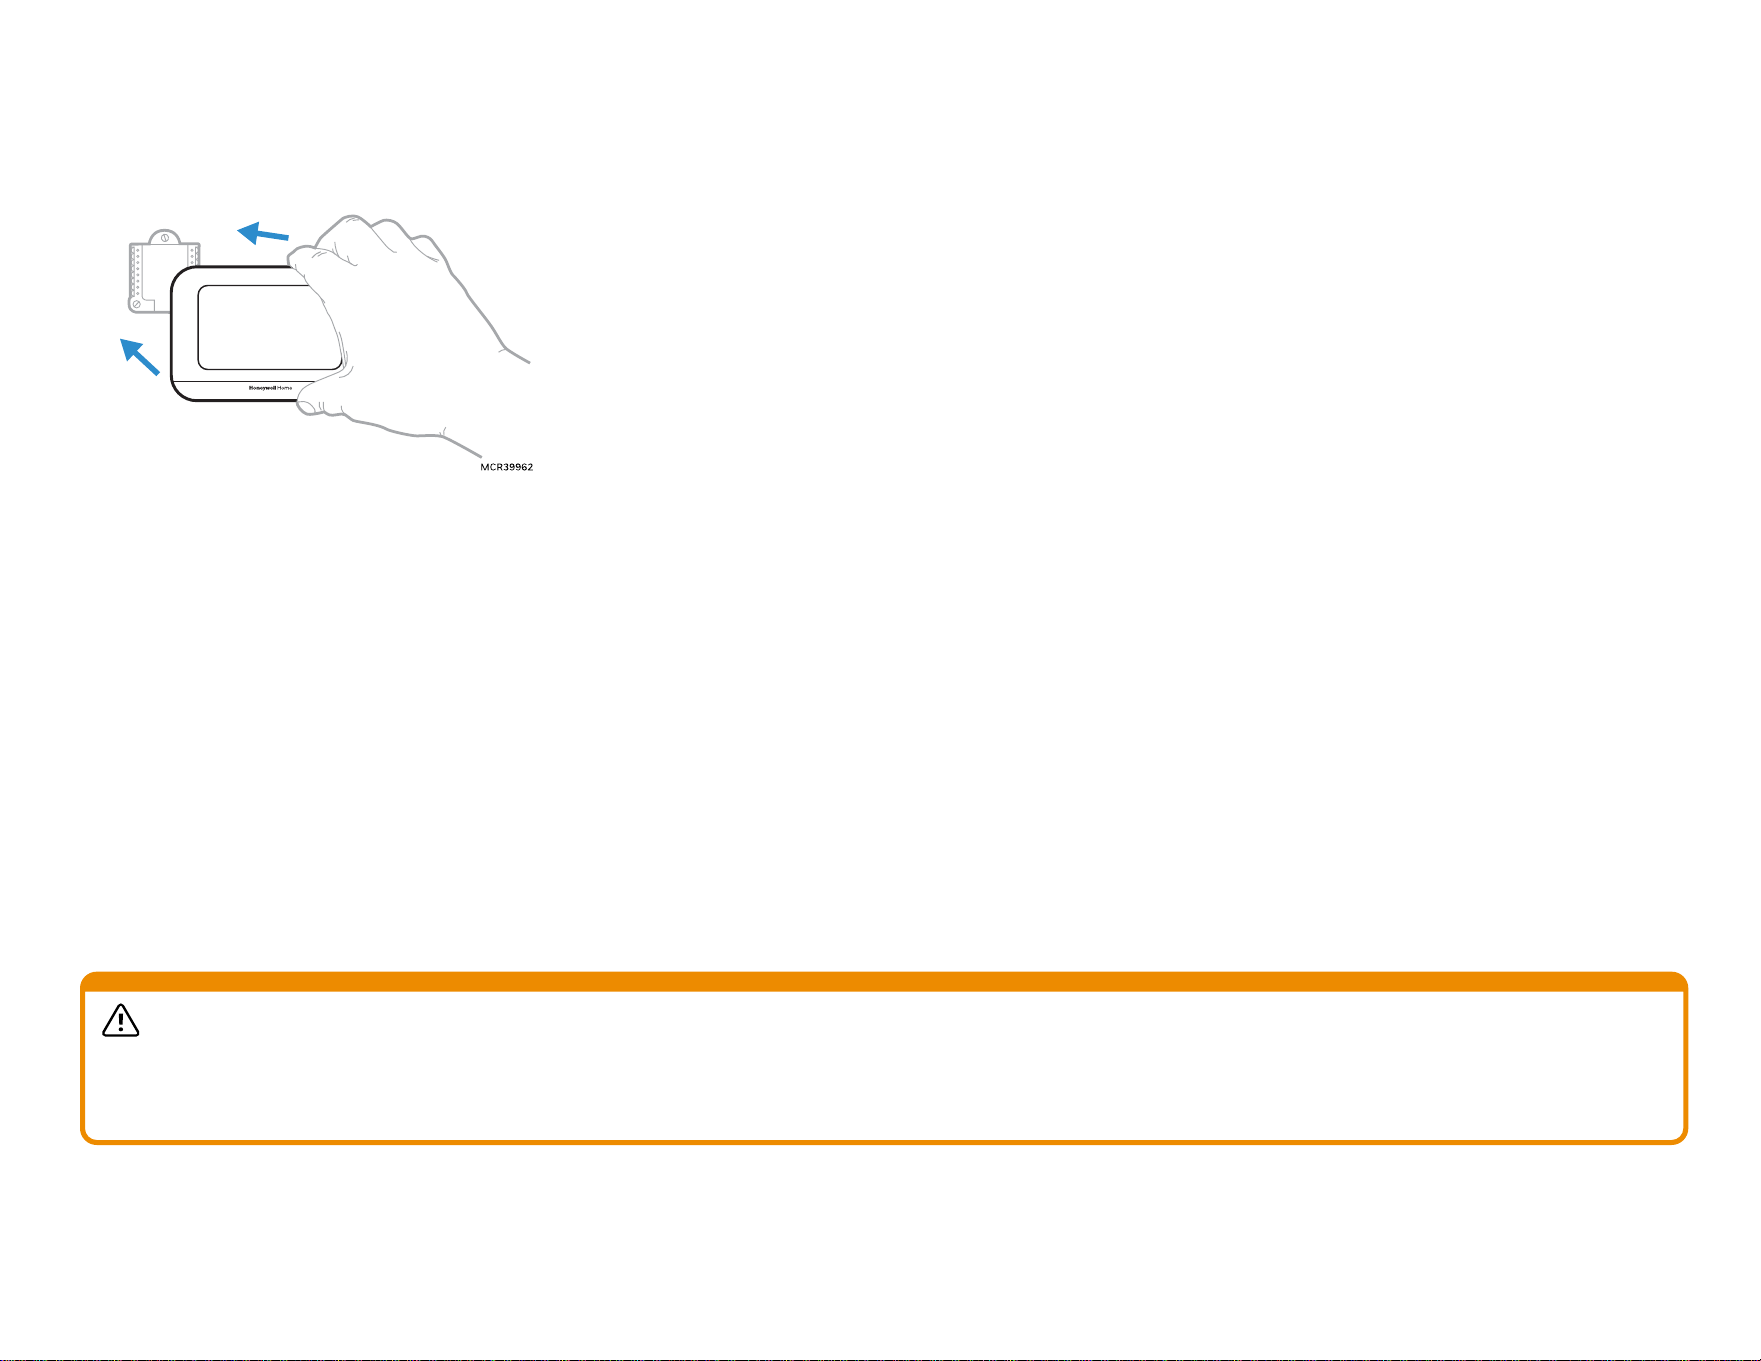
Setup
1. Attach your thermostat.
Align the thermostat onto the UWP and firmly snap it into place.
2. Turn your power ON.
The following topics are for setting up on the thermostat. If using the First Alert App for setup, follow the onscreen instructions on your smart
device.
New Installation
1. After the thermostat has powered up, the display will prompt you to select the language and provide an option to connect wireless sensors. After
these settings the display will ask if you want to do the setup using the app or on device (thermostat display).
2. The X7 will ask questions about the type of system you have. If you are unsure of what type of system you have, refer to your heating/cooling
system equipment literature or call an HVAC professional.
3. The thermostat or app will exit the setup after any questions have been answered. If you entered the modify configuration menu and made
changes after the initial setup, touch DONE to save those settings.
Revising Settings (Modify Configurations)
WARNING
IMPROPER CONFIGURING OF YOUR THERMOSTAT CAN CAUSE UNINTENDED OPERATION OF YOUR HVAC SYSTEM WHICH COULD LEAD TO
PROPERTY DAMAGE, INJURY, INCLUDING DEATH. IF YOU ARE UNSURE OF WHAT TYPE OF SYSTEM YOU HAVE, REFER TO YOUR
HEATING/COOLING SYSTEM EQUIPMENT LITERATURE OR CALL AN HVAC PROFESSIONAL.
20
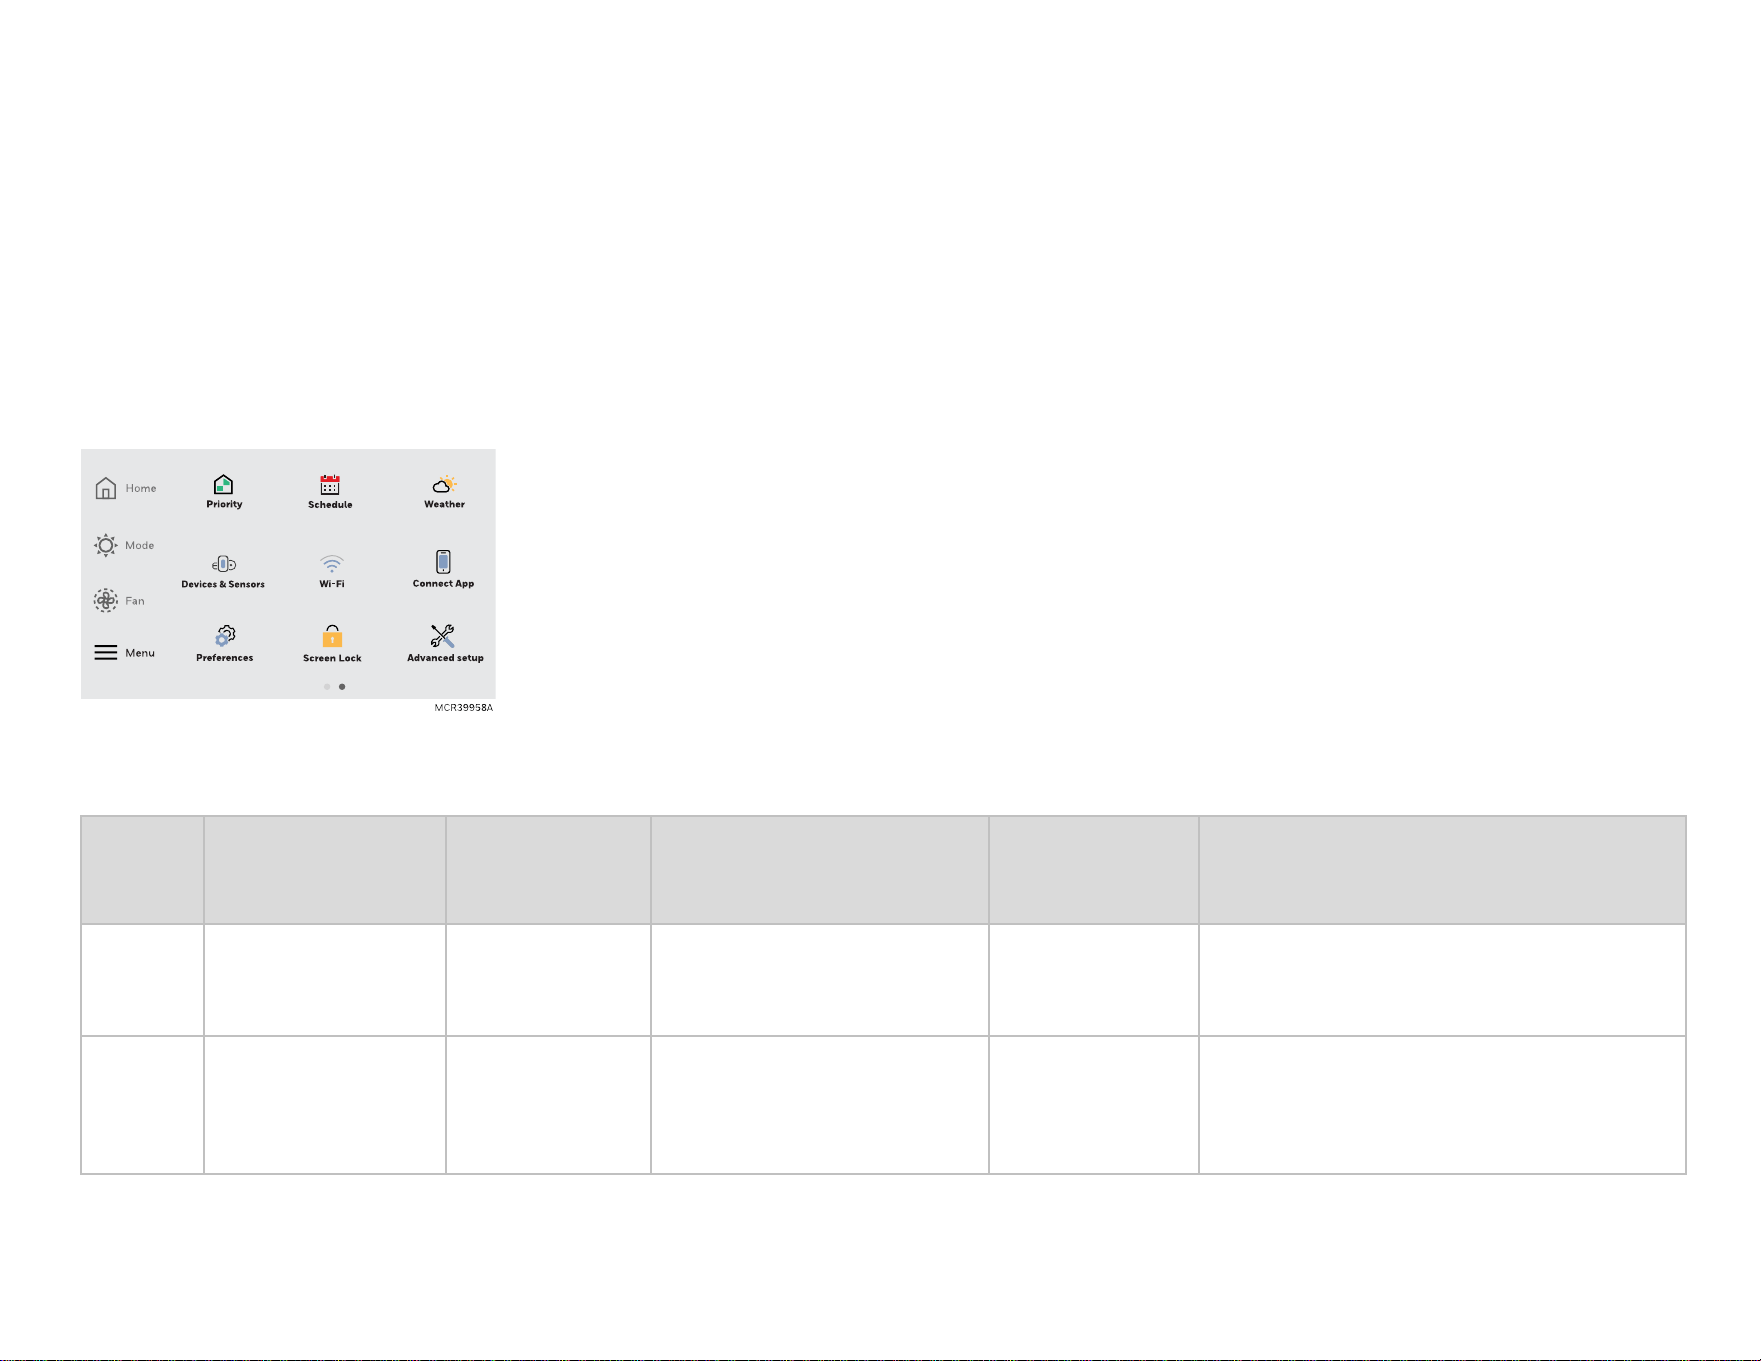
1. After the initial setup is done, you can view or change settings by going to MENU-Advanced Settings-Modify configuration. To see a list of all setup
parameters in the modify configuration menu, go to Modify Configuration Options section. The thermostat displays the setup name and options.
There is a "more information" option available for most of these settings.
2. Touch the Menu icon (in the lower left of display).
3. Select Advanced Settings.
4. Select Modify Configuration.
5. This will allow you to view or change the settings. After selecting the correct option for each setting, touch NEXTat the bottom of the display to
advance to the next option.
6. To see a list of all setup parameters, go to Modify Configuration Options.
7. To save your settings and exit the Modify Configuration menu, touch DONE at the bottom of display.
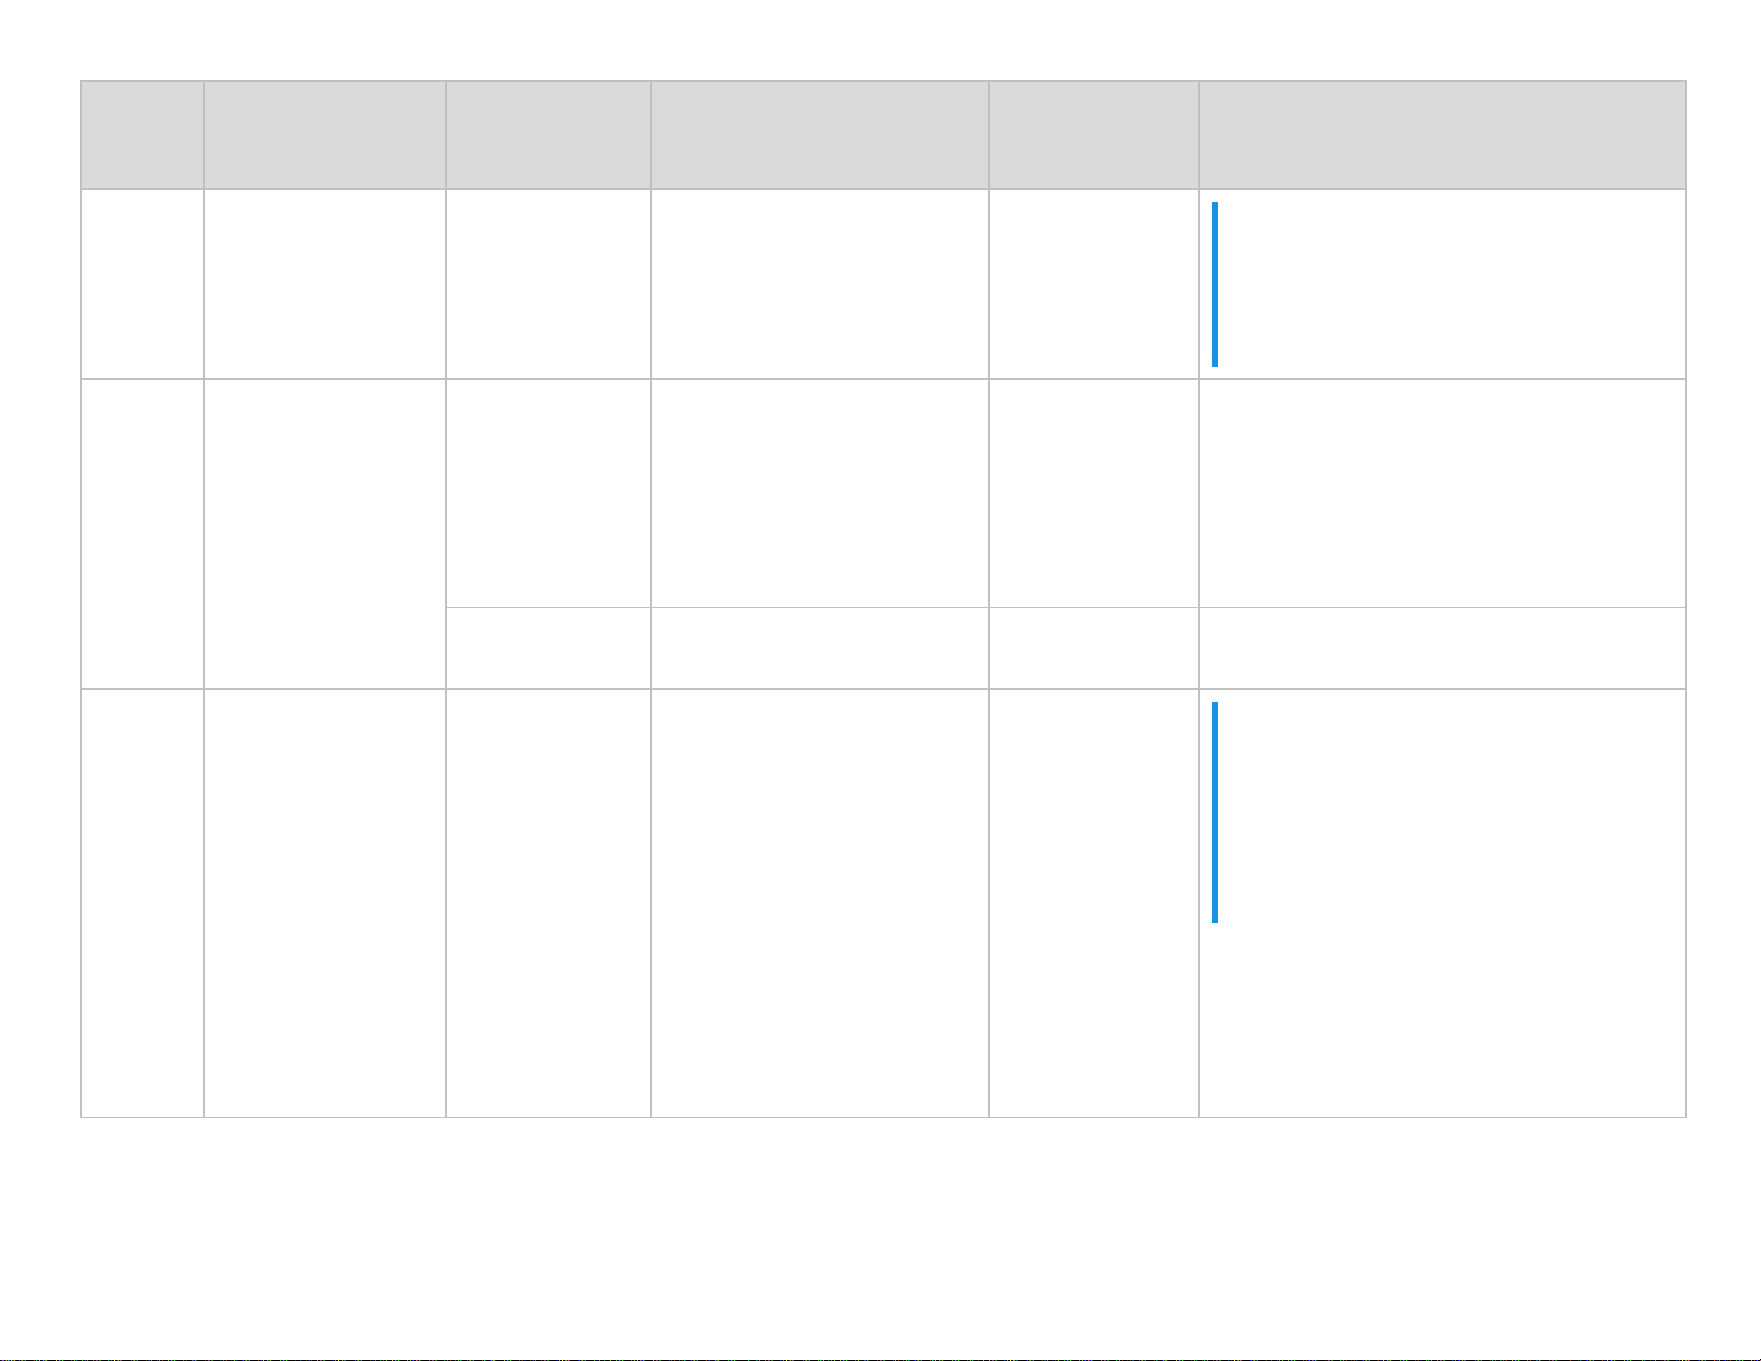
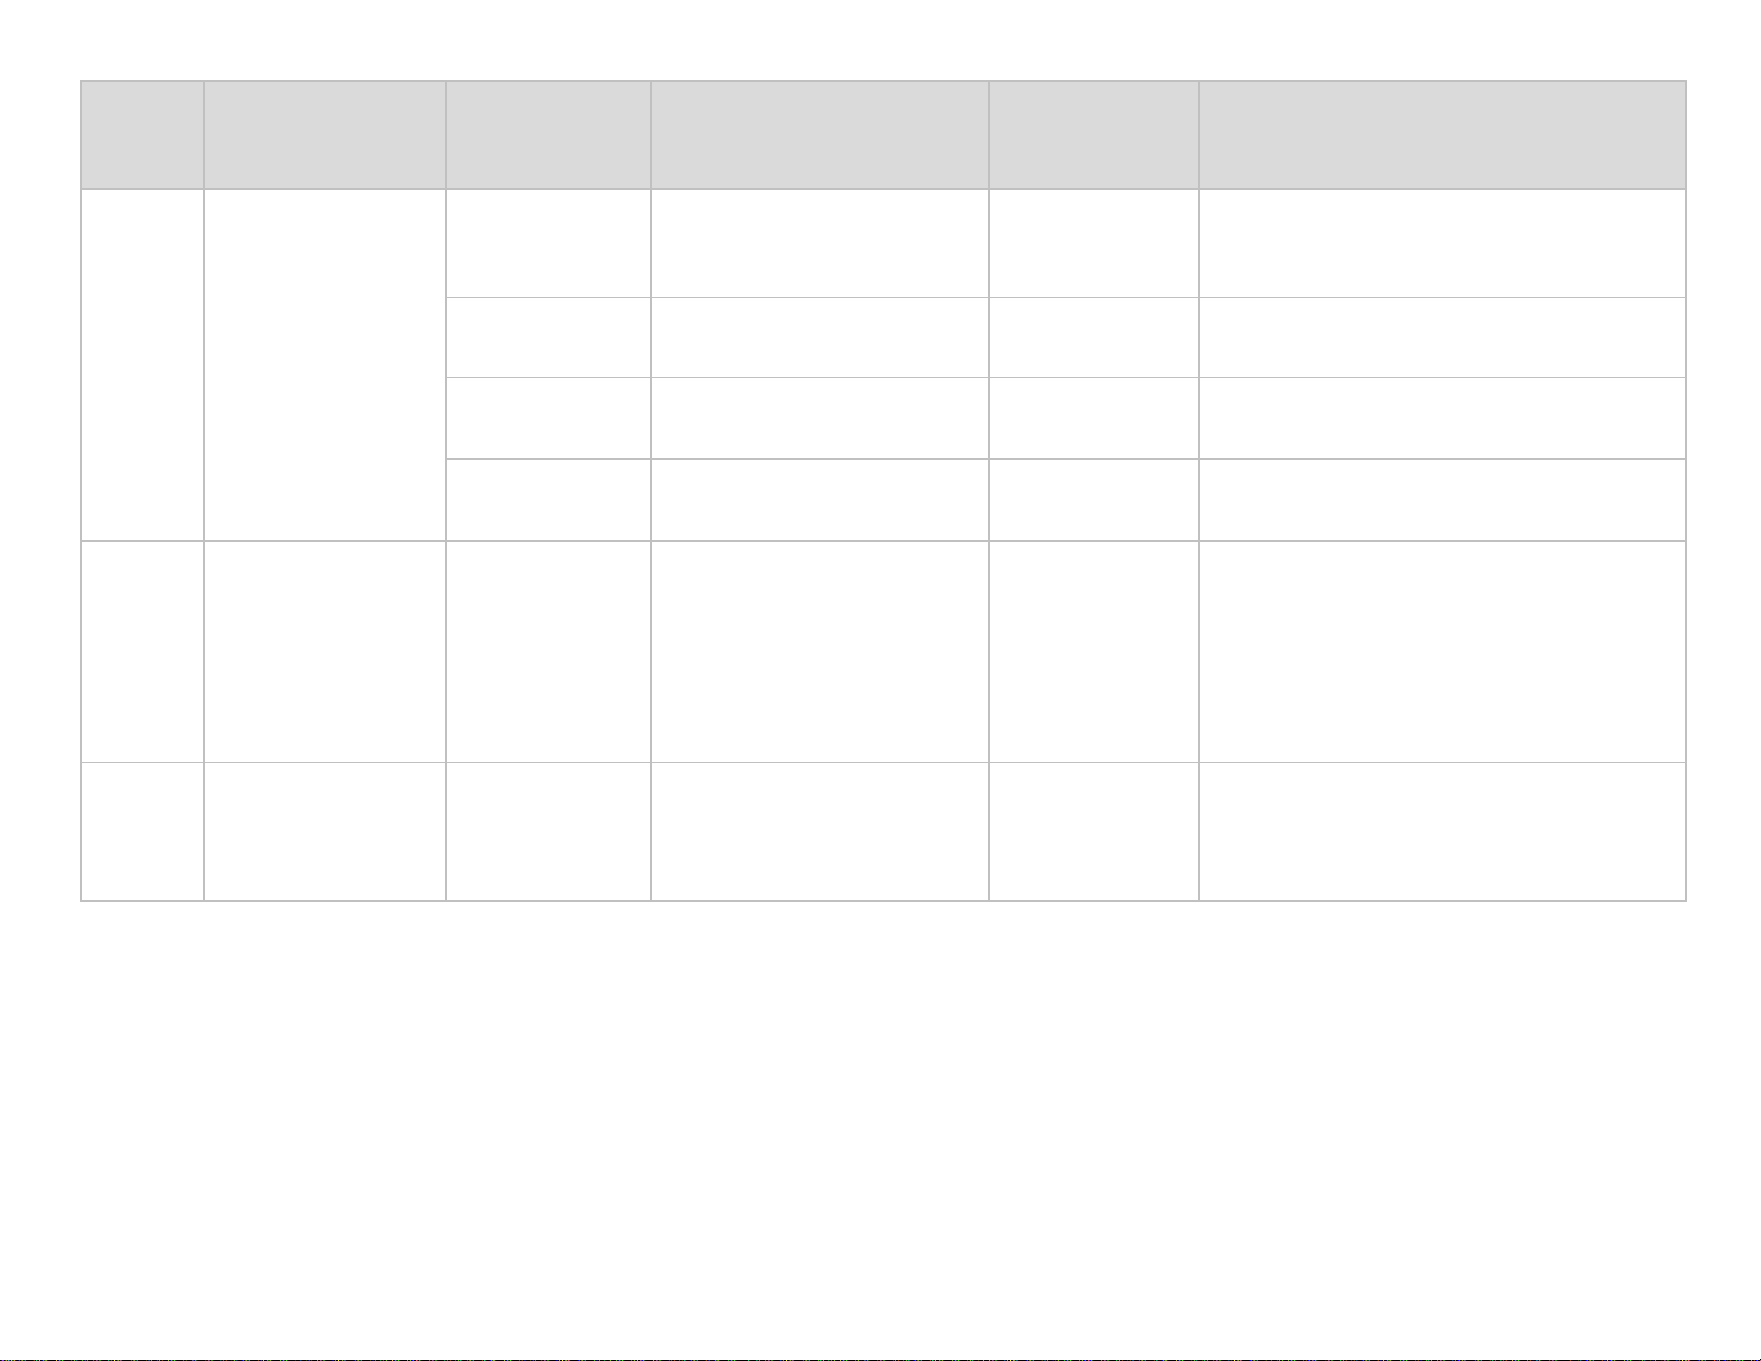
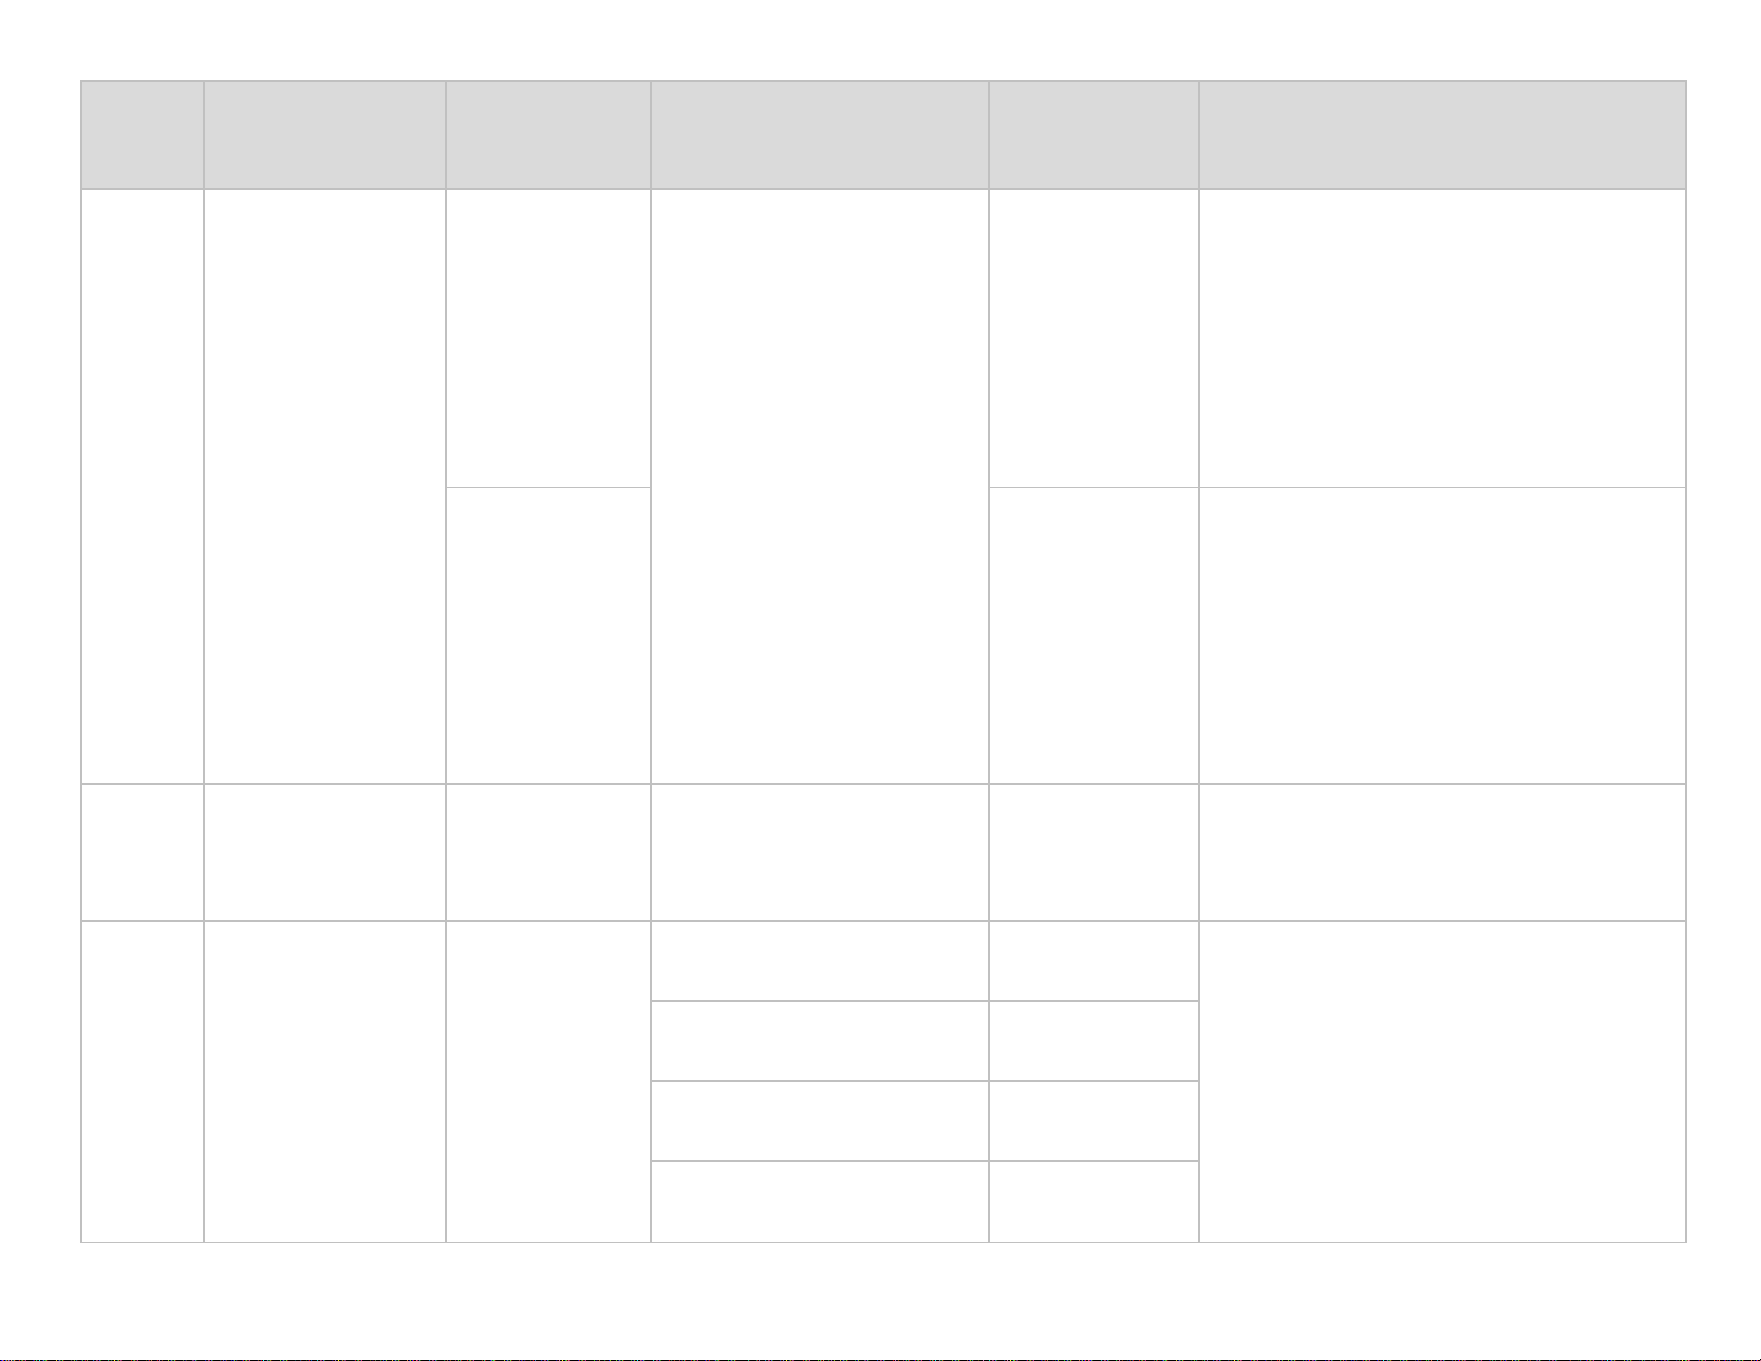
Modify Configuration Options
ISU # Heading Question Options Contingent
previous
setting?
Notes
1000 Language What language
would you like to
use?
l
English
l
Francais
l
Español
ISU number not displayed during initial
setup
1050 Temperature
Format
Which
temperature
scale would you
like to use?
l
Fahrenheit
l
Celsius
21
ISU # Heading Question Options Contingent
previous
setting?
Notes
2000 System Type System Type
l
Conventional Forced Air
Heat
l
Heat Pump
l
Radiant Heat
l
None (Cool only)
IMPORTANT:
It is important that this is set correctly.
If you are unsure about what type of
system you have contact an HVAC
professional to assist.
2010 Equipment type Equipment type
l
Standard Efficiency Gas
Forced Air
l
High Efficiency Gas
Forced Air
l
Oil Forced Air
l
Electric Forced Air
l
Hot Water Fan Coil
2000 =
Conventional
Forced Air Heat
This setting not shown for Heat Pump
Applications.
Equipment type
l
Hot water radiant heat
l
Steam
2000 set to
Radiant Heat
This setting not shown for Heat Pump
Applications.
2060 Reversing Valve Reversing Valve
l
O (O/B on Cool) or
l
B (O/B on Heat)
2000 set to Heat
Pump
IMPORTANT:
System setup is critical. If you are
unsure of this setting, trace the O/B
wire from thermostat to the equipment
to verify the configuration. If you are
still uncertain, contact an HVAC
professional to assist.
O/B wire goes to:
l
O at heat pump, ISU 2060 needs to be
set to O (O/B on cool).
l
B at heat pump, ISU 2060 needs to be
set to B (O/B on heat).
22
ISU # Heading Question Options Contingent
previous
setting?
Notes
2070 Equipment stages Cool stages
l
0-2 stages 2000 set to
other than Heat
Pump
Heat stages
l
1-2
Use for conventional heating systems such
as a gas forced air furnace.
Compressor
Stages
l
1
l
2
2000 set to Heat
Pump
Backup Heat
Stages
l
0
l
1
2000 set to Heat
Pump
2180 Backup Heat Backup Heat
Type
l
Electric Heat Strips
l
Gas or Oil Furnace
l
Hot Water Fan Coil
l
Hot Water Radiant Heat
l
Other
l
I'm not sure
2000 set to Heat
Pump and 2070
Backup Heat
Stages set to 1.
The thermostat or app will display different
options for this but only supports electric
backup. If any other backup heat source is
selected it will warn that the thermostat is
not compatible and recommend the
homeowner contact an HVAC pro to get a
compatible model.
3000 Changeover Changeover
l
Manual
l
Automatic
Any system with
at least 1 Heat
stage and 1 Cool
stage
See AutoChangeover Operation for
Details.
23
ISU # Heading Question Options Contingent
previous
setting?
Notes
3260 Temperature
Control
Extended fan
run time in cool
l
Off
l
30 seconds
l
60 seconds
l
90 seconds
l
2 minutes
l
3 minutes
l
4 minutes
l
5 minutes
l
6 minutes
l
7 minutes
l
8 minutes
l
9 minutes
l
10 minutes
l
11 minutes
l
12 minutes
l
13 minutes
l
14 minutes
l
15 minutes
At least 1 cool
stage
Extended fan
run time in heat
At least 1 heat
stage
4090 Temperature
Control
Adaptive
Intelligent
Recovery
l
No
l
Yes
When scheduling is used, this feature
turns on heat or cooling early to reach the
comfort set point by the scheduled
comfort time
4100 Temperature Limits Temperature
range stops
Minimum cool setpoint; 50F-
99F (10C-37C)
At least 1 stage
of cool
There is a correlation between these
settings. For example, if minimum cool is
set to 50F, minimum heat cannot be set
above 40F
Maximum cool setpoint;
90F-99F (32C-37C)
At least 1 stage
of cool
Minimum heat setpoint;
40F-50F (4.5C-10C)
At least 1 stage
of Heat
Maximum heat setpoint;
40F-90F (4.5 - 32.0C)
At least 1 stage
of Heat
24
ISU # Heading Question Options Contingent
previous
setting?
Notes
4110 Keypad Lockout Keypad Lockout Unlocked, Partially Locked,
Fully Locked
7000 Filtration Filter type
l
None
l
Media
7110 Filtration Replacement
reminders
Air Filter 1 settings:
l
Off
l
10 Run time days
l
20 Run time days
l
30 Run time days
l
45 Run time days
l
60 Run time days
l
90 Run time days
l
120 Run time days
l
150 Run time days
l
30 Calendar days
l
45 Calendar days
l
60 Calendar days
l
75 Calendar days
l
3 Calendar months
l
4 Calendar months
l
5 Calendar months
l
6 Calendar months
l
9 Calendar months
l
12 Calendar months
l
15 Calendar months
7000 = Media
8100 Humidification Humidifier Pad
replacement
reminder
l
Off
l
6 or 12 calendar months
25
ISU # Heading Question Options Contingent
previous
setting?
Notes
9210 Dehumidification
Dehumidifier
Filter
replacement
reminder
l
Off
l
30 Calendar Days
l
60 Calendar Days
l
3 Calendar Months
l
4 Calendar Months
l
5 Calendar Months
l
6 Calendar Months
l
7 Calendar Months
l
8 Calendar Months
l
9 Calendar Months
l
10 Calendar Months
l
11 Calendar Months
l
12 Calendar Months
11000 UV Devices Number of UV
Devices
0, 1, 2
11050 UV Devices UV Bulb
Replacement
Reminders
Replace UV Bulb 1 = Off, 6,
12, 24 calendar months
11000 = 1 or 2
Replace UV Bulb 2 = Off, 6,
12, 24 calendar months
11000 = 2
14010 Clock Format Clock Format
l
12 hour clock
l
24 hour clock
14015 Daylight Savings
Time
Daylight Savings
Time
l
Off
l
On
14020 Display Offsets Indoor Display
Offsets
Indoor Temperature:
(-3 to 3) in 1F increment
(-1.5 to 1.5) in 0.5C
increment.
The display offset is applied to the Home
screen, not the Priority screen. This offset
is not associated with any individual
sensor.
Indoor Humidity:
-12% to 12% RH
26
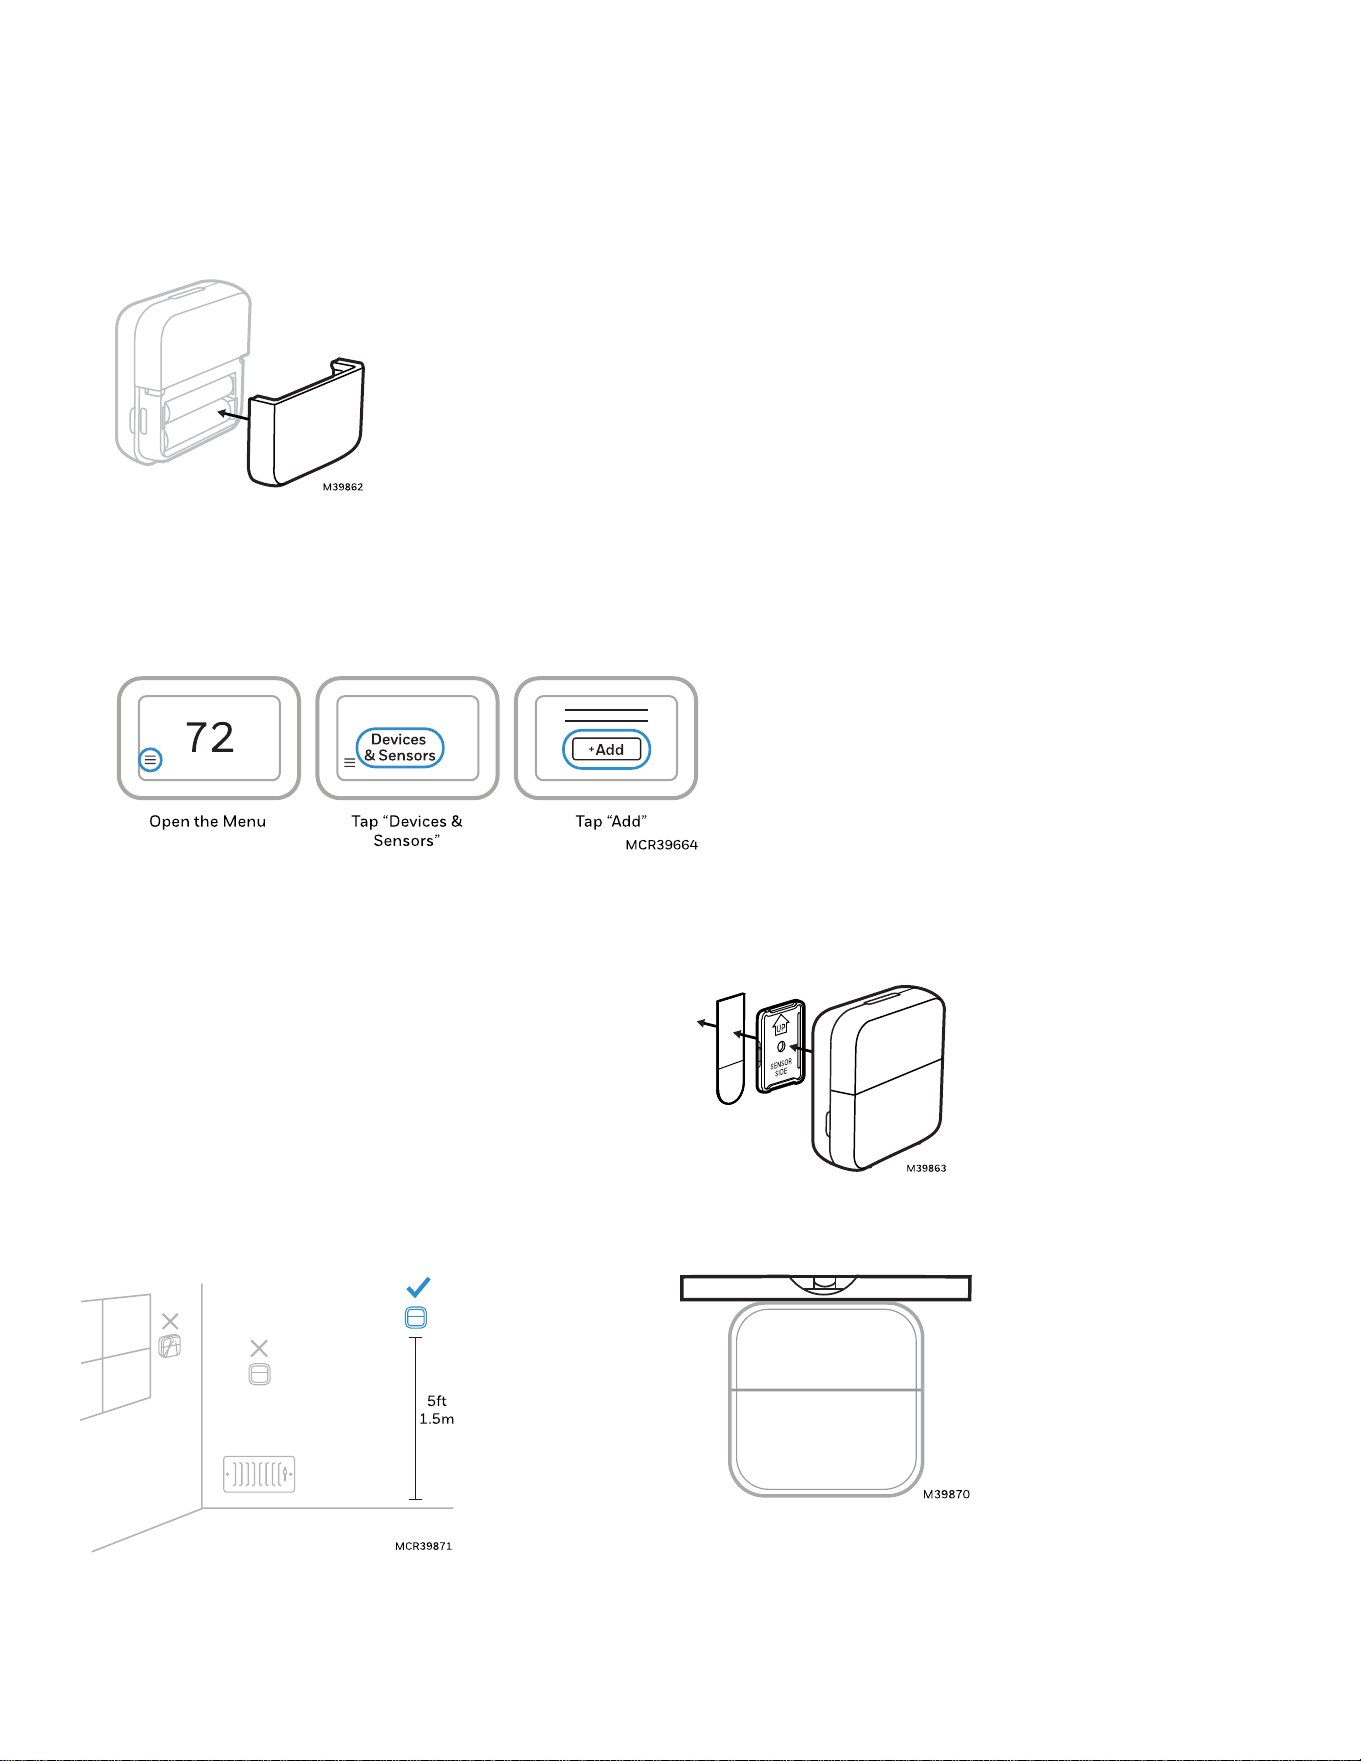
Sensor Installation (X7S models only)
Wireless Indoor Sensor Installation
XRSENSOR Wireless Indoor Sensor
1. Remove cover from base and Insert (2) AAA Alkaline batteries in the sensor.
2. At the thermostat, select Menu.
3. Tap Devices & Sensors.
4. Tap Add.
Follow the on-screen instructions.
5. Snap the sensor onto the wall-plate.
6. Adhere the included command strip to the wall-plate. Then adhere the sensor to the wall. Level sensor for
appearance.
Placement Tips
l
DO place about 5 feet above the floor.
l
DO place on inside walls.
l
DON’T place behind furniture or doors.
l
DON’T place in direct sunlight.
l
DON’T place above air vents.
Placing the indoor sensor Leveling the indoor sensor
27

Advanced Setup Options
NOTE:
The Advanced Setup menu is only available after the initial setup has been completed.
Advanced setup is available if you’d like to customize how your thermostat works.
Most settings are automatically set to commonly preferred options during installation, so there’s usually no
need to make changes. However, if you want to adjust how your system behaves, you can do so in the Advanced
Setup menu.
To access the Advanced Setup menu:
1. Touch the Menu icon on the bottom left of display
2. Select Advanced setup.
Advanced Setup Menu
Modify Configuration
Change system settings. See "Revising Settings (Modify Configurations)" on page20.
Equipment Test
While running equipment in test mode a timer indicates the run time during the test. Equipment automatically
shuts off after 30 minutes if the installer does not end a test before that time.
l
Heat: Select Heat stage(s) to test
l
Em heat: Test Emergency Heat. (For heat pumps with backup heat only)
l
Cool: Select Cool stage(s) to test
l
Fan: Turn fan on or off.
Reset
l
Reset Schedule
l
Delete all Devices (removes wireless sensors)
l
Reset Matter
l
Reset WiFi (removes thermostat from network)
l
Factory Reset (this returns the thermostat to the state it was in prior to installation)
28
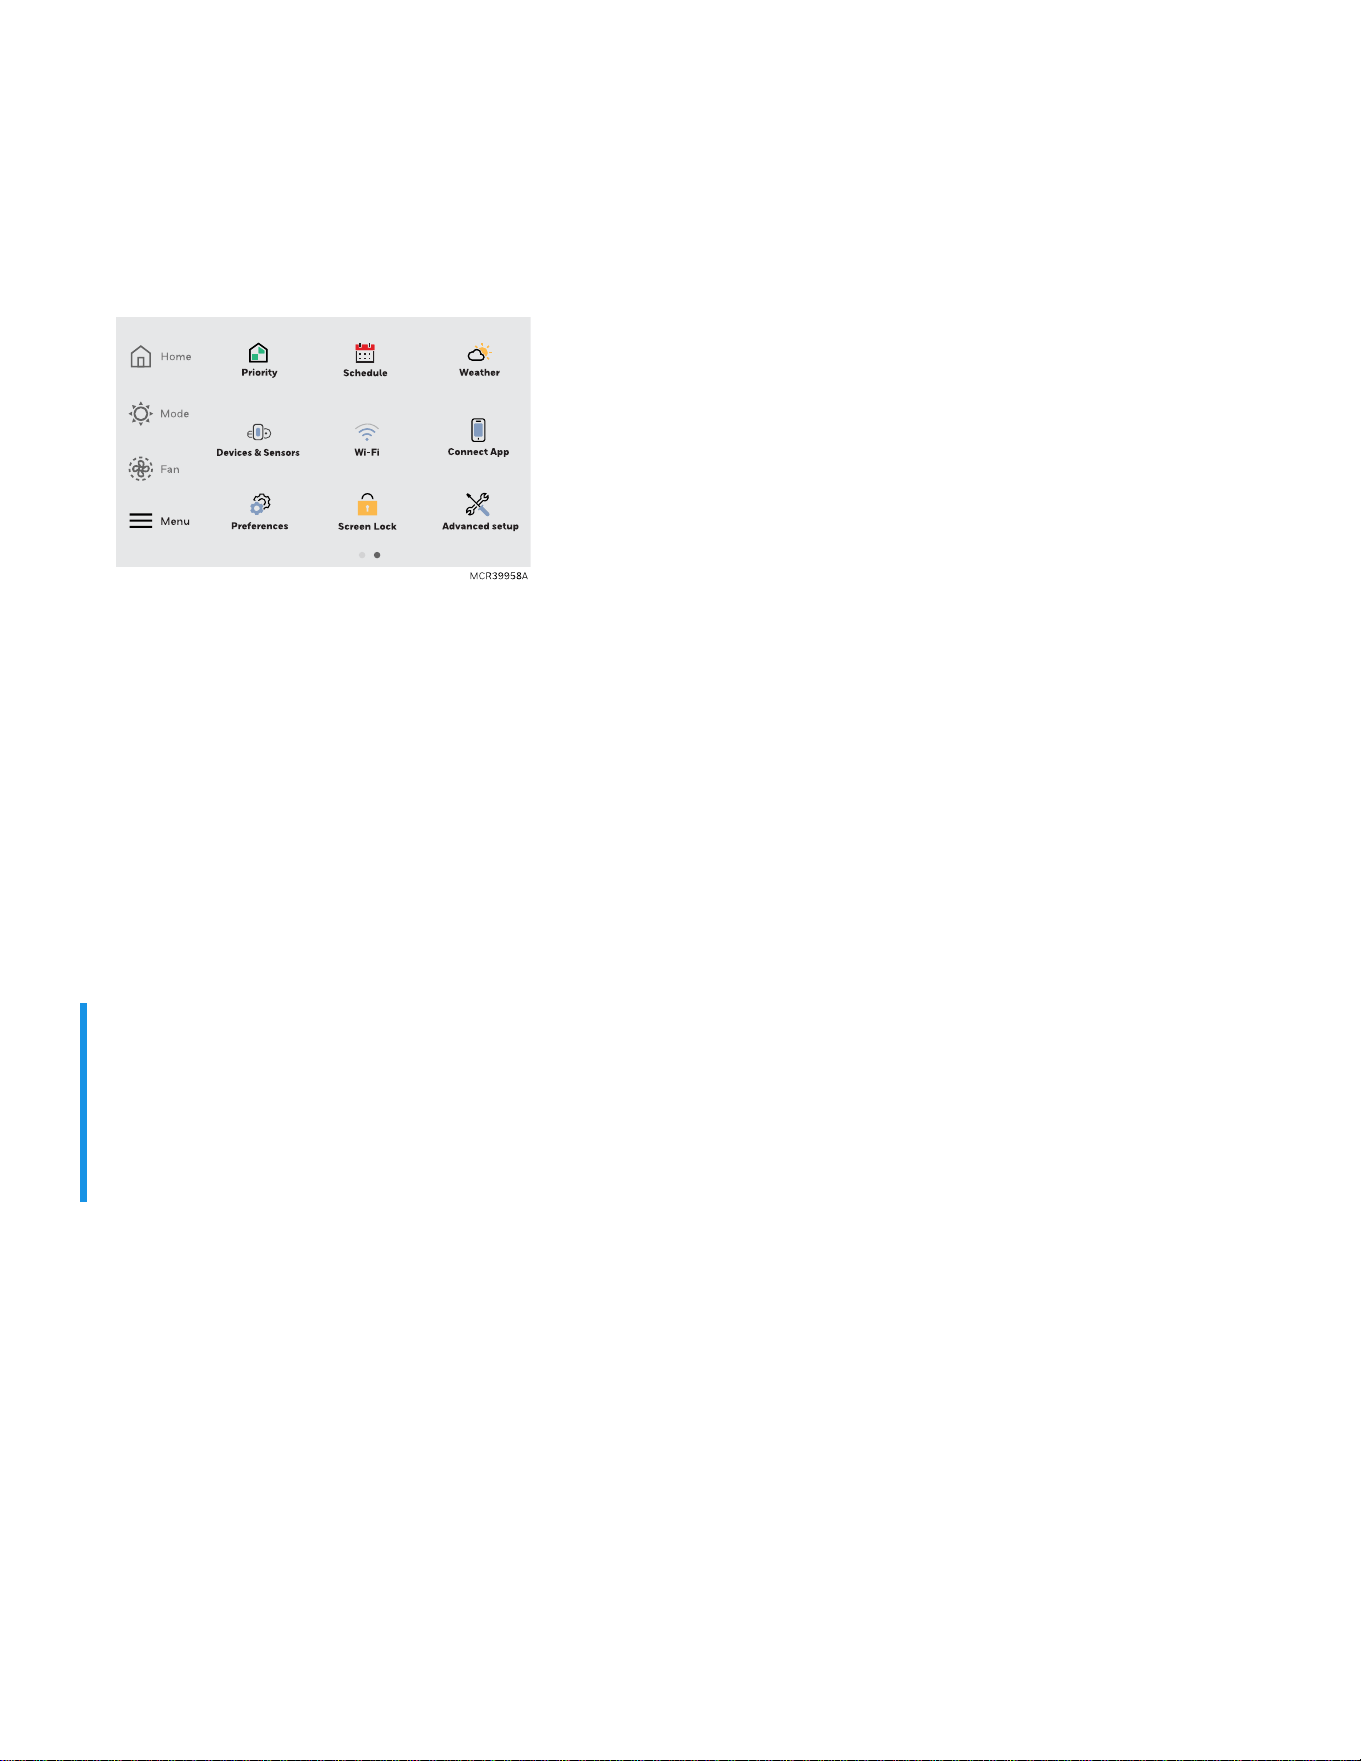
WiFi Setup and Troubleshooting
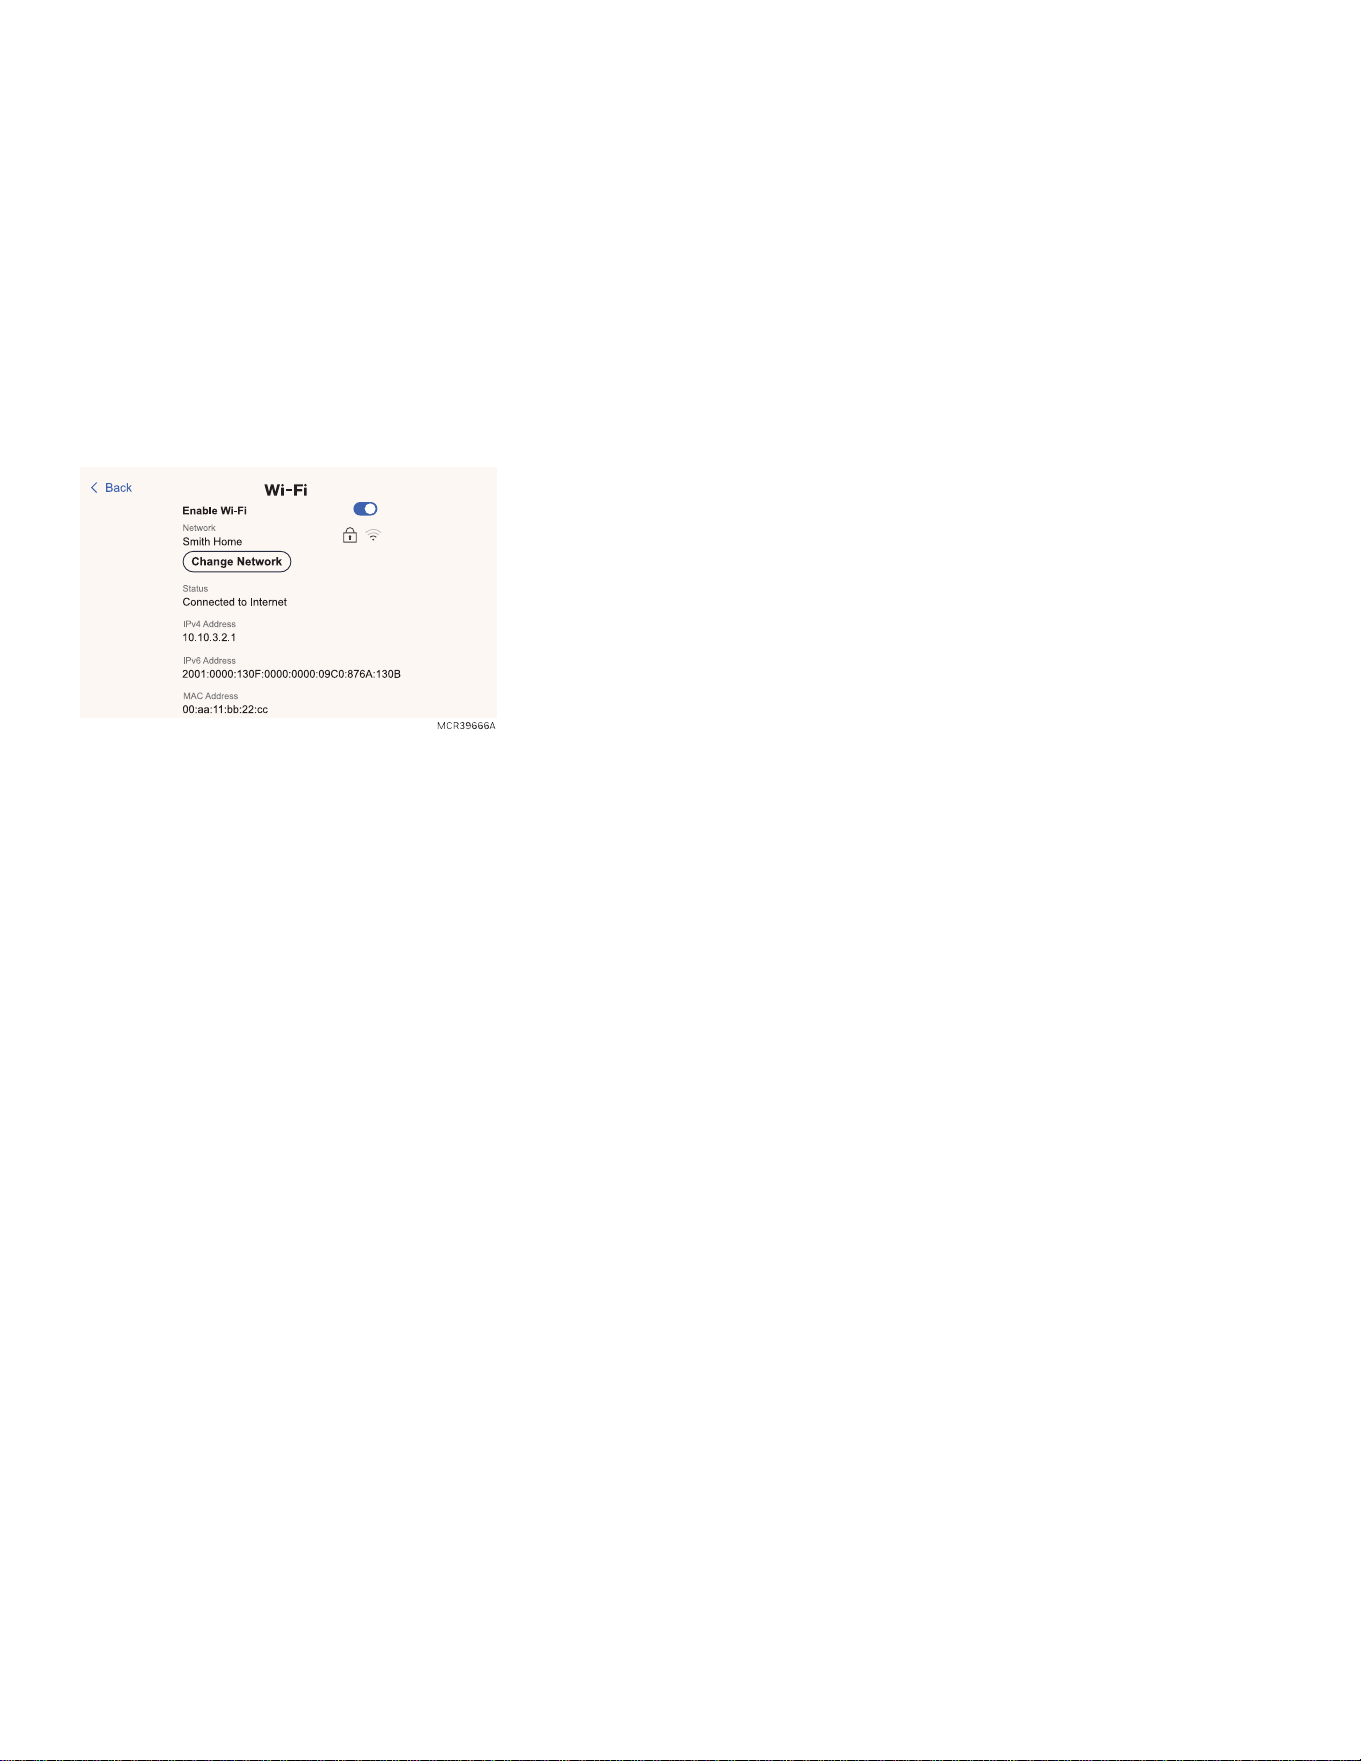
During the initial installation, after the Installer setup, the thermostat will prompt you to set up WiFi and guide
you through the steps. If you are setting up WiFi after the initial installation has already been done, follow the
steps below:
1. Download the First Alert App. Create an account if you do not already have one.
2. On the thermostat, touch the Menu icon in the lower-left corner of the display.
3. Then select Connect App.
4. On the app, touch the plus icon to add a thermostat to your First Alert account and follow the instructions.
Changing the Wi-Fi network or removing the thermostat from a network:
1. Select the Main Menu icon, then select WiFi.
2. There is a slider labeled “Enable WiFi”. Make sure this is set to the right.
3. Touch Choose Network.
4. After a brief delay, the thermostat should show the available networks. Choose your home network from the
list.
5. If this is a secure network, it should prompt you to “Enter WiFi password”. After a brief delay the display
should show “Success! Your thermostat successfully connected to the network.” Touch the OK button.
NOTE:
If you did not successfully connect to the network:
1. Download the First Alert App from the App store or Google Play.
2. Create an account if you do not already have one. The choose "Add Device" and follow the app
instructions to add the thermostat to your account.
Connect to a Hidden WiFi Network
1. Touch MENU, then WiFi.
2. Touch Other.
3. Enter the network name.
4. Select the appropriate network security setting, then touch Select.
5. Enter the WiFi network password.
Unsuccessful WiFi Connection
If you are unsuccessful in connecting the thermostat to the WiFi network, you will see a Connection Failed
screen. Here are three specific reasons the connection might be unsuccessful.
29
Invalid Password
The password you entered is invalid. Check that you have the right password and try again.
No IP Address
The thermostat was unable to obtain an IP address from the router. Verify the router is correctly set up to
automatically assign IP addresses. This connection can take several minutes. If there is still no connection,
remove the thermostat from the wall plate for 10 seconds, then snap it back into place.
No Internet Link
The thermostat connected to the WiFi network but was unable to establish a connection to the internet. Check
the router settings and try again. Make sure the Ethernet cable is plugged into the router and try rebooting the
router if necessary.
WiFi and App FAQs & Troubleshooting:
Q: Will the thermostat still work if the WiFi connection is lost?
A: Yes, you can still manually adjust the temperature at the thermostat. However, some features such as
location-based temperature control (Auto-Away using geofencing technology) can only be managed through
the First Alert App and will not function without a WiFi connection. The thermostat will automatically reconnect
to WiFi once the network is restored.
Q: Is there a way to extend the strength of my WiFi signal?
A: The range (distance) of your WiFi signal is determined by your router. Try moving your router closer to the
location of the thermostat, or use a router with a stronger signal range.
Q: There’s an alert that says “WiFi signal lost” - what should I do?
A: Cycle power to the thermostat. This can be done with the switch on the side of the furnace, at the furnace
breaker or by removing the thermostat from wall plate and then reattaching after 10 seconds or more. Wait 5
minutes for the thermostat to reconnect or select an alternate network (if you have one) in the First Alert App
configuration menu. If the thermostat isn’t able to reconnect, you’ll need to troubleshoot the router to
determine the cause.
Q: The thermostat or app is showing "Datasync". What should I do?
A: Remove the thermostat from wall plate, wait 30 seconds, then reattach it. If the issue persists, unregister and
re-register the thermostat by deleting the thermostat from the app, then tap Add new device to reconnect it. In
the unlikely event that this doesn't resolve the issue, connect the thermostat to a hotspot or alternate network
for 24 hours, then perform a WiFi reset and reconnect it to your home network.
First Alert account and app questions
Q: Why haven’t I received an account activation email?
30

A: If you haven’t received an activation email within 5 minutes, check your Spam folder for a message from
customer-service@resideo.com. If you don’t see it, tap Resend to have the activation email sent again. If you still
don’t receive it, please contact the Technical Support team at 1-800-633-3991.
Q: Can I set up my thermostat with multiple users?
A: Yes. To add users, log into the First Alert App and tap the menu icon in the upper left corner. Select Users, tap
Invite Users and type in the email addresses of the people you’d like to invite. If they already have a First Alert
account set up, the thermostat and its location will automatically be added to their account. If they don’t have
an account, they’ll receive an email prompting them to download the First Alert App and create a new account.
Q: Can I set up location-based temperature control with multiple users?
A: Yes. Location-based temperature control (Auto-Away / geofence technology) will activate based on the last
person who leaves and the first person to return. Each user will need to create their own First Alert account with
a login ID and password. Two users should not share the same account. Each user will then need to enable
location-based temperature control.
Q: Why doesn’t a change I made in the app show up on the thermostat?
A: There may be a short delay when you make temperature and settings changes in the First Alert App. Wait a
few minutes, and if you still don’t see your changes on the thermostat, make sure the thermostat is still
connected to WiFi and restart your First Alert App.
31

Main Menu
From Home Screen, touch the Menu at bottom left of the display. (If this is not shown at home screen, touch
screen to wake display first).
Main Menu Options
WiFi
See "WiFi Setup and Troubleshooting" on page29 for more information
Schedule
l
Create new schedule – (Set a time-based schedule).
l
Turn Off Schedule.
NOTE:
To enable Auto-Away / Geofencing, use the First Alert App.
See "Scheduling and Auto-Away" on page39 for more information.
Connect App
See "Using the First Alert App" on page50 for more information.
Screen Lock
See "Screen Lock setting" on page51 for more information.
Preferences
Preference menu options let you select how the thermostat displays information or responds to certain
situations.
To access the Preferences menu:
l
Touch Menu.
l
Scroll to and select Preferences.
l
Select an option and follow prompts.
l
After any changes, touch Save to save your settings.
Preferences Options
l
Date & Time
l
Display
l
Reminder settings
l
Adaptive Recovery
l
Fallback Room (if wireless sensors are used)
l
Temperature Limits
l
Freeze Protection
Display Settings
l
Idle Screen (See "Idle Screen" on page46)
o
Choose Idle Screen color and Style
32

l
Idle Screen Behavior (Option not shown for X7B)
o
Transition on detection
o
Transition on Tap
l
Temperature Units
o
Farenheit
o
Celsius
l
Language
o
English
o
Francais
o
Español
l
Feels Like Temperature (Takes humidity in account to optimize comfort. See "Feels like Temperature" on page
52)
o
On
o
Off
l
App Change Behavior (Light up when temperature change is made by app)
o
On
o
Off
l
Indoor Display Offsets
o
Temperature -3°F to 3°F or -1.5°C to 1.5°C
o
Humidity 12% RH to 12% RH
l
Clean Screen
o
Timer where display will not change settings when being cleaned.
Reminder Settings (Settings shown vary based on Setup settings)
l
Air Filter 1
l
Humidifier Tank/Water Filter
l
Humidifier Pad
l
Dehumidifier Filter
l
UV Bulb 1
l
UV Bulb 2
Adaptive Recovery
l
On
l
Off
Fallback room
l
Thermostat
l
The name of each wireless sensor used is shown below thermostat
33

Devices and Sensors (X7B doesn't have this setting)
l
Add a wireless sensor. (X7S only)
l
Identify a wireless sensor.
l
Thermostat:
o
Model
o
Temperature & humidity readings
o
Motion detected status (not shown for X7B)
o
WiFi network
o
MAC ID
o
IPV54 address
o
Change room name
l
Indoor Air Sensor:
o
Firmware version
o
Battery strength
o
Wireless signal strength
o
Temperature and Humidity readings
o
Options:
n
Rename sensor (select Room name).
n
Use motion (Allows you to choose not to allow motion to be used from a one or more sensors when “active
rooms” is selected in the priority menu.
n
Motion Sensitivity (HIGH = Triggered when very little motion is detected, MEDIUM = triggered when a
moderate amount of motion is detected, LOW = triggered only when a lot of motion is detected).
n
Delete (Removes that sensor from the thermostat).
n
Blink lights (Will make the light on the indoor sensor you selected blink to help identify which sensor is
matched with each name in the sensor menu.)
Thermostat Information
l
MACAddress
l
IP Address
l
Date Code
l
Firmware Version
l
Model Number
l
Build Date
Equipment Status
l
System mode
l
Heat stages (on or off)
l
Cool stages (on or off)
l
Fan on or off
Matter
See "Matter Setup" on page5 for more information
34
Notifications
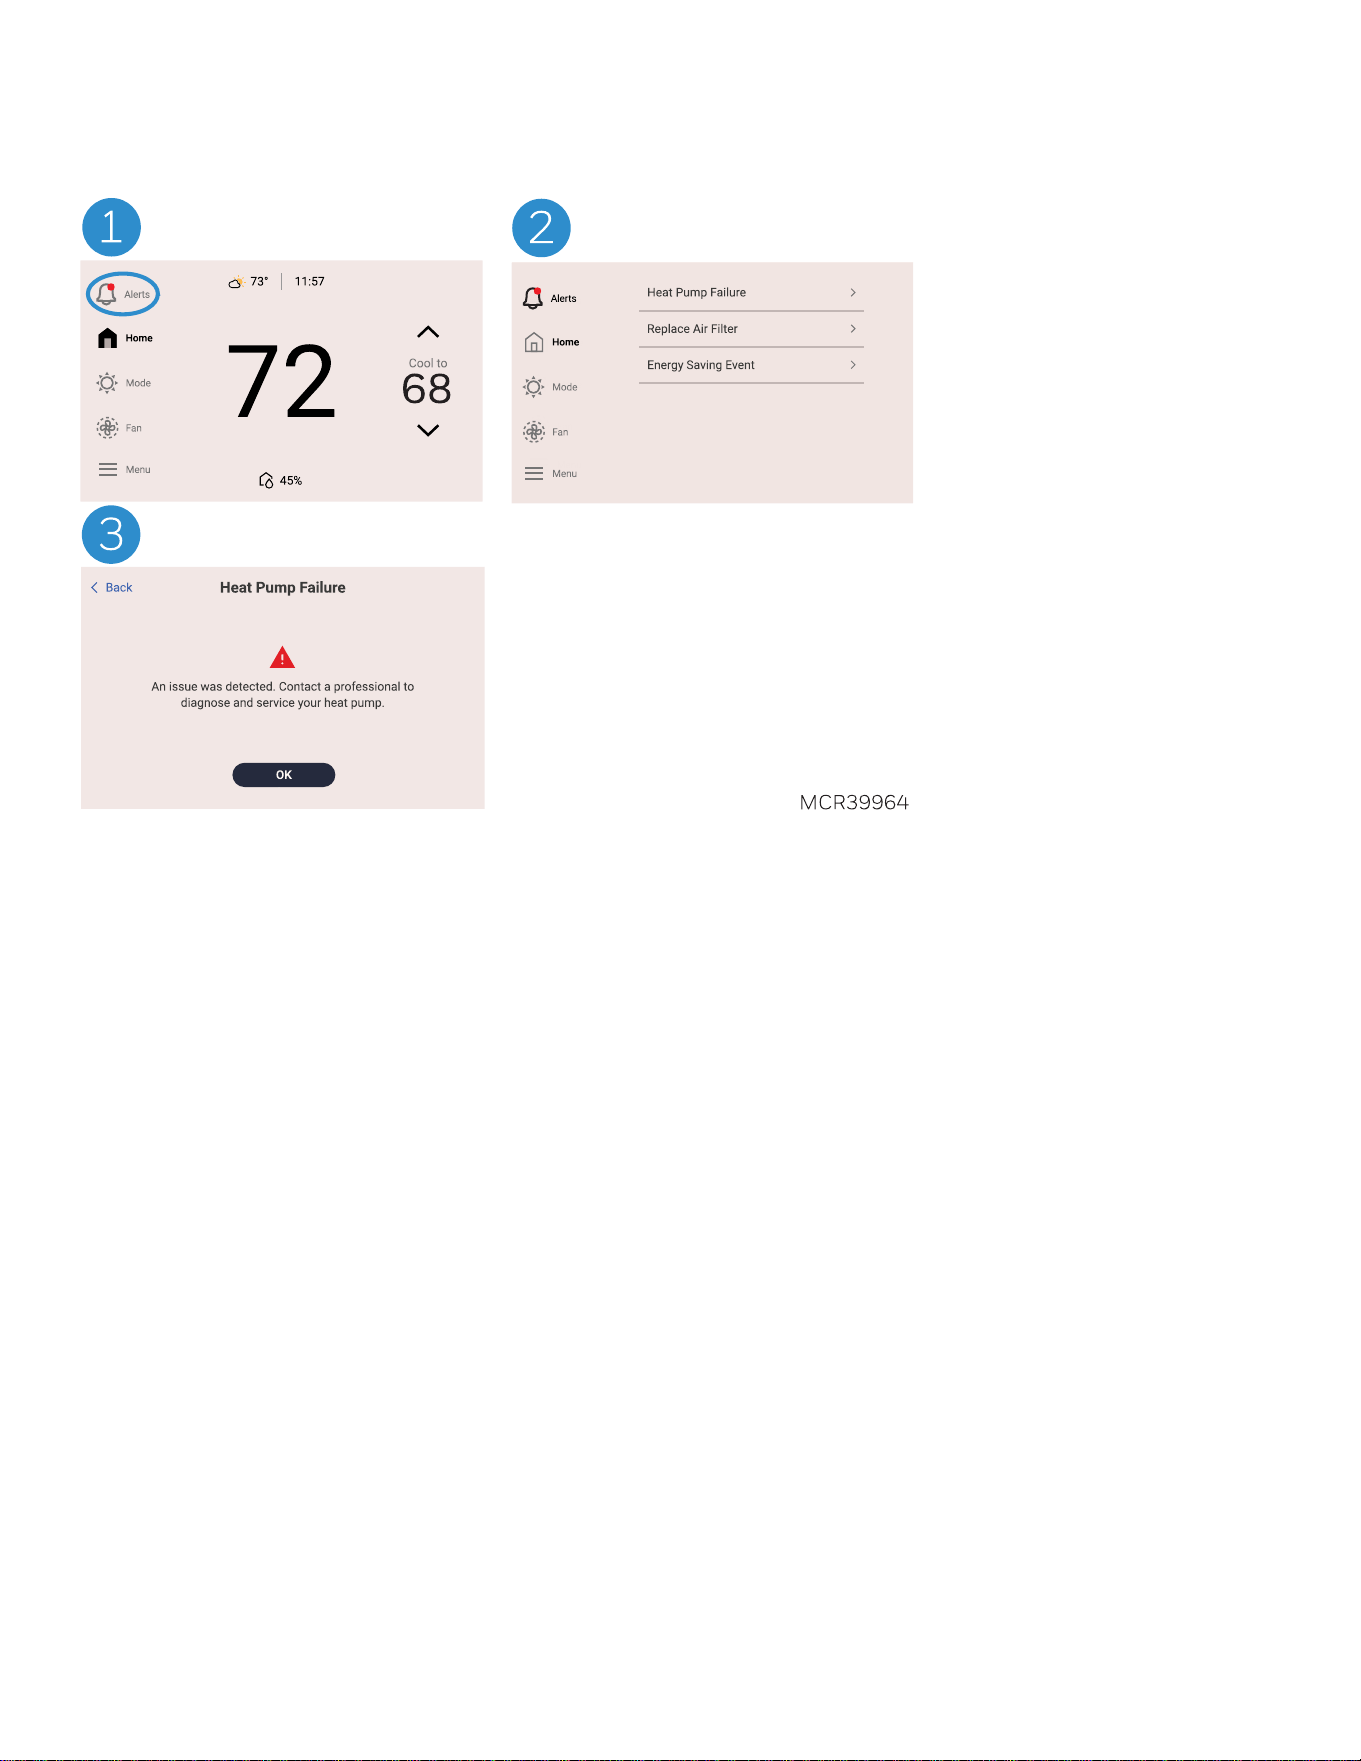
Only displayed when there are active alerts/notifications. Touch Alerts to see details. (See "Alerts and
Reminders" on page37)
Priority
If wireless indoor temperature/humidity/motion sensors are used, select which sensors are used for
temperature control. Choose ACTIVE ROOMS (Rooms with sensors detecting motion) or SELECTED ROOMS
(Manually select which sensors to use).
See "Using Priority" on page45 for more information.
.
35

Set Time and Date
NOTE:
If Wi-Fi is connected, the thermostat will automatically set the time and date using internet sync. Manual
adjustments will not be available while connected.
To check or adjust time and date settings:
1. Touch MENU on the thermostat.
2.
Select Preferences > Date &Time.
If Wi-Fi is not enabled, you will be able to set the time and date manually.
System Mode and Fan Settings
Setting the System Mode
l
Touch Mode.
l
Touch desired option.
l
Heat: Controls only the heating system.
l
Cool: Controls only the cooling system.
l
Off: Heating/cooling systems are off.
l
Auto: Selects heating or cooling depending on the indoor temperature.
l
Em Heat (heat pumps with Aux. Heat): Controls emergency heat. Compressor is locked out.
NOTE:
Mode settings may vary, depending on how your system type and installer settings.
Setting the Fan
NOTE:
Fan setting not available for all system types.
l
Touch Fan.
l
Choose On, Auto, or Circulate:
o
Auto setting only runs the fan with the heating or cooling system.
o
On setting runs the fan continuously.
o
Circ setting runs the fan approx 33% of the time to ensure air circulation.
Programming the Fan
You can set the fan to On, Auto, or Circ for each program when using time-based scheduling.
36
Alerts and Reminders
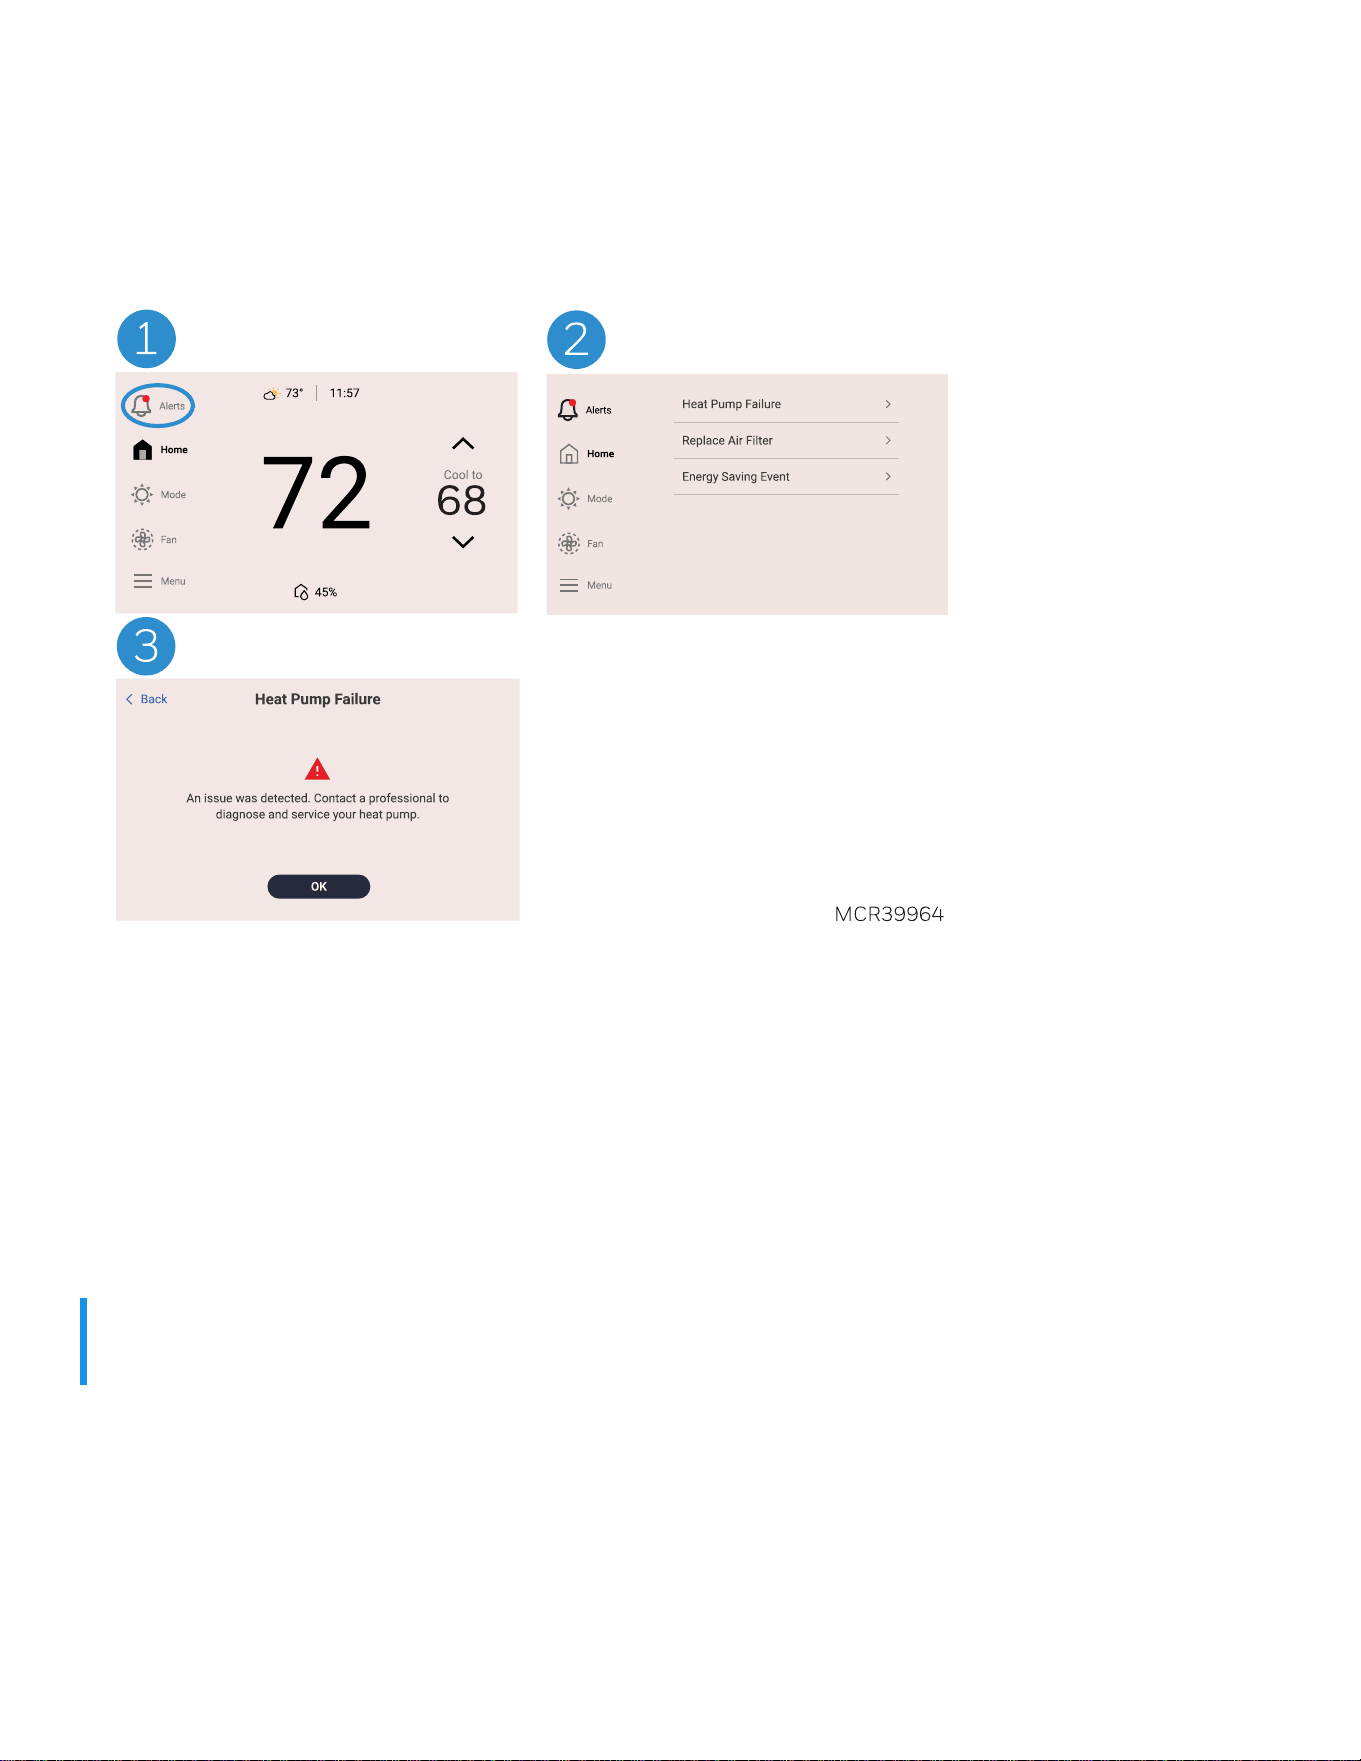
1. The Alerts icon will appear in the upper left of the active home screen when there is an active alert or
notification. Touch the ALERTS icon to view active Alerts & Reminders.
2. Touch the alert or reminder heading to see more information about the alert.
3. Acknowledge the alert or reminder. Reminders will allow you to reset the timer. Less critical Alerts and
notifications may allow options to snooze or dismiss.
IAQ Reminders
You can set up IAQ reminders in the thermostat to remind users when filters, pads, bulbs, etc. need cleaning or
replacement.
l
Air Filter 1
l
Humidifier Pad
l
Dehumidifier Filter
l
UV Bulb 1
l
UV Bulb 2
NOTE:
Reminders are displayed under Preferences>Reminder Settings
To access or adjust the reminder settings
l
Select the Menu icon.
l
Scroll to and select Preferences >Reminder Settings.
l
Select the reminder you want to set from the list (shown above).
l
Touch 5or 6to set timer length. Ranges, increments and units will change based on the reminder.
37

l
Touch Save to save the reminder.
l
Touch Reset Timer when you have completed the recommended maintenance or you can extend the timer
setting to turn off the alert and remind you later to do the recommended maintenance.
l
Repeat these steps for all reminders you want to set
NOTE:
When set for run time days, the thermostat tracks the amount of time the fan has run and compares that
time against the number of run time days selected. Fan run time is counted when there is a call for forced
air heating, cooling, or fan.
38
Scheduling and Auto-Away
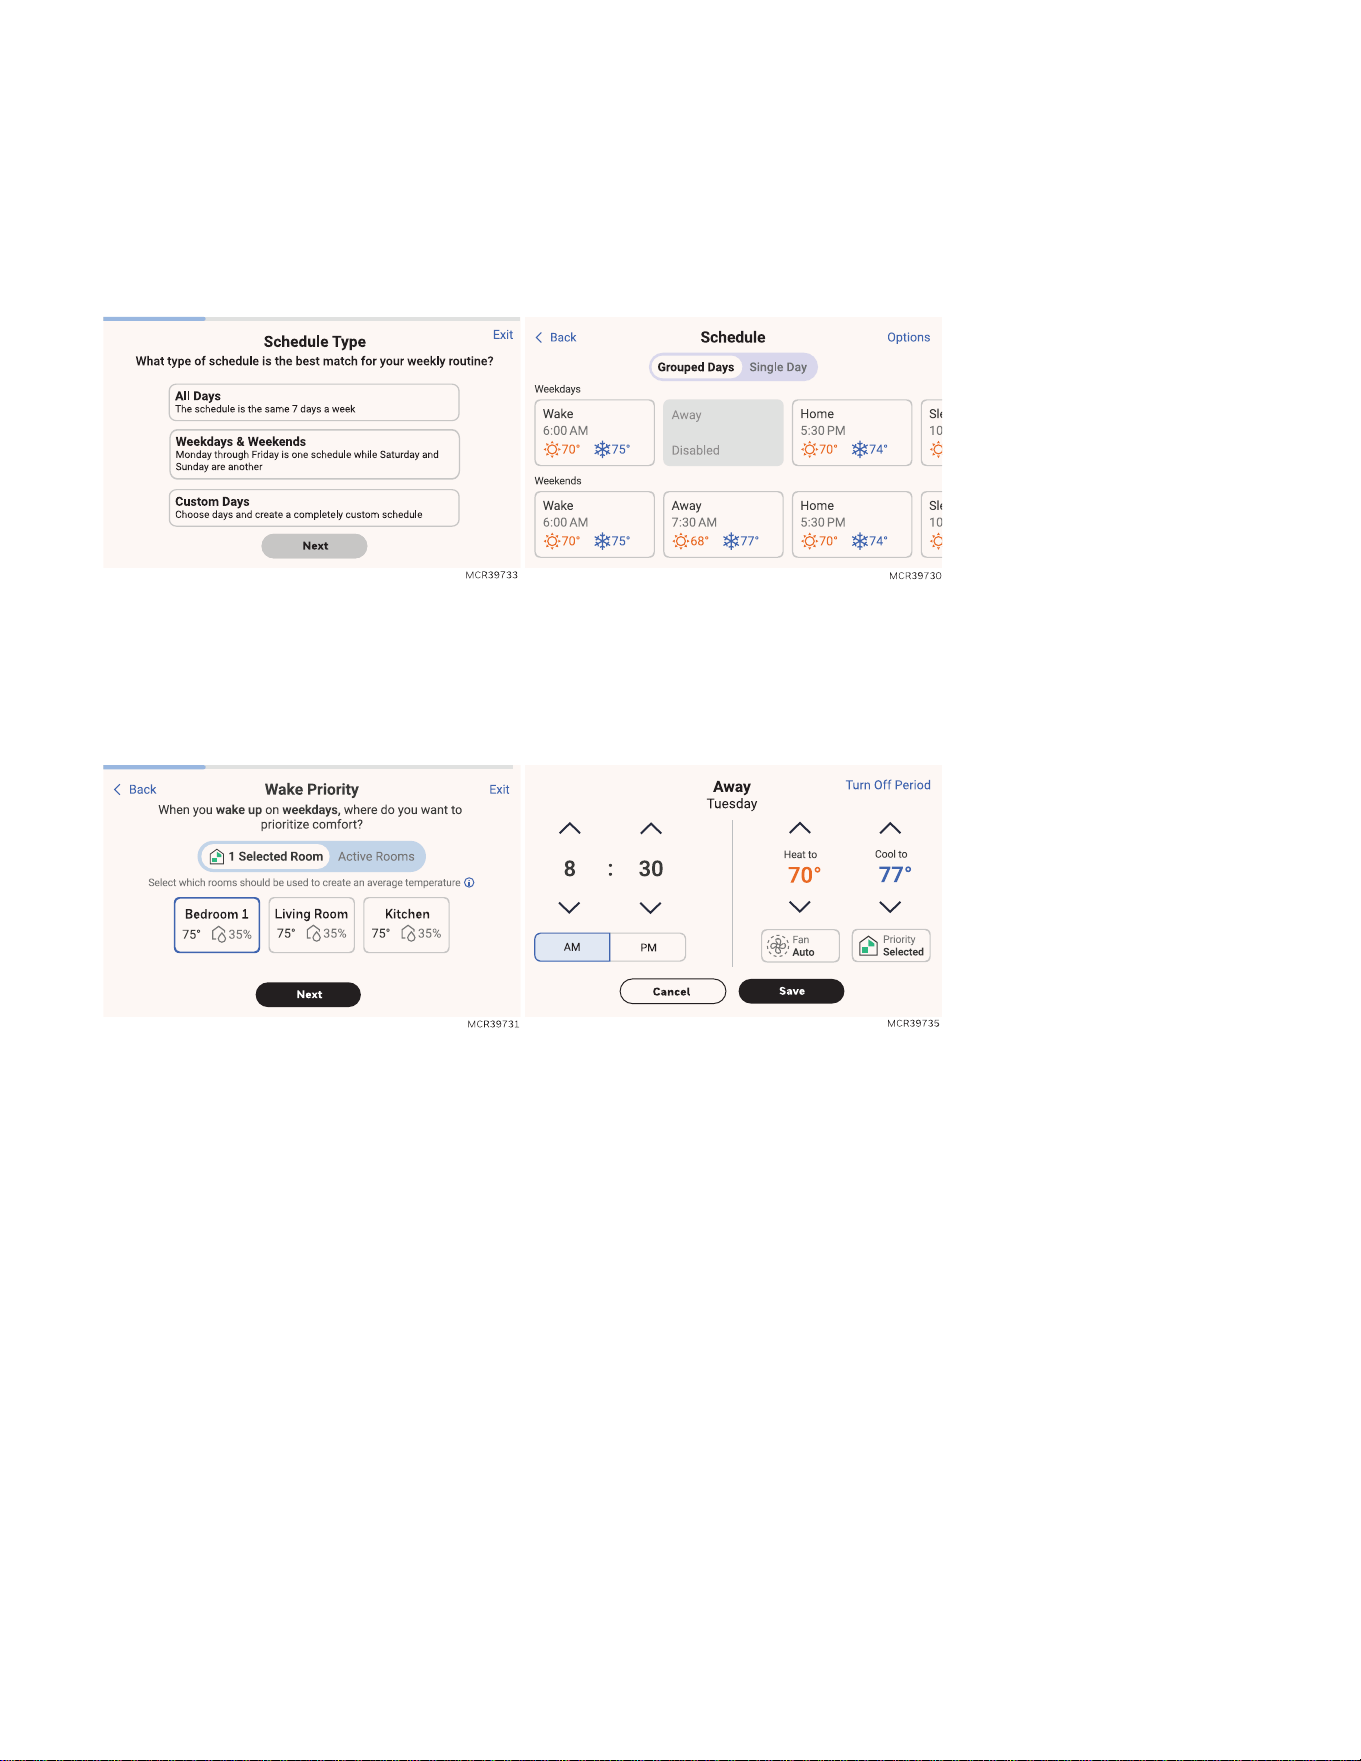
Setting a Schedule On the Thermostat
Touch the Menu icon at the bottom of the home screen display. Then touch Schedule.
l
The schedule menu lets you group days or set days individually.
l
After choosing the schedule type, Touch the period you wish to edit (Wake, Away, Home or Sleep)
l
Touch Time to edit the time for that schedule period.
l
Touch Priority to select which sensors will be used for that period. (X7B does not have this setting)
l
Touch Temperature to set the Heat and Cool setpoints for that period.
l
Touch Fan to select Fan On, Auto, or Circulate for that period
Scheduling Through the App and Auto-Away (App images are subject to change)
Flexible scheduling: You can choose to use location-based temperature control (Auto-Away / geofence
technology), time-based scheduling, or use a combination of both to make sure your home is always
comfortable.
l
Location-based temperature control: Using Auto-Away/Geofencing technology, the thermostat will
automatically use your smartphone’s location, which can save energy when you leave and make your home
comfortable by the time you return.
l
Smart scheduling: Adds a Sleep period to location-based temperature control.
l
Time-based scheduling: You can program a schedule where every day is different, a schedule where
weekdays and weekends are different, or a schedule where every day is the same. There are four adjustable
periods per day: Wake, Away, Home, and Sleep.
l
No schedule: You can also choose not to set a schedule and adjust the thermostat manually.
l
Sensor Priority: Select which sensors are used for each program period or when used manually. (X7B does
not have this setting)
39
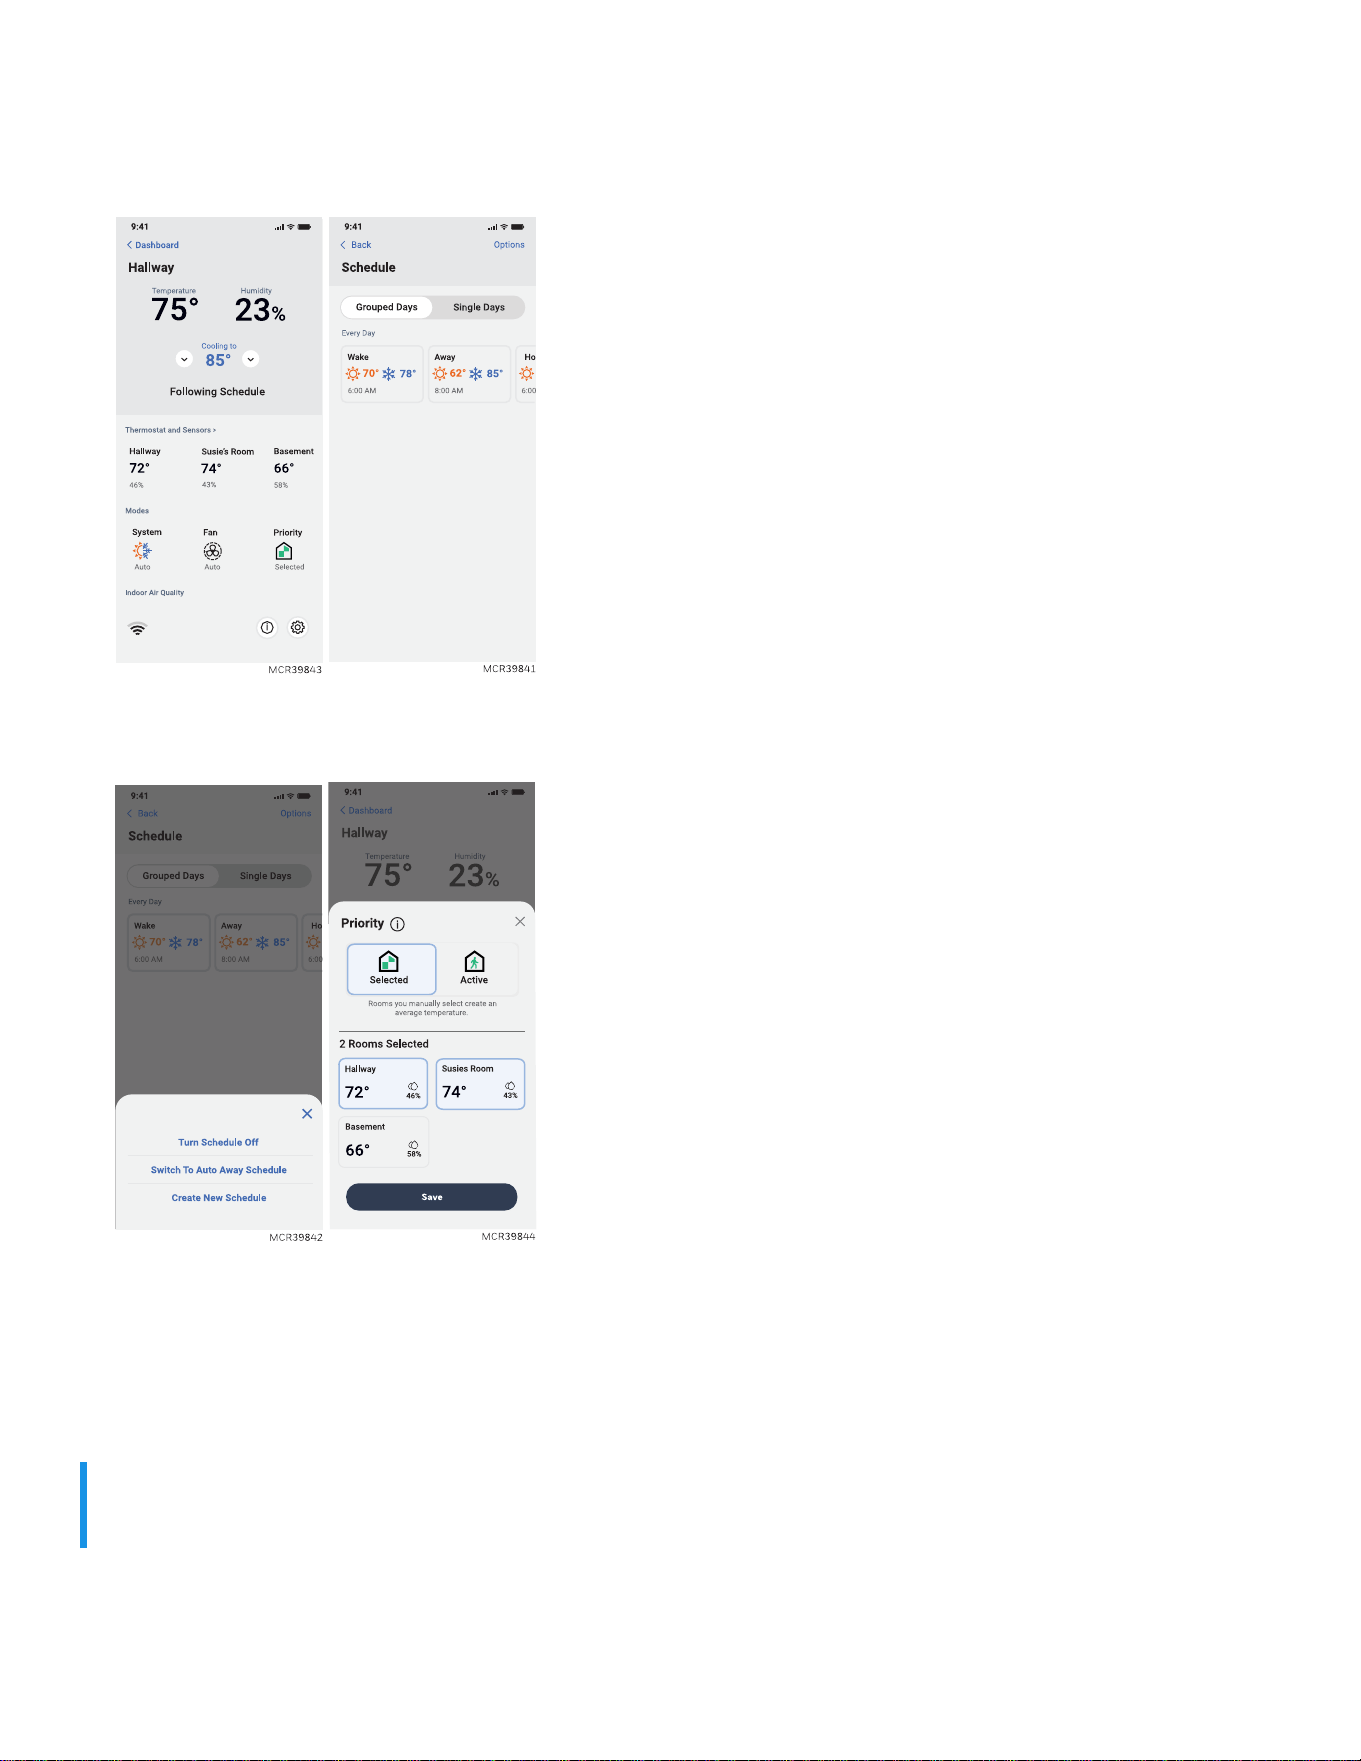
1. In the First Alert App, select the thermostat you wish to schedule. Touch the Calendar icon in the lower right
of the display.
2. Select Grouped Days for all days the same or Single day if you want some days to be scheduled different
than others.
3. Select Options to turn schedule off, create a new time-based schedule, or switch to Auto-Away/Geofencing.
4. Set priority sensor(s) for each program (X7B does not have this setting):
Location-Based Scheduling
When location-based temperature control is used, the thermostat active home screen display will show Using
Home settings, Using Away settings, or Using Sleep settings below the room temperature.
If you manually change the temperature when location-based temperature control is active, the new
temperature will remain in effect until you cross the geofence.
NOTE:
To utilize Auto-Away (Geofencing), set the schedule through the app.
40
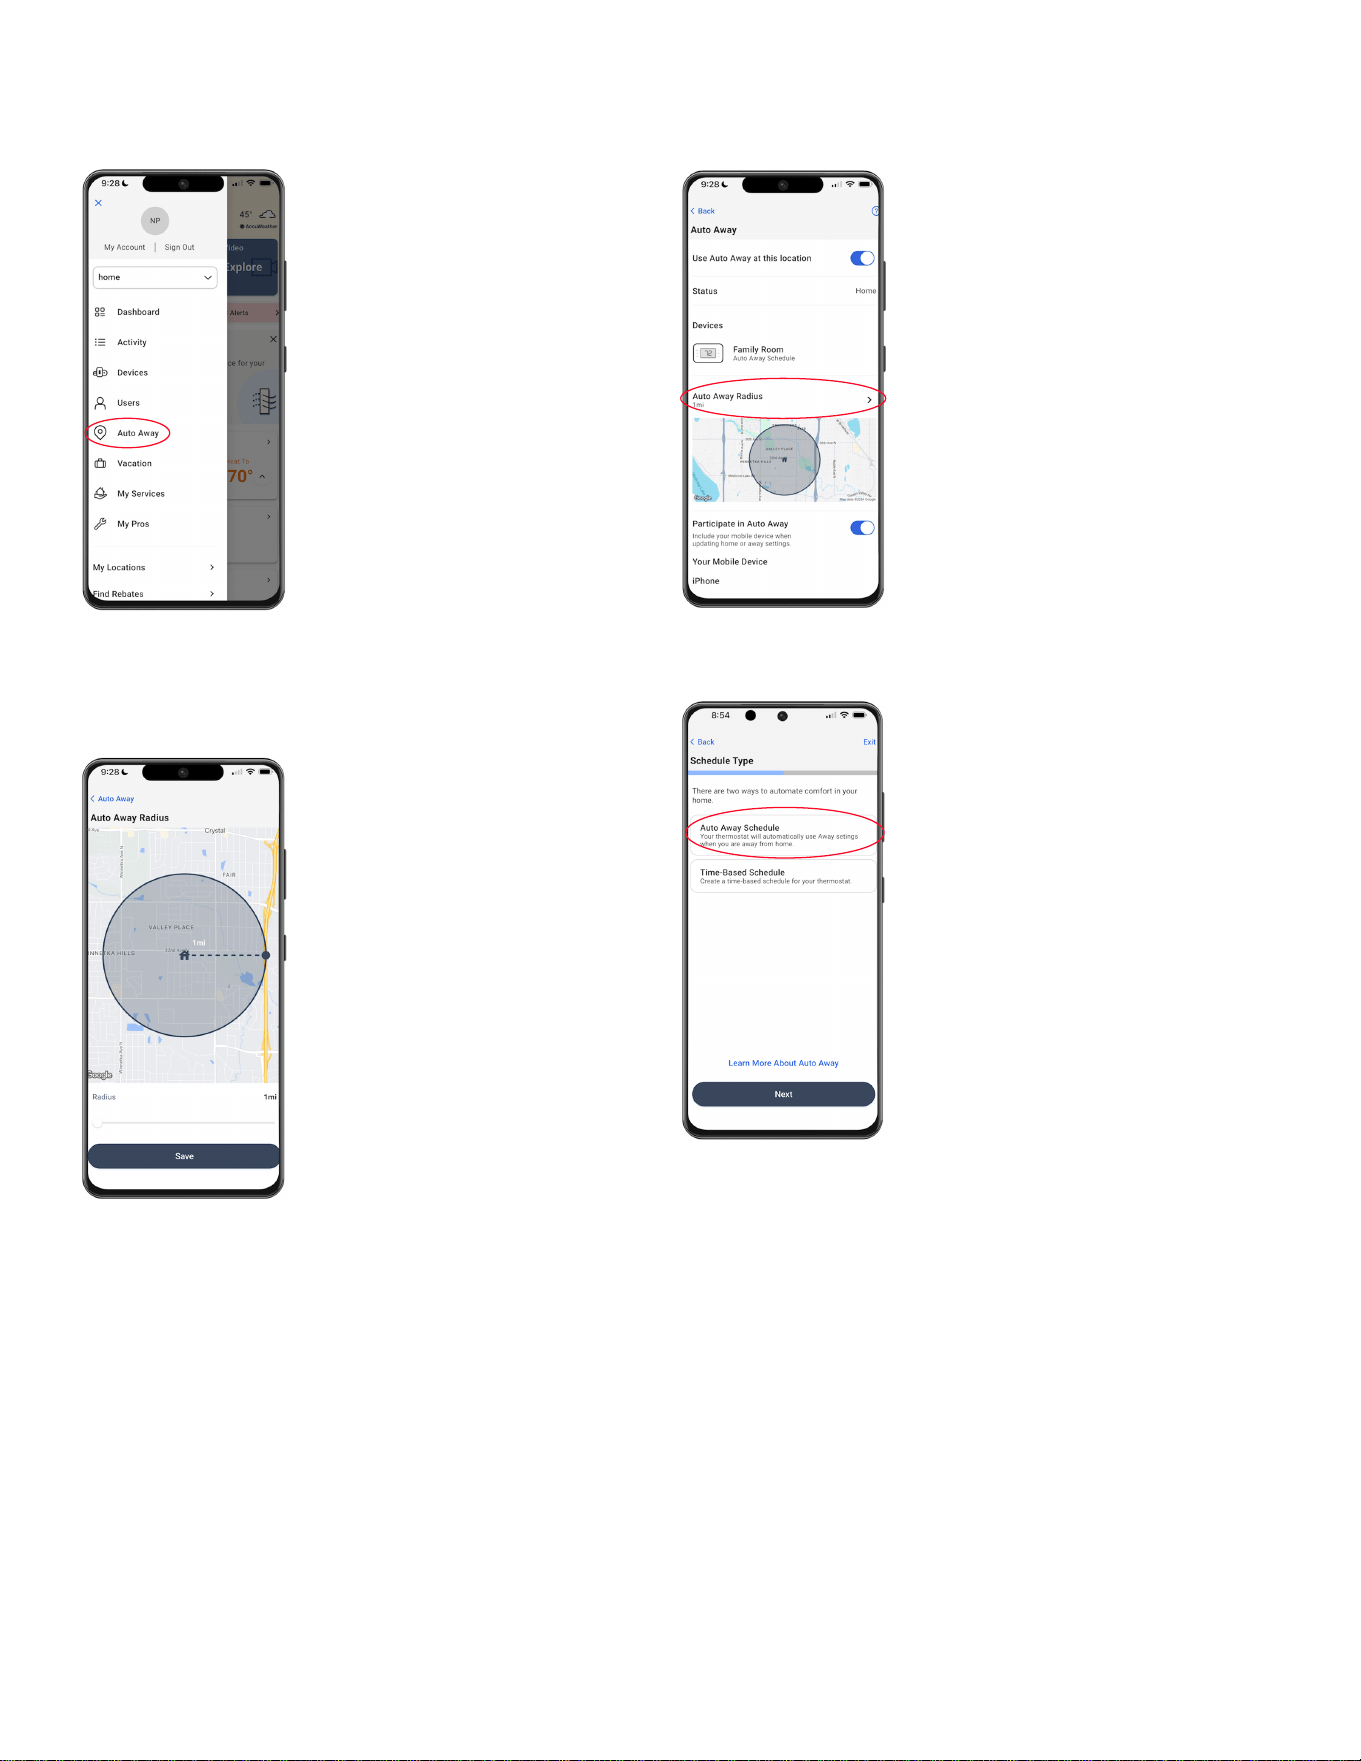
Auto-Away Scheduling
1. Select Auto Away. 2. Set Auto Away Radius.
3. Drag edge of radius to expand.
This determines how far away from the home all
occupants phones should be to trigger away settings.
4. Set Auto Away Schedule.
41
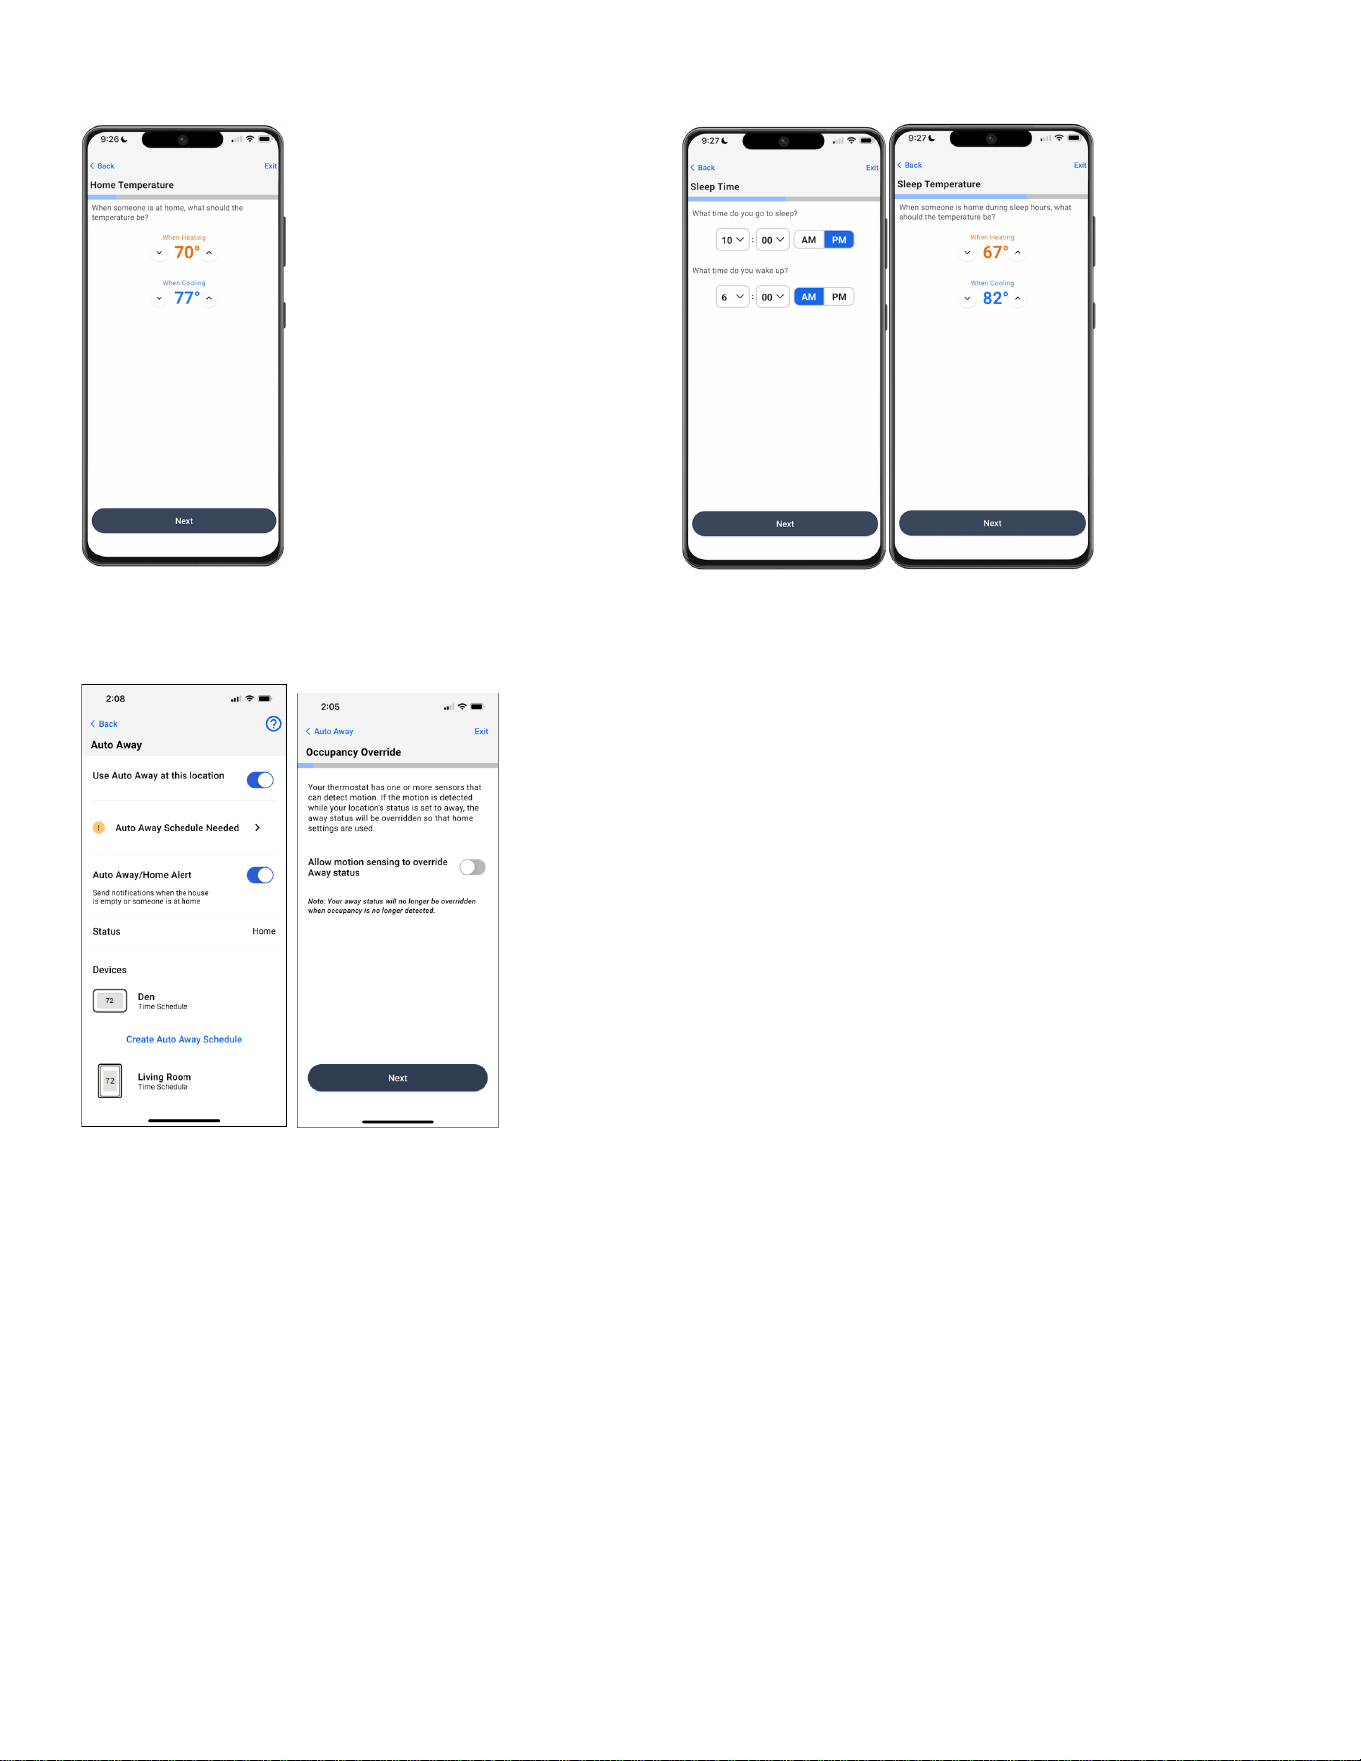
5. Set Home and Away Settings. 6. Set the Sleep Period Time and Temperatures.
When the thermostat is set for auto away, the user can enable motion sensing to override the away status for
thermostats that have an onboard radar sensor and/or are used with wireless indoor sensors. See below.
Schedule Override on Device
With thermostat in Heat, Cool, Auto, or Em Heat mode, touch the up or down arrow to change the set-point. If
thermostat is in Auto mode, select either the Heat or Cool set-point you wish to adjust.
If scheduling is enabled, you'll see Hold until [time] at the bottom of the screen — touch this option.
The display will show: "Use current temperature, fan, and comfort priority settings until…"
Options are:
l
Next Period
l
A Specific Time
l
Permanently
l
Remove hold
Choose the appropriate option. If you chose A Specific time, select the time you want to hold to.
Touch Save to return to Home screen.
42
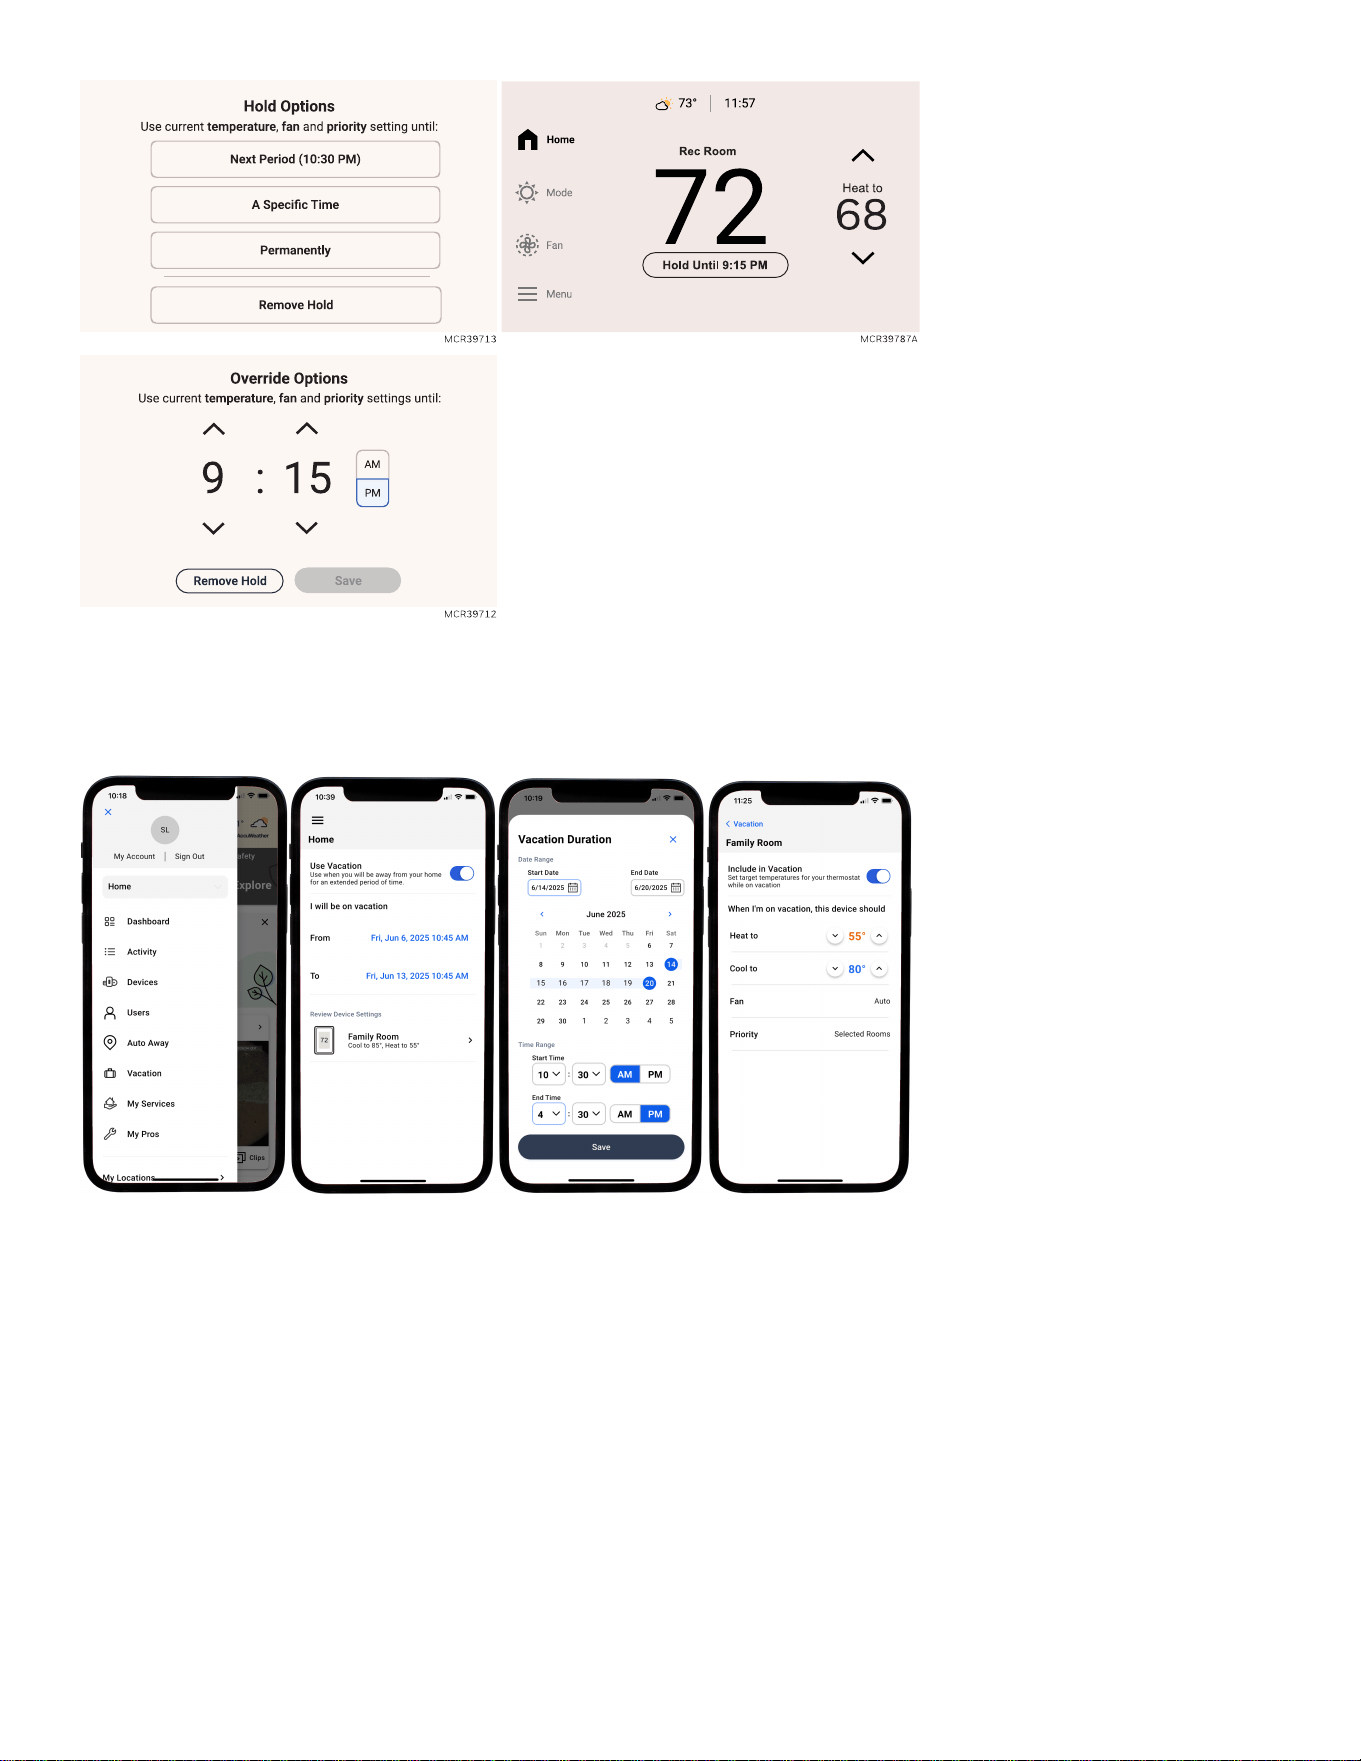
Vacation Hold
Set a vacation hold time on the First Alert app and the home thermostat(s) will save you money while on
vacation.
Fan Scheduling
If scheduling is used, there is a fan setting associated with each schedule period.
Example: the Sleep schedule period may be set to fan auto. If you change the fan setting from the home screen
during an earlier period, the setting will go back to auto at the sleep schedule period.
If you want to change the fan setting and have the new setting be permanent, then make the change to the fan
setting in the schedule settings for each period rather than from the home screen.
43
Getting the Most from the X7S & X7B Smart Thermostats
Multiple programming options that fit your lifestyle:
1. Location-Based scheduling (Auto Away)– The thermostat uses your smartphone’s location
to know when you’re away, and saves you energy. Through geofence technology, it senses
your return and helps make you comfortable upon arrival. You can always manually change
your preset Home and Away temperature either on the thermostat or on the First Alert app.
2. Smart scheduling – Use a combination of geofencing and time scheduling to fit your busy,
active lifestyle.
3. Time-Based scheduling – Program your thermostat for one week; each day (each day is a
different schedule); Mon-Fri, Sat, Sun; or Mon-Fri, Sat-Sun. All days with four adjustable
periods per day.
Smart Alerts. Push notifications remind you of filter changes and warn you of extreme indoor
temperatures.
Adaptive Recovery. Learns your heating and cooling system to deliver the optimal
temperature at the right time.
Auto Change From Heat to Cool. Automatically determine if your home needs heating or
cooling to provide maximum comfort.
Highlights
Wireless indoor sensors
Use wireless indoor sensors with X7S thermostats. Sensors detect temperature, humidity, and PIR. Up to 20
sensors with a 200 foot range.
Prioritize rooms when using wireless indoor sensors (X7S models)
Prioritize a specific room or multiple rooms, or let comfort follow your move using built-in motion detection.
Control on the Go
Adjust your thermostat from anywhere using your tablet or smart phone.
Save Energy
With Auto Away, you can save money on the most expensive part of your energy bill while you’re away.
Know Your Home Is Safe
Get customizable alerts on your mobile device when the basement is so cold a pipe could burst, or if the baby’s
room is getting too hot.
Matter Setup
1. Touch Menu icon at the bottom left of the home screen.
2. Scroll to and select Matter.
44
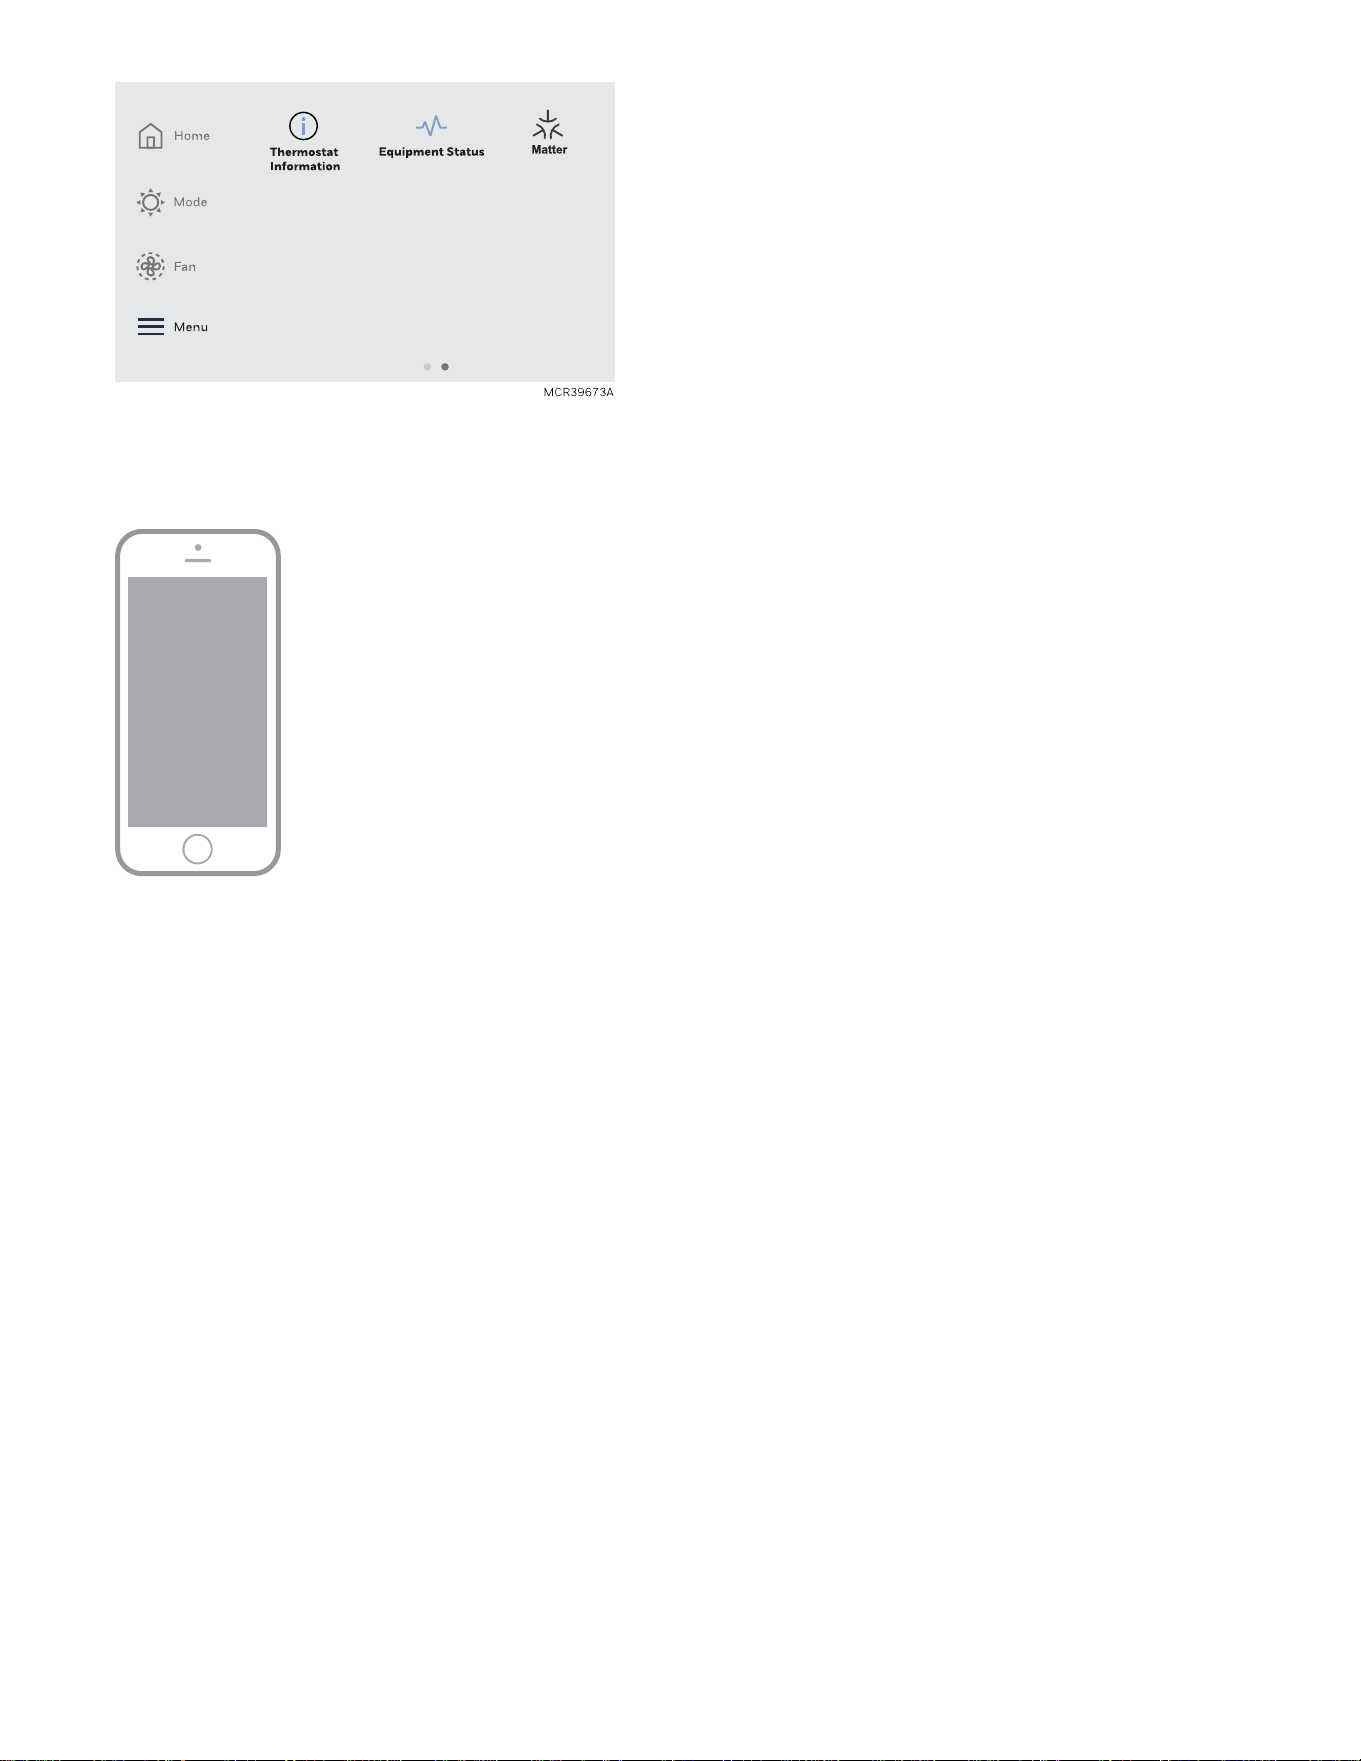
3. Use the smart phone connect to Matter enabled devices by scanning the QR code shown on your
thermostat.
4. Follow the instructions on your phone.
M39091
Using Priority
When wireless indoor sensors are used, the Priority setting creates an average temperature in your home based
on specific rooms. This allows you to prioritize comfort where you want it. To access Priority, touch Menu >
Priority. There are two options to choose from:Selected Rooms and Active Rooms.
Selecting Sensors
The temperature reading displayed on the home screen is from the sensor or sensors that are being used for
temperature control. You can change which sensors are being used for control by selecting menu-priority. From
the home screen, touch Menu icon at the bottom left of the display and select Priority.
Priority Screen
Selected Rooms
When set to “Selected rooms” you may select one or more rooms to read the wireless indoor sensor information
from. When multiple sensors are selected, the temperature is averaged.
45
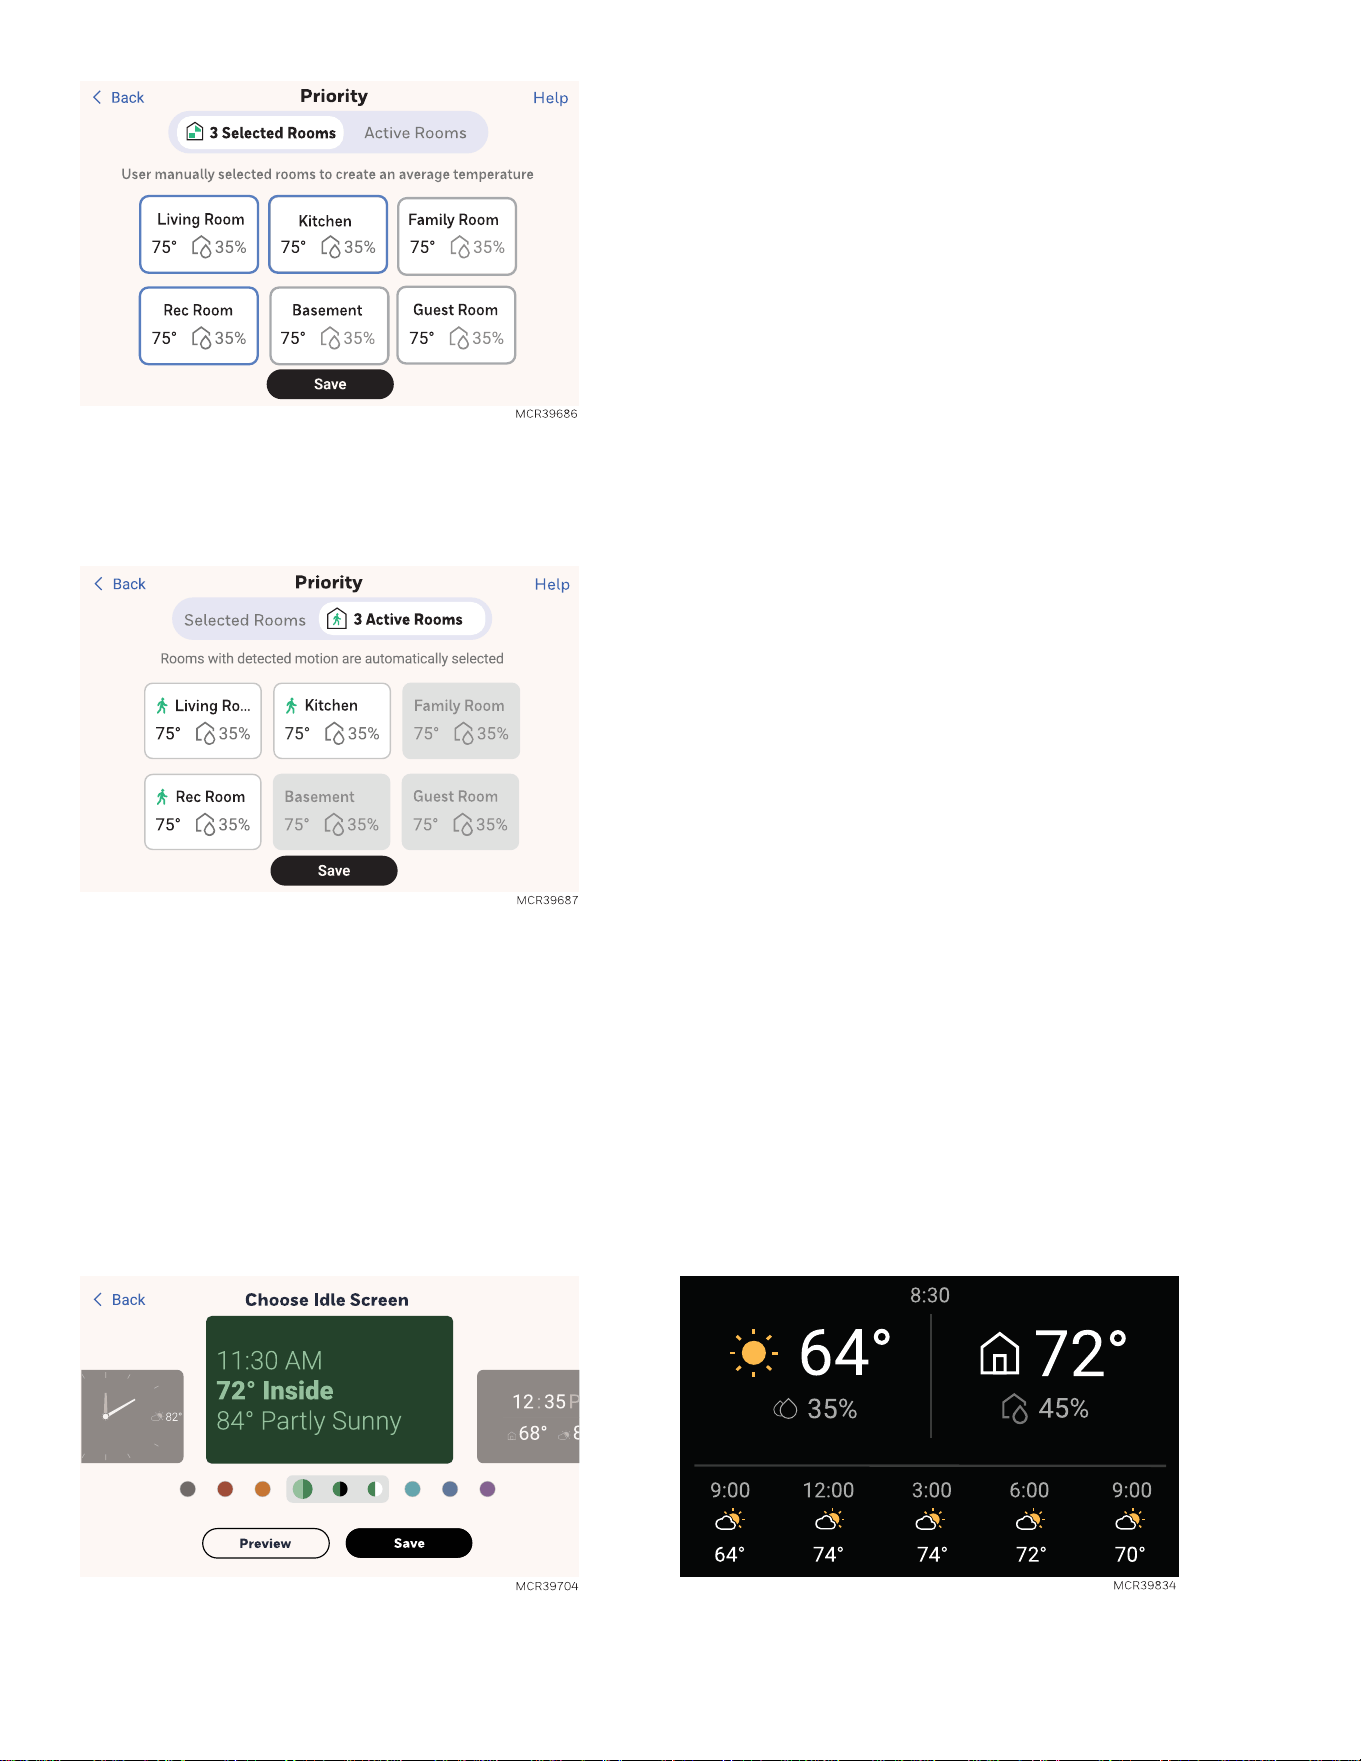
Active Rooms
When set to “Active rooms” the thermostat controls temperature based on the reading from the thermostat
and/or indoor sensors that detect motion.
IAQ Reminders
You can set up IAQ reminders in the thermostat to remind users when filters, pads, bulbs, etc. need cleaning or
replacement.
See "IAQ Reminders" on page37 for more information.
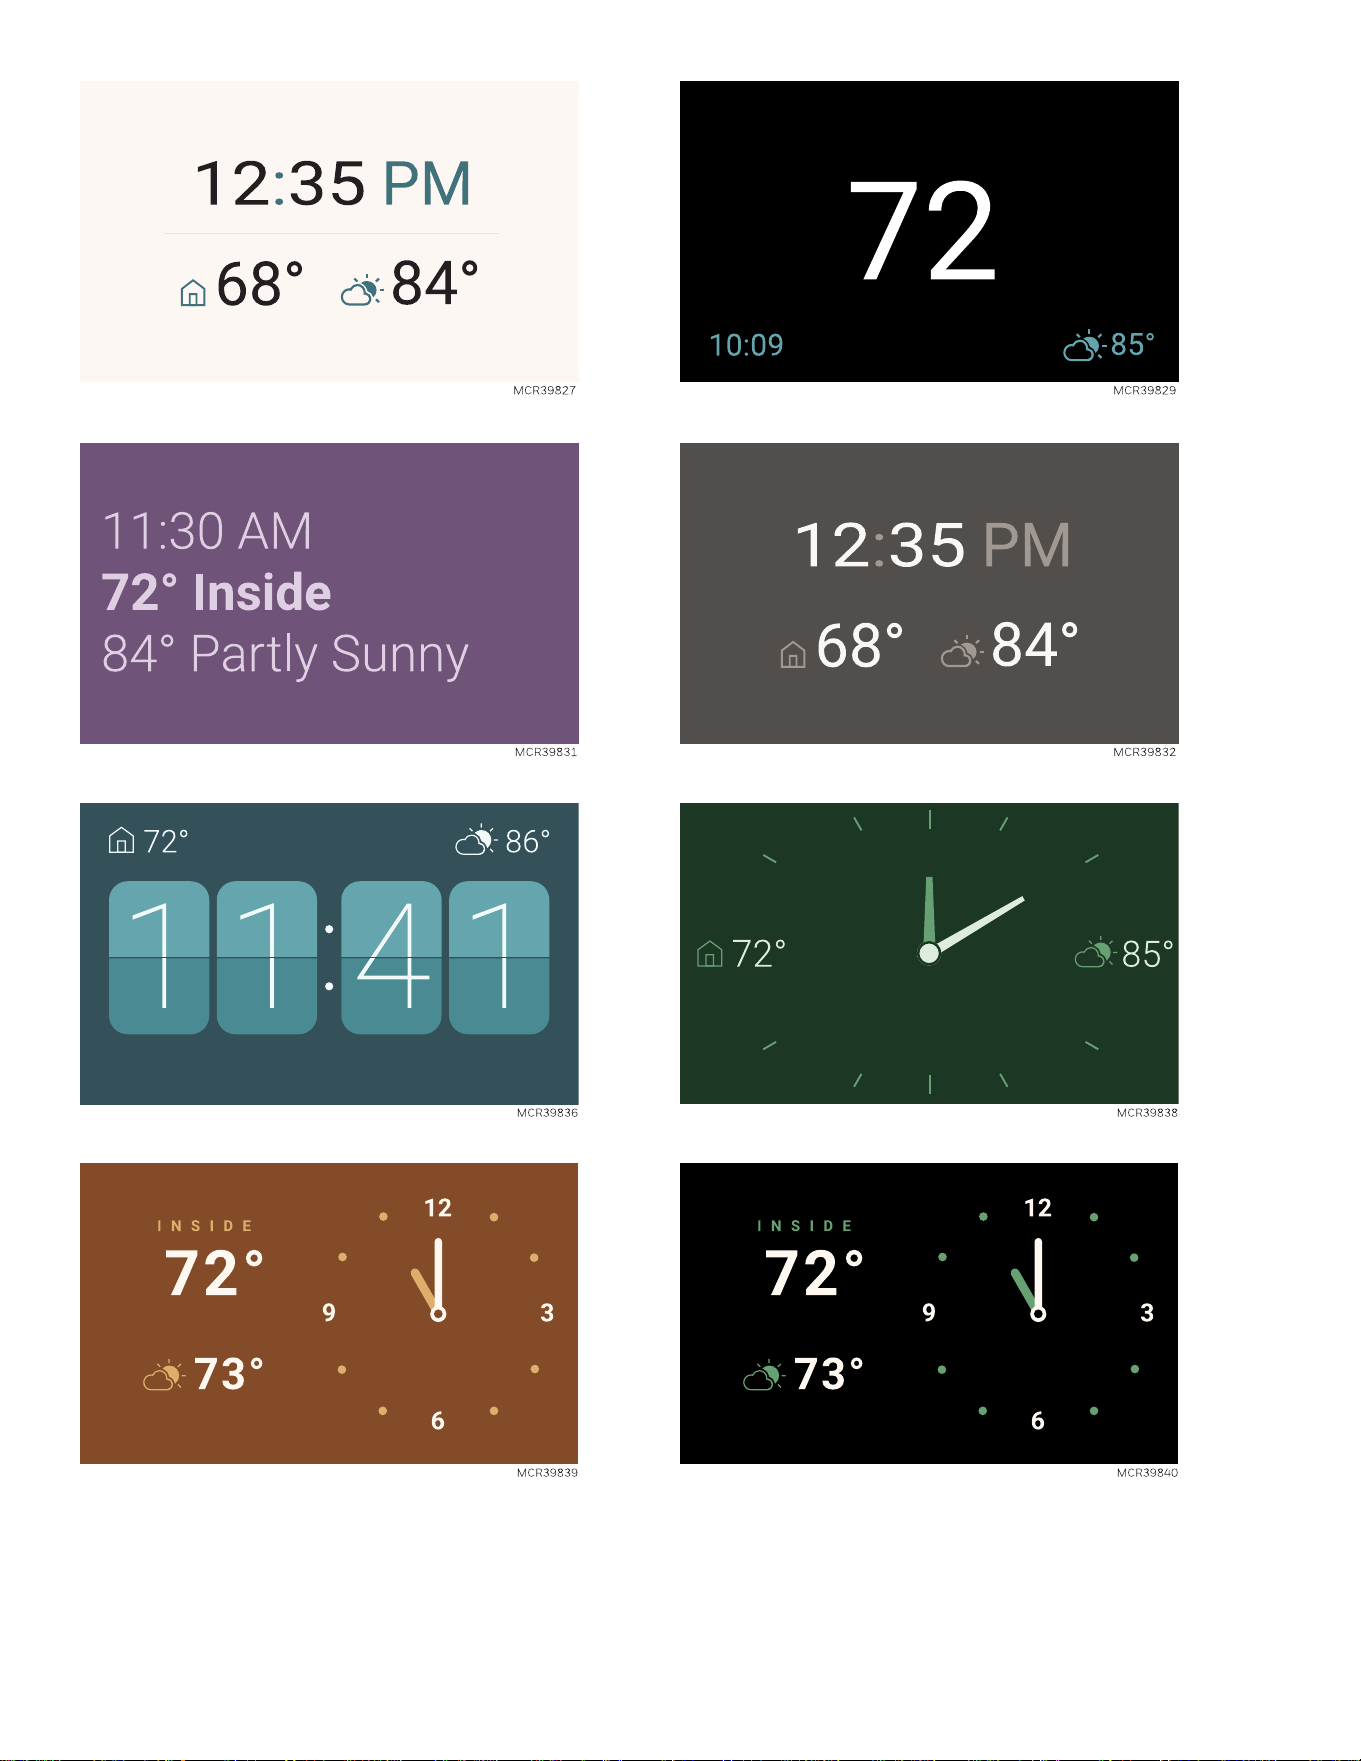
Idle Screen
The X7S & X7B Smart Thermostat allows you to select the screen color and appearance. Select Menu >
Preferences > Display > Idle Screen.
Some of the Idle Screen options are as follows:
46
Fallback Room
Under the preferences menu you can select which Room(s) are used if either:
47
l
The thermostat is set for active rooms and none of the sensors detect activity.
l
The selected sensors (active rooms or selected rooms) lose communication to thermostat (sensor failure,
dead batteries, etc.)
If the fallback sensor is also not communicating, the thermostat sensor will be used unless the installer had
selected “NEVER USE THERMOSTAT”.
If you select Fallback Room then Options, you can select Never use thermostat. This would be done if the
thermostat was mounted in a utility room or other location that is not sensing the space temperature in an area
it is controlling.
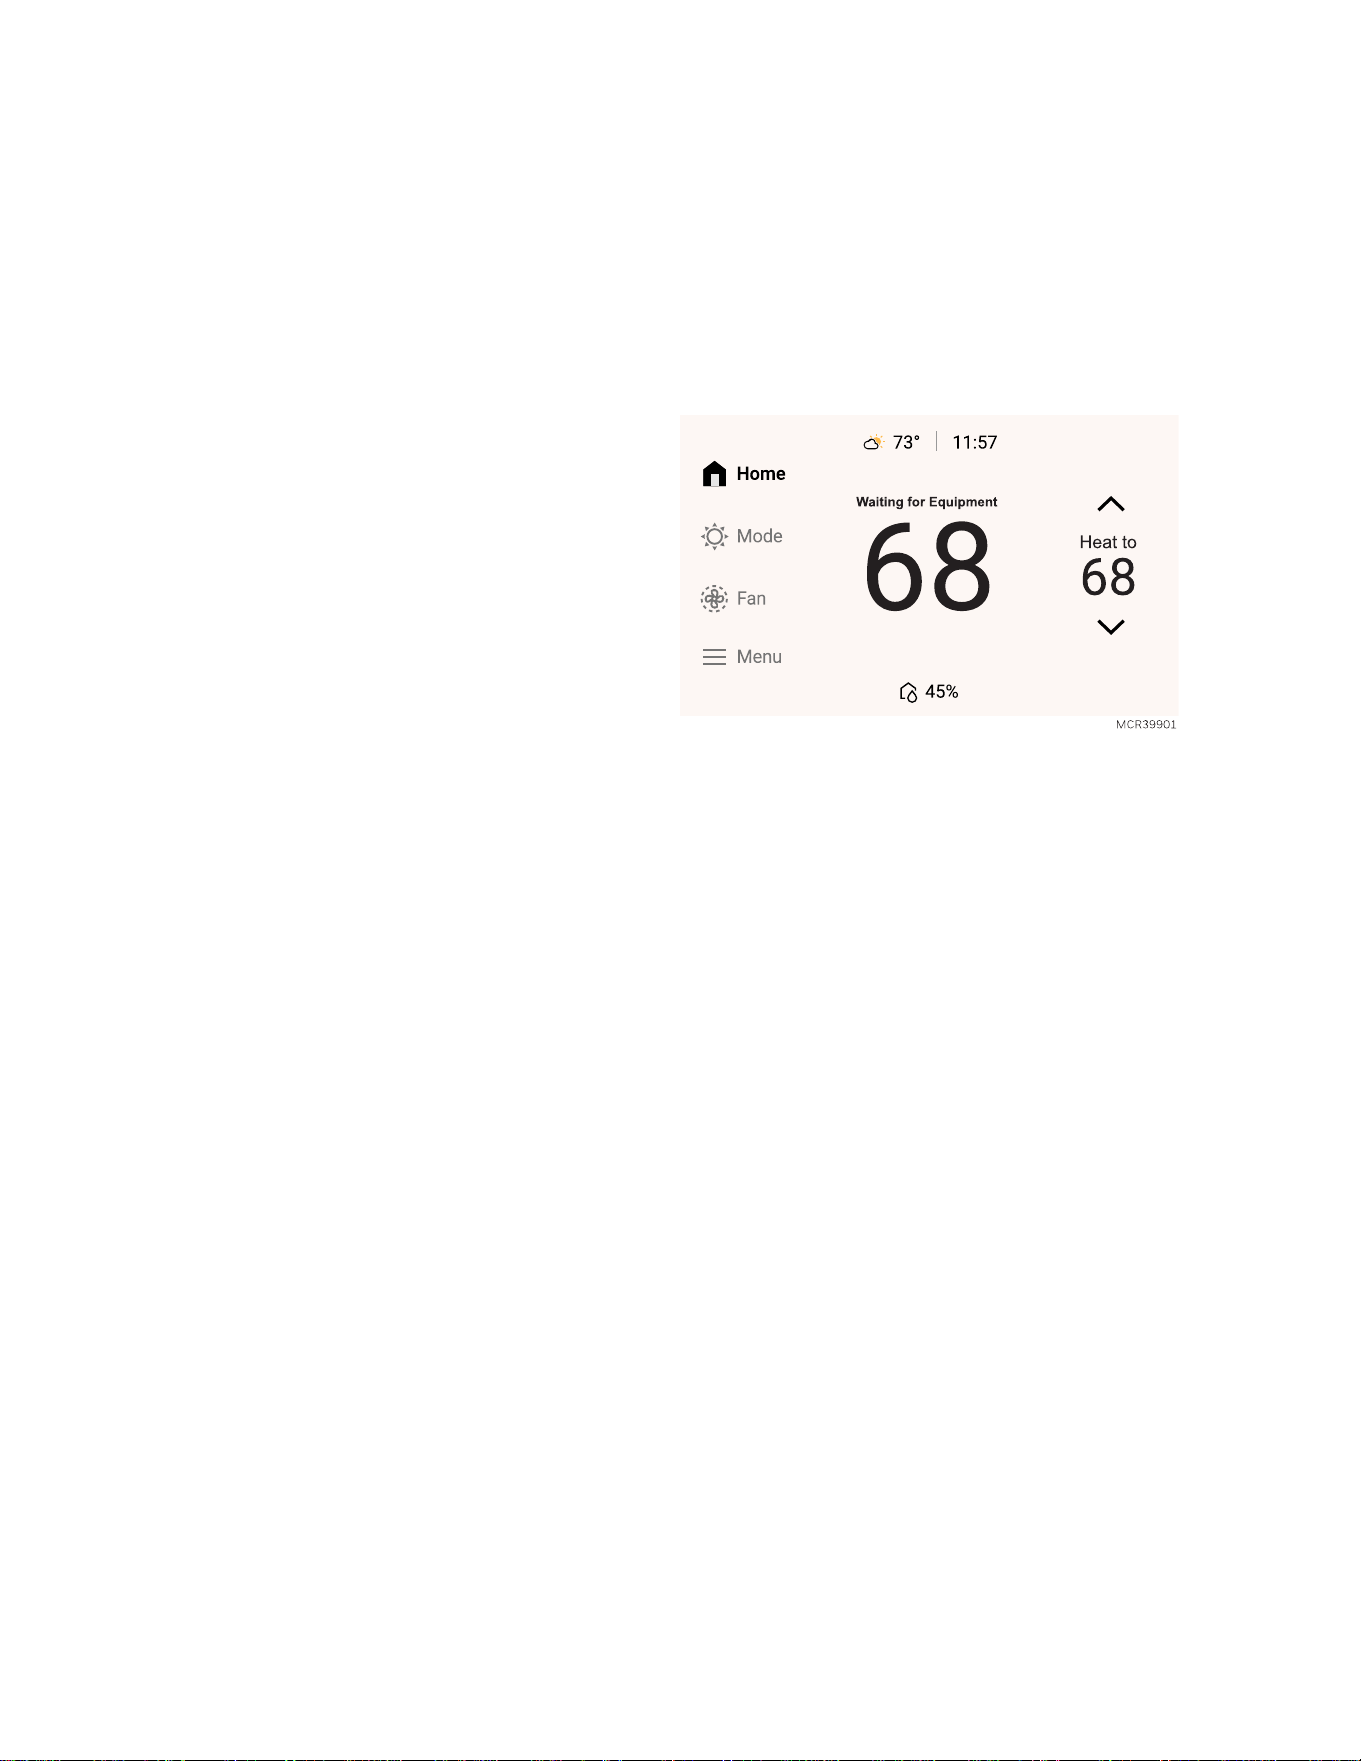
Waiting for Equipment
Damage can occur if your system’s compressor is
restarted too soon after shutdown. The Built-in
Compressor Protection feature forces the compressor
to wait for a few minutes before restarting. During the
wait time, the display will show the message “Waiting
For Equipment” above the room temperature reading.
When the safe wait time has elapsed, the message
disappears, and the thermostat will indicate a call for
heat.
48
Battery Replacement
Indoor Sensor
Replace batteries in your indoor sensor when a warning appears on the thermostat screen, about 60 days before
batteries are depleted.
When the sensor status light begins flashing red, battery power is critically low and will be depleted within 2–3
weeks. During normal operation, the status light remains off.
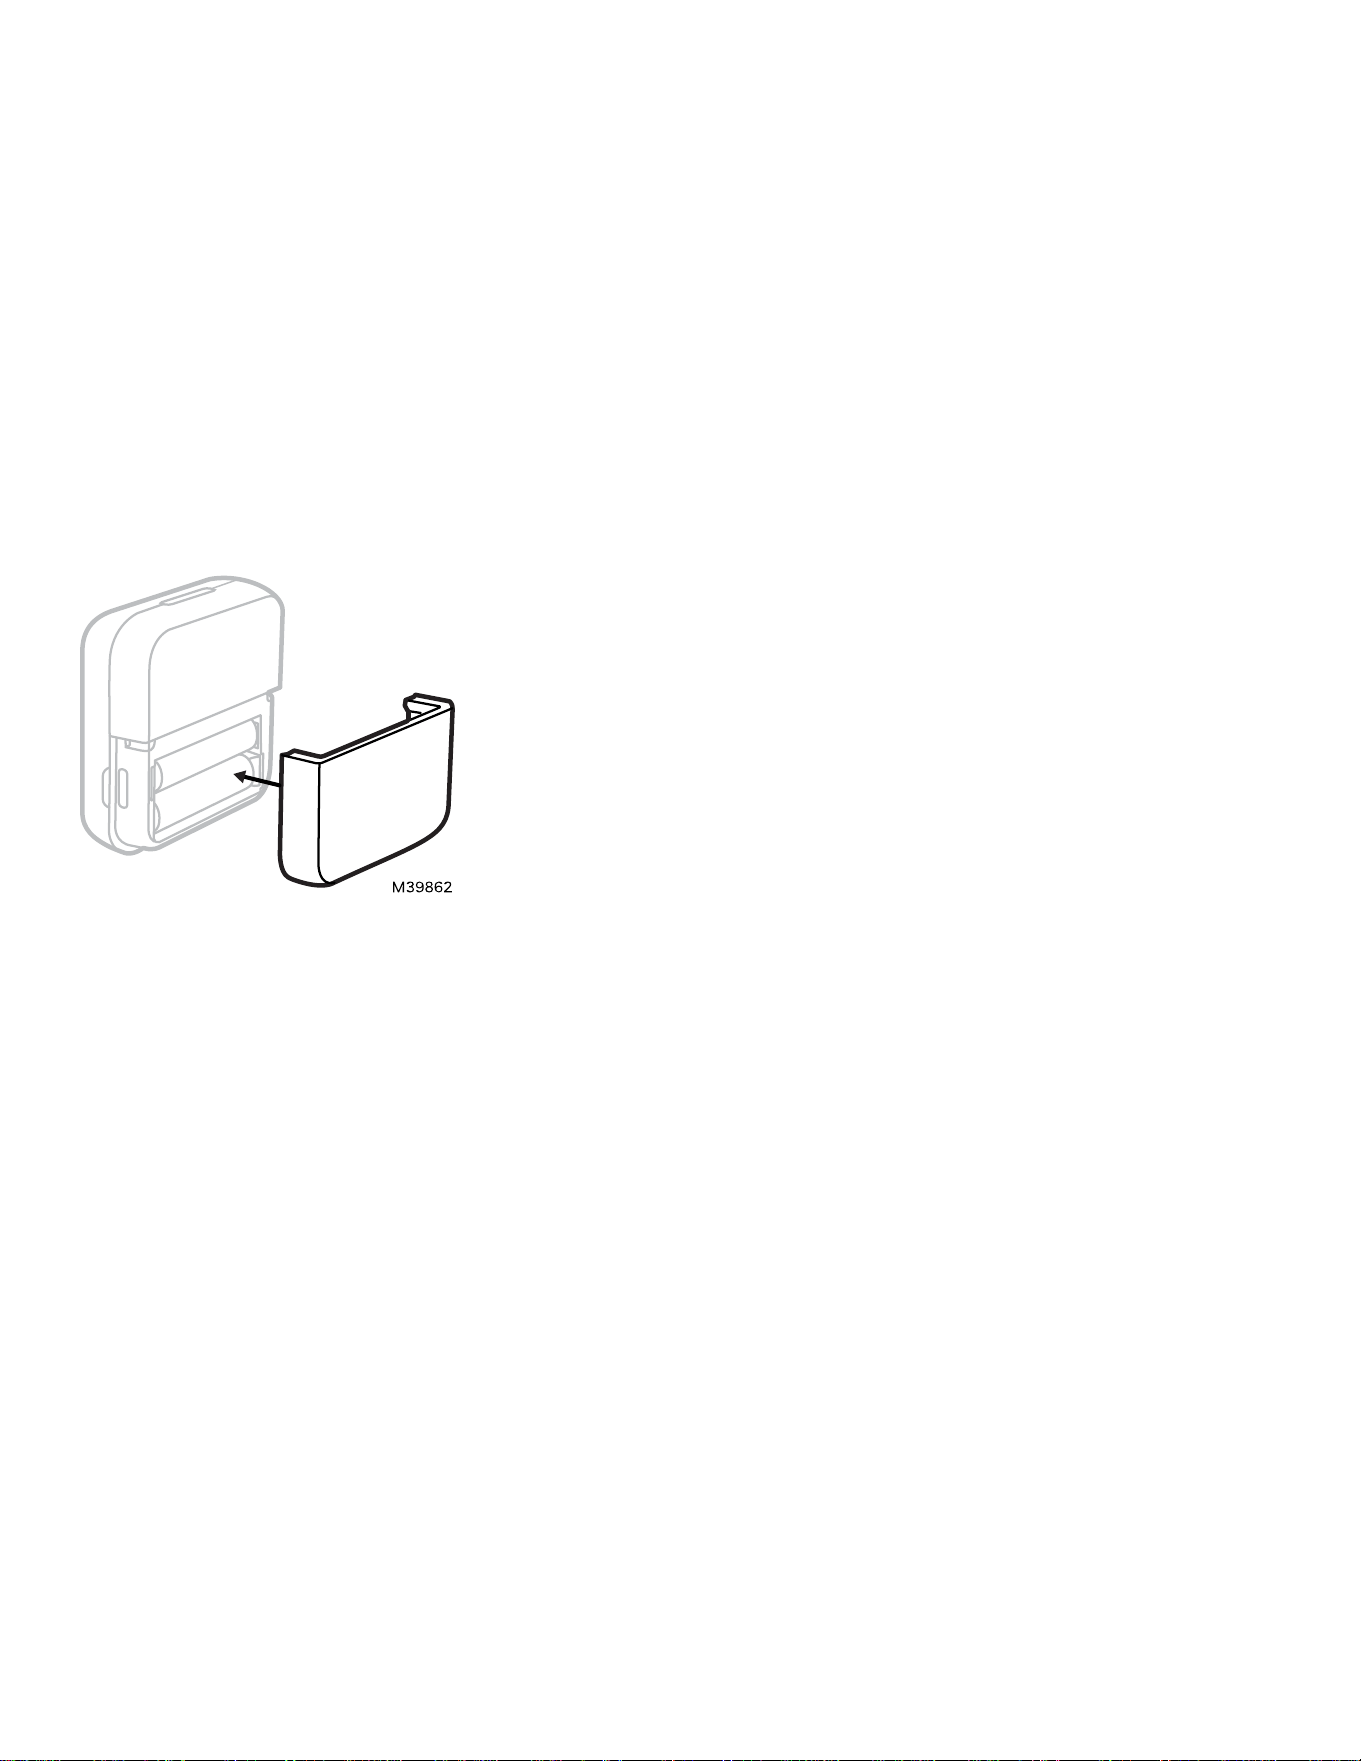
To replace the batteries:
l
Remove the sensor from wall plate.
l
Install 2 fresh AAA alkaline batteries. If the status light flashes green, batteries are good; if it flashes red, you
must use fresh batteries.
l
Attach sensor to wall plate.
The sensor will restore communication with the thermostat a few seconds after new batteries are installed.
49
Using the First Alert App
The First Alert by Resideo app allows you to manage and monitor your connected devices from one convenient
location. The app provides an intuitive interface and powerful tools to help you stay informed and maintain
control of your home or business.
For more information, visit: info.honeywellhome.com/first-alert-app
Key App features
Innovative Interface
An intuitive design makes it easy to navigate and control your devices, helping you manage your home or
business and stay informed about system activity.
Smart Home Partners
Integrate with your preferred smart home platforms for added convenience and expanded control of your
connected devices.
Improved Connectivity
Connect and manage multiple devices across Resideo’s family of brands. The app brings your devices together
so you can monitor and control them from a single location.
NOTE:
The First Alert App is regularly enhanced and the screen display may differ from that shown.
Setting Up the App
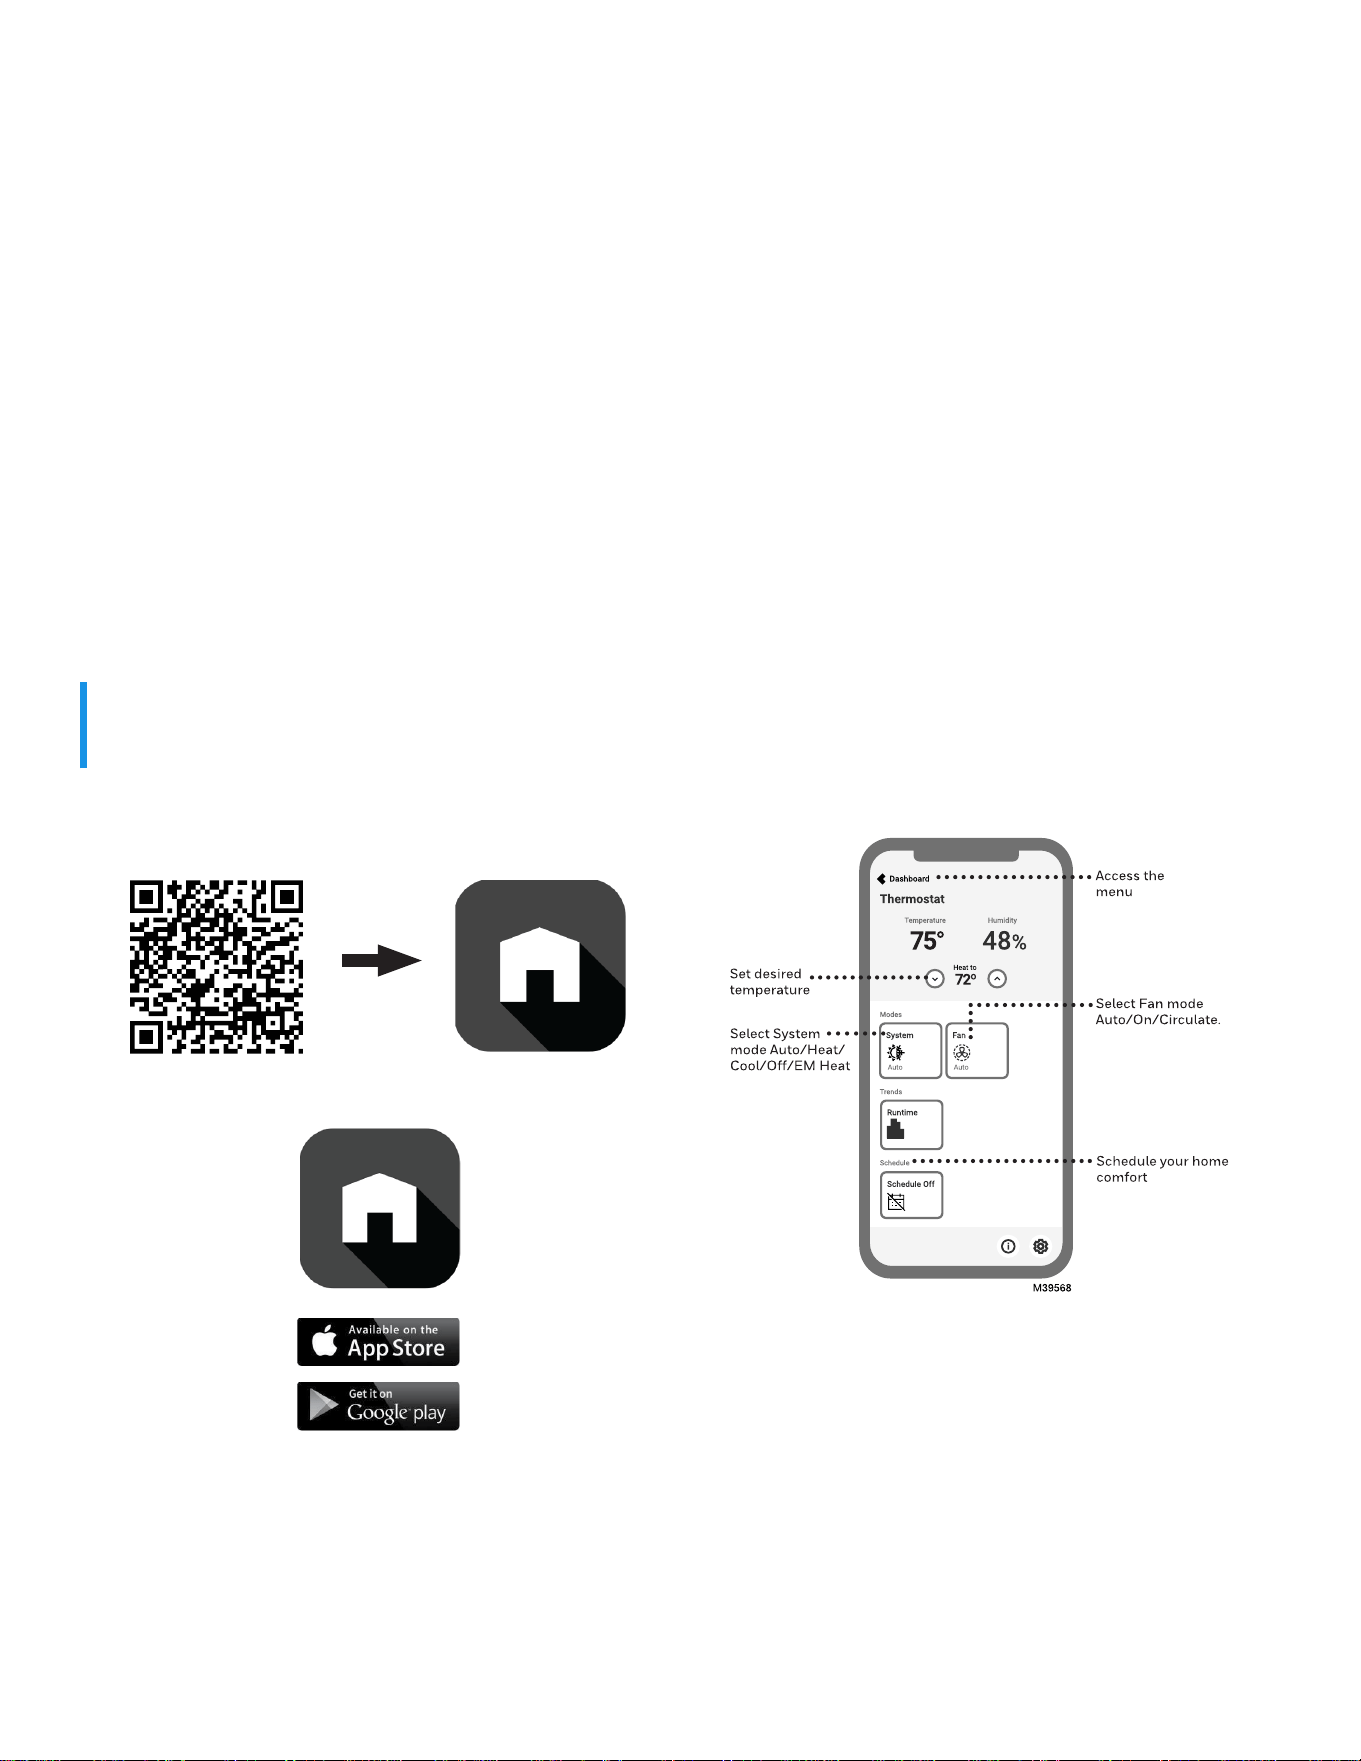
Scan to download the First Alert App
Touch the icon below to download the First Alert App:
To add the thermostat to the app, select MENU>
Connect to App and follow the instructions to connect.
Using the App
l
Scheduling through the app and Auto-Away
l
Connecting to a Video Doorbell
50

Advanced Features
Cleaning the Thermostat Screen
When you select the Clean Screen option, the screen is locked to prevent accidental changes to the thermostat
while you clean the screen.
1. Touch MENU.
2. Scroll to and select Preferences.
3. Select Display.
4. Select Clean Screen.
A prompt asks if you want to clean the screen for 30 seconds.
5. Touch Yes. A countdown timer displays elapsed time until the screen is reactivated.
NOTE:
Do NOT spray any liquid directly on the thermostat. Spray liquids onto cloth, then use the damp cloth to
clean the screen. Use water or household glass cleaner. Avoid abrasive cleansers.
Screen Lock setting
You can adjust security options to prevent unauthorized changes to system settings.
1. Touch MENU.
2. Scroll to and select Screen Lock.
Screen Lock mode options
l
Unlocked: Full access allowed.
l
Partially locked: Only temperature can be changed.
l
Fully locked: No access allowed.
There is an option in the SCREEN LOCK menu to require a passcode to change the Screen Lock setting. If you
choose this option, the thermostat will provide a passcode. Make sure to save this.
Auto Changeover Operation
When configured this way, you can select “Auto” as one of the options under “System mode”.
When a thermostat is set to Auto Changeover, the thermostat has a Heat setpoint and a Cool setpoint and can
run either Heat or Cool as needed.
Em Heat and Auxiliary Heat Operation
Auxiliary Heat:
Auxiliary Heat runs as backup to the heat pump. It runs with the heat pump when:
l
The thermostat is set to Heat mode.
l
Load conditions determine Backup Heat is needed.
Emergency Heat:
Emergency Heat runs when you manually switch the thermostat to the Em Heat mode. When the thermostat is
in Emergency Heat mode, the heat pump is locked out.
Emergency Heat mode is only available when the thermostat is set to control a heat pump plus Backup Heat
stages.
51

From the home screen touch Mode. You can set the thermostat to Heat, Off, Cool, Emergency Heat, or Auto.
(Auto mode may not be available based on installer settings.)
Adaptive Recovery (Sometimes called “Adaptive Intelligent Recovery”)
Over time, the thermostatlearns how long it takes your system to reach your programmed temperature setting.
The thermostat turns on the heating/cooling system early and assures that the programmed temperature
setting is reached at the programmed time regardless of weather conditions. For example, if the Wake program
period is set to 6:00 am with a heat setting of 70 degrees, the heat will turn on before 6:00 am, so the
temperature is 70 degrees at 6:00 am. The thermostat displays "In Recovery” above the indoor temperature
when it turns the system on early.
Adaptive Recovery calculates the recovery ramp based on how far the room temperature is away from the
temperature setting, previous equipment performance and weather history, allowing the thermostat to start
recovery at the optimal time so it can reach the programmed temperature setting at the programmed time. The
thermostat uses two recovery ramps when set up to control a heat pump system; one ramp for the compressor
and one ramp for the auxiliary heat. Once the room temperature intersects the compressor ramp, the
compressor turns on until the set point is reached. If the room temperature does not rise quickly enough and
intersects the second ramp, the auxiliary heat turns on. It takes about one week for the thermostat to adjust to
weather conditions, equipment performance and construction of the home. If the temperature setting is
reached too early or too late, the ramp is adjusted for the next day's recovery.
If you prefer not to use this feature, touch Menu > Preferences > Adaptive Recovery and select Off. Then the
thermostat will not start heating or cooling in advance of the comfort schedule time.
Feels like Temperature
“Feels Like Temperature” is a setting which takes the indoor temperature and relative humidity, as well as
outdoor temperature into account so that you can optimize comfort. For example, when the relative humidity is
very high, 70°F feels much warmer than it does when the relative humidity is very low. For this reason, when
Feels Like Temperature is enabled, the display may show a warmer temperature reading than other thermostats
do when relative humidity is high.
If you prefer not to use this feature, it can be disabled in Menu > Preferences >Display > Feels Like
Temperature.
NOTE: Feels Like Temperature can only be enabled when the thermostat knows the outdoor
temperature from the app.
52

FAQ's
Wireless sensor questions
Q: Which wireless sensors and accessories work with X7S thermostat?
A: The X7S can be paired with up to 20 wireless indoor sensors. It cannot be paired with other Honeywell Home
wireless products or sensors. X7B cannot be paired with wireless sensors. See below for compatible sensor
models:
XRSENSOR-1PK: This is the wireless temperature, humidity and PIR sensor designed for use with X7S
thermostats (the model number shown inside the battery compartment will not have the -1PK or 2PK).
XRSENSOR-2PK: This is a 2 pack of the wireless temperature, humidity and PIR sensor designed for use with
X7S thermostats. (the model number shown inside the battery compartment will not have the -1PK or 2PK).
RCHTSENSOR-1PK: This is the sensor designed for use with T9 thermostats. Older models of this sensor will
not work with X7S thermostats. If you have existing RCHTSENSOR-1PK sensor, you can attempt to pair it with
the X7S. However we would not recommend purchasing these online from a 3rd party seller as you would not be
able to determine the vintage/compatibility. (the model number shown inside the battery compartment will not
have the -1PK or 2PK).
RCHTSENSOR-2PK: This is a 2-pack of the sensor designed for use with T9 thermostats. Older models of this
sensor will not work with X7S thermostats. If you have existing RCHTSENSOR-2PK sensor, you can attempt to
pair it with the X7S. However we would not recommend purchasing these online from a 3rd party seller as you
would not be able to determine the vintage/compatibility. (the model number shown inside the battery
compartment will not have the -1PK or 2PK).
C7189R3010-2: This is a 2 pack of the wireless temperature, humidity and PIR sensor designed for use with
ElitePRO thermostats. This sensor is compatible with X7S thermostats. (the model number shown inside the
battery compartment will not have the -2).
C7189R3002-2: This is a 2 pack of the wireless temperature, humidity and PIR sensor designed for use with
T10+ thermostats. This sensor is compatible with X7S thermostats. (the model number shown inside the battery
compartment will not have the -2).
C7189R2002-2: This is a 2 pack of the wireless temperature, humidity and PIR sensor designed for use with
T10 thermostats. This sensor will not work with X7S thermostats. (the model number shown inside the battery
compartment will not have the -2).
WiFi connection questions
See "WiFi Setup and Troubleshooting" on page29.
Software and security questions
Q: How can I be sure my thermostat is running the most up-to-date firmware?
A: When your thermostat is connected to WiFi, it will automatically receive over-the-air firmware updates from
the First Alert App. These firmware updates contain things such as new features as well as security upgrades.
Keep your thermostat connected to WiFi to ensure it receives these updates.
Q: How can I prevent a cybercriminal from making unauthorized changes to my thermostat?
A: If a cybercriminal gains access to your First Alert app, they can tamper with the settings of the products on
that app, or remove those products from your account and add them to a different account. Make sure you
select a password that meets the recommendations for complexity and save it in a secure location that others
cannot access.
53

Other questions
Q: How can I remove the X7S Smart Thermostat from my WiFi network and App?
A: If you want to replace your X7S thermostat, or if you’re moving out of your home and leaving the thermostat
behind, you’ll first want to clear out the personal settings that are stored on the thermostat. (Even when
disconnected from power, the thermostat will keep your settings and home router information in memory.) We
recommend resetting the thermostat’s WiFi and Matter
®
settings (if previously connected).
Q: Is there a motion sensor in the thermostat?
A: The X7S thermostats have an on-board motion sensor in the thermostat. Additionally up to 20 XRSENSOR
wireless indoor temperature, humidity, and motion sensors can be used with any of the X7S thermostats.
Q: What happens if “Active rooms” is used and no motion is detected in any of the rooms with
sensors?
A: If the thermostat is set to control by active rooms, and no motion is detected, the sensor in the thermostat is
used and the remote sensors are excluded. Most people schedule the sleep period to use “Selected sensors”
rather than “active sensors” and choose the bedrooms for the sleep schedule.
Q: When using active rooms, how long are those rooms considered "Active" after motion has last been
detected?
A: The sensor has an occupancy algorithm based on how many motion events it sees within a certain timeframe.
This was set up so that if someone briefly walks through a room, the sensor will tell the thermostat that the
room is “occupied” for 10 minutes. If someone is in a room longer, then the timeout will be increased
automatically.
Sensors communicate directly with the thermostat via Honeywell Home Redlink 3.0 technology. After sensing
motion, the communication should take less than 3 seconds to assign the room priority, depending on battery
and signal strength.
Q: How do the wireless indoor sensors detects motion.
A: The sensors use a Passive Infrared Sensor (PIR) detector.
Q: How does motion-based priority work with multiple people in the house?
A: If the thermostat’s priority is set to ‘Active Rooms’, then any room that detects motion will become prioritized.
The average of those rooms’ temperatures will be monitored so that the thermostat can adjust to your preferred
temperature setpoint. If one of the sensors no longer detects people in that room, that sensor will adjust after a
period of time, using the algorithm based on motion events that it sees within a certain time frame.
Q: What’s the range of detection on the motion sensor?
A: There are many factors that can affect this (height, body size, layers of clothing, temperature of clothing,
angle, etc.). The typical range of our sensor is up to 20 feet.
Q: Are the X7S thermostats UL and ULC listed or CSA listed?
A: UL, ULC, & CSA ratings are not required for low-voltage rated controls such as the X7S & X7B Smart
Thermostats. UL rating is required for devices supplied by 50 volts or higher.
Q: Why does the display go to the Honeywell Home startup screen?
A: It is normal that the thermostat will go to the startup screen where it shows “Honeywell Home” and then
returns to the idle screen after a short delay if there has been a power outage or if there has been an over-the-
air firmware update. Either of these should be a very infrequent occurrence. If you notice this is happening
regularly, there may be an issue with your equipment. Example: a limit may be tripping due to poor airflow.
54

If the issue happens regularly, we would recommend replacing the furnace filter and having an HVAC pro
service the unit if the issue persists.
NOTE:
A thermostat that uses batteries, or does not have a premium display, may have been masking this type of
system issue, however if a limit is regularly cutting power to the thermostat your system will likely have
reduced performance and could be susceptible to damage.
Q: What happens if there is a power loss to the thermostat?
A: During a power loss the HVAC equipment cannot run.
Once power is restored the thermostat goes through a power up cycle and will initially show "Honeywell Home"
on the screen.
l
If the thermostat is used with any wireless sensors, it will re-establish communication within 6 minutes.
l
If the thermostat had been connected to a WiFi network and the app, it will re-establish connection and
update the time/date.
l
If the thermostat was not connected to a WiFi network and registered to the app, the time/date will need to be
reset for the thermostat to follow the program schedule.
All schedule settings are permanently stored during a power outage, however, if scheduling had been used, the
thermostat will maintain 72F in heat and 78F in cool mode until the time/date has been set.
If the thermostat had been used in a permanent hold, that setting is also permanently stored during a power
outage.
The thermostat will be in the same mode it had been in when power was lost (Example: heat, off, cool).
55

Troubleshooting and Support
If you have difficulty with your thermostat, please try the following suggestions. Most problems can be corrected
quickly and easily.
Display Behavior Is Not As Expected
Display is blank:
l
Check circuit breaker and reset if necessary.
l
Make sure power switch for heating & cooling system is on.
l
Make sure furnace door is closed securely.
l
Make sure the C wire is connected.
Cannot change temperature setpoint:
l
Verify the thermostat is set to the correct mode. Touch Mode to change mode setting.
l
If the display indicates “Setting locked” when you touch the up or down arrow, you can unlock the screen by
selecting Menu > Screen lock.
l
The thermostat may be preventing you from changing the set-point above or below a certain setting because
of minimum and maximum settings. Menu > Preferences > Temperature limits.
l
Default minimum and maximum settings:
o
Heat: 40°F to 90°F (4.5°C to 32.0°C)
o
Cool: 50°F to 99°F (10.0°C to 37.0°C)
Weather menu isn’t displayed:
This menu is only shown when the thermostat is connected to WiFi and the app. If WiFi connection is lost, the
thermostat will not show that option until connection is restored.
Display temperature is inaccurate (reads too high or low)
There are different reasons that the room temperature reading on the thermostat may be reading higher or
lower than expected.
l
“Feels Like Temperature” is a setting that can make the indoor temperature reading show a few degrees
warmer when relative humidity is high. See "Feels like Temperature" on page52.
l
Indoor display offsets can be set to make the display read up to 3 degrees higher or lower than the sensor
reading or +/- 12% RH from the humidity sensor reading. See "Indoor Display Offsets" on page33.
l
If one or more wireless sensors is used, the thermostat can be set to measure temperature at the thermostat,
a wireless sensor, or an average reading. See "Priority" on page35.
Menu options are not shown
When Menu is selected, the display shows menu options and allows the user to scroll left or right to see
additional options. Some options may not be shown if the thermostat is not set to support those settings such
as humidification. If the display is set for a lockout, many of the menu options are not shown. Select MENU >
SCREEN LOCK to view lockout status. The lockout status should only be changed by the thermostat owner and
there may be an option to require a password in order to unlock the screen.
56

Heating or Cooling Issues
Heat runs with thermostat in cool or off mode:
If this happens immediately after installation, the thermostat may be wired or configured incorrectly. Shut off
power for the heating/cooling system at the breaker and call technical support or an HVAC Pro.
Heat doesn’t come on:
When in the heat or emergency heat mode and not calling for heat, the display shows “heat to”.
When calling for heat or emergency heat the display shows “heating to”.
If display is showing “WAITING FOR EQUIPMENT” above the room temperature it is in a delay mode to protect
the equipment. If the delay lasts longer than 5 minutes, see "WAITING FOR EQUIPMENT stuck in display" below.
If display is not showing “WAITING FOR EQUIPMENT”, verify the thermostat is set to Heat, Em Heat, or Auto
mode and verify that the heat setpoint is above room temperature. Does the display indicate “Heating to” (rather
than "heat to") above the set point?
If “HEATING TO” is displayed, and heat does not come on after a short delay, have the installer verify wiring
connections and R/Rc slider switch on UWP are good.
If “HEAT TO” (rather than "HEATING TO") is displayed above the setpoint, but heat set point is above room
temperature, go to EQUIPMENT STATUS and see if any reason is given for why heat is not running.
Check for any active alerts.
Cooling doesn’t come on:
When in the cool mode and not calling for cooling, the display shows “cool to”.
When calling for cooling the display shows “cooling to”.
If display is showing “WAITING FOR EQUIPMENT” above the room temperature it is in a delay mode to protect
the equipment. If the delay lasts longer than 5 minutes, see "WAITING FOR EQUIPMENT stuck in display" below.
If display is not showing “WAITING FOR EQUIPMENT”, verify the thermostat is set to cool, or Auto mode and
verify that the cool setpoint is below room temperature. Does the display indicate “cooling to” (rather than "cool
to") above the set point?
If “COOLING TO” is displayed, and heat does not come on after a short delay, verify the wire connections, R/Rc
slider jumper on UWP (or R, Rh, and Rc jumpers if an EIM is used). If those variables check out, your HVAC
contractor can call Tech Support to verify configuration and for further troubleshooting.
If “COOL TO” (rather than "COOLING TO") is displayed above the setpoint, but cool set point is below room
temperature, go to EQUIPMENT STATUS and see if any reason is given for why cooling is not running.
Check for any active alerts.
WAITING FOR EQUIPMENT stuck in display
If display shows “WAITING FOR EQUIPMENT” then the thermostat is holding off running the heating or cooling
to prevent short cycling or because of a lockout condition. The short cycling delay should last 5 minutes at
most, but an alert lockout will keep that equipment locked out until the alert condition is resolved. The short
cycling delay most commonly would occur on start up, after a power loss, or if someone adjust setpoint within 5
minutes of equipment shutting off.
If you time this and it shows "WAITING FOR EQUIPMENT" for longer than 5 minutes.
57

l
See if there are any active alerts.
l
It is possible there is an intermittently power loss to the thermostat. As a test the installer could remove all
wires besides R and C from UWP and then test the heat or cooling. If the thermostat then indicates a call for
heat or cooling within 5 minutes, a shorted wire or high equipment draw could be interrupting power to the
thermostat momentarily at the start of a heat or cooling call.
Cooling runs below set point:
Verify the cooling is running while cool set point is above the room temperature reading on the display. If so,
verify the thermostat is deliberately running cooling. When doing so, the display shows “Cooling to” (rather than
“COOL TO”). Also, menu equipment status will show if the thermostat is trying to run cooling or not.
l
If display shows “COOL TO” over setpoint, and the cooling is running, something is wrong. Turn off the power
to the cooling equipment and call a professional for assistance.
Heat runs when room temperature reading is above the heat setpoint:
l
If the thermostat is not in heat mode, see “Heat runs with thermostat in cool or off mode”.
l
If the thermostat is in heat or emergency heat mode, verify whether the display indicates a call for heat.
If display shows “HEAT TO” over setpoint, the heat should not be running.
If the display shows “HEATING TO” over setpoint, the thermostat is trying to run the heating.
Display shows HEAT TO and heat is running.
The thermostat is not trying to run the heating at this time. If display shows “HEAT TO” over setpoint, and the
heat is running, something is wrong. Turn off the power to the heating equipment and call a professional for
assistance.
Display shows HEATING TO and heat is running.
The thermostat is trying to run the heating at this time. It is unusual that the thermostat would run heat if the
room temperature reading is above the setpoint in thermostat display. Check equipment status.
Fan Issues
Fan will not run when expected
If the thermostat is set to control a heat-only system such as a boiler, there will not be a fan setting. Menu >
Equipment Status will show the fan state.
The X7S & X7B Smart Thermostat can have the fan set to on, auto, or circ for each schedule period. See "Fan
Scheduling" on page43.
Fan is running unexpectedly
l
The thermostat have different settings that might have turned on the fan. Check Menu > Equipment Status
to see what the thermostat indicates it is running.
l
The thermostat will also run the fan with a call for cooling and in forced air heat systems the fan will also run
with a call for heat (but this may or may not be controlled by the thermostat depending on the system type
settings).
l
The thermostat can have the fan set to on, auto, or circ for each schedule period. See "Fan Scheduling" on
page43.
l
If the thermostat doesn’t indicate the fan is on under the EQUIPMENT STATUS menu, it is possible something
else in the system is controlling the fan such as a separate control for a humidifier, dehumidifier or ventilator.
Fan mode changes by itself
See the "Fan is running unexpectedly" above or "Fan will not run when expected" above.
58

Wireless sensor issues
I cannot pair a wireless sensor to my X7S thermostats?
A: If the sensor had been paired with a previous thermostat, you first need to reset that sensor. Remove the
cover and press/hold the button for approximately 15 seconds to clear it. On the thermostat touch Menu >
Devices and sensors > Add. With the sensor at least 3 feet from the thermostat, press/release the button on the
sensor. If the LED never flashes, verify the batteries are fresh and installed correctly. If the sensor light flashes
but the thermostat display does not indicate thSat it has connected to the sensor, verify sensor compatibility.
See "Q: Which wireless sensors and accessories work with X7S thermostat?" on page53.
Wi-Fi and app-related issues:
See "WiFi Setup and Troubleshooting" on page29.
Customer Assistance
Call Resideo Customer Care toll-free at 1-800-633-3991.
2-year limited warranty
For Warranty information go to resideo.info/US-Warranty-THERMOSTAT
59
Regulatory
Regulatory Information
FCC REGULATIONS
47 CFR § 15.19 (a)(3)
This device complies with part 15 of the FCC Rules. Operation is subject to the following two conditions:
1. This device may not cause harmful interference,
2. This device must accept any interference received, including interference that may cause undesired
operation.
47 CFR § 15.21
Changes or modifications not expressly approved by the party responsible for compliance could void the user’s
authority to operate the equipment.
47 CFR § 15.105 (b)
For additional FCC information for this product, see https://customer.resideo.com/en-
US/support/residential/codes-and-standards/FCC15105/Pages/default.aspx
IC REGULATIONS
RSS-GEN
This device contains license-exempt transmitter(s)/receiver(s) that comply with Innovation, Science and
Economic Development Canada’s license exempt RSS(s). Operation is subject to the following two conditions:
1. This device may not cause interference.
2. This device must accept any interference, including interference that may cause undesired operation of the
device.
RF Exposure Statement: FCC and IC Regulations
Warning:
The antenna(s) used for these transmitters must be installed to provide a separation distance of at least 20 cm
from all persons and must not be colocated or operating in conjunction with any other antenna or transmitter.
Operations in the bands 5150-5250 MHz and 5250-5350 MHz is only for indoor use to reduce the potential for
harmful interference to co-channel mobile satellite systems.
DANGER
ELECTRICAL SHOCK HAZARD
CAN CAUSE ELECTRICAL SHOCK OR EQUIPMENT DAMAGE. DISCONNECT POWER BEFORE
BEGINNING INSTALLATION.
WARNING
EQUIPMENT DAMAGE HAZARD
COMPRESSOR PROTECTION IS BYPASSED DURING TESTING. TO PREVENT EQUIPMENT DAMAGE, AVOID
CYCLING THE COMPRESSOR QUICKLY.
60
WARNING
MERCURY NOTICE
IF THIS PRODUCT IS REPLACING A CONTROL THAT CONTAINS MERCURY IN A SEALED TUBE, DO NOT
PLACE THE OLD CONTROL IN THE TRASH. CONTACT YOUR LOCAL WASTE MANAGEMENT AUTHORITY
FOR INSTRUCTIONS REGARDING RECYCLING AND PROPER DISPOSAL.
IMPORTANT:
ELECTRONIC WASTE NOTICE: The product should not be disposed of with other household waste. Check
for the nearest authorized collection centers or authorized recyclers. The correct disposal of end-of-life
equipment will help prevent negative consequences for the environment and human health.
IFT Regulations
This device operation is subject to the following two conditions:
1. This device may not cause harmful interference.
2. This device must accept any interference, including interference that may cause undesired operation of the
device.
61
Resideo Technologies, Inc.
Scottsdale, AZ 85254
1-480-573-5340
honeywellhome.com
© 2026 Resideo Technologies, Inc.
The Honeywell Home trademark is used under license
from Honeywell International, Inc.
This product is manufactured by Resideo Technologies,
Inc. and its affiliates.
33-00769-01 6/26