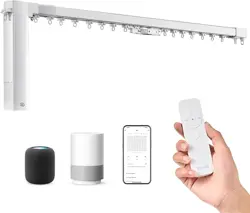

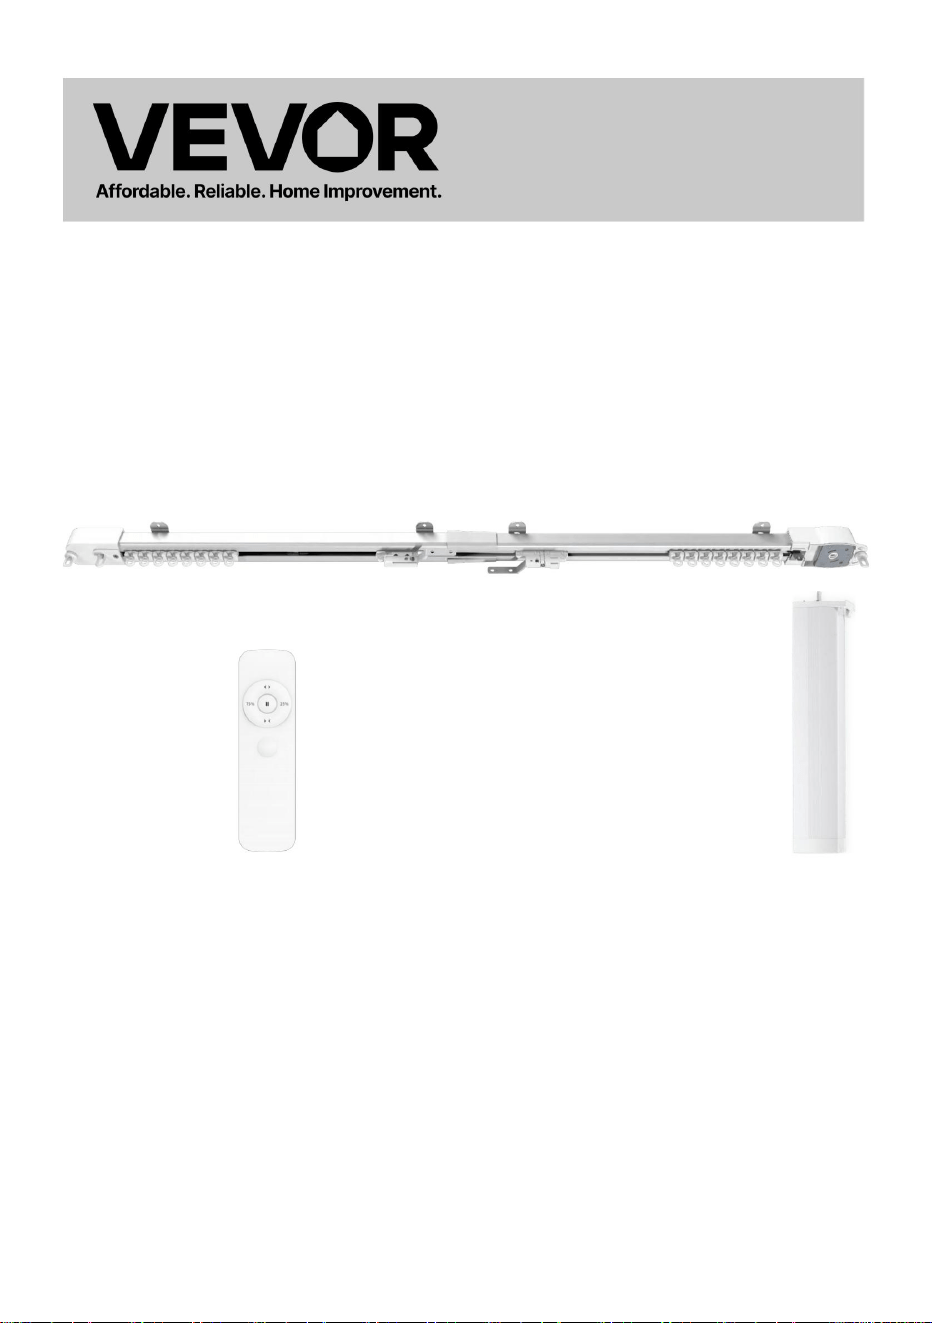
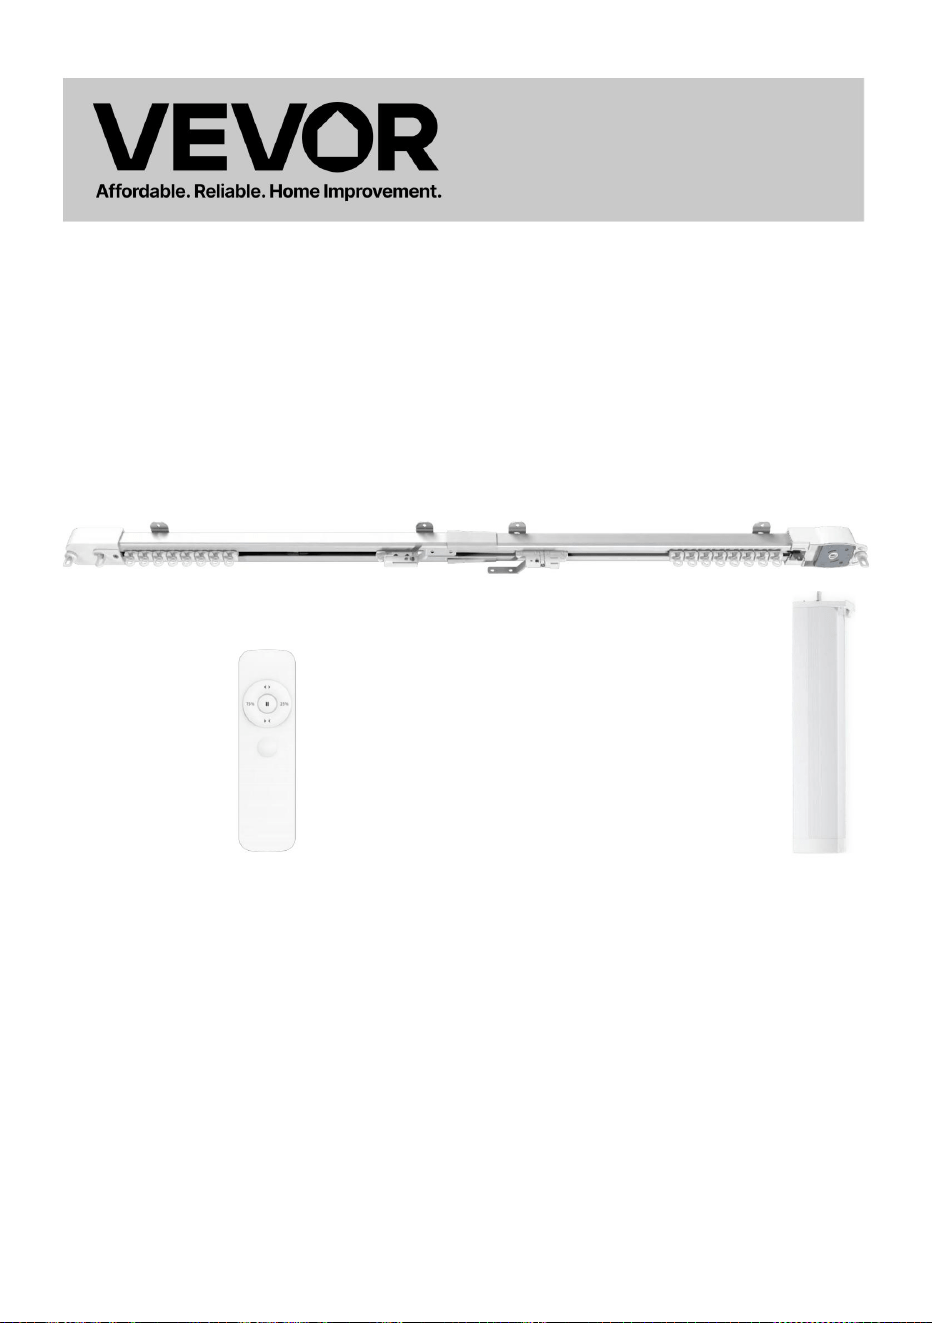
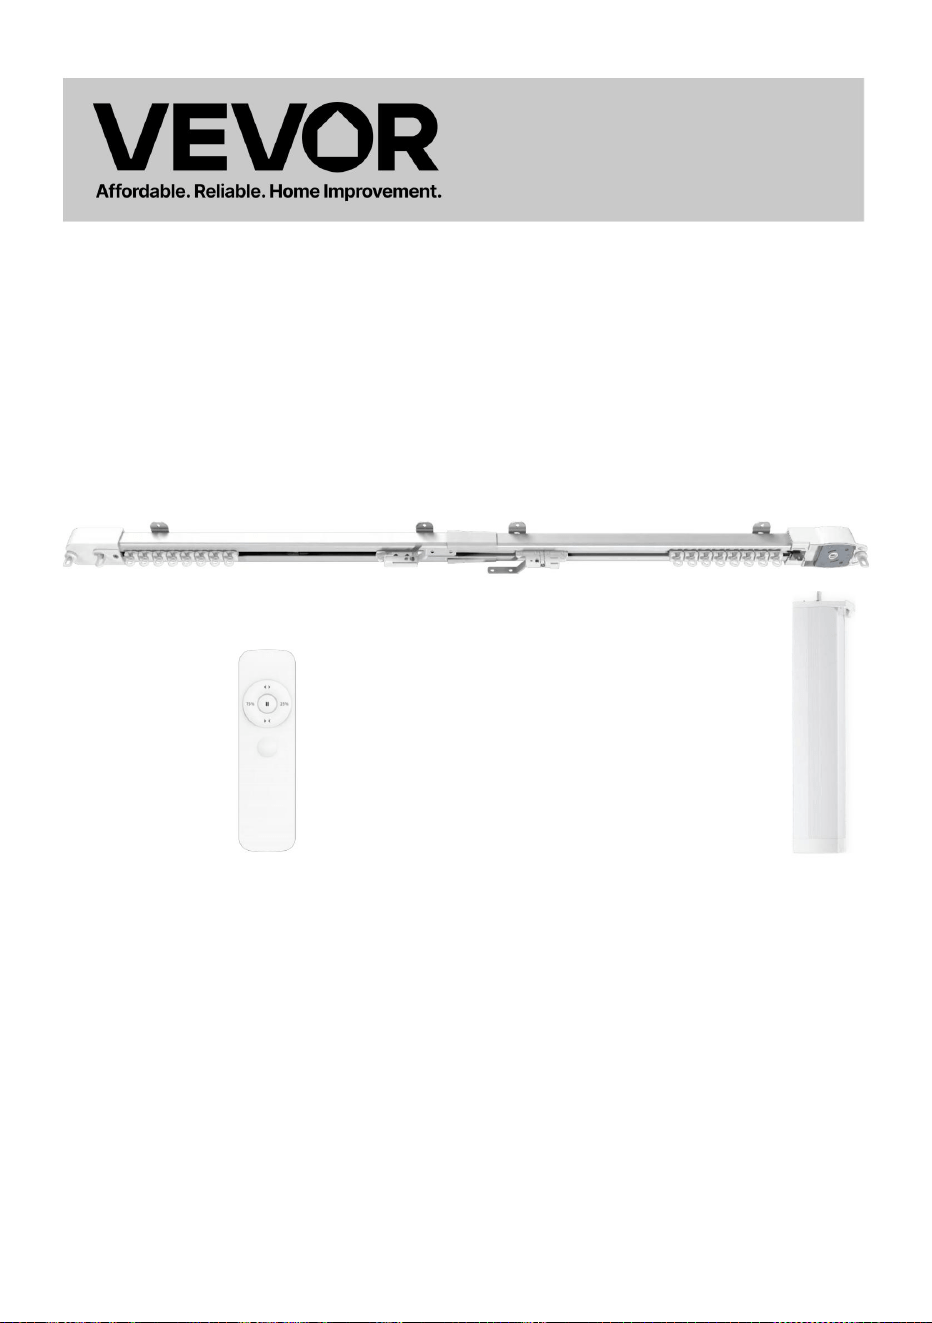
60$57 &857$,16 6<67(0
86(5 0$18$/
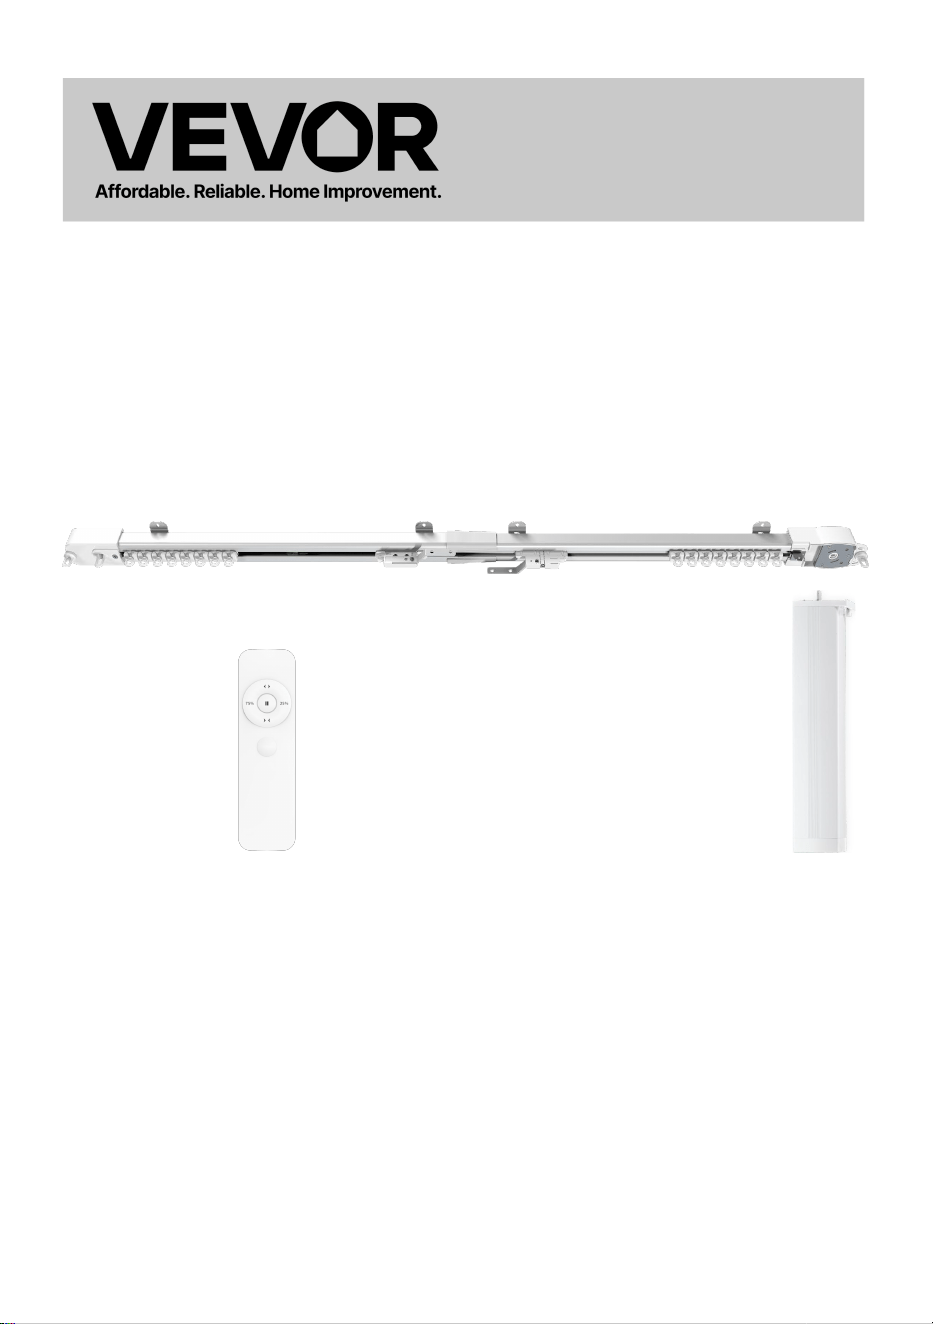
02'(/ 03
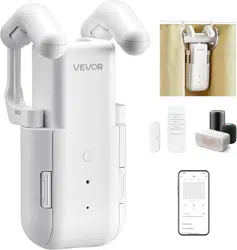
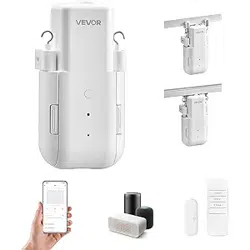
3KRWR IRU UHIHUHQFH
7KLV LV WKH RULJLQDO LQVWUXFWLRQ SOHDVH UHDG DOO PDQXDO LQVWUXFWLRQV FDUHIXOO\
EHIRUH RSHUDWLQJ 9(925 UHVHUYHV D FOHDU LQWHUSUHWDWLRQ RI RXU XVHU
PDQXDO 7KH DSSHDUDQFH RI WKH SURGXFW VKDOO EH VXEMHFW WR WKH SURGXFW \RX
UHFHLYHG 3OHDVH IRUJLYH XV WKDW ZH ZRQW LQIRUP \RX DJDLQ LI WKHUH DUH DQ\
WHFKQRORJ\ RU VRIWZDUH XSGDWHV RQ RXU SURGXFW
60$57 &857$,16
6<67(0
:$51,1*
7KDQN \RX YHU\ PXFK IRU FKRRVLQJ WKLV 6PDUW &XUWDLQV 6\VWHP
3OHDVH UHDG DOO RI WKH LQVWUXFWLRQV EHIRUH XVLQJ LW 7KH LQIRUPDWLRQ ZLOO KHOS
\RX DFKLHYH WKH EHVW SRVVLEOH UHVXOWV
7KH SURGXFWV FDUULHG LQ WKLV FDWDORJ PD\ EH GLIIHUHQW LQ FRORU WKDQ WKH DFWXDO
LWHP
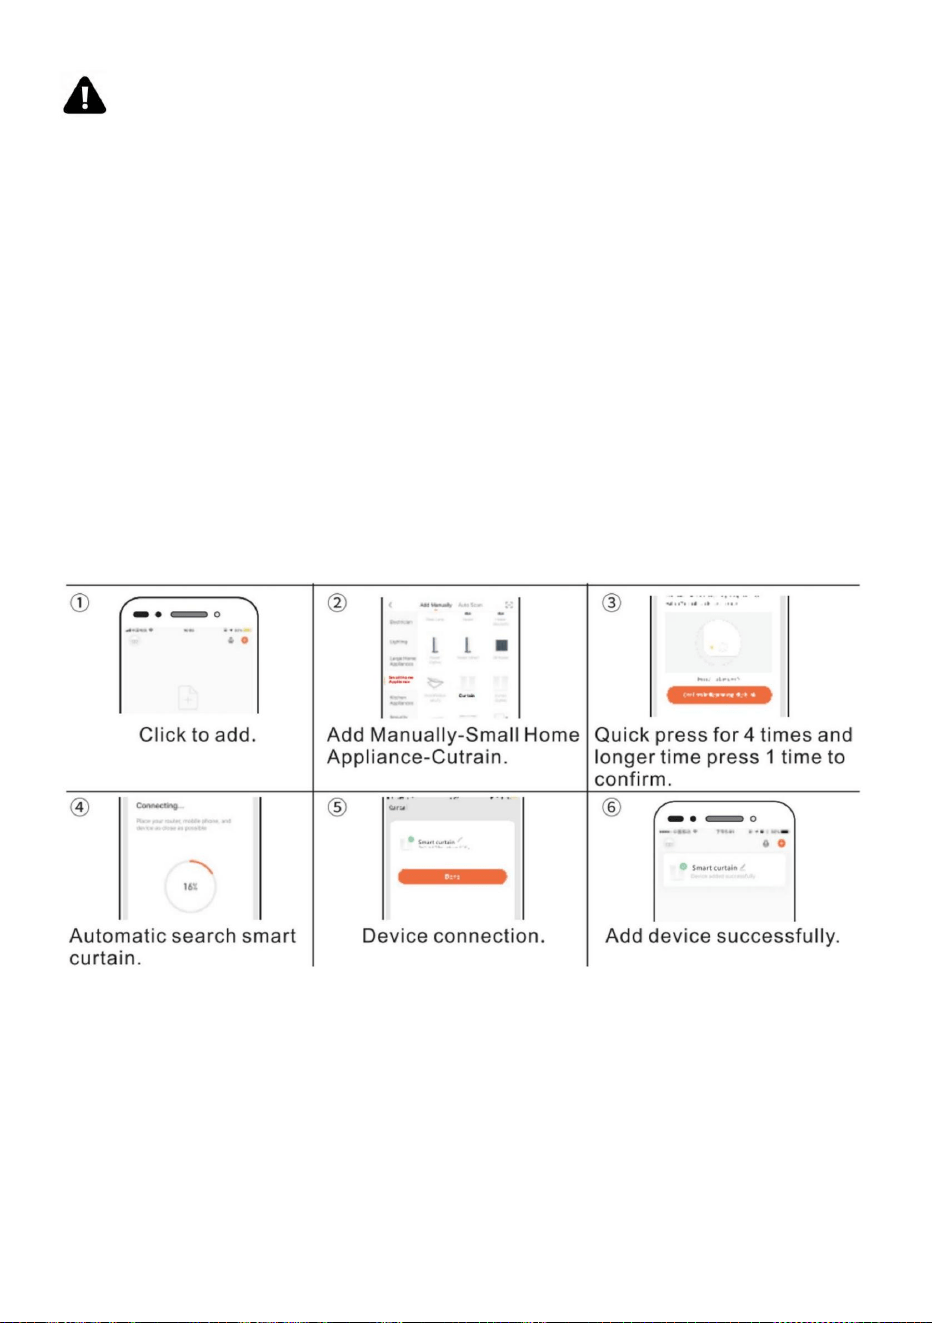
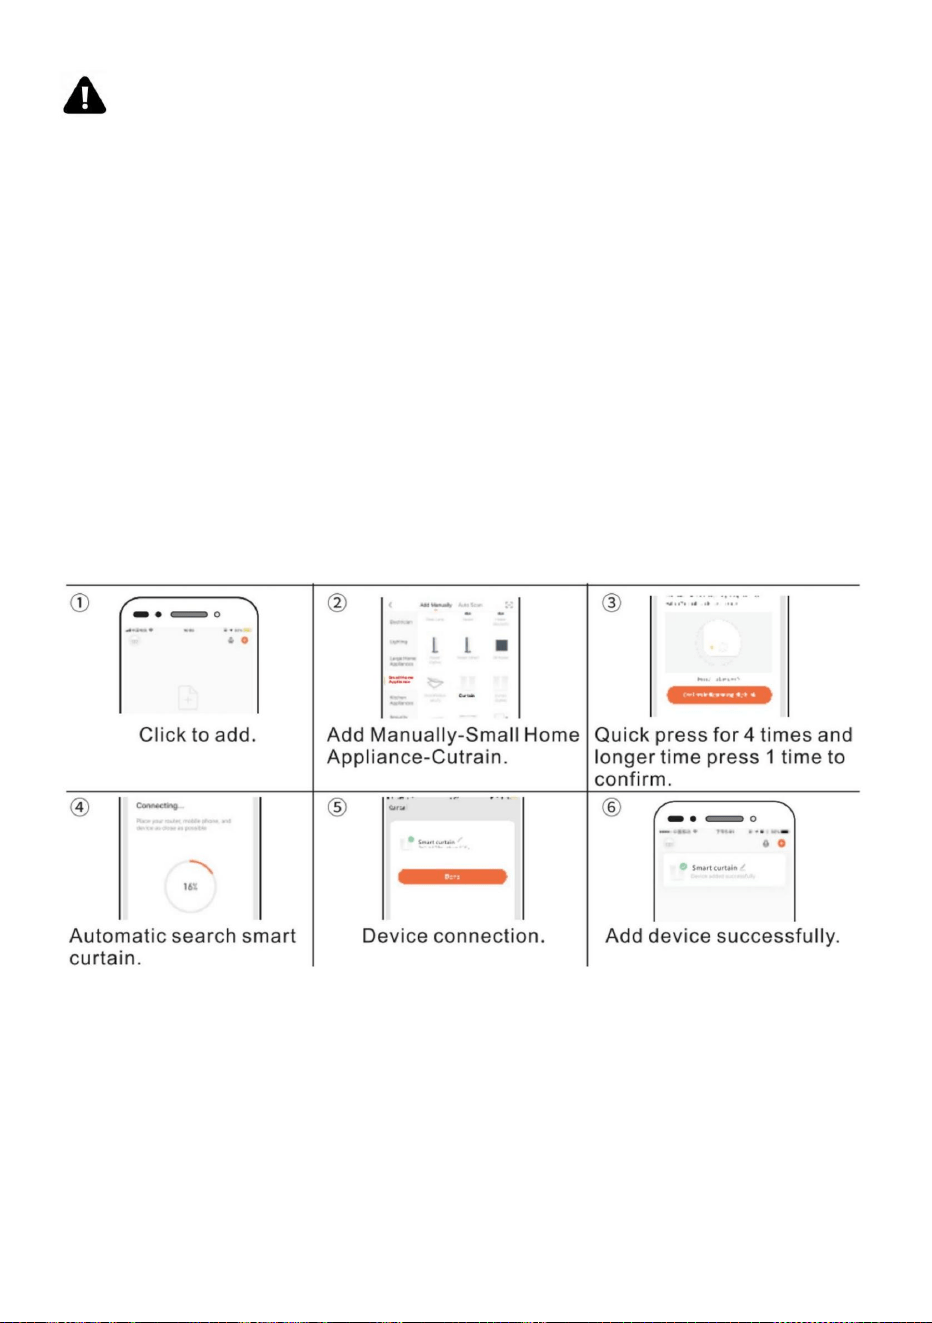
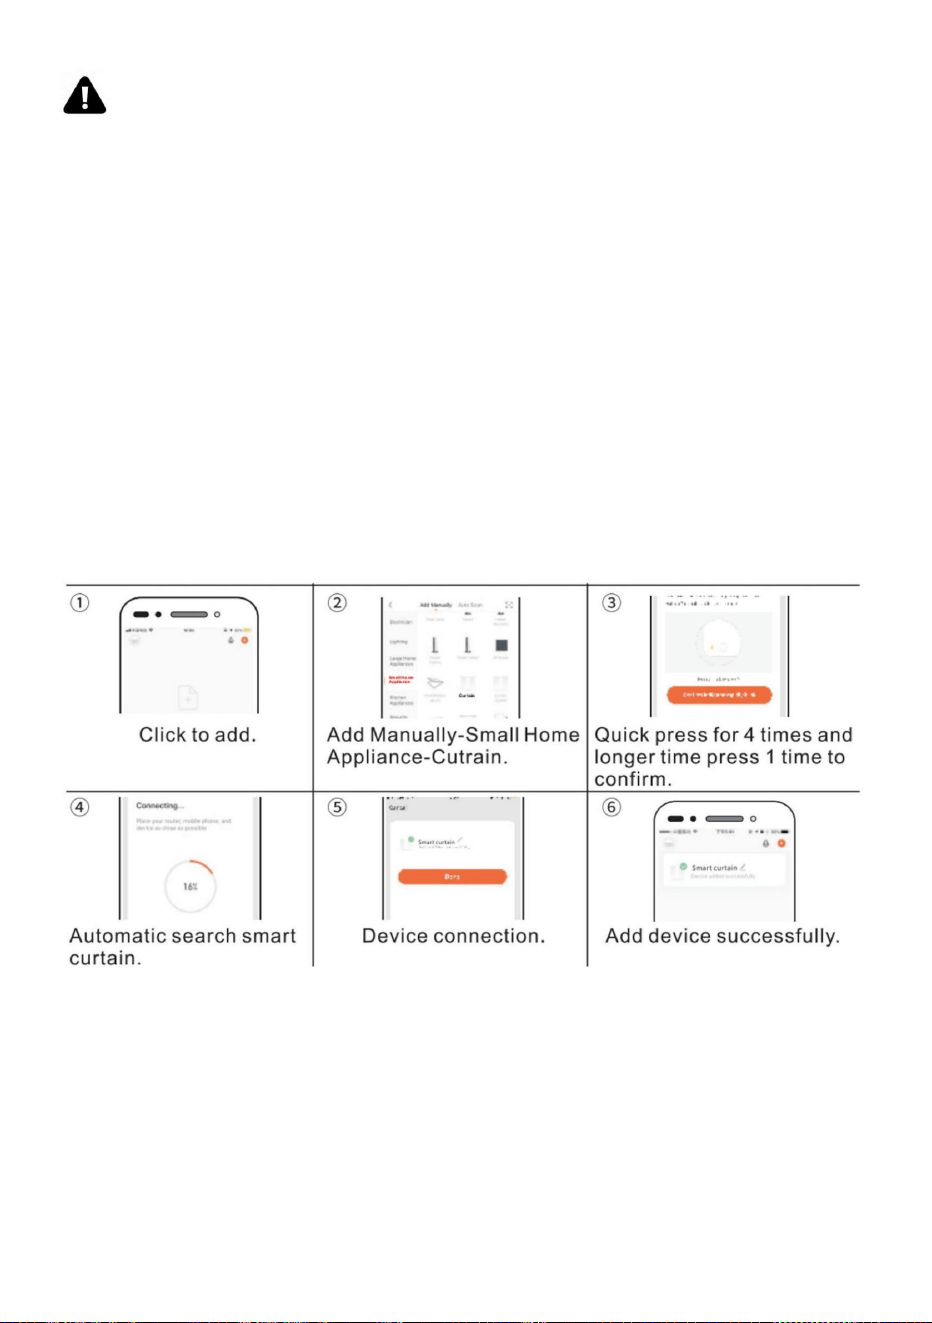
7X\D VPDUW FRQWURO
%DVLF RSHUDWLRQ
6HW RSHQ VWRS FORVH DQG DSSRLQWHG SHUFHQW SRVLWLRQ YLD UHPRWH FRQWURO E\
PRELOH 7KH SHUFHQW SRVLWLRQ IHHGEDFN IXQFWLRQ LV QRW DYDLODEOH
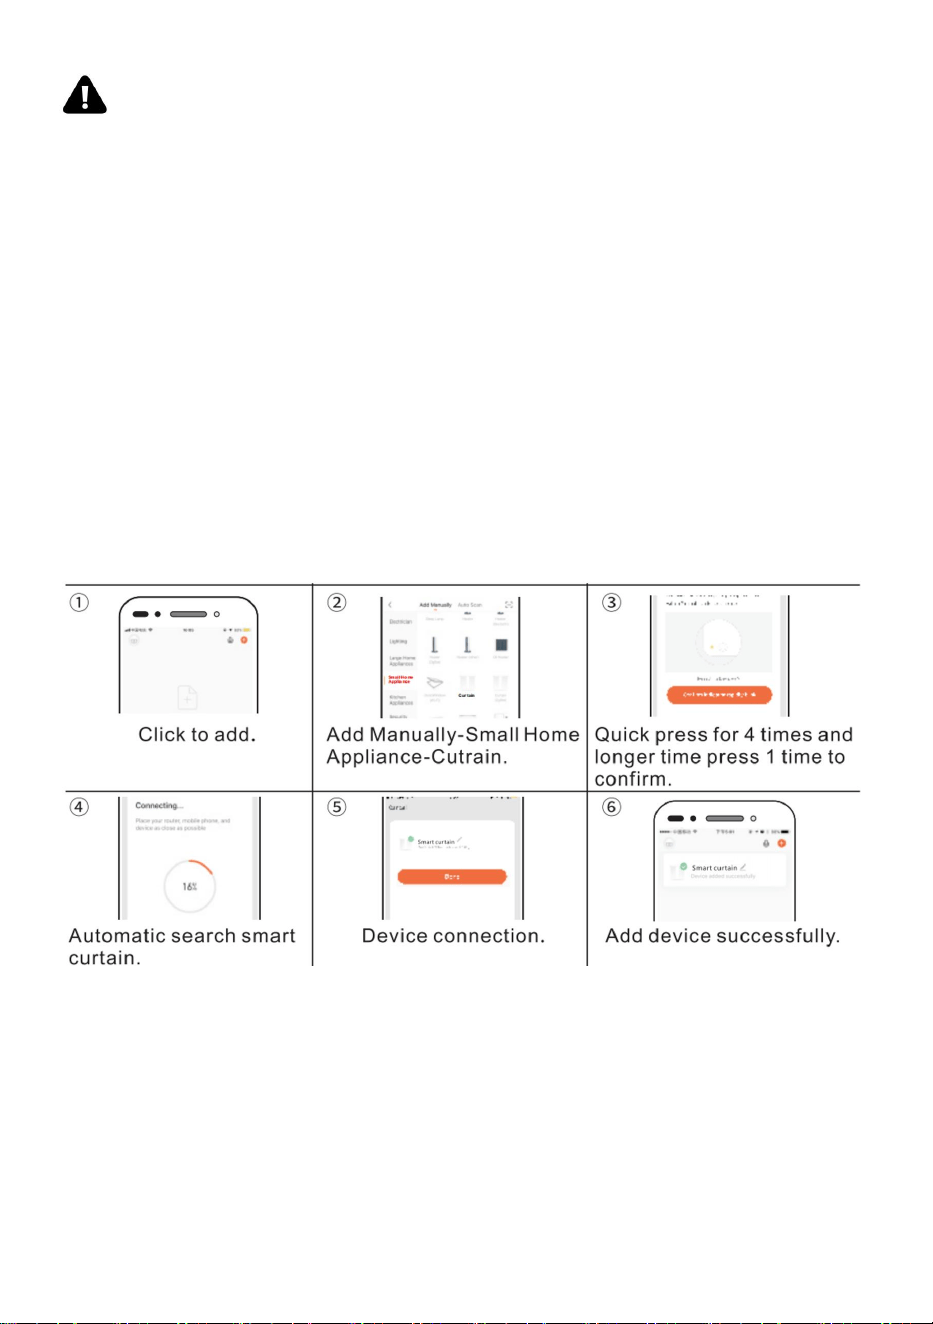
3DLULQJ QHW VHWWLQJ
7HOHVFRSLF UDLO
0RGHO 3
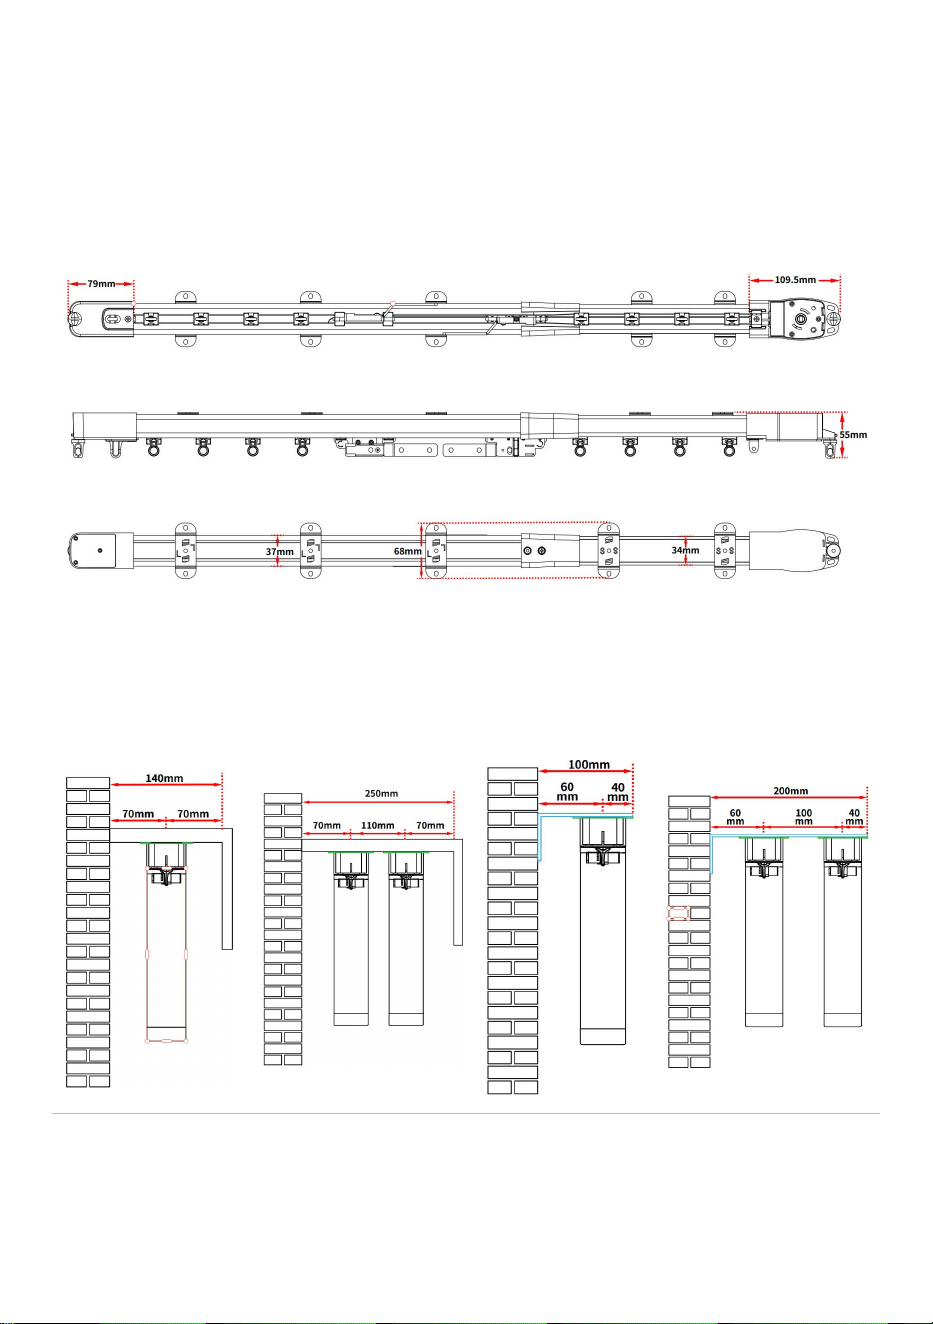
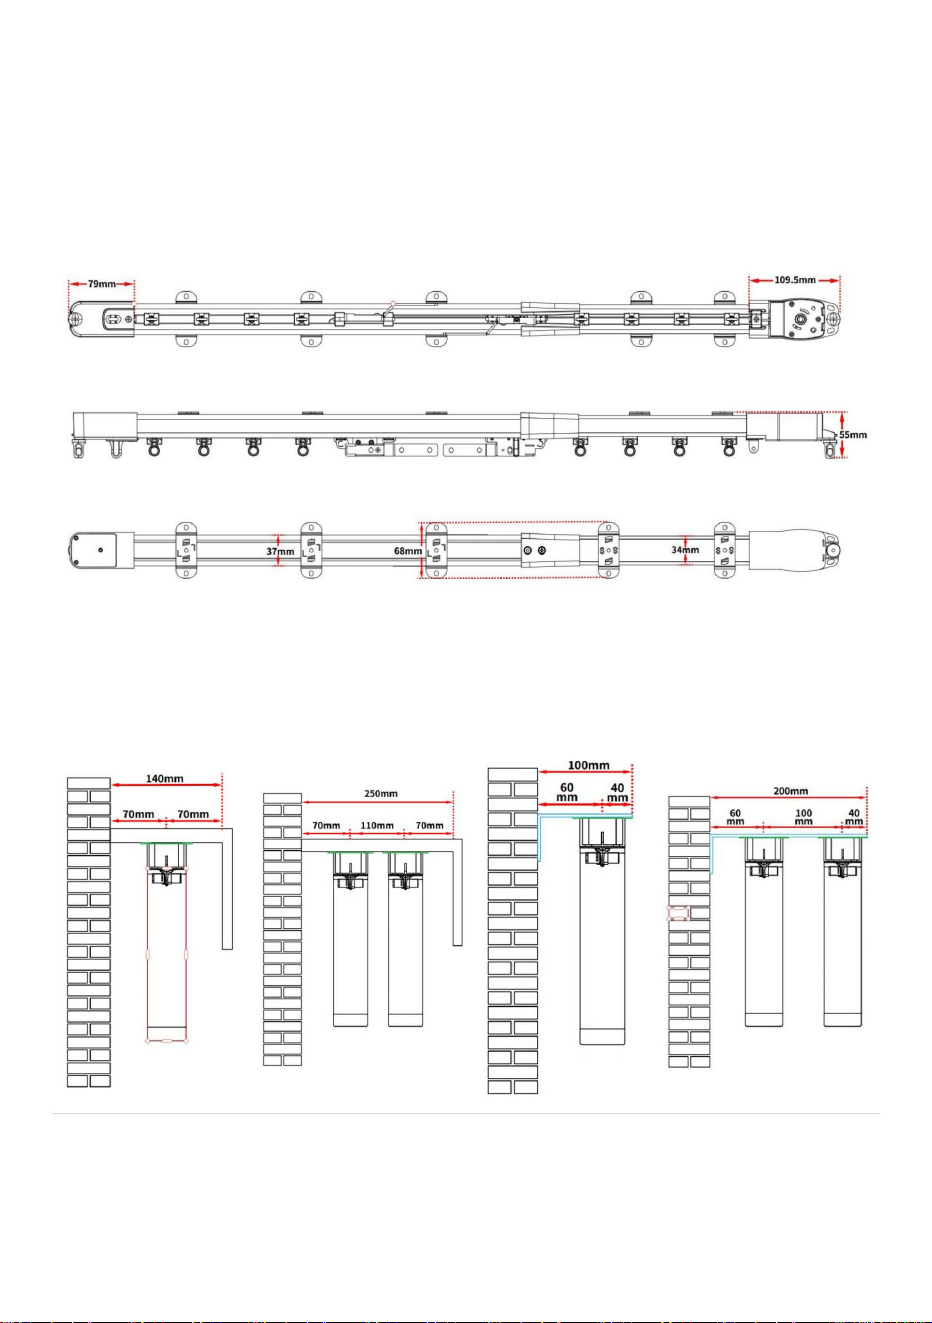
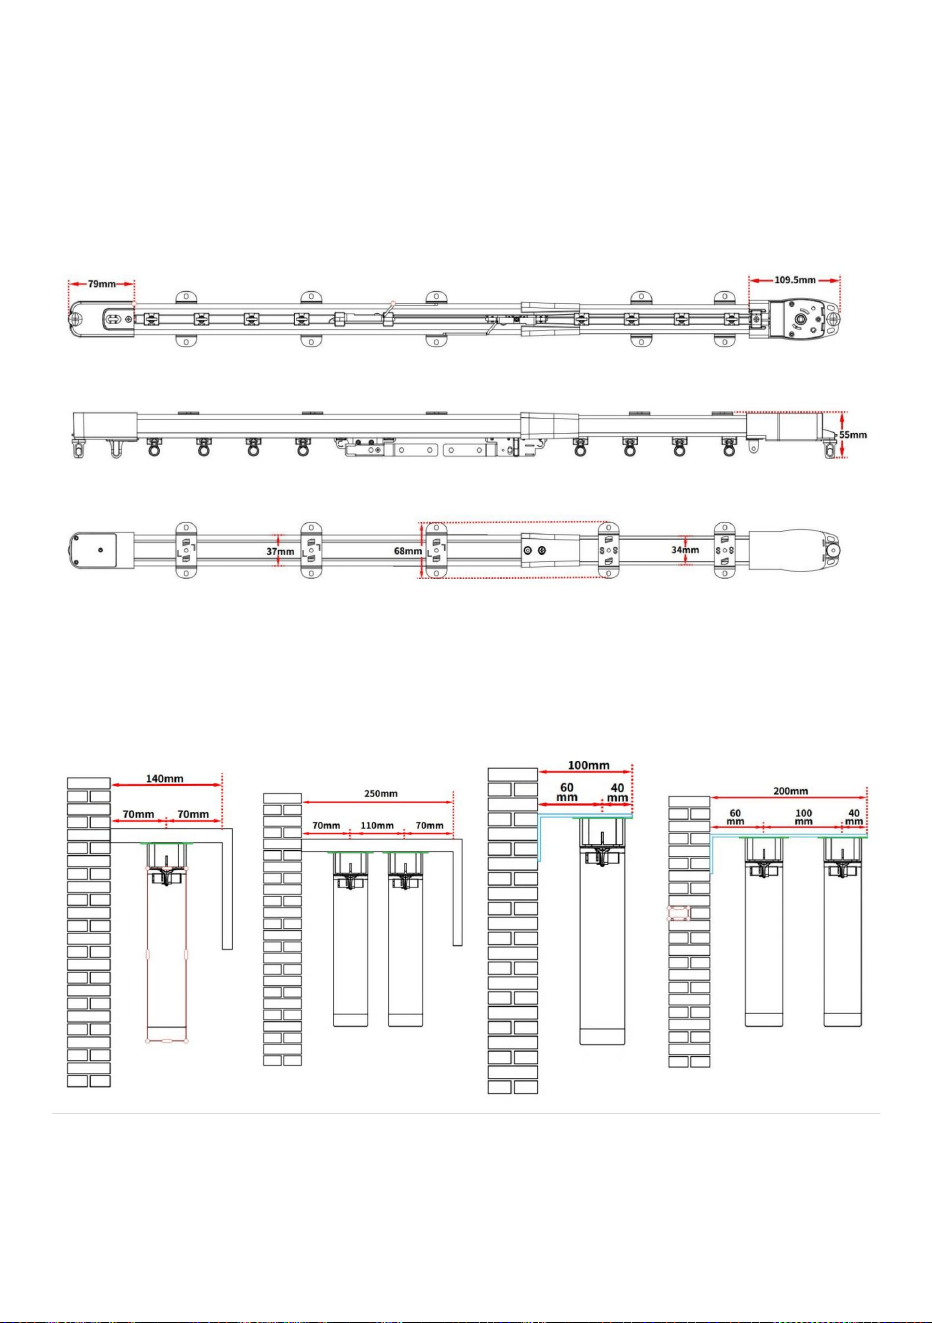
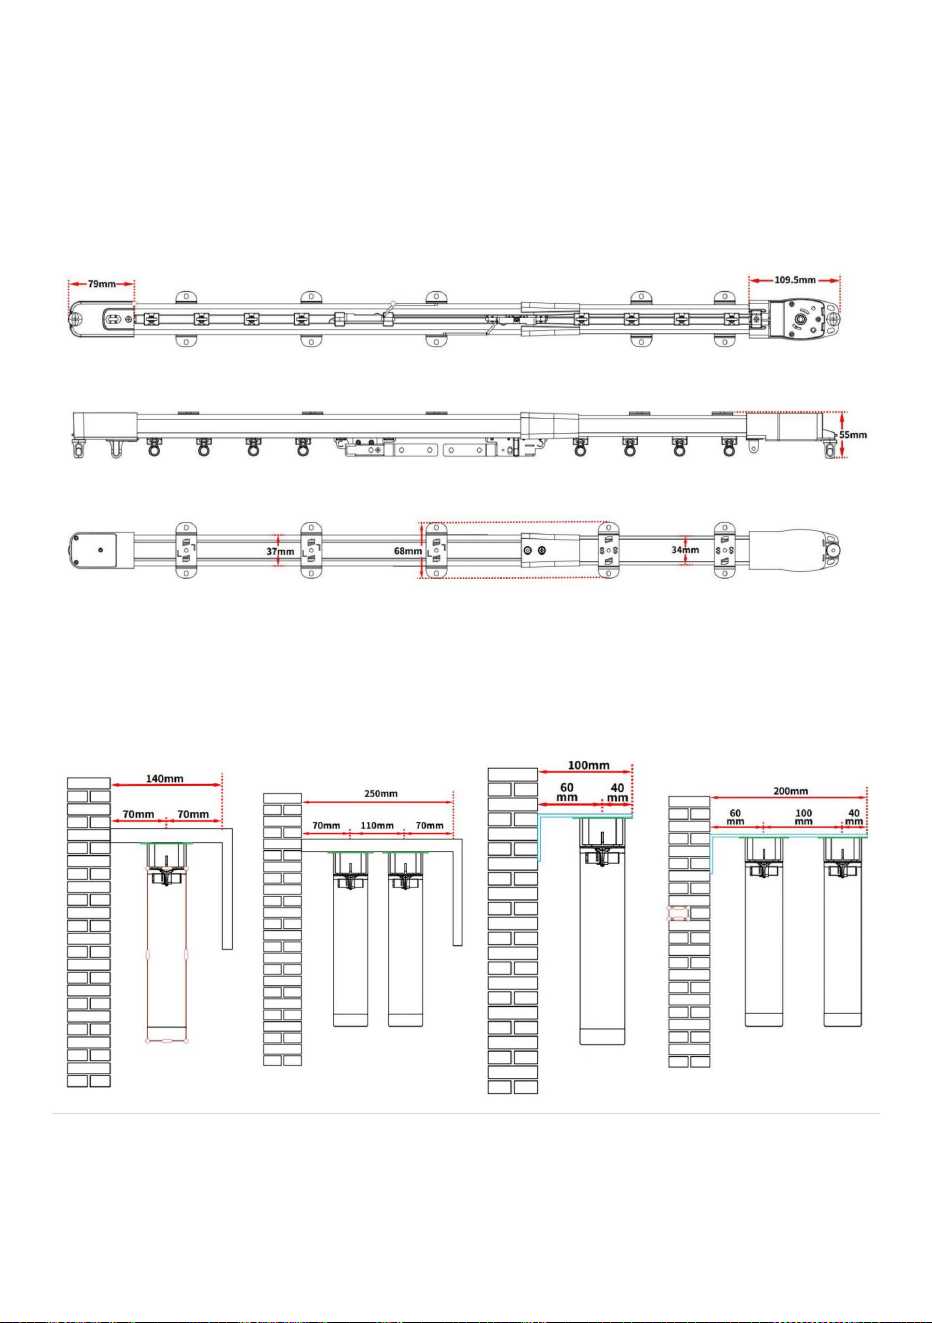
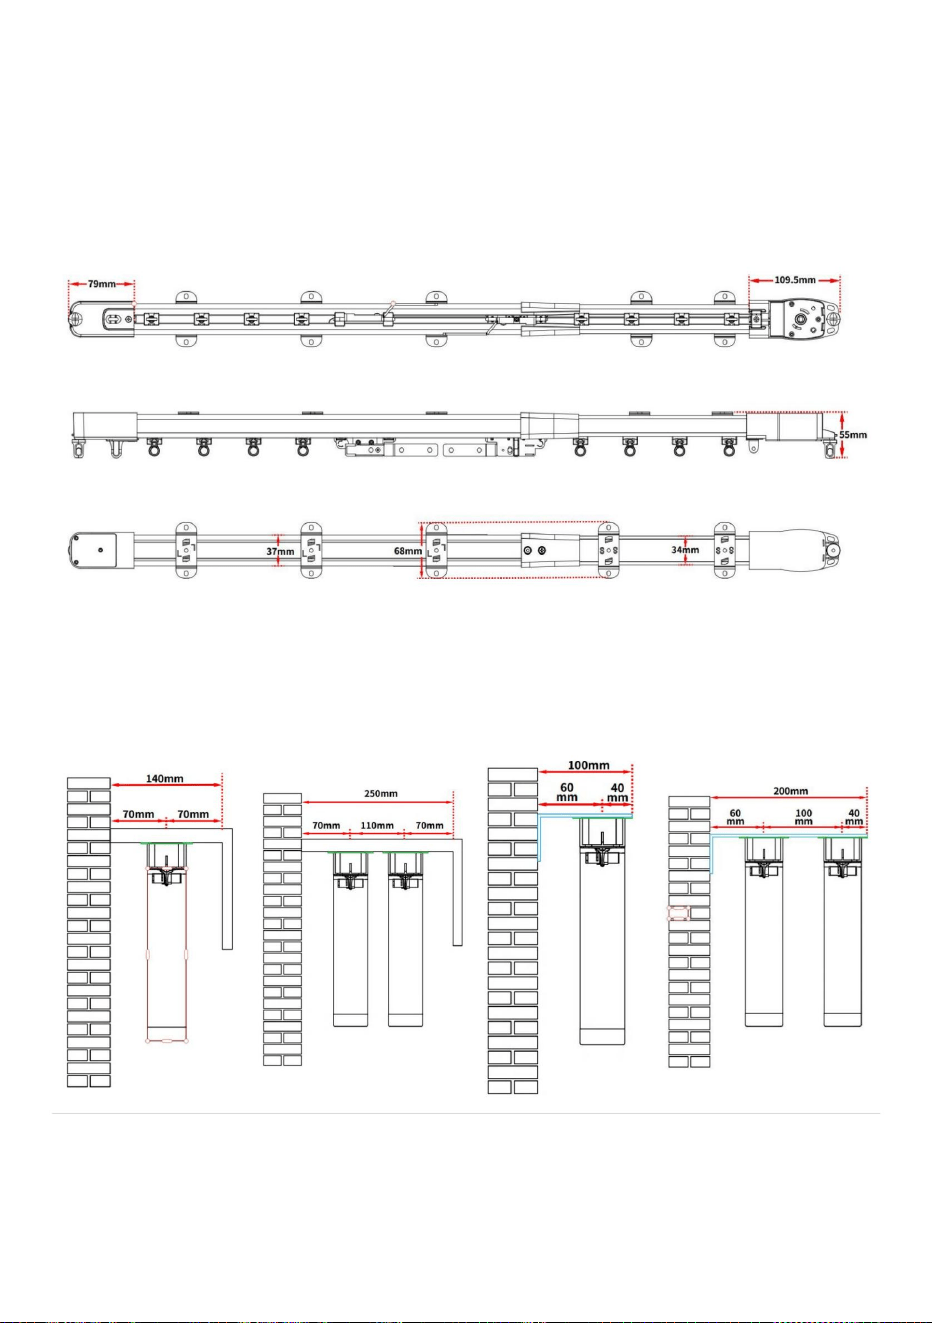
3DUDPHWHUV DQG &RQILJXUDWLRQ
'LPHQVLRQ UDQJH
PP
,QVWDOO GLPHQVLRQ
6LQJOH 5DLO &HLOLQJ
0RXQW
'RXEOH 5DLO &HLOLQJ
0RXQW
6LQJOH 5DLO 6LGH
0RXQW
'RXEOH 5DLO 6LGH 0RXQW
/HQJWK $GMXVWPHQW ,QVWDOODWLRQ 6WHSV
1RWH 7KH DGMXVWPHQW DQG LQVWDOODWLRQ SURFHGXUHV DUH EDVHG RQ WKH GULYHER[ PRGHO ,QVWDOODWLRQ DQG
GHEXJJLQJ VWHSV DUH FRQVLVWHQW DFURVV PRGHOV
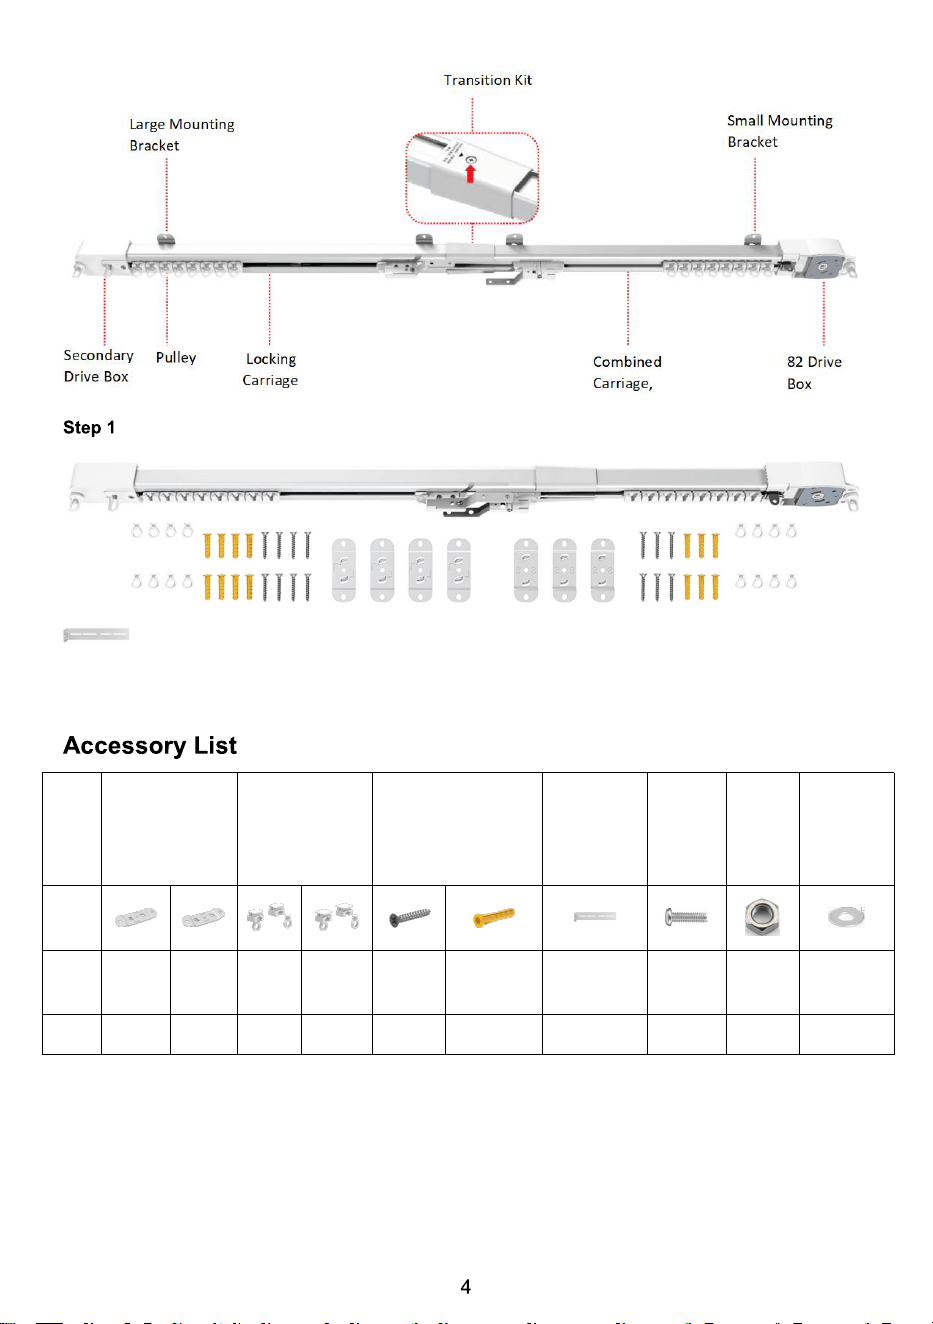
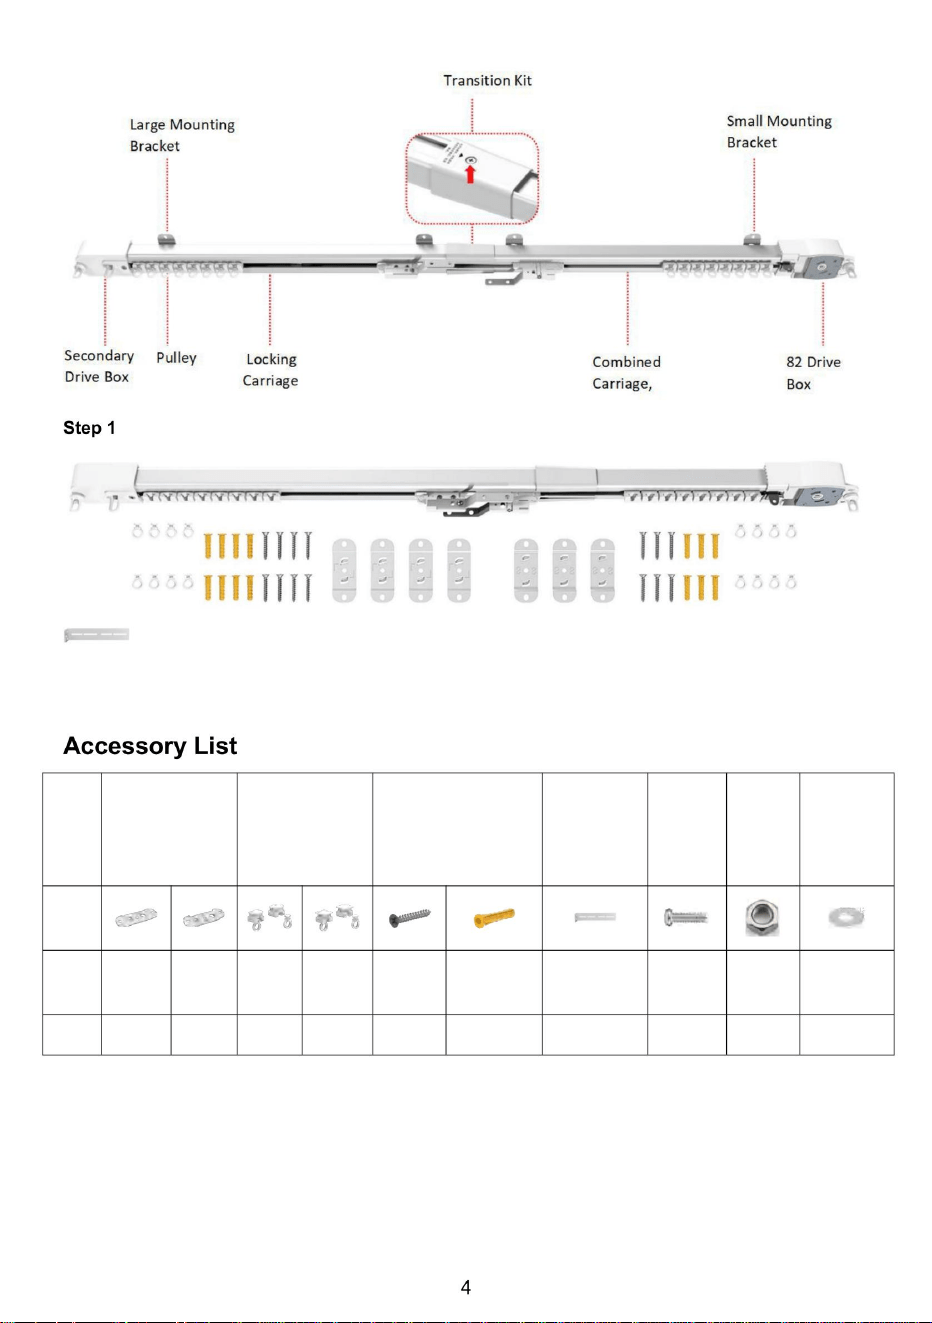
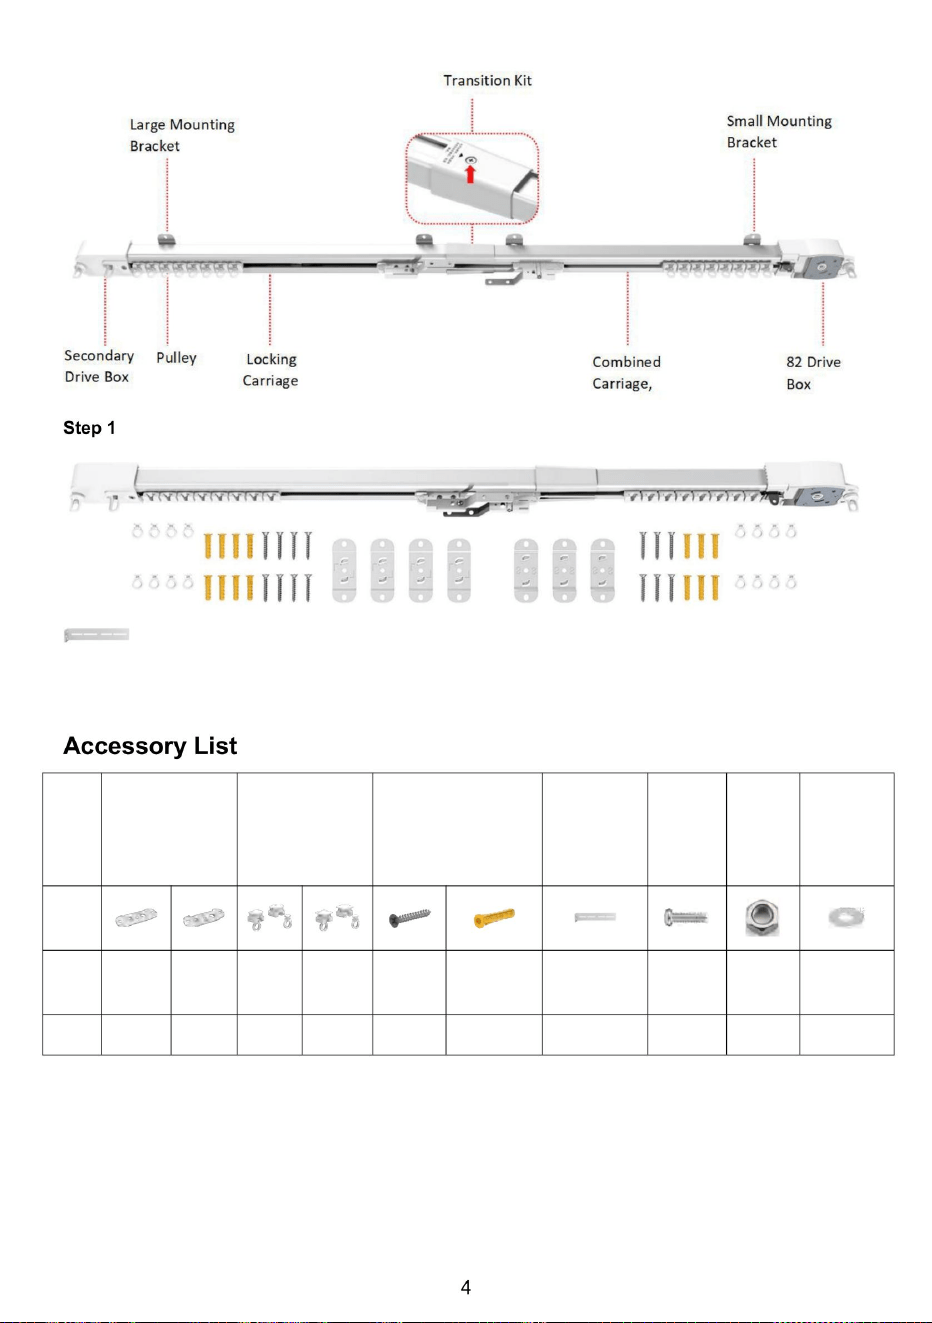
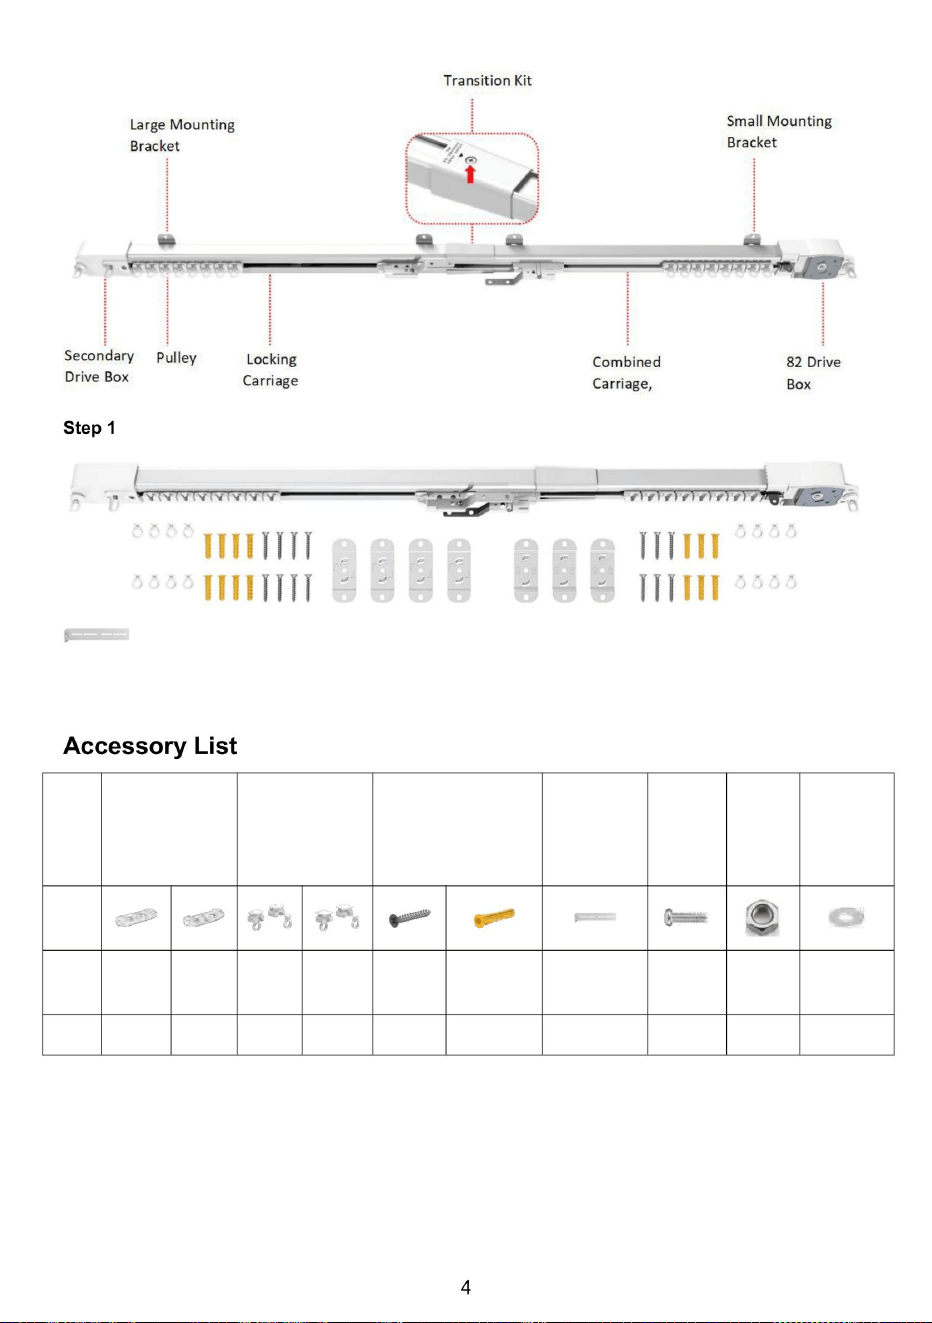
Note:
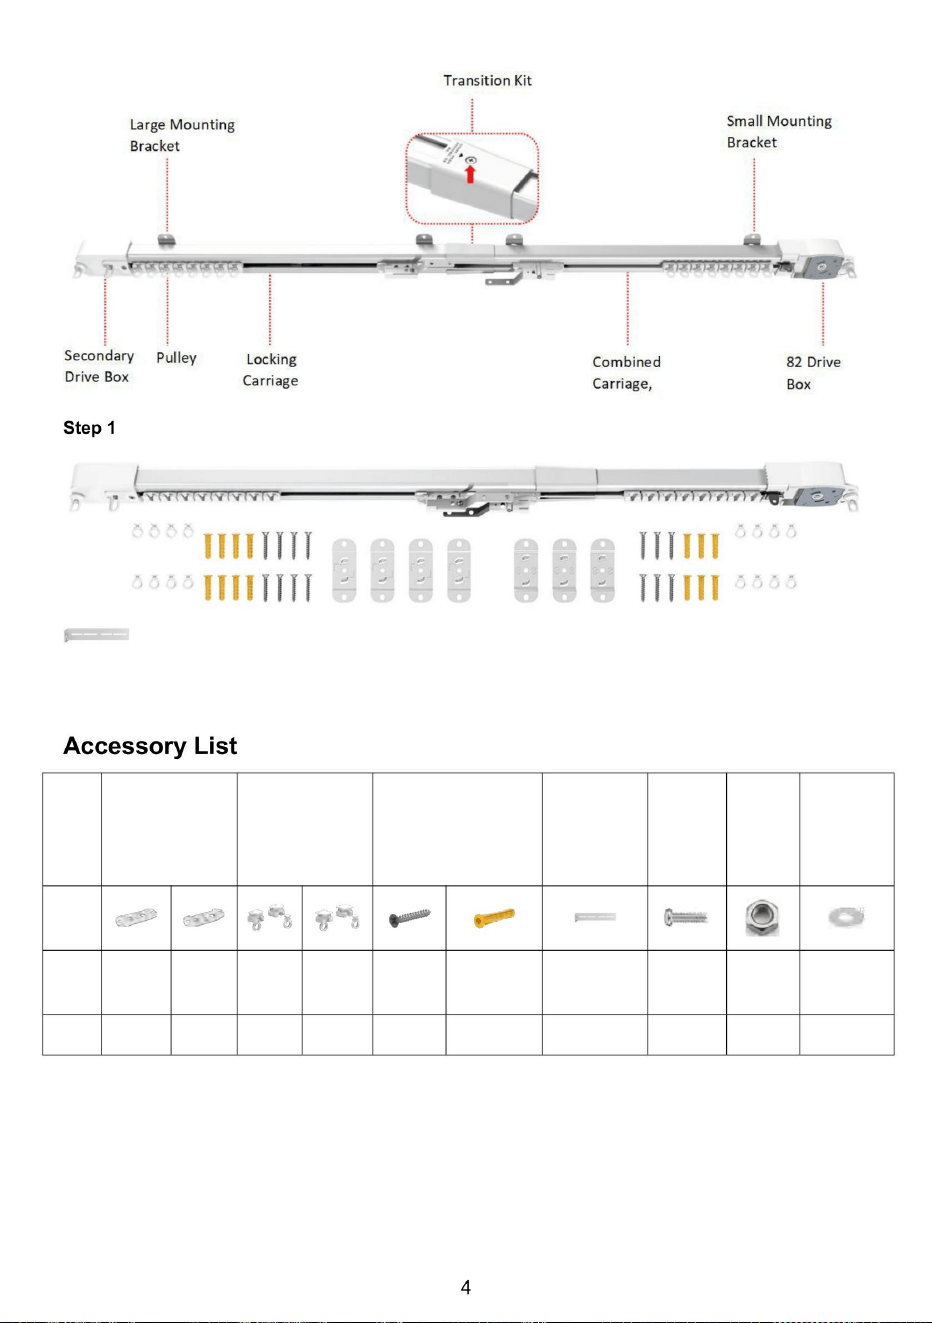
1、Check the packaging and ensure all components are present.
2、For ease of installation, the pulleys may have already been installed on the track.
3、You don’t need to install all the side code accessories.It depends on the the actual situation.
Name
Mounting
Brackets
Pulleys
Install screws
Side code
accessorie
s
screws
nuts
washers
Photo
detail
Large
Small
Large
Small
tapping
screw
Expansion
nail
Qty
6
4
12
12
20
20
10
20
20
20
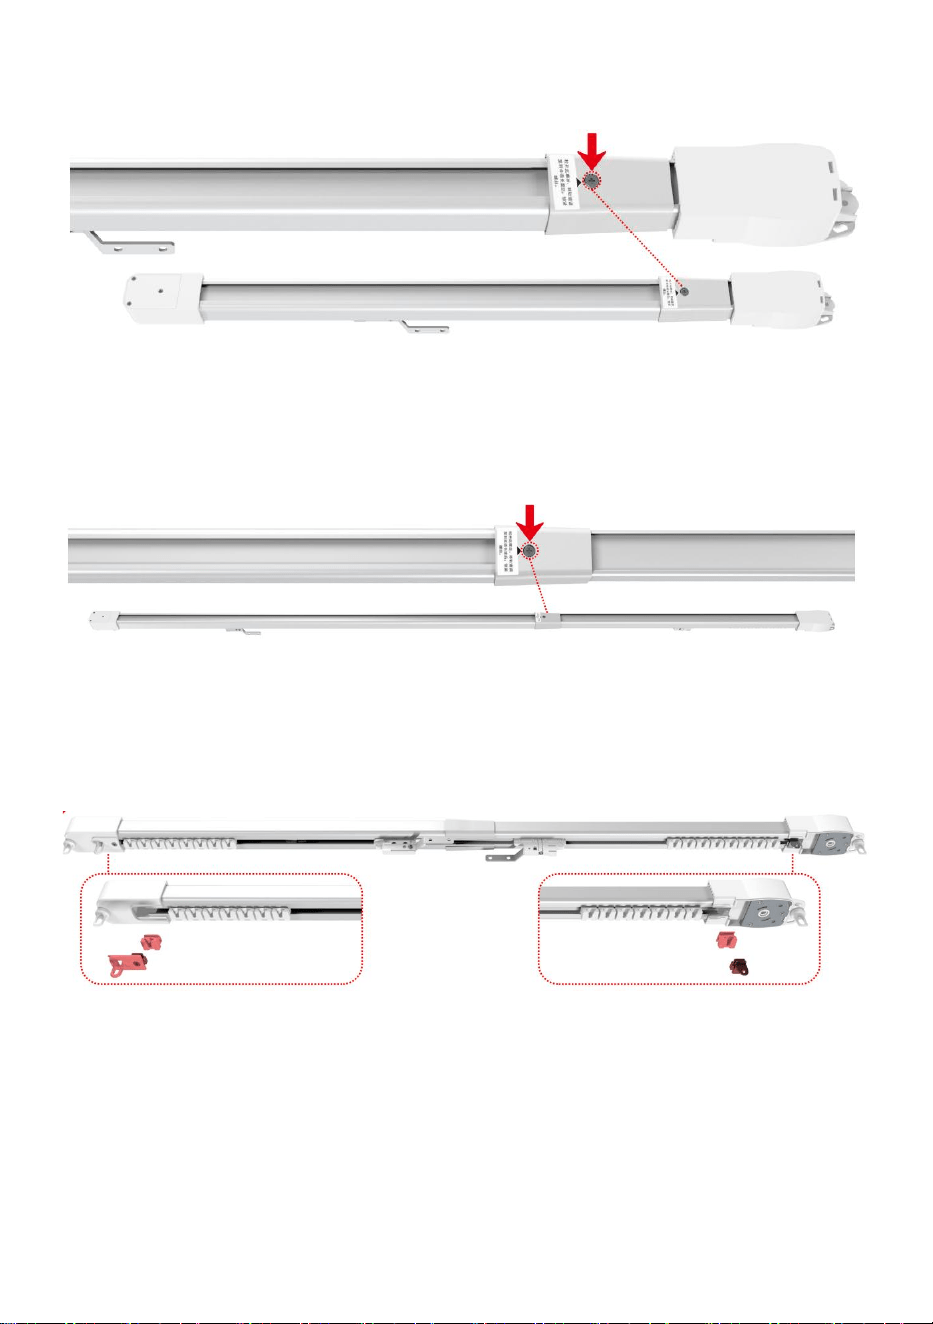
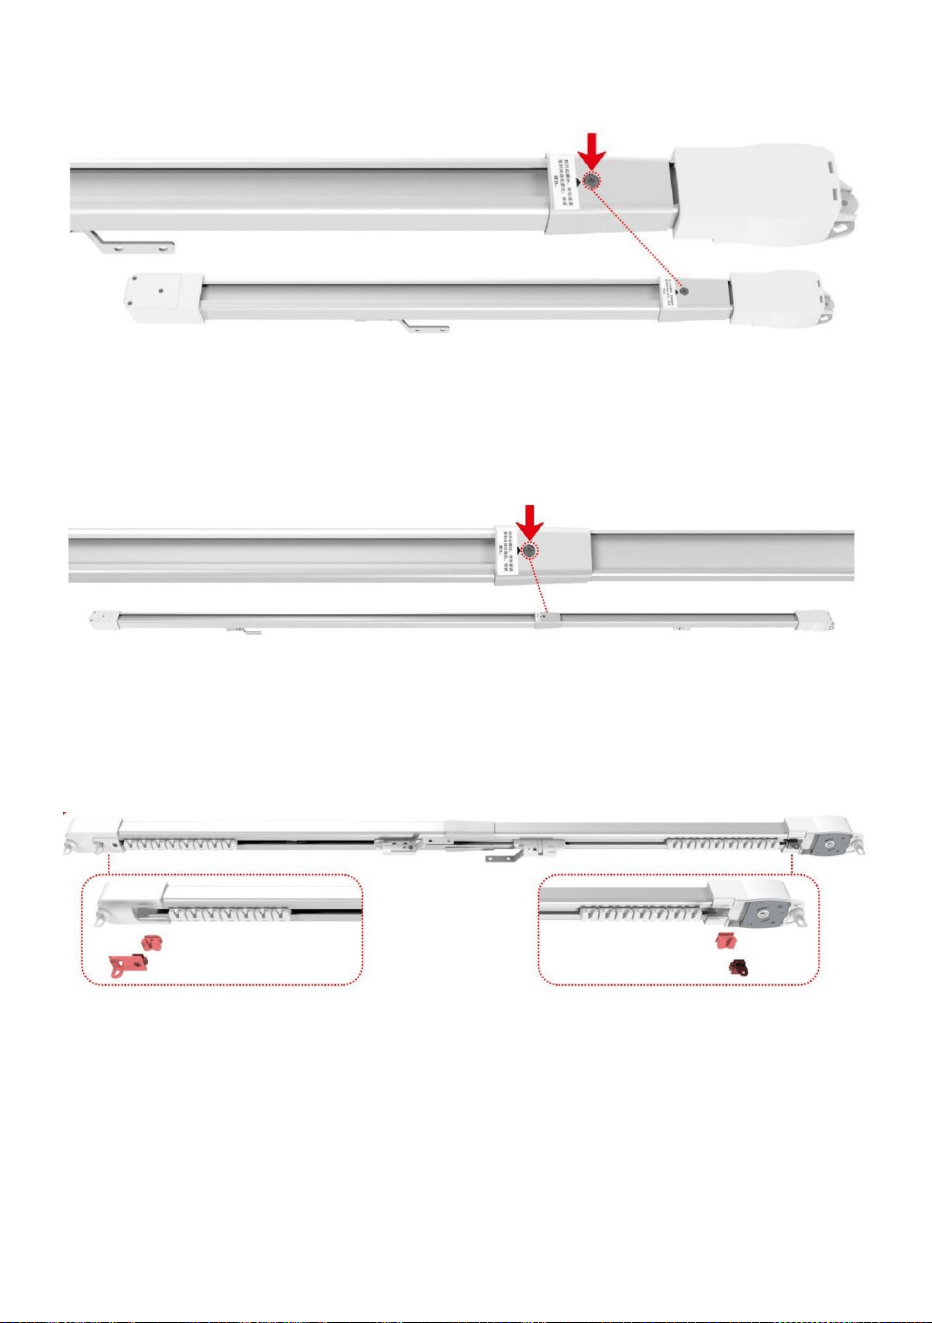
6WHS
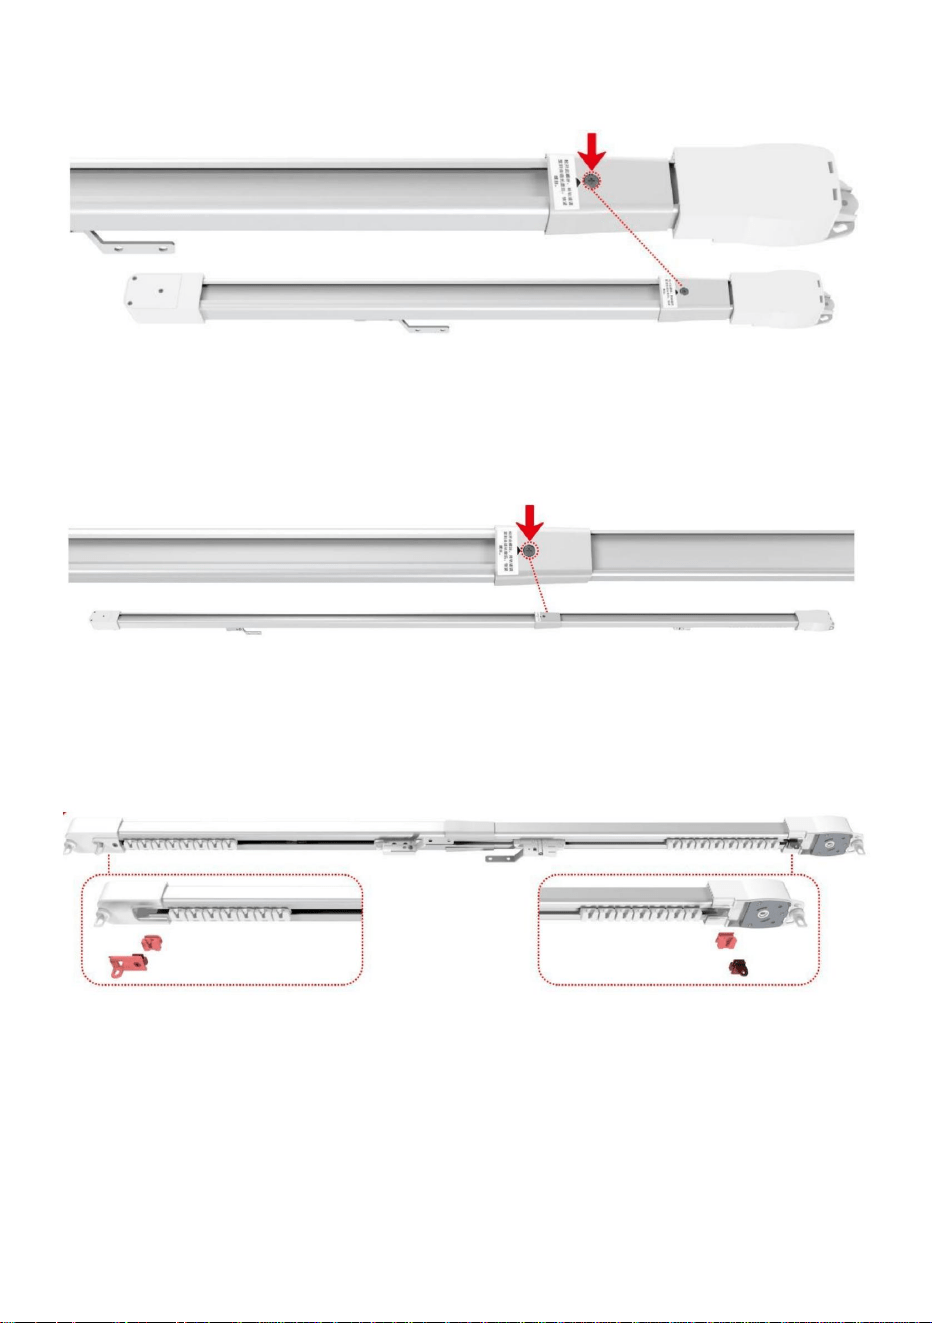
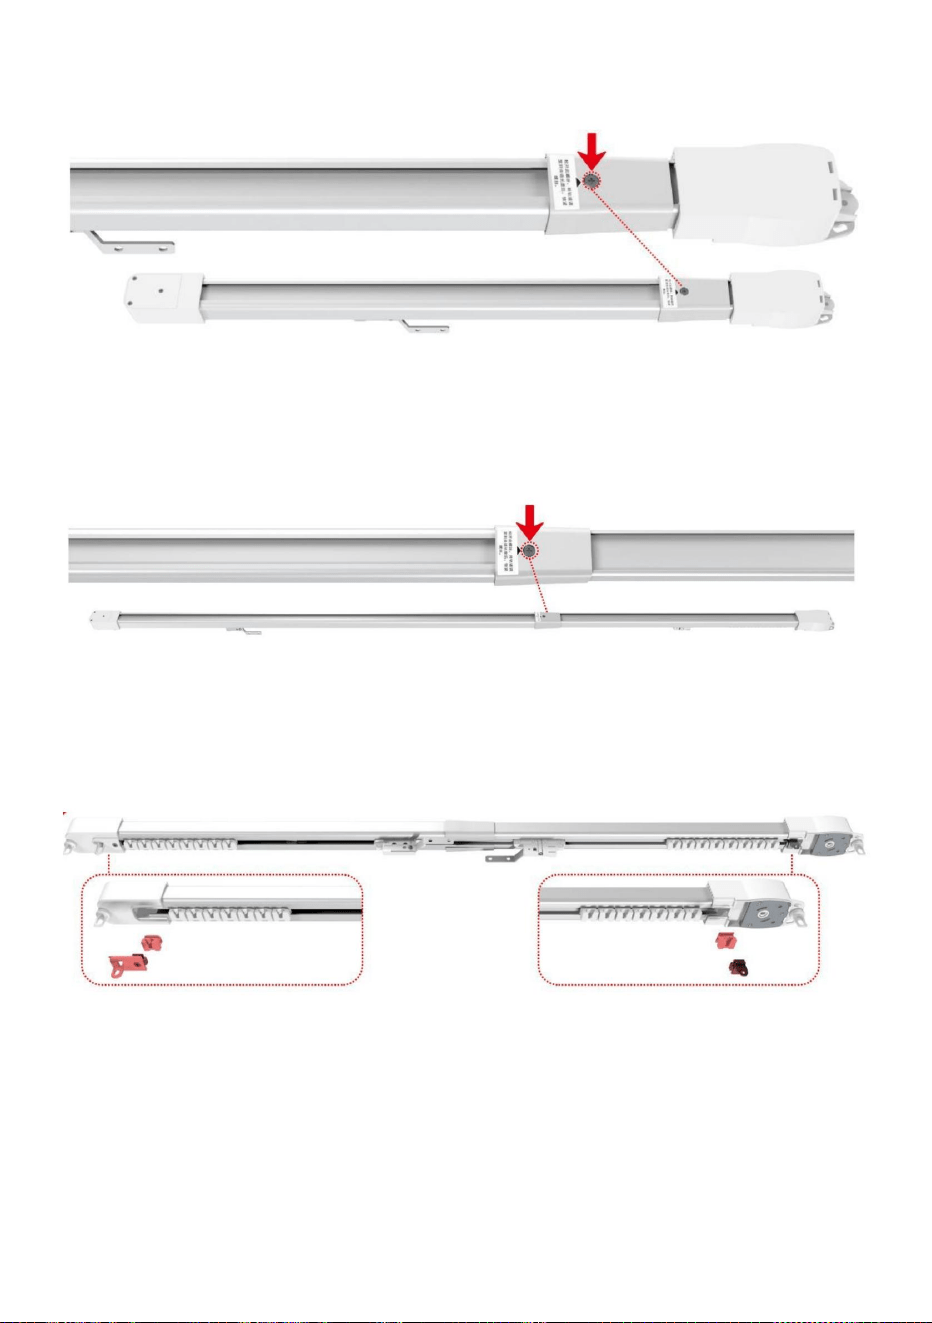
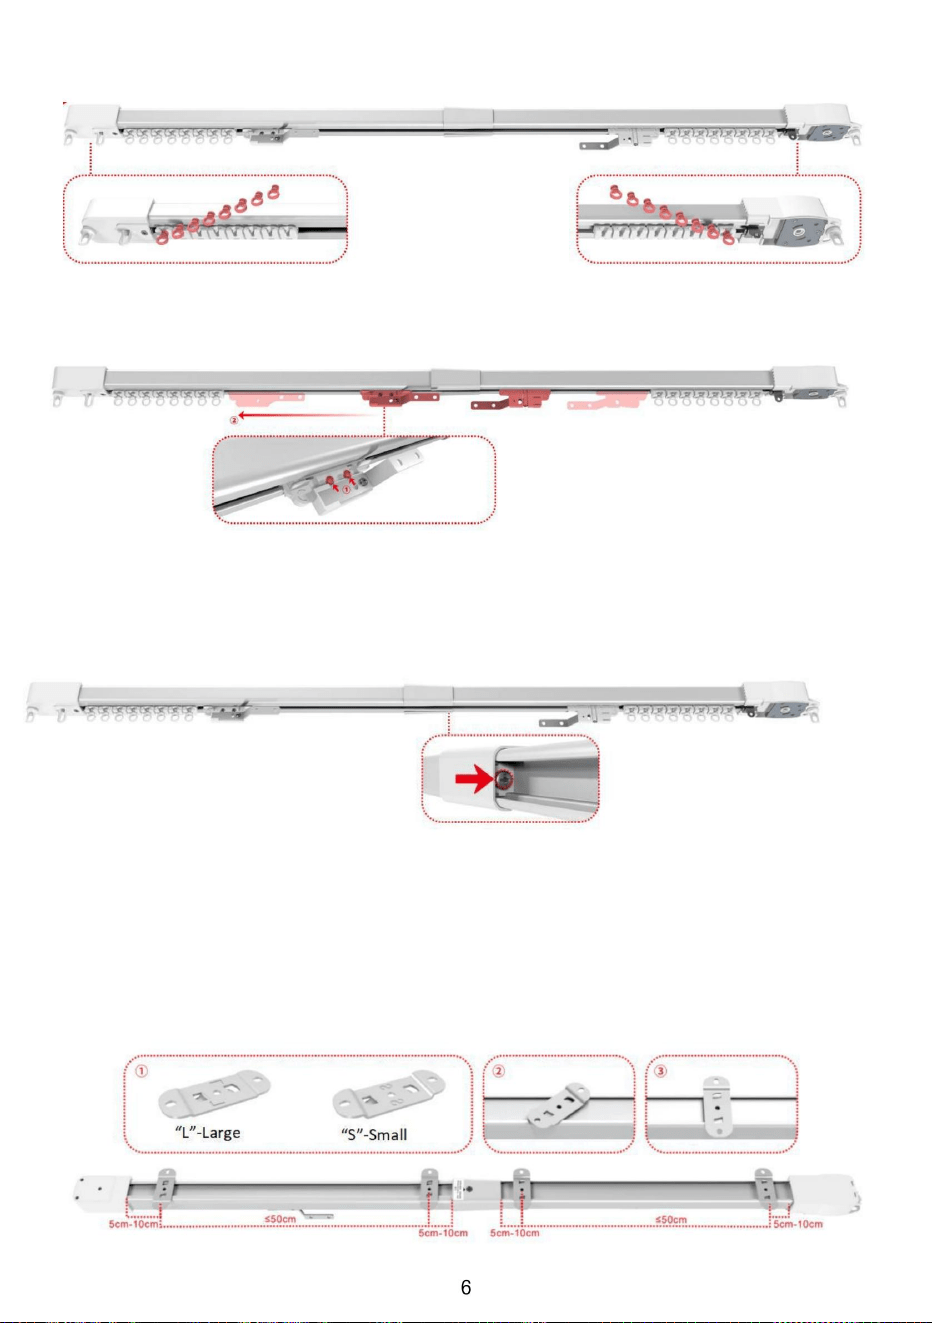
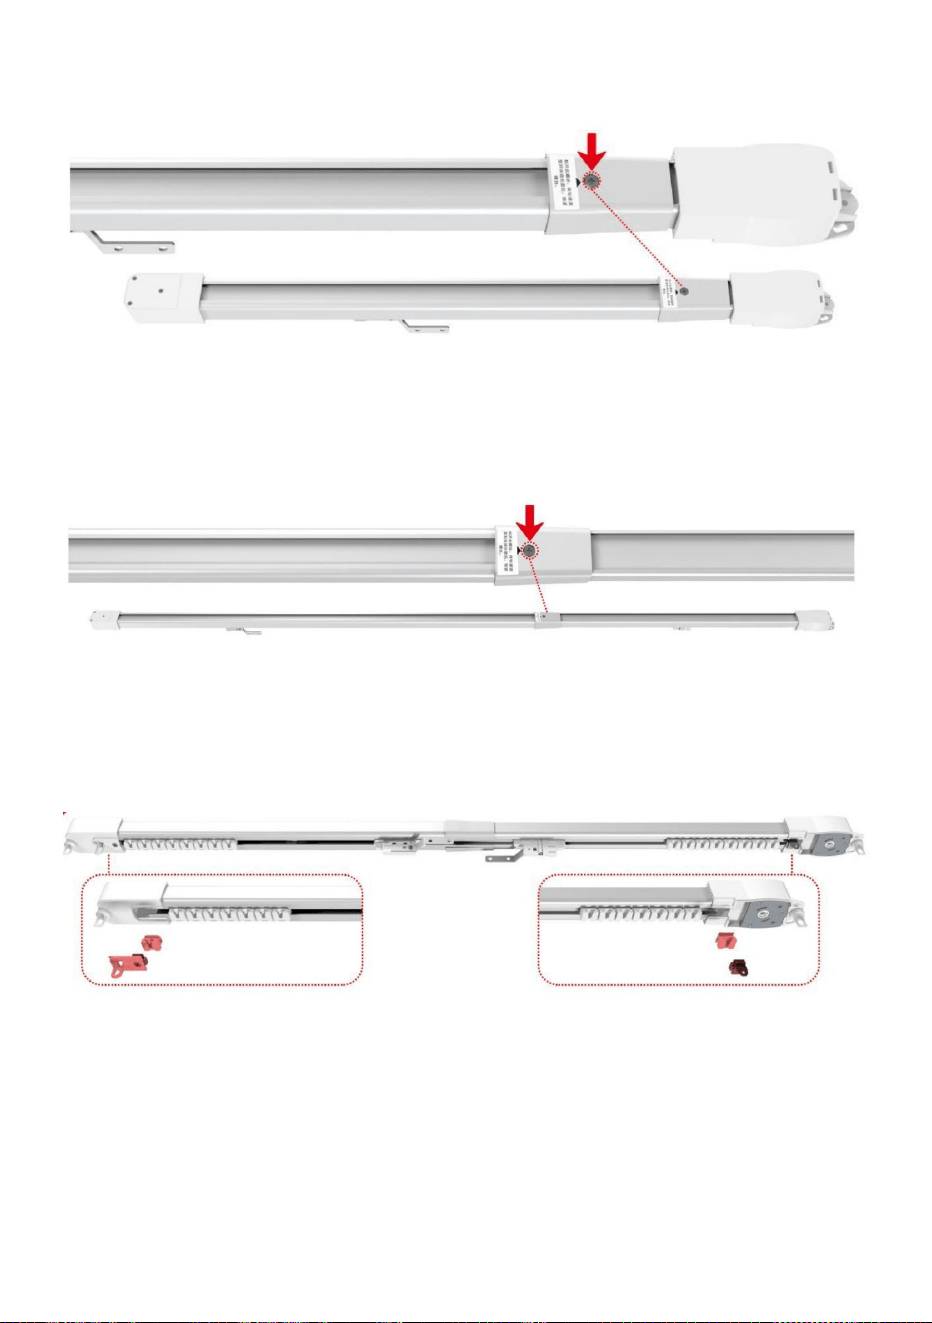
/HQJWK $GMXVWPHQW /RRVHQ WKH FURVVVKDSHG VFUHZ RQ WKH WUDQVLWLRQ NLW +ROG ERWK HQGV RI WKH UDLO
DQG H[WHQG WR WKH GHVLUHG OHQJWK OHDYH DSSUR[LPDWHO\ FP EHWZHHQ WKH GULYH ER[ DQG WKH ZDOO
6WHS 7LJKWHQ WKH FURVVVKDSHG VFUHZ RQ WKH WUDQVLWLRQ NLW WR VHFXUH WKH DGMXVWHG OHQJWK
6WHS $GMXVW 3XOOH\ 4XDQWLW\ 5HPRYH WKH GULYH ER[ FRYHU WR DGG RU UHPRYH SXOOH\V(QVXUH WKH
QXPEHU RI SXOOH\V RQ ERWK VLGHV RI WKH UDLO PDWFKHV WKH QXPEHU RI FXUWDLQ KRRNV
6WHS ,QVWDOO 3XOOH\ 5LQJV$OLJQ WKH SXOOH\ ULQJ ZLWK WKH 9VKDSHG JURRYH RQ WKH VOLGHU DQG SUHVV WR
ORFN LQWR SODFH
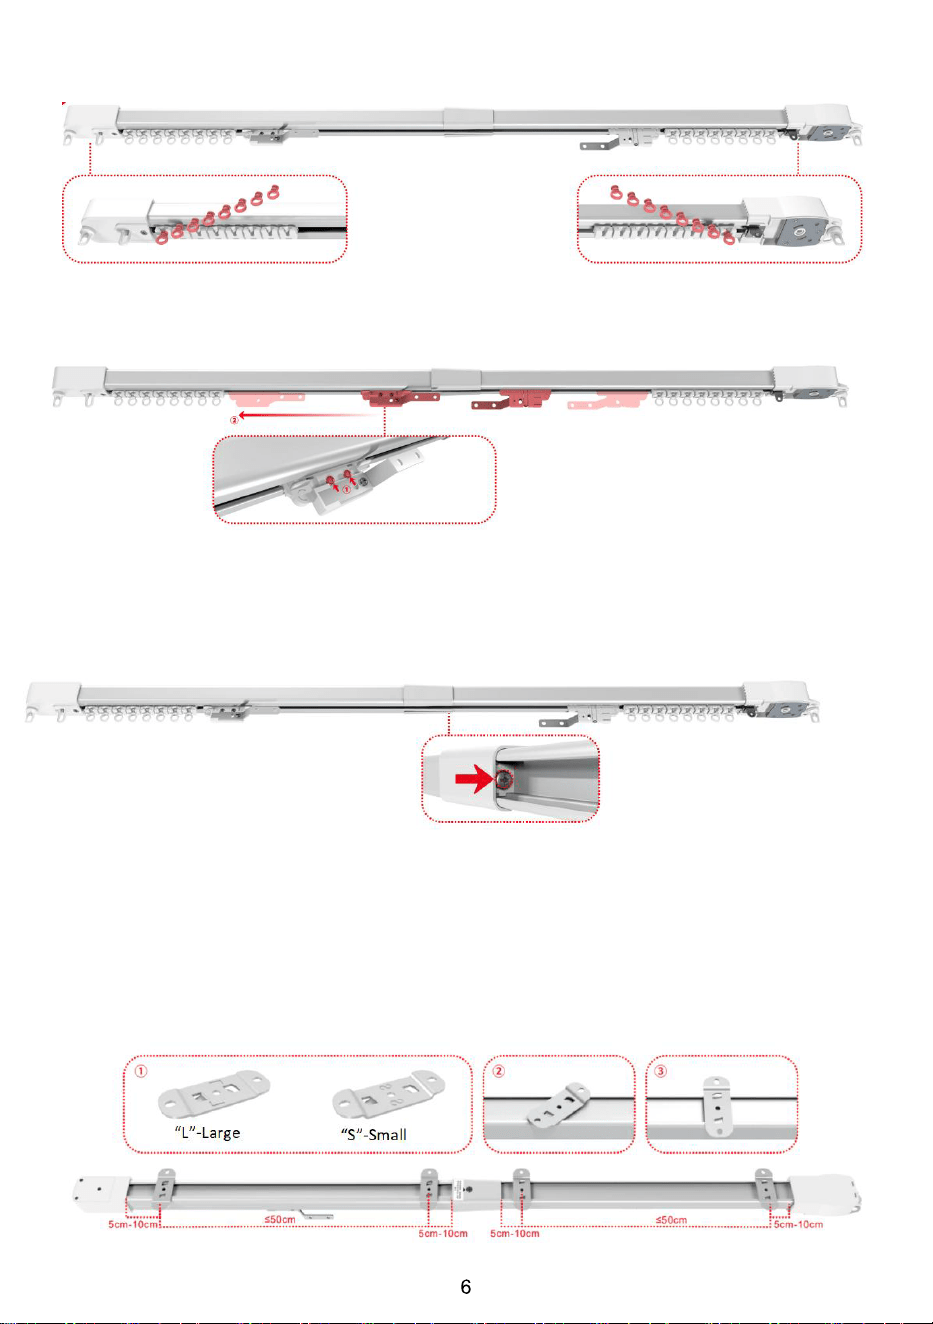
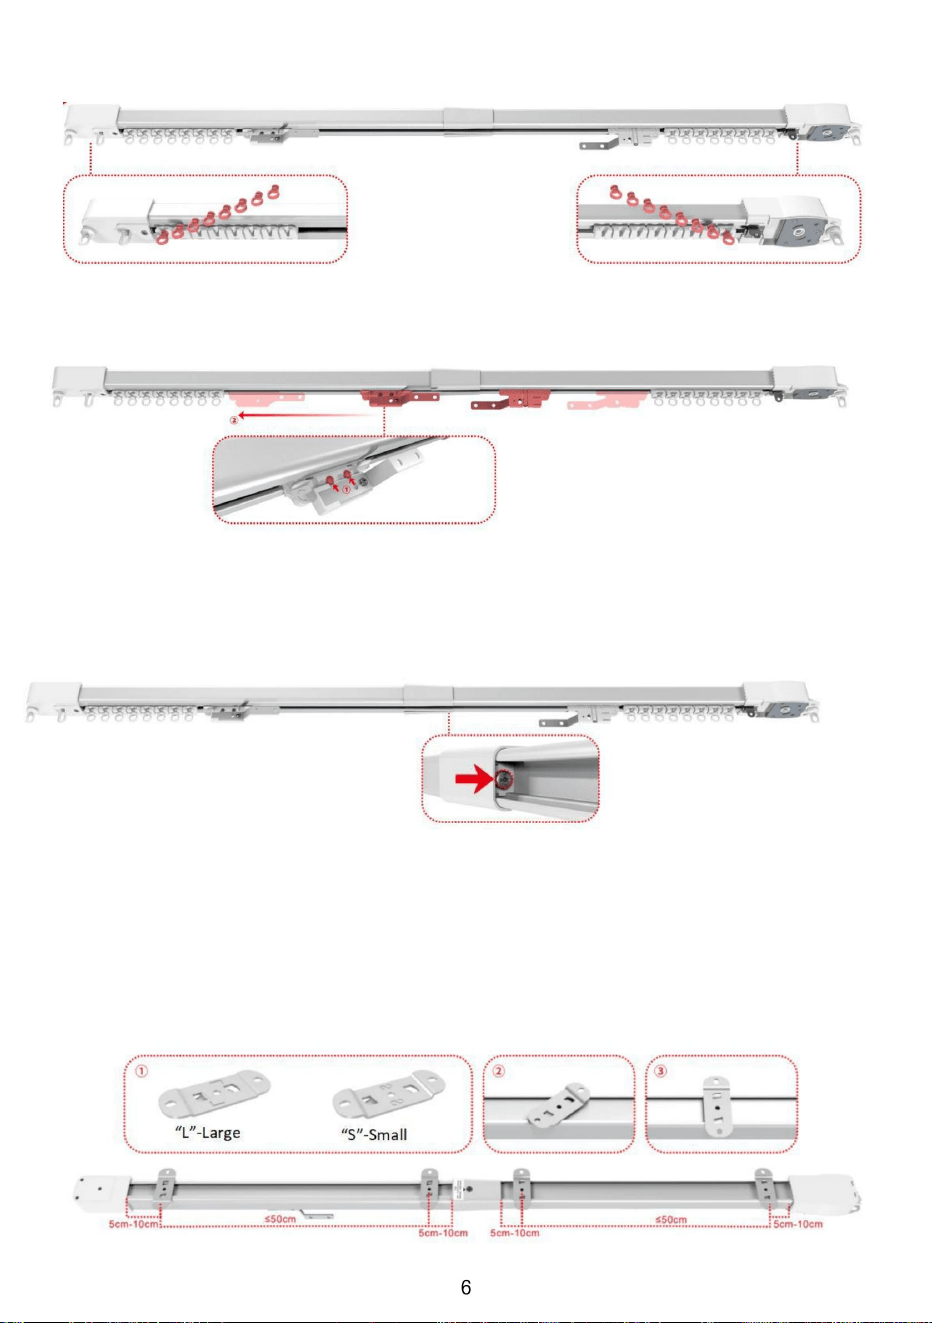
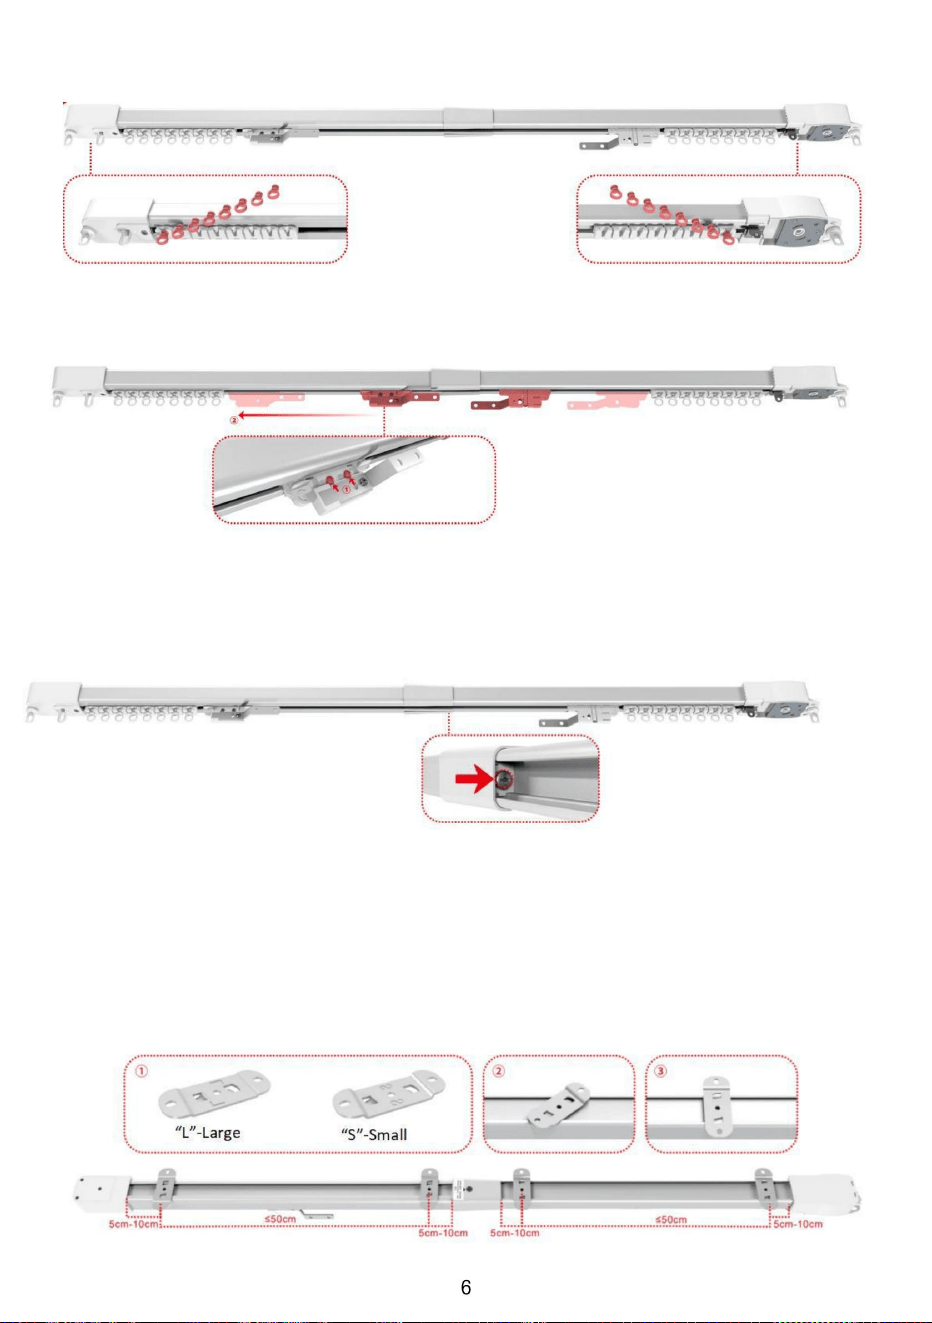
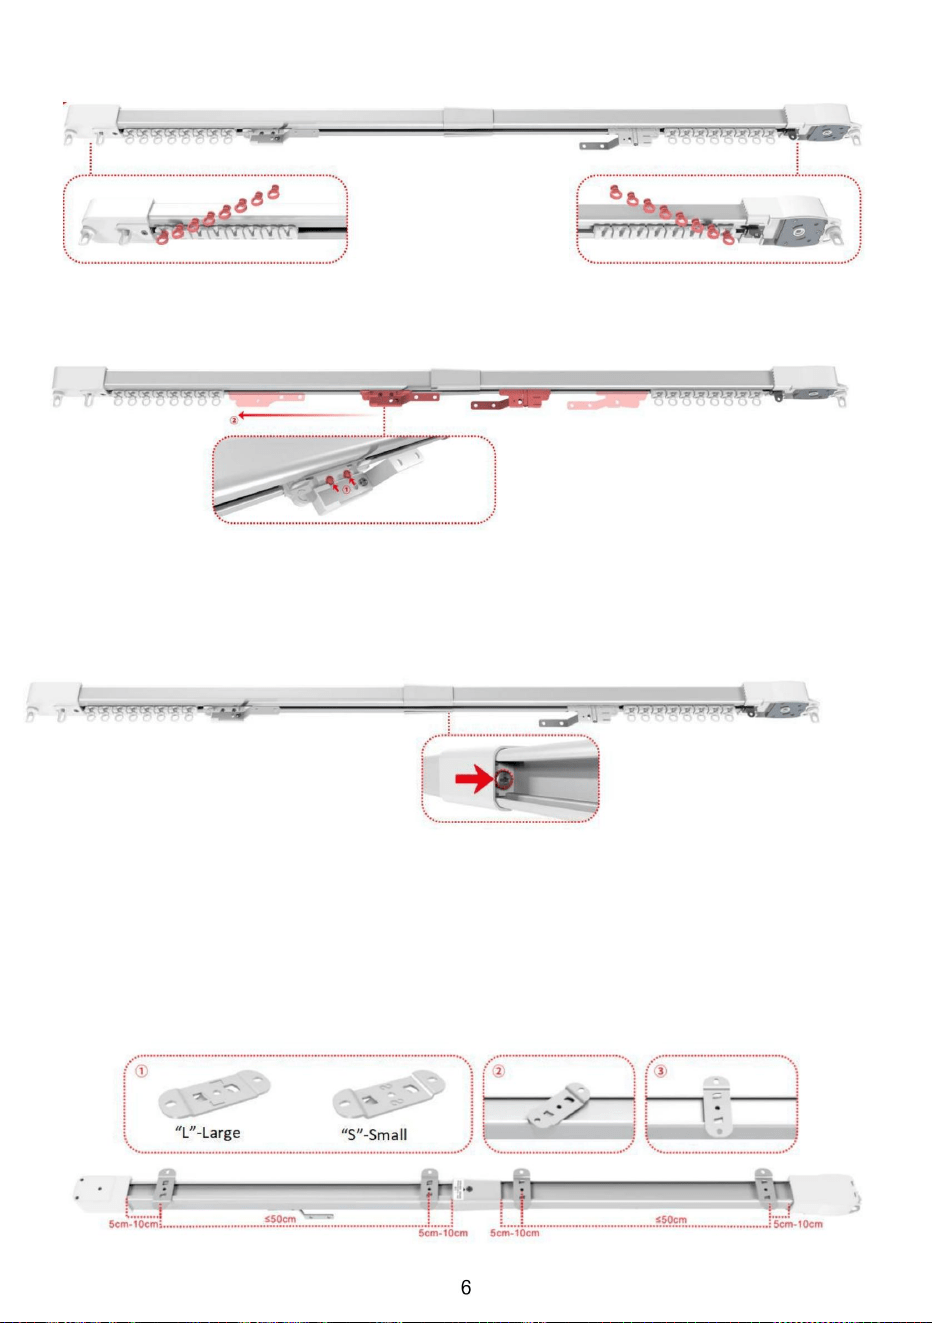
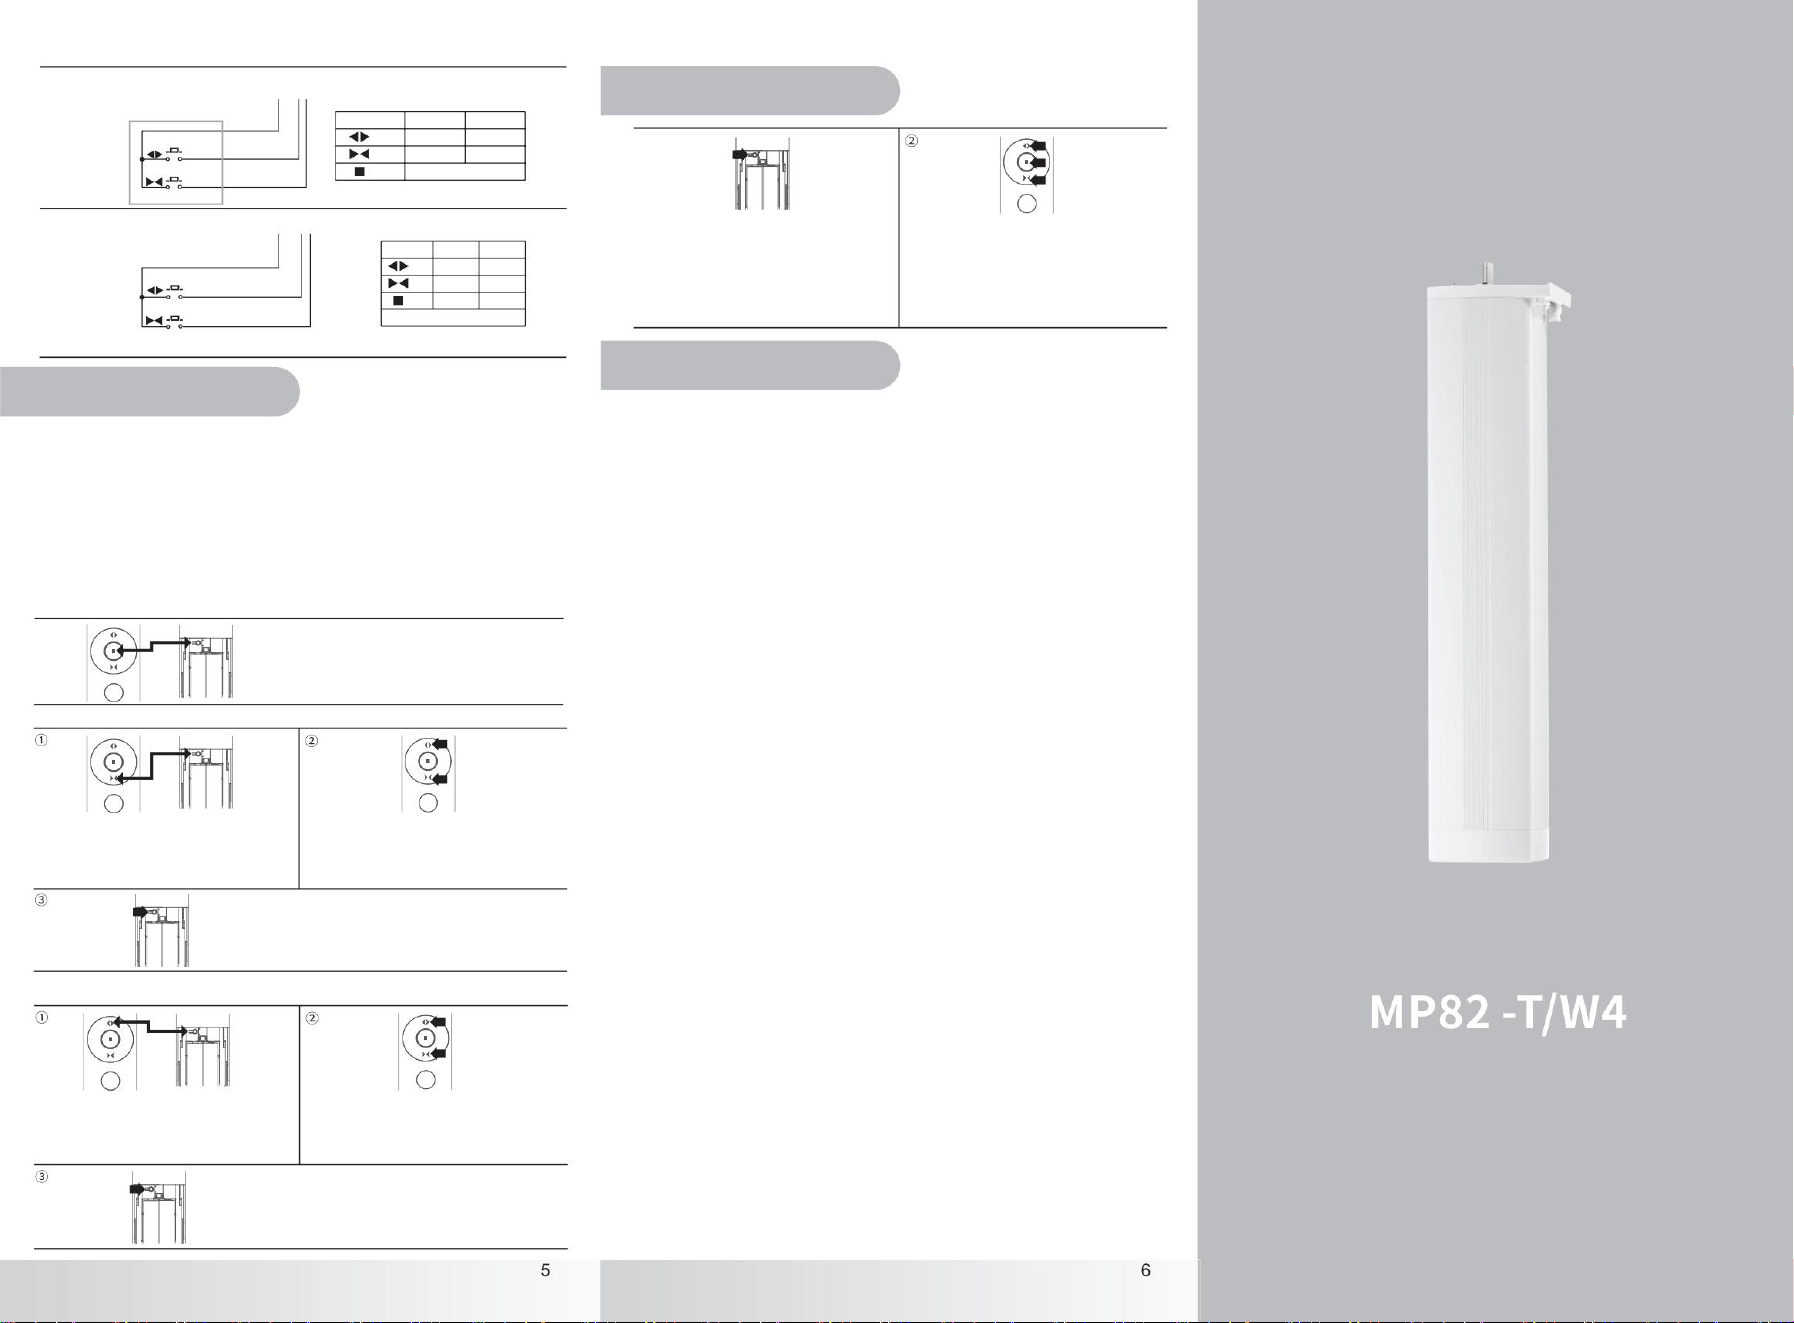
Step 8. Installation code installation, as shown in Figure ② - ③, place the installation code at a 45 °
angle on the top surface of the track, rotate it, and tighten it. Install an installation code at a distance
of about 50cm around the transition kit as the center point.
Step 7. Fine tune the pulley. When the pulley runs dry or loose, we can adjust it by using the
screws on the side of the transition kit.
Step 6 Align Carriages: Loosen the upper screws on the carriages. Move both carriages to the edge
of the drive box, then tighten the screws. Test the carriages to ensure smooth movement.
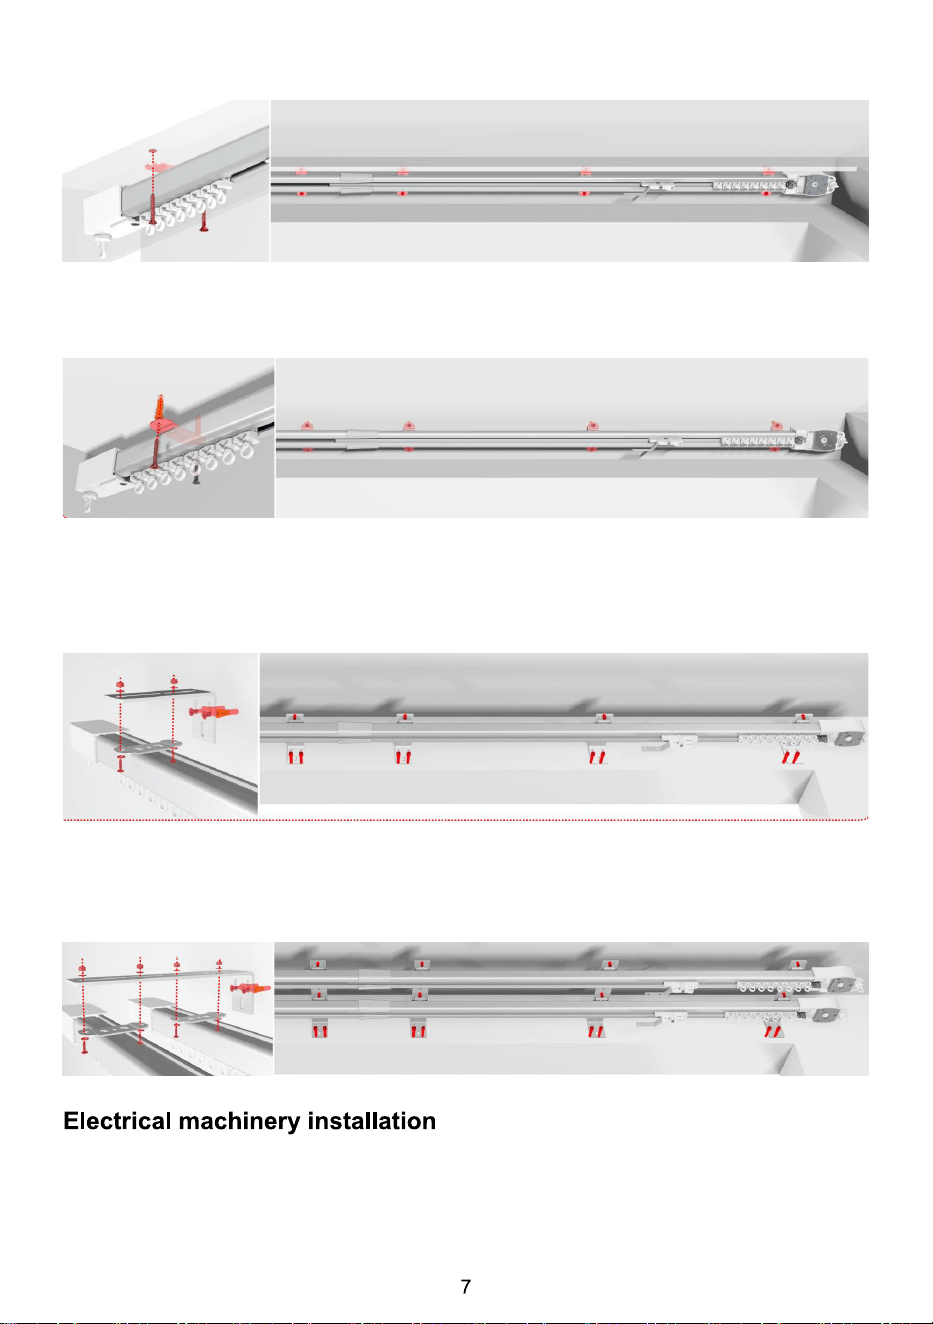
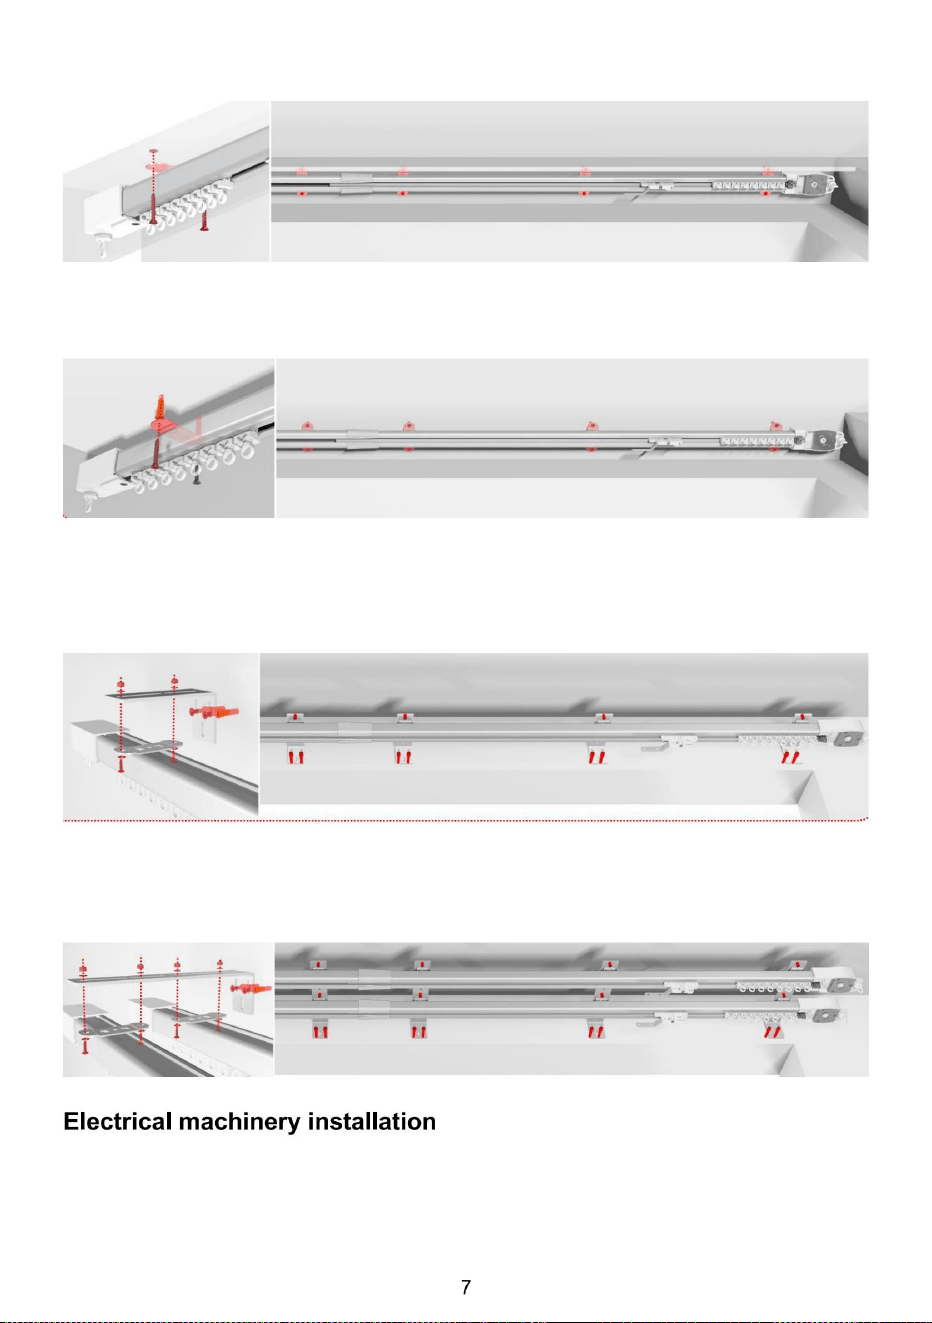
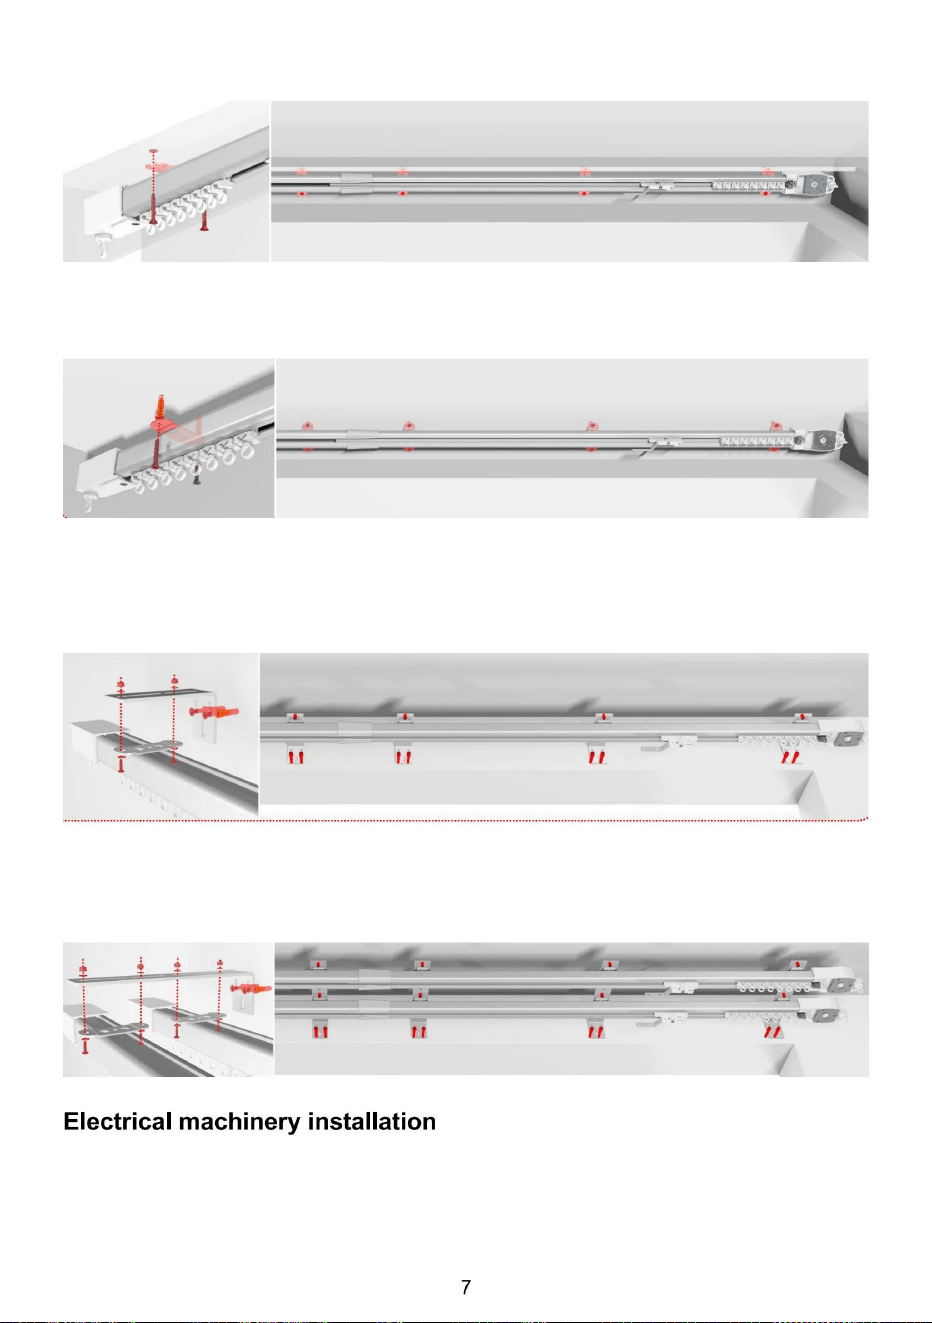
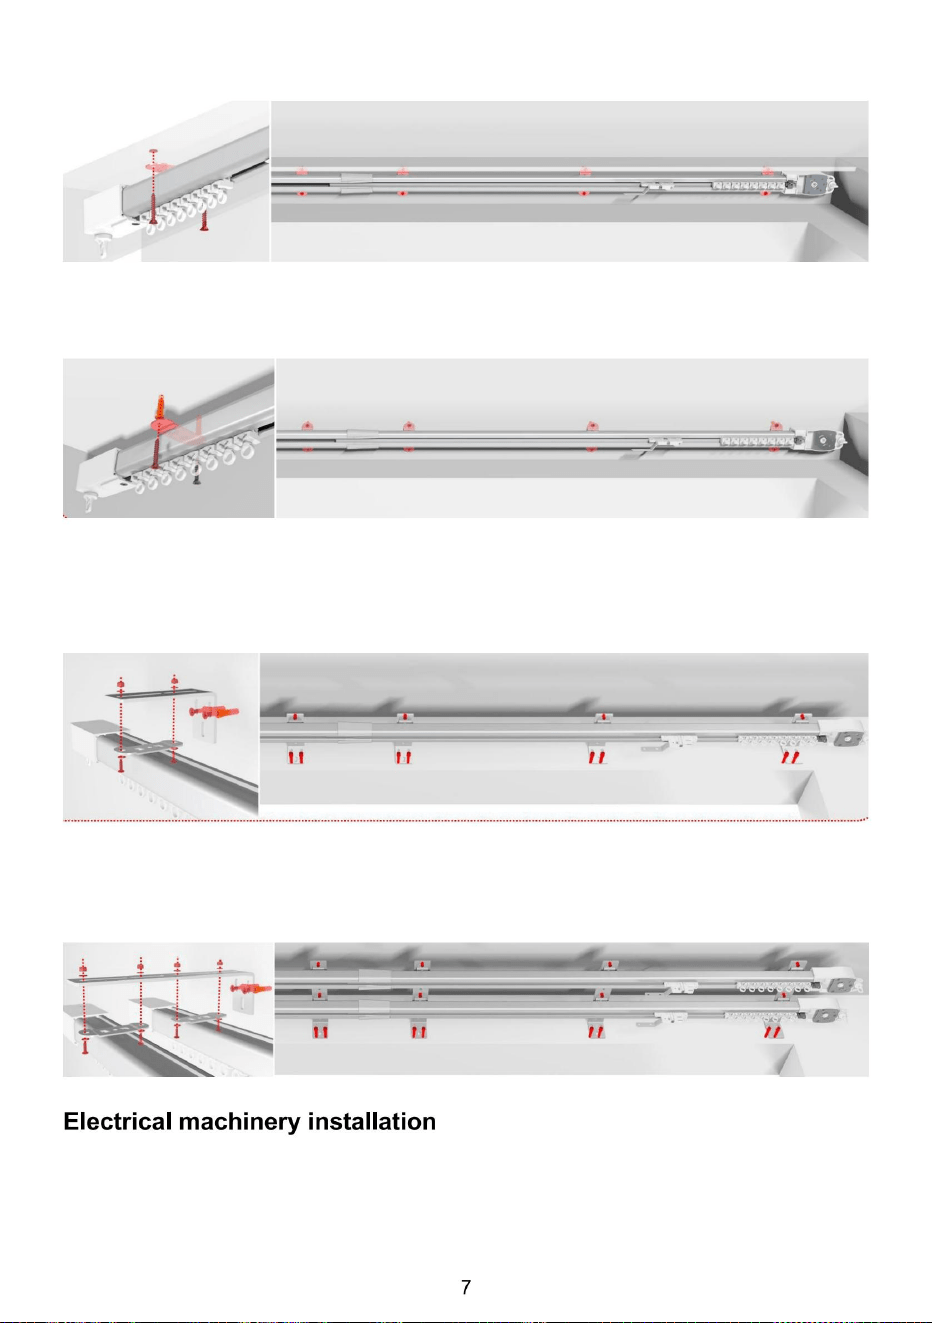
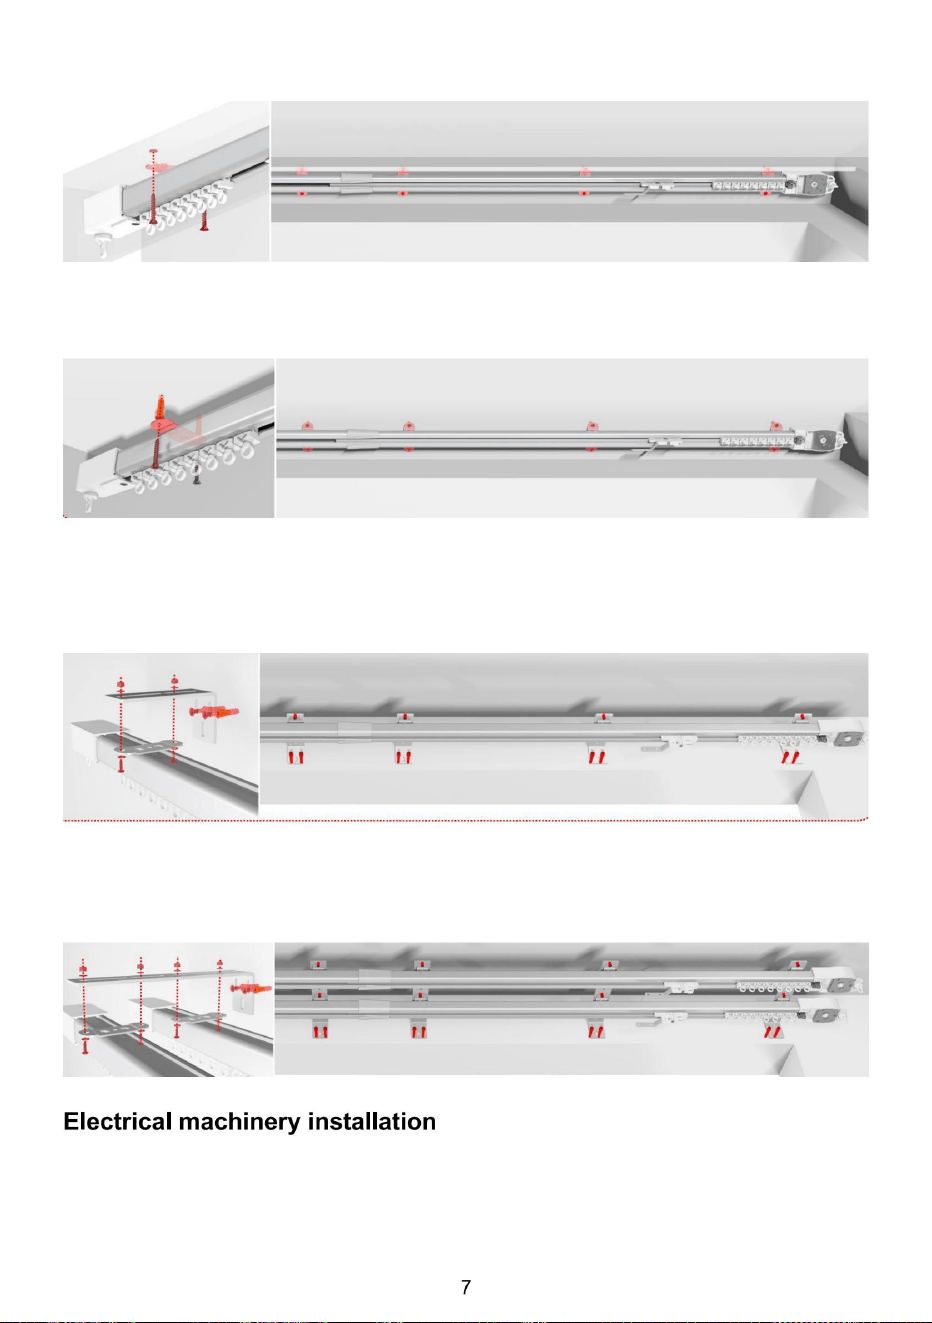
Step 9. Top mounted, installed on the curtain box, can be directly fixed with screws.
Step 10. Installed on the wall, it is necessary to mark the position of the top
installation code on the wall, make holes, install expansion nails, and then fix
them with screws.
Step 11. For side installation, first install the top installation code on the side
installation code according to the left diagram, and then install the side
installation code kit on the track. The wall needs to be marked according to
the installation code, drilled, and fixed with expansion screws after installation.
Step 12. For side installation, first install the top onto the track according to the left
diagram, and then install the side installation code. The wall needs to be marked
according to the installation code, drilled, and fixed with expansion screws after
installation.
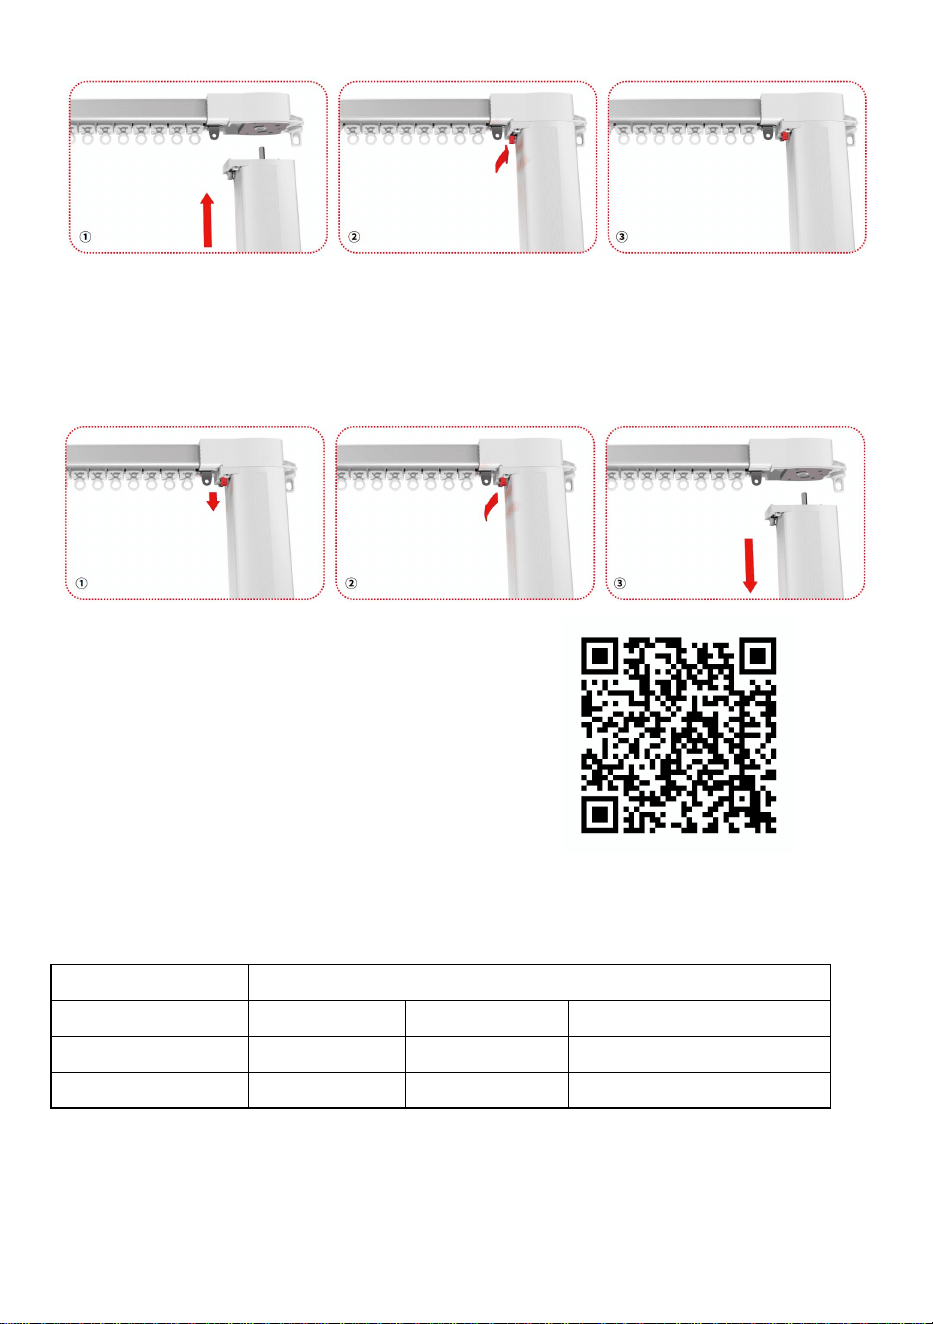
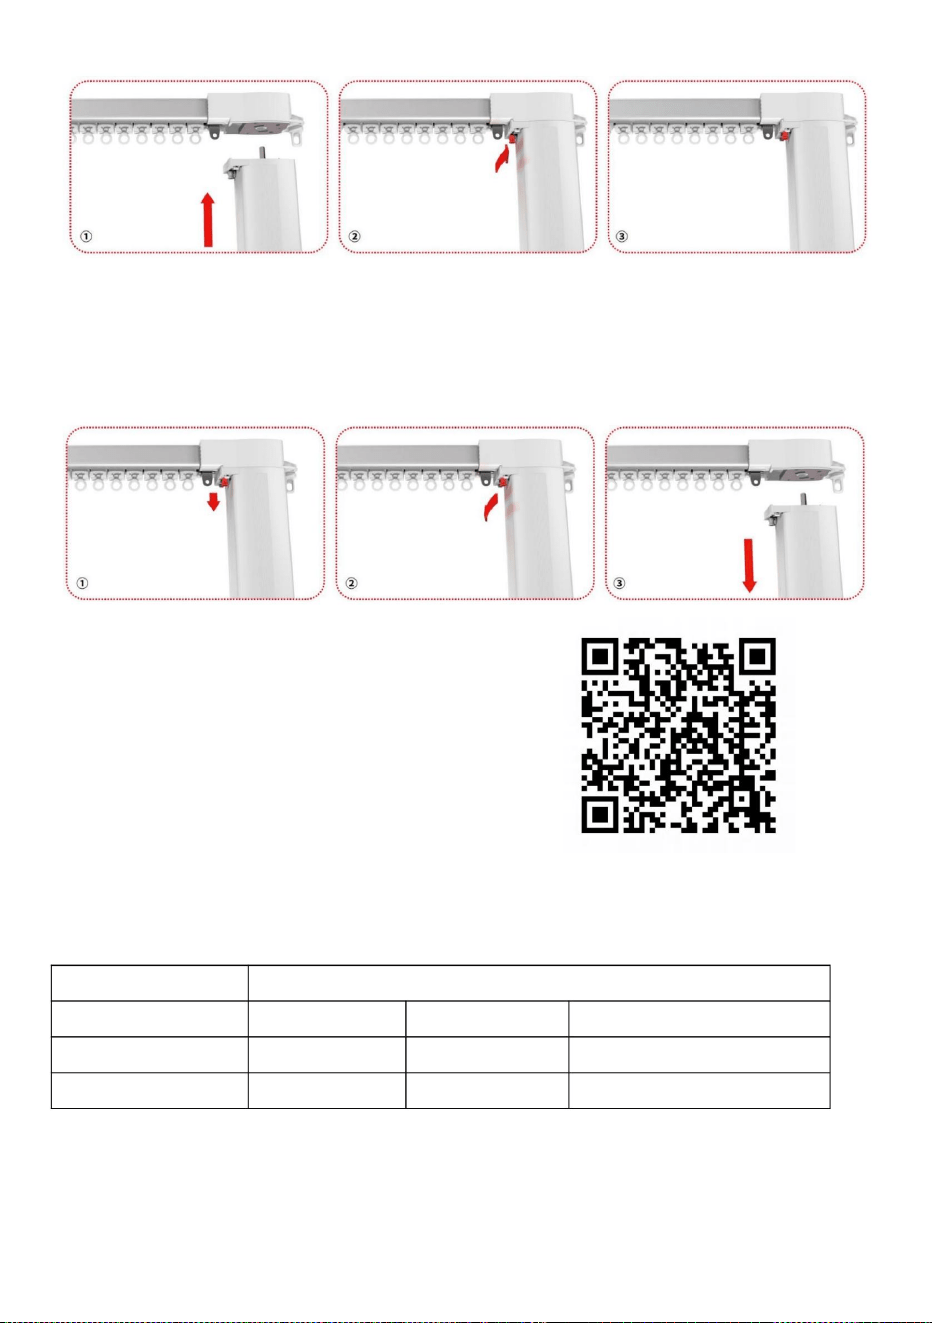
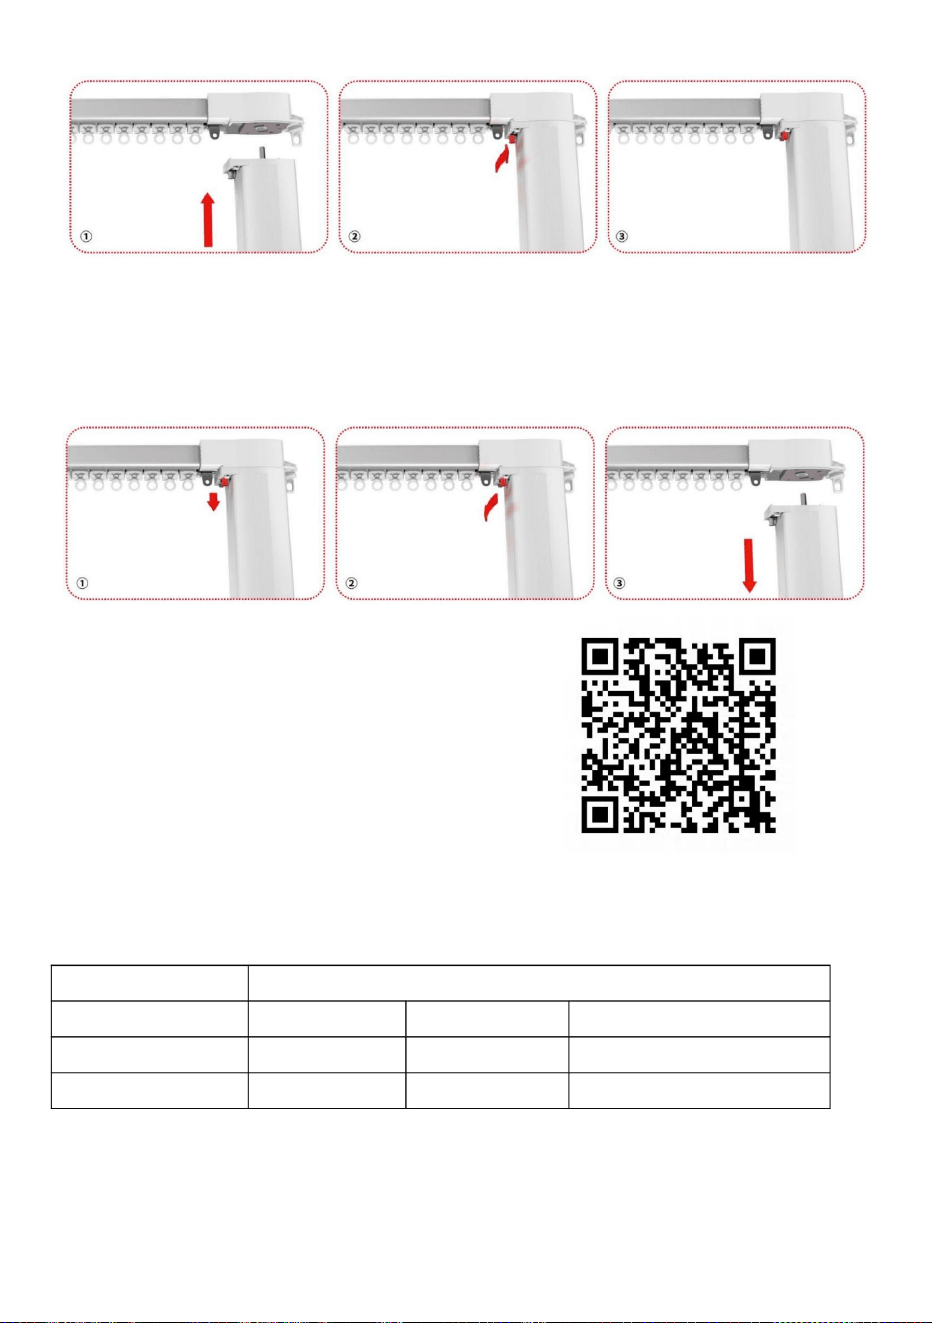
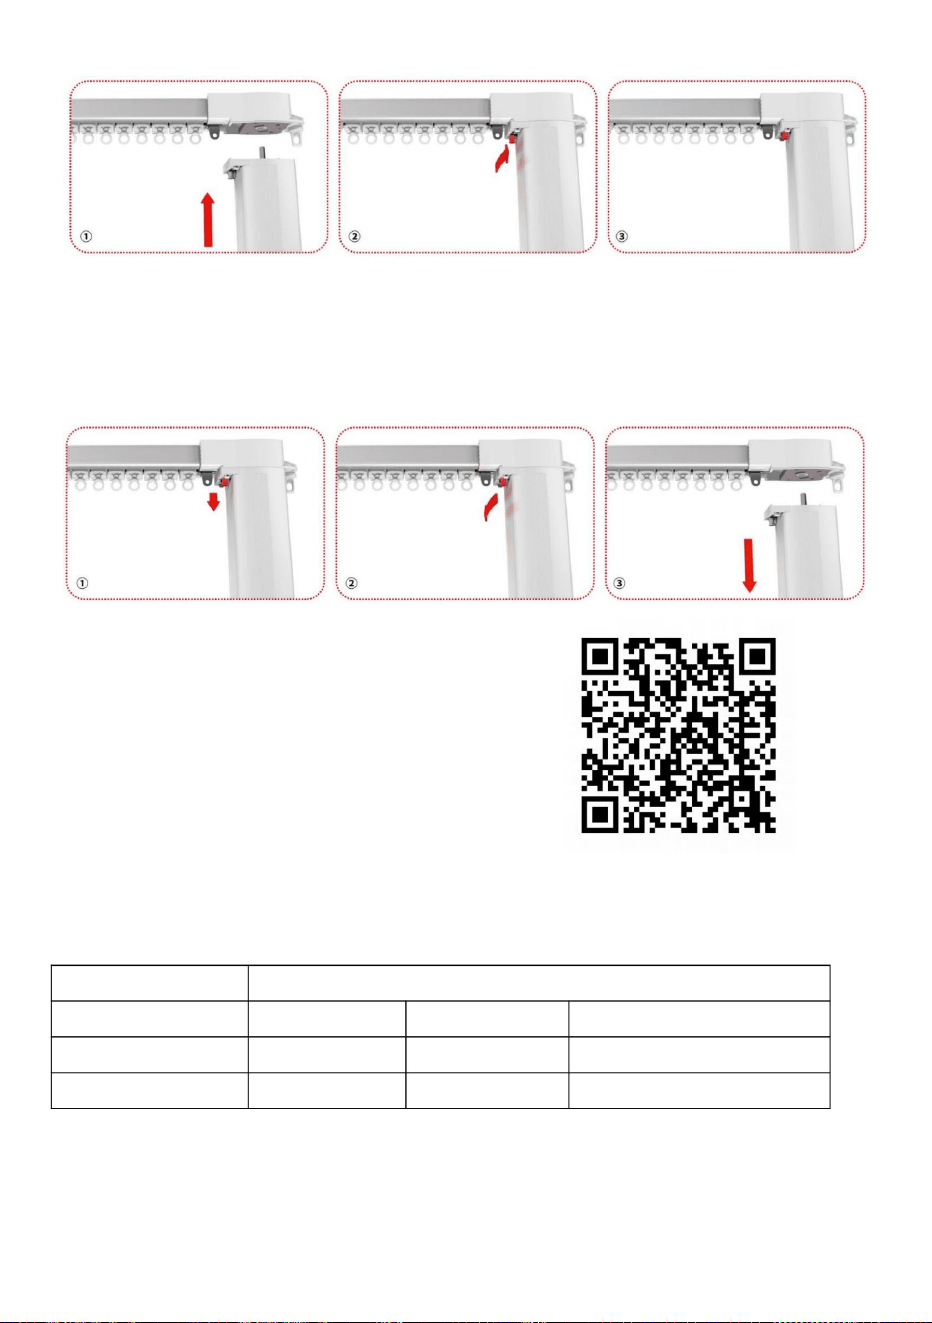
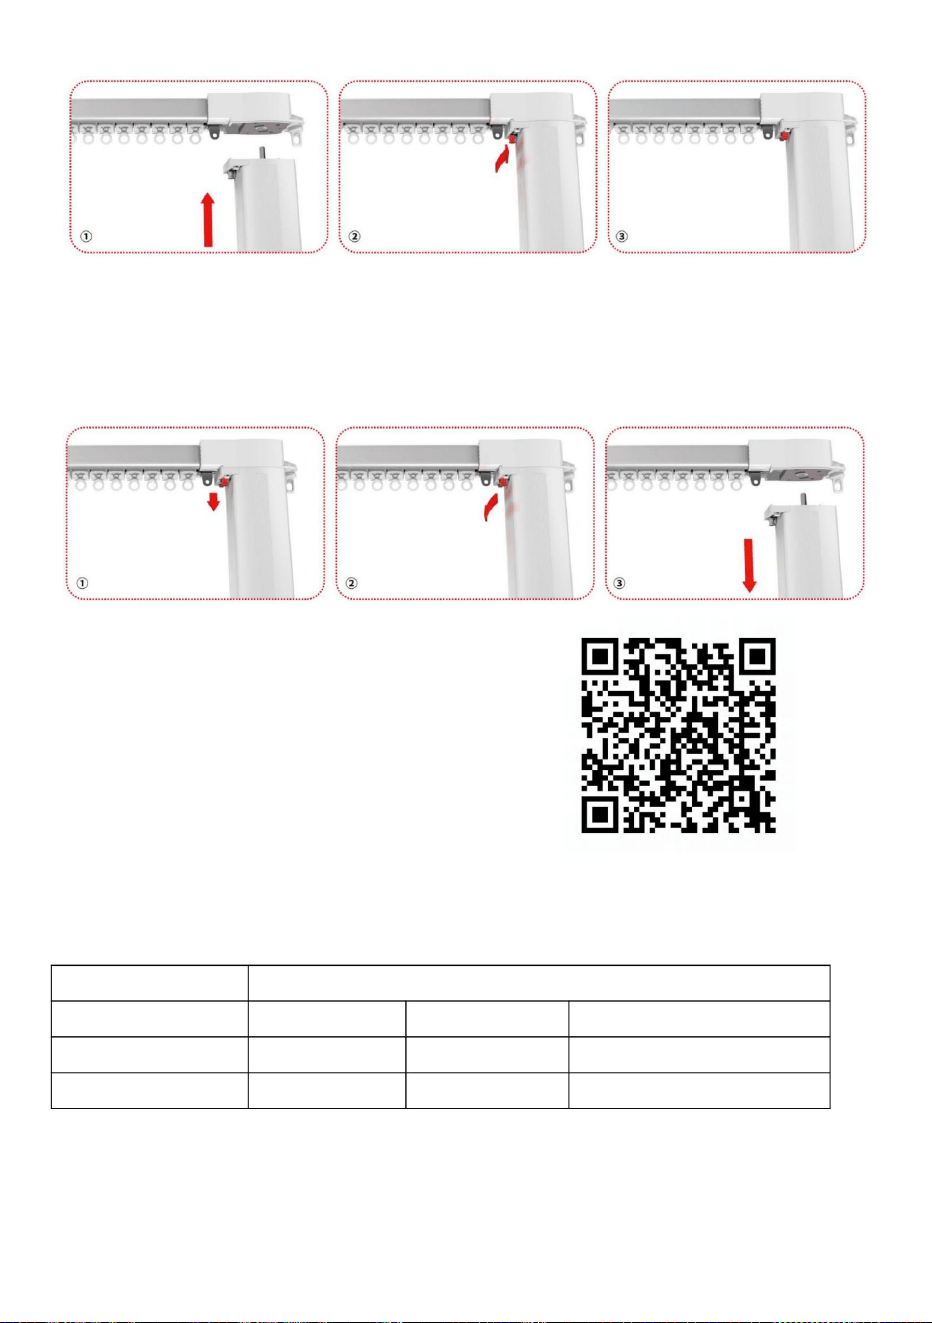
ķ $OLJQ WKH RXWSXW VKDIW RI WKH PRWRU ZLWK WKH WUDFN DQG LQVHUW LW
ĸ 3XOO WKH ORFNLQJ EXFNOH DQG ORFN LW
Ĺ 3UHVV WKH ORFN EXFNOH WR FRQILUP WKDW WKH PRWRU LV ORFNHG
(OHFWULFDO PDFKLQHU\ WHDU GRZQ
3
ķ /LIW WKH ORFNLQJ EXFNOH RI WKH PRWRU
ĸ 3XOO WKH ORFNLQJ EXFNOH
Ĺ 5HPRYH WKH PRWRU
3URGXFW RSHUDWLRQ YLGHR
03
0RWRU PRGHO 3
5DWHG 9ROWDJH 9 $& 5DWHG 6SHHG USP
5DWHG IUHTXHQF\ +] 5DWHG FXUUHQW $
5DWHG 7RUTXH 1āP :RUN QRLVH G%
Scan the QR code to obtain the operation video

)&& ,QIRUPDWLRQ
&$87,21 &KDQJHV RU PRGLILFDWLRQV QRW H[SUHVVO\ DSSURYHG E\ WKH
SDUW\ UHVSRQVLEOH IRU FRPSOLDQFH FRXOG YRLG WKH XVHUV DXWKRULW\ WR
RSHUDWH WKH HTXLSPHQW
7KLV GHYLFH FRPSOLHV ZLWK 3DUW RI WKH )&& 5XOHV 2SHUDWLRQ LV VXEMHFW
WR WKH IROORZLQJ WZR FRQGLWLRQV
7KLV SURGXFW PD\ FDXVH KDUPIXO LQWHUIHUHQFH
7KLV SURGXFW PXVW DFFHSW DQ\ LQWHUIHUHQFH UHFHLYHG LQFOXGLQJ
LQWHUIHUHQFH WKDW PD\ FDXVH XQGHVLUHG RSHUDWLRQ
:$51,1* &KDQJHV RU PRGLILF
DWLRQV WR WKLV SURGXFW QRW H[SUHVVO\
DSSURYHG E\ WKH SDUW\UHVSRQVLEOH IRU FRPSOLDQFH FRXOG YRLG WKH XVHUV
DXWKRULW\ WR RSHUDWH WKH SURGXFW
1RWH 7KLV SURGXFW KDV EHHQ WHVWHG DQG IRXQG WR FRPSO\ ZLWK WKH OLPLWV
IRU D &ODVV % GLJLWDO GHYLFH SXUVXDQW WR 3DUW RI WKH )&& 5XOHV 7KHVH
OLPLWV DUH GHVLJQHG WR SURYLGH UHDVRQDEOH SURWHFWLRQ DJDLQVW KDUPIXO
LQWHUIHUHQFH LQ D UHVLGHQWLDO LQVWDOODWLRQ
7KLV SURGXFW JHQHUDWHV XVHV DQG FDQ UDGLDWH UDGLR IUHTXHQF\ HQHUJ\
DQG LI
QRW LQVWDOOHG DQG XVHG LQ DFFRUGDQFH ZLWK WKH LQVWUXFWLRQV PD\
FDXVH KDUPIXO LQWHUIHUHQFH WR UDGLR FRPPXQLFDWLRQV +RZHYHU WKHUH LV
QR JXDUDQWHH WKDW LQWHUIHUHQFH ZLOO QRW RFFXU LQ D SDUWLFXODU LQVWDOODWLRQ ,I
WKLV SURGXFW GRHV FDXVH KDUPIXO LQWHUIHUHQFH WR UDGLR RU WHOHYLVLRQ
UHFHSWLRQZKLFK FDQ EH GHWHUPLQHG E\ WXUQLQJ WKH SURGXFW RII DQG RQ WKH
XVHU LV HQFRXUDJHG WR WU\ WR FRUUHFW WKH LQWHUIHUHQFH E\ RQH RU PRUH RI
WKH IROORZLQJ PHDVXUHV
ā 5HRULHQW RU UHORFDWH W
KH UHFHLYLQJ DQWHQQD
ā ,QFUHDVH WKH GLVWDQFH EHWZHHQ WKH SURGXFW DQG UHFHLYHU
ā &RQQHFW WKH SURGXFW WR DQ RXWOHW RQ D FLUFXLW GLIIHUHQW IURP WKDW WR ZKLFK
WKH UHFHLYHU LV FRQQHFWHG
ā &RQVXOW WKH GHDOHU RU DQ H[SHULHQFHG UDGLR79 WHFKQLFLDQ IRU
DVVLVWDQFH

0DQXIDFWXUHU *XDQJGRQJ 5DH[ LQWHOOLJHQW WHFKQRORJ\ &R /WG
$GGUHVV 1R /LDQ[LQ 6RXWK 5RDG <XQGRQJKDL 6WUHHW 6DQVKXL 'LVWULFW
)RVKDQ *XDQJGRQJ &KLQD3RVW FRGH
,PSRUWHG WR 86$ 6DQYHQ 7HFKQRORJ\ /WG 6XLWH $QDKHLP
3ODFH 5DQFKR &XFDPRQJD &$

75% 25%75% 25%
75% 25%75% 25%
75% 25%75% 25%
75% 25%75% 25%
75% 25%75% 25%
75% 25%75% 25%
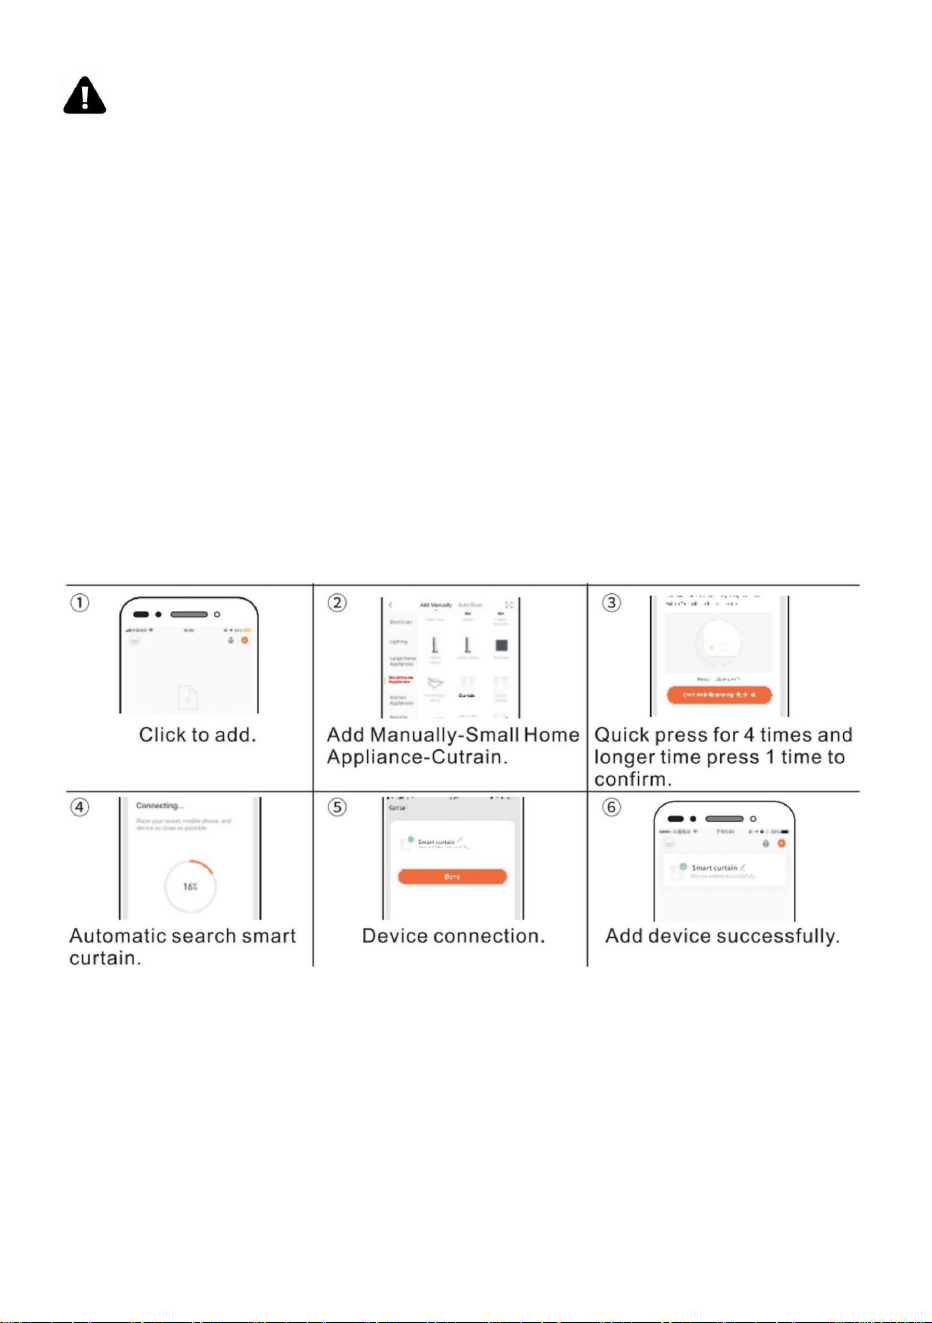
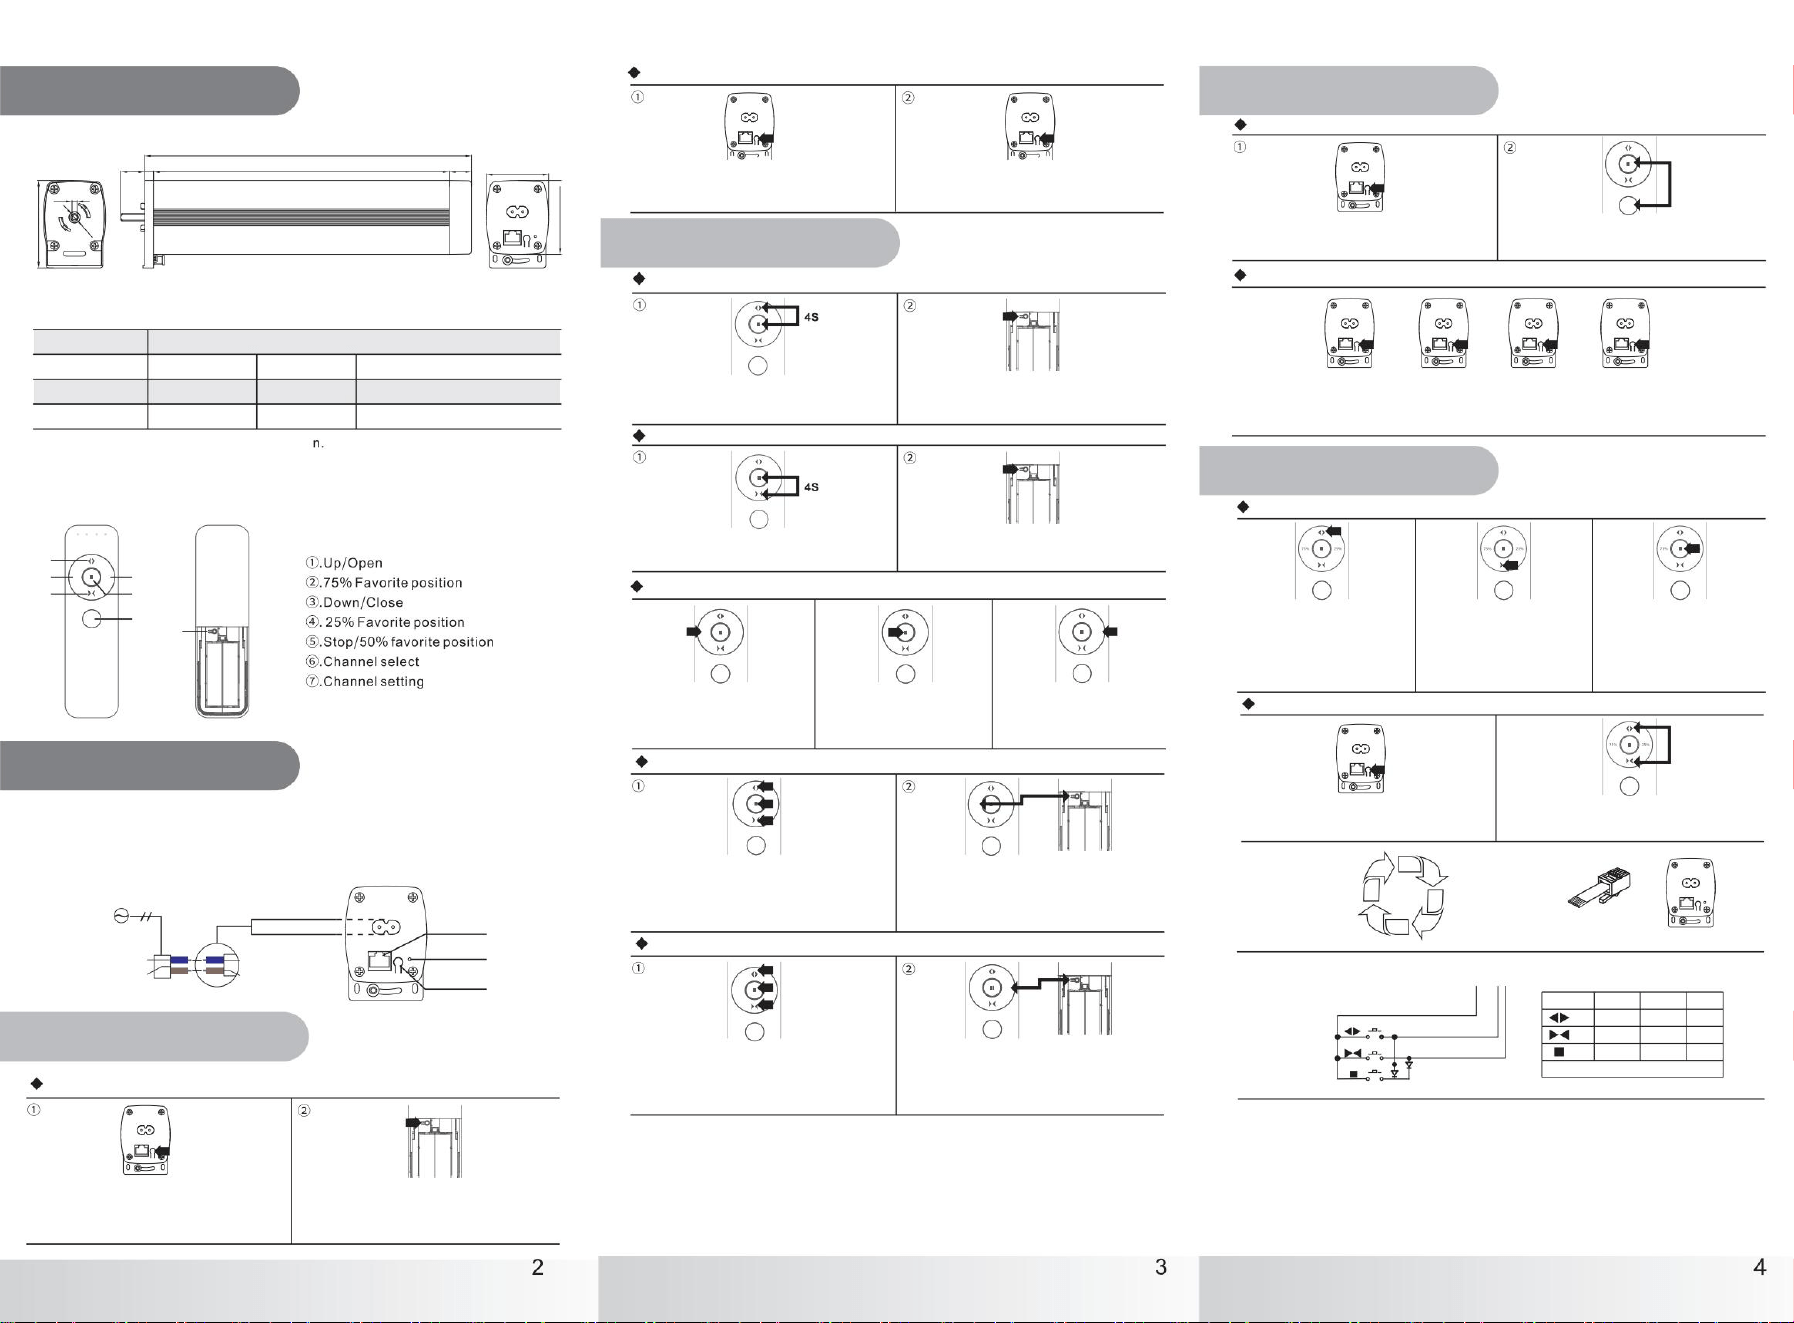
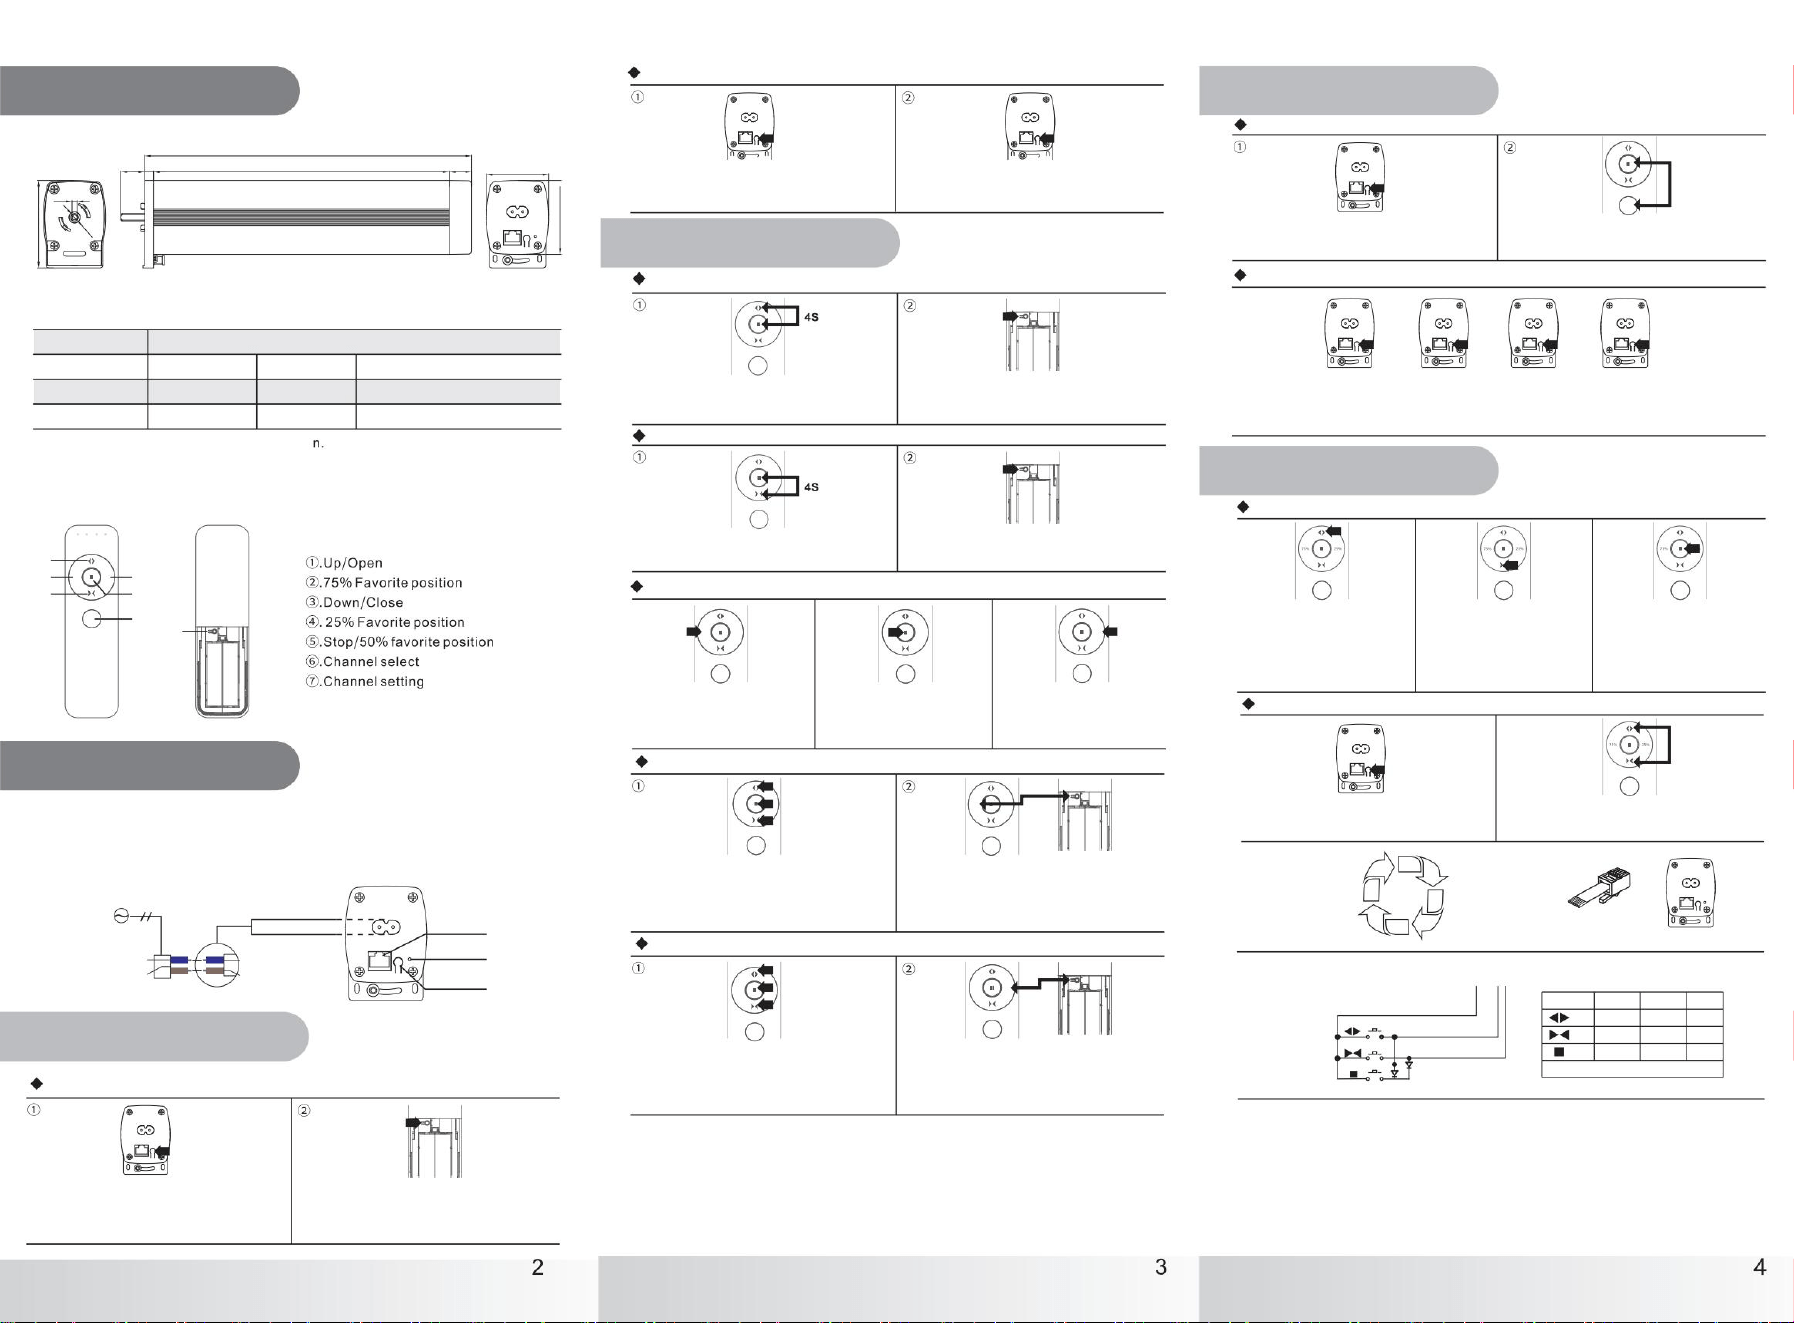
◆ connection method 1
◆ connection method 2
Tmall Genie: When the device is in the state of distribution network, say to the
Tmall Genie speaker: "Tmall Genie, find the device", patiently wait for the Tmall
Genie to find the device, and connect the device, after the link is successful, you
can customize the device name and location, you can control the device on the
phone.
Tmall Genie: Press the motor [Programming] button, release and press for 3
seconds until the indicator light flashes red for 5 times, enter the pairing mode;
Voice command "Tmall Genie, discover the device", patiently wait for the Tmall
Genie to find the device, and connect the device, after the connection is
successful, you can customize the device name and location, you can control the
device on the phone.
Tuya ZigBee: After opening the gateway, press the motor [Programming] button
four times continuously, release and hold down for 3 seconds until the indicator
rainbow flashes, enter the pairing mode, open the Tuya APP, click "+" in the upper
right corner, select "nearby devices" to find the motor, the motor enters the
distribution network, patiently wait for the connection to be successful, you can
control the use of the custom name.
◆ Delete pairing
1)
Method 1:Delete device in APP;
2)Method 2:Factory reset;
3)Method 3:R e-enter the distribution mode to disconnect the network.
AC Input DC Motor Instruction Manual
Smart connection
75r/min
110r
/min
90r
/min
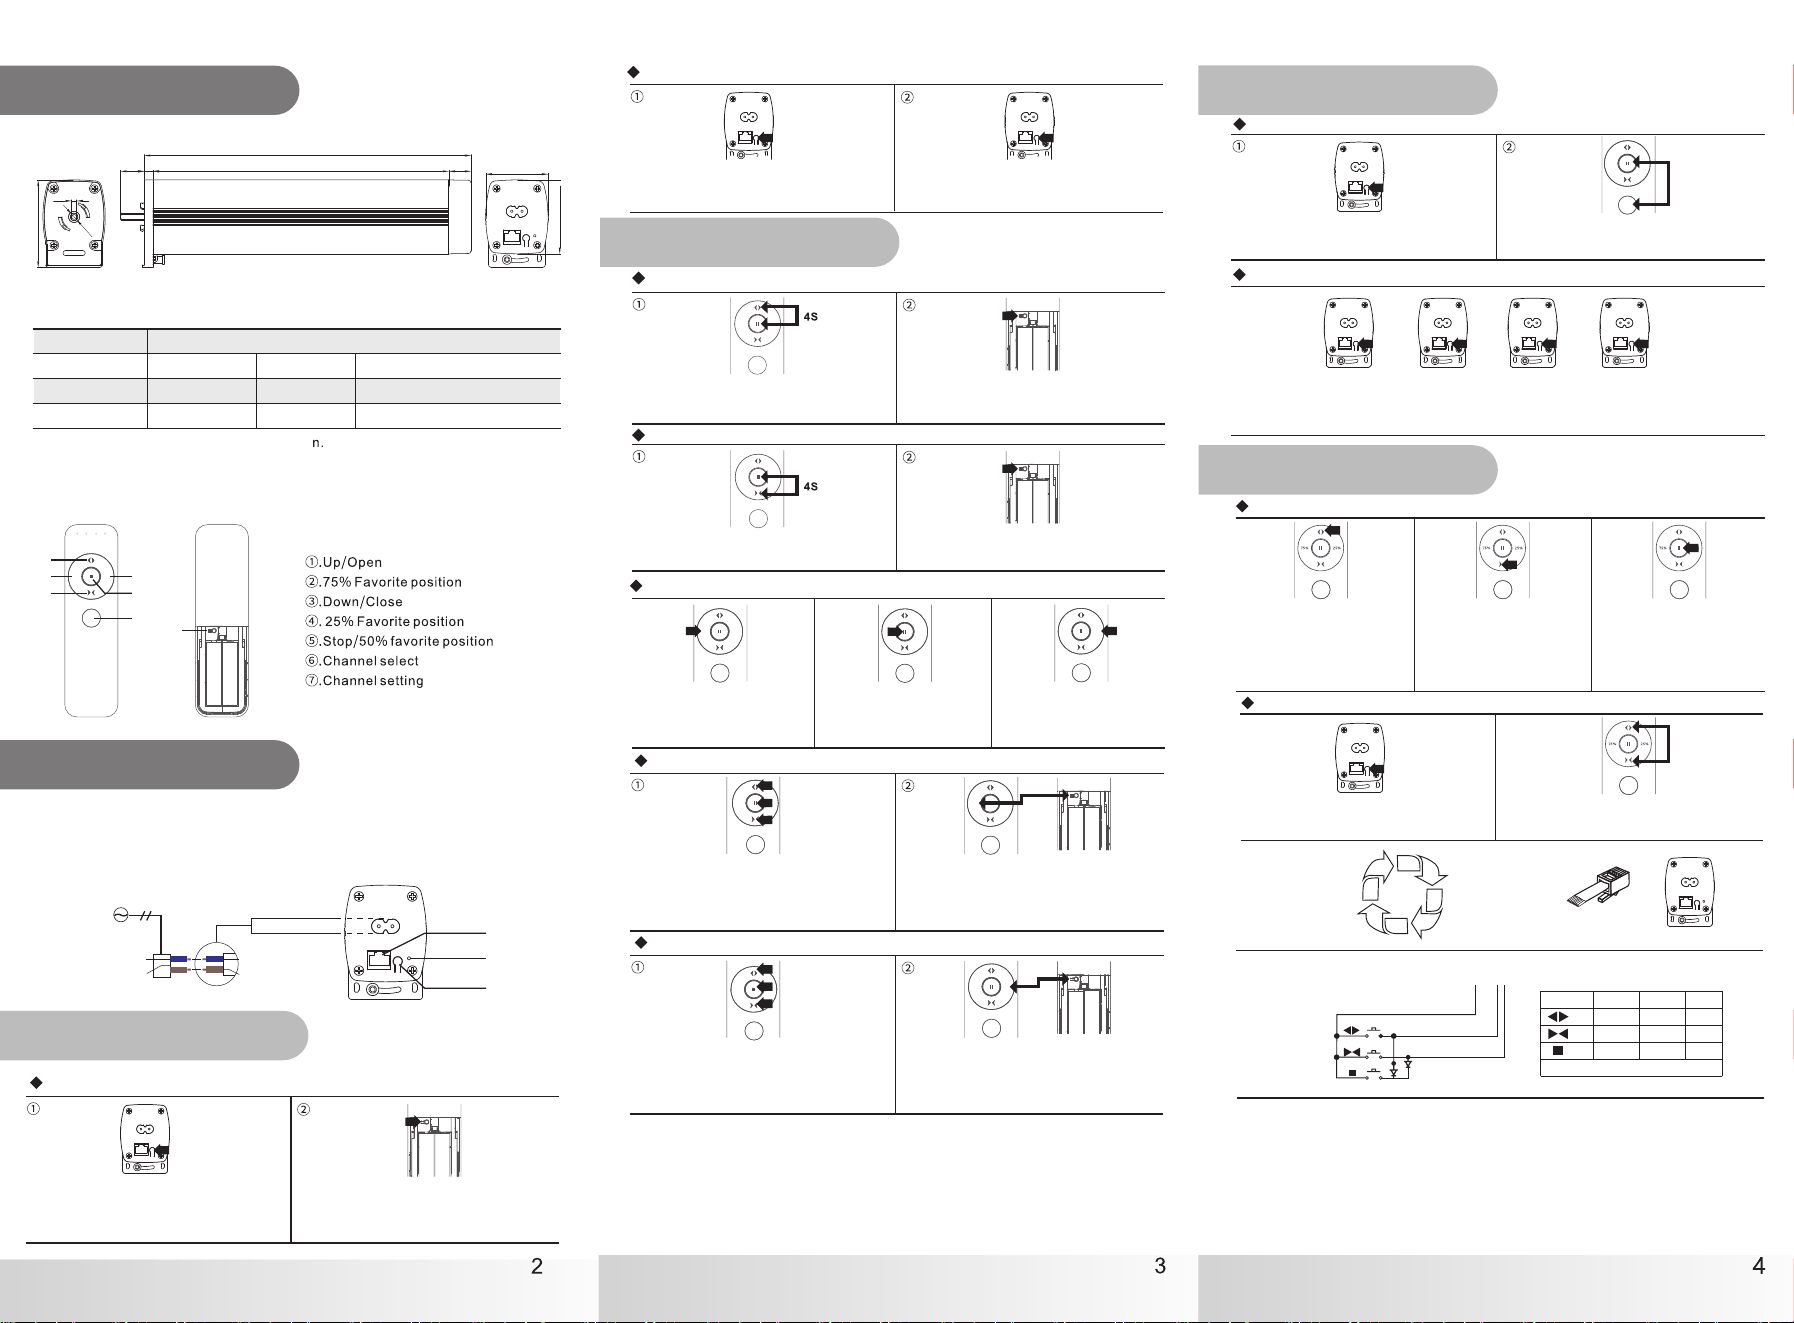
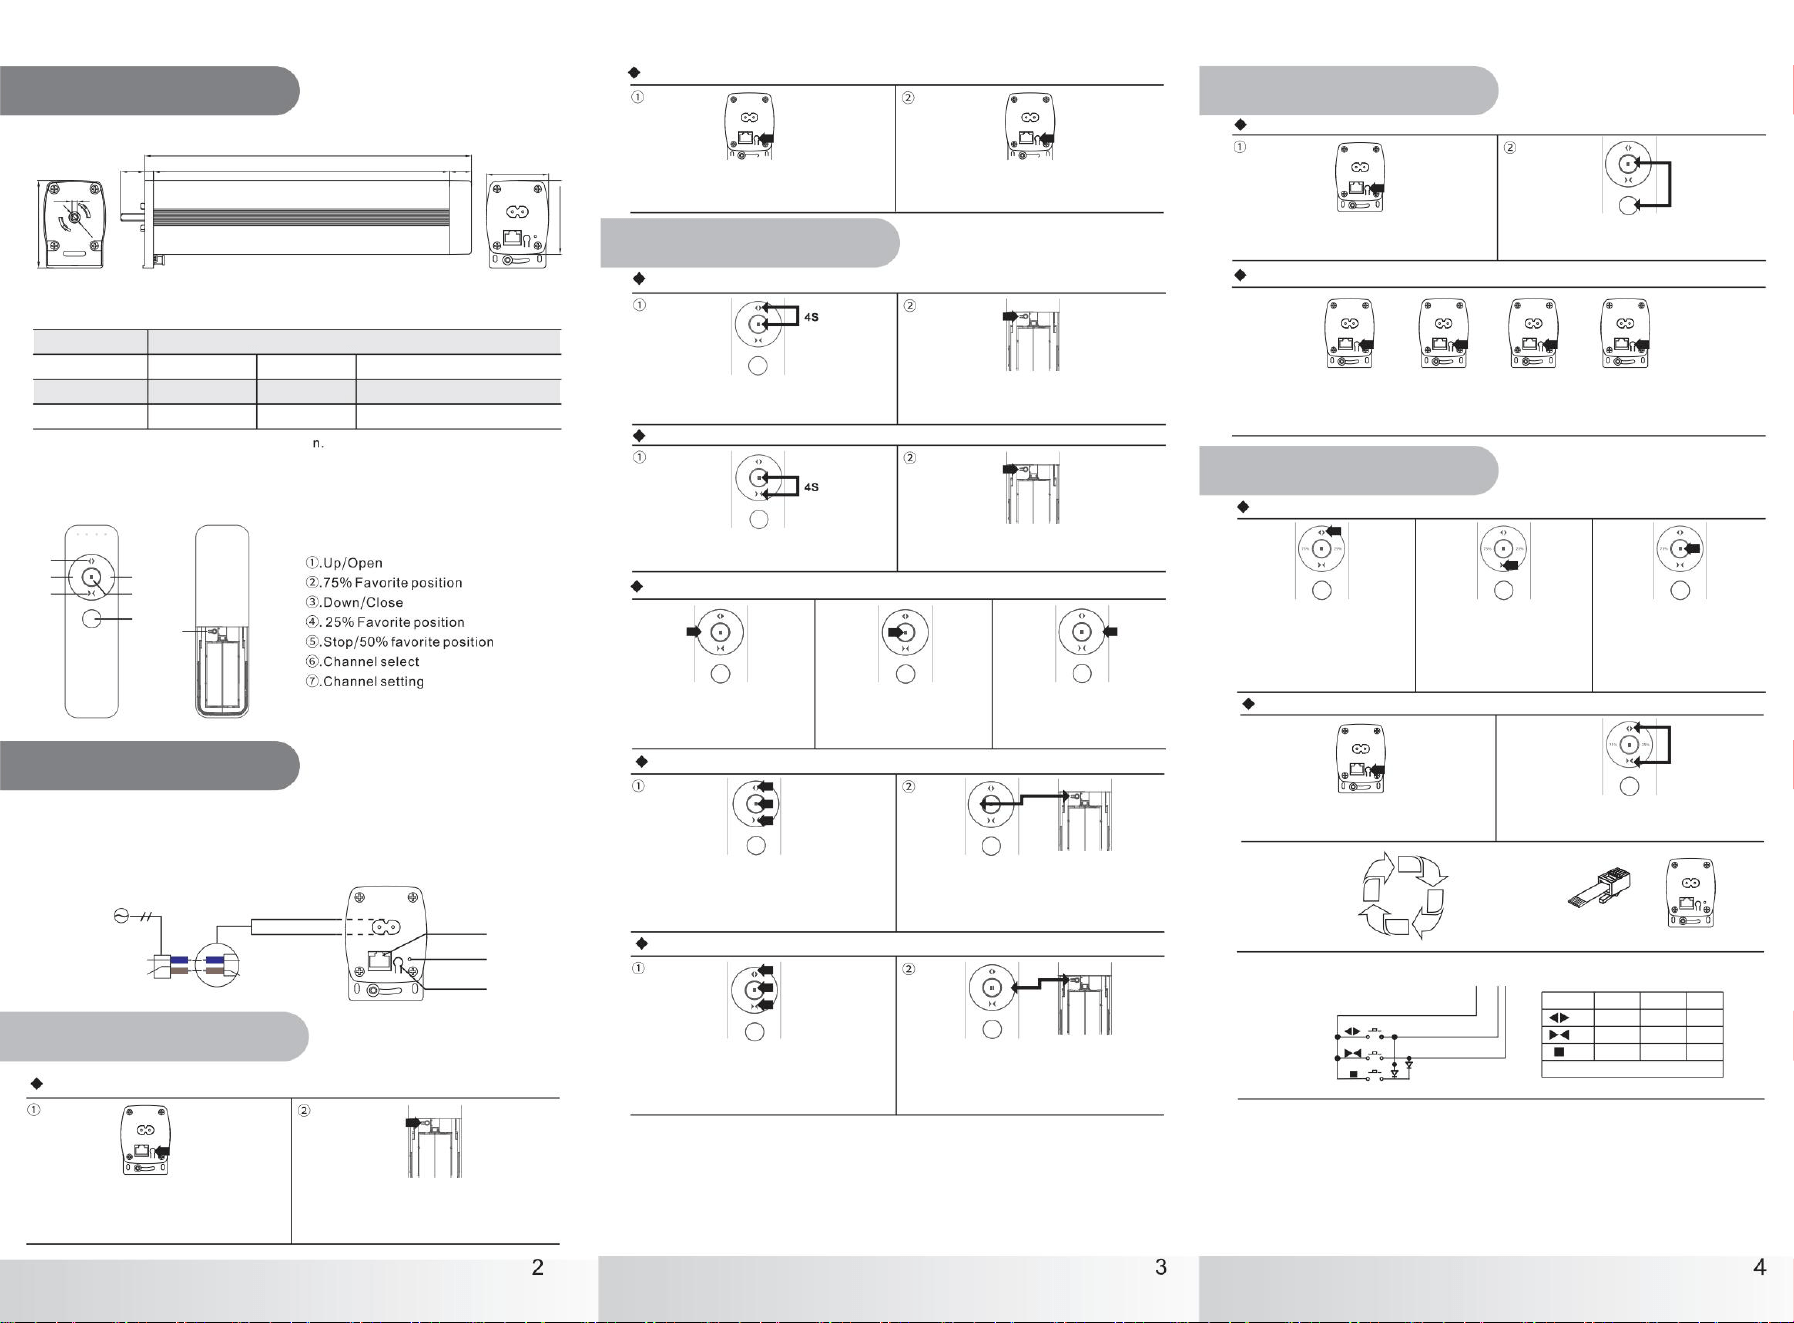
Press[Open]button 3 seconds,adjust to
110r/min.
Press [Stop] button 3 seconds, adjust to
90r/min.
Press[pause] button 3 seconds,adjust to
75r/min.
Motor LED light flash 2times.
Speed adjustment
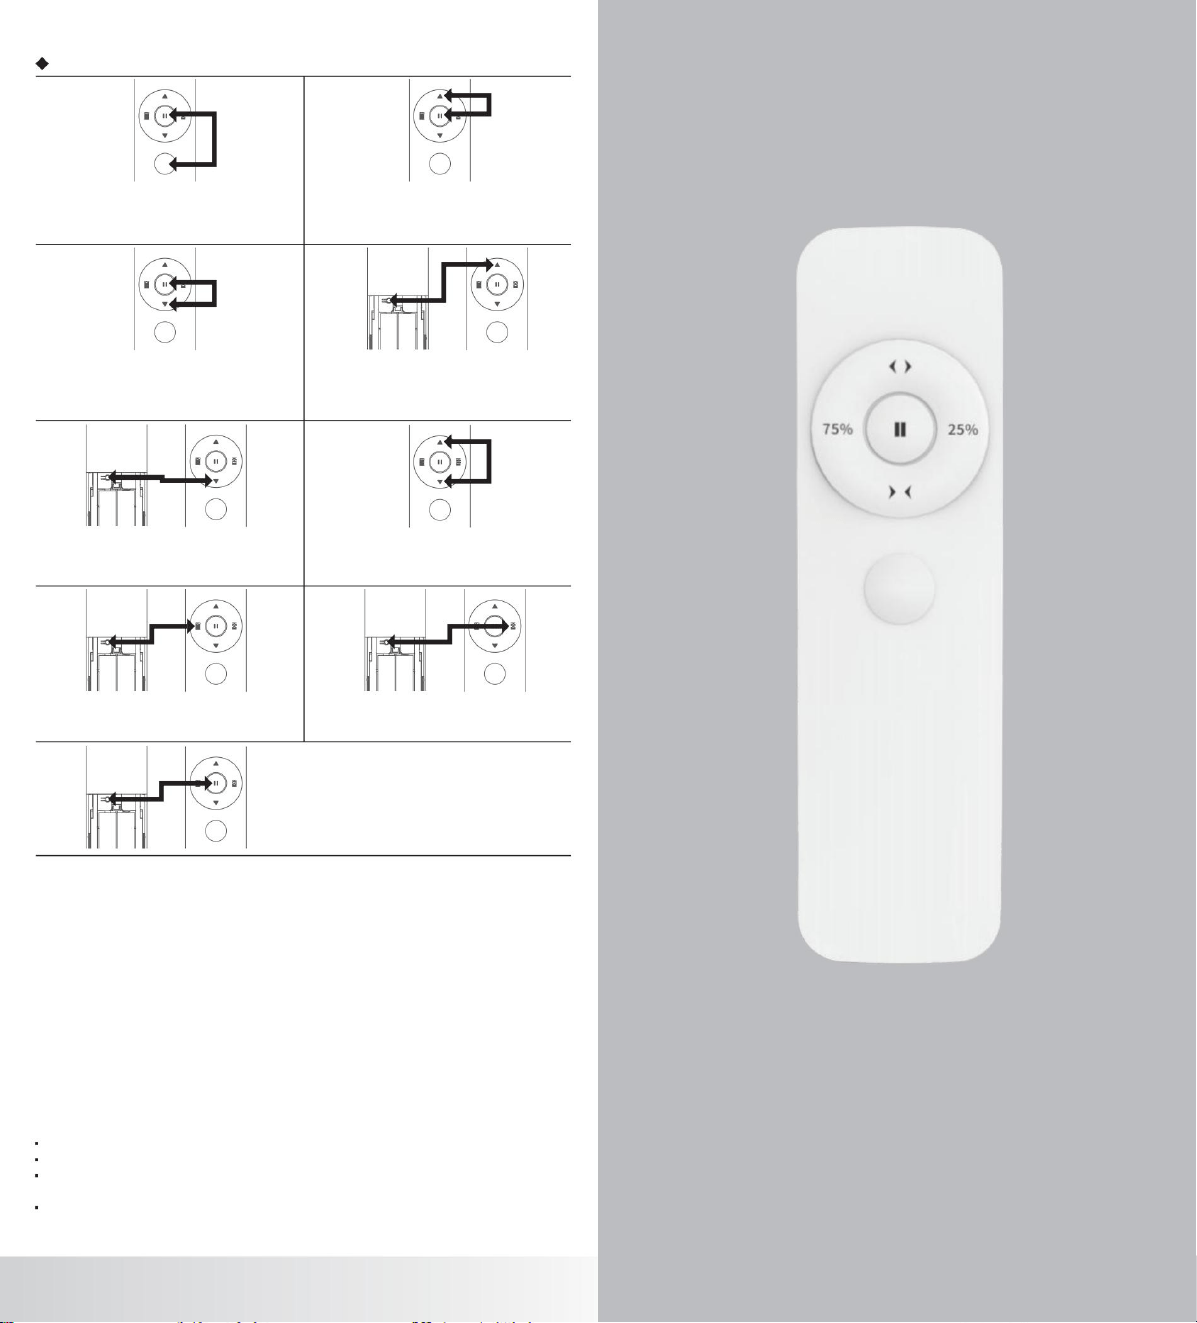
Press [channel setting] button 3 seconds,
enter Speed a djustment mode, LED light
on.
3S
①
Press the remote control [channel setting]
button or press the motor [Programming]
button to set the current position as the
open limit point, The motor shakes one time,
and the motor LED indicator light off.
At the same time, long press the remote
control [Channel setting]+[Up] button for
4 seconds,the motor shakes one time,
the motor LED indicator light will be long
on.
Make the curtain reach the desired position
by pressing the remote control [Up] or
[Down] button within 30 seconds.
◆ Adjustment for up limit
At the same time,long press the remote
control [Close]+[Channel setting] button
for 4 seconds, the motor shakes one
time, the motor LED indicator light is
long on.
Make the curtain reach the desired position
by pressing the remote control [Up] or
[Down] button within 30 seconds.
Press the remote control [Channel setting]
button or press the motor [Programming]
button to s et the current position as the
down limit point, the motor shakes one time,
and the motor LED indicator light off.
◆ Adjustment for down limit
◆ Clear limit
Long press [Channel setting]+[Stop] at
the same time for 6s,clear all limits,motor
shakes one time,Led light flash one time.
1 .After power connection,first time to open or close the curtain, the motor will stop
by locked at 0mm-10mm to the close position. (if the track’s direction is wrong,the
automatic limit tolerance will be bigger,after direction change, the tolerance
resume normal level. )
2.At stop status, power off and then power on again, if no pulling curtain during
power off, no any change for motor limit status , the motor won’t crash to the end of
track. If the pulling the curtain too big distance, after power connection , the motor
may crash to the end of track and then resume limit. If power off during the motor’s
moving process, the motor will resume limit after crash to end of track for the first
time running.
◆ Automatic limit
Set limit
87654321
K1
K2
K1 K2
Operation
(Open)
(Close)
(Stop)
Off
On
On
Off
Press any button to stop
Common
line
Open
Close
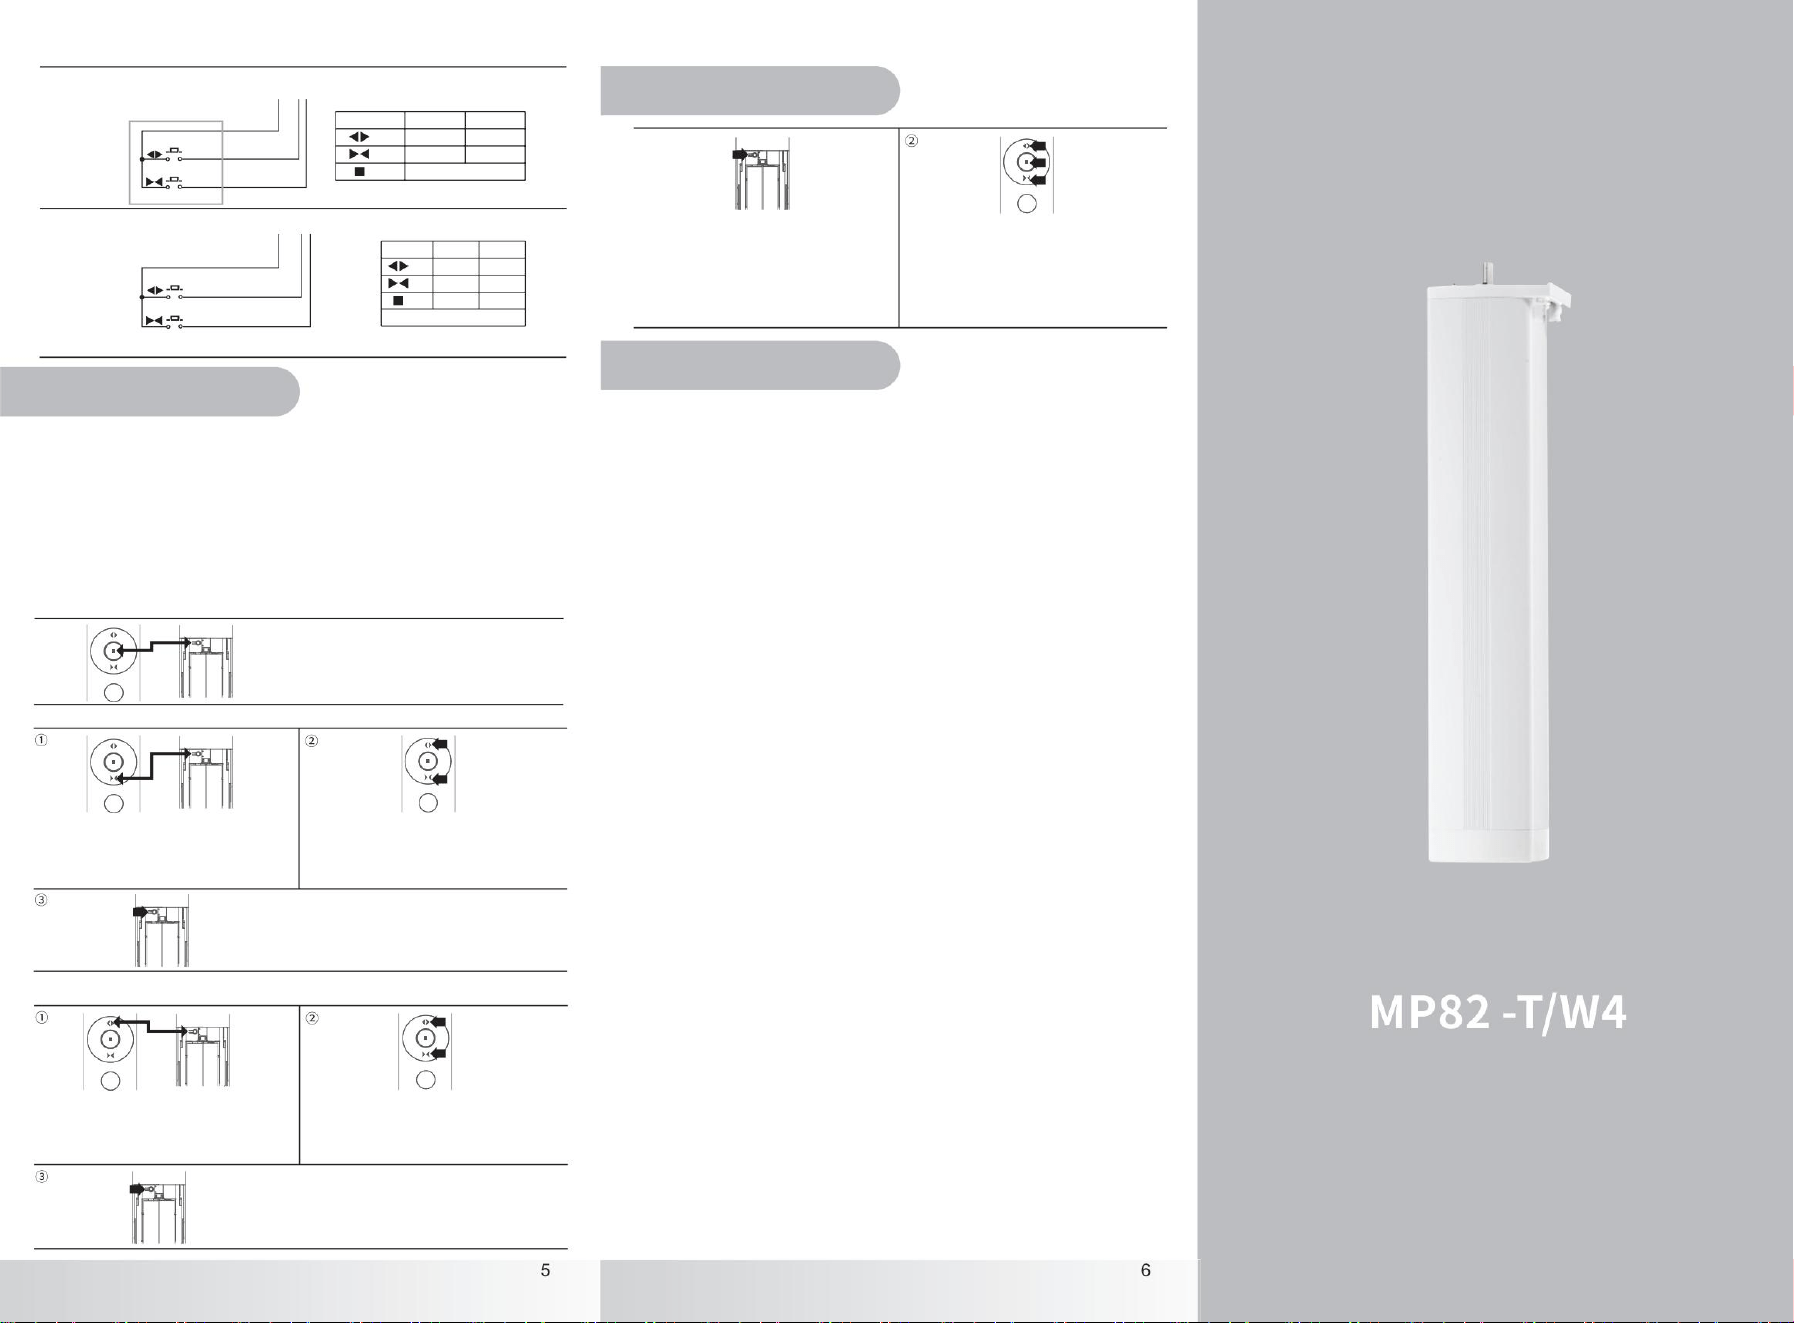
2 button pulse external control ⅠⅡ
87654321
K1
K2
K1 K2
Operation
(Open)
(Close)
(Stop)
Off
On
On
Off
On
On
Action time must continue
Common
line
Open
Close
Point action external control mode
75% 25%
75% 25%
75% 25%75% 25%
75% 25%75% 25%
75% 25%75% 25%
75% 25%75% 25%
75% 25%75% 25%
75% 25%75% 25%
75% 25%75% 25%
75% 25%75% 25%
75% 25%75% 25%
87654321
K2
+
Common
line
Open
Close
Operation
K1 K2
Off
Off action time must less than 1S.
(Open)
K3
(Close)
(Stop)
On
On
On
On
Off
On
On
Off
3 button pulse external control
1
.
8
.
③
3 button pulse
external control
2 button pulse
external control Ⅰ
Point action
external control
2 button pulse
external control Ⅱ
External control mode switch
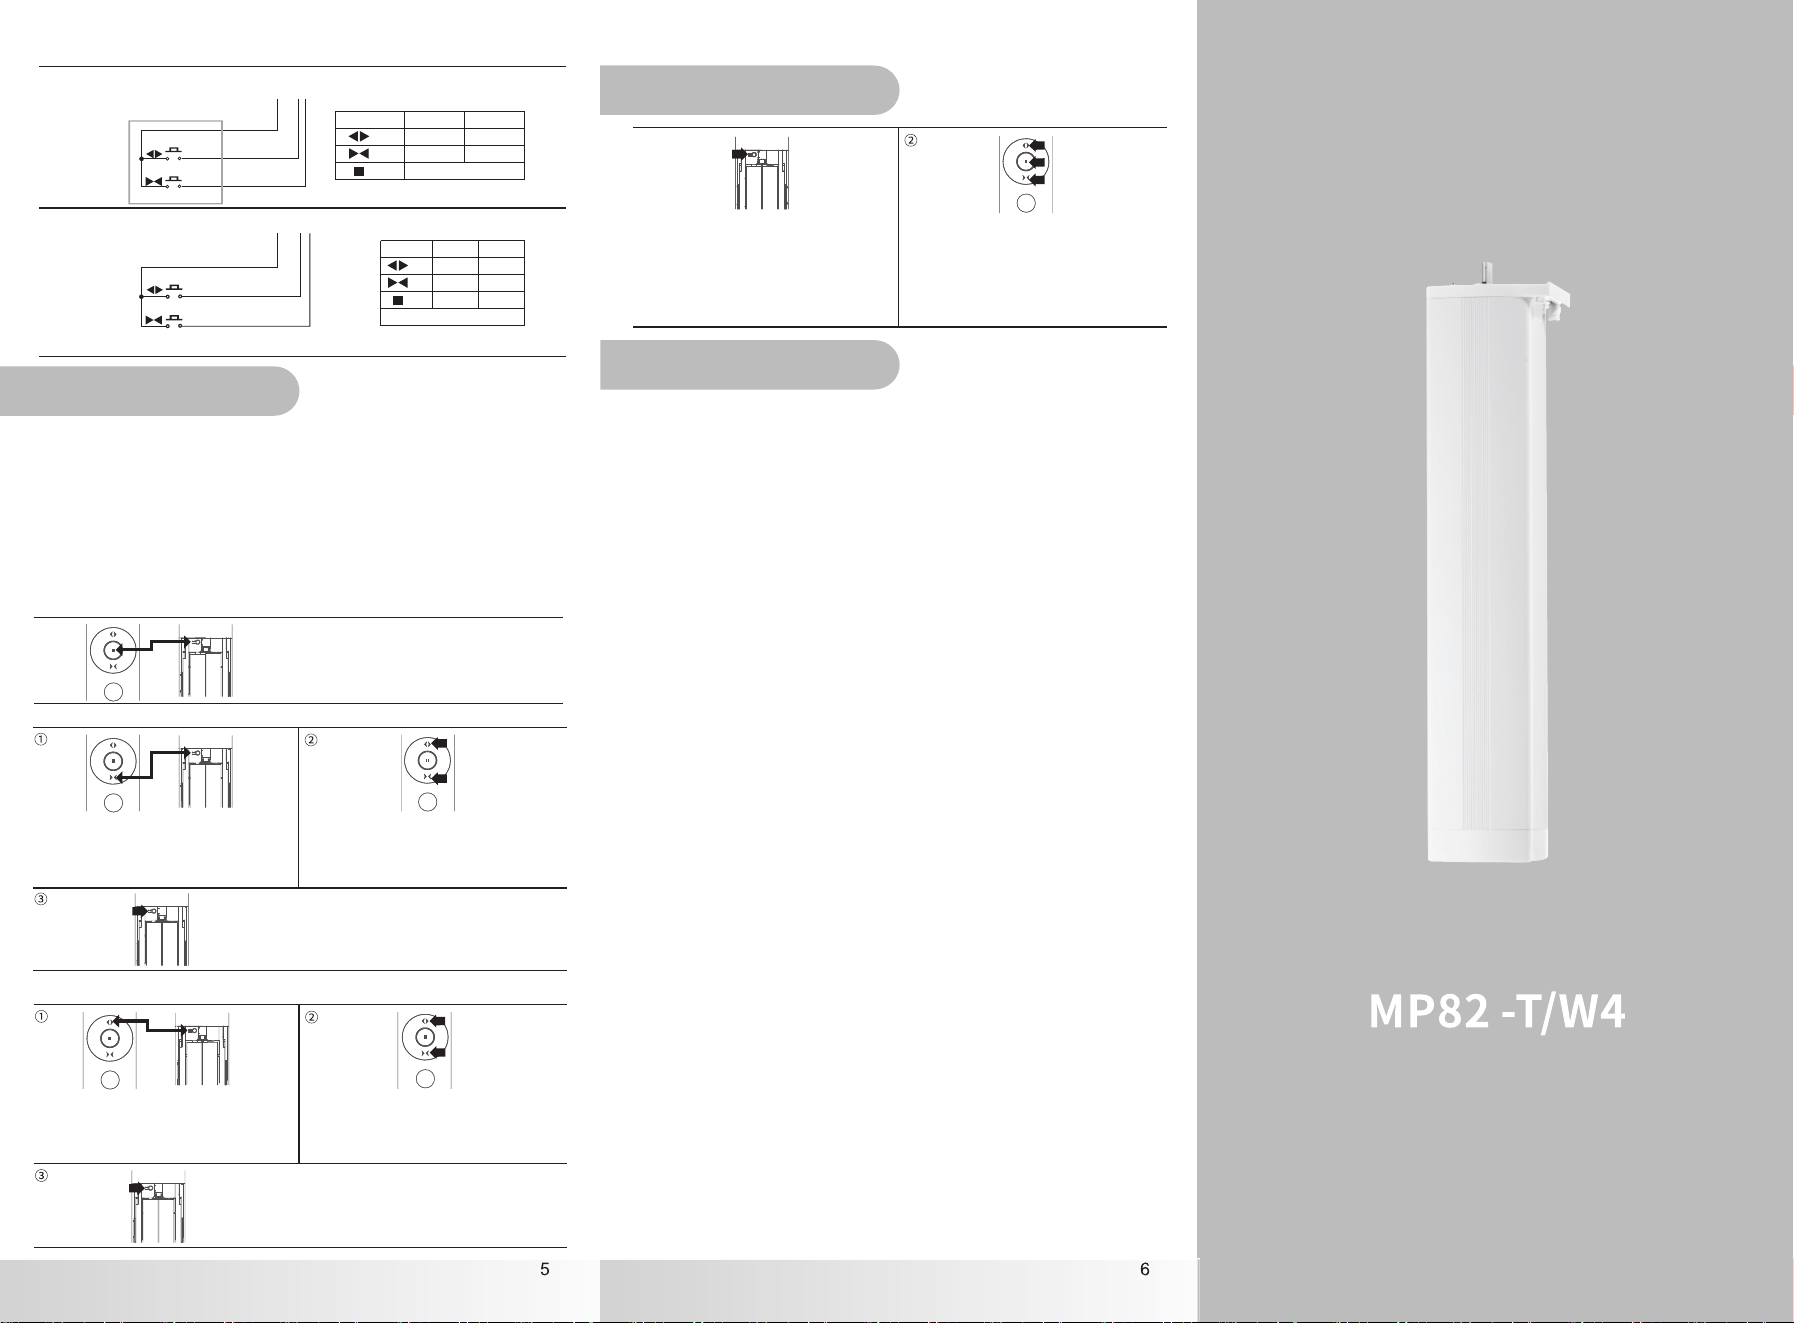
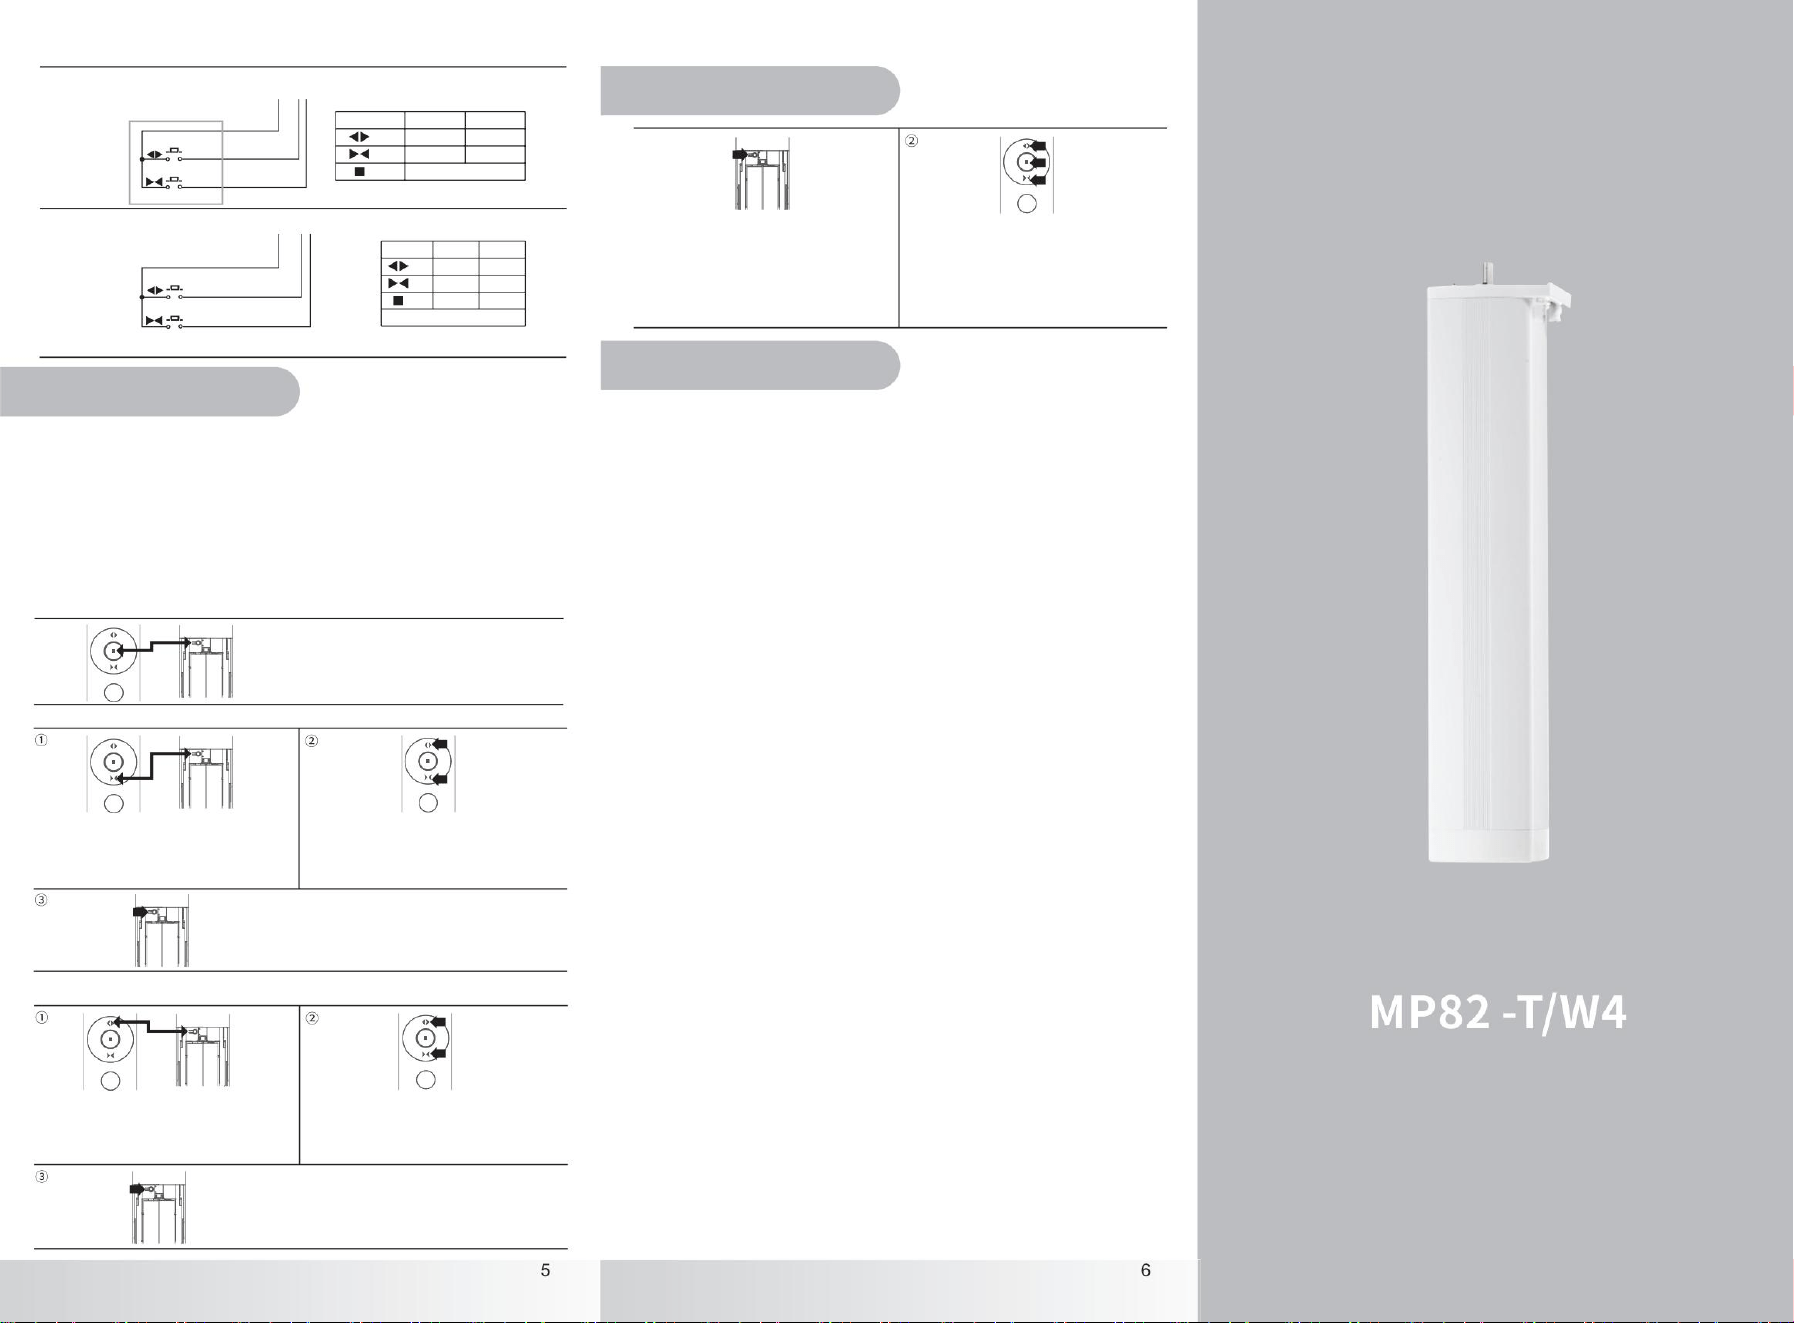
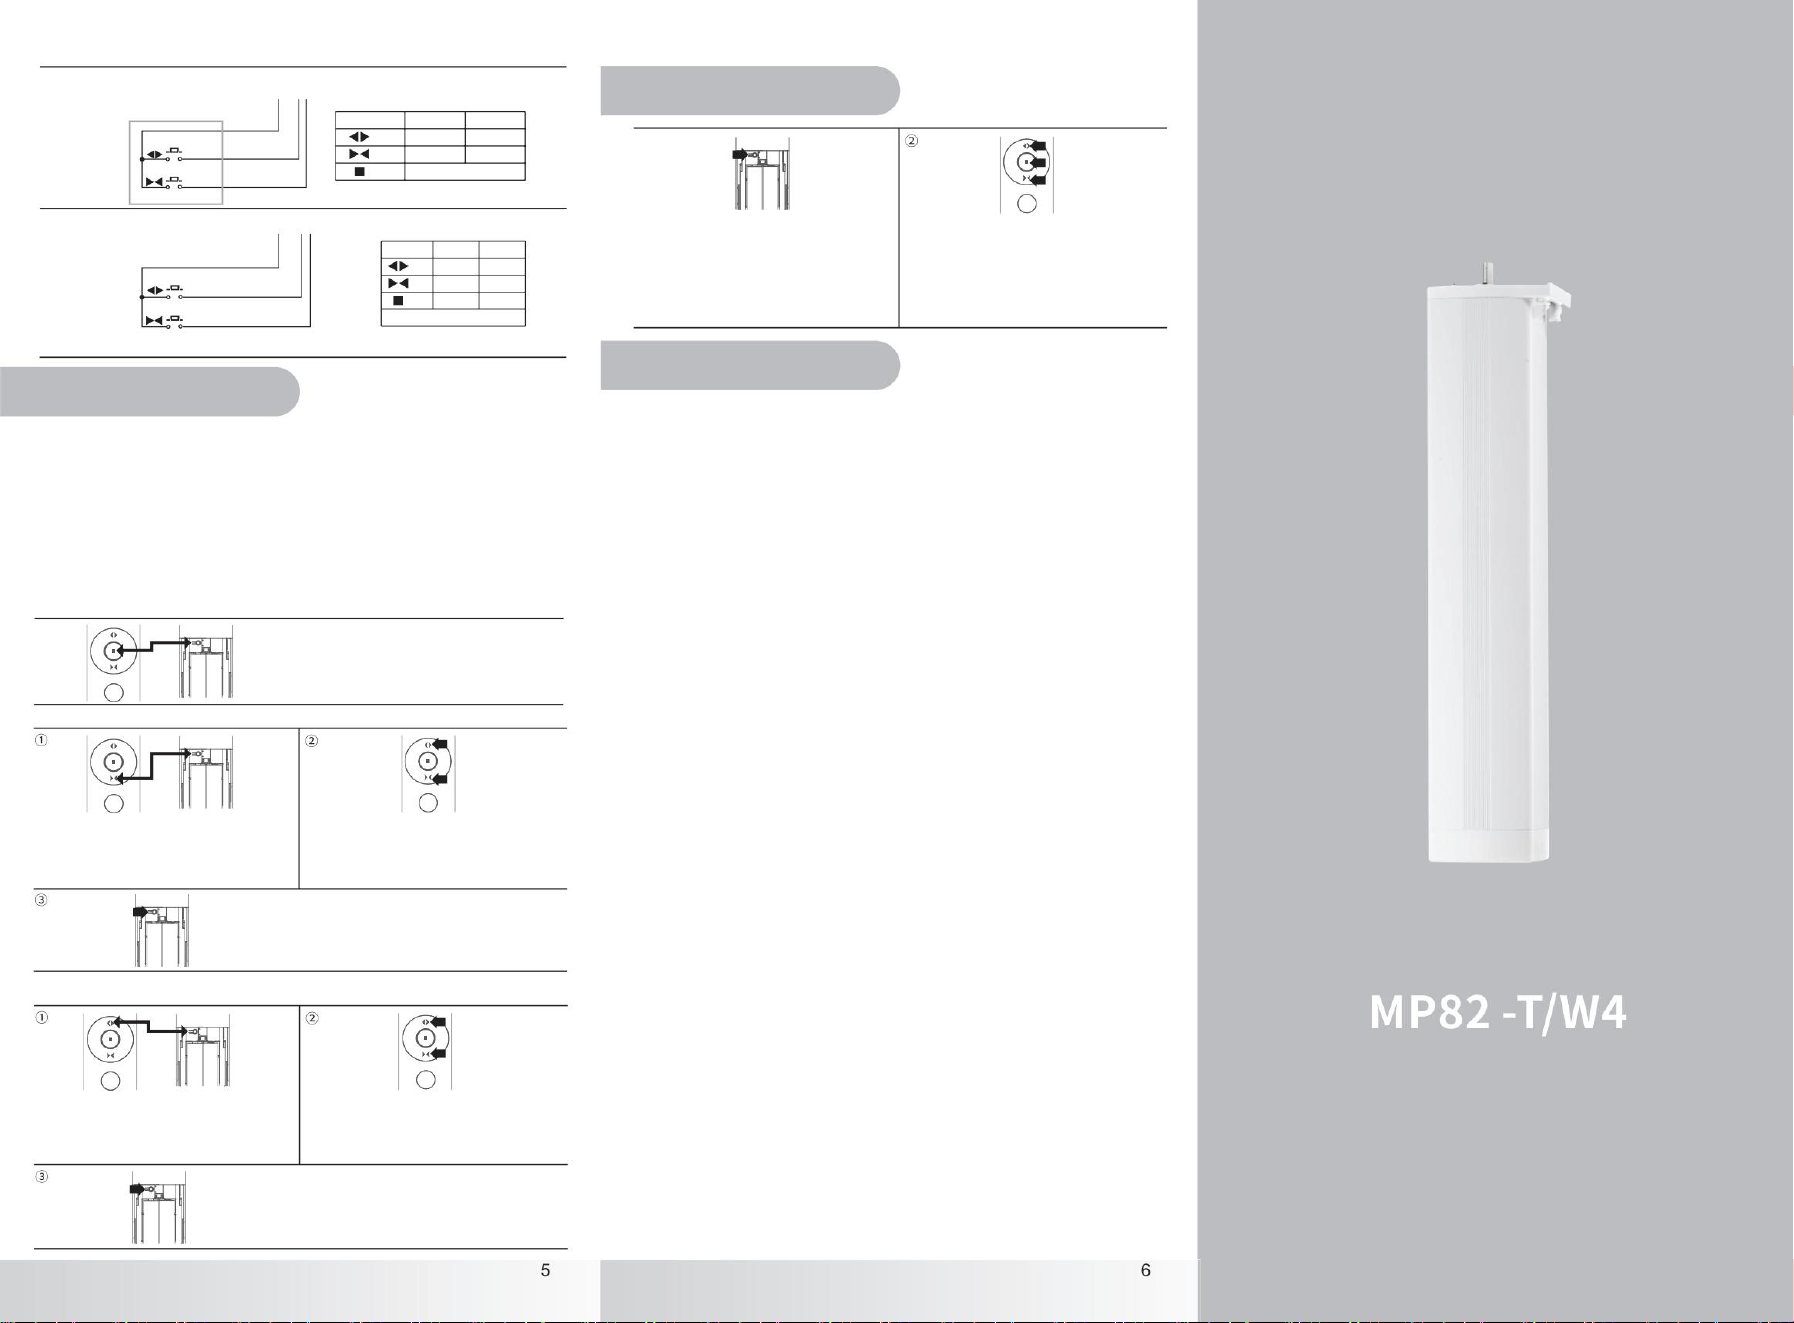
Press the motor [Programming] button
for 3 seconds until the LED indicator
lights up.
①
②
Press the remote control [open]+[close]
button,the motor shakes, the mode change
is completed.
3S
Remote control function
Press the remote control
[open] button, open the
curtain,the motor will run to
the open limit point, stop at
block or stop automatically
after 3 minutes.
①
②
Press the remote control
[close] button, close the
curtain, the motor will run
to the close limit point, stop
at block or stop automatic-
ally after 3 minutes.
In the process of curtain
opening and closing, press
the remote control [stop]
button, the motor will stop
immediately.
③
Control Methods
Short time press twice+ long time press [programming] button twice: short time
press ( light flash) + short time press(light flash) + long time press for 3 seconds
( led light on) + long time press for 3 seconds ( Led light flashes two time s and then
light off ) ,direction change done.
Method 2 (Change direction by programming button )
+ +
3S
+
3S
Press motor [Programming] button 3s
until LED light on,enter learning mode.
Press [channel select]+[Channel select]
buttons,LED light fast flash 3times,
direction setting successfully.
3S
Method 1
Direction setting
①
②
Use the [On], [off], [Stop] buttons to run
the curtain to the desired position.
At the same time, press [25%] +[Channel
Setting] and set the current position as the
middle stop position 2. The motor vibrates
once and the motor indicator lights flash
once.
Set the middle stop point 2
Set the middle stop point 1
①
②
Use the [On], [off], [Stop] buttons to run
the curtain to the desired position.
At the same time, press [75%] +[Channel
Setting] and set the current position as the
middle stop position 1. The motor vibrates
once and the motor indicator lights flash
once.
Middle stop position
Press the button [75%] of
the remote control, the
curtain will run to 75% of
the trip and then stop.
Long press the button
[50%] of remote control,
the curtain will run to 50%
of the trip and then stop.
Press the button [25%] of
the remote control, the
curtain will run to 25% of
the trip and then stop.
Switch off touch control function
Press [Stop] and [Close] button for 4
seconds till the light on, the motor will
shake shortly.
Short Press [Channel setting] button ,
motor vibration then this function can be
switched off successfully.
Switch on touch control function
Press [Stop] and [Open] button for 4
seconds till the light on, the motor will
shake shortly.
Short press [Channel Setting] button,
motor vibration, then this function can be
switched on successfully.
Factory reset
Press the motor [Programming] button
for 3 seconds until the LED indicator
lights up.
Long press the motor [code] button for
more than 7 seconds, the blue light flashes
once, restore factory settings.
3S 7S
Pull to start function
Channel setting
3S
Press the motor [Programming] button
for 3 seconds until the LED indicator
lights up.
Remote control [Channel Setting] button,
the indicator light flashes red for 3 times
and then goes off.The code learning is
successful.
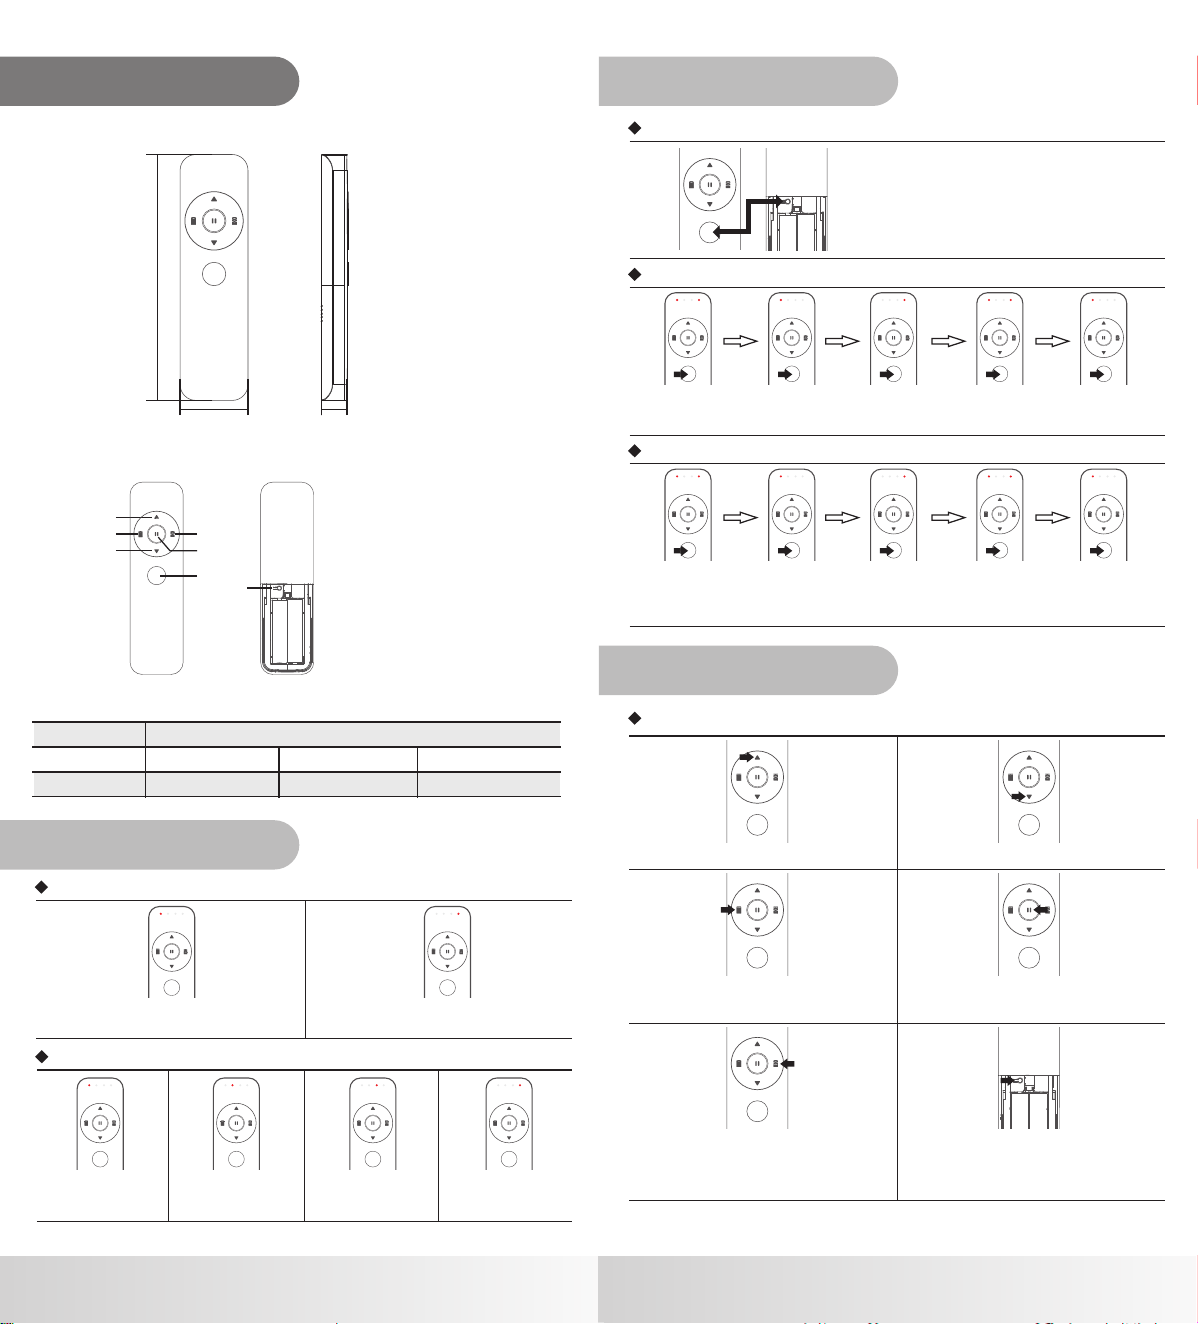
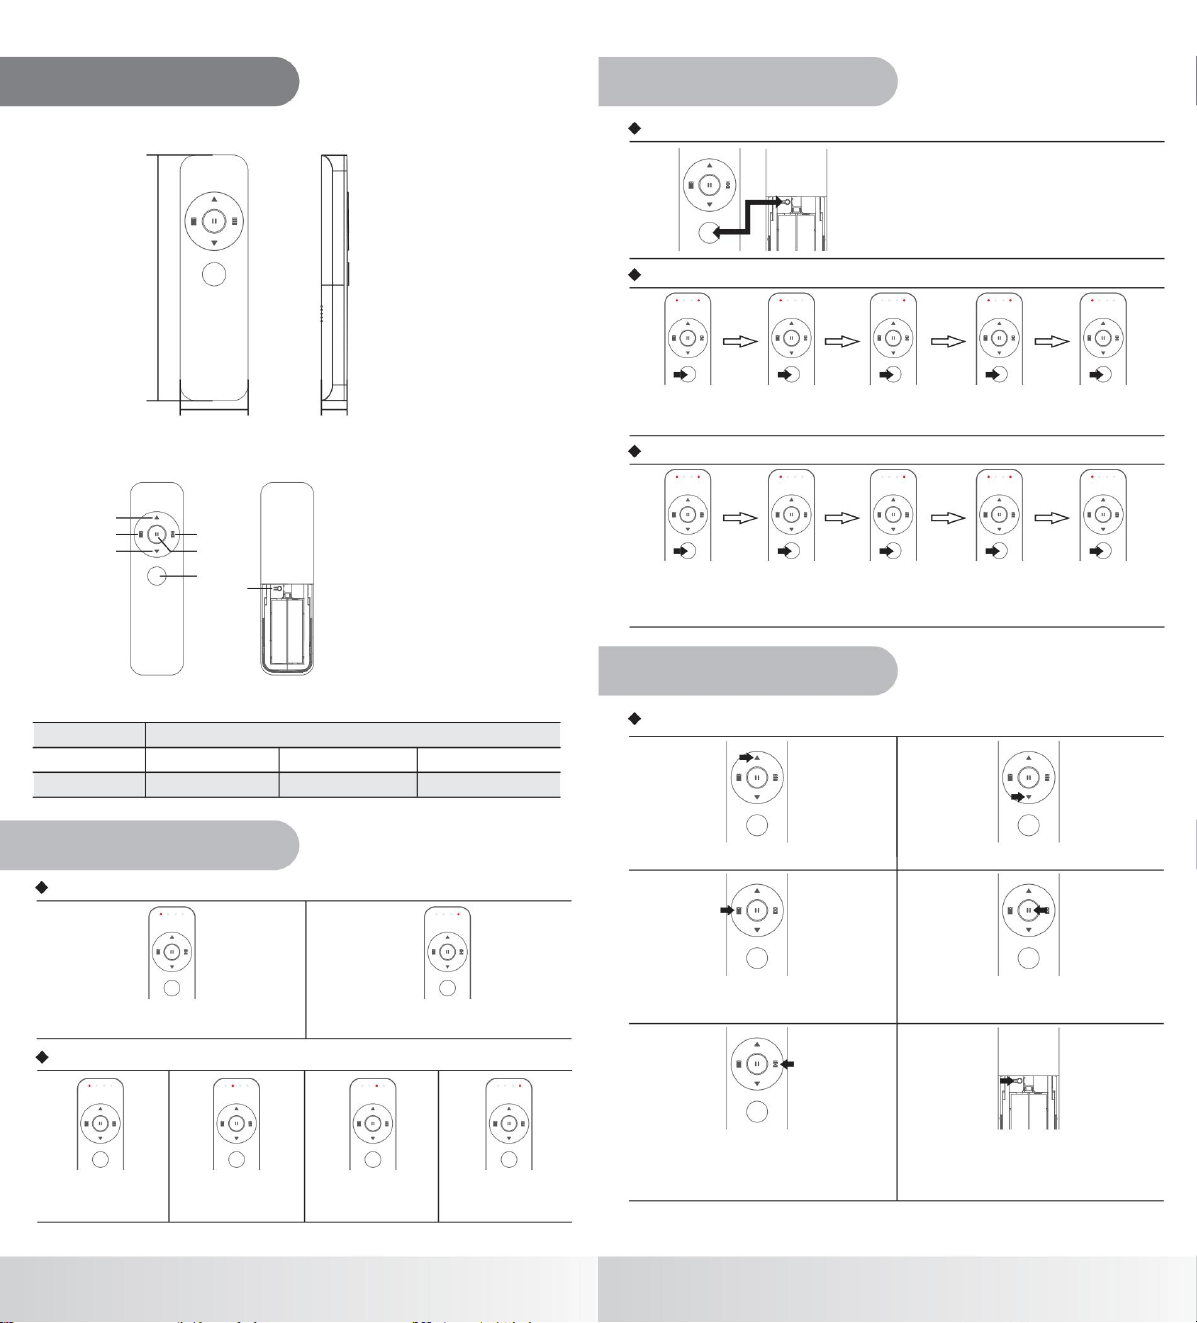
Remote control basic setting
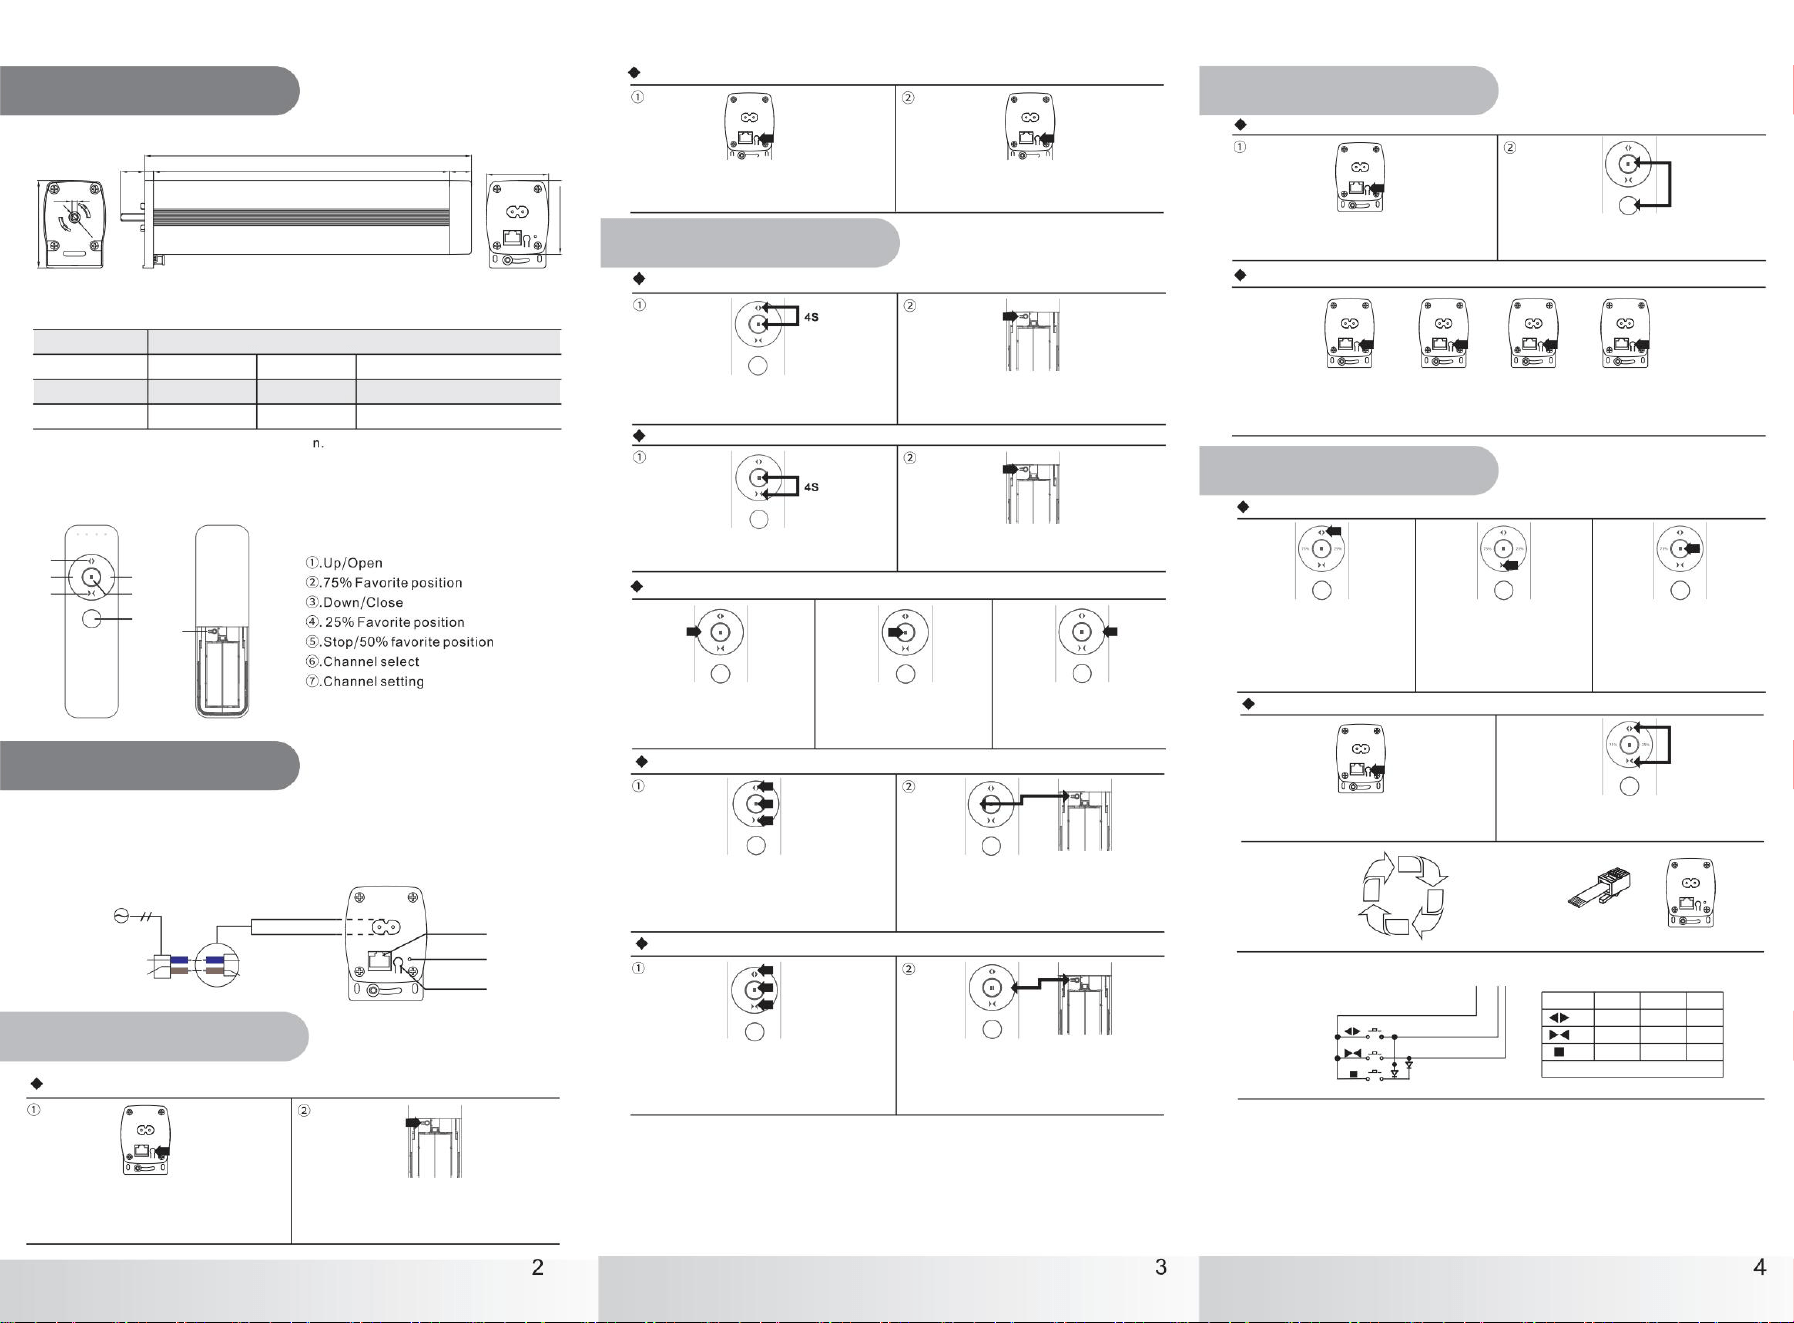
[Signal port] Connect external device
[LED light] Power on/off,code pairing,operation mode.
[Learning button] For remote control setting
[Power port] AC power,refer to "Motor Wiring Method"
A. C. Power input
N(blue)= Neutral wire
L (brown) = Live wire
N(blue)= Neutral wire
L (brown) = Live wire
Learning button
LED light
RJ port
Operation button and port
①
③
④
⑤
⑦
②
⑥
3.Recommended control device
[YR5302 Remote]
MP82-T/W4
100-240V AC
50/60Hz
75r/min(90/110r/min adjustable)
IP41
S3 50%
Rated frequency
Rated Torque
Motor Mode
Rated voltage
Rated Speed
Running time
IP grade
1
.2N m
.
Note: Motor length L subject to product specifications (unit: mm)
2.Product Specification
265
240719.4 18
50.6
60
71
4
Φ
6
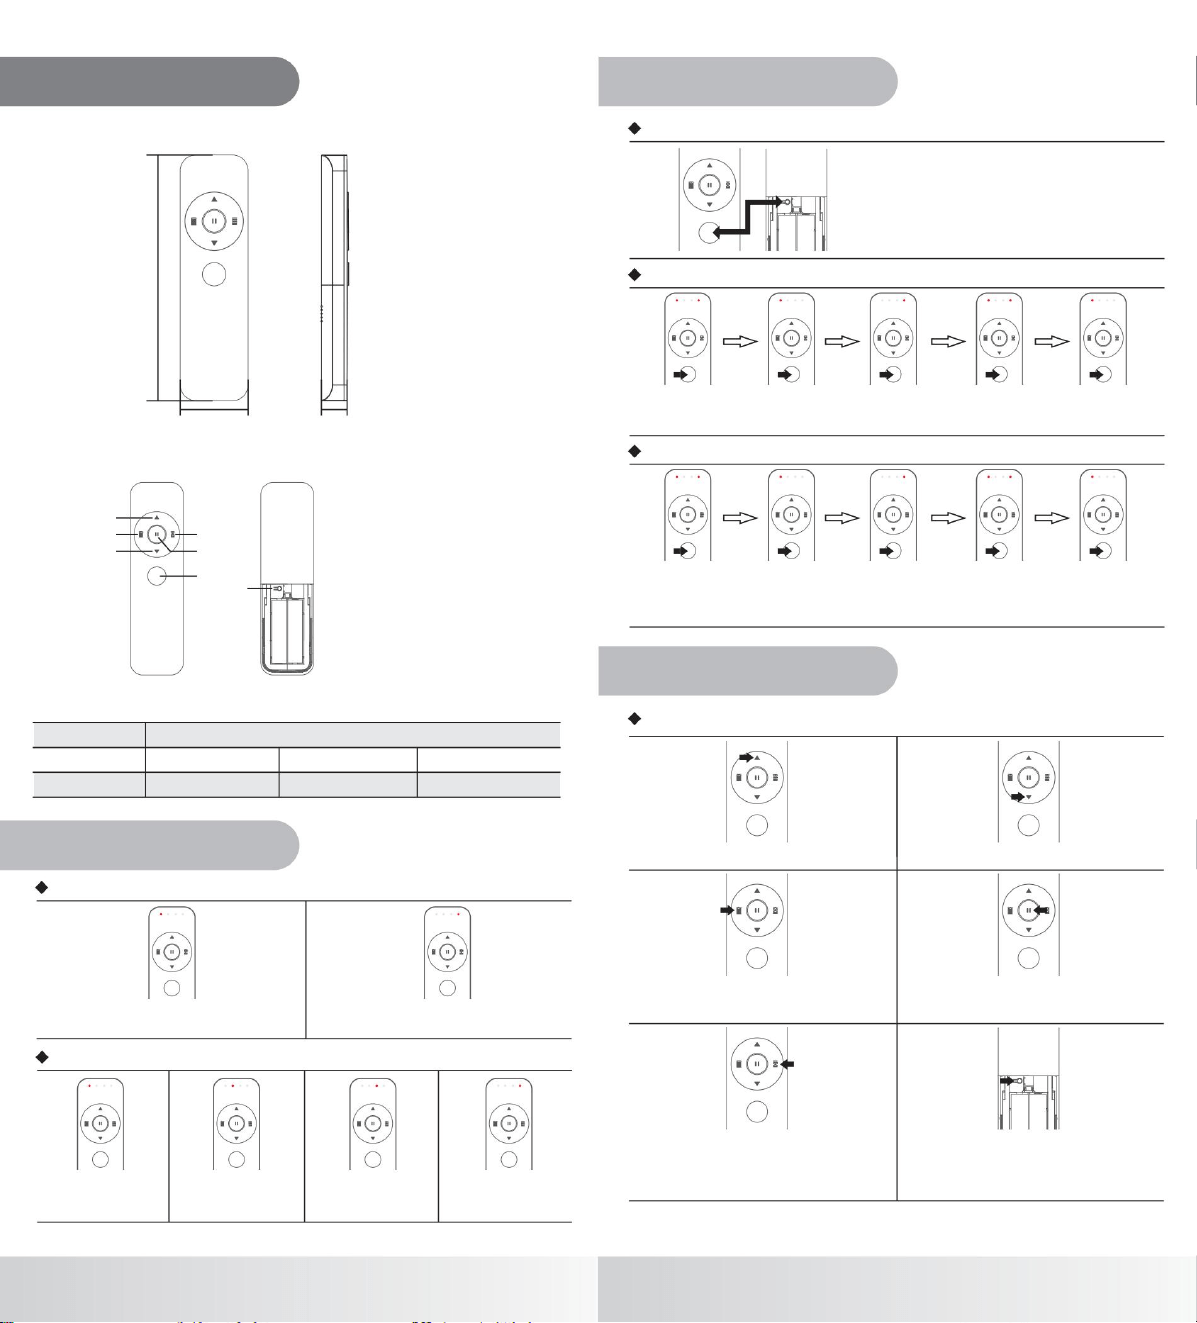
1.Product Size
Product information
Note: factory default rated speed is 75r/min.
①
②
③
Hand-held remote control instruction manual
YR5302
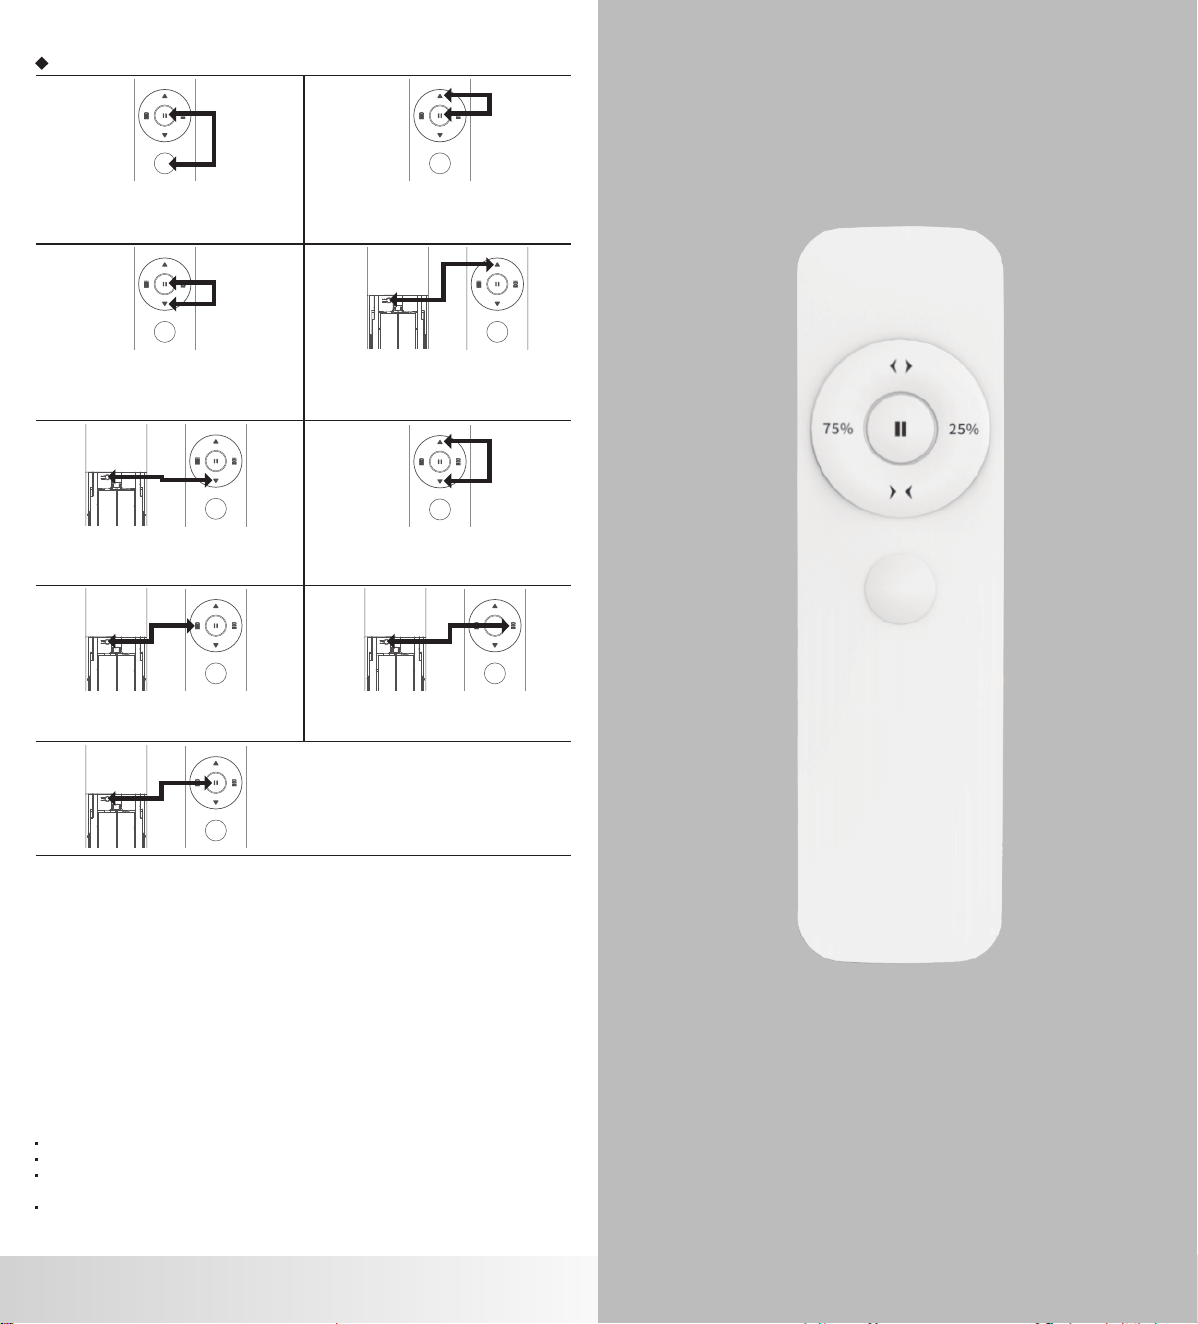
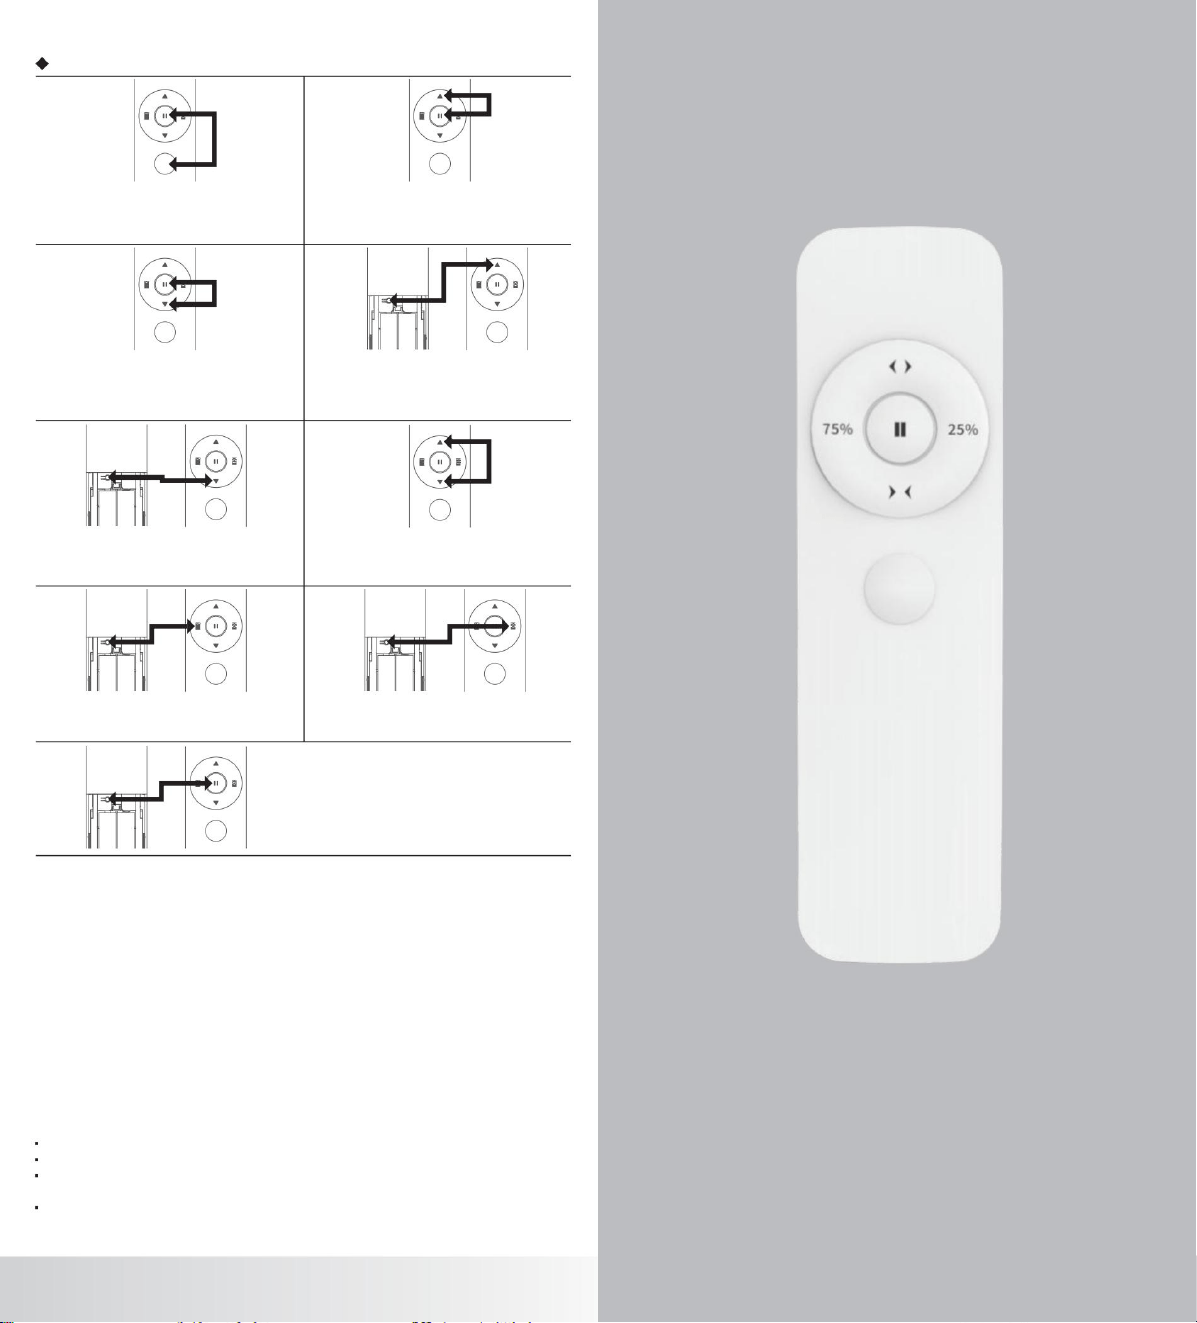
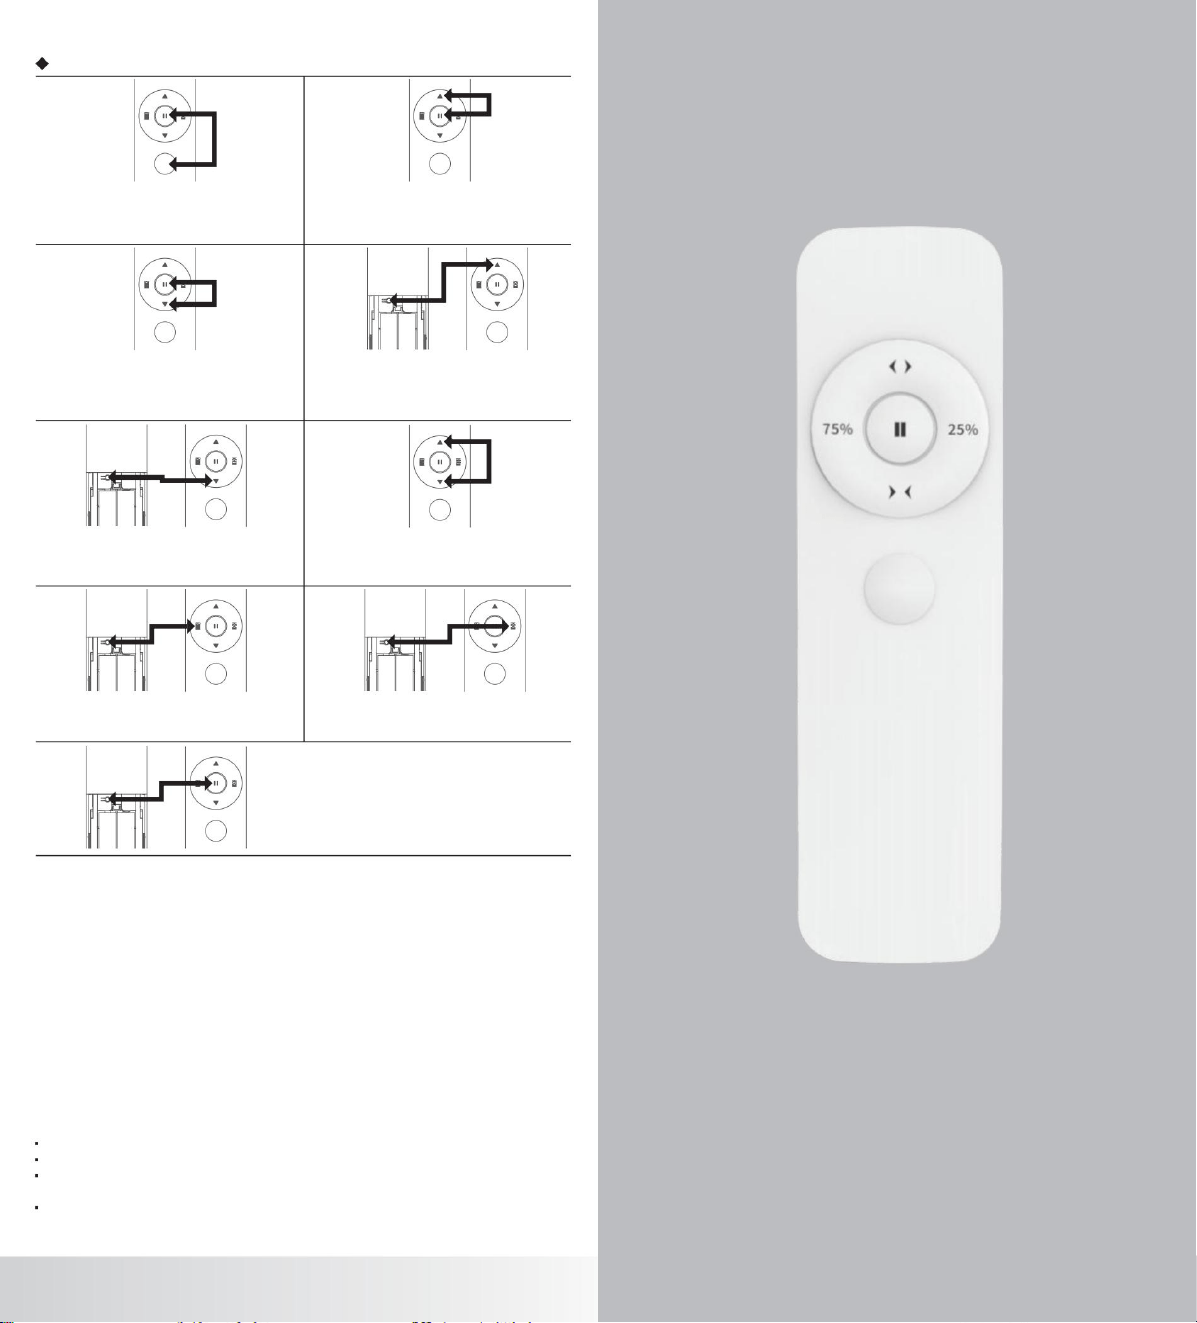
[Channel Selection]+[Stop/50%] : reversing, only
after the controller or motor enters the code
learning state and receives the matched reversing
function code will it be processed.
[Stop/50%]+[Up/Open] : Long press for 5 seconds
to start, and then press the [channel setting] button
to confirm.
[Stop/50%]+[Down/Close] : Long press for 5
seconds to enter the ready to disable manual start,
then short press [Channel settings] button to
confirm.
[Channel Setting]+[Up/Open] : Press long for 5
seconds at the same time to make the motor enter
the state of setting o
n limit point.
[ChannelSetting]+[Down/Close] : Press for 5
seconds at the same time to make the motor enter
the limit point state of down setting.
[Up/Open]+[Down/Close]: external control mode
switching. The controller or motor will only process
after receiving the paired mode switching function
code after entering the code learning state.
[Channel setting]+[75%]:Short press at the same
time,set IP1 limit position.
[Channel setting]+[25%]:Short press at the same
time,set IP2 limit position.
[Channel setting]+[Stop/50%]:Long pre
ss at the
same time,clear limit position.
4
Combination button function
FCC Statement
1. This device complies with Part 15 of the FCC Rules.
Operation is subiect to the following two conditions:
(1)This device may not cause harmful interference.
(2)This device must accept any interference received, including interference that may
cause undesired operation.
2. Changes or modifications not expressly approved by the party responsible for
compliance could voidthe user's authority to operate the equipment.
Note: This equipment has been tested and found to comply with the limits for a class B
digital device.pursuant to Part 15 of the FCC Rules, These limits are designed to provide
reasonable protection against harmful interference in a residential installation.
This equipment generates uses and can radiate radio frequence energy and, if not
installed and usedin accordance with the instructions, may cause harmful interference to
radio communications. However.there is no guarantee that interference will not occur in a
particular installation. if this equip memt doescause harmful interference to radio or
television reception, which can be determined by turning theequipment off and on, the user
is encouraged to try to correct the interference by one or more of thefollowing measures:
·
Reorient orrelocate the receiving antenna.
·
Increase the separation between the equipment and receiver.
·
Connect the equipment into an autlet on a circuit different from that to which the receiver
is connected
·
Consult the dealer or an experienced radio/TV technician for help.The device has been
evaluated to meet general RF exposure requirement. The device can be used inportable
exposure condition without restriction.
Emission frequency Communication protocol
Transmission channel
YR5302
+8dBm
AAA BATTERY X 2pcs
4
Motor model
①
③
④
⑤
⑦
①. p/Open
②.Intermediate stop 75%
③.Down/Close
④.Intermediate stop 25%
⑤.Stop/50%
⑥.Channel selection
⑦.Channel setting
U
②
⑥
2 3
132mm
36.9mm
14.6mm
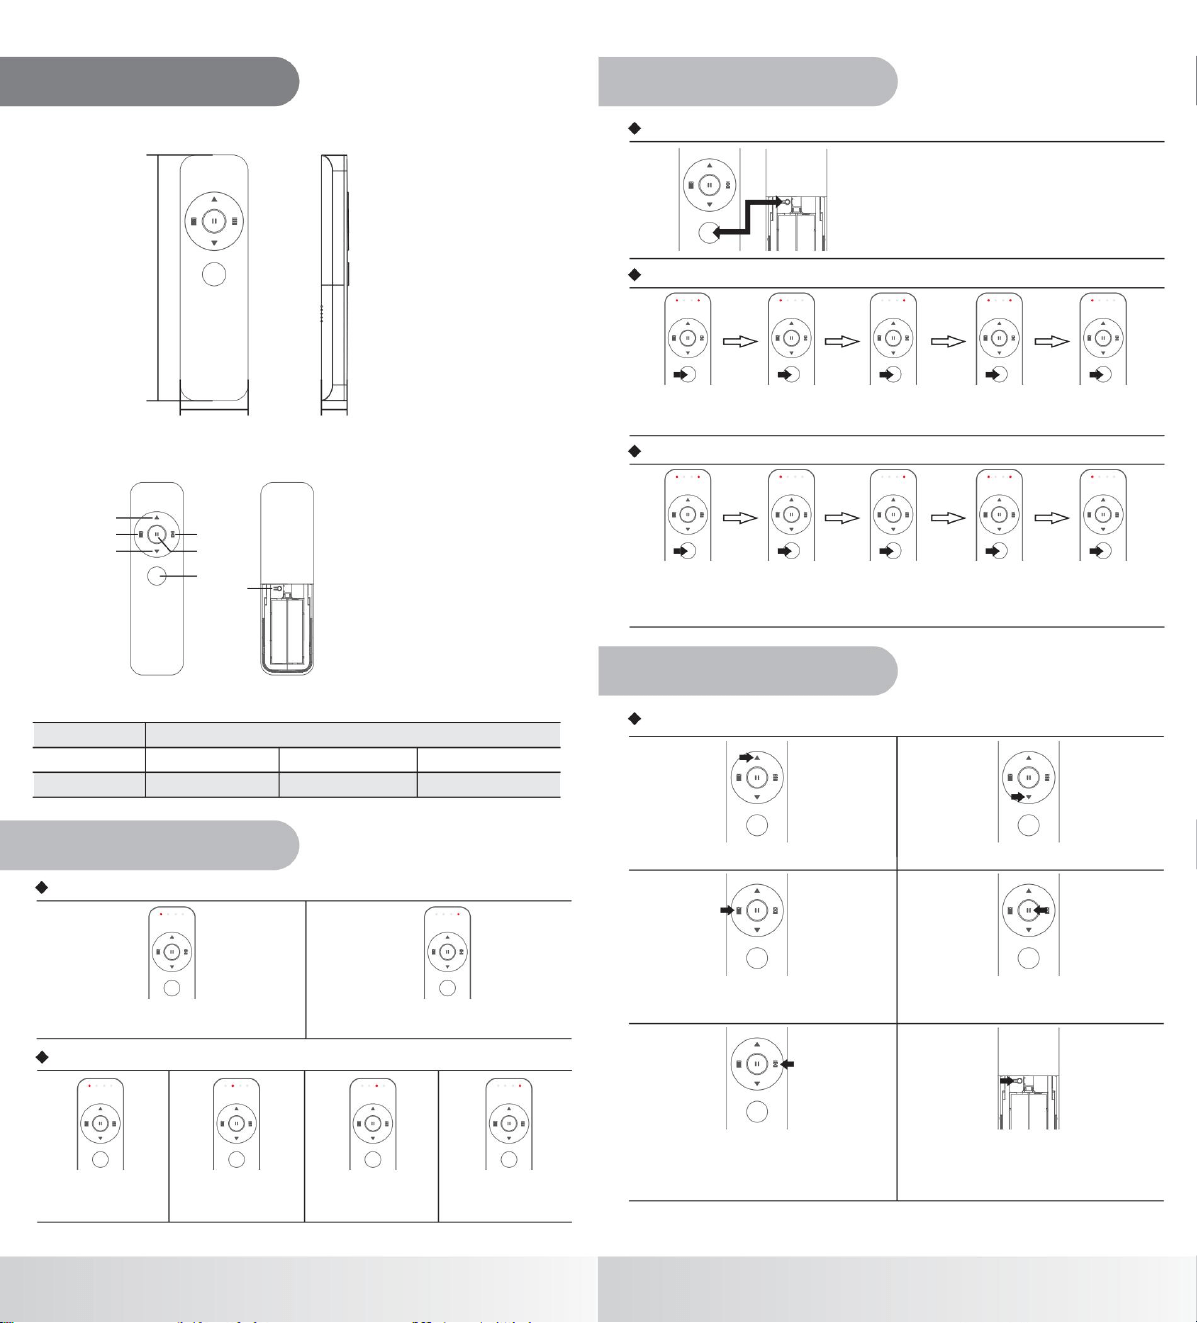
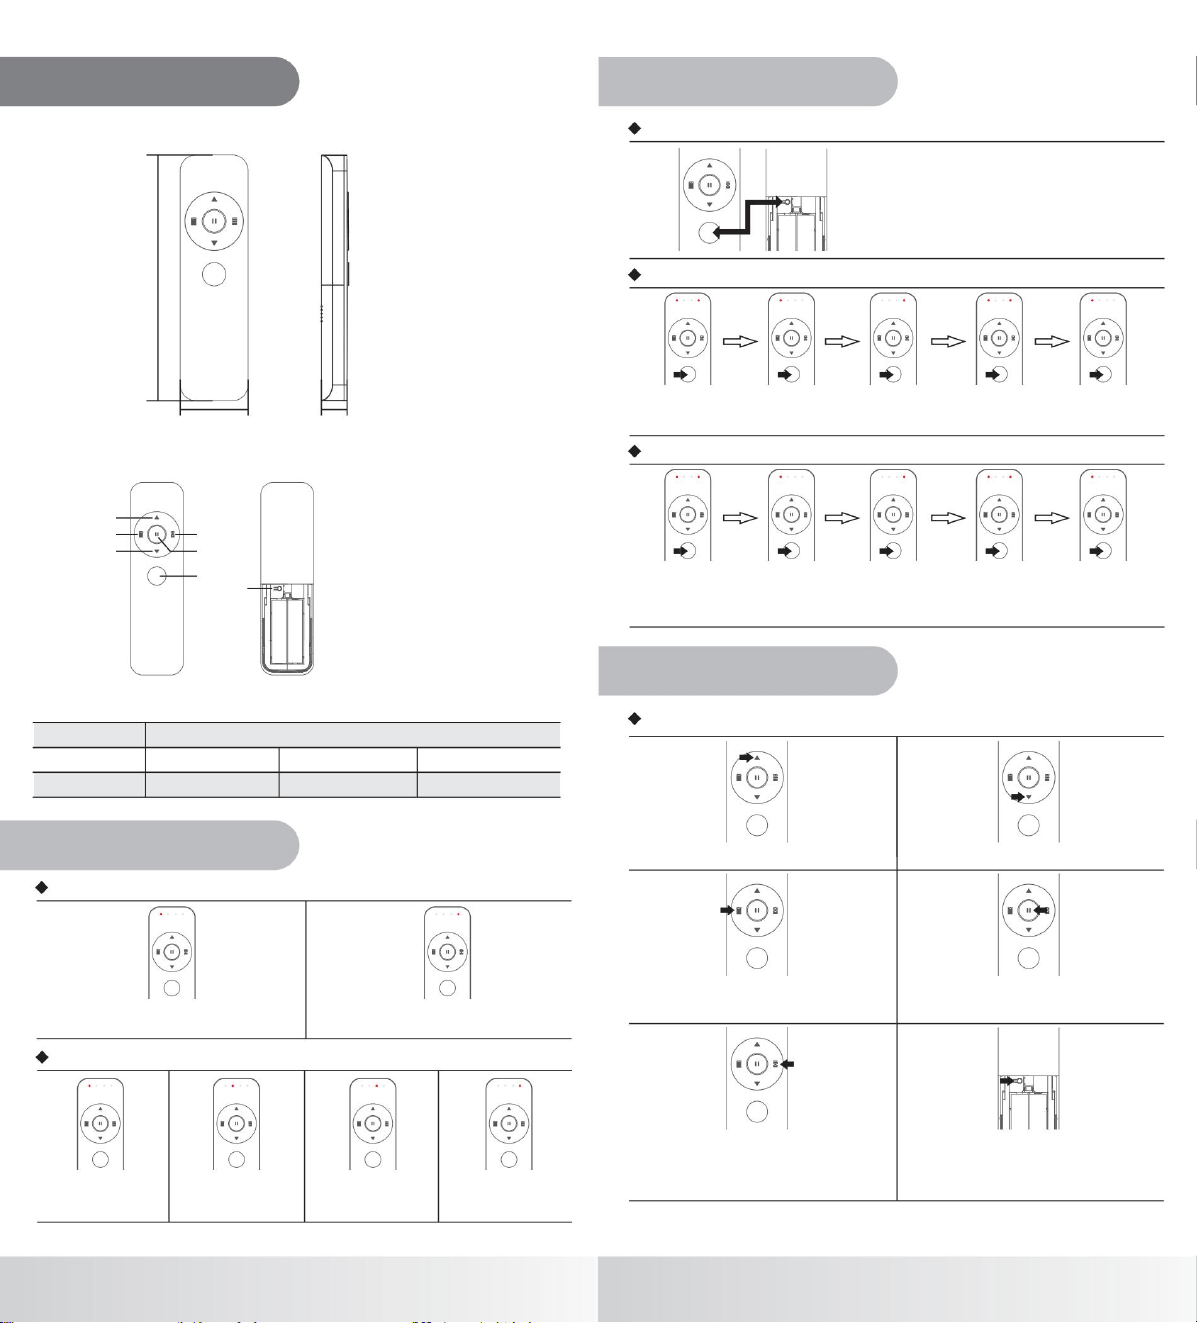
The current maximum number of channels in use
is set to two or four channel switch.
The way to switch two channels and four channels modes
Two channel mode
Press the [Channel Selection] when the remote control LED is off, and the indicator light of the
current channel will light up. Press the [Channel Selection] again within 3 seconds, and select the
channel in the sequence of channel 1→ Channel 2→ group control channel → Channel 1.
Four channel mode
[Intermediate Stop 25%] : short press, turn the
leaf down; Hold for 1.5 seconds to run to the IP3
limit, 25% by default.
[Channel Setting] : used for code learning. The
controller or motor will receive and process
unpaired channel setting button only after
entering the code learning state.
product information
1.Product size
Note: The length L of the remote control depend on product specifications (unit: mm)
2.Button function
3. Product Specifications
Use battery
BLE 5.0
LED indicator function
LED 1 is channel 1, and flashing LED indicates the
signal is transmitting.
LED 4 is channel 2, and flashing LED indicates the
signal is transmitting.
Two channels modes
Four channels modes
LED 1 is channel 1, and
flashing LED indicates
the signal is transmitting
LED 2 is channel 2, and
flashing LED indicates
the signal is transmitting
LED 3 is channel 3, and
flashing LED indicates
the s
ignal is transmitting
LED 4 is channel 4, and
flashing LED indicates
the signal is transmitting.
Channel setting
Press the [Channel Selection] when the LED of the remote control is off, and the indicator light of the
current channel will light up. Press the [Channel Selection] again within 3 seconds, and select the
channel in the sequence of channel 1→ Channel 2→ Channel 3 Channel 4→ group control channel
→ Channel 1.
Button function
Single button function
[Up/Open]: Open the curtain. [Down/Close]: Close the curtain.
[ ]: Short press to up tilting;
long pr
ess 1.5s to run to the IP1 limit position, the
default is 75%.
Intermediate Stop 75%
[Intermediate stop 50%]:Short press,stop.If long
press 4 seconds,run to default 50% limit.

Nota:
1Verifiqueelembalajeyasegúresedequetodosloscomponentesesténpresentes.
2Parafacilitarlainstalación,esposiblequelaspoleasyaesténinstaladasenlapista.
3Noesnecesarioinstalartodoslosaccesoriosdelcódigolateral.Dependedelasituaciónreal.
tornillos
20 20
Nombre
clavo
Instalar
Grande
12
6
tornillos
golpeteo
tornillo
20
Montaje
arandelas
Códigolateral
10
accesorio
Cantidad
20
s
Expansión
4
Poleas
Foto
detalle Pequeño
12
20
nueces
PequeñoGrande
Soportes
Paso6:Alineeloscarros:Aflojelostornillossuperioresdeloscarros.Lleveamboscarrosalbordedela
cajadelaunidadyaprietelostornillos.Compruebequeloscarrossemuevancon
Paso7.Ajustelapolea.Cuandolapoleasesequeoseafloje,podemosajustarlausandoel
tornillosenellateraldelkitdetransición.
suavidad.
°
Paso8.Paralainstalacióndelcódigo,comosemuestraenlasFiguras23,coloqueelcódigoenun
ángulode45°sobrelasuperficiesuperiordelriel,gíreloyapriételo.Coloqueelcódigoaunos50cmdel
kitdetransicióncomopuntocentral.
Paso9.Montajesuperior,instaladoenlacajadelacortina,sepuedefijardirectamentecon
Paso10.Unavezinstaladoenlapared,esnecesariomarcarlaposicióndelcódigodeinstalación
superiorenlapared,haceragujeros,instalarclavosdeexpansiónyluegofijarloscon
Paso11.Paralainstalaciónlateral,primeroinstaleelcódigodeinstalaciónsuperiorenelcódigo
deinstalaciónlateralsegúneldiagramadelaizquierday,acontinuación,instaleelkitde
códigodeinstalaciónlateralenelriel.Lapareddebemarcarsesegúnelcódigodeinstalación,
perforarseyfijarsecontornillosdeexpansióndespuésdelainstalación.
tornillos.
tornillos.
Paso12.Paralainstalaciónlateral,primeroinstalelapartesuperiorsobreelrielsegúneldiagramadela
izquierdayluegoinstaleelcódigodeinstalaciónlateral.Lapareddebemarcarsesegúnelcódigode
instalación,perforarseyfijarsecontornillosdeexpansióndespuésdelainstalación.
EscaneaelcódigoQRparaobtenerelvídeodefuncionamiento


Presionecualquierbotónparadetener
OperaciónK1
Operación
Eltiempodeaccióndebecontinuar
(Detener)
(Abierto)
(Cerca)
(Abierto)
(Detener)
(Cerca)
Apagado
Apagado
En
Apagado
Apagado
En
En
K2
En
K2
K1
En
87654321
K1
Ajustede
Conexióninteligente
velocidad
Establecerlímite
3S
Línea
Cerca
Abierto
común
Líneacomún
Cerca
Abierto
1.Despuésdeconectarlaalimentación,laprimeravezqueabraocierrelacortina,elmotorsedetendrá.
Almismotiempo,mantengapresionadoelbotón[Cerrar]+[Configuracióndecanal]delcontrolremotoparaquela
cortinaalcancelaposicióndeseadapresionandoelbotón[Arriba]o[Abajo]durante4segundos,elmotorse
sacudeen30segundos.
2.Enelestadodeparada,apagueyvuelvaaencender,sinosetiradelacortinaduranteel
Presioneelbotón[Configuracióndecanal]delcontrol
remotoopresioneelbotón[Programación]delmotor
paraestablecerlaposiciónactualcomoelpuntolímite
inferior,elmotorsesacudeunavezylaluzindicadoraLED
delmotorseapaga.
funcionamiento,
•métododeconexión2
•métododeconexión
TuyaZigBee:Despuésdeabrirlapuertadeenlace,presioneelbotón[Programación]delmotor
cuatrovecesseguidas,suelteymantengapresionadodurante3segundoshastaqueelindicadordearcoíris
parpadee,ingresealmododeemparejamiento,abralaaplicaciónTuya,hagaclicen"+"enlaesquinasuperior
derecha,seleccione"dispositivoscercanos"paraencontrarelmotor,elmotoringresaalaredde
distribución,esperepacientementeaquelaconexiónseaexitosa,puedecontrolarelusodelnombre
personalizado.
1
Controlexternodepulsode2botones
LaluzindicadoraLEDdelmotorestaráencendidaduranteuntiempoprolongado.
TmallGenie:cuandoeldispositivoestéenelestadodereddedistribución,digaalaltavozdeTmallGenie:
"TmallGenie,encuentraeldispositivo",esperepacientementeaqueTmallGenieencuentreeldispositivoy
conecteeldispositivo,despuésdequeelenlaceseaexitoso,puedepersonalizarelnombreylaubicacióndel
dispositivo,puedecontrolareldispositivoenelteléfono.
TmallGenie:Presioneelbotóndelmotor[Programación],suelteypresionedurante3segundoshasta
quelaluzindicadoraparpadeeenrojo5veces,ingresealmododeemparejamiento;Comandodevoz"Tmall
Genie,descubreeldispositivo",esperepacientementeaqueTmallGenieencuentreeldispositivoyconecte
eldispositivo,despuésdequelaconexiónseaexitosa,puedepersonalizarelnombreylaubicación
deldispositivo,puedecontrolareldispositivoenel
•Ajustedellímitesuperior
teléfono.
Presioneelbotón[Abrir]durante3segundos,
en.
ajuste.
Presioneelbotón[configuracióndecanal]durante3
segundos,ingresealmododeajustedevelocidad,luzLED110r/min.
Bloqueadoen0mm10mmhastalaposicióndecierre.(Siladireccióndelapistaesincorrecta,latoleranciadel
límiteautomáticoserámayor,despuésdelcambiodedirección,latoleranciavolveráalnivelnormal).
Mantengapresionado[Configuracióndecanal]+[Detener]
almismotiempodurante6segundos,borratodosloslímites,
elmotorsesacudeunavez,laluzLEDparpadeaunavez.
Presioneelbotón[Stop]durante3segundosyajustea
90r/min.
Presioneelbotón[pausa]durante3segundosy
tiempo,laluzindicadoraLEDdelmotorpermaneceencendidaduranteun
tiempoprolongado.
ajuste
a75r/min.
LaluzLEDdelmotorparpadea2veces.
•Ajustedellímiteinferior
en.
110rpm
90rpm
75
Mododecontrolexternodeacción
Almismotiempo,mantengapresionadoelcontrolremotoparaquelacortinaalcancelaposicióndeseada.Controle
[Configuracióndecanal]+botón[Arriba]presionandoelcontrolremoto[Arriba]o4segundos,elmotorse
sacudeunavez,botón[Abajo]dentrode30segundos.
puntual
rpm
•Límiteautomático
Alapagarelmotor,noseproduceningúncambioenelestado
,
elmotornosebloquearáhastaelfinal.
dellímitedelapista.Sisetiradelacortinademasiadolejos,trasconectarlaalimentación,podría
,
elmotor
alcanzarelfinaldelapistayluegoreanudarellímite.Siseapagaduranteelmovimientodelmotor,estereanudará
ellímitetrasalcanzarelfinaldelapistalaprimeravezqueseejecuta.•Borrarlímite
Presioneelbotón[configuracióndecanal]delcontrol
remotoopresioneelbotón[Programación]delmotor
paraestablecerlaposiciónactualcomoelpunto
límitedeapertura,elmotorsesacudeunavezylaluz
indicadoraLEDdelmotorseapaga.
K2
K1
75% 25%
75%
25%
75% 25%
25%75%
75%
75% 25%
25%
87654321
•Eliminaremparejamiento
1Método1:Eliminareldispositivoenlaaplicación;
2Método2:Restablecimientodefábrica;
3Método3:Vuelvaaingresaralmododedistribuciónparadesconectarlared.
K2
ManualdeinstruccionesdelmotordeCCconentradadeCA
En
50/60
K1
87654321
Hz
1,2Nm.
Velocidad
Nota:lavelocidadnominalpredeterminadadefábricaes75r/min.
nominal
Frecuencianominal
100240V
Parnominal
CA
Tensiónnominal
75r/min(90/110r/minajustable)
IP41
Gradodeprotección
S3
Tiempodeejecución
50%
IP
71
60
N(azul)=cableneutro
L(marrón)=Cableconcorriente
Ajustede
L(marrón)=Cableconcorriente
dirección
Informacióndel
Funcióndetirarpara
Botóndeoperaciónypuerto
iniciar
producto
Métodosde
Configuraciónbásicadelcontrolremoto
control
K3
En
En
En
En
K2
Apagado
En
Apagado
En
Apagado
(Detener)
(Abierto)
Mantengapresionadoelbotón[código]delmotor
durantemásde7segundos,laluzazulparpadeauna
vezyrestablecelaconfiguraciónde
(Cerca)
fábrica.
Método2(Cambiarladirecciónmedianteelbotónde
Presionebrevementedosveces+presioneprolongadamenteelbotón[programación]dosveces:presione
brevemente(destellodeluz)+presionebrevemente(destellodeluz)+presioneprolongadamentedurante3
segundos(luzLEDencendida)+presioneprolongadamentedurante3segundos(laluzLEDparpadeadosveces
yluegoseapaga),cambiodedirecciónrealizado.
programación)
2
Configuracióndedirección
exitosa.
LuzLED
1.Tamañodel
Presionelosbotones[Detener]y[Cerrar]durante4
segundoshastaquelaluzseencienda;elmotorse
sacudirá
Presioneelbotón[Programación]delmotordurante
3segundoshastaqueseenciendaelindicador
LED.
brevemente.
producto
2
Restablecimientode
aliadodespuésde3
minutos.
fábrica
MP82T/W4
Desactivarlafuncióndecontroltáctil
Nota:LalongituddelmotorLestásujetaalasespecificacionesdelproducto(unidad:mm)
2.Especificacióndel
botón[50%]delcontrolremoto,
lacortinacorreráhastael50%del
recorridoyluegosedetendrá.
producto
Presionebrevementeelbotón[Configuraciónde
canal]paraactivarlavibracióndelmotoryestafunción
sepodrádesactivarexitosamente.
3segundoshastaqueseenciendaelindicador
LED.
Botón[Configuracióndecanal]delcontrolremoto,laluz
indicadoraparpadeaenrojo3vecesyluegoseapaga.
Elaprendizajedelcódigoesexitoso.
Utilicelosbotones[On],[off],[Stop]paramoverla
cortinaalaposicióndeseada.
Método
2
1
2
Presioneelbotón[Programación]delmotordurante
3segundoshastaqueseenciendaelindicador
Establezcaelpuntodeparadaintermedio2
LED.
Funcióndecontrol
Configuracióndelcanal
remoto
bloquearodetenerautomáticamenteenbloquearodetenerautomáticamente
despuésde3minutos.
Presioneelbotón[Programación]delmotordurante
Establezcaelpuntodeparadaintermedio1
3
HastaqueseenciendalaluzLED,ingresealmododeaprendizaje.
segundos,laluzLEDparpadearárápidamente3veces.
Modomotor
Presionebrevementeelbotón[Configuraciónde
canal],vibracióndelmotor,luegoestafunciónsepuede
activarconéxito.
Presioneelbotón[75%]delcontrol
Mantengapresionadoel
remoto,lacortinacorreráhasta
el75%delrecorridoyluegose
detendrá.
PuertoRJ
2
[Controlremoto
Controlexternodepulsode3botones
YR5302]
Posicióndeparadaintermedia
Interruptordemododecontrolexterno
[Puertodealimentación]
elcontrolremotoPresioneelcontrolremotoparaabrirycerrar,presione
lacortinadelcontrolremoto[detener],elmotorfuncionaráhastala
sedetendráenelpuntolímitedeapertura,sedetendráenelpunto
elbotón[abrir],abraelbotón[cerrar],
Almismotiempo,presione[75%]+[Configuraciónde
canal]yconfigurelaposiciónactualcomolaposiciónde
paradaintermedia1.Elmotorvibraunavezylasluces
indicadorasdelmotorparpadean.
unavez.
cierre
cortina,
EnelprocesodecortinaPresione
decierre,sedetendrá
límite elmotorfuncionaráelbotón,elmotor
inmediatamente.
Conectardispositivoexterno
Encendido/apagado,emparejamientodecódigo,mododeoperación.
Paraconfiguracióndecontrolremoto
AlimentacióndeCA,consulte"Métododecableadodelmotor".
Presione[seleccióndecanal]+[selecciónde
Almismotiempo,presione[25%]+[Configuraciónde
canal]yconfigurelaposiciónactualcomolaposiciónde
paradaintermedia2.Elmotorvibraunavezylasluces
indicadorasdelmotorparpadean.
unavez.
canal]
Activarlafuncióndecontrol
Presionelosbotones[Detener]y[Abrir]durante4
segundoshastaquelaluzseencienda;elmotorse
sacudirábrevemente.
táctil
3.Dispositivodecontrol
recomendado
Presioneelbotón[25%]delcontrol
remoto,lacortinacorreráhasta
el25%delrecorridoyluegose
detendrá.
[Puertodeseñal]
[LuzLED]
[Botóndeaprendizaje]
Botóndeaprendizaje
Utilicelosbotones[On],[off],[Stop]paramoverla
cortinaalaposicióndeseada.
,
Presioneelbotón[Programación]delmotordurante
Presioneelbotón[abrir]+[cerrar]delcontrolremoto,
elmotorsesacudeysecompletaelcambiodemodo.
+ +
Eltiempodeinactividaddebeserinferiora1segundo.
Operación
25%
75%
75%
25%
25%
25%
75%
25%
75%
25%
75% 25%
25%
75%
75%
25%
75%
75% 25%
75%
75%
25%
2
.
5
50.6
265
3S+
7S
1
Controlexternode
pulsode3
Controlexterno
deacciónpuntual
botones
3S
9.47
1
Línea
Abierto
3S
Cerca
común
4
8
3S
240
3S
3S
Controlexternode
pulsode2botones
Controlexternode
pulsode2botones
EntradadeenergíaACP
N(azul)=cableneutro
+K2
Φ6
.8
1
DeclaracióndelaFCC
1.EstedispositivocumpleconlaParte15delasNormasdelaFCC.
Elfuncionamientoestásujetoalasdoscondicionessiguientes:
(1)Estedispositivonopuedecausarinterferenciasdañinas.
(2)Estedispositivodebeaceptarcualquierinterferenciarecibida,incluidaaquellaquepuedaprovocarun
funcionamientonodeseado.
2.Loscambiosomodificacionesnoaprobadosexpresamenteporlaparteresponsabledelcumplimiento
podríananularlaautoridaddelusuarioparaoperarelequipo.
Nota:Esteequipohasidoprobadoysehacomprobadoquecumpleconloslímitesparaundispositivodigital
declaseB,deacuerdoconlaParte15delasNormasdelaFCC.Estoslímitesestándiseñadosparabrindar
protecciónrazonablecontrainterferenciasdañinasenunainstalación
Esteequipogenera,utilizaypuederadiarenergíaderadiofrecuencia.Sinoseinstalayutilizasegúnlas
instrucciones,puedecausarinterferenciasperjudicialesenlascomunicacionesporradio.Sinembargo,nose
garantizaquenoseproduzcaninterferenciasenunainstalaciónespecífica.Siesteequipocausainterferencias
perjudicialesenlarecepciónderadiootelevisión,locualpuededeterminarseencendiéndoloyapagándolo,
serecomiendaalusuarioqueintentecorregirlainterferenciamedianteunaomásdelassiguientesmedidas:
residencial.
Consultealdistribuidoroauntécnicoderadio/TVconexperienciaparaobtenerayuda.Eldispositivohasido
evaluadoparacumplirconlosrequisitosgeneralesdeexposiciónaradiofrecuencias(RF).Puedeutilizarseen
condicionesdeexposiciónportátilsinrestricciones.
Reorientaroreubicarlaantenareceptora.
Aumentarlaseparaciónentreelequipoyelreceptor.
Conectarelequipoaunatomadecorrientedeuncircuitodiferenteaaquelalqueestáconectadoelreceptor.

Notera:
1. Kontrollera förpackningen och se till att alla komponenter finns med.
2. För att underlätta installationen kan remskivorna redan ha monterats på spåret.
3. Du behöver inte installera alla sidokodtillbehör. Det beror på den faktiska situationen.
Bild
Sidokod
Antal
20
s
4
Expansion
Remskivor
detalj
20
nötter
Liten Stor
skruvar
skruva
206
tillbehör
tappning
20
Namn
spika
Montera
12
Stor
skruvar
Montering
20
Fästen
brickor
Små
12
10
Steg 6 Rikta in vagnarna: Lossa de övre skruvarna på vagnarna. Flytta båda vagnarna till kanten av drivenheten och dra sedan åt
skruvarna. Testa vagnarna för att säkerställa att de rör sig smidigt.
Steg 7. Finjustera remskivan. När remskivan går torr eller lös kan vi justera den med hjälp av
skruvarna på sidan av övergångssatsen.
°
Steg 8. Installation av installationskoden, som visas i figur 2-3, placera installationskoden i 45 graders vinkel på skenans
ovansida, rotera den och dra åt den. Montera en installationskod på ett avstånd av cirka 50 cm runt övergångssatsen som mittpunkt.
Steg 10. Installerad på väggen är det nödvändigt att markera positionen för den översta
installationskoden på väggen, göra hål, installera expansionsspikar och sedan fästa dem med skruvar.
Steg 9. Toppmonterad, installerad på gardinlådan, kan fästas direkt med
Steg 11. För sidoinstallation, installera först den övre installationskoden på sidoinstallationskoden
enligt det vänstra diagrammet och installera sedan sidoinstallationskodsatsen på skenan.
Väggen måste märkas enligt installationskoden, borras och fästas med expansionsskruvar efter
installationen.
skruvar.
Steg 12. För sidoinstallation, installera först toppen på skenan enligt det vänstra diagrammet och installera
sedan sidoinstallationskoden. Väggen måste märkas enligt installationskoden, borras och fästas med
expansionsskruvar efter installationen.
Skanna QR-koden för att få videon om operationen


(Öppna)
(Nära)
(Stopp)
Tryck på valfri knapp för att
Operation
(Öppna)
(Nära)
(Stopp)
K1
stoppa
Drift
Av
På
Åtgärdstiden måste fortsätta
På
K2
K1
Öppna
Gemensam
Nära
3S
linje
Gemensam
linje
Nära
Öppna
Ange gräns
Hastighetsjustering
K1
Av
Smart anslutning
På
87654321
K2
På
Av
[kanalinställning]-knappen i 3 sekunder, gå in i hastighetsjusteringsläge,
Tryck på [Öppna]-knappen i 3 sekunder, justera till. Tryck på
LED-lampa 110 r/
• Justering för nedåtriktad gräns
min.
genom att låsa vid 0 mm-10 mm till stängningspositionen. (om spårets riktning är fel, kommer den automatiska
gränstoleransen att vara större, efter riktningsändring återgår toleransen till normal
motorns LED-indikatorlampa lyser länge.
nivå.)
Externt styrläge för
• Automatisk
Långt tryck på [Kanalinställning]+[Stopp] samtidigt i 6
sekunder, nollställ alla gränser, motorn skakar en gång, LED-
lampan blinkar en gång.
gräns
punktåtgärd
Tryck på fjärrkontrollens knapp [kanalinställning] eller tryck
på motorns knapp [programmering] för att ställa in den
aktuella positionen som öppningsgränspunkt. Motorn
skakar en gång och motorns LED-indikator släcks.
på.
ÿ
2. Vid stoppstatus, stäng av strömmen och slå sedan på den igen. Om ingen ridå drar ut den under motorns
Tryck på knappen [Kanalinställning] på fjärrkontrollen eller
tryck på knappen [Programmering] på motorn för att ställa
in den aktuella positionen som nedre gränspunkt. Motorn
skakar en gång och motorns LED-indikator
Samtidigt, tryck länge på fjärrkontrollen för att nå önskad position. Kontrollknapparna [Kanalinställning] + [Upp] skakar i 4
sekunder, motorn skakar en gång, [Ned] inom 30 sekunder.
släcks.
gång
• anslutningsmetod 2
Motorns LED-lampa blinkar 2
Samtidigt, tryck länge på fjärrkontrollen. För att nå önskad position, tryck på knappen [Stäng]+[Kanalinställning] på
fjärrkontrollen i 4 sekunder, motorn vibrerar med en [Ned]-knapp inom 30 sekunder.
gånger.
2-knapps pulsstyrning för extern styrning
Tryck på [Stopp]-knappen i 3 sekunder, justera till 90 r/
min.
Tryck på [paus]-knappen i 3 sekunder, justera till 75 r/
1. Efter strömanslutning, första gången gardinen öppnas eller stängs, stannar motorn.
min.
ÿÿ
Tmall Genie: När enheten är i distributionsnätverket, säg till Tmall Genie-högtalaren: "Tmall Genie, hitta enheten",
vänta tålmodigt tills Tmall Genie hittar enheten och anslut enheten. När länken är upprättad kan du anpassa
enhetens namn och plats, och du kan styra enheten via
Tmall Genie: Tryck på motorknappen [Programmering] , släpp den och tryck i 3 sekunder tills indikatorlampan
blinkar rött 5 gånger, gå in i parningsläge; Röstkommandot "Tmall Genie, upptäck enheten", vänta tålmodigt tills
Tmall Genie hittar enheten och anslut enheten. När anslutningen är lyckad kan du anpassa enhetens namn och
plats, och du kan styra enheten via
• Justering för övre
Motorns LED-indikatorlampa kommer att lysa länge
gräns
telefonen.
telefonen.
110 varv/min
90 varv/min
75 r/
• anslutningsmetod
Strömmen avstängs, ingen förändring av motorns gränsstatus för
,
kraschar den inte till slutet.
spåret. Om ridån dras för långt kan strömanslutningen krascha till slutet av spåret och sedan återgå till
,
motorn
gränsläget. Om strömmen avstängs medan motorn rör sig, återgår motorn till gränsläget efter att den kraschar till slutet
av spåret för första gången den körs. • Rensa
Tuya ZigBee: Efter att ha öppnat gatewayen, tryck på motorknappen [Programmering ]
fyra gånger i sträck, släpp och håll ner i 3 sekunder tills indikatorregnbågen blinkar, gå in i parningsläge, öppna
Tuya-appen, klicka på "+" i det övre högra hörnet, välj "närliggande enheter" för att hitta motorn, motorn går in i
distributionsnätet, vänta tålmodigt på att anslutningen ska lyckas, du kan styra användningen av det
anpassade
på.
namnet.
gränsläget
1
min
75 %
75
25 %
%
75
75 %
%
75 25
25 %
%%
25
75
25 %
%
%
25 %
87654321
K2
På
Av
På
K2
K1
• Radera parkoppling
1) Metod 1: Ta bort enhet i appen;
2) Metod 2: Fabriksåterställning;
3) Metod 3: Återgå till distributionsläget för att koppla bort
Bruksanvisning för AC-ingångsmotor för likström
nätverket.
.8
1
87654321
ÿ6
265
3S+
2-knapps puls extern
kontroll ÿ
7S
Extern styrning
av punktåtgärder
3S
1
Extern pulsstyrning
med 3 knappar
9,47
1
Gemensam
linje
Öppna
3S
Nära
8
4
3S
2-knapps puls extern
styrning ÿ
3S
240
3S
50,6
ÿ
ÿ
ÿ
ÿ
ÿ
ÿ
ÿ
25
+ K2
%
75 %
75 %
25
25
25 %
%
%
25 %
75
75
75 %
%
%
25 %
25
25 %
%
75
75 %
%
75
25 %
%
75 %
25
75 %
%
25
75 %
%
.
ÿ
ÿ
1.
ÿ
Produktstorlek
Tryck på knappen [Stopp] och [Stäng] i 4
sekunder tills lampan tänds, motorn
kommer att skaka kort.
riktningsinställningen har
ÿ
lyckats.
Metod 2 (Ändra riktning med
Tryck på motorknappen [Programmering] i 3 sekunder
tills LED-indikatorn tänds.
programmeringsknappen)
ÿ
Håll motorns [kod]-knapp intryckt i mer än
7 sekunder, den blå lampan blinkar en gång och
återställer
ÿ
fabriksinställningarna.
Kort tryck två gånger + långt tryck två gånger på [programmerings]-knappen: kort tryck (blinkande ljus) + kort tryck
(blinkande ljus) + långt tryck i 3 sekunder (LED-lampan tänds) + långt tryck i 3 sekunder (LED-lampan blinkar två
gånger och släcks sedan), riktningsändringen är klar.
Tryck på motorknappen [Programmering] i 3 sekunder
tills LED-indikatorn
Ställ in mittstopppunkt 2
tänds.
Kanalinställning
ÿ
ÿ
Anslut extern enhet
Ström på/av, kodparning, driftläge.
Använd knapparna [På], [av] och [Stopp] för att köra
ridån till önskad position.
Metod
ÿ
1
Obs: Motorlängd L beroende på produktspecifikationer (enhet: mm)
2. Produktspecifikation
Tryck kort på knappen [Kanalinställning] för att se
motorvibrationen, så kan funktionen stängas av.
MP82-T/
Tryck på motorknappen [Programmering] i 3 sekunder
tills LED-indikatorn tänds.
W4
Stäng av pekkontrollfunktionen
allierad efter 3
Tryck länge på knappen [50%]
på fjärrkontrollen, så körs
gardinen till 50% av sträckan och
stannar sedan.
minuter.
Tryck samtidigt på [75%] + [Kanalinställning] och ställ in
aktuell position som mittstoppposition 1. Motorn vibrerar en
gång och motorindikatorlamporna blinkar.
ÿ
Fabriksåterställning
Fjärrkontrollens [Kanalinställning]-knapp, indikatorlampan
blinkar rött 3 gånger och slocknar sedan. Kodinlärningen
har lyckats.
ÿ
en gång.
[YR5302
Tryck samtidigt på [25%] + [Kanalinställning] och ställ in
aktuell position som mittstoppposition 2. Motorn vibrerar en
gång och motorindikatorlamporna blinkar.
Fjärrkontroll]
Mittstoppsläge
Extern styrlägesbrytare
ÿ
Tryck på knappen [75%] på
fjärrkontrollen, så körs gardinen
till 75% av sträckan och stannar
Extern pulsstyrning med 3 knappar
sedan.
Tryck på motorknappen [Programmering] i
RJ-port
LED-ljus
3
tills LED-lampan tänds, gå in i inlärningsläge.
sekunder, LED-lampan blinkar snabbt 3 gånger.
Tryck kort på knappen [Kanalinställning], motorvibration
aktiveras, sedan kan funktionen slås på.
blockera eller stoppa automatiskt vid blockera eller stoppa automatiskt -
efter 3 minuter.
Ställ in mittstopppunkt 1
Växelström, se "Motorkopplingsmetod"
Fjärrkontrollfunktion
,
Tryck på fjärrkontrollens knapp [öppna]+[stäng], motorn
skakar och lägesbytet är klart.
[Signalport]
[LED-lampa]
[Inlärningsknapp]
[Strömport]
Inlärningsknapp
Slå på
Tryck på knappen [25%] på
fjärrkontrollen, så körs gardinen
till 25% av sträckan och stannar
Använd knapparna [På], [av] och [Stopp] för att köra
ridån till önskad position.
sedan.
pekkontrollfunktionen
ÿ
Tryck på [kanalval]+
en gång.
[Kanalval]
Tryck på [Stopp] och [Öppna] i 4 sekunder tills
lampan tänds, motorn kommer att skaka en kort
stund.
fjärrkontrollen för att öppna och stänga den, tryck på knappen Under ridåns gång Tryck på [öppna],
fjärrkontrollen [stopp]. Motorn kommer att gå till gränspunkten för öppning,
öppna knappen [stäng], stäng ridån med
stoppas stannar vid stängningsgränsen och omedelbart.
För inställning av fjärrkontroll
++
Dra för att starta
Avstängningstiden måste vara kortare än 1S.
Drift
funktionen
Manöverknapp och port
Riktningsinställning
Produktinformation
Grundinställningar för fjärrkontroll
Kontrollmetoder
K1
Av
På
K2
På
Av
(Öppna)
(Nära)
(Stopp)
PåPå
K3
På
På
Av
7 1
6 0
ACP -överinmatning
N(blå) = Neutralledare
N(blå) = Neutralledare
L (brun) = Fasledning
L (brun) = Fasledning
50/60Hz
1,2 Nm.
75 r/min (justerbar 90/110 r/
Obs: Fabriksinställningen för nominellt varvtal är 75 r/min.
3. Rekommenderad styrenhet
min)
Motorläge
Märkspänning
Nominell frekvens
Nominellt
100–240 V växelström
vridmoment
IP41
Nominell hastighet
IP-klassning
S3 50%
Löptid
2. Ändringar eller modifieringar som inte uttryckligen godkänts av den part som ansvarar för efterlevnaden
kan ogiltigförklara användarens rätt att använda utrustningen.
Obs: Denna utrustning har testats och befunnits uppfylla gränserna för en digital enhet av klass B i enlighet med
del 15 i FCC-reglerna. Dessa gränser är utformade för att ge rimligt skydd mot skadlig störning i en bostadsinstallation.
FCC-uttalande
1. Denna enhet uppfyller del 15 av FCC-reglerna.
Användningen är föremål för följande två villkor: (1) Denna enhet får
inte orsaka skadliga störningar.
(2) Denna enhet måste acceptera alla mottagna störningar, inklusive störningar som kan orsaka oönskad
Denna utrustning genererar och kan utstråla radiofrekvensenergi och kan, om den inte installeras och används
i enlighet med instruktionerna, orsaka skadliga störningar på radiokommunikation. Det finns dock ingen garanti för att
störningar inte kommer att uppstå i en viss installation. Om denna utrustning orsakar skadliga störningar på radio- eller
tv-mottagning, vilket kan fastställas genom att stänga av och slå på utrustningen, uppmanas användaren att
försöka korrigera störningarna med en eller flera av följande åtgärder:
funktion.
· Rikta om eller flytta mottagarantennen.
· Öka avståndet mellan utrustningen och mottagaren.
· Anslut utrustningen till ett uttag på en annan krets än den som mottagaren är ansluten
· Kontakta återförsäljaren eller en erfaren radio-/TV-tekniker för hjälp. Enheten har utvärderats för att uppfylla allmänna
krav för RF-exponering. Enheten kan användas under bärbara exponeringsförhållanden utan begränsningar.
till

12
Katrollen
12
Klein
20
Groot
notenschroeven
Foto
schroef
detail
Aantal
20
S
Uitbreiding
Schroeven
4
Groot
installeren
Montage
20
ringen
Haakjes
10
Klein
Zijcode
206
accessoire
tikken
20
Naam
nagel
Opmerking:
1. Controleer de verpakking en zorg ervoor dat alle onderdelen aanwezig zijn.
2. Voor een eenvoudige installatie kunnen de katrollen al op de rails zijn gemonteerd.
3. Het is niet nodig om alle accessoires voor de zijcode te installeren. Dat hangt af van de werkelijke situatie.
Stap 6 Wagens uitlijnen: Draai de bovenste schroeven van de wagens los. Verplaats beide wagens naar de rand van de
aandrijfkast en draai de schroeven vervolgens vast. Test de wagens om er zeker van te zijn dat ze soepel
Stap 7. Stel de poelie nauwkeurig af. Als de poelie droog of los loopt, kunnen we deze afstellen met behulp van de
schroeven aan de zijkant van de overgangskit.
bewegen.
°
Stap 8. Installatie van de installatiecode, zoals weergegeven in figuur 2 - 3, plaats de installatiecode in een hoek van 45° op
het bovenoppervlak van de rail, draai deze en draai hem vast. Installeer een installatiecode op een afstand van ongeveer 50
cm rond de overgangsset als middelpunt.
Stap 10. Nadat de panelen op de muur zijn geïnstalleerd, is het noodzakelijk om de positie van de bovenste
installatiecode op de muur te markeren, gaten te boren, expansiespijkers te installeren en ze vervolgens met
schroeven vast te zetten.
Stap 9. Bovenop gemonteerd, geïnstalleerd op de gordijndoos, kan direct met schroeven worden
Stap 11. Voor zij-installatie installeert u eerst de bovenste installatiecode op de zij-installatiecode volgens
het linker diagram en installeert u vervolgens de zij-installatiecodekit op de rail. De muur moet na
installatie worden gemarkeerd volgens de installatiecode, geboord en vastgezet met expansieschroeven.
vastgezet.
Stap 12. Voor zij-installatie monteert u eerst de bovenkant op de rail volgens het linker diagram en vervolgens de zij-
installatievoorschriften. De muur moet na installatie worden gemarkeerd volgens de installatievoorschriften,
geboord en vastgezet met expansieschroeven.
Scan de QR-code om de bedieningsvideo te bekijken


Druk op een willekeurige knop om te
Operatie K1
stoppen
Operatie
De actietijd moet doorgaan
(Stop)
(Open)
(Dichtbij)
(Open)
Uit
Op
(Stop)
(Dichtbij)
Op
K2
K1
Open
Gemeenschappelijke
Dichtbij
3S
lijn
Gemeenschappelijke
lijn
Dichtbij
Open
Slimme verbinding
Snelheidsregeling
K1
Uit
Limiet instellen
Op
87654321
K2
Op
Uit
2-knops puls externe bediening
• verbindingsmethode 1
ÿÿ
Tmall Genie: Druk op de motorknop [Programmeren] , laat los en druk 3 seconden lang totdat
• Aanpassing voor bovengrens
het
Tmall Genie: Wanneer het apparaat zich in de status van het distributienetwerk bevindt, zeg je tegen de
Tmall Genie-luidspreker: "Tmall Genie, vind het apparaat". Wacht geduldig tot Tmall Genie het apparaat vindt
en sluit het apparaat aan. Zodra de koppeling succesvol is, kun je de naam en locatie van het apparaat
aanpassen en het apparaat op de telefoon
indicatielampje 5 keer rood knippert. Hiermee opent u de koppelingsmodus. Stemopdracht: "Tmall Genie,
ontdek het apparaat". Wacht geduldig tot de Tmall Genie het apparaat vindt en verbind het apparaat. Nadat
de verbinding tot stand is gebracht, kunt u de naam en locatie van het apparaat aanpassen en het
apparaat op de telefoon bedienen.
bedienen.
Druk 3 seconden op de [Stop]-knop en stel in op 90
1. Nadat de stroom is aangesloten, stopt de motor voor de eerste keer wanneer het gordijn wordt geopend of gesloten.
tpm.
Tuya ZigBee: Nadat u de gateway heeft geopend, drukt u op de motorknop [Programmeren ]
vier keer achter elkaar, laat los en houd de knop 3 seconden ingedrukt totdat de indicatorregenboog knippert,
open de koppelingsmodus, open de Tuya APP, klik op "+" in de rechterbovenhoek, selecteer "apparaten in de
buurt" om de motor te vinden, de motor komt in het distributienetwerk, wacht geduldig tot de verbinding
succesvol is, u kunt het gebruik van de aangepaste naam regelen.
2. Bij stopstatus, de stroom uitzetten en vervolgens weer inschakelen, als er geen gordijn wordt getrokken
Druk op de knop [Kanaalinstelling] op de afstandsbediening
of druk op de knop [Programmeren] op de motor om de
huidige positie in te stellen als het neerwaartse
eindpunt. De motor schudt één keer en het LED-
indicatielampje van de motor gaat uit.
tijdens
• verbindingsmethode 2
ÿ
• Koppeling verwijderen
• Automatische
Houd tegelijkertijd de [Kanaalinstelling]+[Omhoog]-knop op de afstandsbediening lang ingedrukt. Laat het gordijn de
gewenste positie bereiken door de [Omhoog]-knop op de afstandsbediening 4 seconden lang ingedrukt te
houden. De motor schudt één keer en de [Omlaag]-
knop binnen 30 seconden.
het motor-LED-indicatielampje zal lang branden
op.
limiet
110 tpm
90 tpm
75
Puntactie externe
Uitgeschakeld, geen verandering in de motorlimietstatus van het
,
de motor, zal deze niet crashen tot het einde van
spoor. Als het gordijn te ver wordt getrokken, kan het na het inschakelen van de stroomtoevoer naar
,
de motor
het einde van het spoor crashen en vervolgens de limiet weer inschakelen. Als de stroom wordt uitgeschakeld tijdens
het bewegen van de motor, zal de motor de limiet weer inschakelen na de crash naar het einde van het spoor voor
de eerste keer
draaien. • Limiet wissen
besturingsmodus
tpm
Druk 3 seconden op de knop [Open], pas aan. Druk
Druk op de knop [kanaalinstelling] van de afstandsbediening
of druk op de knop [programmeren] van de motor om
de huidige positie in te stellen als het open eindpunt.
De motor schudt één keer en het LED-indicatielampje van
de motor gaat uit.
3
seconden op de knop [Kanaalinstelling], ga naar de
snelheidsaanpassingsmodus, LED-lampje 110 tpm.
op.
door te vergrendelen op 0-10 mm tot de gesloten positie. (als de richting van het spoor verkeerd is, zal de
automatische grenstolerantie groter zijn, na een richtingsverandering zal de tolerantie weer op het normale
niveau
Houd tegelijkertijd de [Sluiten]+[Kanaalinstelling]-knop op de afstandsbediening 4 seconden lang ingedrukt. Laat het
gordijn de gewenste positie bereiken door op de [Omhoog]-knop van de afstandsbediening te drukken. De
motor beweegt dan binnen 30 seconden één keer
op de [Omlaag]-knop.
tijd brandt het LED-indicatielampje van de motor lang.
komen.)
Druk 3 seconden op de [pauze]-knop om de snelheid aan te passen
naar 75 tpm.
Motor-LED-lampje knippert 2
Houd [Kanaalinstelling]+[Stop] 6 seconden lang
tegelijkertijd ingedrukt, alle limieten worden gewist, de
motor schudt één keer en het led-lampje knippert één keer.
keer.
• Aanpassing voor neerwaartse limiet
87654321
K2
K1
1ÿMethode 1: Apparaat verwijderen uit APP;
2ÿMethode 2: fabrieksinstellingen herstellen;
3) Methode 3: Ga opnieuw naar de distributiemodus om de verbinding met het netwerk te verbreken.
75% 25%
75% 25%
75% 25%
25%75%
75% 25%
K2
Op
Uit
25%75%
Op
Gebruiksaanwijzing voor AC-ingangs-DC-motor
N(blauw) = neutrale draad
L (bruin) = Stroomdraad
L (bruin) = Stroomdraad
ÿ6
.8
1
25%
75%
75%
25%
75%
75% 25%
75%
75%
25%
25%
75%
75%
25%
25%
25%
25%
75%
75%
25%
75% 25%
ÿ
ÿ
.
ÿ
ÿ
ÿ
ÿ
1
ÿ
4
8
3S
3S
240
3S
2-knops puls externe
bediening ÿ
2-knops puls externe
bediening
ACP- vermogensinput
N(blauw) = neutrale draad
ÿ
50.6
3S+
265
7S
1
3-knops puls externe
Puntactie
externe controle
bediening
3S
9.47
Open
Dichtbij
Gemeenschappelijke
3S
lijn
+ K2
Richtinginstelling
Trek om te starten
Bedieningsknop en poort
functie
Productinformatie
Basisinstelling afstandsbediening
Controlemethoden
(Open)
(Dichtbij)
(Stop)
Druk tegelijkertijd op [25%] + [Kanaalinstelling] en stel de
huidige positie in als de middelste stoppositie 2. De motor
trilt één keer en de motorindicatielampjes knipperen
eenmaal.
[YR5302
3-knops puls externe bediening
ÿ
Middenstoppositie
afstandsbediening]
de motor, het LED-lampje knippert 3 keer
Druk kort op de knop [Kanaalinstelling], de motor trilt
en deze functie kan succesvol worden
Externe besturingsmodusschakelaar
ingeschakeld.
Motormodus
snel,
Druk op de knop [75%] van de
afstandsbediening, het gordijn
zal tot 75% van de reis lopen en
dan stoppen.
Afstandsbedieningsfunctie
automatisch blokkeren of stoppen na 3
Stel het middelste stoppunt 1 in
minuten.
Druk op de [open]+[close]-knop van de
afstandsbediening, de motor schudt en de
modusverandering is voltooid.
,
Druk op de knop [25%] van de
afstandsbediening, het gordijn
zal tot 25% van de reis lopen en
dan stoppen.
Schakel de aanraakbedieningsfunctie
Gebruik de knoppen [Aan], [Uit] en [Stop] om het
gordijn naar de gewenste positie te laten lopen.
Leerknop
ÿ
in
het gordijn drukt u op de afstandsbediening. Druk op de knop Tijdens het openen en sluiten van [open],
van de afstandsbediening. De motor zal draaien tot het gordijn open is,
open de knop [close], sluit het gordijn [stop]
Druk 3 seconden op de [Programmering]-knop van
Druk op [kanaal selecteren]+[kanaal
Houd de [Stop] en [Open] knoppen 4 seconden
ingedrukt totdat het lampje gaat branden. De motor
zal kort
onmiddellijk de motor zal draaien tot het sluitpunt, en stoppen.
schudden.
selecteren]
1.
eenmaal.
Productgrootte
ÿ
ÿ
ÿ
[Signaalpoort]
[LED-lamp]
[Leerknop]
RJ-poort
LED-lamp
[Stroompoort]
Druk 4 seconden op de [Stop] en [Close]
knoppen totdat het lampje gaat branden. De
motor zal kort
ÿ
schudden.
richtinginstelling
Methode 2 (Richting veranderen door
ÿ
ÿ
programmeerknop)
succesvol.
Houd de motor [code]-knop langer dan 7
seconden ingedrukt, het blauwe lampje knippert één
keer en de fabrieksinstellingen worden
Kort indrukken twee keer + lang indrukken [programmeer] knop twee keer: kort indrukken (lampje knippert) +
kort indrukken (lampje knippert) + lang indrukken gedurende 3 seconden (led-lampje aan) + lang indrukken
gedurende 3 seconden (led-lampje knippert twee keer en gaat dan uit), richtingsverandering
Houd de motorknop [Programmeren] 3 seconden
ingedrukt totdat de LED-indicator gaat branden.
voltooid.
hersteld.
Houd de motorknop [Programmeren] 3 seconden
ingedrukt totdat de LED-indicator gaat
Extern apparaat aansluiten
Aan/uit, codekoppeling, bedrijfsmodus.
Voor het instellen van de afstandsbediening
Wisselstroom, zie "Motorbedradingsmethode"
ÿ
ÿ
branden.
Houd de motorknop [Programmeren] 3 seconden
ingedrukt totdat de LED-indicator gaat
Stel het middelste stoppunt 2 in
branden.
Druk kort op de knop [Kanaalinstelling] om
Kanaalinstelling
de
Methode
Let op: Motorlengte L is afhankelijk van de productspecificaties (eenheid: mm)
2.
motortrilling te activeren. Deze functie kan dan succesvol
worden uitgeschakeld.
Productspecificatie
1
Fabrieksinstellingen
Gebruik de knoppen [Aan], [Uit] en [Stop] om het
gordijn naar de gewenste positie te laten lopen.
herstellen
bondgenoot na 3
Druk tegelijkertijd op [75%] + [Kanaalinstelling] en stel de
huidige positie in als de middelste stoppositie 1. De motor
trilt één keer en de motorindicatielampjes
ÿ
knipperen
minuten.
Houd de knop [50%] op de
afstandsbediening lang ingedrukt,
het gordijn zal tot 50% van de reis
lopen en dan stoppen.
totdat het LED-lampje gaat branden. U gaat dan naar de
MP82-T/
Schakel de aanraakbedieningsfunctie
ÿ
uit
W4
leermodus.
Knop [Kanaalinstelling] op de afstandsbediening, het
indicatielampje knippert 3 keer rood en gaat vervolgens
uit. Het leren van de code is gelukt.
ÿ
++
Operatie
K2
Op
Uit
De uitschakeltijd moet korter zijn dan 1 seconde.
Op
K1
Uit
Op
K3
Op
Op
Uit
Op
87654321
50/60Hz
1,2Nm .
100-240V
Let op: de fabrieksinstelling voor de nominale snelheid is 75 tpm.
3. Aanbevolen controleapparaat
AC
Nominale spanning
Nominale frequentie
Nominaal koppel
Nominale snelheid
IP-klasse
IP41
Speelduur
75 tpm (90/110 tpm
S3 50%
instelbaar)
7 1
6 0
FCC-verklaring
1. Dit apparaat voldoet aan Deel 15 van de FCC-regels.
De werking is onderworpen aan de volgende twee voorwaarden:
(1) Dit apparaat mag geen schadelijke interferentie veroorzaken.
(2)Dit apparaat moet alle ontvangen interferentie accepteren, inclusief interferentie die ongewenste werking kan
veroorzaken.
2. Wijzigingen of aanpassingen die niet uitdrukkelijk zijn goedgekeurd door de partij die verantwoordelijk is voor de
naleving, kunnen de bevoegdheid van de gebruiker om het apparaat te bedienen ongeldig maken.
Let op: Dit apparaat is getest en voldoet aan de limieten voor een digitaal apparaat van klasse B, overeenkomstig
Deel 15 van de FCC-regels. Deze limieten zijn bedoeld om een redelijke bescherming te bieden tegen schadelijke
interferentie in een
· Raadpleeg de dealer of een ervaren radio-/tv-technicus voor hulp. Het apparaat is getest en voldoet aan de
algemene RF-blootstellingsvereisten. Het apparaat kan zonder beperkingen worden gebruikt in draagbare
blootstellingsomstandigheden.
woonomgeving.
Deze apparatuur genereert en gebruikt radiofrequentie-energie en kan deze uitstralen. Indien niet
geïnstalleerd en gebruikt volgens de instructies, kan dit schadelijke interferentie in radiocommunicatie veroorzaken.
Er is echter geen garantie dat er in een bepaalde installatie geen interferentie zal optreden. Als dit apparaat
schadelijke interferentie in radio- of televisieontvangst veroorzaakt, wat kan worden vastgesteld door de
apparatuur uit en weer in te schakelen, wordt de gebruiker aangeraden de interferentie te verhelpen door een of meer
van de volgende maatregelen te nemen:
· Heroriënteer of verplaats de ontvangstantenne.
· Vergroot de afstand tussen de apparatuur en de ontvanger.
· Sluit het apparaat aan op een stopcontact op een ander circuit dan waarop de ontvanger is aangesloten.

1.Vérifiezl’emballageetassurezvousquetouslescomposantssontprésents.
2Pourfaciliterl'installation,lespouliespeuventdéjàavoirétéinstalléessurlapiste.
3.Vousn'avezpasbesoind'installertouslesaccessoiresdecodelatéral.Celadépenddelasituationréelle.
rondelles
Code
Photo
latéral
20
s
Expansion
4
Poulies
détail
Qté
Note:
vis noix
PetitGrand
20
accessoire
tapotement
vis
20 20
Nom
clou
Installerles
Grand
12
6
vis
Petit
20
12
Montage
10
Supports
Étape6:Alignementdeschariots:Desserrezlesvissupérieuresdeschariots.Déplacezlesdeuxchariotsjusqu'auborddu
boîtierdulecteur,puisserrezlesvis.Testezleschariotspourvousassurerqu'ilssedéplacentsansà
Étape7.Ajustezlapoulie.Silapoulieestàsecoulâche,vouspouvezlarégleràl'aidedu
vissurlecôtédukitdetransition.
coups.
°
Étape8.Installationducoded'installation,commeillustréauxfigures2à3.Placezlecoded'installationàunanglede
45°surlasurfacesupérieuredurail,faiteslepivoteretserrezle.Installezuncoded'installationàunedistanced'environ
50cmautourdukitdetransition,commepointcentral.
Étape10.Installésurlemur,ilestnécessairedemarquerlapositionducoded'installationsupérieursurlemur,de
fairedestrous,d'installerdesclousd'expansion,puisdelesfixeravecdesvis.
Étape9.Montésurledessus,installésurlecaissonàrideau,peutêtrefixédirectementavecdes
Étape11.Pouruneinstallationlatérale,installezd'abordlecoded'installationsupérieursurlecôté,conformément
auschémadegauche,puisinstallezlekitd'installationlatéralesurlerail.Lemurdoitêtremarqué
conformémentaucoded'installation,percéetfixéavecdesvisàexpansionaprèsl'installation.
vis.
Étape12.Pouruneinstallationlatérale,installezd'abordledessussurlerailconformémentauschémadegauche,puis
installezlesystèmed'installationlatérale.Lemurdoitêtremarquéconformémentaucoded'installation,percéetfixéavec
desvisàexpansionaprèsl'installation.
ScannezlecodeQRpourobtenirlavidéodel'opération


Appuyezsurn'importequelboutonpour
OpérationK1
arrêter
Opération
Letempsd'actiondoitcontinuer
(Fermer)
(Ouvrir)
(Arrêt)
(Ouvrir)
(Arrêt)
(Fermer)
Sur
Désactivé
Sur
Désactivé
Sur
Désactivé
SurDésactivé
Sur
Sur
K2
K1
3S
Ligne
Fermer
Ouvrir
commune
Ligne
commune
Fermer
Ouvrir
Réglagedela
Connexionintelligente
vitesse
Définirunelimite
K2
87654321
K1
Appuyezsurlebouton[Ouvrir]pendant3secondes,
Appuyezlonguementsur[Réglageducanal]+[Arrêt]en
mêmetempspendant6secondes,effaceztoutesleslimites,
lemoteurtrembleunefois,lalumièreLEDclignoteunefois.
réglez
surAppuyezsurlebouton[Réglageducanal]pendant3
secondes,entrezenmodederéglagedelavitesse,laLEDs'allumeà110tr/min.
delimitedumoteur.Silerideauesttirétroploin,aprèslaconnexionélectrique,lemoteur
•Réglagedelalimiteinférieure
peut
s'écraserjusqu'enfindepiste,puisreprendrelalimite.Encasdecoupuredecourantpendantlemouvementdu
moteur,celuicireprendralalimiteaprèss'êtreécraséjusqu'enfindepistelorsdesapremièreutilisation.•
Réinitialiserla
limite
1
Horstension,aucunchangementn'estapportéàlapisted'état
,
sur.
Modedecontrôleexterneàaction
Appuyezsurlebouton[Réglageducanal]dela
télécommandeouappuyezsurlebouton[Programmation]
dumoteurpourdéfinirlapositionactuellecomme
pointlimited'ouverture.Lemoteurtrembleunefoisetle
voyantLEDdumoteurs'éteint.
ponctuelle
Appuyezsurlebouton[Stop]pendant3secondes,réglez
à90tr/min.
Appuyezsurlebouton[pause]pendant3secondes,
•Limiteautomatique
réglez
à75tr/min.
LevoyantLEDdumoteurclignote2fois.
1.Aprèslaconnexionélectrique,lapremièrefoisquevousouvrezoufermezlerideau,lemoteurs'arrête
•méthodedeconnexion
Enmêmetemps,appuyezlonguementsurlatélécommande.Faitesensortequelerideauatteignelaposition
souhaitée.Contrôlezlebouton[Fermer]+[Réglageducanal]enappuyantsurlatélécommande[Haut]ou
pendant4secondes,lemoteursecoueunbouton
[Bas]dansles30secondes.
Pendantcetemps,levoyantLEDdumoteurresteallumé
longtemps.
2
enleverrouillantà0mm10mmjusqu'àlapositionfermée.(siladirectiondelapisteestincorrecte,latolérance
limiteautomatiqueseraplusgrande,aprèslechangementdedirection,latolérancereprendrasonniveau
normal.)
2.Àl'étatd'arrêt,éteignezpuisrallumezl'appareil.Silerideaun'estpastirépendantquelemoteurnes'écrasepasjusqu'àla
Appuyezsurlebouton[Réglageducanal]dela
télécommandeouappuyezsurlebouton[Programmation]
dumoteurpourdéfinirlapositionactuellecomme
pointdelimiteinférieure,lemoteurtrembleunefoisetle
voyantLEDdumoteurs'éteint.
fin,
•méthodedeconnexion
,
lemoteur
1
110tr/min
90tr/min
75tr/
TmallGenie:Lorsquel'appareilestdansl'étatduréseaudedistribution,ditesauhautparleurTmallGenie:
«TmallGenie,trouvel'appareil»,attendezpatiemmentqueTmallGenietrouvel'appareiletconnectel'appareil,
unefoislaliaisonréussie,vouspouvezpersonnaliserlenometl'emplacementdel'appareil,vouspouvez
contrôlerl'appareilsurle
TuyaZigBee:Aprèsavoirouvertlapasserelle,appuyezsurlebouton[Programmation]dumoteur
quatrefoisencontinu,relâchezetmaintenezenfoncépendant3secondesjusqu'àcequel'indicateurarcen
cielclignote,entrezdanslemoded'appairage,ouvrezl'applicationTuya,cliquezsur"+"danslecoinsupérieur
droit,sélectionnez"appareilsàproximité"pourtrouverlemoteur,lemoteurentredansleréseaude
distribution,attendezpatiemmentquelaconnexionsoitréussie,vouspouvezcontrôlerl'utilisationdunom
personnalisé.
téléphone.
min
TmallGenie:Appuyezsurlebouton[Programmation]dumoteur,relâchezetappuyezpendant3
secondesjusqu'àcequelevoyantclignoteenrouge5fois,entrezdanslemoded'appairage;Commande
vocale"TmallGenie,découvrezl'appareil",attendezpatiemmentqueTmallGenietrouvel'appareilet
connectezl'appareil,unefoislaconnexionréussie,vouspouvezpersonnaliserlenomet
l'emplacementdel'appareil,vouspouvezcontrôlerl'appareilsurle
•Réglagedelalimitesupérieure
téléphone.
Commandeexterneàimpulsionsà2boutons
Enmêmetemps,appuyezlonguementsurlatélécommandepourfaireensortequelerideauatteignelaposition
souhaitée.Contrôlezlebouton[Réglageducanal]+[Haut]enappuyantsurlatélécommande[Haut]ou4
secondes,lemoteurtrembleunefois,lebouton[Bas]
dansles30secondes.
levoyantLEDdumoteurseralong
sur.
K1
K2
75% 25%
75%
25%
25%
25%75%
75%
75%
25%75%
25%
87654321
•Supprimerl'appairage
1)Méthode1:Supprimerl'appareildansl'APP;
2)Méthode2:réinitialisationd'usine;
3)Méthode3:Revenezaumodededistributionpourdéconnecterleréseau.
Manueld'instructionsdumoteuràcourantcontinuàentréeCA
K2
K1
50/60
K3
K2
87654321
Hz
100240V
Indicedeprotection
1,2N·m.
IP
CA
Tensionnominale
Fréquencenominale
Couplenominal
75tr/min(90/110tr/minréglable)
Vitesse
S350%
nominale
Duréedefonctionnement
IP41
60
71
N(bleu)=Filneutre
L(marron)=Filsous
N(bleu)=Filneutre
tension
Réglagedela
L(marron)=Filsoustension
direction
Informationssurle
Fonctiondedémarragepar
Boutondefonctionnementetport
traction
produit
Méthodesde
Réglagedebasedelatélécommande
contrôle
Sur
Sur
Sur
Sur
Désactivé
Sur
Désactivé
Sur
Appuyezlonguementsurlebouton[code]du
moteurpendantplusde7secondes,levoyantbleu
clignoteunefois,restaurezlesparamètres
Appuyezsurlebouton[ouvrir]+[fermer]dela
télécommande,lemoteurtremble,lechangementde
modeest
(Ouvrir)
(Fermer)
Désactivé
(Arrêt)
terminé.
d'usine.
réglagedeladirectionavec
Appuyezbrièvementdeuxfois+appuyezlonguementdeuxfoissurlebouton[programmation]:appuyez
brièvement(clignotementdelalumière)+appuyezbrièvement(clignotementdelalumière)+appuyezlonguement
pendant3secondes(lalumièreLEDs'allume)+appuyezlonguementpendant3secondes(lalumièreLEDclignote
deuxfoispuiss'éteint),changementdedirectioneffectué.
succès.
Méthode2(Changerdedirectionenprogrammantle
Appuyezsurlebouton[Programmation]dumoteur
pendant3secondesjusqu'àcequelevoyantLED
s'allume.
bouton)
1
Appuyezsurlesboutons[Stop]et[Fermer]pendant4
secondesjusqu'àcequelalumières'allume,lemoteur
tremblerabrièvement.
1.Tailledu
1
produit
MP82T/
1
W4
Appuyezlonguementsurle
Désactiverlafonctiondecommande
lerideaufonctionnerajusqu'à50%
dutrajetpuiss'arrêtera.
tactile
Réinitialisation
Alliéaprès3
1
minutes.
d'usine
Utilisezlesboutons[On],[Off],[Stop]pour
déplacerlerideaujusqu'àlaposition
souhaitée.
Méthode
Bouton[Réglagedescanaux]delatélécommande,le
voyantclignoteenrouge3foispuiss'éteint.
L'apprentissageducodeestréussi.
1
Appuyezbrièvementsurlebouton[Réglagedu
Remarque:lalongueurdumoteurLestsoumiseauxspécificationsduproduit(unité:mm)
2.Spécificationsdu
canal]pourdésactiverlavibrationdumoteur,puiscette
fonctionpeutêtredésactivéeavecsuccès.
produit
Appuyezsurlebouton[Programmation]dumoteur
pendant3secondesjusqu'àcequelevoyantLED
Appuyezsurlebouton[Programmation]dumoteur
pendant3secondesjusqu'àcequelevoyantLED
s'allume.
s'allume.
Définirlepointd'arrêtcentral2
Réglageducanal
1
Fonctionde
après3
Définirlepointd'arrêtcentral1
minutes.
télécommande
Appuyezsurlebouton[75%]de
latélécommande,lerideauva
courirjusqu'à75%dutrajet
portRJ
lumièreLED
puis
jusqu'àcequelevoyantLEDs'allume,entrezenmoded'apprentissage.
3secondes,levoyantLEDclignoterapidement3
Mode
s'arrêter.
moteur
fois.
Appuyezbrièvementsurlebouton[Réglage
ducanal],lemoteurvibre,puiscettefonction
peutêtreactivéeavecsuccès.
[TélécommandeYR5302]
Positiond'arrêtintermédiaire
Commutateurdemodedecontrôleexterne
Appuyezsurlebouton[Programmation]dumoteurpendant
Appuyezsur[sélectiondechaîne]+[sélectionde
Enmêmetemps,appuyezsur[75%]+[Réglage
ducanal]etdéfinissezlapositionactuellecomme
positiond'arrêtmédiane1.Lemoteurvibreune
foisetlesvoyantsdumoteurclignotent
une
Commandeexterneàimpulsionsà3boutons
fois.
chaîne]
Appuyezsurlesboutons[Stop]et[Open]pendant4
secondesjusqu'àcequelalumières'allume,lemoteur
tremblera
Enmêmetemps,appuyezsur[25%]+[Réglage
ducanal]etdéfinissezlapositionactuellecomme
positiond'arrêtmédiane2.Lemoteurvibreune
foisetlesvoyantsdumoteurclignotent
unefois.
brièvement.
etdefermeturedurideau,appuyezsurlatélécommande.Appuyezsur Pendantleprocessusd'ouverturela
rideau,appuyezsurlebouton[ouvrir],ouvrezlebouton[fermer],fermez
télécommandepourouvriretfermerle
lemoteurfonctionnerajusqu'aurideau,lemoteurfonctionnerasurle lerideauaveclatélécommande[arrêter],bouton,
d'ouverture,s'arrêteraaupointlimitedefermeture,s'arrêteraimmédiatement.
lemoteurarrêteralepointlimite
bloquerouarrêterautomatiquementàbloquerouarrêterautomatiquement
Activerlafonctiondecontrôle
Connecterunpériphériqueexterne
Misesous/horstension,appairagedecode,modedefonctionnement.
Pourleréglagedelatélécommande
AlimentationCA,voir«Méthodedecâblagedumoteur»
tactile
[Portdesignal]
[LumièreLED]
[Boutond'apprentissage]
[Portd'alimentation]
Boutond'apprentissage
Remarque:lavitessenominalepardéfautestde75r/min.
3.Dispositifdecontrôle
Utilisezlesboutons[On],[Off],[Stop]pour
déplacerlerideaujusqu'àlapositionsouhaitée.
recommandé
Appuyezsurlebouton[25%]de
bouton[50%]delatélécommande,
latélécommande,lerideauva
courirjusqu'à25%dutrajetpuis
s'arrêter.
,
++
Letempsd'arrêtdoitêtreinférieurà1s.
Opération
25%
75%
75%
25%
25%
25%
75%
25%
75%
25%
75% 25%
25%
75%
75%
25%
75%
75% 25%
75%
75%
25%
1
.
5
6
50,6
265
3S+
7S
1
Commandeexterneà
impulsionsà3
Contrôleexterne
àactionponctuelle
boutons
3S
9,47
1
Ligne
Ouvrir
3S
Fermer
commune
4
8
3S
240
3S
3S
Commandeexterne
àimpulsionsà2boutons
Commandeexterne
àimpulsionsà2boutons
EntréedepuissanceACP
+K2
Φ6
.8
1
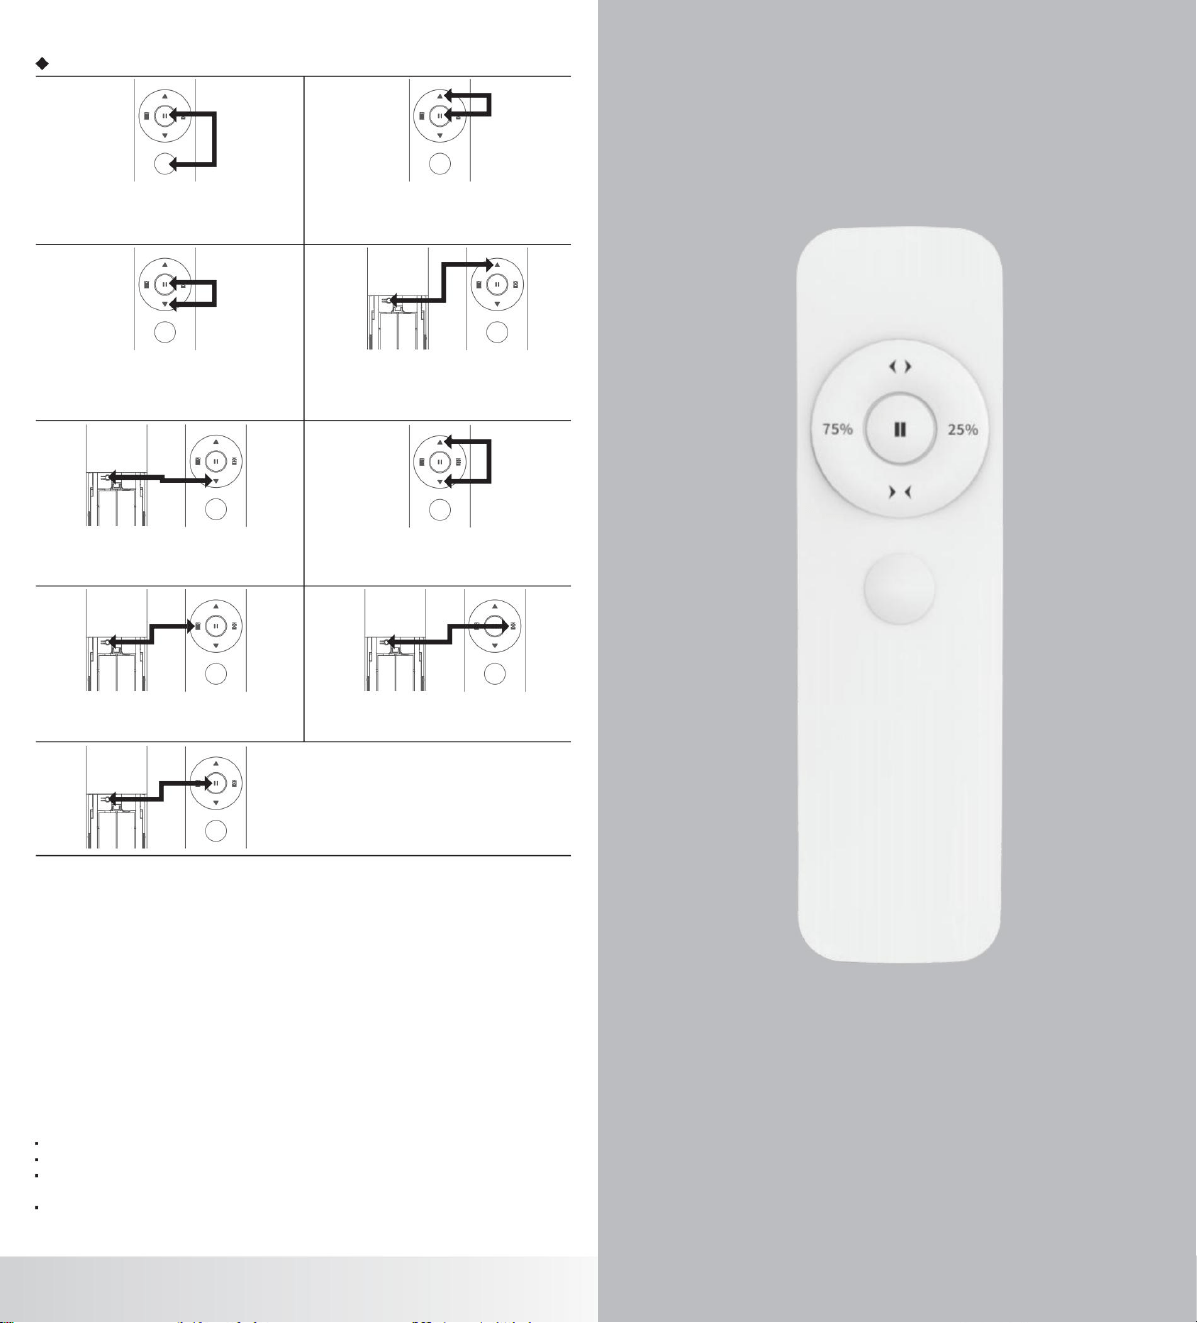
DéclarationdelaFCC
1.Cetappareilestconformeàlapartie15desrèglesdelaFCC.
Sonfonctionnementestsoumisauxdeuxconditionssuivantes:(1)Cet
appareilnedoitpasprovoquerd'interférencesnuisibles.
(2)Cetappareildoitacceptertouteinterférencereçue,ycompriscellesquipeuventprovoquerunfonctionnement
indésirable.
2.Leschangementsoumodificationsnonexpressémentapprouvésparlapartieresponsabledelaconformité
pourraientannulerl'autorisationdel'utilisateuràutiliserl'équipement.
Remarque:cetéquipementaététestéetjugéconformeauxlimitesd'unappareilnumériquedeclasseB,conformémentà
lapartie15desrèglesdelaFCC.Ceslimitessontconçuespourfourniruneprotectionraisonnablecontrelesinterférences
nuisiblesdansuneinstallation
Cetéquipementgénère,utiliseetpeutémettredesradiofréquences.S'iln'estpasinstalléetutiliséconformémentaux
instructions,ilpeutprovoquerdesinterférencesnuisiblesauxcommunicationsradio.Cependant,iln'existeaucunegarantie
quedesinterférencesneseproduirontpasdansuneinstallationdonnée.Sicetéquipementprovoquedesinterférences
nuisiblesàlaréceptionradiooutélévision,cequipeutêtrevérifiéenéteignantetenrallumantl'appareil,l'utilisateur
estencouragéàtenterdecorrigercesinterférencesenprenantuneouplusieursdesmesuressuivantes:
résidentielle.
·Réorienteroudéplacerl’antennederéception.
·Augmenterlaséparationentrel’équipementetlerécepteur.
·Connecterl'équipementàuneprisesuruncircuitdifférentdeceluiauquellerécepteurest
·Consultezvotrerevendeurouuntechnicienradio/TVexpérimentépourobtenirdel'aide.L'appareilaétéévaluépour
répondreauxexigencesgénéralesd'expositionauxradiofréquences.Ilpeutêtreutilisésansrestrictiondansdesconditions
d'expositionportable.
connecté
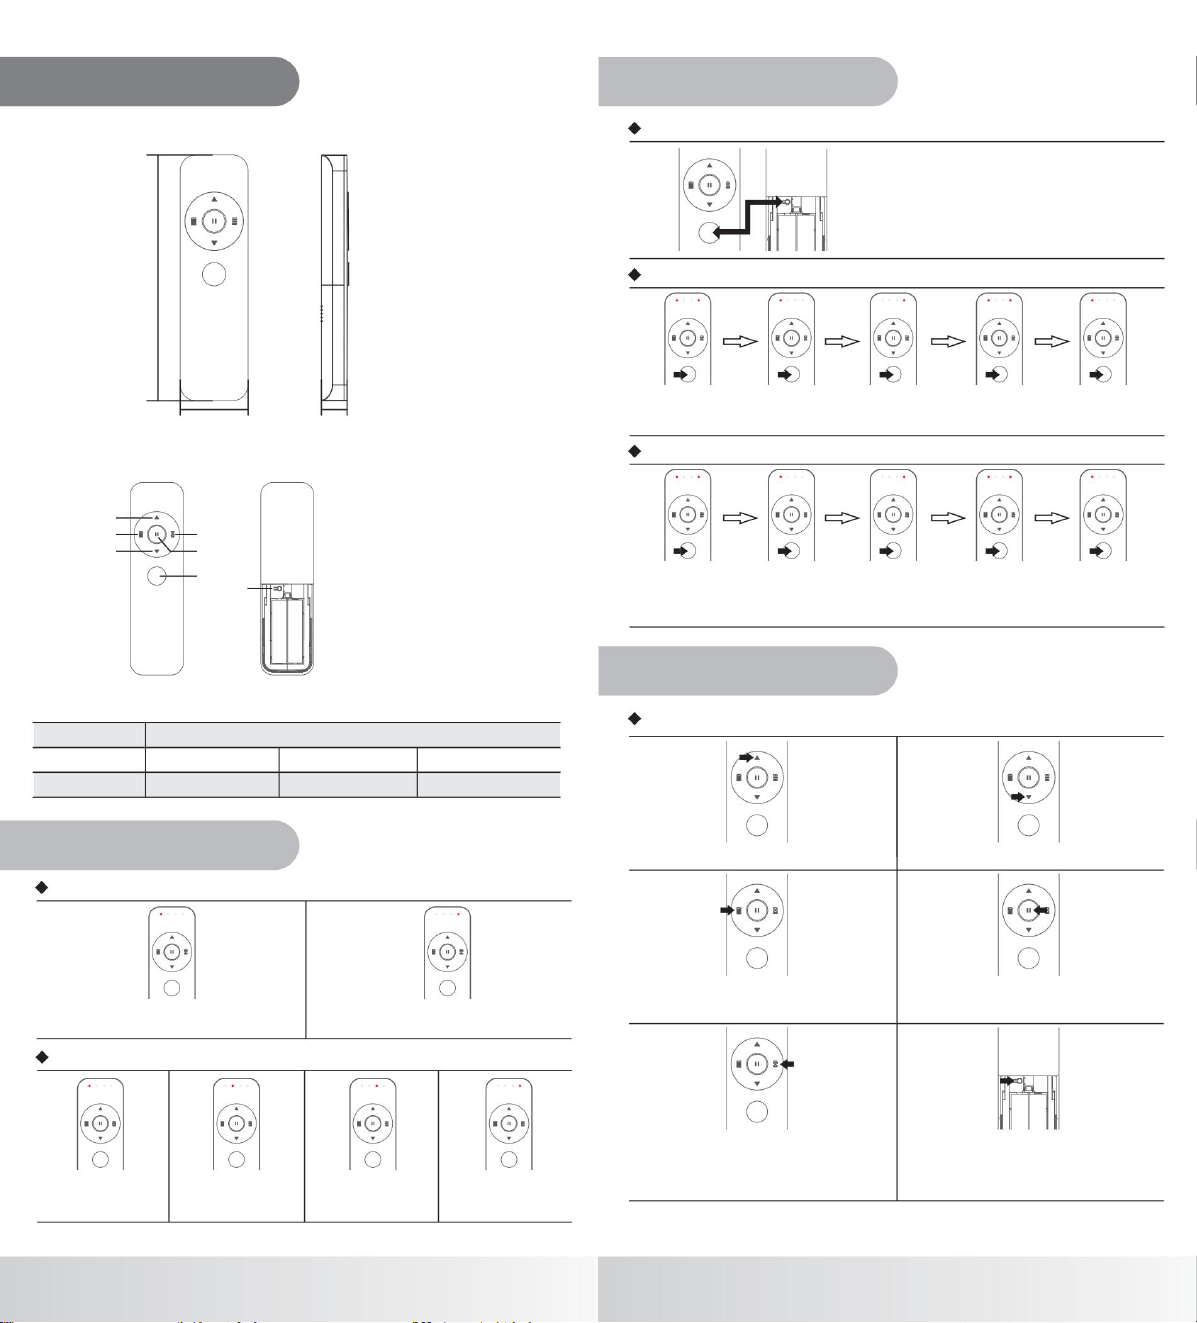

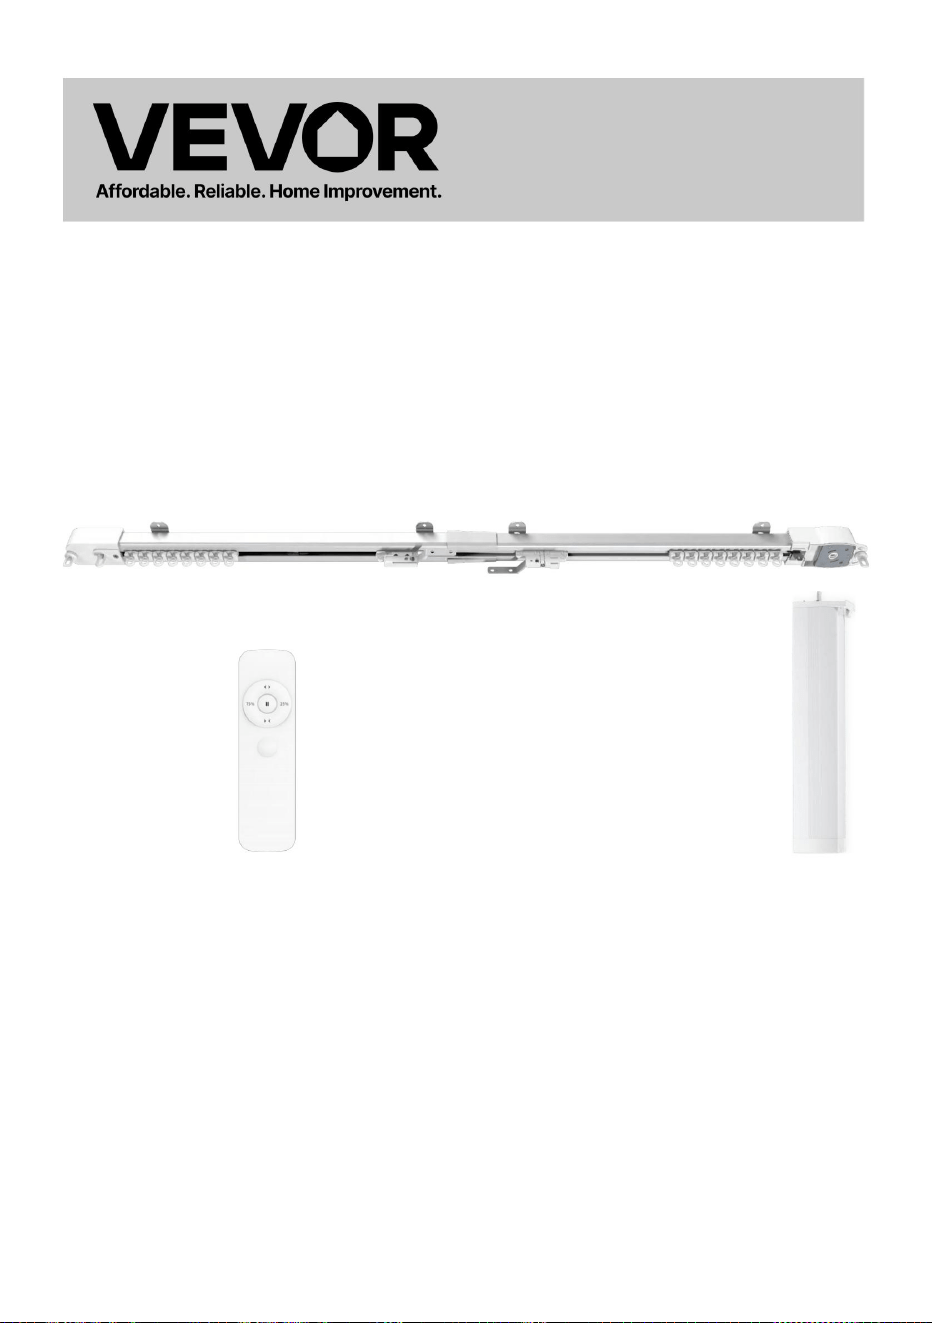
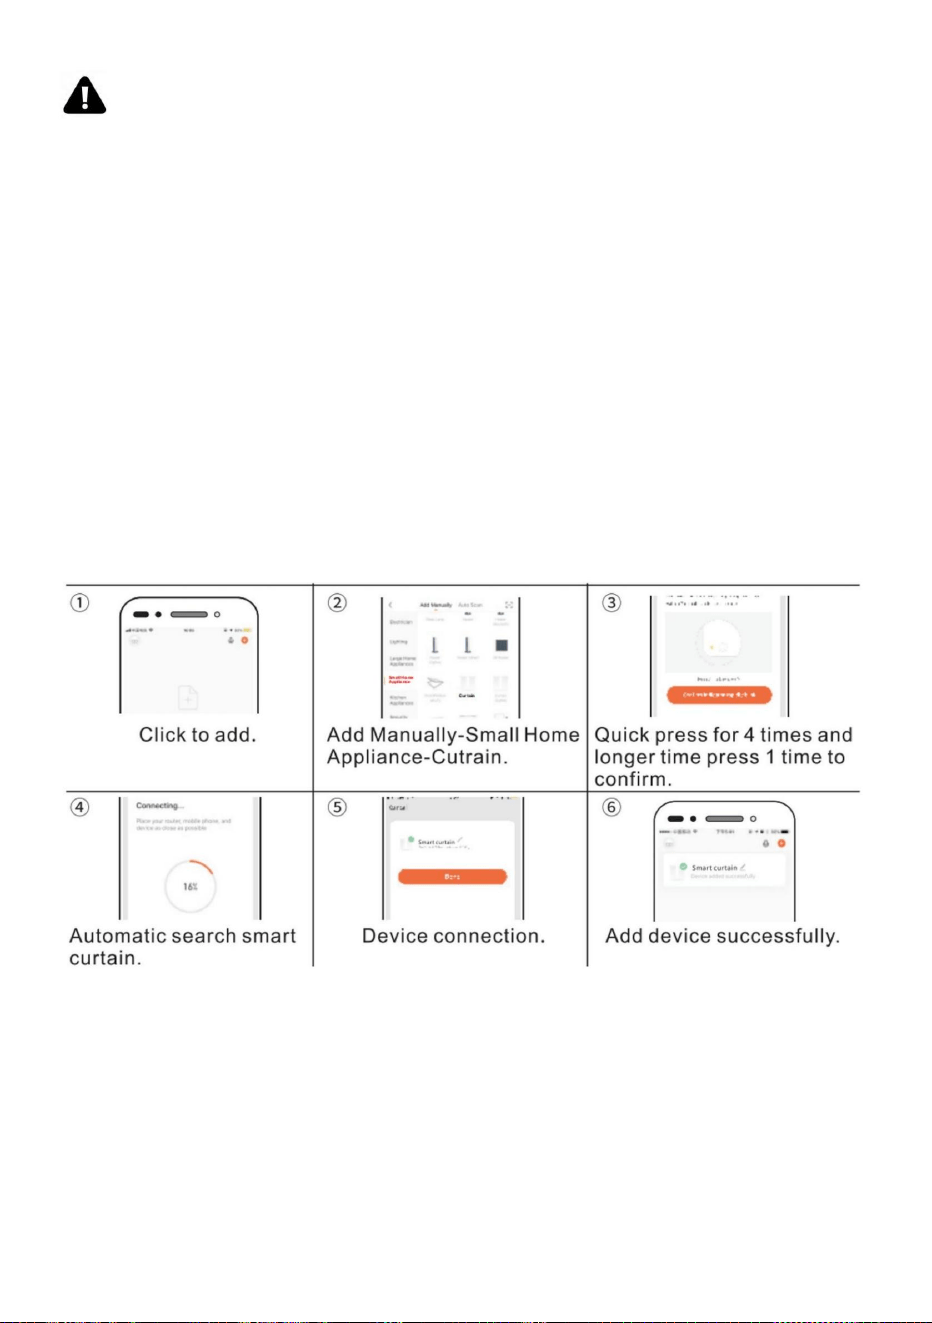
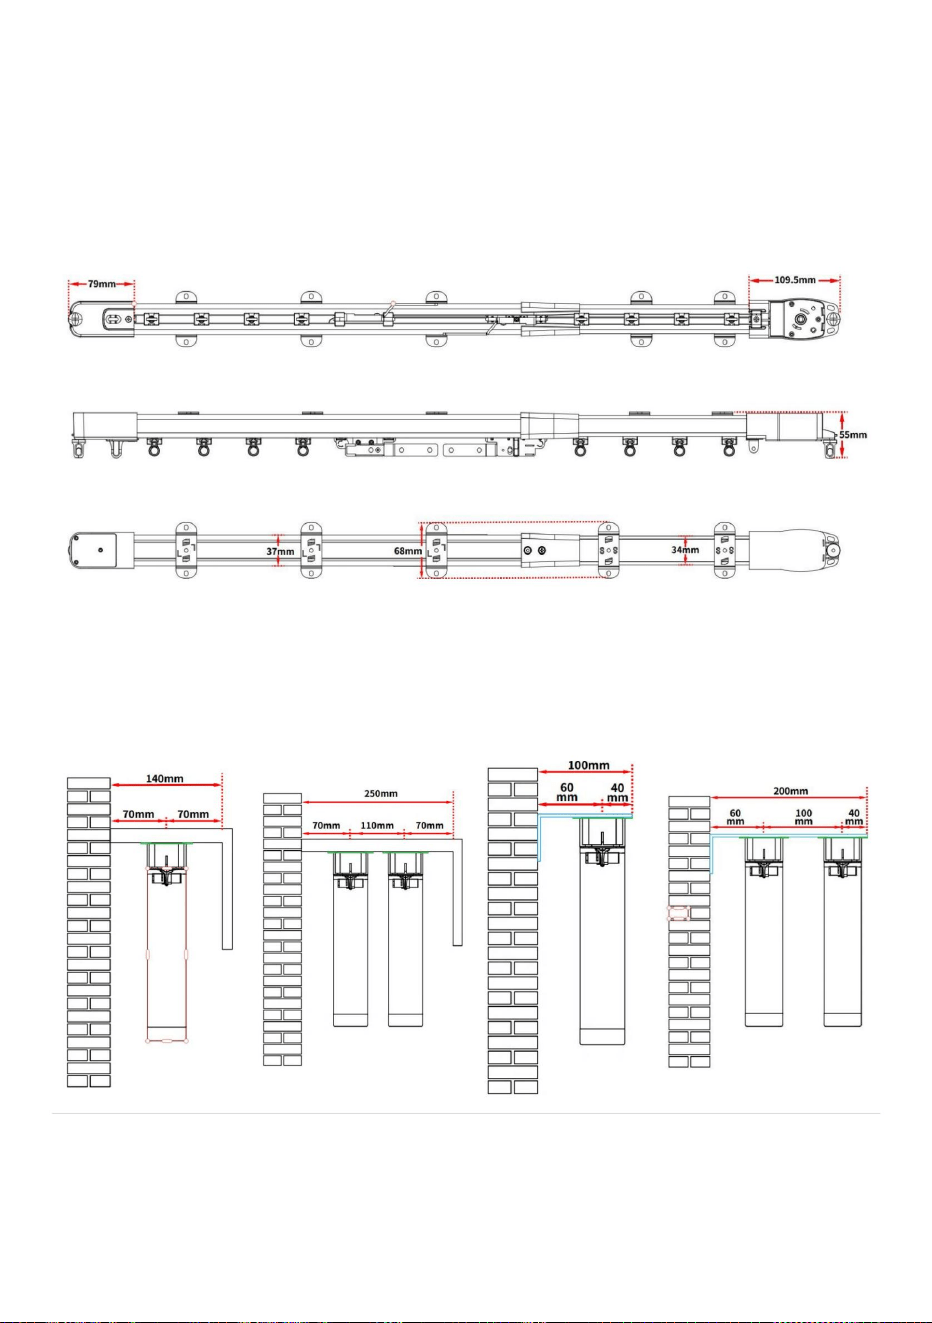
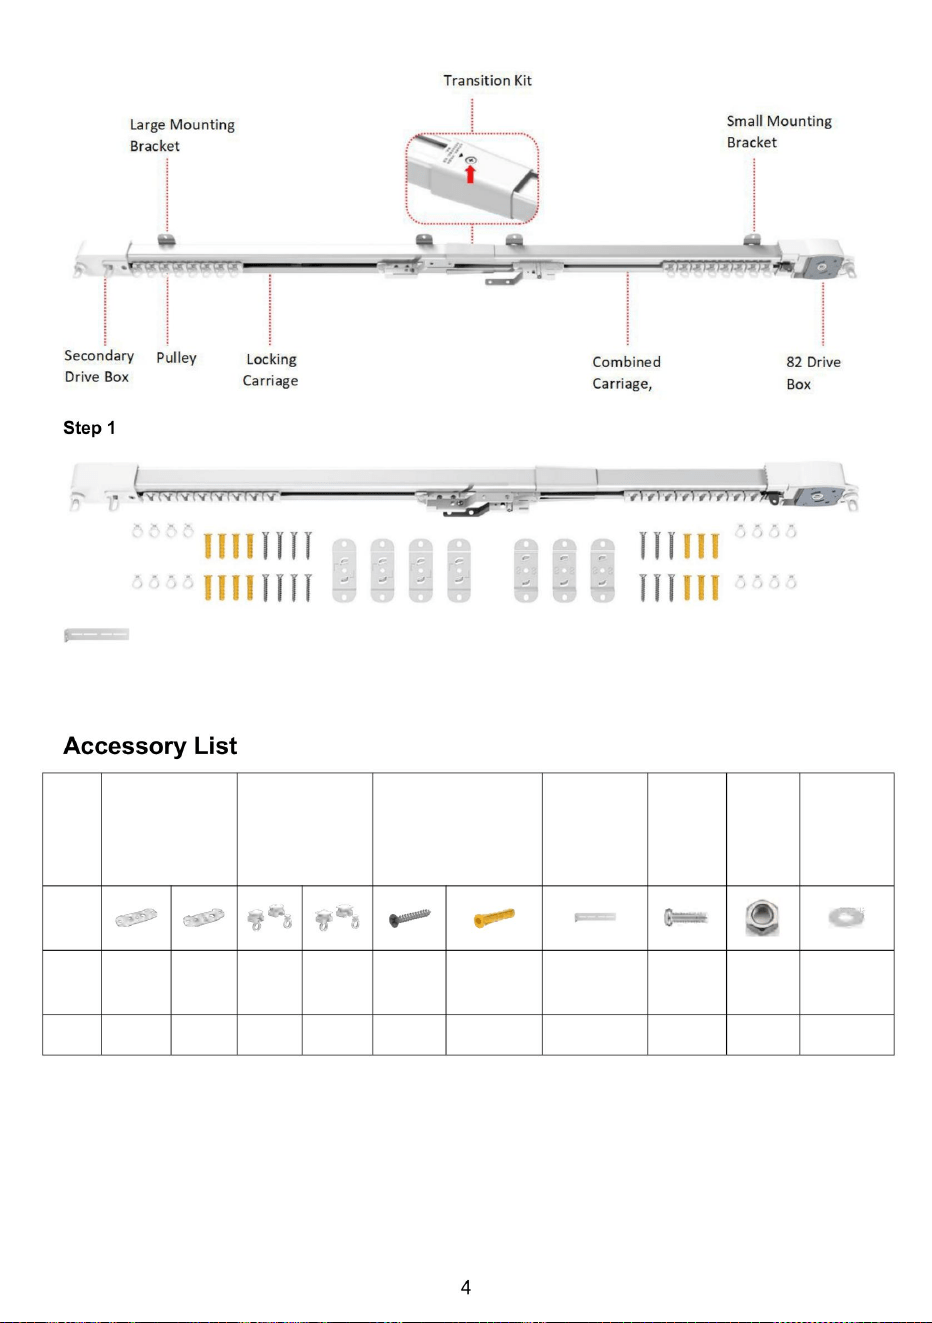
Notiz:
1. Überprüfen Sie die Verpackung und stellen Sie sicher, dass alle Komponenten vorhanden sind.
2. Zur Vereinfachung der Installation sind die Riemenscheiben möglicherweise bereits auf der Schiene installiert.
3. Sie müssen nicht alle Nebencode-Zubehörteile installieren. Dies hängt von der tatsächlichen Situation ab.
Nagel
Riemenscheiben
12
20
Nüsse
Klammern
Schrauben
Foto
Klein
schrauben
Groß
Detail
Menge
20
Erweiterung
4
S
Schrauben
Groß
installieren
20
Montage
Unterlegscheiben
Klein
10
Seitencode
206
Zubehör
Tippen
20
12
Name
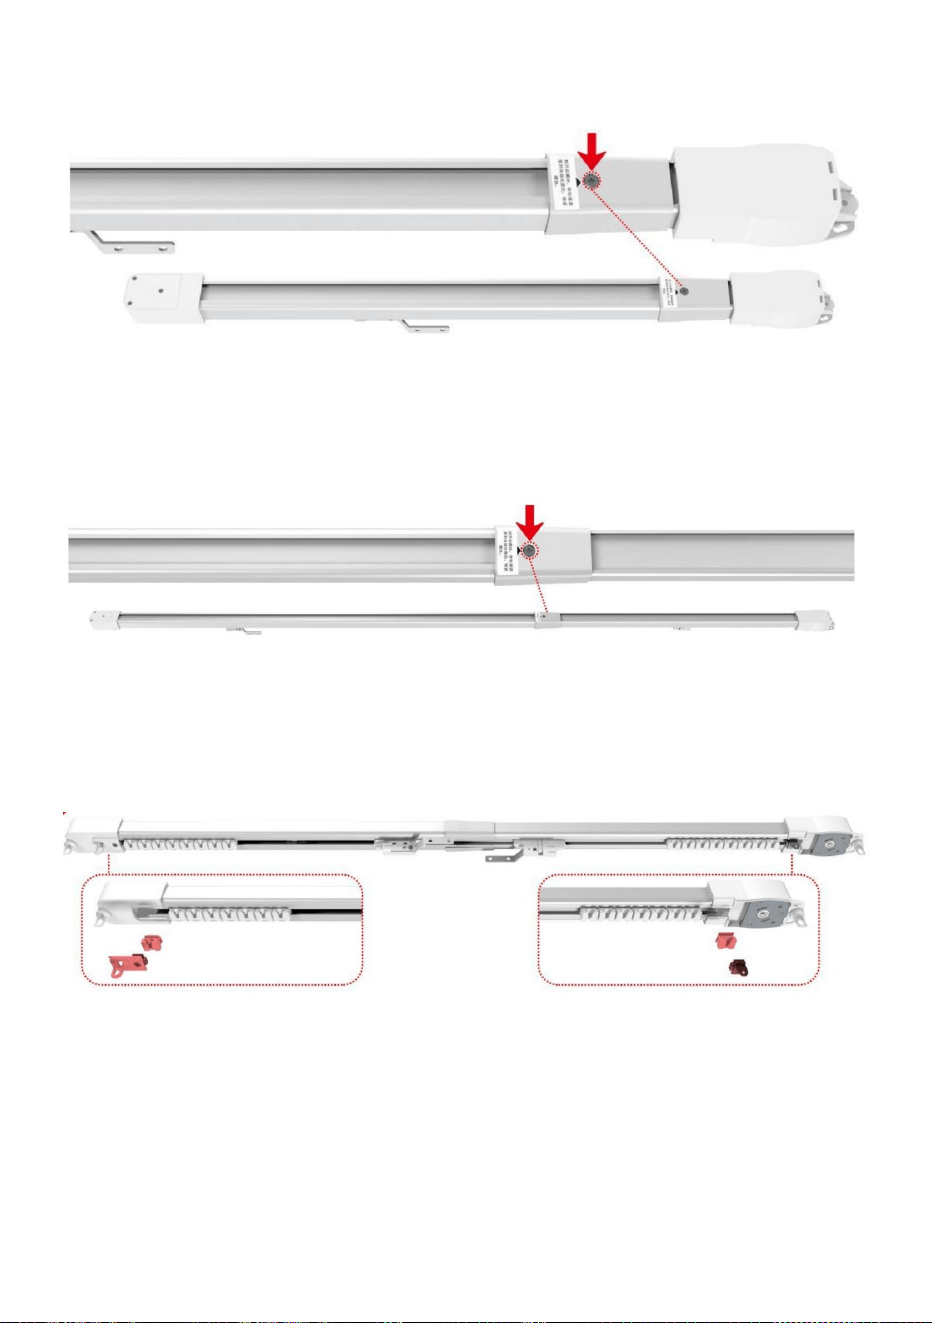
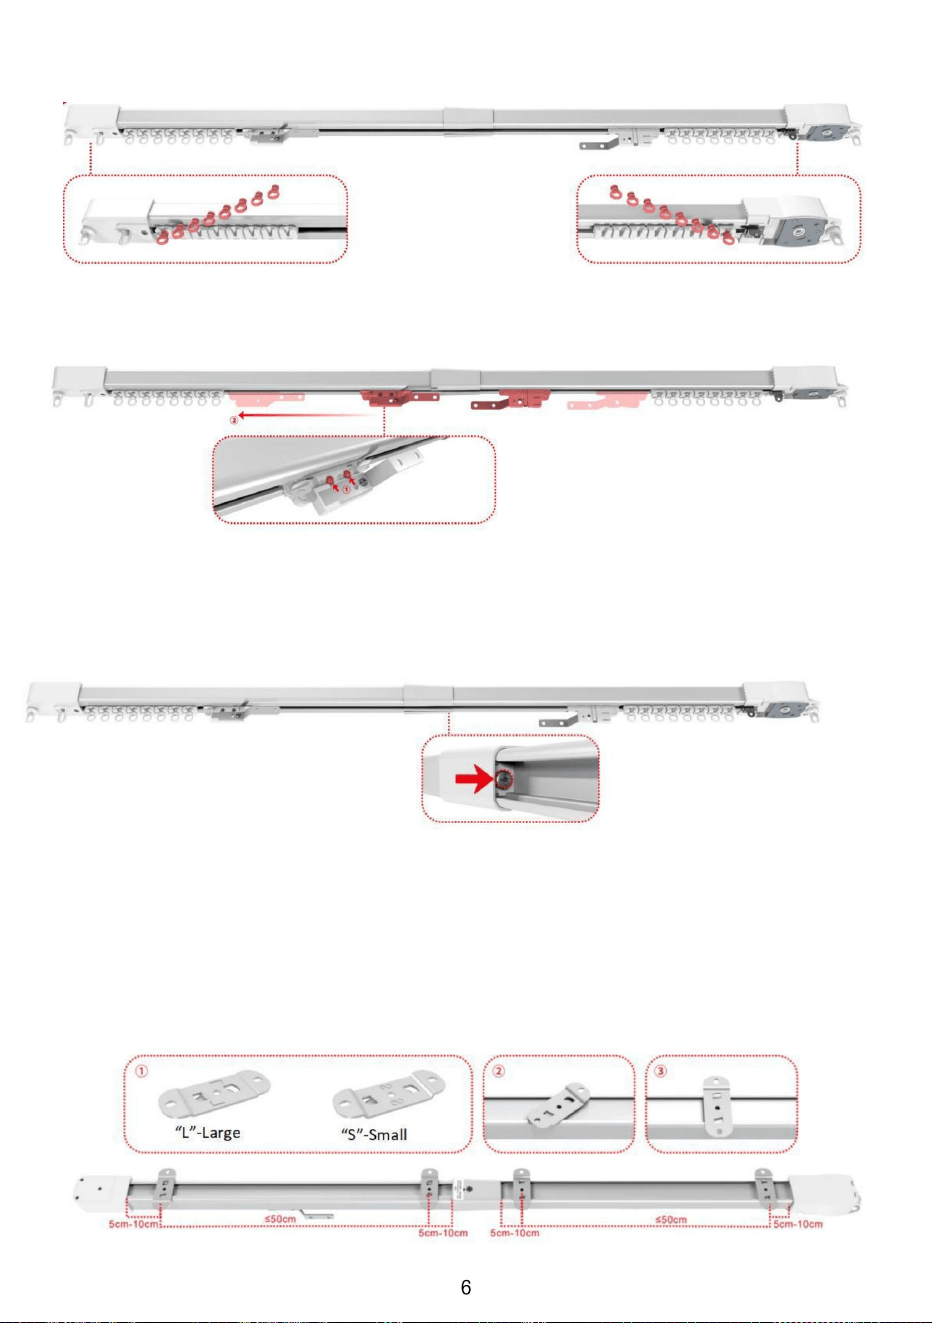
Schritt 6: Schlitten ausrichten: Lösen Sie die oberen Schrauben an den Schlitten. Bewegen Sie beide Schlitten an den Rand des
Antriebskastens und ziehen Sie die Schrauben fest. Testen Sie die Schlitten auf reibungslose
Schritt 7. Feineinstellung der Riemenscheibe. Wenn die Riemenscheibe trocken oder locker läuft, können wir sie mit dem
Schrauben an der Seite des Übergangssatzes.
Bewegung.
°
Schritt 8. Installation des Installationscodes, wie in Abbildung ÿ - ÿ gezeigt. Platzieren Sie den Installationscode in einem 45-
Grad-Winkel auf der Oberseite der Schiene, drehen Sie ihn und ziehen Sie ihn fest. Installieren Sie einen Installationscode in
einem Abstand von ca. 50 cm um das Übergangsset als Mittelpunkt.
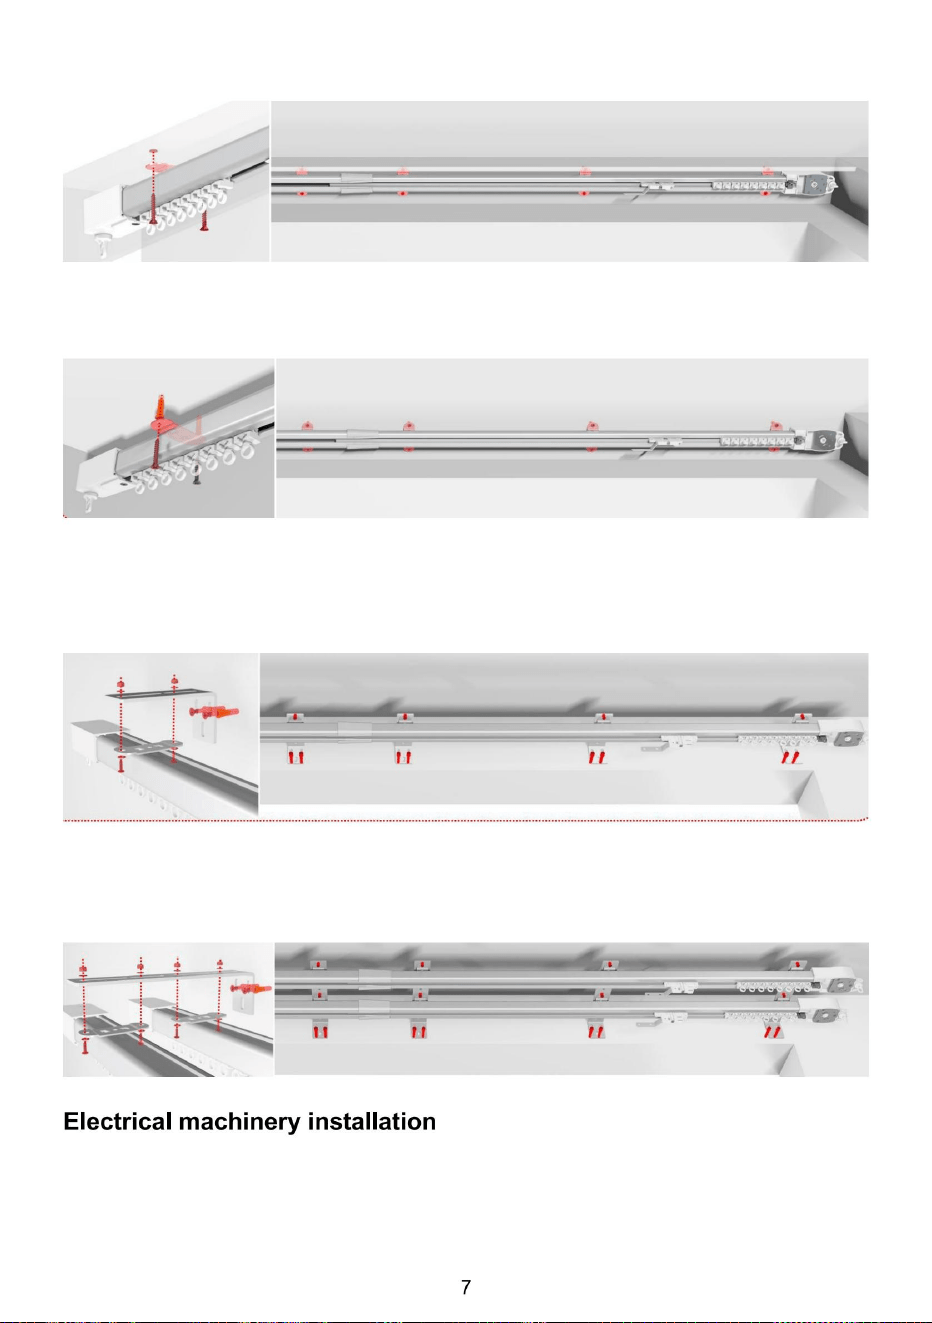
Schritt 9. Oben montiert, auf der Vorhangbox installiert, kann direkt mit Schrauben befestigt
Schritt 10. Bei der Installation an der Wand ist es notwendig, die Position des oberen
Installationscodes an der Wand zu markieren, Löcher zu bohren, Spreiznägel anzubringen und sie
dann mit Schrauben zu
Schritt 11. Für die seitliche Montage installieren Sie zunächst den oberen Montagecode gemäß der
linken Abbildung auf dem seitlichen Montagecode und anschließend das seitliche
Montagecode-Kit auf der Schiene. Die Wand muss gemäß dem Montagecode markiert, gebohrt
und nach der Montage mit Dehnschrauben befestigt werden.
befestigen.
werden.
Schritt 12. Bei der seitlichen Montage montieren Sie zunächst das Oberteil gemäß der linken Abbildung auf
der Schiene und befolgen Sie anschließend die Anweisungen zur seitlichen Montage. Die Wand muss
nach der Montage gemäß den Anweisungen markiert, gebohrt und mit Dehnschrauben befestigt werden.
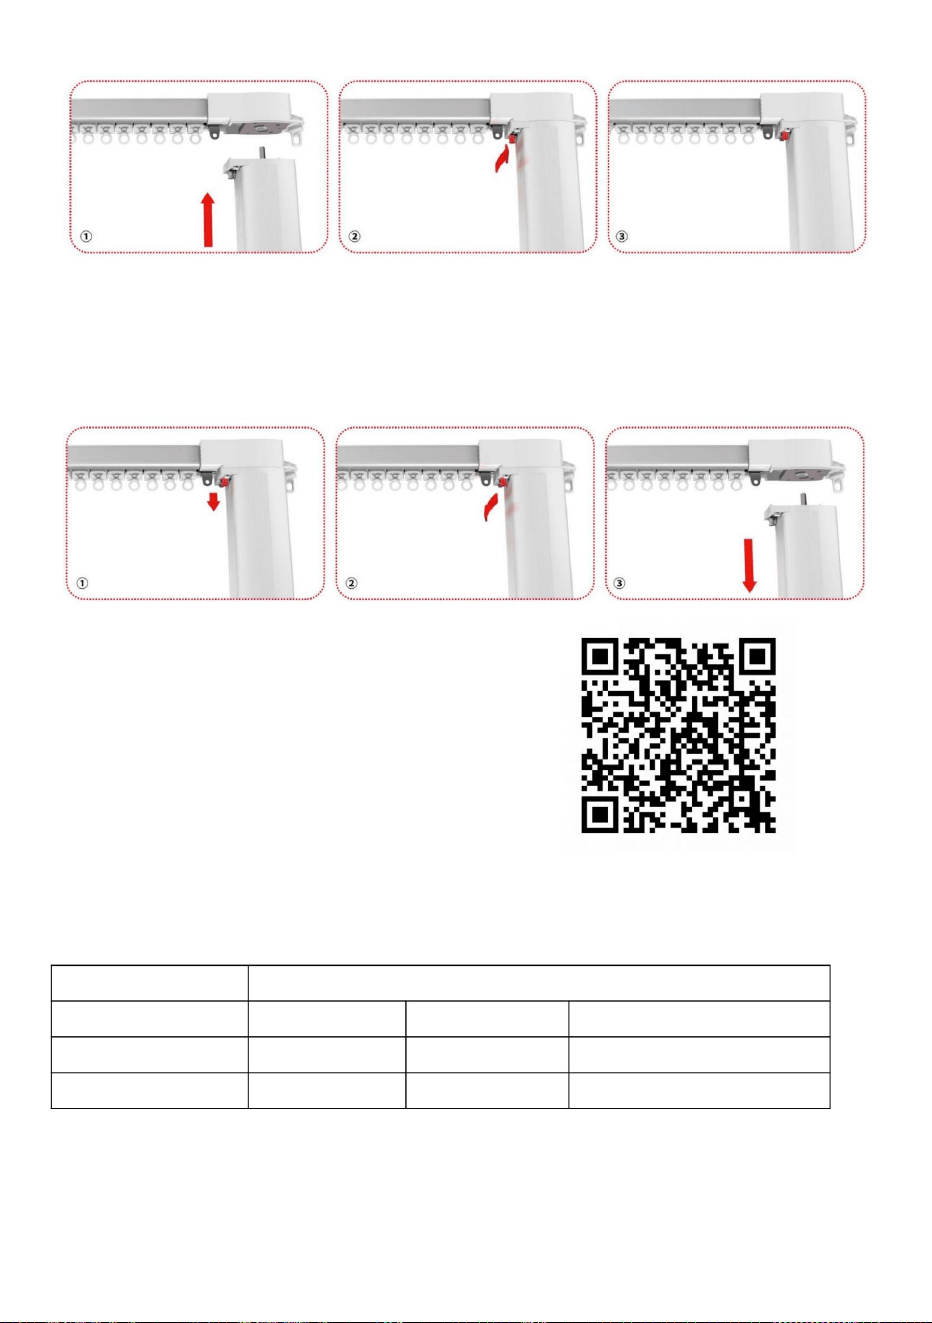
Scannen Sie den QR-Code, um das Operationsvideo zu erhalten


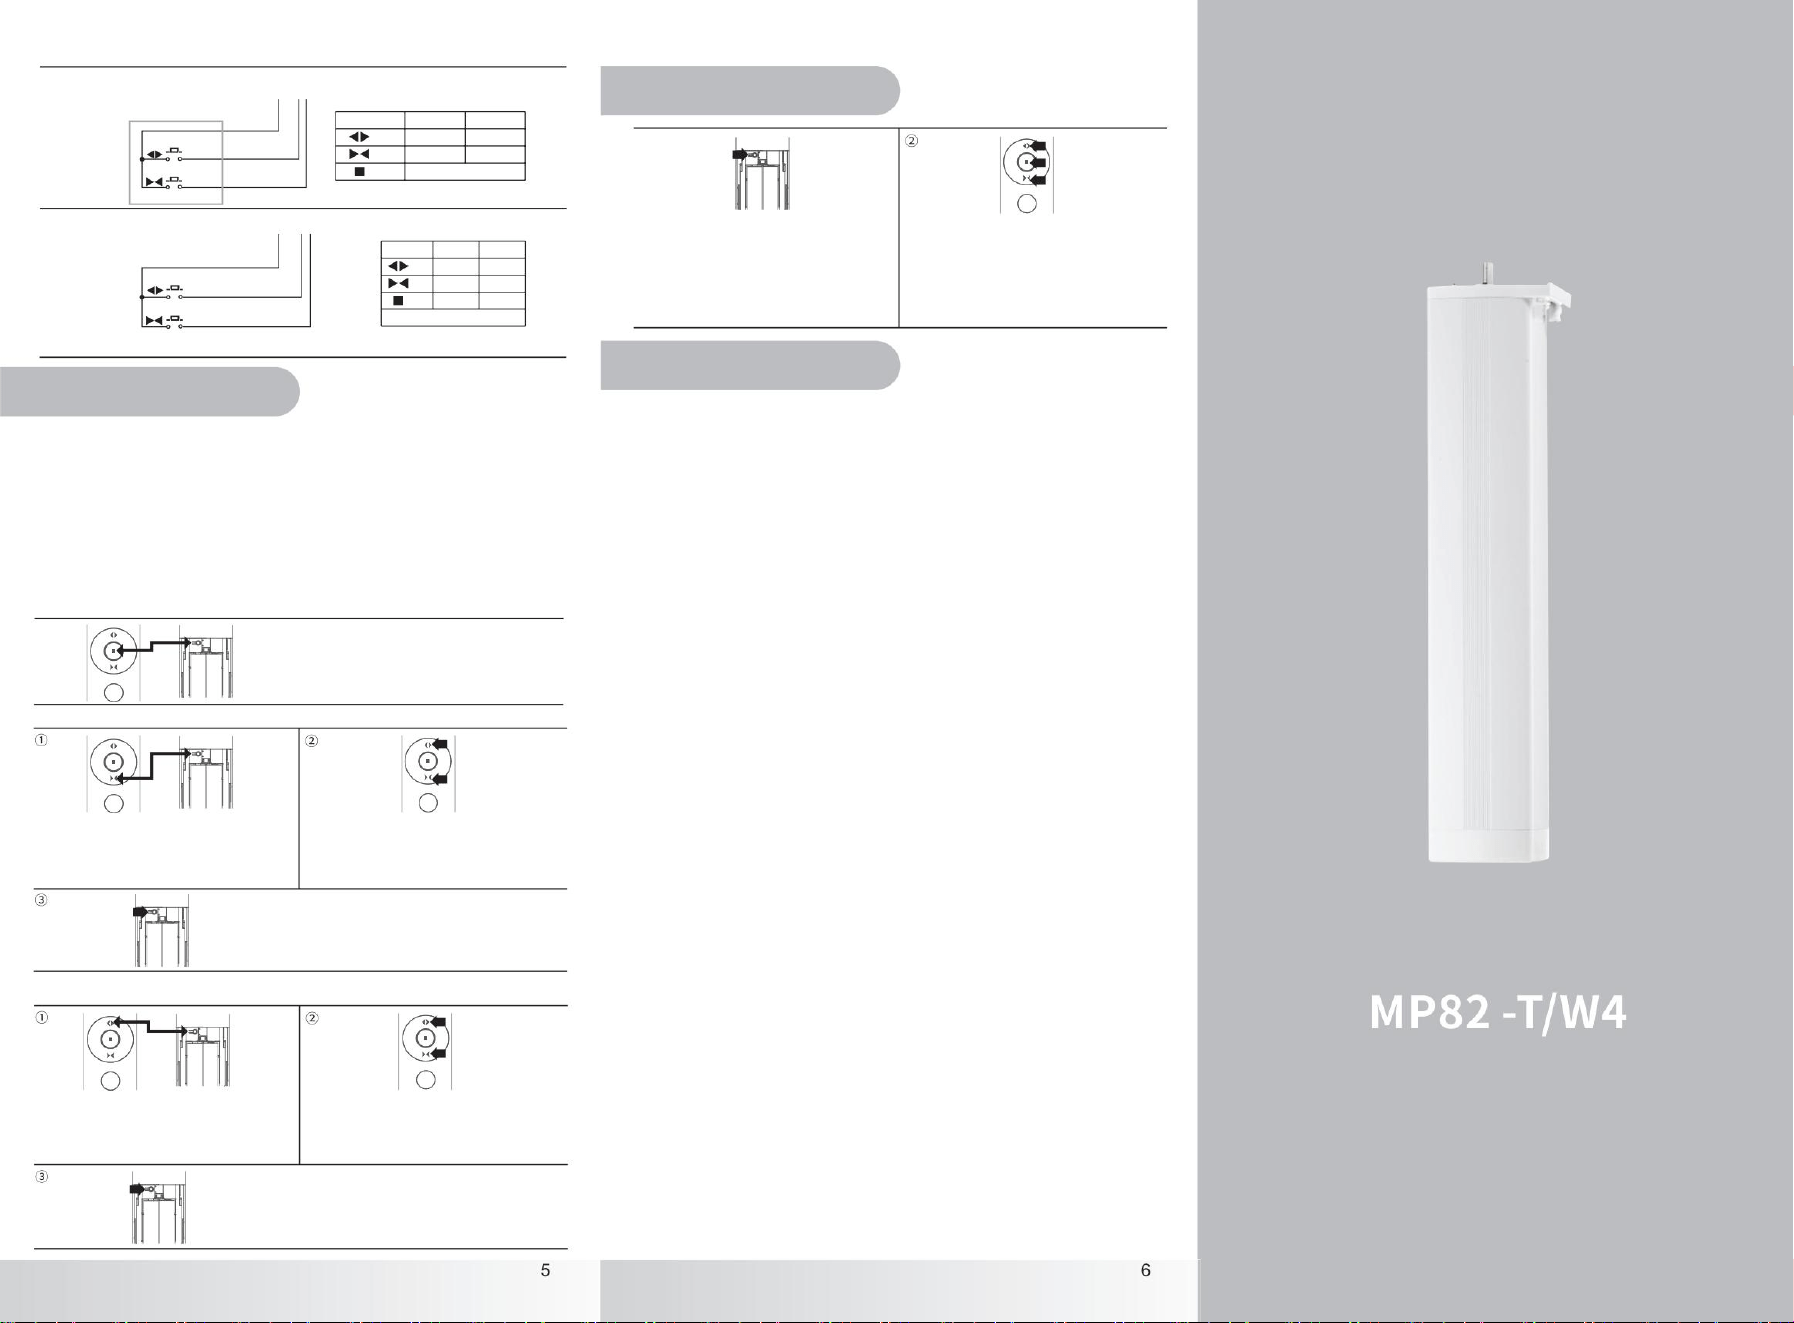
Drücken Sie eine beliebige Taste, um
Betrieb K1
anzuhalten
Betrieb
Die Aktionszeit muss fortgesetzt werden
(Stoppen)
(Offen)
(Schließen)
(Offen)
An
(Stoppen)
(Schließen)
Aus
Aus
An
An
K1
K2
3S
Gemeinsame
Schließen
Offen
Linie
Gemeinsame
Linie
Schließen
Offen
Intelligente Verbindung
Geschwindigkeitseinstellung
K1
Aus
Limit festlegen
An
87654321
K2
An.
ÿ
Punktaktion externer
• Automatisches
• Kopplung löschen
Limit
Steuerungsmodus
Drücken Sie die Taste [Öffnen] 3 Sekunden lang, stellen Sie
Drücken Sie die Taste [Kanaleinstellung] der Fernbedienung
oder die Taste [Programmierung] des Motors, um die
aktuelle Position als Öffnungsgrenzwert festzulegen.
Der Motor rüttelt einmal und die LED-Anzeige des Motors
erlischt.
ein
auf Drücken Sie die Taste [Kanaleinstellung] 3 Sekunden lang,
wechseln Sie in den Geschwindigkeitsanpassungsmodus, LED-Leuchte 110 U/min.
Halten Sie [Kanaleinstellung]+[Stopp] gleichzeitig 6
Sekunden lang gedrückt, um alle Grenzen zu löschen. Der
Motor rüttelt einmal und die LED-Leuchte blinkt einmal.
Bei Stromausfall ändert sich die Motorendlage nicht. Wird
• Anpassung für Down-Limit
der
Vorhang zu weit gezogen, kann er nach dem Einschalten der Stromversorgung bis zum Ende der
2-Tasten-Impuls-Außensteuerung
• Verbindungsmethode
,
der
Schiene abstürzen und anschließend die Endlage wieder einnehmen. Wird der Motor während der Bewegung
ausgeschaltet, nimmt er die Endlage wieder ein, nachdem er beim ersten Anlauf bis zum Ende der Schiene
abgestürzt ist. •
Endlage löschen
Motor
1
ÿÿ
110 U/min
90 U/min
75 U/
Tmall Genie: Wenn sich das Gerät im Verteilungsnetzwerk befindet, sagen Sie zum Tmall Genie-Lautsprecher:
„Tmall Genie, finde das Gerät“, warten Sie geduldig, bis Tmall Genie das Gerät findet, und verbinden Sie das
Gerät. Nachdem die Verbindung erfolgreich hergestellt wurde, können Sie den Gerätenamen und den Standort
anpassen und das Gerät über das Telefon
Tmall Genie: Drücken Sie die Motortaste [Programmierung] , lassen Sie sie los und drücken Sie sie 3
Sekunden lang, bis die Anzeigeleuchte 5 Mal rot blinkt, und wechseln Sie in den Kopplungsmodus. Geben Sie
den Sprachbefehl „Tmall Genie, finde das Gerät“ ein. Warten Sie geduldig, bis Tmall Genie das Gerät findet, und
verbinden Sie das Gerät. Nachdem die Verbindung erfolgreich hergestellt wurde, können Sie den
Gerätenamen und den Standort anpassen und das Gerät über das Telefon
• Anpassung für Obergrenze
steuern.
steuern.
min
Drücken Sie die Taste [Stop] 3 Sekunden lang und stellen Sie auf
90 U/min ein.
Drücken Sie die Taste [Pause] 3 Sekunden lang und stellen Sie sie
auf 75 U/min ein.
Die Motor-LED blinkt 2
1. Nach dem Stromanschluss stoppt der Motor beim ersten Öffnen oder Schließen des
Halten Sie gleichzeitig die Fernbedienungstaste [Schließen]+[Kanaleinstellung] gedrückt. Bringen Sie den Vorhang in die
gewünschte Position, indem Sie die Fernbedienungstaste [Auf] oder [Ab] 4 Sekunden lang drücken. Der Motor
bewegt innerhalb von 30 Sekunden einmal die Taste
[Ab].
Zeit, die LED-Anzeige des Motors leuchtet
Halten Sie gleichzeitig die Fernbedienungstaste [Kanaleinstellung]+[Auf] 4 Sekunden gedrückt, bis der Vorhang die
gewünschte Position erreicht hat. Der Motor rüttelt einmal innerhalb von 30 Sekunden, indem Sie die
Fernbedienungstaste [Auf] oder [Ab] 4 Sekunden lang
drücken.
Die LED-Anzeige des Motors leuchtet lange
An.
lange.
Vorhangs
Mal.
Tuya ZigBee: Nach dem Öffnen des Gateways die Motor- Taste [Programmierung] drücken
viermal hintereinander, loslassen und 3 Sekunden lang gedrückt halten, bis die Regenbogenanzeige blinkt, in den
Kopplungsmodus wechseln, die Tuya-App öffnen, oben rechts auf „+“ klicken, „Geräte in der Nähe“ auswählen, um
den Motor zu finden, der Motor tritt in das Verteilungsnetzwerk ein, geduldig warten, bis die Verbindung
erfolgreich hergestellt wurde, Sie können die Verwendung des benutzerdefinierten Namens steuern.
durch Verriegelung bei 0–10 mm bis zur Schließposition. (Wenn die Spurrichtung falsch ist, wird die automatische
Grenztoleranz größer. Nach der Richtungsänderung wird die Toleranz wieder auf das normale Niveau
zurückgesetzt.)
2. Im Stoppzustand das Gerät ausschalten und wieder einschalten. Wenn während des Betriebs kein
Drücken Sie die Taste [Kanaleinstellung] auf der
Fernbedienung oder die Taste [Programmierung] am
Motor, um die aktuelle Position als unteren Grenzwert
festzulegen. Der Motor rüttelt einmal und die LED-Anzeige
des Motors erlischt.
Vorhang
,
gezogen wird, stürzt der Motor nicht bis zum Ende ab.
• Verbindungsmethode 2
87654321
K2
K1
75
1) Methode 1: Gerät in der App löschen;
2) Methode 2: Auf Werkseinstellungen zurücksetzen;
3ÿ Methode 3: Wechseln Sie erneut in den Verteilungsmodus, um die Netzwerkverbindung zu trennen.
%
75
25 %
%
75
75 %
%
75 25
25 %
%%
25 %
75
25 %
%
K2
An
Aus
25 %
An
Bedienungsanleitung für Gleichstrommotoren mit AC-Eingang
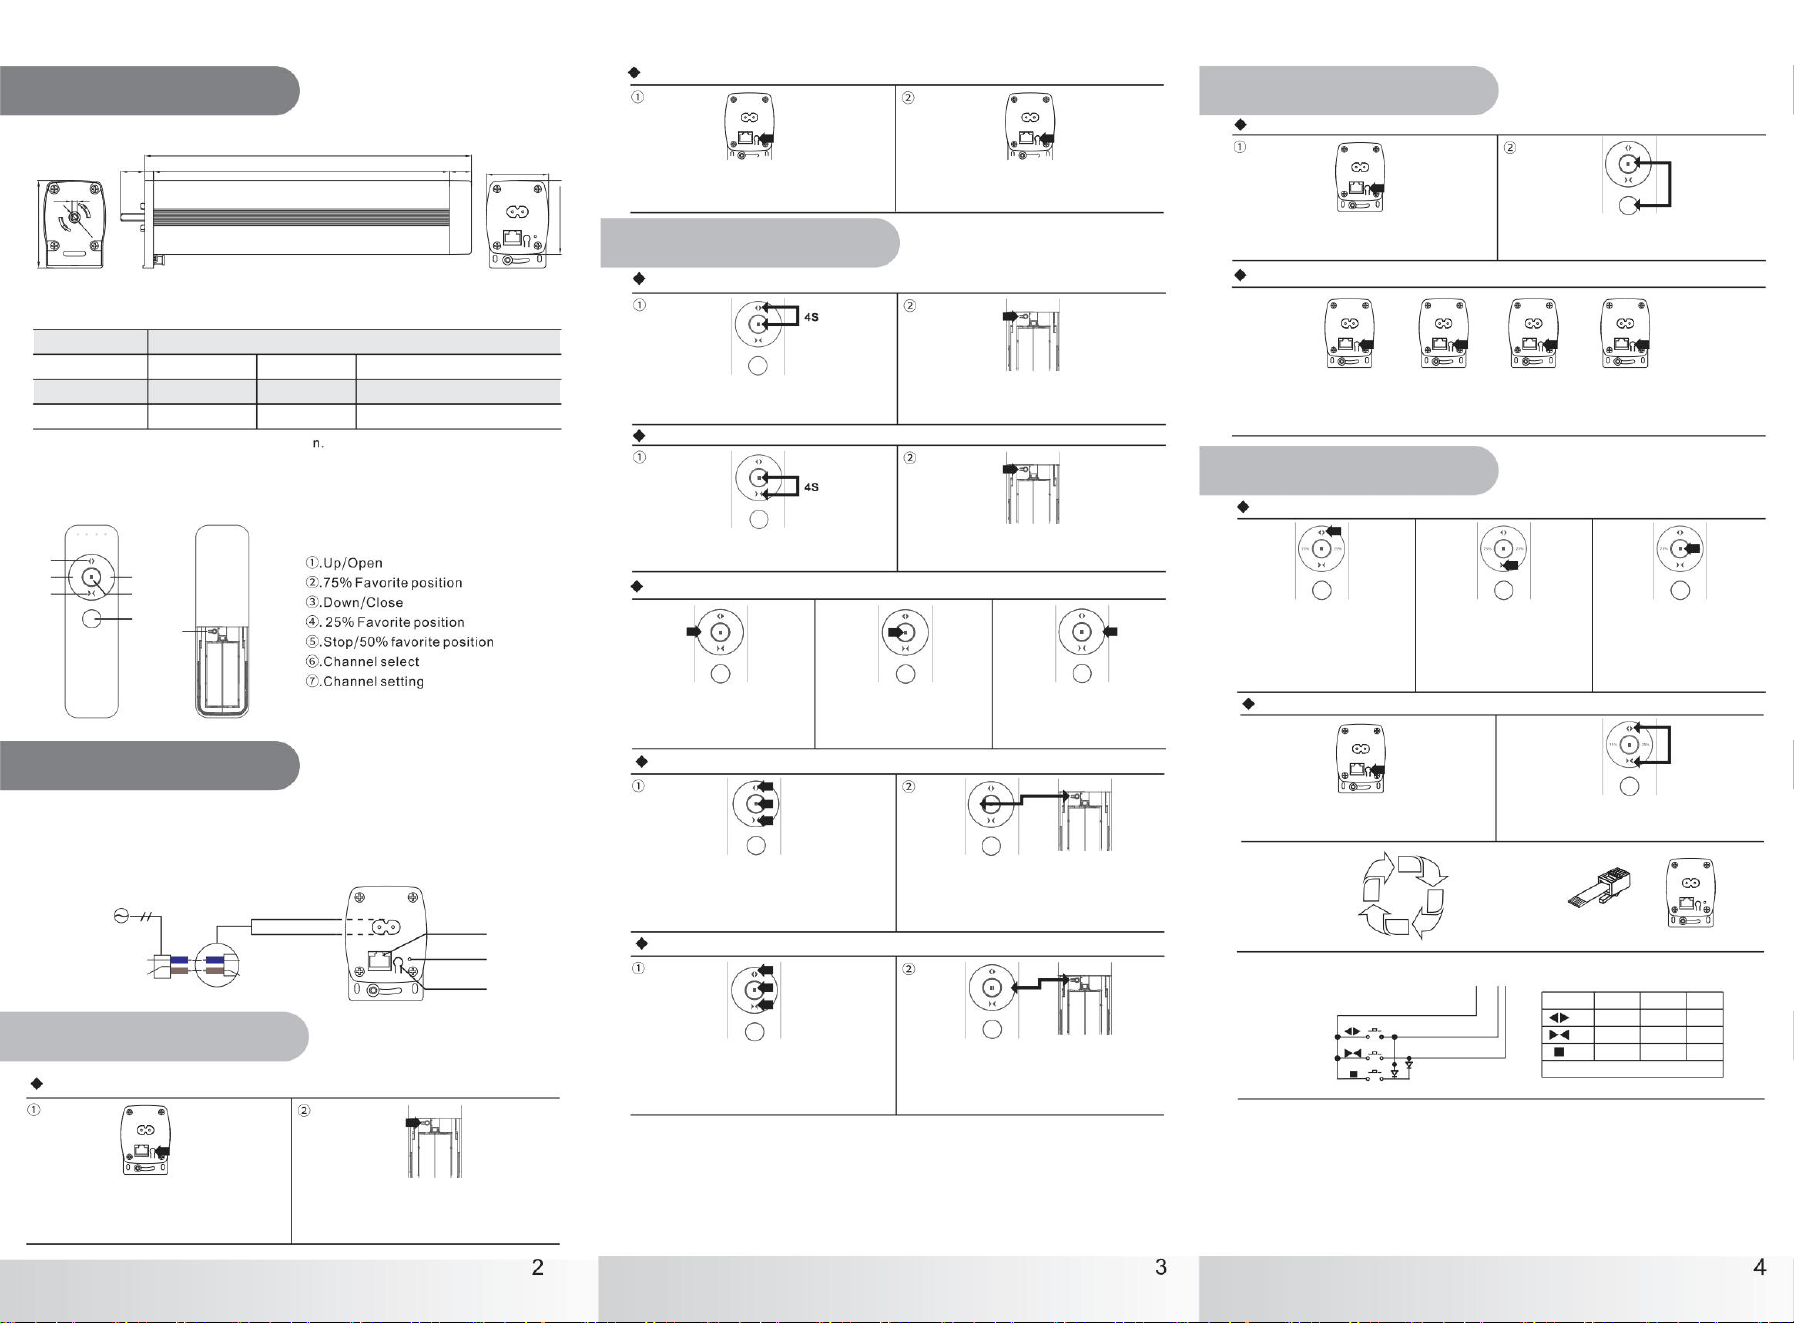
75 U/min (90/110 U/min
50/60 Hz
1,2 Nm.
einstellbar)
100–240 V
Nennfrequenz
Nenndrehmoment
Wechselstrom
Nennspannung
IP-Schutzart
Laufzeit
IP41
S3 50 %
Nenndrehzahl
.8
1
ÿ6
ÿ
ÿ
ÿ
ÿ
ÿ
ÿ
ÿ
50,6
265
3S+
7S
1
3-Tasten-Impuls-
Punktaktion
externe Steuerung
Außensteuerung
3S
9,47
Schließen
1
Gemeinsame
3S
Offen
Linie
4
8
3S
240
3S
3S
2-Tasten-Impuls-
Außensteuerung ÿ
2-Tasten-Impuls-
Außensteuerung ÿ
75
25
+ K2
%
%
75 %
25
25 %
%
25 %
75
25
75 %
%
%
75
25 %
% 25 %
75
25 %
%
25
75 %
%
75
75 %
% 25 %
75 %
25
75 %
%
.
ÿ
ÿ
ÿ
1.Produktgröße
Drücken Sie die Tasten [Stop] und [Close] 4
Sekunden lang, bis das Licht aufleuchtet und
der Motor kurz ruckelt.
ÿ
Richtungseinstellung
LED-Licht
erfolgreich.
Methode 2 (Richtungsänderung durch
Drücken Sie die Motortaste [Programmierung] 3
Sekunden lang, bis die LED-Anzeige aufleuchtet.
Programmiertaste)
ÿ
Halten Sie die Motor-[Code]-Taste länger als 7
Sekunden gedrückt, das blaue Licht blinkt einmal, um
die Werkseinstellungen
ÿ
wiederherzustellen.
Zweimal kurz drücken + zweimal lange drücken. Taste [Programmierung]: kurz drücken (Licht blinkt) + kurz
drücken (Licht blinkt) + 3 Sekunden lang drücken (LED-Licht an) + 3 Sekunden lang drücken (LED-Licht blinkt
zweimal und geht dann aus), Richtungswechsel abgeschlossen.
Drücken Sie die Motortaste [Programmierung] 3
Sekunden lang, bis die LED-Anzeige
Setzen Sie den mittleren Stopppunkt 2
aufleuchtet.
Kanaleinstellung
ÿ
ÿ
Mit den Tasten [Ein], [Aus], [Stopp] können Sie
den Vorhang in die gewünschte Position fahren.
Methode
ÿ
1
Hinweis: Motorlänge L unterliegt den Produktspezifikationen (Einheit: mm)
2.Produktspezifikation
MP82-T/
Drücken Sie die Motortaste [Programmierung] 3
Sekunden lang, bis die LED-Anzeige aufleuchtet.
W4
Touch-Control-Funktion ausschalten
nach 3 Minuten
Drücken Sie lange die Taste
[50 %] der Fernbedienung, der
Vorhang läuft 50 % der Strecke und
stoppt dann.
vollständig.
ÿ
Werksreset
Fernbedienungstaste [Kanaleinstellung], die Kontrollleuchte
blinkt dreimal rot und erlischt dann. Das Lernen des
Codes war erfolgreich.
ÿ
[YR5302
Drücken Sie gleichzeitig [75%] + [Kanaleinstellung] und
stellen Sie die aktuelle Position als mittlere Stoppposition 1
ein. Der Motor vibriert einmal und die Motorkontrollleuchten
blinken
einmal.
Fernbedienung]
Mittlere Stoppposition
Externer Steuermodusschalter
ÿ
Drücken Sie die Taste [75%] der
Fernbedienung, der Vorhang
läuft 75 % der Strecke und stoppt
3-Tasten-Impuls-Außensteuerung
dann.
Drücken Sie die Motortaste [Programmierung]
RJ-Anschluss
3
bis die LED leuchtet, wechseln Sie in den Lernmodus.
Sekunden lang, die LED-Leuchte blinkt 3 Mal schnell.
Motormodus
Drücken Sie kurz die Taste [Kanaleinstellung],
Motorvibration, dann kann diese Funktion erfolgreich
eingeschaltet werden.
Blockieren oder Stoppen automatisch bei Blockieren oder Stoppen
automatisch - nach 3 Minuten.
Setzen Sie den mittleren Stopppunkt 1
Fernbedienungsfunktion
Drücken Sie kurz die Taste [Kanaleinstellung], um die
,
Motorvibration zu aktivieren. Anschließend kann diese
Funktion erfolgreich ausgeschaltet werden.
Drücken Sie auf der Fernbedienung die Tasten
[Öffnen]+[Schließen]. Der Motor vibriert, der Moduswechsel
ist abgeschlossen.
[Signalanschluss]
[LED-Licht]
[Lerntaste]
[Stromanschluss]
Lerntaste
Hinweis: Die werkseitig voreingestellte Nenndrehzahl beträgt 75 U/min.
3.Empfohlenes
Mit den Tasten [Ein], [Aus], [Stopp] können Sie
den Vorhang in die gewünschte Position fahren.
Steuergerät
Touch-Control-Funktion
Drücken Sie die Taste [25%] der
Fernbedienung, der Vorhang
läuft 25 % der Strecke und bleibt
dann stehen.
einschalten
ÿ
Drücken Sie [Kanalauswahl]+
Drücken Sie gleichzeitig [25%] + [Kanaleinstellung] und
stellen Sie die aktuelle Position als mittlere Stoppposition 2
ein. Der Motor vibriert einmal und die Motorkontrollleuchten
blinken
einmal.
[Kanalauswahl]
Drücken Sie die Tasten [Stop] und [Öffnen] 4
Sekunden lang, bis das Licht aufleuchtet. Der
Motor rüttelt kurz.
Schließens des Vorhangs die Fernbedienung, drücken Sie die Taste [Öffnen], drücken
[Stopp] der Fernbedienung, der Motor läuft, um den Vorhang zu öffnen, der Motor
geschlossenen Endpunkt und stoppt
Drücken Sie während des Öffnens und
stoppt am offenen Endpunkt, stoppt
Sie die Taste [Schließen], drücken Sie die Taste
am sofort.
Externes Gerät anschließen
Ein-/Ausschalten, Code-Kopplung, Betriebsmodus.
Zur Fernbedienungseinstellung
Wechselstrom, siehe „Motorverdrahtungsmethode“
++
Richtungseinstellung
Pull-to-Start-
Bedienknopf und Anschluss
Funktion
Produktinformationen
Grundeinstellung der Fernbedienung
Kontrollmethoden
Betrieb
An
Aus
(Offen)
(Schließen)
Die Ausschaltzeit muss weniger als 1ÿSek. betragen.
(Stoppen)
An
7 1
6 0
ACP -Überstromeingang
N (blau) = Neutralleiter
N (blau) = Neutralleiter
L (braun) = stromführendes Kabel
L (braun) = stromführendes Kabel
K2K1
Aus
An
K3
An
An
Aus
An
87654321
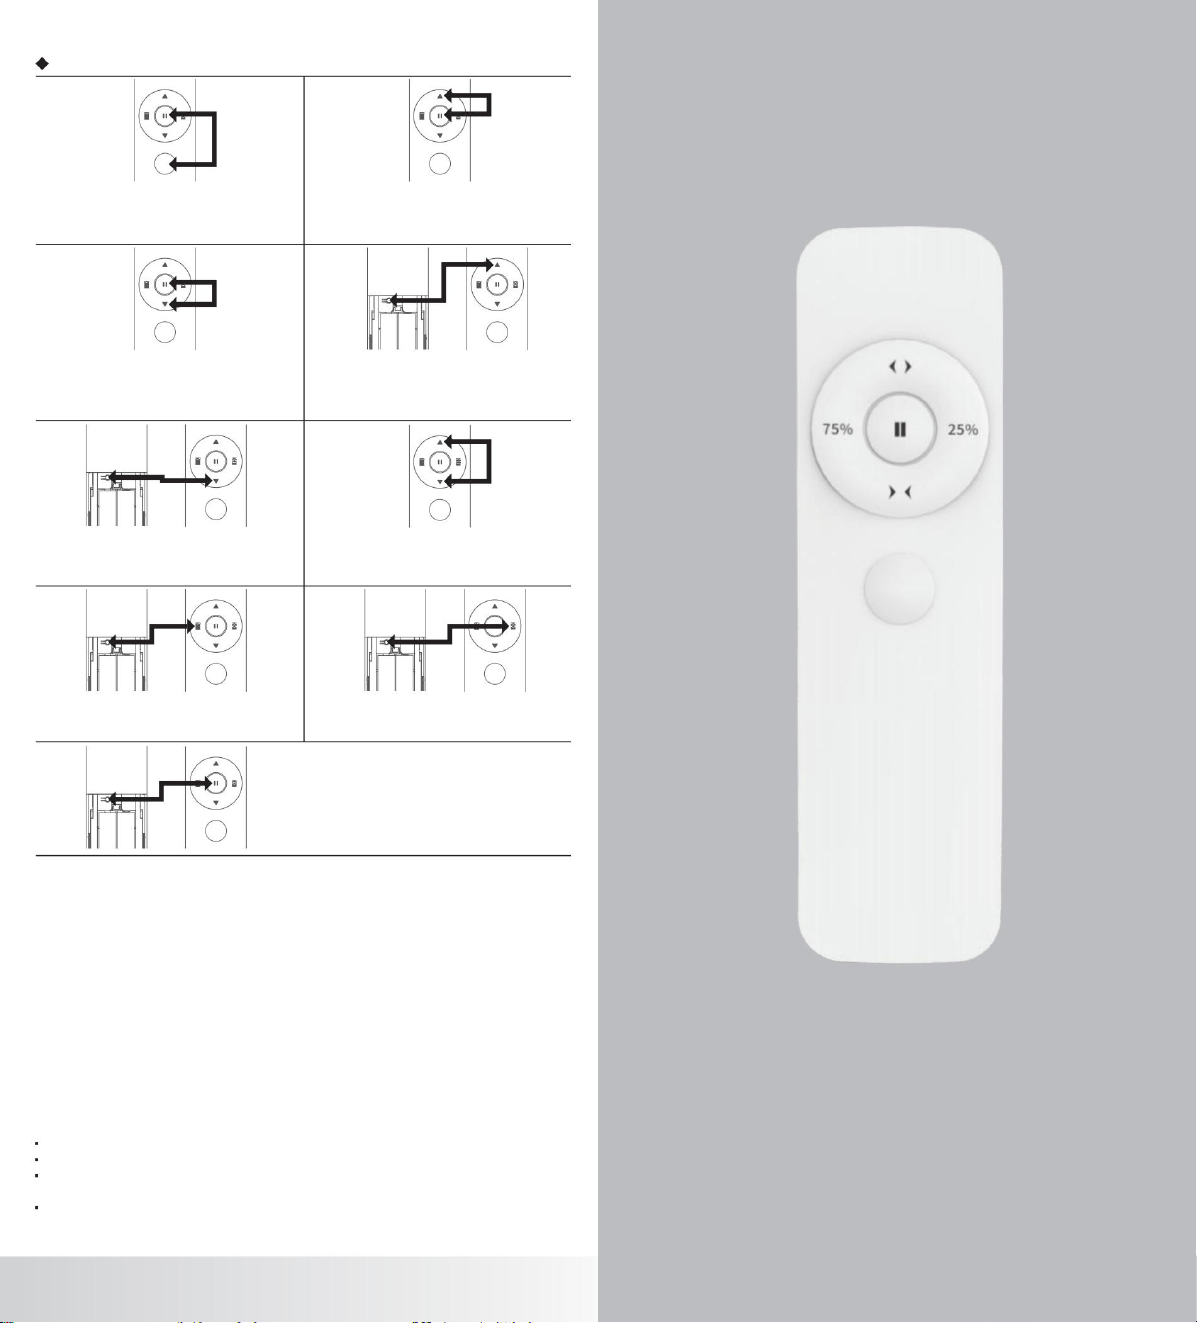
FCC-Erklärung
1. Dieses Gerät entspricht Teil 15 der FCC-Regeln.
Für den Betrieb gelten die folgenden beiden Bedingungen: (1)
Dieses Gerät darf keine schädlichen Störungen verursachen.
(2) Dieses Gerät muss alle empfangenen Störungen tolerieren, einschließlich Störungen, die einen
unerwünschten Betrieb verursachen können.
2. Änderungen oder Modifikationen, die nicht ausdrücklich von der für die Konformität verantwortlichen Partei
genehmigt wurden, können zum Erlöschen der Berechtigung des Benutzers zum Betrieb des Geräts führen.
Hinweis: Dieses Gerät wurde getestet und entspricht den Grenzwerten für ein digitales Gerät der Klasse B gemäß
Teil 15 der FCC-Bestimmungen. Diese Grenzwerte sollen einen angemessenen Schutz gegen schädliche Störungen
bei der Installation in Wohngebieten
Dieses Gerät erzeugt und strahlt Hochfrequenzenergie ab. Bei unsachgemäßer Installation und Verwendung
kann es zu Störungen des Funkverkehrs kommen. Es besteht jedoch keine Garantie dafür, dass bei einer
bestimmten Installation keine Störungen auftreten. Sollte dieses Gerät Störungen des Radio- oder Fernsehempfangs
verursachen (dies lässt sich durch Ein- und Ausschalten des Geräts feststellen), wird dem Benutzer
empfohlen, die Störungen durch eine oder mehrere der folgenden Maßnahmen zu
· Richten Sie die Empfangsantenne neu aus oder verlegen Sie den Standort.
beheben:
bieten.
· Vergrößern Sie den Abstand zwischen Gerät und Empfänger.
· Schließen Sie das Gerät an einen anderen Stromkreis als den Empfänger an.
· Wenden Sie sich an Ihren Händler oder einen erfahrenen Radio-/Fernsehtechniker. Das Gerät wurde auf die
Einhaltung der allgemeinen Anforderungen zur HF-Belastung geprüft. Das Gerät kann ohne Einschränkungen in
tragbaren Umgebungen verwendet werden.
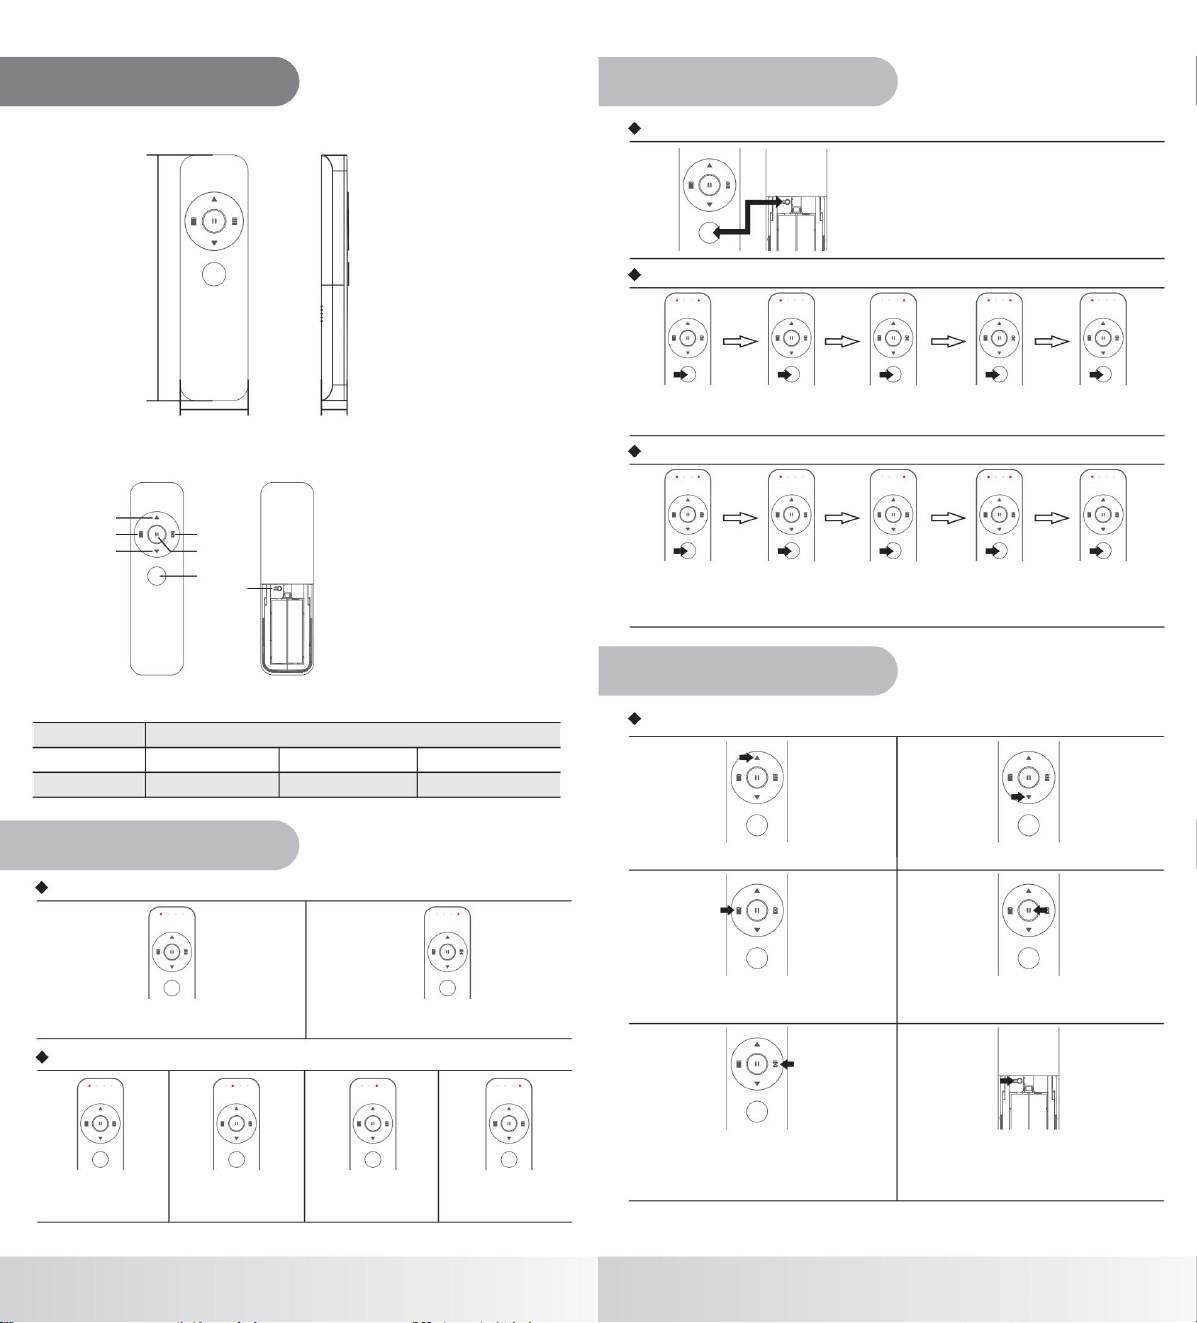

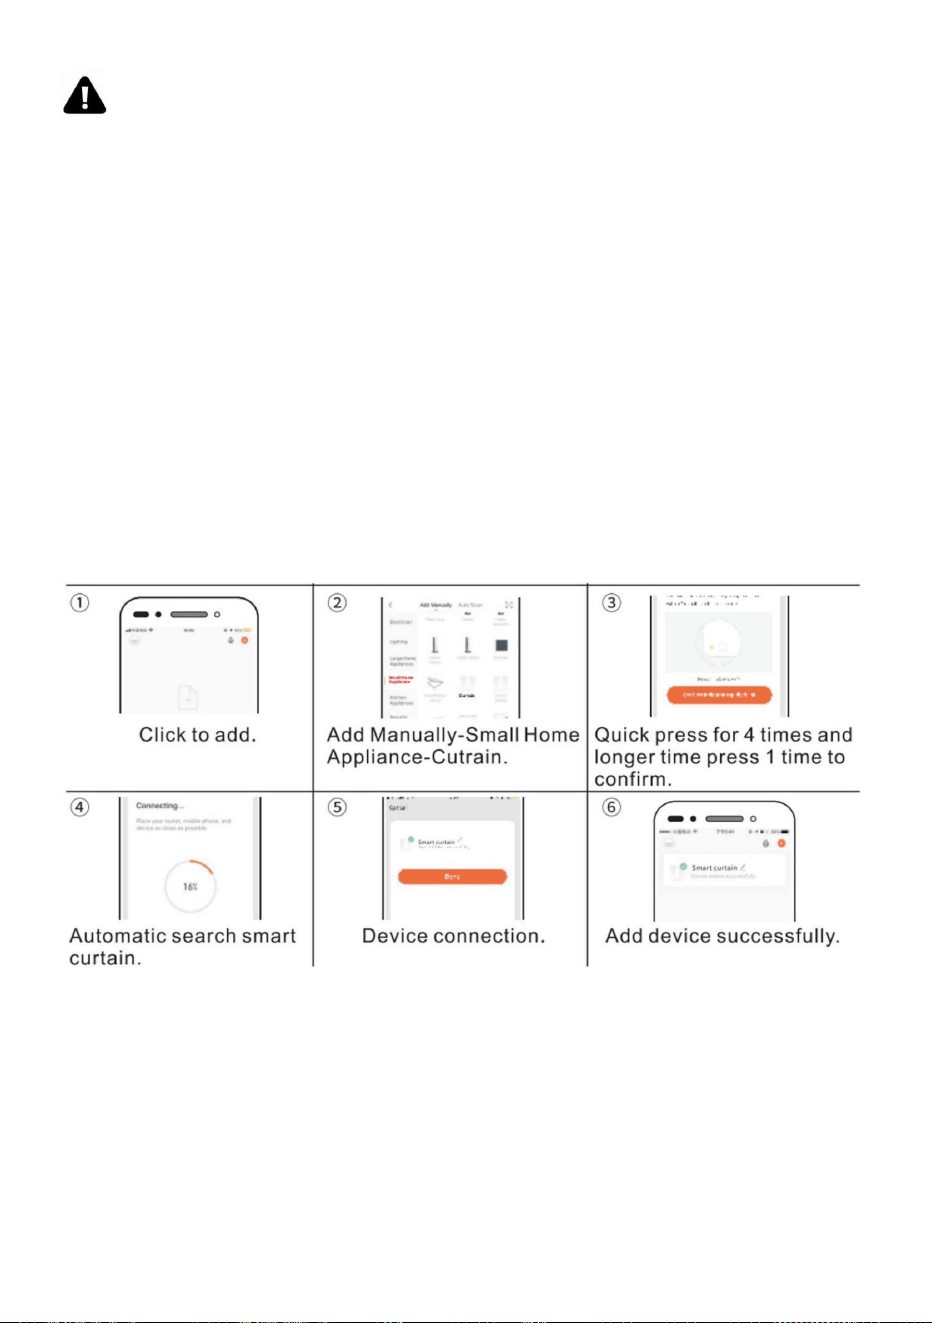
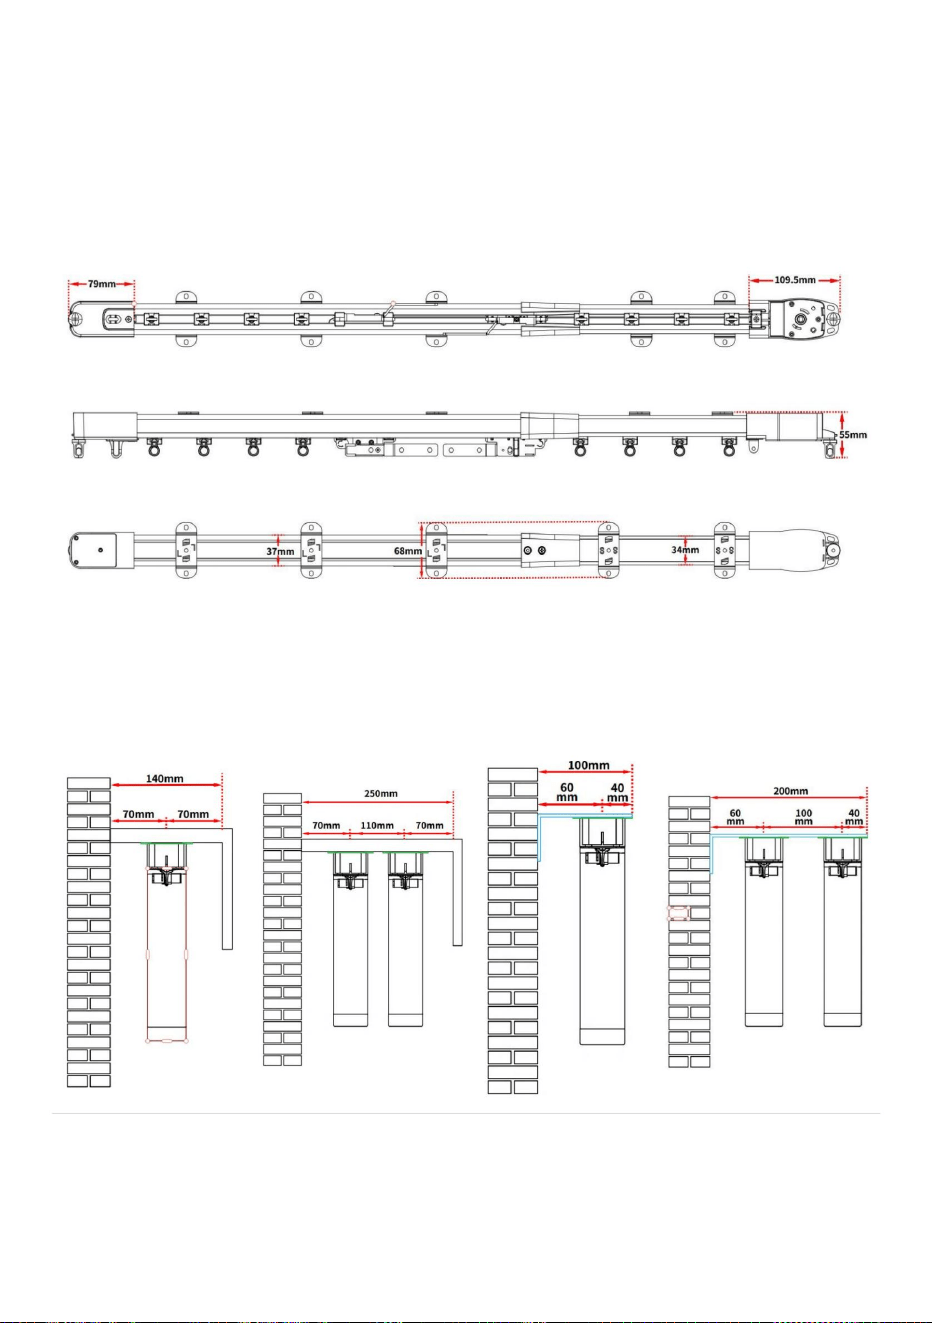
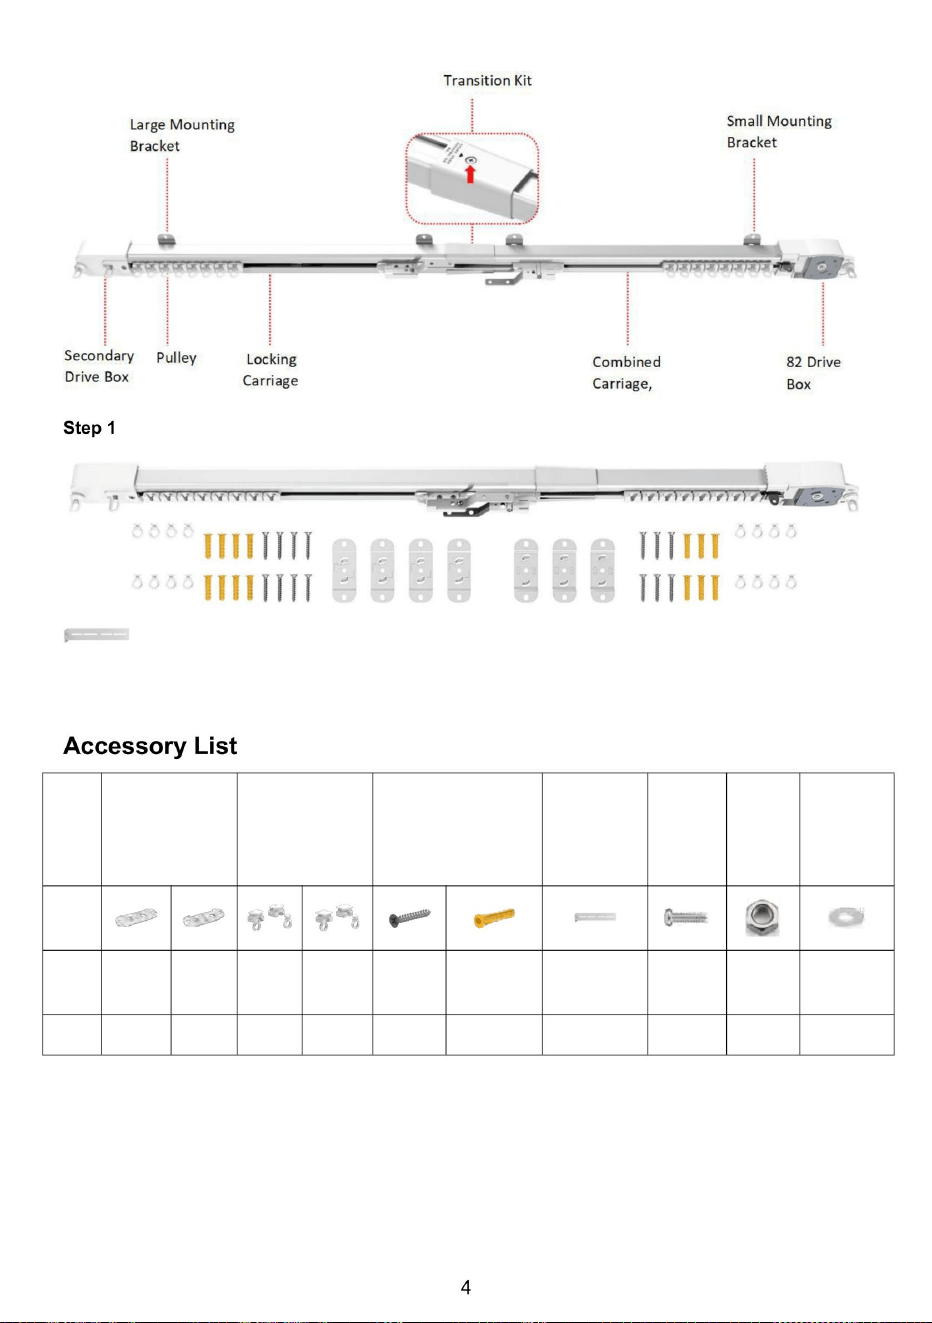
Kod
1. Sprawdź opakowanie i upewnij się, że znajdują się w nim wszystkie elementy.
2. Aby ułatwić montaż, koła pasowe mogą być już zamontowane na torze.
3. Nie ma potrzeby instalowania wszystkich dodatkowych akcesoriów. Zależy to od konkretnej sytuacji.
Notatka:
podkładki
boczny
Zdjęcie
20
S
Ekspansja
Koła
4
pasowe
Montowanie
szczegół
Ilość
Wsporniki
orzechy
Mały
20
Duży
śruby
śruba
akcesorium
6
stukający
20 20
Nazwa Zainstaluj
12
gwóźdź
śruby
Duży
Mały
20
12
10
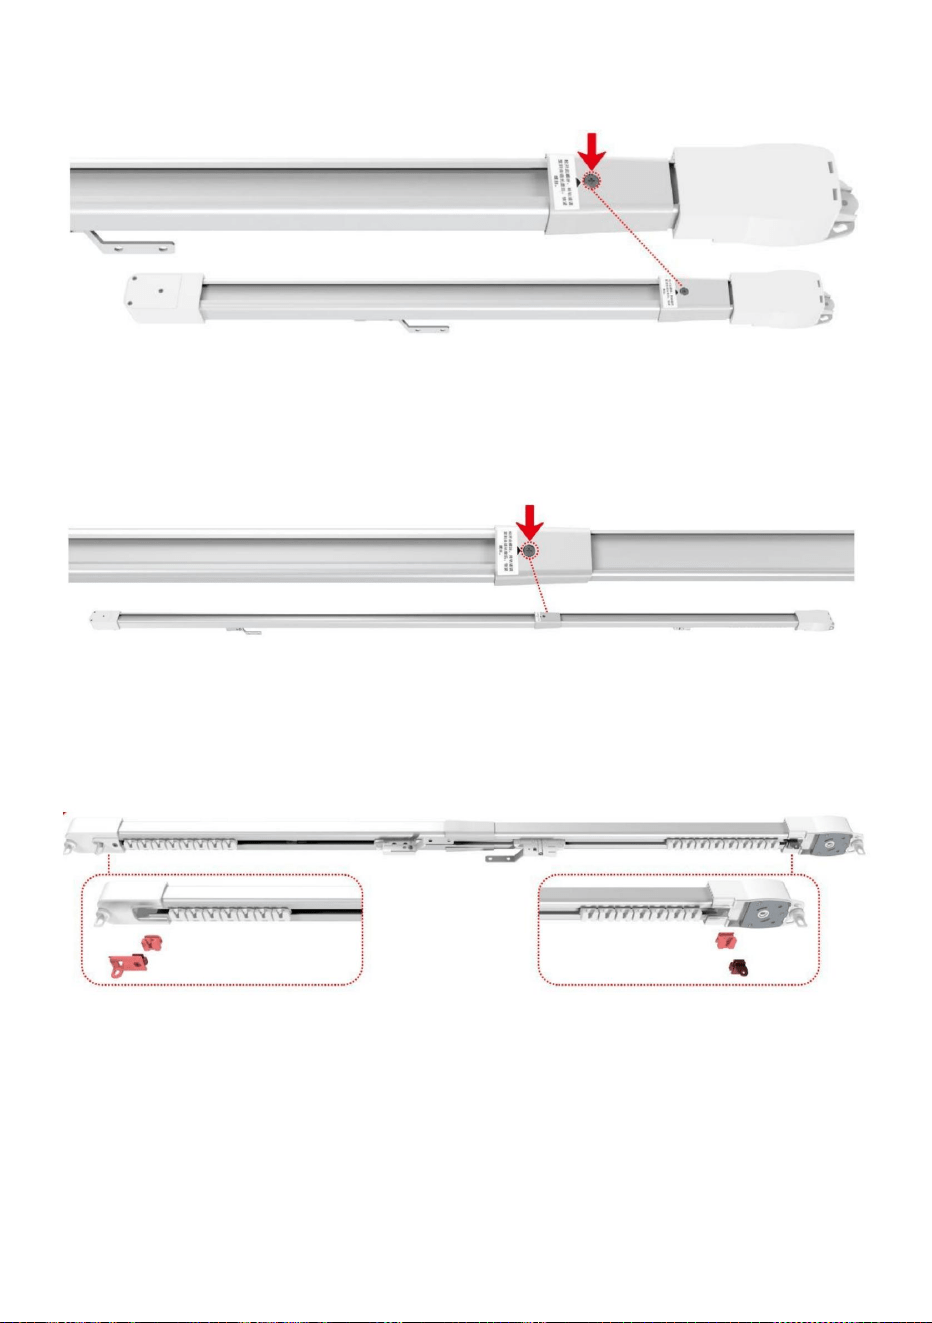
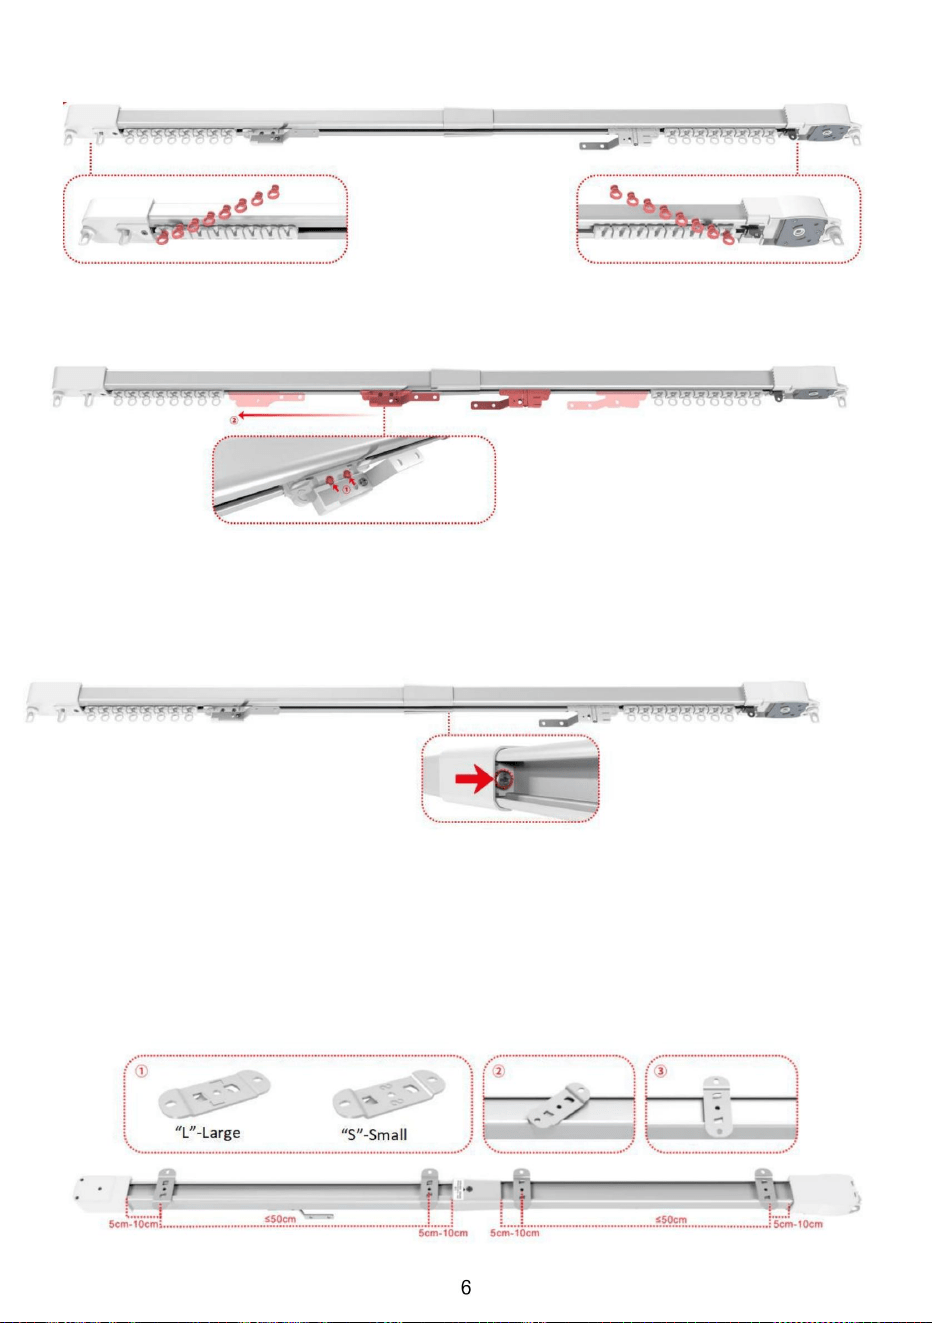
Krok 8. Instalacja kodu instalacyjnego, jak pokazano na rysunku - , umieść kod instalacyjny pod kątem 45 stopni na górnej
Krok 6 Wyrównaj wózki: Poluzuj górne śruby na wózkach. Przesuń oba wózki do krawędzi skrzynki napędowej, a następnie dokręć
śruby. Przetestuj wózki, aby upewnić się, że poruszają się
Krok 7. Dokładne dostrojenie koła pasowego. Gdy koło pasowe jest suche lub luźne, możemy je wyregulować za pomocą
śruby z boku zestawu
powierzchni toru, obróć go i dokręć. Zainstaluj kod instalacyjny w odległości około 50 cm wokół zestawu przejściowego jako
punktu środkowego.
przejściowego.
płynnie.
°
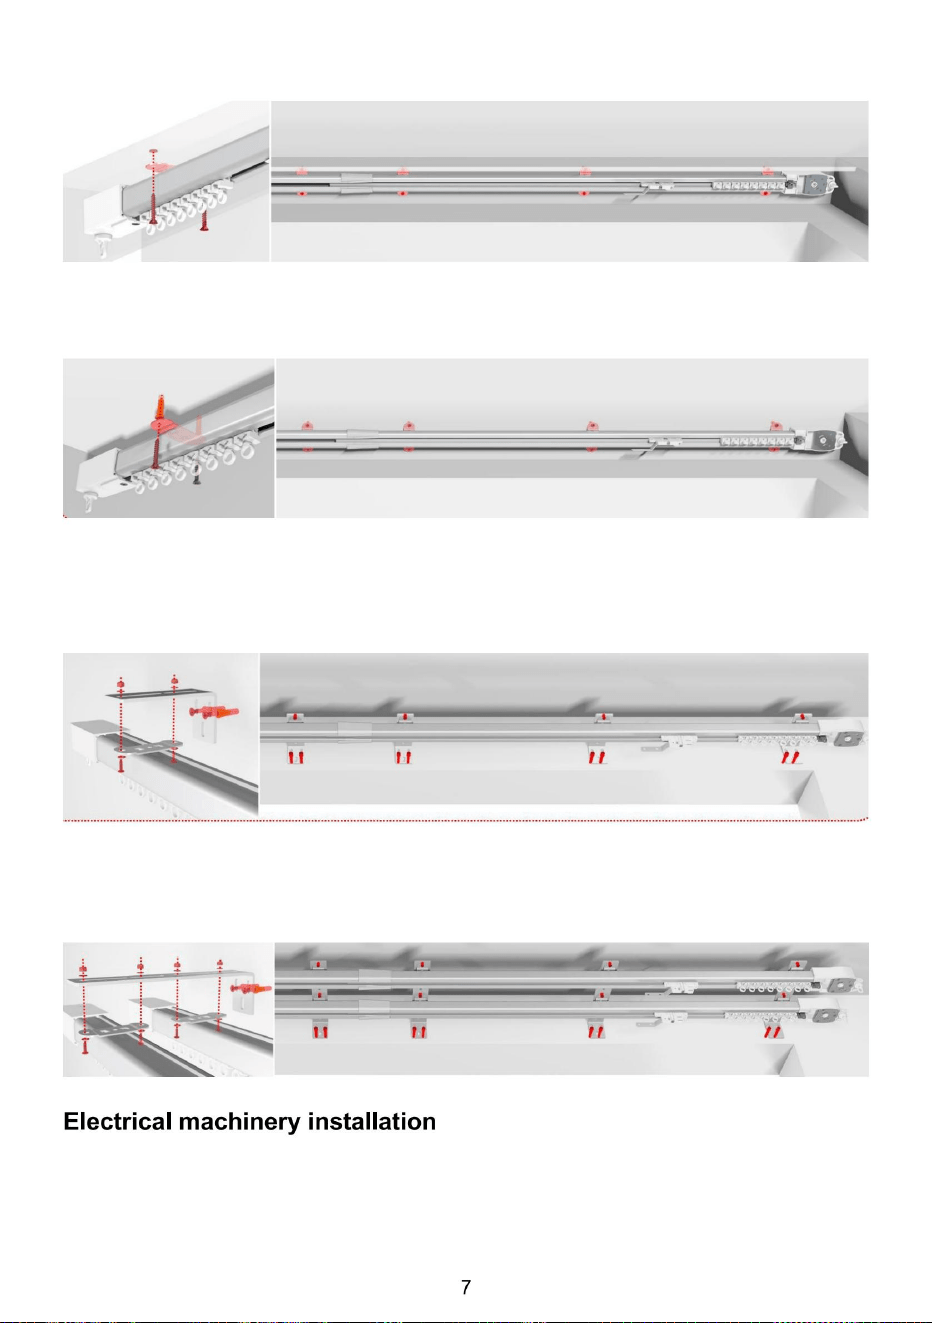
Krok 11. W przypadku instalacji bocznej najpierw zainstaluj górny kod instalacji na kodzie instalacji bocznej zgodnie z
lewym schematem, a następnie zainstaluj zestaw kodów instalacji bocznej na szynie. Ściana musi zostać
oznaczona zgodnie z kodem instalacji, wywiercona i zamocowana za pomocą śrub rozporowych po instalacji.
Krok 9. Montaż na górze, na skrzynce na zasłony, można wykonać bezpośrednio za pomocą
Krok 10. Po zamontowaniu na ścianie należy zaznaczyć na ścianie położenie górnego kodu montażowego, wykonać
otwory, zainstalować gwoździe rozporowe, a następnie przymocować je za pomocą
Krok 12. W przypadku instalacji bocznej najpierw zamontuj górę na szynie zgodnie z lewym schematem, a następnie zainstaluj
kod instalacji bocznej. Ściana musi zostać oznaczona zgodnie z kodem instalacji, wywiercona i zamocowana za pomocą śrub
rozporowych po instalacji.
śrub.
śrub.
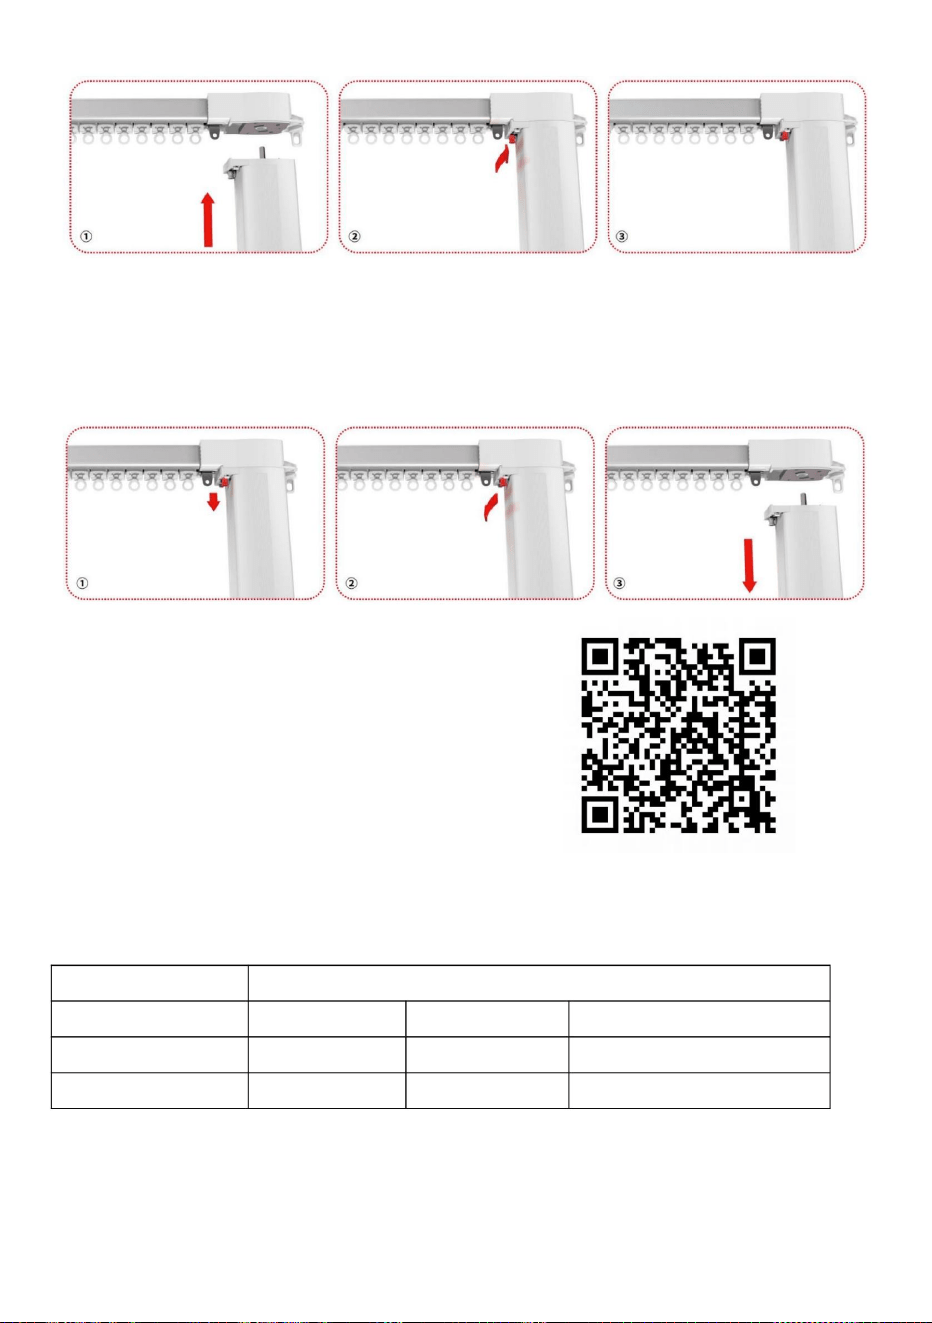
Zeskanuj kod QR, aby uzyskać film z operacji


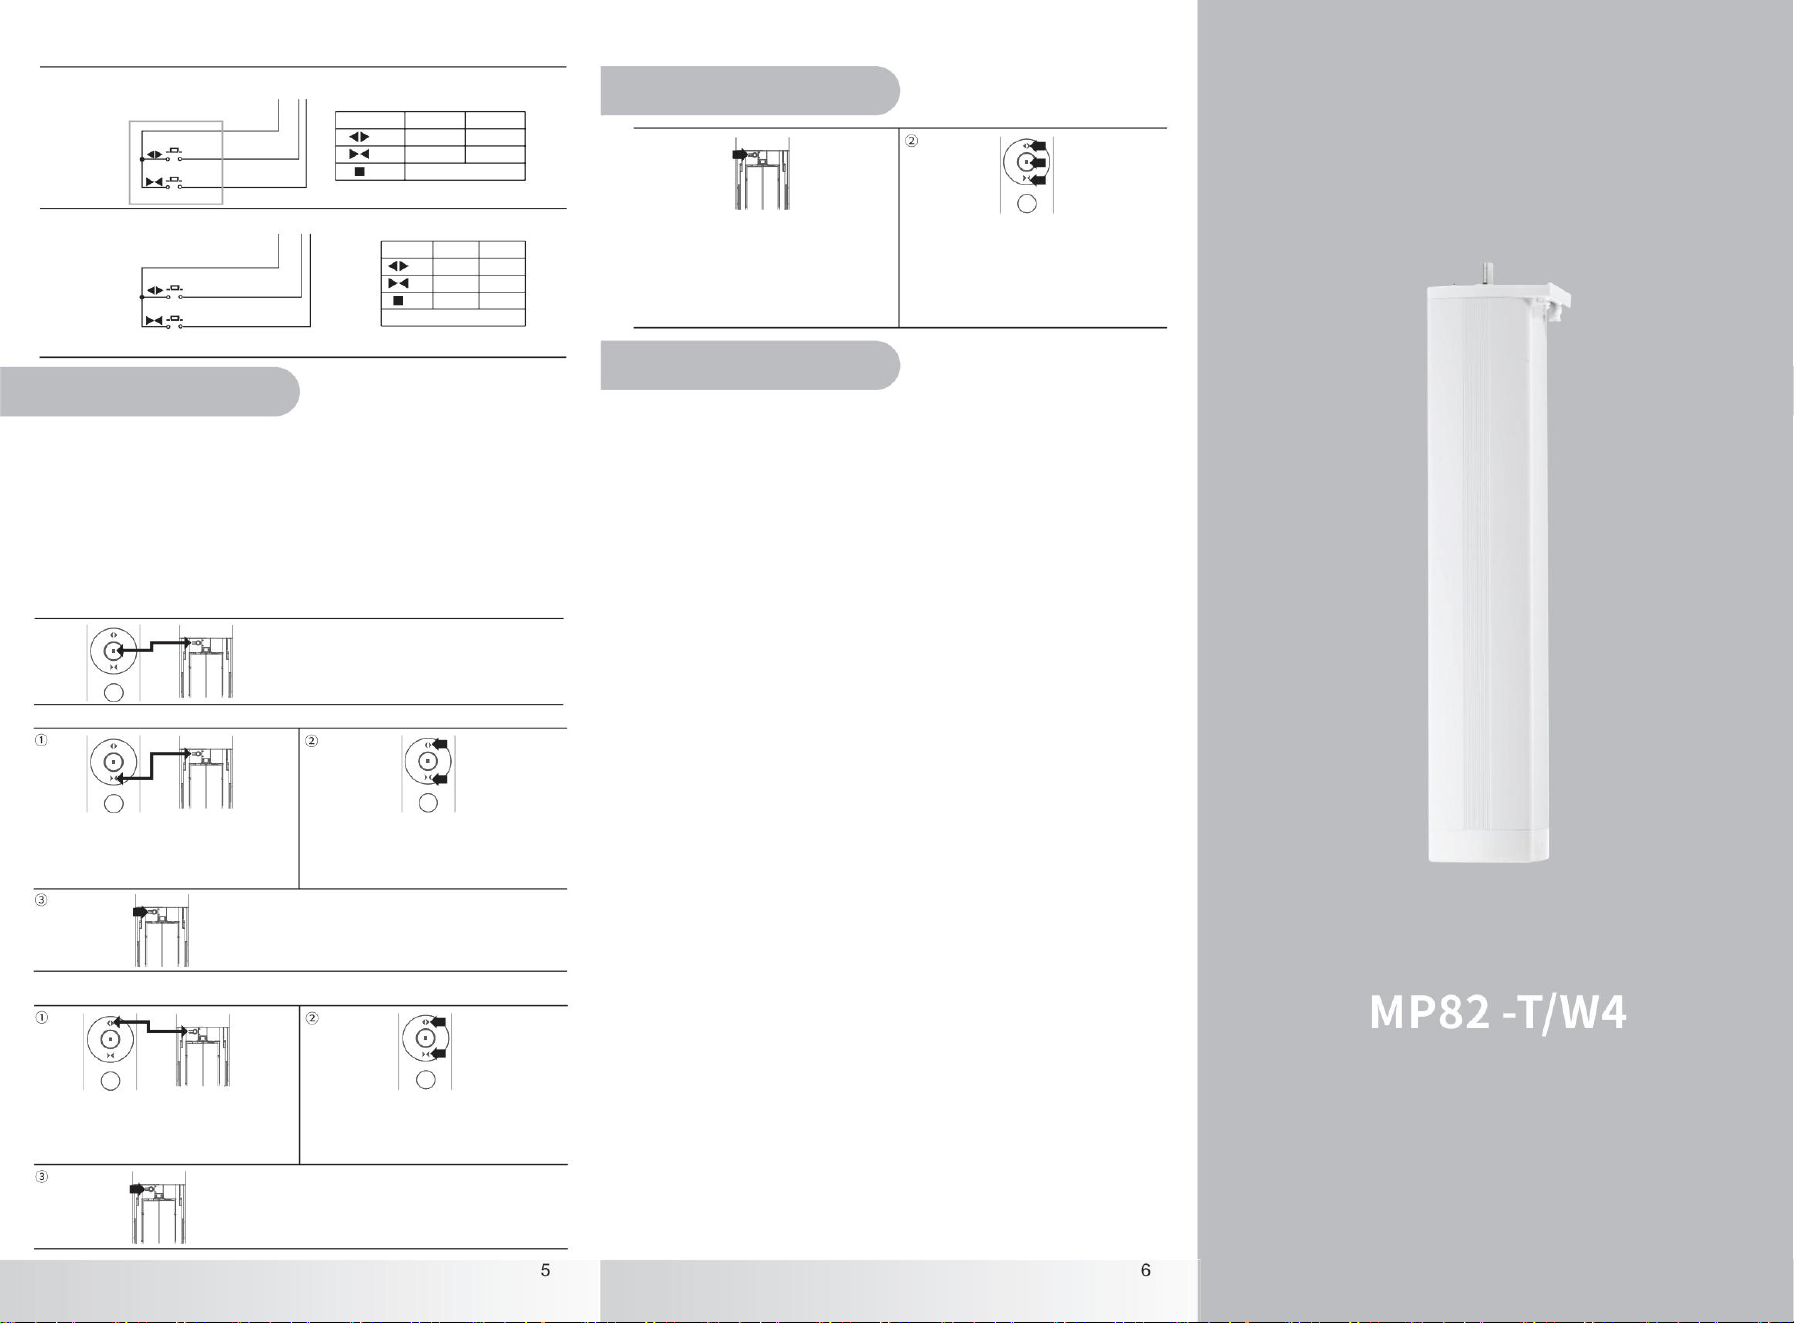
Naciśnij dowolny przycisk, aby zatrzymać
Operacja
Czas akcji musi trwać
K1
Działanie
(Zatrzymywać się)
(Zatrzymywać się)
(Zamknąć)
(Otwarte)
(Otwarte)
(Zamknąć)
Wyłączony
Wyłączony
NA
NA
Wyłączony
NA
NA
Wyłączony
K2
K1
K1 K2
NA
Regulacja
Inteligentne połączenie
prędkości
Ustaw limit
Otwarte
Wspólna
Zamknąć
3S
linia
Otwarte
2-przyciskowy zewnętrzny sterownik impulsowy
Wspólna
Zamknąć
linia
87654321
poprzez zablokowanie na 0mm-10mm do pozycji zamkniętej. (jeśli kierunek ścieżki jest nieprawidłowy, automatyczna
tolerancja graniczna będzie większa, po zmianie kierunku tolerancja powróci do normalnego poziomu.)
Naciśnij przycisk [ustawienia kanału] przez 3 sekundy, aby
Naciśnij przycisk [Otwórz] przez 3 sekundy, ustaw.
przejść do trybu regulacji prędkości, światło LED 110 obr./
Długie naciśnięcie przycisków [Ustawienia kanału] +
[Stop] przez 6 sekund powoduje wyzerowanie wszystkich
limitów, silnik wstrząśnie raz, dioda LED mignie raz.
min.
silnika ścieżki. Jeśli odciągnięcie zasłony jest zbyt duże, po podłączeniu zasilania może nastąpić
awaria na końcu ścieżki, a następnie wznowienie limitu. Jeśli wyłączenie zasilania nastąpi podczas przesuwania się
silnika, silnik wznowi limit po awarii na końcu ścieżki po raz pierwszy. • Wyczyść limit
• Regulacja dolnego limitu
NA.
Tryb sterowania zewnętrznego działania
Naciśnij przycisk pilota [ustawienia kanału] lub naciśnij
przycisk silnika [Programowanie], aby ustawić bieżącą
pozycję jako punkt krańcowy otwarcia. Silnik
wstrząśnie jeden raz, a kontrolka LED silnika zgaśnie.
punktowego
Naciśnij przycisk [Stop] przez 3 sekundy, ustaw prędkość na
90 obr./min.
Naciśnij przycisk [pauza] przez 3 sekundy, ustaw na
• Automatyczne ograniczenie
75
obr./min.
Dioda LED silnika mignęła 2 razy.
1. Po podłączeniu zasilania i pierwszym otwarciu lub zamknięciu zasłony silnik zatrzyma się.
2. W stanie zatrzymania wyłącz zasilanie, a następnie włącz je ponownie, jeśli podczas zaciągania zasłony
• metoda połączenia
Jednocześnie naciśnij i przytrzymaj przycisk pilota, aby zasłona osiągnęła żądaną pozycję [Zamknij] + przycisk [Ustawienia
kanału], naciskając przycisk pilota [W górę] lub przez 4 sekundy, a silnik w ciągu 30 sekund wciśnie jeden przycisk
[W dół].
W tym czasie kontrolka LED silnika świeci się
światłem ciągłym.
2
silnik
wyłączenie zasilania, brak jakichkolwiek zmian dla statusu limitu
,
nie ulegnie uszkodzeniu do końca
• metoda połączenia
Naciśnij przycisk pilota [Ustawienia kanału] lub naciśnij
przycisk silnika [Programowanie], aby ustawić bieżącą
pozycję jako dolny punkt graniczny. Silnik potrząśnie
jeden raz, a kontrolka LED silnika zgaśnie.
1
,
Silnik
110obr./min
90obr./min
75obr./
Tuya ZigBee: Po otwarciu bramki naciśnij przycisk silnika [Programowanie]
cztery razy pod rząd, zwolnij i przytrzymaj przez 3 sekundy, aż wskaźnik tęczy zacznie migać, wejdź w tryb
parowania, otwórz aplikację Tuya, kliknij „+” w prawym górnym rogu, wybierz „urządzenia w pobliżu”, aby znaleźć
silnik, silnik wejdzie do sieci dystrybucyjnej, cierpliwie czekaj na pomyślne nawiązanie połączenia, możesz
kontrolować używanie niestandardowej nazwy.
min
Tmall Genie: Gdy urządzenie znajduje się w trybie sieci dystrybucyjnej, powiedz do głośnika Tmall Genie: „Tmall
Genie, znajdź urządzenie”, cierpliwie czekaj, aż Tmall Genie znajdzie urządzenie i podłącz je. Po pomyślnym
nawiązaniu połączenia możesz dostosować nazwę i lokalizację urządzenia oraz sterować nim za pomocą telefonu.
Tmall Genie: Naciśnij przycisk silnika [Programowanie] , puść i przytrzymaj przez 3 sekundy, aż lampka
kontrolna mignie na czerwono 5 razy, przejdź do trybu parowania; Polecenie głosowe „Tmall Genie, odkryj
urządzenie”, cierpliwie czekaj, aż Tmall Genie znajdzie urządzenie i podłącz je. Po pomyślnym nawiązaniu
połączenia możesz dostosować nazwę i lokalizację urządzenia. Możesz sterować urządzeniem za
pomocą telefonu.
• Regulacja górnego limitu
Jednocześnie naciśnij i przytrzymaj przycisk pilota, aby zasłona osiągnęła żądaną pozycję. Naciśnij przycisk [Ustawienia
kanału] + przycisk [W górę] na pilocie i przytrzymaj go przez 4 sekundy. Silnik wstrząśnie jeden raz. W ciągu 30
sekund naciśnij przycisk [W dół].
Kontrolka LED silnika będzie świecić długo
NA.
87654321
K2
K1
K2
• Usuń parowanie
1) Metoda 1: Usuń urządzenie w aplikacji;
2) Metoda 2: Przywracanie ustawień fabrycznych;
3) Metoda 3: Ponowne przejście do trybu dystrybucji w celu rozłączenia sieci.
NA
25%
75%
75%
25%
75% 25%
25%75%
25%
75% 25%
75%
Instrukcja obsługi silnika prądu stałego z wejściem AC
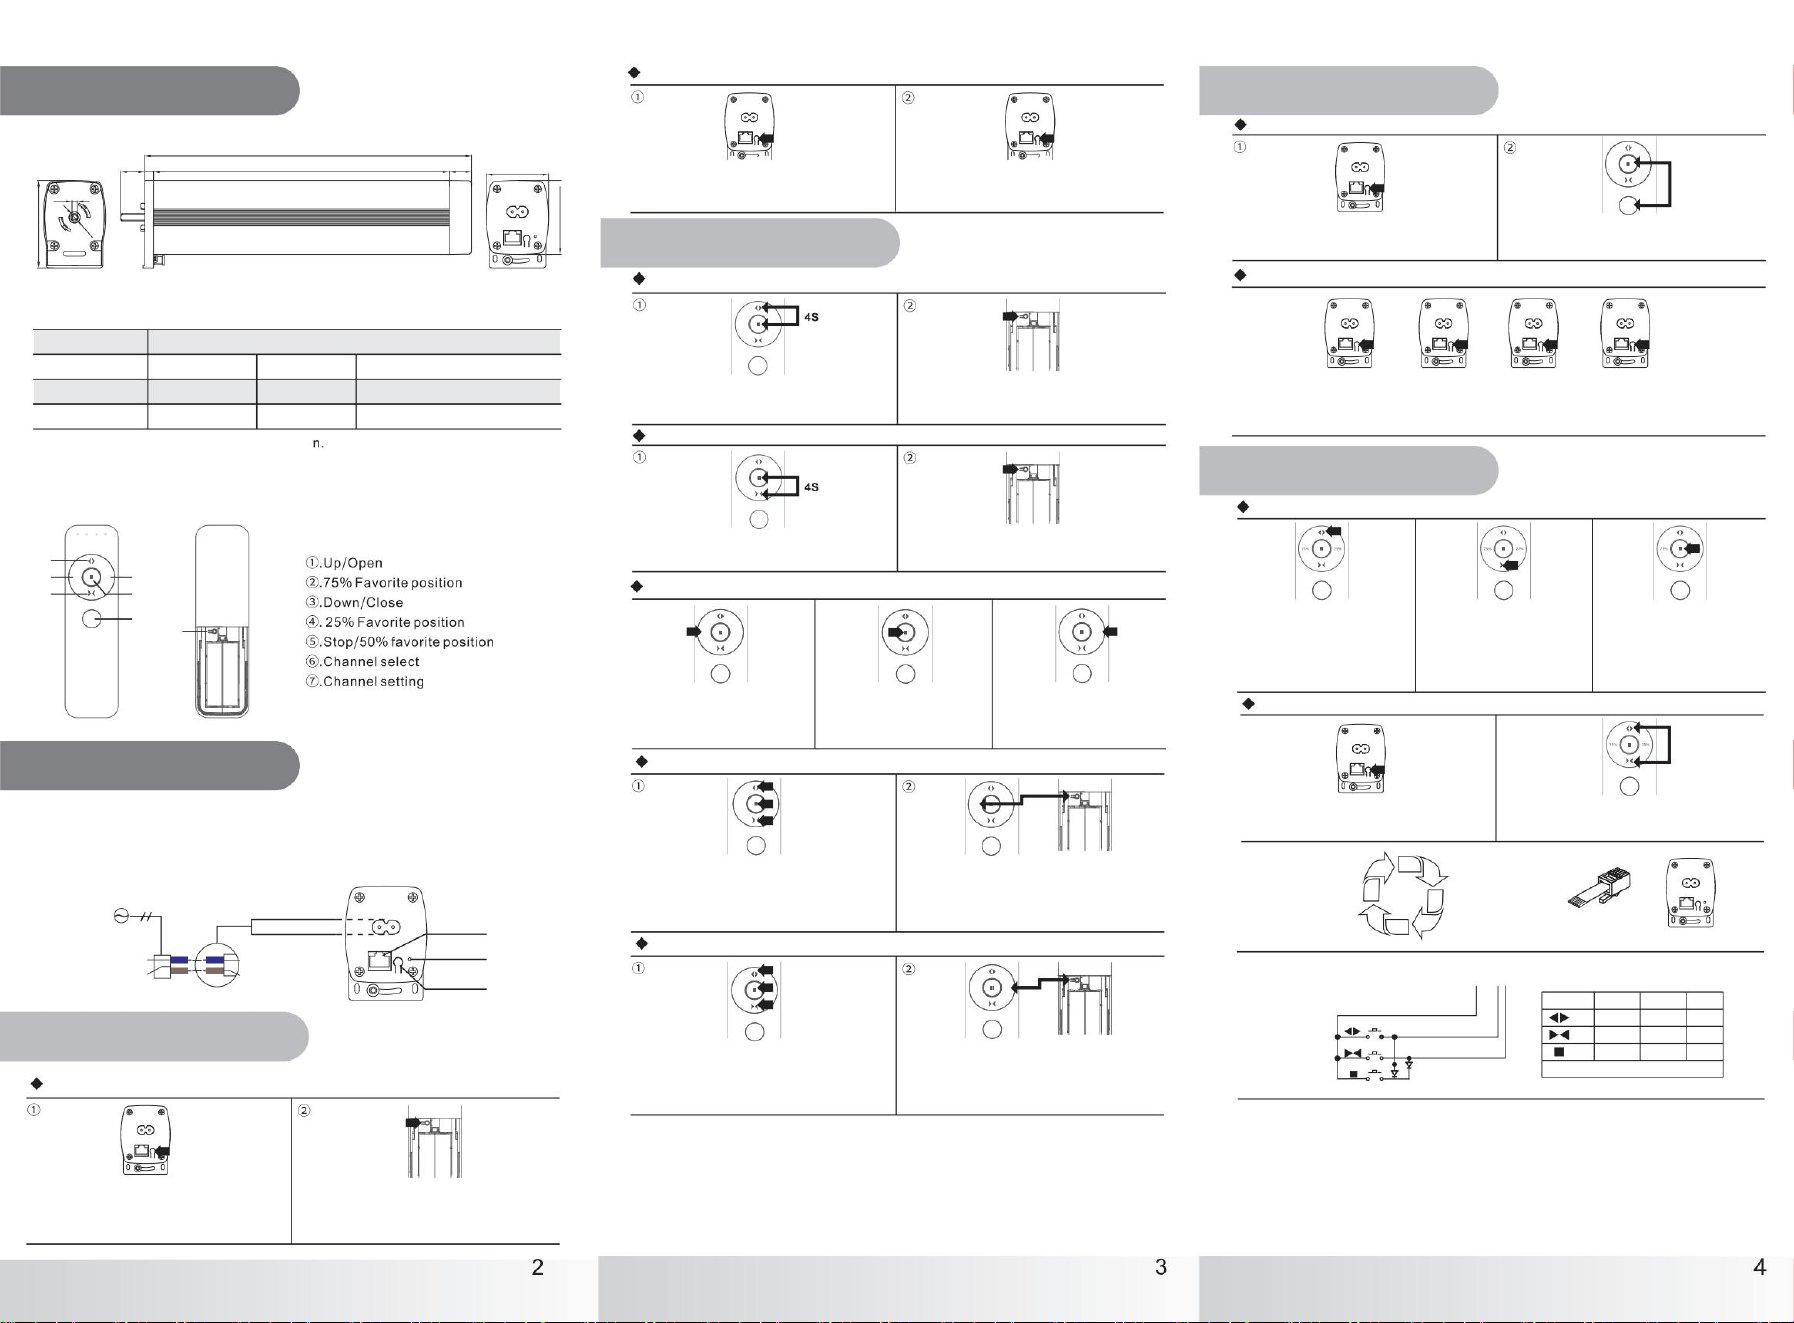
25%
75%
75%
25%
75%
75%
25%
75%
25%
75% 25%
25%
25%
75% 25%
75%
75%
25%
25%
75%
75% 25%
.
Czas wyłączenia musi być krótszy niż 1 s.
Działanie
7S
Punkt działania
kontrola zewnętrzna
3S+
265
1
3-przyciskowy
zewnętrzny sterownik
Wspólna
3S
linia
impulsowy
3S
9,47
Otwarte
Zamknąć
3S
240
3S
1
2-przyciskowy
zewnętrzny sterownik impulsowy
4
8
2-
Wejście zasilania ACP
przyciskowy
zewnętrzny sterownik impulsowy II
50,6
3S
+ K2
Φ6
1,2N·
.8
1
m.
100-240 V prądu
Uwaga: domyślna prędkość znamionowa ustawiona fabrycznie wynosi 75 obr./min.
50/60Hz
zmiennego
75 obr./min (regulowane 90/110 obr./min)
IP41
Prędkość znamionowa
Stopień ochrony IP
Czas
S3 50%
trwania
K1
87654321
7 1
6 0
N(niebieski) = przewód neutralny
Funkcja „pociągnij, aby
N(niebieski) = przewód neutralny
L (brązowy) = Przewód pod
L (brązowy) = Przewód pod napięciem
napięciem
uruchomić”
Informacje o
Ustawienie
Przycisk i port operacyjny
kierunku
produkcie
Metody
Podstawowe ustawienia pilota
kontroli
(Otwarte)
(Zamknąć)
K3
NA
(Zatrzymywać się)
Wyłączony
NA
K2
NA
NA
NA
Wyłączony
NA
1. Rozmiar
Wyłączony
produktu
Naciśnij [wybór kanału]+[wybór
Naciśnij przycisk [Stop] i [Otwórz] przez 4
sekundy, aż zaświeci się lampka, silnik na
chwilę zacznie drżeć.
kanału]
naciśnij przycisk pilota, naciśnij przycisk otwierania i zamykania, Podczas przesuwania zasłony naciśnij
Włącz funkcję sterowania
zamknij zasłonę za pomocą pilota [zatrzymaj], silnik uruchomi zasłonę,
przycisk [otwórz], otwórz przycisk [zamknij],
się w punkcie krańcowym otwierania, zatrzyma się w punkcie krańcowym silnik uruchomi przycisk, silnik zatrzyma
dotykowego
Naciśnij przycisk [25%] na pilocie,
zasłona podniesie się do
Za pomocą przycisków [Wł.], [Wył.], [Stop] ustaw
zasłonę w żądanej pozycji.
25%
3. Zalecane urządzenie
długości, a następnie zatrzyma
się.
sterujące
Naciśnij przycisk [otwórz] + [zamknij] na pilocie,
silnik zacznie wibrować, a zmiana trybu zostanie
zakończona.
,
zamykania, zatrzyma się natychmiast.
zablokuj lub zatrzymaj automatycznie po 3 minutach.
Funkcja zdalnego
Ustaw środkowy punkt zatrzymania 1
sterowania
Naciśnij przycisk [75%] na pilocie,
zasłona podniesie się do 75%
Naciśnij przycisk silnika [Programowanie] i przytrzymaj
Krótkie naciśnięcie przycisku [Ustawienia
kanału] spowoduje wibracje silnika, a następnie
można pomyślnie włączyć tę
długości, a następnie zatrzyma
się.
funkcję.
go
Tryb silnika
Napięcie znamionowe
Częstotliwość znamionowa
Moment znamionowy
Pozycja środkowego zatrzymania
[Pilot
Zewnętrzny przełącznik trybu sterowania
YR5302]
3-przyciskowy zewnętrzny sterownik impulsowy
Jednocześnie naciśnij [25%] + [Ustawienie kanału] i
ustaw bieżącą pozycję jako środkową pozycję
końcową 2. Silnik zawibruje raz, a kontrolki silnika
zaczną migać.
raz.
do momentu zapalenia się diody LED, przejdź do trybu nauki.
przez 3 sekundy, a dioda LED zacznie szybko migać 3
Długie naciśnięcie przycisku
[50%] na pilocie spowoduje
podniesienie zasłony do 50% jej
długości, a następnie zatrzymanie.
razy.
MP82-T/W4
Przywracanie ustawień
Wyłącz funkcję sterowania dotykowego
fabrycznych
sojusznik po 3 minutach.
Metoda
1
Jednocześnie naciśnij [75%] + [Ustawienia kanału] i
ustaw bieżącą pozycję jako środkową pozycję
końcową 1. Silnik zawibruje raz, a kontrolki silnika
Za pomocą przycisków [Wł.], [Wył.], [Stop] ustaw
zasłonę w żądanej
zaczną migać.
raz.
pozycji.
Krótkie naciśnięcie przycisku [Ustawienia
Naciśnij przycisk silnika [Programowanie] przez 3
sekundy, aż zaświeci się kontrolka
Naciśnij przycisk [Ustawienia kanału] na pilocie, kontrolka
zamiga na czerwono 3 razy, a następnie zgaśnie. Nauka
kodu zakończyła się pomyślnie.
LED.
kanału]
spowoduje wibracje silnika, a następnie można wyłączyć
tę funkcję.
Naciśnij przycisk silnika [Programowanie] przez 3
sekundy, aż zaświeci się kontrolka
Ustaw środkowy punkt zatrzymania 2
LED.
Naciśnij i przytrzymaj przycisk silnika [kod] przez
ponad 7 sekund, niebieskie światło mignie raz,
przywracając ustawienia
Krótkie naciśnięcie dwa razy + długie naciśnięcie dwa razy przycisku [programowanie]: krótkie
naciśnięcie (miganie światła) + krótkie naciśnięcie (miganie światła) + długie naciśnięcie przez 3
sekundy (dioda LED zapala się) + długie naciśnięcie przez 3 sekundy (dioda LED miga dwa razy, a
następnie gaśnie), zmiana kierunku
Ustawienia kanału
wykonana.
fabryczne.
Ustawienie kierunku powiodło się.
Naciśnij przycisk silnika [Programowanie] przez 3
sekundy, aż zaświeci się kontrolka LED.
Metoda 2 (zmiana kierunku za pomocą przycisku
programowania)
Uwaga: Długość silnika L zależy od specyfikacji produktu (jednostka: mm)
2. Specyfikacja
Naciśnij przycisk [Stop] i [Zamknij] przez 4
sekundy, aż zaświeci się lampka, silnik na
chwilę zacznie
drżeć.
produktu
[Port sygnałowy]
[Światło LED]
[Przycisk nauki]
[Gniazdo zasilania]
Port RJ
Światło LED
Przycisk nauki
Podłącz urządzenie zewnętrzne
Włączanie/wyłączanie, parowanie kodów, tryb pracy.
Do ustawień zdalnego sterowania
Zasilanie prądem zmiennym, patrz „Metoda okablowania silnika”
++
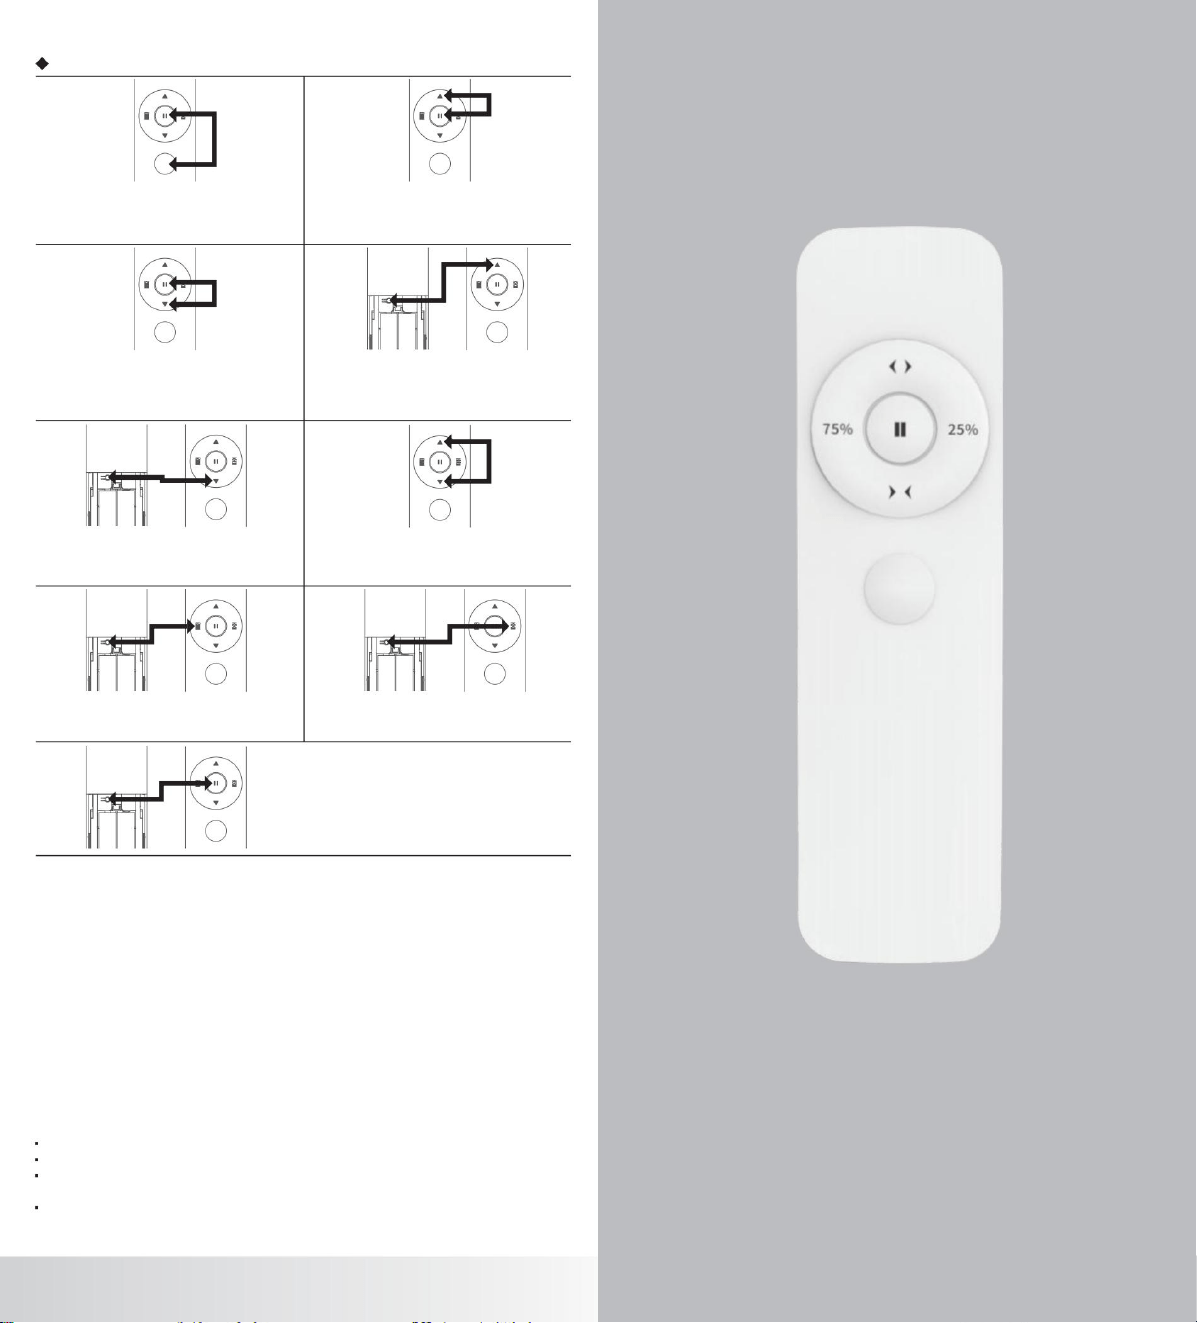
Oświadczenie FCC
1. To urządzenie jest zgodne z częścią 15 przepisów FCC.
Korzystanie z urządzenia podlega następującym dwóm warunkom:
(1) Urządzenie nie może powodować szkodliwych zakłóceń.
(2) Urządzenie to musi być odporne na wszelkie odbierane zakłócenia, w tym zakłócenia mogące powodować
niepożądane działanie.
2. Zmiany lub modyfikacje, na które nie wyraziła wyraźnej zgody strona odpowiedzialna za zgodność,
mogą spowodować unieważnienie prawa użytkownika do korzystania ze sprzętu.
Uwaga: To urządzenie zostało przetestowane i uznane za zgodne z ograniczeniami dla urządzeń cyfrowych klasy
B, zgodnie z częścią 15 przepisów FCC. Ograniczenia te mają na celu zapewnienie odpowiedniej ochrony przed
szkodliwymi zakłóceniami w instalacjach
To urządzenie generuje i może emitować energię o częstotliwości radiowej i jeśli nie jest zainstalowane i
używane zgodnie z instrukcją, może powodować szkodliwe zakłócenia w komunikacji radiowej. Jednak nie ma
gwarancji, że zakłócenia nie wystąpią w konkretnej instalacji. Jeśli to urządzenie powoduje szkodliwe zakłócenia w
odbiorze radia lub telewizji, co można ustalić, wyłączając i włączając urządzenie, zachęca się użytkownika
do podjęcia próby skorygowania zakłóceń za pomocą jednego lub więcej z następujących środków:
domowych.
· Zmiana orientacji lub położenia anteny odbiorczej.
· Zwiększ odległość między urządzeniem i odbiornikiem.
· Podłączyć sprzęt do gniazdka w innym obwodzie niż ten, do którego podłączony jest
· Skonsultuj się ze sprzedawcą lub doświadczonym technikiem radiowo-telewizyjnym, aby uzyskać pomoc.
Urządzenie zostało ocenione pod kątem spełnienia ogólnego wymogu ekspozycji na RF. Urządzenie może być
używane w warunkach przenośnej ekspozycji bez ograniczeń.
odbiornik
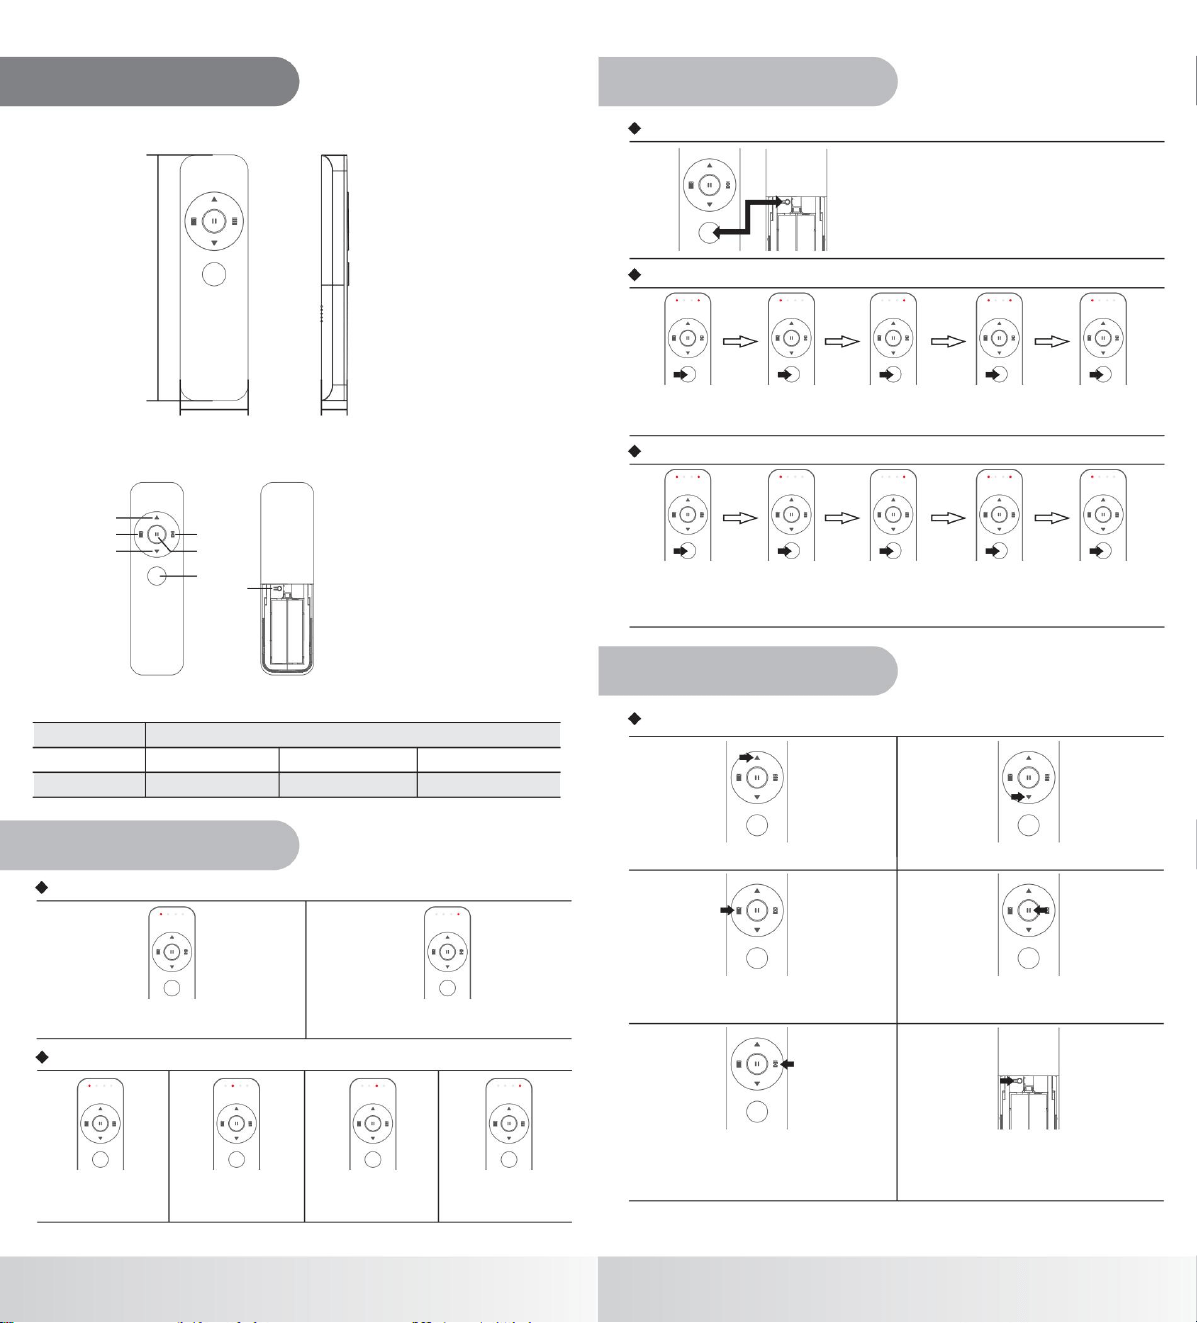

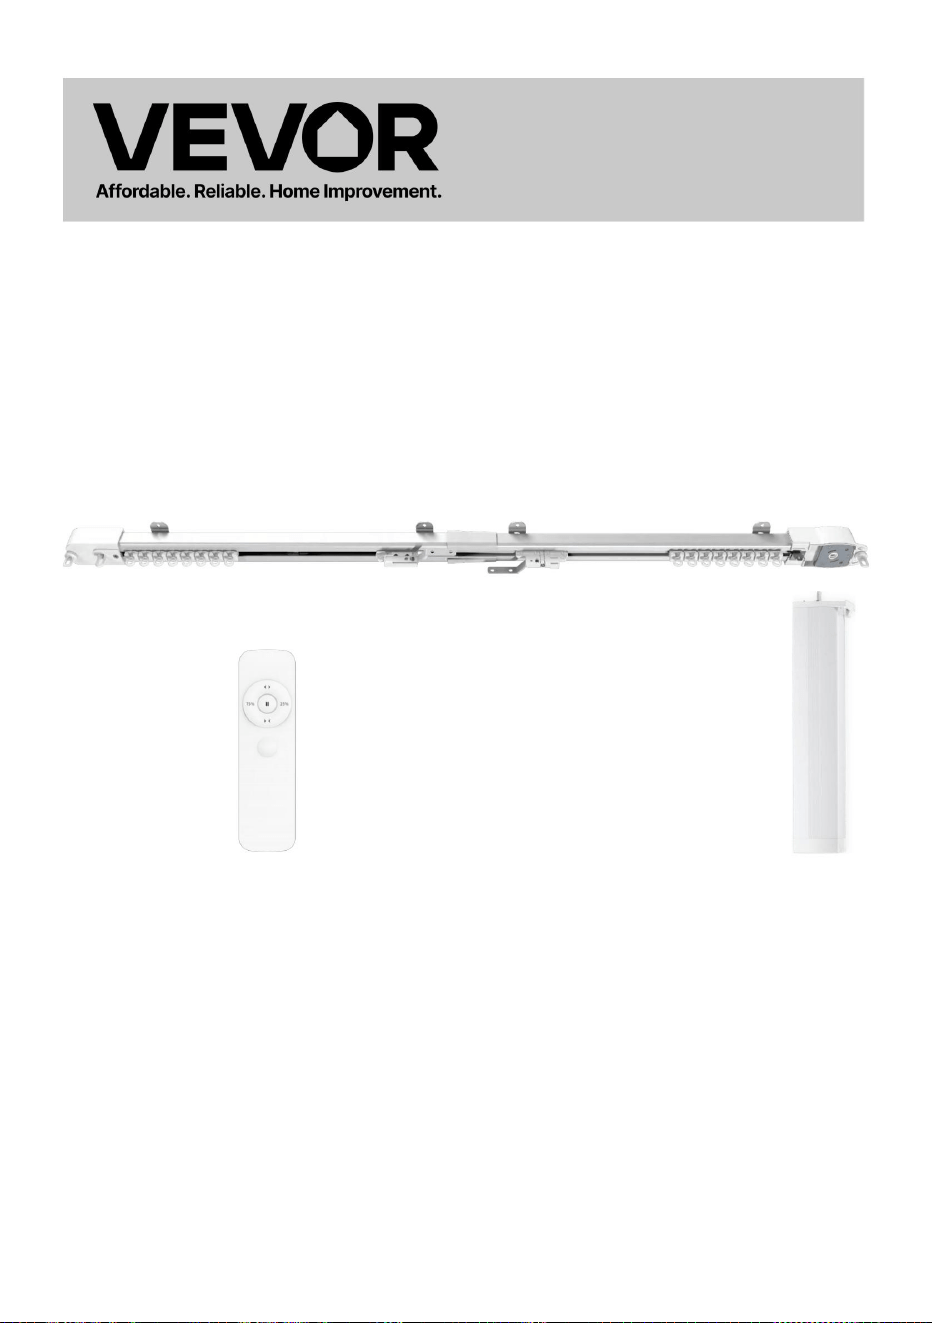
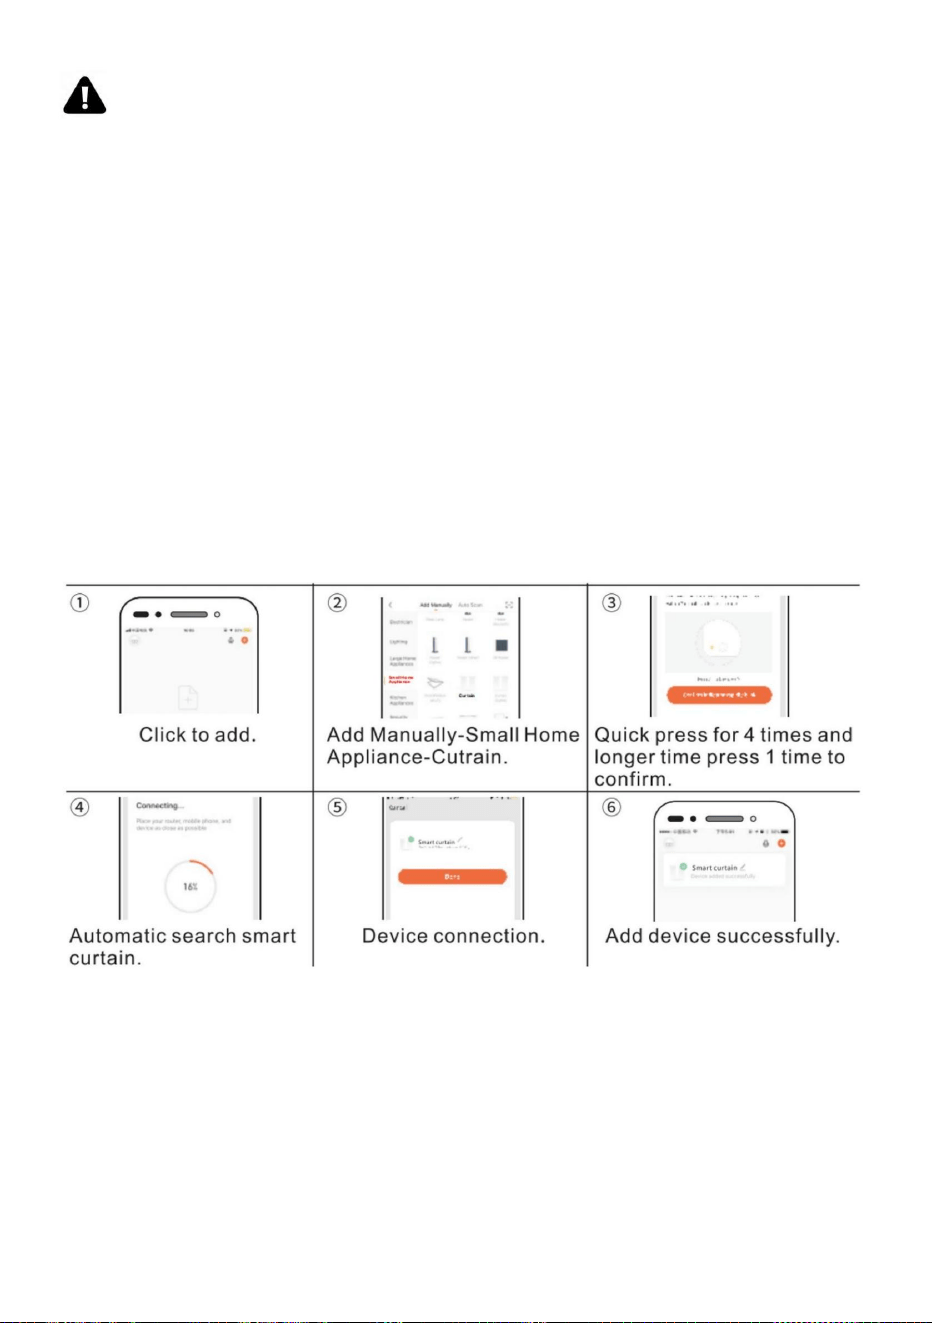
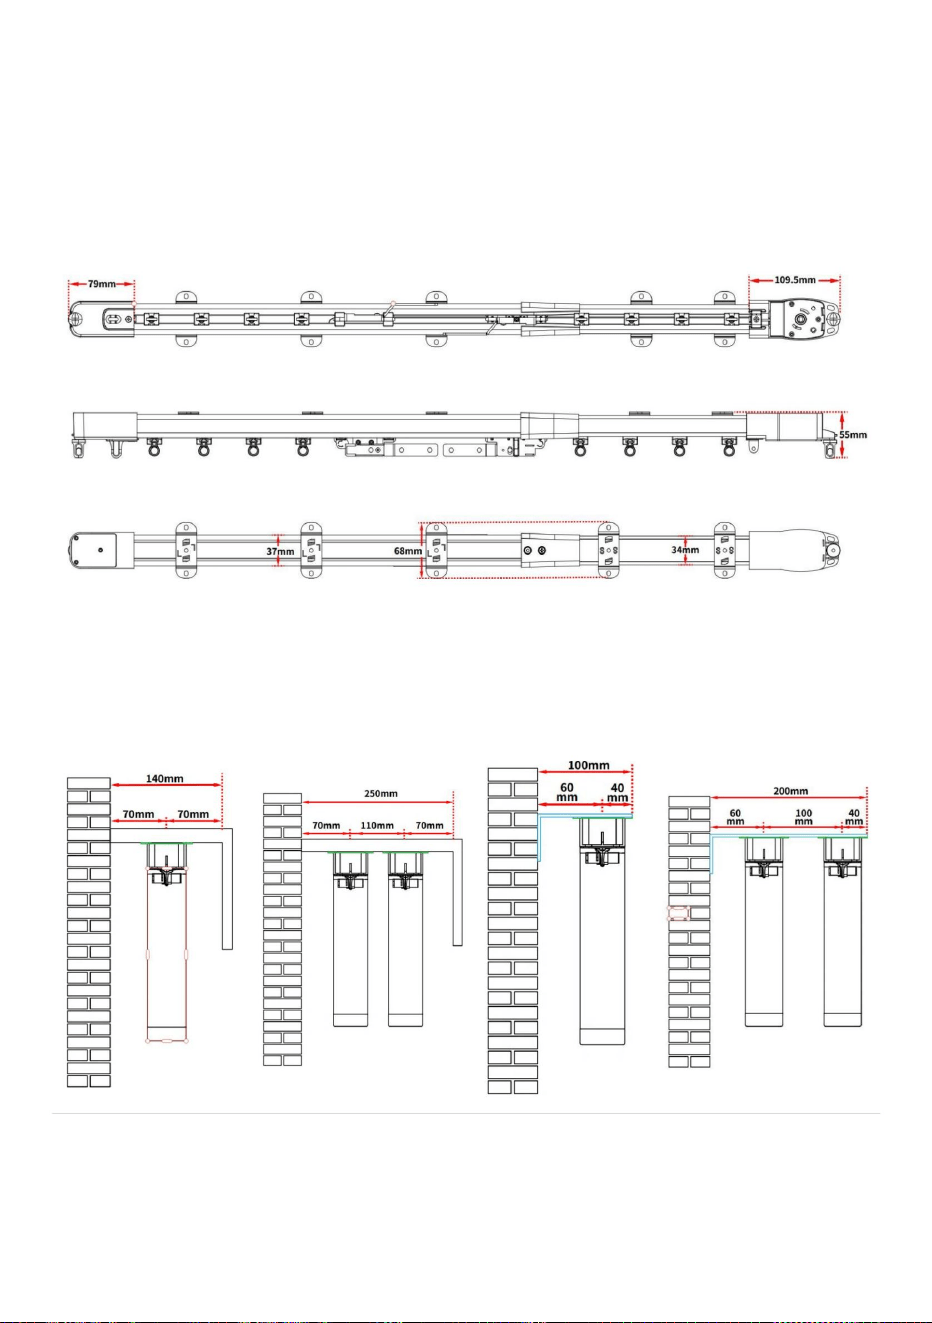
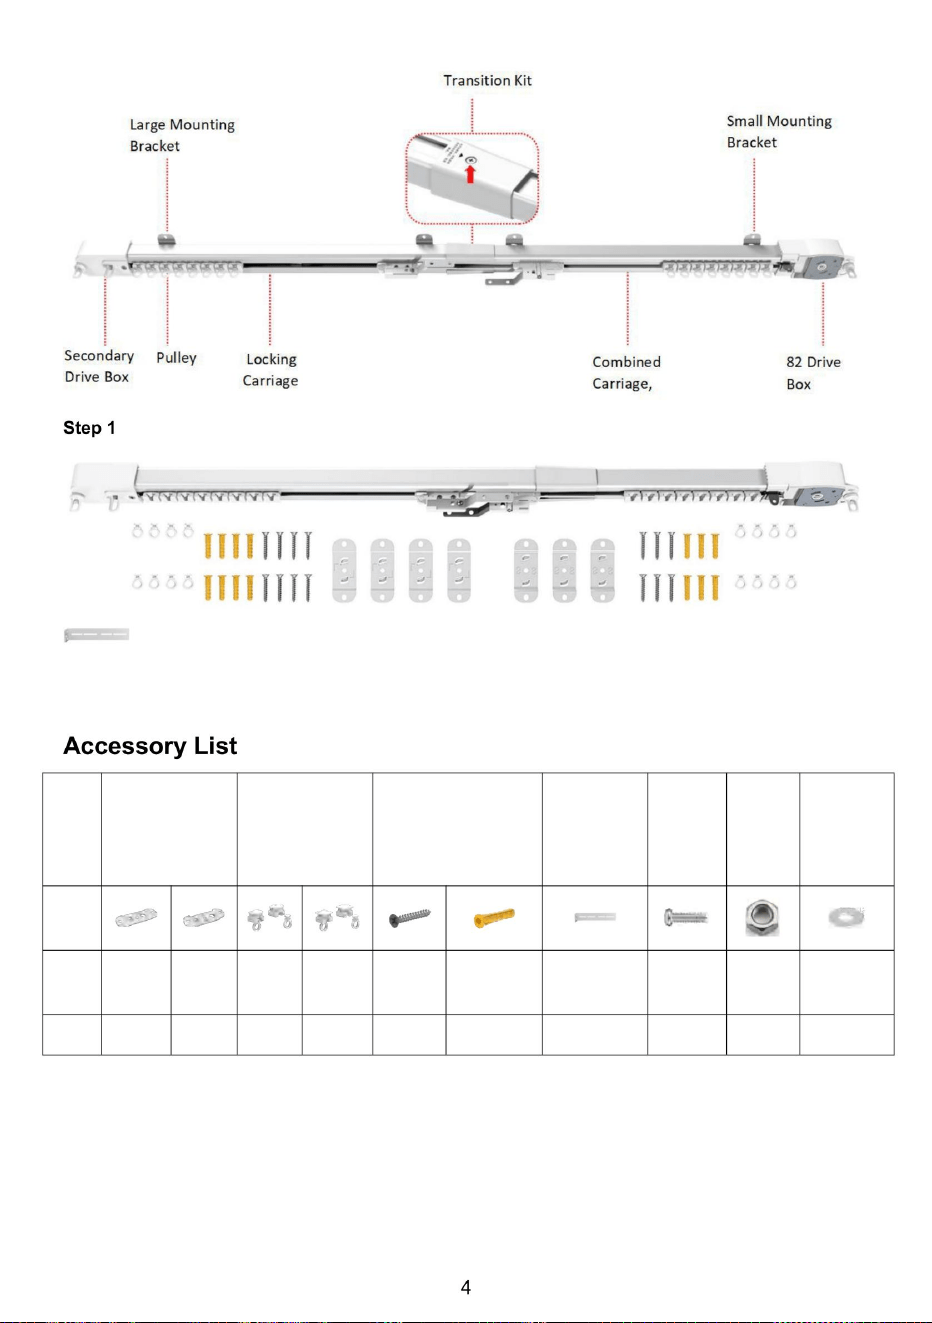
Codice
Nota:
1. Controllare l'imballaggio e assicurarsi che tutti i componenti siano presenti.
2. Per facilitare l'installazione, le pulegge potrebbero essere già installate sulla pista.
3. Non è necessario installare tutti gli accessori del codice laterale. Dipende dalla situazione effettiva.
Foto
laterale
Quantità
20
S
Espansione
4
Pulegge
dettaglio
20
noci
Piccolo Grande
viti
20
accessori
toccando
vite
20
Nome
chiodo
Installare le
Grande
12
6
viti
Montaggio
20
Parentesi
rondelle
Piccolo
12
10
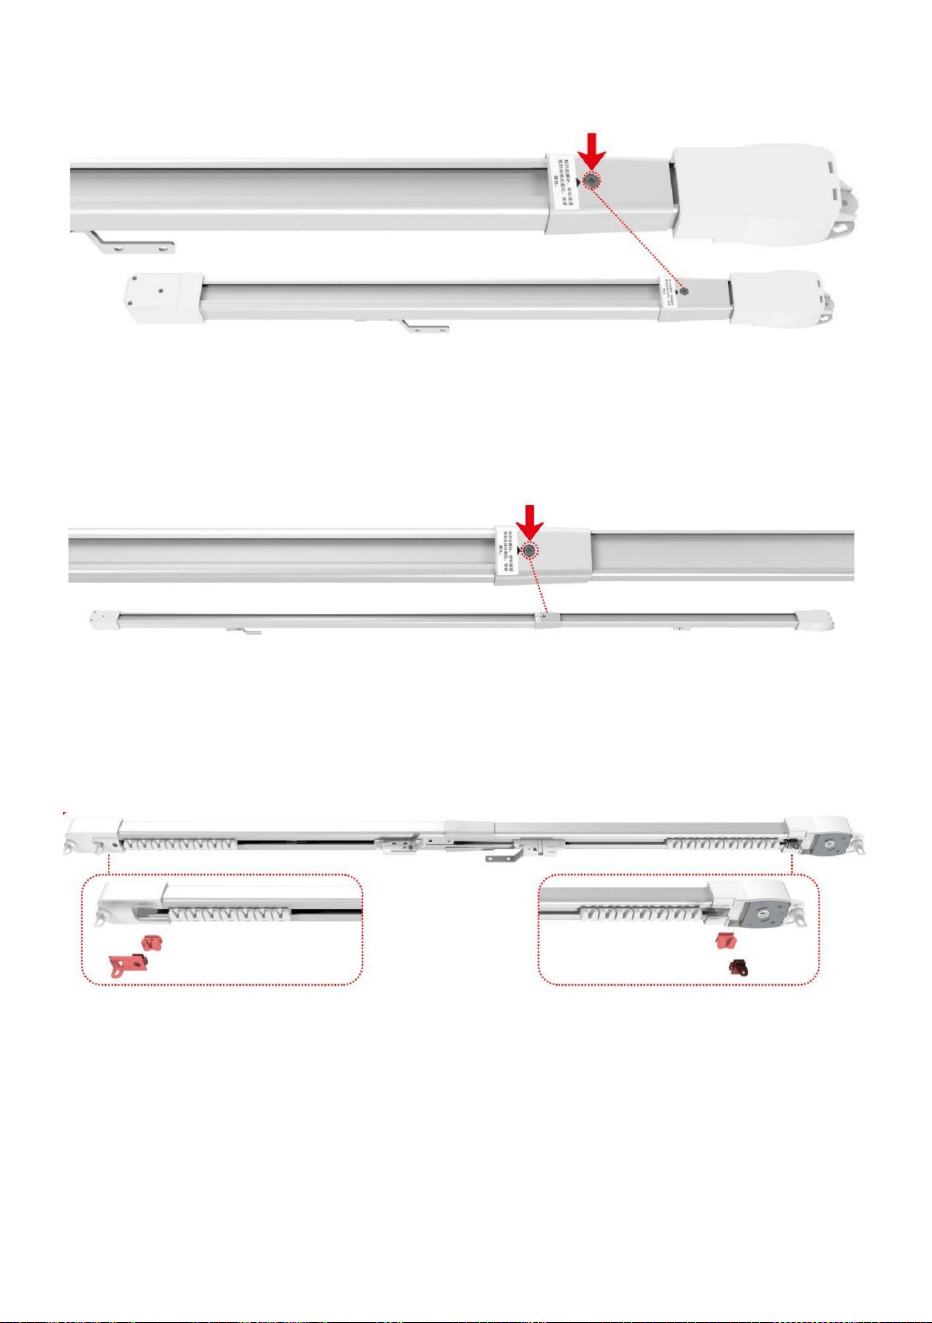
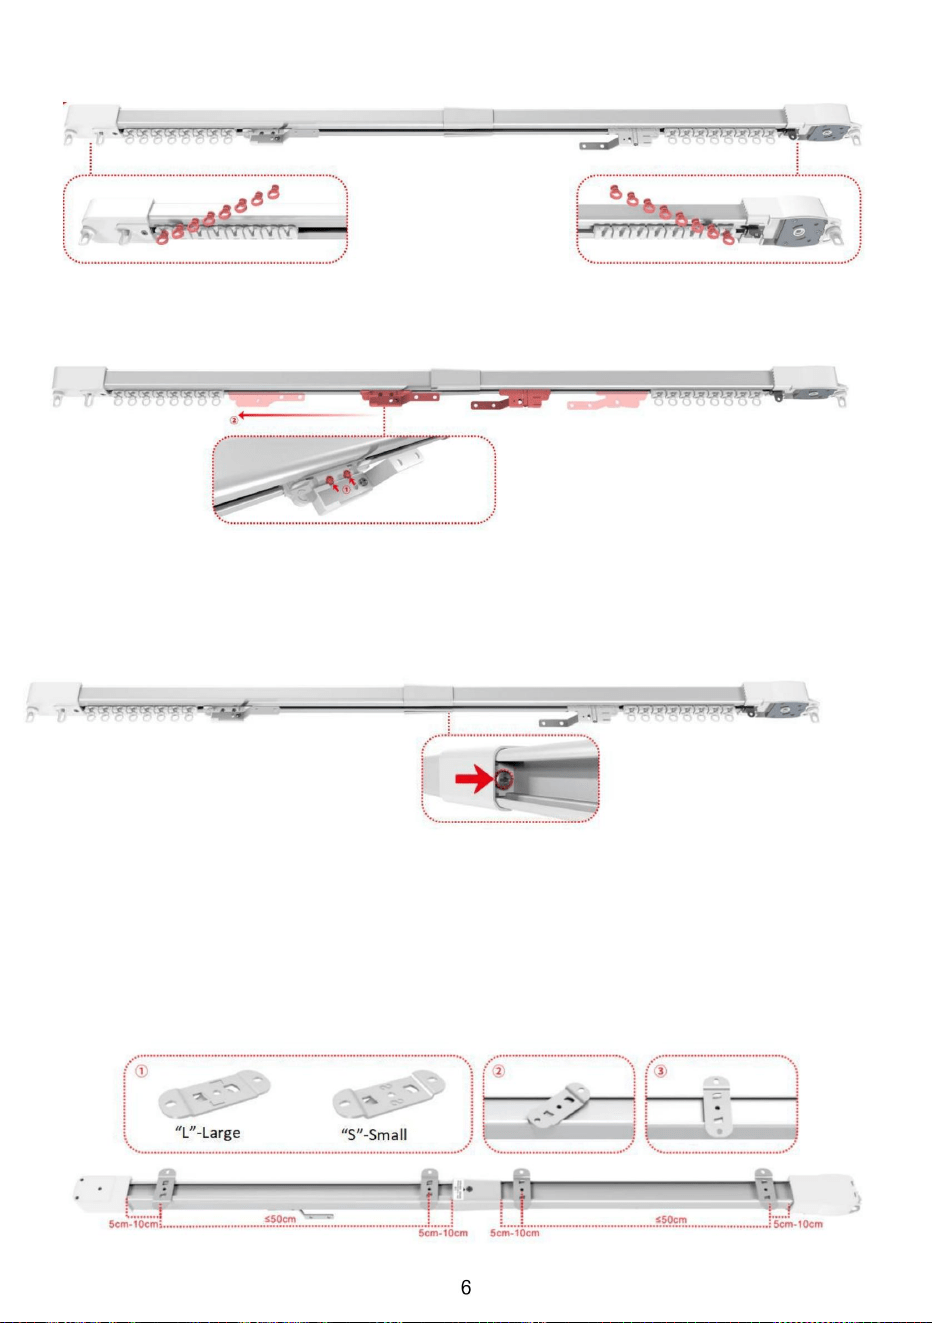
Fase 6: Allineamento dei carrelli: Allentare le viti superiori dei carrelli. Spostare entrambi i carrelli fino al bordo della
scatola dell'unità, quindi serrare le viti. Verificare che i carrelli si muovano
Fase 7. Regolazione fine della puleggia. Quando la puleggia è asciutta o allentata, possiamo regolarla utilizzando
viti sul lato del kit di transizione.
fluidamente.
°
Fase 8. Installazione del codice di installazione, come mostrato nelle Figure 2-3. Posizionare il codice di installazione
a 45° sulla superficie superiore del binario, ruotarlo e serrarlo. Installare il codice di installazione a una distanza di circa
50 cm dal kit di transizione, come punto centrale.
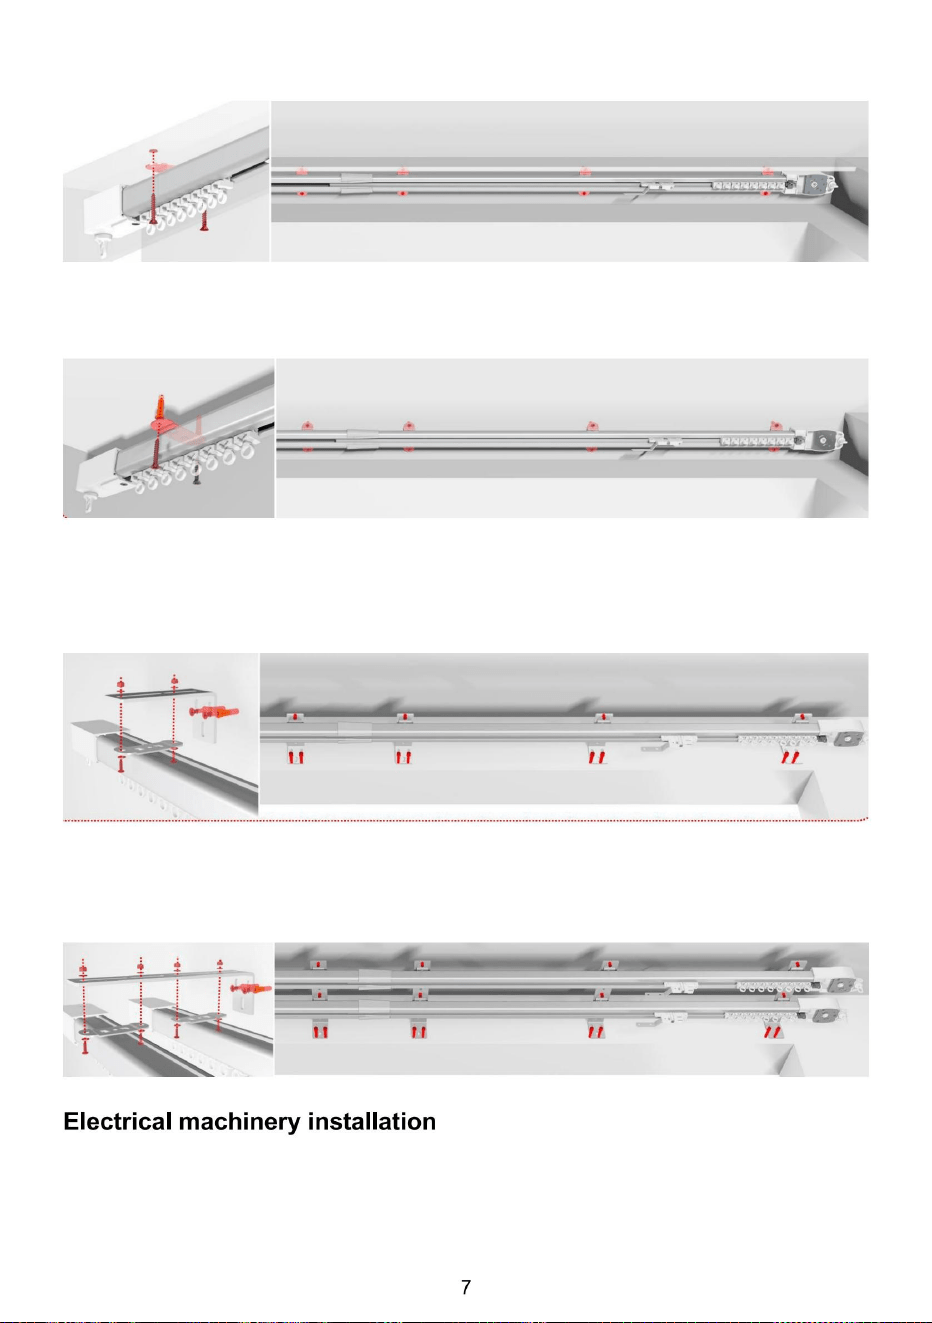
Fase 9. Montaggio superiore, installato sul cassonetto della tenda, può essere fissato direttamente con
Fase 10. Una volta installato sulla parete, è necessario contrassegnare la posizione del codice di
installazione superiore sulla parete, praticare i fori, installare i chiodi di espansione e quindi fissarli
con le
Fase 11. Per l'installazione laterale, installare prima il codice di installazione superiore sul codice
di installazione laterale secondo lo schema a sinistra, quindi installare il kit del codice di
installazione laterale sulla guida. La parete deve essere contrassegnata secondo il codice di
installazione, forata e fissata con viti a espansione dopo l'installazione.
viti.
viti.
Fase 12. Per l'installazione laterale, installare prima la parte superiore sul binario secondo lo schema a
sinistra, quindi installare il codice di installazione laterale. La parete deve essere contrassegnata secondo
il codice di installazione, forata e fissata con viti a espansione dopo l'installazione.
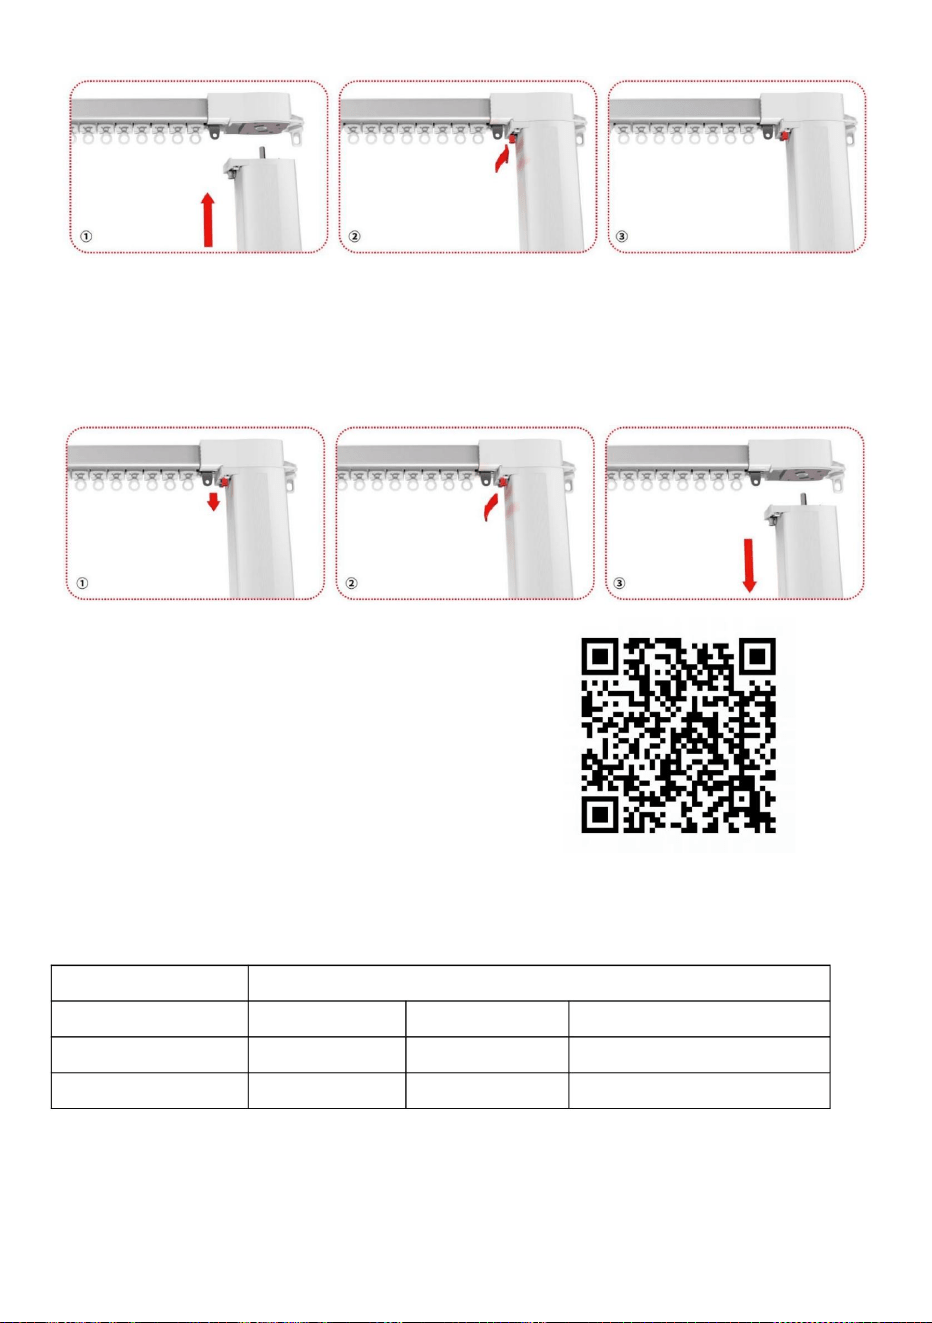
Scansiona il codice QR per ottenere il video dell'operazione


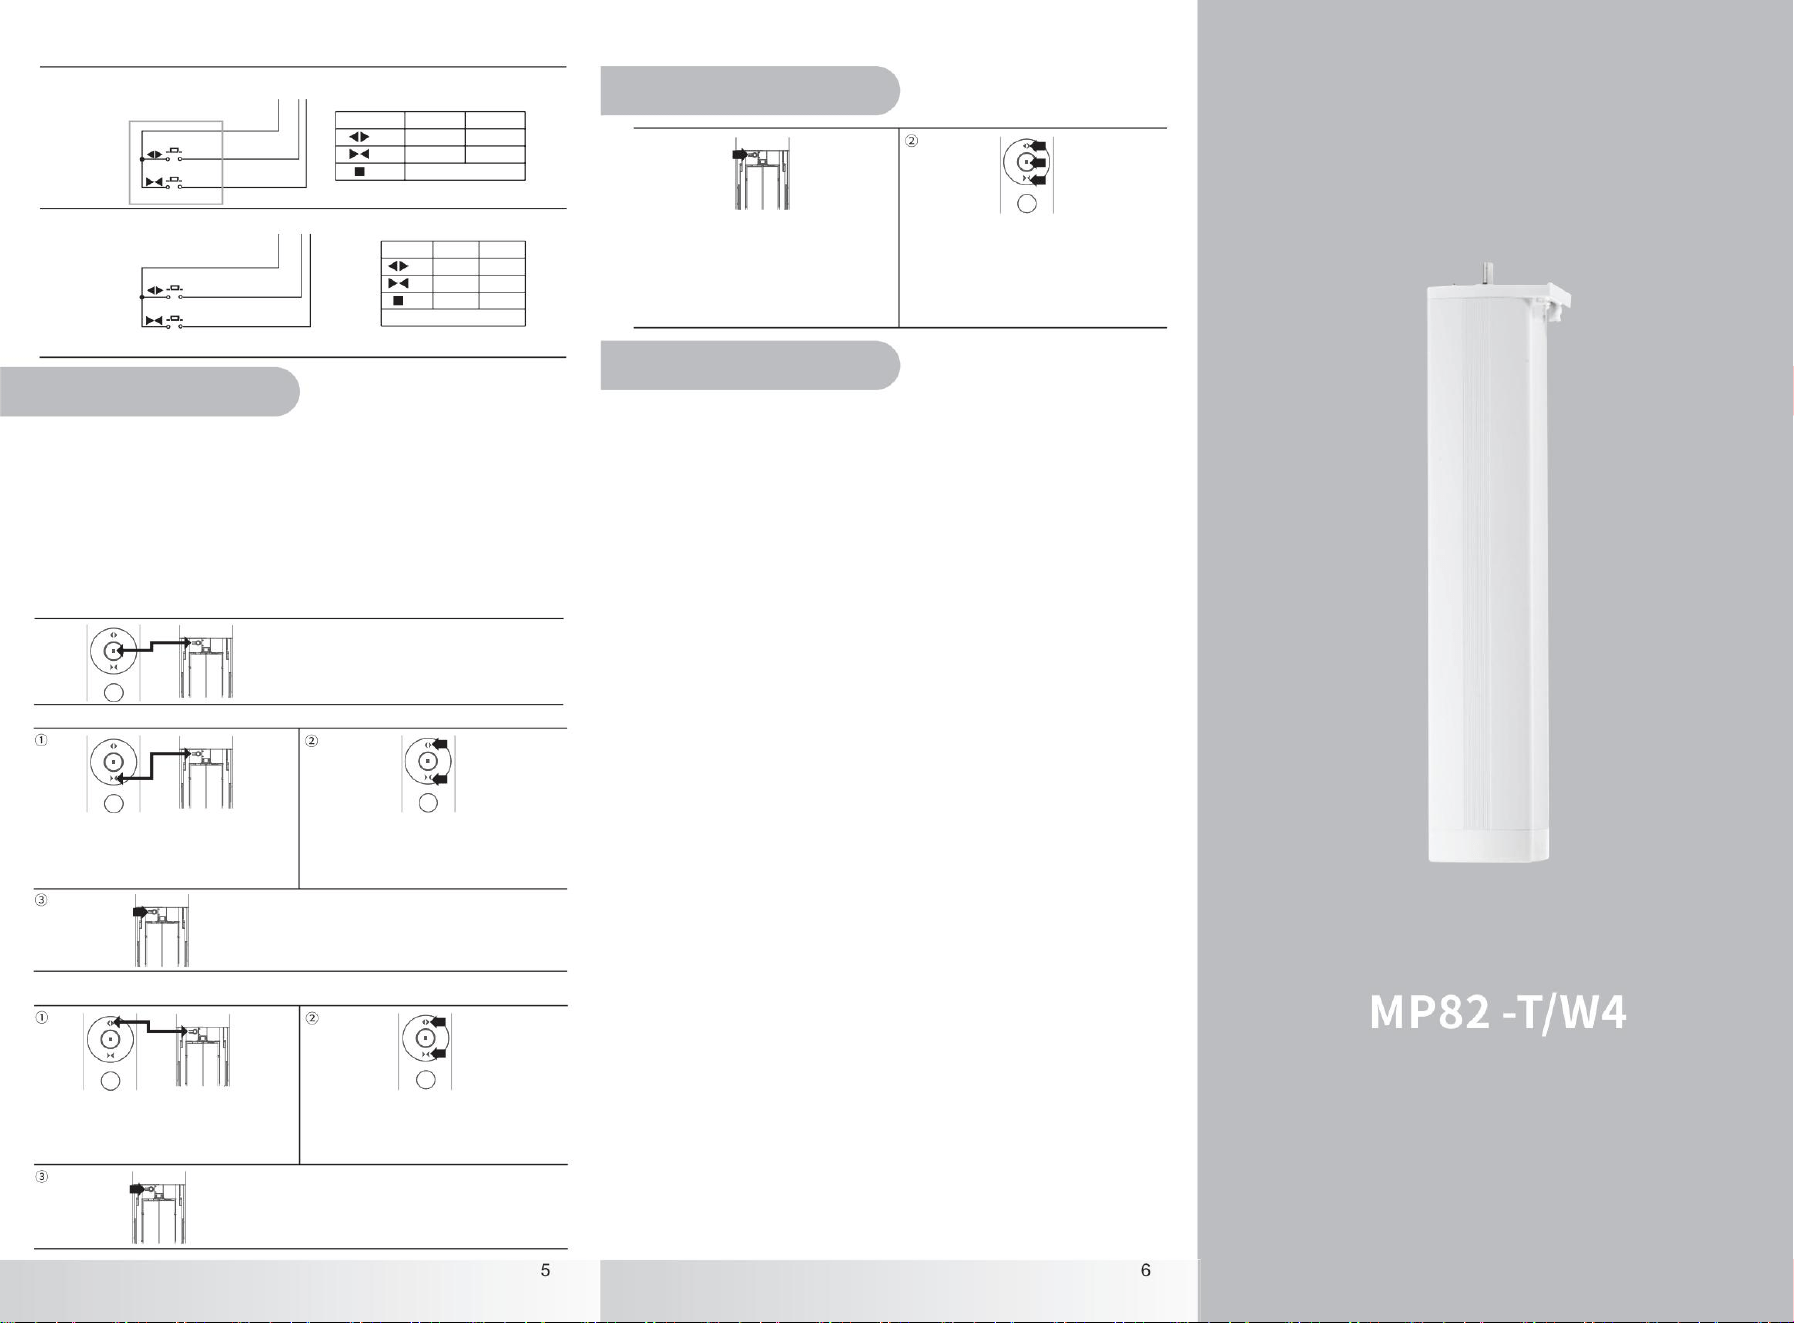
Premere un pulsante qualsiasi per
Operazione K1
interrompere
Operazione
(Aprire)
Il tempo di azione deve continuare
(Fermare)
(Vicino)
(Aprire)
(Fermare)
(Vicino)
Spento
SU
SU
Spento
Spento
Spento
SU
SU
K1
K2
3S
Linea
Vicino
Aprire
comune
Linea
comune
Vicino
Aprire
Regolazione della
Connessione intelligente
velocità
Imposta limite
K1
87654321
K2
SU
Tmall Genie: premere il pulsante [Programmazione] del motore , rilasciarlo e premerlo per 3 secondi finché
Premere il pulsante [impostazione canale] per 3 secondi,
Premere il pulsante [Apri] per 3 secondi, regolare su
accedere alla modalità di regolazione della velocità, luce LED 110r/
la spia non lampeggia in rosso per 5 volte, per entrare nella modalità di associazione; comando vocale "Tmall
Genie, scopri il dispositivo", attendere pazientemente che Tmall Genie trovi il dispositivo e connetterlo; una volta
che la connessione è riuscita, è possibile personalizzare il nome e la posizione del dispositivo e
controllare il dispositivo sul telefono.
min.
bloccandolo a 0 mm-10 mm nella posizione di chiusura. (Se la direzione della pista è errata, la tolleranza del limite
automatico sarà maggiore, dopo il cambio di direzione, la tolleranza tornerà al livello normale.)
Premere a lungo [Impostazione canale]+[Stop]
contemporaneamente per 6 secondi, tutti i limiti vengono
cancellati, il motore vibra una volta, la luce LED lampeggia una volta.
Spento, non si verifica alcuna modifica allo stato del limite
• Regolazione per limite di discesa
del
ÿ
SU.
• Limite automatico
75 giri/min.
La spia LED del motore lampeggia 2
Premere il pulsante [impostazione canale] del telecomando
o premere il pulsante [programmazione] del motore per
impostare la posizione corrente come punto di limite
di apertura. Il motore vibra una volta e la spia LED del motore
si spegne.
volte.
1. Dopo il collegamento all'alimentazione, la prima volta che si apre o si chiude la tenda, il motore si fermerà
Premere il pulsante [Stop] per 3 secondi, regolare a 90
giri/min.
Premere il pulsante [pausa] per 3 secondi e regolare
Contemporaneamente, premere a lungo il pulsante [Chiudi]+[Impostazione canale] del telecomando per far sì che la tenda
raggiunga la posizione desiderata premendo il pulsante [Su] del telecomando per 4 secondi, il motore preme un
pulsante [Giù] entro 30 secondi.
tempo, la spia LED del motore rimane accesa a lungo.
su
2. In stato di arresto, spegnere e riaccendere, se non si tira la tenda durante il funzionamento, il motore non
Premere il pulsante [Impostazione canale] del telecomando
o premere il pulsante [Programmazione] del motore per
impostare la posizione corrente come punto limite di
discesa, il motore vibra una volta e la spia LED del motore si
spegne.
si
,
bloccherà fino alla fine.
• metodo di connessione 2
• metodo di connessione
motore. Se la tenda viene tirata per una distanza eccessiva, dopo il collegamento all'alimentazione
,
il motore
potrebbe bloccarsi a fine corsa e poi riprendere il limite. Se l'alimentazione viene interrotta durante il movimento del
motore, il motore riprenderà il limite dopo l'arresto a fine corsa per la prima volta in funzione. • Cancella
Tuya ZigBee: Dopo aver aperto il gateway, premere il pulsante [Programmazione] del motore
quattro volte di seguito, rilasciare e tenere premuto per 3 secondi finché l'indicatore arcobaleno non lampeggia,
entrare nella modalità di associazione, aprire l'APP Tuya, fare clic su "+" nell'angolo in alto a destra, selezionare
"dispositivi vicini" per trovare il motore, il motore entra nella rete di distribuzione, attendere pazientemente
che la connessione abbia successo, è possibile controllare l'uso del nome personalizzato.
limite
1
Controllo esterno a impulsi a 2 pulsanti
Contemporaneamente, premere a lungo il pulsante [Su] del telecomando per far sì che la tenda raggiunga la posizione
desiderata. Premendo il pulsante [Su] o [Giù] del telecomando per 4 secondi, il motore si muove una volta entro
30 secondi.
la spia LED del motore sarà lunga
SU.
ÿÿ
110 giri/min
90 giri/min
75 giri/
Tmall Genie: quando il dispositivo è nello stato di rete di distribuzione, di' all'altoparlante di Tmall Genie: "Tmall
Genie, trova il dispositivo", attendi pazientemente che Tmall Genie trovi il dispositivo e connetti il dispositivo. Una
volta che il collegamento è riuscito, puoi personalizzare il nome e la posizione del dispositivo e controllarlo dal
telefono.
min
• Regolazione per limite massimo
K2
K1
K2
• Elimina associazione
1) Metodo 1: Eliminare il dispositivo nell'APP;
2) Metodo 2: Ripristino delle impostazioni di fabbrica;
3ÿ Metodo 3: rientrare nella modalità di distribuzione per disconnettere la rete.
SU
Manuale di istruzioni del motore CC con ingresso CA
75% 25%
75% 25%
75% 25%
25%75%
75%
Modalità di controllo esterno dell'azione puntuale
25%
25%75%
87654321
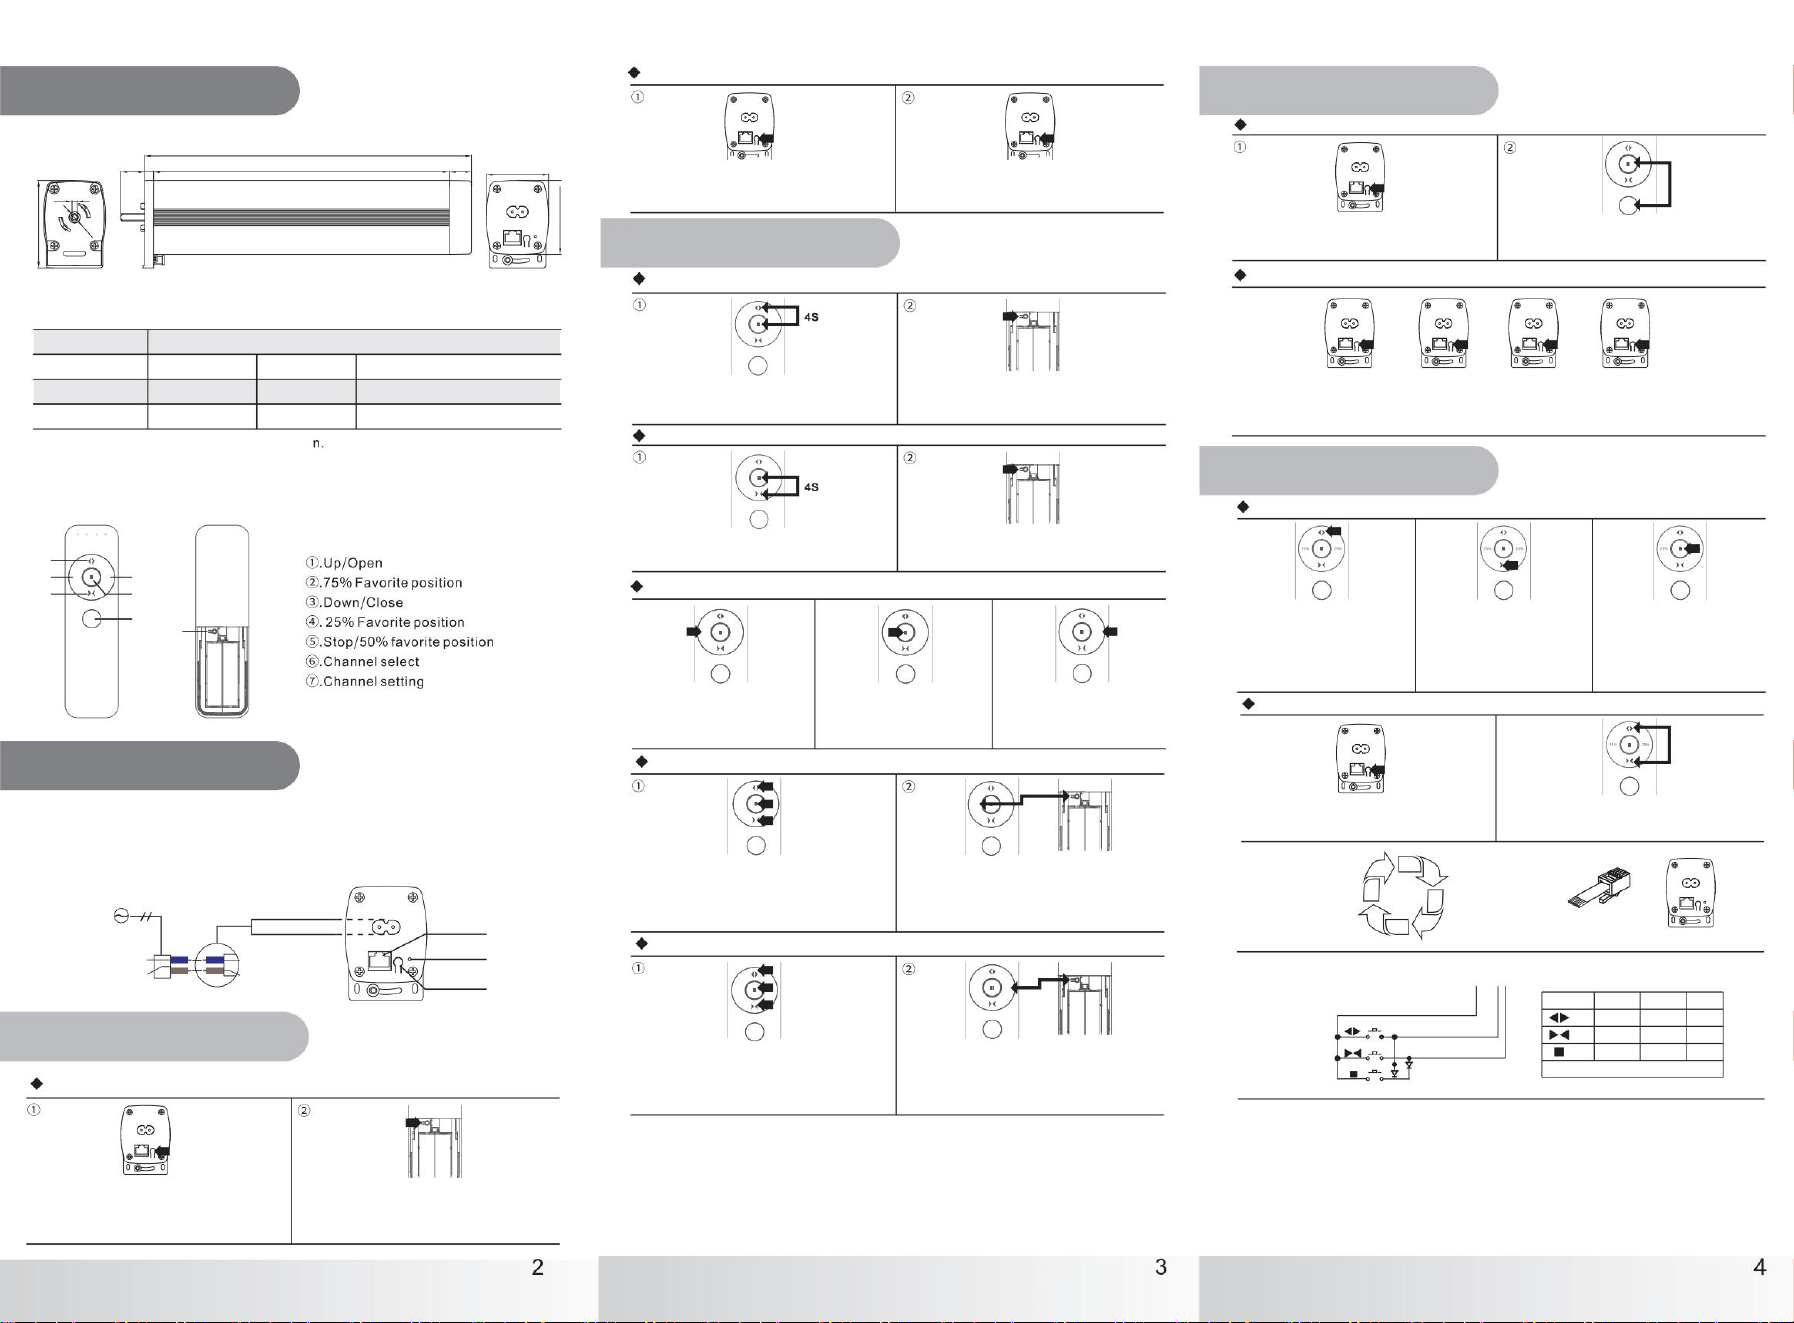
50/60 Hz
1,2 Nm
Grado
Nota: la velocità nominale predefinita di fabbrica è 75 giri/min.
IP
Frequenza nominale
100-240 V
Coppia nominale
CA
Tensione nominale
Velocità
75 giri/min (90/110 giri/min regolabili)
nominale
S3
Tempo di esecuzione
50%
IP41
.8
1
ÿ6
ÿ
ÿ
3.
ÿ
ÿ
ÿ
ÿ
265
3S+
Controllo esterno a
impulsi a 2 pulsanti ÿ
7S
Controllo esterno
dell'azione puntuale
3S
1
Controllo esterno a
impulsi a 3 pulsanti
9.47
Linea
3S
comune
1
Aprire
Vicino
8
4
3S
Controllo esterno a
impulsi a 2 pulsanti ÿ
3S
240
3S
50.6
+ K2
25%
75%
75%
25%
25%
25%
25%
75%
75%
75%
25%
25%
25%
75%
75%
25%
75%
75%
75%
25%
75%
25%
1. Dimensioni del
.
prodotto
Premere il pulsante [Stop] e [Open] per 4 secondi
finché la luce non si accende, il motore inizierà a
vibrare brevemente.
3.
ÿ
ÿ
Premere il pulsante [Stop] e [Chiudi] per 4 secondi
finché la luce non si accende, il motore inizierà a
vibrare
luce LED
brevemente.
Metodo 2 (Cambia direzione tramite il pulsante di
3.
programmazione)
impostazione della direzione eseguita
ÿ
ÿ
correttamente.
Premere a lungo il pulsante [codice] del motore per
più di 7 secondi, la luce blu lampeggia una volta, ripristina
le impostazioni di
Premere il pulsante [Programmazione] del motore
per 3 secondi fino a quando l'indicatore LED non
si accende.
fabbrica.
Premere brevemente due volte + premere a lungo il pulsante [programmazione] due volte: premere
brevemente (lampeggio luminoso) + premere brevemente (lampeggio luminoso) + premere a lungo per 3
secondi (luce LED accesa) + premere a lungo per 3 secondi (luce LED lampeggia due volte e poi si spegne), il
cambio di direzione è avvenuto.
ÿ
Premere il pulsante [Programmazione] del motore
per 3 secondi fino a quando l'indicatore LED non
si
ÿ
accende.
Imposta il punto di arresto centrale 2
Nota: la lunghezza del motore L è soggetta alle specifiche del prodotto (unità: mm)
2.Specifiche del
può essere disattivata
Impostazione del canale
correttamente.
prodotto
Premere il pulsante [Programmazione] del motore
per 3 secondi fino a quando l'indicatore LED non
si accende.
Metodo
Utilizzare i pulsanti [On], [Off], [Stop] per spostare la
tenda nella posizione
ÿ
desiderata.
1
Ripristino delle impostazioni di
finalmente dopo 3 minuti.
fabbrica
MP82-T/
Disattivare la funzione di controllo
ÿ
touch
W4
Premere a lungo il pulsante
[50%] del telecomando, la tenda
si muoverà fino al 50% della corsa
e poi si fermerà.
Pulsante [Impostazione canale] del telecomando, la spia
luminosa lampeggia in rosso per 3 volte e poi si spegne.
L'apprendimento del codice è riuscito.
ÿ
Contemporaneamente, premere [75%] + [Impostazione
canale] e impostare la posizione corrente come posizione
di arresto centrale 1. Il motore vibra una volta e le spie
luminose del motore lampeggiano
una volta.
[Telecomando
Controllo esterno a impulsi a 3 pulsanti
ÿ
YR5302]
Posizione di arresto centrale
finché il LED non si accende, entra nella modalità di apprendimento.
la luce LED lampeggia velocemente 3
Interruttore della modalità di controllo esterno
volte,
Modalità motore
Premere brevemente il pulsante [Impostazione
canale], il motore vibra, quindi questa funzione può
essere attivata correttamente.
Funzione di controllo
Premendo il tasto [75%] del
telecomando, la tenda si
muoverà fino al 75% della corsa
e poi si
Porta RJ
fermerà.
remoto
bloccare o arrestare automaticamente il blocco o l'arresto automatico
Imposta il punto di arresto centrale 1
dopo
Premere brevemente il pulsante [Impostazione canale]
,
per attivare la vibrazione del motore, quindi questa
3 minuti.
funzione
3. Dispositivo di controllo
Premere il pulsante [apri]+[chiudi] del telecomando, il
motore vibra e il cambio di modalità è completato.
consigliato
Premendo il tasto [25%] del
telecomando, la tenda si
muoverà fino al 25% della corsa
e poi si fermerà.
[Porta del segnale]
[Luce LED]
[Pulsante di apprendimento]
[Porta di alimentazione]
Pulsante di apprendimento
Attiva la funzione di controllo
Utilizzare i pulsanti [On], [Off], [Stop] per spostare la
tenda nella posizione desiderata.
touch
3.
chiusura della tenda, premere il pulsante [apri] del telecomando, aprire Durante il processo di apertura e il
telecomando [stop], il motore si attiverà fino al punto limite di apertura,
pulsante [chiudi], chiudere la tenda del
fermerà si fermerà al punto limite di chiusura e si immediatamente.
Premere il pulsante motore [Programmazione] 3 volte,
Premere [selezione canale]+[selezione
Collegare un dispositivo esterno
Accensione/spegnimento, associazione codice, modalità operativa.
Per l'impostazione del controllo remoto
Alimentazione CA, fare riferimento a "Metodo di cablaggio del motore"
canale]
Funzione di avviamento a
Contemporaneamente, premere [25%] + [Impostazione
canale] e impostare la posizione corrente come posizione
di arresto centrale 2. Il motore vibra una volta e le spie del
motore lampeggiano
una volta.
++
strappo
Informazioni sul
Impostazione della
Pulsante e porta di funzionamento
direzione
prodotto
Metodi di
Impostazioni di base del telecomando
controllo
Operazione
(Aprire)
Il tempo di disattivazione deve essere inferiore a 1 secondo.
(Vicino)
SU
(Fermare)
SU SU
Spento
Spento
Spento
6 0
7 1
Potenza in ingresso ACP
N(bluÿ= Filo
L (marrone) = Cavo sotto tensione
neutro
N(bluÿ= Filo neutro
L (marrone) = Cavo sotto tensione
K2
SU
K3
SU
SU
K1
87654321
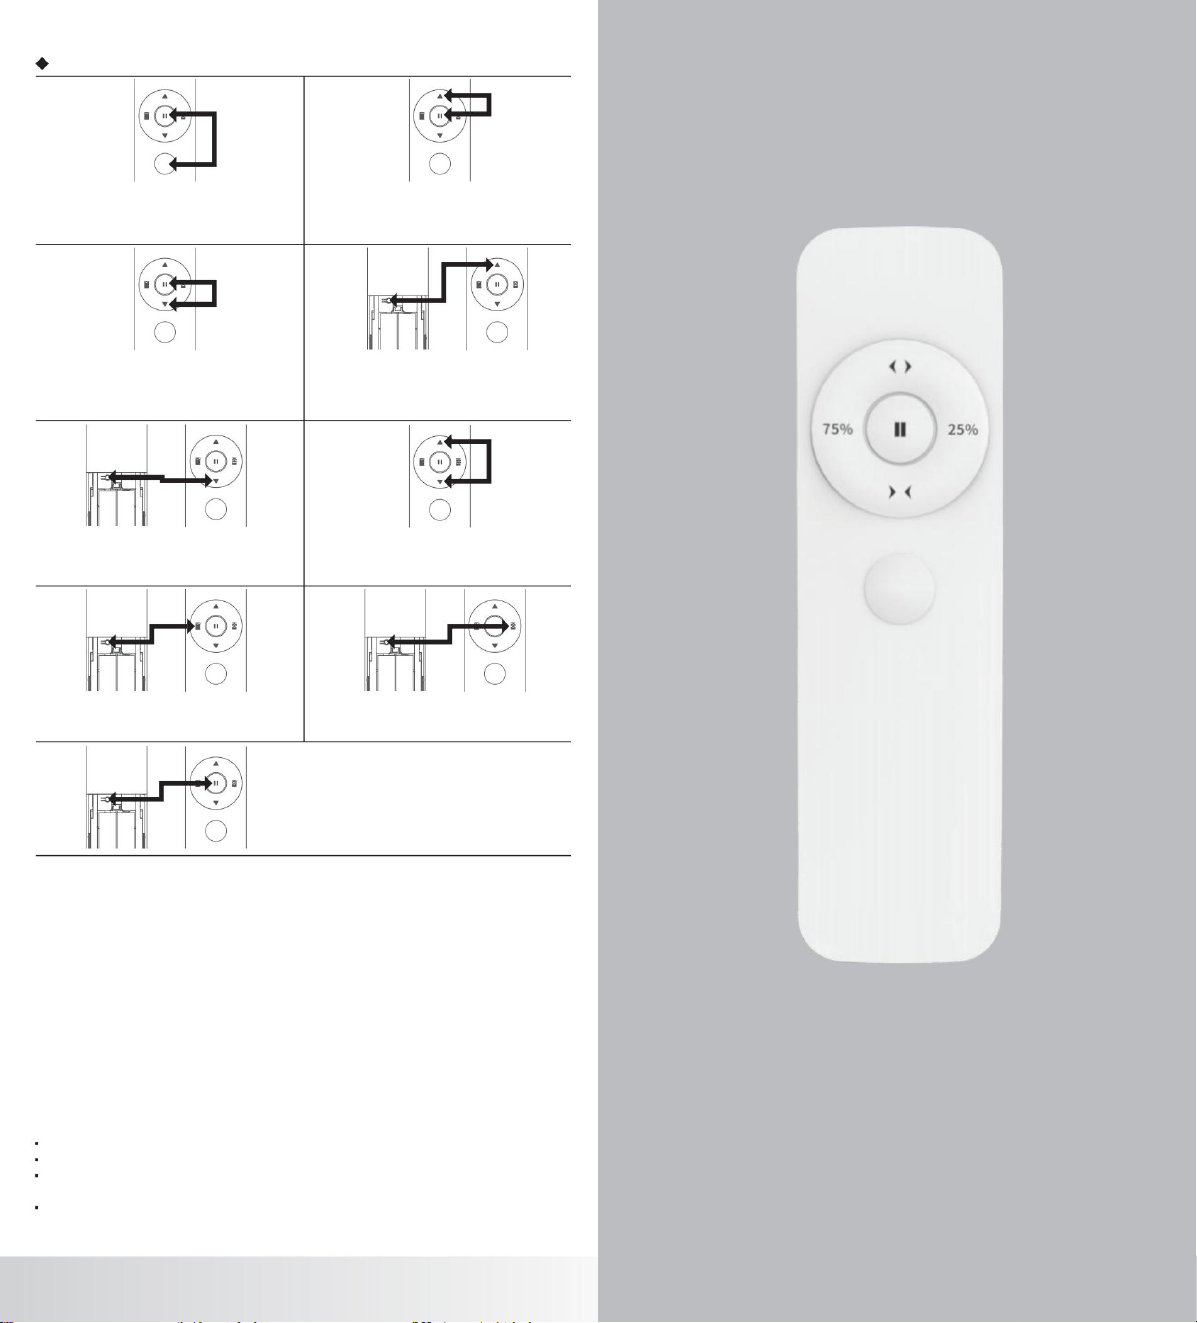
Dichiarazione FCC
1. Questo dispositivo è conforme alla Parte 15 delle Norme FCC.
Il funzionamento è soggetto alle due condizioni seguenti: (1) Questo
dispositivo non deve causare interferenze dannose.
(2)Questo dispositivo deve accettare qualsiasi interferenza ricevuta, comprese le interferenze che potrebbero
causare un funzionamento indesiderato.
2. Eventuali modifiche o alterazioni non espressamente approvate dalla parte responsabile della conformità
potrebbero invalidare il diritto dell'utente a utilizzare l'apparecchiatura.
Nota: questa apparecchiatura è stata testata e ritenuta conforme ai limiti previsti per i dispositivi digitali di classe B,
ai sensi della Parte 15 delle Norme FCC. Tali limiti sono concepiti per fornire una protezione ragionevole contro
interferenze dannose in un'installazione
Questa apparecchiatura genera, utilizza e può irradiare energia a radiofrequenza e, se non installata e
utilizzata in conformità con le istruzioni, può causare interferenze dannose alle comunicazioni radio. Tuttavia, non vi è
alcuna garanzia che tali interferenze non si verifichino in una particolare installazione. Se questa apparecchiatura
causa interferenze dannose alla ricezione radiofonica o televisiva, verificabili spegnendo e riaccendendo
l'apparecchiatura, si consiglia all'utente di provare a correggere l'interferenza adottando una o più delle seguenti misure:
residenziale.
· Riorientare o riposizionare l'antenna ricevente.
· Aumentare la distanza tra l'apparecchiatura e il ricevitore.
· Collegare l'apparecchiatura ad una presa di corrente su un circuito diverso da quello a cui è collegato il
· Consultare il rivenditore o un tecnico radio/TV esperto per assistenza. Il dispositivo è stato valutato come conforme
ai requisiti generali di esposizione alle radiofrequenze (RF). Il dispositivo può essere utilizzato in condizioni di
esposizione portatile senza restrizioni.
ricevitore