

Curtain Driver E1 (Track Version) User Manual
Мотор раздвижных штор E1 (стандарт):
Руководство по эксплуатации
Bedienungsanleitung für Vorhangsmotor E1
(Schienenversion)
Moteur Rideau E1 (Version de la piste)
Manuel d’utilisation
Dispositivo di Azionamento per Tende E1
(versione a binario) Manuale di Istruzioni
Manual de instrucciones para Controlador de
cortinas E1 (Versión de pista)
カーテンドライバE1(トラックタイプ) 取扱説明書
커튼 드라이버 E1 Track Version 사용자 매뉴얼
窗簾驅動器E1(軌道型)使用說明書
01
15
28
42
56
70
84
97
109


Product Introduction
Curtain Driver E1 is a motorized device that can control your existing
curtains automatically, it is based on the Zigbee 3.0 wireless protocol and
can achieve scheduled control of curtains, and work with other smart
devices when connected to the Aqara Home app.
01
Warnings
1.This appliance can be used by children aged from 8 years and above
and persons with reduced physical, sensory or mental capabilities or
lack of experience and knowledge if they have been given supervision
or instruction concerning use of the appliance in a safe way and
understand the hazards involved.
2.Children shall not play with the appliance.
3.Cleaning and user maintenance shall not be made by children without
supervision.
4.WARNING: the drive shall be disconnected from its power source during
cleaning, maintenance and when replacing parts.
5.It must only be supplied at safety extra low voltage corresponding to
the marking on the appliance.
6.WARNING: Important safety instructions. It is important for the safety of
*An Aqara Zigbee 3.0 hub is required. Some functions require specific models of hubs.
Please consult www.aqara.com/support for more details.
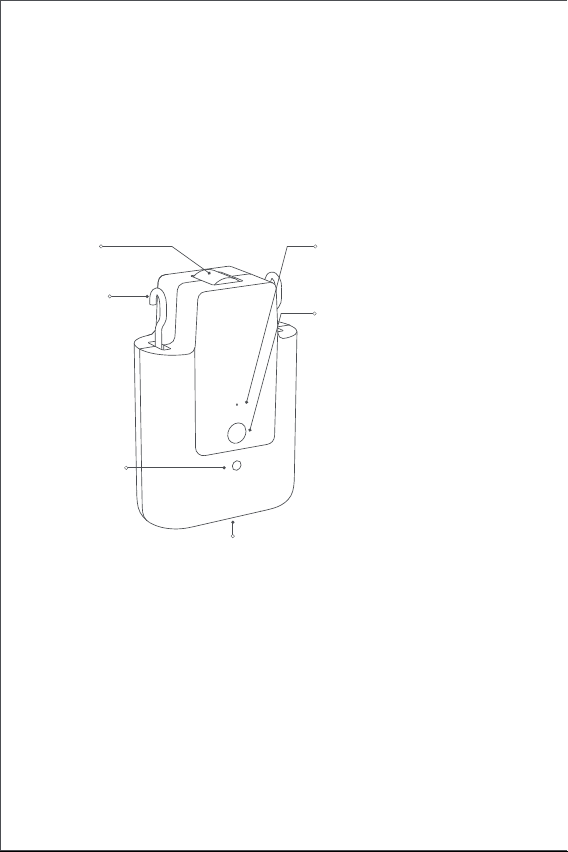
Indicator
Setting button
USB Type-C port
Hook
Wheel
Light sensor
Click once: to open, close or stop
the curtain;
Click twice in succession: to
release, withdraw or stop the
hook;
Click three times in succession: to
manually set the start or end
position of the curtain;
Touch & hold for 5 seconds: to
turn on the device or reset to
factory settings;
Touch & hold for 10 seconds: to
turn o the device.
02
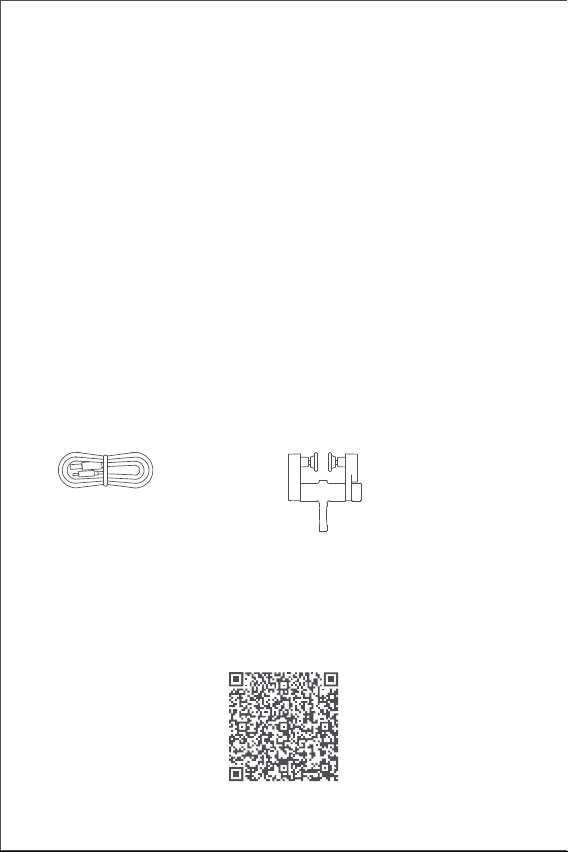
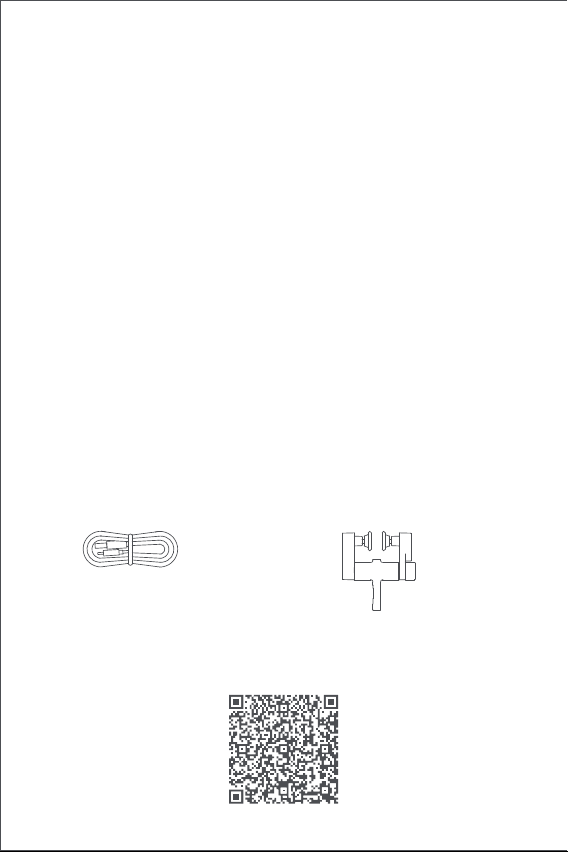
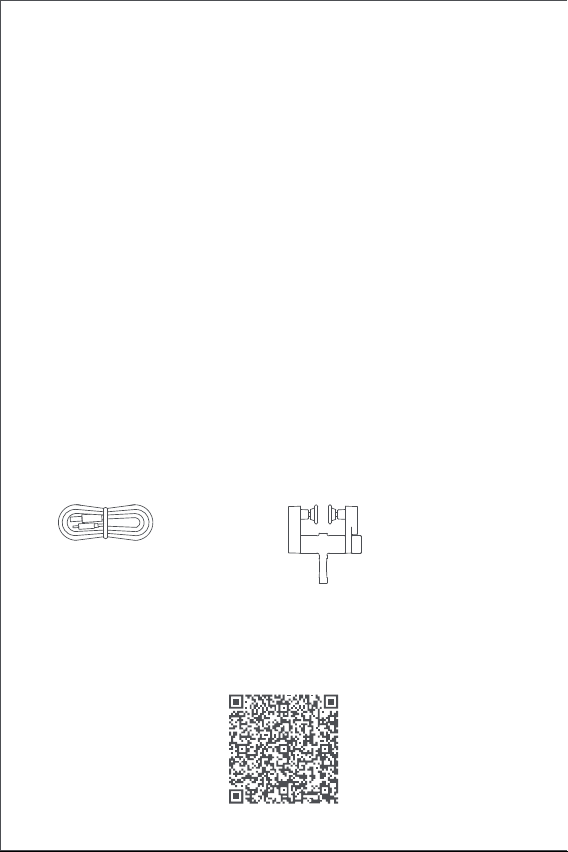
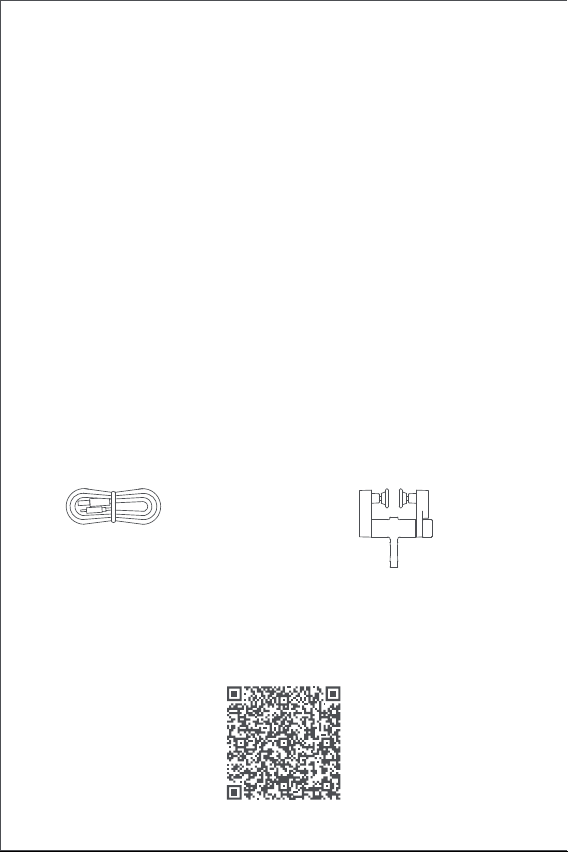
What's in the Box
USB-A to USB-C Cable Track Glider × 2
Tutorial Video
Please scan the QR code below to view the installation and operation
guide video. If the video is unable to be reached, you can also install the
product according to the method described in the manual.
persons to follow these instructions. Save these instructions.
7.Do not allow children to play with fixed controls.
8.Frequently examine the installation for imbalance and signs of wear or
damage to cables springs and fixings. Do not use if repair or
adjustment is necessary.
9.Do not operate when maintenance, such as window cleaning, is being
carried out in the vicinity.
10.WARNING: Important safety instructions. Follow all instructions since
incorrect installation can lead to severe injury.
11.Before installing the drive, remove any unnecessary cords or
components and disable any equipment not needed for powered
operation.
12.That the characteristics of the driven part must be compatible with
the rated load and rated operating time.
13.This appliance contains batteries that are non-replaceable.
14.Fixed controls have to be clearly visible aer installation.
15. The mass and the dimension of the curtain to be driven shall be
compatible with the rated torque and rated operating time.
03
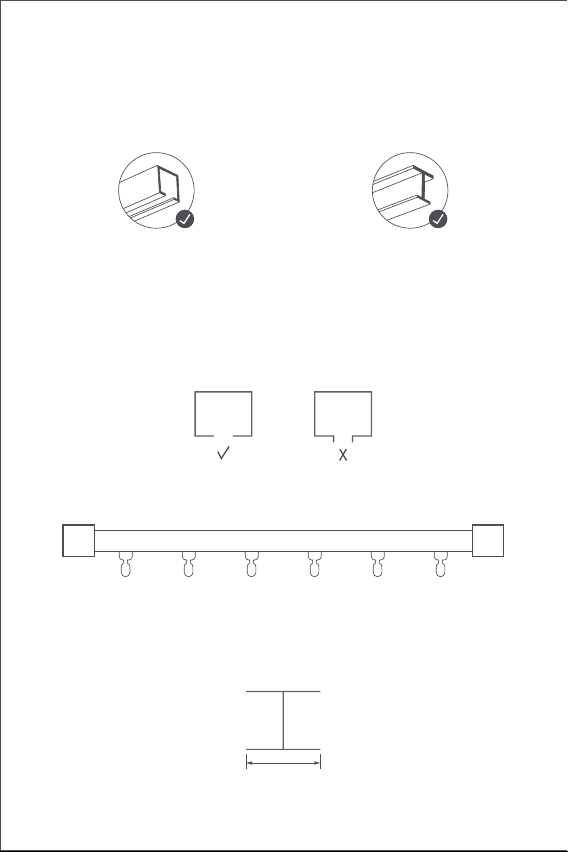
Installation Requirements
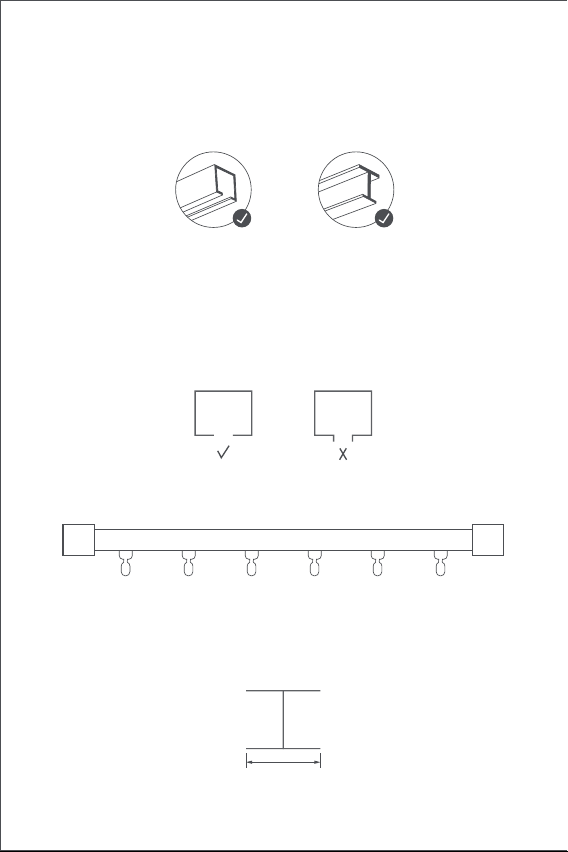
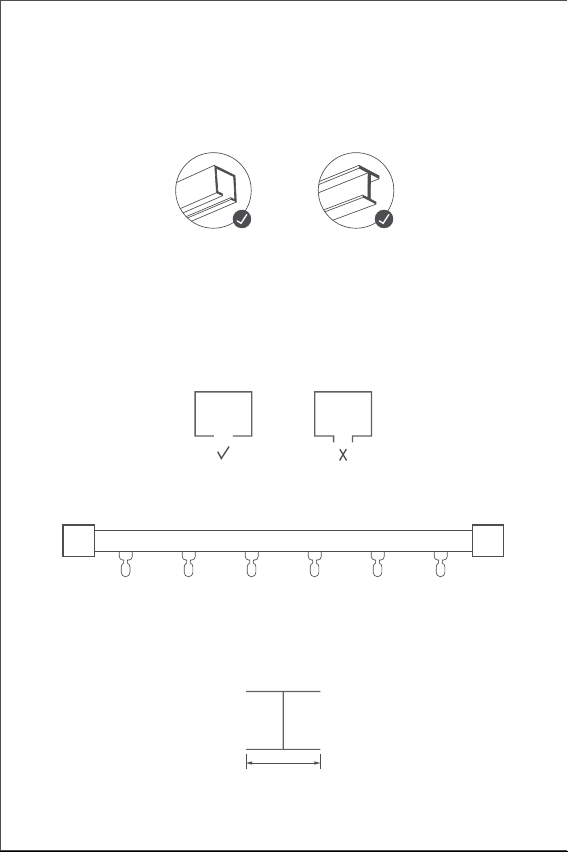
Rail Types
The Smart Curtain Driver E1 (Track Version) be used on U-rails and I-rails.
Installation Requirements of U-Rail
The bottom surface of the U-rail should be flat and smooth.
Installation Requirements of I-Rail
The bottom surface of the I-rail should be flat and smooth, with a width
greater than 10mm.
Width > 10 mm
Both sides of the rail should be sealed tightly with closure heads.
If you would like to use the product on rods, please purchase the Curtain
Driver E1 Rod Version.
U-shaped rails I-shaped rails

04
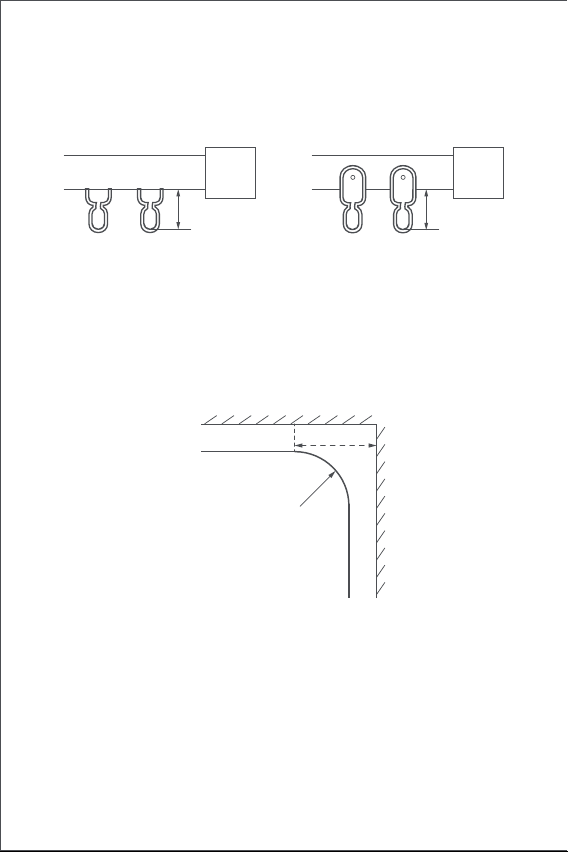
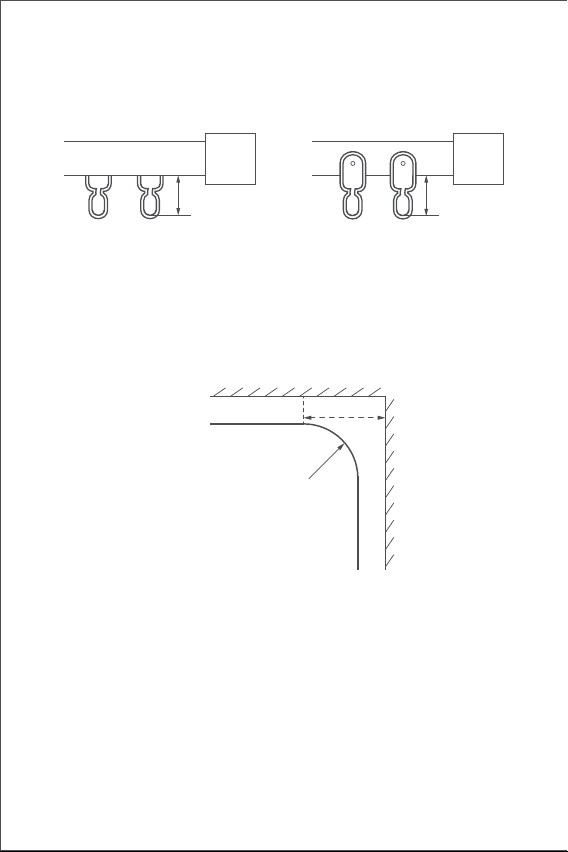
Installation Requirements of Curtain Track Glider
The distance from the upper surface of the bottom of glider hanging ring
to the bottom of the rail should be between 16 mm and 25 mm.
Straight and Special-Shaped Rails
For U-rail and I-rails, the Curtain Driver E1 supports straight and curved
rails. For curved rails, the following conditions should be met around the
bend:
1.This product needs to be connected with the Aqara Home app before
being installed on the curtains.
Before activating the product, please make sure you have the Aqara
Quick Start Guide
Preparation before use
Please read the following steps to start using the product.
U-Rail Glider I-Rail Glider
16~25mm 16~25mm
Top view
Curved rail
Wall
Bend of rail
≥25cm

05
3.Please open the app, tap “Home” and then tap “+” in the top right
corner to enter the“Add Device (Accessory)” page. Select “Curtain
Driver E1” and the hub to be connected to, and add it according to
instructions in the Aqara Home app. Press and hold the Setting button
for 5 seconds, and wait for the voice prompt from the Hub.
4.If you have purchased two or more Curtain Drivers, please connect all of
them to the Aqara Home app before further installation.
5.If you use double-sided curtains, it is necessary to connect two Curtain
Drivers to the app and then put them in one group for simultaneous
control. Enter the main page of the Curtain Driver to be grouped, click
"... " in the upper right corner, select ”Create a group for Curtains” and
follow the instructions.
6.It is recommended to fully charge the product before installation.
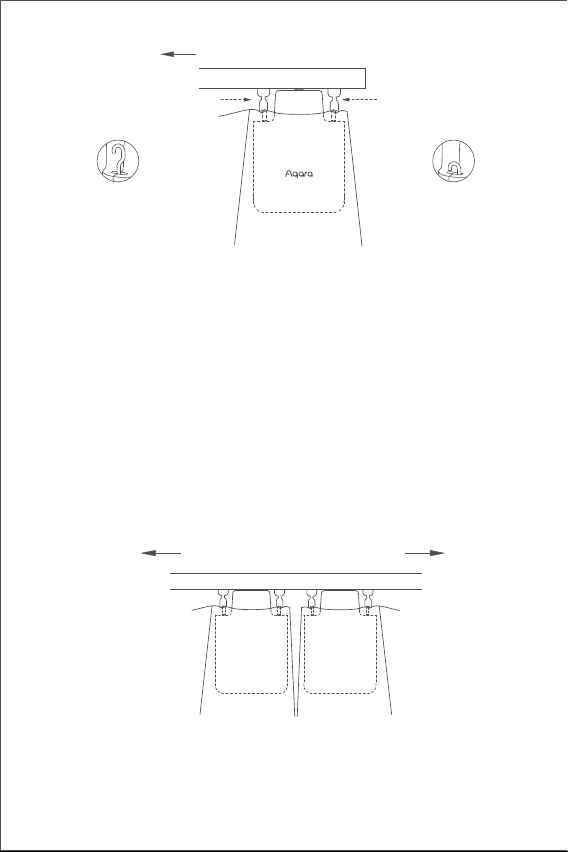
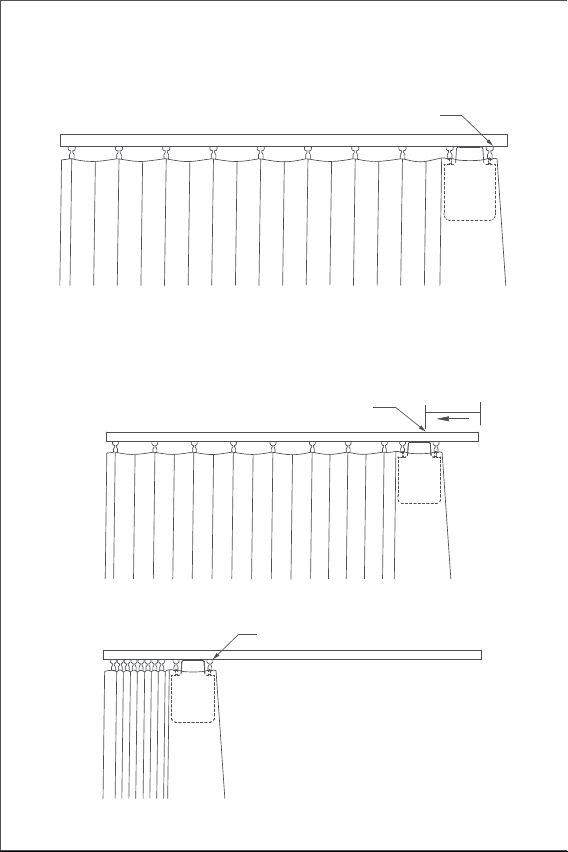
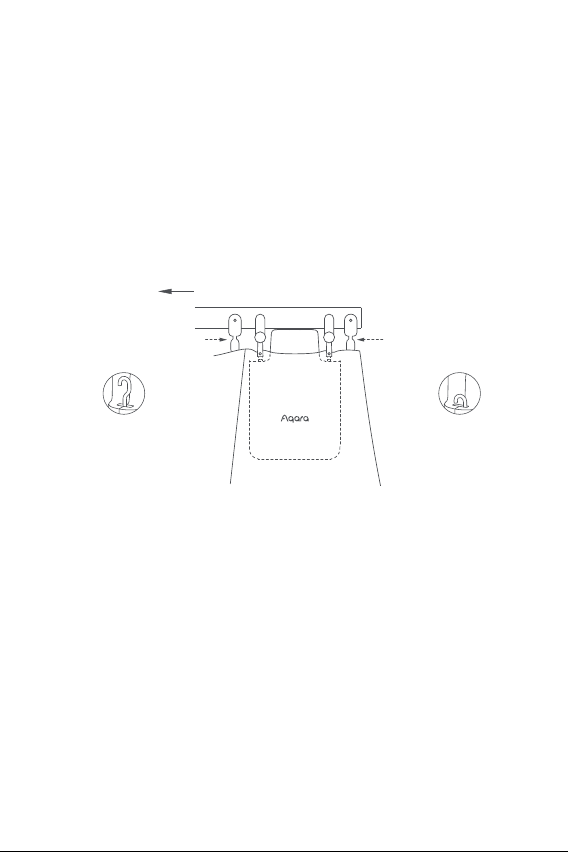
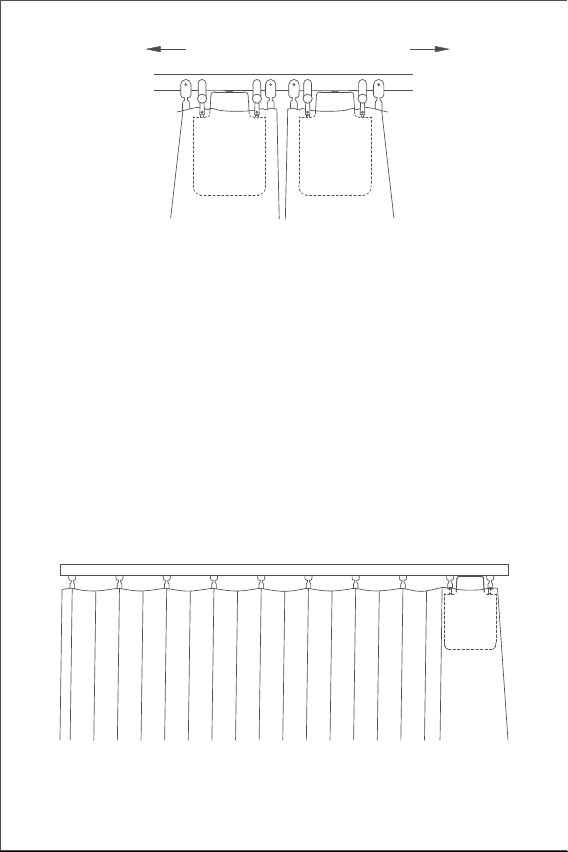
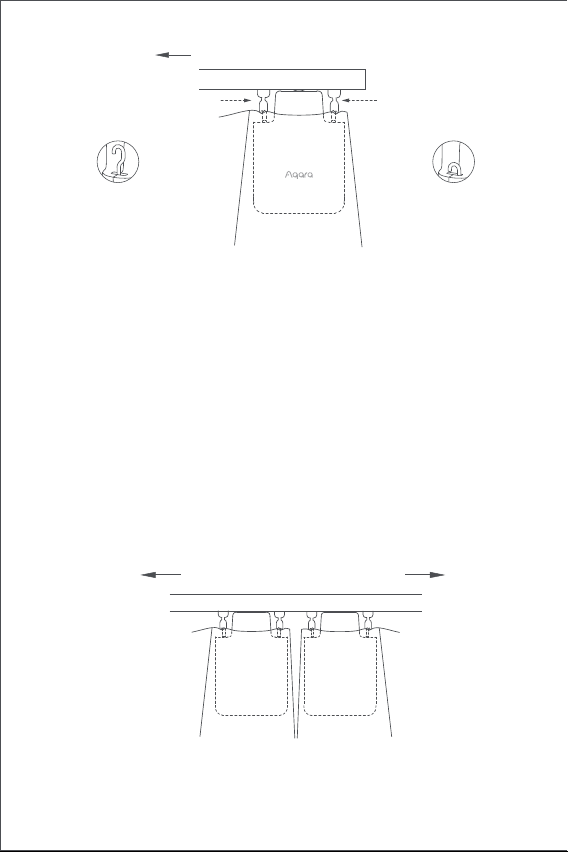
1.Aer startup, click the setting button twice in succession quickly to
release the hook of the Smart Curtain Driver until it reaches out to the
maximum length.
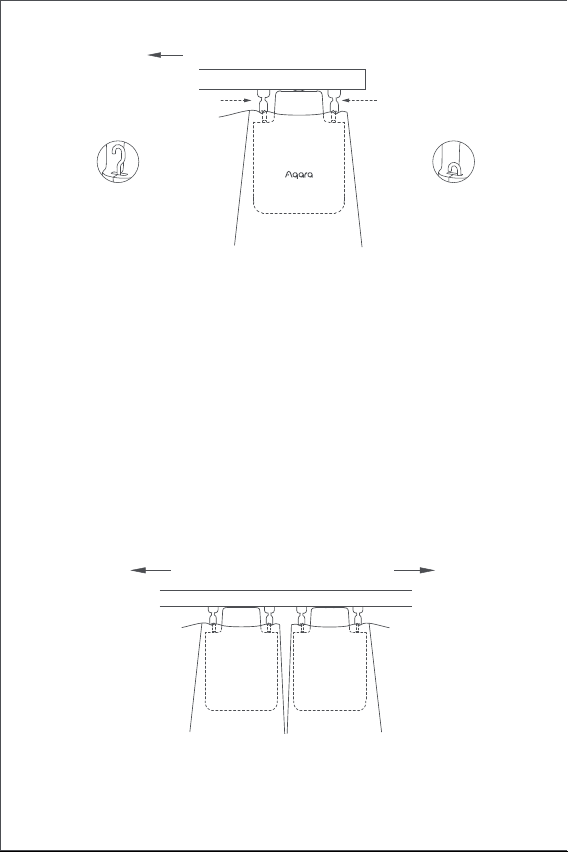
2.Hang the Smart Curtain Driver on the first and the second glider on the
movable side of the curtains (as shown in the figure).
Tips: If there are extra gliders on the rail, they can be placed between the
first and the second hooks of the curtain, above which the Curtain
Driver can be placed.
3.Click the setting button twice in succession quickly to hold the Curtain
Driver onto the rail. Right then, the green indicator light keeps blinking,
and there are 3 short beeps from the buzzer aer the product is held in
place, indicating that the installation is complete.
Installation Methods
Installation Methods for U-Rail
Single-Sided Curtains (only one Curtain Driver is needed)
Home app and the Aqara Zigbee 3.0 hub installed (Please scan the QR
code below to download the app).
06
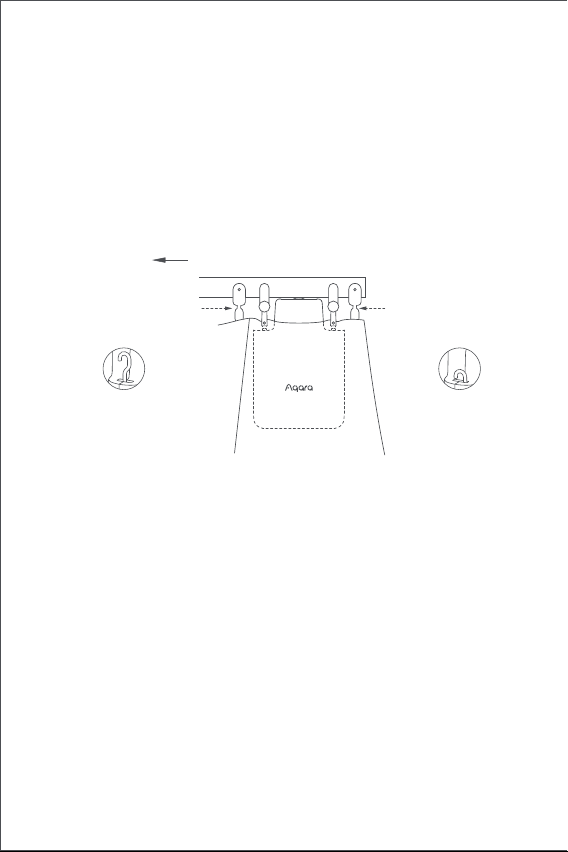
1.Aer startup, click the setting button twice in succession quickly to
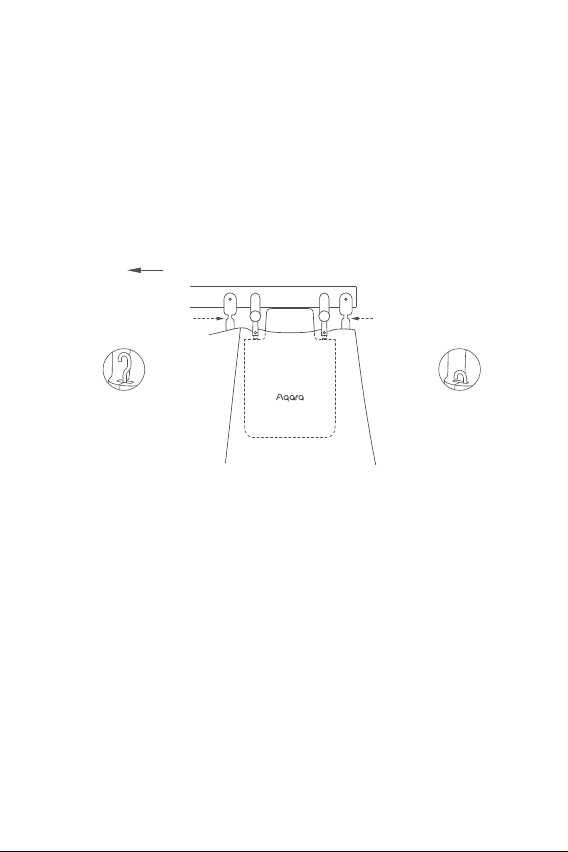
Installation Methods for I-Rail
Single-Sided Curtains (only one Curtain Driver is needed)
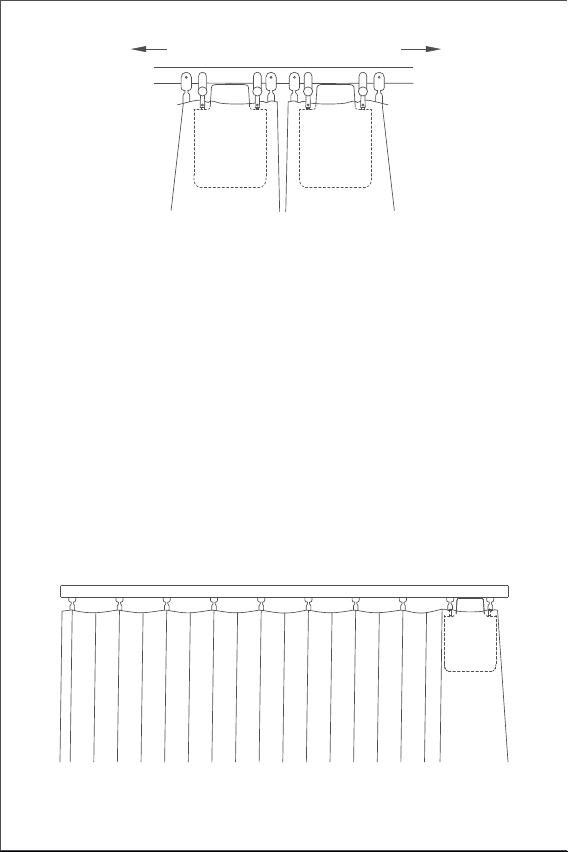
Double-Sided Curtains (two Curtain Drivers are required)
According to the installation method of Curtain Driver for single opening
curtains, hang the two Smart Curtain Drivers on the track gliders of
curtains on le and right sides respectively (as shown in the figure below)
This product can be configured on the app to open and close the curtains
according to the intensity of ambient light. To use the function, the light
sensor should face the outside of the window and the Curtain Driver
should be installed on the side near the window. If you need to control the
opening and closing of curtains according to the light indoor, the light
sensor should face the interior and the Curtain Driver should be installed
on the side near the interior. To optimize the eect of the light sensor,
please ensure that there is no opaque object in front of it.
Opening direction of curtains
The first track glider
Opening direction of curtains
The second track glider
U-rail
The hook reaches
out to the
maximum length
The hook is
locked to the
innermost
U-rail
07
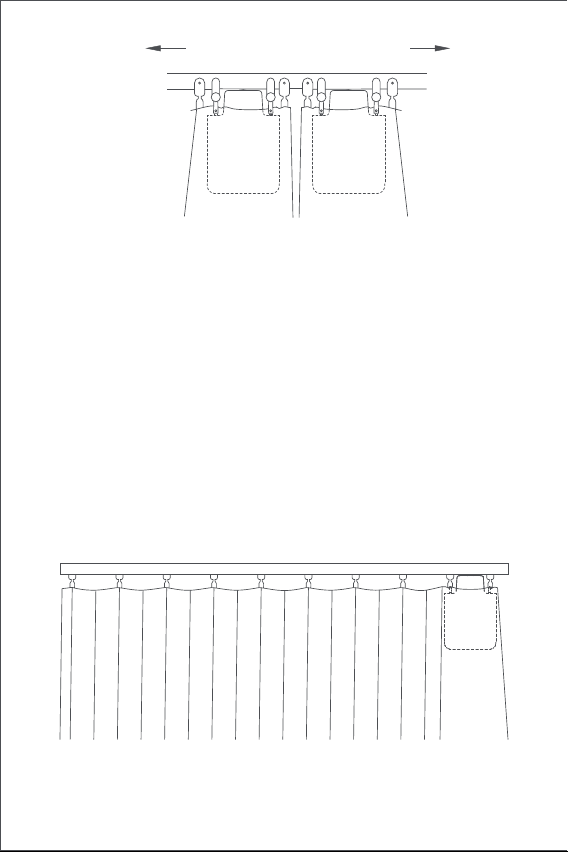
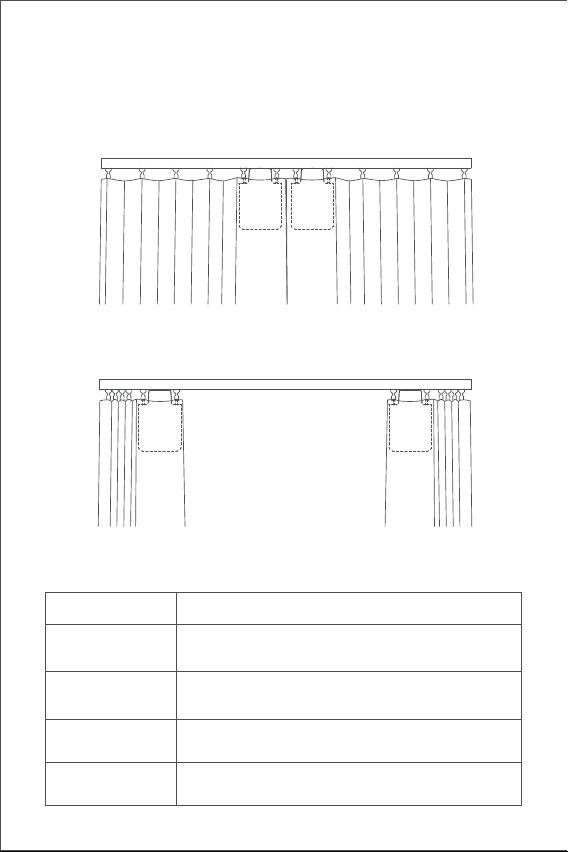
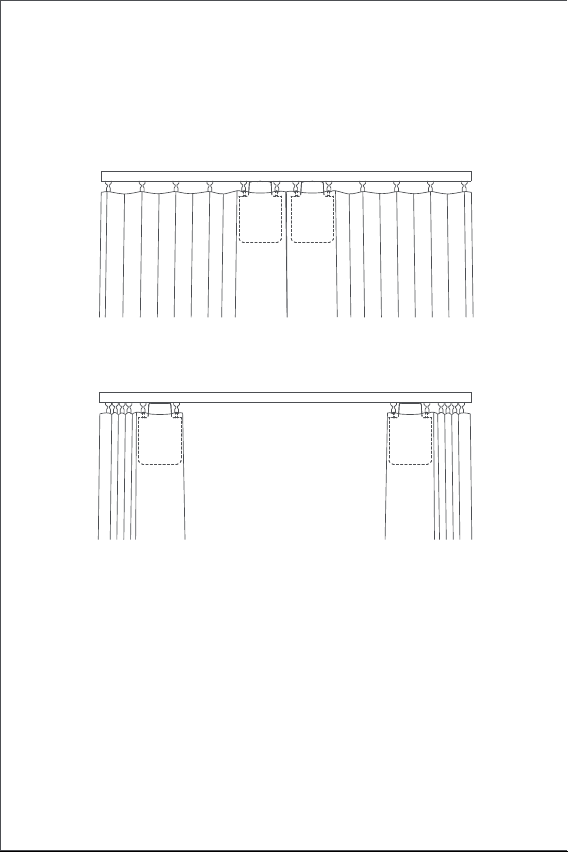
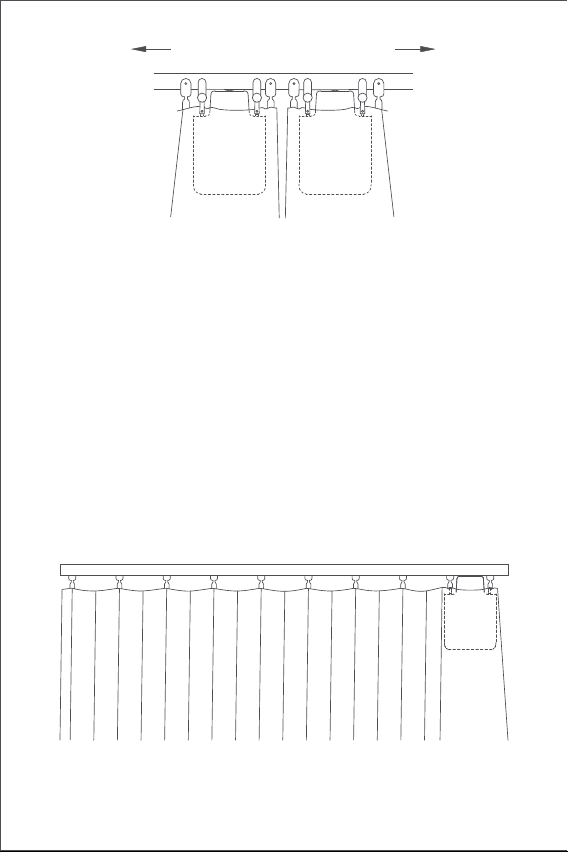
Double-Sided Curtains (two Smart Curtain Drivers are required)
According to the installation method of Curtain Driver for single opening
curtains, hang the two Smart Curtain Drivers on the track gliders of
curtains on le and right sides respectively (as shown in the figure below).
This product can be configured on the app to open and close the curtains
according to the intensity of ambient light. To use the function, the light
sensor should face the outside of the window and the Curtain Driver
should be installed on the side near the window. If you need to control the
opening and closing of curtains according to the light indoor, the light
sensor should face the interior and the Curtain Driver should be installed
on the side near the interior. To optimize the eect of the light sensor,
please ensure that there is no opaque object in front of it.
release the hook of the Smart Curtain Driver until it reaches out to the
maximum length.
2.Install the two adjustable track gliders onto the rail, and put them just
between the first and the second existing track gliders on the movable
side of the curtains(as shown in the figure).
3.Hang the Curtain Driver on the two newly installed adjustable track
gliders
4.Click the setting button twice in succession quickly to hold the Curtain
Driver onto the rail. Right then, the green indicator light keeps blinking,
and there are 3 short beeps from the buzzer aer the product is held in
place, indicating that the installation is complete.
Opening direction of curtains
I-rail
The first track glider
The second track glider
The hook reaches
out to the
maximum length
The hook is
locked to the
innermost
08
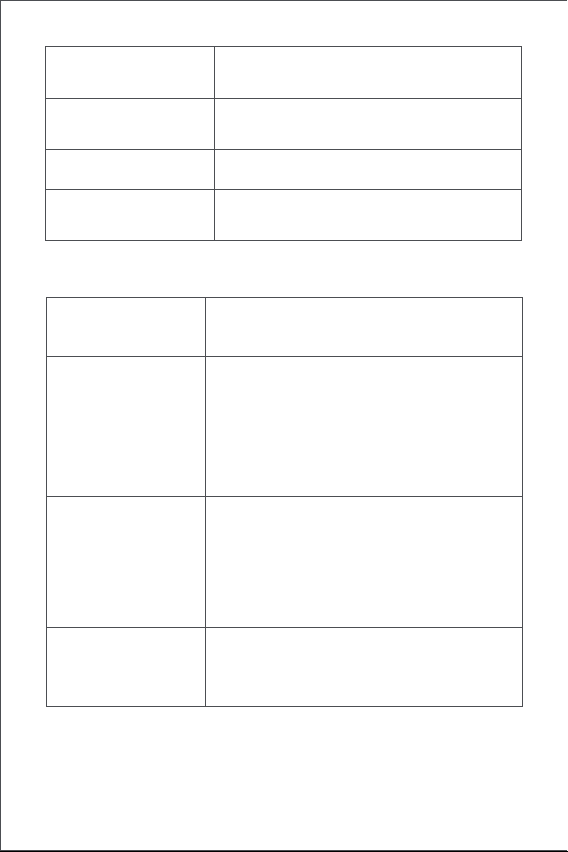
Opening Distance Settings
To ensure proper use of the product, the range should be set for the
product aer the product is installed.
Single-Sided Curtains
1.Aer the device is connected to the Aqara Home app, the opening
distance of the device can be configured on the app. Click the device
card on the Home page of the app and set the stroke as instructed on the
main page of the device.
2.Also, the opening distance of the device can be set by pressing the
setting button when the device is not connected to the Aqara Home app.
Detailed operations are as follows:
A) Pull the curtain until it is completely closed, and install the Curtain
Driver on the rail according to the installation method for the "single-sid-
ed curtains".
Opening direction of curtains
I-rail
09
B) Then click the setting button 3 times in succession quickly to set the
first limit point of the range. The first limit point is set successfully aer
the long "beep".
C) Meanwhile, the Curtain Driver will automatically run to the opening
limited point and stop aer being pulled in the fully opening direction
for about 10cm. Aer the long "beep", another limit point is automatical-
ly and successfully set, which means the opening range of the device is
set up.
about 10cm
At this time, the curtain driver
starts to run automatically
Another stroke limit point (curtain at the
"completely open" position)
First stroke limit point (curtain at the
"completely closed" position)
10
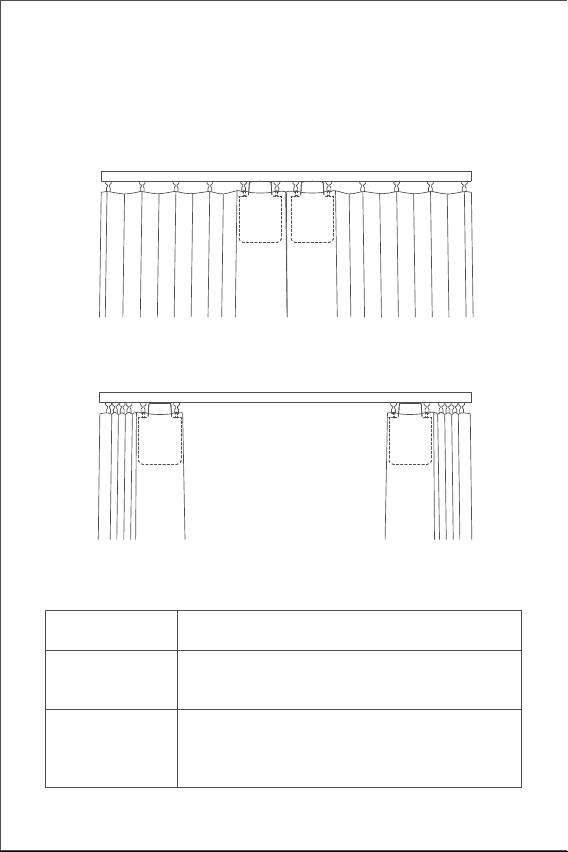
Double-Sided Curtains
Button Operation
A) Pull the curtains on le and right sides until they are completely closed,
and install the two Curtain Drivers at the position on the rail where the
curtains are completely closed according to the installation method for
the "single-sided curtains".
B) Set the opening distance for Curtain Drivers on le and right sides
according to Step B and C for that of "single-sided curtains".
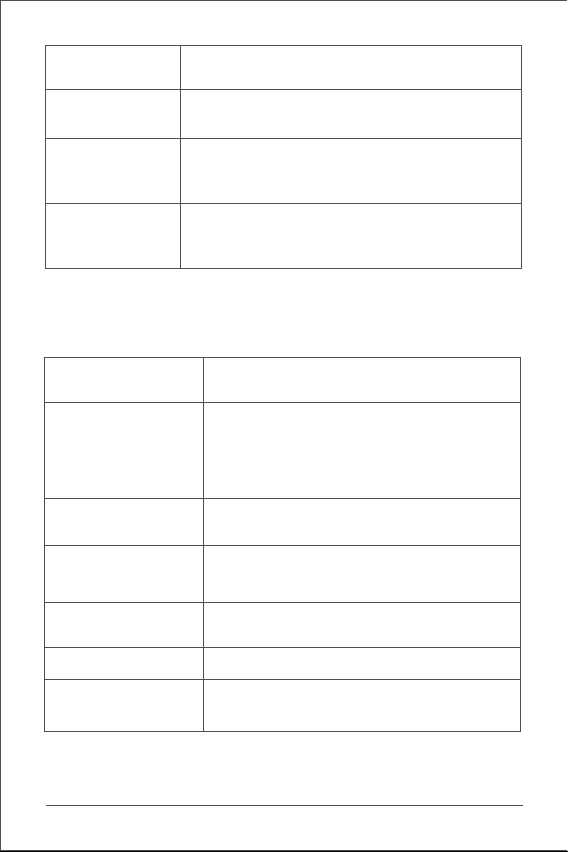
Button Operation Description
Click once
Open, close or stop according to the current state
of the Curtain Driver
Click twice in
succession quickly
Hold, release or stop according to the holding
status of the current Curtain Driver
Set limit point of the range manually
Click three times in
succession quickly
Delete the current range set for the Curtain Driver
Click five times in
succession quickly
11
Indicator Light Description
Buzzer Description
Indicator Light Status Description
Restore factory settings or startup (when it is turned
o)
Quick blinking
of blue light
The Curtain Driver is connecting with the hub
(Aer the device is started for use for the first
time or reset).
Firmware updating is in progress.
Turn o the device
Touch & hold for 10
seconds
Slow blinking of
orange light
Device opening range deleted.
Factory settings restored.
Device searching reaction.
Opening and closing directions switched.
Range limit point was set successfully.
DescriptionBuzzer Status
1 Long beep
3 Short beeps
When the range of Curtain Driver is not
deleted, set the limit point of stroke manually.
When the range of Curtain Driver stroke is
deleted, delete the range again.
The curtain driver is held in place.
The curtain driver is released in place.
Warning of low battery.
2 Short beeps
Holding to the rail is in progress.
Releasing from the rail is in progress.
Green blinking
The device is being charged.
Charging is complete and the adapter is not
removed.
White blinking
Quick blinking of
green light
Steady blinking of
White light
Touch & hold for 5
seconds

12
Battery Charging
When there is a warning of low battery, please charge the Curtain Driver in
a timely fashion. Charging steps are as follows:
Specifications
Dimensions: 145.7 × 96 × 46 mm
Rated Current: 1.5 A
Rated Torque: 0.2 N·m
Wireless Protocol: Zigbee 3.0 IEEE 802.15.4
Model: CM-M01(CM-Curtain Motor series products, M01-the first Motorized
products)
Battery Type: Lithium battery (not replaceable)
Rated Input: 5 V
Rated Power Input: 7.5 W
Rated Rotor Speed:100 r/min
Moving Speed: 12 cm/s
Operating Humidity: 0~95% RH, no condensation
FCC ID: 2AKIT-CMM01
IC: 22635-CMM01
Changes or modifications not expressly approved by the party responsible
for compliance could void the user's authority to operate the equipment.
Note: This equipment has been tested and found to comply with the limits
for a Class B digital device, pursuant to part 15 of the FCC Rules. These
limits are designed to provide reasonable protection against harmful
interference in a residential installation. This equipment generates, uses
and can radiate radio frequency energy and, if not installed and used in
accordance with the instructions, may cause harmful interference to radio
communications. However, there is no guarantee that interference will
not occur in a particular installation. If this equipment does cause harmful
interference to radio or television reception, which can be determined by
turning the equipment o and on, the user is encouraged to try to correct
the interference by one or more of the following measures:
—Reorient or relocate the receiving antenna.
—Increase the separation between the equipment and receiver.
—Connect the equipment into an outlet on a circuit dierent from that to
which the receiver is connected.
—Consult the dealer or an experienced radio/TV technician for help.”
1.Quickly click the setting button twice in succession or use the app to
release the Curtain Driver from the rail, and remove it from the rail;
2.Use the USB charging cable, and plug the end of the Type-C plug into the
charging port on the Curtain Driver and the other end to the adapter for
charging.
3.It takes about 5 hours to fully charge the battery.
13
EU Declaration of Conformity
Hereby, Lumi United Technology Co., Ltd. declares that the
radio equipment type Curtain Driver E1, CM-M01 is in
compliance with Directive 2014/53/EU. The full text of the EU
declaration of conformity is available at the following internet
address: http://www.aqara.com/DoC/
RF Exposure statement
This equipment complies with FCC radiation exposure limits set forth for
an uncontrolled environment. This equipment should be installed and
operated with minimum distance of 20 cm between the radiator and your
body. This transmitter must not be co-located or operating in conjunction
with any other antenna or transmitter.
IC NOTICE TO CANADIAN USERS
This device contains licence-exempt transmitter(s)/receiver(s) that comply
with Innovation, Science and Economic Development Canada’s licence-ex-
empt RSS(s). Operation is subject to the following two conditions:
(1) This device may not cause interference.
(2) This device must accept any interference, including interference that
may cause undesired operation of the device.
This Class B digital apparatus complies with Canadian ICES‐003.
This device complies with RSS‐247 of Industry Canada. Operation is
subject to the condition that this device does not cause harmful
interference.
UK Declaration of Conformity
Hereby, Lumi United Technology Co., Ltd. declares that the radio
equipment type Curtain Driver E1, CM-M01, is in compliance with
Directive 2017 (SI 2017 No. 1206, as amended by SI 2019 No. 696).
The full text of the UK declaration of conformity is available at the following
internet address: http://www.aqara.com/DoC/.
WEEE Disposal and Recycling Information
All products bearing this symbol are waste electrical and electron-
ic equipment (WEEE as in directive 2012/19/EU) which should not
be mixed with unsorted household waste. Instead, you should
protect human health and the environment by handing over your
waste equipment to a designated collection point for the recycling of waste
electrical and electronic equipment, appointed by the government or local
authorities. Correct disposal and recycling will help prevent potential
negative consequences to the environment and human health. Please
contact the installer or local authorities for more information about the
location as well as terms and conditions of such collection points.

14
Zigbee Warnings
Zigbee Operation Frequency: 2405-2475 MHz
Zigbee Maximum Output Power: 13 dBm
Under normal use of condition, this device should be kept a separation
distance of at least 20cm between the antenna and the body of the user.
L'émetteur/récepteur exempt de licence contenu dans le présent appareil
est conforme aux CNR d’Innovation, Sciences et Développement
économique Canada applicables aux appareils radio exempts de licence.
L'exploitation est autorisée aux deux conditions suivantes :
(1) L'appareil ne doit pas produire de brouillage;
(2) L'appareil doit accepter tout brouillage radioélectrique subi, même si
le brouillage est susceptible d'en compromettre le fonctionnement.
Cet appareil numérique de la Classe B conforme à la norme NMB‐003 du
Canada.
Cet appareil est conforme à la norme RSS ‐ 247 d'Industrie Canada. Le
fonctionnement est soumis à la condition que cet appareil ne provoque
pas d'interférences nuisibles.
Federal Communications Commission (FCC) compliance
statement:
This device complies with part 15 of the FCC Rules. Operation is subject
to the following two conditions:
(1) This device may not cause harmful interference, and
(2) this device must accept any interference received, including
interference that may cause undesired operation.
Online Customer Service: www.aqara.com/support
Customer Support Email: [email protected]
Website: www.aqara.com
Manufacturer: Lumi United Technology Co., Ltd.
Address: Room 801-804, Building 1, Chongwen Park, Nanshan iPark, No.
3370, Liuxian Avenue, Fuguang Community, Taoyuan Residential District,
Nanshan District, Shenzhen,China
This equipment complies with IC radiation exposure limits set forth for an
uncontrolled environment. This equipment should be installed and
operated with minimum distance of 20 cm between the radiator and your
body. This transmitter must not be co-located or operating in conjunction
with any other antenna or transmitter.
Cet équipement est conforme aux limites d’exposition aux rayonnements
de la IC établies pour unenvironnement non contrôé. Cet équipement
doit être installé et fonctionner à au moins 20cm de distance d’un
radiateur ou de votre corps.Cet émetteur ne doit pas être co-localisé ou
fonctionner en conjonction avec une autre antenne ou un autre émetteur.
15
Основная информация о продукте
Мотор раздвижных штор E1 (стандарт) ‒ это моторизованное
устройство, которое может автоматически управлять Вашими
шторами, оно основано на беспроводном протоколе Zigbee 3.0 и
может управлять шторами по расписанию и работать с другими
умными устройствами при подключении к приложению Aqara
Home.
Предупреждения
1. Данное устройство могут использовать дети в возрасте от 8 лет
и старше, а также лица с ограниченными физическими,
сенсорными или умственными способностями или с
недостатком опыта и знаний, если они находятся под
наблюдением или получили инструкции относительно
безопасного использования устройства и понимания связанных
с этим опасностей.
2. Не разрешайте детям играть с устройством.
3. Дети не должны производить очистку и техническое
обслуживание без присмотра.
4. ВНИМАНИЕ: Во время очистки, технического обслуживания и
при замене деталей привод должен быть отключен от источника
питания.
5. Он должен питаться только при изолированном или
*Требуется концентратор Aqara Zigbee 3.0. Для некоторых функций требуются
определенные модели концентраторов. Дополнительную информацию см. на
сайте www.aqara.com/support.
Индикатор
Кнопка настройки
порт USB Type-C
Кручок
Ролик
Датчик
света
Нажмите один раз: чтобы
открыть, закрыть или
остановить штору
нажмите два раза подряд:
чтобы освободить, снять или
остановить крючок
нажмите три раза подряд:
чтобы вручную установить
начальное или конечное
положение штор
нажмите и удерживайте в
течение 5 секунд: чтобы
включить устройство или
сбросить до заводских настроек
нажмите и удерживайте в
течение 10 секунд: чтобы
выключить устройство.
16
Упаковочный лист
кабель USB Type-C × 1
блоки раздвижных шкивов × 2
Обучающее видео
Пожалуйста, отсканируйте приведенный ниже QR-код, чтобы
просмотреть видео с руководством по установке и эксплуатации.
Если видео недоступно, Вы также можете установить продукт в
соответствии с методом, описанным в руководстве.
безопасном сверхнизком напряжении (SELV).
6. ВНИМАНИЕ: Важные инструкции по технике безопасности.
Важно, чтобы люди следовали данным инструкциям. Сохраните
эти инструкции.
7. Не разрешайте детям играть с фиксированными элементами
управления.
8. Регулярно проверяйте установку на предмет
несбалансированности и признаков износа или повреждения
пружин и креплений кабелей. Не используйте, если требуется
ремонт или регулировка.
9. Не эксплуатировать, если в непосредственной близости
проводится обслуживание, например, уборка окон.
10. ВНИМАНИЕ: Важные инструкции по технике безопасности.
Следуйте всем инструкциям, поскольку неправильная установка
может привести к серьезным травмам.
11. Перед установкой привода уберите все ненужные шнуры или
компоненты и отключите все оборудование, не требующееся
для работы с питанием.
12. Характеристики приводной части должны быть совместимы с
номинальной нагрузкой и номинальным временем
функционирования.
13. В этом приборе установлены батареи несменного типа.
14. Фиксированные элементы управления должны быть четко
видны после установки.
15. Масса и размеры приводимого в движение полотна должны
соответствовать с номинальным крутящим моментом и
номинальным временем работы.
17
Требования к установке
Типы направляющих
Мотор раздвижных штор E1 (стандарт) можно использовать на
U-образных и I-образных направляющих.
Требования к установке U-образной направляющей
Нижняя поверхность U-образной направляющей должна быть
ровной и гладкой.
Требования к установке I-образной направляющей
Нижняя поверхность I-образной направляющей должна быть
ровной и гладкой, шириной более 10 мм.
ширина > 10 мм
Обе стороны направляющей должны быть плотно закрыты
заглушками.
Если Вы хотите использовать продукт на штангах, приобретите
Привод для штор E1 Версия для штанг.
U-образные направляющие I-образные направляющие
18
Требования к установке блока шкивов для штор
Расстояние от верхней поверхности нижней части подвесного
кольца блока шкива направляющей до нижней части
направляющей должно составлять между 16 мм и 25 мм.
Прямые и специальные направляющие
В случае U-образных и I-образных направляющих привод для штор
E1 поддерживает прямые и изогнутые направляющие. Для
изогнутых направляющих вокруг изгиба должны быть соблюдены
следующие условия:
1.Перед установкой на шторы данный продукт необходимо
подключить к приложению Aqara Home.
2.Перед активацией продукта убедитесь, что у Вас установлено
Инструкция по быстрому запуску
Подготовка перед использованием
Пожалуйста, следуйте шагам ниже для начала использования
продукта.
U-образные направляющие I-образные
направляющие
16~25mm 16~25mm
Вид сверху
Направляющая
Стена
Изгиб
≥25cm

19
3.Пожалуйста, откройте приложение, нажмите «Дом», затем
нажмите «+» в правом верхнем углу для перехода на страницу
«Добавить устройство (аксессуар)». Выберите «Привод для
штор E1» и концентратор, к которому необходимо
подключиться, и добавьте его, следуя инструкциям в
приложении Aqara Home. Нажмите и удерживайте кнопку
настройки в течение 5 секунд и дождитесь голосовой подсказки
от концентратора.
4.Если Вы приобрели два или более приводов для штор,
подключите их все к приложению Aqara Home перед
дальнейшей установкой.
5.Если Вы используете двусторонние шторы, то к приложению
необходимо подключить два привода для штор, после чего
объединить их в одну группу для одновременного управления.
Войдите на главную страницу привода для штор, который
нужно сгруппировать, нажмите «...» в правом верхнем углу,
выберите «Создать группу для штор» и следуйте инструкциям.
6.Перед установкой рекомендуется полностью зарядить
устройство.
1.После запуска дважды быстро нажмите кнопку настройки,
чтобы освободить крючок Умного привода для штор, пока он не
достигнет максимальной длины.
2.Повесьте умный привод для штор на первый и второй блоки
шкивов на подвижной стороне штор (как показано на рисунке).
3.Совет: если на направляющей есть дополнительные блоки
шкивов, их можно разместить между первым и вторым
крючками шторы, над которыми можно разместить привод для
штор.
4.Быстро дважды нажмите кнопку настройки, чтобы удерживать
привод для штор на направляющей. В этот момент зеленый
индикатор продолжает мигать, а зуммер издаст 3 коротких
звуковых сигнала после того, как устройство удерживается на
месте, указывая на то, что установка завершена.
Способы установки
Способы установки U-образной направляющей
Односторонние шторы (требуется только один умный привод
для штор)
приложение Aqara Home и концентратор Aqara Zigbee 3.0
(отсканируйте QR-код ниже, чтобы загрузить приложение).
20
Способы установки I-образной направляющей
Односторонние шторы (требуется только один Умный привод
для штор)
Двусторонние шторы (требуются два Умных привода для штор)
Согласно способу установки приводов для штор, открывающихся
с одной стороны, повесьте два умных привода для штор на блоки
шкивов штор с левой и правой стороны соответственно (как
показано на рисунке ниже).
Данный продукт можно настроить в приложении для открывания
и закрывания штор в зависимости от интенсивности
окружающего освещения. Для использования этой функции
датчик света должен быть направлен в сторону окна, а привод для
штор должен быть установлен сбоку рядом с окном. Если Вам
требуется управлять открыванием и закрыванием штор в
соответствии с освещением в помещении, то датчик света должен
быть направлен внутрь, а привод для штор должен быть
установлен на стороне возле внутренней стороны. Чтобы
оптимизировать эффект датчика света, убедитесь, что перед ним
нет непрозрачных объектов.
направление открывания штор
второй блок шкивов
Направление открывания штор
первый блок шкивов
U-образная направляющая
Крючок достиг
максимальной
длины
крючок
зафиксирован в
самом коротком
положении
U-образная направляющая
21
Двусторонние шторы (требуются два Умных привода для штор)
Согласно способу установки приводов для штор для одинарных
открывающихся занавесок, повесьте два интеллектуальных
привода занавесов на блоки шкивов занавесок с левой и правой
стороны соответственно (как показано на рисунке ниже).
Данный продукт можно настроить в приложении для открывания
и закрывания штор в зависимости от интенсивности
окружающего освещения. Для использования этой функции
датчик света должен быть направлен в сторону окна, а привод для
штор должен быть установлен сбоку рядом с окном. Если Вам
нужно управлять открыванием и закрыванием штор в
соответствии с освещением в помещении, то датчик света должен
быть направлен внутрь, а привод для штор должен быть
установлен на стороне возле внутренней стороны. Чтобы
оптимизировать эффект датчика света, убедитесь, что перед ним
нет непрозрачных объектов.
1.После запуска дважды быстро нажмите кнопку настройки,
чтобы освободить крючок Умного привода для штор, пока он не
достигнет максимальной длины.
2.Установите два регулируемых блока шкивов на направляющую
и поместите их между первым и вторым блоками шкивов на
подвижной стороне штор
3.Повесьте Умный привод для штор на два установленных
регулируемых блока шкивов (как показано на рисунке).
4.Быстро дважды нажмите кнопку настройки, чтобы удерживать
привод для штор на направляющей. В этот момент зеленый
индикатор продолжает мигать, а зуммер издаст 3 коротких
звуковых сигнала после того, как устройство удерживается на
месте, указывая на то, что установка завершена.
направление открывания штор
I-образная направляющая
первый блок шкивов
второй блок шкивов
Крючок достигает
максимальной длины
крючок
зафиксирован в
самом коротком
положении
22
Настройки расстояния открытия
Чтобы гарантировать правильное использование устройства,
диапазон для устройства должен быть установлен после его
установки.
Односторонние шторы
1.После подключения устройства к приложению Aqara Home
расстояние открытия устройства можно настроить в
приложении. На главной странице приложения нажмите
карточку устройства и установите ход, следуя инструкциям на
главной странице устройства.
2.Кроме того, расстояние открытия устройства можно
установить, нажав кнопку настройки, когда устройство не
подключено к приложению Aqara Home. Подробные операции
следующие:
A) Тяните занавеску до тех пор, пока она полностью не закроется,
затем установите привод для штор на направляющую в
соответствии с способу установки для «односторонних штор».
Направление открывания штор
I-образная направляющая

23
B) Затем быстро нажмите кнопку настройки 3 раза подряд, чтобы
установить первую граничную точку диапазона. После длинного
звукового сигнала первая граничная точка будет успешно
установлена.
C) Тем временем привод для штор автоматически подойдет к
точке ограничения открытия и остановится после оттягивания
его в направлении полного открытия примерно на 10 см. После
длинного звукового сигнала автоматически будет установлена
другая граничная точка, что означает, что диапазон открытия
устройства был установлен.
Вторая точка ограничения хода
(положение шторы «полностью
открыто»)
Первая точка ограничения хода
(положение шторки «полностью закрыто»)
10 см
Точка автоматической остановки мотора
24
Двусторонние шторы
A) Оттяните шторы с левой и правой стороны до тех пор, пока они
полностью не закроются, и установите два привода штор в
положение на направляющей, где шторы полностью закрыты,
согласно методу установки для «односторонних штор».
B) Установите расстояние открытия приводов для штор с левой и
правой стороны в соответствии с шагами B и C для
«односторонних штор».
Операции с кнопками
Описание
Нажать один раз
Выполнение операции открывания,
закрывания или остановка в соответствии с
текущим состоянием привода для штор.
Выполнение операций удержания,
отпускания или остановки в соответствии с
состоянием удержания текущего привода для
штор.
Быстро нажать
два раза подряд
Операции с
кнопками
25
Описание светового индикатора
Сброс до заводских настроек или запуск
(когда устройство выключено)
Удалить текущий диапазон, установленный
для привода для штор.
Привод для штор подключается к
концентратору
(После того, как устройство будет
запущено для использования в первый
раз или перезагружено).
Установить границу диапазона вручную
Быстро нажать
три раза подряд
Выключить устройство
Нажать и
удерживать 10
секунд
Быстрое мигание
синим
Выполняется обновление прошивки.
Медленное мигание
оранжевым
Выполняется операция удержания в
направляющей.
Быстрое мигание
зеленым
Статус светового
индикатора
Описание
Быстро нажать
пять раз подряд
Выполняется операция отпускания в
направляющей
Устройство заряжается.Мигает белым
Зарядка завершена, адаптер не
снимается.
Мигает зеленым
Непрерывное
мигание белым
Нажать и
удерживать 5
секунд

26
Зарядка батареи
При появлении предупреждения о низком заряде батареи
своевременно зарядите привод для штор. Зарядка производится
следующим образом:
Информация о параметрах продукта
Размеры: 145.7 × 96 × 46мм
Номинальный ток: 1.5 A
Номинальный крутящий момент: 0.2 Н·м
Беспроводной протокол: Zigbee 3.0 IEEE 802.15.4
Модель: CM-M01(CM-Curtain Motor series products, M01-the first
1.Быстро нажмите кнопку настройки два раза подряд или
используйте приложение, чтобы освободить привод для штор
от направляющей и снять его с направляющей;
2.Используйте USB-кабель для зарядки и вставьте конец вилки
Type-C в порт для зарядки на приводе для штор, а другой конец
‒ в адаптер для зарядки.
3.Полная зарядка батареи занимает около 5 часов.
Описание звуковых сигналов устройства
Диапазон открытия устройства удален.
Сброс до заводских настроек выполнен.
Реакция на поиск устройства.
Переключение направления открытия и
закрытия.
Точка ограничения диапазона успешно
установлена.
ОписаниеЗвуковой сигнал
1 длинный
звуковой сигнал
3 коротких
звуковых сигнала
Если диапазон Привода для штор не
удален, установите граничную точку хода
вручную.
Если диапазон Привода для штор не
удален, установите граничную точку хода
вручную.
Привод для штор удерживается на месте.
Отпускание привода для штор с места.
Предупреждение о низком заряде
батареи.
2 коротких
звуковых сигнала

27
1.Этот прибор - НЕ игрушка. Пожалуйста, не допускайте к нему
детей.
2.Данный прибор предназначен только дляиспользования внутри
помещений. Не используйте его во влажных средах или на
открытом воздухе.
3.Оберегайте прибор от воздействия влаги, не допускайте
попадания воды или других жидкостей на устройство.
4.Не размещайте прибор вблизи источников тепла.
5.Не помещайте прибор в закрытый корпус, если там нет
нормальной вентиляции.
6.Не пытайтесь отремонтировать прибор самостоятельно. Все
ремонтные работы должны выполняться авторизованным
специалистом.
Этот прибор предназначен только для повышения удобства,
качества домашних развлечений и напоминания о статусе
устройства. Он не предназначен для использования в качестве
охранного оборудования для дома, здания, склада или любых
других мест. Если пользователь нарушает инструкции по
использованию прибора, производитель не несет никакой
ответственности за риски и повреждения имущества.
Информация о мерах при неисправности оборудования
В случае обнаружения неисправности оборудования:
1. Извлеките элемент питания;
2. Обратитесь в сервисный центр для получения консультации или
ремонта оборудования
* Оборудование не нуждается в периодическом обслуживании в
течение срока службы
Онлайн-служба поддержки клиентов:
www.aqara.com/support
Эл. почта поддержки клиентов: [email protected]
Сайт: www.aqara.com
Производитель: Lumi United Technology Co., Ltd.
Адрес: Офис 801-804, здание 1, парк Чонгвен, Наньшань iPark, №
3370, проспект Люсянь, микрорайон Фугуан, жилой район
Таоюань, р-н Наньшань, г. Шэньчжэнь, Китай.
Motorized products)
Тип батареи: литиевая батарея (аккумуляторная, несменная)
Номинальное напряжение: 5 В
Номинальная потребляемая мощность: 7,5 Вт
Скорость ротора: 100 об/мин
Скорость движения: 12 см/с
Рабочая влажность: 0~95% относительной влажности, без
конденсации
Правила и условия хранения и транспортировки
Оборудование должно быть защищено от внешних воздействий.
Допустимая температура окружающего воздуха -20° ‒ +60°C (-4° ‒
140°F)

28
Produkt-Einführung
Vorhangsmotor E1 ist ein motorisiertes Gerät, das Ihre vorhandenen
Vorhänge automatisch steuern kann. Es basiert auf dem drahtlosen
Zigbee 3.0-Protokoll und kann eine zeitgesteuerte Steuerung von
Vorhängen und arbeitet mit anderen smarten Geräten zusammen, wenn
es mit der Aqara-Home-App in Verbindung steht.
Warnungen
1.Dieses Gerät kann von Kindern ab 8 Jahren und Personen mit
eingeschränkten körperlichen, sensorischen oder geistigen Fähigkeiten
oder Mangel an Erfahrung und Wissen verwendet werden, wenn sie
beaufsichtigt oder in Bezug auf den sicheren Gebrauch des Geräts
unterwiesen wurden und die damit verbundenen Gefahren verstehen.
2.Kinder dürfen nicht mit dem Gerät spielen.
3.Reinigung und Benutzerwartung dürfen nicht von Kindern ohne
Aufsicht durchgeführt werden.
4.WARNUNG: Der Antrieb muss während der Reinigung, Wartung und
beim Austausch von Teilen von seiner Stromquelle getrennt werden.
5.Es darf nur mit getrennter oder Schutzkleinspannung (SELV) versorgt
werden.
6.WARNHINWEIS: Wichtige Sicherheitshinweise. Für die Sicherheit von
*Ein Aqara Zigbee 3.0-Hub ist erforderlich. Für einige Funktionen sind bestimmte
Modelle von Hubs erforderlich. Bitte besuchen Sie www.aqara.com/support für
weitere Details.
Anzeige
Einstelltaste
USB Typ-C
Anschluss
Haken
Rad
Lichtsensor
Einzelklicken: zum Önen,
Schließen oder Stoppen des
Vorhangs
Doppelklicken:zum Lösen,
Zurückziehen oder Stoppen der
Haken
Dreifachklicken: zum manuellen
Einstellen der Ausgangs- und
Endposition des Vorhangs
5 Sekunden lang berühren und
halten: zum Einschalten des
Geräts oder zum Zurücksetzen
auf die Werkseinstellungen
10 Sekunden lang berühren und
halten: zumAusschalten des
Geräts.
29
Verpackungsliste
Typ-C Kabel × 1 Einstellbare Flaschenzüge × 2
Tutorial-Video
Bitte scannen Sie den QR-Code in unten, um das Video mit der
Installations- und Bedienungsanleitung zu sehen. Wenn das Video nicht
erreicht werden kann, können Sie das Produkt auch gemäß der im
Handbuch der im Handbuch beschriebenen Methode installieren.
Personen ist es wichtig, diese Anweisungen zu befolgen. Bewahren Sie
diese Anweisungen auf.
7.Unter lassen Sie Kinder nicht mit feststehenden Bedienelementen
spielen.
8.Überprüfen Sie die Installation häufig auf Unwucht und Anzeichen von
Verschleiß oder Beschädigung von Kabelfedern und Befestigungen.
Nicht verwenden, wenn eine Reparatur oder Einstellung erforderlich
ist.
9.Betreiben Sie nicht in Betrieb nehmen, wenn in der Nähe Wartungsarbe-
iten, wie z. B. Fensterreinigung, durchgeführt werden.
10.WARNHINWEIS: Wichtige Sicherheitshinweise. Befolgen Sie alle
Anweisungen, da eine falsche Installation zu schweren Verletzungen
führen kann.
11.Entfernen Sie vor der Installation des Laufwerks alle unnötigen Kabel
oder Komponenten und deaktivieren Sie alle Geräte, die nicht für den
Betrieb mit Strom benötigt werden.
12.Dass die Eigenschaen des angetriebenen Teils mit der Nennlast und
der Nennbetriebszeit kompatibel sein müssen.
13.Dieses Gerät enthält Batterien, die nicht austauschbar sind.
14.Feste Bedienelemente müssen nach dem Einbau gut sichtbar sein.
15. Die Masse und die Abmessungen des anzutreibenden Vorhangs
müssen mit dem Nenndrehmoment und der Nennbetriebsdauer
kompatibel sein.

30
Installationsanforderung
Schienentyp
Wenn Sie das Produkt an Stangen verwenden möchten, kaufen Sie bitte
die Vorhangsmotor E1 Stangen-Version.
Installation Requirements of U-Rail
Die Unterseite der U-Schiene soll flach und glatt sein.
Installationsanforderungen der I-Schiene
Die Unterseite der I-Schiene solle flach und glatt sein und eine Breite von
mehr als 10 mm aufweisen.
Breite> 10 mm
Beide Seiten der Schiene sollen mit Verschlussköpfen dicht verschlossen
werden.
Wenn Sie das Produkt an Stangen verwenden möchten, kaufen Sie bitte
die Vorhangsmotor E1 Stangen-Version.
U-Schiene I-Schiene
31
Installationsanforderungen des Vorhangrollenblocks
Der Abstand von der Oberseite der Unterseite des Aufhängerings des
Schienenflaschenzugs zur Unterseite der Schiene soll zwischen 16 mm
und 25 mm betragen.
Gerade und speziell geformte Schienen
Für U-Schienen und I-Schienen unterstützt der Vorhangsmotor E1 gerade
und gebogene Schienen. Für gebogenen Schienen sollen die folgenden
Bedingungen im Bereich der Biegung erfüllt sein:
1. Dieses Produkt muss mit der Aqara Home App verbunden werden,
bevor es auf den Vorhängen installiert werden.
2. Bevor Sie das Produkt aktivieren, stellen Sie bitte sicher, dass Sie die
Aqara Home App und den Aqara Zigbee 3.0 Hub installiert haben (Bitte
scannen Sie den QR-Code unten, um die App herunterzuladen).
Schnellstart-Anleitung
Vorbereitung vor Gebrauch
Bitte lesen Sie die folgenden Schritte, um das Produkt zu benutzen.
U - Schienengleiter I - Schienengleiter
16~25mm 16~25mm
Draufsicht
Sonderförmige Schiene
Fensterrahmen
Gleisdrehung
≥25cm

32
3. Bitte önen Sie die App, tippen Sie auf „Home“ und dann auf „+“ in der
oberen rechten Ecke, um die Seite „Gerät hinzufügen (Zubehör)“
aufzurufen. Wählen Sie „Vorhangsmotor E1“ und den Hub, mit dem es
verbunden werden soll, und fügen Sie es gemäß den Anweisungen in
der Aqara Home App hinzu. Halten Sie die Einstellungstaste 5
Sekunden lang gedrückt und warten Sie auf die Sprachansage des
Hubs.
4. Wenn Sie zwei oder mehr Vorhangsmotoren erworben haben,
verbinden Sie bitte alle vor der weiteren Installation mit der Aqara
Home App.
5. Wenn Sie doppelseitige Vorhänge verwenden, ist es erforderlich, zwei
Vorhangsmotoren mit der App zu verbinden und sie dann für die
gleichzeitige Steuerung in einer Gruppe zusammenzufassen. Rufen Sie
die Hauptseite des zu gruppierenden Vorhangsmotors auf, klicken Sie
auf „... “ in der oberen rechten Ecke, wählen Sie „Eine Gruppe für
Vorhänge erstellen“ und folgen Sie den Anweisungen.
6. Es wird empfohlen, das Produkt vor der Installation vollständig
aufzuladen.
1. Klicken Sie nach dem Einschalten zweimal schnell hintereinander auf
die Einstelltaste, um den Haken des smarten Vorhangsmotors zu lösen,
bis er die maximale Länge erreicht hat.
2. Hängen Sie den smarten Vorhangsmotor an den ersten und zweiten
Flaschenzug auf der der beweglichen Seite des Vorhangs (wie in der
Abbildung gezeigt).
3. Hinweise: Wenn an der Schiene zusätzliche Umlenkrollen vorhanden
sind, können diese zwischen dem ersten und zweiten Haken des
Vorhangs angebracht werden, über denen der Vorhangsmotor
angebracht werden kann.
4. Klicken Sie zweimal schnell hintereinander auf die Einstelltaste, um
den Vorhangsmotor an der der Schiene zu halten. In diesem Moment
blinkt die grüne Anzeigelampe, und es ertönen 3 kurze Pieptöne der
Summer, nachdem das Produkt an seinem Platz gehalten wurde, was
anzeigt, dass die Installation abgeschlossen ist.
Installationsmethode
Installationsmethode für U-Schiene
Einseitiger Vorhang (es wird nur ein smarter Vorhangsmotor benötigt)

33
1. Klicken Sie nach dem Einschalten zweimal schnell hintereinander auf
Installationsmethode für I-Schiene
Einseitiger Vorhang (es wird nur ein smarter Vorhangsmotor benötigt)
Doppelseitige Vorhänge (zwei smarte Vorhangsmotoren sind erforderlich)
Hängen Sie die beiden smarten Vorhangsmotoren entsprechend der
Installationsmethode von Vorhangsmotor für einfach zu önende
Vorhänge an den Rollenblöcken der Vorhänge auf der linken bzw.
rechten Seite auf (wie in der Abbildung unten gezeigt).
Dieses Produkt kann über die App so konfiguriert werden, dass die
Vorhänge je nach Intensität des Umgebungslichts geönet und
geschlossen werden. Um die Funktion zu nutzen, soll der Lichtsensor aus
dem Fenster zeigen und der Vorhangsmotor soll auf der Seite in der Nähe
des Fensters installiert werden. Wenn Sie das Önen und Schließen der
Vorhänge in Abhängigkeit vom Licht im Innenbereich steuern möchten,
soll der Lichtsensor nach innen gerichtet sein und der Vorhangsmotor
soll auf der der Seite in der Nähe des Innenraums installiert werden. Um
die Wirkung des Lichtsensors zu optimieren, stellen Sie bitte sicher, dass
dass sich kein undurchsichtiges Objekt vor dem Sensor befindet.
Önungsrichtung der Vorhänge
der erste Flaschenzug
Önungsrichtung der Vorhänge
der zweite Flaschenzug
U-Schiene
Der Haken reicht
bis zur maximalen
Länge
Der Haken wird an
der Innenseite
verriegelt
U-Schiene
34
Doppelseitige Vorhänge (zwei smarte Vorhangsmotoren sind erforderlich)
Hängen Sie die beiden smarten Vorhangsmotoren entsprechend der
Installationsmethode von Vorhangsmotor für einfach zu önende
Vorhänge an den Rollenblöcken der Vorhänge auf der linken bzw. rechten
Seite auf (wie in der Abbildung unten gezeigt).
Dieses Produkt kann über die App so konfiguriert werden, dass die
Vorhänge je nach Intensität des Umgebungslichts geönet und
geschlossen werden. Um die Funktion zu nutzen, soll der Lichtsensor aus
dem Fenster zeigen und der Vorhangsmotor soll auf der Seite in der Nähe
des Fensters installiert werden. Wenn Sie das Önen und Schließen der
Vorhänge in Abhängigkeit vom Licht im Innenbereich steuern möchten,
soll der Lichtsensor nach innen gerichtet sein und der Vorhangsmotor
soll auf der der Seite in der Nähe des Innenraums installiert werden. Um
die Wirkung des Lichtsensors zu optimieren, stellen Sie bitte sicher, dass
dass sich kein undurchsichtiges Objekt vor dem Sensor befindet.
2. Montieren Sie die beiden verstellbaren Umlenkrollen an der Schiene
und setzen Sie sie genau zwischen die dem ersten und dem zweiten
vorhandenen Flaschenzug auf der beweglichen Seite der Vorhänge (wie
wie in der Abbildung gezeigt).
3. Hängen Sie den smarten Vorhangsmotor an die beiden neu installierten
verstellbaren Umlenkrollen.
4. Klicken Sie zweimal schnell hintereinander auf die Einstelltaste, um den
Vorhangsmotor an der der Schiene zu halten. In diesem Moment blinkt
die grüne Anzeigelampe, und es ertönen 3 kurze Pieptöne der Summer,
nachdem das Produkt an seinem Platz gehalten wurde, was anzeigt,
dass die Installation abgeschlossen ist.die Einstelltaste, um den Haken
des smarten Vorhangsmotors zu lösen, bis er die maximale Länge
erreicht hat.
Önungsrichtung der Vorhänge
I-Schiene
der erste Flaschenzug
der zweite Flaschenzug
Der Haken reicht
bis zur maximalen
Länge
Der Haken wird an
der Innenseite
verriegelt
35
Einstellungen für den Öffnungsabstand
Um eine ordnungsgemäße Verwendung des Produkts zu gewährleisten,
soll die Reichweite nach der Installation des Produkts eingestellt werden.
Einseitiger Vorhang
1. Nachdem das Gerät mit der Aqara Home App verbunden ist, kann der
Önungsabstand des Gerätes in der App konfiguriert werden. Klicken
Sie auf die Gerätekarte auf der Startseite der App und stellen Sie den
Hub wie auf der Hauptseite des Geräts beschrieben ein.
2. Außerdem kann die Önungsweite des Geräts durch Drücken der
Einstelltaste eingestellt werden, wenn das Gerät nicht mit der Aqara
Home App verbunden ist. Die detaillierten Vorgänge sind wie folgt wie
folgt:
A) Ziehen Sie den Vorhang zu, bis er vollständig geschlossen ist, und
installieren Sie den Vorhangsmotor an der auf der Schiene gemäß der
Installationsmethode für „einseitige Vorhänge“.
Önungsrichtung der Vorhänge
I-Schiene

36
B) Klicken Sie dann 3 Mal schnell hintereinander auf die Einstelltaste, um
den ersten Grenzpunkt des Bereichs zu setzen. Der erste Grenzwert ist
nach dem langen „Piepton“ erfolgreich eingestellt.
C)In der Zwischenzeit fährt der Vorhangsmotor automatisch bis zur
Önungsgrenze und stoppt, nachdem er etwa 10 cm in die volle
Önungsrichtung gezogen wurde. Nach dem langen „Piepton“ wird
automatisch und erfolgreich ein weiterer Endpunkt gesetzt, was
bedeutet, dass der Önungsbereich des Geräts eingestellt ist.
etwa 10cm
An diesem Punkt beginnt der
Vorhangbegleiter automatisch zu laufen
Anderer Fahrtbegrenzungspunkt (Vorhang
"vollständig geönet"-Position)
Erster Fahrtbegrenzungspunkt (Vorhang
"vollständig geschlossen"-Position)
37
Doppelseitige Vorhänge
A)Ziehen Sie die Vorhänge auf der linken und rechten Seite, bis sie
vollständig geschlossen sind, und montieren Sie die beiden Vorhang-
smotoren an der Stelle der Schiene, an der die Vorhänge vollständig
geschlossen sind gemäß der Installationsmethode für „einseitige
Vorhänge“.
B) Stellen Sie den Önungsabstand für den Vorhangsmotor auf der linken
und rechten Seite gemäß Schritt B und C für die „einseitigen Vorhänge“
ein.
38
Tastenbedienung
Beschreibung der Anzeige
Tastenbedienung Beschreibung
Beschreibung
Einzelklick
Vorgänge von Önen, Schließen oder Stoppen
entsprechend dem aktuellen Status des des
Vorhangsmotors
Werkseinstellungen wiederherstellen oder starten
(wenn es ausgeschaltet ist)
Den aktuell eingestellten Bereich für den
Vorhangsmotor löschen
Beschreibung der
Anzeige
Vorgänge von Halten, Freigeben oder Anhalten
entsprechend dem Haltestatus des aktuellen
Vorhangsmotors
Der Vorhangsmotor verbindet sich mit dem
Nabe
(Nachdem das Gerät zum ersten Mal in Betrieb
genommen oder zurückgesetzt wurde).
Firmware wird aktualisiert
Grenzpunkt des Bereichs manuell einstellen
Schnell dreimal
hintereinander
klicken
Schnell zweimal
hintereinander
klicken
ausschalten
10 Sekunden lang
berühren und
halten
Schnell fünfmal
hintereinander
klicken
Schnelles Blinken
von orangem Licht
Schnelles Blinken
von blauem Licht
5 Sekunden lang
berühren und
halten

39
Aufladen der Batterie
Wenn eine Warnung über einen niedrigen Batteriestand angezeigt wird,
laden Sie den Vorhangsmotor bitte rechtzeitig auf. Die Schritte zum
Aufladen sind wie folgt:
Buzzer-Beschreibung
Schiene wird festgehalten
Geräteönungsbereich gelöscht.
Werkseinstellungen wiederhergestellt.
Reaktion der Gerätesuche.
Önungs- und Schließrichtung gewechselt;
Der Bereichsgrenzpunkt wurde erfolgreich
gesetzt.
Schiene wird gelöst
Blinken von grünem
Licht
Auflade
Der Ladevorgang ist abgeschlossen und der
Adapter ist nicht entfernt
Blinken von weißem Licht
Schnelles Blinken
von grünem Licht
BeschreibungBuzzer-Status
1 langer Signalton
3 kurze Töne
Wenn der Bereich des Vorhangsmotors nicht
gelöscht wird, stellen Sie den Endpunkt des
Hubes manuell ein.
Wenn der Bereich des Hubs des Vorhangsmo-
tors gelöscht wurde, löschen Sie den Bereich
erneut.
Der Vorhangsmotor ist in Position;
Der Vorhangsmotor ist in Position gelöst;
Warnung vor schwacher Batterie.
2 kurze Töne
Ständiges Blinken
von weißem Licht

40
Informationen zu den Produktparametern
Zigbee-Warnungen
Abmessungen: 145,7 × 96 × 46 mm
Nennstrom: 1,5 A
Nenndrehmoment: 0,2 N-m
Drahtloses Protokoll: Zigbee 3.0 IEEE 802. 15.4
Modell: CM-M01(CM-Curtain Motor series products, M01-the first
Motorized products)
Batterie-Typ: Lithium-Batterie (nicht austauschbar)
Nennspannung: 5 V
Nennleistung: 7.5 W
Rotationsgeschwindigkeit: 100 U/min
Bewegungsgeschwindigkeit: 12 cm/s
Lufeuchtigkeit bei Betrieb: 0~95% RH, keine Kondensation
Zigbee-Betriebsfrequenz: 2405-2475 MHz
Zigbee Maximale Ausgangsleistung: 13 dBm
Unter normalen Bedingungen soll dieses Gerät in einem Abstand von
mindestens mindestens 20 cm zwischen der Antenne und dem Körper des
Benutzers eingehalten werden.
EU-Konformitätserklärung
Hiermit bestätigt Lumi United Technology Co., Ltd., dass das
Funkgerät des Typs Curtain Driver E1, CM-M01 mit der
Verordnung 2014/53/EU in Einklang steht. Der vollständige
Wortlaut der EU-Konformitätserklärung ist unter der folgenden
Internetadresse abrufbar: http://www.aqara.com/DoC/
1. Klicken Sie schnell zweimal hintereinander auf die Einstelltaste oder
verwenden Sie die App, um den Vorhangsmotor von der Schiene zu
lösen und ihn von der Schiene zu entfernen;
2.Verwenden Sie das USB-Ladekabel, und stecken Sie das Ende des
Typ-C-Steckers in den Ladeanschluss am Vorhangsmotor und das
andere Ende in den Adapter zum Aufladen.
3. Es dauert etwa 5 Stunden, bis die Batterie vollständig aufgeladen ist..

41
WEEE-Informationen zur Entsorgung und zum Recycling
Alle mit diesem Symbol gekennzeichneten Produkte sind
Elektroschrott und Elektrogeräte (WEEE entsprechend
EU-Richtlinie 2012/19/EU) und dürfen nicht mit unsortiertem
Haushaltsmüll vermischt werden. Schützen Sie stattdessen Ihre
Mitmenschen und die Umwelt, indem Sie Ihre zu entsorgenden
Geräte an eine dafür vorgesehene, von der Regierung oder einer
lokalen Behörde eingerichtete Sammelstelle zum Recycling von
Elektroschrott und Elektrogeräten bringen. Eine ordnungsgemäße
Entsorgung und Recycling helfen, negative Auswirkungen auf die
Gesundheit von Umwelt und Menschen zu vermeiden. Wenden Sie sich
bitte an den Installateur oder lokale Behörden, um Informationen zum
Standort und den allgemeinen Geschäsbedingungen solcher Sammelstel-
len zu erhalten.
Online-Kundendienst: www.aqara.com/support
Kundendienst-E-Mail: [email protected]
Webseite: www.aqara.com
Fabrikat: Lumi United Technology Co., Ltd.
Anschri: 801-804, Gebäude 1, Chongwen Park, Nanshan Zhiyuan, Nr. 3370,
Liuxian Avenue, Fuguang community, Taoyuan Straße, Nanshan Bezirk,
Shenzhen, China
Made in China

42
Présentation du produit
Moteur Rideau E1 est un dispositif motorisé qui peut contrôler
automatiquement vos rideaux existants, il est basé sur le protocole sans
fil Zigbee 3.0 et peut réaliser un contrôle programmé des rideaux et
fonctionner avec d'autres appareils intelligents lorsqu'il est connecté à
l'application Aqara Home.
Avertissements
1. Cet appareil peut être utilisé par des enfants âgés de 8 ans et plus et
des personnes ayant des capacités physiques, sensorielles ou mentales
réduites ou un manque d’expérience et de connaissances s’ils ont reçu
une supervision ou une instruction concernant l’utilisation de l’appareil
de manière sécuritaire et comprennent les dangers en cause.
2. Les enfants ne doivent pas jouer avec l’appareil.
3. Le nettoyage et l’entretien de l’utilisateur ne doivent pas être e_ectués
par des enfants sans supervision.
4. AVERTISSEMENT : le lecteur doit être déconnecté de sa source
d’énergie pendant le nettoyage, l’entretien et le remplacement des
pièces.
5. Il ne doit être fourni qu’à la tension extra-basse séparée ou de sécurité
(SELV).
*Un hub Aqara Zigbee 3.0 est requis. Certaines fonctions nécessitent des modèles
spécifiques de hub.
*Veuillez consulter www.aqara.com/support pour plus de détails.
Indicateur
Bouton de réglage
Port USB Type-C
Crochet
roue
Capteur de
lumière
Cliquer une fois : pour ouvrir,
fermer ou arrêter le rideau ;
Cliquez deux fois de suite: pour
libérer, retirer ou arrêter le
crochet ;
Cliquez sur trois fois de suite :
pour régler manuellement la
position de début ou de fin du
rideau ;
Touchez et maintenez enfoncé
pendant 5 secondes : pour
allumer l'appareil ou réinitialiser
les paramètres d'usine ;
Touchez et maintenez enfoncé
pendant 5 secondes : pour
éteindre l'appareil.
43
Liste d'emballage
USB Câble de type C × 1 blocs de poulie réglables × 2
Tutoriel Vidéo
Veuillez scanner le code QR ci-dessous pour visualiser la vidéo du guide
d'installation et d'utilisation. Sila vidéo n'est pas accessible, vous pouvez
également installer le produit en suivant la méthode méthode décrite
dans le manuel.
6. AVERTISSEMENT : Instructions de sécurité importantes. Il est
important que la sécurité des personnes suive ces instructions.
Enregistrez ces instructions.
7. Ne laissez pas les enfants jouer avec des commandes fixes.
8. Examiner fréquemment l’installation pour le déséquilibre et les signes
d’usure ou de dommages aux ressorts et aux fixations des câbles. Ne
pas utiliser si la réparation ou l’ajustement est nécessaire.
9. N'utilisez pas l'appareil lorsque des travaux d'entretien, tels que le
nettoyage des vitres, sont en cours à proximité.
10. AVERTISSEMENT : Instructions de sécurité importantes. Suivez toutes
les instructions car une installation incorrecte peut entraîner des
blessures graves.
11. Avant d’installer le lecteur, retirez les cordons ou composants inutiles
et désactivez tout équipement non nécessaire au fonctionnement
alimenté.
12. Les caractéristiques de la pièce entraînée doivent être compatibles
avec la charge nominale et le temps d’exploitation nominal.
13. Cet appareil contient des batteries qui ne sont pas remplaçables.
14. Les commandes fixes doivent être clairement visibles après
l’installation.
15. La masse et la dimension du rideau à entraîner doivent être
compatibles avec le couple nominal et la durée de fonctionnement
nominale.
44
Exigences d'installation
Types de rails
Le Moteur Rideau Intelligent E1 Standard Edition peut être utilisé sur des
rails en U et des rails en I.
Exigences d'installation du Rail en U
La surface inférieure du rail en U doit être plate et lisse.
Exigences d'installation du Rail en I
La surface inférieure du rail en I doit être plate et lisse, avec une largeur
supérieure à 10 mm
Largeur >10mm
Les deux côtés du rail doivent être fermés solidement par des têtes de
fermeture.
Si vous souhaitez utiliser le produit sur des tringles, veuillez acheter le
Moteur Rideau E1 version tige.
Rails en U Rails en I

45
Conditions d'installation de la Poulie de Rideau
La distance entre la surface supérieure de la partie inférieure de l'anneau
de suspension de la poulie du rail et le bas du rail doit être comprise
entre 16mm et 25 mm.
Rails droits et de forme spéciale
Pour les rails en U et en I, le Moteur Rideau E1 supporte les rails droits et
en courbes. Pour rails en courbes, les conditions suivantes doivent être
respectées autour du coude :
1.Ce produit doit être connecté à l'application Aqara Home avant d'être
installé sur les rideaux.
2.Avant d'activer le produit, veuillez vous assurer que l'application Aqara
Home et le concentrateur Aqara Zigbee 3.0 sont installés (Veuillez
scanner le code QR ci-dessous pour télécharger l'application).
Guide de démarrage rapide
Préparation avant utilisation
Veuillez lire les étapes suivantes pour commencer à utiliser le produit.
Glisseur de rail en U Glisseur de rail en I
16~25mm 16~25mm
Vue de dessus
Piste courbe
Mur
point tournant de la piste
≥25cm

46
3. Ouvrez l'application, appuyez sur "Home", puis sur "+" dans le coin
supérieur droit pour accéder à la page "Add Device (Accessory)".
Sélectionnez " Moteur Rideau E1" et le hub auquel il doit être
connecté, puis ajoutez-le conformément aux instructions de
l'application Aqara Home. Appuyez sur le bouton Setting (réglage) et
maintenez-le enfoncé pendant 5 secondes, et attendez l'invite vocale
du hub.
4. Si vous avez acheté deux ou plusieurs Moteurs Rideaux, veuillez les
connecter tous à l'application Aqara Home avant de poursuivre
l'installation.
5. Si vous utilisez des rideaux double face, il est nécessaire de connecter
deux moteurs rideaux à l'application, puis placez-les dans un groupe
pour un contrôle simultané. Entrez dans la page principale du Moteur
Rideau à regrouper, cliquez sur "..." dans le coin supérieur droit,
sélectionnez "Créer un groupe pour les rideaux " et suivez les
instructions.
6. Il est recommandé de charger complètement le produit avant de
l'installer.
1. Après le démarrage, cliquez deux fois de suite sur le bouton de réglage
pour libérer rapidement le crochet du Moteur Rideau Intelligent
jusqu'à ce qu'il atteigne la longueur maximale.
2. Accrocher le Moteur Rideau Intelligent sur la première et la deuxième
poulie du côté mobile des rideaux (comme indiqué sur la figure).
3. Conseils : S'il y a des poulies supplémentaires sur le rail, elles peuvent
être placées entre le premier et le deuxième crochet du rideau,
au-dessus desquels le Moteur Rideau peut être placé.
4. Cliquez rapidement deux fois de suite sur le bouton de réglage pour
maintenir le Moteur Rideau sur le rail. A ce moment-là, le témoin
lumineux vert continue de clignoter, et le buzzer émet 3 bips brefs
courts après que le produit soit maintenu en place, indiquant que
l'installation est terminée.
Méthodes d'installation
Méthodes d'installation du Rail en U
Rideaux simple face (un seul Moteur Rideau Intelligent est nécessaire)
47
1. Après le démarrage, cliquez deux fois de suite sur le bouton de réglage
Méthodes d'installation de l'I-Rail
Rideaux à simple face (un seul Moteur Rideau Intelligent est nécessaire)
Rideaux double-face (deux Moteurs Rideaux Intelligents sont nécessaires)
Selon la méthode d'installation du Moteur Rideau pour les rideaux à
ouverture simple, suspendez rideaux à ouverture simple, accrochez les
deux Moteurs Rideaux Intelligent aux poulies des rideaux à gauche et à
droite respectivement (comme indiqué sur la figure ci-dessous).
Ce produit peut être configuré sur l'application pour ouvrir et fermer les
rideaux en fonction de l'intensité de la lumière ambiante. l'intensité de la
lumière ambiante. Pour utiliser cette fonction, le capteur de lumière doit
être orienté vers l'extérieur de la fenêtre et le Moteur Rideau doit être
installé du côté de la fenêtre. Si vous avez besoin de contrôler
l'ouverture et la fermeture des rideaux en fonction de la lumière
intérieure, le capteur de lumière doit être orienté vers l'intérieur et la
commande de rideaux doit être installée côté proche de l'intérieur. Pour
optimiser l'eet du capteur de lumière, veillez à ce que qu'aucun objet
opaque ne se trouve devant lui.
Sens d'ouverture des rideaux
le premier moufle
Sens d'ouverture des rideaux
le second poulie
rail en U
Le crochet atteint
la longueur
maximale
Le crochet est
verrouillé à
l'intérieur
U-rail

48
Rideaux double face (deux Moteurs Rideaux Intelligents sont requis)
Selon la méthode d'installation du Moteur Rideau pour rideaux à
ouverture simple, accrochez les deux Moteurs Rideaux Intelligents sur les
poulies des rideaux sur les côtés gauche et droit respectivement (comme
le montre la figure ci-dessous).
Ce produit peut être configuré sur l'application pour ouvrir et fermer les
rideaux selon l'intensité de la lumière ambiante. Pour utiliser la fonction,
le capteur de lumière doit faire face à la fenêtre et le Moteur Rideau doit
être installé sur le côté près de la fenêtre. Si vous devez contrôler
l'ouverture et la fermeture des rideaux en fonction de la lumière
intérieure, le capteur de lumière doit faire face à l'intérieur et le Moteur
Rideau doit être installé sur le côté près de l'intérieur. Pour optimiser
l'eet du capteur de lumière, veuillez vous assurer que il n'y a aucun
objet opaque devant lui.
pour libérer rapidement le crochet du Moteur Rideaux Intelligents
jusqu'à ce qu'il atteigne la longueur maximale.
2. Installez les deux poulies réglables sur le rail, et placez-les juste entre
la première et la deuxième poulie existante sur le côté mobile des
rideaux
3. Accrochez le Moteur Rideaux Intelligents aux deux poulies réglables
nouvellement installées (comme indiqué sur la figure).
4. Cliquer rapidement deux fois de suite sur le bouton de réglage pour
maintenir le Moteur Rideau sur le rail. A ce moment-là, le témoin
lumineux vert continue de clignoter et le buzzer émet 3 bips courts
après que le produit ait été mis en place, indiquant que l'installation
est terminée.
Sens d'ouverture des rideaux
rail en I
le premier moufle
le second poulie
Le crochet atteint
la longueur
maximale
Le crochet est
verrouillé à
l'intérieur
49
Paramètres de distance d'ouverture
Pour garantir une utilisation correcte du produit, la distance doit être
définie pour le produit après l'installation du produit.
Rideaux à simple face
1. Une fois l'appareil connecté à l'application Aqara Home, la distance
d'ouverture de l'appareil peut être configurée sur l'application. Cliquez
sur la carte de l'appareil sur la page d'accueil de l'app et réglez la
course comme indiqué sur la page principale de l'appareil.
2. De plus, la distance d'ouverture de l'appareil peut être configurée en
appuyant sur le bouton de réglage lorsque l'appareil n'est pas
connecté à l'application Aqara Home. Les opérations détaillées sont les
suivantes:
A) Tirez le rideau jusqu'à ce qu'il soit complètement fermé et installez le
Moteur Rideau sur le rail selon la méthode d'installation des " rideaux à
simple face ".
Sens d'ouverture des rideaux
I-rail

50
B) Cliquez ensuite sur le bouton de réglage 3 fois de suite rapidement
pour régler le premier point limite de la distance. Le premier point
limite est réglé avec succès après le long "bip".
C) Pendant ce temps, le moteur rideau fonctionnera automatiquement
jusqu'au point d'ouverture limité et arrêtez-vous après avoir été tiré
dans le sens de l'ouverture complète pendant sur 10 cm. Après la
longue "bip", un autre point limite est défini automatiquement et avec
succès, ce qui signifie que le la plage d'ouverture de l'appareil est
configurée..
environ 10cm
À ce stade, le rideau partenaire commence
à fonctionner automatiquement.
Un autre point de fin de course (position
«complètement ouverte» du rideau)
Le 1er point de fin de course (position
«complètement fermée» du rideau)

51
Rideaux double face
A) Tirez les rideaux sur les côtés gauche et droit jusqu'à ce qu'ils soient
complètement fermés et installez les deux Moteurs Rideaux à l'endroit
du rail où les rideaux sont complètement fermés, conformément à la
méthode d'installation des "rideaux simple face".
B) Réglez la distance d'ouverture pour les Moteurs Rideaux sur les côtés
gauche et droit selon l'étape B et C pour les "rideaux simple face".

52
Fonctionnement des boutons
Description du voyant lumineux
Fonctionnement
des boutons
Description
Description
Cliquez une fois
Eectuer l'ouverture, la fermeture ou l'arrêt
opérations en fonction de l'état actuel du Moteur
Rideau
Restaurer les paramètres d'usine ou le démarrage
(quand il est éteint)
Supprimer la plage actuelle définie pour le Moteur
Rideau
État du voyant
lumineux
Faites tenir, relâcher ou arrêter selon le statut de
détention du Moteur Rideau actuel
Le moteur rideau se connecte avec le
Hub
(Après le démarrage de l'appareil pour
première fois ou réinitialiser).
La mise à jour du firmware est en cours.
Définir le point limite de la distance manuellement
Cliquez trois fois de
suite rapidement
Cliquez deux fois
de suite
rapidement
Éteindre l'appareil
Appuyez et
maintenez pendant
10 secondes
Cliquez cinq fois de
suite rapidement
Clignotement lent
du voyant orange
Clignotement
rapide de la
lumière bleue
Appuyez et
maintenez pendant
5 secondes
53
Batterie en charge
Lorsqu'il y a un avertissement de batterie faible, veuillez charger le
Moteur Rideau à temps. Les étapes de charge sont les suivantes :
Description de la sonnerie
Le maintien au rail est en cours.
Distance d'ouverture de l'appareil supprimée.
Paramètres d'usine restaurés.
Réaction de recherche d'appareil.
Sens d'ouverture et de fermeture inversés.
Le point limite de la distance a été défini avec
succès.
La sortie du rail est en cours.
Vert clignotant
L'appareil est en cours de charge.
La charge est terminée et l'adaptateur n’est
pas déconnecté.
Blanc clignotant
Clignotement rapide
du voyant vert
DescriptionÉtat de la sonnerie
1 bip long
3 bips courts
Lorsque la distance du Moteur Rideau n'est
pas supprimé, définir le point limite de course
manuellement.
Lorsque la plage de course du Moteur Rideau
est supprimé, supprimez à nouveau la plage.
Le Moteur Rideau est maintenu en place.
Le Moteur Rideau est libéré en place.
Avertissement de batterie faible.
2 bips courts
Clignotement continu
de la lumière blanche

54
Informations sur les paramètres du produit
Avertissements Zigbee
Dimensions : 145,7 × 96 × 46 mm
Courant nominal : 1,5 A
Couple nominal : 0,2 N·m
Protocole sans fil : Zigbee 3.0 IEEE 802. 15.4
Modèle : CM-M01
(CM-Curtain Motor series products, M01-the first Motorized products)
Type de batterie : batterie au lithium (non remplaçable)
Tension nominale : 5 V
Entrée nominale : 7,5 W
Vitesse de rotation : 100 tr/min
Vitesse de déplacement : 12 cm/s
Humidité de fonctionnement : 0~95 % HR, pas de condensation
Fréquence de fonctionnement Zigbee : 2405-2475 MHz
Puissance maximale Zigbee : 13 dBm
Dans des conditions normales d'utilisation, cet appareil doit être
maintenu à une distance de séparation d'au au moins 20 cm entre
l'antenne et le corps de l'utilisateur.
Déclaration de conformité pour l’Union européenne
Par la présente, Lumi United Technology Co., Ltd., déclare
que cet équipement radio de type Curtain Driver E1, CM-M01
est conforme à la Directive européenne 2014/53/UE.
L’intégralité de la déclaration de conformité pour l’UE est disponible à
l’adresse suivante : http://www.aqara.com/DoC/
1. Cliquez rapidement deux fois de suite sur le bouton de réglage ou
utilisez l'application pour dégager le Moteur Rideau du rail et retirez-le
du rail ;
2. Utilisez le câble de chargement USB et branchez l'extrémité de la prise
de type C dans le port de charge sur le Moteur Rideau et l'autre
extrémité à l'adaptateur pour le chargement
3. Il faut environ 5 heures pour charger complètement la batterie.
55
Service clientèle en ligne : www.aqara.com/support
Courriel du service clientèle : [email protected]
Site Internet : www.aqara.com
Fabricant : Lumi United Technology Co., Ltd.
Adresse: 801-804, bâtiment 1, parc de Chongwen, Nanshan Zhiyuan, n°
3370, avenue de Liuxian, communauté de Fuguang, rue de Taoyuan,
district de Nanshan, Shenzhen, Chine
Made in China
Informations sur la réglementation DEEE sur la mise au
rebut et le recyclage
Tous les produits portant ce symbole deviennent des déchets
d’équipements électriques et électroniques (DEEE dans la
Directive européenne 2012/19/UE) qui ne doivent pas être
mélangés aux déchets ménagers non triés. Vous devez contribuer
à la protection de l’environnement et de la santé humaine en
apportant l’équipement usagé à un point de collecte dédié au
recyclage des équipements électriques et électroniques, agréé par le
gouvernement ou les autorités locales. Le recyclage et la destruction
appropriés permettront d’éviter tout impact potentiellement négatif sur
l’environnement et la santé humaine. Contactez l’installateur ou les
autorités locales pour obtenir plus d’informations concernant l’emplace-
ment ainsi que les conditions d’utilisation de ce type de point de collecte.

56
Introduzione
Il Dispositivo di Azionamento per Tende E1 è un dispositivo motorizzato
in grado di controllare automaticamente le tende esistenti, basandosi sul
protocollo wireless Zigbee 3.0 e può ottenere il controllo programmato
delle tende e funzionare con altri dispositivi intelligenti quando è
connesso all'app Aqara Home.
Avvertenze
1. Questo dispositivo può essere utilizzato da bambini di età pari o
superiore a 8 anni e da persone con ridotte capacità fisiche, sensoriali o
mentali o con mancanza di esperienza e conoscenza se sono stati
supervisionati o istruiti sull'utilizzo del dispositivo in maniera sicura e
ne comprendono i pericoli coinvolti.
2. I bambini non devono giocare con il dispositivo.
3. La pulizia e la manutenzione dell'utente non devono essere eseguite
da bambini senza supervisione.
4. AVVERTENZA: il convertitore di frequenza deve essere scollegato dalla
fonte di alimentazione durante la pulizia, la manutenzione e la
sostituzione di parti.
5. Deve essere fornito solo a tensione separata o a bassissima tensione di
sicurezza (SELV).
*È richiesto un hub Aqara Zigbee 3.0. Alcune funzioni richiedono modelli specifici di
hub.
Per maggiori dettagli consultare il sito www.aqara.com/support.
Indicatore
Pulsante di impostazione
Porta USB di tipo C
Gancio
Ruota
Sensore di
luce
Cliccare una volta: per aprire,
chiudere o fermare la tenda
Cliccare due volte in successione:
per rilasciare, ritirare o fermare il
gancio
Cliccare tre volte in successione:
per impostare manualmente la
posizione di inizio o fine della
tenda
Toccare e tenere premuto per 5
secondi: per accendere il
dispositivo o ripristinare le
impostazioni di fabbrica
Toccare e tenere premuto per 10
secondi: per spegnere il
dispositivo.
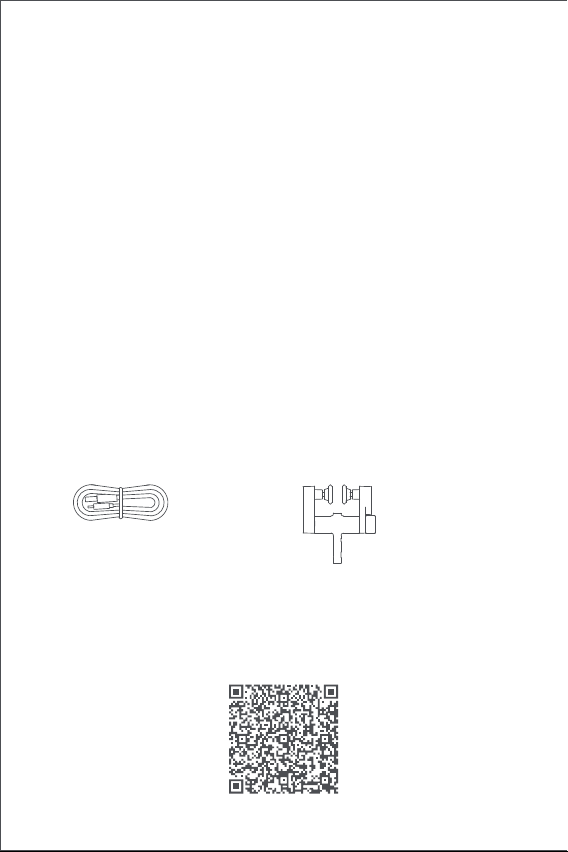
57
Lista di Confezione
cavo USB di tipo C × 1 Blocchi puleggia regolabili × 2
Video Tutorial
Eseguire la scansione del codice QR qui sotto per visualizzare il video
della guida all'installazione e al funzionamento. Se il video non è
raggiungibile, è anche possibile installare il prodotto secondo il metodo
descritto nel manuale.
6. AVVERTENZA: importanti istruzioni di sicurezza. È importante per la
sicurezza delle persone seguire queste istruzioni.Conservare queste
istruzioni.
7. Non permettere ai bambini di giocare con i comandi fissi.
8. Esaminare frequentemente l'installazione per rilevare eventuali
squilibri e segni di usura o danni alle molle e ai fissaggi dei cavi.Non
utilizzare se fosse necessaria la riparazione o la regolazione.
9. Non mettere in funzione quando si eseguono operazioni di manutenzi-
one, come la pulizia di finestre, nelle vicinanze.
10. AVVERTENZA: importanti istruzioni di sicurezza. Seguire tutte le
istruzioni poiché un'installazione errata può causare gravi lesioni.
11.Prima di installare il prodotto, rimuovere eventuali cavi o componenti
non necessari e disabilitare qualsiasi apparecchiatura non necessaria
per il funzionamento alimentato.
12.Le caratteristiche della parte guidata devono essere compatibili con il
carico nominale e il tempo di operazione nominale.
13.Questo dispositivo contiene batterie non sostituibili.
14.I controlli fissi devono essere chiaramente visibili dopo l'installazione.
15. La massa e la dimensione della tenda da funzionare devono essere
compatibili con la coppia nominale e il tempo di funzionamento
nominale.

58
Requisiti per l’Installazione
Tipo di Guida
Il Dispositivo Intelligente di Azionamento per Tende E1 Versione
Standard può essere utilizzato su guide a U e guide a I.
Requisiti per l’Installazione del Guida a U
La superficie inferiore della guida a U deve essere piatta e liscia.
Requisiti per l’Installazione del Guida a I
La superficie inferiore della guida a I deve essere piatta e liscia, con una
larghezza maggiore di 10 mm.
Larghezza > 10 mm
Entrambi i lati della guida devono essere sigillati ermeticamente con teste
di chiusura.
Se si desidera di utilizzare il prodotto su aste, acquistare il Dispositivo di
Azionamento per Tende E1
Versione con Aste.
Guide a U Guide a I
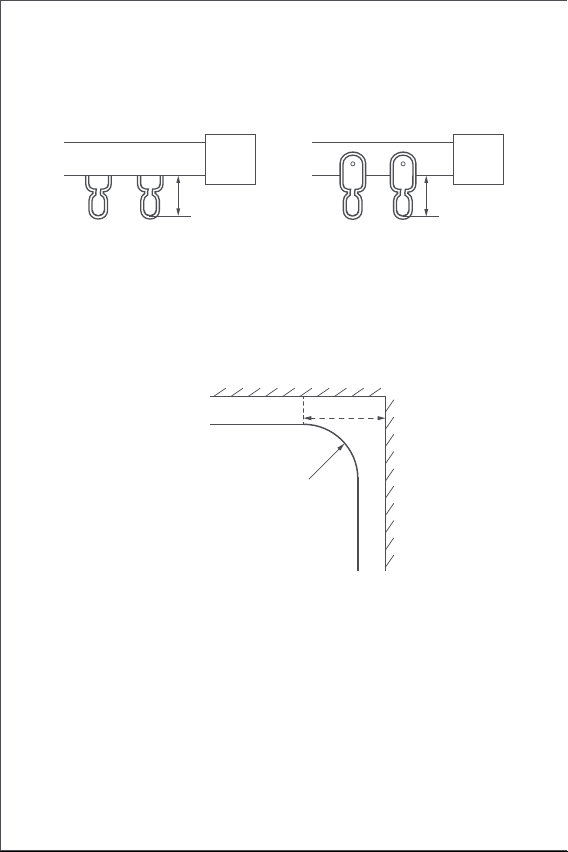
59
Requisiti per l’Installazione del Blocco Puleggia per Tende
La distanza dalla superficie superiore del fondo dell'anello di sospensi-
one del blocco puleggia della guida al fondo della guida deve essere
compresa tra 16 mm e 25 mm.
Guida Diritta e Speciale
Per la guida a U e la guida a I, il Dispositivo di Azionamento per Tende E1
supporta la guida dritta e curva. La guida curva deve soddisfatte le
seguenti condizioni attorno la curva:
1. Questo prodotto deve essere connesso all'app Aqara Home prima di
essere installato sulle tende.
2. Prima di attivare il prodotto, assicurarsi che l'app Aqara Home e l'hub
Aqara Zigbee 3.0 siano installati (scansionare il codice QR qui sotto per
scaricare l'app).
Guida Rapida per l’Avviamento
Preparazione prima dell'uso
Seguire i seguenti passaggi per iniziare a utilizzare il prodotto.
U - Aliante su rotaia I - Aliante su rotaia
16~25mm 16~25mm
Vista verticale
Guida speciale
Telaio della finestra
Giro binario
≥25cm

60
3. Aprire l'app, toccare "Home" e quindi toccare “+" nell'angolo in alto a
destra per accedere alla pagina "Aggiungi dispositivo (accessorio)".
Selezionare "Dispositivo di Azionamento per Tende E1" e l'hub a cui
connettersi e aggiungerlo secondo le istruzioni nell'app Aqara Home.
Tenere premuto il Pulsante Impostazioni per 5 secondi e attendere il
messaggio vocale dall'Hub.
4. Se sono stati acquistati due o più Dispositivi di Azionamento per
Tende, connetterli tutti all'app Aqara Home prima di eettuare
un'ulteriore operazione di installazione.
5. Se si utilizzano tende a due lati, è necessario connettere i due
Dispositivi di Azionamento per Tende all'app e poi metterli in un
gruppo per il controllo simultaneo. Entrare nella pagina principale del
Dispositivo di Azionamento per Tende da raggruppare, cliccare su "..."
nell'angolo in alto a destra, selezionare "Crea un gruppo per tende" e
seguire le istruzioni.
6. Si consiglia di ricaricare completamente il prodotto prima
dell'installazione.
1. Dopo l'avvio, cliccare rapidamente due volte in successione sul
Pulsante di impostazione per rilasciare il gancio del Dispositivo di
Azionamento per Tende finché non raggiunge la lunghezza massima.
2. Appendere il Dispositivo Intelligente di Azionamento per Tende al
primo e al secondo blocco puleggia sul lato mobile della tenda (come
mostrato in figura).
3. Consigli: Se sono presenti ulteriori blocchi sulla guida possono essere
posizionati tra il primo e il secondo gancio della tenda, sopra i quali è
possibile posizionare il Dispositivo di Azionamento per Tende.
4. Cliccare rapidamente due volte in successione sul pulsante di
impostazione per tenere il Dispositivo di Azionamento per Tende sulla
guida. In quel momento, il LED verde continua a lampeggiare e
vengono emessi 3 segnali acustici brevi dal cicalino dopo che il
prodotto è stato tenuto in posizione, indicando che l'installazione è
completa.
Metodi di Installazione
Metodi di Installazione del Guida a U
Tende a Uno Lato (solo un Dispositivo di Azionamento per Tende è
necessario)
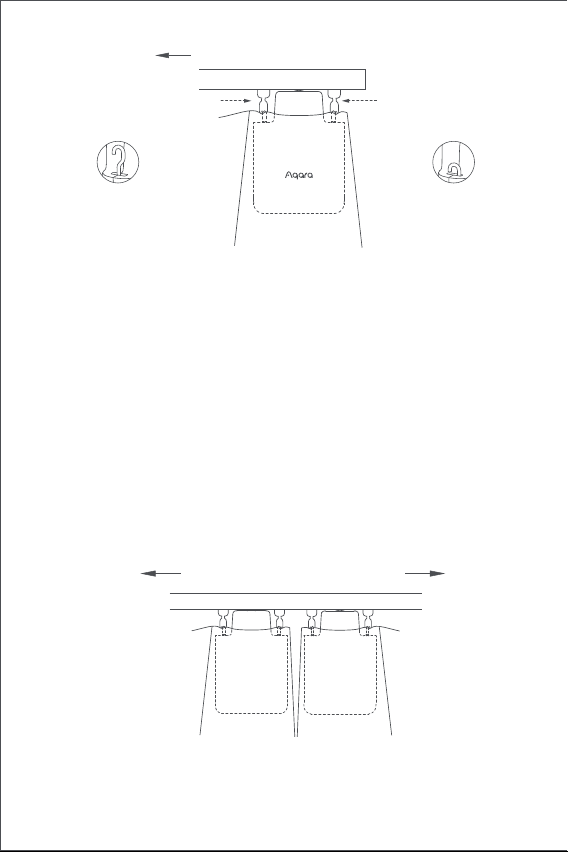
61
1. Dopo l'avvio, cliccare rapidamente due volte in successione sul
Metodi di Installazione del Guida a I
Tende a Uno Lato (solo un Dispositivo di Azionamento per Tende è
necessario)
Appendere i due Dispositivi Intelligenti di Azionamento per Tende sui
blocchi di puleggia delle tende rispettivamente sui lati sinistro e destro in
base al metodo di installazione del Dispositivo di Azionamento per tende
ad apertura singola (come mostrato nella figura sotto).
Questo prodotto può essere configurato sull'app per aprire e chiudere le
tende in base all'intensità della luce ambientale.
Per utilizzare la funzione, il sensore di luce deve essere rivolto verso la
finestra e il Dispositivo di Azionamento per Tende deve essere installato
sul lato vicino alla finestra.
Se è necessario controllare l'apertura e la chiusura delle tende in base
alla luce interna, il sensore di luce deve essere rivolto verso l'interno e il
Dispositivo di Azionamento per Tende deve essere installato sul lato
vicino all'interno. Per ottimizzare l'eetto del sensore di luce, assicurarsi
che non vi siano oggetti opachi davanti ad esso.
Senso di apertura delle tende
primo blocco puleggia
Senso di apertura delle tende
secondo blocco puleggia
guida a U
Il gancio arriva
alla massima
lunghezza
Il gancio è bloccato
all'interno
guida a U
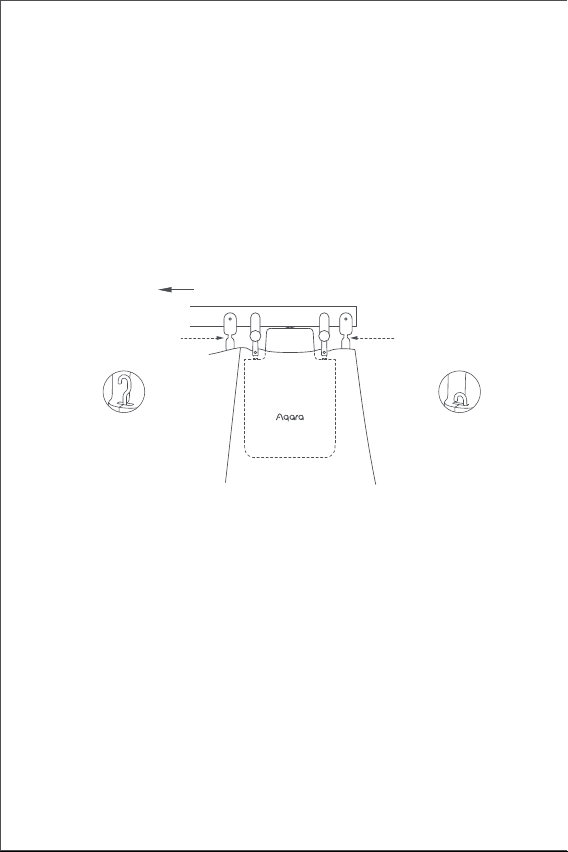
62
Tende a Due Lati (due Dispositivi Intelligenti di Azionamento per Tende
sono richieste)
Appendere i due Dispositivi Intelligenti di Azionamento per Tende sui
blocchi di puleggia delle tende rispettivamente sui lati sinistro e destro in
base al metodo di installazione del Dispositivo di Azionamento per tende
ad apertura singola (come mostrato nella figura sotto).
Questo prodotto può essere configurato sull'app per aprire e chiudere le
tende in base all'intensità della luce ambientale. Per utilizzare la
funzione, il sensore di luce deve essere rivolto verso la finestra e il
Dispositivo di Azionamento per Tende deve essere installato sul lato
vicino alla finestra. Se è necessario controllare l'apertura e la chiusura
delle tende in base alla luce interna, il sensore di luce deve essere rivolto
verso l'interno e il Dispositivo di Azionamento per Tende deve essere
installato sul lato vicino all'interno. Per ottimizzare l'eetto del sensore
di luce, assicurarsi che non vi siano oggetti opachi davanti ad esso.
Pulsante di impostazione per rilasciare il gancio del Dispositivo di
Azionamento per Tende finché non raggiunge la lunghezza massima.
2. Installare i due blocchi di puleggia regolabili sulla guida e mettili tra il
primo e il secondo blocco esistente sul lato mobile della tenda .
3. Appendere il Dispositivo Intelligente di Azionamento per Tende ai due
blocchi di puleggia regolabili appena installate (come mostrato in
figura).
4. Cliccare rapidamente due volte in successione sul pulsante di
impostazione per tenere il Dispositivo di Azionamento per Tende sulla
guida. In quel momento, il LED verde continua a lampeggiare e
vengono emessi 3 segnali acustici brevi dal cicalino dopo che il
prodotto è stato tenuto in posizione, indicando che l'installazione è
completa.
Senso di apertura delle tende
guida a I
primo blocco
puleggia
secondo blocco
puleggia
Il gancio arriva
alla massima
lunghezza
Il gancio è bloccato
all'interno
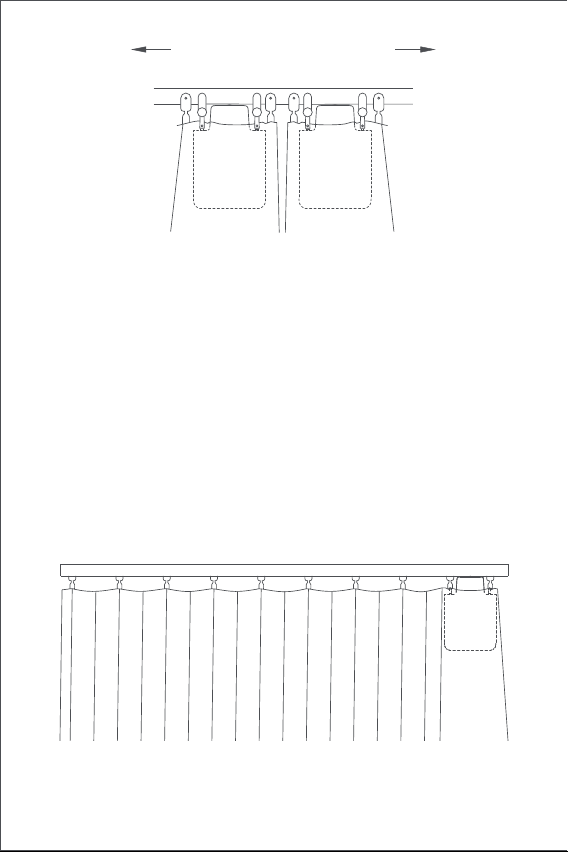
63
Impostazione della Distanza di Apertura
Per garantire un uso corretto del prodotto, è necessario impostare
l'intervallo di apertura dopo l'installazione.
Tende a Uno Lato
1. Dopo che il dispositivo è connesso all'app Aqara Home, la distanza di
apertura del dispositivo puo’ essere configurata sull'app. Cliccare sulla
scheda del dispositivo nella home page dell'app e impostare la corsa
come indicato nella pagina principale del dispositivo.
2. Inoltre, la distanza di apertura del dispositivo può essere impostata
premendo il pulsante di impostazione quando il dispositivo non è
connesso all'app Aqara Home. Le operazioni dettagliate sono le
seguenti:
A) Tirare la tenda finché non è completamente chiusa e installare il
Dispositivo di Azionamento per Tende sulla guida secondo il metodo di
installazione per le "tende a un lato".
Senso di apertura delle tende
guida a I
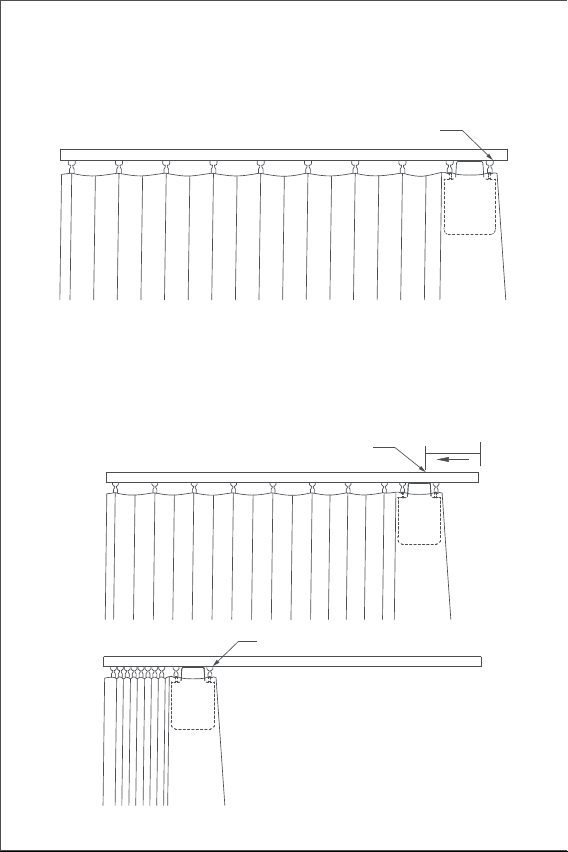
64
B) Cliccare rapidamente tre volte in successione sul pulsante di
impostazione per impostare il primo punto limite dell'intervallo. Il
primo punto limite viene impostato con successo dopo il segnale
acustico lungo.
C) Nel frattempo, il Dispositivo di Azionamento per Tende correrà
automaticamente fino al punto di limitazione dell'apertura e si fermerà
dopo che è stato tirato nel senso di apertura completa per circa 10 cm.
Dopo il segnale acustico lungo, un altro punto limite viene impostato
automaticamente e con successo, il che significa che l'intervallo di
apertura del dispositivo è impostato.
circa 10cm
A questo punto la tenda inizia a
funzionare automaticamente
Un altro punto di fine corsa (posizione
tenda "tutto aperto")
Primo punto di fine corsa (posizione tenda "tutta chiusa")
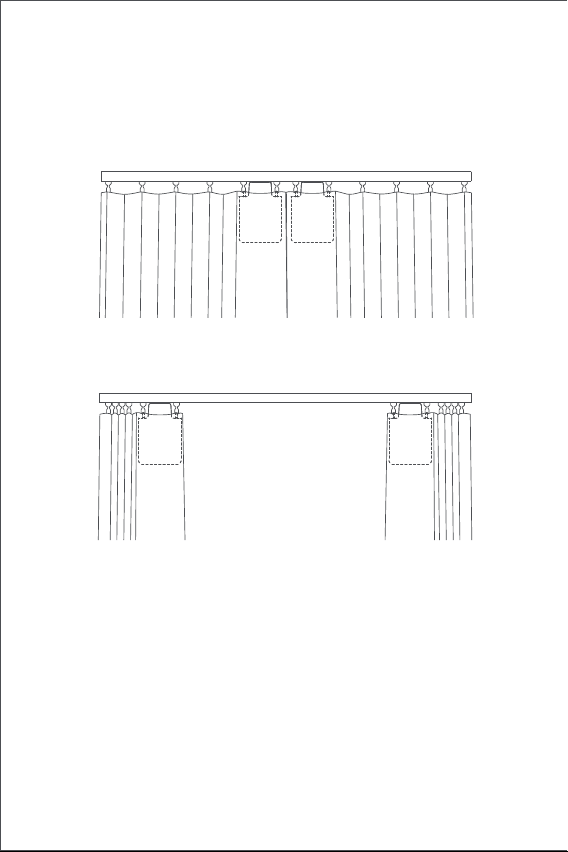
65
Tende a Due Lati
A) Tirare le tende sui lati sinistro e destro finché non sono completa-
mente chiuse e installare i due Dispositivi di Azionamento per Tende
nella posizione sulla guida dove le tende sono completamente chiuse
secondo il metodo di installazione per le "tende a un lato".
B) Impostare la distanza di apertura per i Dispositivi di Azionamento per
Tende sui lati sinistro e destro secondo i passaggi B e C per quello delle
"tende a un lato".
66
Funzionamento del Pulsante
Descrizione dei LED
Funzionamento
del Pulsante
Descrizione
Descrizione
Cliccare
Eseguire le operazioni di apertura, chiusura o
arresto in base allo stato corrente del Dispositivo di
Azionamento per Tende
Ripristinare le impostazioni di fabbrica o
accendere il dispositivo (quando è spento)
Eliminare l'intervallo corrente impostato per il
Dispositivo di Azionamento per Tende
Stato dei LED
Eseguire le operazioni di bloccaggio, rilascio o
arresto in base allo stato di bloccaggio dell'attuale
Dispositivo di Azionamento per Tende
Il Dispositivo di Azionamento per Tende si sta
connettendo all'hub
(Dopo la prima accensione del dispositivo o il
ripristino del dispositivo).
È in corso l'aggiornamento del firmware.
Impostare manualmente il punto limite
dell'intervallo
Cliccare
rapidamente tre
volte in successione
Cliccare
rapidamente due
volte in successione
Spegnere il dispositivo
Toccare e tenere
premuto per 10
secondi
Cliccare
rapidamente cinque
volte in successione
Lampeggio lento
del LED arancione
Lampeggio veloce
del LED blu
Toccare e tenere
premuto per 5
secondi
67
Descrizione del Cicalino
È in corso il bloccaggio alla guida.
Intervallo di apertura del dispositivo
eliminato.
Impostazioni di fabbrica ripristinate.
Ricerca del dispositivo in corso.
Senso di apertura e chiusura invertito.Il punto
limite dell'intervallo è stato impostato con
successo.
È in corso il rilascio dalla guida.
Lampeggio del LED
verde
Il dispositivo è in ricarica.
La ricarica è completa e l'adattatore non è
stato rimosso.
Lampeggio del LED bianco
Lampeggio veloce
del LED verde
DescrizioneStato del Cicalino
1 segnale acustico
lungo
3 bip corti
Quando l'intervallo del Dispositivo di
Azionamento per Tende non viene eliminato,
impostare manualmente il punto limite della
corsa.
Quando l'intervallo del Dispositivo di
Azionamento per Tende viene eliminato,
eliminare l’intervallo di nuovo.
Il Dispositivo di Azionamento per Tende è
bloccato in posizione.
Il Dispositivo di Azionamento per Tende è
rilasciato in posizione.
Avviso di batteria scarica.
2 segnali acustici
brevi
LED bianco acceso fisso

68
Ricarica della batteria
Quando viene visualizzato un avviso di batteria scarica, caricare il
Dispositivo di Azionamento per Tende in modo tempestivo.
Le fasi di ricarica sono le seguenti:
Informazioni sui parametri del prodotto
Dimensioni: 145,7 × 96 × 46 mm
Corrente nominale: 1,5 A
Coppia nominale: 0,2 Nm
Protocollo wireless: Zigbee 3.0 IEEE 802. 15,4
Modello: CM-M01(CM-Curtain Motor series products, M01-the first
Motorized products)
Tipo di batteria: Batteria al litio (non sostituibile)
Tensione nominale: 5 V
Potenza nominale: 7,5 W
Velocità di rotazione: 100 giri/min
Velocità di movimento: 12 cm/s
Umidità di esercizio: 0~95% UR, senza condensa
1.Cliccare sul pulsante di impostazione rapidamente cinque volte in
successione o utilizzare l'app per rilasciare il Dispositivo di Azionamen-
to per Tende dalla guida e rimuoverlo dalla guida;
2.Utilizzare il cavo di ricarica USB e collegare l'estremità della spina di
tipo C alla porta di ricarica sul Dispositivo di Azionamento per Tende e
l'altra estremità all'adattatore per la ricarica.
3.Sono necessarie circa 5 ore per ricaricare completamente la batteria.
69
Avvertenze Zigbee
Frequenza di funzionamento Zigbee: 2405-2475 MHz
Potenza massima in uscita Zigbee: 13 dBm
In condizioni d'uso normali, questo dispositivo deve essere mantenuto a
una distanza di separazione di almeno 20 cm tra l'antenna e il corpo
dell'utente.
Service clientèle en ligne : www.aqara.com/support
Courriel du service clientèle : [email protected]
Site Internet : www.aqara.com
Fabricant : Lumi United Technology Co., Ltd.
Adresse: 801-804, Edificio 1, Parco Chongwen, Nanshan Zhiyuan, Viale
Liuxian, Comunità Fuguang, Quartiere Taoyuan, Distretto di Nanshan,
Città di Shenzhen, Cina
Made in China
Dichiarazione di conformità UE
Con la presente, Lumi United Technology Co., Ltd. dichiara
che il tipo di apparecchiatura radio Curtain Driver E1, CM-M01
è conforme alla Direttiva 2014/53 / UE. Il testo completo della
dichiarazione di conformità UE è disponibile sul seguente indirizzo
internet: http://www.aqara.com/DoC/
Informazioni sullo smaltimento e il riciclaggio dei RAEE
Tutti i prodotti che riportano questo simbolo sono apparecchia-
ture elettriche ed elettroniche (WEEE come nella direttiva 2012/19
/ UE) che non devono essere mescolate con i rifiuti domestici
indierenziati, ed è necessario proteggere la salute umana e
l'ambiente consegnando le apparecchiature di scarto a un punto
di raccolta designato per il riciclaggio dei rifiuti di apparecchiature
elettriche ed elettroniche, designato dal governo o dalle autorità locali. Lo
smaltimento e il riciclaggio corretti aiuteranno a prevenire potenziali
conseguenze negative per l'ambiente e la salute umana. Contattare
l'installatore o le autorità locali per ulteriori informazioni sulla ubicazione,
nonchè i termini e le condizioni di tali punti di raccolta.
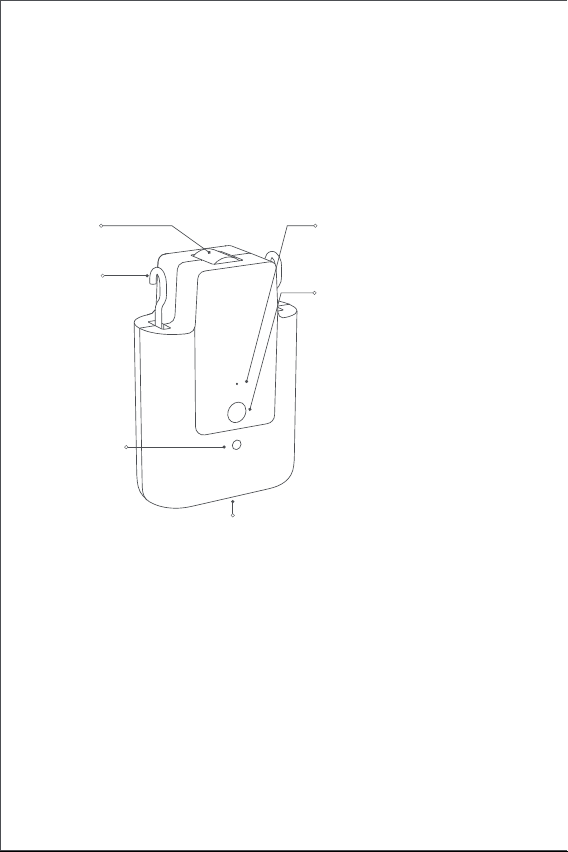
70
Presentación del producto
El controlador de cortinas E1 es un dispositivo motorizado que puede
controlar sus actuales cortinas de forma automática. Se basa en el
protocolo inalámbrico Zigbee 3.0 y ofrece un control programado de las
cortinas. Además, se puede conectar con otros dispositivos inteligentes
cuando se conecta a la aplicación Aqara Home.
Advertencias
1.Este dispositivo puede ser utilizado por niños a partir de 8 años y
personas con capacidades físicas, sensoriales o mentales reducidas o
con falta de experiencia y conocimiento si han recibido supervisión o
instrucciones sobre el uso del aparato de forma segura y comprenden
los peligros. involucrado.
2.Los niños no deben jugar con el aparato.
3.Los niños no deben realizar la limpieza y el mantenimiento sin
supervisión.
4.ADVERTENCIA: el variador debe desconectarse de su fuente de
alimentación durante la limpieza, el mantenimiento y la sustitución de
piezas.
5.Solo debe suministrarse a voltaje extrabajo de seguridad o separado
(SELV).
*Se requiere un hub Aqara Zigbee 3.0. Algunas funciones requieren modelos
específicos de hubs.
Consulte www.aqara.com/support para obtener más detalles.
Indicador
Botón de ajuste
Puerto USB Tipo-C
Gancho
Rueda
Sensor de
luz
Pulse una vez: para abrir, cerrar o
detener la cortina
Pulse dos veces seguidas: para
soltar, retirar o detener el
enganche
Pulse tres veces seguidas: para
fijar manualmente la posición
inicial o final de la cortina
Mantenga pulsado durante 5
segundos: para encender el
dispositivo o restablecer los
ajustes de fábrica
Mantenga pulsado durante 10
segundos: para apagar el
dispositivo.
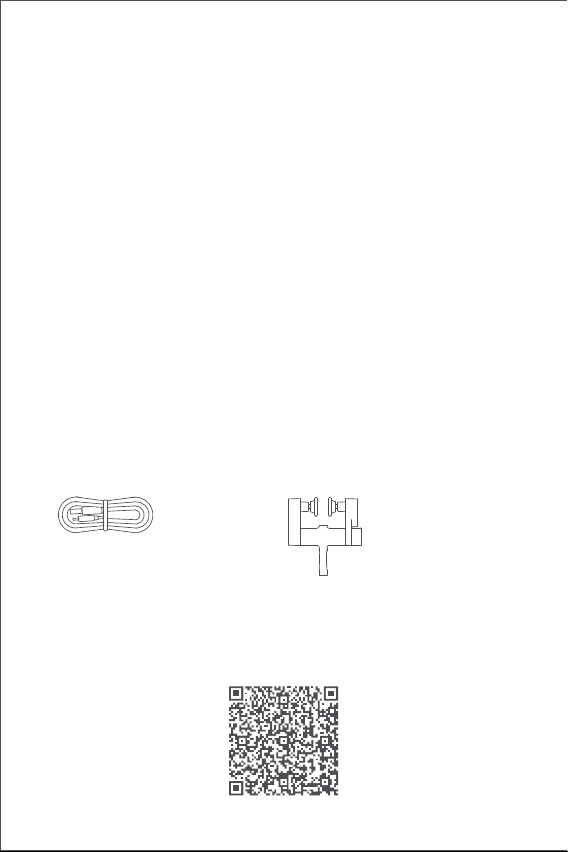
71
Este paquete contiene
Cable USB Tipo-C × 1 Poleas Ajustables × 2
Vídeo tutorial
Por favor, escanee el código QR que aparece a continuación para ver el
vídeo de la guía de instalación y funcionamiento. Si no le es posible
acceder al vídeo, también puede instalar el producto siguiendo las
indicaciones del manual.
6.ADVERTENCIA: Instrucciones de seguridad importantes. Es importante
para la seguridad de las personas seguir estas instrucciones. Guarde
estas instrucciones.
7.No permita que los niños jueguen con controles fijos.
8.Examine con frecuencia la instalación en busca de desequilibrios y
signos de desgaste o daños en los resortes y las fijaciones de los cables.
No lo utilice si es necesario repararlo o ajustarlo.
9.No lo utilice cuando se estén realizando tareas de mantenimiento,
como la limpieza de ventanas, en las inmediaciones.
10.ADVERTENCIA: Instrucciones de seguridad importantes. Siga todas las
instrucciones, ya que una instalación incorrecta puede provocar
lesiones graves.
11.Antes de instalar la unidad, retire cualquier cable o componente
innecesario y desactive cualquier equipo que no sea necesario para el
funcionamiento con alimentación.
12.Que las características de la parte accionada deben ser compatibles
con la carga nominal y el tiempo de operación nominal.
13.Este aparato contiene baterías que no son reemplazables.
14.Los controles fijos deben ser claramente visibles después de la
instalación.
15. La masa y la dimensión de la cortina a accionar deberán ser
compatibles con el par nominal y el tiempo nominal de funcionamien-
to.
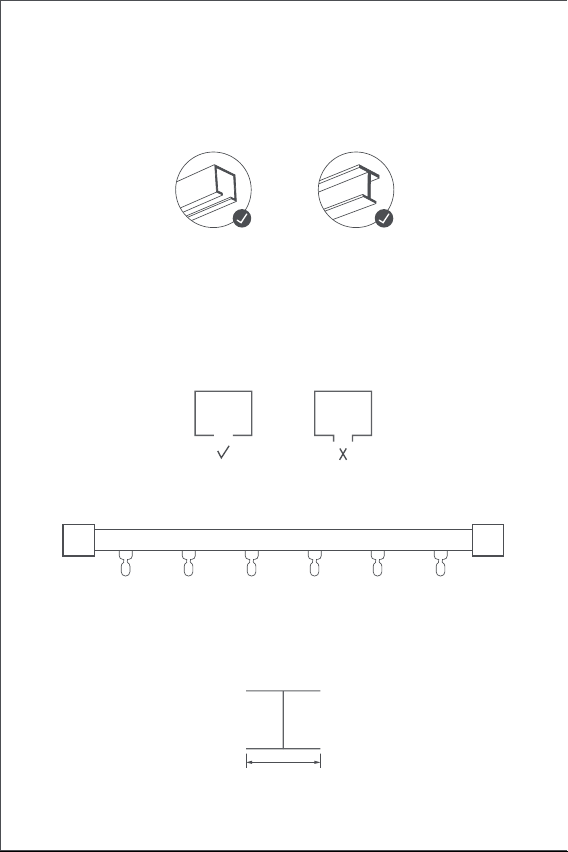
72
Requisitos para la instalación
Tipos de rieles
El controlador de cortinas E1 Edición Estándar, pueden utilizarse en rieles
Tipo-U y rieles Tipo-I.
Requisitos de instalación para un riel tipo U
La superficie inferior del raíl en U debe ser plana y lisa.
Requisitos de instalación para un riel tipo I
La superficie inferior del riel tipo-I debe ser plana y lisa, con una anchura
superior a 10 mm.
Anchura > 10 mm
Ambos lados del riel deben estar correctamente cerrados con retenes.
Si desea utilizar el producto en rieles de varillas, adquiera el controlador
de cortinas E1 Versión para varillas.
Rieles Tipo-U Rieles Tipo-I

73
Requisitos de instalación para cortinas de polea
La distancia desde la cara interna de la parte inferior del anillo colgante
del riel de polea a la parte inferior del riel debe estar entre 16 mm y 25 mm.
Rieles rectos y de forma especial
Para los carriles en U y en I, el controlador de cortina E1 admite carriles
rectos y curvos. Para rieles curvos, deben cumplirse las siguientes
condiciones en torno a la curva:
1. Este producto debe conectarse con la aplicación Aqara Home antes de
ser instalado en las cortinas.
2. Antes de activar el producto, asegúrese de que tiene instalada la
Guía rápida de inicio
Preparación antes de usar
Por favor, lea los siguientes pasos antes de comenzar a utilizar el
producto.
Planeador de riel U Planeador de riel I
16~25mm 16~25mm
Vista vertical
Riel con forma especial
Marco de la ventana
Punto de giro de pista
≥25cm

74
3. Abra la aplicación, pulse "Inicio" y luego pulse "+" en la esquina
superior derecha para entrar en la pantalla "Añadir dispositivo
(accesorio)". Selecciona " Controlador de cortinas E1" y el hub al que
se va a conectar, y añádelo según las instrucciones de la aplicación
Aqara Home. Mantenga pulsado el botón de configuración durante 5
segundos y espere la indicación de voz del hub.
4. Si ha adquirido dos o más controladores de cortina, conecte todos
ellos a la aplicación Aqara Home antes de continuar con la instalación.
5. Si utiliza cortinas de doble riel, es necesario conectar dos controla-
dores de cortina a la aplicación y ponerlos en un mismo grupo para su
control simultáneo.Entre en la página principal del controlador de
cortina que desea agrupar, haga clic en "... " en la esquina superior
derecha, seleccione "Crear un grupo de cortinas"y siga las
instrucciones.
6. Se recomienda que el producto tenga una carga completa antes de su
instalación.
1. Después de la puesta en marcha, pulse el botón de ajuste dos veces
seguidas rápidamente para liberar el gancho del controlador de la
cortina inteligente hasta que alcance la longitud máxima.
2. Cuelgue el controlador de cortinas inteligente en la primera y la
segunda polea en el
lado móvil de las cortinas (tal y como se muestra en la ilustración).
3. Consejos: Si dispone de poleas adicionales en el carril, puede
colocarlas entre el primer y el segundo enganche de la cortina, sobre
los cuales se puede colocar el controlador de la cortina.
4. Haga clic en el botón de ajuste dos veces seguidas rápidamente para
sujetar el controlador de la cortina en el riel. En este momento, la luz
indicadora verde sigue parpadeando, y se emiten 3 pitidos cortos del
aparato una vez que el producto se ha colocado en su sitio, lo que
indica que la instalación se ha completado.
Métodos de instalación
Métodos de instalación de rieles tipo-U
Cortinas de apertura simple (se requiere sólo un controlador de cortina
inteligente)
aplicación Aqara Home y el hub Aqara Zigbee 3.0 (escanee el siguiente
código QR para descargar la aplicación).

75
1. Después de la instalación, pulse el botón de ajuste dos veces seguidas
Métodos de instalación para rieles tipo-I
Cortinas de apertura simple (se necesita sólo un controlador de cortina
inteligente)
Cortinas de apertura doble (se requieren dos controladores de cortina
inteligentes)
De acuerdo con el método de instalación del controlador de cortina para
cortinas de apertura simple, coloque los dos controladores de cortina
inteligentes en las poleas de las cortinas de los lados izquierdo y derecho
respectivamente (tal y como se muestra en la siguiente ilustración).
Este producto puede configurarse en la aplicación para abrir y cerrar las
cortinas según la intensidad de la luz ambiental. Para utilizar la función,
el sensor de luz debe estar orientado hacia fuera de la ventana y el
controlador de cortinas debe instalarse en el lado cercano a la ventana.
Si desea controlar la apertura y el cierre de las cortinas en función de la
luz interior, el sensor de luz debe estar orientado hacia el interior y el
controlador de la cortina debe instalarse en el lado cercano al interior.
Para optimizar el efecto del sensor de luz, asegúrese de que no haya
ningún objeto opaco delante de él.
Dirección de apertura de las cortinas
la primera polea
Sentido de apertura de las cortinas
la segunda polea
riel tipo-U
El gancho alcanza
la longitud
máxima
El gancho está
está bloqueado en
el extremo interior
riel tipo-U
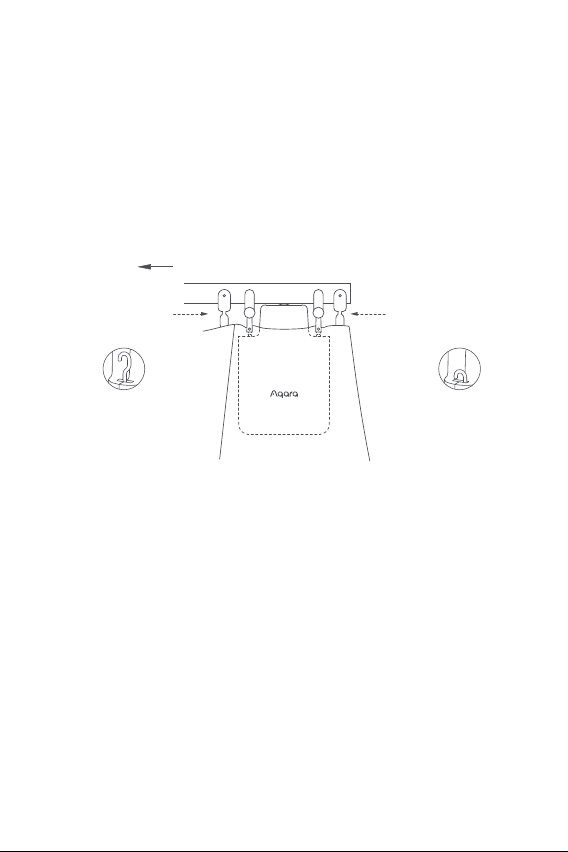
76
Cortinas de apertura doble (se requieren dos controladores de cortina
inteligentes)
De acuerdo con el método de instalación del controlador de cortina para
cortinas de apertura simple, coloque los dos controladores de cortina
inteligentes en las poleas de las cortinas de los lados izquierdo y derecho
respectivamente (tal y como se muestra en la siguiente ilustración).
Este producto puede configurarse en la aplicación para abrir y cerrar las
cortinas según la intensidad de la luz ambiental. Para utilizar la función,
el sensor de luz debe estar orientado hacia fuera de la ventana y el
controlador de cortinas debe instalarse en el lado cercano a la ventana.
Si desea controlar la apertura y el cierre de las cortinas en función de la
luz interior, el sensor de luz debe estar orientado hacia el interior y el
controlador de la cortina debe instalarse en el lado cercano al interior.
Para optimizar el efecto del sensor de luz, asegúrese de que no haya
ningún objeto opaco delante de él.
para liberar el gancho del controlador de la cortina inteligente hasta que
alcance la longitud máxima.
2. Instale los dos bloques de poleas ajustables en el riel, y colóquelos
justo entre el primera y la segunda poleas existentes en el lado móvil
de las cortinas.
3. Cuelgue el controlador inteligente de cortinas en las dos poleas
ajustables recién instaladas (tal y como se muestra en la ilustración).
4. Haga clic en el botón de ajuste dos veces seguidas rápidamente para
sujetar el controlador de la cortina en el riel. En este momento, la luz
indicadora verde sigue parpadeando, y se emiten 3 pitidos cortos del
aparato una vez que el producto se ha colocado en su sitio, lo que
indica que la instalación se ha completado.
Dirección de apertura de las cortinas
riel tipo-I
la primera polea
la segunda polea
El gancho alcanza
la longitud
máxima
El gancho está está
bloqueado en el
extremo interior
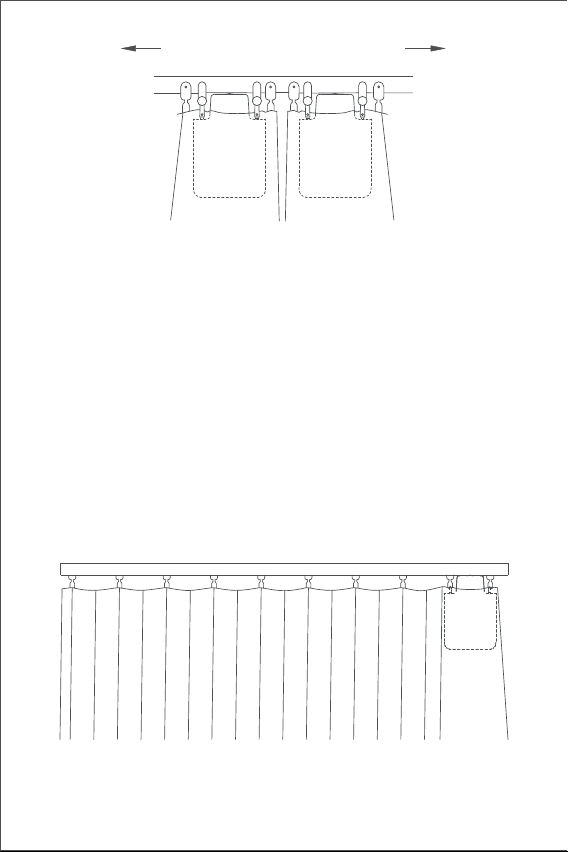
77
Configuración de la distancia de apertura
Para garantizar el correcto uso del producto, el rango de apertura debe
ser ajustado una vez haya finalizado la instalación.
Cortinas de apertura simple
1.Una vez que el dispositivo está conectado a la aplicación Aqara Home, la
distancia de apertura del dispositivo se puede configurar en la
aplicación. Haga clic en la ficha del aparato en la página de inicio de la
app y configure el recorrido según las indicaciones del dispositivo en la
página principal.
2.Así mismo, la distancia de apertura del dispositivo puede ajustarse
pulsando el botón de ajuste del mando cuando el dispositivo no esté
conectado a la aplicación Aqara Home. A continuación se detallan las
instrucciones:
A) Corra la cortina hasta que esté completamente cerrada e instale el
controlador de cortina en el riel de acuerdo con el método de
instalación de las "cortinas de apertura simple".
Dirección de apertura de las cortinas
riel tipo-I
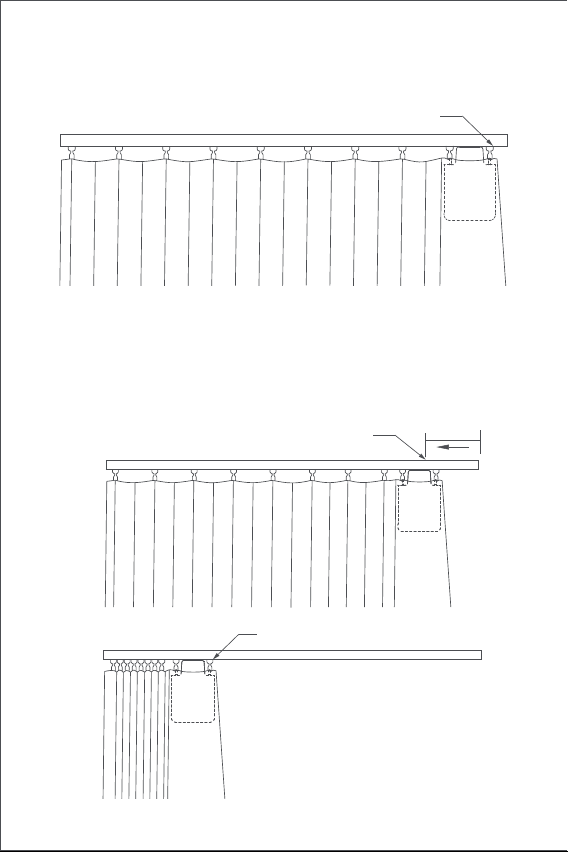
78
B) A continuación, pulse el botón de ajuste 3 veces seguidas de forma
rápida para fijar el primer tope del rango de apertura. Tras escuchar un
"pitido" largo, el primer tope ha quedado configurado con éxito.
C) Mientras tanto, el controlador de cortina se desplazará automática-
mente hacia el punto de apertura límite y se detendrá tras ser arrastrado
hasta el punto de apertura total durante al menos los últimos 10 cm de
riel. Después de escuchar un “pitido" largo, el segundo tope ha sido
configurado con éxito, lo que significa que el rango de apertura del
dispositivo ya está configurado por completo.
Unos 10cm
En este punto, el compañero de cortina comienza
a funcionarse automáticamente.
Otro punto de límite de carrera (posición
de "totalmente abierta" de la cortina)
El primer punto de límite de carrera (posición
de "totalmente cerrada" de la cortina)
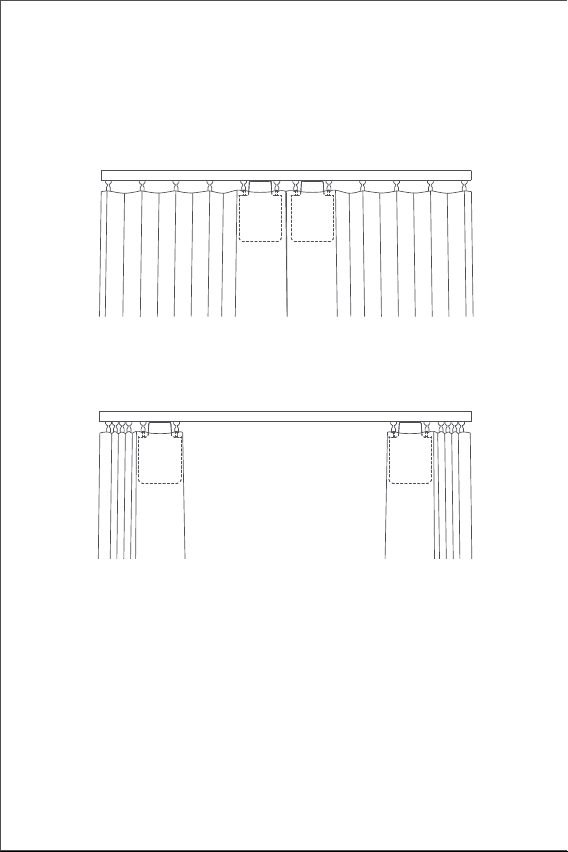
79
Cortinas de doble apertura
A) Tire de las cortinas hacia el centro hasta que queden completamente
cerradas, e instale los dos controladores de cortinas de acuerdo con el
método de instalación de "cortinas de apertura simple".
B) Ajuste la distancia de apertura de los controladores de cortina en los
lados izquierdo y derecho según el paso B y C de la configuración de
apertura para "cortinas de apertura simple".
80
Funcionalidad del botón
Información sobre el indicador luminoso
Acción Descripción
Estatus de la luz
indicadora
Descripción
Un Click
Realiza operaciones de apertura, cierre o parada.
Operaciones en función del estado actual del
controlador de la cortina
Restaurar la configuración de fábrica o el arranque
(cuando está está apagado)
Eliminar el rango actual establecido para el
controlador de la cortina
Dos clicks
seguidos
Parpadeo rápido
de luz azul
Realizar operaciones de detención, continuación o
parada. Operaciones según el estado actual del
controlador de cortinas
El controlador de cortina se está conectando
con el hub.
(Después de poner en marcha el dispositivo
para su uso por primera vez o tras un reinicio).
La actualización del firmware está en curso.
Ajuste manualmente el punto límite del rango de
apertura
Tres clicks
consecutivos
Apagar el dispositivo
Mantener el click
durante diez
segundos
Cinco clicks
consecutivos
Parpadeo lento de
luz naranja
Mantener el click
durante cinco
segundos

81
Carga de la batería
Cuando haya un aviso de batería baja, cargue el controlador de cortina a
tiempo. Los pasos de carga son los siguientes:
Información sobre el zumbido
La sujeción al riel está en curso.
Rango de apertura del controlador borrado.
Ajustes de fábrica restablecidos.
Búsqueda de dispositivos.
Las direcciones de apertura y cierre han sido
intercambiadas.
El punto límite de rango de apertura se ha
establecido con éxito.
La apertura del riel está en curso.
Verde intermitente
El dispositivo se está cargando.
La carga se ha completado y el adaptador
no se ha retirado.
Blanco intermitente
Parpadeo rápido
de luz verde
DescripciónEstatus del zumbido
1 Zumbido rápido
3 Zumbidos cortos
Si no se borra el rango del conductor de la
cortina, ajuste manualmente el tope de
apertura.
Cuando el rango de apertura del controlador
de cortina se elimina, vuelva a borrar el rango.
El controlador de la cortina se mantiene en su
lugar.
El controlador de cortina se suelta por
completo.
Aviso de batería baja.
2 Zumbidos cortos
Luz blanca sin
parpadeo

82
Información sobre los valores del producto
Advertencias sobre Zigbee
Dimensiones: 145.7 × 96 × 46 mm
Corriente nominal: 1.5 A
Par nominal: 0.2 N·m
Protocolo inalámbrico: Zigbee 3.0 IEEE 802. 15.4
Modelo: CM-M01(CM-Curtain Motor series products, M01-the first
Motorized products)
Tipo de batería: Batería de litio (no reemplazable)
Voltaje nominal: 5 V
Entrada nominal: 7.5 W
Velocidad de movimiento: 100 r/min
Velocidad de desplazamiento: 12 cm/s
Rango de humedad aceptado para el correcto funcionamiento: 0~95%
RH, sin condensación
Frecuencia de funcionamiento de Zigbee: 2405-2475 MHz
Potencia máxima de salida de Zigbee: 13 dBm
En condiciones normales de uso, este dispositivo debe mantenerse a una
distancia de separación de menos 20 cm entre la antena y el cuerpo del
usuario.
Declaración de conformidad de la UE
Por la presente, Lumi United Technology Co., Ltd. declara que
el equipo de radio tipo Curtain Driver E1, CM-M01 cumple con
la Directiva 2014/53 / EU. El texto completo de la declaración
de conformidad de la UE está disponible en la siguiente dirección de
Internet: http://www.aqara.com/DoC/
1. Pulse rápidamente el botón de ajuste dos veces seguidas o utilice la
aplicación para soltar el controlador de cortina del riel, y retirarlo del
mismo;
2. Utilice el cable de carga USB y conecte el extremo Tipo-C al puerto de
carga del controlador de cortina y el otro extremo al enchufe
adaptador para la carga.
3. La batería tarda unas 5 horas en cargarse completamente.

83
Servicio al cliente en línea: www.aqara.com/support
Correo electrónico de atención al cliente: [email protected]
Sitio web: www.aqara.com
Fabricante: Lumi United Technology Co., Ltd.
Dirección: Habitación 801- 804, Edificio 1, Parque Chongwen, iPark
Nanshan, No. 3370, Avenida Liuxian, Comunidad Fuguang, Distrito
Residencial de Taoyuan, Distrito de Nanshan, Ciudad de Shenzhen,
China.
Made in China
Información sobre reciclaje y eliminación de RAEE
Todos los productos que llevan este símbolo son residuos de
aparatos eléctricos y electrónicos (RAEE según la directiva
2012/19 / UE) que no deben mezclarse con residuos domésticos
sin clasificar. En su lugar, debe proteger la salud humana y el
medio ambiente entregando sus equipos de desecho a un punto
de recolección designado para el reciclaje de equipos eléctricos y
electrónicos de desecho, designado por el gobierno o las autoridades
locales. La eliminación y el reciclaje correctos ayudarán a prevenir
posibles consecuencias negativas para el medio ambiente y la salud
humana. Comuníquese con el instalador o las autoridades locales para
obtener más información sobre la ubicación, así como los términos y
condiciones de dichos puntos de recolección.
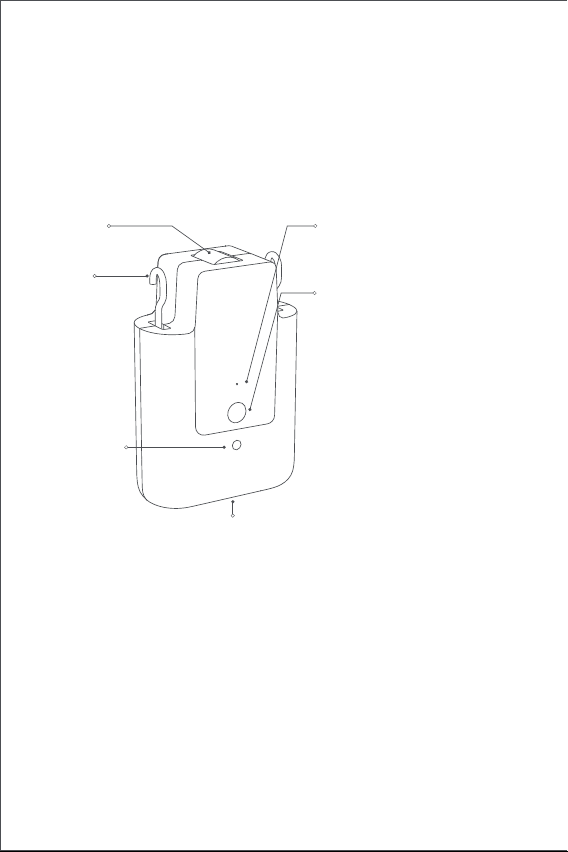
84
製品紹介
カーテン駆動E1はあなたの既存のカーテンを自動的に制御できる電動設
備で、Zigbee 3.0ワイヤレスプロトコルに基づき、カーテンの定時制御が
可能で、Aqara Home appに接続する時に他の知能設備と協力して動作す
ることができます。
警告情報
1. この器具は、8歳以上の小児および身体的、感覚的または精神的能力が
低下している、または経験や知識が不足している人が、安全な方法で器
具の使用に関する監督または指導を受け、危険性を理解している場合に
使用できます。
2. 子供は遊ばないこと。
3. 清掃および使用者のメンテナンスは、子供の監督なしに行ってはなら
ない。
4. 警告:ドライブは、清掃、メンテナンスおよび部品交換の際に電源から
切断するものとする。
5. 絶縁または安全特別低電圧(SELV)でのみ供給してください。
6. 警告: 重要な安全上の注意事項人の安全のためには、これらの指示に従
うことが重要です。これらの指示を保存します。
*Aqara Zigbee 3.0中心が必要です。 一部の機能には特定の型番の中心が必要です。
詳しくはwww.aqara.com/supportにお問い合わせください。
LED
設置ボタン
USB Type-Cポート
フック
ホイール
光センサ
1回クリック:カーテンを開く、閉
じる、または停止します。
連続で2回クリック:フックを解放、
回収、または停止します。
連続で3回クリック:カーテンの開
始または終了位置を手動で設定し
ます。
5秒間長押しすると、設備の電源
を入れるか、工場出荷時の設定に
リセットします。
5秒間長押しすると、設備をシャ
ットダウンします。
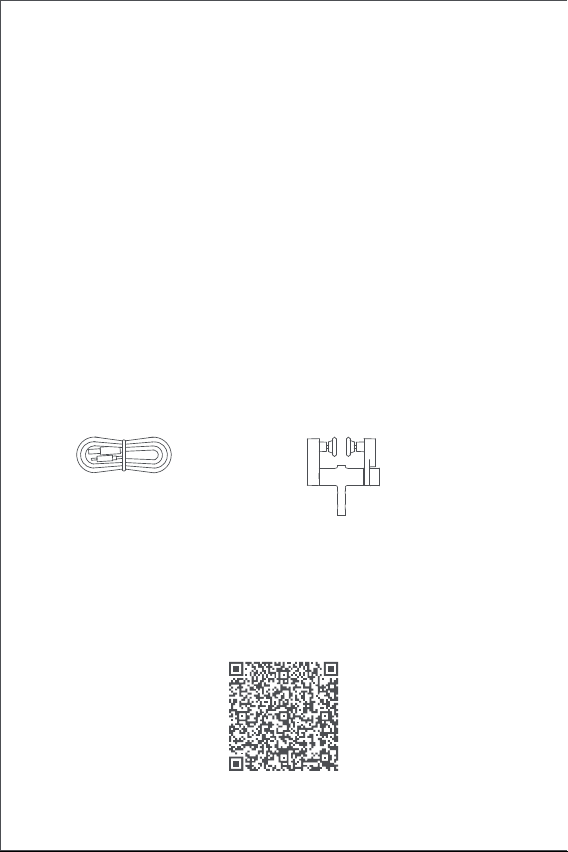
85
包装清单
USB Type-Cケーブル× 1 調整可能な組み合わせ滑車× 2
チュートリアルのビデオ
次のQRコードをスキャンして、取り付けと操作ガイドのビデオを確認し
てください。 ビデオに接続できない場合は、マニュアルの説明に従って
製品を取り付けることもできます。
7. 固定コントロールで子供を遊ばせないでください。
8. ケーブル・スプリングおよび固定具のアンバランス、摩耗または損傷
の徴候がないか、頻繁に点検する。修理や調整が必要な場合は使用しな
いでください。
9. 周辺でゴンドラなどのメンテナンスを行っている場合は使用しないで
ください。
10. 警告: 重要な安全上の注意事項正しく取り付けないと、重傷を負う可
能性がありますので、必ずご使用ください。
11. ドライブを取り付ける前に、不要なコードまたはコンポーネントをす
べて取り外し、電源が入った状態での操作に不要な装置をすべて無効に
してください。
12. 被駆動部の特性が定格荷重及び定格作動時間に適合すること。
13. このアプライアンスには交換不能なバッテリが含まれています。
14. 固定されたコントロールは、インストール後にはっきり見えるように
する必要があります。
15. 駆動するカーテンの質量と寸法は互換性がなければなりません公称ト
ルクと公称動作時間で。15. 駆動するカーテンの質量と寸法は互換性が
なければなりません公称トルクと公称動作時間で。

86
インストール要件
レールタイプ
スマートカーテンドライバE 1スタンダードエディションU -レールとI -レ
ールで使用することができます。
Uレールの設置要件
Uレールの底面は平坦で滑らかでなければならない
Iレールの設置条件
Iレールの底面は平坦で滑らかであり、幅は10 mmより大きい。
幅>10 mm
レールの両側は、閉鎖ヘッドでしっかりと封をされるべきです。
あなたがロッドに製品を使用したい場合は、カーテンドライバーE 1ロッ
ドバージョンを購入してください。
Uレール 工字レール

87
カーテン組み合わせ滑車の取り付け要件
レール組み合わせ滑車のつり輪底部の上面からレール底部までの距離は
16mmから25mmの間であること。
曲がったレールについては、次のような条件が曲げられます:
UレールとIレールのためのまっすぐで特別な形のレール、カーテンドラ
イバーE 1は、まっすぐで曲がったレールを支持します。
1.この製品はカーテンに取り付ける前に、Aqara Homeアプリに接続する
必要があります。
2.製品をアクティベートする前に、Aqara Homeアプリケーションと
クイック・ガイド
使用前の準備
以下の手順を読んで本製品の使用を開始してください。
U型レールグライダー I型レールグライダー
16~25mm 16~25mm
平面図
曲がりレール
壁
レール曲がり角
≥25cm

88
3.アプリを開き、「ホーム」をクリックしてから、右上の「+」をクリッ
クして「設備(添付書類)の追加」ページに入ってください。「カーテン
ドライバE1」と接続する中心を選択し、Aqara Homeアプリの指示に従
って追加します。 設定ボタンを5秒間押して、中心の音声メッセージを
お待ちください。
4.すでに2つ及びそれ以上のカーテンドライバをご購入になった場合は、
さらにインストールする前にそれらをすべてAqara Homeアプリケーシ
ョンに接続してください。
5.両面カーテンをご使用になる場合は、2つのカーテンドライバプログラ
ムをアプリケーションに接続し、それらを1つのグループに入れて同時
に制御する必要があります。 グループ化するカーテンドライバメイン
ページに入り、“...”をクリックして右上にあり、「カーテンのグルー
プの作成」を選択し、指示に従って操作してください。
6.設置前に製品を満充電することをお薦めします。
1.起動後、設置ボタンを素早く連続して2回クリックし、スマートカーテ
ンドライバのフックを最大長さまで外します。
2.スマートカーテンドライバをカーテンの可動側の一番目と2番目の組み
合わせ滑車に掛まする(下図を参照)。
3.ヒント:レールに組み合わせ滑車が追加されている場合、それらはカー
テンの1番目と2番目のフックの間に置くことができ、カーテンドライ
バはその上に置くことができます。
4.設置ボタンを素早く連続して2回クリックし、カーテンドライバをレー
ルに固定します。 このとき、緑色のLEDが点滅し続け、製品が固定さ
れた後、ブザーが3回短いブザー音を立てて、取り付けが完了したこと
を示します
取り付け方法
U-形鋼の取り付け方法
片面カーテン(スマートカーテンドライバが1つのみ必要)
Aqara Zigbee 3.0中心がインストールされていることを確認してください。
(次のQRコードをスキャンしてアプリケーションをダウンロードしてくだ
さい)。

89
1.起動後、設置ボタンを素早く連続して2回クリックし、スマートカーテ
I-字鋼の取り付け方法
片面カーテン(スマートカーテンドライバが1つだけのみ必要)
両面カーテン(スマートカーテンドライバが2つ必要)
シングルオープンカーテンドライバの取り付け方法に応じて、2つのスマ
ートカーテンドライバをそれぞれ左右のカーテンの組み合わせ滑車に掛
けます(下図を参照)。
この製品はアプリに配置でき、環境光の強弱に応じてカーテンを開閉し
ます。この機能を使用するには、光センサを窓の外に向け、カーテンド
ライバを窓に近い側に取り付ける必要があります。 室内の光に応じてカ
ーテンの開閉を制御する必要がある場合は、光センサを室内に向け、カ
ーテンドライバを室内に近い側に取り付ける必要があります。 光センサ
の効果を最適化するために、前面に不透明な物体がないことを確認して
ください。
れているカーテンの開放方向
第1プーリブロック
カーテンの開き方向
第2プーリブロック
Uレール
フックは最大の長
さに達する
フックは最も内側
にロックさ
U-型レール
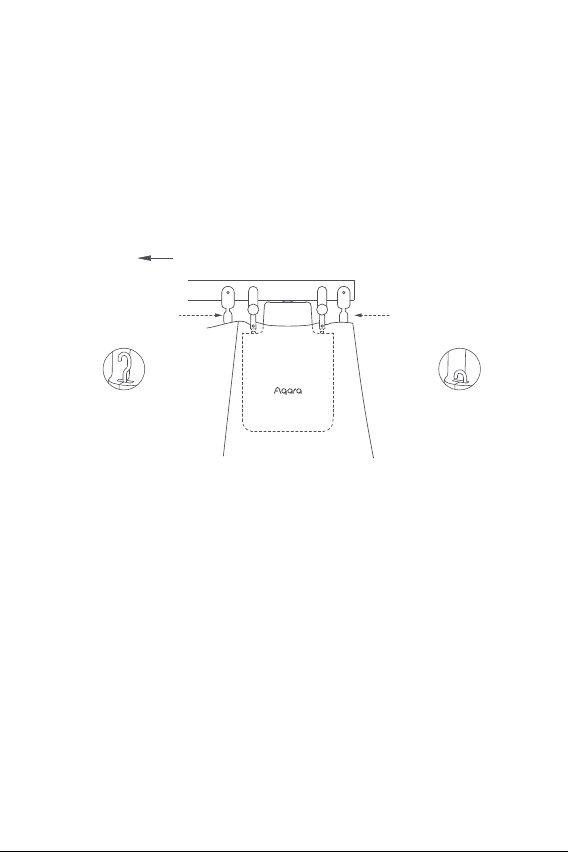
90
両面カーテン(スマートカーテンドライバが2つ必要)
シングルオープンカーテンドライバの取り付け方法に応じて、2つのスマ
ートカーテンドライバをそれぞれ左右のカーテンの組み合わせ滑車に掛
けます(下図を参照)。
この製品はアプリに配置でき、環境光の強弱に応じてカーテンを開閉し
ます。 この機能を使用するには、光センサを窓の外に向け、カーテンド
ライバを窓に近い側に取り付ける必要があります。 室内の光に応じてカ
ーテンの開閉を制御する必要がある場合は、光センサを室内に向け、カ
ーテンドライバを室内に近い側に取り付ける必要があります。 光センサ
の効果を最適化するために、前面に不透明な物体がないことを確認して
ください。
ンドライバのフックを最大長さまで外します。
2.2つの調整可能な組み合わせ滑車をガイドレールに取り付け、カーテン
が働く側の1番目と2番目の既存の組み合わせ滑車の間にちょうど収ま
るようにします(下図を参照)。
3.スマートカーテンドライバを新しく取り付けた2つの調整可能な組み合
わせ滑車に掛けます。
4.設置ボタンを素早く連続して2回クリックし、カーテンドライバをレー
ルに固定します。 このとき、緑色のLEDが点滅し続け、製品が固定さ
れた後、ブザーが3回短いブザー音を立てて、取り付けが完了したこと
を示します。
れているカーテンの開放方向
Iレール
第1プーリブロック
第2プーリブロック
フックは最大の長
さに達する
フックは最も内側
にロックさ
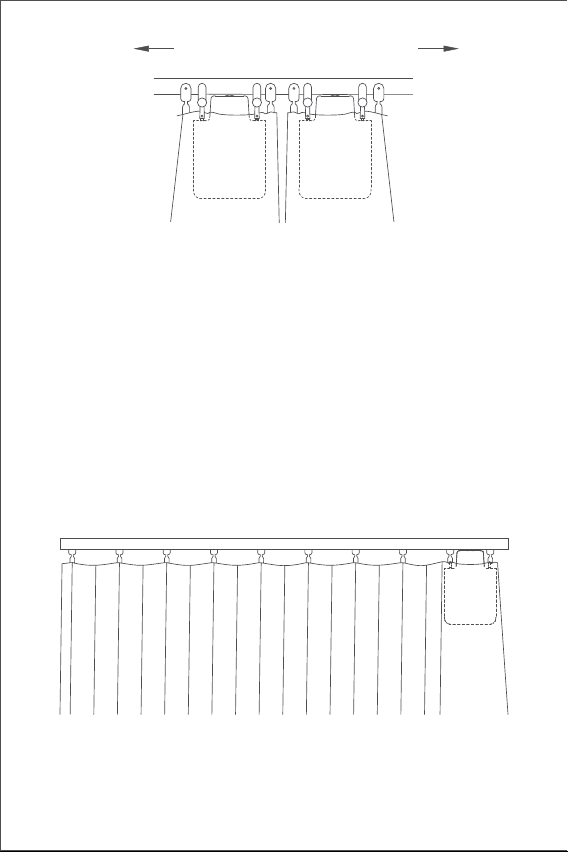
91
開き距離設定
製品の正しい使用を確保するために、製品の設置後に製品の範囲を設定
してください。
片面カーテン
1.設備がAqara Home appに接続された後、アプリで設備の起動距離を設
定することができます。 ホームの設備カードをクリックし、設備ホー
ムの指示に従って筆画を設定します。
2.また、設備がAqara Homeアプリケーションに接続されていない場合は
、設定ボタンを押すことで設備の開き距離を設定できます。 詳細な操
作は次のとおりです。
A) カーテンを完全に閉じるまで引き、「片面カーテン」の取り付け方法
に従ってカーテンドライバをレールに取り付けます。
カーテンの開き方向
I-型ガイド
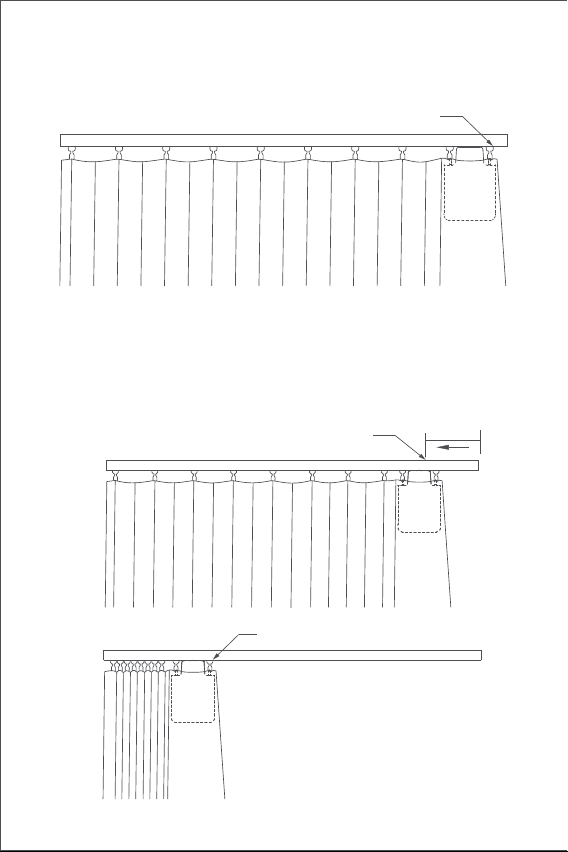
92
B) そして素早く設定ボタンを3回連続してクリックし、範囲の最初の限界
点を設定します。長い間ピーッという音がした後、最初の限界点の設定
の成功となります。
C) 同時に、カーテンドライバは自動的に開き制限点まで作動し、全開方
向に約10cm引いて停止します。 長い間「ピッ」という音がした後、も
う一つの限界点が自動的に正常に設定されます。これは、設備の起動範
囲が設定されていることを意味します。
約10cm
現時点カーテンのパートナーが自動運転を開始。
もう一つのストロークリミットポイント
(カーテン「全開」位置)
最初のストロークリミットポイント(カーテン「全閉」位置)
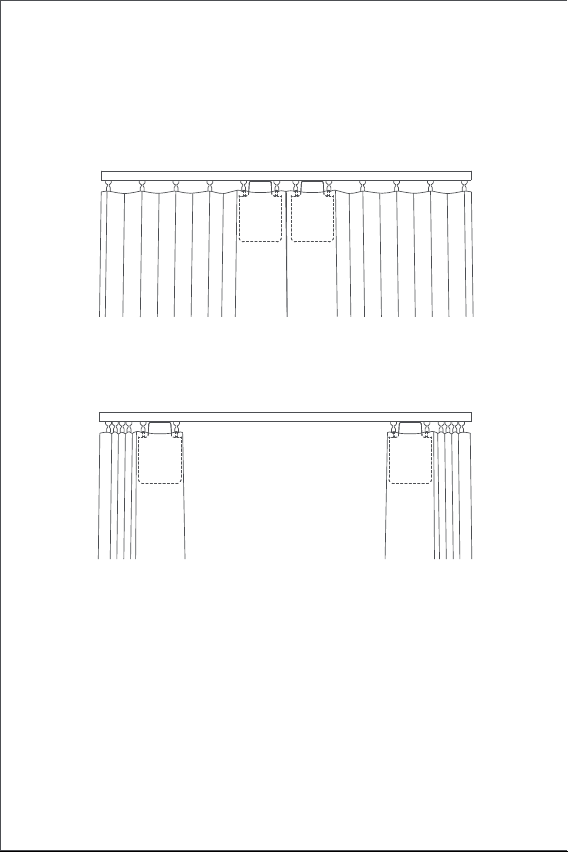
93
両面カーテン
A) 完全に閉まるまで左右のカーテンを引っ張り、「片面カーテン」の取
り付け方法に従って、カーテンが完全に閉まるレールの位置に2つのカ
ーテンドライバを取り付けます。
B) 「片面カーテン」の手順BとCに従って、左右のカーテンドライバの起
動距離を設定します。
94
按钮操作
LEDの説明
ボタン操作 説明
LEDの状態 説明
クリック
現在のカーテンの状態に応じて、オープン、閉じる、
または停止操作を実行します
工場出荷時の設定のリセットまたは電源を入れる(
電源を切った状態の時))
カーテンドライバが現在設定しているストロークを
削除する
2回連続でクイ
ッククリック
ブルーライトク
イック点滅
現在のカーテンドライバの抱っこ状態に応じて、抱
っこ、抱っこ解除、または停止操作を実行します
カーテンドライバがネットワーク配置状態に
入る
(セカンダリ電源を入れて使用するか、デバイ
スをリセットすると表示されます)
OTA バージョンアップ中
ストロークリミットポイントを手動で設定する
3回連続でクイック
クリック
シャットダウン10秒間長押し
5回連続でクイック
クリック
オレンジライトフ
ロー点滅
5秒間長押し
95
バッテリー充電
バッテリー残量不足の警告が出た場合は、すぐにカーテンドライバを充
電してください。 充電手順は以下の通りです:
ブザーの説明
抱え込み操作中
モーターストロークの削除
工場出荷時の設定のリセット
デバイス検索の実行
開閉方向の切り替えに成功
ストロークリミットポイントを手動で設定す
る
抱え込み解除操作実行中緑呼吸
充電中
充電が終了し、アダプタが抜けていない
白呼吸
グリーンライトク
イック点滅
説明ブザー状態
1回長い間音がする
短く3回音がする
カーテンドライバにストロークがある場合、
ストロークリミットポイントを手動で設定す
る動作を実行する
カーテンドライバにストロークがない場合は
、ストロークを削除する動作を実行する
カーテンドライバはその位置に抱きしめる
その位置の抱きしめを解除する
低電力の注意。
2回短く音がする
白ランプが常に点
灯

96
製品パラメータ情報
ブザー警告
サイズ:145.7 × 96 × 46mm
定格電流:1.5 A
定格トルク:0.2 N·m
ワイヤレスプロトコル:Zigbee 3.0 IEEE 802. 15.4
型番:CM-M01(CM-Curtain Motor series products, M01-the first Motorized
products)
バッテリータイプ:リチウム電池(交換不可)
定格電圧:5 V
定格入力:7.5 W
回転速度:100 r/min
移動速度:12 cm/s
動作湿度:0~95% RH、凝縮なし
ブザー操作頻度:2405-2475 MHz
ブザーの最大出力:13 dBm
通常の使用条件では、アンテナとユーザーの体との間に少なくとも20cm
の間隔を保つ必要があります。
オンラインカスタマーサービス:www.aqara.com/support
カスタマー・サポートEメール:[email protected]
ウェブサイト:www.aqara.com
メーカー: Lumi United Technology Co., Ltd.
アドレス: 深セン市南山区桃源街道福光社区留仙大道3370号南山智園崇文
園区1号楼801-804
Made in China
1.設定ボタンを素早く連続して2回クリックするか、appを使用してカー
テンドライバをレールから外し、レールから取り外します。
2.USB充電ケーブルを使用して、Type-Cプラグの一端をカーテンドライバ
の充電口に、もう一端をアダプタに差し込んで充電します。
3. バッテリーを満充電するのに約5時間かかります。

97
제품 소개
Aqara 커튼 드라이버 E1은 기존에 사용하고 있는 커튼을 간편하게 스마트
커튼으로 바꾸어 주는 장치입니다. Aqara Home 앱을 통해 커튼을 제어하고,
지정한 시간에 커튼을 열고 닫거나, 다른 Zigbee 3.0 기반의 아카라 하위 장치와
함께 다양한 스마트홈 시나리오를 구현할 수 있습니다.
경고
1. 안전한 설치를 위해 다음의 안전 지침을 반드시 확인하고 매뉴얼을 보관해
주세요. 부주의한 설치는 큰 사고로 이어질 수 있습니다.
2. 청소, 수리, 교체 등을 진행할 경우 반드시 장치의 전원을 차단 하세요.
3. 주기적으로 케이블 스프링과 고정 장치의 불균형이나 마모, 손상 등이 있는지
점검해 주세요. 수리가 필요하다고 판단되는 경우 장치를 사용하지 마세요.
4. 장치의 수리는 반드시 제조사 또는 제조사에 의해 승인된 설치 파트너를 통해
진행해야 하며, 자가 수리를 진행할 경우 기본 보증 기간이 무효화될 수
있습니다.
5. 주변에서 창문 청소 등의 유지 보수 작업을 진행하는 경우 장치를 동작시키지
마세요.
6. 장치는 동작을 확인할 수 있는 곳에 잘 설치해야 합니다.
7. 장치를 설치하기 전에 전원 작업에 필요하지 않은 모든 장치를 비활성화하고,
불필요한 전원 코드나 부품을 모두 제거해 주세요.
* Aqara 커튼 드라이버 E1을 사용하기 위해서는 Zigbee 3.0 기반의 Aqara 스마트 허브가
필요합니다. 일부 기능은 특정한 허브에서만 지원할 수 있으며 자세한 사항은
www.aqara.com/support를 참고해 주세요.
지시등
설정 버튼
USB C타입 포트
후크
휠
조도 센서
한 번 누르기: 커튼 열기/닫기/정지
두 번 누르기: 후크 열기/잠그기/정지
세 번 누르기: 커튼 열림
시작점/중지점 수동 설정
5초 동안 길게 누르기: 장치 전원
켜기/공장 초기화
10초 동안 길게 누르기: 장치 전원
끄기
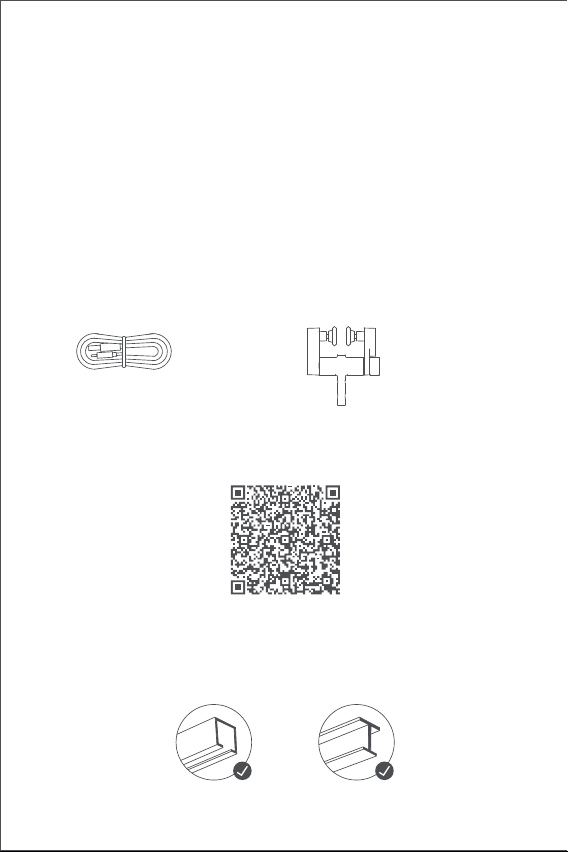
98
패키지 구성
USB C타입 케이블 * 1 커튼 롤러 * 2
설치 영상
아래의 QR코드를 설치하여 제품 설치 영상을 확인해 보세요. 영상 확인이
불가능한 경우 네이버 아카라 스마트홈 카페(cafe.naver.com/aqara) 에서
확인해 주세요.
제품 설치 조건
*설치 가능한 레일 형태*
커튼 드라이버 E1은 U-레일 및 I-레일에서 사용하실 수 있습니다.
8. 장치의 구동부는 정격 부하 및 정격 동작 시간에 부합하는 범위 내에서
사용해야 합니다.
9. 해당 장치에는 교체 불가능한 배터리가 내장되어 있습니다.
10. 8세 미만의 어린이와 신체, 감각 또는 인지 능력이 저하된 사용자는 안전을
위해 해당 장치를 사용해서는 안됩니다.
11. 어린이가 해당 장치를 가지고 놀지 않도록 주의해 주세요.
12. 어린이가 해당 장치를 청소하거나 관리해서는 안됩니다.
13. 부주의하게 사용하는 경우 위험할 수 있으므로 어린이의 손이 닿지 않는 곳에
설치해 주세요.
14. 해당 제품의 배터리는 교체할 수 없습니다.
15. 구동할 커튼의 품질과 치수는 정격 토크 및 정격 작동 시간에 적합해야 합니다.
U-레일 I-레일
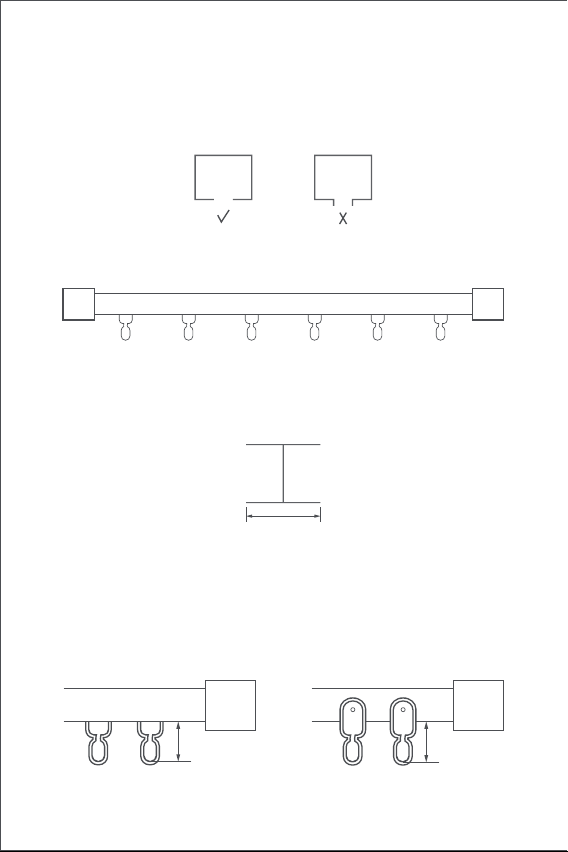
99
U-레일에 설치하기 위한 필요 조건
U-레일의 바닥면이 평평한 형태여야 합니다. (그림 참조)
I-레일에 설치하기 위한 필요 조건
I-레일의 바닥면이 평평한 형태여야 하며, 너비가 10mm 이상이어야 합니다.
설치 가능한 커튼 롤러
설치한 후의 커튼 롤러의 길이가 16mm에서 25mm 사이여야 합니다.
너비 > 10mm
레일의 양쪽이 마개로 막혀있어야 합니다.
커튼봉 타입의 커튼에 사용하기 위해서는 "커튼 드라이버 E1 Rod Version"을
사용 하세요.
U-레일에 설치된 경우 I-레일에 설치된 경우
16~25mm 16~25mm
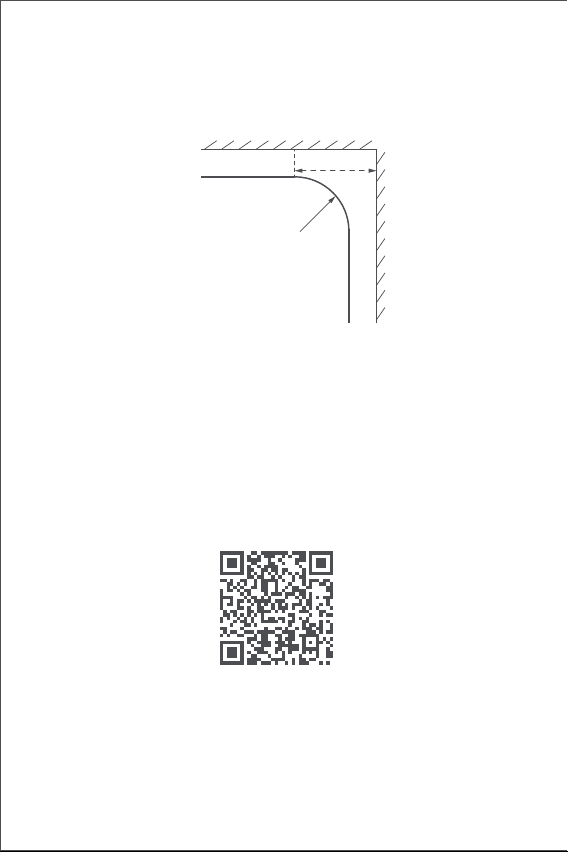
100
커튼 드라이브 E1은 직선 및 곡선 형태의 U-레일과 I-레일에 설치할 수 있습니다.
곡선 형태의 레일에 설치하는 경우 아래와 같은 조건인 경우에 설치할 수
있습니다.
직선 및 특수형 레일
1. 해당 장치를 사용하기 위해서는 Zigbee 3.0을 지원하는 Aqara 스마트 허브가
반드시 설치되어 있어야 합니다.
2. 아래의 QR코드를 스캔하거나 구글 플레이 또는 애플 앱스토어에서 Aqara
Home 앱을 다운로드해 주세요.
3. Aqara Home 앱을 열고 홈 탭을 선택한 다음 오른쪽 상단의 “+”를 눌러 장치
추가 페이지로 이동합니다. “커튼 드라이버 E1”과 연결할 허브를 선택하고 앱의
안내 사항에 따라 장치를 추가해 주세요. 설정 버튼을 5초 동안 누른 후
허브에서 나오는 음성 안내를 기다려 주세요.
4. 커튼 드라이버를 2개 이상 사용하는 경우 설치할 모든 장치를 Aqara Home
앱에 미리 연결해 주세요.
5. 양방향으로 커튼을 사용하기 위해서는 2개의 커튼 드라이버를 앱에 연결한 후
제품 사용 가이드
아래의 안내 사항에 따라 커튼 드라이버 E1을 설치해 주세요.
사용 전 준비 사항
위에서 바라본 경우
특수형 레일
벽면/창틀
곡면
≥25cm
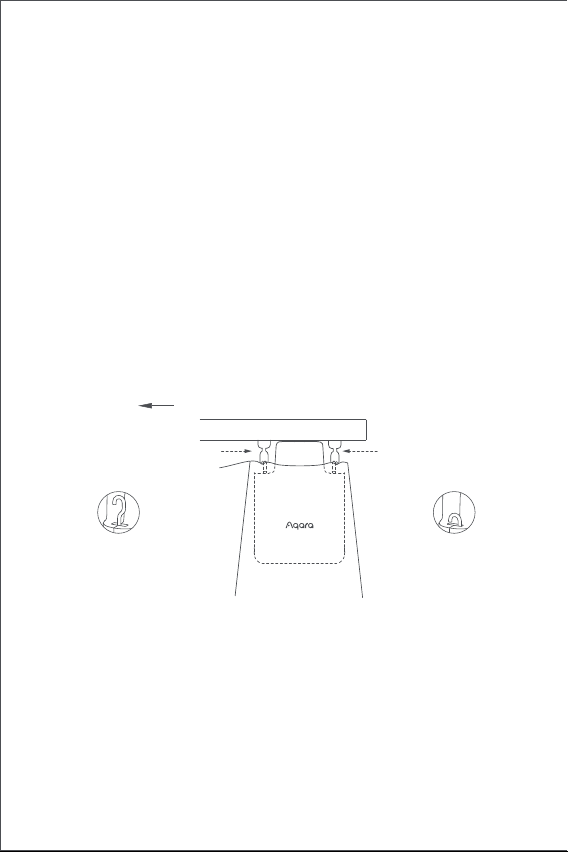
101
1. 커튼 드라이버의 전원을 켜고 “설정 버튼"을 빠르게 두 번 눌러 장치의 후크가
최대 길이로 나올 때까지 기다려 주세요. 기다리는 동안 설치의 편의를 위해
커튼을 완전히 닫아 주세요.
2. 커튼이 열리는 방향의 첫 번째와 두 번째 커튼 롤러에 커튼 드라이버를 걸어
주세요.
- TIP: 커튼 레일에 여분의 커튼 롤러가 설치되어 있는 경우 커튼이 열리는 쪽의 첫
번째와 두 번째 커튼 롤러에 커튼 드라이버를 고정하여 사용할 수 있습니다.
3. “설정 버튼"을 빠르게 두 번 눌러 커튼 드라이버를 커튼봉에 고정시킵니다.
지시등이 초록색으로 깜빡이며 제품이 고정되면 짧은 알림음이 3번 울립니다.
설치 방법
U-레일 설치 방법
한 방향으로 열기(커튼 드라이버 1개 사용 시)
커튼 드라이버에 내장된 조도 센서를 통해 주변 조도에 따라 자동으로 커튼을 열고
닫을 수 있습니다. 외부 조도 환경을 기반으로 커튼을 자동화하는 경우 커튼
드라이버를 창가 쪽에 설치하고, 조도 센서가 창 밖을 향하도록 설치해야 합니다.
실내 조도에 따라 커튼을 자동화하는 경우에는 커튼 드라이버를 실내 방향으로
설치하고 조도 센서도 실내를 바라보도록 설치해야 합니다. 보다 정확한 조도
측정을 위해 센서를 가리는 물체가 없는지 확인해 주세요.
그룹으로 설정하여 동시에 제어할 수 있도록 해야 합니다. 그룹화를 진행할 커튼
드라이버를 선택하여 오른쪽 상단의 “...”를 누른 후 “커튼용 그룹 생성"을
선택하여 앱의 안내 사항에 따라 설치해 주세요.
6. 장치를 설치하기 전에 완전히 충전하는 것이 좋습니다.
커튼이 열리는 방향
첫 번째 커튼 롤러두 번째 커튼 롤러
U-레일
후크가 모두 열린
경우
후크는 장치 안쪽에
들어가 있습니다.
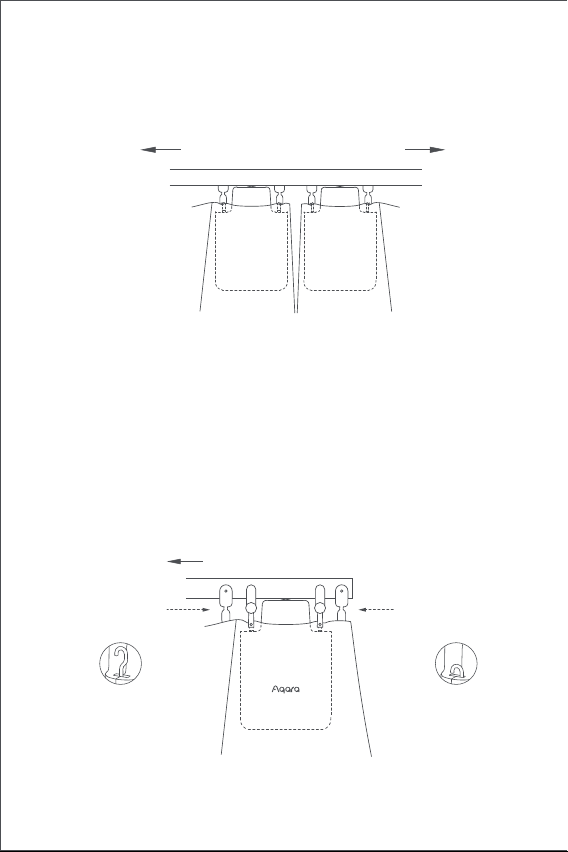
102
1. 커튼 드라이버의 전원을 켜고 “설정 버튼"을 빠르게 두 번 눌러 장치의 후크가
최대 길이로 나올 때까지 기다려 주세요. 기다리는 동안 설치의 편의를 위해
커튼을 완전히 닫아 주세요.
2. 동봉된 커튼 롤러 2개를 커튼이 열리는 방향의 첫 번째와 두 번째 위치에
설치해 주세요. (그림 참조)
3. 커튼 드라이버를 새롭게 설치한 커튼 롤러에 고정시켜 주세요.(그림 참조)
4. “설정 버튼"을 빠르게 두 번 눌러 커튼 드라이버를 커튼봉에 고정시킵니다.
지시등이 초록색으로 깜빡이며 제품이 고정되면 짧은 알림음이 3번 울립니다.
I-레일 설치 방법
한 방향으로 열기(커튼 드라이브 1개 필요)
양방향으로 열기(커튼 드라이버 2개 필요)
양쪽 커튼이 완전히 닫힌 상태에서 아래의 그림에 표시된 위치에 커튼 드라이버 2
개를 설치합니다. (설치 방법은 한 방향으로 여는 경우 참조)
커튼이 열리는 방향
커튼이 열리는 방향
I-레일
첫 번째 커튼 롤러
두 번째 커튼 롤러
후크가 모두 열린
경우
후크는 장치 안쪽에
들어가 있습니다.
U-레일
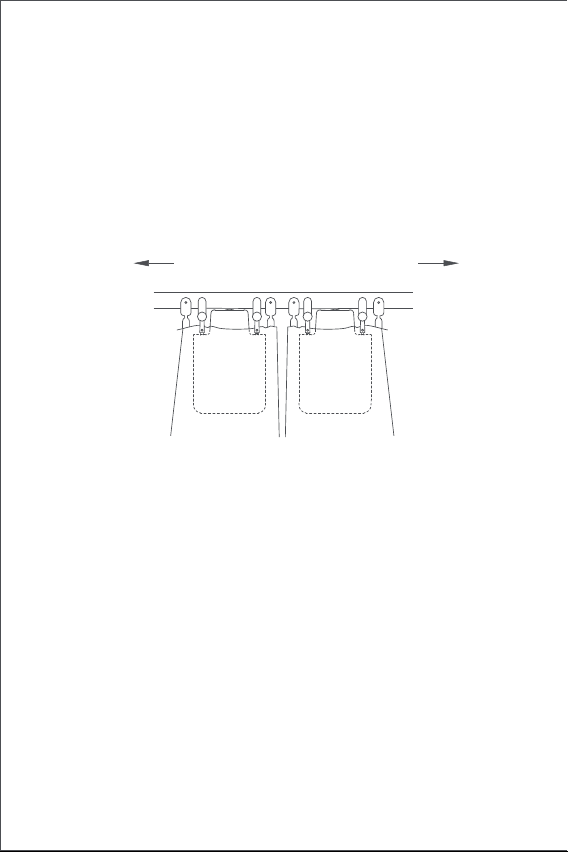
103
양방향으로 열기(커튼 드라이버 2개 필요)
양쪽 커튼이 완전히 닫힌 상태에서 아래의 그림에 표시된 위치에 커튼 드라이버 2
개를 설치합니다. (설치 방법은 한 방향으로 여는 경우 참조)
열림 범위 설정
커튼 드라이버 E1을 설치한 후 사용 환경에 맞게 커튼이 열리는 범위의 시작과 끝
지점을 설정해야 합니다.
한 방향으로 여는 경우
1. Aqara Home 앱에서 “커튼 드라이버 E1”을 선택한 후 열림 범위를 설정할 수
있습니다.
2. Aqara Home에 연결하지 않은 경우 설정 버튼을 눌러 열림 범위를 수동으로
설정할 수 있습니다.
A) 커튼을 완전히 닫은 후 “한 방향으로 열기" 방법을 확인하여 커튼 드라이버를
설치 하세요.
커튼 드라이버에 내장된 조도 센서를 통해 주변 조도에 따라 자동으로 커튼을 열고
닫을 수 있습니다. 외부 조도 환경을 기반으로 커튼을 자동화하는 경우 커튼
드라이버를 창가 쪽에 설치하고, 조도 센서가 창 밖을 향하도록 설치해야 합니다.
실내 조도에 따라 커튼을 자동화하는 경우에는 커튼 드라이버를 실내 방향으로
설치하고 조도 센서도 실내를 바라보도록 설치해야 합니다. 보다 정확한 조도
측정을 위해 센서를 가리는 물체가 없는지 확인해 주세요.
커튼이 열리는 방향
I-레일
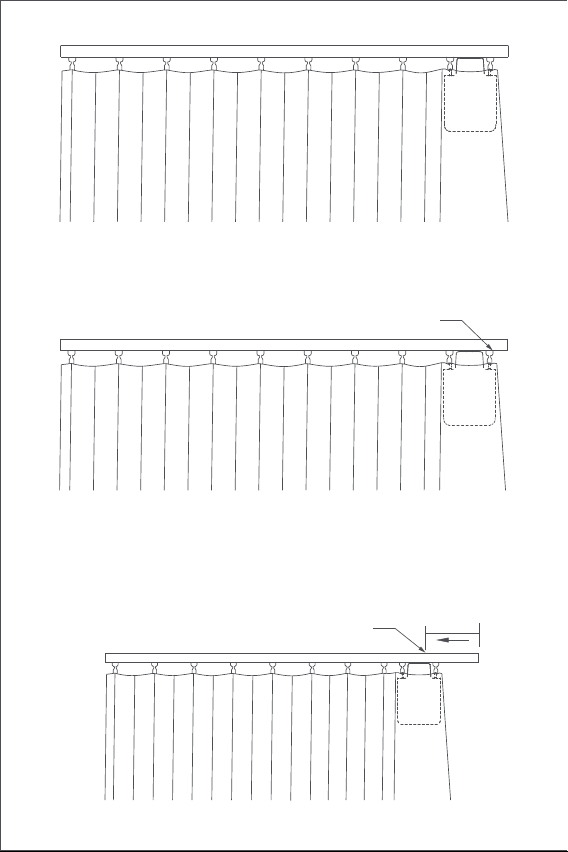
104
B) 설정 버튼을 연속으로 3번 눌러 커튼이 열리는 시작점을 설정합니다. 시작점이
성공적으로 설정되는 경우 장치에서 긴 “삐" 소리가 한 번 송출됩니다.
C) 시작점을 설정한 후 커튼이 열리는 방향으로 커튼 드라이버를 약 10cm 정도
손으로 밀어주세요. 커튼 드라이버가 자동으로 커튼이 완전히 열리는 지점까지
이동한 후, 커튼이 마지막으로 열리는 중지점을 자동으로 설정합니다.
약 10cm
해당 지점에서 커튼 드라이버가 자동으로 이동합니다.
커튼이 완전히 닫힌 상태에서 시작점 위치

105
양방향으로 여는 경우
A) 양쪽 커튼을 완전히 닫은 후 “한 방향으로 여는 경우"의 설치 방법을 확인하여
커튼 드라이버 2개를 설치 하세요.
B) “한 방향으로 여는 경우"의 B와 C단계에 따라 양쪽 커튼 드라이브의 열림
범위를 설정해 주세요.
커튼이 완전히 열린 상태에서 중지점 위치
106
설정 버튼 사용 방법
지시등 설명
설정 버튼
동작 설명
지시등 상태 상태 설명
한 번 누르기 커튼 드라이버의 현재 상태에 따라 열기/닫기/정지
공장 초기화 또는 전원 켜기(장치가 꺼진 상태에서)
커튼 열림 시작점/중지점 삭제하기
빠르게 두 번 누르기
파란불 빠르게 깜빡임
커튼 드라이버의 현재 상태에 따라 후크열기/잠그기/정지
커튼 드라이버 스마트 허브에 연결 중
(장치를 처음 사용하거나 리셋한 후)
펌웨어 업데이트 중
커튼 열림 시작점/중지점 수동으로 설정하기빠르게 세 번 누르기
장치 끄기10초간 길게 누르기
빠르게 다섯 번누르기
주황불 천천히 깜빡임
5초간 길게 누르기
107
신호음 설명
레일을 잡고 있음
열림 범위 삭제
공장 초기화 완료
장치 검색 중
커튼 열림/닫힘 방향 변경
커튼 시작점/중지점 설정 성공
레일에서 해제 중초록불 깜빡임
장치 충전 중
충전이 완료되었으나 어댑터에 연결 중
흰색불 깜빡임
초록불 빠르게 깜빡임
상태 설명신호음
1번 길게 삐—
3번 짧게 삐.삐.삐.
(이미 커튼 열림 시작점/중지점이 설정된 상황에서)
커튼 열림 시작점/중지점을 설정하려는 경우
(아직 커튼 열림 시작점/중지점이 없는 상황에서)
커튼 열림 시작점/중지점 삭제를 하려는 경우
커튼 드라이버가 제자리에 고정되어 있습니다.
커튼 드라이버가 제자리에 해제됩니다.
배터리 부족 경고.
2번 짧게 삐.삐.
흰색불 계속 깜빡임

108
배터리 충전 방법
배터리 부족 경고가 표시되는 경우 즉시 커튼 드라이버를 충전해 주세요.
제품 사양
모델명: CM-M01
(CM-Curtain Motor series products, M01-the first Motorized products)
제품 사이즈: 145.7 × 96 × 46mmmm
정격 전류: 1.5A
정격 토크: 0.2 Nm
정격 전압: 5V
정격 입력: 7.5W
회전 속도: 100r/min
이동 속도: 12cm/s
작동 습도: 0~95% RH, 비결로조건
무선통신 프로토콜: Zigbee
배터리 타입: 리튬 배터리(교체 불가능)
제조업체: Lumi United Technology Co., Ltd.
주소: 중국 심천시 남산구 도원가도 푸광 커뮤니티 류시안 애비뉴 3370 남산
지위안 총원단지 1호 빌딩 801-804
Made in China
1. 설정 버튼을 빠르게 두 번 누르거나, Aqara Home 앱을 사용하여 레일에서
커튼 드라이버를 제거해 주세요.
2. USB C타입 케이블을 장치와 어댑터에 연결하여 충전해 주세요.
3. 배터리를 완전히 충전하는 데에는 약 5시간이 소요됩니다.
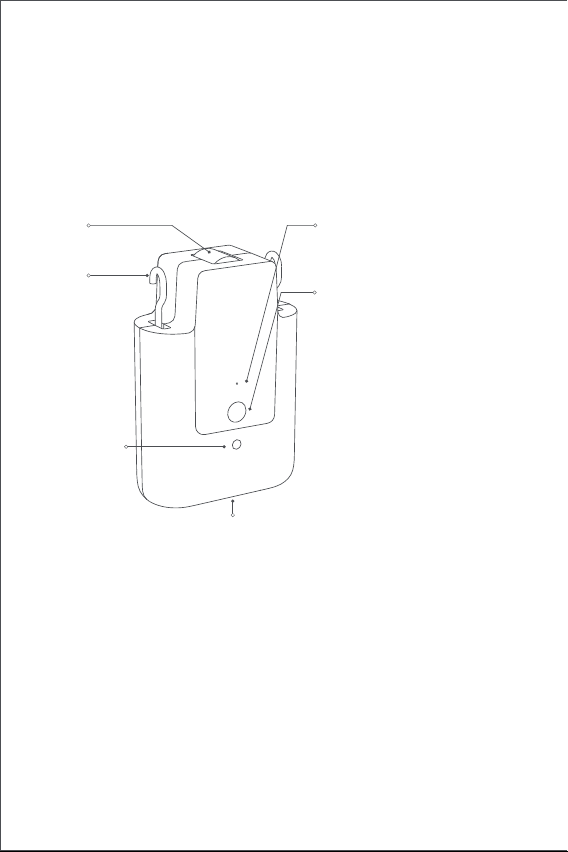
109
產品介紹
窗簾驅動器E1是一款可自動控制您現有窗簾的電動裝置,其是以Zigbee 3.0
無線通訊協定為基礎,實現窗簾的預約控制,並且在與Aqara Home App應
用程式連線後,可與其他智慧裝置協力運作。
警告事項
1.8歲及以上的兒童,以及體能、感官能力或腦力下降或缺乏經驗和知識的
人可以使用本產品,但前提是其使用行為在監督之下,或其已經接受有關
安全使用本產品的指導並瞭解相關風險。
2.兒童不應將本產品視作玩具。
3.無人監督的情况下,禁止兒童清潔和維護本產品。
4.警告:清潔、維護和更換零件之前,應斷開驅動器的電源。
5.只能採用單獨或額定安全低電壓(SELV)供電。
6.警告:重要的安全訓示。遵守這些訓示,對確保人員安全十分重要。請妥
善保存這些訓示。
7.切勿让儿童将固定的控制装置视作玩具玩耍。
8.經常檢查裝置是否不平衡,且電纜彈簧和固定件是否出現磨損或受損迹象。
如需修理或調整,請勿使用。
*需要一組Aqara Zigbee 3.0 集線器。某些功能需要特定型號的集線器。請造訪
www.aqara.com/support網站以了解更多詳情。
指示燈
設定按鍵
USB Type-C連接埠
鉤
輪
光感應器
按一下:將窗簾打開、閉合或停止;
連按2下:將掛鉤鬆開、撤回或停
止;
連按3下:手動設置窗簾的開始或
結束位置;
長按5秒:開機或恢復出廠設置;
長按5秒:關閉設備。
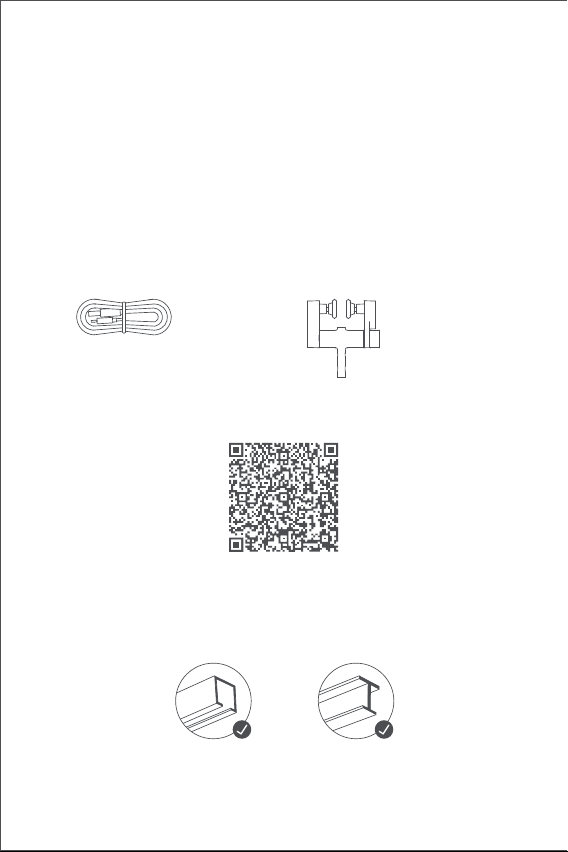
110
包裝清單
USB Type-C 傳輸線 × 1 可調整滑輪組 × 2
教學影片
安裝需求
軌道類型
請掃描下方QR碼查看安裝操作指導影片。如無法觀看影片,也可以按照手
冊中描述的方法安裝產品。
Smart Curtain Driver E1 標準版可用於 U 型軌道和 I 型軌道。
如想在桿件上使用該產品,請購買窗簾驅動器 E1 桿件版。
9.在附近進行維護工作(例如擦窗)時,請勿操作。
10.警告:重要的安全訓示。遵循所有的訓示,因為錯誤按照會造成嚴重傷
害。
11.安裝驅動器之前,請拆下所有不必要的線纜和零件,並禁用任何無需通
電操作的設備。
12.被驅動部件的特性必須與額定荷載和額定工作時間相相容。
13.本設備包含不可更換的電池。
14.安裝後,固定控制裝置必須清晰可見。
15. 被驅動的窗簾的質量和尺寸應兼容額定扭矩和額定運行時間。
U型軌道 I型軌道
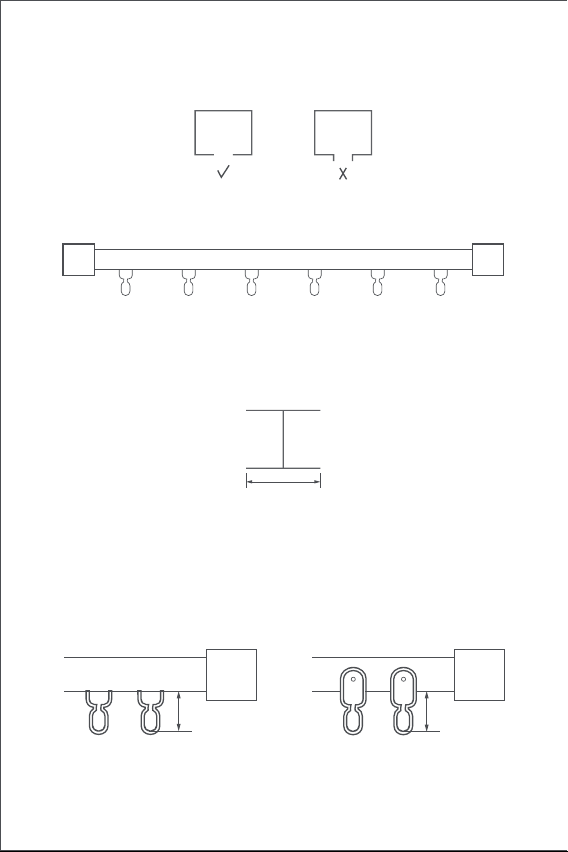
111
U型軌道安裝需求
U型軌道的底面應平整且光滑。
I型軌道安裝需求
I型軌道的底面應平整且光滑,且寬度需大於10mm。
窗簾滑輪組安裝需求
軌道滑輪組的吊環底部上表面到軌道底部的距離應在16mm~25mm之間。
寬度 > 10 mm
軌道兩側應用閉合接頭緊閉封合。
U型軌道滑翔器 I型軌道滑翔器
16~25mm 16~25mm
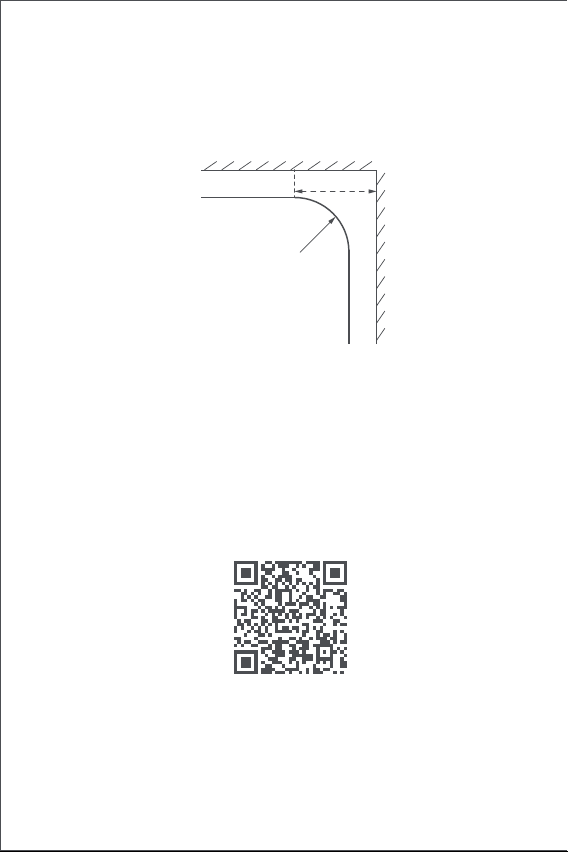
112
使用U 型軌道和 I 型軌道時,窗簾驅動器 E1 支援直線和彎曲軌道。 使用彎
曲軌道時,彎曲處應滿足以下條件:
直線軌道與異型軌道
1.將本產品安裝到窗簾前需要連線上Aqara Home APP應用程式。
啟用產品前,請確保您已安裝Aqara Home APP應用程式和Aqara Zigbee
3.0 集線器(請掃描下方QR碼下載APP應用程式)。
3.請開啟應用程式,點擊「首頁」,然後點擊右上方「+」,進入「新增設
備(配件)」頁面。依照Aqara Home應用程式中的說明,選擇並新增「
窗簾驅動器E1」與欲連線的集線器。長按設定鍵5秒,等待集線器語音指
示。
4.如您有購買兩組以上的窗簾驅動器,請在安裝之前將全部都連線到 Aqara
Home 應用程式。
5.如欲使用於雙開窗簾,則需將兩個窗簾驅動器連線到應用程式,然後將
快速入門指南
使用前準備
請詳閱以下步驟,開始使用本產品。
俯視圖
彎曲軌道
牆壁
軌道轉彎處
≥25cm
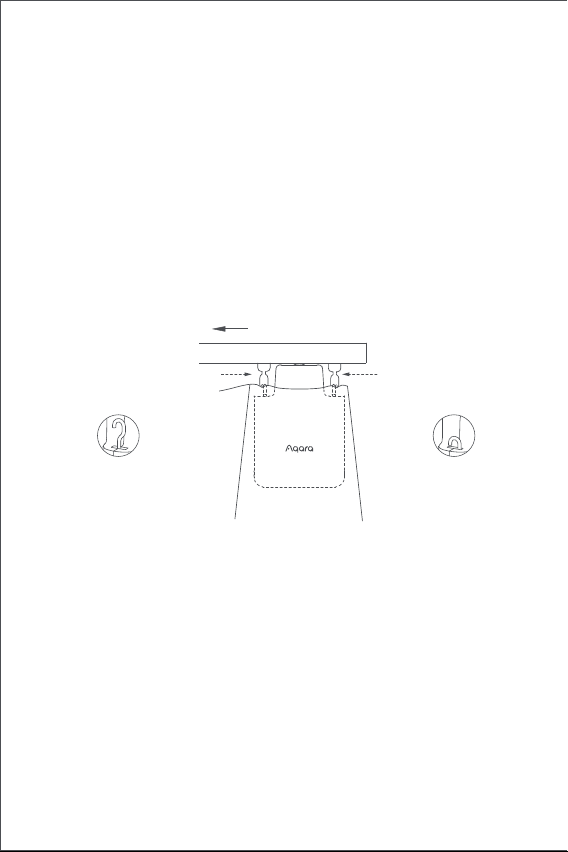
113
1.於啟動後,連按2下設定按鍵,將智慧窗簾驅動器的掛鉤釋放到最大長度。
2.將智慧窗簾驅動器掛在窗簾活動側的第一、第二滑輪組上(如圖所示)。
3.安裝訣竅:如果軌道上有多的滑輪組,可以將它們放在窗簾的第一和第
二個掛鉤間,並將窗簾驅動器可置於其上。
4.連續按兩下設定按鍵,將窗簾驅動器固定在軌道上。此時綠色指示燈持
續閃爍,產品固定到位後蜂鳴器3短音,指示安裝完成。
U型軌道的安裝方法
單開窗簾(僅需一組智慧窗簾驅動器)
雙開窗簾(需兩組智慧窗簾驅動器)
如同單開窗簾的窗簾驅動器的安裝方法,分別將兩組智慧窗簾驅動器掛在
左右兩側的窗簾滑輪組上(如下圖所示)。
本產品可透過應用程式設定,根據環境光線的強度控制打開和閉合窗簾。
使用該功能時,光感測器應朝向窗外安裝,窗簾驅動器應安裝在靠近窗戶
側。如需根據室內光線來控制窗簾的開合,則光感測器應朝向室內,窗簾
驅動器應安裝在靠近室內側。請確保其前方沒有不透明物體,以達到光感
測器的最佳效果。
它們放在同一群組內作同步控制。進入需要分組的窗簾驅動器首頁,點擊
右上方「...」,選擇「為窗簾建立群組」,並依照指示操作。
6.於此建議您於安裝前充飽產品的電量。
窗簾開啟方向
第一滑輪組第二滑輪組
U型軌道
掛鉤伸出到最大長度
掛鉤鎖在最內側
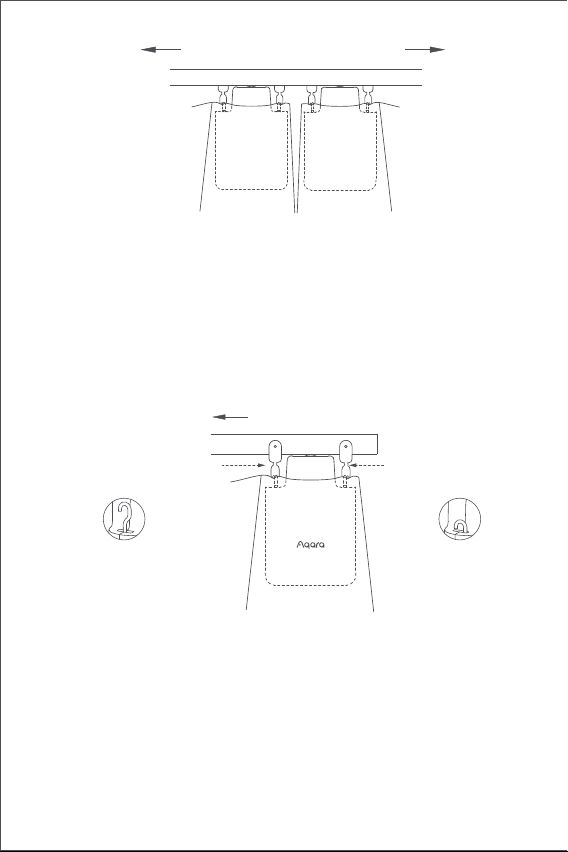
114
1.於啟動後,連按2下設定按鍵,將智慧窗簾驅動器的掛鉤釋放到最大長度。
2.將兩個可調滑輪組安裝到軌道上,將它們放在窗簾活動側的現有第一、
第二滑輪組之間(如圖所示)。
3.將智慧窗簾驅動器掛在兩個新安裝的可調滑輪組上 (如圖所示)。
4.連續按兩下設定按鍵,將窗簾驅動器固定在軌道上。此時綠色指示燈持
續閃爍,產品固定到位後蜂鳴器3短音,表示安裝完成。
I型軌道的安裝方法
單開窗簾(僅需一組智慧窗簾驅動器)
本產品可透過應用程式設定,根據環境光線的強度控制打開和閉合窗簾。
使用該功能時,光感測器應朝向窗外安裝,窗簾驅動器應安裝在靠近窗戶
側。如需根據室內光線來控制窗簾的開合,則光感測器應朝向室內,窗簾
驅動器應安裝在靠近室內側。請確保其前方沒有不透明物體,以達到光感
測器的最佳效果。
窗簾的開啟方向
窗簾開啟方向
I型軌道
第一滑輪組
第二滑輪組
掛鉤伸出到最大長度
掛鉤鎖在最內側
U型軌道
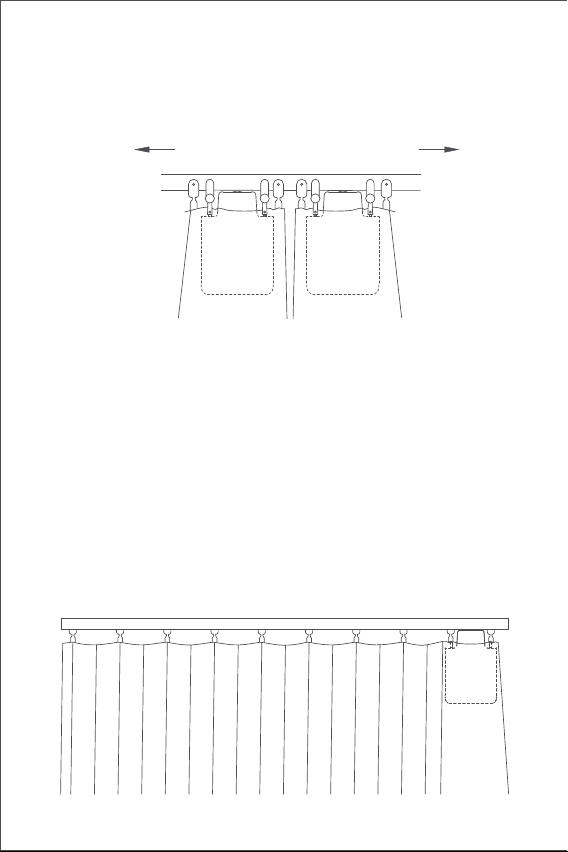
115
雙開窗簾(需兩組智慧窗簾驅動器)
如同單開窗簾的窗簾驅動器的安裝方法,分別將兩組智慧窗簾驅動器掛在
左右兩側的窗簾滑輪組上(如下圖所示)。
打開行程設定
為確保產品得以正常使用,請於產品安裝後設定其移動範圍。
單開窗簾
1.設備連接Aqara Home app應用程式後,可在app應用程式上設定設備的
打開行程。 在APP應用程式首頁點擊設備設定卡,按照設備首頁說明設定
行程。
2.此外在設備未連接Aqara Home應用程式時,可以透過設定按鍵來設定設
備的打開行程。詳細操作如下:
A) 將窗簾拉至完全閉合,再按照「單開窗簾」的安裝方法將窗簾驅動器安
裝在軌道上。。
窗簾開啟方向
I 型軌道
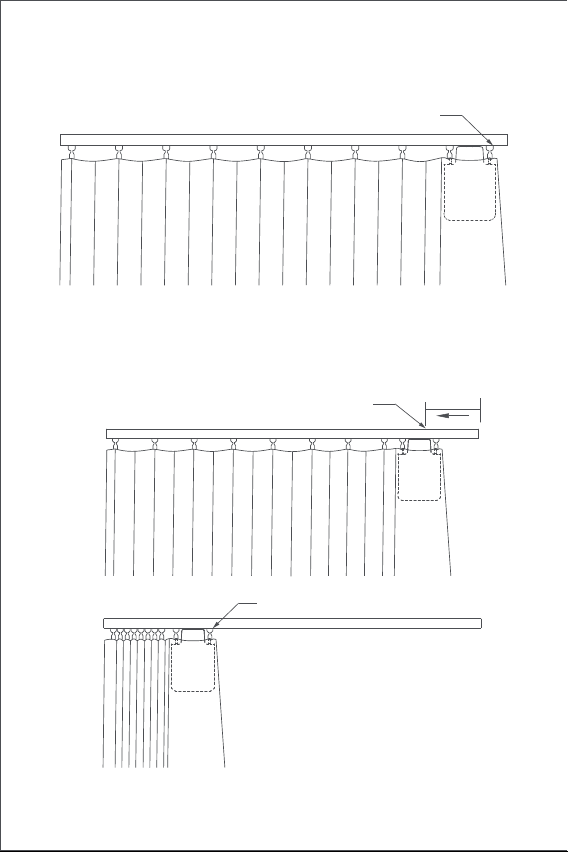
116
B) 然後連按3下設定按鍵,設定範圍的第一個行程限位點。於一聲長「嗶」
後,第一個行程限位點設置成功。
C) 同時窗簾驅動器在全開方向上被拉動約10公分後會自動運行到行程限位
點並停止。一聲長「嗶」後,另一個行程限位點自動
設置成功,表示設備的開啟範圍設定完畢。
約10cm
此時窗簾伴侶開始自動運行
另一個行程限位點(窗簾“全開”位置)
第一個行程限位點(窗簾“全關”位置)
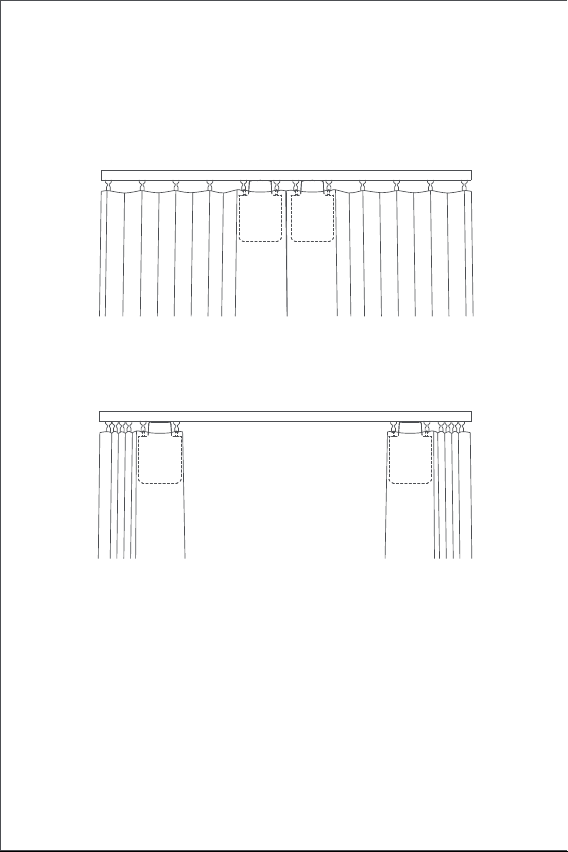
117
雙開窗簾
A)將左右兩側的窗簾拉至完全閉合,再按照「單開窗簾」的安裝方法,將兩
個窗簾驅動器安裝在窗簾完全閉合的軌道位置。將左右兩側的窗簾拉至完
全閉合,並按照「單開窗簾」的安裝方法,將兩個窗簾驅動器安裝在窗簾
完全閉合的軌道位置。
B) 根據「單面窗簾」的B、C步驟設置左右兩側的窗簾驅動器的打開行程。
118
按键操作
指示燈狀態
按键操作 說明
指示燈狀態 說明
按1下
根據目前窗簾驅動器的狀態進行打開、閉合或停止操
作
恢復出場設定或開機(於開機狀態時)
刪除窗簾驅動器的目前行程設定
連按2下
快速閃爍藍光
根據目前窗簾驅動器的保持狀態進行打開、閉合或停
止操作
窗簾驅動器與集線器連線
(首次開機使用或重置設備後)
韌體生集中
手動設定行程限位點連按3下
關機長按10秒
連按5下
慢速閃爍橘光
長按5秒
119
電池充電
當出現低電量警告時,請及時充電窗簾驅動器。 充電步驟如下:
蜂鳴器說明
正維持在軌道上
打開行程已刪除。
已恢復出廠設定。
進行設備搜尋。
已切換打開與閉合方向。
行程限位點設定成功。
正在從軌道釋放綠光呼吸
正在充電
充電完成且電源轉換器未拔出
白光呼吸
快速閃爍綠光
説明蜂鳴器說明
1聲長鳴
3聲短鳴
當窗簾驅動器的行程沒有被刪除時,手動設定行
程的限位點。
當窗簾驅動器的行程被刪除時, 重新刪除行程。
窗簾驅動器保持到位。
解除窗簾驅動器保持到位。
低電量提醒。
2聲短鳴
白光常亮

120
產品參數資訊
Zigbee 警告
尺寸: 145.7 × 96 × 46 mm
額定電流: 1.5 A
額定轉矩: 0.2 N·m
無線協定: Zigbee 3.0 IEEE 802.15.4
型號: CM-M01(CM-Curtain Motor series products, M01-the first
Motorized products)
電池類型: 鋰電池(不可替換)
額定電壓: 5 V
額定輸入功率: 7.5 W
旋轉速度: 100 轉/分
移動速度: 12 公分/秒
工作濕度: 0~95% RH, 無冷凝
Zigbee 工作頻率: 2405-2475 MHz
Zigbee 最大輸出功率: 13 dBm
本設備在正常使用情況下,天線與使用者身體間應保持至少20cm的距離。
線上客戶服務:www.aqara.com/support
客服電子郵箱:[email protected]
网址:www.aqara.com
製造商:深圳綠米聯創科技有限公司
地址:中國深圳市南山區桃源街道福光社區留仙大道3370號南山智園崇文
園區1號樓801-804
Made in China
1.連按2下設定按鍵、或使用APP將窗簾驅動器從軌道上鬆開,再將其從軌
道取下;
2.使用USB充電線,將Type-C接頭的一端插入窗簾驅動器的充電口,另一端
插入電源轉換器進行充電。
3.充飽電池需5小時。


Scatola
PAP 21
Carta
RACCOLTA DIFFERENZIATA
Verifica le disposizioni del tuo Comune.
Separa le componenti e conferiscile in modo corretto.
Scatola
PAP 21
Carta
Manuale
Carta
PAP 22
Maniglia
Plastica
PP 5
Borsa
Plastica
CPE 7
PAP
22