Original instructions.
© 2026 Manufactured for All Season Power LLC.
Snow Joe
®
, Sun Joe
®
, Aqua Joe
®
and Auto Joe
®
are registered trademarks used under license from
Weather Brands LLC.
New Castle, DE 19720
*DISCLAIMER: Initial no‑load voltage, when fully charged,
peaks at 20V; nominal voltage under typical load is 18V.
SAVE THESE INSTRUCTIONS
1
THANK YOU FOR YOUR PURCHASE!
Failure to register your product purchase will not diminish
your warranty rights. For more information visit shopjoe.com
Place UPC sticker here
UPGRADE YOUR COVERAGE
AT SHOPJOE.COM
/
REGISTER
FOR UP TO 3, 4, OR 5 YEARS OF TOTAL TOOL COVERAGE
When we say we stand behind our product, we mean it! Now you can blow, mow, cut,
saw or tend to any other yard task with confidence, knowing that if there is a problem
with your tool within the warranty period, we will gladly solve it.
+EXTENDED
WARRANTY
ACTIVATE YOUR
1 YEAR WARRANTY
RECEIVE
90 DAYS BONUS COVERAGE
VISIT
SHOPJOE.COM/REGISTER
TELL YOUR FRIENDS
AND TAG US!
We love to hear your feedback! Share your experience by
writing comments and reviews on shopjoe.com, or
connect with us on social media!
HAS YOUR SNOW JOE
EXPERIENCE LEFT
YOU SMILING?
#GOWITHJOE
E Q
OR HAS SOMETHING
LEFT YOU LESS
THAN SATISFIED?
WE’RE SORRY
ABOUT THAT!
Our friendly customer service team is ready to
help you with any issues you may have.
@ SNOWJOECO
CALL US
1-866-225-9723
m
For fastest response
CHAT WITH US
SHOPJOE.COM/CHAT
Model X20-TRIM-2A Form No. ASP-X20-TRIM-2A-880E-M (TFG)
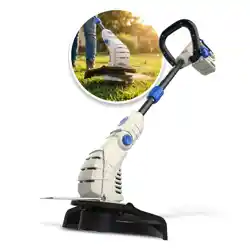
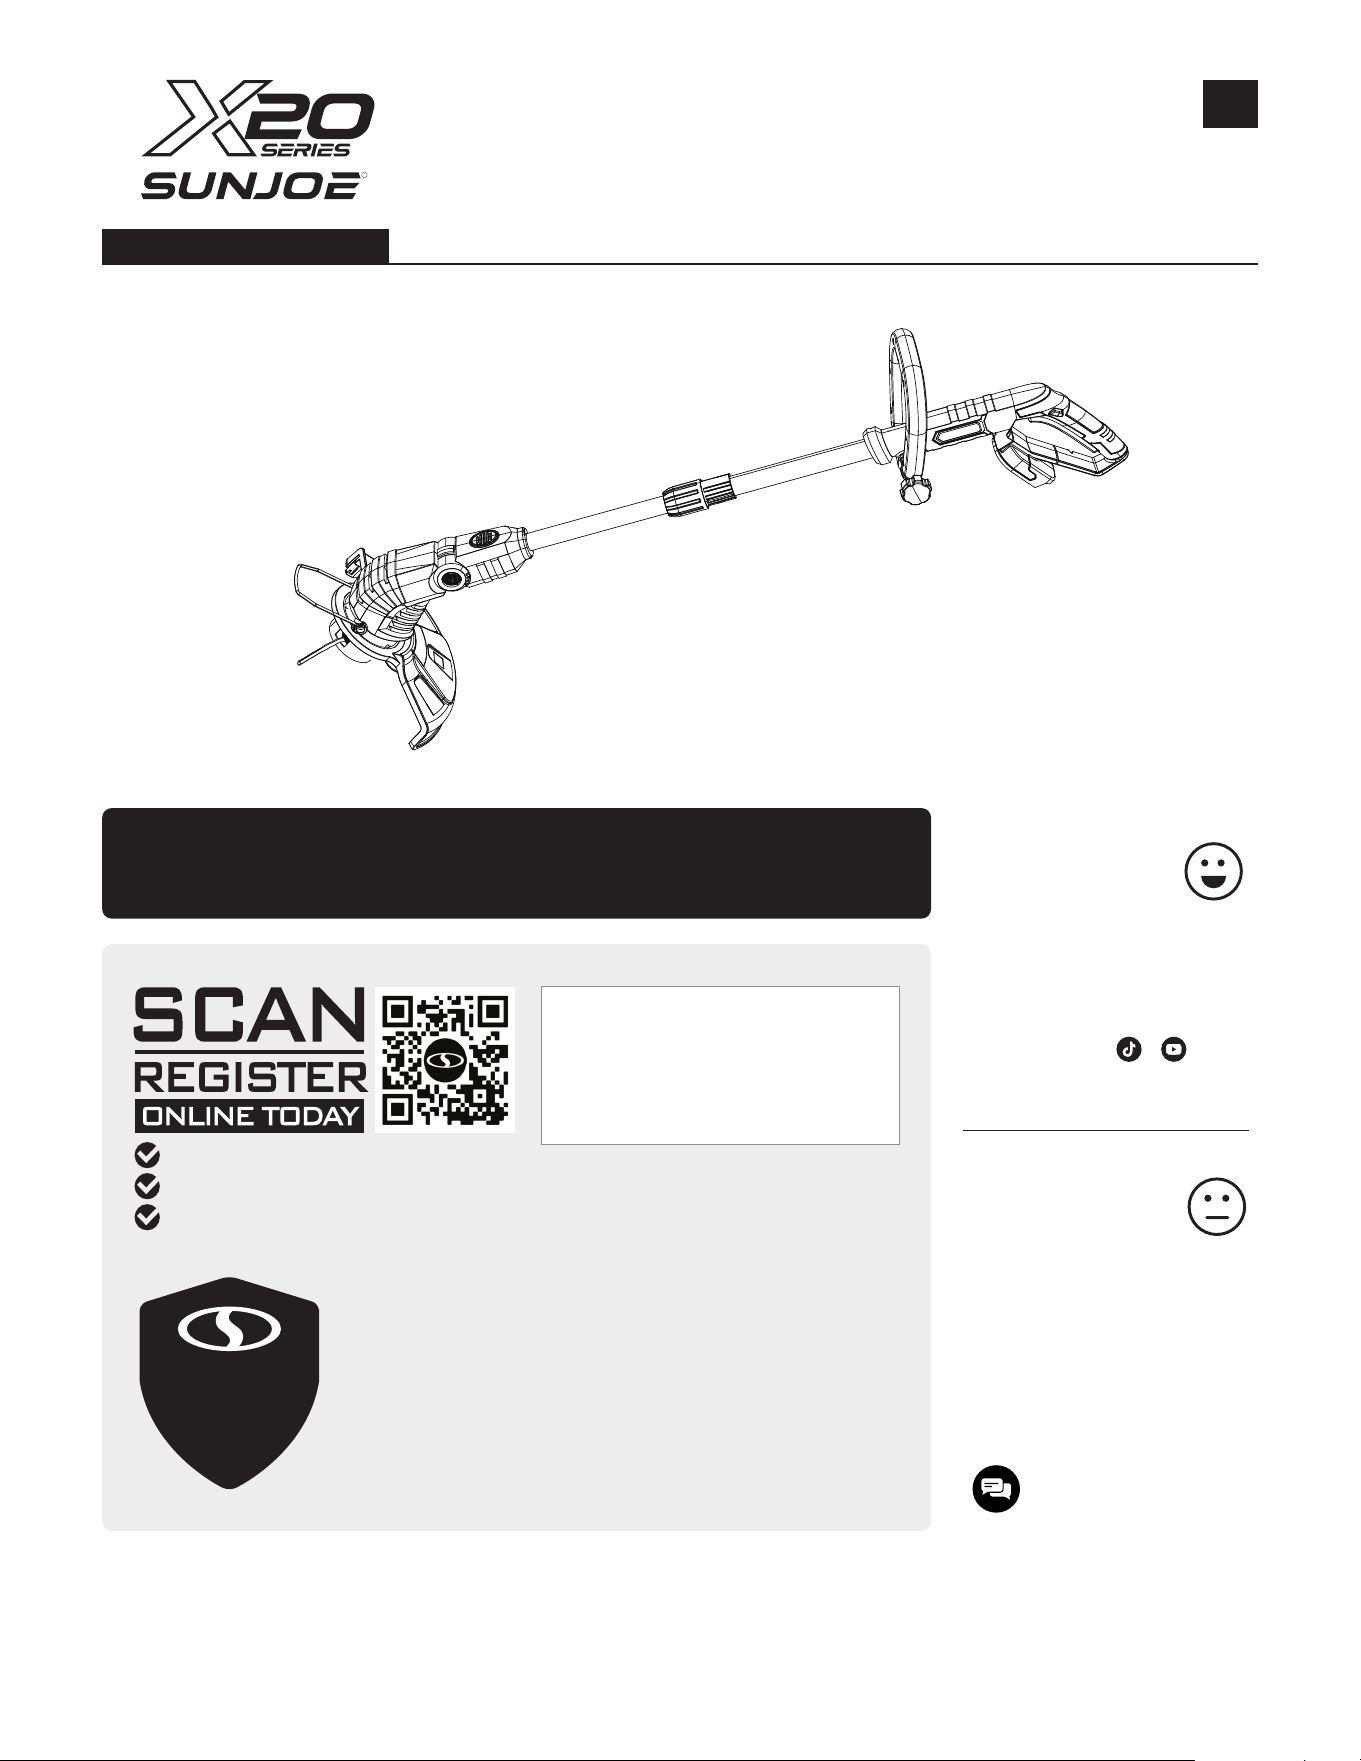
CORDLESS TRIMMER + EDGER
20-VOLT MAX* | 2.0 Ah | 12 INCH
EN
OPERATOR’S MANUAL
R

Model X20-TRIM-2A Form No. ASP-X20-TRIM-2A-880E-M (TFG)
CORDLESS TRIMMER + EDGER
20-VOLT MAX* | 2.0 Ah | 12 INCH
EN
OPERATOR’S MANUAL
R
SAVE THESE INSTRUCTIONS
2
IMPORTANT!
Safety Instructions
All Operators Must Read These
Instructions Before Use
mCAUTION!
Before using this cordless tool, carefully read and observe the
safety rules and instructions listed below. Before starting work,
make sure that you know how to stop the machine in case of
an emergency. The incorrect use of this machine could cause
serious injury. Keep these instructions in a safe place and on
hand so that they can be consulted when required.
mCAUTION!
The cordless grass trimmer + edger should only be used for
cutting lawns and for trimming along the borders of flower beds.
Other uses of the trimmer + edger that are not indicated in these
instructions could damage the trimmer + edger or seriously
injure the operator.
GENERAL Safety Rules
mWARNING! When using the cordless grass trimmer
+ edger basic safety precautions should always be followed
to reduce the risk of fire, electric shock, and personal injury,
including the following:
1. Prevent unintentional starting. Ensure the switch is in the
off-position before connecting to battery pack, picking up
or carrying the appliance. Carrying the appliance with your
finger on the switch or energizing appliance that have the
switch on invites accidents.
2. Disconnect the battery pack from the appliance before
making any adjustments, changing accessories, or storing
appliance. Such preventive safety measures reduce the risk
of starting the appliance accidentally.
3. Recharge only with the charger specified by the
manufacturer. A charger that is suitable for one type of
battery pack may create a risk of fire when used with
another battery pack.
4. Use appliances only with specifically designated battery
packs. Use of any other battery packs may create a risk of
injury and fire.
5. When battery pack is not in use, keep it away from other
metal objects, like paper clips, coins, keys, nails, screws
or other small metal objects, that can make a connection
from one terminal to another. Shorting the battery terminals
together may cause burns or a fire.
6. Under abusive conditions, liquid may be ejected from the
battery; avoid contact. If contact accidentally occurs, flush
with water. If liquid contacts eyes, additionally seek medical
help. Liquid ejected from the battery may cause irritation or
burns.
7. Do not use a battery pack or appliance that is damaged
or modified. Damaged or modified batteries may exhibit
unpredictable behavior resulting in fire, explosion or risk
of injury.
8. Do not expose a battery pack or appliance to fire or
excessive temperature. Exposure to fire or temperature may
cause explosion.
9. Follow all charging instructions and do not charge the
battery pack or appliance outside of the temperature range
specified in the instructions. Charging improperly or at
temperatures outside of the specified range may damage
the battery and increase the risk of fire.
10. Have servicing performed by a qualified repair person using
only identical replacement parts. This will ensure that the
safety of the product is maintained.
11. Do not modify or attempt to repair the appliance or the
battery pack (as applicable) except as indicated in the
instructions for use and care.
12. Replacement parts – When servicing, use only identical
replacement parts.
13. Avoid dangerous environments – Do not use appliances in
damp or wet locations. Do not use in rain.
14. Keep children and bystanders away – Children and other
spectators, including pets, should be kept at least 50 feet
(15 meters) away from the work area. When the grass is cut,
stones and debris contained in the grass can be picked up
by the trimmer + edger and dispersed into the air. These
flying projectiles can cause blindness or other bodily injury.
15. Dress properly – Always wear suitable clothing when using
the trimmer + edger to prevent head, hand, or feet injuries.
Do not wear loose clothing or jewelry. They can get caught
in moving parts.
16. Use safety glasses – Also use safety footwear,
snug-fitting clothing, protective gloves, hearing and
head protection.
17. Use the right tools – Do not use tools for any job except
that for which they are intended.
18. Do not force the tool – It will do the job better and with
less likelihood of injury if it is used at the rate for which it
was designed.

3
19. Do not overreach – Keep proper footing and balance at all
times.
20. Stay alert – Watch what you are doing. Use common sense.
Do not operate the trimmer + edger when you are tired, or
under the influence of alcohol or drugs.
21. Store idle tools indoors – When not in use, tools should
be stored indoors in a dry and high or locked-up place out
of the reach of children.
22. Maintain tools with care – Inspect the trimmer + edger
periodically and replace if damaged. Repair the trimmer +
edger only at an authorized service facility. Keep handles
dry, clean, and free from oil and grease.
23. Checked for damaged parts – Before continuing to use
the cordless trimmer + edger, a guard or other part that is
damaged should be carefully checked to determine that it
will operate properly and perform its intended function.
Check for the alignment of moving parts, binding of moving
parts, breakage of parts, mounting, and any other condition
that may affect the trimmer + edger’s operation. A guard or
other part that is damaged should be properly repaired or
replaced by an authorized service center unless indicated
elsewhere in this manual.
Grass trimmer and lawn edge
trimmer safety warnings
a. Do not use the machine in bad weather conditions,
especially when there is a risk of lightning. This
decreases the risk of being struck by lightning.
b. Thoroughly inspect the area for wildlife where the
machine is to be used. Wildlife may be injured by the
machine during operation.
c. Thoroughly inspect the area where the machine is to
be used and remove all stones, sticks, wires, bones,
and other foreign objects. Thrown objects can cause
personal injury.
d. Before using the machine, always visually inspect to
see that the cutter and the cutter assembly are not
damaged. Damaged parts increase the risk of injury.
e. Keep guards in place. Guards must be in working
order and be properly mounted. A guard that is loose,
damaged, or is not functioning correctly may result in
personal injury.
f. Keep all cooling air inlets clear of debris. Blocked air
inlets and debris may result in overheating or risk of fire.
g. Wear eye protection and ear protection. Adequate
protective equipment will reduce personal injury.
h. While operating the machine, always wear non-slip
and protective footwear. Do not operate the machine
when barefoot or wearing open sandals. This reduces
the chance of injury to the feet from contact with the
moving cutter.
i. Always wear clothing such as trousers that covers the
operator's legs while operating the machine. Contact
with the moving cutter or line may cause injury.
j. Keep bystanders away while operating the machine.
Thrown debris can result in serious personal injury.
k. Do not operate the machine above waist height. This
helps prevent unintended cutter contact and enables
better control of the machine in unexpected situations.
l. Exercise caution when operating the machine in wet
grass. Walk, never run. This reduces the risk of slipping
and falling which may result in personal injury.
m. Do not operate the machine on excessively steep
slopes. This reduces the risk of loss of control, slipping
and falling which may result in personal injury.
n. When working on slopes, always be sure of your
footing, always work across the face of slopes, never
up or down and exercise extreme caution when
changing direction. This reduces the risk of loss of
control, slipping and falling which may result in personal
injury.
o. Keep all parts of the body away from the moving
trimmer cutter or line. Do not clear material from
the machine until it has been disconnected from the
power source. The moving trimmer cutter or line may
result in serious personal injury.
p. Carry the machine with the machine switched off and
away from your body. Proper handling of the machine
will reduce the likelihood of accidental contact with a
moving trimmer cutter or line.
q. Only use replacement cutting heads and trimmer
cutters or lines specified by the manufacturer. Do not
replace the trimmer cutters or lines with metal wires
or blades. Incorrect replacement parts may cause loss of
control, breakage and injury.
r. Follow instructions for changing accessories.
s. Always use two hands when operating the machine.
Holding the machine with both hands will avoid loss of
control
t. Hold the machine by insulated gripping surfaces
only, because the cutting line or blade may contact
hidden wiring or its own cord. Cutting line or blades
contacting a "live" wire may make exposed metal parts of
the machine "live" and could give the operator an electric
shock.
u. Always keep proper footing and operate the machine
only when standing on the ground. Slippery or unstable
surfaces may cause a loss of balance or control of the
machine.
v. Maintain control of the machine and do not touch
cutters, lines or blades and other hazardous moving
parts while they are still in motion. This reduces the
risk of injury from moving parts
w. When clearing jammed material or servicing the
machine, turn off the machine and remove the battery.
Unexpected starting of the machine while clearing
jammed material or servicing may result in serious
personal injury.

4
Battery + Charger
Safety Instructions
We pay a great deal of attention to the design of every battery
pack to ensure that we supply you with batteries that are safe,
durable and have a high energy density. The battery cells have
a wide range of safety devices. Each individual cell is initially
formatted and its electrical characteristic curves are recorded.
This data is then used exclusively to be able to assemble the
best possible battery packs.
Despite all the safety precautions, caution must always be
exercised when handling batteries. The following points must
be obeyed at all times to ensure safe use. Safe use can only be
guaranteed if undamaged cells are used. Incorrect handling of
the battery pack can cause cell damage.
IMPORTANT! Analyses confirm that incorrect use and poor care
of high-performance batteries are the main factors responsible
for personal and/or product damage.
mWARNING! Use only approved replacement batteries;
other batteries may damage the cordless trimmer + edger
and cause it to malfunction, which can lead to serious
personal injury.
mWARNING! Do not use a battery pack or appliance that
is damaged or modified. Damaged or modified batteries may
exhibit unpredictable behavior resulting in fire, explosion or risk
of injury.
Do not modify or attempt to repair the battery pack except as
indicated in the instructions for use and care.
Have your battery pack serviced by a qualified repair person
using only identical replacement parts. This will ensure that the
safety of the battery pack is maintained.
mCAUTION! To reduce the risk of injury, charge the
Snow Joe
®
20V* ECOSHARP
®
2.0 Ah Lithium-ion Battery pack
only in its designated Snow Joe
®
20V* ECOSHARP
®
Lithium-ion
charger.
Other types of chargers present risk of fire, personal injury and
damage. Do not wire a battery pack to a power supply plug or
car cigarette lighter. Such misuse will permanently disable or
damage the battery pack.
• Avoid dangerous environments – Do not charge the battery
pack in rain, snow or in damp or wet locations. Do not use
the battery pack or charger in the presence of explosive
atmospheres (gaseous fumes, dust or flammable materials)
because sparks may be generated when inserting or
removing the battery pack, which could lead to a fire.
• Charge in a well-ventilated area – Do not block the charger
vents. Keep them clear to allow for proper ventilation. Do not
allow smoking or open flames near a charging battery pack.
Vented gases may explode.
NOTE: The safe temperature range for the battery is
41°F – 104°F (5°C – 40°C). Do not charge the battery
outside in freezing weather; charge it at room temperature.
• Maintain charger cord – When unplugging the charger,
pull the plug, not the cord, from the receptacle to reduce the
risk of damage to the electrical plug and cord. Never carry
the charger by its cord or yank it by the cord to disconnect it
from the receptacle. Keep the cord away from heat,
oil and sharp edges. Make sure the cord will not be stepped
on, tripped over or subjected to damage or stress when the
charger is in use. Do not use the charger with a damaged
cord or plug. Replace a damaged charger immediately.
• Do not use an extension cord unless it is absolutely
necessary – Using the wrong, damaged or improperly wired
extension cord poses a risk of fire and electric shock. If
an extension cord must be used, plug the charger into a
properly wired 16 gauge or larger extension cord with the
female plug matching the male plug on the charger. Make
sure that the extension cord is in good electrical condition.
• Charger
only – The charger must be plugged into an
appropriate receptacle.
• Use only recommended attachments – Use of an
attachment not recommended or sold by the battery charger
or battery pack manufacturer may result in risk of fire, electric
shock or personal injury.
• Unplug charger when not in use – Make sure to remove
battery packs from unplugged chargers.
mWARNING! To reduce the risk of electric shock,
always unplug the charger before performing any cleaning or
maintenance. Do not allow water to flow into the charger.
• Do not burn or incinerate battery packs –
Battery packs may explode, causing personal injury or
damage. Toxic fumes and materials are created when battery
packs are burned.
• Do not crush, drop or damage battery packs – Do not
use the battery pack or charger if they have sustained a
sharp blow, been dropped, run over or have been damaged
in any way (i.e. pierced with a nail, hit with a hammer,
stepped on, etc.).
• Do not disassemble – Incorrect reassembly may pose a
serious risk of electric shock, fire or exposure to toxic battery
chemicals. If the battery or charger are damaged, contact
an authorized Snow Joe
®
+ Sun Joe
®
dealer or call the All
Season Power customer service center at 1-866-225-9723
for assistance.
• Battery chemicals cause serious burns – Never let a
damaged battery pack contact the skin, eyes or mouth. If a
damaged battery pack leaks battery chemicals, use rubber
or neoprene gloves to safely dispose of it. If skin is exposed
to battery fluids, wash the affected area with soap and
water and rinse with vinegar. If eyes are exposed to battery
chemicals, immediately flush with water for
20 minutes and seek medical attention. Remove and dispose
of contaminated clothing.
• Do not short circuit – A battery pack will short circuit if a
metal object makes a connection between the positive and
negative contacts on the battery pack. Do not place a battery

5
pack near anything that may cause a short circuit, such as
paper clips, coins, keys, screws, nails and other metallic
objects. A short-circuited battery pack poses a risk of fire and
severe personal injury.
• Store your battery pack and charger in a cool, dry place –
Do not store the battery pack or charger where temperatures
may exceed 113ºF (45ºC), such as in
direct sunlight or inside a vehicle or metal building during the
summer.
Information about the battery
1. The battery pack supplied with your cordless trimmer +
edger is only partially charged. The battery pack has to
be charged completely before you use the tool for the
first time.
2. For optimum battery performance, avoid low discharge
cycles by charging the battery pack frequently.
3. Lithium-ion batteries are subject to a natural aging process.
The battery pack must be replaced at the latest when
its capacity falls to just 80% of its capacity when new.
Weakened cells in an aged battery pack are no longer
capable of meeting the high power requirements needed for
the proper operation of your trimmer + edger, and therefore
pose a safety risk.
4. Do not throw battery packs into an open fire as this poses a
risk of explosion.
5. Do not ignite the battery pack or expose it to fire.
6. Do not exhaustively discharge batteries. Exhaustive
discharge will damage the battery cells. The most common
cause of exhaustive discharge is lengthy storage or
non-use of partially discharged batteries. Stop working as
soon as the performance of the battery falls noticeably or
the electronic protection system triggers. Place the battery
pack in storage only after it has been fully charged.
7. Protect batteries and the tool from overloads. Overloads
will quickly result in overheating and cell damage inside the
battery housing even if this overheating is not
apparent externally.
8. Avoid damage and shocks. Immediately replace batteries
that have been dropped from a height of more than one
meter or those that have been exposed to violent shocks,
even if the housing of the battery pack appears to be
undamaged. The battery cells inside the battery may have
suffered serious damage. In such instances, please read the
waste disposal information for proper battery disposal.
9. If the battery pack suffers overloading and overheating, the
integrated protective cutoff will switch off the equipment for
safety reasons.
IMPORTANT! Do not press the ON/OFF switch any more if
the protective cut-off has been activated. This may damage
the battery pack.
10. Use only original battery packs. The use of other batteries
poses a fire risk and may result in injuries or an explosion.

6
Information about the charger and the
charging process
1. Please check the data marked on the rating plate of the
battery charger. Be sure to connect the battery charger to
a power supply with the voltage marked on the rating plate.
Never connect it to a different mains voltage.
2. Protect the battery charger and its cord from damage. Keep
the charger and its cord away from heat, oil and sharp
edges. Have damaged cords repaired without delay by a
qualified technician at an authorized Snow Joe
®
+
Sun Joe
®
dealer or call the All Season Power customer
service center at 1-866-225-9723.
3. Electrical plugs must match the outlet. Never modify
the plug in any way. Do not use any adapter plugs with
grounded appliances. Unmodified plugs and matching
outlets will reduce the risk of electric shock.
4. Keep the battery charger, battery pack and the cordless
tool out of the reach of children.
5. Do not use the supplied battery charger to charge other
cordless tools.
6. During periods of heavy use, the battery pack will become
warm. Allow the battery pack to cool to room temperature
before inserting it into the charger to recharge.
7. Do not overcharge batteries. Do not exceed the maximum
charging times. These charging times only apply to
discharged batteries. Frequent insertion of a charged or
partially charged battery pack will result in overcharging
and cell damage. Do not leave batteries in the charger for
days on end.
8. Never use or charge batteries if you suspect that it has
been more than 12 months since the last time they were
charged. There is a high probability that the battery
pack has already suffered dangerous damage
(exhaustive discharge).
9. Charging batteries at a temperature below 41°F (5°C) will
cause chemical damage to the cells and may cause a fire.
10. Do not use batteries that have been exposed to heat during
the charging process, as the battery cells may have suffered
dangerous damage.
11. Do not use batteries that have suffered curvature or
deformation during the charging process or those
that exhibit other atypical symptoms (gassing, hissing,
cracking, etc.).
12. Never fully discharge the battery pack (maximum
recommended depth of discharge is 80%). A complete
discharge of the battery pack will lead to premature aging of
the battery cells.
Protection from environmental influences
1. Wear suitable work clothes. Wear safety goggles.
2. Protect your cordless tool and the battery charger from
moisture and rain. Moisture and rain can cause dangerous
cell damage.
3. Do not use the cordless tool or the battery charger near
vapors and flammable liquids.
4. Use the battery charger and cordless tools only in dry
conditions and at an ambient temperature of 41°F – 104°F
(5°C – 40°C).
5. Do not keep the battery charger in places where the
temperature is liable to reach over 104°F (40°C).
In particular, do not leave the battery charger in a car that is
parked in the sunshine.
6. Protect batteries from overheating. Overloads, overcharging
and exposure to direct sunlight will result in overheating and
cell damage. Never charge or work with batteries that have
been overheated – replace them immediately, if possible.
7. Store the charger and your cordless tool only in dry
locations with an ambient temperature of -50°F – 113°F
(-10°C – 45°C). Store your Lithium-ion battery pack in a
cool, dry place at a temperature of 77°F (25°C). Protect the
battery pack, charger and cordless tool from humidity and
direct sunlight. Only place fully charged batteries in storage
(charged to at least 40%).
8. Prevent the Lithium-ion battery pack from freezing.
Battery packs that were stored below 32°F (0°C) for more
than 60 minutes must be discarded.
9. When handling batteries, be wary of electrostatic charge.
Electrostatic discharges can damage the electronic
protection system and the battery cells. Avoid electrostatic
charging and never touch the battery poles.
7
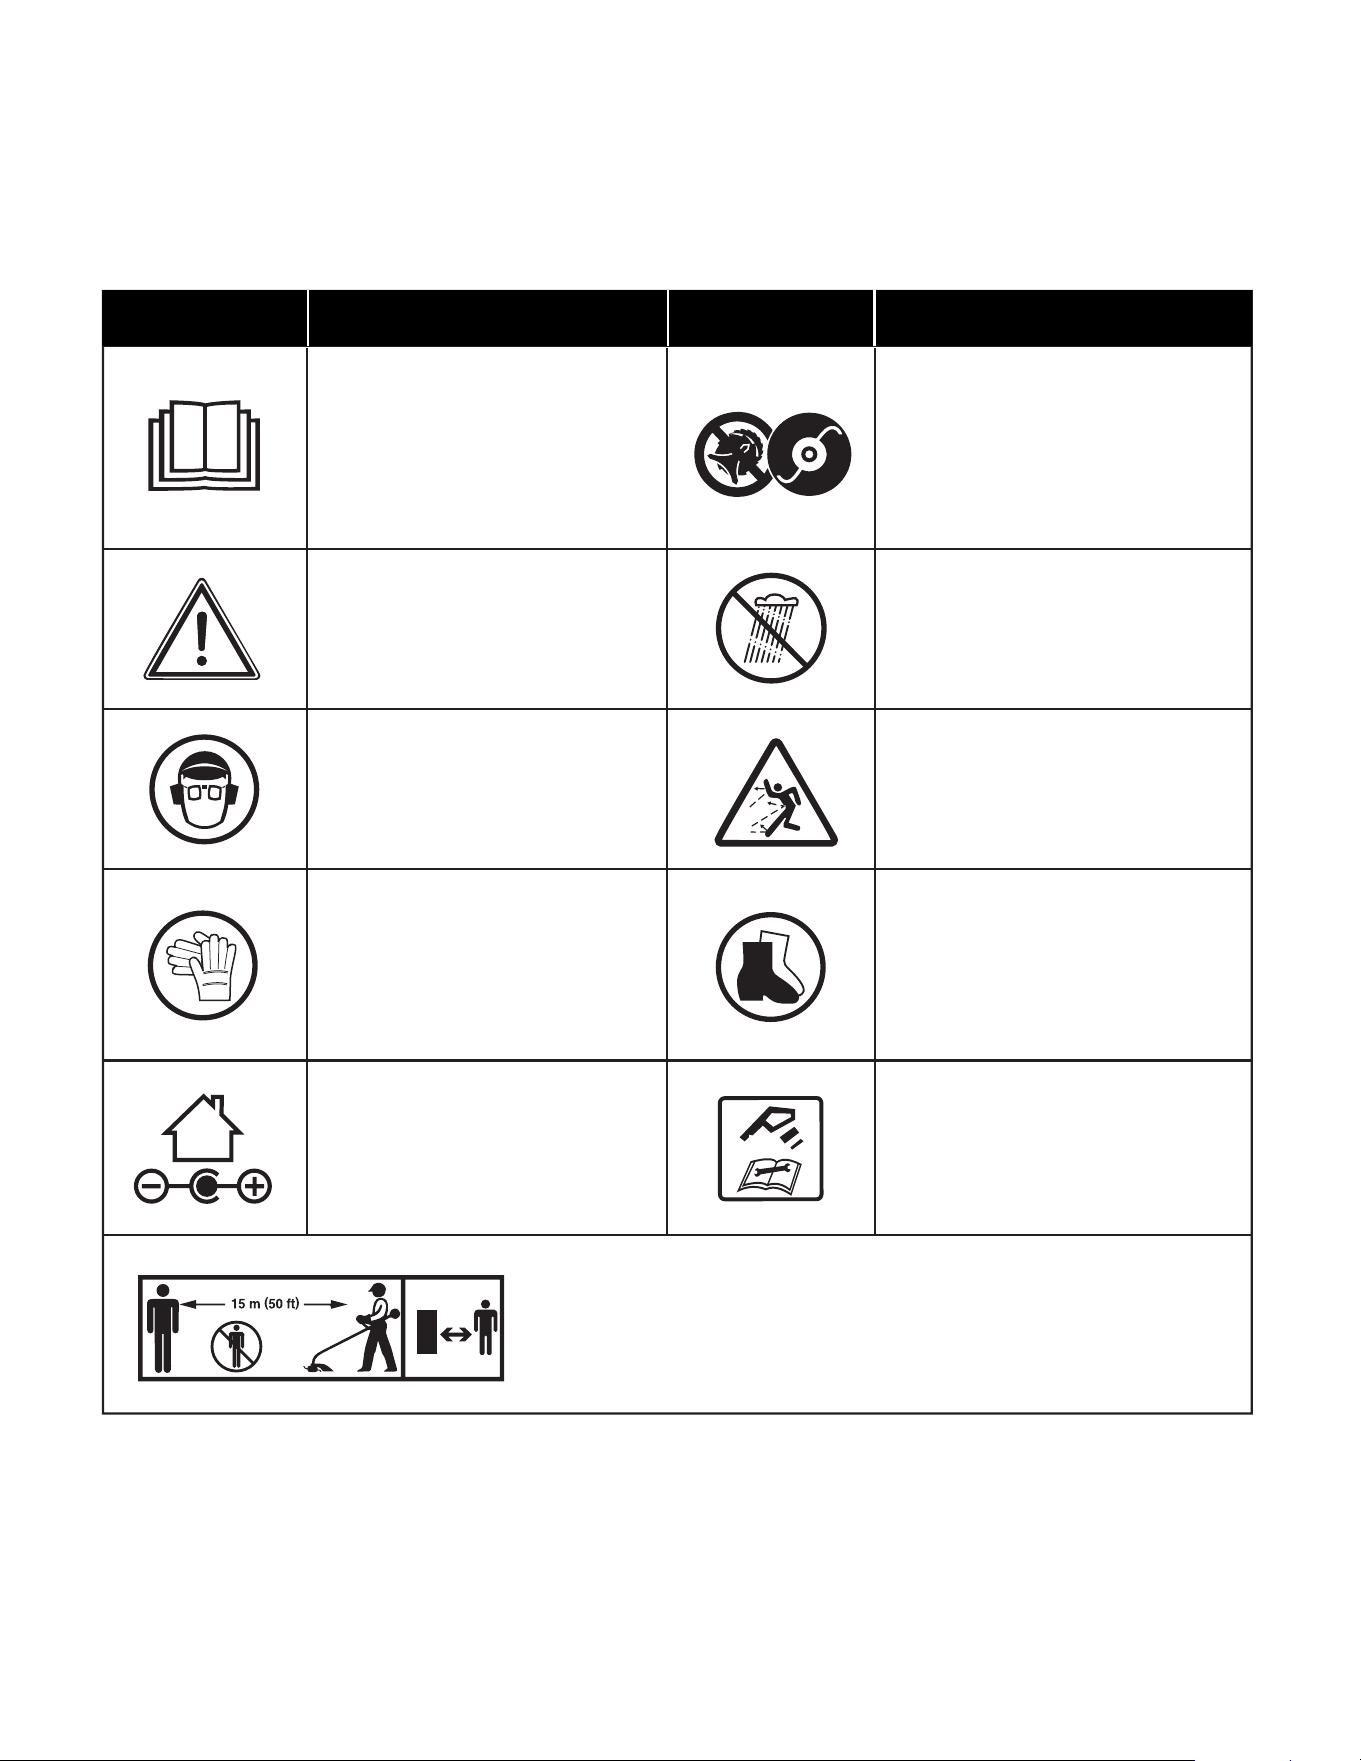
Safety Symbols
The following table depicts and describes safety symbols that may appear on this product. Read, understand, and follow all
instructions on the machine before attempting to assemble and operate.
READ THE OPERATOR'S
MANUAL(S) – Read, understand,
and follow all instructions in the
user manual(s) before attempting to
assemble and operate.
SAFETY ALERT – Indicates
a precaution, a warning, or
a danger.
Disconnect the battery pack before
any repair or maintenance.
WARNING! Do not expose the unit
to rain or wet conditions.
WEAR EYE AND HEARING
PROTECTION – For protection
against injury, wear ear defenders
and safety goggles.
Do not use metal blades.
Symbols SymbolsDescriptions Descriptions
Wear safety gloves during
use to protect hands.
Wear non-slip footwear that will
protect your feet and improve your
footing on slippery surfaces.
Beware of flying objects
and debris.
Indoor use only. Only use
battery charger indoors.
WARNING! Keep bystanders and children a safe distance away. The distance
between the machine and bystanders shall be at least 15 m (50 ft).
8
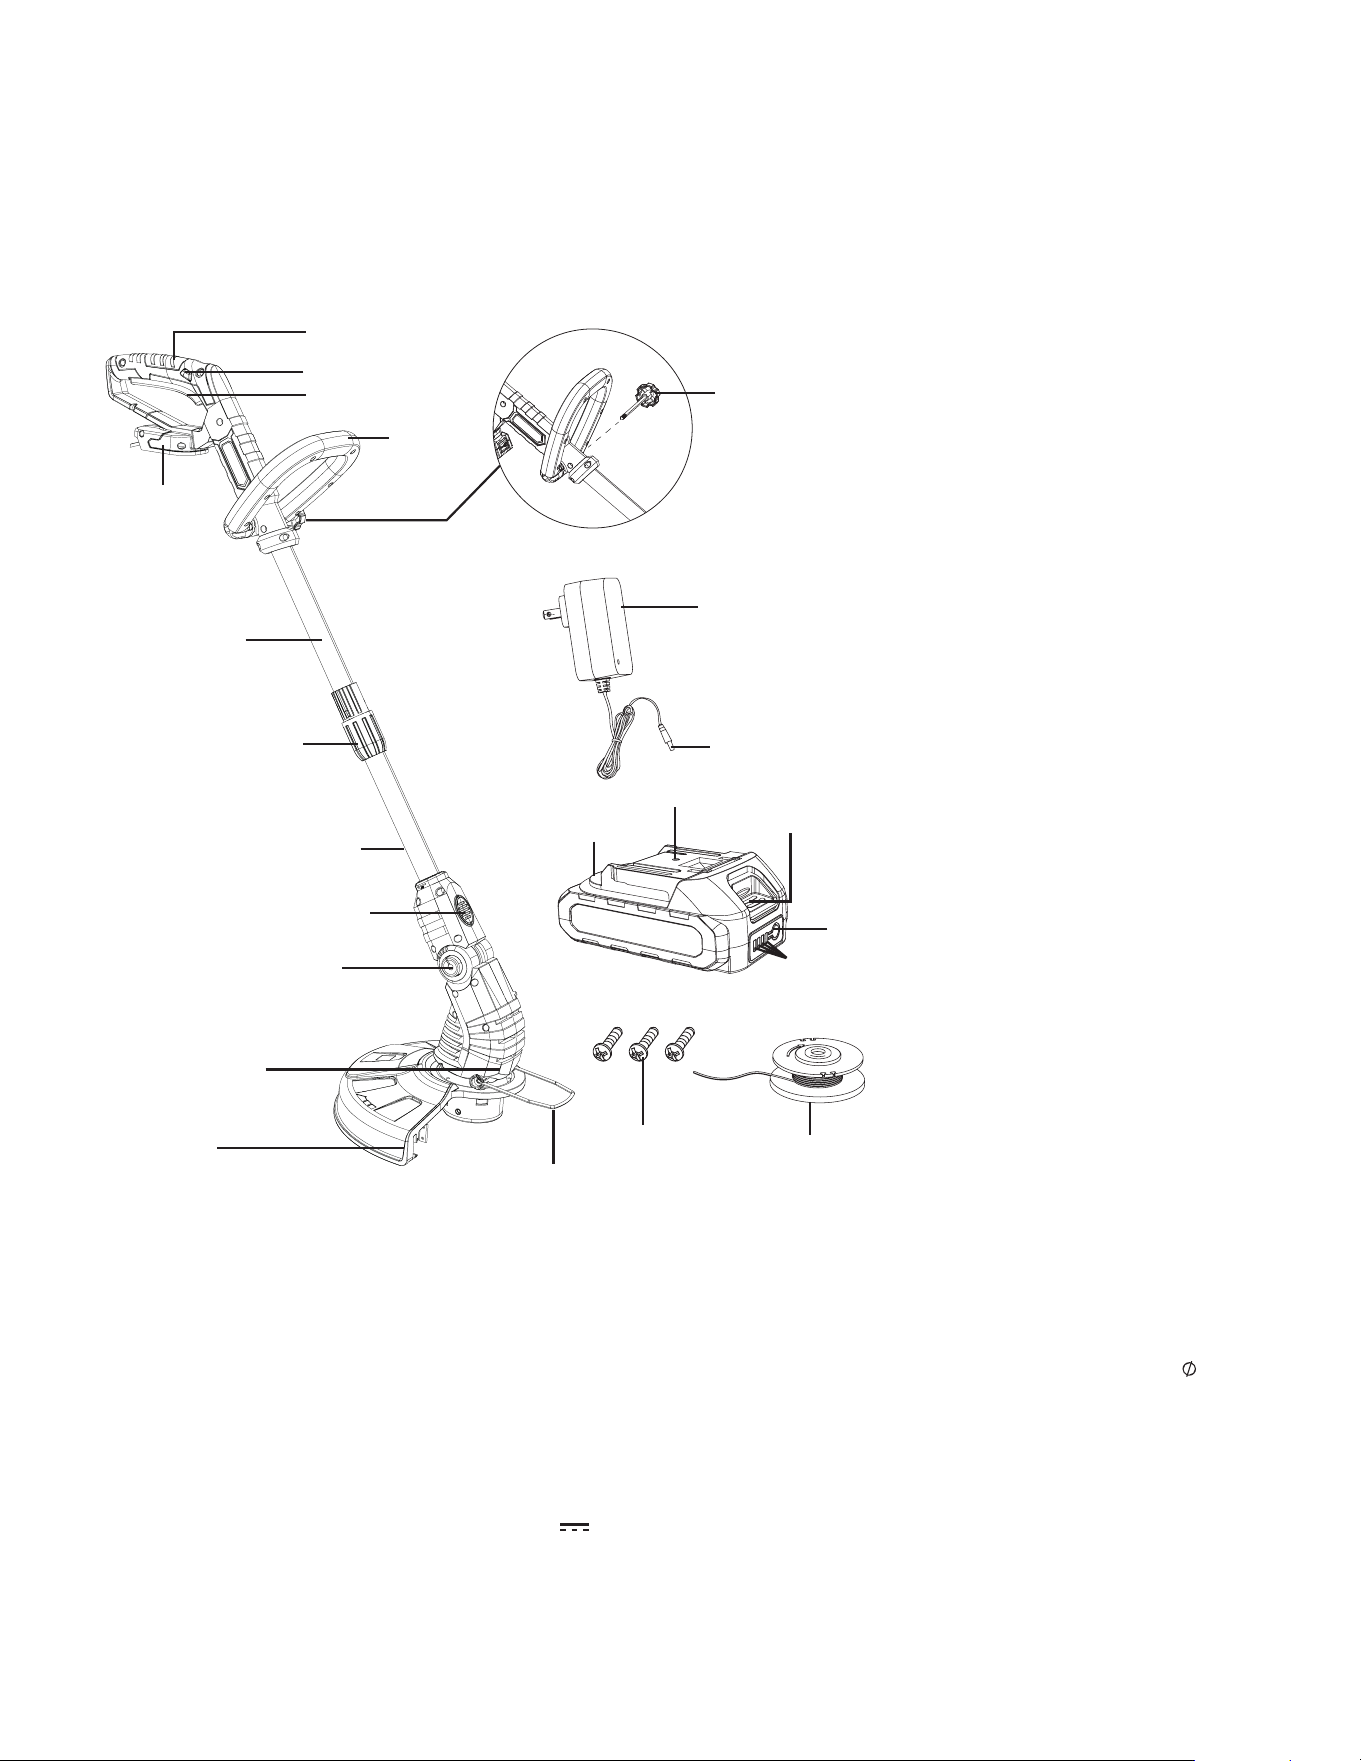
Know Your CORDLESS TRIMMER + EDGER
Read the owner’s manual and safety instructions carefully before operating the cordless trimmer + edger. Compare the illustration
below to the cordless trimmer + edger in order to familiarize yourself with the location of the various controls and adjustments. Save
this manual for future reference.
Technical Data
Motor ................................................................................................180W
Battery Voltage Max* ............................................................. 20V D.C.
Battery Capacity ......................................................................... 2.0 Ah
Charger Input ............................................................. 100 – 240V AC,
50/60 Hz, 0.5 A max
Charger Output ............................................... 21V D.C.
750 mA
Charge Time Max ........................................................... 3 hrs 30 mins
Cutting line .................................................................................
1.6mm
No Load Speed ..................................................................... 8500 RPM
Cutting Diameter ................................................... 12 inch (30.48 cm)
Telescoping Pole ............................................. 36.6 inch to 48.4 inch
(93 cm to 123 cm)
Net Weight ................................................................ 5.95 lbs (2.7 kg)
1. Battery compartment
2. Handle knob
3. Telescoping pole
4. Telescopic shaft adjustment knob
5. Lower pole
6. handle locking button
7. Multi-angle head adjustment button
8. Motor housing
9. Safety guard
10. Edger guide + flower guard
11. Screws
12. Trimmer Lines
13. 20V* ECOSHARP
®
2.0 Ah
Lithium-ion Battery
14. Charge socket
15. Push lock button
16. Charge level button
17. Battery indicators
18. Charger plug
19. 21V* Lithium-ion charger
20. Auxiliary handle
21. On/Off switch
22. Safety button
23. Handle
3
5
6
7
1
2
4
8
9
10
11
13
16
17
14
15
18
19
21
20
22
23
12

9
Unpacking
Carton Contents
• Grass trimmer + edger
• Safety guard
• Auxiliary handle with knob
• 20V* ECOSHARP
®
2.0 Ah Lithium-ion battery
• 21V* Lithium-ion charger
• Screws (× 3)
• 3 m Trimmer lines (× 4)
• Manual
1. Carefully remove the cordless trimmer + edger and check to
see that all of the above items are supplied.
2. Inspect the product carefully to make sure no breakage or
damage occurred during shipping. If you find damaged or
missing parts, DO NOT return the unit to the store. Please
call the All Season Power customer service center at 1-866-
225-9723.
NOTE: Do not discard the shipping carton and packaging
material until you are ready to use the cordless trimmer
+ edger. The packaging is made of recyclable materials.
Properly dispose of these materials in accordance with local
regulations or save the packaging for long-term product
storage.
IMPORTANT! The equipment and packaging material are
not toys. Do not let children play with plastic bags, foils, or small
parts. These items can be swallowed and pose a suffocation
risk!
Battery Pack Operation
The equipment is powered by a Lithium-ion battery. The battery
pack is completely sealed and maintenance free. There are 4
indicator lights: 25%, 50%, 75%, 100%.
Battery Indicator Lights
The battery features 4 LED indicator lights to show the remaining
charge:
• 1 light on – 25% charge
• 2 lights on – 50% charge
• 3 lights on – 75% charge
• 4 lights on – 100% (fully charged)
NOTE: If the charge level button does not appear to be working,
insert the battery into the charger and charge as needed.
NOTE: Immediately after using the battery pack, the charge level
button may display a lower charge than it will if checked a few
minutes later. The battery cells “recover” some of their charge
after resting.
Charger Operation
m
WARNING! Charge only 20V* ECOSHARP
®
2.0 Ah
Lithium-ion battery packs with its compatible 20V* Lithium-ion
charger. Other types of batteries may cause personal injury and
damage.
To reduce the risk of electric shock, do not allow water to flow
into the charger's AC/DC plug.
When to Charge the 20V* ECOSHARP
®
2.0 Ah Lithium-ion battery
NOTE: The 20V* ECOSHARP
®
2.0 Ah Lithium-ion battery packs
do not develop a "memory" when charged after only a partial
discharge. Therefore, it is not necessary to run down the battery
pack before inserting the charger plug.
• Use the battery indicator lights to determine when to charge
your 20V* ECOSHARP
®
2.0 Ah Lithium-ion battery pack.
• You can "top-off" your battery pack's charge before starting a
big job or after a long day of use.
10
Charging the Battery
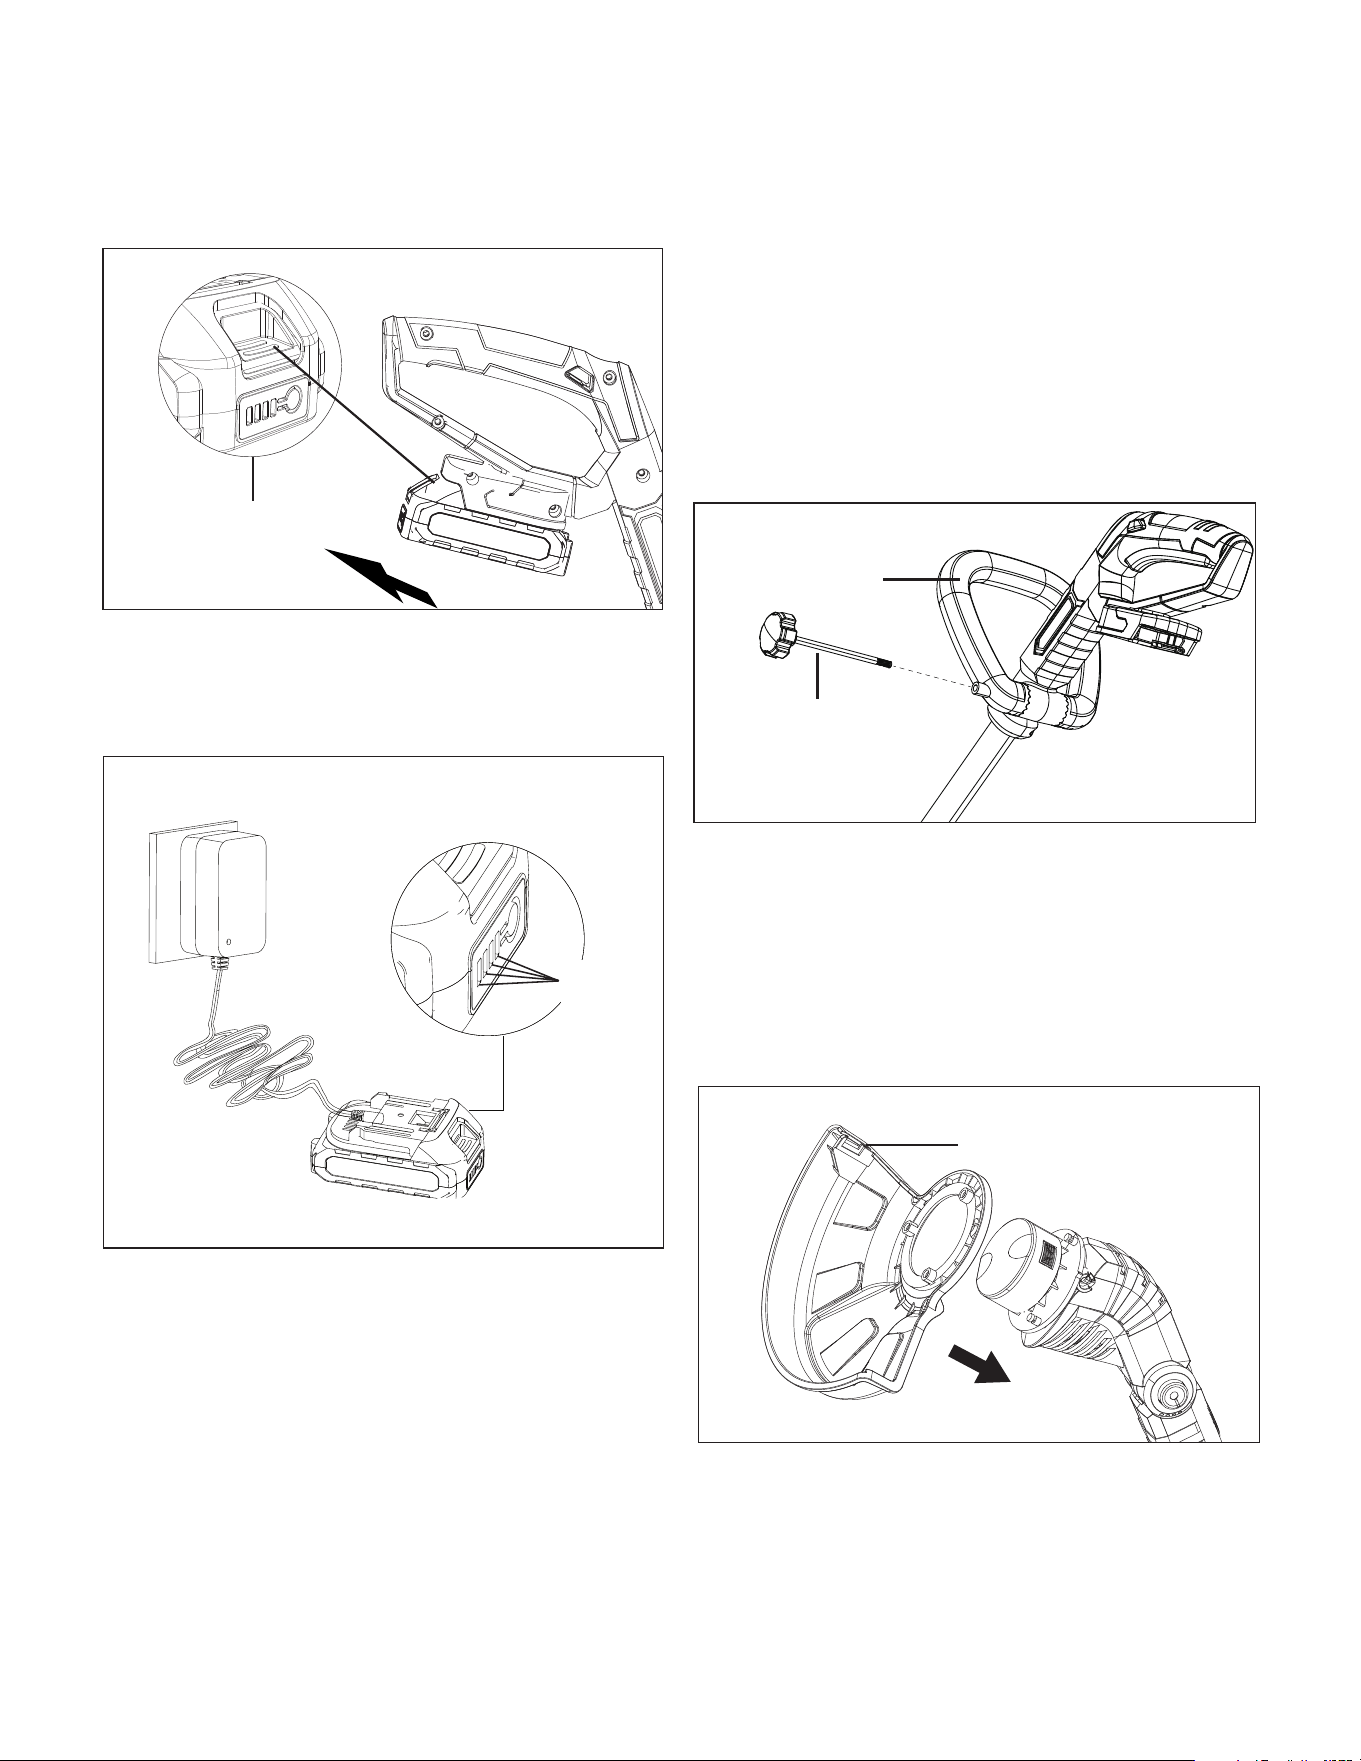
1. Press the push lock button on the battery to pull the
battery pack out of the equipment (Fig. 1).
2. Check that the mains voltage is the same as that marked
on the rating plate of the battery charger. Then, plug the
charger adapter into an appropriate AC power outlet.
Connect the charger plug into the charge socket of the
battery to start charging (Fig. 2).
3. The battery will take approximately 3 hrs 30 mins to charge.
During the charging process, the indicator light of the
charger is red. When the indicator light of the charger turns
green, the charger should be unplugged immediately.
mCAUTION! FIRE HAZARD. When disconnecting the
charger from the battery, be sure to unplug the charger from the
outlet first, then disconnect the charger from the battery.
4. Timely recharging of the battery will help prolong the
battery's life. You must recharge the battery pack when you
notice a drop in the equipment's power.
IMPORTANT! Never allow the battery pack to become fully
discharged as this will cause irreversible damage to the battery.
Assembly
Before using the cordless grass trimmer + edger, follow these
instructions to assemble.
mWARNING! Do not insert the battery until assembly is
complete. Failure to comply could result in accidental starting
and possible serious personal injury.
Fitting the Auxiliary Handle
1. Align the handle with the handle base, insert the Handle
knob into the opening. Turn the handle knob clockwise to
tighten and secure the auxiliary handle in place (Fig. 3).
Auxiliary
handle
Fig. 3
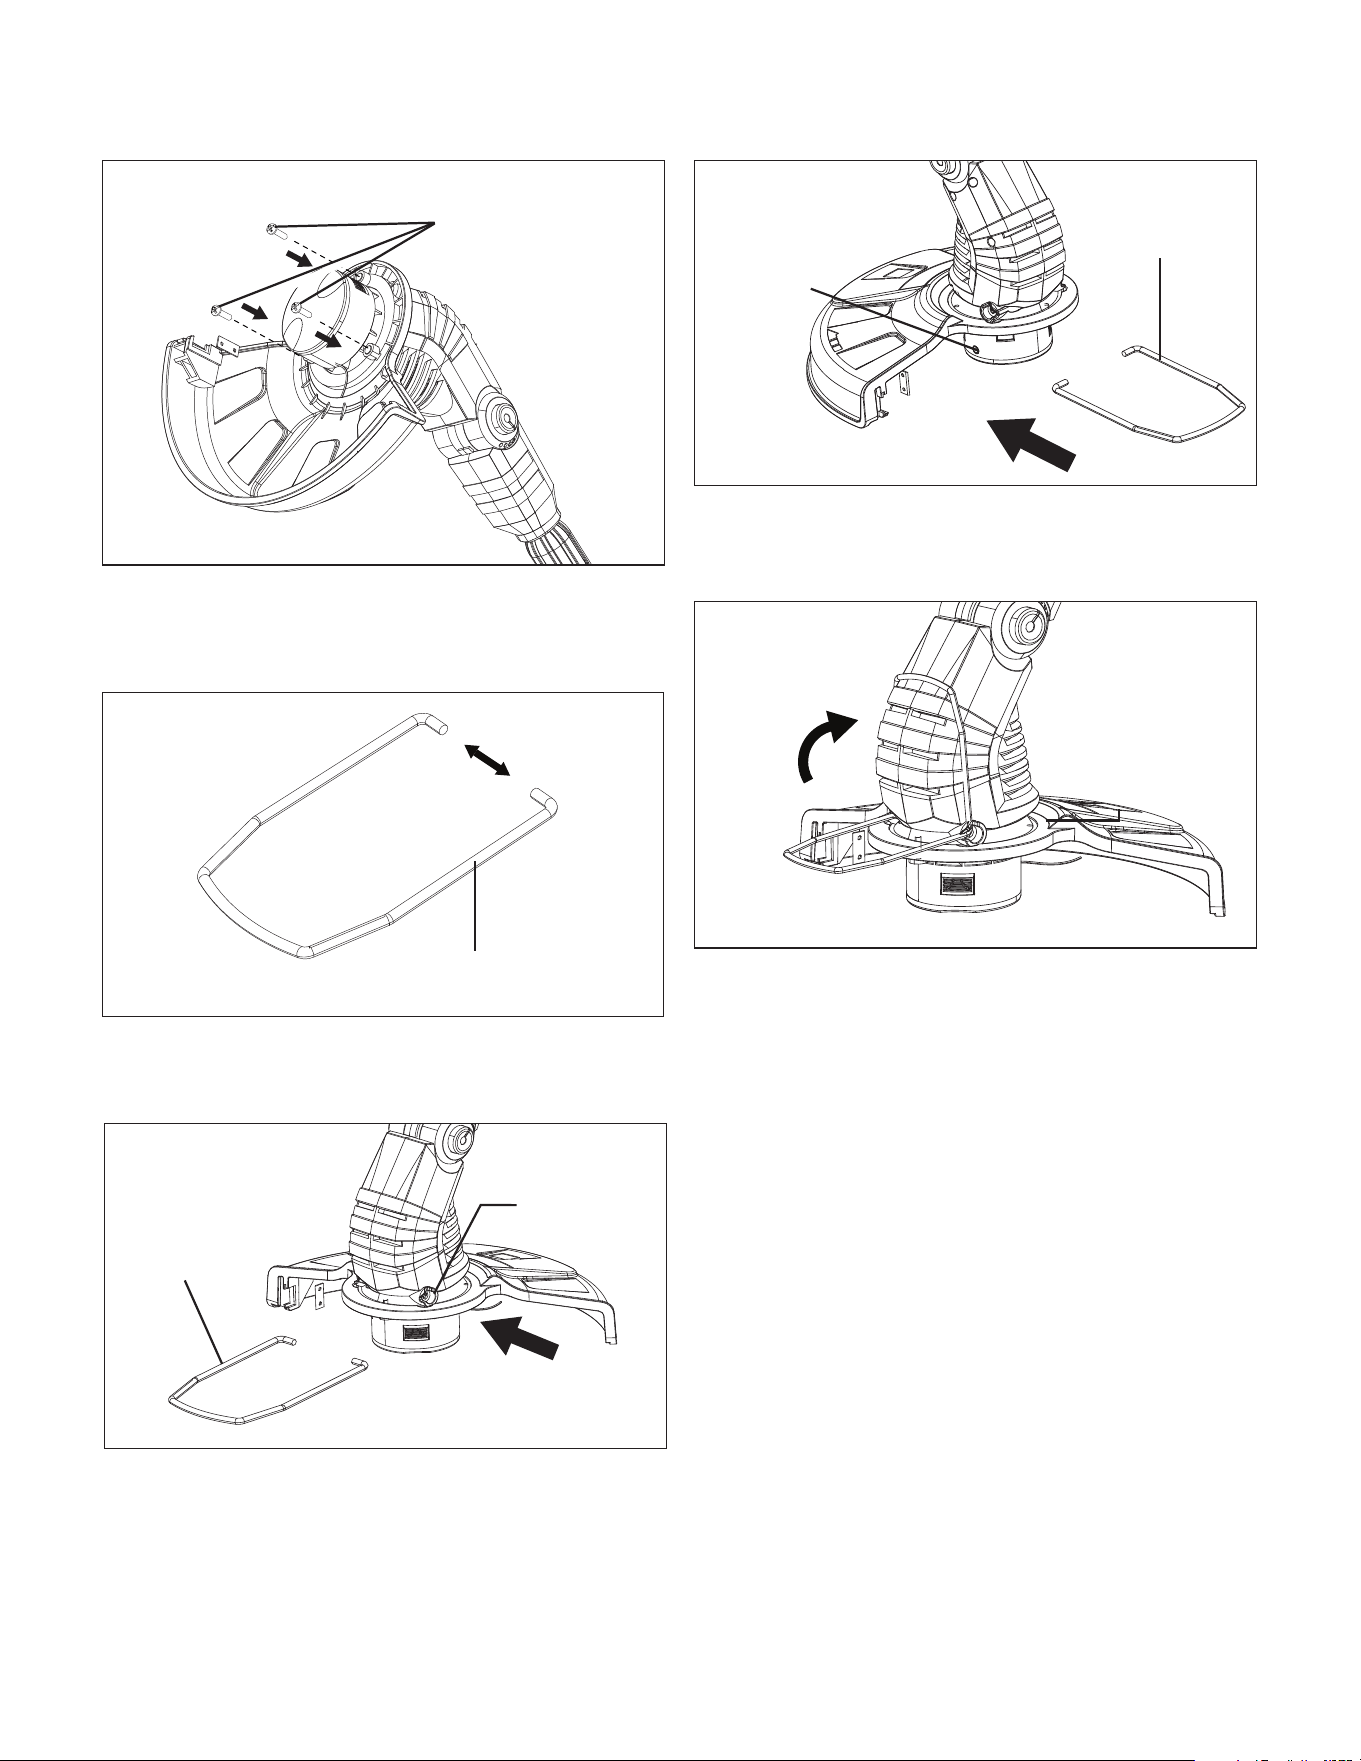
Fitting the Safety Guard
mWARNING! The guard must be properly installed. The
guard provides the operator and other bystanders with some
protection from thrown objects.
1. Place the safety guard in the direction of the arrow shown
to align it with the screw holes in the motor housing
(Fig. 4).
NOTE: Never use the tool unless the safety guard is properly
tted.
2. Firmly press the safety guard into place and secure it to the
trimmer head with the screws provided (Fig. 5).
Fig. 1
Push lock button
Fig. 2
Battery
indicators
Fig. 4
Safety guard
Handle
knob
11
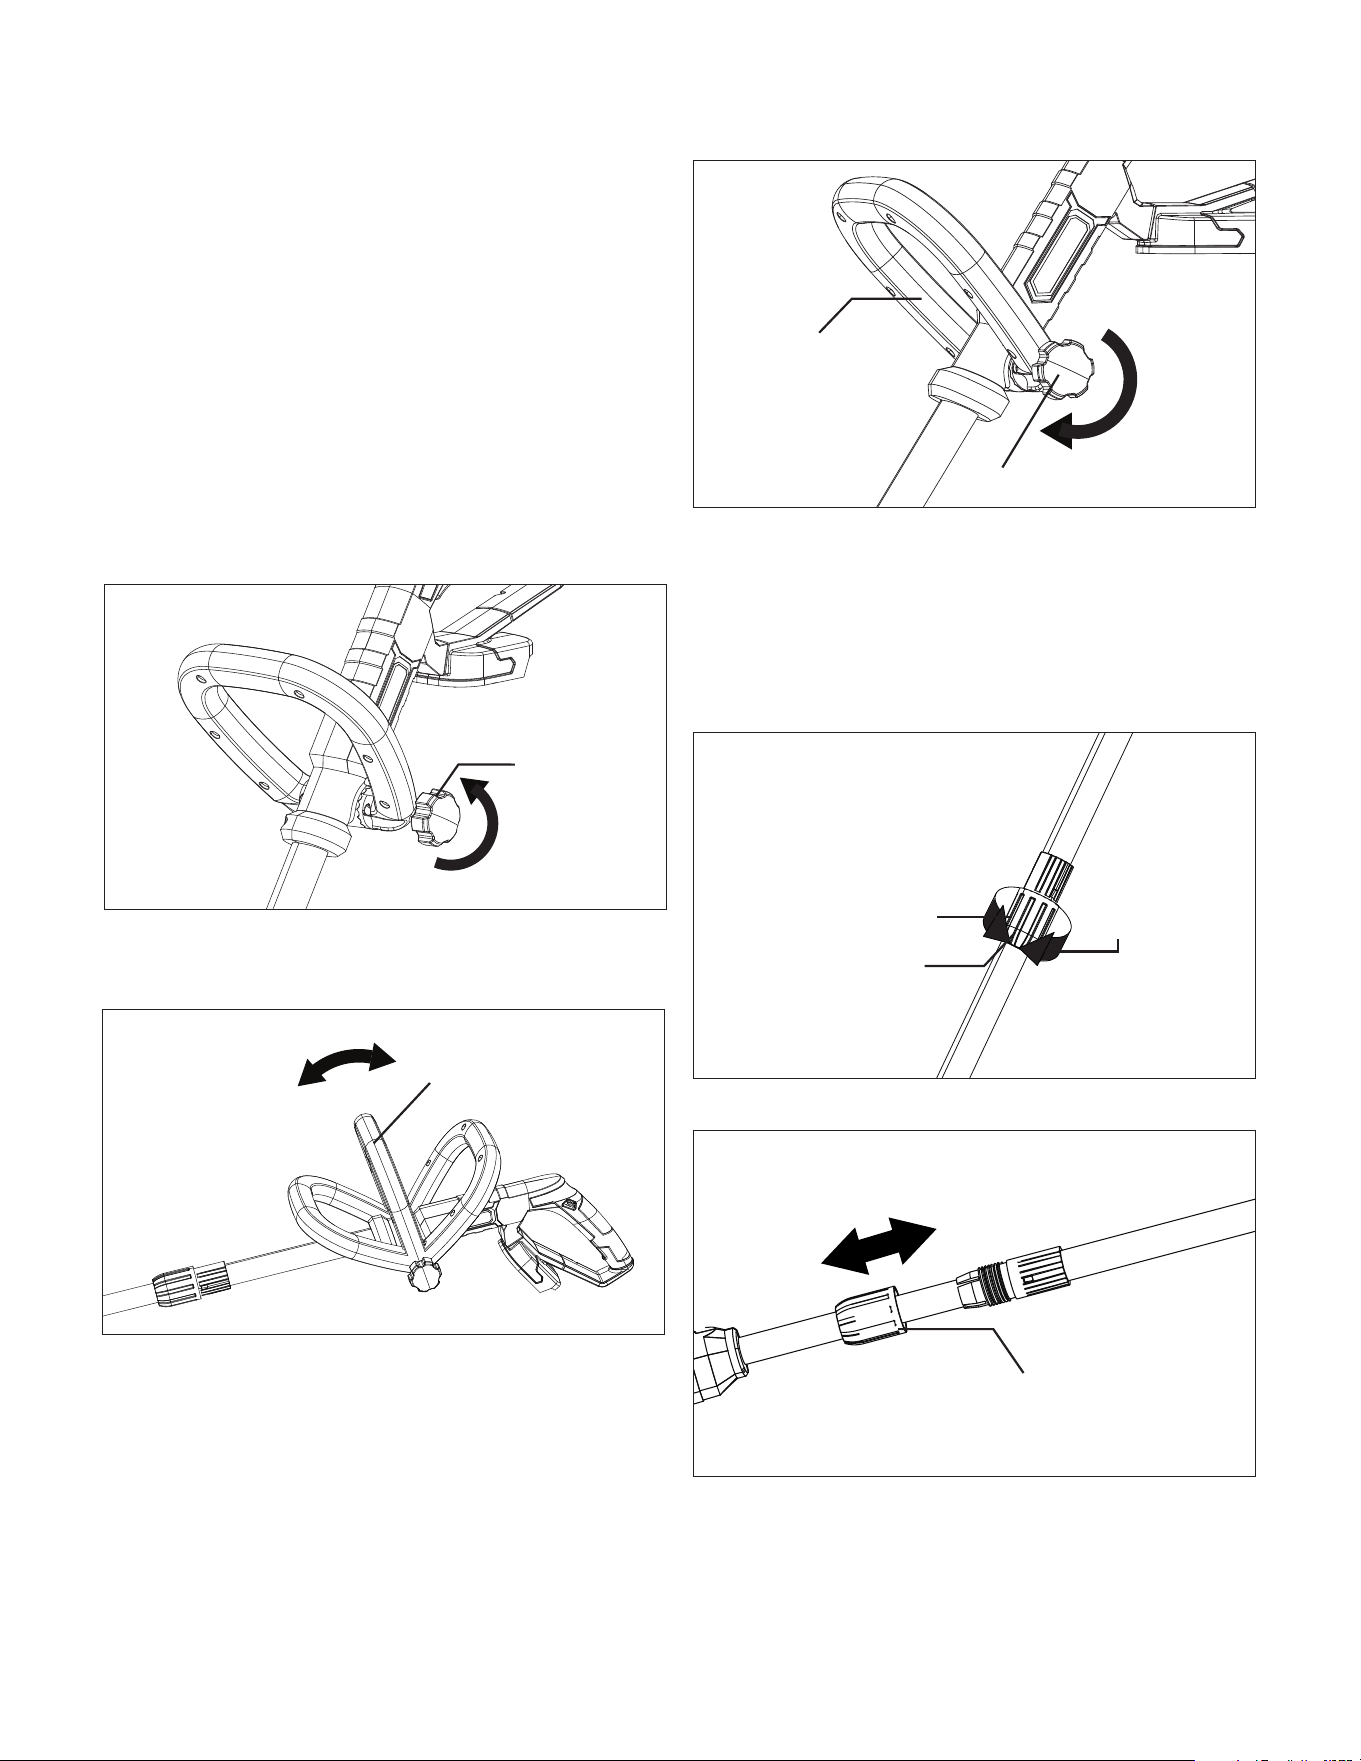
Fitting the Edger Guide + Flower Guard
1. Lightly spread the edger guide + flower guard by hand while
approaching the motor housing (Fig. 6).
2. While lightly spreading the edger guide + flower guard, fit
the curved ends into the small holes on both sides of the
motor housing, and release (Figs. 7 & 8).
3. The edger guide + flower guard can be flipped up so it
stores against the motor housing for convenient storage,
when not in use (Fig. 9).
Fig. 9
Fig. 5
screws
Fig. 6
Edger guide + flower guard
Fig. 7
Small hole on
the housing
Edger guide +
flower guard
RIGHT SIDE VIEW
Edger guide +
flower guard
Fig. 8
Small hole on
the housing
LEFT SIDE VIEW
12
Operation
m
WARNING! Do not install the battery until adjustments are
completed. Improper compliance may cause unintended startup,
leading to severe personal injury.
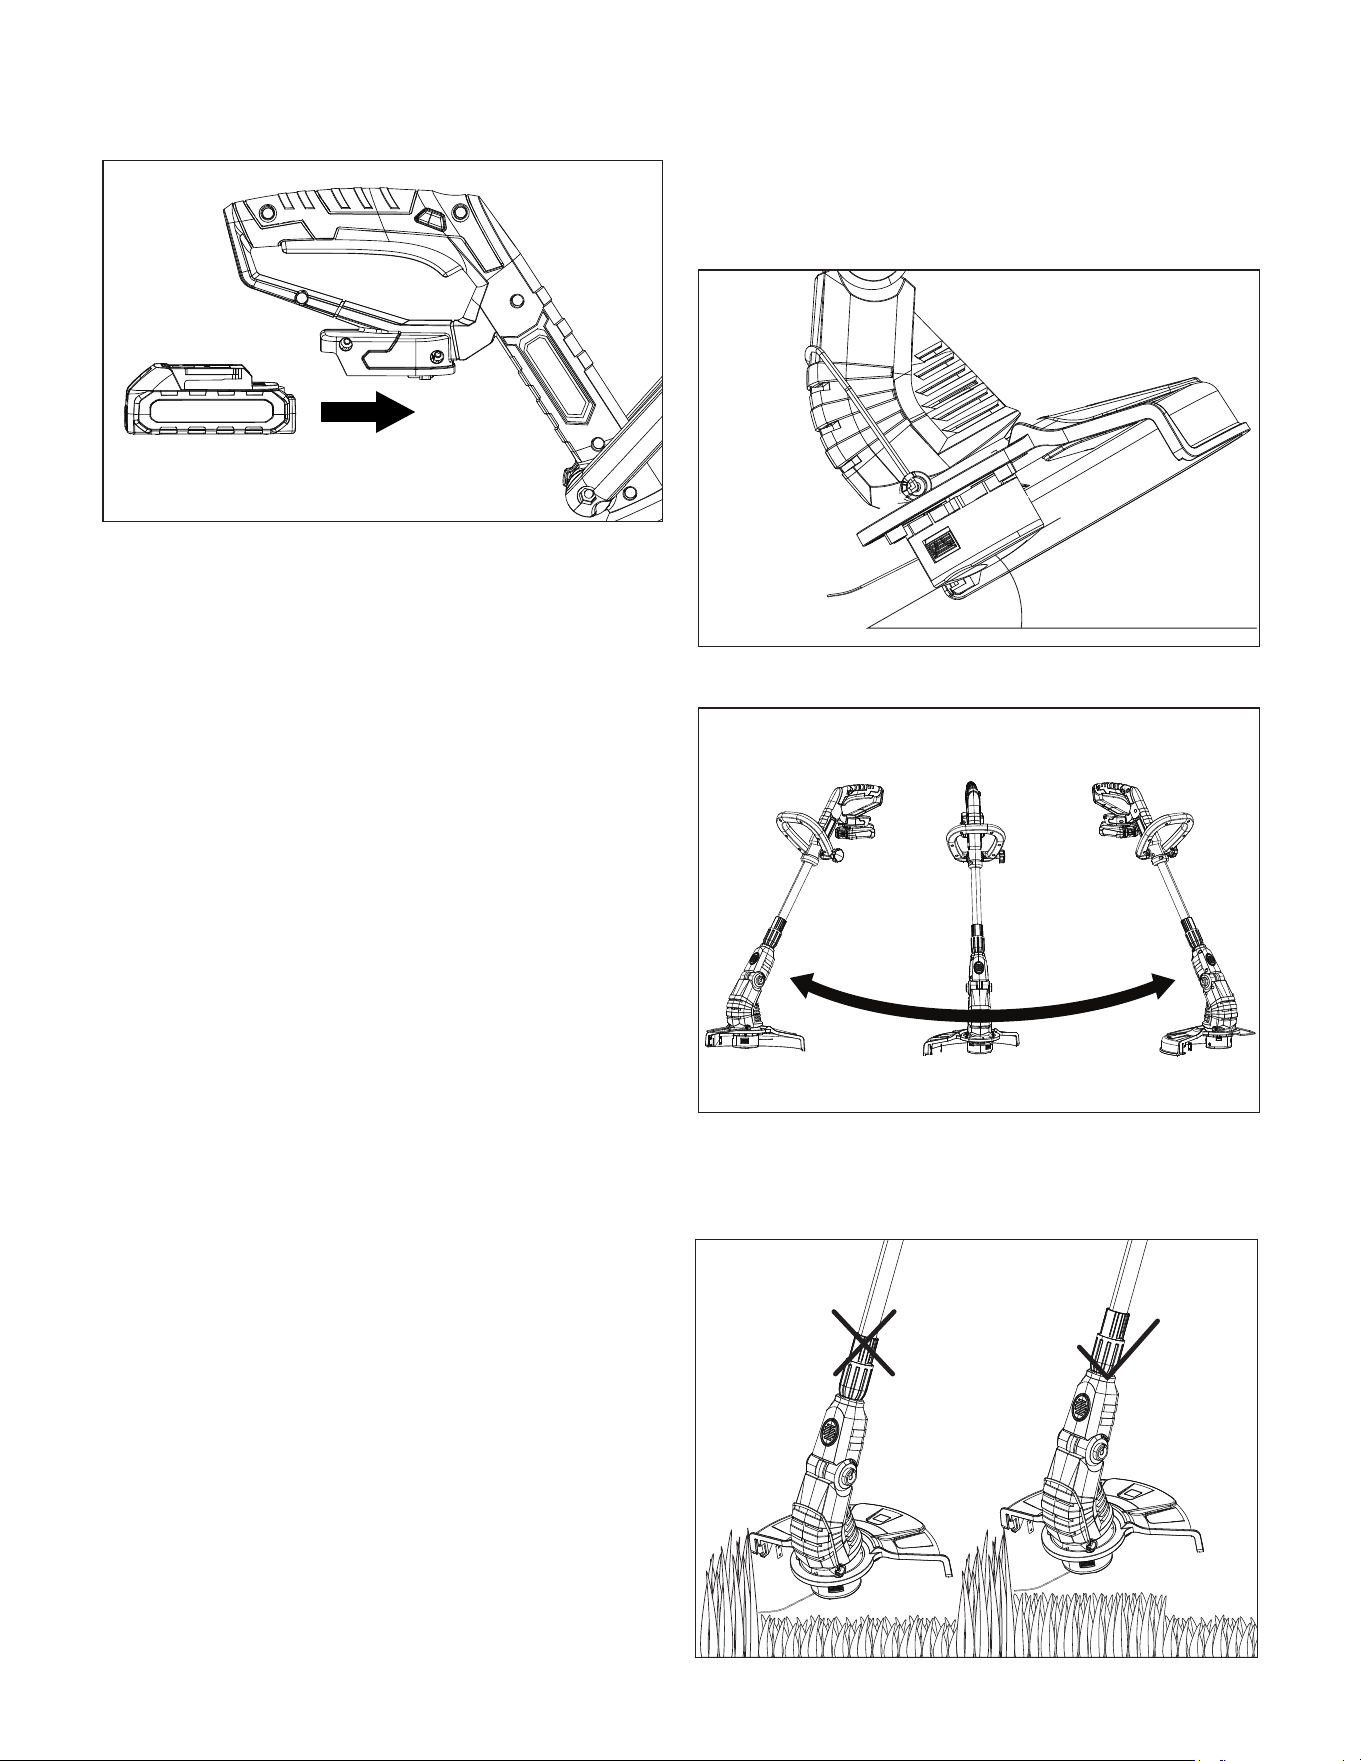
Auxiliary Handle Adjustment
NOTE: For maximum comfort and control, adjust the auxiliary
handle to fit your height. Shorter users adjust the auxiliary
handle to a lower position (away from your body). Taller users
adjust the auxiliary handle to an upper position (towards to
your body). Make sure your forearm is straight when using the
machine.
1. Loosen the auxiliary handle by turning the handle knob
counterclockwise (Fig. 10).
2. Adjust the auxiliary handle to a comfortable working
position (Fig. 11).
3. Turn the handle knob clockwise to tighten and secure the
auxiliary handle in place (Fig. 12).
Fig. 12
Handle knob
Height Adjustment
Switch off the machine and remove the battery. Wait until the
trimmer line comes to a complete stop. The telescoping tube
can be extended or shortened for ease of use.
1. Rotate the telescopic shaft adjustment knob as shown to
unlock (Fig. 13).
Fig. 13
Telescopic shaft
adjustment knob
Lock
Unlock
2. Pull and adjust the shaft to a comfortable height (Fig. 14).
Fig. 14
Telescopic shaft
adjustment knob
3. Tighten the knob to lock the pole.
4. Slide the battery into the battery compartment until it clicks
to lock it into position (Fig. 15).
Fig. 10
Handle knob
Auxiliary Handle
Fig. 11
Auxiliary handle
13
Trimming
• Wear non-slip gloves for maximum grip and protection.
• For the best cutting action against walls, fences, and in high
grass, move the grass trimmer slowly so grass is cut with the
tip of the high speed nylon line.
• Avoid dragging the grass trimmer and string spool hub in
contact with the ground.
• Trim only when grass and weeds are dry.
NOTE: As the weather becomes cooler, the tendency for the
nylon line to break becomes greater. DO NOT USE WHEN
TEMPERATURE IS BELOW 50ºF (10ºC).
• Cut tall grass from top down. This will prevent grass from
wrapping around the shaft housing and string head which
may cause damage from overheating.
• If grass becomes wrapped around the string head:
– Stop the trimmer.
– Unplug the string trimmer.
– Remove the grass.
• Hold the grass trimmer with your right hand on the rear
handle and your left hand on the front auxiliary handle. The
trimmer + edger should be held at a comfortable position with
the rear handle about hip height.
mWARNING! Always hold the trimmer away from body. Any
contact with the grass trimmer cutting head while operating can
result in serious personal injury.
• The life of your nylon line is dependent upon following
instructions for proper use, as well as what is being cut, and
where the cutting is being done.
mWARNING! Remove stones, loose pieces of wood, and
other objects from the cutting area. The string continues to
rotate for a few seconds after switching off the trimmer. Let the
motor come to a complete stop before resuming operation. Do
not rapidly switch the trimmer off and on.
mCAUTION! Always wear eye protection.
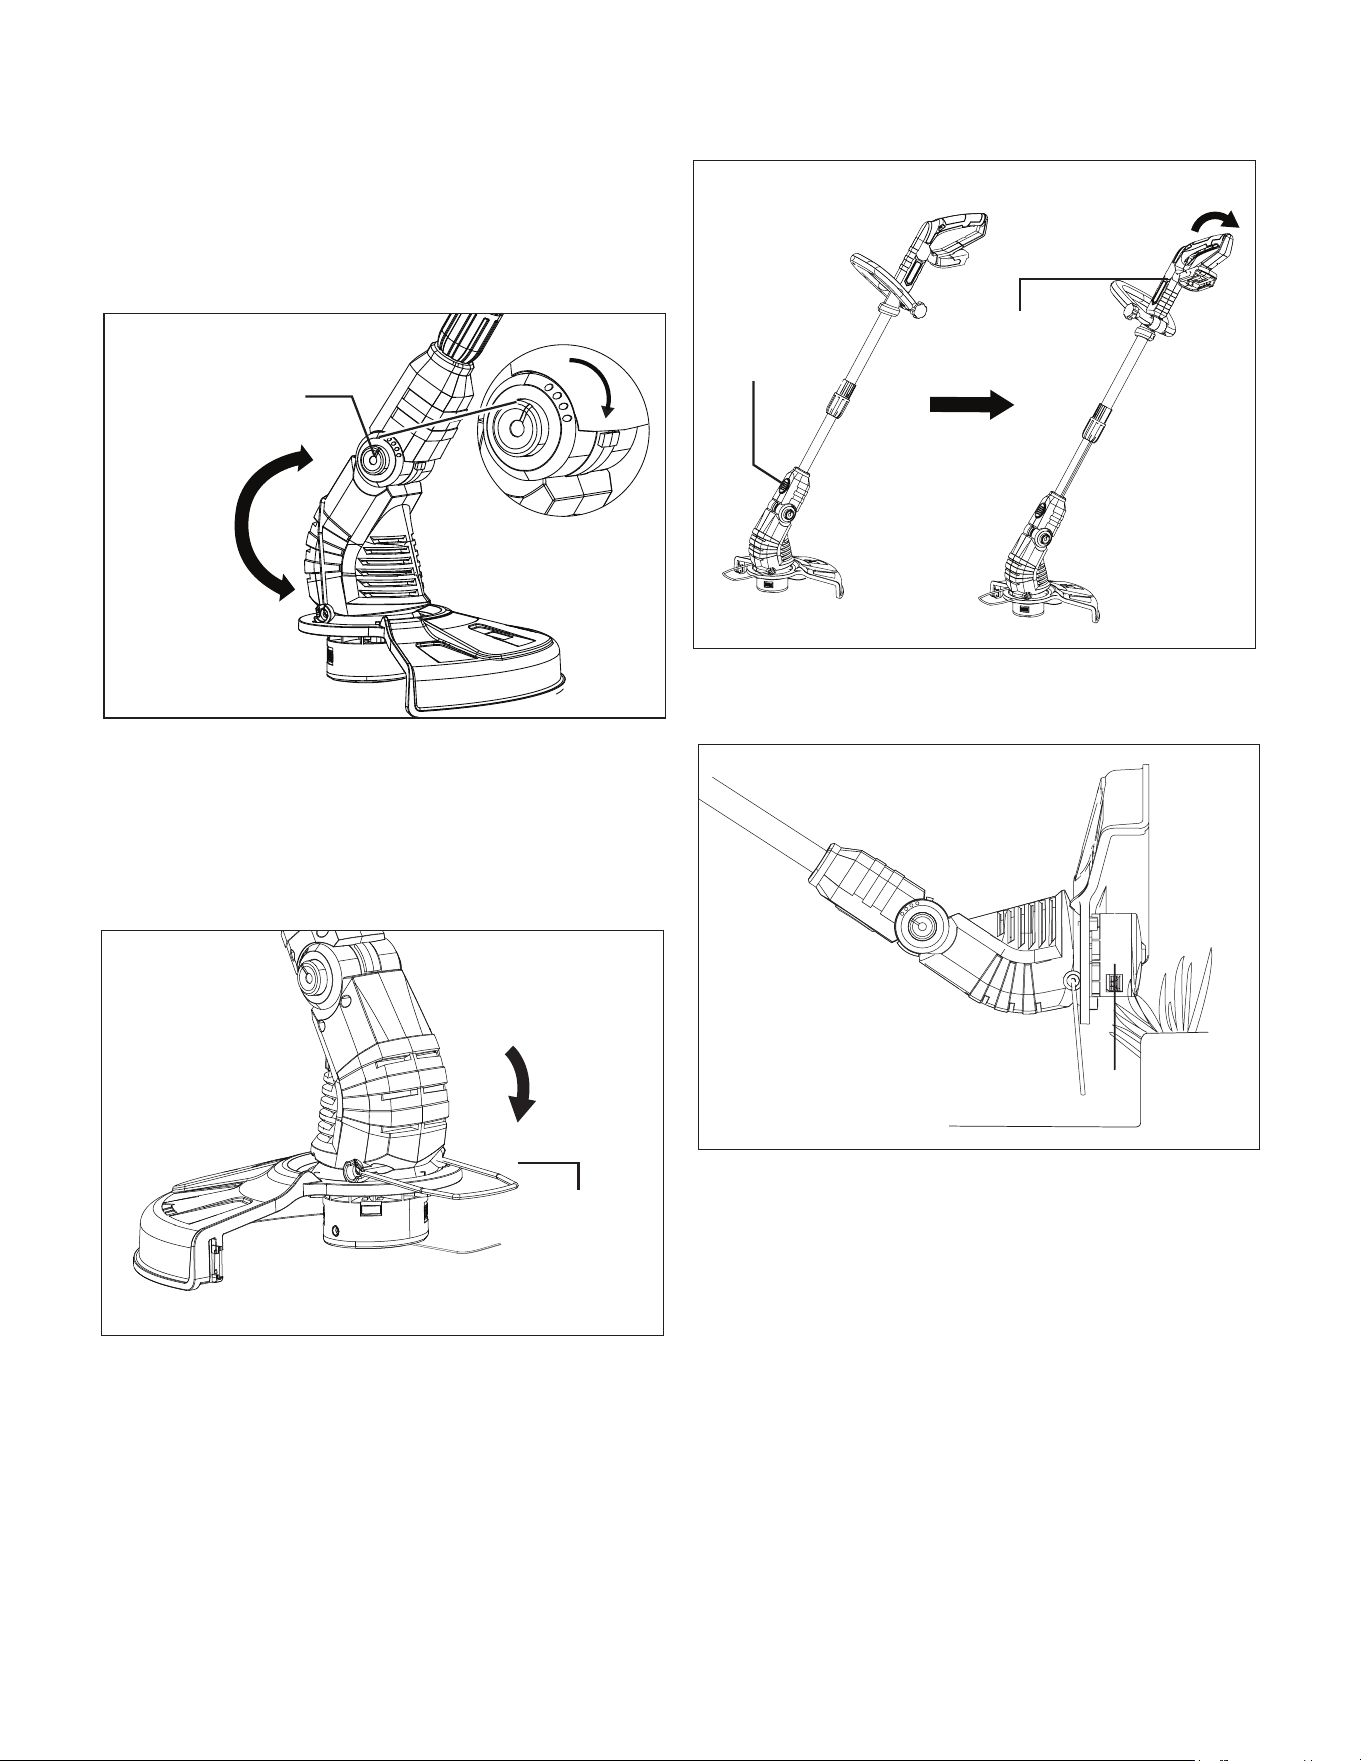
1. Hold the trimmer at an angle of approximately 10 – 30
degrees to the work area (Fig. 16).
2. Slowly swing the trimmer from side to side (Fig. 17).
3. Do not overload your trimmer; instead, take small “bites”
of grass, working from the top to the bottom. This will
keep the machine operating at high speed and will greatly
improve its cutting eciency (Fig. 18).
Fig. 15
10° – 30°
Fig. 16
Fig. 17
Fig. 18
14
Adjusting Multi-Angle Trimming Head
1. Press the multi-angle head adjustment button to position
the trimmer head at four angles: 0°, 15°, 30° and 45°. No
digital graduations on the actual unit; the diagram is for
indication only (Fig. 19).
Edging
1. To convert for maintenance edging, turn OFF and unplug
the tool.
2. To use the edger guide + flower guard, flip it down from its
stored position (Fig. 20).
3. Press trimmer/edger handle locking button then turn the
trimmer head to 90 degree and release (Fig. 21). The tool
is locked in edger mode.
Fig. 21
Trimmer Handle
Trimmer/edger
handle locking
button
4. Use the edge of the guard as a guide when cutting near
fences and walls (Fig. 22).
5. Move the edger in a backwards direction when trimming
around edges to avoid damage.
0
0°
15°
30°
45°
° to 45°
Fig. 19
Multi-angle head
adjustment button
Fig. 20
Fig. 22
Edger guide +
flower guard
15
Advancing Strings
NOTE: Your trimmer uses 0.063 in. (1.6 mm) diameter nylon line
to cut grass and weed quickly and easily. In time, the tip of the
nylon line will become worn and the auto-feed mechanism will
automatically feed and trim a fresh length of line. The cutting line
will wear faster if the cutting is done along sidewalks or other
abrasive surfaces or heavier weeds are being cut.
The trimmer + edger is equipped with an auto-feed head.
Bumping the head to try to advance the string will damage
trimmer.
1. With the unit running, release the ON/OFF switch trigger.
2. Wait two seconds, and press the ON/OFF switch trigger.
NOTE: The strings will extend approximately 1/4 in. with each
stop and start of the switch trigger until the strings reach the
length of the safety guard.
3. Resume the trimming + edging.
mWARNING! Do not operate the grass trimmer + edger in a
tree, on a ladder, or on a scaffold; this is extremely dangerous.
mWARNING! Do not bump the unit on ground in attempt to
feed line or for any other purpose.
Maintenance
m
WARNING! Make sure to remove the battery from your
cordless grass trimmer + edger before inspecting its parts.
mWARNING! Always wear protective gloves during
maintenance tasks. Do not carry out maintenance when the
motor is running or hot.
• Your trimmer line can dry out over time. To keep your line in
top condition, store spare pre-wound spools or bulk line in a
plastic resealable bag with a tablespoon of water.
• Never use water or chemical cleaners to clean your grass
trimmer + edger. Wipe it clean with a dry cloth.
• Plastic parts may be cleaned by using mild soap and a damp
rag.
• Always store your grass trimmer + edger in a dry place.
Do not allow any liquid to get inside it.
• Keep the motor ventilation slots clean.
• If you see some sparks flashing in the ventilation slots,
this is normal and will not damage your power tool.
IMPORTANT! To ensure product safety and reliability, repairs,
maintenance, and adjustments to this power tool should be
performed only with identical replacement parts. Contact
your authorized Snow Joe
®
+ Sun Joe
®
dealer or call the All
Season Power customer service center at 1-866-225-9723 for
assistance.
Replacing the Spool + Clearing Jams and
Tangled Lines
mWARNING! Remove the battery before changing the
trimmer line.
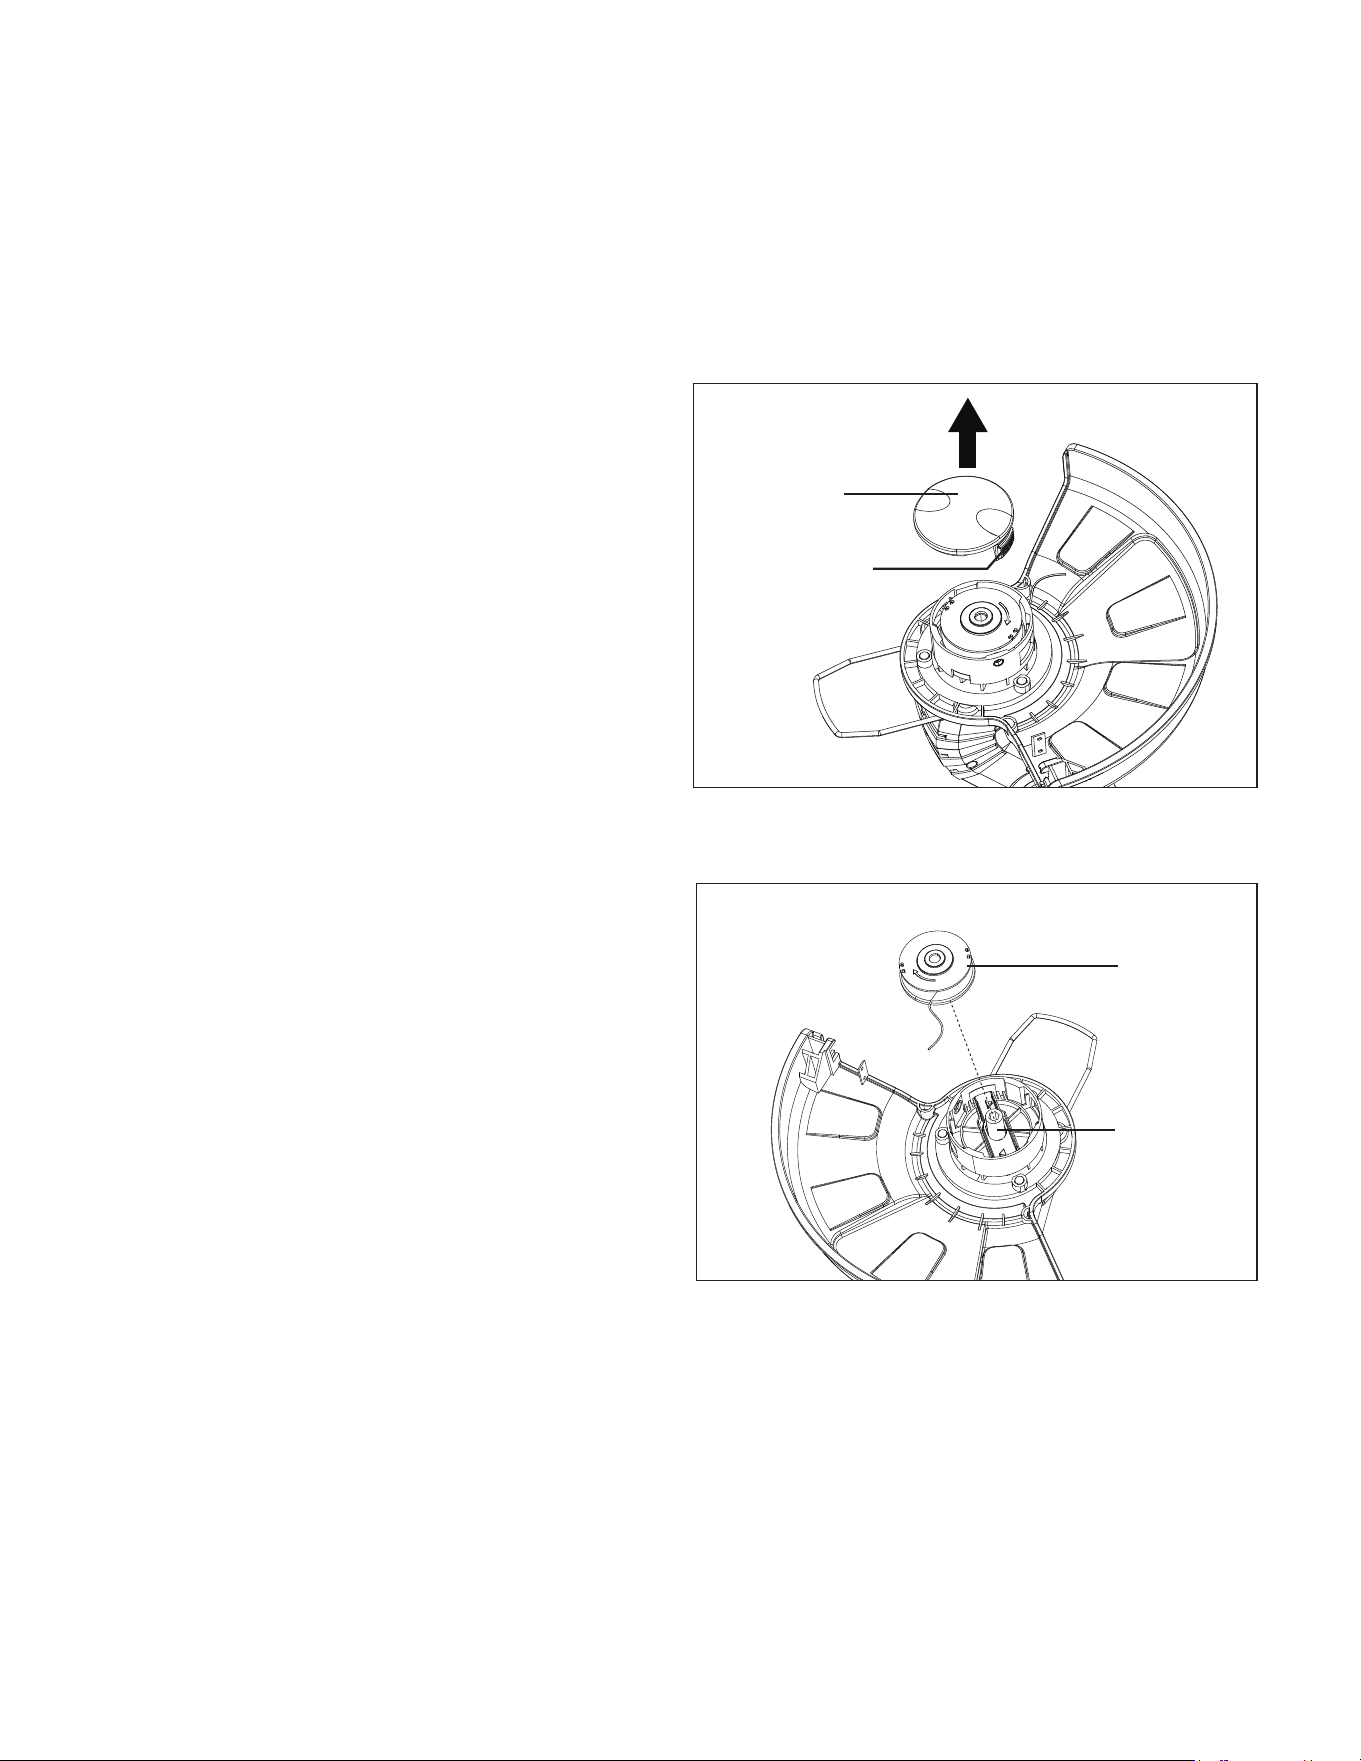
1. Press together both release tabs on the line spool cover
and remove the cover by pulling it straight off (Fig. 23).
Fig. 23
Spool cover
Tab
2. Lift and remove the spool out of the hub (Fig. 24) and clean
out any dirt or grass residue.
3. In case of jams or tangled line, unwrap about 6 inches
(15 cm) of line to ensure that it's not damaged.
4. Pass the trimmer line through the exit slot, then align
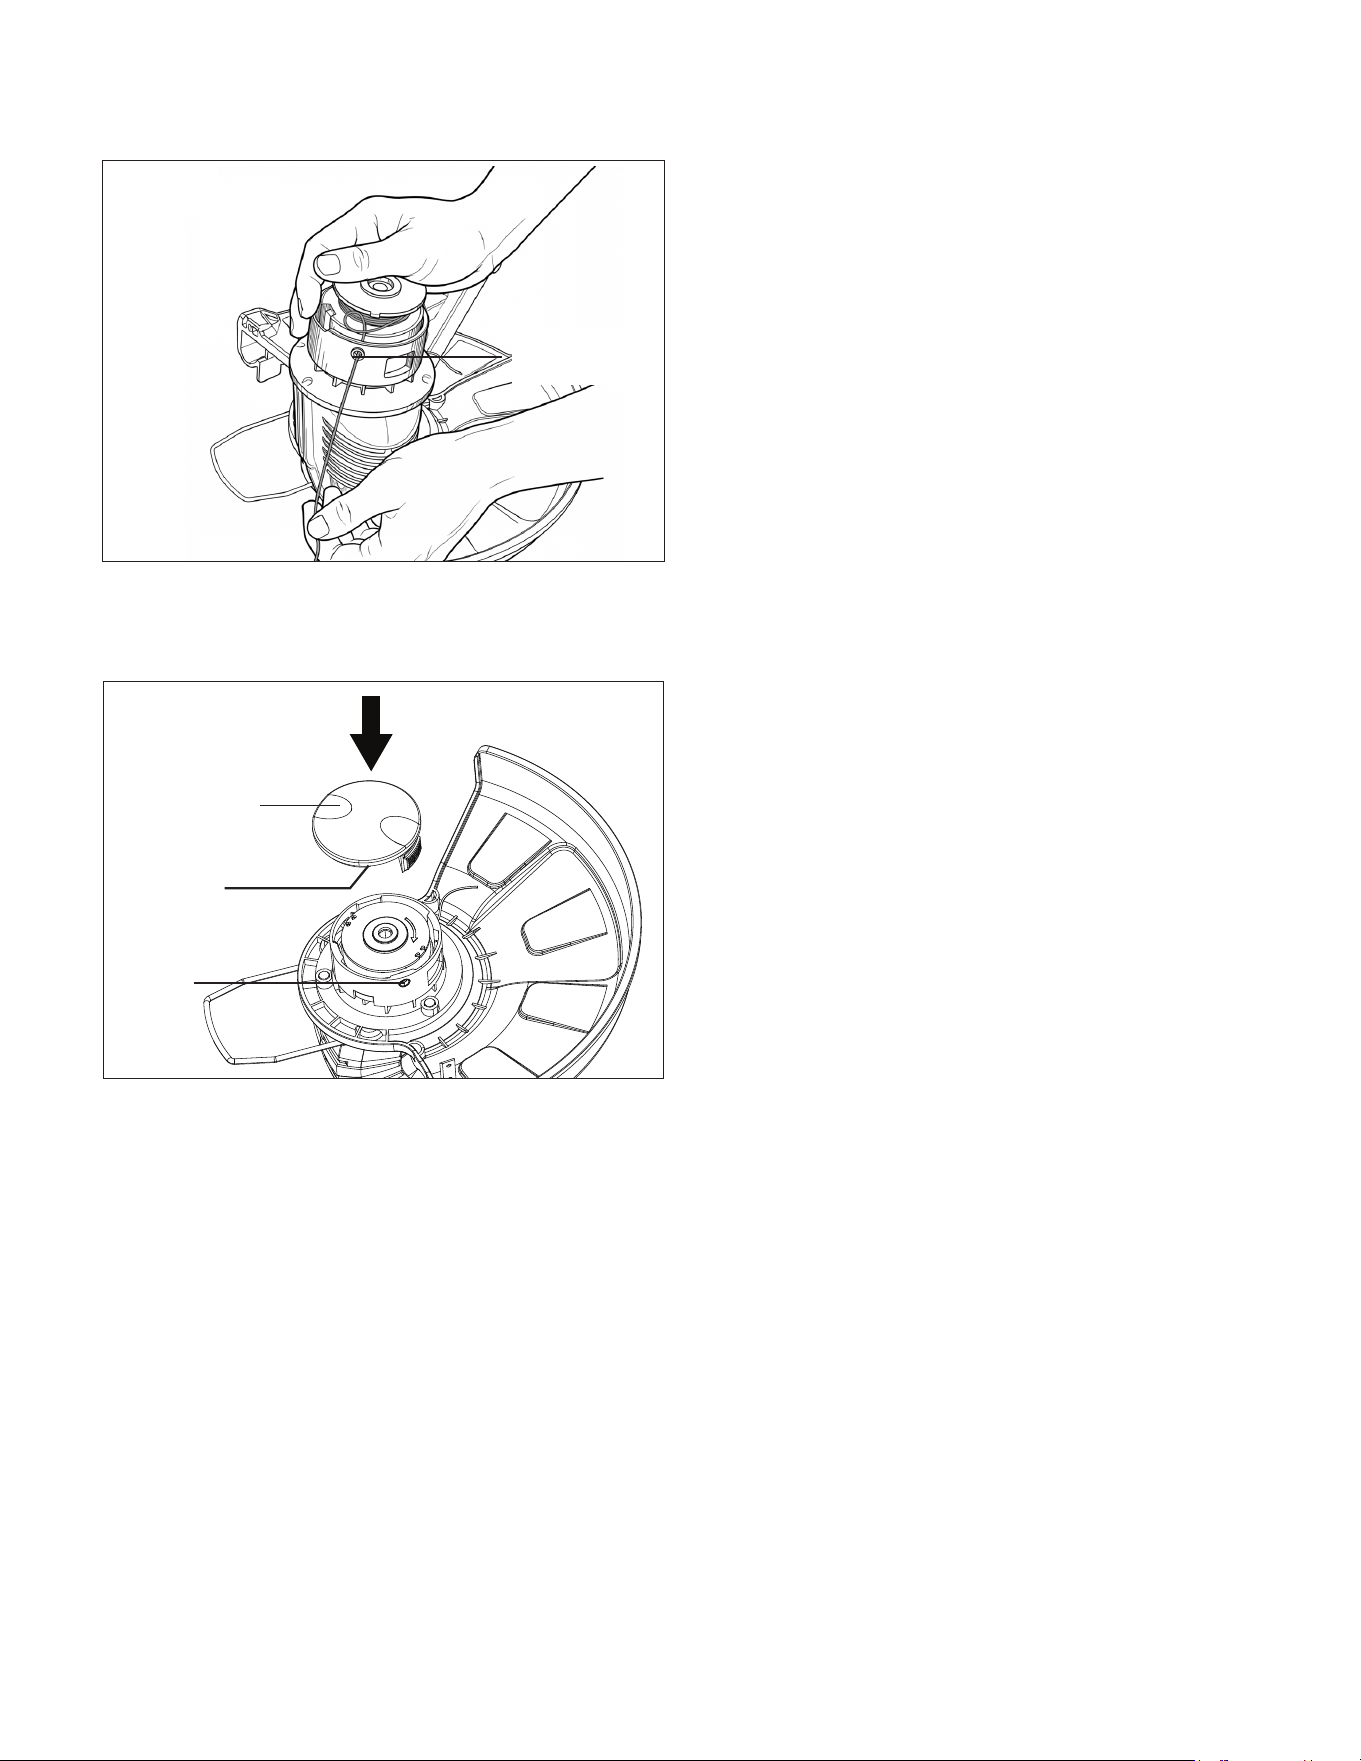
and press the spool onto the hub until it clicks into place.
Ensure the line is free of tangles before securing the cover.
(Fig. 25).
Fig. 24
Spool
Hub
16
Fig. 25
5. Reinstall the spool cover by depressing the release tabs
into their slots in the hub, and push down until the spool
cover clicks into place. (Fig. 26).
6. Reinsert the battery and turn the tool on. In a few seconds,
you will hear the line being cut automatically to the proper
length.
Maintenance
m
WARNING! Before performing any maintenance task, turn
off the machine and remove the battery.
mWARNING! Always wear protective gloves during
maintenance tasks. Do not carry out maintenance when the
motor is running or hot.
• Regular cleaning and maintenance of you grass trimmer
+ edger will ensure efficiency and prolong the life of your
machine.
• After each cutting operation, take apart and clean out the
grass and soil from the whole trimmer + edger and guard.
• During operation, keep the air vents clean and free from
grass.
• Only use a cloth soaked with hot water and a soft brush to
clean the grass trimmer + edger.
• Do not spray or wet the appliance with water.
• Do not use detergents or solvents as these could ruin the
trimmer. The plastic parts can easily be damaged by chemical
agents.
• For repairs which have not been explained in these
instructions, contact an authorized service center at 1-866-
225-9723.
IMPORTANT! Repairs, maintenance, and adjustments to this
power tool should be performed only by a qualified repair
person using only identical replacement parts. This will
ensure that the safety of the product is maintained. Contact
your authorized Snow Joe
®
+ Sun Joe
®
dealer or call the All
Season Power customer service center at 1-866-225-9723 for
assistance.
Fig. 26
Spool cover
Tab
Slot
Pass the
trimmer line

17
Proper Care for Battery + Charger
mWARNING! To reduce the risk of injury, always unplug the
charger and remove the battery pack from the charger before
performing any maintenance task. Never disassemble the battery
pack or charger. Contact your Snow Joe
®
+ Sun Joe
®
dealer or
the All Season Power customer service center for ALL repairs.
1. To reduce the risk of injury and damage, never immerse
your battery pack or charger in liquid or allow any liquid to
flow inside these components.
2. Clean out dust and debris from charger vents and electrical
contacts by blowing with compressed air.
3. Use only a soft, clean and dry brush to clean the battery
pack and charger, keeping away from all electrical contacts.
Certain cleaning agents and solvents are harmful to plastics
and other insulated parts. Some of these include gasoline,
turpentine, lacquer thinner, paint thinner, chlorinated
cleaning solvents, ammonia and household detergents
containing ammonia. Never use flammable or combustible
solvents around battery packs, battery chargers or tools.
Storage
Follow these recommendations for storing the grass trimmer +
edger.
• Clean the grass trimmer + edger thoroughly before storing.
• Store the trimmer + edger in a stable and safe location out of
the reach of children. Keep the trimmer + edger in a dry place
where the temperature is not too hot or too cold.
• Do not store the grass trimmer + edger resting against the
floor. Hang it by the upper handgrip so that the guard does
not touch anything. If the guard rests against a surface,
its shape and dimensions could be permanently altered, and
could render the machine unsafe to use.
Battery + Charger Off-Season Storage
1. Do not expose your battery pack or charger to water, rain or
allow them to get wet. This could permanently damage the
charger and the battery pack. Do not use oil or solvents to
clean or lubricate your battery pack as the plastic casing
can become brittle and crack, causing a serious risk of
injury.
2. Store the battery pack and charger at room temperature
away from moisture. Do not store in damp locations where
corrosion of terminals may occur. As with other battery
pack types, permanent capacity loss can result if the pack
is stored for long periods of time at high temperatures (over
120ºF/49ºC).
Battery Caution + Disposal
Always dispose of your battery pack according to federal, state,
and local regulations. Contact a recycling agency in your area
for recycling locations.
mCAUTION! Even discharged battery packs contain
some energy. Before disposing, use electrical tape to cover the
terminals to prevent the battery pack from shorting, which could
cause a fire or explosion.
mWARNING! To reduce the risk of injury or explosion,
never burn or incinerate a battery pack even if it is damaged,
dead or completely discharged. When burned, toxic fumes and
materials are emitted into the surrounding atmosphere.
1. Batteries vary according to device. Consult your manual for
specific information.
2. Install only new batteries of the same type in your product
(where applicable).
3. Failure to insert batteries in the correct polarity, as indicated
in the battery compartment or manual, may shorten the life
of the batteries or cause batteries to leak.
4. Do not mix old and new batteries.
5. Do not mix Alkaline, Standard (Carbon-Zinc) or
Rechargeable (Nickel Cadmium, Nickel Metal Hydride,
or Lithium-ion) batteries.
6. Do not dispose of batteries in fire.
7. Batteries should be recycled or disposed of as per state
and local guidelines.
Service + Support
If your Sun Joe
®
X20-TRIM-2A cordless grass trimmer + edger
requires service or maintenance, please call the All Season
Power customer service center at 1-866-225-9723.

18
Model + Serial Numbers
When contacting the company, reordering parts, or arranging
service from an authorized dealer, you will need to provide the
model and serial numbers, which can be found on the decal
located on the housing of the unit. Copy these numbers into the
space provided below.
Record the following numbers from the housing or handle of your
new product:
X20-TRIM-2A
Model #:
Serial #:
Federal Communications Commission
(FCC)
mWARNING! Any changes or modifications to this unit
not expressly approved by the party responsible for compliance
could void the user's authority to operate the equipment.
Class B device:
NOTE: This equipment has been tested and found to comply
with the limits for a Class B digital device, pursuant to part 15 of
the FCC Rules.
These limits are designed to provide reasonable protection
against harmful interference in a residential installation.
This equipment generates, uses and can radiate radio
frequency energy and, if not installed and used in accordance
with the instructions, may cause harmful interference to radio
communications.
However, there is no guarantee that interference will not occur
in a particular installation.
If this equipment does cause harmful interference to radio or
television reception, which can be determined by turning the
equipment off and on, the user is encouraged to try to correct
the interference by one or more of the following measures:
• Reorient or relocate the receiving antenna.
• Increase the separation between the equipment and
receiver.
• Connect the equipment into an outlet on a circuit different
from that to which the receiver is connected.
• Consult the dealer or an experienced radio/TV technician
for help.
19
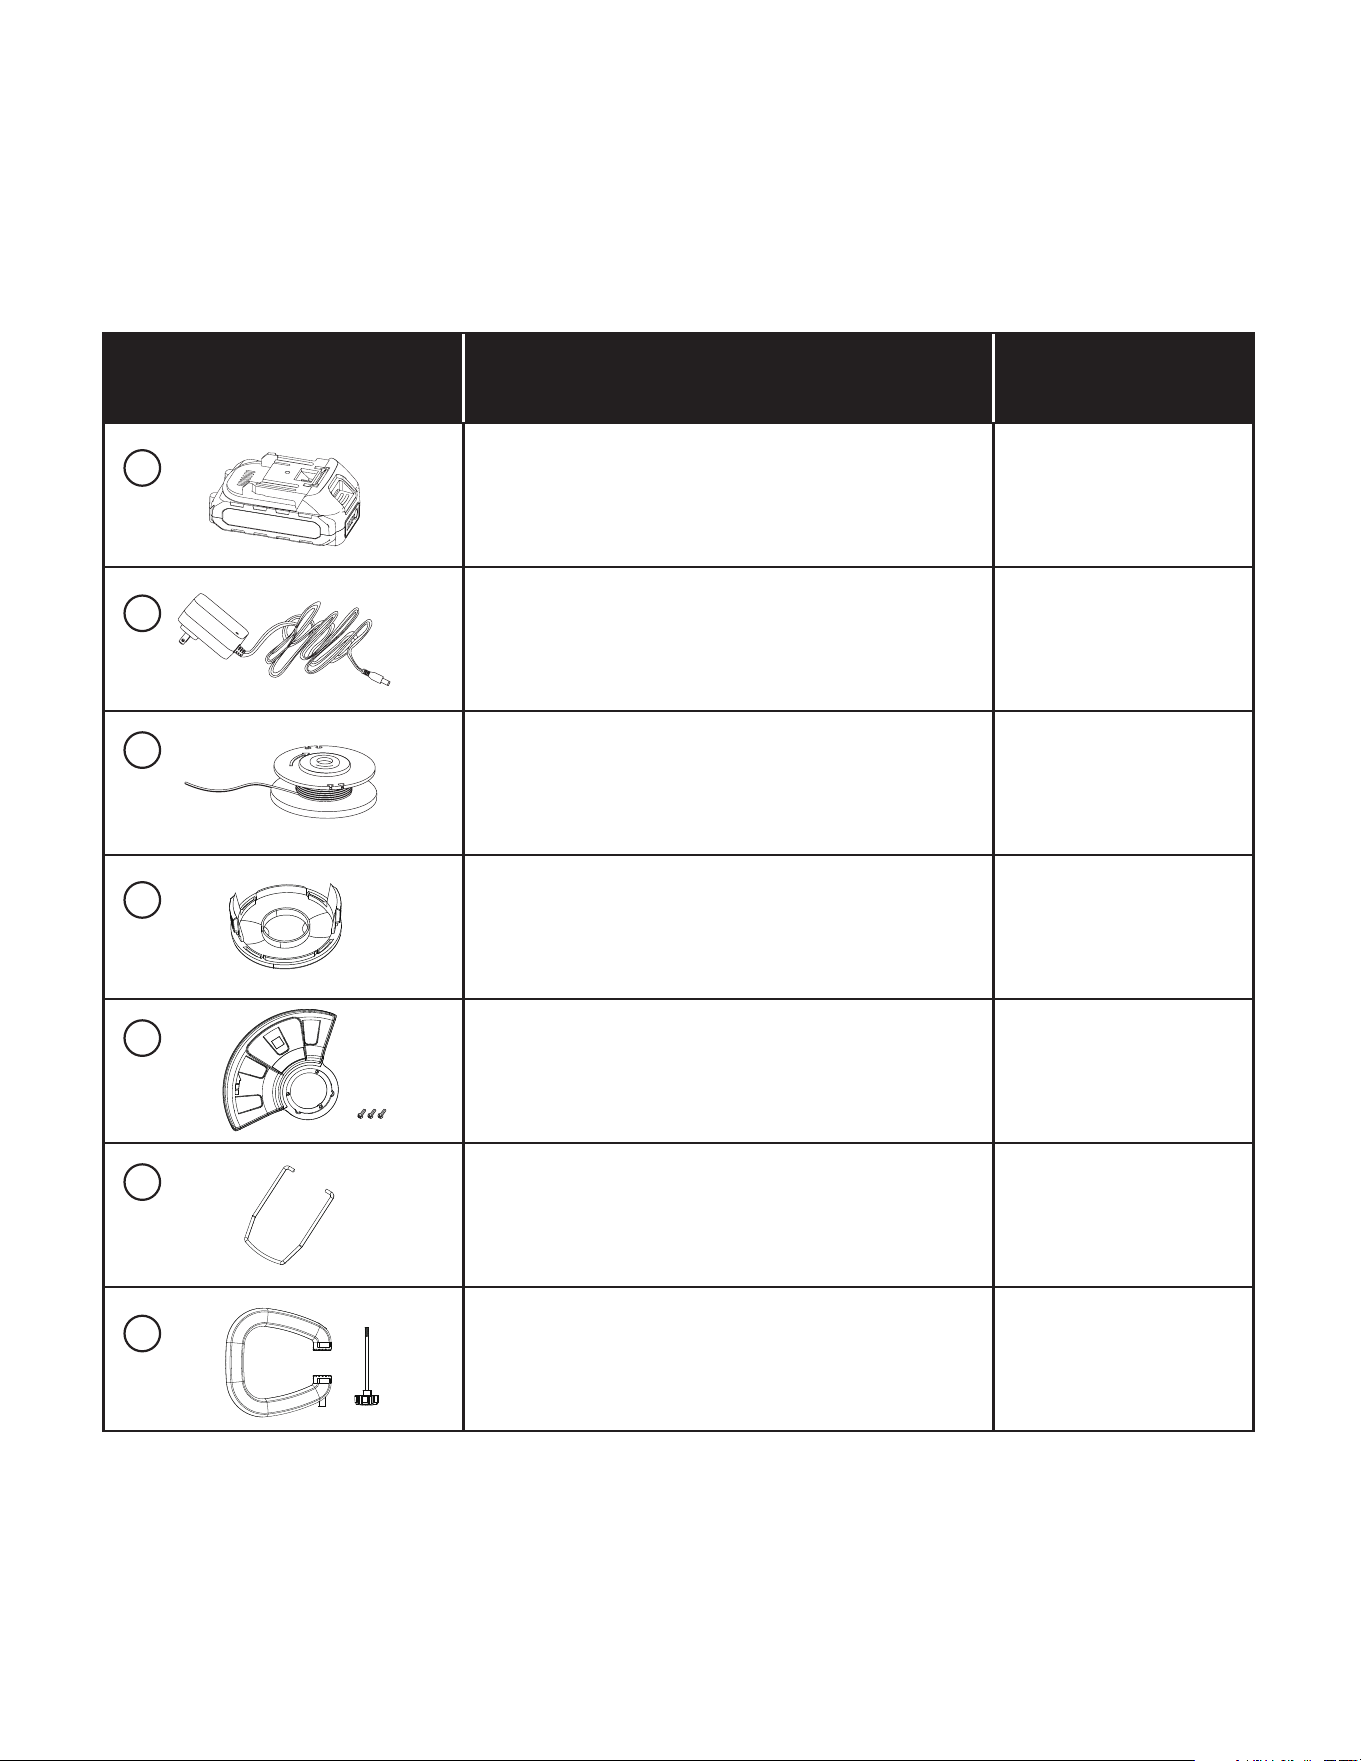
Optional Accessories
m
WARNING! ALWAYS use only authorized Snow Joe
®
+ Sun Joe
®
replacement parts and accessories. NEVER use replacement
parts or accessories that are not intended for use with this cordless trimmer + edger. Contact All Season Power if you are unsure
whether it is safe to use a particular replacement part or accessory with your cordless trimmer + edger. The use of any other
attachment or accessory can be dangerous and could cause injury or mechanical damage.
Accessories Item Model
1
20V ECOSHARP
®
2.0 Ah Lithium-ion Battery 20V-BATT-2A
2
21V Lithium-ion Charger CZRW2200750U
3
3 m Trimmer Lines (×4) X20-TRIM-LINE
4
Spool Cover X20-TRIM-SPOOL-CVR
5
Safety Guard + Screws (3) X20-TRIM-GUARD-KIT
6
Edger Guide + Flower Guard X20-TRIM-EDGE-KIT
7
Auxiliary Handle with Knob X20-TRIM-HANDLE
NOTE: Accessories are subject to change without any obligation on the part of All Season Power to provide notice of such changes.
Accessories can be ordered online at shopjoe.com or via phone by contacting the All Season Power customer service center at
1-866-225-9723.

20
Troubleshooting
Most difficulties are easy to fix. Consult the troubleshooting table for common problems and their solutions. If you continue to
experience problems or need repairs beyond these minor adjustments, please call 1-866-225-9723 for assistance.
mWARNING! Always remove the battery before performing any adjustments, maintenance or repairs to your cordless grass
trimmer + edger.
Problem Possible Cause Solution
Grass trimmer + edger does not start
a) Battery charge is low
b) Battery is not fully seated in
compartment
c) Battery is overheated
d) Safety button not being held while
pressing trigger
a) Charge the battery fully before use;
confirm all 4 LED indicators are lit
b) Remove and firmly reinsert the
battery until it clicks into place;
inspect battery connection prongs for
damage
c) Allow the battery to cool to room
temperature before use
d) Press and hold the safety button first,
then squeeze the trigger to start
e) If the unit still does not start after all
checks, contact All Season Power at
1-866-225-9723
Grass trimmer + edger vibrates
excessively
a) Trimmer head or string spool is
clogged with grass or debris
b) Spool is damaged, cracked, or
incorrectly seated
a) Remove the spool cover and spool;
clean all slots and carefully remove
any trapped grass and debris
b) Inspect the spool for damage;
replace if cracked or worn
c) Ensure the spool is properly aligned
and seated on the hub before
replacing the cover
d) If vibration persists, contact an
authorized dealer or call All Season
Power at 1-866-225-9723
Unit runs for a few seconds or minutes
then stops
a) Battery not fully charged
b) Battery or motor overheated;
thermal protection cutoff triggered
c) Spool housing clogged with grass
or debris
d) Motor overloaded from cutting thick
or heavy grass
a) Recharge the battery fully; confirm all
4 LED indicators are lit before use
b) Allow the unit and battery to cool to
room temperature before restarting;
do not press ON/OFF repeatedly
after cutoff triggers — this may
damage the battery
c) Remove spool cover and clean all
grass and debris from the spool
housing
d) Trim cutting line so it just reaches the
line trimming blade; work in smaller
passes from top to bottom
Trimmer line not advancing / auto-feed
not working
a) Line is tangled or jammed inside
the spool
b) Line has dried out and fused
together
c) Spool is empty
d) Spool cover is not fully seated
a) Remove spool cover and spool;
unwrap approximately 6 inches (15
cm) of line to clear the jam; ensure
line is tangle-free before reinstalling
b) Remove spool and separate any
fused line; store spare line in a
sealed bag with a small amount of
water to prevent drying
c) Replace with a new pre-wound spool
or rewind with 0.063 in. (1.6 mm)
diameter nylon line
d) Press spool cover down firmly until
both release tabs click into place
e) Do NOT bump the unit on the ground
to advance line — this will damage the
trimmer

2121
Problem Possible Cause Solution
Trimmer line breaks frequently or will
not hold
a) Ambient temperature is below 50°F
(10°C)
b) Excessive contact with abrasive
surfaces (sidewalks, concrete,
brick)
c) Incorrect line diameter being used
d) Line dried out from improper
storage
a) Do not use the trimmer when
temperature is below 50°F (10°C);
nylon line becomes brittle in cold
weather
b) Use only the tip of the line to cut near
hard surfaces; minimize dragging the
full line length along abrasive edges
c) Use only 0.063 in. (1.6 mm) diameter
nylon replacement line — do not
substitute other sizes or types
d) Store spare line or pre-wound spools
in a sealed bag with a small amount
of water to keep the line pliable
Motor stops when switching to edger
mode
a) Trimmer head not fully locked into
90° edger position
b) Spool housing clogged; motor
struggling under load
c) Battery connection disrupted during
head rotation
a) Press and hold the trimmer/edger
head locking button firmly while
rotating the head; rotate fully to 90°
and release until it clicks into place
b) Remove spool cover and clean out all
grass and debris before switching to
edger mode
c) Ensure the battery is fully seated and
connections are secure; remove and
reinsert the battery then retry
d) Flip the edger guide + flower guard
down from its stored position before
use in edger mode
Smoke coming from motor / unit
stopped after smoking
a) Motor ventilation slots blocked by
grass or debris
b) Motor overloaded or overheated
c) Internal component damage
a) Stop use immediately and remove the
battery
b) Do not attempt to restart — continued
use after smoking can cause
permanent damage or injury
c) Ensure all motor ventilation slots are
clear of grass clippings and debris
before any further use
d) Contact All Season Power at 1-866-
225-9723 before attempting further
use; unit may require service or
replacement under warranty
Battery not charging
a) Charger not properly connected
b) Battery or charger exposed to
moisture
c) Battery stored more than 12 months
without charging
d) Battery temperature outside safe
charging range
a) Ensure the charger plug is fully
inserted into the battery charge
socket and the charger is plugged
into a working AC outlet
b) Do not charge in wet or damp
conditions; inspect charger and
battery for moisture or corrosion
damage
c) If the battery has not been charged in
over 12 months, it may have suffered
irreversible damage and should be
replaced
d) Charge only within the safe
temperature range of 41°F – 104°F
(5°C – 40°C); bring battery to room
temperature before charging
Telescoping pole slips or will not lock
a) Telescopic shaft adjustment knob is
not fully tightened
b) Knob or shaft area is dirty or worn
a) Rotate the telescopic shaft
adjustment knob firmly in the lock
direction until fully secure
b) Clean the adjustment knob and shaft
area of any grass or dirt buildup
c) If slipping persists after tightening,
contact All Season Power at 1-866-
225-9723
Only a company specialist may be able to correct faults that cannot be rectified with the aid of this table. Please call the All Season
Power customer service department at 1-866-225-9723.
22
R1_09222025
OUR CUSTOMER PROMISE + LIMITED WARRANTY
OUR WARRANTY:
All Season Power warrants new, genuine, powered and non-powered Products to be free from defects in material or workmanship when
used for ordinary household use for a period of one year from the date of purchase or delivery by the original, end-user purchaser when
purchased from All Season Power or from one of All Season Power’s authorized sellers with proof of purchase. Because All Season Power
is unable to control the quality of its Products sold by unauthorized sellers, unless otherwise prohibited by law, this Warranty does not
cover Products purchased from unauthorized sellers. If you have any questions about how to buy from an authorized seller, chat with us at
shopjoe.com/support or call us at 1-866-225-9723. If your Product does not work or there’s an issue with a specific part that is covered
by the terms of this Warranty, All Season Power will elect to either (1) send you a free replacement part, (2) replace the Product with a new
or comparable product (which may include a refurbished, like-new product) at no charge, or (3) repair the Product. How cool is that!
PRODUCT REGISTRATION:
All Season Power strongly encourages you to register your Product. You can register online at shopjoe.com/register, by chatting with us at
shopjoe.com/support
or calling our Customer Service Department at 1-866-225-9723. Failure to register your Product will not diminish your
warranty rights. However, registering your Product will allow All Season Power to better serve you with any of your customer service needs.
WHO CAN SEEK LIMITED WARRANTY COVERAGE:
This Warranty is extended by All Season Power to the original purchaser and original owner of the Product.
WHAT IS NOT COVERED?
This Warranty does not apply if the Product has been used commercially or for non-household or rental applications. This Warranty also
does not apply if the Product was purchased from an unauthorized seller. This Warranty also does not cover cosmetic changes that do
not affect performance. Wearing parts like belts, augers, chains and tines are not covered under this Warranty, and can be purchased at
shopjoe.com or by calling 1-866-225-9723.
We encourage you to use CERTIFIED AUTHENTIC Snow Joe
®
, Sun Joe
®
, Aqua Joe
®
+ Auto Joe
®
replacement parts + accessories. Damage
caused by the use of any other parts + accessories on your Product will not be covered under the warranty. Genuine parts + accessories
can be found and purchased here by entering the model number of your product.
ABOVE ALL ELSE, All Season Power, LLC (“All Season Power”) is dedicated to you, our customer. We strive to make your experience as
pleasant as possible. Unfortunately, there are times when a Snow Joe
®
, Sun Joe
®
, Aqua Joe
®
or Auto Joe
®
product (“Product”) does not
work or breaks under normal operating conditions. We think it’s important that you know what you can expect from us. That’s why we have
a Limited Warranty (“Warranty”) for our Products.
When you register your powered or non-powered Product with All Season Power at shopjoe.com/register, you will receive an additional
90 days of warranty coverage. In addition, you will have the option of purchasing extended warranty coverage beyond the standard 1-year
manufacturer’s warranty. Choose from two, three, or four years of extended coverage through Extend, Inc. Additional charges apply. When
you Go With Joe
®
, you’re not just buying an extended warranty; you’re buying total peace of mind to know that you can rely on our top-notch
tools, top-tier customer support, complete product coverage + no hassle return policy. Chat with us at shopjoe.com/support or call us at
1-866-225-9723 7 days a week 10AM-6PM EST. We’ve got you covered!
There are no warranties which extend beyond those stated herein. ANY IMPLIED WARRANTIES THAT MAY BE APPLICABLE TO PRODUCTS,
INCLUDING IMPLIED WARRANTIES OF MERCHANTABILITY OR FITNESS FOR A PARTICULAR PURPOSE, ARE LIMITED IN DURATION
TO THE DURATION OF THIS WARRANTY. Some States do not allow limitations on how long an implied warranty lasts, so the above
limitation may not apply to you.
UNDER NO CIRCUMSTANCES SHALL WE BE LIABLE FOR ANY SPECIAL, INCIDENTAL, OR CONSEQUENTIAL DAMAGES BASED UPON
BREACH OF THIS LIMITED WARRANTY, BREACH OF CONTRACT OR STRICT LIABILITY. Some States do not allow the exclusion or
limitation of incidental or consequential damages, so the above limitation or exclusion may not apply to you. This warranty gives you specific
legal rights, and you may also have other rights which vary from State to State. This warranty supersedes those printed in product manuals.
EN
R

shopjoe.com