
Technical Support and E-Warranty Certificate www.vevor.com/support
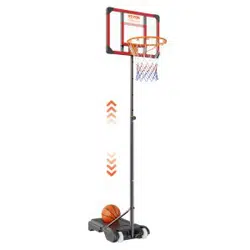
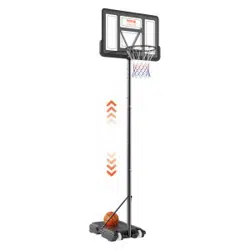
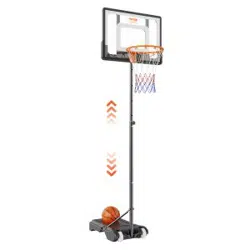
BASKETBALL HOOP STAND
MODEL:M0182
We continue to be committed to provide you tools with competitive price.
"Save Half", "Half Price" or any other similar expressions used by us only represents an
estimate of savings you might benefit from buying certain tools with us compared to the major
top brands and dose not necessarily mean to cover all categories of tools offered by us. You
are kindly reminded to verify carefully when you are placing an order with us if you are
actually saving half in comparison with the top major brands.

- 1 -
MODEL:M0182
Have product questions? Need technical support? Please feel free to
contact us:
Technical Support and E-Warranty Certificate
www.vevor.com/support
NEED HELP? CONTACT US!
This is the original instruction, please read all manual instructions
carefully before operating. VEVOR reserves a clear interpretation of our
user manual. The appearance of the product shall be subject to the
product you received. Please forgive us that we won't inform you again if
there are any technology or software updates on our product.
BASKETBALL HOOP STAND

- 2 -
INSTRUCTIONS
Thank you very much for choosing this Basketball Hoop Stand. Please
read all of the instructions before using it.The information will help you
achieve the best possible results.
WARNING:
Please read this manual carefully before using the product. Failure to do so
may result in serious injury.
ASSEMBLY PRECAUTIONS
1. Assemble needs to follow these instructions. Incorrect assembly can be
a hazard.
2. Wear safety goggles and heavy-duty work gloves during assembly.
3. Do not assemble when tired or under the influence of alcohol, drugs or
medication.
4. Weight capacity and other product capabilities only apply to a wholly and
correctly assembled product.
5. Keep the assembly area clean and well-lit.
6. Keep bystanders out of the area during assembly.
7. The weight of plate is heavy; pay attention to the installation to avoid
hurting it, and if necessary, find someone to assist with the installation.
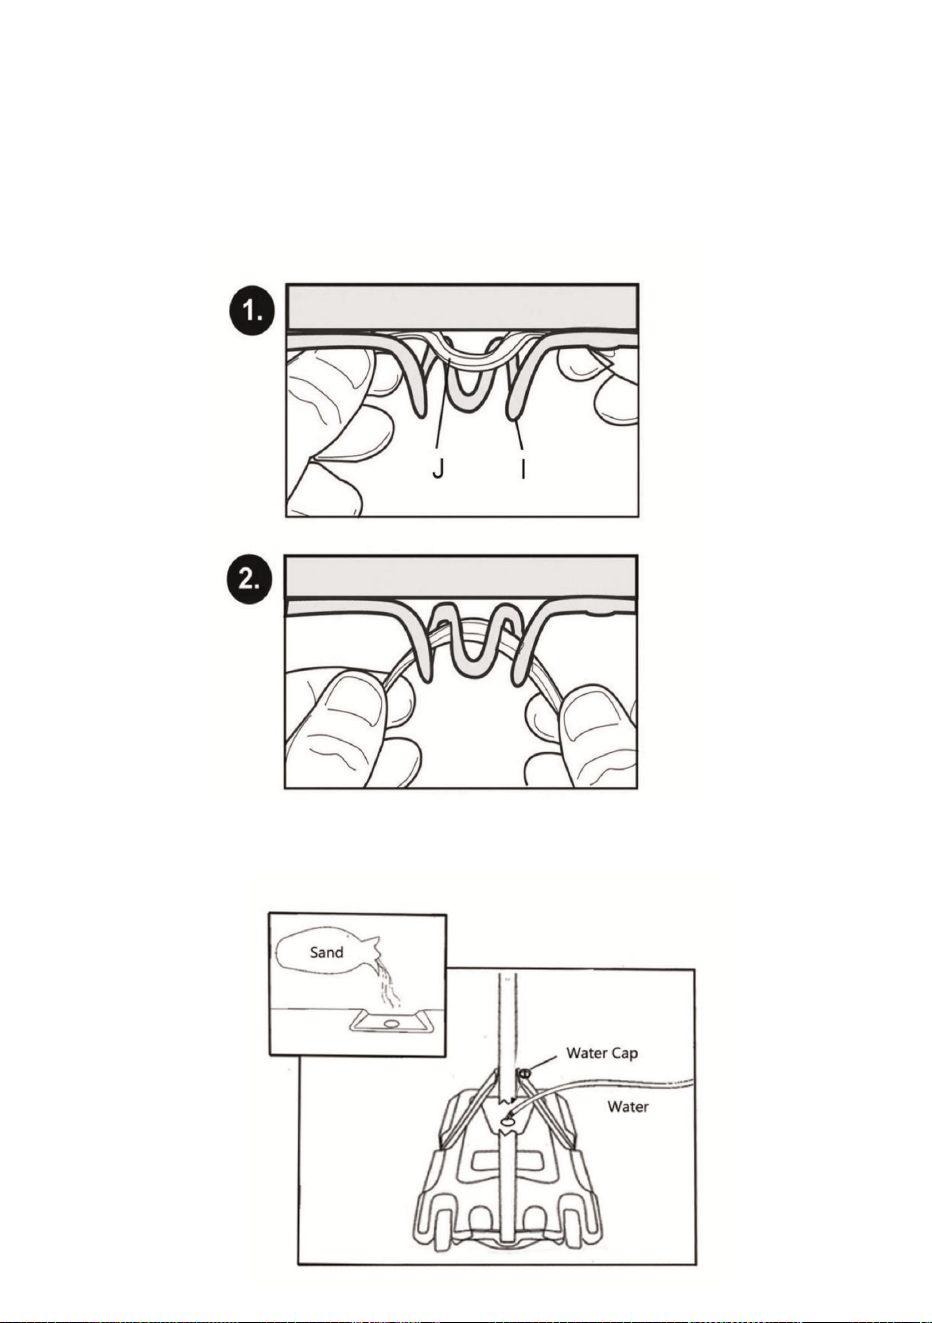
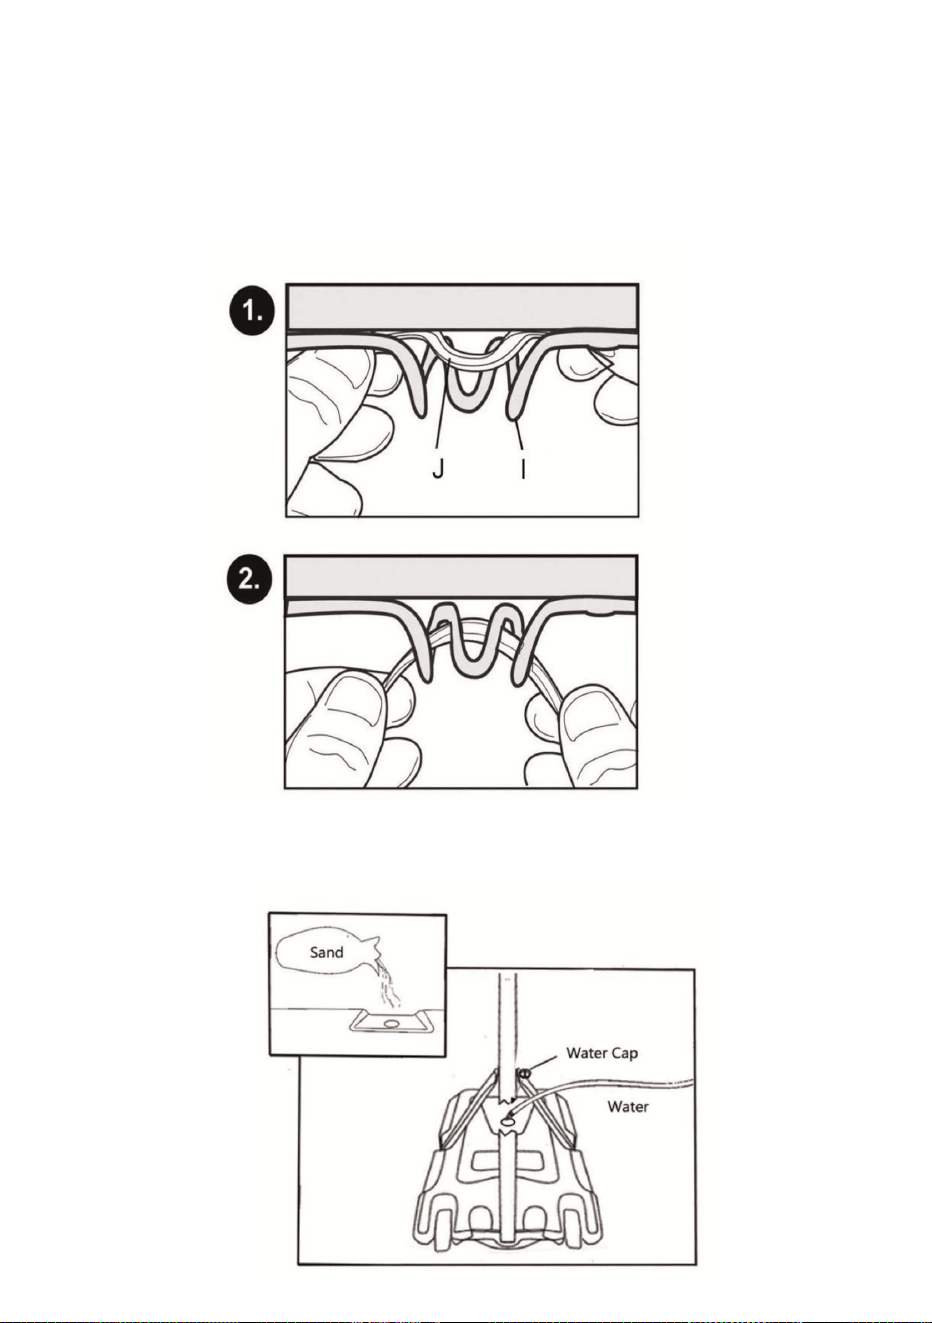
8.When installing the bracket, it is best to put some water in the base first
to avoid the collapse of the backboard.
9.Assembly should be done by adults only.
10.Do not hang from the rim or climb on the pole. Do not climb on the
base or structure in general, as this could result in serious injuries.
11. WARNING: This product contains small parts. If swallowed, it will pose
a choking hazard. Keep these small parts away from children when
assembling!

- 3 -
USE PRECAUTIONS
WARNING: TO PREVENT SERIOUS INJURY AND DEATH FROM
TIPPING:
1. Use as intended only. Do not sit or stand on the product.
2. Inspect before every use. Do not use it if parts are loose or damaged.
3. Use on flat, level, and hard surfaces only.
4.If any parts are missing, broken, damaged, or worn, stop using this item
until repairs are made and factory replacement parts are installed.
5.Adjustment and moving of the basketball set must be carried out by
adults.
6.Always check the unit to ensure the base is full of water or sand, and that
all fittings and hardware are tight before each use.
7.Do not allow water to freeze in the base.
WARNING:
For your safety, please do not dunk or hang from the basketball hoop.
SAVE THESE INSTRUCTIONS

- 4 -
PART LIST
Part No
Name&Specificati
on
Qt
y
Remarks
A
Plastic head knob
1
Fix Top Pole(W) On Middle Pole(X)
B1,B2,
B3
Bolt,M8*35MM
4
Connect Rim(I)&backboard(K),& Top
Pole(W)
C1,C2,
C3
Bolt,M8*20MM
2
Connect base(S)&Base
Brace(L1),(L2)
D1,D2,
D3
Bolt,M8*55MM
2
Connect middle pole (X)& Bottom
Pole(Y),And connect Top
pole(W)&Middle Pole(X)
E1,E2,
E3
Bolt,M8*60MM
1
Connect Bottom pole (Y)& Base
brace(L1),(L2)
G
Wheel
2
H
Water Cap
1
I
Rim
1
J
Net
1
K
Backboard
1
L1
Right Brace
1
L2
Left Brace
1
M
Wheel Shaft
N
Pole Cap
1
W
Top Pole
1
X
Middle Pole
1
Y
Bottom Pole
1
S
Base
1
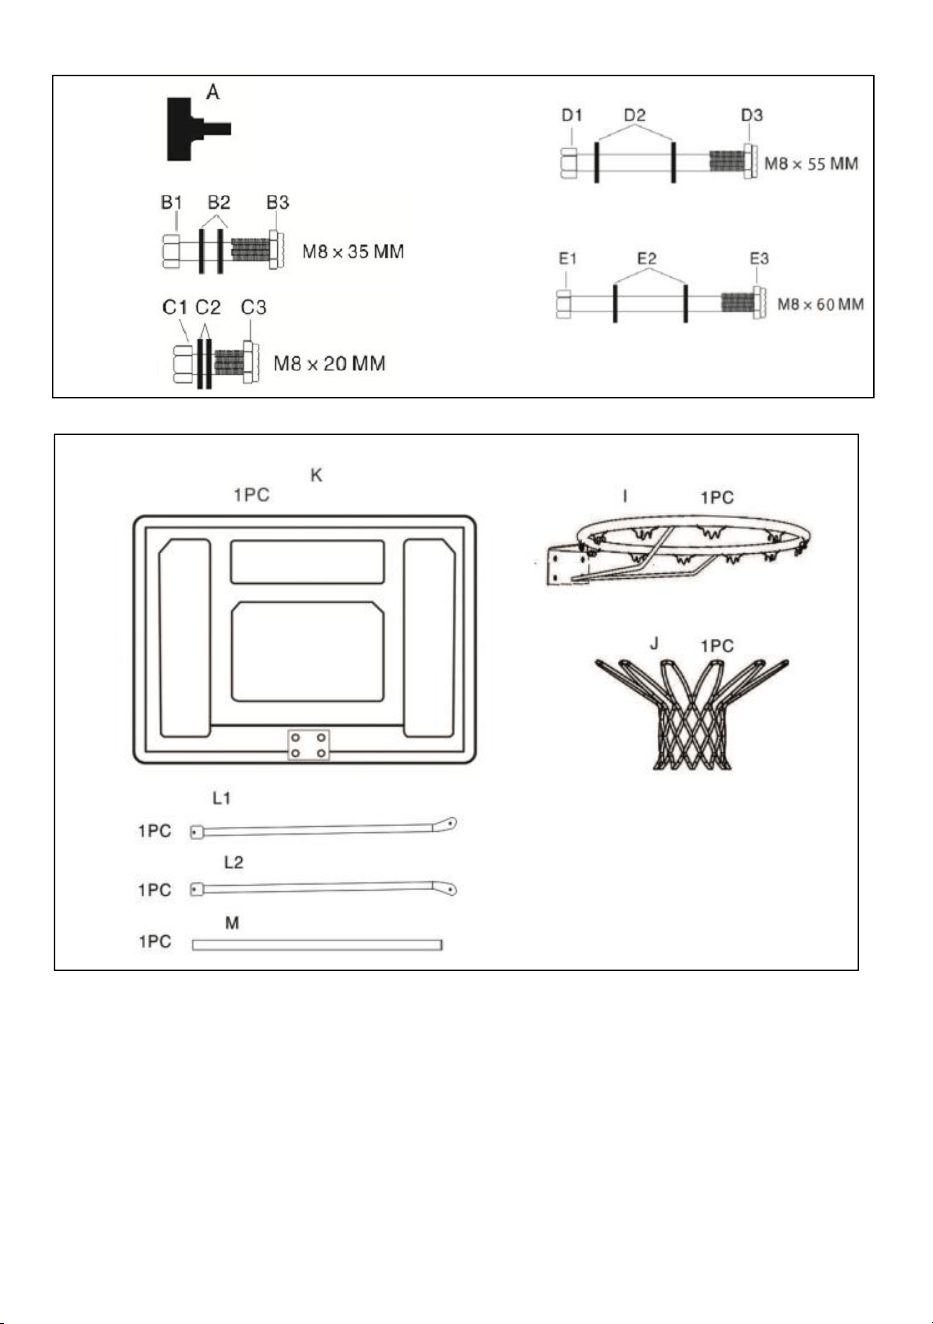
- 5 -
1 PCS 2 PCS
4 PCS 1 PCS
2 PCS
- 6 -
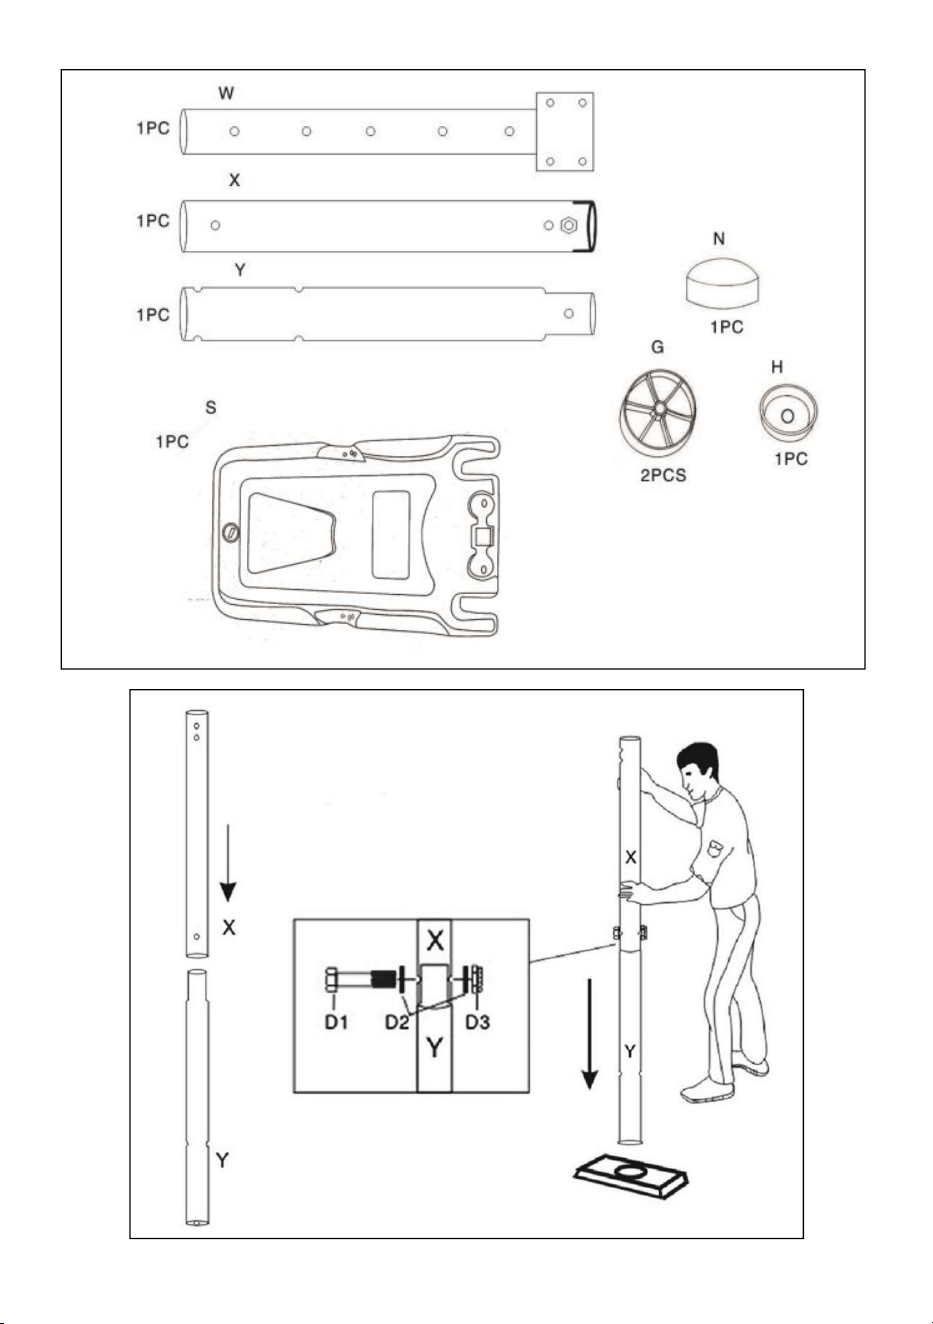
Connect the Middle Pole(X)&Bottom Pole(Y) as shown,Fix them by Bolt
Set(D1),(D2)&(D3).
- 7 -
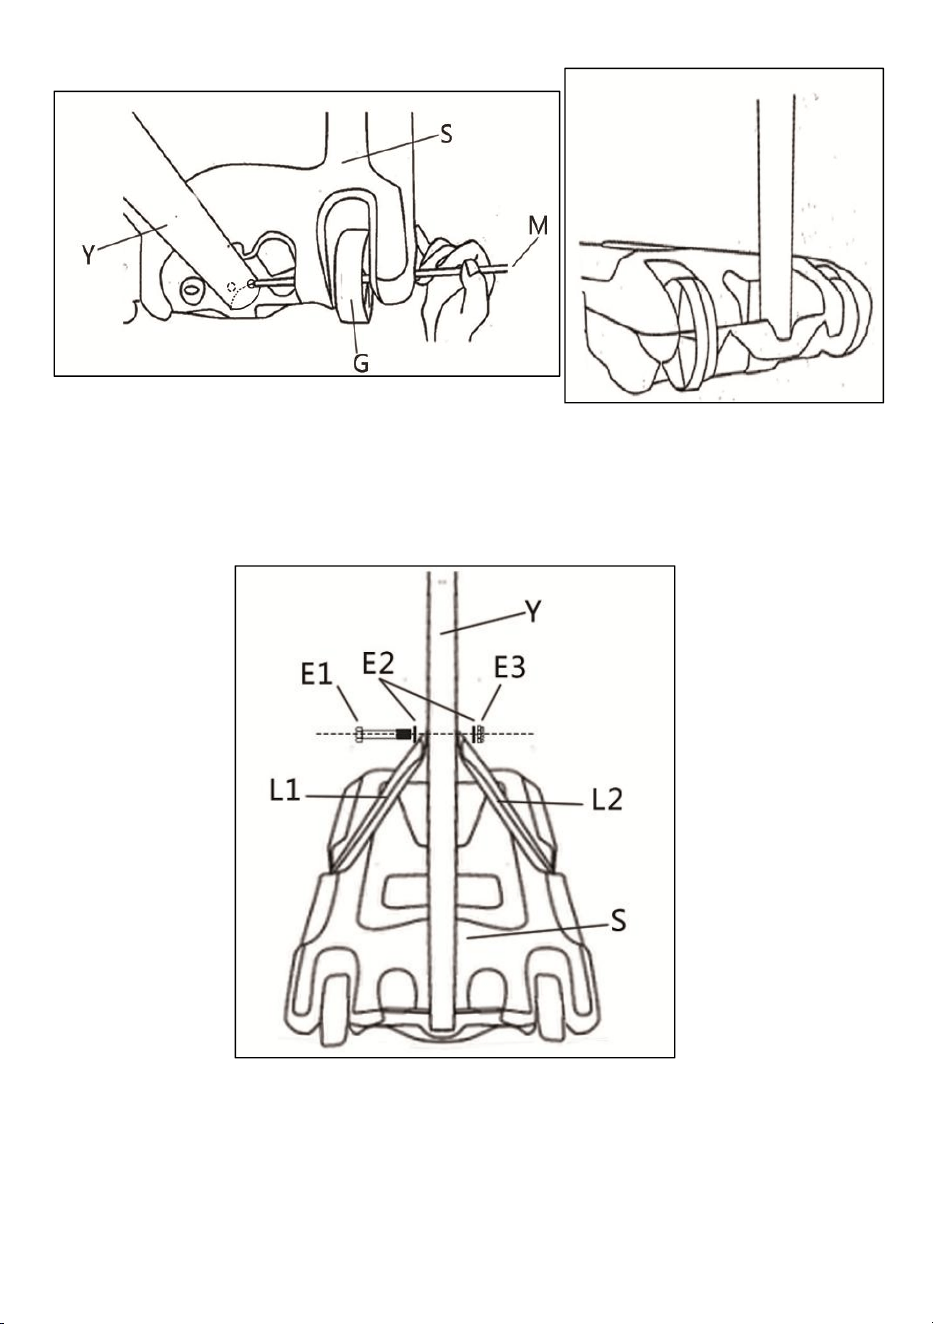
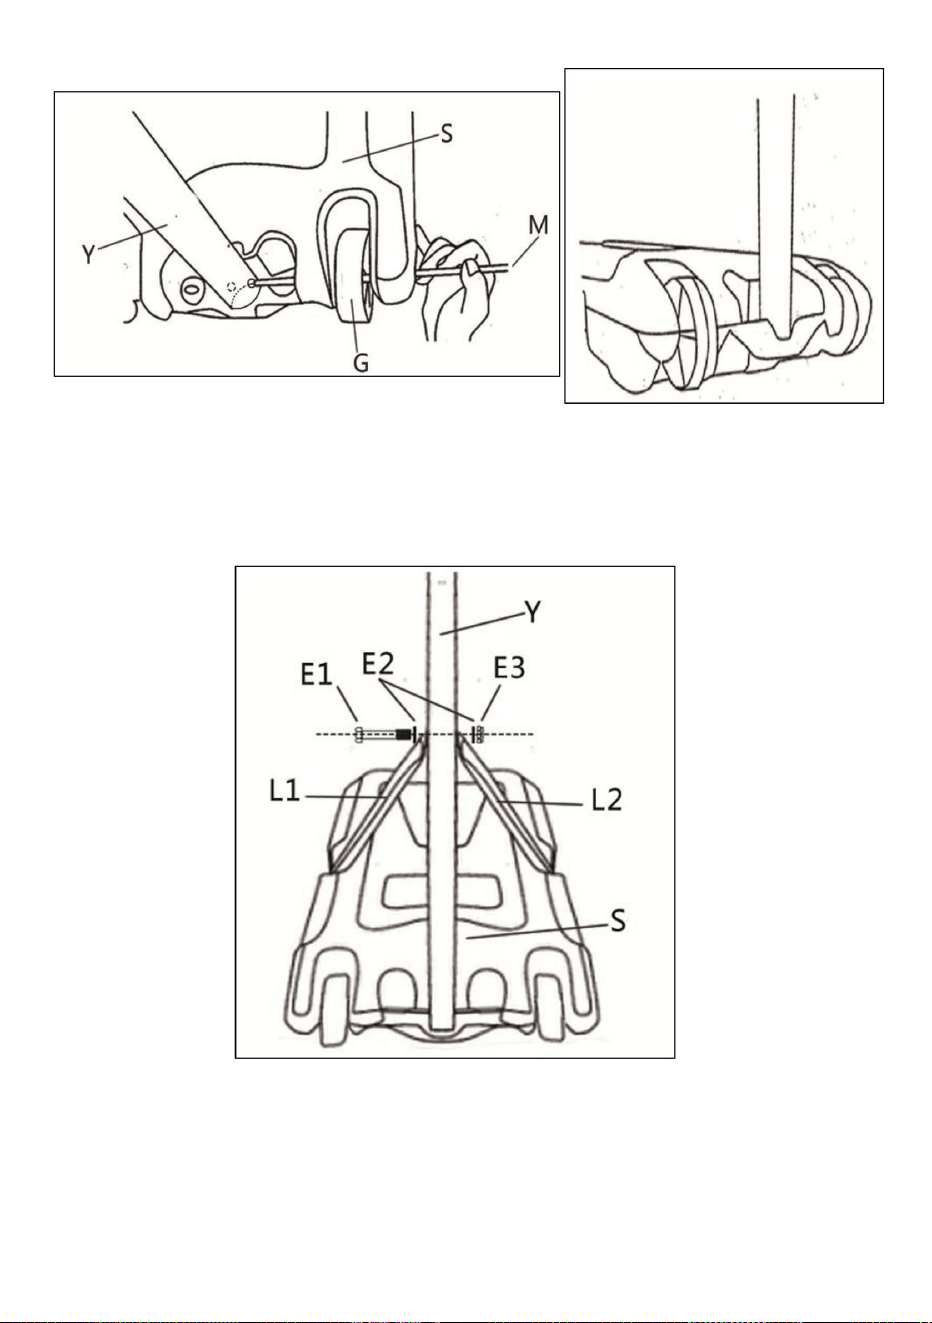
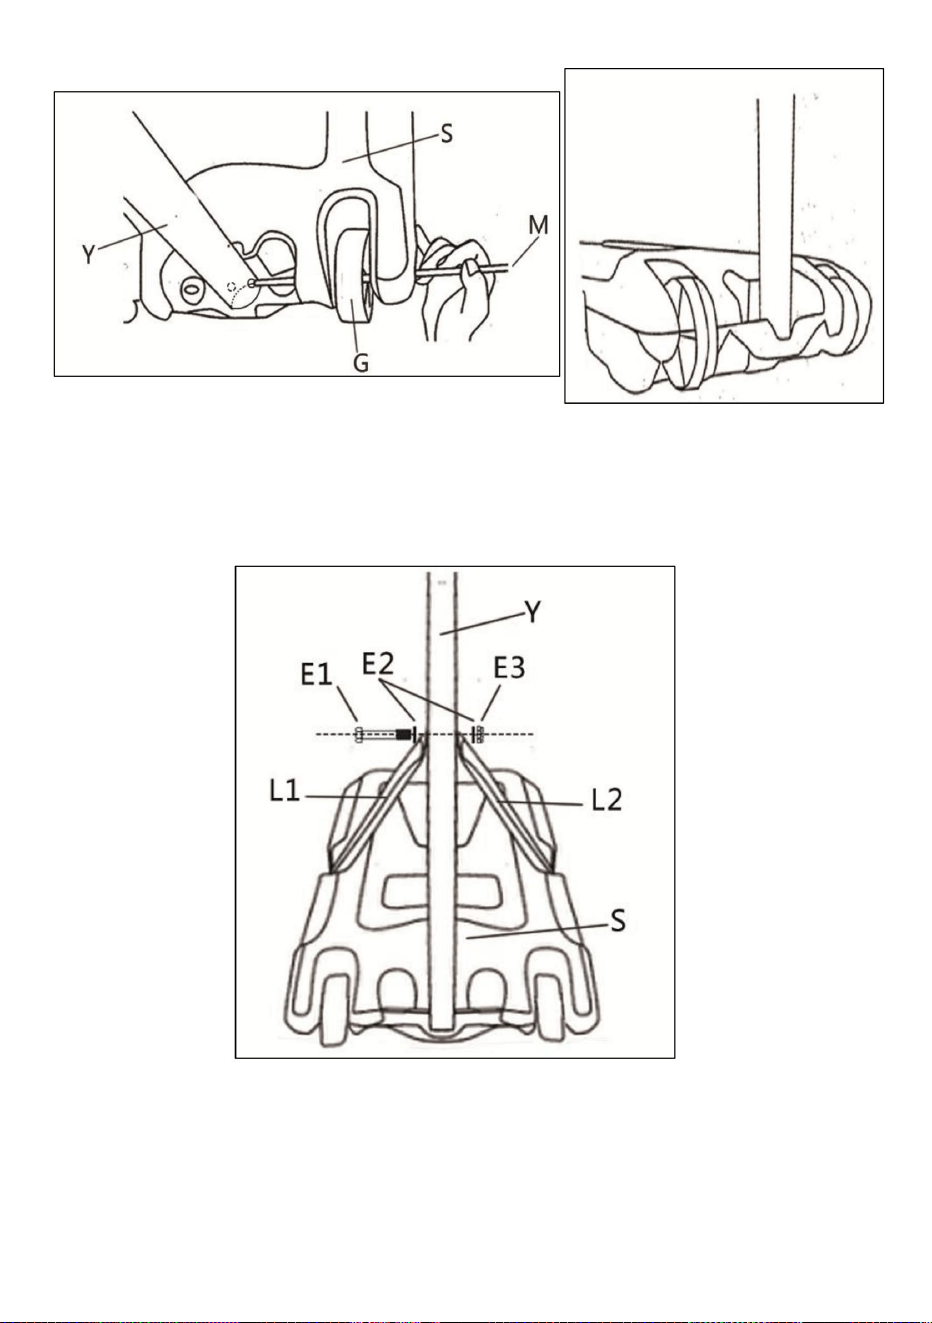
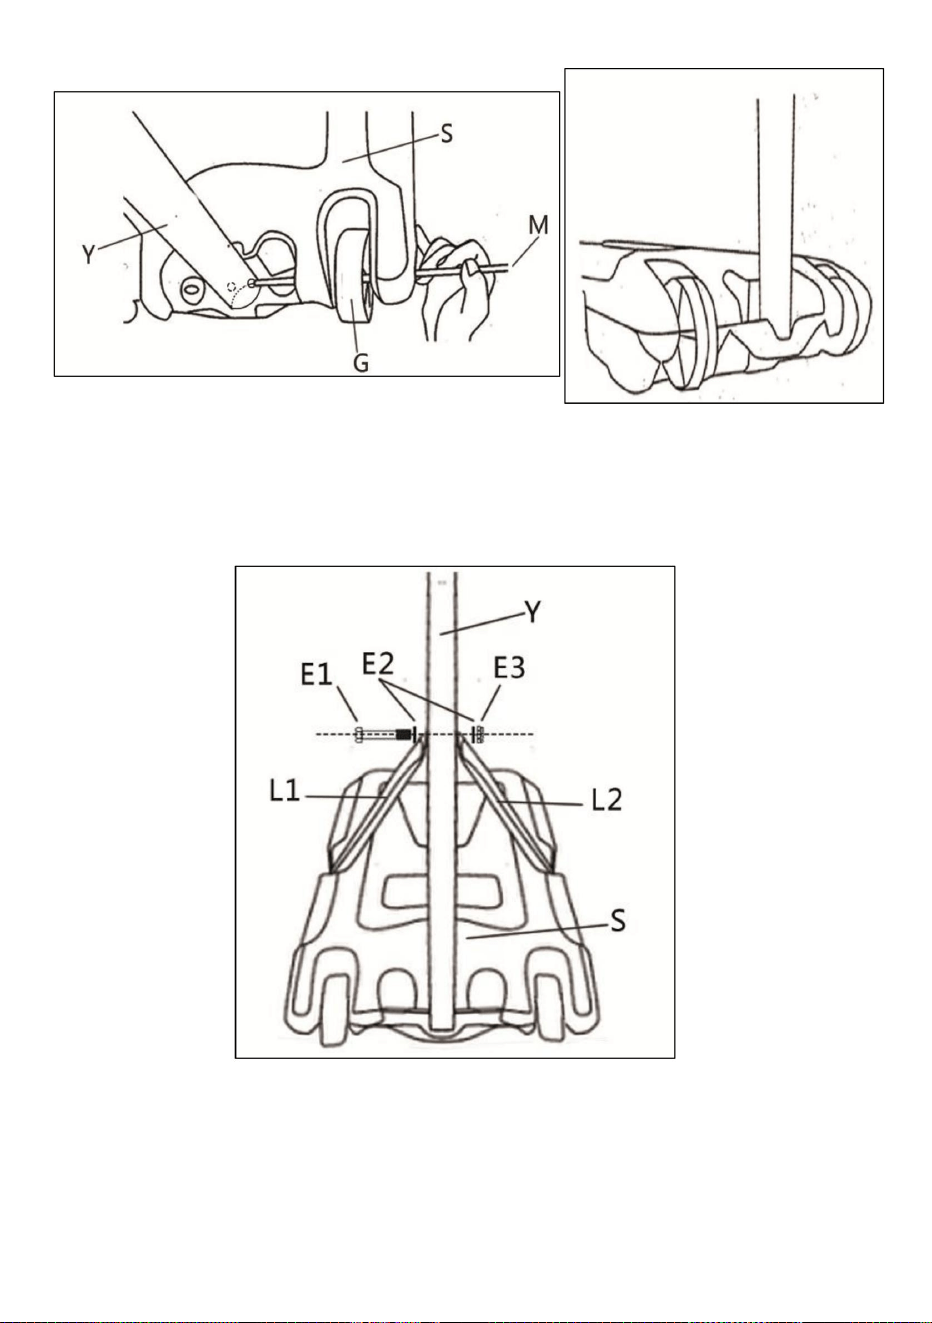
Insert the Wheel Shaft(M) into Wheel(G),Base(S) and end of Bottom
Pole(Y) as shown.
- 8 -
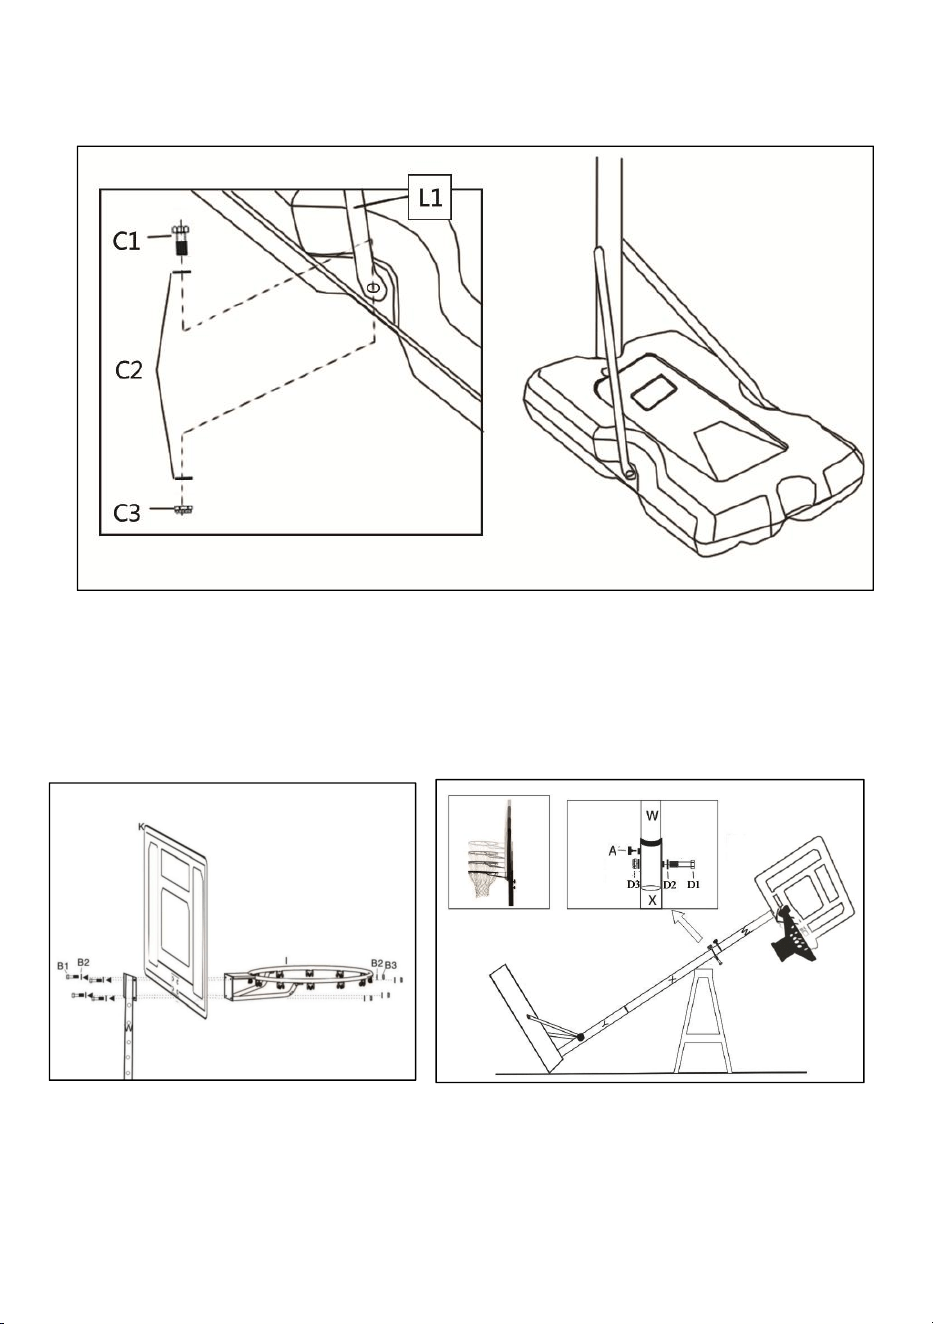
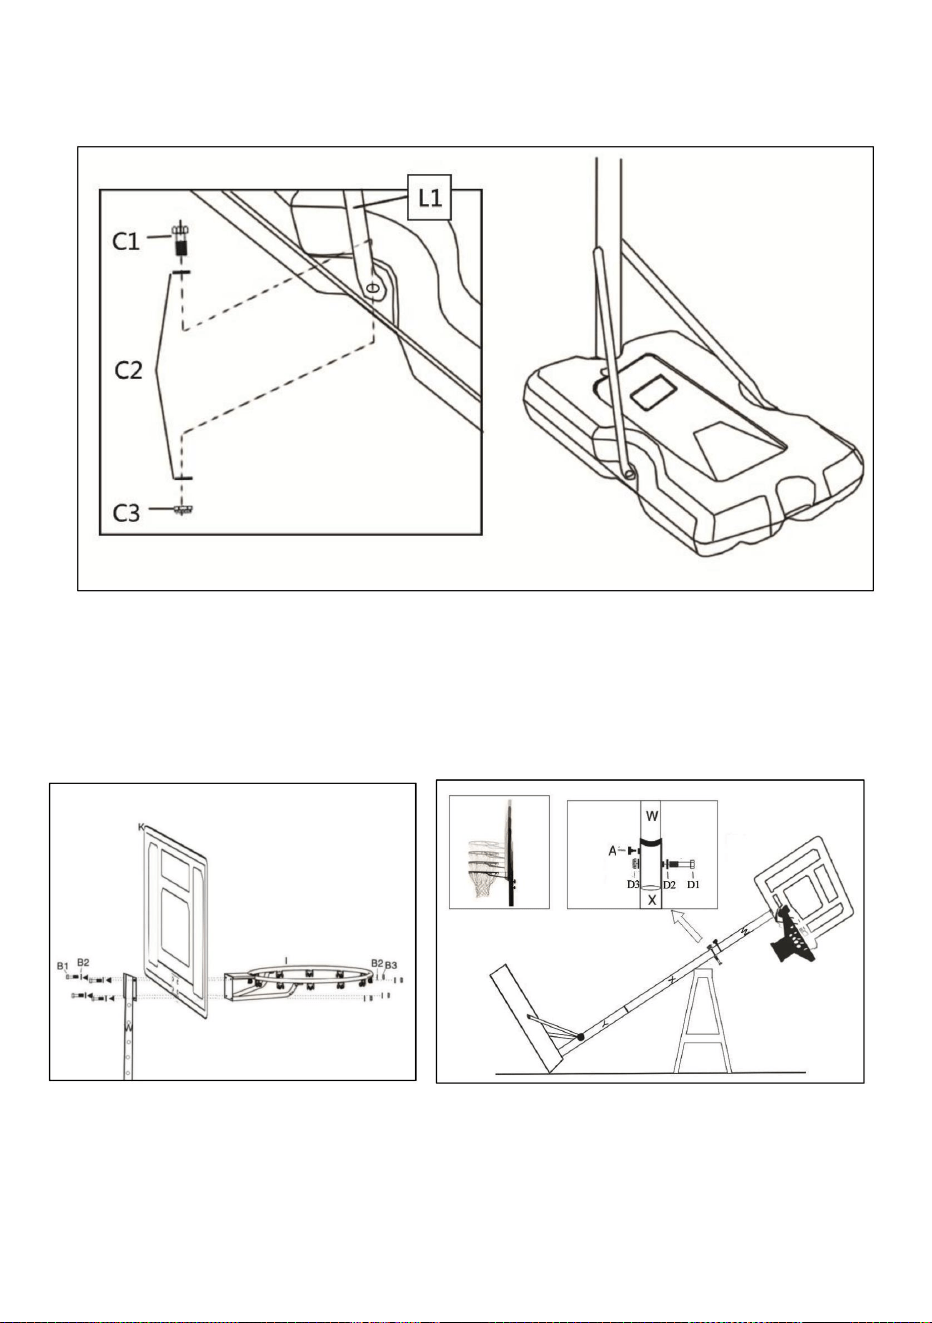
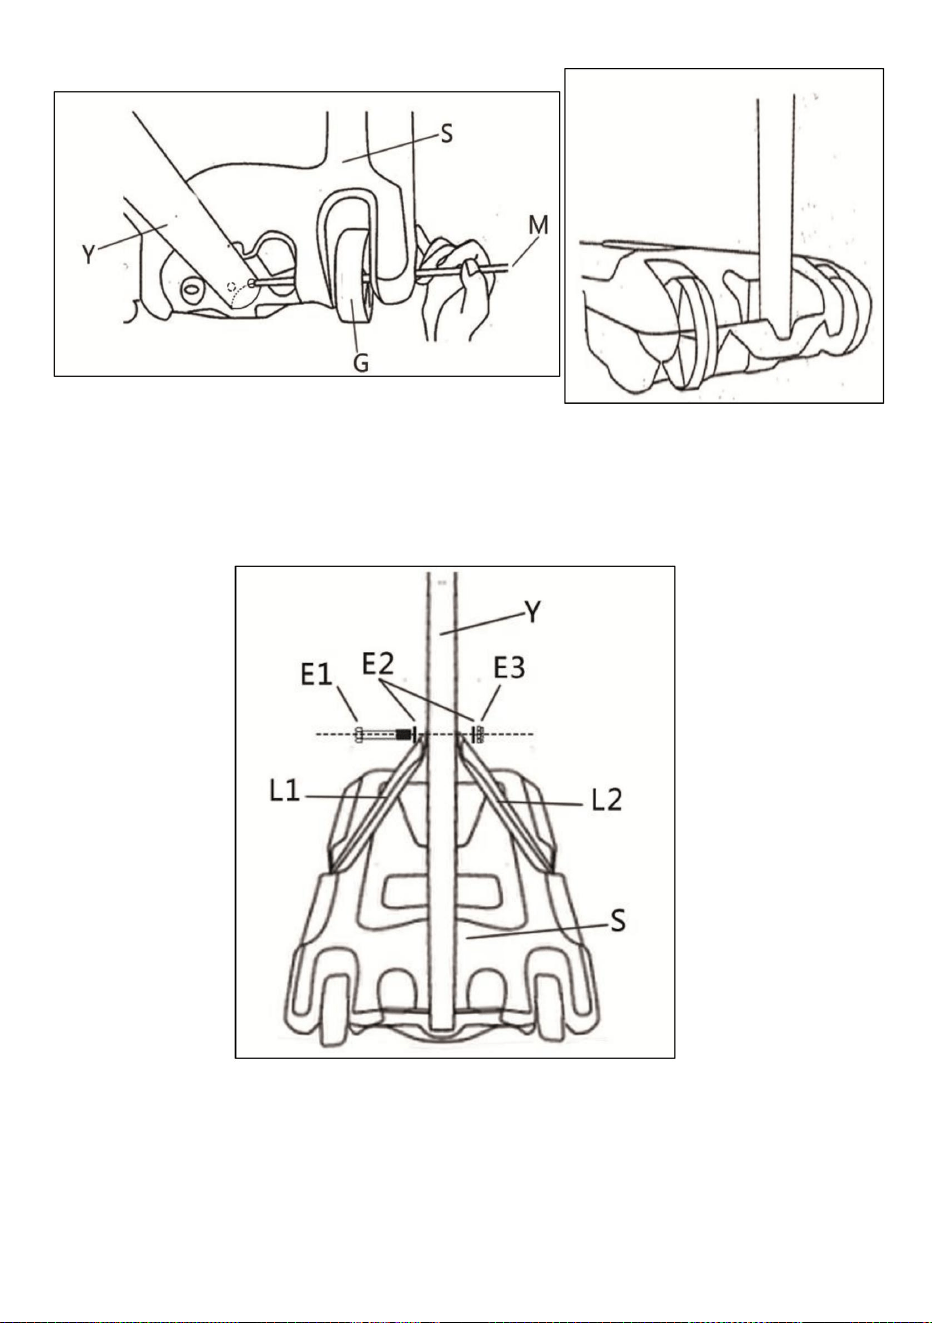
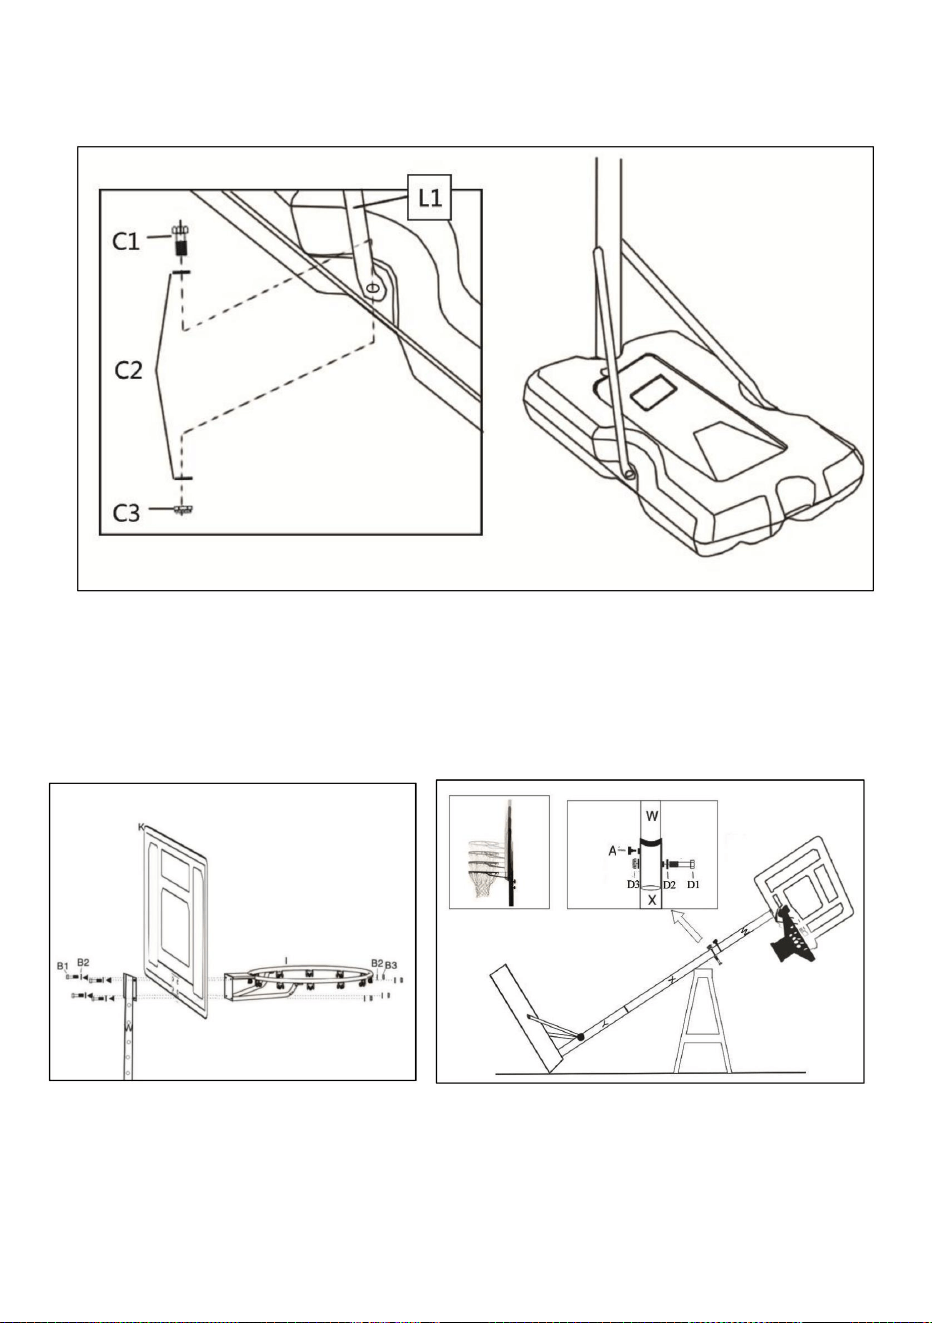
Fix one end of Pole Brace(L1)&(L2) on Bottom Pole(Y) by Bolt
Set(E1),(E2)&(E3) as shown
Fix the other end of Pole Brace(L1)&(L2) on two sides of Base(S) by Bolt
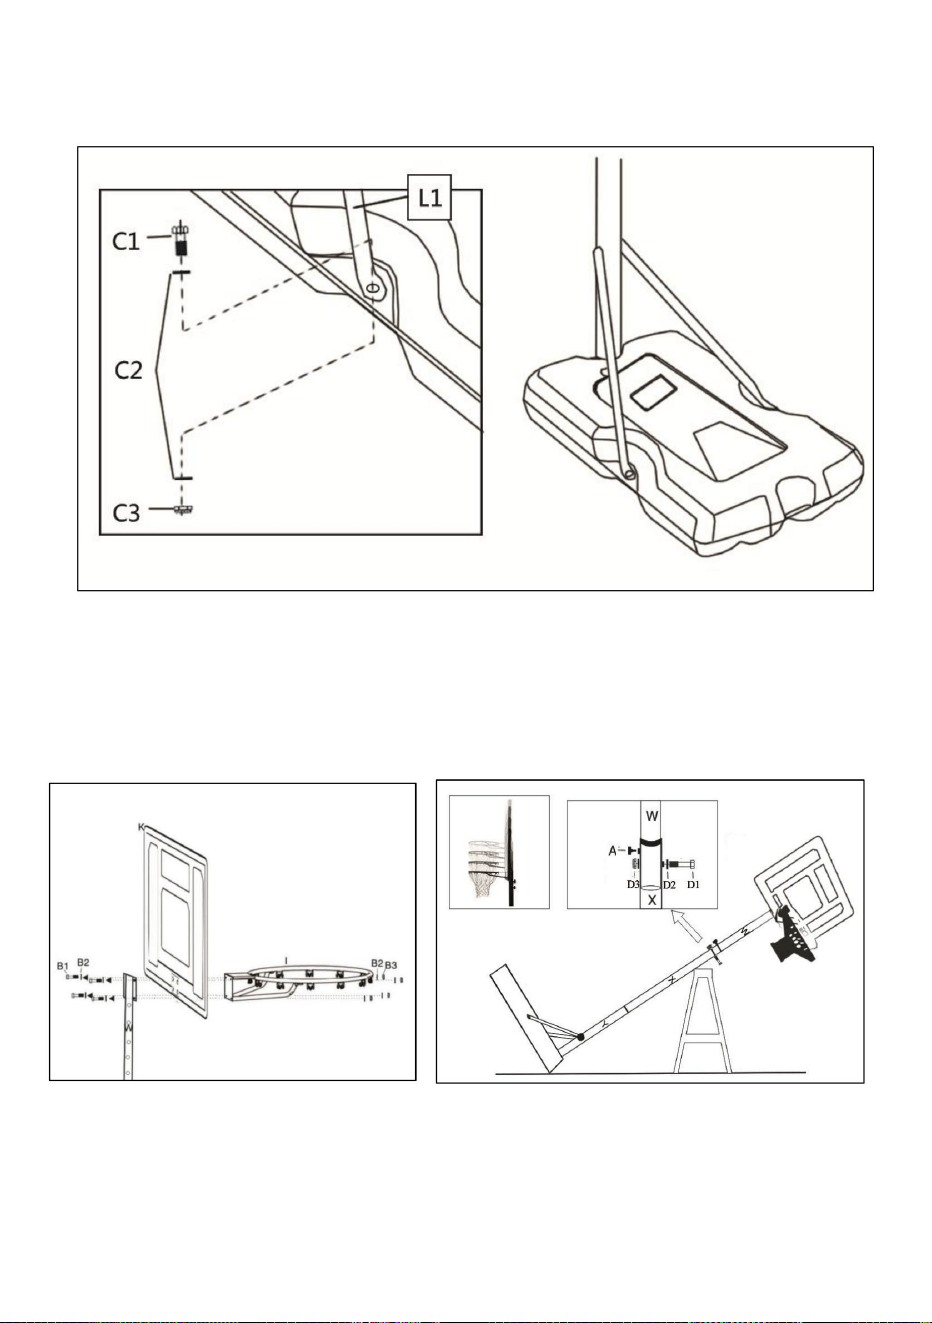
Set(C1),(C2)&(C3) as shown.
Install Rim(I)&Top Pole(W) on Backboard(K) by Bolt Set (B1),(B2)&(B3) as
shown.
- 9 -
Insert the Top Pole(W) into Middle Pole (X),adjust it to required height,then
fix them by Plastic Head Knob(A)&Bolt Set(D1),(D2)&(D3) as shown.Adjust
the height by change the Bolt Set(D1),(D2)&(D3) in different holes on Top
Pole(W).
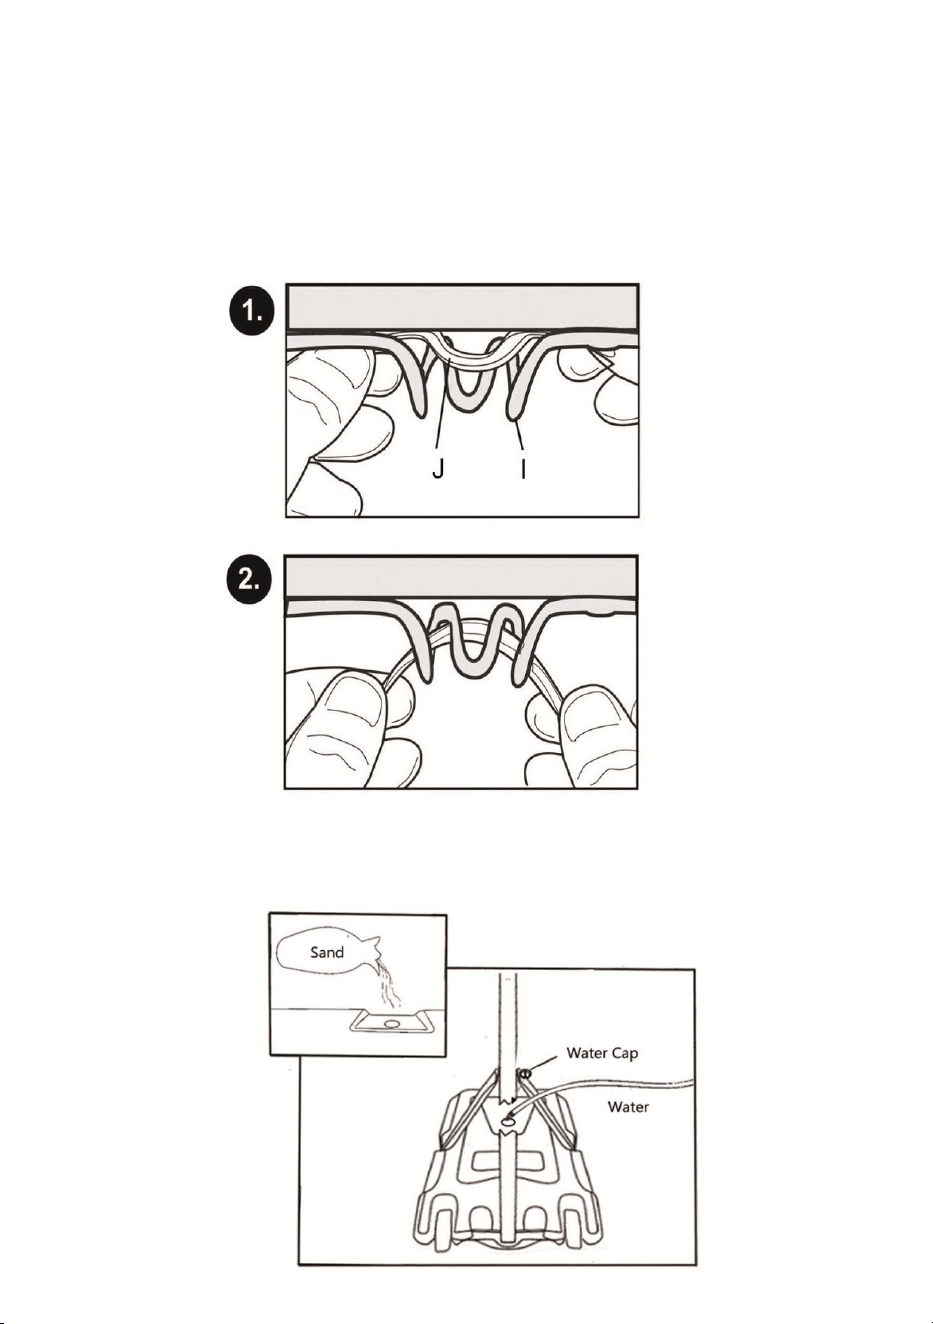
Install Net (J) on Rim (I) as shown.
Filling the base(S) with water or sand to keep steady.
- 10 -
Address:Baoshanqu Shuangchenglu 803long 11hao 1602A-1609shi
Shanghai
Imported to AUS: SIHAO PTY LTD, 1 ROKEVA STREETEASTWOOD
NSW 2122 Australia
Imported to USA: Sanven Technology Ltd., Suite 250, 9166 Anaheim
Place, Rancho Cucamonga, CA 91730
REP
UK
Pooledas Group Ltd
Unit 5 Albert Edward House, The Pavilions
Preston, United Kingdom
REP
EC
SHUNSHUN GmbH
Römeräcker 9 Z2021, 76351
Linkenheim-Hochstetten, Germany


MODÈLE:M0182
«Économisezlamoitié»,«Moitiéprix»outouteautreexpressionsimilaireutiliséeparnousnereprésente
qu'uneestimationdeséconomiesquevouspourriezréaliserenachetantcertainsoutilscheznousparrapport
auxgrandesmarquesetnecouvrepasnécessairementtouteslescatégoriesd'outilsquenousproposons.
Nousvousrappelonsdebienvouloirvérifiersoigneusementlorsquevouspassezunecommandechez
noussivouséconomisezréellementlamoitiéparrapportauxgrandesmarques.
Nouscontinuonsànousengageràvousfournirdesoutilsàdesprixcompétitifs.
SUPPORTPOURPANIERDEBASKETBALL
Assistancetechniqueetcertificatdegarantieélectroniquewww.vevor.com/support
Machine Translated by Google

Vousavezdesquestionssurnosproduits?Vousavezbesoind'assistancetechnique?
N'hésitezpas
ànouscontacter:Assistancetechniqueetcertificatdegarantie
électroniquewww.vevor.com/support
MODÈLE:M0182
Ils'agitdelanoticed'utilisationd'origine.Veuillezlireattentivementtoutesles
instructionsdumanuelavantdel'utiliser.VEVORseréserveledroitd'interpréterclairement
notremanueld'utilisation.L'apparenceduproduitdépendduproduitquevousavez
reçu.Veuilleznousexcuser,nousnevousinformeronsplusencasdemiseàjourtechnologique
oulogicielledenotreproduit.
BESOIND'AIDE?CONTACTEZNOUS!
SUPPORTPOURPANIERDEBASKETBALL
1
Machine Translated by Google

PRÉCAUTIONSD'ASSEMBLAGE
AVERTISSEMENT:
2
médicament.
1.L'assemblagedoitsuivrecesinstructions.Unassemblageincorrectpeutentraîner
undanger.
obtenirlesmeilleursrésultatspossibles.
7.Lepoidsdelaplaqueestlourd;faitesattentionàl'installationpouréviter
l'endommageret,sinécessaire,trouverquelqu'unpourvousaideràl'installer.
Mercibeaucoupd'avoirchoisicesupportdepanierdebasket.S'ilvousplaît
2.Portezdeslunettesdesécuritéetdesgantsdetravailrésistantspendantl’assemblage.
peutentraînerdesblessuresgraves.
5.Gardezlazonedemontagepropreetbienéclairée.
8.Lorsdel'installationdusupport,ilestpréférabledemettred'abordunpeud'eaudanslabase
11.AVERTISSEMENT:Ceproduitcontientdepetitespièces.Encasd'ingestion,ilpeutprésenterdesrisquespourlasanté.
6.Gardezlesspectateurshorsdelazonependantlemontage.
risqued'étouffement.Gardezcespetitespièceshorsdeportéedesenfants
assemblage!
4.Lacapacitédepoidsetlesautrescapacitésduproduitnes'appliquentqu'àunproduitentièrementet
Veuillezlireattentivementcemanuelavantd'utiliserleproduit.Lenonrespectdecetteconsigne
produitcorrectementassemblé.
10.Nevousaccrochezpasaubordetnegrimpezpassurlepoteau.Negrimpezpassurle
baseoustructureengénéral,carcelapourraitentraînerdesblessuresgraves.
3.Nepasmontersivousêtesfatiguéousousl'influencedel'alcool,dedroguesou
liseztouteslesinstructionsavantdel'utiliser.Lesinformationsvousaideront
pouréviterl'effondrementdupanneau.
9.L'assemblagedoitêtreeffectuépardesadultesuniquement.
INSTRUCTIONS
Machine Translated by Google

AVERTISSEMENT:
3
3.Utiliseruniquementsurdessurfacesplanes,niveléesetdures.
jusqu'àcequelesréparationssoienteffectuéesetquelespiècesderechanged'usinesoientinstallées.
2.Inspectezl'appareilavantchaqueutilisation.Nel'utilisezpassidespiècessontdesserréesouendommagées.
touslesraccordsetlematérielsontserrésavantchaqueutilisation.
1.Utiliseruniquementcommeprévu.Nepass'asseoirnisetenirdeboutsurleproduit.
4.Sidespiècesmanquent,sontcassées,endommagéesouusées,cessezd'utilisercetarticle
POURBOIRE:
AVERTISSEMENT:POURÉVITERDESBLESSURESGRAVESETLAMORT
adultes.
7.Nelaissezpasl’eaugelerdanslabase.
CONSERVEZCESINSTRUCTIONS
5.Leréglageetledéplacementdujeudebasketballdoiventêtreeffectuéspar
6.Vérifieztoujoursl'appareilpourvousassurerquelabaseestpleined'eauoudesableetque
Pourvotresécurité,veuilleznepasfairededunkouvoussuspendreaupanierdebasket.
PRÉCAUTIONSD'EMPLOI
Machine Translated by Google

Jante
K
C1,C2,
Remarques
1
2
Connectezlepôlecentral(X)etlebas
1
Boutonàtêteenplastique1
Boulon,M8*20MM
Orthèsegauche
N
Champ(W)
H
accolade(L1),(L2)
Base
1
Boulon,M8*55MM
Accolade(L1),(L2)
Bouchond'eau
J
et
M
4
Orthèsedroite
2
1
Connectezlepoteauinférieur(Y)etlabase
G
Pôleinférieur
1
ET
D3
Pôlesupérieur
Connectezlerebord(I),lepanneauarrière(K)etledessus
1
Roue
Connectezlaoulesbasesetlabase
E3
Panneau
sur
L2
Boulon,M8*35MM
1
pôle(W)etpôlecentral(X)
1
1
Qt
B3
D1,D2,
Fixezlepoteausupérieur(W)surlepoteaucentral(X)
X
Champdeplafond
C3
NumérodepièceNometspécifié
L1
E1,E2,
S
Pôledumilieu
Pôle(Y)etconnectezlehaut
1
Boulon,M8*60MM
Filet
2
UN
Arbrederoue
DANS
1
je
B1,B2,
1
LISTEDESPIÈCES
4
Machine Translated by Google

5
4pièces 1pièce
2pièces1pièce
2pièces
Machine Translated by Google

6
Connectezlepôlecentral(X)etlepôleinférieur(Y)commeindiqué,fixezlesàl'aidedujeude
boulons(D1),(D2)et(D3).
Machine Translated by Google
7
Insérezl'arbrederoue(M)danslaroue(G),labase(S)etl'extrémitédupoteau
inférieur(Y)commeindiqué.
Machine Translated by Google
8
Fixezl'autreextrémitédusupportdepoteau(L1)et(L2)surlesdeuxcôtésdelabase(S)àl'aidedujeudeboulons
(C1),(C2)et(C3)commeindiqué.
Installezlerebord(I)etlepoteausupérieur(W)surlepanneauarrière(K)àl'aidedujeudeboulons(B1),(B2)et(B3)
commeindiqué.
Définissez(E1),(E2)et(E3)commeindiqué
Fixezuneextrémitédusupportdepoteau(L1)et(L2)surlepoteauinférieur(Y)àl'aided'unboulon
Machine Translated by Google
9
Installezlefilet(J)surlajante(I)commeindiqué.
Insérezlepoteausupérieur(W)danslepoteaucentral(X),ajustezleàlahauteurrequise,puisfixezlesà
l'aideduboutonàtêteenplastique(A)etdujeudeboulons(D1),(D2)et(D3)commeindiqué.Ajustezla
hauteurenchangeantlejeudeboulons(D1),(D2)et(D3)dansdifférentstroussurlepoteausupérieur
(W).
Remplirlaoulesbasesavecdel'eauoudusablepourlesmaintenirstables.
Machine Translated by Google

REPRÉSENTANTDUROYAUMEUNI
REPRÉSENTANTDELACE
GroupePooledasLtd
Unité5MaisonAlbertEdward,LesPavillons
ImportéauxÉtatsUnis:SanvenTechnologyLtd.,Suite250,9166Anaheim
Place,RanchoCucamonga,CA91730
Preston,RoyaumeUni
ImportéenAustralie:SIHAOPTYLTD,1ROKEVASTREET,ASTWOOD
NSW2122Australie
Shanghai
Adresse:BaoshanquShuangchenglu803long11hao1602A1609shi
Römeräcker9Z2021,76351
SHUNSHUNGmbH
LinkenheimHochstetten,Allemagne
10
Machine Translated by Google


MODELL:M0182
„Sparen Sie die Hälfte“, „Halber Preis“ oder andere ähnliche Ausdrücke, die wir verwenden, stellen nur eine
Schätzung der Ersparnis dar, die Sie beim Kauf bestimmter Werkzeuge bei uns im Vergleich zu den großen
Topmarken erzielen können, und decken nicht unbedingt alle von uns angebotenen Werkzeugkategorien ab. Wir
möchten Sie freundlich daran erinnern, bei Ihrer Bestellung bei uns sorgfältig zu prüfen, ob Sie im Vergleich
zu den großen Topmarken tatsächlich die Hälfte sparen.
Wir sind weiterhin bestrebt, Ihnen Werkzeuge zu wettbewerbsfähigen Preisen anzubieten.
BASKETBALLKORBSTÄNDER
Technischer Support und E-Garantie-Zertifikat www.vevor.com/support
Machine Translated by Google

Haben Sie Fragen zum Produkt? Benötigen Sie technischen Support? Bitte kontaktieren Sie
uns:
Technischer Support und E-Garantie-Zertifikat www.vevor.com/
support
MODELL:M0182
Dies ist die Originalanleitung. Bitte lesen Sie alle Anweisungen sorgfältig durch, bevor
Sie das Gerät in Betrieb nehmen. VEVOR behält sich eine klare Auslegung unserer
Bedienungsanleitung vor. Das Erscheinungsbild des Produkts richtet sich nach dem
Produkt, das Sie erhalten haben. Bitte verzeihen Sie uns, dass wir Sie nicht erneut informieren,
wenn es Technologie- oder Software-Updates für unser Produkt gibt.
BASKETBALLKORBSTÄNDER
Brauchen Sie Hilfe? Kontaktieren Sie uns!
- 1 -
Machine Translated by Google

VORSICHTSMASSNAHMEN BEI DER MONTAGE
WARNUNG:
- 2 -
6. Halten Sie während der Montage unbeteiligte Zuschauer vom Bereich fern.
Erstickungsgefahr. Halten Sie diese Kleinteile von Kindern fern, wenn
kann zu schweren Verletzungen führen.
5. Halten Sie den Versammlungsbereich sauber und gut beleuchtet.
2. Tragen Sie während der Montage eine Schutzbrille und strapazierfähige Arbeitshandschuhe.
Vielen Dank, dass Sie sich für diesen Basketballkorbständer entschieden haben. Bitte
beschädigen, und suchen Sie sich ggf. jemanden, der Ihnen bei der Installation hilft.
8.Wenn Sie die Halterung installieren, geben Sie am besten zuerst etwas Wasser in die Basis
eine Gefahr.
1. Die Montage muss diesen Anweisungen folgen. Eine falsche Montage kann
7. Das Gewicht der Platte ist schwer; achten Sie auf die Installation, um zu vermeiden
um die bestmöglichen Ergebnisse zu erzielen.
Medikamente.
9. Die Montage sollte nur von Erwachsenen durchgeführt werden.
11. WARNUNG: Dieses Produkt enthält Kleinteile. Bei Verschlucken besteht eine Gefahr
Lesen Sie vor der Verwendung alle Anweisungen. Die Informationen helfen Ihnen
3. Montieren Sie nicht, wenn Sie müde sind oder unter dem Einfluss von Alkohol, Drogen oder
um ein Zusammenbrechen des Backboards zu vermeiden.
Zusammenbau!
oder der Struktur im Allgemeinen, da dies zu schweren Verletzungen führen kann.
Bitte lesen Sie dieses Handbuch sorgfältig durch, bevor Sie das Produkt verwenden.
4. Gewichtskapazität und andere Produkteigenschaften gelten nur für ein vollständig
korrekt montiertes Produkt.
10. Hängen Sie sich nicht an den Rand und klettern Sie nicht auf die Stange. Klettern Sie nicht auf die
ANWEISUNGEN
Machine Translated by Google

4.Wenn Teile fehlen, kaputt, beschädigt oder abgenutzt sind, verwenden Sie diesen Artikel nicht mehr
3. Nur auf flachen, ebenen und harten Oberflächen verwenden.
bis Reparaturen durchgeführt und Ersatzteile aus der Fabrik eingebaut wurden.
5. Die Anpassung und Bewegung des Basketball-Sets muss von
KIPPEN:
2. Vor jedem Gebrauch überprüfen. Nicht verwenden, wenn Teile lose oder beschädigt sind.
1. Nur bestimmungsgemäß verwenden. Nicht auf dem Produkt sitzen oder stehen.
WARNUNG: UM SCHWERE VERLETZUNGEN UND TOD DURCH
Erwachsene.
6.Überprüfen Sie immer, ob der Sockel mit Wasser oder Sand gefüllt ist und ob
Aus Sicherheitsgründen dunken Sie bitte nicht und hängen Sie nicht am Basketballkorb.
7. Lassen Sie kein Wasser im Sockel gefrieren.
BEWAHREN SIE DIESE ANWEISUNGEN AUF
Prüfen Sie vor jedem Gebrauch, ob alle Armaturen und Beschläge fest sind.
- 3 -
WARNUNG:
VORSICHTSMASSNAHMEN BEIM GEBRAUCH
Machine Translated by Google

- 4 -
TEILELISTE
B1, B2,
ICH
1
1
A
2
IN
Radwelle
Netto
Pol (Y), Und oben verbinden
Bolzen, M8*60MM
1
E1,E2,
S
Mittelpol
Teilenummer, Name und Angabe
C3
Befestigen Sie die obere Stange (W) an der mittleren Stange (X).
D1,D2,
X
L1
Kappenfeld
Qt
B3
Pol (W) und Mittelpol (X)
1
1
1
An
Bolzen, M8*35MM
L2
Rückwand
Basis(n) und Basis verbinden
E3
Rad
1
Verbinden Sie Rand (I) & Rückwand (K) & Oberseite
D3
UND
Oberer Pol
Untere Stange (Y) und Basis verbinden
1
G
2
1
Untere Stange
Und
4
M
J
Wasserkappe
Rechte Klammer
Klammer(L1),(L2)
Bolzen, M8*55MM
Klammer(L1),(L2)
H
1
Base
Feld(W)
Kunststoffkopfknopf 1
N
Bolzen, M8*20MM
Linke Zahnspange
Verbinden Sie den mittleren Pol (X) und den unteren
2
1
1
Hinweise
C1, C2,
K
Rand
Machine Translated by Google

2 STK
2 STK
4 Stück
1 STK
1 STK
- 5 -
Machine Translated by Google

Verbinden Sie die mittlere Stange (X) und die untere Stange (Y) wie gezeigt und befestigen Sie sie mit dem
Schraubensatz (D1), (D2) und (D3).
- 6 -
Machine Translated by Google

Stecken Sie die Radwelle (M) wie gezeigt in das Rad (G), die Basis (S) und das Ende
der unteren Stange (Y).
- 7 -
Machine Translated by Google

Setzen Sie (E1), (E2) und (E3) wie gezeigt
Befestigen Sie das andere Ende der Stangenstrebe (L1) und (L2) an zwei Seiten der Basis (S) mit dem Schraubensatz
(C1), (C2) und (C3), wie gezeigt.
Befestigen Sie ein Ende der Stangenstrebe (L1) und (L2) mit einer Schraube an der unteren Stange (Y).
Montieren Sie Felge (I) und obere Stange (W) mit dem Schraubensatz (B1), (B2) und (B3) wie gezeigt am Backboard (K).
- 8 -
Machine Translated by Google
Installieren Sie das Netz (J) wie gezeigt auf der Felge (I).
Stecken Sie die obere Stange (W) in die mittlere Stange (X), stellen Sie sie auf die gewünschte Höhe ein und befestigen
Sie sie dann mit dem Kunststoffkopfknopf (A) und dem Bolzensatz (D1), (D2) und (D3), wie gezeigt. Stellen Sie die Höhe
ein, indem Sie den Bolzensatz (D1), (D2) und (D3) in den verschiedenen Löchern an der oberen Stange (W) austauschen.
Füllen Sie die Basis(n) mit Wasser oder Sand, um für Stabilität zu sorgen.
- 9 -
Machine Translated by Google
- 10 -
Einheit 5 Albert Edward House, Die Pavillons
Pooledas Group Ltd
NSW 2122 Australien
Linkenheim-Hochstetten, Germany
Nach AUS importiert: SIHAO PTY LTD, 1 ROKEVA STREETEASTWOOD
Importiert in die USA: Sanven Technology Ltd., Suite 250, 9166 Anaheim Place,
Rancho Cucamonga, CA 91730
Schanghai
Adresse: Baoshanqu Shuangchenglu 803long 11hao 1602A-1609shi
SHUNSHUN GmbH
Preston, Vereinigtes Königreich
Römeräcker 9 Z2021, 76351
Vertreter der EG
UK REP
Machine Translated by Google


MODELLO:M0182
"Risparmia la metà", "Metà prezzo" o qualsiasi altra espressione simile da noi utilizzata rappresenta
solo una stima del risparmio che potresti ottenere acquistando determinati utensili con noi rispetto ai
principali marchi principali e non significa necessariamente coprire tutte le categorie di utensili da noi
offerti. Ti ricordiamo cortesemente di verificare attentamente quando effettui un ordine con noi se
stai effettivamente risparmiando la metà rispetto ai principali marchi principali.
Continuiamo a impegnarci per fornirvi strumenti a prezzi competitivi.
SUPPORTO PER CANESTRO DA BASKET
Supporto tecnico e certificato di garanzia elettronica www.vevor.com/support
Machine Translated by Google

Hai domande sul prodotto? Hai bisogno di supporto tecnico? Non esitare a contattarci:
Supporto
tecnico e certificato di garanzia elettronica www.vevor.com/
support
MODELLO:M0182
Questa è l'istruzione originale, si prega di leggere attentamente tutte le istruzioni del
manuale prima di utilizzare. VEVOR si riserva una chiara interpretazione del nostro manuale
utente. L'aspetto del prodotto sarà soggetto al prodotto ricevuto. Vi preghiamo di
perdonarci se non vi informeremo di nuovo se ci sono aggiornamenti tecnologici o software sul
nostro prodotto.
HAI BISOGNO DI AIUTO? CONTATTACI!
SUPPORTO PER CANESTRO DA BASKET
- 1 -
Machine Translated by Google

PRECAUZIONI DI MONTAGGIO
AVVERTIMENTO:
- 2 -
6. Tenere gli astanti fuori dall'area durante l'assemblea.
un rischio di soffocamento. Tenere queste piccole parti lontano dalla portata dei bambini quando
può provocare gravi lesioni.
5. Mantenere l'area di assemblaggio pulita e ben illuminata.
2. Durante il montaggio, indossare occhiali protettivi e guanti da lavoro resistenti.
Grazie mille per aver scelto questo supporto per canestro da basket. Per favore
8.Quando si installa la staffa, è meglio mettere prima un po' d'acqua nella base
danneggiandolo e, se necessario, trova qualcuno che ti aiuti con l'installazione.
un pericolo.
11. ATTENZIONE: Questo prodotto contiene piccole parti. Se ingerito, può causare
assemblaggio!
1. Il montaggio deve seguire queste istruzioni. Un montaggio non corretto può essere
7. Il peso della piastra è elevato; prestare attenzione all'installazione per evitare
ottenere i migliori risultati possibili.
farmaco.
9. Il montaggio deve essere eseguito solo da adulti.
3. Non riunirsi quando si è stanchi o sotto l'effetto di alcol, droghe o
leggere tutte le istruzioni prima di utilizzarlo. Le informazioni ti aiuteranno
per evitare il crollo del tabellone.
base o struttura in generale, poiché ciò potrebbe causare gravi lesioni.
Si prega di leggere attentamente questo manuale prima di utilizzare il prodotto. In caso contrario,
prodotto assemblato correttamente.
4. La capacità di peso e le altre capacità del prodotto si applicano solo a un prodotto completamente e
10. Non appendersi al bordo o arrampicarsi sul palo. Non arrampicarsi sul
ISTRUZIONI
Machine Translated by Google

4. Se alcune parti risultano mancanti, rotte, danneggiate o usurate, interrompere l'utilizzo dell'articolo.
3. Utilizzare solo su superfici piane, livellate e dure.
finché non vengono effettuate le riparazioni e non vengono installati i pezzi di ricambio originali.
5. La regolazione e lo spostamento del set da basket devono essere effettuati da
1. Utilizzare solo come previsto. Non sedersi o stare in piedi sul prodotto.
2. Ispezionare prima di ogni utilizzo. Non utilizzarlo se le parti sono allentate o danneggiate.
MANCIA:
ATTENZIONE: PER PREVENIRE LESIONI GRAVI E MORTE DA
adulti.
6. Controllare sempre l'unità per assicurarsi che la base sia piena di acqua o sabbia e che
Per la vostra sicurezza, vi preghiamo di non schiacciare o appendervi al canestro da basket.
7. Non lasciare che l'acqua congeli nella base.
SALVA QUESTE ISTRUZIONI
tutti i raccordi e la ferramenta siano ben serrati prima di ogni utilizzo.
- 3 -
AVVERTIMENTO:
PRECAUZIONI D'USO
Machine Translated by Google

1
Polo centrale
parentesi graffa(L1),(L2)
H
Base
Campo(W)
N
Tutore sinistro
Manopola testa in plastica 1
Bullone, M8*20MM
Collegare il polo centrale (X) e quello inferiore
2
1
1
Osservazioni
C1,C2,
E
Cerchio
Collega il cerchio (I) e il tabellone (K) e la parte superiore
Palo superiore
D3
E
1
Palo inferiore
Collegare il palo inferiore (Y) e la base
G
2
1
4
M
Tutore destro
E
J
Tappo dell'acqua
Parentesi graffa(L1),(L2)
Bullone, M8*55MM
Campo del berretto
Fissare il palo superiore (W) sul palo centrale (X)
D1,D2,
X
Quantità
B3
1
1
polo (W) e polo centrale (X)
1
Bullone, M8*35MM
L2
SU
Tabellone
Collega base(S)&Base
E3
Ruota
1
B1,B2,
IO
1
1
IN
Albero della ruota
UN
2
Netto
Bullone, M8*60MM
1
Palo (Y) e collega la parte superiore
E1,E2,
S
Part No Name&Specificati
C3
L1
ELENCO DEI PEZZI
- 4 -
Machine Translated by Google

- 5 -
4 PZ
2 PZ
2 PZ1 PZ
1 PZ
Machine Translated by Google

- 6 -
Collegare il palo centrale (X) e il palo inferiore (Y) come mostrato, fissarli con il set di
bulloni (D1), (D2) e (D3).
Machine Translated by Google
Inserire l'albero della ruota (M) nella ruota (G), nella base (S) e nell'estremità del palo
inferiore (Y) come mostrato.
- 7 -
Machine Translated by Google

- 8 -
Fissare l'altra estremità del supporto del palo (L1) e (L2) su due lati della base (S) mediante il set di bulloni
(C1), (C2) e (C3) come mostrato.
Imposta (E1), (E2) e (E3) come mostrato
Fissare un'estremità del supporto del palo (L1) e (L2) sul palo inferiore (Y) tramite bullone
Installare il cerchio (I) e il palo superiore (W) sul tabellone (K) mediante il set di bulloni (B1), (B2) e (B3) come
mostrato.
Machine Translated by Google

- 9 -
Installare la rete (J) sul cerchio (I) come mostrato.
Inserire il palo superiore (W) nel palo centrale (X), regolarlo all'altezza desiderata, quindi fissarli con la
manopola di plastica (A) e il set di bulloni (D1), (D2) e (D3) come mostrato. Regolare l'altezza cambiando il
set di bulloni (D1), (D2) e (D3) in fori diversi sul palo superiore (W).
Riempire la base con acqua o sabbia per mantenerla stabile.
Machine Translated by Google

Rappresentante della CE
RAPPRESENTANZA DEL REGNO UNITO
Unità 5 Albert Edward House, I padiglioni
Gruppo Pooledas Ltd
Nuovo Galles del Sud 2122 Australia
Azienda
Importato in AUS: SIHAO PTY LTD, 1 ROKEVA STREETEASTWOOD
Importato negli USA: Sanven Technology Ltd., Suite 250, 9166 Anaheim
Place, Rancho Cucamonga, CA 91730
Sciangai
Indirizzo: Baoshanqu Shuangchenglu 803long 11hao 1602A-1609shi
Römeräcker 9 Z2021, 76351
Linkenheim-Hochstetten, Germania
Preston, Regno Unito
- 10 -
Machine Translated by Google


MODELO:M0182
SOPORTEPARAARODEBALONCESTO
Soportetécnicoycertificadodegarantíaelectrónicawww.vevor.com/support
"Ahorrelamitad","mitaddeprecio"ocualquierotraexpresiónsimilarqueutilicemossolorepresenta
unaestimacióndelahorroquepodríaobteneralcomprarciertasherramientasconnosotrosencomparación
conlasprincipalesmarcasynonecesariamentesignificaquecubratodaslascategoríasdeherramientas
queofrecemos.Lerecordamosque,alrealizarunpedidoconnosotros,verifiquecuidadosamentesi
realmenteestáahorrandolamitadencomparaciónconlasprincipalesmarcas.
Seguimoscomprometidosabrindarleherramientasaprecioscompetitivos.
Machine Translated by Google

1
¿NECESITAAYUDA?¡CONTÁCTENOS!
SOPORTEPARAARODEBALONCESTO
¿Tienepreguntassobreelproducto?¿Necesitaasistenciatécnica?Nodudeenponerseen
contactocon
nosotros:Asistenciatécnicaycertificadodegarantíaelectrónica
www.vevor.com/support
MODELO:M0182
Estassonlasinstruccionesoriginales,leaatentamentetodaslasinstruccionesdel
manualantesdeutilizarelproducto.VEVORsereservaunainterpretaciónclaradenuestro
manualdeusuario.Laaparienciadelproductoestarásujetaalproductoquerecibió.
Perdónenospornoinformarlenuevamentesihayactualizacionesdetecnologíaosoftwareen
nuestroproducto.
Machine Translated by Google

1.Paraelmontaje,sigaestasinstrucciones.Unmontajeincorrectopuedeser
Conseguirlosmejoresresultadosposibles.
7.Elpesodelaplacaeselevado;presteatenciónalainstalaciónparaevitar
unpeligro.
lastimándoloy,siesnecesario,busqueaalguienqueleayudeconlainstalación.
9.Elmontajedeberáserrealizadoúnicamenteporadultos.
¡ensamblando!
Muchasgraciasporelegirestesoporteparaarodebaloncesto.Porfavor,
2.Usegafasdeseguridadyguantesdetrabajoresistentesduranteelmontaje.
Puedeprovocarlesionesgraves.
5.Mantengaeláreadereuniónlimpiaybieniluminada.
8.Alinstalarelsoporte,esmejorponerunpocodeaguaenlabaseprimero.
11.ADVERTENCIA:Esteproductocontienepiezaspequeñas.Siseingieren,puedencausar
6.Mantengaalostranseúntesfueradeláreaduranteelmontaje.
peligrodeasfixia.Mantengaestaspiezaspequeñasfueradelalcancedelosniñoscuando
4.Lacapacidaddepesoyotrascapacidadesdelproductosoloseaplicanaunproductototalmentenuevo.
10.Nosecuelguedelbordenisesubaalposte.Nosesubaalposte.
Leaatentamenteestemanualantesdeutilizarelproducto.Delocontrario,
Productocorrectamenteensamblado.
baseoestructuraengeneral,yaqueestopodríaocasionarlesionesgraves.
Leatodaslasinstruccionesantesdeusarlo.Lainformaciónleayudará.
3.Nosereúnacuandoestécansadoobajolainfluenciadelalcohol,drogaso
paraevitarelcolapsodeltablero.
medicamento.
PRECAUCIONESDEMONTAJE
ADVERTENCIA:
INSTRUCCIONES
2
Machine Translated by Google

ADVERTENCIA:
3.Úseloúnicamenteensuperficiesplanas,niveladasyduras.
hastaqueserealicenlasreparacionesyseinstalenlaspiezasderepuestodefábrica.
2.Inspeccioneelproductoantesdecadauso.Noloutilicesihaypiezassueltasodañadas.
Todoslosaccesoriosyherrajesestánbienapretadosantesdecadauso.
1.Utilíceloúnicamenteparaelfinprevisto.Nosesienteniseparesobreelproducto.
4.Sifaltanpiezas,estánrotas,dañadasodesgastadas,dejedeusaresteartículo.
PROPINA:
ADVERTENCIA:PARAEVITARLESIONESGRAVESYLAMUERTEPOR
adultos.
7.Nopermitaqueelaguasecongeleenlabase.
GUARDEESTASINSTRUCCIONES
5.Elajusteymovimientodeljuegodebaloncestodebeserrealizadopor
6.Revisesiemprelaunidadparaasegurarsedequelabaseestéllenadeaguaoarenayque
Porsuseguridad,nosumerjanisecuelguedelarodebaloncesto.
PRECAUCIONESDEUSO
3
Machine Translated by Google

Conecteelaro(I)yeltablero(K)ylapartesuperior
Rueda
Postesuperior
Y
D3
Posteinferior
1
Conecteelposteinferior(Y)ylabase
GRAMO
1
2
METRO
4
y
Tirantederecho
Tapadeagua
Yo
Perno,M8*55MM
Abrazadera(L1),(L2)
Base
1
yo
llave(L1),(L2)
Campo(W)
Tiranteizquierdo
norte
Perilladeplásticoparacabeza1
Perno,M8*20MM
2
Conecteelpolomedio(X)yelpoloinferior
1
1
C1,C2,
Observaciones
Borde
K
I
B1,B2,
1
1
Ejederueda
EN
2
A
Neto
1
Perno,M8*60MM
Polo(Y),Yconectalapartesuperior
S
E1,E2,
C3
NúmerodepiezaNombreyespecificado
L1
Polomedio
Campodelímite
D1,D2,
Fijeelpostesuperior(W)enelpostecentral(X)
Qt
B3
incógnita
1
1
Polo(W)ypolomedio(X)
1
L2
Perno,M8*35MM
en
Respaldo
Conectelabase(s)ylabase
E3
1
LISTADEPIEZAS
4
Machine Translated by Google

5
4piezas 1pieza
2piezas1pieza
2piezas
Machine Translated by Google

6
Conecteelpostemedio(X)yelposteinferior(Y)comosemuestra.Fíjelosconeljuegode
pernos(D1),(D2)y(D3).
Machine Translated by Google

7
Inserteelejedelarueda(M)enlarueda(G),labase(S)yelextremodelposteinferior
(Y)comosemuestra.
Machine Translated by Google
8
Conjunto(E1),(E2)y(E3)comosemuestra
Instaleelborde(I)yelpostesuperior(W)eneltablero(K)coneljuegodepernos(B1),(B2)y(B3)comose
muestra.
Fijeelotroextremodelsoportedelposte(L1)y(L2)enlosdosladosdelabase(S)coneljuegodepernos(C1),
(C2)y(C3)comosemuestra.
Fijeunextremodelsoportedelposte(L1)y(L2)enelposteinferior(Y)conunperno
Machine Translated by Google

9
Instalelared(J)enelborde(I)comosemuestra.
Inserteelpostesuperior(W)enelpostemedio(X),ajústeloalaalturarequerida,luegofíjelosconlaperilla
decabezadeplástico(A)yeljuegodepernos(D1),(D2)y(D3)comosemuestra.Ajustelaaltura
cambiandoeljuegodepernos(D1),(D2)y(D3)endiferentesorificiosenelpostesuperior(W).
Llenela(s)base(s)conaguaoarenaparamantenerla(s)estable(s).
Machine Translated by Google

REPRESENTANTECE
REPRESENTANTEDELREINOUNIDO
GrupoPooledasLtd.
Unidad5CasaAlbertEdward,LosPabellones
ImportadoaEE.UU.:SanvenTechnologyLtd.,Suite250,9166Anaheim
Place,RanchoCucamonga,CA91730
SHUNSHUNGmbH
ImportadoaAustralia:SIHAOPTYLTD,1ROKEVASTREETEASTWOOD
NuevaGalesdelSur2122Australia
Llevaralafuerza
Dirección:BaoshanquShuangchenglu803long11hao1602A1609shi
Römeräcker9Z2021,76351
LinkenheimHochstetten,Alemania
Preston,ReinoUnido
10
Machine Translated by Google


MODEL:M0182
„Oszczędź połowę”, „Połowa ceny” lub inne podobne wyrażenia używane przez nas stanowią
jedynie szacunkowe oszczędności, jakie możesz uzyskać, kupując u nas określone narzędzia w
porównaniu z głównymi markami i niekoniecznie oznaczają one objęcie wszystkich kategorii
oferowanych przez nas narzędzi. Uprzejmie przypominamy, aby dokładnie sprawdzić, czy
składając u nas zamówienie faktycznie oszczędzasz połowę w porównaniu z głównymi markami.
Nadal staramy się oferować Państwu narzędzia w konkurencyjnych cenach.
STOJAK NA KOSZ DO KOSZYKÓWKI
Wsparcie techniczne i certyfikat gwarancji elektronicznej www.vevor.com/support
Machine Translated by Google
To jest oryginalna instrukcja, przed użyciem należy uważnie przeczytać wszystkie
instrukcje. VEVOR zastrzega sobie jasną interpretację naszej instrukcji obsługi. Wygląd produktu
będzie zależał od produktu, który otrzymałeś. Prosimy o wybaczenie, że nie poinformujemy
Cię ponownie, jeśli w naszym produkcie pojawią się jakiekolwiek aktualizacje technologiczne lub
oprogramowania.
MODEL:M0182
Masz pytania dotyczące produktu? Potrzebujesz wsparcia technicznego? Skontaktuj się z
nami: Wsparcie
techniczne i certyfikat E-Gwarancji www.vevor.com/support
STOJAK NA KOSZ DO KOSZYKÓWKI
POTRZEBUJESZ POMOCY? SKONTAKTUJ SIĘ Z NAMI!
- 1 -
Machine Translated by Google

ŚRODKI OSTROŻNOŚCI PODCZAS MONTAŻU
OSTRZEŻENIE:
- 2 -
lek.
1. Montaż musi być zgodny z poniższymi instrukcjami. Nieprawidłowy montaż może być
zagrożenie.
osiągnąć najlepsze możliwe rezultaty.
7. Płyta jest ciężka, zwróć uwagę na montaż, aby uniknąć
jego uszkodzenia, a jeśli to konieczne, znajdź kogoś, kto pomoże Ci przy instalacji.
Dziękujemy bardzo za wybranie tego stojaka na kosz do koszykówki. Proszę
2. Podczas montażu należy nosić okulary ochronne i solidne rękawice robocze.
może spowodować poważne obrażenia.
5. Utrzymuj miejsce zgromadzenia w czystości i zapewnij dobre oświetlenie.
8. Podczas montażu uchwytu najlepiej jest najpierw wlać trochę wody do podstawy
11. OSTRZEŻENIE: Ten produkt zawiera małe części. W przypadku połknięcia może spowodować
6. Podczas montażu nie dopuszczaj osób postronnych na teren montażu.
ryzyko zadławienia. Trzymaj te małe części z dala od dzieci, gdy
złożenie!
4. Nośność i inne parametry produktu dotyczą wyłącznie produktu całkowicie i
Przed użyciem produktu należy uważnie przeczytać tę instrukcję. W przypadku jej nieprzestrzegania
Produkt prawidłowo zmontowany.
10. Nie wieszaj się na obręczy ani nie wspinaj się na drążek. Nie wspinaj się na
podstawy lub konstrukcji w całości, gdyż może to spowodować poważne obrażenia.
3. Nie należy gromadzić się, będąc zmęczonym lub pod wpływem alkoholu, narkotyków lub
Przed użyciem przeczytaj wszystkie instrukcje. Informacje te pomogą Ci
aby uniknąć zawalenia się tablicy.
9. Montażu mogą dokonywać wyłącznie osoby dorosłe.
INSTRUKCJE
Machine Translated by Google

OSTRZEŻENIE:
3. Stosować wyłącznie na płaskich, równych i twardych powierzchniach.
do czasu wykonania naprawy i zainstalowania części zamiennych.
2. Przed każdym użyciem sprawdź. Nie używaj, jeśli części są luźne lub uszkodzone.
5.Regulację i przenoszenie zestawu do koszykówki należy wykonywać
1. Używać wyłącznie zgodnie z przeznaczeniem. Nie siadać ani nie stawać na produkcie.
4. Jeśli brakuje jakichkolwiek części, są one uszkodzone, zepsute lub zużyte, zaprzestań używania tego przedmiotu
NAPIWKI:
OSTRZEŻENIE: ABY UNIKNĄĆ POWAŻNYCH OBRAŻEŃ I ŚMIERCI
dorośli.
6. Zawsze sprawdzaj, czy podstawa jednostki jest pełna wody lub piasku,
wszystkie okucia i elementy montażowe są dokręcone przed każdym użyciem.
Dla własnego bezpieczeństwa prosimy nie wsadzać piłki do kosza ani nie wisieć na obręczy do koszykówki.
ZAPISZ TE INSTRUKCJE
7. Nie dopuść do zamarznięcia wody w podstawie.
ŚRODKI OSTROŻNOŚCI
- 3 -
Machine Translated by Google

Obrzeże
K
C1,C2,
Uwagi
1
2
Podłącz środkowy biegun (X) i dolny
1
Pokrętło głowicy plastikowej 1
Śruba, M8*20MM
Lewy nawias klamrowy
N
Pole(W)
H
aparat ortodontyczny(L1),(L2)
Opierać
1
Śruba, M8*55MM
Aparat ortodontyczny (L1), (L2)
Nakrętka na wodę
J
I
M
4
Prawy wspornik
2
1
Podłącz dolny biegun (Y) i podstawę
G
Dolny biegun
1
I
D3
Górny biegun
Połącz obręcz (I) i tablicę (K) oraz górę
1
Koło
Podłącz bazę(y) i bazę
E3
Tablica
NA
L2
Śruba, M8*35MM
1
biegun(W) i środkowy biegun(X)
1
1
Ilość
B3
D1, D2,
Zamocuj górny słupek (W) na środkowym słupku (X)
X
Pole Cap
L1
Nr części Nazwa i określenie
S
E1, E2,
C3
Środkowy biegun
Biegun (Y) i podłącz górę
1
Śruba, M8*60MM
Internet
2
A
Wał koła
W
1
I
B1, B2,
1
LISTA CZĘŚCI
- 4 -
Machine Translated by Google

- 5 -
2 SZT.
1 szt.4 szt.
1 szt.
2 SZT.
Machine Translated by Google

- 6 -
Połącz środkowy słupek (X) i dolny słupek (Y) tak, jak pokazano, a następnie przymocuj je za pomocą
zestawu śrub (D1), (D2) i (D3).
Machine Translated by Google
- 7 -
Włóż wał koła (M) do koła (G), podstawy (S) i końca dolnego drążka
(Y), jak pokazano.
Machine Translated by Google

- 8 -
Ustaw (E1), (E2) i (E3) jak pokazano
Zamontuj obręcz (I) i górny słupek (W) na tablicy (K) za pomocą zestawu śrub (B1), (B2) i (B3), jak pokazano.
Przymocuj drugi koniec wspornika słupka (L1) i (L2) do dwóch stron podstawy (S) za pomocą zestawu
śrub (C1), (C2) i (C3), jak pokazano.
Przymocuj jeden koniec wspornika słupa (L1) i (L2) do dolnego słupa (Y) za pomocą śruby
Machine Translated by Google

- 9 -
Zamontuj siatkę (J) na obręczy (I) zgodnie z rysunkiem.
Włóż górny słupek (W) do środkowego słupka (X), dostosuj go do wymaganej wysokości, a następnie zamocuj je za
pomocą plastikowego pokrętła (A) i zestawu śrub (D1), (D2) i (D3), jak pokazano. Dostosuj wysokość, zmieniając zestaw
śrub (D1), (D2) i (D3) w różnych otworach na górnym słupku (W).
Napełnianie podstawy(podstaw) wodą lub piaskiem w celu zachowania stabilności.
Machine Translated by Google

Przedstawiciel UE
REP WIELKIEJ BRYTANII
Grupa Pooledas Ltd.
Jednostka 5 Dom Alberta Edwarda, Pawilony
Importowane do USA: Sanven Technology Ltd., Suite 250, 9166 Anaheim
Place, Rancho Cucamonga, CA 91730
Preston, Wielka Brytania
Importowane do AUS: SIHAO PTY LTD, 1 ROKEVA STREETEASTWOOD
NSW 2122 Australia
Szanghaj
Adres: Baoshanqu Shuangchenglu 803long 11hao 1602A-1609shi
Römeräcker 9 Z2021, 76351
SHUNSHUN GmbH
Linkenheim-Hochstetten, Niemcy
- 10 -
Machine Translated by Google


MODEL:M0182
"Bespaar de helft", "halve prijs" of andere soortgelijke uitdrukkingen die wij gebruiken, geven alleen een schatting
van de besparingen die u kunt behalen door bepaalde gereedschappen bij ons te kopen in vergelijking met de grote
topmerken en betekenen niet noodzakelijkerwijs dat alle categorieën gereedschappen die wij aanbieden, worden gedekt.
Wij herinneren u eraan om zorgvuldig te controleren of u daadwerkelijk de helft bespaart in vergelijking met de
grote topmerken wanneer u een bestelling bij ons plaatst.
Wij streven er voortdurend naar om u gereedschappen tegen concurrerende prijzen te leveren.
BASKETBAL HOEPELSTANDAARD
Technische ondersteuning en e-garantiecertificaat www.vevor.com/support
Machine Translated by Google

- 1 -
HULP NODIG? NEEM CONTACT MET ONS OP!
BASKETBAL HOEPELSTANDAARD
Dit is de originele instructie, lees alle handleidingen zorgvuldig door voordat u het
product gebruikt. VEVOR behoudt zich een duidelijke interpretatie van onze gebruikershandleiding
voor. Het uiterlijk van het product is afhankelijk van het product dat u hebt ontvangen.
Vergeef ons dat we u niet opnieuw zullen informeren als er technologie- of software-updates
voor ons product zijn.
MODEL:M0182
Heeft u vragen over het product? Heeft u technische ondersteuning nodig? Neem dan gerust
contact met
ons op: Technische ondersteuning en E-garantiecertificaat
www.vevor.com/support
Machine Translated by Google

medicatie.
1. De montage moet volgens deze instructies worden uitgevoerd. Onjuiste montage kan
een gevaar.
om de best mogelijke resultaten te behalen.
7. Het gewicht van de plaat is zwaar; let op de installatie om te voorkomen
het beschadigen en indien nodig iemand zoeken die kan helpen met de installatie.
Hartelijk dank voor het kiezen van deze Basketball Hoop Stand.
2. Draag tijdens de montage een veiligheidsbril en stevige werkhandschoenen.
kan ernstig letsel tot gevolg hebben.
5. Zorg ervoor dat de verzamelplaats schoon en goed verlicht is.
8. Bij het installeren van de beugel is het het beste om eerst wat water in de basis te doen
11. WAARSCHUWING: Dit product bevat kleine onderdelen. Als u het inslikt, kan het gevaarlijk zijn.
6. Houd omstanders uit de buurt tijdens de montage.
verstikkingsgevaar. Houd deze kleine onderdelen uit de buurt van kinderen wanneer
in elkaar zetten!
4. Het draagvermogen en andere productmogelijkheden zijn alleen van toepassing op een geheel en
Lees deze handleiding zorgvuldig door voordat u het product gebruikt. Als u dit niet doet,
correct gemonteerd product.
10. Ga niet aan de rand hangen of op de paal klimmen. Klim niet op de
de basis of de structuur in het algemeen, omdat dit tot ernstig letsel kan leiden.
3. Kom niet in actie als u moe bent of onder invloed van alcohol, drugs of
Lees alle instructies voordat u het gebruikt. De informatie zal u helpen
om te voorkomen dat het backboard instort.
9. Alleen volwassenen mogen het geheel in elkaar zetten.
- 2 -
MONTAGEVOORZORGSMAATREGELEN
WAARSCHUWING:
INSTRUCTIES
Machine Translated by Google

3. Alleen gebruiken op vlakke, vlakke en harde oppervlakken.
totdat de reparaties zijn uitgevoerd en de vervangende onderdelen van de fabriek zijn geïnstalleerd.
2. Inspecteer voor elk gebruik. Gebruik het niet als onderdelen los of beschadigd zijn.
7. Laat het water niet bevriezen in de basis.
1. Gebruik alleen zoals bedoeld. Ga niet op het product zitten of staan.
4. Als er onderdelen ontbreken, kapot zijn, beschadigd zijn of versleten zijn, stop dan met het gebruik van dit artikel.
FOOIEN:
WAARSCHUWING: OM ERNSTIG LETSEL EN DE DOOD TE VOORKOMEN
Controleer voor elk gebruik of alle fittingen en hardware goed vastzitten.
Voor uw eigen veiligheid verzoeken wij u om niet aan de basketbalring te hangen of te duiken.
6. Controleer altijd het apparaat om er zeker van te zijn dat de basis vol water of zand zit en dat
BEWAAR DEZE INSTRUCTIES
5. Het verstellen en verplaatsen van de basketbalset moet worden uitgevoerd door
volwassenen.
- 3 -
WAARSCHUWING:
GEBRUIK VOORZORGSMAATREGELEN
Machine Translated by Google

- 4 -
ONDERDELENLIJST
Bout, M8*55MM
Steun (L1), (L2)
Bevestig de bovenste paal (W) op de middelste paal (X)
X
Waterdop
J
M
4
En
Rechter beugel
1
2
Onderste paal
1
Verbind de onderste paal (Y) en de basis
G
Bovenste paal
EN
D3
Verbind de rand (I) & het achterbord (K) & de bovenkant
Rand
Ik
C1,C2,
Opmerkingen
1
2
Verbind de middelste paal (X) en de onderkant
1
Linker beugel
N
Kunststof kopknop 1
Bout, M8*20MM
Veld (W)
Baseren
1
H
beugel(L1),(L2)
C3
Onderdeelnr. Naam en gespecificeerd
L1
S
E1,E2,
1
Bout, M8*60MM
Paal (Y), en sluit de bovenkant aan
Middenpool
Netto
Wielas
IN
2
A
1
I
B1,B2,
1
1
Wiel
Verbind basis(en) en basis
E3
Achterbord
L2
Bout, M8*35MM
op
1
1
1
paal (W) & Middelste paal (X)
Qt
B3
Cap-veld
D1,D2,
Machine Translated by Google

- 5 -
4 STUKS 1 STUKS
2 STUKS1 STUKS
2 STUKS
Machine Translated by Google

- 6 -
Verbind de middelste paal (X) en de onderste paal (Y) zoals afgebeeld. Bevestig ze met de
boutenset (D1), (D2) en (D3).
Machine Translated by Google

- 7 -
Plaats de wielas (M) in het wiel (G), de basis (S) en het uiteinde van de onderste
paal (Y) zoals afgebeeld.
Machine Translated by Google

- 8 -
Bevestig het andere uiteinde van de paalbeugel (L1) en (L2) aan twee kanten van de basis (S) met de boutenset (C1),
(C2) en (C3) zoals afgebeeld.
Installeer de rand (I) en de bovenste paal (W) op het achterbord (K) met behulp van de boutenset (B1), (B2) en (B3) zoals
afgebeeld.
Stel (E1), (E2) en (E3) in zoals afgebeeld
Bevestig één uiteinde van de paalbeugel (L1) en (L2) aan de onderste paal (Y) met een bout
Machine Translated by Google

- 9 -
Installeer Net (J) op de rand (I) zoals afgebeeld.
Plaats de bovenste paal (W) in de middelste paal (X), pas de gewenste hoogte aan en bevestig ze
vervolgens met de plastic kopknop (A) en de boutset (D1), (D2) en (D3) zoals afgebeeld. Pas de hoogte
aan door de boutset (D1), (D2) en (D3) in verschillende gaten op de bovenste paal (W) te verwisselen.
Vul de basis(en) met water of zand om ze stevig te houden.
Machine Translated by Google

- 10 -
Pooledas Groep Ltd
Unit 5 Albert Edward House, De Paviljoens
Geïmporteerd naar de VS: Sanven Technology Ltd., Suite 250, 9166 Anaheim
Place, Rancho Cucamonga, CA 91730
Preston, Verenigd Koninkrijk
Geïmporteerd naar AUS: SIHAO PTY LTD, 1 ROKEVA STREETEASTWOOD
NSW 2122 Australië
Sjanghai
Adres: Baoshanqu Shuangchenglu 803long 11hao 1602A-1609shi
SHUNSHUN GmbH
Linkenheim-Hochstetten, Duitsland
Römeräcker 9 Z2021, 76351
EC-REP
VK REP
Machine Translated by Google


MODELL: M0182
"Spara halva", "halva priset" eller andra liknande uttryck som används av oss representerar endast
en uppskattning av besparingar du kan dra nytta av att köpa vissa verktyg hos oss jämfört med de stora
toppmärkena och dosen betyder inte nödvändigtvis att täcka alla kategorier av verktyg som erbjuds av
oss. Du påminns vänligen om att noggrant kontrollera när du gör en beställning hos oss om du
faktiskt sparar hälften i jämförelse med de främsta stora varumärkena.
Vi fortsätter att vara engagerade i att ge dig verktyg till konkurrenskraftiga priser.
BASKETBALLSTÄLL
Teknisk support och e-garanticertifikat www.vevor.com/support
Machine Translated by Google

- 1 -
BASKETBALLSTÄLL
BEHÖVER HJÄLP? KONTAKTA OSS!
Har du produktfrågor? Behöver du teknisk support? Kontakta oss gärna: Teknisk support och
e-
garanticertifikat www.vevor.com/support
MODELL: M0182
Detta är den ursprungliga instruktionen, läs alla instruktioner noggrant innan du
använder den. VEVOR reserverar sig för en tydlig tolkning av vår användarmanual. Utseendet
på produkten är beroende av den produkt du fått. Ursäkta oss att vi inte kommer att
informera dig igen om det finns någon teknik eller mjukvaruuppdateringar på vår produkt.
Machine Translated by Google

4. Viktkapacitet och andra produktegenskaper gäller endast en helt och
6. Håll åskådare borta från området under monteringen.
10. Häng inte från fälgen eller klättra på stången. Klättra inte på
en kvävningsrisk. Håll dessa små delar borta från barn när
kan resultera i allvarliga skador.
5. Håll monteringsområdet rent och väl upplyst.
11. VARNING: Denna produkt innehåller små delar. Om den sväljs kommer den att posera
skada den, och vid behov hitta någon som kan hjälpa till med installationen.
2. Använd skyddsglasögon och kraftiga arbetshandskar vid montering.
Tack så mycket för att du valde detta Basketball Hoop Stand. Behaga
8. När du installerar fästet är det bäst att lägga lite vatten i basen först
1. Montering måste följa dessa instruktioner. Felaktig montering kan vara
en fara.
7. Vikten på plattan är tung; var uppmärksam på installationen för att undvika
montering!
9. Montering bör endast utföras av vuxna.
uppnå bästa möjliga resultat.
medicin.
3. Montera inte ihop när du är trött eller påverkad av alkohol, droger eller
läs alla instruktioner innan du använder den. Informationen hjälper dig
Läs denna bruksanvisning noggrant innan du använder produkten. Underlåtenhet att göra det
korrekt monterad produkt.
för att undvika kollaps av ryggplattan.
bas eller struktur i allmänhet, eftersom detta kan resultera i allvarliga skador.
- 2 -
FÖRSIKTIGHETSÅTGÄRDER FÖR MONTERING
VARNING:
INSTRUKTIONER
Machine Translated by Google

4. Om några delar saknas, är trasiga, skadade eller slitna, sluta använda detta föremål
tills reparationer är gjorda och fabriksreservdelar har installerats.
3. Använd endast på plana, jämna och hårda ytor.
alla beslag och hårdvara är täta före varje användning.
1. Använd endast på avsett sätt. Sitt eller stå inte på produkten.
2. Inspektera före varje användning. Använd den inte om delar är lösa eller skadade.
TIPPNING:
VARNING: FÖR ATT FÖREBYGGA ALLVARLIGA SKADA OCH DÖDSFALL AV
7. Låt inte vatten frysa i basen.
5.Justering och flyttning av basketsetet måste utföras av
vuxna.
SPARA DESSA INSTRUKTIONER
För din säkerhet, dunk inte eller häng inte i basketkorgen.
6. Kontrollera alltid enheten för att säkerställa att basen är full av vatten eller sand, och det
- 3 -
VARNING:
ANVÄND FÖRSIKTIGHETSÅTGÄRDER
Machine Translated by Google

- 4 -
DELLISTA
Hjulaxel
I
2
A
1
jag
B1,B2,
1
C3
Del nr Namn&Specificerat
L1
S
E1,E2,
1
Bult, M8*60MM
Pole(Y),Och anslut Top
Mellanpol
Netto
1
1
1
pole(W)&Mellan pole(X)
Qt
B3
Kepsfält
D1,D2,
Fixa översta stolpen (W) på mellanstången (X)
X
1
Hjul
Anslut bas(S)&Bas
E3
Ryggstöd
L2
Bult, M8*35MM
på
Nedre stolpe
1
Anslut bottenpolen (Y) och basen
G
Top Pole
OCH
D3
Anslut fälg(I)&backboard(K),& Top
Bult, M8*55MM
Stag(L1),(L2)
Vattenlock
J
M
4
och
Höger stag
1
2
Vänster stag
N
Plasthuvudknopp 1
Bult, M8*20MM
Fält (W)
Bas
1
H
stag(L1),(L2)
Fälg
K
C1,C2,
Anmärkningar
1
2
Anslut mittpolen (X) & Botten
1
Machine Translated by Google

- 5 -
4 st
2 st1 st
2 st
1 st
Machine Translated by Google

- 6 -
Anslut mellanpolen (X) & Bottenpolen (Y) enligt bilden, Fäst dem med
bultsats (D1),(D2)&(D3).
Machine Translated by Google
- 7 -
Sätt in hjulaxeln (M) i hjulet (G), basen (S) och änden av bottenstången
(Y) enligt bilden.
Machine Translated by Google
Fäst den andra änden av stavstödet(L1)&(L2) på två sidor av basen(S) med bultsats(C1),
(C2)&(C3) enligt bilden.
Ställ in(E1),(E2)&(E3) som visas
Fixa ena änden av stolpstag(L1)&(L2) på bottenstång(Y) av Bolt
Installera Rim(I)&Top Pole(W) på Backboard(K) med bultsats (B1),(B2)&(B3) enligt bilden.
- 8 -
Machine Translated by Google

Installera nätet (J) på fälgen (I) enligt bilden.
Sätt in den övre stolpen (W) i mellanstången (X), justera den till önskad höjd, fixera dem sedan
med plasthuvudknopp(A) & bultsats (D1),(D2)&(D3) som visas. Justera höjden med ändra
bultsatsen(D1),(D2)&(D3) i olika hål på den övre polen(W).
Fyll basen(S) med vatten eller sand för att hålla den stadig.
- 9 -
Machine Translated by Google

EC REP
UK REP
Importerad till USA: Sanven Technology Ltd., Suite 250, 9166 Anaheim
Place, Rancho Cucamonga, CA 91730
NSW 2122 Australien
Pooledas Group Ltd
Preston, Storbritannien
Importerad till AUS: SIHAO PTY LTD, 1 ROKEVA STREETEASTWOOD
Enhet 5 Albert Edward House, The Pavilions
Shanghai
Adress: Baoshanqu Shuangchenglu 803long 11hao 1602A-1609shi
Linkenheim-Hochstetten, Tyskland
SHUNSHUN GmbH
Römeräcker 9 Z2021, 76351
- 10 -
Machine Translated by Google