
EN
BAGLESS VACUUM CLEANER
Translation of the original manual
SVC 1015TQ 3AAA
SVC 1016GR 3AAA
SVC 1015TQ 3AAA
SVC 1016GR 3AAA
A
1
2
3
4
5
6
7
8
9
10
11
12
13
A
14
15
16
17
18
19
20
21
22
23
24
26
25
28
27
B
C
D1 D2
- 1 -
12/2023
2023, .
EN Bagless Vacuum Cleaner
Important Safety Instructions
READ CAREFULLY AND STORE FOR FUTURE USE.
• This vacuum cleaner may be used by children 8 years of
age and older and by persons with physical, sensory or
mental impairments or by inexperienced persons, if they
are properly supervised or have been informed about
how to use of this vacuum cleaner in asafe manner and
understand the potential dangers.
• Children must not play with the appliance. Cleaning and
maintenance must not be carried out by unsupervised
children.
• If the power cord is damaged, have it replaced in
aprofessional service centre in order to prevent
adangerous situation. It is forbidden to use the appliance
with the power cord damaged.
WARNING:
Avoid contact with the rotating parts of the hand-
held accessories of the vacuum cleaner. There is
arisk of catching onthese parts andpossible injury.
Pull the plug out of the socket before cleaning or
maintaining the appliance.
Follow the instructions foruse andmaintenance
provided inthis user'smanual.

- 2 -
12/2023
2023, .
• This vacuum cleaner is designed for use in households, offices and similar types of areas. Do not use in industrial surroundings.
• Do not expose the vacuum cleaner to direct sunlight and do not place it near an open fire or appliances that are asource of heat.
• Before connecting the power cord to apower socket, check that the technical details on its rating label match the electrical voltage in the socket.
• Make sure that the power cord does not touch hot surfaces or sharp objects.
• Do not immerse the vacuum cleaner in water or other liquids or rinse it under running water.
• Before turning on the vacuum cleaner, check that the vacuum cleaner is correctly assembled andthat all inlet andoutflow filters are installed in their
place.
• Make sure that the air outlet or suction opening is not blocked when the vacuum cleaner is in operation.
• Do not use the vacuum cleaner to vacuum the following items:
- smouldering cigarettes, burning objects, matches or hot ashes;
- water and other liquids;
- flammable or volatile substances;
- sharp objects such as shards, needles, pins, etc;
- flour, plaster, cement and other building materials;
- larger pieces of paper or plastic bags, which can easily block the suction opening.
• When vacuuming some types of floor coverings, an electrostatic charge may be generated which poses no danger to the user.
• Do not attach the suction nozzle or tube to any part of the face or body.
• Always switch the vacuum cleaner off and unplug it from the mains socket when leaving it unattended, after use and before cleaning.
• Disconnect the power cord from the socket by pulling the plug, not the cord. Otherwise, damage to the power cord or the socket may occur. When
winding, it is recommended to hold the power cord with your hand.
• Do not use the vacuum cleaner if it is not working correctly, if it has been damaged or has been submerged in water.
• Do not repair or modify the vacuum cleaner yourself. Have all repairs or adjustments performed at an authorised service centre. By tampering with
the appliance, you expose yourself to the risk of losing your legal rights regarding faulty performance or warranty for quality.
- 3 -
2023, .
12/2023
• Thank you for purchasing our SENCOR product; we hope you will be
satisfied with it.
• Before using this appliance, please familiarise yourself with the
user’smanual, even if you are already familiar with using similar
types of appliances. Use the appliance only as described in this
user'smanual. Keep the manual for future reference.
• It is recommended to keep the original shipping carton, packing
material, receipt and confirmation of the extent of the seller'sliability
or warranty certificate at least for the duration of the legal right of
defective performance or quality guarantee. When transporting the
appliance, we recommend packaging it again in the original box
provided by the manufacturer.
. . . . . . . . . . . . . . . . . . . . . . . . . . . . . . . . . . . . . . . . . . . . . . . . . . . . . . . . . . . . . . . . . . . .
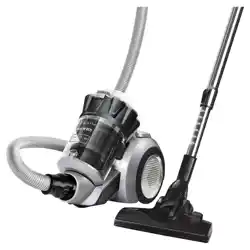
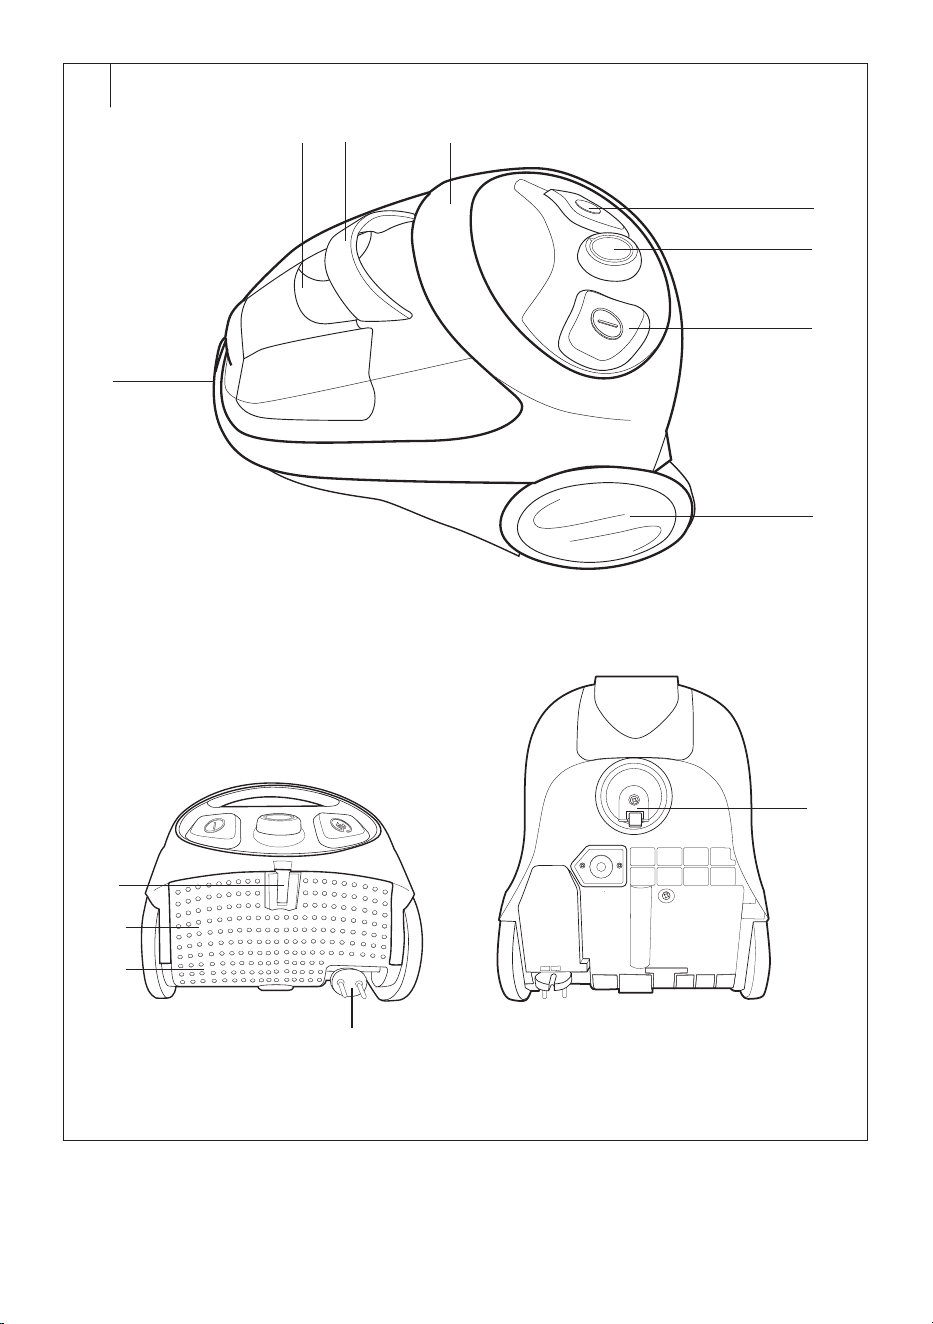
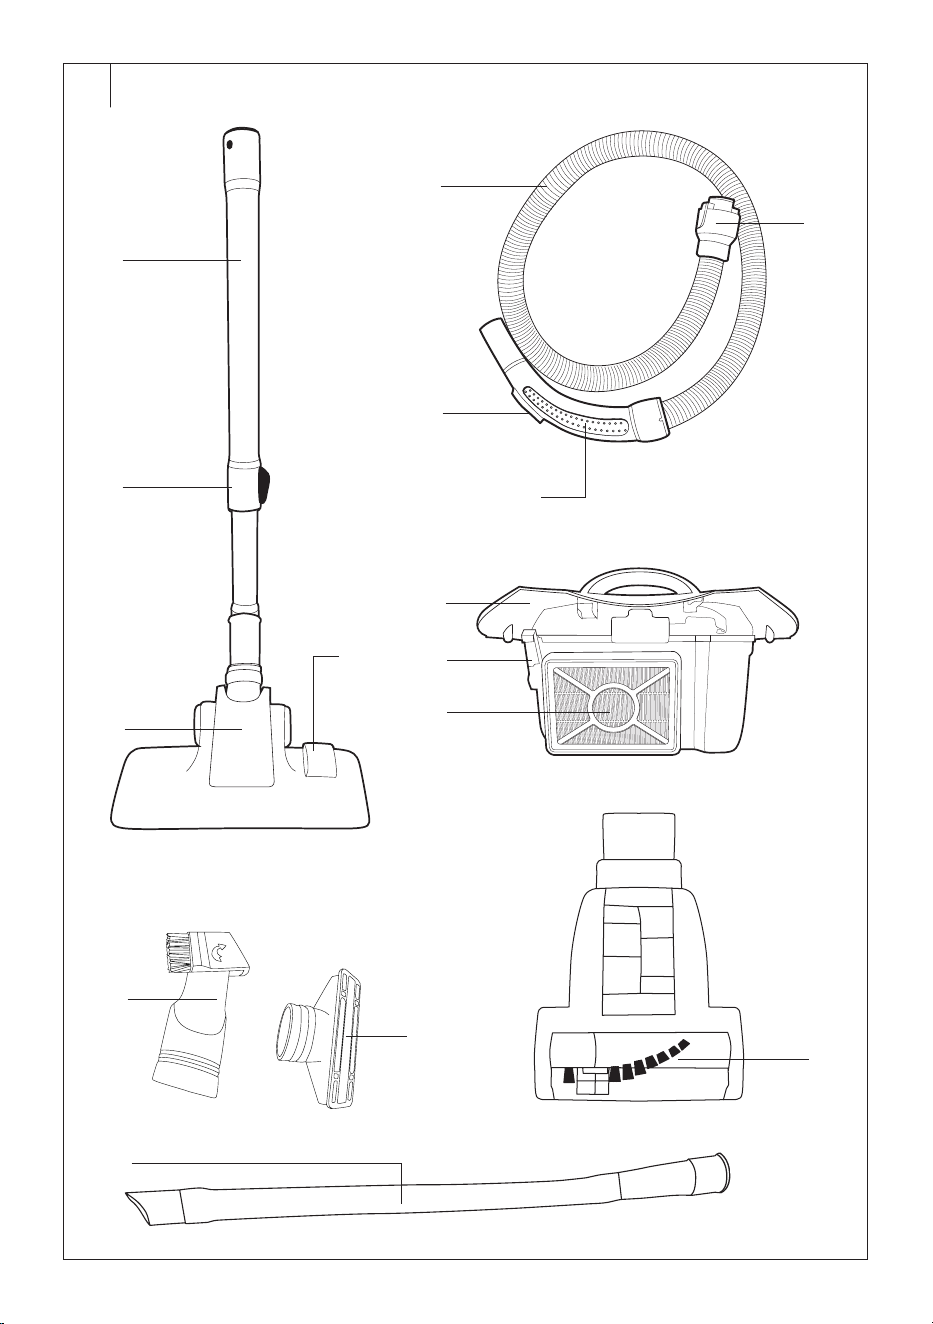
DESCRIPTION
A1 Flexible hose insertion hole
A2 Dust containers
A3 Dust container handle
A4 Handle forcarrying the
vacuum cleaner
A5 Button for winding the supply
cable
A6 Rotary suction power
controller
A7 Vacuum cleaner on/off button
A8 Rear castors
A9 Groove for inserting the floor
nozzle
A10 Air outlet grille
A11 Outflow filter (located under
the grille)
A12 Power cord
A13 Lower travel wheel
A14 Telescopic tube
A15 Lock foradjusting the length
of the telescopic tube
A16 Floor nozzle
A17 Flap toextend/retract bristles
A18 Flexible hose
A19 Sliding air supply flap
A20 Flexible hose handle
A21 Flexible hose release locks
A22 Dust container lid
A23 HEPA filter release lock
A24 HEPA filter
A25 2-in-1 combined slot and dust
nozzle
A26 Upholstery nozzle
A27 Flexible long slot nozzle
(SVC 1016GR only)
A28 Cat & Dog mini turbo brush
(SVC 1016GR only)
. . . . . . . . . . . . . . . . . . . . . . . . . . . . . . . . . . . . . . . . . . . . . . . . . . . . . . . . . . . . . . . . . . . .
BEFORE FIRST USE
• Before first use, remove the vacuum cleaner and its accessories form
the packaging and remove all promotional labels and tags. Check that
neither the vacuum cleaner nor any of its components is damaged.
. . . . . . . . . . . . . . . . . . . . . . . . . . . . . . . . . . . . . . . . . . . . . . . . . . . . . . . . . . . . . . . . . . . .
PURPOSE OF USE
• The vacuum cleaner is designed tovacuum dust anddirt fromsmooth
floor coverings, carpets, mats, etc. andtovacuum dust fromfurniture,
upholstery, etc.
. . . . . . . . . . . . . . . . . . . . . . . . . . . . . . . . . . . . . . . . . . . . . . . . . . . . . . . . . . . . . . . . . . . .
ASSEMBLING AND DISASSEMBLING THE VACUUM CLEANER
Warning:
Before assembling or disassembling the vacuum
cleaner, always make sure that it is switched off
and the power plug is disconnected from the mains
socket.
Assembling the Vacuum Cleaner
1. Insert the end of the flexible hose into the opening in thefront part
of the vacuum cleaner. Push gently until you hear aclick. This
indicates proper securing.
2. Insert the handle of the flexible hose into the wider end of the
telescopic tube.
3. Fit the floor nozzle to the narrower end of the tube. Push until you
feel resistance.
Disassembling the Vacuum Cleaner
1. Grasp the telescopic tube at the floor nozzle with one hand andthe
floor nozzle with the other. Pull the telescopic tube out of thefloor
nozzle.
2. Grasp the flexible hose handle with one hand andthe telescopic
tube with the other. Pull the handle of the flexible hose out of
thetelescopic tube.
3. Press the locks to release the flexible hose end on both sides and
carefully pull the flexible hose end out of the vacuum cleaner.
TELESCOPIC TUBE LENGTH ADJUSTMENT
Adjust the length of the telescopic tube as needed – slide and hold the
tube lock while pulling or sliding the bottom of the telescopic tube to
adjust it to the desired length. Then loosen the lock and pull the bottom of
the tube alittle until you hear aclick. The telescopic tube is now securely
set in position.
. . . . . . . . . . . . . . . . . . . . . . . . . . . . . . . . . . . . . . . . . . . . . . . . . . . . . . . . . . . . . . . . . . . .
USING YOUR VACUUM CLEANER
Connecting the Vacuum Cleaner to the Mains
Pull the plug attached to the power cord out from the vacuum cleaner
until the desired length of the cord is out of the product. Then insert the
plug into aproperly grounded mains socket.
Warning:
Yellow marking on the supply cable warns that the
cable is close to its end. Do not pull the cord further
than the red marking.
Floor Nozzle Adjustment According to Surface Type
You may set the inlet nozzle according to the floor surface by adjusting
the inlet flap:
• If you want to vacuum carpets, close the bristles of the inlet inside the
inlet nozzle, by turning the flap accordingly.
• If you want to vacuum hard and smooth surfaces, move the bristles
out of the nozzle, by turning the flap accordingly.
Turning the Vacuum Cleaner On and Off
To switch your machine on or off, press the on/off button on the vacuum
cleaner body.
Suction Strength Control
The suction can be adjusted by means of arotary controller and, to
alesser extent, by asliding flap on the flexible hose handle.
Tips
• Use the maximum suction strength when vacuuming carpets or
floors with ahard surface. Use the reduced strength when vacuuming
upholstery, window curtains, etc.
• If the hose holder becomes blocked when vacuuming, disconnect it
from the tube and also disconnect the hose from the vacuum cleaner
body. Then place the holder inside the suction hole on the vacuum
cleaner body and vacuum the stuck dirt out.
Temporary Interruption of the Vacuuming Process
If you want to stop vacuuming for ashort time, insert the stopper on the
floor nozzle (located at the rear of the floor nozzle) into the groove at the
rear of the vacuum cleaner (A9).
Ending the Vacuuming Process
• When you have finished vacuuming, first switch off the vacuum
cleaner by pressing the on/off button and then unplug the power cord
from the mains socket.
EN
Bagless Vacuum Cleaner
User’sManual
- 4 -
2023, .
12/2023
• To wind the power cord back to the vacuum cleaner, press and hold
the winding button with one hand and guide the cable or hold the plug
with the other hand to prevent damage to the inlet.
Recommendation:
If the winding process stops and part of the power cord is still outside,
release the winding button and pull the cable out again by about 50 cm
and press the winding button again and repeat the winding process.
Carrying the Vacuum Cleaner
If you need to carry the vacuum cleaner, hold it only by the handle.
Warning:
Never try to carry your vacuum cleaner by holding
the dust container handle!
. . . . . . . . . . . . . . . . . . . . . . . . . . . . . . . . . . . . . . . . . . . . . . . . . . . . . . . . . . . . . . . . . . . .
USING YOUR ACCESSORIES
Using the Combined Slot Nozzle
• Combined slot nozzle is used for vacuuming in hard to reach places
(e.g. windows, corners, book shelves, areas between mattresses,
upholstery, etc.).
• By simply ejecting the bristles, you will be able to suck dust
frombrittle or delicate surfaces.
• Place the combined slot nozzle on the handle of the flexible hose.
Upholstery Nozzle
• The upholstery nozzle is suitable forvacuuming upholstered furniture,
upholstered surfaces, etc.
Long Flexible Slot Nozzle
• The long flexible slot nozzle is used tovacuum very hard-to-reach
places anywhere in your home or car.
Cat&Dog Mini Turbo Brush (SVC 1016GR only)
• The Cat&Dog mini turbo brush is the best helper for removing animal
hair, hair, etc., and is also suitable for vacuuming hard-to-reach
places. You can use it not only at home, but alsoinyour car. It quickly
andeffectively removes hair, animal hair andother dirt from car seats,
upholstery, pillows andother textile surfaces.
. . . . . . . . . . . . . . . . . . . . . . . . . . . . . . . . . . . . . . . . . . . . . . . . . . . . . . . . . . . . . . . . . . . .
STORAGE
You can either store the vacuum cleaner by folding it back into its
individual parts or leave it folded and lock the floor nozzle in the groove at
the rear of the vacuum cleaner.
Warning:
Do not move the vacuum cleaner when it is folded
and locked in the parked position! It may break off or
the lug for the floor nozzle may break off.
. . . . . . . . . . . . . . . . . . . . . . . . . . . . . . . . . . . . . . . . . . . . . . . . . . . . . . . . . . . . . . . . . . . .
CLEANING AND MAINTENANCE
Before cleaning, unplug the power cord from the mains socket and allow
the appliance to cool down.
Warning:
To prevent the risk of electric shock, do not submerge
the appliance, plug or power cord in water or any
other liquid.
Cleaning the Vacuum Cleaner
Wipe the outer surface of the vacuum cleaner, flexible hose, telescopic
tube, floor nozzle andcombined slot nozzle with aslightly damp cloth
and dry with atowel.
Warning:
Do not use abrasive cleaning agents, solvents, or any
substances to clean any parts of the appliance that
could damage the surface of the appliance. None
of the components of this appliance are dishwasher
safe.
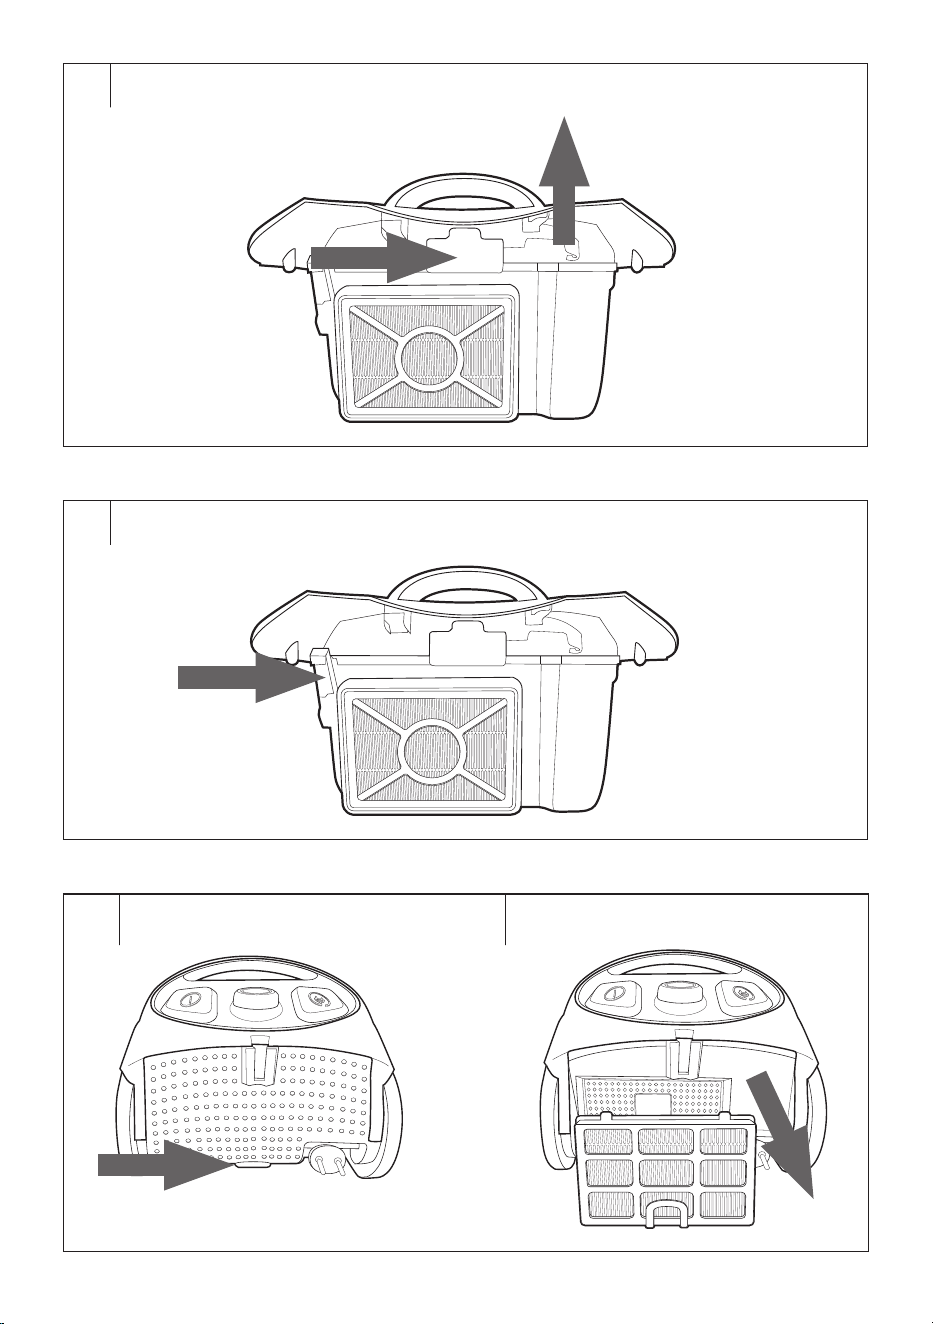
Emptying the Dust Container
Empty the dust container after each use of the vacuum cleaner, or during
vacuuming if you notice areduced performance or afull container.
1. Make sure the vacuum cleaner is switched off and the plug is
disconnected from the mains socket.
2. Hold the dust container by its handle andpull the dust container
upwards.
3. Press the button for releasing the lid andtilt open the lid – see Fig. B.
4. Dump the contents of the dust container into the garbage bin or
dust bin. For hygiene reasons, we recommend emptying the dust
container outside the living area.
5. Close the lid. Proper closing is signalled by aclick.
6. Place the dust container back into the vacuum cleaner.
Note:
The lid is removable. When the lid is fully opened, the lid
attachment is released. To fit the lid, position the lid against
the dust container so that the tabs on the lid fit under the
handle on the container. Then place the lid on the container
andclose it.
Cleaning the Dust Container
Regularly clean the dust container to prevent the formation of unpleasant
odours.
1. Empty the dust container as described above.
2. Pull the HEPA filter lock towards you to release the HEPA filter –
see Figure C. Remove the filter and shake it out. Remove the dirt
with asoft brush or dry cloth. In the event of heavy soiling, you can
vacuum them out using adifferent vacuum cleaner with an attached
brush nozzle. Do not wash the HEPA filter in water. This may
damage the lid. In the event that the HEPA filter is already heavily
soiled or deformed, replace it with anew one. We recommend
replacing the HEPA filter based on the frequency of use at least once
every six months.
3. Wipe the dust container with aslightly damp cloth and wipe dry.
4. Insert the HEPA filter back into the container until you hear the HEPA
filter lock click.
5. Close the lid. Proper closing is signalled by aclick.
6. Place the dust container back into the vacuum cleaner.
Warning:
Do not use the vacuum cleaner with awet or damp
HEPA filter, without the HEPA filter or without the dust
container being properly inserted.
Note:
If the HEPA filter is not installed or is not installed
correctly, the HEPA filter lock will remain loose and
therefore it will not be possible to insert the dust
container back into the vacuum cleaner body.
Outflow Filter Cleaning
1. Press the air outlet grille lock upwards to release the grille – see Fig.
D1.
2. Carefully remove the grille andoutflow filter – see Fig. D2.
3. Clean the grille andfilter under running water. Allow them to dry
completely.
4. Insert the outflow filter into the top of the vacuum cleaner first
andthen gently insert the bottom of the filter until you hear aclick.
5. Fit the grille of the upper part forward so that the protrusions on
the grille fit into the holes in thebody of the vacuum cleaner. Push
gently until you hear aclick.
This indicates that the grille is properly secured in place.
- 5 -
2023, .
12/2023
Warning:
Do not use the vacuum cleaner with awet or damp
outflow filter, without an outflow filter or without
agrille.
Warning:
To dry the outflow filter, do not use adryer, hair dryer
or dry it in direct sunlight. Allow to dry freely.
Changing the Outflow Filter
In the event that the outflow filter is heavily soiled or deformed, replace it
with anew one. We recommend replacing it based on the frequency of
use at least once every six months.
1. Press the air outlet grille lock upwards to release the grille – see Fig.
D1.
2. Carefully remove the grille andoutflow filter – see Fig. D2.
3. Discard the used outflow filter.
4. Insert the new outflow filter into the top of the vacuum cleaner first
andthen gently insert the bottom of the filter until you hear aclick.
5. Fit the grille of the upper part forward so that the protrusions on
the grille fit into the holes in thebody of the vacuum cleaner. Push
gently until you hear aclick.
This indicates that the grille is properly secured in place.
Long-term Storage
If the vacuum cleaner will not be used for along time, clean it according
to the above instructions. Before storing, ensure that the vacuum cleaner
and all accessories are thoroughly clean and dry. Store the appliance in
adry, clean, and well-ventilated place away from extreme temperatures
and out of the reach of children or pets.
. . . . . . . . . . . . . . . . . . . . . . . . . . . . . . . . . . . . . . . . . . . . . . . . . . . . . . . . . . . . . . . . . . . .
TROUBLESHOOTING
Before you decide to contact an authorized service centre, please read the
following tips in the troubleshooting chart:
Problem Possible cause Solution
The vacuum cleaner
will not start.
The power cord is not
firmly inserted in the
mains socket.
Insert the plug
firmly into the
mains socket.
The vacuum cleaner is
not switched on.
Turn on the
vacuum cleaner.
The suction output
is weak.
Floor nozzle, telescopic
tube or flexible nozzles
are clogged.
Remove the
cause of the
blockage.
The dust container is full. Empty the dust
container.
The HEPA filter is heavily
soiled.
Clean the HEPA
filter.
The power cord does
not fully feed back into
the vacuum cleaner.
The power cord is
twisted.
Pull out the
power cord
andstraighten it.
The power cord cannot
be removed from
thevacuum cleaner.
The power cord is
twisted.
Press the cable
rewind button
and try again.
The suction strength
control does not
function.
The suction strength
control may be
damaged.
Turn the vacuum
cleaner off and
then on again.
If the fault
persists, contact
your authorised
service centre.
. . . . . . . . . . . . . . . . . . . . . . . . . . . . . . . . . . . . . . . . . . . . . . . . . . . . . . . . . . . . . . . . . . . .
TECHNICAL SPECIFICATIONS
Rated voltage.........................................................................................220–240 V~
Nominal frequency ....................................................................................50-60 Hz
Rated power input .............................................................................................800 W
Noise level ...................................................................................................< 80 dB(A)
Length of the power cord ...................................................................................... 5 m
Operating range ................................................................................................... 7.5 m
Dust container capacity ........................................................................................1.5 l
Dimensions (length × width × height) ............................. 324 x 250 x 207 cm
Weight ................................................................................................................... 4.4 kg
The declared noise emission level of the appliance is 80 dB(A), which
represents alevel Aof acoustic power with respect to areference acoustic
power of 1 pW.
Safety Class for Electric Shock Protection:
Class II – Electric shock protection is provided by double or
heavy-duty insulation.
Amendments to text and technical parameters are reserved.
. . . . . . . . . . . . . . . . . . . . . . . . . . . . . . . . . . . . . . . . . . . . . . . . . . . . . . . . . . . . . . . . . . . .
INSTRUCTIONS AND INFORMATION ON DISPOSAL OF USED
PACKAGING MATERIAL
Dispose of used packaging material in the designated waste disposal area
determined by the municipality.
DISPOSING OF USED ELECTRICAL AND ELECTRONIC EQUIPMENT
This symbol on the products or accompanying documents
indicates that used electrical and electronic products
should not be disposed of with regular municipal waste.
For proper disposal and recycling of these products, deliver
them to designated collection points. Alternatively, in some
European Union states or other European countries the
products can be returned to the local retailer when buying
an equivalent new product. By properly disposing of this
product, you help preserve valuable natural resources and contribute to
preventing potential negative impacts on the environment and human
health resulting from improper waste disposal. For further details, contact
your local authorities or the nearest collection point. Fines may be
imposed for improper disposal of this type of waste in accordance with
national regulations.
For Business Entities in European Union States
If you want to dispose of electric or electronic devices, ask your retailer or
supplier for the necessary information.
Disposal in Other Countries Outside the European Union
This symbol is valid in the European Union. To dispose of this product
elsewhere, request necessary information on the correct disposal method
from local authorities or your retailer.
This product complies with all the essential requirements of
the applicable EU directives.

FAST ČR, a.s.
U Sanitasu 1621
CZ-251 01 Říčany
www.sencor.eu