La sonnerie par défaut d'usine est « Ding Dong » ou
« Sonnette d'alarme ». Pour définir une sonnerie
différente pour l'accessoire,suivez les étapes ci-dessous:
(1) Modification via l’application (recommandé)
Sur la page d’accueil du carillon, accédez
successivement à : Accessoires → Carillon → Sonnerie
de l’appareil. Choisissez la sonnerie souhaitée et
enregistrez le paramètre. La modification est terminée.
(2) Modification locale sur le carillon
① Appuyez deux fois de suite sur la touche SET. La LED
verte clignote pour indiquer le mode de jumelage.
② Utilisez les touches Précédent / Suivant pour
sélectionner votre sonnerie (32 sonneries disponibles).
③ Activez l’accessoire pour envoyer le signal de
jumelage. La lecture de la sonnerie confirme la
validation.
④ Appuyez brièvement sur la touche SET pour quitter
rapidement le mode de jumelage.
Deutsch
Français
Italiano
Español
01 Außenansicht
01 Schéma d'apparence
01 Schema dell’aspetto
01 Diagrama de apariencia
01 Appearance Diagram
06 Installation
05 Changing the Ringtone
English
Detaillierte
Anleitung
Manuel
détaillé
Manuale
dettagliato
Manual
detallado
04 Funktionsprüfung
(1) Stromtest: Verbinden Sie den Rufempfänger mit
einer Stromquelle. Der normale Betrieb wird bestätigt,
wenn die Statusanzeigelampe blinkt und es klingelt.
(2) Anrufprüfung: Aktivieren Sie ein Zubehör. Wenn der
Rufempfänger blinkt und klingelt, und Ihr Handy
gleichzeitig eine Push-Nachricht von der App erhält,
dann funktioniert die Anruffunktion normal.
04 Test de fonctionnement
(1) Test d'alimentation: Connectez l'appelleur à une
source d'alimentation. Le fonctionnement normal est
confirmé lorsque la lampe d'indication d'état clignote
et qu'il sonne.
(2) Test d'appel: Activez un accessoire. Si l'appelleur
clignote et sonne, et que votre téléphone reçoit
simultanément une notification push de l'app, alors la
fonction d'appel fonctionne normalement.
04 Test delle funzioni
(1) Test di alimentazione: Collega il chiamante a una
fonte di alimentazione. Il funzionamento normale è
confermato quando la luce indicatore di stato
lampeggia e suona.
(2) Test di chiamata: Attiva un accessorio. Se il
chiamante lampeggia e suona, e il tuo telefono riceve
simultaneamente una notifica push dall'App, allora la
funzione di chiamata funziona normalmente.
04 Prueba de Funciones
(1) Prueba de alimentación: Conecte el llamador a una
fuente de alimentación. El funcionamiento normal se
confirma cuando la luz indicadora de estado parpadea
y suena.
(2) Prueba de llamada: Active un accesorio. Si el
llamador parpadea y suena, y su teléfono recibe
simultáneamente una notificación push de la App,
entonces la función de llamada funciona normalmente.
05 Klingelton ändern
Die werkseitig eingestellte Klingelton ist „Ding Dong“
oder „Alarmton“. Um einen anderen Klingelton für das
Zubehör einzustellen, befolgen Sie die unten
stehenden Schritte:
(1) Änderung per APP (empfohlen)
Gehen Sie auf die Startseite der Klingel und tippen Sie
nacheinander auf: Zubehör → Klingel → Gerätek-
lingelton. Wählen Sie den gewünschten Ton aus und
tippen Sie anschließend auf Speichern. Die Einstellung
ist damit abgeschlossen.
(2) Lokale Änderung direkt an der Klingel
① Drücken Sie die SET-Taste zweimal hintereinander.
Die grüne LED blinkt – der Kopplungsmodus ist aktiviert.
05 Modification de la sonnerie
05 Cambio suoneria
La suoneria predefinita di fabbrica è « Ding Dong » o
« Tono di allarme ». Per impostare una suoneria diversa
per l'accessorio, segui i passaggi seguenti :
(1) Modifica tramite APP (consigliato)
Nella pagina principale del campanello, selezionare in
sequenza: Accessori → Campanello → Suoneria
dispositivo. Scegliere la suoneria preferita e salvare le
impostazioni. La modifica è completata.
(2) Modifica locale sul campanello
① Premere due volte consecutive il tasto SET. Il LED
verde lampeggia e segnala l’attivazione della modalità
di accoppiamento.
② Selezionare la suoneria con i tasti Precedente /
Successivo (32 opzioni disponibili).
③ Attivare l’accessorio per inviare il segnale di
accoppiamento. La riproduzione della suoneria
conferma l’esito positivo.
④ Premere brevemente il tasto SET per uscire
rapidamente dalla modalità.
05 Cambio de tono de llamada
El tono de llamada predeterminado de fábrica es « Ding
Dong » o « Tono de alarma ». Para configurar un tono de
llamada diferente para el accesorio, siga los pasos a
continuación :
(1) Cambio mediante APP (recomendado)
En la página principal del timbre, acceda en orden a:
Accesorios → Timbre → Tono del dispositivo. Seleccione
el tono deseado y guarde los ajustes. El cambio finaliza
automáticamente.
(2) Cambio local en el timbre
① Presione dos veces seguidas el botón SET. El LED verde
parpadea para indicar el modo de emparejamiento.
② Elija el tono con los botones Anterior / Siguiente
(32 tonos disponibles).
③ Active el accesorio para emitir la señal de
emparejamiento. Si el timbre reproduce el tono
seleccionado, el ajuste es correcto.
④ Pulse brevemente el botón SET para salir del modo
de emparejamiento.
Tension de fonctionnement: DC 5V
Courant en veille: ≤ 60mA
Courant d'alarme: < 100mA
Wi-Fi: IEEE 802.11 b/g/n 2.4G
Fréquence sans fil: 433.92MHz (FSK)
Portée sans fil: > 100m (espace ouvert)
Température de fonctionnement: -10°C ~ +55°C
Humidité de fonctionnement: ≤ 95%RH (non condensant)
07 Technische Daten
Betriebsspannung: DC 5V
Standby-Strom: ≤ 60mA
Alarmstrom: < 100mA
Wi-Fi: IEEE 802.11 b/g/n 2.4G
Drahtlose Frequenz: 433.92MHz (FSK)
Drahtlose Reichweite: > 100m (offener Raum)
Betriebstemperatur: -10°C ~ +55°C
Betriebsfeuchtigkeit: ≤ 95%RH (nicht kondensierend)
07 Caractéristiques techniques
07 Specifiche tecniche
Tensione di funzionamento: DC 5V
Corrente in standby: ≤ 60mA
Corrente di allarme: < 100mA
Wi-Fi: IEEE 802.11 b/g/n 2.4G
Frequenza wireless: 433.92MHz (FSK)
Raggio wireless: > 100m (spazio aperto)
Temperatura di funzionamento: -10°C ~ +55°C
Umidità di funzionamento: ≤ 95%RH (non condensante)
07 Especificaciones técnicas
Voltaje de funcionamiento: DC 5V
Corriente en espera: ≤ 60mA
Corriente de alarma: < 100mA
Wi-Fi: IEEE 802.11 b/g/n 2.4G
Frecuencia inalámbrica: 433.92MHz (FSK)
Alcance inalámbrico: > 100m (espacio abierto)
Temperatura de funcionamiento: -10°C ~ +55°C
Humedad de funcionamiento:≤95%RH (no condensante)
Detailed
Manual
04 Function Testing
03 App-Download & Geräteverbindung
(1) Scannen Sie den QR-Code zum
Herunterladen und Installieren der App, dann
vervollständigen Sie die Registrierung.
(2) Geräteverbindung
① Am Telefon: verbinden Sie sich mit
dem 2.4GHz Wi-Fi.
② Am Gerät: Halten Sie die "SET"-Taste 5 Sekunden
lang gedrückt, bis die blaue LED blinkt.
③ In der App: Tippen Sie auf "+" → Wählen Sie "Smart
Caller" → Geben Sie das Wi-Fi-Passwort ein → Folgen
Sie den Hinweisen, um abzuschließen.
02 Fabrikeinstellungen und Installationshinweise
03 Téléchargement de l’App & Connexion
du Dispositif
(1) Scannez le code QR pour télécharger
et installer l'App, puis complétez
l'enregistrement.
(2) Connecter le dispositif
① Sur le téléphone:
connectez-vous au Wi-Fi 2.4GHz.
② Sur le dispositif: Maintenez la touche "SET" enfoncée
pendant 5s jusqu'à ce que la LED bleue clignote.
③ Dans l'App: Appuyez sur "+" → Sélectionnez "Smart
Caller" → Saisissez le mot de passe Wi-Fi → Suivez les
invites pour terminer.
02 Paramètres d'usine et Notes d'installation
03 Download dell'App & Collegamento del
dispositivo
(1) Scansiona il codice QR per scaricare
e installare l'App, quindi completa la
registrazione.
(2) Collegare il dispositivo
① Sul telefono: connetti al Wi-Fi 2.4GHz.
② Sul dispositivo: Tieni premuto il pulsante
"SET" per 5s fino a quando la LED blu lampeggia.
③ Nell'App: Tocca "+" → Seleziona "Smart Caller" →
Inserisci la password Wi-Fi → Segui i prompt per finire.
02 Impostazioni di fabbrica e Note di installazione
03 Descarga de la App & Conexión del dispositivo
(1) Escanee el código QR para
descargar e instalar la App,
luego complete el registro.
(2) Conectar dispositivo
① En el teléfono:
conéctese al Wi-Fi 2.4GHz.
② En el dispositivo: Mantenga presionado el botón
"SET" durante 5s hasta que el LED azul parpadee.
③ En la App: Toque "+" → Seleccione "Smart Caller" →
Ingrese la contraseña Wi-Fi → Siga los indicadores
para finalizar.
02 Configuraciones de fábrica y Notas de instalación
Smart Life
Smart Life
Smart Life
Smart Life
Smart Life
02 Factory Settings and Installation Notes
(1) Power Test: Connect the Caller to a power source.
Normal operation is confirmed when the status indicator
light flashes and it rings.
(2)Call Test: Activate an accessory. If the Caller flashes
and rings, and your phone simultaneously receives a
push notification from the app, then the call function is
operating normally.
The factory default ringtone is "Ding Dong" or "Alarm
Tone". To set a different ringtone for the accessory,
follow the steps below:
(1) Change via APP (Recommended)
On the Call home page, tap in sequence: Accessories →
Call → Device Ringtone, select the desired ringtone,
then tap Save. The change is now complete.
(2) Change locally on the Call
①Press the SET button twice in a row. The green LED will
flash, indicating that pairing mode has been entered.
② Press the Previous or Next button to select the desired
ringtone (32 ringtones are available).
③ Trigger the accessory (e.g., press its button) to send
a pairing signal. When the Call plays the selected
ringtone, the change is successful.
④ After successful modification, briefly press the SET
button once to quickly exit pairing mode.
Mark and drill holes at the installation location, then
insert wall anchors. Use a Phillips screwdriver to
tighten the screws clockwise to secure the mounting
bracket. Finally, align the caller with the bracket and
press it downward to snap into place.
(2) Connect Device
① On phone:
connect to 2.4GHz Wi‑Fi.
② On device: Hold "SET" for 5 s until blue LED flashes.
③ In App: Tap "+" → Select " Smart Caller" → Enter
Wi‑Fi password → Follow prompts to finish.
Operating Voltage:DC 5V
Standby Current:≤60mA
Alarm Current:<100mA
Wi-Fi:IEEE 802.11 b/g/n 2.4G
Wireless Frequency:433.92MHz (FSK)
Wireless Range:>100m (open space)
Operating Temperature:-10°C ~ +55°C
Operating Humidity:≤95%RH (non‑condensing)
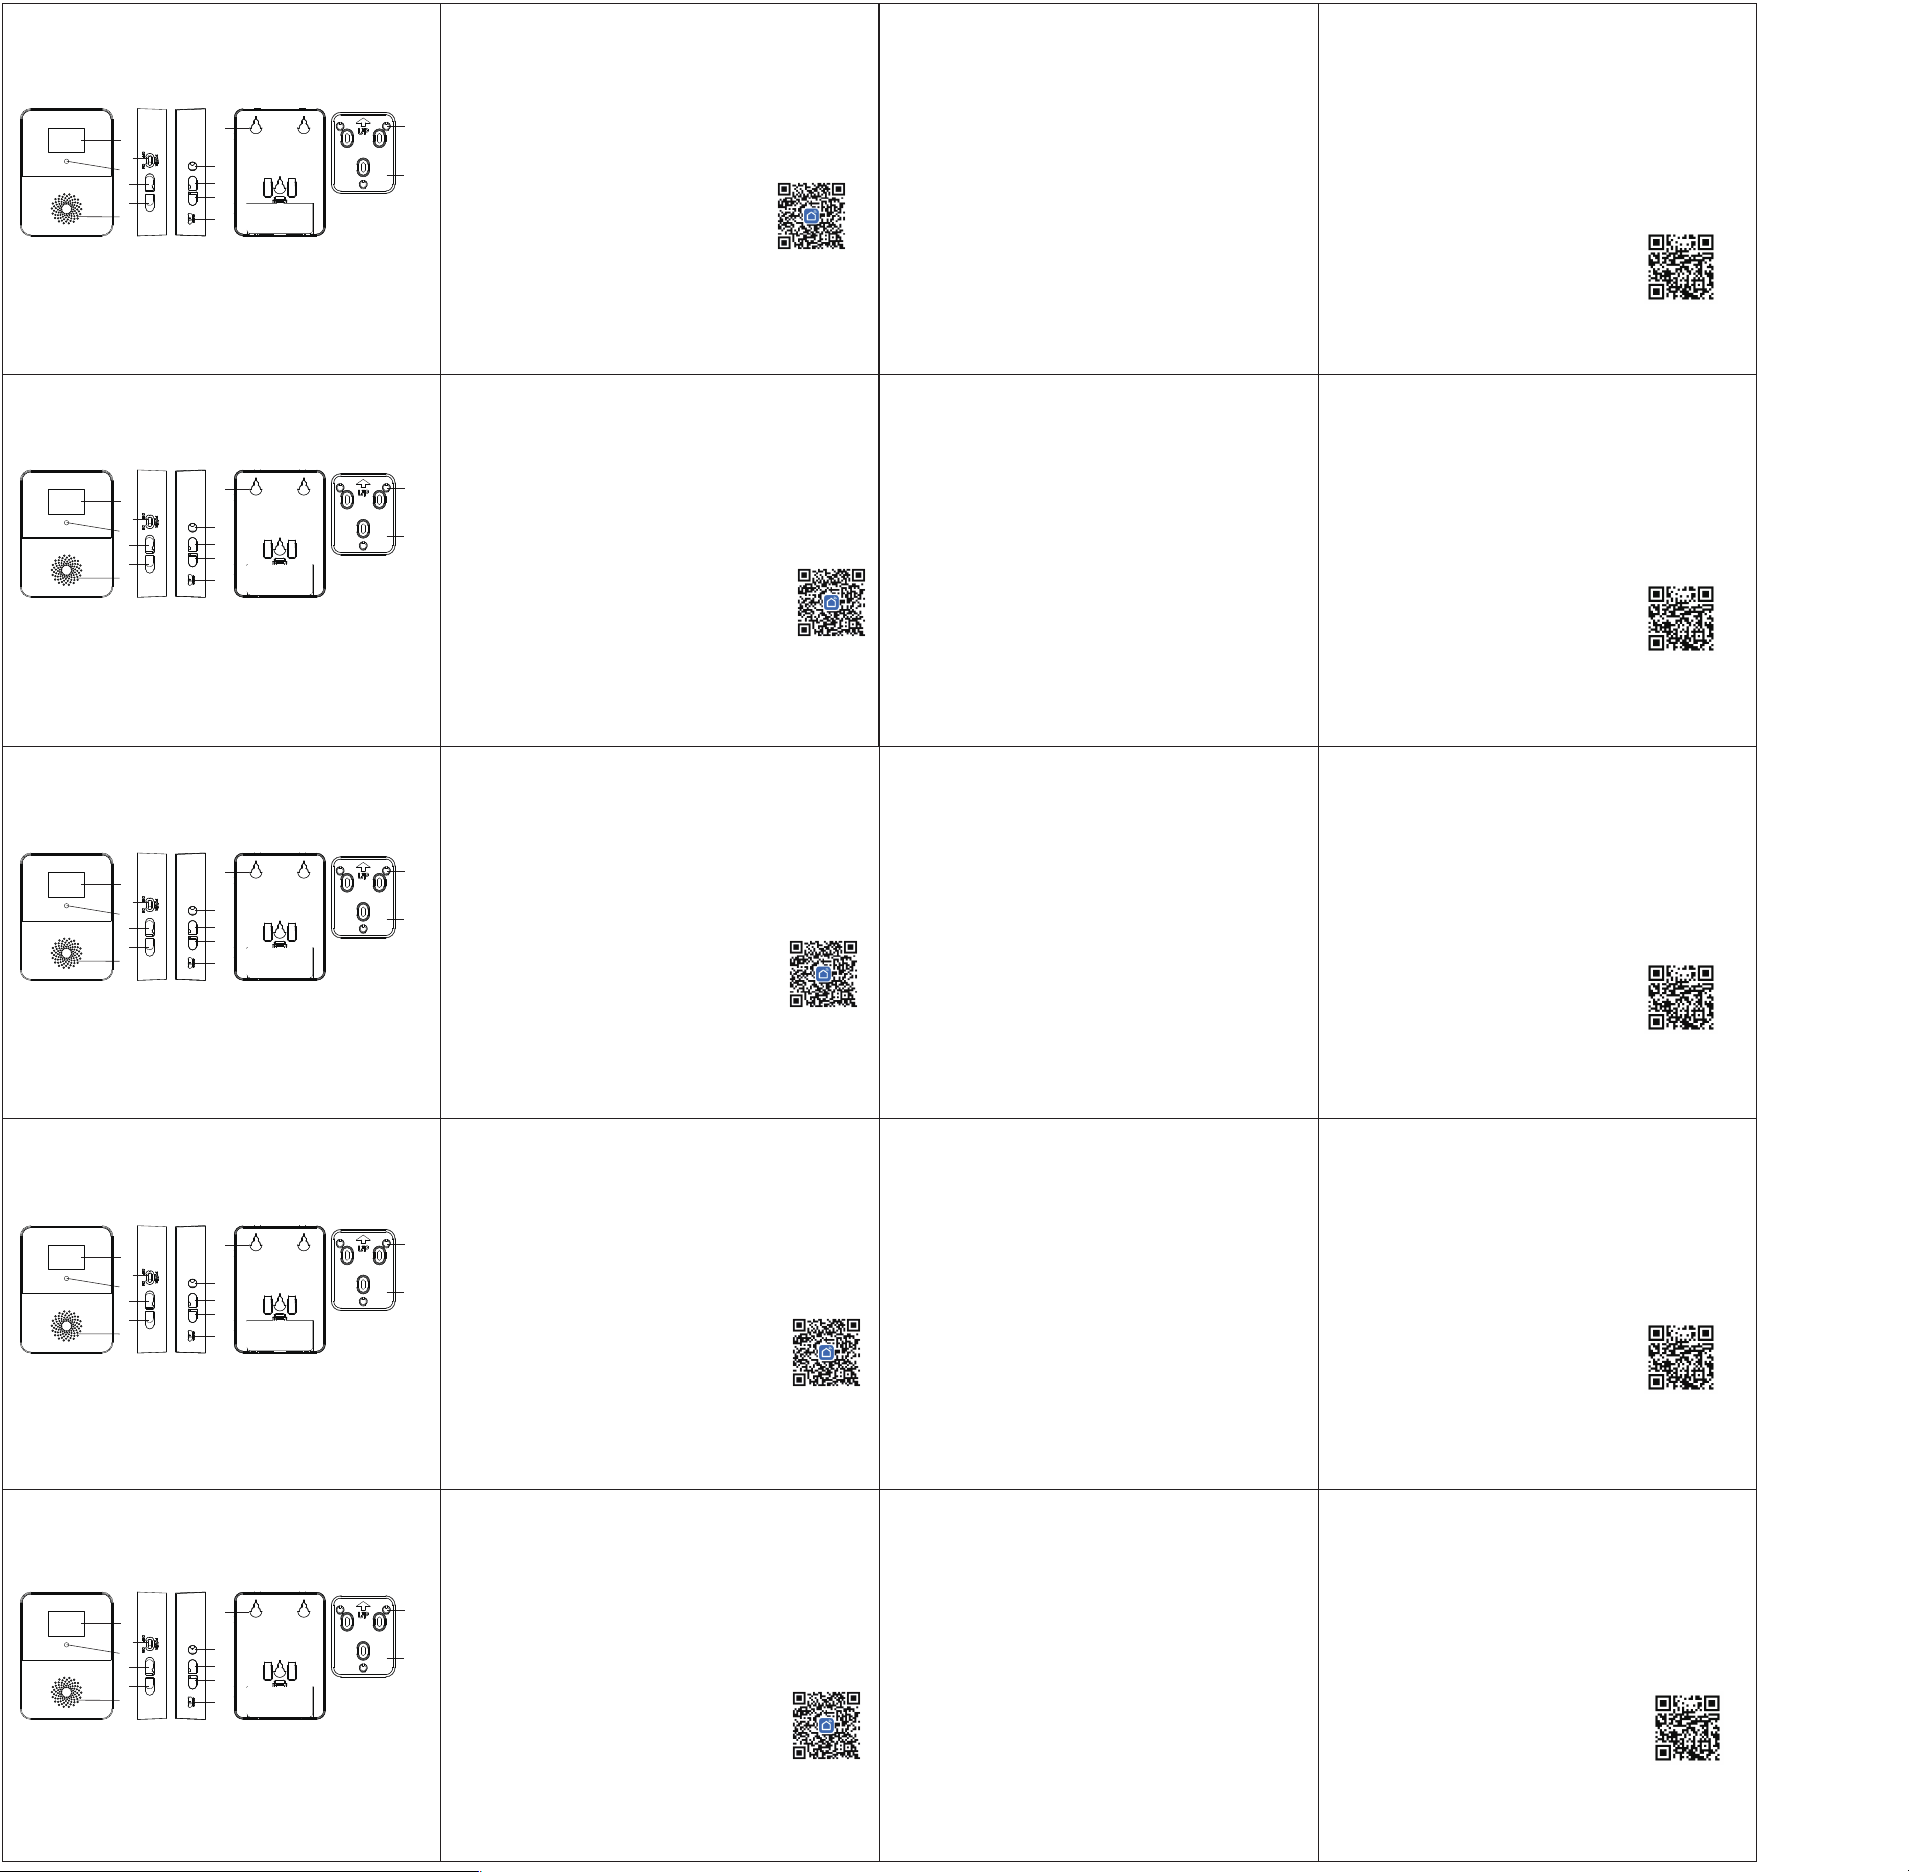
1.Digital Display
2. Status indicator light
3. Speaker
4. Volume +
5. Volume –
6. SET Button
7. Previous Track
8. Next Track
9. Power Supply Port
10. Mounting Hole(s)
11. Screw Hole(s)
12. Mounting Bracket
13. Power Switch
03 App Download & Device Connection
(1) Scan QR code to download and
install the App, then complete
registration.
1. Digital Display
2. Statusanzeigelampe
3. Lautsprecher
4. Lautstärke +
5. Lautstärke –
6. SET-Taste
7. Vorheriges Lied
8. Nächstes Lied
9. Stromversorgungsport
10. Montageloch(e)
11. Schraublöcher
12. Montagehalterung
13. Stromschalter
1. Affichage numérique
2. Lampe d'indication
d'état
3. Haut-parleur
4. Volume +
5. Volume –
6. Bouton SET
7. Chanson précédente
8. Chanson suivante
9. Port d'alimentation
10. Trous de montage
11. Trous à vis
12. Support de montage
13. Interrupteur d'alimentation
1. Display digitale
2. Luce indicatore di
stato
3. Altoparlante
4. Volume +
5. Volume –
6. Pulsante SET
7. Brano precedente
8. Brano successivo
9. Porta di alimentazione
10. Foro di montaggio
11. Fori a vite
12. Staffa di montaggio
13. Interruttore di alimentazione
1. Pantalla digital
2. Luz indicadora de
estado
3. Altavoz
4. Volumen +
5. Volumen –
6. Botón SET
7. Canción anterior
8. Canción siguiente
9. Puerto de alimentación
10. Agujero de montaje
11. Agujeros para tornillos
12. Soporte de montaje
13. Interruptor de alimentación
Wi-Fi Smart Caller Schnellstartanleitung
Guide de mise en route rapide pour
le callér intelligent Wi-Fi
Manuale di avvio rapido per il
chiamatore intelligente Wi-Fi
Manual de inicio rápido para
el llamador inteligente Wi-Fi
Wi-Fi Smart Caller Quick Start Manual
1
2
3
4
13
5
6
7
8
10
11
9
12
1
2
3
4
13
5
6
7
8
10
11
9
12
1
2
3
4
13
5
6
7
8
10
11
9
12
1
2
3
4
13
5
6
7
8
10
11
9
12
1
2
3
4
13
5
6
7
8
10
11
9
12
Der Anrufer und die Zubehörteile werden im Fabrik vorab
voreingestellt. Verbinden Sie einfach über den
Type-C-Anschluss mit einer 5V-Netzversorgung, schalten
Sie den Stromschalter auf "EIN" und konfigurieren Sie
den Wi-Fi – das Gerät ist sofort einsatzbereit. Bei der
Ergänzung eines neuen Zubehörteils verweisen Sie bitte
auf das detaillierte Benutzerhandbuch, testen Sie dessen
Funktion vor dem Einbau und stellen Sie sicher, dass es
sich im stabilen Empfangsbereich des Anrufers befindet.
L'appareil d'appel et les accessoires sont préconfigurés
usine. Connectez simplement à une alimentation 5V via
le port Type-C, activez l'interrupteur d'alimentation en
position "ON" et configurez le Wi-Fi – l'équipement est
prêt à l'emploi. Pour ajouter un nouvel accessoire,
veuillez consulter le manuel d'utilisation détaillé, tester
sa fonctionnalité avant l'installation et vous assurer
qu'il est placé dans la zone de couverture stable du
signal de l'appareil.
Il dispositivo di chiamata e gli accessori sono
preconfigurati in fabbrica. Basta connettersi a una fonte
di alimentazione 5V tramite la porta Type-C, attivare
l'interruttore di alimentazione in posizione "ON" e
configurare il Wi-Fi – il prodotto è pronto all'uso. Per
aggiungere un nuovo accessorio, consultare il manuale
d'uso dettagliato, testare la sua funzione prima
dell'installazione e assicurarsi che sia posizionato nella
gamma di copertura stabile del segnale del dispositivo.
El dispositivo de llamada y los accesorios se configuran
previamente en la fábrica. Conéctelo simplemente a una
fuente de alimentación de 5V a través del puerto Type-C,
active el interruptor de alimentación en la posición "ON"
y configure el Wi-Fi – el equipo estará listo para usar. Si
necesita añadir un nuevo accesorio, consulte el manual
de usuario detallado, teste su función antes de la
instalación y asegúrese de que se coloque dentro del
rango de cobertura estable de la señal del dispositivo.
The caller and accessories are pre‑paired at the factory.
Simply connect to a 5V power supply via the Type-C
port, turn the power switch to ON, configure the Wi-Fi,
and it's ready to use. If you need to add a new
accessory, please refer to the detailed user manual, test
its function before installation, and ensure it is placed
within the caller’s stable signal coverage range.
07 Technical Specifications
06 Installation
Löcher markieren, bohren und Wanddübel einsetzen.
Halterung mit Kreuzschraubendreher festschrauben.
Gerät an der Halterung ausrichten und nach unten
einrasten lassen.
② Wählen Sie mit den Tasten Vorherig / Nächst den
gewünschten Klingelton aus (32 Töne zur Auswahl).
③ Lösen Sie das Zubehör aus (z. B. durch Tastendruck),
um ein Kopplungssignal zu senden. Ertönt der
ausgewählte Ton an der Klingel, ist die Änderung
erfolgreich.
④ Drücken Sie kurz die SET-Taste, um den
Kopplungsmodus sofort zu verlassen.
06 Installation
Marquez et percez les trous, puis insérez les chevilles
murales. Fixez le support avec un tournevis cruciforme.
Alignez l’appareil et encliquetez-le vers le bas.
06 Installazione
Segnare e forare i fori, inserire i tasselli murali. Fissare
la staffa con cacciavite a croce. Allineare il dispositivo e
premere verso il basso per agganciarlo.
06 Instalación
Marque y perfore los orificios, inserte los tacos de
pared. Fije el soporte con destornillador Phillips. Alinee
el equipo y presione hacia abajo para encajarlo.

§
15.105 Information to the user.
Note: This equipment has been tested and found to comply with the limits for a Class B digital device, pursuant to part 15 of the FCC Rules. These
limits are designed to provide reasonable protection against harmful interference in a residential installation. This equipment generates uses and
can radiate radio frequency energy and, if not installed and used in accordance with the instructions, may cause harmful interference to radio
communications. However, there is no guarantee that interference will not occur in a particular installation. If this equipment does cause harmful
interference to radio or television reception, which can be determined by turning the equipment off and on, the user is encouraged to try to
correct the interference by one or more of the following measures: -Reorient or relocate the receiving antenna.
-Increase the separation between the equipment and receiver.
-Connect the equipment into an outlet on a circuit different from that to which the receiver is
connected. -Consult the dealer or an experienced radio/TV technician for help.
*RF warning for Mobile device:
This equipment complies with FCC radiation exposure limits set forth for an uncontrolled environment. This equipment should be installed and operated with
minimum distance 20cm between the radiator & your body.