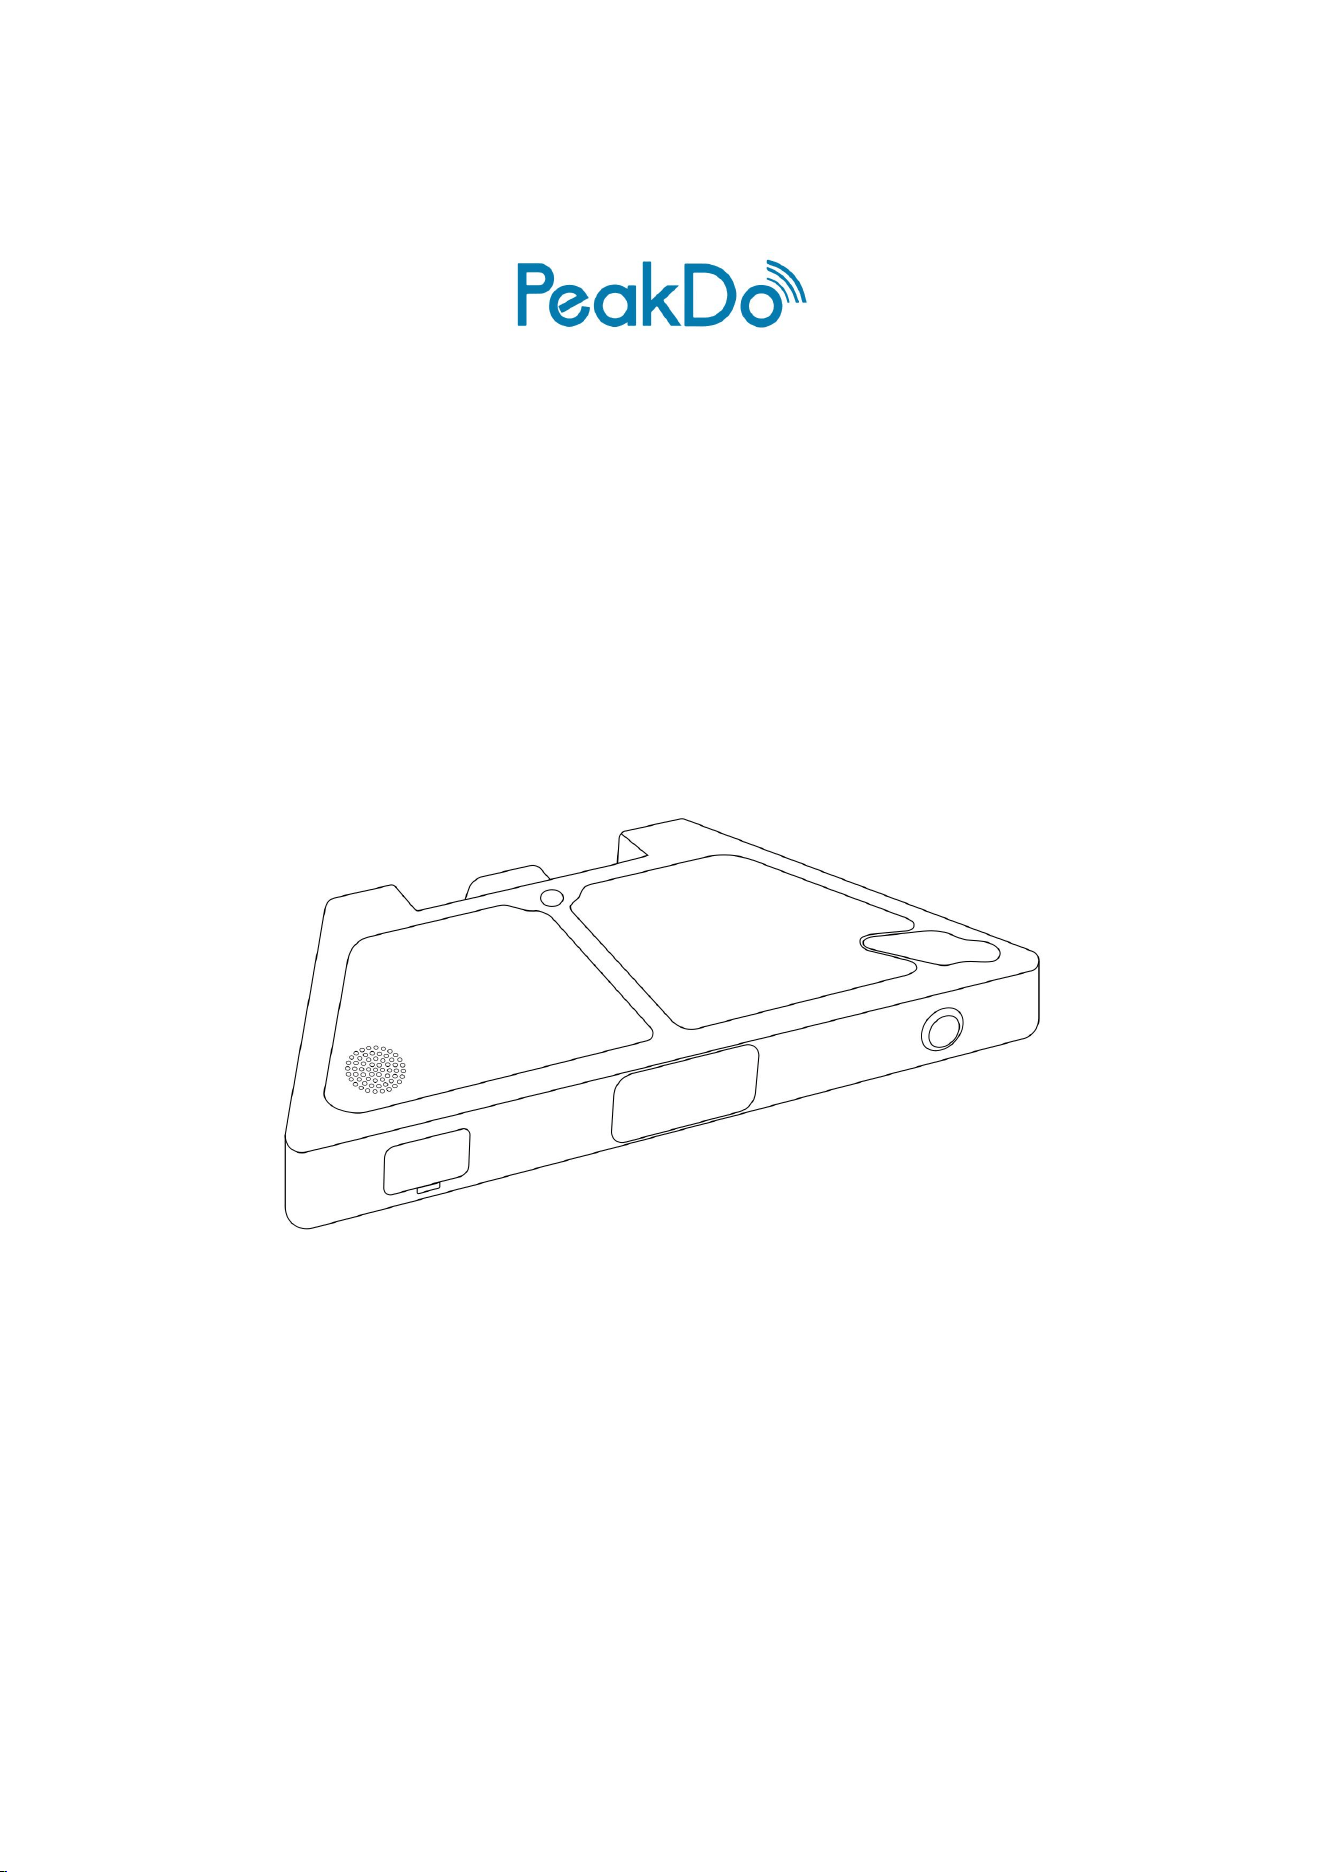
LinkPower Ultra
Power Bank for Starlink® Mini
Quick Start
V 3.0

LinkPower Ultra Quick Start
2
Introduction
Meet the LinkPower Ultra power solution!
The LinkPower Ultra power bank is a compact, high-efficiency power solution engineered
with next-generation semi-solid state battery technology, designed exclusively for the
Starlink® Mini.
With an airline-safe 99.9Wh battery capacity, LinkPower Ultra provides over 5.5+ hours of
continuous runtime, keeping your internet connection alive - even in remote locations.
LinkPower Ultra supports USB-C bidirectional power delivery. With 100W
1,2
USB-C input, it
charges from 20% to 80% in just 45 minutes. The USB-C port also delivers 65W output, perfect
for powering your phone, laptop, and other USB-C devices.
DC and magnetic DC input ports of LinkPower Ultra:
When using the original Starlink Mini charger, the maximum input power is up to 60W.
When used with a 12V car charger, the maximum input power is up to 65W.
Best of all, LinkPower Ultra can power the Starlink® Mini while charging itself via the USB-C
port - ensuring uninterrupted operation when you need it most.
Press and hold the power button for 2 seconds. Release the button when the breathing light
starts flashing to turn the DC output on or off. Use this function to control power to your
Starlink® Mini.
NOTE:
1. Before using LinkPower Ultra for the first time, you must activate it.
Plug in an external PD power supply to activate the LinkPower Ultra.
Hold the power button for 10 seconds. Activation is complete once the screen turns on.
2. Input (Charging) power limit can be set via Web App. The max power limit is 100W.
3. Warning: Charging or discharging the battery at high power levels may significantly reduce
its lifespan. For optimal battery health, avoid excessive power usage unless necessary.
The device may become warm during high-power output. This is normal.

LinkPower Ultra Quick Start
3
Control Methods
1. Wi-Fi Connection:
After the device is connected to the internet, you can use the app to monitor the status of
LinkPower Ultra anytime, anywhere and set scheduled power on/off.
Note:
Manual power-off is not supported via the app.
The device does not support remote power-on or power-off via Wi-Fi.
2. Bluetooth Connection:
After pairing the device with the app via Bluetooth, you can:
Turn the device on or off
Enable or disable the DC output
View the device status
Set Scheduled Power On/Off
3. Button Control:
The physical button can be used to:
Turn the device on or off
Enable or disable the DC output
Refer to the following sections for additional button functions.
LinkPower Ultra Quick Start
4
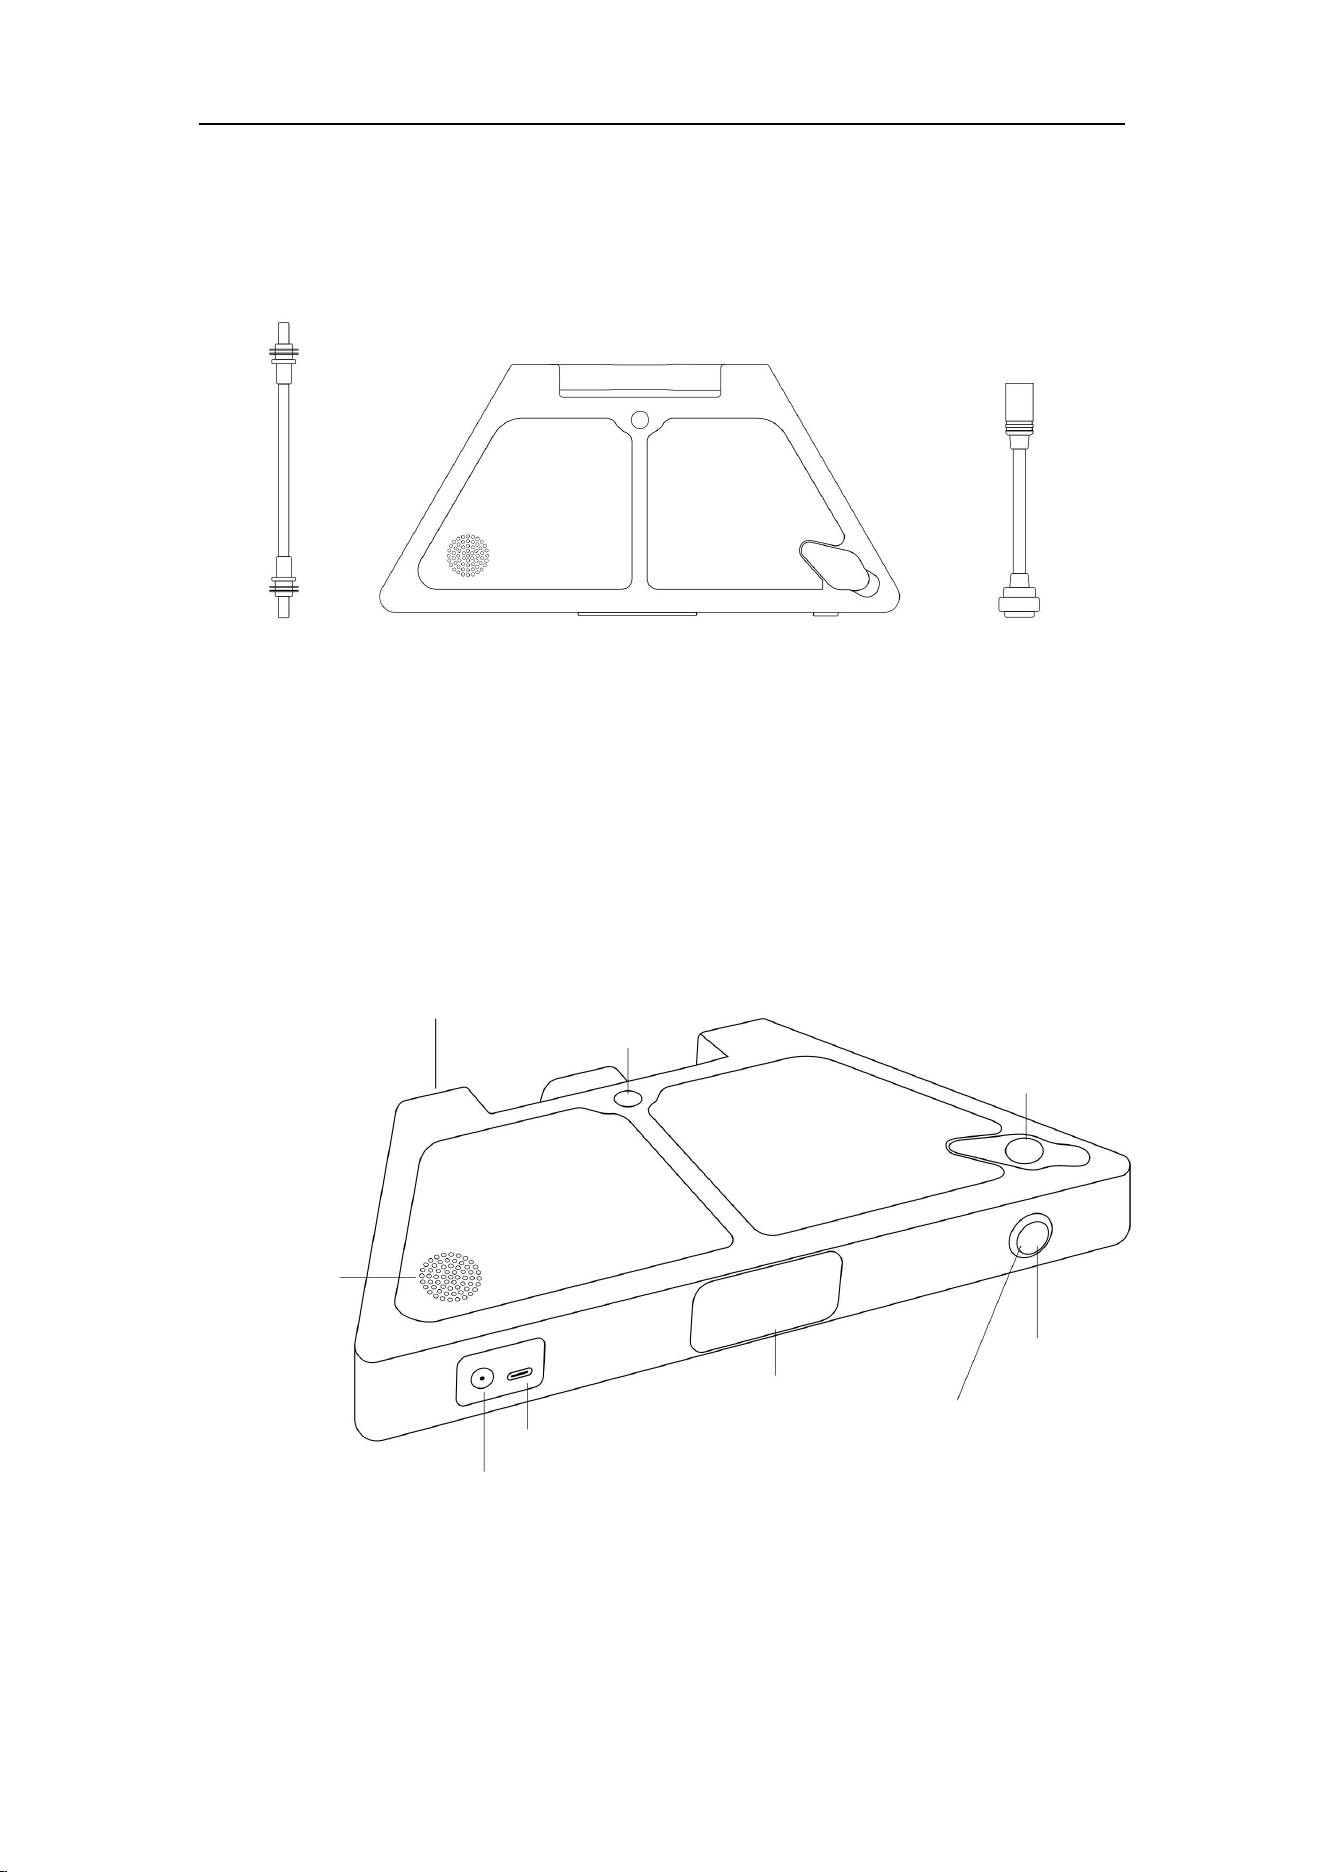
What’s In the Box
Device Overview
WARNING: The DC output port is for output only. Do not connect any DC power
adapters, as it may damage the device.
DC-to-DC Cable
LinkPower Ultra
DC to magnetic DC cable
DC output port
1/4-inch screw hole
DC magnetic input port
Power button
LED
LCD
Type-C PD output/input port
DC input port
DC output port
LinkPower Ultra Quick Start
5
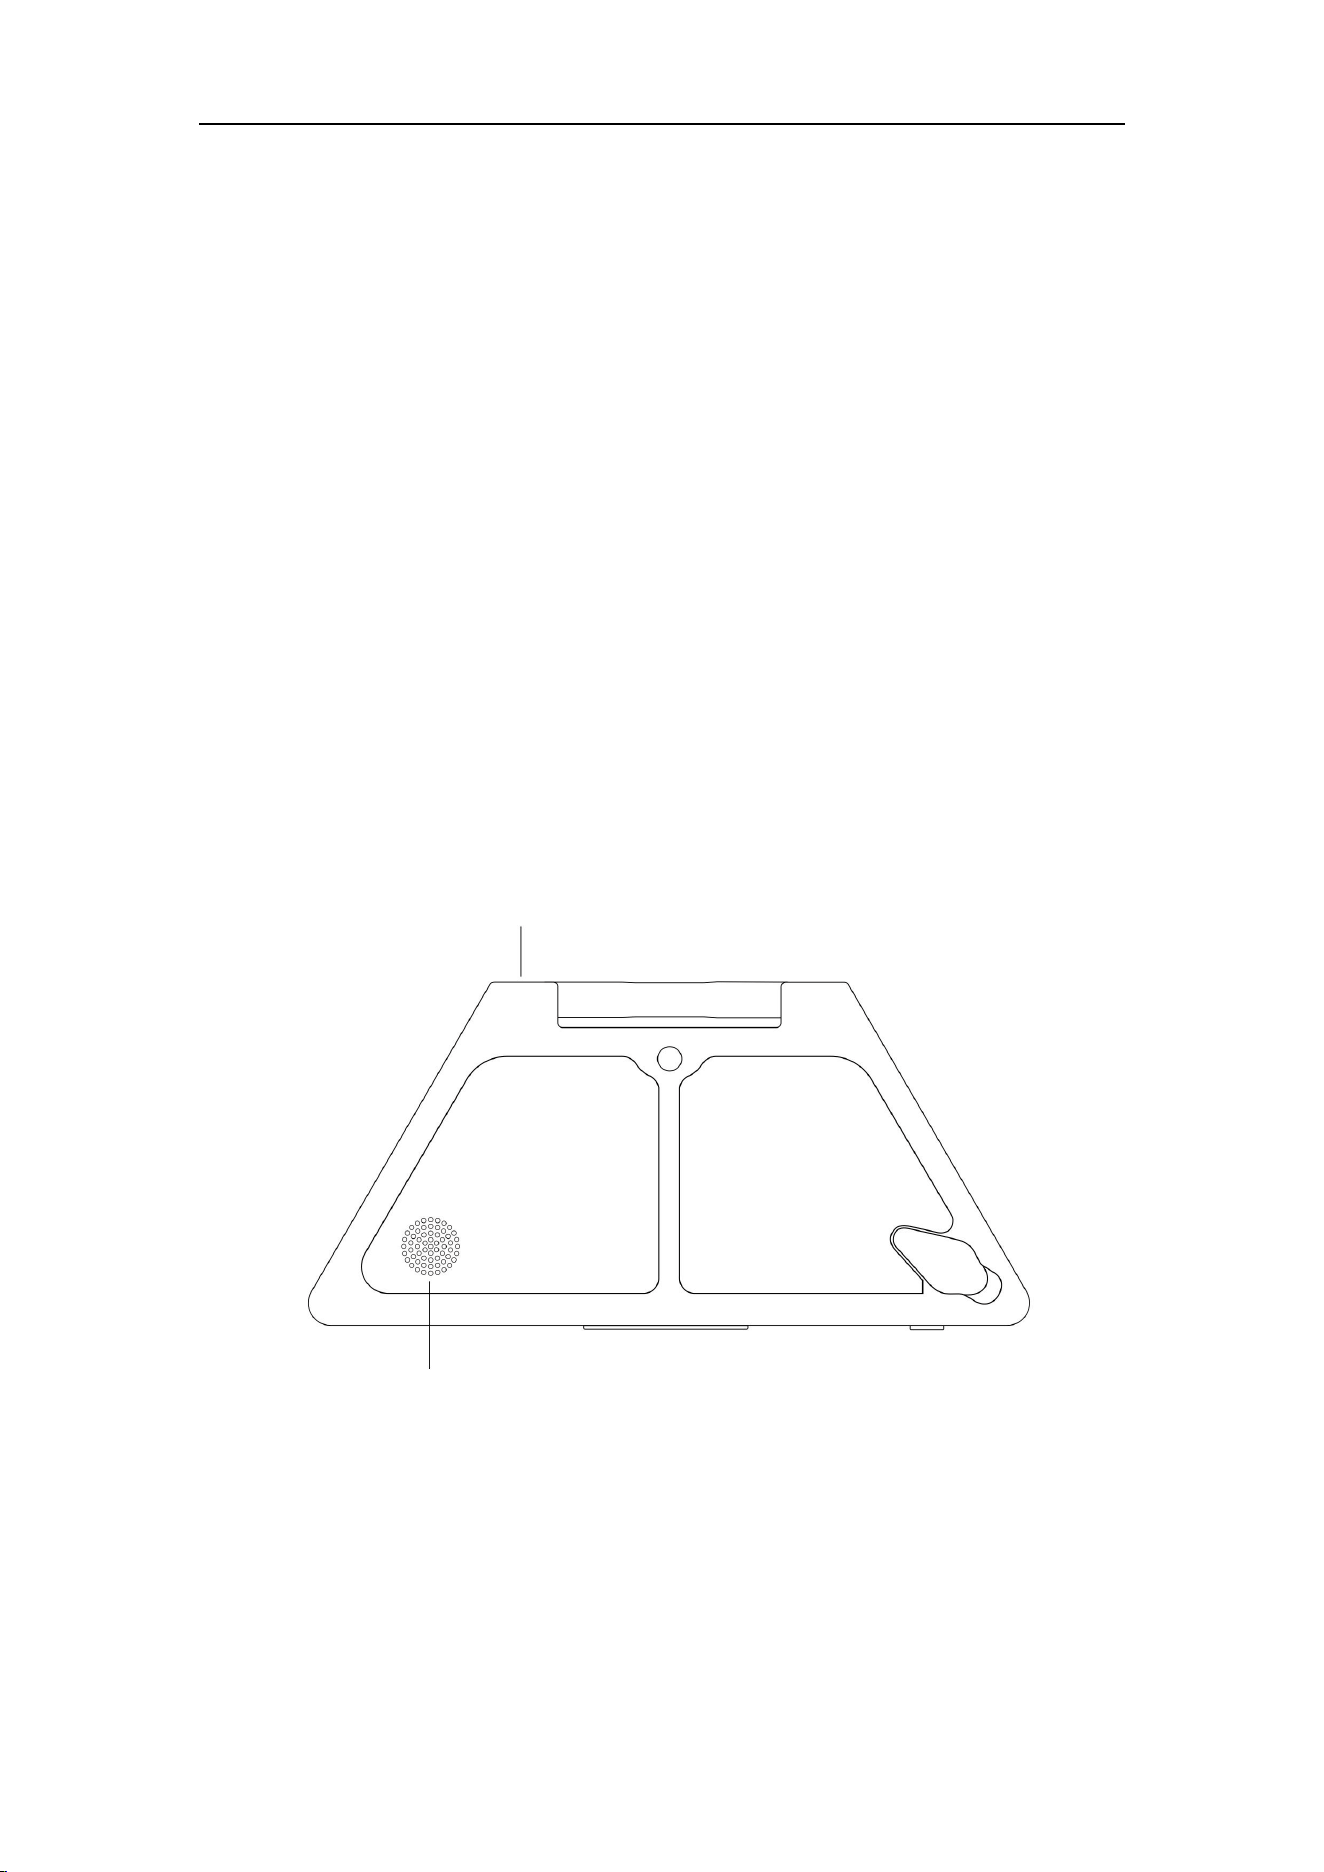
Intelligent Active Cooling System
To ensure sustained high-performance and maximize battery lifespan, LinkPower Ultra
features a fully automated thermal management system:
Auto-Start at 52°C: When the internal temperature reaches 52°C, the active cooling fan
triggers automatically to dissipate heat quickly.
Auto-Stop at 45 ° C: Once the temperature cools down to 45 ° C, the cooling system
automatically shuts off to save energy and maintain silent operation.
Note: Please keep ventilation grilles clear of obstructions during operation to ensure optimal
thermal performance.
Air Outlet
Air Inlet
LinkPower Ultra Quick Start
6
Setup
WARNING: The DC output port is for output only. Do not connect any DC power
adapters, as it may damage the device.
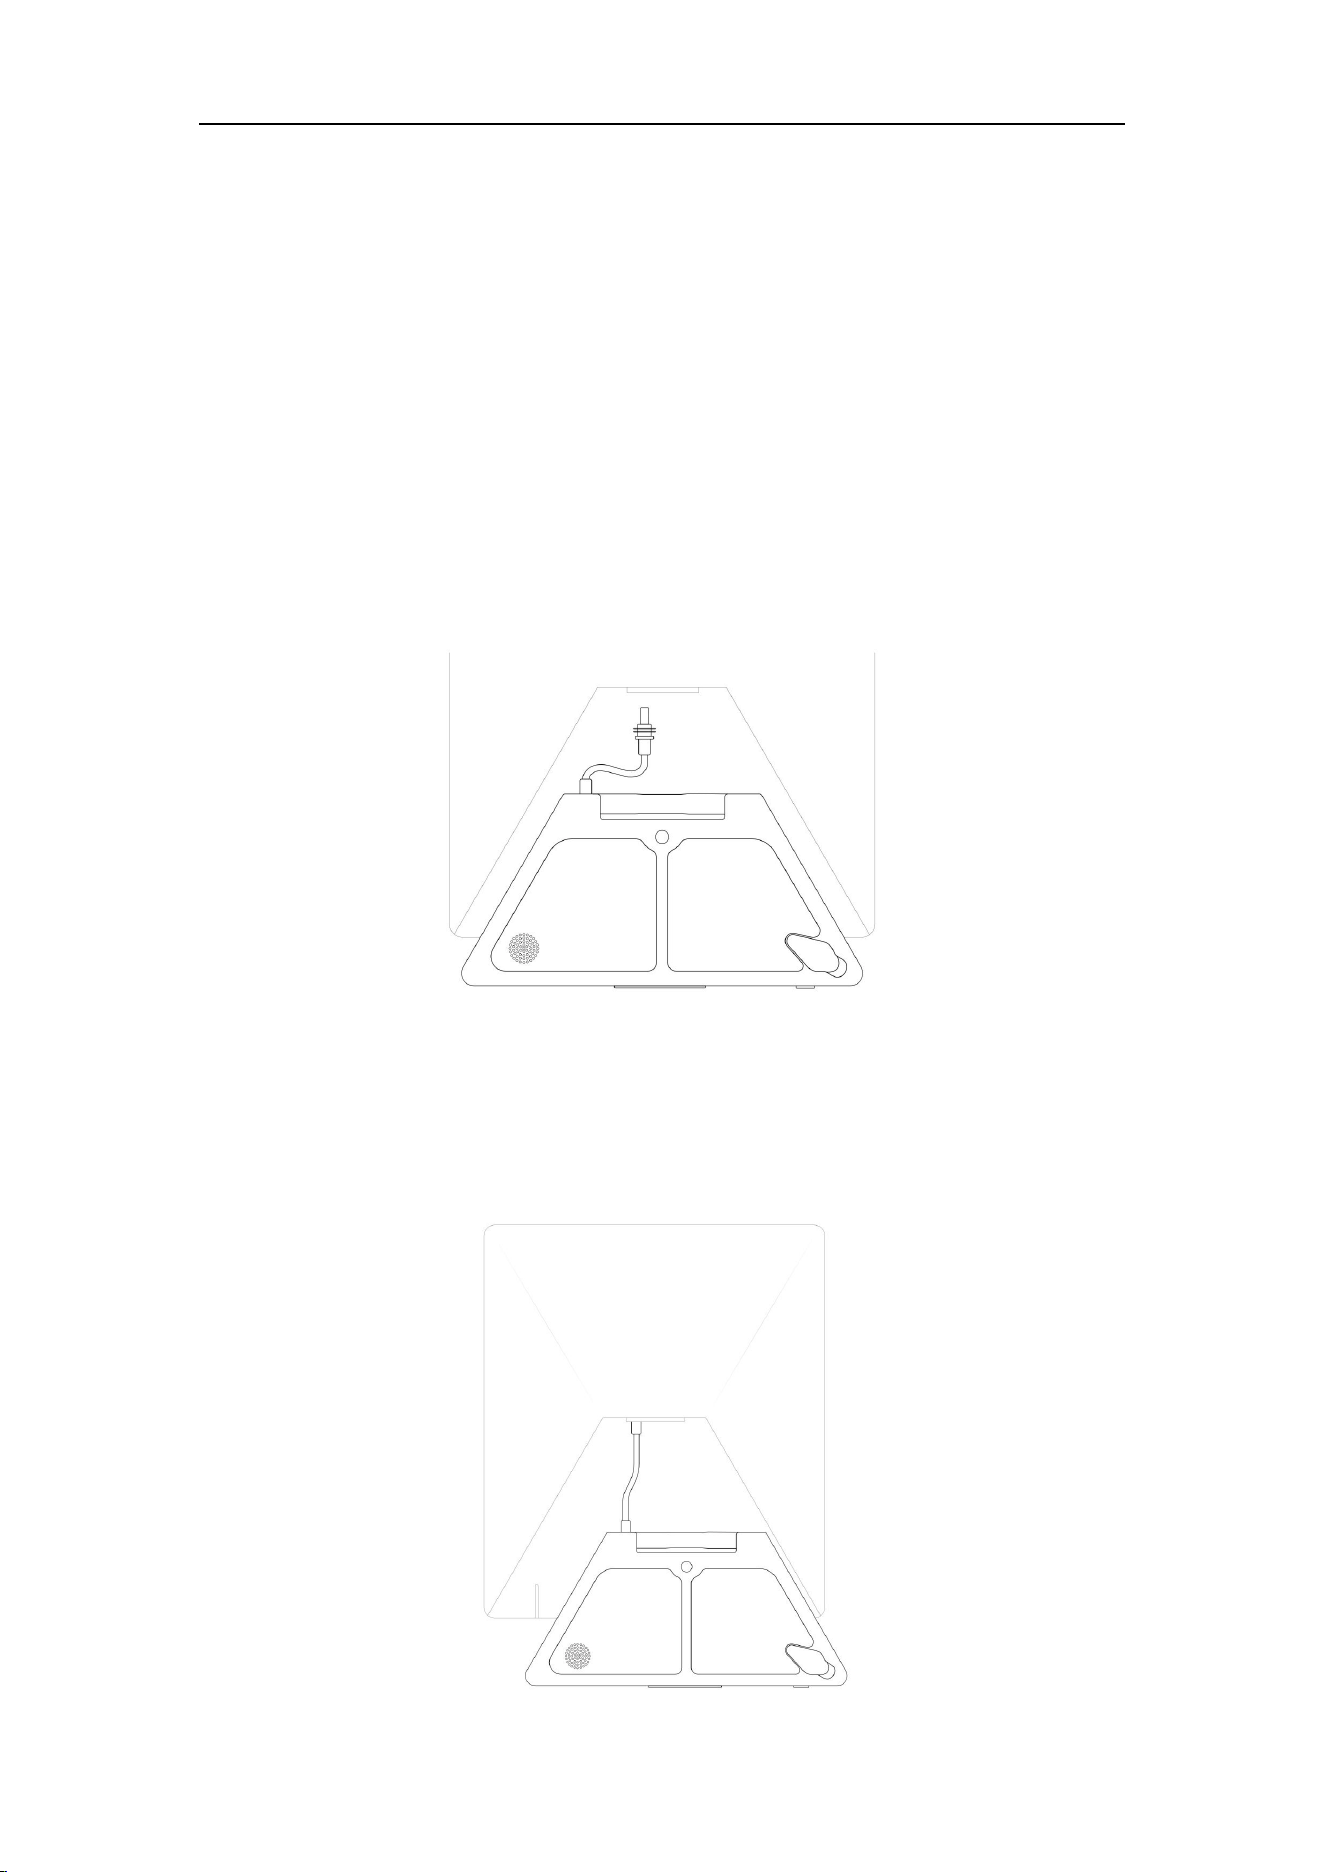
1. Place the Starlink® Mini face down on a table or other flat surface. Be careful not to
scratch the face of the Starlink® Mini. Remove the kickstand if used.
2. Unpack the LinkPower Ultra and plug the included DC-to-DC cable into the DC port on
the LinkPower Ultra.
3.
4. Plug the other end of the DC cable into the DC port on the Starlink® Mini. Ensure the
plug is fully inserted such that the plug face is flush with the DC port surface to guarantee
a secure connection.
LinkPower Ultra Quick Start
7
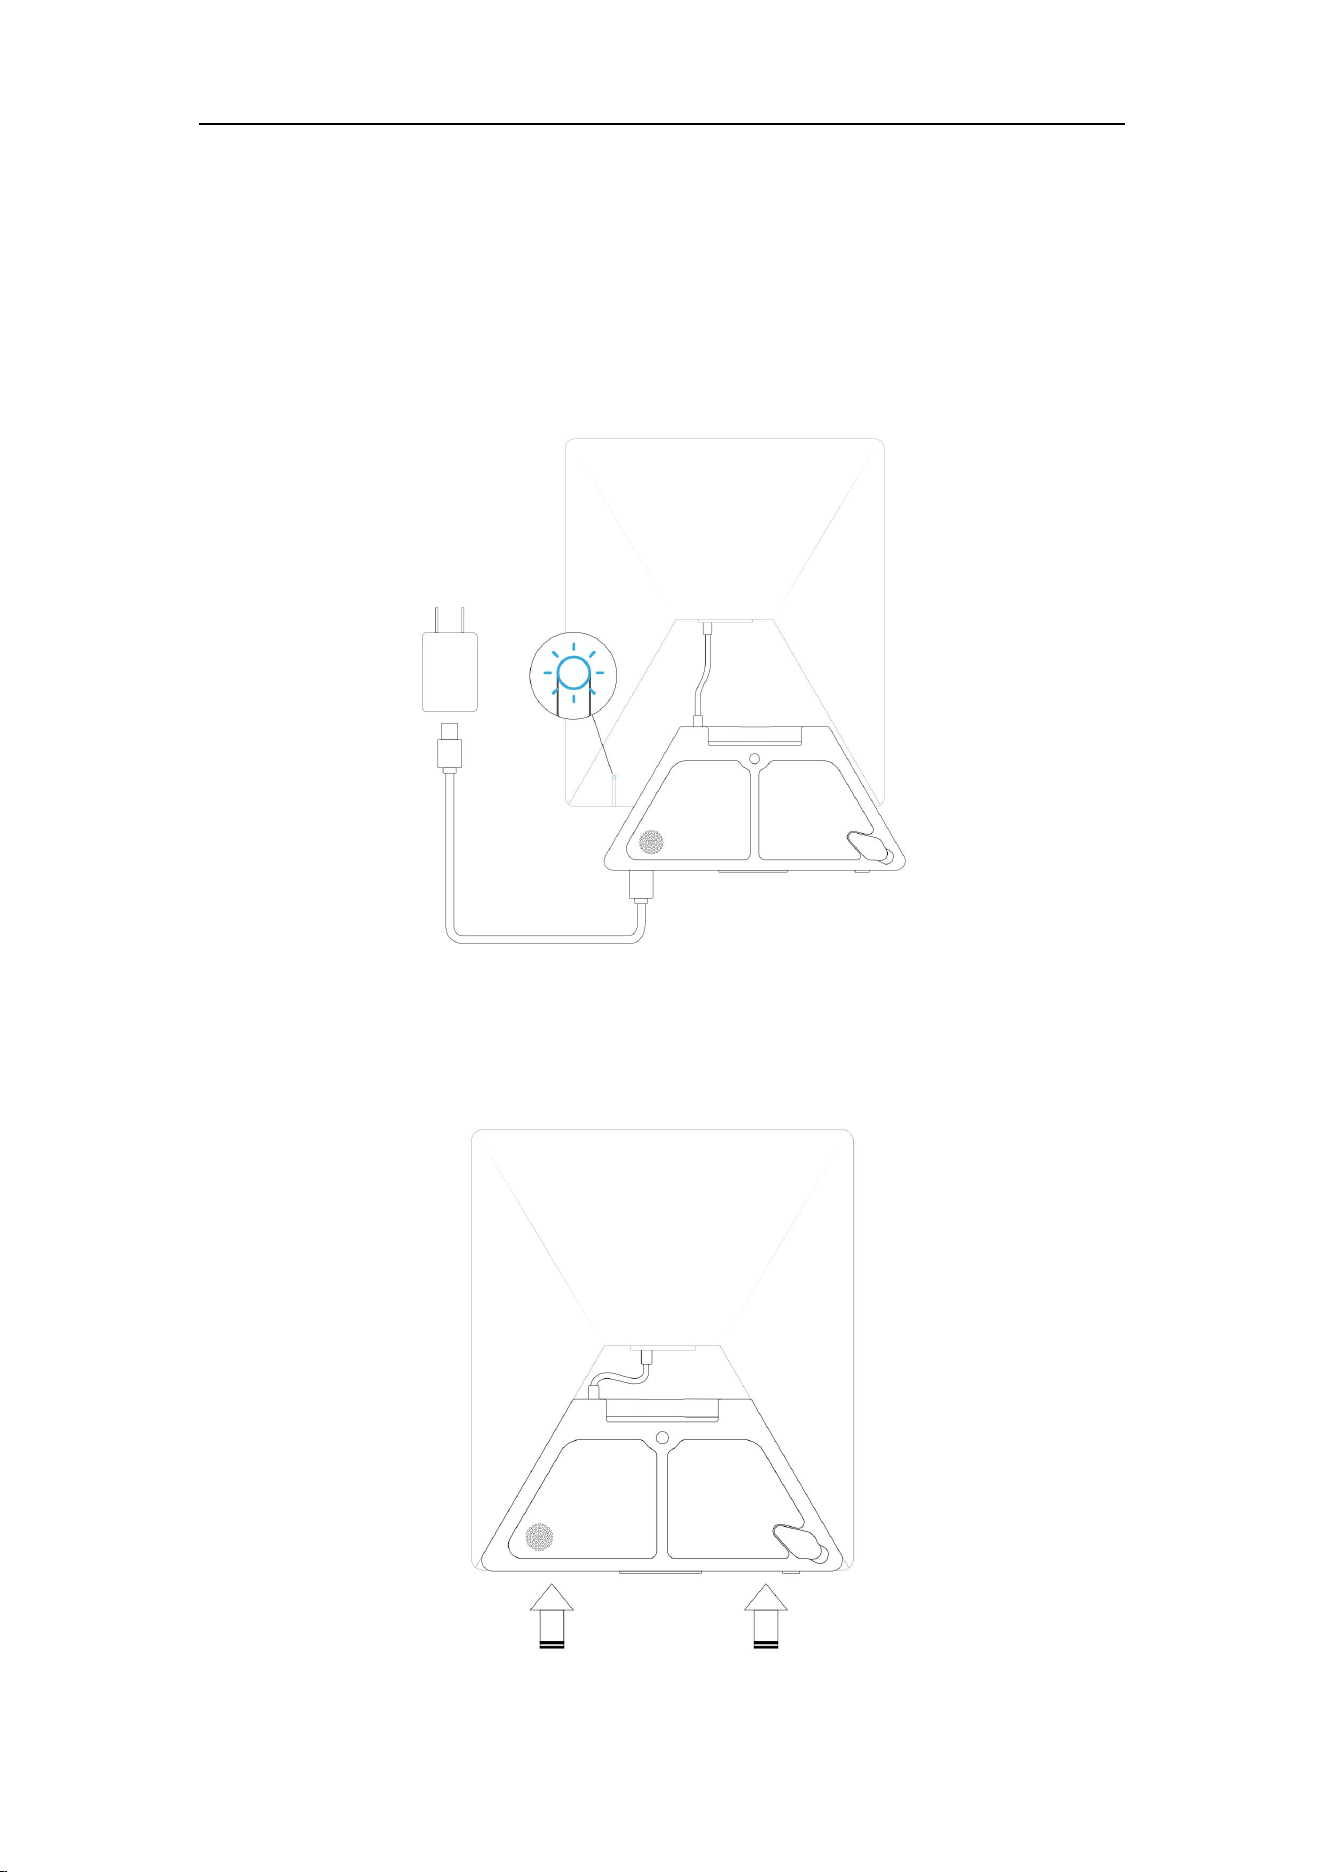
5. Plug in an external PD power supply to activate the LinkPower Ultra. Alternatively, press
and hold the power button for 10 seconds. Activation is complete once the screen turns
on. When the LinkPower Ultra powered on, the LED indicator on the power button will
light up. The Starlink® Mini will automatically power on, and its LED indicator will begin
flashing.
NOTE: After LinkPower Ultra has been activated, you can remove the external PD power
supply.
6. Gently slide the LinkPower Ultra toward the Starlink® Mini until you hear a clicking sound.
This indicates that the LinkPower Ultra is securely attached to the Starlink® Mini.
LinkPower Ultra Quick Start
8
7. Setup is complete. You can now use your Starlink® Mini as normal, powered by the
attached LinkPower Ultra.
Usage
Charging
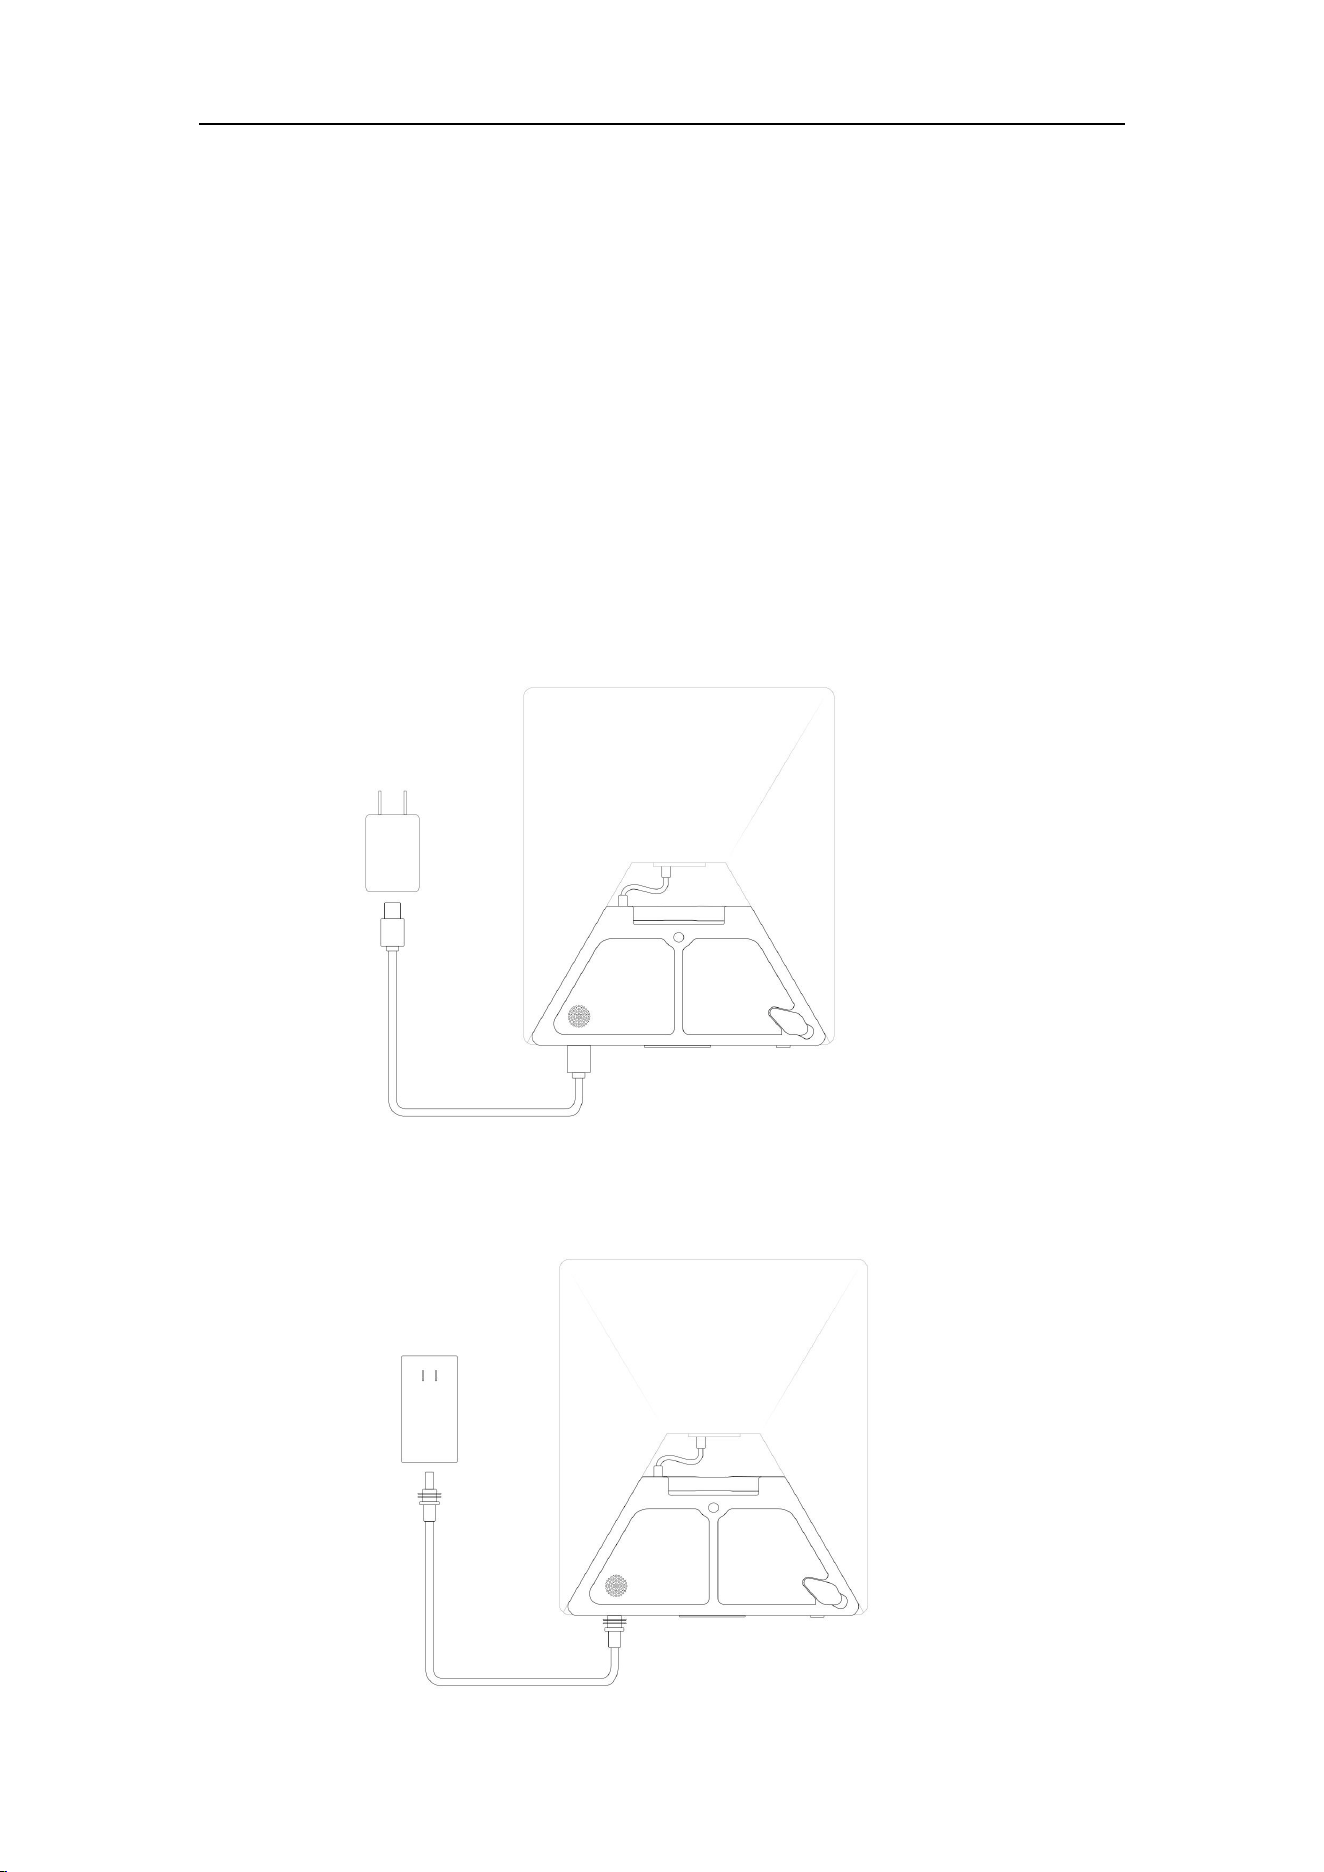
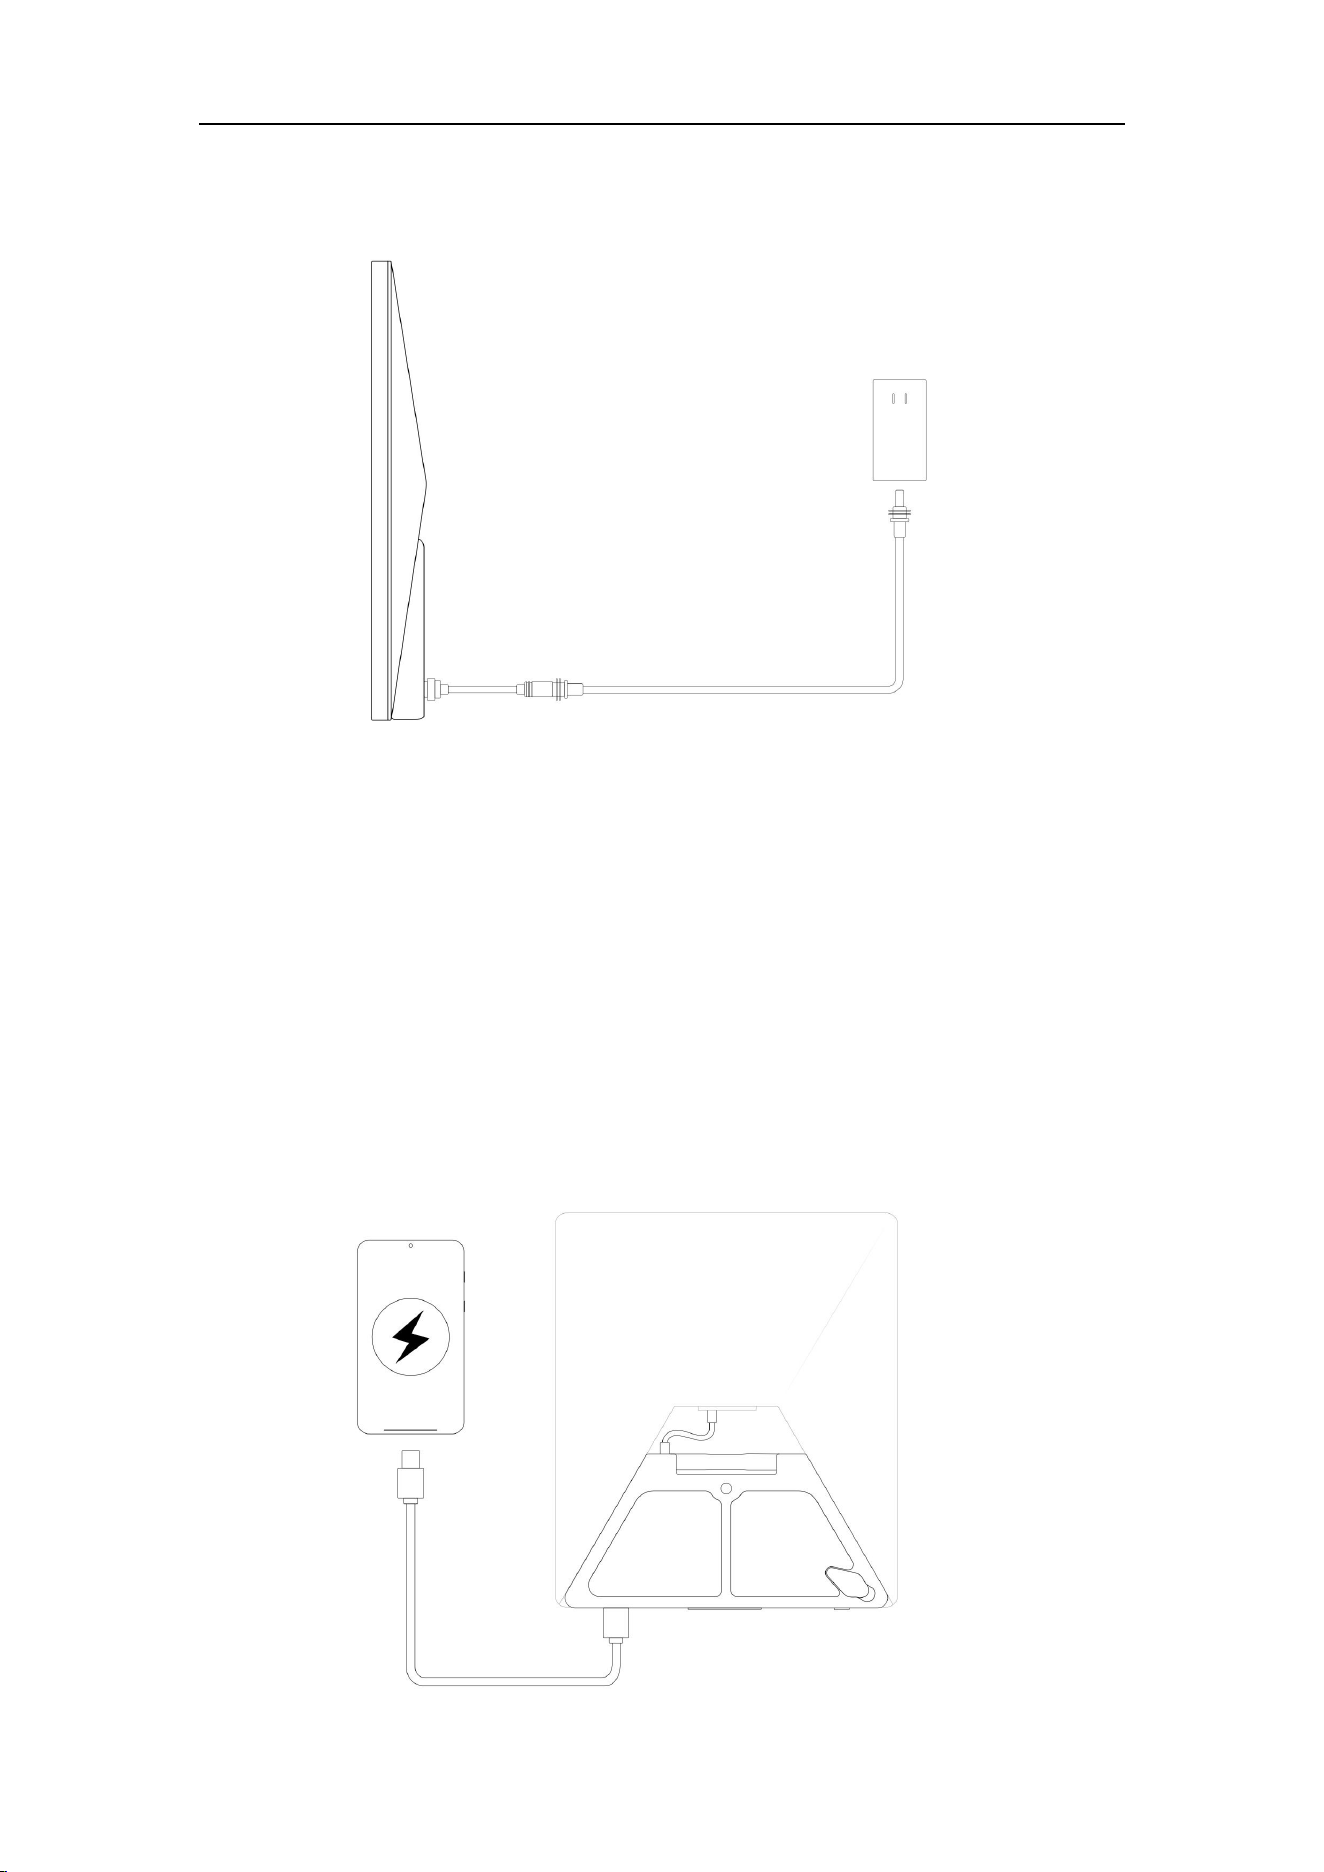
LinkPower Ultra supports the following three charging methods while simultaneously
powering the Starlink Mini:
1. Type-C PD Charging:Charge LinkPower Ultra via the Type-C PD port while (Supports PD
3.1, PPS, and QC5。Compatible with QC 3.0 / 2.0, FCP, AFC, SCP, and Apple 2.4A)
2. DC Input Charging:Charge LinkPower Ultra through the DC input. Compatible with the
original Starlink Mini power adapter, enabling charging and operation at the same time.
LinkPower Ultra Quick Start
9
3. Magnetic DC Charging: Supports charging via a DC-to-DC magnetic connector (standard
with LinkPower Ultra) when connected to a DC power supply.
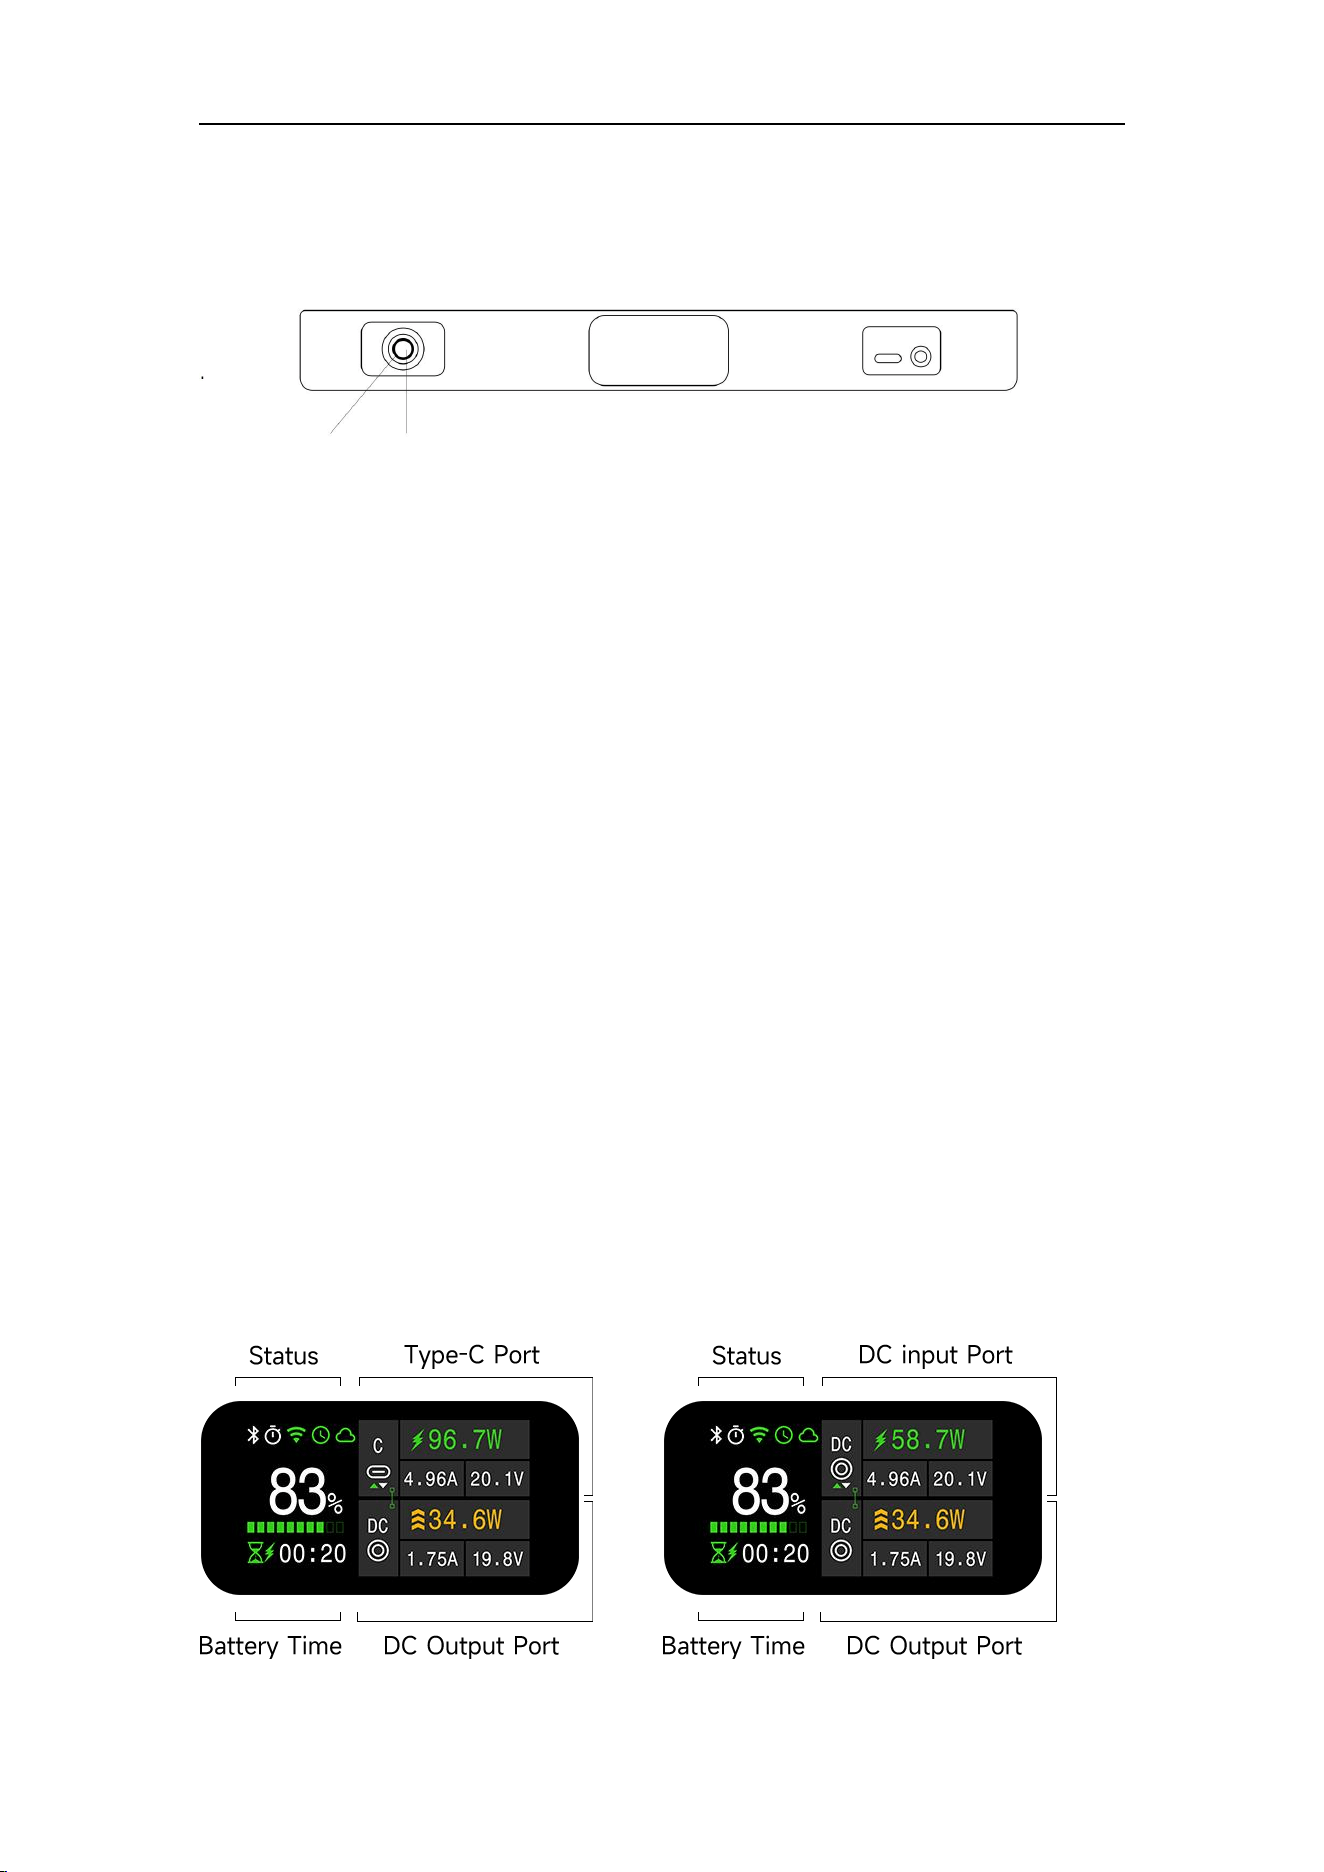
Works as a normal power bank
When needed, LinkPower Ultra can also be used to charge other devices through its USB
Type-C PD port.
NOTE: The power bank reserves approximately 10%~15% of its capacity for the Starlink
Mini. When the remaining battery level falls below this range, the Type-C output will
automatically turn off to ensure better overall usability and avoid your Starlink Mini
powering down unexpectedly (due to USB outputs draining the battery).
LinkPower Ultra Quick Start
10
Power Button Functions
·
1. Power Off
Press and hold the power button for approximately 10 seconds to turn off LinkPower Ultra.
2. DC Output Toggle
Press and hold the power button for approximately 2 seconds. Release the button when the
breathing light starts flashing to turn the DC output on or off.
3. Breathing Light On / Off: (When the DC output port is on) Quickly press the power button
twice to turn the breathing light on or off.
4. Sleep Mode
Press and hold the power button for approximately 6 seconds. Release the button when the
breathing light starts flashing to enter sleep mode.
To wake up the device, press and hold the power button for approximately 6 seconds until
the screen turns on.
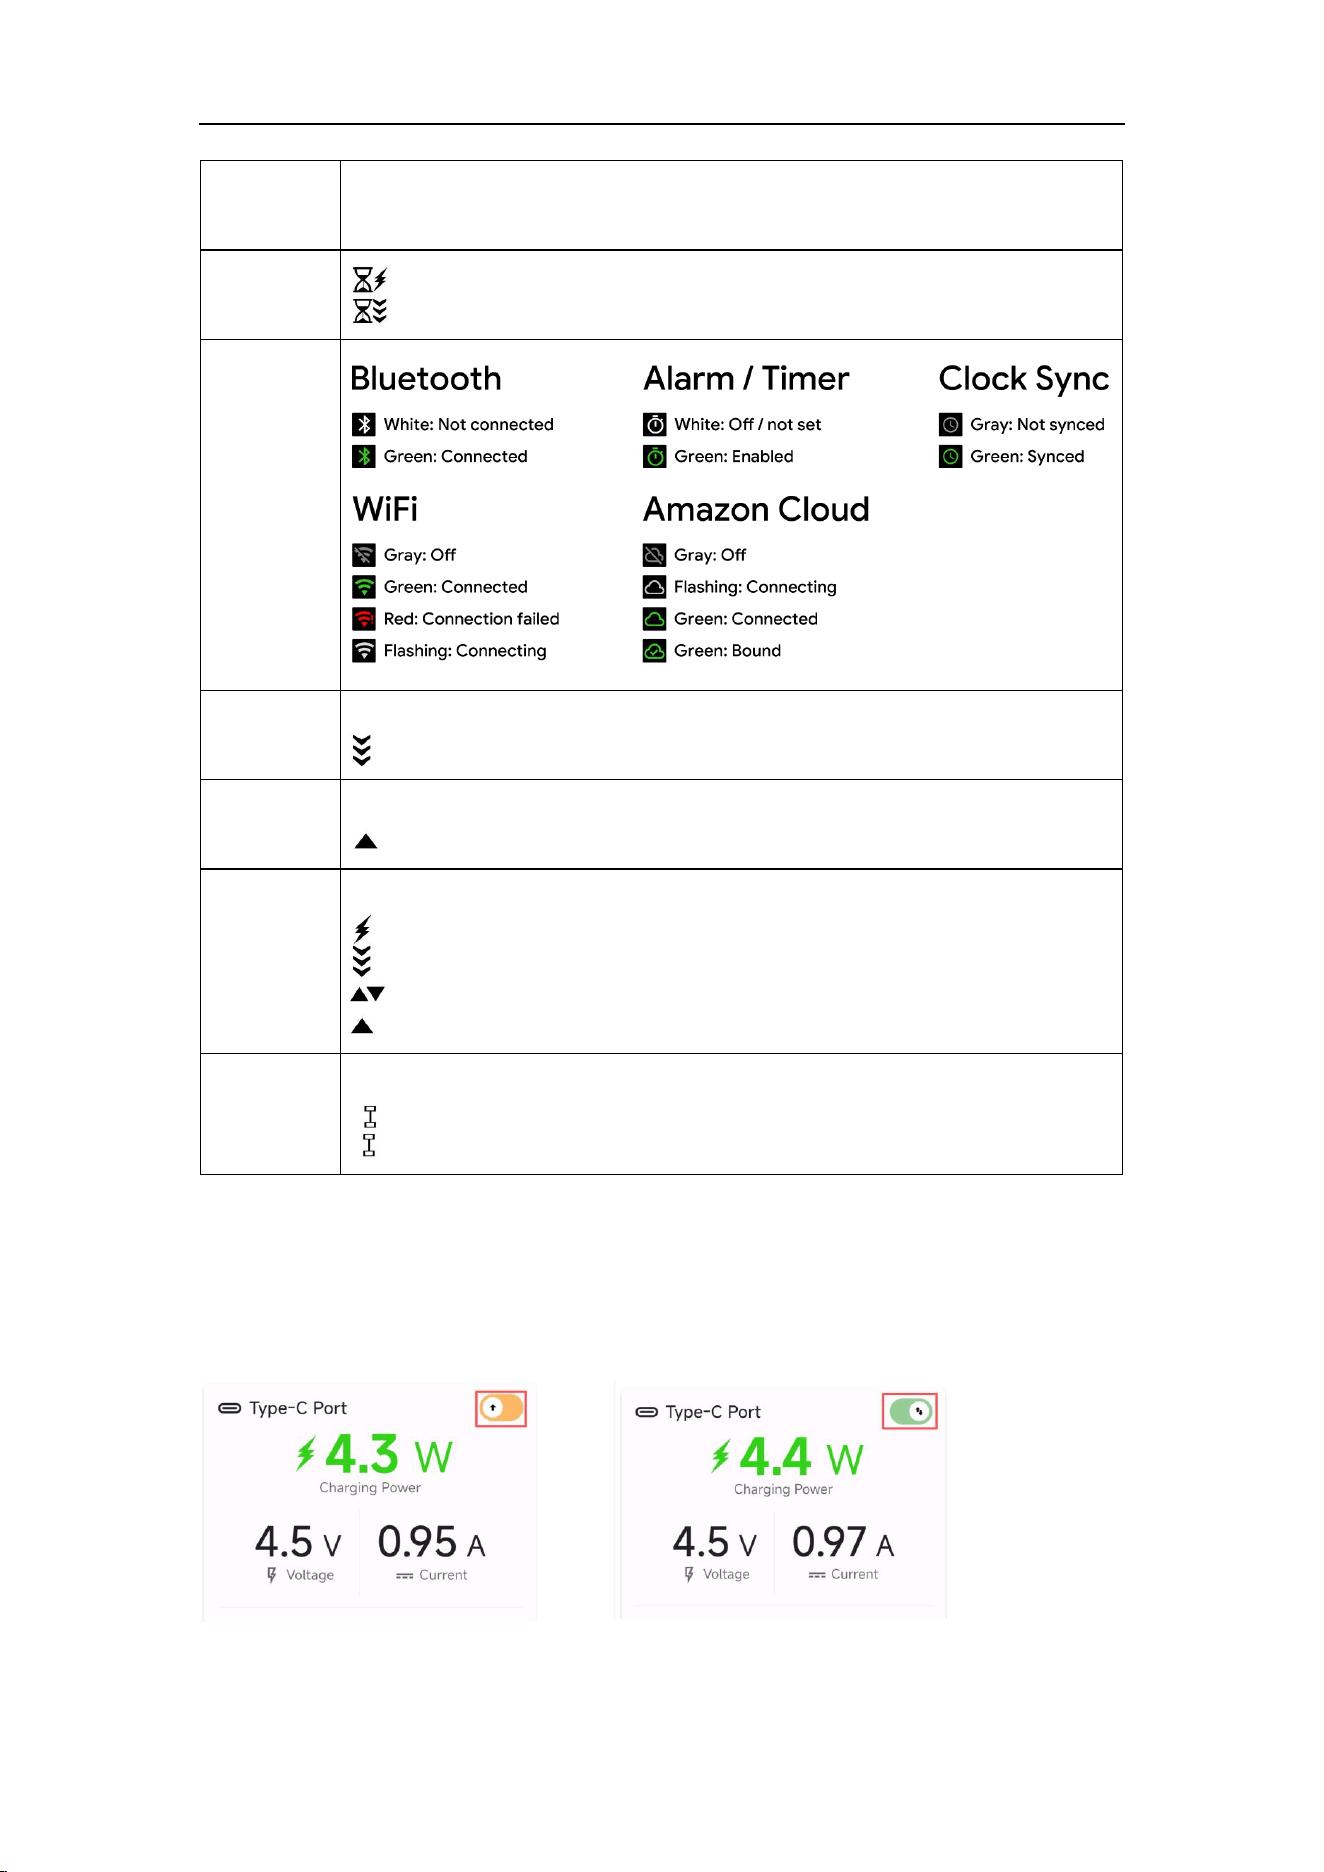
Check the status
To check the status of LinkPower Ultra, press Power Button once to turn on the LCD screen.
Following is the layout of the full UI:
Power button
Breathing LED
LinkPower Ultra Quick Start
11
Battery
Level
Displays Battery Level
Battery
Time
Displays the estimated time until LinkPower Ultra is fully charged
Displays the estimated time until LinkPower Ultra is fully discharged
Status
DC output
Port
Displays the power, current, voltage and work status of the DC port
Indicate DC port is discharging
DC input
Port
Displays the power, current, voltage and work status of the DC port
Charging is in progress via the DC port
Type-C
Port
Displays the power, current, voltage and work status of the Type-C port
Indicate Type-C port is charging
Indicate Type-C port is discharging
Enable charging or discharging
Enable charging-only mode
Bypass
State
Located between the DC and Type-C displays
When the color is yellow, it indicates manual activation
When the color is green, it indicates automatic activation
When the DC port is enabled, the LED indicator will gently pulse.
Open the app, scroll down to find the Type-C port, and tap the button on the right to switch
between Charge Only and Charging/Discharging
Charging Only
Charging or Discharging

LinkPower Ultra Quick Start
12
Smart Bypass Mode — Always On Power
Directly power your Starlink Mini from external source
No interruption Smarter protection
How Bypass Mode Works :
Manual Activation:
Enable Bypass anytime via Web App for direct power supply.
Auto at Low Battery:
When battery drops below 3%, external power automatically takes over.
→ Keeps Starlink Mini running without interruption
Auto at Full Charge:
When battery reaches 100%, Bypass activates automatically
→ Prevents overcharging and protects battery lifespan
Ensure Sufficient Input Power ( External Power ≥ Starlink Mini Power Consumption ):
When battery is extremely low, the external power source must provide enough output
power to run Starlink Mini directly.
If power is insufficient, the device may not operate properly.
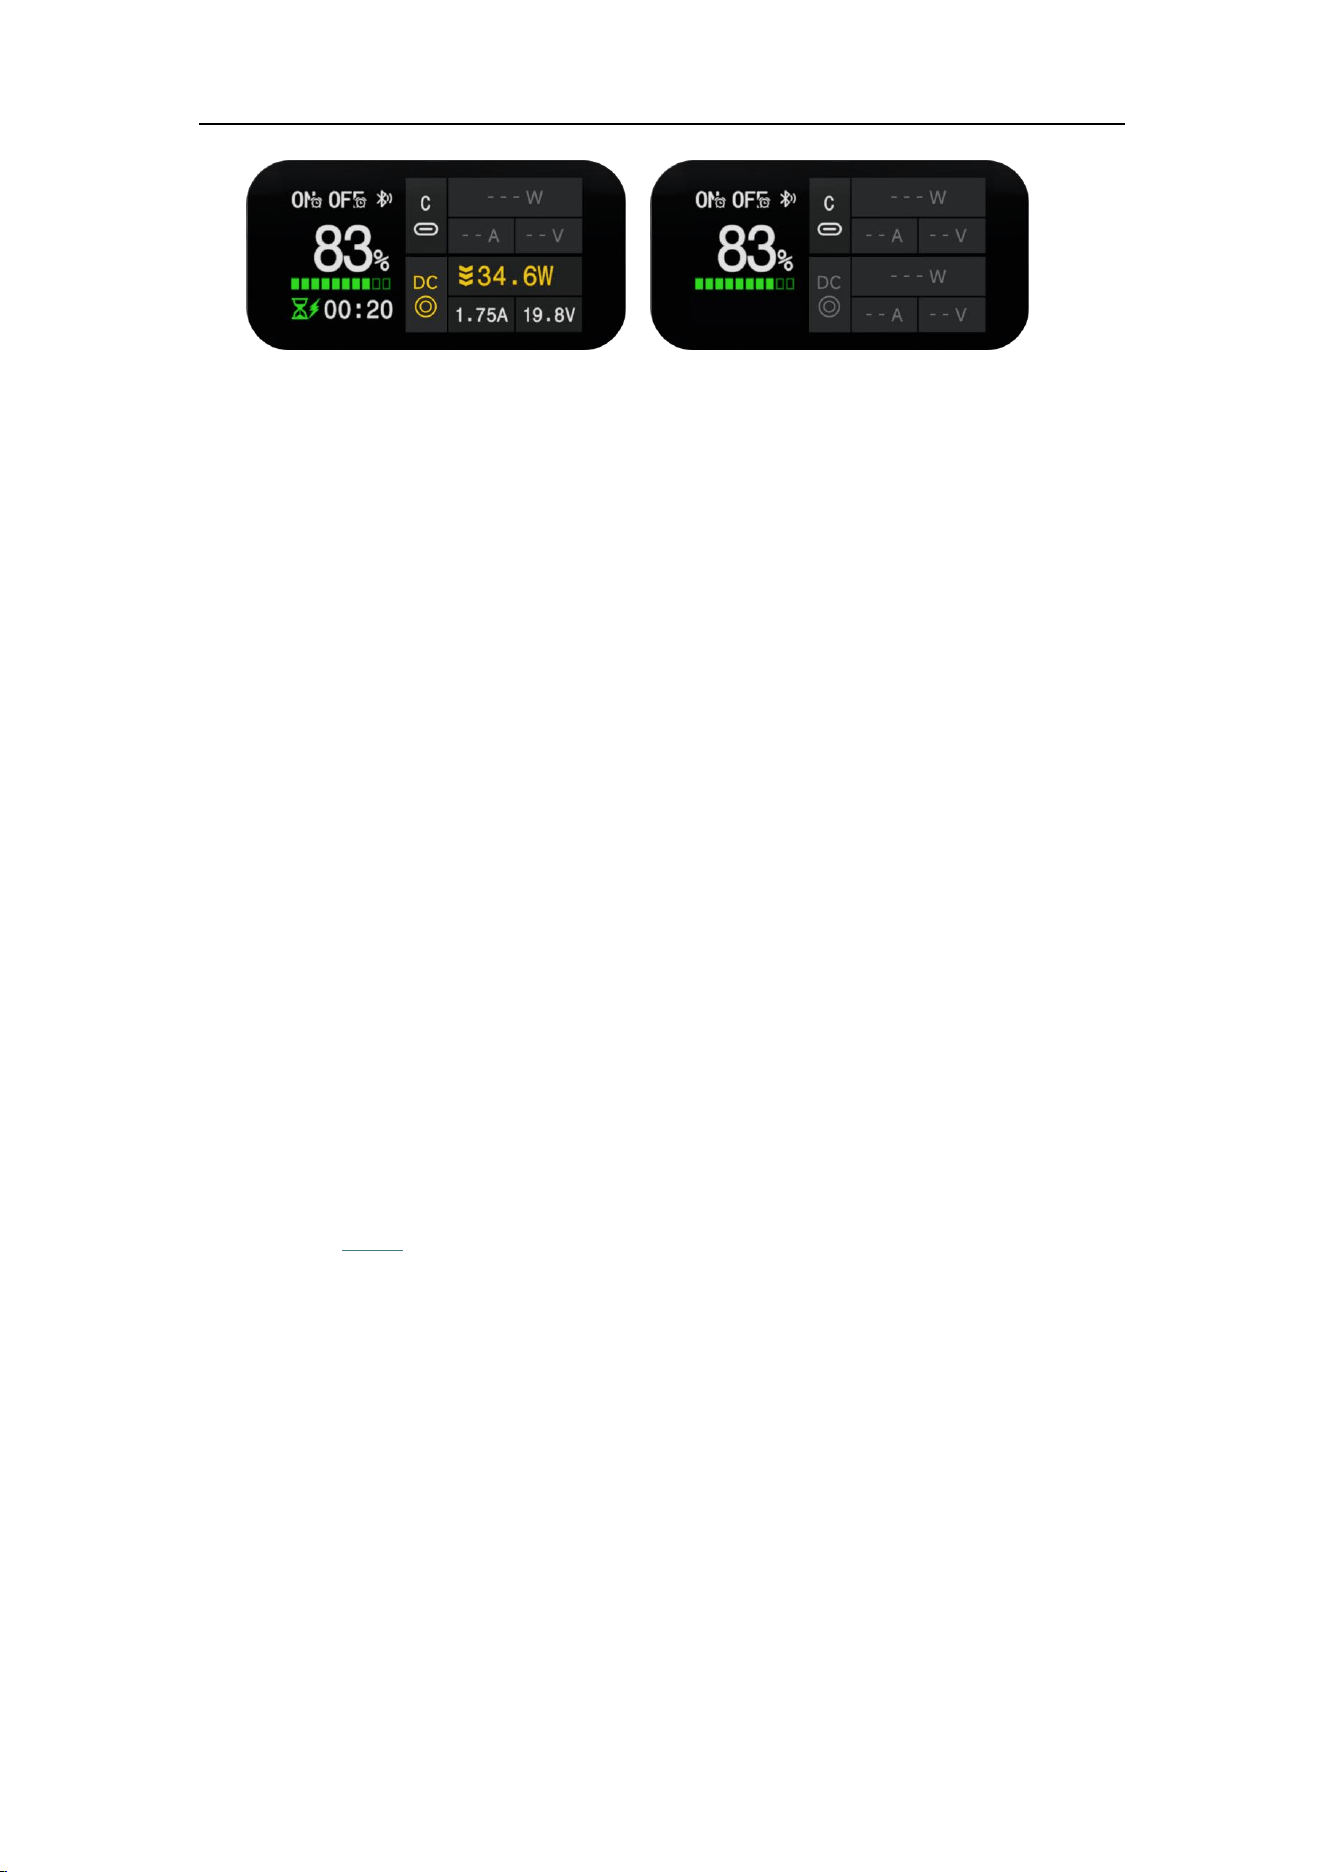
Manually Controlling the DC Port
You can manually enable or disable the LinkPower Ultra's DC port, which in turn powers your
Starlink® Mini on or off.
To do this, press and hold the Power Button for at least 2 seconds. The LED indicator will
quickly flash twice to confirm this action.
When the DC port is enabled, the LED indicator will gently pulse.
When the DC port is disabled, the LED indicator will turn off.
LinkPower Ultra Quick Start
13
Shutting Down LinkPower Ultra
If you don't plan to use LinkPower Ultra for an extended period, you can shut it down
completely. This helps to preserve battery life and health.
To do so, press and hold the Power Button for at least 10 seconds. Once LinkPower Ultra is
fully shut down, the Power Button will become unresponsive.
To restart LinkPower Ultra from a complete shutdown, Plug in an external PD power supply
to activate the LinkPower Ultra. Alternatively, press and hold the power button for 10 seconds.
Activation is complete once the screen turns on.
Using Web App
NOTE: The Web App currently only works on following browsers:
Windows/macOS: Chrome, Edge, Opera
Android: Chrome, Edge, Opera, Samsung Internet
iOS: Bluefy
NOTE: The Web App can function offline after your initial visit.
enabled
disabled
LinkPower Ultra Quick Start
14
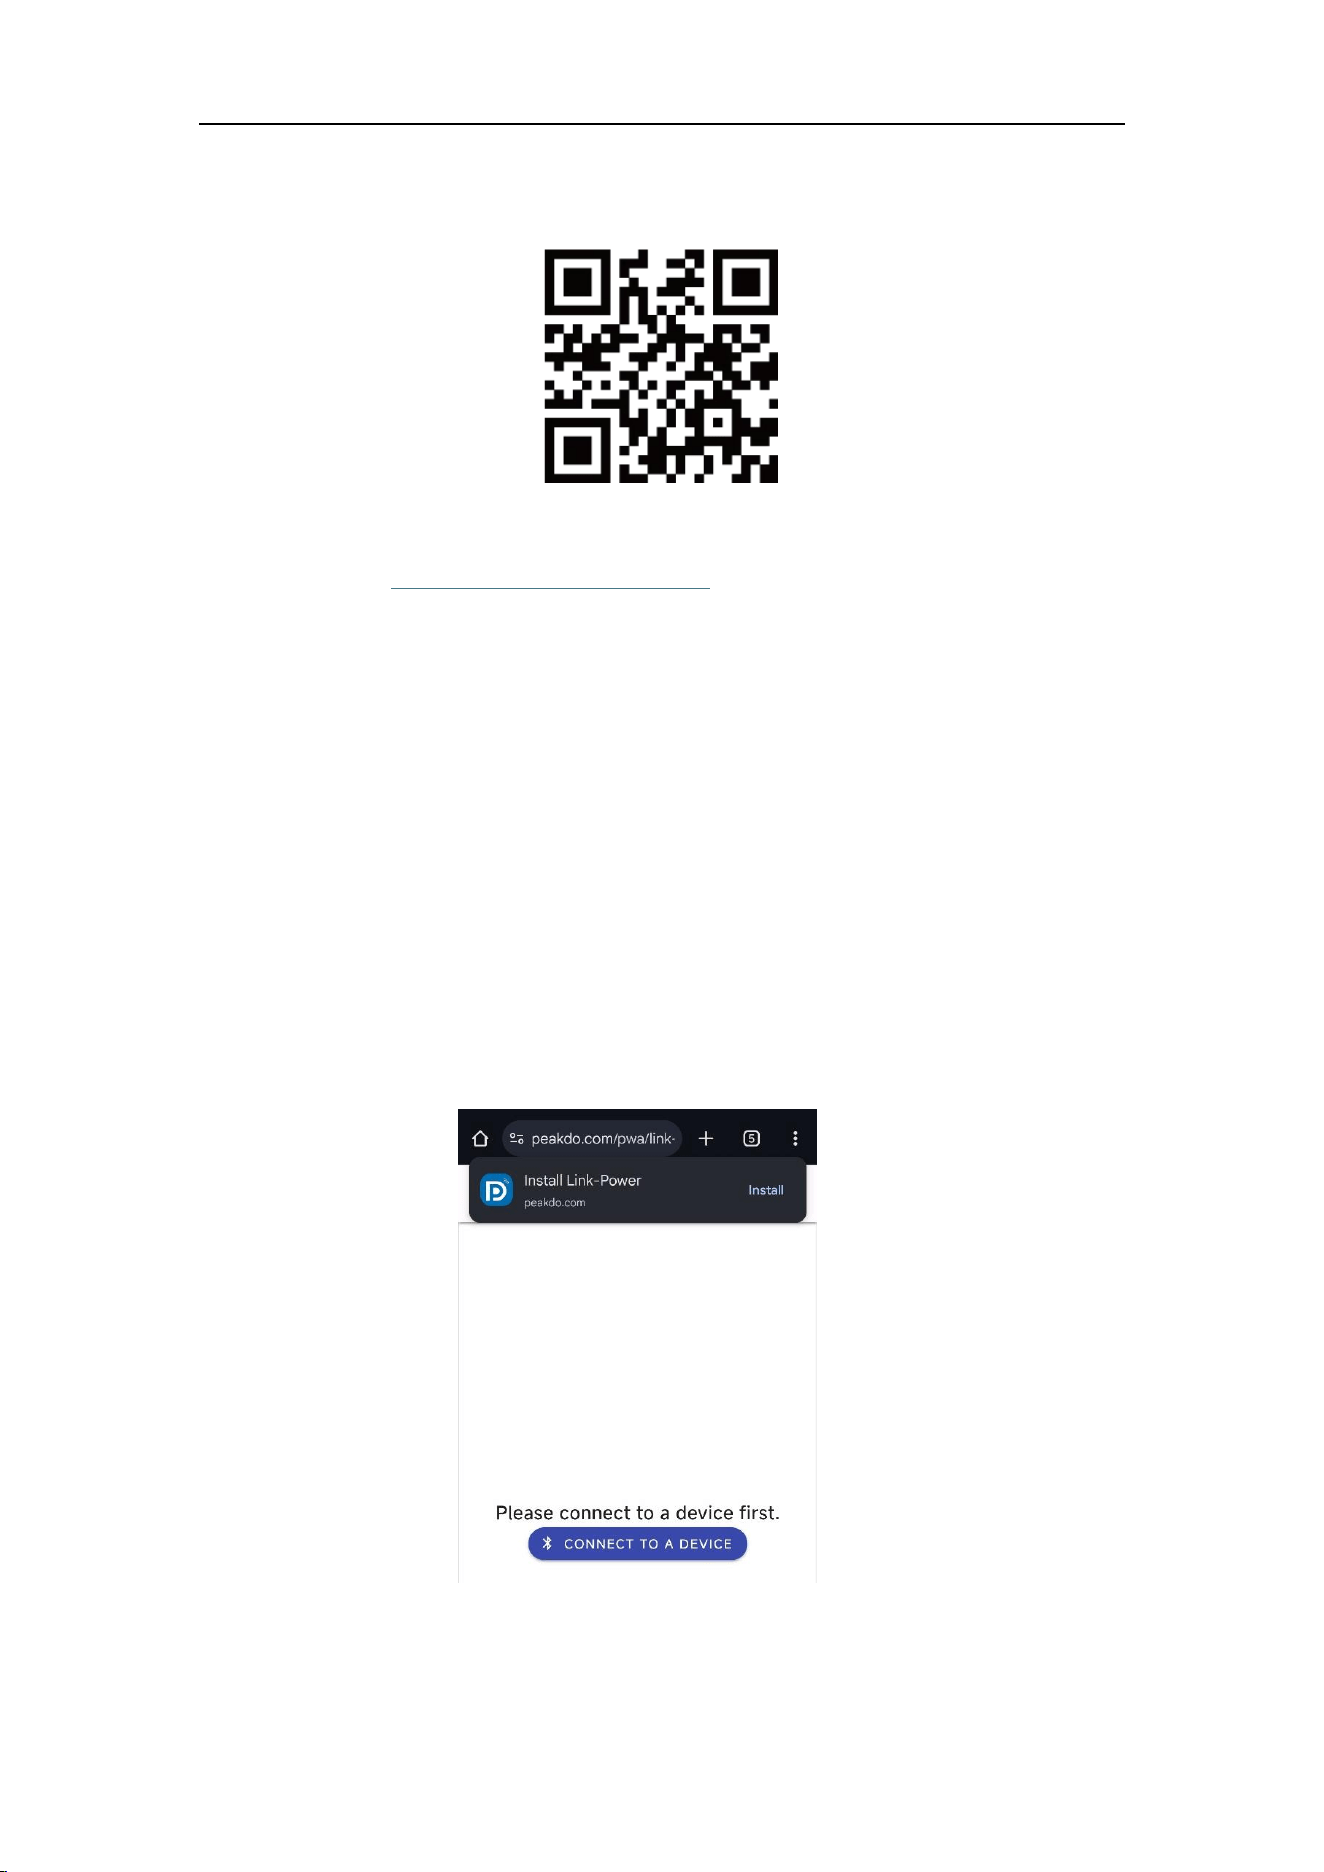
Access Web App
Scan the following QR code, or the one on the back of the LinkPower Ultra.
Or type in the URL https://pwa-dev.peakdo.ca/lp3/ manually.
(Optional) Install Web App
NOTE: You may need to grant your browser 'Home screen shortcuts' permission.
You can access the Web App directly in your browser. For a more integrated experience, you
can also install it like a native app, which provides a launch icon on your desktop or allows it
to be pinned to your Windows Taskbar.
When you visit the Web App for the first time, your browser may prompt you to install it.
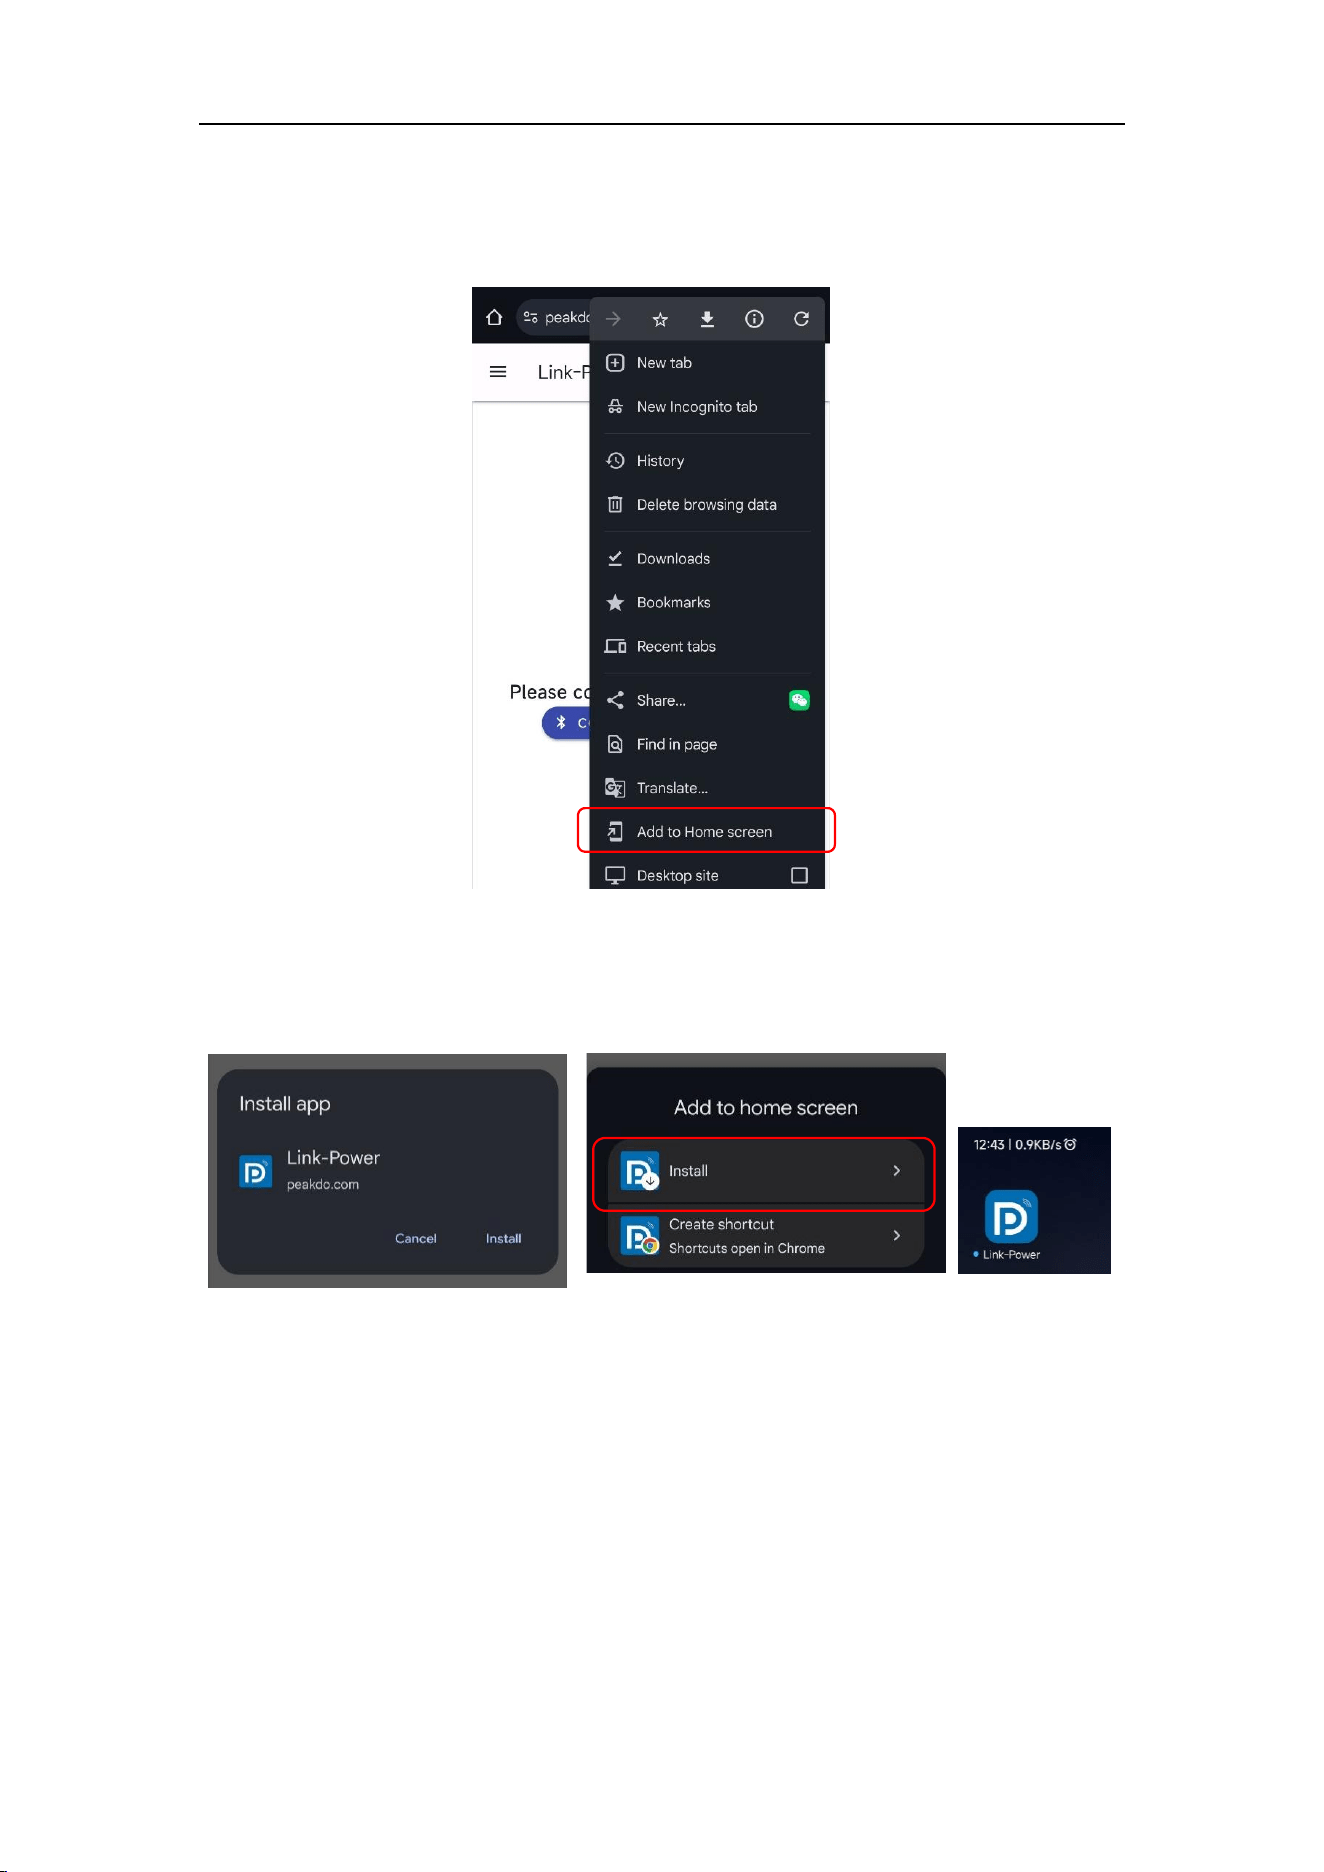
LinkPower Ultra Quick Start
15
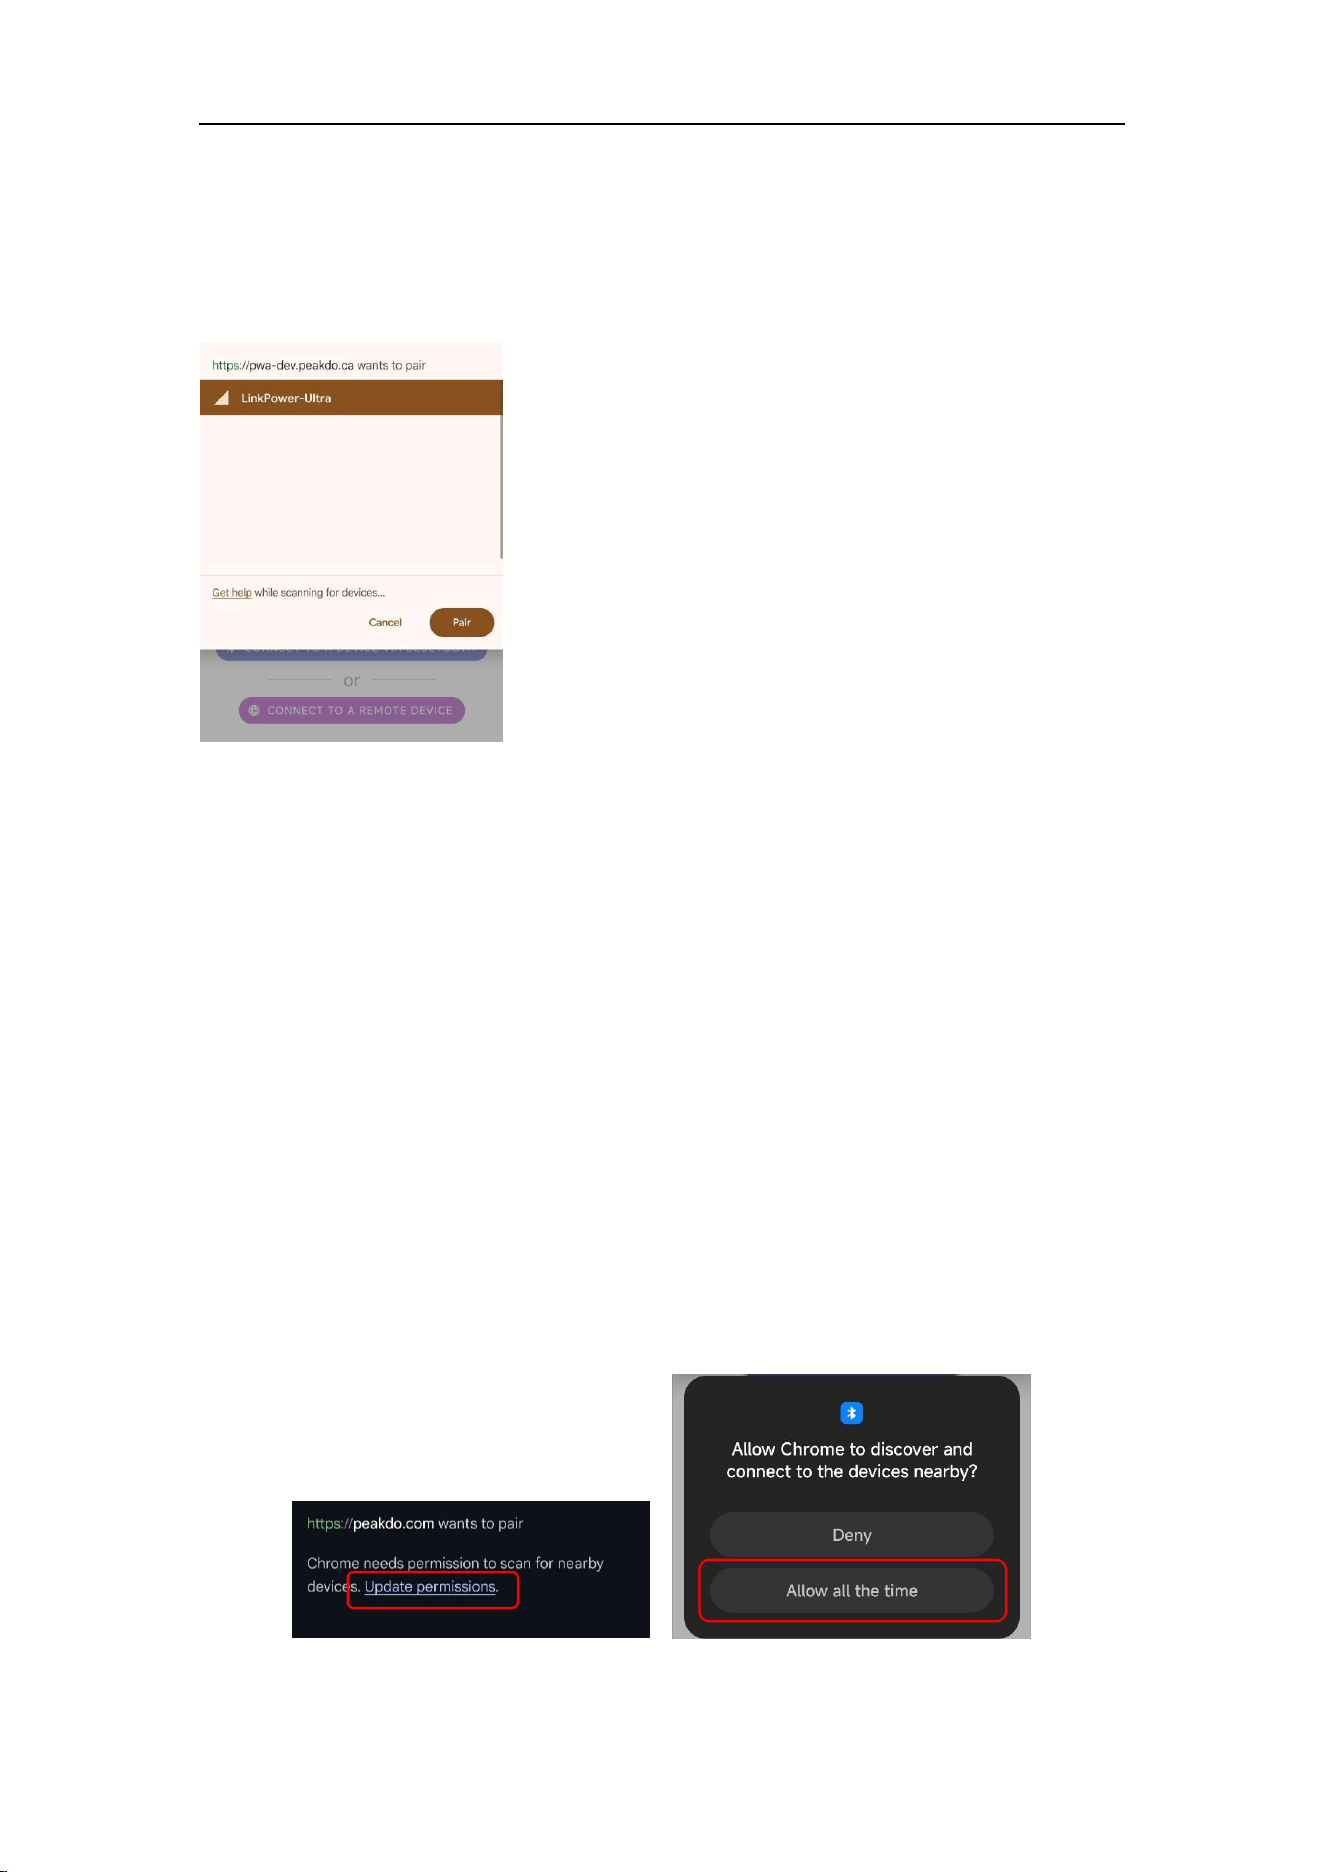
If not, you can typically find the installation option via your browser's "Add to Home screen"
or similar menu.
Follow the on-screen guide to install the Web App:
LinkPower Ultra Quick Start
16
Connect to LinkPower Ultra
The Web App communicates with LinkPower Ultra via Bluetooth.
Note: In some cases, the Bluetooth device name may appear as ESP32.
You can connect to your LinkPower Ultra by tap the “Connect to a device” button.
Your browser will scan for all nearby LinkPower Ultra devices and display them in a list,
allowing you to select one to pair.
NOTE: In some situations, a previously paired or bonded device may not show up in the list.
You can unpair or remove the bond from your system and try again.
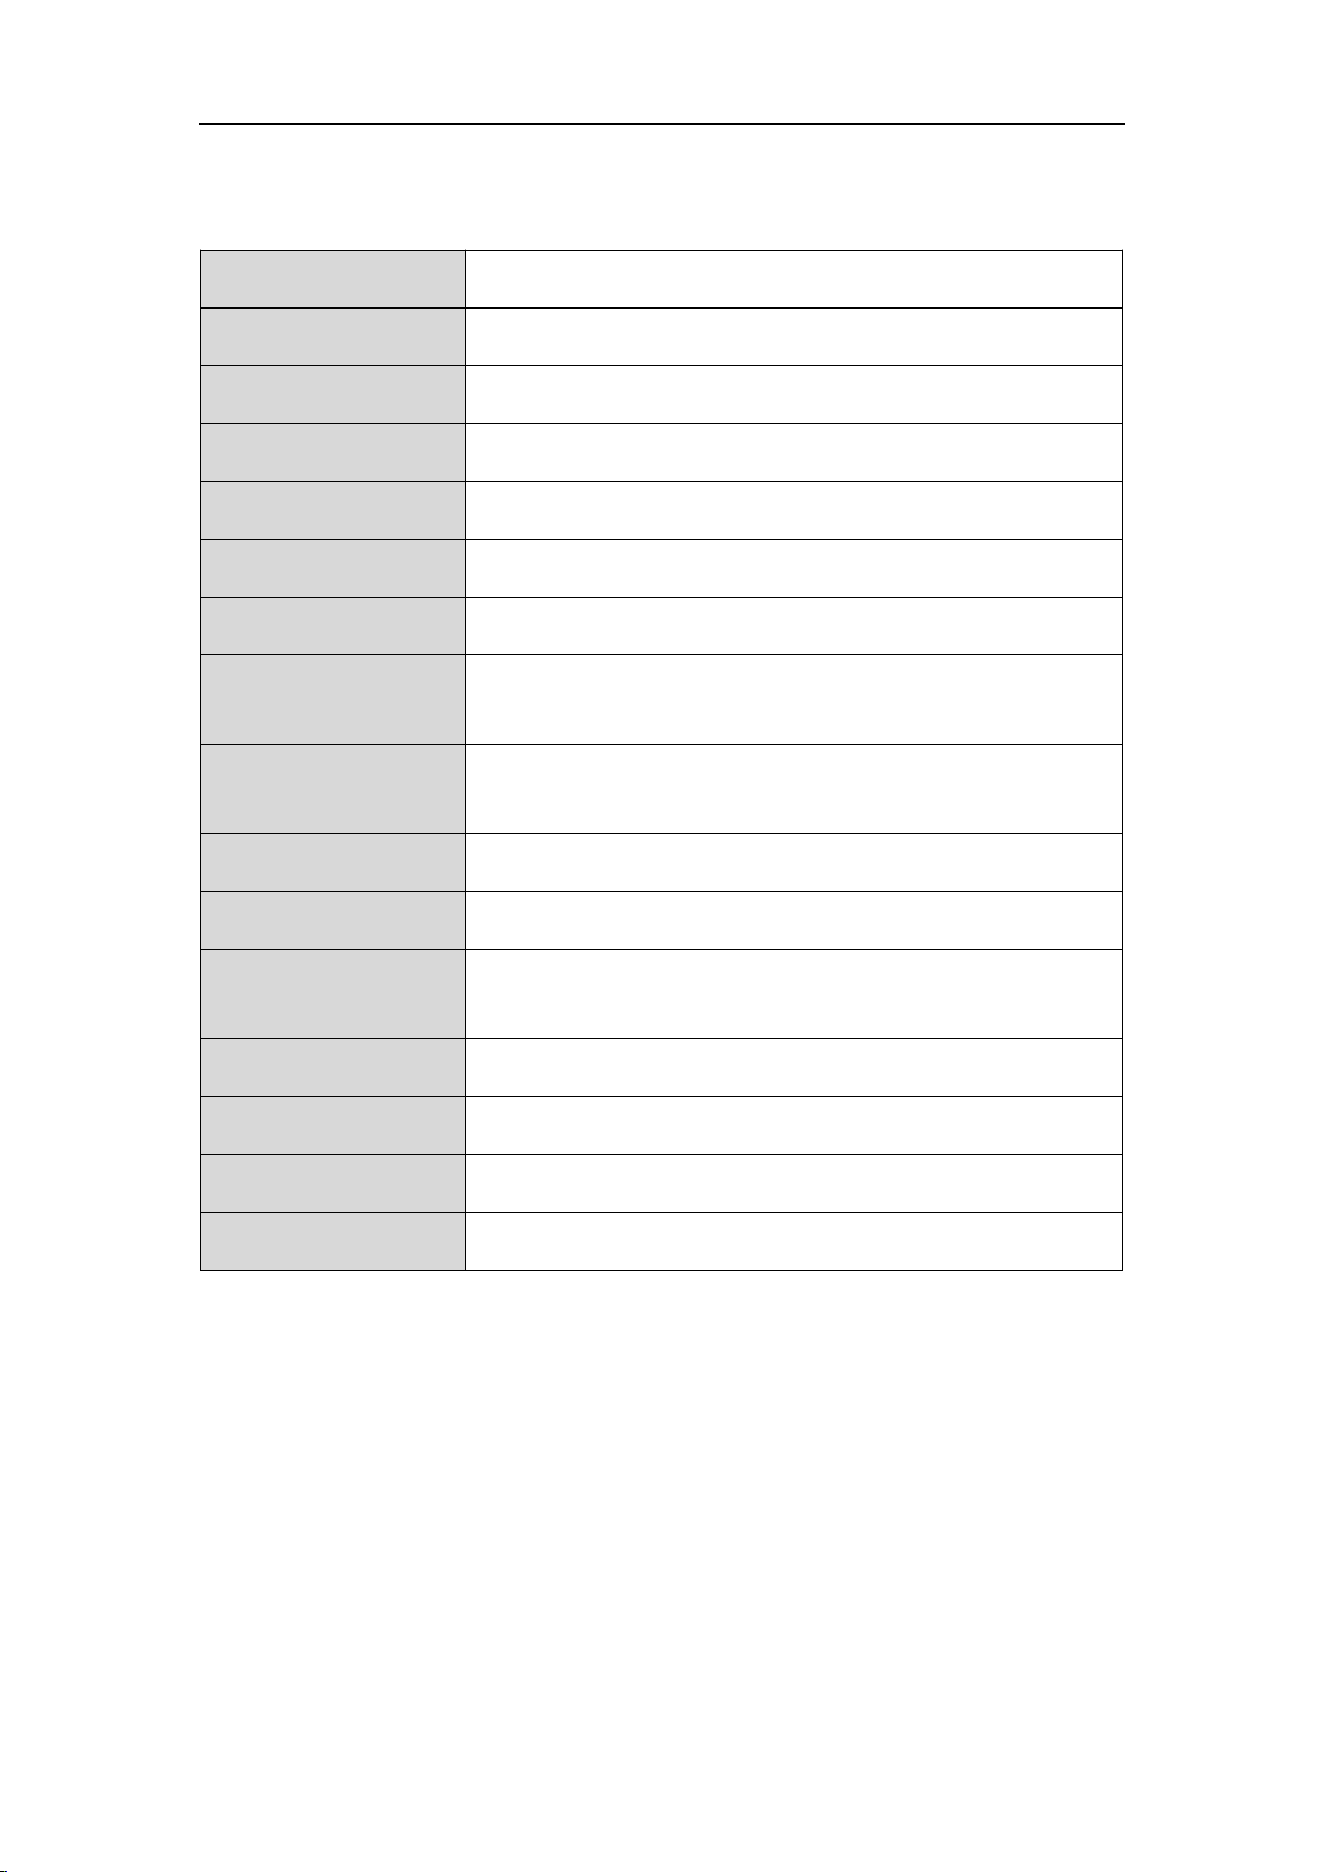
Grant permission to Browser
If your browser lacks Bluetooth access permission, it may prompt you to grant it.
Follow the on-screen guide to allow access:

LinkPower Ultra Quick Start
17
Pair with LinkPower Ultra
When connect to the LinkPower Ultra device, your operating system (OS) will prompt you to
enter a PIN to pair with the LinkPower Ultra device. You'll only need to do this once, unless
you delete the LinkPower Ultra bond from your OS settings.
NOTE: A random six‑ digit PIN will be displayed on the LCD screen. If not, use the default
PIN 020555.
Troubleshooting
Our Web App has been successfully tested with the following browsers:
Windows/macOS: Chrome, Edge
Android: Chrome, Edge, Samsung Internet
iOS: Bluefy
1. Activate LinkPower Ultra, and make sure Bluetooth is turned on: the Bluetooth icon should
be highlighted white (not green or dim grey) on top of the screen.
2. Make sure your system has Bluetooth hardware and it is turned on:
For Windows
Go to `Settings` → `Bluetooth & devices`. Make sure Bluetooth is turned on
In `Bluetooth & devices`, click `Add device`
Choose `Bluetooth`
Wait for Windows to discover your BLE device, you should see the device named
`Link-Power-3` in the list
For Android
Make sure Bluetooth is turned on
you should see the device named `Link-Power-2` in the `Available devices` list
3. Install and launch a supported browser
LinkPower Ultra Quick Start
18
Specifications
Product Name
LinkPower Ultra
Battery Capacity
Battery Runtime
~5.5Hours for Starlink® Mini
Battery Type
21700 Lithium Battery
Ports
PD/USB-C; DC 5.5 x 2.1;magnetic DC
DC Input
DC 12-30V (65W Max)
DC Output
DC 15-21V (65W Max)
PD/USB-C Input
5V-3A; 9V-3A; 12V-3A; 15V-3A; 20V-3.25A;
Default 65W Max
1,2
.
PD/USB-C Output
5V-3A; 9V-3A; 12V-3A; 15V-3A; 20V-3.25A;
Default 65W Max
Screen
1.05" LCD
Control
Power Button / Bluetooth Low Energy
Others
LED Indicator;
A standard 1/4-inch screw holes.
Dimensions
243mm x 115mm x 27 mm
Weight
~663g
Working Temperature
-20℃ ~ 60°C
Waterproof Rating
IP65
1. Input (Charging) Power Limit can be set via Web App. The max power limit is 100W.
2. Warning: Charging or discharging the battery at high power levels may significantly reduce
its lifespan. For optimal battery health, avoid excessive power usage unless necessary.
99.9Wh,
27000mAh(3.7v)

FCC Warnning:
This equipment has been tested and found to comply with the limits for a Class B digital device,
pursuant to part 15 of the FCC Rules. These limits are designed to provide
reasonable
protection againstharmful interference in a residential installation. This equipment generates,
uses and can radiateradio
frequency
energy
and,
if
not
installed
and
used
in
accordance
with
the
instructions,
maycause
harmful
interference
to
radio
communications.
However,
there
is
no
guarantee
thatinterference
will
not
occur
in
a
particular
installation.
If
this
equipment
does
cause
harmfulinterference to radio or television reception, which can be
determined by turning the equipmentoff
and
on,
the
user
is
encouraged
to
try
to
correct
the
interference
by
one
or
more
of
thefollowing measures:
•
Reorient or relocate the receiving antenna.
•
Increase the separation between the equipment and receiver.
•
Connect the equipment into an outlet on a circuit different from that to which the receiver is
connected.
• Consult the dealer or an experienced radio/TV technician for help.
Caution:
Any
changes
or
modifications
to
this
device
not
explicitly
approved
by
manufacturer
could void your authority to operate this equipment.
This
device
complies
with
part
15
of
the
FCC
Rules.
Operation
is
subject
to
the
following
two
conditions:
(1)This
device
may
not
cause
harmful
interference,
and
(2)
this
device
must
accept
any
interference received, including interference that may cause undesired operation.
This
equipment
complies
with
FCC
radiation
exposure
limits
set
forth
for
an
uncontrolled
environment.
This
equipment
should
be
installed
and
operated
with
minimum
distance
20cm
between the radiator and your body.