
Document Version: V1.4
i

Document Version: V1.4
i
Copyright Statement
© 2021-2023 Shenzhen Tenda Technology Co., Ltd. All rights reserved.
is a registered trademark legally held by Shenzhen Tenda Technology Co., Ltd. Other brand and product names mentioned herein are
trademarks or registered trademarks of their respective holders. Copyright of the whole product as integration, including its accessories and
software, belongs to Shenzhen Tenda Technology Co., Ltd. No part of this publication can be reproduced, transmitted, transcribed, stored in a
retrieval system, or translated into any language in any form or by any means without the prior written permission of Shenzhen Tenda Technology
Co., Ltd.
Disclaimer
Pictures, images and product specifications herein are for references only. To improve internal design, operational function, and/or reliability, Tenda
reserves the right to make changes to the products without obligation to notify any person or organization of such revisions or changes. Tenda does
not assume any liability that may occur due to the use or application of the product described herein. Every effort has been made in the preparation
of this document to ensure accuracy of the contents, but all statements, information and recommendations in this document do not constitute a
warranty of any kind, express or implied.

Document Version: V1.4
ii
Preface
Thank you for choosing Tenda! Please read this guide before you start.
Applicable models
This guide applies to all Tenda camera products that can be managed by the TDSEE App. The contained images and UI screenshots are subject to the
actual products. In this guide, unless otherwise specified:
- CP6 is used for illustrations here.
- The TDSEE App with version 1.1.0.2 is taken as an example.
- Operations in this guide are based on iOS. Devices of other operating systems may differ.
Conventions
The typographical elements that may be found in this document are defined as follows.
Item
Presentation
Example
Cascading menus
>
System > Live Users
Parameter and value
Bold
Set User Name to Tom.
Variable
Italic
Format: XX:XX:XX:XX:XX:XX
UI control
Bold
On the Policy page, tap the OK button.
Document Version: V1.4
iii
Item
Presentation
Example
Message
“ ”
The “Success” message appears.
The symbols that may be found in this document are defined as follows.
Symbol
Meaning
This format is used to highlight information of importance or special interest. Ignoring this type of note may
result in ineffective configurations, loss of data or damage to the device.
This format is used to supplement or explain the description of relevant operations.
Technical support
Contact us if you need more help. We will be glad to assist you as soon as possible.
Email address: t[email protected]
Website: www.tendacn.com
Revision history
Tenda is constantly searching for ways to improve its products and documentation. The following table indicates any changes that might have been
made since this guide was released.
Document Version: V1.4
iv
Version
Description
Date
V1.4
1. Added the description of the set up OSD, enable one-touch call function, and help center
function.
2. Optimized the description of add the camera to TDSEE App, home page, basic settings,
modify Wi-Fi settings, set up alarm, cloud storage, Micro SD card storage recording, enable
WDR mode, device reboot, share device to friends and relatives, delete sharing relationship,
help&feedback function.
3. Optimized sentence expression.
2023-08-30
V1.3
1. Added the description of the WDR Mode, Volume Settings and Video Standard functions.
2. Optimized the description of the Home page, Basic Settings, Alarm, Patrol Settings and
Calling Mode functions.
3. Optimized sentence expression.
2023-05-30
V1.2
1. Added a method to add a camera through UUID.
2. Added the description of the Device Reboot function.
3. Added the description of the Smart Control function.
4. Deleted the description of the continuous recording of the Cloud Storage.
5. Optimized sentence expression.
2023-01-05
V1.1
Updated the method of adding the camera to the TDSEE App.
2021-09-13
V1.0
Original publication.
2021-04-28

Document Version: V1.4
v
Contents
Install the TDSEE App ................................................................................................................................................................................................. 1
Login .......................................................................................................................................................................................................................... 2
Add a camera to TDSEE App ....................................................................................................................................................................................... 4
Method 1: Add a camera through QR code ....................................................................................................................................................................... 4
Method 2: Add a camera through one-tap ...................................................................................................................................................................... 11
Method 3: Add a camera through AP .............................................................................................................................................................................. 15
Method 4: Add a camera in a wired manner (Not applicable for CP3)............................................................................................................................ 22
Method 5: Add a camera through UUID .......................................................................................................................................................................... 26
Home page ............................................................................................................................................................................................................... 32
Basic settings ............................................................................................................................................................................................................ 33
Monitoring operation ....................................................................................................................................................................................................... 33
Preview multiple images at the same time ...................................................................................................................................................................... 37
Set up calling mode (Example: CH7-WCA) ....................................................................................................................................................................... 40
Set up the volume of the microphone and speaker (Example: CH7-WCA) ..................................................................................................................... 42
Method 1 ...................................................................................................................................................................................................................... 42
Method 2 ...................................................................................................................................................................................................................... 44

Document Version: V1.4
vi
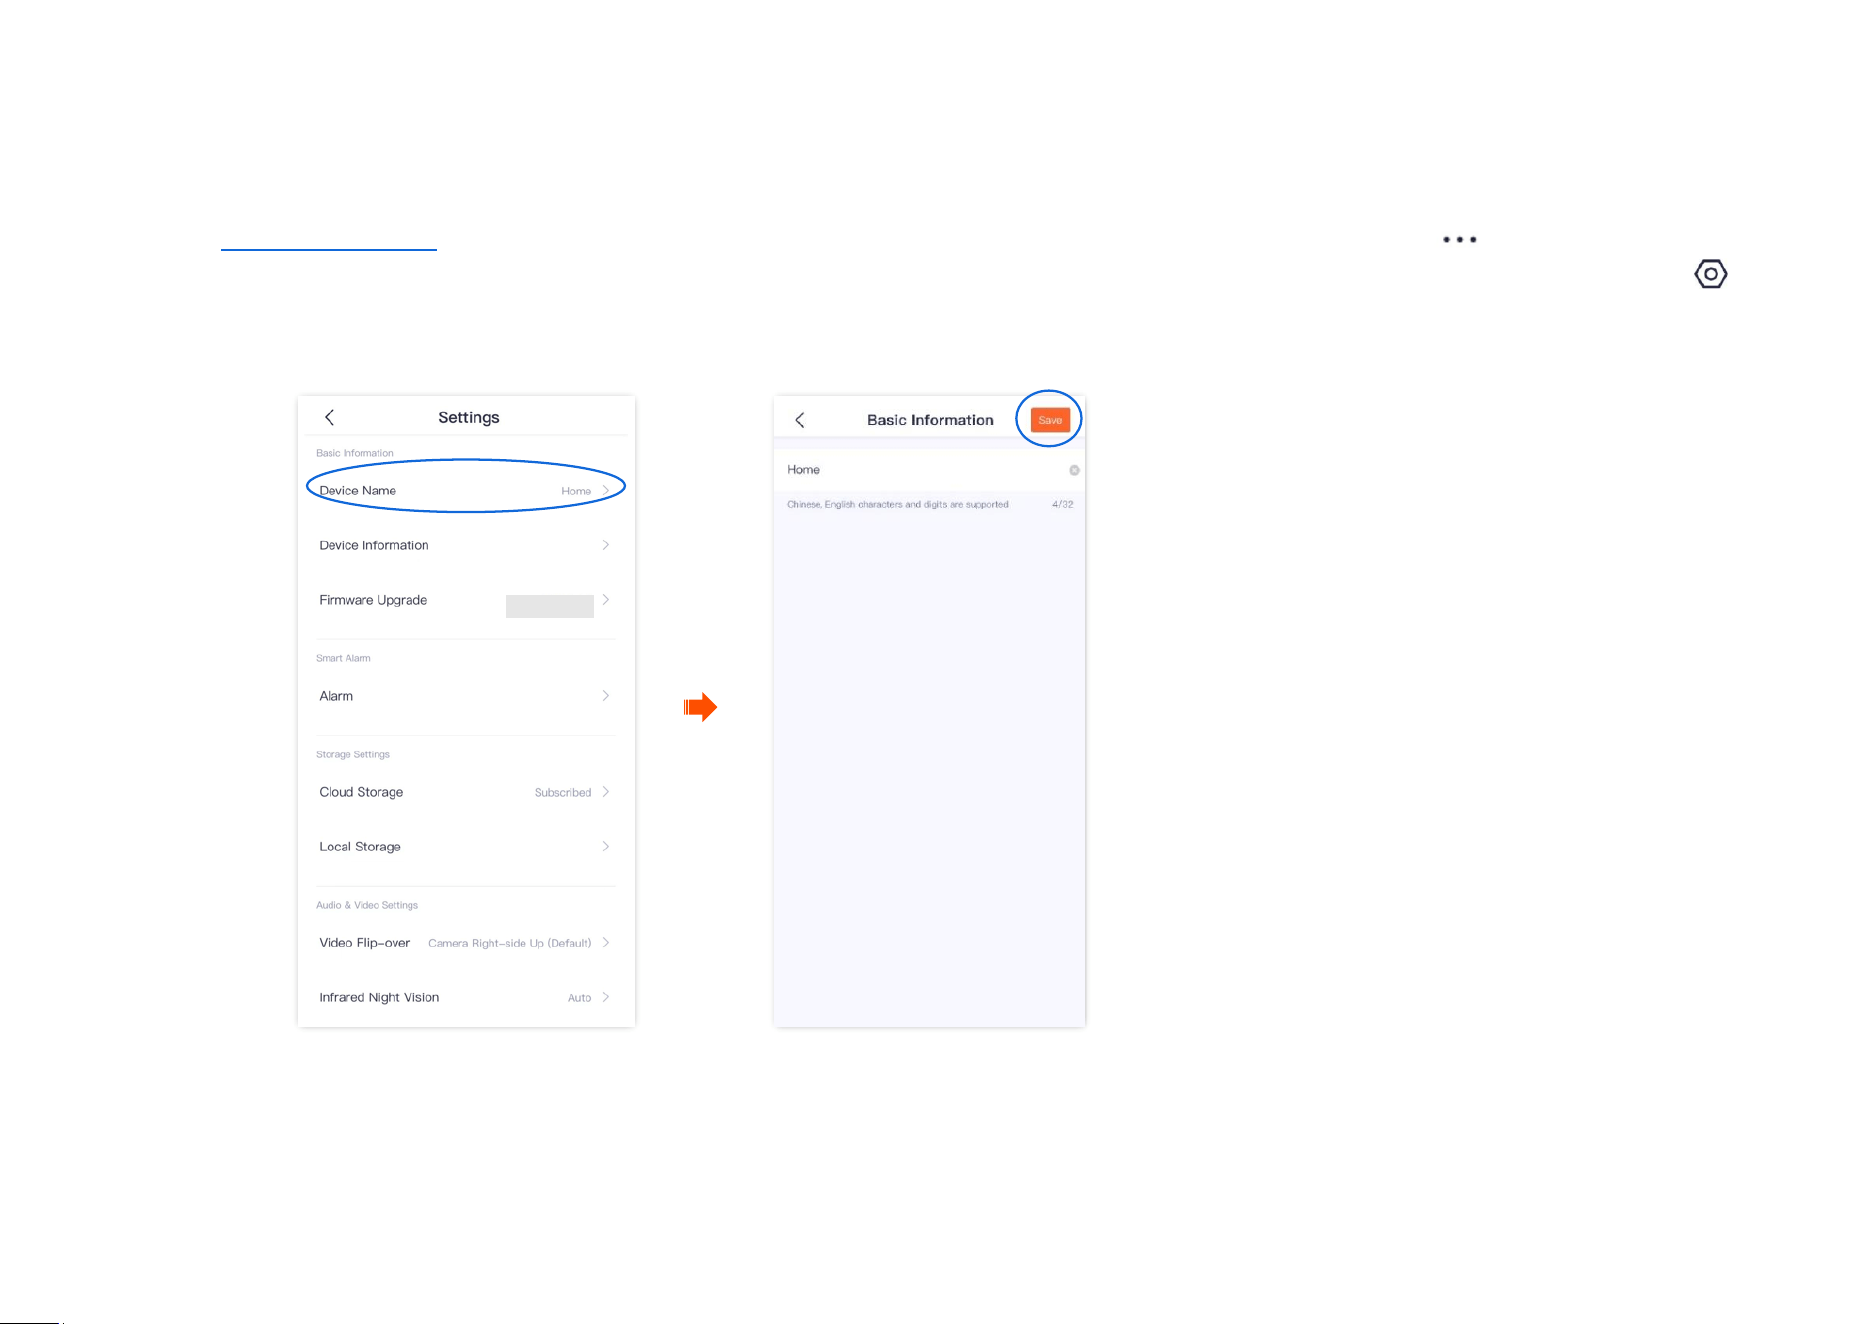
Name your camera ........................................................................................................................................................................................................... 46
Check the basic information of your device .................................................................................................................................................................... 47
Modify the Wi-Fi settings ......................................................................................................................................................................................... 49
Upgrade device software .......................................................................................................................................................................................... 52
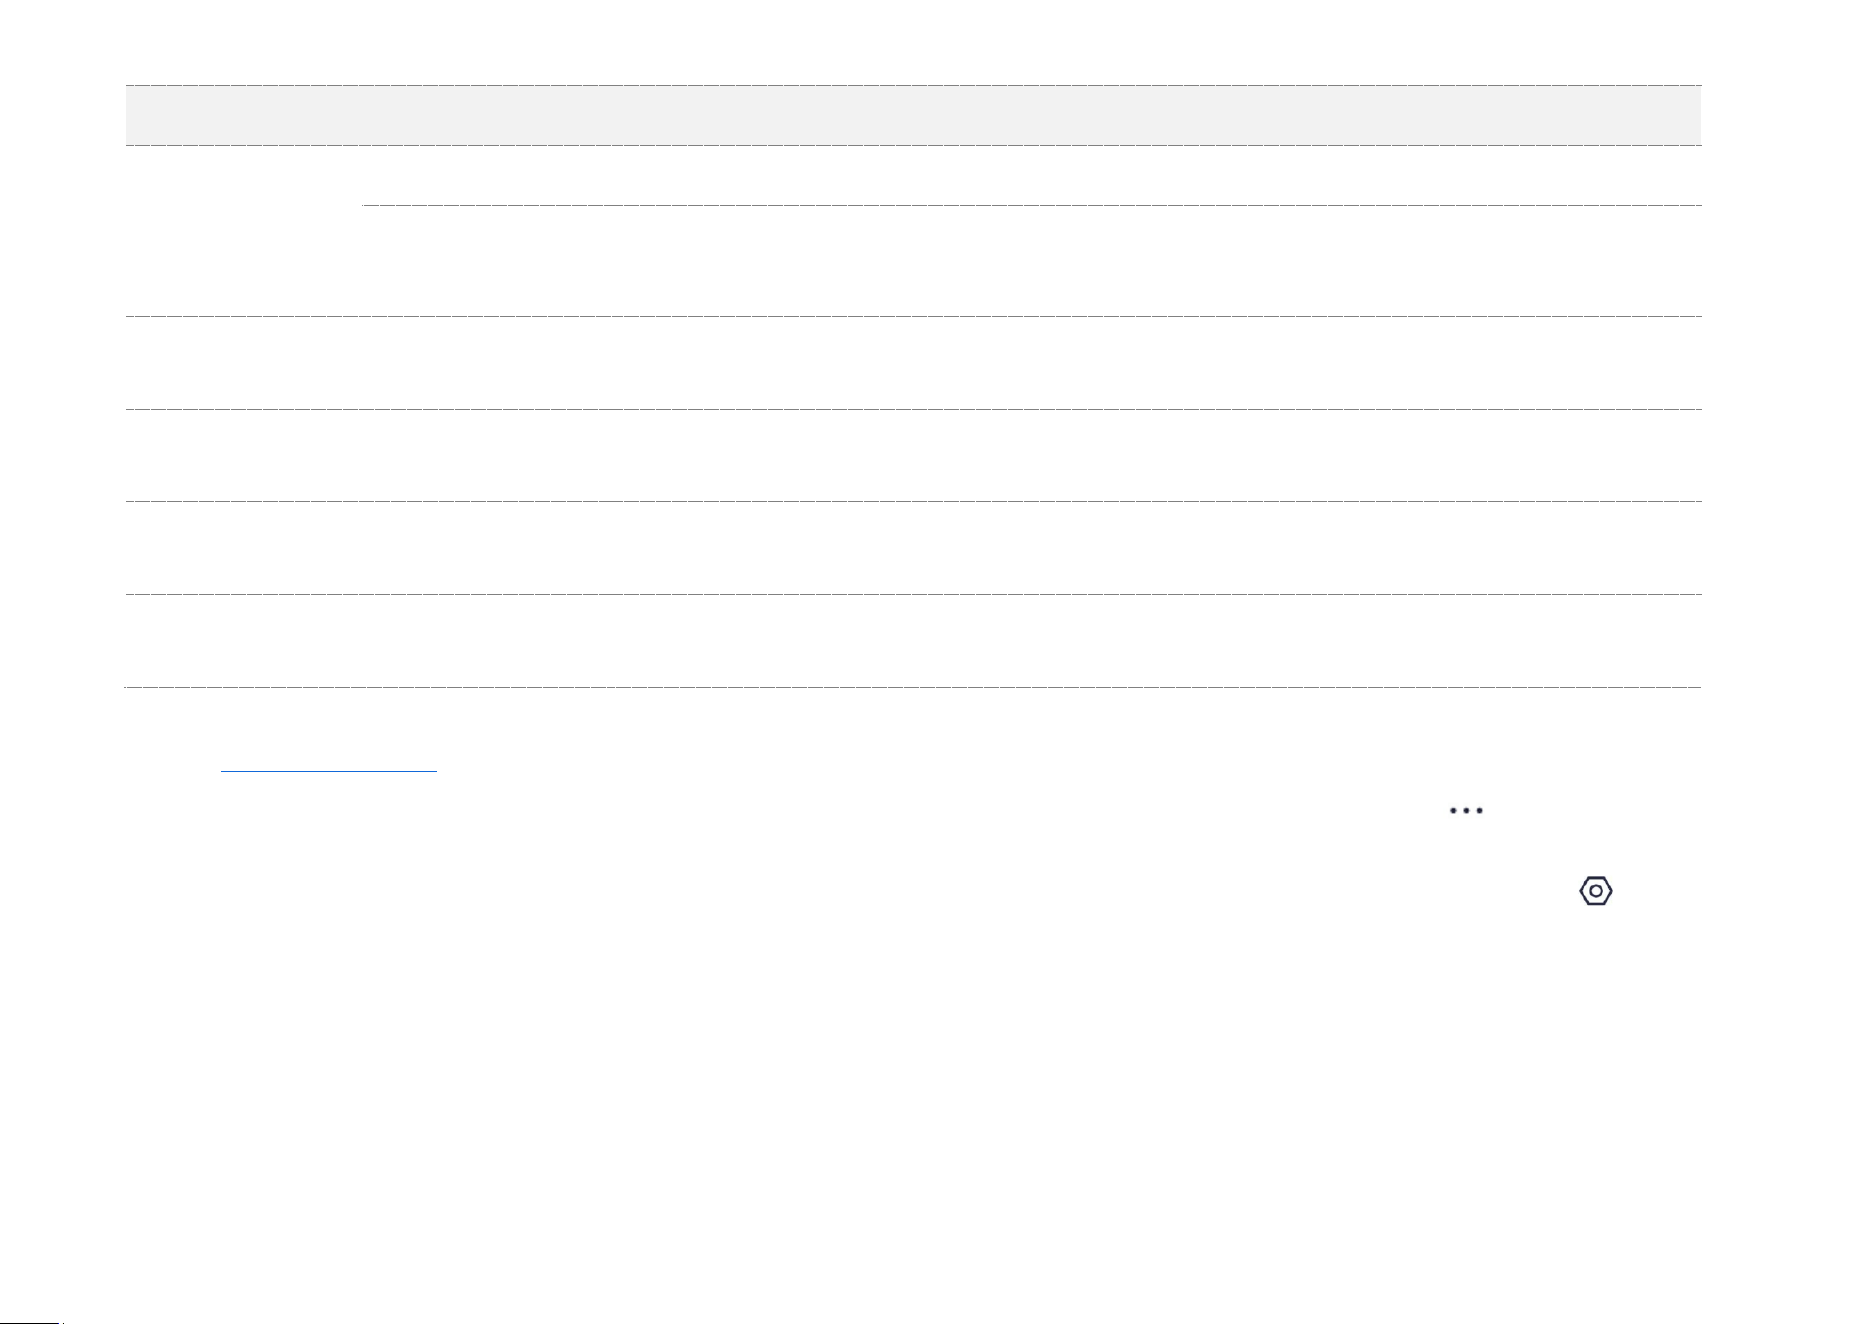
Set up alarm (Example: CP3 Pro) .............................................................................................................................................................................. 53
Method 1 ...................................................................................................................................................................................................................... 53
Method 2 ...................................................................................................................................................................................................................... 55
Set up alarm (Example: CH7-WCA) ........................................................................................................................................................................... 57
Method 1 (Recommended) .......................................................................................................................................................................................... 57
Method 2 ...................................................................................................................................................................................................................... 60
Enable human tracking (Example: CH7-WCA) ........................................................................................................................................................... 61
Method 1 (Recommended) .......................................................................................................................................................................................... 61
Method 2 ...................................................................................................................................................................................................................... 62
Cloud ........................................................................................................................................................................................................................ 63
Subscribe to the cloud storage service ............................................................................................................................................................................ 64
Method 1 (Recommended) .......................................................................................................................................................................................... 64
Method 2 ...................................................................................................................................................................................................................... 67
Method 3 ...................................................................................................................................................................................................................... 68
Method 4 ...................................................................................................................................................................................................................... 69

Document Version: V1.4
vii
Check and edit cloud storage video ................................................................................................................................................................................. 70
Disable the cloud storage service .................................................................................................................................................................................... 72
Method 1 ...................................................................................................................................................................................................................... 72
Method 2 ...................................................................................................................................................................................................................... 74
Transfer the cloud storage service package ..................................................................................................................................................................... 75
Method 1 ...................................................................................................................................................................................................................... 75
Method 2: ..................................................................................................................................................................................................................... 78
Replace the cloud storage service package ..................................................................................................................................................................... 80
Method 1 ...................................................................................................................................................................................................................... 80
Method 2 ...................................................................................................................................................................................................................... 83
Cancel the subscription package ...................................................................................................................................................................................... 85
Method 1 ...................................................................................................................................................................................................................... 85
Method 2 ...................................................................................................................................................................................................................... 88
Check remaining time of cloud storage ........................................................................................................................................................................... 90
Check/Modify/Cancel my order ....................................................................................................................................................................................... 91
Micro SD card recording storage ............................................................................................................................................................................... 92
Use Micro SD card for the first time ................................................................................................................................................................................. 92
Set Micro SD card recording mode .................................................................................................................................................................................. 94
Format Micro SD card ...................................................................................................................................................................................................... 96

Document Version: V1.4
viii
Check or edit the Micro SD card video ............................................................................................................................................................................. 99
Check Micro SD card available storage ............................................................................................................................................................................ 50
Set up video flip-over ............................................................................................................................................................................................... 52
Set up night vision mode .......................................................................................................................................................................................... 53
Set up infrared night vision ....................................................................................................................................................................................... 55
Enable WDR mode (Example: CH7-WCA) .................................................................................................................................................................. 57
Set up OSD (Example: CH7-WCA) .............................................................................................................................................................................. 59
Modify the time zone ............................................................................................................................................................................................... 60
Turn off the LED indicator of the device .................................................................................................................................................................... 61
Patrol settings (Example: CH7-WCA) ......................................................................................................................................................................... 62
Device reboot ........................................................................................................................................................................................................... 65
Reboot the device now .................................................................................................................................................................................................... 65
Reboot schedule .............................................................................................................................................................................................................. 67
Modify the video standard (Example: CP3 Pro) ......................................................................................................................................................... 69
Enable the device call (Example: CP3 Pro) ................................................................................................................................................................ 70
Delete the device ..................................................................................................................................................................................................... 73
Check messages........................................................................................................................................................................................................ 74
Album ...................................................................................................................................................................................................................... 75
Delete photos/videos ....................................................................................................................................................................................................... 75

Document Version: V1.4
ix
Download photos/videos to the smartphone ................................................................................................................................................................. 76
Share photos/videos with friends or through social platform ......................................................................................................................................... 77
Share device ............................................................................................................................................................................................................. 78
Method 1 (Recommended) .......................................................................................................................................................................................... 78
Method 2 ...................................................................................................................................................................................................................... 81
Method 3 ...................................................................................................................................................................................................................... 82
Method 4 ...................................................................................................................................................................................................................... 84
Accept sharing .......................................................................................................................................................................................................... 86
Method 1 (Recommended) .......................................................................................................................................................................................... 86
Method 2 ...................................................................................................................................................................................................................... 87
Delete sharing relationship ....................................................................................................................................................................................... 88
Method 1 The sharer cancels the sharing relationship ............................................................................................................................................... 89
Method 2 The accepter deletes the sharing relationship ............................................................................................................................................ 90
Method 3 The accepter deletes the device ................................................................................................................................................................. 91
Add your friends ....................................................................................................................................................................................................... 92
Method 1 ...................................................................................................................................................................................................................... 92
Method 2 ...................................................................................................................................................................................................................... 93
Accept invitation from your friends .......................................................................................................................................................................... 94
Method 1 (Recommended) .......................................................................................................................................................................................... 94

Document Version: V1.4
x
Method 2 ...................................................................................................................................................................................................................... 95
Delete your friends ................................................................................................................................................................................................... 96
Smart control ........................................................................................................................................................................................................... 97
Method of binding Alexa account and TDSEE account .................................................................................................................................................... 97
Method 1: Bind Alexa APP through TDSEE App ........................................................................................................................................................... 97
Method 2: Bind TDSEE APP through Alexa App ......................................................................................................................................................... 101
Bind your Echo show with an Alexa account ................................................................................................................................................................. 103
Reset device password ........................................................................................................................................................................................... 104
About us ................................................................................................................................................................................................................. 105
Help Center ............................................................................................................................................................................................................ 106
Help & Feedback .................................................................................................................................................................................................... 107
FAQ ................................................................................................................................................................................................................................. 107
Feedback ........................................................................................................................................................................................................................ 107
Settings .................................................................................................................................................................................................................. 109
My profile .............................................................................................................................................................................................................. 110

Document Version: V1.4
1
Install the TDSEE App
If you already have the TDSEE App, please log in.
If you have NOT got one, scan the following QR code, or search for TDSEE in Google Play or App Store, download and install it onto your
smartphone/tablet.
The smartphone system supports Android 6.0 and above, and iOS 11 and above.
Or
TDSEE
Document Version: V1.4
2
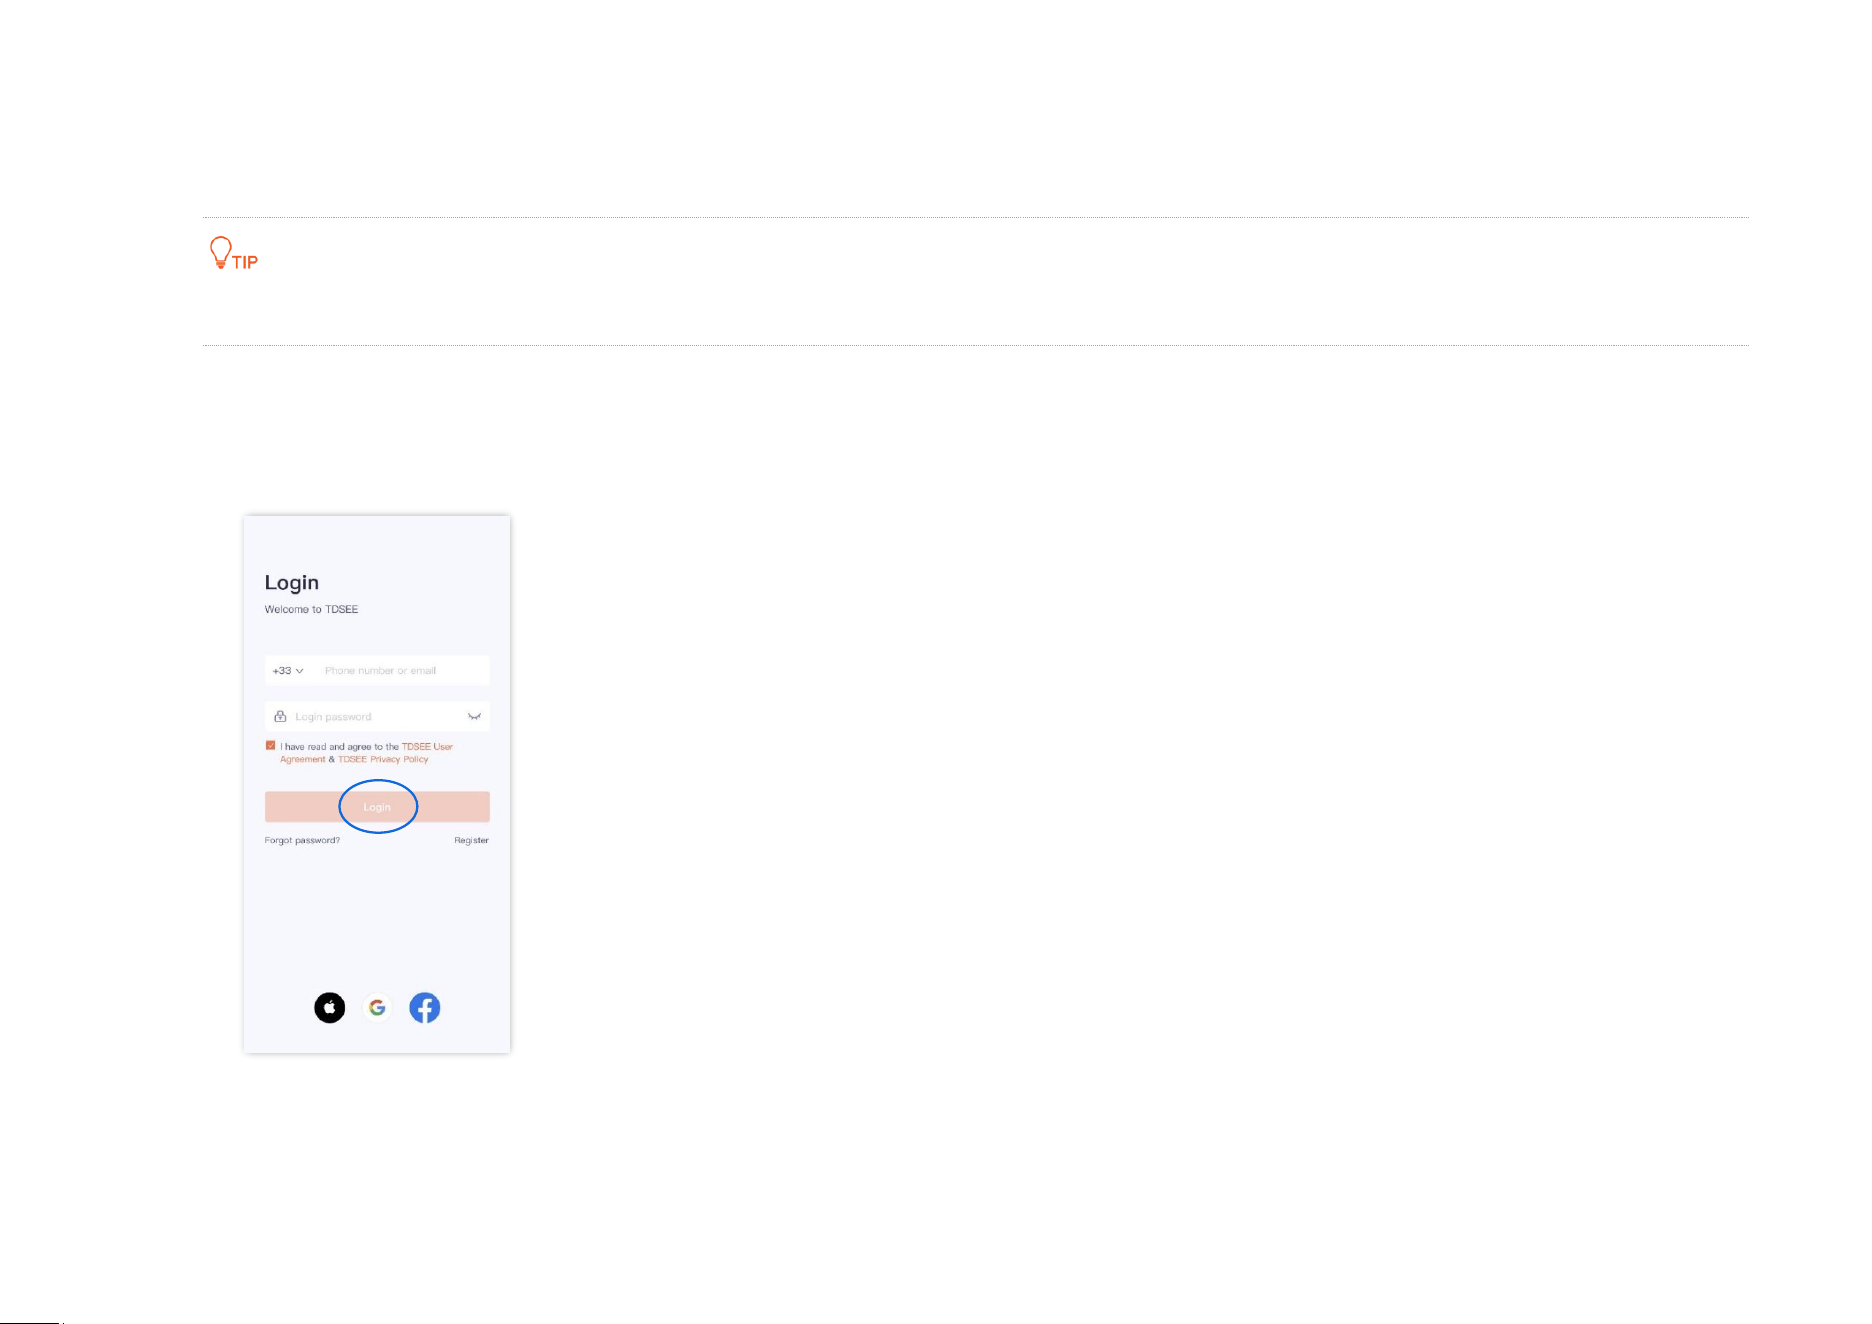
Login
Ensure that your smart device used for setup, such as a smartphone, can access the internet.
If you already have a registered account
Step 1 Open the TDSEE App.
Step 2 Enter the registered smartphone number or email address and password, and tap Login.
----End
Document Version: V1.4
3
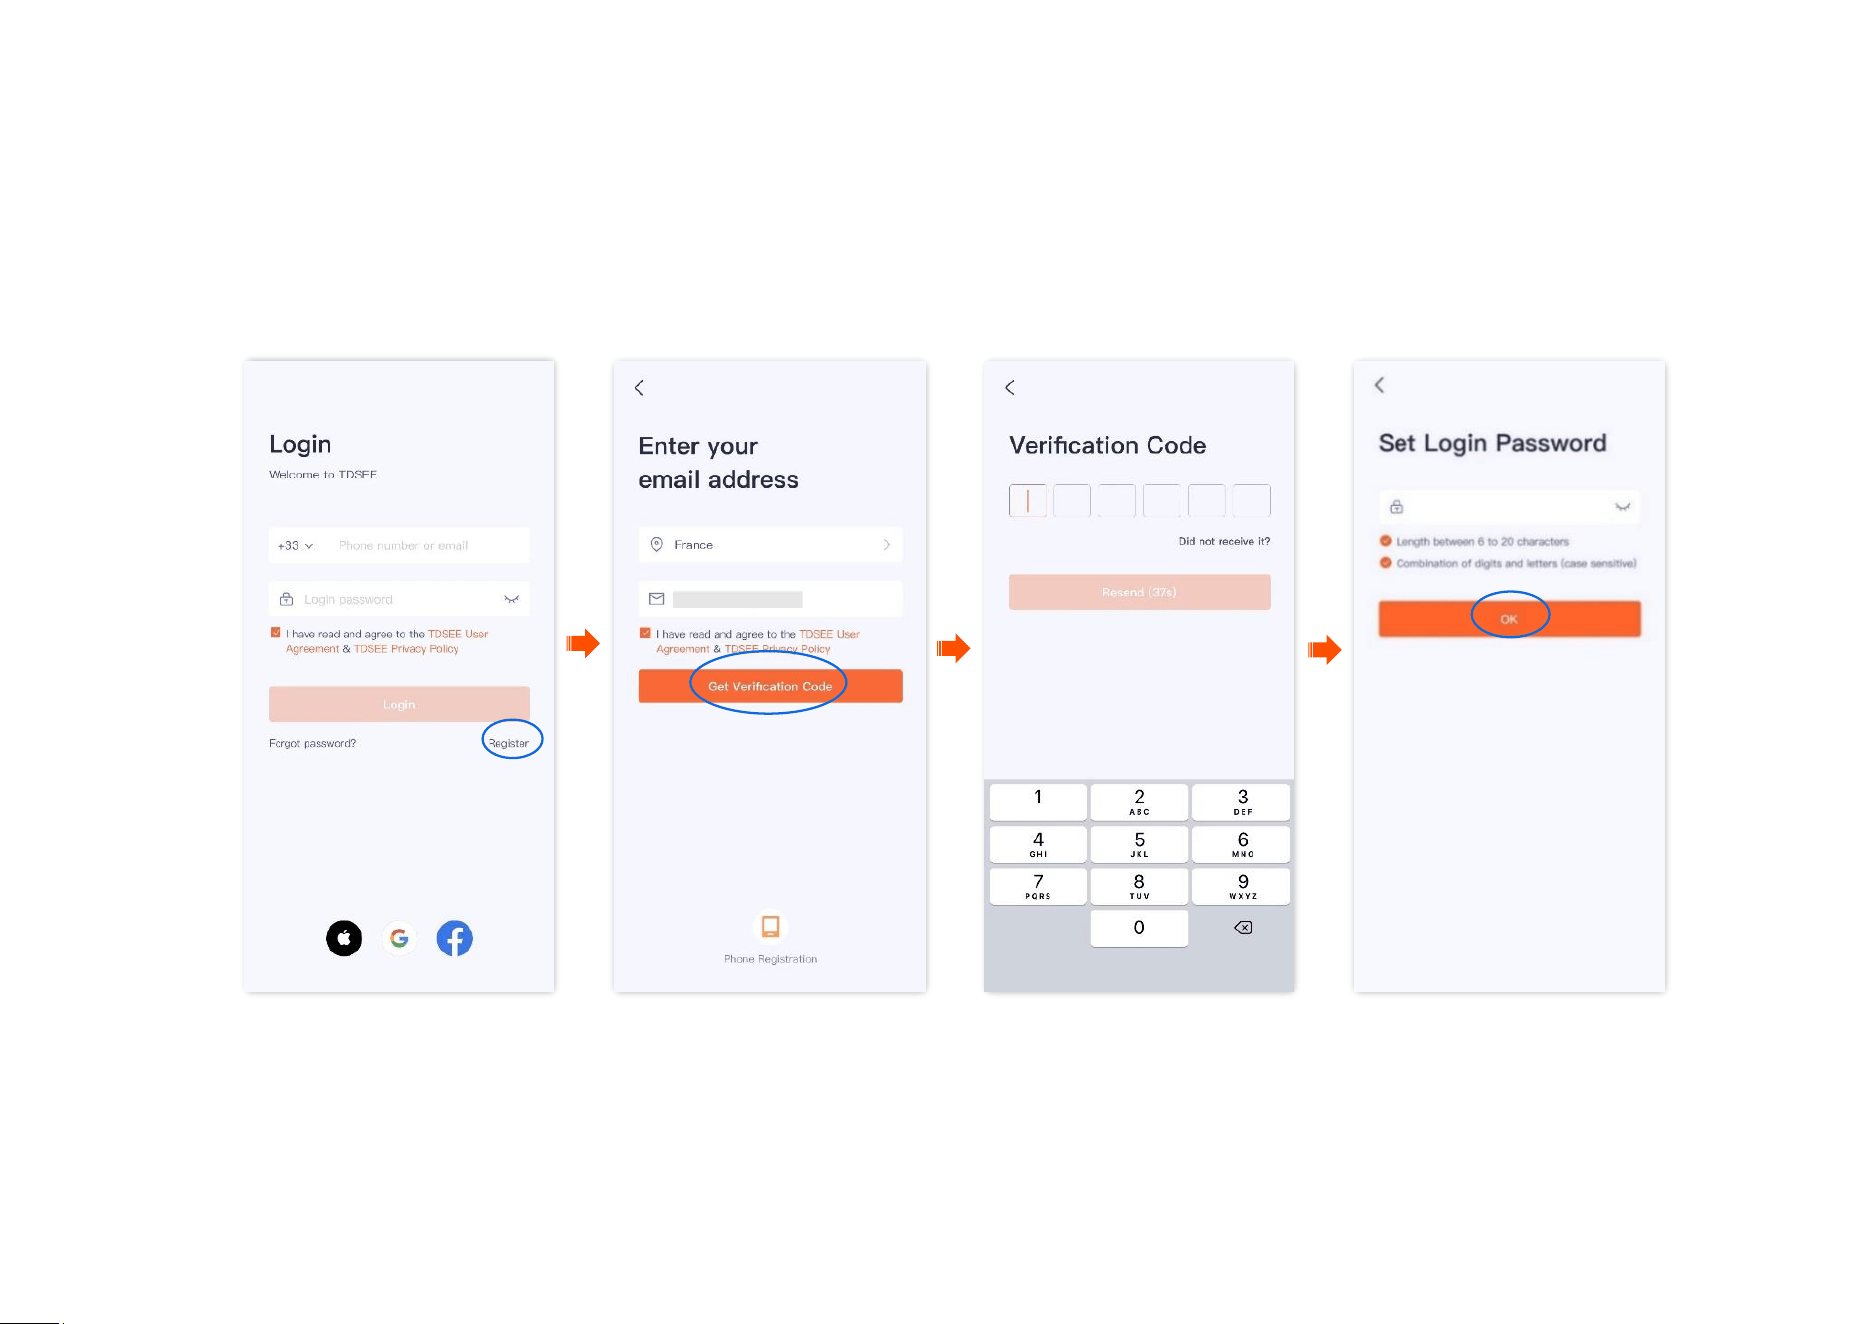
If you DO NOT have a registered account (Example: Email Registration)
Step 1 Open the TDSEE App. Tap Register.
Step 2 Select the region where you are, enter your email address, tick I have read and agree to the TDSEE User Agreement & TDSEE Privacy Policy,
and then tap Get Verification Code.
Step 3 Enter the Verification Code.
Step 4 Set the login password, and tap OK.
----End

Document Version: V1.4
4
Add a camera to TDSEE App
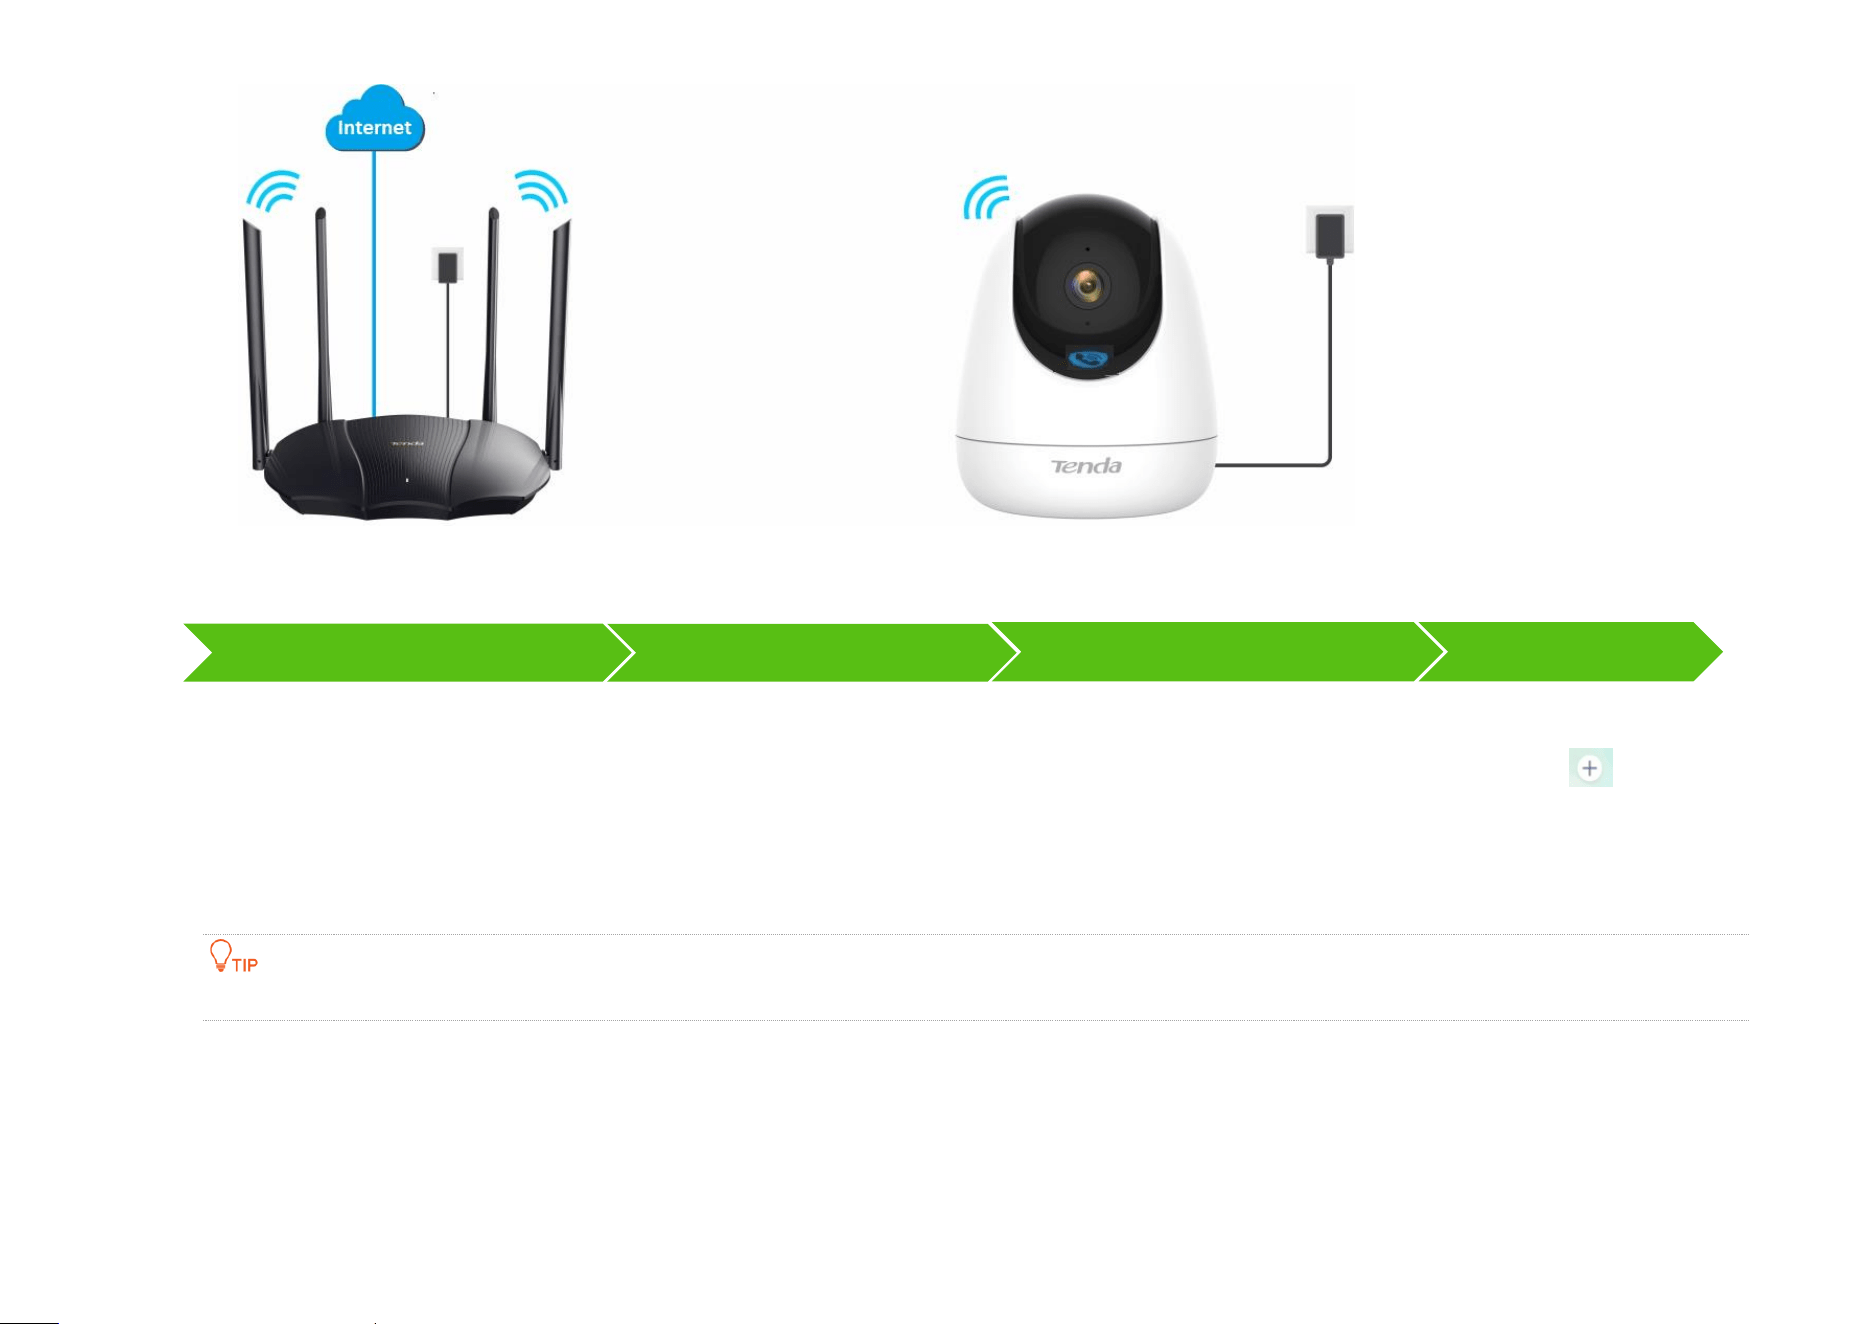
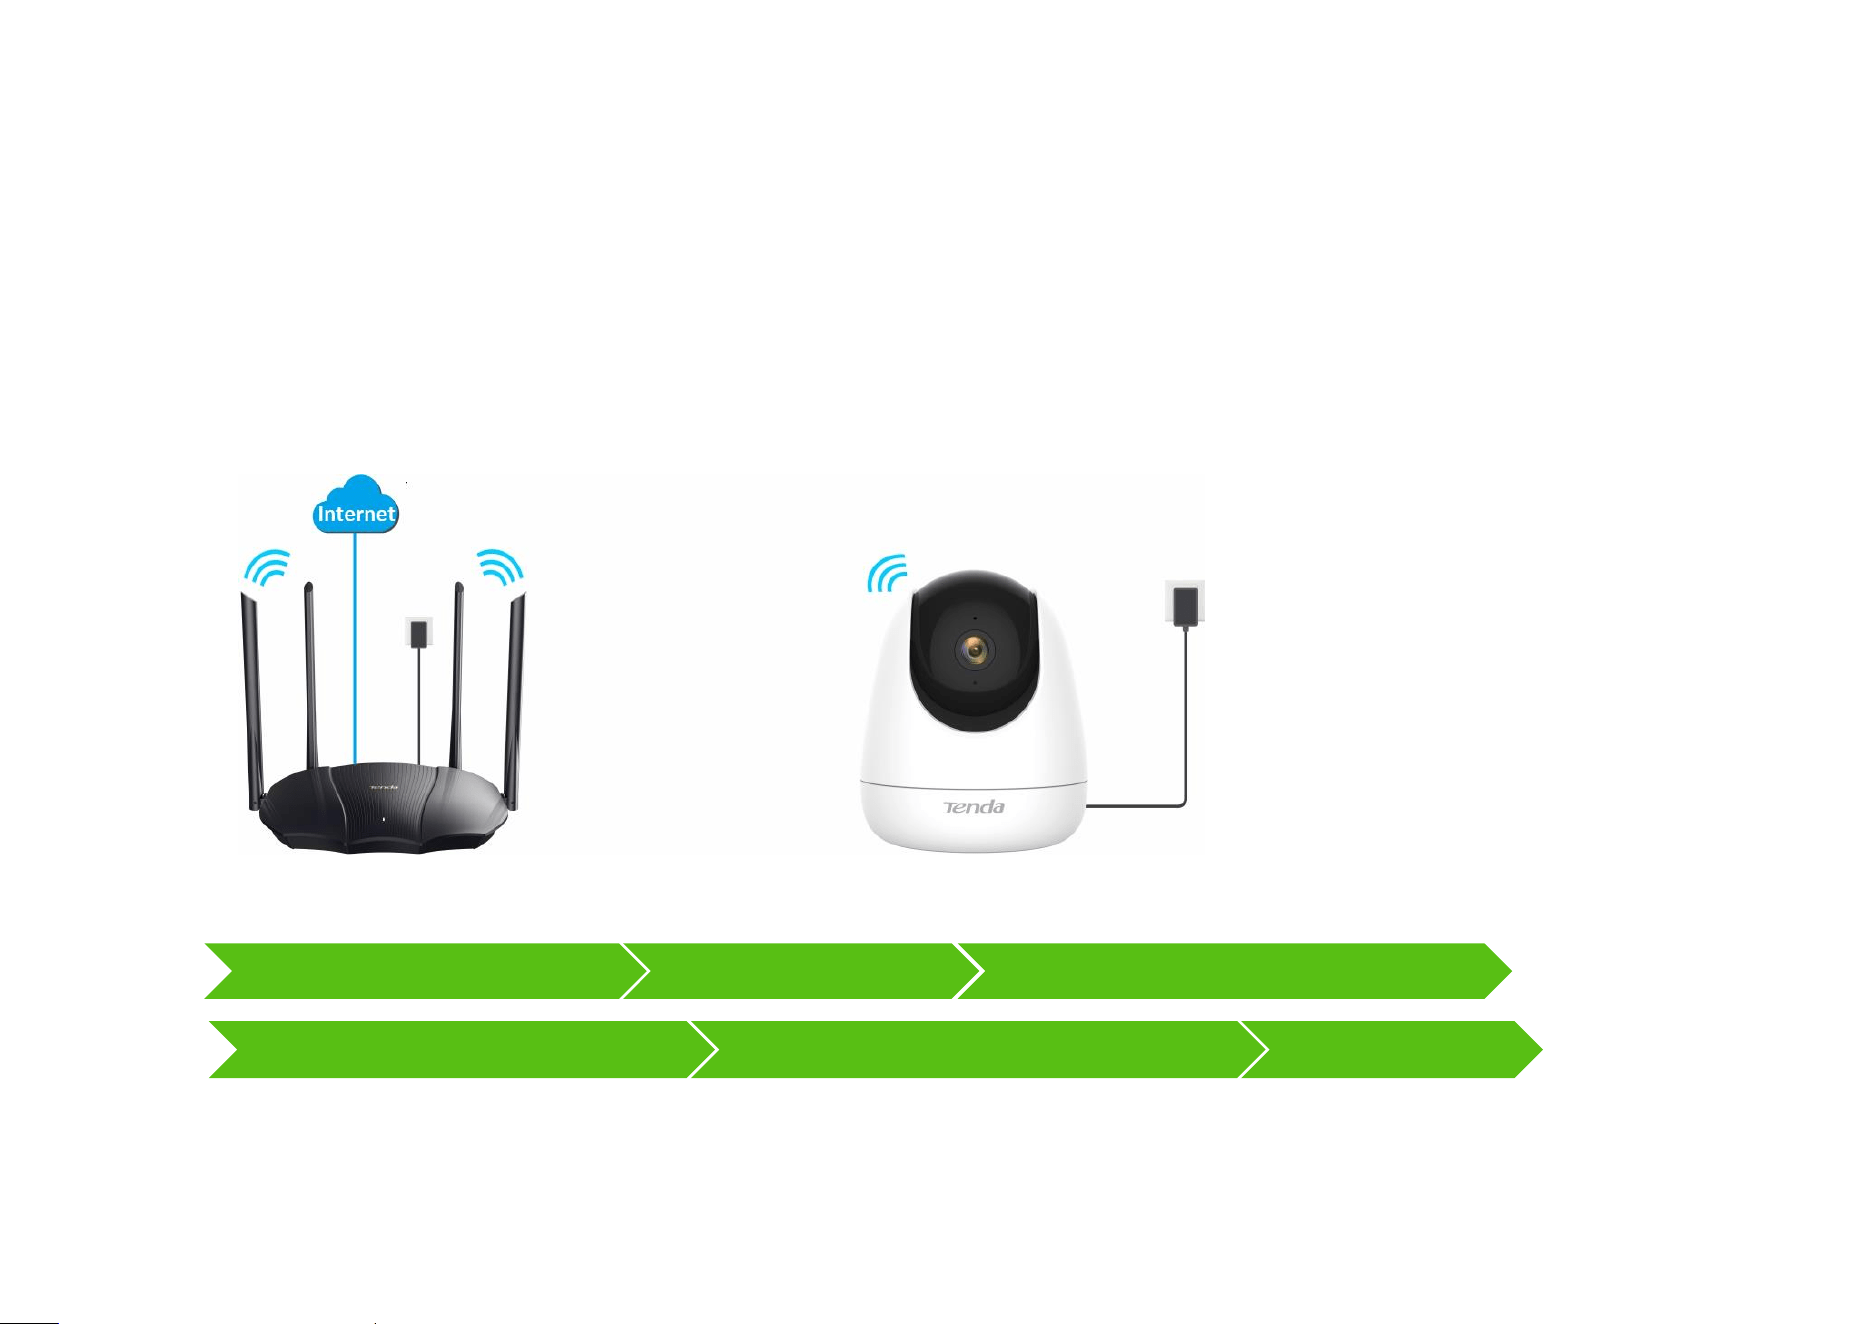
Before adding the camera, ensure that the router is connected to the internet successfully and the filter function is disabled.
Method 1: Add a camera through QR code
The TDSEE App with version 1.3.0 is used for illustrations here, and the CP3 Pro is used for illustrations here.
Step 1 Power on the camera.
The LED indicator lights solid red after the camera is powered on. When the LED indicator blinks blue quickly, the camera is waiting to
connect to a 2.4 GHz Wi-Fi network.
Assume that the 2.4 GHz Wi-Fi information of the router is:
− Wi-Fi name: Tenda_123456
− Wi-Fi password: UmXmL9UK
Document Version: V1.4
5
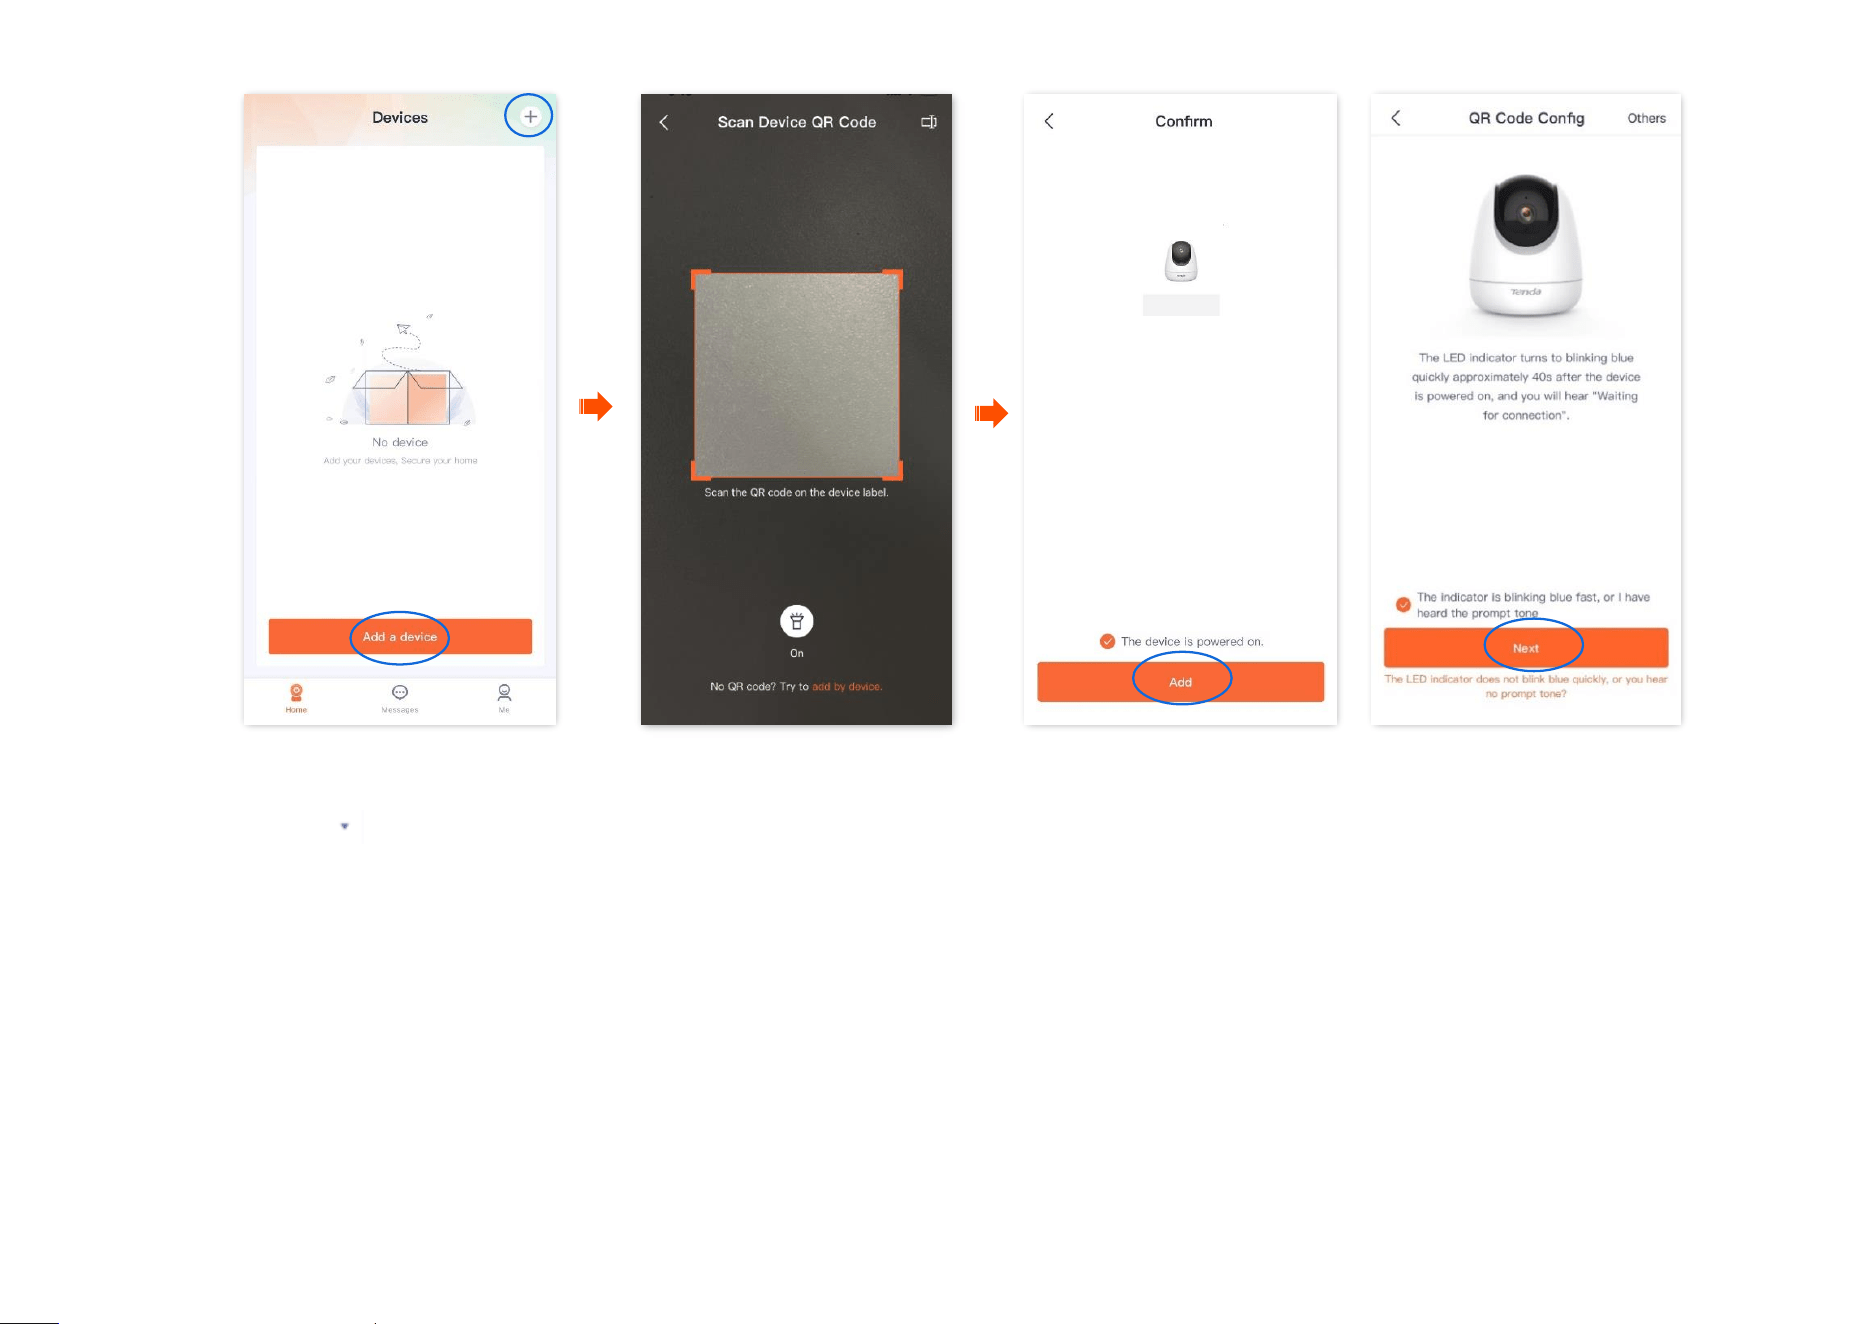
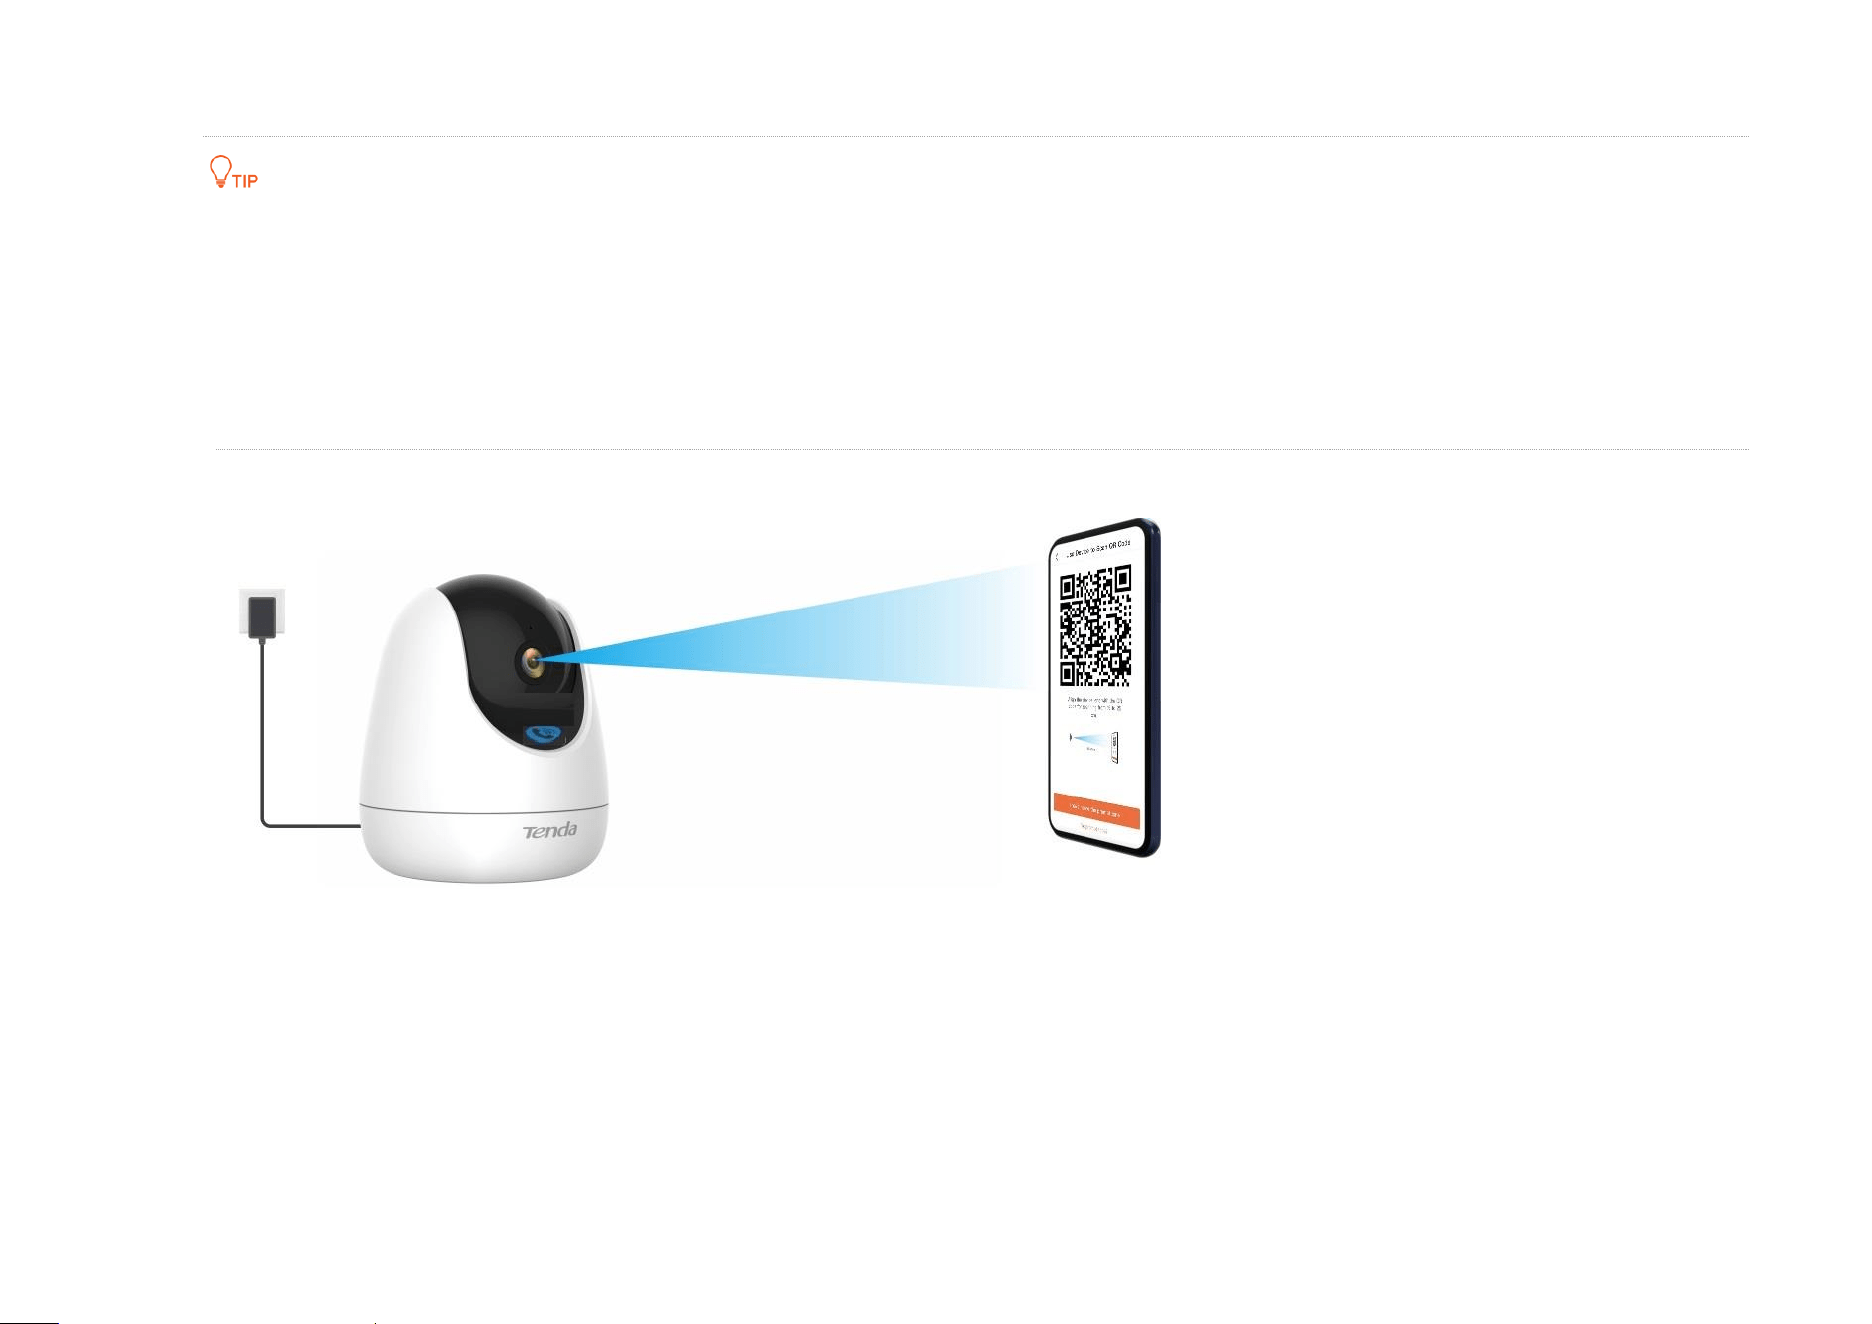
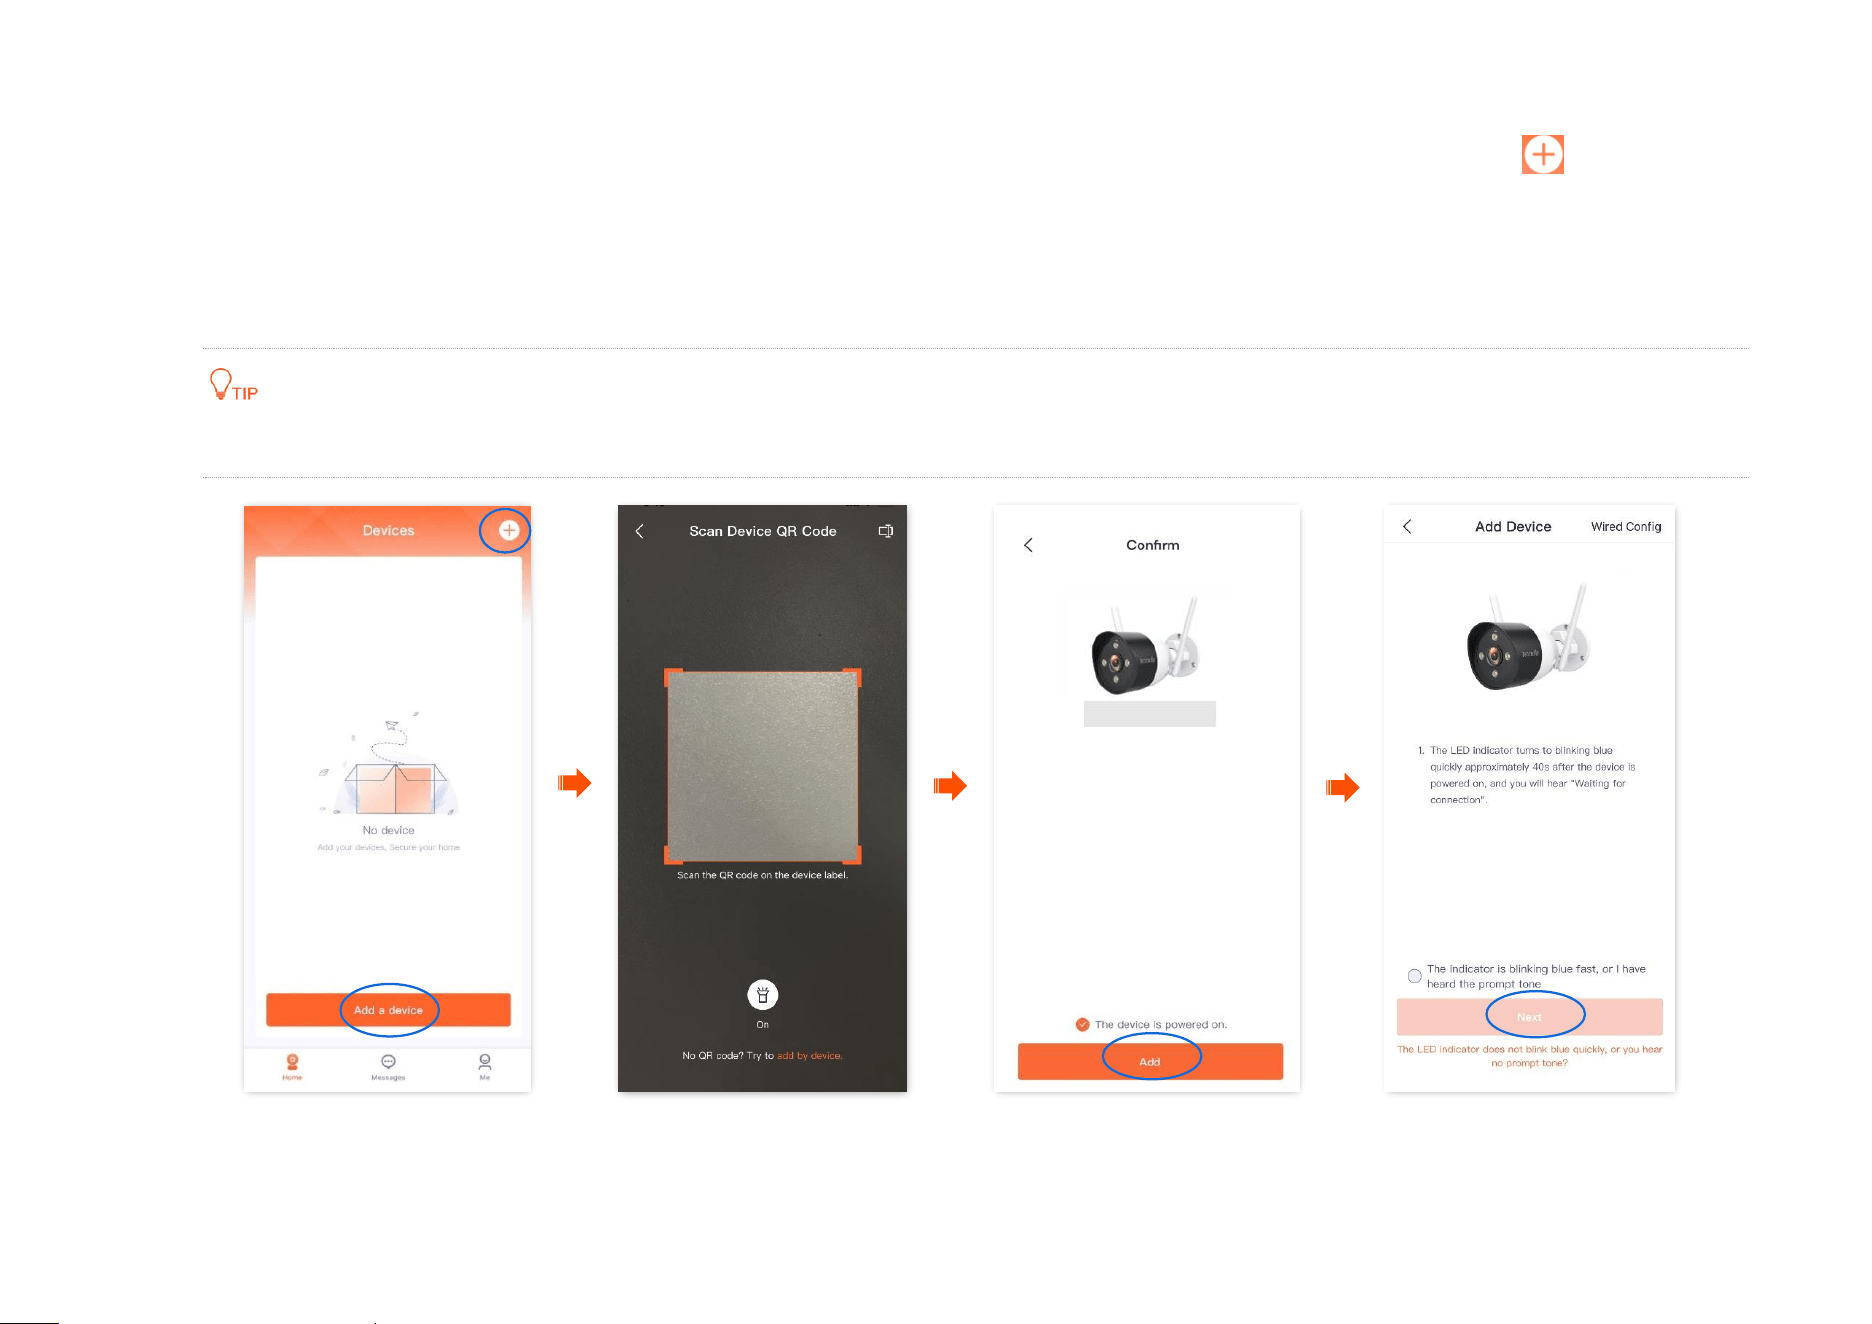
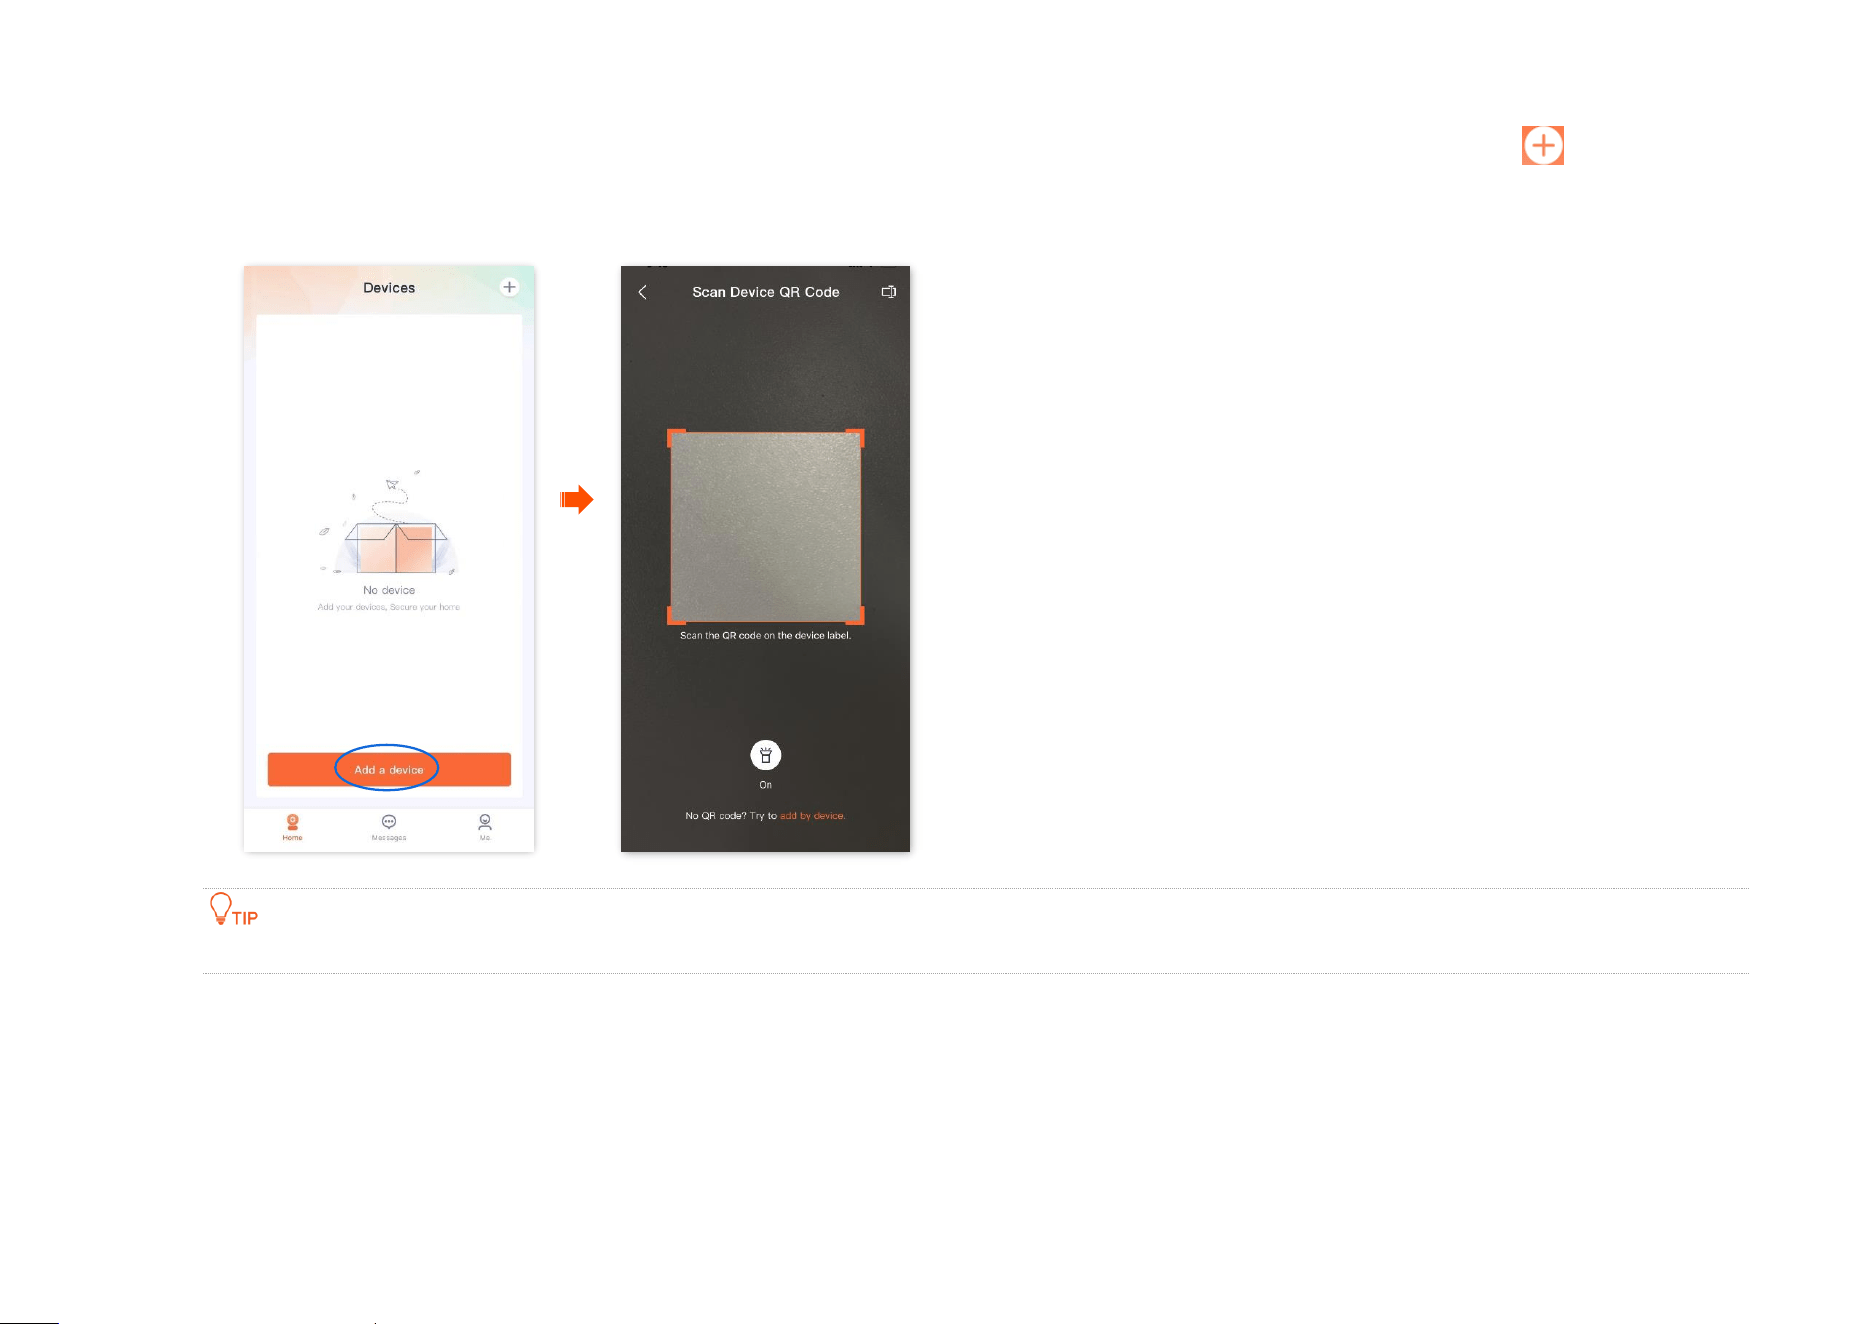
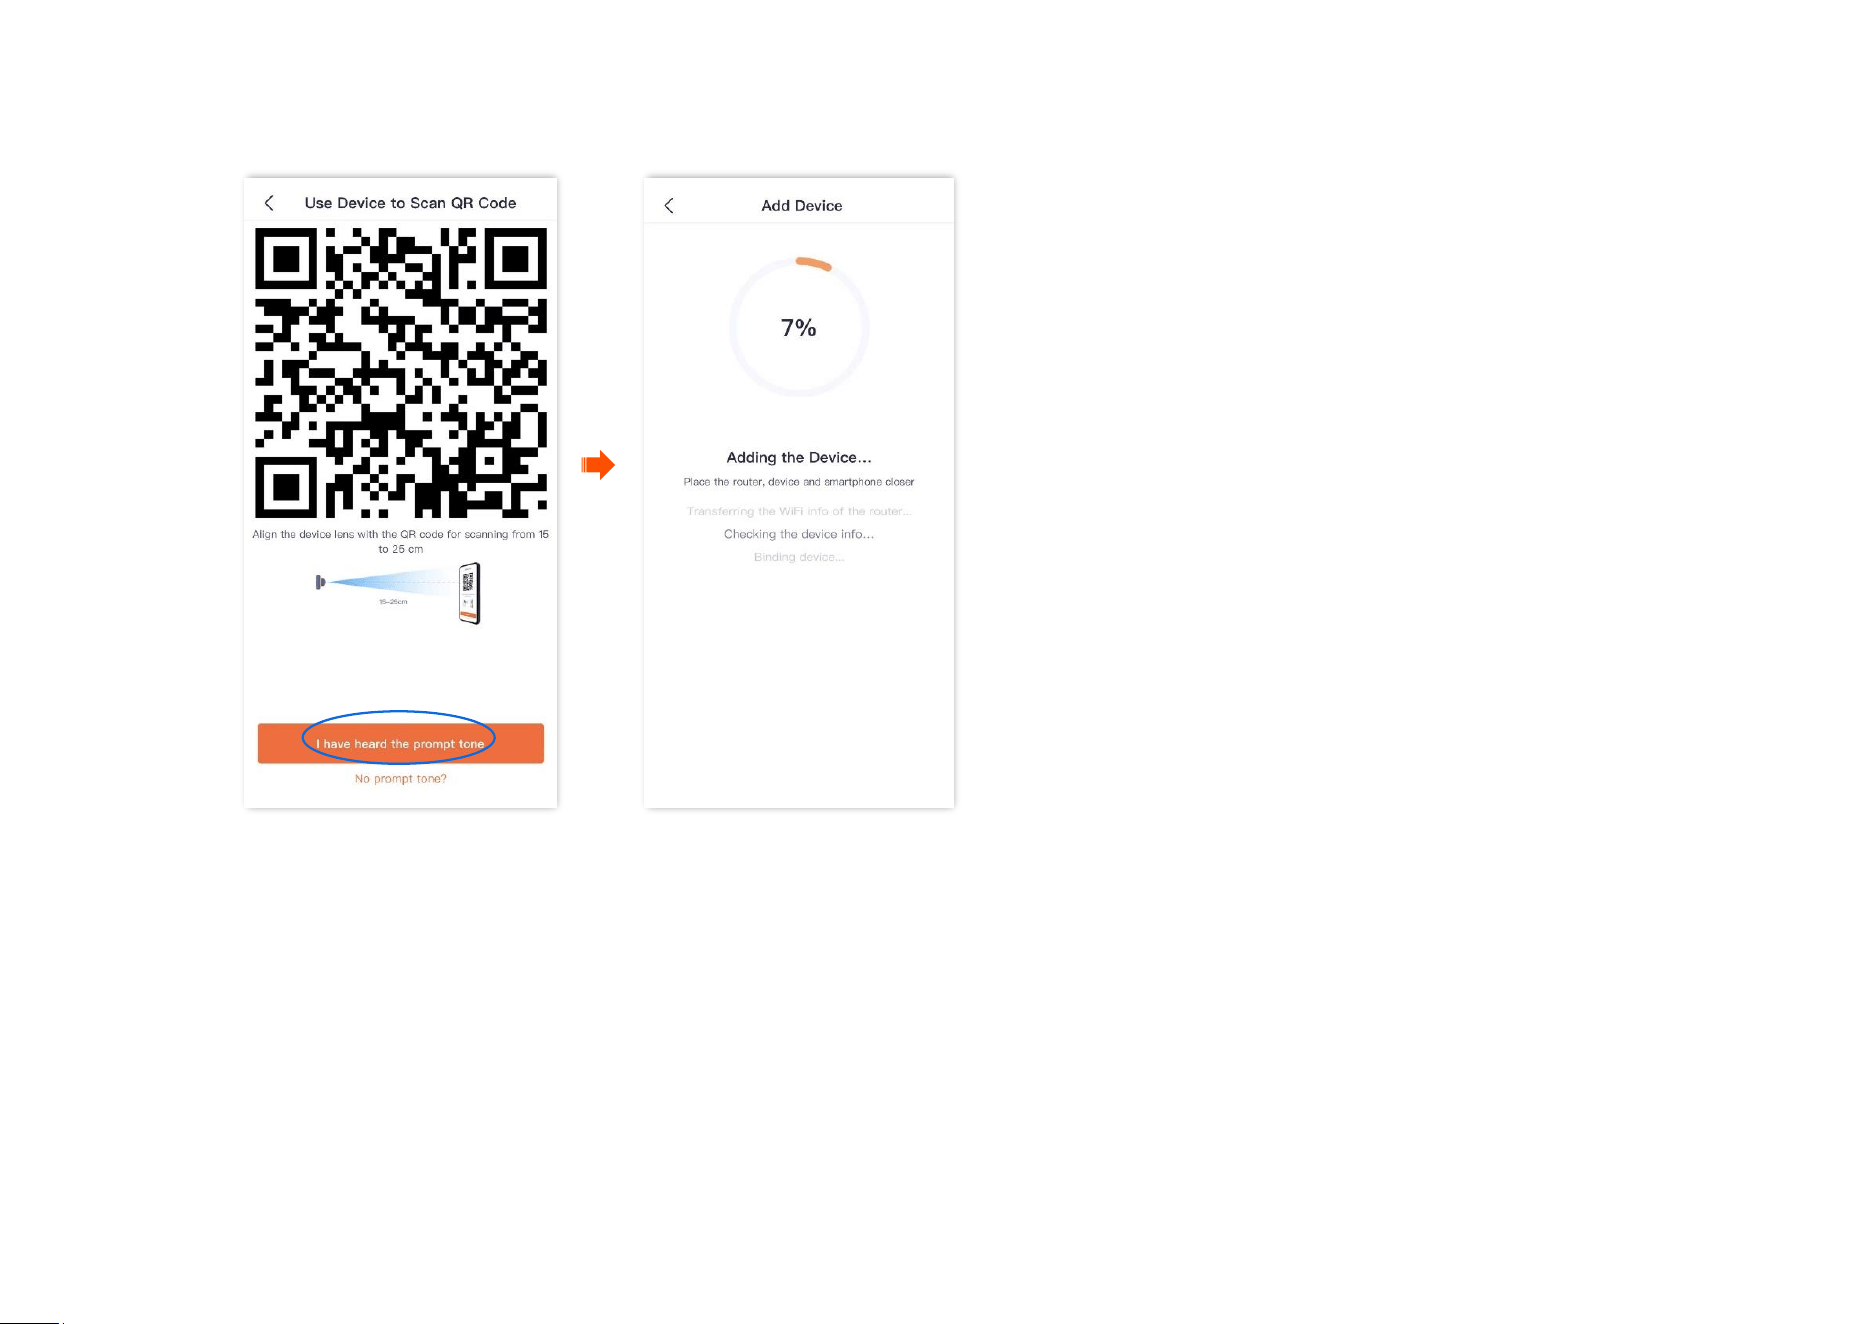
Step 2 Add the camera to TDSEE App.
1
Scan the QR code of the camera.
(1)
Open the TDSEE App on a smartphone that is connected to the internet. Enter the homepage, and tap Add a device or in the
upper right corner of the homepage.
(2) Scan the QR code on the bottom of the camera.
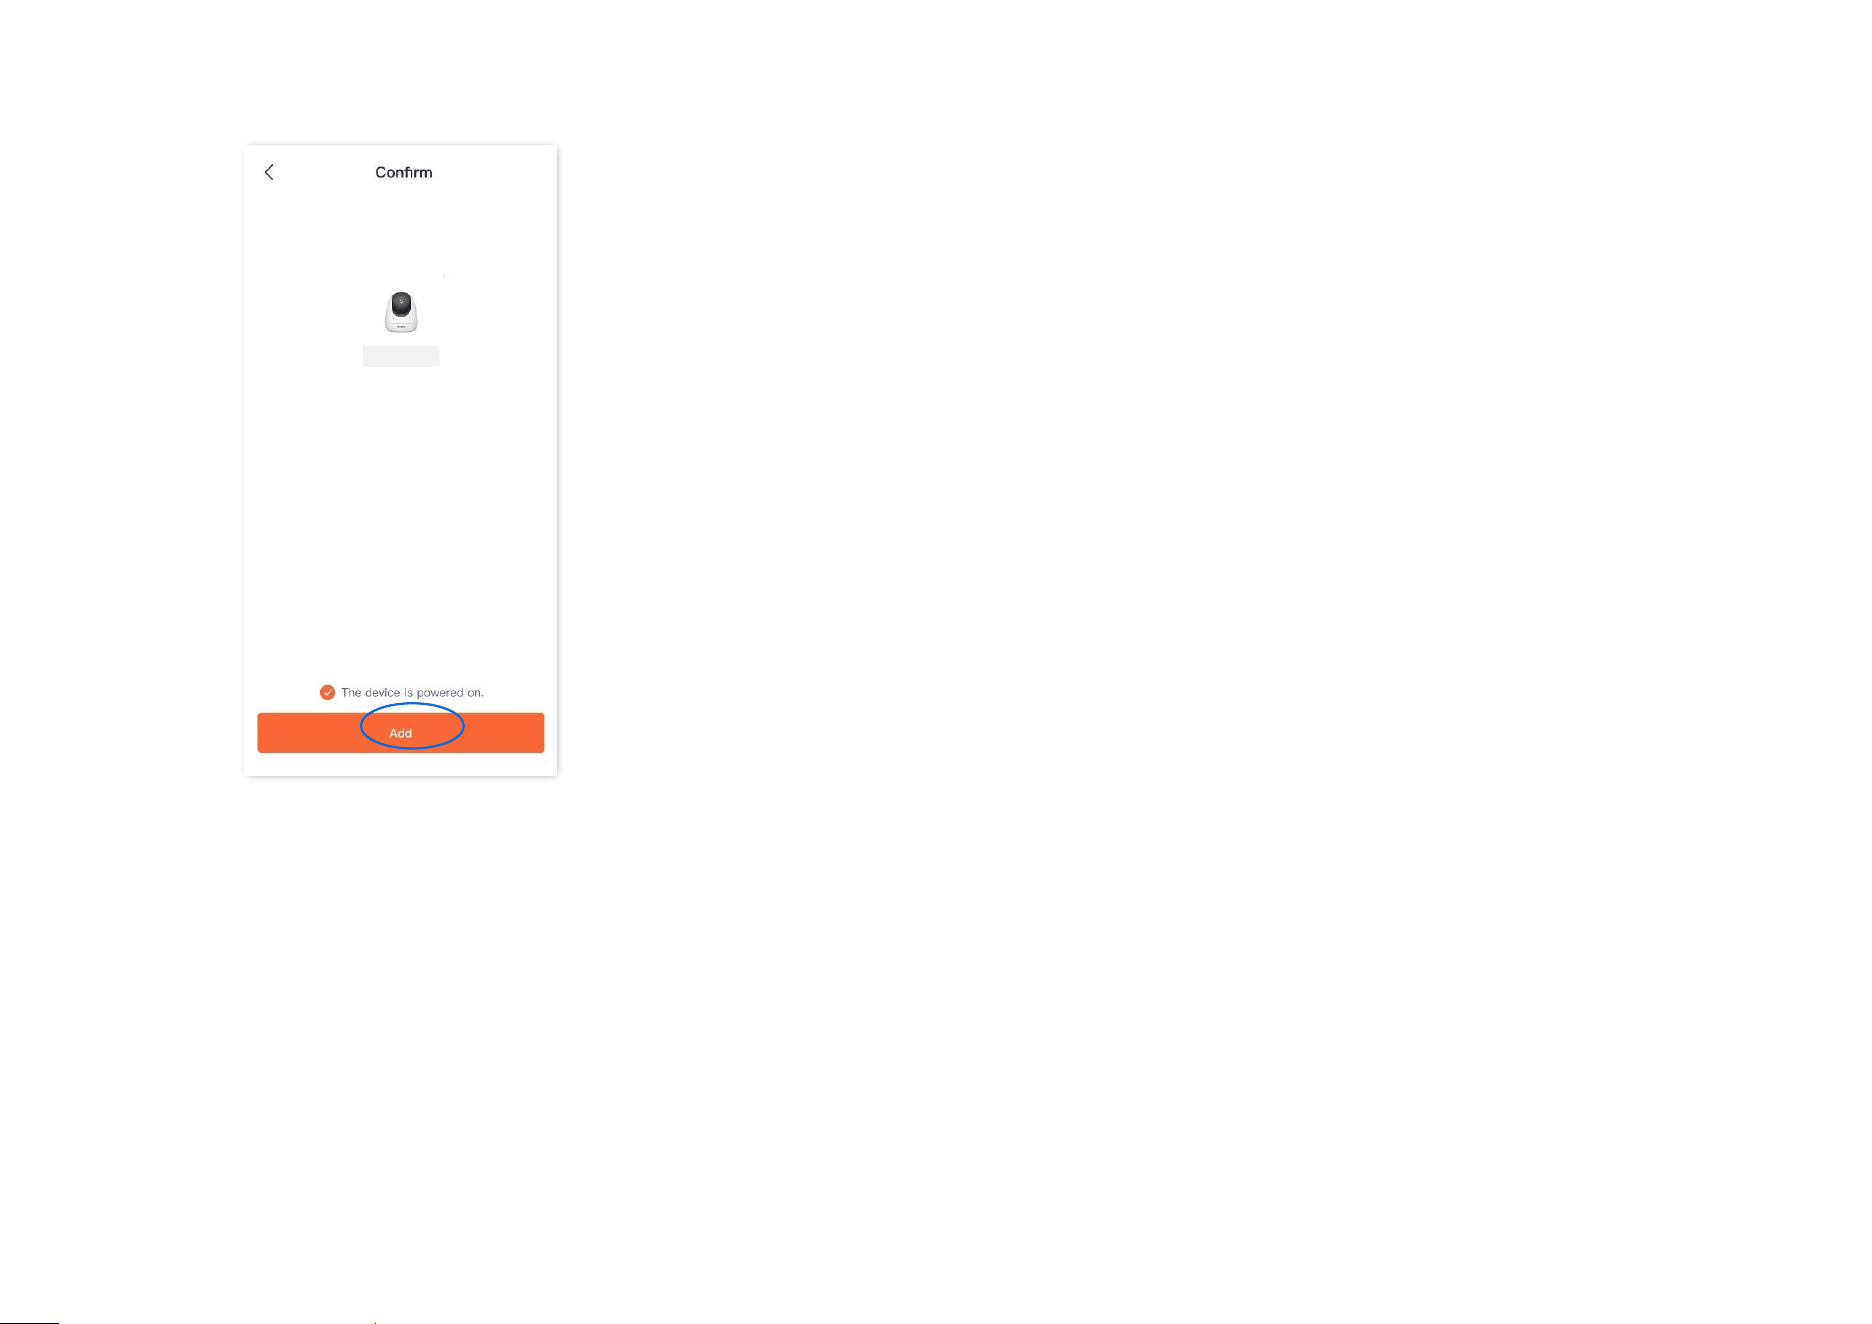
(3) Confirm and tick The device is powered on. Tap Add.
(4) Confirm and tick The indicator is blinking blue fast, or I have heard the prompt tone, and tap Next.
If a prompt pops up asking for access to the camera of your smartphone, please allow it.
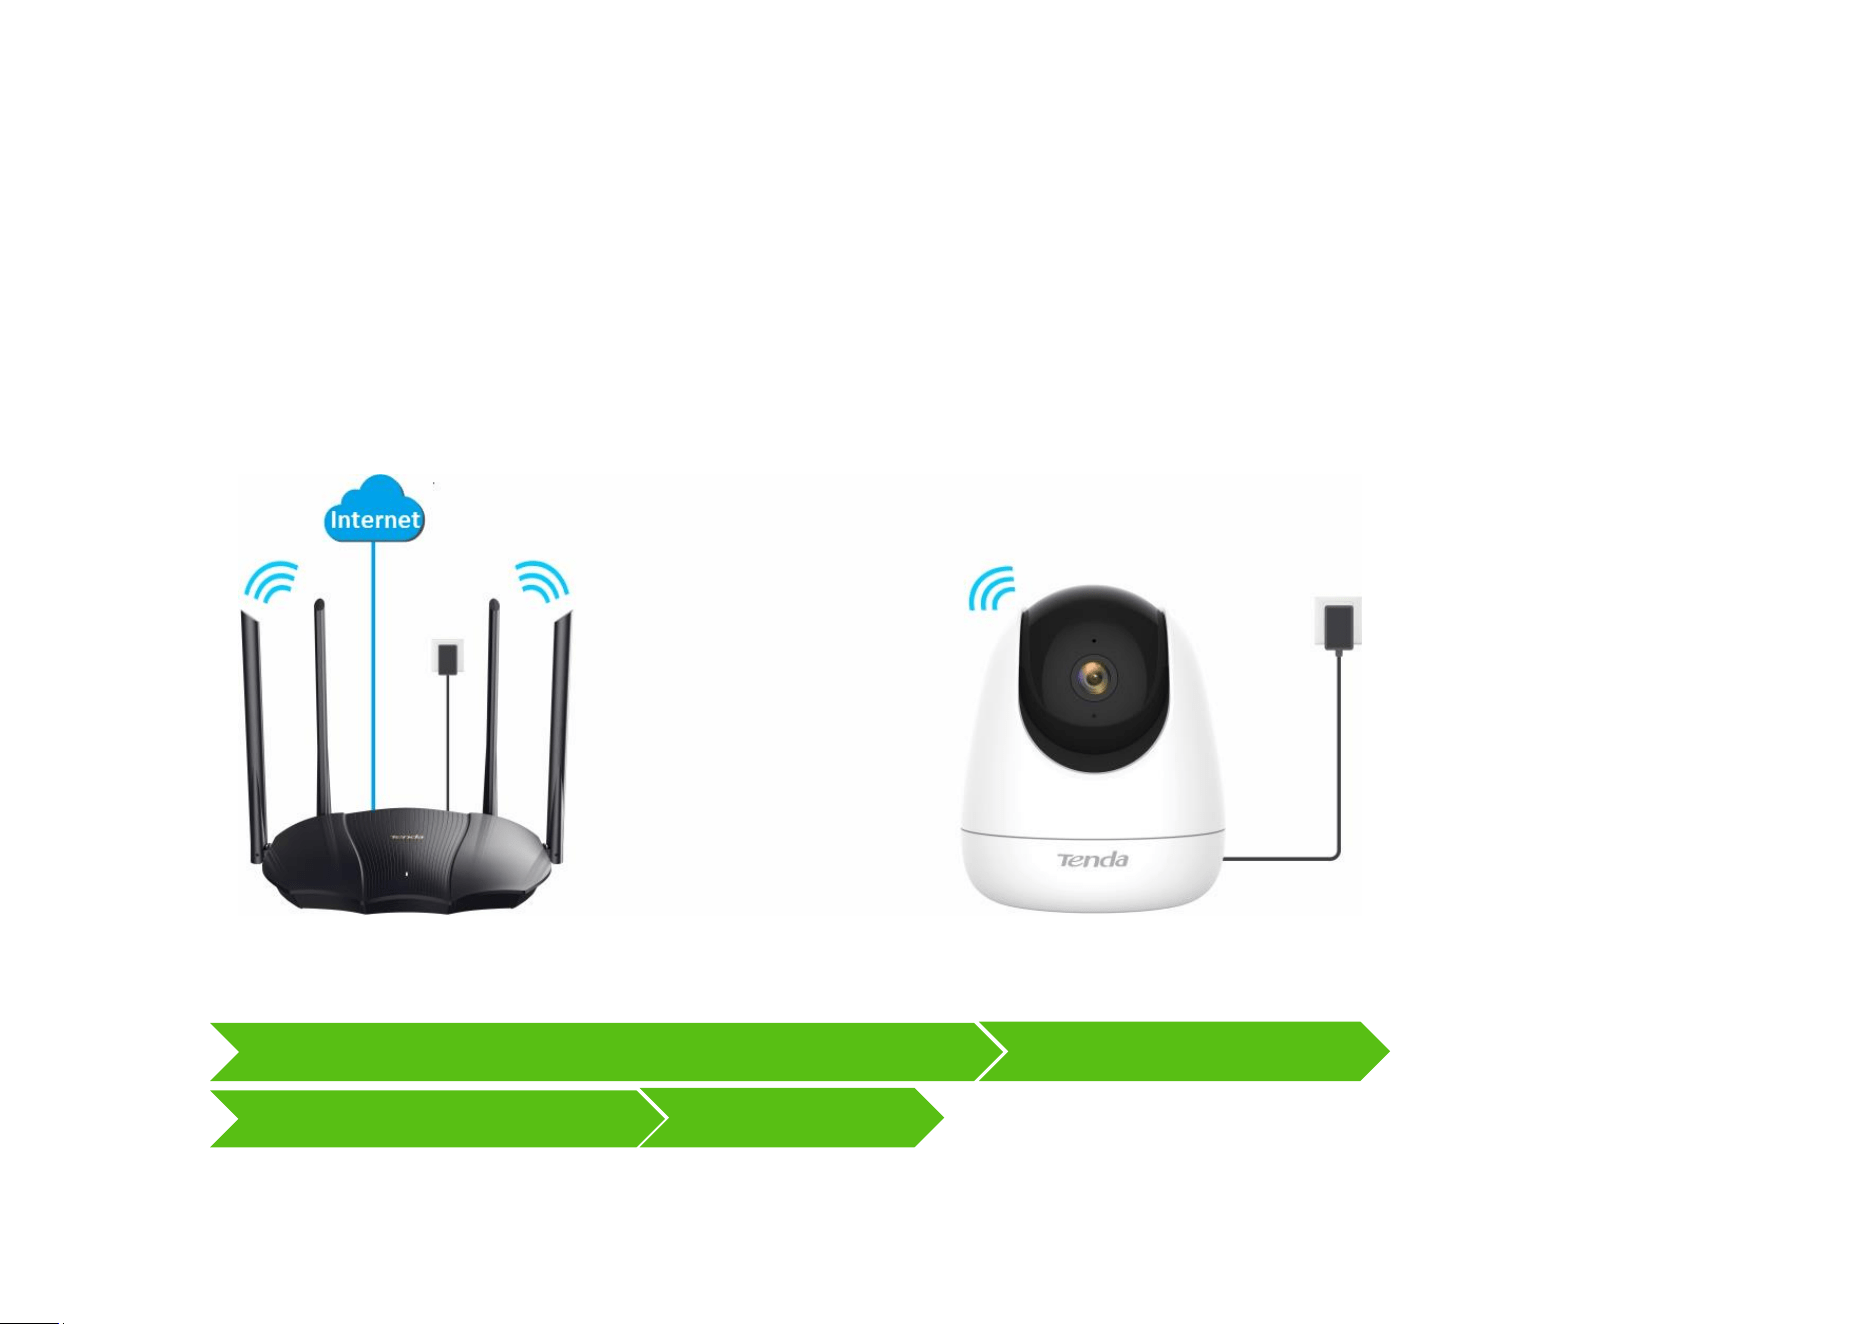
Router
Power on the camera
Scan the QR code of the camera
Connect to the router's Wi-Fi
Camera scans the App's QR code
Name your camera
Document Version: V1.4
6
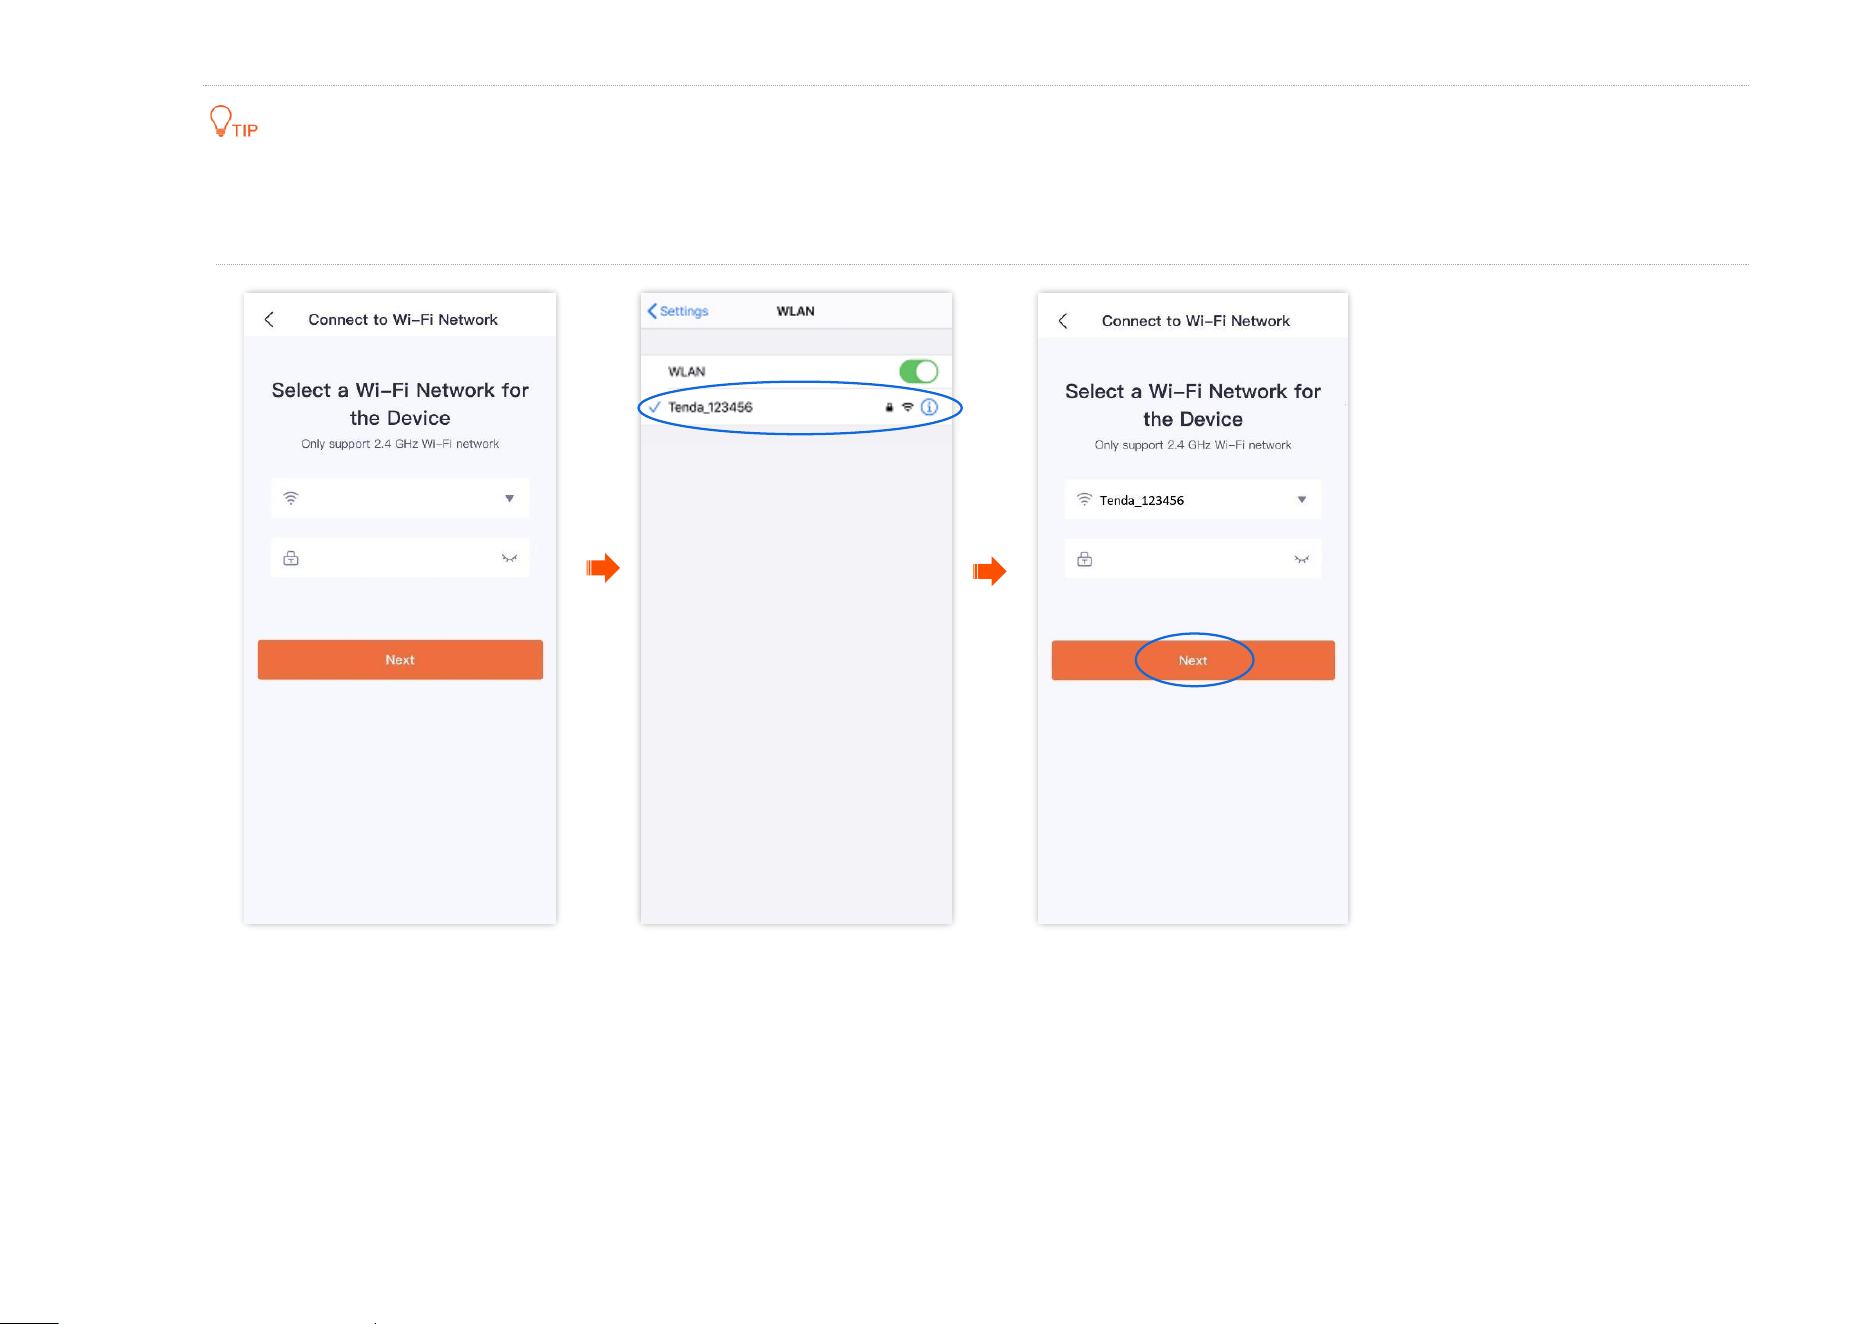
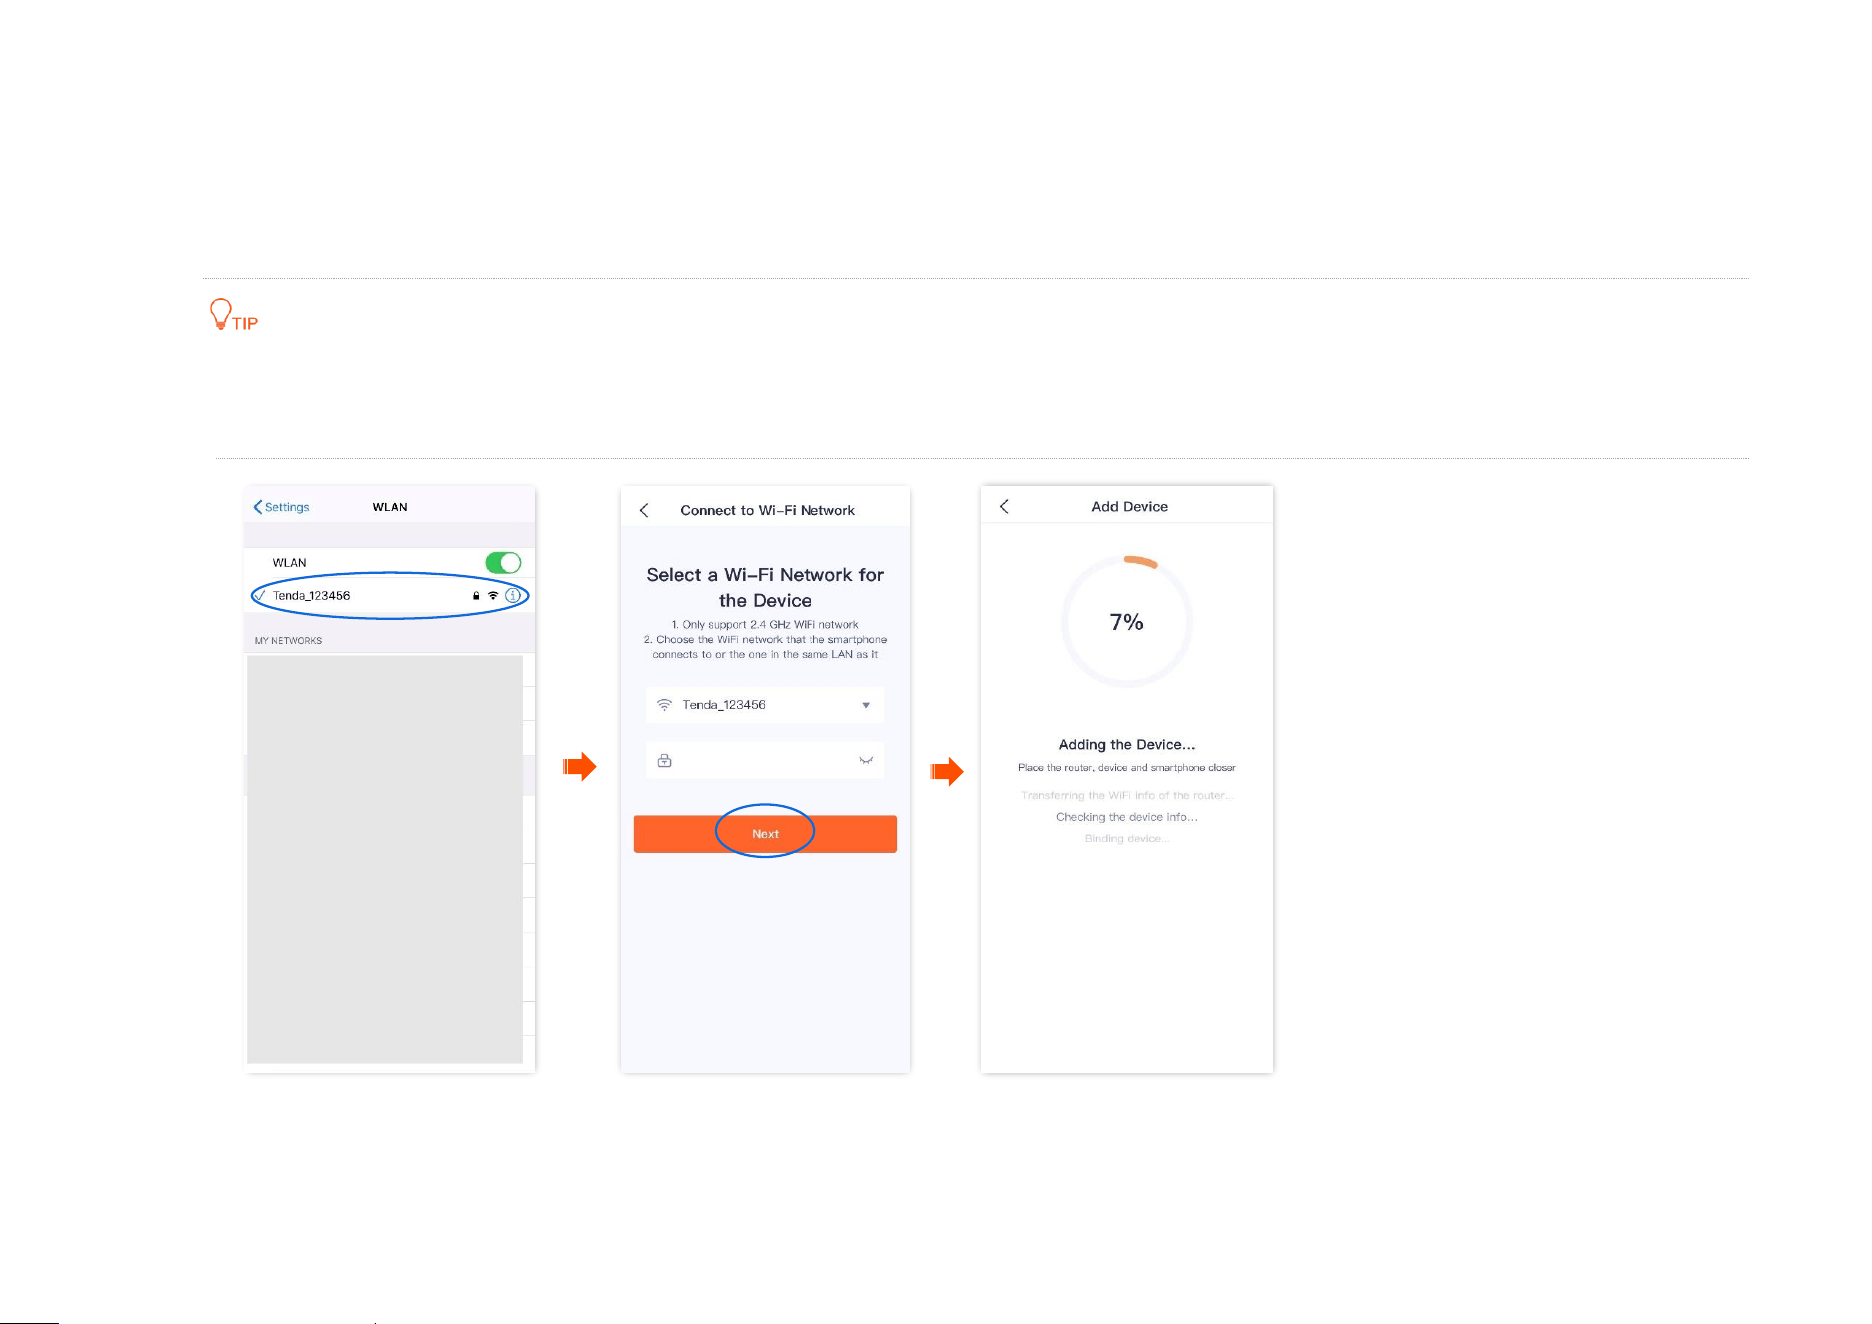
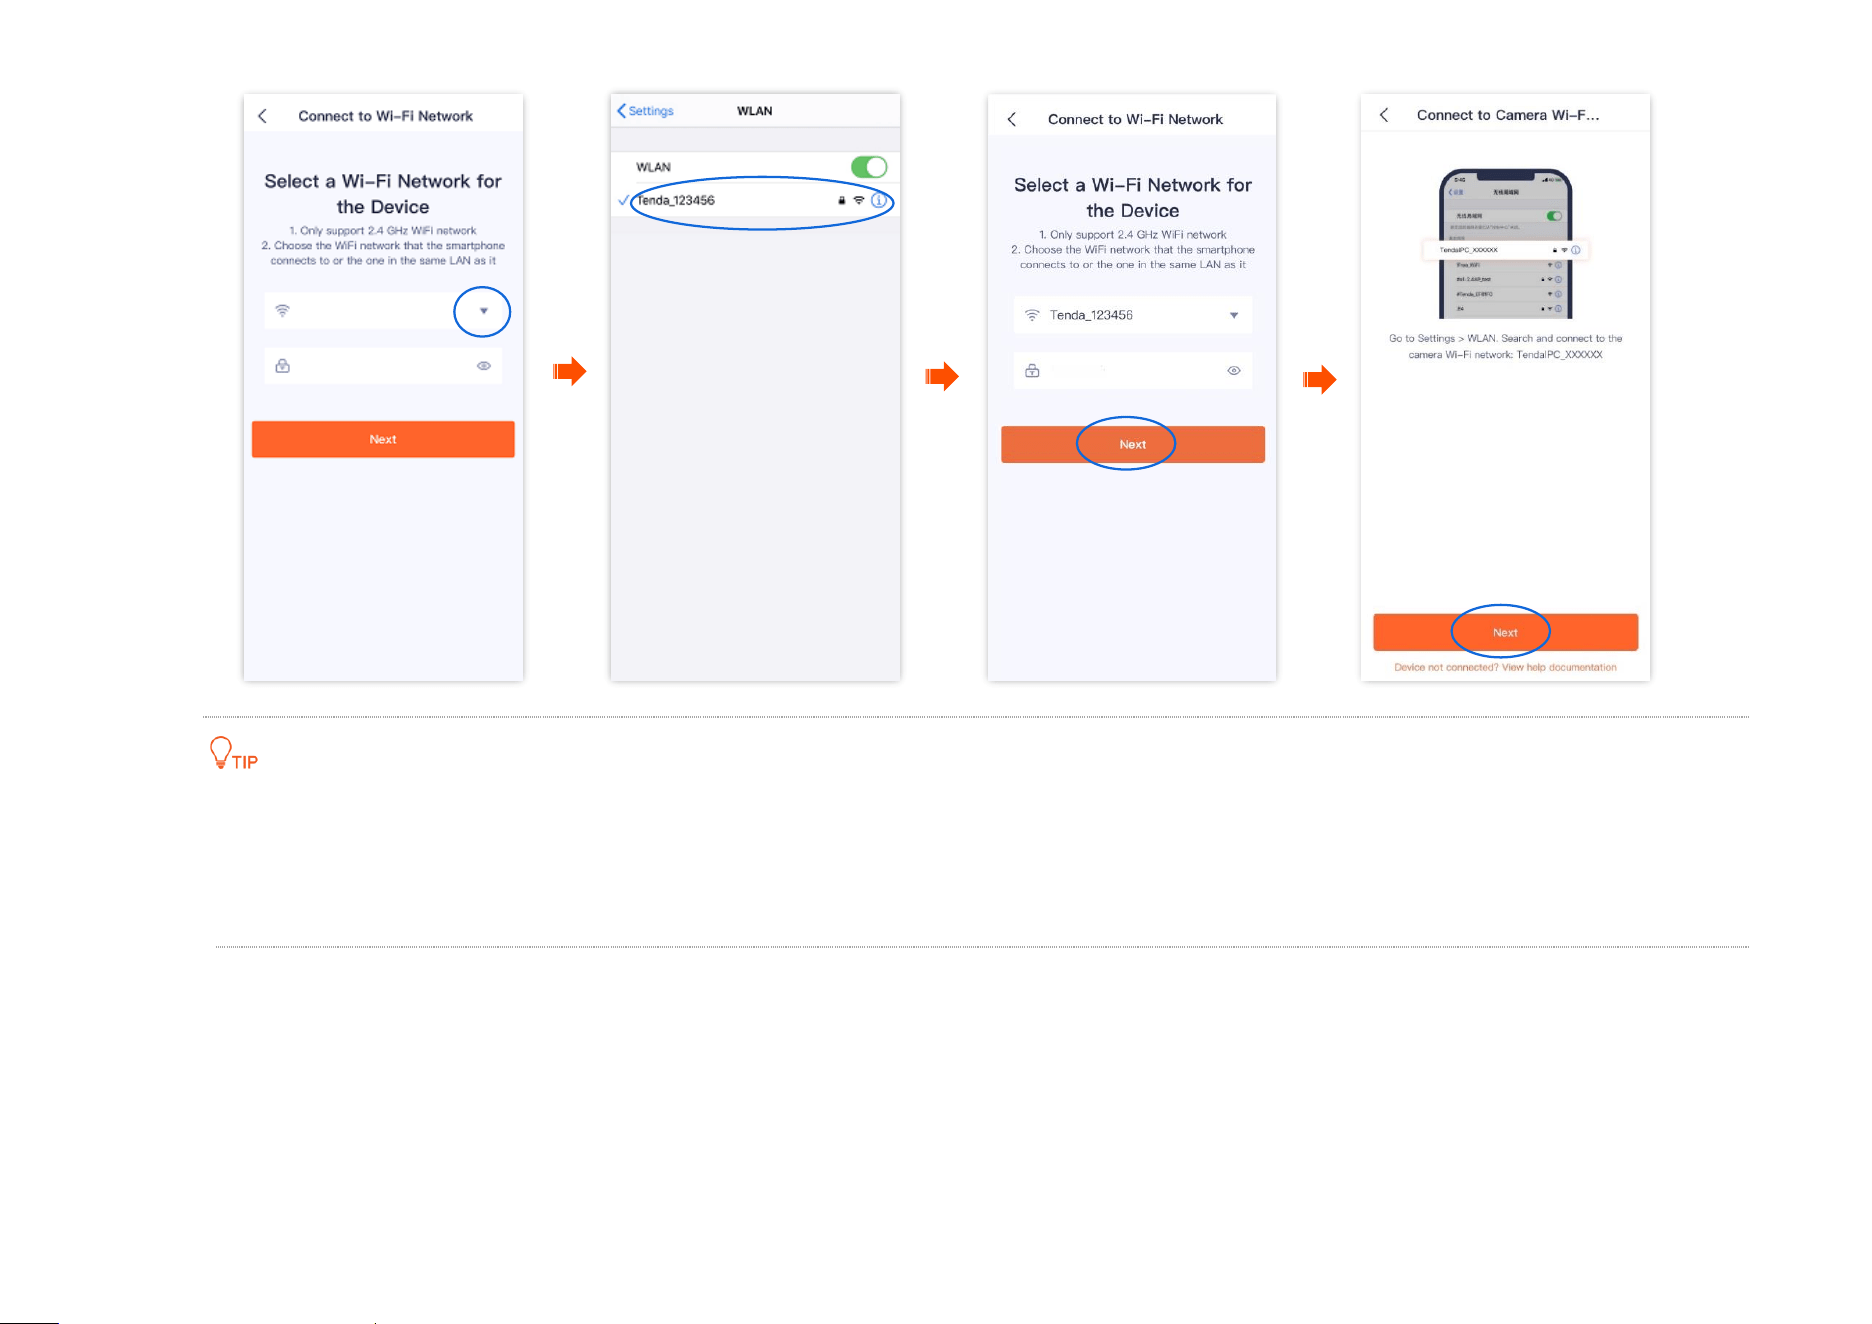
2 Connect to the router's Wi-Fi.
(1)
Tap to navigate to Settings > WLAN of your smartphone. Then connect your smartphone to the 2.4 GHz Wi-Fi network of the
router, which is Tenda_123456 in this example.
(2) Return to the TDSEE App, enter the Wi-Fi password, and tap Next.
Document Version: V1.4
7
You are recommended to connect to the 2.4 GHz Wi-Fi network of the router with the good network quality.
If a prompt pops up asking for access to the location information of your smartphone, please allow it.
Document Version: V1.4
8
3 Camera scans the App's QR code.
If you do not hear the prompt tone, try the following solutions:
Try moving the smartphone back and forth to adjust the distance between the screen of the smartphone and the camera, and keep each
position for about two seconds.
Ensure that the camera lens has no shade or blemishes. Remove the protective film (if any) and try again.
Ensure that the smartphone screen is clear, with no cracks and no reflections.
(1) Align the lens of the camera with the QR code for scanning from 15 to 25 cm.

Document Version: V1.4
9
(2) When you hear a prompt tone “Connecting. Please wait”, tap I have heard the prompt tone, then the TDSEE App starts to add the
device.
Wait a moment, and the camera is added successfully.

Document Version: V1.4
10
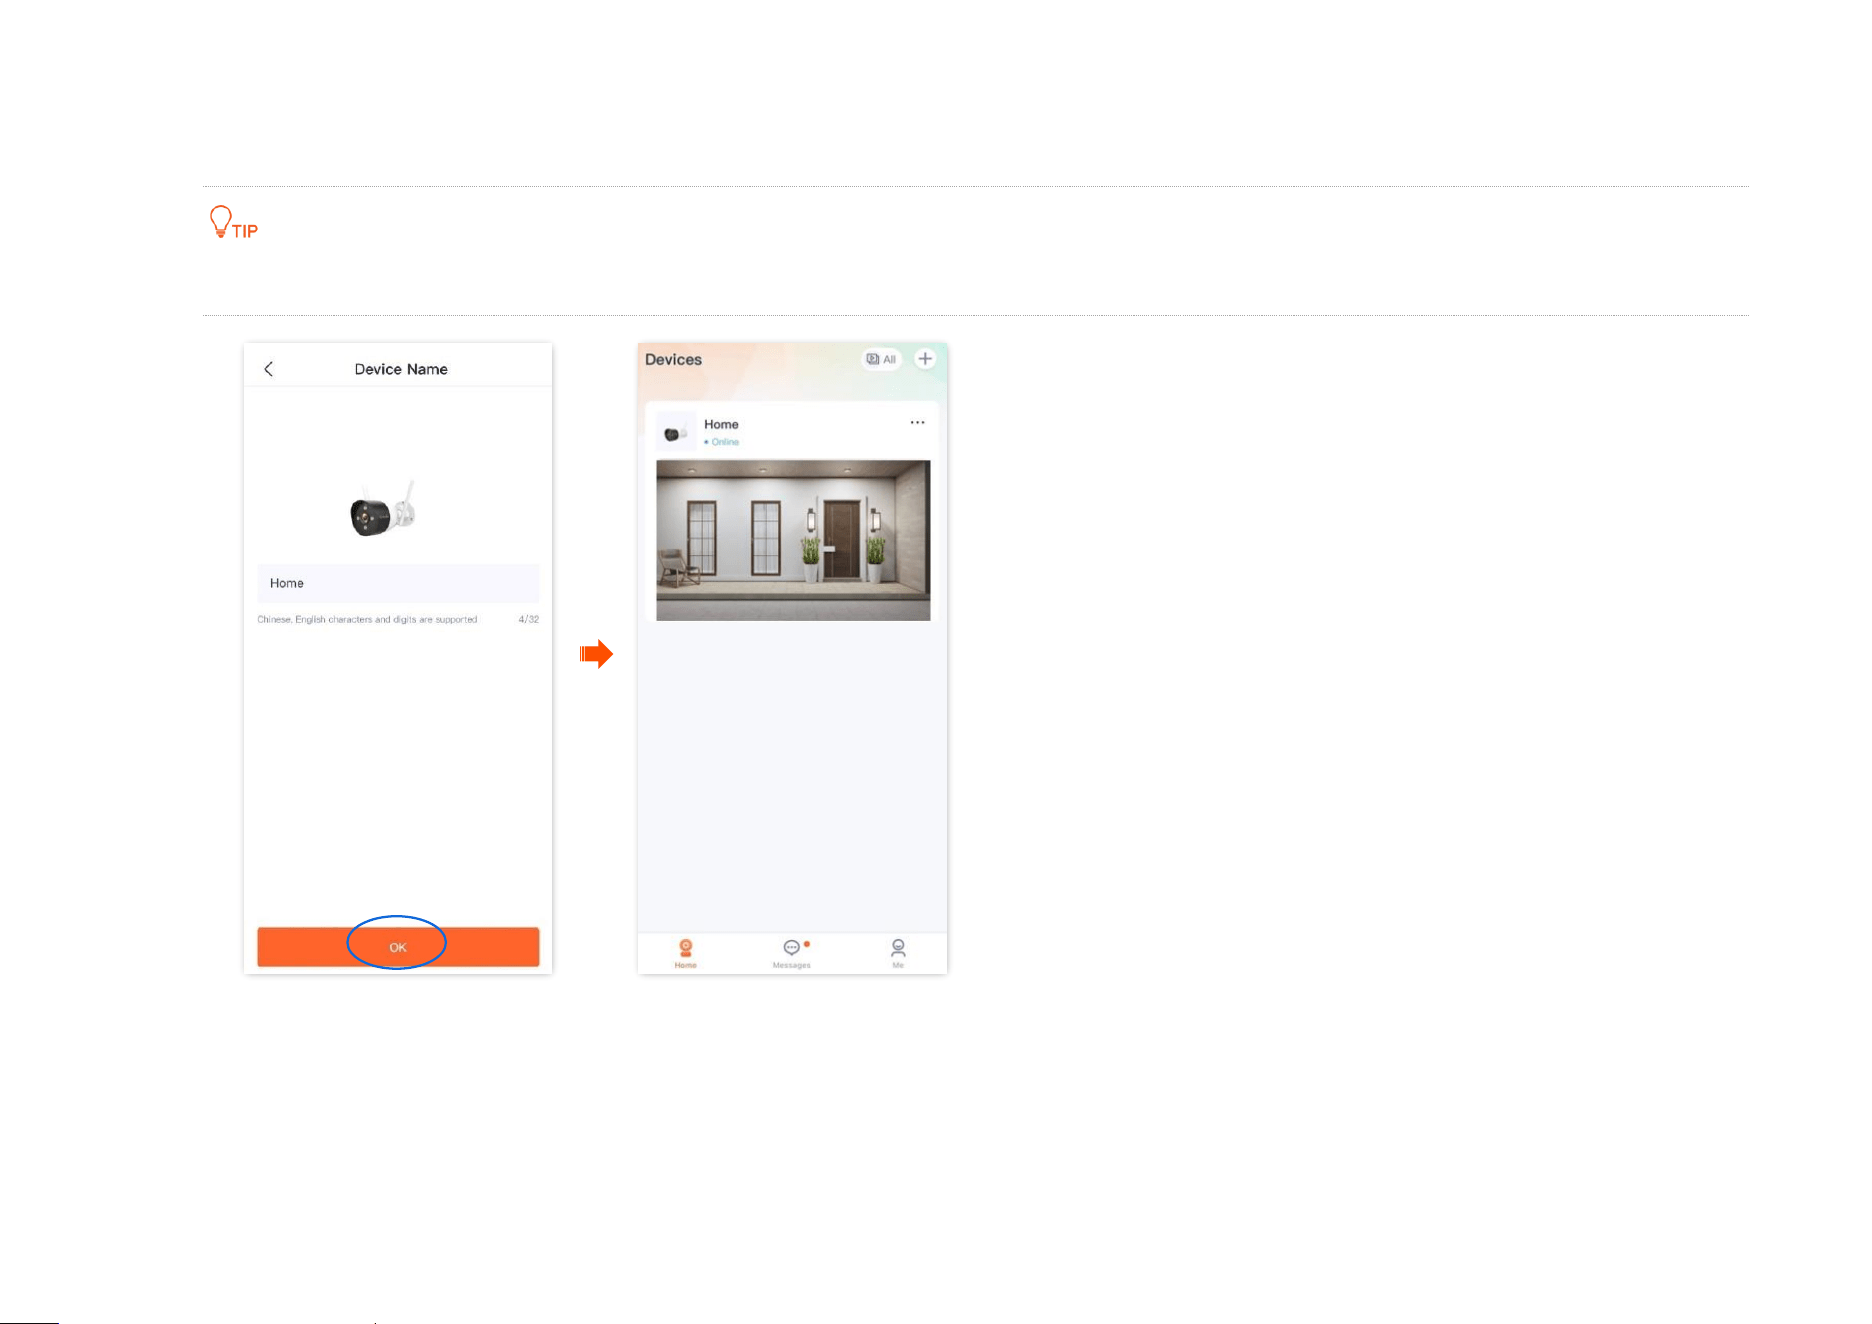
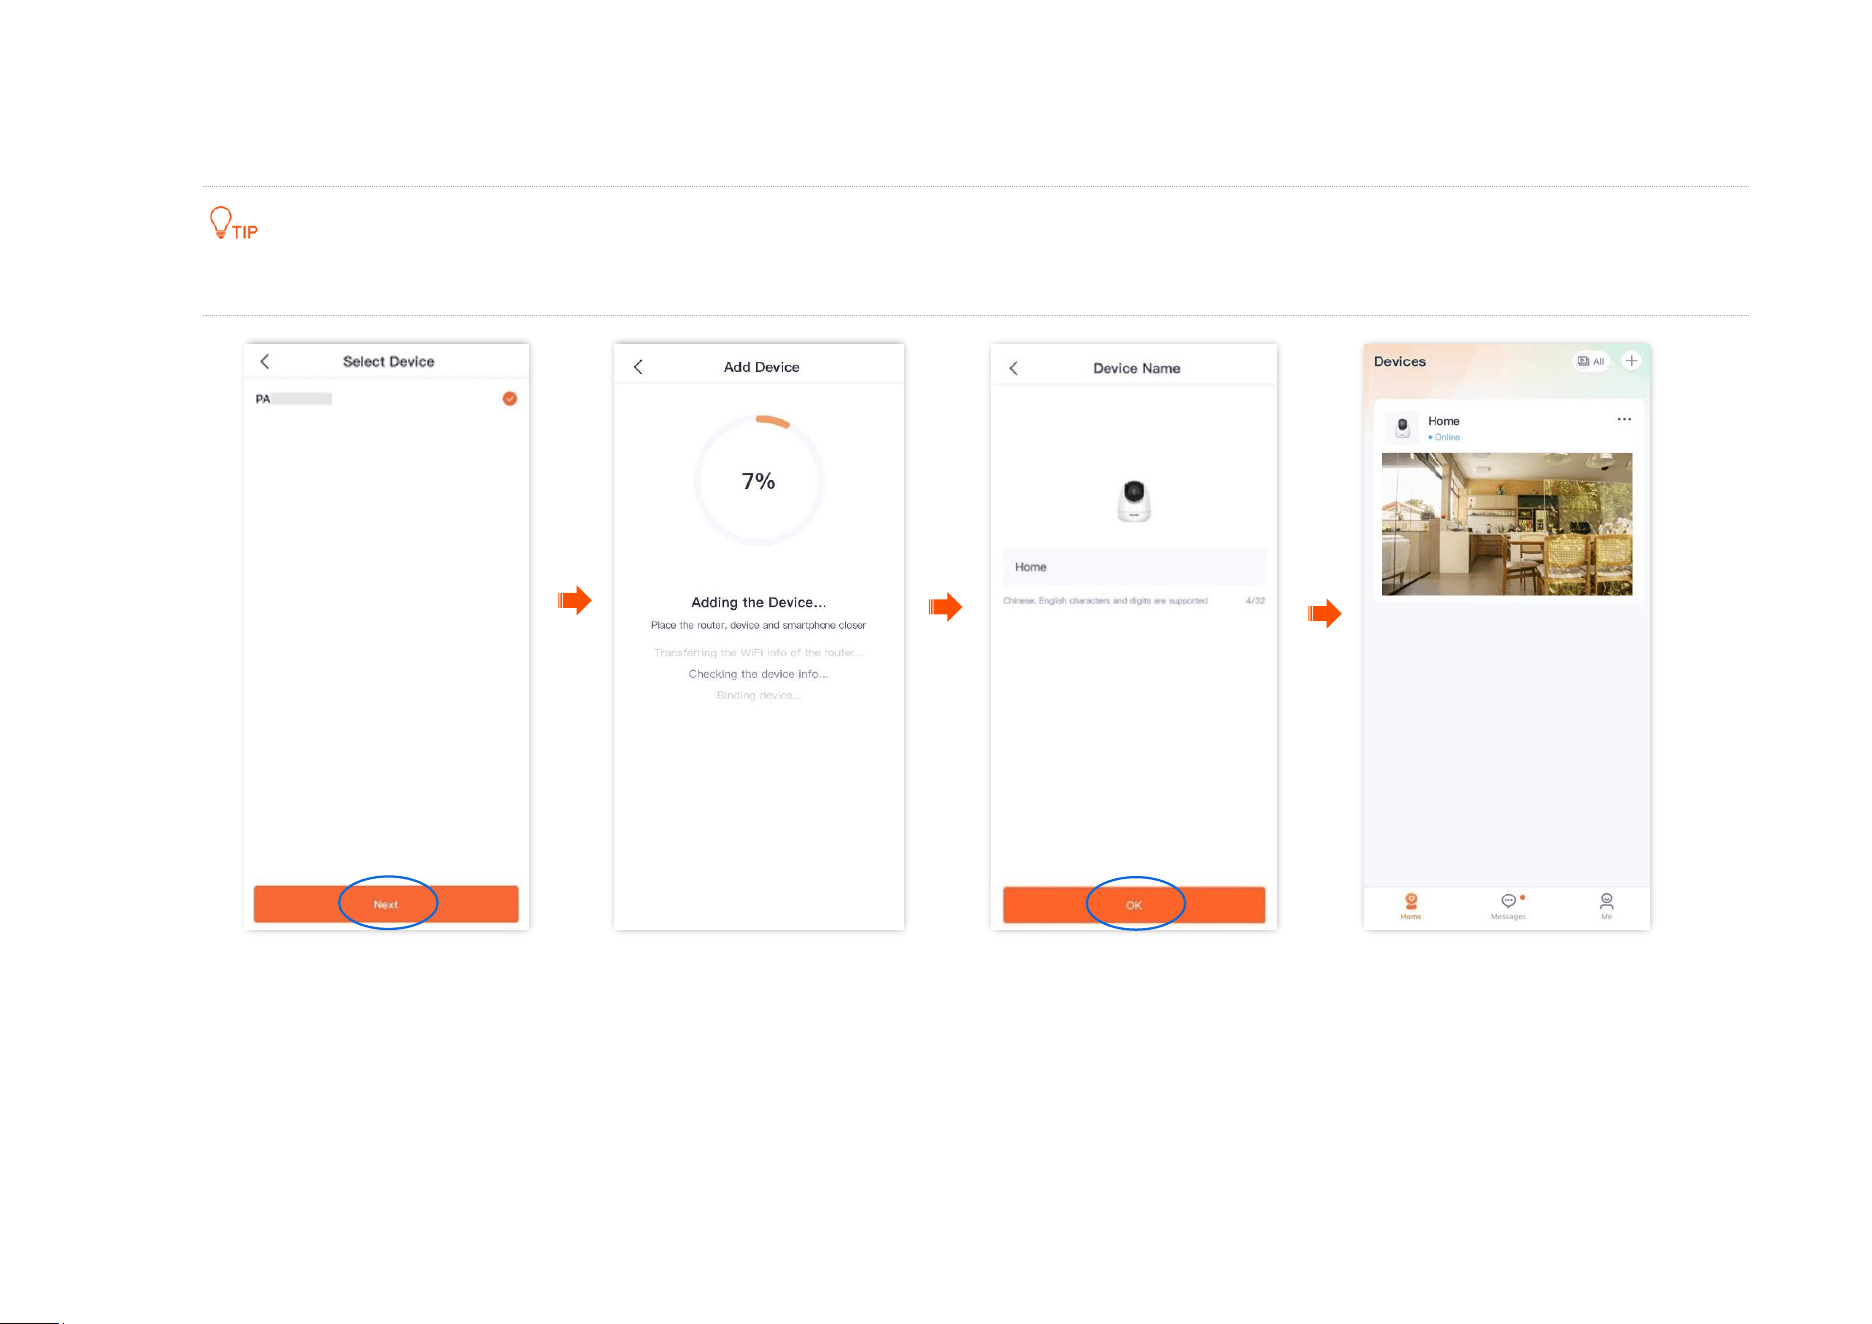
4 Name your camera.
You can name your camera, which is Home in this example. Tap OK.
If it is the first time to use a new camera, name the camera and tap Next, the Free Cloud Storage page will pop up, you can get it as required.
----End

Document Version: V1.4
11
Method 2: Add a camera through one-tap
It is applicable for camera CT6-WCA. The TDSEE App with version 1.3.0 is used for illustrations here.
Assume that the 2.4 GHz Wi-Fi information of the router is:
- Wi-Fi name: Tenda_123456
- Wi-Fi password: UmXmL9UK
Step 1 Power on the camera.
The LED indicator lights solid red after the camera is powered on. When the LED indicator blinks blue quickly, the camera is waiting to
connect to a 2.4 GHz Wi-Fi network.
Step 2 Add the camera to TDSEE App.
Scan the QR code of the camera
Smartphone connects to the router's Wi-Fi
Camera connects to the router's Wi-Fi
Name your camera
Document Version: V1.4
12
1
Scan the QR code of the camera.
(1)
Open the TDSEE App on a smartphone that is connected to the internet. Enter the homepage, tap Add a device or in the upper
right corner of the homepage.
(2) Scan the QR code on the bottom of the camera.
(3) Confirm and tick The device is powered on. Tap Add.
(4) Confirm and tick The indicator is blinking blue fast, or I have heard the prompt tone, and tap Next.
If a prompt pops up asking for access to the camera of your smartphone, please allow it.
Document Version: V1.4
13
2 Smartphone connects to the router's Wi-Fi.
3 Camera connects to the router’s Wi-Fi.
(1) Connect to the 2.4 GHz Wi-Fi network of the router, which is Tenda_123456 in this example.
(2) Return to the TDSEE App, enter the Wi-Fi password, and tap Next.
You are recommended to connect to the 2.4 GHz Wi-Fi network of the router with the good network quality.
If a prompt pops up asking for access to the location information of your smartphone, please allow it.
Wait a moment, and the camera is added successfully.
Document Version: V1.4
14
4 Name your camera.
You can name your camera, which is Home in this example. Tap OK.
If it is the first time to use a new camera, name the camera and tap Next, the Free Cloud Storage page will pop up, you can get it as required.
----End
Document Version: V1.4
15
Method 3: Add a camera through AP
The TDSEE App with version 1.3.0 is used for illustrations here.
Step 1 Power on the camera.
The LED indicator lights solid red after the camera is powered on. When the LED indicator blinks blue quickly, the camera is waiting to
connect to a 2.4 GHz Wi-Fi network.
Assume that the 2.4 GHz Wi-Fi information of the router is:
− Wi-Fi name: Tenda_123456
− Wi-Fi password: UmXmL9UK
Step 2 Add the camera to TDSEE App.
Power on the camera
Router
Scan the QR code of the camera
Select AP configuration
Smartphone connects to the router's Wi-Fi
Camera connects to the router's Wi-Fi
Name your camera
Smartphone connects to the camera's Wi-Fi
Document Version: V1.4
16
1
Scan the QR code of the camera.
(1)
Open the TDSEE App on a smartphone that is connected to the internet. Enter the homepage, tap Add a device or in the upper
right corner of the homepage.
(2) Scan the QR code on the bottom of the camera.
If a prompt pops up asking for access to the camera of your smartphone, please allow it.
Document Version: V1.4
17
(3) Confirm and tick The device is powered on. Tap Add.
Document Version: V1.4
18
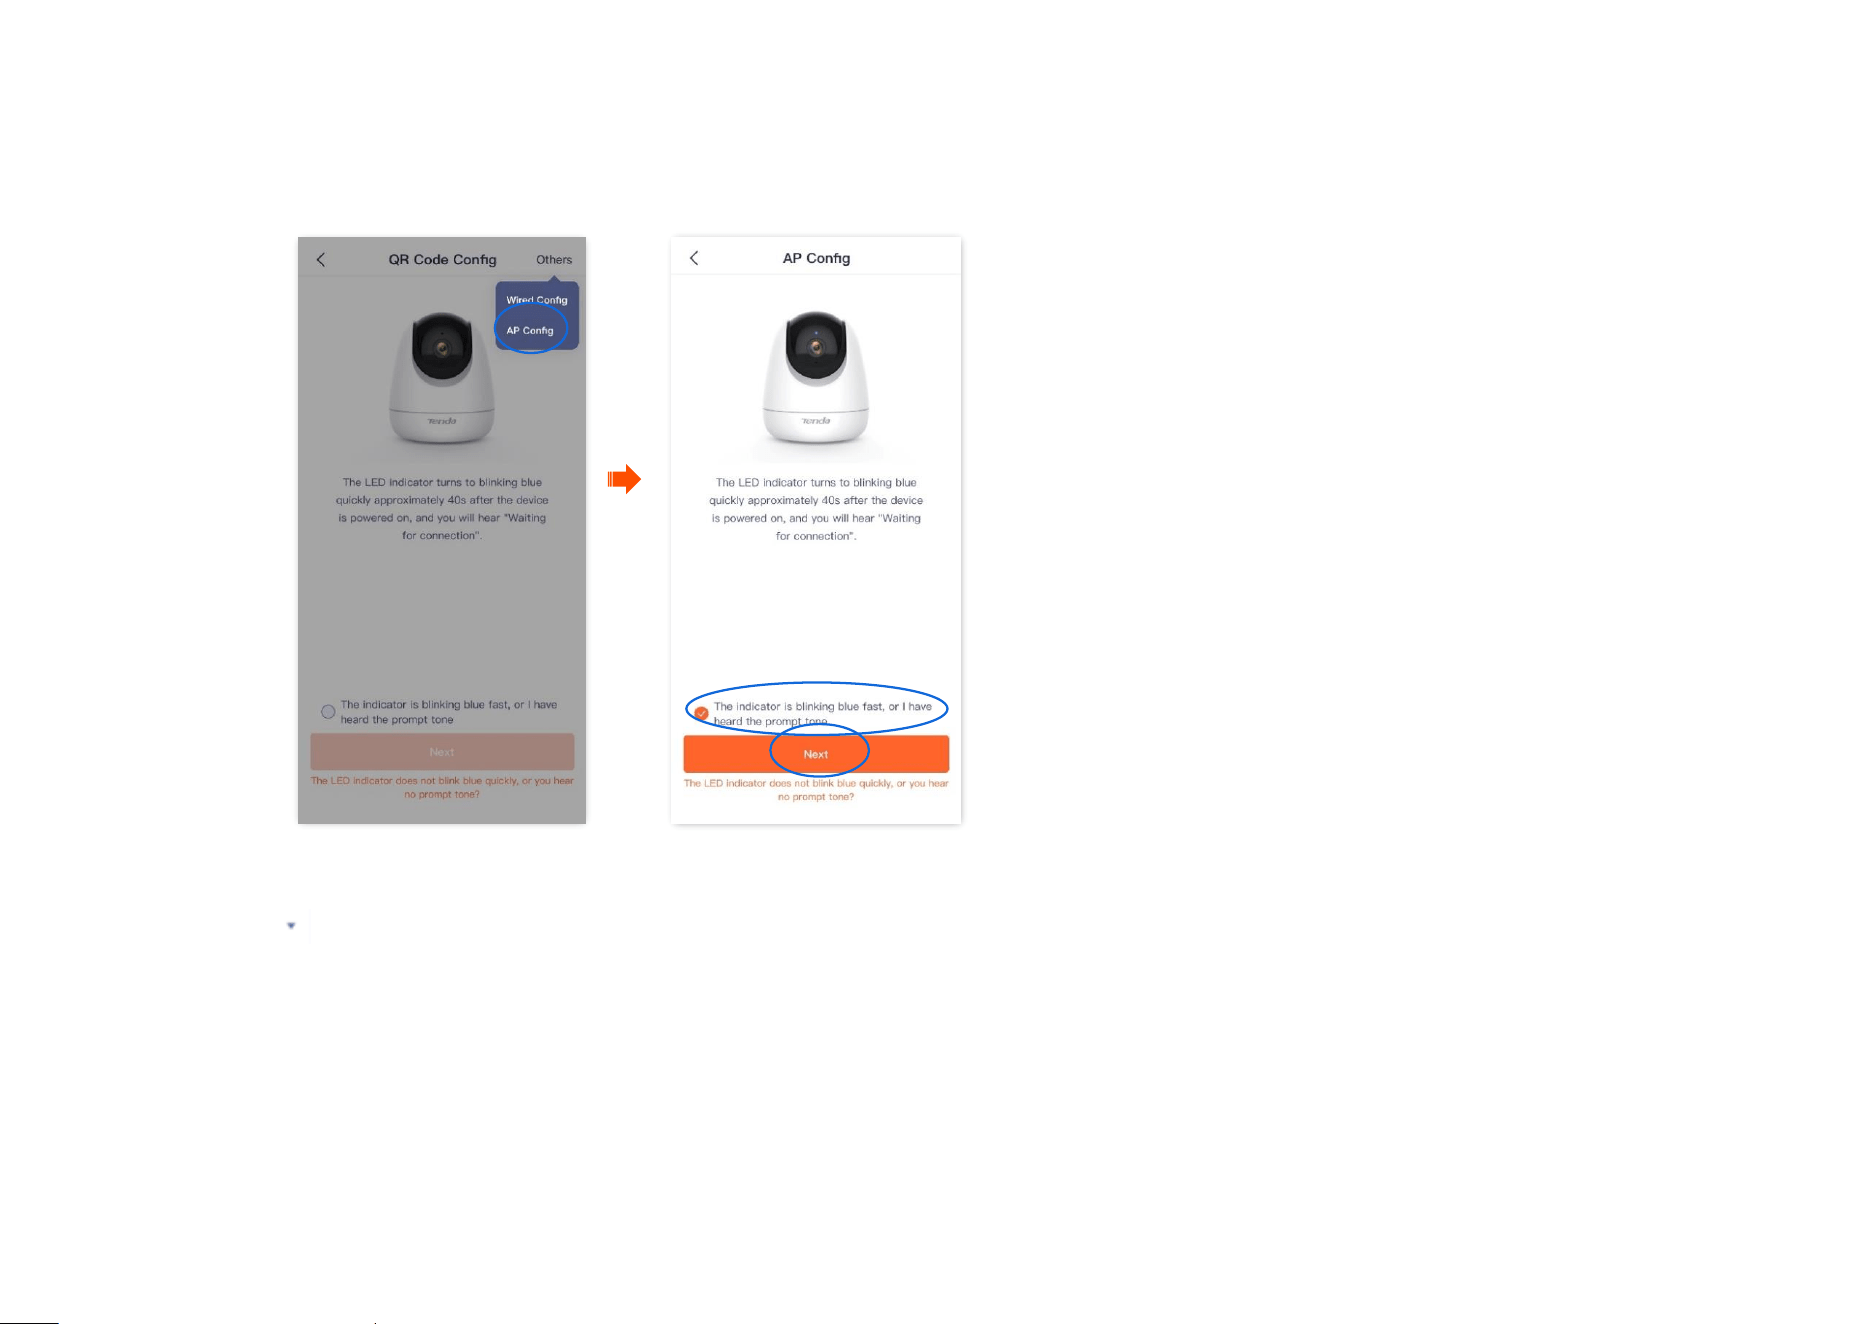
2 Select AP configuration.
(1) Tap Others in the upper right corner, then select AP Config.
(2) Confirm and tick The indicator is blinking blue fast, or I have heard the prompt tone, and tap Next.
3
Smartphone connects to the router's Wi-Fi.
Tap to go to Settings > WLAN of your smartphone. Then connect to the 2.4 GHz Wi-Fi network of the router, which is Tenda_123456 in
this example.
4 Camera connects to the router's Wi-Fi. Return to the TDSEE App, enter the Wi-Fi password, and then tap Next.
Document Version: V1.4
19
You are recommended to connect to the 2.4 GHz Wi-Fi network of the router with the good network quality.
The Precise Location needs to be enabled.
If a prompt pops up asking for access to the location information of your smartphone, please allow it.

Document Version: V1.4
20
5 Smartphone connects to the camera’s Wi-Fi.
(1) Navigate to Settings > WLAN of your smartphone, and then connect to the default SSID (Wi-Fi name) of the camera.
The SSID is TendaIPC_XXXXXX, and XXXXXX indicates the last six characters of its UUID which can be found on the bottom of the camera.
When you connect to the Wi-Fi name of the camera, you need to connect it manually. Some Android smartphones can automatically add
the Wi-Fi name of the camera.
(2) Return to TDSEE App, then tap Next. The TDSEE App is adding the device.
Wait a moment, and the camera is added successfully.

Document Version: V1.4
21
6 Name your camera.
You can name your camera, which is Home in this example, and tap OK.
If it is the first time to use a new camera, name the camera and tap Next, the Free Cloud Storage page will pop up, you can get it as required.
----End
Document Version: V1.4
22
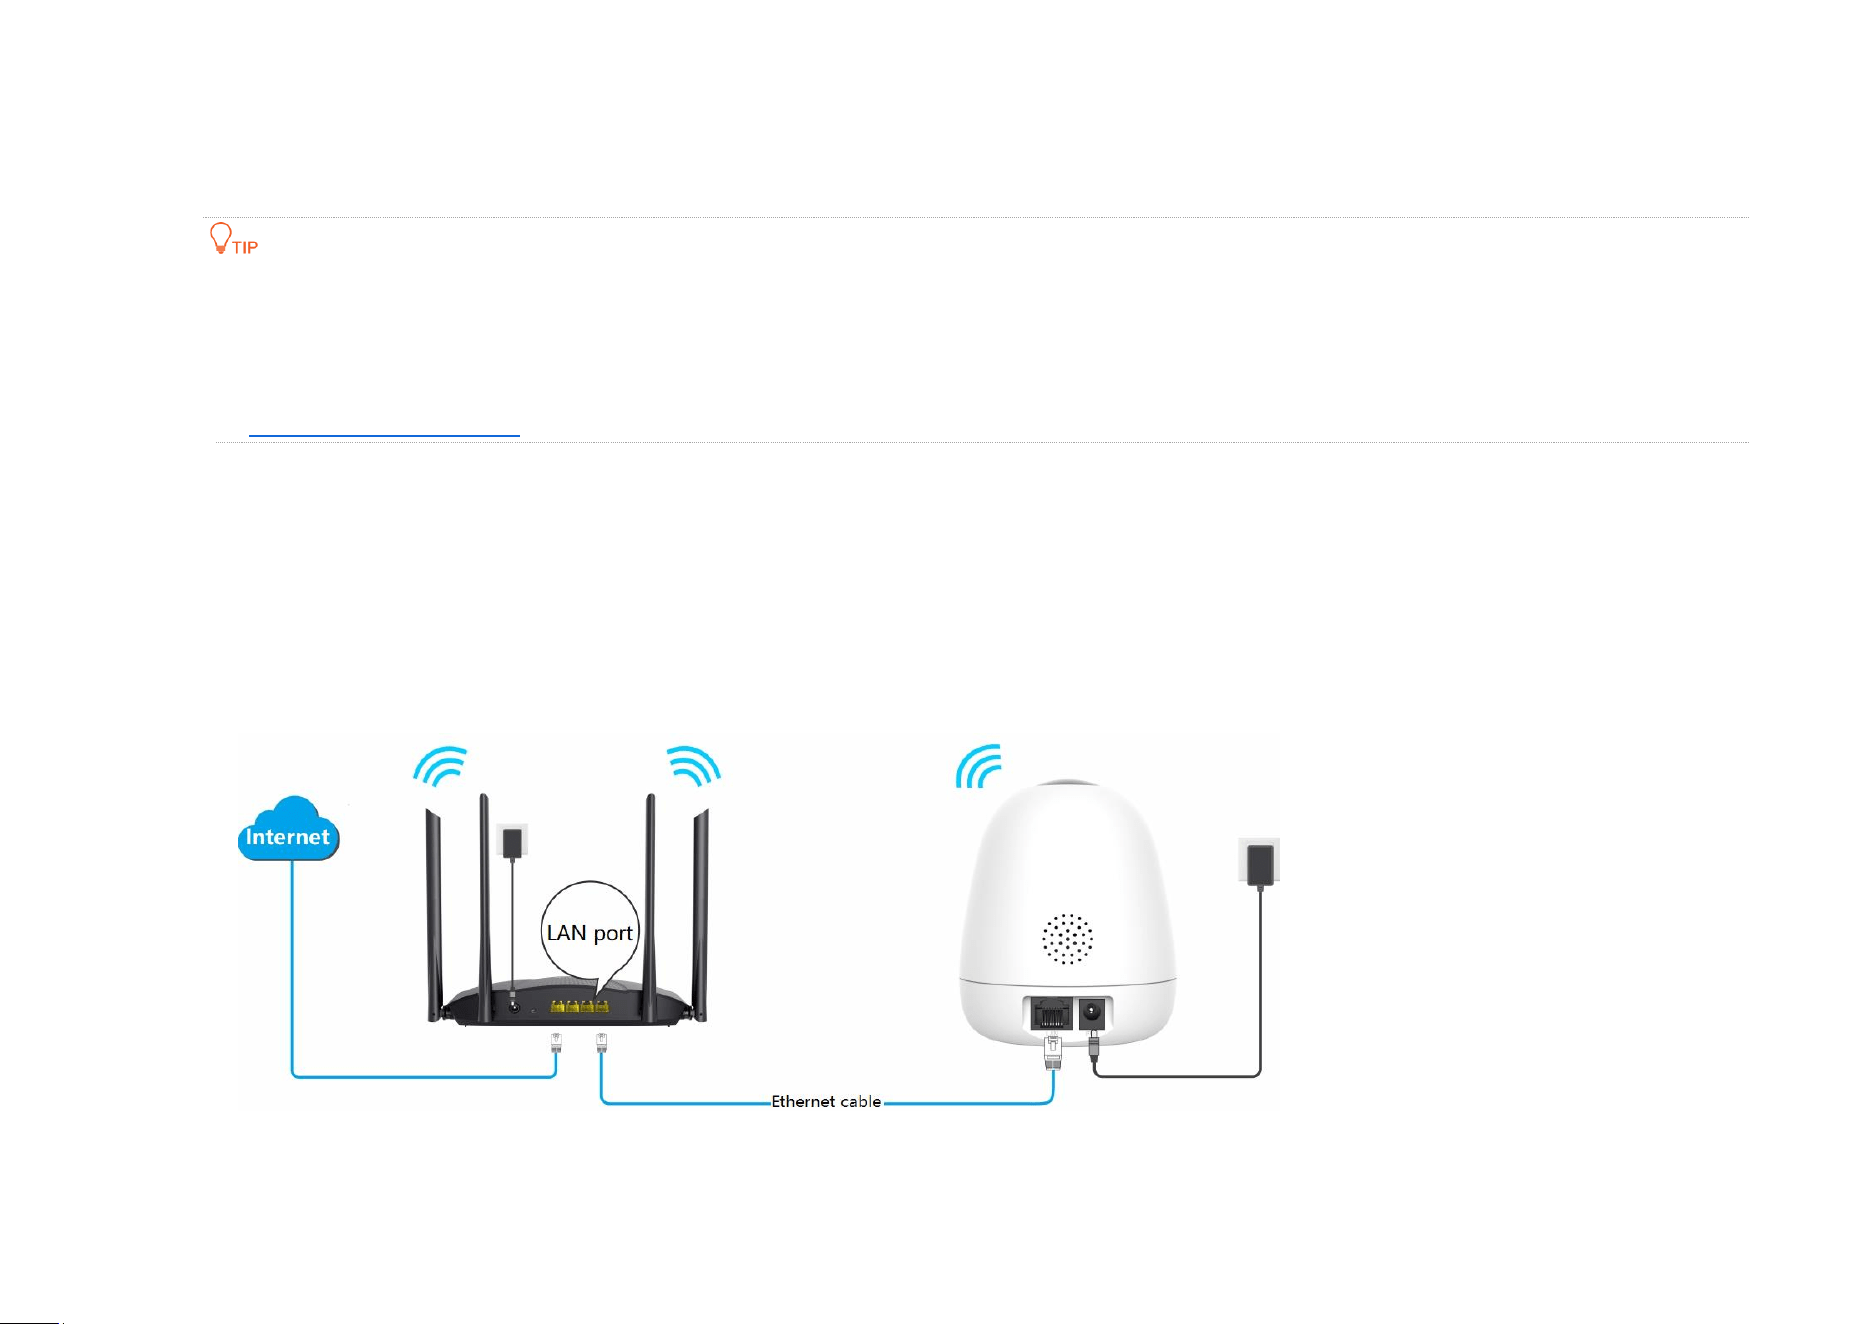
Method 4: Add a camera in a wired manner (Not applicable for CP3)
The TDSEE App with version 1.3.0 is used for illustrations here.
After adding the camera successfully through Wired Config:
Do not disconnect the Ethernet cable between the camera and the router. You can connect the camera with an Ethernet cable to the LAN
port of another router that can access the internet.
If you want to manage the camera in a wireless manner, you can configure the Wi-Fi that is connected to the internet successfully. Refer to
modify the Wi-Fi settings for details. Settings completed, you can unplug the Ethernet cable between the camera and the router.
Assume that the Wi-Fi name and Wi-Fi password of the router are:
− Wi-Fi name: Tenda_123456
− Wi-Fi password: UmXmL9UK
Step 1 Connect the smartphone to the Wi-Fi network of the router, which is Tenda_123456 in this example.
Step 2 Power on the camera. The LED indicator lights solid red after the camera is powered on. When the LED indicator blinks blue quickly, the
camera is waiting for connection.
Step 3 Connect the LAN port of the camera to the LAN port of the router using an Ethernet cable.
Power on the camera
Router
Document Version: V1.4
23
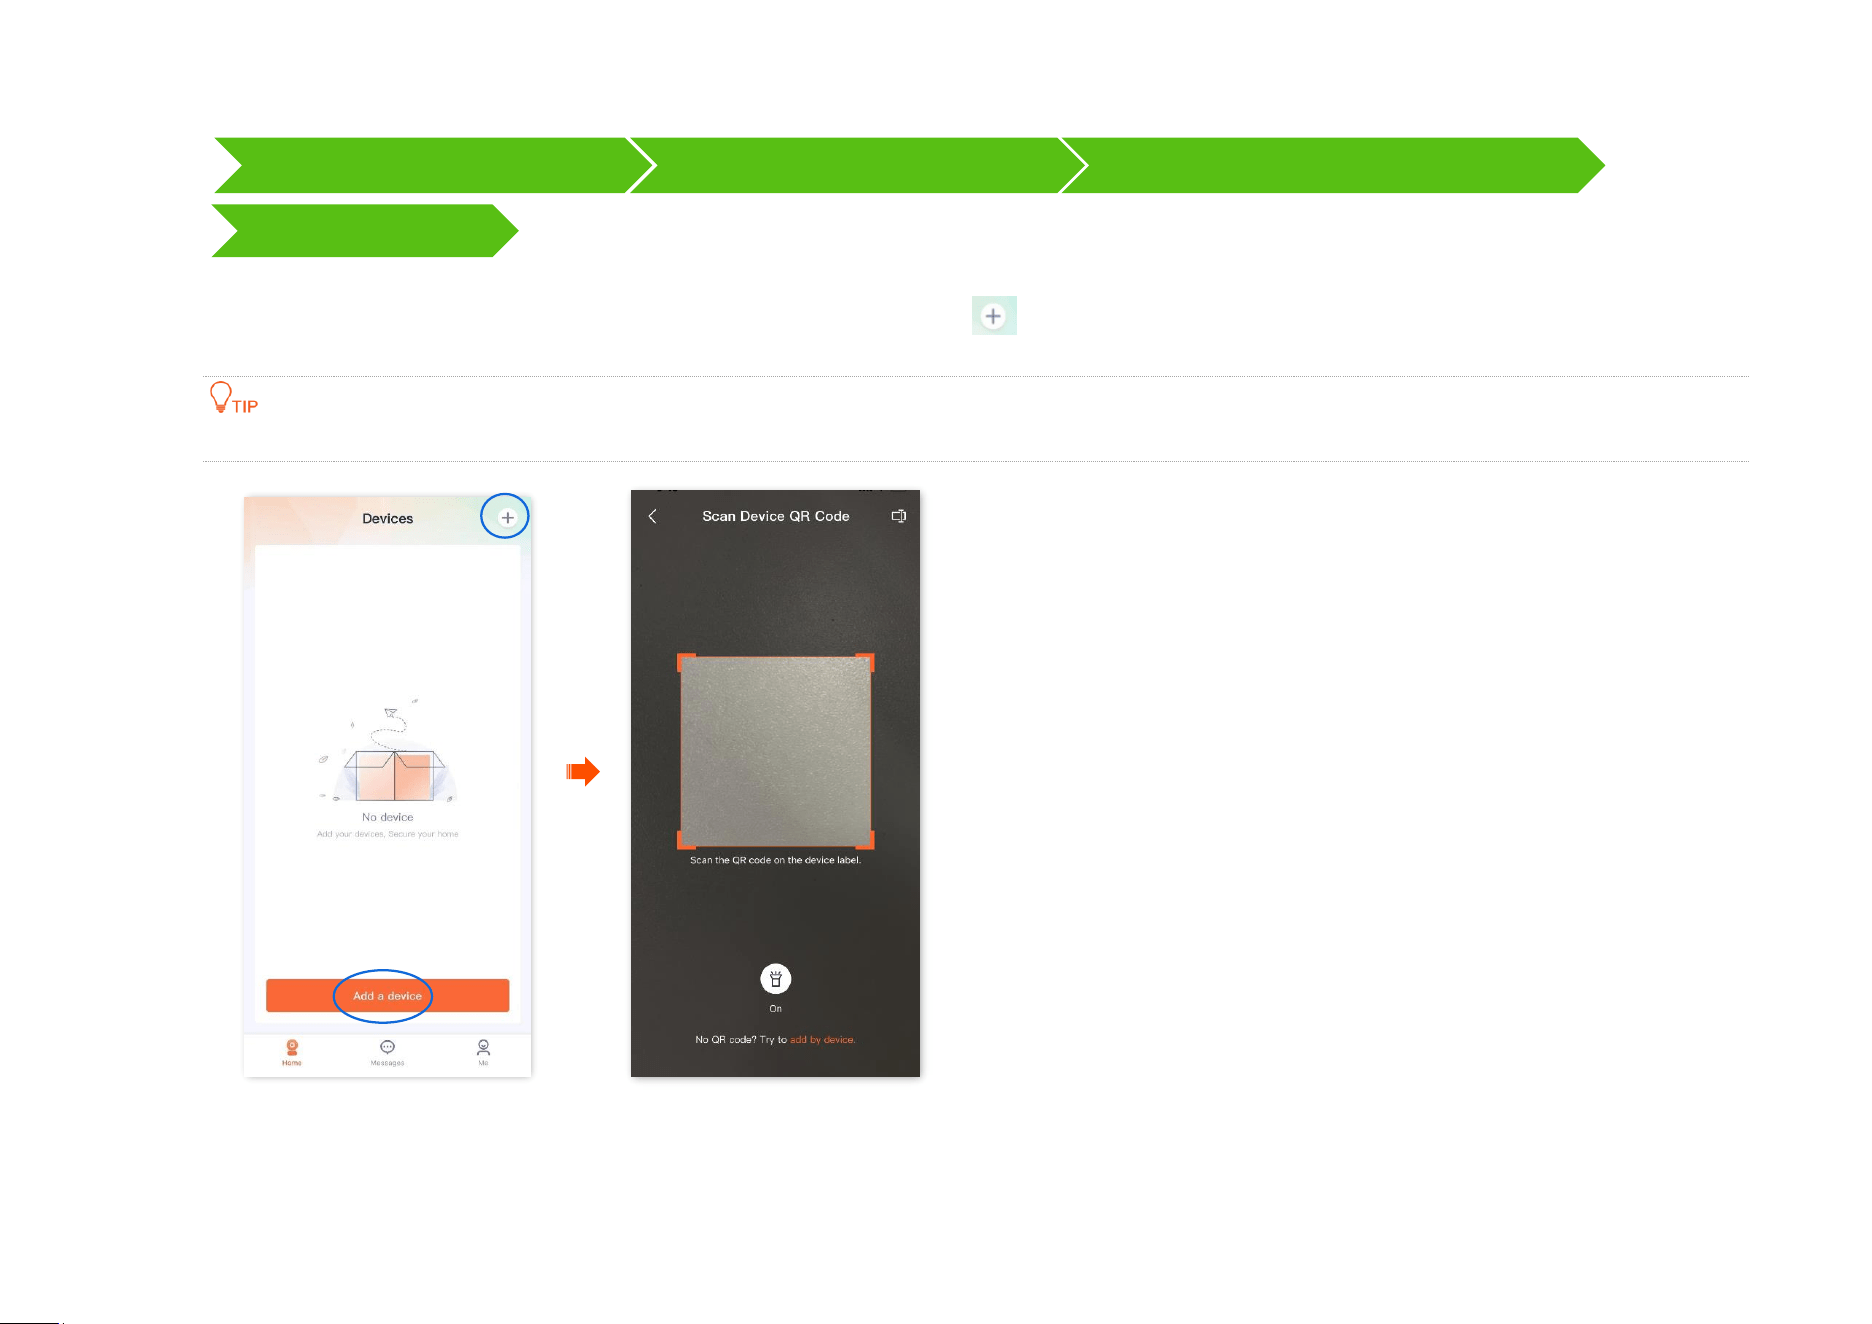
Step 4 Add the camera to TDSEE App.
1 Scan the QR code of the camera.
(1)
Open the TDSEE App. Enter the homepage, tap Add a device or in the upper right corner of the homepage.
(2) Scan the QR code on the bottom of the camera.
If a prompt pops up asking for access to the camera of your smartphone, please allow it.
Scan the QR code of the camera
Select the wired configuration
Select the camera that you want to add
Name your camera
Document Version: V1.4
24
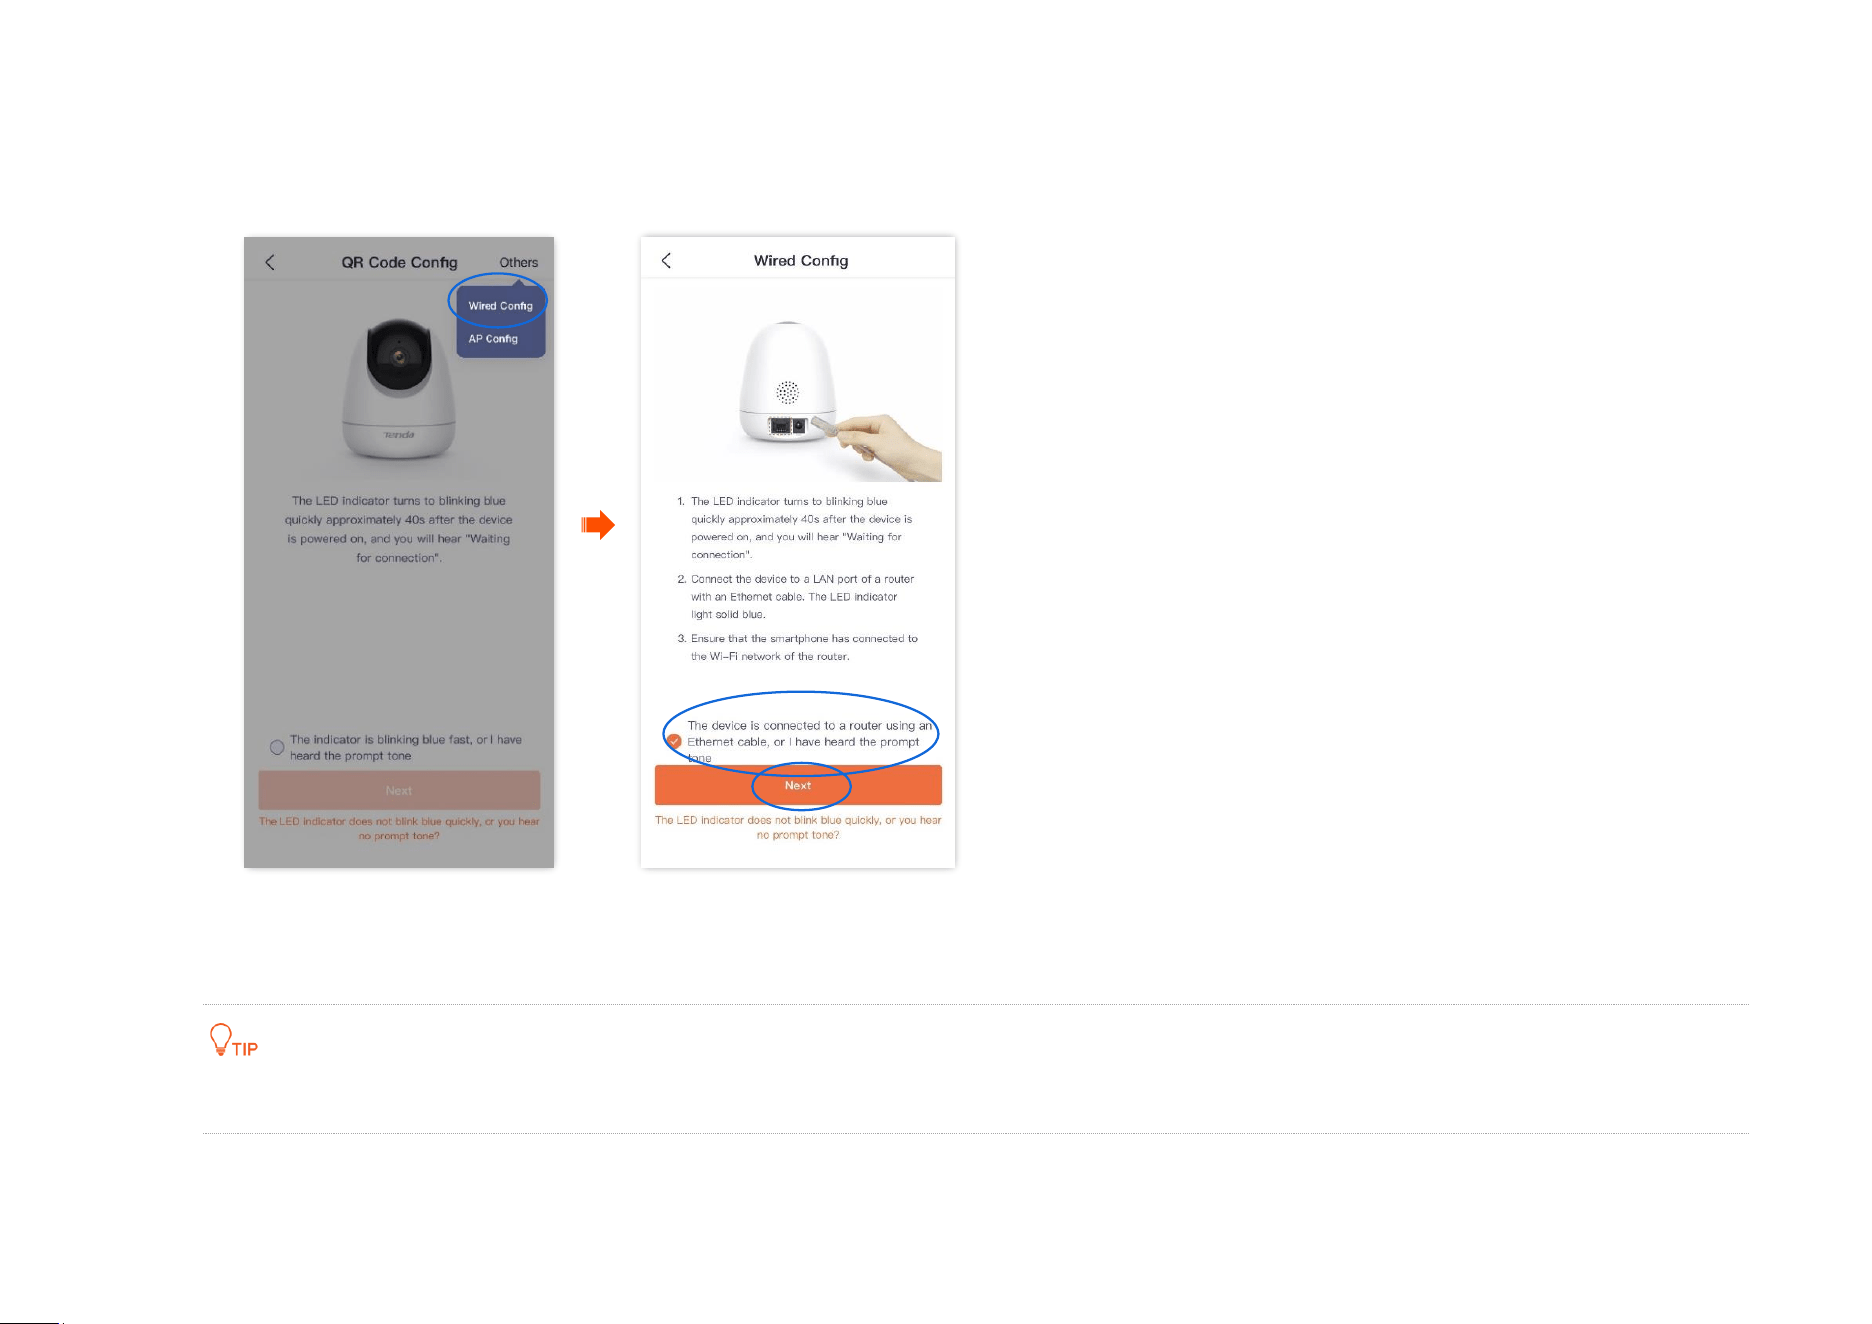
2 Select the wired configuration.
(1) Tap Others in the upper right corner, then select Wired Config.
(2) Confirm and tick The device is connected to a router using an Ethernet cable, or I have heard the prompt tone, and tap Next.
3 Select the camera that you want to add, then tap Next. The TDSEE App is adding the device.
Wait a moment, and the camera is added successfully.
The default name of the camera is the UUID, which UUID can be found on the bottom label of the device.
Document Version: V1.4
25
4 Name your camera.
You can name your camera, which is Home in this example. Then tap OK.
If it is the first time to use a new camera, name the camera and tap Next, the Free Cloud Storage page will pop up, you can get it as required.
----End
Document Version: V1.4
26
Method 5: Add a camera through UUID
The TDSEE App with version 1.3.0 is used for illustrations here.
Step 1 Power on the camera.
The LED indicator lights solid red after the camera is powered on. When the LED indicator blinks blue quickly, the camera is waiting to
connect to a 2.4 GHz Wi-Fi network.
Assume that the 2.4 GHz Wi-Fi information of the router is:
− Wi-Fi name: Tenda_123456
− Wi-Fi password: UmXmL9UK
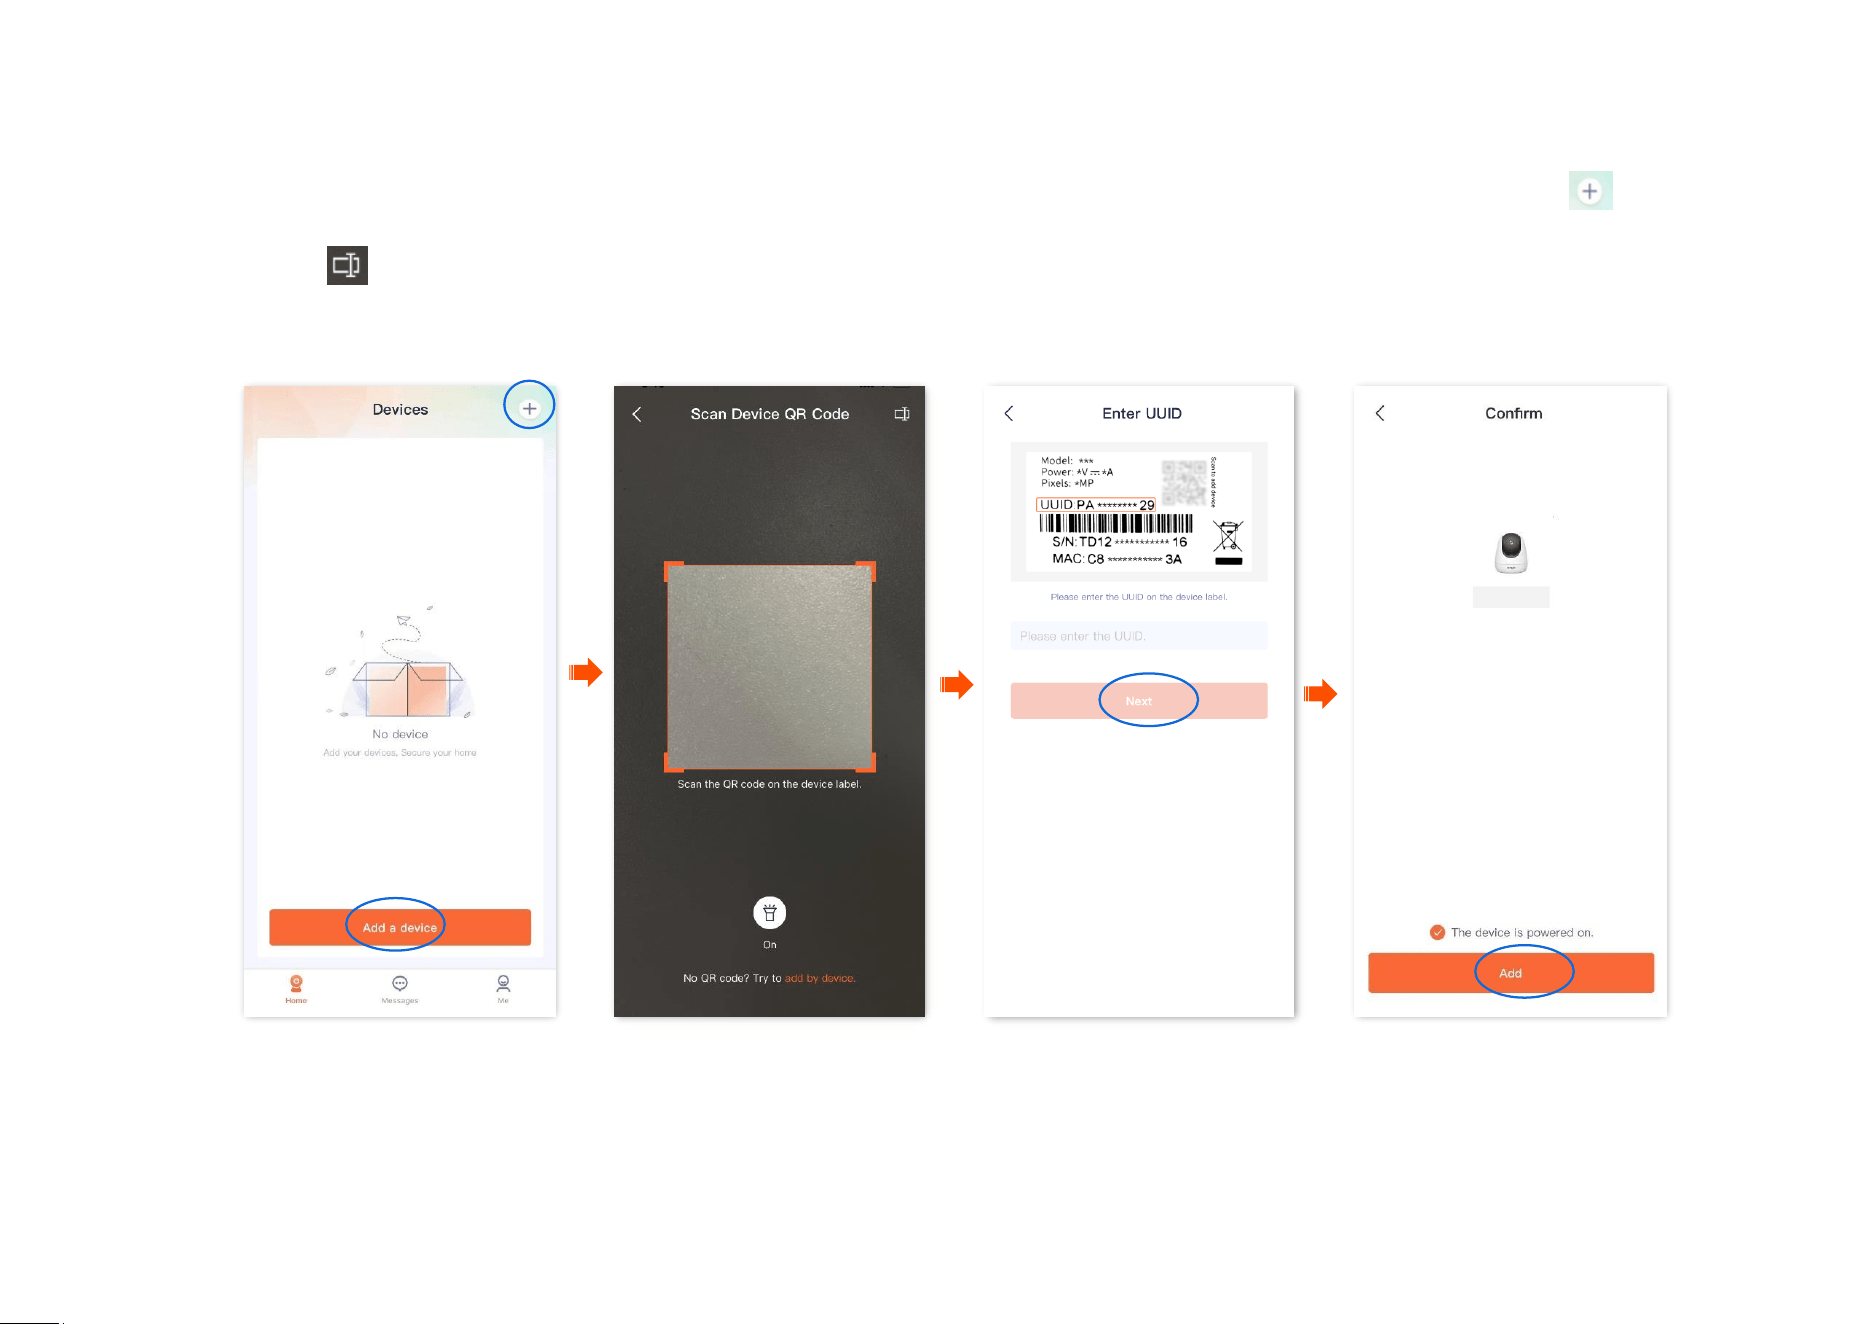
Step 2 Add the camera to TDSEE App.
Router
Power on the camera
Select the UUID configuration and enter the UUID of the camera
Camera scans the App's QR code
Name your camera
Connect to the router's Wi-Fi
Document Version: V1.4
27
1
Select the UUID configuration and enter the UUID of the camera.
(1)
Open the TDSEE App on a smartphone that is connected to the internet. Enter the homepage, and tap Add a device or in the
upper right corner of the homepage.
(2)
Tap on the upper-right corner of the Scan Device QR Code page.
(3) Enter the UUID of the camera, and the UUID can be found on the bottom label of the camera. Tap Next.
(4) Confirm and tick The device is powered on. Tap Add.
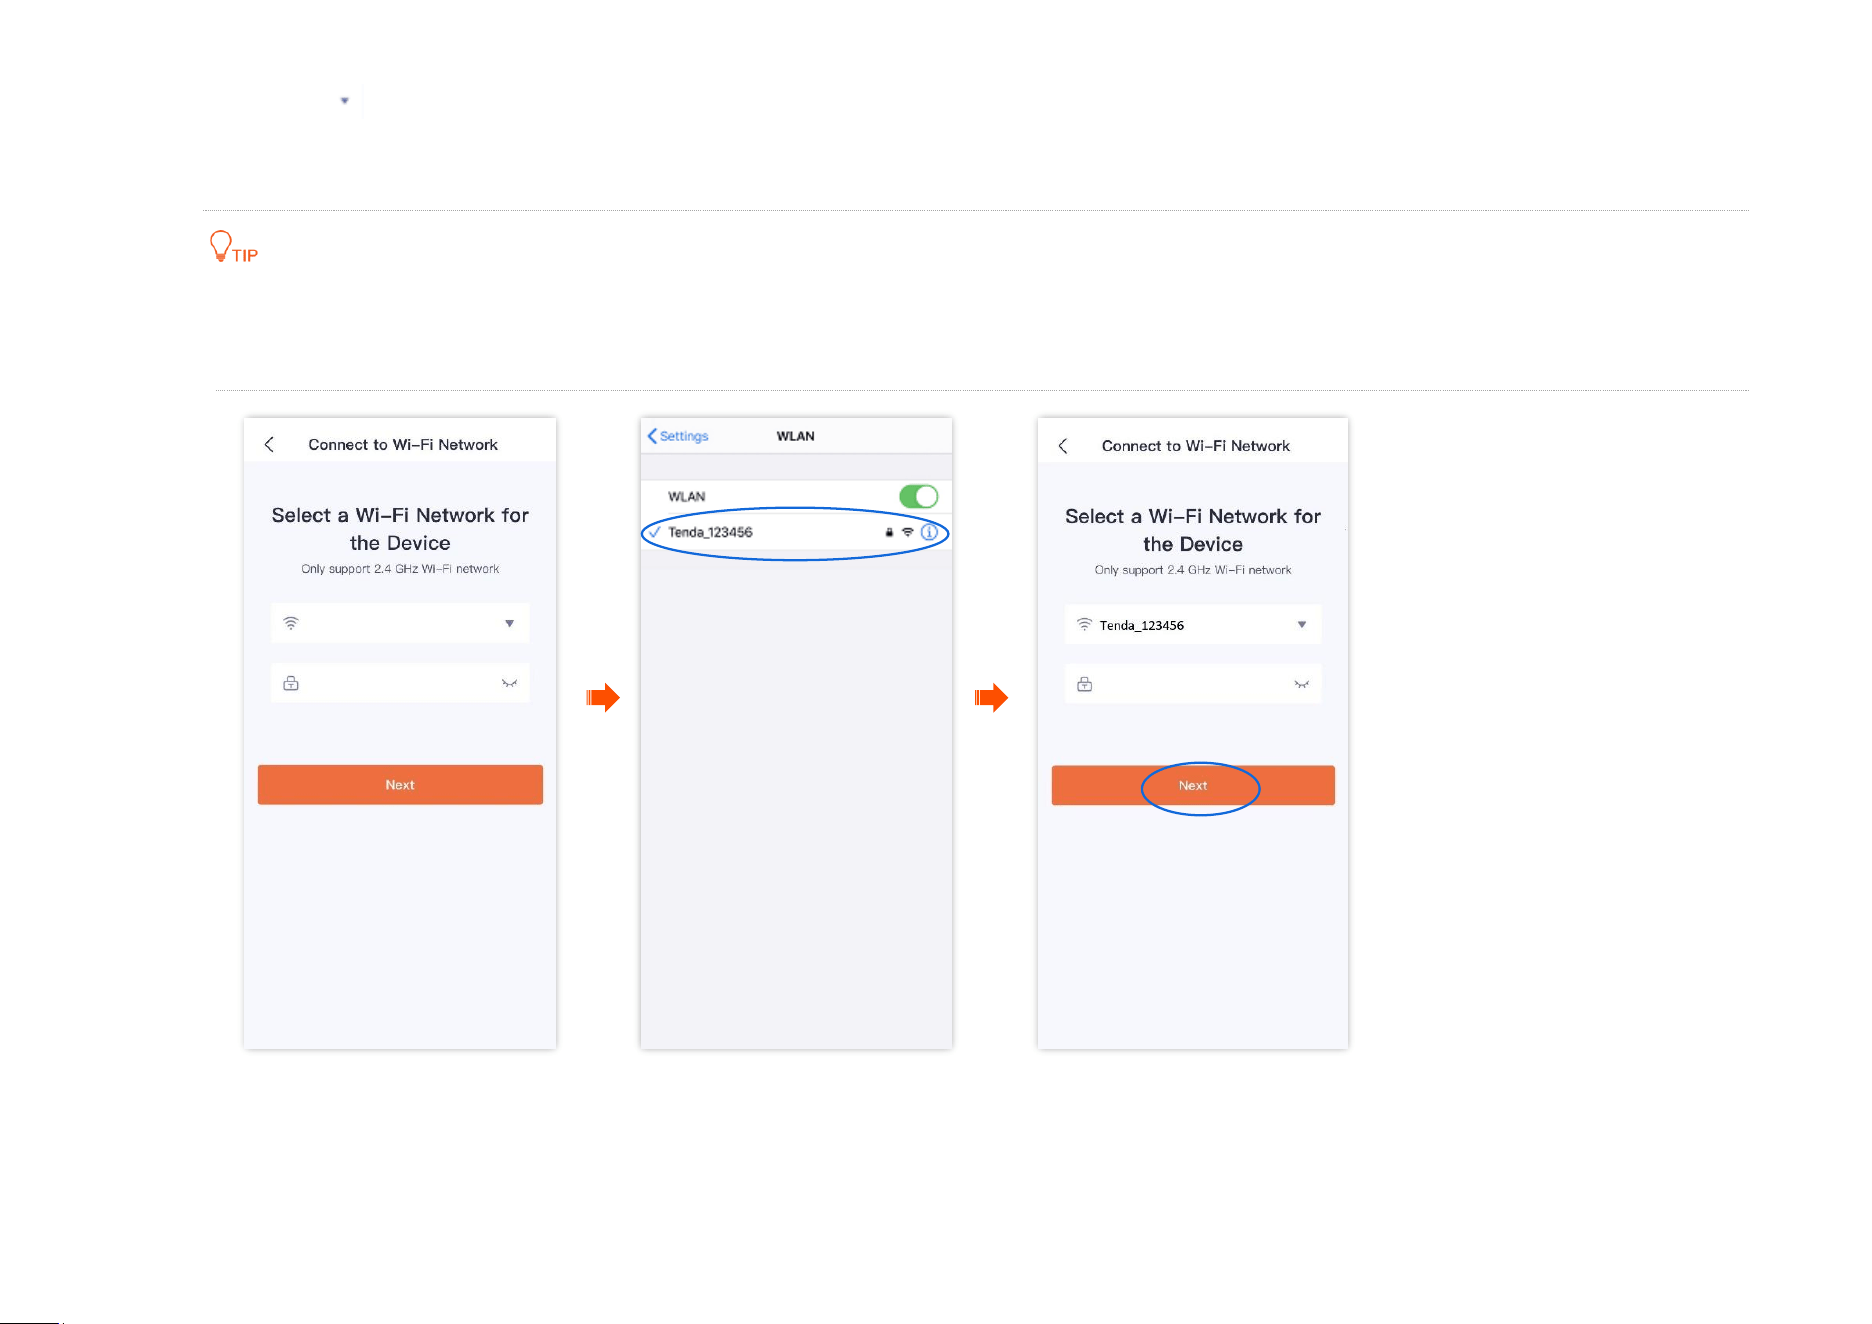
2 Connect to the router's Wi-Fi.
Document Version: V1.4
28
(1)
Tap to navigate to Settings > WLAN of your smartphone. Then connect your smartphone to the 2.4 GHz Wi-Fi network of the
router, which is Tenda_123456 in this example.
(2) Return to the TDSEE App, enter the Wi-Fi password, and tap Next.
You are recommended to connect to the 2.4 GHz Wi-Fi network of the router with the good network quality.
If a prompt pops up asking for access to the location information of your smartphone, please allow it.
3 Camera scans the App's QR code.

Document Version: V1.4
29
If you do not hear the prompt tone, try the following solutions:
Try moving the smartphone back and forth to adjust the distance between the screen of the smartphone and the camera, and keep each
position for about two seconds.
Ensure that the camera lens has no shade or blemishes. Remove the protective film (if any) and try again.
Ensure that the smartphone screen is clear, with no cracks and no reflections.
(1) Align the lens of the camera with the QR code for scanning from 15 to 25 cm.
Document Version: V1.4
30
(2) When you hear a prompt tone “Connecting. Please wait”, tap I have heard the prompt tone, then the TDSEE App starts to add the
device.
Wait a moment, and the camera is added successfully.
Document Version: V1.4
31
4 Name your camera.
You can name your camera, which is Home in this example. Tap OK.
If it is the first time to use a new camera, name the camera and tap Next, the Free Cloud Storage page will pop up, you can get it as required.
----End
Document Version: V1.4
32
Home page
The TDSEE App with version 1.3.0 is used for illustrations here.
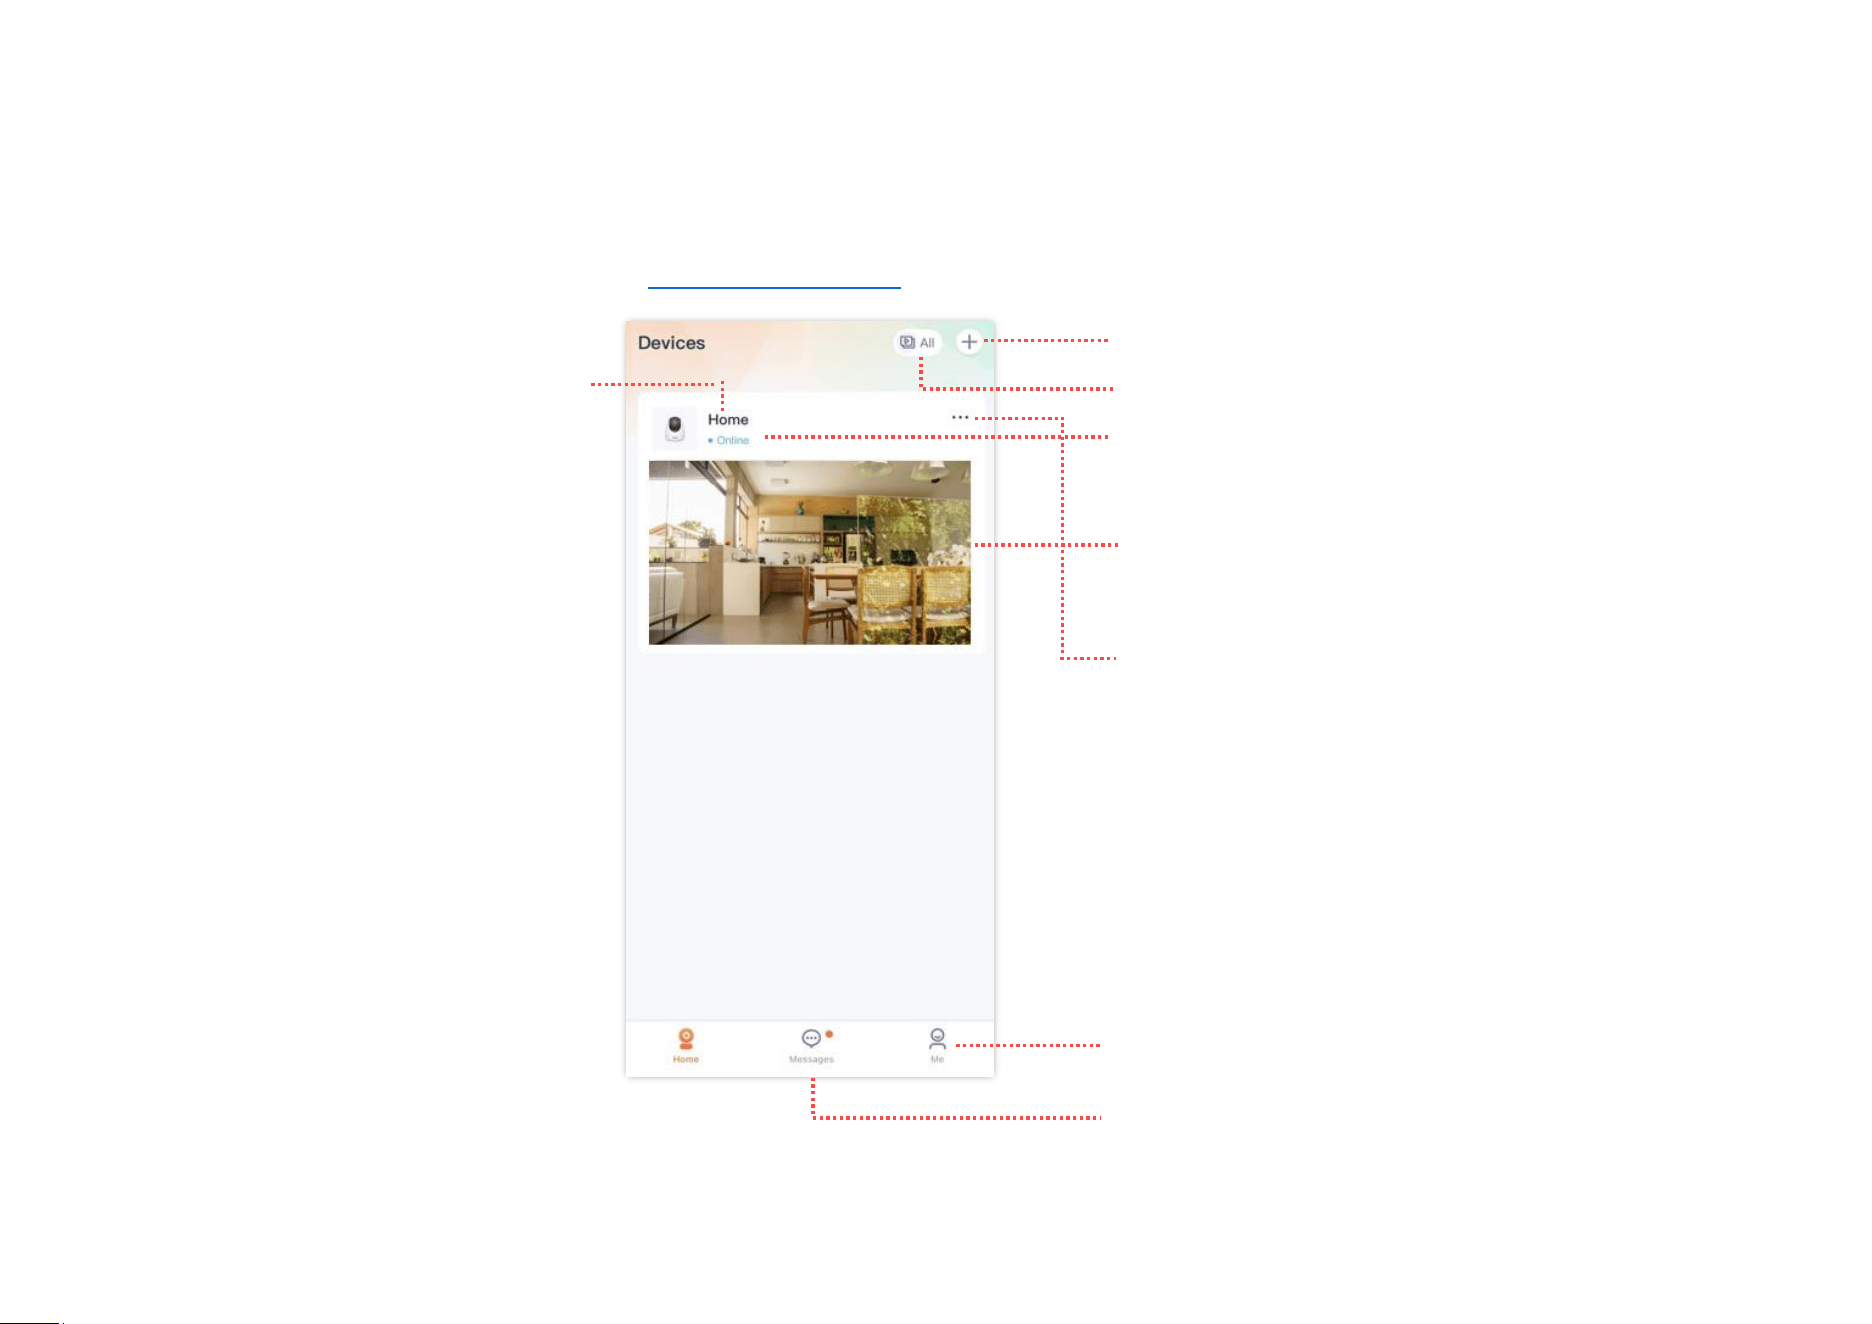
By default, the Homepage is displayed after you log in to the TDSEE App. You can preview all devices under this account, or add a device, and so on.
Check the name of your device
Tap it to add a device
Check device status
Tap it to check more settings
Tap it to check system messages and notification
messages of each device
Monitoring video of the camera. Tap it to perform
detailed settings for the camera
Tap it to preview monitoring images of multiple cameras
at the same time
Tap it to view the sharing status and cloud storage
status, and enter the sharing, cloud storage, and device
settings page
Document Version: V1.4
33
Basic settings
The TDSEE App with version 1.1.11 is used for illustrations here.
Monitoring operation
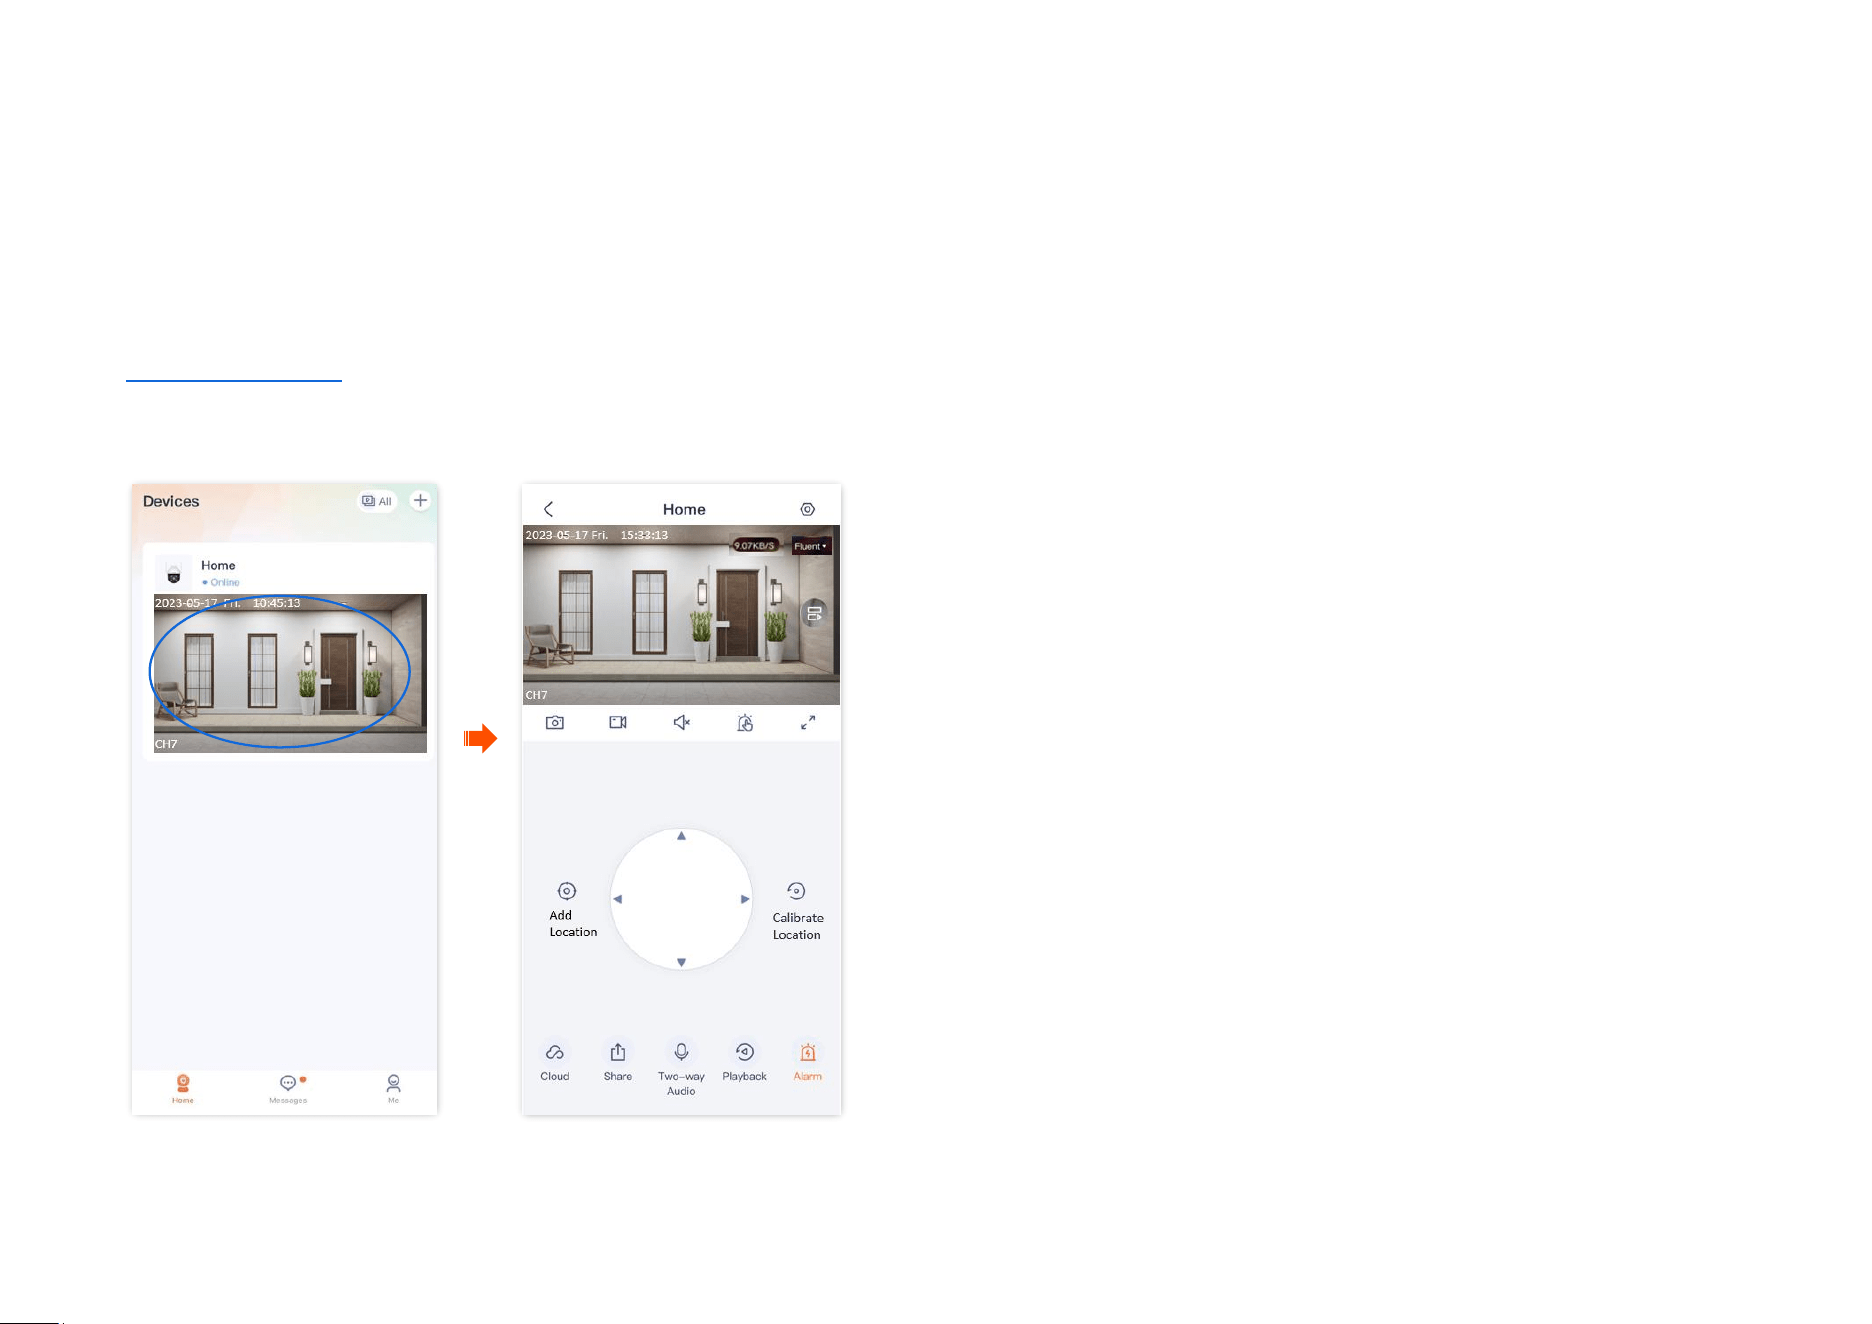
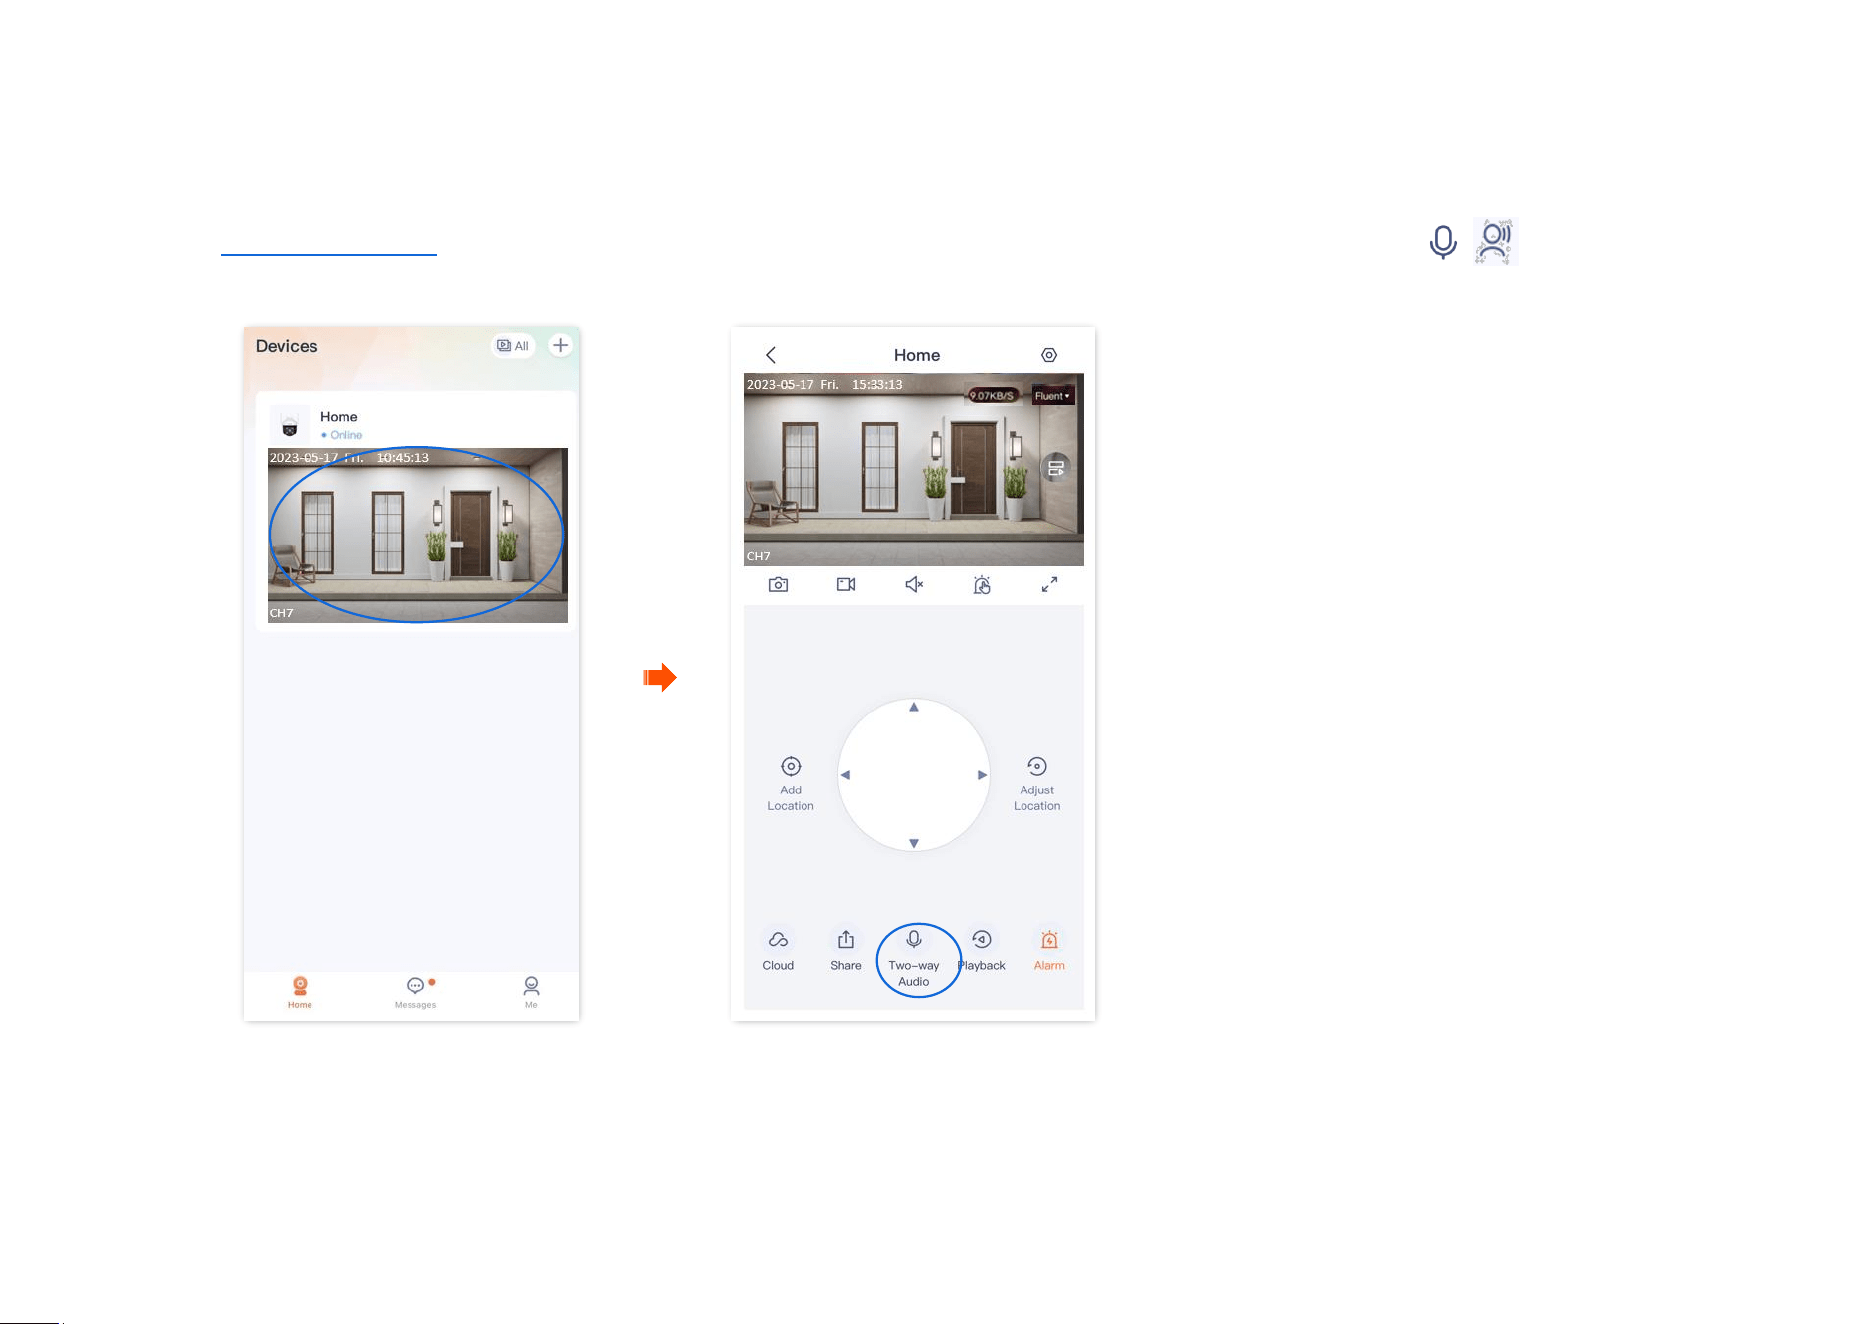
Log in to TDSEE App. Tap the specific device on the homepage, which is the camera Home in this example, then you can perform basic settings.
If you want to scale up any part of the video, you can double-tap the video and slide, or use the pinch-to-zoom gesture to see the details.
Document Version: V1.4
34
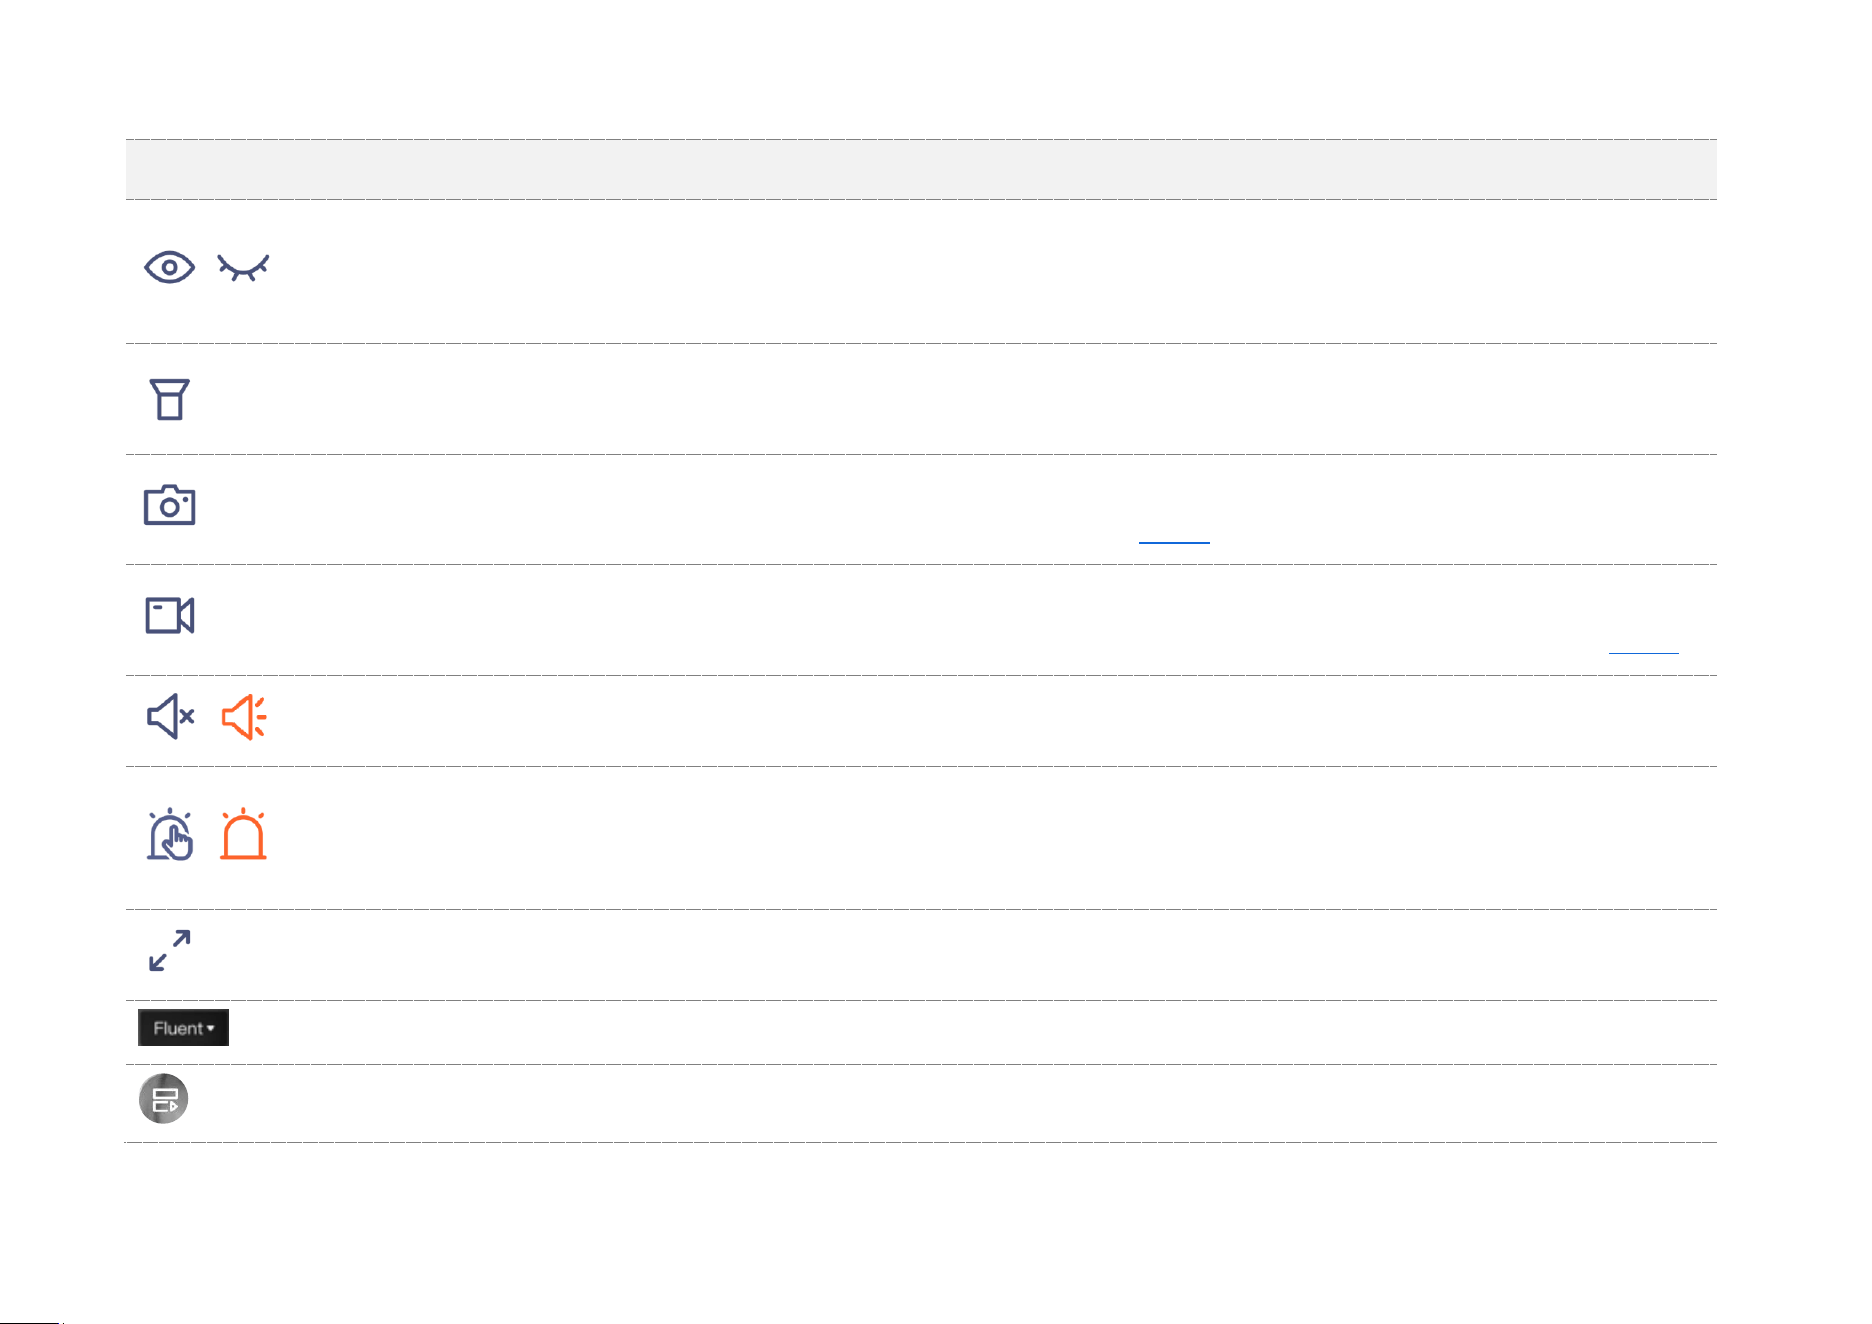
Parameter description
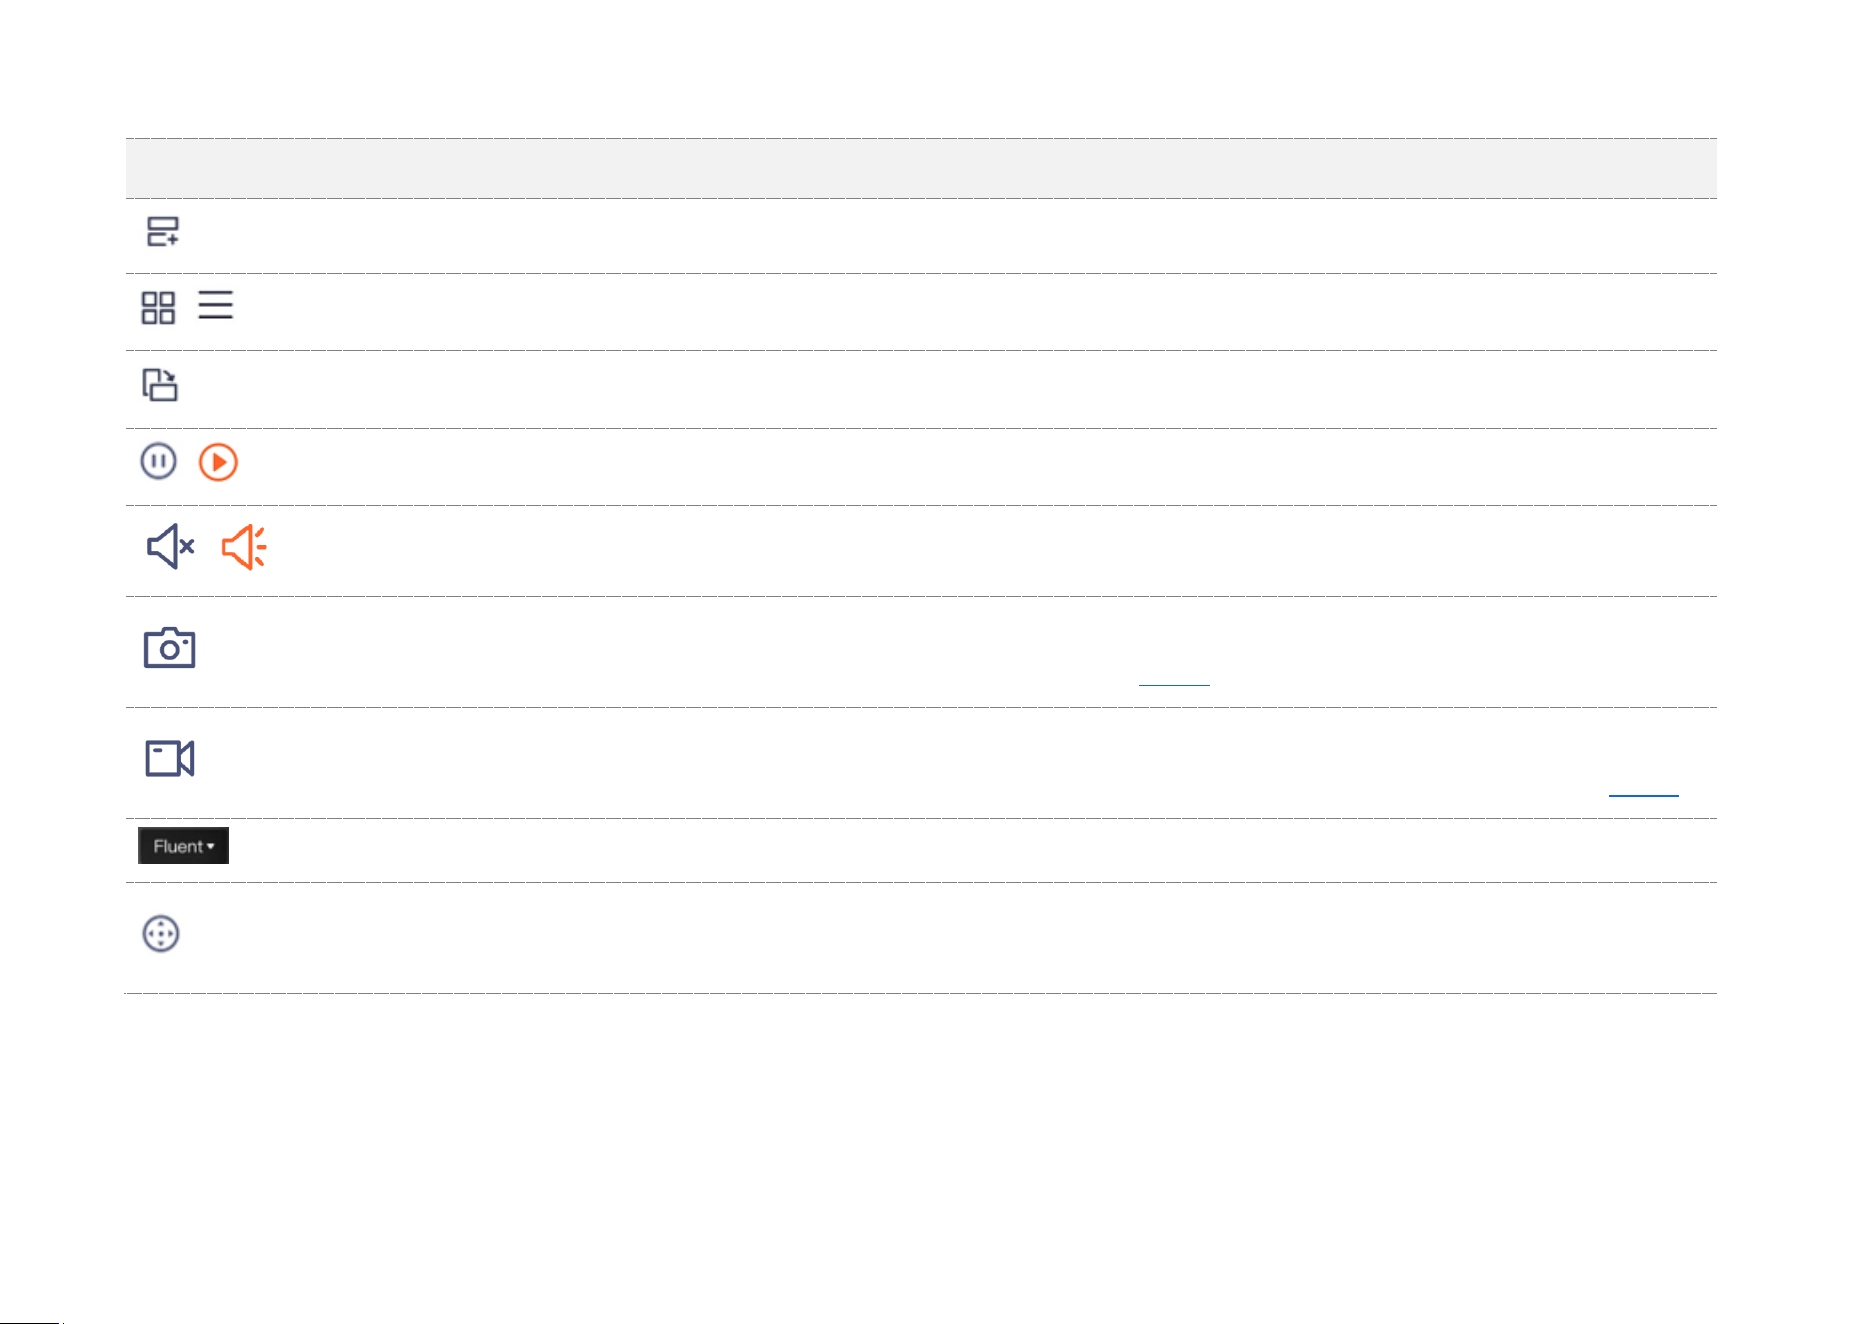
Parameter
Description
/
Tap it to shutter or unshutter the camera lens. By default, the camera lens is unshuttered.
After the camera lens is shuttered, the video image is disabled. At the same time, the camera lens automatically rotates
downward to hide and no longer monitors.
Tap it to turn on or off the light. By default, the light is off.
It is applicable for the full-color version camera.
Screenshots.
Tap it to save the screenshot of the current monitoring image to TDSEE Album.
Recording.
Tap it to start recording, and tap it again to stop recording. Successful recordings are automatically saved to TDSEE Album.
/
Tap it to enable or disable the camera audio. By default, the audio is disabled.
/
Manual alarm.
After the button is tapped, the camera will alarm through sound and light, and automatically count down. When the
countdown ends, the alarm ends.
Tap it to view the image in full screen.
Tap it to change the video clarity. High resolution requires high bandwidth. Please select it as required.
Multiple image preview. Tap it to select multiple cameras to preview images at the same time.
Document Version: V1.4
35
Parameter
Description
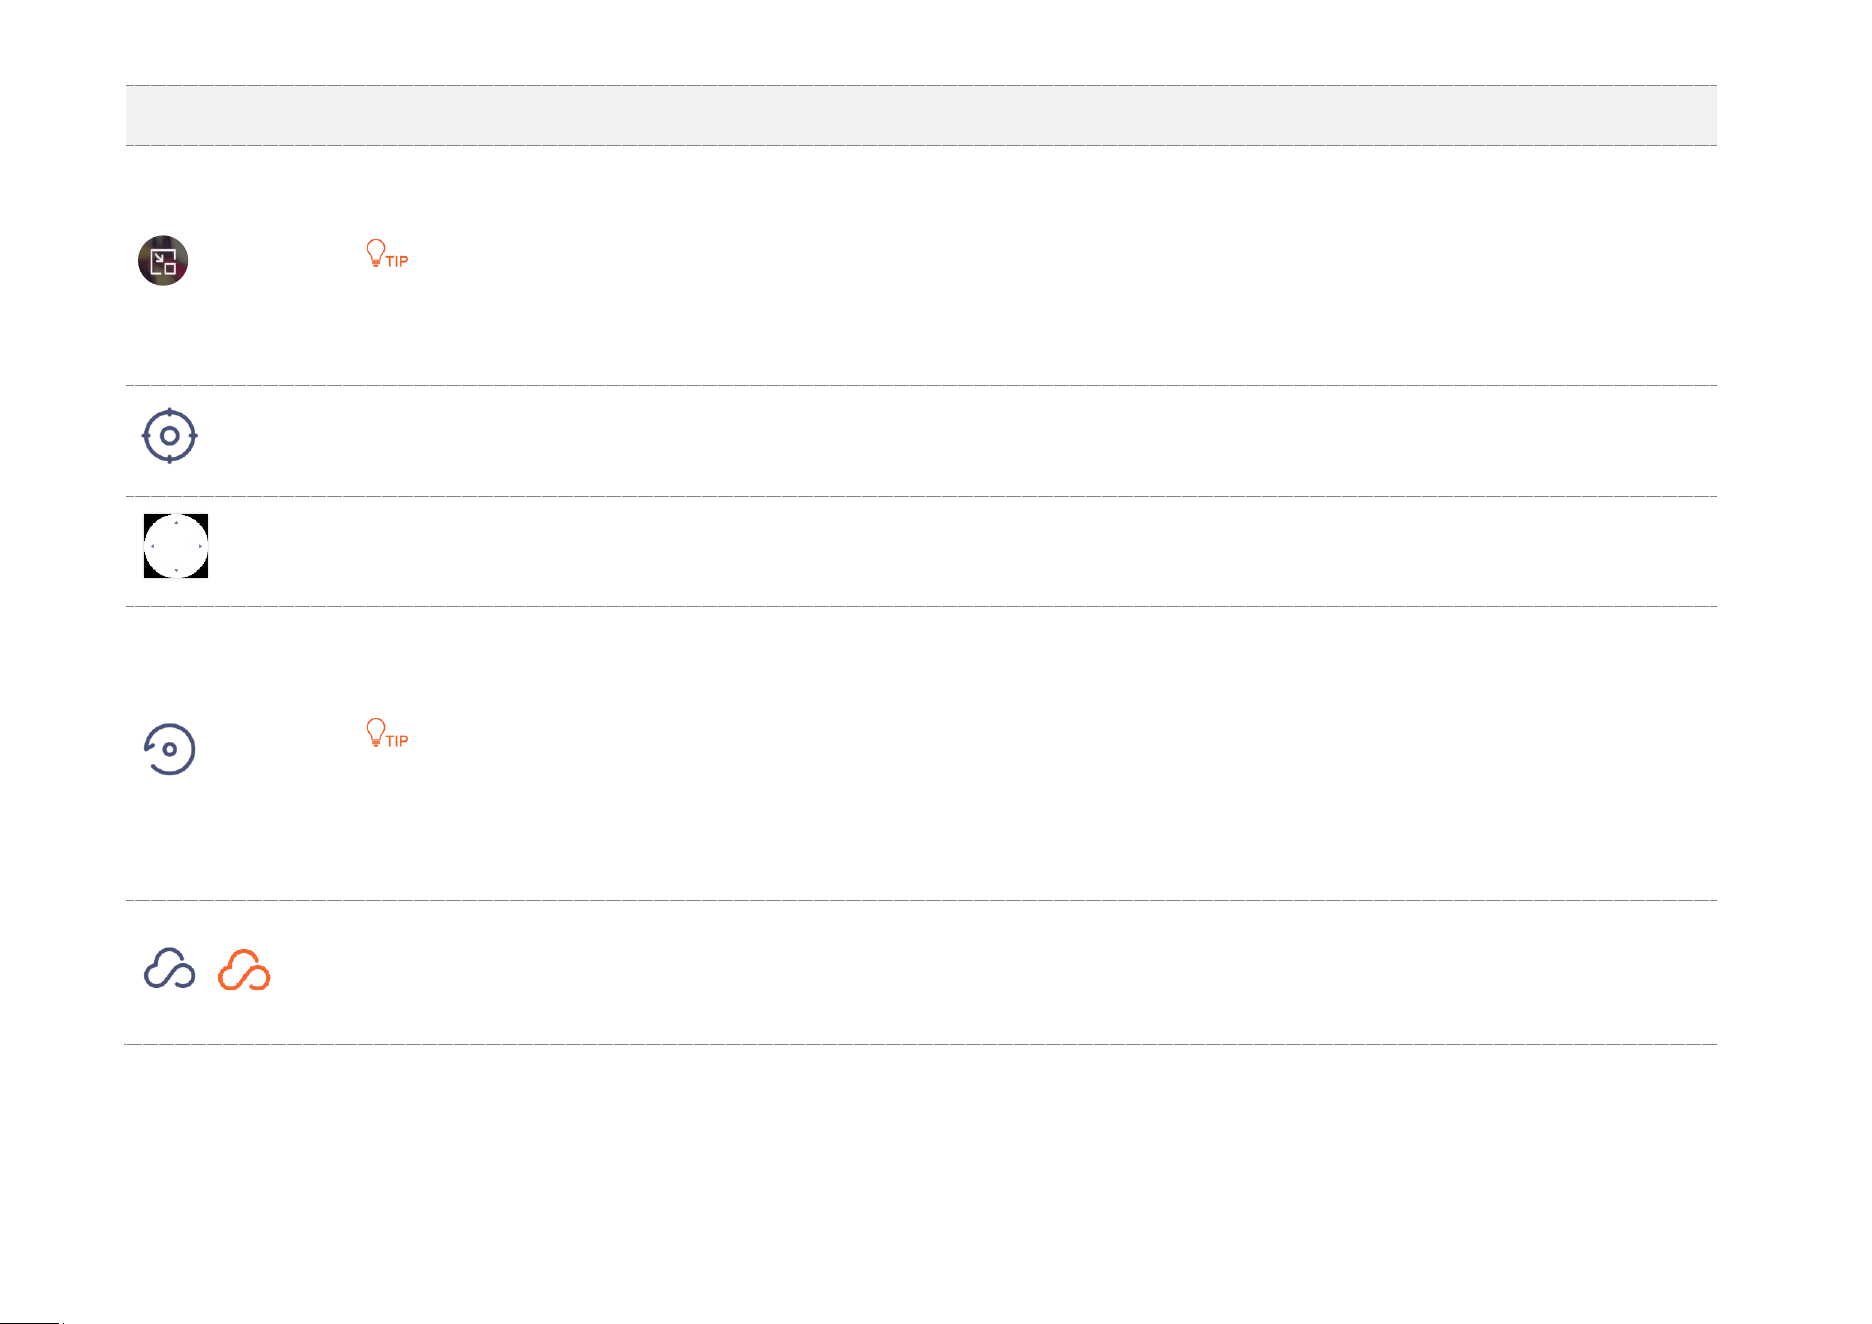
Image within image. Tap it to keep the camera preview image on the screen. Tap the upper-left corner of the screen to
close it.
Only available for the Android system. To normally use this function, please allow the TDSEE App to be displayed on the
upper layer of other applications on your smartphone.
Add location.
Tap it to add a specified monitoring location for the camera.
Location selection panel.
Tap it to adjust the monitoring position of the camera.
Calibrate location.
Tap it to calibrate the lens of the camera to the default location.
If the monitoring position changes owing to external forces, such as manual rotation, to ensure that the location recorded
by the TDSEE App matches the actual location of the camera, it is recommended to perform the Calibrate Location
operation before selecting the monitoring location of the camera through the TDSEE App.
/
Cloud storage service.
After the cloud storage service is subscribed, the monitoring videos will be uploaded to the cloud and you can watch and
edit cloud storage videos as required.
Document Version: V1.4
36
Parameter
Description
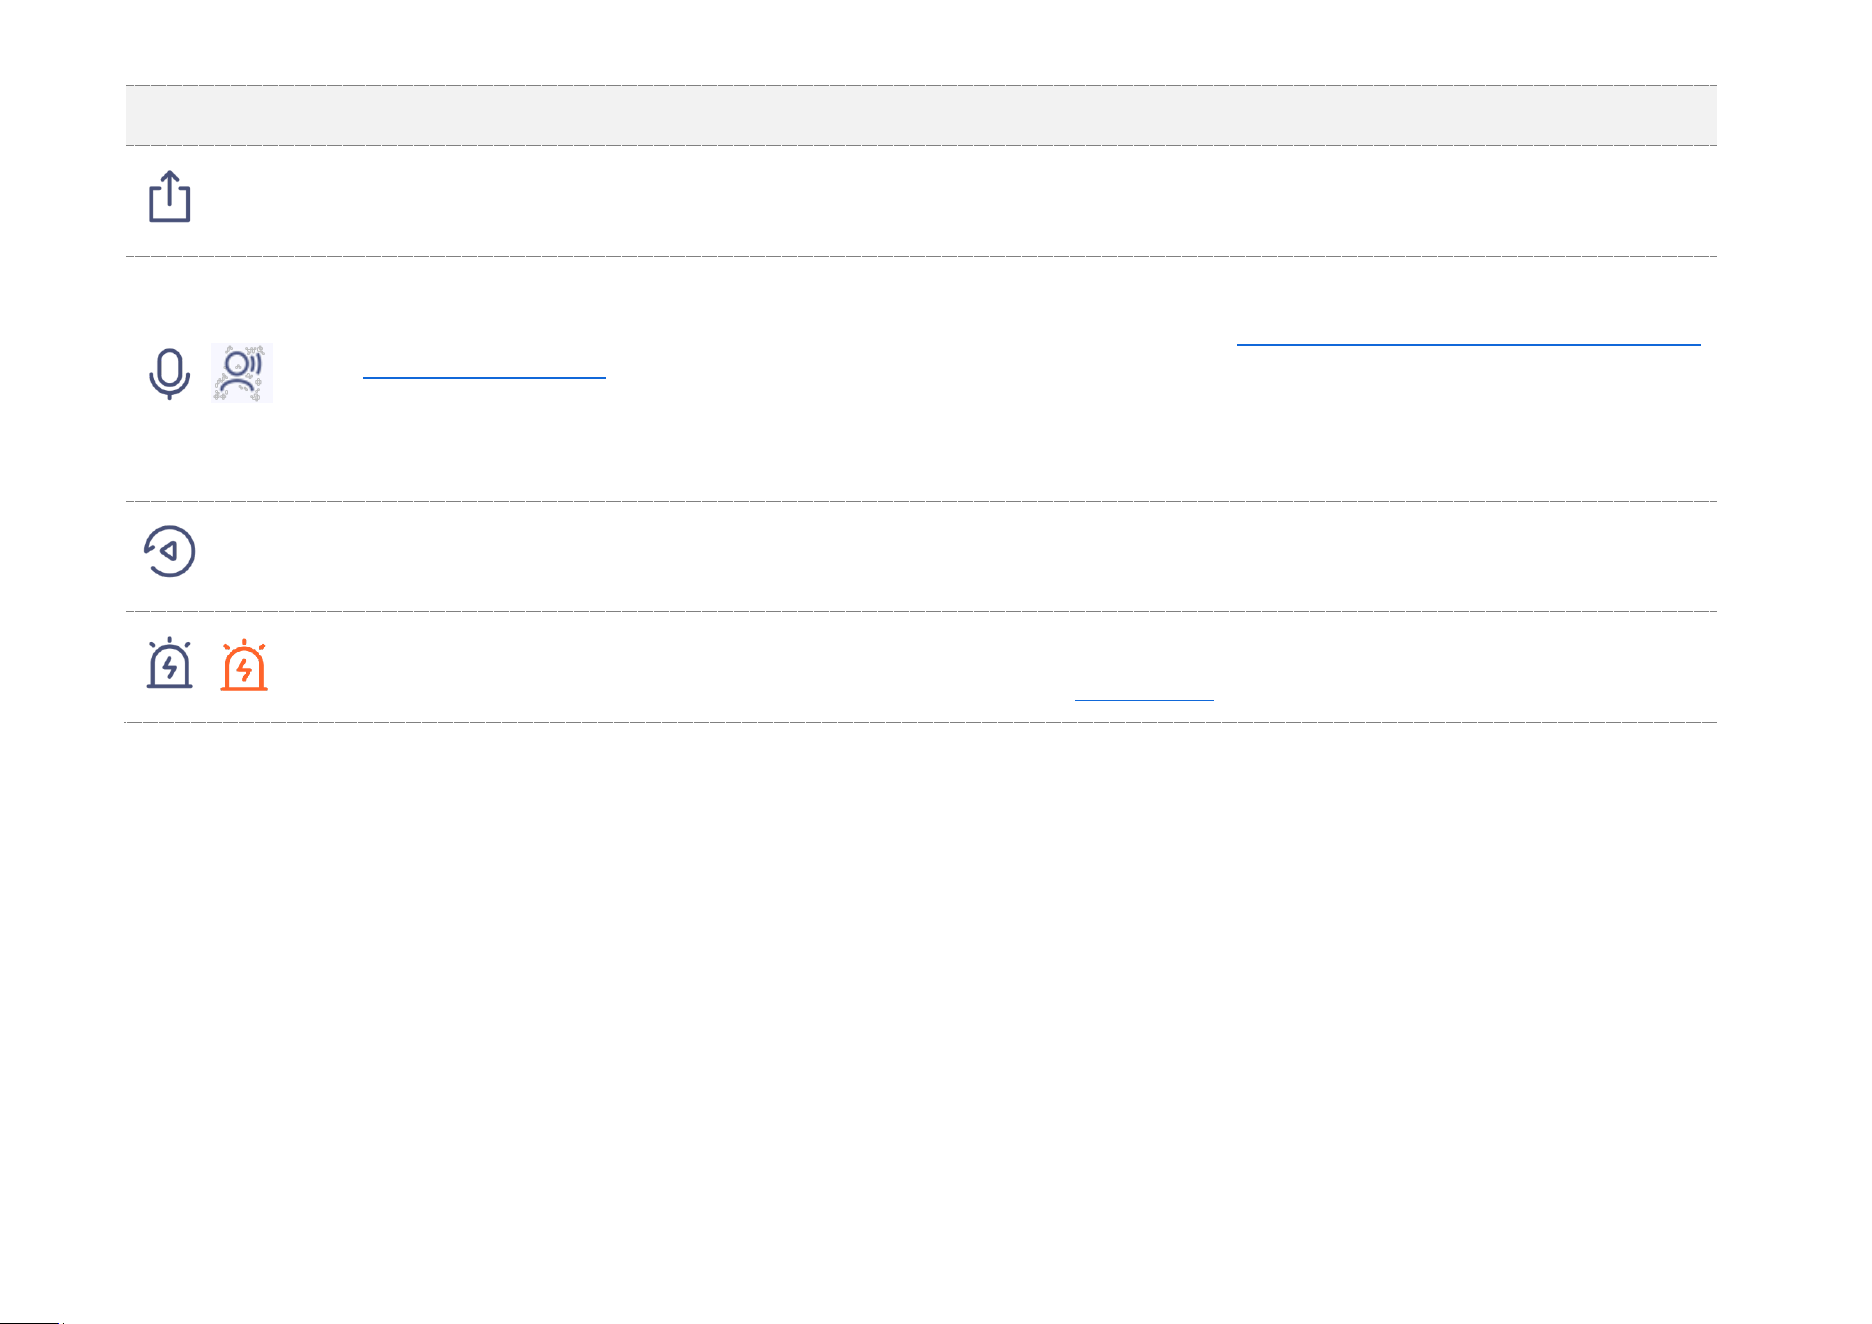
Share devices or add friends.
Tap it to share the device with others for management. Only members with registered accounts could be shared.
/
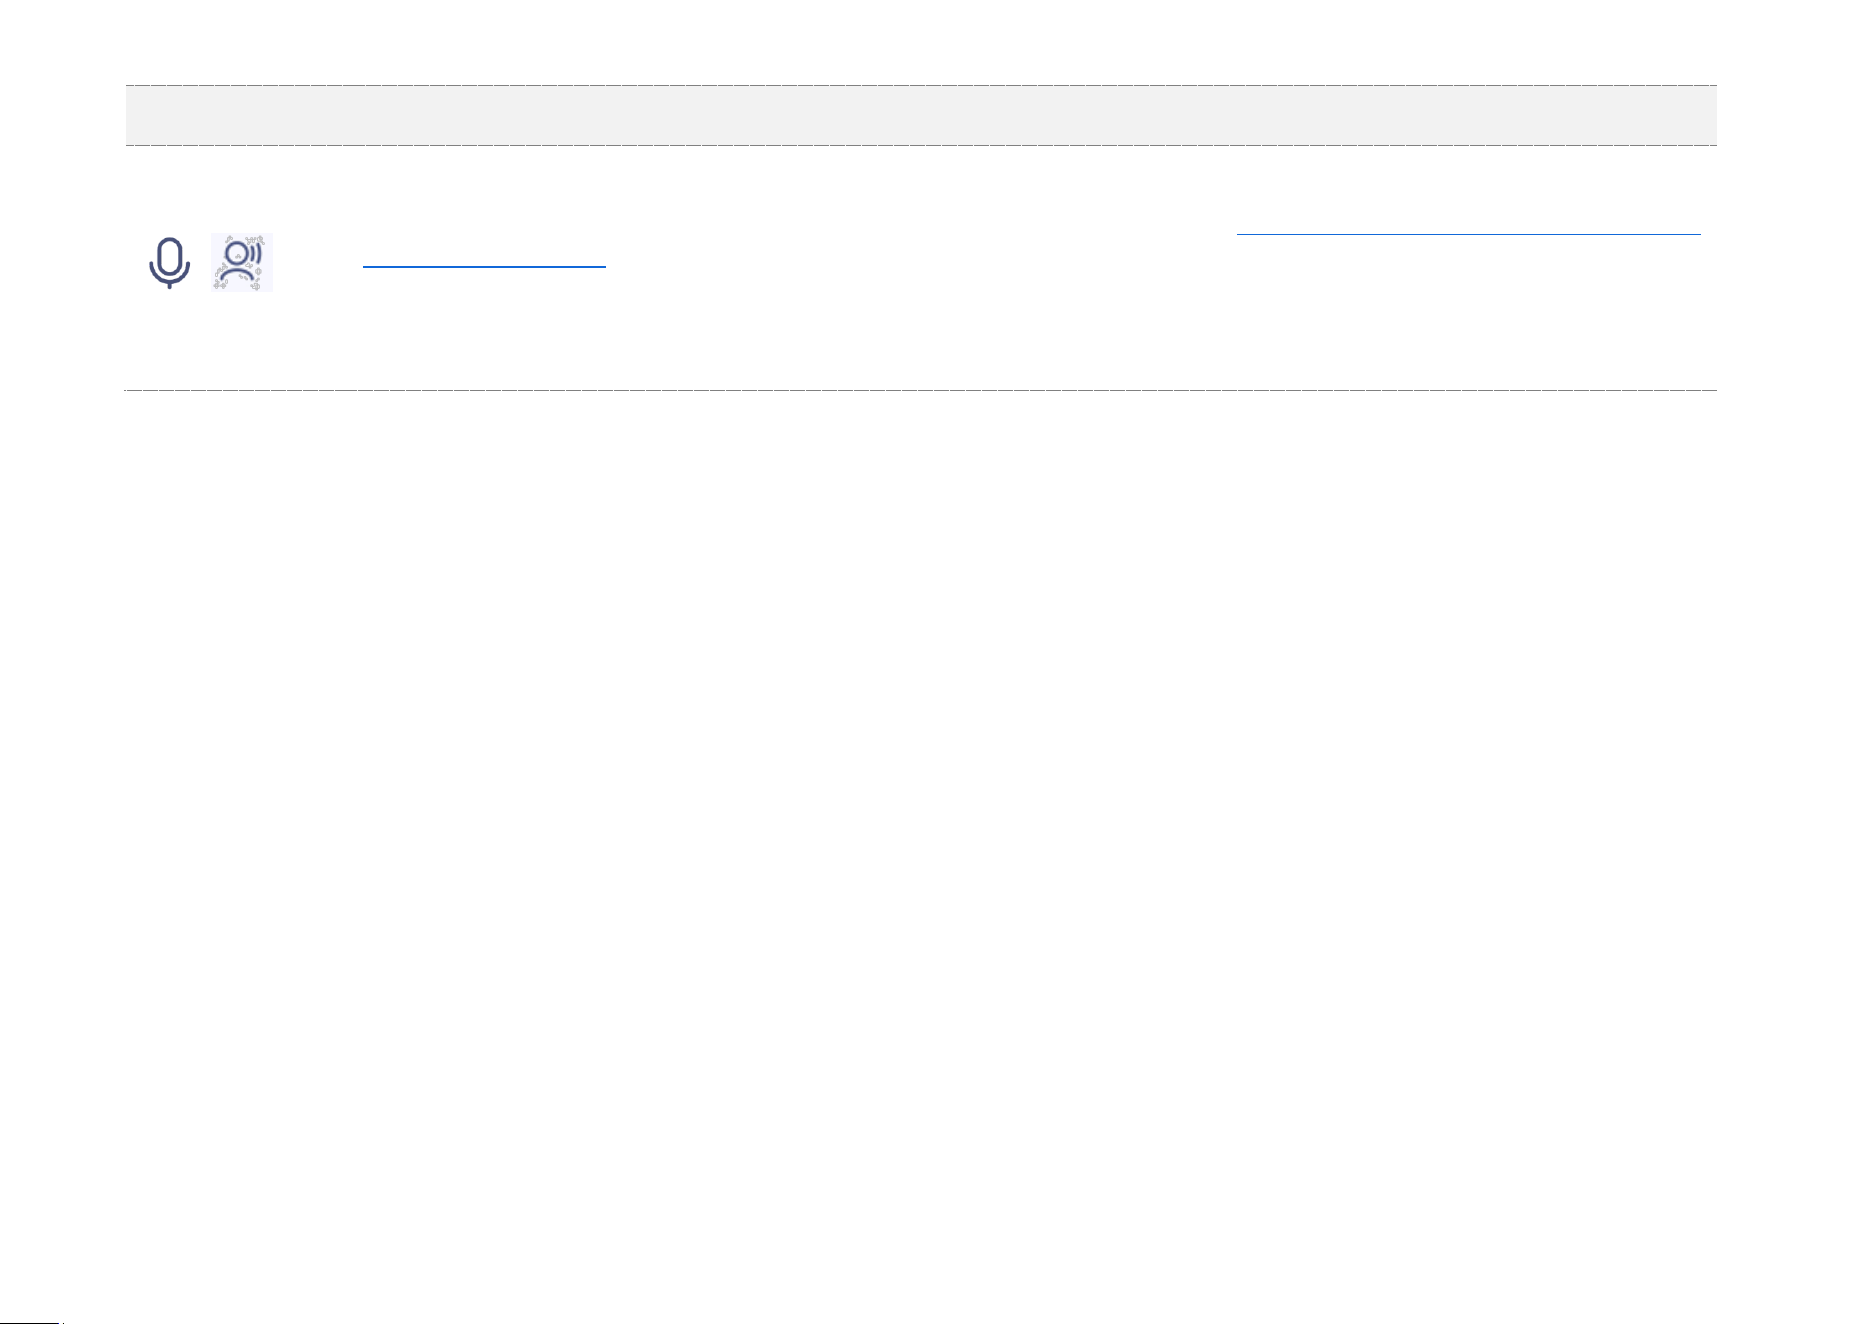
Two-way audio or voice input mode.
You can change modes in the lower left corner of the settings page, and you can adjust the volume of the microphone and
speaker of the camera in the lower right corner.
Two-way Audio: Tap to realize real-time communication between TDSEE App and the camera. Tap again to end the call.
Voice Input: Press and hold this button to talk to the camera from the TDSEE App. Release the button to end the talk.
Playback.
Tap it to check monitoring videos stored on a Micro SD card.
/
Alarm.
Tap it to set up alarm-related parameters of the camera. Refer to Set up Alarm for details.
Document Version: V1.4
37
Preview multiple images at the same time
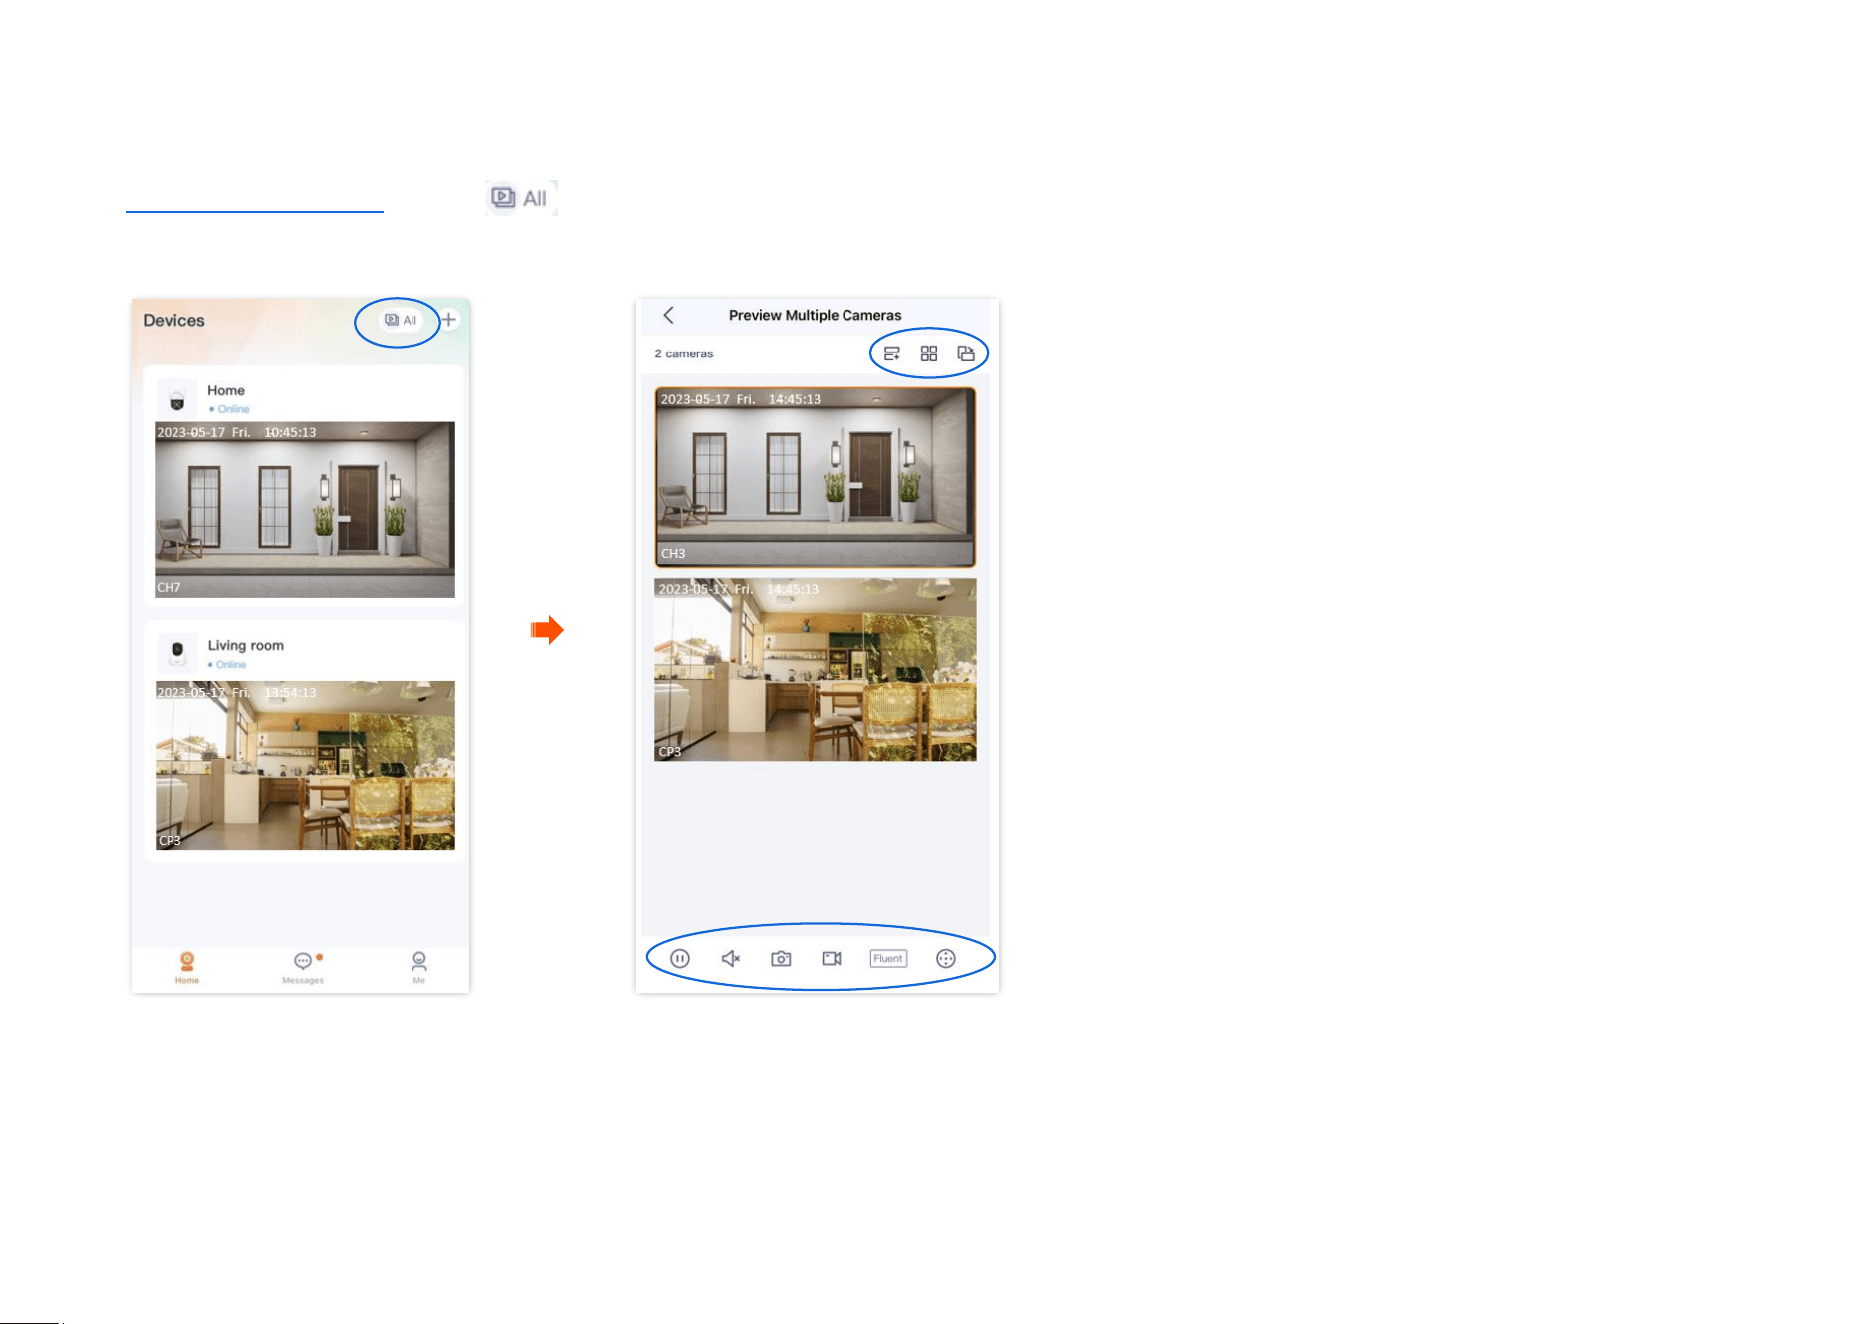
Log in to the TDSEE App and tap in the upper right corner of the homepage to preview the real-time monitoring images of all online cameras
at the same time. After tapping an image, you can also perform some quick operations on the camera.
Document Version: V1.4
38
Parameter description
Parameter
Description
Tap it to add or delete the monitoring image.
/
Tap it to watch the monitoring image in list (large picture) or grid (small picture).
Tap it to watch the monitoring image of the selected camera in landscape or portrait.
/
Tap it to play back or pause the monitoring video for the selected camera.
/
Tap it to enable or disable the camera audio. By default, the audio is disabled.
Screenshots.
Tap it to save the screenshot of the current monitoring image to TDSEE Album.
Recording.
Tap it to start recording, and tap it again to stop recording. Successful recordings are automatically saved to TDSEE Album.
Tap it to change the video clarity. High resolution requires high bandwidth. Please select it as required.
Location selection panel.
Tap it to adjust the monitoring position of the camera.
Document Version: V1.4
39
Parameter
Description
/
Two-way audio or voice input mode.
You can change modes in the lower left corner of the settings page, and you can adjust the volume of the microphone and
speaker of the camera in the lower right corner.
Two-way Audio: Tap to realize real-time communication between TDSEE App and the camera. Tap again to end the call.
Voice Input: Press and hold this button to talk to the camera from the TDSEE App. Release the button to end the talk.
Document Version: V1.4
41
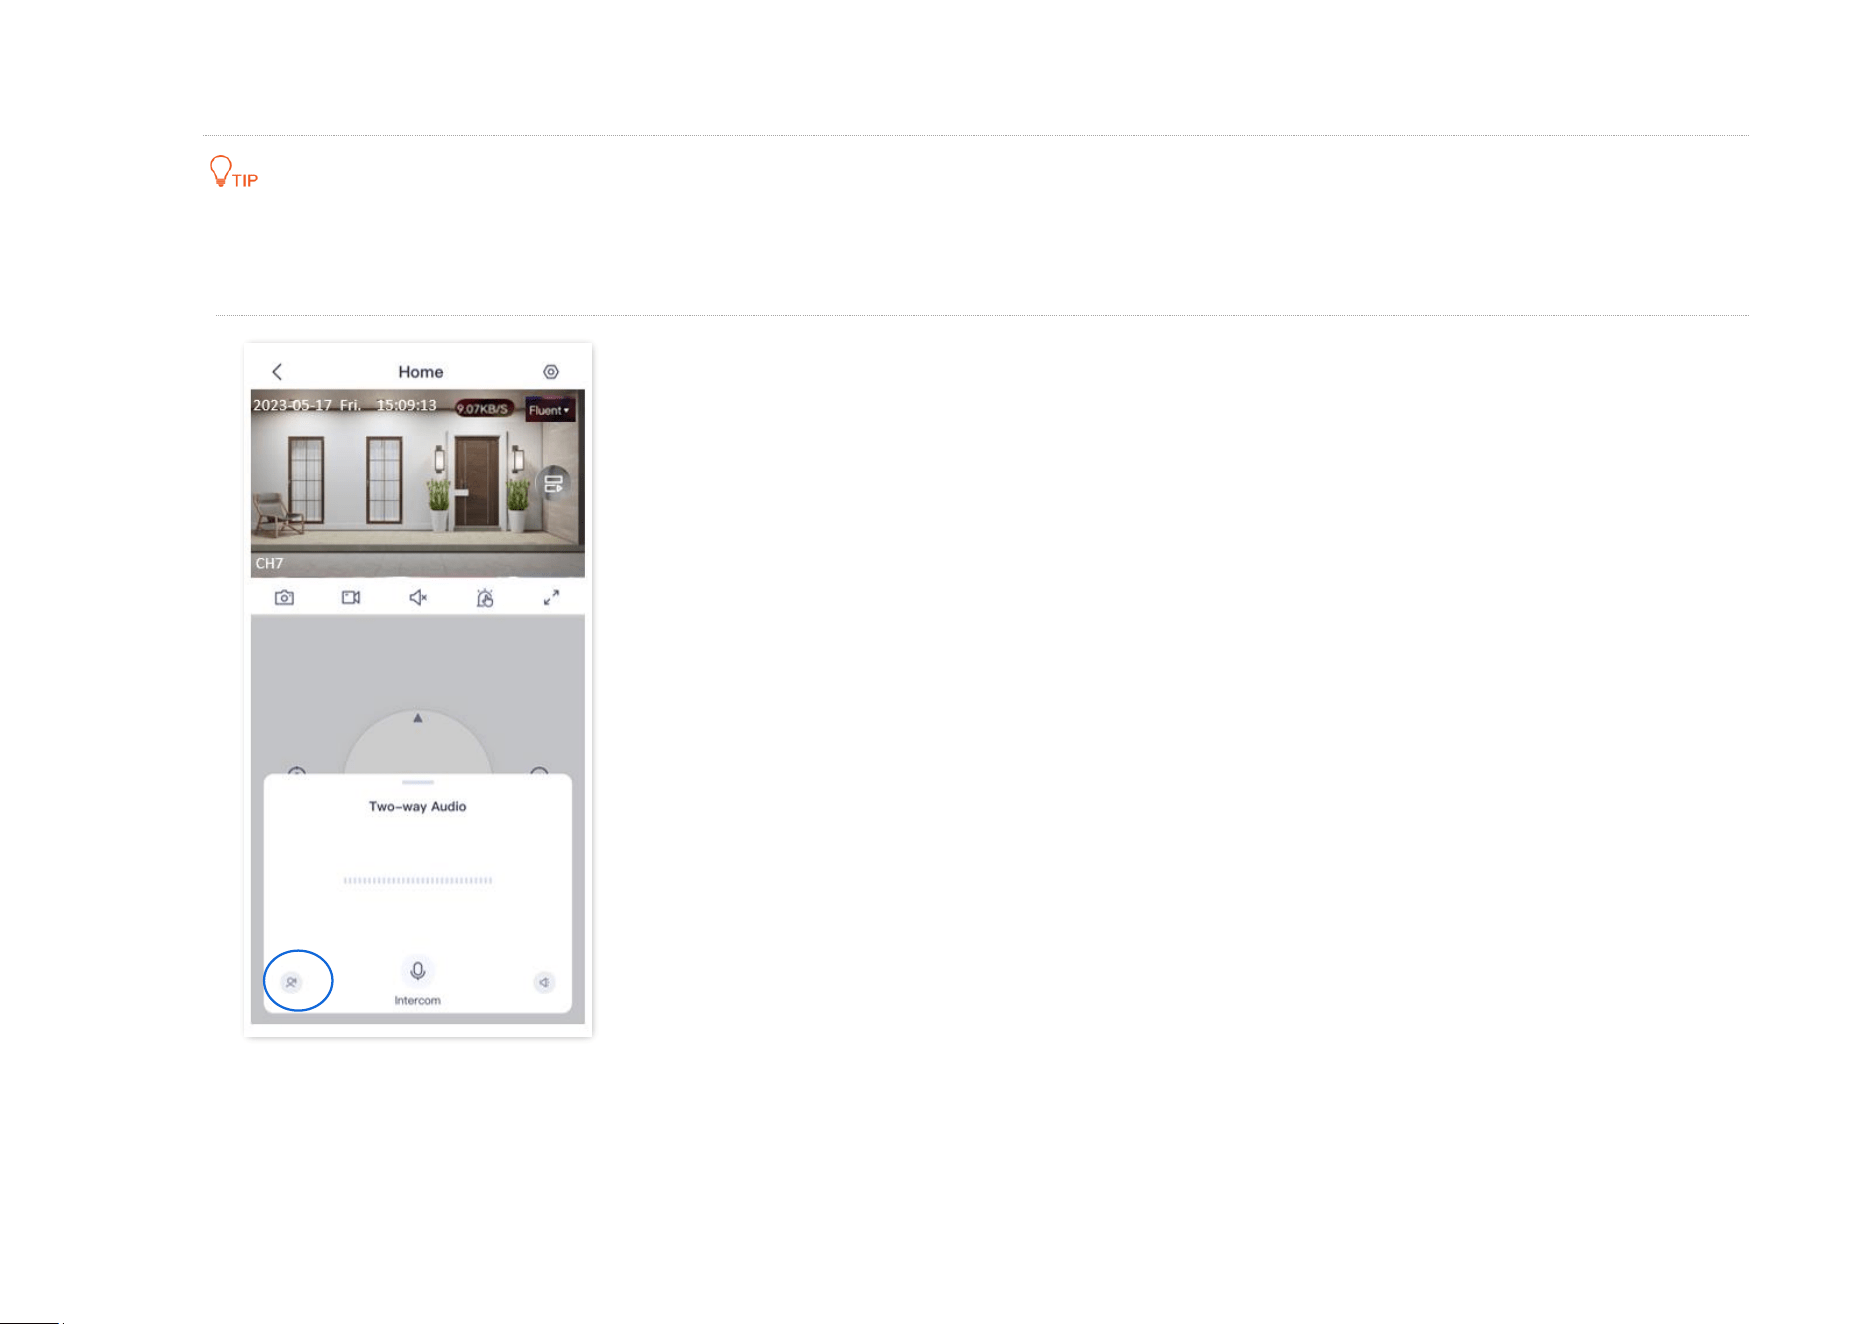
Step 2 Tap the icon in the lower-left corner to switch to the two-way audio or voice input mode as required.
Two-way Audio: Tap to realize real-time communication between TDSEE App and the camera. Tap again to end the call.
Voice Input: Press and hold this button to talk to the camera from the TDSEE App. Release the button to end the talk.
---End
Document Version: V1.4
42
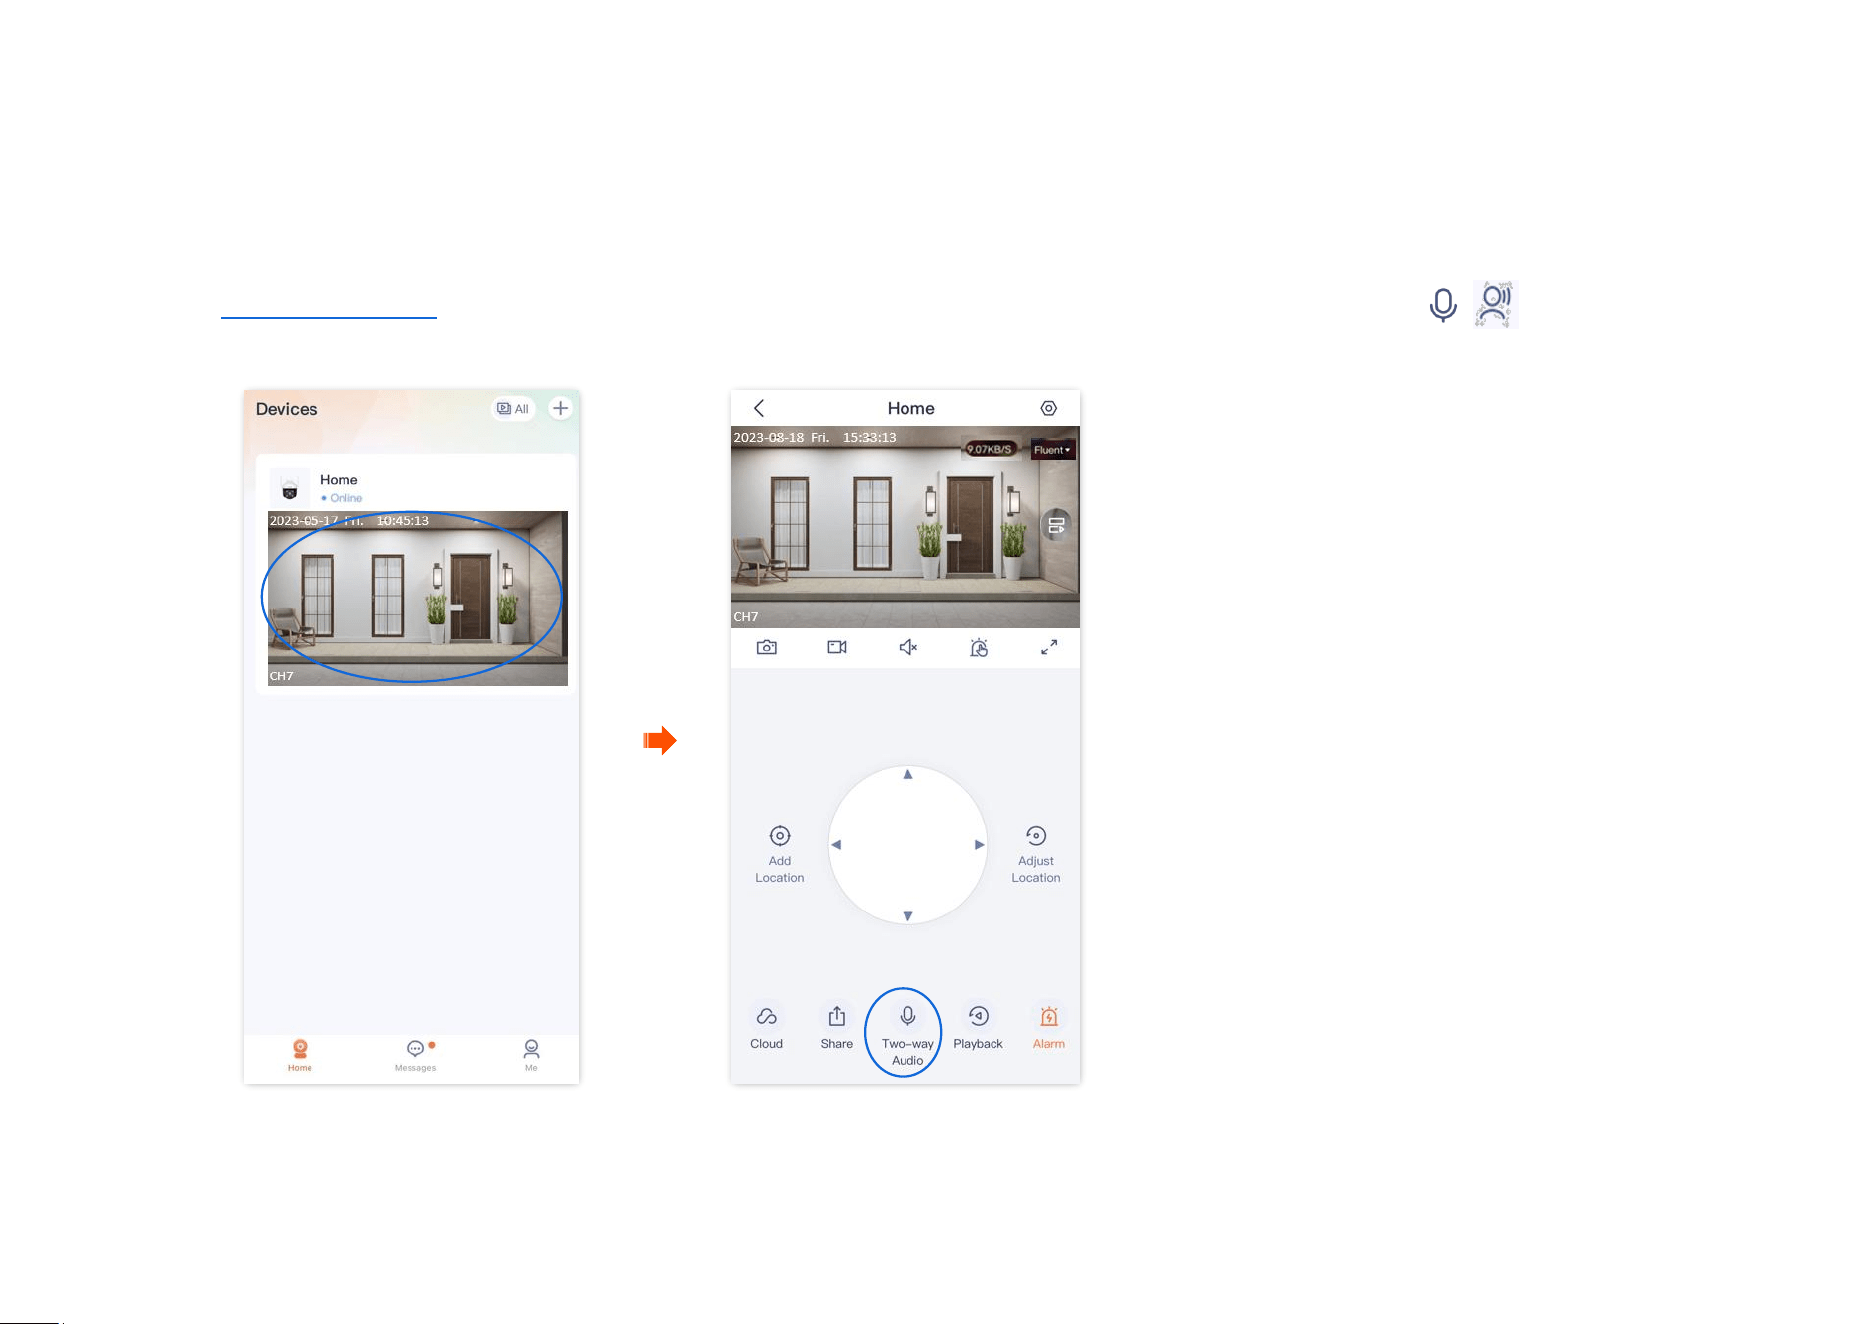
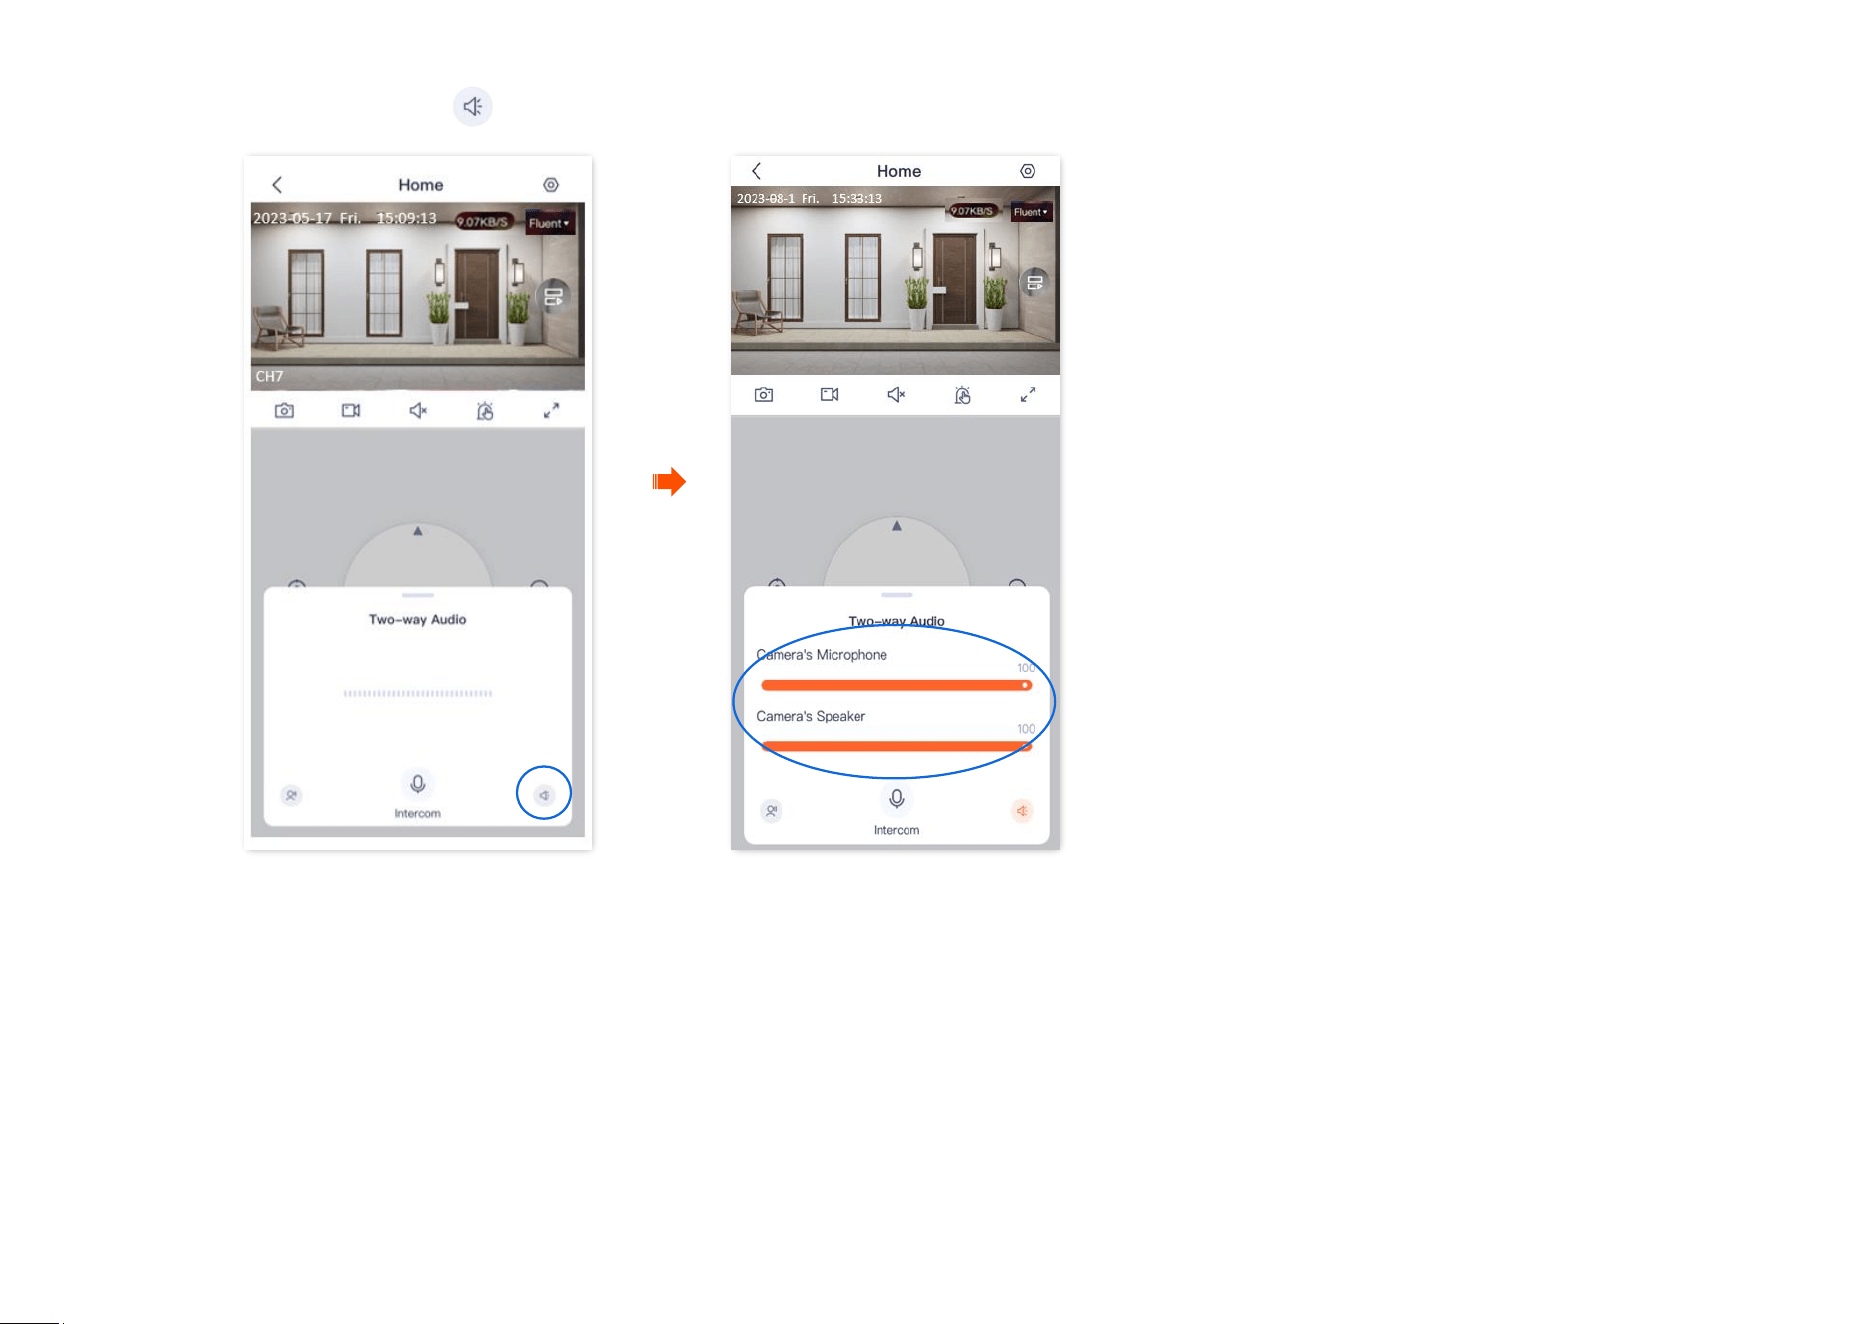
Set up the volume of the microphone and speaker (Example: CH7-WCA)
The TDSEE App with version 1.1.11 is used for illustrations here.
Method 1
Step 1
Log in to TDSEE App. Tap the specific device on the homepage, which is the camera Home in this example. Tap / in the bottom of
the page.
Document Version: V1.4
43
Step 2
Tap the volume icon in the lower right corner, then adjust the volume of the microphone and speaker of the camera as required.
---End
Document Version: V1.4
45
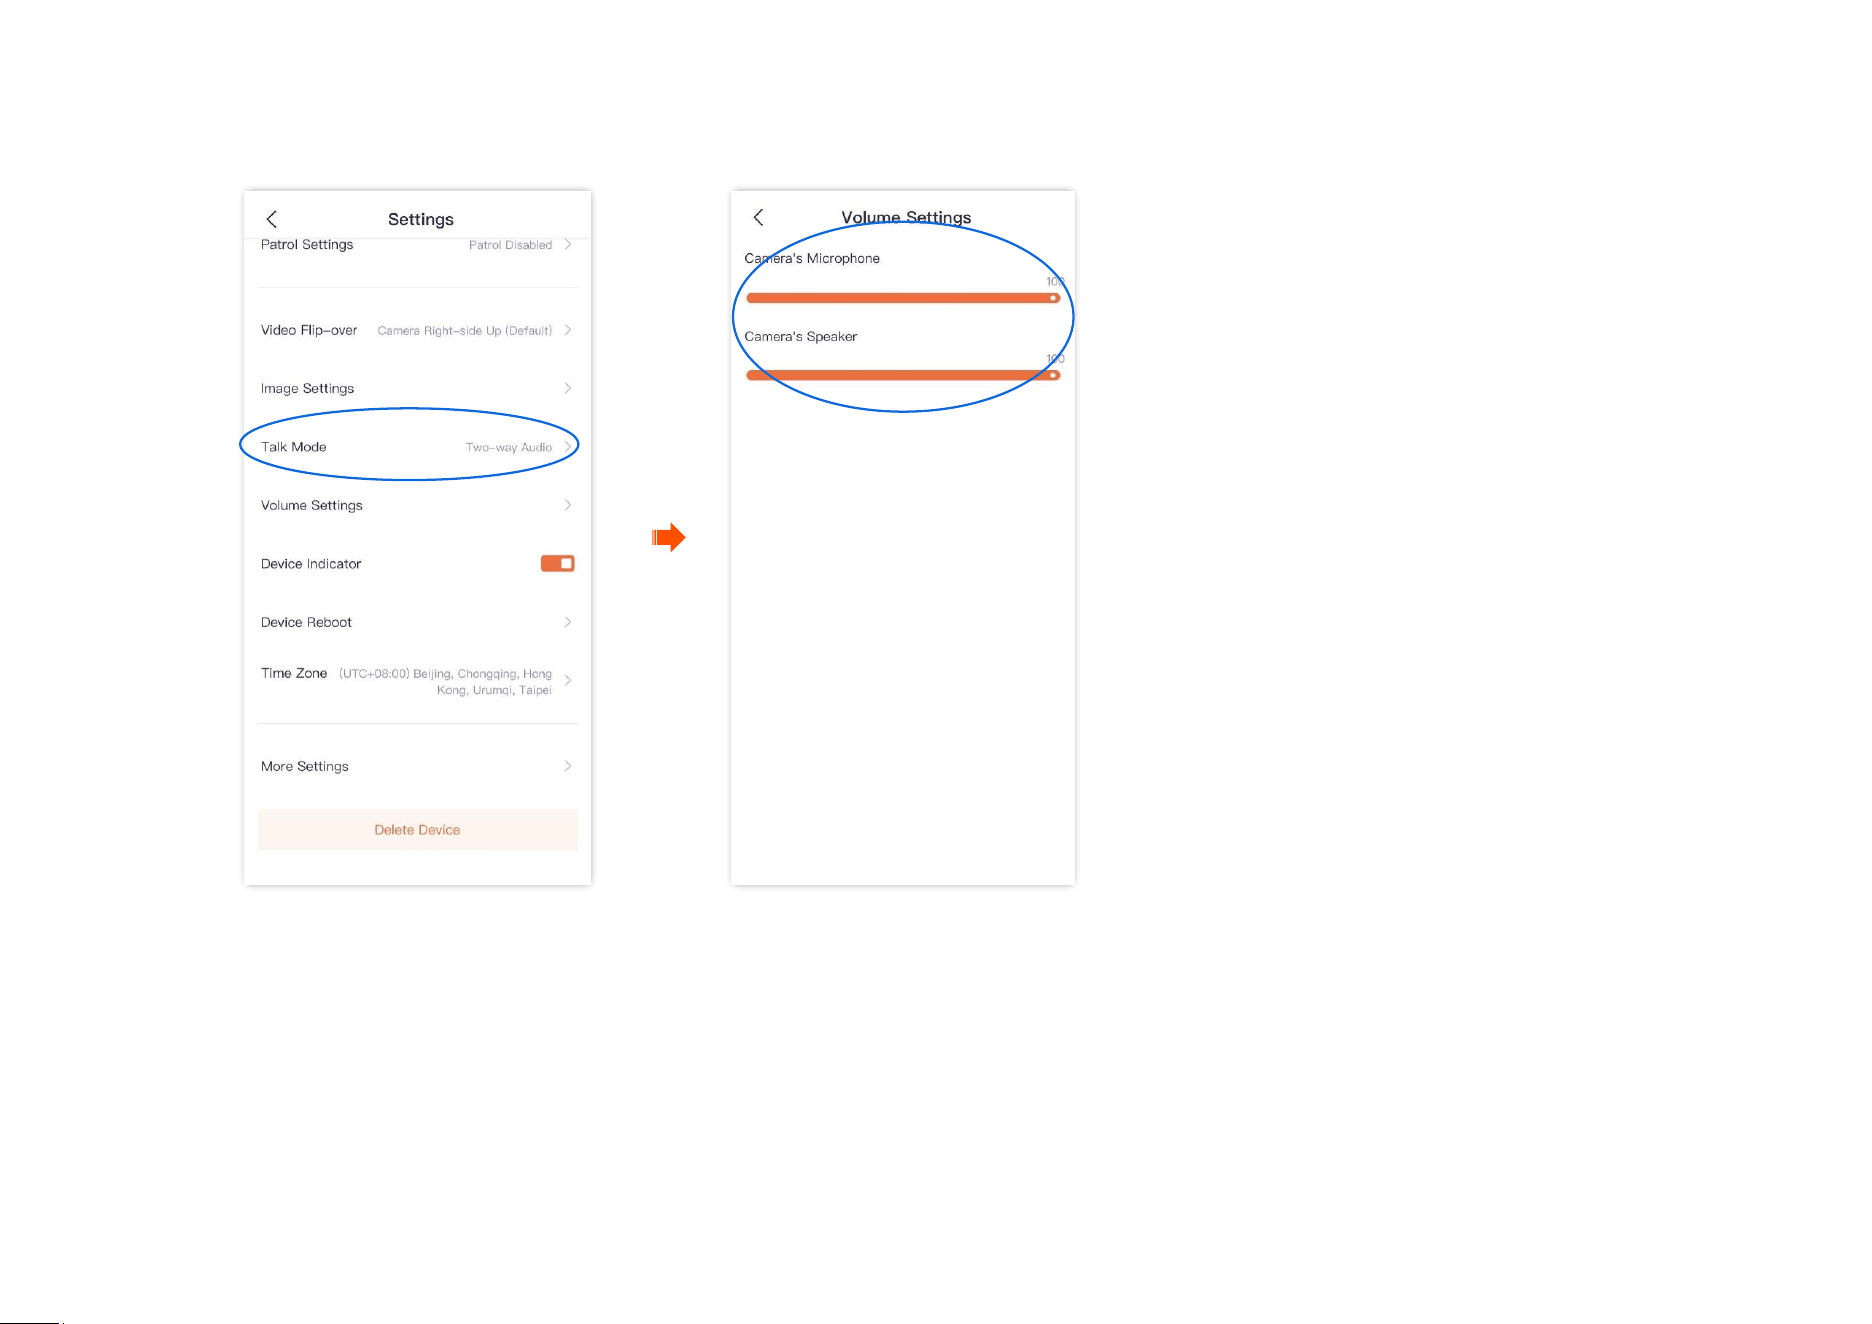
Step 2 Slide down to find and tap Volume Settings.
Step 3 Adjust the volume of the microphone and speaker of the camera as required.
---End
Document Version: V1.4
46
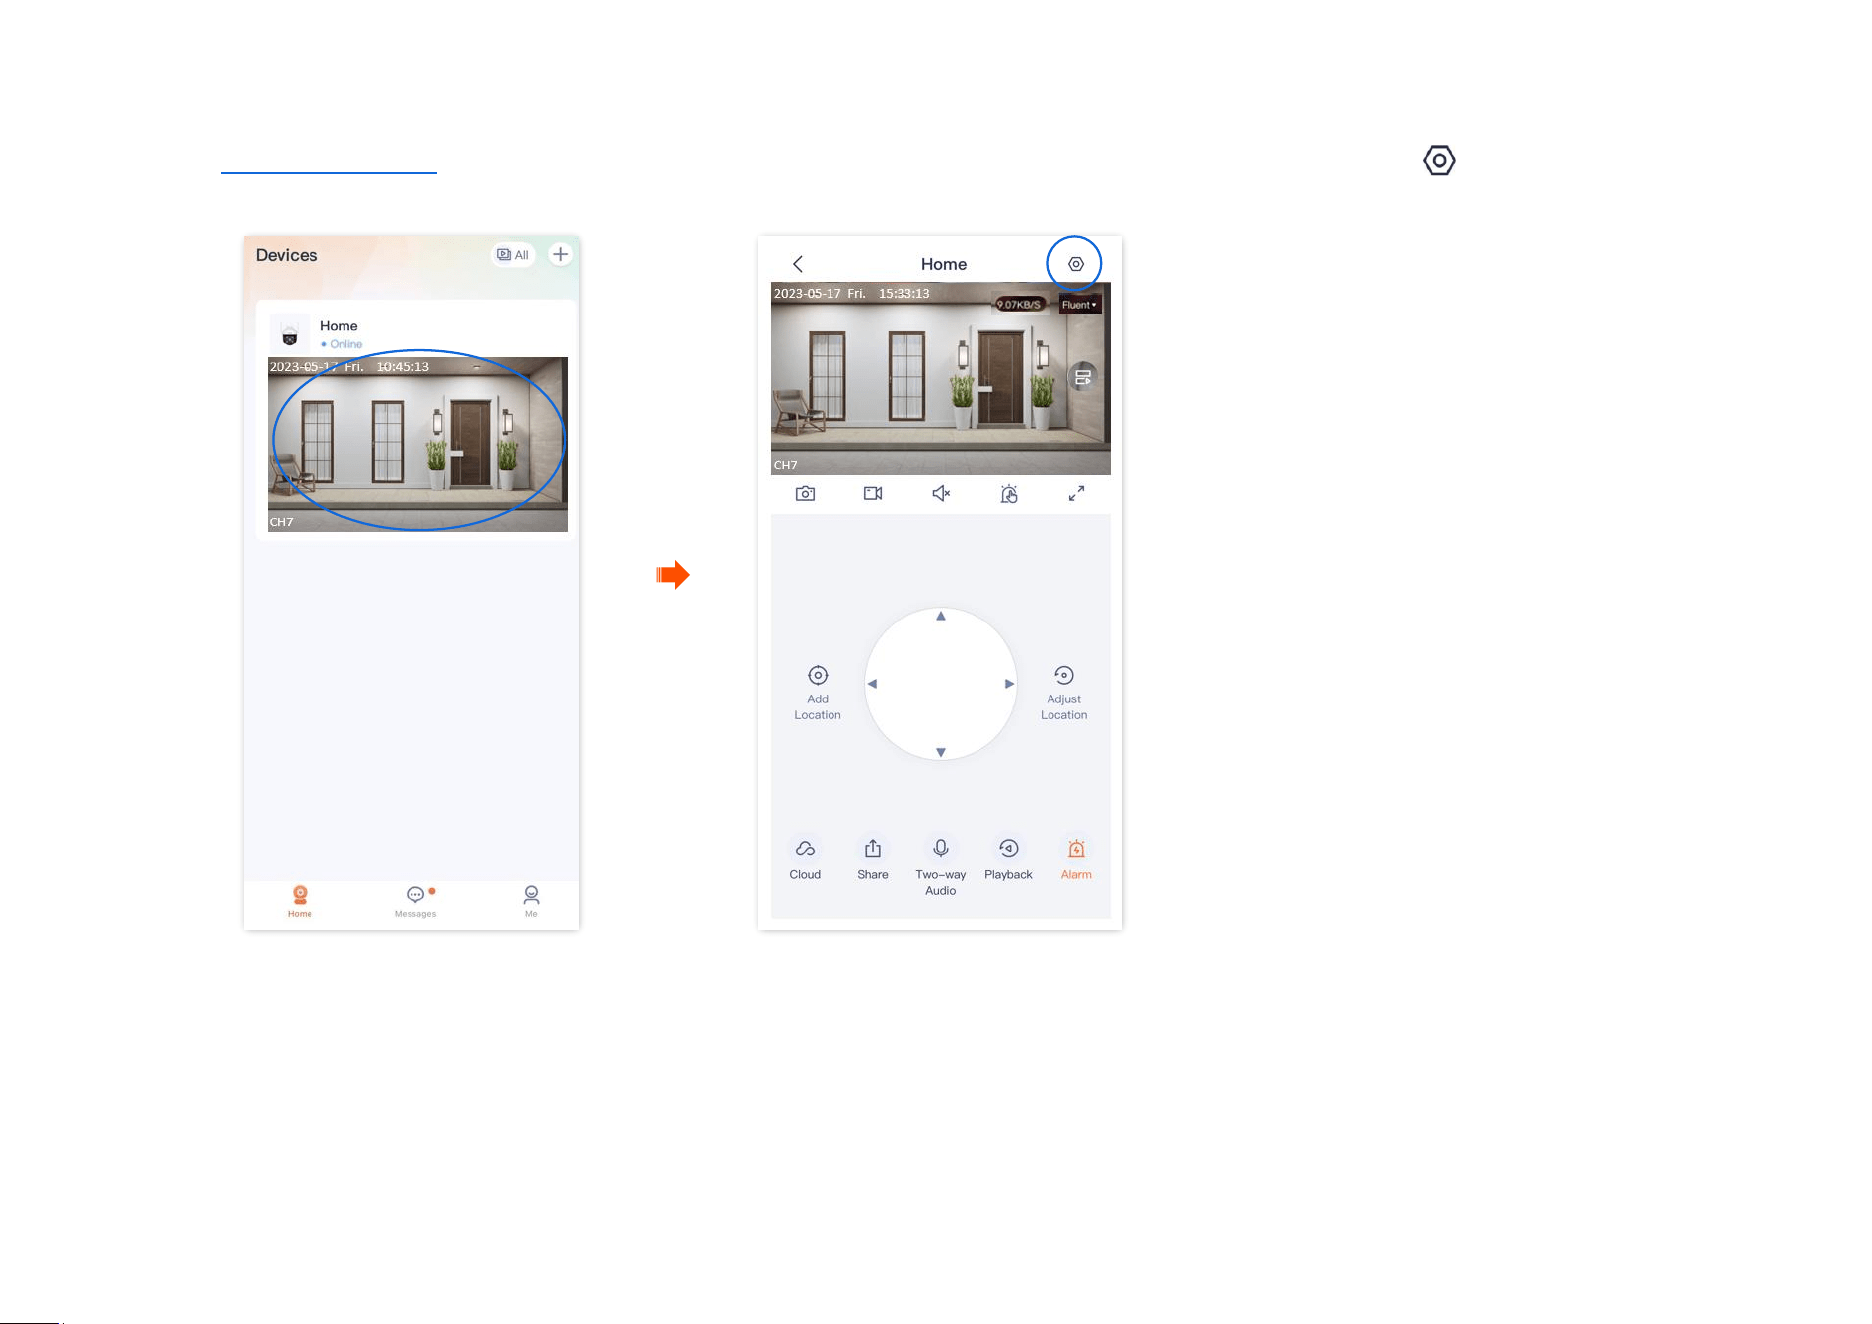
Name your camera
The TDSEE App with version 1.3.0 is used for illustrations here.
Step 1
Log in to TDSEE App. Find the specific device on the homepage, which is the camera Home in this example. Tap in the right corner, and
tap Device Settings. (or tap the camera that you want to rename on the homepage, which is the camera Home in this example, and tap
in the upper right corner.)
Step 2
Tap Device Name, name your camera as required, then tap Save.
----End
Document Version: V1.4
47
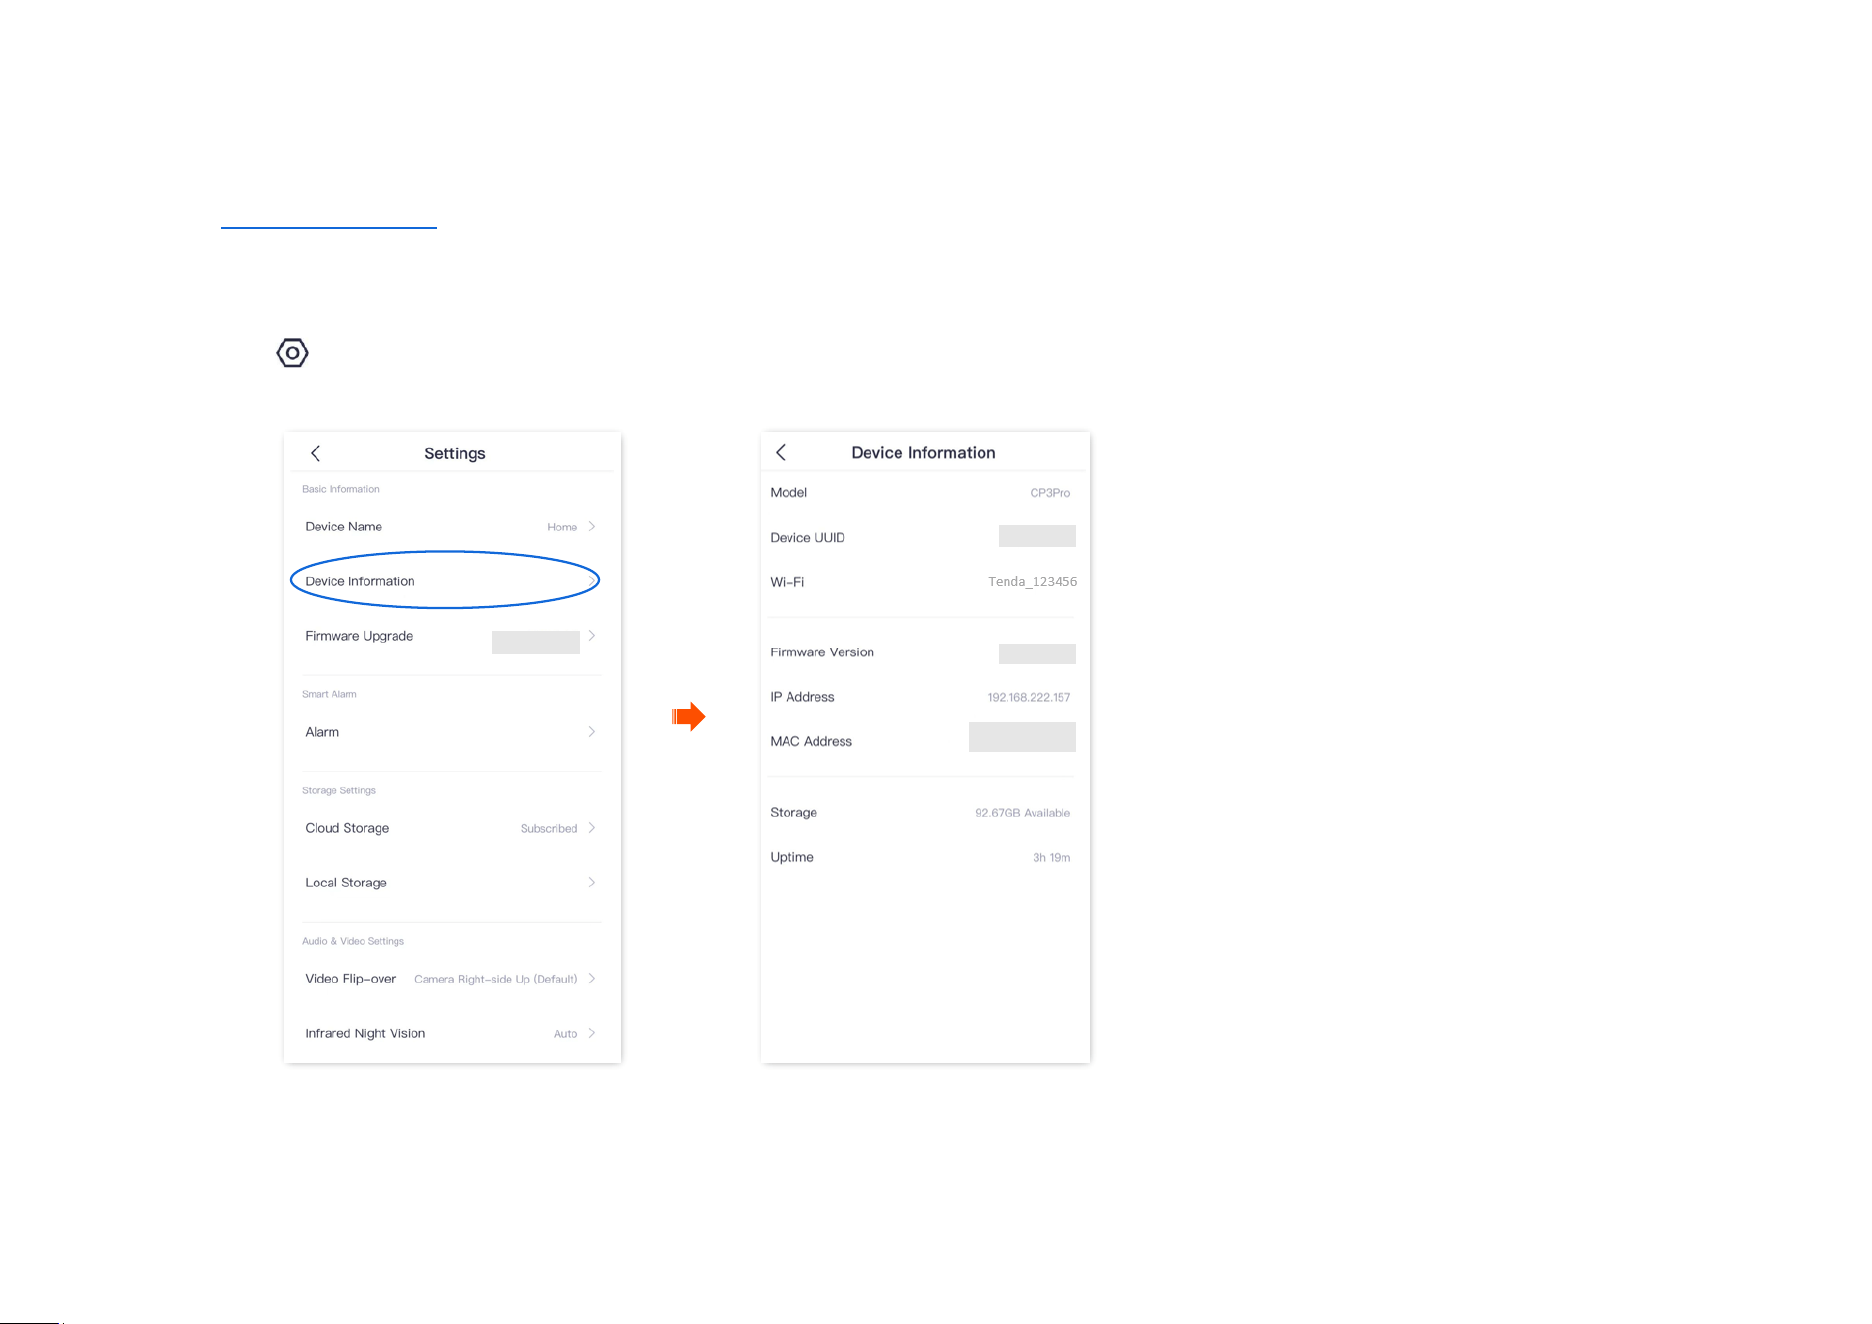
Check the basic information of your device
The TDSEE App with version 1.3.0 is used for illustrations here.
Step 1
Log in to TDSEE App, and enter the settings page of the camera.
- Method 1: Find the camera you want to check the basic information on the homepage, which is Home in this example, tap on the right
corner, and tap Device Settings.
- Method 2: Find the camera you want to check the basic information on the homepage, which is Home in this example, and tap Settings
( ) in the upper-right corner.
Step 2
Tap Device Information, then you can check the basic information of the camera, such as the device model, IP address and MAC address.
----End
Document Version: V1.4
48
Parameter description
Parameter
Description
Model
Specifies the model of camera.
Device UUID
Universal Unique Identifier (UUID) identifies the uniqueness of the camera.
When adding a camera through the TDSEE App, you can add it using the UUID number.
Wi-Fi
Specifies the name of the Wi-Fi to which the camera is connected.
Firmware Version
Specifies the system firmware version of the camera.
IP Address
Specifies the IP address obtained by the camera from the upper-layer DHCP server. If the camera
supports web management, the IP address is also the management IP address of the camera.
Users on the same LAN as the camera can use this IP address to log in to the web UI of the
camera.
MAC Address
Specifies the MAC address of the camera.
Storage
Specifies the remaining storage space of the MicroSD card.
Uptime
Specifies the duration of continuous running since the camera was last activated.
Document Version: V1.4
49
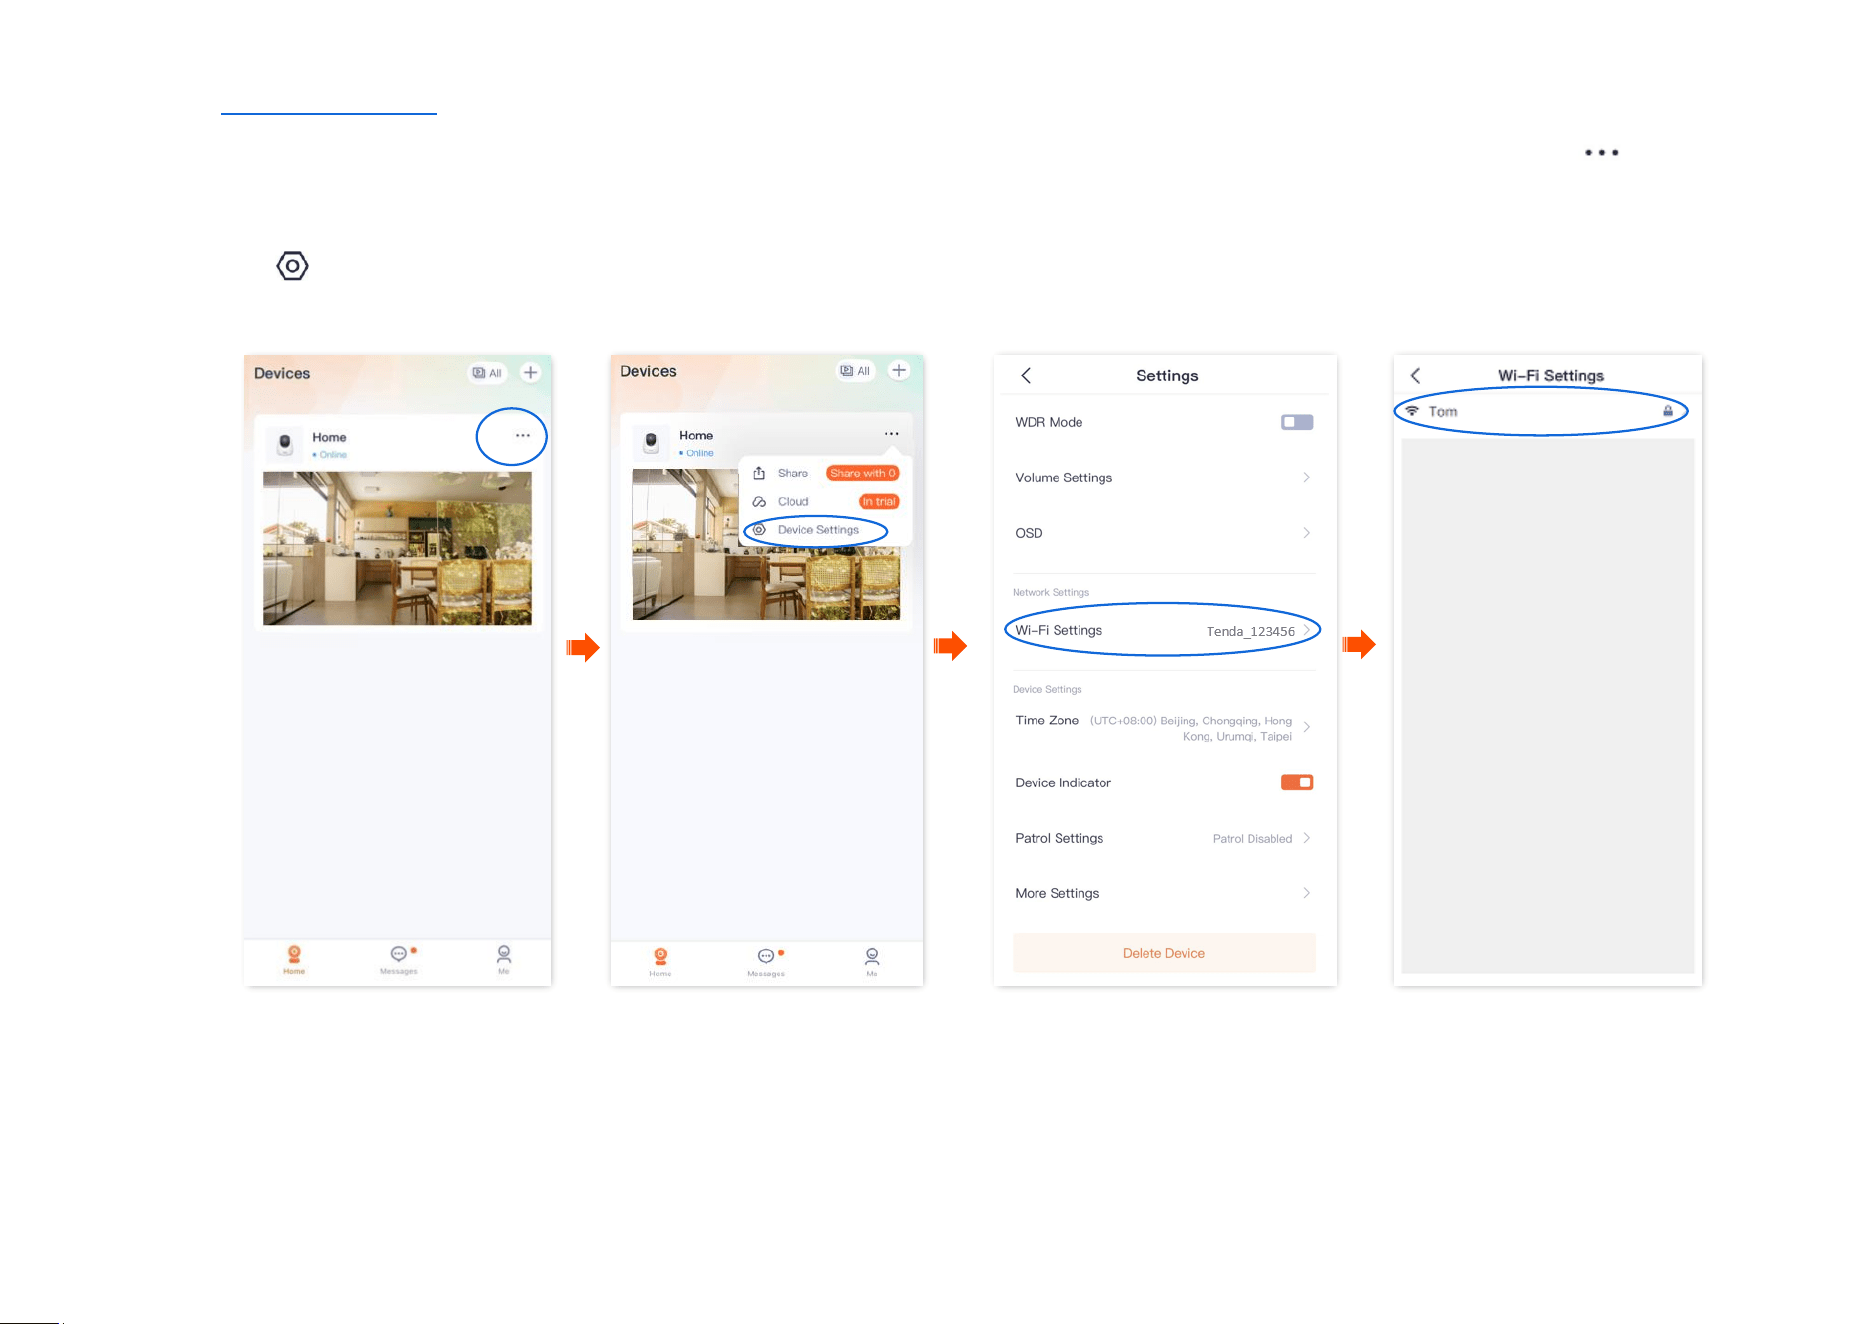
Modify the Wi-Fi settings
The TDSEE App with version 1.3.0 is used for illustrations here.
Tap the specific device on the homepage, tap in the upper right corner, then find Wi-Fi Settings.
You can modify information about the Wi-Fi to which the device is connected.
Before modifying or configuring the Wi-Fi settings of your camera, ensure that the camera status is online.
Scenario: The current monitoring videos of the camera are not smooth, so you want to change the Wi-Fi network to which the camera is connected.
Requirement: Ensure that the camera can monitor normally and the monitoring video is smooth.
Solution: You need to connect to another 2.4 GHz Wi-Fi network. Assume that the Wi-Fi name is Tom, and the Wi-Fi password is Tom12345. The Wi-
Fi Settings function can meet this requirement.
Document Version: V1.4
50
Step 1
Log in to TDSEE App, and enter the settings page of the camera.
- Method 1: Find the camera you want to modify the Wi-Fi settings on the homepage, which is Home in this example, tap on the
right corner, and tap Device Settings.
- Method 2: Find the camera you want to modify the Wi-Fi settings on the homepage, which is Home in this example, and tap Settings
( ) in the upper-right corner.
Step 2 Tap Wi-Fi Settings, then select a new Wi-Fi network, which is Tom in this example.

Document Version: V1.4
51
Step 3 Enter the Wi-Fi password of the Wi-Fi network, which is Tom12345 in this example, and tap Connect. Wait for 1 to 2 minutes till it can
monitor normally after the camera successfully establishes the connection again.
----End
Document Version: V1.4
52
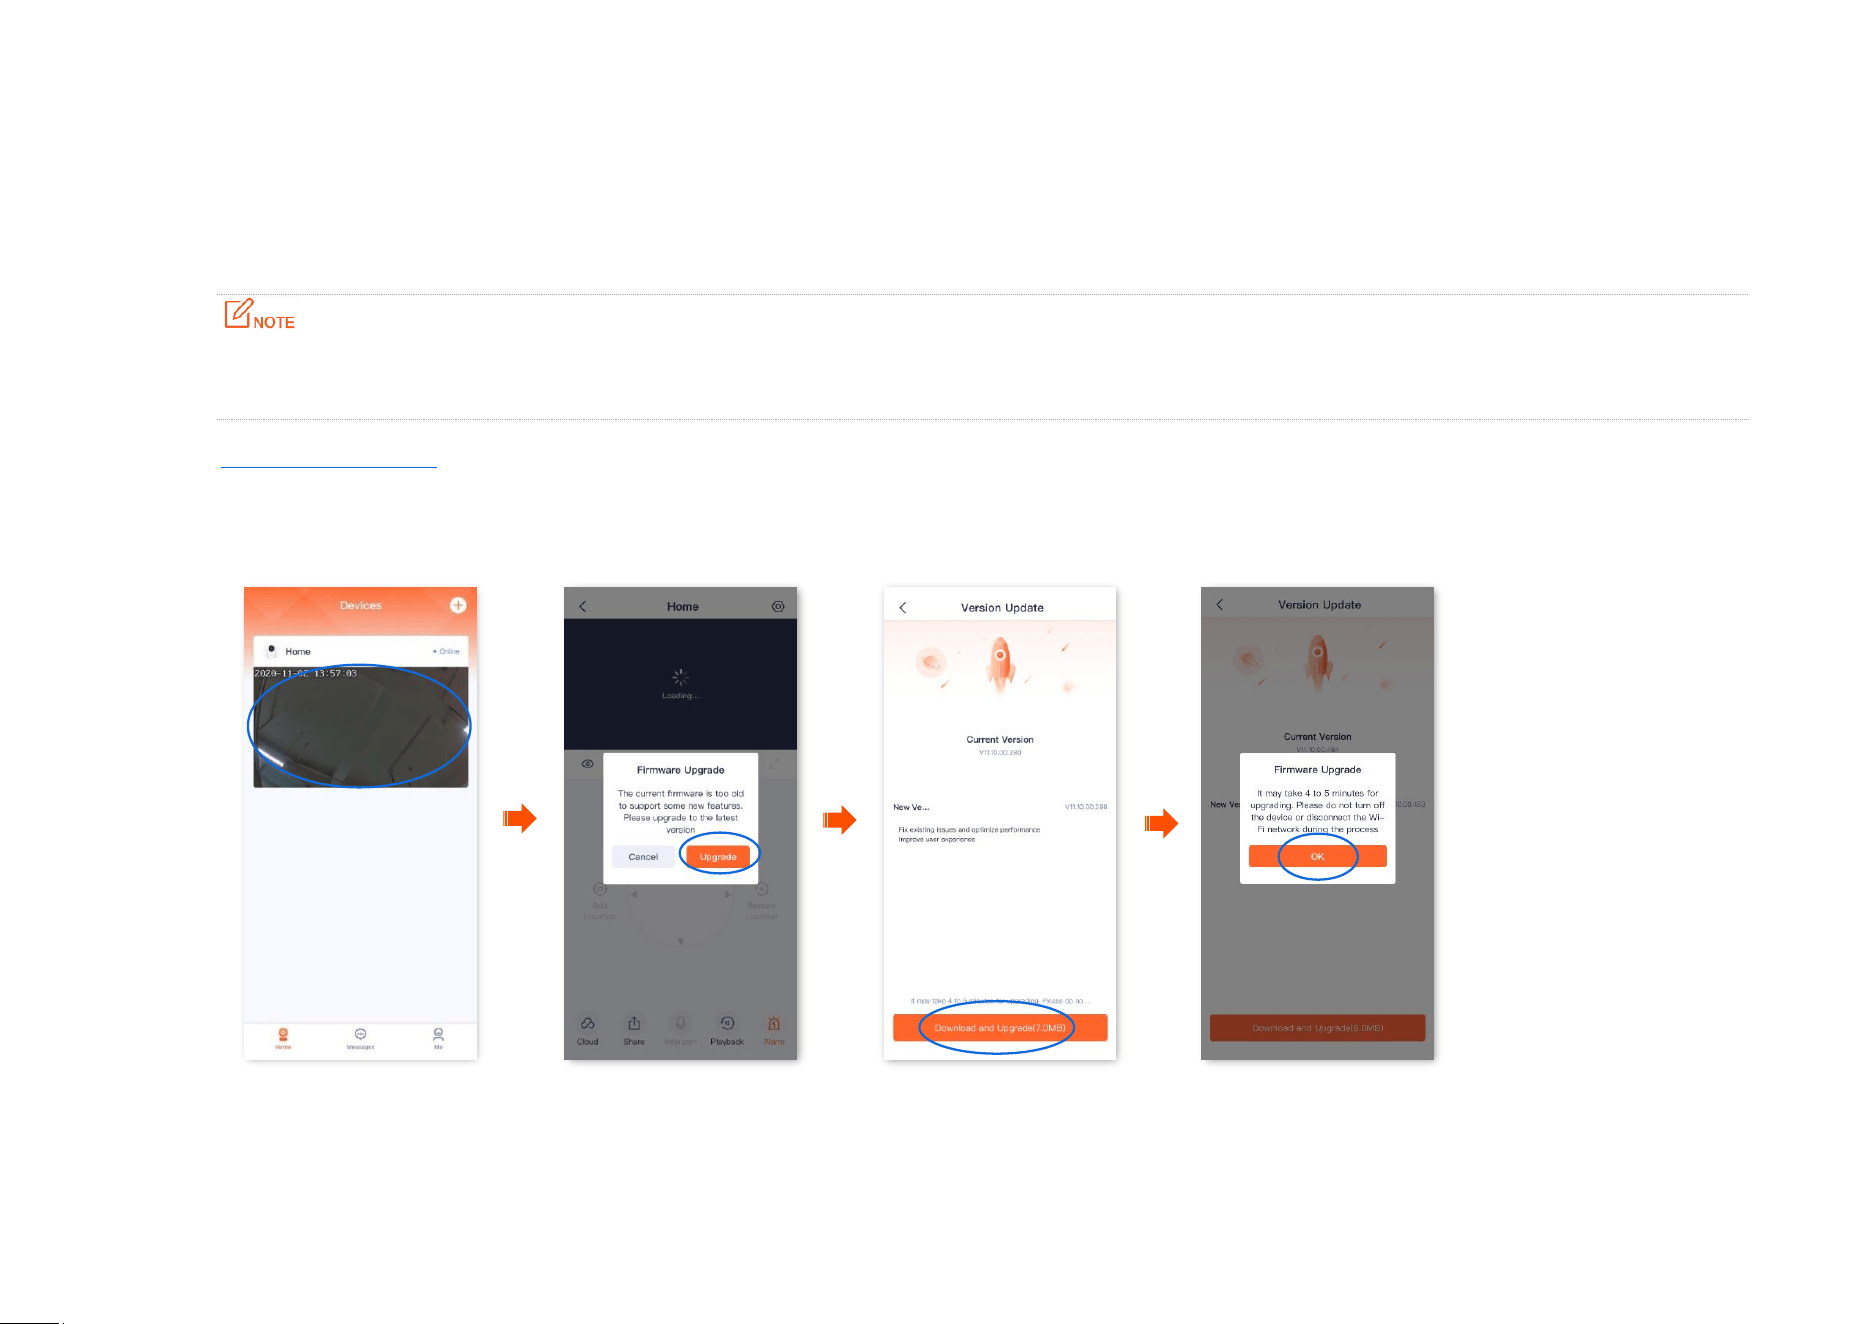
Upgrade device software
Tenda is devoted to constantly improving and innovating products to provide users with a smoother online experience. The device can achieve new
functions or more stable performance through firmware upgrades. Upgrade the firmware if a new firmware version is detected.
During the upgrade, do not cut off the power or disconnect the device from the internet, otherwise, the upgrade may fail and damage the
device.
Step 1 Log in to TDSEE App. Tap the specific device on the homepage, which is the camera Home in this example. The firmware upgrade window
will pop up if a new firmware version is detected. Tap Upgrade.
Step 2 Tap Download and Upgrade, and tap OK in the pop-up window. The TDSEE App will download the firmware and upgrade automatically. After
upgrading successfully, the device will automatically reboot.
----End
Document Version: V1.4
53
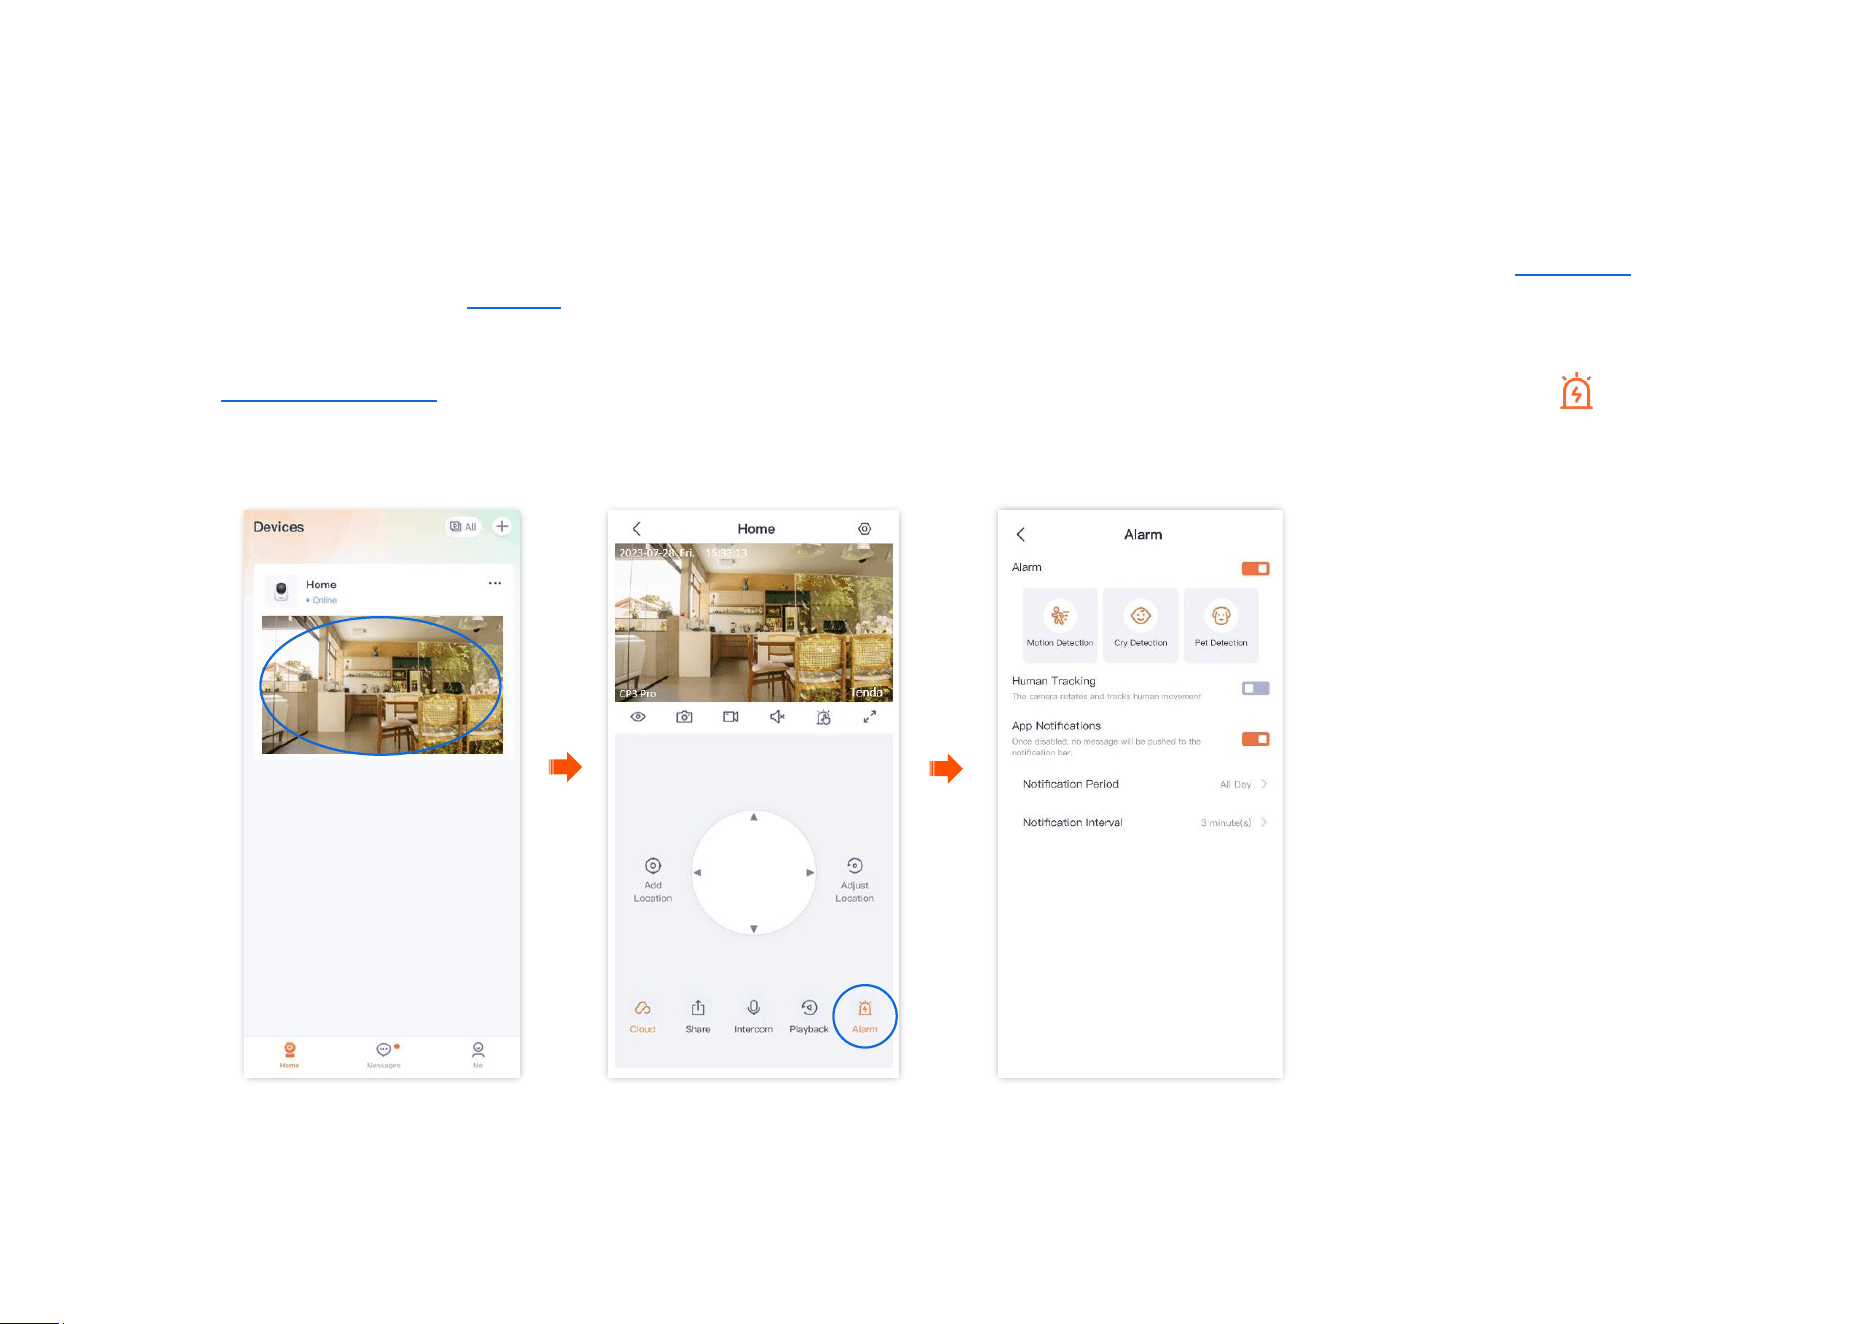
Set up alarm (Example: CP3 Pro)
The TDSEE App with version 1.3.0 is used for illustrations here.
After the alarm function is enabled, the camera can send alarm messages and monitoring images to TDSEE App according to the alarm type. You can
check specific messages on the message page.
Method 1
Step 1
Log in to TDSEE App. Tap the specific device on the homepage, which is the camera Home in this example. Then tap Alarm in the lower
right corner.
Step 2 Modify the relevant parameters according to the actual conditions.
---End
Document Version: V1.4
54
Parameter description
Parameter
Description
Alarm
Specifies whether to enable the alarm function.
Motion Detection
Motion Detection
When human is detected, the camera will send alarm information and monitoring image to TDSEE
App.
Human Detection
When an image change is detected, the camera will send alarm information and monitoring
images to TDSEE App.
Human detection and vehicle detection are configured only when Motion Detection is enabled.
Sensitivity
Specifies the detection sensitivity of the camera. You can select it as required.
Alarm Period
Specifies the period in which the camera generates alarms.
You can select the period preset by the system, or customize it as required.
Sound & Light Alarm
Alarm Prompt Tone: Specifies the alarm prompt tone of the camera. You can select mute or
audio preset by the system, or custom audio.
If the prompt tone is not mute, the camera produces an audio alert when an alarm is detected.
White Flashlight: Specifies whether to enable the white flashlight function. The camera flashes
white when the alarm is detected.
Cry Detection/Pet
Detection
Cry Detection
When crying is detected, the camera will send alarm information and monitoring image to
TDSEE App.
When a pet is detected, the camera will send alarm information and monitoring image to TDSEE
App.
Pet Detection
Document Version: V1.4
55
Parameter
Description
Sensitivity
Specifies the detection sensitivity of the camera. You can select it as required.
Alarm Period
Specifies the period in which the camera generates alarms.
You can select the period preset by the system, or customize it as required.
Human Tracking
After the function is enabled, when human activity is detected, the TDSEE App tracks and follows
the subject.
APP Notifications
After the function is enabled, when an image change is detected, the camera will send
notifications and monitoring images to the TDSEE App during the Alarm Period.
Notification Period
Specifies the period for receiving an alarm notification in the notification bar. This parameter can
be configured only when APP Notifications is enabled.
Notification Interval
Specifies the interval for receiving an alarm notification in the notification bar. This parameter can
be configured only when APP Notifications is enabled.
Method 2
Step 1
Log in to TDSEE App, and enter the settings page of the camera.
- Method 1: Find the camera you want to set up alarm on the homepage, which is Home in this example, tap on the right corner ,
and tap Device Settings.
- Method 2: Find the camera you want to set up alarm on the homepage, which is Home in this example, and tap Settings ( ) in the
upper-right corner.
Step 2 Modify the relevant parameters according to the actual conditions.
Document Version: V1.4
56
---End
Document Version: V1.4
57
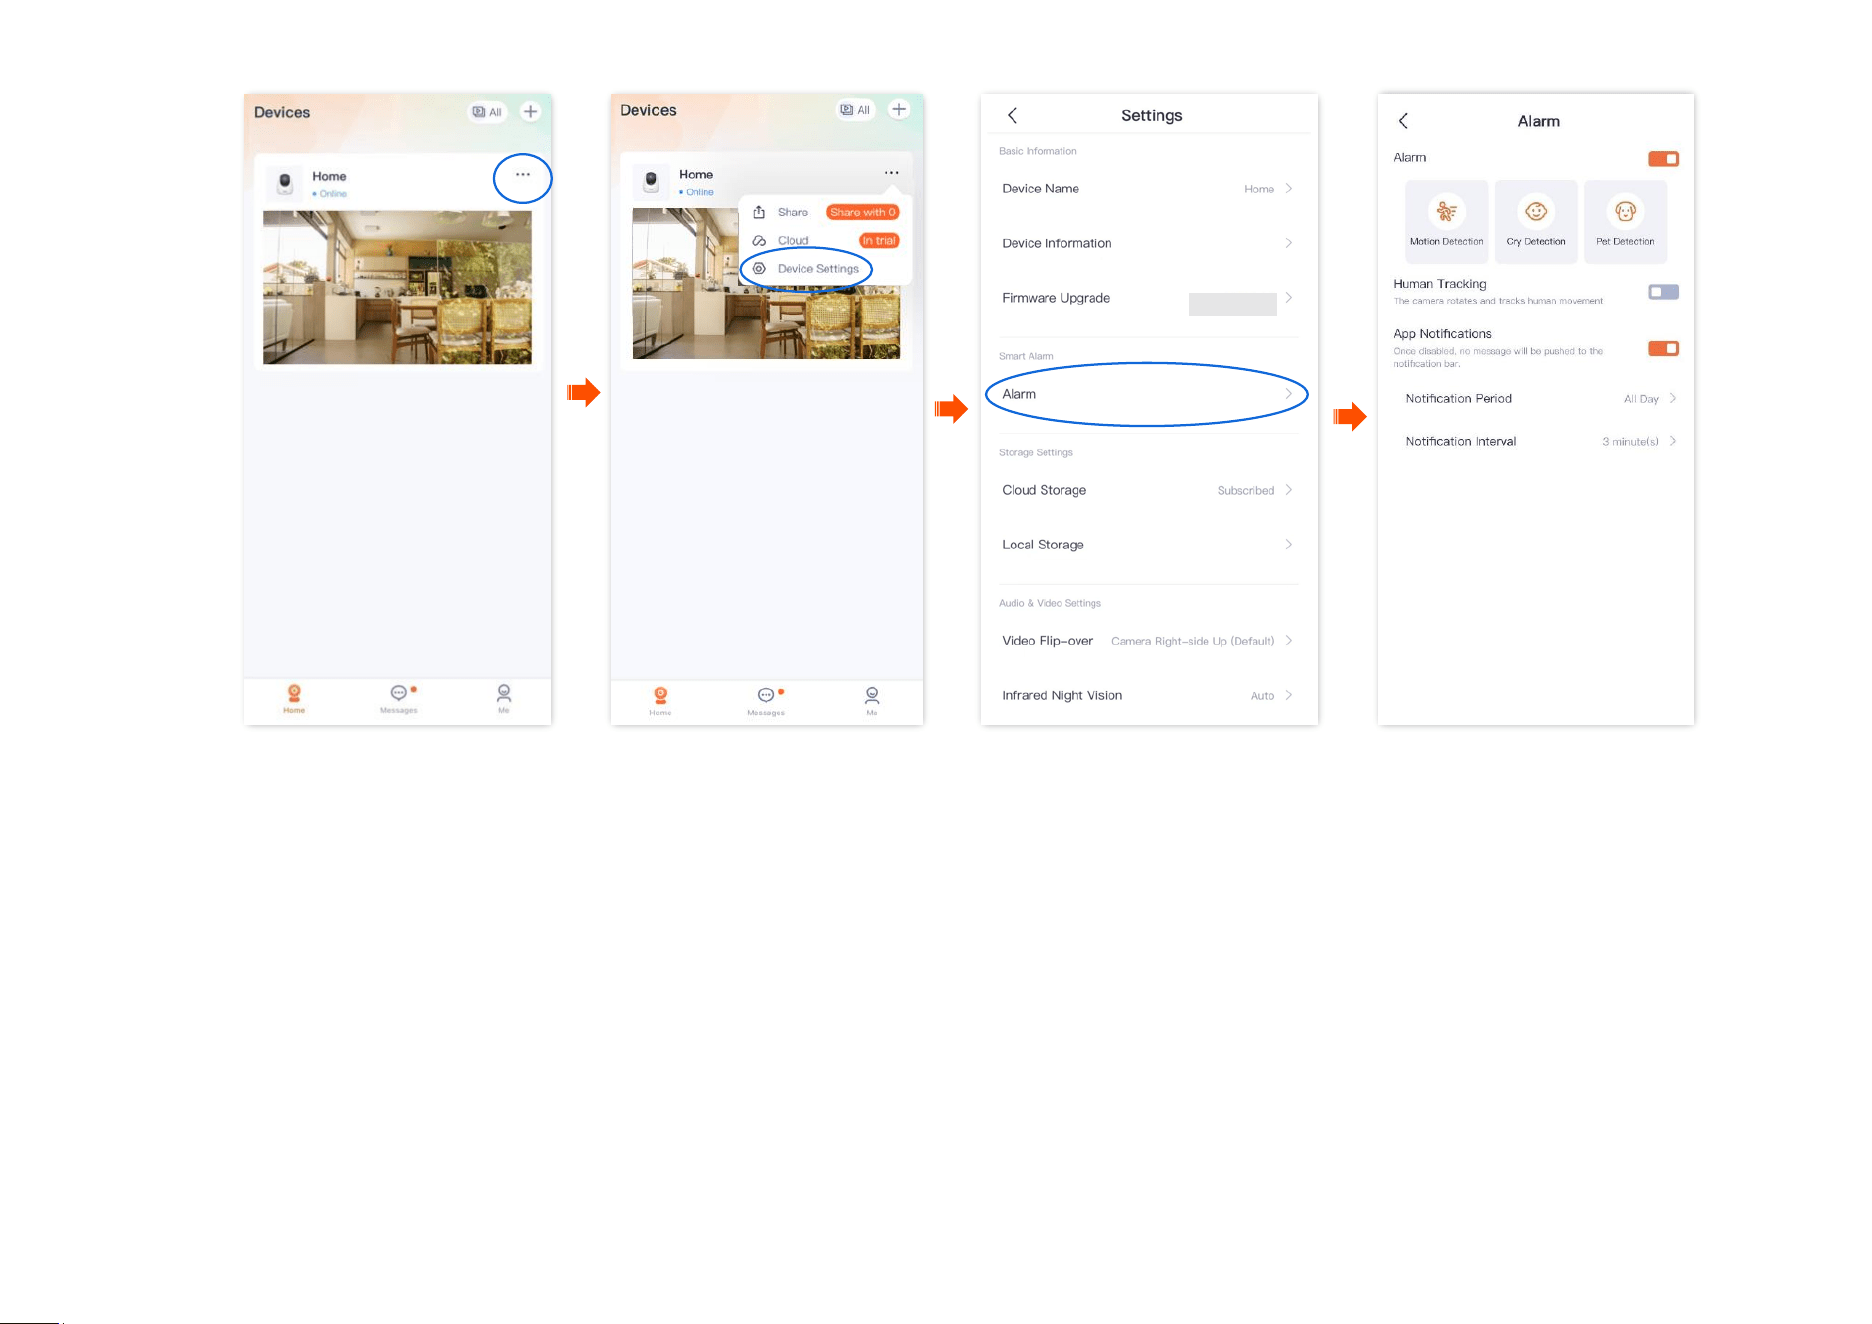
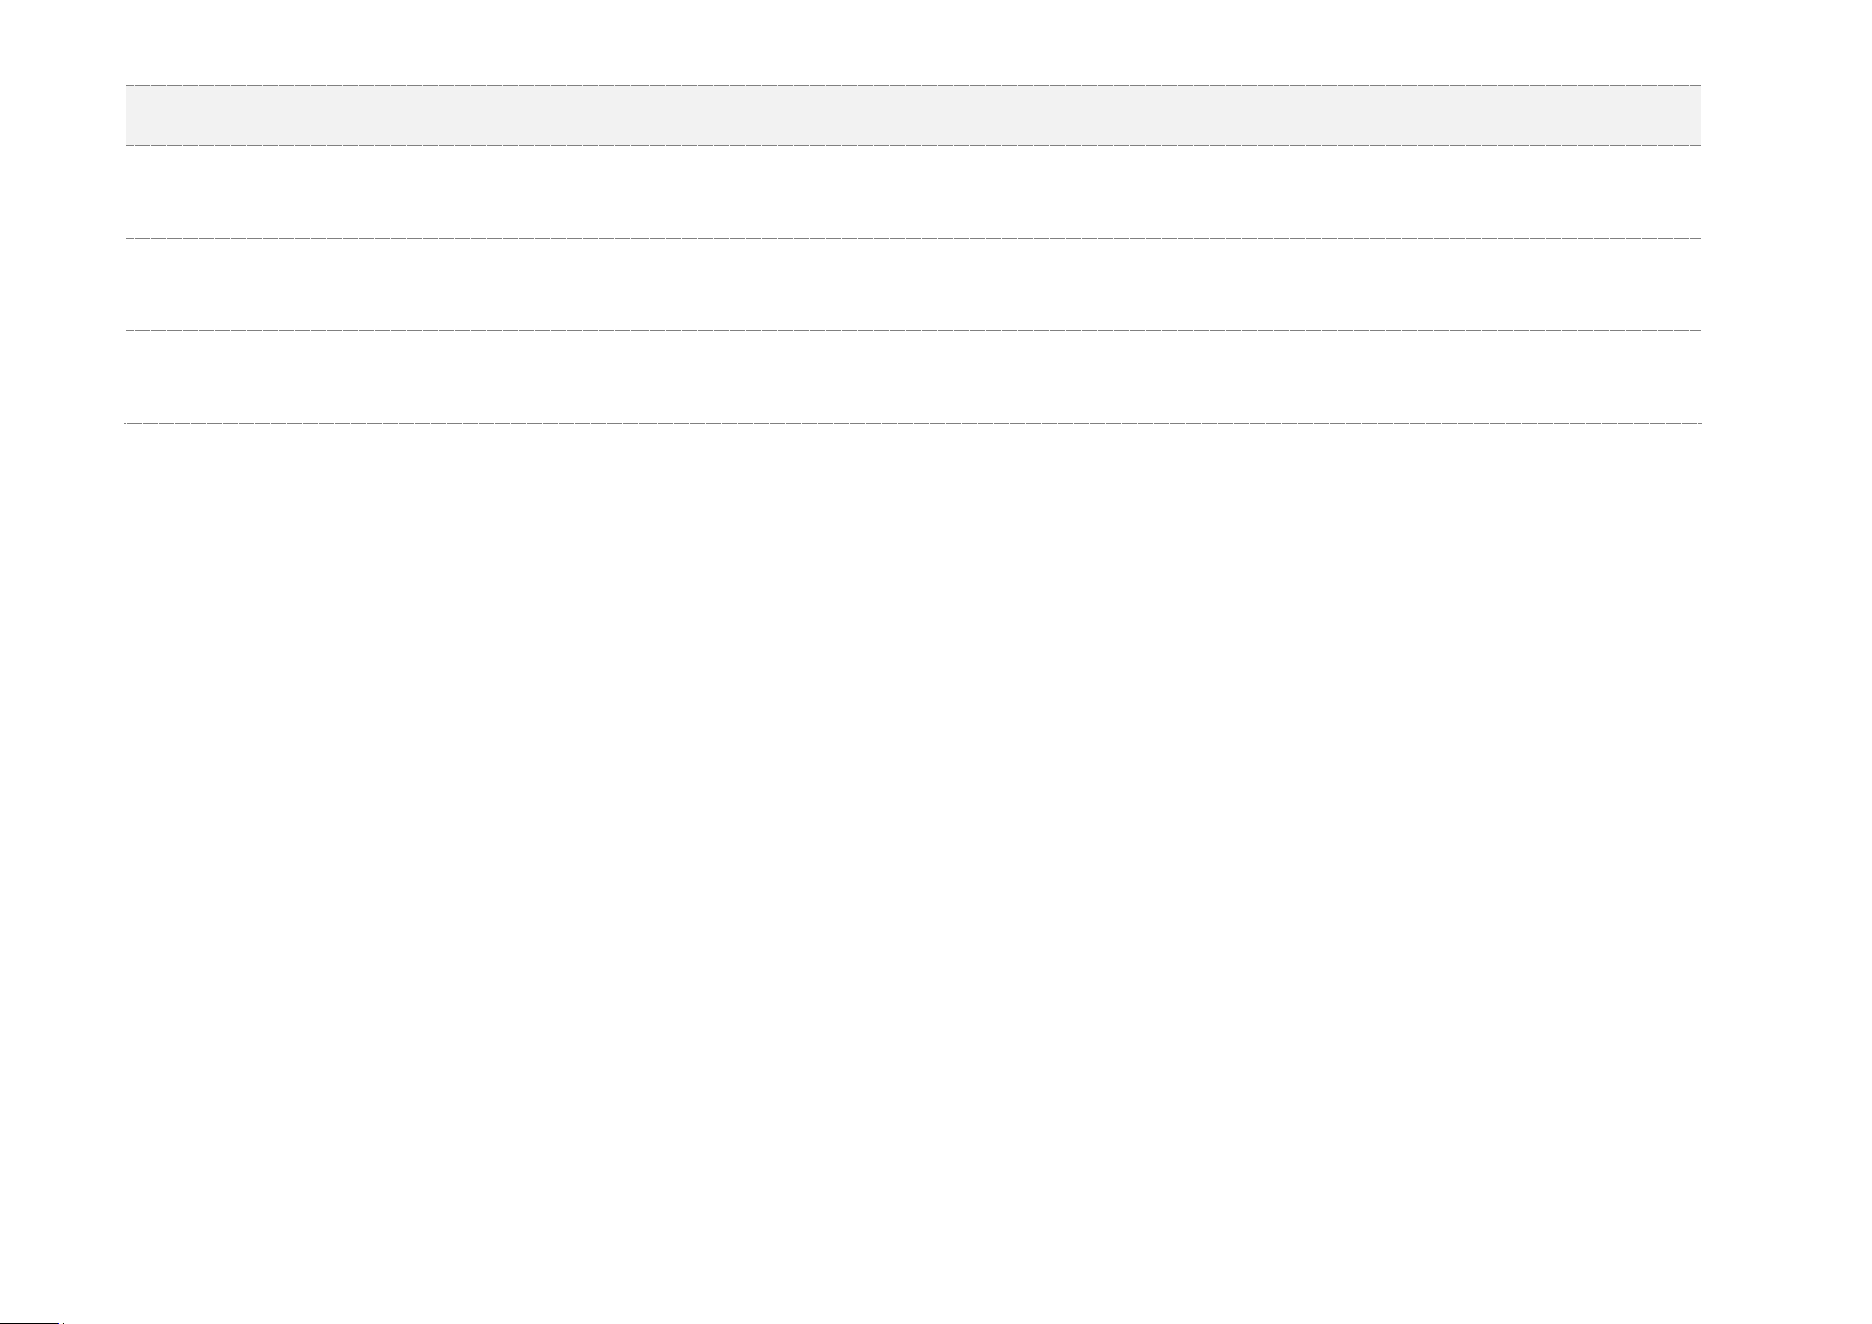
Set up alarm (Example: CH7-WCA)
The TDSEE App with version 1.3.0 is used for illustrations here.
After the alarm function is enabled, the camera can send alarm messages and monitoring images to TDSEE App according to the alarm type. You can
check specific messages on the message page.
Method 1 (Recommended)
Step 1
Log in to TDSEE App. Tap the specific device on the homepage, which is the camera Home in this example. Then tap Alarm in the lower
right corner.
Step 2 Modify the relevant parameters according to the actual conditions.
----End
Document Version: V1.4
58
Parameter description
Parameter
Description
Alarm
Specifies whether to enable the alarm function.
Motion Detection
Motion Detection
When an image change is detected, the camera will send alarm information and monitoring
images to TDSEE App.
Human Detection
When human is detected, the camera will send alarm information and monitoring image to
TDSEE App.
Vehicle Detection
Vehicle Detection: When a vehicle is detected, the camera will send alarm information and
monitoring image to TDSEE App.
Human detection and vehicle detection are configured only when Motion Detection is
enabled.
Sensitivity
Specifies the detection sensitivity of the camera. You can select it as required.
Sound & Light Alarm
Alarm Prompt Tone: Specifies the alarm prompt tone of the camera. You can select mute or
audio preset by the system, or custom audio.
If the prompt tone is not mute, the camera produces an audio alert when an alarm is
detected.
White Flashlight: Specifies whether to enable the white flashlight function. The camera
flashes white when the alarm is detected.
Human Tracking
After the function is enabled, when human activity is detected, the TDSEE App tracks and
follows the subject.
Document Version: V1.4
59
Parameter
Description
App Notifications
After the function is enabled, when an image change is detected, the camera will send
notifications and monitoring images to the TDSEE App during the Alarm Period.
Notification Period
Specifies the period for receiving an alarm notification in the notification bar. This parameter
can be configured only when APP Notifications is enabled.
Notification Interval
Specifies the interval for receiving an alarm notification in the notification bar. This parameter
can be configured only when APP Notifications is enabled.
Document Version: V1.4
60
Method 2
Step 1
Log in to TDSEE App, and enter the settings page of the camera.
- Method 1: Find the camera you want to quit sharing on the homepage, which is Home in this example, tap on the right corner,
and tap Device Settings.
- Method 2: Find the camera you want to quit sharing on the homepage, which is Home in this example, and tap Settings ( ) in the
upper-right corner.
Step 2 Tap Alarm, then modify the relevant parameters as required.
---End

Document Version: V1.4
61
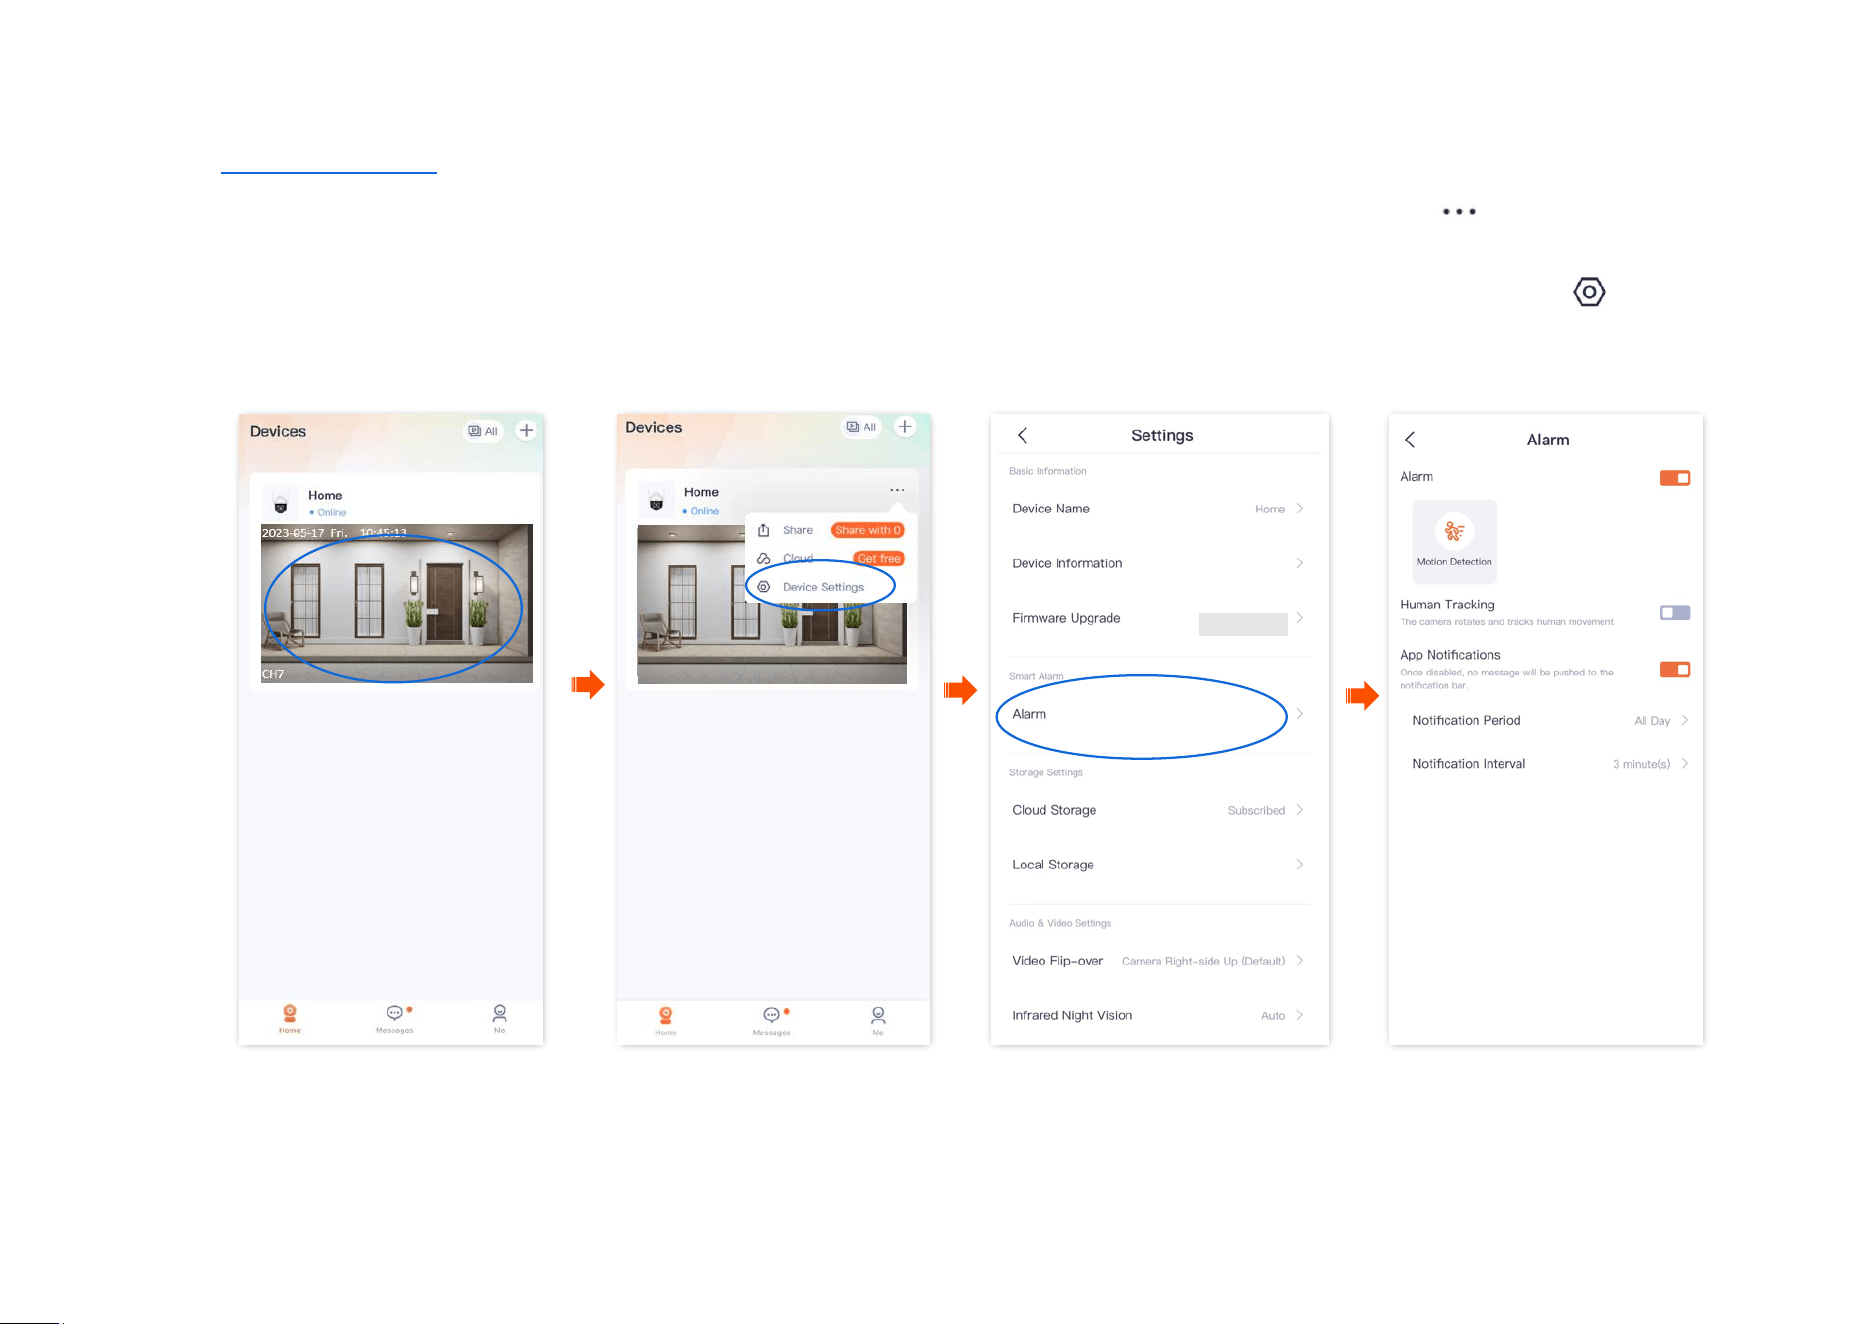
Enable human tracking (Example: CH7-WCA)
The TDSEE App with version 1.1.11 is used for illustrations here.
After the human tracking function is enabled, when the camera detects figure movement, the camera tracks and follows the subject.
Method 1 (Recommended)
Step 1
Log in to TDSEE App. Tap the specific device on the homepage, which is the camera Home in this example. Then tap Alarm in the lower
right corner.
Step 2
Enable Human Tracking.
---End

Document Version: V1.4
63
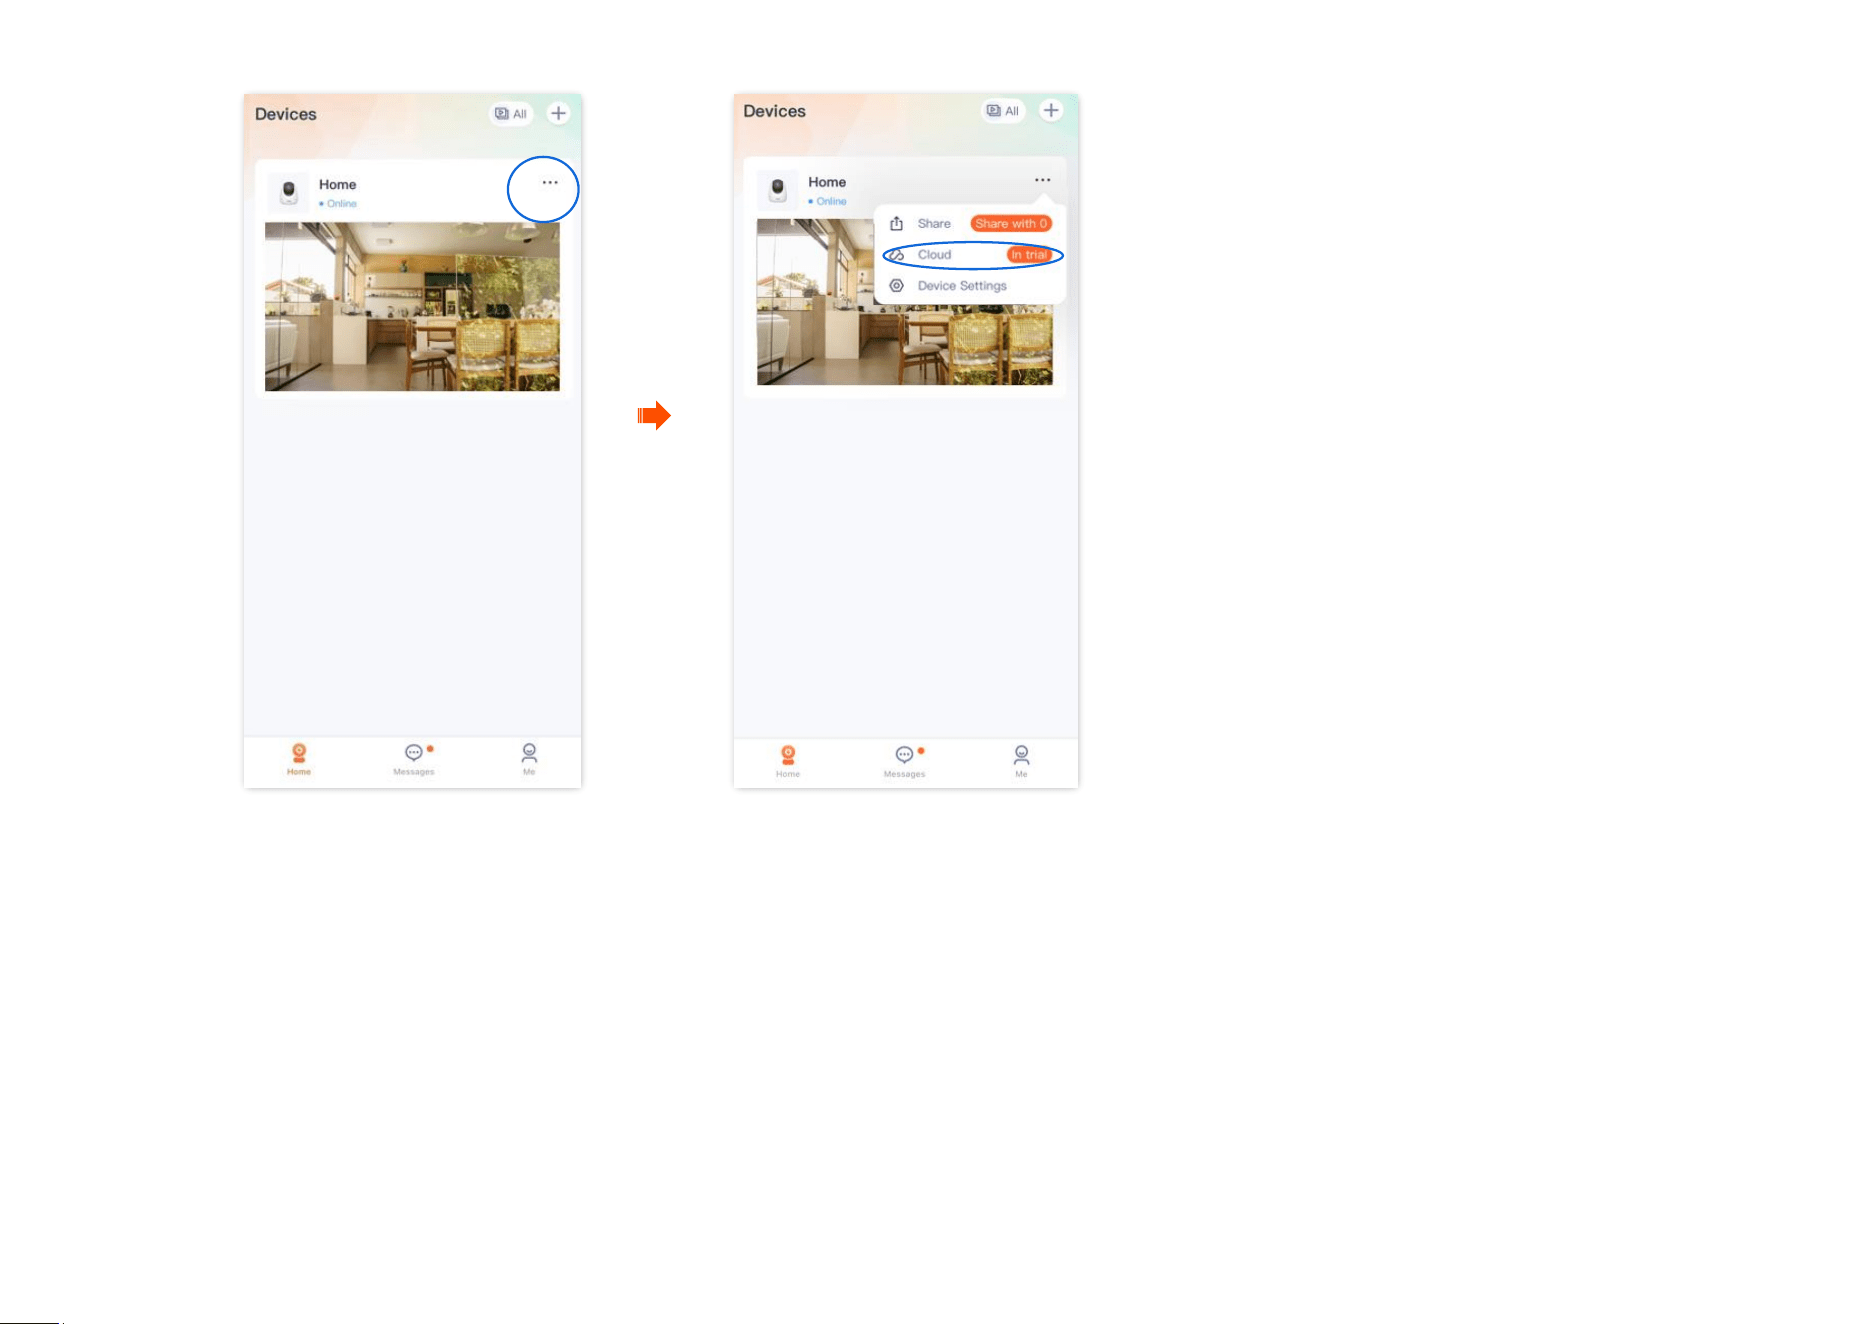
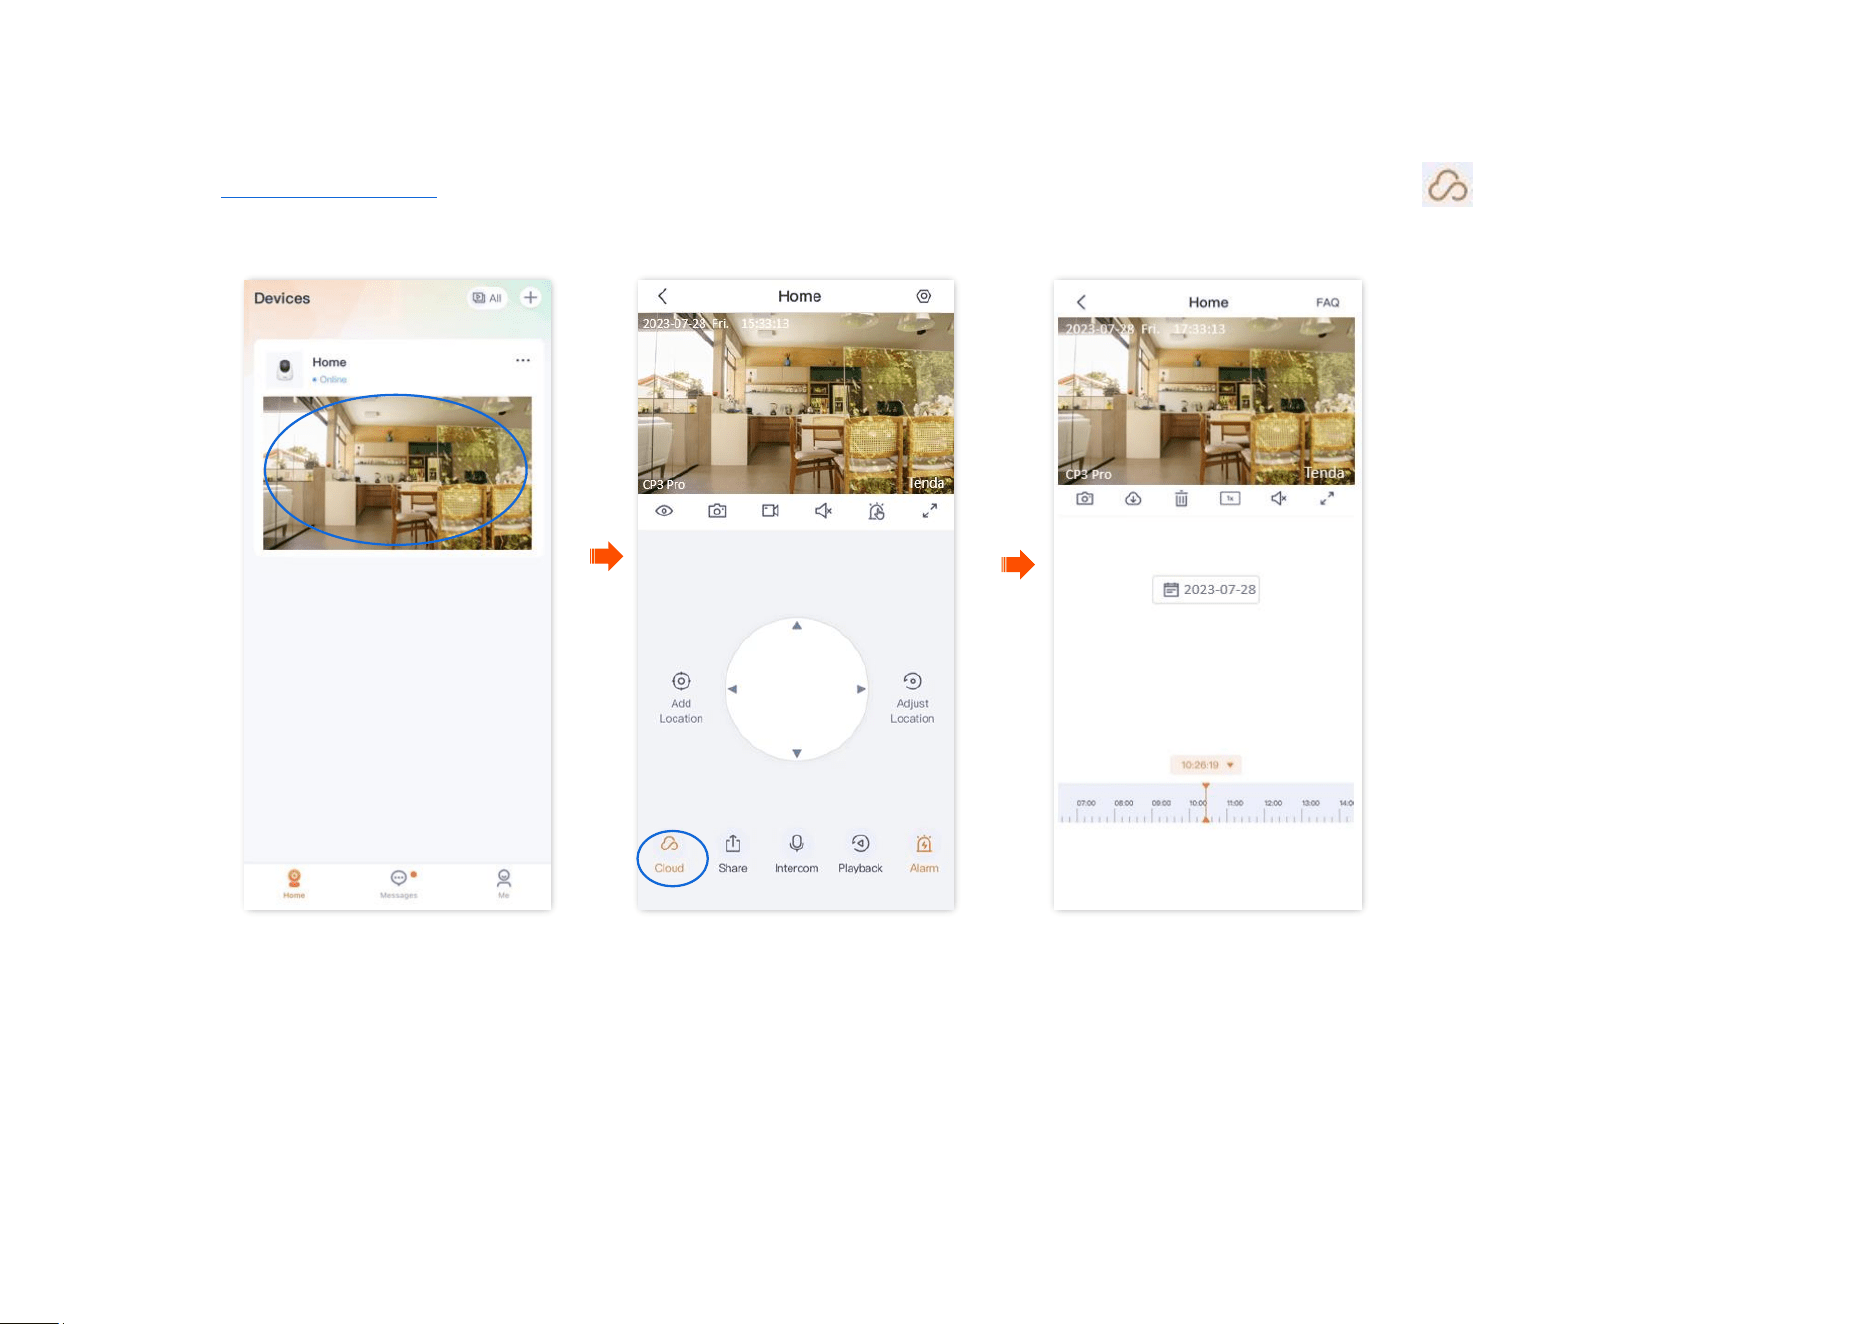
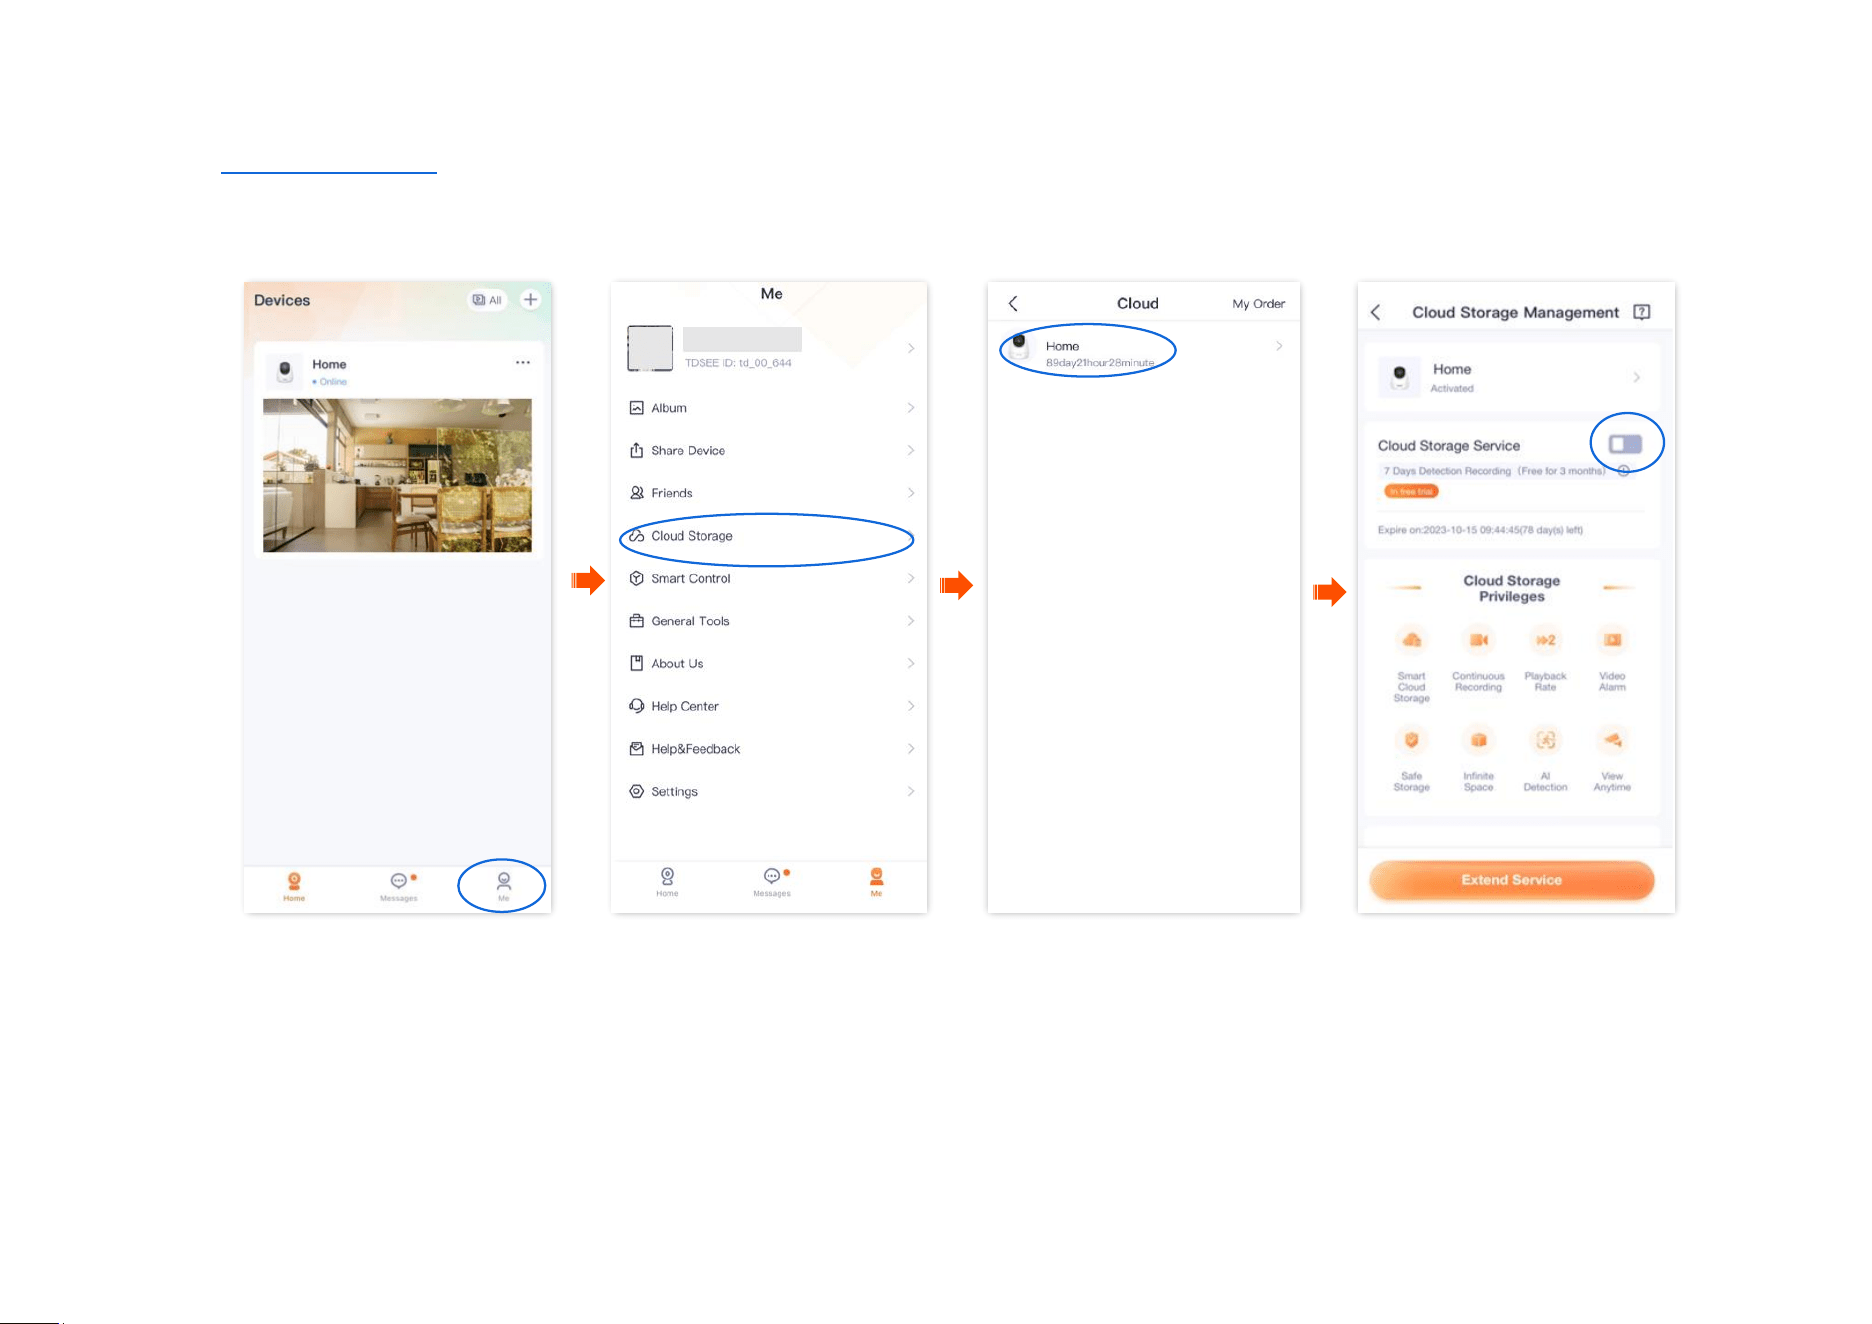
Cloud
The TDSEE App with version 1.3.0 is used for illustrations here.
After you subscribe to the cloud storage service, the monitoring videos of the device will be stored on the cloud. You can check the video anytime
anywhere.
Cloud storage service description:
− Cloud storage service is only applicable to Tenda IP cameras and NVR channels.
− The price of the cloud storage service is subject to that displayed on the TDSEE App page.
− At least 2 Mbps network bandwidth is required.
− The cloud storage service type of the camera refers to detection recording.
− The package types include subscription packages (automatic renewal, such as monthly plan) and standard packages (a one-time
payment, such as for one month). You can cancel the automatic renewal service at any time. After cancellation, no further deduction will
be made upon expiration.
− You can enjoy free cloud storage service (7 Days Detection Recording) for 3 months upon the first activation of the cloud service.
− Package service effective priority: Subscription package > Standard package > Free cloud storage package.
Document Version: V1.4
64
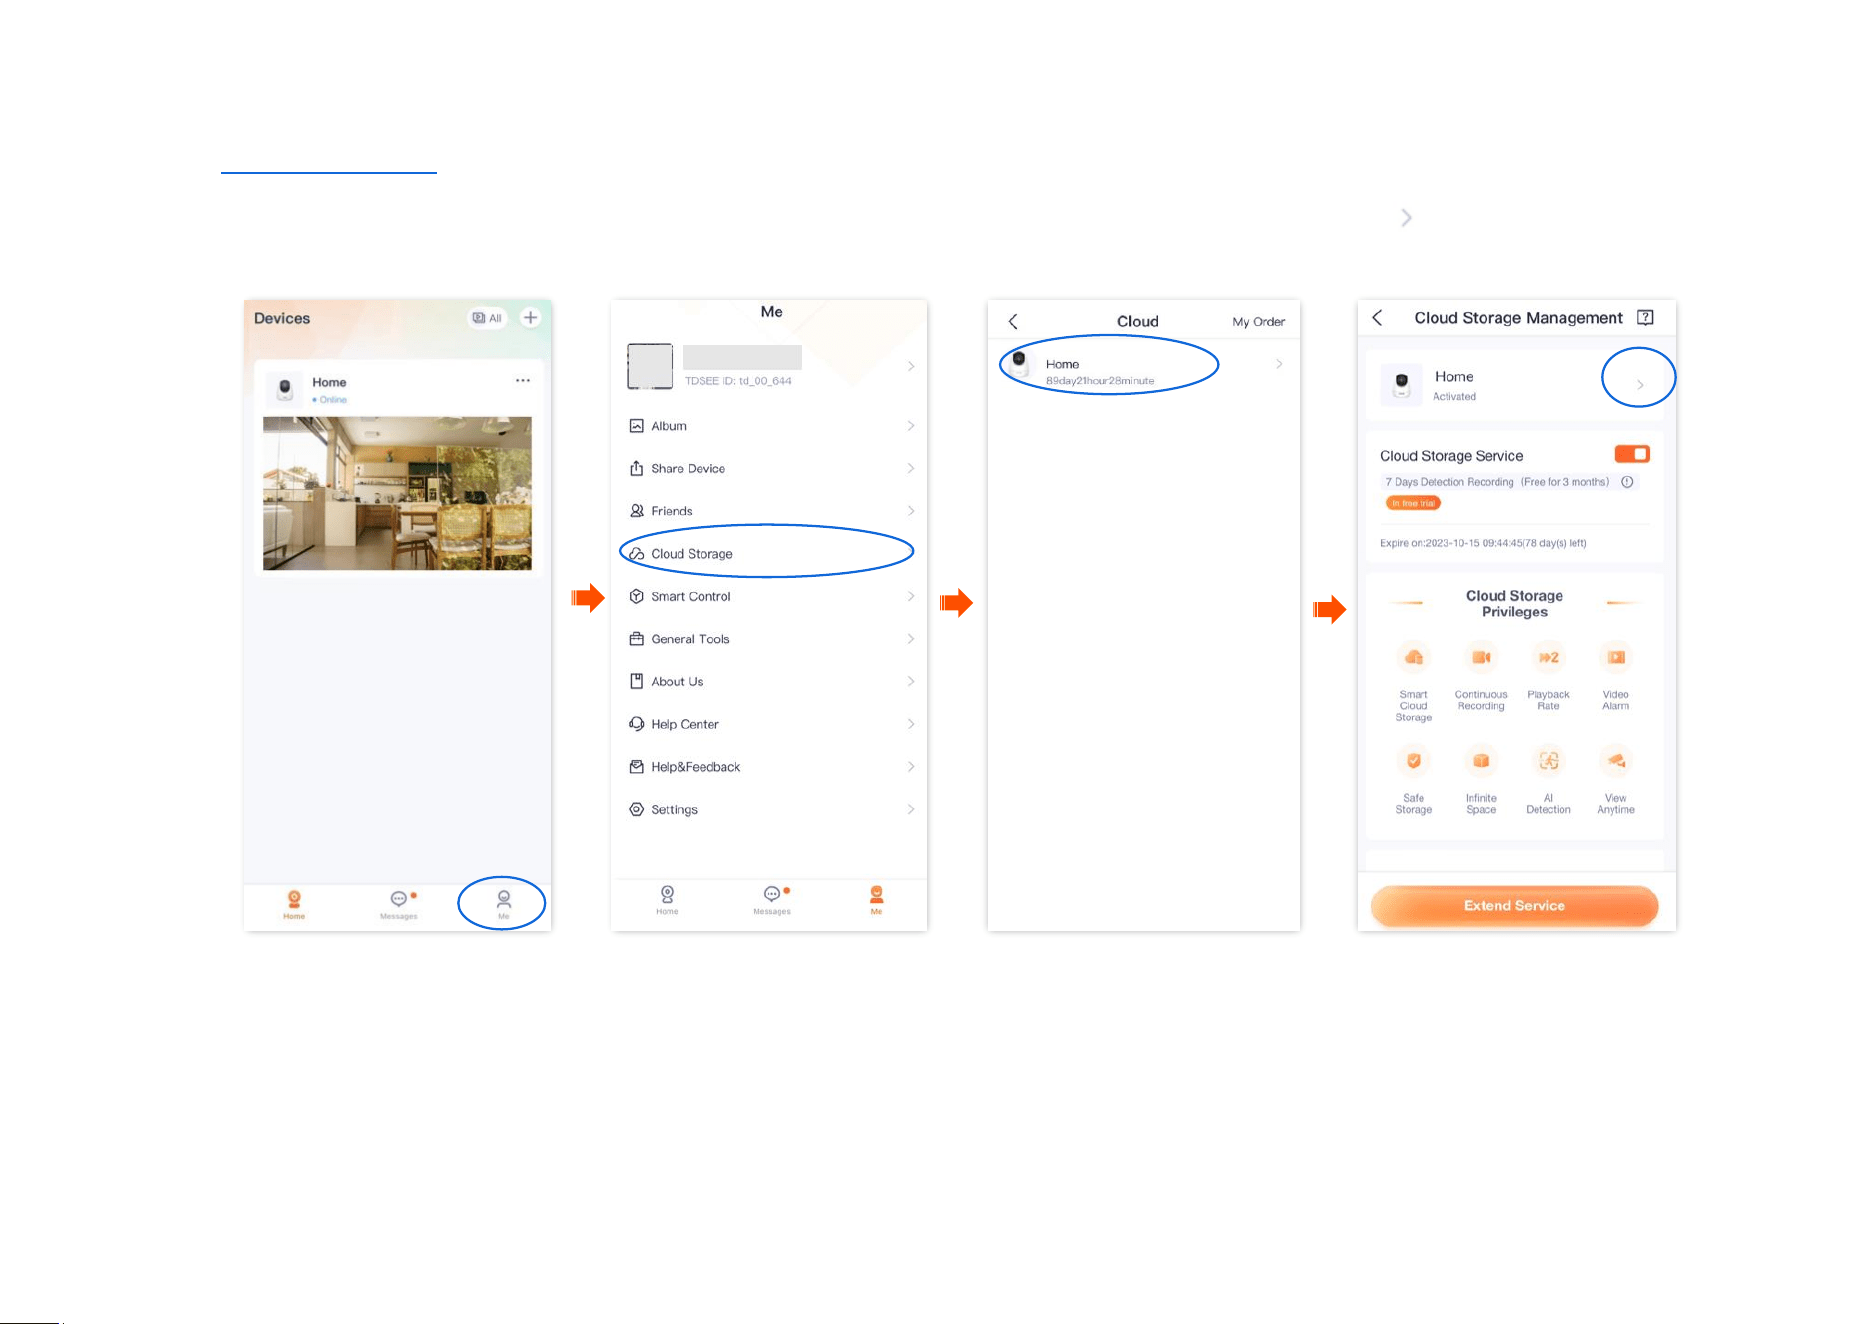
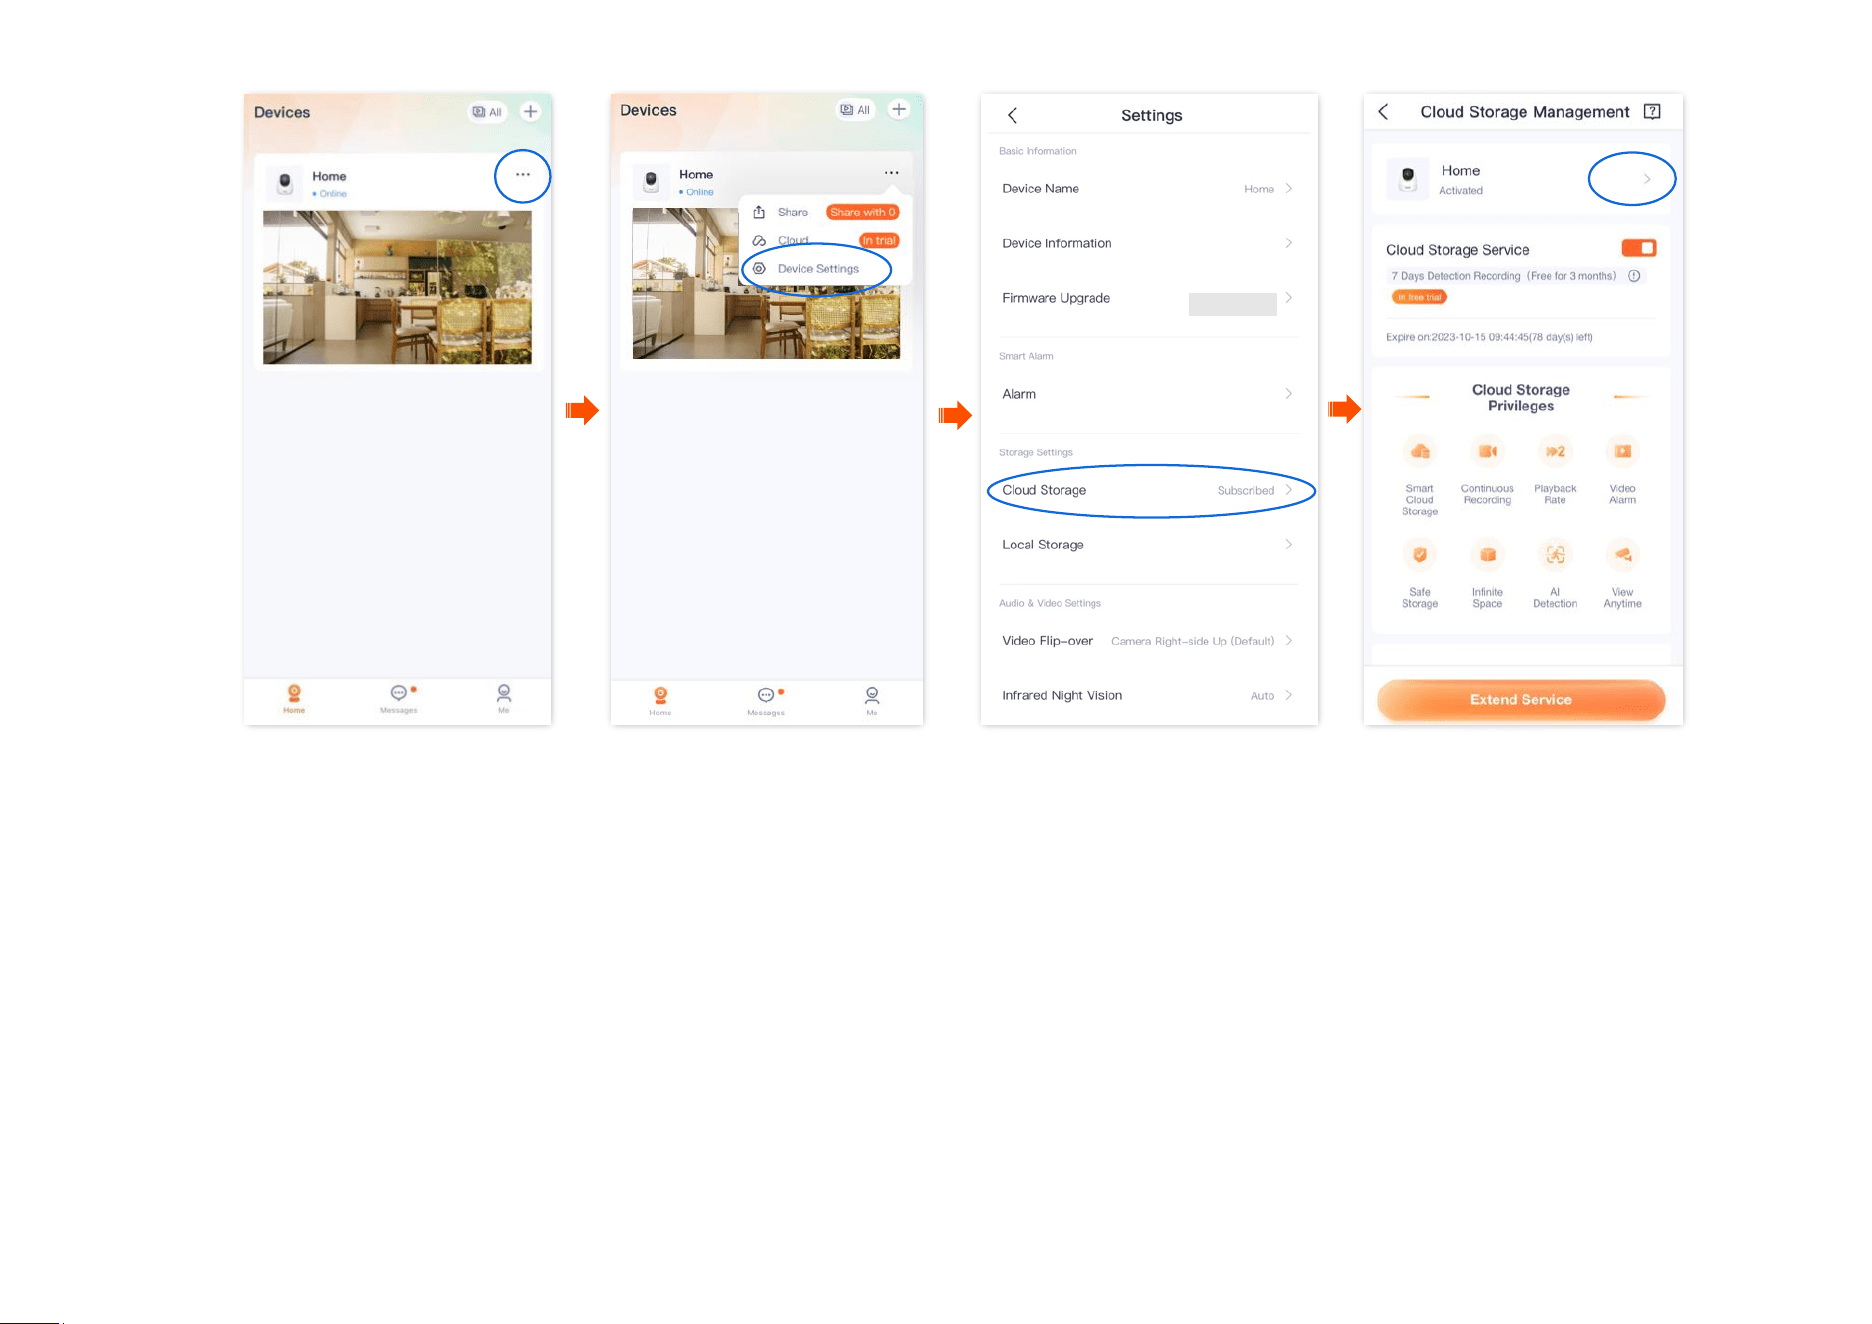
Subscribe to the cloud storage service
Russia supports coupon code redemption.
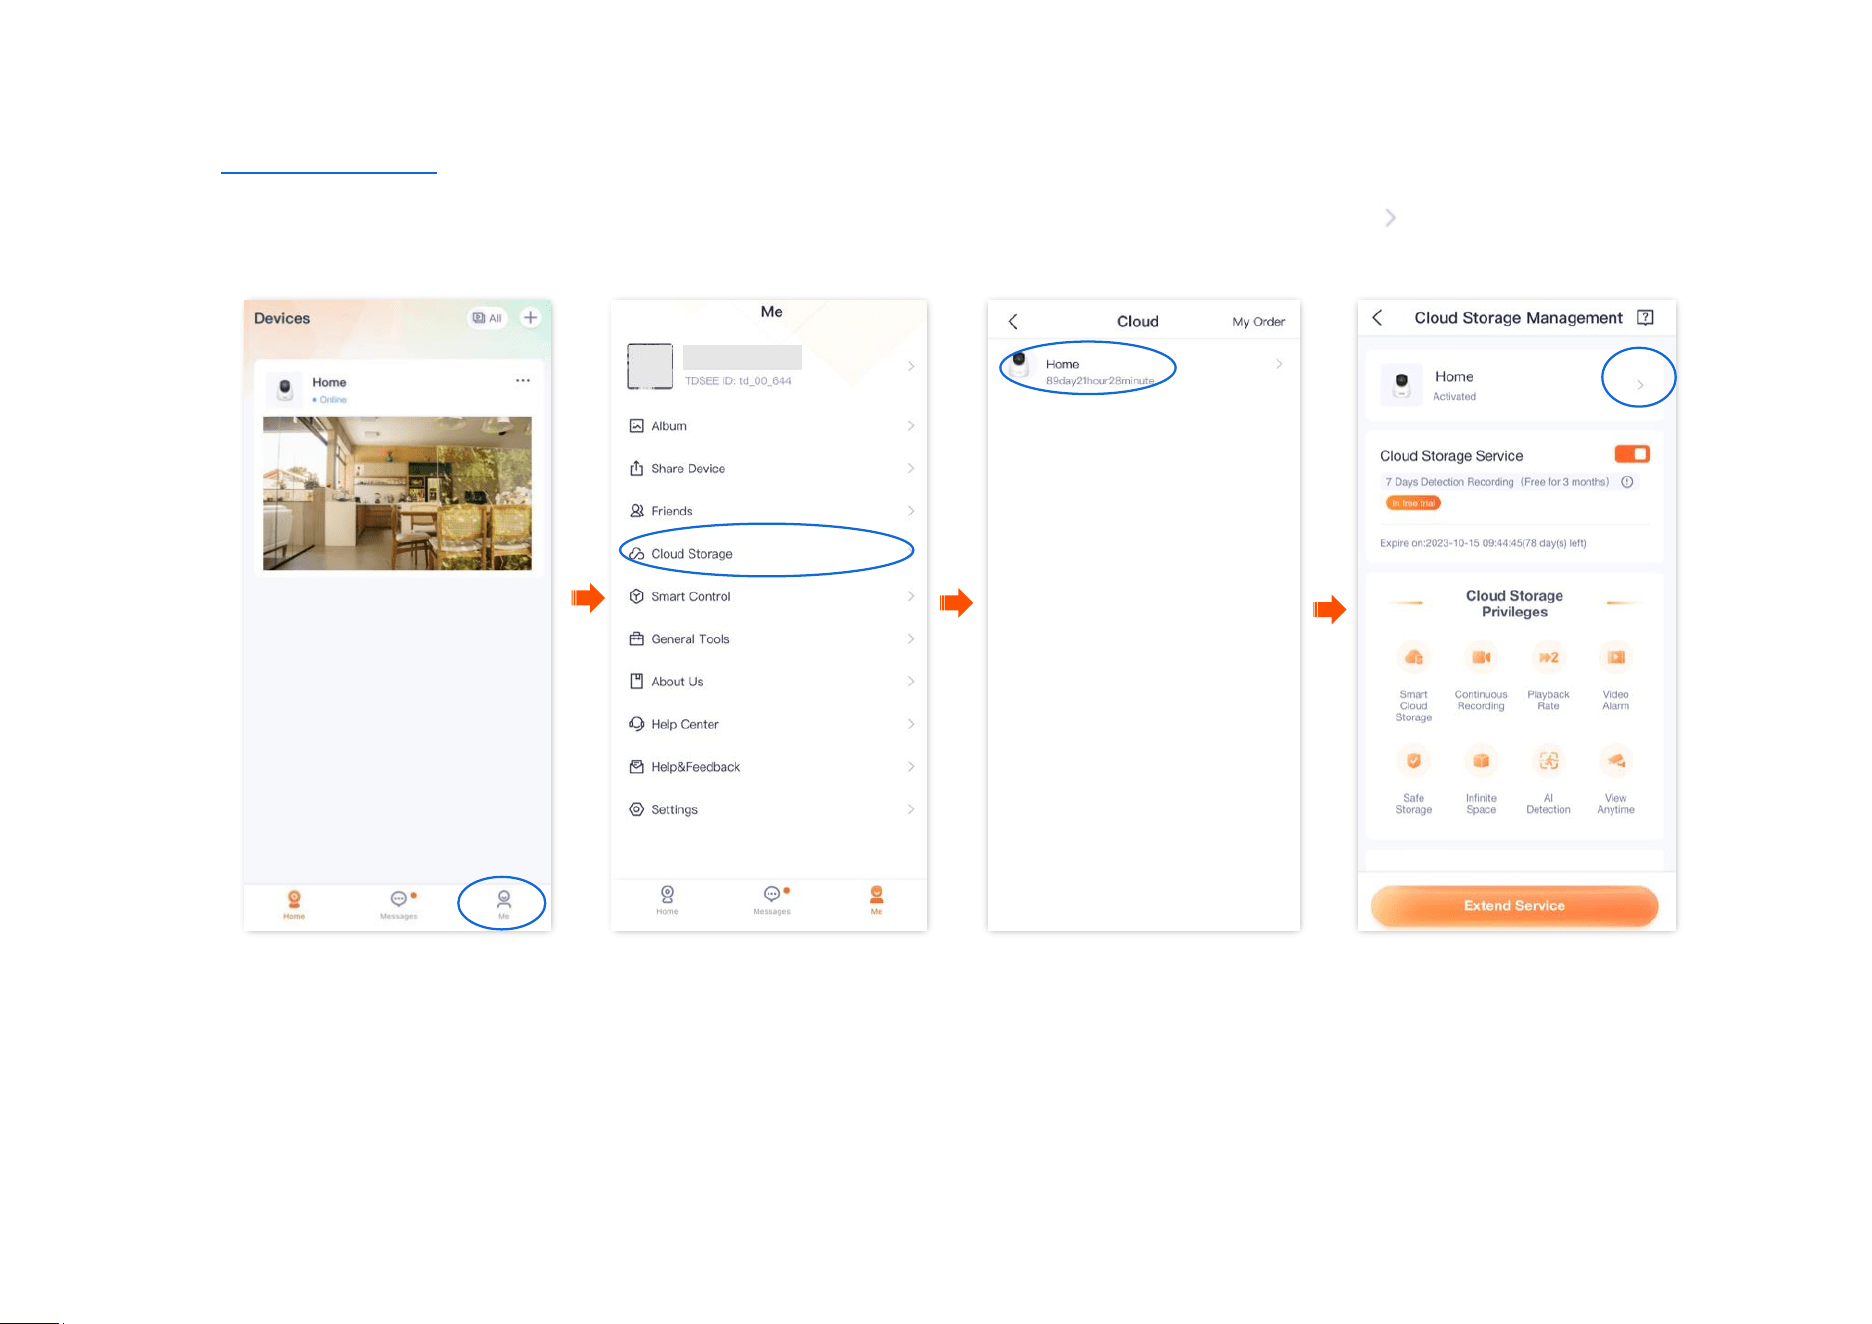
Method 1 (Recommended)
The 3-month free cloud storage is taken as an example here. It is for reference only.
Step 1
Log in to TDSEE App. Find the camera that you want to buy cloud storage service on the homepage, which is the camera Home in this
example. Tap in the right corner.
Step 2
Tap Cloud. The following figure uses the 3-month free cloud storage as an example. It is for reference only.
Document Version: V1.4
65
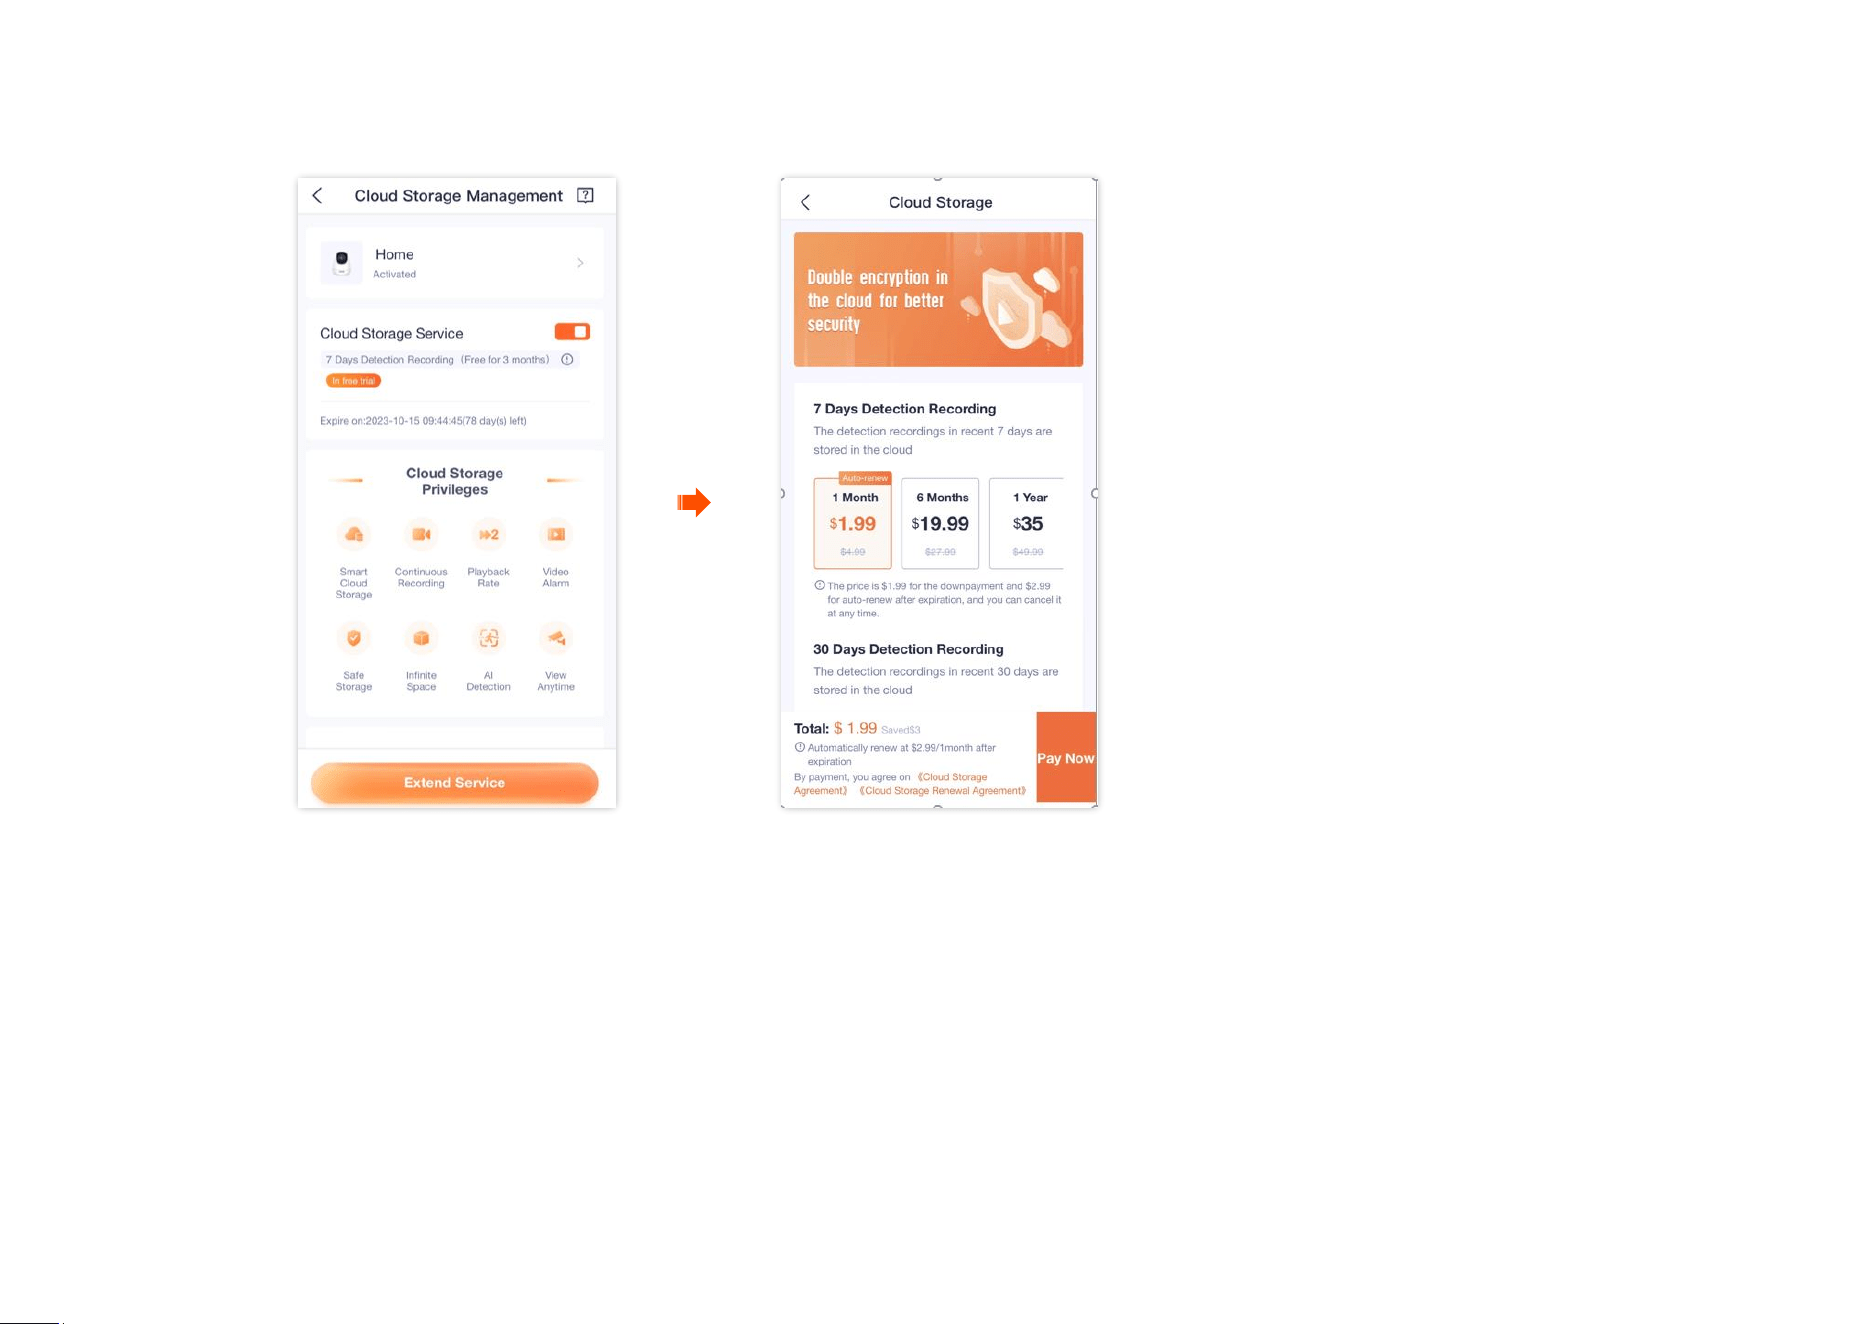
Document Version: V1.4
66
Step 3
Tap Extend Service, and follow the on-screen instructions to subscribe to the cloud storage service package. After subscribing successfully,
the service is activated immediately.
----End
Document Version: V1.4
67
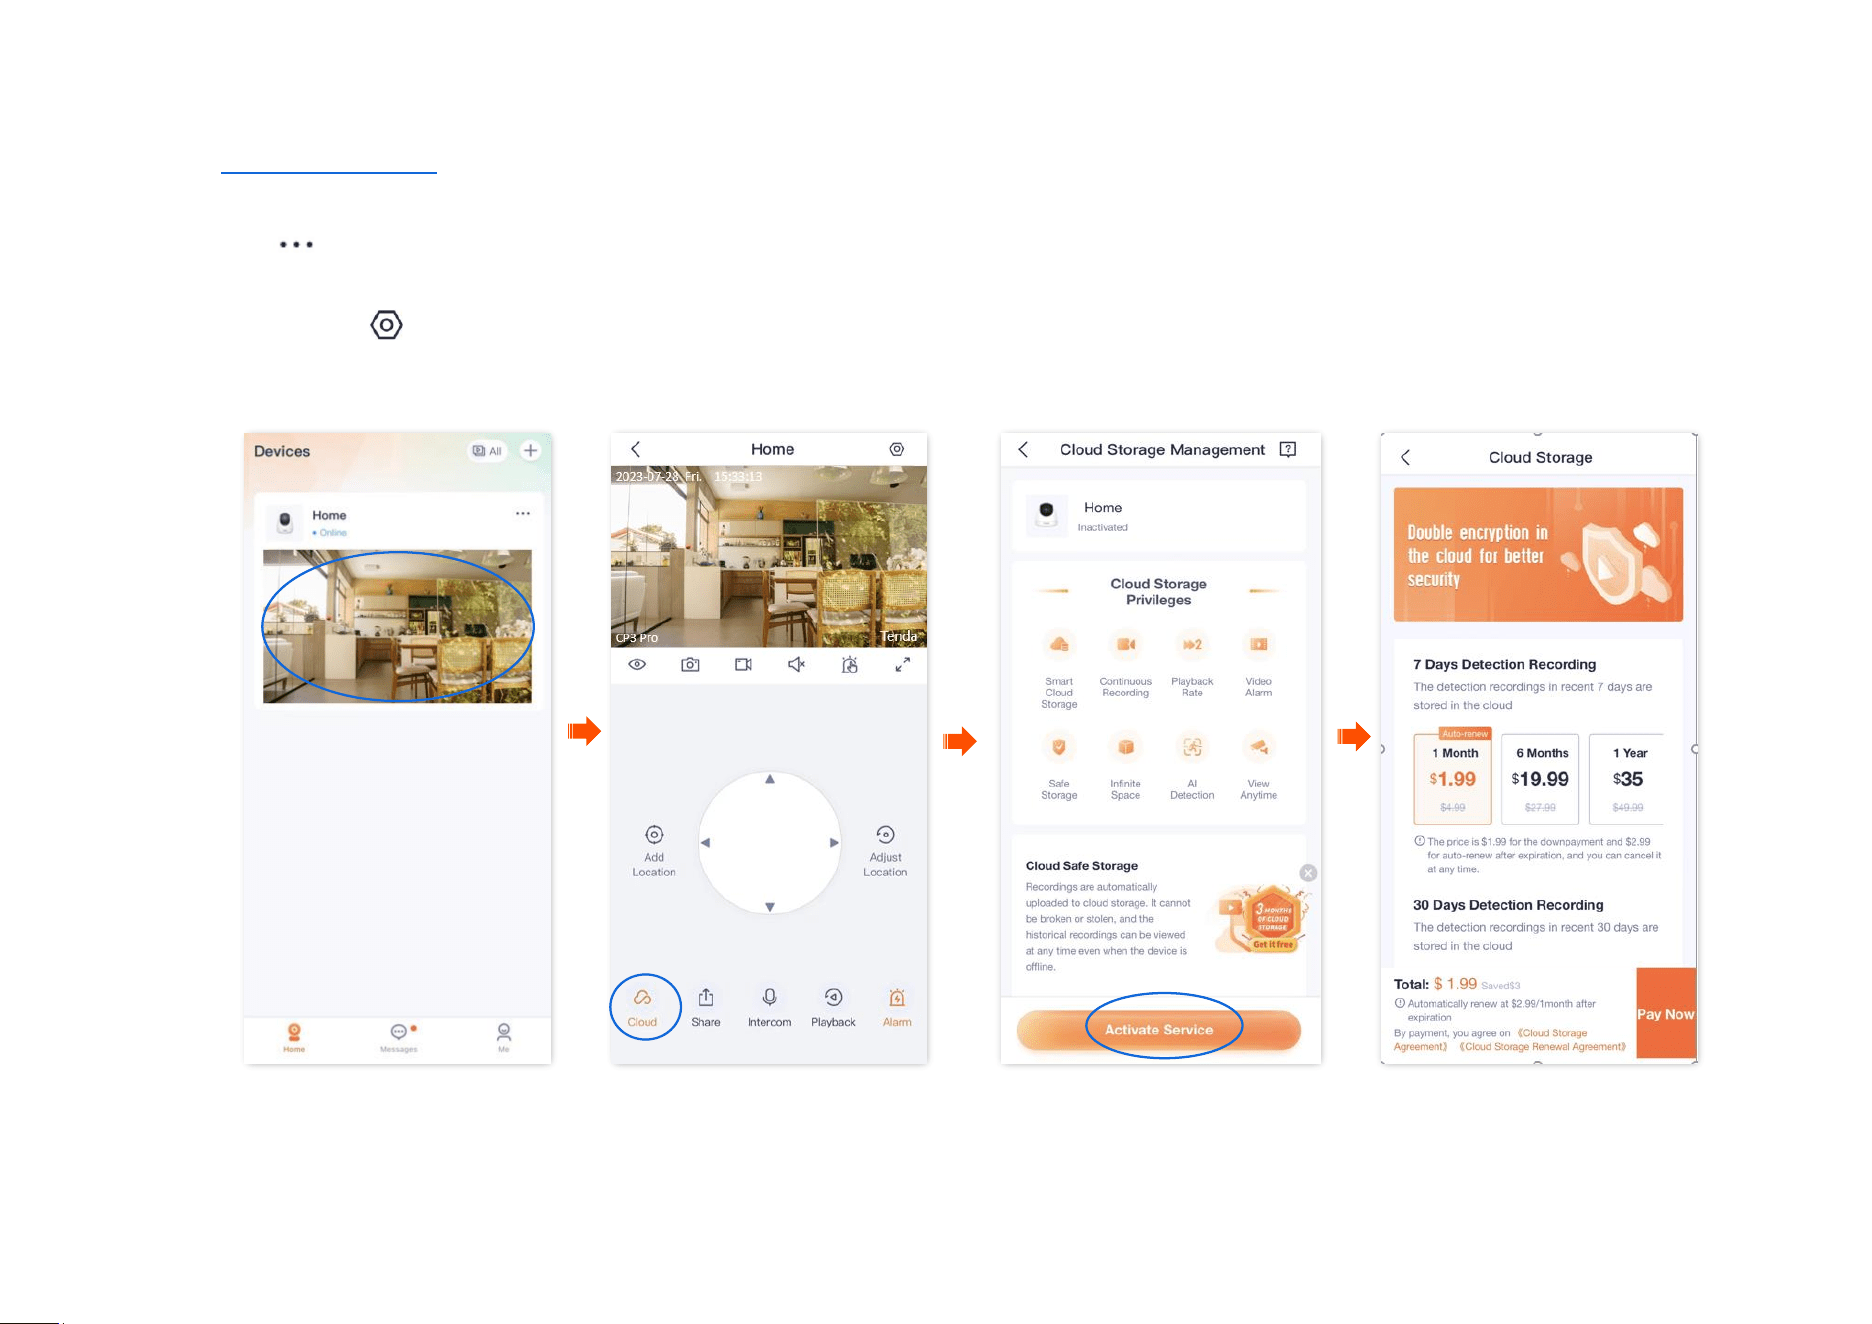
Method 2
Step 1
Log in to TDSEE App, and enter the settings page of the camera.
- Method 1: Find the camera you want to subscribe to the cloud storage service on the homepage, which is Home in this example, tap
on the right corner, and tap Device Settings.
- Method 2: Find the camera you want to subscribe to the cloud storage service on the homepage, which is Home in this example, and tap
Settings ( ) in the upper-right corner.
Step 2
Tap Activate Service, and follow the on-screen instructions to subscribe to the cloud storage service package. After subscribing successfully,
the service is activated immediately.
---End
Document Version: V1.4
68
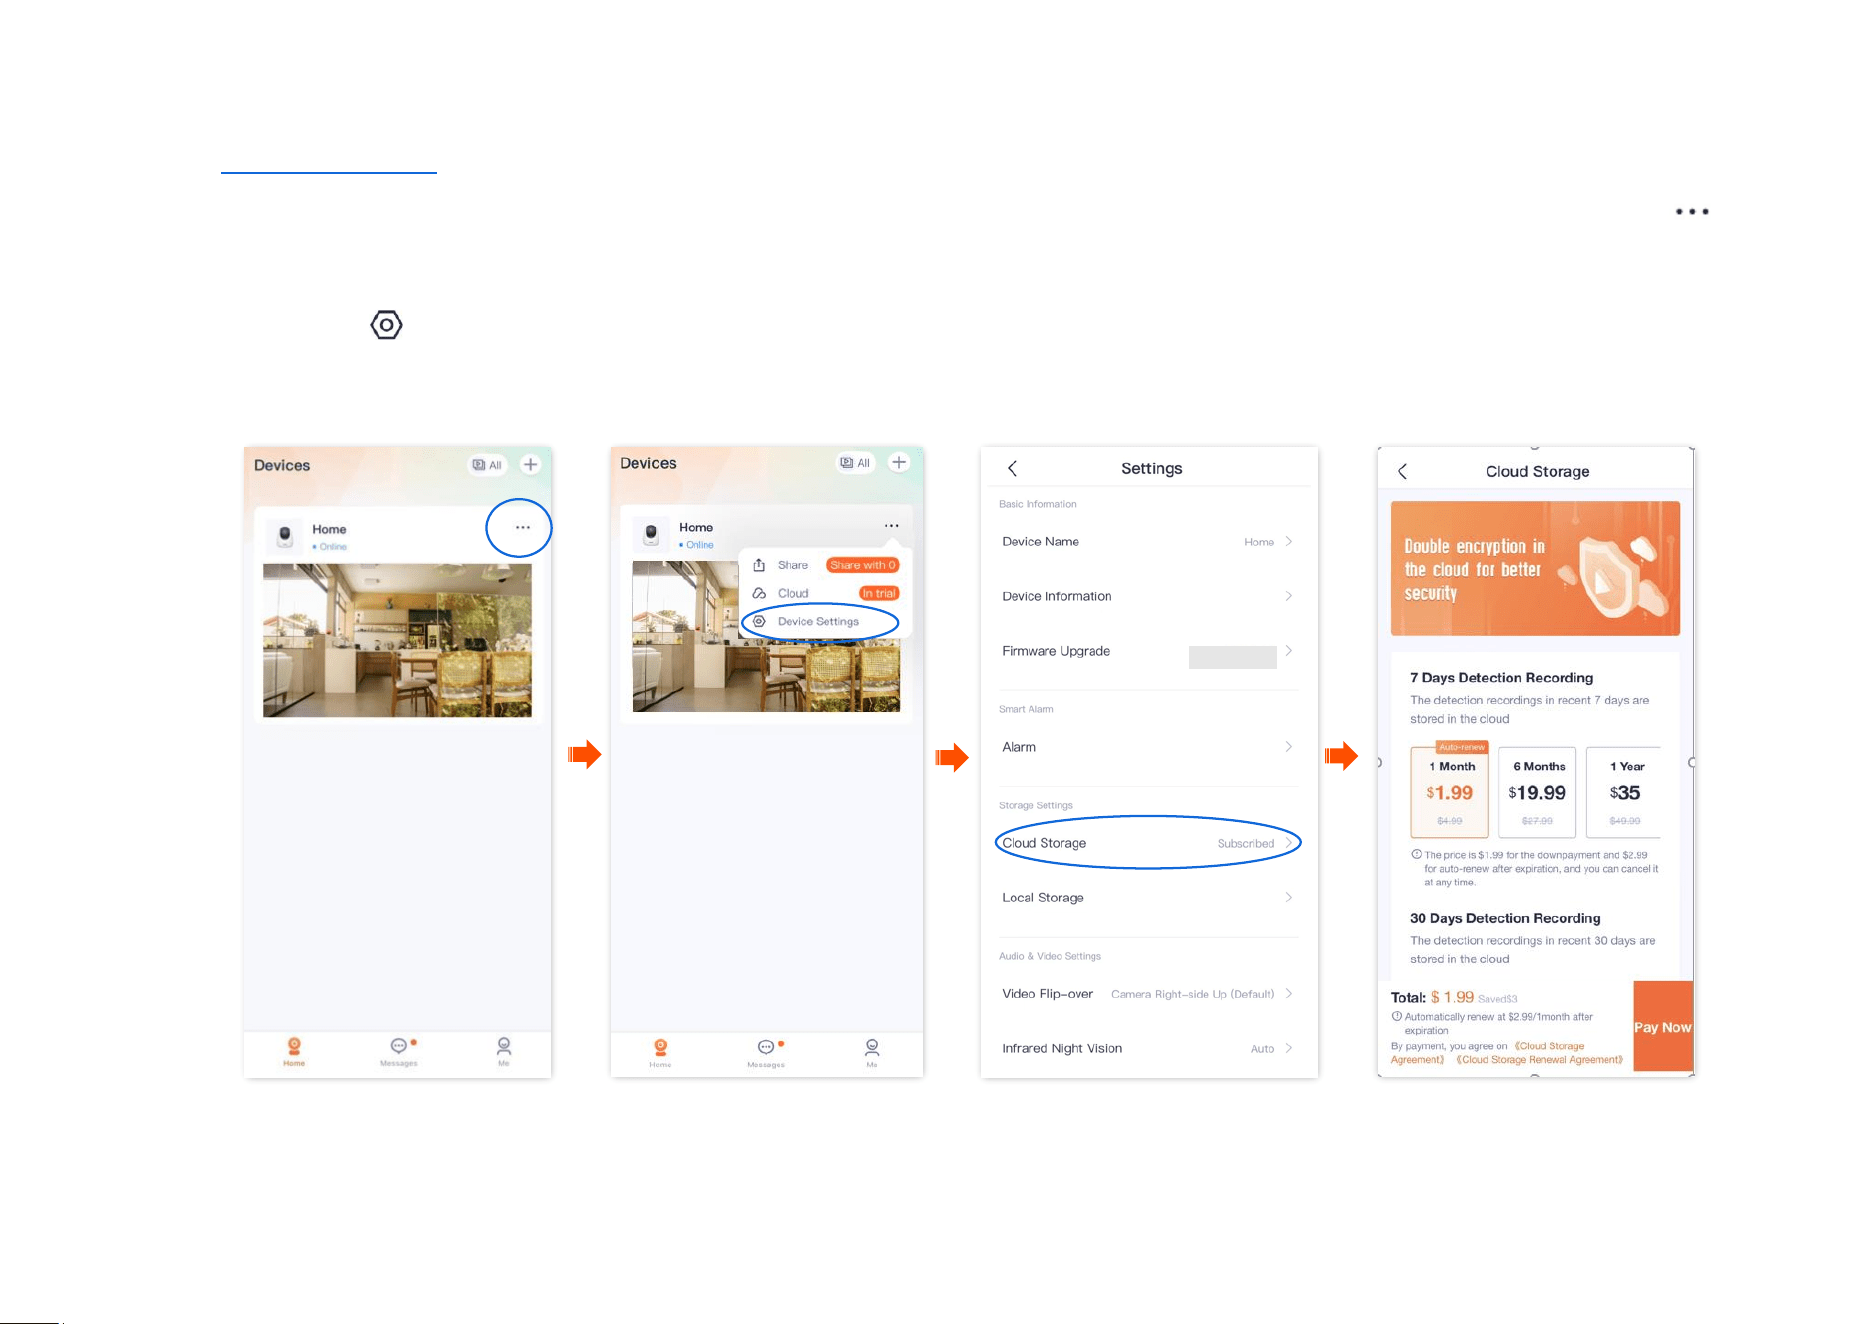
Method 3
Step 1
Log in to TDSEE App, and enter the settings page of the camera.
- Method 1: Find the camera you want to purchase the cloud storage service on the homepage, which is Home in this example, tap
on the right corner, and tap Device Settings.
- Method 2: Find the camera you want to purchase the cloud storage service on the homepage, which is Home in this example, and tap
Settings ( ) in the upper-right corner.
Step 2
Tap Cloud Storage, and follow the on-screen instructions to subscribe to the cloud storage service package. After subscribing successfully,
the service is activated immediately.
----End
Document Version: V1.4
69
Method 4
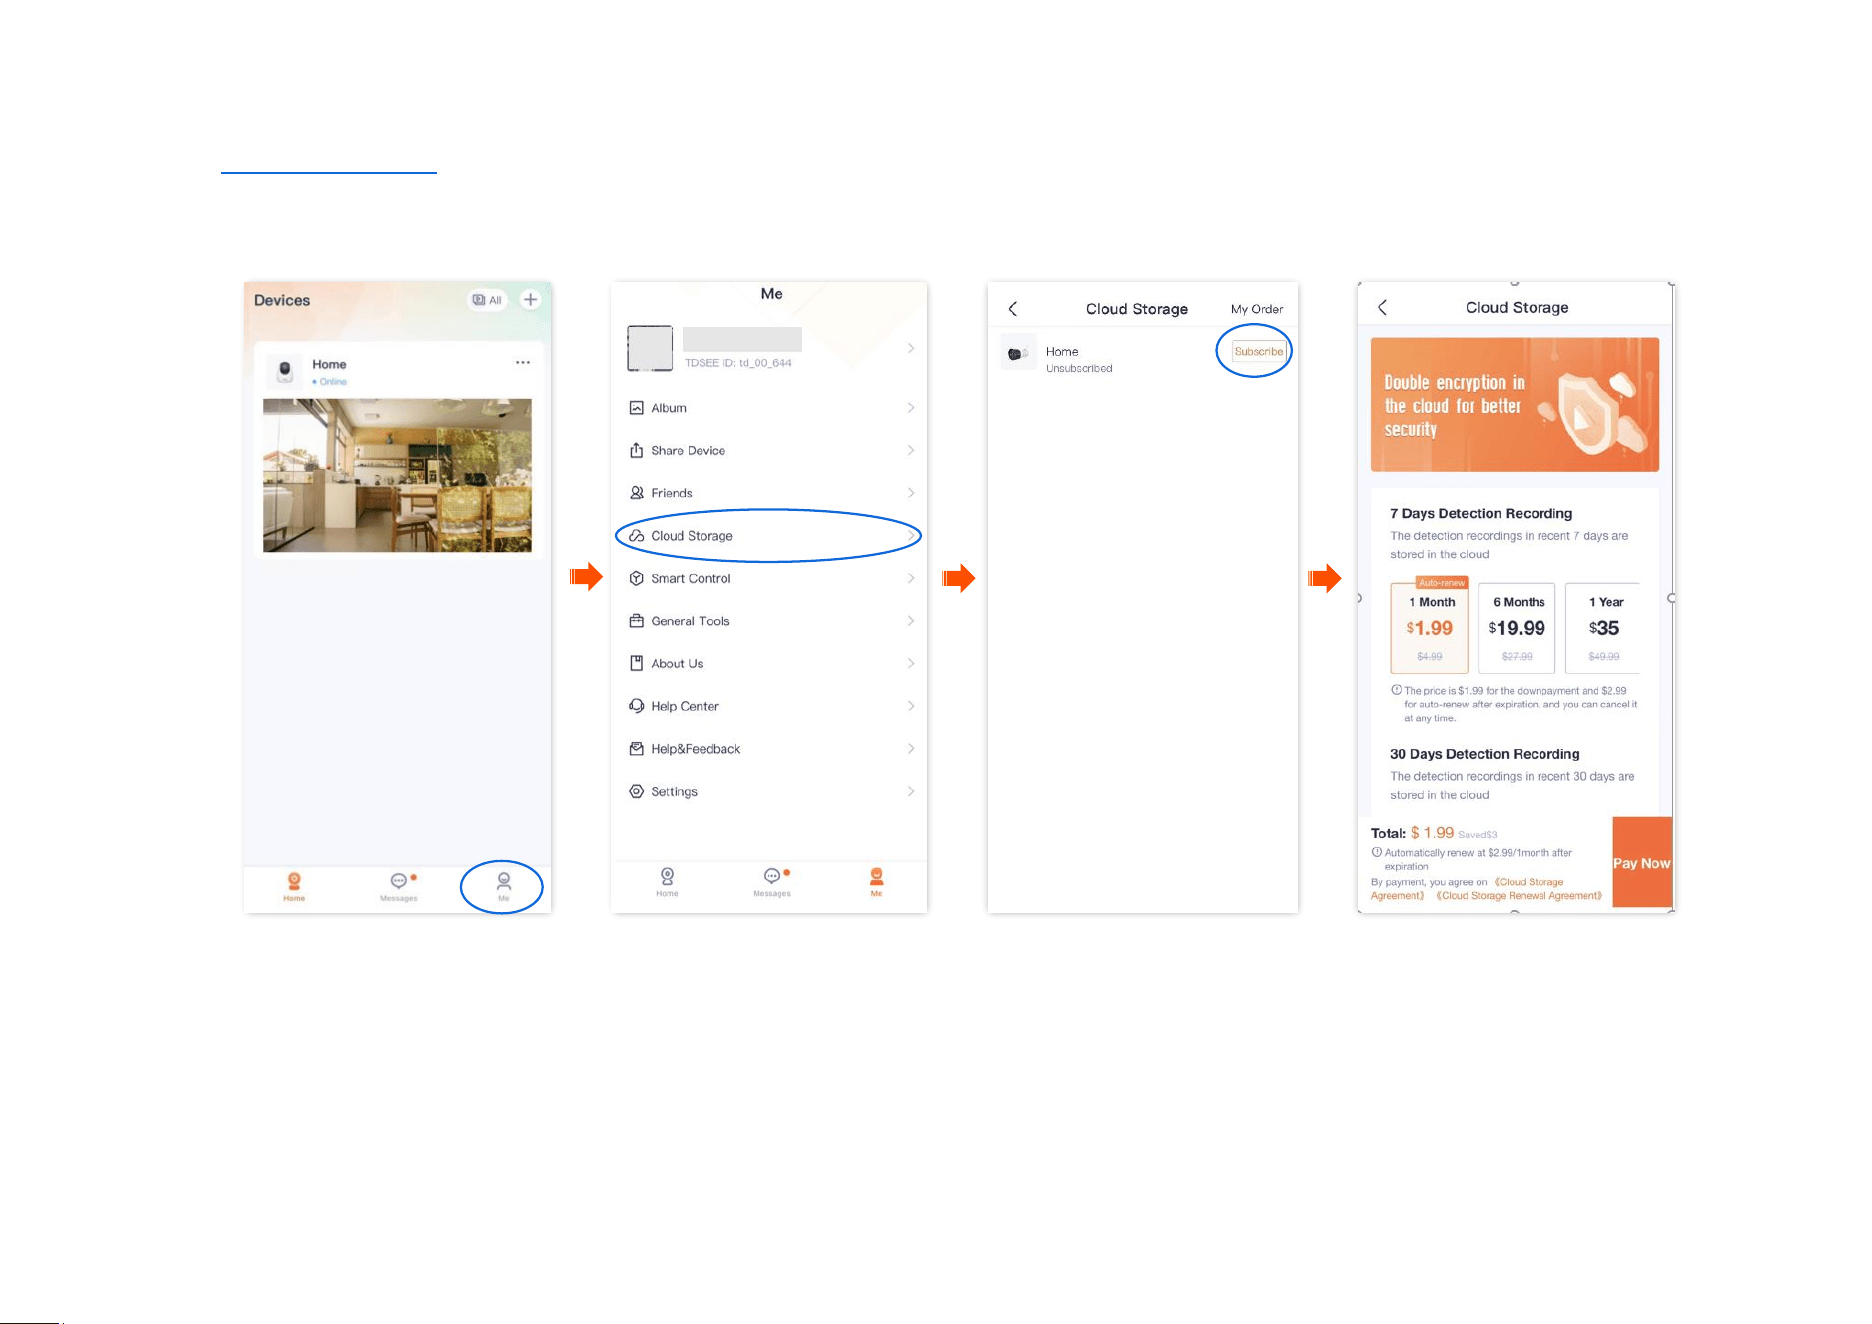
Step 1 Log in to TDSEE App, and navigate to Me > Cloud Storage.
Step 2 Find the device that you want to subscribe to the cloud storage service, which is Home in this example, and tap Subscribe. Follow the on-
screen instructions to subscribe to the cloud storage service package. After subscribing successfully, the service is activated immediately.
----End
Document Version: V1.4
71
Cloud video parameter description
Parameter
Description
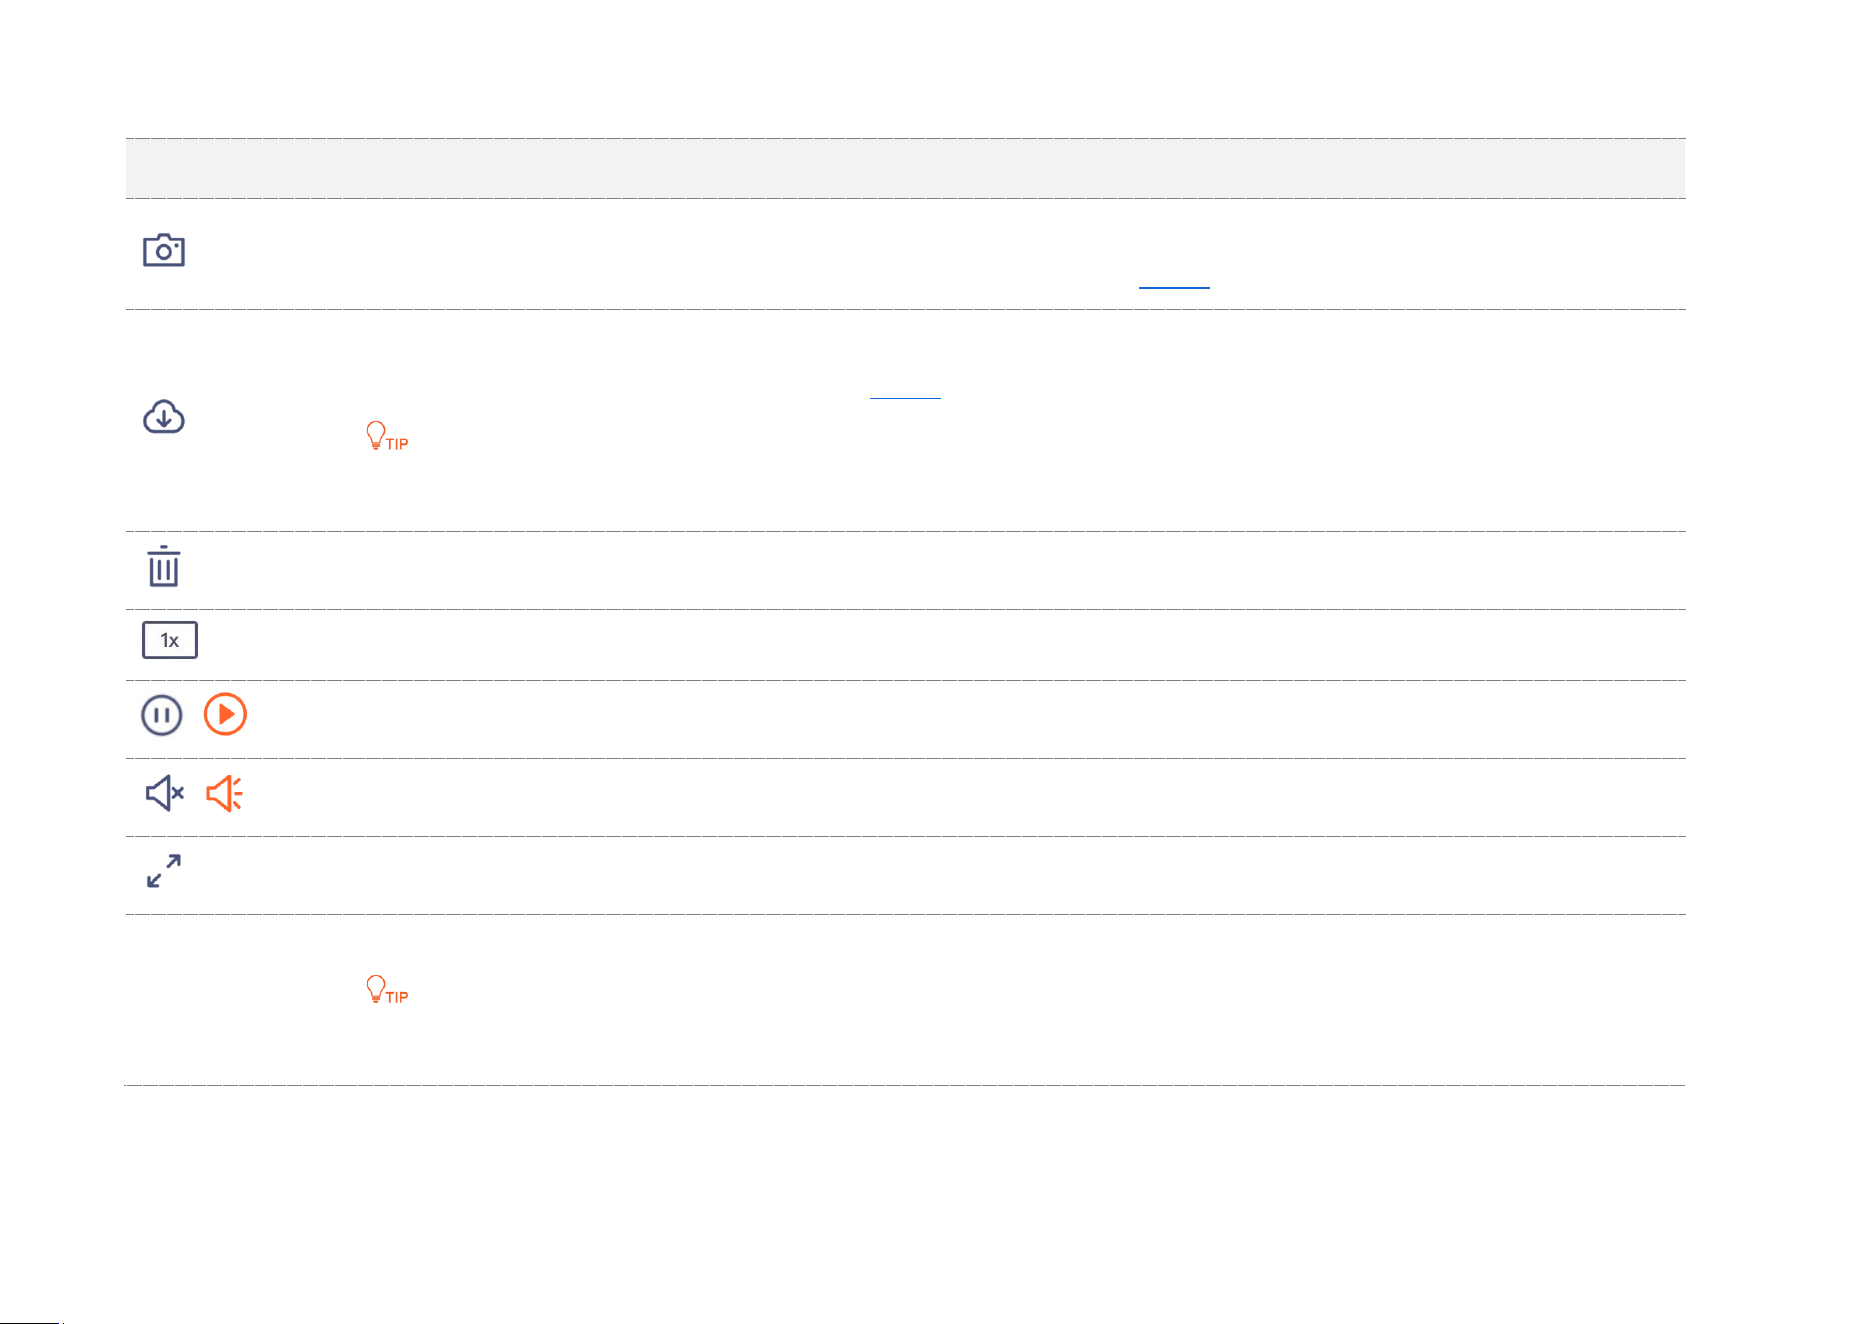
Screenshots.
Tap it to save the screenshot of the current monitoring image to TDSEE Album.
Download.
Tap it to download the specific video to TDSEE Album.
Only one video can be downloaded at a time.
Tap it to delete the specific cloud storage video. Deleted videos cannot be restored.
Tap it to select a playback rate.
/
Tap it to pause or play the video.
/
Tap it to disable or enable the camera audio.
Tap it to view the image in full screen.
Recording video
timeline
Orange means detection recording. Gray means no recording.
You can choose a specific date on the timeline.
Document Version: V1.4
72
Disable the cloud storage service
Method 1
After the cloud storage service function is disabled, the device will not upload videos to the cloud. Please operate with caution.
Disabling the cloud storage service does not extend the validity period of the cloud storage service.
Step 1
Log in to TDSEE App, and enter the settings page of the camera.
- Method 1: Find the camera you want to disable the cloud storage service on the homepage, which is Home in this example, tap
on the right corner, and tap Device Settings.
- Method 2: Find the camera you want to disable the cloud storage service on the homepage, which is Home in this example, and tap
Settings ( ) in the upper-right corner.
Step 2
Tap Cloud Storage Service and disable it. Read the prompt message, and tap Confirm.

Document Version: V1.4
73
----End
Document Version: V1.4
74
Method 2
Step 1 Log in to TDSEE App, and navigate to Me > Cloud Storage.
Step 2 Select a device on which you want to disable the cloud storage service, which is Home in this example. Tap Cloud Storage Service and disable
it. Read the prompt message, and tap Confirm.
----End

Document Version: V1.4
75
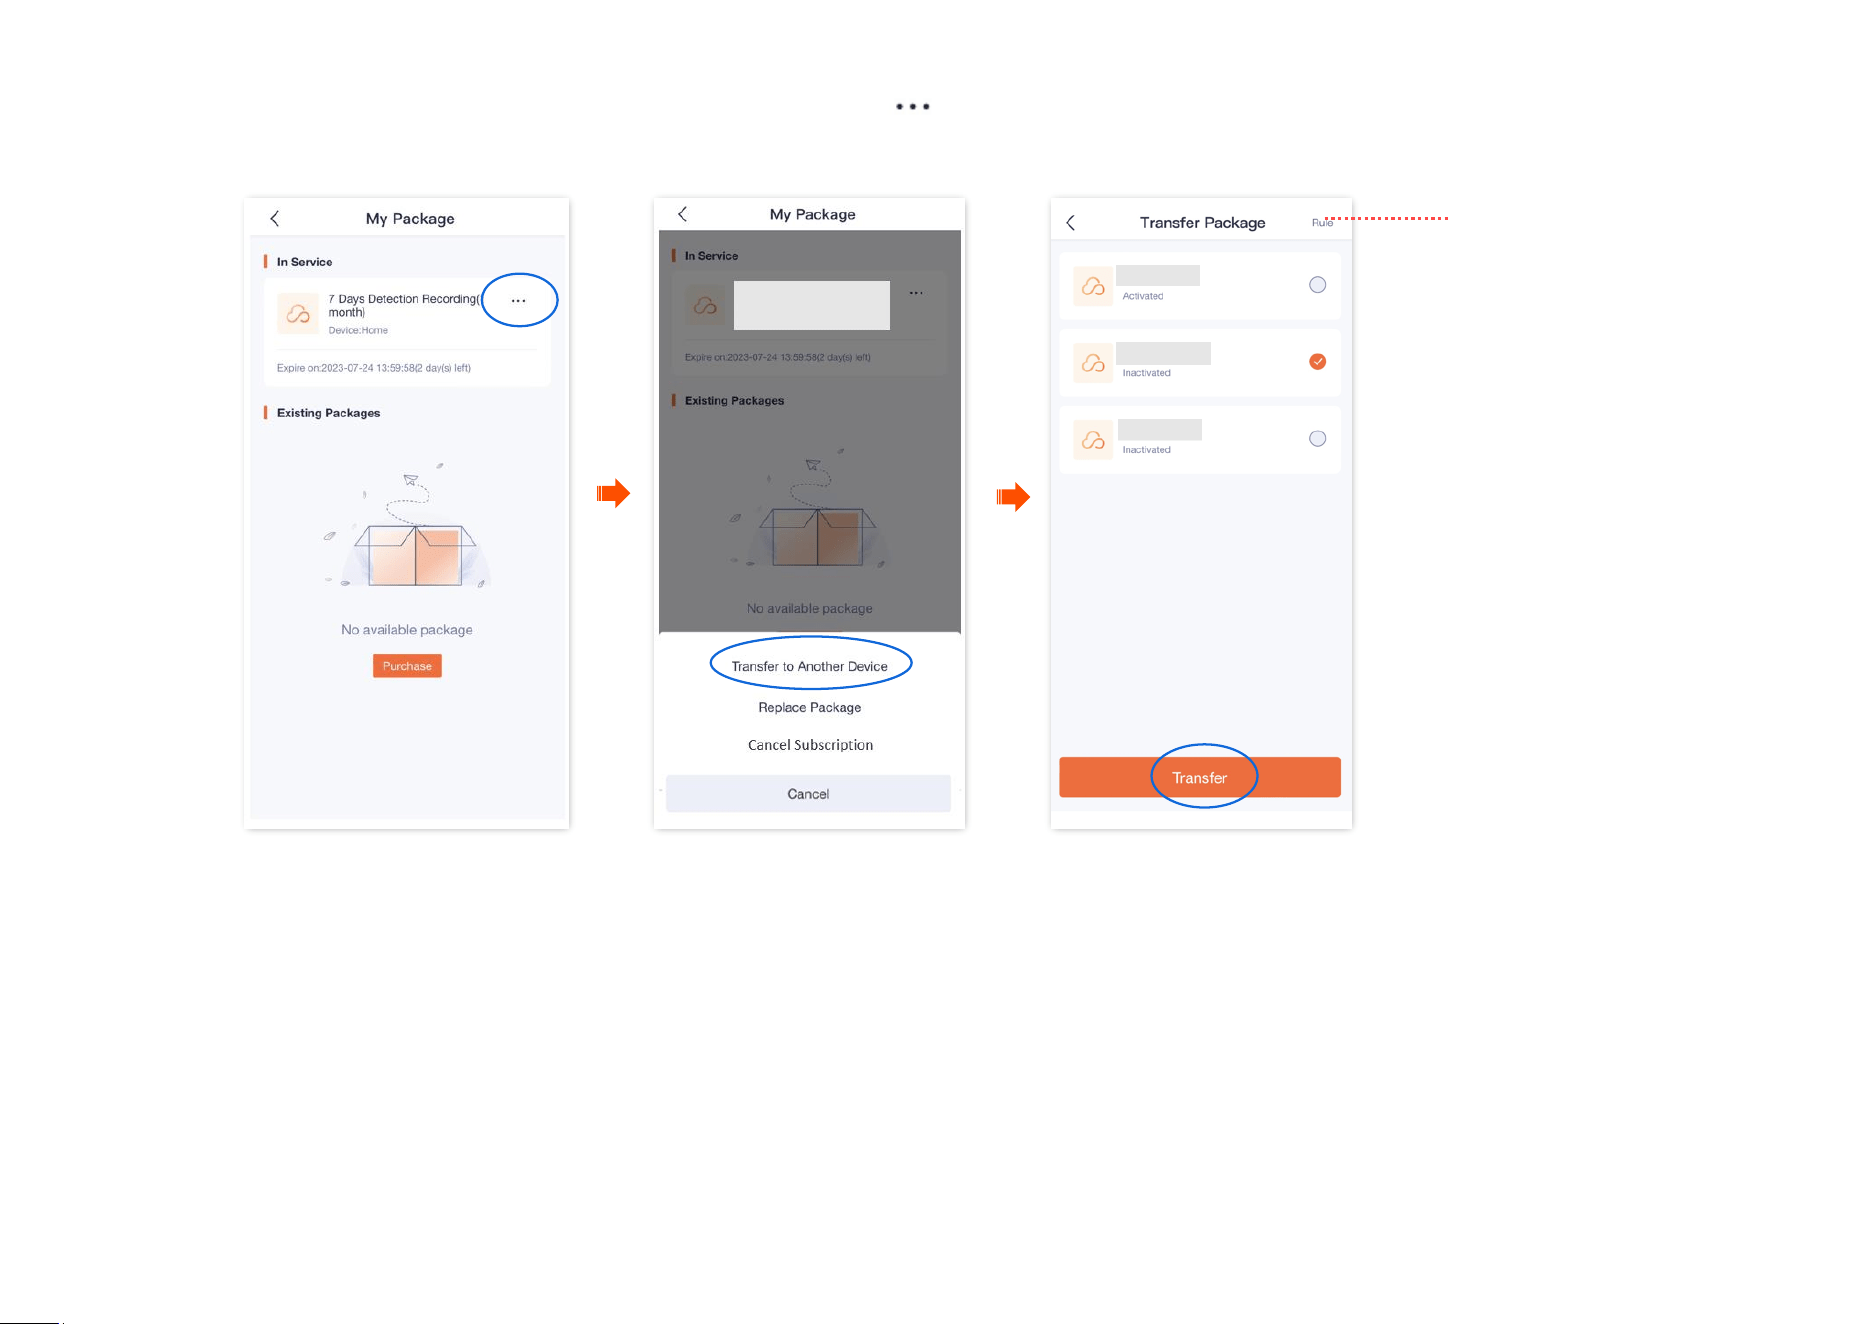
Transfer the cloud storage service package
Packages in effect or to be effective can be transferred to other cameras under the same TDSEE account, which takes effect immediately after
transfer.
- Free trial packages and preferential packages cannot be transferred.
- The package cannot be transferred to the camera that is using the subscription package.
- The cloud storage package can be transferred only once every day.
Method 1
Step 1 Log in to TDSEE App, and enter the settings page of the camera.
- Method 1: Find the camera you want to transfer the cloud storage service on the homepage, which is Home in this example, tap
on the right corner, and tap Device Settings.
- Method 2: Find the camera you want to transfer the cloud storage service on the homepage, which is Home in this example, and tap
Settings ( ) in the upper-right corner.
Step 2
Tap Cloud Storage, and tap on the right of the camera Home.

Document Version: V1.4
76

Document Version: V1.4
77
Step 3
Find the package to be transferred on My Package page, tap on the right, and tap Transfer to Another Device.
Step 4
Select the camera that accepts the package transfer and tap Transfer. Read the prompt message, and tap Confirm.
---End
Tap it to check the
specific rules for
package transfers.
Document Version: V1.4
79
Step 3
Find the package to be transferred on My Package page, tap on the right, and tap Transfer to Another Device.
Step 4
Select the camera that accepts the package transfer and tap Transfer. Read the prompt message, and tap Confirm.
---End
Tap it to check the
specific rules for
package transfers.
Document Version: V1.4
80
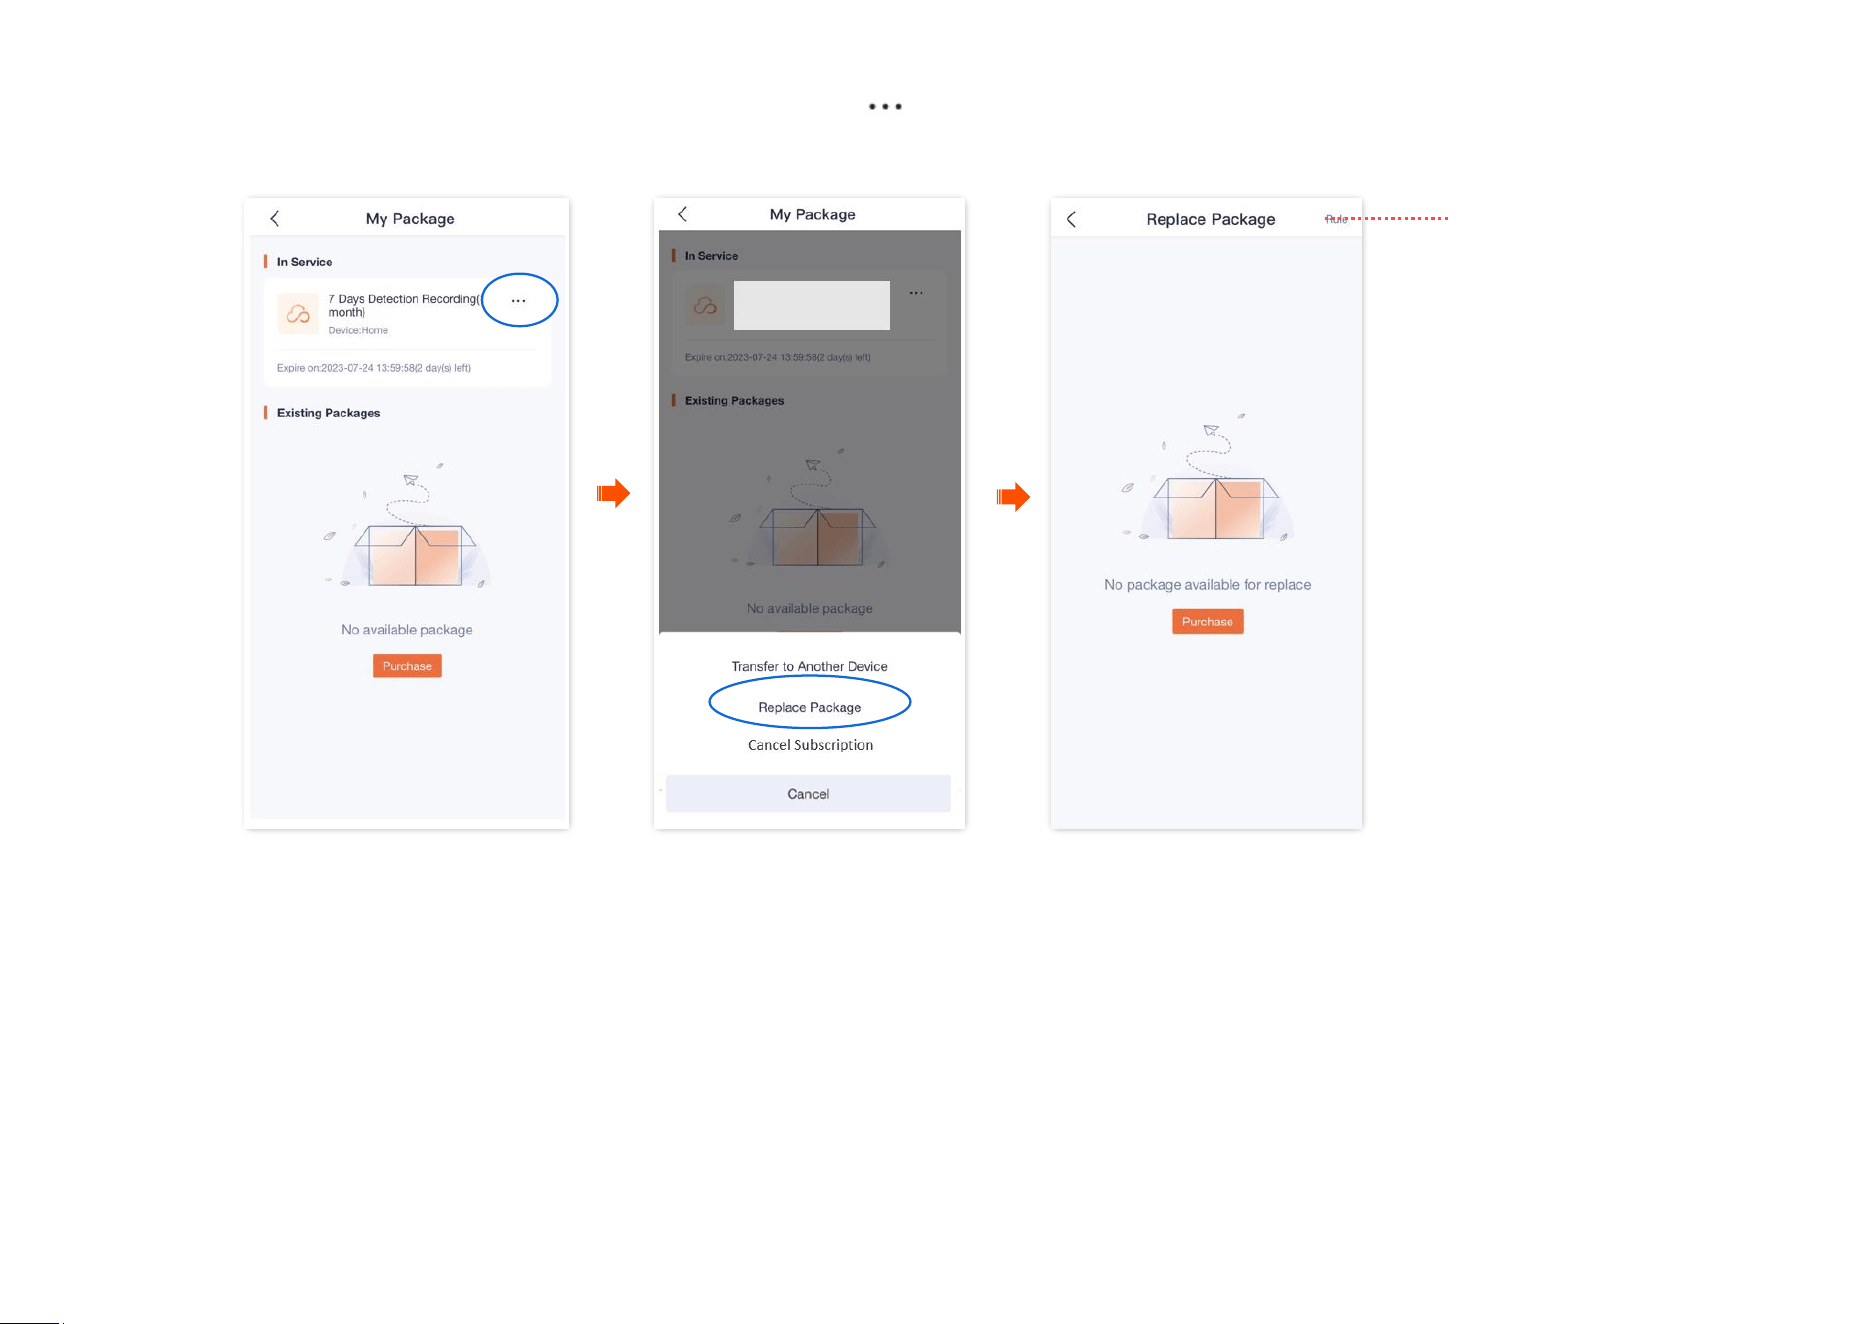
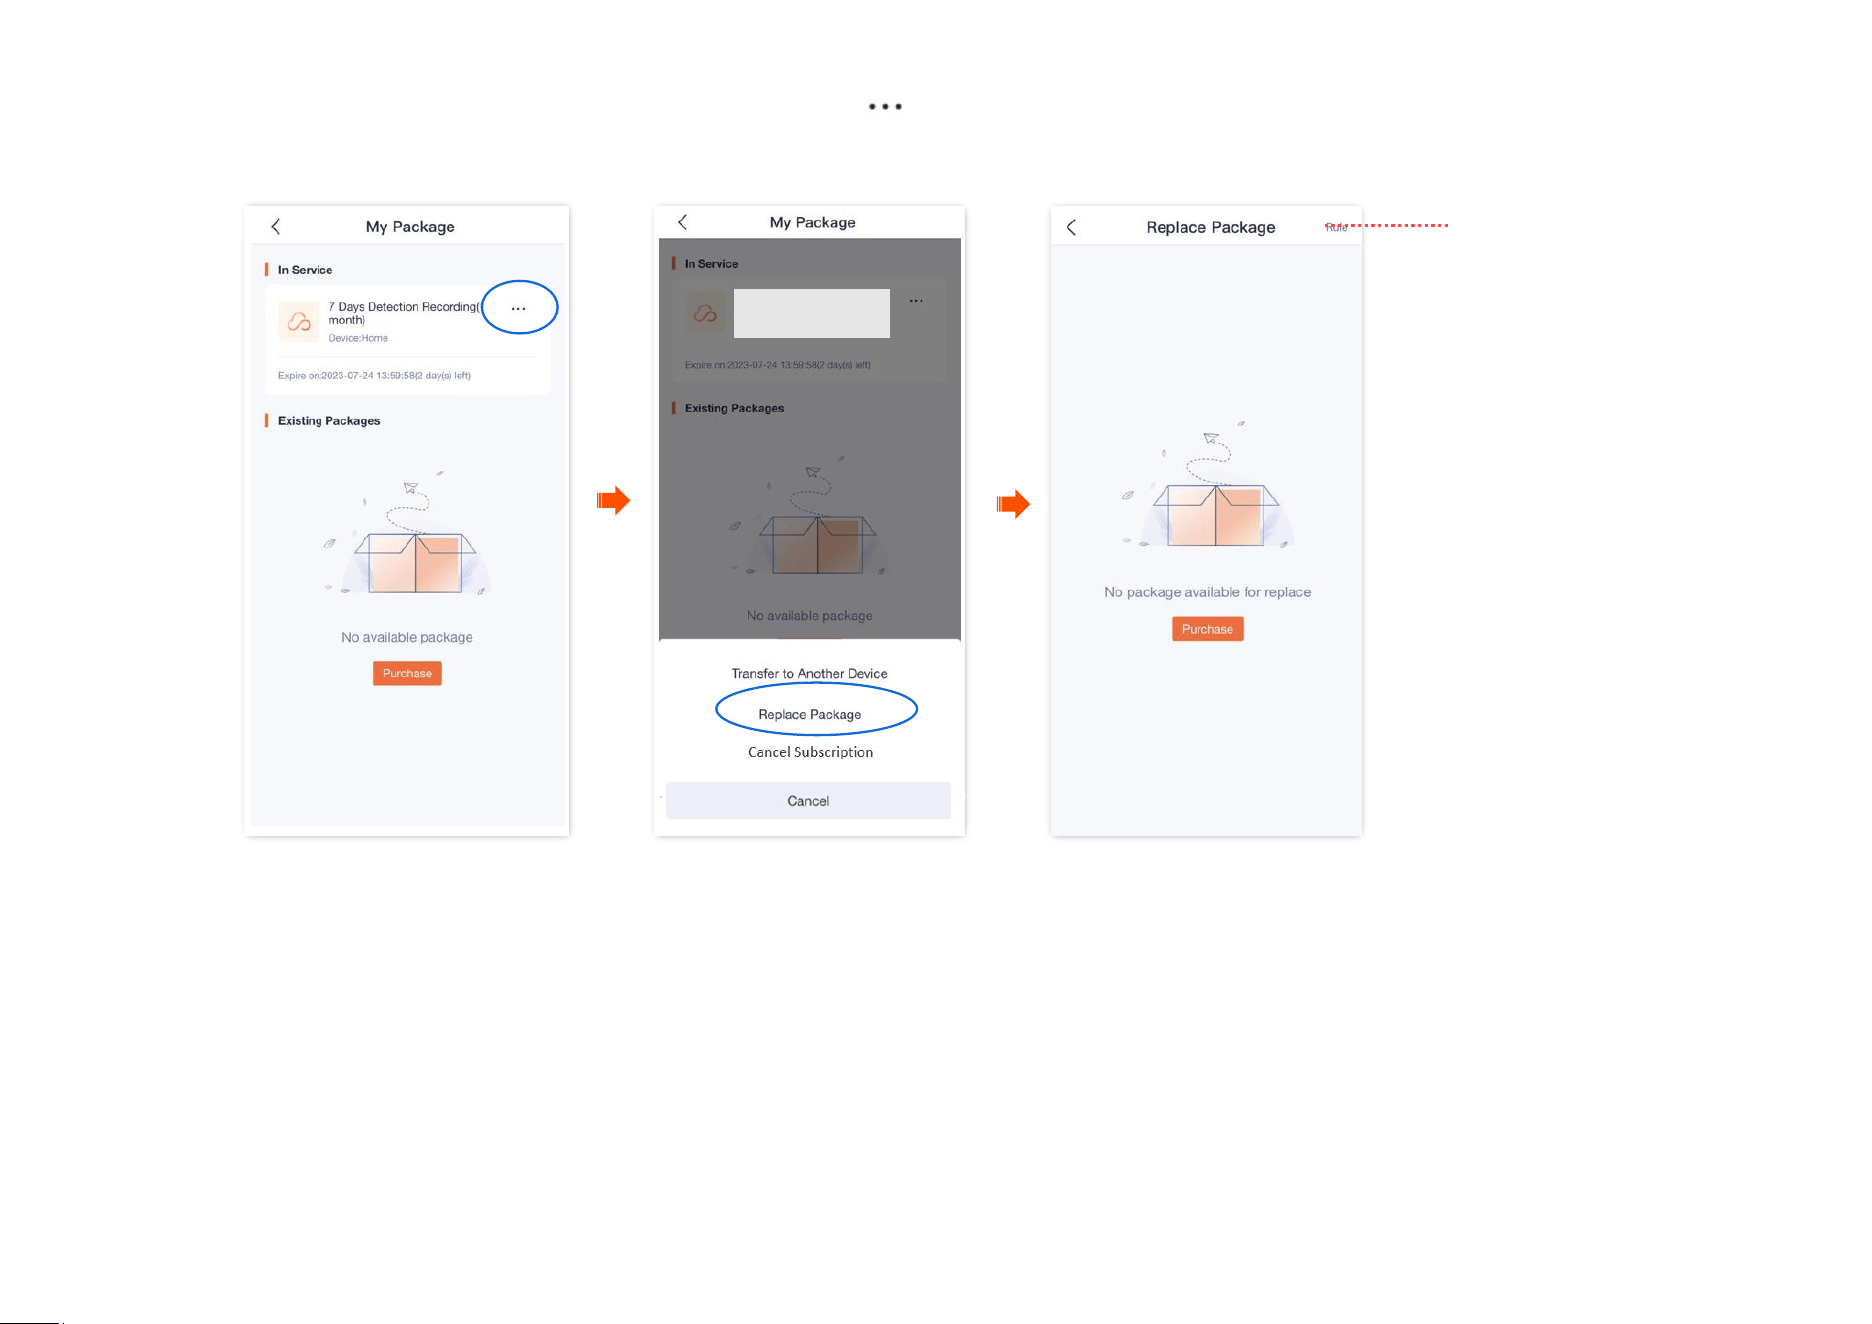
Replace the cloud storage service package
If you purchase multiple ( 2) standard paid packages for a single camera, you can replace the package in effect for another package.
Free trial packages and preferential packages cannot be transferred.
The cloud storage package can be replaced only once every day.
Method 1
Step 1 Log in to TDSEE App, and enter the settings page of the camera.
- Method 1: Find the camera you want to replace the cloud storage service on the homepage, which is Home in this example, tap
on the right corner, and tap Device Settings.
- Method 2: Find the camera you want to replace the cloud storage service on the homepage, which is Home in this example, and tap
Settings ( ) in the upper-right corner.
Step 2
Tap Cloud Storage, and tap on the right of the camera Home.

Document Version: V1.4
81
Document Version: V1.4
82
Step 3
Find the package to be replaced on My Package page, tap on the right, and tap Replace Package.
Step 4
Select the package to be replaced and tap Replace.
---End
Tap it to check the
specific rules for
package transfers.

Document Version: V1.4
84
Step 3 Find the package to be replaced on My Package page, tap on the right, and tap Replace Package.
Step 4
Select the package to be replaced and tap Replace.
---End
Tap it to check the
specific rules for
package transfers.

Document Version: V1.4
85
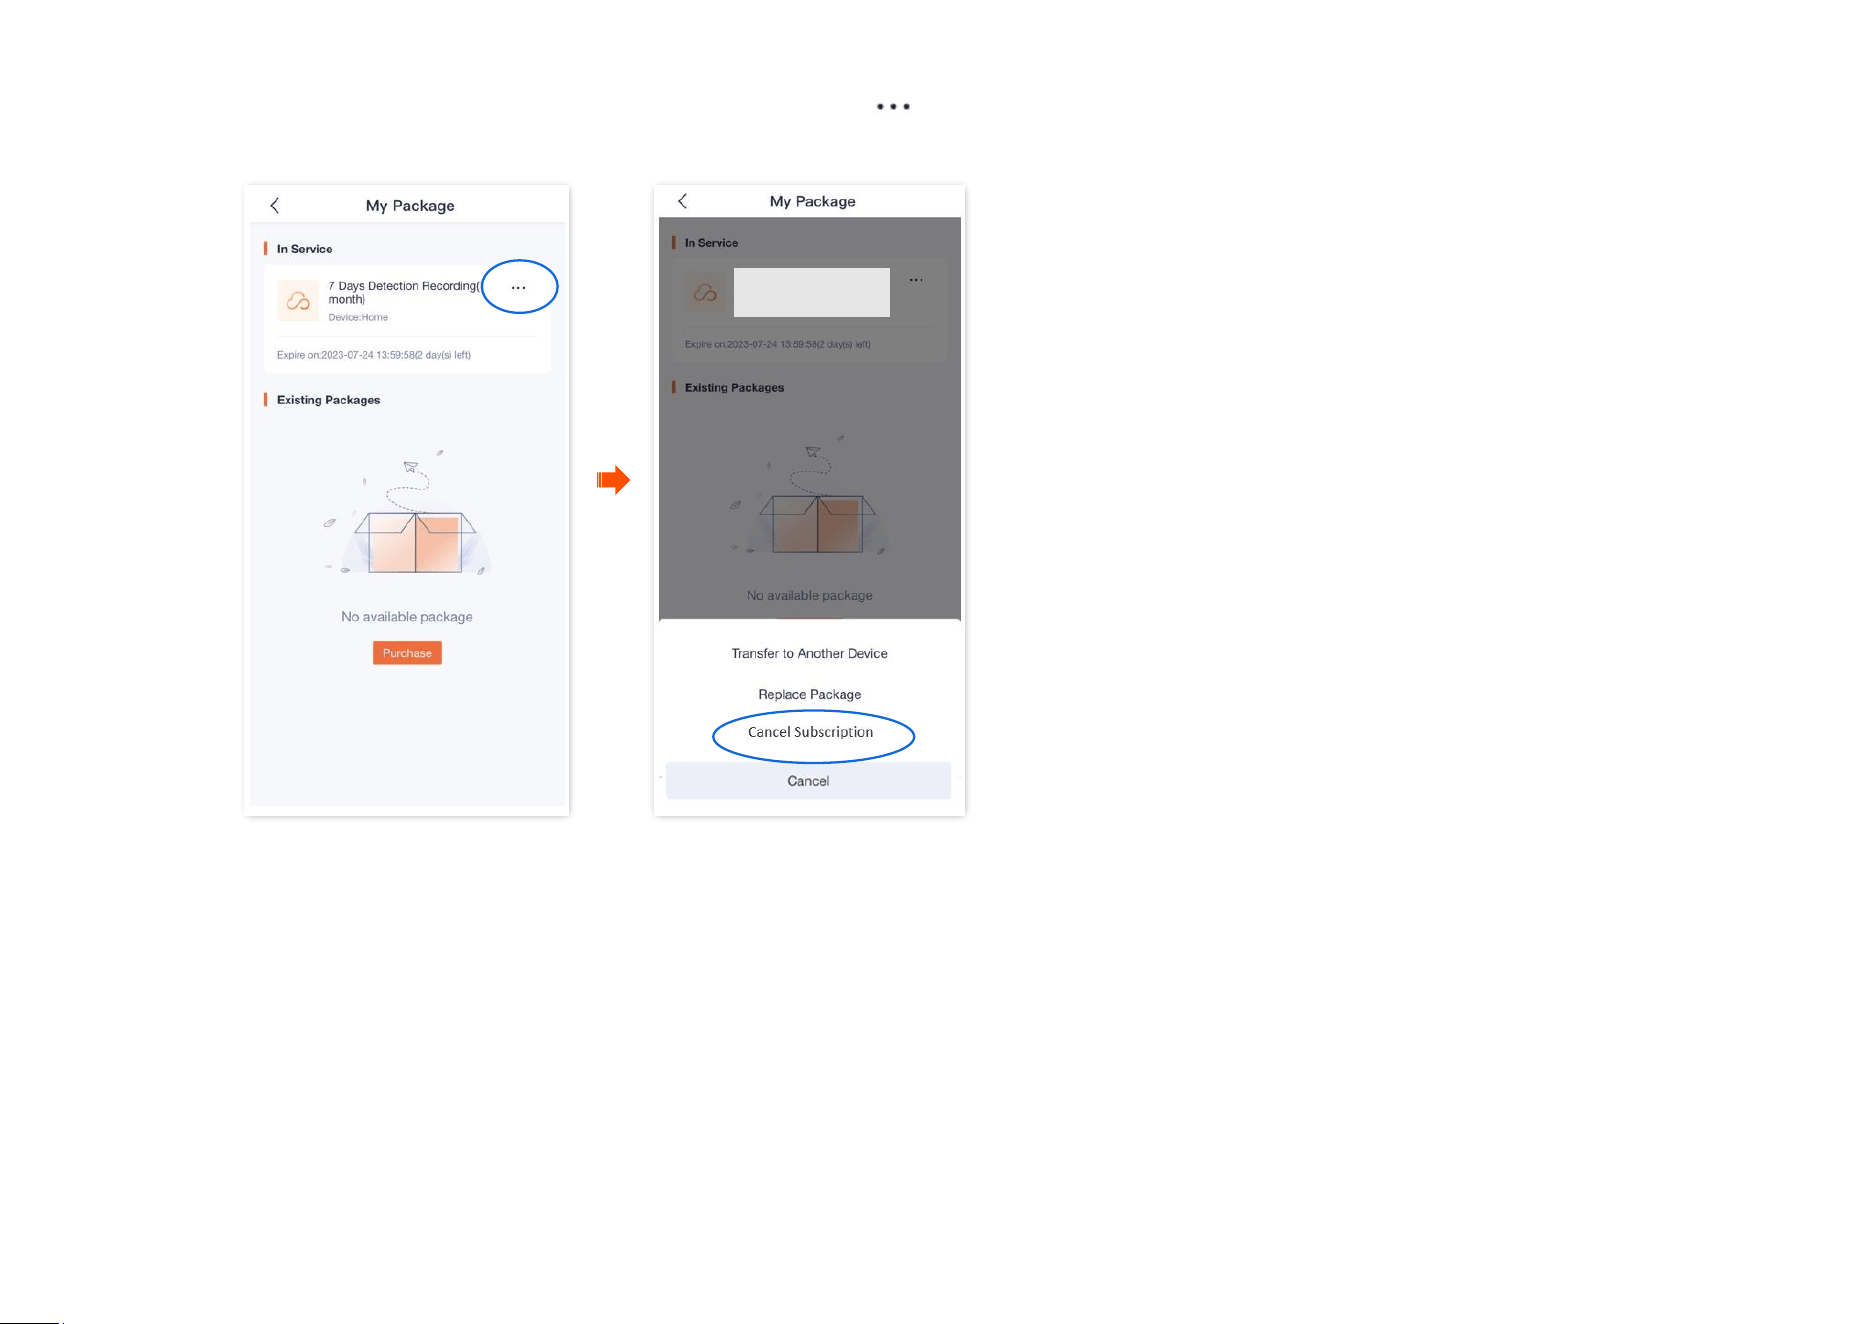
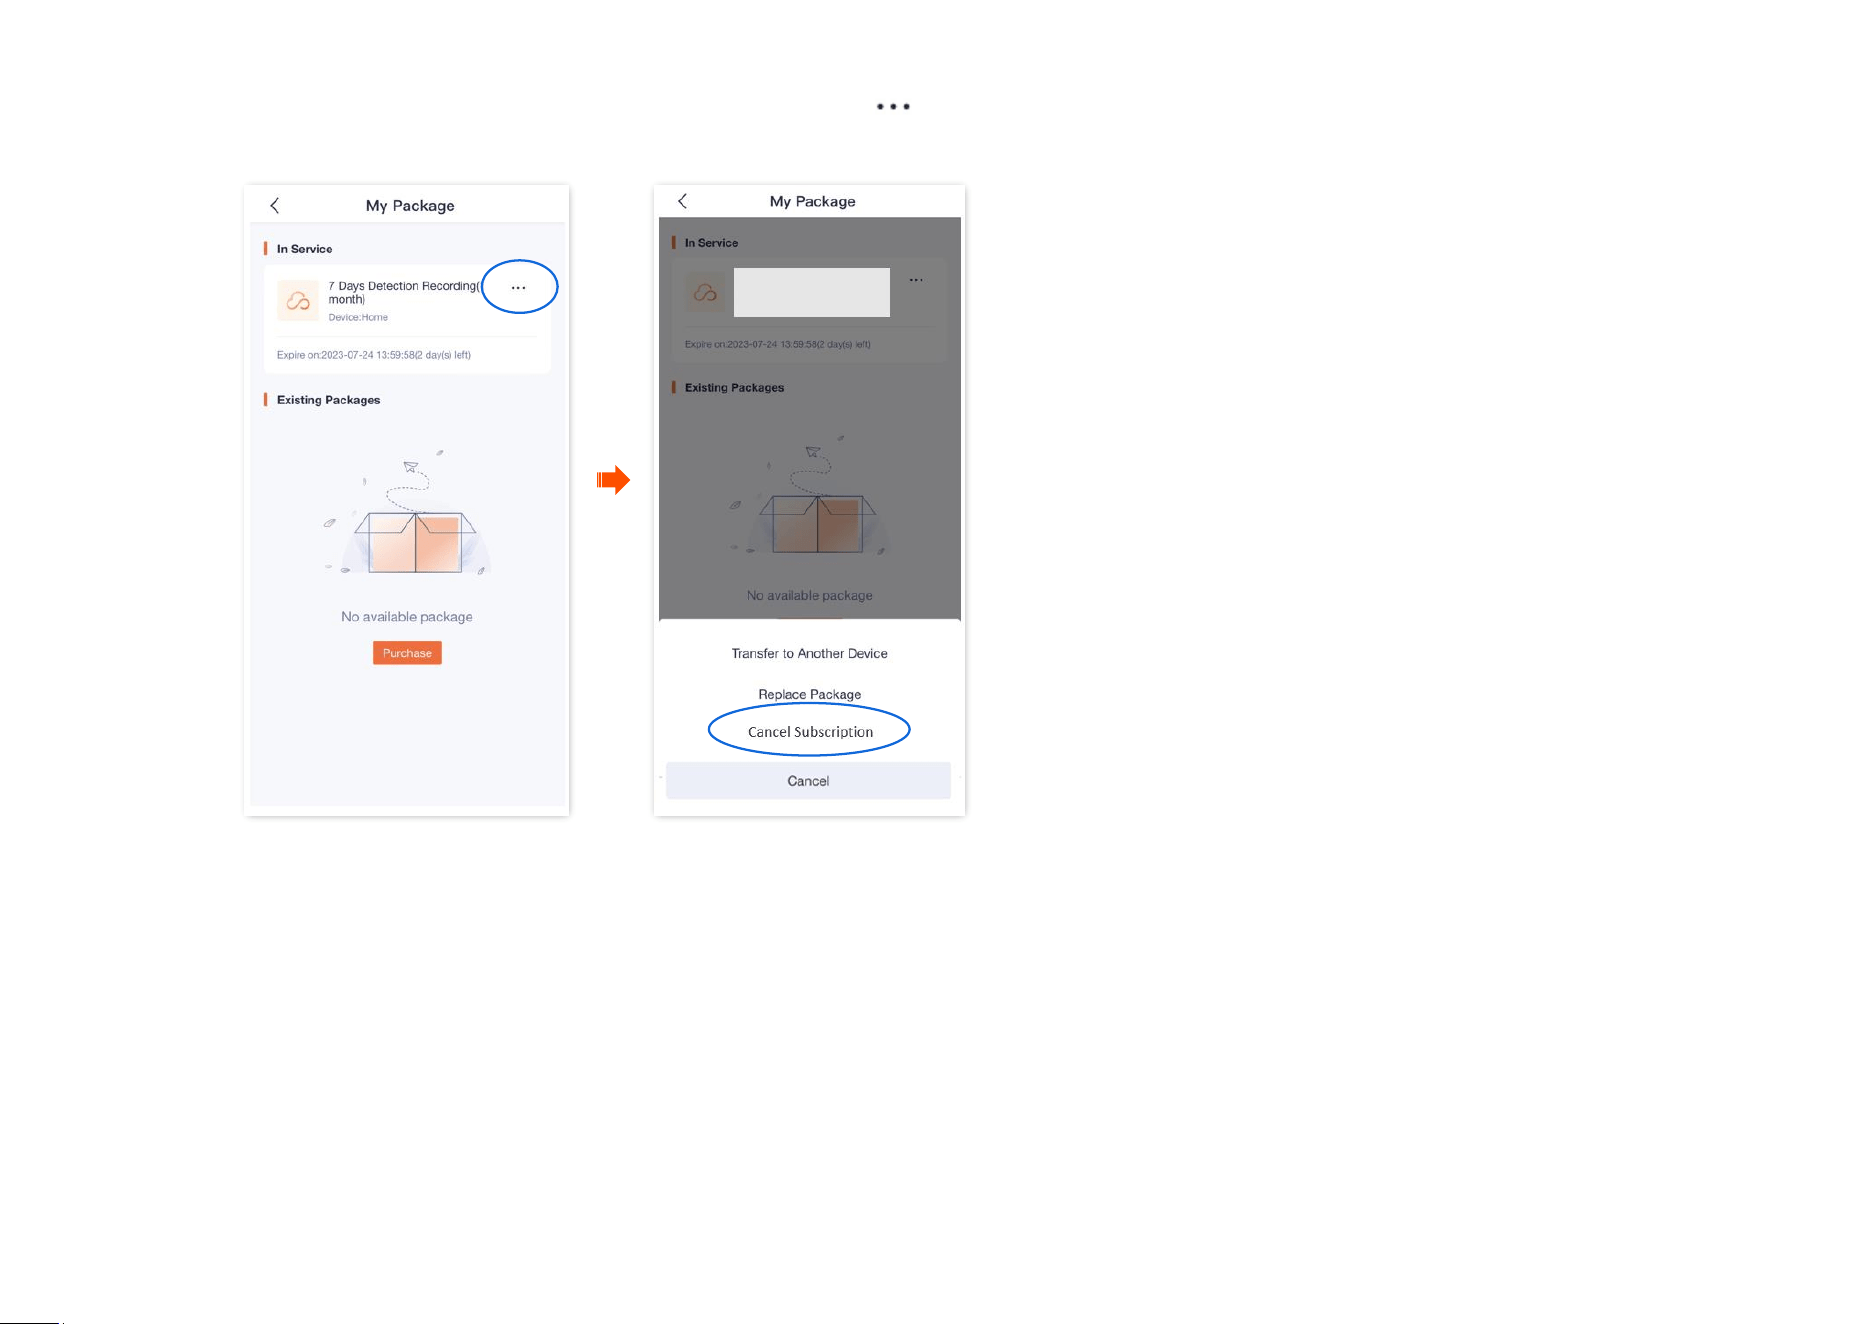
Cancel the subscription package
Subscription packages: Packages that renew automatically. This type of package will be automatically renewed upon expiration. You can also cancel
the automatic renewal at any time, after cancellation, no further deduction will be made upon expiration.
Method 1
Step 1 Log in to TDSEE App, and enter the settings page of the camera.
- Method 1: Find the camera you want to cancel the cloud storage service on the homepage, which is Home in this example, tap
on the right corner, and tap Device Settings.
- Method 2: Find the camera you want to cancel the cloud storage service on the homepage, which is Home in this example, and tap
Settings ( ) in the upper-right corner.
Step 2
Tap Cloud Storage, and tap on the right of the camera Home.
Document Version: V1.4
86
Document Version: V1.4
87
Step 3
Find the package to be cancelled on My Package page, tap on the right, and tap Cancel Subscription. Read the prompt message, and
tap Confirm.
---End
Document Version: V1.4
89
Step 3
Find the package to be cancelled on My Package page, tap on the right, and tap Cancel Subscription. Read the prompt message, and
tap Confirm.
---End
Document Version: V1.4
90
Check remaining time of cloud storage
Step 1 Log in to TDSEE App, and enter the settings page of the camera.
- Method 1: Find the camera you want to check the remaining time of the cloud storage on the homepage, which is Home in this example,
tap on the right corner, and tap Device Settings.
- Method 2: Find the camera you want to check the remaining time of the cloud storage on the homepage, which is Home in this example,
and tap Settings ( ) in the upper-right corner.
Step 2 Tap Cloud Storage to check remaining time of cloud storage service.
---End
Document Version: V1.4
91
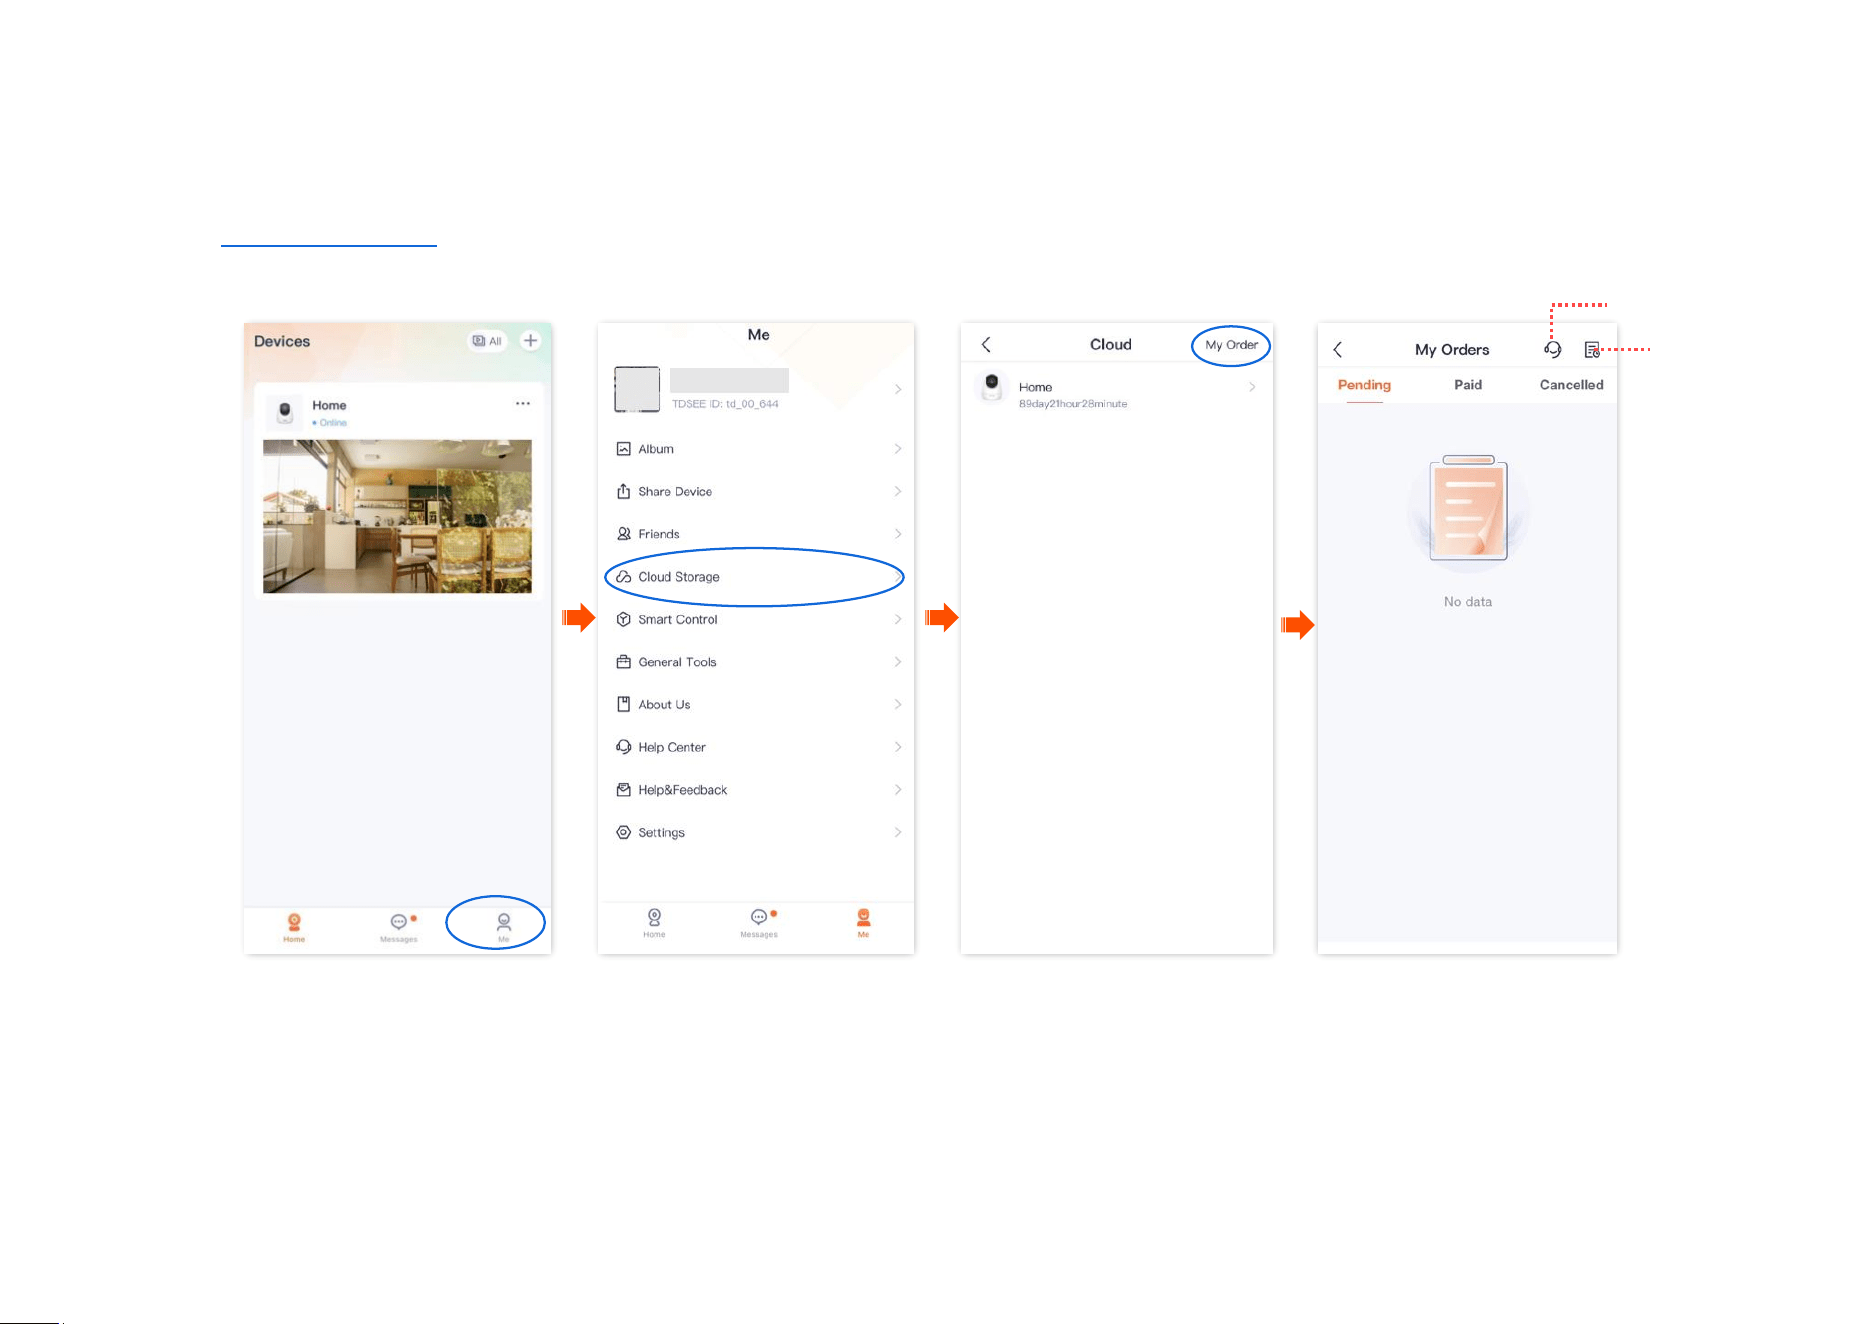
Check/Modify/Cancel my order
You can check the order status of the cloud storage service, including pending payment orders, paid orders and cancelled orders.
Step 1 Log in to TDSEE App, and navigate to Me > Cloud Storage.
Step 2 Tap My Order in the upper right corner to check the order status of the cloud storage service.
----End
Redemption
Record
Help Center
Document Version: V1.4
92
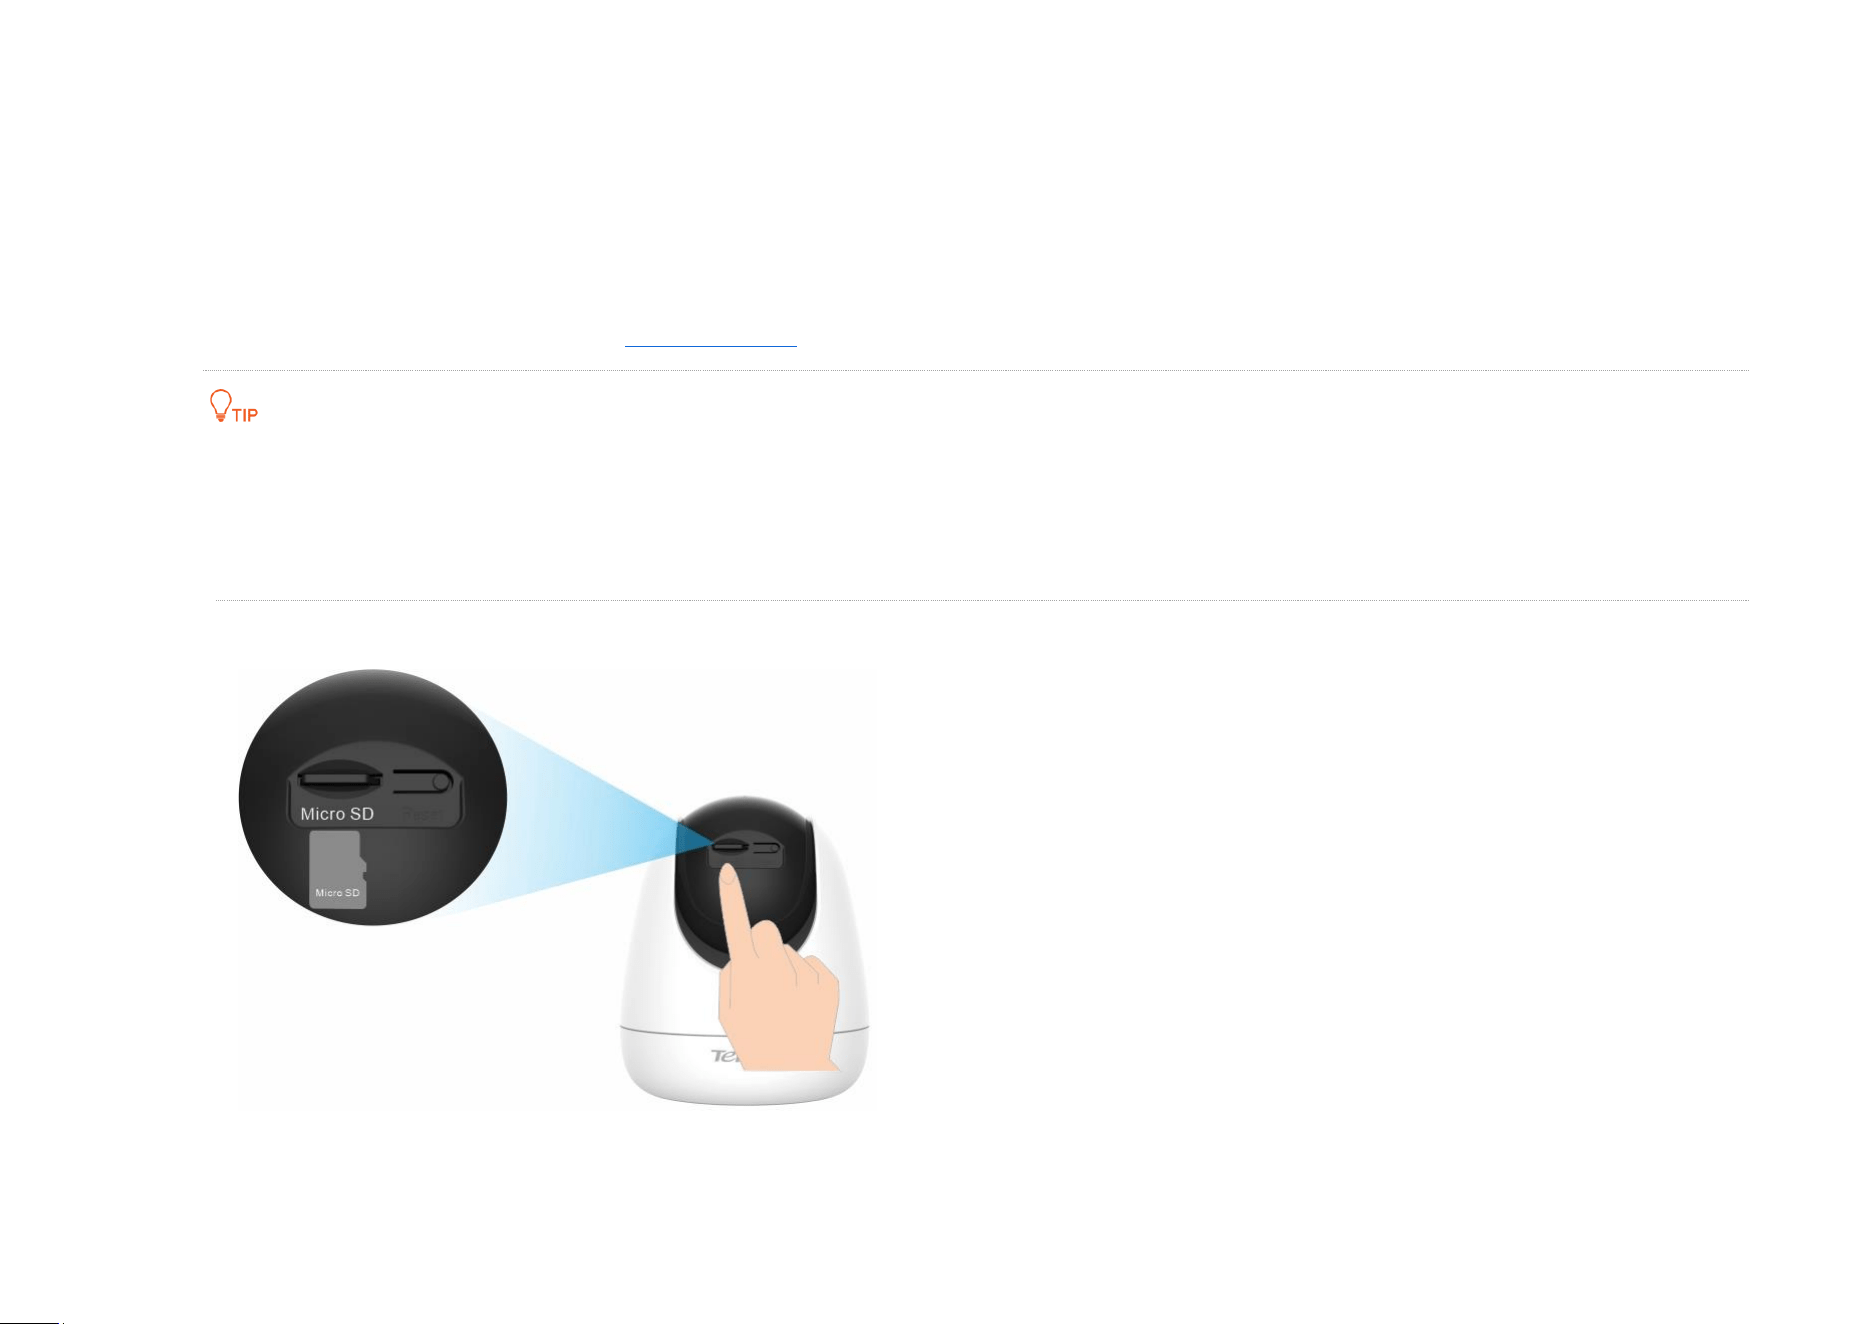
Micro SD card recording storage
Use Micro SD card for the first time
Tenda camera supports storage recordings on Micro SD card (self-prepared by users). After the camera successfully identifies the Micro SD card, it will
automatically start recording according to the recording mode.
Ensure that the storage capacity of the Micro SD card is 2 to 128 G, and the read and write speed is Class 10.
Tenda camera supports recording via Micro SD card of FAT32, exFAT and NTFS formats.
If the App prompts that the Micro SD card needs to be formatted, follow the on-screen instructions.
Step 1 Insert the Micro SD card in the slot of the camera (turn the lens upward, then you can see it).
Document Version: V1.4
93
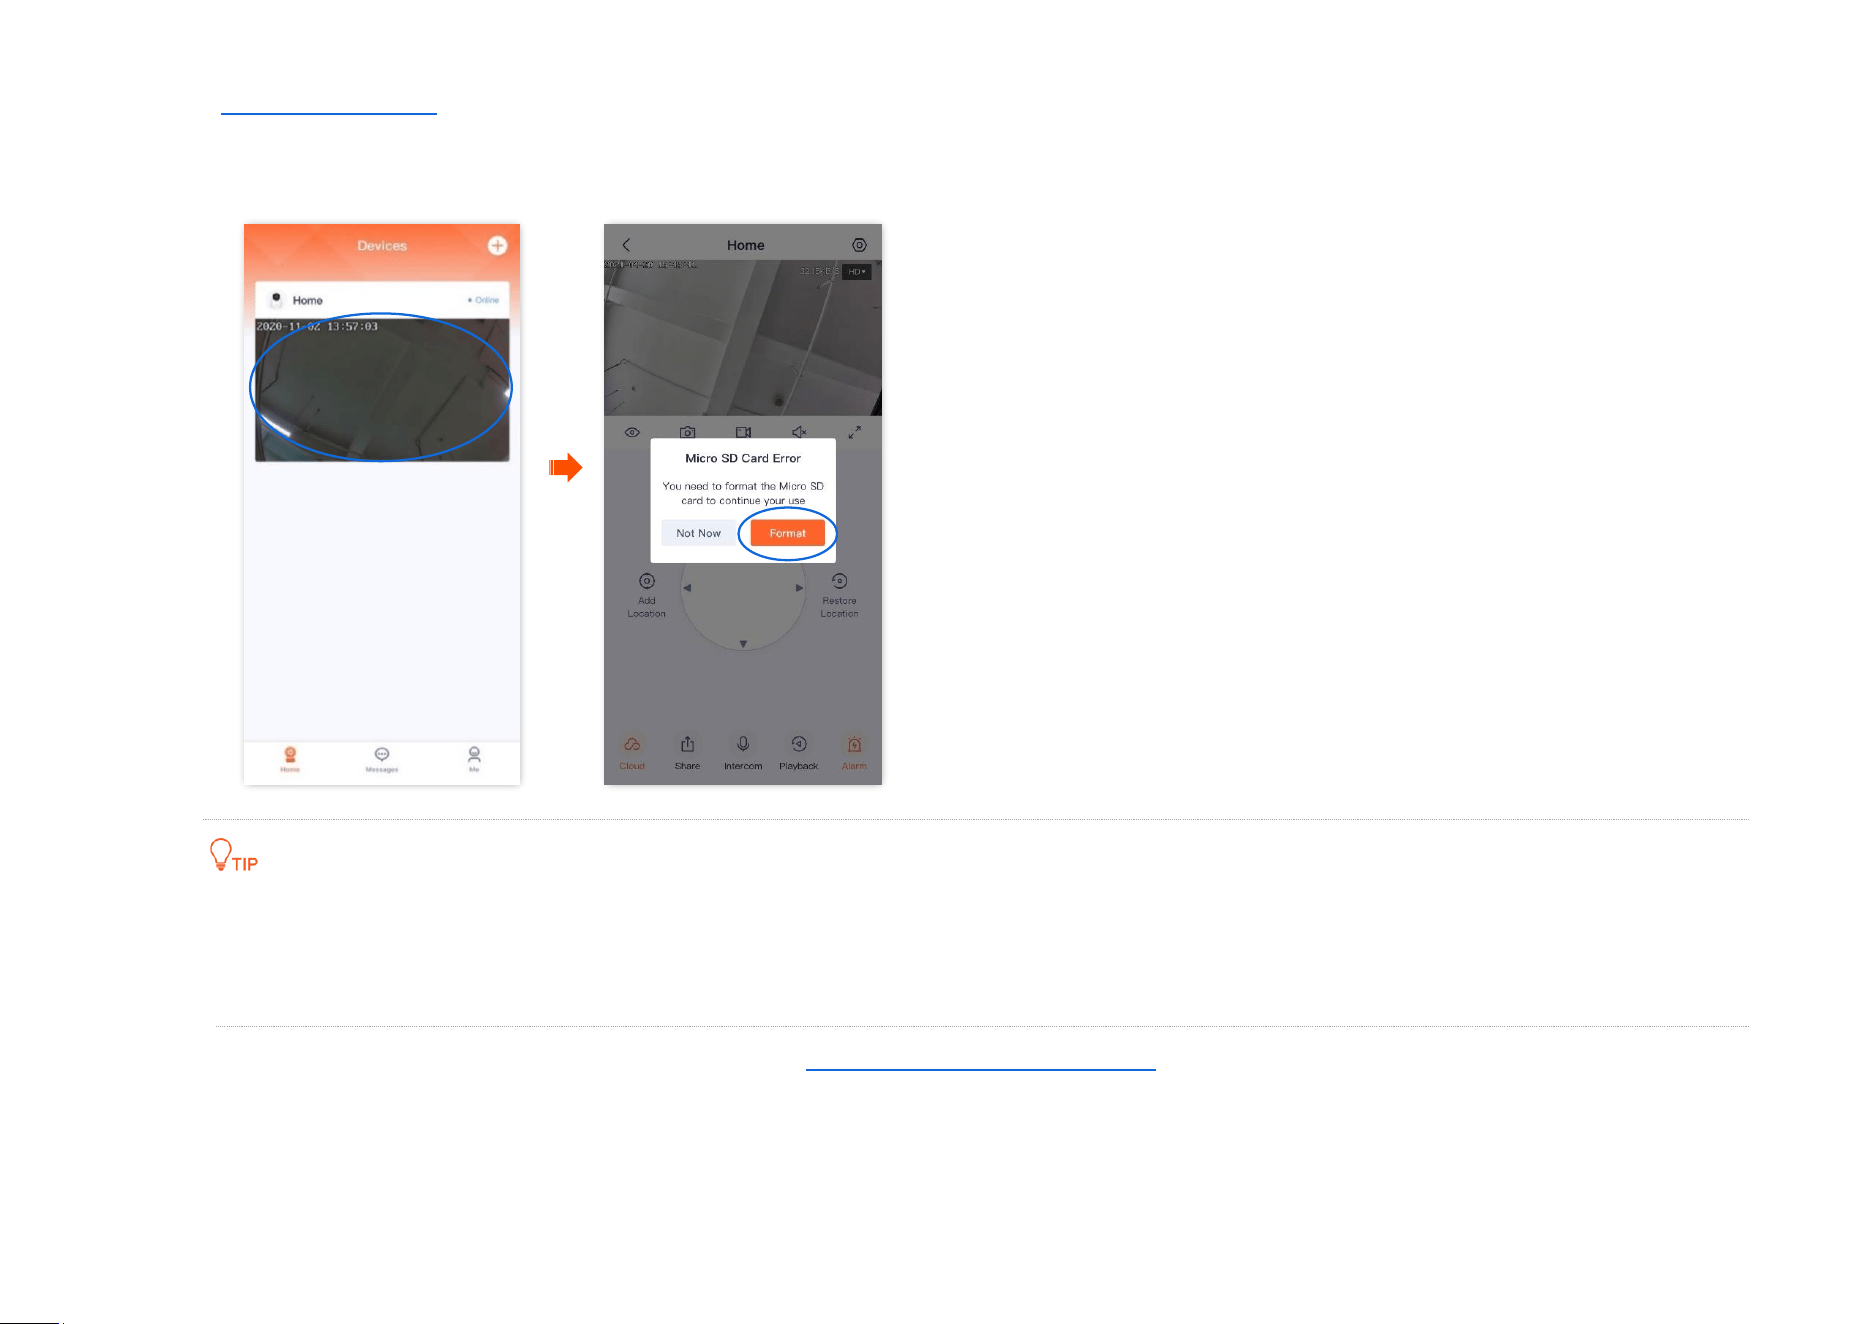
Step 2 Log in to TDSEE App to check whether the Micro SD card can be identified normally.
Tap the camera on the homepage. If a window pops up Micro SD Card Error, it indicates that the current format of the Micro SD card does
not meet the requirements. Format it according to the instructions.
If the formatting of the Micro SD card fails, try the following solutions:
Power off the camera, unplug and insert the Micro SD card, then power on the camera again.
You can find a professional to test or use MyDiskTest software to check whether the Micro SD card is normal.
Step 3 Set the recording mode of the Micro SD card. Refer to Micro SD card recording settings for detailed steps.
----End

Document Version: V1.4
94
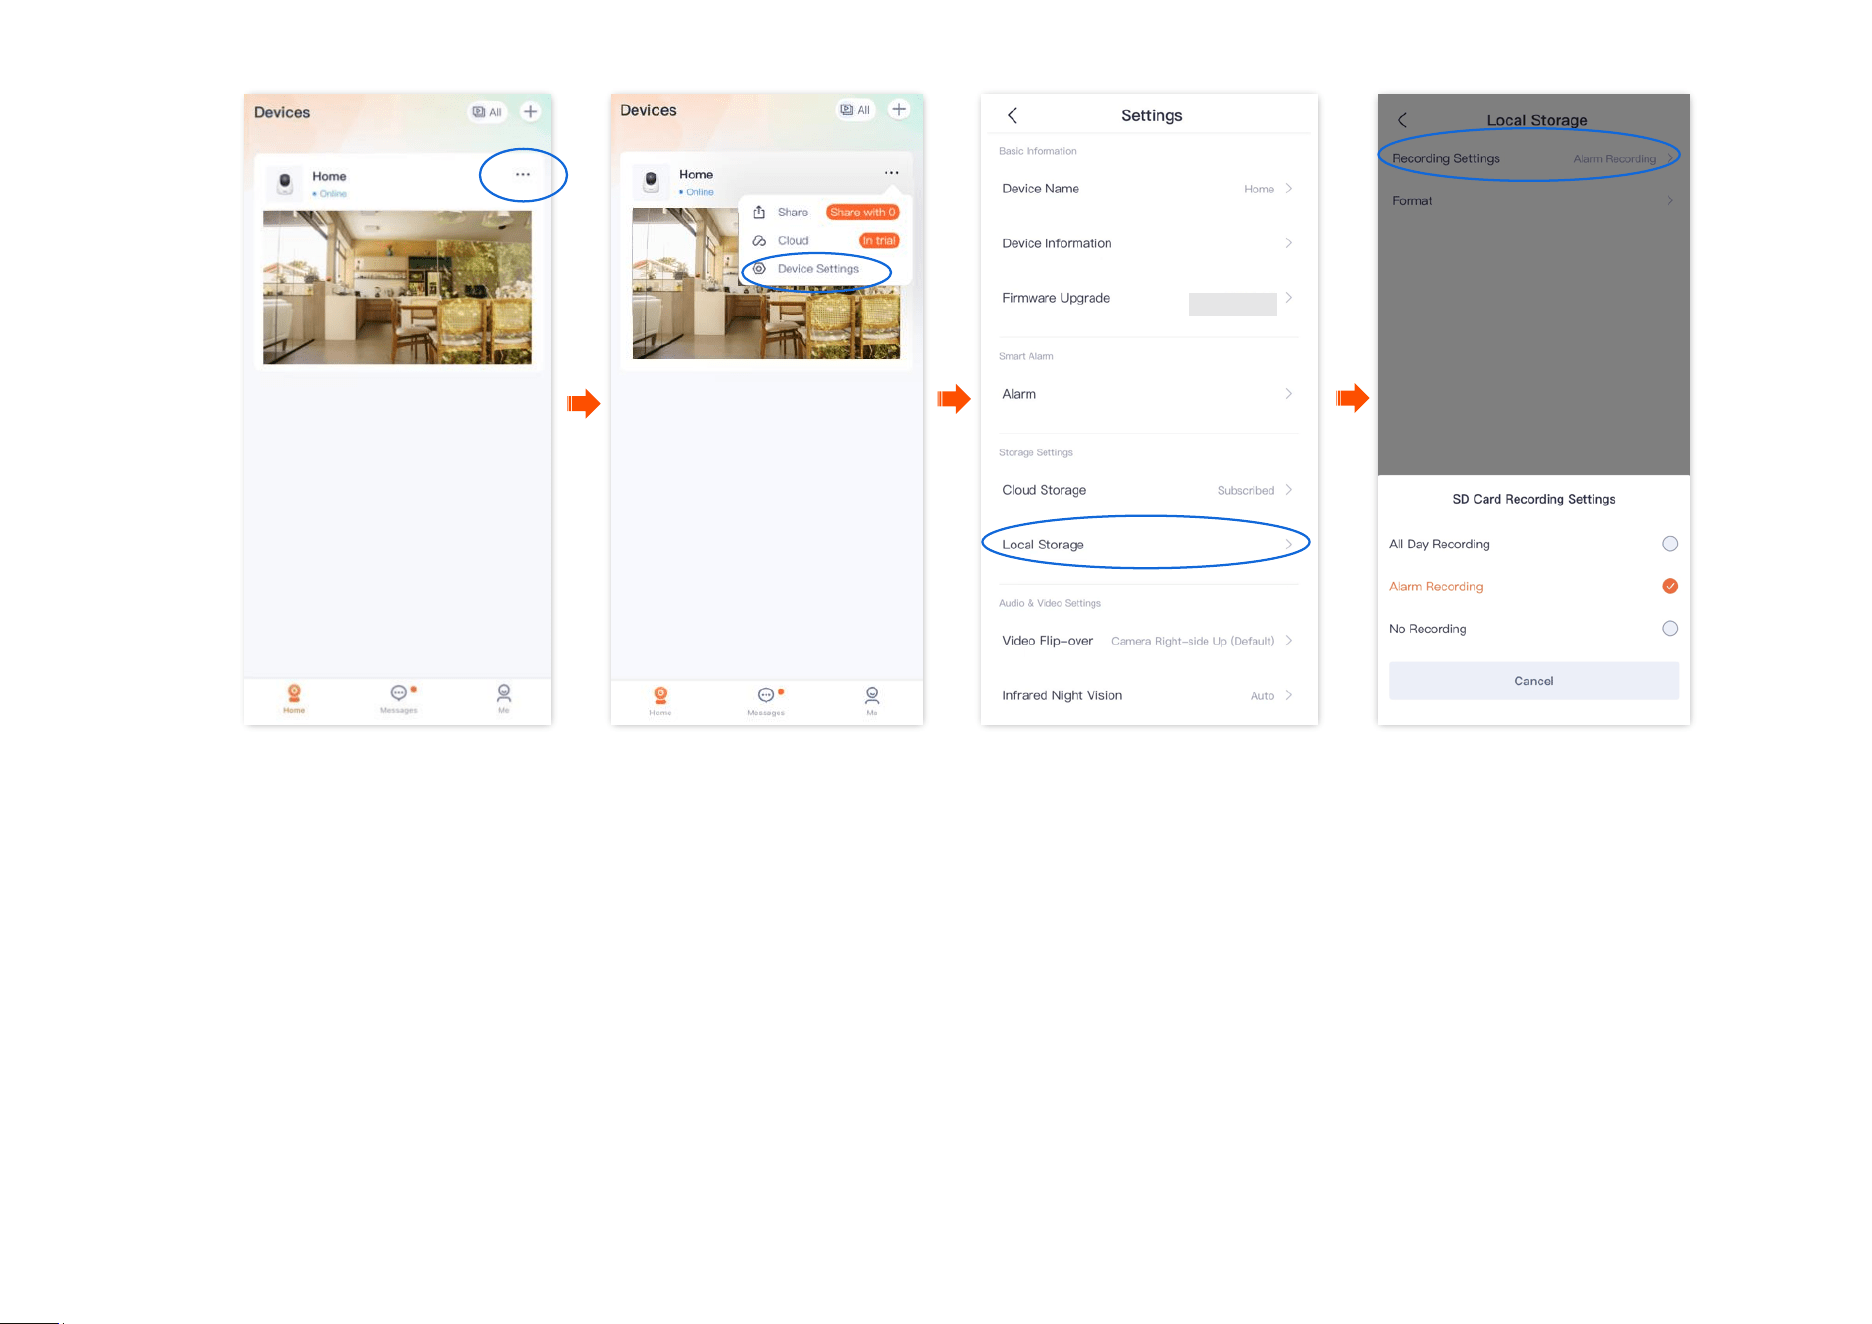
Set Micro SD card recording mode
The TDSEE App with version 1.3.0 is used for illustrations here.
Tenda camera supports recording storage on Micro SD card (self-prepared). You can set the recording type of the Micro SD card here.
The types of Micro SD card recording are the following:
- All-day recording: 24 hours continuous recording.
- Alarm recording: The camera starts recording once the alarm is triggered.
- No recording: Not recording.
Step 1 Log in to TDSEE App, and enter the settings page of the camera.
- Method 1: Find the camera you want to set Micro SD card recording mode on the homepage, which is Home in this example, tap
on the right corner, and tap Device Settings.
- Method 2: Find the camera you want to set Micro SD card recording mode on the homepage, which is Home in this example, and tap
Settings ( ) in the upper-right corner.
Step 2
Navigate to Local Storage > Recording Settings, and select the recording mode as required.
Document Version: V1.4
95
----End
Document Version: V1.4
96
Format Micro SD card
The TDSEE App with version 1.3.0 is used for illustrations here.
If the camera cannot identify the Micro SD card, or you want to clear the recording video of the Micro SD, you can format the Micro SD card.
Do not cut off the power of the camera during the formatting; otherwise, the Micro SD card may fail to format or even be damaged.
Step 1 Log in to TDSEE App, and enter the settings page of the camera.
- Method 1: Find the camera you want to format Micro SD card on the homepage, which is Home in this example, tap on the right
corner, and tap Device Settings.
- Method 2: Find the camera you want to format Micro SD card on the homepage, which is Home in this example, and tap Settings ( ) in
the upper-right corner.
Step 2 Navigate to Local Storage > Format.
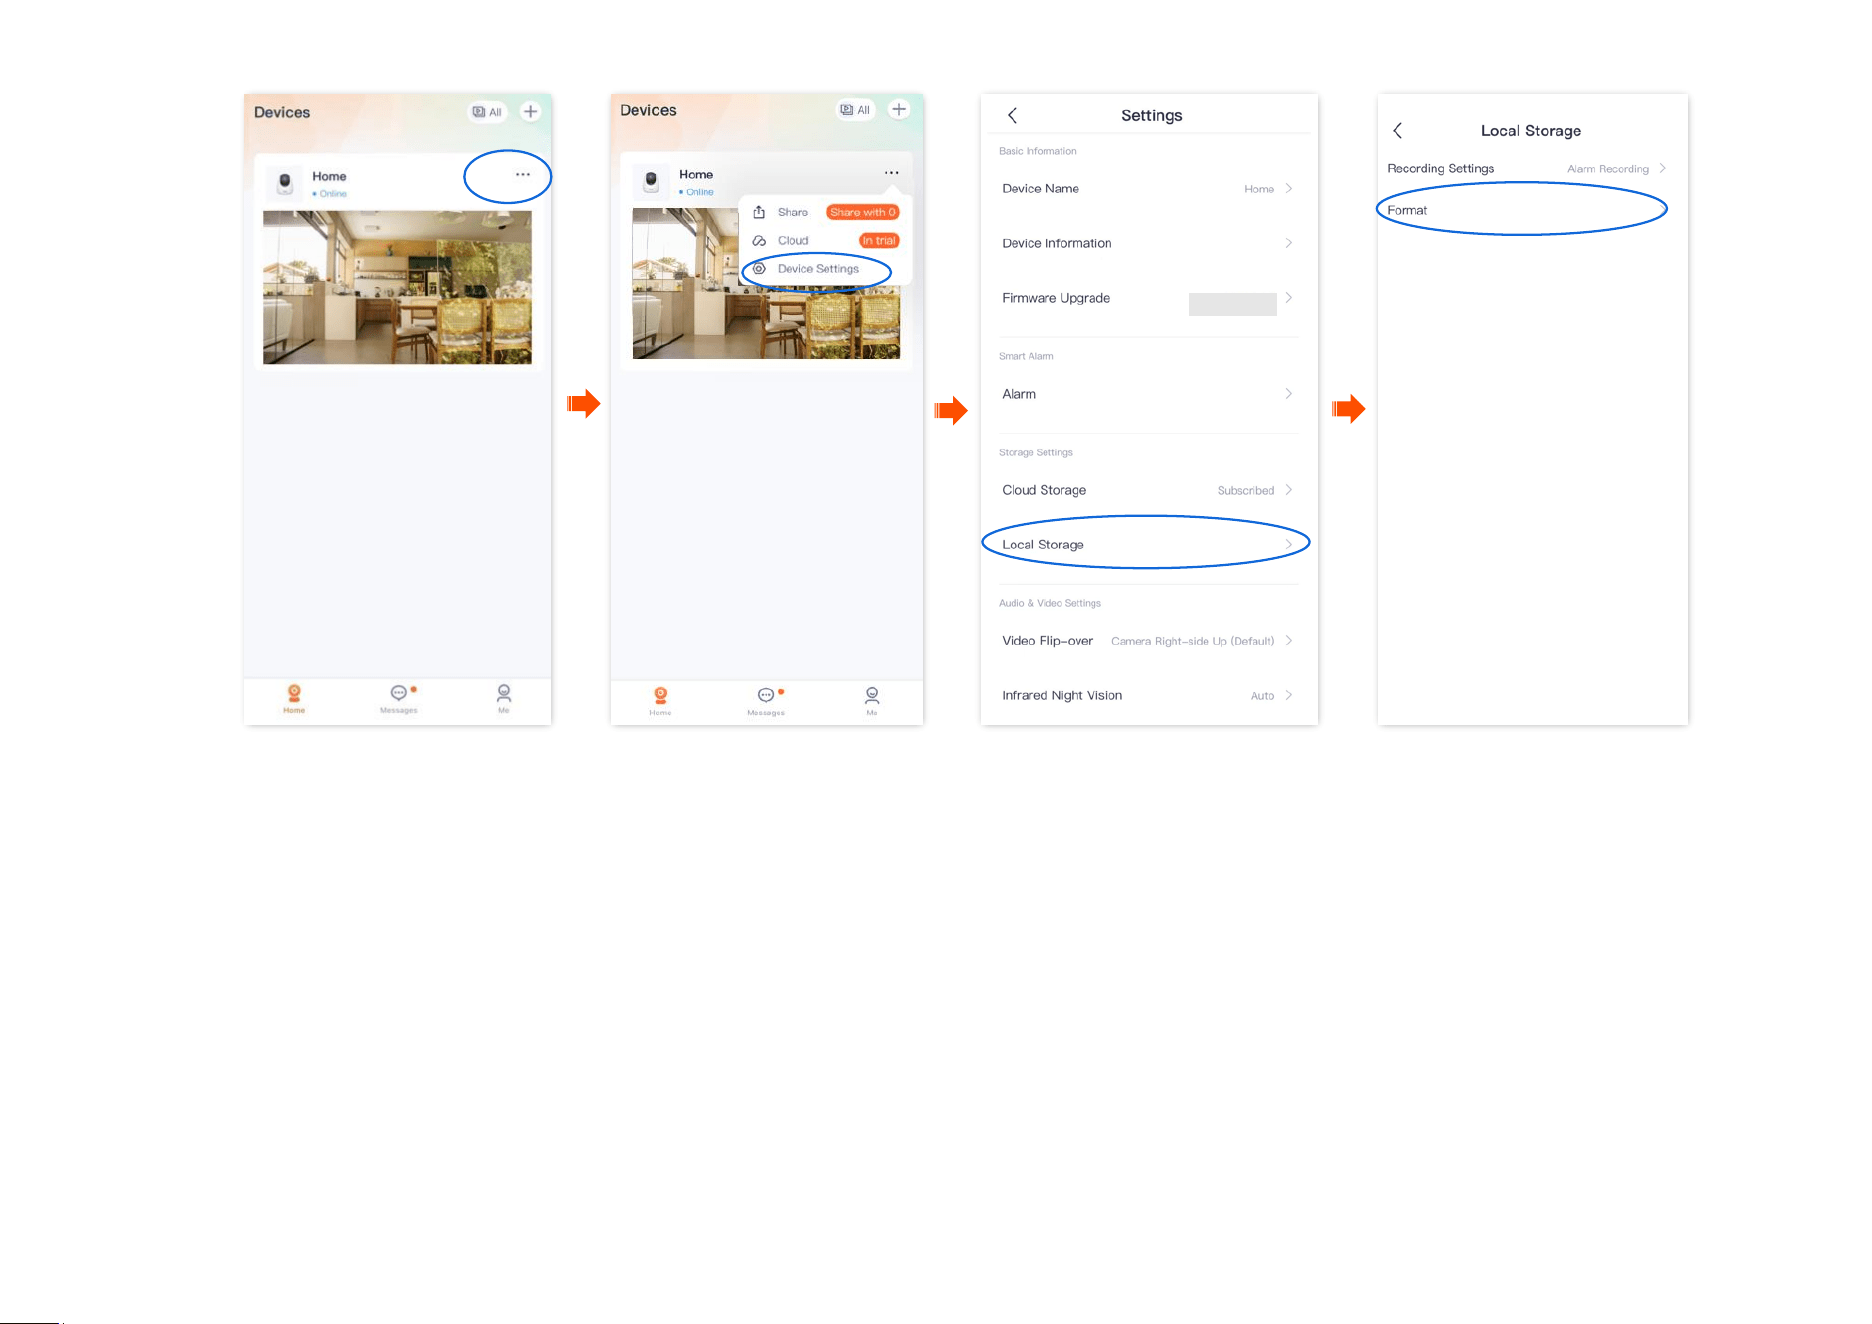
Document Version: V1.4
97
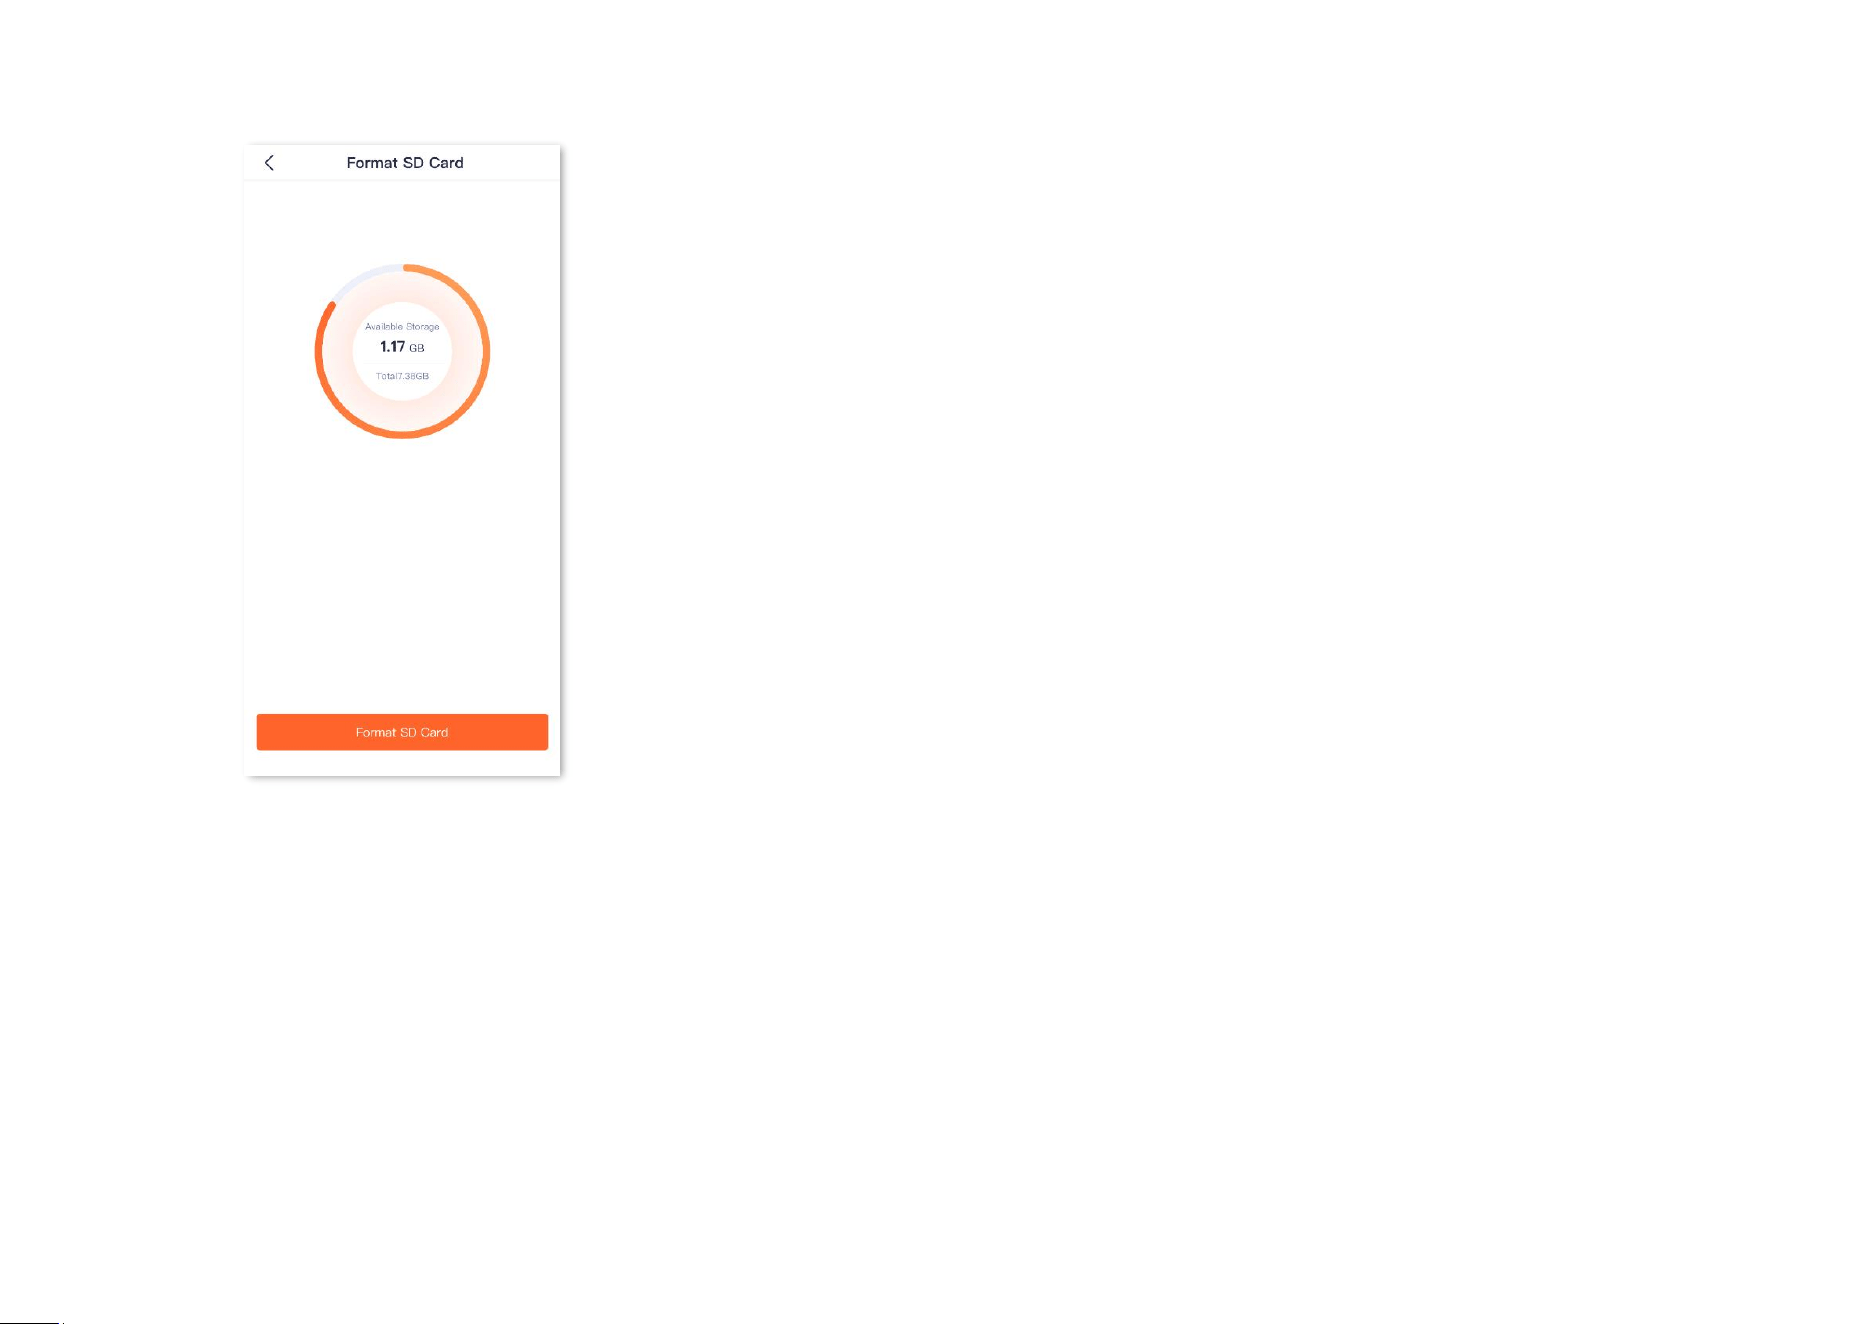
Document Version: V1.4
98
Step 3 Tap Format.
----End
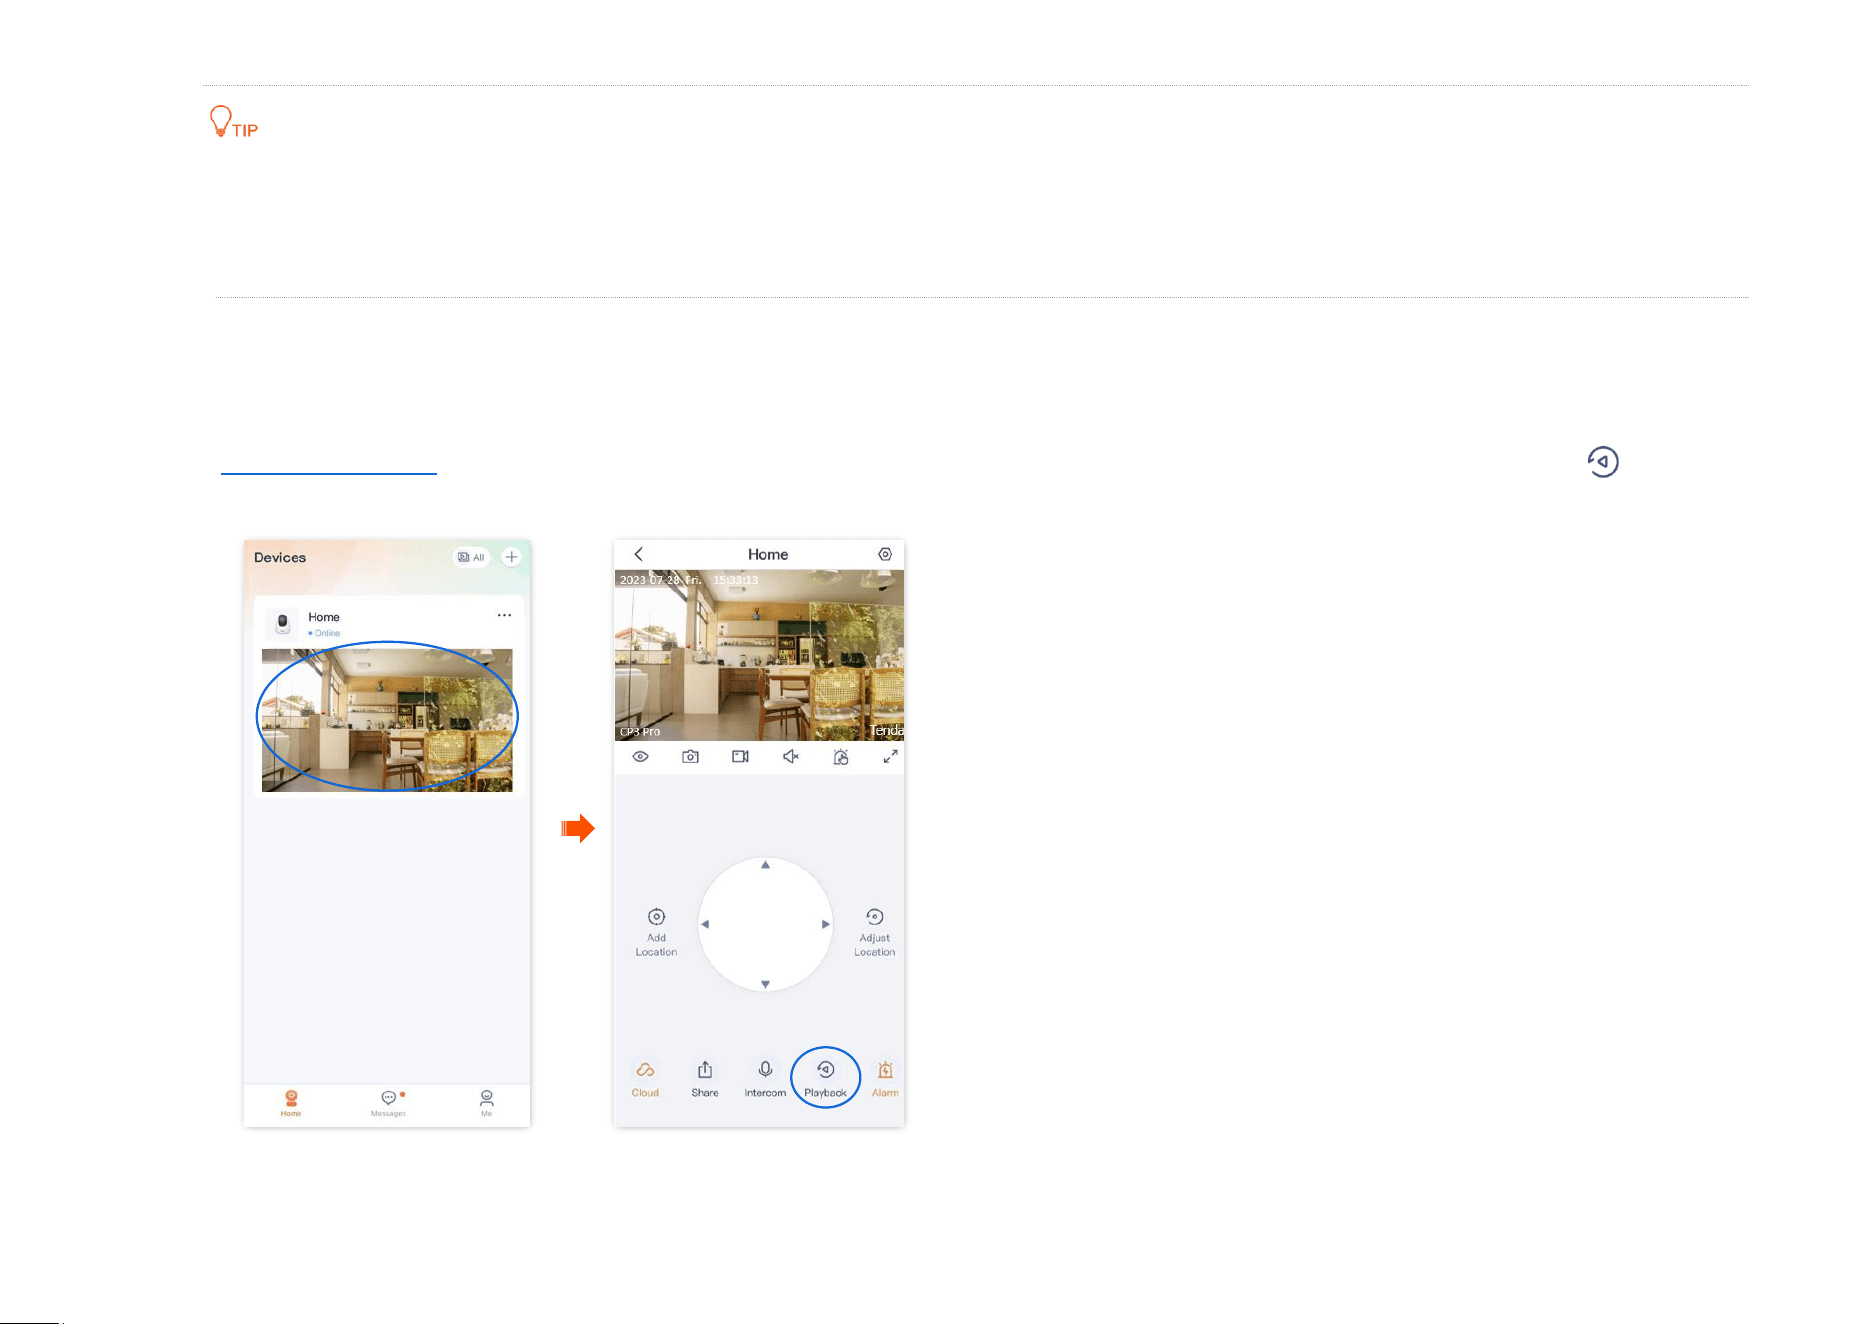
Document Version: V1.4
99
If the formatting of the Micro SD card fails, try the following solutions:
Cut off the power of the camera, unplug and insert the Micro SD card, then power on the camera again.
You can find a professional to test or use MyDiskTest software to check whether the Micro SD card is normal.
Check or edit the Micro SD card video
Step 1
Log in to TDSEE App. Tap the specific device on the homepage, which is the camera Home in this example. Then tap Playback in the
lower right corner.
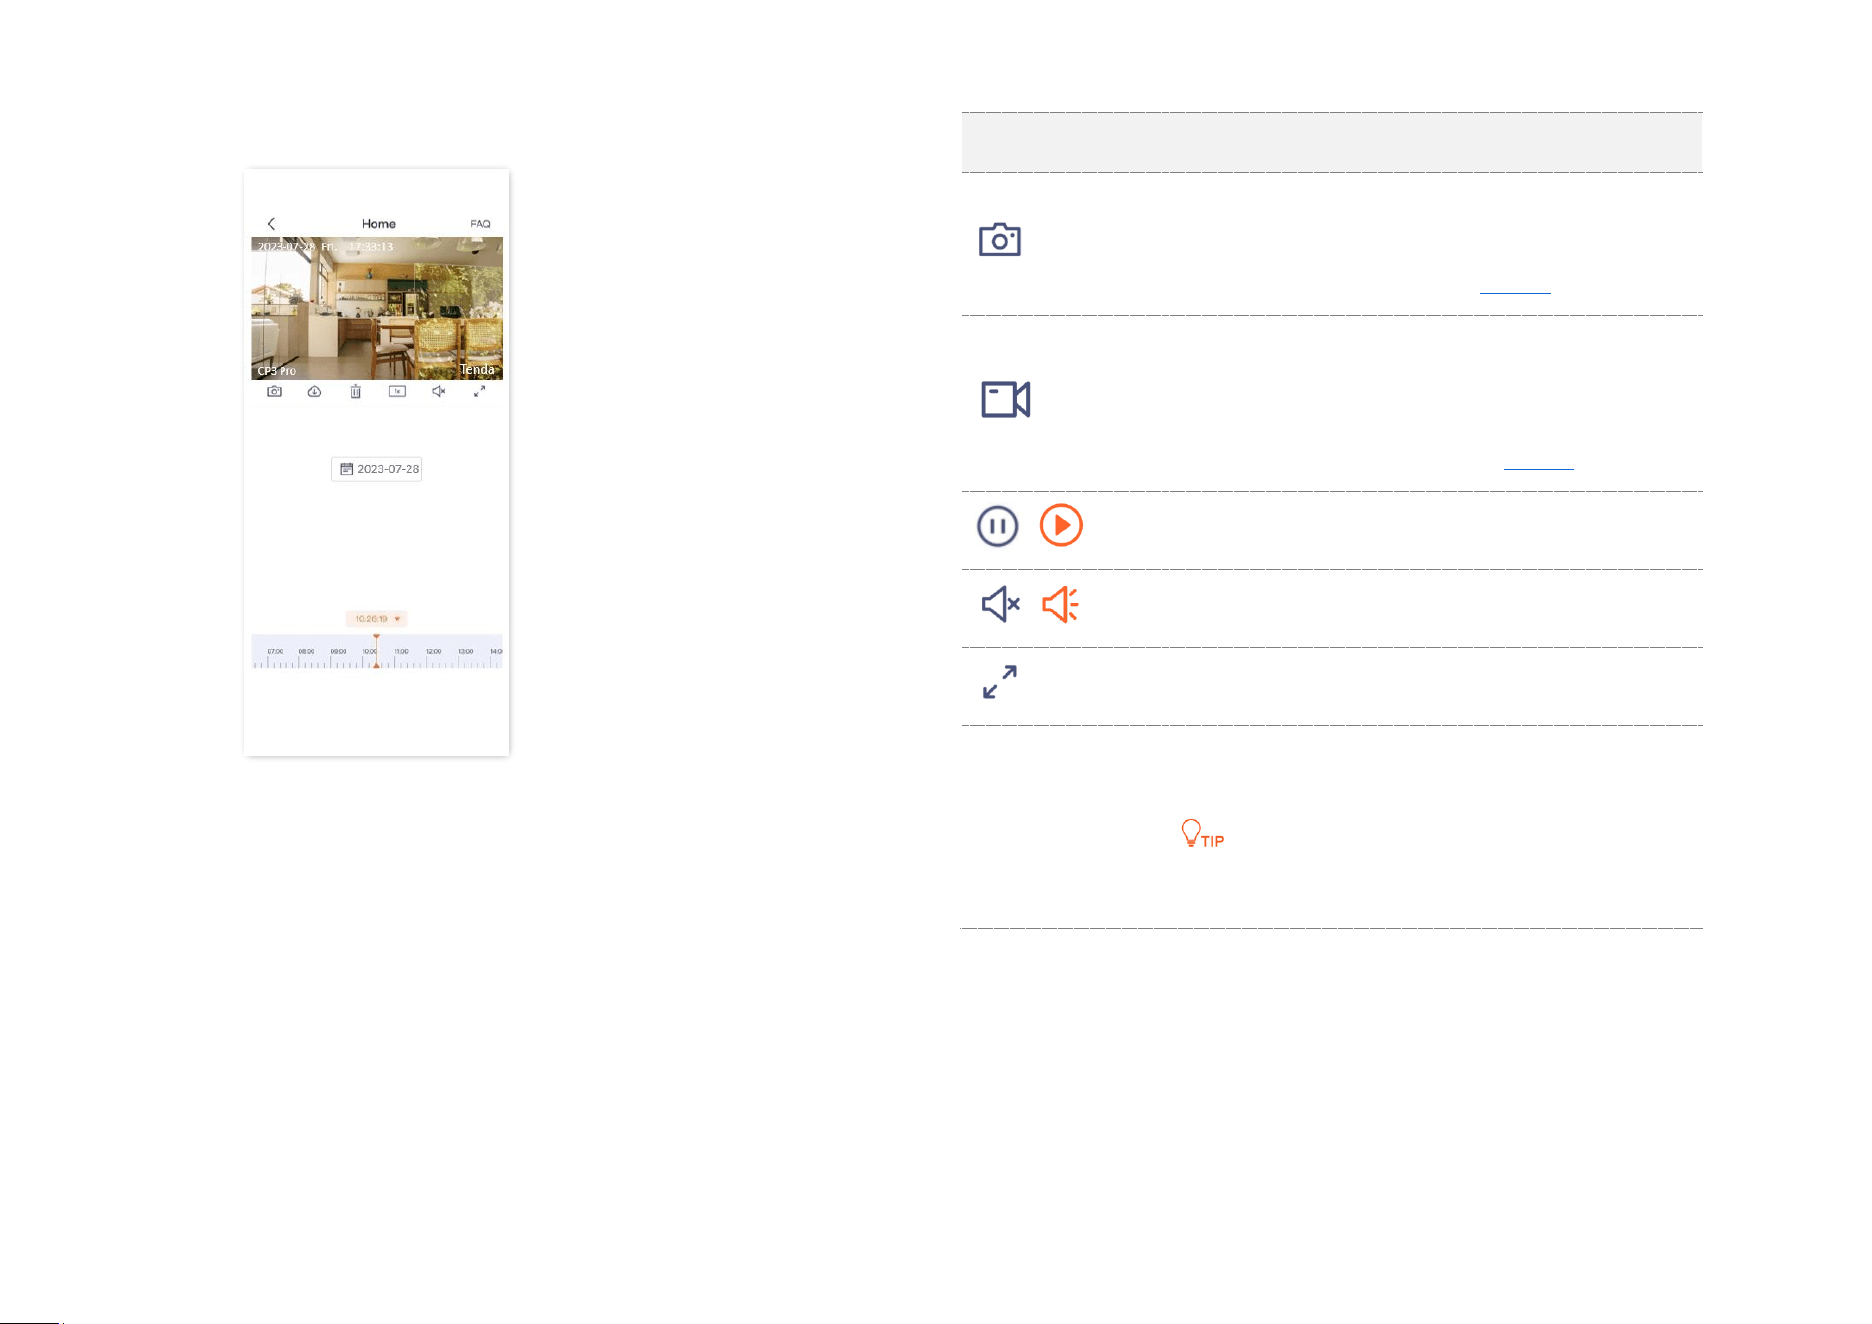
Document Version: V1.4
49
Step 2 You can check and edit the video according to the actual
conditions.
----End
Parameter description
Parameter
Description
Screenshots.
Tap it to save the screenshot of the current
monitoring image to TDSEE Album.
Recordings.
Tap it to start recording, and tap it again to
stop recording. Successful recordings are
automatically saved to TDSEE Album.
/
Tap it to pause or play the video.
/
Tap it to disable or enable the camera audio.
Tap it to view the image in full screen.
Recording video
timeline
Orange means detection recording. Gray
means no recording.
You can choose a specific time on the timeline.
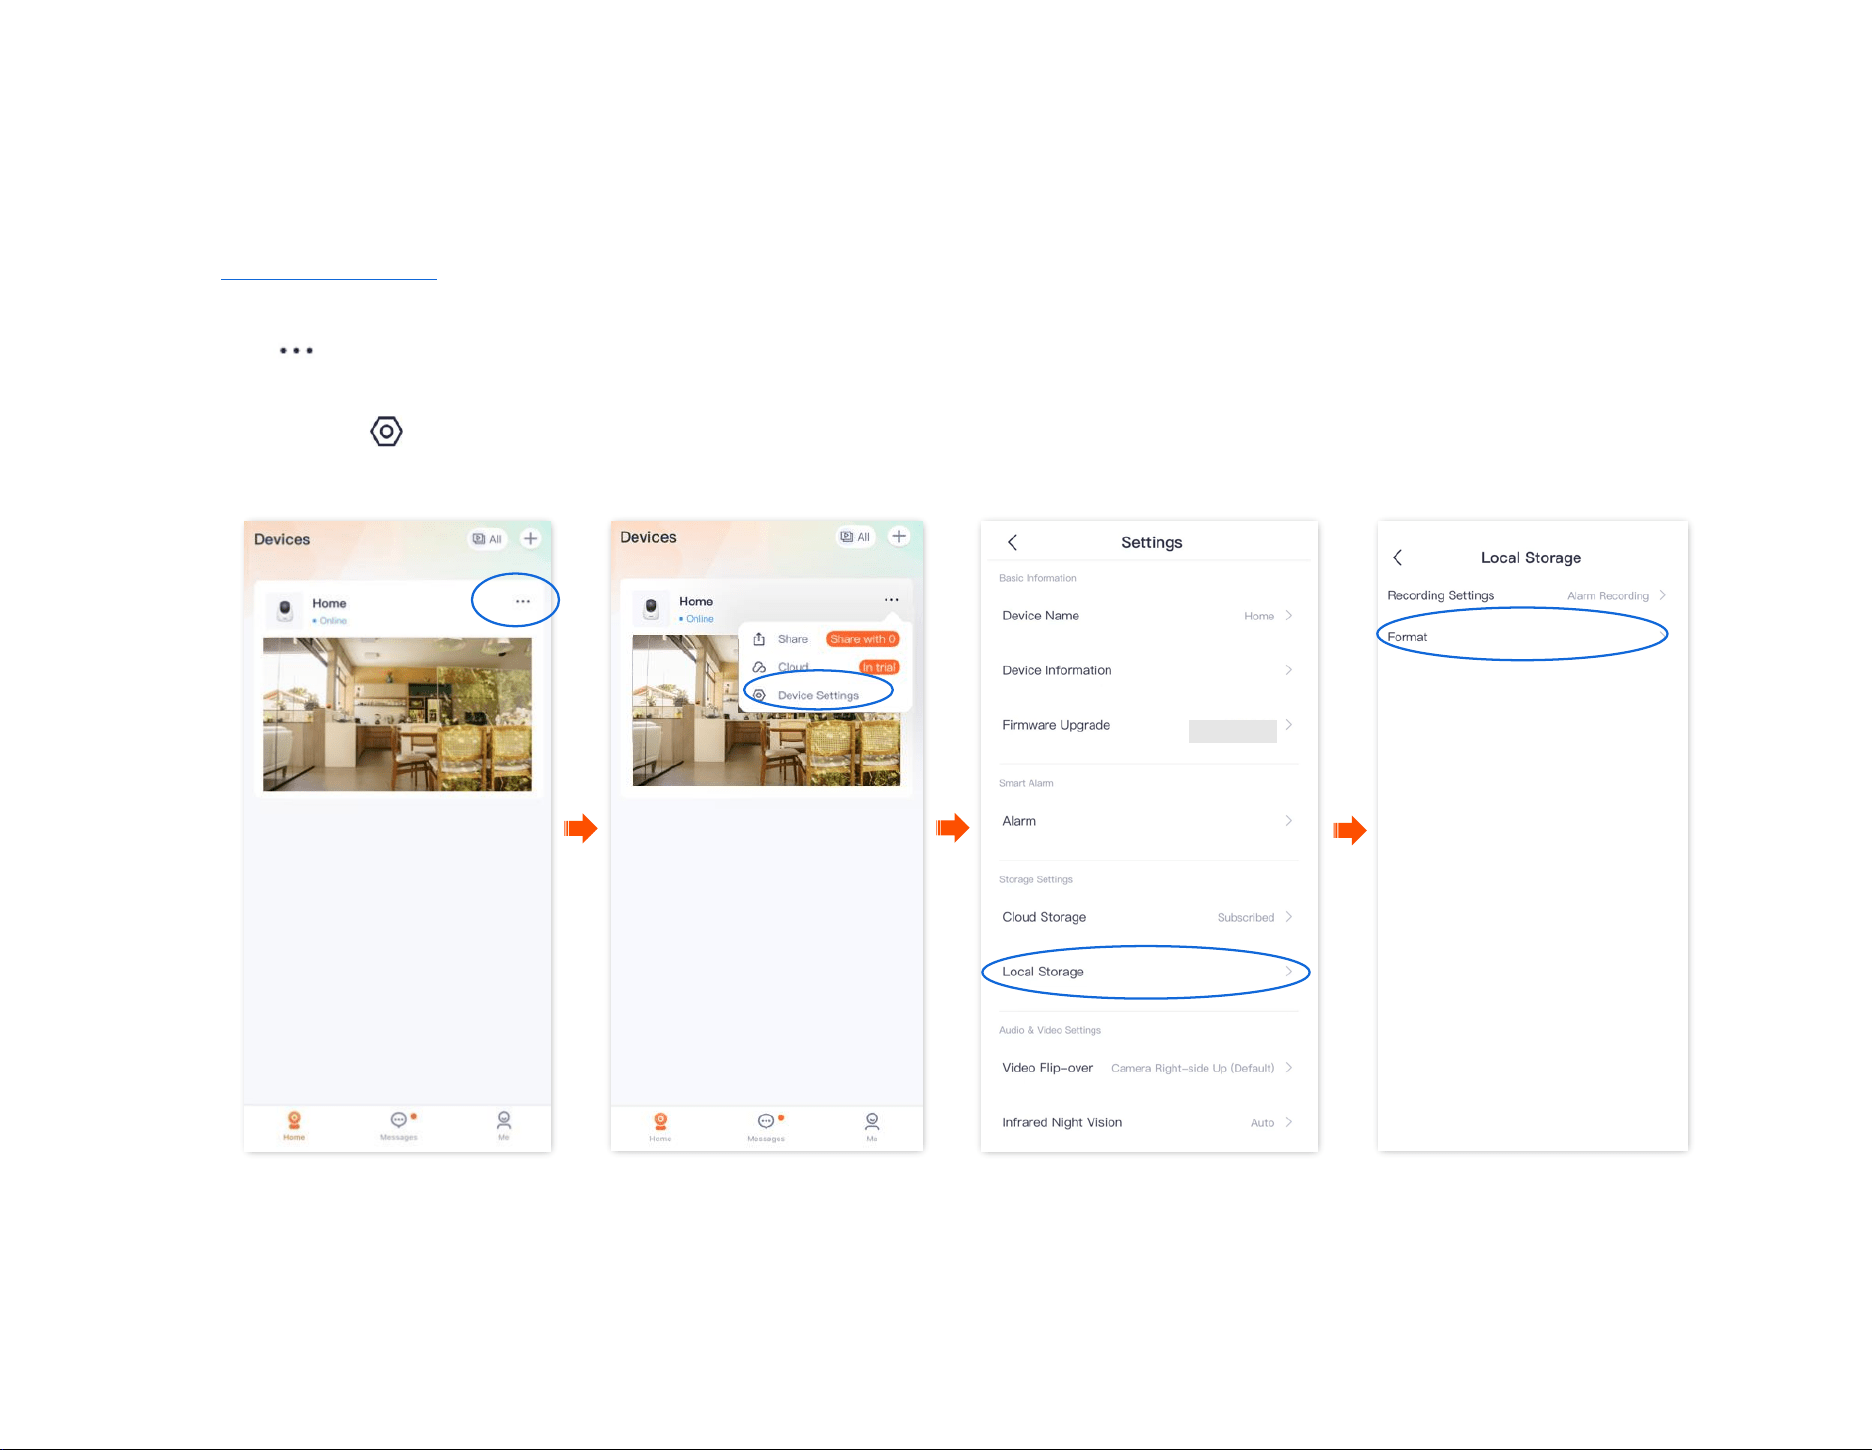
Document Version: V1.4
50
Check Micro SD card available storage
The TDSEE App with version 1.3.0 is used for illustrations here.
Step 1 Log in to TDSEE App, and enter the settings page of the camera.
- Method 1: Find the camera you want to check Micro SD card available storage on the homepage, which is Home in this example, tap
on the right corner, and tap Device Settings.
- Method 2: Find the camera you want to check Micro SD card available storage on the homepage, which is Home in this example, and tap
Settings ( ) in the upper-right corner.
Step 2 Navigate to Local Storage > Format.
---End
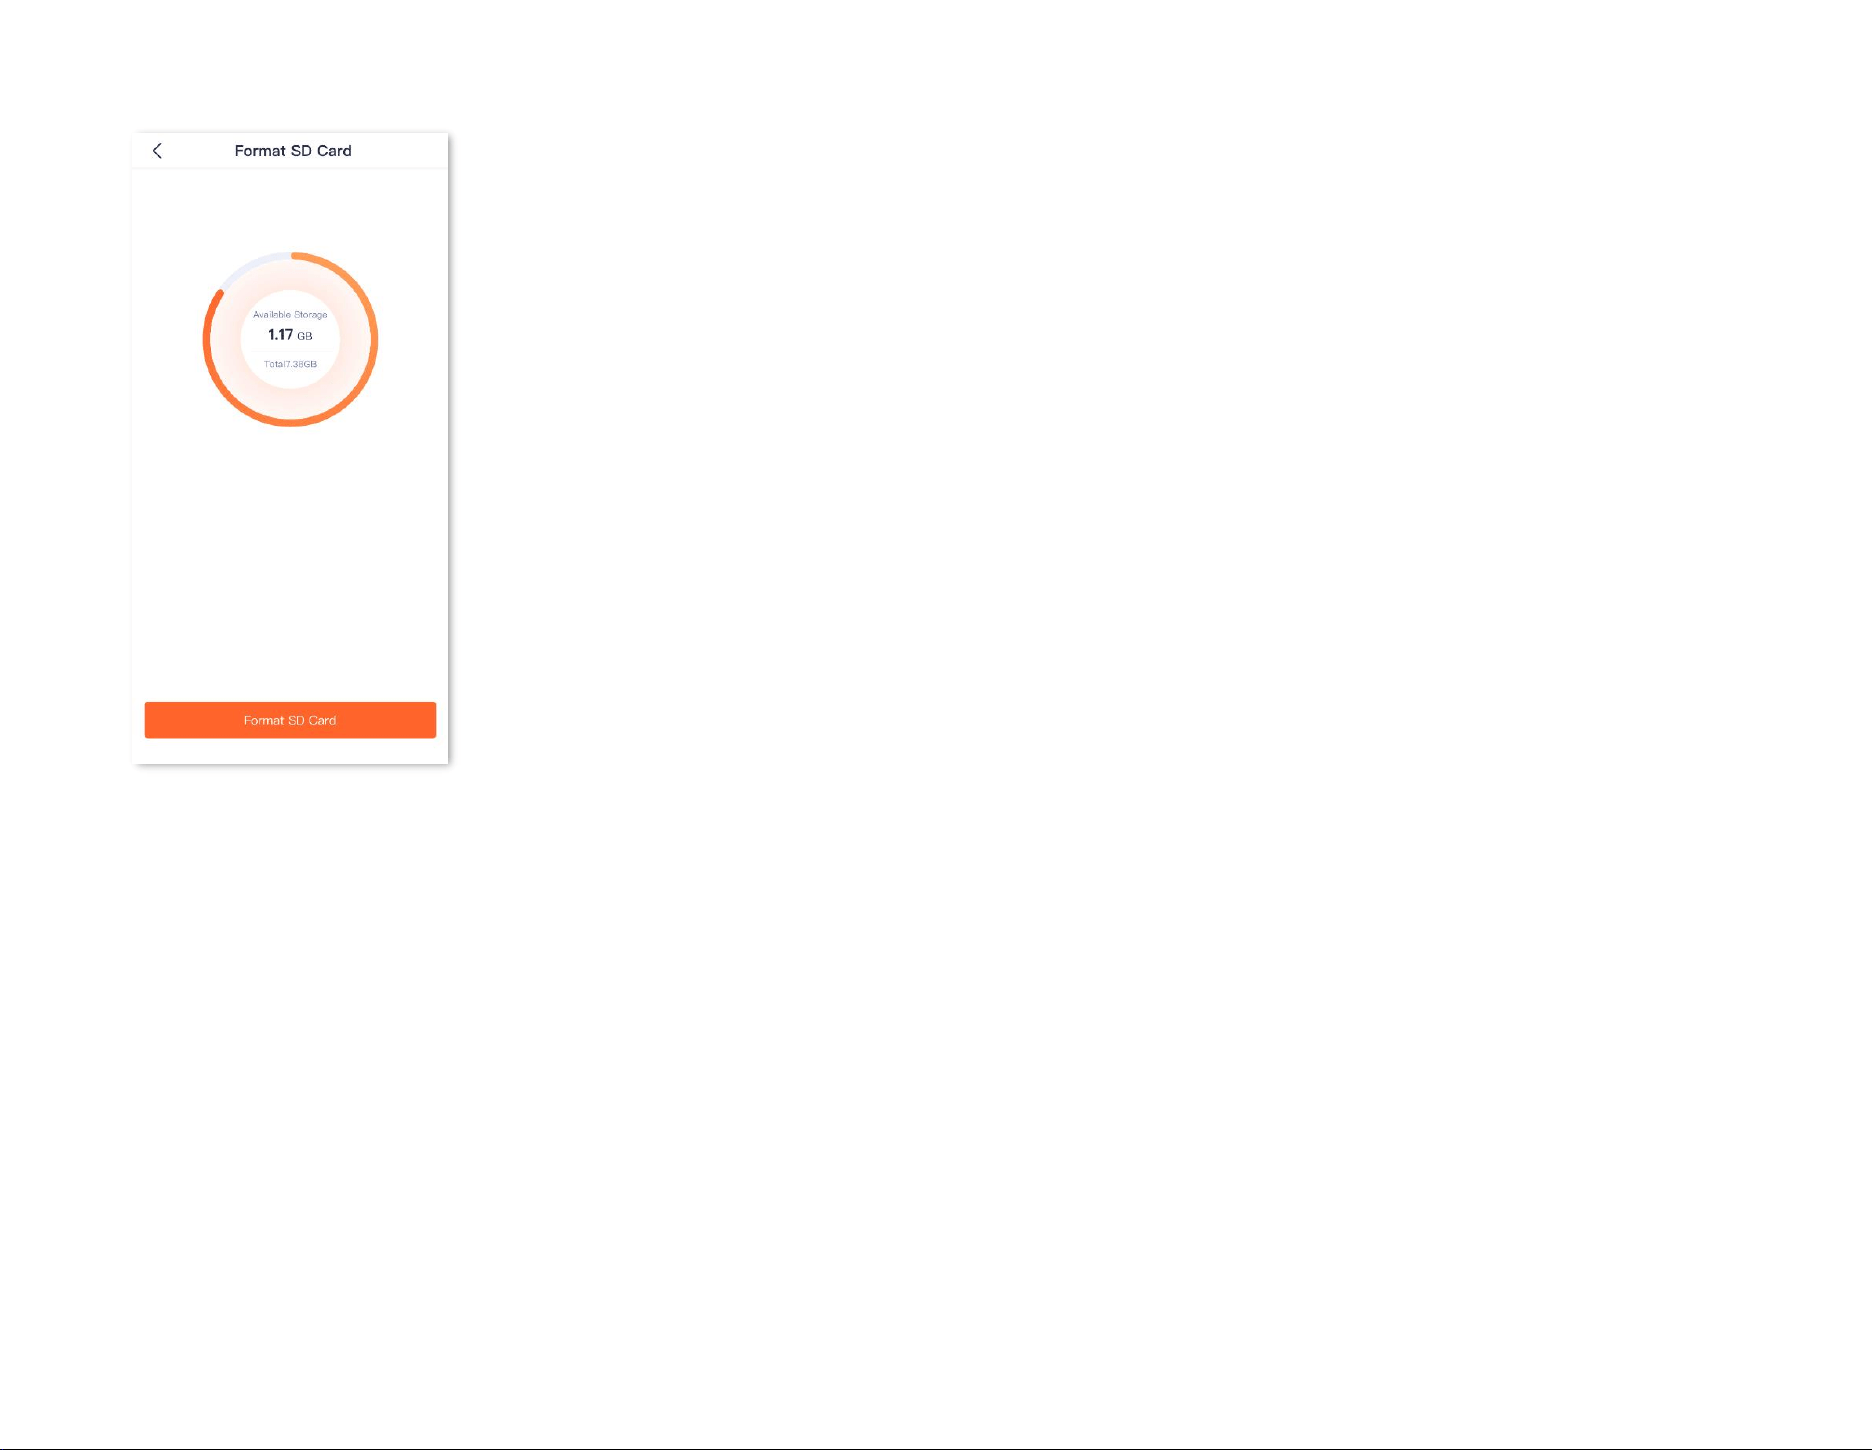
Document Version: V1.4
51
You can check the available storage of the Micro SD card.
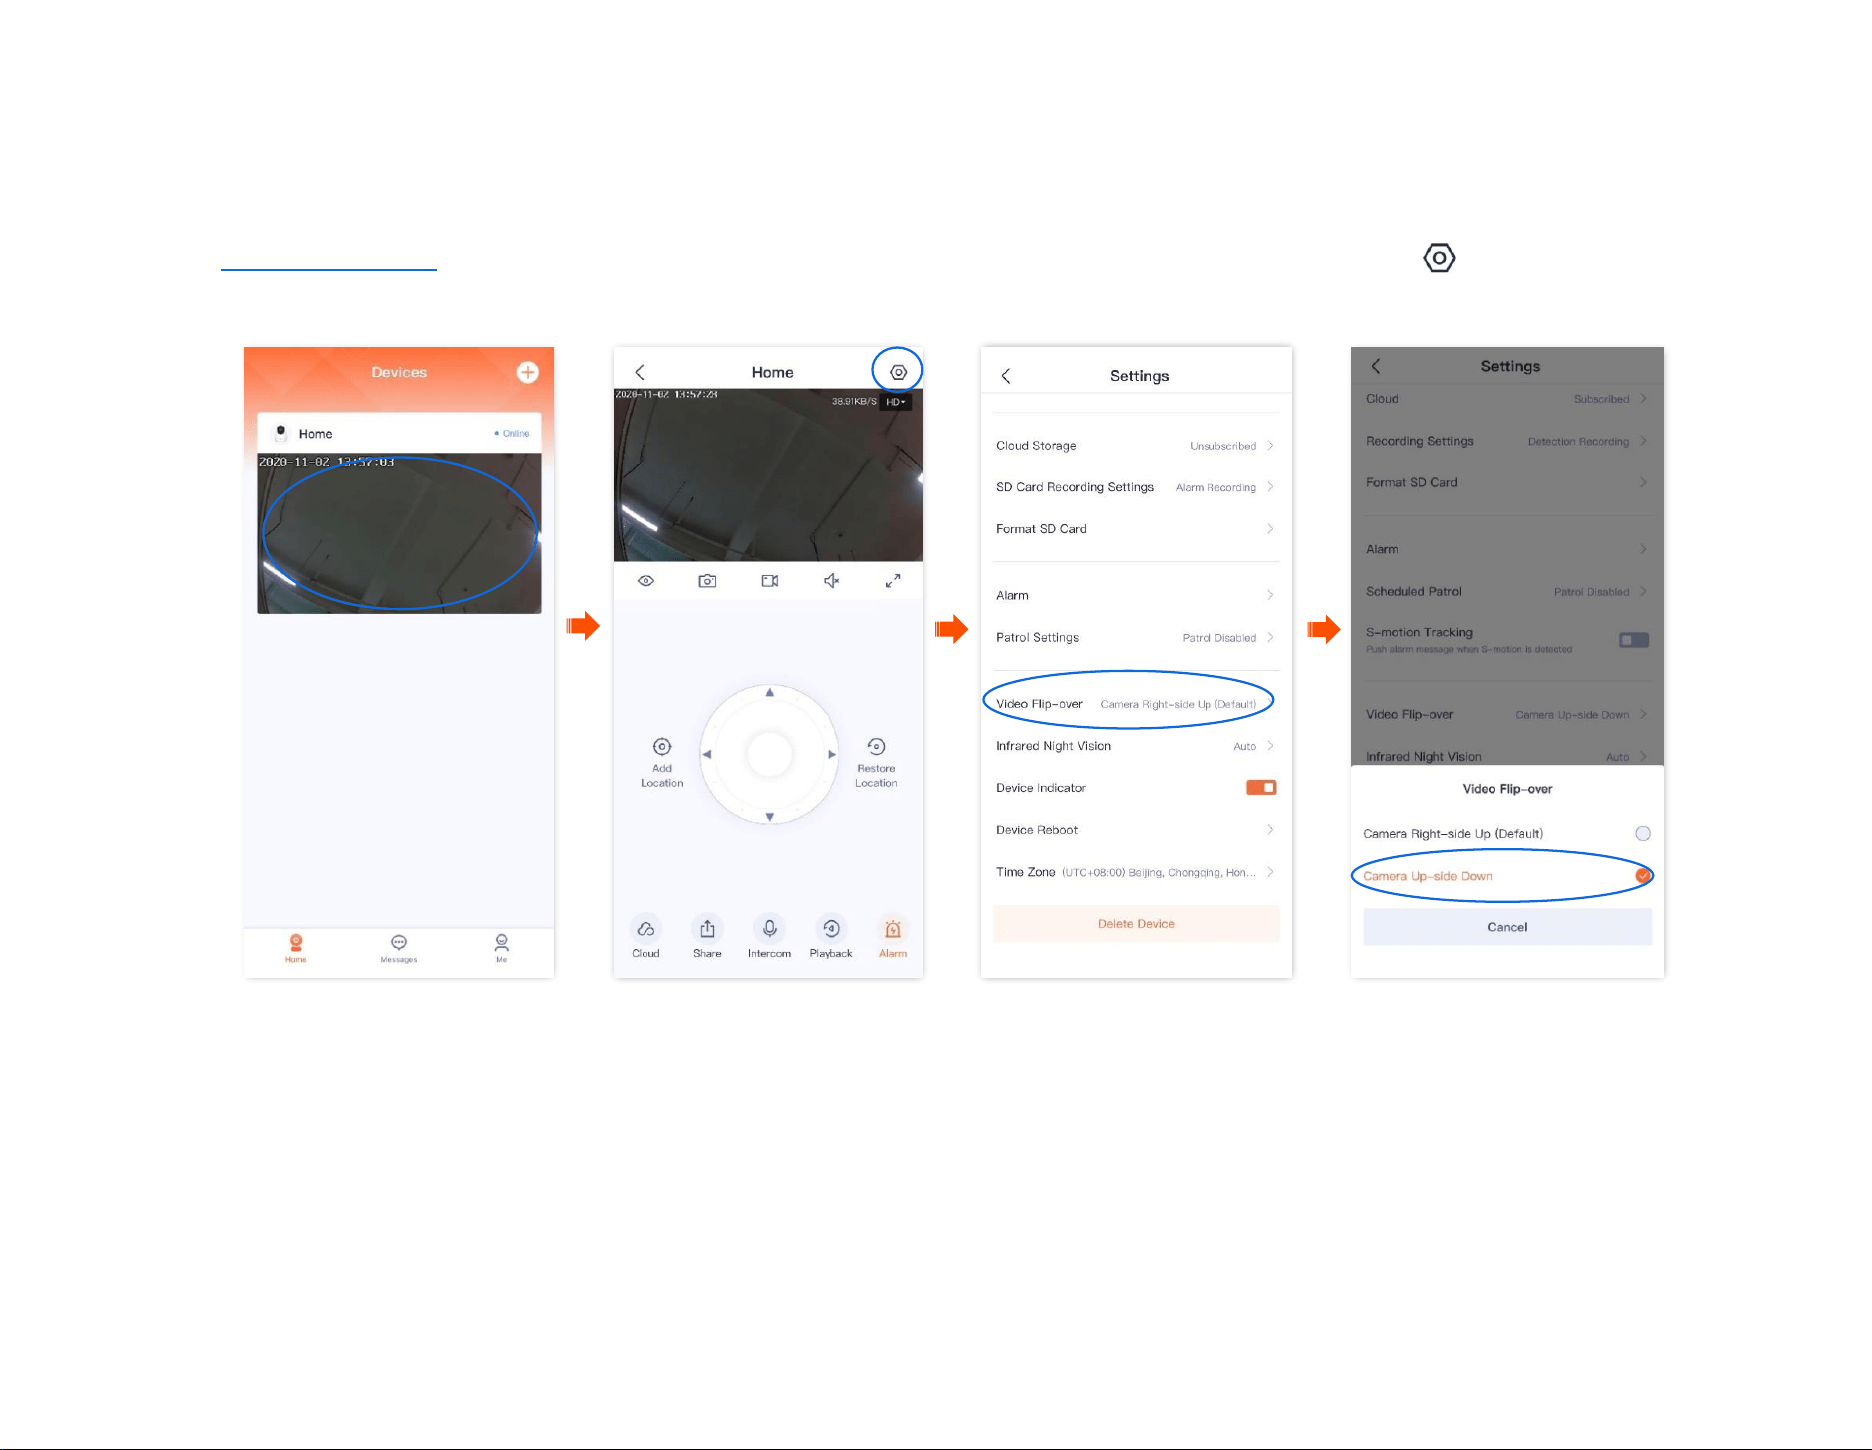
Document Version: V1.4
52
Set up video flip-over
If the camera installation method is ceiling mounting, to facilitate monitoring, you need to set the direction to Camera Up-side Down.
Step 1
Log in to TDSEE App. Tap the specific device on the homepage, which is the camera Home in this example. Tap in the upper right corner.
Step 2
Scroll down to the bottom of the page, tap Video Flip-over, and select Camera Up-side Down.
----End
Document Version: V1.4
53
Set up night vision mode
It is applicable for the full-color version camera. CT6 is used as an example for illustrations.
You can set the monitoring mode of the camera at night. In a dark environment without visible light or with weak light, the camera turns on the fill
light and infrared light according to the situation to ensure that it can monitor normally.
The full-color camera supports three night-vision modes: Smart mode, full-color mode, and black & white mode. The monitoring image effect and
light status of the camera in each mode are shown below.
Night vision mode
Monitoring images at night
Smart mode
When the camera does not detect an alarm, the monitoring image is black and white (IR lights are on while spotlights
are off).
When the camera detects an alarm, the monitoring image is colorful (spotlights are solid on for fill light while IR lights
are off).
Full-color mode
The monitoring image is always colorful (spotlights are always solid on to fill the light. IR lights are always off).
Black & white mode
When the white flashlight function is enabled:
The monitoring image is always black and white (IR lights are always on), and when the camera detects an alarm, the
spotlights flash (to alarm).
When the white flashlight function is disabled:
The monitoring image is always black and white (IR lights are always on while spotlights are always off)
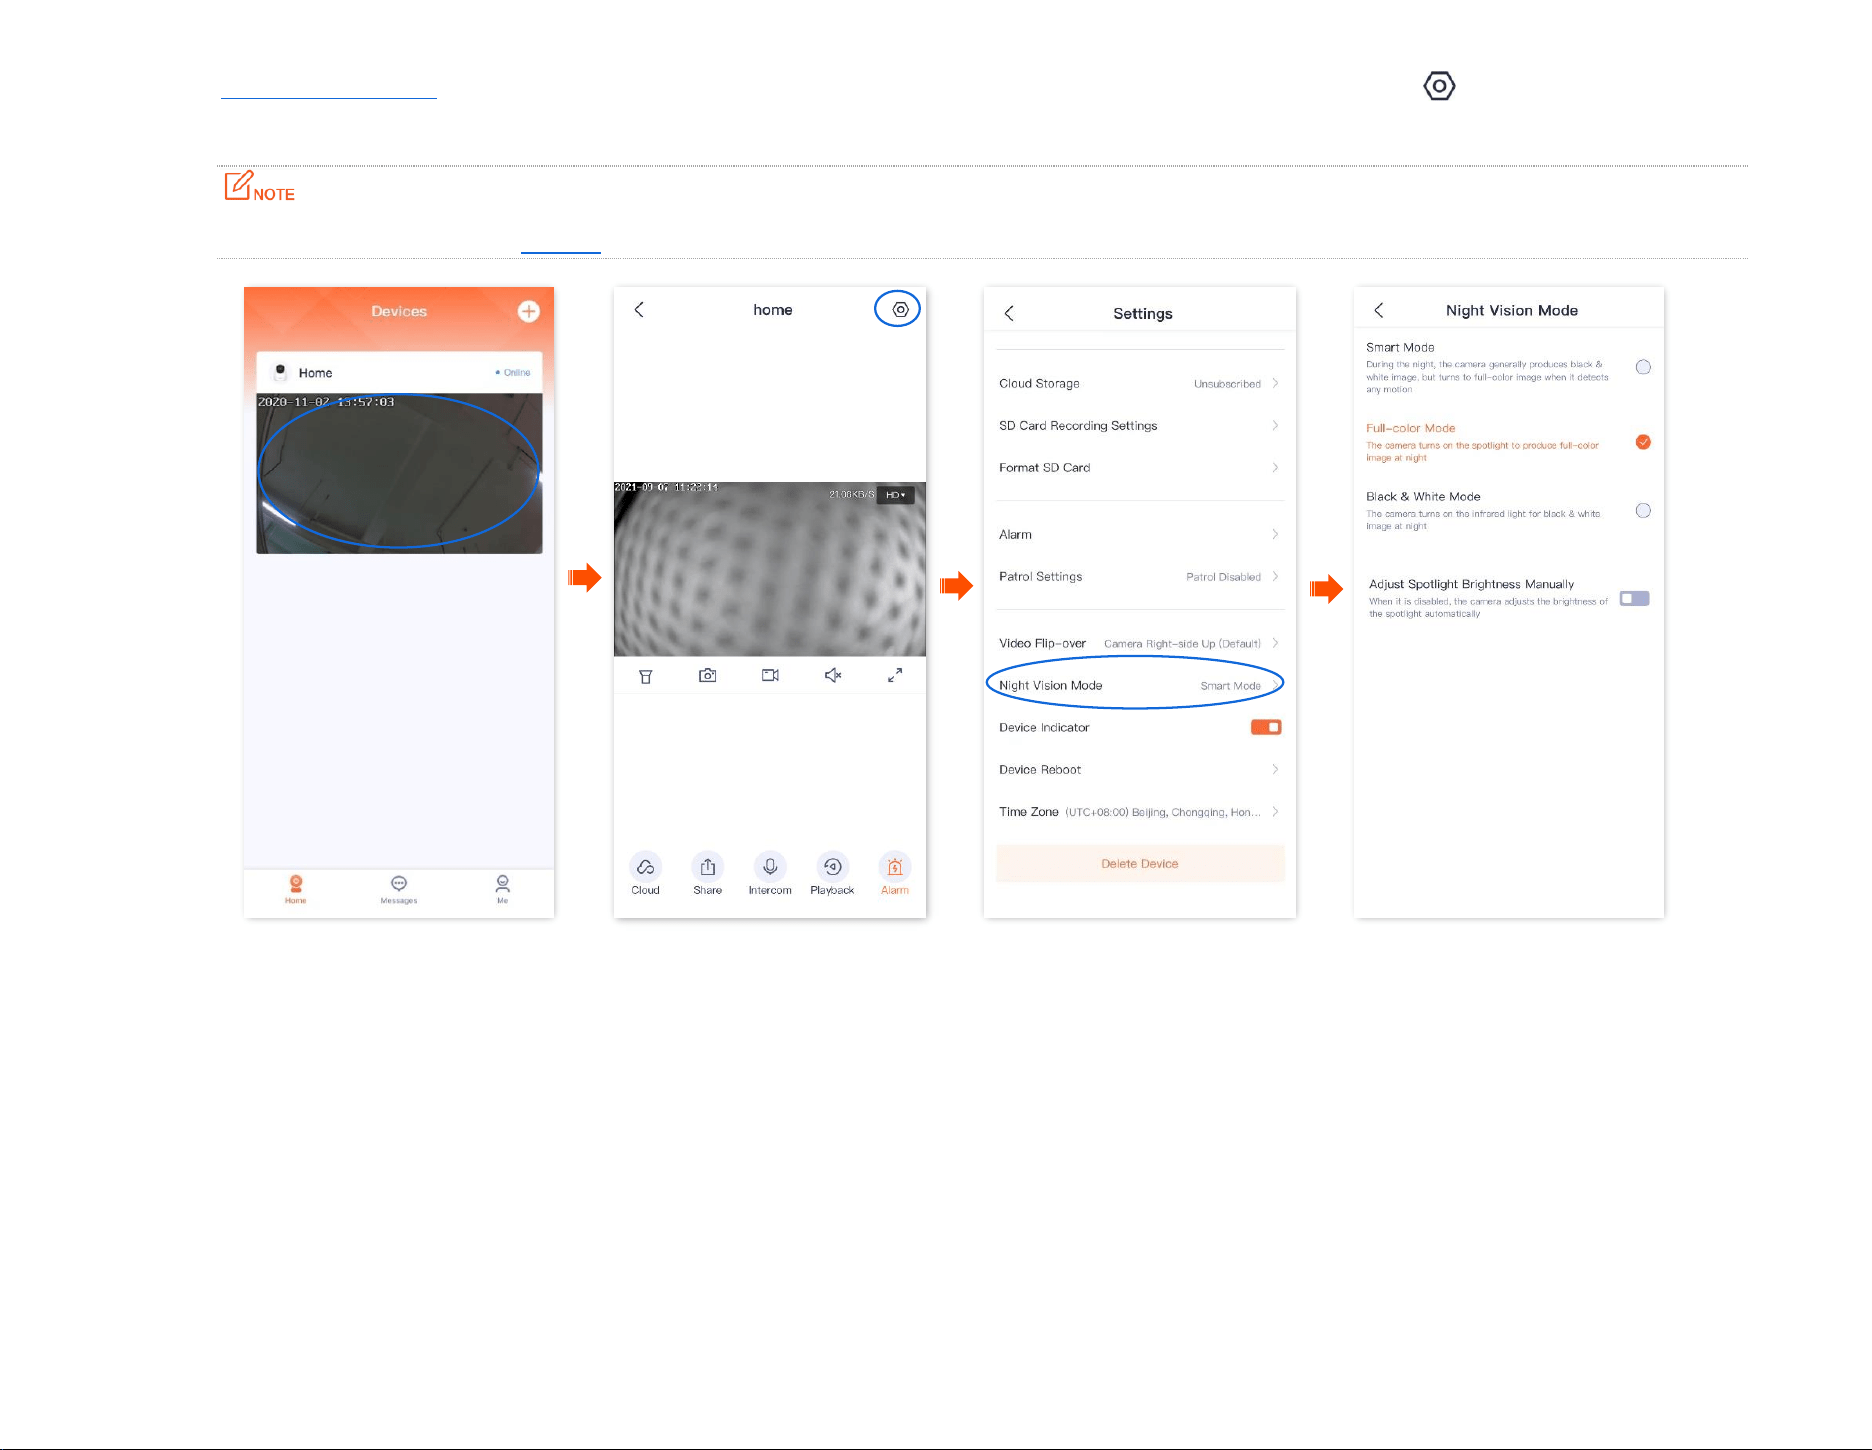
Document Version: V1.4
54
Step 1
Log in to TDSEE App. Tap the specific device on the homepage, which is the camera Home in this example. Tap in the upper right corner.
Step 2 Scroll down to the bottom of the page, find and tap Night Vision Mode. Select the mode according to the actual conditions.
If you manually turn on the fill light, the monitoring image will be colorful no matter which mode the camera works in.
----End
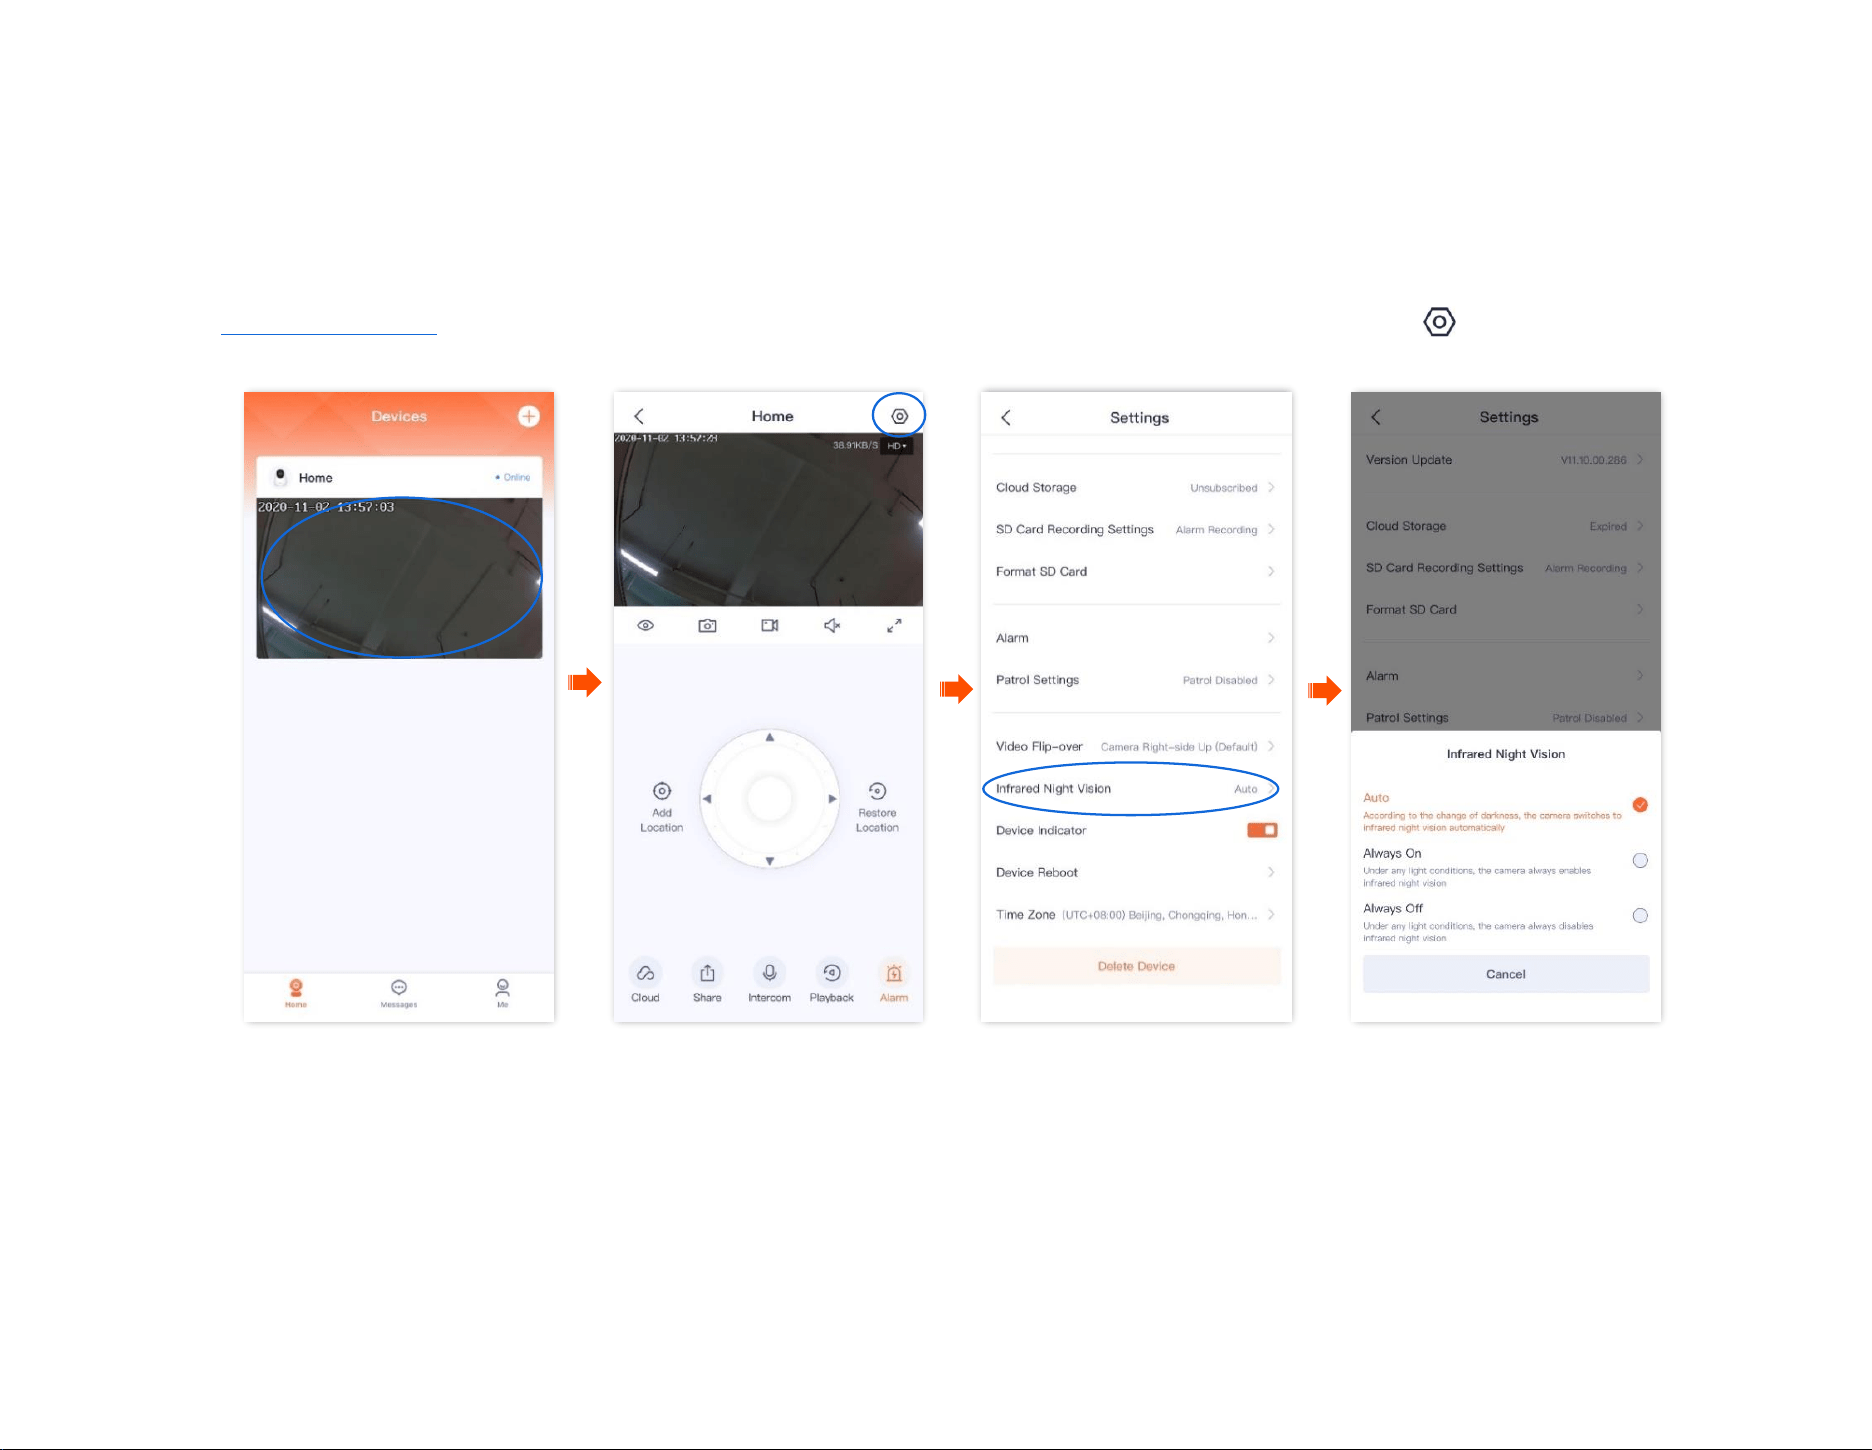
Document Version: V1.4
55
Set up infrared night vision
It applies to the infrared version camera. CP6 is used as an example for illustrations.
Infrared night vision indicates that in a dark environment without visible light or with weak light, the camera turns on the infrared light to ensure that
the camera can monitor normally, and the image is black and white.
Step 1
Log in to TDSEE App. Tap the specific device on the homepage, which is the camera Home in this example. Tap in the upper right corner.
Step 2 Scroll down to the bottom of the page, find and tap Infrared Night Vision. Select the mode according to the actual conditions.
----End
Document Version: V1.4
56
Parameter description
Infrared night vision
IR light status & Monitoring image
Auto
According to the brightness change of ambient light, the camera turns on or off the infrared night vision
automatically to adjust the color of the monitoring image.
If the brightness is strong enough, the monitoring image is colorful (IR lights are off).
If there is no light or weak light, the monitoring image is black and white (IR lights are on).
Always on
The camera always enables infrared night vision, and the monitoring image is black and white.
Always off
The camera always disables infrared night vision.
If the brightness is strong enough, the monitoring image is colorful.
If there is no light or weak light, the camera cannot monitor normally.

Document Version: V1.4
57
Enable WDR mode (Example: CH7-WCA)
The TDSEE App with version 1.3.0 is used for illustrations here.
In backlight mode, the monitoring image of the camera may be uneven. After the WDR Mode is enabled, the system will automatically adjust the
brightness of the dark and bright areas in the image to make the image clearer.
Step 1 Log in to TDSEE App, and enter the settings page of the camera.
- Method 1: Find the camera you want to enable WDR mode on the homepage, which is Home in this example, tap on the right
corner, and tap Device Settings.
- Method 2: Find the camera you want to enable WDR mode on the homepage, which is Home in this example, and tap Settings ( ) in
the upper-right corner.
Step 2
Tap Image Settings, and enable WDR Mode.
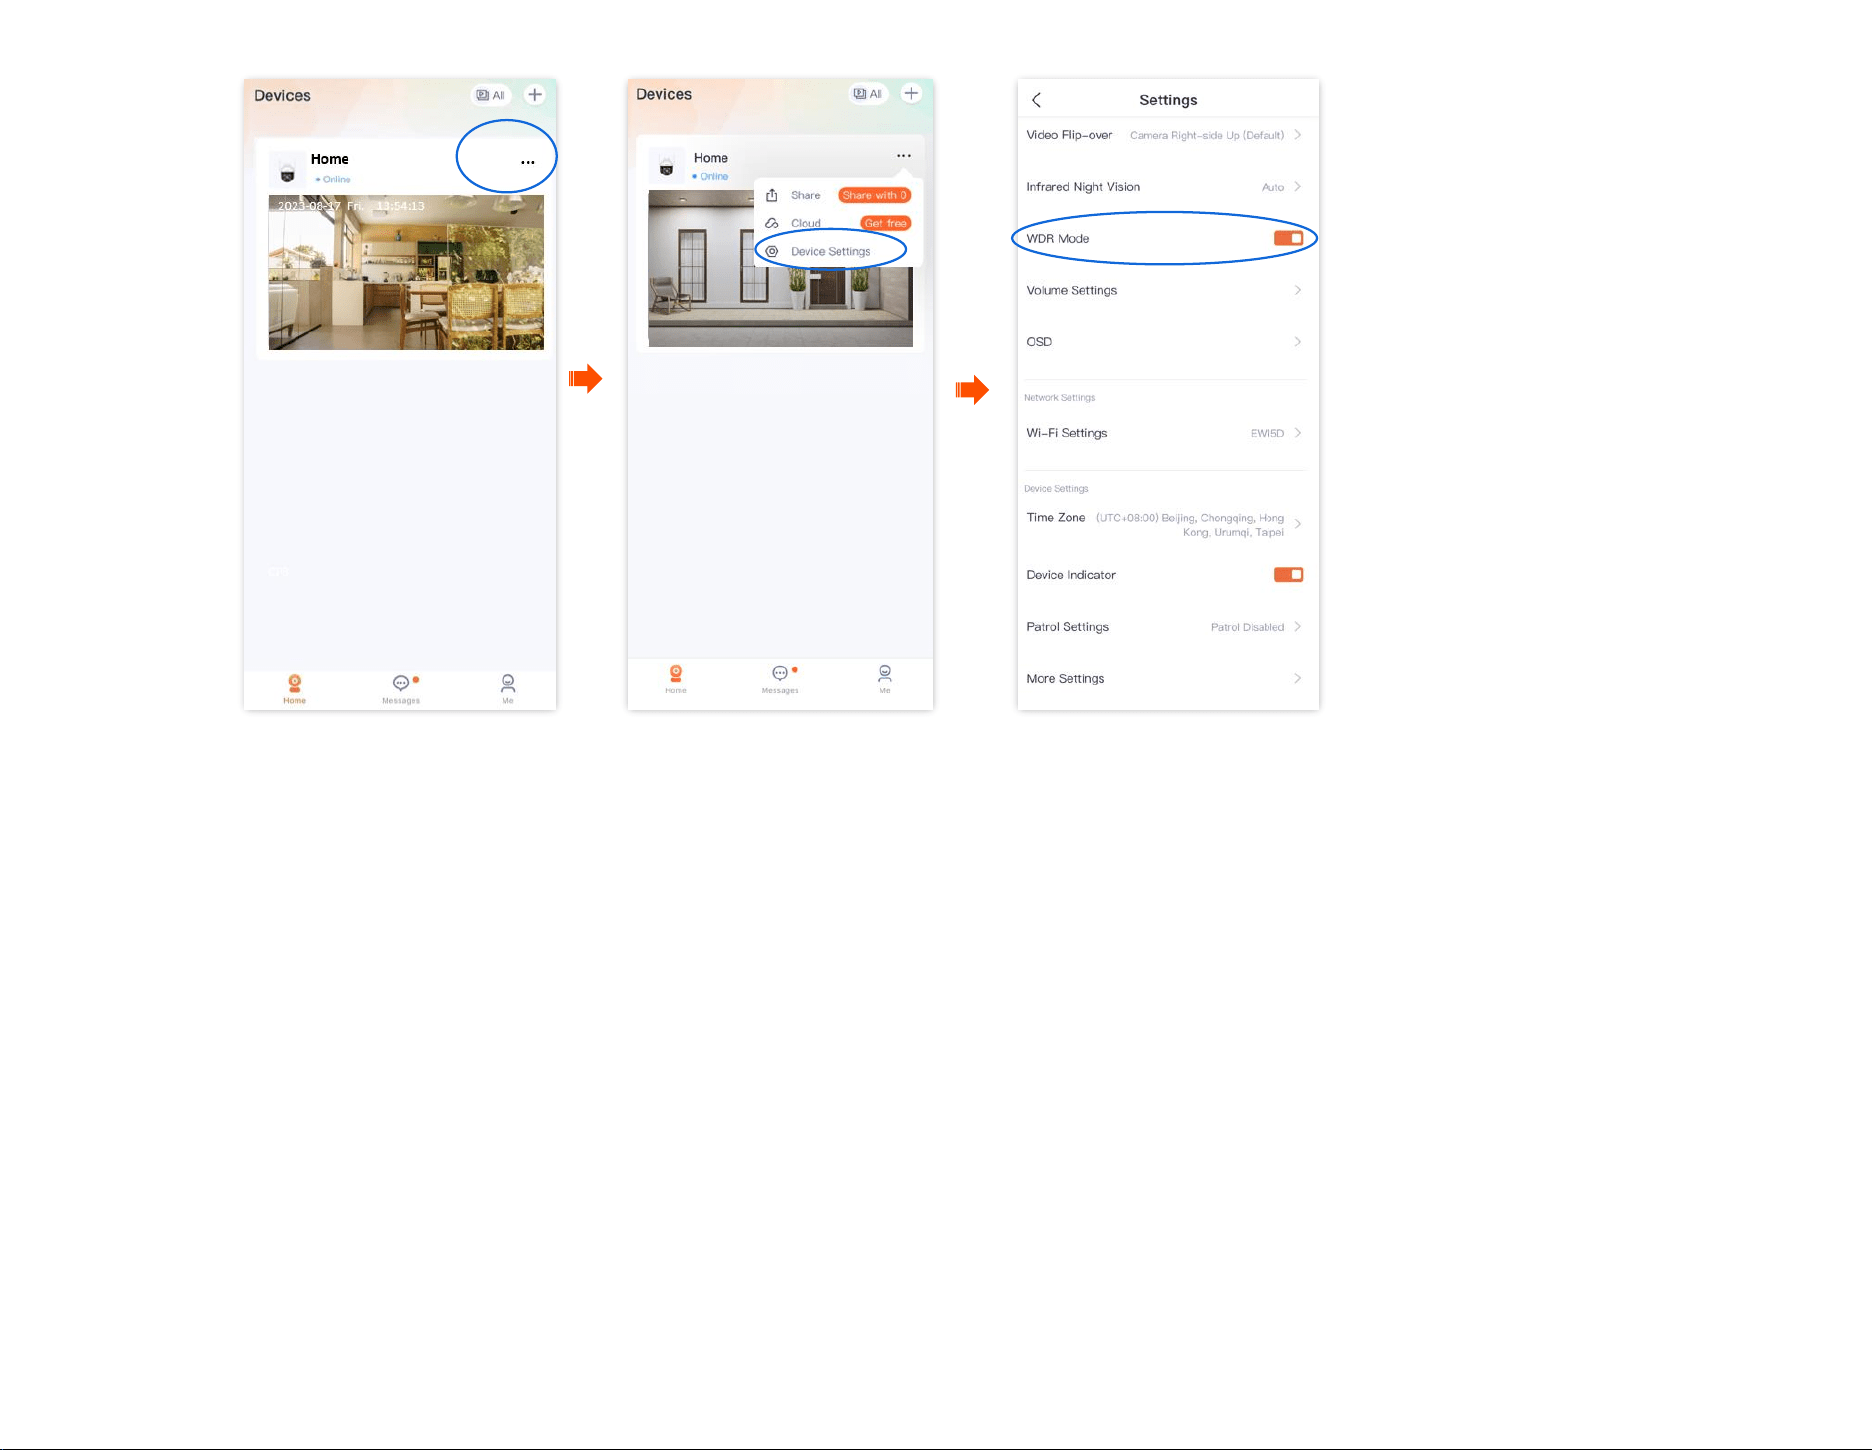
Document Version: V1.4
58
---End
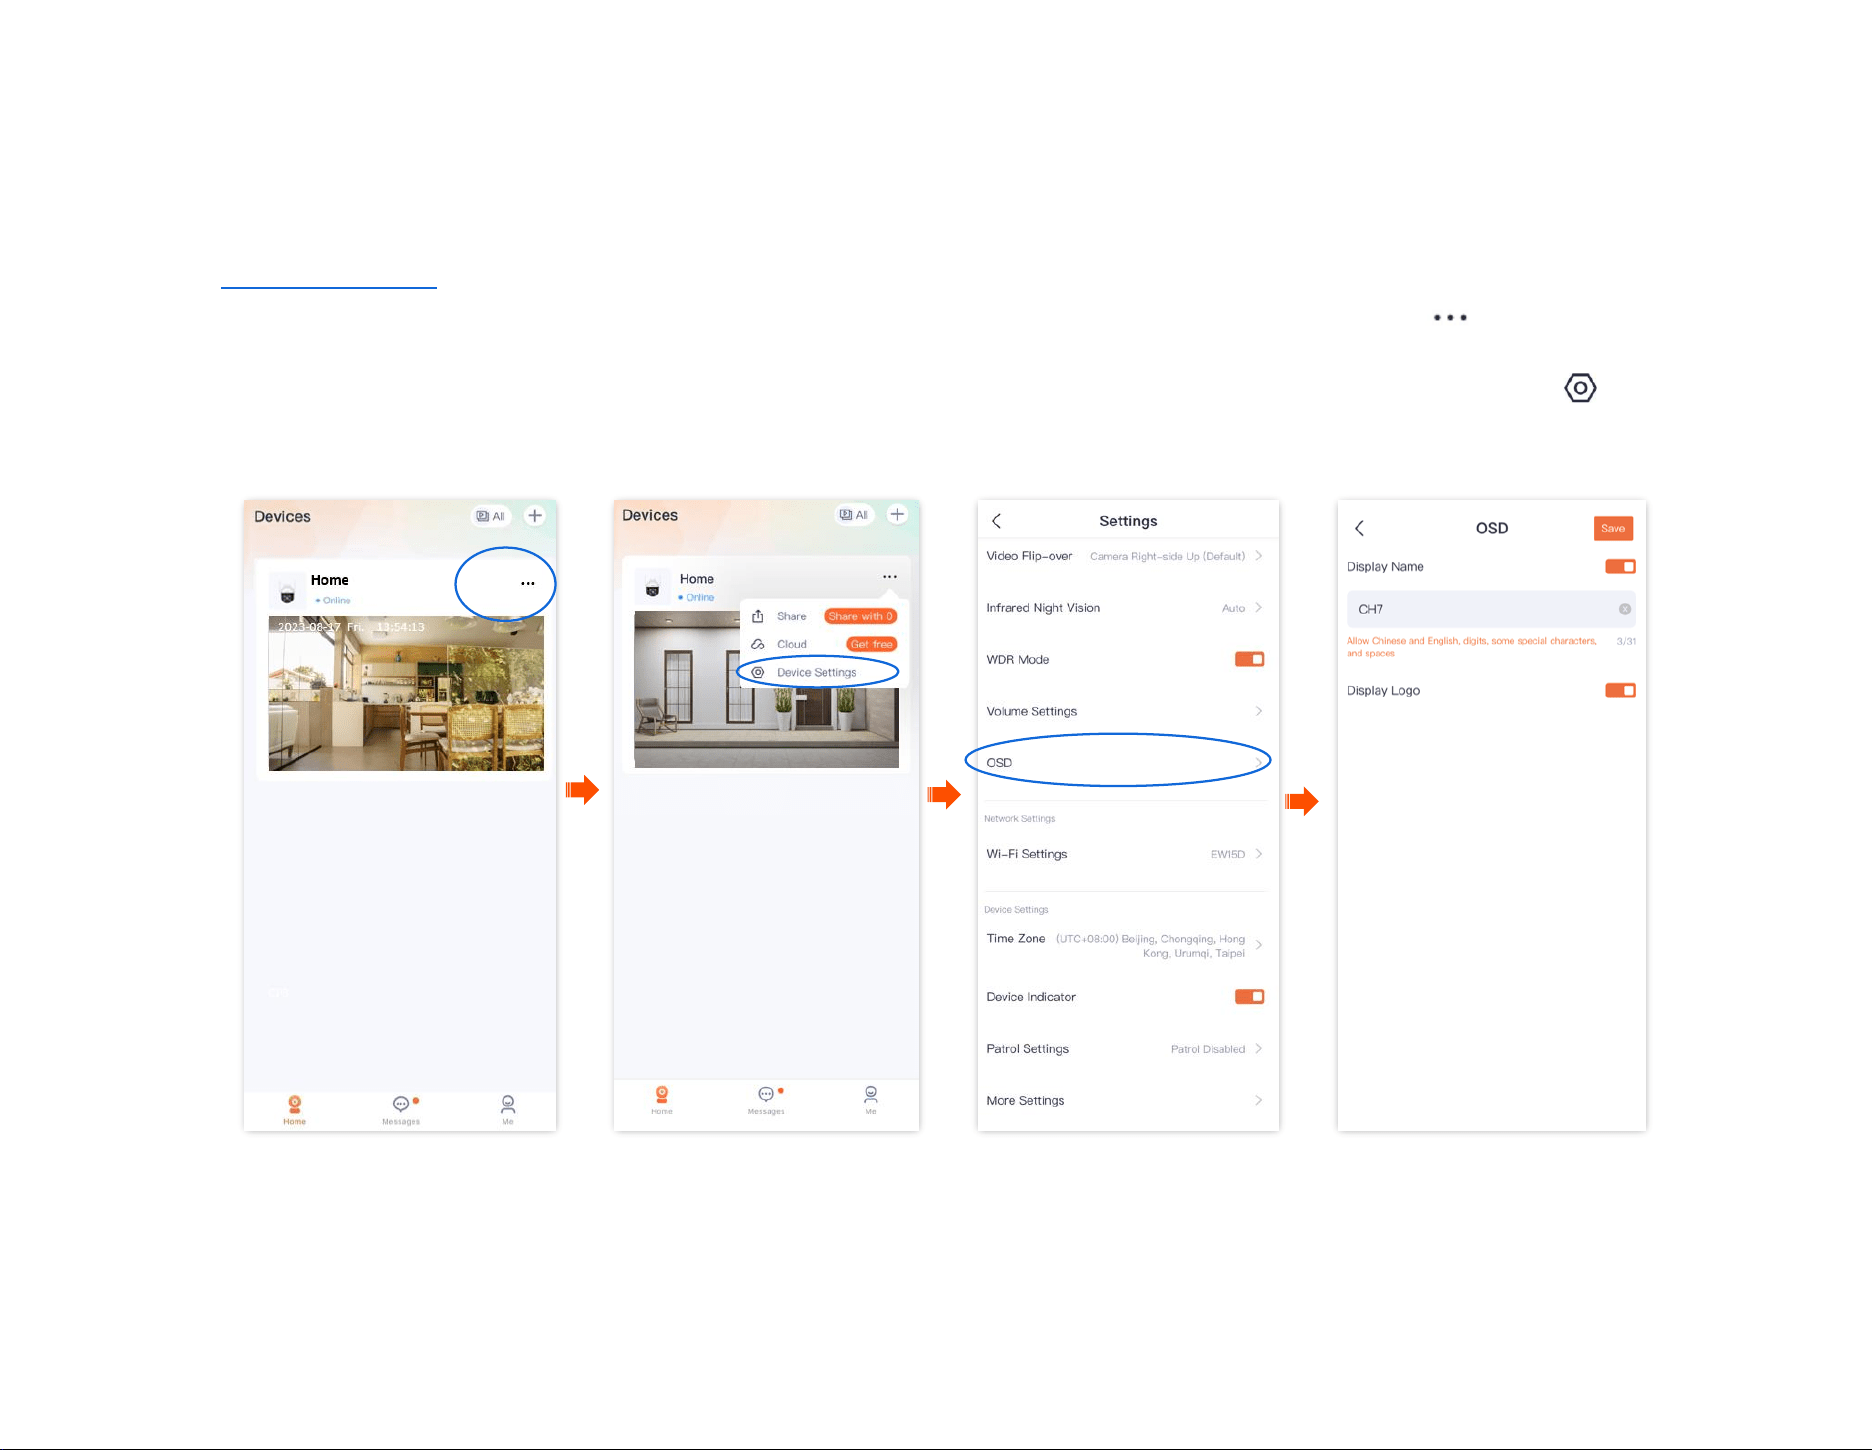
Document Version: V1.4
59
Set up OSD (Example: CH7-WCA)
The TDSEE App with version 1.3.0 is used for illustrations here.
After an OSD is set, you can see the camera name and Tenda logo in the monitoring image, which can enhance product publicity and visibility.
Step 1 Log in to TDSEE App, and enter the settings page of the camera.
- Method 1: Find the camera you want to set up OSD on the homepage, which is Home in this example, tap on the right corner,
and tap Device Settings.
- Method 2: Find the camera you want to set up OSD on the homepage, which is Home in this example, and tap Settings ( ) in the
upper-right corner.
Step 2 Tap OSD, and set the camera name and display the Tenda logo as required.
---End
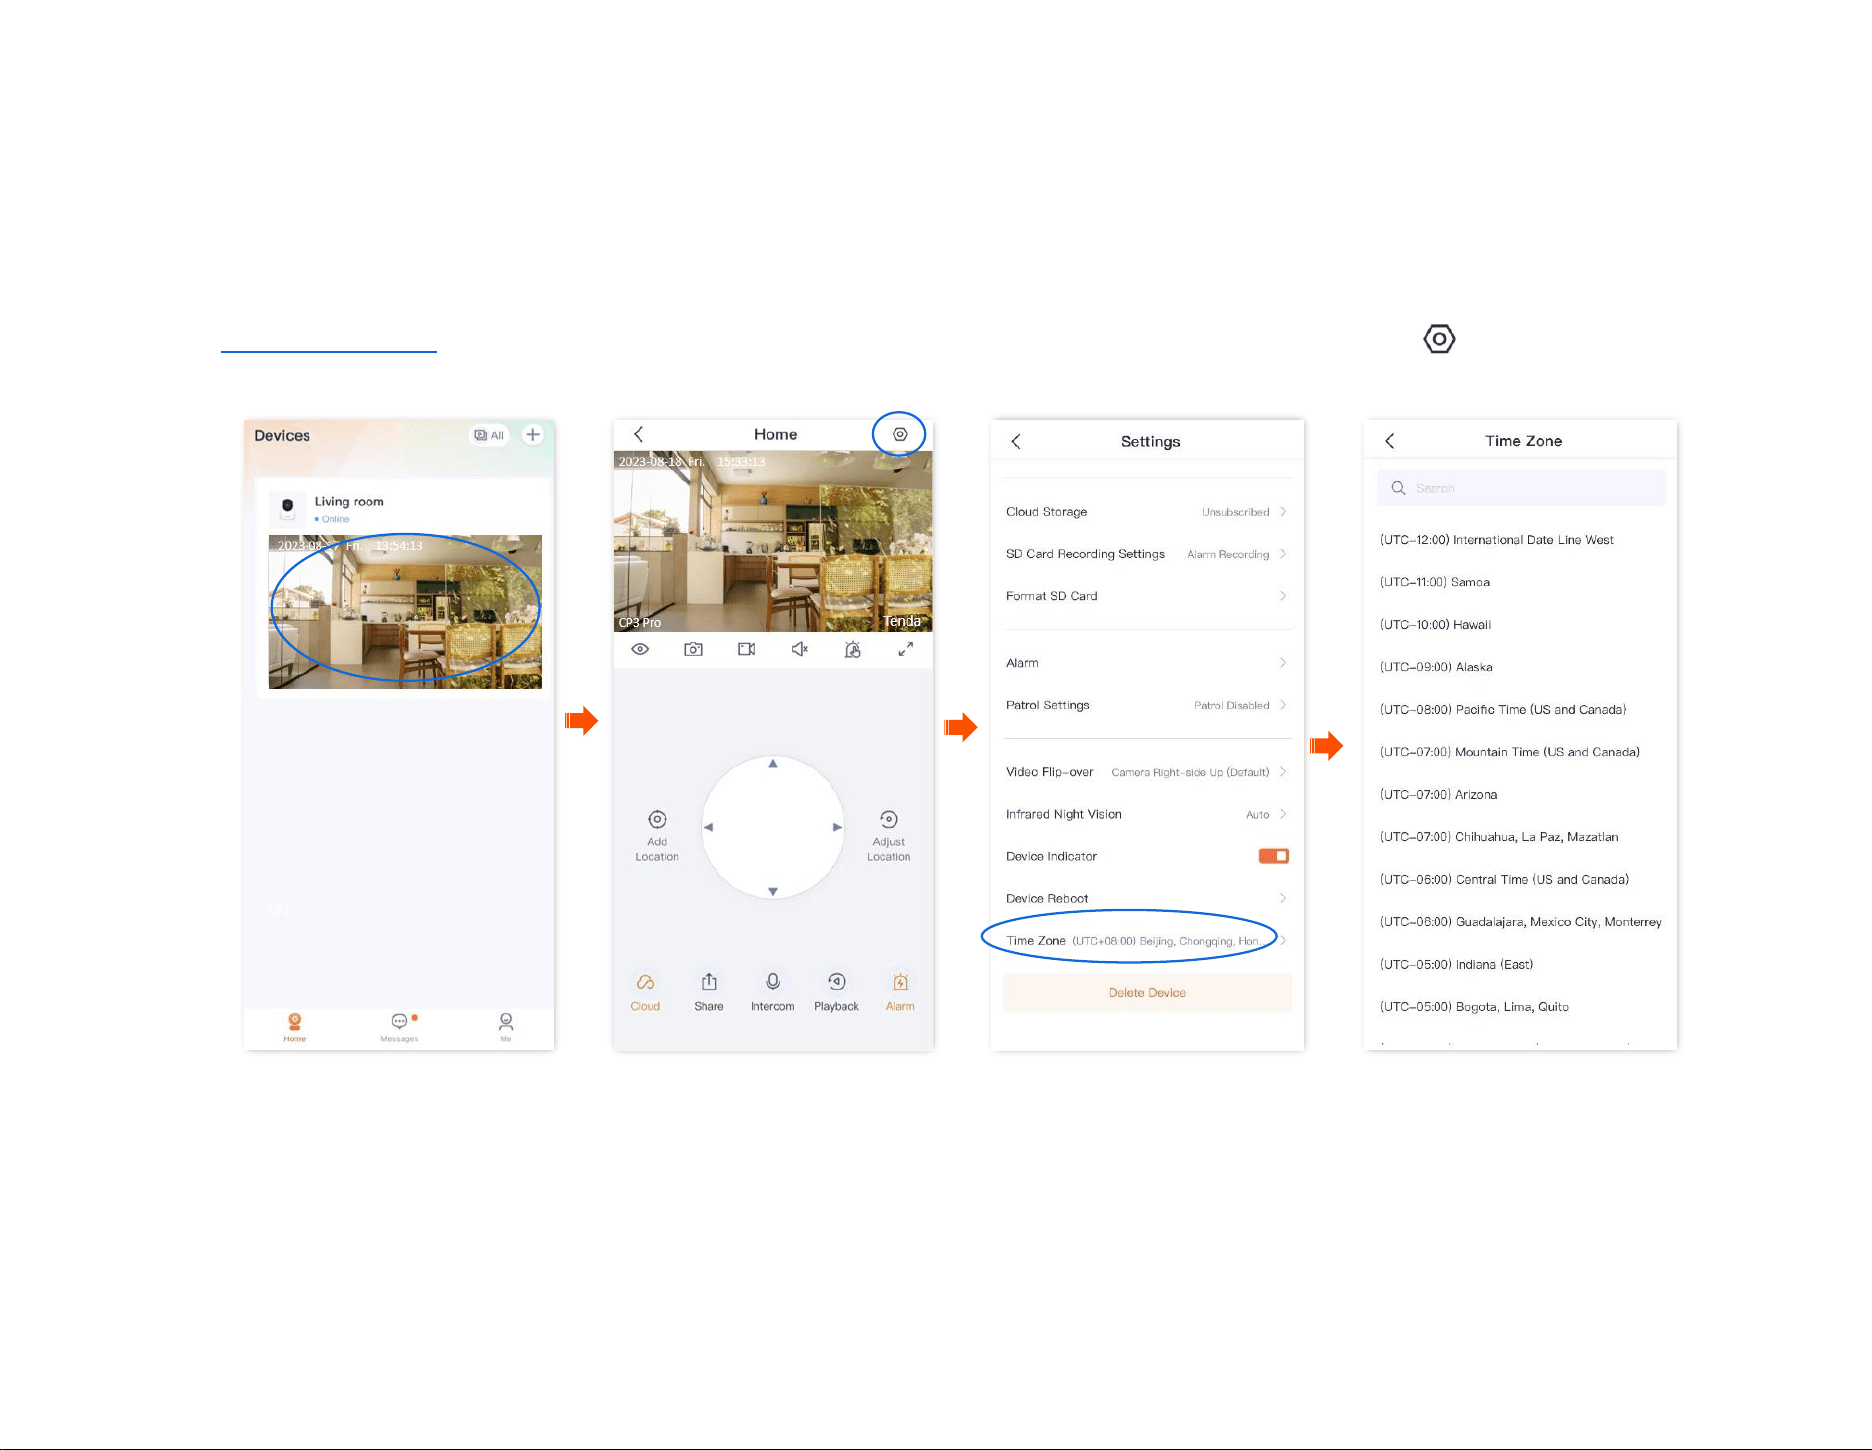
Document Version: V1.4
60
Modify the time zone
The TDSEE App with version 1.1.8 is used for illustrations here.
You can modify the time zone of the device here.
For time-based functions to take effect correctly, ensure that the time zone of your device is correct.
Step 1
Log in to TDSEE App. Tap the specific device on the homepage, which is the camera Home in this example. Tap in the upper right corner.
Step 2 Scroll down to the bottom of the page, tap Time Zone, and select a time zone according to the actual conditions.
----End
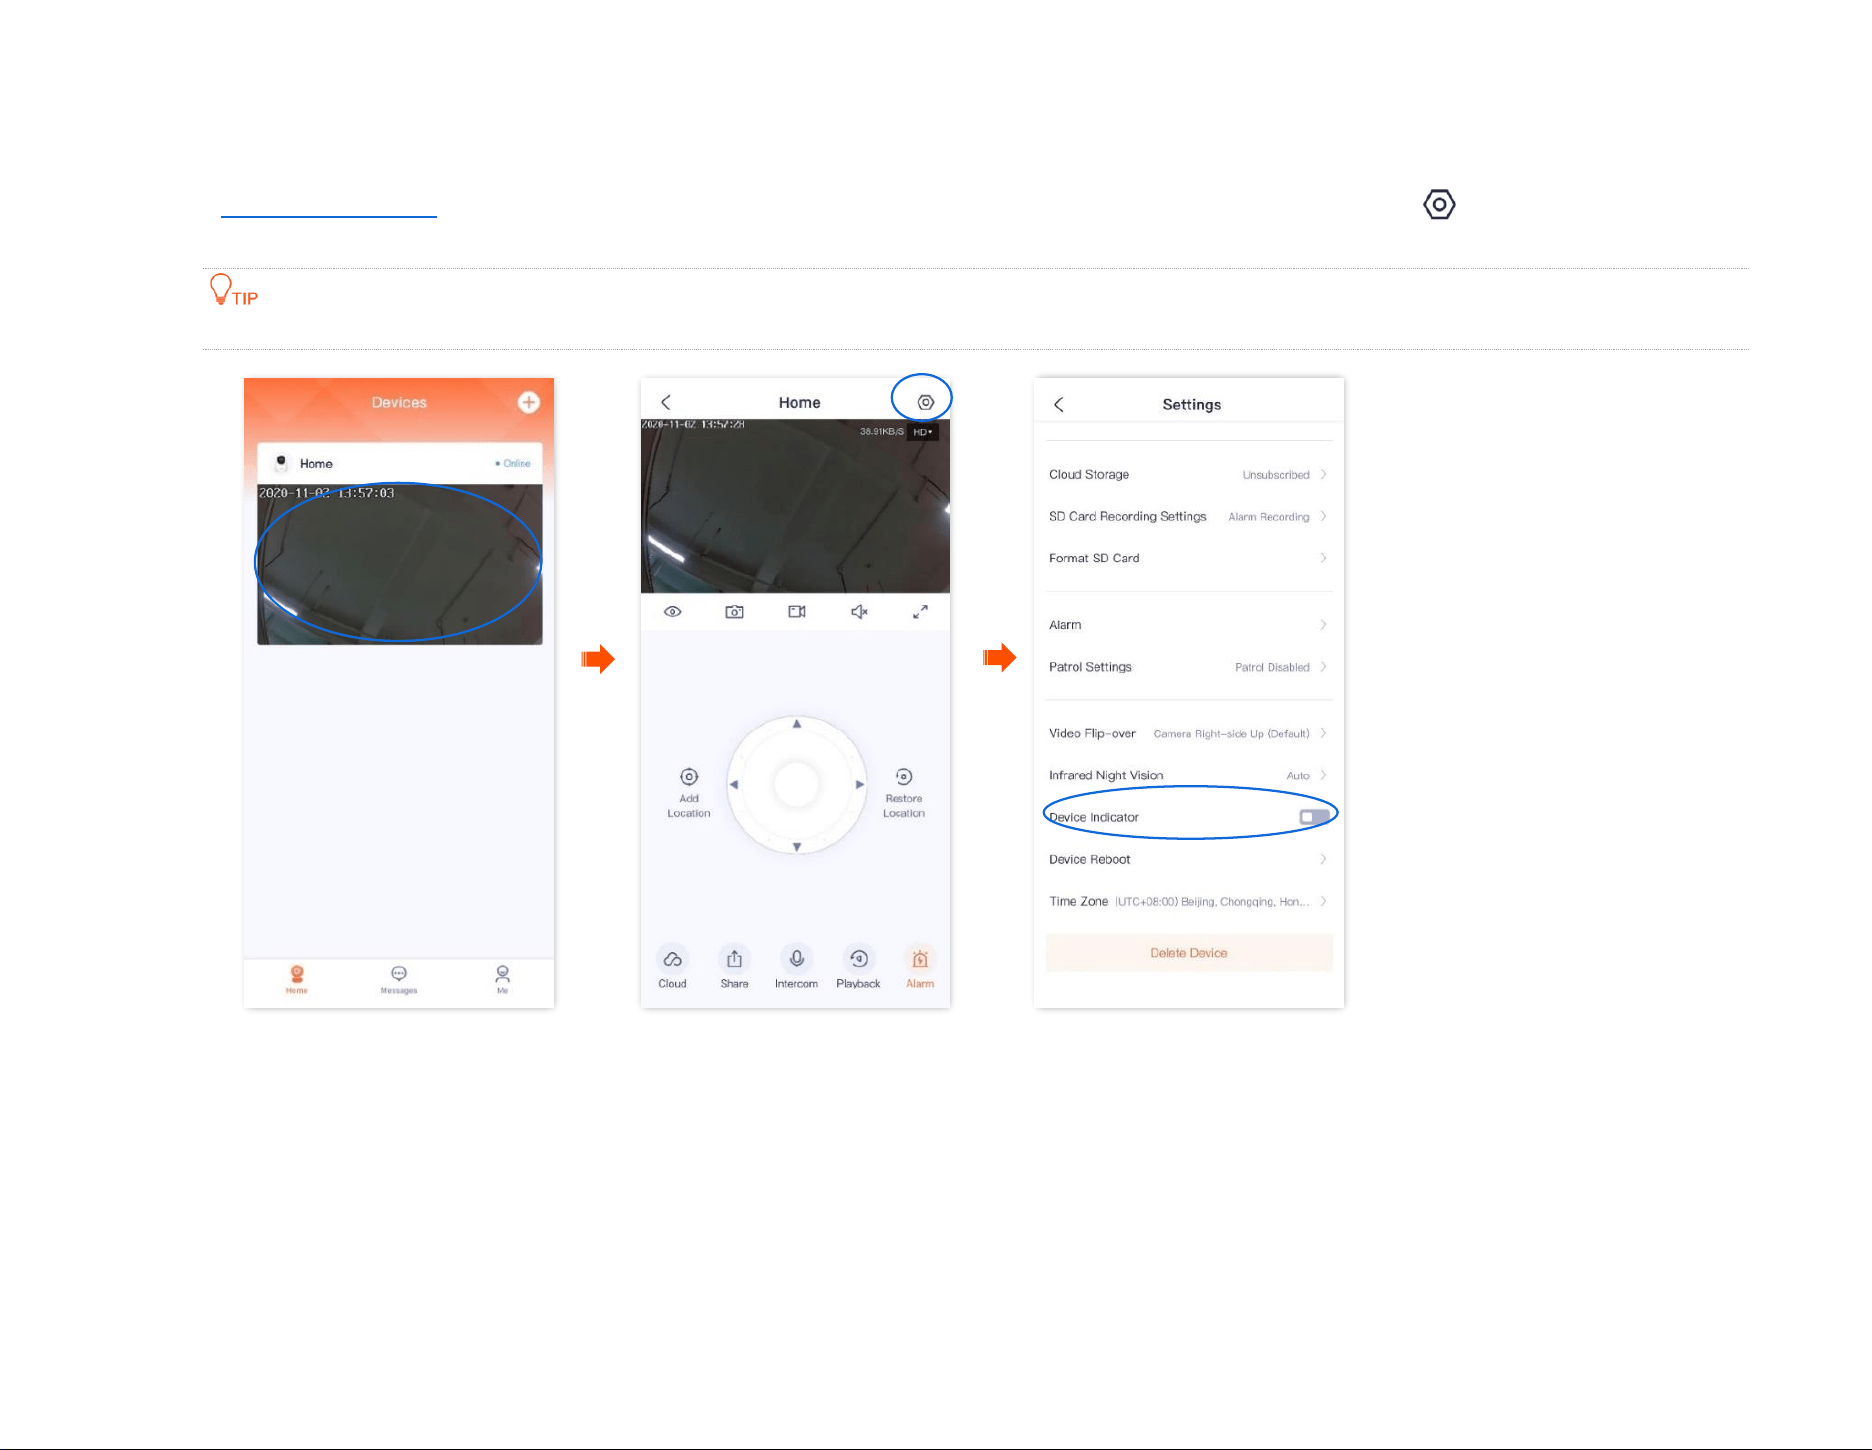
Document Version: V1.4
61
Turn off the LED indicator of the device
Step 1
Log in to TDSEE App. Tap the specific device on the homepage, which is the camera Home in this example. Tap in the upper right corner.
Step 2
Scroll down to the bottom of the page, find Device Indicator and disable it.
After the LED indicator of the device is turned off, you can turn on it again on this page.
----End

Document Version: V1.4
62
Patrol settings (Example: CH7-WCA)
The TDSEE App with version 1.1.11 is used for illustrations here.
Log in to the TDSEE App, tap the specific device on the homepage, tap in the upper right corner, then tap Patrol Settings.
You can set up patrol of the camera, including panoramic patrol and location patrol.
− Panoramic patrol: The camera performs 360° patrol of its surroundings.
− Location patrol: The camera patrols the location you specified. You need to add the location in Basic settings in advance.
Assume that you want to use the camera to monitor gate and garage area every 10 minutes at 9:00 to 20:00 from Monday to Friday.
Step 1 Add the camera patrol location.
1 Log in to TDSEE App. Tap the specific device on the homepage, which is the camera Home in this example.
2
Tap to adjust the location you want to monitor, which is Gate in this example. Then tap Add Location.
3
Tap , personalize a name with location, which is Gate in this example, and tap Save.
If you want to delete the previously added location, tap Edit, select the location and tap Delete.
The location added after the specified position patrol is enabled will be added to the camera during the next patrol.
4 Refer to substeps 2 to 3 to add the locations of the garage.
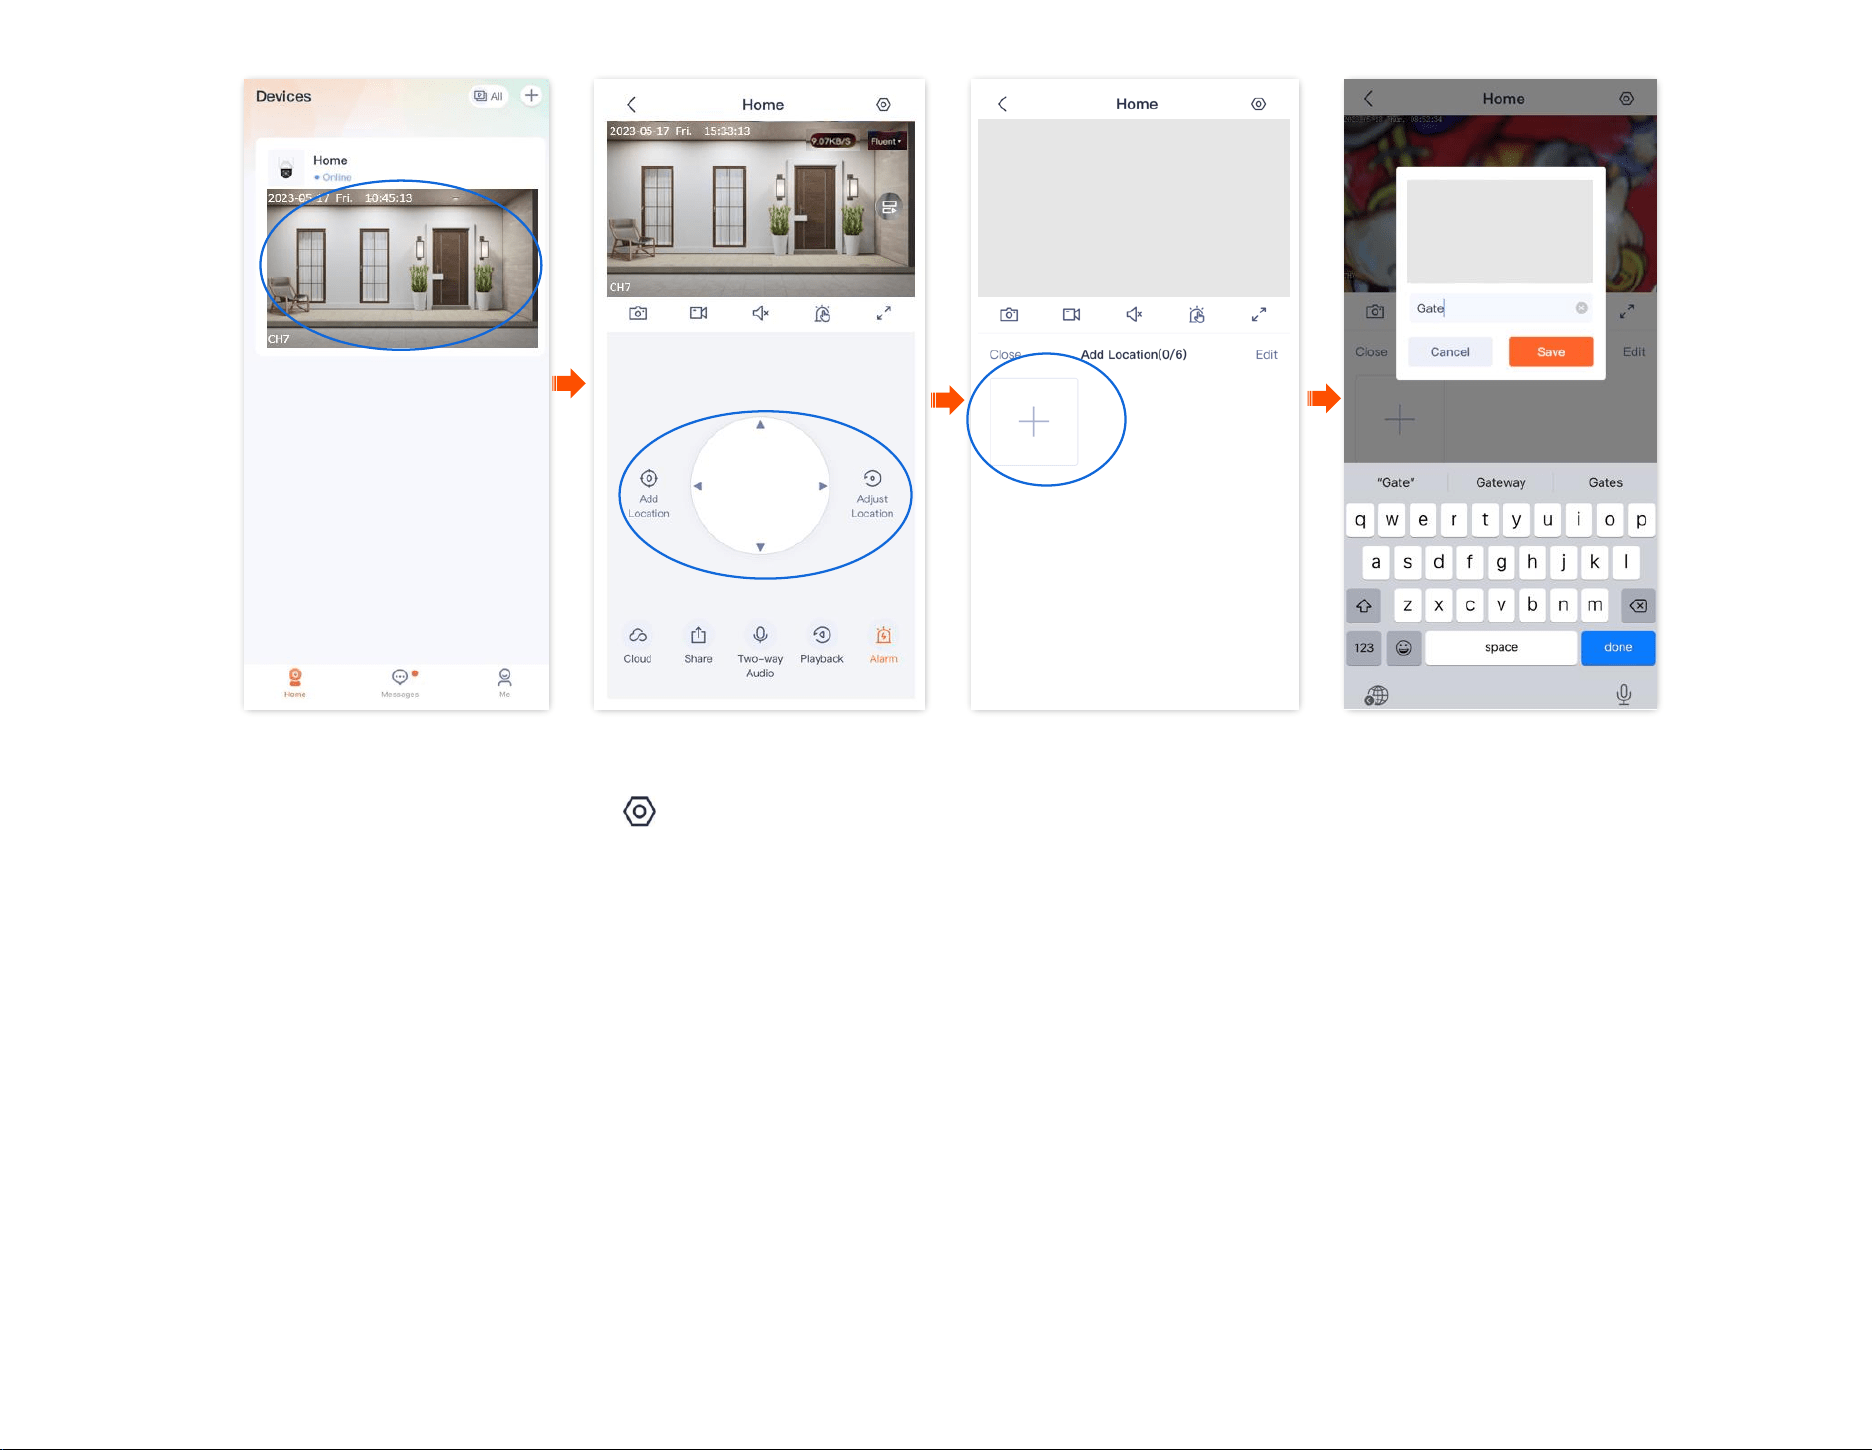
Document Version: V1.4
63
Step 2 Set a camera to patrol the gate and garage area every 10 minutes at 9:00 to 20:00 from Monday to Friday.
1
Enter the camera monitor page, tap in the upper right corner, then tap Patrol Settings.
2 Enable the Patrol Settings function, and select Custom Patrol.
3 Set Patrol Period to 9:00-20:00 from Monday to Friday, and set Patrol Interval to 10 minutes.
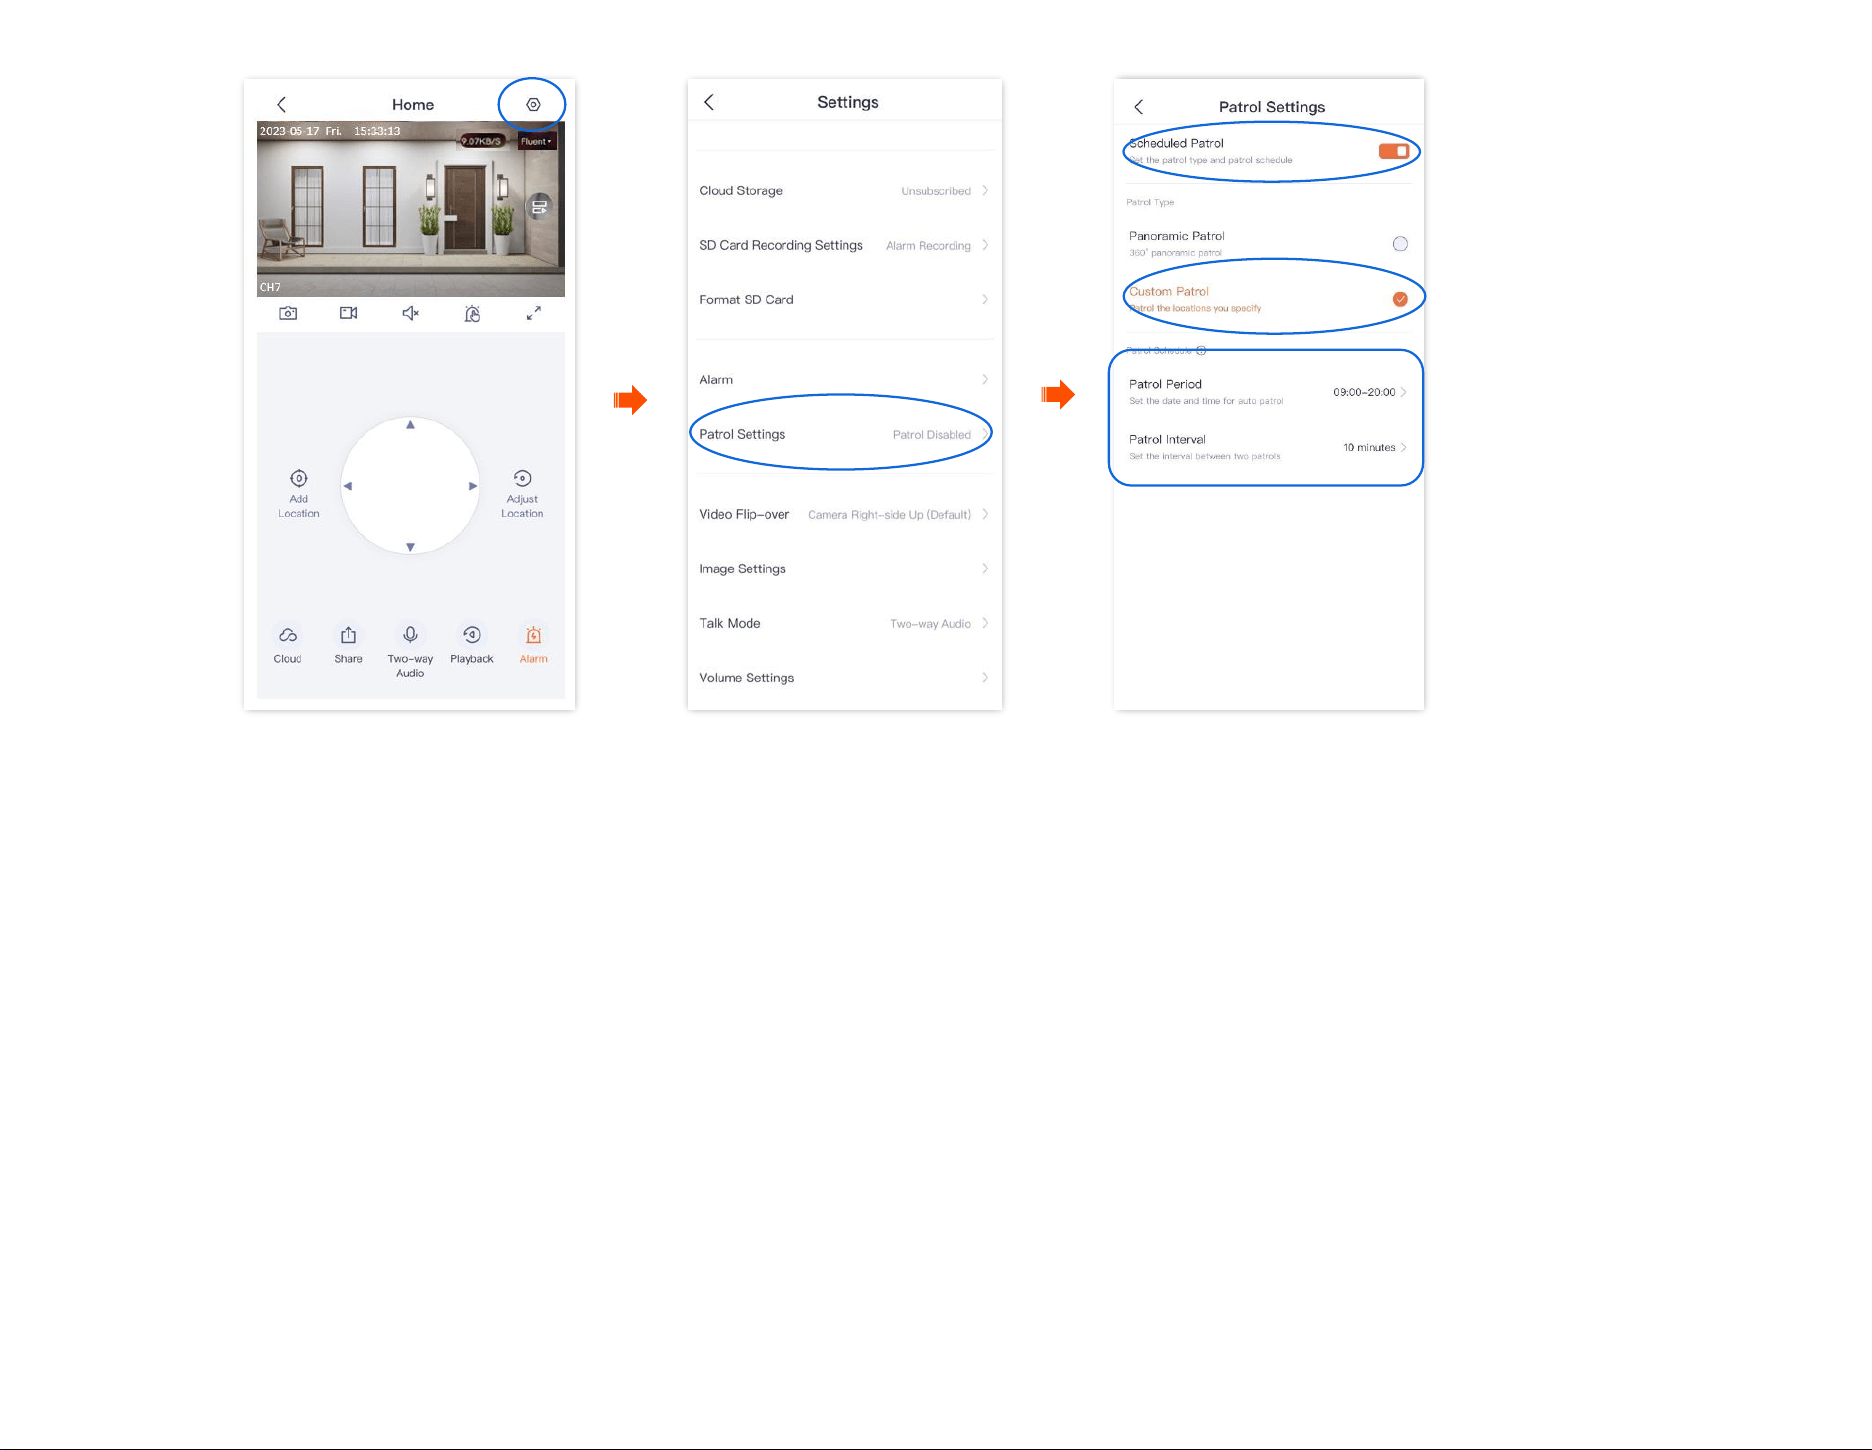
Document Version: V1.4
64
---End
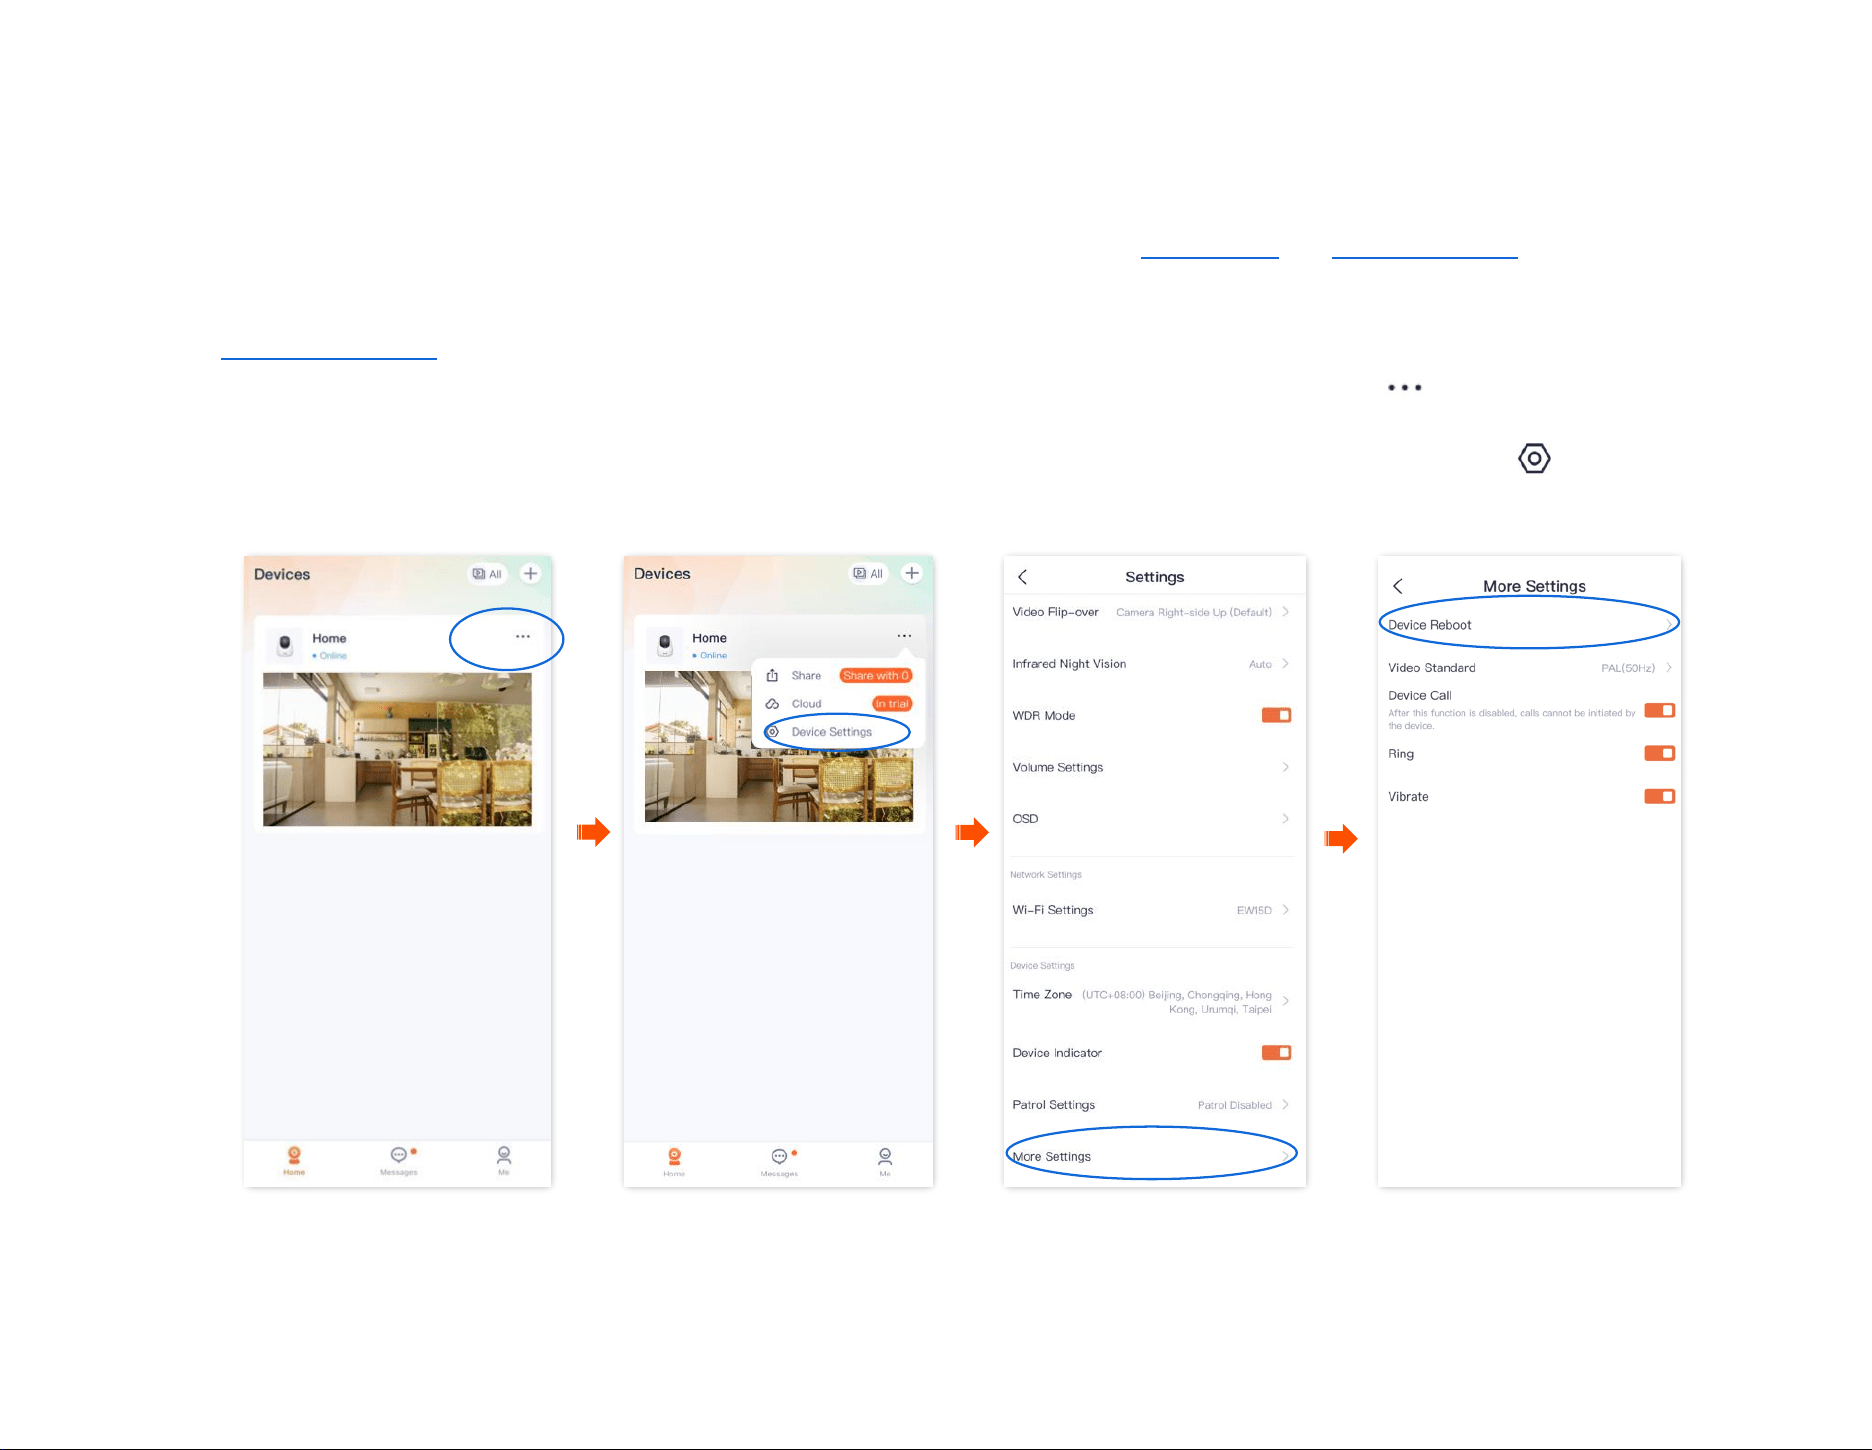
Document Version: V1.4
65
Device reboot
The TDSEE App with version 1.3.0 is used for illustrations here.
You can reboot the device on the Settings page. There are two methods to reboot the device: Reboot Now and Schedule Reboot.
Reboot the device now
Step 1 Log in to TDSEE App, and enter the settings page of the camera.
- Method 1: Find the camera you want to reboot on the homepage, which is Home in this example, tap on the right corner, and
tap Device Settings.
- Method 2: Find the camera you want to reboot on the homepage, which is Home in this example, and tap Settings ( ) in the upper-
right corner.
Step 2
Scroll down to the bottom of the page, and navigate to More Settings > Device Reboot.
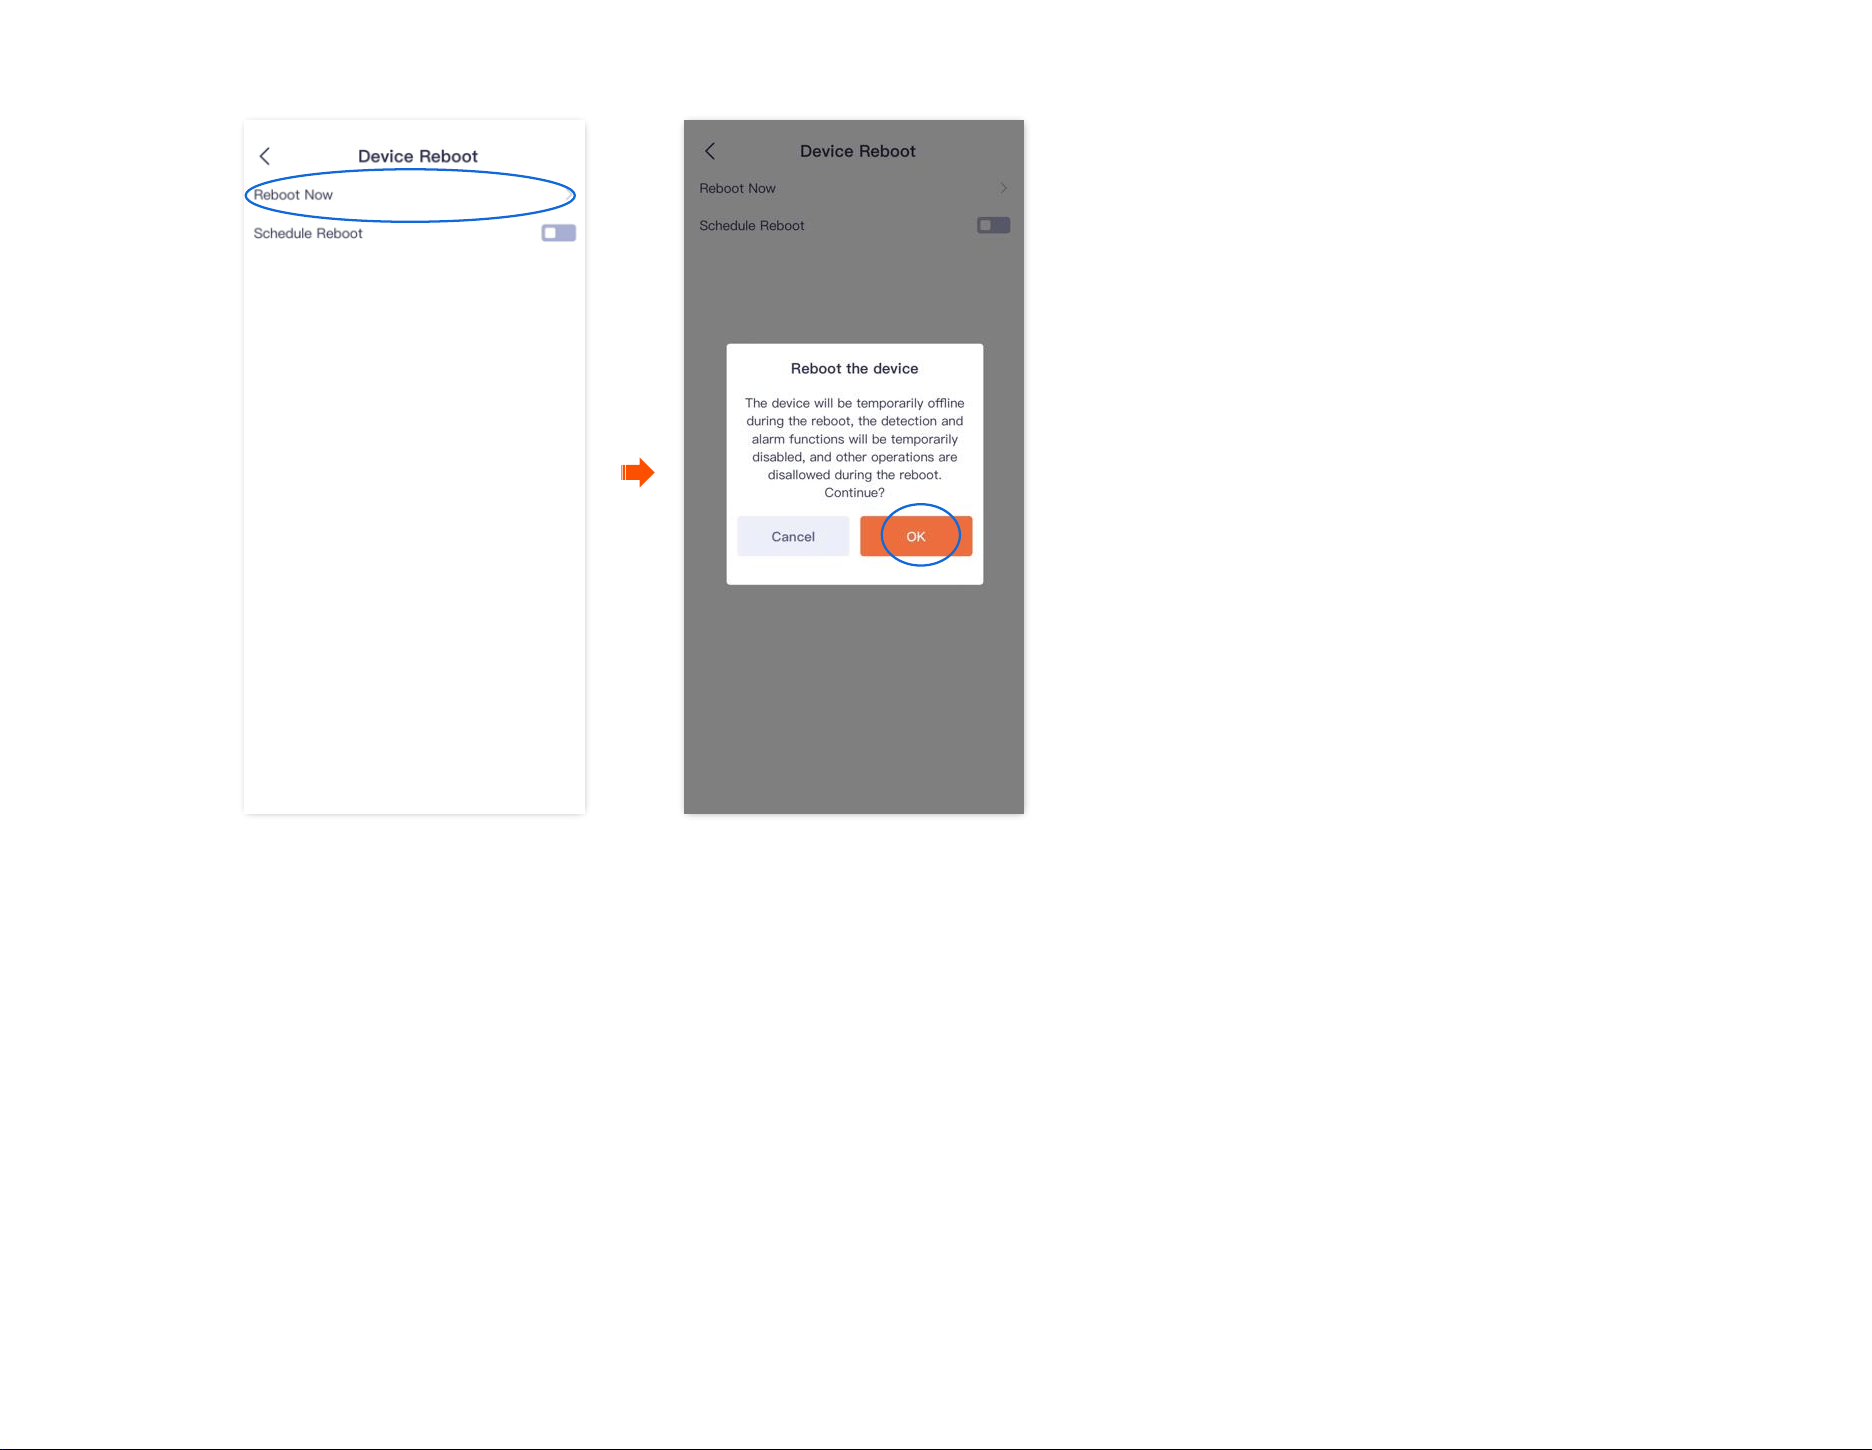
Document Version: V1.4
66
Step 3
Tap Reboot Now, and then tap OK in the pop-up window.
----End
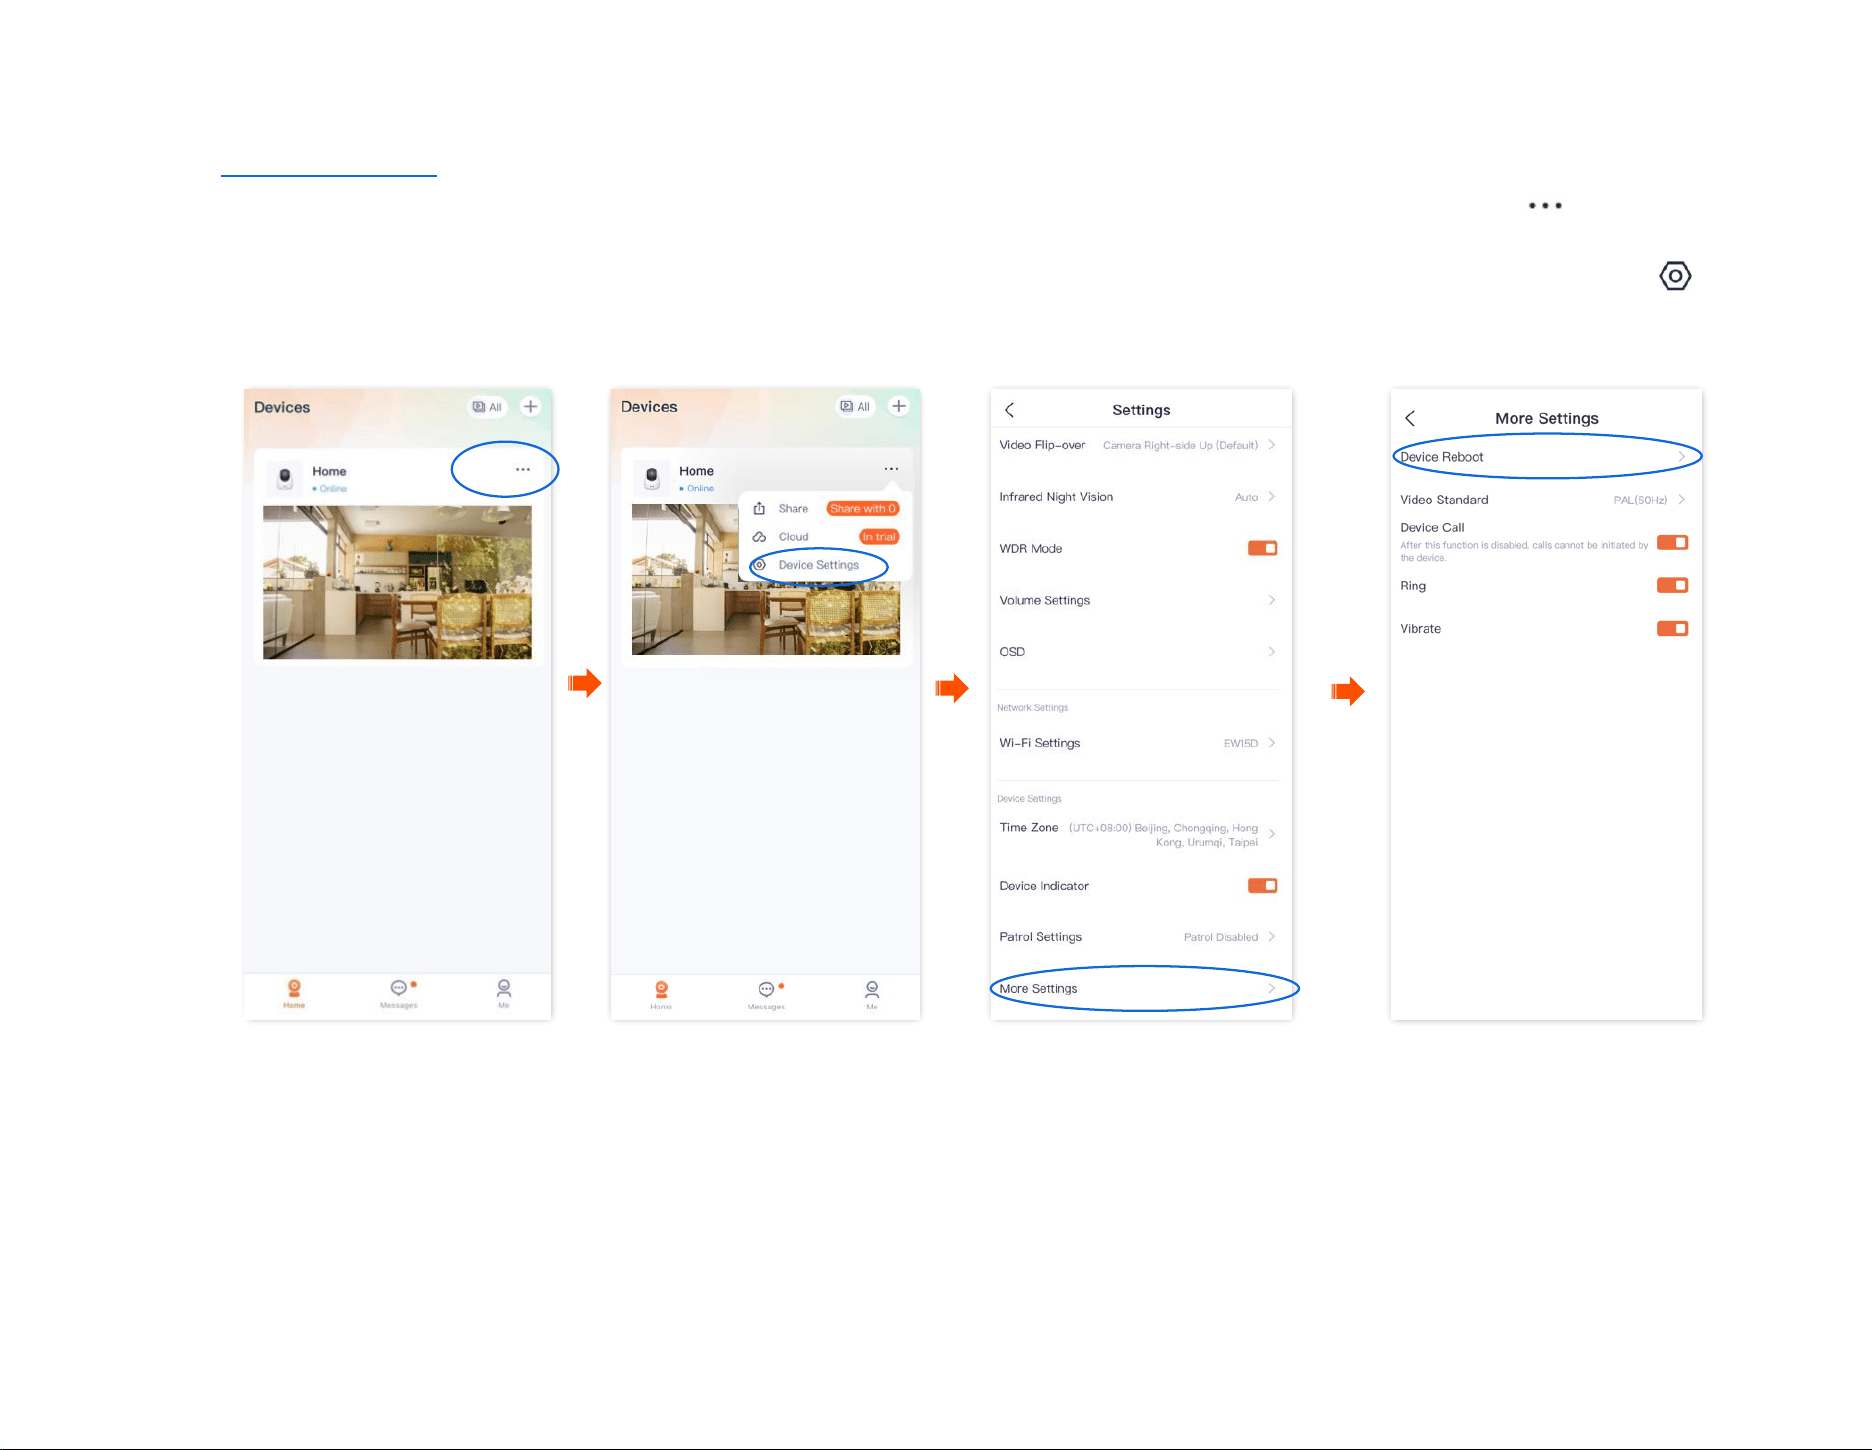
Document Version: V1.4
67
Reboot schedule
Step 1 Log in to TDSEE App, and enter the settings page of the camera.
- Method 1: Find the camera you want to set schedule reboot on the homepage, which is Home in this example, tap on the right
corner, and tap Device Settings.
- Method 2: Find the camera you want to set schedule reboot on the homepage, which is Home in this example, and tap Settings ( ) in
the upper-right corner.
Step 2
Scroll down to the bottom of the page, and navigate to More Settings > Device Reboot.

Document Version: V1.4
68
Step 3
Enable the Schedule Reboot. Tap Reboot Time to set the time and date, which are 08:00:00 and Mon in this example, and then tap OK.
---End
Settings completed. The device will reboot automatically every Monday at 8:00 am.
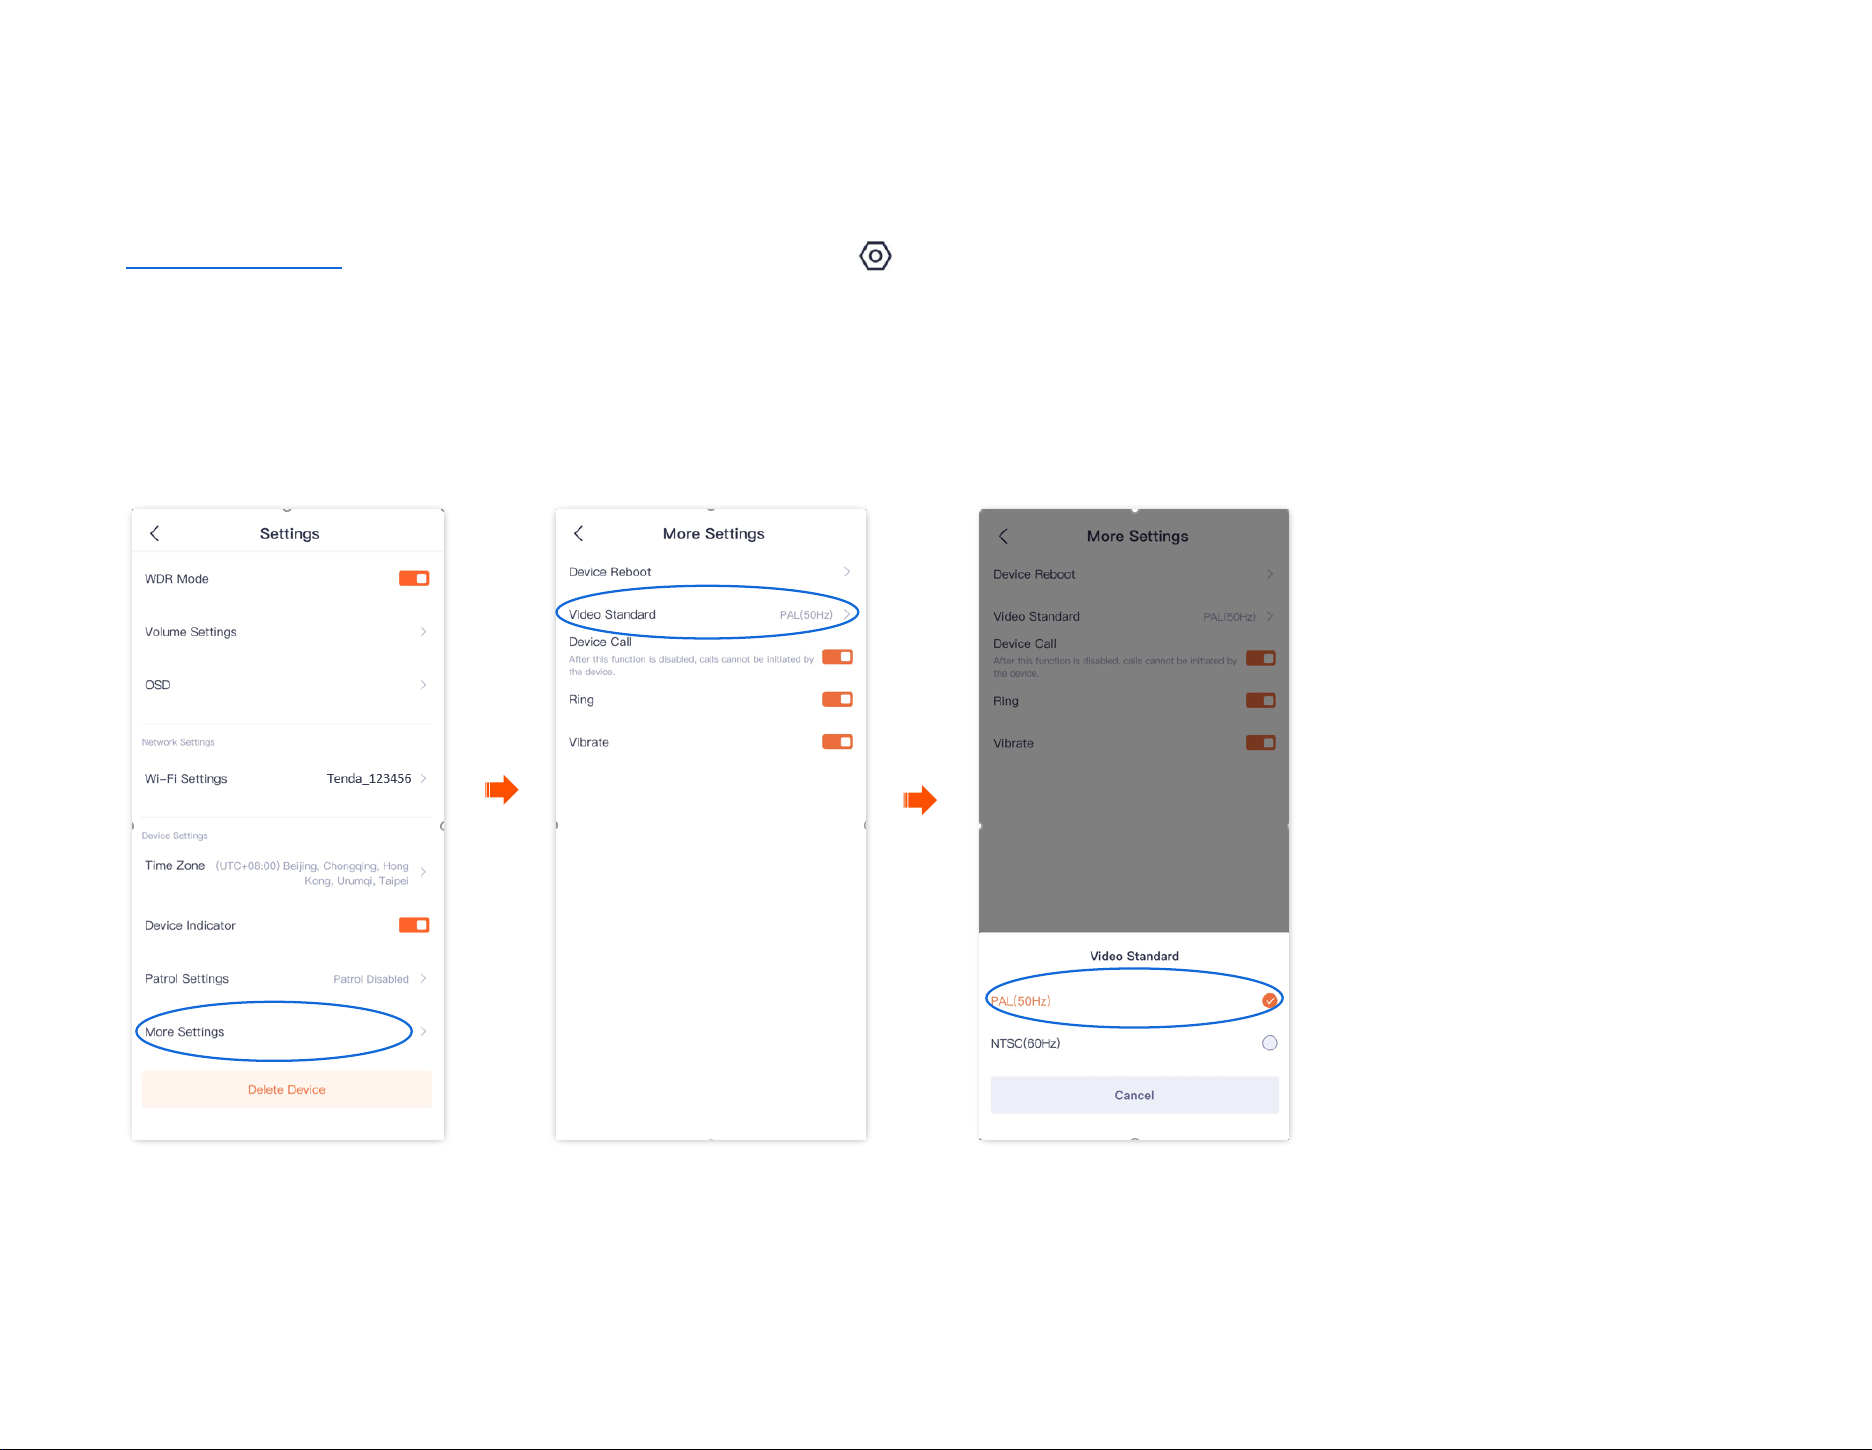
Document Version: V1.4
69
Modify the video standard (Example: CP3 Pro)
The TDSEE App with version 1.3.0 is used for illustrations here.
Log in to TDSEE App. Tap the specific device on the homepage. Tap in the upper right corner, and navigate to More Settings > Video Standard.
Here, you can modify the video standard to solve the problem that the video cannot be displayed normally due to the different formats used in
different countries/regions.
- PAL(50Hz): Phase Alternating Line. It is available for such countries or regions as mainland China, China Hong Kong, and the United Kingdom.
- NTSC(60Hz): National Television System Committee. It is available for such countries or regions as China Taiwan, the United States, Japan, and
Canada.
Document Version: V1.4
70
Enable the device call (Example: CP3 Pro)
The TDSEE App with version 1.3.0 is used for illustrations here.
The Device Call function is used with the hardware one-touch call button of the camera. After the Device Call function is enabled, if you press
the one-touch call button (1-3 seconds) of the camera, you can receive a voice call on the TDSEE App (the camera has been added), at this
time, tap the accept button, the App side and the camera side can realize two-way communication.
When the TDSEE App is in the background or closed, you need to tap the message in the push bar to enter the TDSEE App, and then you can
tap the accept button to realize two-way communication.
Step 1 Log in to TDSEE App, and enter the settings page of the camera.
- Method 1: Find the camera you want to enable the device call on the homepage, which is Home in this example, tap on the right
corner, and tap Device Settings.
- Method 2: Find the camera you want to enable the device call on the homepage, which is Home in this example, and tap Settings ( )
in the upper-right corner.
Step 2 Scroll down to the bottom of the page, and tap More Settings.
Step 3 Enable the Device Call function, and then set the tone to ringing or vibration as required.
Ensure that your phone system sound is not muted.
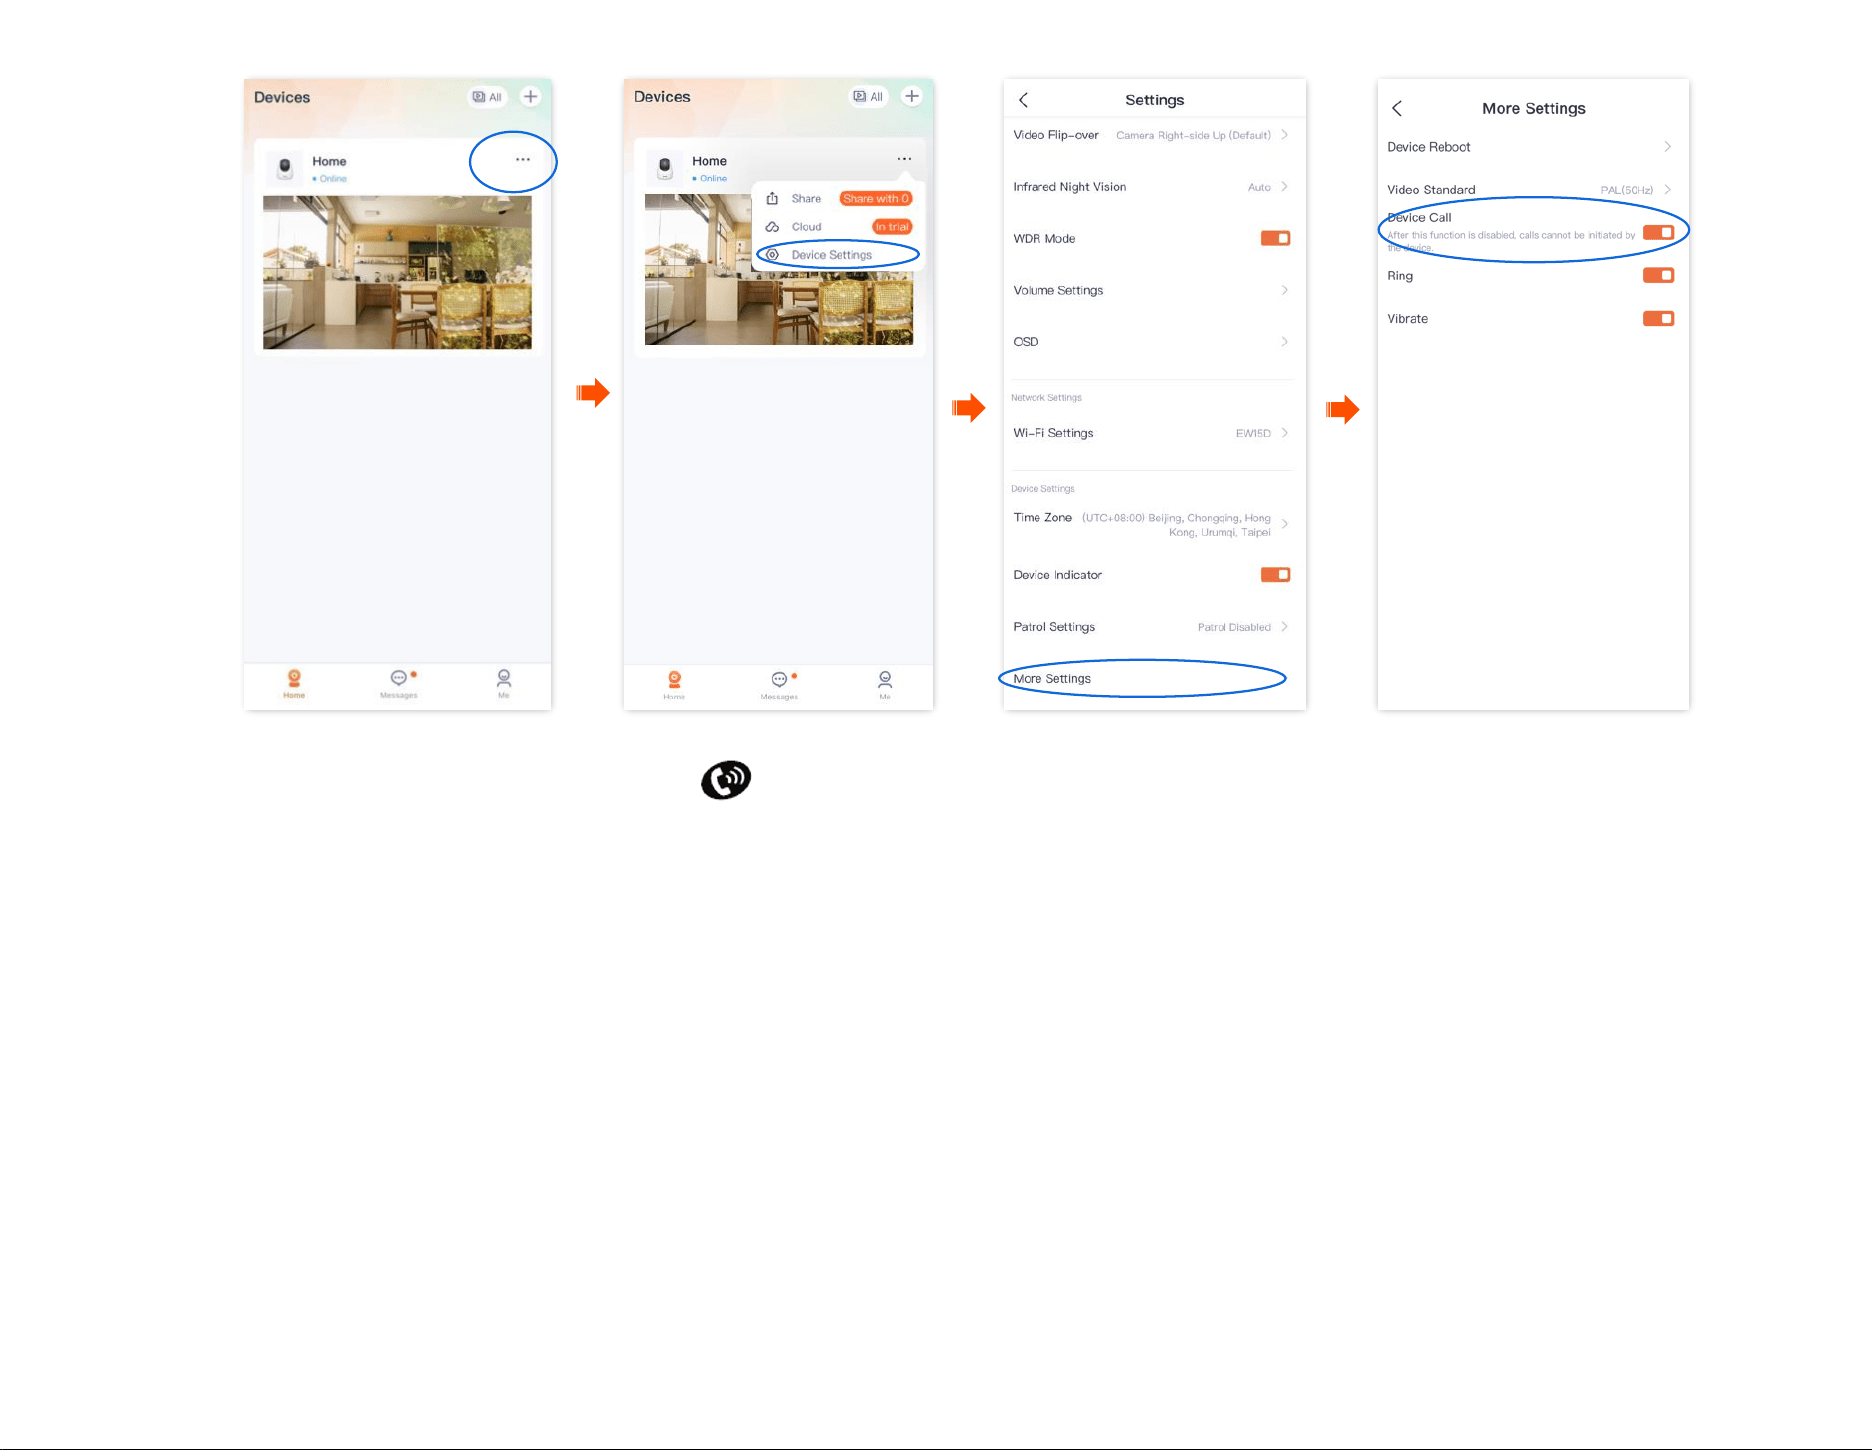
Document Version: V1.4
71
Settings completed. Press the one-touch call button of the camera (1-3 seconds), and the camera will ring.
- If you are running on the TDSEE App (the camera has been added), you will receive a voice call. When you tap the accept button, the App and the
camera can talk in a two-way communication.
- If you do not run the TDSEE App (the camera has been added), the App message center and the notification bar of the smartphone will display a
call notification.
- If a camera has been shared with multiple accounts and one of the accounts accepts or rejects the camera, the other accounts are not displayed.
- If the smartphone does not answer the call 30 seconds after the ring, the camera automatically cancels the call.
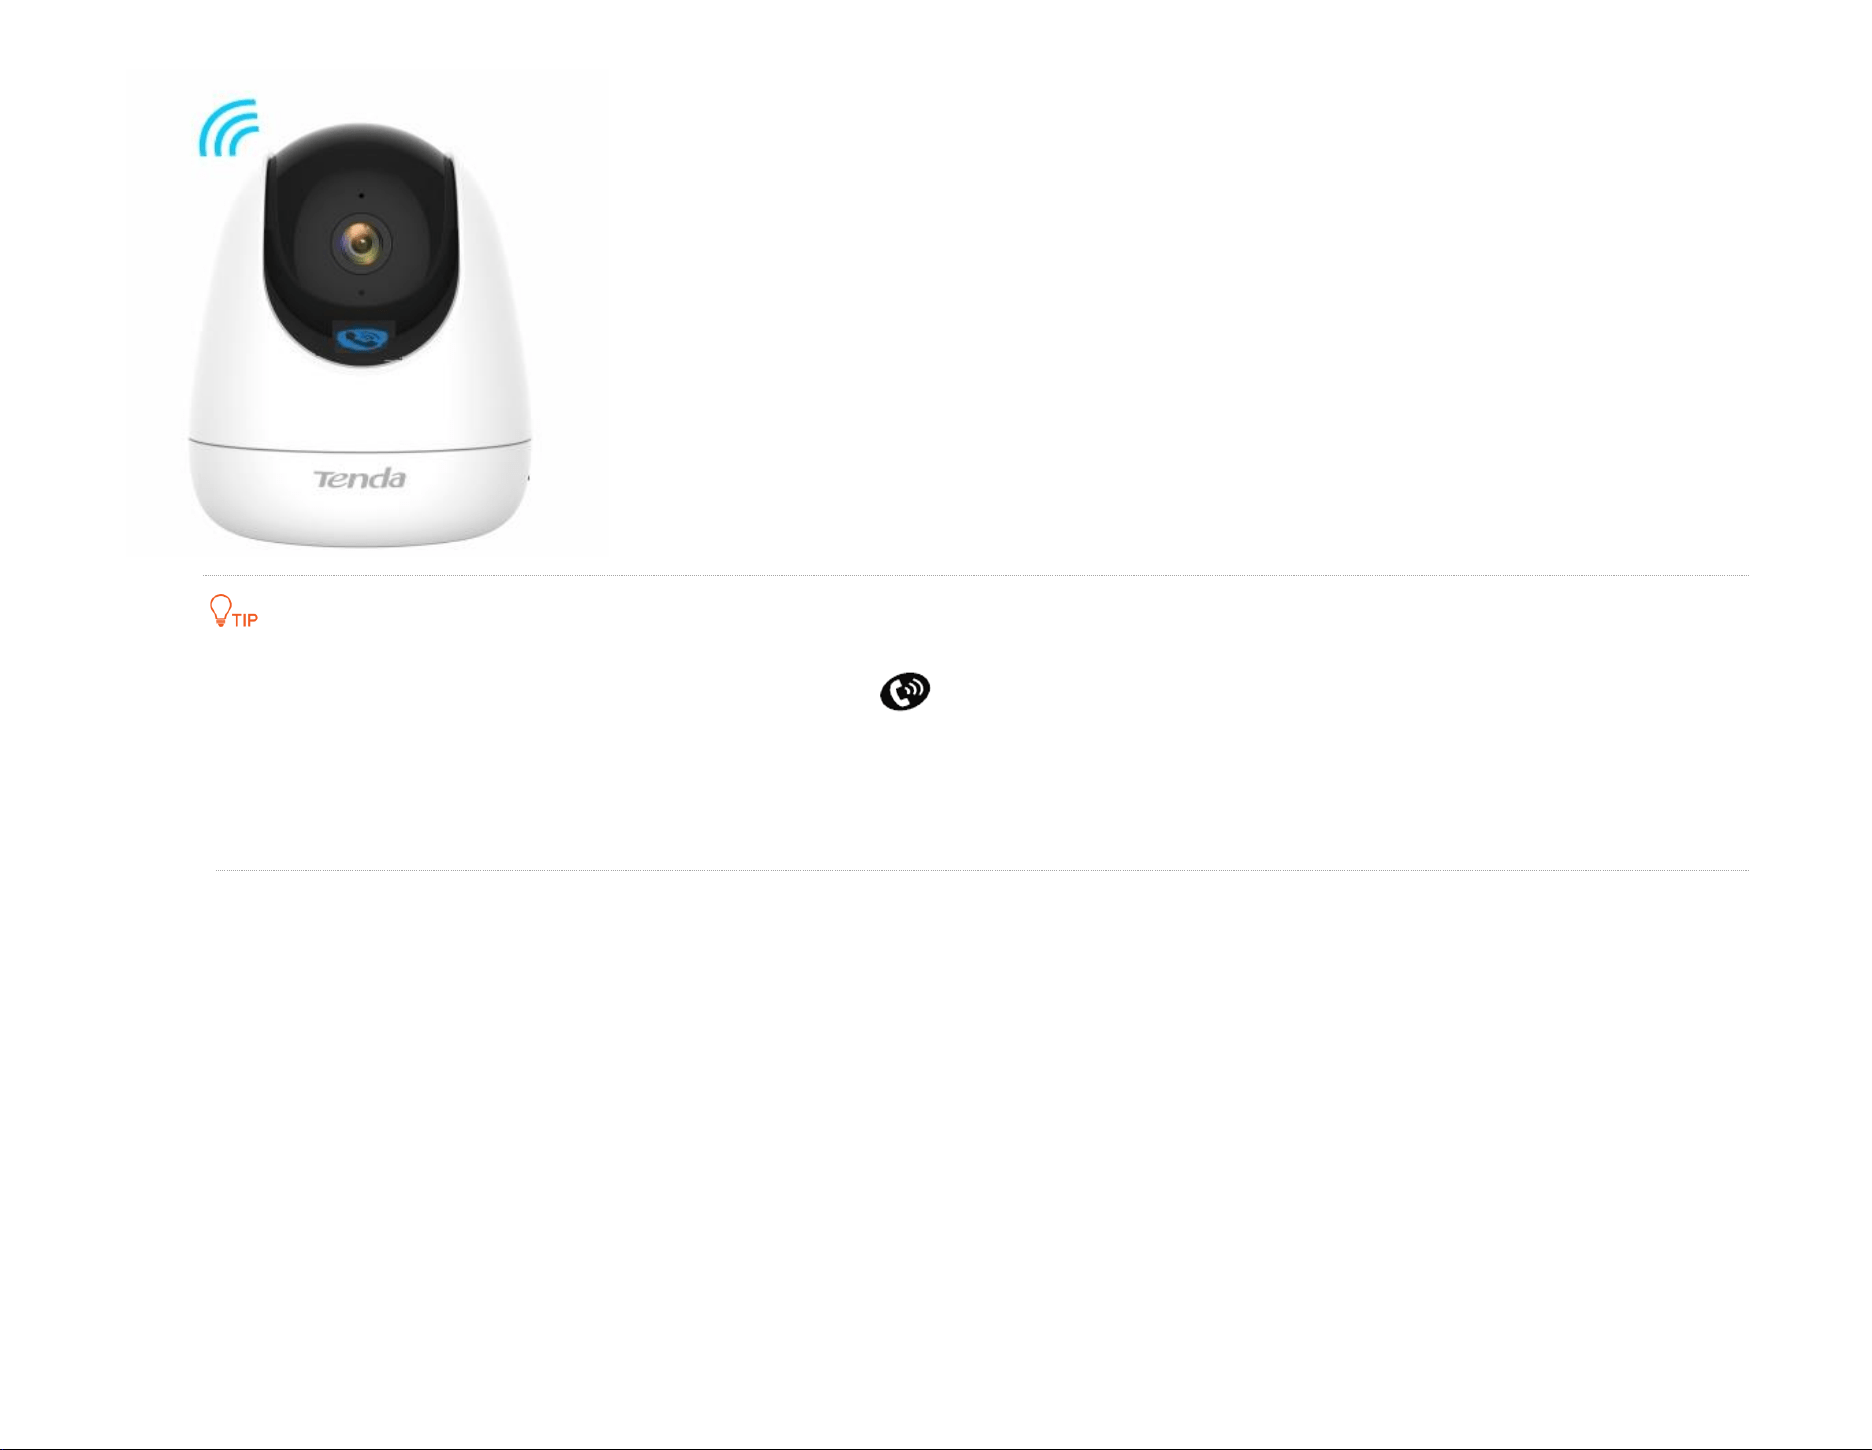
Document Version: V1.4
72
If the camera is busy after pressing the one-touch call button of the camera (1-3 seconds), ensure that:
The Device Call function is enabled.
The camera has been added to TDSEE App and is online.
The TDSEE App (the camera has been added) does not talk to other devices.
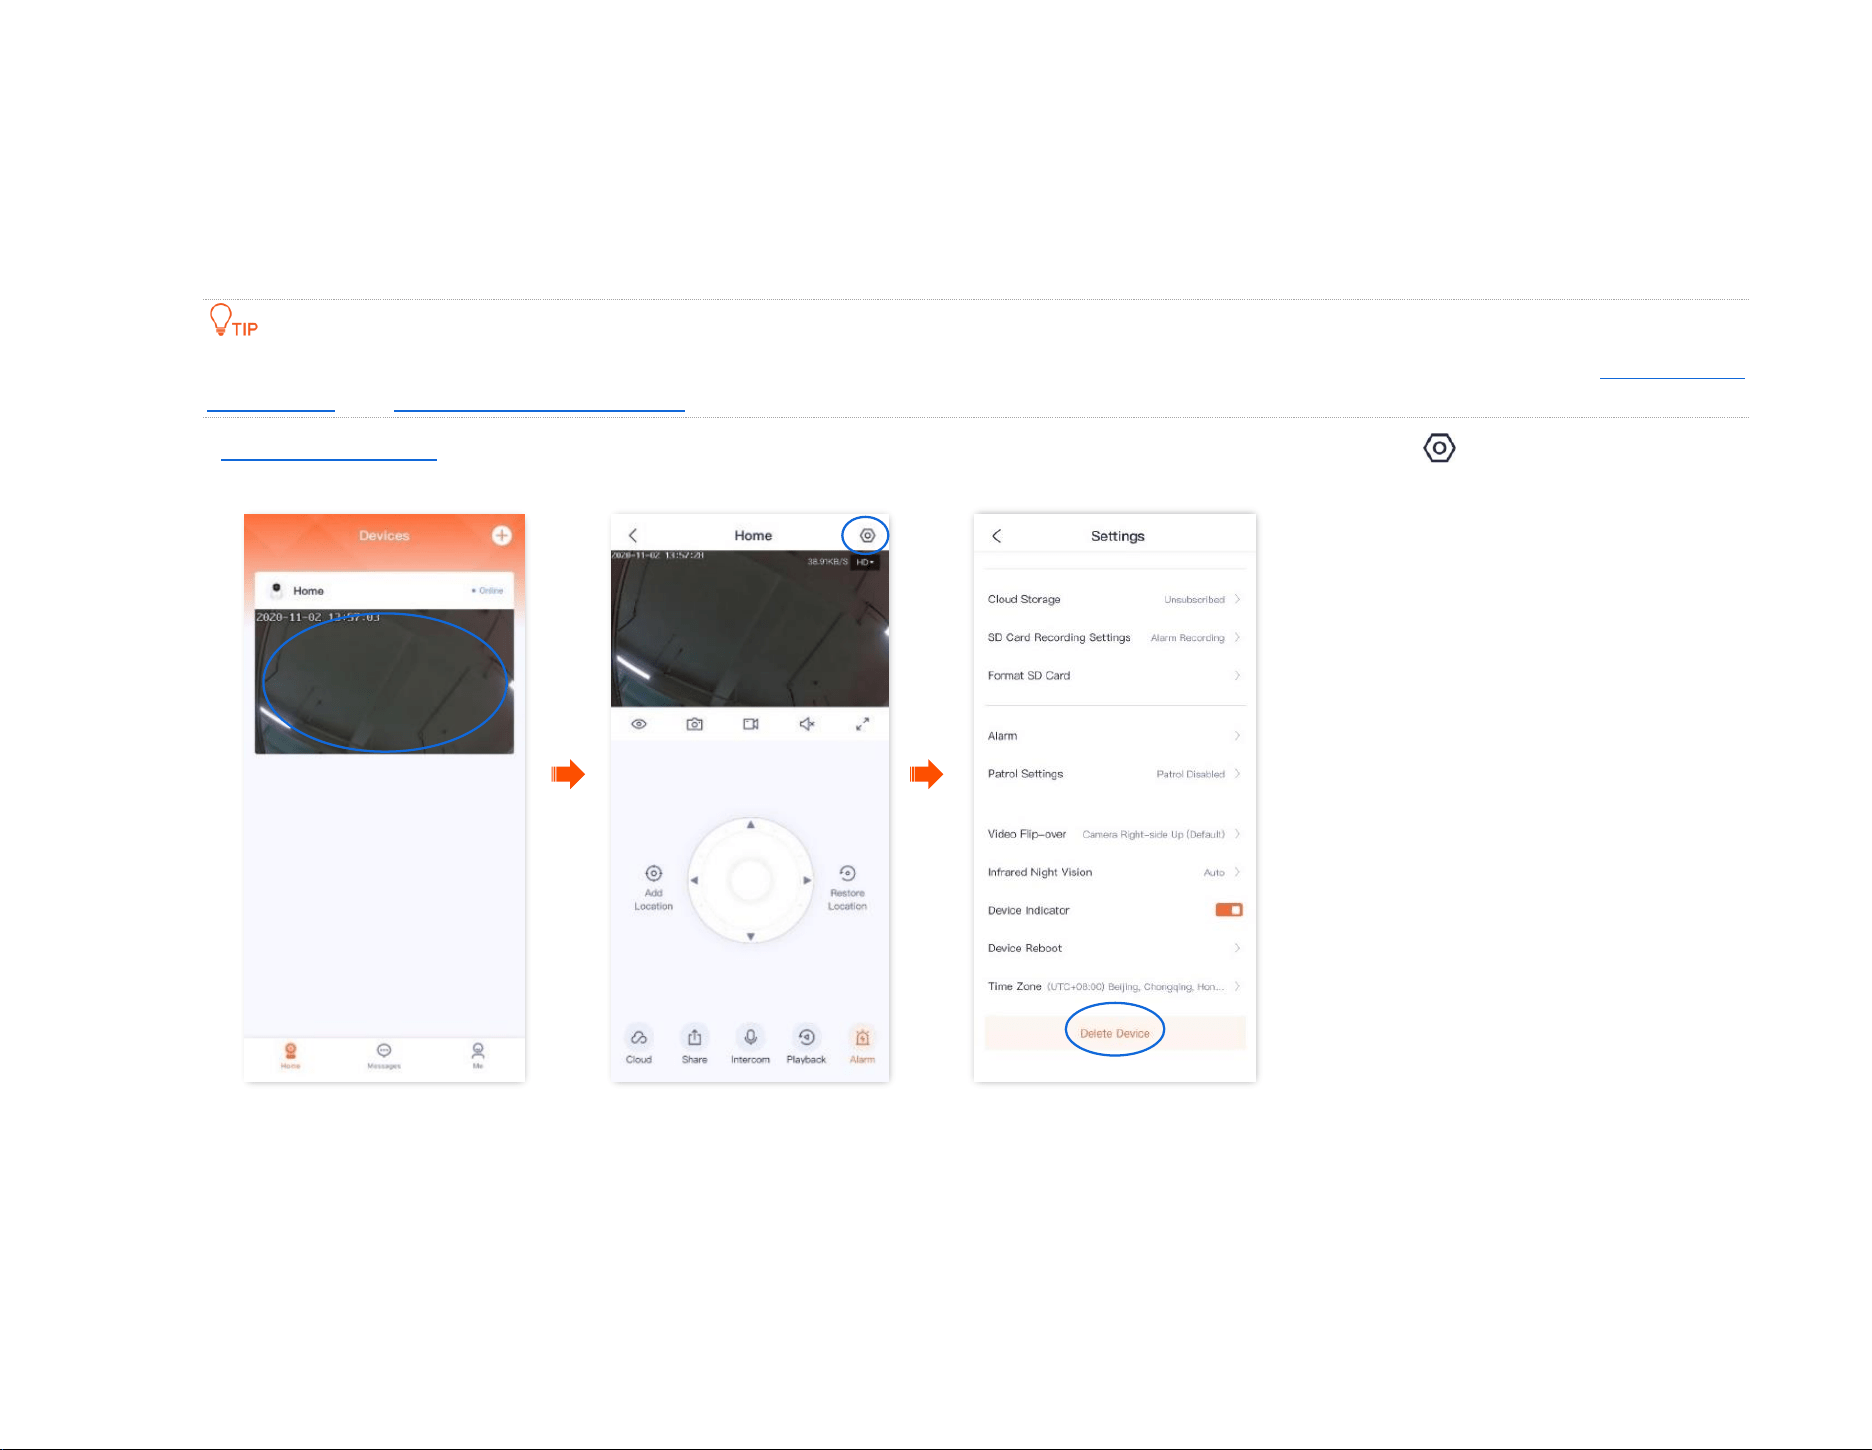
Document Version: V1.4
73
Delete the device
A device can be added by only one account. If any of the following situations occurs, delete the device on the TDSEE App first.
- Another account needs to add the device.
- The device is abnormal and needs to be repaired or returned.
Delete devices will clear the binding relationship between the device and the account, including Wi-Fi configuration information, add location
information, and custom alarm prompt tone.
Step 1
Log in to TDSEE App. Tap the specific device on the homepage, which is the camera Home in this example. Tap in the upper right corner.
Step 2 Scroll down to the bottom of the page, and tap Delete Device.
----End
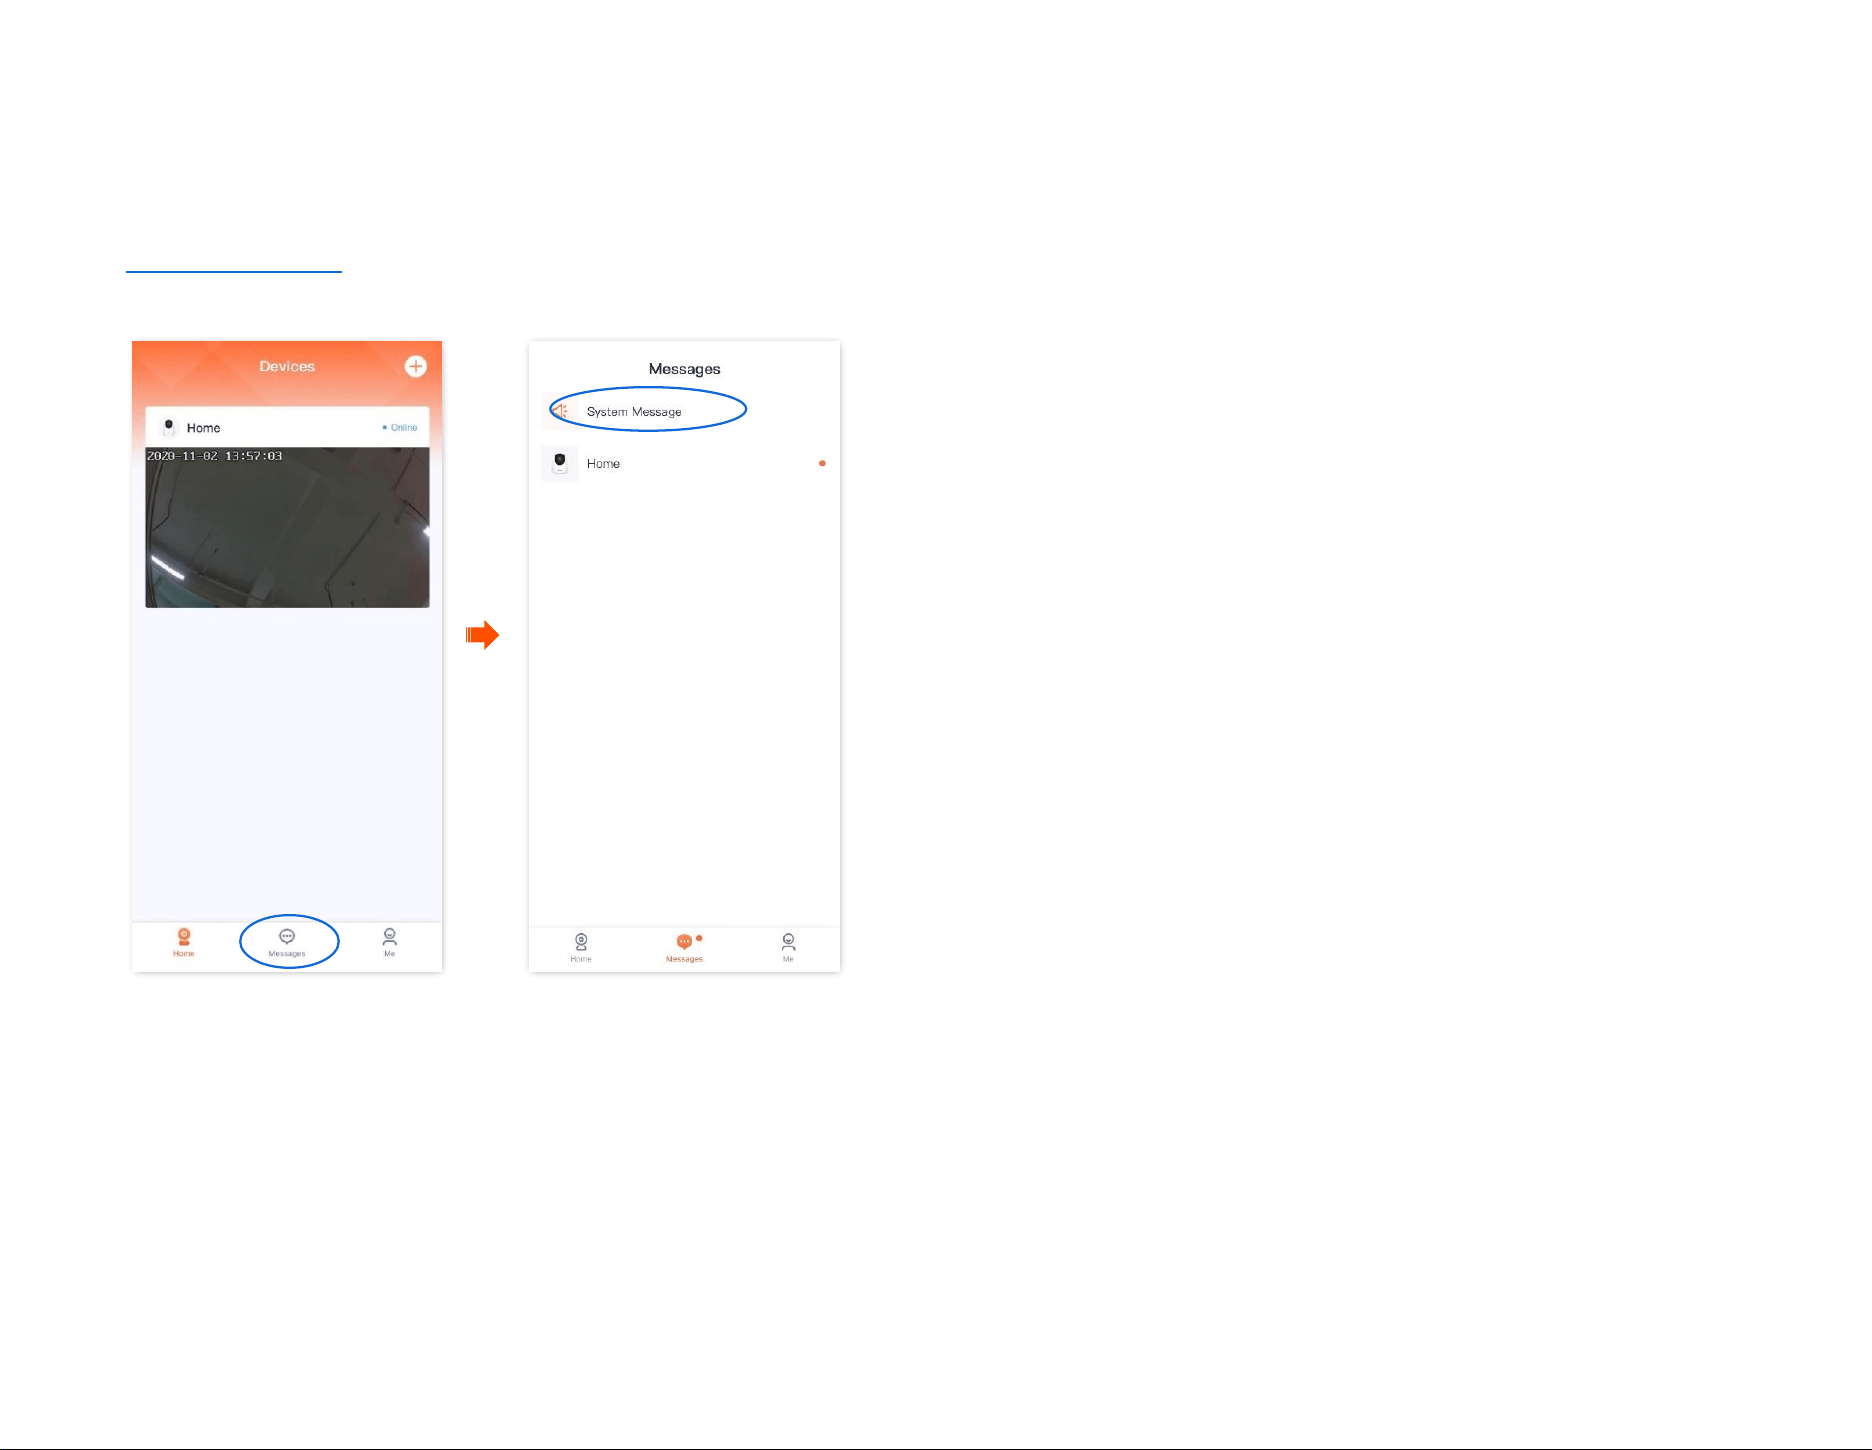
Document Version: V1.4
74
Check messages
You can check system messages and notification messages of each device on the Messages page.
Log in to TDSEE App. Navigate to Messages > System Message to check such information as login notifications, friend notifications, and device-
sharing notifications. Tap the specific device to check relevant alarm messages.
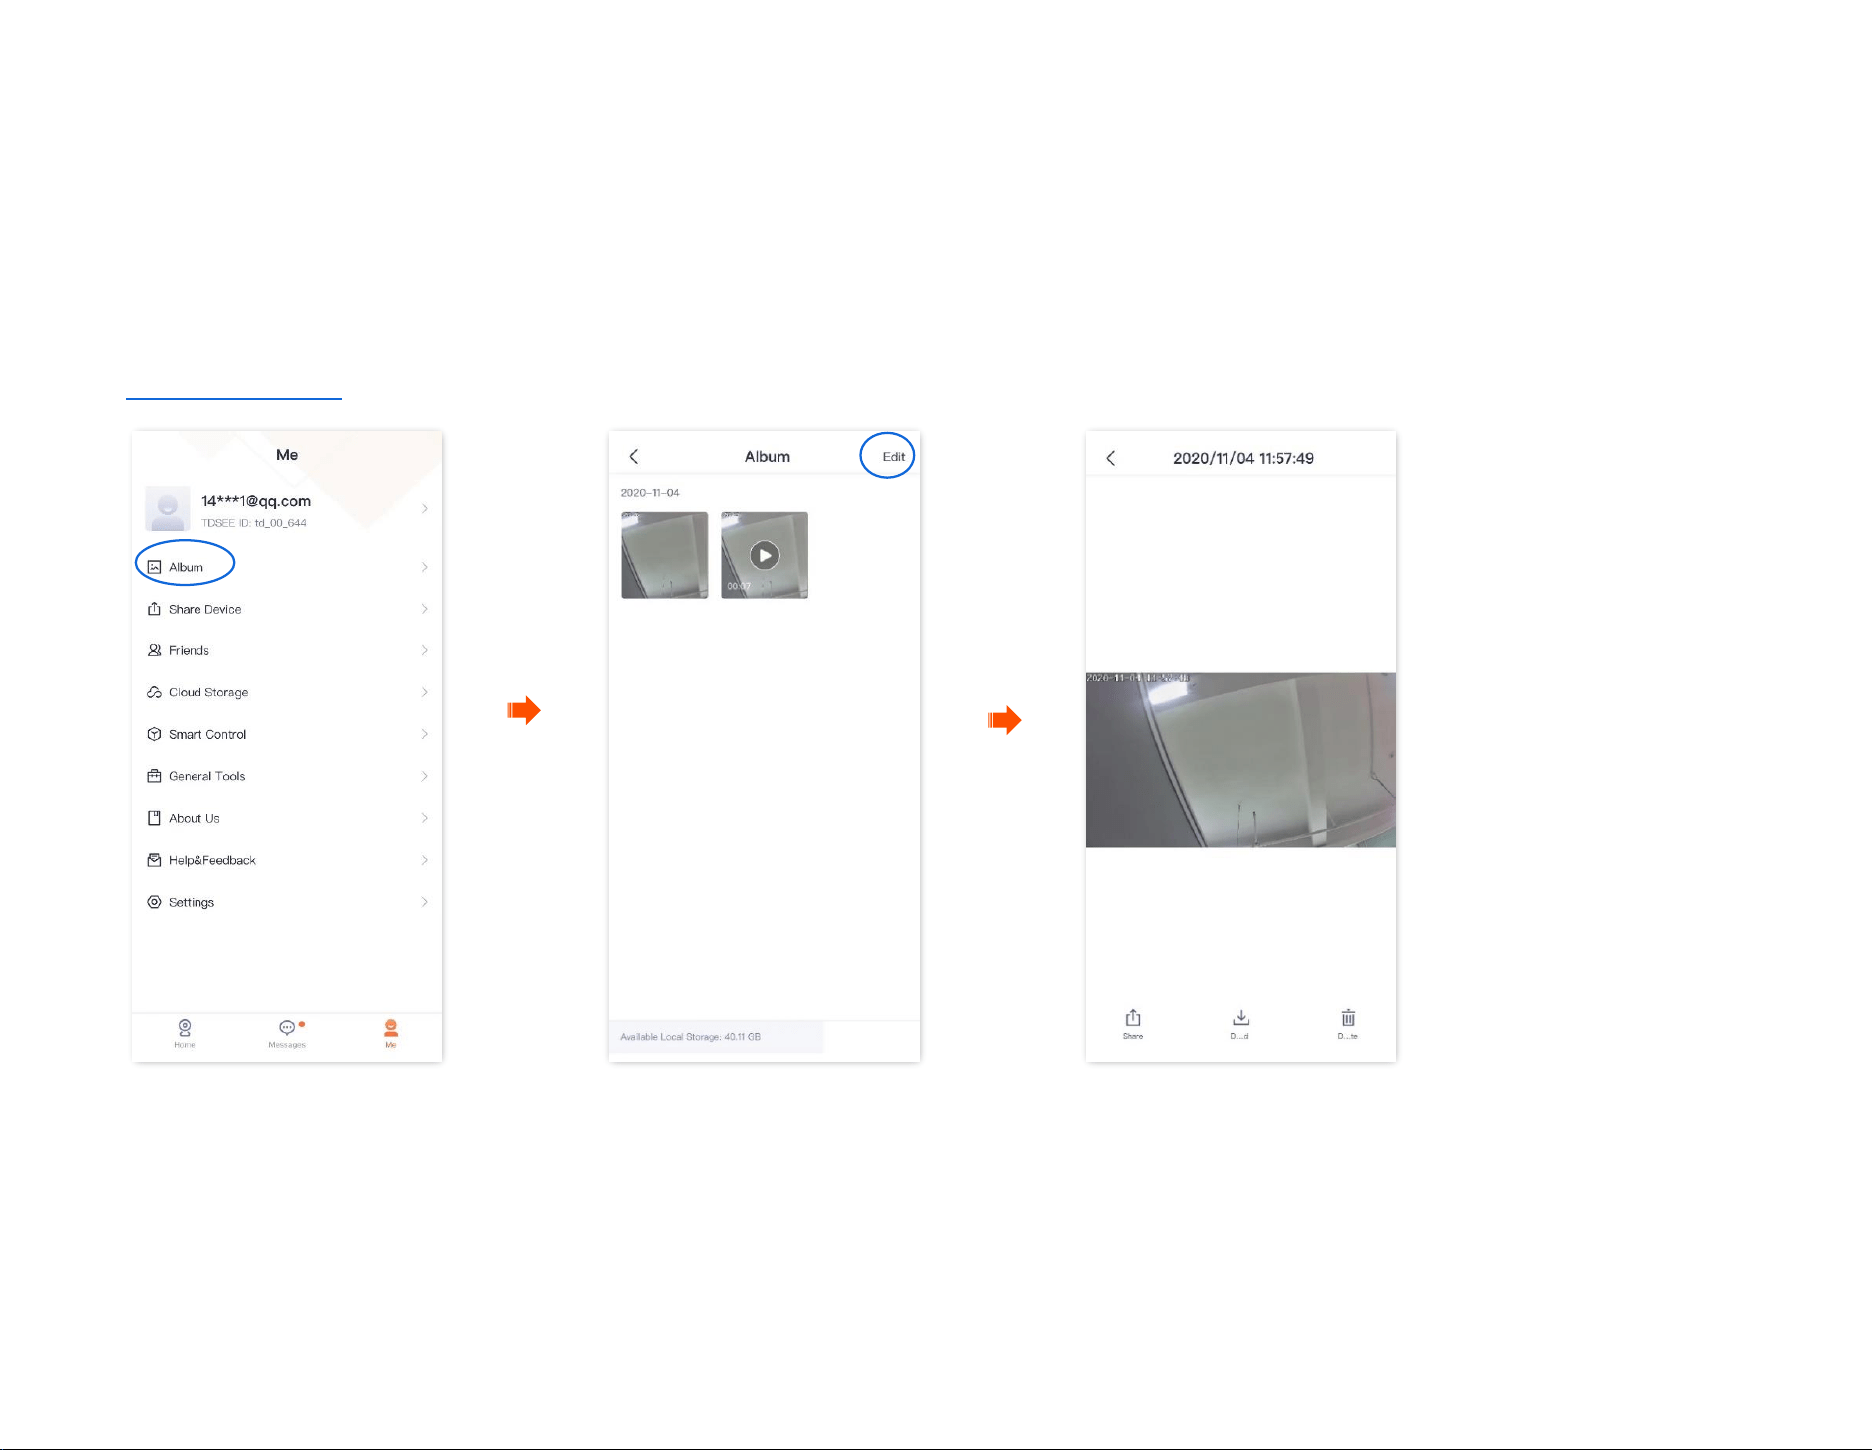
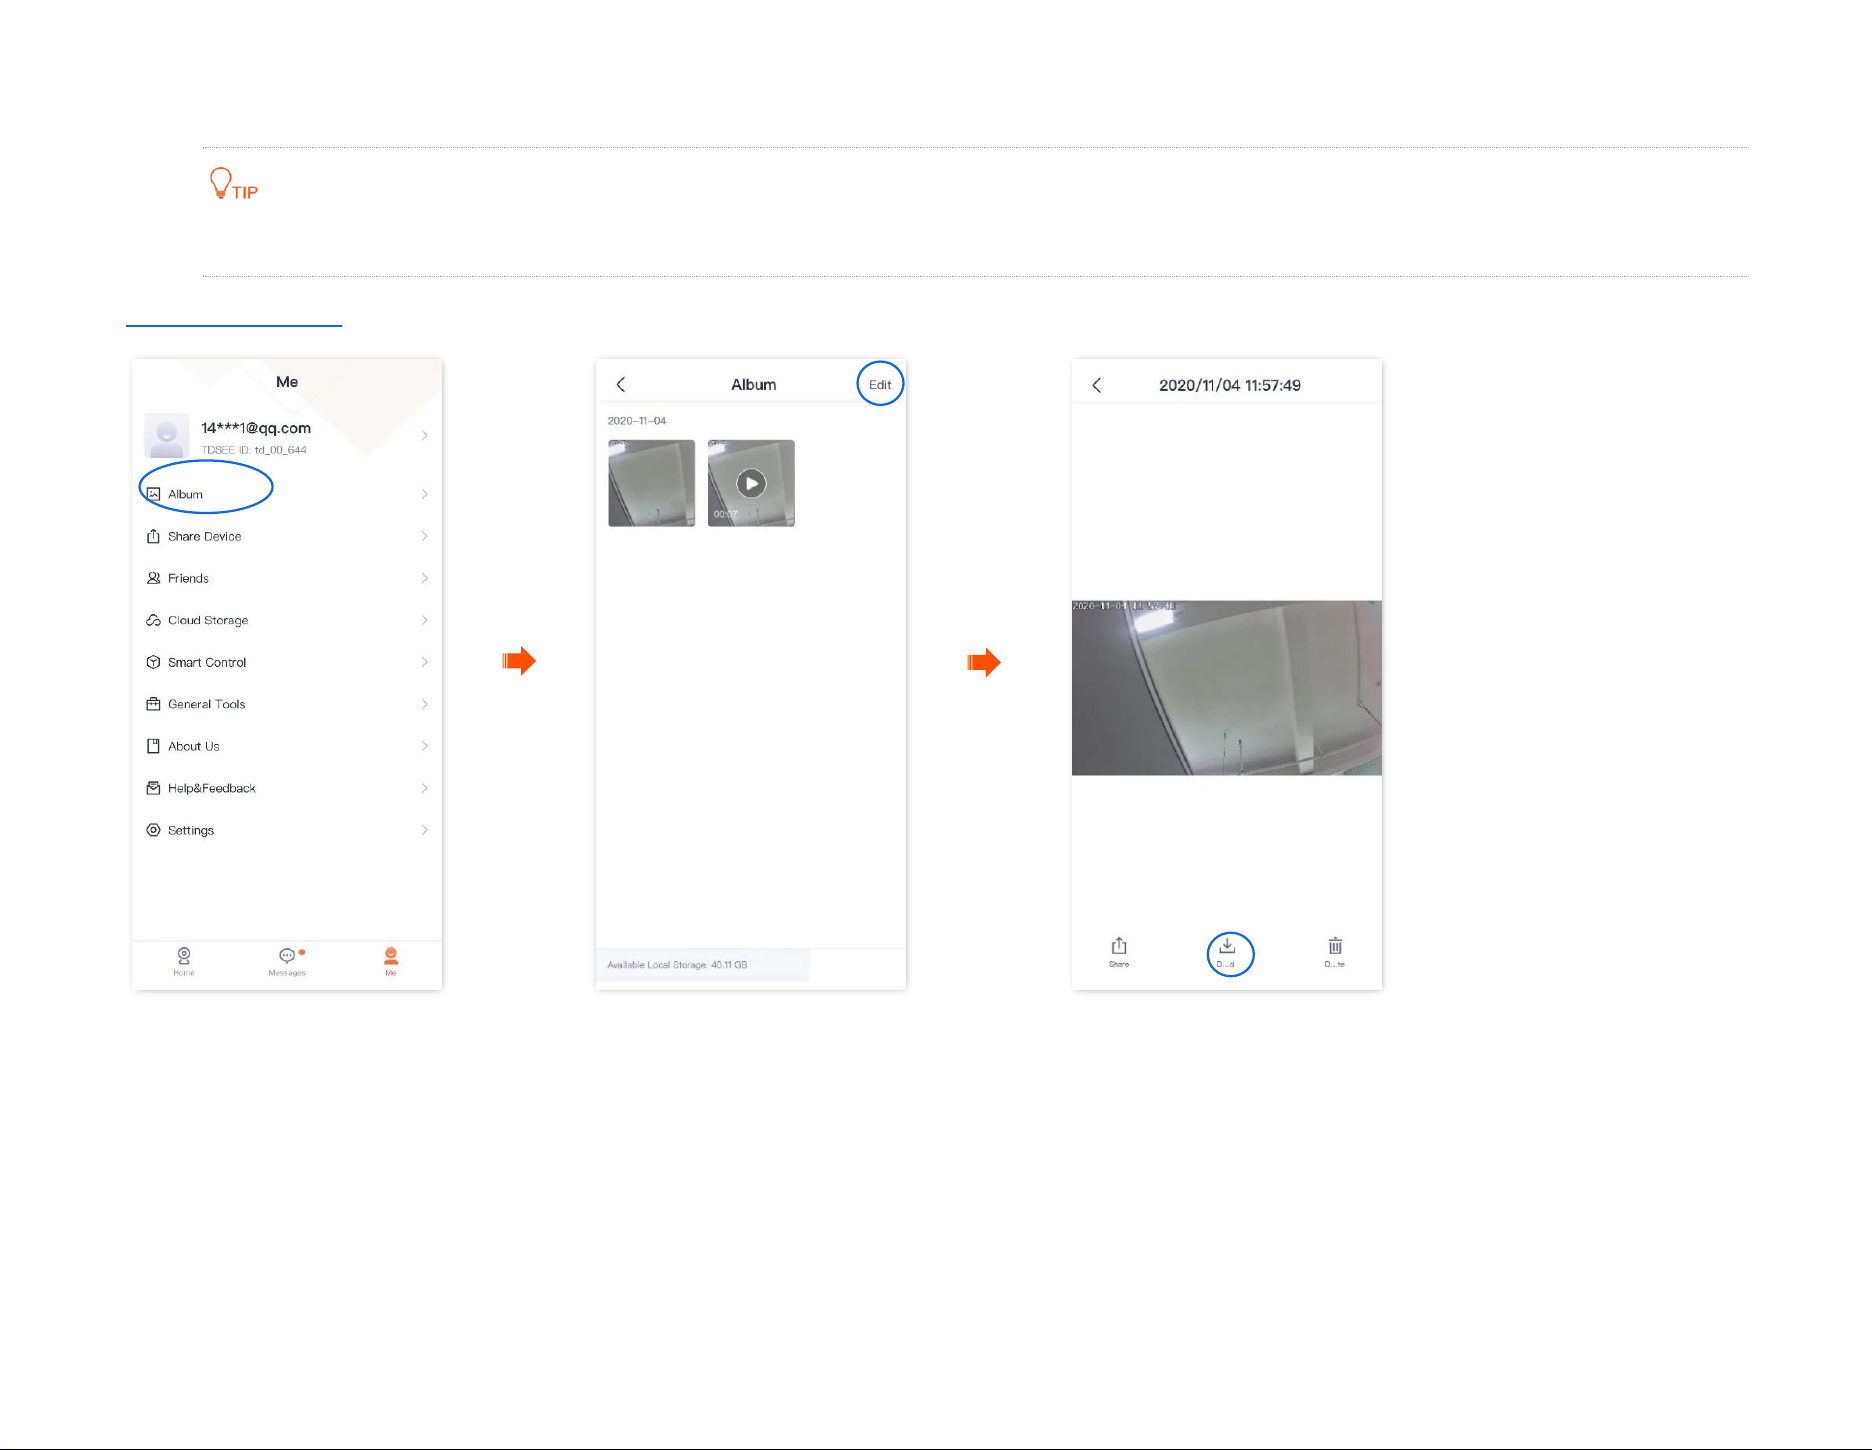
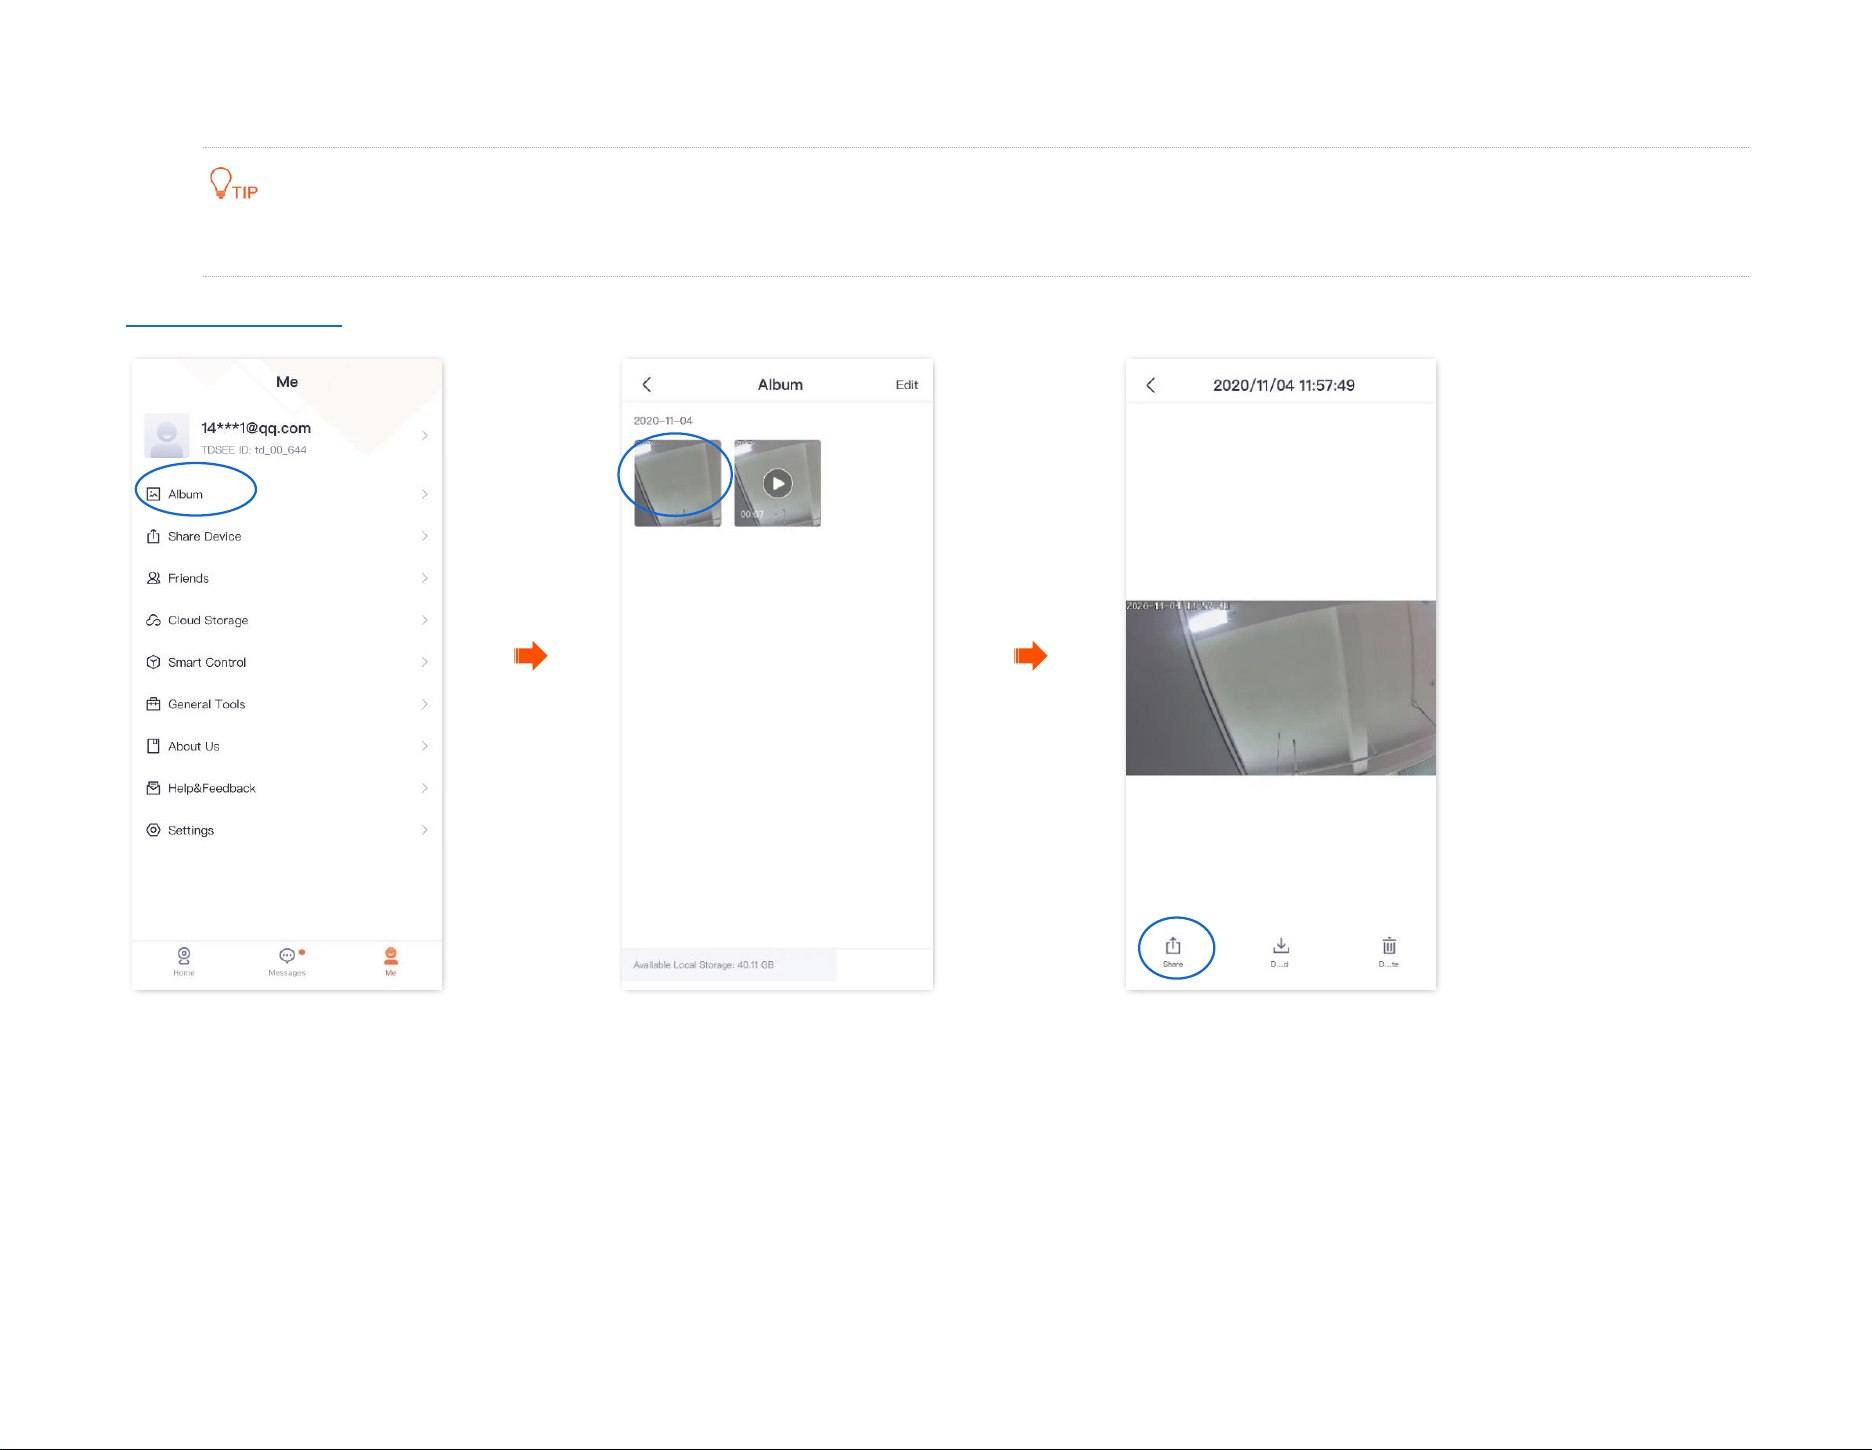

Document Version: V1.4
78
Share device
The TDSEE App with version 1.3.0 is used for illustrations here.
Sharing the devices under your account with friends, then your friends can check the monitoring video of the camera and obtain certain management
rights.
Method 1 (Recommended)
Step 1 Add the TDSEE App account of your friends. Refer to Add your friends for detailed steps.
Step 2 Share the device with your friend.
1
Log in to TDSEE App, and enter the settings page of the camera.
- Method 1: Find the camera you want to share with your friends on the homepage, which is Home in this example, tap on the
right corner, and tap Share.
- Method 2: Find the camera you want to share with your friends on the homepage, which is Home in this example, and tap Settings ( )
in the upper-right corner.
2
Tap .
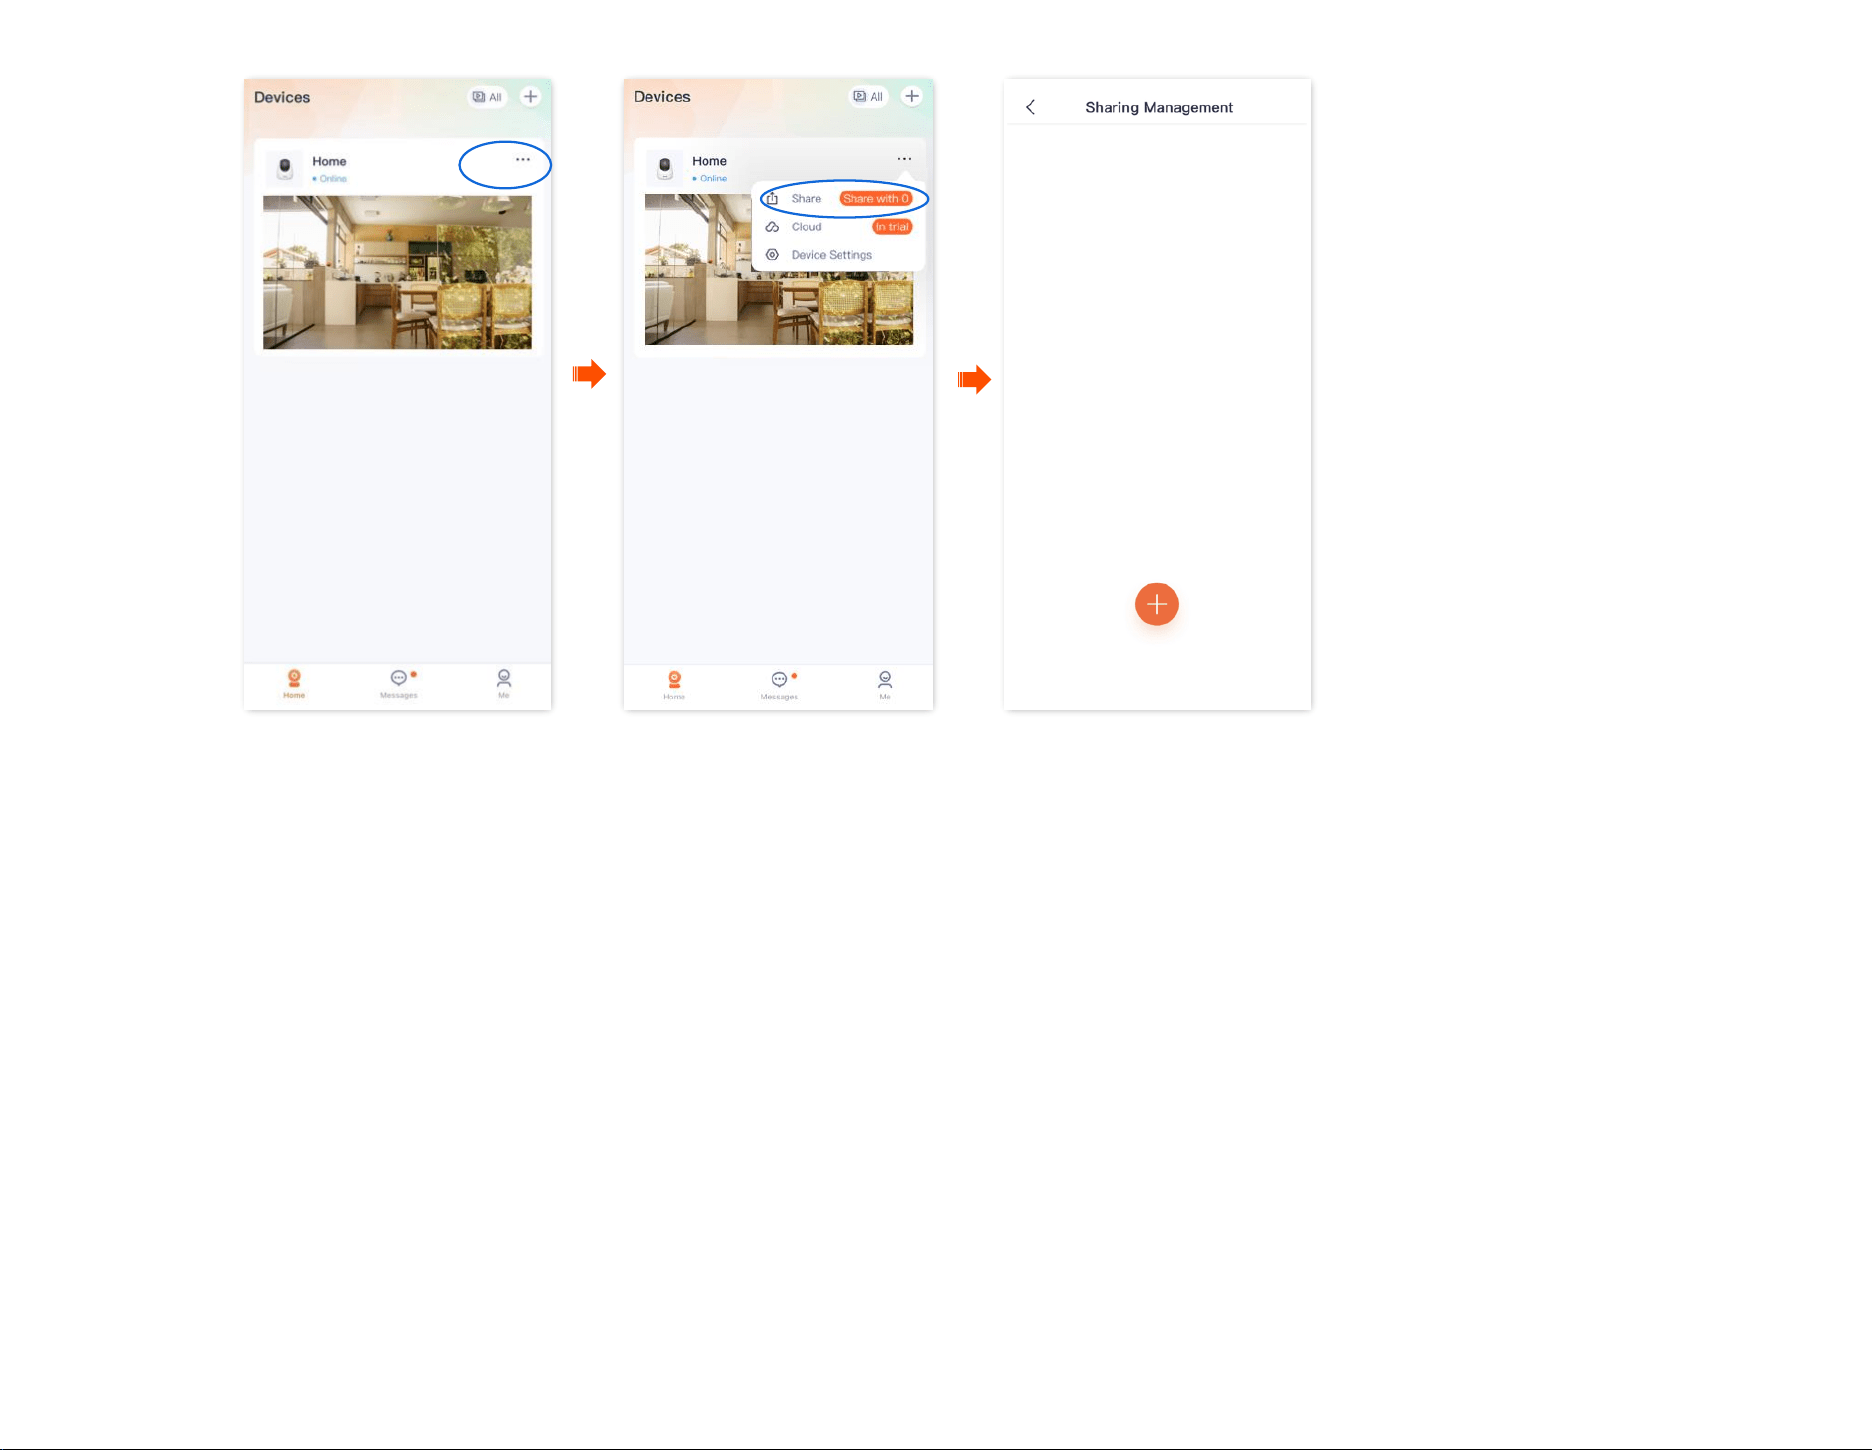
Document Version: V1.4
79
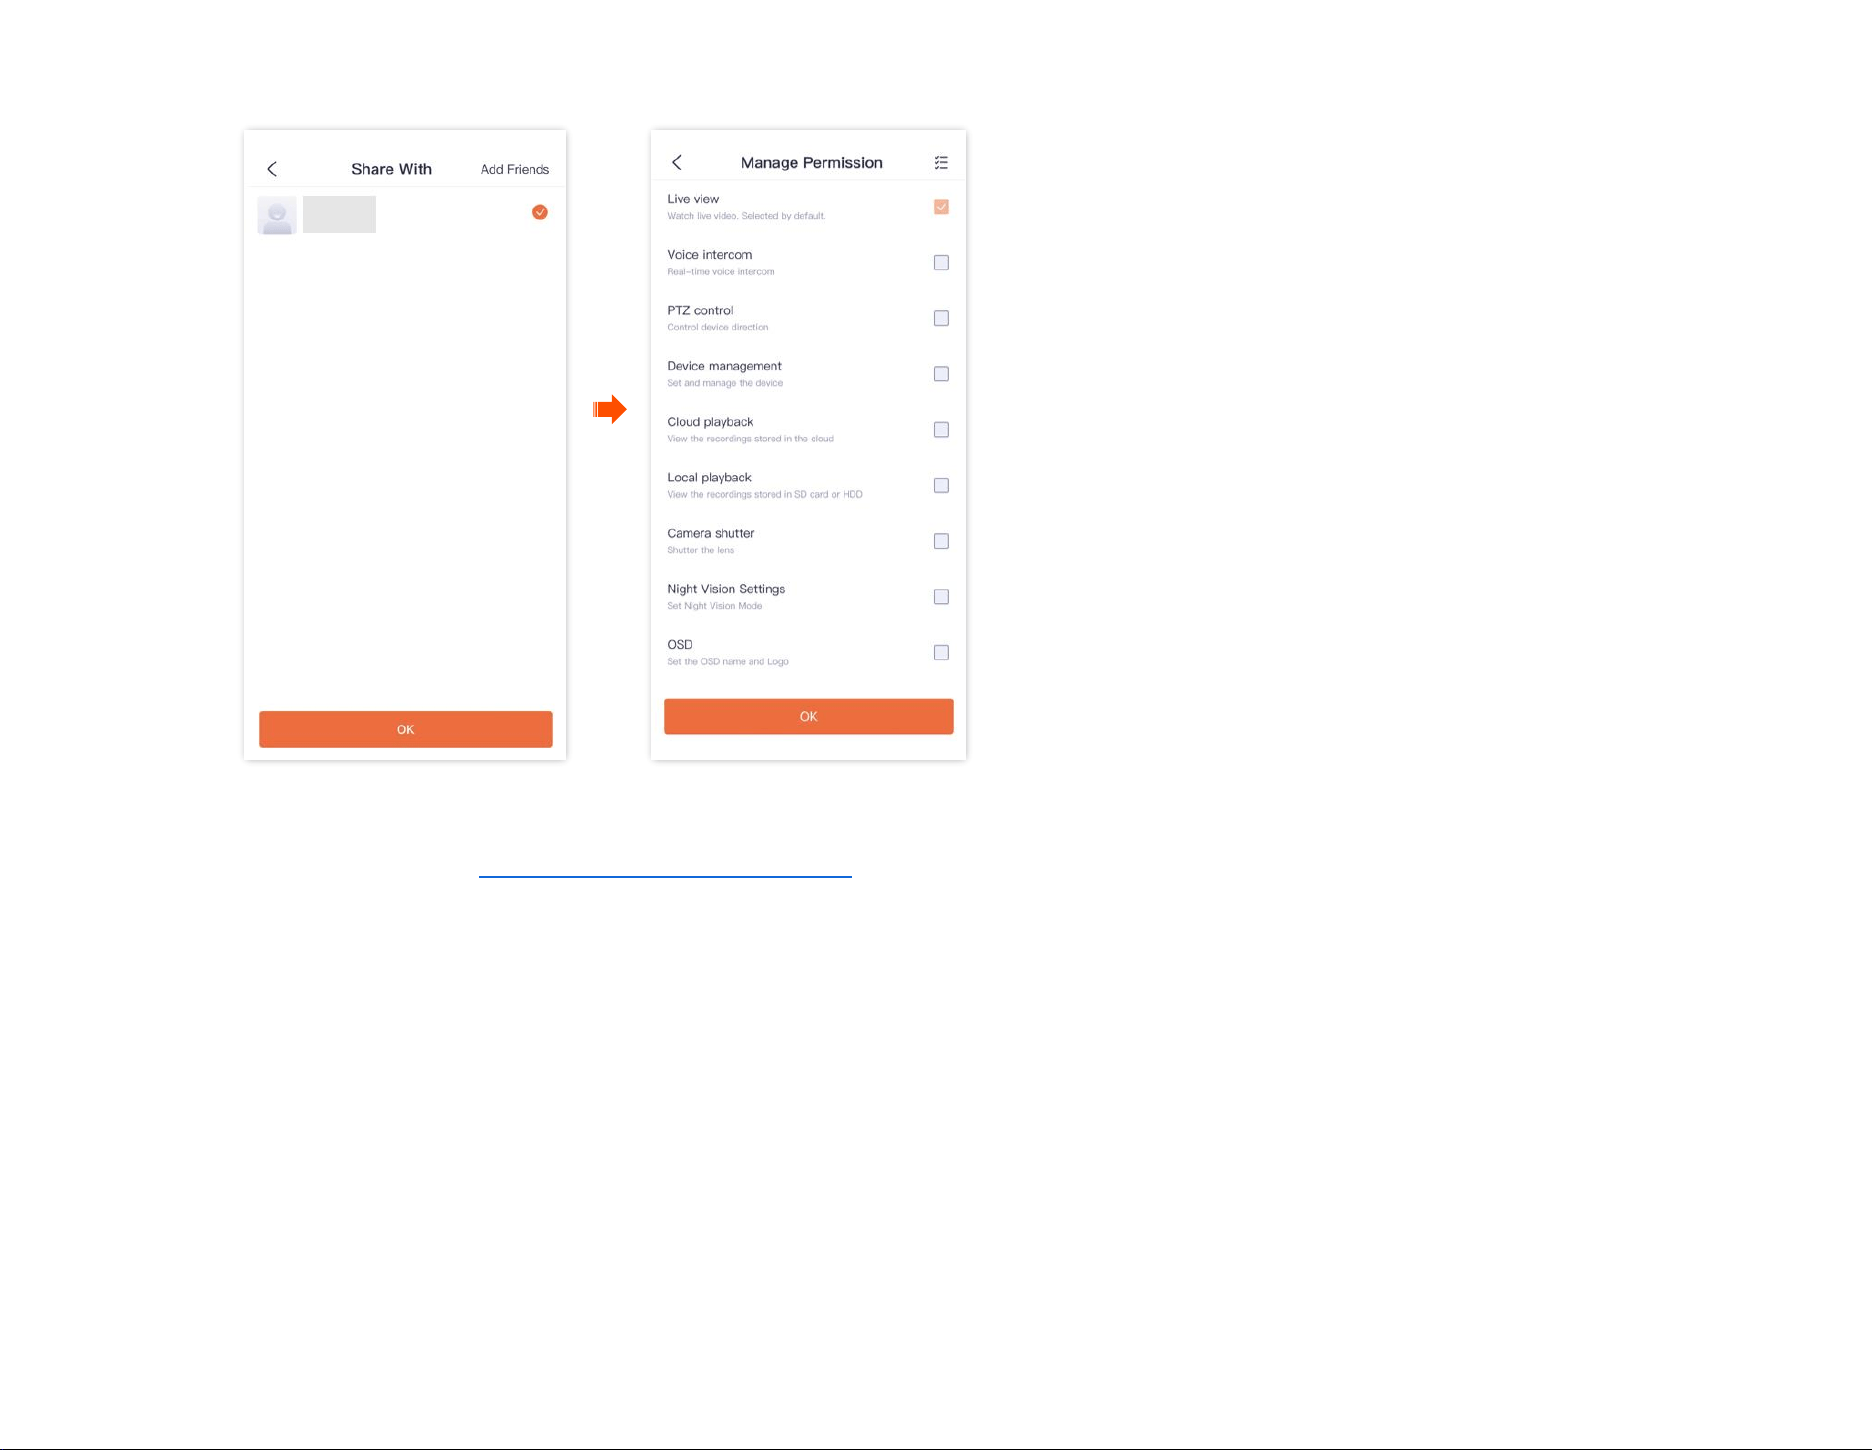
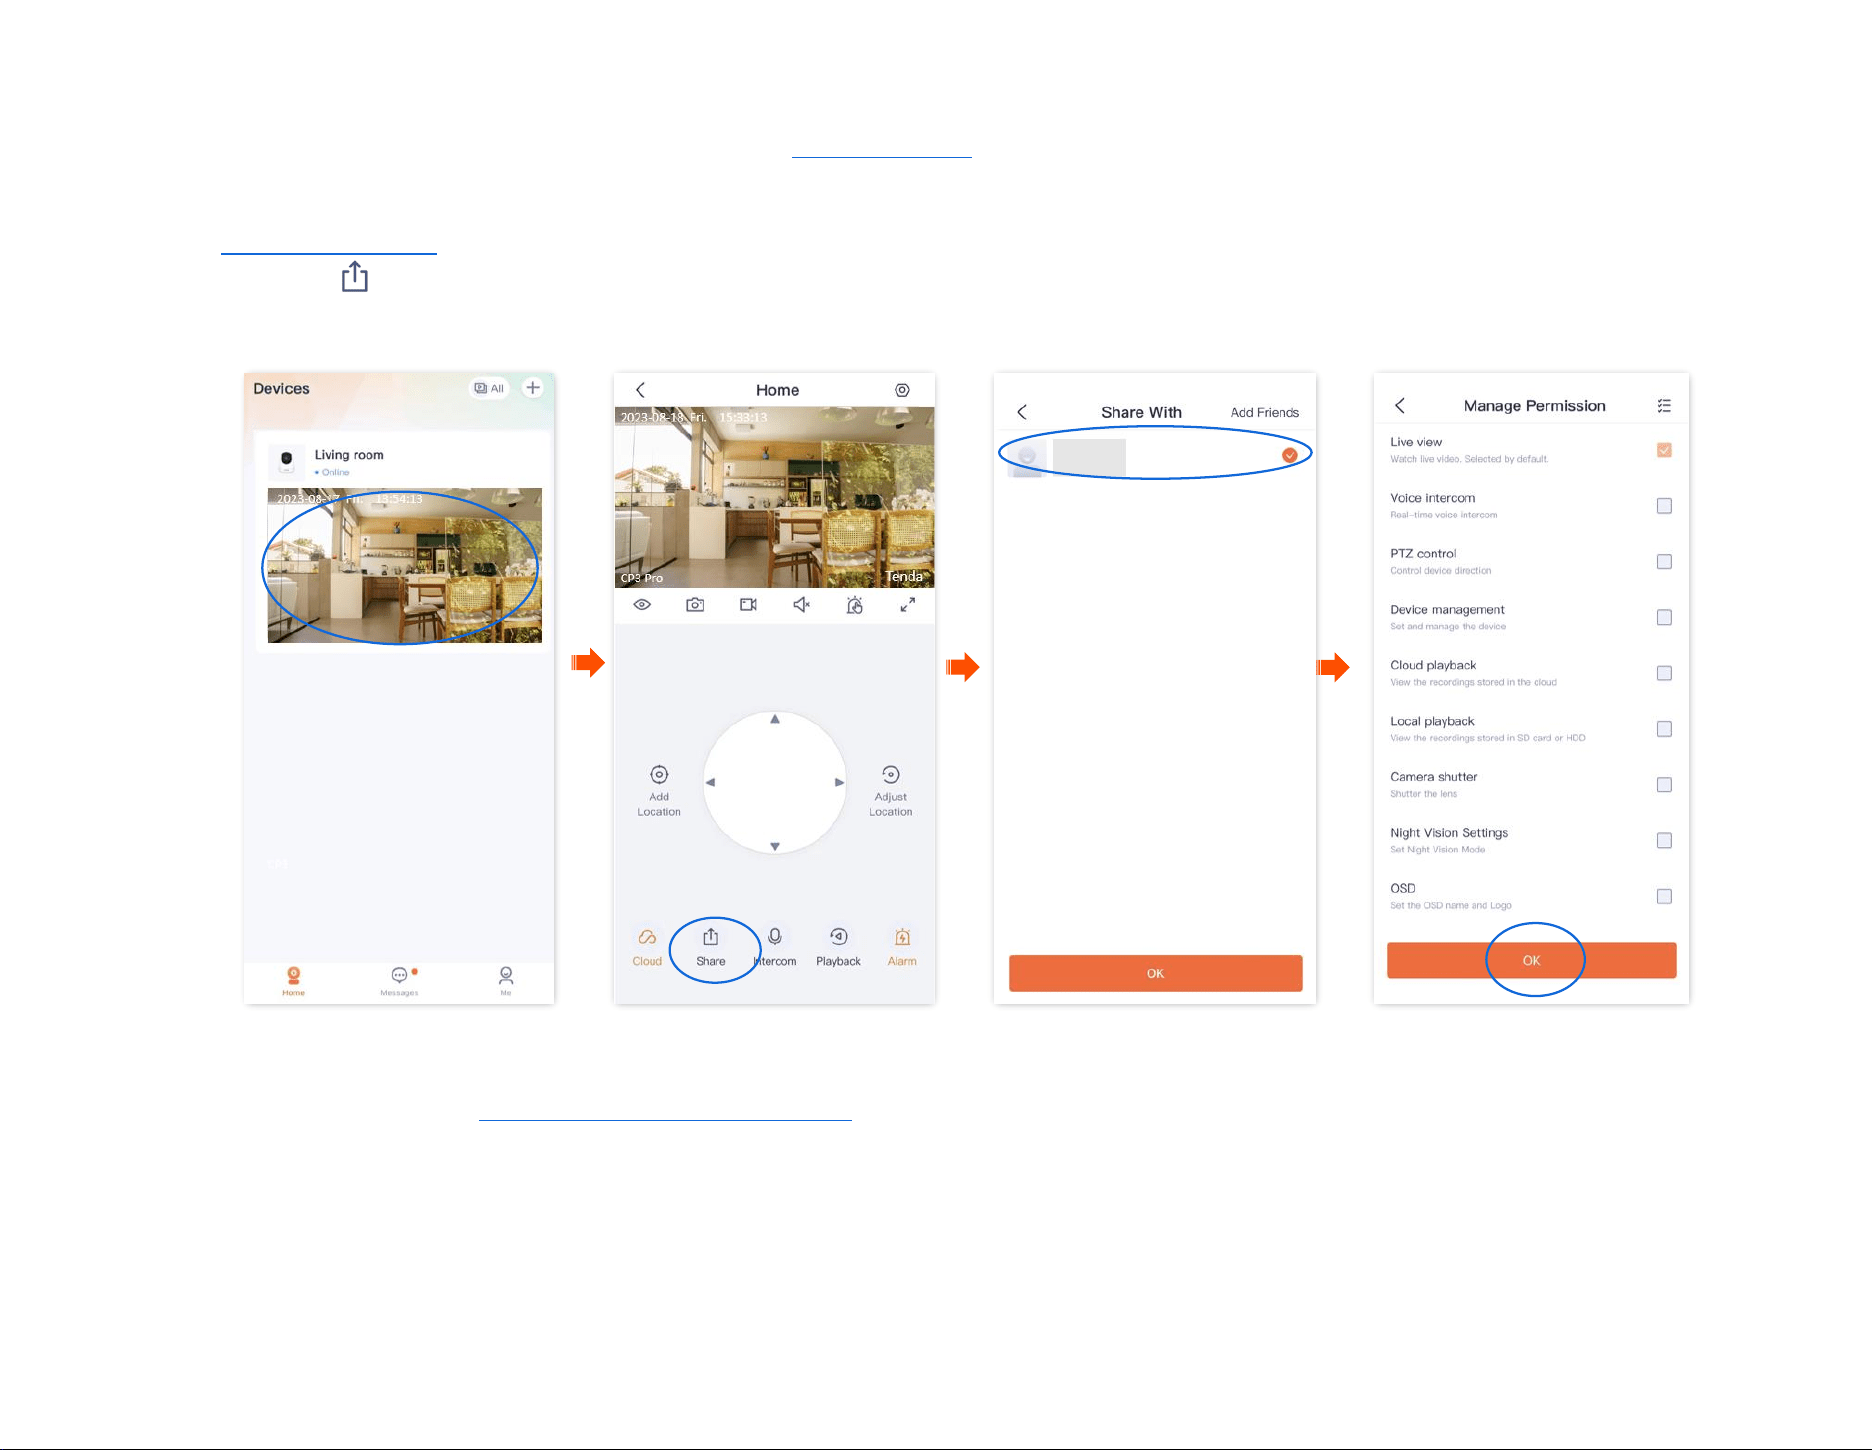
Document Version: V1.4
81
Method 2
Step 1 Add the TDSEE App account of your friends. Refer to Add your friends for detailed steps.
Step 2 Share the device with your friend.
1
Log in to TDSEE App. Enter the homepage, tap the device you want to share with your friend, which is the camera Home in this example, and
then tap in the lower left corner.
2
Choose a friend, and tap OK. Choose the management permissions you want to share, and tap OK.
----End
After logging in to TDSEE App to accept the device shared from you, your friend can view the monitoring videos of the camera and enjoy certain
management permissions.
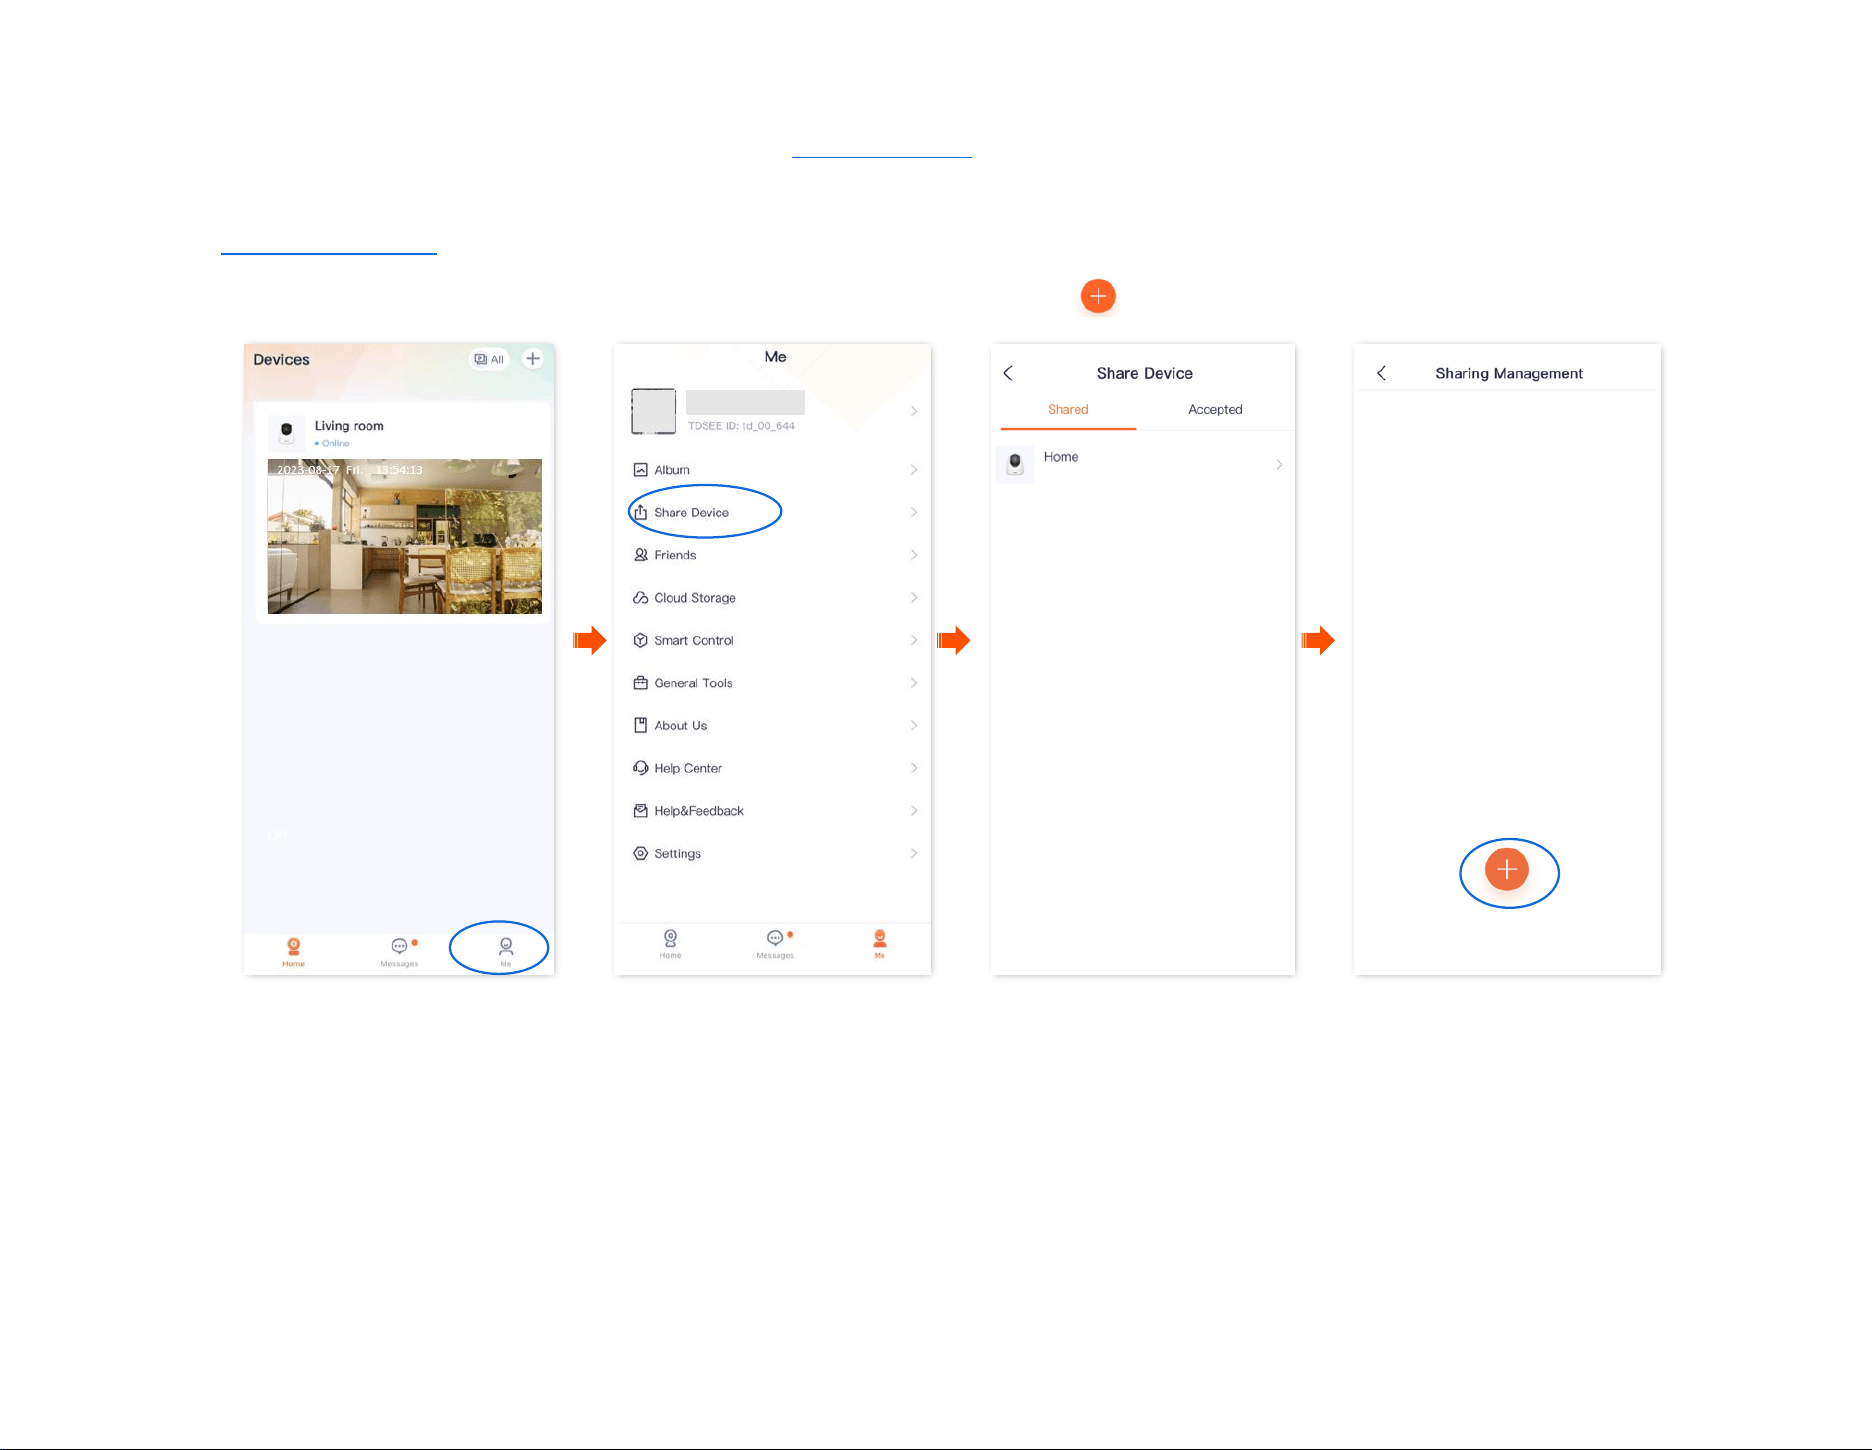
Document Version: V1.4
82
Method 3
Step 1 Add the TDSEE App account of your friends. Refer to Add your friends for detailed steps.
Step 2 Share the device with your friends.
1 Log in to TDSEE App. Enter the homepage, and navigate to Me > Share Device.
2
Choose a device to share with your friend, which is Home in this example. Tap .
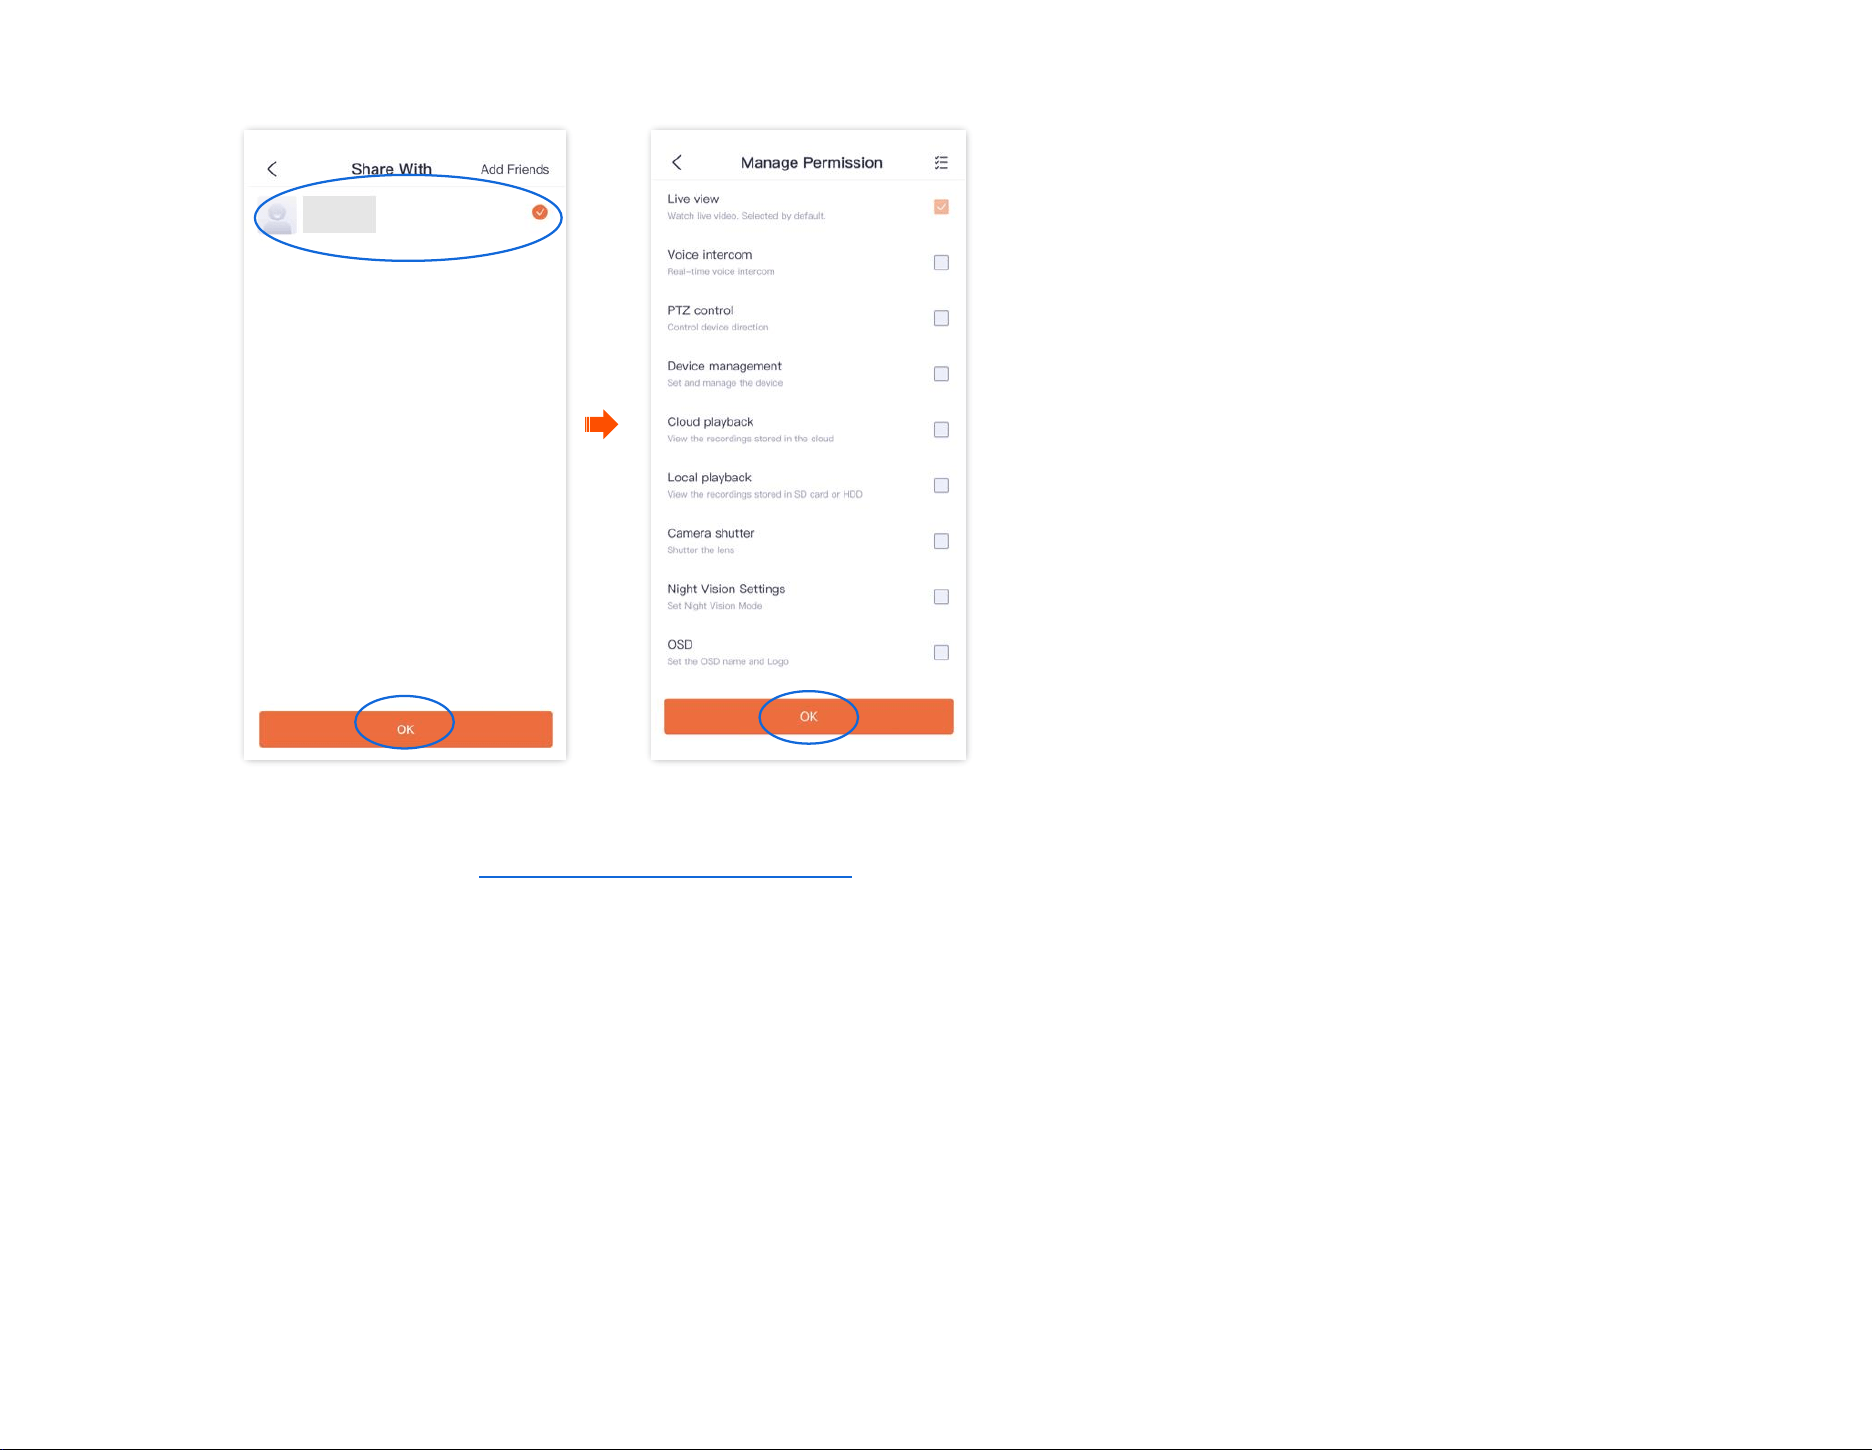
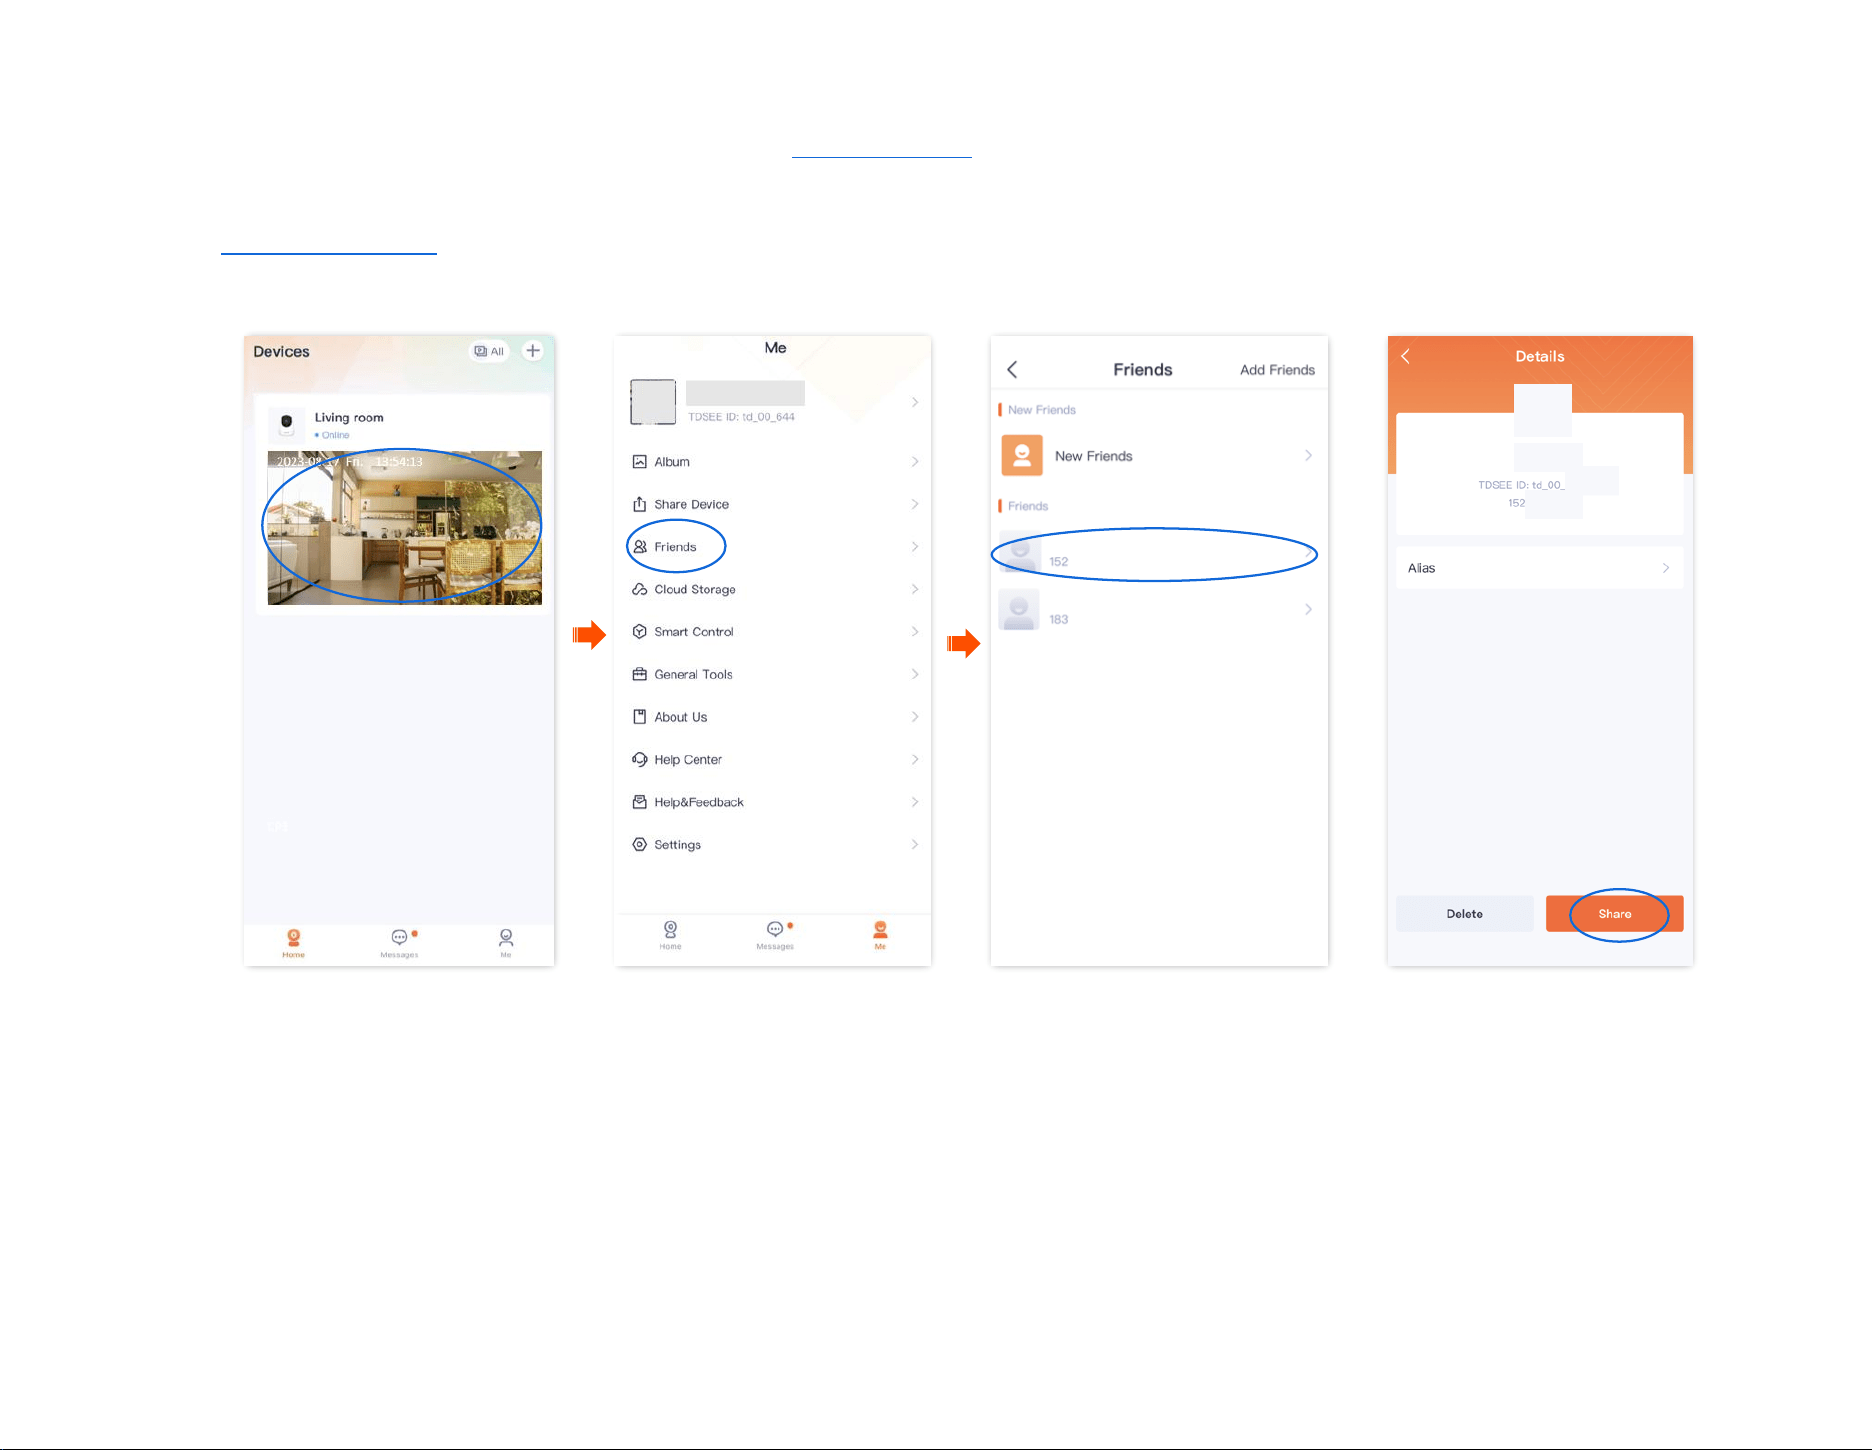
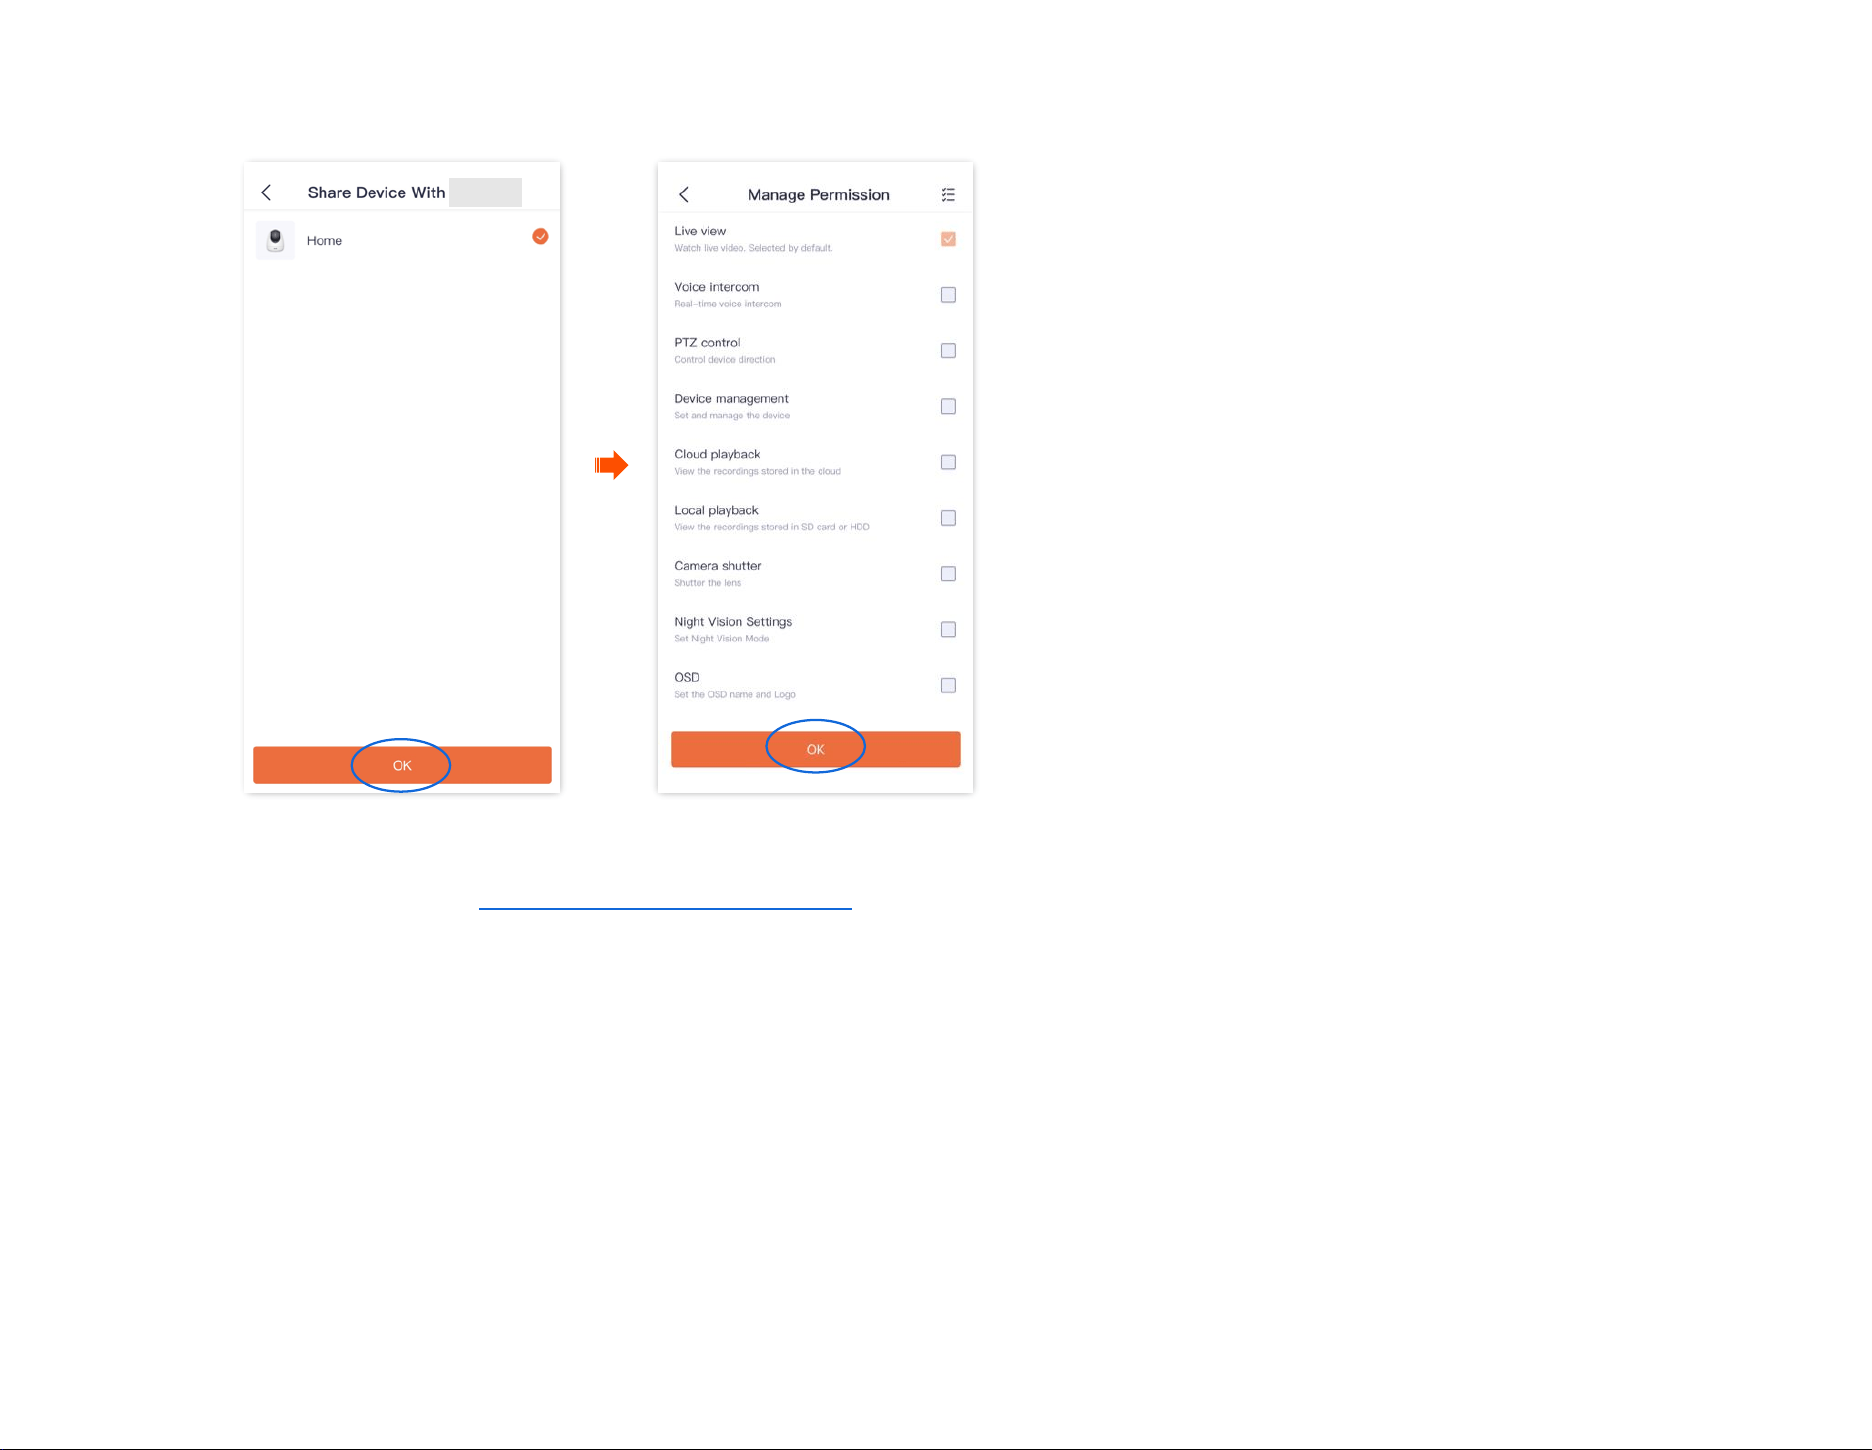
Document Version: V1.4
85
3 Choose a device to share with your friend, which is Home in this example, and tap OK. Choose the management permissions you want to
share, and tap OK.
----End
After logging in to TDSEE App to accept the device shared from you, your friends can view the monitoring video of the camera and enjoy certain
management permissions.

Document Version: V1.4
86
Accept sharing
If someone shares a device with you, after you accept sharing request, you can check the monitoring videos and have some management
permissions.
Method 1 (Recommended)
Log in to TDSEE App, tap Messages at the bottom of the homepage, find the corresponding notification message, and tap Accept.
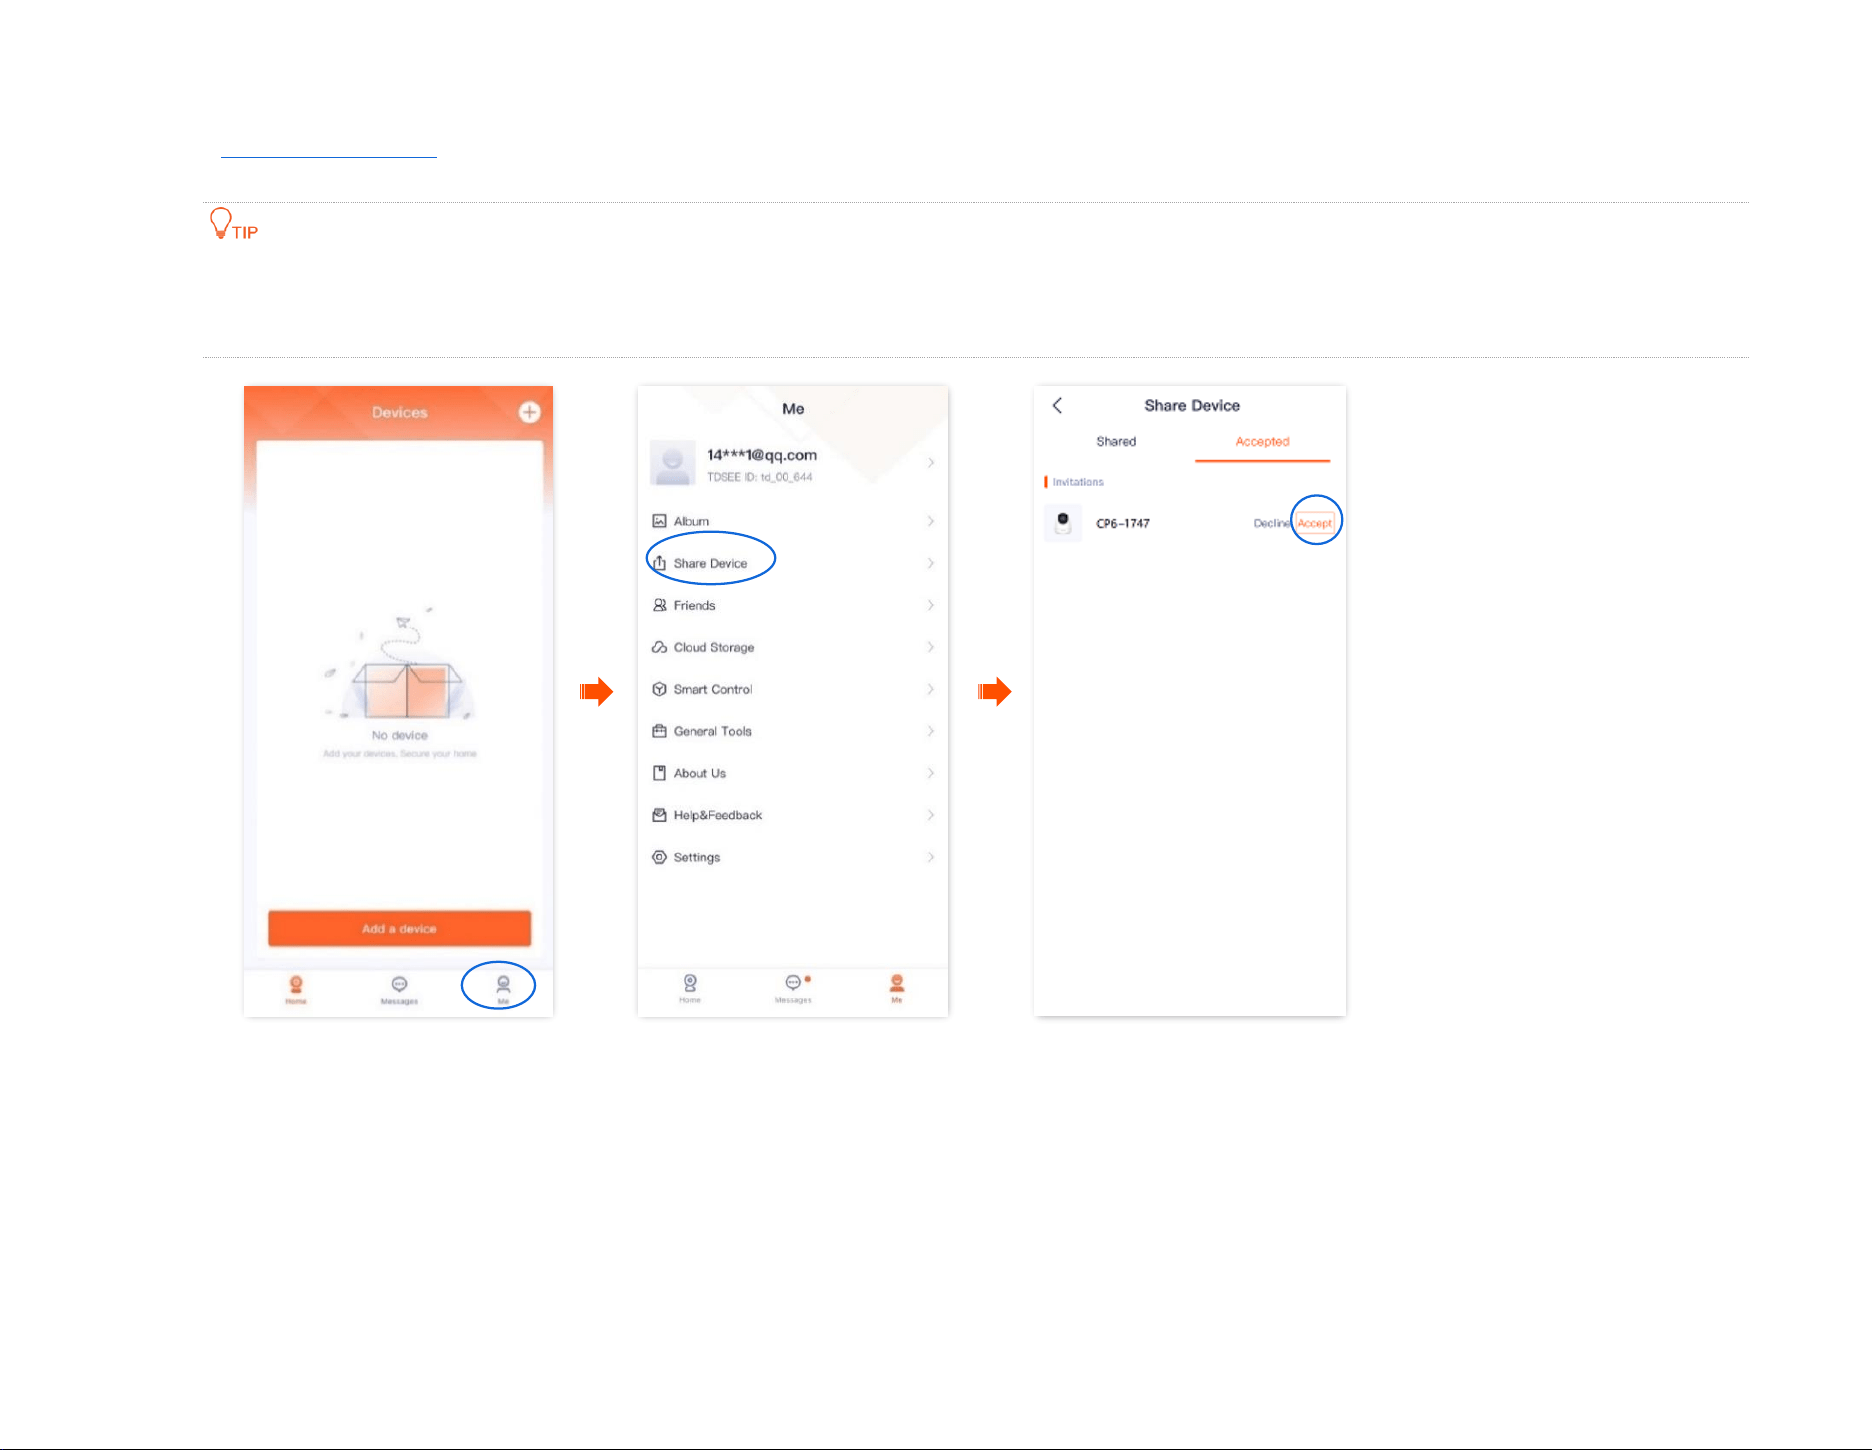
Document Version: V1.4
87
Method 2
Step 1 Log in to TDSEE App, enter the homepage, navigate to Me > Share Device.
Step 2 Tap Accepted, find the device that your friends share with you, and tap Accept, which is CP6-1747 in this example.
- The name of the shared camera is In the format of Camera model-Last four characters of the camera’s UUID, and the UUID can be found
on the bottom of the device.
- After sharing succeeds, when the friend relationship is dissolved or the device is deleted, the sharing will be invalid.
----End
After accepting the shared device successfully, you can check the monitoring image of the camera on the homepage.

Document Version: V1.4
88
Delete sharing relationship
After you successfully share the device with your friends, if you do not want to continue to share the device, you can dissolve the sharing relationship.
Methods to dissolve the sharing relationship are shown as follows:
- The sharer cancels the sharing relationship
- The accepter deletes the sharing relationship
- The accepter deletes the device
The sharing relationship will also be dissolved in the following situations:
- The friend relationship is dissolved in the TDSEE App.
- The sharer deletes the shared device.
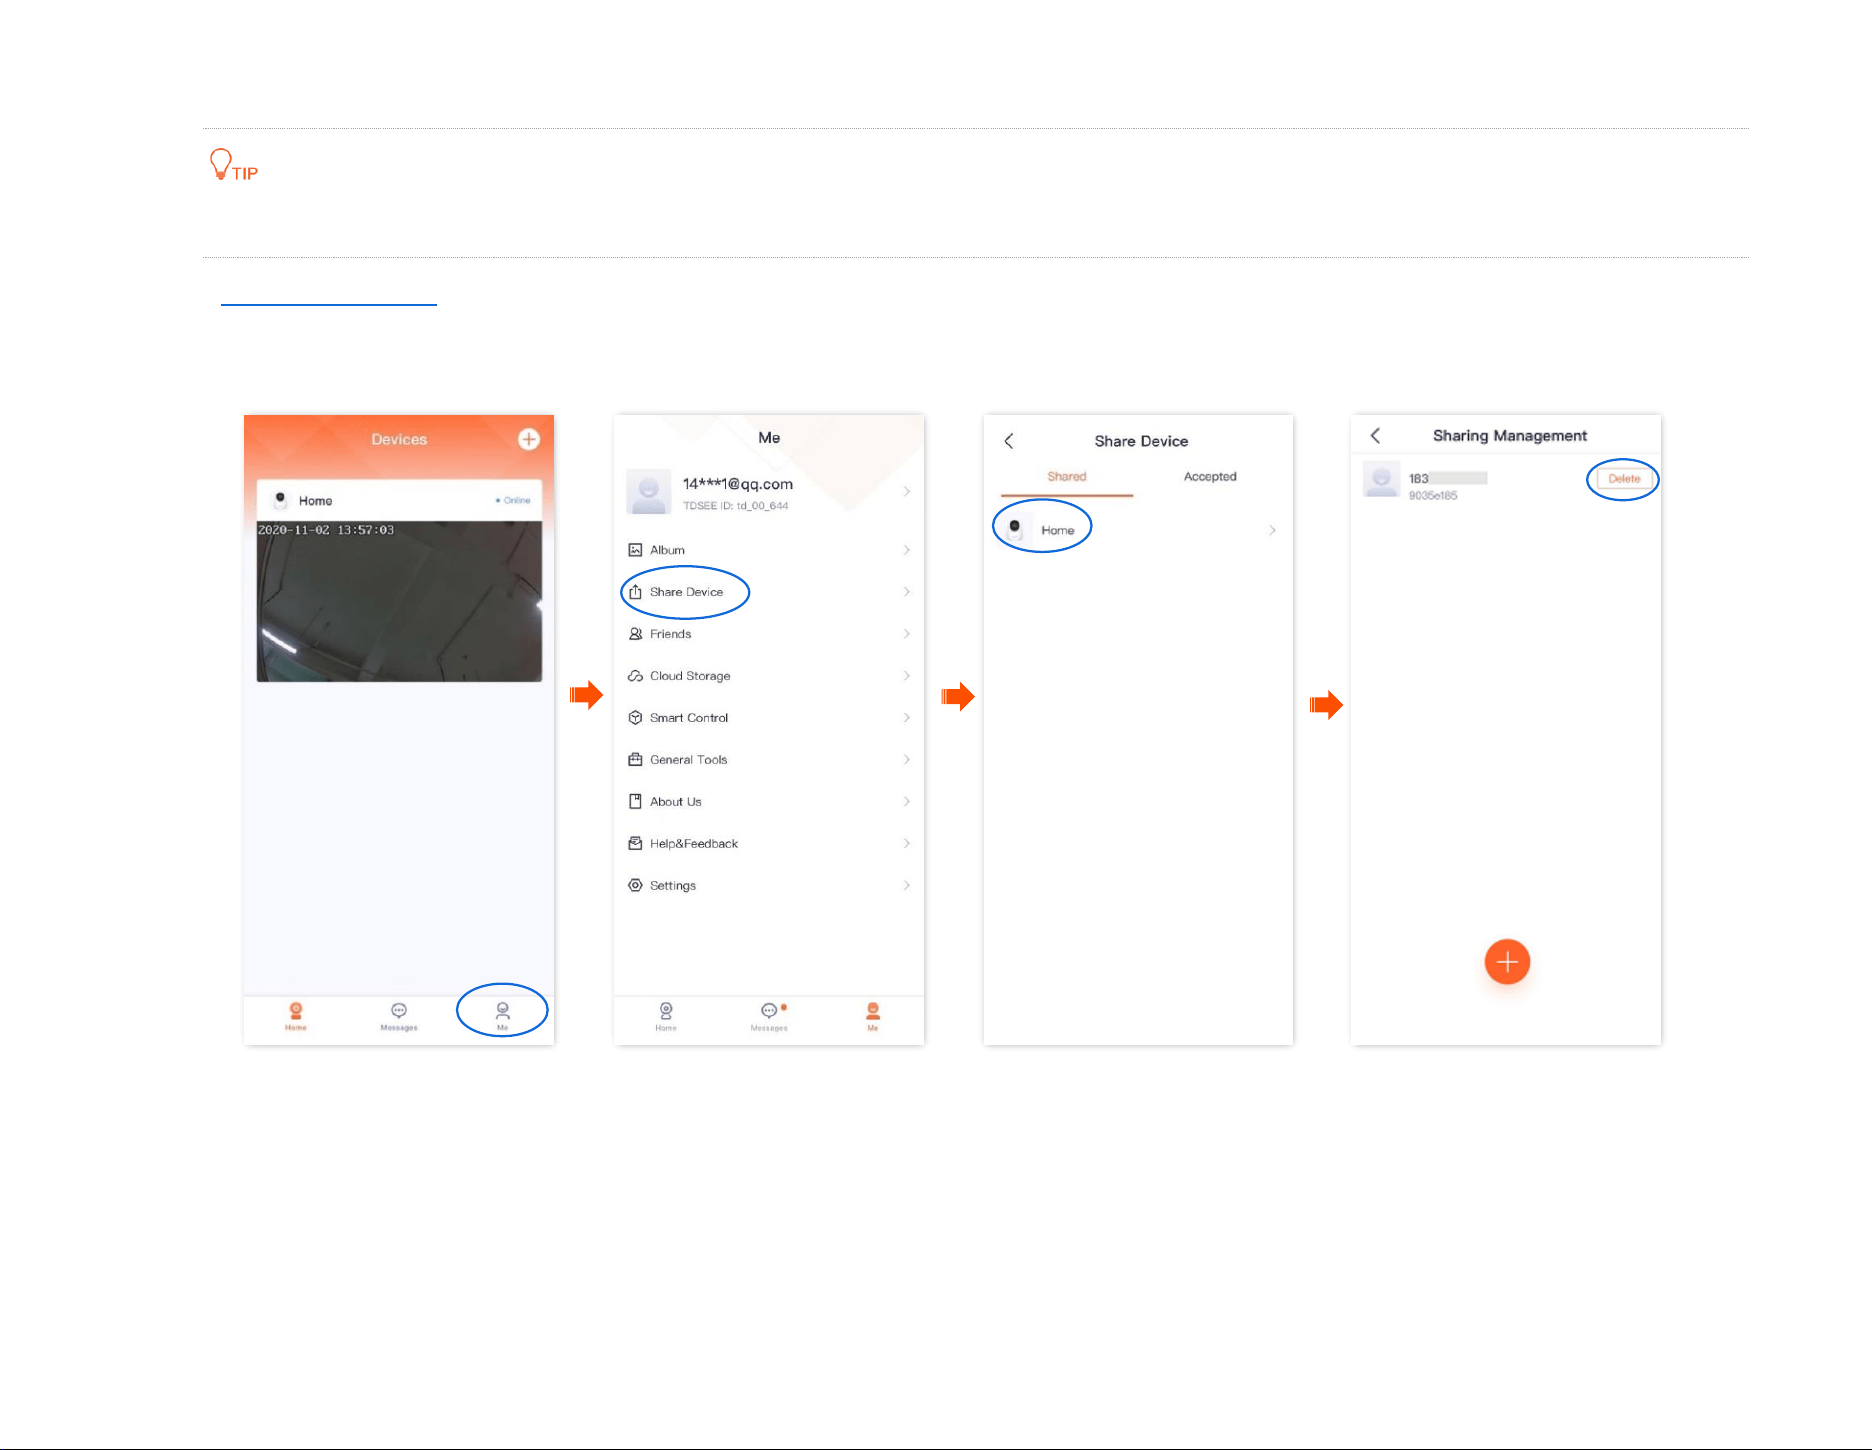
Document Version: V1.4
89
Method 1 The sharer cancels the sharing relationship
The following steps are all performed by the sharer.
Step 1 Log in to TDSEE App, enter the homepage, then tap Share Device.
Step 2 Tap the device of which you want to cancel sharing, which is the camera Home in this example. Find the friend you want to cancel sharing
with and tap Delete.
----End
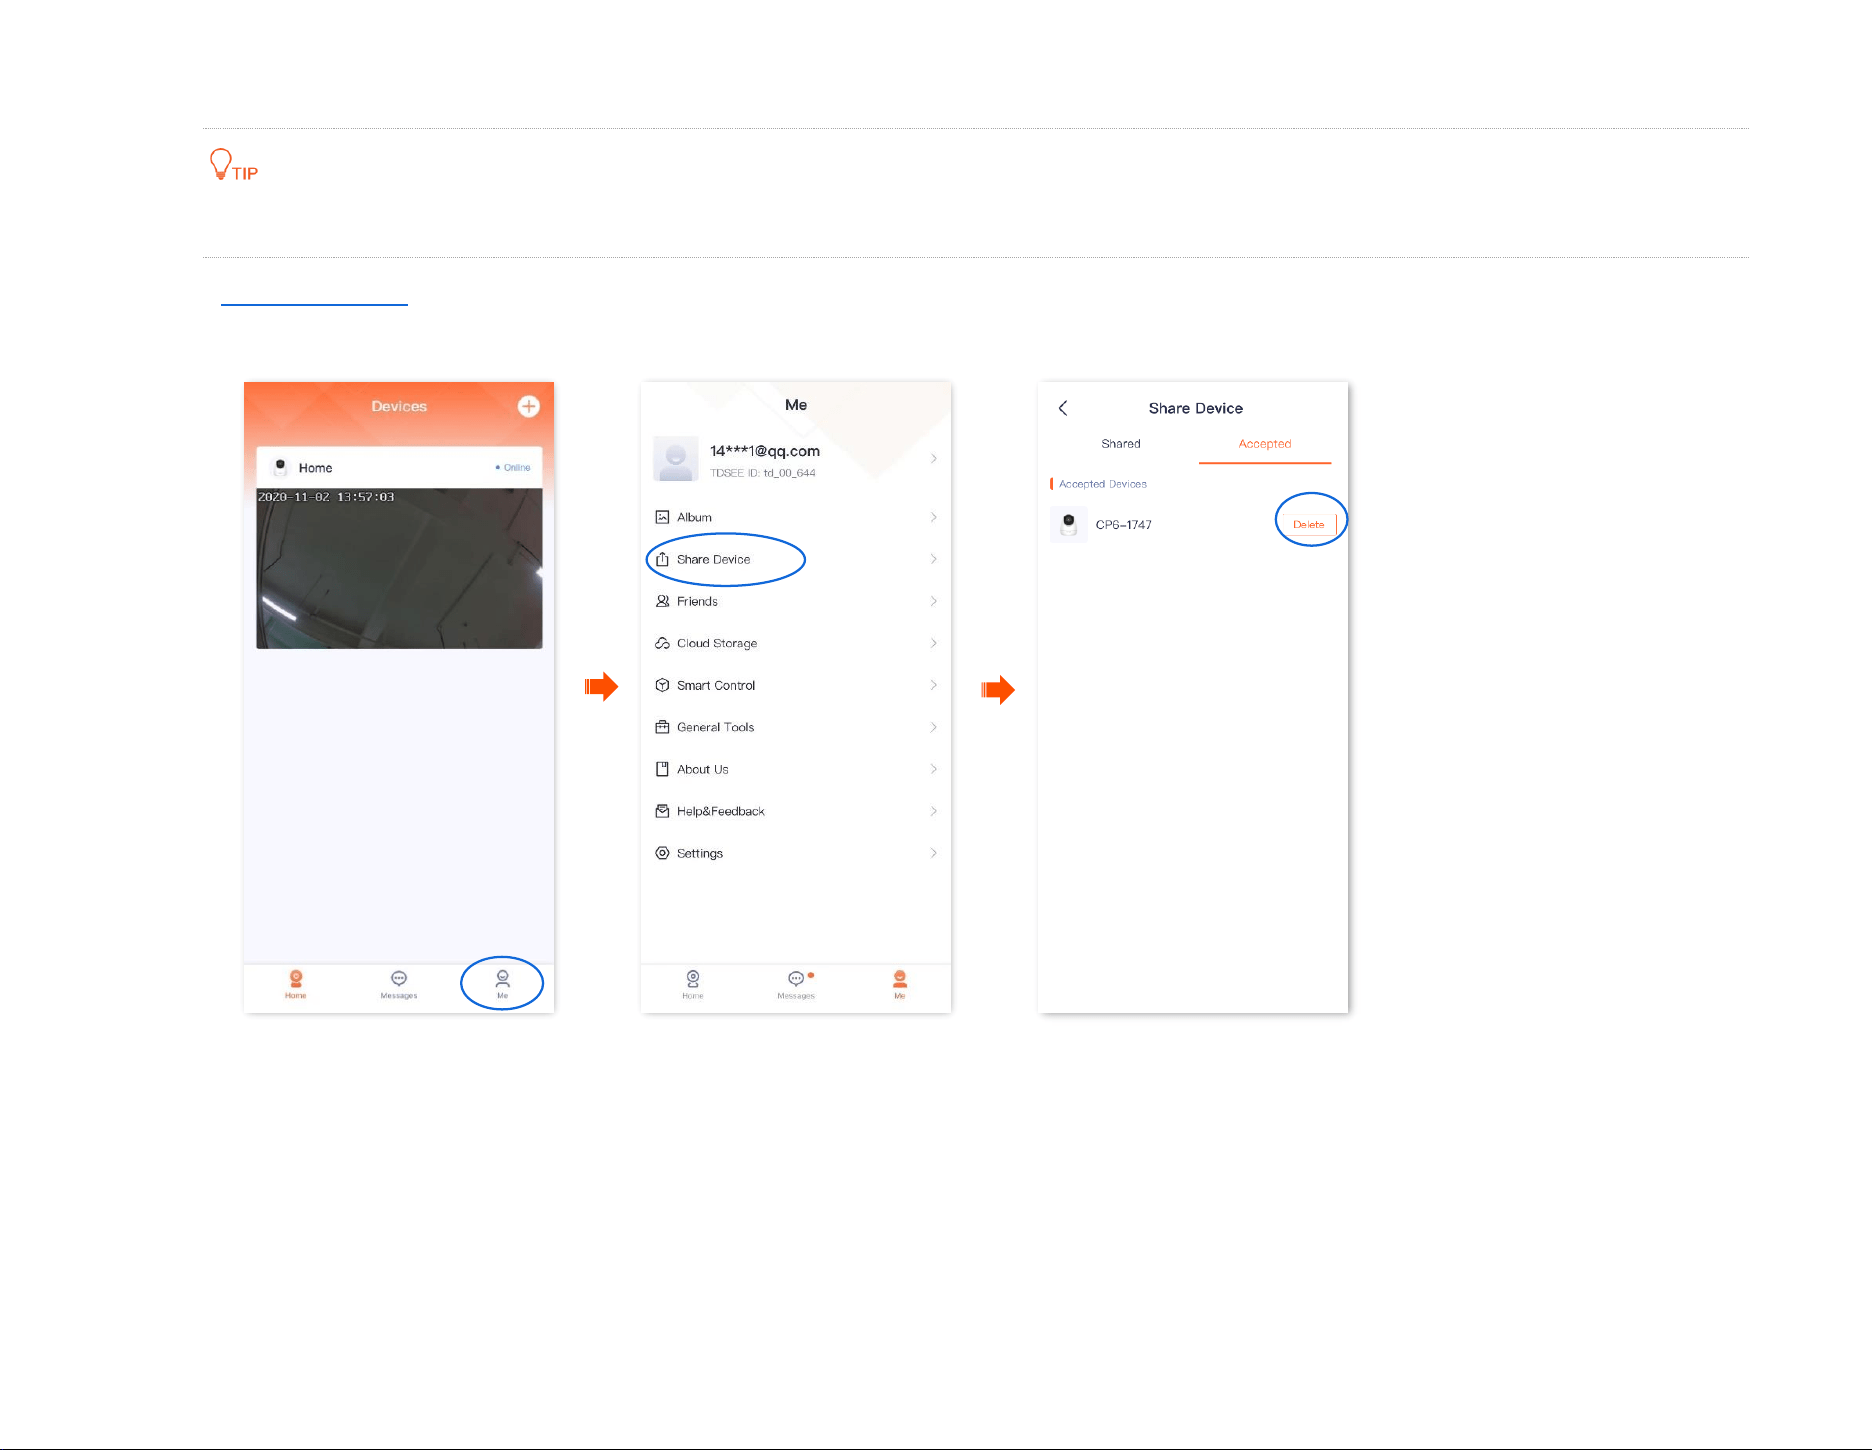
Document Version: V1.4
90
Method 2 The accepter deletes the sharing relationship
The following steps are all performed by the accepter.
Step 1 Log in TDSEE App, enter the homepage, then tap Share Device.
Step 2 Tap Accepted, find the device shared by another user, which is CP6-1747 in this example, and tap Delete.
----End
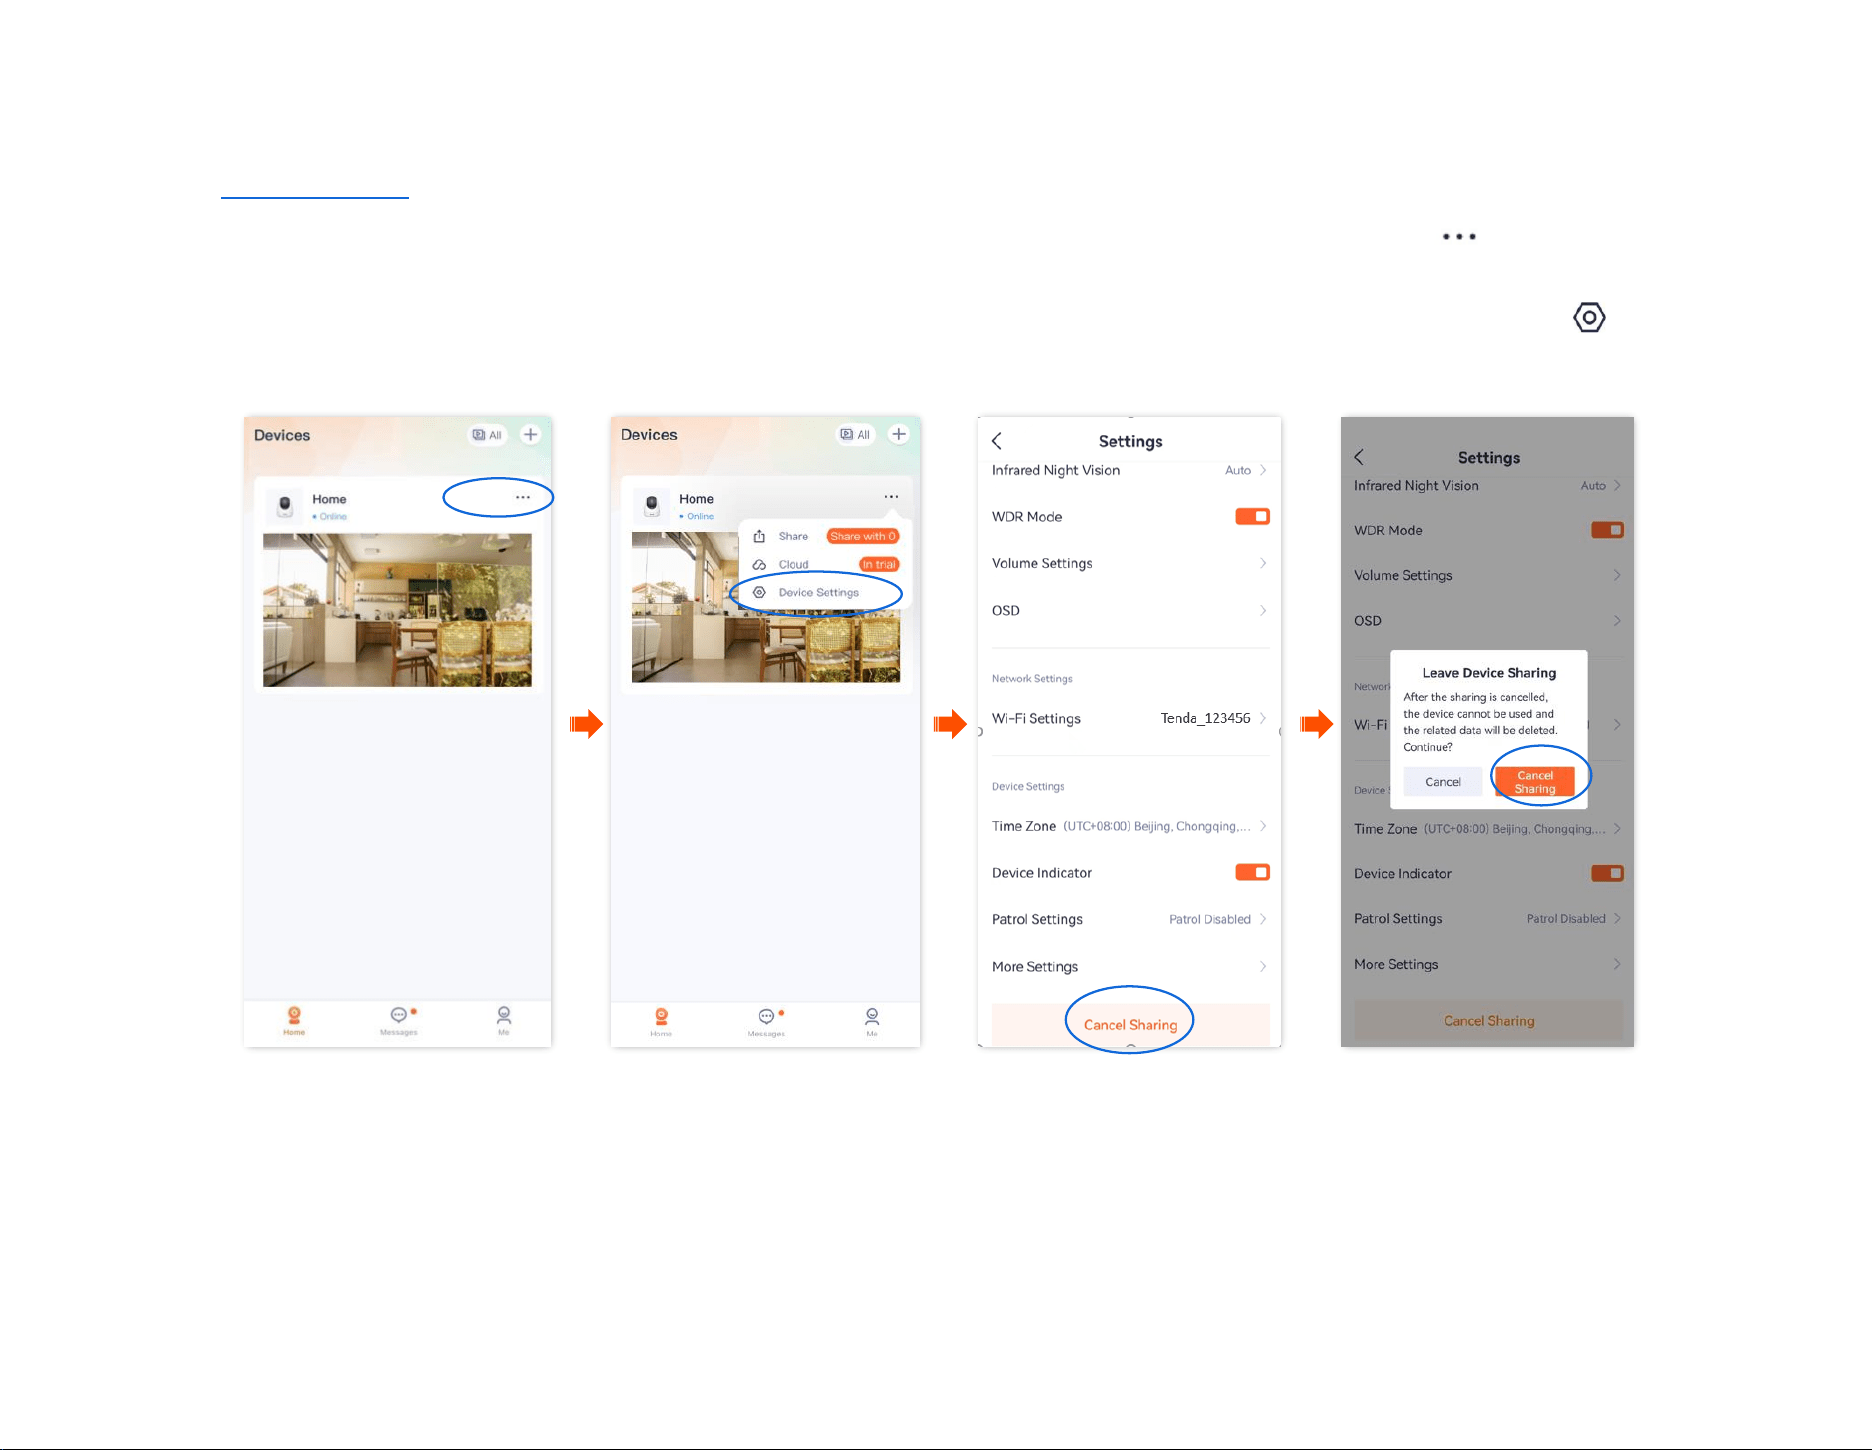
Document Version: V1.4
91
Method 3 The accepter deletes the device
The TDSEE App with version 1.3.0 is used for illustrations here.
Step 1
Log in TDSEE App, and enter the settings page of the camera.
- Method 1: Find the camera you want to quit sharing on the homepage, which is Home in this example, tap on the right corner,
and Device Settings.
- Method 2: Find the camera you want to quit sharing on the homepage, which is Home in this example, and tap Settings ( ) in the
upper-right corner.
Step 2
Scroll down to the bottom of the page, find and tap Cancel Sharing. Tap Cancel Sharing in the pop-up window.
----End

Document Version: V1.4
92
Add your friends
You can add the TDSEE App accounts of your friends here.
After adding friends successfully, you can share the devices under the current account of the TDSEE App with your friends, and your friends can also manage
the device.
Method 1
Step 1 Log in to TDSEE App, and tap the device you want to share with friends on the homepage, which is the camera Home in this example.
Step 2
Tap Share in the lower left corner.
Step 3 Tap Add Friends in the upper right corner, and enter the phone number or email address of your friends.
----End
Your friends log in to TDSEE App and accept the invitations from you. Refer to Accept invitation from your friends for detailed steps.
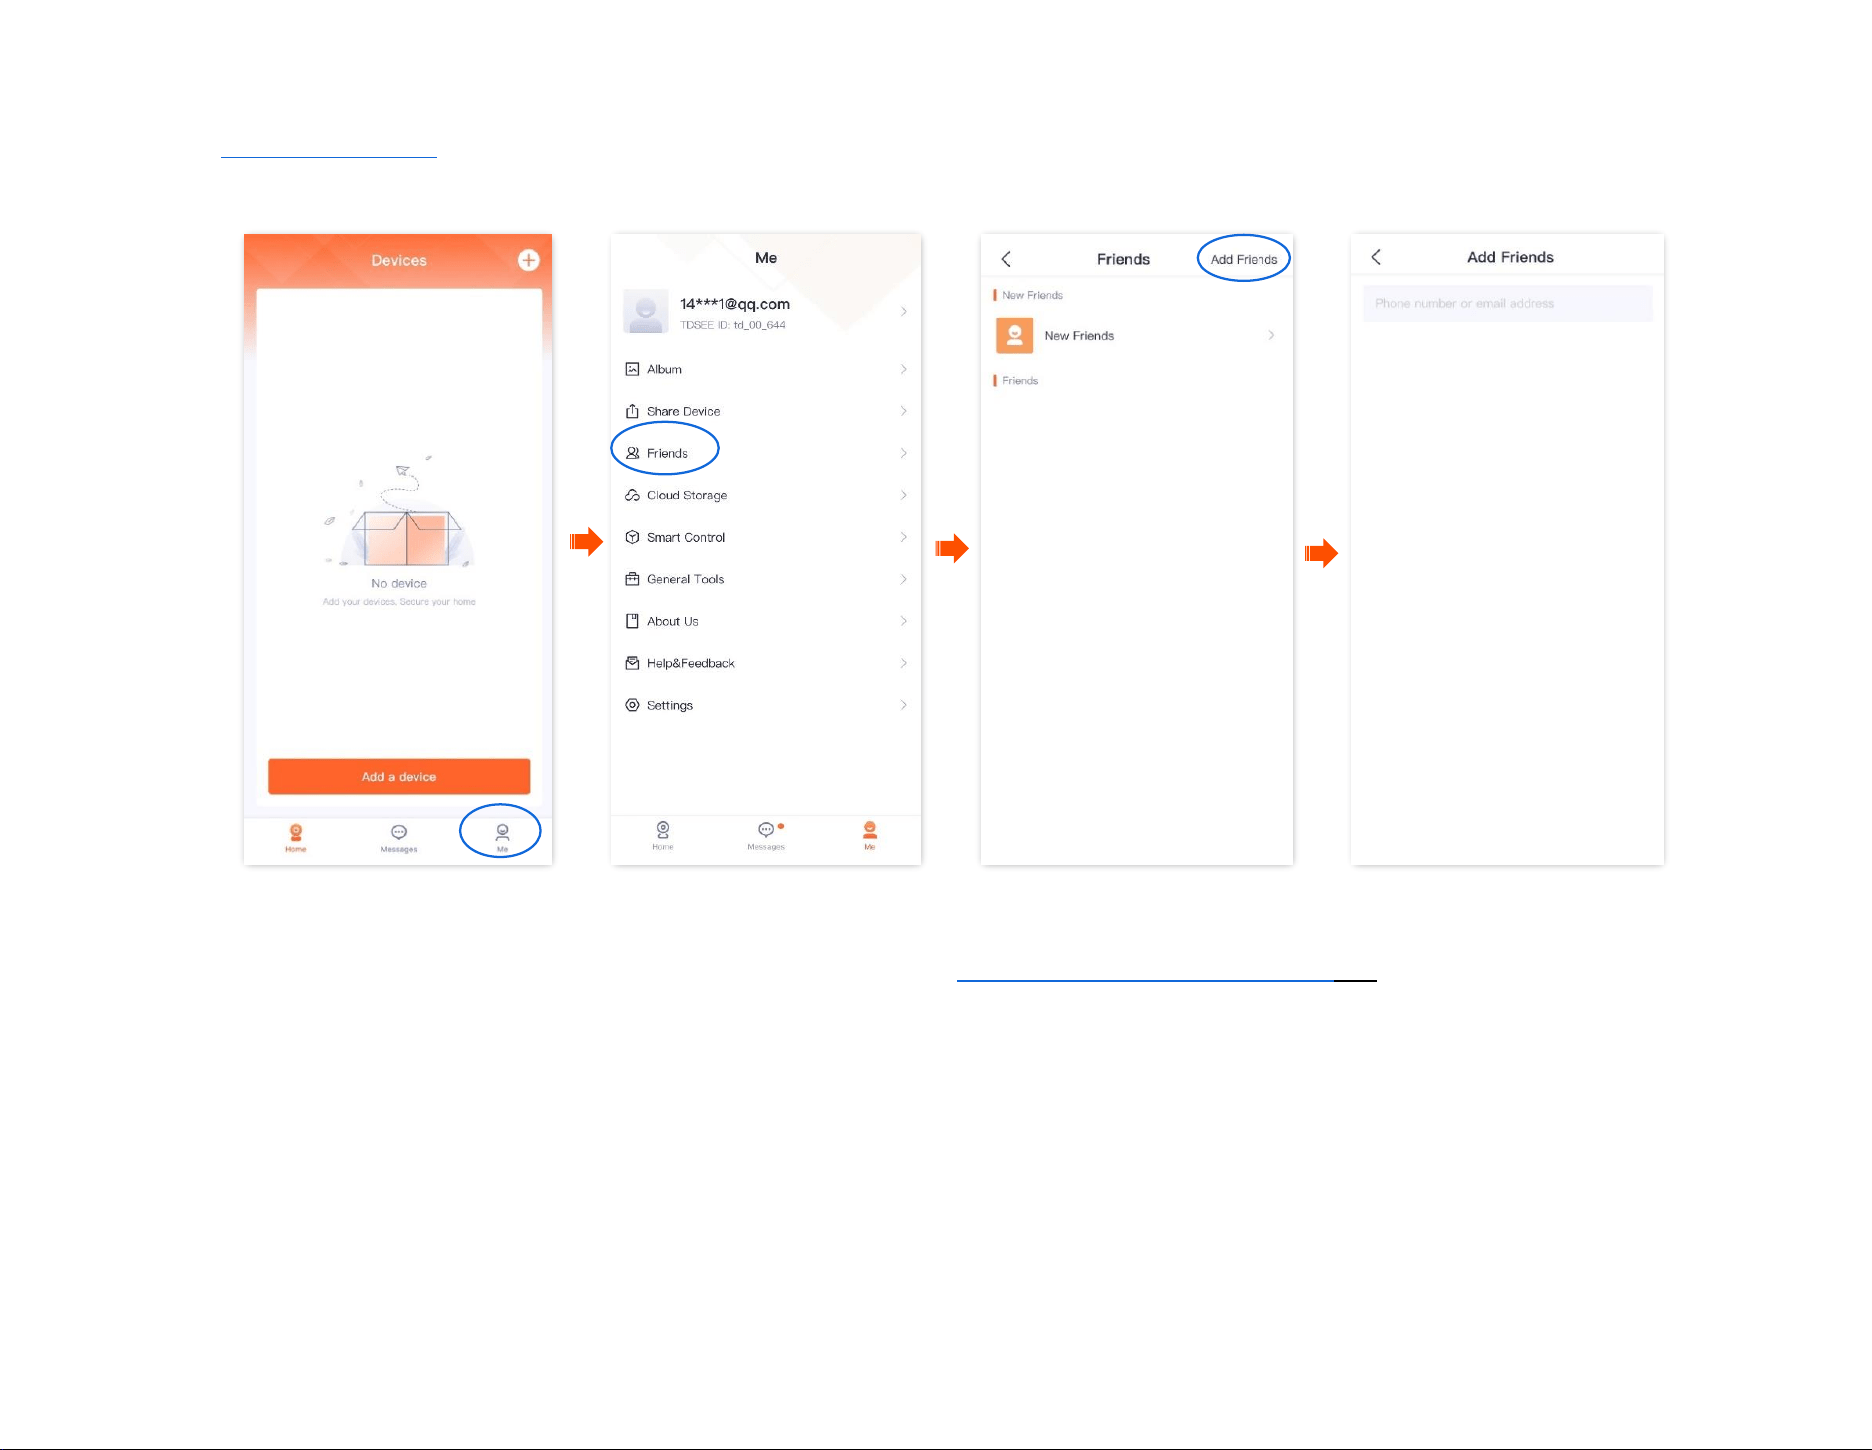
Document Version: V1.4
93
Method 2
Step 1 Log in to TDSEE App, and navigate to Me > Friends.
Step 2 Tap Add Friends in the upper right corner, and enter the phone number or email address.
----End
Your friends log in to TDSEE App and accept the invitation from you. Refer to Accept invitation from your friends for detailed steps.
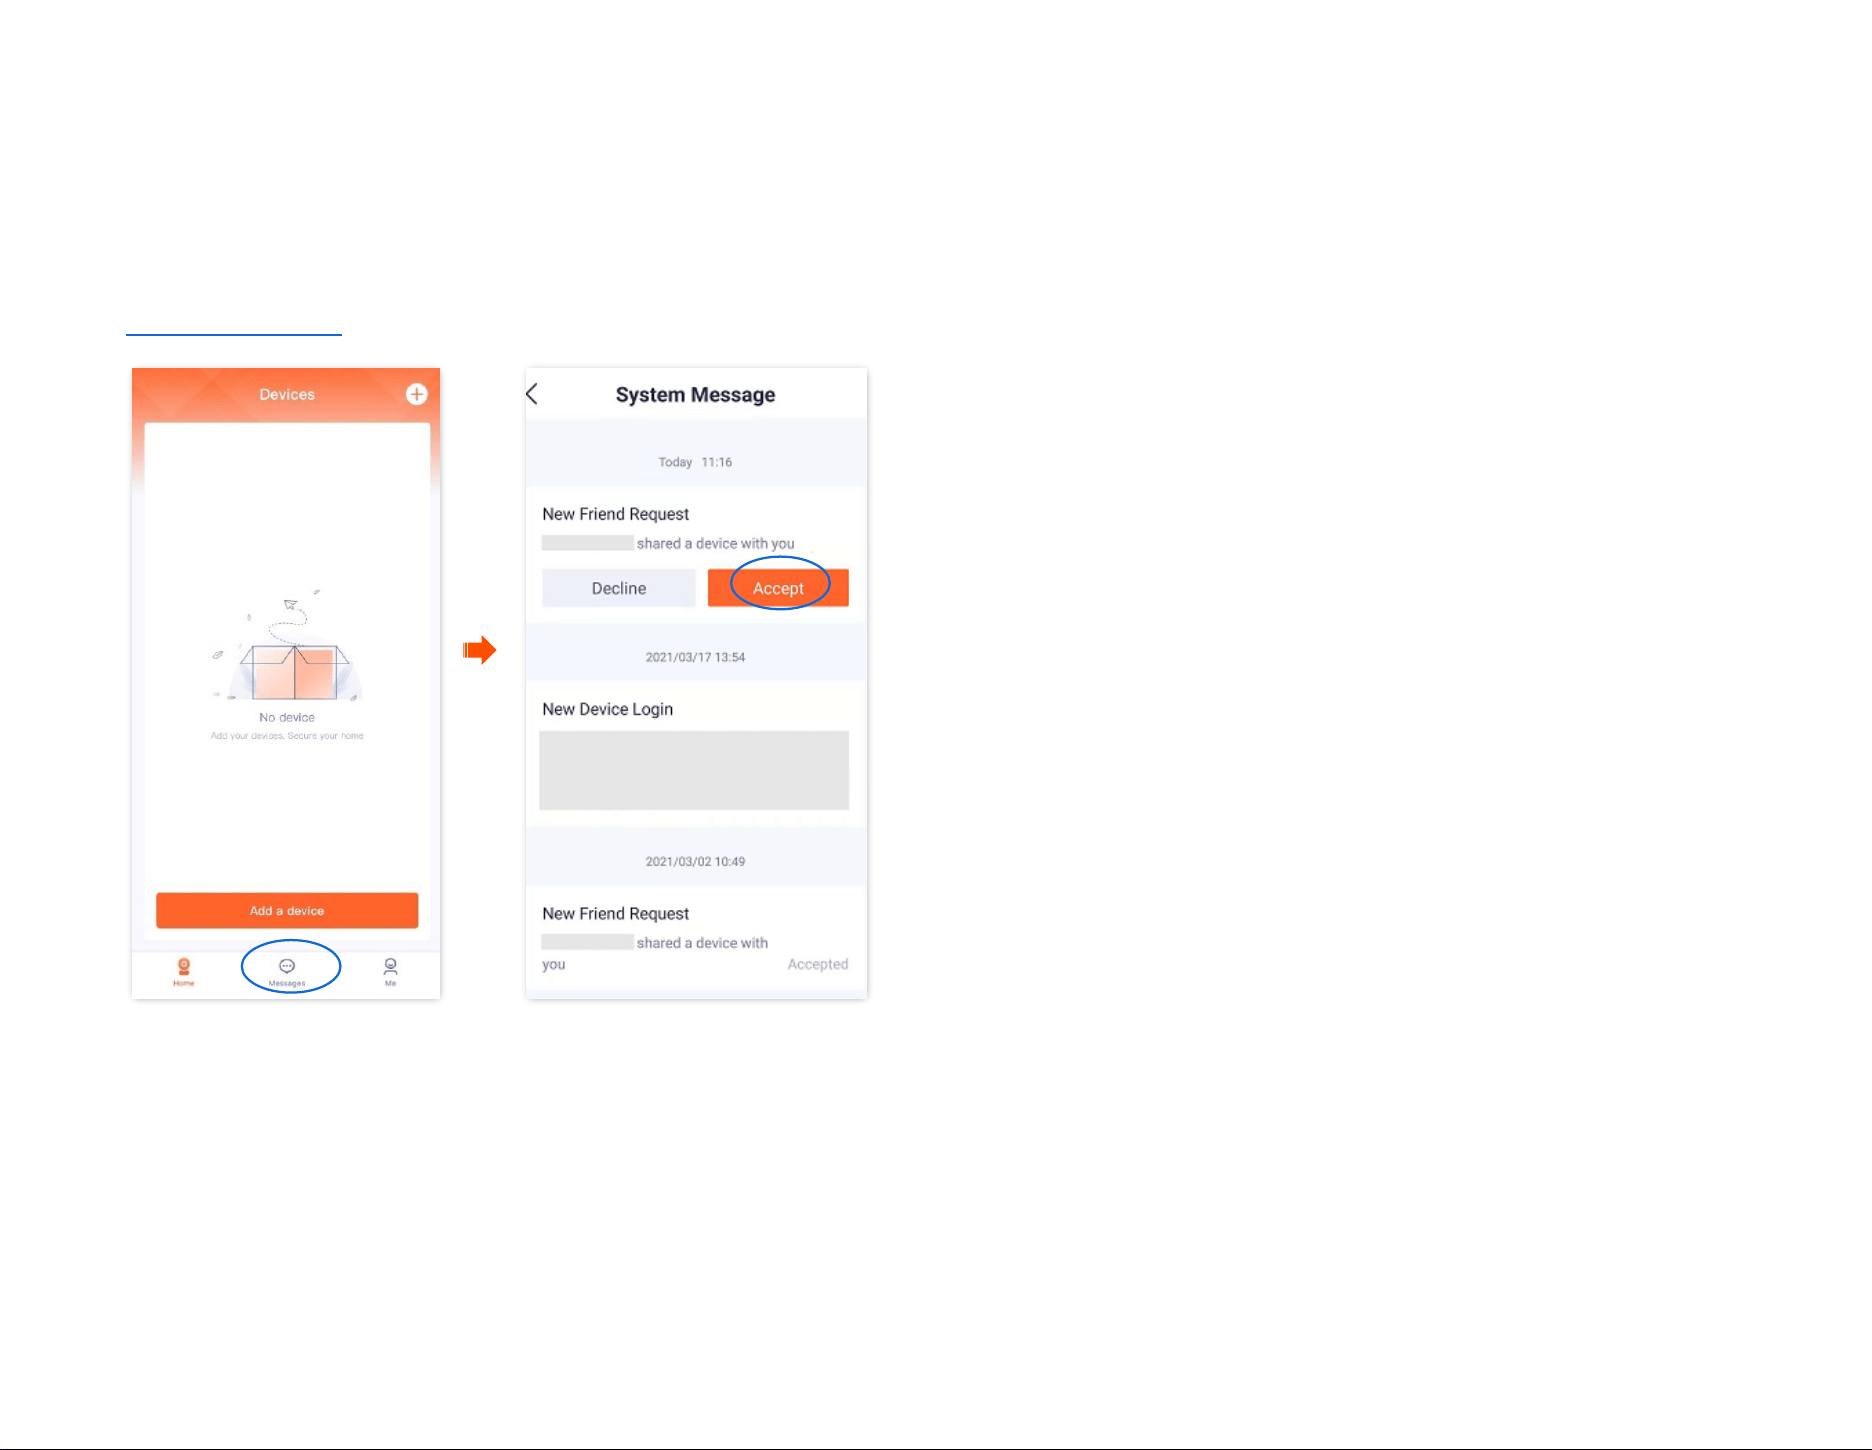
Document Version: V1.4
94
Accept invitation from your friends
If someone has sent you an invitation to add you as a friend in TDSEE App, you can accept the invitation here.
Method 1 (Recommended)
Log in to TDSEE App, and enter the Messages page. Find the corresponding notification message, then tap Accept.
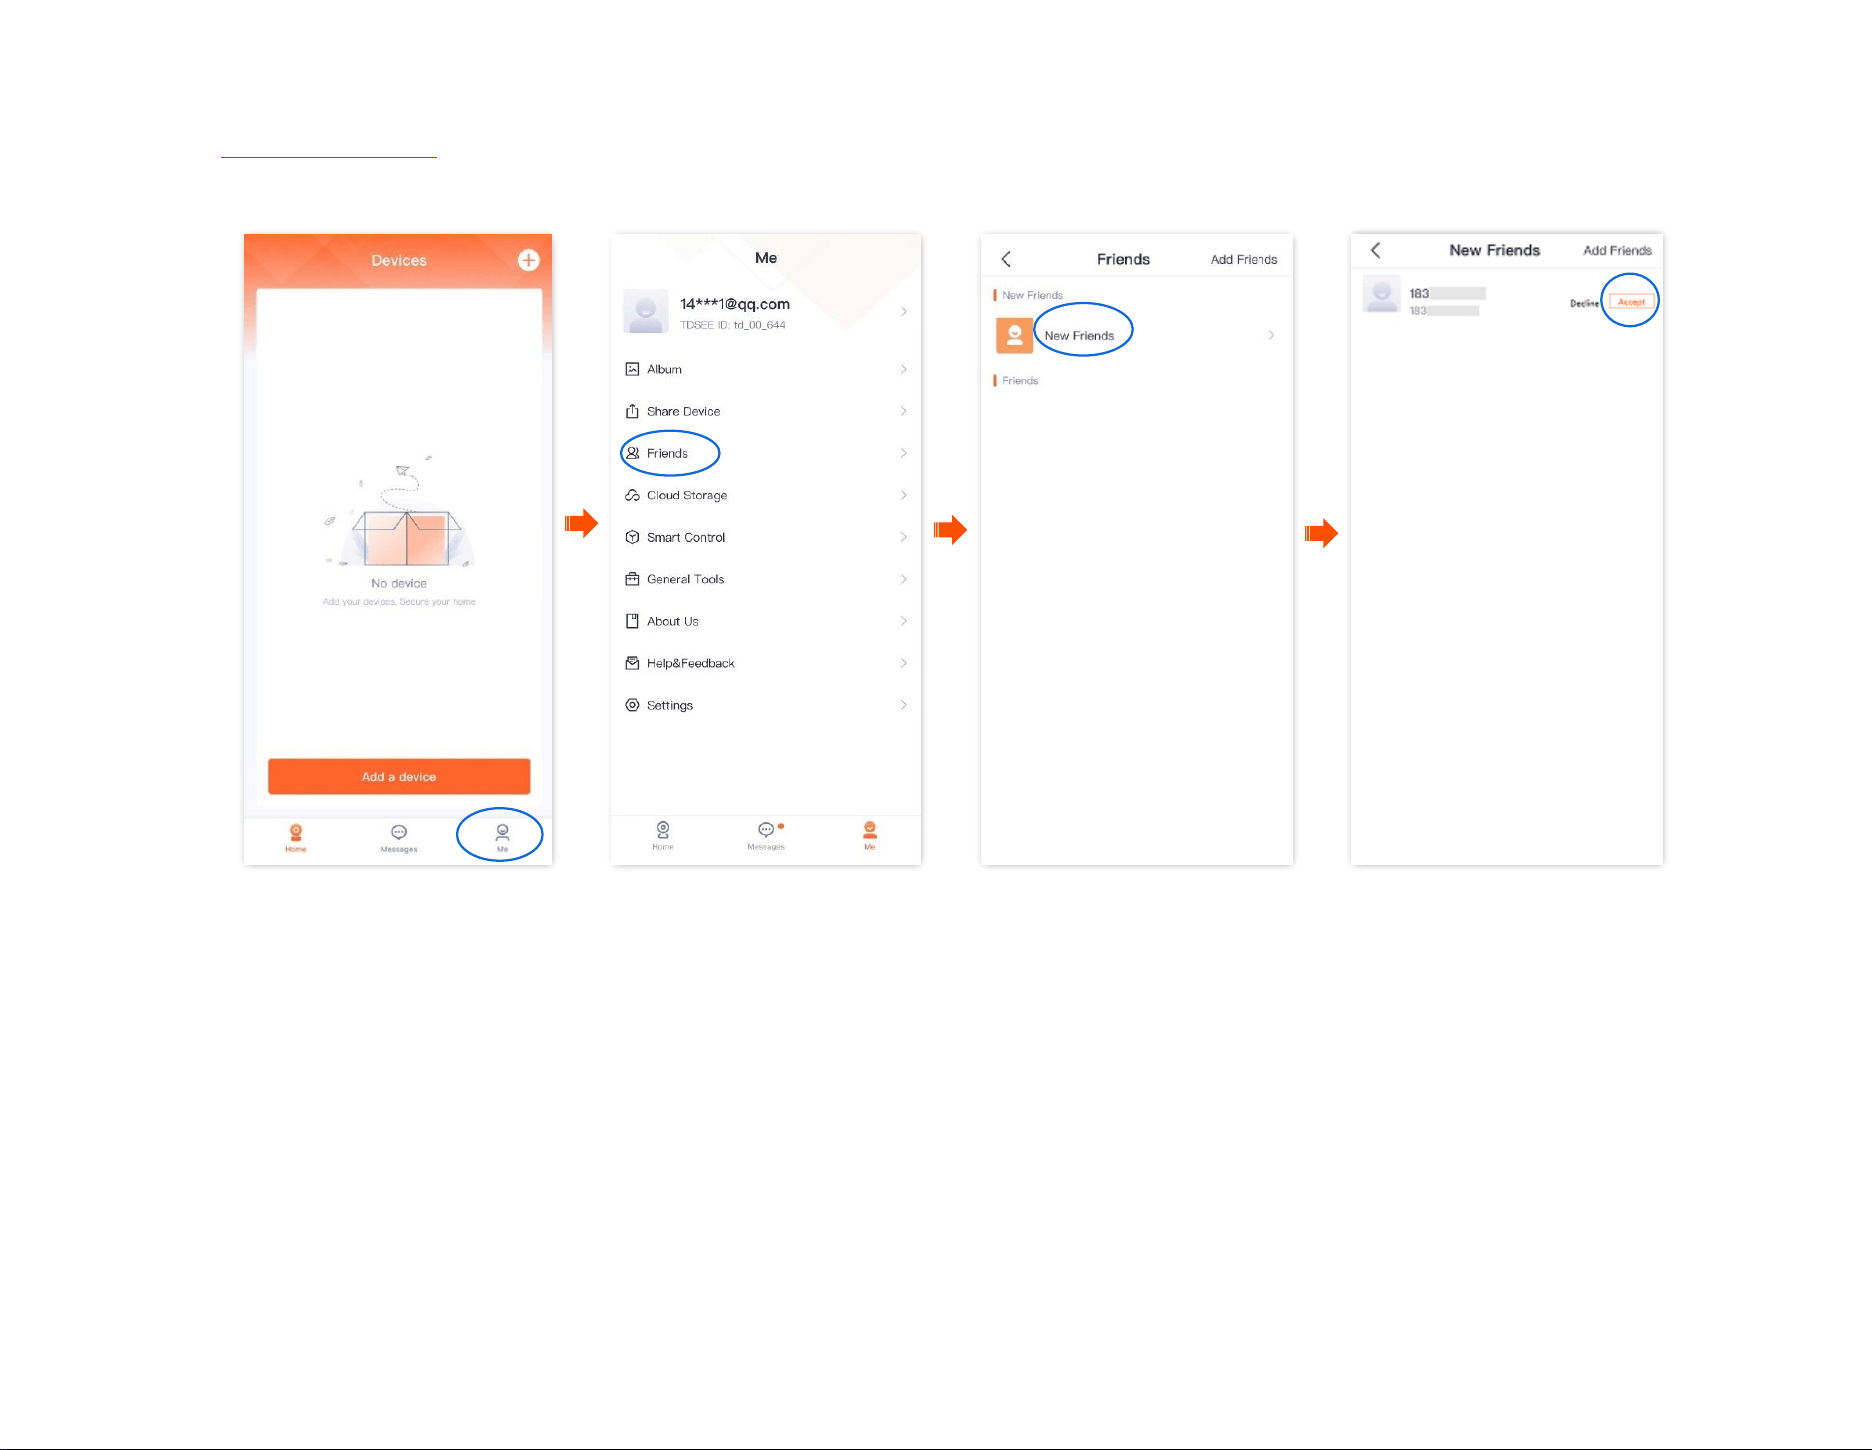
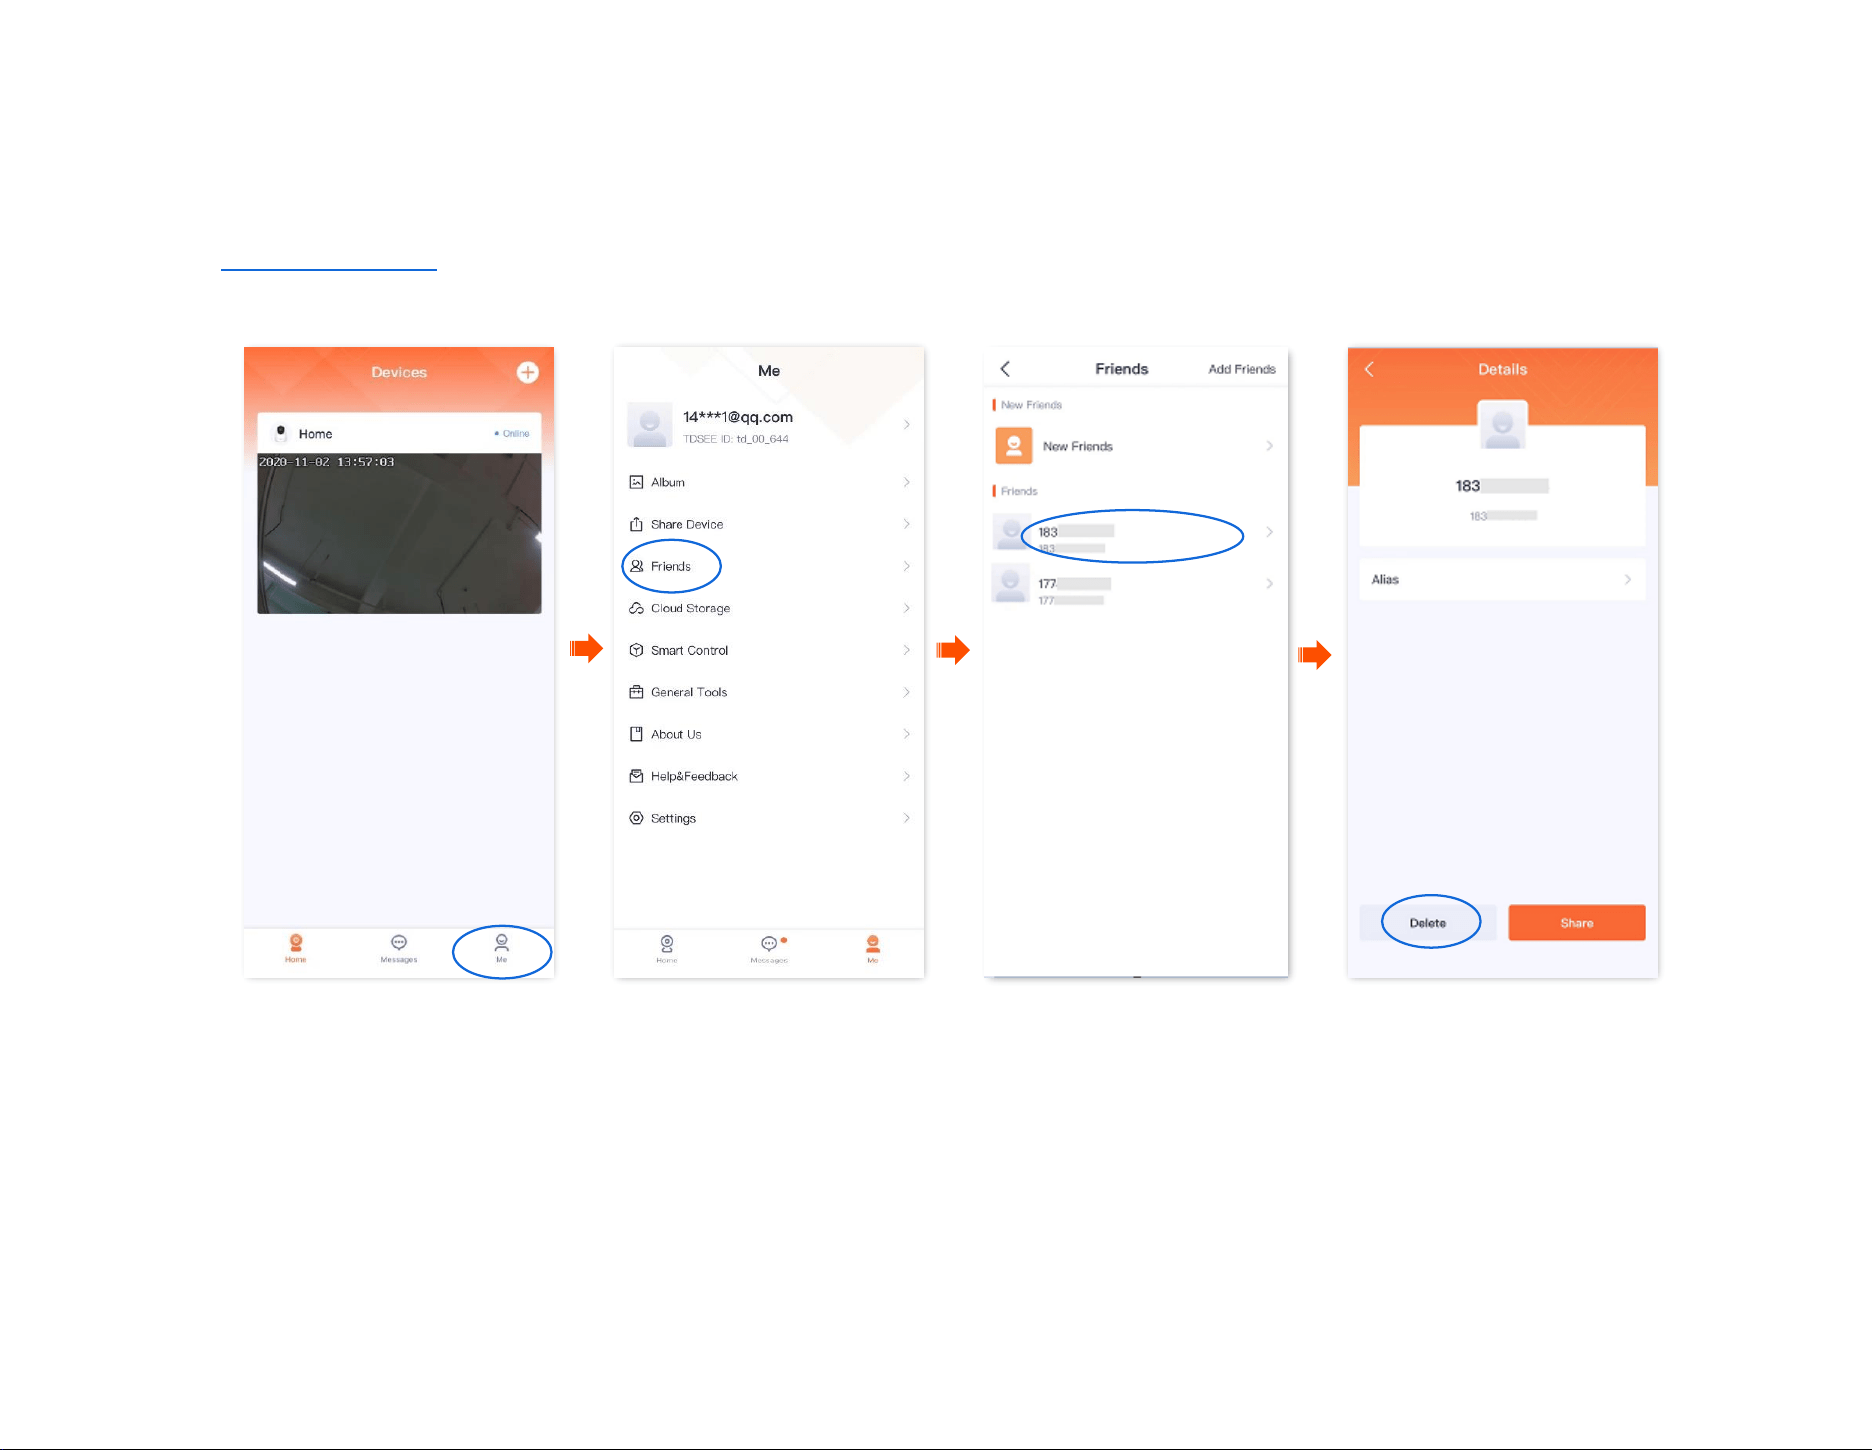
Document Version: V1.4
97
Smart control
The TDSEE App with version 1.1.7 is used for illustrations here.
Navigate to Me > Smart Control to enter the Smart Control page.
TDSEE App supports the binding of Alexa. After binding successfully, you can control the camera with your voice through Echo show.
- If you log in with a third-party account and have not registered a TDSEE App account, you cannot use the Smart Control function.
- Some areas do not support Smart Control function. The actual TDSEE App page prevails.
Method of binding Alexa account and TDSEE account
Method 1: Bind Alexa APP through TDSEE App
Step 1 Download the Alexa App.
Search for Alexa App in Google Play or App Store, download and install it onto your smartphone.
Amazon Alexa
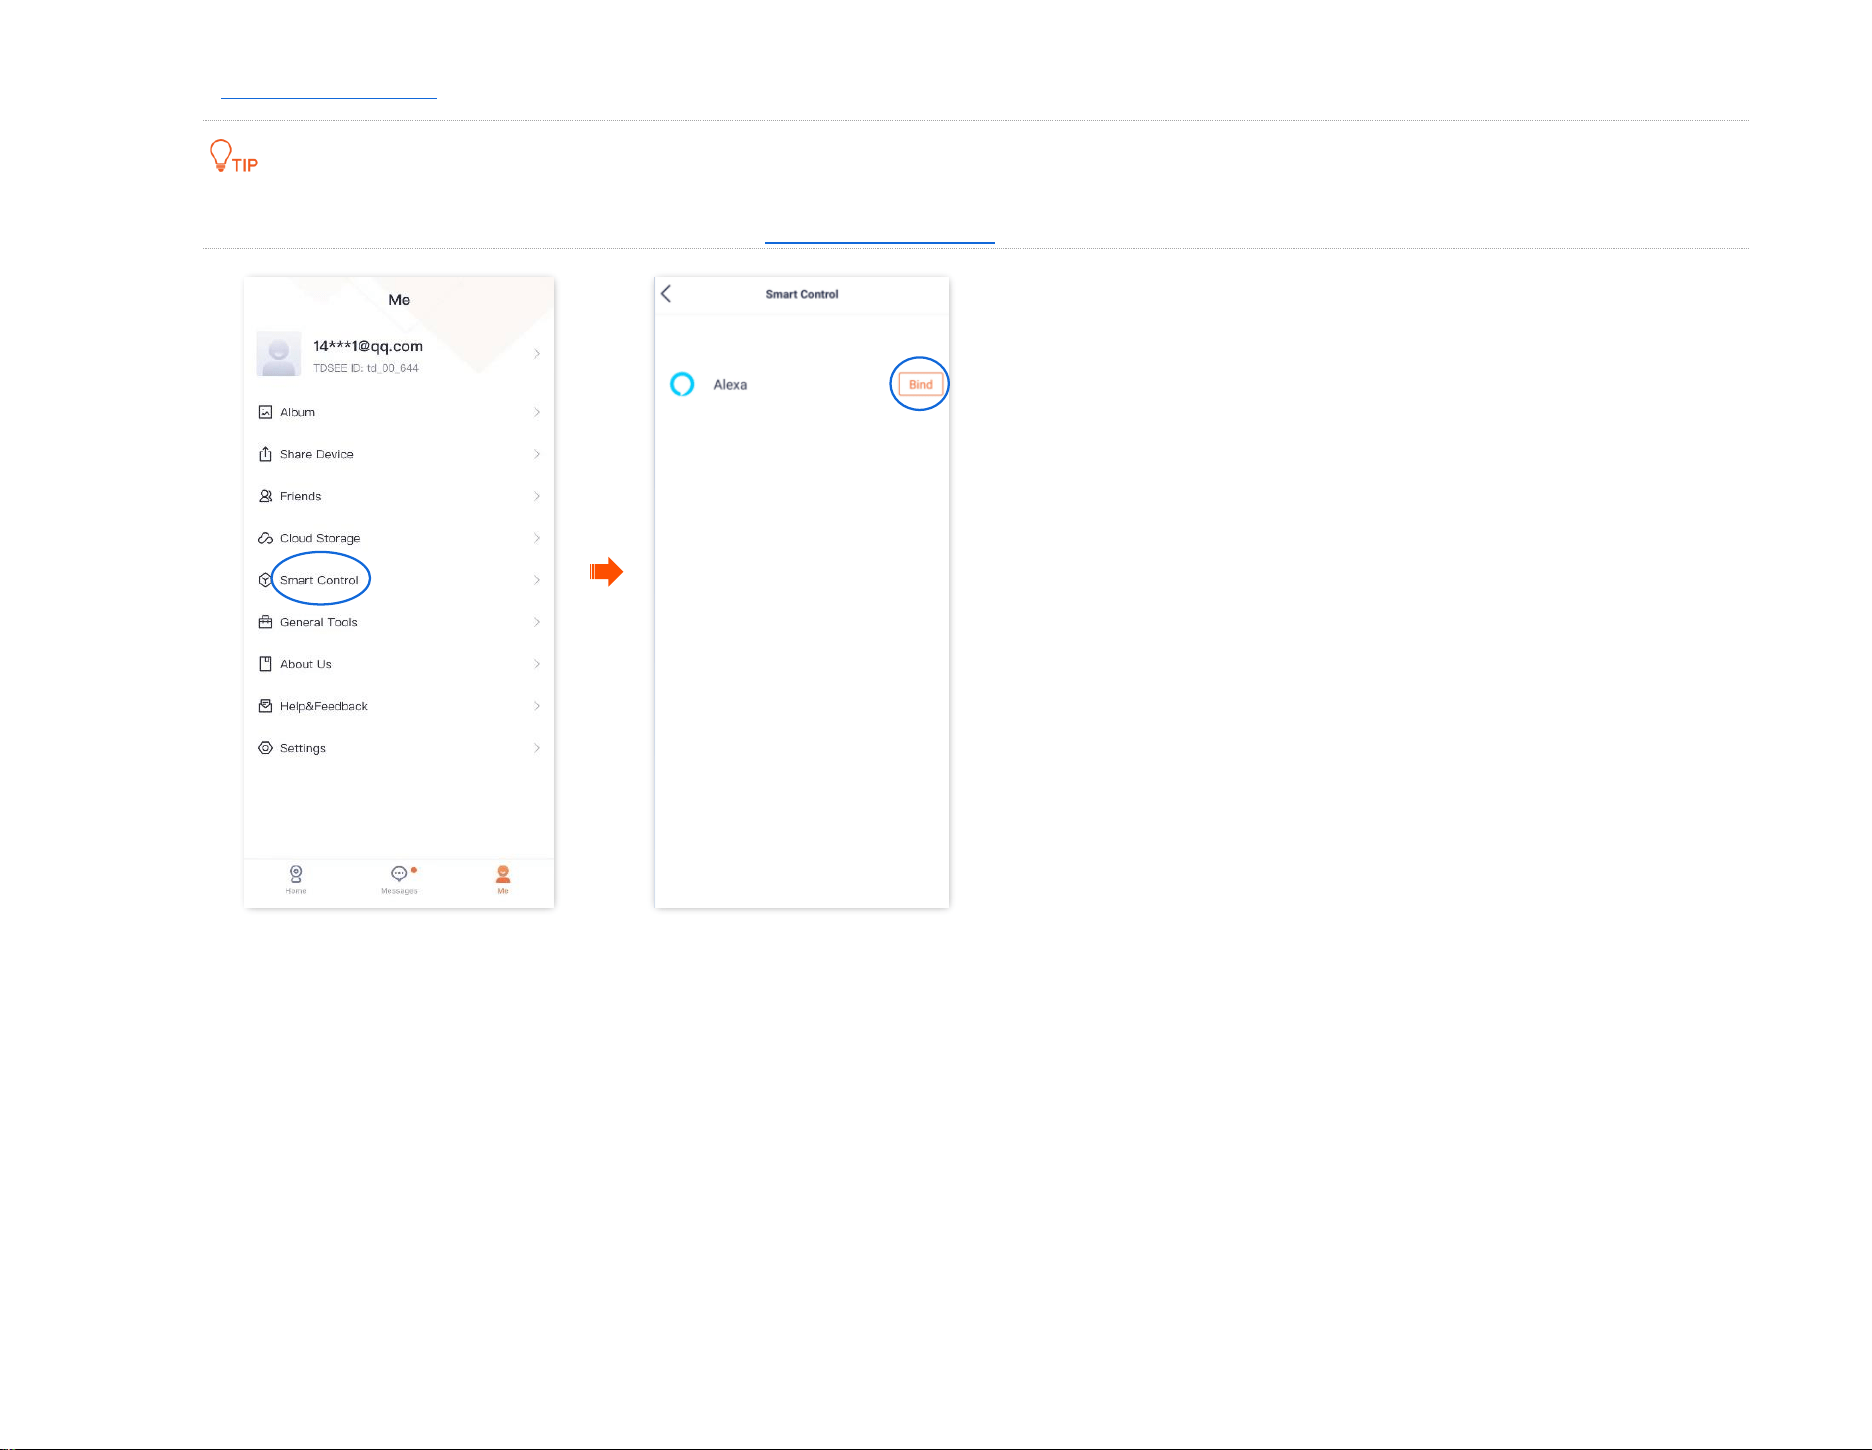
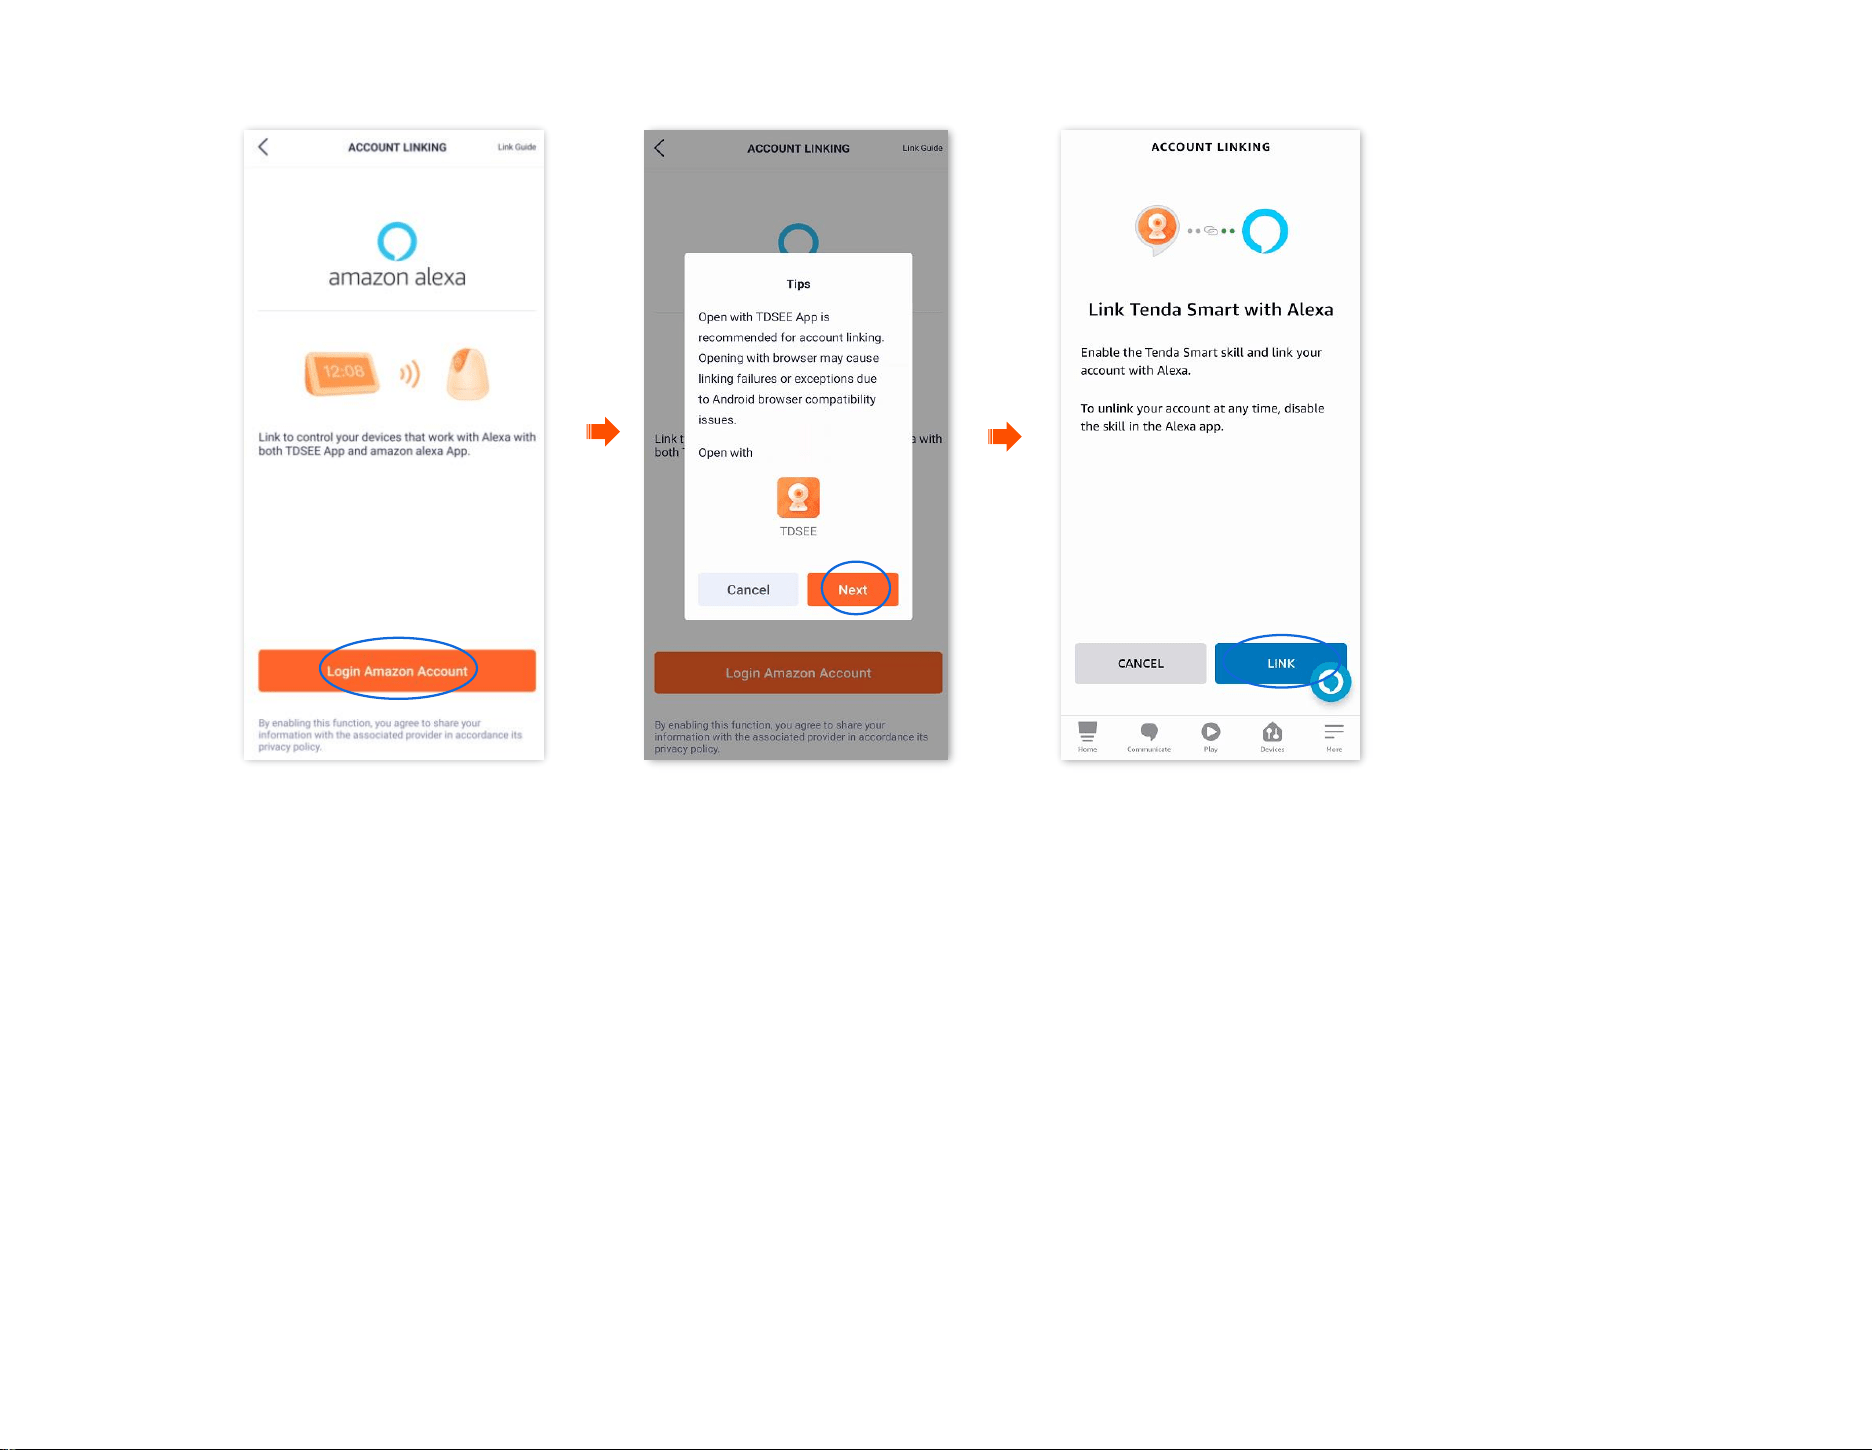
Document Version: V1.4
99
Step 3 Tap Login Amazon Account, tap Next in the pop-up window, and then tap LINK.
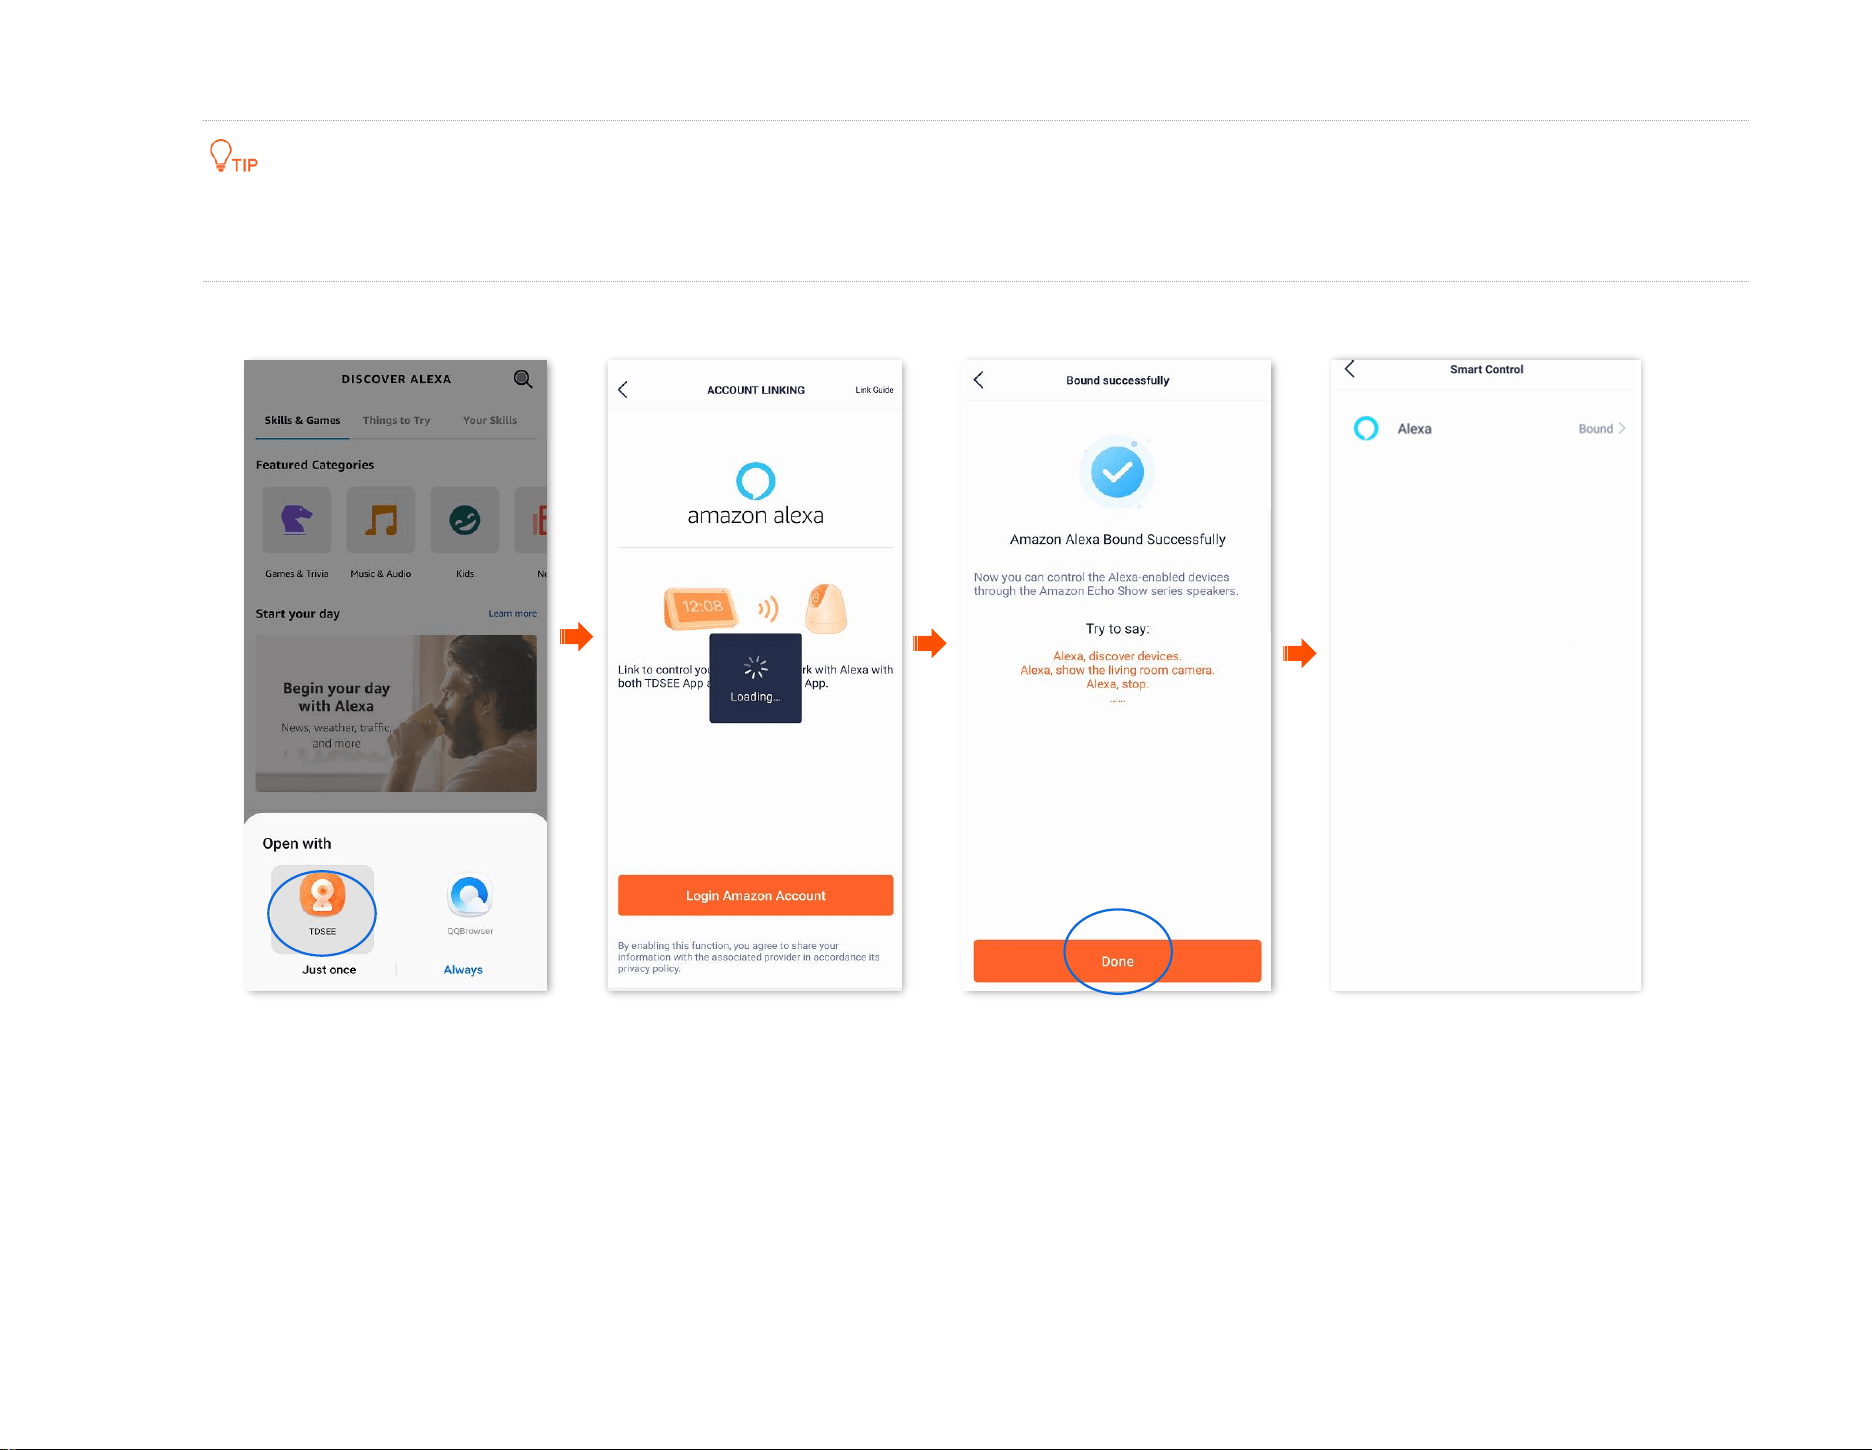
Document Version: V1.4
100
Step 4 Select Open with TDSEE. Wait a moment, the Amazon Alexa bound successfully through TDSEE App.
If you use an Android system to bind Alexa App through TDSEE App, you are recommended to open with TDSEE App to link Tenda Smart and
Alexa. If you open a browser to link Tenda Smart and Alexa, there is a risk of binding failure.
Step 5 Tap Done.
---End

Document Version: V1.4
101
Method 2: Bind TDSEE APP through Alexa App
For some Android smartphones, even if you have installed TDSEE App, when you bind TDSEE App through Alexa App, you may also need
to redirect to the web page for binding.
If you do not have installed the TDSEE App, please follow the on-screen instructions.
Step 1 Log in to your Alexa App with your registered account, and navigate to More > Skills & Games.
Step 2
Tap (SEARCH) in the upper-right corner, search Tenda Smart in the search box and then tap Tenda Smart.
Step 3 Tap ENABLE TO USE, and then select Open with TDSEE.
---End
Your Tenda Smart account has been successfully linked, you can tap Next to continue to discover your device.
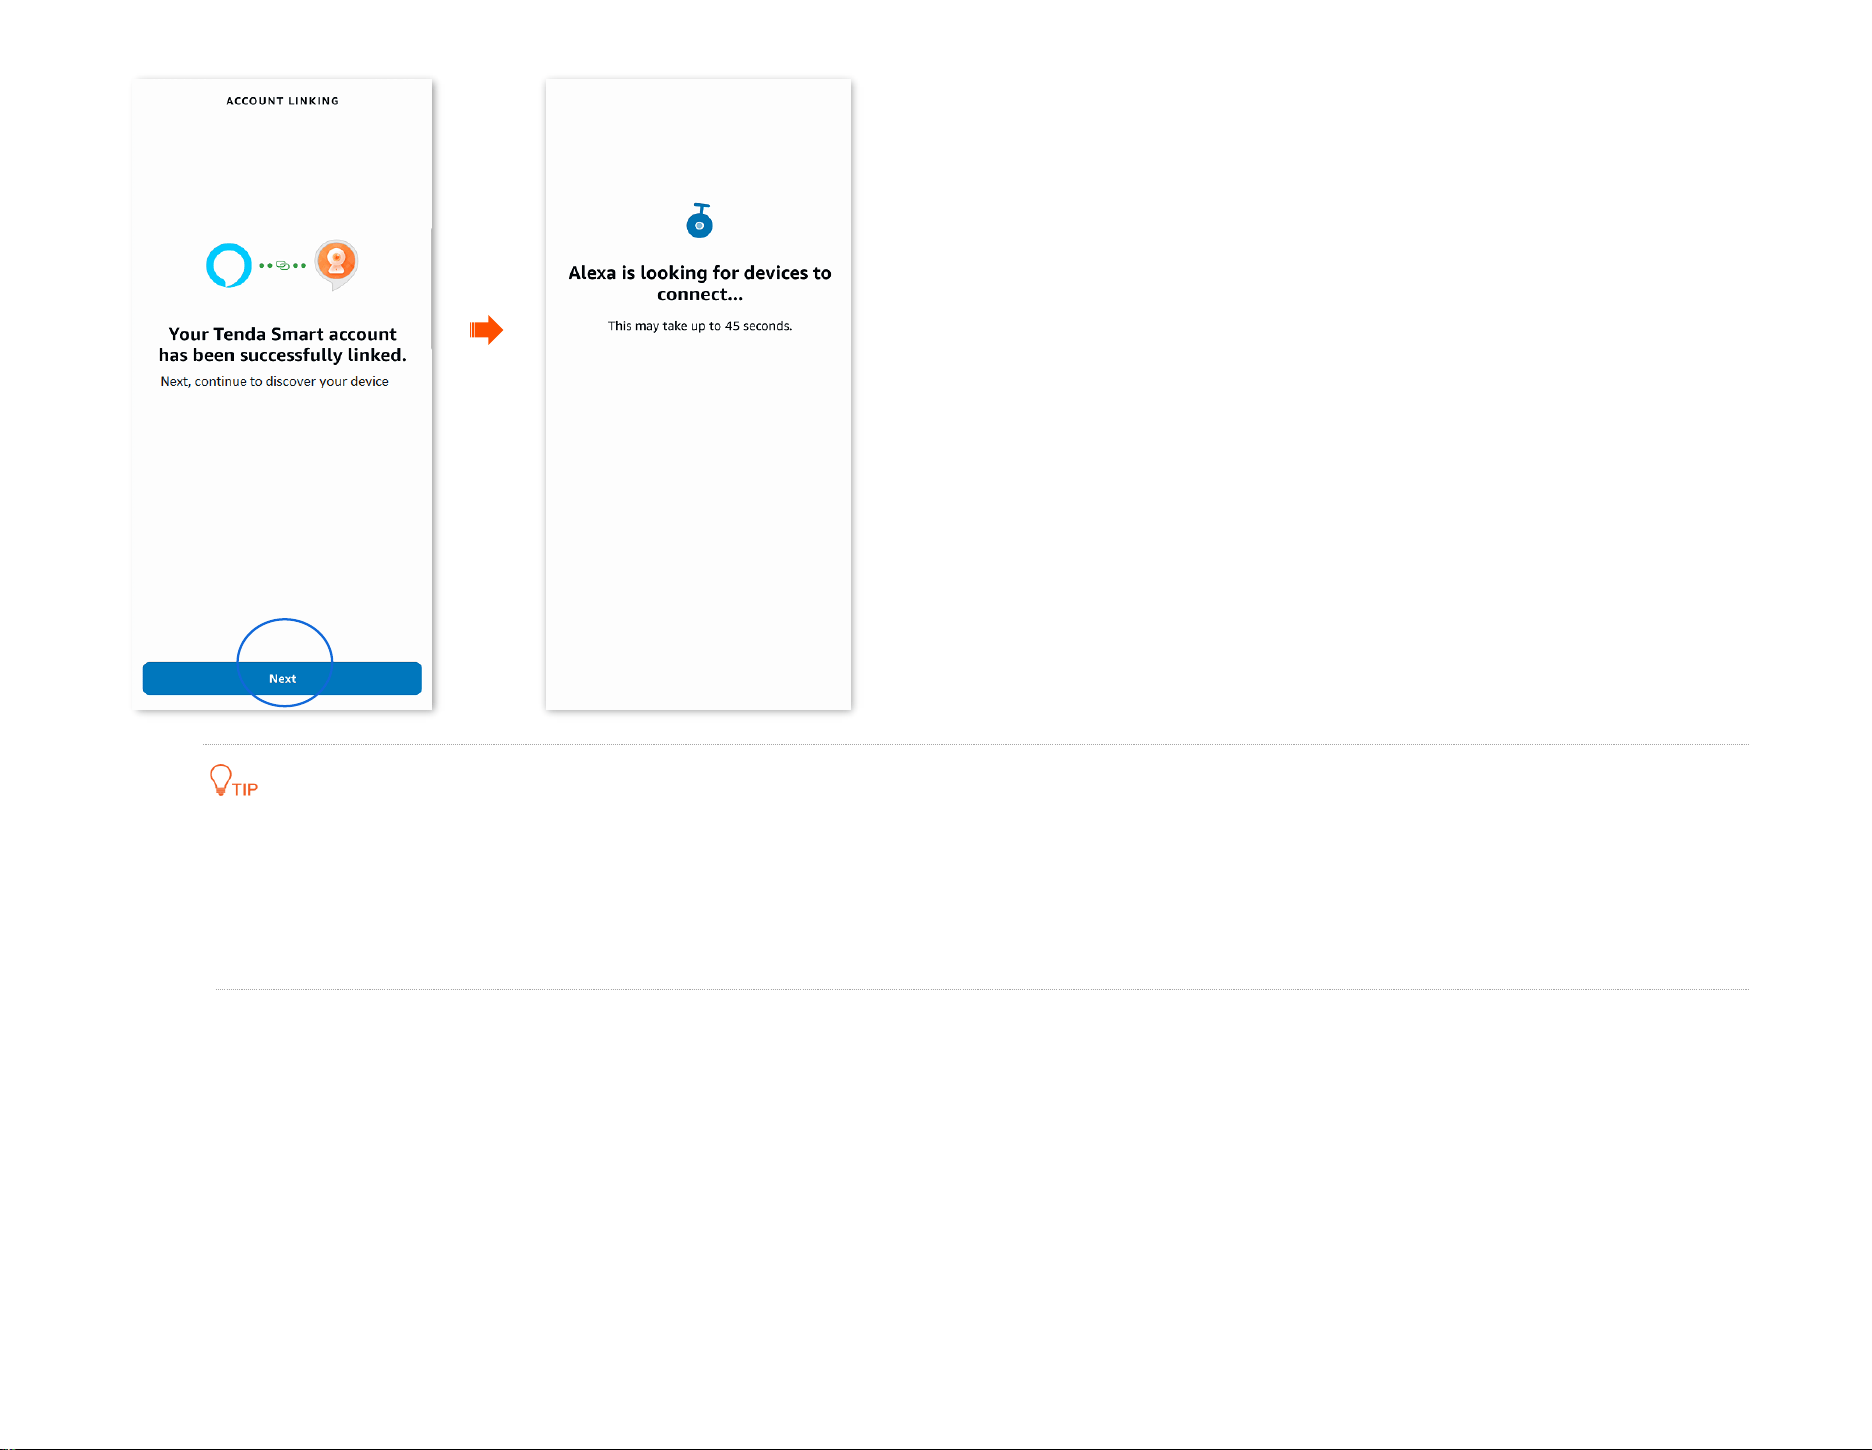
Document Version: V1.4
102
If you want to unbind the relationship between the Alexa App and TDSEE App, log in to your Alexa App with your registered account, and
navigate to More > Skills & Games > Your Skills to operate.
If you want to delete the discovered devices on the Alexa App, log in to your Alexa App with your registered account, and navigate to
Device > Cameras to operate.
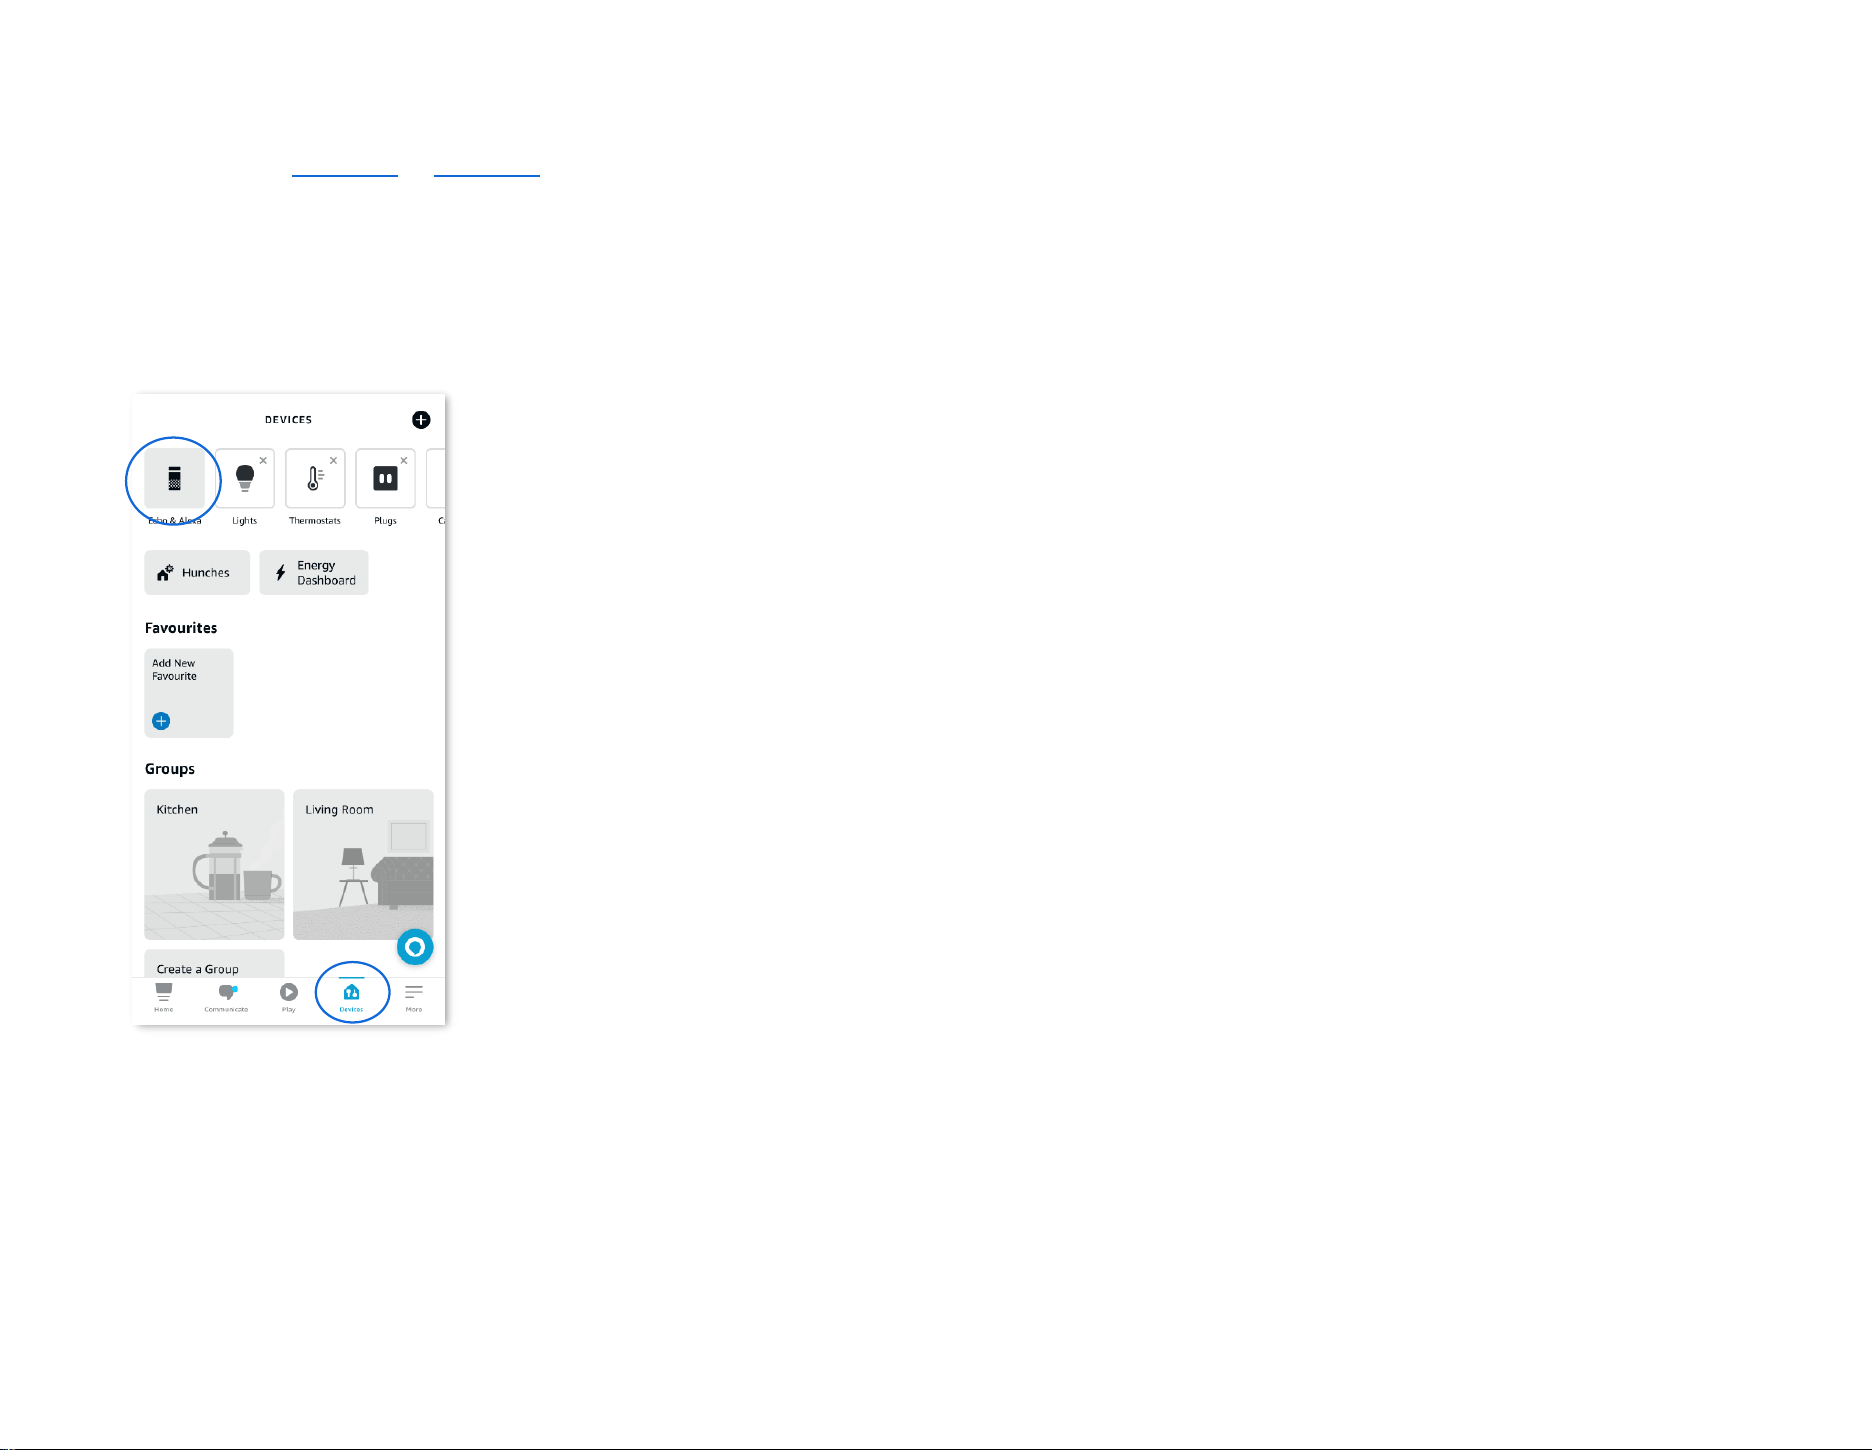
Document Version: V1.4
103
Bind your Echo show with an Alexa account
Step 1 Select Method 1 or Method 2 to bind your TDSEE App and Alexa App.
Step 2 Open the Echo show, and then follow the instructions to enter the Alexa account and add the Echo show to Alexa App.
---End
When Alexa App successfully synchronizes the camera added in TDSEE App, you can voice control the camera through Echo show. For example,
"Alexa, show me the bedroom."

Document Version: V1.4
104
Reset device password
Navigate to Me > General Tools to enter the Reset device password page.
You can change the login password of the camera here. Currently, this function is in development and will be available soon.
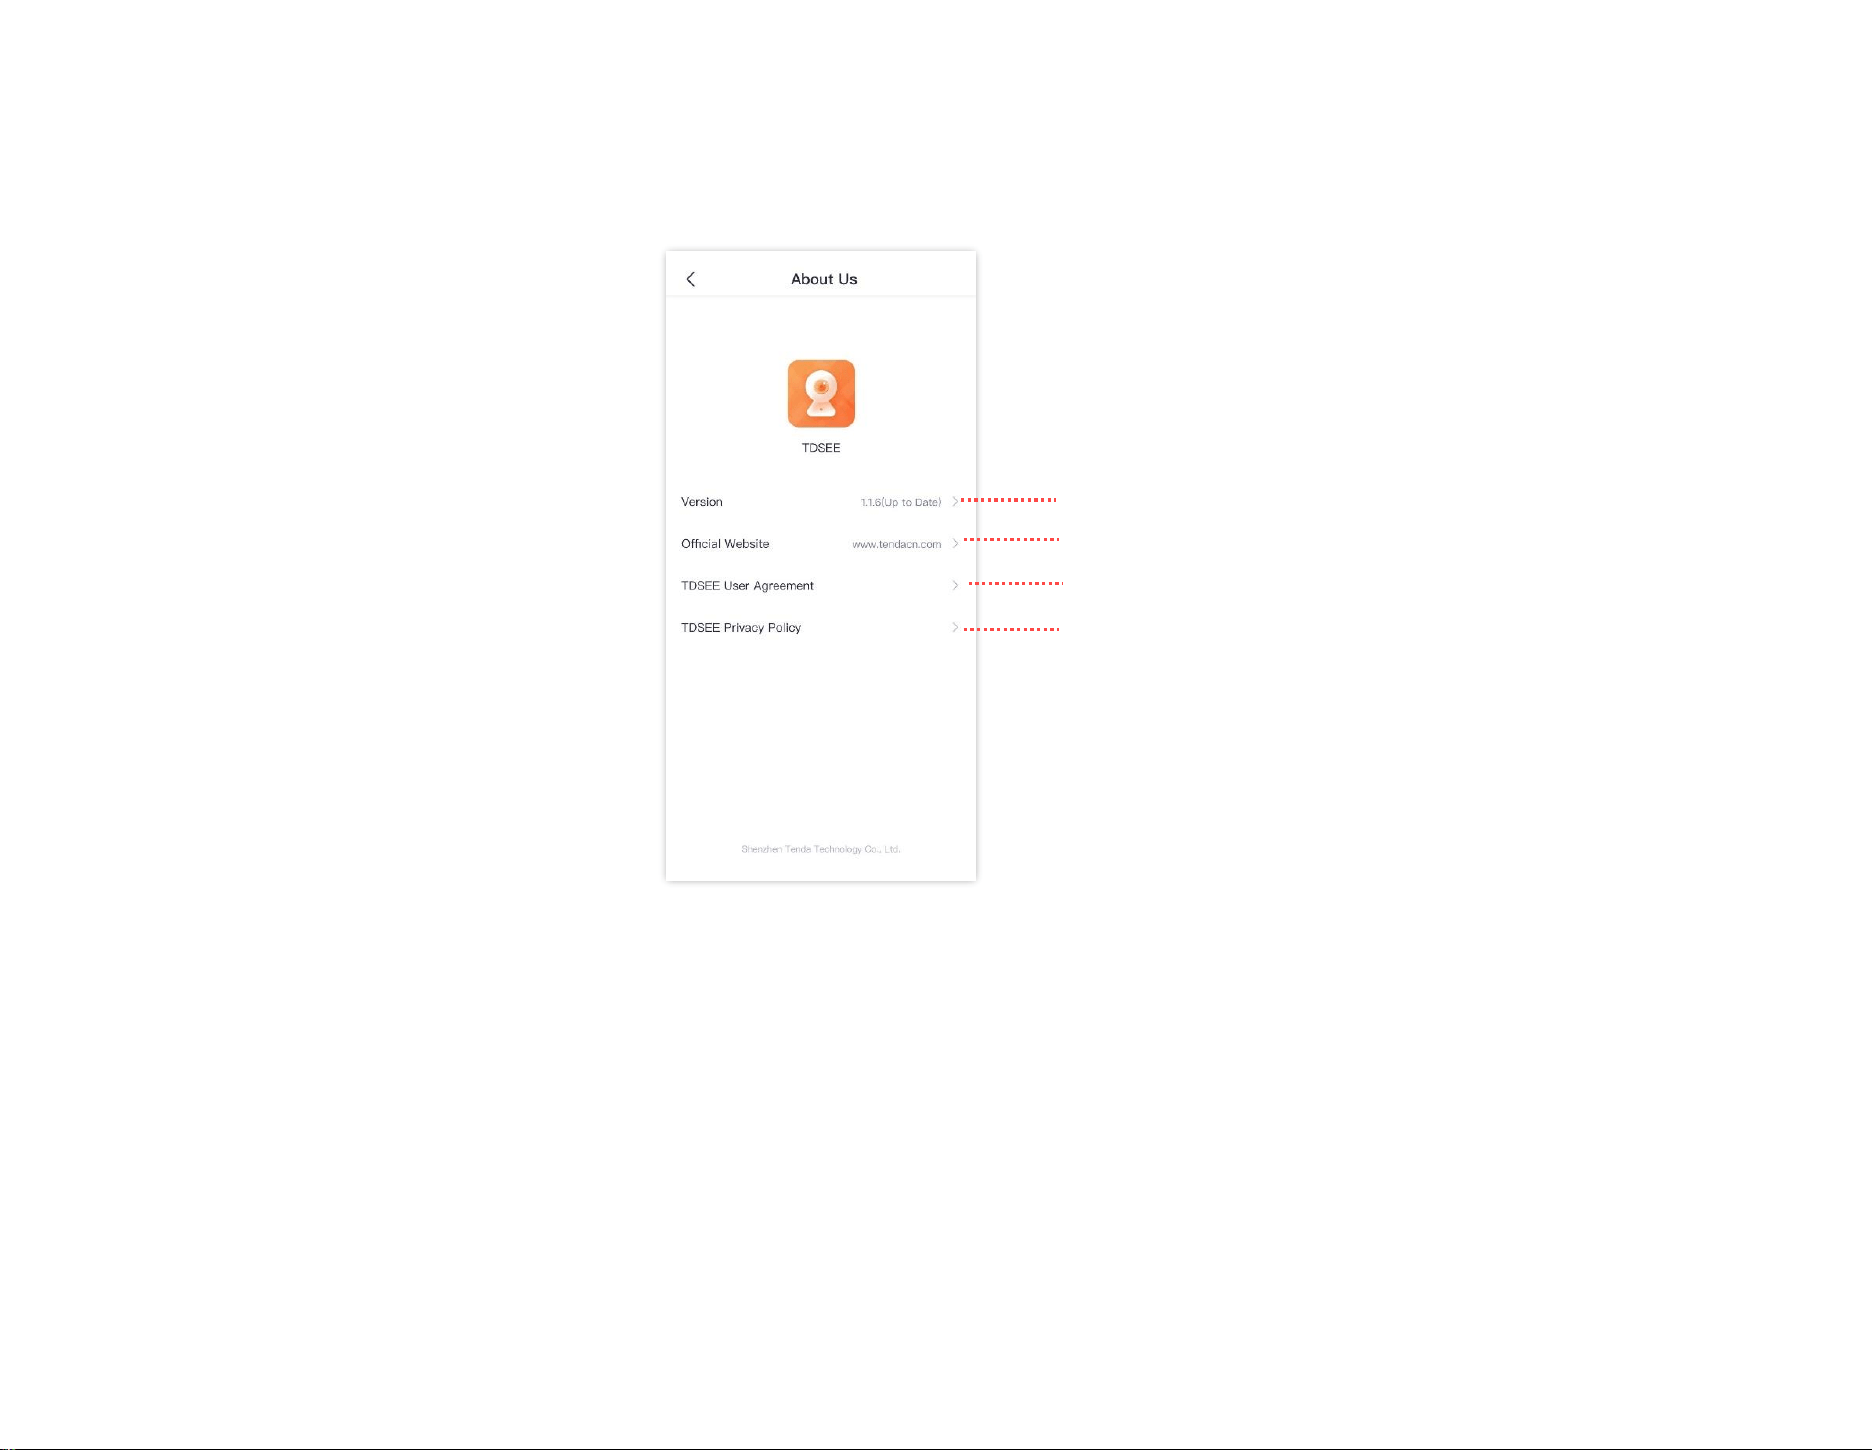
Document Version: V1.4
105
About us
Navigate to Me > About Us to enter the About Us page.
Check firmware version and upgrade device firmware
Tap it to visit Tenda official website
Tap it to check TDSEE user agreement
Tap it to check TDSEE privacy policy
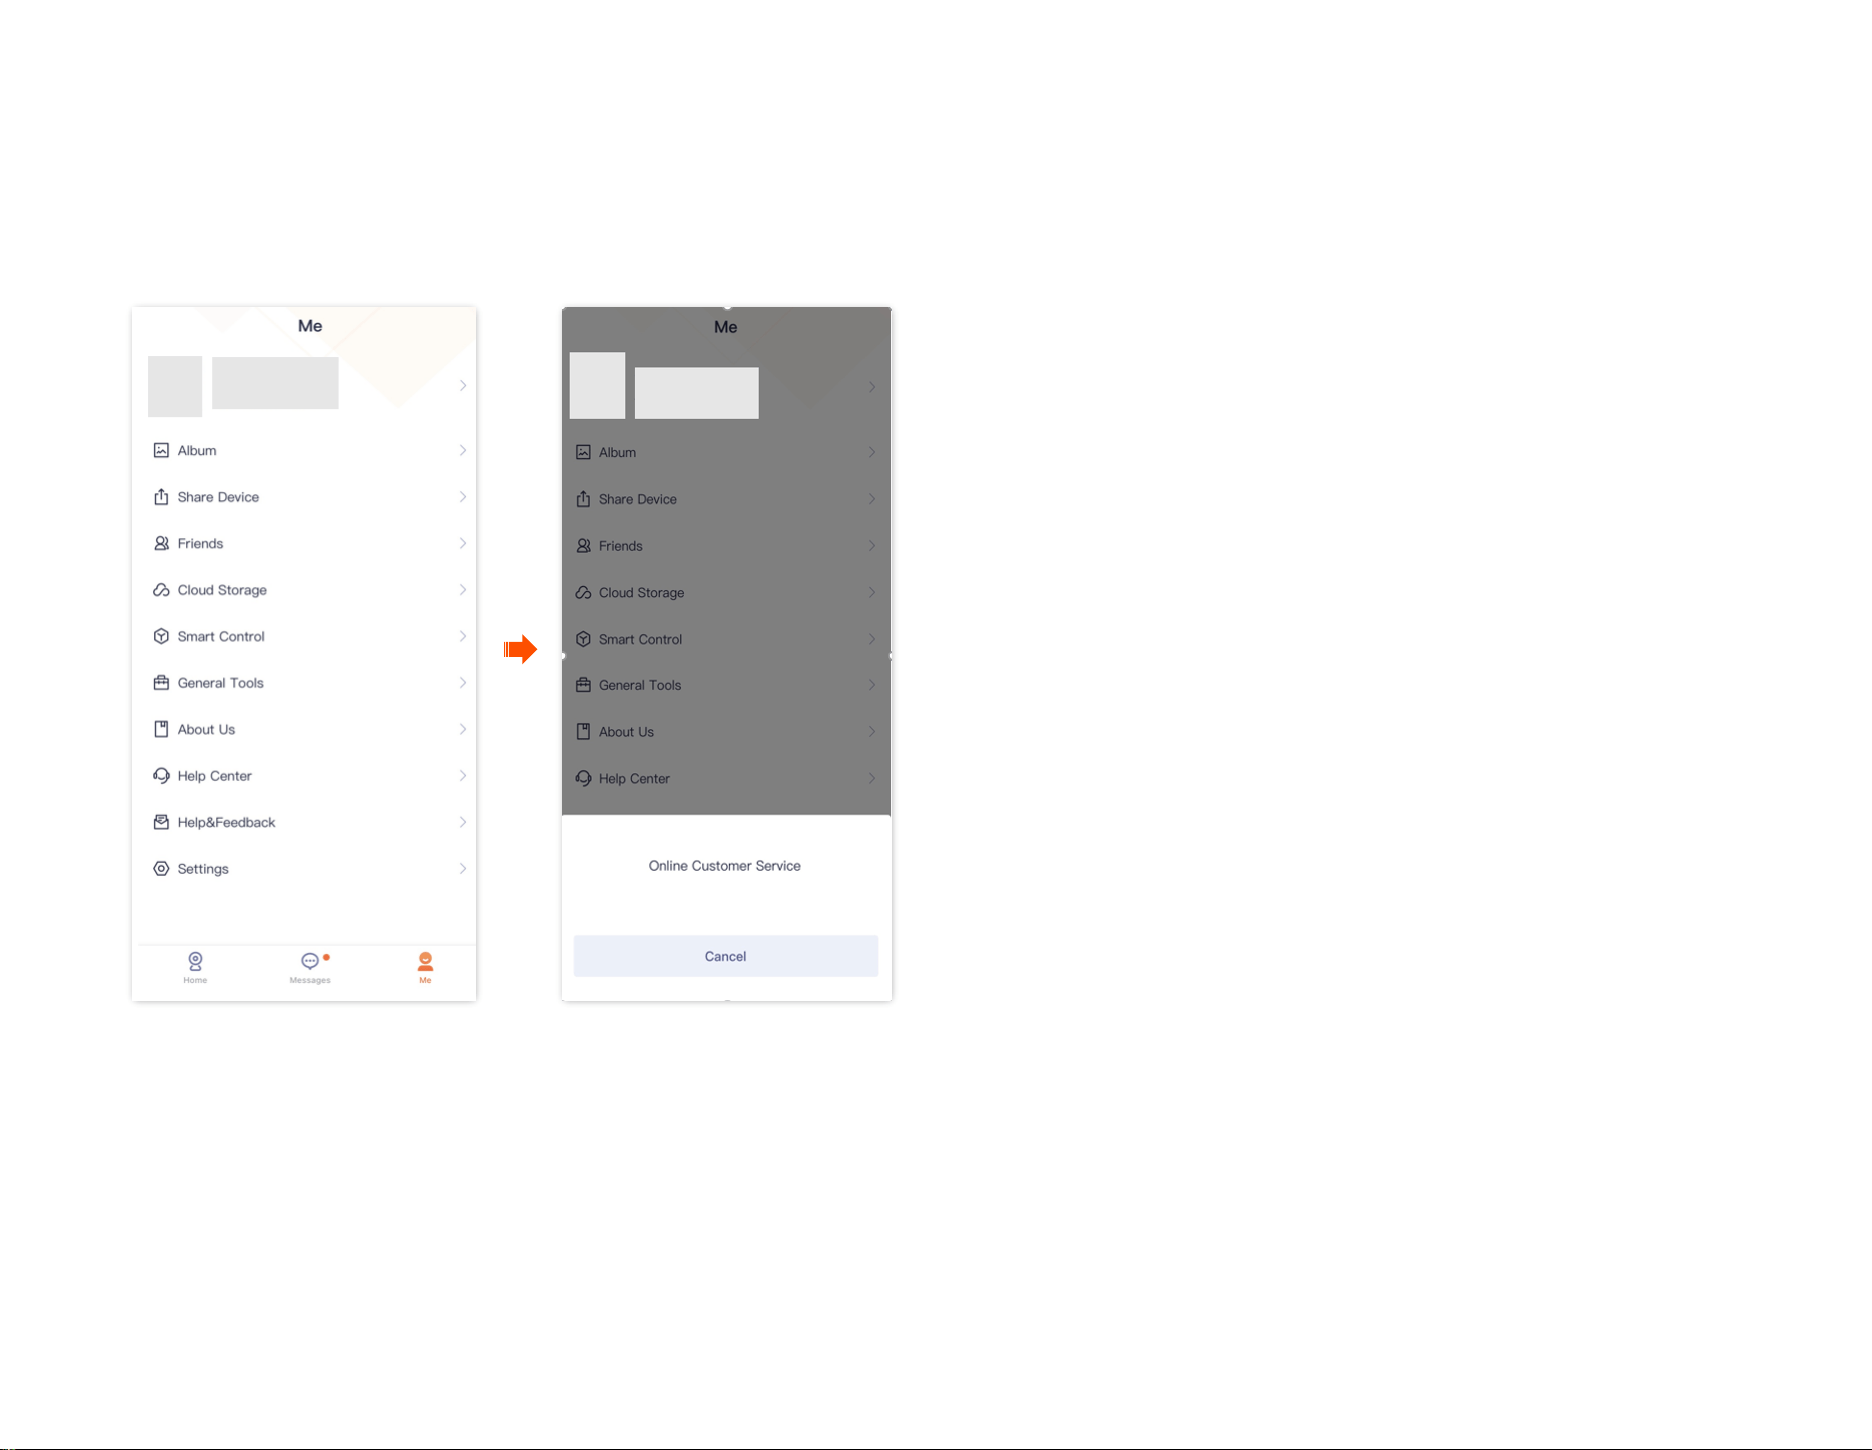
Document Version: V1.4
106
Help Center
The TDSEE App with version 1.3.0 is used for illustrations here.
Navigate to Me > Help Center to enter the Help Center page.

Document Version: V1.4
107
Help & Feedback
The TDSEE App with version 1.3.0 is used for illustrations here.
FAQ
Navigate to Me > Help & Feedback to enter the FAQ page.
If you cannot find the solutions, please contact us, and we will solve the problem for you as soon as possible.
You can give us feedback in the two ways below:
− Contact us according to the contact information shown in the previous Technical Support part.
− Submit your feedback in Feedback.
Feedback
Navigate to Me > Help & Feedback, and then tap Feedback at the bottom page to enter the Feedback page.
If you have problems when using our device or App, or you have any comments or suggestions for us, you can give us feedback, and we will solve the
problem for you as soon as possible.
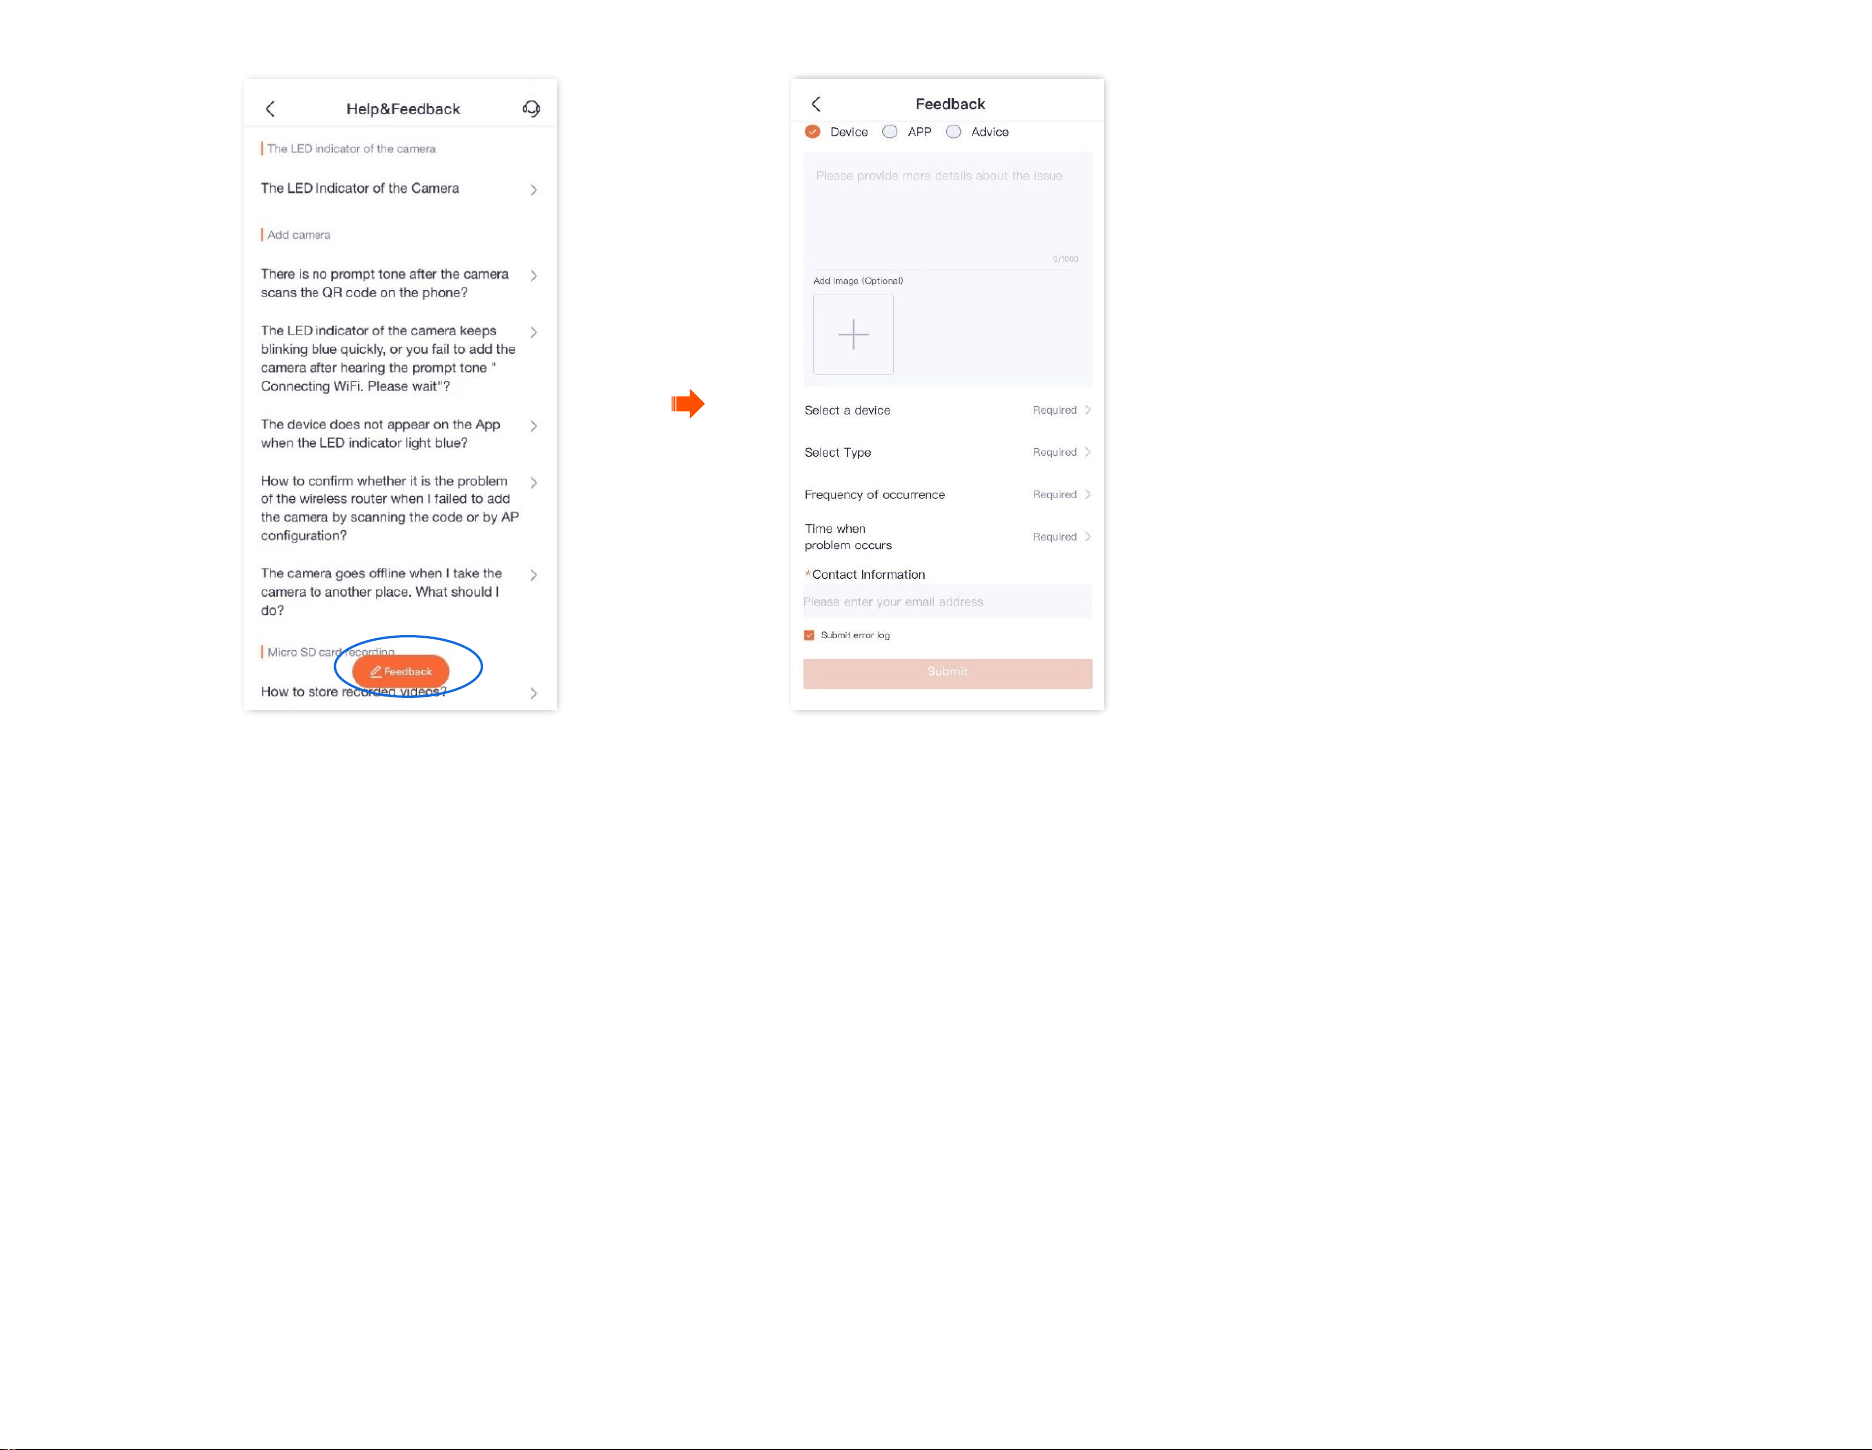
Document Version: V1.4
108
Document Version: V1.4
109
Settings
The TDSEE App with version 1.2.0 is used for illustrations here.
Navigate to Me > Settings.
- You can clear the cache of the TDSEE, or enable/disable Notifications function here. After the Notification function is disabled, the terminal
device will block the message notification of the TDSEE App.
- You can also set time zone preferences as required.
- You can enable/disable Splash Ads function here. After the Splash Ads function is disabled, the launch screen page of the TDSEE App no longer
shows the advertisement.
Document Version: V1.4
110
My profile
The TDSEE App with version 1.1.7 is used for illustrations here.
To replace the profile photo, set a nickname, change the password, cancel the account, or log out, tap the account on the upper side of the Me page.
Change profile photo
Set nickname
The current account of the TDSEE App
Modify the password of the TDSEE App
Cancel account of the TDSEE App
Logout
Bind the phone number
Bind the third-party account