
Technical Support and E-Warranty Certificate www.vevor.com/support
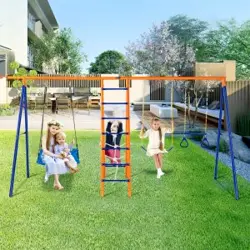
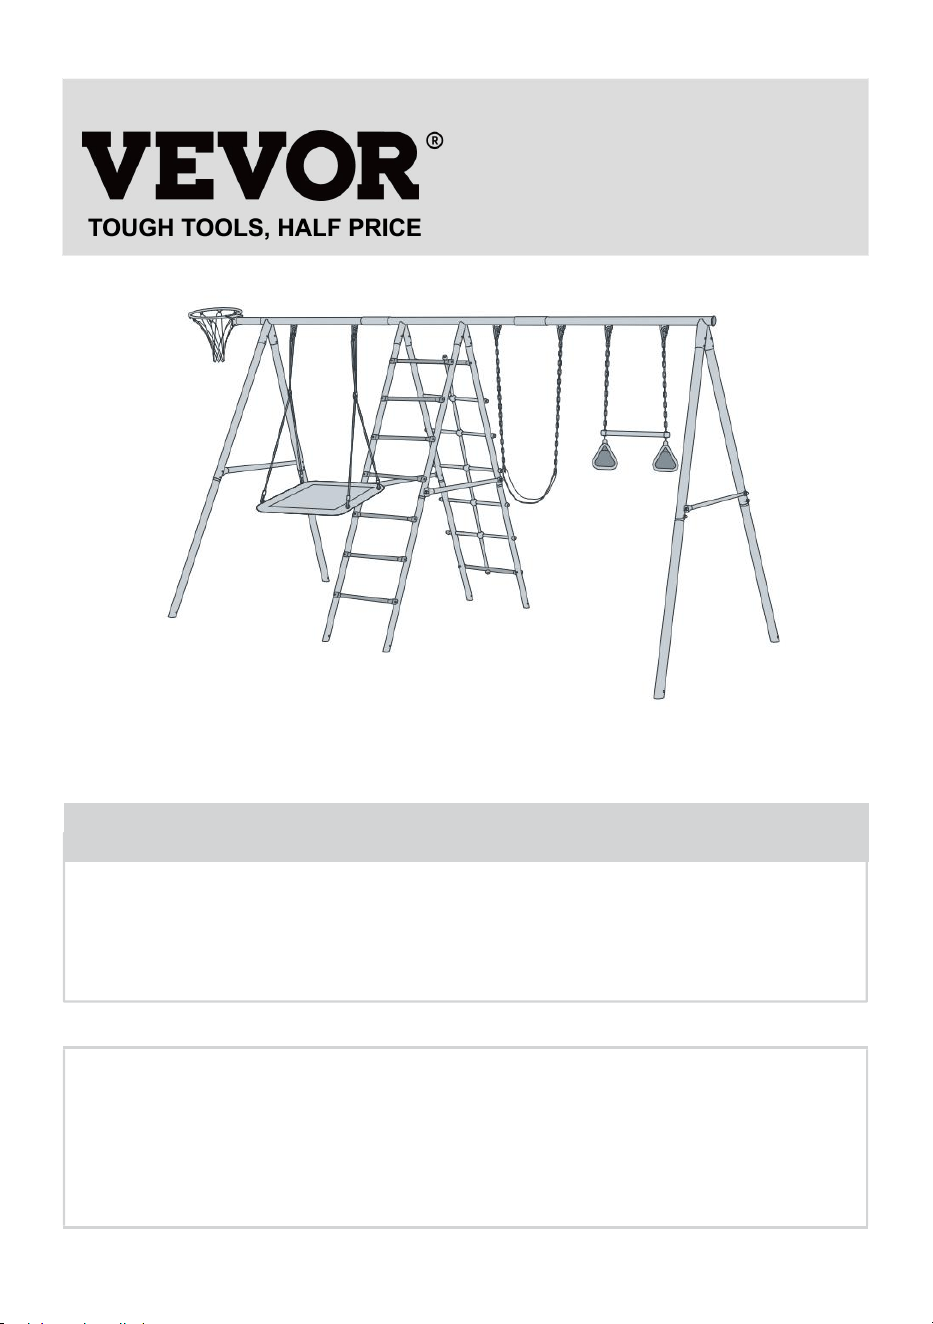
A-Frame Swing Set
S026
We continue to be committed to provide you tools with competitive price.
"Save Half", "Half Price" or any other similar expressions used by us only represents an
estimate of savings you might benefit from buying certain tools with us compared to the major
top brands and does not necessarily mean to cover all categories of tools offered by us. You
are kindly reminded to verify carefully when you are placing an order with us if you are
actually saving half in comparison with the top major brands.
1
MODEL: S026
Have product questions? Need technical support? Please feel free to
contact us:
Technical Support and E-Warranty Certificate
www.vevor.com/support
NEED HELP? CONTACT US!
This is the original instruction, please read all manual instructions
carefully before operating. VEVOR reserves a clear interpretation of our
user manual. The appearance of the product shall be subject to the
product you received. Please forgive us that we won't inform you again if
there are any technology or software updates on our product.
A-Frame Swing Set
2
INSTRUCTIONS
Thank you very much for choosing this A-Frame Swing Set.
- Please read all of the instructions before using it. The information will help you
achieve the best possible results.
The products carried in this catalog may be different in color than the actual item.
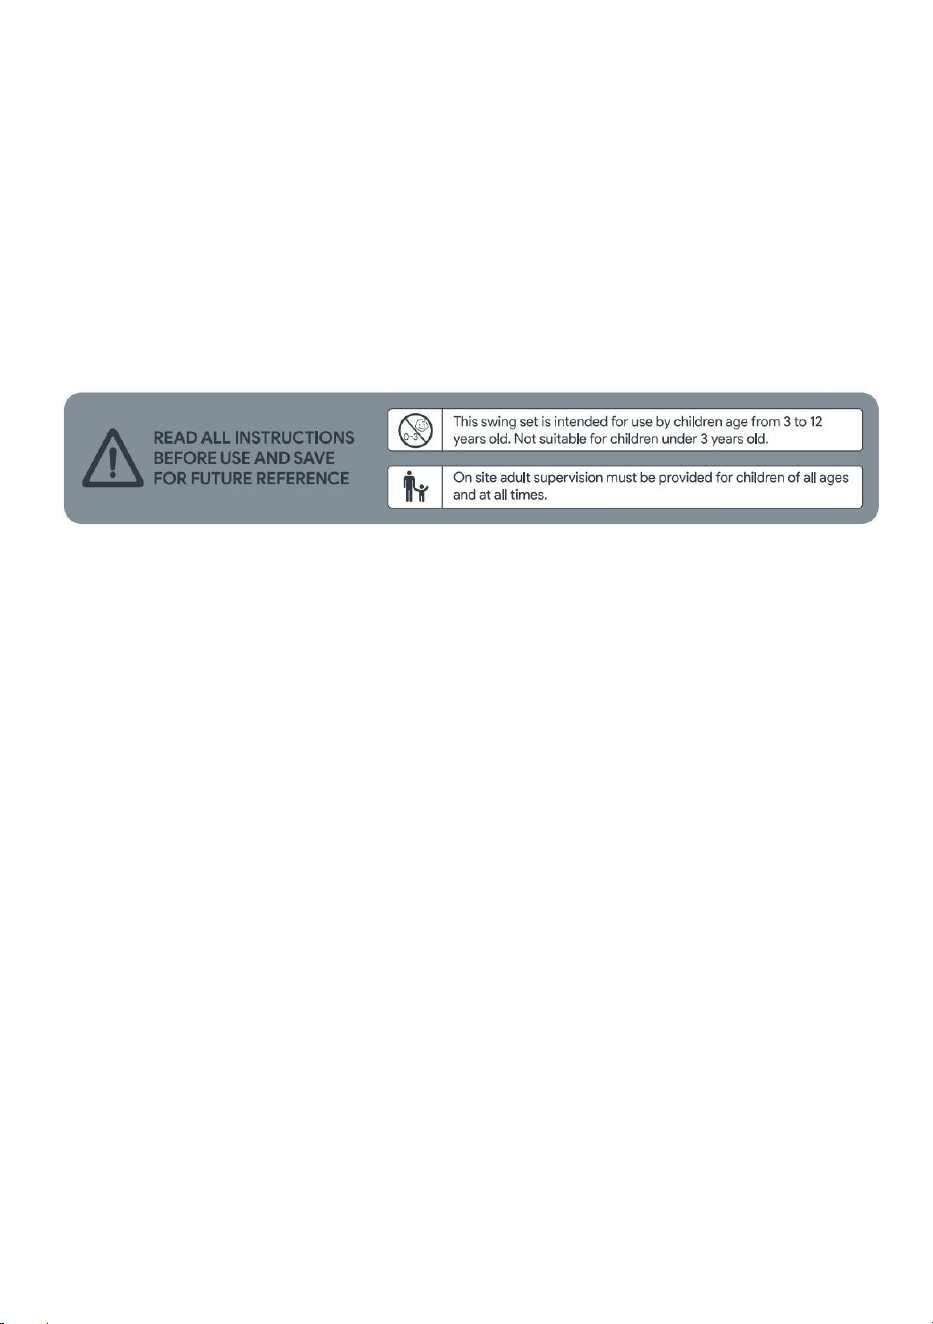
IMPORTANT SAFETY INSTRUCTIONS
SAFE PLAY AREA
DO NOT install the swing set over concrete, asphalt, or any other hard
surface. A fall onto a hard surface can result in serious injury. Install on an
unpaved steady surface, such as grass or a solid layer of sand.
DO NOT install the swing set on sloping ground. This leaning puts additional
stress on all connections and joints and further causes those connections to
loosen and fail.
The safe play area refers to a zone extending 6 ft. (200 cm) beyond the swing
set on all sides. Install the ground cover in the safe play zone.
Remove all tripping hazards such as rocks, stumps, roots etc.from the safe
play area.
The safe play area must be free of all structures, fences, garage,house,
overhanging branches, laundry lines, electrical wires and other obstacles to
ensure safe play.
Children should stay out of the work area until the safe play area is cleared of
obstacles, the swing set has been completely installed, all hardware has been
tightened and checked, and all tools have been picked up.

3
SAFE PLAY
Teach your children to play safely.
Dress children appropriately. Avoid accessories, clothing with
drawstrings, loose fitting clothes and stringed items placed around the
neck, which could become entangled or snagged on equipment. Dress
with well fitting and full foot enclosing footwear. Also bike helmets
should be taken off before playing on the swing set.
DO NOT use the swing set in any other manner than the way intended.
DO NOT play upon wet weather conditions because of potentially
slippery surfaces.
DO NOT twist swing chains or ropes or loop them over the top support
bar as this may reduce the strength of the chain or rope.
DO NOT attach extra items to the swing set that is not specifically
designed for use with the swing set, including (but not limited to)
clothes lines, electrical devices, loose ropes or chains etc.
Caution children NOT to:
Jump off the swing while it is in motion
Swing an empty seat swing at an angle
Hang upside down from any part of the gym set
Grasp or stop another child on any moving equipment
Walk close to, in front of, between or behind moving items
Caution children to sit in the centre of the swing with their full weight on
the seat.
Make sure that climbing ropes or chains are secured at both ends and
cannot be looped back on itself.
All components may become hot when exposed to direct sunlight.
Make sure the swing set is not hot before allowing children to play.
SAVE THESE INSTRUCTIONS
4
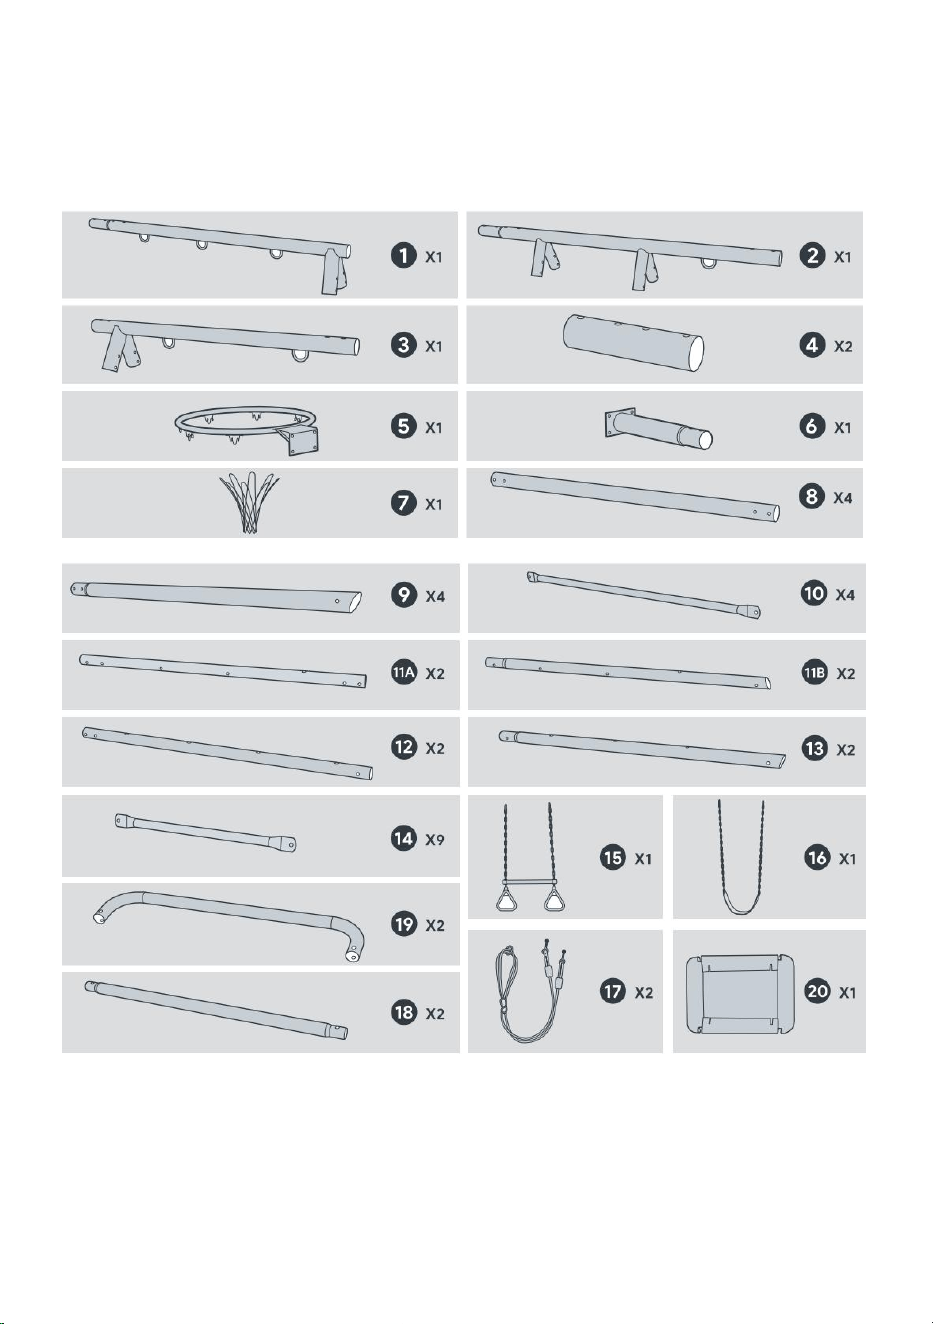
Assembly and Use
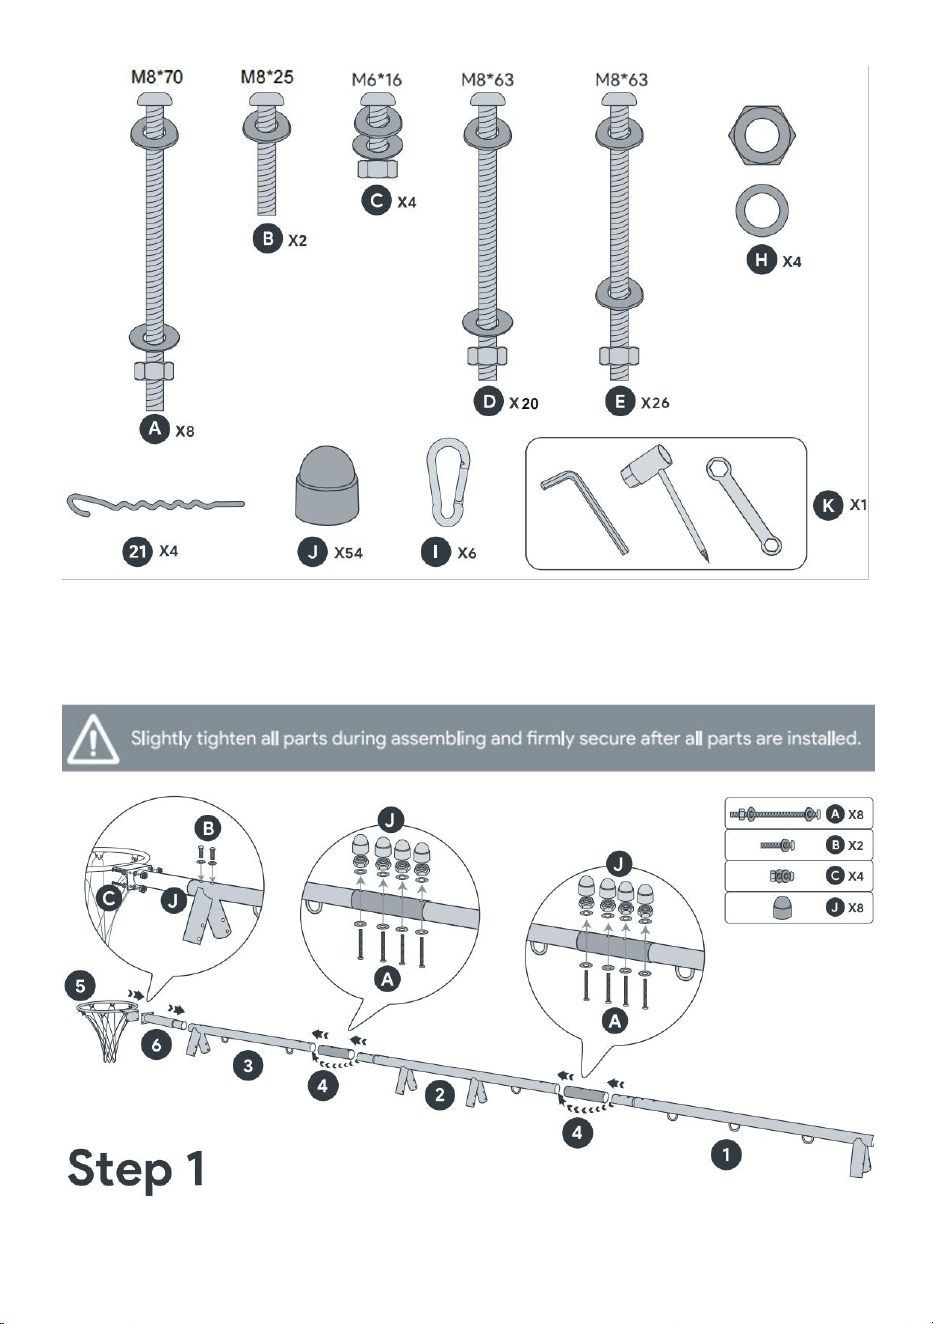
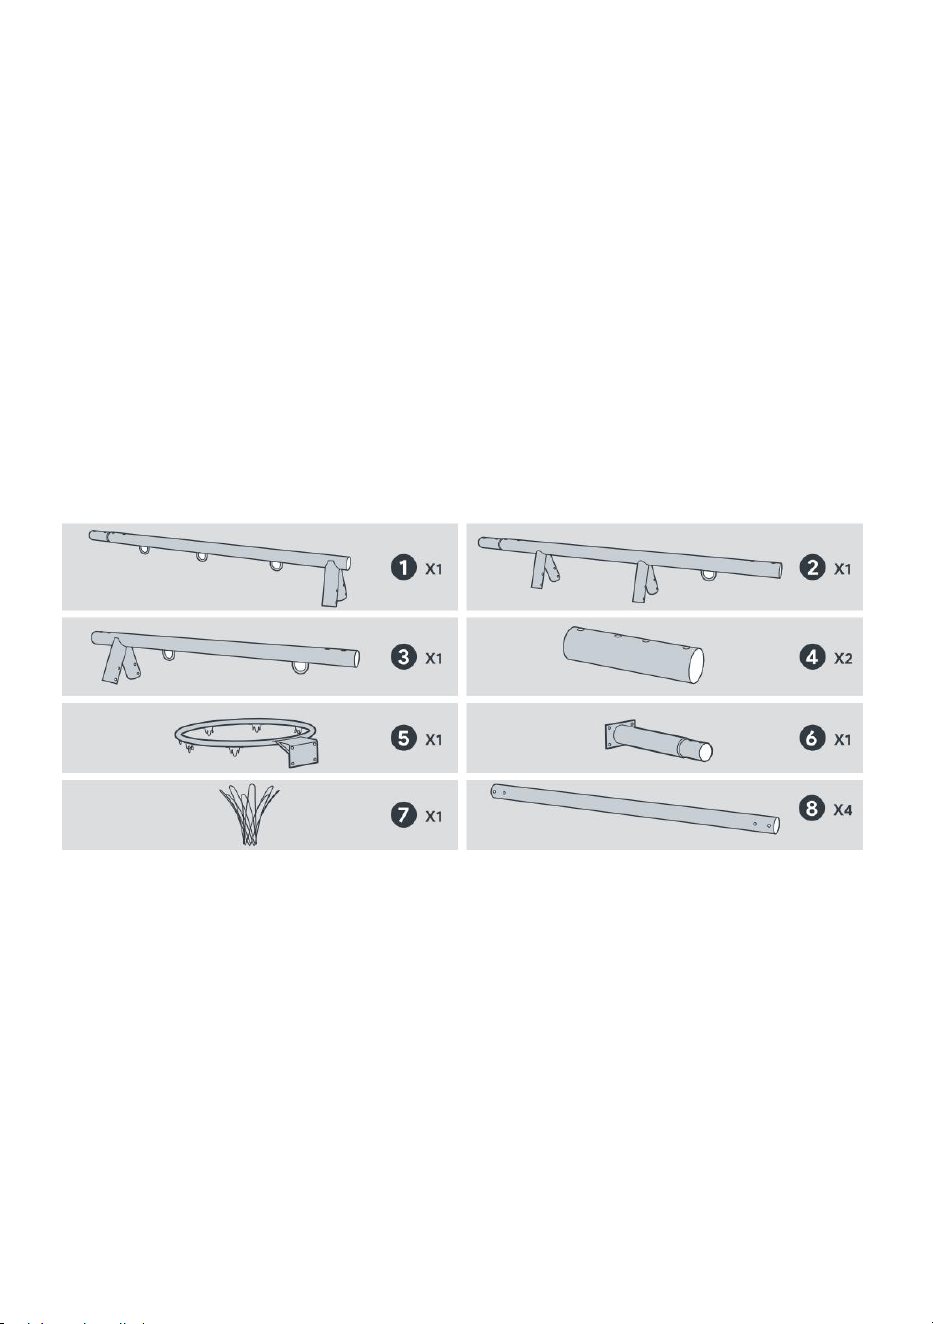
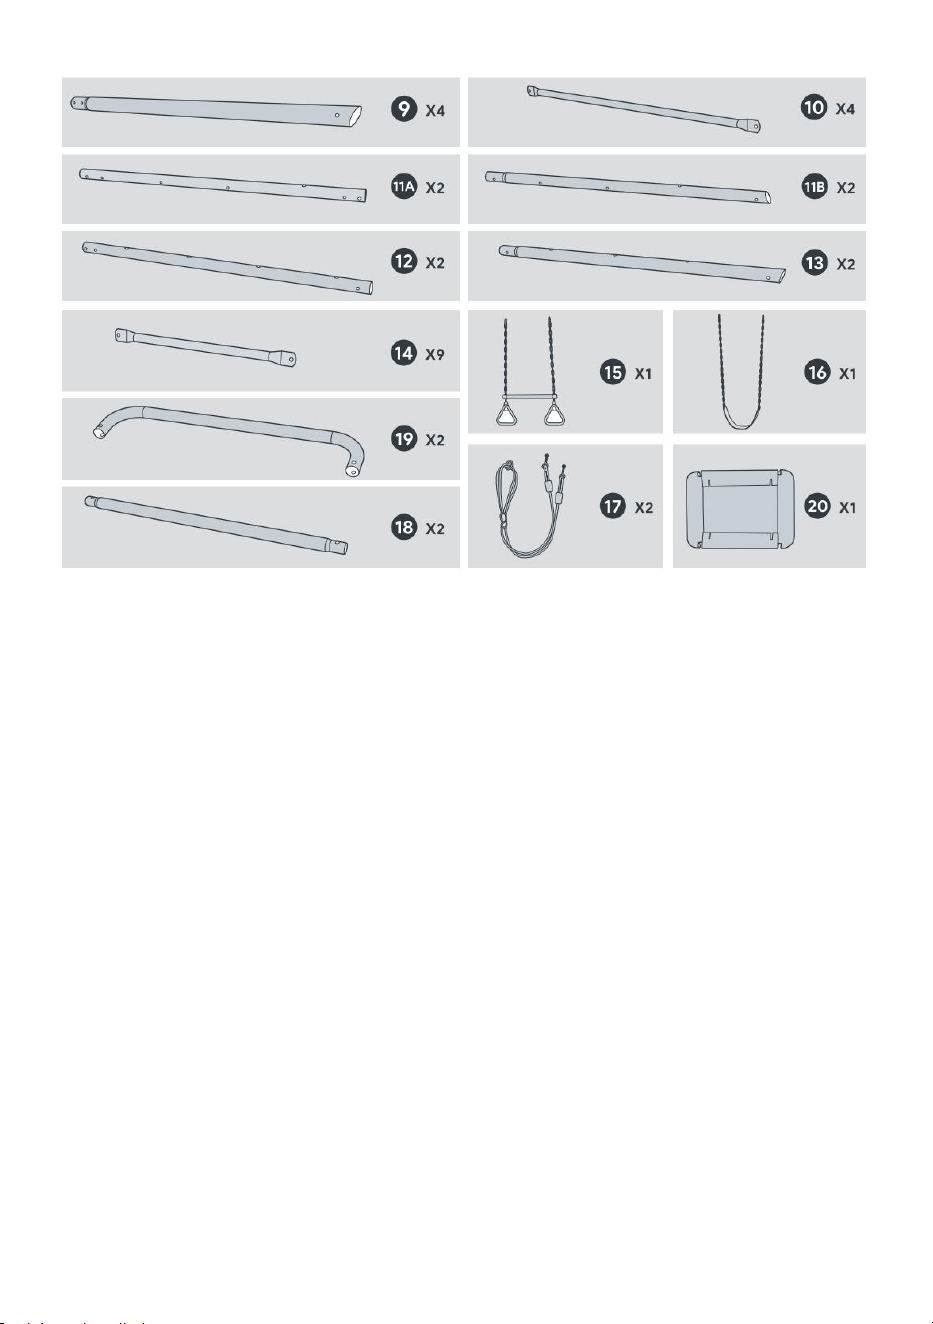
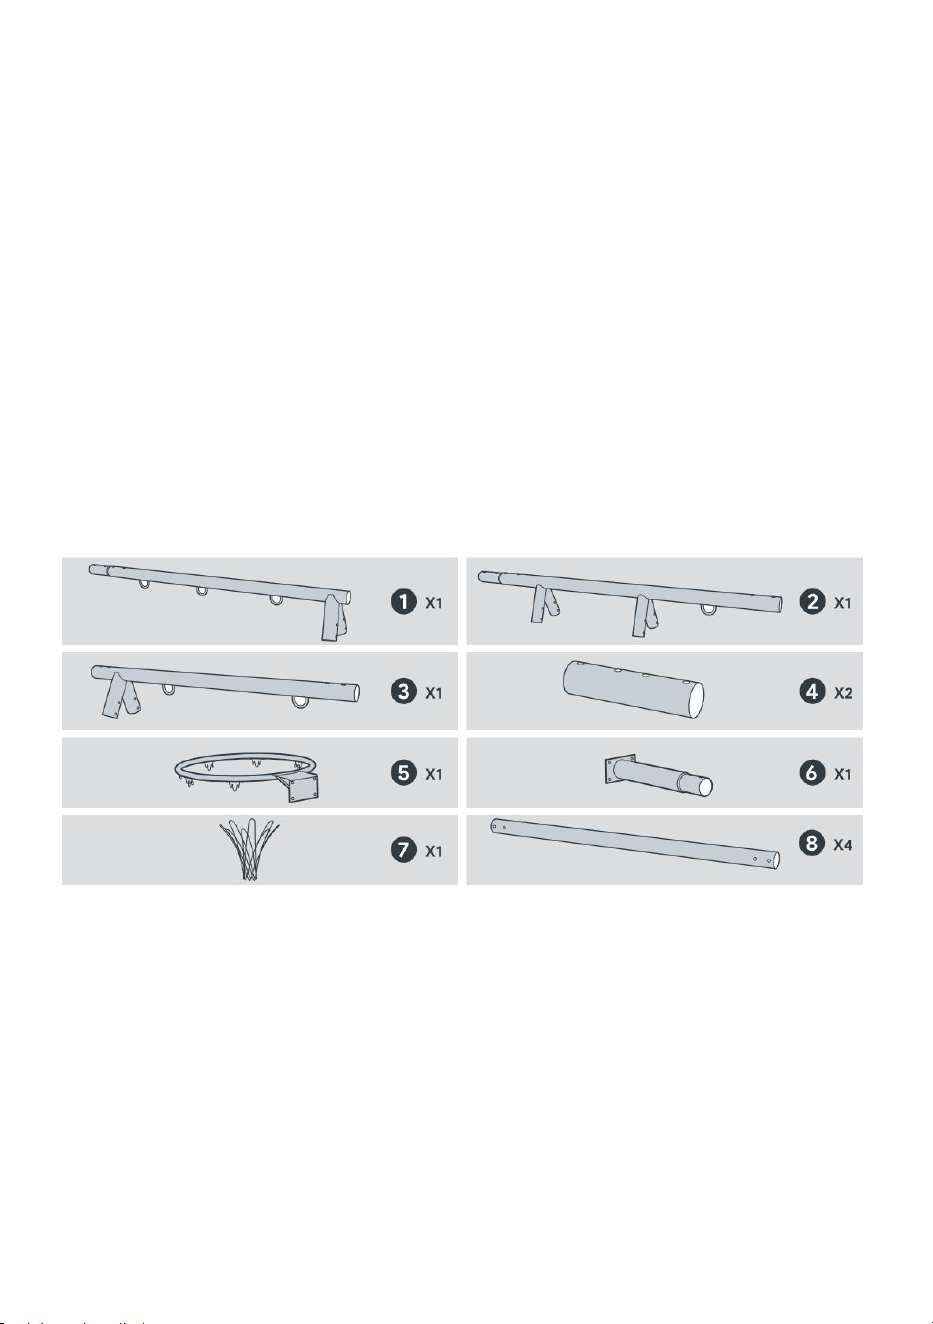
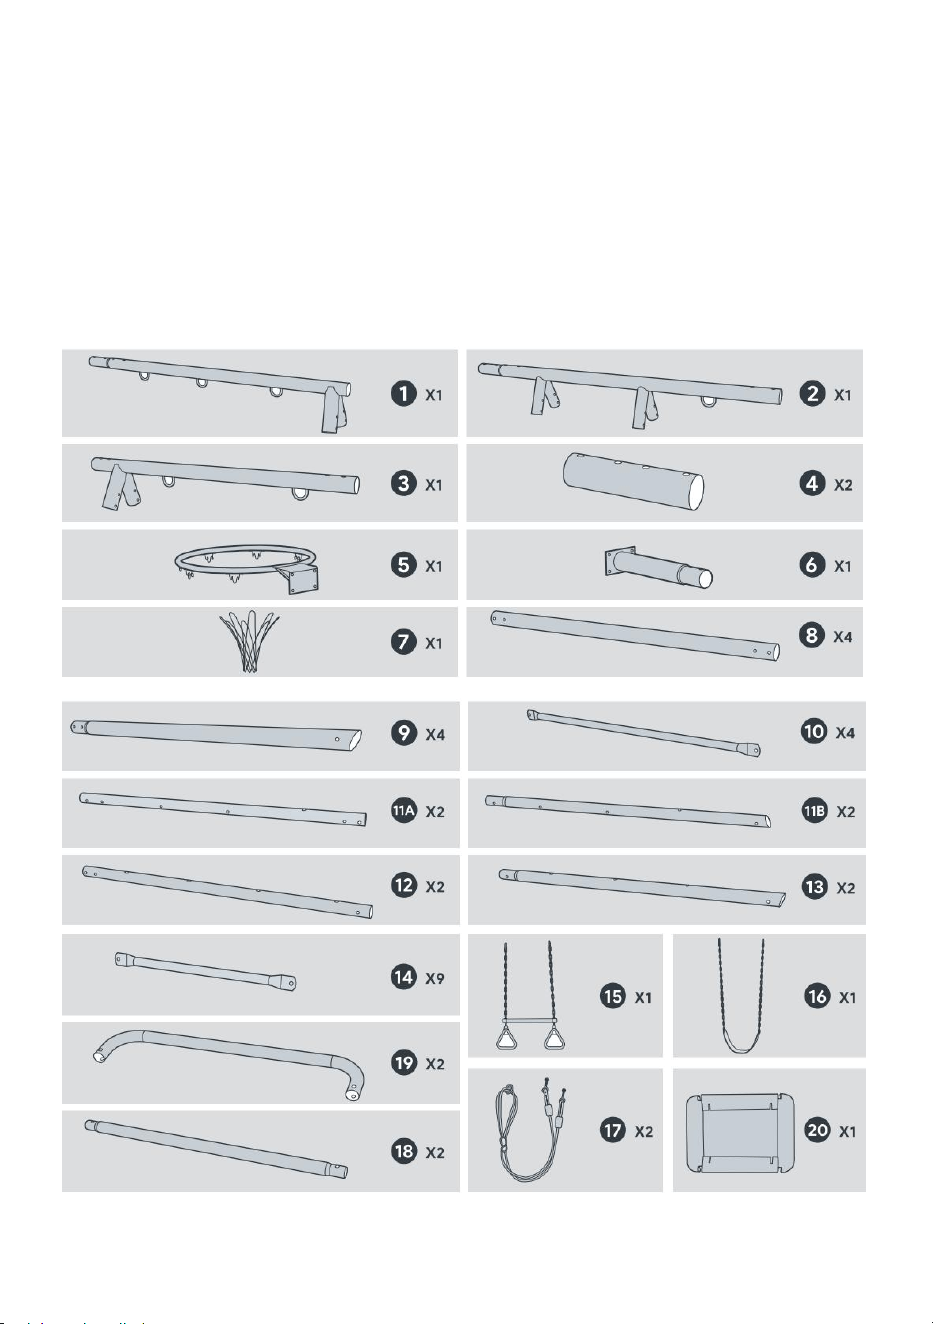
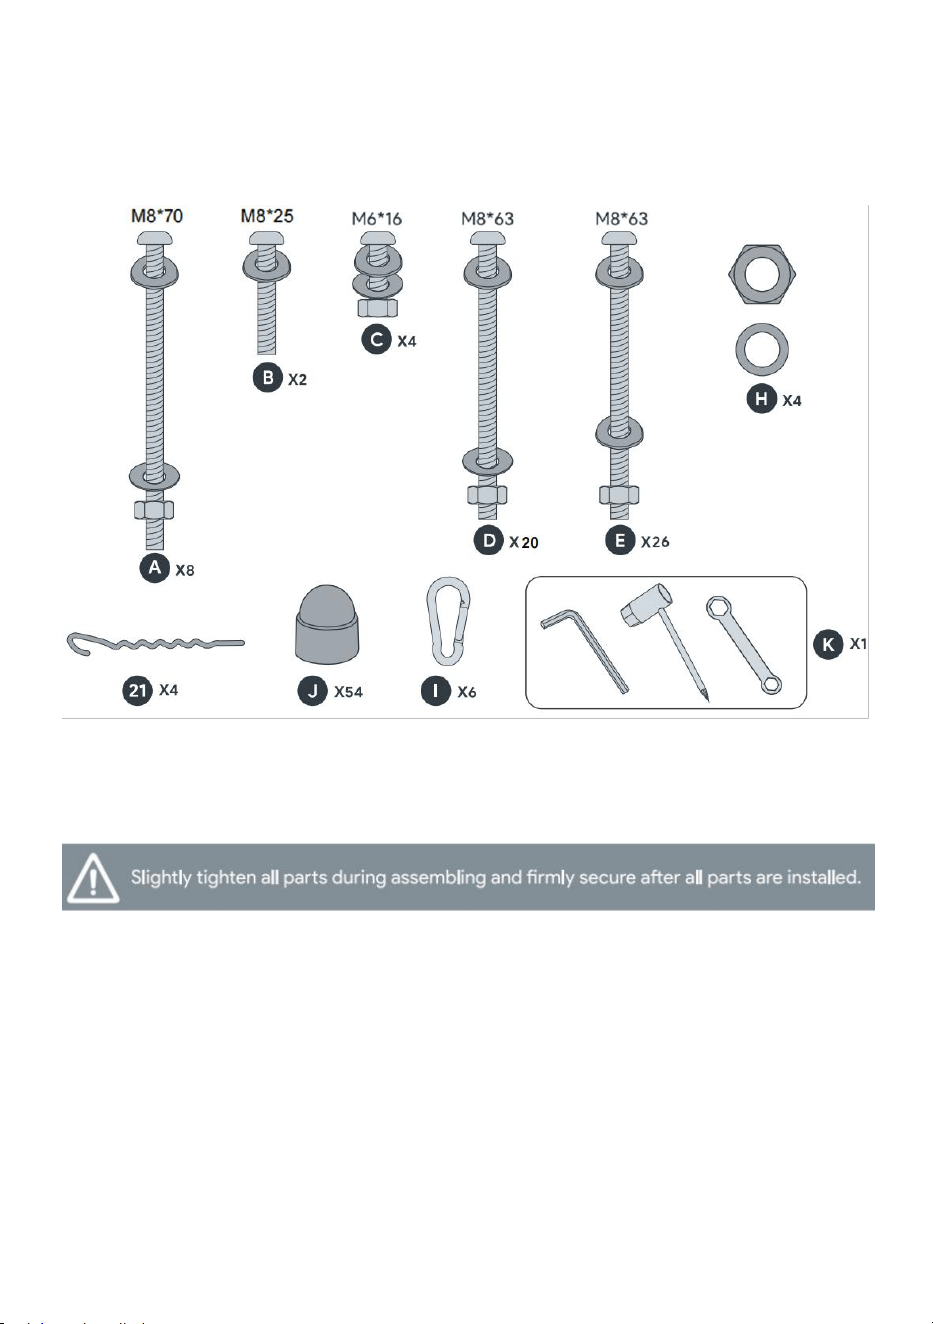
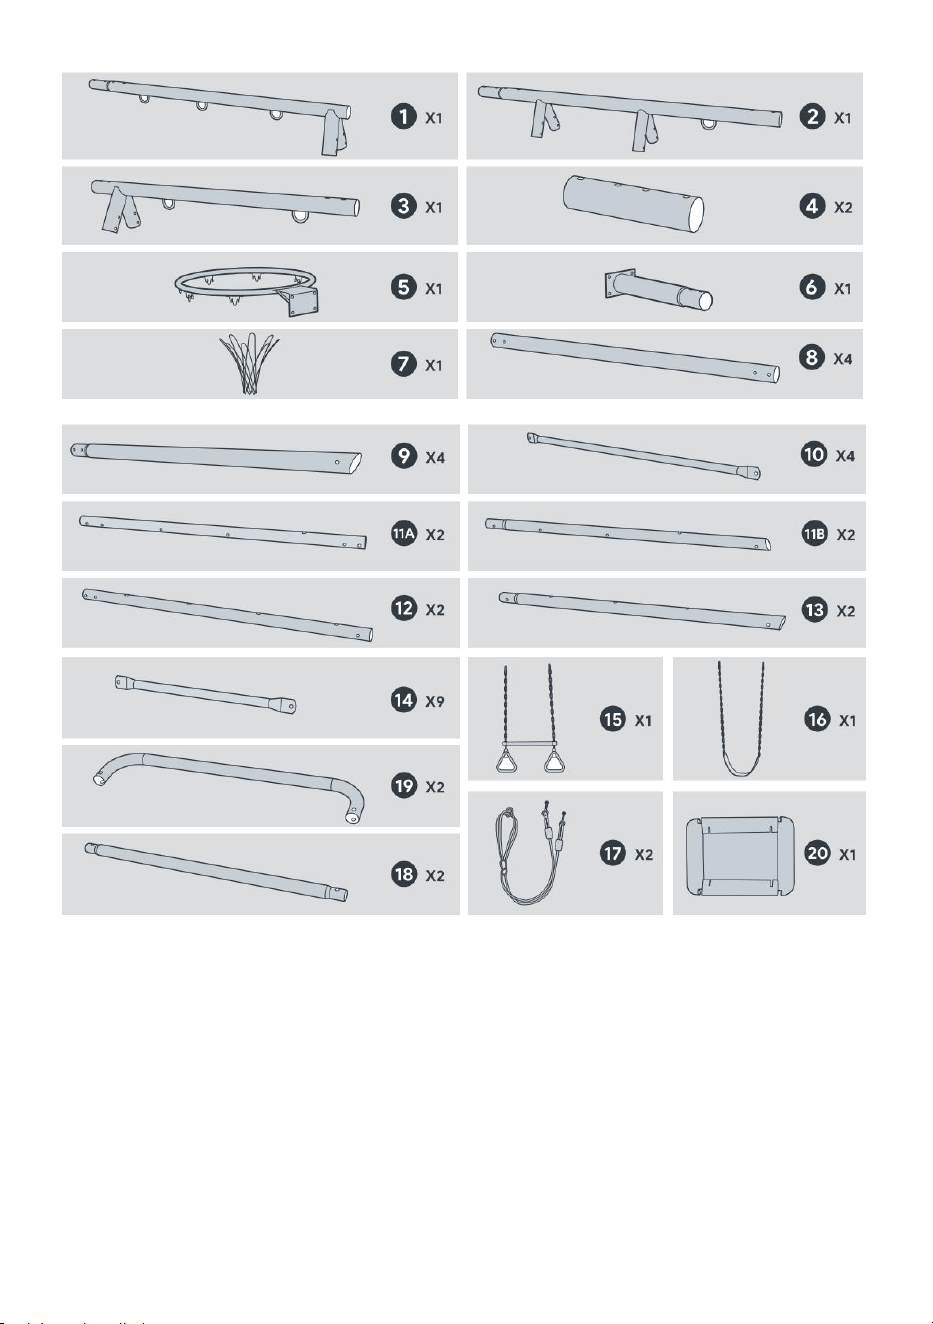
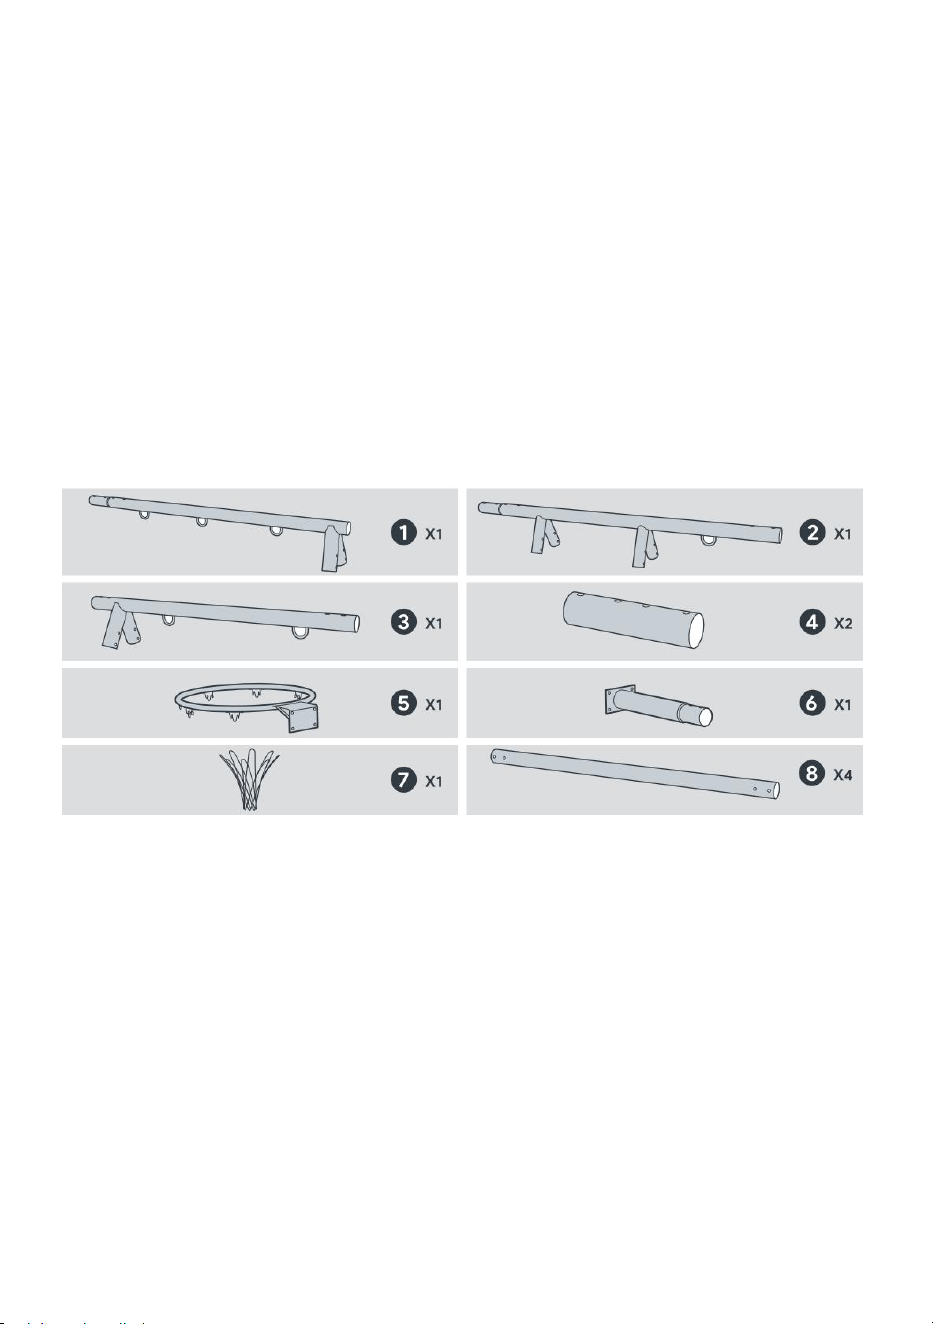
Swing Set Parts
5
ASSEMBLING SWING SET

6
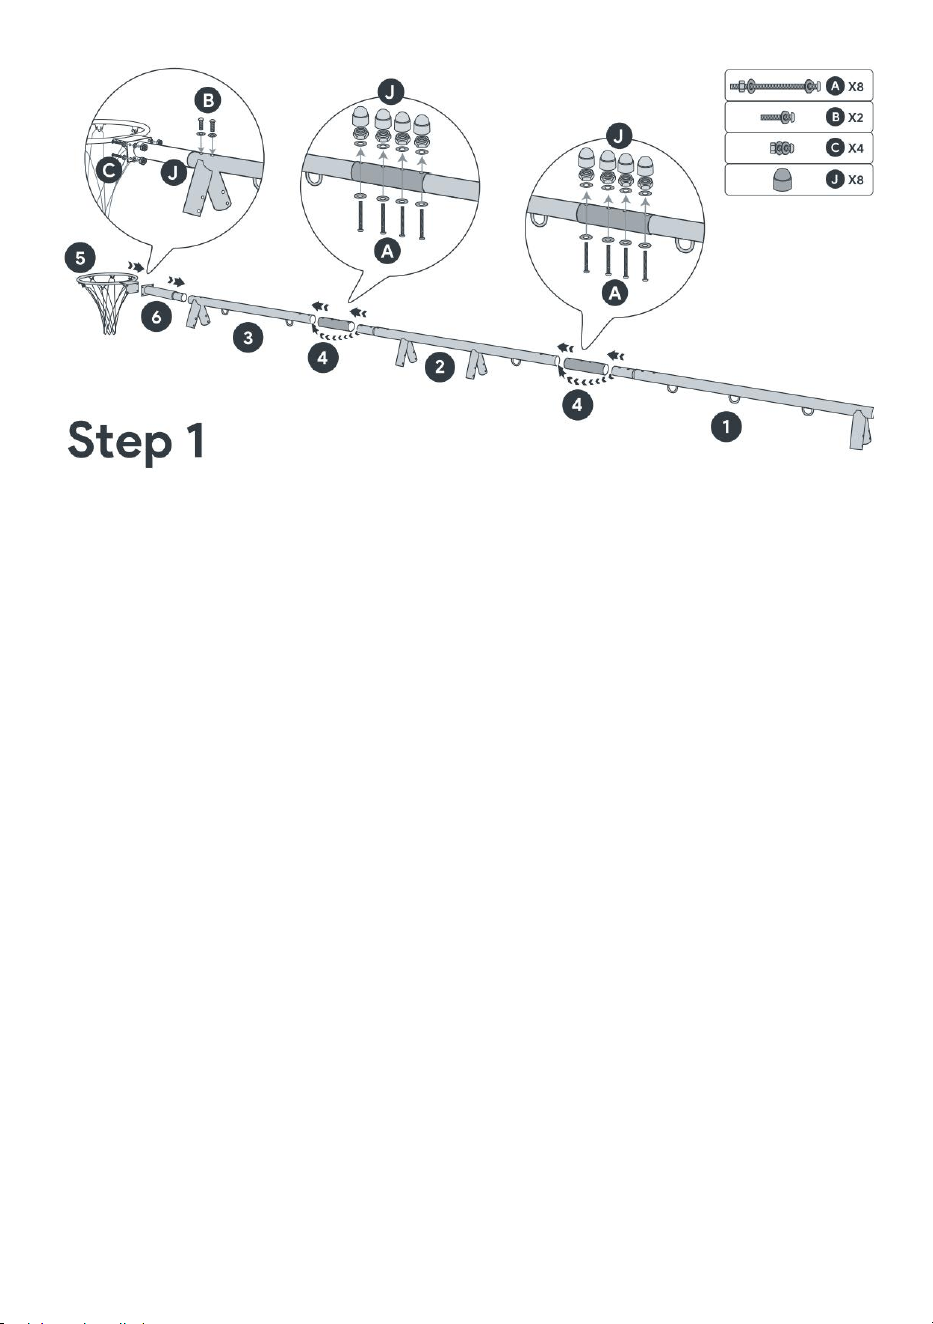
Step1
1. Install the hoop onto tube 6, lock it with screw C, and place the J head
guard on the nut.
2. Connect tube 6 and tube 3 and lock them with screw B.
3. Connect pipes 3, 4, and 2, lock them with screw A, and place the J head
guard on the nut.
4. Connect pipes 2, 4, and 1, lock them with screw A, and place the J head
guard on the nut.
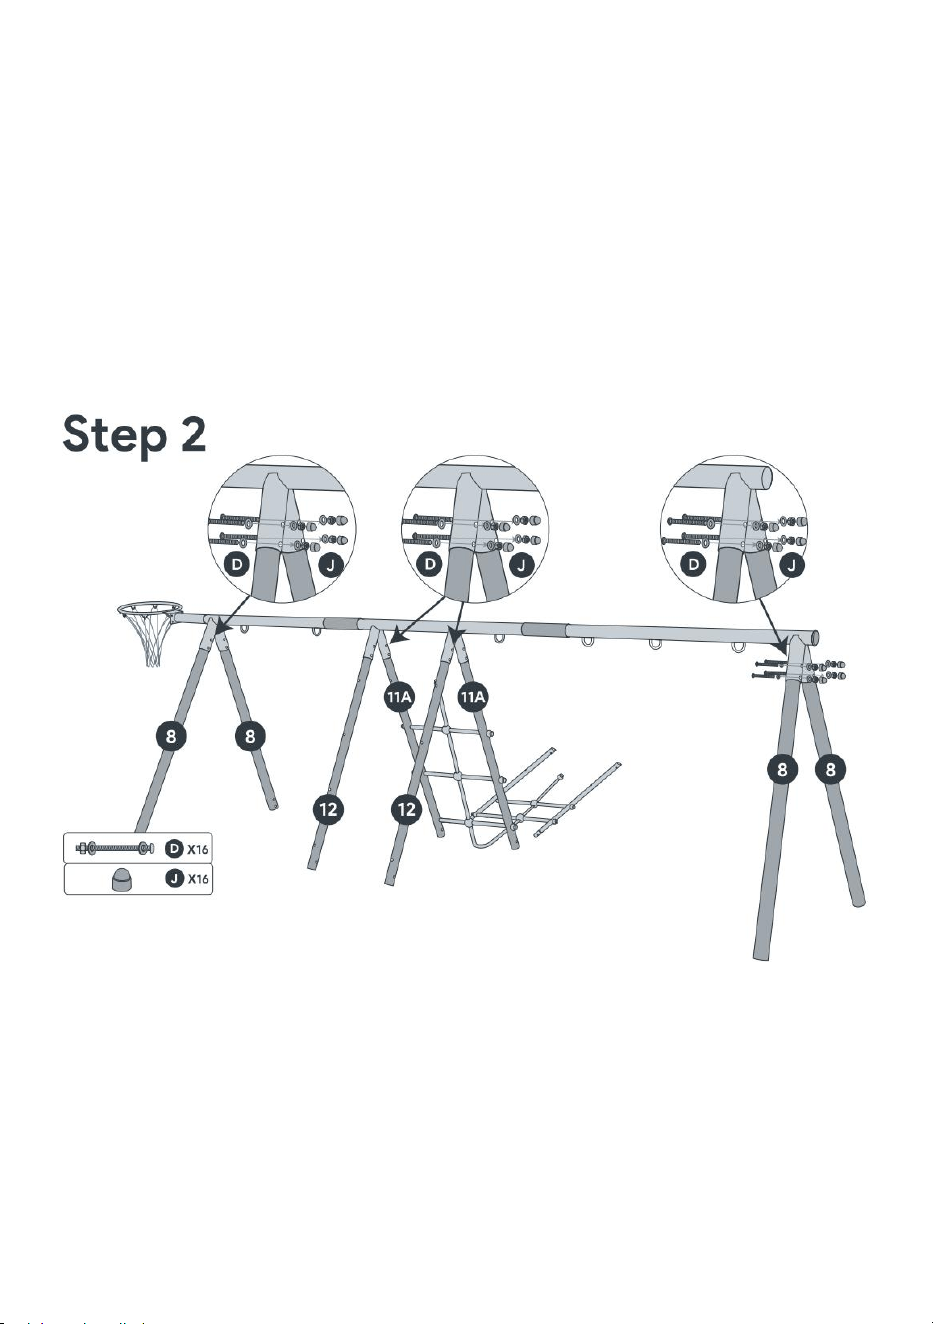
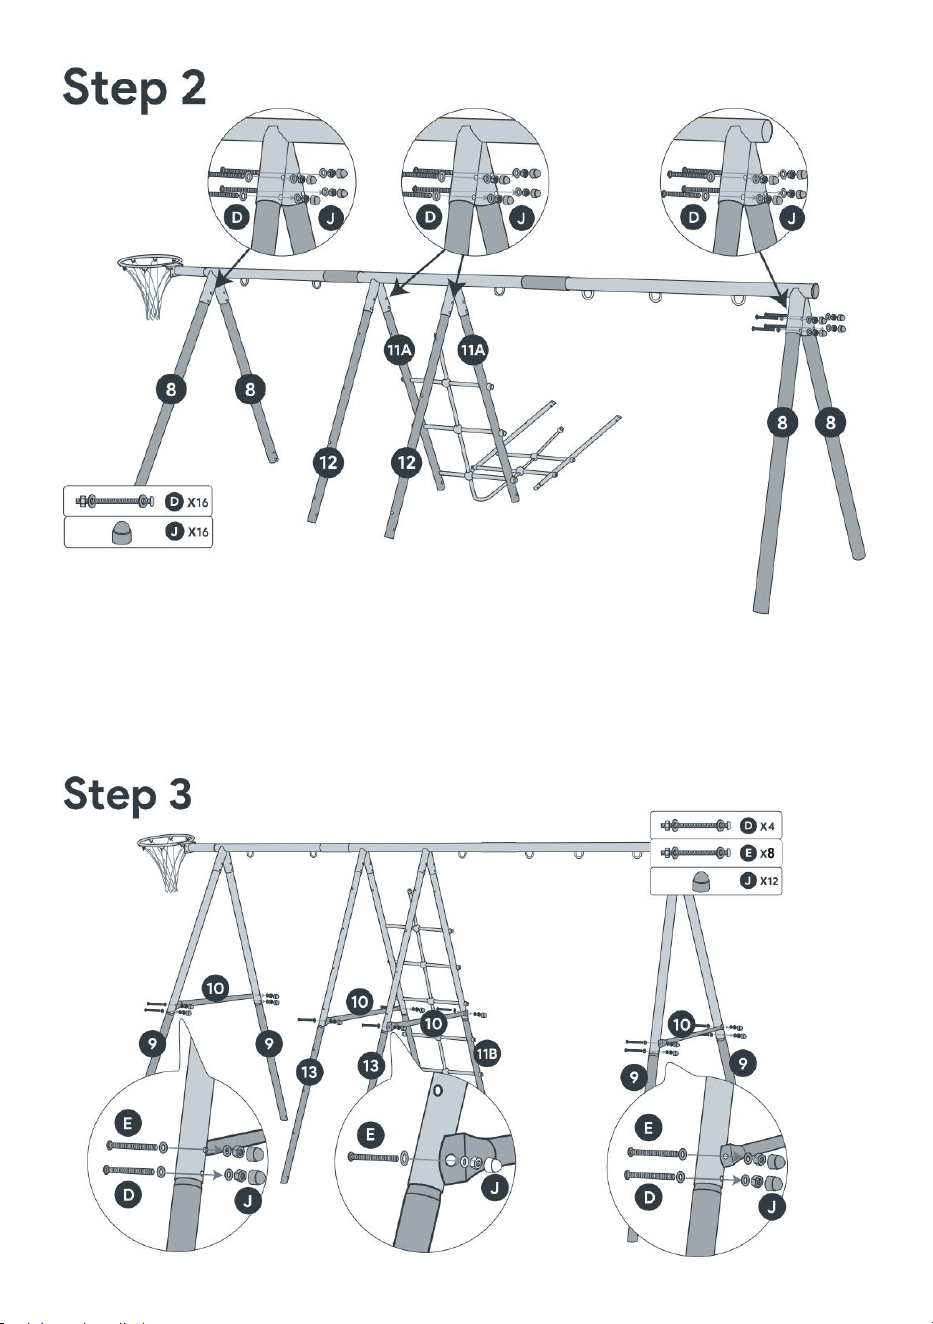
Step2
Install the upper support pipes 8, 11A, and 12 onto the main pole as shown
in the diagram, fix and lock them with screws D, and cover the head guard
J on the nut.
7
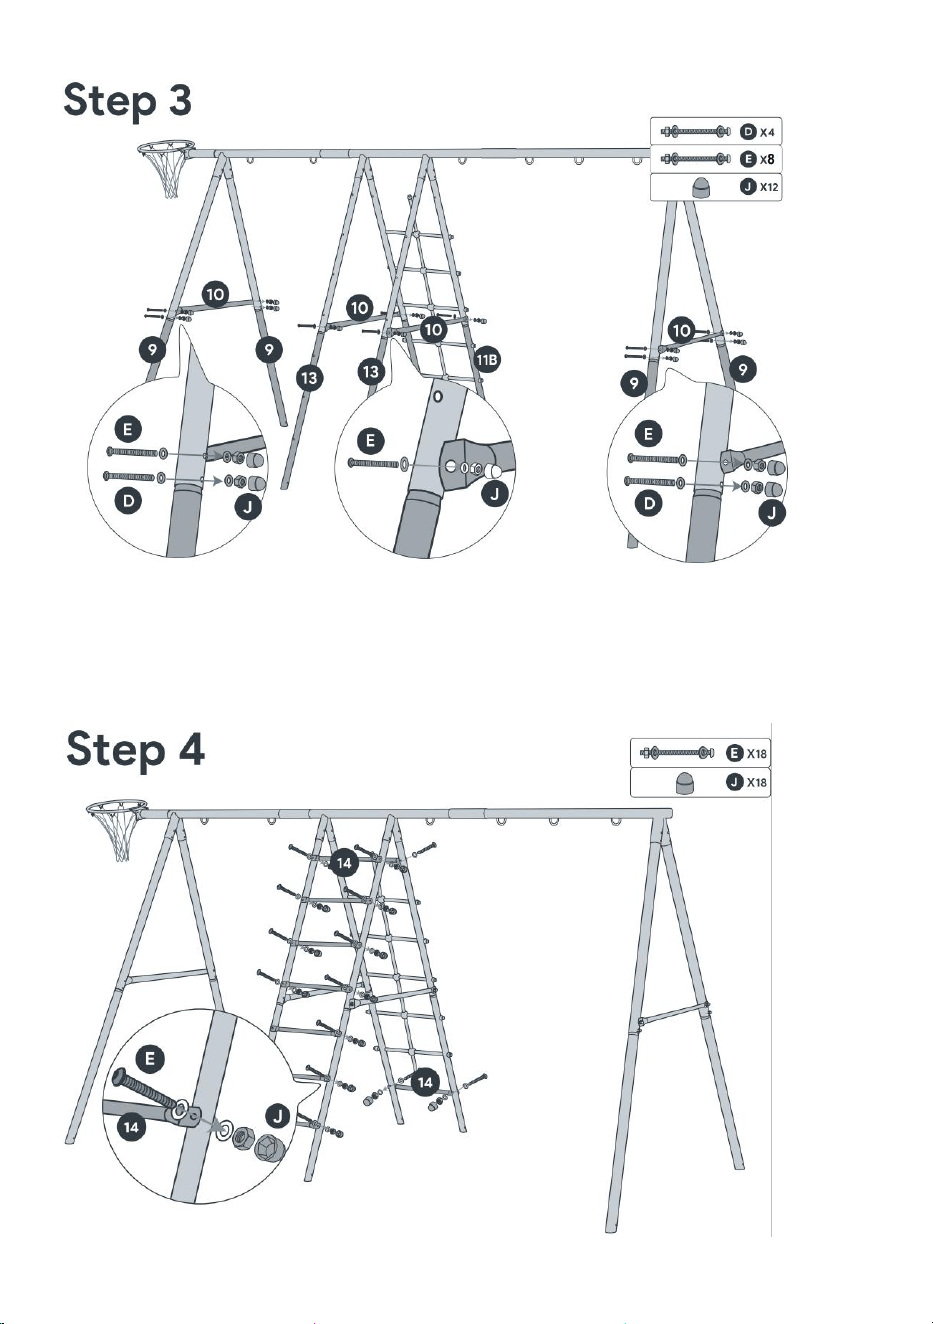
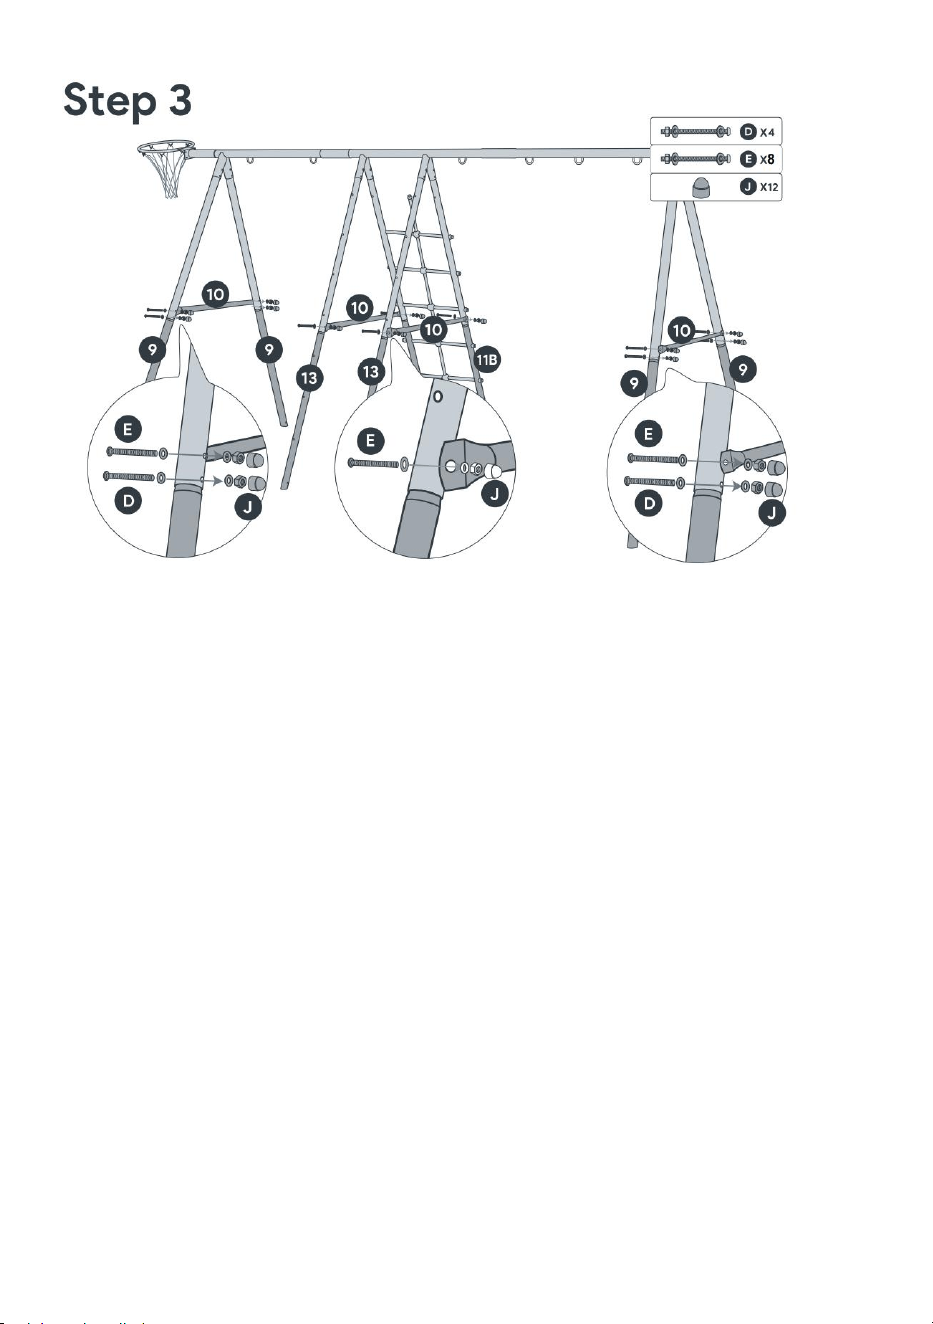
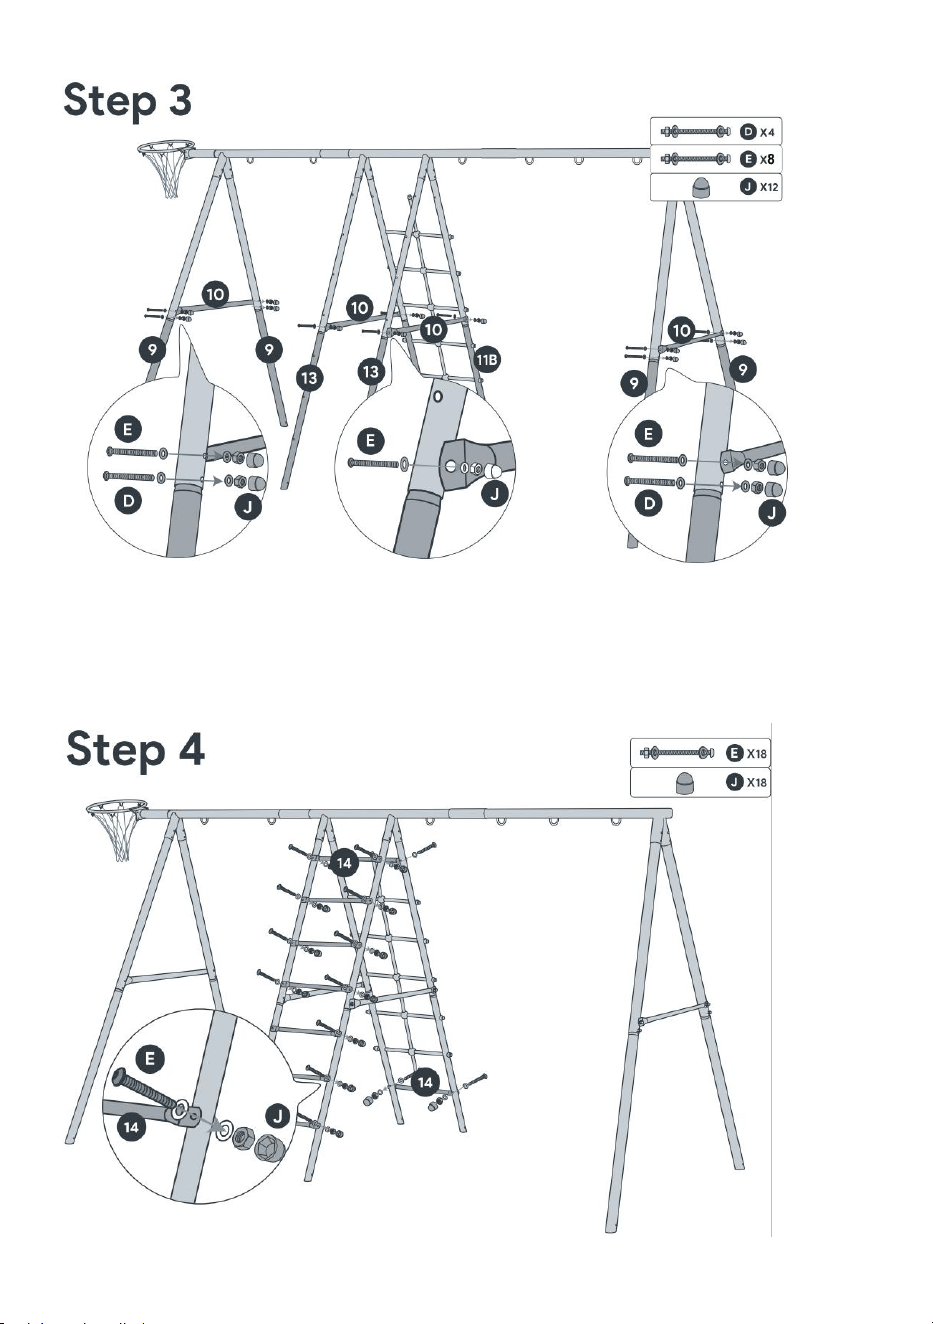
Step3
Install and connect the lower support pipes 9 and 13 to the upper support pipes,
and fix the support connection pipes 10 with E screws and D screws as shown in
the figure. Cover the head guard J on the nut.

8
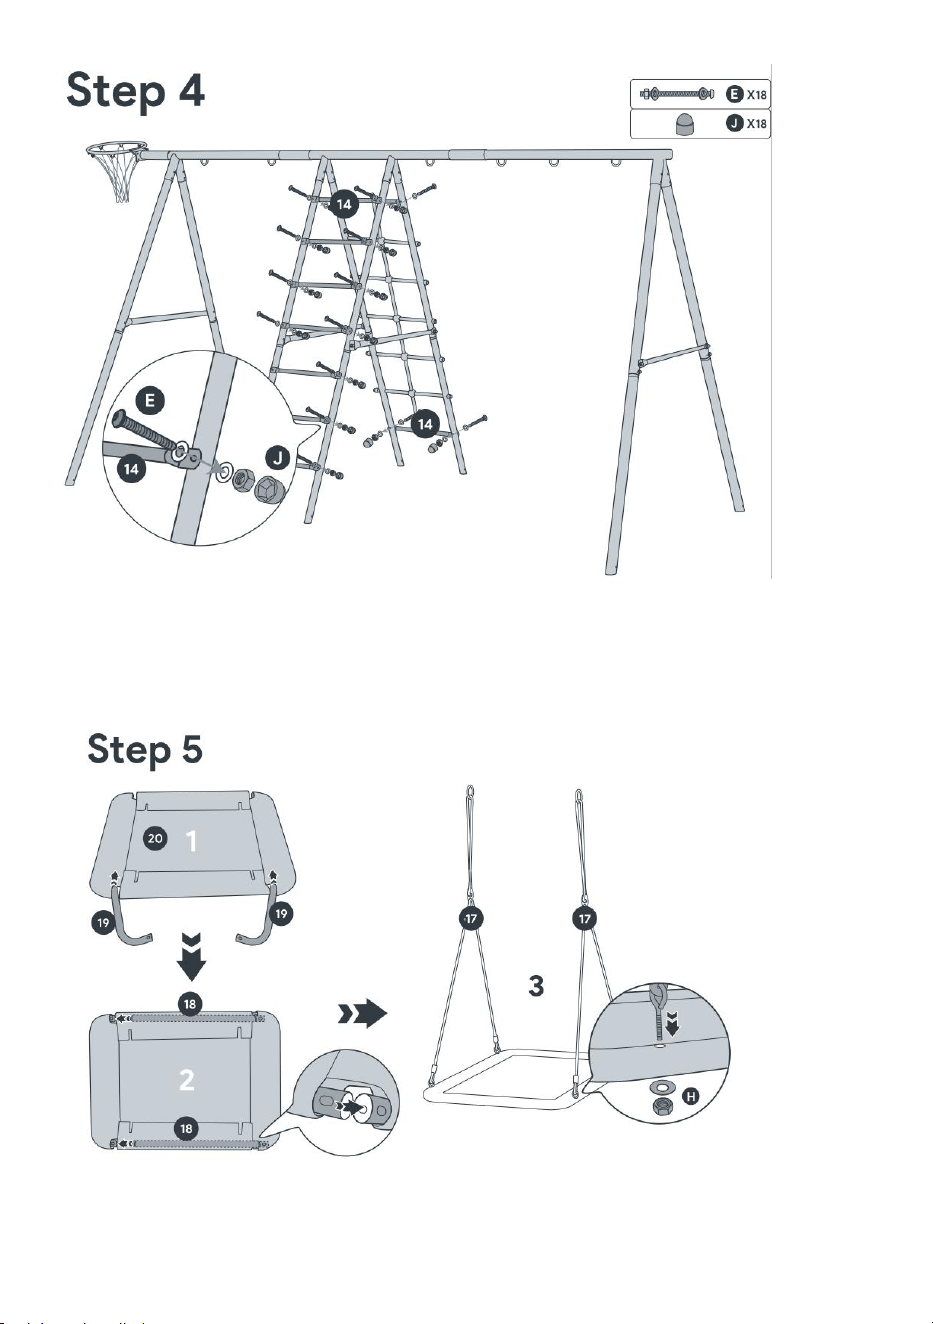
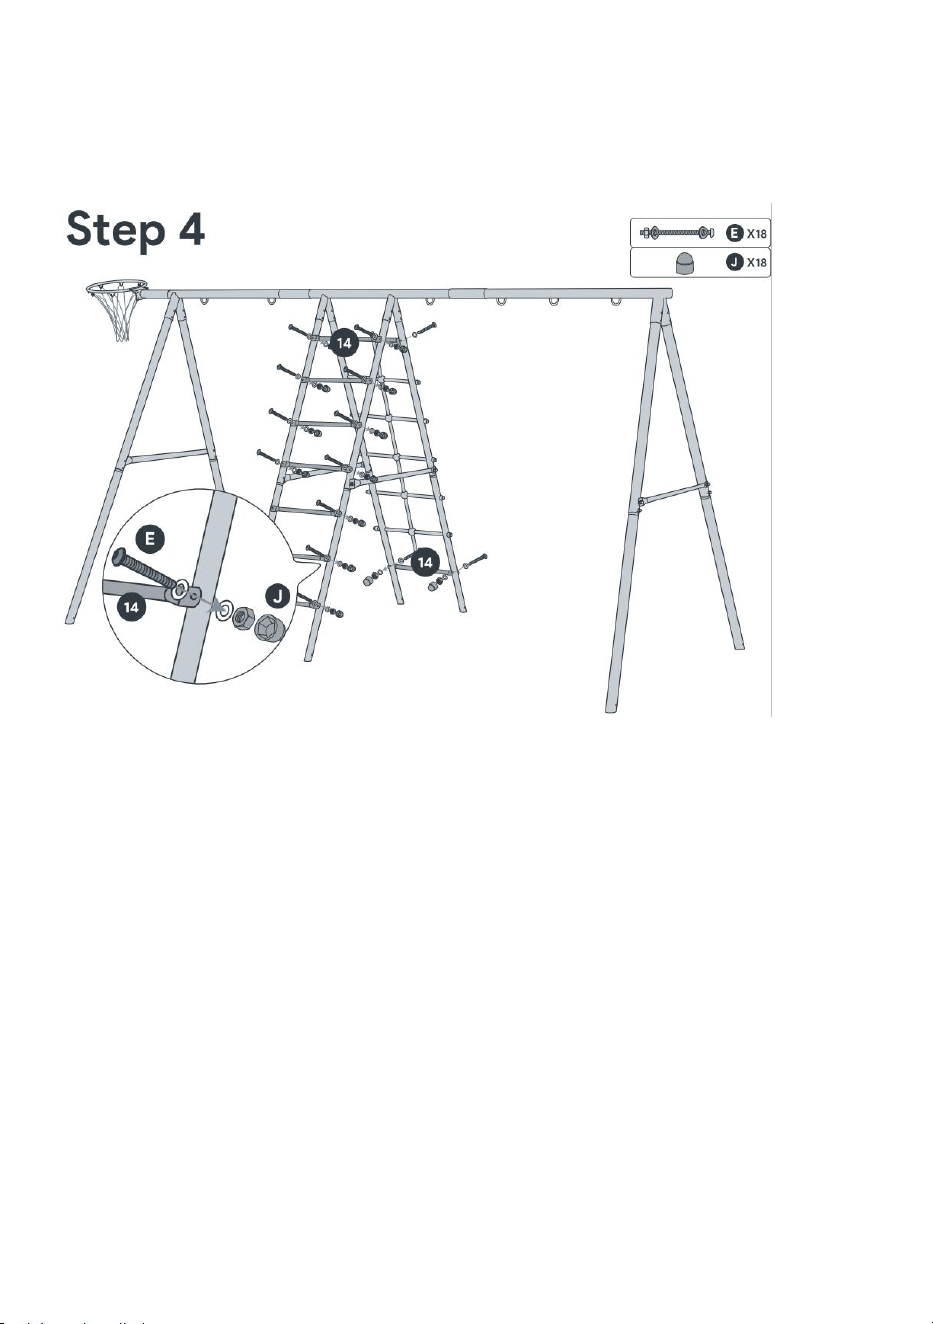
Step4
As shown in the figure, fix the ladder connecting rod to the ladder support rod with
E screws and cover it with a head guard J on the nut.
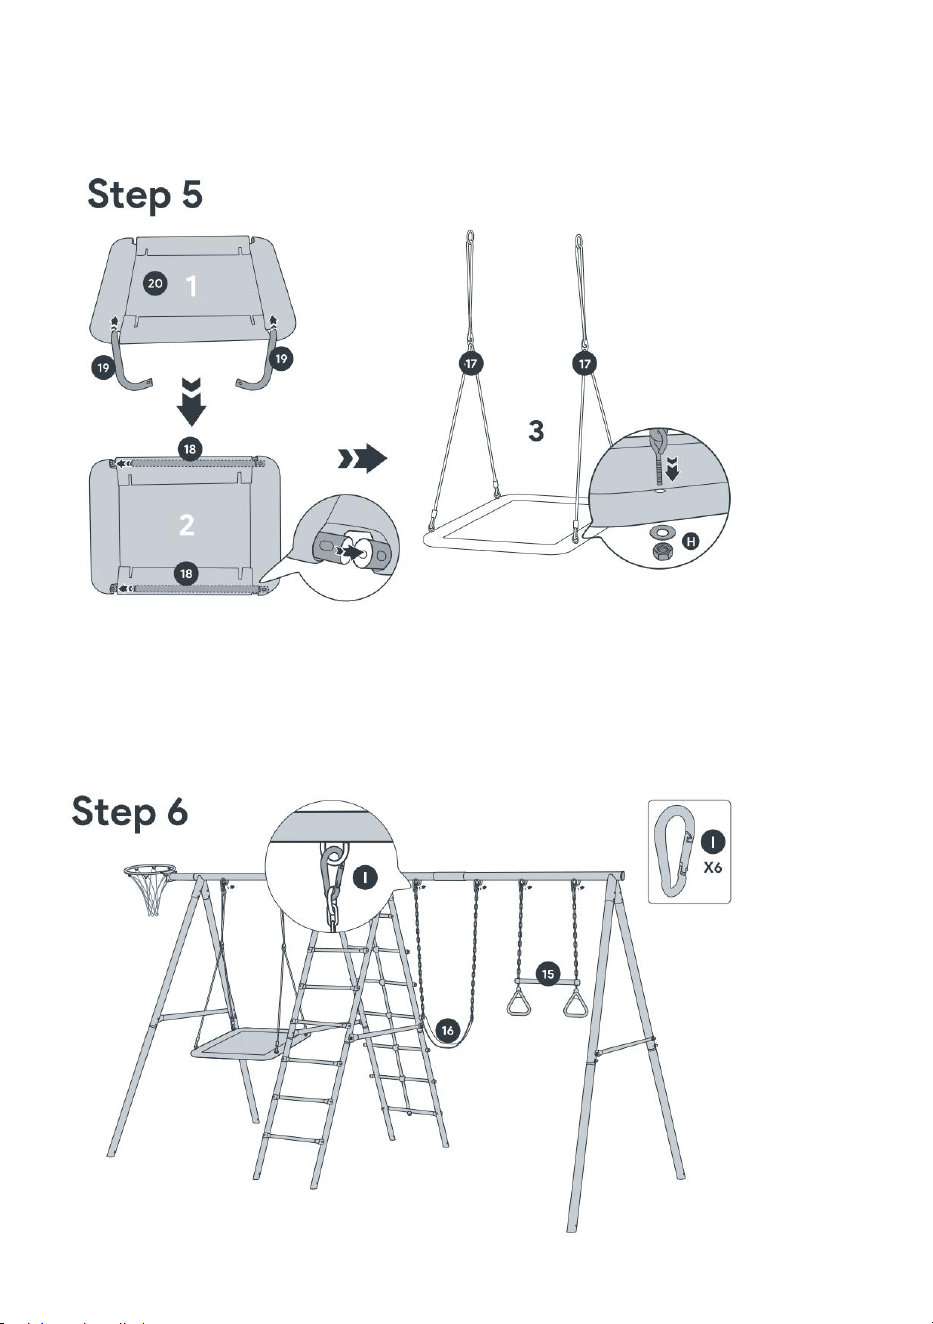
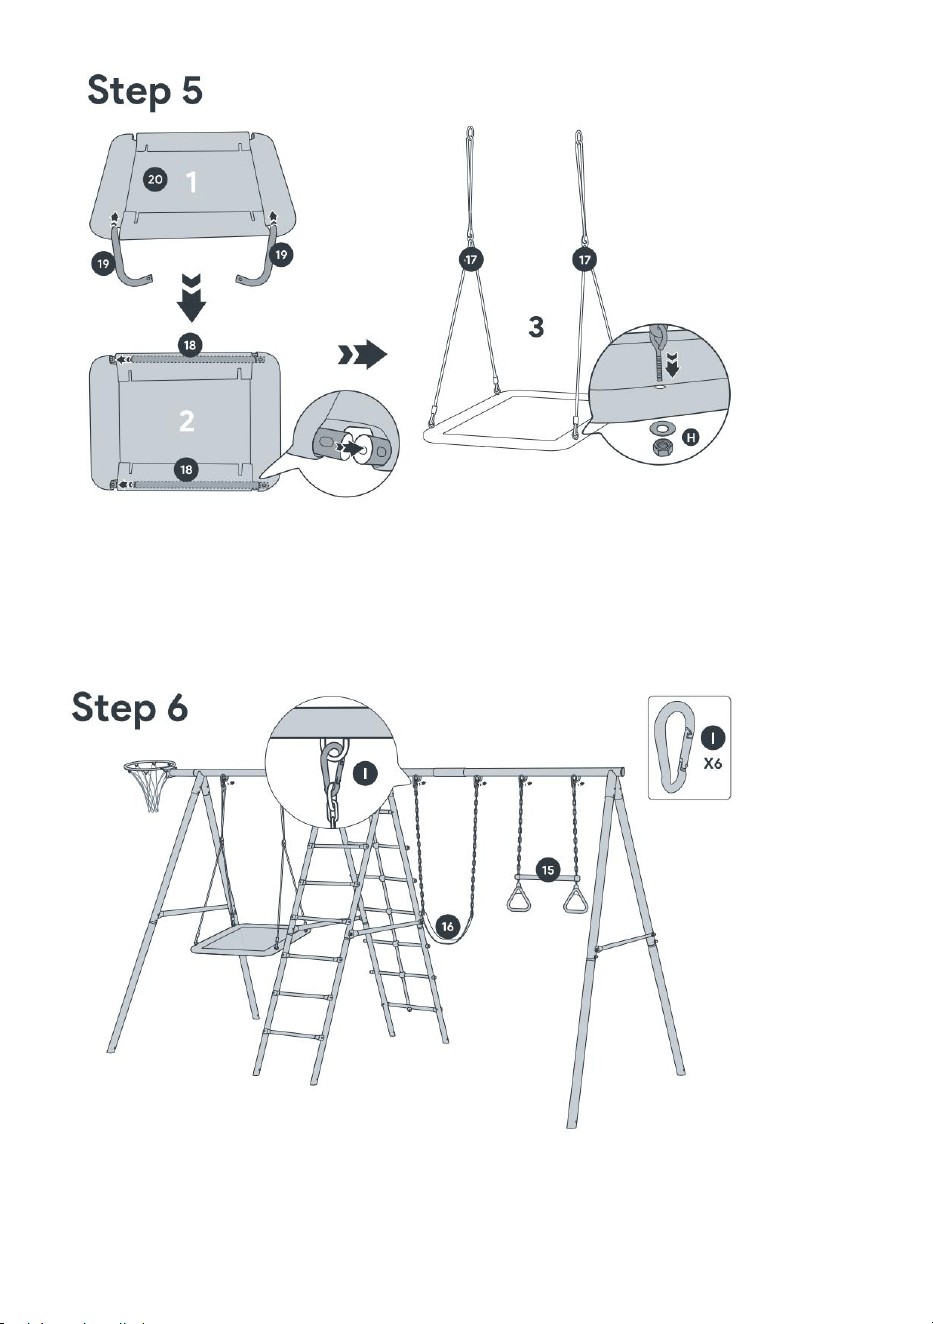
Step5
First, insert bend pipe 19 into the suspension chair cover, then insert
straight pipe 18 and connect pipes 18 and 19. Secure and lock them with H
screws.

9
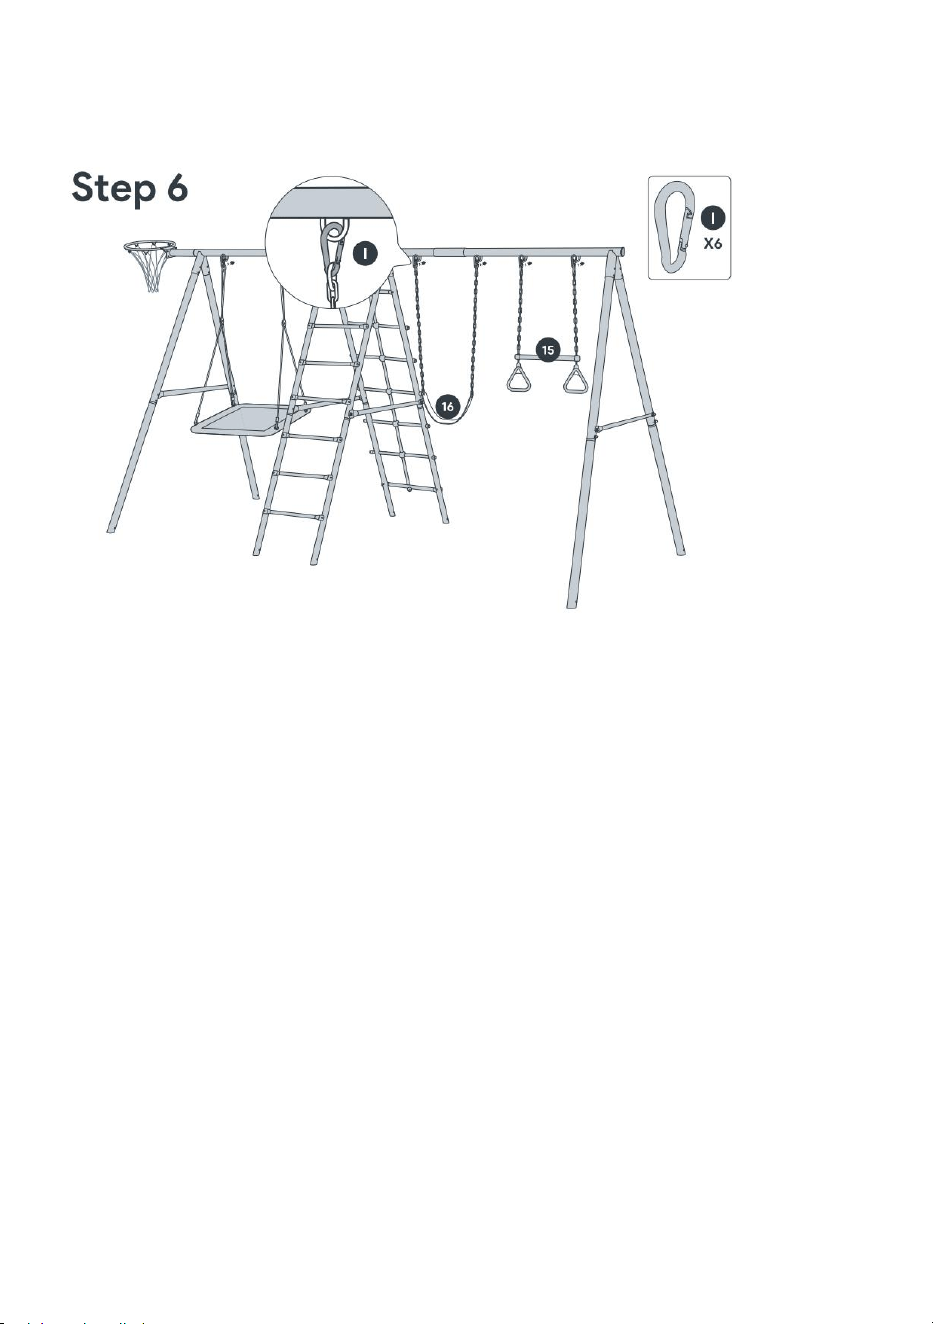
Step6
Use the mountaineering buckle “I”to connect the hanging chair, swing seat, and
suspension ring to the main swing pole.
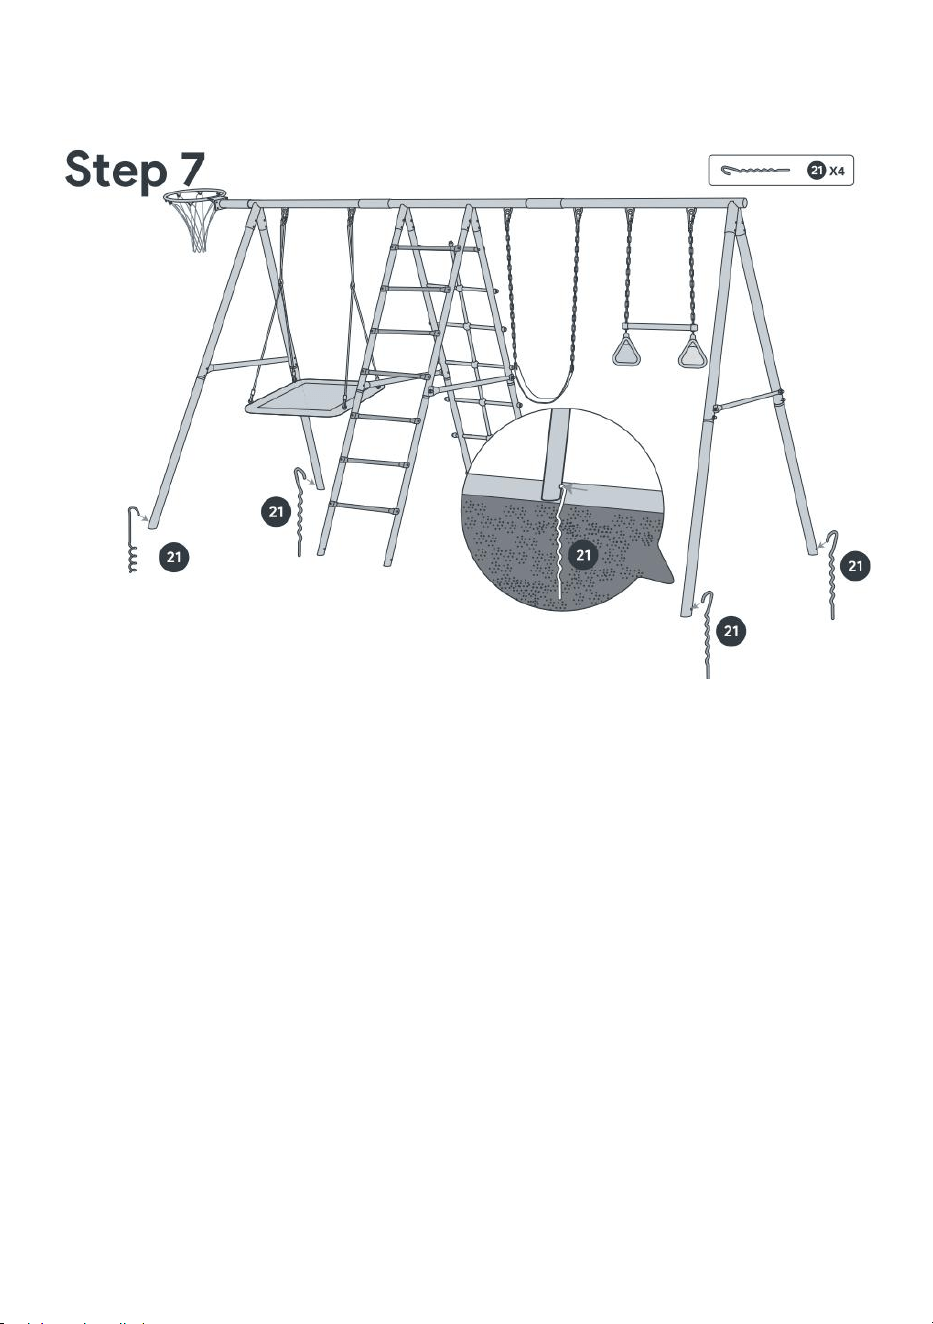
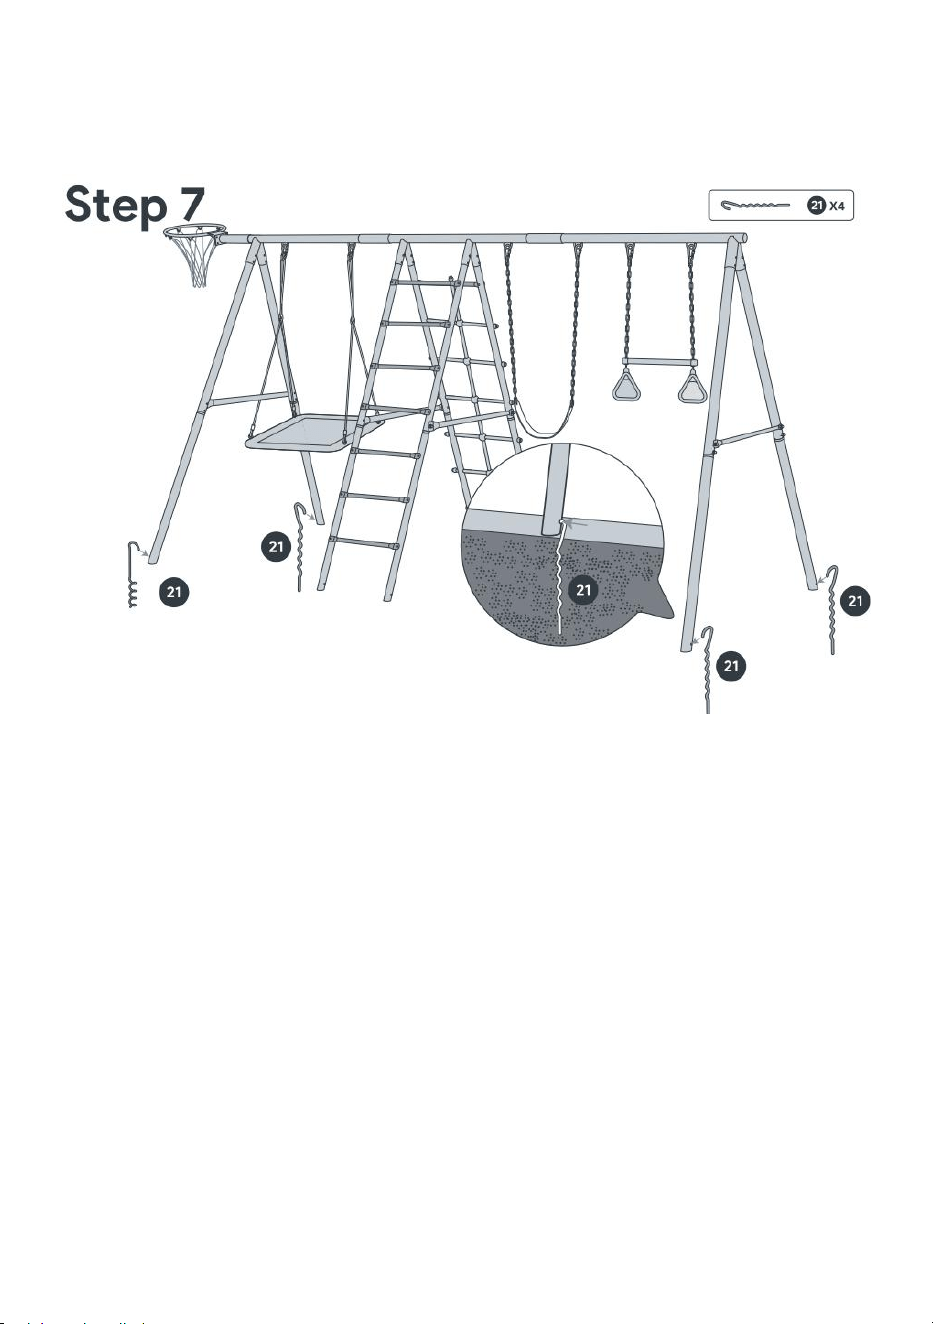
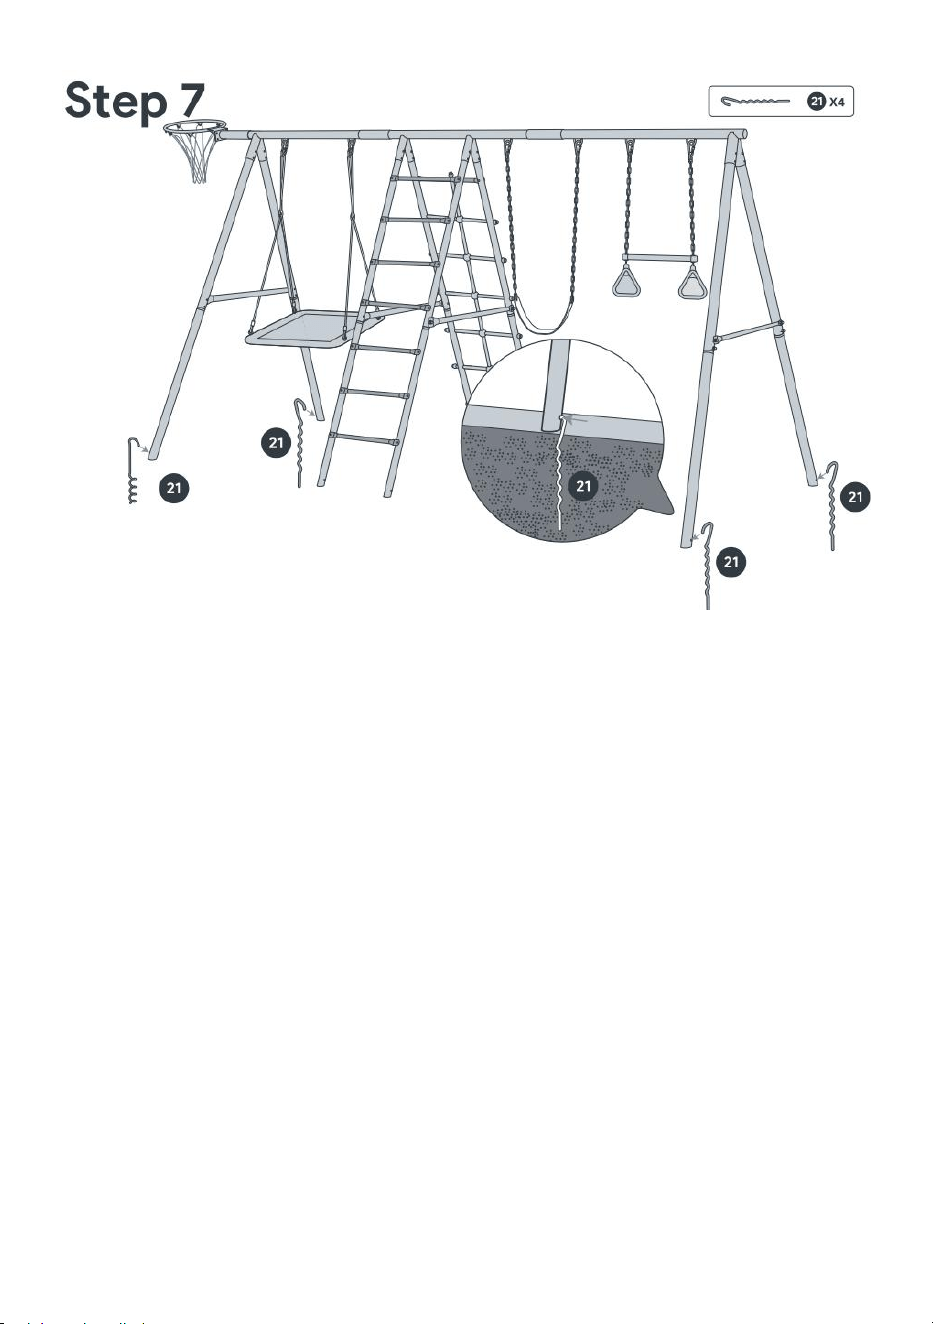
Step7
Fix the swing in the soil with the ground hook 21.
MAINTENANCE
· Check the poles, handles and screw connections regularly for cracks, damage and
material fatigue. If you discover any damage, the scaffolding must not be used. Please
contact your seller to replace the damaged items with new ones. Use only original
replacement elements!
· Never use aggressive cleaning agents for cleaning!
Disposal
The product packaging consists of recyclable materials. Dispose of them in
an environmentally
friendly manner and in the collection containers provided.

10
Manufacturer: FUJIAN KANGLAIBAO CO., LTD.
Address: NO.1, INDUSTRIAL 6TH-ROAD, INDUSTRIAL
AREA,LIAN CHENGCOUNTY ,LONGYAN CITY, FUJIAN
PROVINCE,CHINA
Imported to AUS: SIHAO PTY LTD. 1 ROKEVA
STREETEASTWOOD NSW 2122 Australia
Imported to USA: Sanven Technology Ltd. Suite 250, 9166
Anaheim Place, Rancho Cucamonga, CA 91730
REP
EC
E-CrossStu GmbH
Mainzer Landstr.69, 60329
Frankfurt am Main.
REP
UK
YH CONSULTING LIMITED.
C/O YH Consulting Limited Office 147,
Centurion House, London Road,
Staines-upon-Thames, Surrey, TW18 4AX


2
Supporto tecnico e certificato di garanzia elettronica www.vevor.com/support
Set altalena con telaio ad A
S026
We continue to be committed to provide you tools with competitive price.
"Save Half", "Half Price" or any other similar expressions used by us only represents an
estimate of savings you might benefit from buying certain tools with us compared to the major
top brands and does not necessarily mean to cover all categories of tools offered by us. You
are kindly reminded to verify carefully when you are placing an order with us if you are
actually saving half in comparison with the top major brands.

1
MODELLO: S026
Have product questions? Need technical support? Please feel free to
contact us:
Technical Support and E-Warranty Certificate
www.vevor.com/support
NEED HELP? CONTACT US!
This is the original instruction, please read all manual instructions
carefully before operating. VEVOR reserves a clear interpretation of our
user manual. The appearance of the product shall be subject to the
product you received. Please forgive us that we won't inform you again if
there are any technology or software updates on our product.
A-Frame Swing Set

2
ISTRUZIONI
Grazie mille per aver scelto questo set altalena A-Frame .
- Si prega di leggere tutte le istruzioni prima di utilizzarlo. Le informazioni ti
aiuteranno a ottenere i migliori risultati possibili.
I prodotti presenti in questo catalogo potrebbero differire nel colore rispetto
all'articolo reale.
IMPORTANTI ISTRUZIONI DI SICUREZZA
AREA GIOCO SICURA
NON installare l'altalena su cemento, asfalto o qualsiasi altra superficie dura.
Una caduta su una superficie dura può provocare lesioni gravi. Installare su
una superficie stabile non pavimentata, come erba o uno strato solido di
sabbia.
NON installare l'altalena su un terreno in pendenza. Questa inclinazione
esercita ulteriore stress su tutti i collegamenti e i giunti e provoca inoltre
l'allentamento e il guasto di tali collegamenti.
L'area di gioco sicura si riferisce ad una zona che si estende per 200 cm (6
piedi) oltre l'altalena su tutti i lati. Installare la copertura del terreno nell'area di
gioco sicura.
Rimuovere tutti i pericoli di inciampo come rocce, ceppi, radici, ecc. dall'area
di gioco sicura.
L'area di gioco sicura deve essere libera da strutture, recinzioni, garage, case,
rami sporgenti, fili della biancheria, cavi elettrici e altri ostacoli per garantire
un gioco sicuro.
I bambini devono rimanere fuori dall'area di lavoro finché l'area di gioco sicura
non è stata liberata da ostacoli, l'altalena non è stata completamente

3
installata, tutta la bulloneria è stata serrata e controllata e tutti gli strumenti
non sono stati raccolti.
GIOCO SICURO
Insegna ai tuoi figli a giocare in sicurezza.
Vestire i bambini in modo appropriato. Evitare accessori, indumenti
con lacci, abiti larghi e oggetti con corde posizionati intorno al collo,
che potrebbero impigliarsi o impigliarsi nell'attrezzatura. Indossare
calzature ben aderenti e che avvolgano completamente i piedi. Anche i
caschi da bicicletta devono essere tolti prima di giocare sull'altalena.
NON utilizzare l'altalena in nessun modo diverso da quello previsto.
NON giocare in condizioni di tempo umido a causa delle superfici
potenzialmente scivolose.
NON attorcigliare le catene o le corde dell'altalena né avvolgerle sulla
barra di supporto superiore poiché ciò potrebbe ridurre la resistenza
della catena o della corda.
NON attaccare all'altalena oggetti aggiuntivi che non siano
specificatamente progettati per l'uso con l'altalena, inclusi (ma non
limitati a) fili per stendere, dispositivi elettrici, corde o catene allentate,
ecc.
Attenzione ai bambini a NON :
Salta dall'altalena mentre è in movimento
Oscillare un'altalena del sedile vuoto in un angolo
Appendere a testa in giù da qualsiasi parte della palestra
Afferrare o fermare un altro bambino su qualsiasi attrezzatura in
movimento
Camminare vicino, davanti, tra o dietro gli oggetti in movimento
Avvertire i bambini di sedersi al centro dell'altalena con tutto il peso sul
sedile.
Assicurarsi che le corde o le catene da arrampicata siano fissate su
entrambe le estremità e non possano essere avvolte su se stesse.
Tutti i componenti potrebbero surriscaldarsi se esposti alla luce solare

4
diretta. Assicurarsi che l'altalena non sia calda prima di consentire ai
bambini di giocare.
CONSERVA QUESTE ISTRUZIONI
Assemblaggio e utilizzo
Parti del set altalena

5

6
MONTAGGIO DEL SET ALTALENA

7
Passo 1
5. Installare il telaio sul tubo 6, bloccarlo con la vite C e posizionare la
protezione della testa J sul dado.
6. Collegare il tubo 6 e il tubo 3 e bloccarli con la vite B.
7. Collegare i tubi 3, 4 e 2, bloccarli con la vite A e posizionare la
protezione della testa J sul dado.
8. Collegare i tubi 2, 4 e 1, bloccarli con la vite A e posizionare la
protezione della testa J sul dado .
Passo 2
Installare i tubi di supporto superiori 8, 11A e 12 sul palo principale come
mostrato nello schema, fissarli e bloccarli con le viti D e coprire la
protezione della testa J sul dado.

8
Passaggio 3
Installare e collegare i tubi di supporto inferiori 9 e 13 ai tubi di supporto superiori e
fissare i tubi di collegamento del supporto 10 con le viti E e le viti D come mostrato
in figura Coprire la protezione della testa J sul dado.
9
Passaggio 4
Come mostrato in figura, fissare la biella scala all'asta supporto scala con le viti E
e coprirla con un copritesta J sul dado.
Passaggio 5
Innanzitutto, inserire il tubo piegato 19 nel rivestimento della sedia sospesa,
quindi inserire il tubo dritto 18 e collegare i tubi 18 e 19. Fissarli e bloccarli
con le viti H.

10
Passaggio 6
Utilizzare la fibbia da alpinismo " I " per collegare la sedia sospesa, il sedile
dell'altalena e l'anello di sospensione al palo principale dell'altalena.
Passaggio 7
Fissare l'altalena al terreno con il gancio a terra 21 .
MANUTENZIONE
· Controllare regolarmente i pali, le maniglie e i collegamenti a vite per individuare
eventuali crepe, danni e usura del materiale. Se si riscontrano danni, l'impalcatura non
deve essere utilizzata. Contattare il venditore per sostituire gli articoli danneggiati con
altri nuovi elementi!
· Non utilizzare mai detergenti aggressivi per pulizia!
Disposizione
L'imballaggio del prodotto è costituito da materiali riciclabili. Smaltirli in
modo rispettoso dell'ambiente
modo amichevole e negli appositi contenitori di raccolta.
11
Produttore: FUJIAN KANGLAIBAO CO., LTD.
Indirizzo: NO.1, 6A STRADA INDUSTRIALE, AREA INDUSTRIALE,
CONTEA DI LIAN CHENG, CITTÀ DI LONGYAN, PROVINCIA DEL
FUJIAN, CINA
Importato in AUS: SIHAO PTY LTD. 1 ROKEVA
STREETEASTWOOD NSW 2122 Australia
Importato negli Stati Uniti: Sanven Technology Ltd. Suite 250,
9166 Anaheim Place, Rancho Cucamonga, CA 91730
REP
EC
E-CrossStu GmbH
Mainzer Landstr.69, 60329
Frankfurt am Main.
REP
UK
YH CONSULTING LIMITED.
C/O YH Consulting Limited Office 147,
Centurion House, London Road,
Staines-upon-Thames, Surrey, TW18 4AX


2
Wsparcie techniczne i certyfikat e-gwarancji www.vevor.com/support
Zestaw huśtawek z ramą A
S026
We continue to be committed to provide you tools with competitive price.
"Save Half", "Half Price" or any other similar expressions used by us only represents an
estimate of savings you might benefit from buying certain tools with us compared to the major
top brands and does not necessarily mean to cover all categories of tools offered by us. You
are kindly reminded to verify carefully when you are placing an order with us if you are
actually saving half in comparison with the top major brands.
1
MODEL: S026
Have product questions? Need technical support? Please feel free to
contact us:
Technical Support and E-Warranty Certificate
www.vevor.com/support
NEED HELP? CONTACT US!
This is the original instruction, please read all manual instructions
carefully before operating. VEVOR reserves a clear interpretation of our
user manual. The appearance of the product shall be subject to the
product you received. Please forgive us that we won't inform you again if
there are any technology or software updates on our product.
A-Frame Swing Set

2
INSTRUKCJE
Dziękujemy bardzo za wybranie tego zestawu huśtawek A-Frame .
- Przed użyciem przeczytaj całą instrukcję. Informacje te pomogą Ci osiągnąć
najlepsze możliwe rezultaty.
Produkty prezentowane w tym katalogu mogą różnić się kolorem od
rzeczywistego.
WAŻNE INSTRUKCJE BEZPIECZEŃSTWA
BEZPIECZNY MIEJSCE ZABAW
NIE instaluj huśtawki na betonie, asfalcie lub innej twardej powierzchni
Upadek na twardą powierzchnię może spowodować poważne obrażenia.
Montuj huśtawkę na nieutwardzonej, stabilnej powierzchni, takiej jak trawa
lub solidna warstwa piasku.
NIE instaluj zestawu huśtawkowego na pochyłym podłożu. Takie
przechylenie powoduje dodatkowe obciążenie wszystkich połączeń i
połączeń, a ponadto powoduje poluzowanie i uszkodzenie tych połączeń.
Bezpieczny obszar zabawy oznacza strefę rozciągającą się na odległość 200
cm poza huśtawkę ze wszystkich stron. W bezpiecznej strefie zabawy należy
zamontować pokrycie podłoża.
Usuń wszystkie elementy stwarzające ryzyko potknięcia, takie jak kamienie,
pniaki, korzenie itp. z bezpiecznego obszaru gry.
Bezpieczny obszar zabawy musi być wolny od wszelkich konstrukcji,
ogrodzeń, garaży, domów, zwisających gałęzi, sznurów do prania,
przewodów elektrycznych i innych przeszkód, aby zapewnić bezpieczną
zabawę.
Dzieci powinny pozostać poza obszarem pracy do czasu oczyszczenia

3
bezpiecznego obszaru zabawy z przeszkód, całkowitego zamontowania
huśtawki, dokręcenia i sprawdzenia wszystkich elementów osprzętu oraz
pobrania wszystkich narzędzi.
BEZPIECZNA GRA
Naucz swoje dzieci bezpiecznej zabawy.
Ubieraj dzieci odpowiednio. Unikaj akcesoriów, ubrań ze sznurkami,
luźnych ubrań i przedmiotów zawiązanych na szyi, które mogą
zaplątać się lub zaczepić o sprzęt. Ubieraj się wraz z dobrze
dopasowanym i zakrywającym całą stopę obuwiem. Przed zabawą
należy zdjąć także kaski rowerowe na huśtawce.
NIE WOLNO używać huśtawki w sposób inny niż przeznaczony.
NIE GRAJ w mokrych warunkach pogodowych ze względu na
potencjalnie śliską nawierzchnię.
NIE skręcać łańcuchów ani lin huśtawkowych ani nie zarzucać ich na
górny drążek nośny, ponieważ może to zmniejszyć wytrzymałość
łańcucha lub liny.
NIE mocuj do huśtawki dodatkowych elementów, które nie są
specjalnie zaprojektowane do użytku z huśtawką, w tym (ale nie
ograniczając się do) sznurów do ubrań, urządzeń elektrycznych,
luźnych lin lub łańcuchów itp.
Przestrzegaj dzieci, aby NIE :
Zeskocz z huśtawki, gdy jest w ruchu
Huśtaj pustą huśtawkę z siedziskiem pod kątem
Zawieś do góry nogami na dowolnej części zestawu gimnastycznego
Chwyć lub zatrzymaj inne dziecko na poruszającym się sprzęcie
Podejdź blisko, przed, pomiędzy lub za poruszającymi się
przedmiotami
Należy zwrócić uwagę, aby dzieci siedziały na środku huśtawki, całym
ciężarem ciała spoczywając na siedzisku.
Upewnij się, że liny lub łańcuchy wspinaczkowe są zabezpieczone na
obu końcach i nie można ich ponownie skręcić.
4
Wszystkie elementy mogą się nagrzać pod wpływem bezpośredniego
światła słonecznego. Zanim pozwolisz dzieciom bawić się, upewnij się,
że huśtawka nie jest gorąca.
ZACHOWAJ TE INSTRUKCJE
Montaż i użytkowanie
Części zestawu huśtawek
5

6
MONTAŻ ZESTAWU HANDLOWEGO

7
Krok 1
9. Zamontuj obręcz na rurze 6, zablokuj ją śrubą C i umieść osłonę główki
J na nakrętce.
10. Połącz rurkę 6 i rurkę 3 i zablokuj je śrubą B.
11. Podłącz rury 3, 4 i 2, zablokuj je śrubą A i załóż osłonę głowicy J na
nakrętkę.
12. Połącz rury 2, 4 i 1, zabezpiecz je śrubą A i załóż osłonę głowicy J na
nakrętkę .
Krok 2
Zamontuj górne rury nośne 8, 11A i 12 na słupie głównym, jak pokazano na
schemacie, przymocuj i zabezpiecz je śrubami D, a następnie zakryj
osłonę główki J na nakrętce.

8
Krok 3
Zamontuj i połącz dolne rury wsporcze 9 i 13 z górnymi rurami wsporczymi i
przymocuj rury łączące wsporcze 10 za pomocą śrub E i śrub D, jak pokazano na
rysunku. Zakryj osłonę głowicy J na nakrętce.

9
Krok 4
Jak pokazano na rysunku, przymocuj drążek łączący drabinę do pręta nośnego
drabiny za pomocą śrub E i przykryj go osłoną czołową J na nakrętce.
Krok 5
Najpierw włóż kolanko 19 do pokrowca fotela wiszącego, następnie włóż
prostą rurę 18 i połącz rury 18 i 19. Zabezpiecz i zablokuj śrubami H.
Krok 6
10
Użyj klamry alpinistycznej „ I ”, aby połączyć wiszące krzesło, siedzisko
huśtawki i pierścień do zawieszenia z głównym drążkiem huśtawki.
Krok 7
Zamocuj huśtawkę w ziemi za pomocą haka uziemiającego 21 .
KONSERWACJA
· Regularnie sprawdzaj słupy, uchwyty i połączenia śrubowe pod kątem pęknięć,
uszkodzeń i zmęczenia materiału. W przypadku stwierdzenia uszkodzeń rusztowania
nie należy używać. Prosimy o kontakt ze sprzedawcą w celu wymiany uszkodzonych
elementów na nowe elementy!
· Nigdy nie używaj agresywnych środków czyszczących czyszczenie!
Sprzedaż
Opakowanie produktu składa się z materiałów nadających się do
recyklingu. Należy je utylizować w sposób przyjazny dla środowiska
przyjazny sposób i w dostarczonych pojemnikach do zbiórki.
Producent: FUJIAN KANGLAIBAO CO., LTD.

11
Adres: NR 1, 6-TA DROGA PRZEMYSŁOWA, OBSZAR
PRZEMYSŁOWY, Hrabstwo LIAN CHENG, MIASTO LONGYAN,
PROWINCJA FUJIAN, CHINY
Import do Australii: SIHAO PTY LTD. 1 ROKEVA
STREETEASTWOOD NSW 2122 Australia
Import do USA: Sanven Technology Ltd. Suite 250, 9166 Anaheim
Place, Rancho Cucamonga, CA 91730
REP
EC
E-CrossStu GmbH
Mainzer Landstr.69, 60329
Frankfurt am Main.
REP
UK
YH CONSULTING LIMITED.
C/O YH Consulting Limited Office 147,
Centurion House, London Road,
Staines-upon-Thames, Surrey, TW18 4AX


2
Technischer Support und E-Garantiezertifikat www.vevor.com/support
A-Frame-Schaukelset
S026
We continue to be committed to provide you tools with competitive price.
"Save Half", "Half Price" or any other similar expressions used by us only represents an
estimate of savings you might benefit from buying certain tools with us compared to the major
top brands and does not necessarily mean to cover all categories of tools offered by us. You
are kindly reminded to verify carefully when you are placing an order with us if you are
actually saving half in comparison with the top major brands.

1
MODELL: S026
Have product questions? Need technical support? Please feel free to
contact us:
Technical Support and E-Warranty Certificate
www.vevor.com/support
NEED HELP? CONTACT US!
This is the original instruction, please read all manual instructions
carefully before operating. VEVOR reserves a clear interpretation of our
user manual. The appearance of the product shall be subject to the
product you received. Please forgive us that we won't inform you again if
there are any technology or software updates on our product.
A-Frame Swing Set

2
ANWEISUNGEN
Vielen Dank, dass Sie sich für dieses A-Frame-Schaukelset entschieden haben .
- Bitte lesen Sie alle Anweisungen, bevor Sie es verwenden. Die Informationen
helfen Ihnen, die bestmöglichen Ergebnisse zu erzielen.
Die in diesem Katalog aufgeführten Produkte können farblich vom tatsächlichen
Artikel abweichen.
WICHTIGE SICHERHEITSANWEISUNGEN
SICHERER SPIELBEREICH
NICHT auf Beton, Asphalt oder einer anderen harten Oberfläche. Ein Sturz
auf eine harte Oberfläche kann zu schweren Verletzungen führen. Installieren
Sie sie auf einer unbefestigten, stabilen Oberfläche, wie z. B. Gras oder einer
festen Sandschicht.
NICHT auf abschüssigem Boden auf. Diese Neigung belastet alle
Verbindungen und Verbindungen zusätzlich und führt dazu, dass sich diese
Verbindungen lockern und versagen.
Der sichere Spielbereich bezieht sich auf eine Zone, die sich auf allen Seiten
6 Fuß (200 cm) über die Schaukel hinaus erstreckt. Installieren Sie die
Bodenabdeckung in der sicheren Spielzone.
Entfernen Sie alle Stolperfallen wie Steine, Baumstümpfe, Wurzeln usw. aus
dem sicheren Spielbereich.
Der sichere Spielbereich muss frei von allen Strukturen, Zäunen, Garagen,
Häusern, überhängenden Ästen, Wäscheleinen, Elektrokabeln und anderen
Hindernissen sein, um ein sicheres Spielen zu gewährleisten.
Kinder sollten sich vom Arbeitsbereich fernhalten, bis der sichere
Spielbereich von Hindernissen befreit ist, die Schaukel vollständig installiert

3
wurde, alle Beschläge festgezogen und überprüft wurden und alle Werkzeuge
aufgenommen wurden.
SICHERES SPIEL
Bringen Sie Ihren Kindern bei, sicher zu spielen.
Ziehen Sie Kinder angemessen an. Vermeiden Sie Accessoires,
Kleidung mit Kordelzug, locker sitzende Kleidung und Schnüre, die
sich an der Ausrüstung verfangen könnten. Tragen Sie auch gut
sitzende und den Fuß vollständig umschließende Schuhe auf der
Schaukel.
NICHT anders als vorgesehen.
Sie NICHT bei nassem Wetter, da der Untergrund möglicherweise
rutschig ist.
NICHT und legen Sie sie NICHT über die obere Stützstange, da dies
die Festigkeit der Kette oder des Seils verringern kann.
Sie KEINE zusätzlichen Gegenstände an der Schaukel, die nicht
speziell für die Verwendung mit der Schaukel konzipiert sind,
einschließlich (aber nicht beschränkt auf) Wäscheleinen, elektrische
Geräte, lose Seile oder Ketten usw.
Weisen Sie Kinder darauf hin, Folgendes NICHT zu tun:
Springen Sie von der Schaukel, während sie in Bewegung ist
Schwingen Sie eine leere Sitzschaukel schräg
Hängen Sie es kopfüber an einen beliebigen Teil des Fitness-Sets
Ergreifen oder stoppen Sie ein anderes Kind an einem sich
bewegenden Gerät
Gehen Sie nah an, vor, zwischen oder hinter sich bewegenden
Gegenständen
Achten Sie darauf, dass Kinder mit ihrem gesamten Gewicht auf dem
Sitz in der Mitte der Schaukel sitzen.
Achten Sie darauf, dass Kletterseile oder -ketten an beiden Enden
gesichert sind und nicht auf sich selbst zurückgeschlungen werden
können.

4
Alle Komponenten können heiß werden, wenn sie direktem
Sonnenlicht ausgesetzt werden. Stellen Sie sicher, dass die Schaukel
nicht heiß ist, bevor Sie Kinder spielen lassen.
ANLEITUNG AUFBEWAHREN
Montage und Verwendung
Schaukel-Set-Teile

5

6
MONTAGE DES SCHAUKEL-SETS
7
Schritt 1
13. Montieren Sie den Reifen auf Rohr 6, sichern Sie ihn mit der Schraube
C und setzen Sie den J- Kopfschutz auf die Mutter.
14. Verbinden Sie Rohr 6 und Rohr 3 und verriegeln Sie diese mit der
Schraube B.
15. Verbinden Sie die Rohre 3, 4 und 2, sichern Sie sie mit der Schraube A
und setzen Sie den J-Kopfschutz auf die Mutter.
16. Verbinden Sie die Rohre 2, 4 und 1, sichern Sie sie mit der Schraube A
und setzen Sie den J-Kopfschutz auf die Mutter .
Schritt 2
Montieren Sie die oberen Stützrohre 8, 11A und 12 wie in der Abbildung
gezeigt am Hauptmast, befestigen und sichern Sie sie mit den Schrauben
D und decken Sie den Kopfschutz J auf der Mutter ab.
8
Schritt 3
Installieren und verbinden Sie die unteren Stützrohre 9 und 13 mit den oberen
Stützrohren und befestigen Sie die Stützverbindungsrohre 10 mit E-Schrauben
und D-Schrauben, wie in der Abbildung gezeigt. Decken Sie den Kopfschutz J mit
der Mutter ab.
9
Schritt 4
Befestigen Sie die Leiterverbindungsstange wie in der Abbildung gezeigt mit
E-Schrauben an der Leiterstützstange und decken Sie sie mit einem Kopfschutz J
an der Mutter ab.
Schritt 5
Führen Sie zuerst das gebogene Rohr 19 in den Bezug des Hängestuhls
10
ein, dann das gerade Rohr 18 und verbinden Sie die Rohre 18 und 19.
Befestigen und verriegeln Sie diese mit H-Schrauben.
Schritt 6
Verwenden Sie die Bergsteigerschnalle „ I “, um den Hängesessel, den
Schaukelsitz und den Aufhängering mit der Hauptschaukelstange zu verbinden.

11
Schritt7
Befestigen Sie die Schaukel mit dem Erdhaken 21 im Boden .
WARTUNG
· Überprüfen Sie regelmäßig die Stangen, Griffe und Schraubverbindungen auf Risse,
Beschädigungen und Materialermüdung. Bitte wenden Sie sich an Ihren Verkäufer, um
die beschädigten Teile durch neue zu ersetzen Elemente!
· Verwenden Sie niemals aggressive Reinigungsmittel Reinigung!
Entsorgung
Die Produktverpackung besteht aus wiederverwertbaren Materialien.
Entsorgen Sie diese umweltgerecht
freundlich und in den bereitgestellten Sammelbehältern abzugeben.
Hersteller: FUJIAN KANGLAIBAO CO., LTD.
Adresse: NR. 1, INDUSTRIAL 6TH-ROAD, INDUSTRIEGEBIET,
LIAN CHENGCOUNTY, STADT LONGYAN, PROVINZ FUJIAN,
CHINA
12
Importiert nach AUS: SIHAO PTY LTD. 1 ROKEVA
STREETEASTWOOD NSW 2122 Australien
In die USA importiert: Sanven Technology Ltd. Suite 250, 9166
Anaheim Place, Rancho Cucamonga, CA 91730
REP
EC
E-CrossStu GmbH
Mainzer Landstr.69, 60329
Frankfurt am Main.
REP
UK
YH CONSULTING LIMITED.
C/O YH Consulting Limited Office 147,
Centurion House, London Road,
Staines-upon-Thames, Surrey, TW18 4AX


2
Assistance technique et certificat de garantie électronique www.vevor.com/support
Ensemble de balançoire à cadre en A
S026
We continue to be committed to provide you tools with competitive price.
"Save Half", "Half Price" or any other similar expressions used by us only represents an
estimate of savings you might benefit from buying certain tools with us compared to the major
top brands and does not necessarily mean to cover all categories of tools offered by us. You
are kindly reminded to verify carefully when you are placing an order with us if you are
actually saving half in comparison with the top major brands.

1
MODÈLE: S026
Have product questions? Need technical support? Please feel free to
contact us:
Technical Support and E-Warranty Certificate
www.vevor.com/support
NEED HELP? CONTACT US!
This is the original instruction, please read all manual instructions
carefully before operating. VEVOR reserves a clear interpretation of our
user manual. The appearance of the product shall be subject to the
product you received. Please forgive us that we won't inform you again if
there are any technology or software updates on our product.
A-Frame Swing Set

2
INSTRUCTIONS
Merci beaucoup d'avoir choisi cet ensemble de balançoires en A.
- Veuillez lire toutes les instructions avant de l'utiliser. Les informations vous
aideront à obtenir les meilleurs résultats possibles.
Les produits présentés dans ce catalogue peuvent avoir une couleur différente de
celle de l'article réel.
CONSIGNES DE SÉCURITÉ IMPORTANTES
ZONE DE JEU SÉCURISÉE
N'installez PAS la balançoire sur du béton, de l'asphalte ou toute autre
surface dure. Une chute sur une surface dure peut entraîner des blessures
graves. Installez-la sur une surface stable non pavée, comme de l'herbe ou
une solide couche de sable.
N'installez PAS la balançoire sur un sol en pente. Cette inclinaison exerce
une pression supplémentaire sur toutes les connexions et tous les joints et
provoque en outre le desserrage et la défaillance de ces connexions.
L'aire de jeu sécuritaire fait référence à une zone s'étendant de 6 pi (200 cm)
au-delà de la balançoire de tous les côtés. Installez le couvre-sol dans la
zone de jeu sécuritaire.
Retirez tous les risques de trébuchement tels que les roches, les souches, les
racines, etc. de l'aire de jeu sécurisée.
L'aire de jeu sécuritaire doit être exempte de toute structure, clôture, garage,
maison, branches en surplomb, cordes à linge, fils électriques et autres
obstacles pour garantir un jeu sécuritaire.
Les enfants doivent rester en dehors de la zone de travail jusqu'à ce que l'aire
de jeu sécurisée soit dégagée de tout obstacle, que la balançoire soit

3
complètement installée, que toute la quincaillerie ait été serrée et vérifiée et
que tous les outils aient été ramassés.
JEU SÉCURISÉ
Apprenez à vos enfants à jouer en toute sécurité.
Habillez les enfants de manière appropriée. Évitez les accessoires, les
vêtements avec des cordons de serrage, les vêtements amples et les
articles à cordes placés autour du cou, qui pourraient s'emmêler ou
s'accrocher à l'équipement. Habillez-vous avec des chaussures bien
ajustées et enveloppant les pieds. Les casques de vélo doivent
également être retirés avant de jouer. sur la balançoire.
N'utilisez PAS la balançoire d'une manière autre que celle prévue.
NE PAS jouer par temps humide en raison de surfaces potentiellement
glissantes.
NE PAS tordre les chaînes ou les cordes de la balançoire et ne pas les
enrouler sur la barre de support supérieure car cela pourrait réduire la
résistance de la chaîne ou de la corde.
NE PAS attacher d'objets supplémentaires à la balançoire qui ne sont
pas spécifiquement conçus pour être utilisés avec la balançoire, y
compris (mais sans s'y limiter) des cordes à linge, des appareils
électriques, des cordes ou des chaînes lâches, etc.
Avertissez les enfants de NE PAS :
Sauter de la balançoire pendant qu'elle est en mouvement
Faire pivoter une balançoire de siège vide à un angle
Suspendu à l'envers à n'importe quelle partie de l'ensemble de gym.
Saisir ou arrêter un autre enfant sur tout équipement en mouvement
Marcher à proximité, devant, entre ou derrière des objets en
mouvement
Avertissez les enfants de s'asseoir au centre de la balançoire avec
tout leur poids sur le siège.
Assurez-vous que les cordes ou chaînes d'escalade sont sécurisées
aux deux extrémités et ne peuvent pas être enroulées sur
4
elles-mêmes.
Tous les composants peuvent devenir chauds lorsqu'ils sont exposés
à la lumière directe du soleil. Assurez-vous que la balançoire n'est pas
chaude avant de permettre aux enfants de jouer.
CONSERVEZ CES INSTRUCTIONS
Assemblage et utilisation
Pièces de balançoire

5

6
ASSEMBLAGE DE LA BALANÇOIRE

7
Étape 1
17. Installez l'arceau sur le tube 6, verrouillez-le avec la vis C et placez le
protège -tête J sur l'écrou.
18. Connectez le tube 6 et le tube 3 et verrouillez-les avec la vis B.
19. Connectez les tuyaux 3, 4 et 2, verrouillez-les avec la vis A et placez le
protège -tête J sur l'écrou.
20. Connectez les tuyaux 2, 4 et 1, bloquez-les avec la vis A et placez le
protège -tête J sur l'écrou .
Étape 2
Installez les tuyaux de support supérieurs 8, 11A et 12 sur le poteau
principal comme indiqué sur le schéma, fixez-les et verrouillez-les avec les
vis D, et recouvrez le protège-tête J sur l'écrou.

8
Étape 3
Installez et connectez les tuyaux de support inférieurs 9 et 13 aux tuyaux de
support supérieurs, et fixez les tuyaux de connexion de support 10 avec des vis E
et des vis D comme indiqué sur la figure. Couvrez le protège -tête J sur l'écrou.

9
Étape 4
Comme indiqué sur la figure, fixez la bielle de l'échelle à la tige de support de
l'échelle avec des vis E et recouvrez-la d'un protège -tête J sur l'écrou.
Étape 5
Insérez d'abord le tuyau coudé 19 dans la housse du fauteuil à suspension,
puis insérez le tuyau droit 18 et connectez les tuyaux 18 et 19. Fixez-les et
verrouillez-les avec des vis H.
10
Étape 6
Utilisez la boucle d'alpinisme « I » pour relier le fauteuil suspendu, le siège de
balançoire et l'anneau de suspension au poteau principal de la balançoire.
Étape 7
Fixez la balançoire dans le sol avec le crochet de terre 21 .
ENTRETIEN
· Vérifiez régulièrement les poteaux, les poignées et les raccords vissés pour déceler
des fissures, des dommages et une fatigue du matériau. Si vous constatez des
dommages, l'échafaudage ne doit pas être utilisé. Veuillez contacter votre vendeur
pour remplacer les éléments endommagés par des neufs. éléments!
· N'utilisez jamais de produits de nettoyage agressifs pour nettoyage!
Élimination
L'emballage du produit est constitué de matériaux recyclables.
Éliminez-les de manière écologique.
de manière conviviale et dans les conteneurs de collecte mis à disposition.

11
Fabricant : FUJIAN KANGLAIBAO CO., LTD.
Adresse: NO.1, 6ÈME ROUTE INDUSTRIELLE, ZONE
INDUSTRIELLE, COMTÉ DE LIAN CHENG, VILLE DE LONGYAN,
PROVINCE DU FUJIAN, CHINE
Importé en Australie : SIHAO PTY LTD. 1 ROKEVA
STREETESTWOOD NSW 2122 Australie.
Importé aux États-Unis : Sanven Technology Ltd. Suite 250, 9166
Anaheim Place, Rancho Cucamonga, CA 91730
REP
EC
E-CrossStu GmbH
Mainzer Landstr.69, 60329
Frankfurt am Main.
REP
UK
YH CONSULTING LIMITED.
C/O YH Consulting Limited Office 147,
Centurion House, London Road,
Staines-upon-Thames, Surrey, TW18 4AX


2
Technische ondersteuning en e-garantiecertificaat www.vevor.com/support
A-frame schommelset
S026
We continue to be committed to provide you tools with competitive price.
"Save Half", "Half Price" or any other similar expressions used by us only represents an
estimate of savings you might benefit from buying certain tools with us compared to the major
top brands and does not necessarily mean to cover all categories of tools offered by us. You
are kindly reminded to verify carefully when you are placing an order with us if you are
actually saving half in comparison with the top major brands.

1
MODEL: S026
Have product questions? Need technical support? Please feel free to
contact us:
Technical Support and E-Warranty Certificate
www.vevor.com/support
NEED HELP? CONTACT US!
This is the original instruction, please read all manual instructions
carefully before operating. VEVOR reserves a clear interpretation of our
user manual. The appearance of the product shall be subject to the
product you received. Please forgive us that we won't inform you again if
there are any technology or software updates on our product.
A-Frame Swing Set

2
INSTRUCTIES
Hartelijk dank dat u voor deze schommelset met A-frame hebt gekozen .
- Lees alle instructies voordat u het gebruikt. De informatie zal u helpen de best
mogelijke resultaten te bereiken.
De producten in deze catalogus kunnen qua kleur afwijken van het daadwerkelijke
artikel.
BELANGRIJKE VEILIGHEIDSINSTRUCTIES
VEILIGE SPEELRUIMTE
NIET op beton, asfalt of een ander hard oppervlak. Een val op een hard
oppervlak kan leiden tot ernstig letsel. Installeer het apparaat op een
onverharde, stabiele ondergrond, zoals gras of een stevige laag zand.
NIET op een hellende ondergrond. Hierdoor worden alle verbindingen en
verbindingen extra belast, waardoor deze verbindingen losraken en falen.
De veilige speelzone verwijst naar een zone die zich aan alle kanten 200 cm
(6 ft.) voorbij de schommel uitstrekt. Installeer de bodembedekking in de
veilige speelzone.
Verwijder alle struikelgevaren zoals stenen, stronken, wortels etc. uit de
veilige speelruimte.
De veilige speelruimte moet vrij zijn van alle constructies, hekken, garage,
huis, overhangende takken, waslijnen, elektriciteitsdraden en andere
obstakels om veilig spelen te garanderen.
Kinderen moeten uit het werkgebied blijven totdat de veilige speelruimte vrij is
van obstakels, de schommel volledig is geïnstalleerd, alle
bevestigingsmiddelen zijn vastgedraaid en gecontroleerd en al het
gereedschap is opgepakt.

3
VEILIG SPELEN
Leer uw kinderen veilig spelen.
Kleed kinderen op de juiste manier. Vermijd accessoires, kleding met
trekkoorden, loszittende kleding en voorwerpen met touwtjes die rond
de nek worden geplaatst en die verstrikt kunnen raken of blijven haken
aan de uitrusting. Kleed u met goed passende schoenen die de voet
volledig omsluiten op de schommel.
Gebruik de schommel NIET op een andere manier dan waarvoor
deze bedoeld is.
NIET op natte weersomstandigheden vanwege mogelijk gladde
oppervlakken.
NIET en lus ze NIET over de bovenste steunstang, aangezien dit de
sterkte van de ketting of het touw kan verminderen.
GEEN extra items aan de schommel die niet specifiek zijn ontworpen
voor gebruik met de schommel, inclusief (maar niet beperkt tot)
waslijnen, elektrische apparaten, losse touwen of kettingen enz.
Waarschuw kinderen dat ze NIET :
Spring van de schommel terwijl deze in beweging is
Zwaai een lege stoelschommel schuin
Hang ondersteboven aan een deel van de gymset
Grijp of stop een ander kind op bewegende apparatuur
Loop dicht bij, voor, tussen of achter bewegende voorwerpen
Zorg ervoor dat kinderen in het midden van de schommel zitten, met
hun volle gewicht op de stoel.
Zorg ervoor dat klimtouwen of kettingen aan beide uiteinden zijn
vastgemaakt en niet op zichzelf kunnen worden teruggelust.
Alle onderdelen kunnen heet worden als ze worden blootgesteld aan
direct zonlicht. Zorg ervoor dat de schommel niet heet is voordat u
kinderen laat spelen.
4
BEWAAR DEZE INSTRUCTIES
Montage en gebruik
Onderdelen voor schommelsets
5
MONTEREN VAN SCHOMMELSET
6
Stap 1
21. Installeer de ring op buis 6, zet deze vast met schroef C en plaats de
J- hoofdbeschermer op de moer.
22. Verbind buis 6 en buis 3 en zet ze vast met schroef B.
23. Sluit de leidingen 3, 4 en 2 aan, zet ze vast met schroef A en plaats de
J-hoofdbeschermer op de moer.
24. Sluit de leidingen 2, 4 en 1 aan, zet ze vast met schroef A en plaats de
J-hoofdbeschermer op de moer .
7
Stap 2
Installeer de bovenste steunpijpen 8, 11A en 12 op de hoofdpaal zoals
weergegeven in het diagram, bevestig en vergrendel ze met schroeven D,
en bedek de hoofdbeschermer J op de moer.
8
Stap 3
de onderste steunpijpen 9 en 13 aan op de bovenste steunpijpen, en bevestig de
steunverbindingspijpen 10 met E-schroeven en D-schroeven zoals weergegeven
in de afbeelding .
Stap 4
Bevestig, zoals weergegeven in de afbeelding, de ladderverbindingsstang aan de
laddersteunstang met E-schroeven en bedek deze met een hoofdbeschermer J op
de moer.
9
Stap 5
Steek eerst de bochtbuis 19 in de hoes van de hangstoel, steek vervolgens
de rechte buis 18 erin en sluit de buizen 18 en 19 aan. Zet ze vast en zet
ze vast met H-schroeven.
Stap6
Gebruik de berggesp “ I ” om de hangstoel, het schommelzitje en de
ophangring aan de hoofdschommelpaal te bevestigen.
10
Stap 7
Bevestig de schommel in de grond met de grondhaak 21 .
ONDERHOUD
· Controleer de palen, handgrepen en schroefverbindingen regelmatig op scheuren,
beschadigingen en materiaalmoeheid. Als u schade constateert, mag de steiger niet
worden gebruikt. Neem contact op met uw verkoper om de beschadigde artikelen te
vervangen door nieuwe. Gebruik alleen originele vervanging elementen!
· Gebruik nooit agressieve schoonmaakmiddelen voor schoonmaak!
Beschikbaarheid
De productverpakking bestaat uit recycleerbare materialen. Gooi deze op
een milieuvriendelijke manier weg
vriendelijke wijze en in de daarvoor bestemde inzamelcontainers.
Fabrikant: FUJIAN KANGLAIBAO CO., LTD.

11
Adres: NR 1, INDUSTRIËLE 6E WEG, INDUSTRIEEL GEBIED,
LIAN CHENGCOUNTY, LONGYAN STAD, PROVINCIE FUJIAN,
CHINA
Geïmporteerd naar AUS: SIHAO PTY LTD 1 ROKEVA
STREETEASTWOOD NSW 2122 Australië
Geïmporteerd naar de VS: Sanven Technology Ltd. Suite 250,
9166 Anaheim Place, Rancho Cucamonga, CA 91730
REP
EC
E-CrossStu GmbH
Mainzer Landstr.69, 60329
Frankfurt am Main.
REP
UK
YH CONSULTING LIMITED.
C/O YH Consulting Limited Office 147,
Centurion House, London Road,
Staines-upon-Thames, Surrey, TW18 4AX


2
Teknisk support och e-garanticertifikat www.vevor.com/support
A-Frame gungsats
S026
We continue to be committed to provide you tools with competitive price.
"Save Half", "Half Price" or any other similar expressions used by us only represents an
estimate of savings you might benefit from buying certain tools with us compared to the major
top brands and does not necessarily mean to cover all categories of tools offered by us. You
are kindly reminded to verify carefully when you are placing an order with us if you are
actually saving half in comparison with the top major brands.

1
MODELL: S026
Have product questions? Need technical support? Please feel free to
contact us:
Technical Support and E-Warranty Certificate
www.vevor.com/support
NEED HELP? CONTACT US!
This is the original instruction, please read all manual instructions
carefully before operating. VEVOR reserves a clear interpretation of our
user manual. The appearance of the product shall be subject to the
product you received. Please forgive us that we won't inform you again if
there are any technology or software updates on our product.
A-Frame Swing Set

2
INSTRUKTIONER
Tack så mycket för att du valde detta A-Frame swingset .
- Läs alla instruktioner innan du använder den. Informationen hjälper dig att uppnå
bästa möjliga resultat.
Produkterna i denna katalog kan ha en annan färg än den faktiska artikeln.
VIKTIGA SÄKERHETS INSTRUKTIONER
SÄKERT LEKOMRÅDE
INTE gungställningen över betong, asfalt eller någon annan hård yta. Ett fall
på en hård yta kan resultera i allvarliga skador.
INTE gungställningen på sluttande underlag. Denna lutning lägger ytterligare
belastning på alla anslutningar och leder och gör att anslutningarna lossnar
och går sönder.
Det säkra lekområdet hänvisar till en zon som sträcker sig 200 cm utanför
gungställningen på alla sidor. Installera markskyddet i den säkra lekzonen.
Ta bort alla snubbelrisker såsom stenar, stubbar, rötter etc. från det säkra
lekområdet.
Det säkra lekområdet måste vara fritt från alla strukturer, staket, garage, hus,
överhängande grenar, tvättlinor, elektriska ledningar och andra hinder för att
säkerställa säker lek.
Barn bör hålla sig utanför arbetsområdet tills det säkra lekområdet är fritt från
hinder, gungställningen har installerats helt, all hårdvara har dragits åt och
kontrollerats och alla verktyg har plockats upp.
SÄKER SPEL

3
Lär dina barn att leka säkert.
Klä barn på lämpligt sätt. Undvik tillbehör, kläder med dragsko, löst
sittande kläder runt halsen, som kan fastna i utrustningen på
gungställningen.
INTE gungställningen på något annat sätt än avsett.
INTE i våta väderförhållanden på grund av potentiellt hala ytor.
INTE svängkedjor eller rep eller ögla dem över den övre stödstången
eftersom det kan minska styrkan på kedjan eller repet.
INTE extra föremål på gungställningen som inte är specifikt utformade
för användning med gungställningen, inklusive (men inte begränsat till)
klädlinor, elektriska apparater, lösa rep eller kedjor etc.
Varning för barn att INTE :
Hoppa av gungan medan den är i rörelse
Sväng en tom sitsgunga i vinkel
Häng upp och ner från valfri del av gymset
Ta tag i eller stoppa ett annat barn på någon rörlig utrustning
Gå nära, framför, mellan eller bakom rörliga föremål
Varning för barn att sitta i mitten av gungan med sin fulla vikt på sätet.
Se till att klätterrep eller kedjor är säkrade i båda ändarna och inte kan
loopas tillbaka på sig själv.
Alla komponenter kan bli varma när de utsätts för direkt solljus Se till
att gungställningen inte är varm innan du låter barn leka.
SPARA DESSA INSTRUKTIONER
Montering och användning
Swing Set delar
4

5
MONTERING AV GUNGSTÄLL

6
Steg 1
25. Montera bågen på rör 6, lås den med skruv C och placera J-
huvudskyddet på muttern.
26. Anslut rör 6 och rör 3 och lås dem med skruv B.
27. Anslut rör 3, 4 och 2, lås dem med skruv A och placera
J-huvudskyddet på muttern.
28. Anslut rör 2, 4 och 1, lås dem med skruv A och placera
J-huvudskyddet på muttern .
Steg 2
Installera de övre stödrören 8, 11A och 12 på huvudstolpen som visas i
diagrammet, fixera och lås dem med skruvarna D och täck över
huvudskyddet J på muttern.

7
Steg 3
Montera och anslut de nedre stödrören 9 och 13 till de övre stödrören, och fäst
stödanslutningsrören 10 med E-skruvar och D-skruvar som visas i figuren. Täck
huvudskyddet J på muttern.

8
Steg 4
Som visas i figuren, fäst stegens vevstång på stegens stödstång med E-skruvar
och täck den med ett huvudskydd J på muttern.
Steg 5
För först in böjröret 19 i upphängningsstolens lock, sätt sedan in rakt rör 18
och anslut rören 18 och 19. Säkra och lås dem med H-skruvar.
Steg 6

9
Använd bergklättringsspännet " I " för att ansluta hängstolen, gungstolen och
upphängningsringen till huvudsvingstången.
Steg 7
Fäst gungan i jorden med markkroken 21 .
UNDERHÅLL
· Kontrollera regelbundet stolpar, handtag och skruvförband med avseende på sprickor,
skador och materialutmattning element!
· Använd aldrig aggressiva rengöringsmedel för rengöring!
Förfogande
Produktförpackningen består av återvinningsbart material
vänligt sätt och i de uppsamlingskärl som tillhandahålls.
Tillverkare: FUJIAN KANGLAIBAO CO., LTD.
Adress: NO.1, INDUSTRIAL 6TH-ROAD, INDUSTRIAL AREA,
LIAN CHENGCOUNTY, LONGYAN CITY, FUJIAN PROVINCE,
KINA

10
Importerad till AUS: SIHAO PTY LTD 1 ROKEVA
STREETEASTWOOD NSW 2122 Australien
Importerad till USA: Sanven Technology Ltd. Suite 250, 9166
Anaheim Place, Rancho Cucamonga, CA 91730
REP
EC
E-CrossStu GmbH
Mainzer Landstr.69, 60329
Frankfurt am Main.
REP
UK
YH CONSULTING LIMITED.
C/O YH Consulting Limited Office 147,
Centurion House, London Road,
Staines-upon-Thames, Surrey, TW18 4AX


3
We continue to be committed to provide you tools with competitive price.
"Save Half", "Half Price" or any other similar expressions used by us only represents an
estimate of savings you might benefit from buying certain tools with us compared to the major
top brands and does not necessarily mean to cover all categories of tools offered by us. You
are kindly reminded to verify carefully when you are placing an order with us if you are
actually saving half in comparison with the top major brands.

1
MODELO: S026
Have product questions? Need technical support? Please feel free to
contact us:
Technical Support and E-Warranty Certificate
www.vevor.com/support
NEED HELP? CONTACT US!
This is the original instruction, please read all manual instructions
carefully before operating. VEVOR reserves a clear interpretation of our
user manual. The appearance of the product shall be subject to the
product you received. Please forgive us that we won't inform you again if
there are any technology or software updates on our product.
A-Frame Swing Set

2
INSTRUCCIONES
Muchas gracias por elegir este juego de columpios con estructura en A.
- Lea todas las instrucciones antes de usarlo. La información le ayudará a lograr
los mejores resultados posibles.
Los productos incluidos en este catálogo pueden tener un color diferente al del
artículo real.
INSTRUCCIONES DE SEGURIDAD IMPORTANTES
ÁREA DE JUEGO SEGURA
NO instale el columpio sobre concreto, asfalto o cualquier otra superficie
dura. Una caída sobre una superficie dura puede provocar lesiones graves.
Instálelo sobre una superficie firme sin pavimentar, como césped o una capa
sólida de arena.
NO instale el columpio en un terreno inclinado. Esta inclinación genera
tensión adicional en todas las conexiones y uniones y además hace que esas
conexiones se aflojen y fallen.
El área de juego segura se refiere a una zona que se extiende 6 pies (200 cm)
más allá del columpio en todos los lados. Instale la cubierta del suelo en la
zona de juego segura.
Retire todos los peligros de tropiezo, como piedras, tocones, raíces, etc., del
área de juego segura.
El área de juego segura debe estar libre de estructuras, cercas, garajes,
casas, ramas colgantes, tendederos, cables eléctricos y otros obstáculos
para garantizar un juego seguro.
Los niños deben permanecer fuera del área de trabajo hasta que se eliminen
los obstáculos del área de juego segura, se haya instalado completamente el

3
columpio, se hayan apretado y revisado todos los herrajes y se hayan
recogido todas las herramientas.
JUEGO SEGURO
Enseña a tus hijos a jugar con seguridad.
Vista a los niños adecuadamente. Evite accesorios, ropa con
cordones, ropa holgada y artículos con cordones colocados alrededor
del cuello, que podrían enredarse o engancharse en el equipo.
Vístase con calzado que le quede bien y que cubra los pies. También
se deben quitar los cascos de bicicleta antes de jugar. en el columpio.
NO utilice el columpio de ninguna otra manera que no sea la prevista.
NO juegue en condiciones climáticas húmedas debido a las
superficies potencialmente resbaladizas.
NO retuerza las cadenas o cuerdas del columpio ni las pase por
encima de la barra de soporte superior, ya que esto puede reducir la
resistencia de la cadena o la cuerda.
NO coloque elementos adicionales en el columpio que no estén
diseñados específicamente para usarse con el columpio, incluidos
(entre otros) tendederos, dispositivos eléctricos, cuerdas o cadenas
sueltas, etc.
Advierta a los niños que NO :
Salta del columpio mientras está en movimiento.
Balancee un asiento vacío en ángulo
Colgar boca abajo de cualquier parte del set de gimnasio.
Agarrar o detener a otro niño en cualquier equipo en movimiento.
Camine cerca, delante, entre o detrás de objetos en movimiento.
Advierta a los niños que se sienten en el centro del columpio con todo
su peso sobre el asiento.
Asegúrese de que las cuerdas o cadenas para escalar estén
aseguradas en ambos extremos y no puedan enrollarse sobre sí
mismas.
Todos los componentes pueden calentarse cuando se exponen a la
4
luz solar directa. Asegúrese de que el columpio no esté caliente antes
de permitir que los niños jueguen.
GUARDA ESTAS INSTRUCCIONES
Montaje y uso
Piezas del columpio

5

6
MONTAJE DEL COLUMPIO

7
Paso 1
29. Instale el aro en el tubo 6, fíjelo con el tornillo C y coloque el protector
del cabezal J en la tuerca.
30. Conecte el tubo 6 y el tubo 3 y bloquéelos con el tornillo B.
31. Conecte los tubos 3, 4 y 2, asegúrelos con el tornillo A y coloque el
protector del cabezal J en la tuerca.
32. Conecte los tubos 2, 4 y 1, asegúrelos con el tornillo A y coloque el
protector del cabezal J en la tuerca .
Paso 2
Instale los tubos de soporte superiores 8, 11A y 12 en el poste principal
como se muestra en el diagrama, fíjelos y asegúrelos con los tornillos D y
cubra el protector de la cabeza J con la tuerca.
8
Paso 3
Instale y conecte los tubos de soporte inferiores 9 y 13 a los tubos de soporte
superiores y fije los tubos de conexión de soporte 10 con tornillos E y tornillos D
como se muestra en la figura. Cubra el protector del cabezal J en la tuerca.

9
Etapa 4
Como se muestra en la figura, fije la biela de la escalera a la varilla de soporte de
la escalera con tornillos E y cúbrala con un protector de cabeza J en la tuerca.
Paso 5
Primero, inserte el tubo curvo 19 en la funda de la silla colgante, luego
inserte el tubo recto 18 y conecte los tubos 18 y 19. Asegúrelos y
bloquéelos con tornillos H.

10
Paso6
Utilice la hebilla de montañismo “ I ” para conectar la silla colgante, el asiento
del columpio y el anillo de suspensión al poste principal del columpio.
Paso 7
Fije el columpio en el suelo con el gancho para el suelo 21 .
MANTENIMIENTO
· Compruebe periódicamente los postes, las manijas y las conexiones roscadas para
detectar grietas, daños y fatiga del material. Si descubre algún daño, no debe utilizar el
andamio para reemplazar los elementos dañados por otros nuevos. ¡elementos!
· Nunca utilice agentes de limpieza agresivos para ¡limpieza!
Desecho
El embalaje del producto está compuesto por materiales reciclables.
Deséchelos de forma respetuosa con el medio ambiente.
manera amigable y en los contenedores de recolección provistos.
Fabricante: FUJIAN KANGLAIBAO CO., LTD.

11
DIRECCIÓN: NO.1, INDUSTRIAL 6TH-ROAD, ZONA INDUSTRIAL,
CONDADO DE LIAN CHENG, CIUDAD DE LONGYAN,
PROVINCIA DE FUJIAN, CHINA
Importado a AUS: SIHAO PTY LTD. 1 ROKEVA
STREETEASTWOOD NSW 2122 Australia
Importado a EE. UU.: Sanven Technology Ltd. Suite 250, 9166
Anaheim Place, Rancho Cucamonga, CA 91730
REP
EC
E-CrossStu GmbH
Mainzer Landstr.69, 60329
Frankfurt am Main.
REP
UK
YH CONSULTING LIMITED.
C/O YH Consulting Limited Office 147,
Centurion House, London Road,
Staines-upon-Thames, Surrey, TW18 4AX

