
Technical Support and E-Warranty Certificate www.vevor.com/support
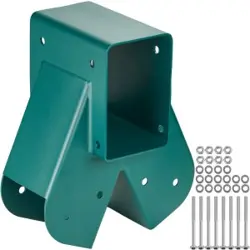
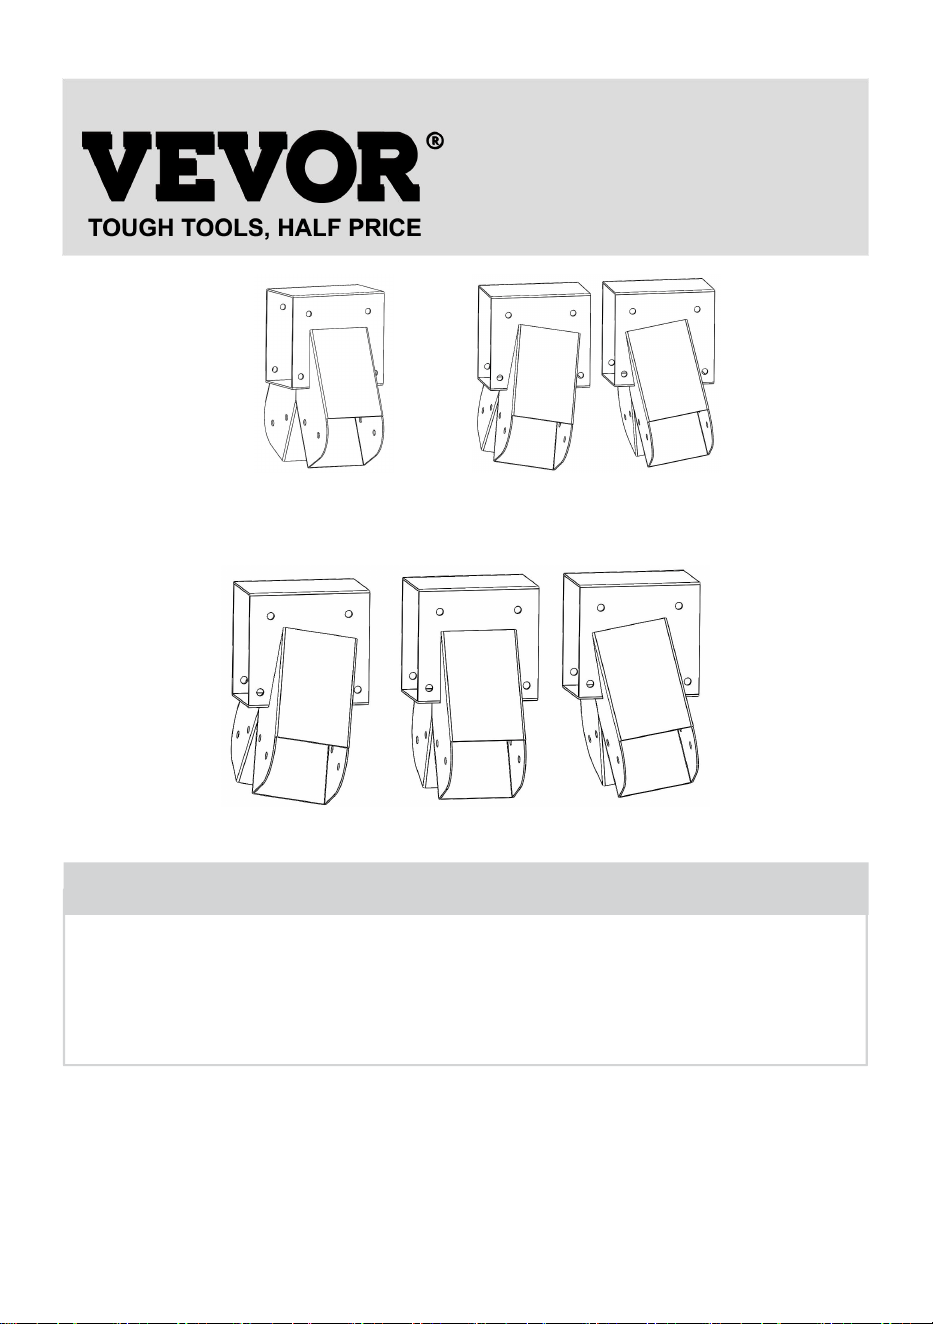
SWING BRACKET
SERIES:QQZJ-95-X
Tip: X is 1/2/3
We continue to be committed to provide you tools with competitive price.
"Save Half", "Half Price" or any other similar expressions used by us only represents an
estimate of savings you might benefit from buying certain tools with us compared to the major
top brands and does not necessarily mean to cover all categories of tools offered by us. You
are kindly reminded to verify carefully when you are placing an order with us if you are
actually saving half in comparison with the top major brands.


- 1 -
QQZJ-95-1 QQZJ-95-2
QQZJ-95-3
Have product questions? Need technical support? Please feel free to
contact us:
Technical Support and E-Warranty Certificate
www.vevor.com/support
NEED HELP? CONTACT US!
This is the original instruction, please read all manual instructions
carefully before operating. VEVOR reserves a clear interpretation of our
user manual. The appearance of the product shall be subject to the
product you received. Please forgive us that we won't inform you again if
there are any technology or software updates on our product.
SWING BRACKET

- 2 -
WARNING:
1. Do not allow children to climb on the unit. 2. Keep children and pets
away during assembly.
ASSEMBLY PRECAUTIONS
1. Please assemble the product in strict accordance with the instructions.
Incorrect assembly could be hazardous.
2. Please wear safety goggles and work gloves properly during assembly.
3. Do not try to assemble the product when feeling tired or when under the
influence of alcohol, drugs or medication.
4. Load bearing capacity and other product parameters are applied to the
properly and completely assembled product only.
5. Separate and count all parts and hardware.
6. Prepare the following tool: Philips Head Screwdriver.
7. If using power tools, please be careful to slow down and stop when
needed.
8. Two people are required for assembly.
9. Follow the intended uses only.
Save the instruction.
Product Paremeters
Model
QQZJ-95-1
QQZJ-95-2
QQZJ-95-3
Top Beam Inner Size
3.7x5.7 inch
3.7x5.7 inch
3.7x5.7 inch
Support Legs Inner
Size
3.7x3.7 inch
3.7x3.7 inch
3.7x3.7 inch
Number of Items
1 PCS
2 PCS
3 PCS
Colour
Green
Green
Green
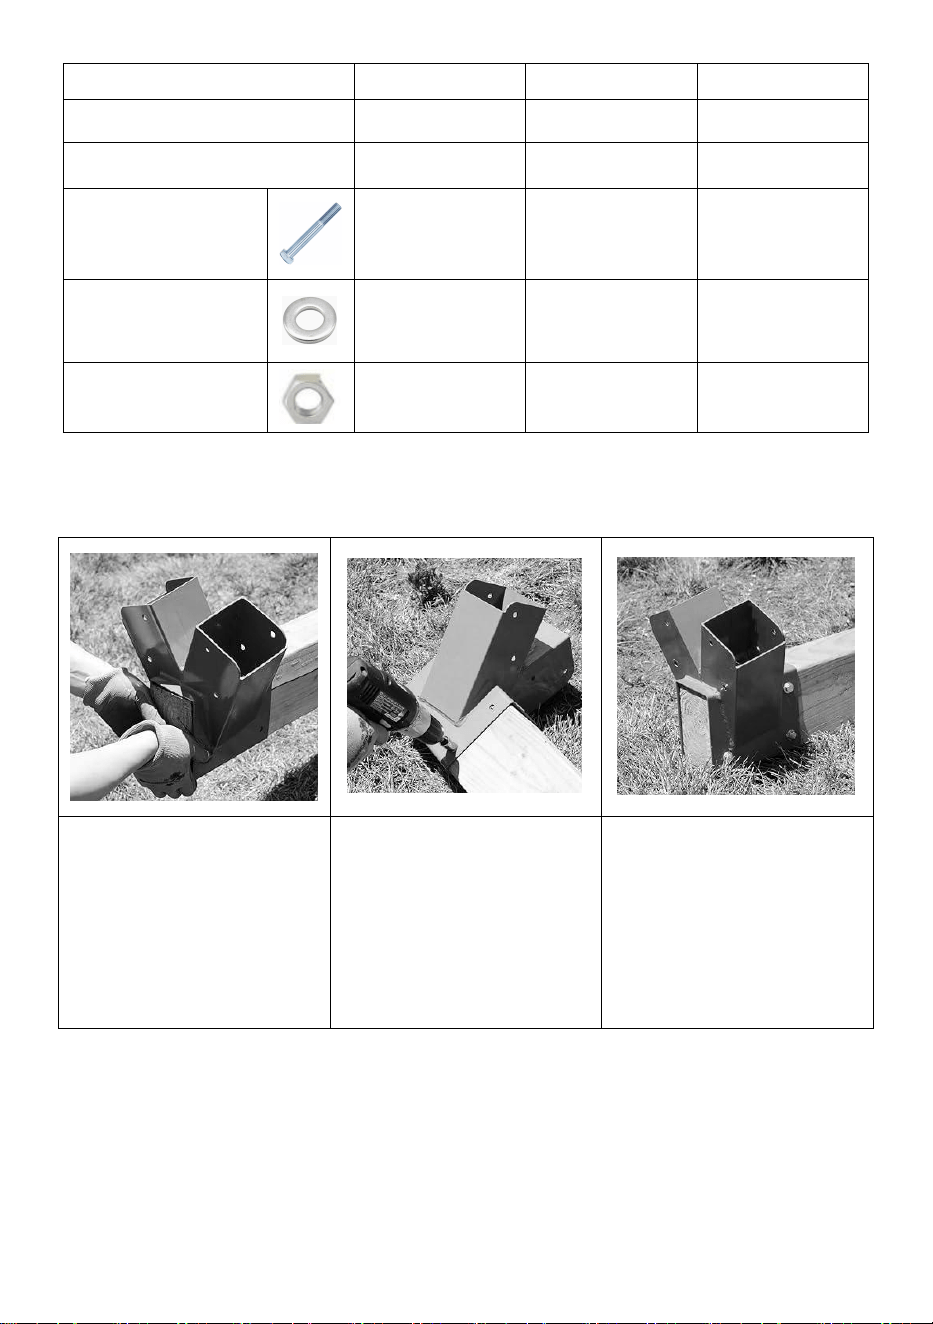
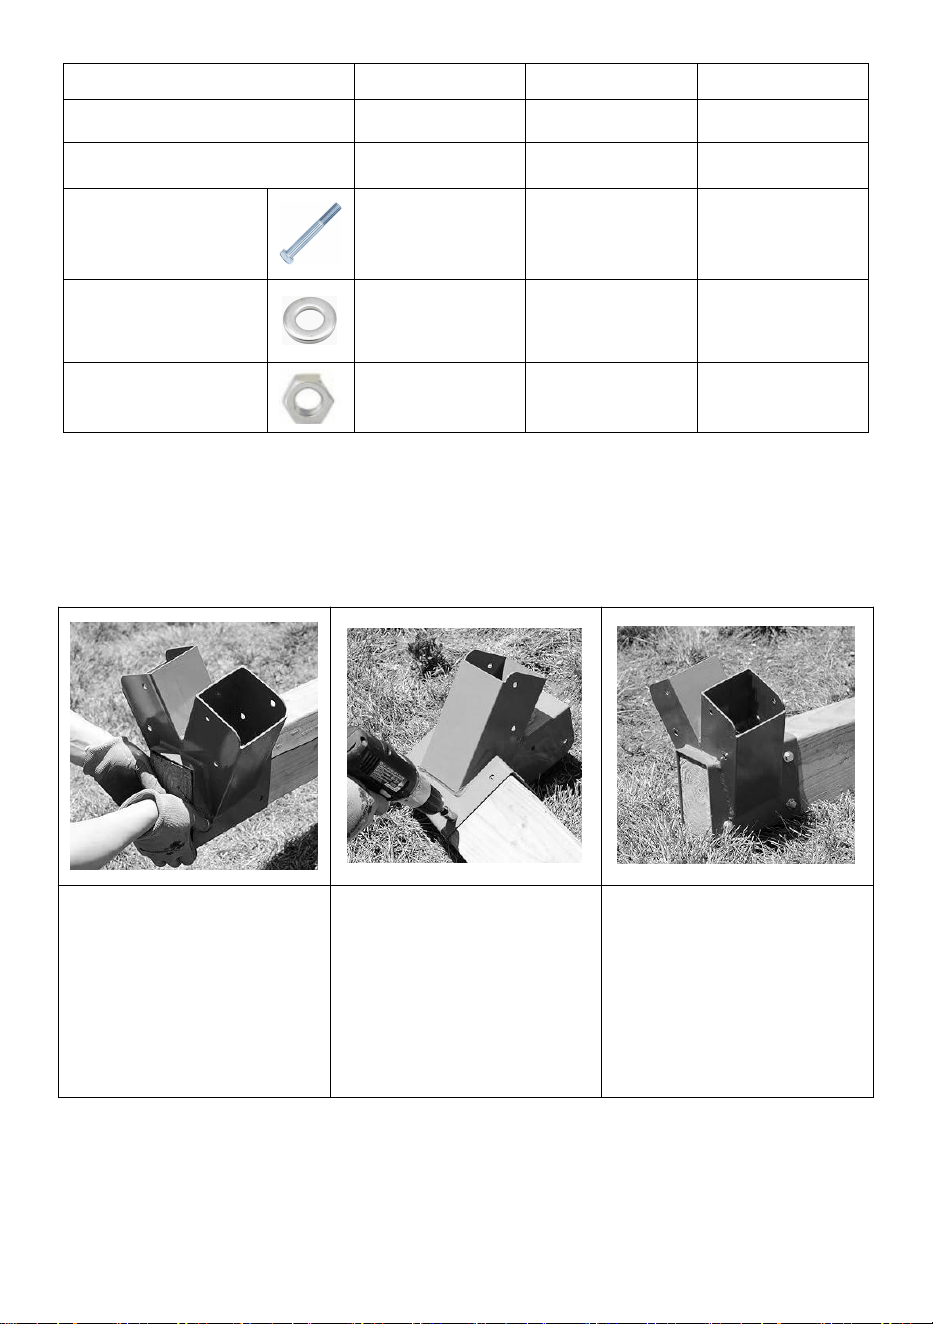
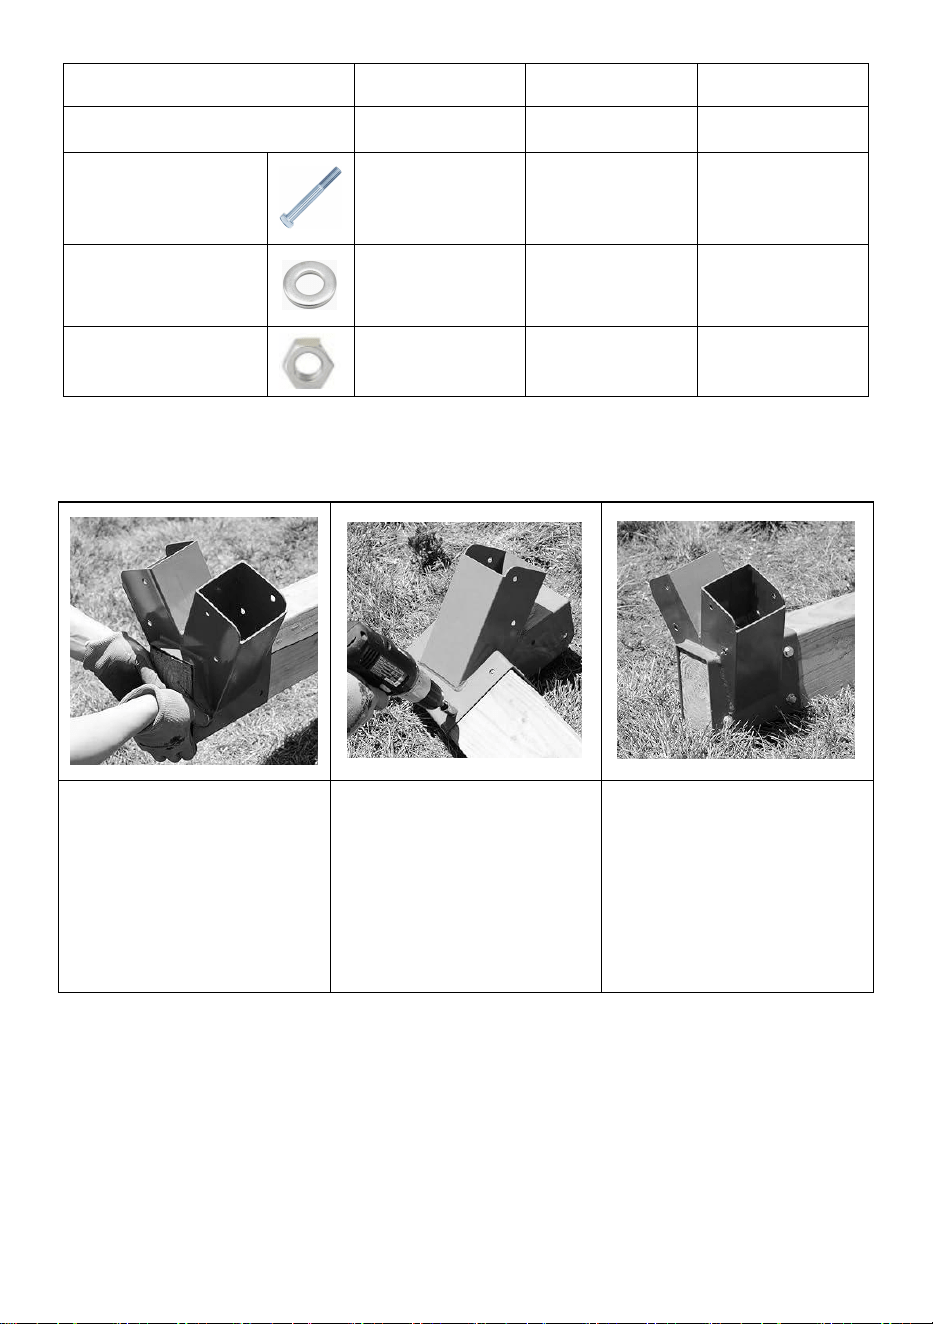
Screws
8 PCS
16 PCS
24 PCS
Flat Cushion
16 PCS
32 PCS
48 PCS
- 3 -
Nut M8
8 PCS
16 PCS
24 PCS
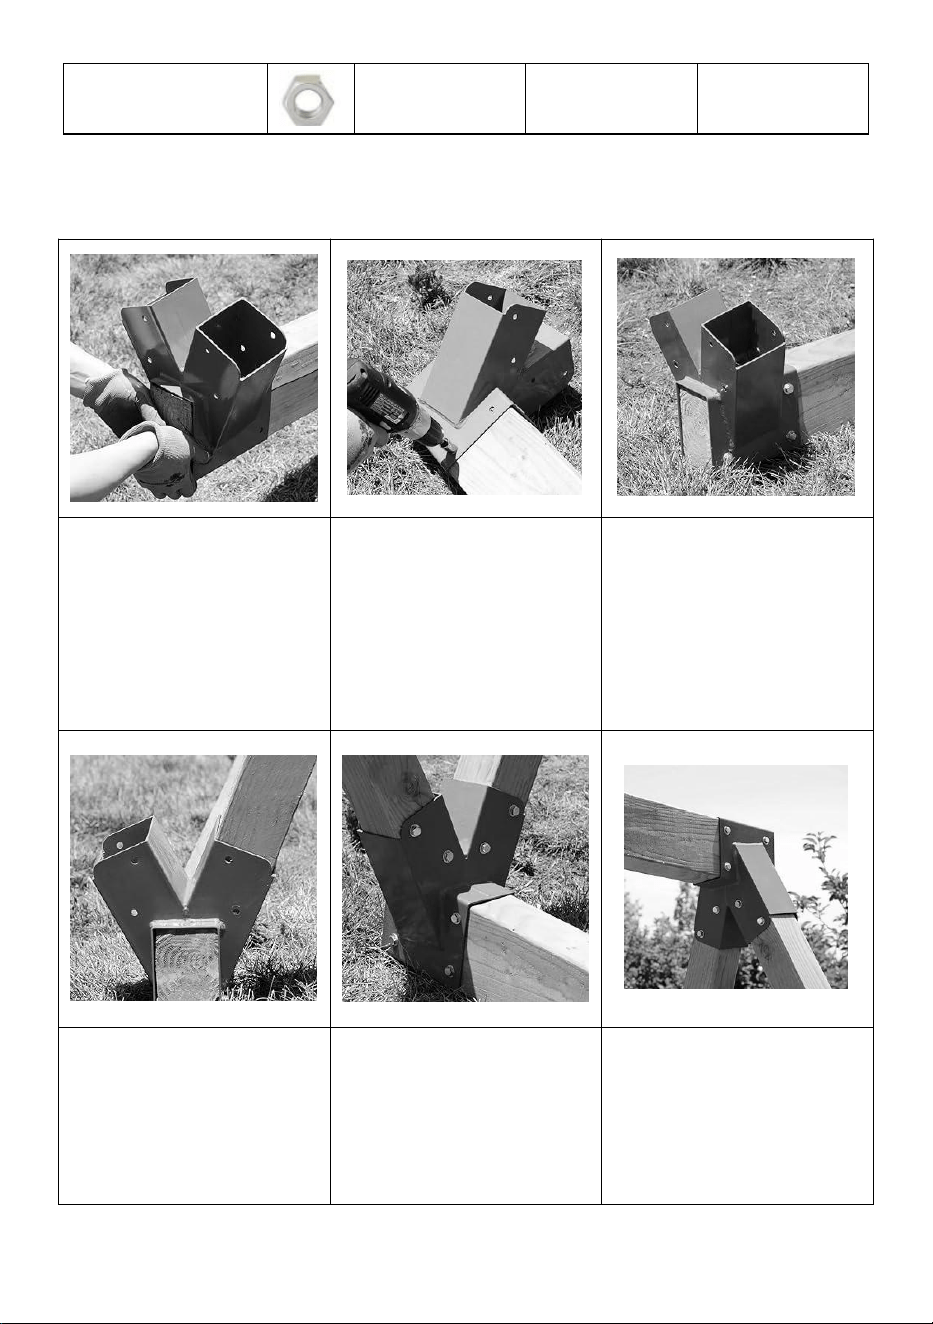
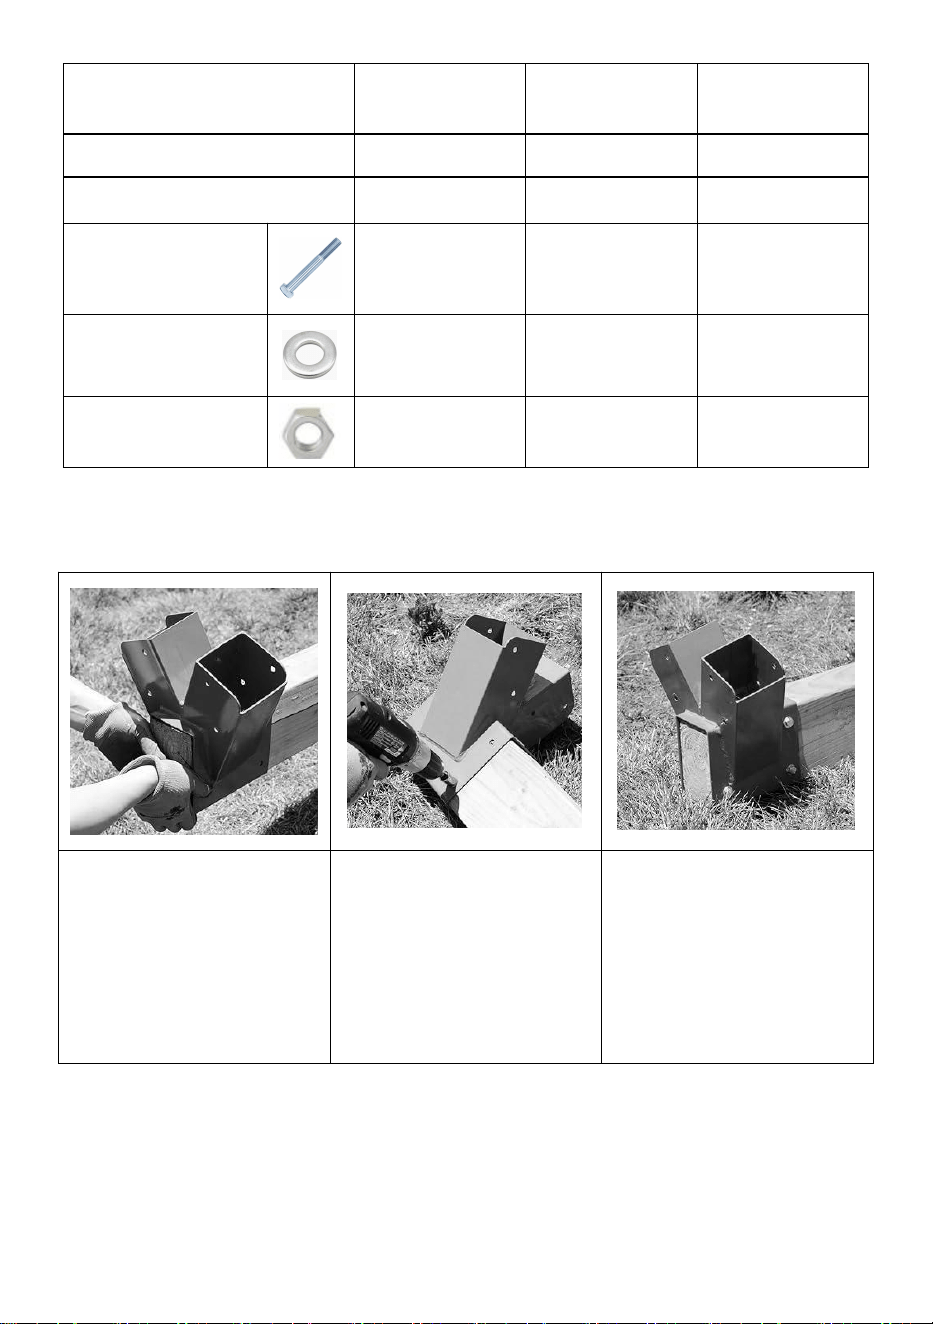
Swing Set Bracket Instruction Manaual
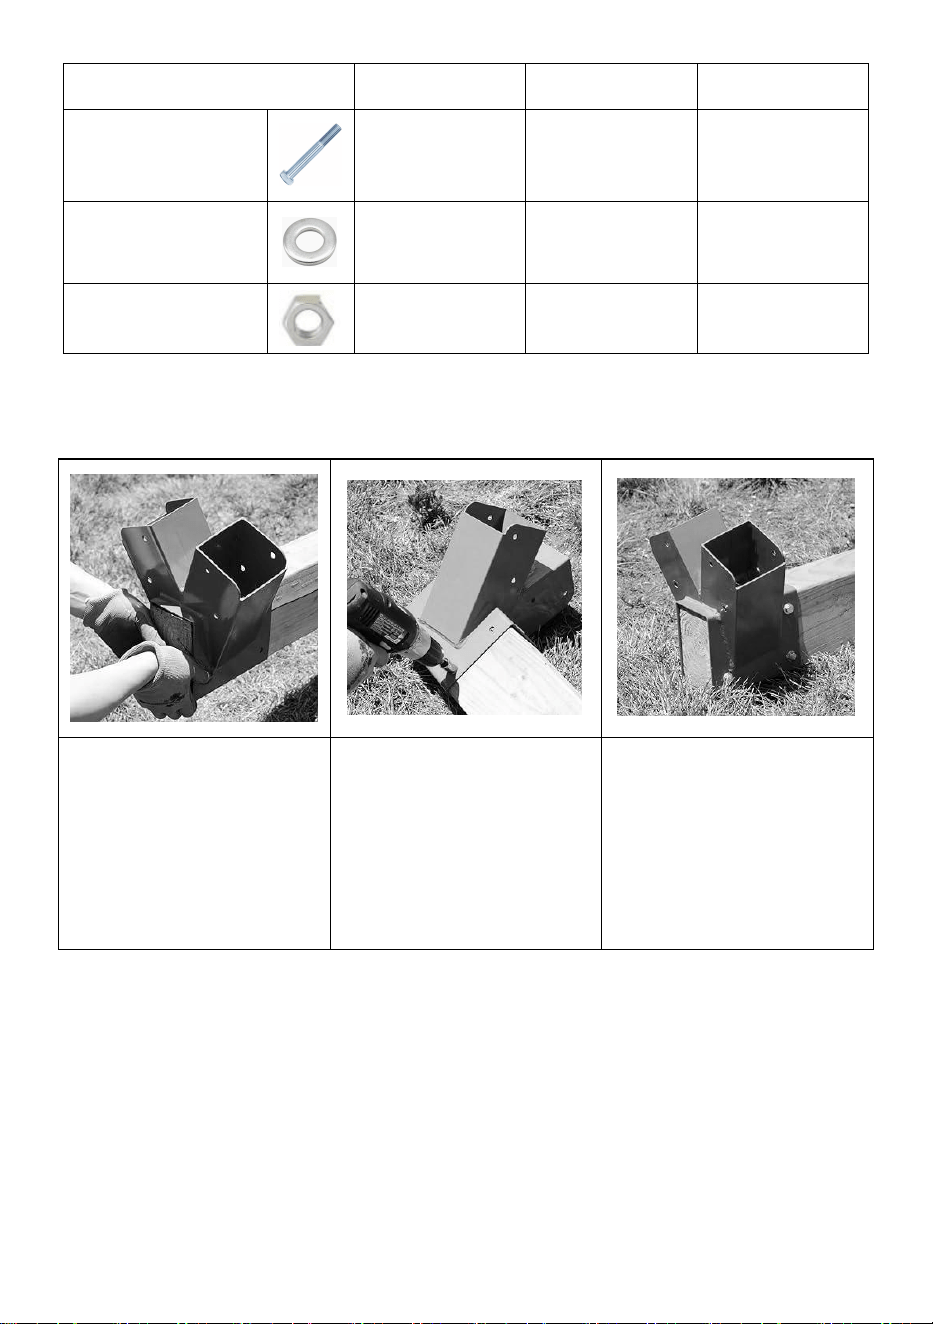
Step 1
Slide the bracket until
it's flush with the
wood.
Step 2
First drill holes, Than
use lag bolts and
washes fasten
brackets.
Step 3
Repeat on other sides.
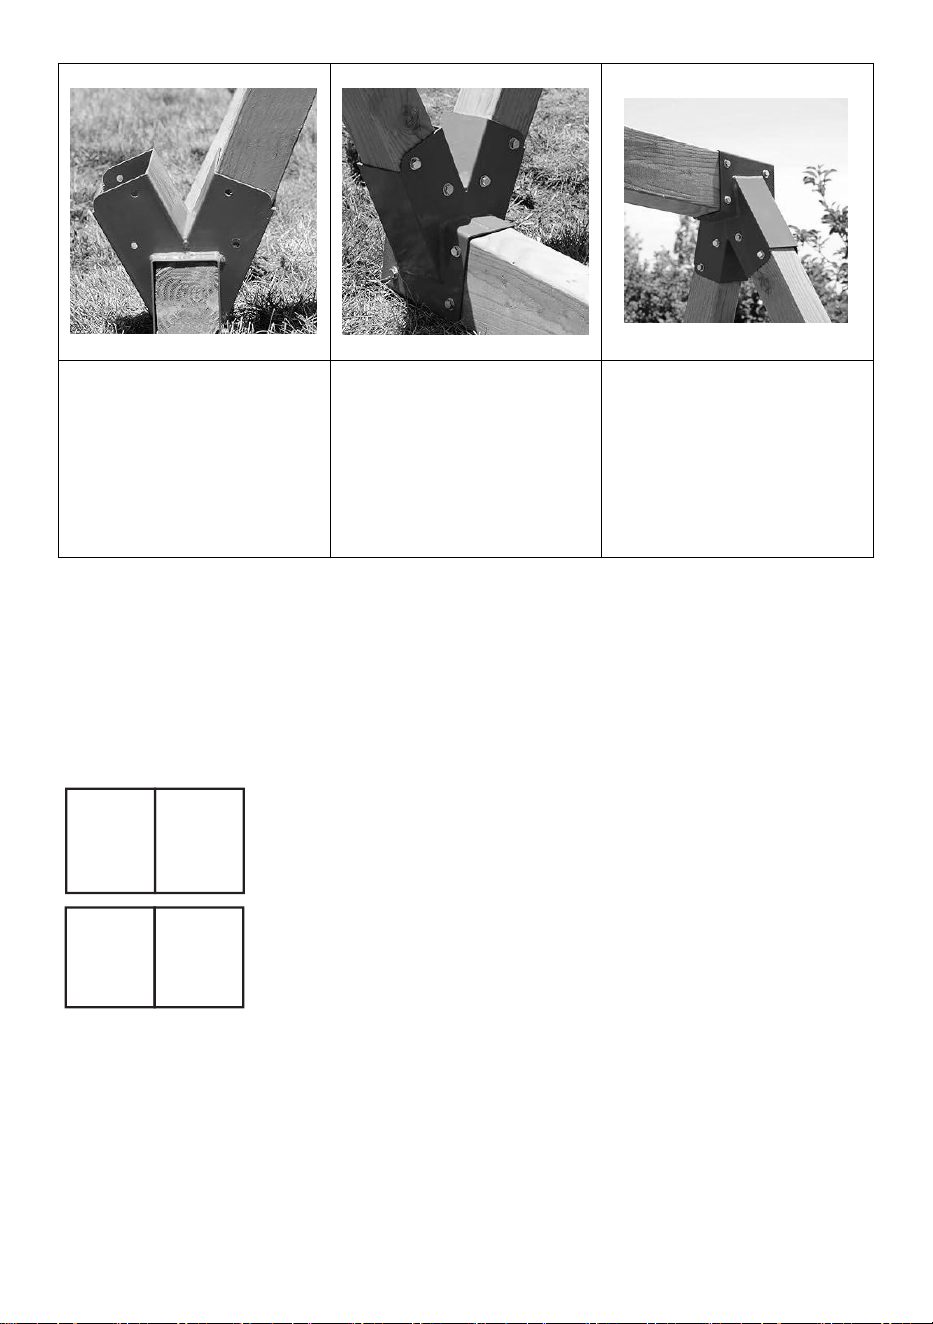
Step 4
Slide the wood into the
bracket.
Step 5
Slide both side in than
drill them with lag bolts
and washers.
Step 6
Repeat step 1-5 on
other side.

- 4 -
REP
UK
Pooledas Group Ltd
Unit 5 Albert Edward House, The
Pavilions Preston, United Kingdom
REP
EC
SHUNSHUN GmbH
Römeräcker 9 Z2021, 76351
Linkenheim-Hochstetten, Germany
Address : Baoshanqu Shuangchenglu 803long 11hao 1602A-1609shi
Shanghai
Imported to AUS: SIHAO PTY LTD. 1 ROKEVA STREETEASTWOOD
NSW 2122 Australia
Imported to USA: Sanven Technology Ltd. Suite 250, 9166 Anaheim
Place, Rancho Cucamonga, CA 91730


Assistance technique et certificat de garantie électronique www.vevor.com/support
SUPPORT PIVOTANT
SÉRIE : QQZJ-95- X
Astuce : X vaut 1/2/3
We continue to be committed to provide you tools with competitive price.
"Save Half", "Half Price" or any other similar expressions used by us only represents an
estimate of savings you might benefit from buying certain tools with us compared to the major
top brands and does not necessarily mean to cover all categories of tools offered by us. You
are kindly reminded to verify carefully when you are placing an order with us if you are
actually saving half in comparison with the top major brands.


- 1 -
QQZJ-95-1 QQZJ - 95-2
QQZJ-95-3
Have product questions? Need technical support? Please feel free to
contact us:
Technical Support and E-Warranty Certificate
www.vevor.com/support
NEED HELP? CONTACT US!
SWING BRACKET

- 2 -
This is the original instruction, please read all manual instructions
carefully before operating. VEVOR reserves a clear interpretation of our
user manual. The appearance of the product shall be subject to the
product you received. Please forgive us that we won't inform you again if
there are any technology or software updates on our product.
AVERTISSEMENT:
1. Ne laissez pas les enfants grimper sur l'appareil. 2. Éloignez les enfants
et les animaux domestiques pendant l'assemblage.
PRÉCAUTIONS DE MONTAGE
1. Veuillez assembler le produit en stricte conformité avec les instructions.
Un assemblage incorrect pourrait être dangereux.
2. Veuillez porter correctement des lunettes de sécurité et des gants de
travail pendant l'assemblage.
3. N'essayez pas d'assembler le produit lorsque vous vous sentez fatigué
ou sous l'influence de l'alcool, de drogues ou de médicaments.
4. La capacité de charge et les autres paramètres du produit sont
appliqués uniquement au produit correctement et complètement assemblé.
5. Séparez et comptez toutes les pièces et le matériel.
6. Préparez l'outil suivant : Tournevis cruciforme.
7. Si vous utilisez des outils électriques, veillez à ralentir et à vous arrêter
si nécessaire.
8. Deux personnes sont nécessaires pour le montage.
9. Suivez uniquement les utilisations prévues.
Enregistrez les instructions.
Paramètres du produit
Modèle
QQZJ-95-1
QQZJ-95-2
QQZJ-95-3
Taille intérieure de la
poutre supérieure
3,7x5,7
pouces
3,7x5,7
pouces
3,7x5,7
pouces
Jambes de soutien
3,7x3,7
3,7x3,7
3,7x3,7

- 3 -
Taille intérieure
pouces
pouces
pouces
Nombre d'objets
1 PCS
2 pièces
3 PIÈCES
Couleur
Vert
Vert
Vert
Des vis
8 pièces
16 PIÈCES
24 pièces
Coussin plat
16 PIÈCES
32 pièces
48 pièces
Écrou M8
8 pièces
16 PIÈCES
24 pièces
Manuel d'instructions du support de balançoire
Étape 1
Faites glisser le
support jusqu'à ce qu'il
affleure le bois.
Étape 2
Percez d’abord des
trous, puis utilisez des
tire-fonds et des
supports de fixation.
Étape 3
Répétez sur les autres
côtés.

- 4 -
REP
UK
Pooledas Group Ltd
Unit 5 Albert Edward House, The
Pavilions Preston, United Kingdom
REP
EC
SHUNSHUN GmbH
Römeräcker 9 Z2021, 76351
Linkenheim-Hochstetten, Germany
Étape 4
Faites glisser le bois
dans le support.
Étape 5
Faites glisser les deux
côtés puis percez-les
avec des tire-fonds et
des rondelles.
Étape 6
Répétez les étapes 1 à
5 de l’autre côté.
Adresse : Baoshanqu Shuangchenglu 803long 11hao 1602A-1609shi
Shanghai
Importé en Australie : SIHAO PTY LTD . 1 ROKEVA STREETASTWOOD
NSW 2122 Australie
Importé aux États-Unis : Sanven Technology Ltd. Suite 250, 9166
Anaheim Place, Rancho Cucamonga, CA 91730

- 5 -


Technischer Support und E-Garantiezertifikat www.vevor.com/support
SCHWENKHALTERUNG
SERIE: QQZJ-95- X
Tipp: X ist 1/2/3
We continue to be committed to provide you tools with competitive price.
"Save Half", "Half Price" or any other similar expressions used by us only represents an
estimate of savings you might benefit from buying certain tools with us compared to the major
top brands and does not necessarily mean to cover all categories of tools offered by us. You
are kindly reminded to verify carefully when you are placing an order with us if you are
actually saving half in comparison with the top major brands.


- 1 -
QQZJ-95- 1 QQZJ-95- 2
QQZJ-95-3
Have product questions? Need technical support? Please feel free to
contact us:
Technical Support and E-Warranty Certificate
www.vevor.com/support
NEED HELP? CONTACT US!
SWING BRACKET

- 2 -
This is the original instruction, please read all manual instructions
carefully before operating. VEVOR reserves a clear interpretation of our
user manual. The appearance of the product shall be subject to the
product you received. Please forgive us that we won't inform you again if
there are any technology or software updates on our product.
WARNUNG:
1. Erlauben Sie Kindern nicht, auf das Gerät zu klettern. 2. Halten Sie
Kinder und Haustiere während der Montage fern.
VORSICHTSMASSNAHMEN BEI DER MONTAGE
1. Bitte bauen Sie das Produkt unter strikter Einhaltung der Anweisungen
zusammen. Eine falsche Montage kann gefährlich sein.
2. Bitte tragen Sie bei der Montage ordnungsgemäß eine Schutzbrille und
Arbeitshandschuhe.
3. Versuchen Sie nicht, das Produkt zusammenzubauen, wenn Sie sich
müde fühlen oder unter dem Einfluss von Alkohol, Drogen oder
Medikamenten stehen.
4. Tragfähigkeit und andere Produktparameter beziehen sich
ausschließlich auf das ordnungsgemäß und vollständig montierte Produkt.
5. Trennen und zählen Sie alle Teile und Hardware.
6. Bereiten Sie das folgende Werkzeug vor: Kreuzschlitzschraubendreher.
7. Wenn Sie Elektrowerkzeuge verwenden, achten Sie bitte darauf,
langsamer zu fahren und bei Bedarf anzuhalten.
8. Für den Aufbau sind zwei Personen erforderlich.
9. Befolgen Sie nur die vorgesehenen Verwendungszwecke.
Speichern Sie die Anweisung.
Produktparameter
Modell
QQZJ-95-1
QQZJ-95-2
QQZJ-95-3
Innenmaße des
Oberbalkens
3,7 x 5,7 Zoll
3,7 x 5,7 Zoll
3,7 x 5,7 Zoll
- 3 -
Stützbeine Innere
Größe
3,7 x 3,7 Zoll
3,7 x 3,7 Zoll
3,7 x 3,7 Zoll
Anzahl der Teile
1 Stück
2 STÜCK
3 STÜCK
Farbe
Grün
Grün
Grün
Schrauben
8 STÜCK
16 STÜCK
24 STÜCK
Flaches Kissen
16 STÜCK
32 STK
48 STÜCK
Mutter M8
8 STÜCK
16 STÜCK
24 STÜCK
Bedienungsanleitung für die Swing-Set-Halterung
Schritt 1
Schieben Sie die
Halterung, bis sie
bündig mit dem Holz
abschließt.
Schritt 2
Zuerst Löcher bohren,
dann Ankerschrauben
verwenden und die
Halterungen
befestigen.
Schritt 3
Auf den anderen
Seiten wiederholen.
- 4 -
REP
UK
Pooledas Group Ltd
Unit 5 Albert Edward House, The
Pavilions Preston, United Kingdom
REP
EC
SHUNSHUN GmbH
Römeräcker 9 Z2021, 76351
Linkenheim-Hochstetten, Germany
Schritt 4
Schieben Sie das Holz
in die Halterung.
Schritt 5
Schieben Sie beide
Seiten hinein und
bohren Sie sie dann
mit Zugschrauben und
Unterlegscheiben.
Schritt 6
Wiederholen Sie die
Schritte 1–5 auf der
anderen Seite.
Adresse: Baoshanqu Shuangchenglu 803long 11hao 1602A-1609shi
Shanghai
Importiert nach AUS: SIHAO PTY LTD . 1 ROKEVA
STREETEASTWOOD NSW 2122 Australien
In die USA importiert: Sanven Technology Ltd. Suite 250, 9166 Anaheim
Place, Rancho Cucamonga, CA 91730

- 5 -


Supporto tecnico e certificato di garanzia elettronica www.vevor.com/support
STAFFA OSCILLANTE
SERIE: QQZJ-95- X
Suggerimento: X è 1/2/3
We continue to be committed to provide you tools with competitive price.
"Save Half", "Half Price" or any other similar expressions used by us only represents an
estimate of savings you might benefit from buying certain tools with us compared to the major
top brands and does not necessarily mean to cover all categories of tools offered by us. You
are kindly reminded to verify carefully when you are placing an order with us if you are
actually saving half in comparison with the top major brands.


- 1 -
QQZJ-95- 1 QQZJ-95- 2
QQZJ-95-3
Have product questions? Need technical support? Please feel free to
contact us:
Technical Support and E-Warranty Certificate
www.vevor.com/support
NEED HELP? CONTACT US!
SWING BRACKET

- 2 -
This is the original instruction, please read all manual instructions
carefully before operating. VEVOR reserves a clear interpretation of our
user manual. The appearance of the product shall be subject to the
product you received. Please forgive us that we won't inform you again if
there are any technology or software updates on our product.
AVVERTIMENTO:
1. Non permettere ai bambini di salire sull'unità. 2. Tenere lontani i bambini
e gli animali domestici durante il montaggio.
PRECAUZIONI DI MONTAGGIO
1. Si prega di assemblare il prodotto attenendosi rigorosamente alle
istruzioni. Un montaggio errato potrebbe essere pericoloso.
2. Indossare correttamente occhiali protettivi e guanti da lavoro durante il
montaggio.
3. Non tentare di montare il prodotto quando ci si sente stanchi o sotto
l'influenza di alcol, droghe o farmaci.
4. La capacità di carico e altri parametri del prodotto vengono applicati solo
al prodotto correttamente e completamente assemblato.
5. Separare e contare tutte le parti e l'hardware.
6. Preparare il seguente strumento: cacciavite a croce.
7. Se si utilizzano utensili elettrici, fare attenzione a rallentare e fermarsi
quando necessario.
8. Per il montaggio sono necessarie due persone.
9. Seguire solo gli usi previsti.
Salva l'istruzione.
Parametri del prodotto
Modello
QQZJ-95-1
QQZJ-95-2
QQZJ-95-3
Dimensioni interne
della trave superiore
3,7x5,7 pollici
3,7x5,7 pollici
3,7x5,7 pollici
Gambe di supporto
3,7x3,7 pollici
3,7x3,7 pollici
3,7x3,7 pollici
- 3 -
Dimensione interna
Numero di articoli
1 PZ
2 PZ
3 PEZZI
Colore
Verde
Verde
Verde
Viti
8 PZ
16 PZ
24 PZ
Cuscino piatto
16 PZ
32 PZ
48 PZ
Dado M8
8 PZ
16 PZ
24 PZ
Manuale di istruzioni della staffa del set altalena
Passo 1
Far scorrere la staffa
finché non è a filo con
il legno.
Passo 2
Per prima cosa
praticare i fori, quindi
utilizzare i tirafondi e le
lavaggi per fissare le
staffe.
Passaggio 3
Ripeti sugli altri lati.

- 4 -
REP
UK
Pooledas Group Ltd
Unit 5 Albert Edward House, The
Pavilions Preston, United Kingdom
REP
EC
SHUNSHUN GmbH
Römeräcker 9 Z2021, 76351
Linkenheim-Hochstetten, Germany
Passaggio 4
Far scorrere il legno
nella staffa.
Passaggio 5
Far scorrere entrambi i
lati e forarli con bulloni
e rondelle.
Passaggio 6
Ripeti i passaggi 1-5
sull'altro lato.
Indirizzo: Baoshanqu Shuangchenglu 803long 11hao 1602A-1609shi
Shanghai
Importato in AUS: SIHAO PTY LTD . 1 ROKEVA STREETEASTWOOD
NSW 2122 Australia
Importato negli Stati Uniti: Sanven Technology Ltd. Suite 250, 9166
Anaheim Place, Rancho Cucamonga, CA 91730

- 5 -


Soporte técnico y certificado de garantía electrónica www.vevor.com/support
SOPORTE OSCILANTE
SERIE: QQZJ-95- X
Consejo: X es 1/2/3
We continue to be committed to provide you tools with competitive price.
"Save Half", "Half Price" or any other similar expressions used by us only represents an
estimate of savings you might benefit from buying certain tools with us compared to the major
top brands and does not necessarily mean to cover all categories of tools offered by us. You
are kindly reminded to verify carefully when you are placing an order with us if you are
actually saving half in comparison with the top major brands.


- 1 -
QQZJ-95- 1 QQZJ-95- 2
QQZJ-95-3
Have product questions? Need technical support? Please feel free to
contact us:
Technical Support and E-Warranty Certificate
www.vevor.com/support
NEED HELP? CONTACT US!
SWING BRACKET

- 2 -
This is the original instruction, please read all manual instructions
carefully before operating. VEVOR reserves a clear interpretation of our
user manual. The appearance of the product shall be subject to the
product you received. Please forgive us that we won't inform you again if
there are any technology or software updates on our product.
ADVERTENCIA:
1. No permita que los niños se suban a la unidad. 2. Mantenga alejados a
los niños y las mascotas durante el montaje.
PRECAUCIONES DE MONTAJE
1. Ensamble el producto estrictamente de acuerdo con las instrucciones.
El montaje incorrecto podría ser peligroso.
2. Utilice gafas de seguridad y guantes de trabajo correctamente durante
el montaje.
3. No intente montar el producto cuando se sienta cansado o bajo la
influencia del alcohol, drogas o medicamentos.
4. La capacidad de carga y otros parámetros del producto se aplican
únicamente al producto ensamblado de manera adecuada y completa.
5. Separe y cuente todas las piezas y herrajes.
6. Prepare la siguiente herramienta: Destornillador Philips.
7. Si utiliza herramientas eléctricas, tenga cuidado de reducir la velocidad
y detenerse cuando sea necesario.
8. Para el montaje se necesitan dos personas.
9. Siga únicamente los usos previstos.
Guarde la instrucción.
Parámetros del producto
Modelo
QQZJ-95-1
QQZJ-95-2
QQZJ-95-3
Tamaño interior de la
viga superior
3,7x5,7
pulgadas
3,7x5,7
pulgadas
3,7x5,7
pulgadas
Patas de apoyo
3,7x3,7
3,7x3,7
3,7x3,7
- 3 -
Tamaño interior
pulgadas
pulgadas
pulgadas
Número de items
PC 1
2 piezas
3 PIEZAS
Color
Verde
Verde
Verde
Tornillos
8 piezas
16 piezas
24 piezas
Cojín plano
16 piezas
32 piezas
48 piezas
Tuerca M8
8 piezas
16 piezas
24 piezas
Manual de instrucciones del soporte del juego de
columpios
Paso 1
Deslice el soporte
hasta que quede al ras
con la madera.
Paso 2
Primero taladre los
agujeros, luego use
tirafondos y los
lavados sujetan los
soportes.
Paso 3
Repita en otros lados.

- 4 -
REP
UK
Pooledas Group Ltd
Unit 5 Albert Edward House, The
Pavilions Preston, United Kingdom
REP
EC
SHUNSHUN GmbH
Römeräcker 9 Z2021, 76351
Linkenheim-Hochstetten, Germany
Etapa 4
Desliza la madera en
el soporte.
Paso 5
Deslice ambos lados
hacia adentro y luego
perfórelos con
tirafondos y arandelas.
Paso 6
Repita los pasos 1-5
en el otro lado.
Dirección: Baoshanqu Shuangchenglu 803long 11hao 1602A-1609shi
Shanghai
Importado a AUS: SIHAO PTY LTD . 1 ROKEVA STREET ASTWOOD
NSW 2122 Australia
Importado a EE. UU.: Sanven Technology Ltd. Suite 250, 9166 Anaheim
Place, Rancho Cucamonga, CA 91730

- 5 -


Wsparcie techniczne i certyfikat e-gwarancji www.vevor.com/support
WSPORNIK WAHADŁOWY
SERIA: QQZJ-95- X
Wskazówka: X to 1/2/3
We continue to be committed to provide you tools with competitive price.
"Save Half", "Half Price" or any other similar expressions used by us only represents an
estimate of savings you might benefit from buying certain tools with us compared to the major
top brands and does not necessarily mean to cover all categories of tools offered by us. You
are kindly reminded to verify carefully when you are placing an order with us if you are
actually saving half in comparison with the top major brands.


- 1 -
QQZJ-95- 1 QQZJ-95- 2
QQZJ-95-3
Have product questions? Need technical support? Please feel free to
contact us:
Technical Support and E-Warranty Certificate
www.vevor.com/support
NEED HELP? CONTACT US!
SWING BRACKET

- 2 -
This is the original instruction, please read all manual instructions
carefully before operating. VEVOR reserves a clear interpretation of our
user manual. The appearance of the product shall be subject to the
product you received. Please forgive us that we won't inform you again if
there are any technology or software updates on our product.
OSTRZEŻENIE:
1. Nie pozwalaj dzieciom wspinać się na urządzenie. 2. Podczas montażu
trzymaj dzieci i zwierzęta z daleka.
ŚRODKI OSTROŻNOŚCI PRZY MONTAŻU
1. Prosimy o złożenie produktu ściśle według instrukcji. Nieprawidłowy
montaż może być niebezpieczny.
2. Podczas montażu należy nosić okulary ochronne i rękawice robocze.
3. Nie przystępuj do składania produktu będąc zmęczonym, pod wpływem
alkoholu, narkotyków lub leków.
4. Nośność i inne parametry produktu odnoszą się wyłącznie do produktu
prawidłowo i całkowicie zmontowanego.
5. Oddziel i policz wszystkie części i osprzęt.
6. Przygotuj następujące narzędzie: Śrubokręt Philips.
7. Jeśli korzystasz z elektronarzędzi, pamiętaj, aby zwolnić i zatrzymać się,
jeśli zajdzie taka potrzeba.
8. Do montażu potrzebne są dwie osoby.
9. Postępuj zgodnie z przeznaczeniem.
Zapisz instrukcję.
Parametry produktu
Model
QQZJ-95-1
QQZJ-95-2
QQZJ-95-3
Rozmiar wewnętrzny
górnej belki
3,7 x 5,7 cala
3,7 x 5,7 cala
3,7 x 5,7 cala
Nogi wspierające
Wewnętrzny rozmiar
3,7 x 3,7 cala
3,7 x 3,7 cala
3,7 x 3,7 cala
- 3 -
Liczba przedmiotów
1 szt
2 szt
3 SZT
Kolor
Zielony
Zielony
Zielony
Śruby
8 szt
16 szt
24 SZT
Płaska
poduszka
16 szt
32 szt
48 SZT
Nakrętka M8
8 szt
16 szt
24 SZT
Instrukcja obsługi wspornika zestawu huśtawkowego
Krok 1
Przesuń wspornik, aż
zrówna się z
drewnem.
Krok 2
Najpierw wywierć
otwory, następnie użyj
śrub do drewna i
zamocuj wsporniki.
Krok 3
Powtórz po innych
stronach.

- 4 -
REP
UK
Pooledas Group Ltd
Unit 5 Albert Edward House, The
Pavilions Preston, United Kingdom
REP
EC
SHUNSHUN GmbH
Römeräcker 9 Z2021, 76351
Linkenheim-Hochstetten, Germany
Krok 4
Wsuń drewno do
wspornika.
Krok 5
Wsuń obie strony, a
następnie wywierć w
nich śruby do drewna i
podkładki.
Krok 6
Powtórz kroki 1-5 po
drugiej stronie.
Adres: Baoshanqu Shuangchenglu 803long 11hao 1602A-1609shi
Szanghaj
Import do AUS: SIHAO PTY LTD . 1 ROKEVA STREETEASTWOOD
NSW 2122 Australia
Import do USA: Sanven Technology Ltd. Suite 250, 9166 Anaheim Place,
Rancho Cucamonga, CA 91730

- 5 -


Technische ondersteuning en e-garantiecertificaat www.vevor.com/support
SCHOMMELBEUGEL
SERIE: QQZJ-95- X
Tip: X is 1/2/3
We continue to be committed to provide you tools with competitive price.
"Save Half", "Half Price" or any other similar expressions used by us only represents an
estimate of savings you might benefit from buying certain tools with us compared to the major
top brands and does not necessarily mean to cover all categories of tools offered by us. You
are kindly reminded to verify carefully when you are placing an order with us if you are
actually saving half in comparison with the top major brands.

- 1 -
QQZJ-95-1 QQZJ - 95-2
QQZJ-95-3
Have product questions? Need technical support? Please feel free to
contact us:
Technical Support and E-Warranty Certificate
www.vevor.com/support
NEED HELP? CONTACT US!
SWING BRACKET

- 2 -
This is the original instruction, please read all manual instructions
carefully before operating. VEVOR reserves a clear interpretation of our
user manual. The appearance of the product shall be subject to the
product you received. Please forgive us that we won't inform you again if
there are any technology or software updates on our product.
WAARSCHUWING:
1. Laat kinderen niet op het apparaat klimmen. 2. Houd kinderen en
huisdieren tijdens de montage uit de buurt.
MONTAGEVOORZORGSMAATREGELEN
1. Monteer het product strikt volgens de instructies. Een onjuiste montage
kan gevaarlijk zijn.
2. Draag tijdens de montage een veiligheidsbril en werkhandschoenen.
3. Probeer het product niet in elkaar te zetten als u zich moe voelt of onder
invloed bent van alcohol, drugs of medicijnen.
4. Draagvermogen en andere productparameters gelden alleen voor het
correct en volledig gemonteerde product.
5. Scheid en tel alle onderdelen en hardware.
6. Houd het volgende gereedschap gereed: kruiskopschroevendraaier.
7. Als u elektrisch gereedschap gebruikt, zorg er dan voor dat u langzamer
gaat rijden en stopt wanneer dat nodig is.
8. Voor de montage zijn twee personen nodig.
9. Volg uitsluitend het beoogde gebruik.
Bewaar de instructie.
Productparameters
Model
QQZJ-95-1
QQZJ-95-2
QQZJ-95-3
Binnenmaat bovenbalk
3,7x5,7 inch
3,7x5,7 inch
3,7x5,7 inch
Steunbenen
Binnenmaat
3,7x3,7 inch
3,7x3,7 inch
3,7x3,7 inch
Aantal stuks
1 stuk
2 STUKS
3 STUKS
- 3 -
Kleur
Groente
Groente
Groente
Schroeven
8 STUKS
16 STUKS
24 STUKS
Plat kussen
16 STUKS
32 STUKS
48 STUKS
Moer M8
8 STUKS
16 STUKS
24 STUKS
Gebruiksaanwijzing Schommelsetbeugel
Stap 1
Verschuif de beugel
totdat deze gelijk ligt
met het hout.
Stap 2
Boor eerst gaten,
gebruik dan lagbouten
en wast de beugels
vast.
Stap 3
Herhaal aan andere
kanten.

- 4 -
REP
UK
Pooledas Group Ltd
Unit 5 Albert Edward House, The
Pavilions Preston, United Kingdom
REP
EC
SHUNSHUN GmbH
Römeräcker 9 Z2021, 76351
Linkenheim-Hochstetten, Germany
Stap 4
Schuif het hout in de
beugel.
Stap 5
Schuif beide zijden
naar binnen en boor
ze met
houtdraadbouten en
ringen.
Stap 6
Herhaal stap 1-5 aan
de andere kant.
Adres: Baoshanqu Shuangchenglu 803long 11hao 1602A-1609shi
Shanghai
Geïmporteerd naar AUS: SIHAO PTY LTD . 1 ROKEVA
STREETEASTWOOD NSW 2122 Australië
Geïmporteerd naar de VS: Sanven Technology Ltd. Suite 250, 9166
Anaheim Place, Rancho Cucamonga, CA 91730

- 5 -


Teknisk support och e-garanticertifikat www.vevor.com/support
SVÄNGFÄSTE
SERIE: QQZJ-95- X
Tips: X är 1/2/3
We continue to be committed to provide you tools with competitive price.
"Save Half", "Half Price" or any other similar expressions used by us only represents an
estimate of savings you might benefit from buying certain tools with us compared to the major
top brands and does not necessarily mean to cover all categories of tools offered by us. You
are kindly reminded to verify carefully when you are placing an order with us if you are
actually saving half in comparison with the top major brands.


- 1 -
QQZJ-95- 1 QQZJ-95- 2
QQZJ-95-3
Have product questions? Need technical support? Please feel free to
contact us:
Technical Support and E-Warranty Certificate
www.vevor.com/support
NEED HELP? CONTACT US!
SWING BRACKET

- 2 -
This is the original instruction, please read all manual instructions
carefully before operating. VEVOR reserves a clear interpretation of our
user manual. The appearance of the product shall be subject to the
product you received. Please forgive us that we won't inform you again if
there are any technology or software updates on our product.
VARNING:
1. Låt inte barn klättra på enheten. 2. Håll barn och husdjur borta under
monteringen.
FÖRSIKTIGHETSÅTGÄRDER FÖR MONTERING
1. Vänligen montera produkten i strikt enlighet med instruktionerna.
Felaktig montering kan vara farligt.
2. Använd skyddsglasögon och arbetshandskar ordentligt under
monteringen.
3. Försök inte att sätta ihop produkten när du känner dig trött eller är
påverkad av alkohol, droger eller medicin.
4. Bärförmåga och andra produktparametrar tillämpas endast på den
korrekt och färdigmonterade produkten.
5. Separera och räkna alla delar och hårdvara.
6. Förbered följande verktyg: Philips huvudskruvmejsel.
7. Om du använder elverktyg, var noga med att sakta ner och stanna vid
behov.
8. Två personer krävs för montering.
9. Följ endast avsedd användning.
Spara instruktionen.
Produktparametrar
Modell
QQZJ-95-1
QQZJ-95-2
QQZJ-95-3
Top Beam Inre Storlek
3,7 x 5,7 tum
3,7 x 5,7 tum
3,7 x 5,7 tum
Stödben Inre storlek
3,7 x 3,7 tum
3,7 x 3,7 tum
3,7 x 3,7 tum
Antal artiklar
1 st
2 st
3 st

- 3 -
Färg
Grön
Grön
Grön
Skruvar
8 st
16 st
24 st
Platt kudde
16 st
32 st
48 st
Mutter M8
8 st
16 st
24 st
Instruktionsmanual för gungställningsfäste
Steg 1
Skjut fästet tills det är
jämnt med träet.
Steg 2
Första borra hål,
Använd sedan lag
bultar och tvättar fästa
fästen.
Steg 3
Upprepa på andra
sidor.

- 4 -
REP
UK
Pooledas Group Ltd
Unit 5 Albert Edward House, The
Pavilions Preston, United Kingdom
REP
EC
SHUNSHUN GmbH
Römeräcker 9 Z2021, 76351
Linkenheim-Hochstetten, Germany
Steg 4
Skjut in träet i fästet.
Steg 5
Skjut in båda sidorna
och borra dem med
lagbultar och brickor.
Steg 6
Upprepa steg 1-5 på
andra sidan.
Adress: Baoshanqu Shuangchenglu 803long 11hao 1602A-1609shi
Shanghai
Importerad till AUS: SIHAO PTY LTD . 1 ROKEVA STREETEASTWOOD
NSW 2122 Australien
Importerad till USA: Sanven Technology Ltd. Suite 250, 9166 Anaheim
Place, Rancho Cucamonga, CA 91730

- 5 -


