
User's Guide

™
Copyrights and Trademarks
No part of this publication may be reproduced, stored in a retrieval system, o
r transmitted in any form or by any means, electronic, mechanical,
photocopying, recording, or otherwise, without the prior written permission of Seiko Epson Corporation. The information contained herein is
designed only for use with this Epson printer. Epson is not responsible for any use of this information as applied to other printers.
Neither Seiko Epson Corporation nor its affiliates shall be liable to the purchaser of this product or third parties for damages, losses, costs, or expenses
incurred by the purchaser or third parties as a result of accident, misuse, or abuse of this product or unauthorized modifications, repairs, or alterations
to this product, or (excluding the U.S.) failure to strictly comply with Seiko Epson Corporation’s operating and maintenance instructions.
Seiko Epson Corporation shall not be liable for any damages or problems arising from the use of any options or any consumable products other than
those designated as Original Epson Products or Epson Approved Products by Seiko Epson Corporation.
Seiko Epson Corporation shall not be held liable for any damage resulting from electromagnetic interference that occurs from the use of any interface
cables other than those designated as Epson Approved Products by Seiko Epson Corporation.
Microsoft, Windows, and Microsoft Edge are registered trademarks of Microsoft group of companies.
Apple, Mac, OS X, macOS and Safari are trademarks of Apple Inc., registered in the U.S. and other countries.
Intel and Intel Core are trademarks of Intel Corporation or its subsidiaries.
Adobe, Illustrator, and Acrobat Reader are either registered trademarks or trademarks of Adobe in the United States and/or other countries.
Google Chrome and YouTube are trademarks of Google LLC.
QR Code is a registered trademark of DENSO WAVE INCORPORATED in Japan and other countries.
Firefox is a trademark of the Mozilla Foundation in the U.S. and other countries.
BEMCOT
is a trademark of Asahi Kasei Corporation.
General Notice: All other trademarks are the property of their respective owners and used for identification purposes only.
SC-S7100 Series User's Guide
Copyrights and Trademarks
2
© 2025 Epson America, Inc.
10/25
CPD-66366R1

Note for U.S., Canada, and Latin American Users
IMPORTANT: Before using this product, make sure you read the online Safety Instructions.
SC-S7100 Series User's Guide
Copyrights and Trademarks
3

Contents
Copyrights and Trademarks
Note for U.S., Canada, and Latin American Users. . . 3
Notes on Manuals
Meaning of Symbols........................ 6
Screenshots.............................. 6
Illustrations.............................. 6
Operating System References.................. 6
Windows.............................. 6
Mac OS............................... 6
Manual Organization....................... 6
Viewing Video Manuals................... 7
Viewing PDF Manuals..................... 7
Introduction
Printer Parts.............................. 9
Front Section........................... 9
Inside................................ 12
Back................................. 14
Control Panel.......................... 15
Home Screen.......................... 17
Notes on Handling........................ 24
Notes When Using the Printer.............. 24
Notes When Not Using the Printer........... 24
Notes When Using the Control Panel......... 25
Notes on Handling Ink Supply Units......... 25
Precautions When Handling and Storing Media. 26
Introduction to the Software Provided.......... 28
Basic Software.......................... 28
Epson Edge Print PRO................... 29
Other Available Software.................. 29
Using Epson Edge Print PRO (Windows Only). . . . 31
Starting Procedure...................... 31
Acquiring and Registering EMX Files......... 31
Closing Procedure....................... 31
Using Epson Edge Dashboard................ 31
Starting Procedure...................... 31
Registering the Printer.................... 32
Download the EMX File.................. 32
Closing Procedure....................... 32
Using EPSON Software Updater (Windows Only). . 32
Checking Software Update Availability........ 32
Receiving Update Notifications............. 33
Using Web Config......................... 33
Summary of Functions................... 33
Starting Procedure...................... 33
Closing Procedure....................... 34
Uninstalling Software...................... 34
Windows............................. 34
Mac OS.............................. 34
Notes on the Administrator Password........... 35
Checking the Initial Password.............. 35
Changing the Password................... 35
Basic Operations
Workflow for Correct Printing................ 36
Registering Media Settings on the Printer. . . . . . . . 36
Notes When Handling Media................. 37
Notes on Loading Media.................... 37
Loading Media........................... 38
Configure Settings for Loaded Media........... 39
Using the Auto Take-up Reel Unit............. 40
Precautions to Prevent Misalignment during
Take-up.............................. 41
Loading Media into the Auto Take-up Reel Unit 41
When Paper Tape is Unavailable............ 42
Optimizing Media Settings (Automatic
Adjustment)............................. 46
Precautions When Performing Print
Adjustments........................... 46
Automatic Adjustment Procedure........... 46
If You Cannot Perform Automatic Adjustment. . 47
Before Printing........................... 49
Printing................................ 49
Changing Settings During Printing............ 49
Changing the Heater's Temperature.......... 50
Correcting Banding...................... 50
Replacing the Media....................... 50
Replacing Expended Media................ 51
Replacing Media that is not Expended........ 51
Printable Area............................ 53
Media Edge That Is the Reference for the
Printable Area.......................... 53
Printable Area.......................... 54
Maintenance
When to Perform Various Maintenance
Operations.............................. 56
SC-S7100 Series User's Guide
Contents
4

Components Requiring Regular Cleaning
and Cleaning Timing..................... 56
Locations of Consumables and Replacement
Timing............................... 57
Other Maintenance...................... 58
What You Will Need....................... 59
Supplied with the Printer.................. 59
Sold Separately......................... 59
Precautions Regarding Maintenance............ 60
Performing Regular Cleaning................. 61
Daily Cleaning......................... 61
Monthly Cleaning....................... 61
Shaking the Ink Supply Units Periodically........ 63
Precautions When Shaking................ 63
Shaking.............................. 63
Replacing Ink Supply Units.................. 64
Precautions When Replacing............... 64
Replacement Procedure................... 64
Disposing of Waste Ink..................... 65
Precautions When Replacing the Waste Ink
Bottle................................ 65
Replacing the Waste Ink Bottle.............. 65
Replacing Maintenance Parts Kit.............. 66
Preparing and Replacement Timing.......... 66
Replacement Procedure................... 67
Replacing the Media Edge Plates.............. 67
Nozzle Check and Head Cleaning............. 70
Types of Nozzle Checks................... 70
How to Print a Nozzle Check Pattern. . . . . . . . . 70
Types of Cleaning....................... 71
Performing Head Cleaning................ 71
Pre-maintenance When Not Using the Printer
for an Extended Period..................... 72
Performing Pre-maintenance............... 72
When Resuming Use..................... 73
Cleaning Inside the Printer Cover............. 73
Cleaning the Pressure Rollers................. 73
Applying Grease to the Carriage Rod........... 74
Location of Carriage Rod and Tools Used...... 74
Lubrication Procedure.................... 75
Storing Grease......................... 75
Handling Used Consumables................. 75
Disposal.............................. 75
Control Panel Menu
Menu List............................... 76
Details of the Menu........................ 84
General Settings Menu................... 84
Media Settings Menu..................... 93
Maintenance Menu..................... 100
Replacement Part Information Menu........ 102
Printer Status Menu..................... 102
Problem Solver
When a Message is Displayed................ 103
When a Maintenance Call/Printer Error Occurs. . 103
Troubleshooting......................... 105
You Cannot Print (Because the Printer Does
Not Work)........................... 105
The Printer Sounds Like It Is Printing, but
Nothing Prints........................ 106
The Prints Are Not What You Expected...... 107
Media............................... 109
Others.............................. 110
Appendix
Options and Consumable Products........... 111
Ink Supply Units....................... 111
Others.............................. 112
Supported Media......................... 113
Moving and Transporting the Printer.......... 113
Suitable Installation Locations............. 113
Moving the Printer..................... 113
Transport............................ 115
Media Settings List for Each Media Type........ 116
System Requirements..................... 117
Epson Edge Dashboard.................. 117
Epson Edge Print PRO................... 118
Web Config........................... 118
Specifications Table....................... 120
Important Notes Regarding the Printer......... 122
SC-S7100 Series User's Guide
Contents
5
Notes on Manuals
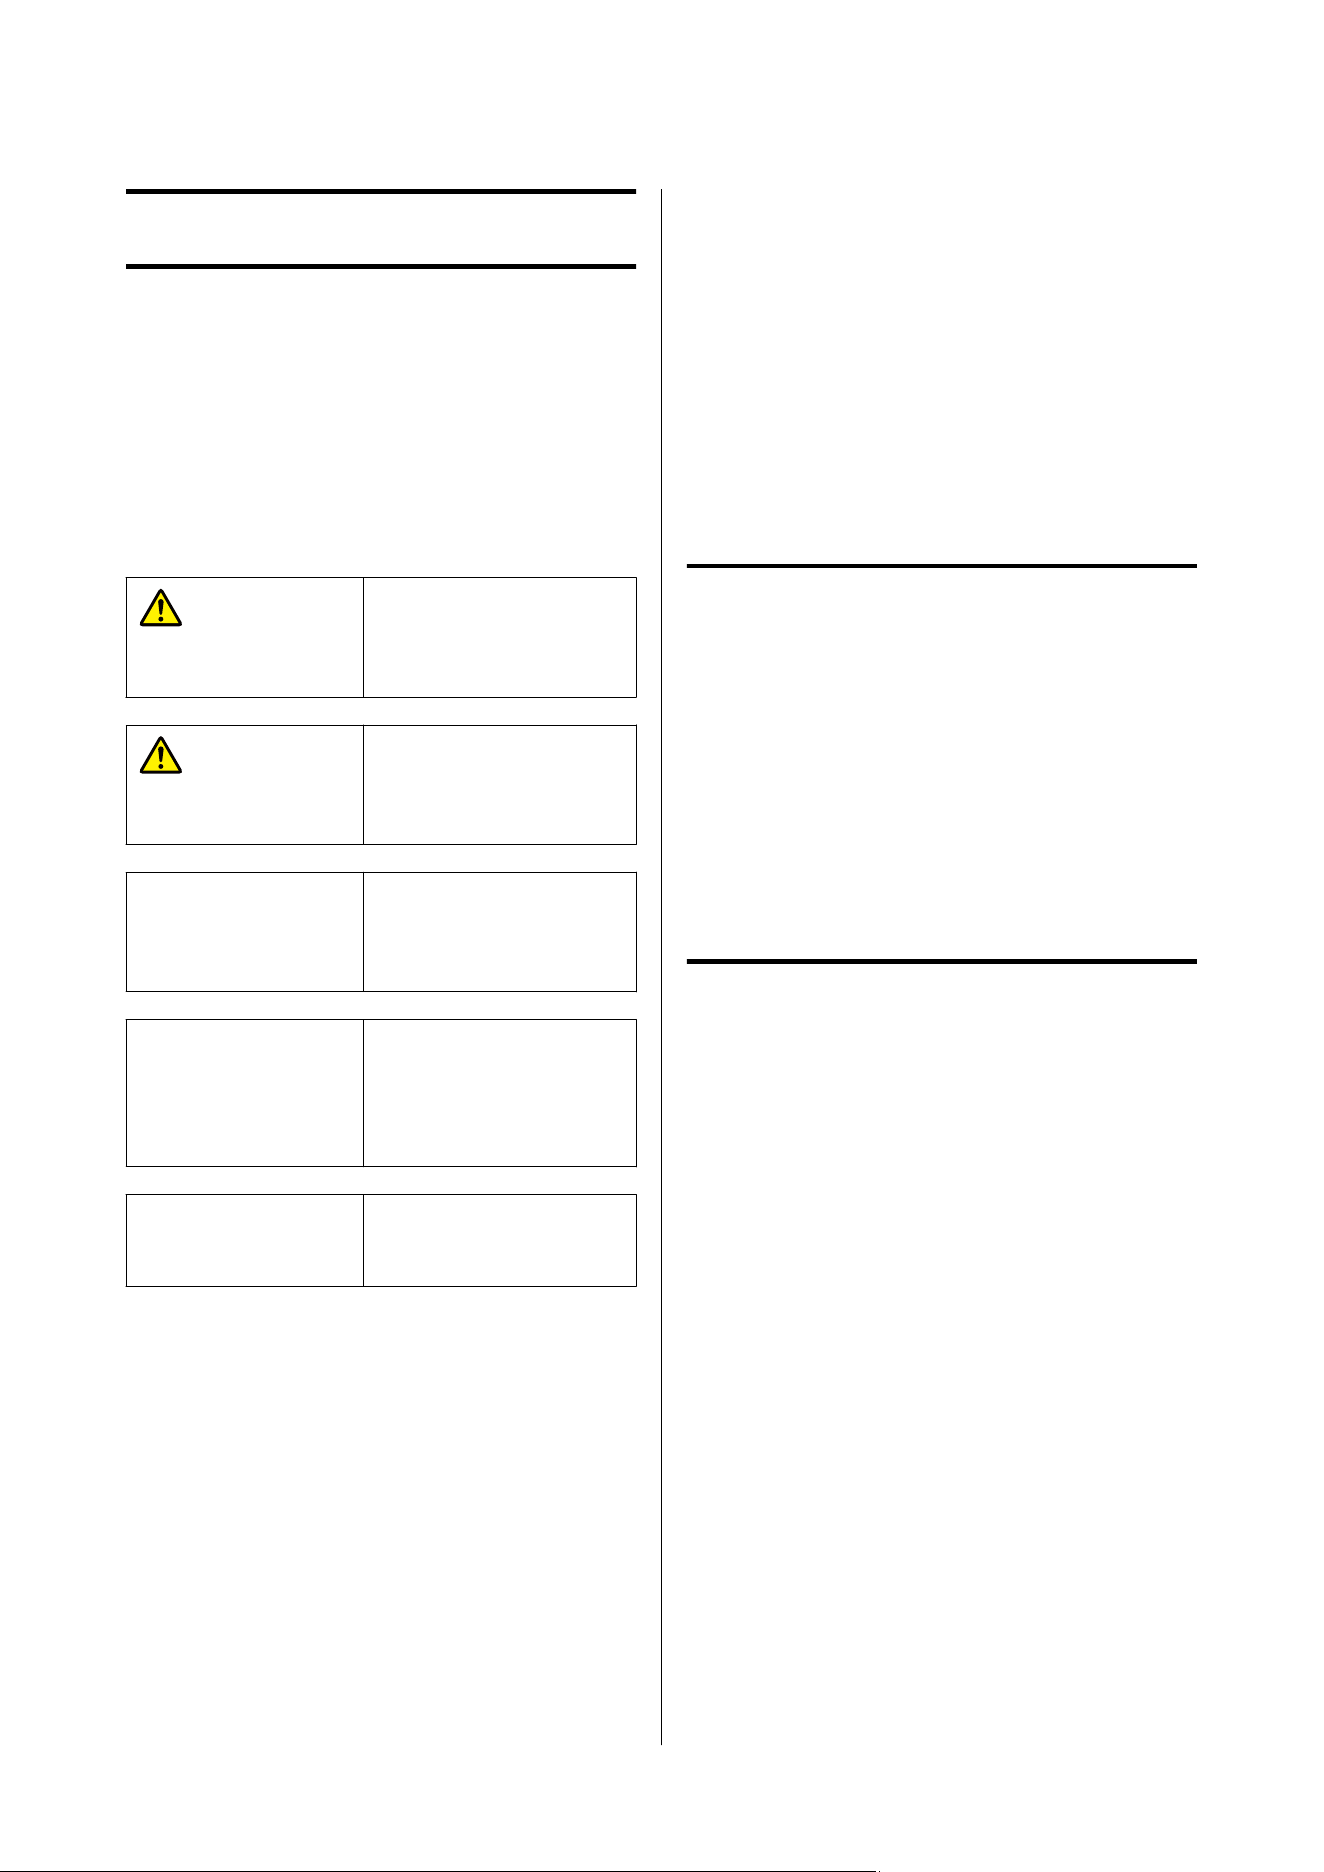
Meaning of Symbols
To prevent injury to customers or third parties
and damage to property, this manual uses the
following symbols to warn of dangerous operations
and handling. Make sure you understand the meaning
of these symbols before reading this manual.
War ni ng :
Warning s must be
followed to avoid serious
bodily injury.
Caution:
Cautions must be
followed to avoid bodily
injury.
c
Important:
Important must be
followed to avoid damage
to this product.
Note:
Notes contain useful or
additional information on
the operation of this
product.
U
Indicates related reference
content.
Screenshots
❏ Screenshots used in this manual may differ
slightly from the actual screens.
❏ Unless otherwise stated, the Windows screenshots
used in this manual are from Windows 10.
Illustrations
The illustrations may differ slightly from the model
you are using. Please be aware of this when using the
manual.
Operating System
References
Windows
In this manual, terms such as “Windows 11”,
“Windows 10”, and “Windows 8.1” refer to the
following operating systems. Additionally, “Windows”
is used to refer to all versions.
❏ Microsoft
®
Windows
®
11 operating system
❏ Microsoft
®
Windows
®
10 operating system
❏ Microsoft
®
Windows
®
8.1 operating system
Mac OS
In this manual, “Mac OS” is used to refer to Mac OS X
10.9.5 or later as well as macOS 10.12 or later.
Manual Organization
U.S., Canada, and Latin America
To view user manuals, visit the support site for your
region and search for your product:
❏ https://epson.com/support (U.S.)
❏ https://epson.ca/support (Canada)
❏ https://latin.epson.com/support (Latin America)
Other Regions
The manuals for the product are organized as shown
below.
You can view the PDF manuals using Adobe Acrobat
Reader or Preview (Mac OS).
SC-S7100 Series User's Guide
Notes on Manuals
6
Setup Guide
(booklet)
Provides information on how
to setup the printer after
unpacking it from the box.
Make sure you read this
manual to perform operations
safely.
Safety Instructions
(booklet)
Provides instructions that
should be followed to prevent
injury to customers or third
parties and damage to
property. Make sure you read
this to ensure the product is
used safely and correctly. For
some regions, this content is
included in the Setup Guide.
Online Manual
User's Guide (PDF) This manual explains how to
use the printer.
Troubleshooting &
Tips
This manual provides some
frequently asked questions and
tips to help you use the printer
efficiently.
Epson Video
Manuals
These videos show you how
to load media and perform
maintenance.
Network Guide
(PDF)
This manual provides
information on using the
printer over a network.
Epson Support
(PDF)
Provides information about
Epson Support for each region.
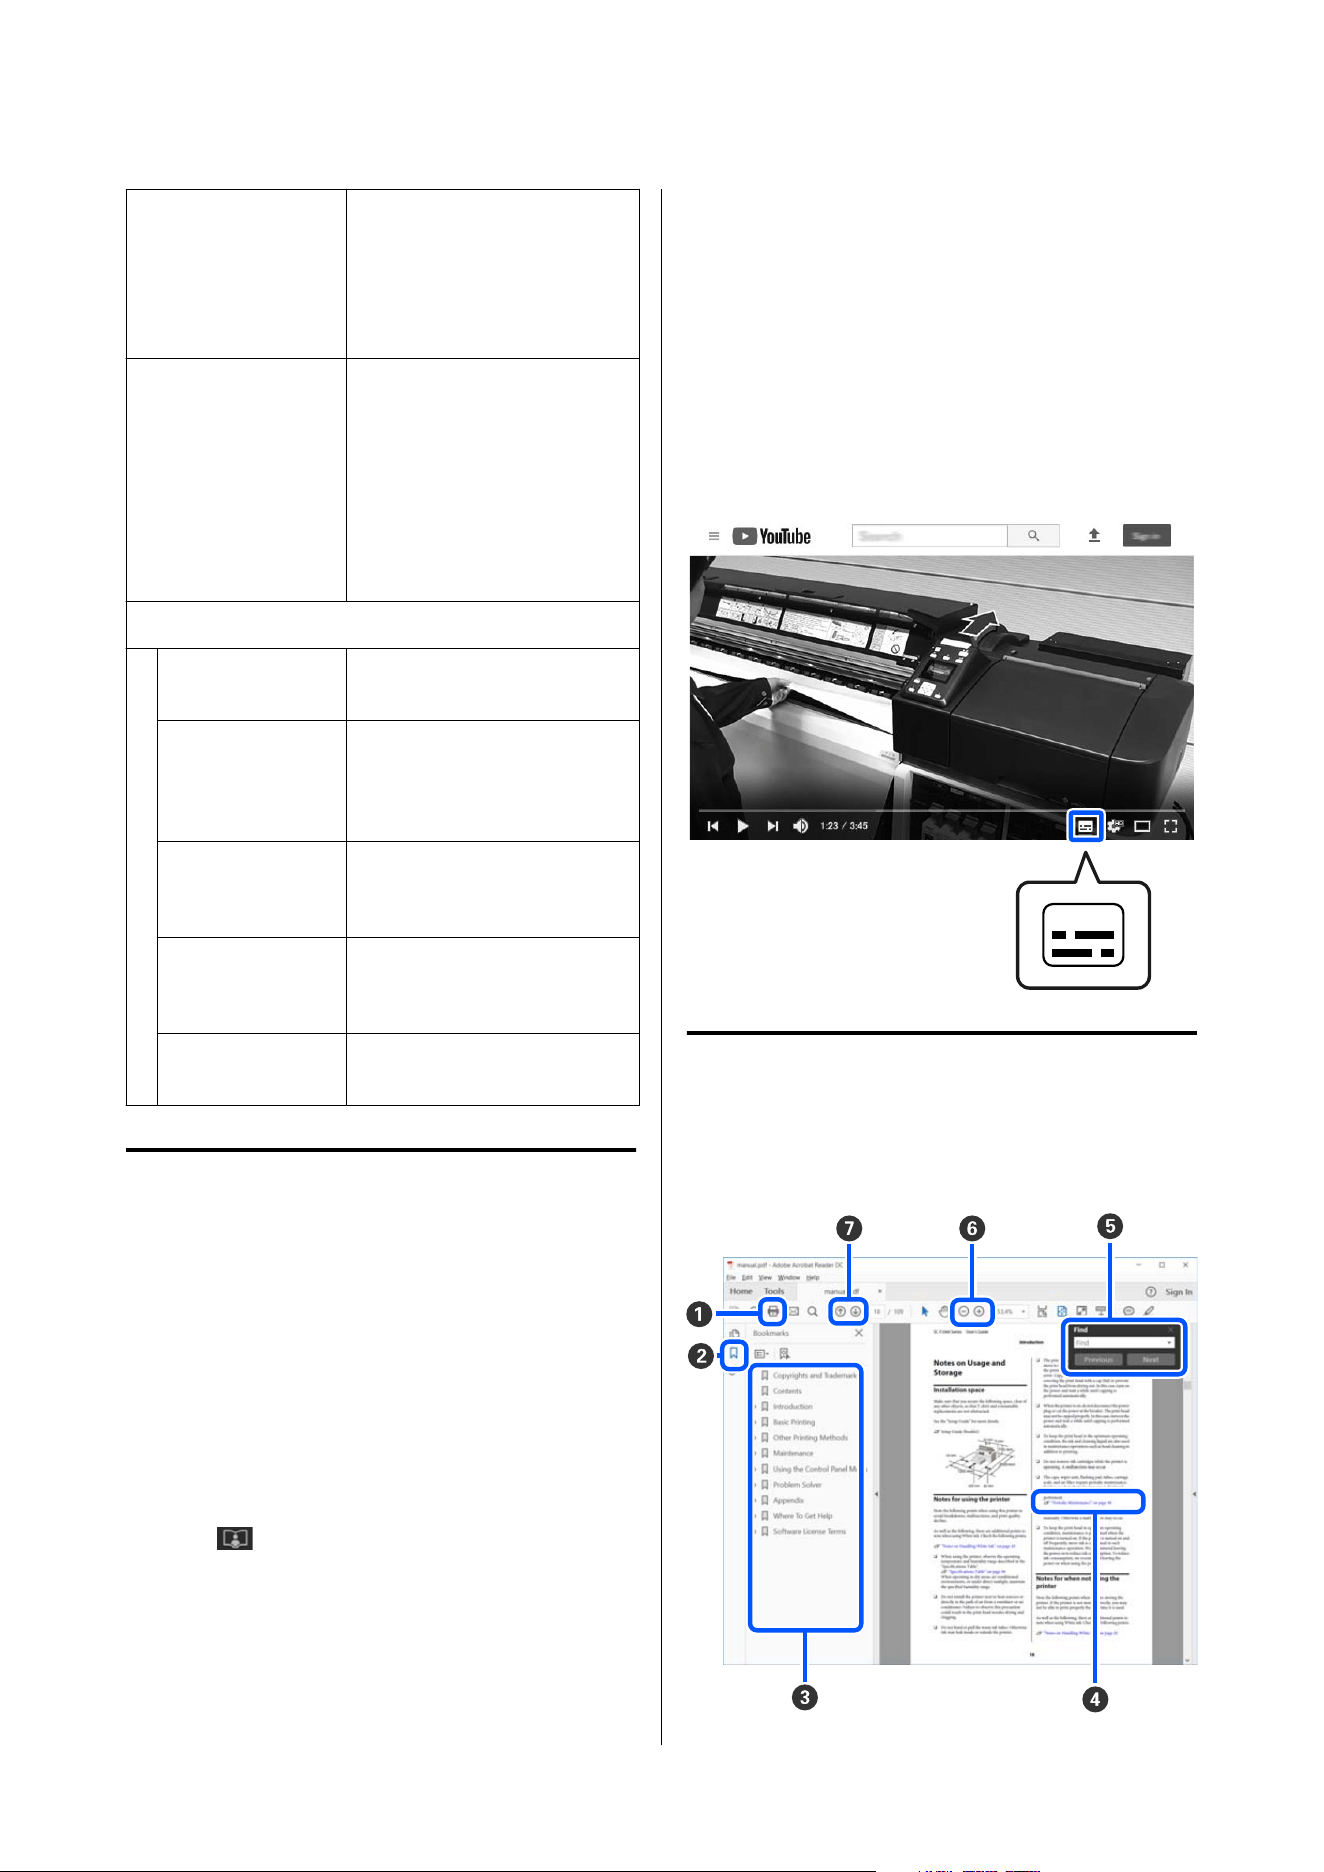
Viewing Video Manuals
The video manuals have been uploaded to YouTube
and can be viewed by clicking the blue text below.
Epson Video Manuals
You can also view the video manuals in the following
ways:
U.S., Canada, and Latin America
Click the (Link to Manual) button at the top of
the control panel screen and access the QR code that
appears.
U “Home screen (status display)” on page17
Other Regions
❏ Click Epson Video Manuals (Videos) on the top
page of the Online Manual.
❏ Access the QR code in the Setup Guide (booklet).
If the subtitles are not displayed when you play the
video, click the subtitles icon shown in the image
below.
Viewing PDF Manuals
This section uses Adobe Acrobat Reader DC as an
example to explain the basic operations for viewing
the PDF in Adobe Acrobat Reader.
SC-S7100 Series User's Guide
Notes on Manuals
7

A
Click to print the PDF manual.
B
Each time it is clicked the bookmarks are hidden
or shown.
C
Click the title to open the relevant page.
Click [+] to open the titles lower in the hierarchy.
D
If the reference is in blue text, click the blue text to
open the relevant page.
To return to the original page, do the following.
For Windows
While pressing the Alt key, press the key.
For Mac OS
While pressing the command key, press the
key.
E
You can input and search for keywords, such as the
names of items you want to confirm.
For Windows
Right click on a page in the PDF manual and select
Find in the menu that is displayed to open the
search toolbar.
For Mac OS
Select Find in the Edit menu to open the search
toolbar.
F
To enlarge the text in the display that is too small
to see well, click
. Click to reduce the size.
To specify a part of an illustration or screenshot to
enlarge, do the following.
For Windows
Right click on the page in the PDF manual
and select Marquee Zoom in the menu that is
displayed. The pointer changes to a magnifying
glass, and you can use it to specify the range of the
place you want to enlarge.
For Mac OS
Click the View menu - Zoom - Marquee Zoom in
this order to change the pointer to a magnifying
glass. Use the pointer as a magnifying glass to
specify the range of the place you want to enlarge.
G
Opens the previous page or next page.
SC-S7100 Series User's Guide
Notes on Manuals
8
Introduction
Printer Parts
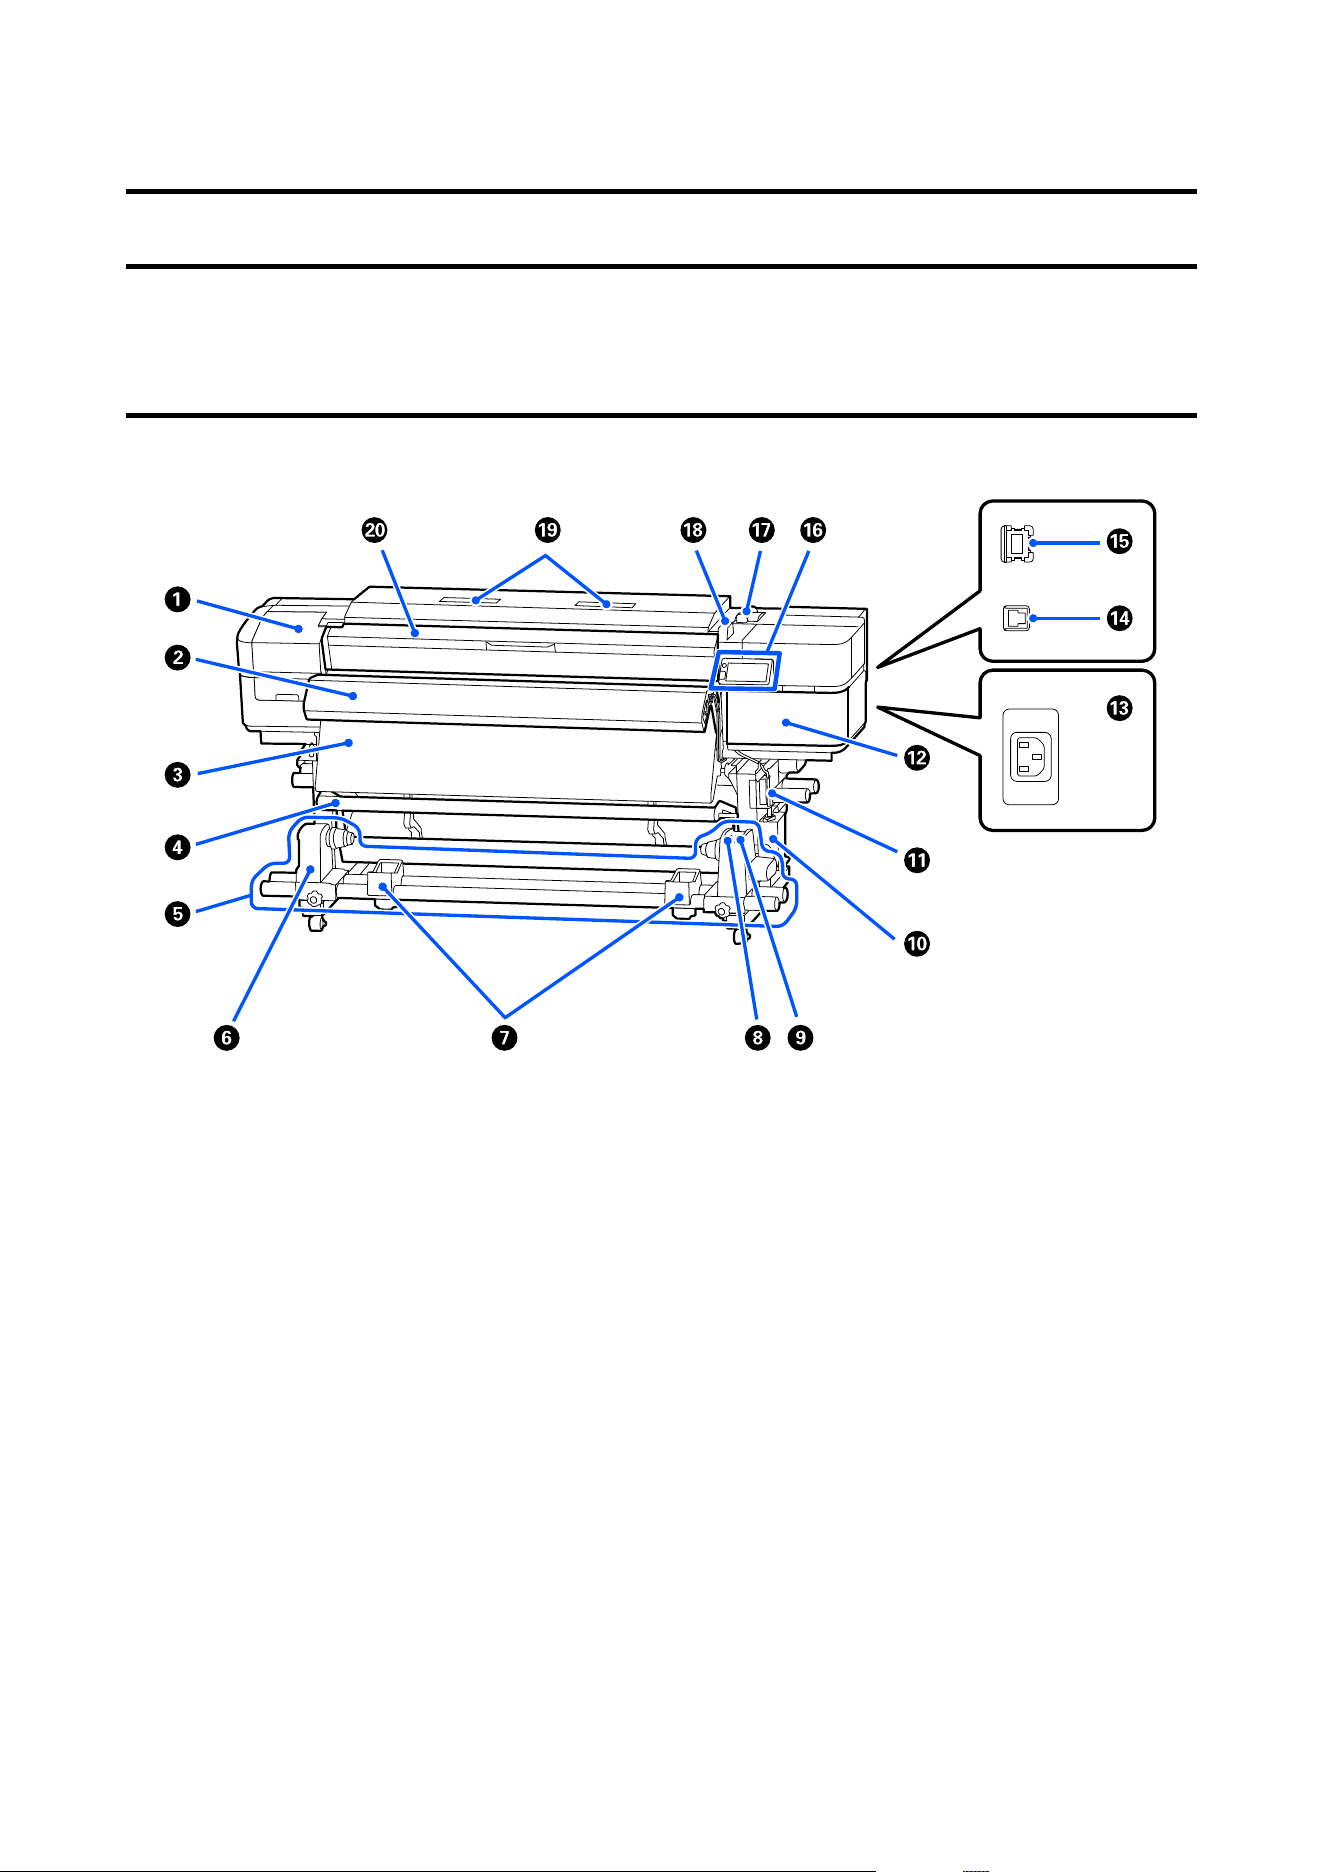
Front Section
A
Maintenance cover
Open to replace consumables and for cleaning. There is a maintenance cover on both the left and the right.
Normally closed when using the printer.
U “Replacing Maintenance Parts Kit” on page66
U “Monthly Cleaning” on page61
B
Additional Print Drying System
Can be used to rapidly dry ink after printing. After installation, it will operate automatically according to the
Drying Fan settings for each registered media.
C
After heater
The heater can be used to rapidly dry ink after printing.
U “Changing the Heater's Temperature” on page50
D
Tension bar
The tension bar maintains tension to prevent slack of the media when winding it.
SC-S7100 Series User's Guide
Introduction
9

E
Auto take-up reel unit
Automatically takes up printed media.
F
Media holder
Place the roll core for media take-up on this holder. There is a media holder on both the left and the right.
G
Media supports
Rest media temporarily on these supports when removing the take-up roll. There is a media support on both
the left and the right.
H
Auto switch
Use this switch to set the winding direction (printable side facing in or out) when automatically taking up
printed media. To take up printed media by manually operating the take-up reel unit, set the switch to the
center O to turn off the auto take-up function.
I
Manual switch
Position this switch based on the winding direction when manually taking up printed media.
J
Waste ink bottle
Waste ink collects in this bottle. Replace it with a new waste ink bottle when a message is displayed on the
control panel prompting you to do so.
U “Disposing of Waste Ink” on page65
K
Waste ink tube
Tube for ejecting waste ink. Be sure the end of this tube is inserted into the waste ink bottle while the printer is
in use so that waste ink does not splash out.
U “Disposing of Waste Ink” on page65
L
Ink cover
Open to shake or replace the ink supply units. Normally closed when using the printer.
There is a security lock slot on the top of the cover.
M
AC inlet
Connect the power cable supplied with the printer.
N
USB port
Connect the USB cable.
O
LAN port
Connect the LAN cable.
P
Control panel
U “Control Panel” on page15
SC-S7100 Series User's Guide
Introduction
10

Q
Media loading lever
This lever raises and lowers the pressure roller that holds the media in place.
Move the lever to the front to lower the pressure roller and hold the media in place.
Move the lever to the back to raise the pressure roller and release the media.
R
Alert lamp
This lamp turns on or flashes when an error occurs.
On/Flash : An error occurred. How the lamp turns on or flashes varies with the type of error. The
control panel displays a description of the error.
Off : No error.
S
Air filter
This filter allows air to pass through the inside of the printer during operation and absorbs ink mist. The air
filter is a consumable item. Replace the wiper unit at the same time.
U “Replacing Maintenance Parts Kit” on page66
T
Printer cover
Open when loading media, cleaning the inside of the printer, or removing jammed media. Normally closed
when using the printer.
SC-S7100 Series User's Guide
Introduction
11
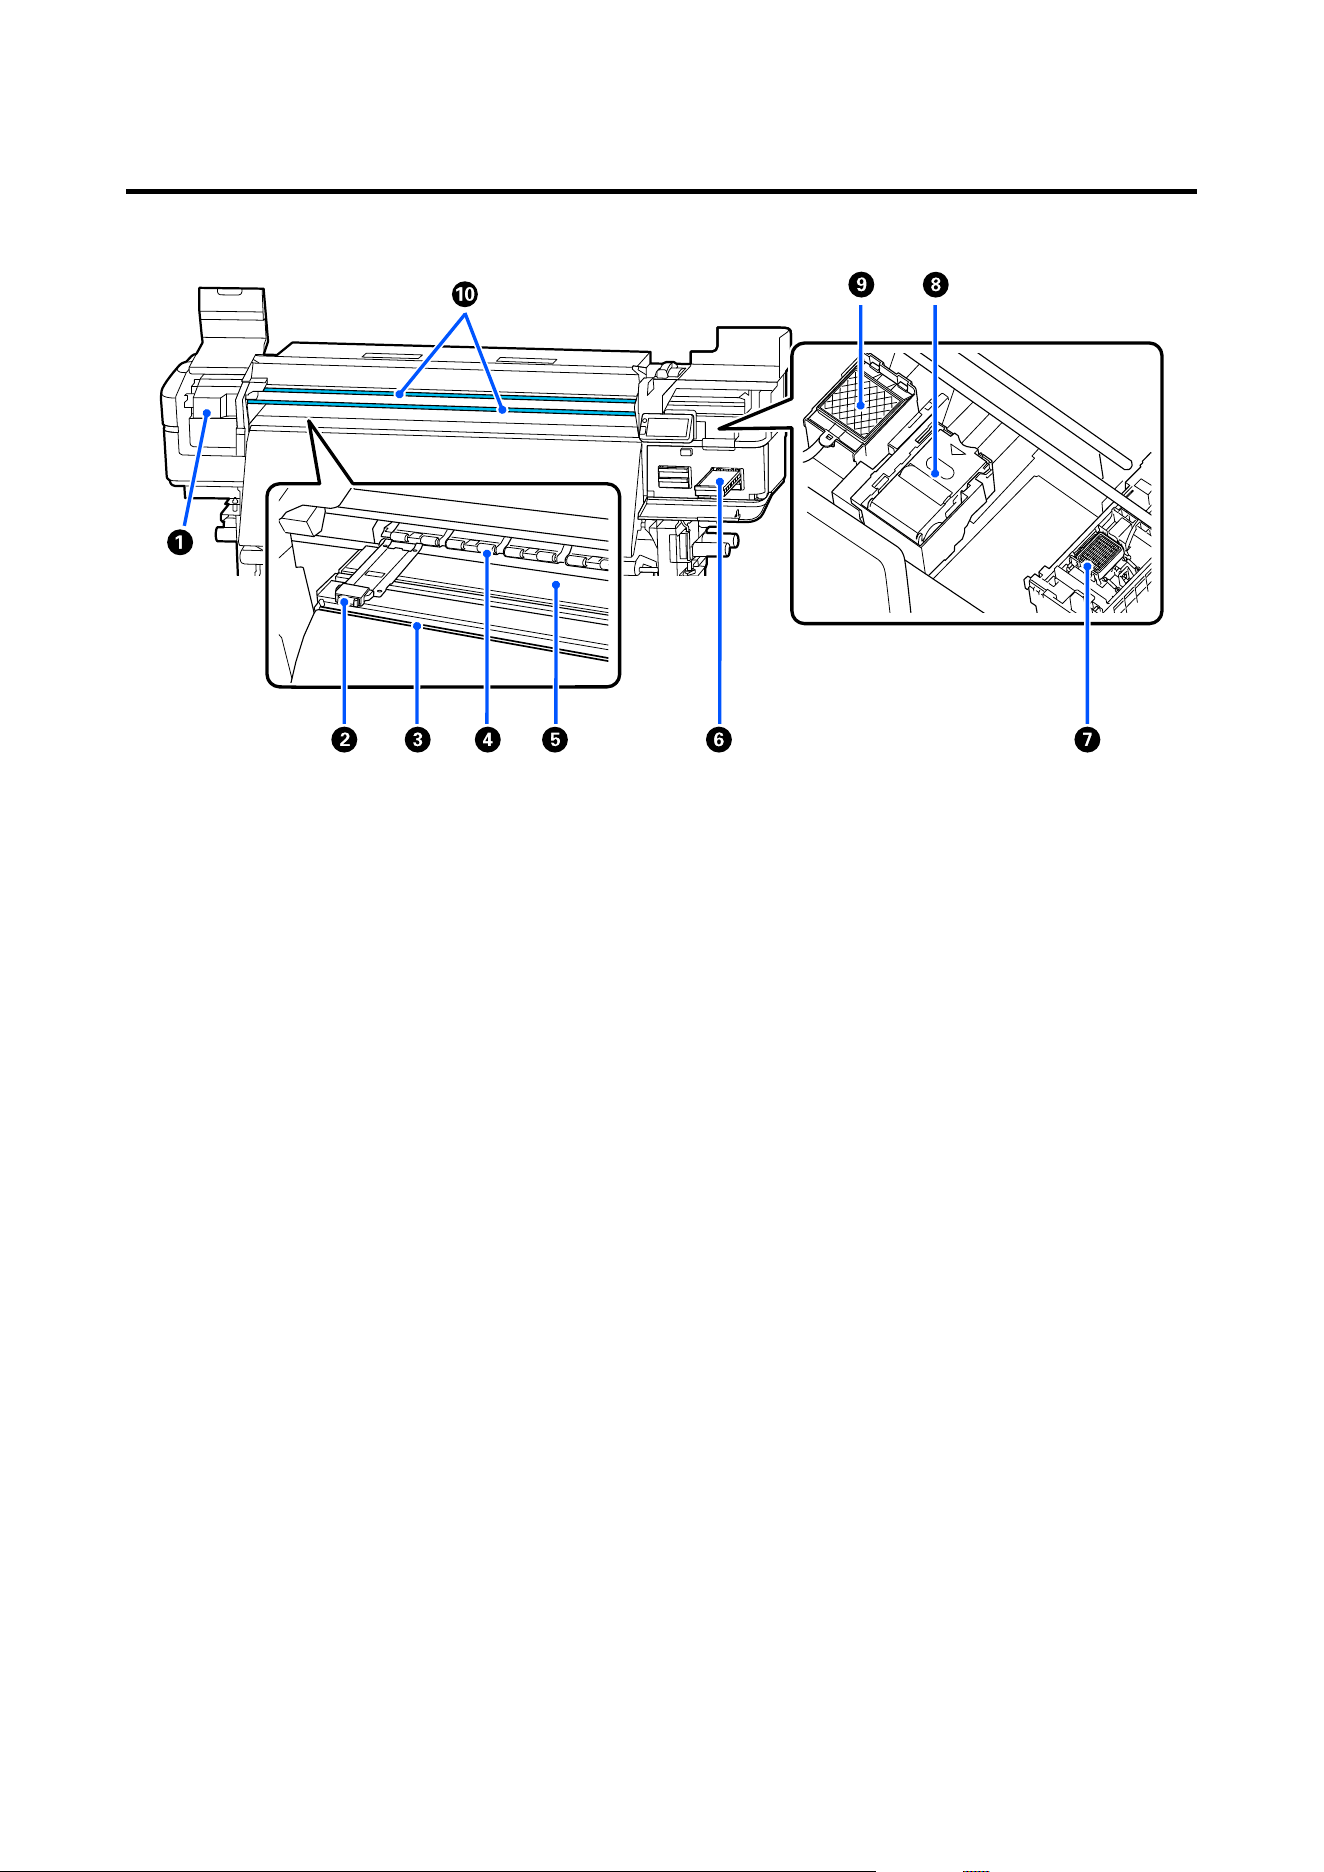
Inside
A
Print head
The print head prints by moving left and right while emitting ink. When print results are dirty, check for dirt
stuck to the print head and clean it, if necessary. Clean it at least once a month.
U “Performing Regular Cleaning” on page61
B
Media edge plates
The media edge plates prevent the media from riding up and keep fibers on the cut edge of the media from
touching the print head. Position the plates at either side of the media before printing.
U “Loading Media” on page38
C
Cutter groove
When cutting the media, slide the blade of a commercially available cutter along this groove to cut.
D
Pressure rollers
These rollers press down on the media during printing. These move up and down in conjunction with the
media loading lever.
Clean these rollers if the dirt on the rollers is staining the surface of the media.
U “Cleaning the Pressure Rollers” on page73
E
Platen heater
Heating the media helps stabilize ink adhesion. If lint, dust, or ink adheres to this, it could cause clogged nozzles
or ink drops to occur, so be sure to clean it daily.
U “Daily Cleaning” on page61
SC-S7100 Series User's Guide
Introduction
12

F
Ink tray
Insert the ink supply unit for the color indicated on the label. Place all of the ink trays in the printer.
G
Capping station
Except during printing, this cap covers the print head nozzles to prevent them from drying out. Clean it at least
once a month.
U “Performing Regular Cleaning” on page61
H
Wiper Unit
Used to wipe off ink that is stuck to the surface of the print head nozzles. The wiper unit is a consumable item.
Replace when a message is displayed on the control panel prompting you to do so.
U “Replacing Maintenance Parts Kit” on page66
I
Flushing pad
Ink is discharged onto this pad during flushing. The flushing pad is a consumable item. Replace the wiper unit
at the same time.
U “Replacing Maintenance Parts Kit” on page66
J
Carriage rods A/B
These two rods, upper and lower, support the print head (carriage). When the amount of printing reaches the
specified value, a message appears prompting you to lubricate them with grease.
U “Applying Grease to the Carriage Rod” on page74
SC-S7100 Series User's Guide
Introduction
13
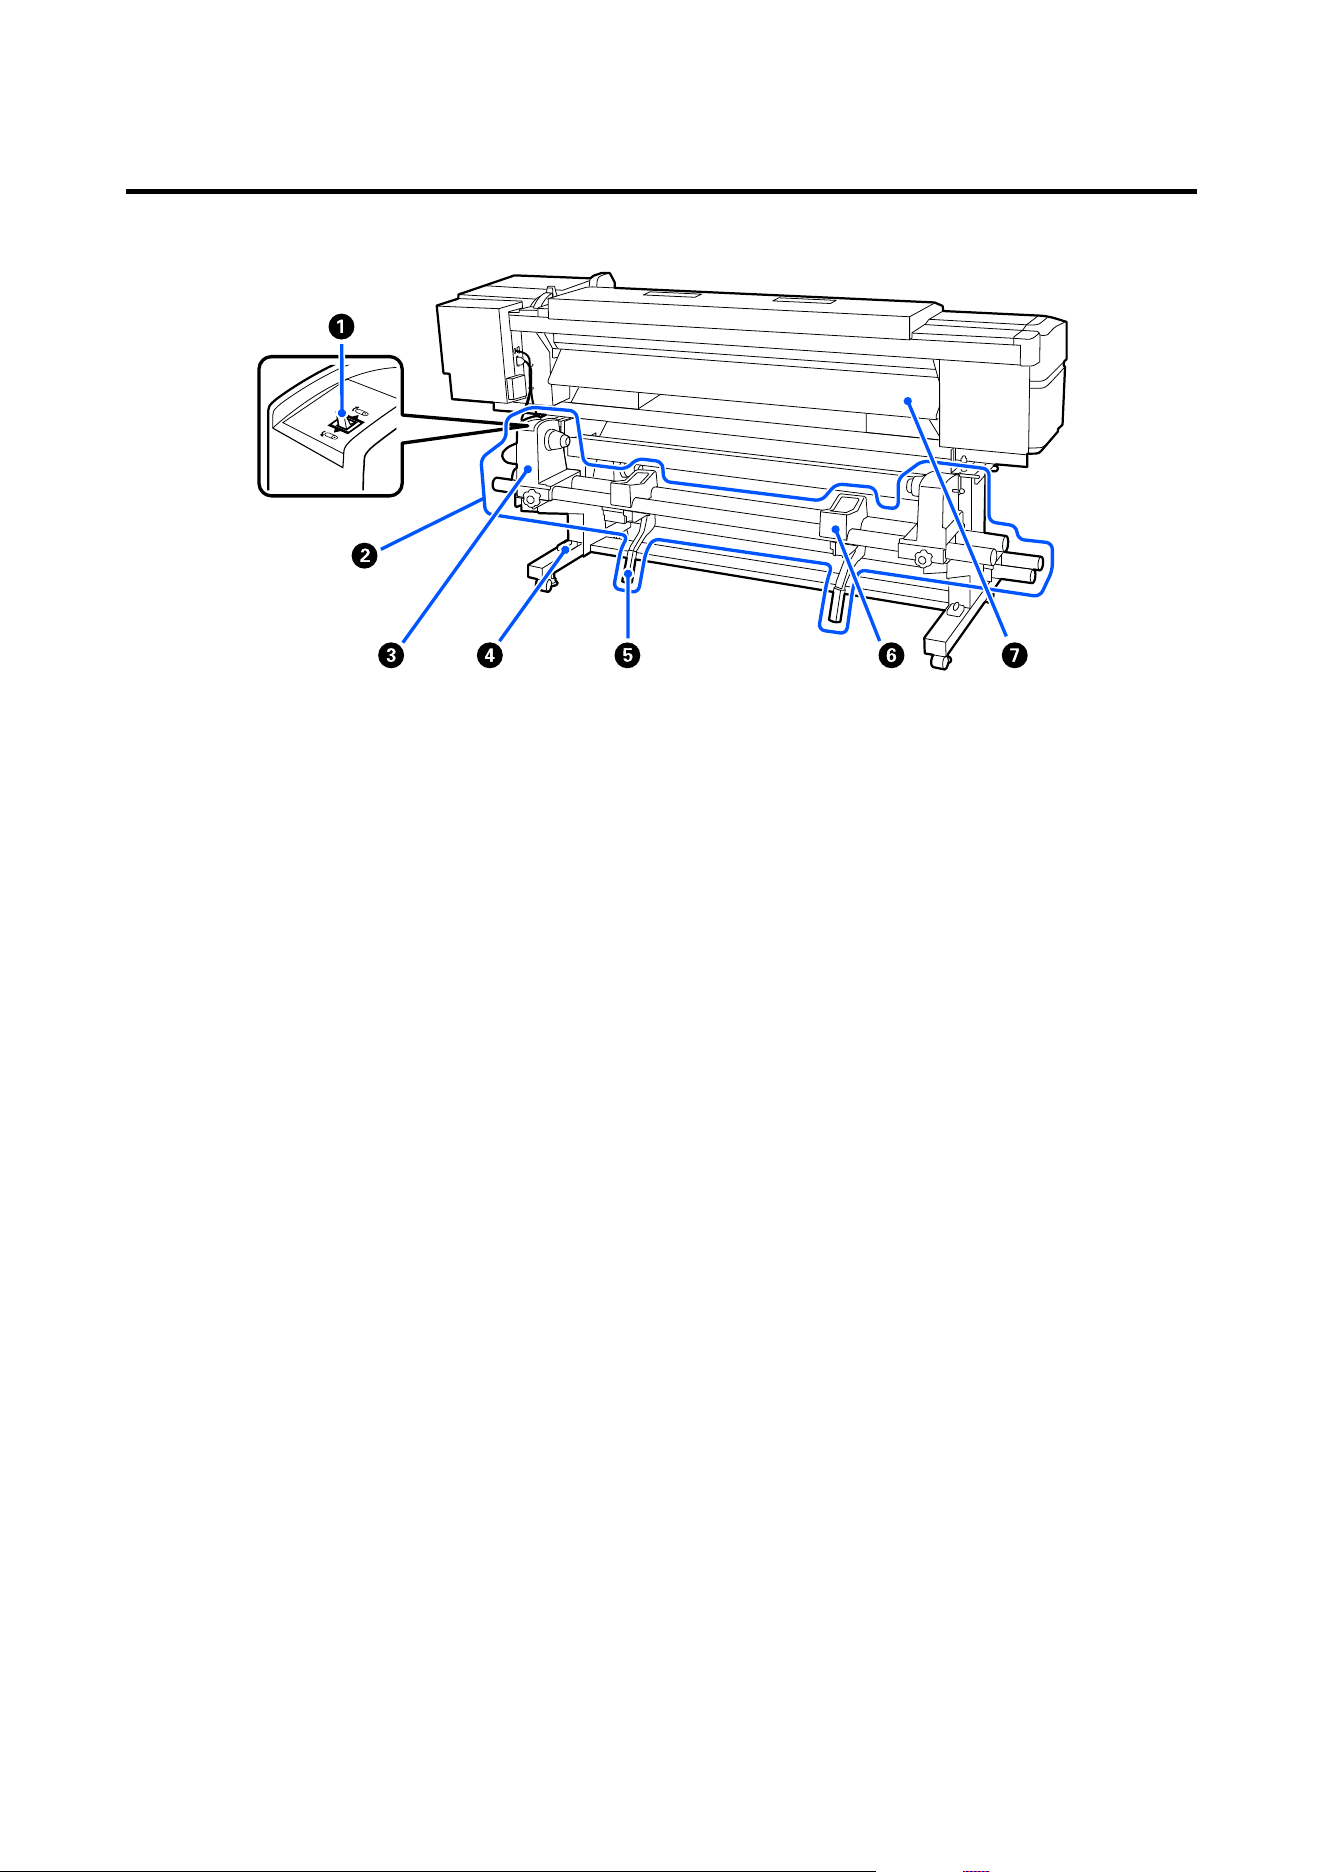
Back
A
Drive switch
Rewinds media during media replacement.
B
Media feeding unit
Automatically feeds the media loaded for printing into the machine.
C
Media holder
Place media on this holder. There is a media holder on both the left and the right.
D
Level gauge
When installing on a carpeted floor or a sloping floor, check the horizontal level of the printer. There is a level
gauge on both the left and the right.
E
Lift lever
If the media to be mounted on the media holder seems heavy, use this lever to raise the media to the level of the
media holder. There is a lift lever on both the left and the right.
F
Media support
Rest media on this support before placing it on the media holder. There is a media support on both the left and
the right.
G
Pre-heater
Pre-heat the media before printing to avoid sudden temperature changes in the printing area.
SC-S7100 Series User's Guide
Introduction
14
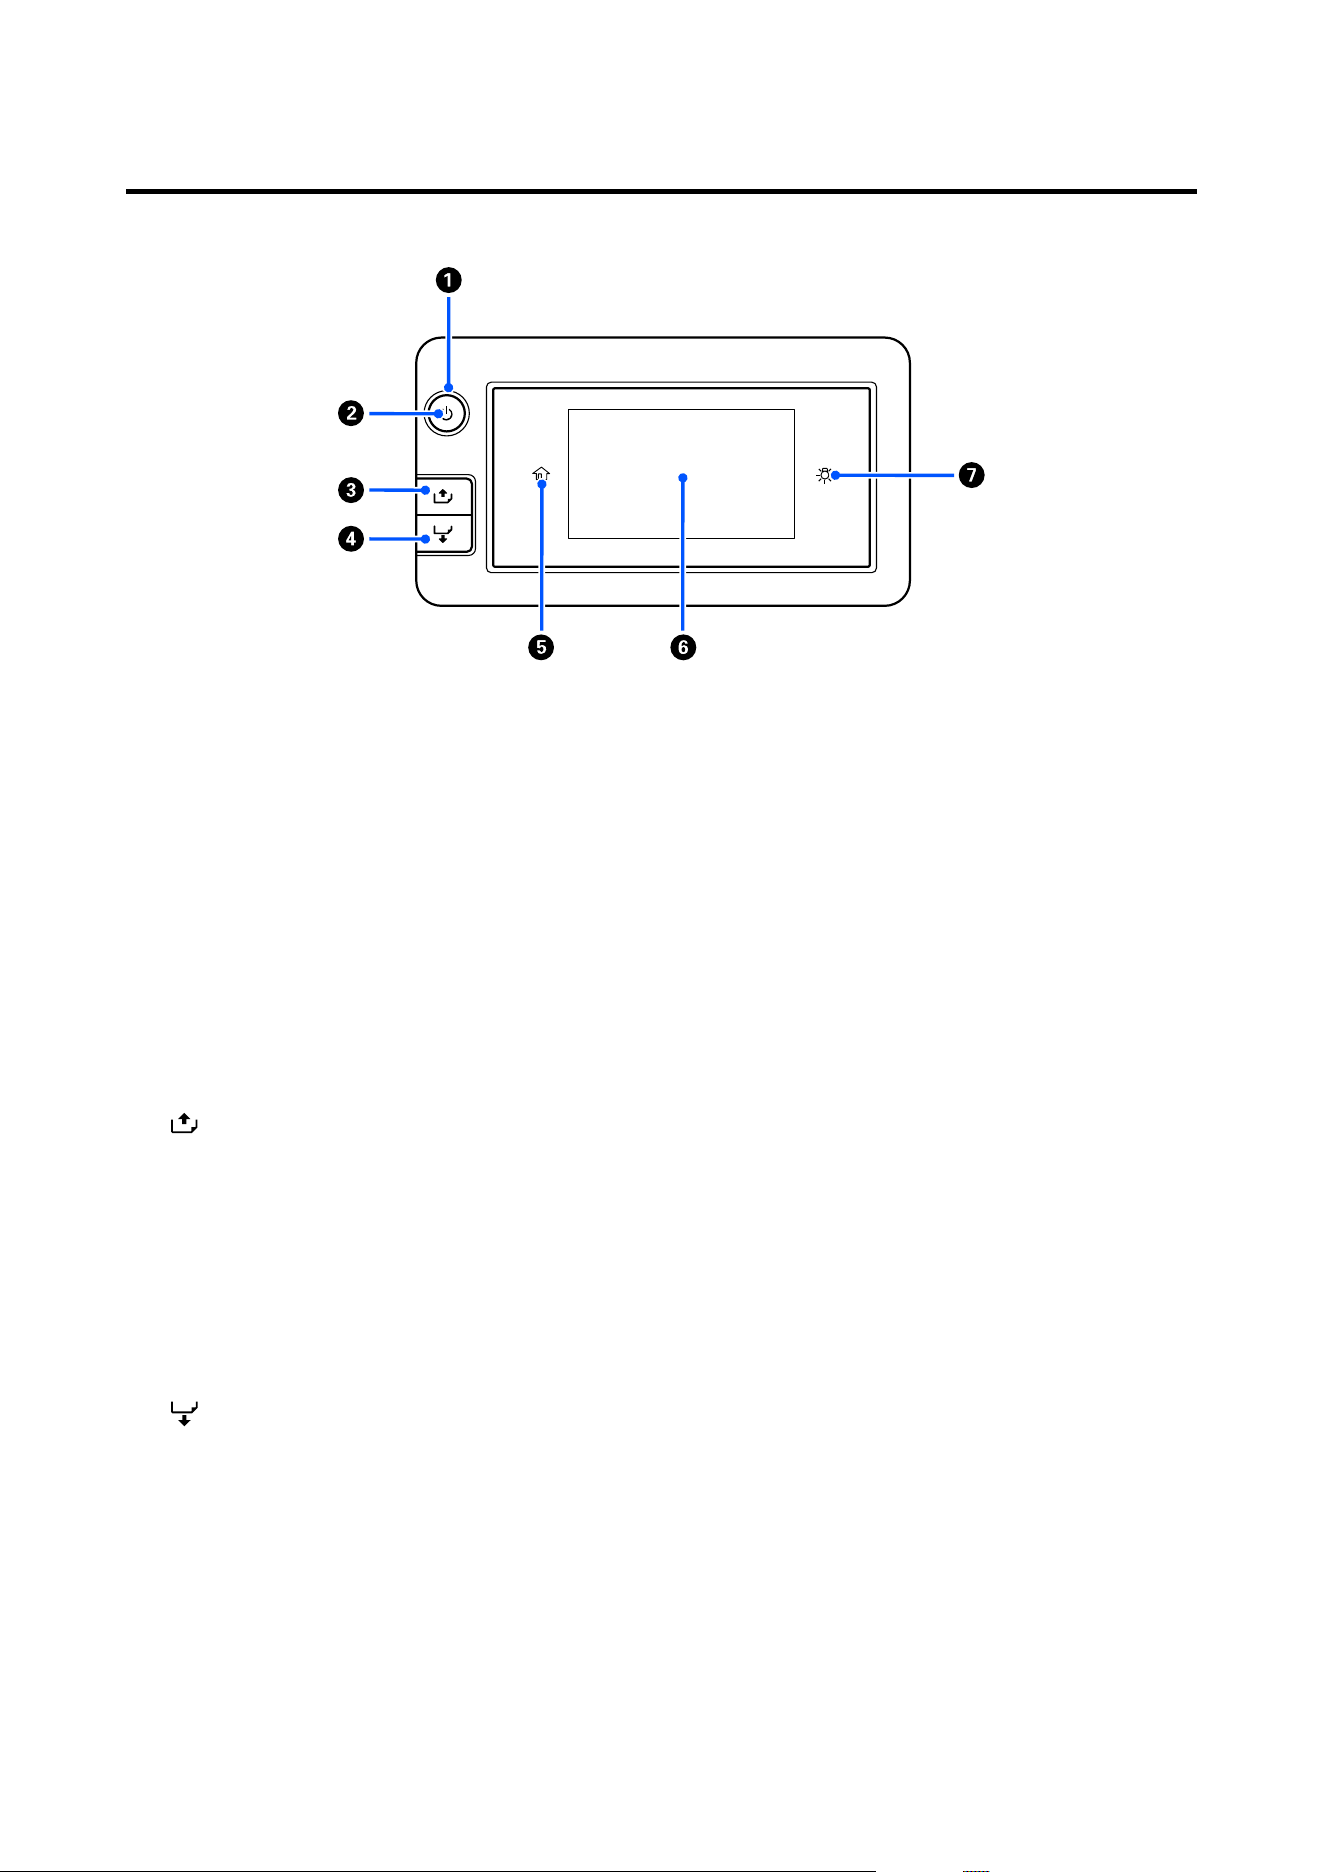
Control Panel
A
P Light (power light)
The printer's operational status is indicated by a lit or flashing light.
On : The power is on.
Flashing : The printer is performing an operation, such as receiving data, shutting down, or
performing Head Cleaning.
Off : The power is off.
B
P Button (power button)
Turns the power on and off.
C
[
] button (rewind button)
Depending on the status of the media loading lever, operations differ as shown below.
❏ When the media loading lever is at the front
You can rewind the media by holding down the button. Rewinding stops when the leading edge of the media reaches
the print start position. Rewind can be resumed by releasing the button and then pressing it again. Press and hold the
button to speed up the rewinding.
❏ When the media loading lever is at the back
You can rewind media that has been loaded with the printable side out by holding down the button.
D
[
] button (feed button)
Depending on the status of the media loading lever, operations differ as shown below.
❏ When the media loading lever is at the front
You can feed the media by holding down the button. Press and hold the button to speed up the feeding.
❏ When the media loading lever is at the back
You can rewind media that has been loaded with the printable side in by holding down the button.
SC-S7100 Series User's Guide
Introduction
15

E
(home button)
Press to return to the home screen during menu operations (when is lit).
(home button) is not lit when it cannot be used.
F
Screen
Displays the printer's status, menus, error messages, and other information.
U “Home Screen” on page17
G
(light button)
Switches the inside light on or off. Press this area to turn off the inside light, when it is on. Pressing it while the
inside light is off, turns it on.
is off when the inside light cannot be turned on/off due to the operating status of the printer.
SC-S7100 Series User's Guide
Introduction
16
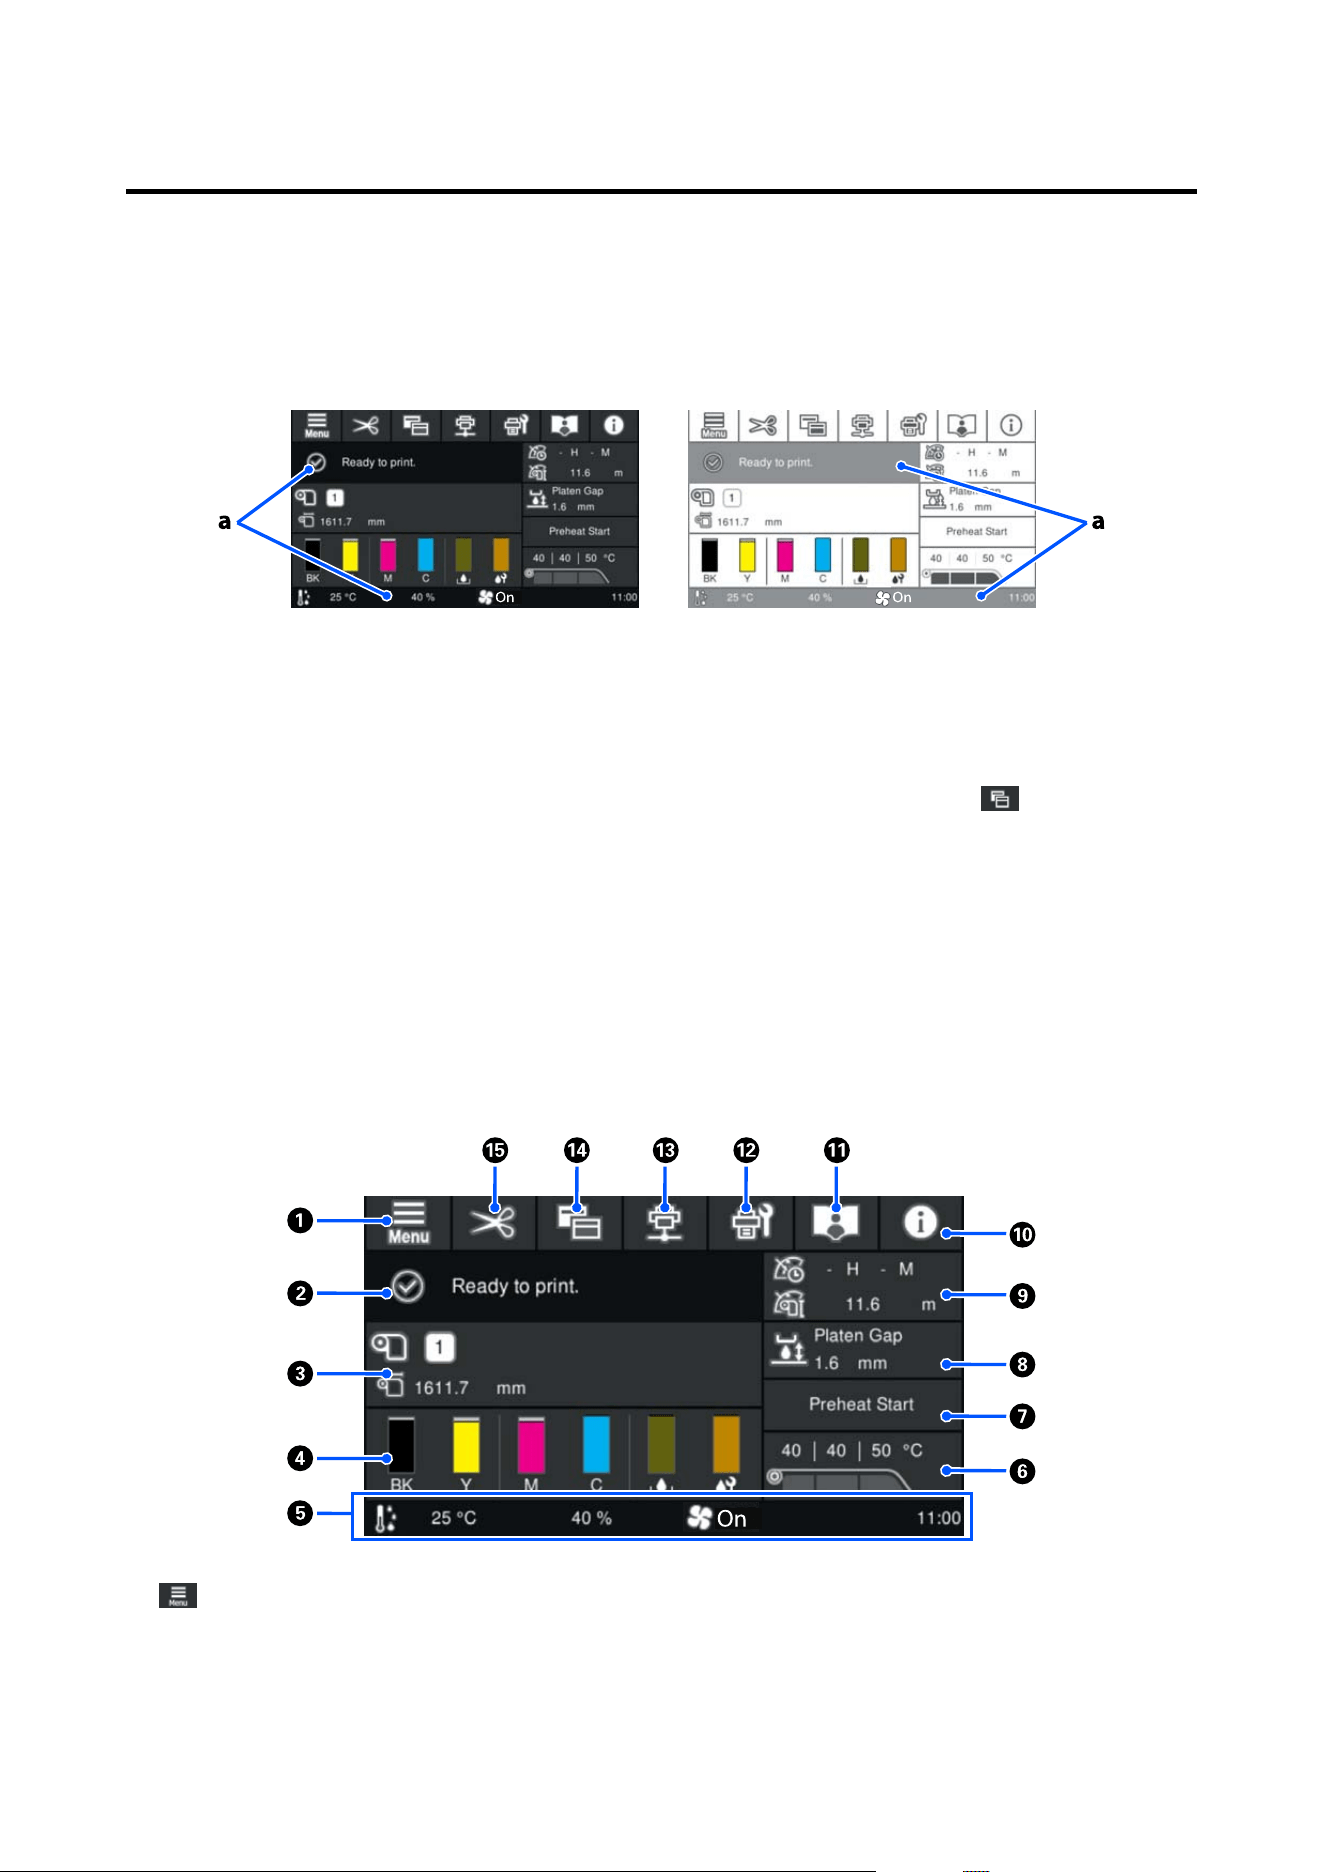
Home Screen
The screen of the printer is a touch panel. The background color can be changed in Basic Settings - Screen
Customization on the General Settings menu as shown in the following illustration.
The black/light gray areas (a) are the display areas and do not respond even if you press them. The rest of the areas
can be pressed to view information or make adjustments.
Depending on the printer's operating status, some of the buttons displayed at the top of the screen may not be able
to perform their functions. If the function is unavailable, the icon is grayed out and the button does not respond
even when pressed.
The home screen has the following two types and you can switch between them by pressing
.
❏ Home screen (status display)
You can check the current status of the printer.
U “Home screen (status display)” on page17
❏ Home screen (adjust while printing)
You can quickly change the major adjustment values. You can also make adjustments while printing.
U “Home screen (adjust while printing)” on page22
Home screen (status display)
A
(menu)
The settings menu will be displayed.
U “Control Panel Menu” on page76
SC-S7100 Series User's Guide
Introduction
17
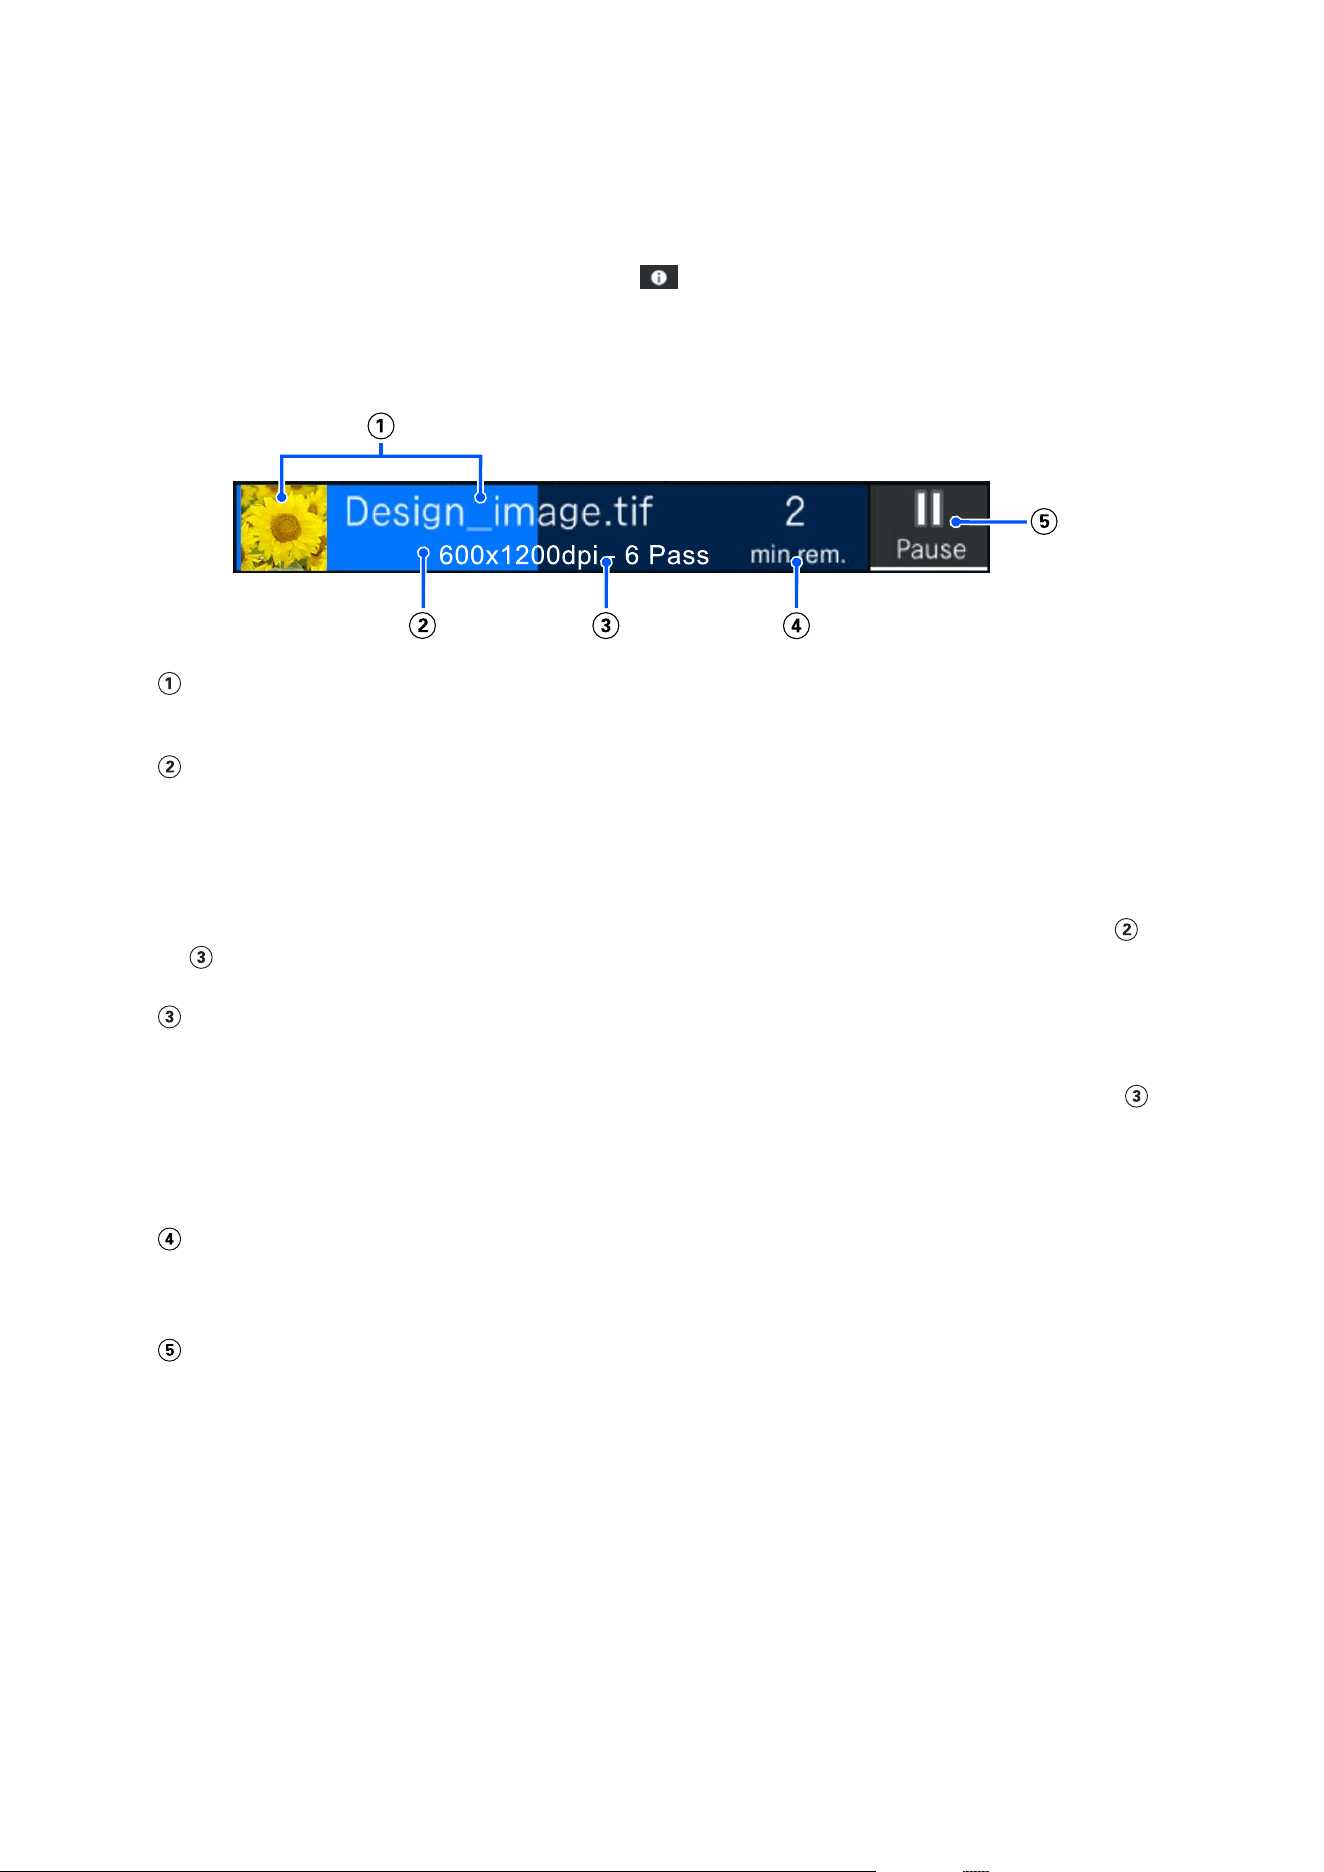
B
Status display area
Displays the printer's status and warning messages. Only the most recent notifications are shown in this area.
You can check all warning notifications by pressing
.
When a print job is received, the displayed content changes as shown below. The following provides an
explanation of each display.
Displays a thumbnail of the image being printed and the file name. A thumbnail image may not be shown,
depending on the type of RIP being used.
Displays a progress bar showing the printing or preparation progress.
This normally displays the progress until printing is complete. Depending on the settings, progress from
print preparation to the start of printing, and from the start of printing to completion may be displayed
separately.
By pressing the display area while printing, you can change the settings for the content displayed in
and
.
Displays the Printed Length for the media, Remaining Print Length for the media, Time until media
replacement, or the Pass Mode.
Pressing the display area while printing opens a screen in which you can set the content displayed in
.
Select 1 item that you want to display.
Time until media replacement displays the estimated time.
Normally, the estimated time until printing is complete is displayed. Depending on the settings, the time
estimated from print preparation to the start of printing, and the time estimated from the start of printing
to completion may be displayed separately.
This is the Pause (Suspend) button.
Press this button and select whether to stop printing immediately (Immediate pause) or stop after printing
the current page (or job if it is a single page) (Pause between pages). Pressing Resume on the screen during
a pause resumes printing. However, if you select Immediate pause, printing may become disrupted when
printing restarts.
Appears as the Start button while warming up, until the heater reaches the set temperature. Pressing this
button starts printing, even if the heater temperature is low.
SC-S7100 Series User's Guide
Introduction
18

C
Media info
Displays the name and number of the currently selected registered media, as well as the width of the currently
loaded media. When Remaining Amount Management is set to On, the remaining amount of the loaded
media is also displayed. Pressing this area displays the Media Settings from the settings menu where you can
change to a different registered media number or change the settings for the media number that is currently
selected.
D
Status of consumables
Displays the approximate amount remaining and the status of consumables such as the ink supply unit. By
pressing this area, you can check a more detailed estimate of the amount remaining and the part number for
each consumable.
The following provides an explanation of each display.
Ink supply unit status
Indicates the approximate amount of ink remaining. The bar goes lower as the remaining ink runs low.
The letters are abbreviations of the colors. The relation of the abbreviations and the ink colors is shown
below.
BK : Black
Y:Yellow
M:Magenta
C:Cyan
Depending on the status of the ink supply unit, the display of the bar changes as shown below.
: Ink is low. You need to prepare a new ink supply unit.
: Ink is expended. Replace the old ink supply unit with a new one.
: It is time to shake the ink supply unit. Pull out the ink tray and shake it.
Waste ink bottle status
Indicates the approximate amount of space available in the waste ink bottle. The bar goes lower as the
amount of remaining space decreases.
: The waste ink bottle is almost full. Prepare a new waste ink bottle.
SC-S7100 Series User's Guide
Introduction
19
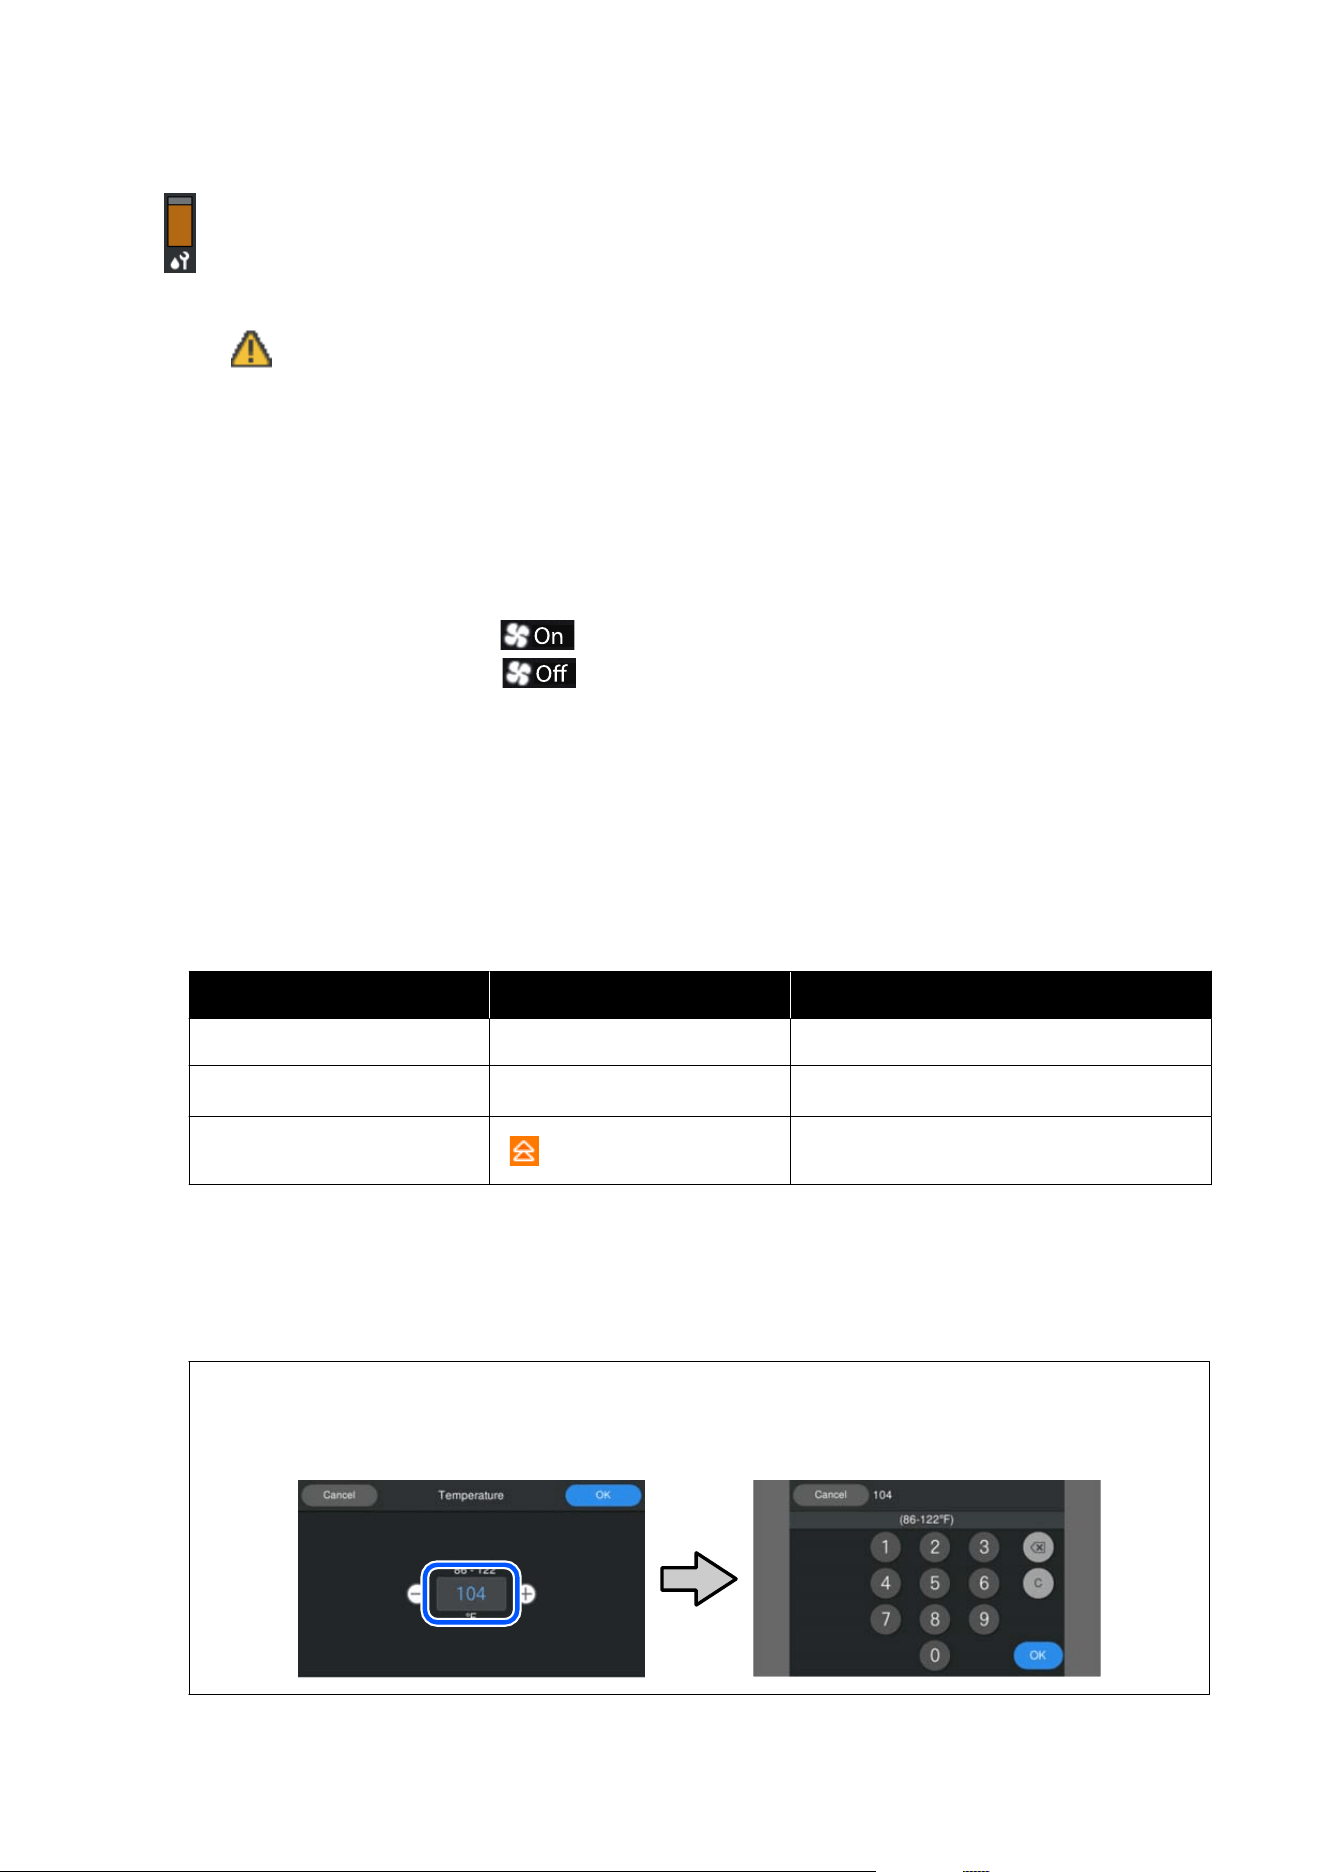
Maintenance Parts Kit status
Indicates the approximate amount of wiper unit remaining. The bar goes lower as the remaining ink
runs low.
: The wiper unit is running low, so you need to prepare a new wiper unit.
E
Footer
Displays the current temperature, humidity, and time. You may not be able to print correctly unless you use the
printer under the appropriate environmental conditions.
The icons shown below are displayed to indicate the Drying Fan setting for the currently selected registered
media.
❏ When the Drying Fan setting is On:
❏ When the Drying Fan setting is Off:
The above icons do not appear unless the Additional Print Drying System is connected before the printer is
turned on. If the icons do not appear, turn the power off and then on again.
F
Heater Temperature
Displays the temperature selected for each heater when using the selected registered media. The displayed
status under the number changes as shown below depending on the temperature of the heaters. Press this area
to display the settings screen where you can change the values.
Background Color Icon Status
Gray - Heater is stopped
Lit orange -
Heater is warming
*
Flashing orange Heater is heating
*When Printer Settings - Heater Control on Print Completion is set to 50%, the background color is
gray even when the heater is warming. To raise the heater temperature to the set temperature during
standby, press the Preheat Start area in G.
Note:
You can enter values on the numeric keypad screen by pressing the area (in the box) where the number is displayed,
as shown in the illustration.
SC-S7100 Series User's Guide
Introduction
20

G
Preheat Start/Stop
The heater starts heating when a job is sent, and printing starts when the heater reaches the set temperature.
Press Preheat Start to start pre-heating the heater. Pre-heating allows you to start printing quickly once a job
has been sent. You can start/stop pre-heating for the heater each time you press this area.
Additionally, the heater turns off after the time set in Sleep Timer in the settings menu has elapsed. Heating
starts when a print job is sent, but you can still press Preheat Start if necessary. Also, if Heater is set to Off in
the settings menu, pressing Preheat Start does nothing and pre-heating does not start.
H
Platen Gap
Displays the platen gap value for the currently selected registered media. Press this area to display the settings
screen where you can change the values.
I
Notice on when to perform maintenance or Periodic Cleaning
Displays the remaining print duration, print page counter, or print length until maintenance or Periodic
Cleaning is performed when the following conditions are met.
❏ Maintenance Cleaning: 24 hours in advance
❏ Periodic Cleaning (Print Duration): 24 hours in advance
❏ Periodic Cleaning (Print Page): 10 pages in advance
❏ Periodic Cleaning (Print Length): 16 m in advance
You can press this area to perform Head Cleaning if necessary.
Also, maintenance cleaning may be performed regardless of the notification when the printer is turned back
on.
J
(Printer Status)
If a warning notification has been generated, is displayed on the right like this: . Press this area, then
press Message List to display a list of warning notifications. You can check detailed information and the
handling procedure for each item by pressing it in the list. Items are removed from the list as those actions are
taken.
K
(link to manual)
Displays a QR code that takes you directly to the online manual.
Depending on your country or region, the QR code may take you directly to the Epson Video Manuals.
L
(Maintenance)
The Maintenance menu is displayed on the screen, and you can perform maintenance such as cleaning parts
and replacing consumables.
M
/ (Switch connection status)
The following icons indicate the connection status between the computer and the printer.
Connection
on
:
SC-S7100 Series User's Guide
Introduction
21
Connection
off
:
Press this area to switch the connection on or off.
For example, you can finish work more efficiently by turning the connection off to prevent jobs from being
received before performing maintenance such as printing a nozzle check pattern or executing Head Cleaning
after cleaning around the print head.
Note that you may not be able to switch depending on the operating status of the printer. In this situation, the
icon is grayed out indicating that the function is disabled.
N
(Switch screens)
Switch between the Home screen (status display) and the Home screen (adjust while printing) every time this
area is pressed.
O
(feed media to cutting position)
Depending on the settings for the currently selected registered media, the end of the print may be on the platen
heater after printing is complete. If you want to send the end of the print to the cutting position, you can press
this area to feed the media to the cutting position. Furthermore, if you perform an operation to feed the end of
the print to the cutting position while it is in the cutting position, the print start position on the platen heater is
fed to the cutting position.
U “How to cut and remove the taken-up media” on page51
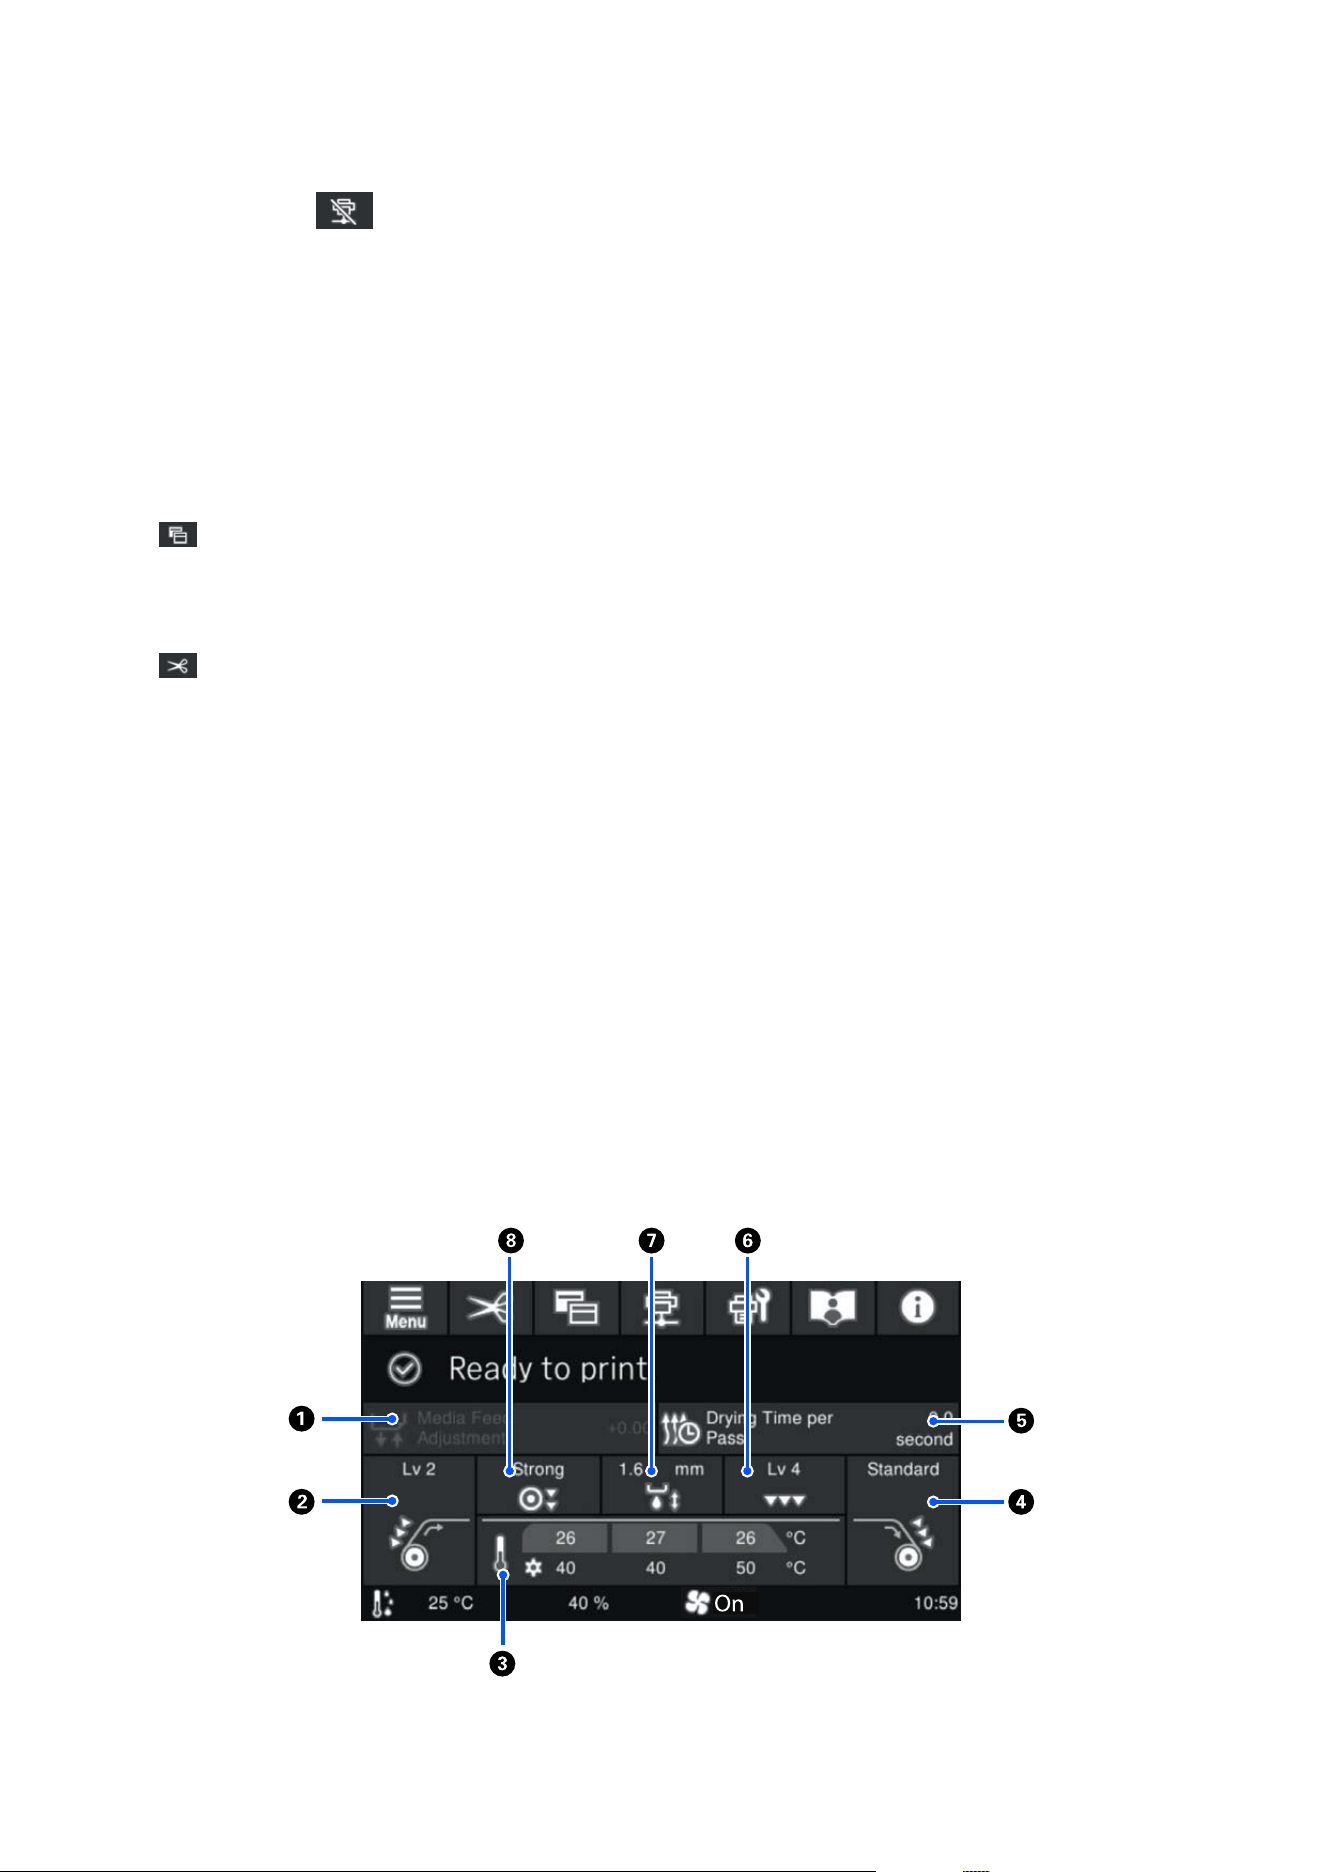
Home screen (adjust while printing)
The following section only describes parts that differ from the Home screen (status display). You can change the
value for each setting even while printing. Adjustments are applied to the settings for the currently selected media.
See the following for more information on each item.
U “Control Panel Menu” on page76
SC-S7100 Series User's Guide
Introduction
22

A
Media Feed Adjustment
To correct banding that occurs during printing, press this area to perform media feed corrections.
If the feed amount is too small, black bands (dark stripes) appear; correct the feed amount upwards (+).
In contrast, if the feed amount is too large, white bands (pale stripes) appear; correct the feed amount
downwards (-). The value indicates the amount of feed that has been corrected as a percentage or as a positive
(+) or negative (-) value.
B
Feeding Tension
Displays the Feeding Tension setting. Press this area to change the setting if necessary, for example, if the media
wrinkles during printing.
C
Heater temperature
The heater's current temperature is displayed on the top row, and the set temperature is displayed on the
bottom row. Press this area to change the temperature. You can also start/stop pre-heating for the heater.
D
Rewind Tension
Displays the Rewind Tension setting. Press this area to change the setting if necessary, for example, if the media
has slack while being rewound or the media wrinkles during printing.
E
Drying Time per Pass
Displays the setting for the Drying Time per Pass. Press this area to change the drying time.
F
Paper Suction
Displays the current setting for the strength of the paper suction applied by the platen heater to the media.
Press this area to change the setting if necessary, for example, if the media is wavy on the platen heater.
G
Platen Gap
Displays the setting for the platen gap. Press this area to change the setting.
H
Pressure Roller Load
Displays the setting for the pressure roller load. Press this area to change the setting if necessary, for example, if
the media wrinkles near the pressure roller during printing.
SC-S7100 Series User's Guide
Introduction
23

Notes on Handling
Notes When Using the Printer
Note the following points to avoid breakdowns,
malfunctions, and print quality decline.
❏ When using the printer, follow the operating
temperature and humidity range described in the
“Specifications Table”.
U “Specifications Table” on page120
Note, however, that the desired results may not
be achieved if the temperature and humidity
are within the limits for the printer but not
within those for the media. Be sure the operating
conditions suit the media. For more information,
see the documentation supplied with the media.
Also, when operating in dry areas, air conditioned
environments, or direct sunlight, maintain the
appropriate humidity.
❏ Make sure the work space is kept clean. If dust
or lint enter into the printer, it could damage
the printer, clog the print head nozzles, or cause
media feeding issues.
❏ Avoid using the printer in locations with heat
sources or that are exposed to direct drafts from
ventilators or air conditioners. The print head
nozzles could dry out and clog.
❏ The print head may not be capped (the print head
may not return to the right side) if the printer is
turned off when media is jammed or an error has
occurred. Capping is a function for automatically
covering the print head with a cap (lid) to prevent
the print head from drying out. In this case, turn
on the power and wait a while until capping is
performed automatically.
❏ When the power is on, do not remove the power
plug or cut the power at the breaker. Otherwise,
the print head may not be capped properly. In this
case, turn on the power and wait a while until
capping is performed automatically.
❏ Do not bend or tug the waste ink tube. Ink could
spill inside or around the printer.
❏ Maintenance such as cleaning and replacement
must be performed according to usage frequency
or at recommended intervals. Failure to perform
regular maintenance could result in loss of
print quality. In the absence of the appropriate
maintenance, continued use could damage the
print head.
U “Components Requiring Regular Cleaning
and Cleaning Timing” on page56
❏ Print head cleaning is performed automatically at
a fixed interval after printing to keep the print
head nozzles from clogging.
Be sure that the waste ink bottle is installed
whenever the printer is on.
❏ As well as being expended during printing,
ink is used during Head Cleaning and other
maintenance operations required to keep the print
head in working order.
Notes When Not Using the
Printer
If you are not using it, note the following points when
storing the printer. If it is not stored correctly, you may
not be able to print properly the next time it is used.
❏ If you are not going to use the printer for an
extended period (the power is off), perform
pre-storage maintenance using the cleaning ink
supply unit sold separately. If the printer is left
in this condition, it may be impossible to clear
clogging in the print head.
See the following for more information.
U “Pre-maintenance When Not Using the
Printer for an Extended Period” on page72
❏ If you do not print for a long time and do not
perform pre-storage maintenance, turn the printer
on at least once every seven days.
If you do not print for a long time, the print head
nozzles may become clogged. Head cleaning is
performed automatically after startup when the
printer is turned on. Head cleaning prevents print
head clogging and maintains print quality. Do
not turn the printer off until head cleaning is
complete.
Leaving the printer for too long without turning it
on may result in a malfunction.
SC-S7100 Series User's Guide
Introduction
24

❏ If you have not used the printer for a long time,
check the print head for clogging before you start
printing. Perform head cleaning if the print head
is clogged.
U “How to Print a Nozzle Check Pattern” on
page70
❏ The pressure rollers may crease media left in the
printer. The media may also become wavy or
curled, causing jams or resulting in the media
coming into contact with the print head. Remove
the media before putting the printer in storage.
After removing the media, move the media
loading lever to the front.
❏ Store the printer after confirming that the
print head has been capped (the print head is
positioned at the far right). If the print head is left
uncapped for a long time, the print quality may
decline.
Note:
If the print head is not capped, turn the printer on, and
then turn it off.
❏ Close all covers before placing the printer in
storage. If you are not using the printer for a
long time, put an anti-static cloth or cover on the
printer to prevent dust. The print head nozzles are
very small, and they can become clogged easily if
fine dust gets on the print head, and you may not
be able to print properly.
❏ When storing the printer, be sure that it is level:
do not store it on an angle, on end, or upside
down.
Notes When Using the Control
Panel
❏ Touch the panel with your fingers. It only works
when touched by a finger.
❏ Do not touch the panel with a sharp object, such
as the tip of a ballpoint pen or mechanical pencil.
There is a risk of damaging the panel.
❏ If the panel gets dirty, wipe it clean with a soft
cloth. If it is very dirty, soak a soft cloth in a
diluted solution of neutral detergent, wring it out
well, and wipe off the dirt. After that, wipe the
panel with a soft dry cloth. Do not use volatile
chemicals such as thinner, benzene, or alcohol.
There is a risk of damaging the surface of the
panel.
❏ Do not use the product in an environment subject
to rapid changes in temperature or humidity.
Condensation may form inside the panel, causing
performance to deteriorate.
❏ Some pixels on the screen may not light or may
remain lit constantly. Uneven brightness may also
occur due to the characteristics of the LCD, but
this is not a malfunction.
Notes on Handling Ink Supply
Units
Note the following points when handling ink supply
units to maintain good print quality.
❏ Extra ink is required to fully charge the print
head nozzles the first time the printer is used;
therefore, replacement ink supply units will be
needed earlier than usual.
❏ Store ink supply units at room temperature out of
direct sunlight.
❏ To ensure print quality, we recommend using all
of the ink before whichever of the following dates
is earlier:
❏ The expiration date shown on the ink supply
unit packaging
❏ One year from the date the ink supply unit
was installed in the printer
❏ If you move the ink supply units from a cold place
to a warm place, leave them at room temperature
for more than four hours before using them.
❏ Do not touch the IC chip on the ink supply unit.
You may not be able to print properly.
SC-S7100 Series User's Guide
Introduction
25

❏ Do not leave the printer without ink supply units
installed. The ink in the printer will dry out and
the printer will not function as expected. Leave
ink supply units installed even when the printer is
not in use.
❏ Because the IC chip manages the information for
the ink supply unit, such as the remaining ink
level, you can still reinsert and use them if you
removed them before the replacement message
appears.
❏ When storing an ink supply unit that has been
removed during use, use the cleaning stick from
the included maintenance kit in advance to absorb
any ink adhering to the ink supply port. If the
ink in the supply port dries out, it may cause ink
leakage when you reinstall the ink supply unit and
use it again.
See the following for detailed cleaning
instructions.
U “Pre-maintenance When Not Using the
Printer for an Extended Period” on page72
❏ While ink supply units are in storage, keep the ink
supply ports free of dust. The ink supply port has
a valve in it so it does not need to be capped.
❏ Removed ink supply units may have ink around
the ink supply ports, so be careful not to get any
ink on the surrounding area when removing the
ink supply units.
❏ To maintain the quality of the print head, this
printer stops printing before ink supply units are
completely expended.
❏ Although the ink supply units may contain
recycled materials, this does not affect printer
function or performance.
❏ Do not dismantle or remodel ink supply units.
You may not be able to print properly.
❏ Do not drop or knock an ink supply unit against
hard objects; otherwise, the ink may leak from the
ink supply unit.
❏ The ink supply units installed in the printer must
be removed and thoroughly shaken once every
three weeks.
U “Shaking” on page63
Precautions When Handling
and Storing Media
Note the following when handling or storing media.
Media that are in poor condition will not produce
good quality prints.
Be sure to read the documentation provided with each
type of media.
Precautions when handling and
storing
❏ Do not fold the media or damage the printable
surface.
❏ Do not touch the printable surface. Moisture and
oils from your hands can affect print quality.
❏ When handling media, hold it by both edges. We
recommend wearing cotton gloves.
❏ Keep the media dry.
❏ Packaging materials can be used to store media
and should not be thrown away.
❏ Avoid locations that are subject to direct sunlight,
excessive heat, or humidity.
❏ When not in use, media should be removed
from the printer, rewound, and inserted in its
original packaging for storage. Leaving media in
the printer for extended periods may cause it to
deteriorate.
❏ Do not place exposed media directly on the floor.
Media should be rewound and inserted in its
original packaging for storage.
SC-S7100 Series User's Guide
Introduction
26

❏ Do not carry media with the media surface
pressed against clothing.
Handle paper in its individual packaging until just
before loading the paper in the printer.
Handling Media After Printing
To maintain long lasting, high quality print results,
note the following points.
❏ Do not rub or scratch the printed surface. If it is
rubbed or scratched, the ink may peel off.
❏ Do not touch the printed surface, as this may
remove the ink.
❏ Make sure printouts are completely dry before
folding or stacking, If they are stacked without
drying, the colors in the overlapping areas
may change (or marks may be left on the
overlapping areas). These marks can be removed
if you remove the media and allow it to dry
immediately; however, if left unattended, the
marks may become permanent.
❏ Avoid direct sunlight.
❏ To prevent discoloration, store prints as instructed
in the documentation supplied with the media.
SC-S7100 Series User's Guide
Introduction
27

Introduction to the Software Provided
In the following section, we describe the Windows compatible software that is provided.
Note:
Printer drivers are not provided. A software RIP is required for printing. “Epson Edge Print PRO”, Epson's software RIP
for Windows, is supplied with the printer.
For Mac OS users
Download Epson Edge Dashboard from the Epson website to be able to do the following. For details, see the
manual provided with Epson Edge Dashboard.
❏ Update the firmware
❏ Import print settings files (EMX files) provided by Epson into commercial software RIPs.
https://www.epson.com
Basic Software
The method for providing software differ according to the country and region in which you live.
U.S., Canada, and Latin America
To view and download software options, visit the support site for your region and search for your product:
❏ https://epson.com/support (U.S.)
❏ https://epson.ca/support (Canada)
❏ https://latin.epson.com/support (Latin America)
Other Regions
The basic software is provided on Setup Navi (website).
Download and install the software from the Internet. Connect your computer to the Internet and install the
software.
The following table shows the software supplied.
For more information on each software application, see the online help for each software application.
Software Name Summary
EPSON Software Updater The software checks if new software or update information is available on the Internet and
installs it. You can also update the manuals for the printer.
Epson communications
drivers
Epson communications drivers are required when using Epson Edge Dashboard or Epson Edge
Print PRO, or when using a commercial RIP to connect a computer and the printer by USB.
Make sure these are installed.
SC-S7100 Series User's Guide
Introduction
28

Software Name Summary
EpsonNet Config SE With this software, you can configure various network settings for the printer from your
computer. This is useful as it allows you to enter addresses and names using the keyboard.
Epson Edge Print PRO
Epson Edge Print PRO is Epson's genuine software RIP. It makes color matching easy and allows you to make the
most of the features of your Epson printer.
Install Epson Edge Print PRO on a computer that has the basic software installed. To install it, access the URL
printed on the sheet inside the Epson Edge Print PRO package.
When you install Epson Edge Print PRO, the following two applications will also be installed at the same time.
❏ Epson communications drivers: This is required when connecting Epson Edge Print PRO to the printer.
❏ Epson Edge Dashboard: This supplements the Epson Edge Print PRO functions by importing print settings
files (EMX files) provided by Epson for each media type.
See the following for more information on Epson Edge Print PRO.
U “Using Epson Edge Print PRO (Windows Only)” on page31
Other Available Software
In addition to the basic software, the following software is available.
Software Name Summary
Epson Edge Dashboard
This is installed when you install Epson Edge Print PRO
*
. After installation, it operates as
resident software. The following features are available.
❏ Notifies you when a printer firmware update is available. You can download and update
the latest firmware by following the wizard.
❏ Notifies you of the status of registered printers when you are using a commercial software
RIP.
❏ You can use Epson Edge Dashboard to monitor the status of the printer when it is
connected to the computer with a USB cable or over a network.
U “Using Epson Edge Dashboard” on page31
Web Config This software is for network administrators and is pre-installed on the printer. You can start it
from a web browser via a network. You can configure the network security settings from Web
Config. It also provides an e-mail notification function to inform you about errors and other
events on the printer.
U “Using Web Config” on page33
SC-S7100 Series User's Guide
Introduction
29

* If you have not installed Epson Edge Print PRO, see below.
U.S., Canada, and Latin America
To download Epson Edge Dashboard, visit the support site for your region and search for your product:
❏ https://epson.com/support (U.S.)
❏ https://epson.ca/support (Canada)
❏ https://latin.epson.com/support (Latin America)
Other Regions
Start EPSON Software Updater and install it from Other useful software.
U “Checking Software Update Availability” on page32
Note:
In addition to the above, the Epson Web site provides useful software that is compatible with the printer. Check the
following.
https://www.epson.com
SC-S7100 Series User's Guide
Introduction
30

Using Epson Edge Print
PRO (Windows Only)
Starting Procedure
The application can be launched using any of the
following methods.
❏ Double click the shortcut icon created on the
desktop.
❏ Click the Windows Start button - All Programs -
Epson Software - Epson Edge Print.
For more information, see the Epson Edge Print PRO
online help.
Acquiring and Registering EMX
Files
To print correctly on the media you are using, you
need media settings and print information appropriate
for the media you are using.
For each media type, Epson provides a print setting
(EMX) file that contains optimized media settings and
print information (the provided files differ according
to the country and region in which you live).
See the following for details on EMX files.
U “Registering Media Settings on the Printer” on
page36
Epson Edge Print PRO allows you to easily perform
the following operations in wizard format.
❏ Download EMX files
❏ Automatically register print information in Epson
Edge Print PRO
❏ Register media settings to a media number on the
printer
For more details on how to acquire and register EMX
files, see the Epson Edge Print PRO help.
Closing Procedure
Select Done from File at the top left of the screen.
Using Epson Edge
Dashboard
Starting Procedure
Epson Edge Dashboard is a Web application.
A
The application can be launched using either of
the following two methods.
Windows
❏ Click the Epson Edge Dashboard icon on the
taskbar on your desktop, and select Show Epson
Edge Dashboard.
❏ Click Start - All Programs (or Programs) - Epson
Software - Epson Edge Dashboard.
Mac OS
❏ Click the Epson Edge Dashboard icon displayed
on the menu bar of the desktop, and select Show
Epson Edge Dashboard.
❏ Double-click the Applications - Epson Software
- Epson Edge Dashboard - Epson Edge
Dashboard icon.
SC-S7100 Series User's Guide
Introduction
31

B
Epson Edge Dashboard starts.
For more information, see the Epson Edge Dashboard
online help.
Registering the Printer
Epson Edge Dashboard can monitor, manage, and
copy Media Settings to registered printers.
For Windows, printers are registered automatically,
allowing you to monitor and manage them
immediately after starting the Epson Edge Dashboard.
If your printer is not automatically registered, check
that you are using it under the following conditions.
❏ A communication driver provided with the
printer has been installed on a computer
❏ The computer and printer are connected
❏ The printer is on standby
Printers are not automatically registered for Mac OS.
Register your printer manually from the Register
Printer screen. This screen is displayed when you start
Epson Edge Dashboard for the first time. For details,
see the Epson Edge Dashboard help.
Download the EMX File
To print correctly on your media when you are using
a commercial software RIP, you must register the
media's print information and media setting values on
the printer and in the RIP.
You can use print setting file (EMX file) provided by
Epson, which provides optimum print quality settings
for the commercially available media being used. (The
provided files differ according to the country and
region in which you live.)
See the following for details on EMX files.
U “Registering Media Settings on the Printer” on
page36
After downloading an EMX file, you need to perform
the following steps.
❏ Copy the media settings to the printer.
For details, see the Epson Edge Dashboard help.
❏ Import the print information (print settings) into
a commercial software RIP.
See the manual for your software RIP for details.
Closing Procedure
Close the Web browser. However, since Epson Edge
Dashboard is a resident software, it does not stop
running.
Using EPSON Software
Updater (Windows Only)
Note:
EPSON Software Updater is not available in all regions.
U.S., Canada, and Latin American users:
To check for software updates, visit the support site for
your region and search for your product:
❏ https://epson.com/support (U.S.)
❏ https://epson.ca/support (Canada)
❏ https://latin.epson.com/support (Latin America)
Checking Software Update
Availability
A
Check the following status.
❏ The computer is connected to the Internet.
❏ The printer and the computer can
communicate.
B
Start EPSON Software Updater.
Windows 8.1
Enter the software name in the search charm,
and select the icon displayed.
SC-S7100 Series User's Guide
Introduction
32
Other Windows versions
Click Start - All Programs (or Programs) -
Epson Software - EPSON Software Updater.
Note:
You can also start by clicking the printer icon
on the desktop taskbar and selecting Software
Update.
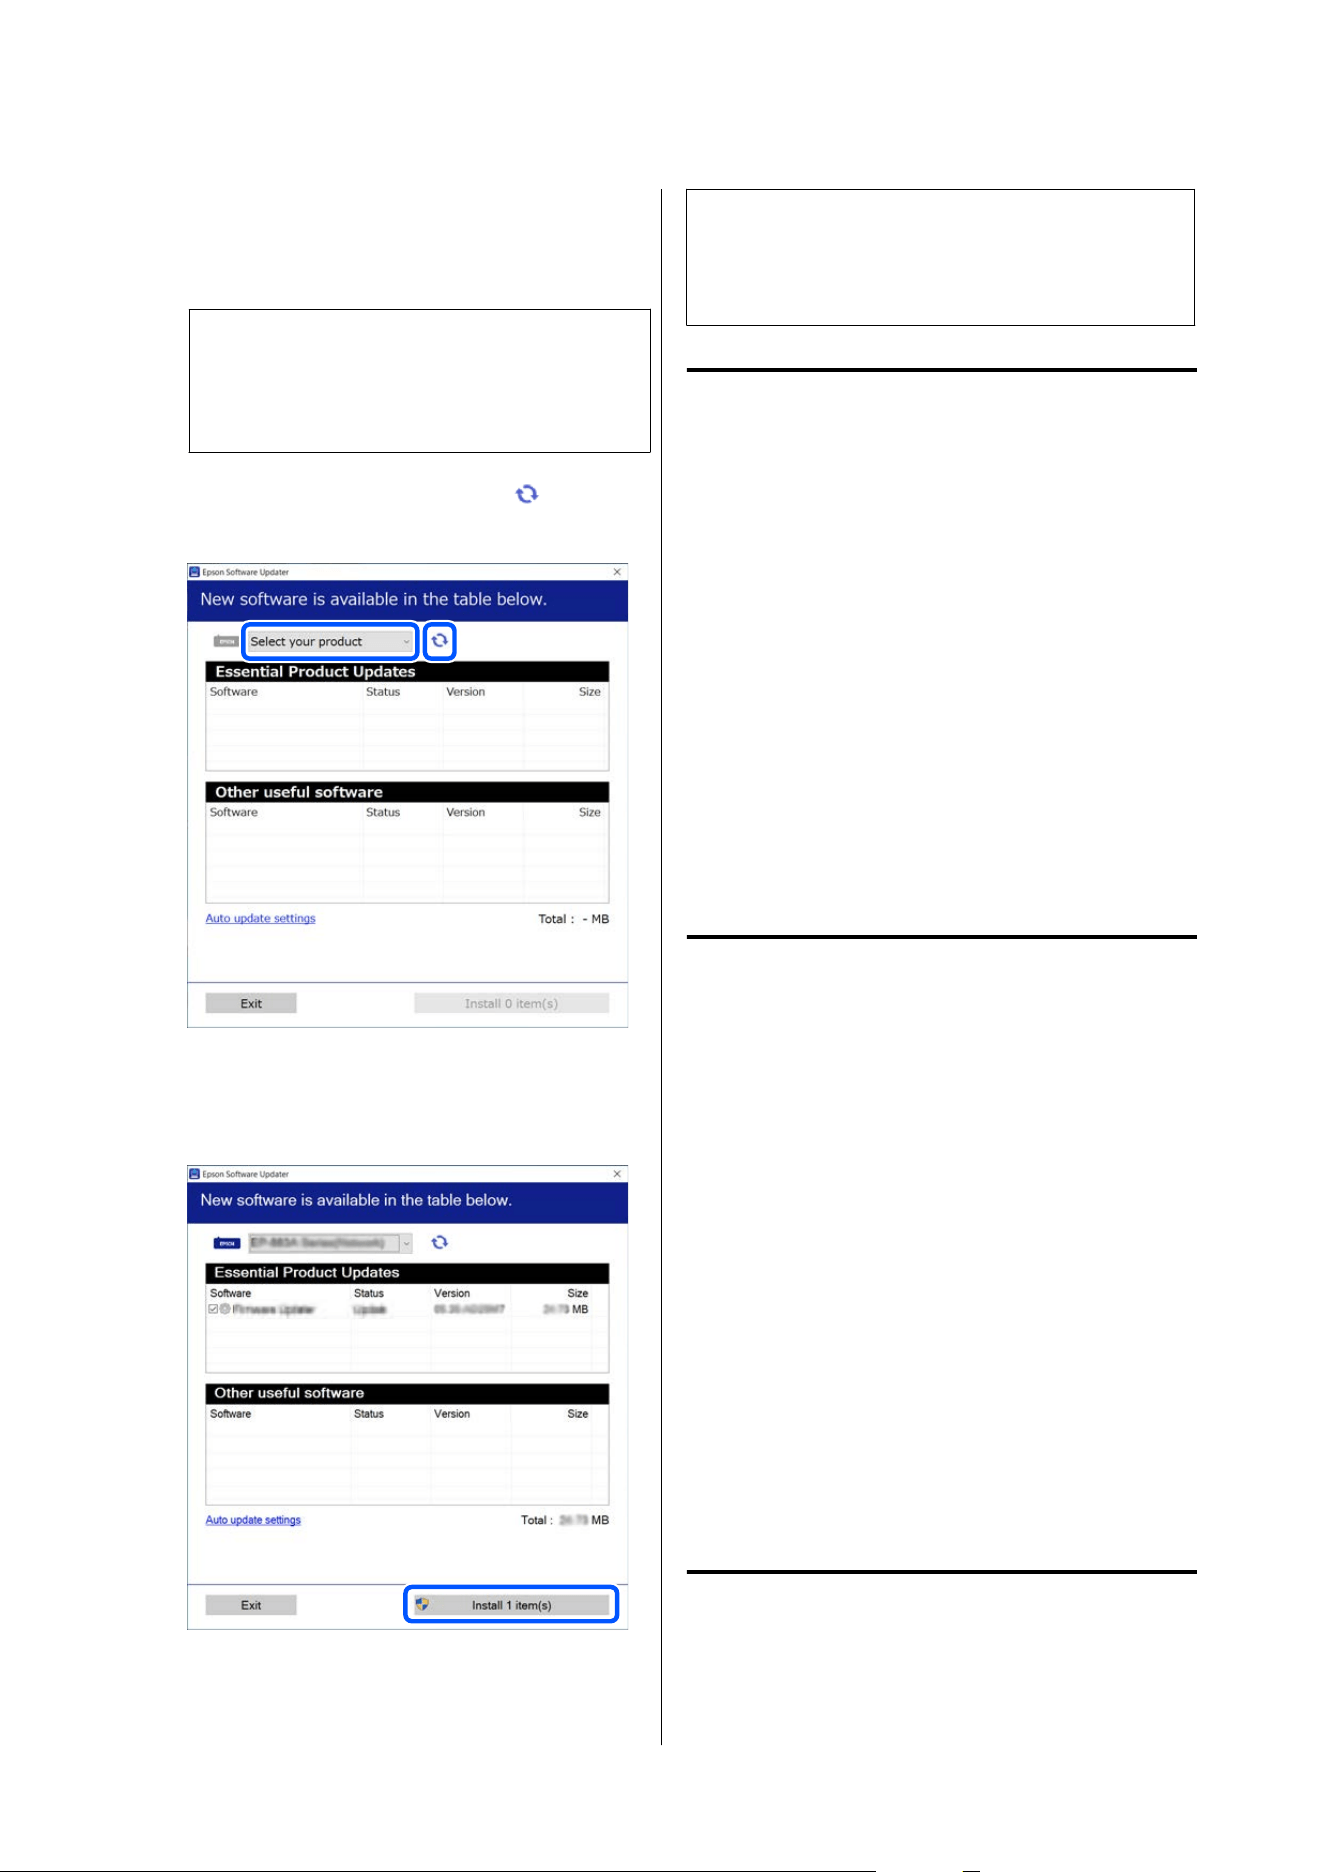
C
Select your printer, and then click to check
for the latest software.
D
Select the software you want to update, and
then click the Install button to start the
installation.
Follow the on-screen instructions to continue.
c
Important:
Do not turn off the computer or printer while
updating.
Receiving Update Notifications
A
Start EPSON Software Updater.
B
Click Auto update settings.
C
Select an interval for checking for updates on
the printer's Interval to Check box, and then
click OK.
Using Web Config
Provides an overview of starting the software and the
functions provided.
Summary of Functions
The following are the main functions of Web Config.
What general users can do
The following information can be checked by anyone.
❏ The status of the printer (such as the remaining
amount of ink and replacement parts, and the
firmware version)
❏ Network settings (these cannot be changed)
What administrators can do
When logged on as an administrator, you can
configure advanced security settings such as network
settings for the printer, SSL/TLS communication,
IPsec/IP filtering, and IEEE802.1X, which cannot be
done with the device alone.
Starting Procedure
Start the software on a computer that is connected to
the same network as the printer.
SC-S7100 Series User's Guide
Introduction
33

A
Check the printer's IP address.
Confirm that the printer is ready to print.
Press
(menu), and then select General
Settings - Network Settings - Network Status -
Wired LAN Status.
B
Start a Web browser on the computer that is
connected to the printer over the network.
C
Enter the IP address of the printer in the
address bar of the Web browser and press the
Enter or Return key.
Format:
IPv4: https://IP address of printer/
IPv6: https://[IP address of printer]/
Example:
IPv4: https://192.168.100.201/
IPv6: https://[2001:db8::1000:1]/
To log on as an administrator, proceed to the
next step.
D
Click Log in at the top-right of the screen, enter
your User Name and Current password, and
then click OK.
When you log in for the first time, leave
User Name blank, enter the initial password in
Administrator Password, and then click OK.
U “Checking the Initial Password” on
page35
Closing Procedure
Close the Web browser.
Uninstalling Software
c
Important:
❏ Log into a "Computer administrator" account
(an account with administrative privileges).
❏ Enter the administrator password when
prompted and then proceed with the
remainder of the operation.
❏ Exit any other applications that may be
running.
Windows
This section describes how to uninstall applications
using Epson communications drivers as an example.
We recommend performing this procedure with the
printer turned off and the cable disconnected from the
computer.
Windows 11
A
Click the Start button and then Settings.
The Settings screen is displayed.
B
Click Apps from the menu on the left side of
the screen.
C
Click Apps & features (or Installed apps).
D
Click the menu button for SC-S7100 Series
Comm Driver from the list and select
Uninstall from the menu.
Follow the on-screen instructions to continue.
When the confirmation message is displayed,
click Ye s .
Other Windows versions
A
Open the Control Panel, and then click
Uninstall a program.
B
Select SC-S7100 Series Comm Driver from the
list and click Uninstall.
Follow the on-screen instructions to continue.
When the confirmation message is displayed,
click Ye s .
Mac OS
The following describes how to remove Epson Edge
Dashboard.
A
Close Epson Edge Dashboard.
B
Double-click Applications - Epson Software
- Epson Edge Dashboard - Epson Edge
Dashboard Uninstaller.
Follow the on-screen instructions to continue.
SC-S7100 Series User's Guide
Introduction
34
Notes on the
Administrator Password
The initial password for each printer is different
when the printer is shipped from the factory. We
recommend that you do not continue to use the initial
password when you start using the printer; change it
to a password of your choice.
Checking the Initial Password
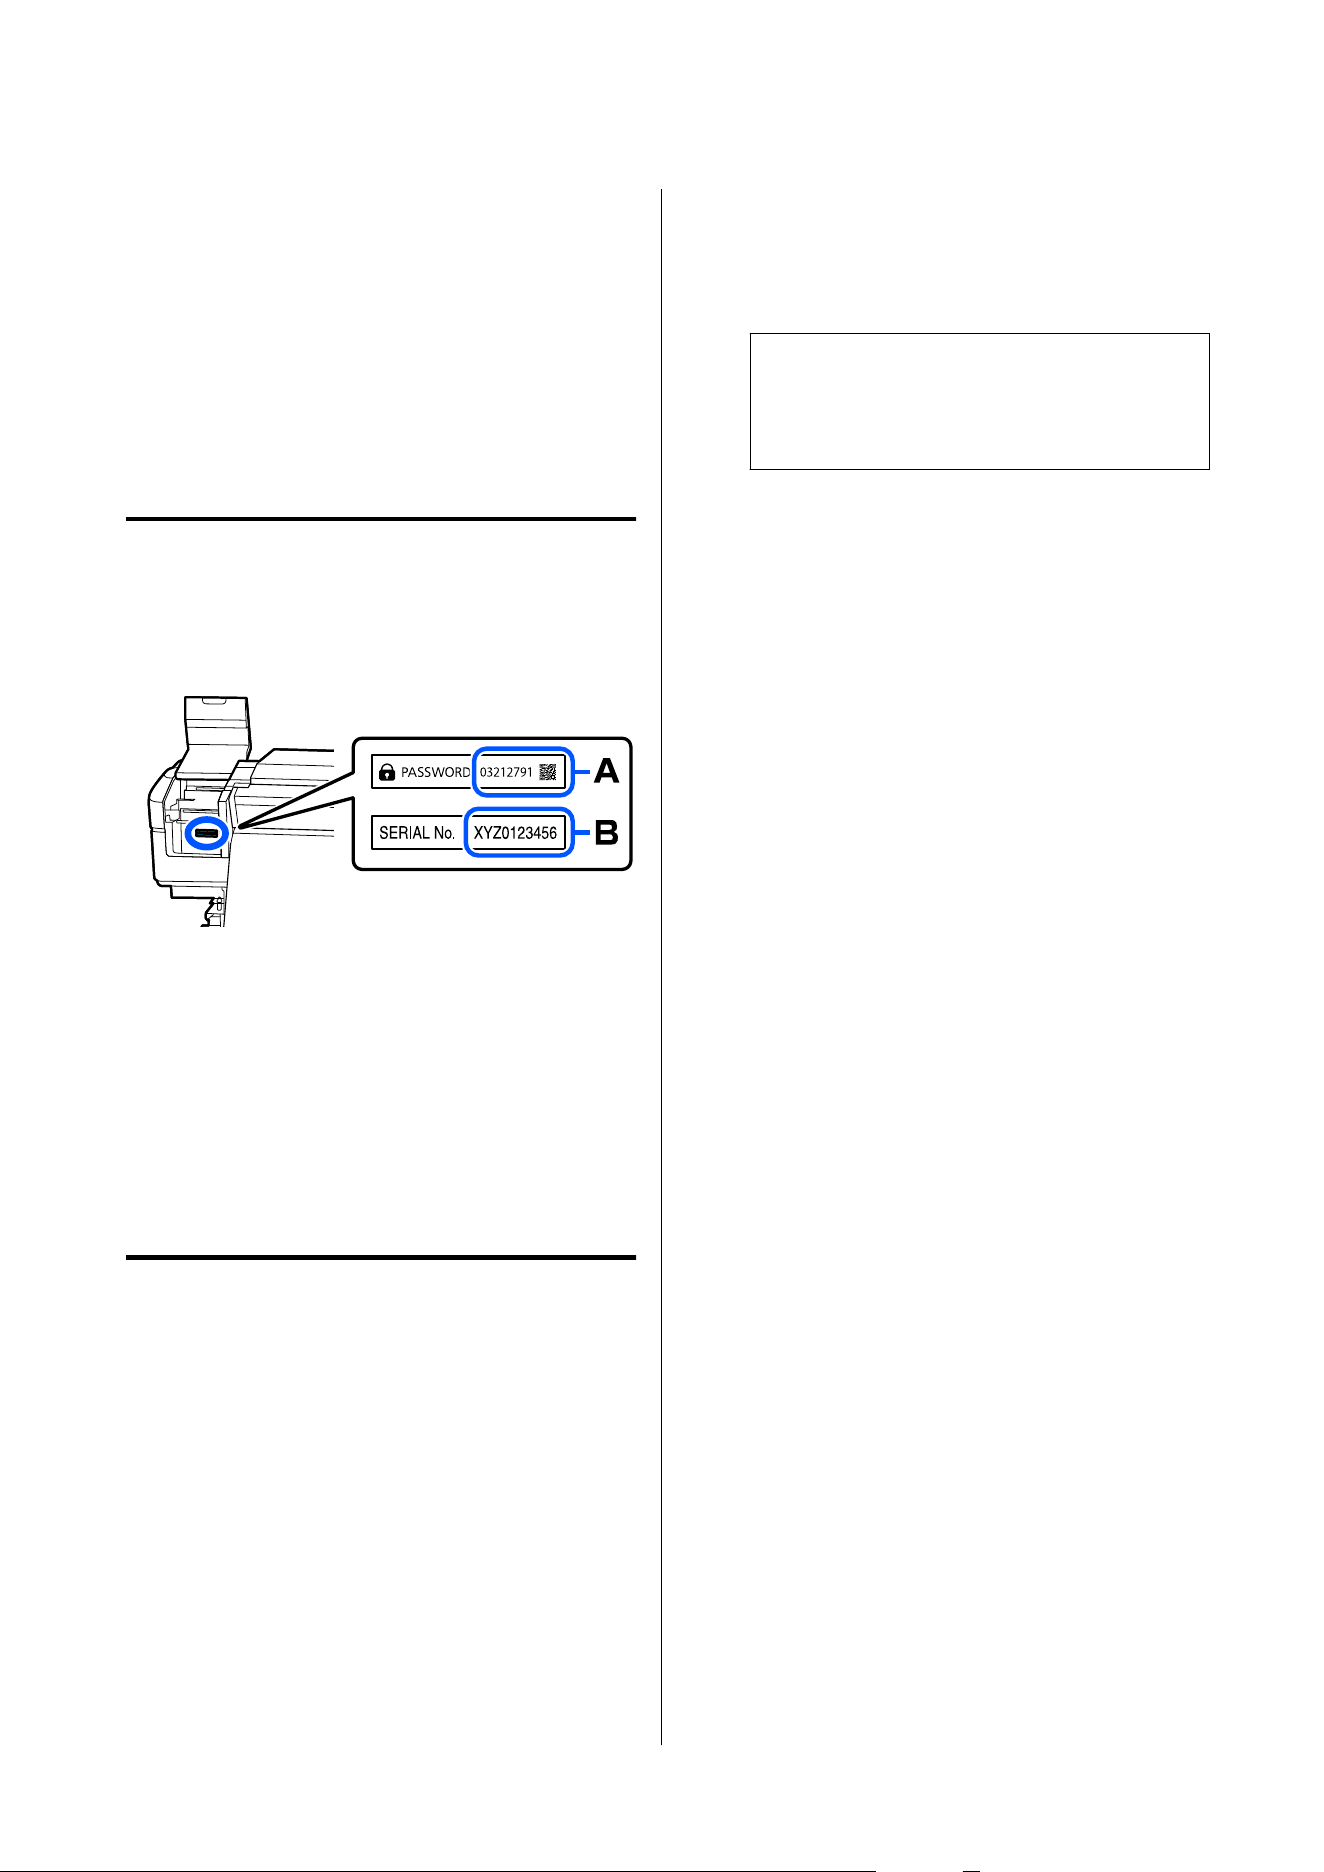
The initial administrator password is on the label
inside the left maintenance cover.
❏ If the label says "PASSWORD": The initial
password is indicated in A next to PASSWORD.
(In the example in the illustration, the initial
password is "03212791".)
❏ If the label does not say "PASSWORD": The initial
password is indicated in B next to SERIAL No.
(In the example in the illustration, the initial
password is "XYZ0123456".)
Changing the Password
A
Start Web Config and log in as an
administrator.
U “Starting Procedure” on page33
B
Select the Product Security tab - Change
Administrator Password.
C
Enter your current password in Current
password.
D
Enter your new password in New Password
and Confirm New Password, and then click
OK.
Input the User Name if necessary.
c
Important:
If you forget the password, contact your
dealer or Epson Support for assistance.
SC-S7100 Series User's Guide
Introduction
35
Basic Operations
Workflow for Correct
Printing
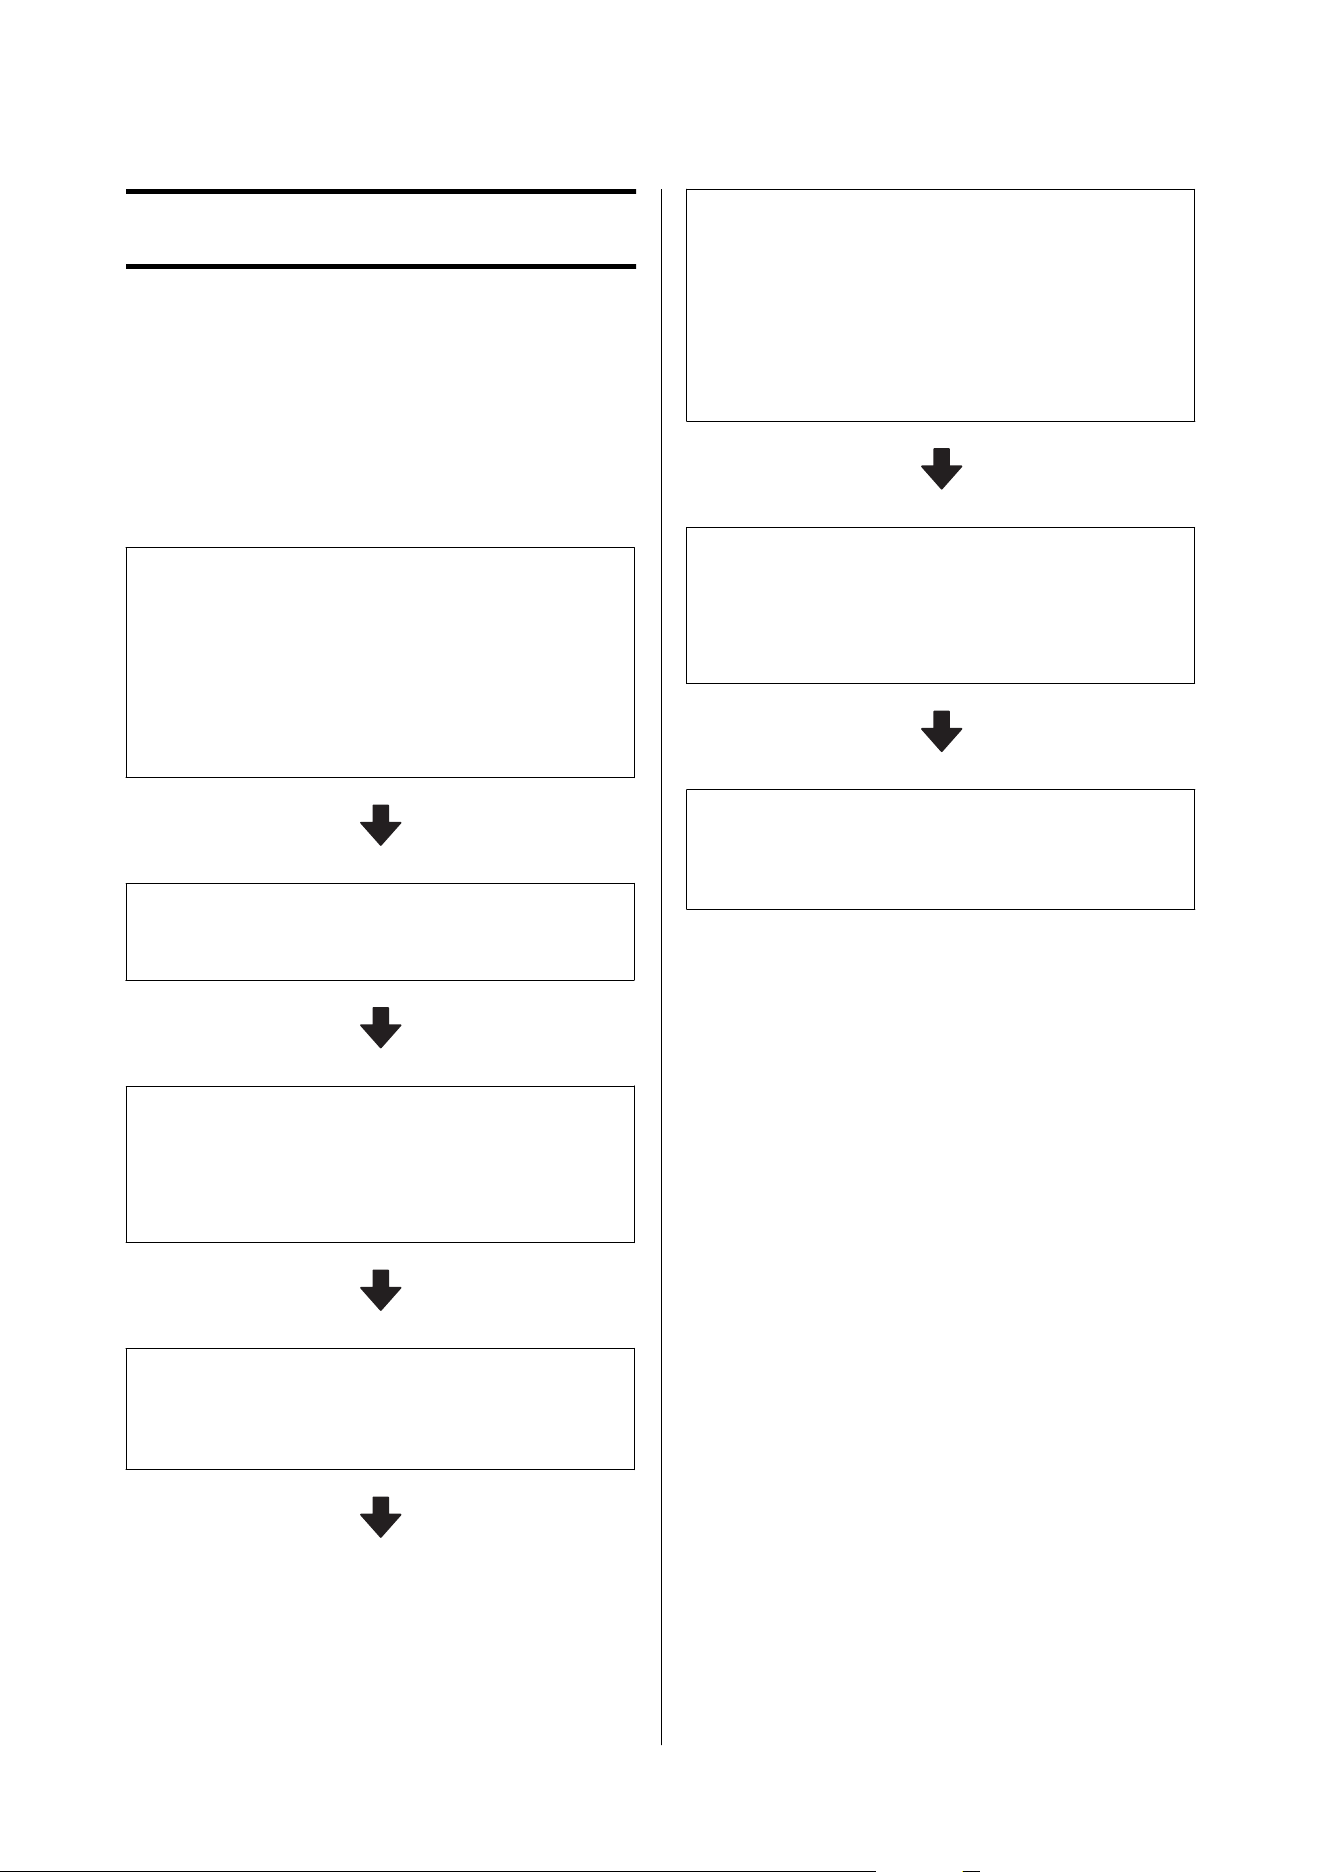
Follow the instructions below to print correctly on
your media.
1. Register media settings on the printer
To print properly on the media you are using, you need
the appropriate media settings and print information for
the media. You can easily register media settings to the
printer using the following method.
U “Registering Media Settings on the Printer” on
page36
2. Load media
U “Loading Media” on page38
3. Select settings for loaded media
Select the number of a registered media that has the
media setting values registered.
U “Configure Settings for Loaded Media” on page39
4. Load media into the auto take-up reel unit
U “Loading Media into the Auto Take-up Reel Unit” on
page41
5. Optimize the media settings (when using new
media)
Adjust the settings for optimal printing by correcting
for any individual differences between the media and
printer you are using.
U “Optimizing Media Settings (Automatic Adjustment)”
on page46
6. Checking before Printing
Before printing, check the amount of ink remaining and
the condition of the nozzles on the print head.
U “Before Printing” on page49
7. Print
Print from Epson Edge Print PRO or a commercial
software RIP.
Registering Media
Settings on the Printer
You can register media settings in one of the following
ways.
Using the general-purpose media settings that are
pre-registered in the printer
The printer has six general-purpose media settings
according to the media type.
When you select a media type, the printer prints using
the general-purpose media settings appropriate for
that media type.
After loading the media, select the media type
appropriate for the loaded media in Media Settings.
U “Configure Settings for Loaded Media” on
page39
SC-S7100 Series User's Guide
Basic Operations
36
Downloading an EMX file and registering the
settings
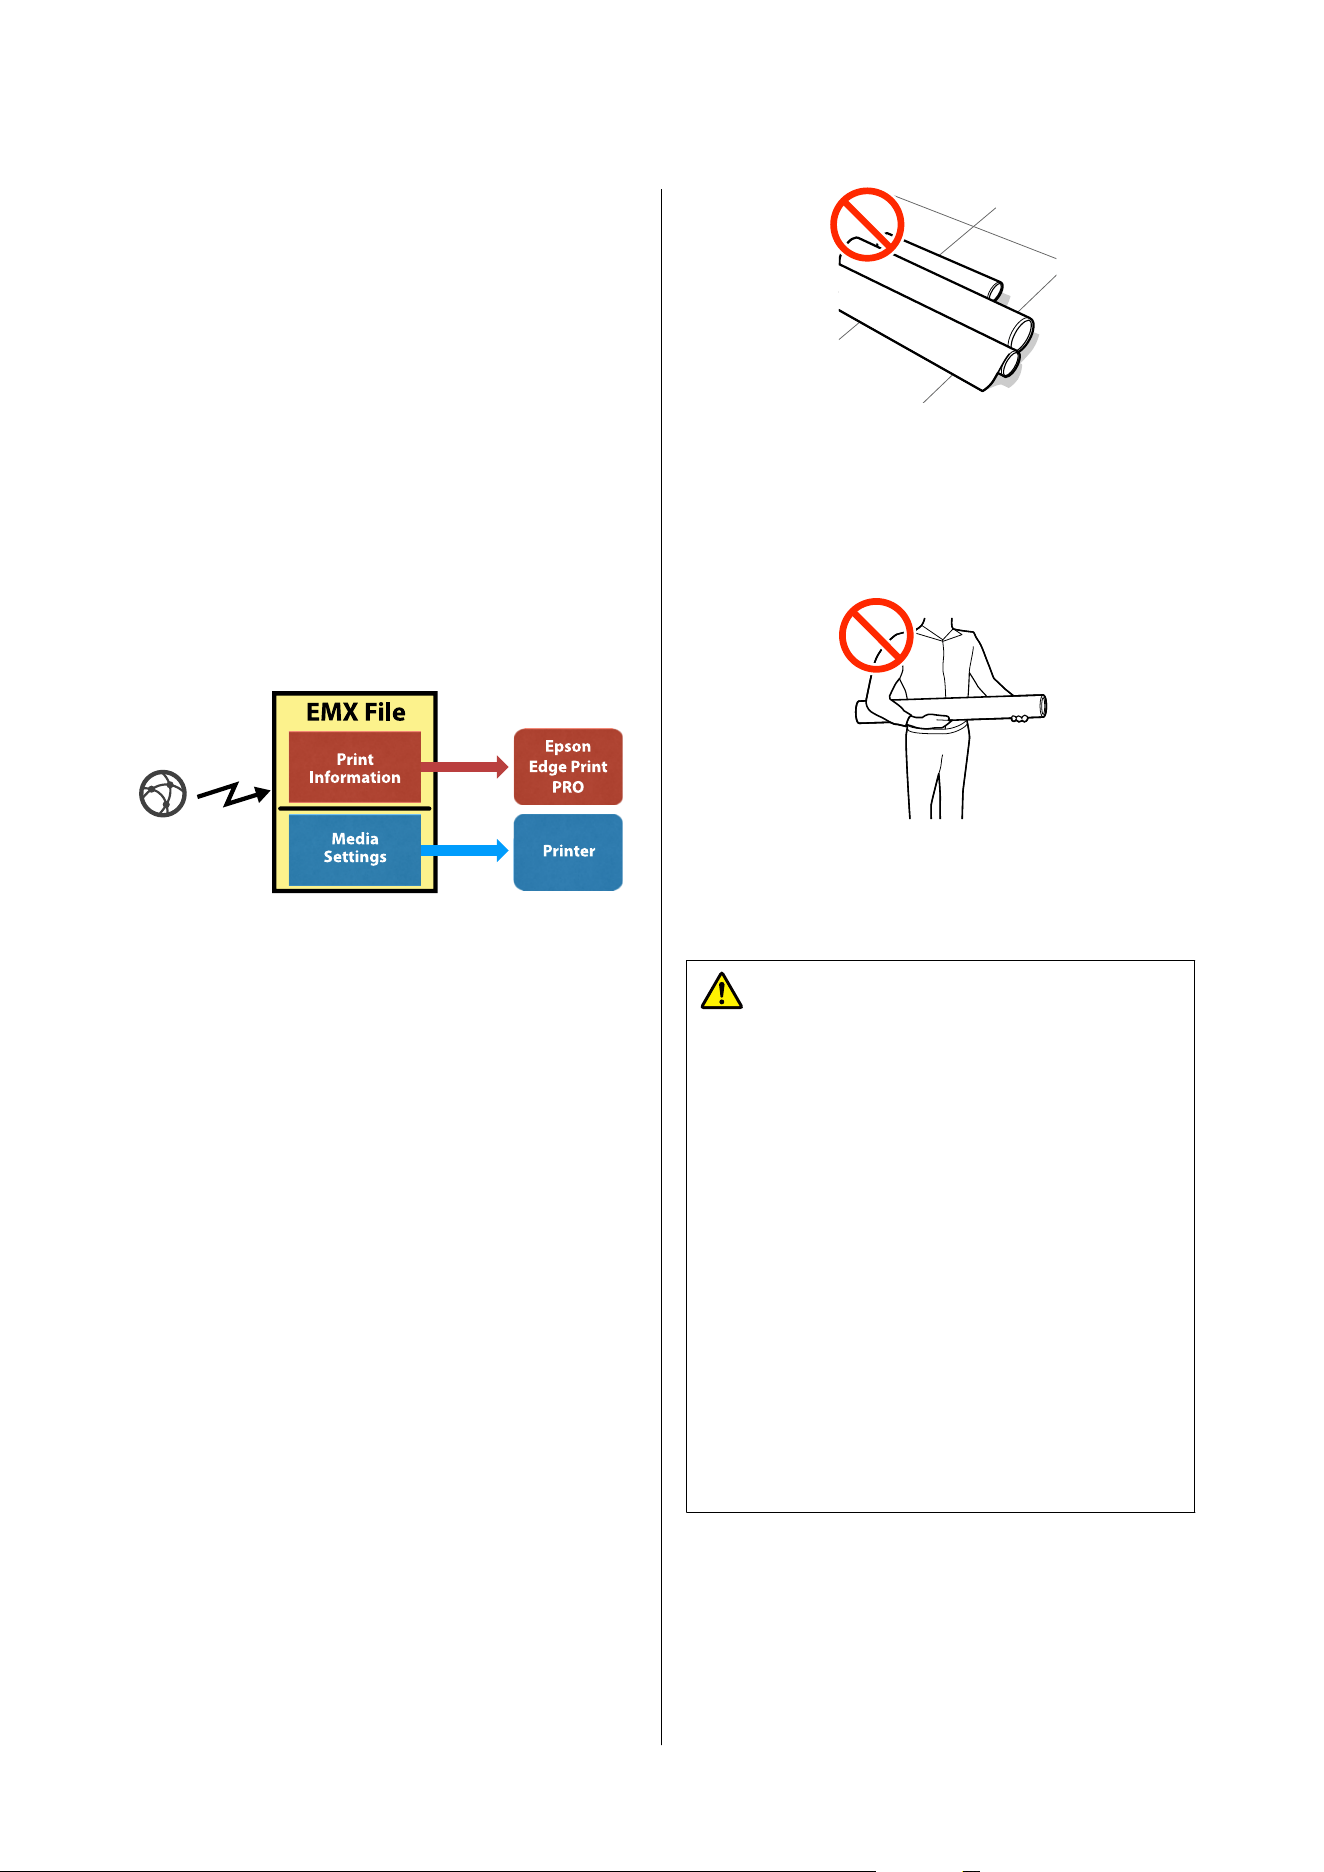
An EMX file provided by Epson is a single print
settings file containing the following information
necessary to print properly on commercially available
media (the provided files differ according to the
country and region in which you live).
❏ Print Information: Settings for ICC profiles that
are used in the RIP, the number of passes, the
resolution, and more.
❏ Media Settings: The settings appropriate for the
media you are using that are registered to the
printer's Media Management for the Platen Gap,
Feeding Tension, and more.
When using the software RIP Epson Edge Print PRO
supplied with the printer, download the EMX file from
Epson Edge Print PRO.
When using a commercial software RIP, download the
EMX file using Epson Edge Dashboard.
Notes When Handling
Media
If the following points are not observed when
handling media, small amounts of dust and lint may
stick to the media surface and cause ink drops in the
print results or cause the nozzles to clog.
Do not place exposed media directly on the floor.
Media should be rewound and inserted in its original
packaging for storage.
Do not carry media with the media surface pressed
against clothing.
Handle paper in its individual packaging until just
before loading the paper in the printer.
Notes on Loading Media
Caution:
❏ The heaters and media edge plate may be hot;
observe all necessary precautions. Failure to
observe the necessary precautions could result
in burns.
❏ Because the media is heavy, it should not be
carried by one person. For media weighing
40 kg (88 lb) or more, use of a lifter is
recommended.
❏ Be careful not to trap your hands or fingers
when opening or closing the printer cover.
Failure to observe this precaution could result
in injury.
❏ Do not rub your hands along the edges of the
media. The edges of the media are sharp and
can cause injury.
Load the media just before printing.
The pressure may crease media left in the printer. The
media may also become wavy or curled, causing jams
or resulting in the media coming into contact with the
print head.
SC-S7100 Series User's Guide
Basic Operations
37
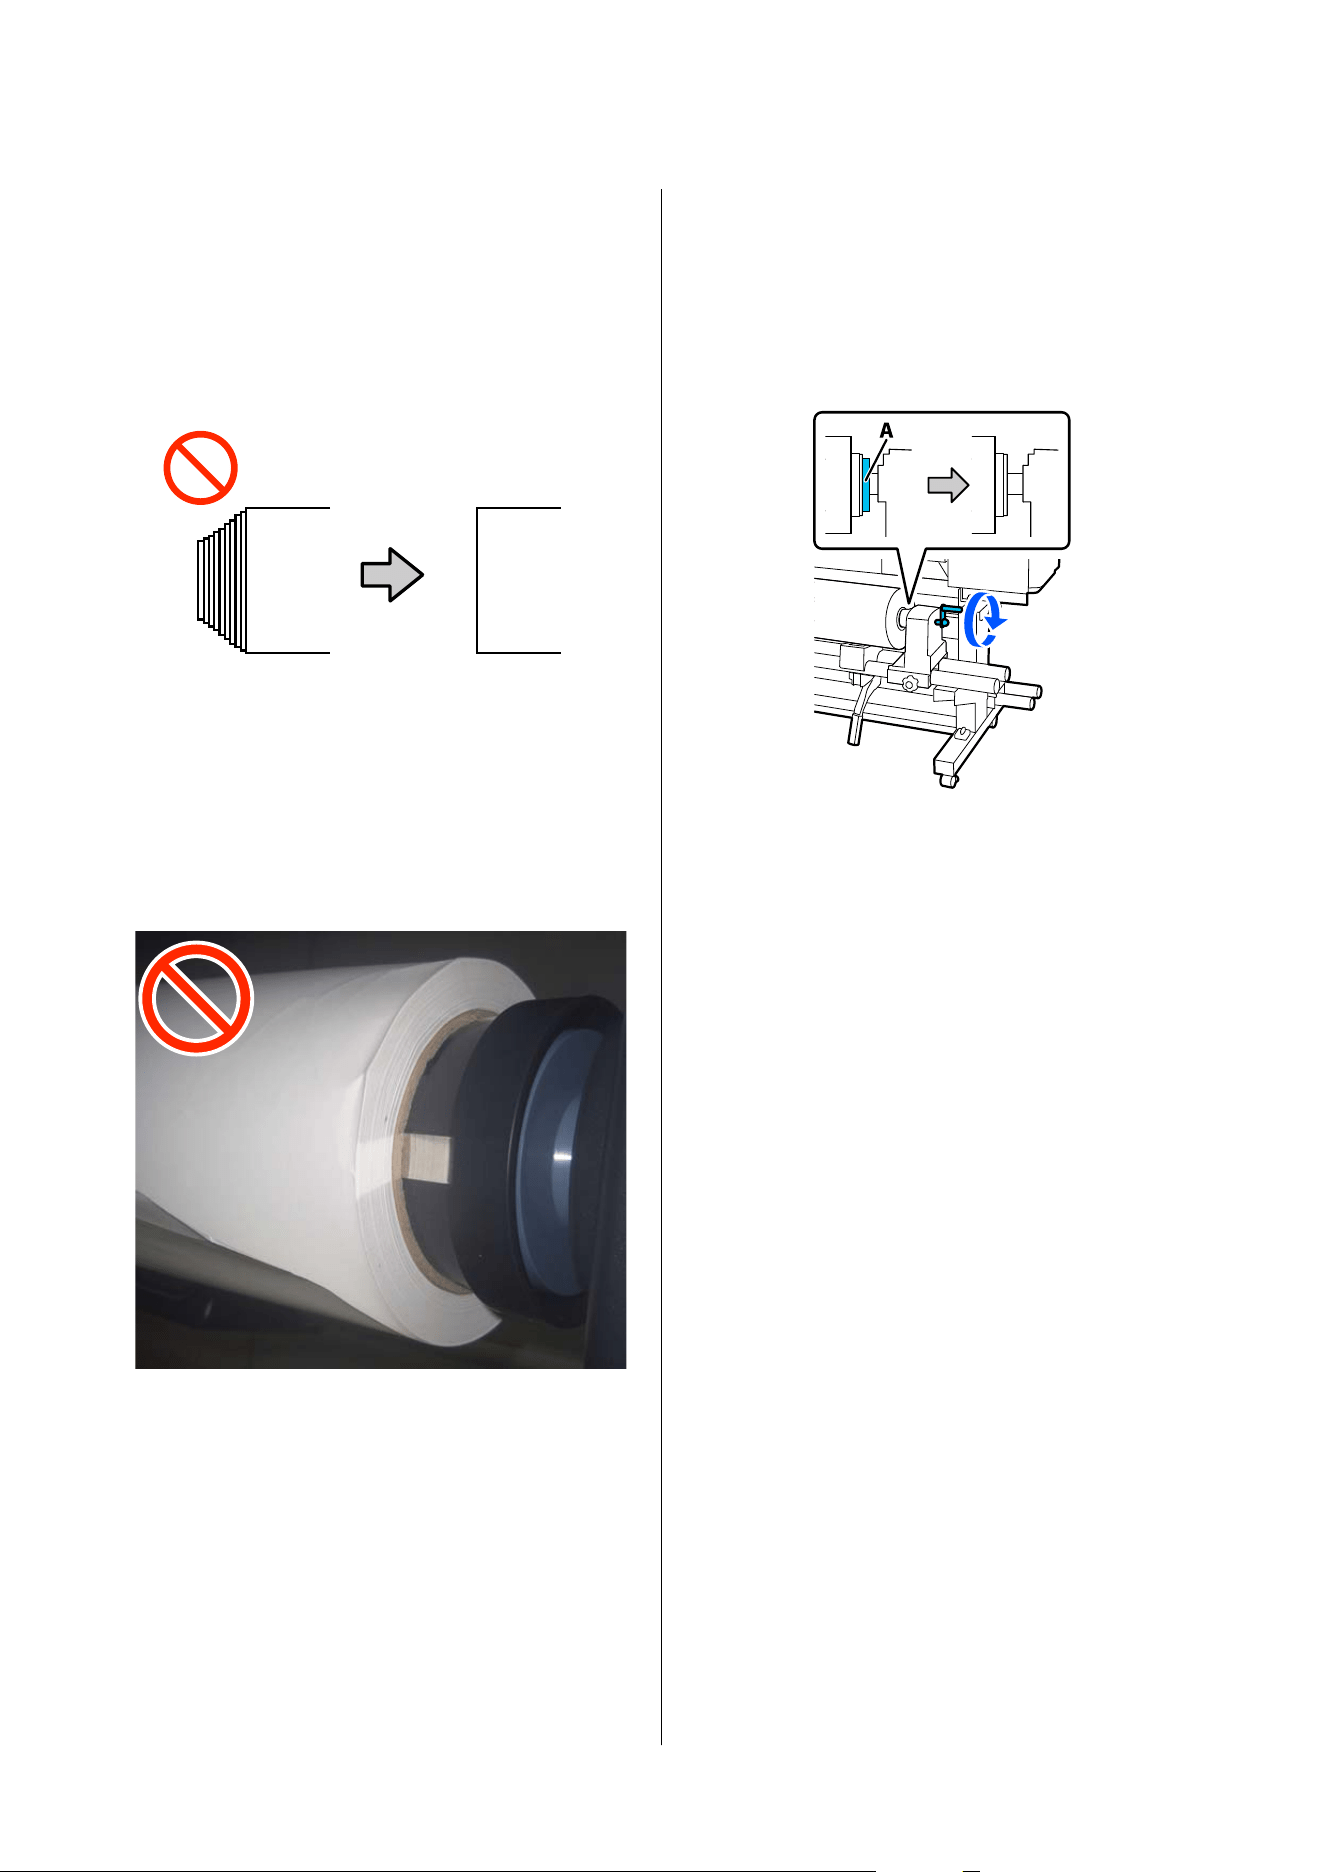
Do not load media if the right and left edges are
uneven.
If media is loaded and the right and left edges of the
roll are uneven, media feeding problems may cause
the media to move around during printing. Either
rewind to align the edges or use a roll without any
issues.
Media that cannot be used
Do not use media that is folded, wrinkled, scuffed,
torn, or dirty. The media could rise up and contact the
print head and damage it.
Do not use paper that is frayed at the ends of the roll,
wrinkled, or torn, as shown in the following image.
Do not rotate the handle for the media holder too
much.
When turning the handle to push in part A, as
shown in the illustration, do not turn the handle any
further once part A is hidden. Failure to observe this
precaution could damage the media holder.
Handle the media edge plates with care.
❏ When aligning the media edge plates with both
edges of the media, make sure that the edges of
the media are positioned so that they are at the
centers of the holes in the media edge plates.
Incorrect positioning causes banding (horizontal
banding, tint unevenness, or stripes) during
printing.
❏ Do not use the media edge plates with media that
is 0.5 mm (0.02 in.) or more thick. The media
edge plates could touch and damage the print
head.
❏ Do not use the media edge plates if the left and
right sides of the printed media are smudged
when printing.
❏ Move the media edge plates to the left and right
edges of the platen heater when they are not in
use.
Loading Media
As shown below, you can load media while checking
the procedure on the panel screen.
You can check the procedure in a video on YouTube.
SC-S7100 Series User's Guide
Basic Operations
38
Epson Video Manuals
Read the following before starting this procedure.
U “Notes When Handling Media” on page37
U “Notes on Loading Media” on page37
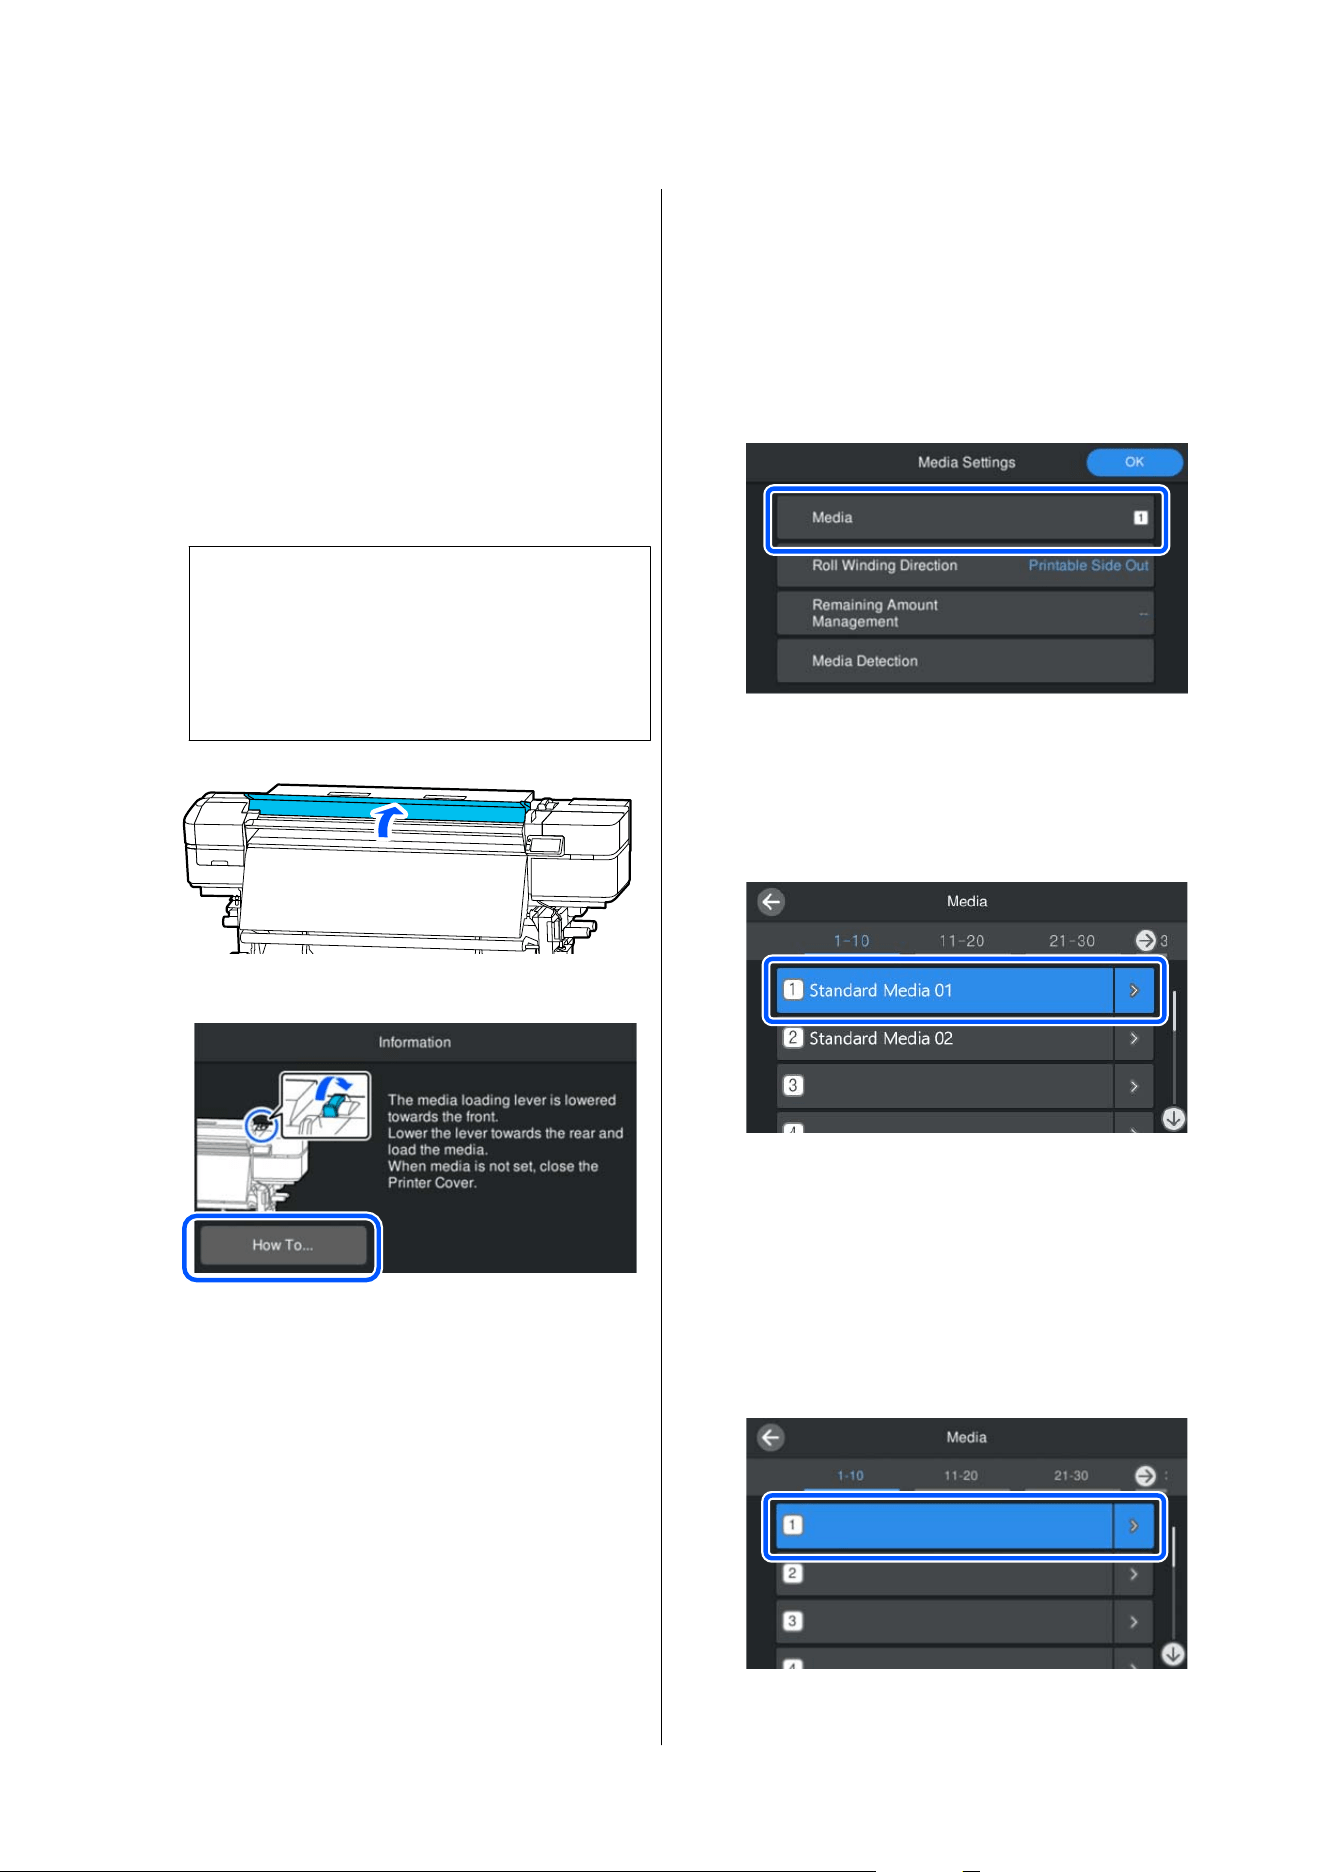
A
Check that Open Printer Cover and load the
media. is displayed, and then open the printer
cover.
c
Important:
Do not touch any components inside the
printer cover or maintenance cover except in
the locations specified. This can damage the
printer so it cannot print properly.
B
Press How To... to view the loading procedure.
Follow the on-screen instructions to perform
the procedure.
When you have finished loading the media, follow
the instructions on the control panel to configure the
settings for the loaded media.
U “Configure Settings for Loaded Media” on
page39
Configure Settings for
Loaded Media
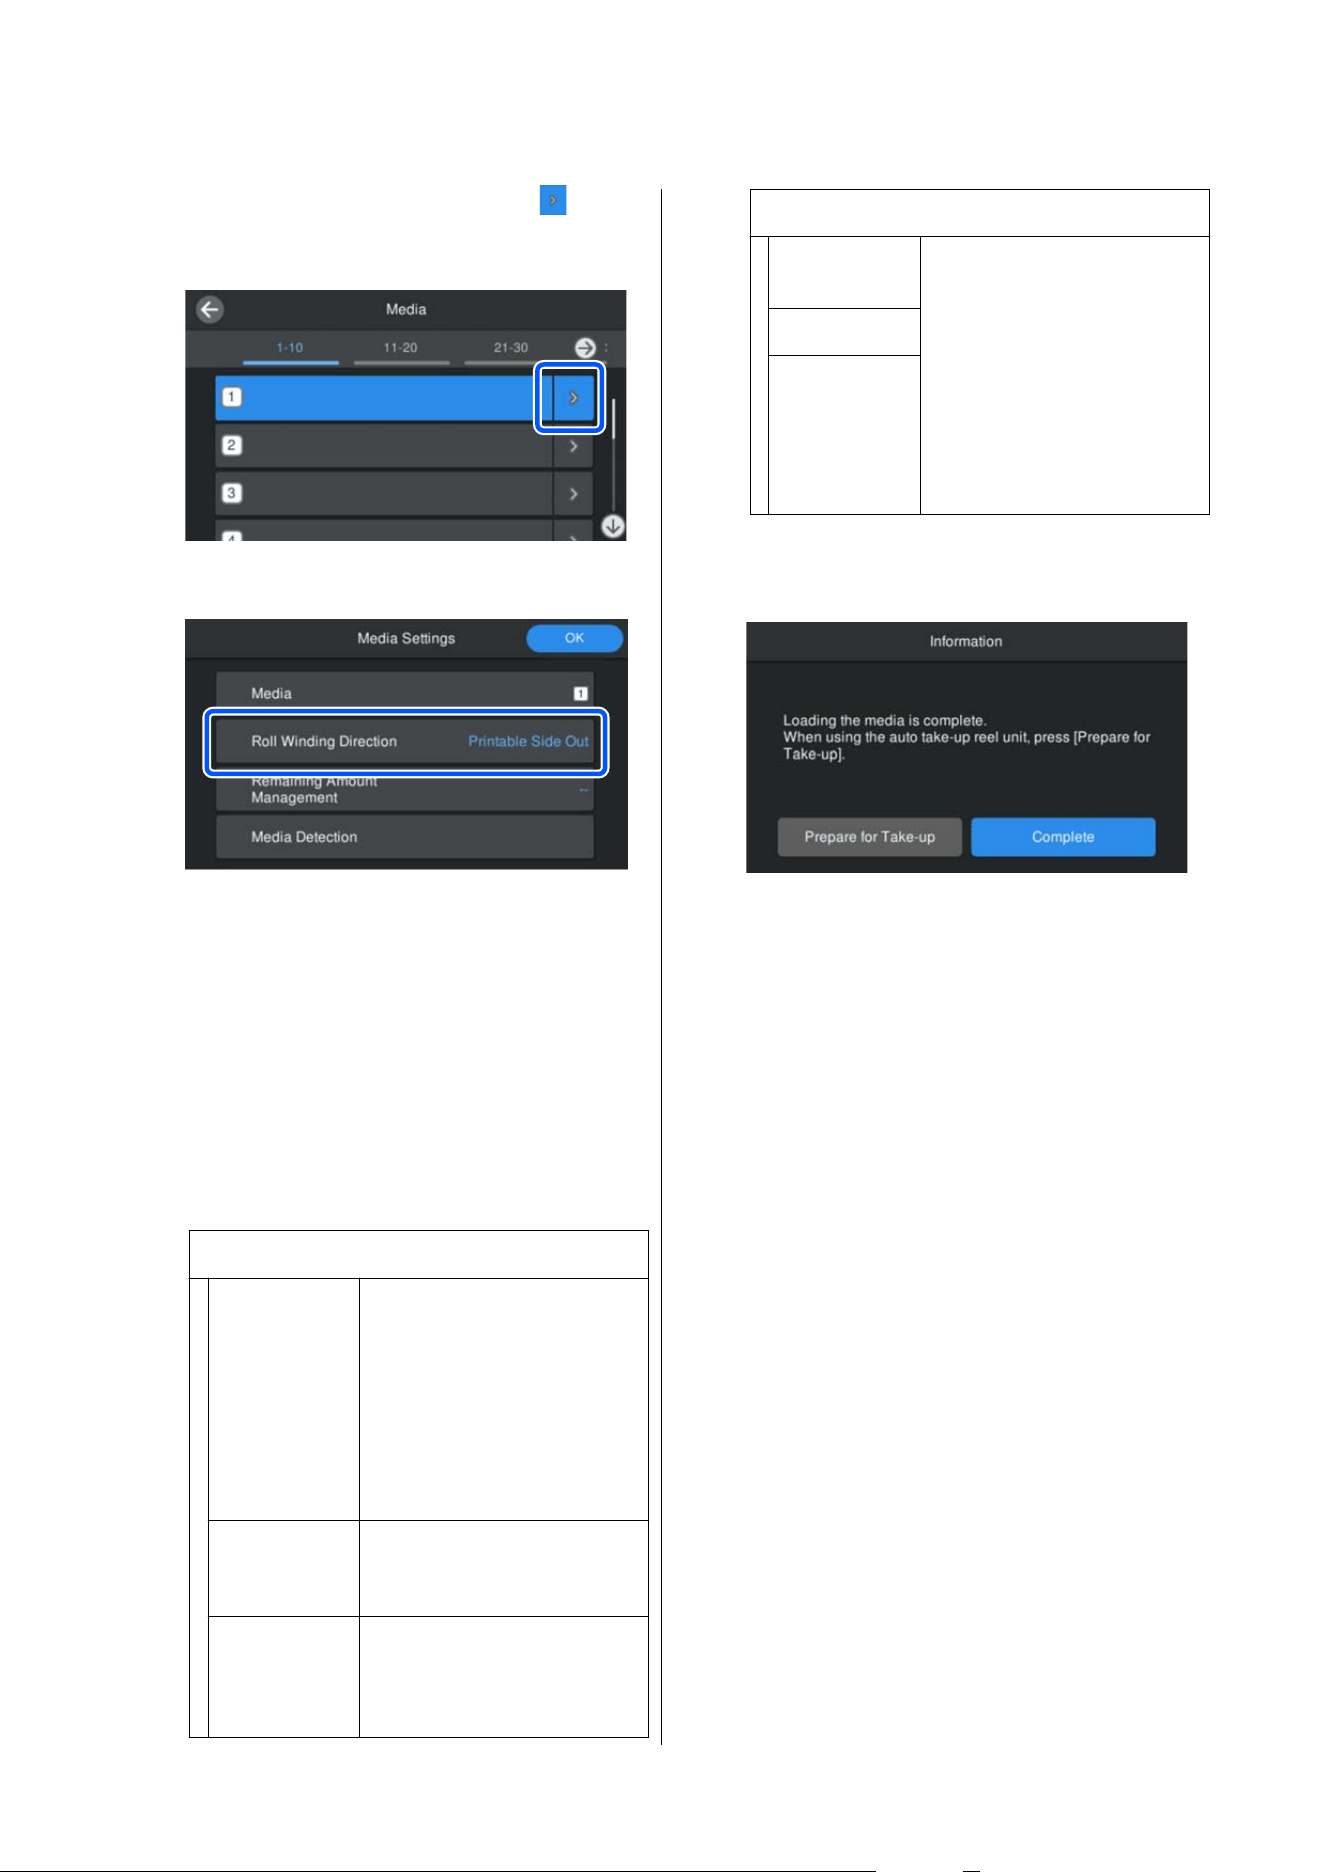
A
Press Media to select the registered
media number that contains the settings
corresponding to the loaded media.
When Media Settings have been registered
for the loaded media/EMX files have already
been downloaded.
Select the registered media number.
When Media Settings have not been
registered for the loaded media
In this situation, select an unregistered number.
If you select an unregistered number, the
screen where you can select the Media Type is
displayed. Select the Media Type that matches
the type of media you have loaded.
SC-S7100 Series User's Guide
Basic Operations
39
To change the media type later, press -
Edit - Media Type on the screen where the
registered media number is displayed.
B
Check the Roll Winding Direction.
On the Media Settings screen, check that
the winding direction matches the winding
direction for the loaded media.
If the direction is different, press Roll Winding
Direction to change the setting.
C
If necessary, enable operations to perform when
feeding paper and press OK.
See the table below and configure the settings if
necessary.
Remaining Amount Management
Remaining
Amount
Management
The manufacturer's default
setting is set to Off, but if
you turn this setting On and
set the Remaining Amount
and Remaining Alert, you can
check the remaining amount
of media on the control panel
making it easier to understand
when to replace the media.
Remaining
Amount
Input the Remaining Amount
of the loaded media (length of
the media).
Remaining
Alert
A warning message is
displayed when the remaining
amount of the roll set here is
reached.
Media Detection
Width
Detection
We recommend this normally
be set to the manufacturer's
default setting.
Turn Off the Width Detection
and End Detection settings
and enter the Media Width
only when using transparent
media or other media whose
media width or media end
cannot be detected correctly.
Media Width
End Detection
D
Follow the on-screen instructions to finish
loading the media.
When using the auto take-up reel unit
Press Prepare for Take-up. Next, see the
following.
U “Using the Auto Take-up Reel Unit” on
page40
When not using the auto take-up reel unit
Press Complete.
After a moment, Ready to print. is displayed
on the screen, and you can start printing. Send
the data you want to print from the computer.
Using the Auto Take-up
Reel Unit
The auto take-up reel unit automatically takes up
media as it is printed.
The auto take-up reel unit for this printer can take up
paper in either of the directions shown below.
Printed side out Printed side in
SC-S7100 Series User's Guide
Basic Operations
40
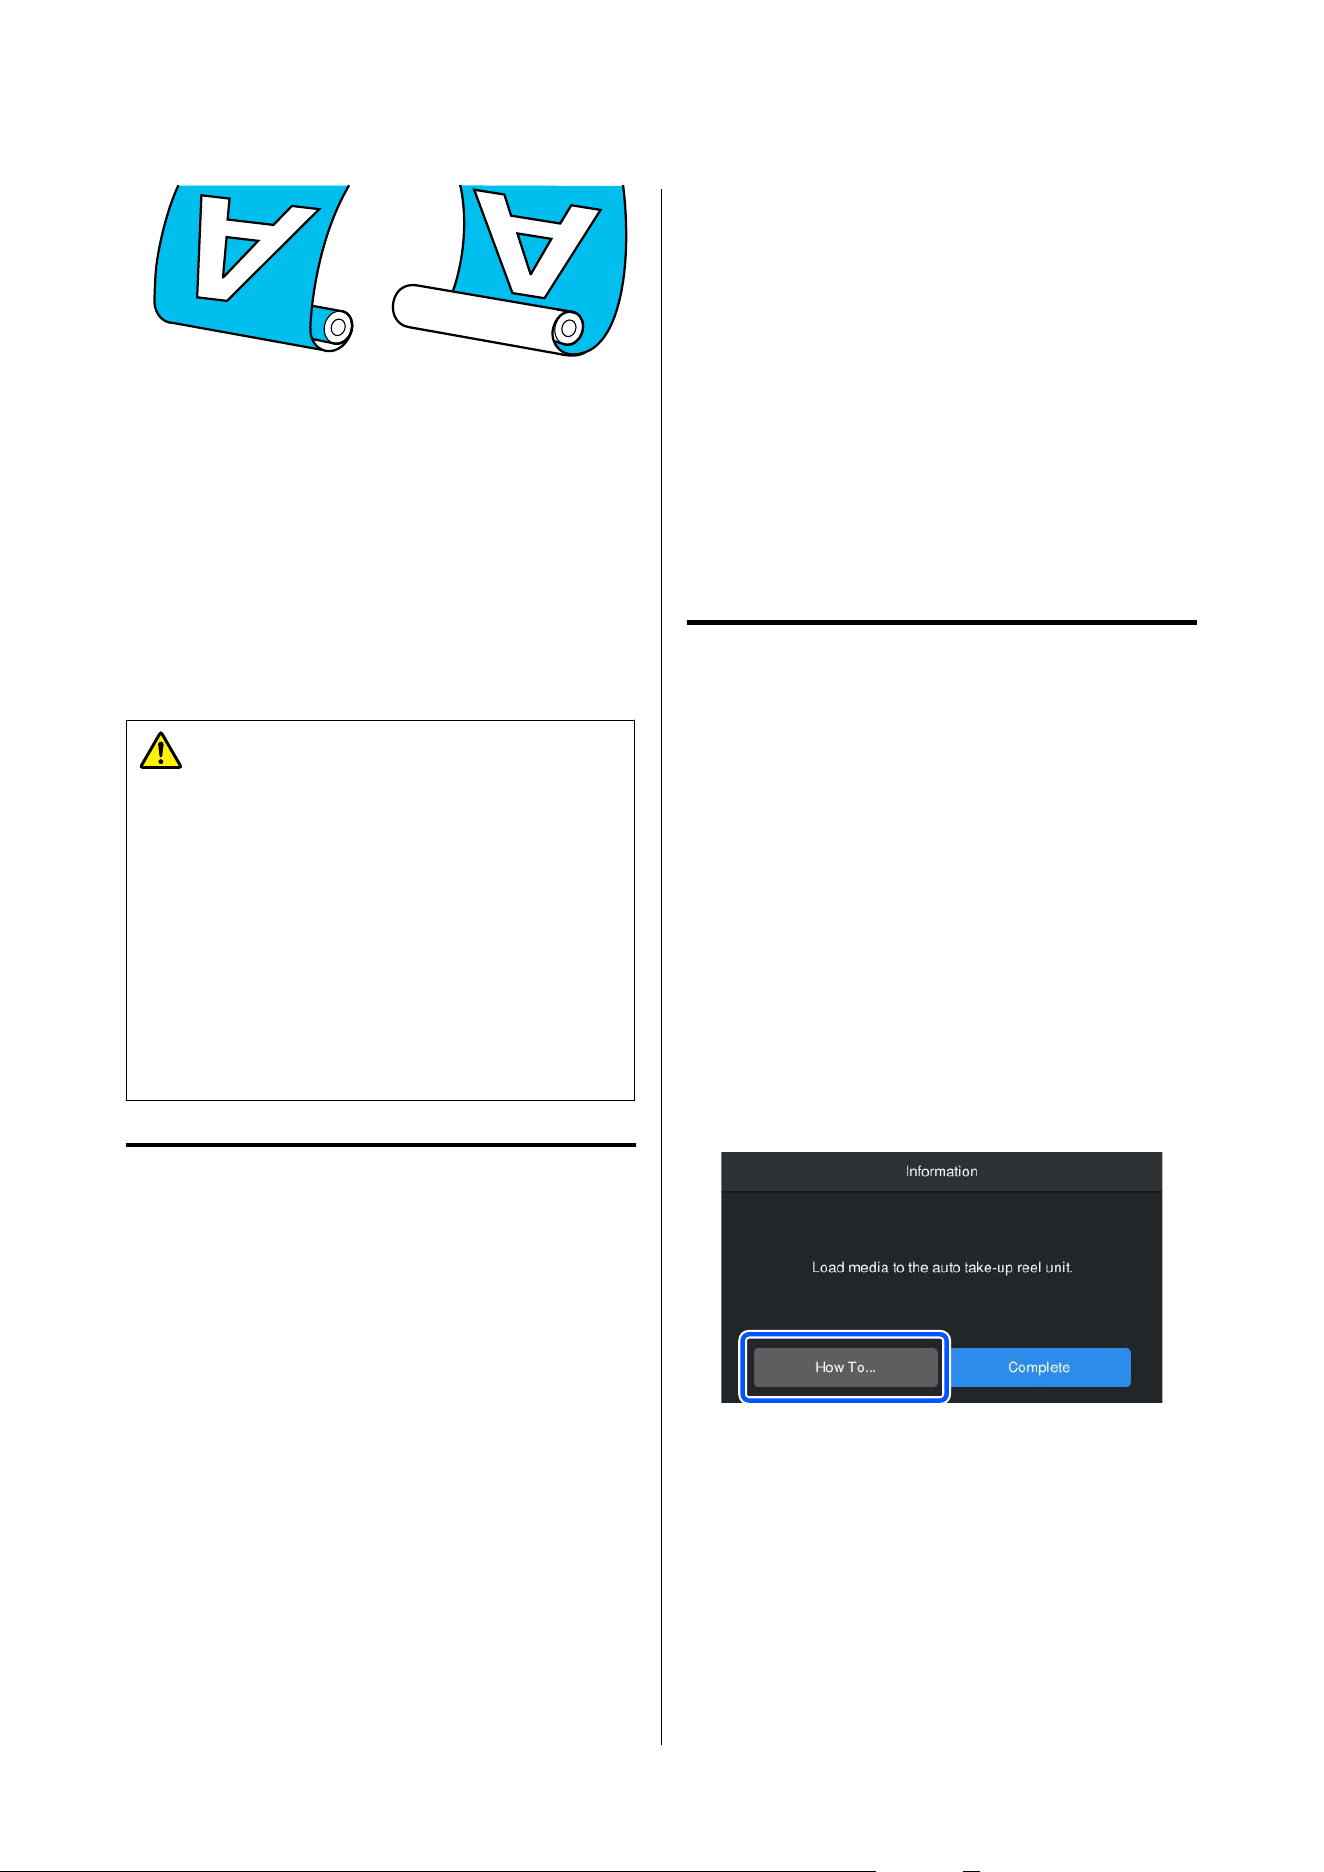
Taking-up with printed side out places the printed
surface on the outside of the roll.
Taking-up with printed side in places the printed
surface on the inside of the roll.
You can check the procedure in a video on YouTube.
Epson Video Manuals
Caution:
❏ Follow the instructions in the manual when
loading media or roll cores or removing media
from the take-up roll.
Dropping media, roll cores, or take-up rolls
could result in injury.
❏ Be sure that your hands or hair do not get
caught in the media feeding unit or the auto
take-up reel unit while it is operating.
Failure to observe this precaution could result
in injury.
Precautions to Prevent
Misalignment during Take-up
The following points will help to minimize
misalignment when taking up long printed materials.
Make sure you are using a roll core that is longer
than the width of the media.
This ensures that the media can be correctly taken-up
without extending beyond the edges of the roll core.
Cut the edge of the paper and affix paper tape to
secure it in the center of the roll core.
Due to the following advantages, we recommend using
paper tape to attach the media to the take-up roll core.
❏ It helps prevent lateral misalignment and media
from moving around, ensuring stable print length
for each job.
❏ It minimizes media waste.
When the supplied paper tape runs out, purchase
commercially available paper tape with a width of 20
to 25 mm (0.8 to 1 in.) (that is not easily stretched or
cut). If you do not have any paper tape, as a substitute
you can cut media into a strip that is 20 to 25 mm (0.8
to 1 in.) wide and approximately 70 cm (28 in.) long,
and then attach the ends of the strip to the media and
the roll core using adhesive tape.
Loading Media into the Auto
Take-up Reel Unit
This section shows the procedure using paper tape.
You can check the procedure in a video on YouTube.
Epson Video Manuals
If you do not have paper tape at hand, see the
following.
U “When Paper Tape is Unavailable” on page42
In the following screen, press How To... on the screen
to load the media while checking the procedure on the
panel's screen. Follow the on-screen instructions.
SC-S7100 Series User's Guide
Basic Operations
41
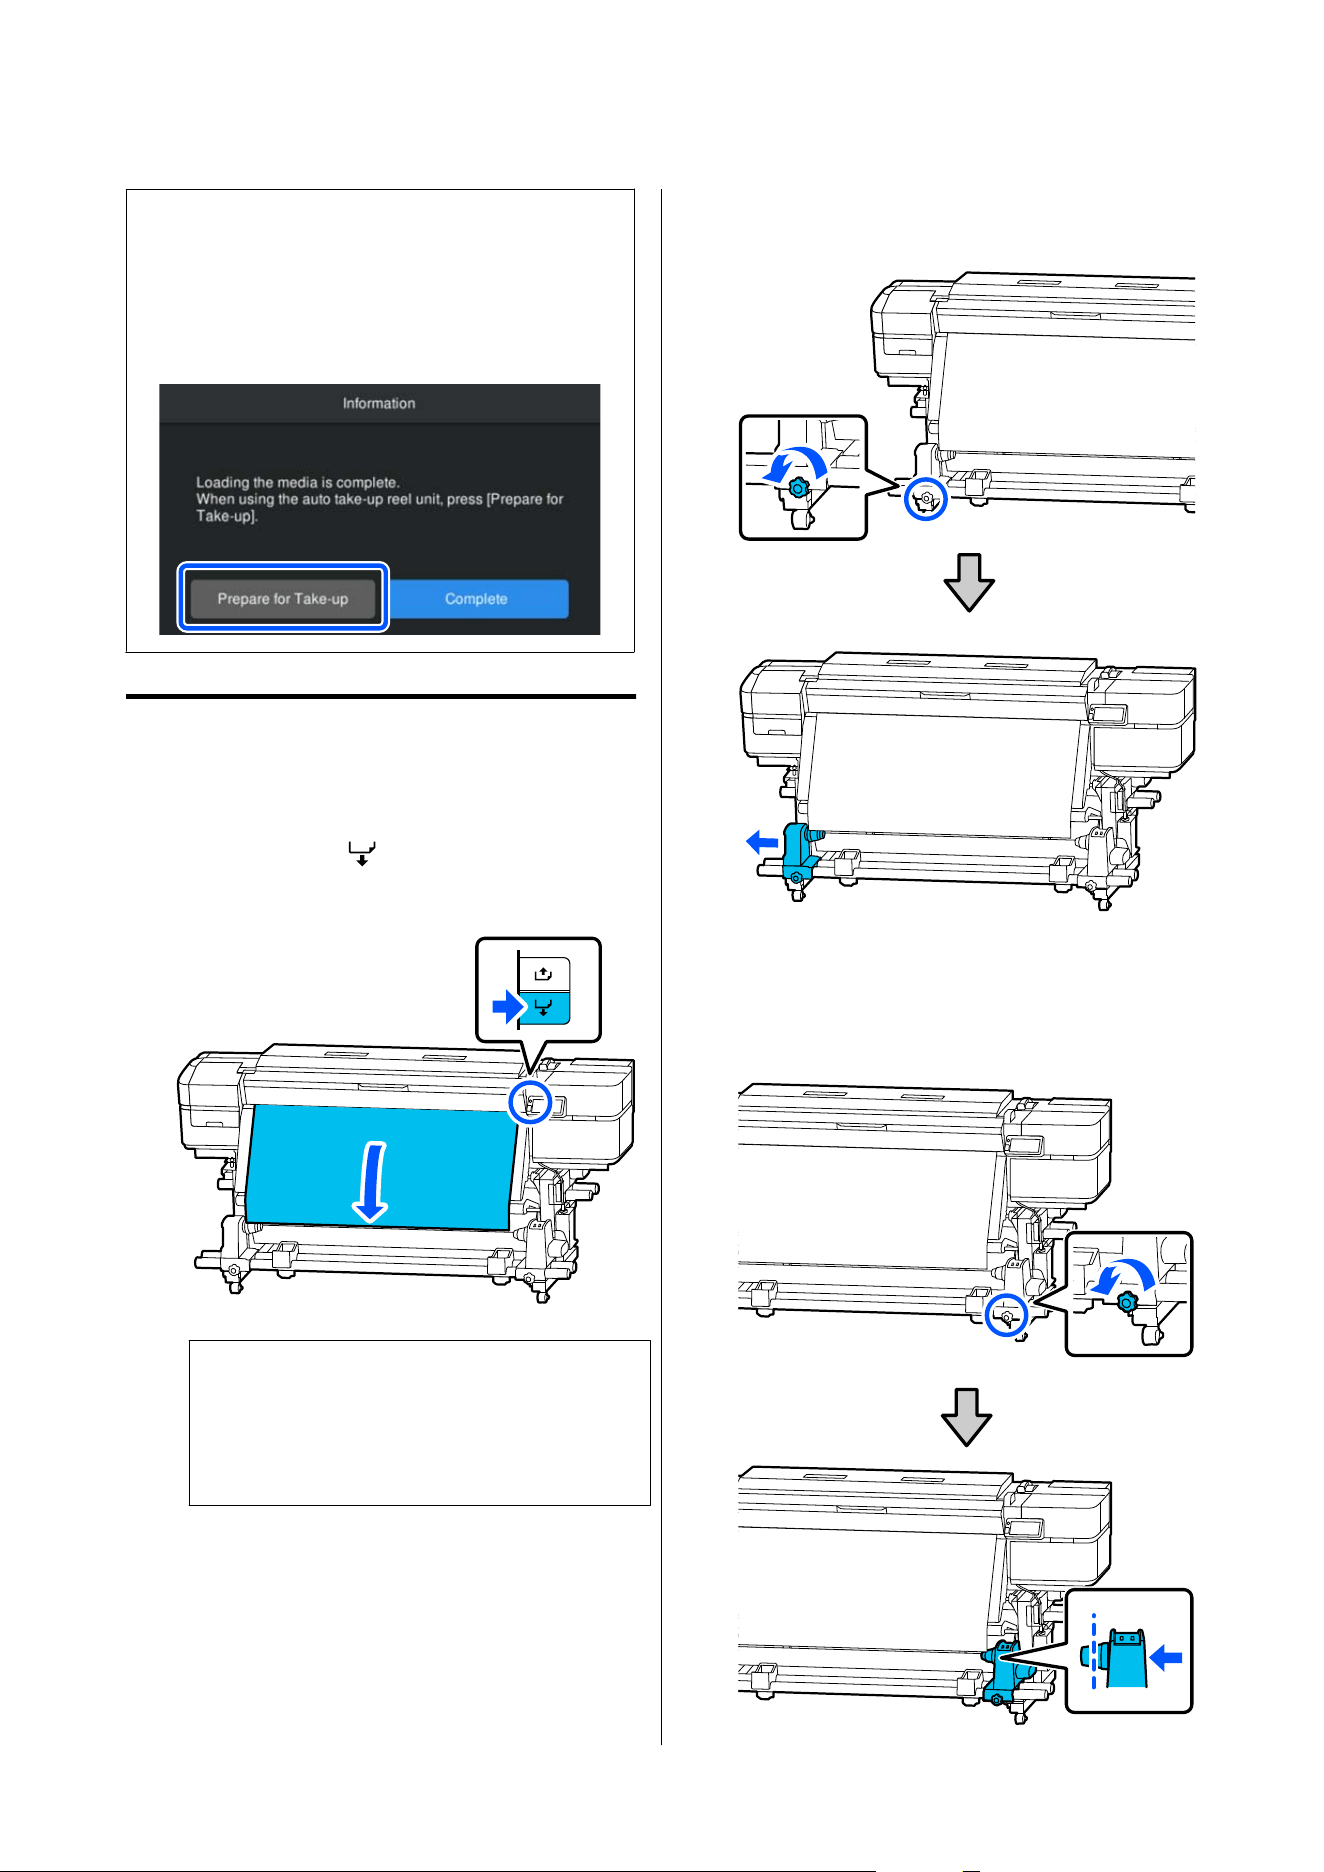
Note:
If this screen is not displayed when you are loading
media, move the media loading lever to the rear and
then back to the front again. The previous screen is
displayed when you select Prepare for Take-up in the
screen shown below.
When Paper Tape is Unavailable
Attaching the Roll Core
A
Hold down the [ ] button on the control
panel to feed the media to the media holder
position.
c
Important:
Do not pull the media by hand. Pulling by
hand can cause the media to twist during the
take-up process.
B
Loosen the locking screw on the left media
holder and move the holder out.
C
Loosen the locking screw on the right media
holder and move it to the loading position that
matches where you want the right side of the
core to be located.
SC-S7100 Series User's Guide
Basic Operations
42
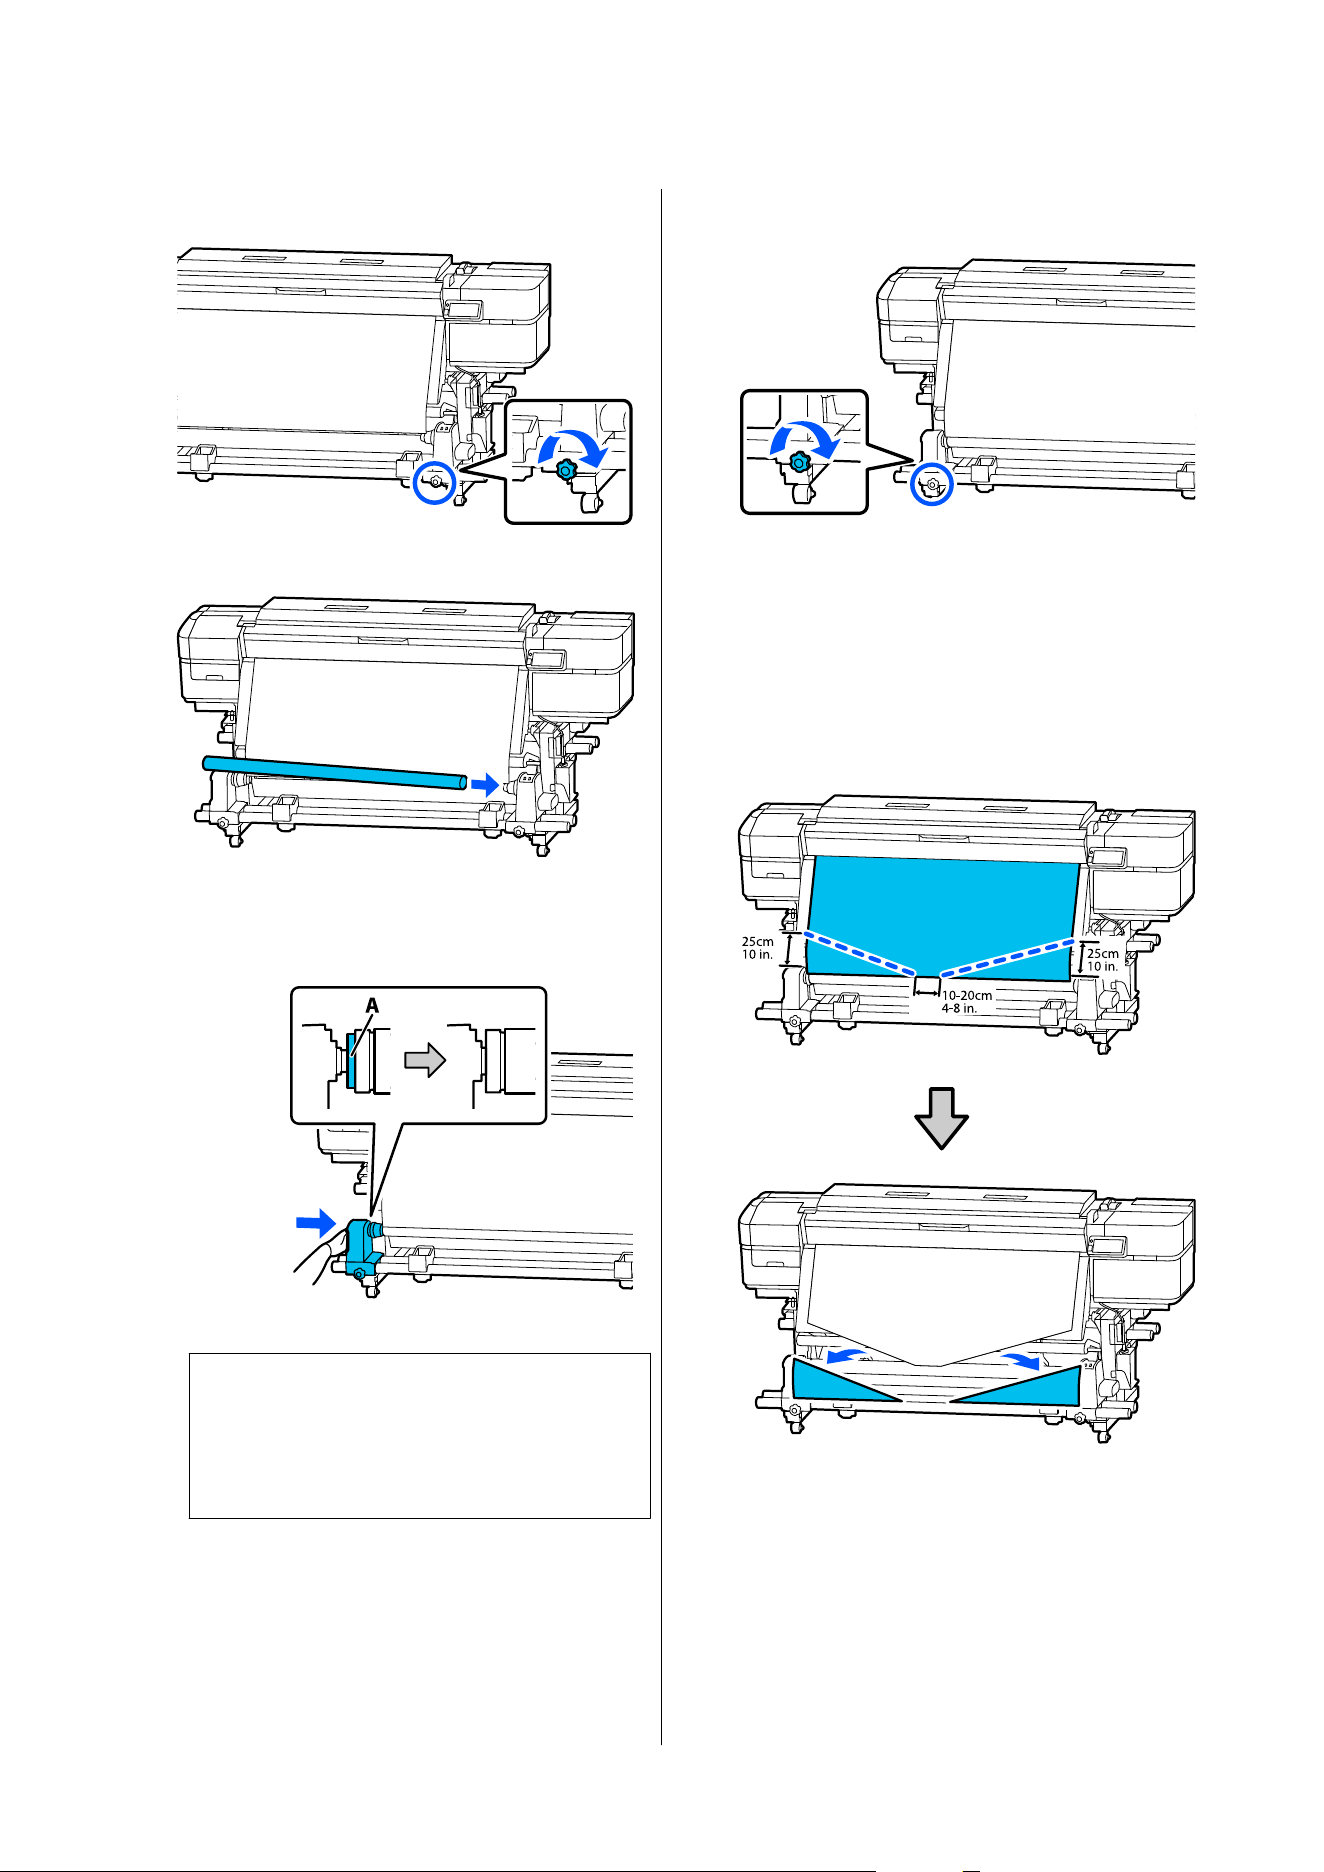
D
Tighten the locking screw securely.
E
Insert the roll core onto the right media holder.
F
Insert the left media holder into the roll core
and press it in until part A in the illustration is
completely inserted.
c
Important:
Once the part labeled A cannot be seen, do
not push it in any further. If it is inserted too
far, the media will be taken up incorrectly.
G
Tighten the locking screw securely.
H
Leave a 10 to 20 cm (4 to 8 in.) wide section in
the center of the media, and cut at least 25 cm
(10 in.) in length from the left and right corners
of the media.
Cutting the left and right corners of the media
helps prevent them from bending and getting
caught during the initial take-up, ensuring it is
taken-up evenly.
Next, see the following.
U “How to Take Up Media” on page44
SC-S7100 Series User's Guide
Basic Operations
43
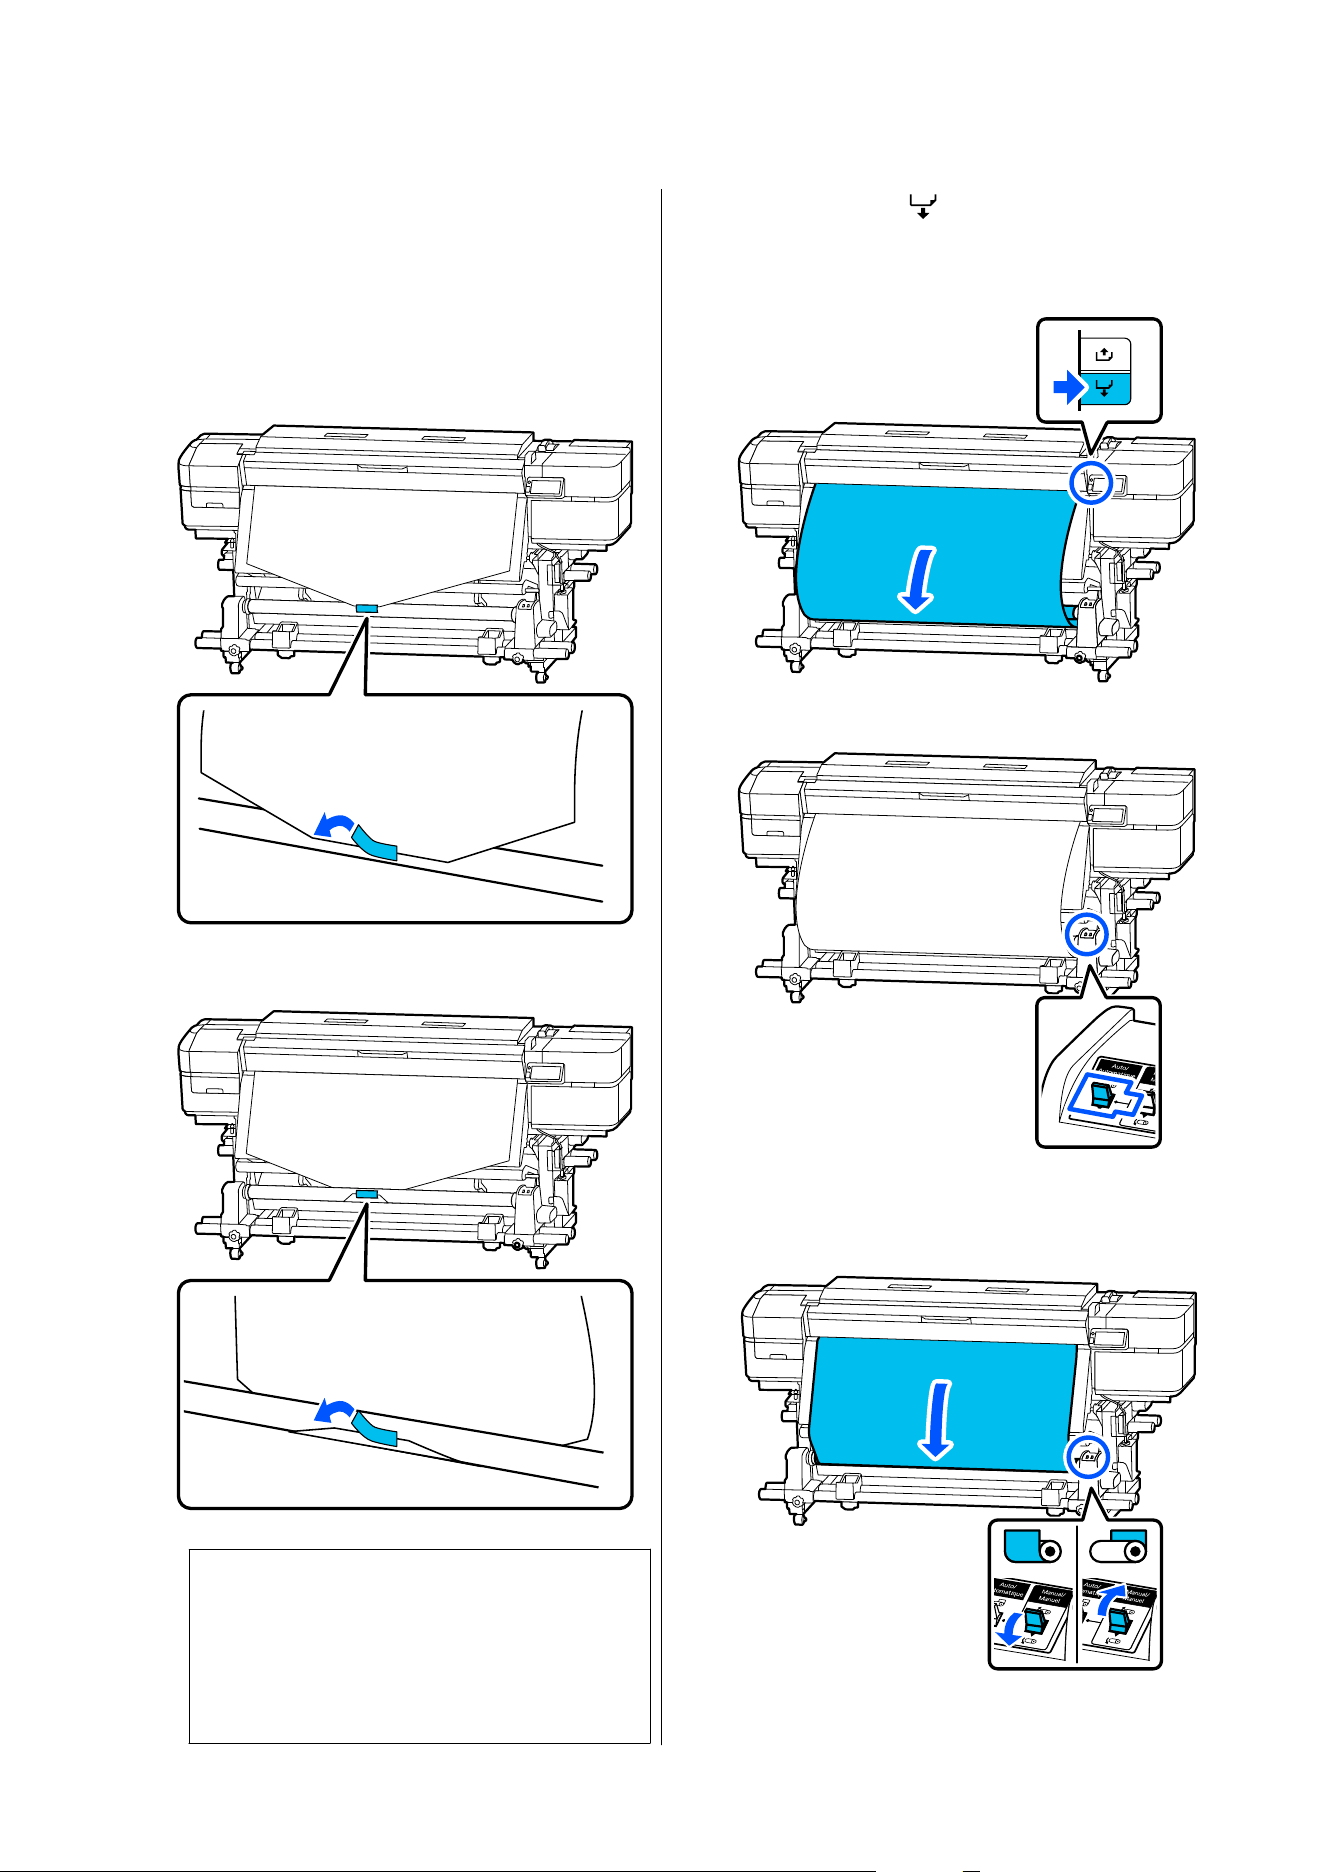
How to Take Up Media
A
While pulling the center of the media straight
down, attach it to the take-up roll core using
commercially available adhesive tape in the
take-up direction.
When the printed side is out
When the printed side is in
c
Important:
Make sure the media is taut when you attach
it to the take-up roll core. The media may
move around during take-up if it is attached
while there is slack.
B
Hold down the [ ] button on the
control panel to feed out enough media for
approximately one complete turn of the take-up
roll core.
C
Flip the Auto switch to the O position.
D
Position the Manual switch based on the
take-up direction and take-up the media
around the roll core for one complete turn.
SC-S7100 Series User's Guide
Basic Operations
44
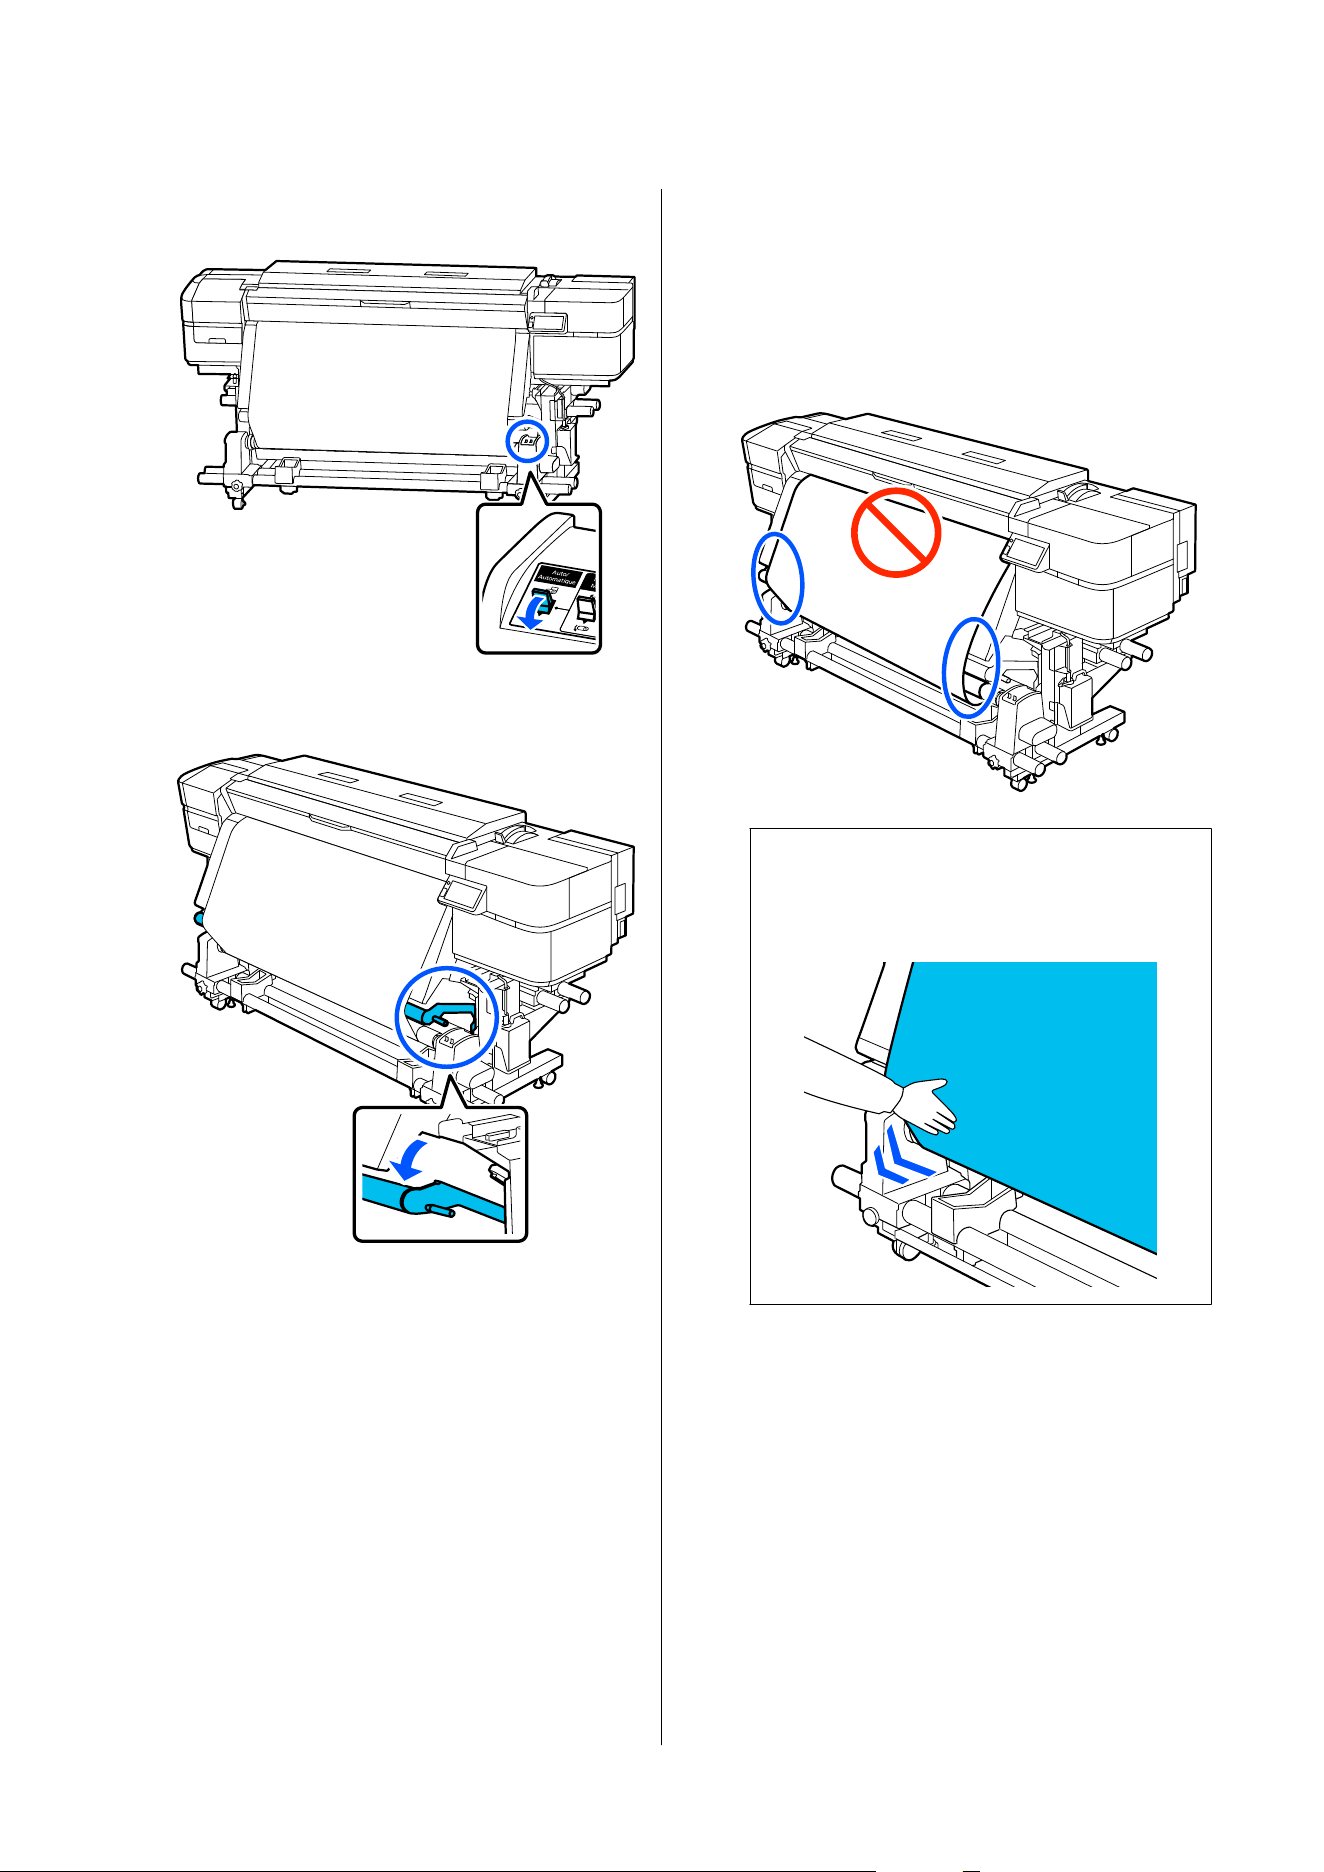
E
Set the Auto switch to match with the take-up
direction.
F
Lower the tension bar until it slightly touches
the media.
G
Check that the media is installed without any
warping.
If the tension on the left and right of the
media differs, as shown in the circled areas in
the illustration below, it will not be taken-up
correctly. If either side is slack, start again from
step 1.
Note:
You can also check for tension differences by
gently tapping both ends of the media, as shown in
the following illustration.
SC-S7100 Series User's Guide
Basic Operations
45
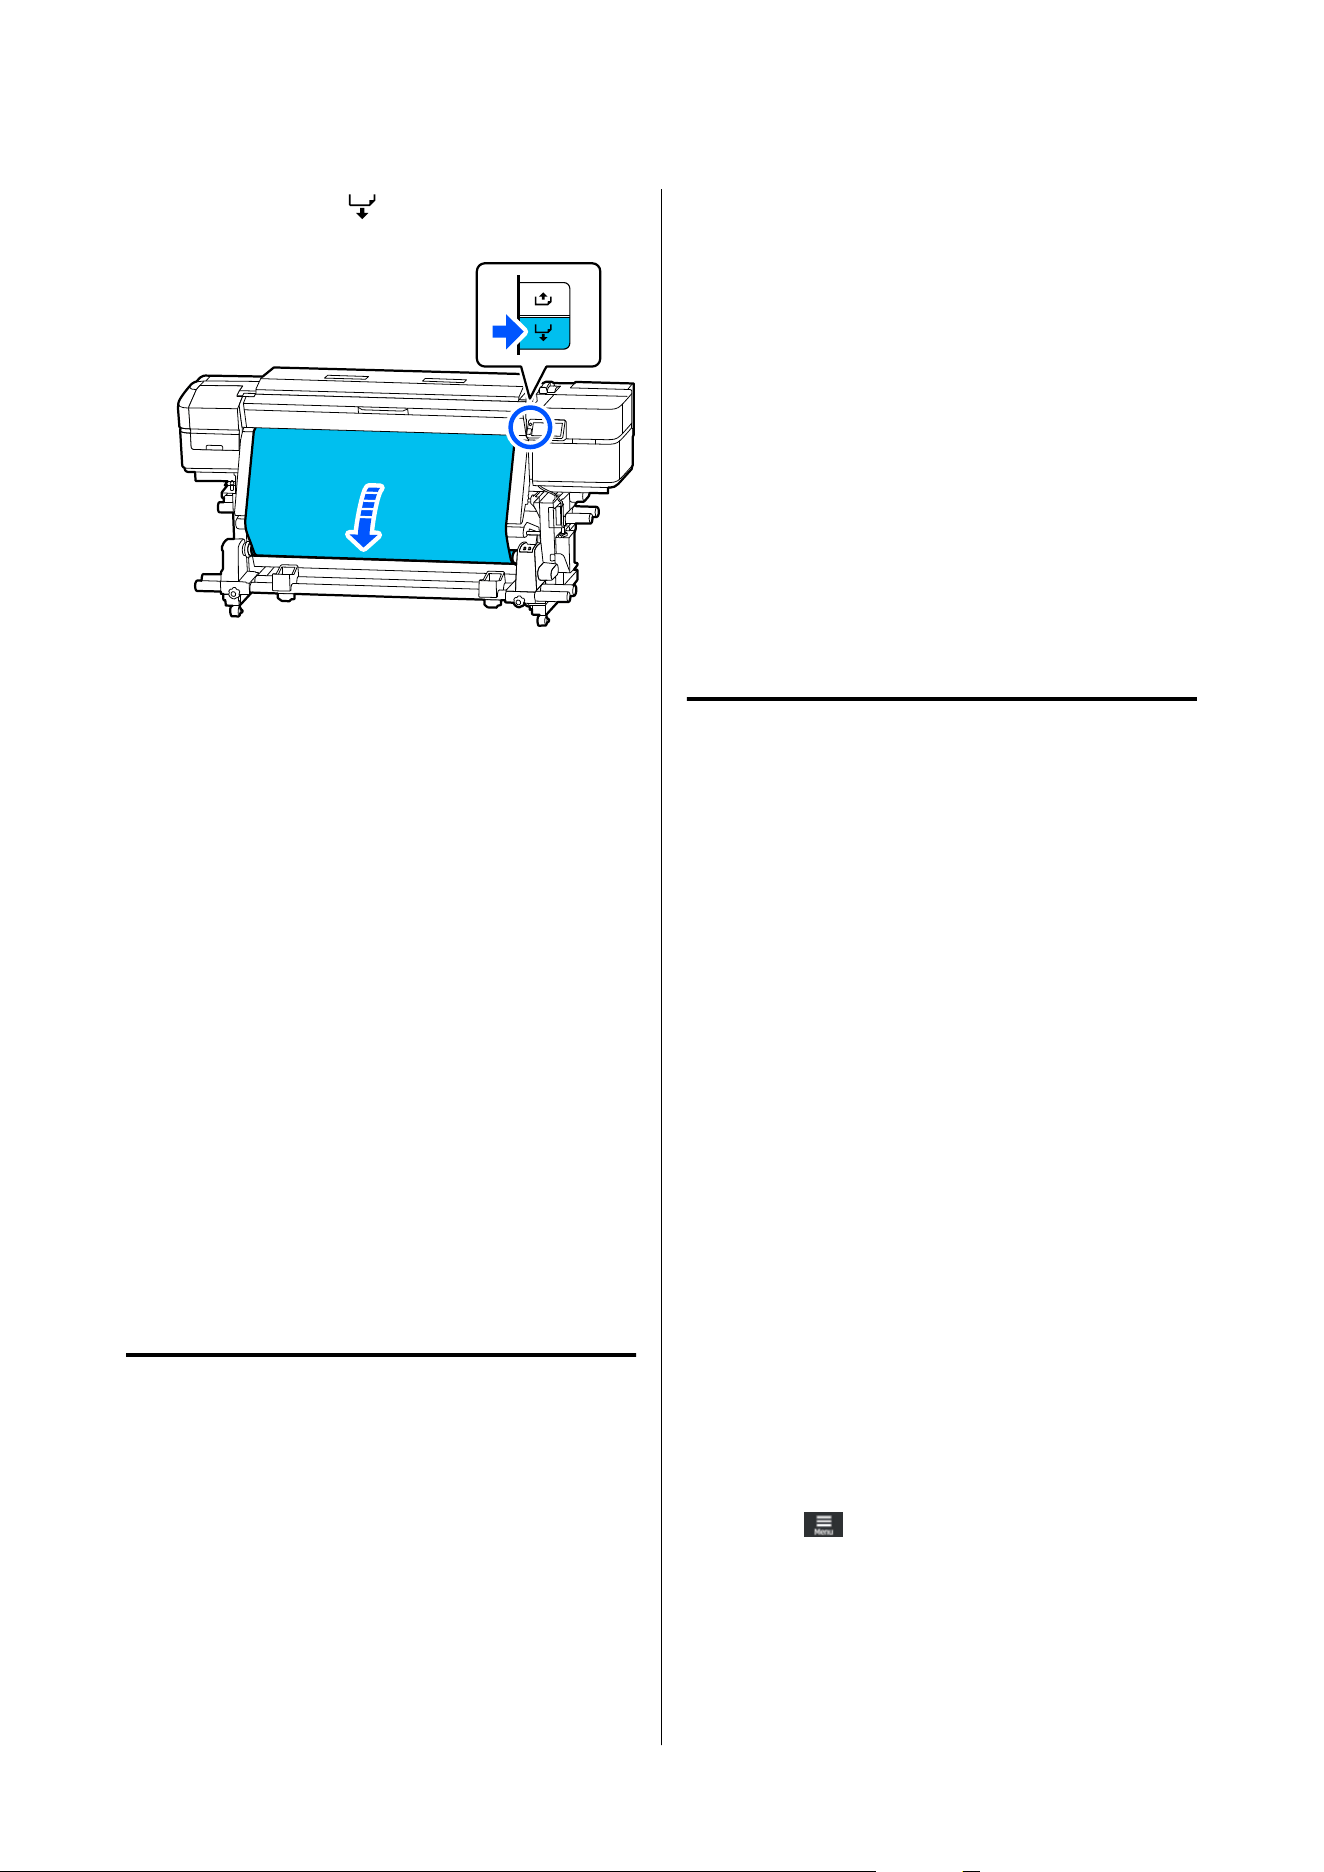
H
Hold down the [ ] button until the media
has wrapped around once or twice.
Optimizing Media
Settings (Automatic
Adjustment)
You need to optimize the media settings in
the following cases. To optimize the media
settings, perform Automatic Adjustment from Print
Adjustments.
When registering media settings in the EMX file to
the printer
When you are using Epson Edge Print PRO or Epson
Edge Dashboard to register the media settings from
a downloaded EMX file, you need to optimize the
settings to correct for the individual characteristics of
the media and printer you are using.
When changing Advanced Settings after saving
media settings
Precautions When Performing
Print Adjustments
Adjustments are made based on the media loaded
in the printer.
❏ Using the actual printing conditions, correctly
load the media that needs to be adjusted in the
printer.
❏ If you are attaching the auto take-up reel unit to
print, place the media on the auto take-up reel
unit during Print Adjustments.
❏ When registering the media settings to the printer,
make sure you select the name set in Media
Management from the Settings menu in Select
Media.
Make sure nozzles are not clogged before
adjusting.
If nozzles are clogged, adjustments will not be
performed correctly.
Print to visually inspect the check pattern (Standard),
and then perform Print Head Cleaning if necessary.
Automatic Adjustment
Procedure
Automatic Adjustment performs Media Feed
Adjustment and Print Head Alignment automatically
while printing the pattern.
The approximate length of the media required to print
the test pattern is given below.
Approximately 300 mm (11.8 inches)
You may not be able to perform Automatic
Adjustment depending on the media you are using. If
an error occurs, or if you notice banding or graininess
in the print results even after performing Automatic
Adjustment, perform Manual Adjustment from the
Print Adjustments menu.
U “If You Cannot Perform Automatic Adjustment”
on page47
A
Check that the printer is ready, and load the
media according to the actual usage conditions.
U “Precautions When Performing Print
Adjustments” on page46
B
Press (menu), and then press Media
Settings - Print Adjustments - Automatic
Adjustment.
SC-S7100 Series User's Guide
Basic Operations
46
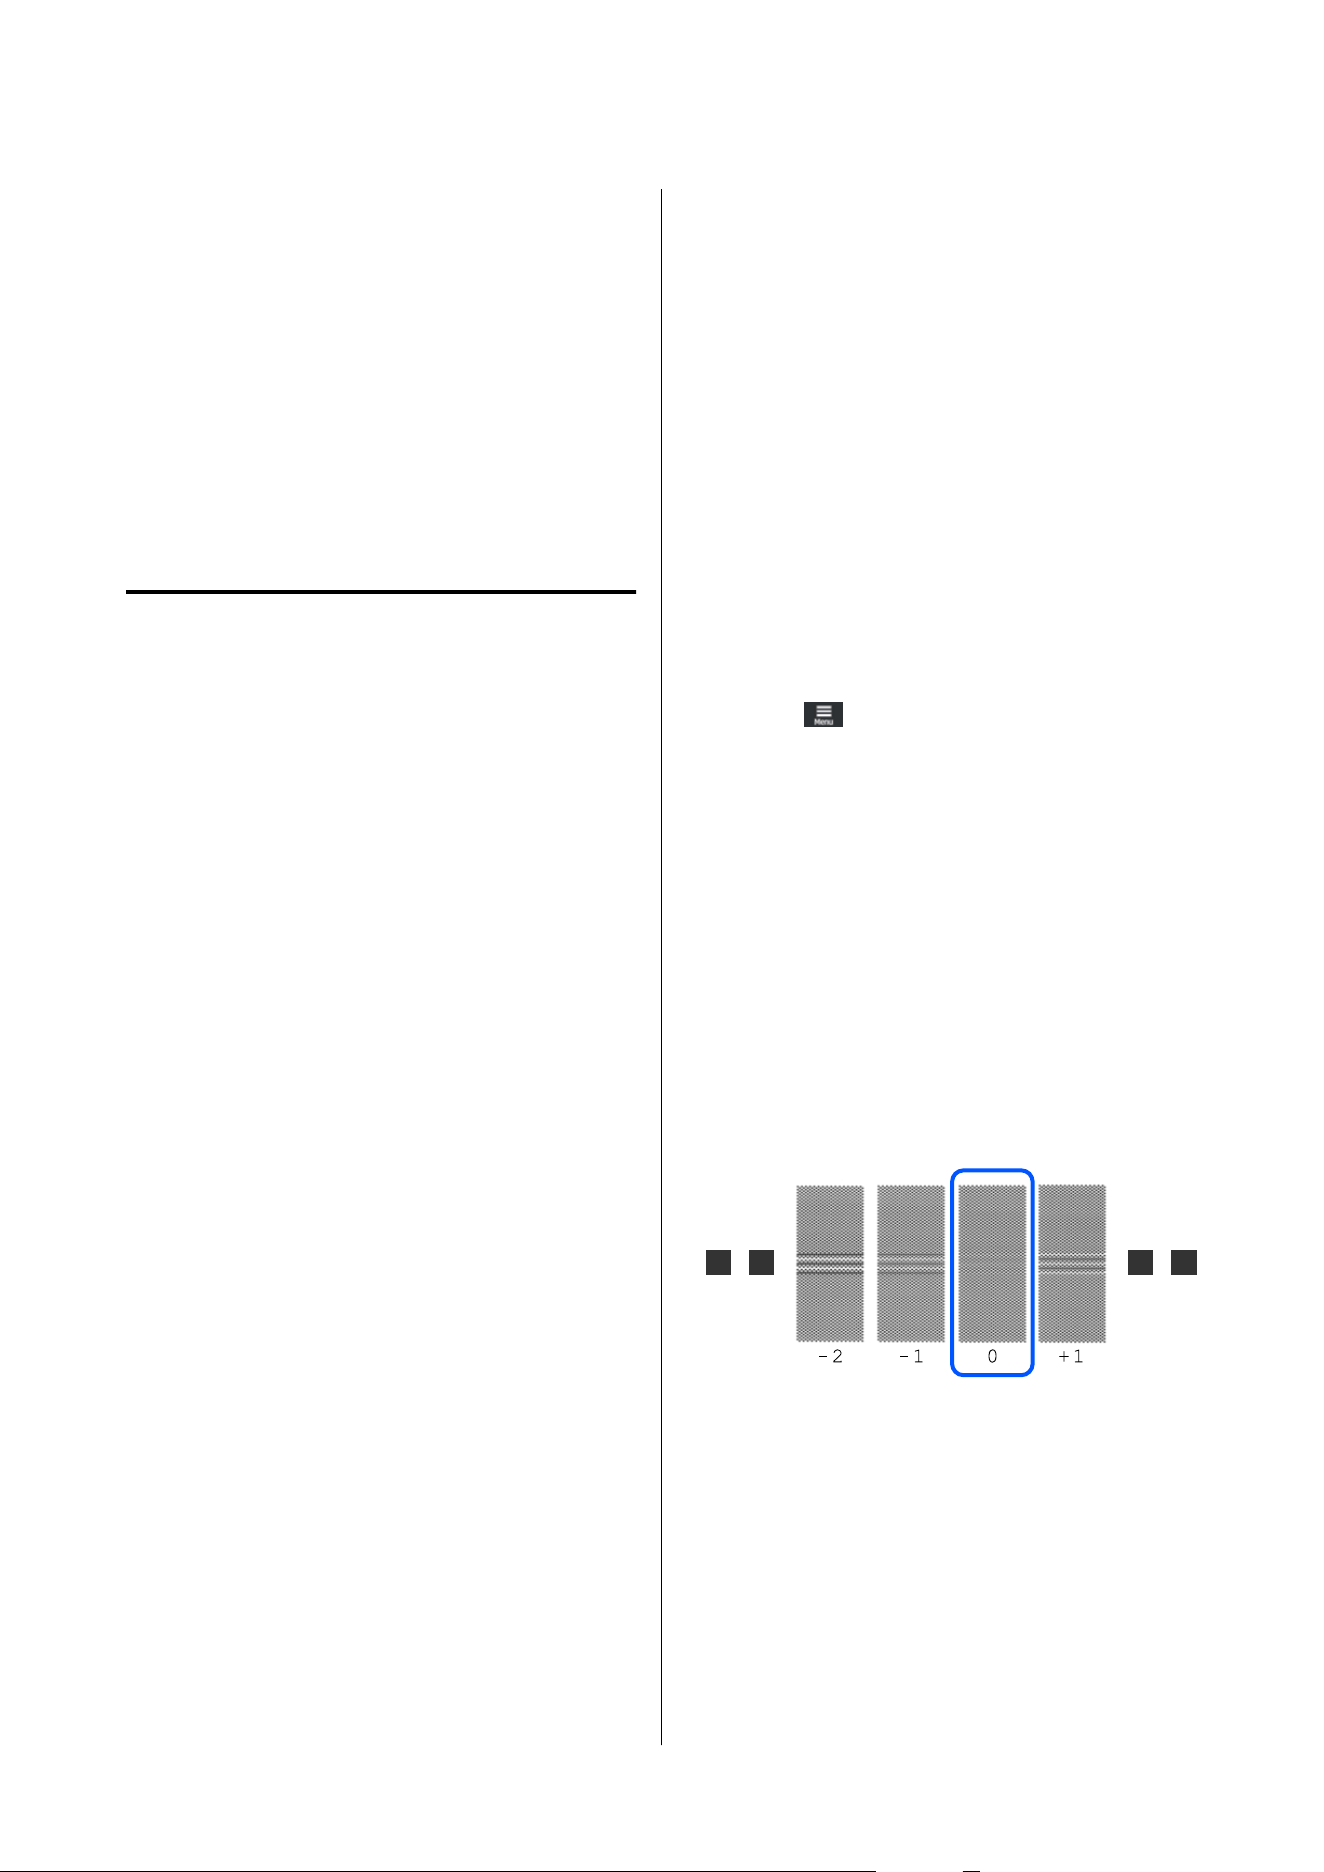
C
Check the instructions displayed on the screen,
and then press Auto Adjustment.
If you did not check the condition of the
nozzles in advance, press Nozzle Check Pattern
and adjust the printer while the nozzles are not
clogged.
D
Press Start.
Auto adjust starts, and the adjustment pattern is
printed.
Wait until adjustment is complete.
If You Cannot Perform
Automatic Adjustment
After performing Media Feed Adjustment, continue
with Print Head Alignment. For both adjustments,
visually check the printed pattern and enter the
measured values for adjustment.
Types of Manual Adjustment
Media Feed Adjustment
This menu is also used when banding (horizontal
banding, tint unevenness, or stripes) is detected in
printing results.
You c a n s e l e c t f r om Manual(Standard) or
Manual(Measurement) to perform adjustments.
❏ Manual(Standard)
Usually, this is selected.
U “Setting procedure for Manual(Standard)” on
page47
❏ Manual(Measurement)
This is useful for making accurate print
adjustments when printing on uneven media such
as canvas or media that bleeds-through easily,
such as cloth.
U “Setting procedure for
Manual(Measurement)” on page48
Print Head Alignment
You can also perform this if you notice graininess in
the print results.
U “Print Head Alignment” on page47
Manual Adjustment Procedure
Setting procedure for Manual(Standard)
The approximate length of the media required to print
the test pattern is given below.
Approx. 170 mm (6.69 in.)
When executing adjustments, be sure to read the
following:
U “Precautions When Performing Print
Adjustments” on page46
A
Check that the printer is ready, and load the
media according to the actual usage conditions.
B
Press (menu), and then press Media
Settings - Print Adjustments - Manual
Adjustment - Media Feed Adjustment -
Manual(Standard).
C
Press Start.
An adjustment pattern is printed. Wait until
printing is complete.
D
Check the printed adjustment pattern.
Two groups of adjustment patterns, 1-A and
1-B, are printed. Select the pattern with the
least amount of overlapping or gaps for each
group. For example, you would select "0" for the
pattern below.
SC-S7100 Series User's Guide
Basic Operations
47
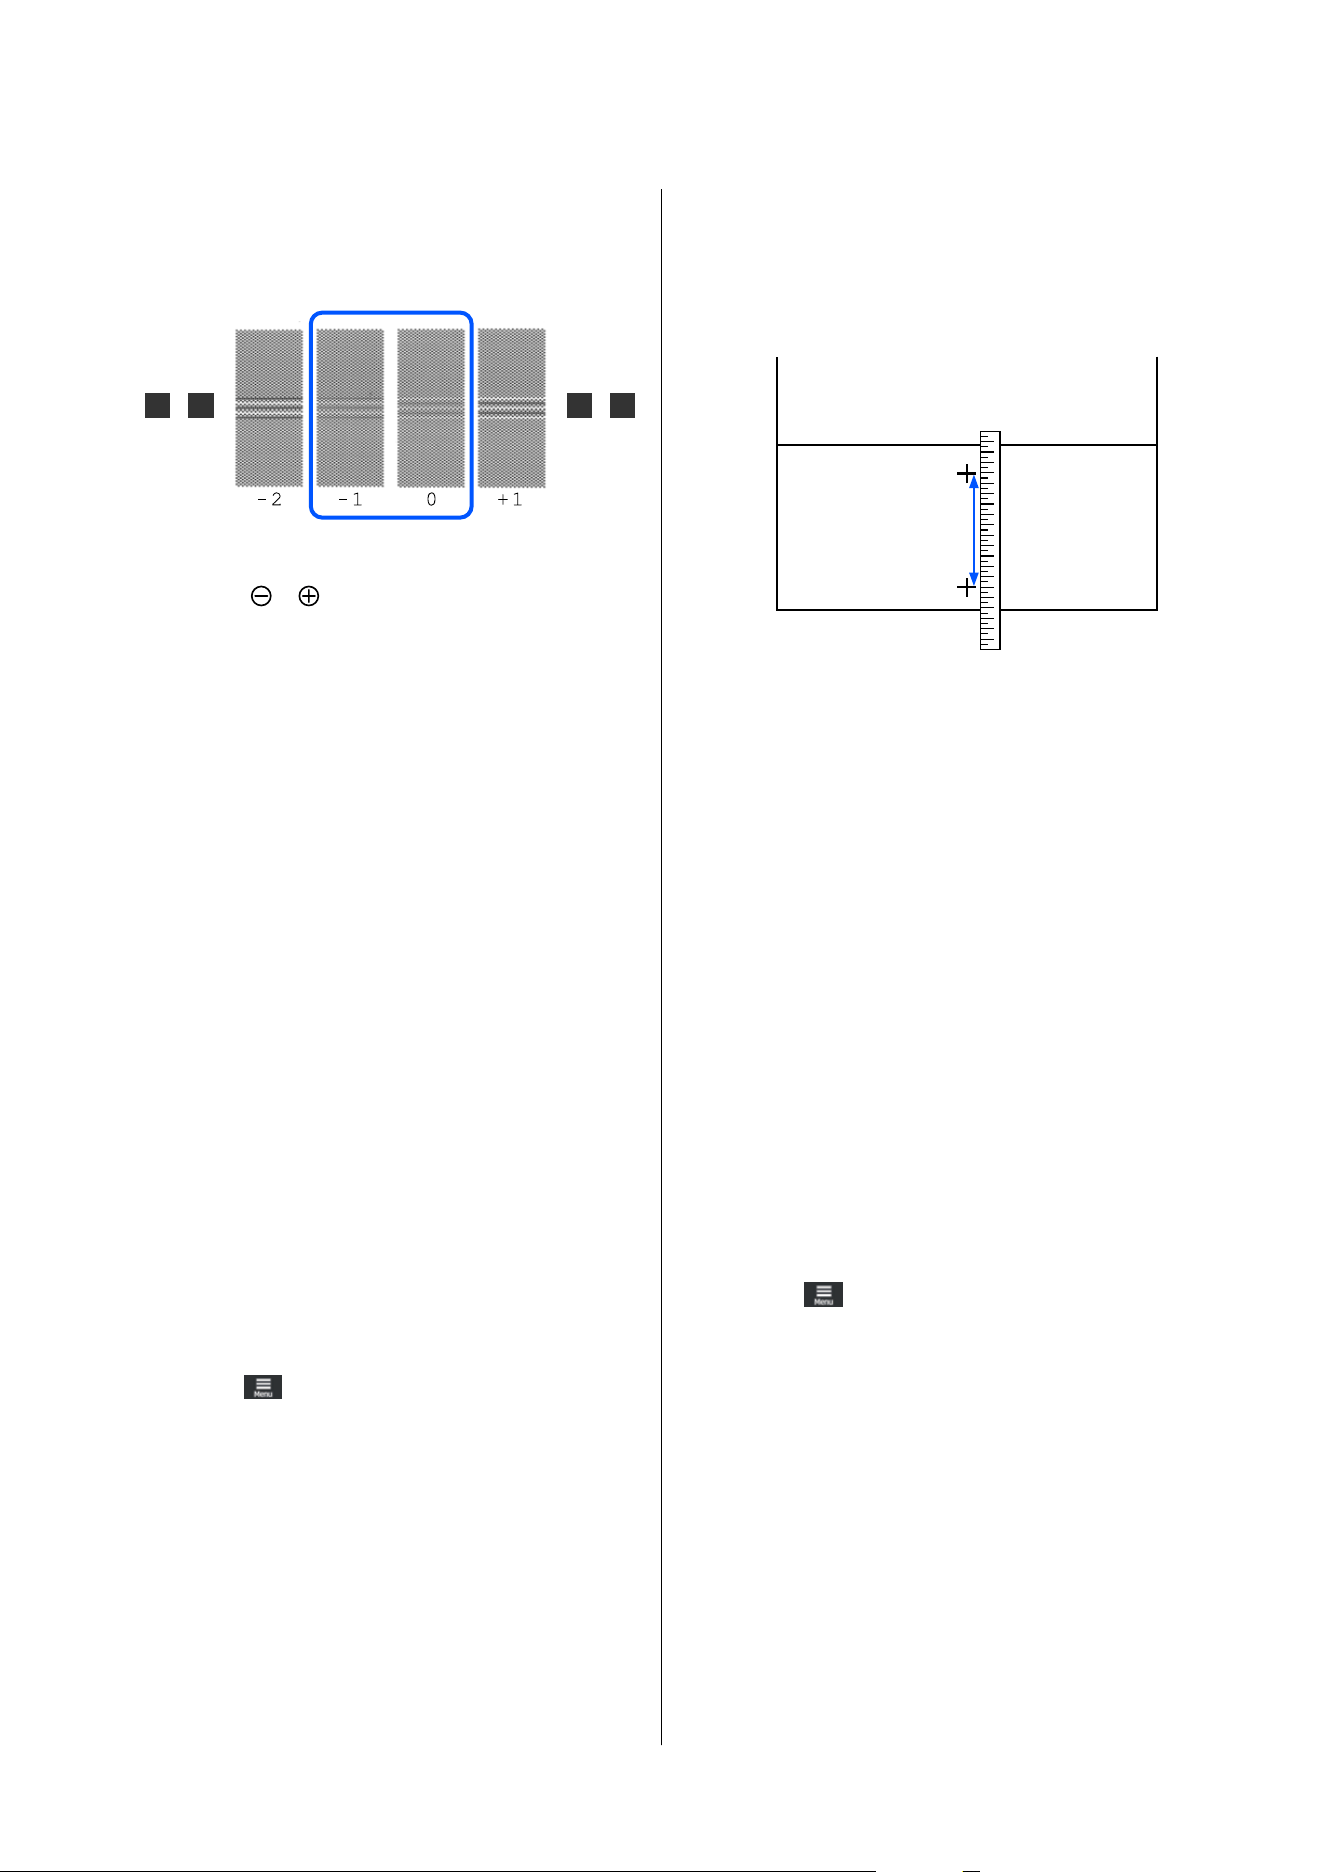
If two patterns with the least overlapping or
gaps are similar, select the number in between
the patterns. For example, you would select
"-0.5" for the pattern below.
E
On the screen for entering adjustment values,
press
/ to enter the value acquired by
multiplying the number of the pattern selected
in step 4 by 0.10.
❏ If 1 was selected, 1 x 0.10; therefore, enter
"0.10".
❏ If -1 and 0 are the same, -0.5 x 0.10; therefore,
enter "-0.05".
Enter values for both 1-A and 1-B, and press
OK to finish the adjustment.
Setting procedure for Manual(Measurement)
The approximate length of the media required to print
the test pattern is given below.
Approx. 820 mm (32.28 in.)
When executing adjustments, be sure to read the
following:
U “Precautions When Performing Print
Adjustments” on page46
A
Check that the printer is ready, and load the
media according to the actual usage conditions.
B
Press (menu), and then press Media
Settings - Print Adjustments - Manual
Adjustment - Media Feed Adjustment -
Manual(Measurement).
C
Press Start.
An adjustment pattern is printed. Wait until
printing is complete.
D
Check the printed adjustment pattern.
Cut after the adjustment pattern, spread it
out on a flat surface, and then measure it
using a scale. Use a scale that can measure in
increments of at least 0.5 mm.
E
The screen for entering confirmation results for
the adjustment pattern is displayed.
Enter the value measured in step 4, and then
press OK to finish the adjustment.
Print Head Alignment Procedure
The approximate length of the media required to print
the test pattern is given below.
Approx. 100 mm (8.2 in.)
When executing adjustments, be sure to read the
following:
U “Precautions When Performing Print
Adjustments” on page46
A
Check that the printer is ready, and load the
media according to the actual usage conditions.
B
Press (menu), and then press Media
Settings - Print Adjustments - Manual
Adjustment - Print Head Alignment.
C
Press Start.
An adjustment pattern is printed. Wait until
printing is complete.
SC-S7100 Series User's Guide
Basic Operations
48
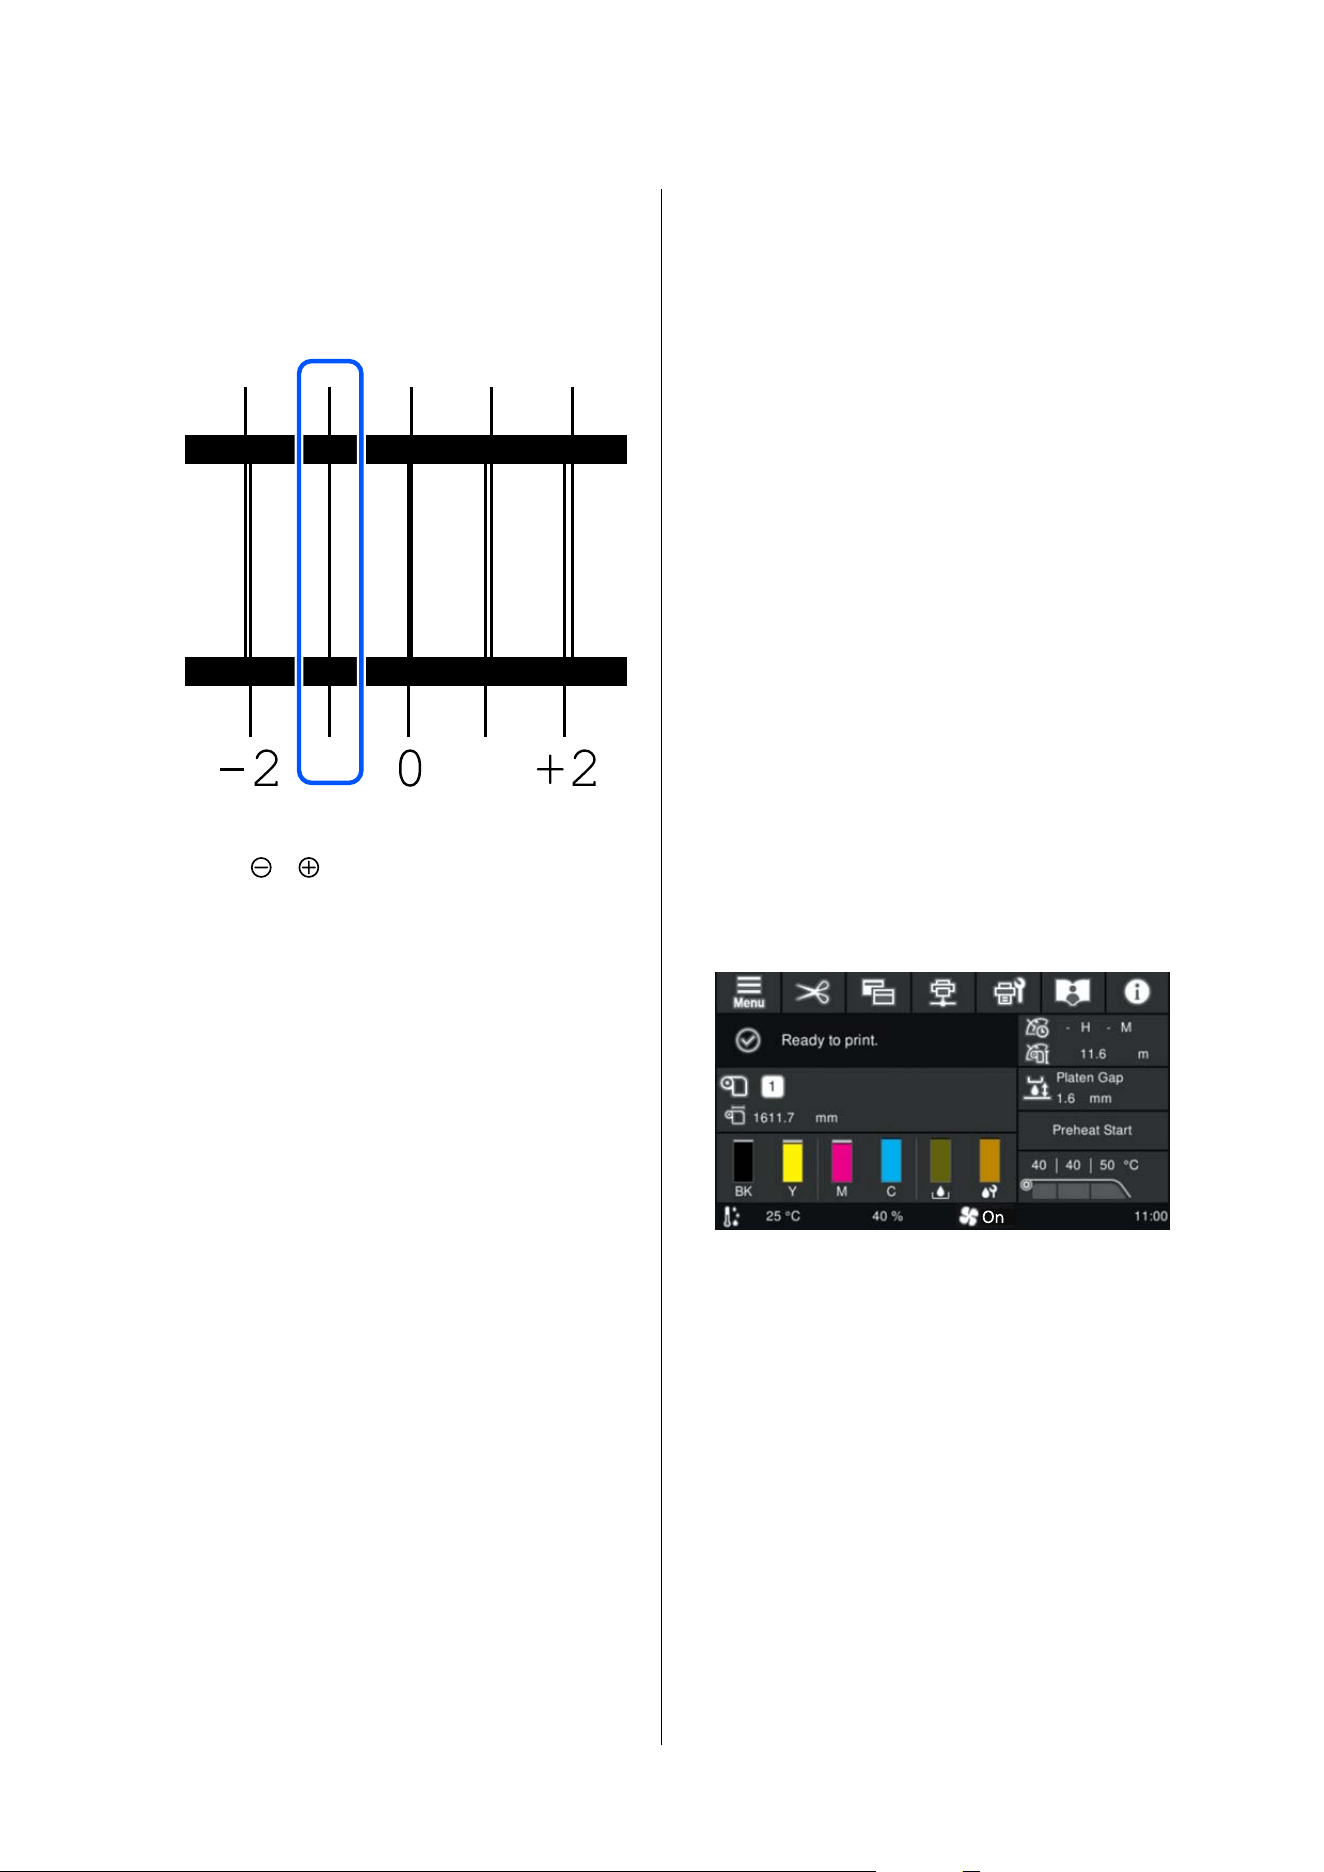
D
Check the printed adjustment pattern.
Two blocks, A and B of #1, are printed. Select
the finest lined pattern (all lines overlap) for
both. For example, you would select "-1" for the
block shown below.
E
On the screen for entering adjustment values,
press
/ to enter the numbers selected
in step 4, #1A and #1B, in this order, and then
press OK.
Before Printing
To maintain print quality, perform the following
inspection before starting work each day.
Checking the amount of ink remaining
If the ink level falls below the minimum threshold
during printing, you can continue printing by
replacing the relevant ink supply units. However,
replacing the ink during printing may result in
color variation depending on how the ink dries. We
recommend replacing any ink supply units running
low with new ones in advance when you plan to print
a large volume of material. You can reinstall and use
the removed ink supply units again.
You can check the remaining ink level using the icons
on the screen.
U “Home Screen” on page17
Replacing Ink Supply Units
U “Replacement Procedure” on page64
Shaking Ink Supply Units
If a message is displayed informing you that it is time
to shake the ink, shake the ink.
U “Shaking the Ink Supply Units Periodically” on
page63
Checking the nozzle check pattern
You can check the status of the nozzles by printing a
nozzle check pattern.
Perform Head Cleaning if parts of the printed nozzle
check pattern are faint or missing.
U “Nozzle Check and Head Cleaning” on page70
Printing
You can start printing when you have finished loading
the media and Ready to print. is displayed. In the
software RIP, select the same media type as the media
selected on the printer. Send a print job to start
printing.
Changing Settings
During Printing
You can change the settings for the adjustment items
displayed on the home screen during printing.
U “Home Screen” on page17
The following example explains how to change the
temperature setting for the heater, and how to correct
the media feed amount when banding occurs in the
printouts.
SC-S7100 Series User's Guide
Basic Operations
49
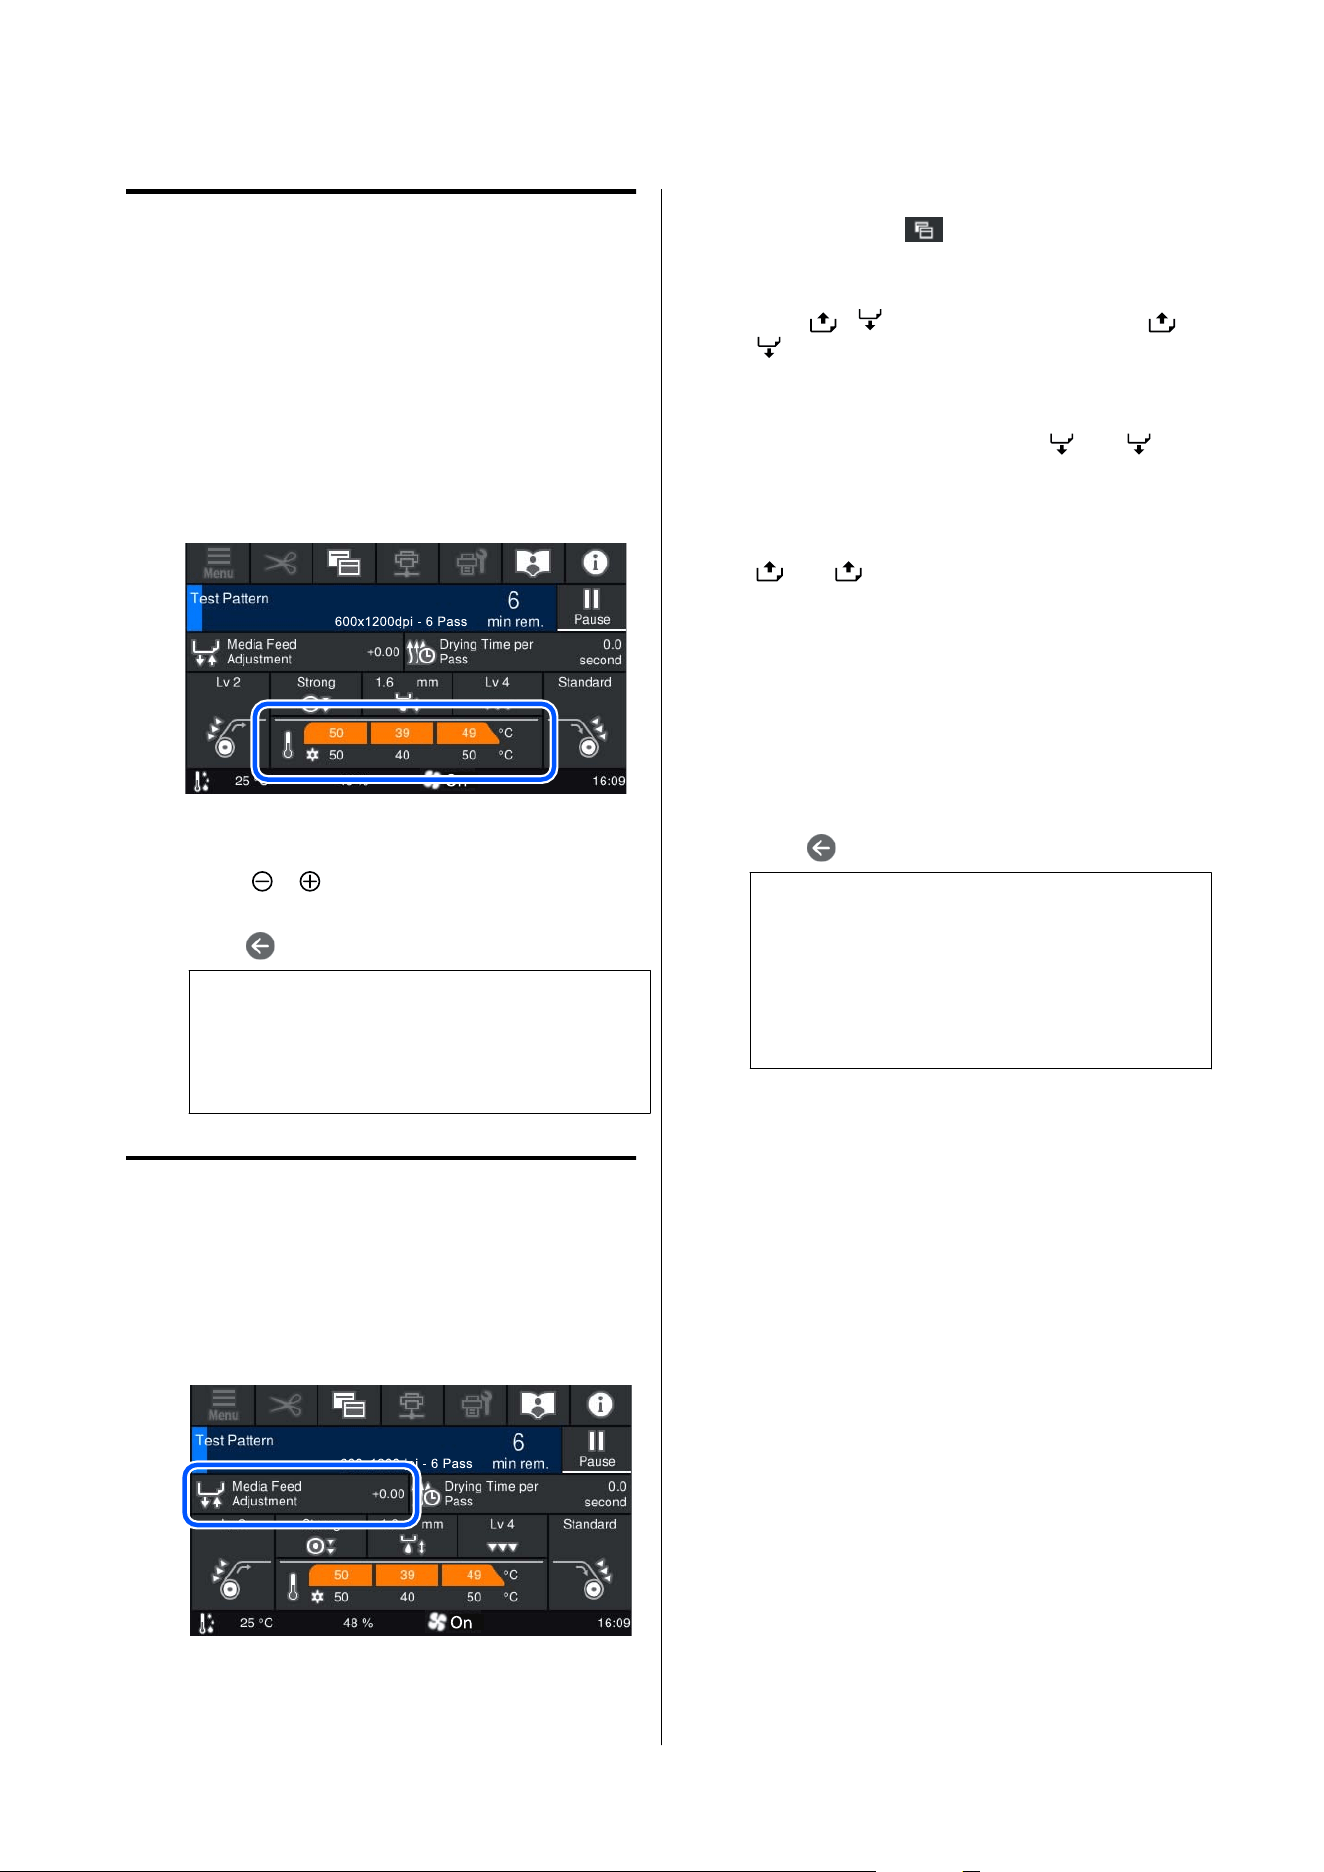
Changing the Heater's
Temperature
A
Press the Temperature area on the adjust while
printing screen.
The screen for changing the temperature
setting for each heater is displayed.
You can also change this setting by pressing
the Temperature area on the Status Indicator
screen.
B
Choose a value.
Press
/ to change the temperature.
C
Press to return to the home screen.
Note:
The time needed for the heaters to reach the
specified temperatures varies with the ambient
temperature.
Correcting Banding
When you want to correct banding during printing,
correct the media feed amount.
A
During printing, press the following area on the
adjust while printing screen.
If the adjust while printing screen is not
displayed, press
(switch screens) on the
Home screen.
B
Press / on the screen, or press the /
buttons on the control panel to change the
value.
If the feed amount is too small, black bands
(dark stripes) appear; press the
(or
button) to adjust the feed amount upwards.
In contrast, if the feed amount is too large,
white bands (pale stripes) appear; press the
(or button) to adjust the feed amount
downwards.
C
Check the print results and if you are not
satisfied with the results, go back to step 2 and
change the setting values again.
The setting for the currently selected registered
media number is updated.
D
Press to return to the home screen.
Note:
The results of changing the settings are un-done if
you perform any of the following operations.
❏ Restart Media Feed Adjustment.
❏ Execute Clear All Data and Settings.
When you have finished the target printing, we
recommend performing Print Adjustments from the
settings menu.
U “Optimizing Media Settings (Automatic
Adjustment)” on page46
Replacing the Media
This section explains how to replace media with
another media while there is still media remaining,
and how to replace media with new media when the
media ends.
See the following according to your needs.
U “Replacing Expended Media” on page51
SC-S7100 Series User's Guide
Basic Operations
50
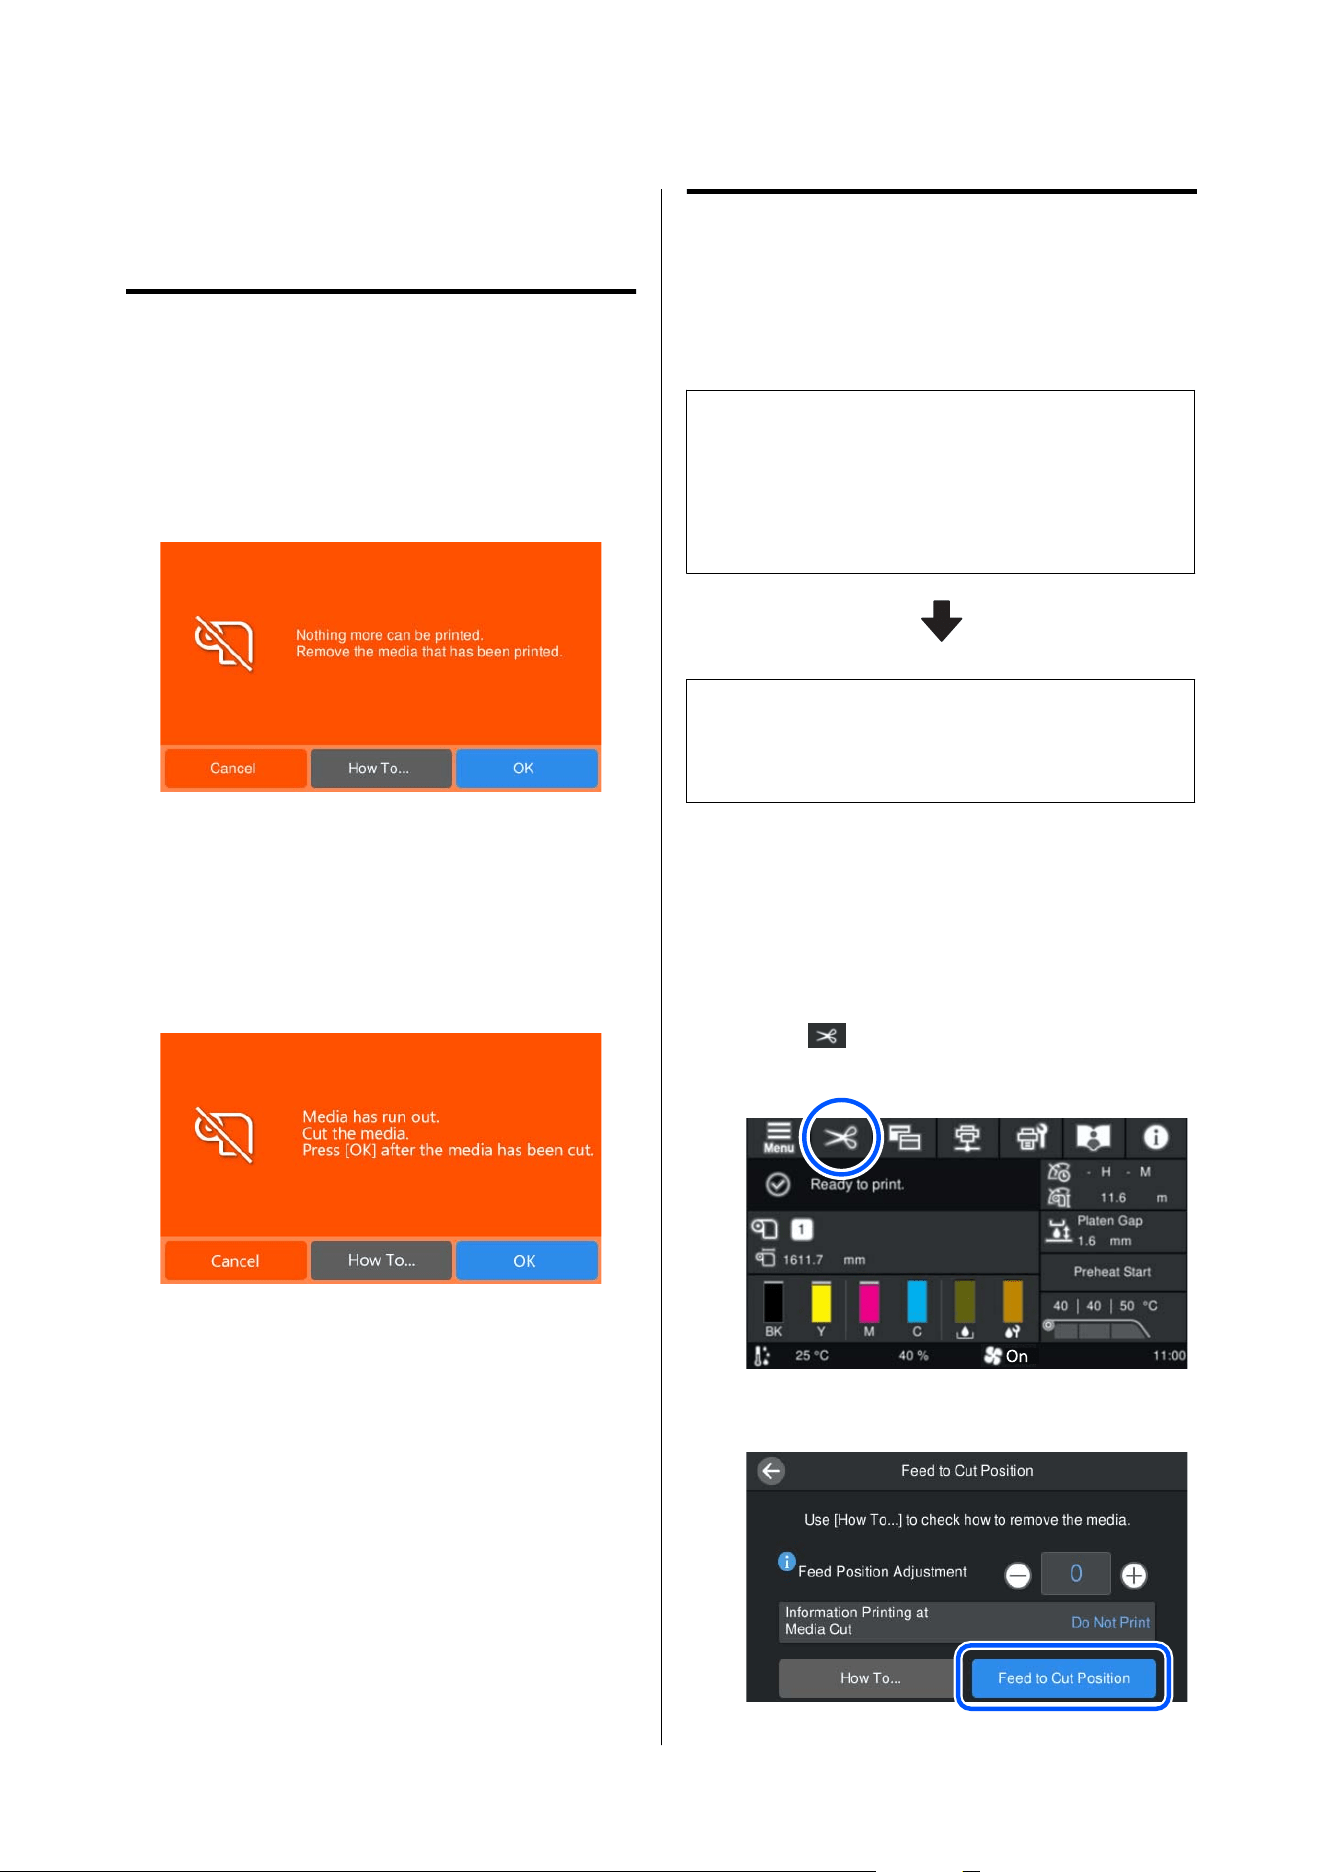
U “Replacing Media that is not Expended” on
page51
Replacing Expended Media
If the media runs out during printing, one of the
following media-out errors is displayed on the control
panel screen, depending on how the media ran out.
❏ When the end of the media has come off the roll
core
Press How To... to remove the roll core of the
finished media and the rewound media while
checking the procedure on the panel's screen.
Follow the on-screen instructions.
❏ When the end of the media is still attached to the
roll core
Open the printer cover and remove the roll core of
the finished media and the rewound media while
checking the procedure on the panel's screen.
To continue printing, load new media without
canceling the print job. When new media is loaded
and the printer is ready to print, the rest of the job is
printed.
U “Loading Media” on page38
Replacing Media that is not
Expended
Follow the steps below when replacing media that is
still being used.
1. Cut the media and remove the taken-up
media.
Cut the printed part and remove the taken-up media.
U “How to cut and remove the taken-up media” on
page51
2. Remove the media from the media feeding
unit.
U “Removing Media” on page52
How to cut and remove the taken-up
media
A
Confirm that the printer is ready to print.
B
Press (feed media to cutting position) on
the control panel screen.
C
Press Feed to Cut Position.
SC-S7100 Series User's Guide
Basic Operations
51
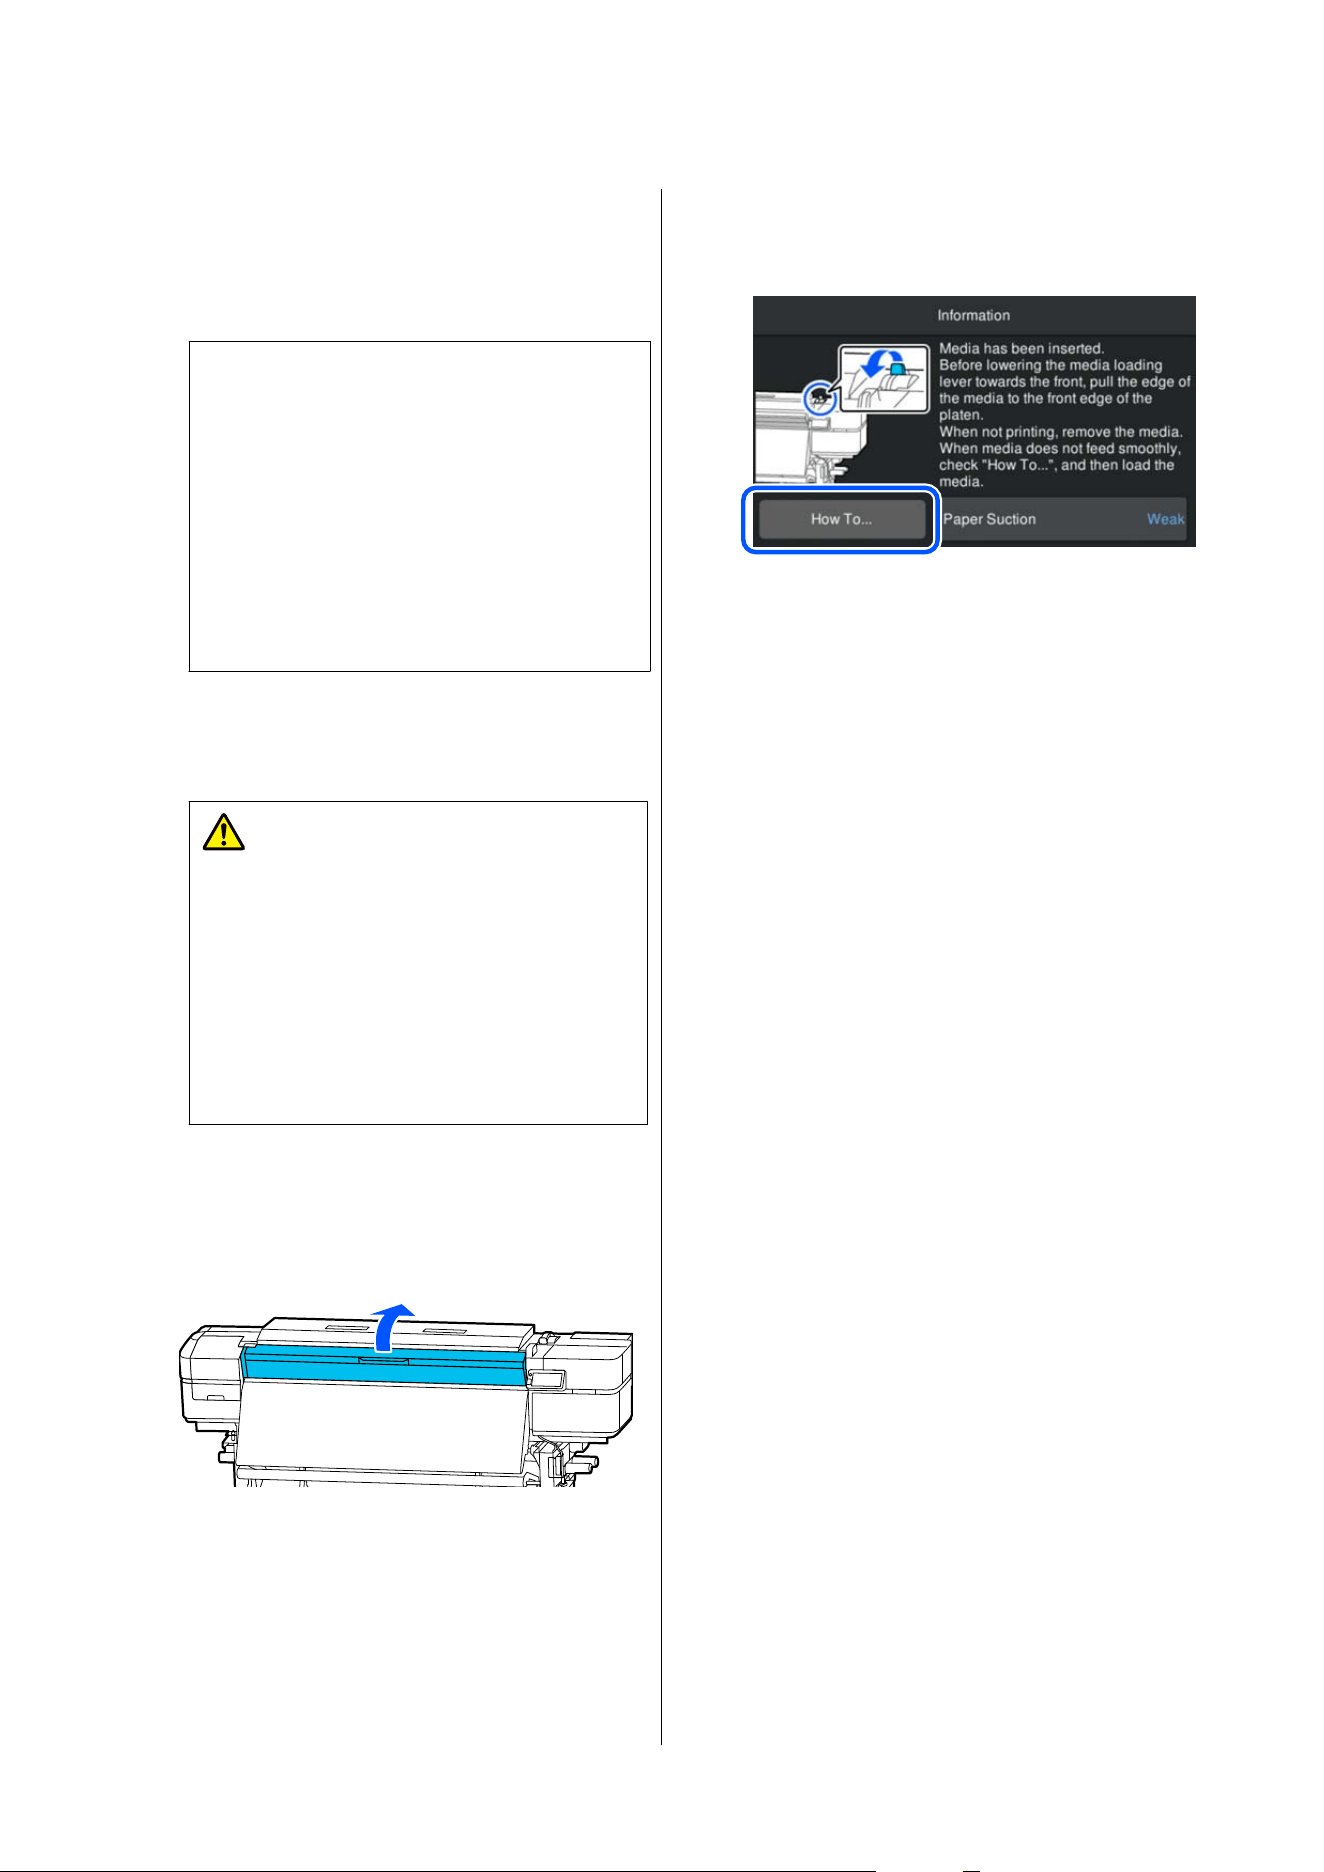
Changing Feed Position Adjustment allows
you to adjust the feed rate relative to the
standard value. If you want to adjust the
margins for the print results, adjust the feed
position, and then press Feed to Cut Position.
Note:
If the following settings are both set to On, when
you press Feed to Cut Position, the remaining
amount of media and information about the
printer at that time are printed before the media is
fed to the cutting position.
❏ Remaining Amount Management in Media
Settings
❏ Information Printing at Media Cut in
Printer Settings
D
Press How To... to cut and remove the taken-up
media while checking the procedure on the
panel's screen.
Caution:
❏ The heaters and media edge plate
may be hot; observe all necessary
precautions. Failure to observe the
necessary precautions could result in
burns.
❏ When cutting media, be careful not to
cut your fingers or hands with the cutter
or other blades.
Removing Media
A
Open the printer cover.
B
Press How To... - Removing media in this
order and follow the on-screen instructions to
remove the media.
SC-S7100 Series User's Guide
Basic Operations
52
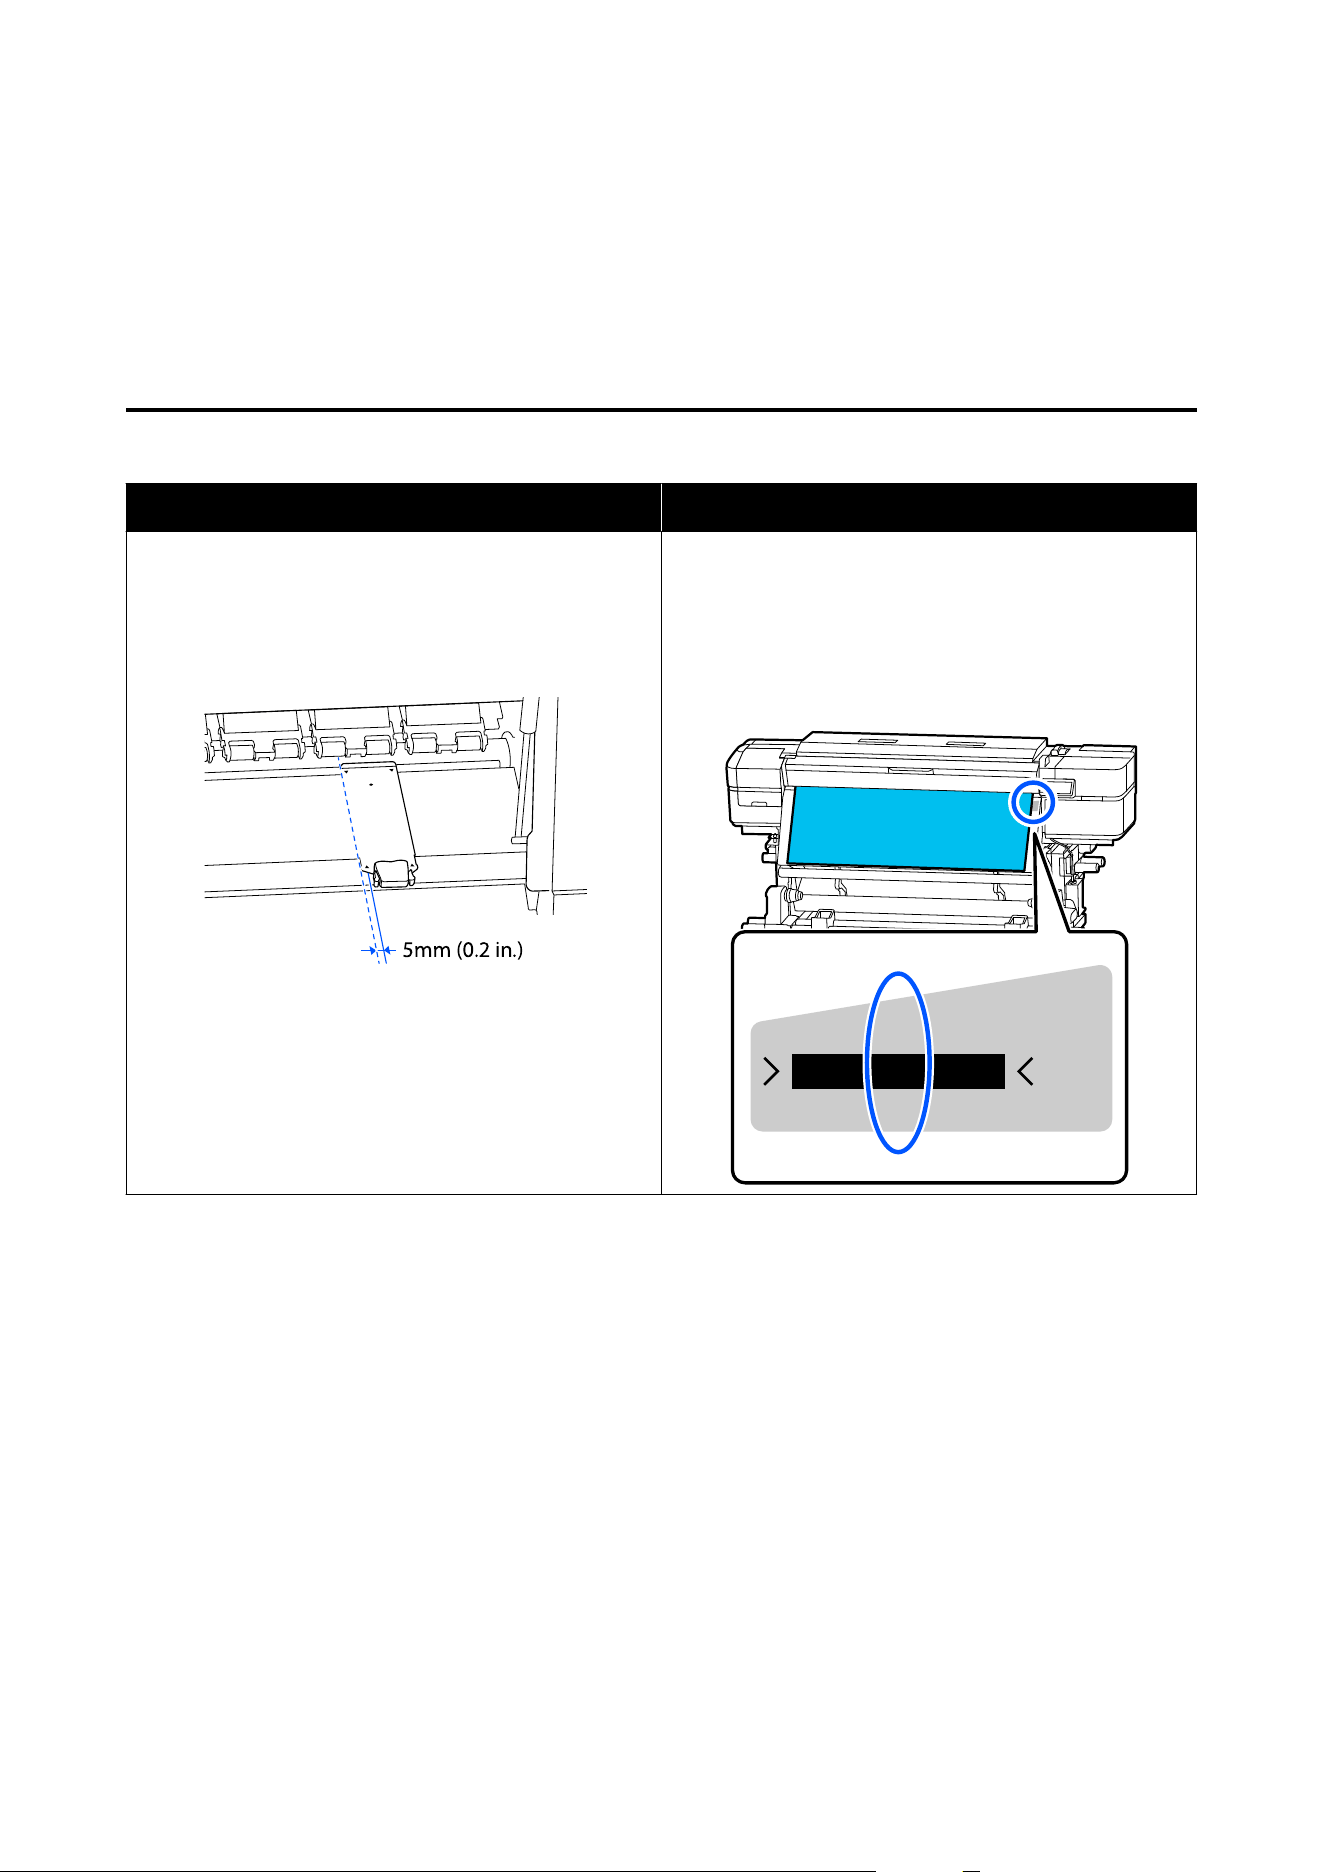
Printable Area
The position of the media edge that is used as a reference for the printable area changes depending on the setting
in General Settings - Printer Settings - Media Detection - Width Detection and whether the media edge plates
are being used. There, the printable area described below will vary.
Media Edge That Is the Reference for the Printable Area
When Width Detection is On When Width Detection is Off
The printer automatically detects the left and right edges of
the loaded media.
When the media edge plates are installed, the dashed line
in the figure below is detected by the printer as the edge of
the media.
When the media edge plates are installed correctly, the
position of the dashed line is 5 mm (0.2 in.) inside of the
actual edge of the media.
Install the media edge plates correctly so that the margins
and print start position are as intended.
U “Loading Media” on page38
The center of the black rectangle on the label below is
recognized by the printer as the standard position for the
right edge of the media. The left edge of the media is the
value (300 to 1625.6 mm [11.81 to 64.00 in]) set from the
Settings menu in General Settings - Printer Settings -
Media Detection - Media Width, regardless of the width
of the media that is loaded.
SC-S7100 Series User's Guide
Basic Operations
53
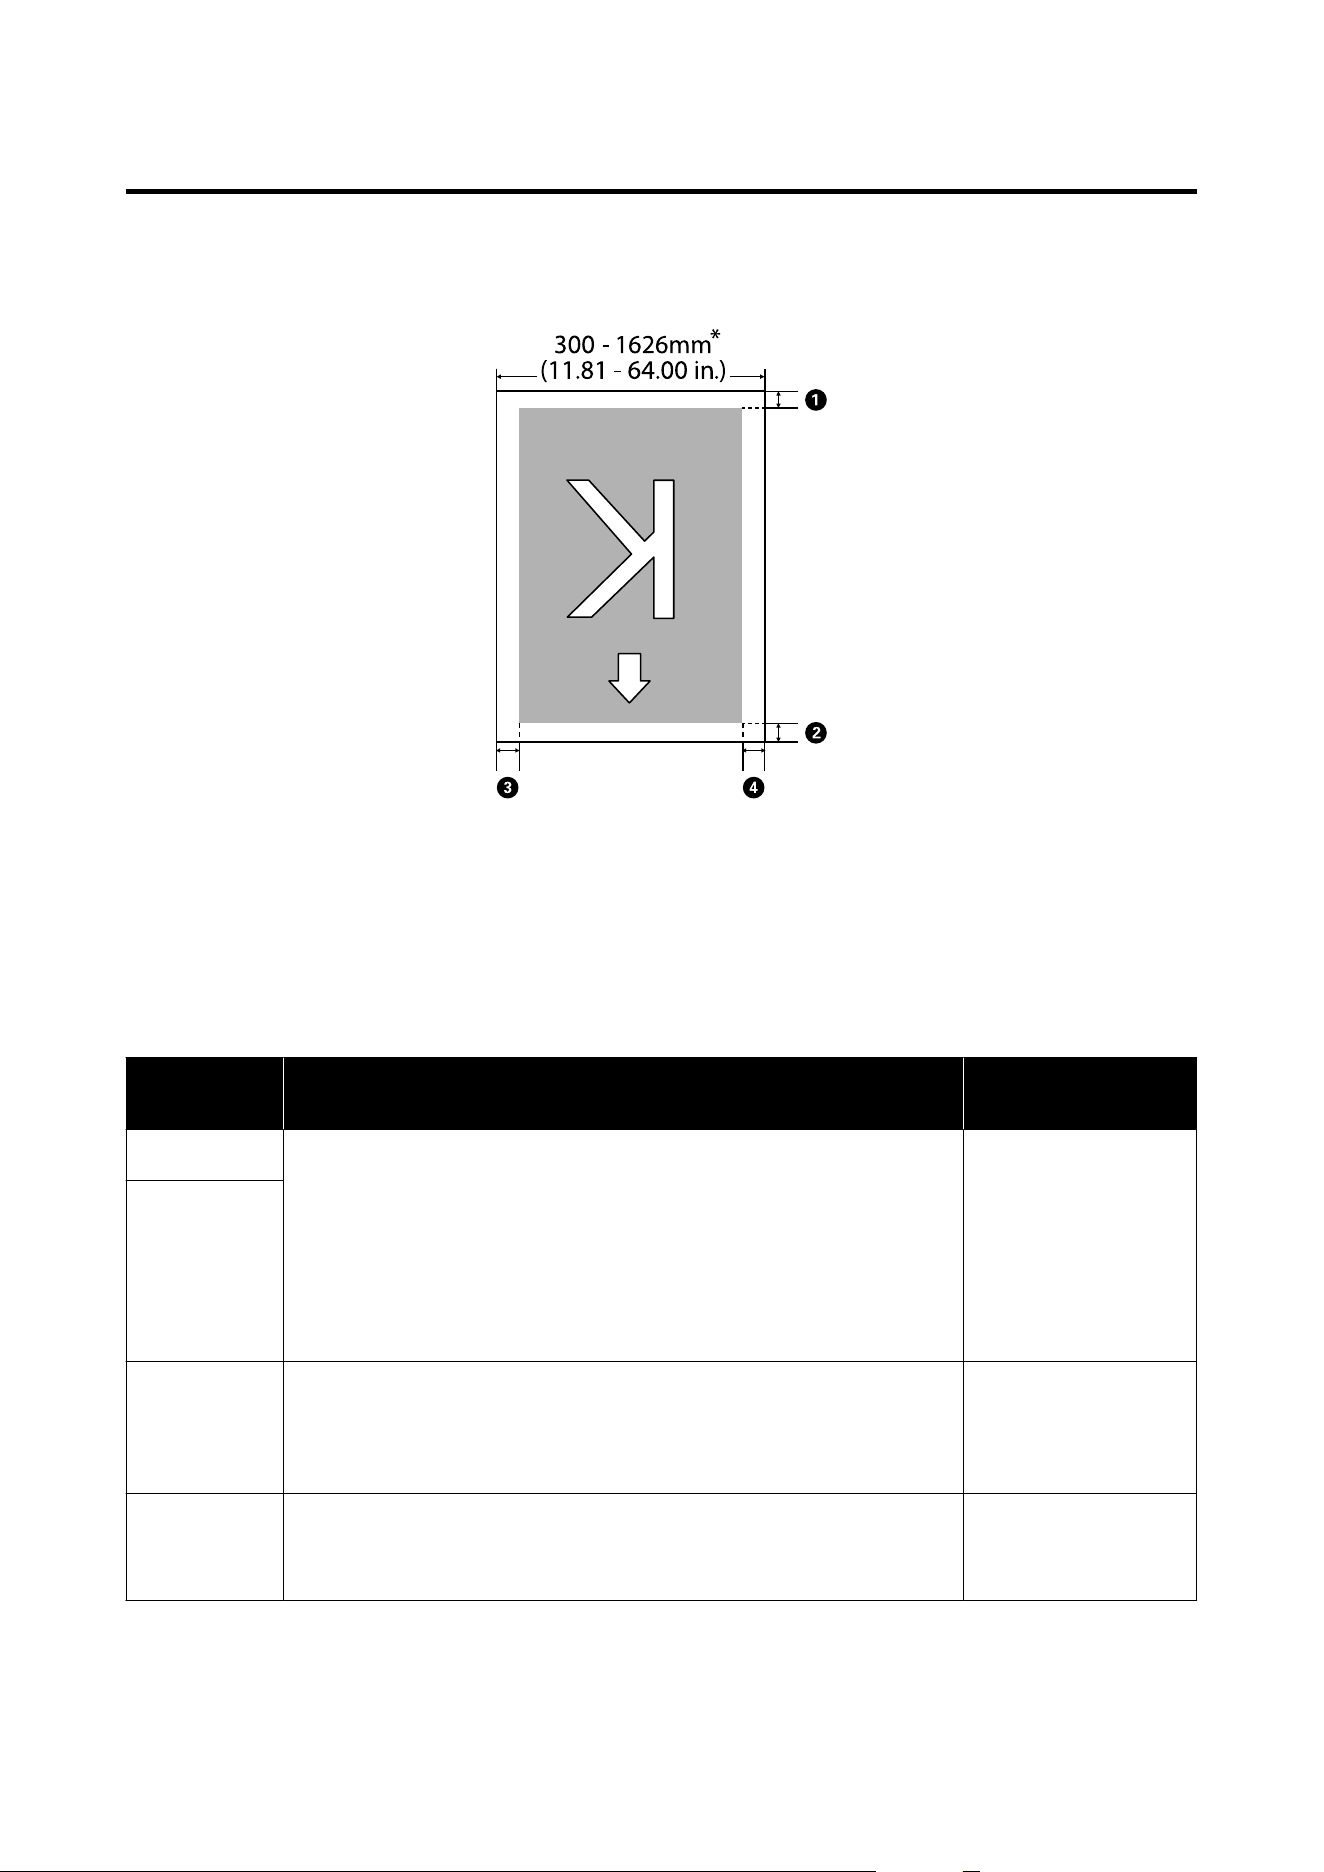
Printable Area
The gray area in the illustration below shows the printable area. The arrow indicates the feed direction.
* When the Width Detection setting is set to Off, the value set at that time (300 to 1625.6 mm [11.81 to 64.00
in.]) is used.
A to D indicates the margins on all four sides. On the printer, set the margins for each item in General Settings -
Printer Settings - Margins. See the following for more details.
Margin
Position
Explanation Available Setting
Range
ARear
*1
Half of the value set in Margin Between Pages is added as a margin. This can
also be set in the RIP.
The leading edge margin is equal to the Skip Wrinkled Media setting if both
of the following conditions are met:
❏ Skip Wrinkled Media setting is On in the settings for the selected media
❏ Skip Wrinkled Media setting is greater than 1/2 of the Margin Between
Pages setting (Except during continuous printing)
0 to 499.5 mm
(0 to 19.67 in.)
BLeading
edge
*1
CRight edge
*2, *3
The total of the values selected for Print Start Position and Side(Right). The
default setting for Print Start Position is 0 mm and Side(Right) is 5 mm (0.2 in.).
When media edge plates are used, add 5 mm (0.2 in.) to this value to get the
actual margin.
3 to 1000 mm
(0.12 to 39.37 in.)
DLeft edge
*2,
*3
The value selected for Side(Left). The default setting is 5 mm (0.2 in.).
When media edge plates are used, add 5 mm (0.2 in.) to this value to get the
actual margin.
3 to 25 mm
(0.12 to 0.98 in.)
*1 The set margin and the actual print results may differ depending on the RIP being used. Contact the RIP
manufacturer for more information.
SC-S7100 Series User's Guide
Basic Operations
54

*2 This may be available in the RIP depending on the RIP software being used. Contact the RIP manufacturer
for more information.
*3 Note the following points when setting margins.
❏ Leave margins of 5 mm (0.2 in.) or more when using media edge plates. Narrower margins could result in the printer
printing on the media edge plates.
❏ If the total of the print data width and the left and right margins exceeds the printable area, a portion of the data will
not be printed.
Note:
If the following points are not observed when Width Detection is set to Off, printing may occur outside the left and right
edges of the media. Ink used outside the edges of the media will stain the inside of the printer.
❏ Ensure that the print data width does not exceed the loaded media width.
❏ When media is loaded to the left of the right side reference position, align the Print Start Position setting with the
position where the media is set.
U “General Settings Menu” on page84
SC-S7100 Series User's Guide
Basic Operations
55
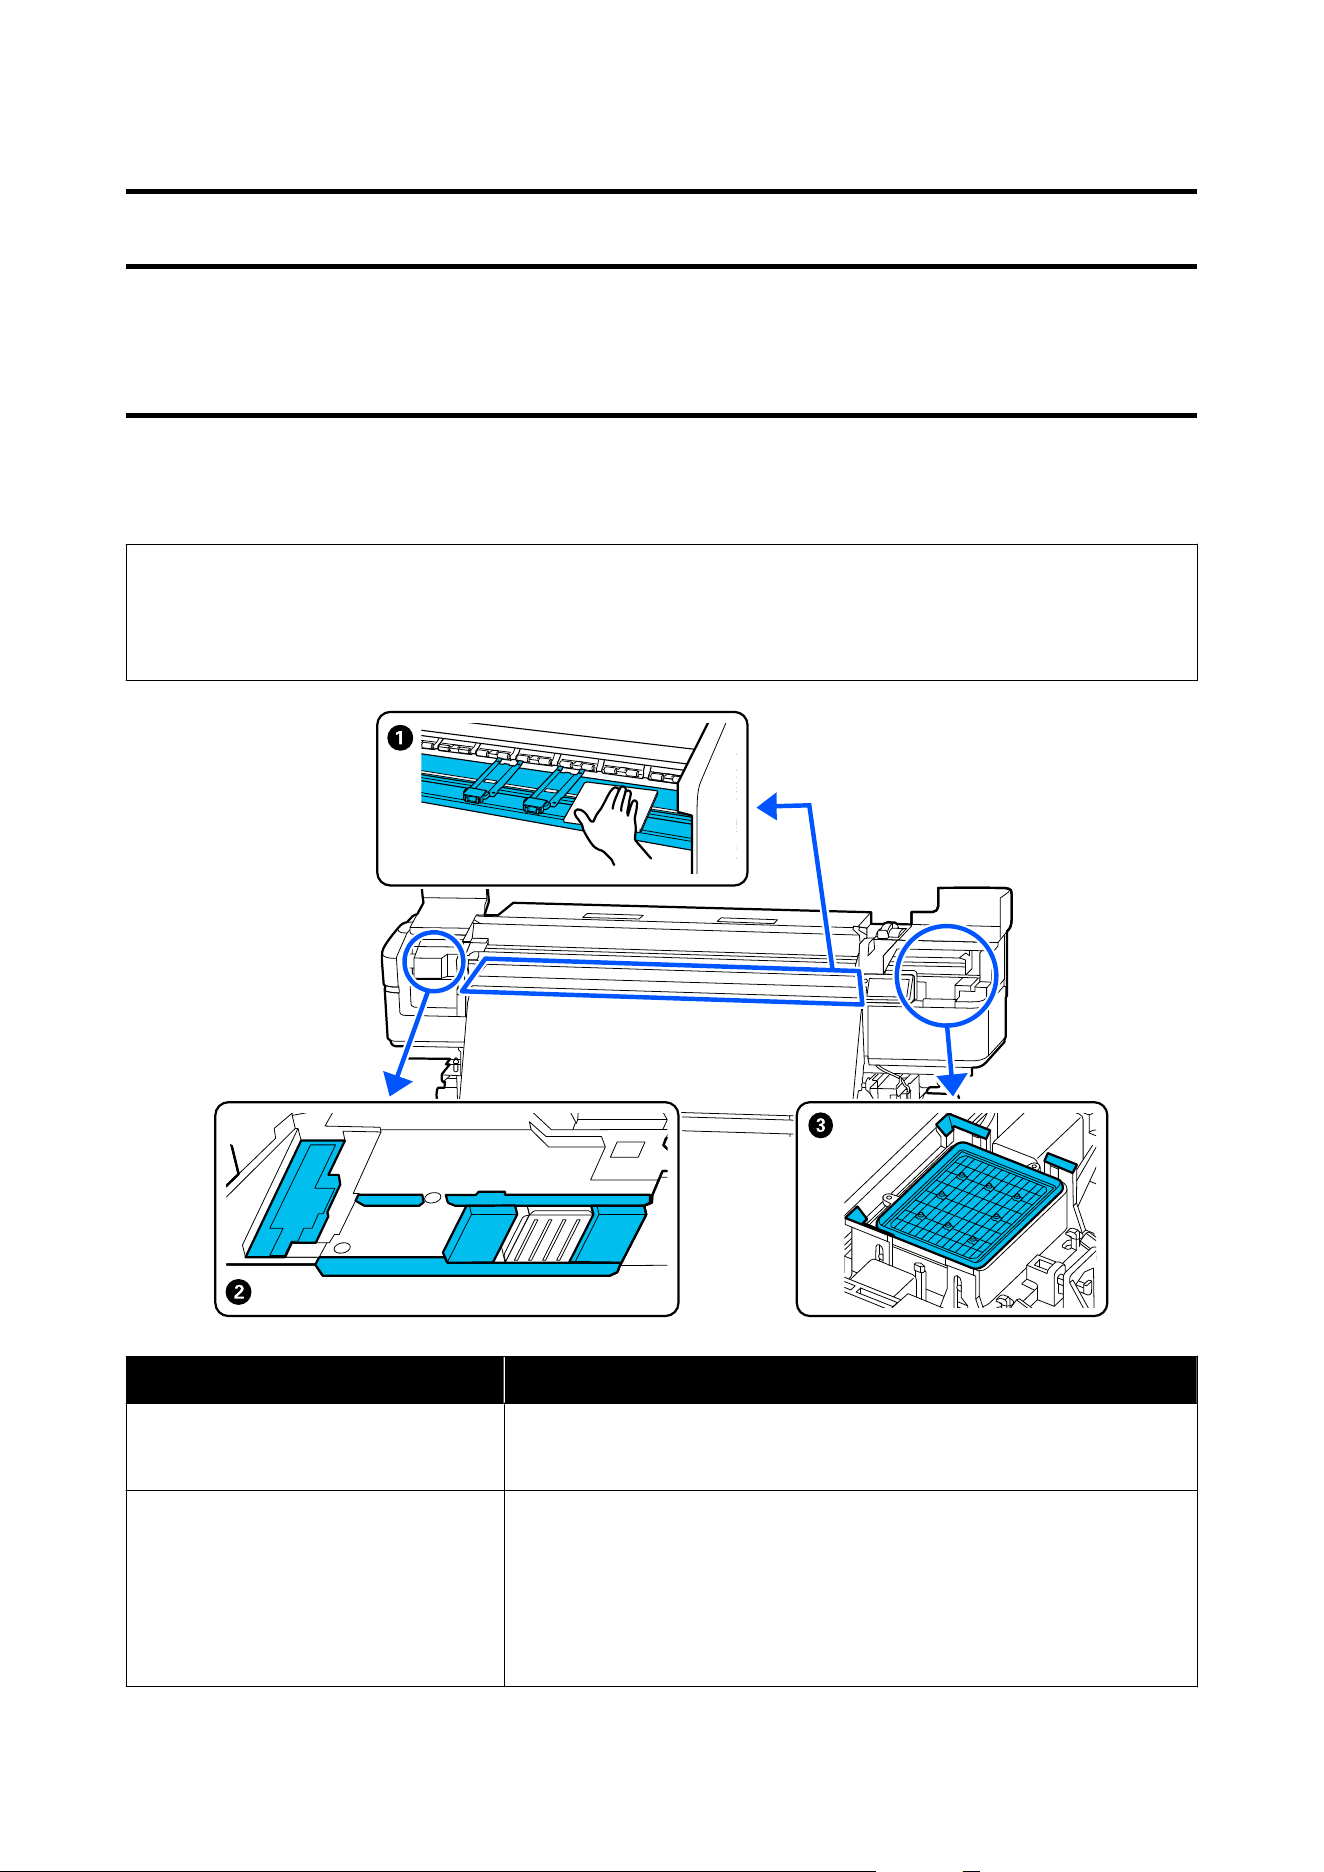
Maintenance
When to Perform Various Maintenance Operations
Components Requiring Regular Cleaning and Cleaning Timing
If you continue to use the printer without cleaning, it could cause clogged nozzles or ink drops to occur.
c
Important:
Do not touch any components inside the printer cover or maintenance cover except in the locations specified.
This can damage the printer so it cannot print properly.
When to perform Component to be cleaned
When starting work every day
A Platen heater and media edge plates
U “Daily Cleaning” on page61
At least once a month
B Around the print head
C cap
U “Performing Regular Cleaning” on page61
You can check the procedure in a video on YouTube.
Epson Video Manuals
SC-S7100 Series User's Guide
Maintenance
56
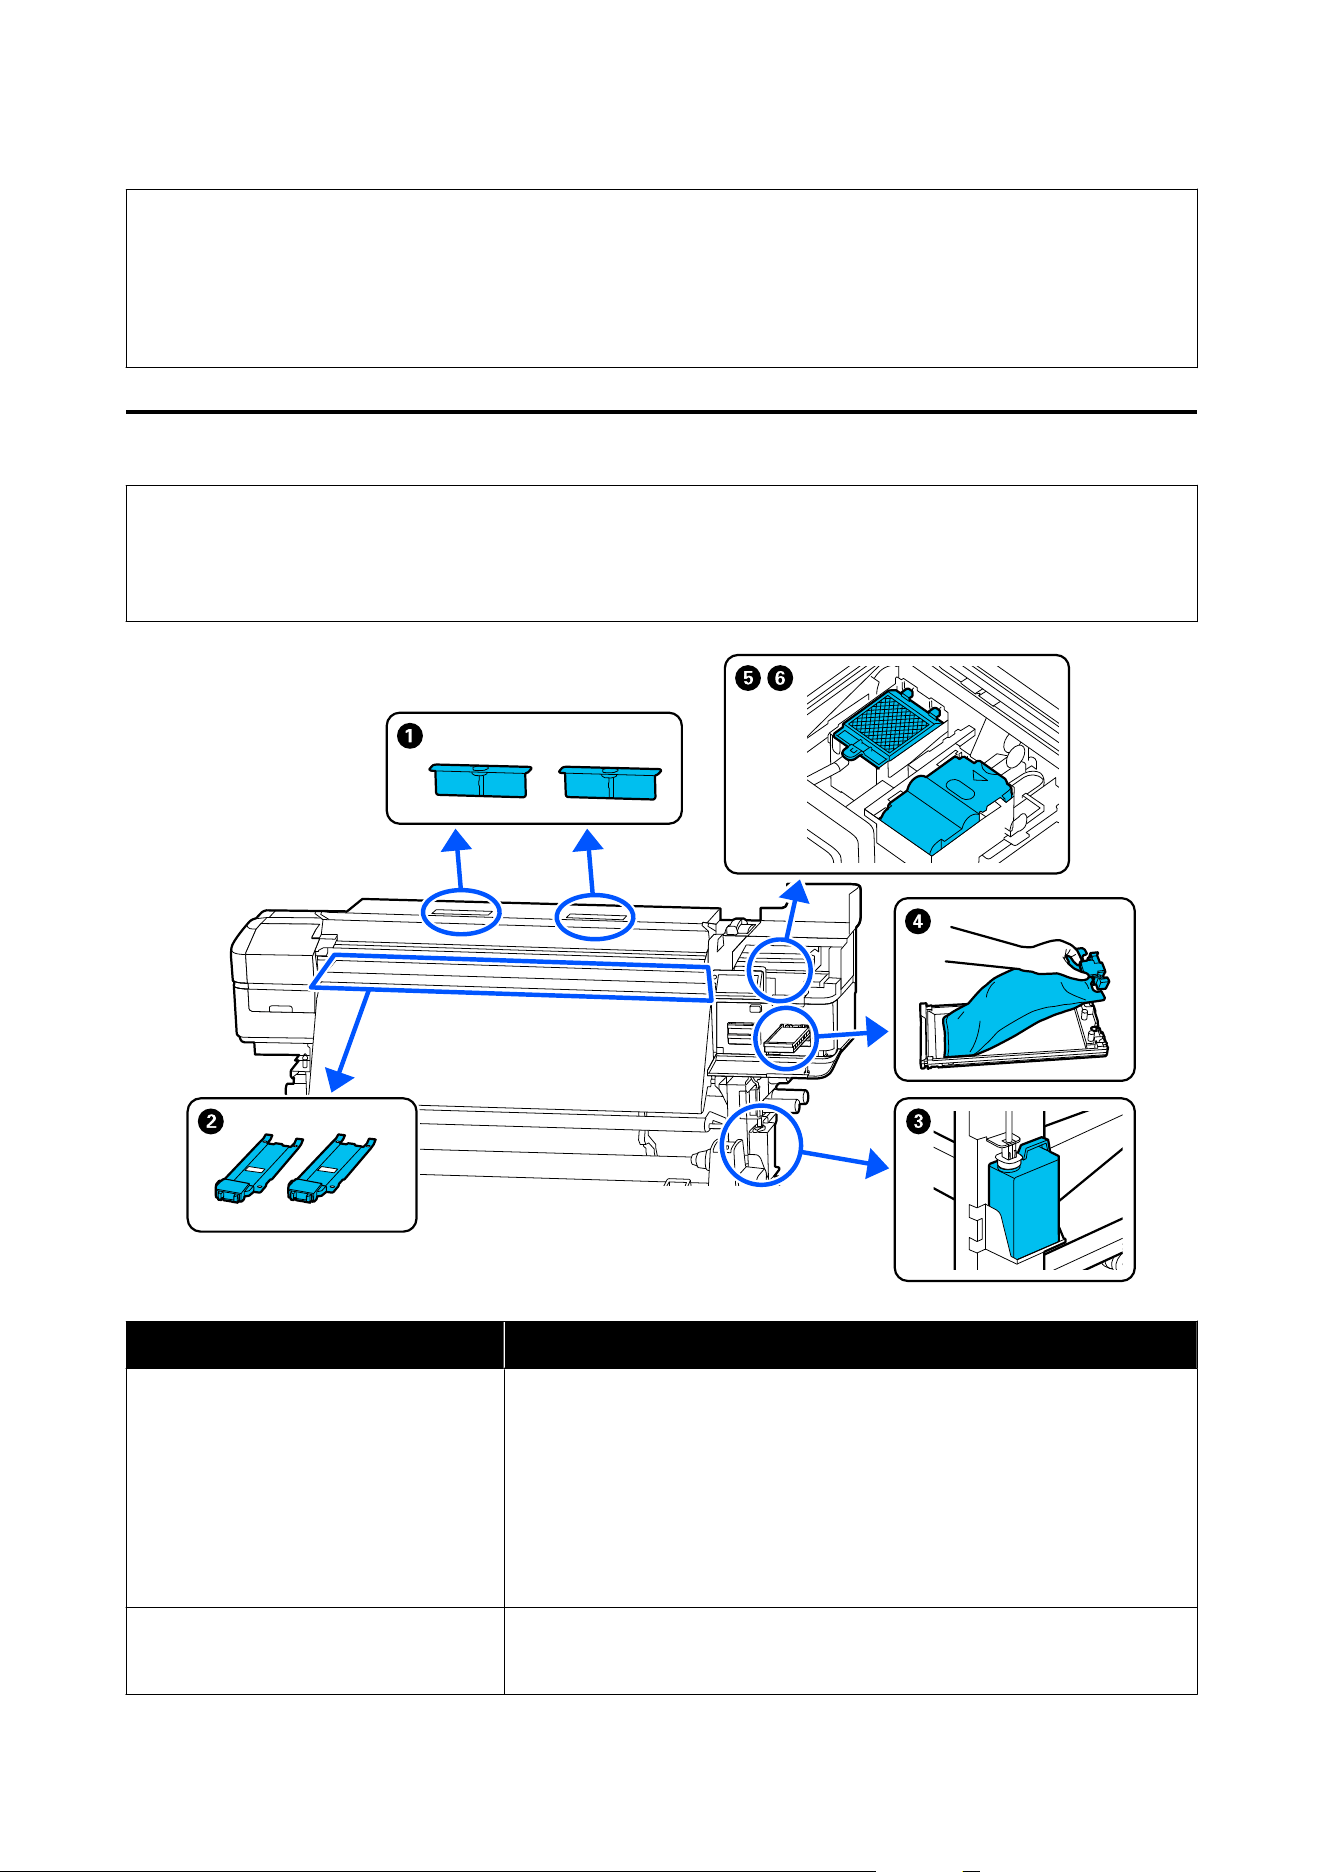
c
Important:
The printer contains precision instruments. If any lint or dust adheres to the nozzles on the print head, print
quality will decline.
Perform regular cleaning more frequently depending on the environment and media being used.
Locations of Consumables and Replacement Timing
c
Important:
Do not touch any components inside the printer cover or maintenance cover except in the locations specified.
This can damage the printer so it cannot print properly.
When to perform Component to be replaced
When a replacement message is
displayed on the control panel screen
A Air filter
E Flushing pad
F Wiper unit
U “Replacing Maintenance Parts Kit” on page66
C Waste ink bottle
U “Disposing of Waste Ink” on page65
When the plates are deformed or
damaged.
B Media edge plates
U “Replacing the Media Edge Plates” on page67
SC-S7100 Series User's Guide
Maintenance
57
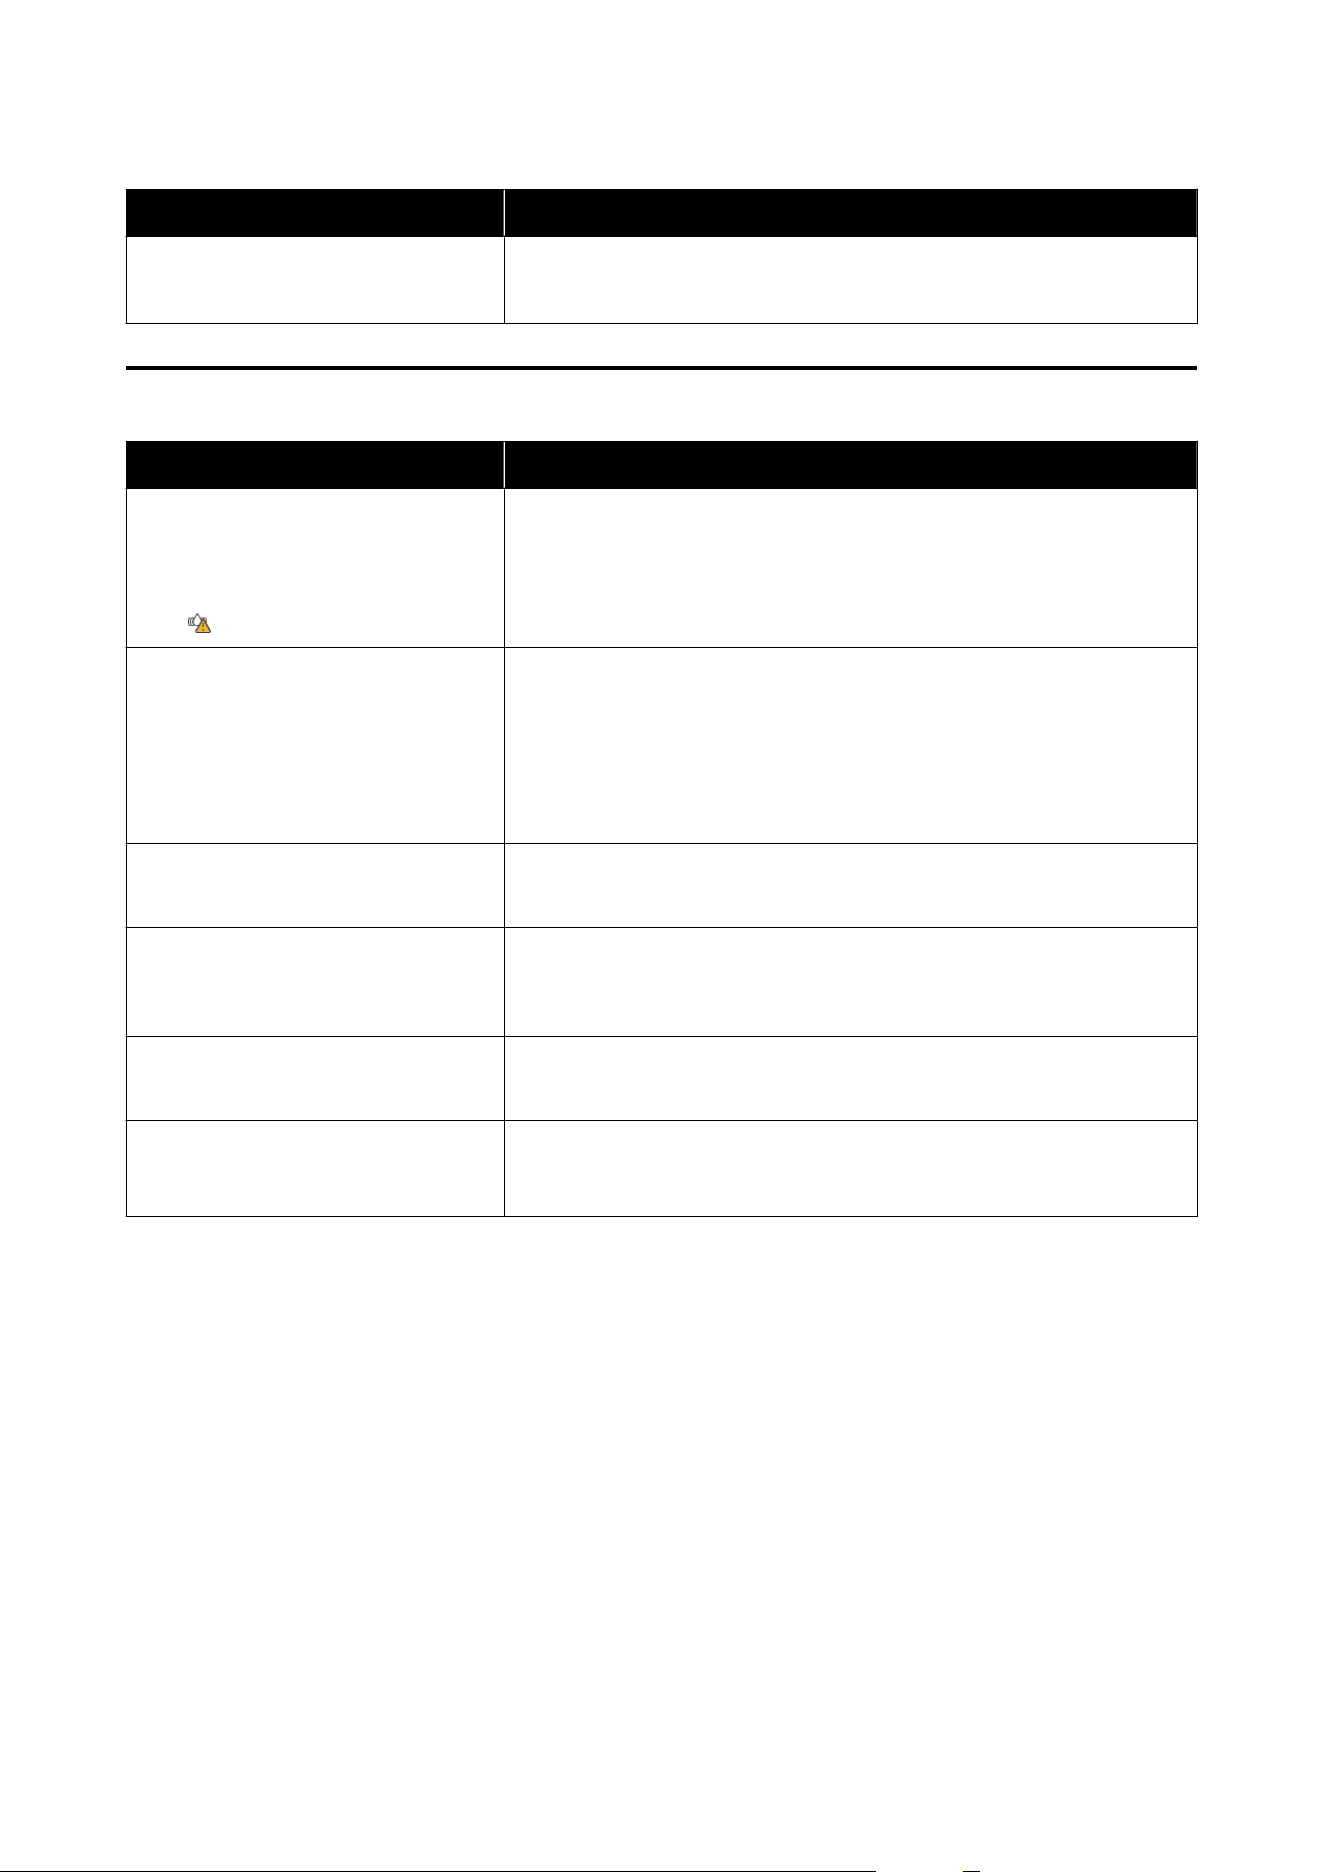
When to perform Component to be replaced
When an error appears on the control
panel screen indicating ink is expended
D Ink supply units
U “Replacing Ink Supply Units” on page64
Other Maintenance
When to perform Operation
❏ Once every three weeks
❏ When the control panel screen
shows Ink shaking is needed.
Shake the ink supply unit which
is displayed.
Shaking the Ink Supply Unit
U “Shaking the Ink Supply Units Periodically” on page63
❏ When checking if nozzles are
clogged
❏ When checking which colors are
clogged
❏ When you notice horizontal stripes
or tint unevenness (banding)
Print Head Nozzle Check
U “Nozzle Check and Head Cleaning” on page70
When roller marks appear in print results Cleaning pressure rollers
U “Cleaning the Pressure Rollers” on page73
When not using the printer for an
extended period (the power is off)
Perform Pre-Storage Maint.
U “Pre-maintenance When Not Using the Printer for an Extended Period” on
page72
When it becomes hard to see inside the
printer
Cleaning inside the printer cover
U “Cleaning Inside the Printer Cover” on page73
When the control panel screen shows It
is time to apply grease to the carriage
rod.
Applying the supplied grease to the carriage rod
U “Applying Grease to the Carriage Rod” on page74
SC-S7100 Series User's Guide
Maintenance
58
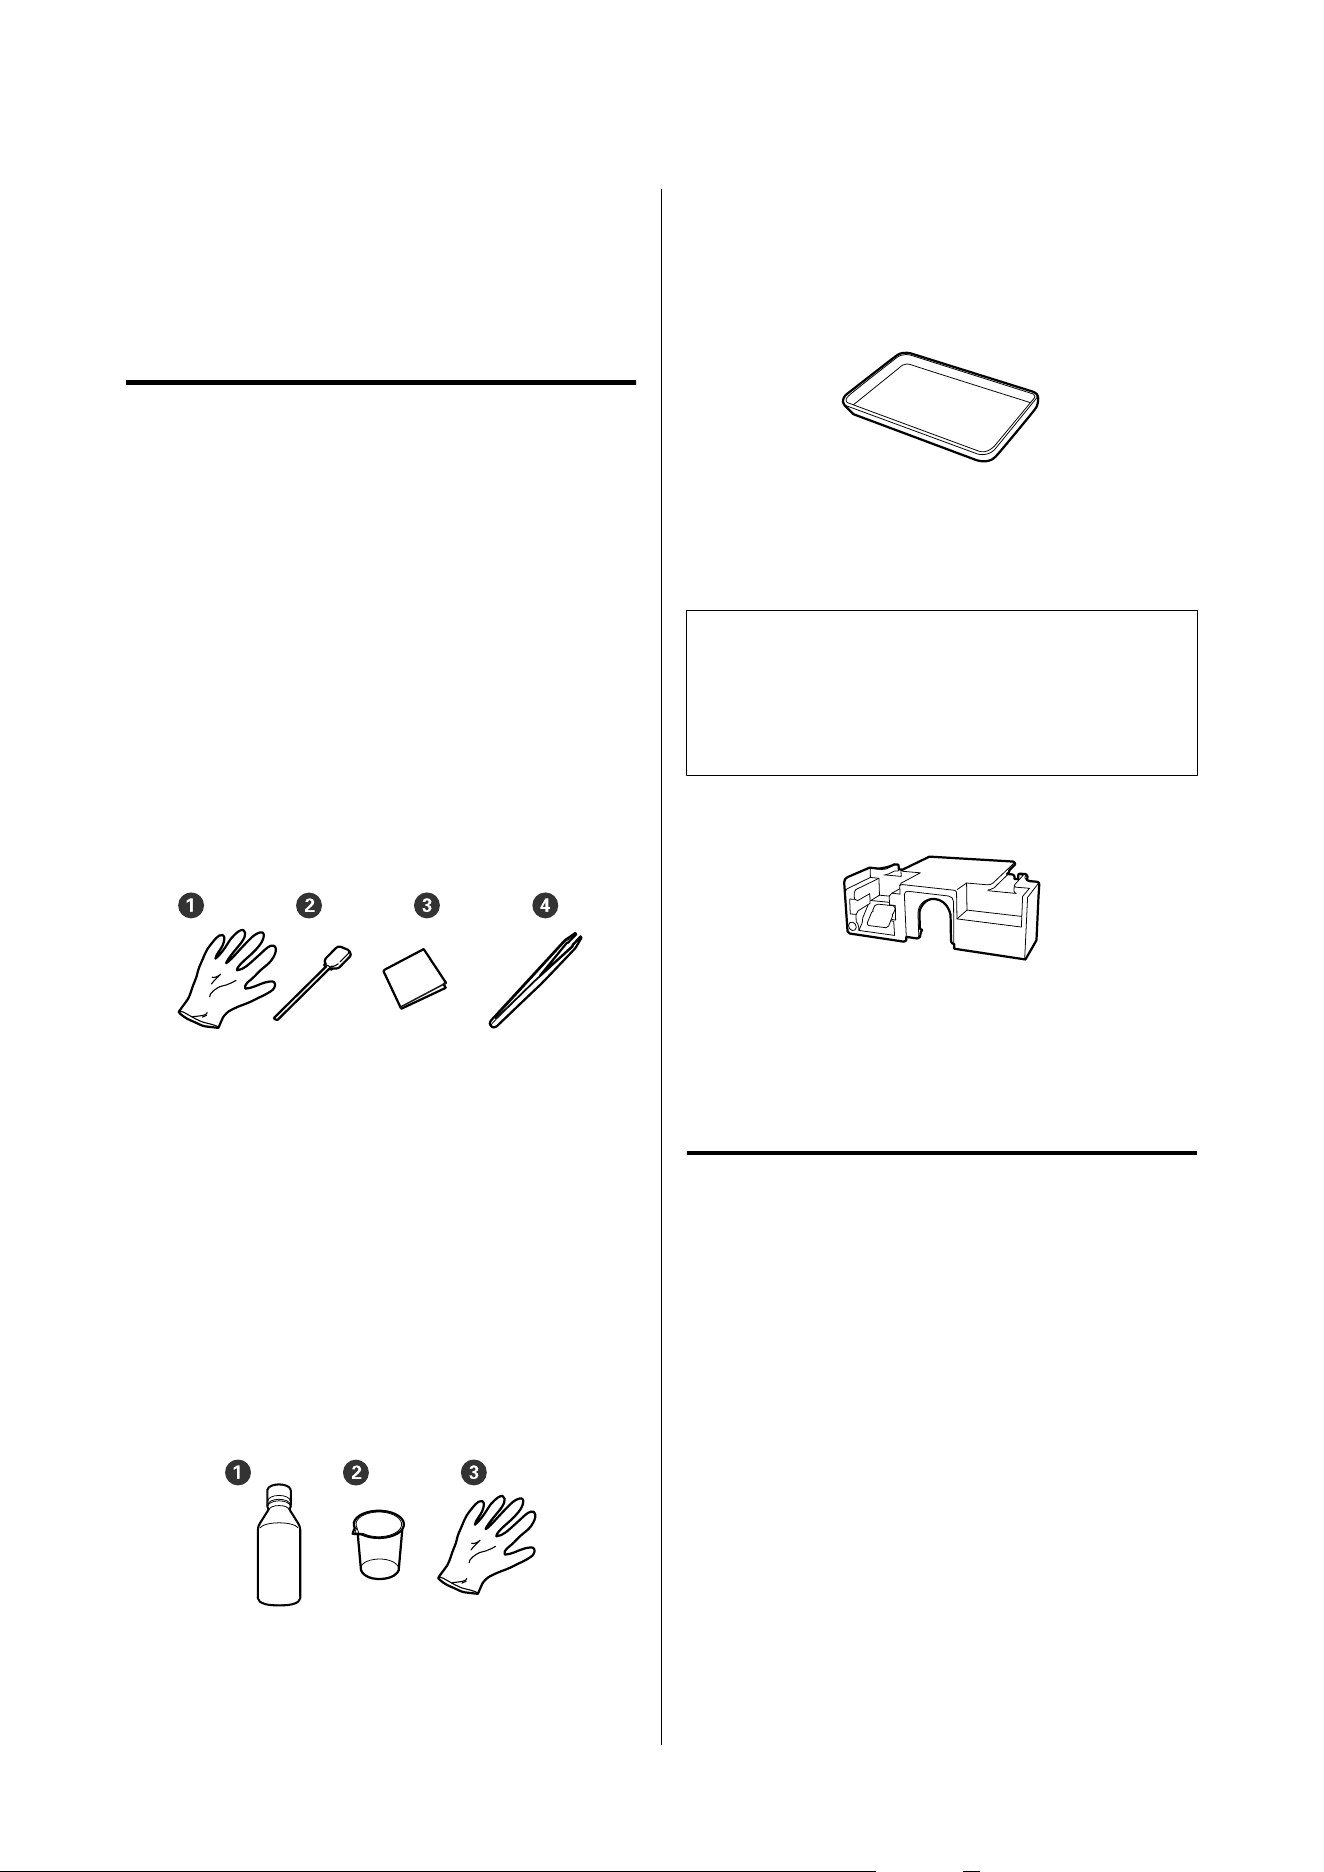
What You Will Need
Ready the following items before beginning cleaning
and replacement.
Supplied with the Printer
When the supplied parts have been completely used,
purchase new consumables.
Use genuine parts when replacing ink supply units or
performing maintenance.
U “Options and Consumable Products” on page111
If the supplied gloves have worn out, use commercially
available nitrile gloves.
Set of maintenance tools
These cleaning tools are supplied with the printer and
are mainly used for periodic cleaning.
A Gloves (x12)
B Cleaning sticks (x20)
C Clean-room wipers (x100)
D Tweezers (x1)
Ink cleaner
Use when wiping ink stains.
The following things are in the kit.
A Ink cleaner (x1)
B Cup (x1)
C Gloves (x12)
How to use U “Using Ink Cleaner” on page62
A metal tray
Use when placing cleaning utensils, removed
consumables, or ink cleaner poured into the container
supplied with the printer.
c
Important:
Placing used cleaning sticks and so on directly on
top of the printer may cause deformation due to
the properties of the ink cleaner.
Tray attachment
This is used to prepare for Pre-Storage Maint. when
the printer will not be used for more than a month,
and when resuming use, and when executing Head
Washing .
Sold Separately
Protective eyeglasses
Protects your eyes against ink and cleaning liquid.
Mask
Protects your nose and mouth from ink and cleaning
liquid.
Soft cloth
Use when cleaning inside the printer. Use material that
is not likely to generate lint or static electricity.
SC-S7100 Series User's Guide
Maintenance
59

Precautions Regarding
Maintenance
Note the following points when cleaning and replacing
parts.
Caution:
❏ During maintenance, wear protective clothing,
including protective eyewear, gloves, and a
mask.
If ink, waste ink, or cleaning liquid come into
contact with your skin or enter your eyes or
mouth, take the following actions.
❏ If fluid adheres to your skin, wash it
off using large volumes of soapy water.
If you notice any reaction developing in
the affected area, consult with a qualified
physician immediately.
❏ If ink gets into your eyes, wash them
out immediately with water. Failure to
observe this precaution could result in
bloodshot eyes or mild inflammation.
Consult with a qualified physician if any
other problems should develop.
❏ If fluid enters your mouth, consult with a
physician as soon as possible.
❏ If swallowed, do not induce vomiting.
Consult with a physician as soon as
possible. If vomiting is induced, vomited
material may enter the windpipe, which is
dangerous.
❏ Store ink supply units, cleaning ink supply
units, waste ink, and cleaning liquid out of
the reach of children. Do not drink the ink.
❏ After replacing the waste ink bottle or using
the ink cleaner, wash your hands and rinse
your mouth thoroughly.
❏ Remove the media from the printer before
proceeding.
U “Replacing the Media” on page50
❏ Never touch the belts, circuit boards, or any parts
that do not require cleaning. Failure to observe
this precaution could result in malfunction or
reduced print quality.
❏ Do not use anything other than the supplied or
consumable cleaning stick. Other types of sticks
that produce lint will damage the print head.
❏ Always use fresh cleaning sticks. Reusing sticks
can make stains even harder to remove.
❏ Do not touch the tips of the cleaning sticks. Oil
from your hands could damage the print head.
❏ When cleaning using cleaning liquid, do not use
anything other than the specified cleaning liquid.
Using anything else could result in malfunction or
reduced print quality.
❏ Do not use water or alcohol to clean around the
print head or cap. When ink mixes with water or
alcohol, it will harden.
❏ Touch a metallic object before starting work to
discharge any static electricity.
SC-S7100 Series User's Guide
Maintenance
60
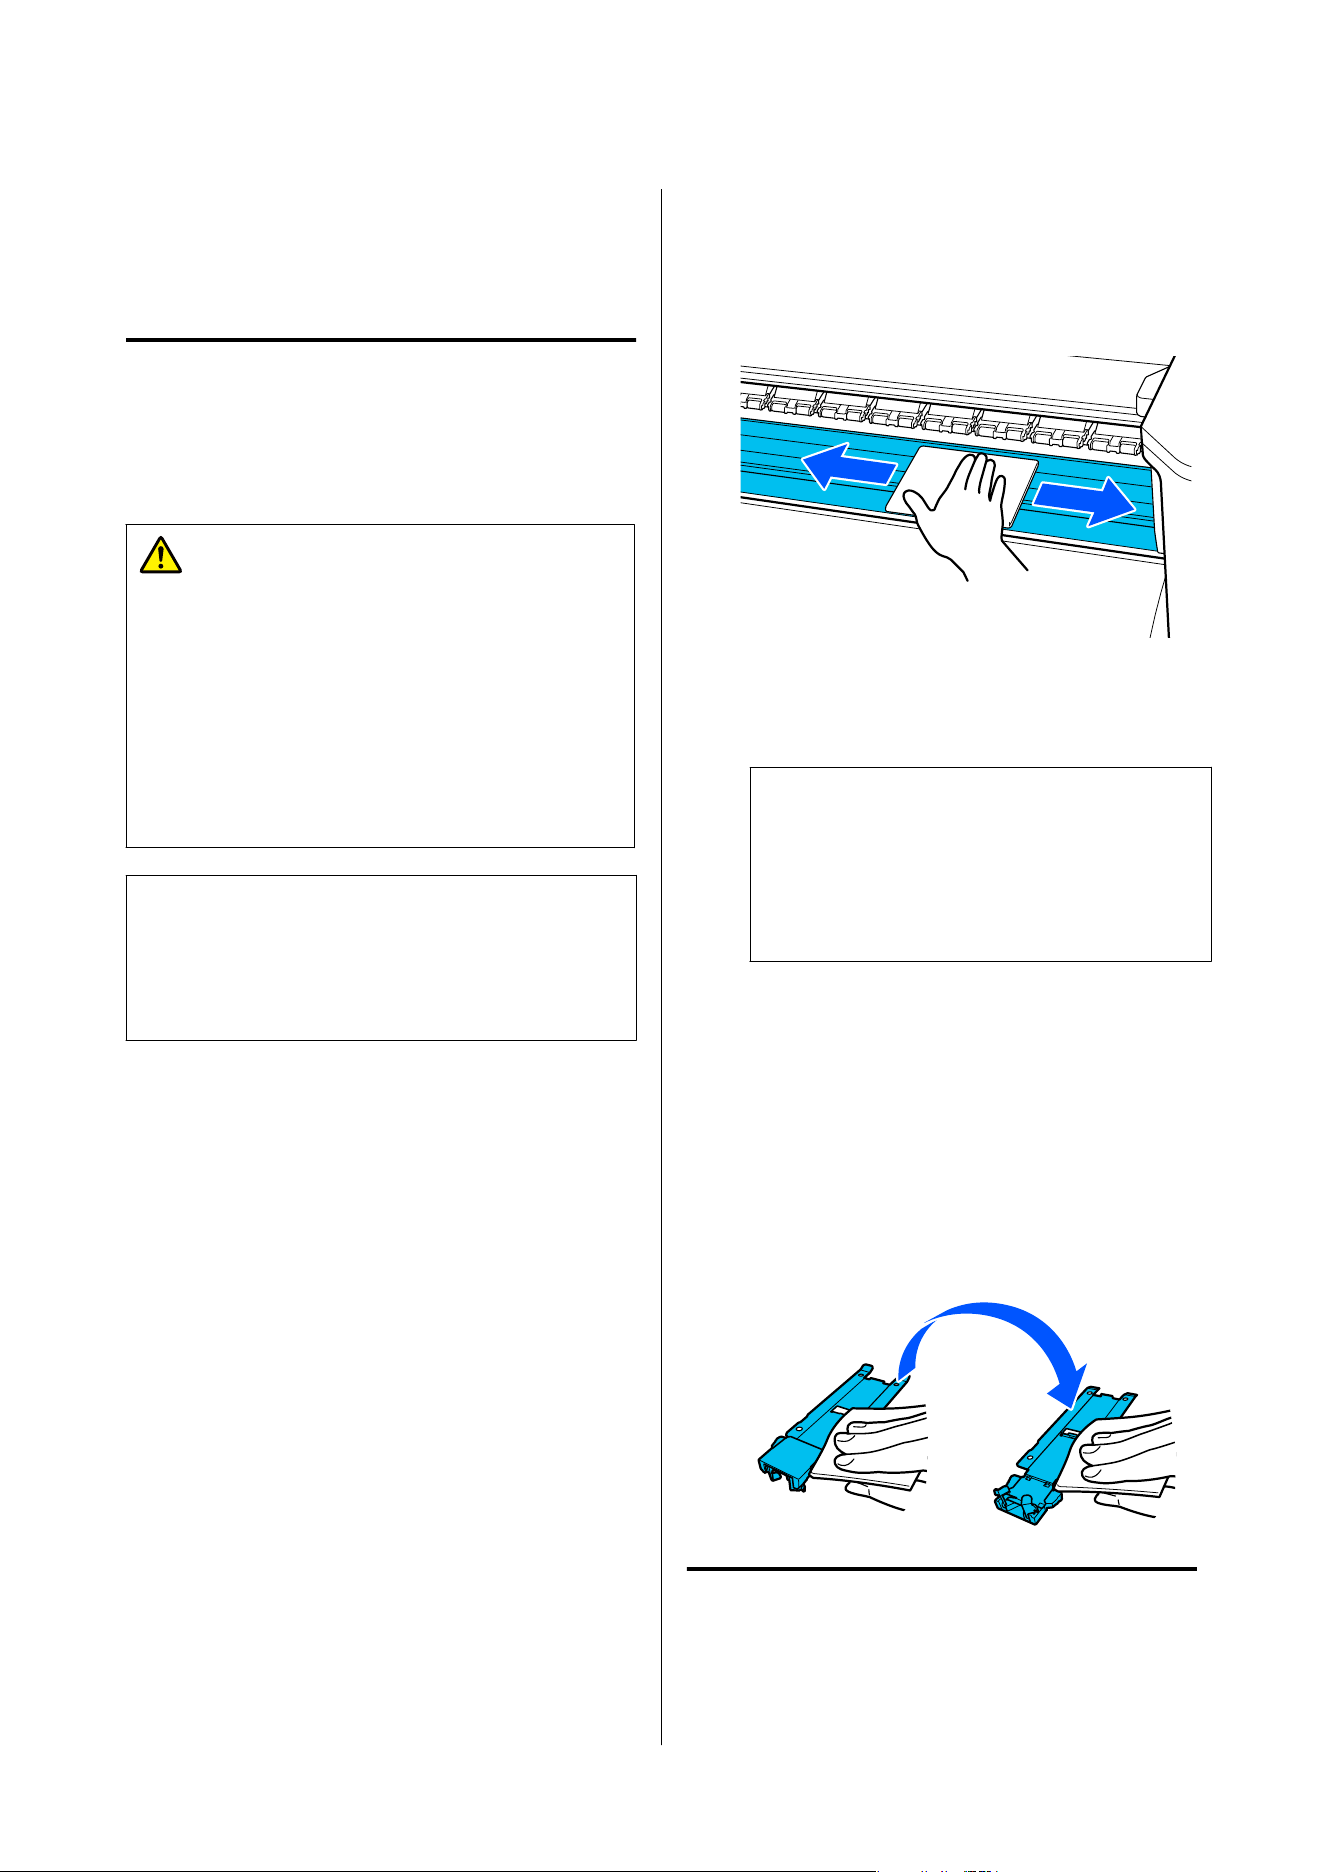
Performing Regular
Cleaning
Daily Cleaning
When lint, dust, or ink adheres to the platen heater or
the media edge plates, it could cause clogged nozzles
or ink drops to occur.
Caution:
❏ The heaters and media edge plate may be hot;
observe all necessary precautions. Failure to
observe the necessary precautions could result
in burns.
❏ Be careful not to trap your hands or fingers
when opening or closing the printer cover.
Failure to observe this precaution could result
in injury.
c
Important:
When cleaning the platen heater or the media
edge plates, do not use ink cleaner. Doing so could
damage the parts.
A
Make sure the printer is turned off and the
screen has turned off, and then unplug the
power plugs for both the prin
ter and the
Additional Print Drying System from the
outlets.
B
Wait for one minute after unplugging the power
plugs.
C
Open the printer cover.
D
Soak a soft cloth in water, wring it out
thoroughly, and then wipe off any ink, lint, or
dust that has adhered to the platen heater.
Carefully remove lint and dust stuck in the
groove of the platen heater.
E
Soak a soft cloth in water, wring it out
thoroughly, and then wipe off any lint, or dust
that has adhered to the media edge plates.
c
Important:
When media with glue has been used, wipe
away glue using a diluted neutral detergent.
If you continue printing while glue is stuck to
the rear, it may rub against the print head.
When using media with glue and when ink
adheres
Remove the media edge plates from the printer,
and clean the front and back of the plates.
When stains are removed, be sure to attach the
plates to their original positions.
Removing and attaching the media edge plates
U “Replacing the Media Edge Plates” on
page67
Monthly Cleaning
Clean any lint or waste ink that has accumulated
around the print head/area around the cap using the
following procedure.
SC-S7100 Series User's Guide
Maintenance
61
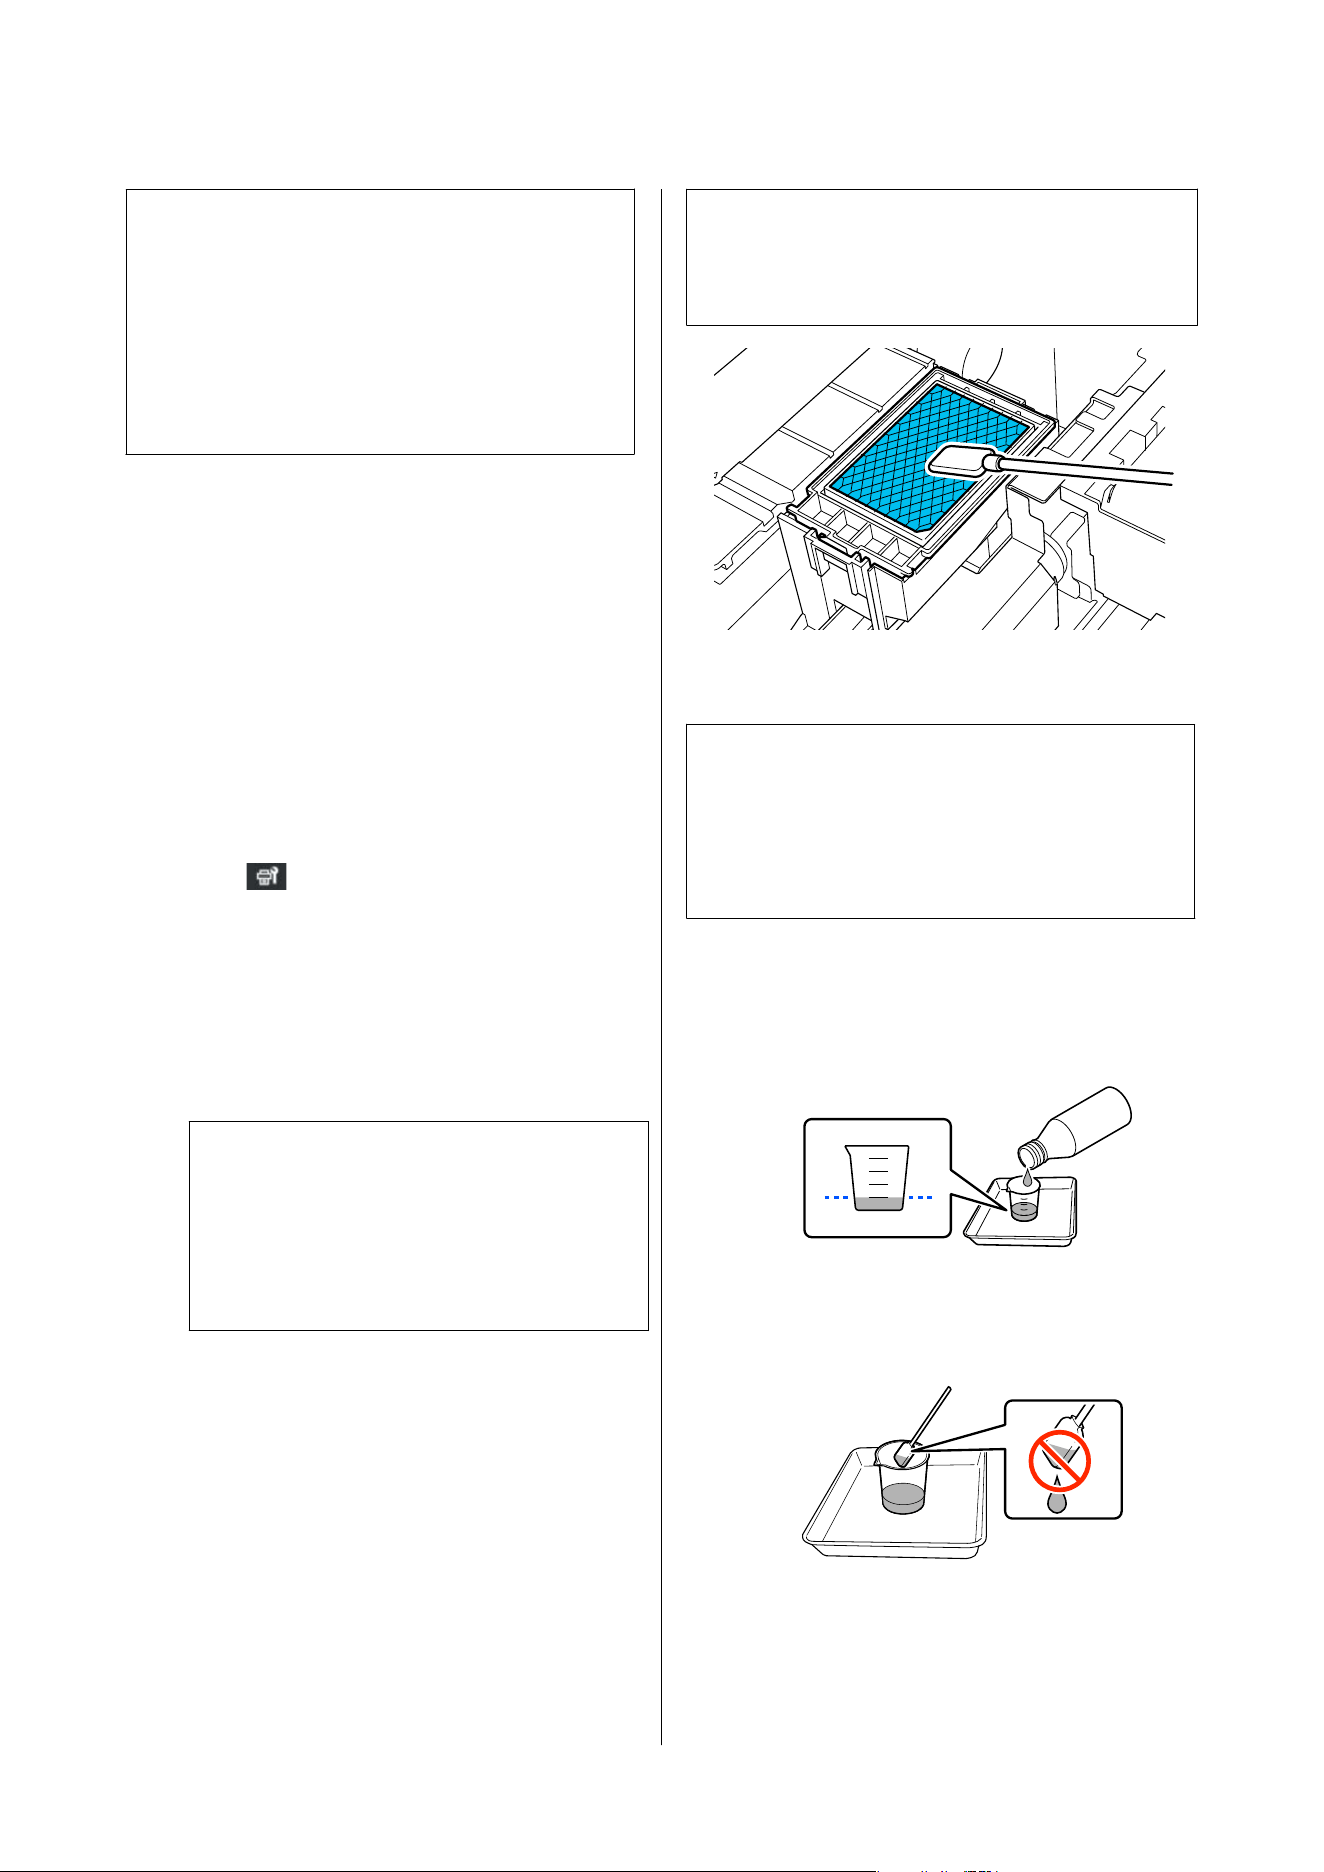
c
Important:
The following message is displayed on the control
panel display if cleaning has not been performed
for one month. If the message is displayed, clean
the area immediately.
It is time to clean the Print Head/Area around
the Cap.
Cleaning procedure
Before starting this procedure, be sure to read the
following:
U “Precautions Regarding Maintenance” on page60
U “Using Ink Cleaner” on page62
You can check the procedure in a video on YouTube.
Epson Video Manuals
A
Press (Maintenance), and then press
Cleaning the Maintenance Parts - Print Head/
Area around the Cap.
B
Press Start, and then press How To... to view
the procedure.
The print head moves to the maintenance
position on the left.
Note:
The buzzer sounds 7 minutes after the print head
is moved (default setting).
Check the message on the screen, and press OK to
continue. After 7 more minutes have passed, the
buzzer sounds again.
Follow the on-screen instructions to perform
the procedure.
When the printed result shows problems such as
clogged nozzles, ink drops, or streaks
Check the surface of the flushing pad for lint when
cleaning the cap.
If lint or dust adheres to the surface of the flushing
pad, use the tip of a cleaning stick to remove it.
c
Important:
Do not deform the metal section of the top surface.
If it is deformed, it may damage the print head.
Using Ink Cleaner
c
Important:
Use the specified ink cleaner only to clean around
the print head and cap. Do not use ink cleaner
in areas not specified in the manual, as it may
damage the parts.
A
Place the container supplied with the ink
cleaner on the metal tray and pour in
approximately 10 ml (up to the lowest mark)
of ink cleaner.
B
Dampen the cleaning stick with ink cleaner.
When doing this, do not allow ink cleaner to
drip from the cleaning stick.
When soaking a clean-room wiper with ink
cleaner, use the ink cleaner poured into the
container.
SC-S7100 Series User's Guide
Maintenance
62
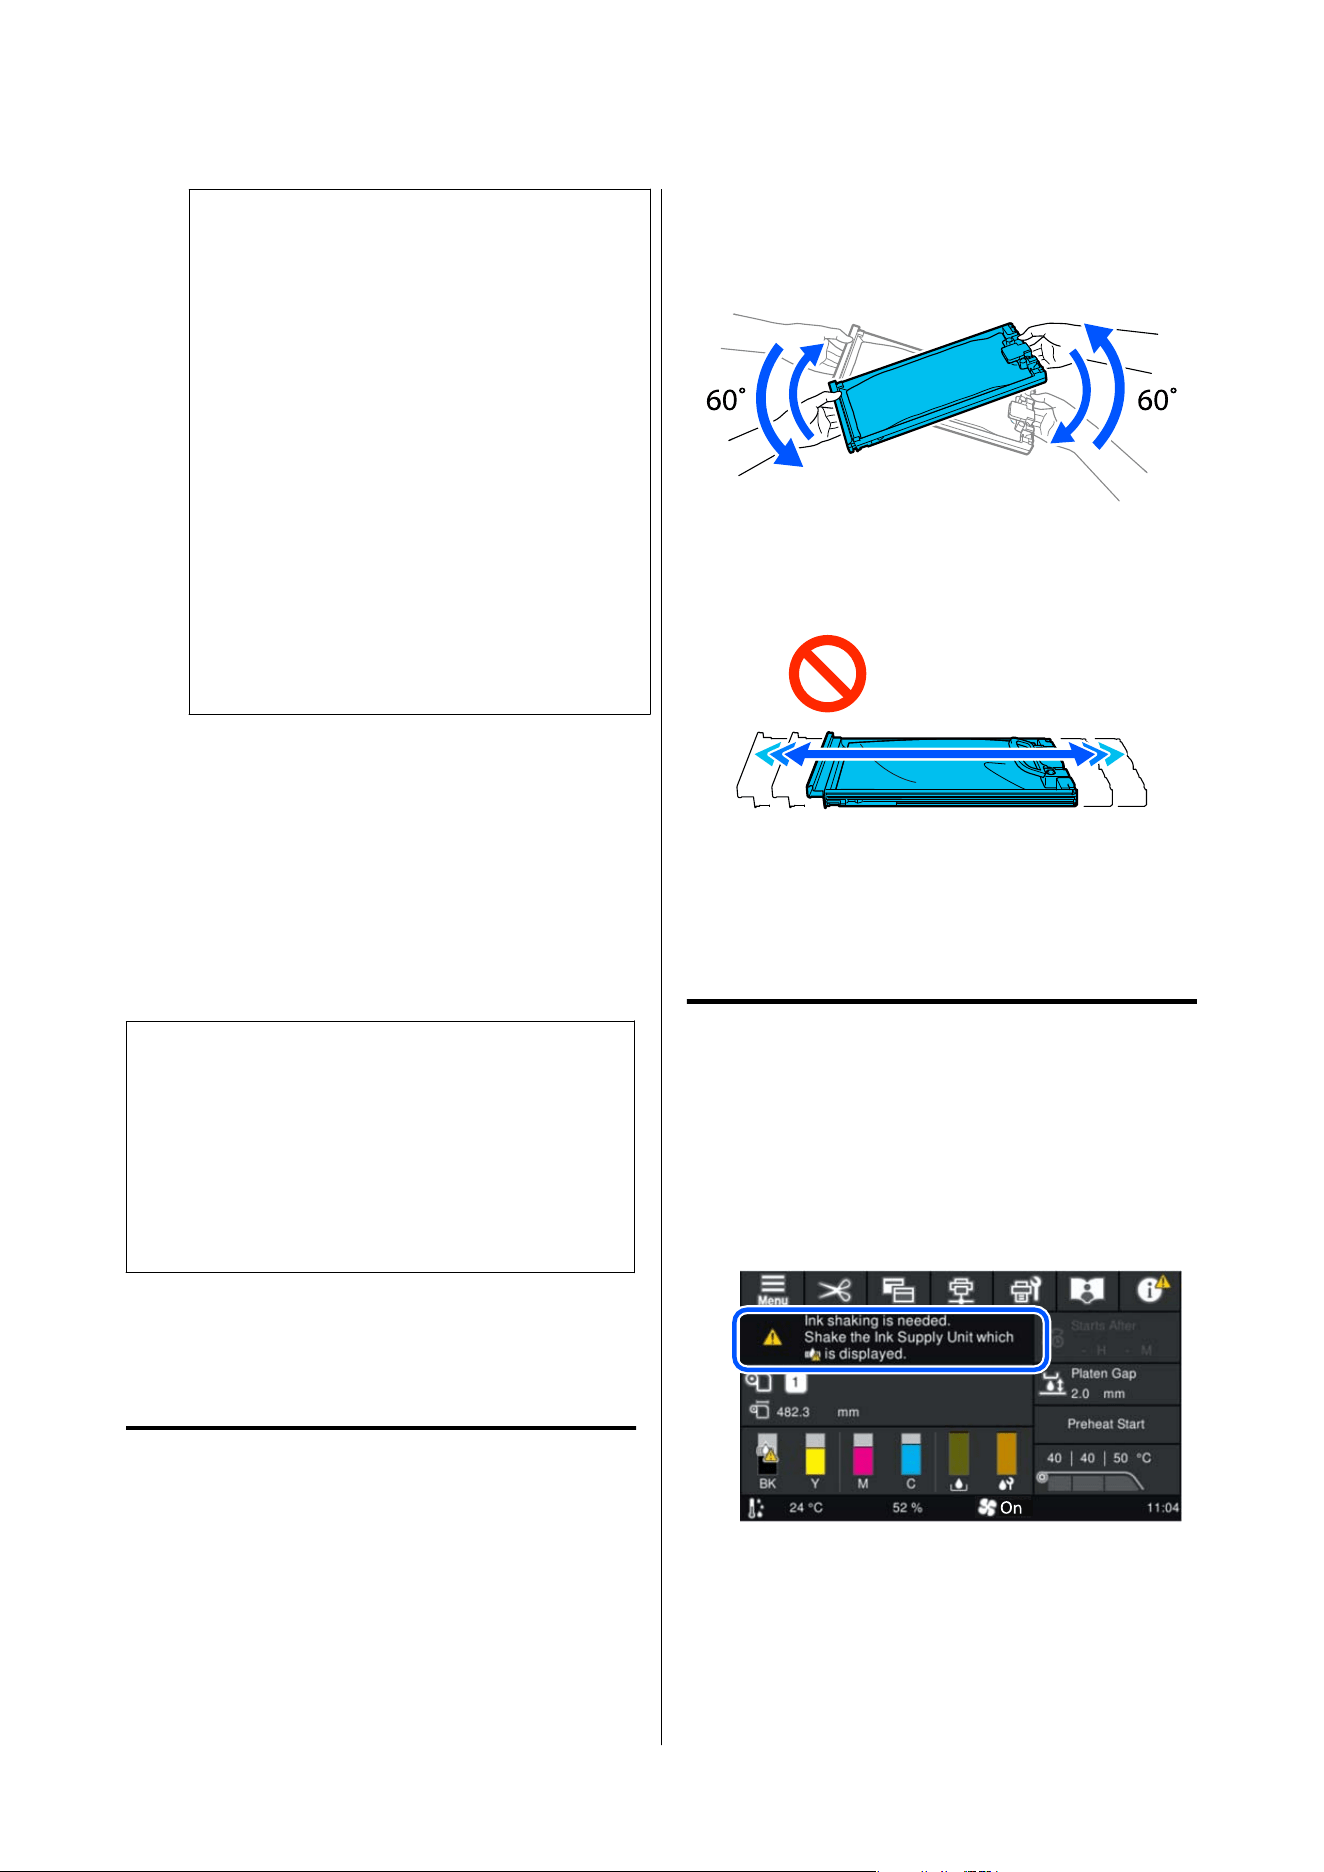
c
Important:
❏ Do not use ink cleaner that has already
been used for cleaning. Using dirty ink
cleaner will make staining worse.
❏ Used ink cleaner, cleaning sticks, and
clean-room wipers are classified as
industrial waste.
U “Handling Used Consumables” on
page75
❏ Store ink cleaner at room temperature
out of direct sunlight.
❏ After using the ink cleaner, be sure to
close the lid securely. The ink cleaner may
leak or evaporate if the lid is not closed
securely.
Shaking the Ink Supply
Units Periodically
If a message is displayed informing you that it is
time to shake the ink, remove the ink supply unit
immediately and shake it.
c
Important:
The ink supply units used in this printer are, due
to characteristics of their ink, prone to gradual
sedimentation (components settling to the bottom
of the liquid). If ink settles, tint unevenness
and nozzle clogs occur. Shake ink supply units
periodically after installing them.
After installing an ink supply unit in the printer, a
message prompting you to shake the unit is displayed
at 3-week intervals.
Precautions When Shaking
❏ When removing the ink tray, support the bottom
of the tray with your hand. If you remove the tray
using one hand, it may fall and be damaged due to
the weight.
❏ When shaking the ink supply unit, set it in the ink
tray and shake it up and down at an angle of about
60 degrees 5 times in 5 seconds as shown in the
following illustration.
❏ Do not forcefully shake or swing ink supply units
or ink trays containing ink supply units. Ink could
leak.
❏ Removed ink supply units may have ink around
the ink supply port, so be careful not to get any
ink on the surrounding area when removing the
ink supply units.
Shaking
If a message is displayed informing you that it is time
to shake the ink, you can check the procedure on the
control panel while shaking the ink supply unit.
A
On the screen, press the status of consumables
area.
SC-S7100 Series User's Guide
Maintenance
63
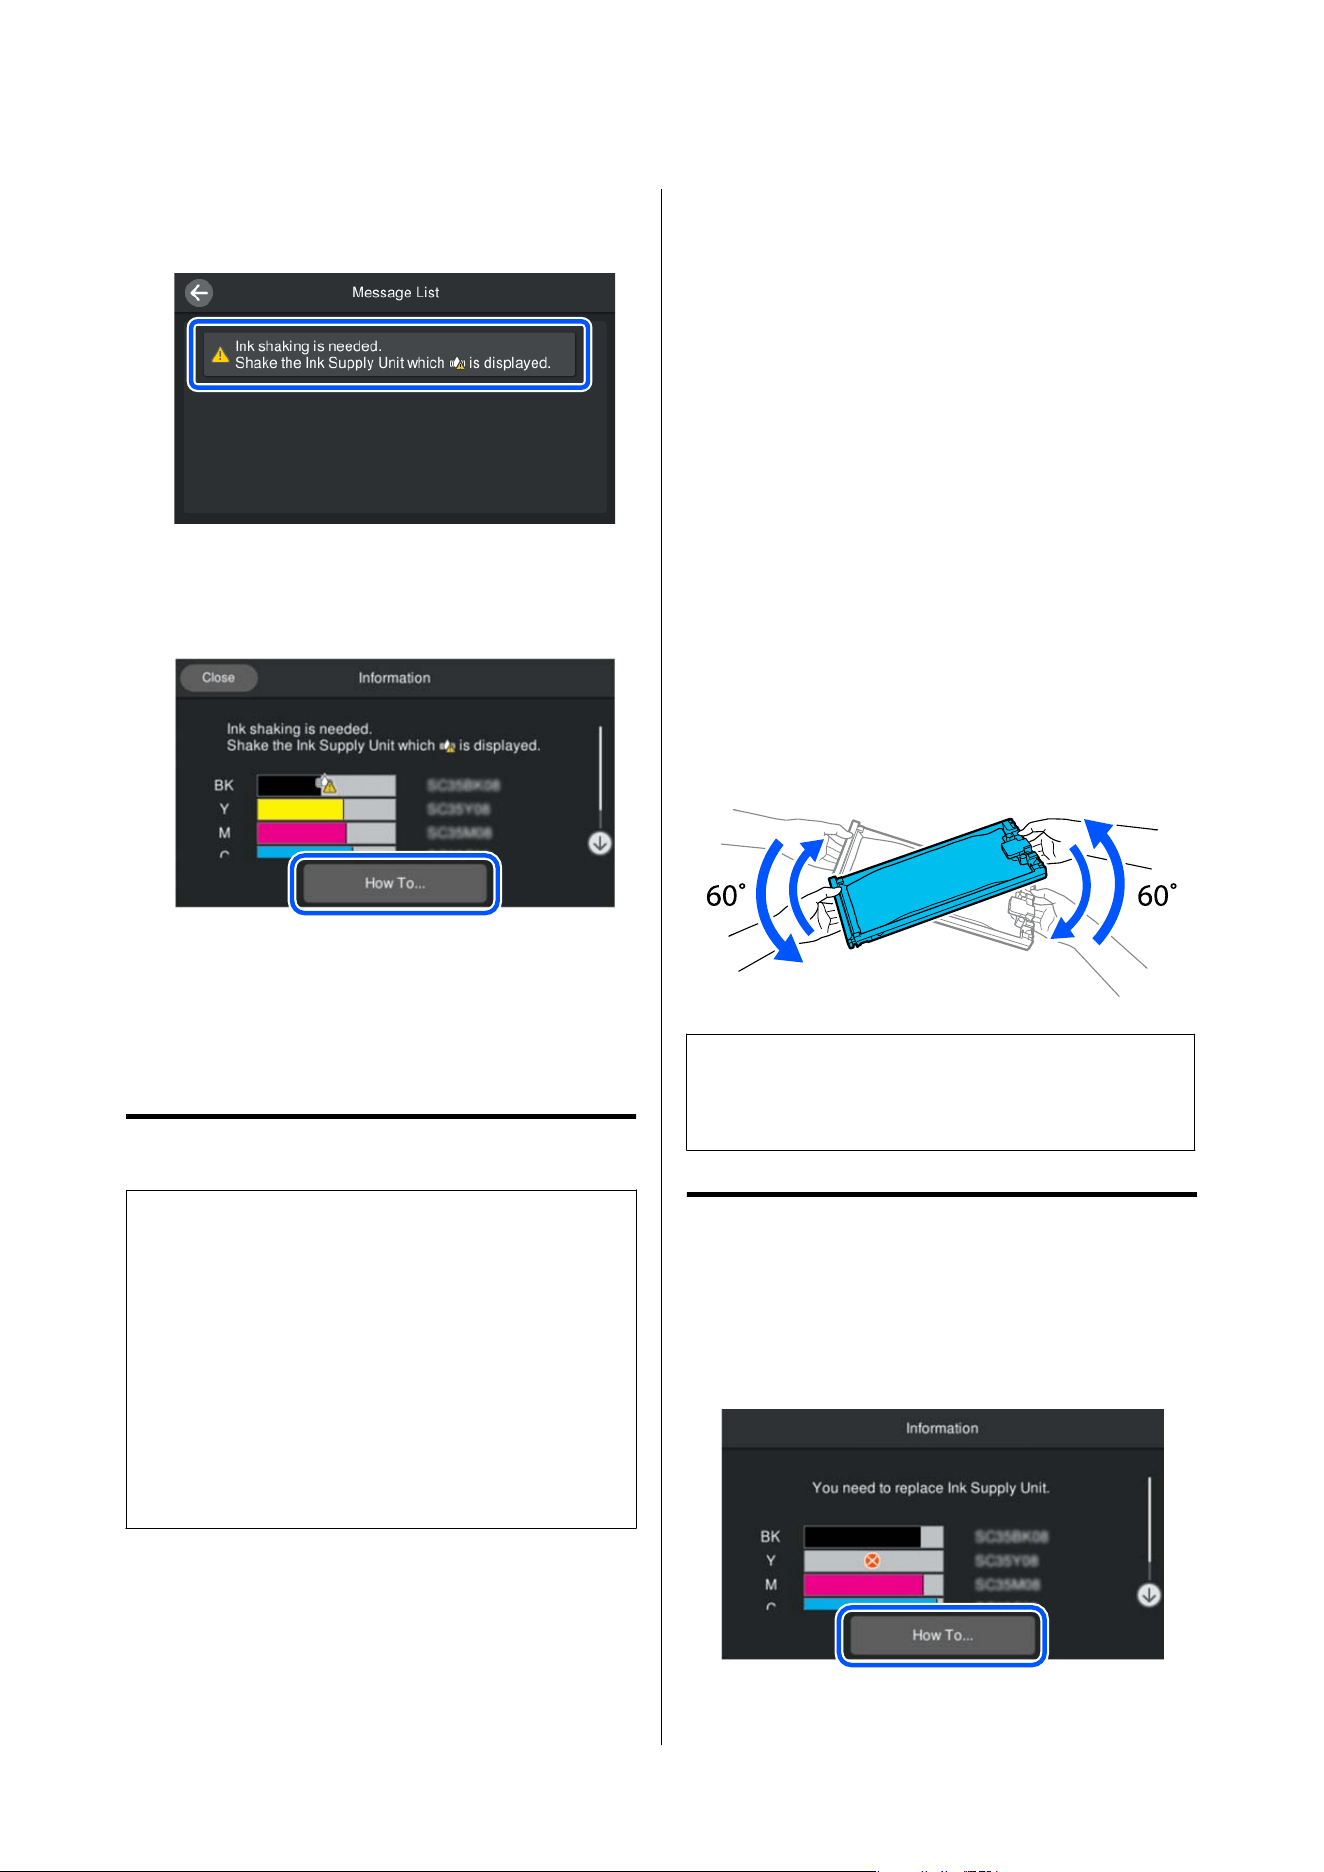
B
In the Message List, press the message
informing you that it is time to shake the ink.
C
Press How To... to view the procedure. Follow
the on-screen instructions to perform the
procedure.
Replacing Ink Supply
Units
Precautions When Replacing
c
Important:
Epson recommends the use of genuine Epson ink
supply units. Epson cannot guarantee the quality
or reliability of non-genuine ink. The use of
non-genuine ink may cause damage that is not
covered by Epson’s warranties, and under certain
circumstances, may cause erratic printer behavior.
Information about non-genuine ink levels may
not be displayed, and use of non-genuine ink is
recorded for possible use in service support.
❏ You cannot print if the amount of ink remaining
in even one color falls below the minimum
threshold.
If the amount of ink remaining falls below the
minimum threshold during printing, you can
continue printing by replacing the relevant ink
supply units. If you continue to use ink supply
units when they are running low on ink, you
may need to replace the ink supply units during
printing. Replacing the ink during printing may
result in color variation depending on how the
ink dries. If you are concerned about color
variation, we recommend replacing them with
new ink supply units before printing. You can
reinstall and use the removed ink supply units
until the amount of ink remaining falls below the
minimum threshold.
Follow the steps below to replace the ink supply
units and cleaning ink supply units.
❏ Place all of the ink trays in the printer.
❏ Before you replace the ink supply unit, you must
shake it. When shaking the ink supply unit, set
it in the ink tray and carefully shake it up and
down at an angle of about 60 degrees 5 times in 5
seconds as shown in the following illustration.
Note:
Ink supply units contain components to help maintain
print quality. These components are not foreign bodies.
Replacement Procedure
When a Replacement Prompt Message is Displayed
Press How To.... You can check the procedure on the
control panel while replacing the ink supply unit.
SC-S7100 Series User's Guide
Maintenance
64
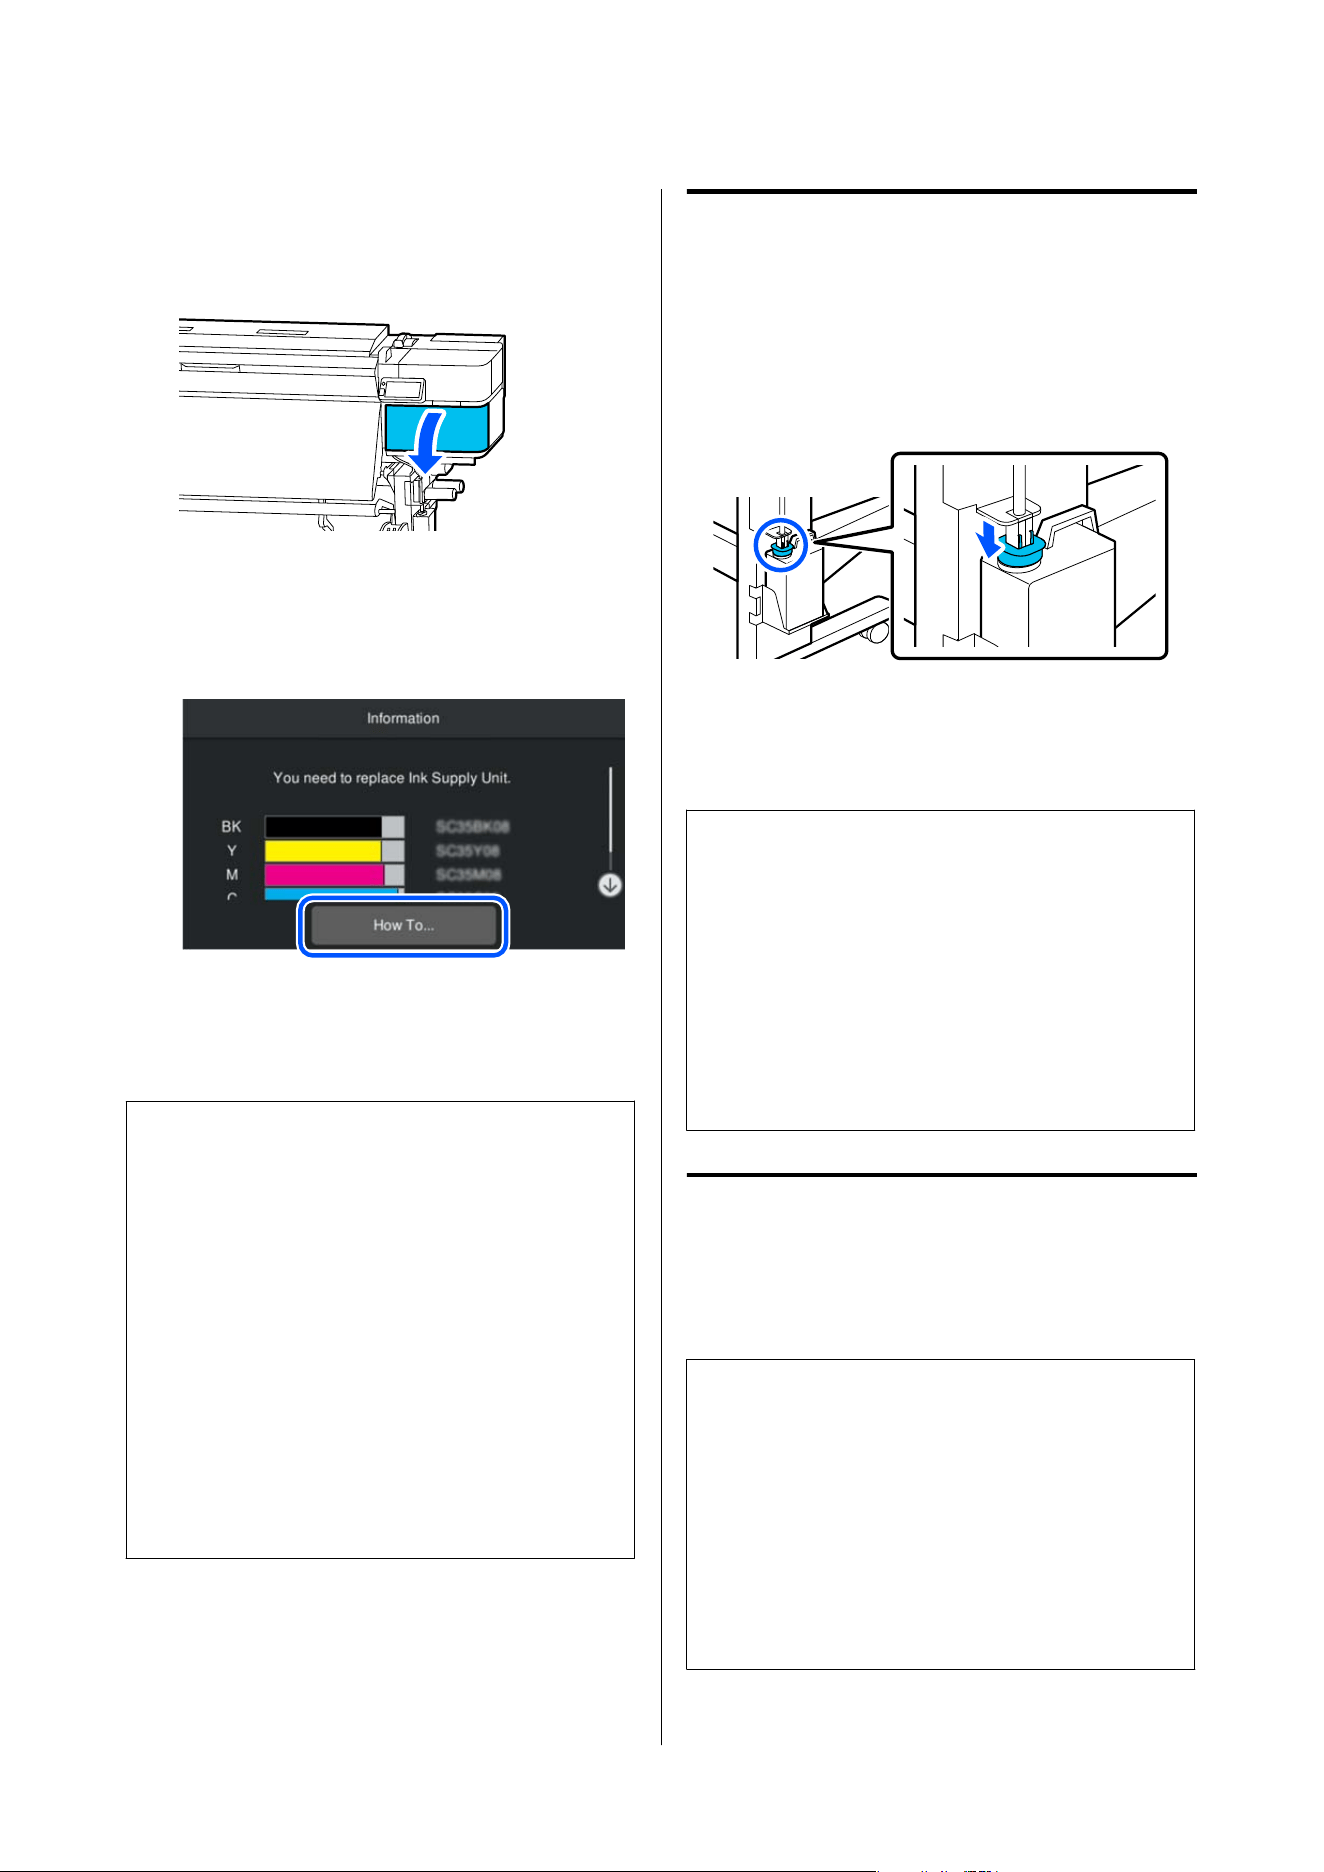
When you want to replace the ink because there is
not much left for the amount of printing
A
Open the ink cover.
B
Press How To... on the control panel screen to
view the procedure.
Follow the on-screen instructions to perform
the procedure.
Disposing of Waste Ink
c
Important:
Waste Ink Counter
The printer uses the waste ink counter to track
waste ink and displays the following message when
the counter reaches the warning level. If you
replace the waste ink bottle when this replacement
prompt message is displayed, the counter is cleared
automatically.
If you replace the waste ink bottle before being
prompted by a message, such as when operating
the printer at night, always clear the waste ink
counter by doing the replacement operation from
the settings menu.
Precautions When Replacing
the Waste Ink Bottle
❏ Be sure to confirm that the waste ink tube is
inserted in the mouth of the waste ink bottle.
Check that the stopper is stuck close to the mouth
of the bottle. If there is a gap, waste ink may
splatter and stain the surrounding area.
❏ You will need the lid for the waste ink bottle when
disposing of waste ink. Keep the lid in a safe place;
do not throw it out.
c
Important:
Never remove the waste ink bottle during printing
or while the printer is performing the following
operations unless instructed to do so on-screen.
Waste ink may leak.
❏ Head Cleaning
❏ Head Washing
❏ Pre-Storage Maint.
Replacing the Waste Ink Bottle
There are two methods for replacing the waste
ink bottle as described below. Use the appropriate
replacement method to suit your situation.
c
Important:
When the message The waste ink bottle is
nearing the end of its service life. is displayed,
prepare a new waste ink bottle as soon as possible.
See the following when replacing the waste ink
bottle at this stage in the procedure.
U “When you want to replace it at any time” on
page66
Read the following before starting this procedure.
SC-S7100 Series User's Guide
Maintenance
65
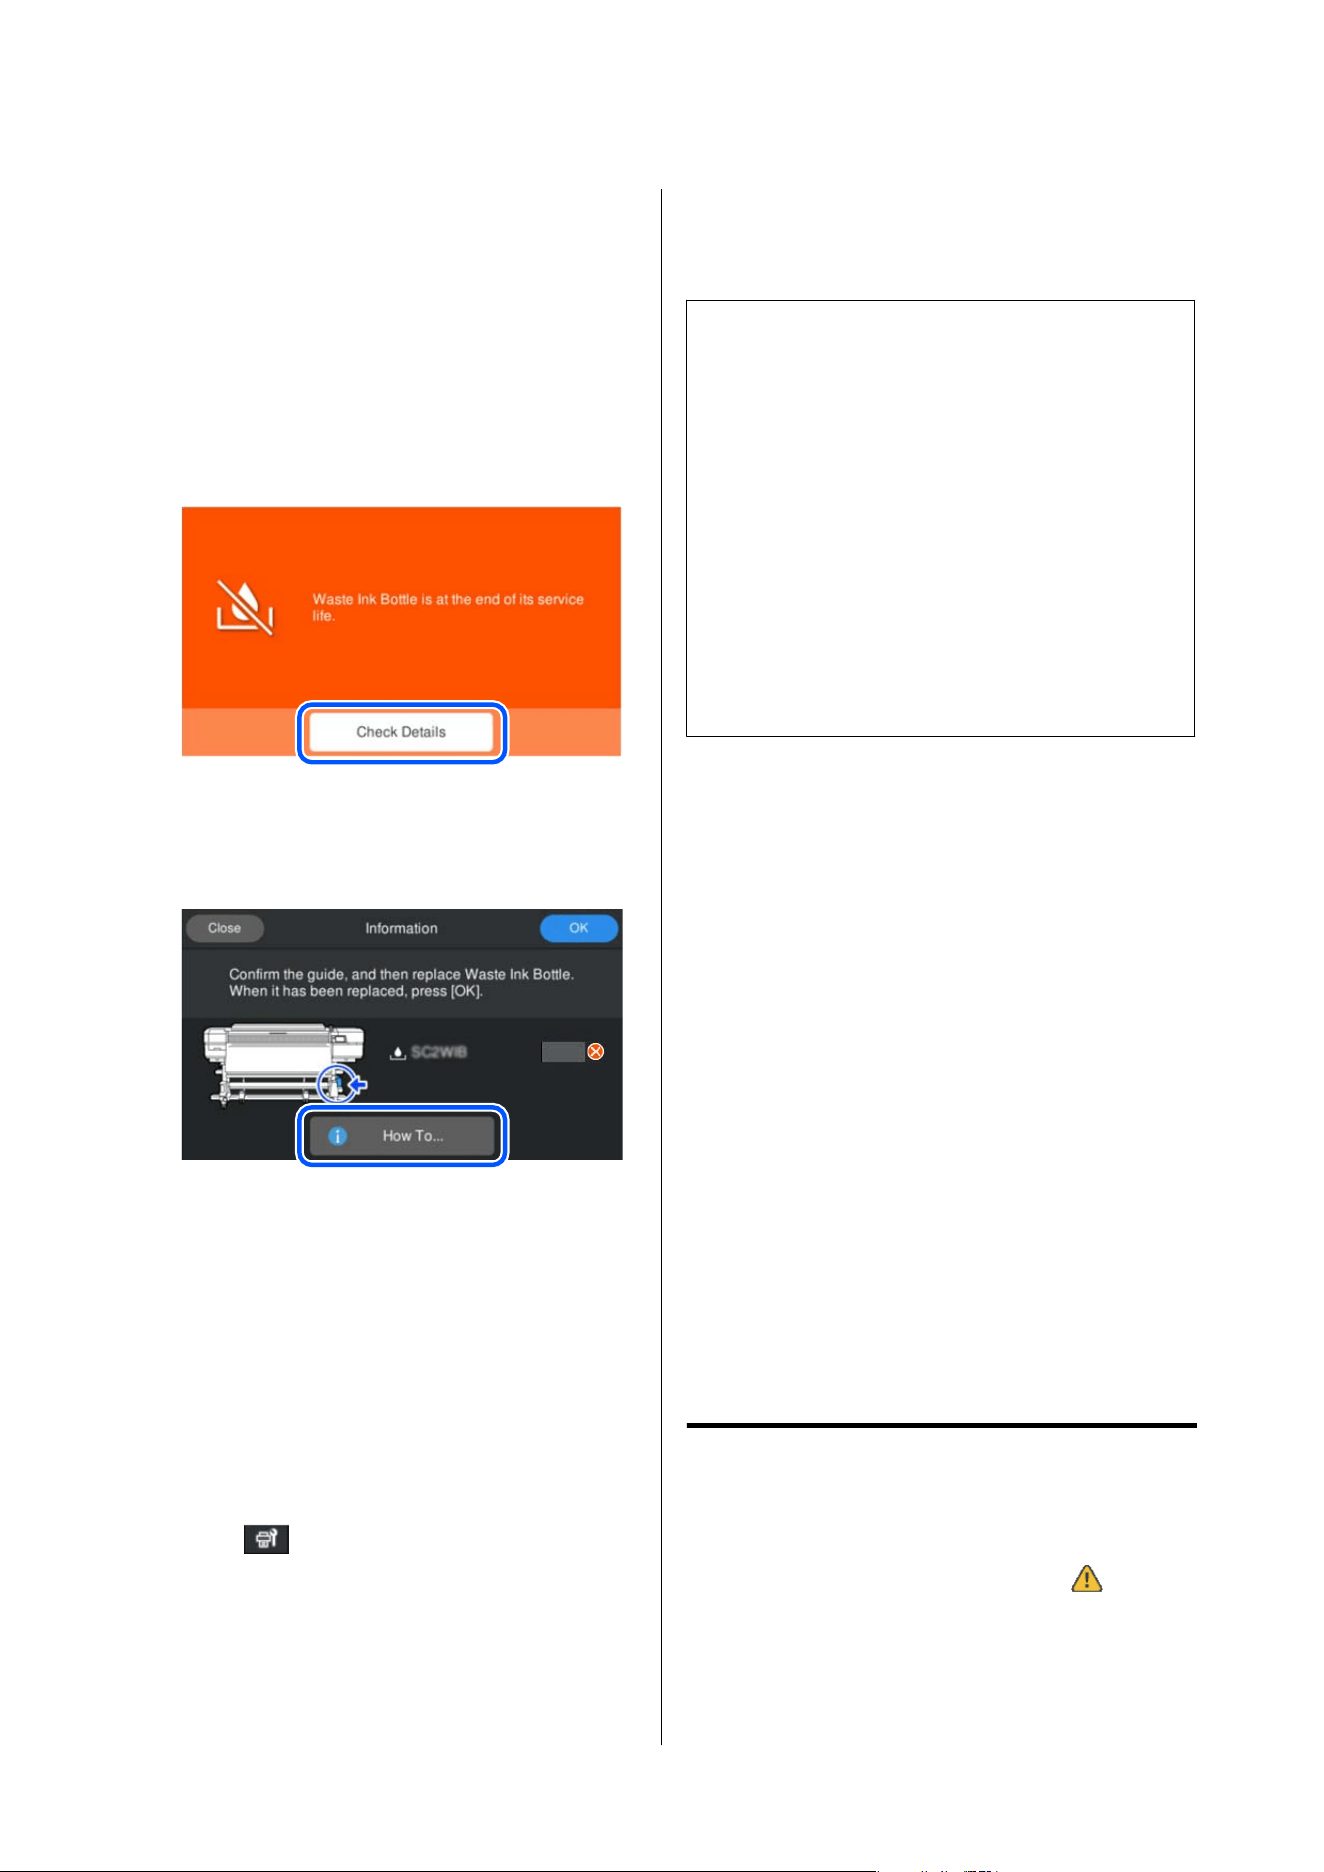
U “Precautions Regarding Maintenance” on page60
When a message is displayed
indicating it is time to replace the
waste ink bottle
A
When the following error screen appears, press
Check Details, then press Waste Ink Bottl e on
the next screen.
B
Press How To... on the following screen, to
check the procedure on the control panel while
replacing the waste ink bottle.
When you want to replace it at any
time
When you want to replace the waste ink bottle as
part of night operations or after a large quantity of
printing, but before the printer displays a message
indicating that it is time to replace the bottle, follow
the steps below. If you do not follow the steps
below, you will not receive a message at the correct
replacement interval next time.
A
Press (Maintenance), and then press
Replace Waste Ink Bottle.
B
Press How To... to view the procedure.
Follow the on-screen instructions to perform
the procedure.
We recommend that you leave the waste ink in the
Waste Ink Bottle for disposal and do not transfer it to
another container.
Note:
Note the following points when transferring waste ink
from the Waste Ink Bottle to another container.
❏ Use a container made of PE (polyethylene) when
transferring the waste ink.
❏ Attach the spout included with the printer to the
rim of the Waste Ink Bottle and transfer the waste
ink.
❏ Pour the waste ink carefully. Pouring the waste ink
quickly may cause it to spill and splatter.
❏ Securely close the lid of the container to which you
transferred the waste ink and store it in a location
that is not exposed to open flames.
Disposing of used waste ink and waste ink bottles
U “Disposal” on page75
Replacing Maintenance
Parts Kit
The Maintenance Parts Kit contains the following
parts.
❏ Wiper unit (x1)
❏ Flushing pad (x1)
❏ Air filter (x2)
Always choose replacement maintenance parts that
are specified for this printer.
U “Options and Consumable Products” on page111
Preparing and Replacement
Timing
When The Maintenance Parts is nearing the end
of its service life. is displayed, or when
is displayed for the remaining amount of the
Maintenance Parts Kit
Obtain a new Maintenance Parts Kit as soon as
possible.
SC-S7100 Series User's Guide
Maintenance
66
When you want to replace the parts at this stage,
perform Replace Maintenance Parts from the settings
menu, and then replace the parts. If you do not replace
them from the settings menu, the maintenance parts
counter will not operate correctly.
U “Maintenance Menu” on page100
c
Important:
About the maintenance parts counter
The printer tracks amounts consumed using the
maintenance parts counter and displays a message
when the counter reaches the warning level.
If you replace the Maintenance Parts Kit according
to the message Maintenance Parts is at the
end of its service life., the counter is cleared
automatically.
If you replace it before this message is displayed, be
sure to do the replacement work from the settings
menu.
When Maintenance Parts is at the end of its service
life. is displayed
See the following section, and replace all the parts
included in the Maintenance Parts Kit. Printing
cannot be performed if the parts are not replaced.
Replacement Procedure
Precautions When Replacing Parts
c
Important:
❏ If the flushing pad is lifted too vigorously
when removing it, waste ink may be splashed
around. Be careful when working.
❏ After replacing the flushing pad, be sure it is
installed correctly.
If the hooks are lifted up when the printer is
used, the print head may be damaged.
Before starting this procedure, be sure to read the
following:
U “Precautions Regarding Maintenance” on page60
A
On the Maintenance Parts is at the end of its
service life. screen, press OK.
If the message is not displayed, press
(Maintenance), and then press Replace
Maintenance Parts.
B
Check the message, and then press Start.
The print head moves to the maintenance
position.
Note:
The buzzer sounds 7 minutes after the print head
is moved (default setting).
Check the message on the screen, and press OK to
continue. After 7 more minutes have passed, the
buzzer sounds again.
C
Press How To... on the control panel screen to
view the procedure and replace the part.
Replacing the Media
Edge Plates
If the media edge plates supplied with the printer
become deformed or damaged, be sure to replace
them with new ones.
Make sure you use the Media edge plates for this
printer.
U “Options and Consumable Products” on page111
c
Important:
If you continue to use the printer with a deformed
or damaged media edge plate, the print head could
be damaged.
A
Remove media, and turn off the printer. Check
that the screen display has turned off, and then
unplug the power plugs for both the printer
and Additional Print Drying System from the
outlets.
U “How to cut and remove the taken-up
media” on page51
SC-S7100 Series User's Guide
Maintenance
67
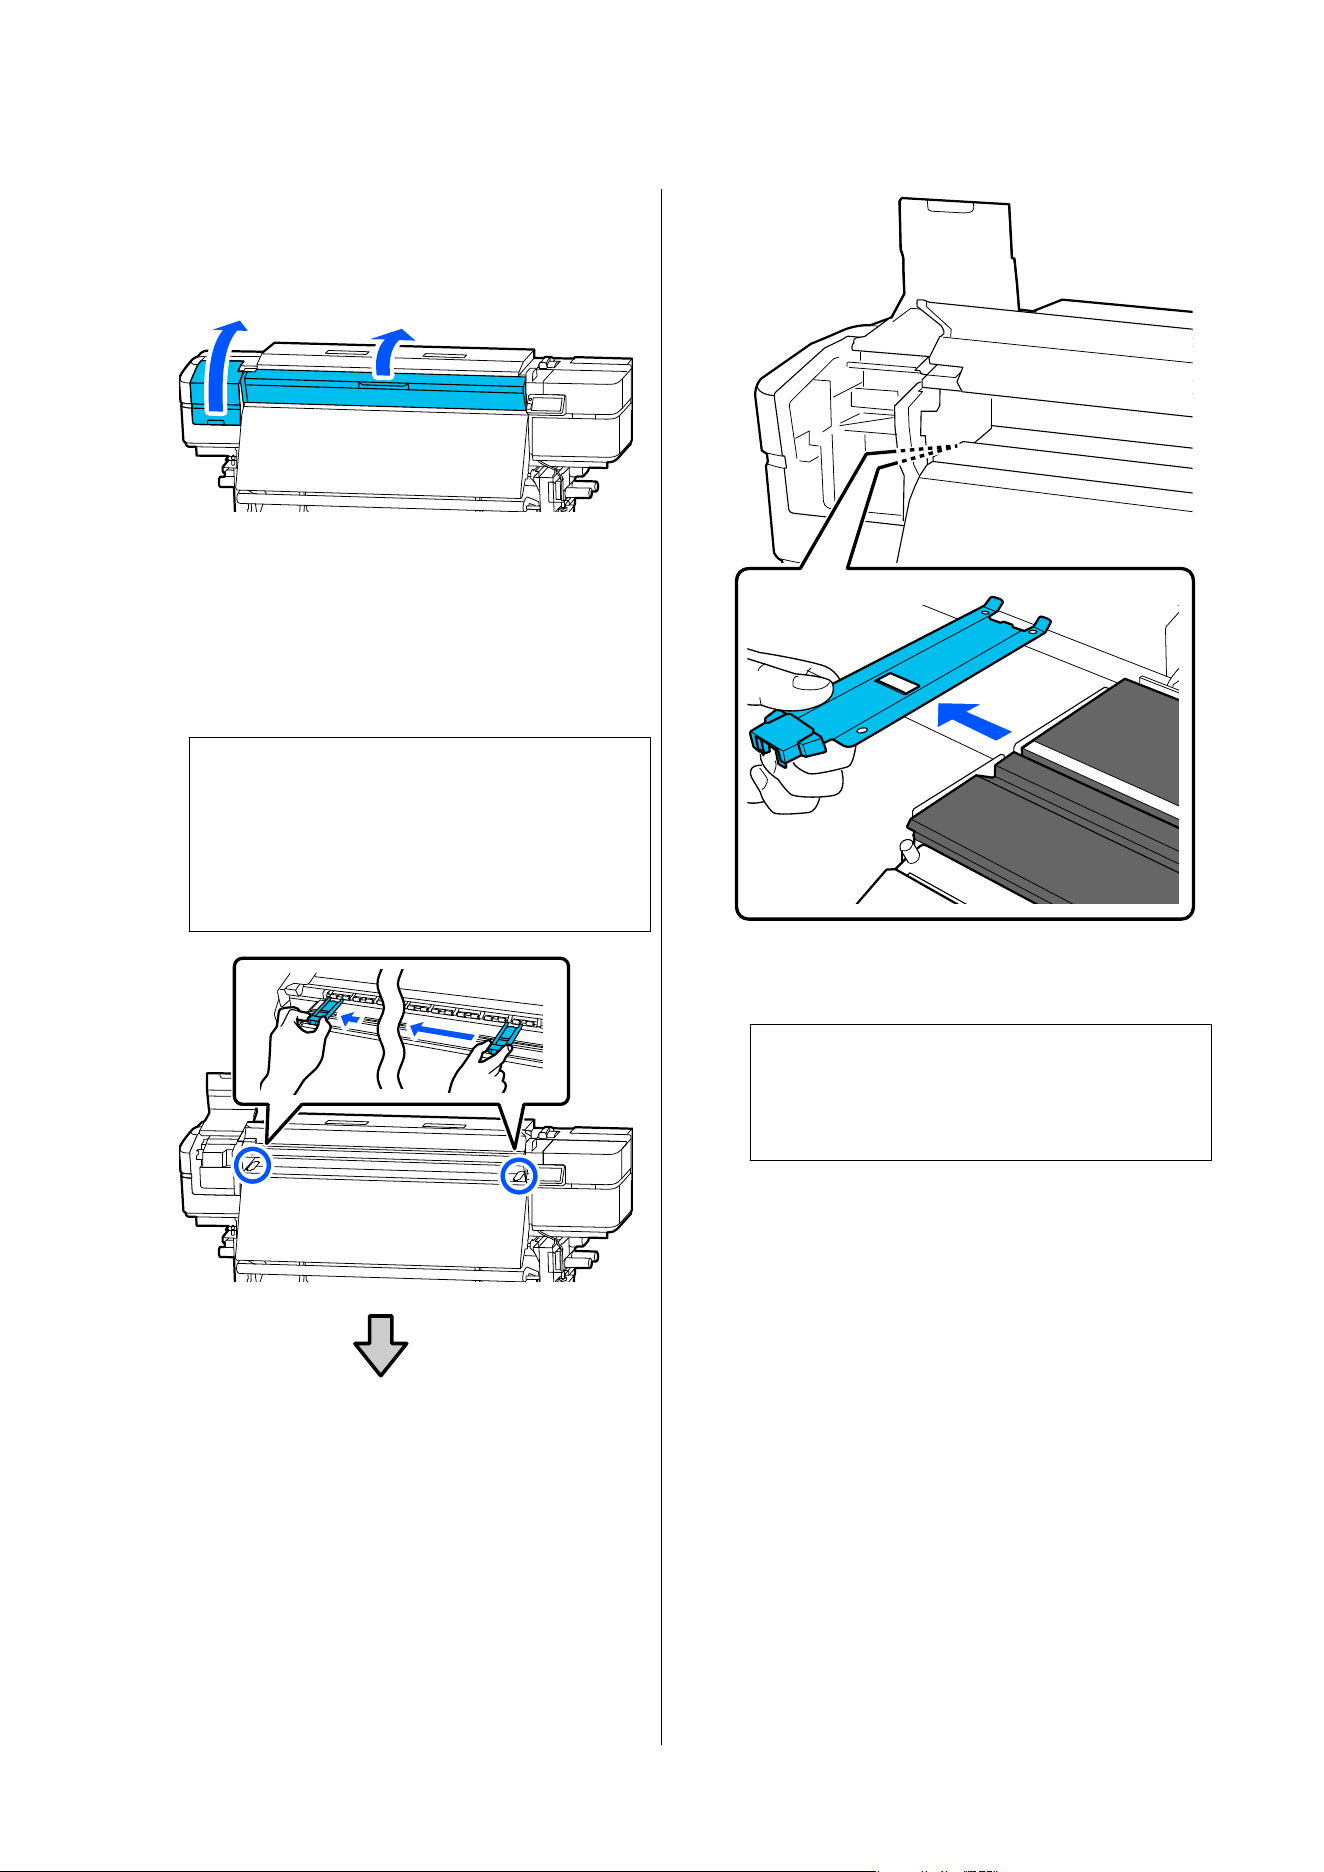
B
Unplug the printer and wait for a minute before
opening the left maintenance cover and the
printer cover.
C
While pressing on the tabs on both sides of the
media edge plate, move it to the left edge of the
platen heater to remove it.
When replacing just the right media edge plate,
remove the left side first, and then remove the
right.
c
Important:
Be sure to remove the media edge plate
from the left edge of the platen heater.
Removing the plate from the right may cause
a malfunction.
D
Insert a new media edge plate into the left edge
of the platen heater.
c
Important:
You cannot insert the media edge plates from
the right.
When inserting the plate, check the following
two points.
SC-S7100 Series User's Guide
Maintenance
68
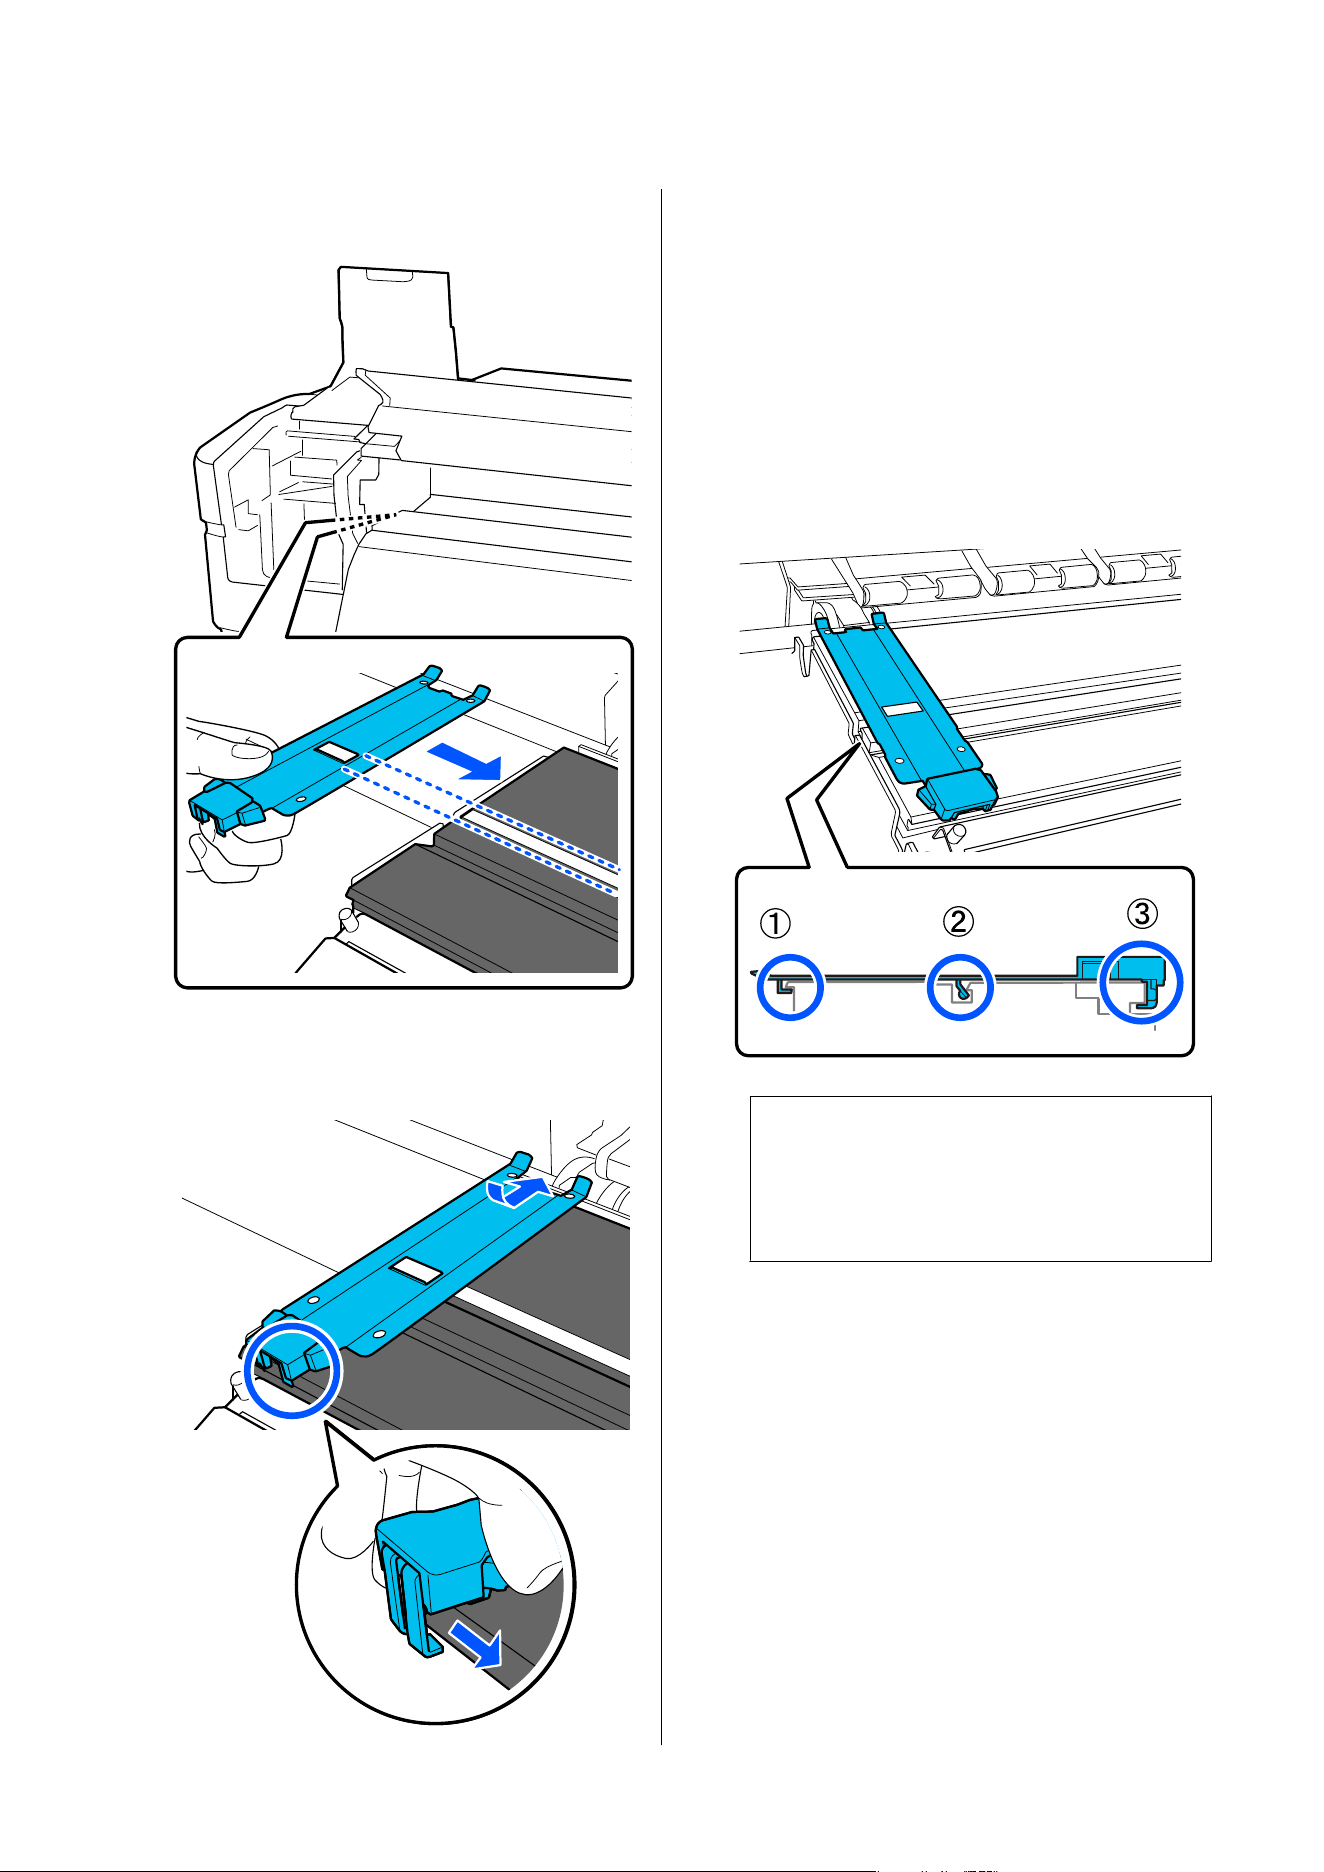
(1) Align the white line on the platen heater
with the white line on the media edge plate.
(2) While pressing the tip of the metallic plate
against the platen heater, attach the hooks to
the front corner of the platen heater.
E
Check that three hooks on the underside of the
media edge plate are securely hooked as shown
below and that there is no gap between the
platen heater and media edge plate.
(1) Hook on tip clamps onto inner edge of the
platen heater
(2) Hook on the back side of white line on the
media edge plate clamps into groove in front of
white line
(3) Hooks on underside of tabs clamp onto
front edge of the platen heater
c
Important:
If hooked sections are not positioned correctly,
return to Step 3 to attach them again.
Otherwise, the head may be damaged.
SC-S7100 Series User's Guide
Maintenance
69
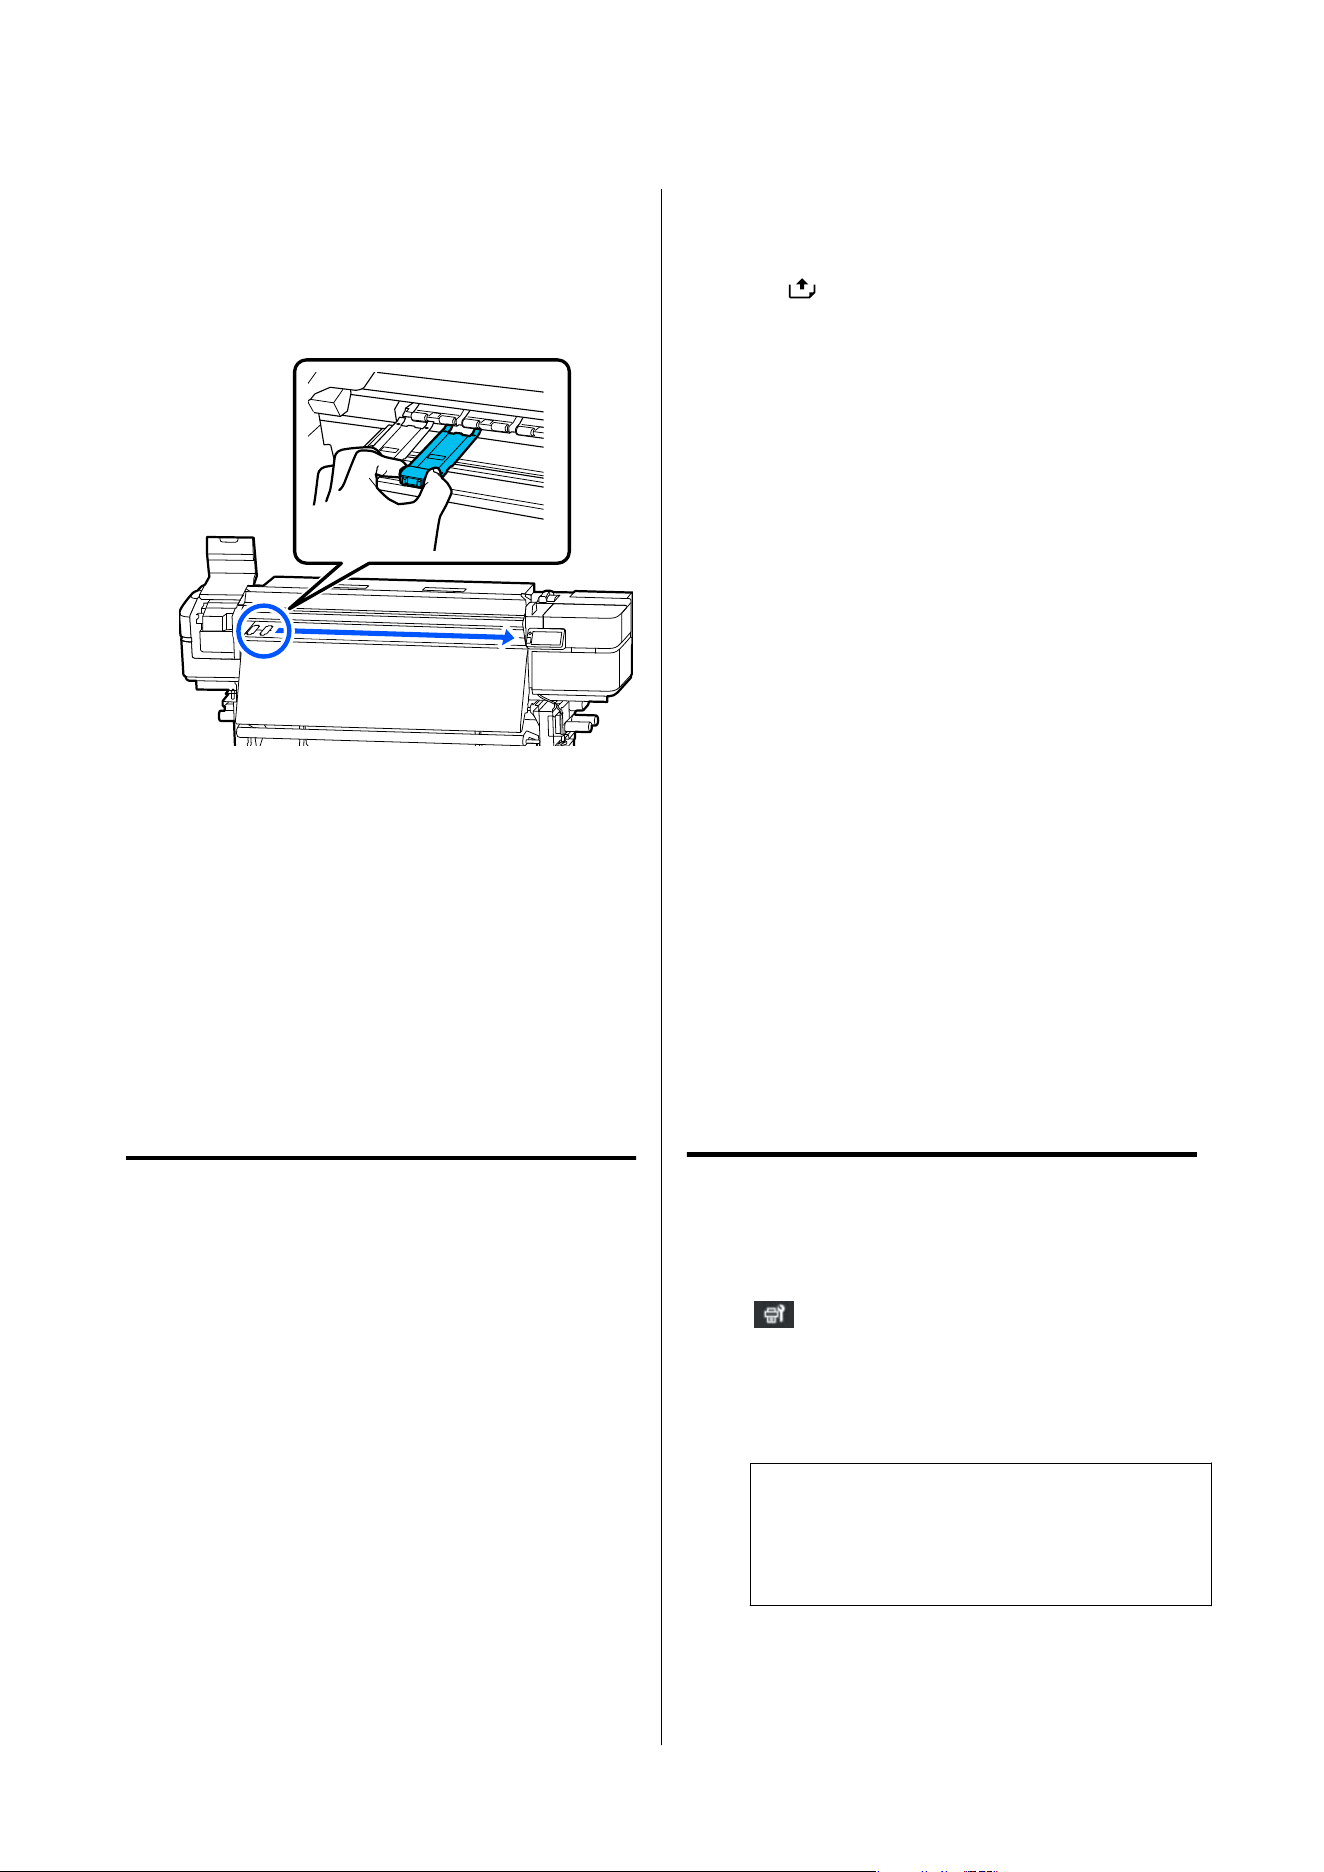
F
While pressing on the tabs on both sides of
each of the media edge plates, move one to the
left side and the other to the right side of the
platen heater.
Releasing the tab fixes the media edge plate.
G
Close the left maintenance cover and printer
cover.
Nozzle Check and Head
Cleaning
We recommend that you check the print head nozzles
for clogs each time before you print to ensure quality
results.
Types of Nozzle Checks
There are the following two ways to check the print
head for clogged nozzles.
On-Demand Nozzle Pattern
If you want to check the condition of the nozzles
before printing, or if you see stripes or unevenness in
the print results, you can print out a check pattern and
visually check it to see the condition of the nozzles.
See the following for details.
U “How to Print a Nozzle Check Pattern” on
page70
Depending on the width of the loaded media, you can
save media by printing additional test patterns in the
space beside an existing pattern: To print them in line,
press the [
] button (rewind button) to rewind the
media to the position where you want to print the
pattern.
❏ If the width is 51 to 64 inches, you can print up to
three patterns (one on the left, one in the center,
and one on the right).
❏ If the width is equal to or greater than 34inches
but less than 51 inches, you can print up to two
patterns (one on the left and one on the right).
❏ If the width of the media is less than 34 inches,
you cannot print side by side.
Nozzle Check between Pages
When printing for the set number of pages
*
is
complete, the next page is printed across the printed
check pattern. When all printing is complete, you
can visually inspect the pattern to determine whether
there may be faint or missing colors in the preceding
or following printout.
U “General Settings Menu” on page84
* Print jobs that do not include multiple pages are
counted as one page.
How to Print a Nozzle Check
Pattern
A
Check that the printer is ready to print, press
(Maintenance), and then press Print
Head Nozzle Check.
B
Select the desired print position, and then press
Start.
Note:
The available print positions differ depending on
the width of the media loaded in the printer and
the Width Detection setting.
The check pattern is printed.
SC-S7100 Series User's Guide
Maintenance
70
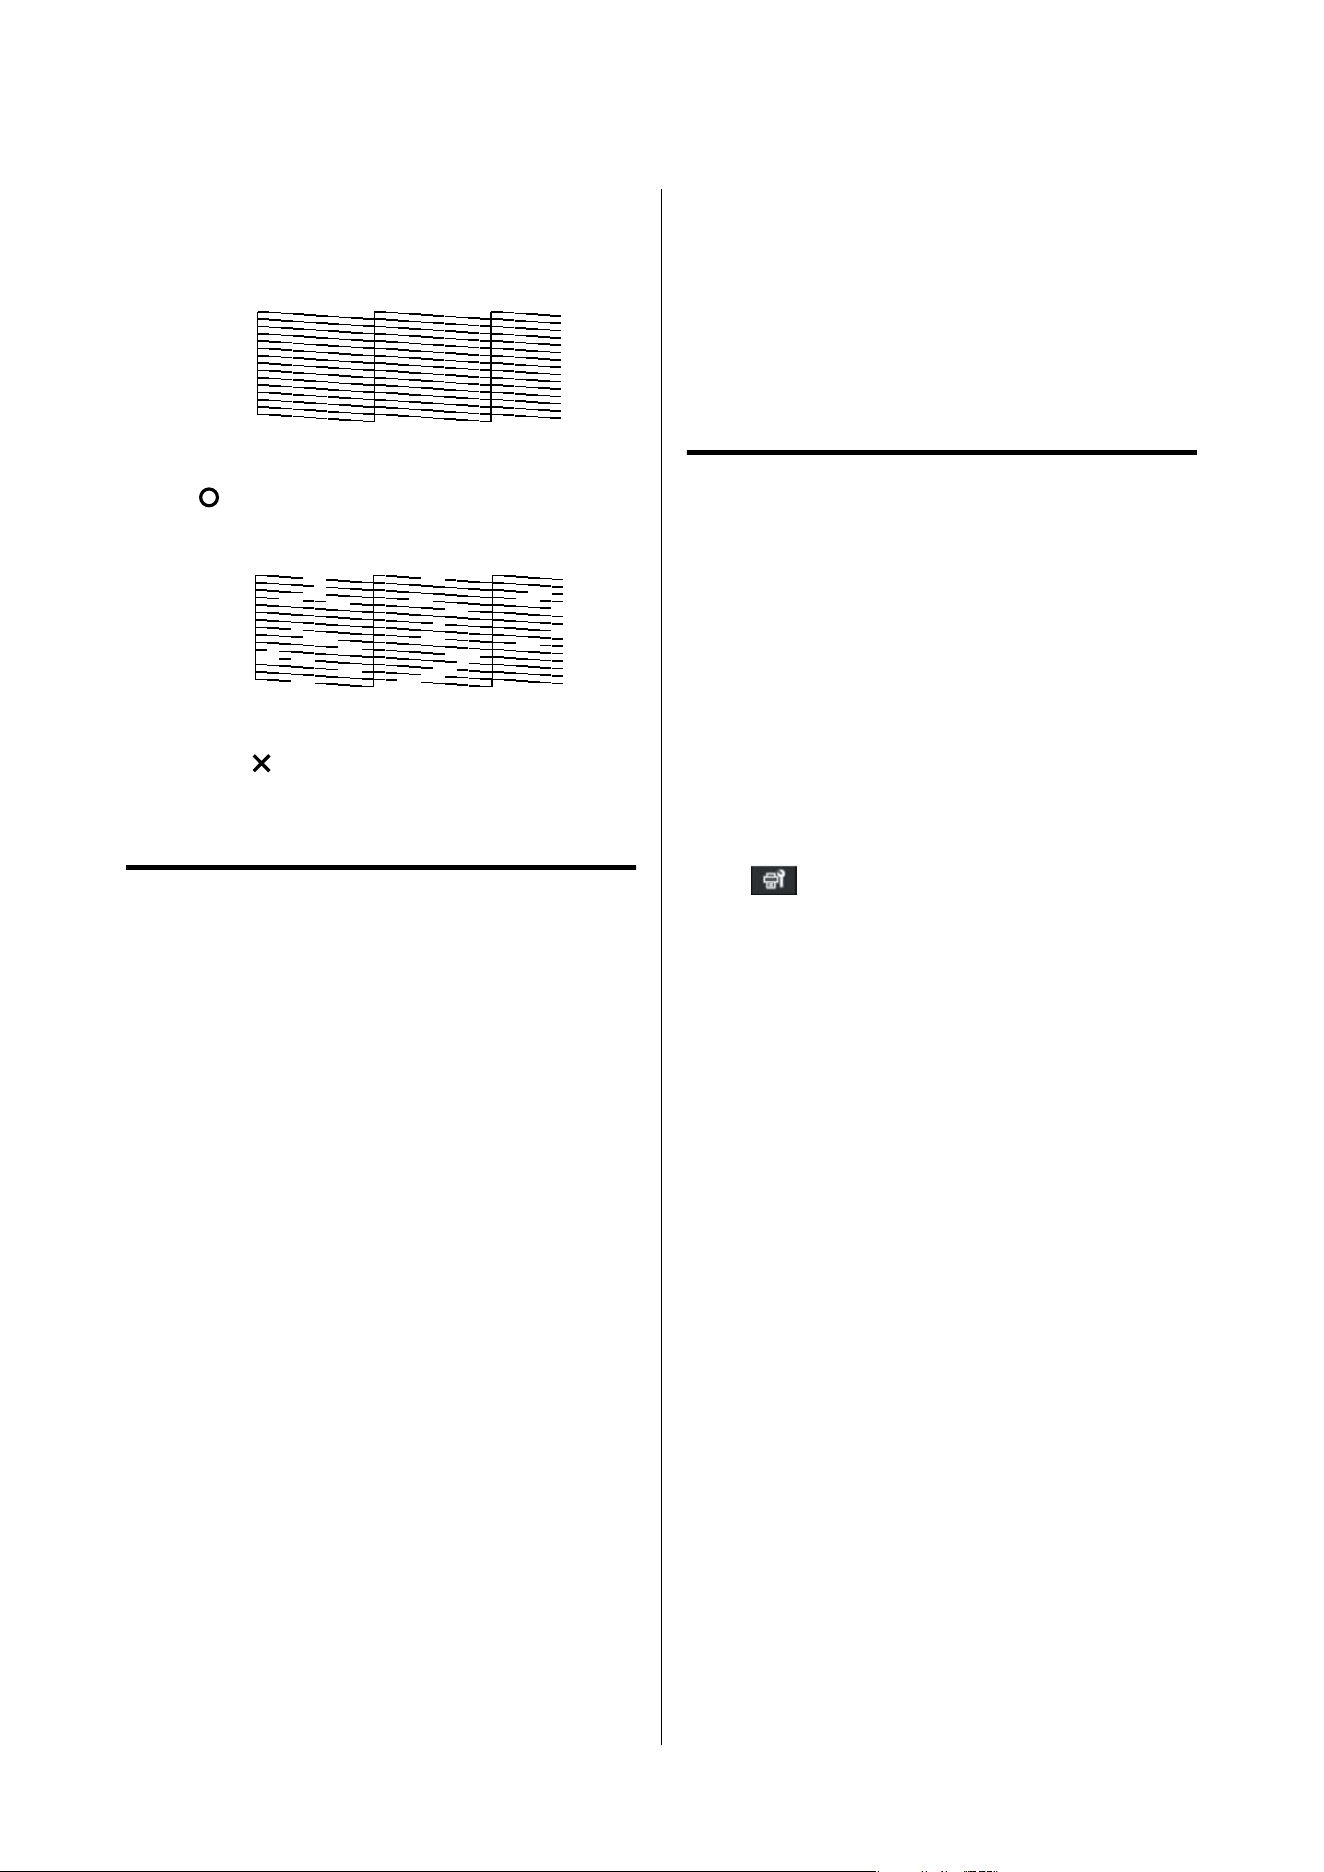
C
Check the check pattern. Cut the media as
necessary.
Example of clean nozzles
If there are no gaps in the check pattern, press
[
].
Example of clogged nozzles
If there are gaps in the nozzle check pattern,
press [
], and then perform Head Cleaning.
U “Performing Head Cleaning” on page71
Types of Cleaning
The following three types of Head Cleaning are
available.
Perform Head Cleaning as necessary
If there are gaps in the nozzle check pattern, or if there
are streaks in the print results, the colors are wrong, or
there are ink drops, perform Head Cleaning.
You can also specify the cleaning intensity you want,
but if you select Auto Cleaning, the printer will check
how clogged the nozzles are and automatically clean
them at the optimal intensity.
See the following for details on how to perform Head
Cleaning.
U “Performing Head Cleaning” on page71
Perform Head Cleaning periodically
This printer comes with a built-in automatic
maintenance function that automatically performs
Head Cleaning at a set time or when it is determined
to be necessary based on the results of automatically
monitoring the nozzles. Set Print Duration, Print
Counter, or Print Length as the interval.
U “General Settings Menu” on page84
Set Maintenance Cleaning
In Maintenance Setting, set Maintenance Cleaning
to On to perform Head Cleaning automatically after a
set period of time has passed, to keep the print head in
good condition.
U “General Settings Menu” on page84
Performing Head Cleaning
Cleaning levels and order of
execution
Perform Auto Cleaning first. If this does not clear
the clogs, perform Cleaning (Light), then Cleaning
(Medium), and then Cleaning (Heavy) until the clogs
are cleared.
Procedure
A
Check that the printer is ready to print, press
(Maintenance), and then press Head
Cleaning.
B
Select a cleaning method.
Select Auto Cleaning first.
After the second time, execute Cleaning
(Light), Cleaning (Medium), and then
Cleaning (Heavy) in this order to increase the
intensity.
C
Press Start.
A confirmation message is displayed when
cleaning is complete.
If clogging is cleared
Continue with normal operations.
If nozzles are still clogged
Return to step 1, execute Cleaning (Light),
Cleaning (Medium), and then Cleaning
(Heavy) in this order to increase the intensity
until the clogs are cleared.
If nozzles are still clogged even after
performing Cleaning (Heavy)
The areas around the print head may be dirty.
SC-S7100 Series User's Guide
Maintenance
71
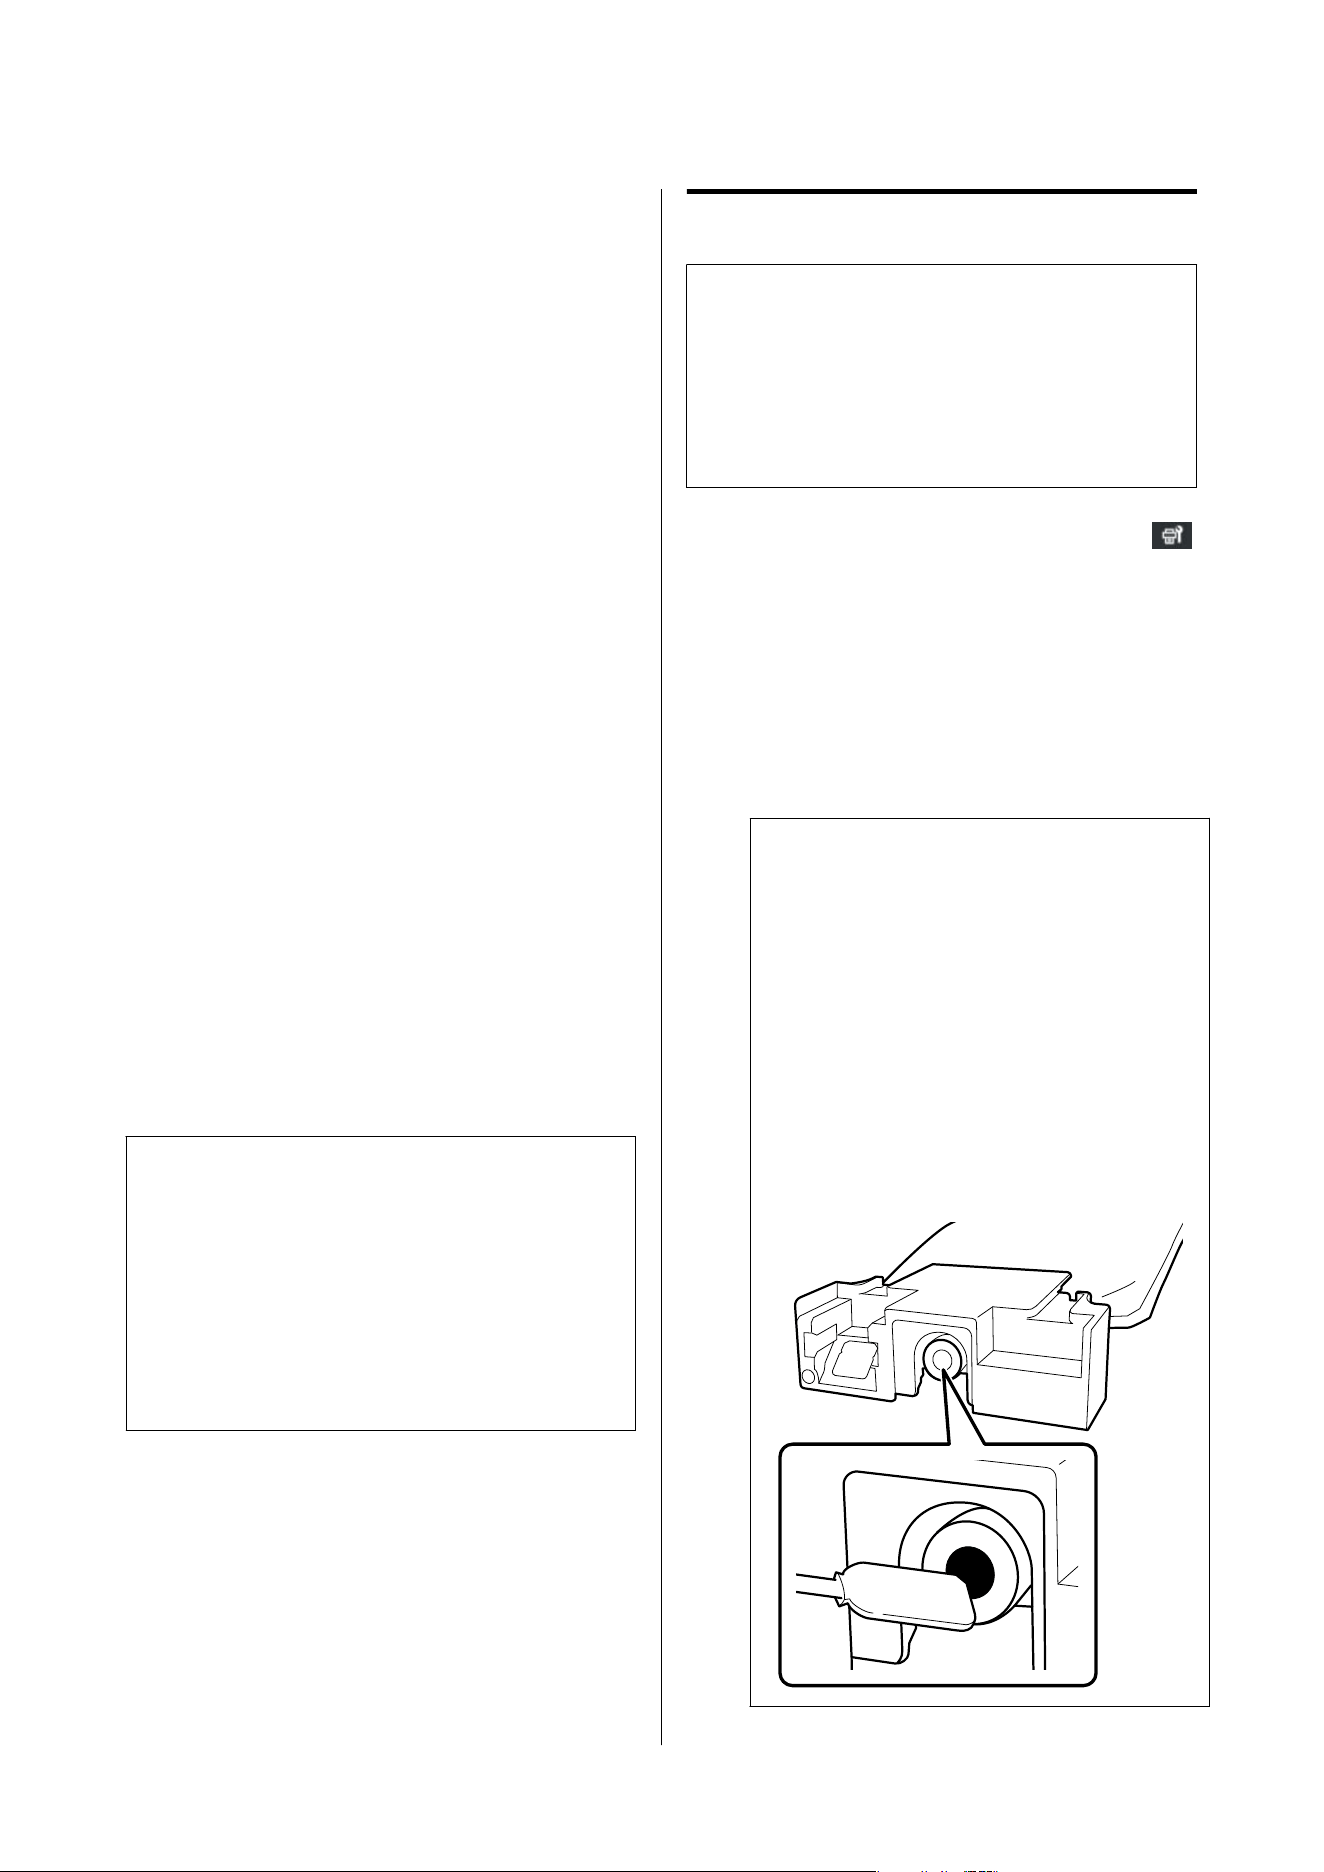
Perform the following steps.
(1) Cleaning around the Print Head and area around
the Cap.
U “Monthly Cleaning” on page61
If clogging is not cleared after performing (1),
perform (2).
(2) Perform Head Washing from the settings menu.
U “Maintenance Menu” on page100
Pre-maintenance When
Not Using the Printer for
an Extended Period
Always perform pre-storage maintenance if the printer
will not be used (and will be turned off) for more than
one month.
The following items are used for the pre-maintenance
procedure.
❏ Cleaning ink supply unit (sold separately) (x4)
❏ Tray attachment (supplied with the printer) (x4)
c
Important:
If you do not perform Pre-Storage Maintenance,
a print head nozzle could become permanently
clogged.
If you are not going to use the printer
for an extended period and do not perform
pre-maintenance, turn on the power at least once
every seven days.
Performing Pre-maintenance
c
Important:
If insufficient ink or cleaning liquid remains, the
functions may not be performed. If the remaining
levels are low, make sure you have new ink supply
units or cleaning ink supply units on hand, just in
case.
A
Make sure the printer is on, and then press
(Maintenance) - Pre-Storage Maint..
B
Check the message displayed on the screen, and
then press Start.
Follow the on-screen instructions to perform
the procedure.
Press How To... on the screen to view the
procedure.
c
Important:
Before storing the removed ink supply unit,
clean any ink that may have adhered to the
ink supply port. Use a cleaning stick that is
provided for cleaning.
❏ To pre vent color mixing, use a new
cleaning stick for each color.
❏ Gently touch the corner of a cleaning
stick to the ink supply port to absorb any
ink. There is no need to wipe off the ink.
Do not press or move the cleaning stick
with too much force.
SC-S7100 Series User's Guide
Maintenance
72
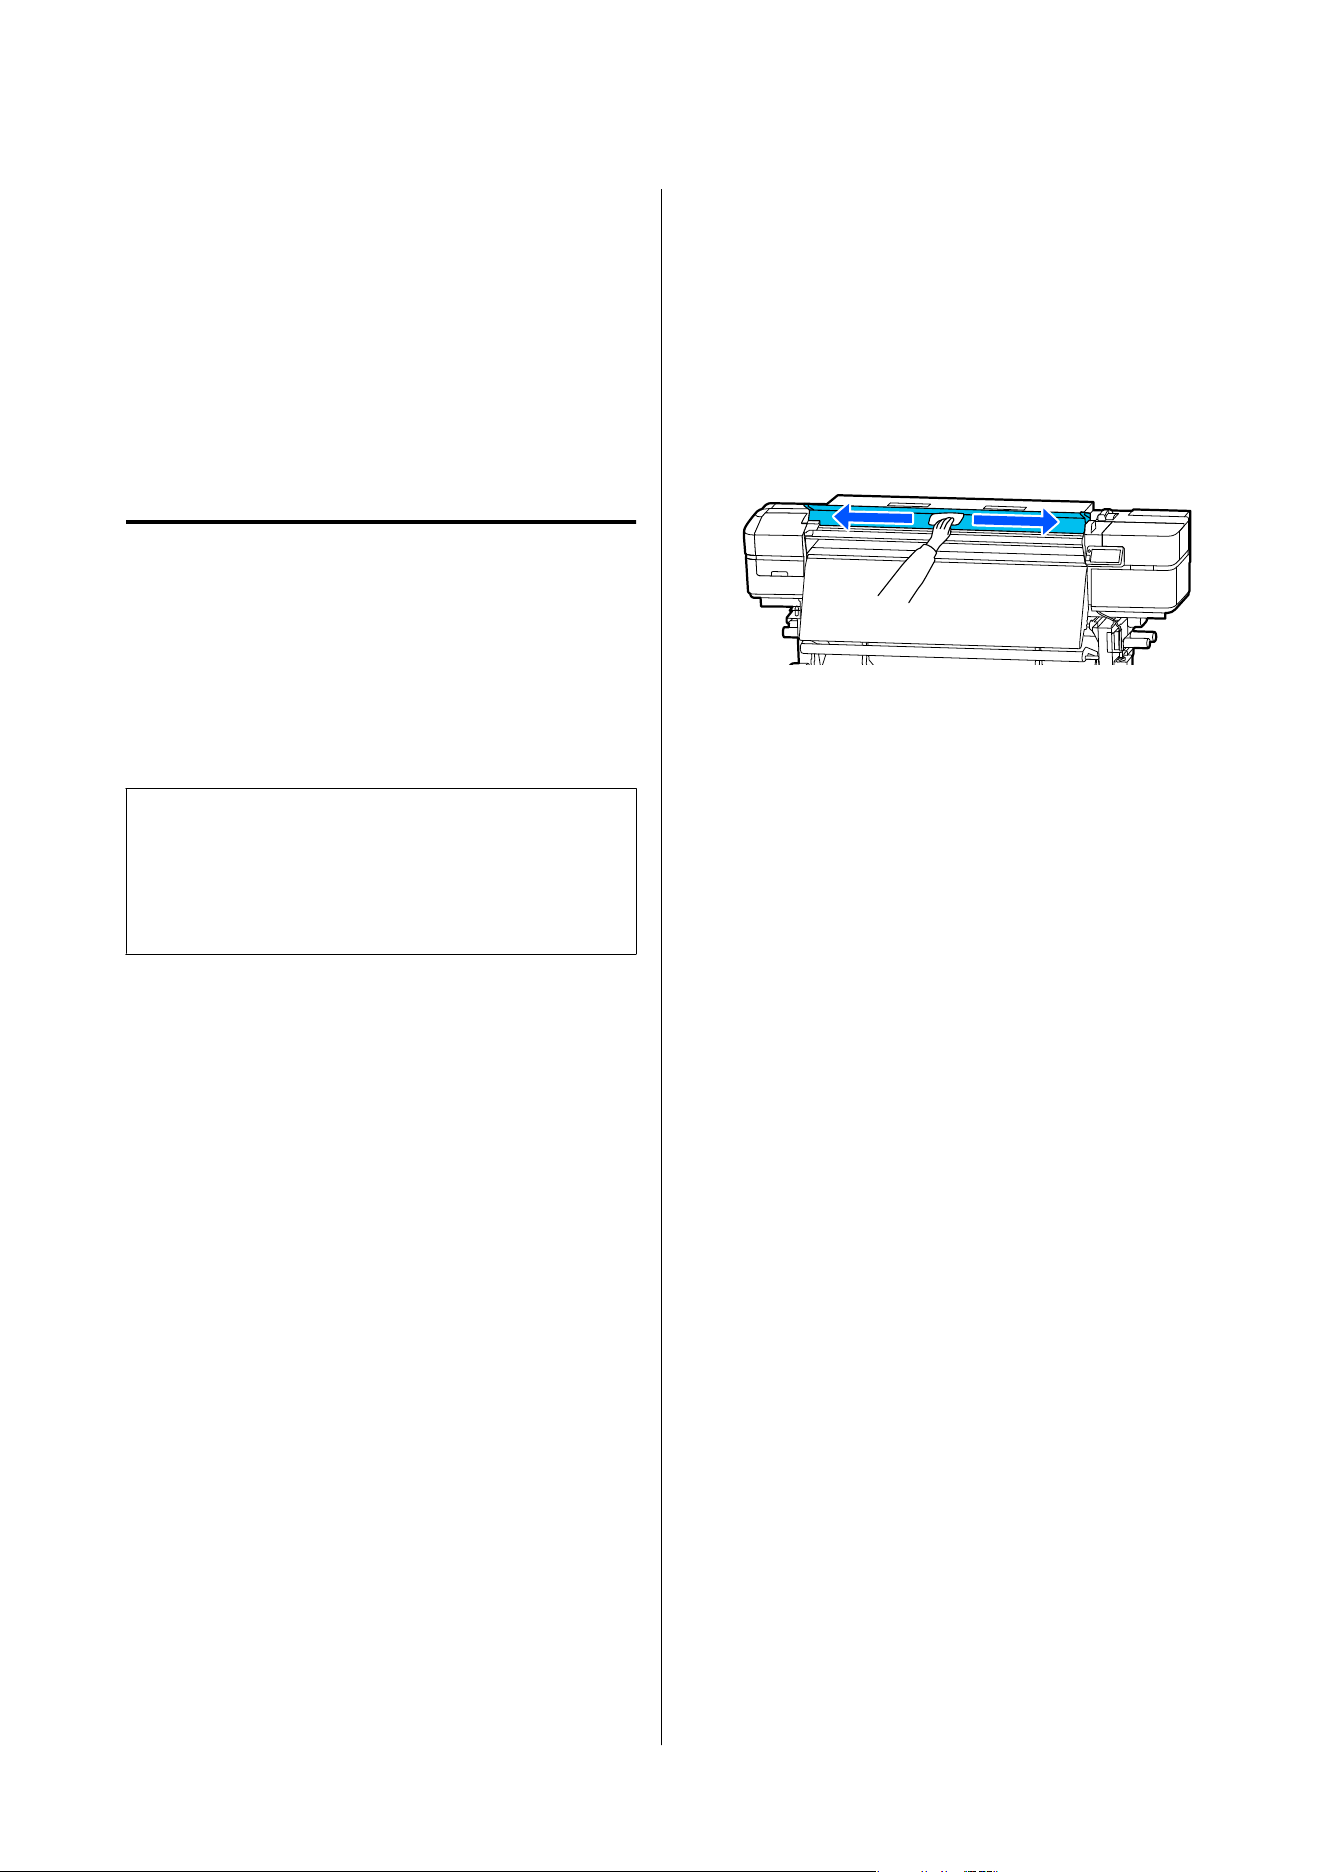
C
When a message indicating switching is
complete is displayed, turn off the printer.
Note the following points when storing the printer and
any removed, partially used ink supply units.
U “Notes When Not Using the Printer” on page24
U “Notes on Handling Ink Supply Units” on page25
When Resuming Use
What you will need
❏ 4 colors of ink supply units (Cyan, Magenta,
Yel l ow, B l a ck )
❏ Tray attachment (supplied with the printer) (x4)
c
Important:
When resuming use, charge the printer with ink.
When refilling using a removed ink supply unit,
have a new ink supply unit on hand, just in case.
How to resume use
Turn on the printer and follow the on-screen
instructions on the control panel screen to install the
ink supply unit.
Press How To... on the screen to view the procedure.
Cleaning Inside the
Printer Cover
The inside of the printer cover may become dirty due
to ink mist. Continuing to use the printer while it is
dirty may make it difficult to see inside.
If it gets dirty, follow the steps below to clean it.
A
Make sure the printer is turned off and the
screen has turned off, and then unplug the
power plugs for both the prin
ter and
Additional Print Drying System from the
outlets.
B
Wait for one minute after unplugging the power
plugs.
C
Open the printer cover.
D
Soak a soft cloth in water, wring it out
thoroughly, and then wipe off any lint or dust
from the transparent area inside the printer
cover.
For dirt that cannot be removed with just water,
wipe it with a cloth soaked in neutral detergent
and thoroughly wrung out.
Cleaning the Pressure
Rollers
If the pressure rollers are used while they are still dirty
with ink mist, dirt from the rollers may transfer to the
print results.
When the rollers are dirty, follow the steps below to
clean them.
A
Make sure the printer is turned off and the
screen has turned off, and then unplug the
power plugs for b
oth the printer and Additional
Print Drying System from the outlets.
B
Wait for one minute after unplugging the power
plugs.
C
Open the printer cover.
D
Raise the media loading lever.
SC-S7100 Series User's Guide
Maintenance
73
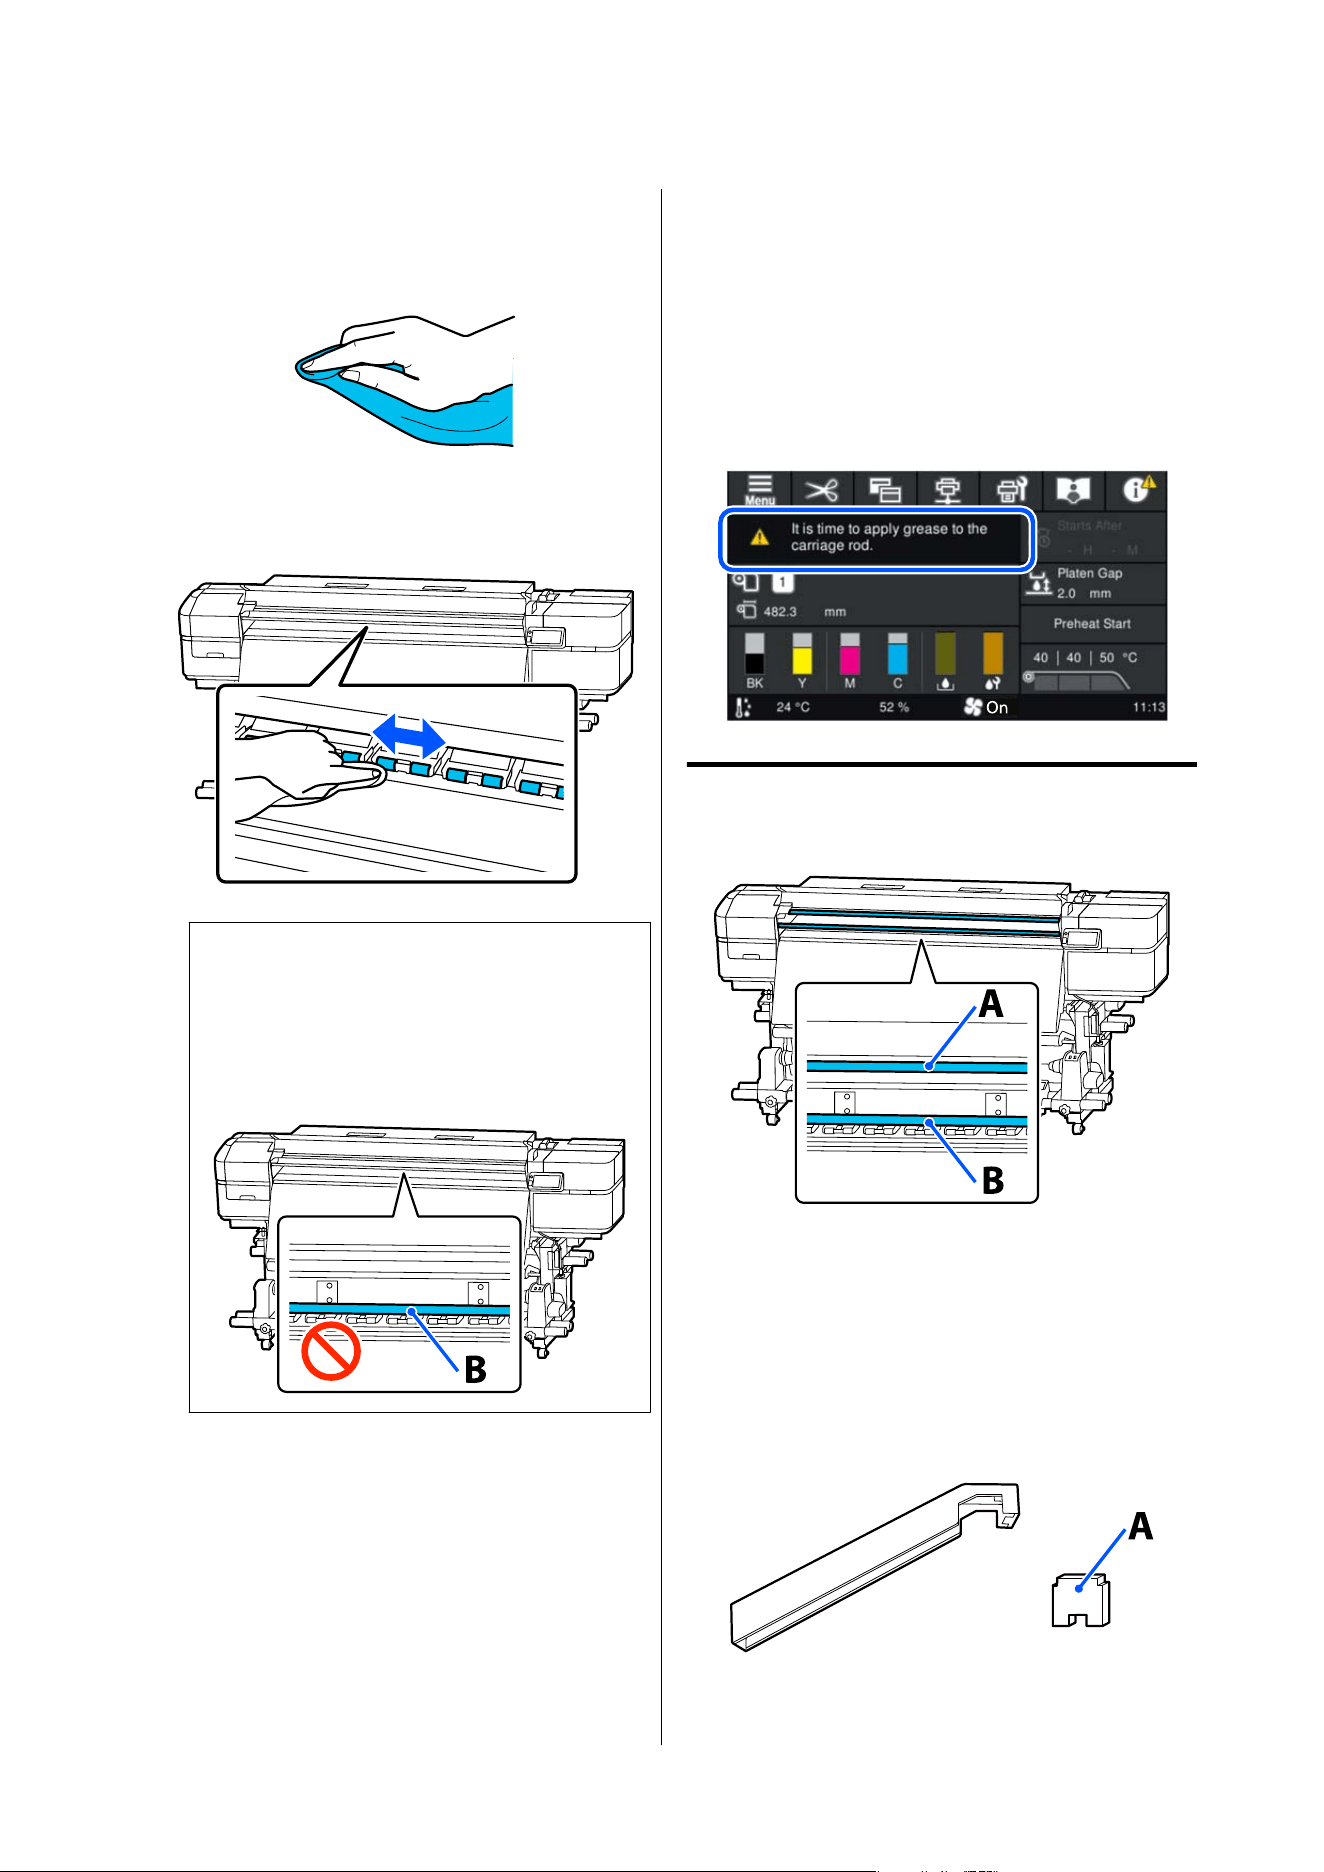
E
Wrap a soft cloth that has been soaked in water
and thoroughly wrung out around your finger,
ensuring it does not cover the top side of your
finger, as shown in the illustration.
F
Use the cloth to wipe the sides of the pressure
rollers where dirt may have accumulated
during printing.
c
Important:
When wiping, make sure the cloth and your
fingers do not touch carriage rod B.
If the cloth or your fingers touch the rod, an
error could occur during printing.
Applying Grease to the
Carriage Rod
When the control panel screen shows It is time to
apply grease to the carriage rod., use the following
procedure to apply grease to the carriage rod as soon
as possible.
Location of Carriage Rod and
Tools Used
There are two carriage rods, rod A and rod B. Apply
grease to both rods using the grease kit supplied with
the printer. The tools used to apply grease to each rod
are different as shown in the figure below.
Carriage rod A
Grease tool (left) and pad A (right)
SC-S7100 Series User's Guide
Maintenance
74
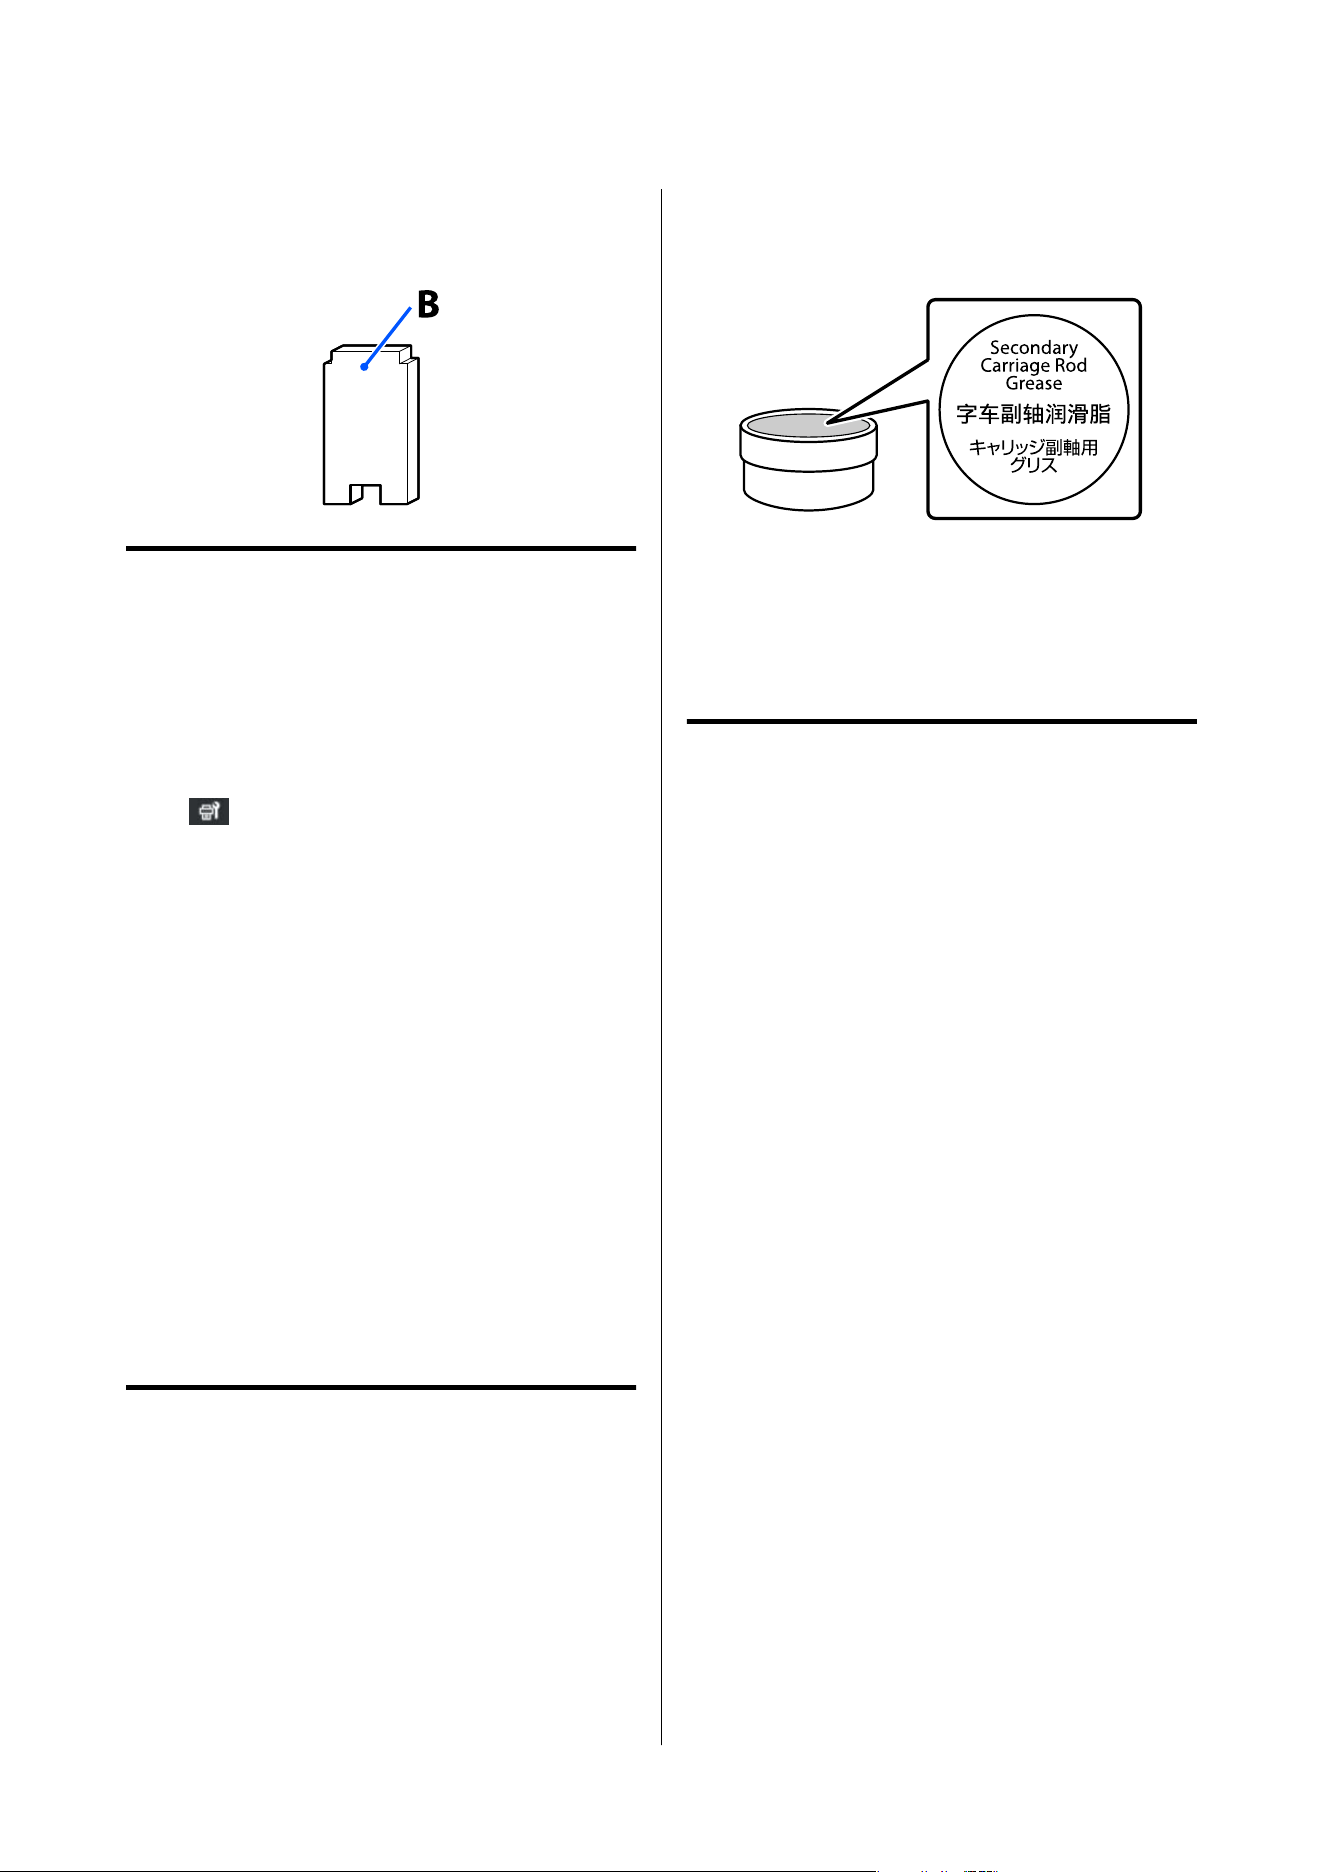
Carriage rod B
Pad B
Lubrication Procedure
Before starting this procedure, be sure to read the
following:
U “Precautions Regarding Maintenance” on page60
A
Check that the printer is ready to print, press
(Maintenance), and then press Adding
Grease to the Carriage Rod.
B
Check the message, and then press Start.
C
Press How To... on the control panel to follow
the procedure for lubrication.
D
When the procedure is complete, press Done
on the screen.
E
Remove the stained pad from the grease tool,
and then store the grease tool with the grease.
Disposing of used pad, cleaning sticks, and
other items used to apply grease
U “Handling Used Consumables” on
page75
Storing Grease
❏ Replace the cap to prevent foreign objects falling
into the grease.
❏ Store the container at room temperature with the
cap uppermost in a location that is not exposed to
direct sunlight.
Handling Used
Consumables
Disposal
The following used parts with adhered ink are
classified as industrial waste.
❏ Cleaning stick
❏ Clean-room wiper
❏ Ink cleaner
❏ Waste in k
❏ Waste in k b ottle
❏ Wiper unit
❏ Flushing pad
❏ Air filter
❏ Media after printing
❏ Empty ink supply unit and cleaning ink supply
unit
Dispose of items according to local laws and
regulations. For example, contract an industrial waste
disposal company for disposal. In such cases, submit
the “Safety data sheets” to the industrial waste disposal
company.
You can download them from your local Epson Web
site.
SC-S7100 Series User's Guide
Maintenance
75
Control Panel Menu
Menu List
The following items and parameters can be set and executed in the Menu. See the reference pages for more details
on each item.
General Settings
For more information on these items, see U “General Settings Menu” on page84
Item Parameter
Basic Settings
LCD Brightness 1 to 9
Sounds
Button Press 0, 1, 2, 3
Alert 0, 1, 2, 3
Optional Alert
Volume 0, 1, 2, 3
Repeat Off, Until Stopped
Completion Notice 0, 1, 2, 3
Warning Notice
Volume 0, 1, 2, 3
Repeat Off, Until Stopped
Error Tone
Volume 0, 1, 2, 3
Repeat Off, Until Stopped
Sound Type Pattern1, Pattern2, Pattern3
Alert Lamp Notice On, Off
Sleep Timer 1 to 240
Wake from Sleep
Touch LCD Screen to Wake On, Off, Scheduled
Date/Time Settings
Date/Time
Daylight Saving Time Off, On (Winter, Summer)
SC-S7100 Series User's Guide
Control Panel Menu
76
Item Parameter
Time Difference -12:45 to +13:45
Language Japanese, English, French, Italian, German, Portuguese, Spanish,
Dutch, Russian, Korean, Traditional Chinese, Simplified Chinese
Screen Customization
Background Color Gray, Black, White
Display Information While Printing
Progress Section Overall, Preparation and Action
Supplementary Information Printed Length, Remaining Print Length, Time until media
replacement, Pass Mode
Keyboard QWERTY, AZERTY, QWERTZ
Unit Settings
Length Unit m, ft/in
Temperature °C, °F
Printer Settings
Margins
Side(Right) 3 to 25 mm (0.12 to 0.98 inch)
Side(Left) 3 to 25 mm (0.12 to 0.98 inch)
Margin Between Pages 0 to 999 mm (0.00 to 39.33 inch)
Width Adjustment -10.0 to 10.0 mm (-0.394 to 0.394 inch)
Print Start Position 0 to 1000 mm (0.00 to 39.37 inch)
SC-S7100 Series User's Guide
Control Panel Menu
77
Item Parameter
Media Detection
Width Detection On, Off
Media Width 300.0 to 1625.6 mm (11.81 to 64.00 inch)
End Detection On, Off
Detect Paper Skew On, Off
Nozzle Check between Pages
On
Execution Timing
Print Length 1 to 9999 m (3.28 to 32805.12 ft)
Print Page 1 to 9999 pages
Print Duration 1 to 9999 minutes
Off
Information Printing at Media Cut
Media Remaining Information On, Off
Print Information On, Off
Print Position Right, Center
Heater
Power On Action Start Heating on Power On, Start Heating Manually
Heater Control on Print Completion 100%, 50%, 0%
Media Feeding Start Feeding on Power On, Start Feeding Manually
Inside Light Auto, Manual
Optional Alert
Print Length Alert
On 0.01 to 999.99 m (0.03 to 3280.81 ft)
Off
Restore Default Settings Network Settings, Clear All Data and Settings
Maintenance Setting
SC-S7100 Series User's Guide
Control Panel Menu
78
Item Parameter
Cleaning Setting
Threshold of Clogged Nozzles 1 to 70
Max Retry Cleaning Count 0, 1, 2
Actions Beyond Threshold of Missing Nozzles Stop Printing, Show Alert, Auto Cleaning
Maintenance Cleaning
On
Interval
Scheduled 1 to 240 hours
Before Job Start
Cleaning Level Light, Medium, Heavy
Off
Network Settings
Network Status Wired LAN Status, Print Status Sheet
Advanced
Device Name
TCP/IP Auto, Manual
Proxy Server Do Not Use, Use
IPv6 Address Enable, Disable
Link Speed & Duplex Auto, 100BASE-TX Auto, 10BASE-T Half Duplex, 10BASE-T Full
Duplex, 100BASE-TX Half Duplex, 100BASE-TX Full Duplex
Redirect HTTP to HTTPS Enable, Disable
Disable IPsec/IP Filtering
Disable IEEE802.1X
Media Settings
For more information on these items, see U “Media Settings Menu” on page93
Item Parameter
Current Settings
SC-S7100 Series User's Guide
Control Panel Menu
79
Item Parameter
Media 01 XXXXXXXXXX to 50 XXXXXXXXXX
Media Type
Media Width
Width Detection On, Off
Media Width 300.0 to 1625.6 mm (11.81 to 64.00 inch)
End Detection On, Off
Advanced Settings
Print Adjustments
Automatic Adjustment
Manual Adjustment
Media Feed Adjustment Manual(Standard), Manual(Measurement)
Print Head Alignment
Media Management
SC-S7100 Series User's Guide
Control Panel Menu
80
Item Parameter
01 XXXXXXXXXX to 50 XXXXXXXXXX
Change Name
Media Type Adhesive Vinyl, Banner, Film, Textile, Paper/Other, Canvas
Advanced Settings
Pre-Heater
Pre-Heater On, Off
Temperature 30 to 50 °C (86 to 122 °F)
Platen Heater
Platen Heater On, Off
Temperature 30 to 50 °C (86 to 122 °F)
After Heater
After Heater On, Off
Temperature 30 to 55 °C (86 to 131 °F)
Drying Time per Pass 0.0 to 10.0 Secs
Proceed to Drying after Print No Rewind, Rewind, Off
Drying Fan On, Off
Print Head Warm Up Long, Short, Off
Platen Gap 1.6, 2.0, 2.5
Feeding Tension Lv1 to Lv4
Paper Suction Lv0 to Lv10
Head Movement Range Data Width, Printer Width, Media Width
Multi-Strike Printing On (2 to 8), Off
Media Feed Speed Limitation On, Off
Pressure Roller Load Light, Medium, Strong
Skew Reduction On, Off
SC-S7100 Series User's Guide
Control Panel Menu
81
Item Parameter
Roll Winding Direction Printable Side Out, Printable Side In
Take-Up Standard, Strength Tension
Skip Wrinkled Media Off, On (10 to 1000 mm)
Periodic Cleaning
Auto
Manual
Execution Timing
Print Duration 1 to 1440 minutes
Suspend until Next Page On, Off
Print Page 1 to 100 pages
Print Length 1.0 to 100.0 m (3.3 to 328.1 ft)
Pre-execute on previous page On, Off
Cleaning Level Extra Light, Light, Medium, Heavy
Remaining Amount Management
Remaining Amount Management On, Off
Remaining Amount 1.0 to 999.9 m (3.3 to 3280.5 ft)
Remaining Alert 1.0 to 15.0 m (3.3 to 49.2 ft)
Print Length Management
Auto Reset Off, Before Job Start
Manual Reset
Maintenance
For more information on these items, see U “Maintenance Menu” on page100
Item Parameter
Print Head Nozzle Check
Print Position Right, Center, Left
Head Cleaning Auto Cleaning, Cleaning (Light), Cleaning (Medium), Cleaning
(Heavy)
Print Head Fluff & Ink Mist Removal
Print Head Warm Up
Cleaning the Maintenance Parts Print Head/Area around the Cap
Adding Grease to the Carriage Rod
SC-S7100 Series User's Guide
Control Panel Menu
82

Item Parameter
Replace Maintenance Parts
Replace Waste Ink Bottle
Pre-Storage Maint.
Head Washing
Supply Status
Displays the amount of wear and the model number for each consumable item.
U “Options and Consumable Products” on page111
Replacement Part Information
Details on menu U “Replacement Part Information Menu” on page102
Printer Status
Details on menu U “Printer Status Menu” on page102
SC-S7100 Series User's Guide
Control Panel Menu
83
Details of the Menu
General Settings Menu
* indicates default settings.
Item Parameter Explanation
Basic Settings
LCD Brightness
1 to 9 (9
*
)
Adjusts the brightness of the control panel display.
Sounds
Button Press 0 Sets the volume of the sounds when the power button and control
panel screen are operated.
1
*
2
3
Alert 0 Sets the volume of the sounds when hardware, such as the covers and
media loading lever, are operated.
1
2
*
3
Optional Alert
Volume 0 Sets the volume and the repetition of sounds when the specified print
length set in Print Length Alert is reached.
1
2
*
3
Repeat Off
Until Stopped
*
Completion Notice 0 Sets the volume of the sounds when print jobs or maintenance
operations are finished.
1
2
3
*
SC-S7100 Series User's Guide
Control Panel Menu
84
Item Parameter Explanation
Warning Notice
Volume 0 Sets the volume and the repetitions of sounds when it is time to replace
consumables.
1
2
*
3
Repeat
Off
*
Until Stopped
Error Tone
Volume 0 Sets the volume and the repetitions of sounds when an error occurs and
printing cannot continue.
1
2
3
*
Repeat Off
Until Stopped
*
Sound Type Pattern1 Sets the type of sounds. Sounds that are easy to hear in the printer's
operating environment can be set.
Pattern2
Pattern3
*
Alert Lamp Notice
On
*
Sets whether or not (On/Off) the alert lamp turns on when an error
notification is received.
Off
SC-S7100 Series User's Guide
Control Panel Menu
85
Item Parameter Explanation
Sleep Timer
1 to 240 (15
*
)
Sets how long before the printer enters sleep mode when no print jobs
are received and no errors are detected. In sleep mode, heaters turn off,
the control panel screen turns off, and the internal motors and other
components consume less power.
Press any button on the control panel to restore the screen display. The
printer is only fully reactivated when a print job is received, or when
another operation involving printer hardware is performed.
Wake from Sleep Set whether or not screen operations during sleep mode will return the
printer from sleep mode. When Off is selected, press the power button
to return from sleep mode.
Selecting Scheduled allows you to specify a time period, from 0:00 to
23:45 in 15 minute increments, when a screen operation will return the
printer from sleep mode.
Touch LCD Screen to Wake
On
*
Off
Scheduled 0:00 to 23:45
Date/Time Settings
Date/Time Sets the printer’s built-in clock. The time set here is displayed on the
Home screen. It is also used for job logs and the printer's status as
shown in Epson Edge Dashboard.
Daylight Saving
Time
Off (Winter)
*
Sets daylight saving time.
On (Summer)
Time Difference -12:45 to +13:45 Sets the time difference with coordinated universal time (UTC) in 15
minute increments. In network environments with a time difference, set
this as necessary when administrating the printer.
Language Japanese Select the language used in the control panel display.
English
*
French
Italian
German
Portuguese
Spanish
Dutch
Russian
Korean
Traditional Chinese
Simplified Chinese
SC-S7100 Series User's Guide
Control Panel Menu
86
Item Parameter Explanation
Screen Customization
Background Color Gray Select the color scheme used in the control panel display. You can set a
color scheme that is easy to see in the environment in which the printer
is installed.
Black
*
White
Display Information While Printing
Progress Section
Overall
*
Sets the progress section of the progress bar displayed during printing
in the status display area on the home screen.
Select Overall to display the overall progress from print preparation to
print completion.
Select Preparation and Action to display the following progress
statuses.
❏ From print preparation to print start (pre-heating the heater, and
so on)
❏ From print start to print completion
Preparation and
Action
Supplementary
Information
Printed Length Sets the supplementary information displayed during printing in the
status display area on the home screen.
Remaining Print
Length
Time until media
replacement
Pass Mode
*
Keyboard
QWERTY
*
Select the keyboard layout for the text input screens that are displayed,
such as when inputting names to register Media Settings.
AZERTY
QWERTZ
Unit Settings
Length Unit
m
*
Choose the units of length used in the control panel display and when
printing test patterns.
ft/in
Temperature
°C
*
Choose the temperature units used in the control panel display.
°F
SC-S7100 Series User's Guide
Control Panel Menu
87

Item Parameter Explanation
Printer Settings
Margins
Side(Right)
3 to 25 mm (5
*
)
(0.12 to 0.98 inch
[0.20
*
])
Sets the width of the right margin when media is loaded in the printer.
See the following for more information.
U “Printable Area” on page53
Side(Left)
3 to 25 mm (5
*
)
(0.12 to 0.98 inch
[0.20
*
])
Sets the width of the left margin when media is loaded in the printer.
See the following for more information.
U “Printable Area” on page53
Margin Between Pa‐
ges
0 to 999 mm (10
*
)
(0.00 to 39.33 inch
[0.39
*
])
Sets the margin between printed pages. For single-page print jobs, this
is the margin placed between jobs.
Width Adjustment -10.0 to 10.0 mm
(0
*
)
(-0.394 to 0.394 inch
[0.00
*
])
You can adjust a margin between pages. Even after making
adjustments, the size of the margin may change, depending on the
media and usage environment.
The margin increases when the number is moved in the + direction, and
decreases when the number is moved in the - direction.
U “Printable Area” on page53
Print Start Position
0 to 1000 mm (0
*
)
(0.00 to 39.37 inch
[0.00
*
])
Adjust this parameter if you want to print from the near center of the
media or if you want to shift the printed area left from the Side(Right)
setting. The area from the right edge of the media is left blank using the
width set in Print Start Position. If a value is selected for Side(Right), an
additional area corresponding to the width selected for Side(Right) will
be left blank.
See the following for more information.
U “Printable Area” on page53
SC-S7100 Series User's Guide
Control Panel Menu
88
Item Parameter Explanation
Media Detection
Width Detection
On
*
Select whether or not (On)/(Off) the media width is detected. Try
setting this to Off if media width errors are displayed when printing
even though the media is correctly loaded. However, we recommend
setting this to On when using the printer. Changed settings are
reflected when the media is reloaded.
Off
Media Width 300.0 to 1625.6 mm
(300.0
*
)
(11.81 to 64.00 inch
[11.81
*
])
When Width Detection is set to On, the value that is automatically read
from the media loaded in the printer is displayed.
When Width Detection is set to Off, enter the exact width of the media
that is loaded in the printer.
If the correct media width is not set, the printer may print beyond the
edges of the media. Ink used outside the edges of the media will stain
the inside of the printer.
Changed settings are reflected when the media is reloaded.
End Detection
On
*
Select whether or not (On/Off) the end of the media is detected. Try
setting Off if media out errors are displayed when printing even though
the media is correctly loaded. However, we recommend setting this to
On when using the printer.
Off
Detect Paper Skew On Select whether the printer will stop printing and display an error (On)
or whether the printer will continue printing (Off) when skewed media
is detected. We recommend setting this to On when loading media
without using the media edge plates, such as when printing on thick
media.
Off
*
Nozzle Check between Pages
On When On is selected, a nozzle check pattern is printed periodically
at the specified timing. When printing is complete, you can visually
inspect the check pattern to determine whether there are any stripes or
unevenness in the preceding or following printout.
Select either Print Length, Print Page, or Print Duration to set the
timing for printing the check pattern.
Execution Timing
Print Length
1 to 9999 m (99
*
)
(3.28 to 32805.12 ft
[324.80
*
])
Print Page 1 to 9999 pages
(99
*
)
Print Duration 1 to 9999 minutes
(99
*
)
Off
*
SC-S7100 Series User's Guide
Control Panel Menu
89
Item Parameter Explanation
Information Printing at Media Cut
Media Remaining
Information
On Prints information, such as the remaining amount of media, when
media is removed or replaced.
When Media Remaining Information is set to On, the following
information is printed on the unused side from the cut position.
To print the media remaining information, set Remaining Amount
Management in Media Settings to On.
❏ Model: Model of the printer
❏ Serial No.: Serial number of the printer
❏ F/W Version: Firmware version of the printer
❏ Print Date: Date and time of printing
❏ Bank No.: Media setting number when printing
❏ Media Type: Media type registered to the media number when
printing
❏ Media Width: Automatically detected value of media width
❏ Remaining Amount: Remaining amount of media
When Print Information is set to On, the following information is
printed on the printed side of the cut position.
❏ Model: Model of the printer
❏ Serial No.: Serial number of the printer
❏ F/W Version: Firmware version of the printer
❏ Print Date: Date and time of printing
❏ Bank No.: Media setting number when printing
❏ Media Type: Media type registered to the media setting number
when printing
❏ Media Width: Automatically detected value of media width
❏ Print Length: Amount of media used
If you want to cut the left and right corners of the media when
preparing it for the next loaded media, set Print Position to Center.
Off
*
Print Information On
Off
*
Print Position
Right
*
Center
Heater
Power On Action Start Heating on
Power On
Sets the time to start preheating the heater. When Start Heating on
Power On is set, preheating starts automatically when the printer is
turned on and started up, regardless of the media loading status. For
Start Heating Manually, press the Preheat Start button on the home
screen to start preheating.
Start Heating
Manually
*
Heater Control on
Print Completion
100%
*
Set how long the heater temperature is maintained after printing is
complete. For continuous printing, use it at 100% constantly. If you
select 50%, the heater remains at approximately half the preheat
temperature. If you select 0%, preheating stops after printing is
complete.
Changes to the settings take effect after the next job has been printed.
50%
0%
SC-S7100 Series User's Guide
Control Panel Menu
90
Item Parameter Explanation
Media Feeding Start Feeding on
Power On
*
Sets the behavior of media settings, such as the media type and roll
winding specifications, when the printer is turned off and back on again
when media is loaded.
When Start Feeding on Power On is set, paper feeding starts
immediately using the current settings without displaying the Media
Settings screen. For Start Feeding Manually, paper feeding starts after
you have made settings on the Media Settings screen displayed.
Start Feeding
Manually
Inside Light
Auto
*
Select whether to turn on/off the light inside the printer cover
automatically (Auto) or whether to use the control panel operations
as necessary (Manual).
Auto: The light turns on automatically for operations that need light,
such as printing, and turns off when the operation is complete.
Manual: You need to press the
(Inside Light button) on the control
panel to turn the light on/off.
Manual
Optional Alert
Print Length Alert When Print Length Alert is set to On, you will receive a message
and notification sound when the set print length is reached. The
print length is only measured during printing. (Including blank spaces
between jobs and between pages, and when proceeding to drying after
printing)
The print length is reset when any of the following actions are
performed.
❏ Moving the media loading lever to release the media
❏ Pressing
(feed media to cutting position) on the control panel
screen
❏ Changing the print length setting
❏ Turning off the printer
You can change the notification sound from Optional Alert.
On
Print Length 0.01 to 999.99 m
(0.70
*
)
(0.03 to 3280.81 ft
[2.29
*
])
Off
*
Restore Default Set‐
tings
Network Settings Network Settings: Restores all the Advanced settings in the network
settings menu to their default setting values.
Clear All Data and Settings: Restores all menu settings to their default
setting values.
Clear All Data and
Settings
SC-S7100 Series User's Guide
Control Panel Menu
91
Item Parameter Explanation
Maintenance Setting
Cleaning Setting
Threshold of Clog‐
ged Nozzles
1 to 70 (1
*
)
The printer automatically checks the state of clogging of the nozzles
in the print head during printing and cleaning. As a result of the
check, nozzles that cannot maintain normal print quality, due to the ink
ejection volume falling below a certain level, are detected as clogged
nozzles.
Here, there are settings related to maintenance to be performed when a
clogged nozzle is detected. These settings apply to the following.
❏ Auto nozzle clogging check before printing
❏ Auto Cleaning
Threshold of Clogged Nozzles sets the number of clogged nozzles
that will trigger maintenance.
Max Retry Cleaning Count sets the number of times maintenance
will be repeated if the nozzle clogging is not resolved in a single
maintenance session.
Max Retry Cleaning
Count
0
*
1
2
Actions Beyond
Threshold of Missing
Nozzles
Stop Printing Sets the action when the number of clogged nozzles that are
detected during printing exceeds the number set in Cleaning Setting -
Threshold of Clogged Nozzles.
With Stop Printing, the message Auto Nozzle Maintenance found
that the allowable number of clogged nozzles has been exceeded.
The print quality may decline. is displayed on the control panel
screen, printing is stopped, and the printer enters standby status.
With Show Alert, printing continues without stopping while the above
message remains displayed on the control panel screen.
With Auto Cleaning, cleaning is performed automatically before the
next job starts to print.
Show Alert
*
Auto Cleaning
Maintenance Cleaning When On is set, Head Cleaning is performed automatically when the
printer is not used for a specified period or before starting a job. This
cleaning ejects sedimented ink in the ink tubes to prevent print quality
from falling.
On
Interval
Scheduled
1 to 240 hours (72
*
)
Before Job Start
Cleaning Level Light
Medium
*
Heavy
Off
*
SC-S7100 Series User's Guide
Control Panel Menu
92
Item Parameter Explanation
Network Settings
Network Status Wired LAN Status You can view a summary of the selected Advanced settings.
When Print Status Sheet is selected, a list is printed.
Print Status Sheet
Advanced
Device Name Select a variety of network settings.
TCP/IP
Auto
*
Automatically sets the printer's IP address by using the DHCP function
of the router, for example.
Manual Select this option when assigning a fixed IP address to the printer, and
then enter the necessary information, such as the IP address and subnet
mask, to configure the settings.
Proxy Server Use If you are using a proxy server to connect from an intranet to the
internet, and you want to use functions such as firmware updates or
other functions that allow the printer to access the internet directly, set
Use and set the server name and port number.
Do Not Use
*
IPv6 Address
Enable
*
Select whether to enable or disable IPv6 functionality.
Disable
Link Speed & Du‐
plex
Auto
*
If you are using 1000BASE-T Full Duplex, set Auto.
100BASE-TX Auto
100BASE-TX Half
Duplex
100BASE-TX Full
Duplex
10BASE-T Half
Duplex
10BASE-T Full
Duplex
Redirect HTTP to
HTTPS
Enable
*
Select whether to enable or disable the automatic redirection of HTTP
to HTTPS.
Disable
Disable IPsec/IP Filtering Use the pre-installed software Web Config to enable this setting.
You can only disable the setting from the control panel menu.
See the following for detailed information on starting Web Config.
U “Using Web Config” on page33
Disable IEEE802.1X
Media Settings Menu
* indicates default settings.
SC-S7100 Series User's Guide
Control Panel Menu
93
Item Parameter Explanation
Current Settings
Media 01 XXXXXXXXXX to
50 XXXXXXXXXX
Choose the Media Settings to use. The registered name appears in
XXXXXXXXXX.
Media Type Displays the currently selected Media Type.
Media Width Selecting this item will take you to General Settings - Printer Settings
- Media Detection settings.
The media width recognized by the printer varies according to the
Media Detection - Width Detection settings.
U “General Settings Menu” on page84
Advanced Settings You can change the Advanced Settings for the registered media
selected in Media.
See the following table for details on the setting content.
U “Media Management items” on page95
Print Adjustments
Automatic Adjustment Automatic Adjustment is performed in the following cases.
❏ When media settings for EMX files are registered to the printer
❏ When changing Advanced Settings after saving Media Settings
❏ When using media of different widths, even if they are of the same
media type
If an error occurs during Automatic Adjustment or you notice banding
or graininess in the print results, perform Manual Adjustment.
See the following for more information.
U “Optimizing Media Settings (Automatic Adjustment)” on page46
Manual Adjustment
Media Feed Adjust‐
ment
Manual(Standard)
Manual(Measureme
nt)
Print Head Alignment
Media Management
01 XXXXXXXXXX to 50 XXXXXXXXXX Change the registered Media Settings.
U “Media Management items” on page95
Press the
area to the right of Media Settings to copy the currently
selected settings to another media setting number, or initialize all
settings.
Remaining Amount Management
SC-S7100 Series User's Guide
Control Panel Menu
94
Item Parameter Explanation
Remaining Amount
Management
On When On is selected, you can set Remaining Amount and Remaining
Alert. Setting each item to manage the remaining amount makes it
easier to know when it is time to replace the media.
Once this is set to On, when you have loaded the media, you will
be prompted to enter the registered media settings number and the
media length (Remaining Amount).
Off
*
Remaining Amount 1.0 to 999.9 m (50.0
m
*
)
(3.3 to 3280.5 ft
[164.0 ft
*
])
Sets the total length of the loaded media. You can set in increments of
0.1 m (0.1ft). The amount of media remaining is estimated based on the
length you set here and the length of the printout, and is displayed on
the Home screen.
Remaining Alert 1.0 to 15.0 m (5.0
m
*
)
(3.3 to 49.2 ft [16.4
ft
*
])
Sets a value at which point a warning message is displayed to inform
you that the remaining amount of media is too low. You can set in
increments of 0.1 m (0.1 ft).
Print Length Management
Auto Reset
Off
*
Select whether not to automatically reset the print length value (Off) or
to reset it when the next job starts (Before Job Start).
When Off is selected, the value does not reset until you perform
Manual Reset. However, once the value reaches 9999, it automatically
resets and returns to 0.
When Before Job Start is selected, the value returns to 0 when printing
starts for the next job so you can check the print length per job. You can
also check how far along the print job is while printing.
Before Job Start
Manual Reset When a reset is performed, the value for print length returns to 0.
Media Management items
When you select the Media Type when loading media, or download an EMX file using the supplied Epson Edge
Print PRO or Epson Edge Dashboard and register the media setting values to the printer, the media setting values
are already set to match the media being used and therefore do not need to be changed normally. When using
special media or when a problem such as head striking or banding is detected in printing results, change the
default.
The default settings for each of the following items differ depending on the content set in Media Type.
Item Parameter Explanation
Change Name Assign a name of up to 20 characters to the Media Settings being
saved. Using distinctive names makes it easier to select banks for use.
Media Type Adhesive Vinyl Select the Media Type that matches the type of media you have
loaded. The printer stores the optimum media settings according to
the Media Type. When the Media Type is changed, each setting for
media registered to the current media setting number changes to the
value for the Media Type after changing.
U “Media Settings List for Each Media Type” on page116
Banner
Film
Textile
Paper/Other
Canvas
SC-S7100 Series User's Guide
Control Panel Menu
95
Item Parameter Explanation
Advanced Settings In most situations, use the values set for each media type as they are.
When using special media or when a problem such as head striking
or banding is detected in printing results, change the default.
Pre-Heater
Pre-Heater On Select whether or not (On/Off) to use the pre-heater. When this
is set to Off, the heater does not heat up even when a print job
is received or when you press Preheat Start on the home screen/
heater temperature settings screen.
Off
Temperature 30 to 50 °C (86 to
122 °F)
The heater heats up to the temperature set here when a print job
is received or when you press Preheat Start on the home screen/
heater temperature settings screen.
Platen Heater
Platen Heater On Select whether or not (On/Off) to use the platen heater. When this
is set to Off, the heater does not heat up even when a print job
is received or when you press Preheat Start on the home screen/
heater temperature settings screen.
Off
Temperature 30 to 50 °C (86 to
122 °F)
The heater heats up to the temperature set here when a print job
is received or when you press Preheat Start on the home screen/
heater temperature settings screen. If the temperature of the platen
heater is too high, it may cause nozzle clogging.
After Heater
After Heater On Select whether or not (On/Off) to use the after heater. When this
is set to Off, the heater does not heat up even when a print job
is received or when you press Preheat Start on the home screen/
heater temperature settings screen.
Off
Temperature 30 to 55 °C (86 to
131 °F)
The heater heats up to the temperature set here when a print job
is received or when you press Preheat Start on the home screen/
heater temperature settings screen.
SC-S7100 Series User's Guide
Control Panel Menu
96
Item Parameter Explanation
Drying Time per Pass 0.0 to 10.0 Secs Set the time, in the range of 0.0 to 10.0 seconds, to stop feeding the
media to allow the ink to dry after printing one pass. The time needed
for the ink to dry varies with ink density and the media used. If the ink
blurs on the media, set a longer time for drying the ink. Increasing the
drying time increases the time needed to print.
Proceed to Drying after
Print
No Rewind Select whether to feed the end of the printout to the after heater
position after printing (No Rewind, Rewind) or not to feed it (Off).
When No Rewind is set, the media that has been fed for drying is not
rewound when the next job is received. This is suitable for printing
the next job after cutting the media.
When Rewind is set, the media that has been fed for drying is
automatically rewound before printing when the next print job is
received, which avoids creating any unnecessary margins. This is
suitable for continuous, consecutive printing.
If you need to cut the media when Rewind is set, hold down the
[
] button (rewind button) to return the end of the printout to the
cutter groove before cutting. If you cut the media without rewinding,
the next print job will not be performed correctly.
Rewind
Off
Drying Fan On Select whether or not (On/Off) to use the Additional Print Drying
System.
Off
Print Head Warm Up Long If you notice horizontal banding or incorrect colors in the printouts,
condensation may have formed on the print head surface. This issue
may occur when the ambient temperature is low or when printing
large areas at a high ink density. When this function is enabled,
the printer automatically warms up when a print job is received
to prevent condensation on the print head surface. Printing starts
when the temperature of the heater and print head reach the target
temperature.
If the issue continues even after setting this to Short, try setting
it to Long. Setting this to Long increases the effectiveness of
condensation prevention, but it also increases the warm-up time.
This function does not work if the platen heater is set to Off.
Short
Off
SC-S7100 Series User's Guide
Control Panel Menu
97
Item Parameter Explanation
Platen Gap 1.6 Set the Platen Gap (the distance between the print head and the
media).
In most situations, use the values set for each media type as they
are. If the print results are scratched or smudged, they may be
improved by setting a larger value. However, choosing a larger gap
than required may result in ink stains inside the printer, reduced print
quality, or shorter product life.
2.0
2.5
Feeding Tension Lv1 to Lv4 In most situations, use the values set for each Media Type as they are.
Increase tension if creases appear in the media during printing. The
higher the value, the greater the tension.
Paper Suction Lv0 to Lv10 Set the strength of the suction by the platen heater on the media.
The higher the value, the greater the suction.
In most situations, use the values set for each Media Type as they are.
If the media is wavy on the platen heater, increase the setting.
If graininess or out-of-focus characteristics are detected in printing
results obtained using thin or soft media or if the media is not fed
normally, reduce the set value.
Head Movement Range Data Width Choose the range over which the print head moves during printing.
Data Width: The print head moves within the range of the print
data's width. Restricting the extent of the print heads' movement
increases print speed.
Printer Width: The print head moves within the range of the printer's
maximum media width. Select this option for more even print results
with less variation.
Media Width: The print head moves within the range of the width of
the media that is loaded.
Printer Width
Media Width
Multi-Strike Printing On (2 to 8) Choose the number of times each line is printed.
To perform high-density printing, increase the frequency.
Off
SC-S7100 Series User's Guide
Control Panel Menu
98
Item Parameter Explanation
Media Feed Speed Limi‐
tation
On Normally, leave this Off.
Set this to On if media sticks, wrinkles, or tears easily when printing
on thin media.
When this is set to On, print speed slows down.
Off
Pressure Roller Load Light In most situations, use the values set for each Media Type as they are.
If the following occurs when printing, you may be able to eliminate
the problem by; changing the Pressure Roller Load to Light.
❏ Wrinkling around the pressure rollers.
❏ Staining due to the media striking the print head.
❏ Pressure rollers leaving marks on the media.
Medium
Strong
Skew Reduction On Select whether or not (On/Off) the printer performs operations to
correct media skew (media fed skewed) when media is loaded.
Normally, leave this On. Set this to Off if the media shows marks
from the rollers due to skew corrections.
Off
Roll Winding Direction Printable Side Out Set this according to the winding specifications of the media being
loaded.
Printable Side In
Take-Up Standard Normally, leave this at Standard.
If the media sticks while printing on media that builds up static easily
and cannot be taken up correctly because of problems, such as being
wavy, set this to Strength Tension. If the issue continues even when
this is set to Strength Tension, use media that is less prone to static
electricity.
Strength Tension
Skip Wrinkled Media Off Normally, leave this Off.
To avoid printing on the wrinkled part at the leading edge of the
media at the start of printing, we recommend setting the length to
300 mm. However, if you want to set a different length depending
on the media you are using and the print content, you can set the
length so that printing is not performed within a range of 10 to 1000
mm from the leading edge. Set the length in increments of 10 mm.
However, no media is fed when jobs are continuous.
On (10 to 1000 mm)
SC-S7100 Series User's Guide
Control Panel Menu
99
Item Parameter Explanation
Periodic Cleaning
Auto Performs periodic head cleaning at the optimal time based on the
media settings.
Manual When setting the frequency according to how often you use the
printer, set it to Manual.
Execution Timing Set the frequency of periodic cleaning to Print Duration, Print Page,
or Print Length.
Print Duration 1 to 1440 minutes
(120 minutes
*
)
Print Duration sets how many minutes of printing time to wait
before cleaning the print head.
Normally, leave Suspend until Next Page set to On. If you set
Suspend until Next Page to Off, head cleaning is performed even
during printing when it is time for periodic cleaning.
Suspend until
Next Page
On
*
Off
Print Page 1 to 100 pages (10
pages
*
)
Print Page sets how many pages to print before cleaning the print
head.
Print Length
*
1.0 to 100.0 m (3.3
to 328.1 ft)
Print Length sets how many meters to print before cleaning the
print head.
Normally, leave Pre-execute on previous page set to On. If you set
Pre-execute on previous page to Off, head cleaning is performed
even during printing when it is time for periodic cleaning.
Pre-execute on
previous page
On
*
Off
Cleaning Level
Extra Light
*
Sets the strength at which to execute head cleaning.
Light
Medium
Heavy
Maintenance Menu
* indicates default settings.
Item Explanation
Print Head Nozzle Check Print a pattern, and then check the status of the nozzles for the print
head. Inspect the pattern visually and perform Head Cleaning if you
detect any missing colors.
See the following for details.
U “Nozzle Check and Head Cleaning” on page70
The settings displayed in Print Position differ depending on the width
of the media loaded in the printer and the Width Detection setting.
Print Position Right
Center
Left
Head Cleaning
SC-S7100 Series User's Guide
Control Panel Menu
100
Item Explanation
Auto Cleaning Execute Head Cleaning. Perform Auto Cleaning first. If this does not
clear the clogs, perform in the order Cleaning (Light), then Cleaning
(Medium), and then Cleaning (Heavy).
If nozzles are still clogged even after performing Cleaning (Heavy),
check the following for information on what to try next.
U “Nozzle Check and Head Cleaning” on page70
Cleaning (Light)
Cleaning (Medium)
Cleaning (Heavy)
Print Head Fluff & Ink Mist Removal Do this if nozzles are still clogged and ink drops form even after
performing head cleaning.
Print Head Warm Up If you notice horizontal banding or incorrect colors in the printouts,
condensation may have formed on the print head surface. This issue
may occur when the ambient temperature is low or when printing
large areas at a high ink density. If you enable Print Head Warm Up
in Media Management, the printer automatically warms up when a
print job is received to prevent condensation on the print head surface.
Printing starts when the temperature of the heater and print head
reaches the target temperature. To shorten the warm-up time, perform
this function just before sending the print job. When this function is
selected, warm-up begins.
This function does not work if the platen heater is set to Off.
Cleaning the Mainte‐
nance Parts
Print Head/Area
around the Cap
Start cleaning the selected parts. See the following for more
information on cleaning.
U “Monthly Cleaning” on page61
Adding Grease to the Carriage Rod Use this only to lubricate carriage rod A/B.
U “Applying Grease to the Carriage Rod” on page74
Replace Maintenance Parts If you are replacing the Maintenance Parts Kit before the message
indicating that it is time to replace the Maintenance Parts Kit appears
on the control panel's screen, do so from this menu.
Replace Waste Ink Bottle If you are replacing the waste ink bottle before the message indicating
that it is time to replace the waste ink bottle appears on the control
panel's screen, do so from this menu.
U “When you want to replace it at any time” on page66
Pre-Storage Maint. Always perform pre-storage maintenance if the printer will not be used
(and will be switched off) for one month or more. See the following for
more information.
U “Pre-maintenance When Not Using the Printer for an Extended
Period” on page72
Head Washing Perform this if nozzle clogging is not cleared after performing head
cleaning several times and cleaning around the print head.
Use the following to clean the head.
❏ Cleaning ink supply unit (sold separately) (x4)
❏ Tray attachment (supplied with the printer) (x4)
SC-S7100 Series User's Guide
Control Panel Menu
101
Replacement Part Information Menu
Item Explanation
Suction Cap
Contact your dealer or Epson Support for assistance.
Ink Holder (Left)
Ink Holder (Right)
Ink Tube
Cloth Wiper Carriage
Carriage Motor
Printer Status Menu
Item Explanation
Firmware Version Displays the selected information.
If you set the printer name using Epson Edge Dashboard supplied with
this printer, that name is displayed in Printer Name.
Printer Name
Fatal Error Log
Operation Report Total Print Area
Total Media Feed
Length
Total Carriage Pass
SC-S7100 Series User's Guide
Control Panel Menu
102
Problem Solver
When a Message is Displayed
If one of the following messages is displayed, read and follow the instructions below.
Messages What to do
Failed to inspect the condition of nozzles.
Cannot run "Auto Cleaning".
Select cleaning strength manually and
run Cleaning.
The printer has exceeded the temperature at which printer operations are
guaranteed. Adjust the temperature of the room, to start using the printer
again.
U “Specifications Table” on page120
The combination of the IP address and
the subnet mask is invalid.
For details, see your documentation.
Make sure you have entered the correct values for the IP address and the
default gateway.
If you do not know the correct values, contact your network administrator.
Recovery Mode Firmware update failed, and the printer started in recovery mode. Follow the
steps below to update the firmware again.
1. Connect the computer and the printer with a USB cable (updates cannot be
performed over a network connection when the printer is in recovery mode).
2. Download the latest firmware from the Epson website, and then start the
update.
Communication between the network
and the printer is unstable.
You may be able to resolve this by
setting IEEE802.3az (Energy Efficient
Ethernet) to "Off".
See your documentation for details.
When the IEEE802.3az feature is set to On, the connection may become
unstable, depending on your network environment, resulting in printing issues.
Press OK to finish printing.
See the following and use Web Config to set the IEEE802.3az feature to Off.
U “Configuring IEEE 802.3az settings” on page106
When a Maintenance Call/Printer Error Occurs
Error messages What to do
Maintenance Request: Replace Parts
Soon
XXXXXXXX
A part used in the printer is nearing the end of its service life.
Contact your dealer or Epson Support and tell them the maintenance request
code.
You cannot clear the maintenance request until the part is replaced. A printer
error occurs if you continue to use the printer.
Maintenance Request: End of Parts
Service Life
XXXXXXXX
SC-S7100 Series User's Guide
Problem Solver
103

Error messages What to do
Printer error.
Turn the power off and on again.
For details, see your documentation.
XXXXXX
Printer errors are displayed in the following situations.
❏ The power cable is not connected securely
❏ An error that cannot be cleared occurs
When a printer error occurs, the printer automatically stops printing. Turn off
the printer, disconnect the power cable from the outlet and from the AC inlet
on the printer, and then reconnect. Turn on the printer again.
If the same call for service is displayed on the LCD panel after turning the
printer off and on several times using the procedure above, contact your dealer
or Epson Support for assistance. Tell them the call for service code is "XXXXXX".
The Take In Media Holder cannot be
recognized.
Turn off the power and check whether
the Take In Media Holder is connected
correctly.
XXXXXX
Turn off the printer, disconnect and reconnect the communication cable
connector for the media feeding unit, and then turn the printer back on.
If the same call for service is displayed on the LCD panel after turning the
printer off and on several times using the procedure above, contact your dealer
or Epson Support for assistance. Tell them the call for service code is "XXXXXX".
SC-S7100 Series User's Guide
Problem Solver
104
Troubleshooting
U.S., Canada, and Latin America
For information on additional common issues and
their solutions, see the online Troubleshooting & Tips.
Other Regions
The “Troubleshooting & Tips” section of the online
manual also introduces common troubles and how
to deal with them. Please refer to this section in
conjunction with this chapter.
You Cannot Print (Because the
Printer Does Not Work)
The printer does not turn on.
o
Is the power cable plugged into the
electrical outlet and the printer?
Make sure the power cable is securely plugged into
the printer.
o
Is there any problem with the electrical
outlet?
Make sure your outlet works by connecting the
power cable for another electric product.
The printer is not communicating
with the computer.
o
Is the cable plugged in properly?
Make sure the printer's interface cable is securely
plugged into the correct terminal of the computer
and the printer. Also, make sure the cable is not
broken nor bent. If you have a spare cable, try
connecting with the spare cable.
o
Does the interface cable specification match
the specifications for the computer?
See the "Interface" section in the Specifications
table.
U “Specifications Table” on page120
o
When using a USB hub, is it being used
correctly?
In the USB specification, daisy-chains of up to five
USB hubs are possible. However, we recommend
that you connect the printer to the first hub
connected directly to the computer. Depending on
the hub you are using, the operation of the printer
may become unstable. If this should occur, plug the
USB cable directly into your computer's USB port.
o
Is the USB hub recognized correctly?
Make sure the USB hub is recognized correctly on
the computer. If it is, disconnect the USB hub from
the computer and connect the computer directly to
the printer. Ask the USB hub manufacturer about
USB hub operation.
You cannot print under the network
environment.
o
Are the network settings correct?
Ask your network administrator for the network
settings.
o
Connect the printer directly to the
computer using a USB cable, and then try
to print.
If you can print via USB, there are some problems
on the network environment. Ask your system
administrator, or refer to the manual for your
network system. If you cannot print via USB, see the
appropriate section in this User's Guide.
o
Is the network connection unstable?
Turn off the router, wait for about 10 seconds, and
then turn it on again.
o
Are you using a wired LAN connection with
a device that supports IEEE802.3az (Energy
Efficient Ethernet)?
When using a wired LAN connection with a
device that supports IEEE802.3az (Energy Efficient
Ethernet), the connection may become unstable or
disconnect, or the communication may slow down.
Follow the steps below to disable IEEE802.3az on
the printer and then connect.
SC-S7100 Series User's Guide
Problem Solver
105
Configuring IEEE 802.3az settings
A
Disconnect the LAN cables connected to the
computer and the printer.
B
Disable IEEE802.3az on your computer if it is
enabled.
See the manual for your computer for setting
details.
C
Connect the computer and the printer directly
with a LAN cable.
D
On the printer, check the printer’s IP address
in
(Menu) - General Settings - Network
Settings - Network Status - Wired LAN
Status.
E
On the computer, start Web Config. Start a Web
browser and enter the printer's IP address.
F
Log in as an administrator.
Logging in U “Using Web Config” on page33
G
Select the Network Settings tab - Wired LAN.
H
Set IEEE802.3az to Off.
I
Click Next.
J
Click Settings.
K
Disconnect the LAN cable that directly
connects the computer and the printer.
L
If you disabled IEEE802.3az on your computer
in step 2, enable it now.
M
Reconnect the LAN cable that you
disconnected in step 1.
If the issue continues even though you changed
the above settings, a device other than the printer
may be causing the problem. Check the settings and
connection states, etc. of the router and computer.
The printer has an error.
o
View the message displayed in the control
panel.
U “Control Panel” on page15
U “When a Message is Displayed” on page103
The Printer Sounds Like It Is
Printing, but Nothing Prints
The print head moves, but nothing
prints.
o
Confirm the printer operation.
Print a check pattern. Check patterns can be printed
without connecting the printer to a computer and
hence can be used to check printer function and
status.
U “How to Print a Nozzle Check Pattern” on
page70
Refer to the following section for information on
what to do if the pattern does not print correctly.
Check pattern does not print
correctly.
o
Perform head cleaning.
The nozzles may be clogged. Print a check pattern
again after performing head cleaning.
U “Nozzle Check and Head Cleaning” on page70
o
Has the printer been left unused for a long
time?
If the printer has not been used for a long time, the
nozzles may have dried up and clogged.
Steps to take when the printer has not been used
for a long time U “Notes When Not Using the
Printer” on page24
SC-S7100 Series User's Guide
Problem Solver
106

The Prints Are Not What You
Expected
Print quality is poor, uneven, too
light, too dark, obvious graininess,
or the tone differs.
o
Are the print head nozzles clogged?
If the nozzles are clogged, specific nozzles do not
fire ink and the print quality declines. Try printing a
check pattern.
U “How to Print a Nozzle Check Pattern” on
page70
o
Perform Print Adjustments.
There is a slight gap between the print head and
the media, so the colors may be applied in slightly
different positions due to the following factors.
❏ Difference in the direction the print head is
moving (right to left or left to right)
❏ Temperature and humidity
❏ Inertial force of movement of the print head
The color position differences may cause the print
results to show obvious graininess or to appear
out-of-focus.
Also, large discrepancies in the feed amount cause
banding (horizontal banding, tint unevenness, or
stripes).
You can adjust color position differences and
the amount of media that is fed by doing Print
Adjustments. Perform Print Head Alignment and
Media Feed Adjustment for Media Settings and
adjust according to the media being used.
U “Optimizing Media Settings (Automatic
Adjustment)” on page46
o
Are you using a genuine Epson ink supply
unit?
This printer has been developed for use with
genuine Epson ink. If you use non-Epson ink,
printouts may be faint, or the remaining ink level
may not be detected correctly, causing the color to
change. Be sure to use the correct ink supply unit.
o
Are you using an old ink supply unit?
The print quality declines when an old ink supply
unit is used. Replace the old ink supply unit with a
new one. Use all of the ink in the ink supply unit
before the date printed on the package or within a
year of installing the ink supply unit in the printer,
whichever is sooner.
o
Are the heaters at the correct temperature?
Raise the temperature if the print results are blurred
or smudged or the ink clots. Note, however, that
raising the temperature too high can cause the
media to shrink, wrinkle, or deteriorate.
In addition, the heaters may require some time
to reach the desired temperature if the ambient
temperature is low. The heaters may also not
have the desired effect after reaching the selected
temperature if the media is too cold. Allow the
media to warm to room temperature before use.
o
Are media settings correct?
Confirm that the media settings in the software RIP
or on the printer match the media actually in use.
o
Are you printing with Head Movement
Range set to Data Width?
When Head Movement Range is set to Data Width
in the settings menu, the print quality may slightly
decrease in exchange for faster speed. For higher
printing quality, set Head Movement Range to
Printer Width or Media Width.
U “Media Settings Menu” on page93
o
Are you comparing the printing results to
the image on the display monitor?
Since monitors and printers produce colors
differently, printed colors will not always match
on-screen colors perfectly.
o
Was a printer cover opened during
printing?
Opening the printer cover or maintenance cover
during printing causes the print head to stop
abruptly, resulting in uneven colors. Do not open
the covers while printing is in progress.
SC-S7100 Series User's Guide
Problem Solver
107
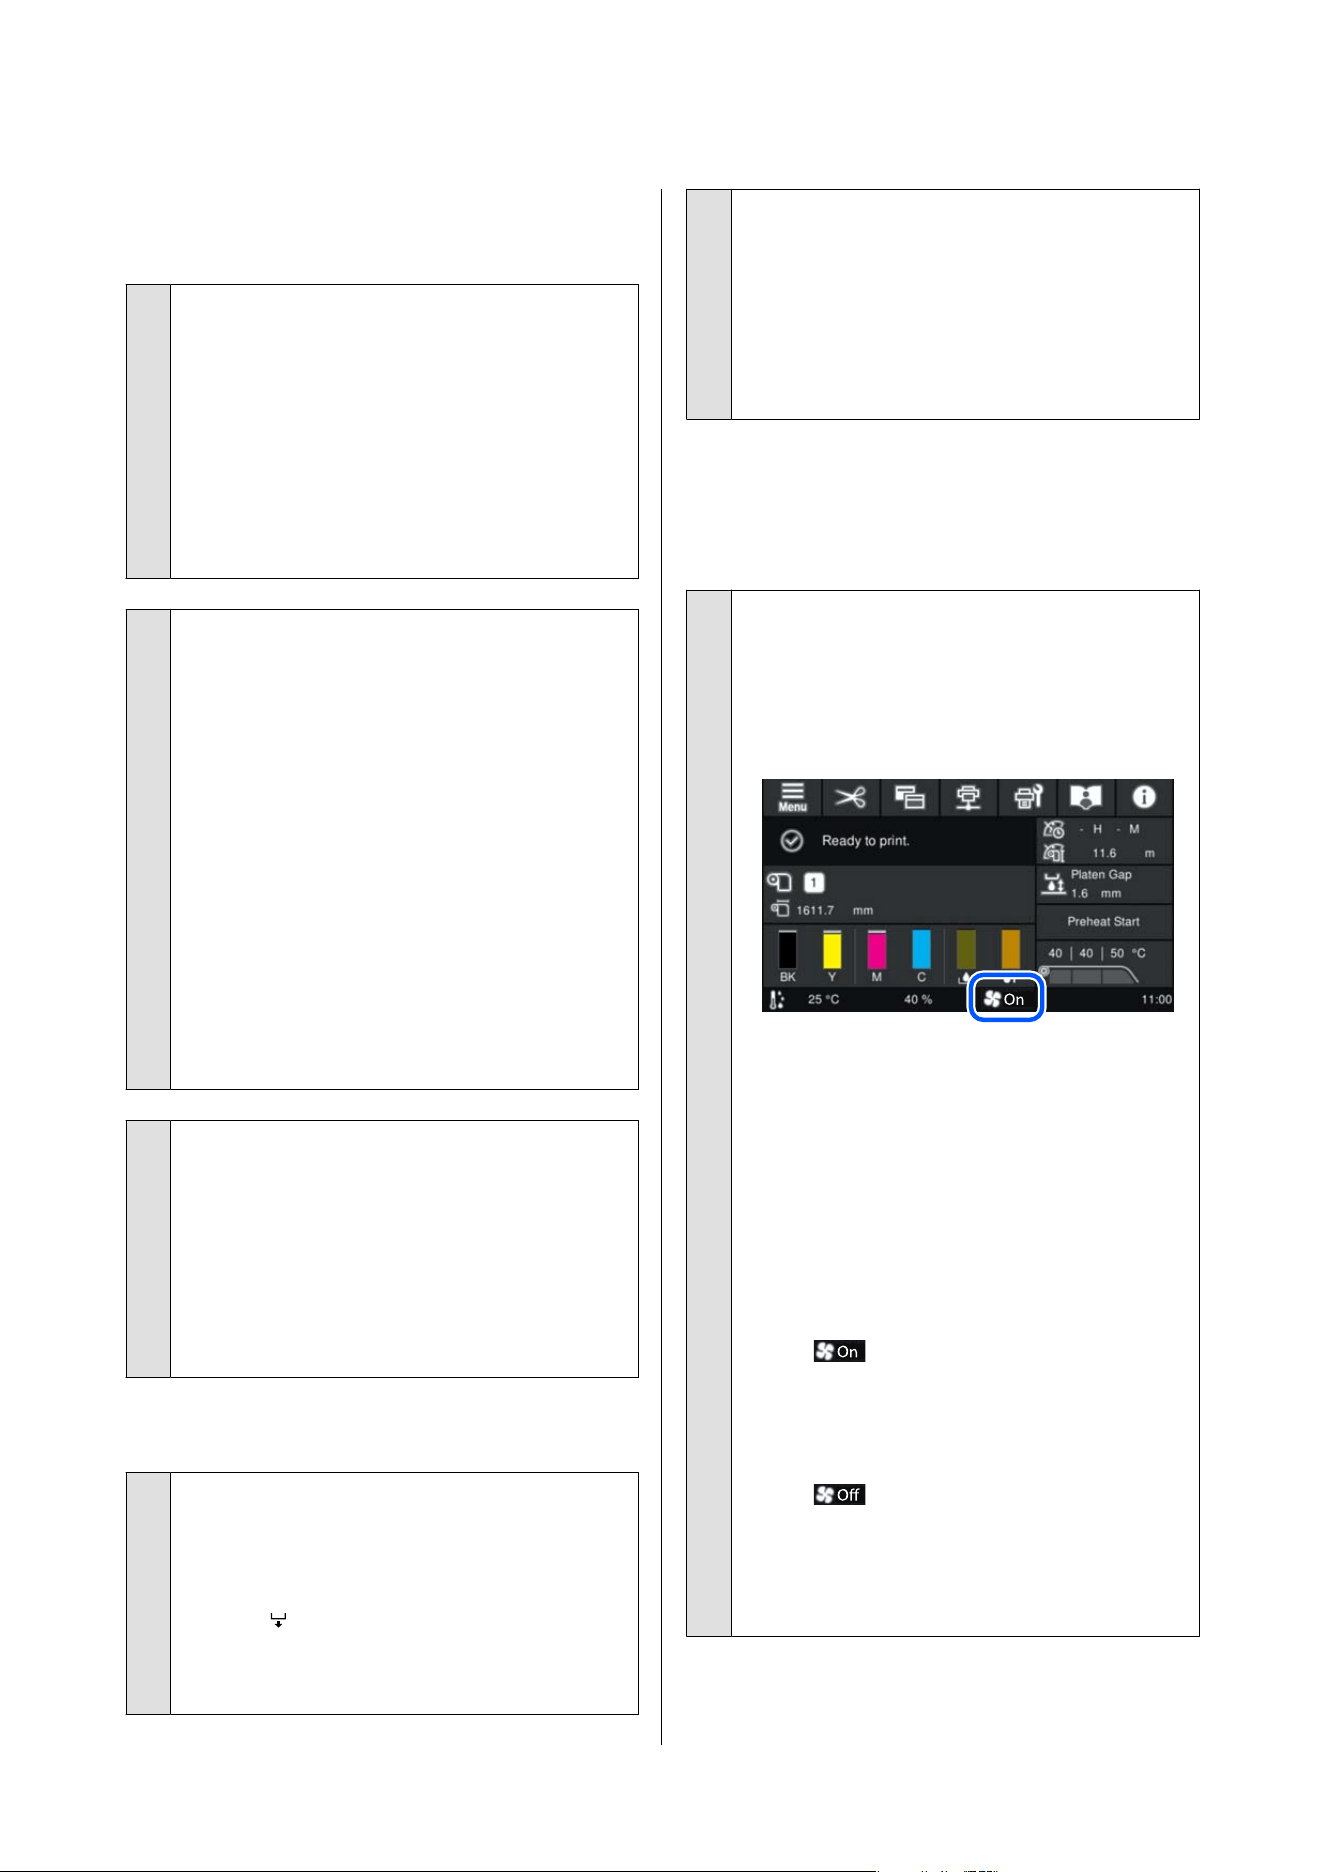
The print is not positioned properly
on the paper.
o
Is the media loaded correctly and are the
margins correct?
If the media is not loaded correctly, the results
may be off center or part of the data may not be
printed. You should also check whether the correct
options are selected for side margins and Print
Start Position in the settings menu.
U “Loading Media” on page38
U “General Settings Menu” on page84
o
Is the media skewed?
If the media is not loaded correctly, the media
may skew and the print position may be displaced.
Be careful of the following, and load the media
correctly.
❏ When pulling out the media, hold the center of
the media in one hand, and pull it straight out.
❏ When you attach the end of the media to the
roll core, pull the center section of the media
straight down as you affix it.
❏ When attaching paper tape to the roll core,
make sure the media is taut when you attach it
to the take-up roll core.
U “Loading Media” on page38
U “Using the Auto Take-up Reel Unit” on page40
o
Is the media wide enough for the print
data?
Although printing normally stops if the print image
is wider than the media, data will be printed beyond
the edges of the media if Off is selected for Width
Detection in the settings menu. Choose On for
Width Detection in the settings menu.
U “General Settings Menu” on page84
Vertical ruled lines are misaligned.
o
Is the media wavy?
Certain types of media may develop waves under
some conditions (humidity and temperature) while
installed in the printer. If a wave has developed,
press the
button in the control panel to feed the
media and avoid the affected area. We recommend
that you lower the temperature and humidity to
prevent waves developing.
o
Is the print head misaligned?
If the print head is misaligned, ruled lines may be
misaligned accordingly. When vertical ruled lines
are misaligned, select Print Head Alignment to
adjust print head misalignment that occurs during
printing.
U “Manual Adjustment Procedure” on page47
Printed material transfers to the
back of the media as it winds up (ink
set-off)
o
Is the Additional Print Drying System
operating normally?
Check the icon displayed in the footer of the control
panel screen (enclosed area in the figure below)
when the Drying Fan is not operating.
When no icon is displayed
The Additional Print Drying System is not connected
correctly.
Turn off the power to the printer and check the
connections of the power cable and connected
cables. If nothing is displayed even after turning the
power to the printer back on, the Additional Print
Drying System could be malfunctioning.
Contact your dealer or Epson Support for assistance.
When is displayed
The Additional Print Drying System could be
malfunctioning.
Contact your dealer or Epson Support for assistance.
When is displayed
The Additional Print Drying System is set to not
be used. Under the selected media registration
number, change the setting for Advanced Settings
- Drying Fan to On.
SC-S7100 Series User's Guide
Problem Solver
108
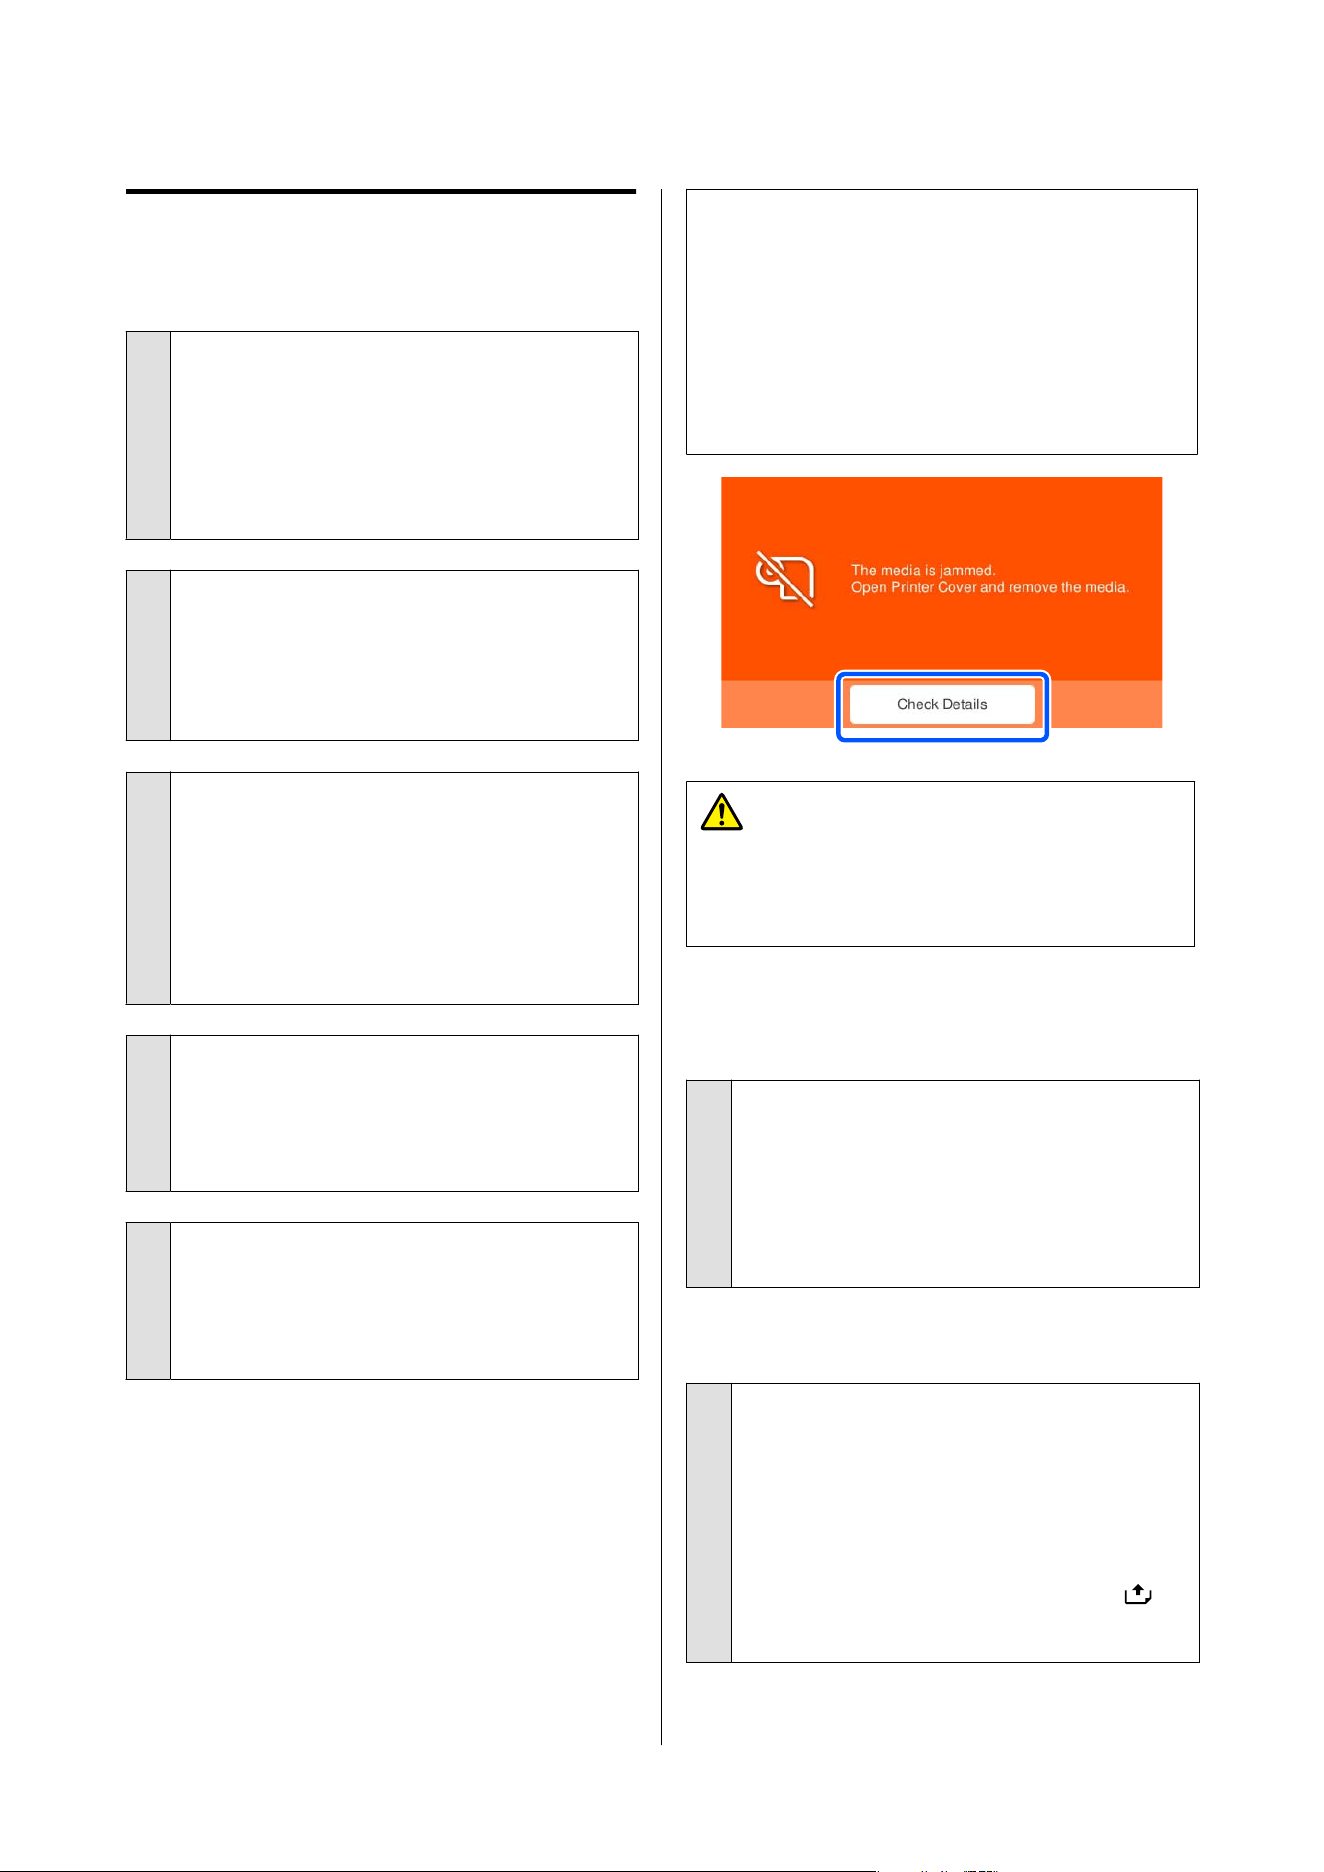
Media
Media Jams.
o
Is media curled, folded, curved, creased, or
wavy?
Cut and remove the curled, folded, curved, creased,
or wavy part.
U “How to cut and remove the taken-up media”
on page51
o
Did you leave the media loaded for a long
time?
The pressure rollers may crease media left in the
printer, or the media may also become wavy or
curled.
o
Is the media too thick or too thin?
❏ Check the media specifications to determine
whether it can be used in the printer.
U “Supported Media” on page113
❏ For information on how to configure print
settings using the software RIP, contact the RIP
manufacturer.
o
Is Paper Suction set too high?
In the media settings, reduce Paper Suction (the
force that sucks media down the media path).
U “Media Settings Menu” on page93
o
Is the media sticking together due to static?
Try changing Take-Up to Strength Tension in the
Media Settings menu.
U “Media Settings Menu” on page93
Removing Jammed Media.
Check the error displayed on the control panel screen,
and then follow the on-screen instructions to remove
the media.
c
Important:
Stop using the printer if the media edge plates
become deformed. Continuing to use the printer
with deformed media edge plates may cause
damage to the pressure rollers and print head.
Contact your dealer or Epson Support for
assistance.
Caution:
Be careful not to trap your hands or fingers when
opening or closing the printer cover. Failure to
observe this precaution could result in injury.
Printing does not stop even when
the media runs out
o
Is the setting for detecting the end of the
media on the printer set to Off?
If the End Detection setting in the Printer Settings
menu is set to Off, the printer may not be able to
detect when the media has run out.
U “General Settings Menu” on page84
Media slips off when printing starts
o
Are you cutting media partway with
Proceed to Drying after Print set to Rewind?
If media is cut at the point just after printing and
then rewound when the next print job starts, the
media may come off the pressure roller and printing
cannot be performed.
When cutting after printing, hold down the [
]
button (rewind button) to rewind the end of the
print to the cutter groove before cutting.
SC-S7100 Series User's Guide
Problem Solver
109
Others
Heater automatically turns off
o
The Pre-Heater, Platen Heater, and After Heater
turn off if no print job is received and no errors
occur in the printer for a certain time. You can
change the time until the heater automatically
switches to off in Sleep Timer from the settings
menu. U “General Settings Menu” on page84
The heaters will reactivate when a print job is
received or preheating starts.
The control panel display keeps
turning off.
o
Is the printer in sleep mode?
When no operations are performed on the printer
for the time set in Sleep Timer in the setup menu,
the printer enters sleep mode. You can change the
time before entering sleep mode in the General
Settings menu.
U “General Settings Menu” on page84
Sleep mode is canceled when a print job is
received, the media loading lever is used, or another
operation involving printer hardware is performed.
The administrator password has
been forgotten.
o
Contact your dealer or Epson Support.
The red light is on inside the printer.
o
This is not a failure.
The light inside the printer may turn on during
operation.
SC-S7100 Series User's Guide
Problem Solver
110
Appendix
For the latest information, see the Epson Web site. (as of April, 2024)
Options and Consumable Products
Ink Supply Units
SC-S7100/SC-S7160
Color name Product number
Black T51P1
Cyan T51P2
Magenta T51P3
Yellow T51P4
SC-S7130/SC-S7140
Color name Product number
Black T51S1
Cyan T51S2
Magenta T51S3
Yellow T51S4
SC-S7170
Color name Product number
Black T51N1
Cyan T51N2
Magenta T51N3
Yellow T51N4
Epson recommends the use of genuine Epson Ink Supply Unit. Epson cannot guarantee the quality or reliability
of non-genuine ink. The use of non-genuine ink may cause damage that is not covered by Epson’s warranties, and
under certain circumstances, may cause erratic printer behavior. Information about non-genuine ink levels may
not be displayed, and use of non-genuine ink is recorded for possible use in service support.
SC-S7100 Series User's Guide
Appendix
111
Others
Product name Product
number
Explanation
Cleaning Ink Supply Unit T56L0 Use for Pre-Storage Maintenance and Head Washing.
Waste Ink Bottle T7240 This is the same as the waste ink bottle supplied with the printer.
Maintenance Parts Kit C13S210164 The following consumable items are included in one maintenance
set.
❏ Wiper unit (x1)
❏ Flushing pad (x1)
❏ Air filters (x2)
❏ Gloves (x2)
Ink Cleaner T6993 Identical to the Ink Cleaner supplied with the printer.
Clean Room Wiper
*
C13S090016 Identical to the Clean Room Wiper supplied with the printer.
Cleaning Stick C13S090013 Identical to the Cleaning Stick supplied with the printer.
Media Edge Plate C12C932411 Identical to the media holding plates supplied with the printer. Sold
on a 1-plate basis.
U “Replacing the Media Edge Plates” on page67
* Not available for purchase in some countries and regions. We recommend BEMCOT M-3 II from the Asahi Kasei Corporation
when purchasing commercial products.
SC-S7100 Series User's Guide
Appendix
112
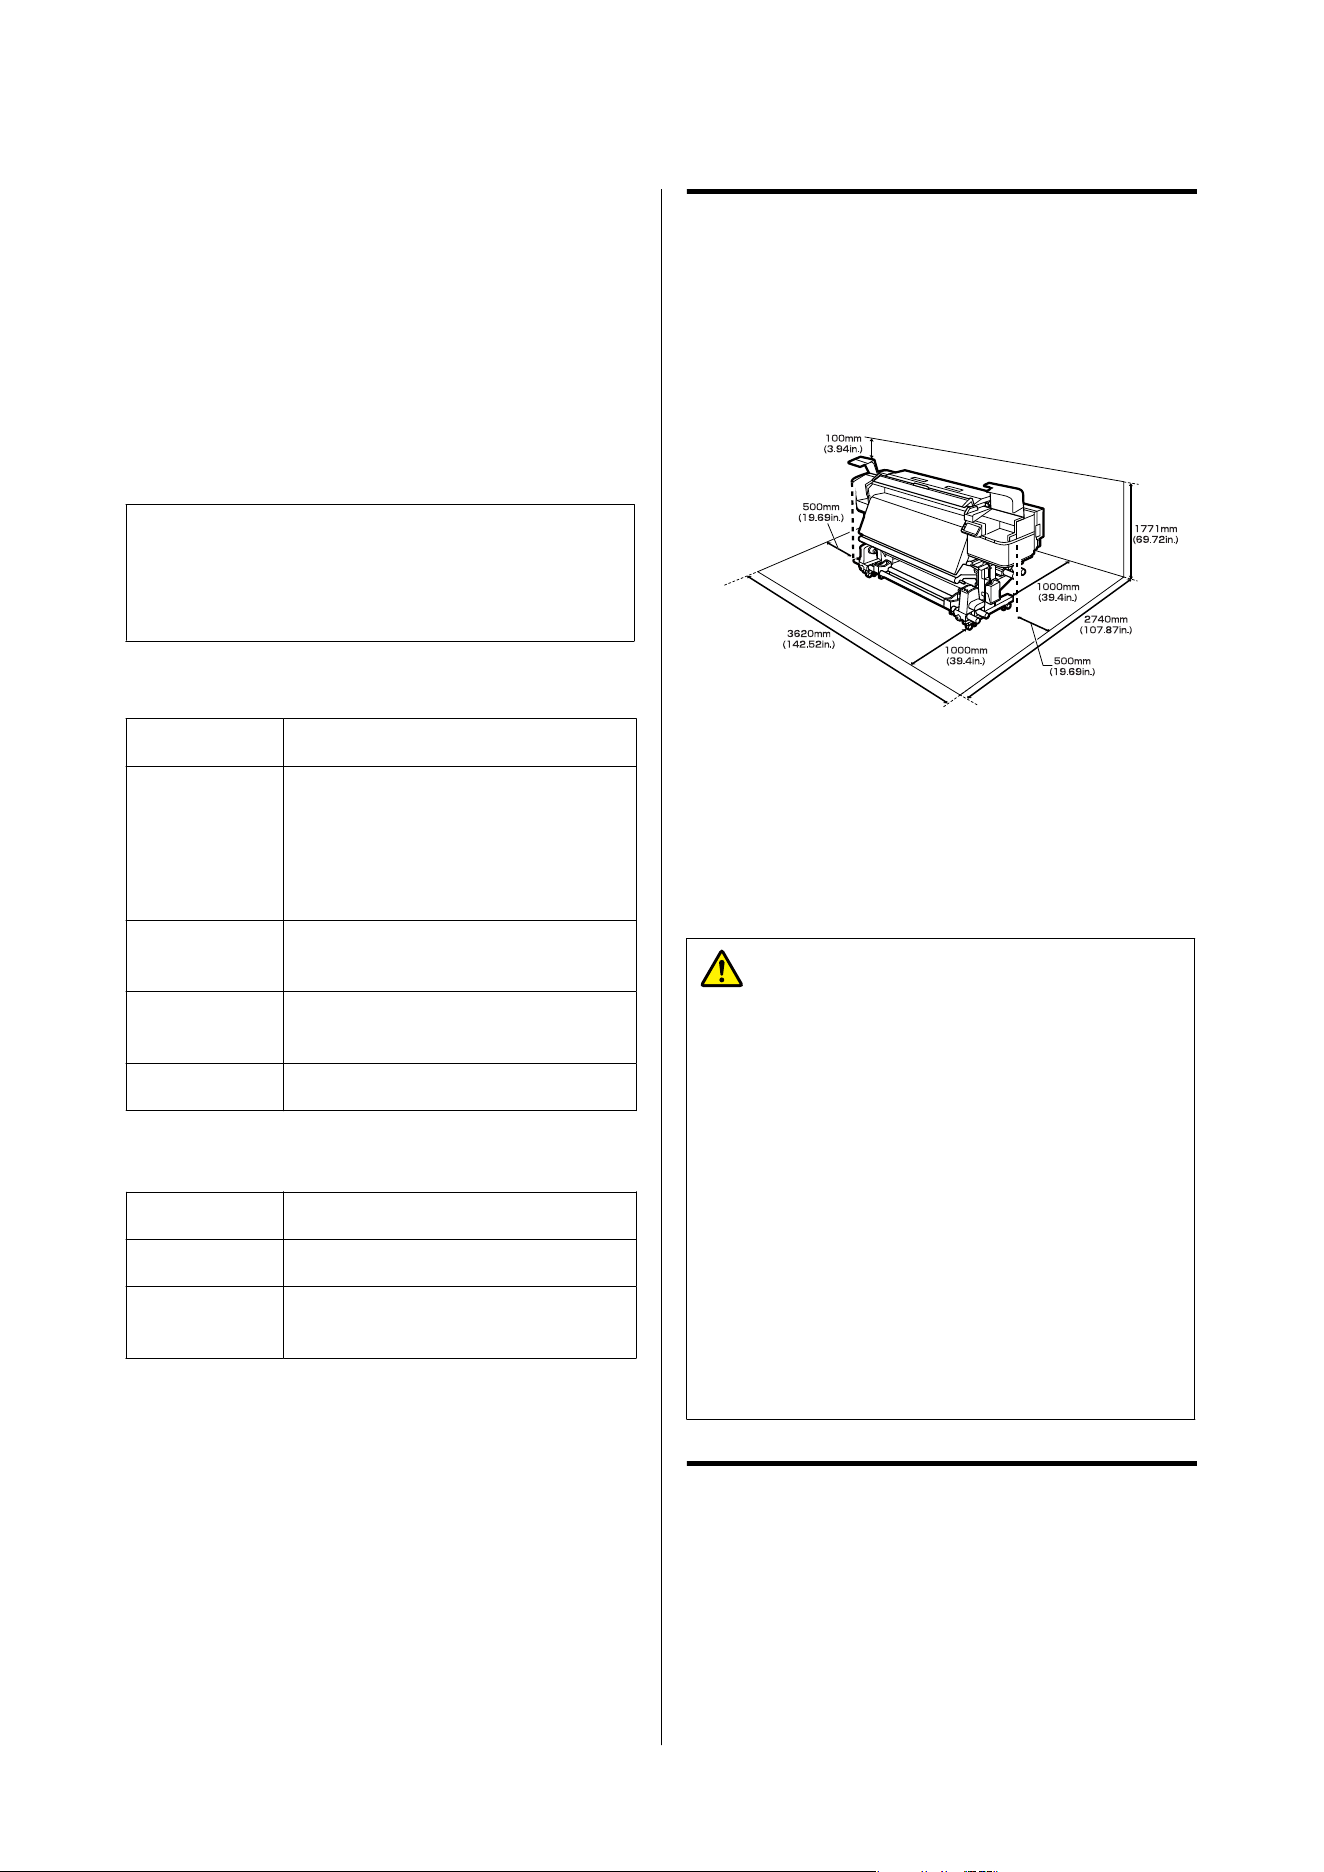
Supported Media
The following media can be used with the printer.
Print quality is greatly affected by the type and
quality of media used. Choose a media suited to the
task at hand. For information on use, refer to the
documentation supplied with the media or contact the
manufacturer. Before buying media in large quantities,
try printing on a smaller sample and check the results.
c
Important:
Do not use media that is wrinkled, scuffed, torn,
or dirty.
Roll media
Roll core size 2 or 3 inch
Roll outer
diameter
Media feeding unit:
Max. 250 mm (9.84 in.)
Auto take-up reel unit:
Max. 200 mm (7.87 in.)
Media width 300 mm (11.8 inches) to 1625.6 mm
(64 inches)
Media
thickness
1 mm (0.03 in.) or less
Roll weight Up to 45 kg (99 lb)
Cut media
Media width 300 mm to 1625.6 mm (11.8 to 64 in.)
Media length 500 mm (19.68 in.) or more
Media
thickness
1 mm (0.03 in.) or less
Moving and Transporting
the Printer
This section describes how to move and transport the
product.
Suitable Installation Locations
Install this printer in a location that meets the
following guidelines.
❏ A stable location that is flat and does not transmit
vibrations, with sufficient space around it, as
shown in the illustration.
❏ A location that can sufficiently support the weight
of the printer (approx. 287 kg (approx. 632.73 lb))
❏ A location where power cables for the printer
and the Additional Print Drying System can be
connected to separate dedicated outlets
War ni ng :
❏ To prevent ground leak accidents, connect to
a grounded (earthed) outlet. Connecting to
anything other than a grounded outlet could
result in electric shock or fire. Check the
electrical outlet that will be used. If the outlet
is not grounded, contact your dealer.
❏ Use only the type of power source indicated
on the printer's label. An electric shock or fire
could occur.
❏ Do not connect the power cable to a power
strip or multi plug. An electric shock or fire
could occur. Connect the power cable directly
to an outlet for domestic use.
Moving the Printer
This section explains how to move the printer to
another location on the same floor on which there
are no bumps or gaps. See below for information
on moving the printer between floors or to another
building.
U “Transport” on page115
SC-S7100 Series User's Guide
Appendix
113
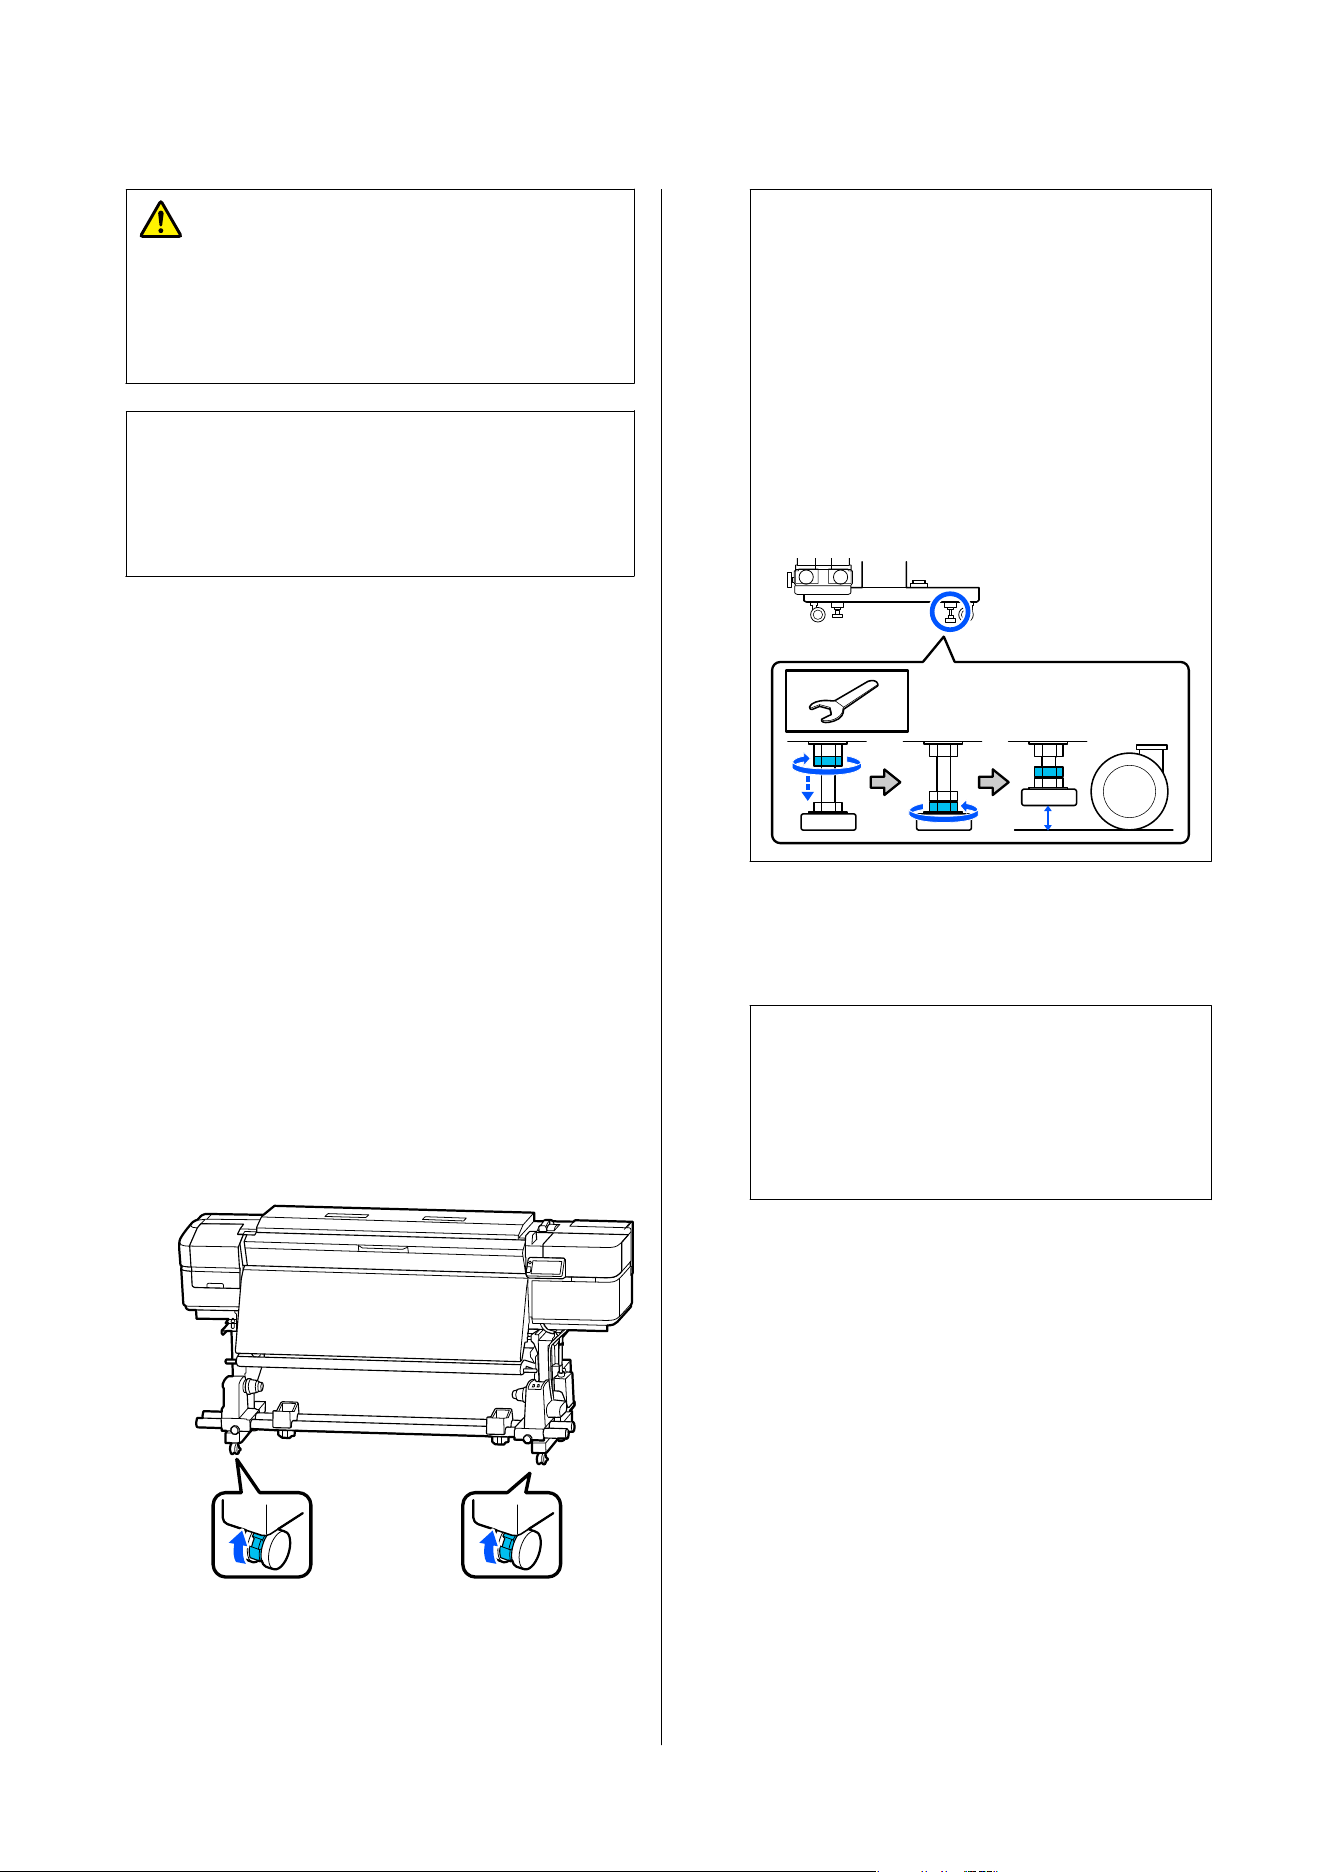
Caution:
Do not tilt the product more than 10 degrees
forward or back while moving it. Failure to
observe this precaution could result in the printer
falling over, causing accidents.
c
Important:
Do not remove the ink supply units. Failure to
observe this precaution could result in the nozzles
drying out.
Getting Ready
A
Confirm that the printer is off.
B
Remove the waste ink bottle.
U “Replacing the Waste Ink Bottle” on
page65
C
Disconnect all power cables and computer
communication cables from the printer.
Be sure to unplug the power plug of the
Additional Print Drying System from the outlet
as well.
D
Remove media from the media feeding unit and
the auto take-up reel unit.
E
Unlock the two casters at the front.
c
Important:
Be sure to raise the levelers above the casters
before moving the printer. Moving the printer
without raising the levelers could cause a
malfunction. You need the spanner supplied
to adjust the levelers.
(1) Loosen the nut on the top of the levelers.
(2) Turn the nut on the bottom
counter-clockwise.
(3) Check that it is above the caster.
F
Move the printer.
Have 2 people, 1 on either side of the printer,
move the printer.
c
Important:
Use the casters on the dedicated printer stand
to move the printer indoors a short distance
over a level floor. They can not be used for
transport.
Post-Move Installation
U.S., Canada, and Latin America
Contact your dealer for product installation. The
product must be installed by an authorized dealer.
Damage to the product from unauthorized installation
will not be covered by your Epson warranty.
Other regions
After moving the printer, follow the steps below to
ready it for use.
SC-S7100 Series User's Guide
Appendix
114
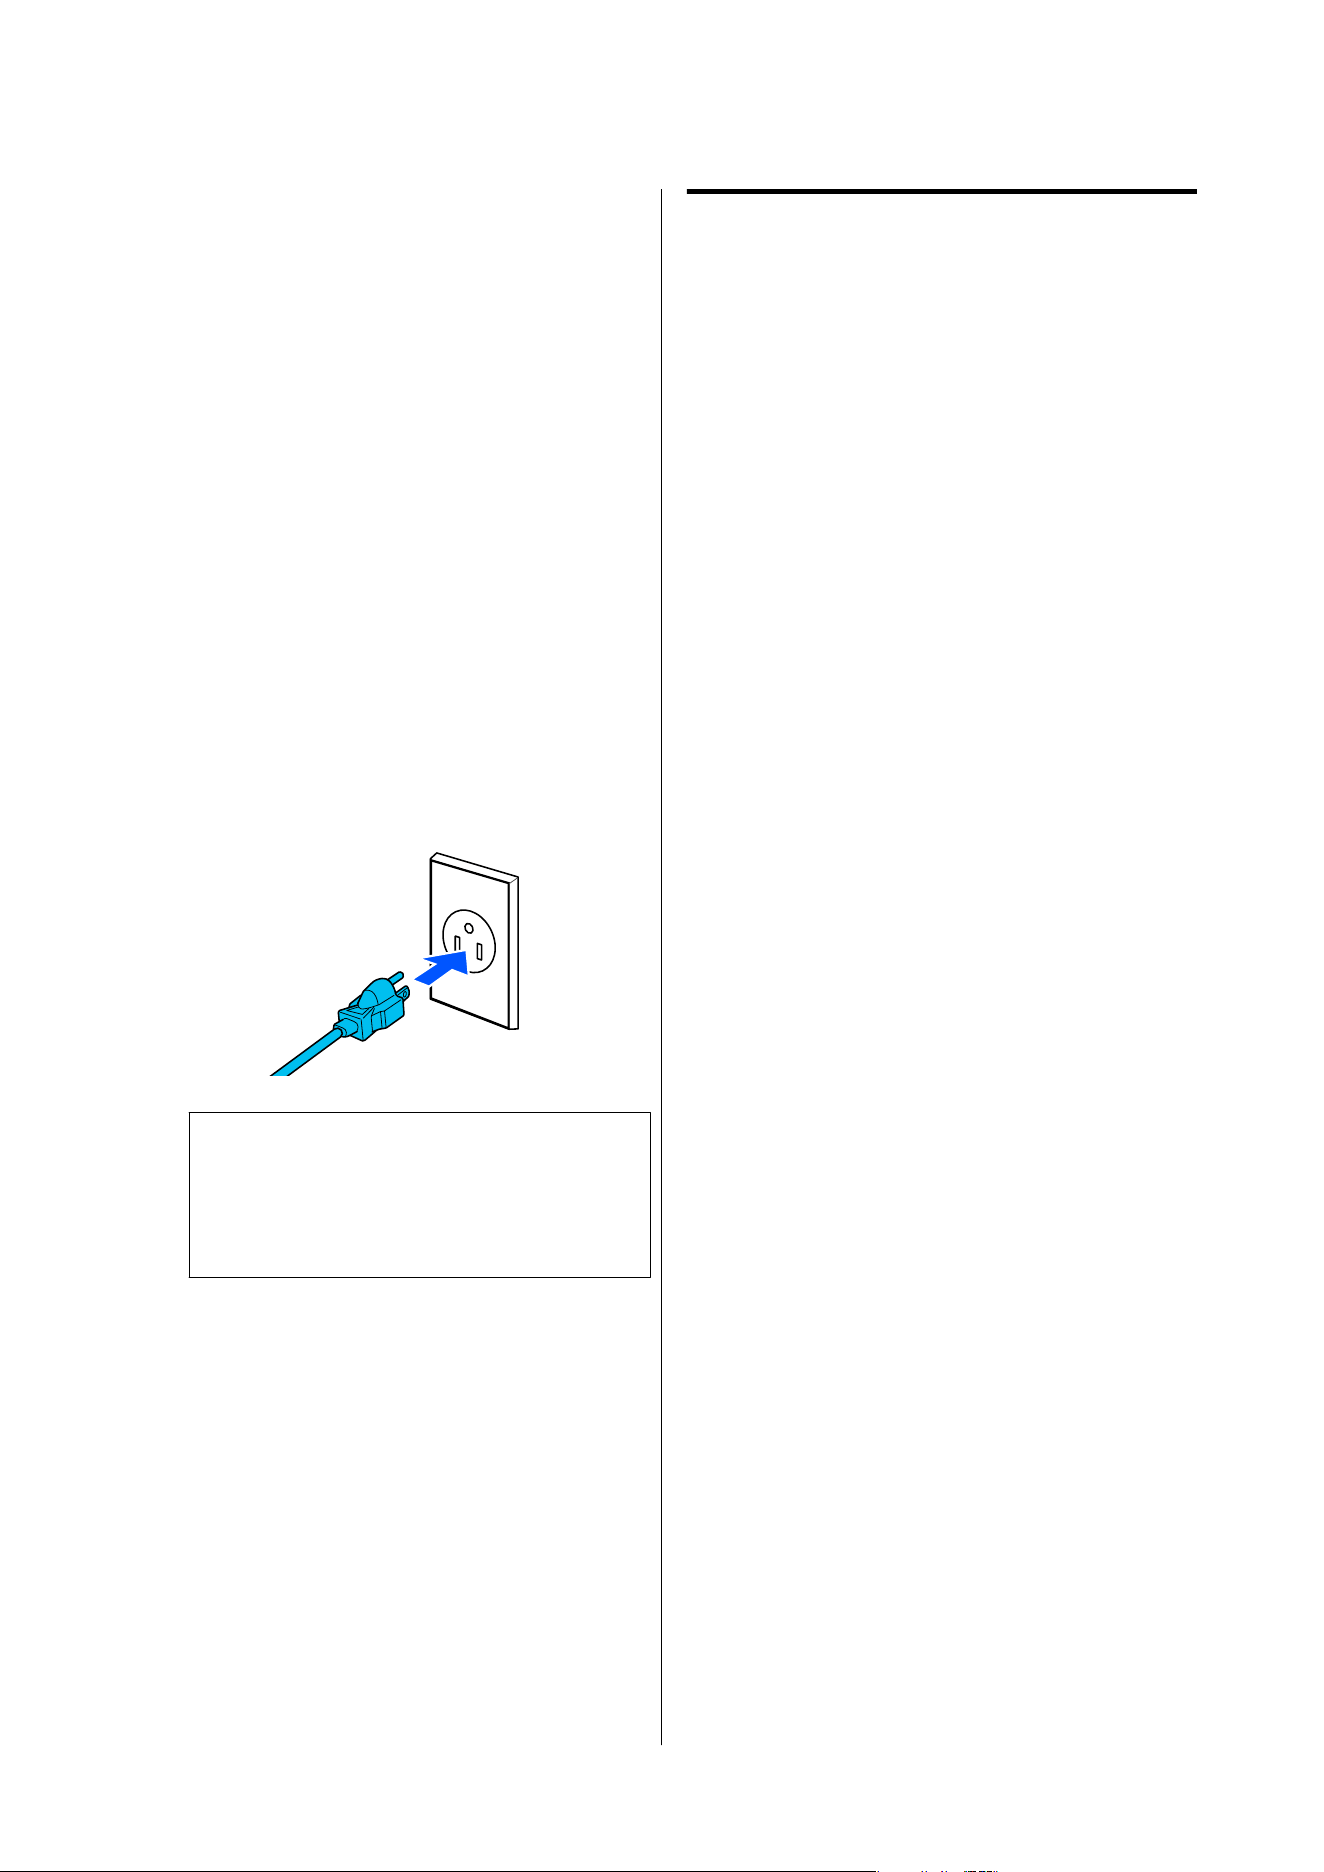
A
Check that the location is appropriate for
installation.
U “Suitable Installation Locations” on
page113
B
See the Setup Guide and perform the following
procedures.
❏ Lock the casters
❏ Attach the waste ink bottle
❏ Level the printer
❏ Connect the computer communication cable
U Setup Guide (booklet)
If you do not have the Setup Guide on hand,
you can check the Online Manual.
C
Plug the power plug into an outlet with a
grounding (earth) connector, and then turn on
the power.
c
Important:
The shape of the plug varies with the region
or country of sale. Use the supplied power
cable only.
D
Perform a Print Head Nozzle Check to check
for clogged nozzles.
U “How to Print a Nozzle Check Pattern” on
page70
E
Execute Print Adjustments in the Settings
menu.
U “Optimizing Media Settings (Automatic
Adjustment)” on page46
Transport
Before transporting the printer, contact your dealer or
Epson Support.
SC-S7100 Series User's Guide
Appendix
115
Media Settings List for Each Media Type
The following table shows the media settings registered when a Media Type is selected.
Item
Media Type
Adhesive
Vinyl
Banner Film Canvas Textile
Paper/
Other
Pre-Heater
Temperature
50°C/122°F 40°C/104°F 40°C/104°F 40°C/104°F 40°C/104°F 40°C/104°F
Platen Heater
Temperature
40°C/104°F 40°C/104°F 40°C/104°F 40°C/104°F 40°C/104°F 40°C/104°F
After Heater
Temperature
50°C/122°F 50°C/122°F 50°C/122°F 50°C/122°F 50°C/122°F 50°C/122°F
Drying Time per Pass 0 second 0 second 0 second 0 second 0 second 0 second
Proceed to Drying
after Print
OffOffOffOffOffOff
Drying Fan OnOnOnOnOnOn
Print Head Warm UpOffOffOffOffOffOff
Platen Gap 1.6 2.0 1.6 2.0 2.0 1.6
Feeding Tension Lv2 Lv2 Lv2 Lv2 Lv4 Lv2
Paper Suction Lv4 Lv4 Lv4 Lv4 Lv4 Lv4
Head Movement
Range
Data Width Data Width Data Width Data Width Data Width Data Width
Multi-Strike PrintingOffOffOffOffOffOff
Media Feed Speed
Limitation
OffOffOffOffOffOff
Pressure Roller Load Strong Medium Medium Medium Light Strong
Skew ReductionOnOnOffOnOnOn
Roll Winding Direction Printable
Side Out
Printable
Side Out
Printable
Side Out
Printable
Side Out
Printable
Side Out
Printable
Side Out
Take-Up StandardStandardStandardStandardStandardStandard
Skip Wrinkled Media Off Off Off Off Off Off
Periodic Cleaning Auto Auto Auto Auto Auto Auto
SC-S7100 Series User's Guide
Appendix
116
System Requirements
Each software can be used in the following environments. (As of July, 2025)
The supported operating systems may change.
For the latest information, see the Epson Web site.
Epson Edge Dashboard
c
Important:
Make sure the computer on which the Epson Edge Dashboard is installed meets the following requirements.
If these requirements are not met, the software cannot monitor the printer correctly.
❏ Disable your computer's hibernate function.
❏ Disable the sleep function so that the computer does not enter sleep status.
Windows PC
Operating systems Windows 11
Windows 10 x64
CPU Multi-core processor (3.0 GHz or faster)
Intel
®
Core
™
i5 3.4 GHz or faster recommended
Free memory 4 GB or more
Hard disk
(free space during installation)
2 GB or more
Display resolution 1280 x 1024 or better
Communication interface High Speed USB
Ethernet 1000Base-T
Browser Microsoft Edge
Mac
Operating systems Mac OS X 10.9.5 or later
CPU Multi-core processor (3.0 GHz or faster)
Intel
®
Core
™
i5 3.4 GHz or faster recommended
Free memory 4 GB or more
Hard disk
(free space during installation)
2 GB or more
Display resolution 1280 x 1024 or better
SC-S7100 Series User's Guide
Appendix
117
Communication interface High Speed USB
Ethernet 1000Base-T
Browser Safari 6 or later
Epson Edge Print PRO
Minimum Operating Environment
Operating systems Windows 11
Windows 10 x64
CPU Intel
®
Core
™
i3 3.0 GHz or faster (released after April 2014)
Free memory 8 GB or more
Hard disk
(free space during installation)
50 GB or more
Display resolution 1280 x 1024 or better
Communication interface High Speed USB
Ethernet 100Base-TX/1000Base-T
The computer on which this software is installed is expected to be able to simultaneously use other applications,
such as Adobe Illustrator. Therefore, we recommend using a computer with the highest specifications available.
In addition, the data that this software handles is normally several GB, and could reach several tens of GB for long
high-quality print jobs.
Because of this, we recommend a computer that has sufficient available memory storage capacity.
The recommended environment for using this software is as follows.
Recommended environment
Operating systems Windows 11
Windows 10 x64
CPU Intel
®
Core
™
i7-14700 processor or better
Free memory 32 GB or more
Storage
(free space during installation)
SSD 1 TB or more
Display resolution 1280 x 1024 or better
Communication interface Hi-Speed USB
Gigabit Ethernet
Web Config
The following browsers are supported. Make sure you are using the latest version of the browser.
SC-S7100 Series User's Guide
Appendix
118

Microsoft Edge, Firefox, Chrome, Safari
SC-S7100 Series User's Guide
Appendix
119
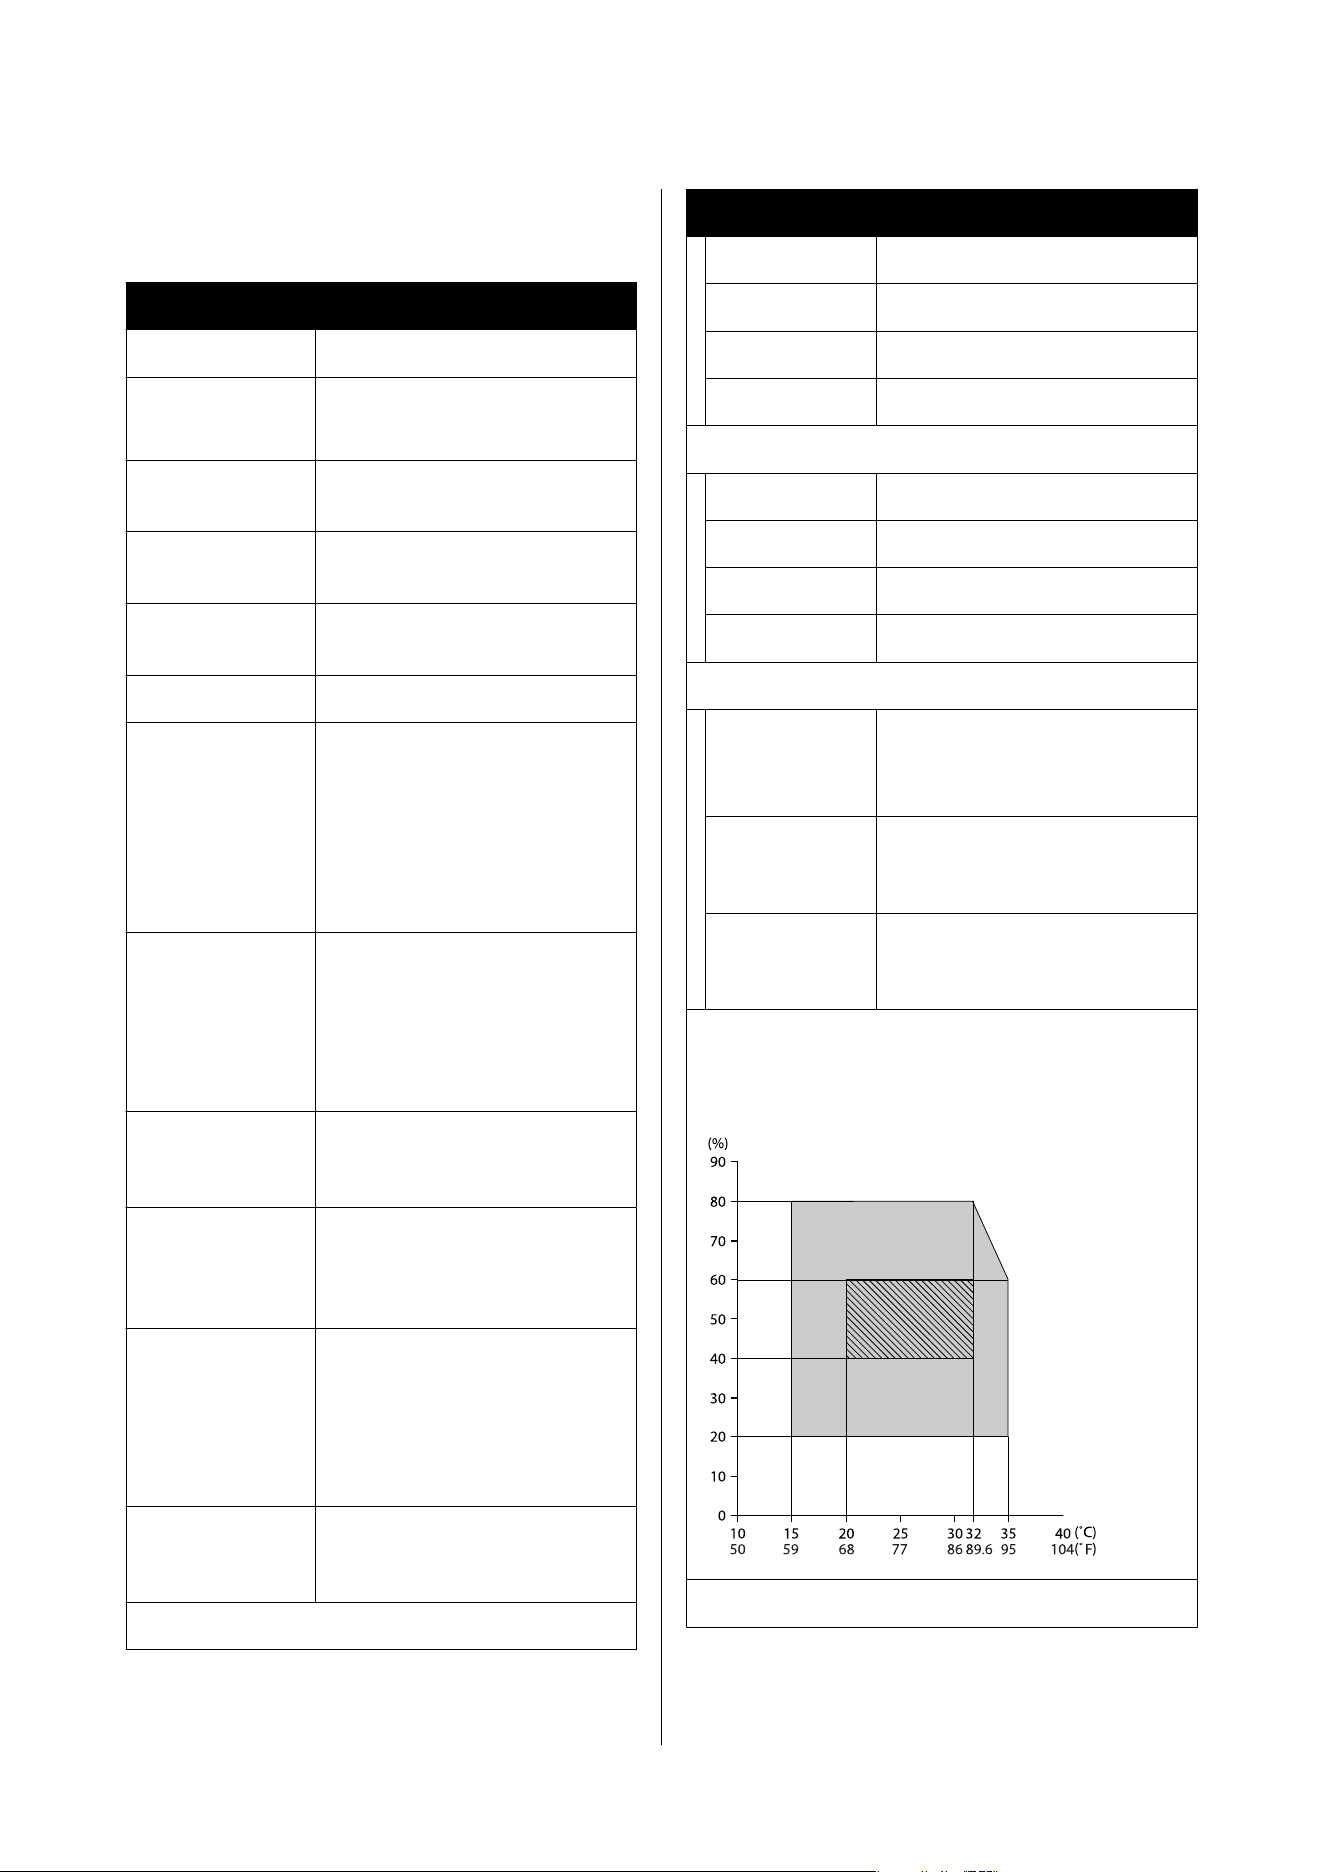
Specifications Table
Printer Specifications
Printing method On-demand ink jet
Nozzle configura‐
tion
400 nozzles x 2 rows x 4 colors
(Black, Yellow, Magenta, Cyan)
Resolution (maxi‐
mum)
1200x1200dpi
Control code ESC/P raster (undisclosed
command)
Media feed meth‐
od
Friction feed
Built-in memory 1GB
Interface
SuperSpeed USB
*1
IEEE802.3u (100BASE-TX)
IEEE802.3ab (1000BASE-T)
*2
IEEE 802.3az (Energy-saving type.
Requires that the connected
device supports IEEE802.3az.)
Rated voltage
(printer)
SC-S7160:
AC200-240 V
Other models:
AC100-120 V / AC200-240 V
Rated voltage (Ad‐
ditional Print Dry‐
ing System)
AC100-120 V / AC200-240 V
Rated frequency
(printer, Addition‐
al Print Drying Sys‐
tem)
50/60Hz
Rated current
(printer)
SC-S7160:
10 A
Other models:
12 A/10 A
Rated current (Ad‐
ditional Print Dry‐
ing System)
1 A / 0.5 A
Power consumption (printer)
Printer Specifications
In use Approx. 1100 W
Ready status Approx. 520W
Sleep mode Approx. 3.0W
Power off Approx. 0.3 W
Power consumption (Additional Print Drying System)
In use Approx. 45 W
Ready status Approx. 1.0 W
Sleep mode Approx. 1.0 W
Power off Approx. 0.3 W
Temperature and humidity (without condensation)
In use 15 to 35 °C (59 to 95 °F), 20 to 80%
Recommended: 20 to 32 °C (68 to
89.6 °F), 40 to 60%
In storage
(Before
unpacking)
-20 to 60 °C (-4 to 140 °F), 5 to 85%
(Within 120 hours at 60 °C (140 °F),
within a month at 40 °C (104 °F)
In storage
(After
unpacking)
-20 to 40 °C (-4 to 104 °F), 5 to 85%
(Within a month at 40 °C (104 °F)
Temperature and humidity range
Gray area: Printing
Cross-hatch lines: Recommended
Dimension
SC-S7100 Series User's Guide
Appendix
120
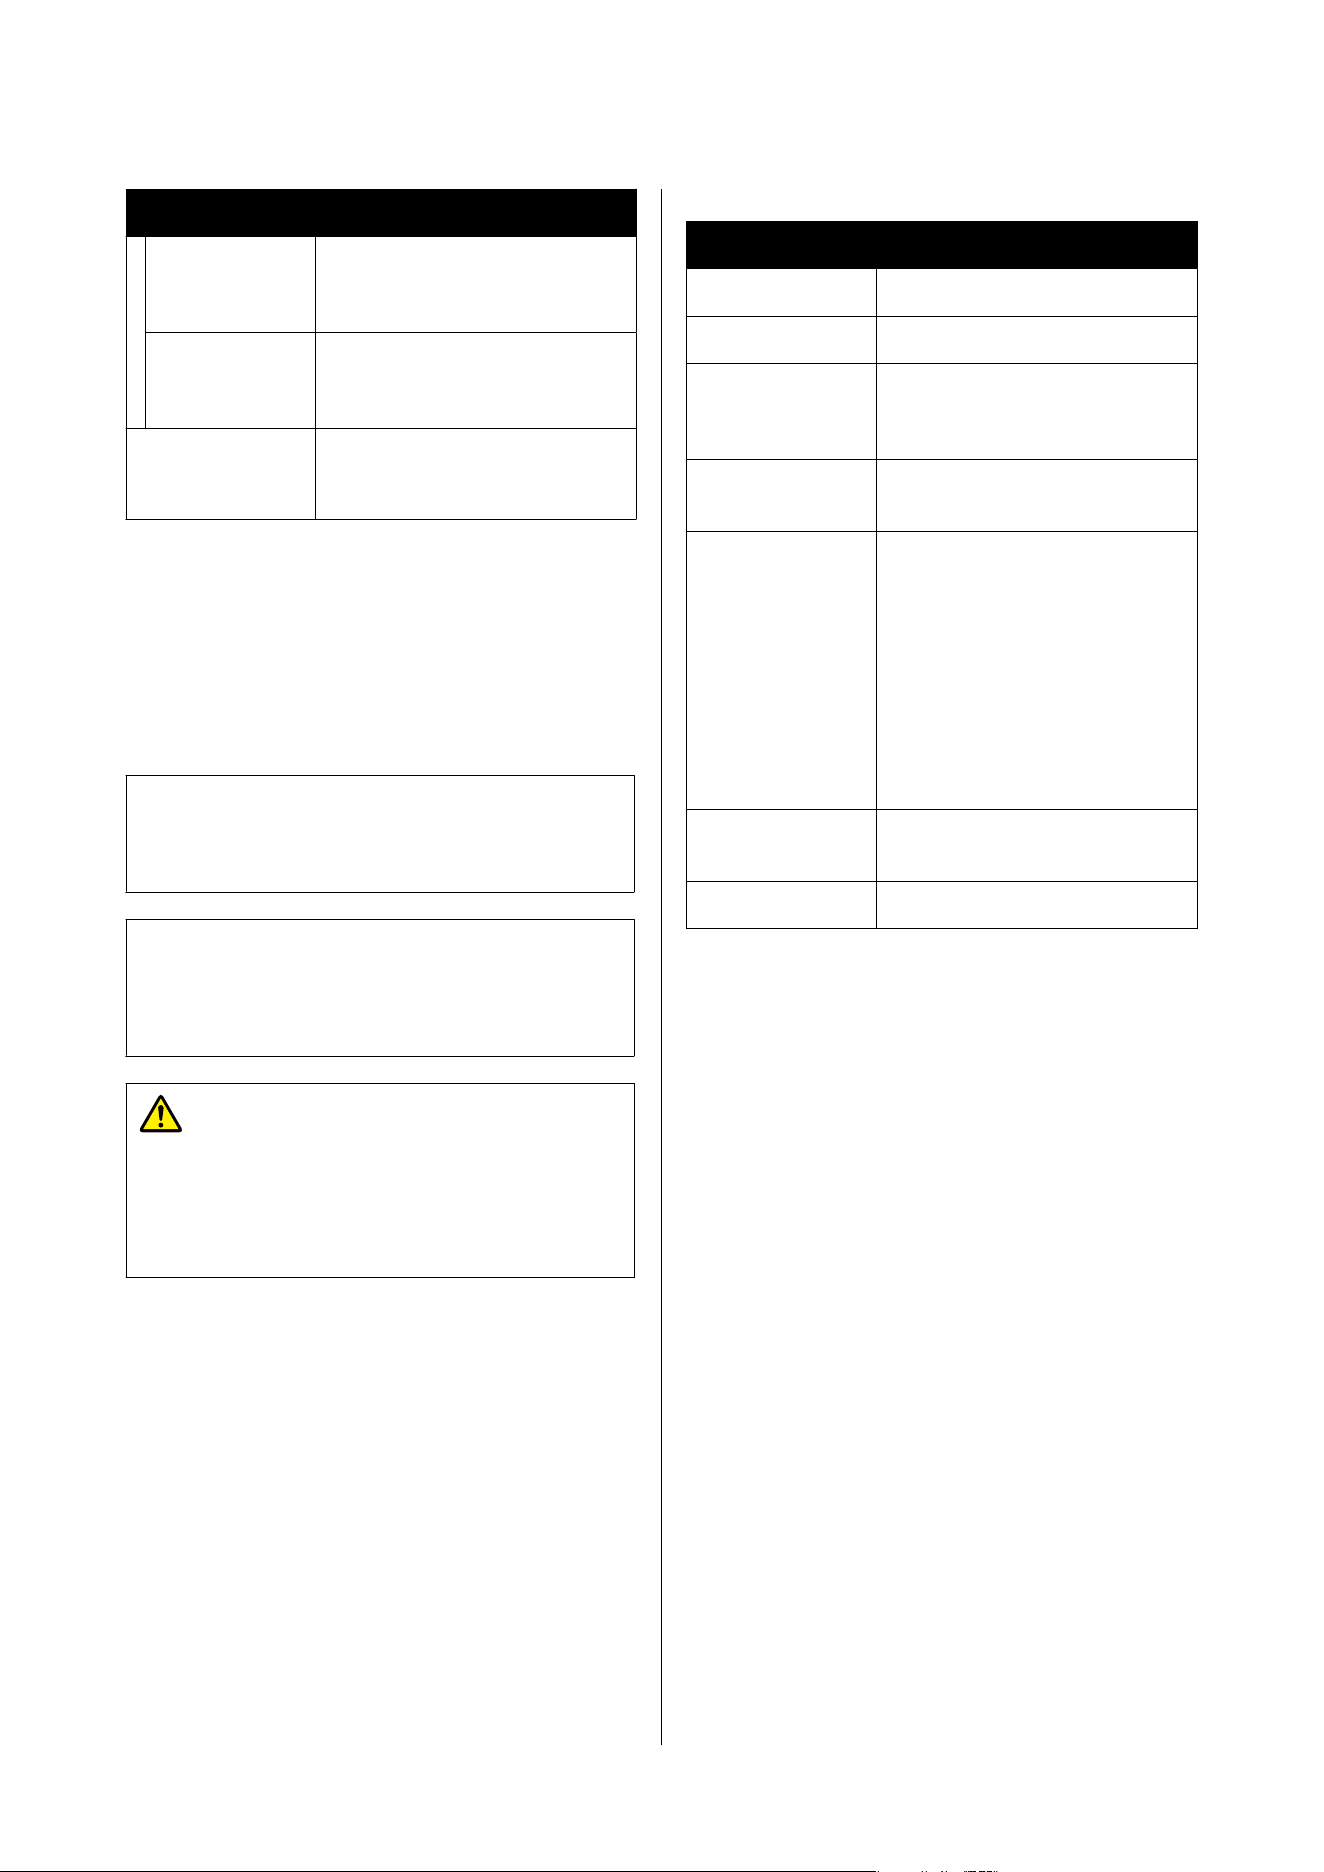
Printer Specifications
Storage
dimensions
(W) 2620 x (D) 989 x (H) 1338 mm
(W) 103.14 x (D) 38.93 x (H) 54.64
in.
Maximum
dimensions
(W) 2620 x (D) 1167 x (H) 1671 mm
(W) 103.14 x (D) 45.94 x (H) 65.78
in.
Weight
Approx. 287kg
*3
Approx. 632.73lb
*3
*1 SuperSpeed USB is equivalent to USB 3.0
*2 Use a shielded twisted pair cable (category 5e or
higher).
*3 Not including ink supply units.
Note:
For stable color printing, maintain a constant room
temperature of 20 to 32 °C (68 to 89.6 °F).
c
Important:
Use the printer at an altitude of 2000 m (6562 ft.)
or less.
War ni ng :
This is a class A product. In a domestic
environment this product may cause radio
interference in which case the user may be
required to take adequate measures.
Information of EU declaration of conformity
The full text of the EU declaration of conformity of
this equipment is available at the following internet
address.
https://www.epson.eu/conformity
ZICTA Type Approval for Users in Zambia
See the following website to check the information for
ZICTA Type Approval.
https://support.epson.net/zicta/
Ink Specifications
Type Dedicated ink supply unit
Types of ink Pigment ink (eco-solvent ink)
Use by date Date printed on the ink
supply unit (stored at normal
temperatures)
Print quality
guarantee expiry
One year (after installing in the
printer)
Storage
temperature
When packed and stored/when
installed in the printer:
-20 to 40 °C (-4 to 104 °F)
(Within 4 days at -20 °C [-4 °F],
within 1 month at 40 °C [104 °F])
When packed and transported:
-20 to 60 °C (-4 to 140 °F)
(Within 4 days at -20 °C [-4 °F],
within 1 month at 40 °C [104 °F],
within 72 hours at 60 °C [140 °F])
Dimensions
(approx.)
117 (W) x 360 (D) x 30 (H) mm
(4.6 [W] x 14.17 [D] x 1.18 [H] in.)
Capacity 800ml
SC-S7100 Series User's Guide
Appendix
121

Important Notes
Regarding the Printer
Restrictions on Copying
Observe the following restrictions to ensure the
responsible and legal use of the printer.
Copying of the following items is prohibited by law:
❏ Bank bills, coins, government-issued marketable
securities, government bond securities, and
municipal securities
❏ Unused postage stamps, pre-stamped postcards,
and other official postal items bearing valid
postage
❏ Government-issued revenue stamps, and
securities issued according to legal procedure
Exercise caution when copying the following items:
❏ Private marketable securities (stock certificates,
negotiable notes, checks, etc.), monthly passes,
concession tickets, etc.
❏ Passports, driver’s licenses, warrants of fitness,
road passes, food stamps, tickets, etc.
Note:
Copying these items may also be prohibited by law.
Responsible use of copyrighted materials:
Printers can be misused by improperly copying
copyrighted materials. Unless acting on the advice of
a knowledgeable attorney, be responsible and respectful
by obtaining the permission of the copyright holder
before copying published material.
SC-S7100 Series User's Guide
Appendix
122