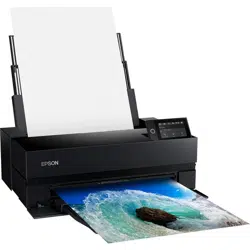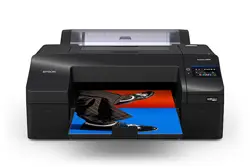

Epson
®
SureColor
®
P5370 User's Guide


3
Contents
SureColor P5370 User's Guide................................................................................................................. 11
Introduction to Your Printer...................................................................................................................... 12
Printer Features ................................................................................................................................. 12
Optional Equipment and Replacement Parts................................................................................. 13
Available Software ............................................................................................................................. 13
Notations Used in the Documentation ................................................................................................ 14
Printer Part Locations......................................................................................................................... 15
Product Parts - Front ..................................................................................................................... 15
Product Parts - Top/Inside ............................................................................................................. 16
Product Parts - Rear...................................................................................................................... 18
Using the Control Panel ..................................................................................................................... 18
Control Panel................................................................................................................................. 19
Changing the LCD Screen Language............................................................................................ 21
Selecting the Date and Time ......................................................................................................... 22
Setting a Password and Locking the Control Panel ....................................................................... 22
Using Power Saving Settings ............................................................................................................. 24
Changing the Sleep Timer Settings ............................................................................................... 24
Changing the Power Off Timer Settings ........................................................................................ 24
Printer Usage Guidelines ................................................................................................................... 25
Installation Space .......................................................................................................................... 26
Using Your Printer ......................................................................................................................... 26
Storing Your Printer ....................................................................................................................... 27
Wi-Fi or Wired Networking........................................................................................................................ 29
Network Security Recommendations ................................................................................................. 29
Wi-Fi Infrastructure Mode Setup......................................................................................................... 30
Selecting Wireless Network Settings from the Control Panel ........................................................ 31
Wi-Fi Direct Mode Setup .................................................................................................................... 33
Enabling Wi-Fi Direct Mode........................................................................................................... 33
Wi-Fi Protected Setup (WPS)............................................................................................................. 34
Using WPS to Connect to a Network ............................................................................................. 35

4
Printing a Network Status Sheet......................................................................................................... 35
Printing a Network Connection Report ............................................................................................... 36
Network Connection Report Codes and Messages....................................................................... 37
Changing or Updating Network Connections ..................................................................................... 42
Accessing the Web Config Utility................................................................................................... 42
Changing a USB Connection to a Wi-Fi Connection...................................................................... 43
Changing a Wi-Fi Connection to a Wired Network Connection...................................................... 43
Connecting to a New Wi-Fi Router ................................................................................................ 44
Disabling Wi-Fi Features ............................................................................................................... 44
Media Handling.......................................................................................................................................... 46
Media Handling Precautions .............................................................................................................. 46
Roll Paper Handling ........................................................................................................................... 48
Removing the Roll Media Adapter - 2-inch Core............................................................................ 48
Installing the Roll Media Adapter - 3-inch Core.............................................................................. 49
Loading Roll Paper on the Spindle ................................................................................................ 50
Installing the Borderless Spacer.................................................................................................... 52
Loading Roll Paper ........................................................................................................................ 53
Cutting Roll Paper ......................................................................................................................... 55
Cutting Roll Paper Manually...................................................................................................... 56
Printing Cutting Guidelines ....................................................................................................... 58
Removing Roll Paper..................................................................................................................... 60
Cut Sheet Handling ............................................................................................................................ 60
Loading Cut Sheets in the Paper Cassette.................................................................................... 60
Loading Cut Sheets in the Rear Manual Feeder............................................................................ 62
Loading Media in the Front Manual Feeder ................................................................................... 63
Creating Custom Media Settings........................................................................................................ 64
Creating Custom Paper Settings Using the Control Panel............................................................. 64
Selecting Custom Paper Configurations ................................................................................... 66
Using Epson Media Installer .......................................................................................................... 66
Epson Media Installer Screens ................................................................................................. 67
Downloading Epson Media Settings ......................................................................................... 70
Creating Custom Media Settings Using Epson Media Installer ................................................. 71
Edit Media Settings Options...................................................................................................... 74

5
Sharing Custom Media Settings with Other Computers............................................................ 76
Available Epson Papers ..................................................................................................................... 78
Borderless Paper Type Compatibility ................................................................................................. 86
Supported Paper Widths for Borderless Printing................................................................................ 87
Printing from a Computer ......................................................................................................................... 89
Printing with Windows ........................................................................................................................ 89
Selecting Basic Print Settings - Windows ...................................................................................... 89
Paper Configuration Options - Windows ................................................................................... 92
Advanced B&W Photo Options - Windows................................................................................ 93
Print Quality Options - Windows ............................................................................................... 94
Color Management Options - Windows .................................................................................... 94
Advanced Color Controls - Windows ........................................................................................ 95
Paper Source Options - Windows ............................................................................................. 96
Roll Paper Options - Windows .................................................................................................. 96
Using Layout Manager - Windows ............................................................................................ 99
Selecting Print Layout Options - Windows................................................................................... 105
Reduce/Enlarge Options - Windows ....................................................................................... 106
Page Layout Options - Windows............................................................................................. 106
Selecting Additional Settings - Windows ..................................................................................... 107
Saving, Sharing, and Customizing the Printer Settings ............................................................... 109
Saving and Sharing Print Settings - Windows......................................................................... 109
Editing Print Setting Displays - Windows ................................................................................ 111
Printing Your Document or Photo - Windows............................................................................... 113
Checking Print Status - Windows............................................................................................ 114
Selecting Default Print Settings - Windows.................................................................................. 114
Changing the Language of the Printer Software Screens............................................................ 116
Changing Automatic Update Options .......................................................................................... 118
Printing on a Mac ............................................................................................................................. 119
Selecting Basic Print Settings - Mac ............................................................................................ 119
Advanced Color Settings - Mac............................................................................................... 123
Print Quality Settings - Mac..................................................................................................... 125
Print Options - Mac ................................................................................................................. 125
Selecting Print Layout Options - Mac........................................................................................... 126

6
Selecting Roll Paper Settings - Mac ............................................................................................ 126
Selecting Paper Configuration Settings - Mac ............................................................................. 129
Managing Color - Mac ................................................................................................................. 129
Color Matching Options - Mac................................................................................................. 130
Sizing Printed Images - Mac........................................................................................................ 131
Selecting Printing Preferences - Mac .......................................................................................... 131
Printing Preferences - Mac...................................................................................................... 132
Printing Your Document or Photo - Mac ...................................................................................... 133
Checking Print Status - Mac.................................................................................................... 135
Using the Control Panel Menus.............................................................................................................. 136
Accessing the Printer's Menus ......................................................................................................... 136
Paper Setting Menu.......................................................................................................................... 136
Basic Settings Menu......................................................................................................................... 147
Printer Settings Menu....................................................................................................................... 149
Network Settings Menu .................................................................................................................... 153
System Administration Menu............................................................................................................ 154
Maintenance Menu........................................................................................................................... 155
Printer Status Menu.......................................................................................................................... 156
Replacing Consumables......................................................................................................................... 158
Ink Safety Precautions ..................................................................................................................... 158
Check Cartridge and Maintenance Box Status................................................................................. 160
Checking Ink and Maintenance Box Status on the LCD Screen .................................................. 160
Checking Ink and Maintenance Box Status with Windows .......................................................... 161
Checking Ink and Maintenance Box Status - Mac ....................................................................... 162
Purchase Epson Ink and Maintenance Boxes ................................................................................. 164
Ink Cartridge and Maintenance Box Part Numbers...................................................................... 164
Removing and Installing Ink Cartridges............................................................................................ 165
Replacing the Maintenance Box....................................................................................................... 170
Replacing the Borderless Maintenance Box..................................................................................... 171
Adjusting Print Quality............................................................................................................................ 173
Print Head Maintenance................................................................................................................... 173
Print Head Nozzle Check............................................................................................................. 173
Checking the Nozzles Using the Product Control Panel ......................................................... 174

7
Checking the Nozzles Using a Computer Utility...................................................................... 175
Print Head Cleaning .................................................................................................................... 176
Cleaning the Print Head Using the Product Control Panel ...................................................... 177
Cleaning the Print Head Using a Computer Utility................................................................... 178
Running a Power Cleaning Using the Product Control Panel.................................................. 180
Running a Power Cleaning Using a Computer Utility .............................................................. 181
Media Setting Optimization.......................................................................................................... 184
Adjusting the Paper Feed Using the Product Control Panel.................................................... 184
Aligning the Print Head Using the Product Control Panel........................................................ 185
Maintenance and Transportation ........................................................................................................... 187
Cleaning Your Product ..................................................................................................................... 187
Cleaning the Platen.......................................................................................................................... 187
Cleaning the Roll Paper Feed Slot ................................................................................................... 189
Replacing the Cutter......................................................................................................................... 192
Cleaning the Print Head Cap Area ................................................................................................... 199
Moving or Transporting Your Product............................................................................................... 199
Solving Problems .................................................................................................................................... 202
Checking for Software Updates........................................................................................................ 202
Product Status Messages ................................................................................................................ 203
Resetting Control Panel Defaults ..................................................................................................... 205
Solving Printer Problems.................................................................................................................. 206
Product Does Not Turn On or Turns Off Unexpectedly................................................................ 206
LCD Screen Shuts Off ................................................................................................................. 206
Media Does Not Cut Cleanly ....................................................................................................... 207
Red Light Shines Inside the Printer ............................................................................................. 207
Product Stops Printing Unexpectedly .......................................................................................... 207
Forgot the Administrator Password ............................................................................................. 208
Software Installation Problems .................................................................................................... 208
Solving Network Problems ............................................................................................................... 209
Product Cannot Connect to a Wireless Router or Access Point .................................................. 209
Network Software Cannot Find Product on a Network................................................................. 210
Product Does Not Appear in Mac Printer Window ....................................................................... 211
Wired Network Connection Becomes Unstable........................................................................... 212

8
Cannot Print Over a Network....................................................................................................... 212
Solving Printing Problems ................................................................................................................ 214
Nothing Prints.............................................................................................................................. 214
Print Head Moves But Nothing Prints .......................................................................................... 215
Solving Paper Problems................................................................................................................... 215
Paper Feeding Problems............................................................................................................. 215
Image Is Not Positioned Correctly On the Media ......................................................................... 216
Paper Jam Problems ................................................................................................................... 216
Solving Print Quality Problems......................................................................................................... 217
Nozzle Check Pattern Prints Incorrectly ...................................................................................... 217
Overall Print Quality is Poor......................................................................................................... 217
Lines Are Misaligned ................................................................................................................... 219
Prints are Scuffed or Smeared .................................................................................................... 219
Prints are Wrinkled ...................................................................................................................... 221
Margins Appear in Borderless Prints ........................................................................................... 222
Uninstall Your Product Software....................................................................................................... 222
Uninstalling Product Software - Windows.................................................................................... 222
Uninstalling Product Software - Mac............................................................................................ 223
Where to Get Help (U.S. and Canada) ............................................................................................. 224
Where to Get Help (Latin America)................................................................................................... 225
Technical Specifications ........................................................................................................................ 228
Windows System Requirements ...................................................................................................... 228
Mac System Requirements .............................................................................................................. 229
Printing Specifications...................................................................................................................... 229
Paper Specifications ........................................................................................................................ 230
Printable Area Specifications ........................................................................................................... 231
Ink Specifications ............................................................................................................................. 233
Dimension Specifications ................................................................................................................. 234
Electrical Specifications ................................................................................................................... 235
Environmental Specifications ........................................................................................................... 236
Interface Specifications .................................................................................................................... 237
Network Interface Specifications ...................................................................................................... 237
Safety and Approvals Specifications ................................................................................................ 239

9
Notices ..................................................................................................................................................... 240
Important Safety Instructions............................................................................................................ 240
General Product Safety Instructions ............................................................................................ 240
LCD Screen Safety Instructions................................................................................................... 244
Wireless Connection Safety Instructions ..................................................................................... 245
FCC Compliance Statement............................................................................................................. 245
Binding Arbitration and Class Waiver ............................................................................................... 246
Trademarks...................................................................................................................................... 249
Copyright Notice............................................................................................................................... 249
A Note Concerning Responsible Use of Copyrighted Materials................................................... 250
Default Delay Times for Power Management for Epson Products ............................................... 250
Copyright Attribution.................................................................................................................... 250


11
SureColor P5370 User's Guide
Welcome to the SureColor P5370 User's Guide.
For a printable PDF copy of this guide, click here.
Note: Availability of products in this guide varies by country.

12
Introduction to Your Printer
Refer to these sections to learn more about your printer and this manual.
Printer Features
Available Software
Notations Used in the Documentation
Printer Part Locations
Using the Control Panel
Using Power Saving Settings
Printer Usage Guidelines
Printer Features
The Epson SureColor P5370 printer includes these special features:
High productivity
• Advanced MicroPiezo AMC 10-channel print head
• Available 200 ml high-capacity ink cartridges with increased black density
• Auto-switching between roll paper and high-capacity cut sheet cassette
Reliability
• Improved dust and static control for reduced print head nozzle maintenance
• Ink-repellent print head surface for reduced nozzle clogging
High resolution
• Prints at resolutions up to 5760 x 1440 dpi
• Supports variable-sized droplet technology as small as 1.5 picoliter
Easy-to-use setup and operation
• Intuitive, easy-to-read, 4.3-inch, color LCD touchscreen
• Four media paths, all front-loaded for easy access
• Easy-to-use software
Optional Equipment and Replacement Parts
Parent topic: Introduction to Your Printer
13
Optional Equipment and Replacement Parts
You can purchase genuine Epson ink, paper, and accessories from an Epson authorized reseller. To
find the nearest reseller, visit proimaging.epson.com (U.S.) or proimaging.epson.ca (Canada), select
your product series and product, and click the Where to Buy button. Or call 800-GO-EPSON (800-463-
7766) in the U.S. or 800-807-7766 in Canada.
In addition to the accessories listed below, extended service plans are available.
Note: Availability of accessories varies by country.
Option or part Part number
Replacement ink maintenance box T619000
Replacement borderless maintenance box T619100
Additional 2"/3" roll media spindle C12C811251
Replacement printer cutter blade C12C815351
Cleaning sheets C13S400045
Cleaning sticks C13S090013
Parent topic: Printer Features
Available Software
The table below provides an overview of the software available for your product.
You can download and install the necessary software from the Epson website using the instructions on
the Start Here sheet. For detailed information about the software on your system, see the software help
or the online Administrator's Guide.
Note: An Internet connection is required to obtain the product software.
Software Description
Printer driver Allows your computer to communicate specifically with your printer.
Before printing from your computer, make sure you have set up your
product and installed the latest software.

14
Software Description
Epson Software Updater Periodically checks for software updates and then notifies you and
installs the software if an update is available. You can select the
interval for update checks and make settings for receiving update
notifications. In addition to driver updates, also allows you to update
product firmware and previously installed applications, and install
additional software that is compatible with the printer.
Epson Edge Dashboard Allows you to manage the status of multiple printers and easily copy
custom paper settings from one printer to another.
Epson Media Installer Allows you to download paper information, including ICC profiles,
print modes, and print control parameters, from Internet servers and
save it in the printer or printer driver.
Web Config Pre-installed software that allows you to access your printer from a
web browser via a network, and perform administrative functions
such as checking ink levels, updating firmware, configuring network
and advanced security settings, and editing custom paper settings
that can then be exported to a file or imported to another printer. Also
provides an e-mail notification function to inform you when printer
errors occur.
Epson Print Layout
(Windows/macOS/iOS)
Provides a streamlined photo printing interface with enhanced
functionality and flexibility to make color-managed printing quick and
easy.
LFP Accounting Tool (Windows) Records print job activity information along with ink and paper costs
that can be easily exported to a spreadsheet.
Parent topic: Introduction to Your Printer
Notations Used in the Documentation
Follow the guidelines in these notations as you read your documentation:
• Warnings must be followed carefully to avoid bodily injury.
• Cautions must be observed to avoid damage to your equipment.
• Notes contain important information about your printer.
• Tips contain additional printing information.
Parent topic: Introduction to Your Printer
15
Printer Part Locations
Check the printer part illustrations to learn about the parts on your printer.
Product Parts - Front
Product Parts - Top/Inside
Product Parts - Rear
Parent topic: Introduction to Your Printer
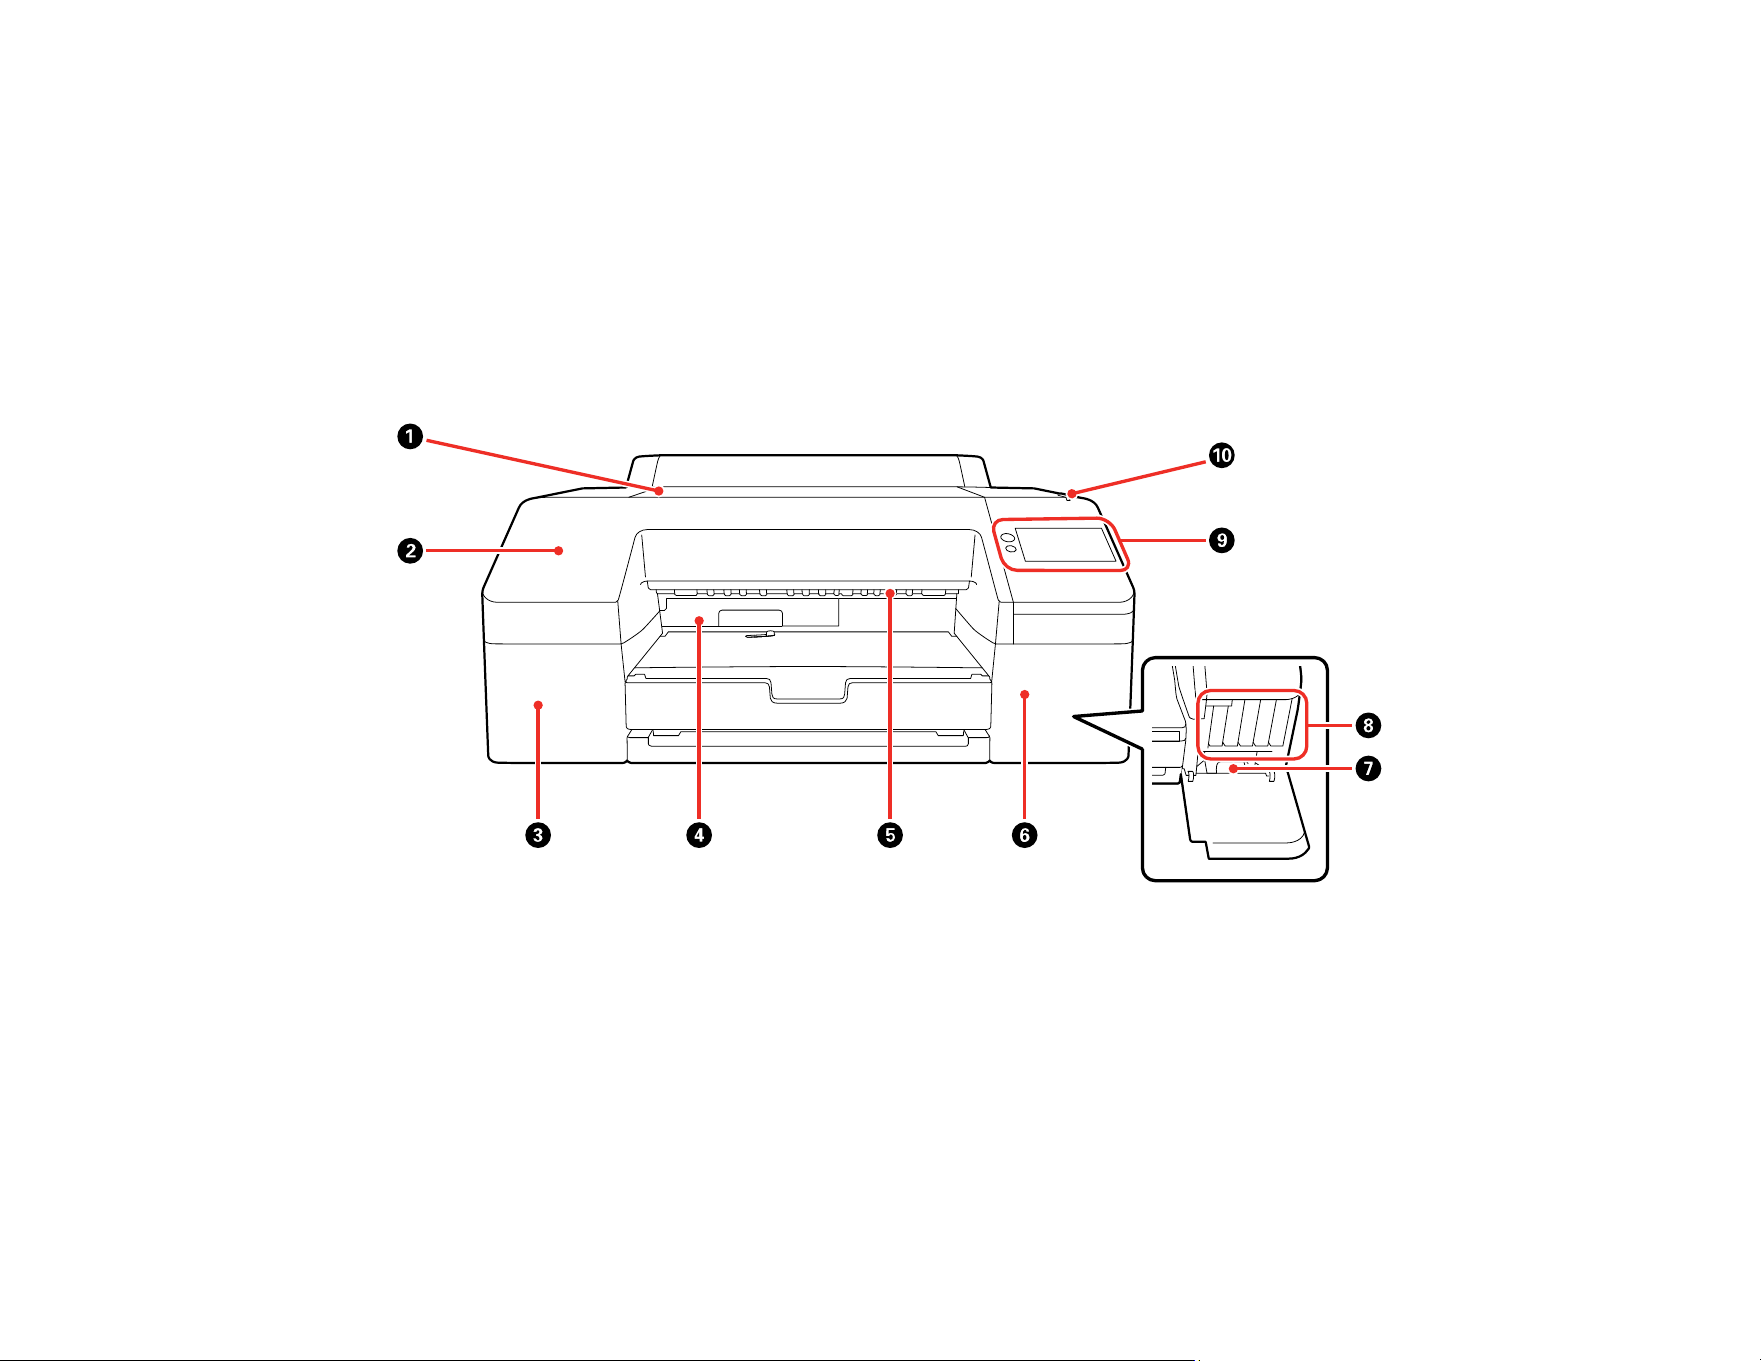
Product Parts - Front
1 Printer cover
2 Front cover
3 Ink cartridge cover (left)
4 Borderless maintenance box
5 Paper eject roller
6 Ink cartridge cover (right)
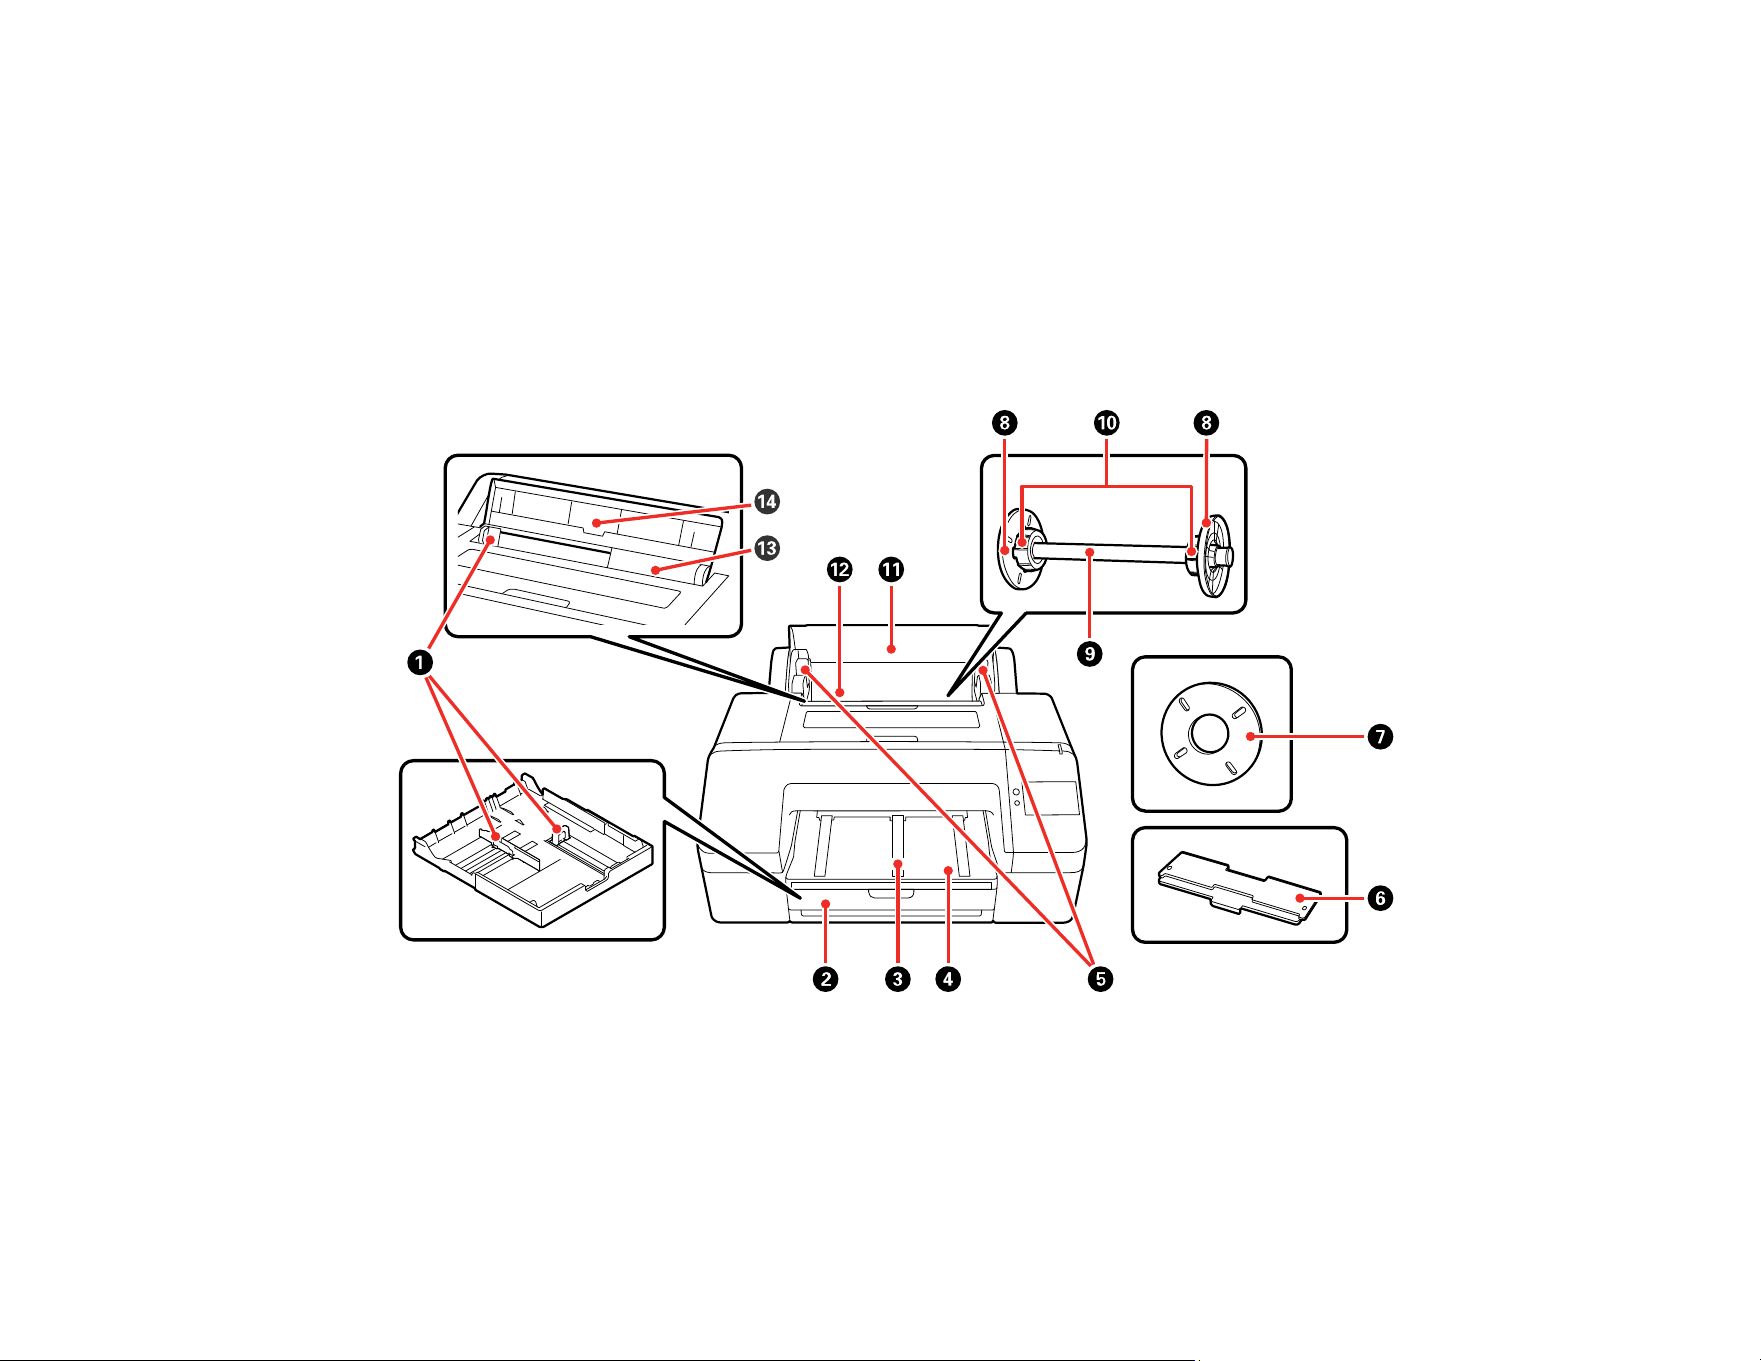
17
5 Roll paper spindle holders
6 Paper cassette cover
7 Borderless printing spacer
8 Media edge guide
9 Spindle
10 Roll adapter
11 Roll paper cover
12 Roll paper feeder
13 Cut sheet feeder
14 Paper support
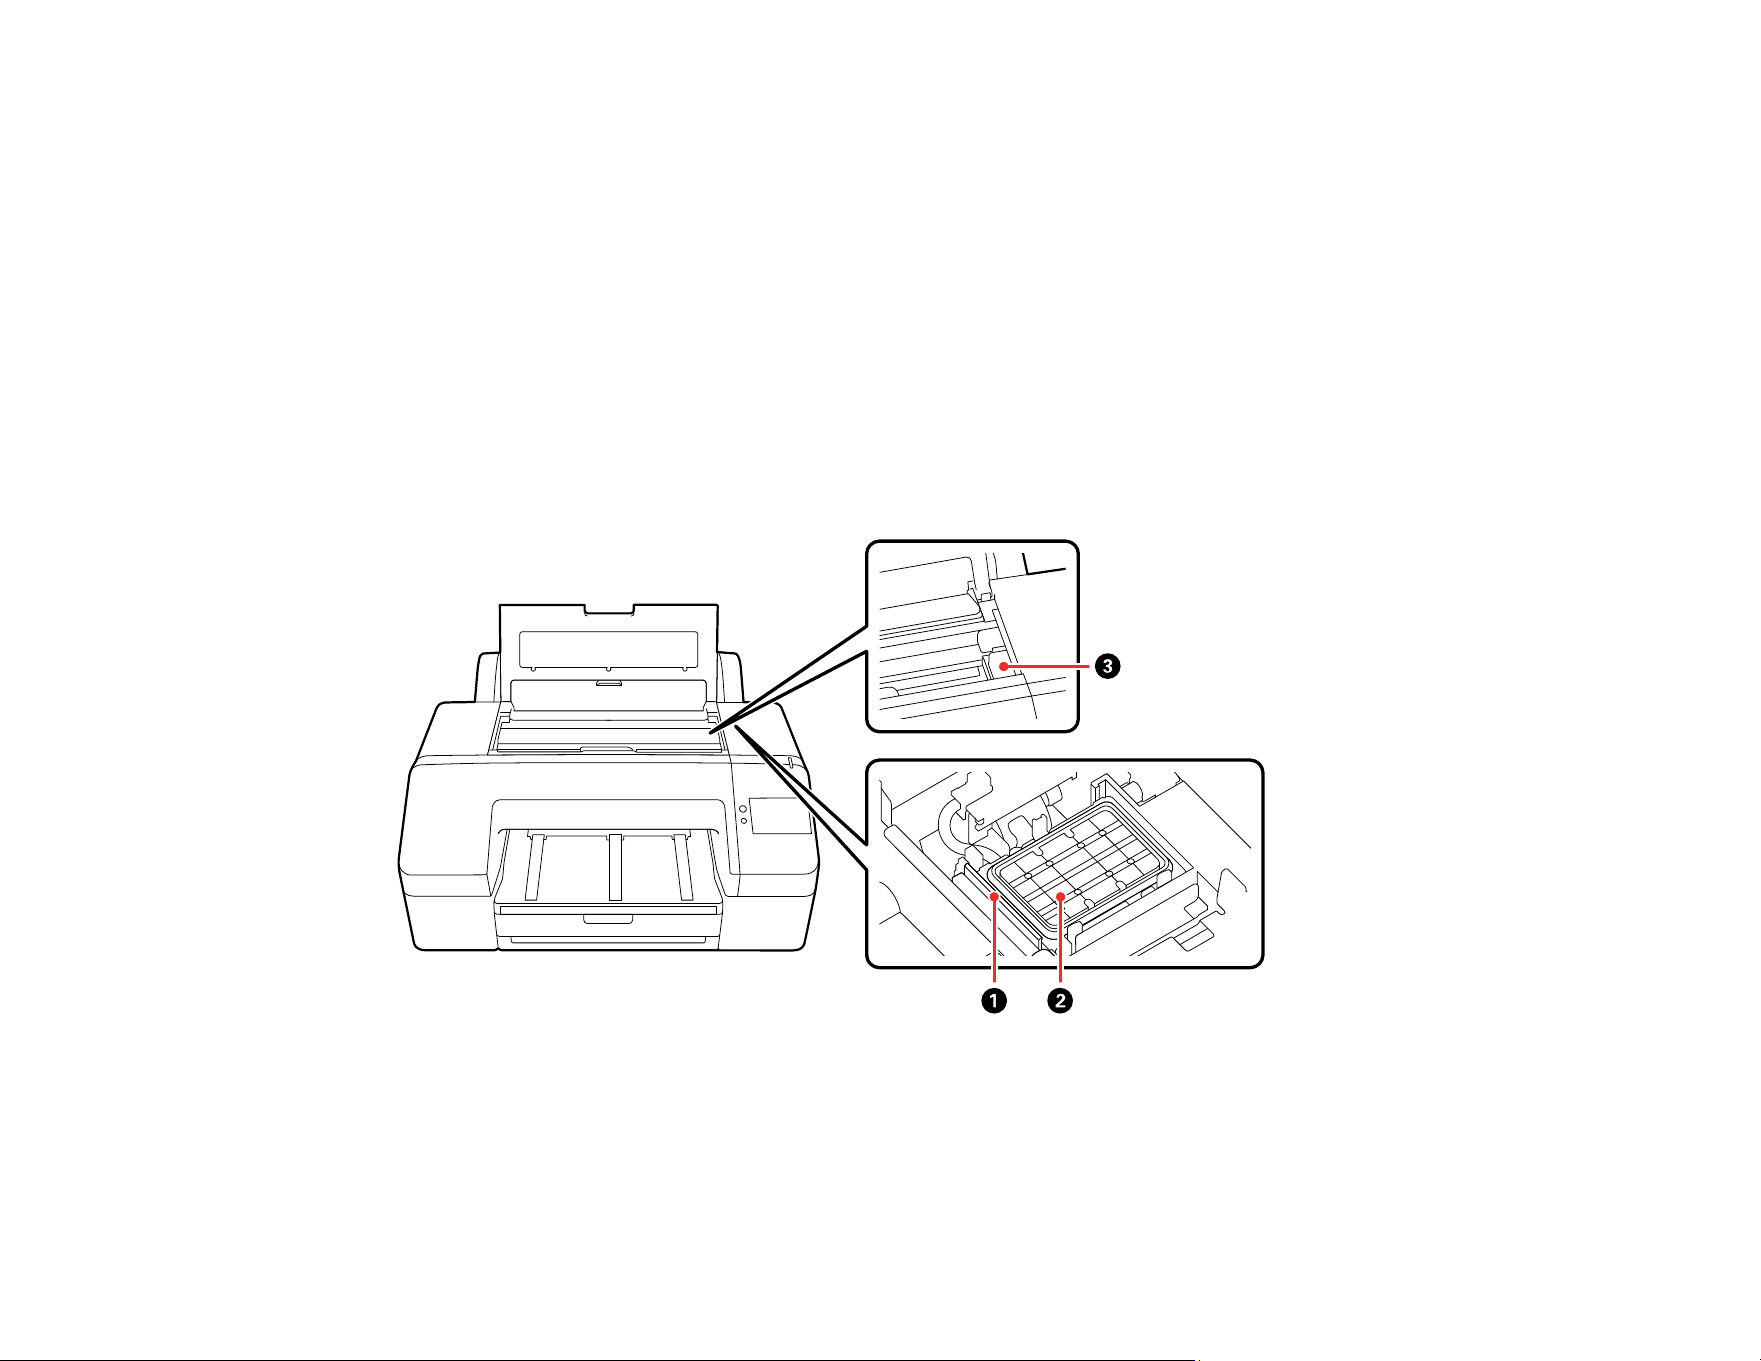
1 Wiper
2 Capping station
3 Print head
18
Parent topic: Printer Part Locations
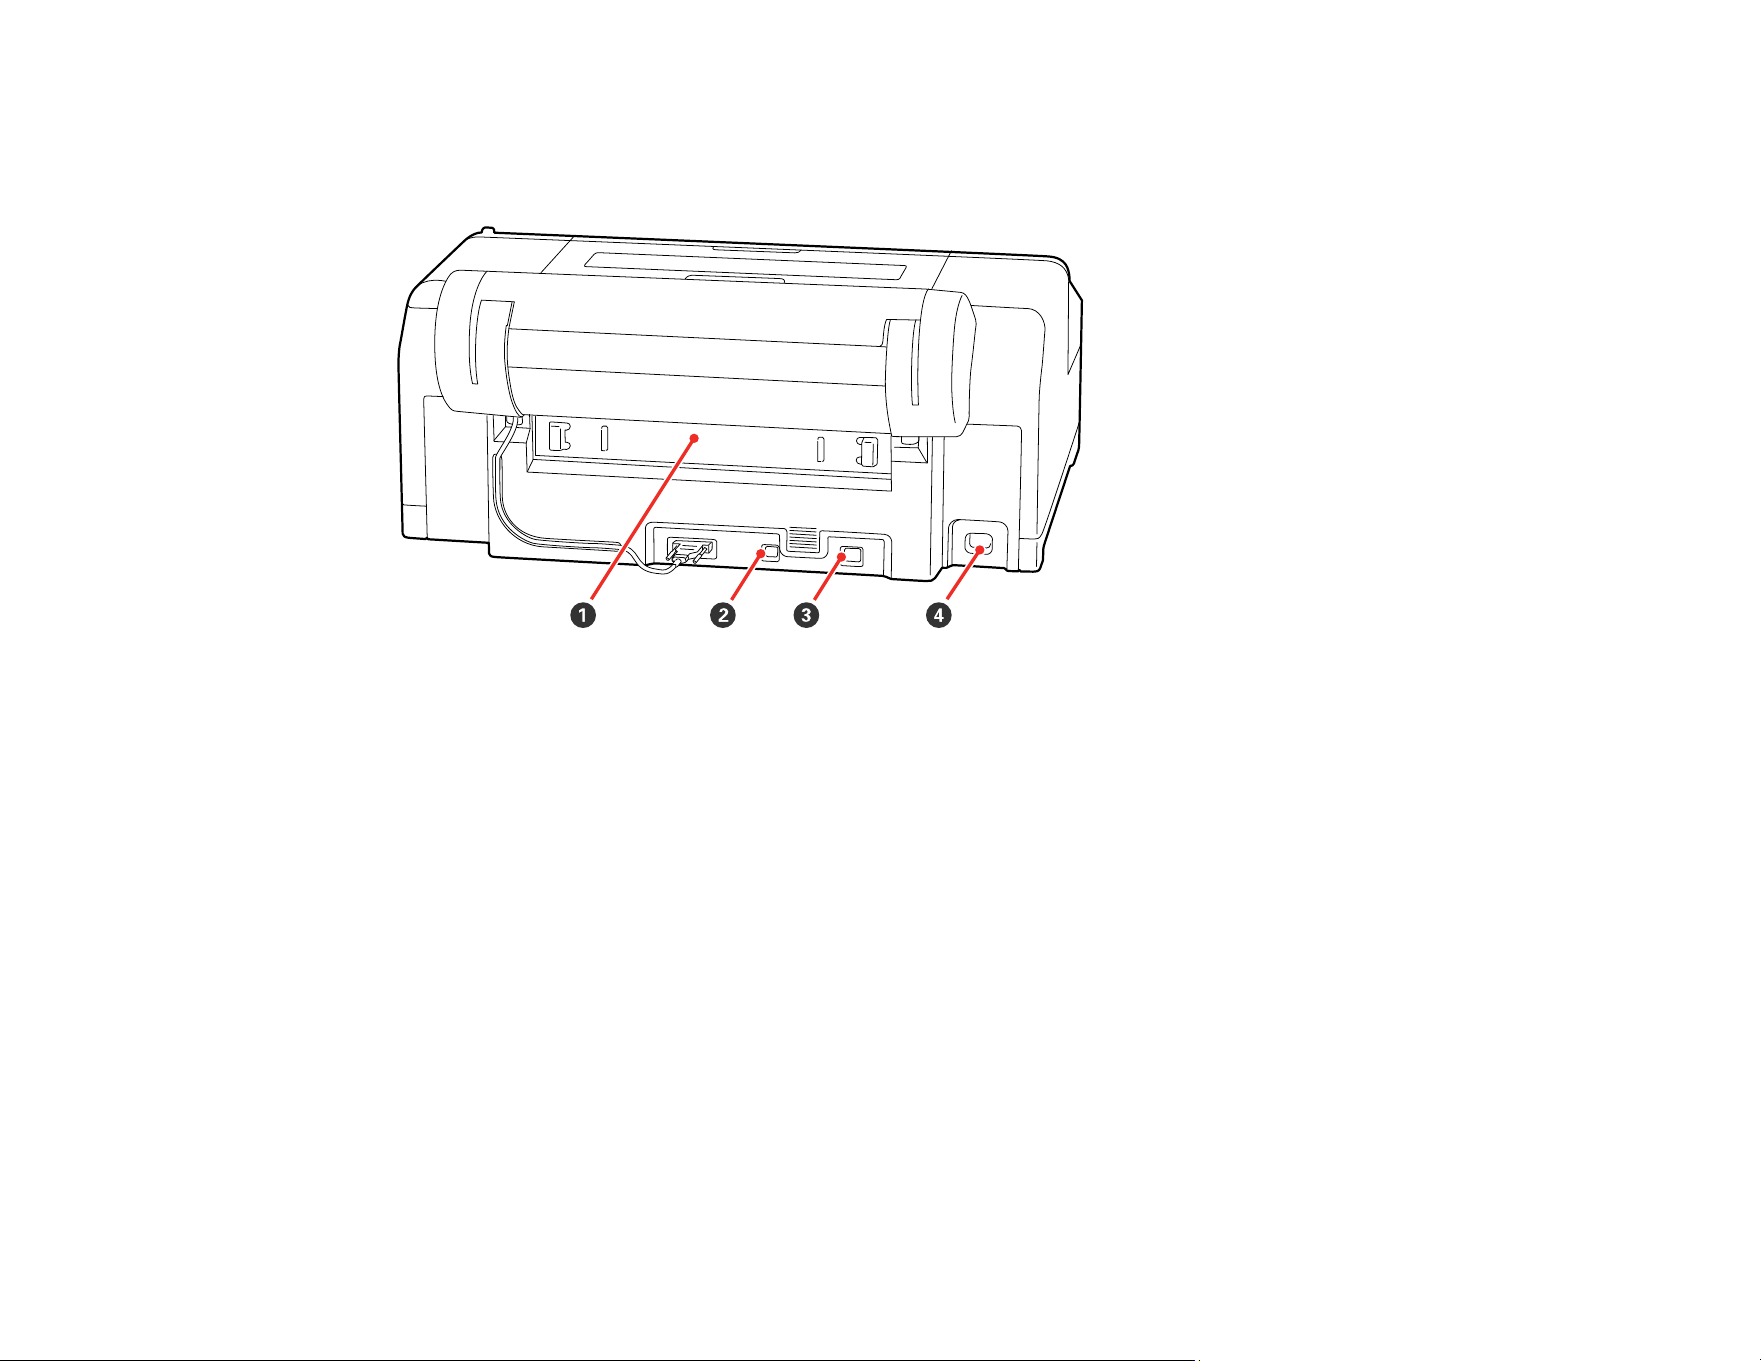
Product Parts - Rear
1 Rear cover
2 USB port
3 Ethernet/LAN port
4 AC inlet
Parent topic: Printer Part Locations
Using the Control Panel
See these sections to learn about the control panel and select control panel settings.
Control Panel
Changing the LCD Screen Language
Selecting the Date and Time
Setting a Password and Locking the Control Panel
Parent topic: Introduction to Your Printer
19
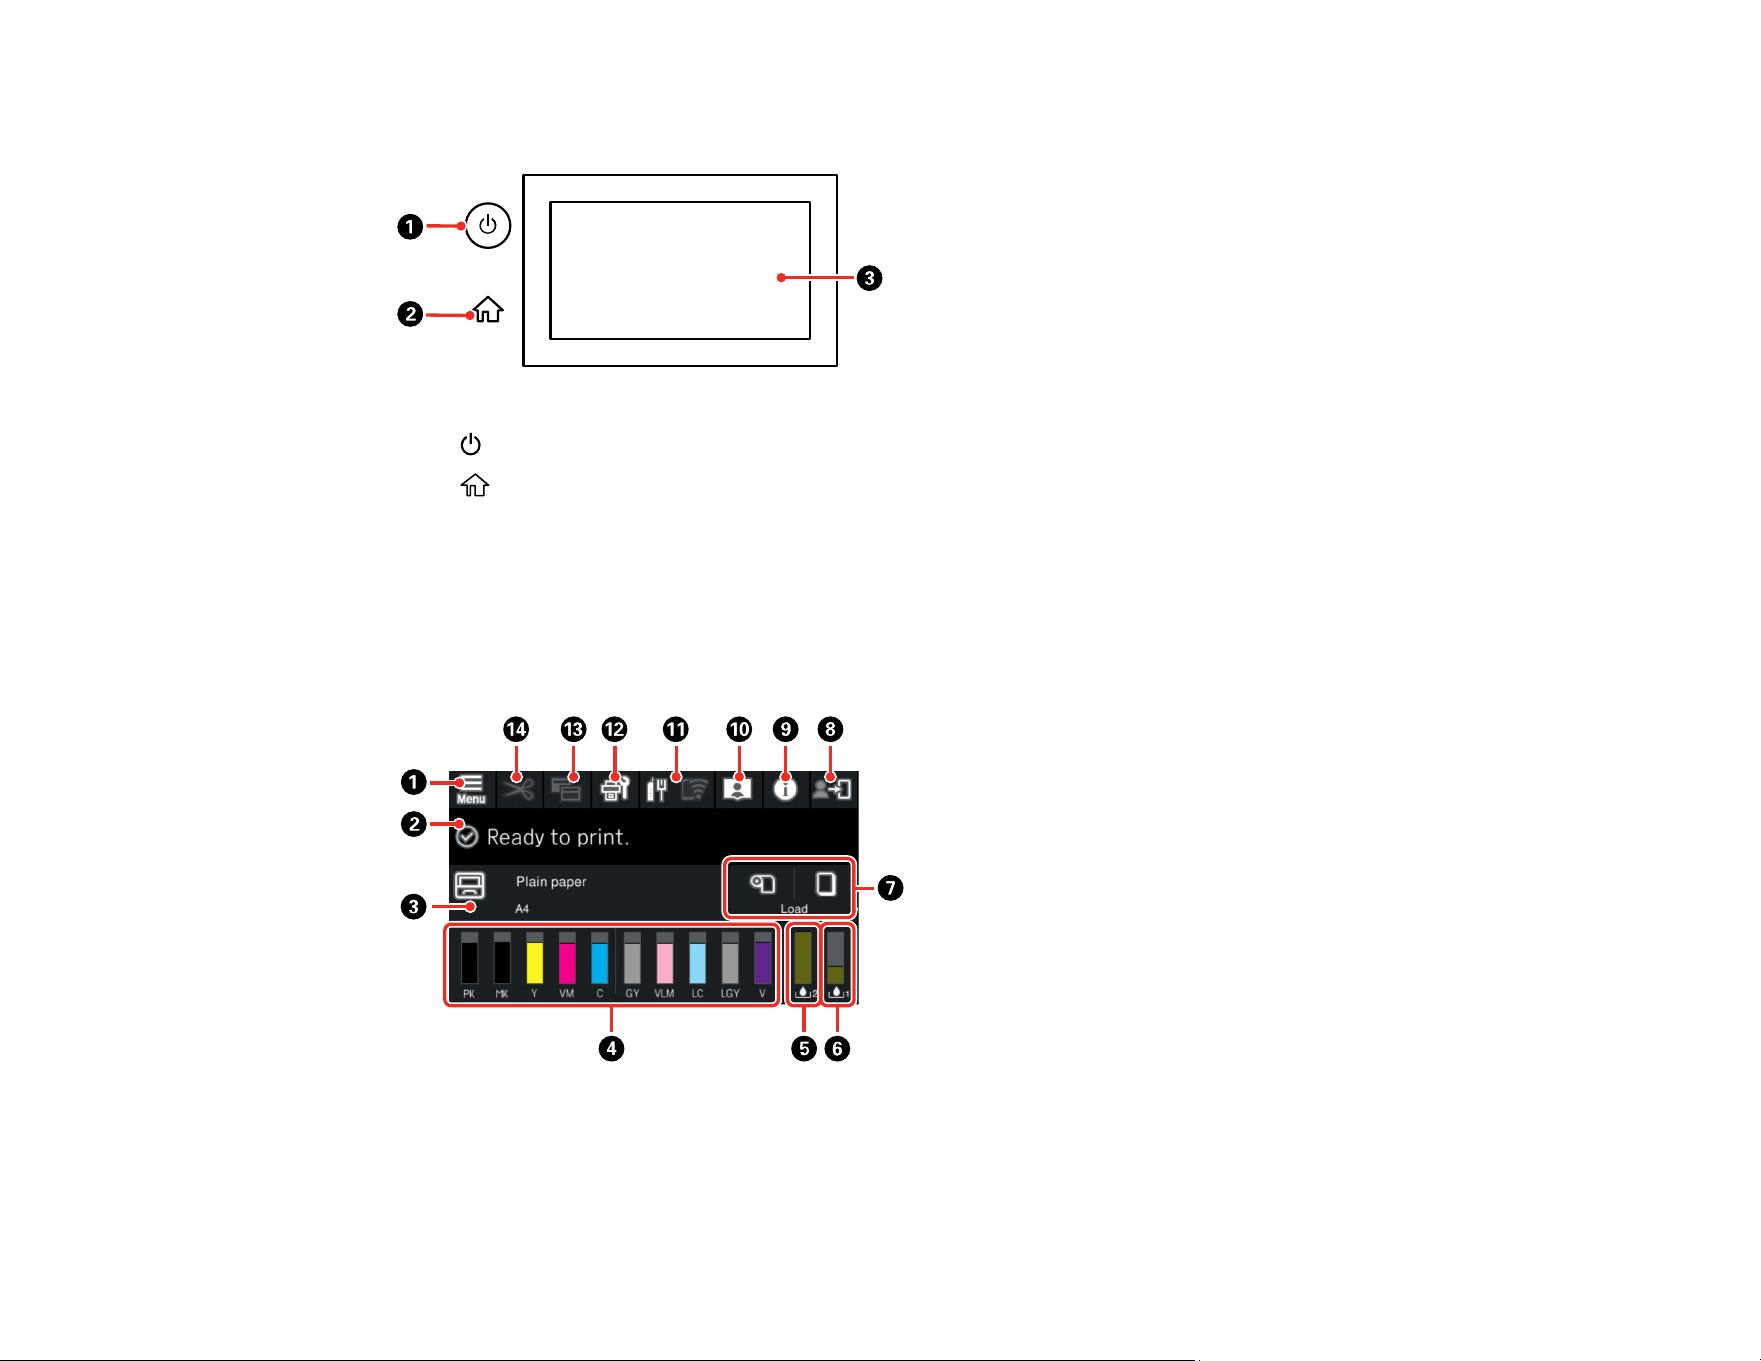
Control Panel
1
power button
2
home button
3 LCD touchscreen
LCD Screen
Note: You can select the screen switching icon to toggle between the home screen and the ink level
display.
1 Access menu items
2 Displays the printer's status, error messages, and other information

20
3 Displays paper information
When paper is not loaded, - - - is displayed. If there is no paper loaded in either paper source,
select to display the Paper Setting screen.
4 Displays the amount of ink remaining
The abbreviation below each bar indicates the ink color.
PK: Photo Black
MK: Matte Black
Y: Yellow
VM: Vivid Magenta
M: Magenta
C: Cyan
GY: Gray
VLM: Vivid Light Magenta
LC: Light Cyan
LGY: Light Gray
V: Violet
When the notification icon is displayed, the corresponding ink color is running low. Tap the
display area to check the model number of the ink cartridge.
5 Displays the amount of space remaining in the borderless maintenance box
When the notification icon is displayed, the corresponding box is almost full. Tap the display
area to check the borderless maintenance box model number.
6 Displays the amount of space remaining in the maintenance box
When the notification icon is displayed, the maintenance box is almost full. Tap the display
area to check the maintenance box model number.
7 Paper input/output
Accesses the paper feed settings to load and eject roll paper or poster board

21
8 Lock setting icon
Displays the login or log out screen when Lock Setting is enabled. You must enter the admin
password to access any of the locked settings. See the online Administrator's Guide for more
details.
9 Information icon
Displays consumable item information and a list of messages
10 Online manual icon
Displays a QR code that links to product videos
11 Network status icons; select to switch the network connection status
: No Ethernet or Wi-Fi connection
: Ethernet connection established
: No Wi-Fi connection
: Wi-Fi network error or the product is searching for a connection
: Wi-Fi connection established; the number of bars indicates signal strength
: No Wi-Fi Direct connection
: Wi-Fi Direct connection established
12 Displays the Maintenance menu
You can check and clean the print head nozzles, replace consumables, and clean parts.
13 Switches the Home screen display
14 Displays settings for feeding and cutting roll paper
Parent topic: Using the Control Panel
Changing the LCD Screen Language
You can change the language used on the LCD screen.
1. Press the home button, if necessary.
2. Select the Menu icon.
3. Select General Settings > Basic Settings > Language.

22
4. Select a language.
5. Press the home button to exit.
Parent topic: Using the Control Panel
Selecting the Date and Time
Before using your product, select the current date, time, and daylight saving phase in your area, and
choose your preferred date and time format.
Note: This setting can be locked by an administrator. If you cannot access or change this setting,
contact your administrator for assistance.
1. Press the home button, if necessary.
2. Select the Menu icon.
3. Select General Settings > Basic Settings > Date/Time Settings.
4. Select Date/Time.
5. Select the date format you want to use.
6. Use the on-screen keyboard to enter the current date and select OK.
7. Select the time format you want to use.
8. Use the on-screen keyboard to enter the current time and select OK.
9. Select Daylight Saving Time and select either Summer or Winter.
10. Press the home button to exit.
Parent topic: Using the Control Panel
Setting a Password and Locking the Control Panel
You can set an administrator password to lock the following settings and prevent them from being
changed:
Note: The locked settings may differ depending on your product.
• Network settings
• Certain Basic Settings
• Certain Printer Settings

23
• Certain Maintenance Settings
• System Administration settings
• Web Config settings
• EpsonNet Config settings
Note: This setting can be locked by an administrator. If you cannot access or change this setting,
contact your administrator for assistance. For more information on administration settings, see the online
Administrator's Guide.
1. Press the home button, if necessary.
2. Select the Menu icon.
3. Select General Settings > System Administration > Security Settings > Admin Settings.
4. Select Admin Password > Change.
5. Do one of the following:
• If you have set an administrator password before, enter the current password, then enter and
confirm the new password in the fields provided.
• If you have not set an administrator password before, enter the default password in the current
password field, then enter a new password and confirm it in the fields provided.
Note: The default password is the product's serial number. Check the label on the back of the printer
to locate the serial number. The default user name is blank.
6. Select OK.
7. Select Lock Setting > On to lock settings.
A prompt appears confirming that you want to enable locked settings. Select Yes to enable the
setting and return to the home screen.
The lock setting icon is displayed on the home screen when the lock setting is enabled.
You must enter the admin password to access any of the locked settings.
Note: You can restore the administrator password to the default password by selecting Restore Default
Settings on the Admin Password screen and entering the administrator password. If you forget your
password, contact Epson for assistance.

24
Parent topic: Using the Control Panel
Using Power Saving Settings
Your product enters sleep mode automatically and turns off the LCD screen if it is not used for a period
of time. You can make the time period shorter and select other options to save energy and resources.
Changing the Sleep Timer Settings
Changing the Power Off Timer Settings
Parent topic: Introduction to Your Printer
Changing the Sleep Timer Settings
You can adjust the time period before your product enters sleep mode and turns off the LCD screen.
Note: This setting can be locked by an administrator. If you cannot access or change this setting,
contact your administrator for assistance.
1. Press the home button, if necessary.
2. Select the Menu icon.
3. Select General Settings > Basic Settings > Sleep Timer.
4. Do one of the following:
• Press the + or – button to increase or decrease the number of minutes.
• Press the number to display the on-screen keypad, select the number of minutes (between 1 and
60), and select OK.
Note: The default setting is 4 minutes.
5. Select OK.
When your product enters sleep mode, the control panel's screen goes dark, but the power light
remains on.
Parent topic: Using Power Saving Settings
Changing the Power Off Timer Settings
You can have the product turn off automatically if it is not used for a specified period of time.

25
Note: This setting can be locked by an administrator. If you cannot access or change this setting,
contact your administrator for assistance.
Note: The default setting is Off.
1. Press the home button, if necessary.
2. Select the Menu icon.
3. Select General Settings > Basic Settings > Power Off Timer.
4. Select a time period between 30minutes and 12h (12 hours).
Note: Increasing the time will affect the printer’s energy efficiency. Please consider the environment
before making any changes.
Parent topic: Using Power Saving Settings
Printer Usage Guidelines
Follow the guidelines in these sections as you use your printer, consumables, and print media.
Installation Space
Using Your Printer
Storing Your Printer
Parent topic: Introduction to Your Printer
26
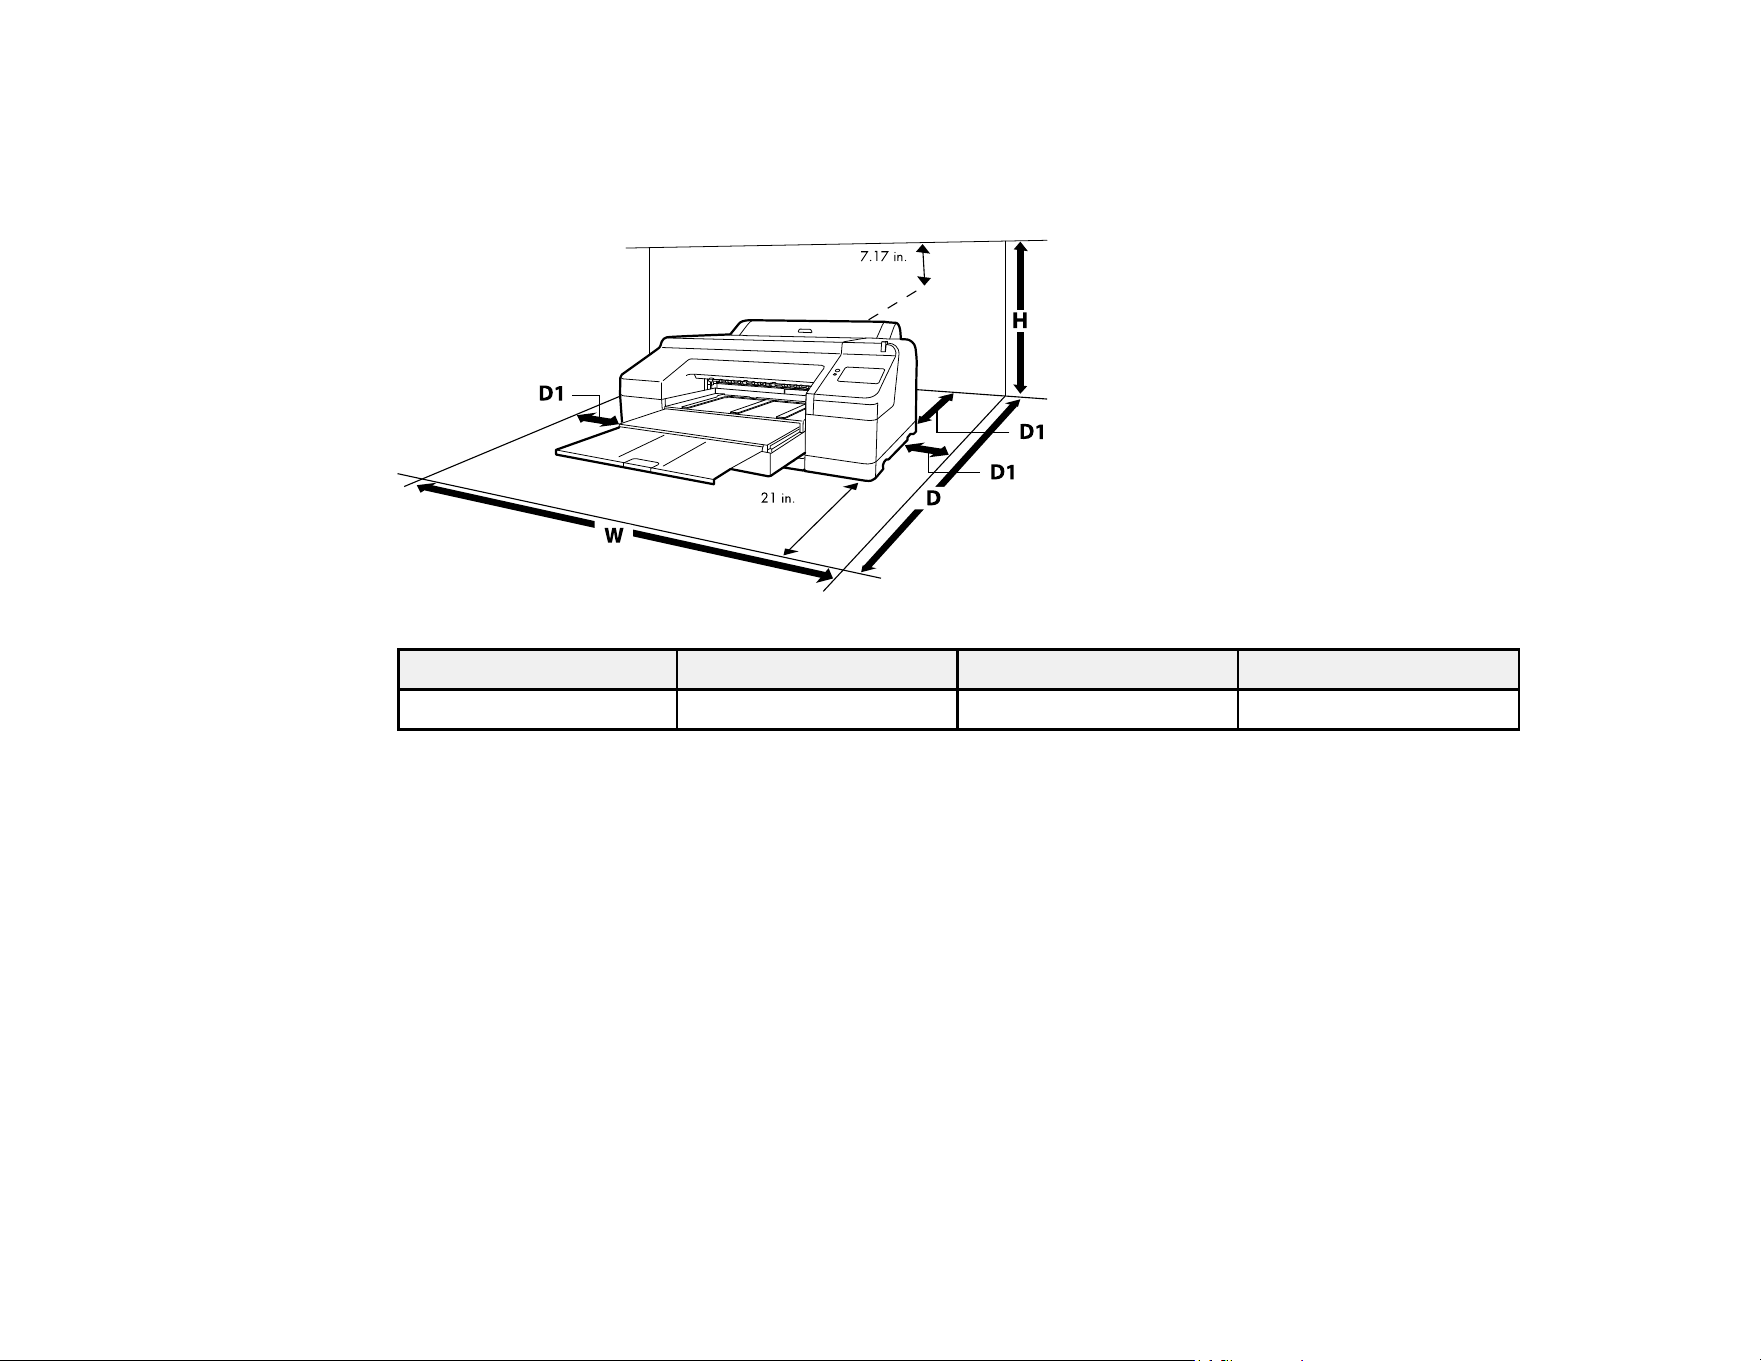
Installation Space
Make sure that you clear the following amount of working space so that you can eject paper and replace
consumables as necessary for your model.
(182 mm)
(533 mm)
W D D1 H
45.79 in. (1163 mm) 53.11 in. (1349 mm) 5.91 in. (150 mm) 23.07 in. (586 mm)
The following space is required behind the printer when printing on poster board of certain sizes:
• A2: approximately 14.56 inches (370 mm)
• A3+: approximately 10.23 inches (260 mm)
• A3: approximately 7.87 inches (200 mm)
• A4: approximately 2.75 inches (70 mm)
Parent topic: Printer Usage Guidelines
Using Your Printer
Follow these guidelines as you use your printer:
• Operate the printer only within the specified operating temperature and humidity range for your
product and your media. For more information, see the documentation supplied with the media.
• Check to make sure you maintain the specified humidity range, especially in dry areas or air
conditioned environments.

27
• Keep the printer out of direct sunlight.
• Do not install the printer next to heat sources or directly in the path of exhaust from a ventilator or air
conditioner. Failure to observe this precaution could result in the print head nozzles drying out and
clogging.
• Make sure the product work space is kept free of dust or lint that could damage your product or clog
the print head nozzles.
• Perform maintenance operations according to usage frequency or at the recommended intervals.
Failure to perform regular maintenance could reduce print quality or damage the print head.
• If an error occurs and the printer is turned off without first resolving the error, the print head may not be
in the home (or capped) position, which may cause the print head to dry out. In this case, turn on the
power and wait until the carriage is in the home position.
• When the printer is on, do not disconnect the power cable or cut the power at the circuit breaker. The
print head may not be in the home (or capped) position. In this case, turn on the power and wait a
while until the print head is in the home position.
Note: To keep the print head in the optimum operating condition, ink is used in maintenance operations
such as head cleaning.
Parent topic: Printer Usage Guidelines
Storing Your Printer
Follow these guidelines if you need to store your printer for a long period:
• If the printer is not used for an extended period of time, the print head nozzles may become clogged.
We recommend that you print once every week to prevent the nozzles from clogging.
• Remove any loaded media before storing the printer to prevent the pressure rollers from causing
creases in the media, which may cause jams or damage to the print head.
• Make sure that the print head is in the home (or capped) position before storing the printer. If it is left
away from the home position for a long time, the print quality may decline. Turn the printer on and then
off again to move the print head to the home position.
• Close all the covers on the printer to prevent dust and debris from getting in. If the printer will be not be
used for an extended period of time, protect it with an anti-static cloth or other cover. The print head
nozzles can become clogged if fine dust gets on the print head, and you may not be able to print
properly.
• If the printer is turned on after an extended period of time with the power off, run a nozzle check before
you start printing and clean the print head, if necessary.


29
Wi-Fi or Wired Networking
See these sections to use your product on a Wi-Fi or wired network.
Network Security Recommendations
Wi-Fi Infrastructure Mode Setup
Wi-Fi Direct Mode Setup
Wi-Fi Protected Setup (WPS)
Printing a Network Status Sheet
Printing a Network Connection Report
Changing or Updating Network Connections
Network Security Recommendations
To help deter unauthorized access to your product over a network, you should protect your network
environment using appropriate security measures.
Security measures such as these can help deter threats such as loss of user data, use of telephone and
fax lines, and other intrusions:
• Enable security on your wireless LAN
Enable the appropriate security on the wireless LAN you plan to use with your product. Network
security such as a network password can deter interception of traffic over the wireless LAN. Your
router may already have a default password enabled by your Internet service provider (ISP). See your
ISP and router documentation for instructions on how to change the default password and better
secure your network.
• Connect your product only to a network protected by a firewall
Connecting your product directly to the Internet may leave it vulnerable to security threats. Instead,
connect it to a router or other network connection protected by a firewall. Your router may already
have a firewall set up by your Internet service provider; check with your ISP for confirmation. For best
results, set up and use a private IP address for your network connection.
• Change the default administrator password on your product
If your product has an option to set an administrator password, change the default administrator
password to deter access by unauthorized users to personal data stored on your product, such as IDs,
passwords, and contact lists.
Parent topic: Wi-Fi or Wired Networking
30
Wi-Fi Infrastructure Mode Setup
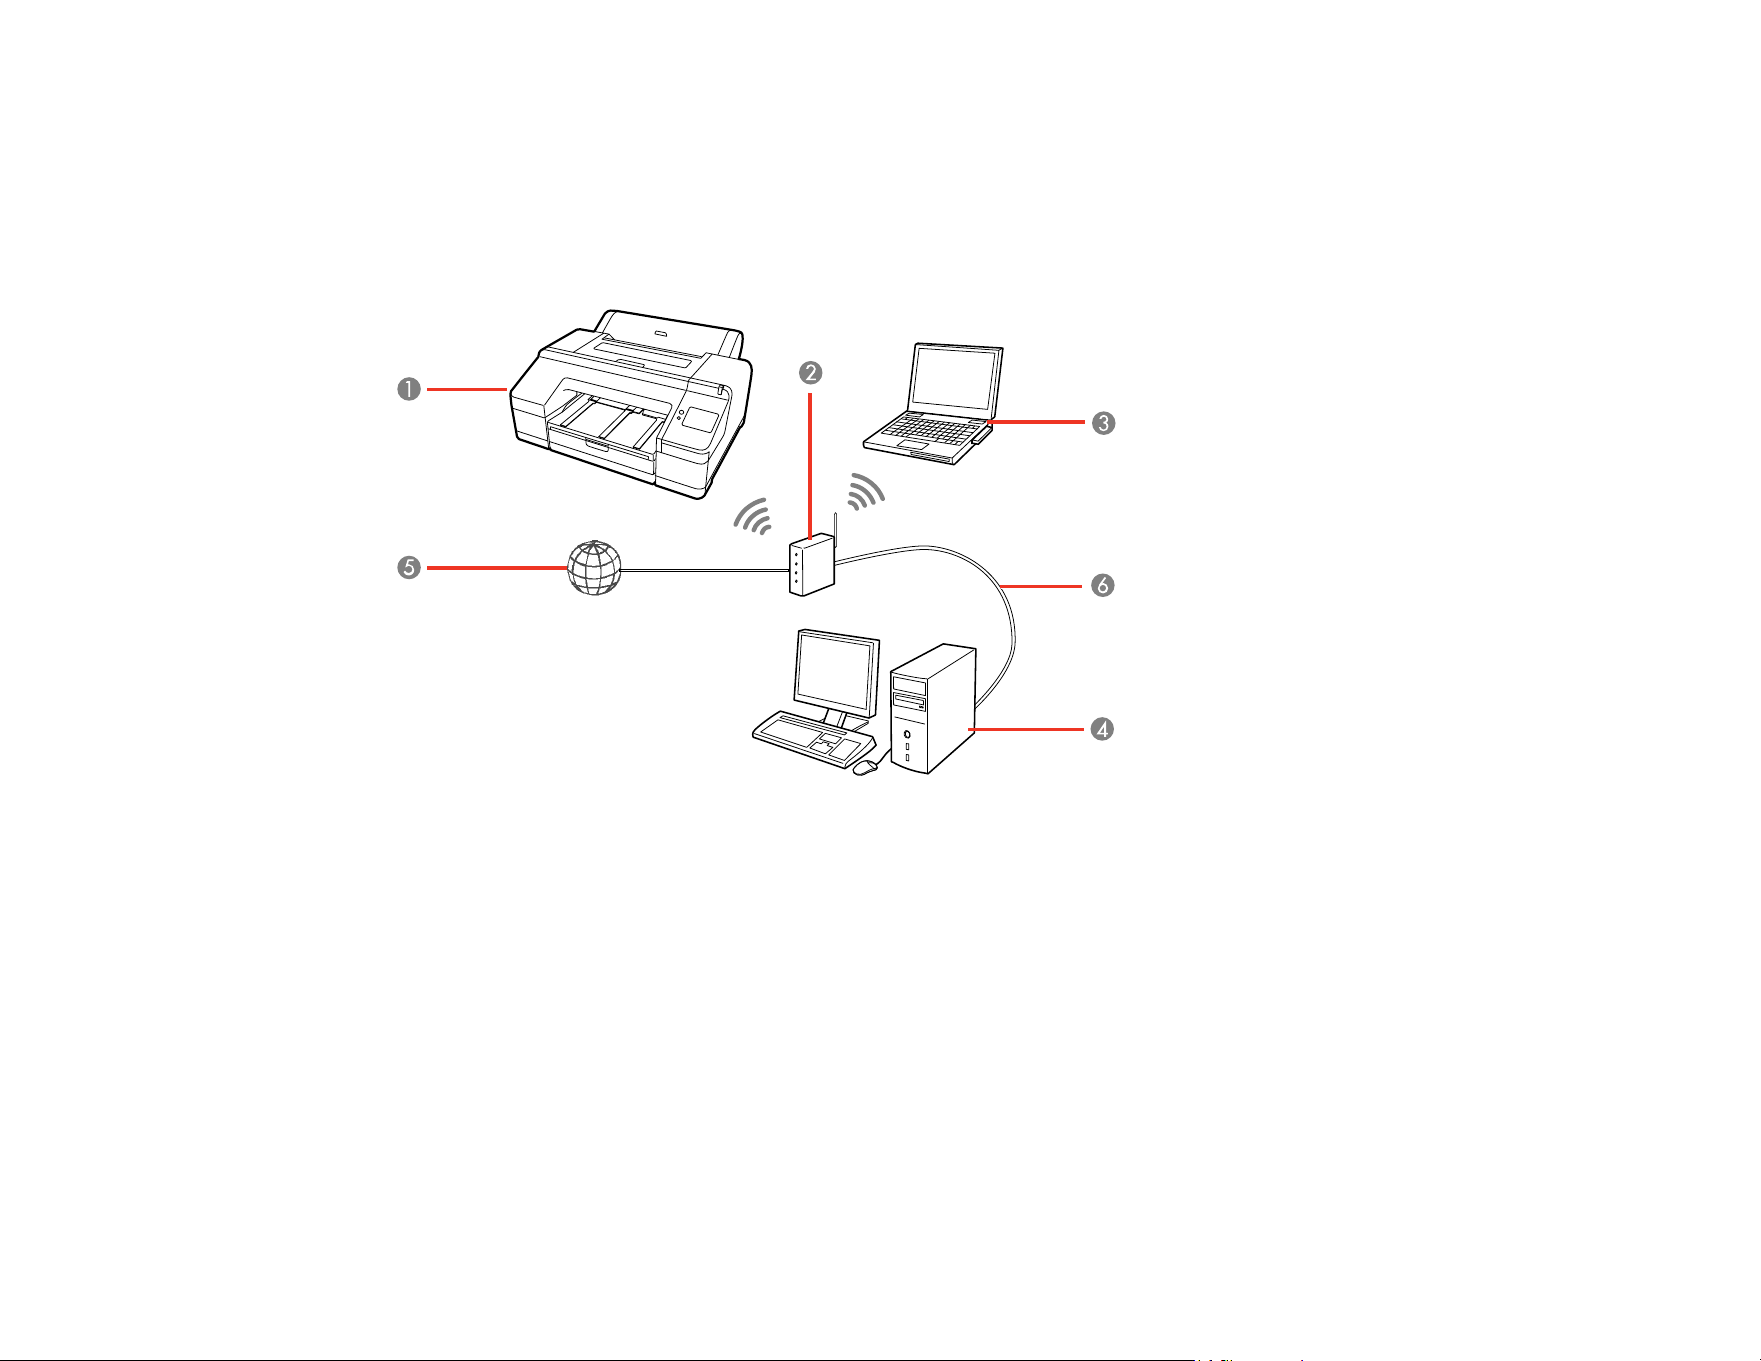
You can set up your product to communicate with your computer using a wireless router or access point.
The wireless router or access point can be connected to your computer over a wireless or wired network.
Note: You cannot connect to a wired and wireless network at the same time.
1 Epson product
2 Wireless router or access point
3 Computer with a wireless interface
4 Computer
5 Internet
6 Ethernet cable (used only for wired connection to the wireless router or access point)
Selecting Wireless Network Settings from the Control Panel
Parent topic: Wi-Fi or Wired Networking
31
Selecting Wireless Network Settings from the Control Panel
You can select or change wireless network settings using your product control panel.
To install your product on a wireless network, install the necessary software by downloading it from the
Epson website. The installer program guides you through network setup.
Note: This setting can be locked by an administrator. If you cannot access or change this setting,
contact your administrator for assistance.
1. Press the home button, if necessary.
2. Select the network icon.
Note: Icon may look different depending on connection status.
3. Select Router > Start Setup or Change Settings > Wi-Fi Setup Wizard.
4. Select the name of your wireless network or select Enter Manually to enter the name manually. Use
the on-screen keyboard to enter your network name.
Note: If you enter the wireless network manually, select Available for Password, and then enter the
password.
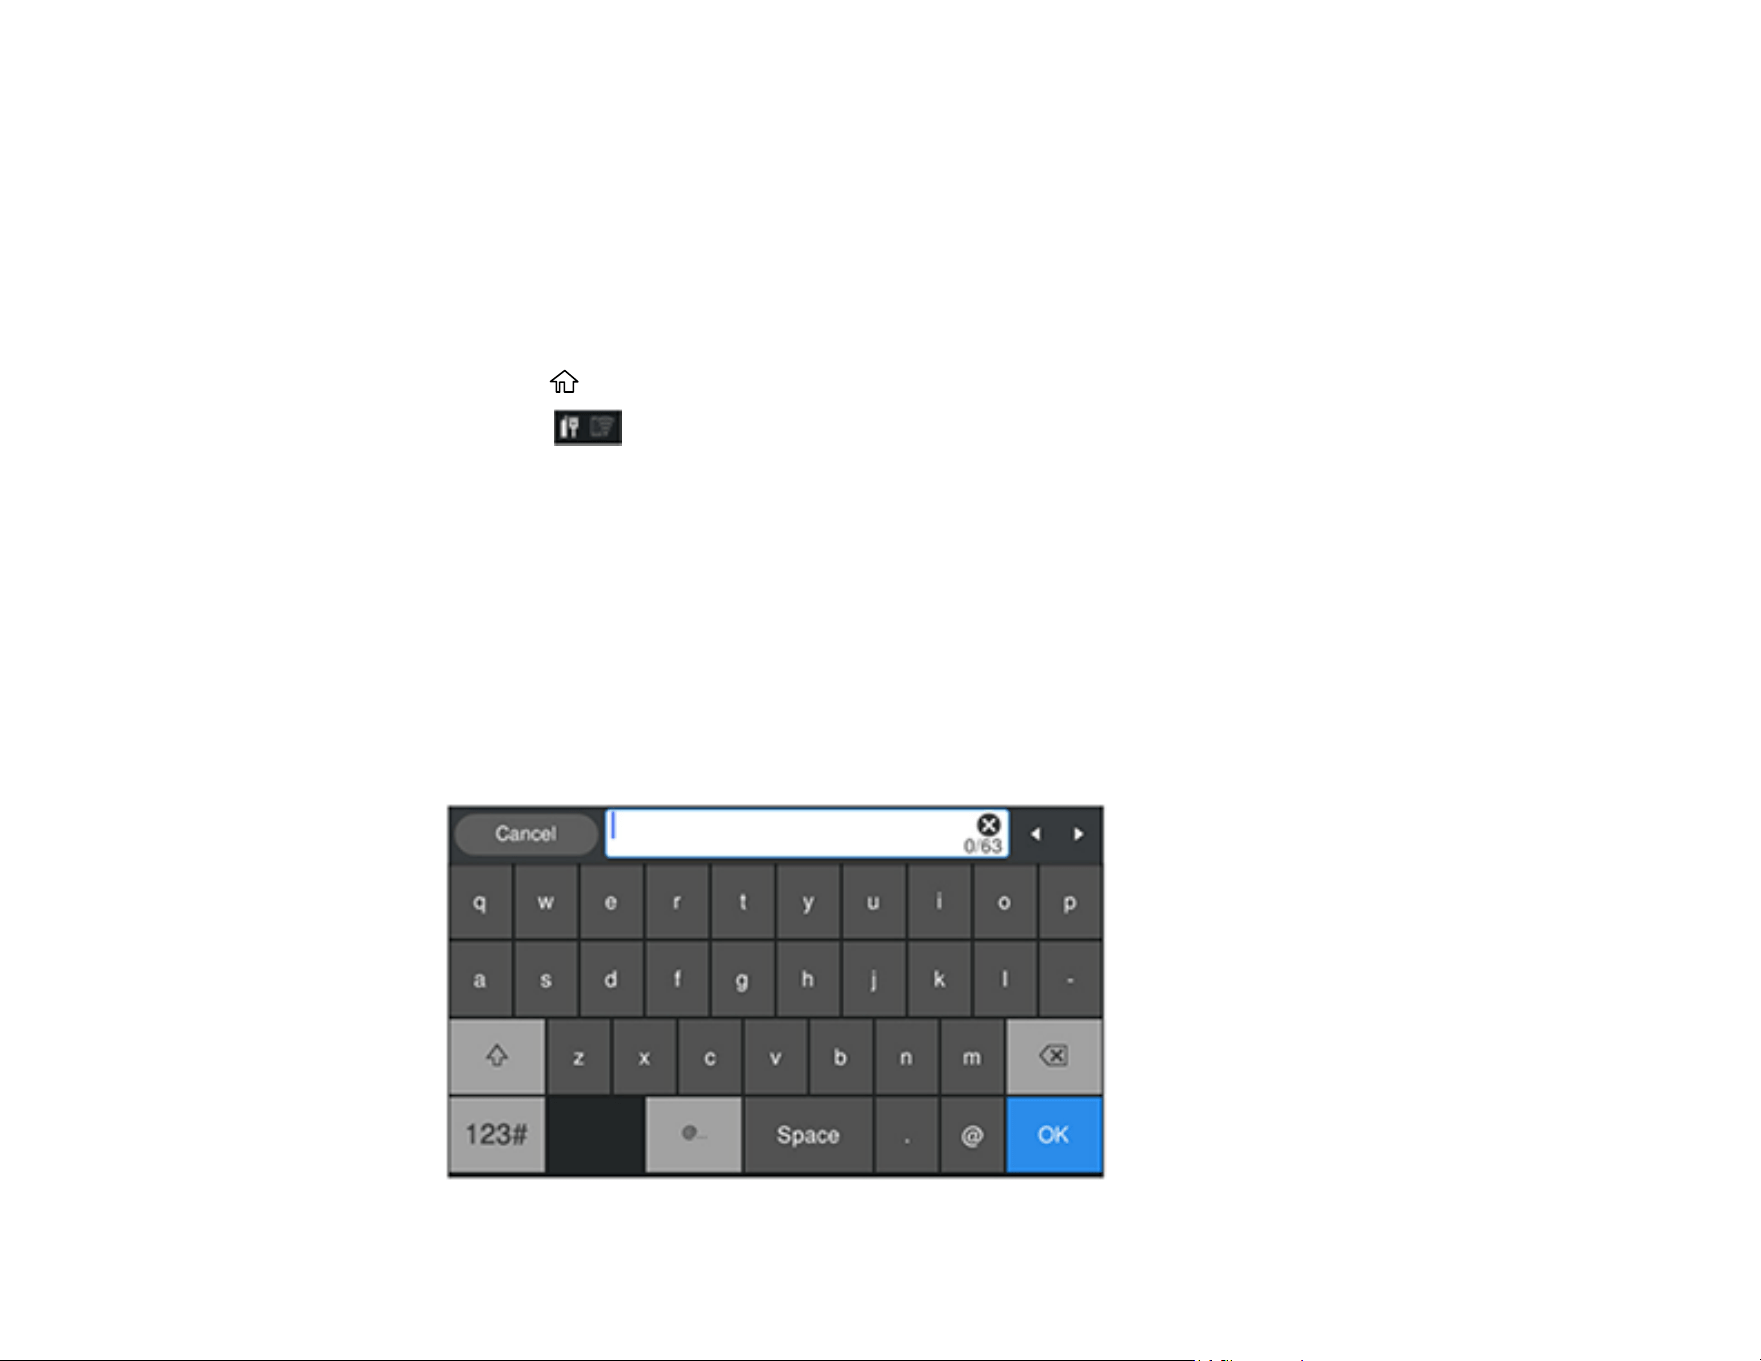
5. Select the Enter Password field and enter your wireless password using the on-screen keyboard.

32
Note: The network name and password are case sensitive. Be sure to correctly enter uppercase and
lowercase letters, and numeric or special characters.
• To move the cursor, press the left or right arrows.
• To enter numbers or symbols, select 123#.
• To change the case of letters, select .
• To delete the previous character, select .
• To enter a space, select Space.
6. Select OK when you finish entering your password.
7. Confirm the displayed network settings and select Start Setup to save them.
A message appears when setup is complete.
8. Do one of the following:
• If setup was successful, select Close to exit or wait for the message to disappear.
• If setup was unsuccessful, select Print Check Report to print a network setup report or Re-enter
to re-enter your network name and password.
9. Press the home button to exit.
You see the Wi-Fi icon on the LCD screen and should be able to connect to your product directly
from your computer or device, and then print. If you are printing from a computer, make sure you
installed the network software from the Epson website.
Note: If you don't see the Wi-Fi icon, you may have selected the wrong network name or entered
the password incorrectly. Repeat these steps to try again.
Parent topic: Wi-Fi Infrastructure Mode Setup
33
Wi-Fi Direct Mode Setup
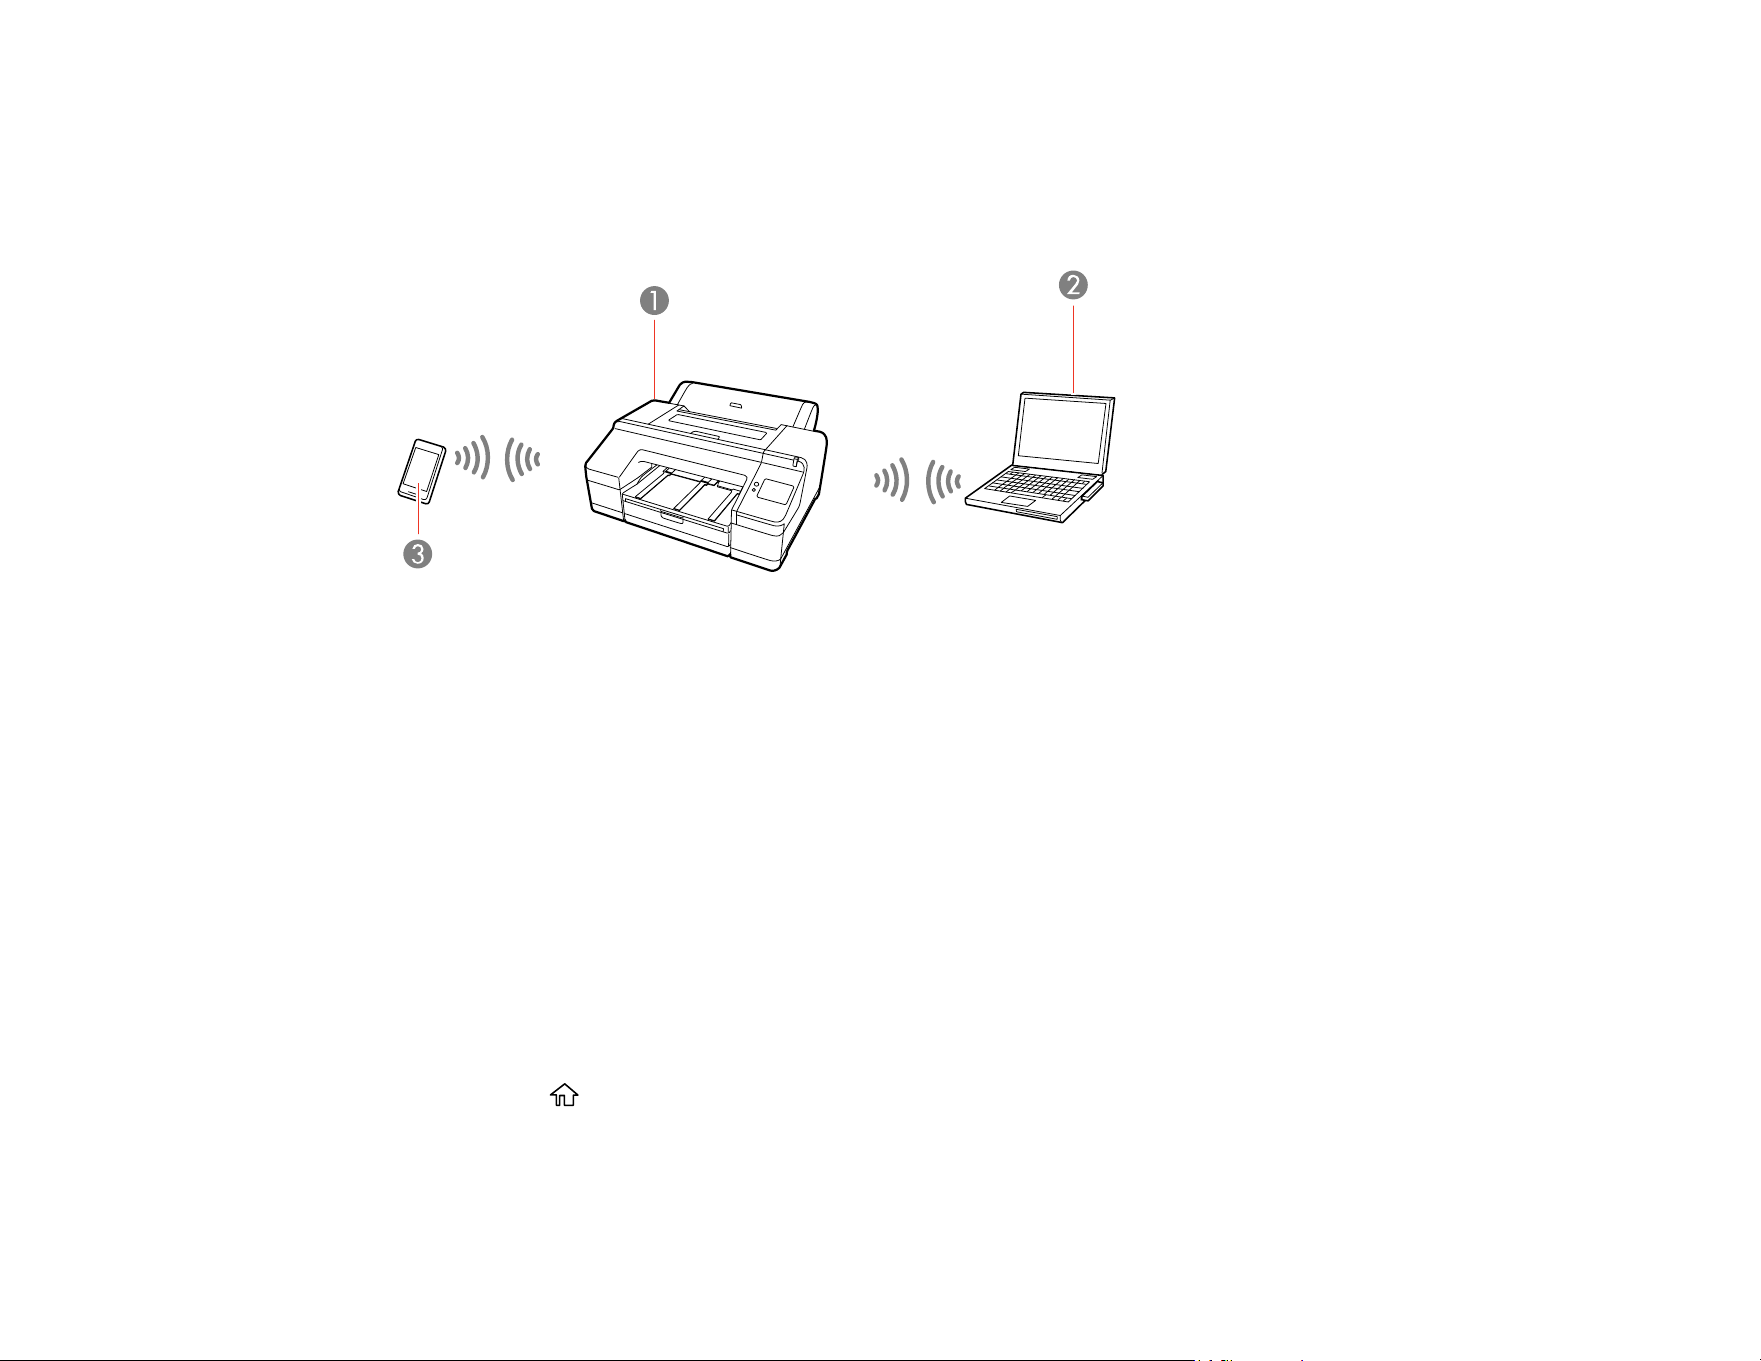
You can set up your product to communicate directly with your computer or another device without
requiring a wireless router or access point. In Wi-Fi Direct Mode, the product itself acts as a network
access point for up to 8 devices.
1 Epson product
2 Computer with a wireless interface
3 Other wireless device
Enabling Wi-Fi Direct Mode
Parent topic: Wi-Fi or Wired Networking
Enabling Wi-Fi Direct Mode
You can enable Wi-Fi Direct mode to allow direct communication between your product and computer or
other devices without a wireless router or access point.
Note: This setting can be locked by an administrator. If you cannot access or change this setting,
contact your administrator for assistance.
1. Press the home button, if necessary.

34
2. Select the network icon.
Note: Icon may look different depending on connection status.
3. Select Wi-Fi Direct > Start Setup > iOS or Other OS Devices .
Wi-Fi Direct is enabled, and the Wi-Fi network name (SSID) and password are displayed.
Note: If Wi-Fi Direct is already enabled, the network name (SSID), password, number of connected
devices, and general procedures for setting up other devices are displayed.
4. Use your computer or wireless device to select the Wi-Fi network name (SSID) displayed on the
LCD screen, then enter the password shown.
5. When a connection is established, select Complete to finish.
6. Select Close on the LCD screen to close the network connection settings screen or press the
home button to exit.
You see the Wi-Fi Direct icon on the LCD screen and should be able to connect to your product
directly from your computer or device, and then print. If you are printing from a computer, make sure
you installed the network software from the Epson website.
Note: If you don't see the Wi-Fi Direct icon on the LCD screen, you may have selected the wrong
network name or entered the password incorrectly. Repeat these steps to try again.
Any connected devices will be disconnected when you turn off the printer. To reconnect after turning the
printer back on, repeat these steps.
Parent topic: Wi-Fi Direct Mode Setup
Wi-Fi Protected Setup (WPS)
If your network uses a WPS-enabled wireless router or access point, you can quickly connect your
product to the network using Wi-Fi Protected Setup (WPS).
Note: To check if your router is WPS-enabled, look for a button labeled WPS on your router or access
point. If there is no hardware button, there may be a virtual WPS button in the software for the device.
Check your network product documentation for details.
Using WPS to Connect to a Network

35
Parent topic: Wi-Fi or Wired Networking
Using WPS to Connect to a Network
If you have a WPS-enabled wireless router or access point, you can use Wi-Fi Protected Setup (WPS) to
connect your product to the network.
Note: This setting can be locked by an administrator. If you cannot access or change this setting,
contact your administrator for assistance.
1. Press the home button, if necessary.
2. Select the network icon.
Note: Icon may look different depending on connection status.
3. Select Router > Start Setup or Change Settings > Push Button Setup (WPS).
4. Hold down the WPS button on your wireless router until the security light flashes.
5. Select Start Setup on the LCD screen within two minutes of activating WPS on your router.
If connection was successful, a confirmation message appears. Select Close or wait for the
message to time out. If connection was unsuccessful, an error message appears. Select OK or
Close and repeat these steps to try again.
6. Press the home button to exit.
You see the Wi-Fi icon on the LCD screen and should be able to connect to your product directly
from your computer or device, and then print. If you are printing from a computer, make sure you
installed the product software from the Epson website.
Note: If you don't see the Wi-Fi icon, restart the access point, move it closer to the printer, and
repeat these steps to try again. If it still does not work, print a network connection report and check
the solution.
Parent topic: Wi-Fi Protected Setup (WPS)
Printing a Network Status Sheet
You can print a network status sheet to help you determine the causes of any problems you may have
using your product on a network.

36
Before you begin, make sure paper is loaded in the product.
1. Select the Menu icon.
2. Select General Settings > Network Settings > Network Status.
3. Select Print Status Sheet > Print.
Examine the settings shown on the network status sheet to diagnose any problems you have.
Parent topic: Wi-Fi or Wired Networking
Printing a Network Connection Report
You can print a network connection report to view solutions to any problems you may have using your
product on a network.
1. Select the Menu icon.
2. Select General Settings > Network Settings.
3. Select Connection Check.
4. Select Yes.
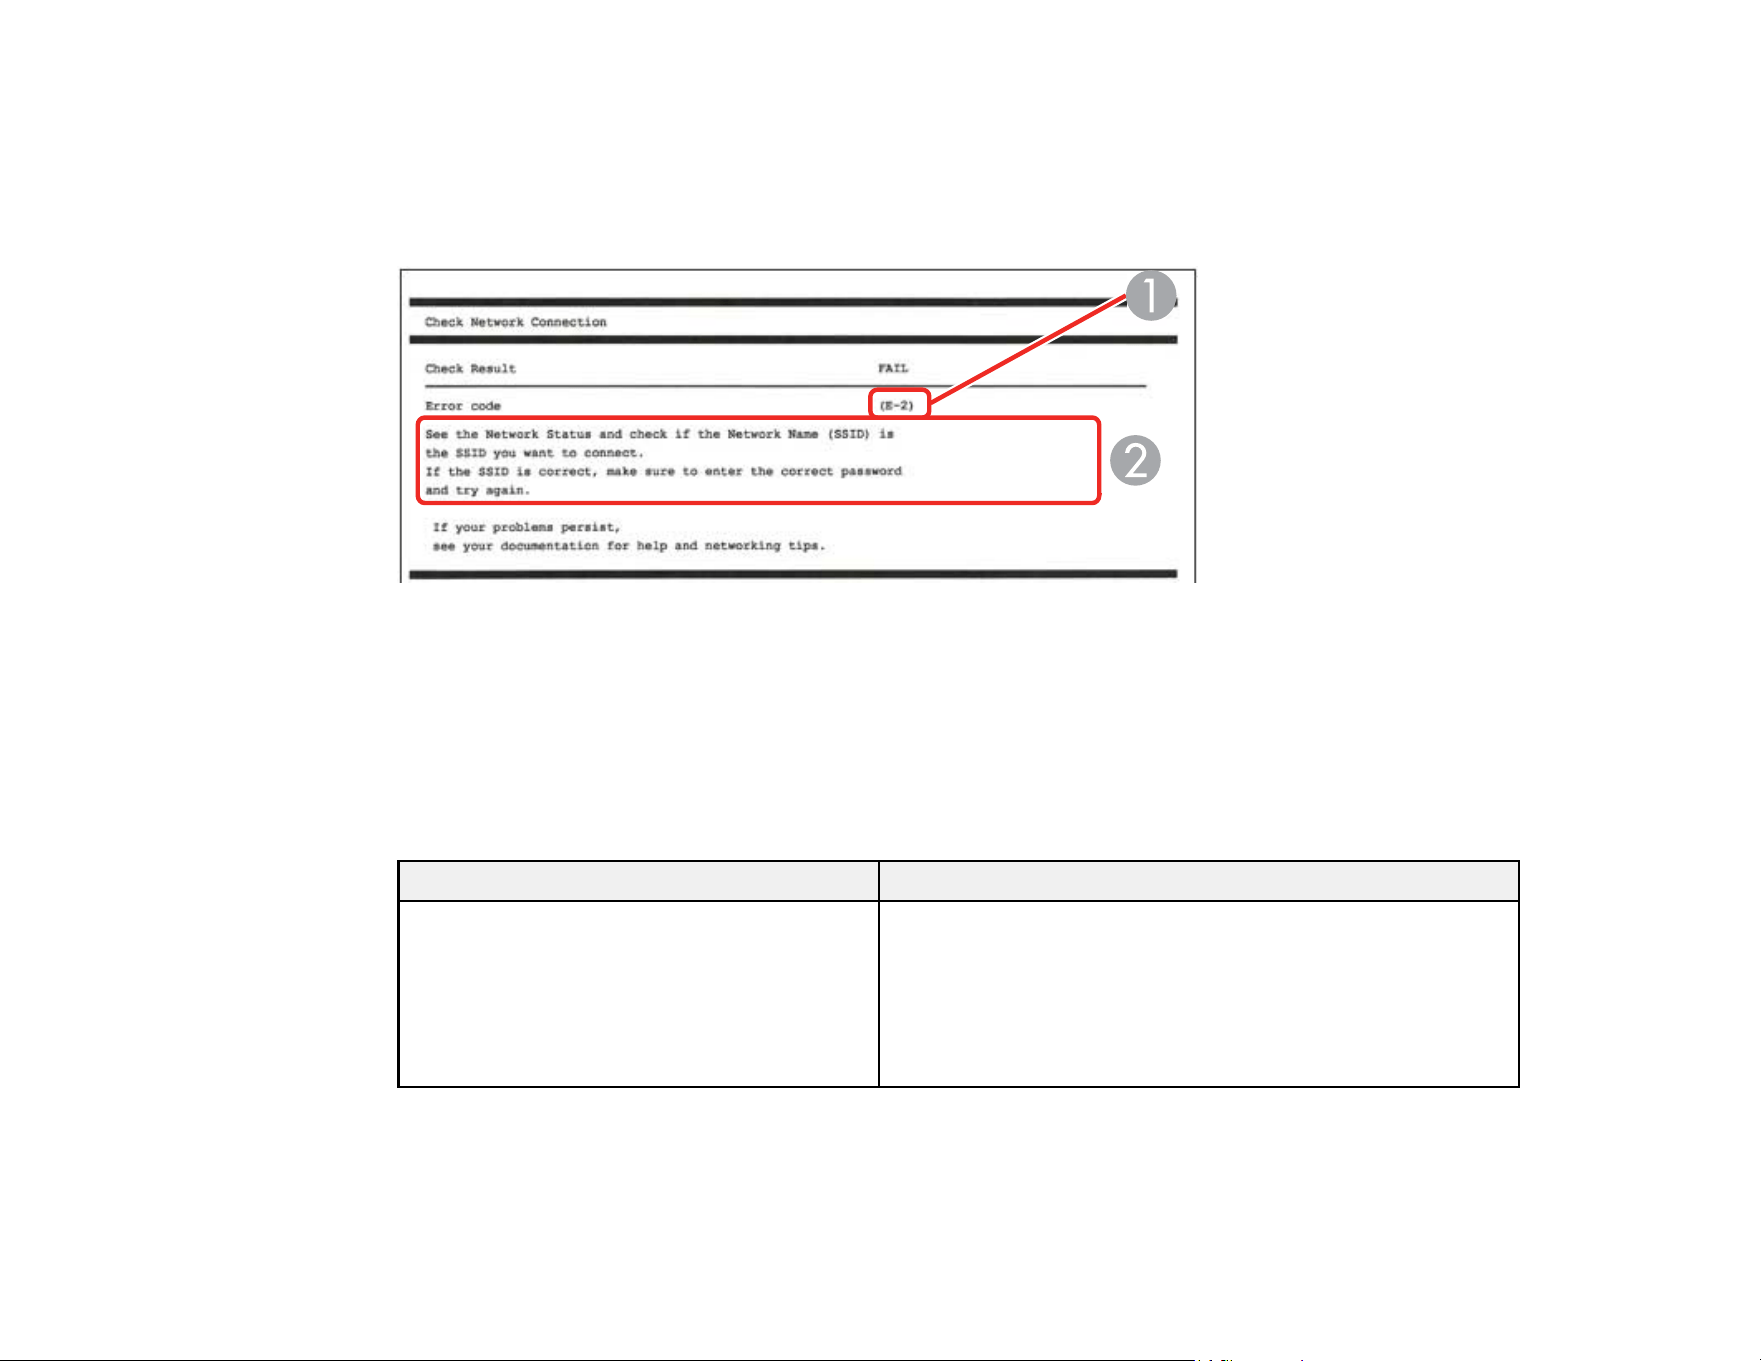
Examine the error codes and solutions shown on the network connection report.
Network Connection Report Codes and Messages
Parent topic: Wi-Fi or Wired Networking
37
Network Connection Report Codes and Messages
Check the error codes and messages on the network connection report to solve problems you may
encounter with network connections. The tables here list solutions to problems based on the error codes
and messages that may appear at the top of the report.
1 Error code
2 Message
Note: Error codes and messages listed here may not all apply to your product.
Error Codes and Messages
Error code and message Solution
E-1
Confirm that the network cable is
connected and network devices such as a
hub, router, or access point are turned on.
Make sure your router, access point, and/or hub are
turned on, and the network cable is securely connected to
your device and your product.
If you are trying to set up Wi-Fi, remove the network cable
and set up Wi-Fi again. Ethernet and Wi-Fi cannot be
connected at the same time.

38
Error code and message Solution
E-2, E-3, or E-7
No wireless network names (SSID) found.
Confirm that the router/access point is
turned on and the wireless network (SSID)
is set up correctly. Contact your network
administrator for assistance.
No wireless network names (SSID) found.
Confirm that the wireless network name
(SSID) of the PC you wish to connect is set
up correctly. Contact your network
administrator for assistance.
Entered security key/password does not
match the one set for your router/access
point. Confirm security key/password.
Contact your network administrator for
assistance.
Check the following:
• Make sure your router or access point is turned on and
is correctly connected to your computer or network
device.
• Turn off the router or access point, wait about 10
seconds, and turn it on again.
• Move your product closer to your router or access point,
and remove any obstacles between them. Also move
your product away from devices such as wireless
phones or microwaves.
• Confirm that the SSID shown on the network
connection report matches the label on your router or
access point. Also make sure your SSID uses only
ASCII characters and symbols, or your product cannot
display the SSID correctly.
• If you are trying to connect using the WPS push button
method, make sure your router or access point supports
it.
• If you are using a network password, check the label on
your router or access point to confirm that you are using
the correct password, or check with your network
administrator or router/access point documentation.
• If you are connecting to a smart device that generates
an SSID, check the device documentation for the SSID
and password you should use.
• If your wireless connection suddenly disconnects, and
another smart device was added to the network using a
WPS push button method, or your network was set up
using a non-WPS push button method, try downloading
and installing your product software again.

39
Error code and message Solution
E-5
Security mode (e.g. WEP, WPA) does not
match the current setting of the printer.
Confirm security mode, and contact the
network administrator for assistance.
If the security on your router or access point is not one of
the following types, change the type of security on your
router or access point and reset your product's network
settings.
• WEP-64 bit (40 bit)
• WEP-128 bit (104 bit)
• WPA PSK (TKIP/AES); also known as WPA Personal
• WPA2 PSK (TKIP/AES); also known as WPA2 Personal
• WPA (TKIP/AES)
• WPA2 (TKIP/AES)
• WPA3-SAE (AES)
• WPA2/WPA3-Enterprise
E-6
MAC address of your printer may be
filtered. Check whether your router/access
point has restrictions such as MAC address
filtering. See the documentation of the
router/access point or contact your network
administrator for assistance.
If your router or access point has MAC address filtering
enabled, register your product's MAC address so it is not
filtered. Locate the MAC address on the network
connection report and check your router or access point
documentation for instructions.
If your router or access point is using shared
authentication with WEP security, confirm that you are
using the correct authentication key and index.
If your router or access point limits the number of
connected devices, raise the connection limit. See your
router or access point documentation for instructions.
E-8
Incorrect IP address is assigned to the
printer. Confirm IP address setup of the
network device (hub, router, or access
point). Contact your network administrator
for assistance.
If your product's Obtain IP Address setting is set to Auto,
enable DHCP on your router or access point. If it is set to
Manual, the IP address may be out of range or on a
different network segment; set a valid IP address using
your product control panel or the Web Config utility.
You can also try turning off your product and the router or
access point, waiting about 10 seconds, and turning them
on again.

40
Error code and message Solution
E-9
Confirm the connection and network setup
of the PC or other device. Connection using
the EpsonNet Setup is available. Contact
your network administrator for assistance.
Make sure your computer or network device are turned
on. Also make sure that you can access the Internet and
other devices on the same network from the devices you
are trying to connect to your product.
If you still cannot connect to your product, turn off your
router or access point, wait about 10 seconds, and turn it
on again. Download and install your product software
again to reset your network settings.
E-10
Confirm IP address, subnet mask, and
default gateway setup. Connection using
the EpsonNet Setup is available. Contact
your network administrator for assistance.
Make sure other devices on the network are turned on and
do the following:
• If your product's Obtain IP Address setting is set to
Manual, check the IP address, subnet mask, and
default gateway addresses on the network connection
report to see if they are correct. If not, correct the
settings.
• If DHCP is enabled, set your product's Obtain IP
Address setting to Auto. If you want to use the DHCP-
assigned address as a static address, set the Obtain IP
Address setting to Manual, enter the product's IP
address as listed on the network connection report, and
set the subnet mask to 255.255.255.0.
If you still cannot connect to your product, turn off your
router or access point, wait about 10 seconds, and turn it
on again.
E-11
Setup is incomplete. Confirm default
gateway setup. Connection using the
EpsonNet Setup is available. Contact your
network administrator for assistance.
If you set your product's TCP/IP Setup setting to Manual,
check that the default gateway address listed on the
network connection report is correct. Also turn on the
device that is set as the default gateway.

41
Error code and message Solution
E-12
Confirm the following:
-Entered security key/password is correct
-Index of the security key/password is set to
the first number
-IP address, subnet mask, or default
gateway setup is correct
Contact your network administrator for
assistance.
Make sure other devices on the network are turned on and
do the following:
• Make sure the IP address, subnet mask, and default
gateway addresses are correct, if you are entering them
manually.
• Confirm that the subnet mask and default gateway
addresses for other devices are the same.
• Make sure the IP address does not conflict with other
devices.
If you still cannot connect to your product, do the
following:
• Turn off your router or access point, wait about 10
seconds, and turn it on again.
• Download and install your product software again to
reset your network settings.
• If your router or access point uses WEP security with
several registered passwords, make sure that the first
registered password is set on your product.
E-13
Confirm the following:
-Entered security key/password is correct
-Index of the security key/password is set to
the first number
-Connection and network setup of the PC
or other device is correct
Contact your network administrator for
assistance.
Make sure your router, access point, and/or hub are
turned on. Also make sure the TCP/IP setup on your
router, access point, and/or hub is not set manually; this
may cause your product's network settings to differ from
the manually set up devices.
If you still cannot connect to your product, do the
following:
• Turn off your router or access point, wait about 10
seconds, and turn it on again.
• Download and install your product software again to
reset your network settings.
• If your router or access point uses WEP security with
several registered passwords, make sure that the first
registered password is set on your product.

42
Network Environment Messages
Message Solution
The Wi-Fi environment needs to be
improved. Turn the wireless router off and
then turn it on. If the connection does not
improve, see the documentation for the
wireless router.
Move your product closer to your router or access point,
and remove any obstacles between them. Then turn off
your router or access point, wait about 10 seconds, and
turn it back on again. If you still cannot connect to your
product, check the documentation that came with your
router or access point for solutions.
*No more devices can be connected.
Disconnect one of the connected devices if
you want to add another one.
You can connect up to 8 computers or other devices to
your product using a Wi-Fi Direct (Simple AP) connection.
If you want to add another device, disconnect an existing
connected device first.
The same SSID as Wi-Fi Direct exists in
the environment. Change the Wi-Fi Direct
SSID if you cannot connect a smart device
to the printer.
Change the Wi-Fi Direct SSID. You can change the
network name after "DIRECT-XX-". The custom name
must be 22 characters or less.
Parent topic: Printing a Network Connection Report
Changing or Updating Network Connections
See these sections to change or update how your product connects to a network.
Note: See the online Administrator's Guide for detailed information.
Accessing the Web Config Utility
Changing a USB Connection to a Wi-Fi Connection
Changing a Wi-Fi Connection to a Wired Network Connection
Connecting to a New Wi-Fi Router
Disabling Wi-Fi Features
Parent topic: Wi-Fi or Wired Networking
Accessing the Web Config Utility
You can select your product's network settings and confirm its operating status using a web browser.
You do this by accessing your product's built-in Web Config utility from a computer or other device that is
connected to the same network as your product.

43
Note: For more information on the Web Config utility, see the online Administrator's Guide.
1. Print a network status sheet.
2. Locate the IP address for your product that is listed on the network status sheet.
3. On a computer or other device connected to the same network as your product, open a web
browser.
4. Enter your product's IP address into the address bar and press Enter.
You see the available Web Config utility options.
Note: The administrator password is required to access the full capabilities of the Web Config utility.
The default password is the product's serial number. Check the label on your product to locate the
serial number.
Parent topic: Changing or Updating Network Connections
Changing a USB Connection to a Wi-Fi Connection
If you have already connected your product to your computer using a USB connection, you can change
to a Wi-Fi connection.
1. Disconnect the USB cable from your product.
2. Uninstall your product software.
3. Download and install your product software from the Epson website using the instructions on the
Start Here sheet.
Parent topic: Changing or Updating Network Connections
Changing a Wi-Fi Connection to a Wired Network Connection
If you have already connected your product to your computer wirelessly, you can change to a wired
network connection if necessary.
1. Press the home button, if necessary.
2. Select the network icon.
Note: Icon may look different depending on connection status.
3. Select Description.

44
4. Select Wired LAN Connection Method > Start Setup.
The Wi-Fi connection is disabled and a confirmation message appears. Select OK and then press
the home button to exit.
5. Connect one end of an Ethernet network cable to the product's LAN port.
6. Connect the other end to any available LAN port on your router or access point.
Parent topic: Changing or Updating Network Connections
Connecting to a New Wi-Fi Router
If you change the wireless router you have been using on your network, you need to update your
product's Wi-Fi connection to the new router.
1. Do one of the following:
• Windows: Uninstall your product software.
• Mac: Go to the next step.
2. Download and install your product software from the Epson website using the instructions on the
Start Here sheet.
Parent topic: Changing or Updating Network Connections
Disabling Wi-Fi Features
You may need to disable your product's Wi-Fi features if you change your network connection type or
need to solve a problem with your network connection.
Note: Before disabling Wi-Fi features, make a note of your product's SSID (network name) and
password.
Note: This setting can be locked by an administrator. If you cannot access or change this setting,
contact your administrator for assistance.
1. Press the home button, if necessary.
2. Select the network icon.
Note: Icon may look different depending on connection status.
3. Select Router > Change Settings > Others > Disable Wi-Fi.


46
Media Handling
See these sections to load and handle media on your product.
Media Handling Precautions
Roll Paper Handling
Cut Sheet Handling
Creating Custom Media Settings
Available Epson Papers
Borderless Paper Type Compatibility
Supported Paper Widths for Borderless Printing
Media Handling Precautions
Follow these guidelines as you load media in your product and remove printed media:
• Maintain a constant room temperature when using Epson special media; optimal conditions are
between 59 °F (15 °C) and 77 °F (25 °C), with 40 to 60% humidity. Changes in temperature and
humidity may cause paper to become wavy or curled.
• Avoid touching the printable surface of the paper with your bare hands; moisture and oils from your
hands can affect print quality.
• Handle paper by the edges but do not rub your hands along the edges of the media; the sharp edges
could cut you. Wear cotton gloves when handling media, if possible.
• Do not fold the media or otherwise damage its printable surface; do not get the media wet.
• Make sure media is clean from debris and dust before loading.
• Do not throw away the paper packaging as you can use it to store the paper.
• If you are loading Epson UltraSmooth Fine Art Paper, disable the Auto Loading setting or the
pressure roller may leave marks on the surface of the paper.
• Do not remove or insert the paper cassette while printing from the paper cassette. It may cause print
quality to decline or cause a paper jam. If you remove the paper cassette while printing, wait until
printing is complete to reinsert the paper cassette.
• When loading paper in the paper cassette, follow the steps on the LCD screen and always remove the
paper cassette from the printer to load paper in it. If paper is loaded while the paper cassette is still in
the printer, it could cause print quality to decline or cause a paper jam.

47
• Load media just before printing on it to avoid creases from the pressure rollers; creases may cause
jams or cause the media to rub against the print head. Remove roll paper that is not in use from the
printer; if roll paper is left in the printer for a long period of time, paper quality may decline. Rewind the
media and store it in its original packaging.
• Do not load media if the edges are uneven on the roll; this could cause feeding problems. Rewind the
media on the roll or use a different roll.
• Place unused media in its original packaging for storage. Keep the media dry and avoid storage
locations that are subject to direct sunlight, excessive heat, or high humidity. Store cut sheets flat to
prevent curling.
• Do not use media that is too thick, too thin, wrinkled, torn, cut, folded or creased, curled, or has a
sticker or tape on it; otherwise, the media may jam or the prints may be soiled. (See the link below for
paper specifications.) Flatten the paper before use by bending it in the opposite direction. For roll
paper, cut off any damaged ends and reload the roll. For cut sheets, use new paper.
• Make sure to remove any protective tape from the media before loading, otherwise paper jams could
occur.
• Dry printed media completely before folding or stacking it. Do not touch, rub, or scratch the printed
surface, otherwise you may damage the print.
• Do not place prints in an album before they are completely dry, otherwise you may blur the ink.
• Do not use a dryer to dry the prints.
• Display and store printed media as instructed in the media documentation.
• Avoid placing prints in direct sunlight.
• Typically, prints and photos can fade over time due to the effects of light and various environmental
factors. This also applies to Epson special media, however, the degree of color distortion can be
minimized by following proper storage procedures. See the documentation supplied with Epson
special media for detailed information on handling the paper after printing.

48
Note: The colors of photos, posters, and other printed materials may appear different under different
lighting conditions.
Parent topic: Media Handling
Roll Paper Handling
See these sections to load, cut, and remove roll paper in your product.
Removing the Roll Media Adapter - 2-inch Core
Installing the Roll Media Adapter - 3-inch Core
Loading Roll Paper on the Spindle
Installing the Borderless Spacer
Loading Roll Paper
Cutting Roll Paper
Removing Roll Paper
Parent topic: Media Handling
Removing the Roll Media Adapter - 2-inch Core
For roll canvas media with a 2-inch core, you need to remove the roll media adapter from the paper stop
to match the core size of your roll canvas media.
Note: Thin media (less than 250 gsm) is not supported for this core size.
1. Remove the black paper stop from the spindle.
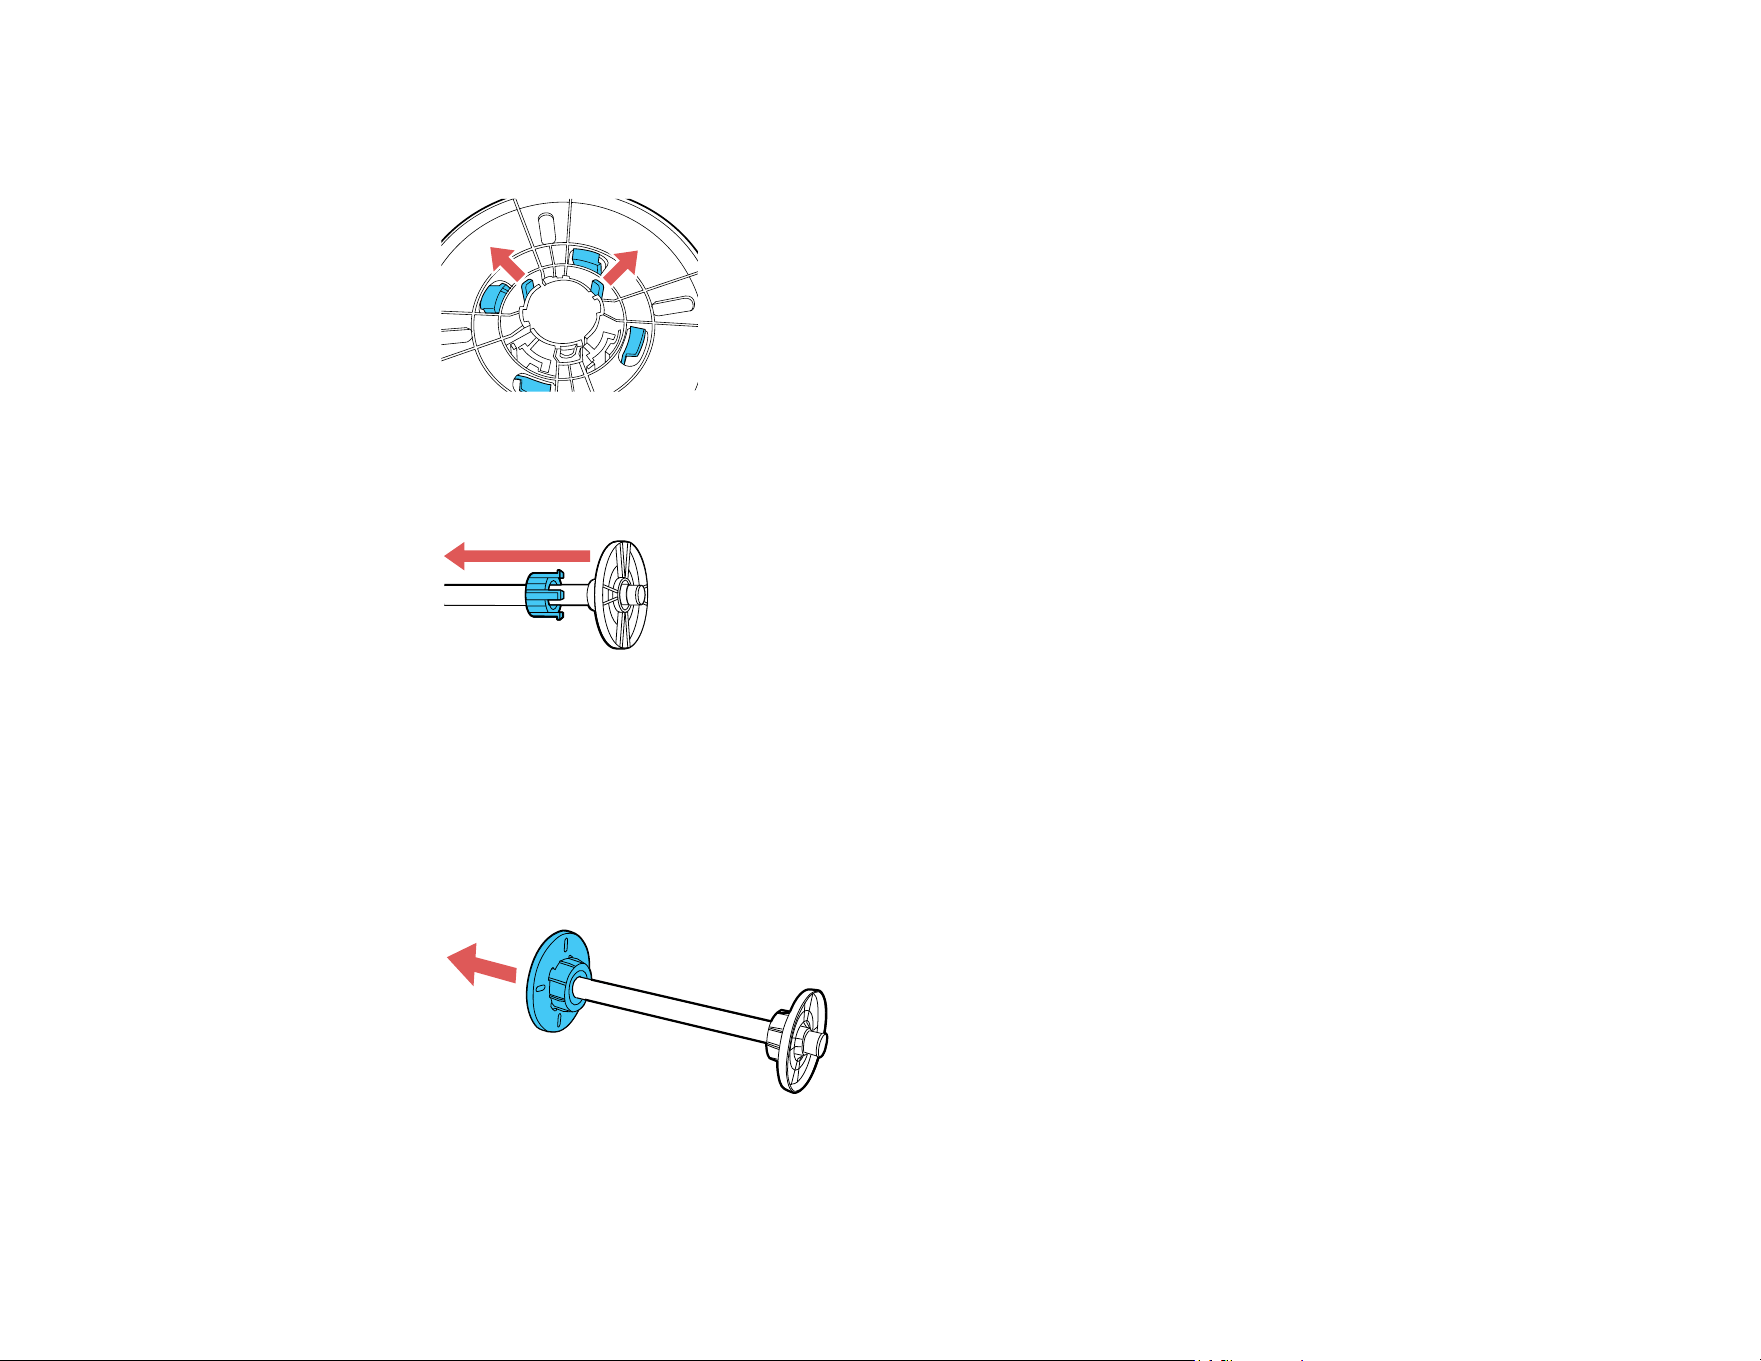
49
2. Push out the two hooks on the black paper stop and remove the gray adapter from the paper stop.
3. To remove the gray adapter from the other paper stop, slide it off the spindle.
Parent topic: Roll Paper Handling
Installing the Roll Media Adapter - 3-inch Core
For roll paper with a 3-inch core, you need to install the roll media adapter onto the paper stop to match
the core size of your roll paper.
1. Remove the black paper stop from the spindle.

50
2. Align the triangles on the gray adapter with the triangles on the paper stop and press until the hooks
click into place.
3. Insert the other gray adapter onto the spindle and attach it to the other paper stop.
Parent topic: Roll Paper Handling
Loading Roll Paper on the Spindle
Load roll canvas media on the spindle included with the roll paper unit.
1. Remove any tape and protective paper from the end of the roll. Make sure the paper is cut straight
across to avoid paper feeding problems.
Note: Avoid touching the surface of your paper or resting it on a dusty area. With canvas media that
you have previously loaded, it’s a good idea to cut the edge straight each time you reload it.
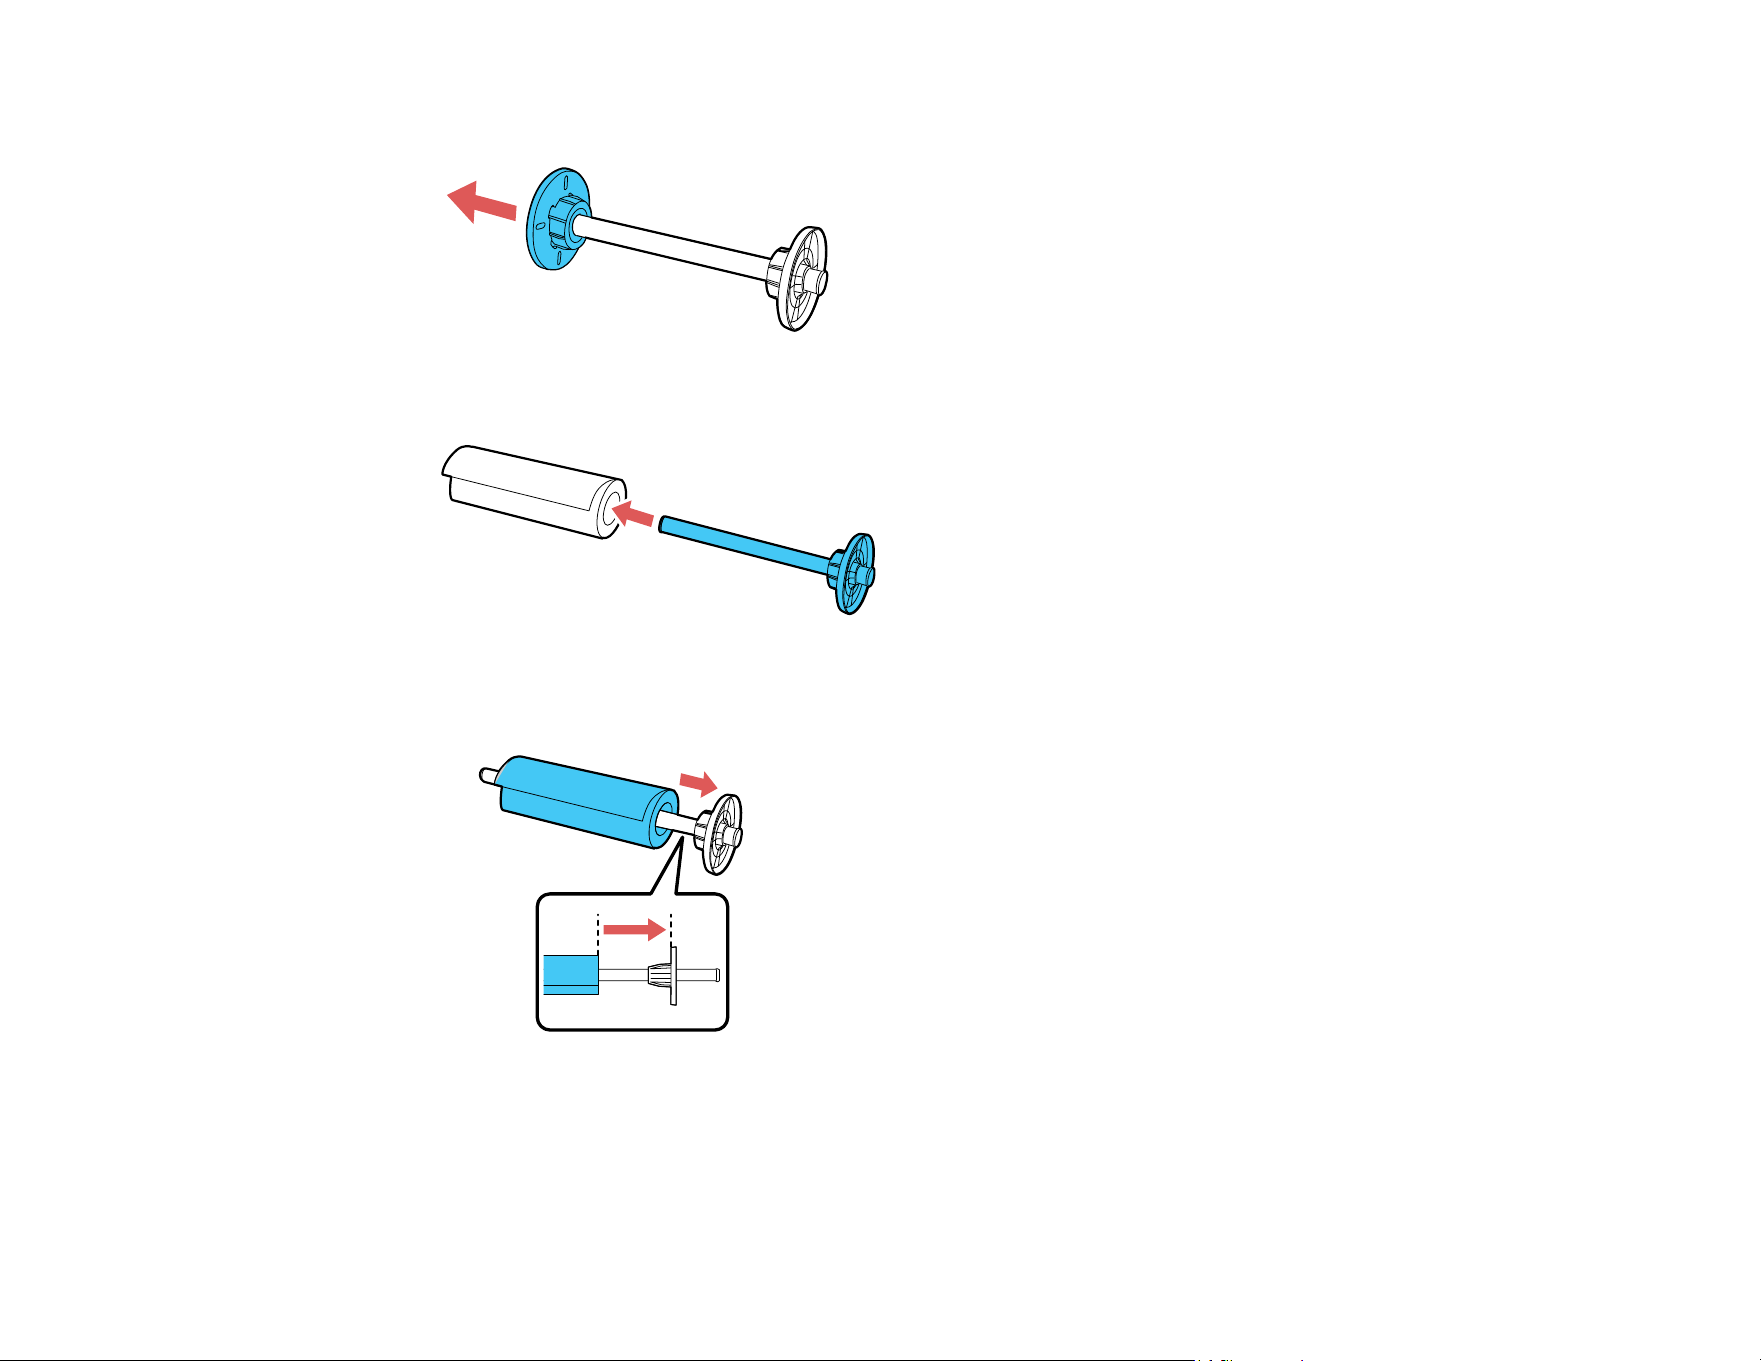
51
2. Remove the black paper stop from the spindle.
3. Insert the spindle into the roll paper core so that the end of the roll paper is facing towards you.
4. Press the roll paper against the fixed paper stop until that there is no gap between the paper stop
and the roll paper.
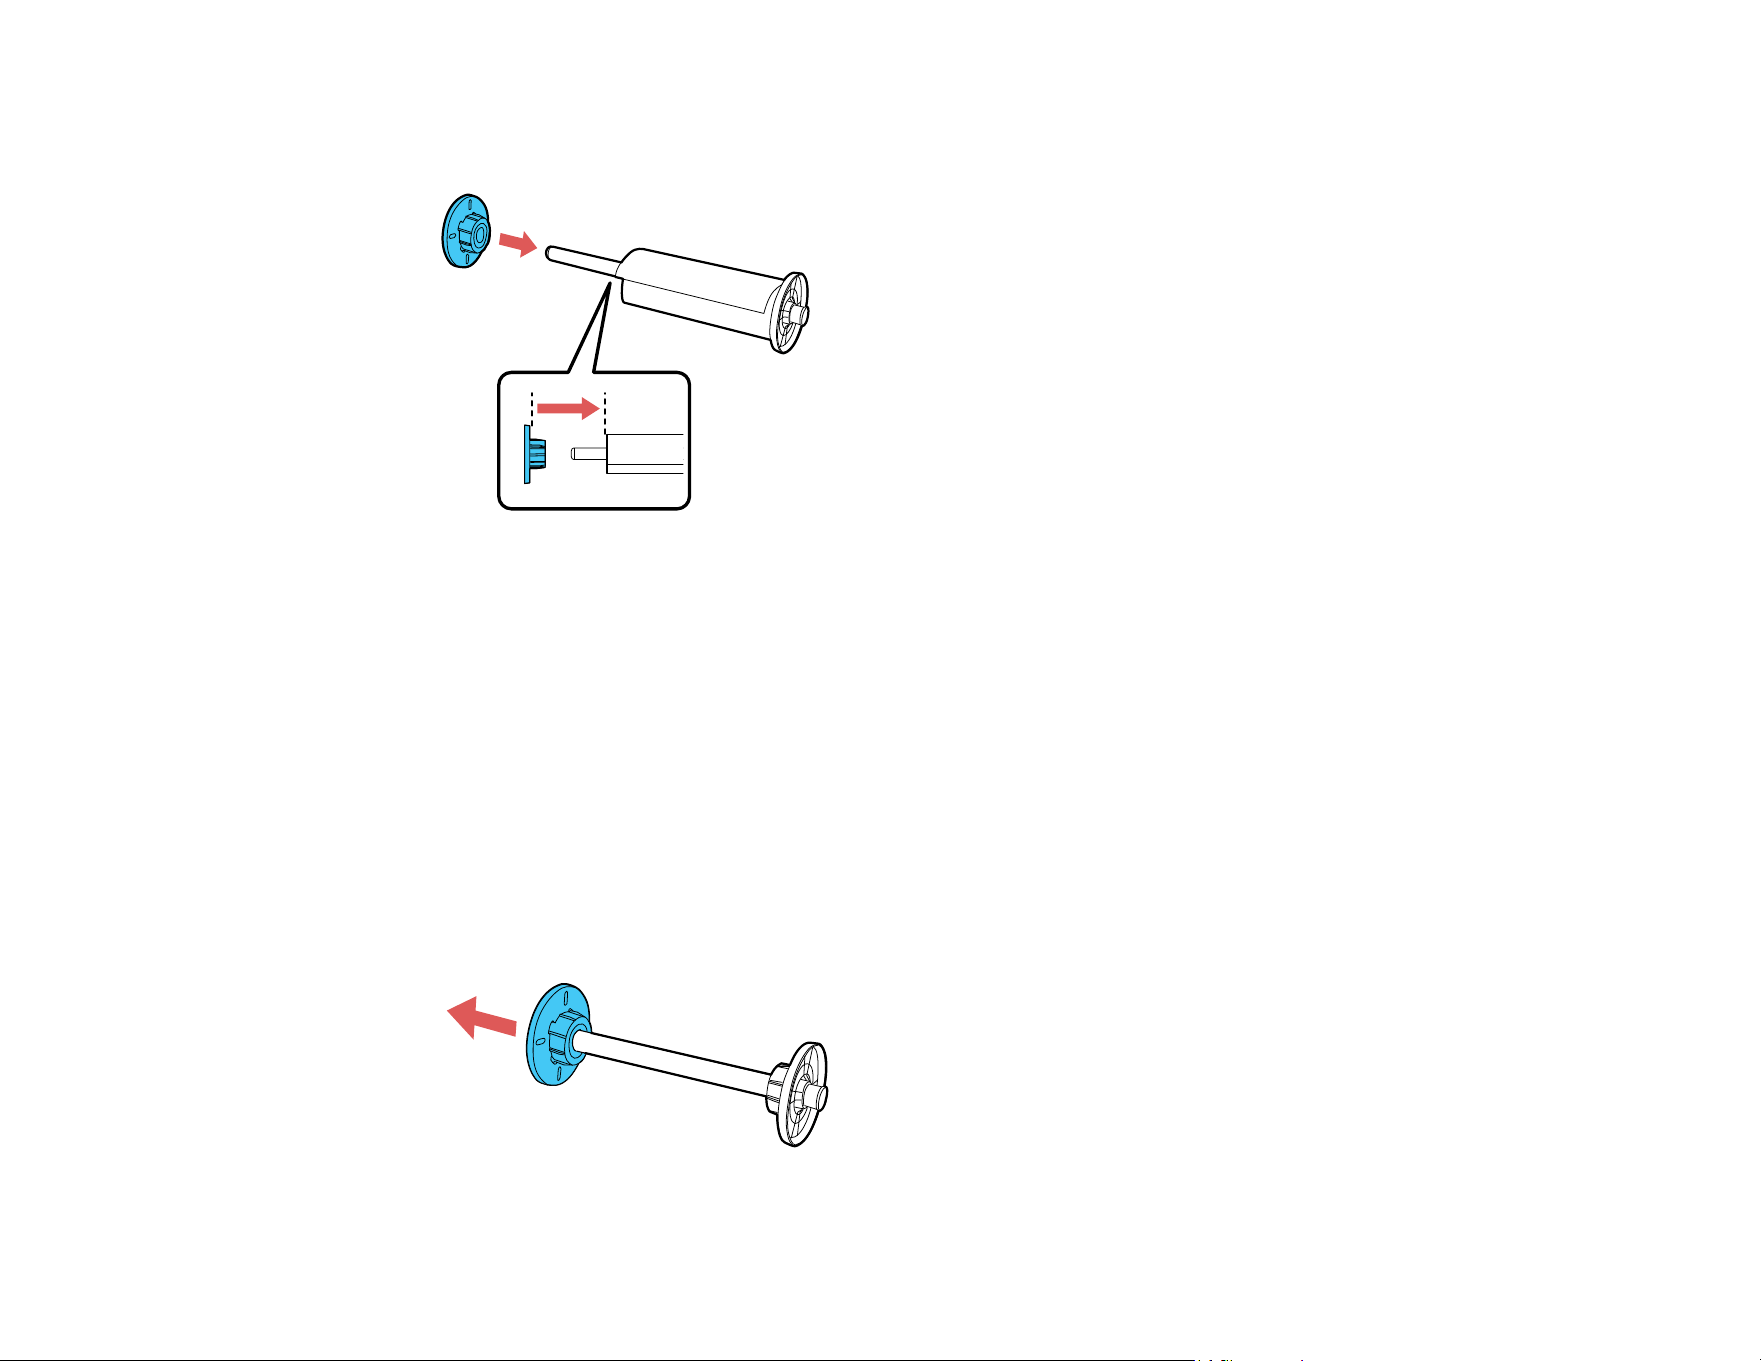
52
5. Insert the black paper stop onto the spindle and press in until there is no gap between the paper stop
and the roll paper.
Parent topic: Roll Paper Handling
Installing the Borderless Spacer
When you perform borderless printing on roll paper with the following widths, you may need to install the
borderless spacer:
• A2 (16.5 in. [420 mm])
• US B (11 in. [279.4 mm])
• 8 in. (203.2 mm)
Note: Only 2-inch core media is supported when using the borderless spacer.
1. Remove the black paper stop from the spindle.
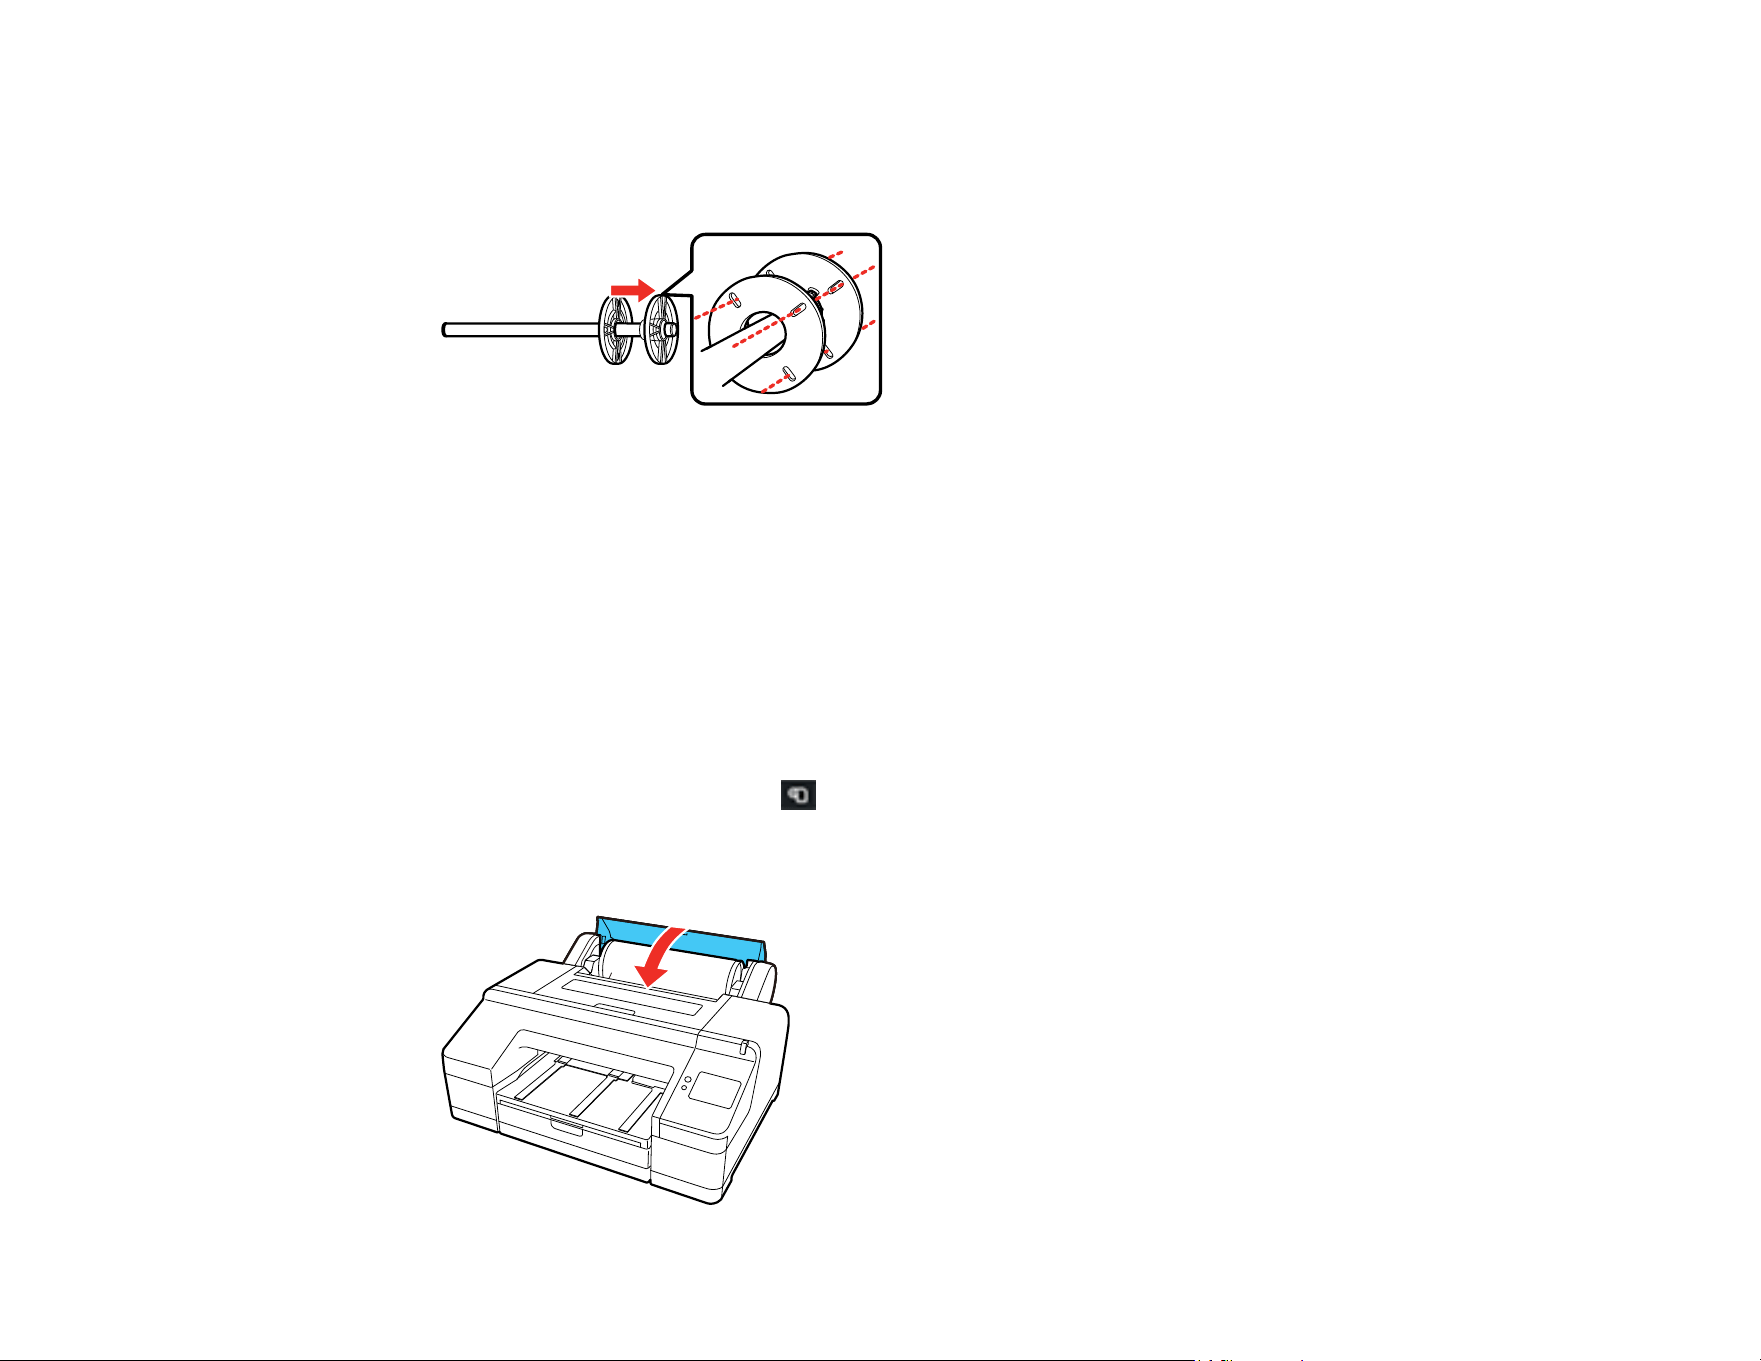
53
2. Remove any roll media adapters from the black and gray paper stops, if necessary.
3. Slide the spacer all the way onto the spindle until it reaches the gray paper stop on the other end.
Make sure the holes in the spacer and paper stop line up exactly.
To remove the spacer, remove the black paper stop from the spindle and then remove the spacer by
holding its outer edge and pulling it straight off.
Parent topic: Roll Paper Handling
Related references
Borderless Paper Type Compatibility
Loading Roll Paper
You can load roll paper with a 2- or 3-inch core and a width of up to 17 inches (43 cm).
1. Make sure the printer is turned on.
2. On the control panel, select the icon.
3. Select How To... and follow the on-screen instructions to load roll paper.
4. Close the roll paper cover.
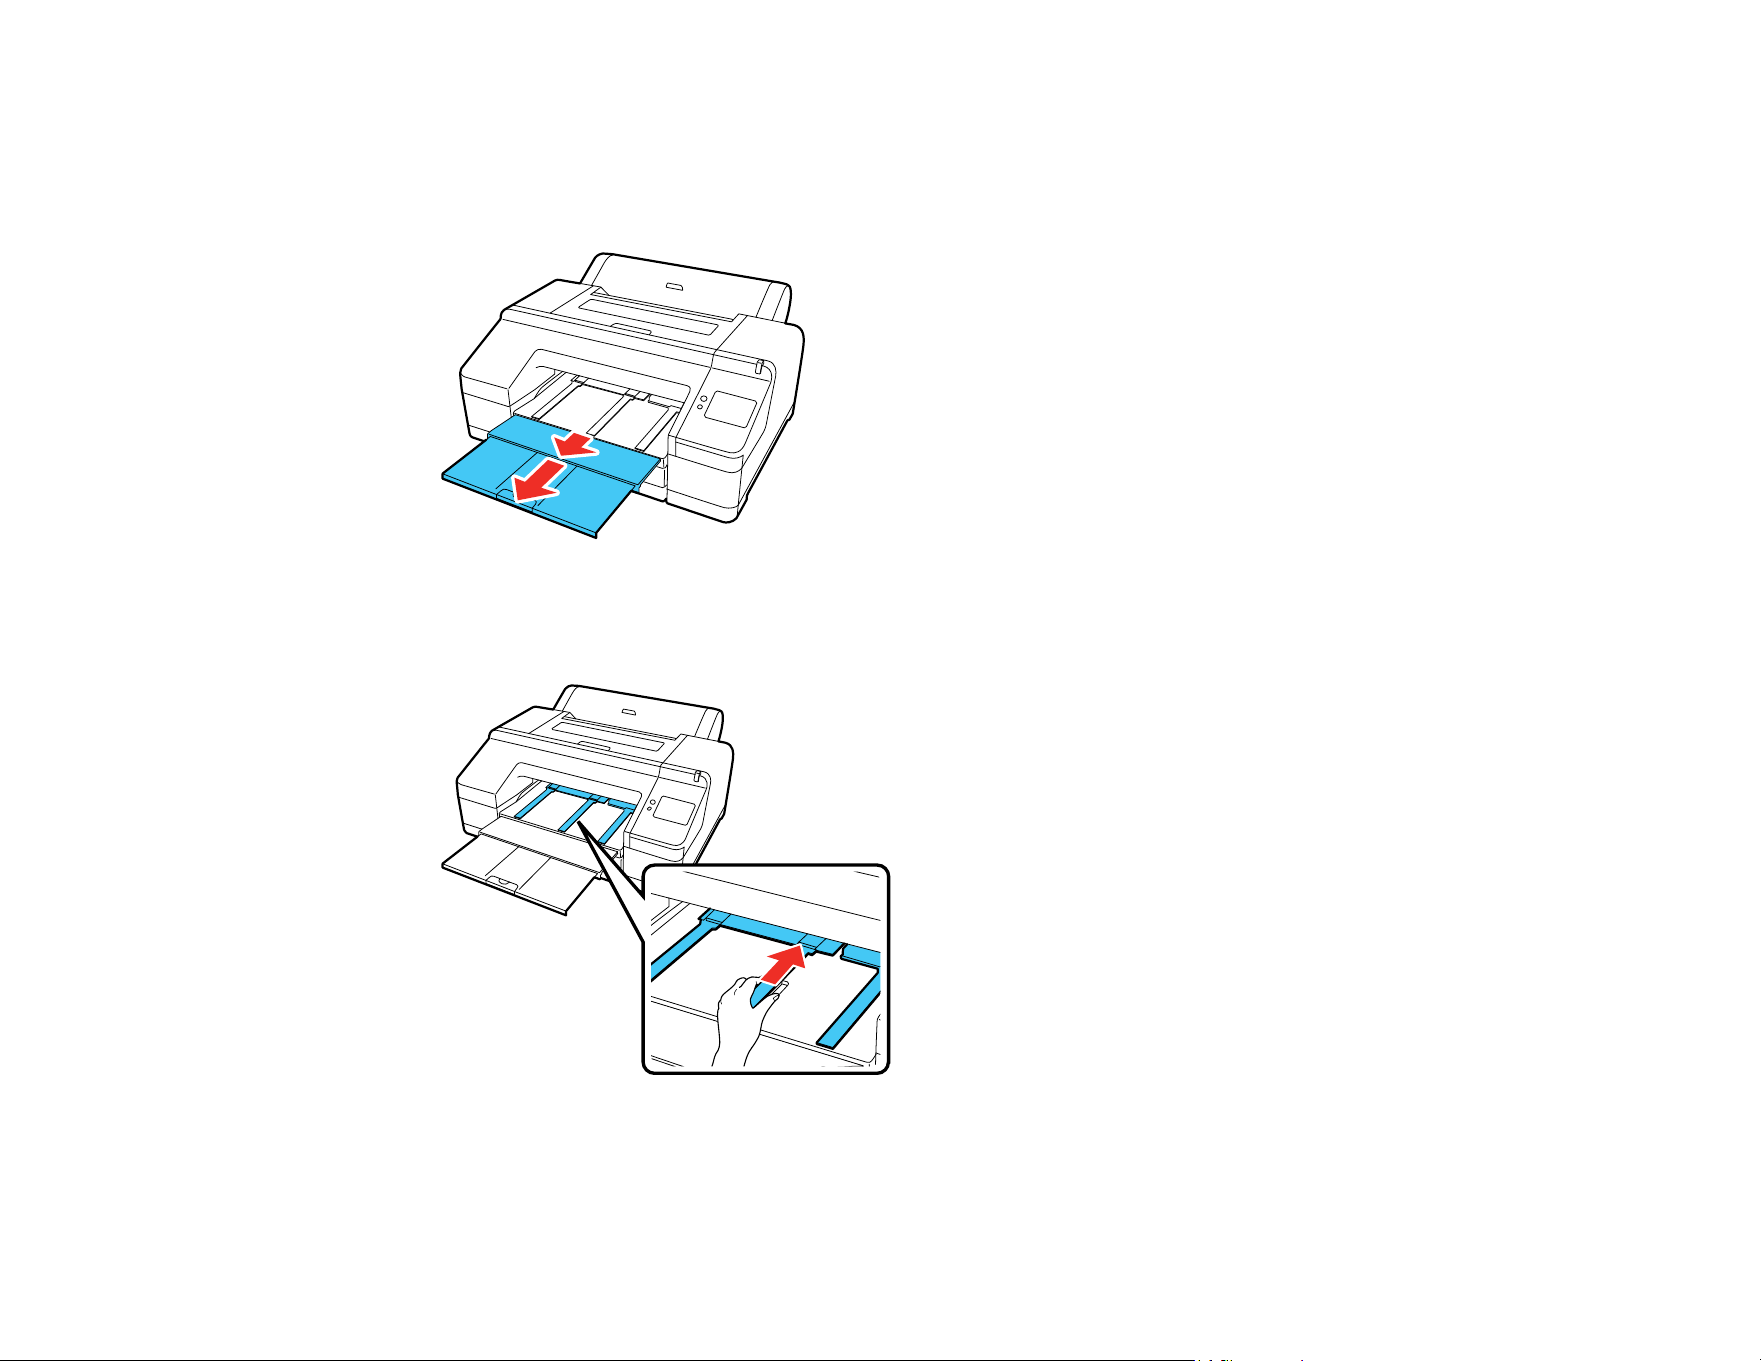
54
Note: To prevent dust from accumulating inside the printer, always keep the roll paper cover closed
unless you are loading or unloading media.
5. Slide out the output tray. Do not raise the paper stopper or the roll paper may not eject correctly.
Note: If you are printing on plain paper or thin media types, raise the paper eject support. This
prevents paper from curling up in the output tray, which can cause paper jams and print head strikes.
When you are done loading roll paper, the paper setting screen appears.

55
6. Set the paper settings for the roll paper you loaded.
Note: The output tray can only hold one sheet of roll paper at a time. Remove each sheet as it is
ejected without letting the sheets stack up on the output tray. Do not allow cut sheets and roll paper
to stack up together.
Parent topic: Roll Paper Handling
Related references
Available Epson Papers
Paper Specifications
Roll Paper Options - Windows
Related tasks
Selecting Roll Paper Settings - Mac
Removing Roll Paper
Cutting Roll Paper
The printer has a built-in cutter that can automatically cut most paper types or you can cut your prints
manually. When Auto Cut is turned on, paper is automatically cut after each page prints, or if the roll
paper leading edge is not straight.
To switch between automatic or manual cutting methods, select Menu > General Settings > Printer
Settings > Paper Source Settings > Roll Paper Setup > Cut Settings > Auto Cut on the control panel
or adjust the auto cut settings in the printer driver. The setting selected in the printer driver overrides the
control panel setting.
Caution: Do not use the built-in cutter with these paper types or you may damage or dull the blade:
• Fine art paper
• Canvas
• Matte poster board
When you print on these paper types, you need to disable the Auto Cut setting and cut the print
manually. You can print cutting guidelines to help you.
Note: If the Quick Cut setting is enabled, the top area may become slightly uneven depending on the
image since the print stops while the leading edge of the roll paper is cut. If you do not want to have an
uneven leading edge, disable Quick Cut.

56
Cutting Roll Paper Manually
Printing Cutting Guidelines
Parent topic: Roll Paper Handling
Related references
Roll Paper Options - Windows
Related tasks
Selecting Roll Paper Settings - Mac
Cutting Roll Paper Manually
You can disable the Auto Cut option to keep your prints on the roll until you manually cut them using the
built-in cutter.
1. Turn off the Auto Cut setting in the printer driver or the control panel, depending on the situation:
• If you want to cut the paper manually, turn off the setting in the printer driver. Select Advanced >
Roll Paper Option > Auto Cut.
Note: The Auto Cut setting in the printer driver takes priority over the setting in the control panel.
The printer driver setting returns to automatic cutting when you close the application.
• If you are using a paper type that cannot be cut with the built-in cutter, turn off the setting in the
control panel. From the roll paper information area, select Advanced Paper Settings > Auto Cut
> Off.
2. Print your file.
3. Select the cut icon.
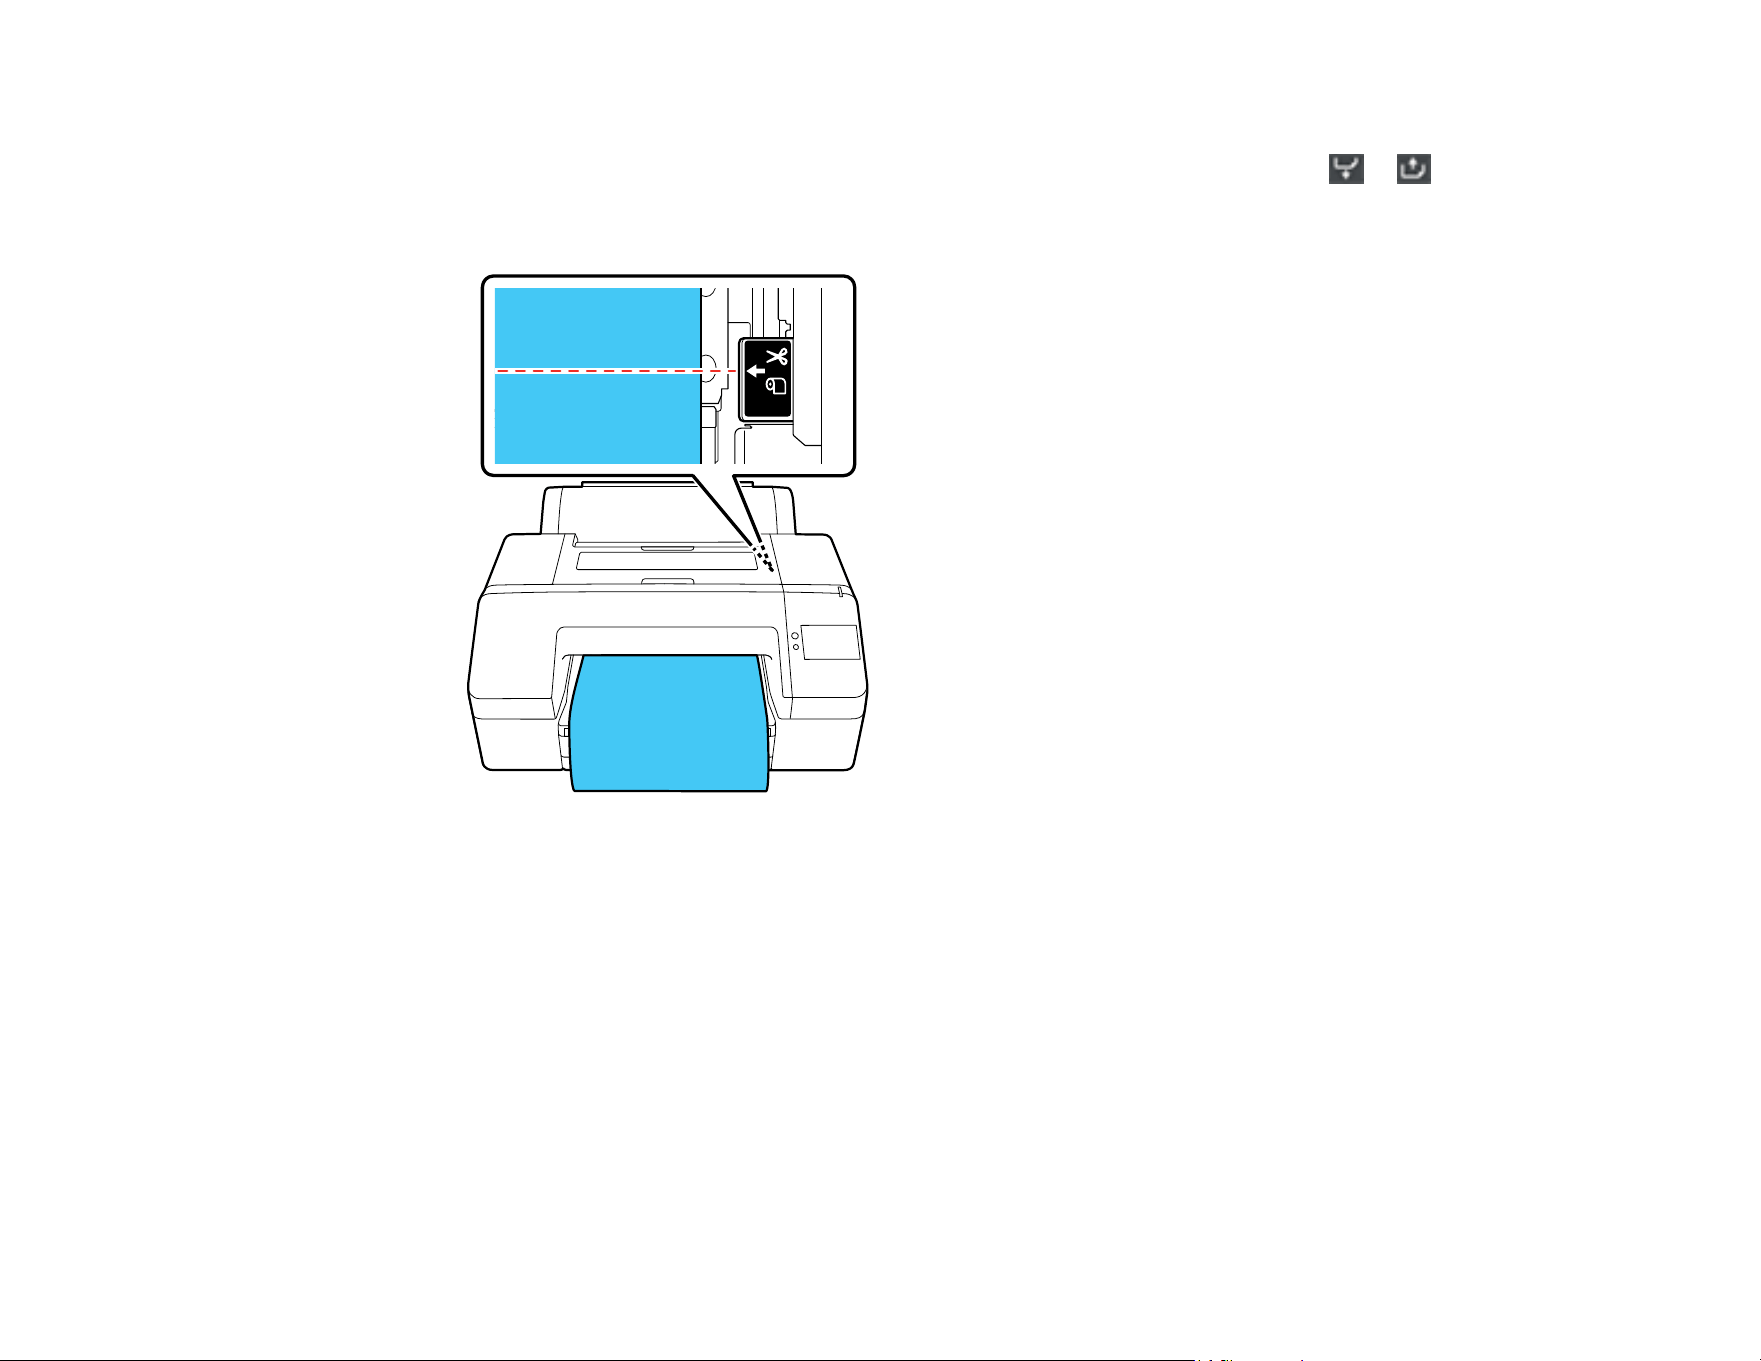
57
4. Do one of the following:
• If you want to move the paper into a different cutting position, press and hold the or icon
until the cut location reaches the cutting position labeled on the printer, and then select Cut.
• If you don't need to reposition the paper, select Cut to cut the paper with the built-in cutter.
Note: The minimum length of paper you can cut with the built-in cutter is 3.15 in. (80 mm) or 5 inches
(127 mm), depending on the paper type. These minimum lengths cannot be changed. Paper is
automatically fed if the length is shorter than the minimum. Cut any excess paper by hand, as
necessary.
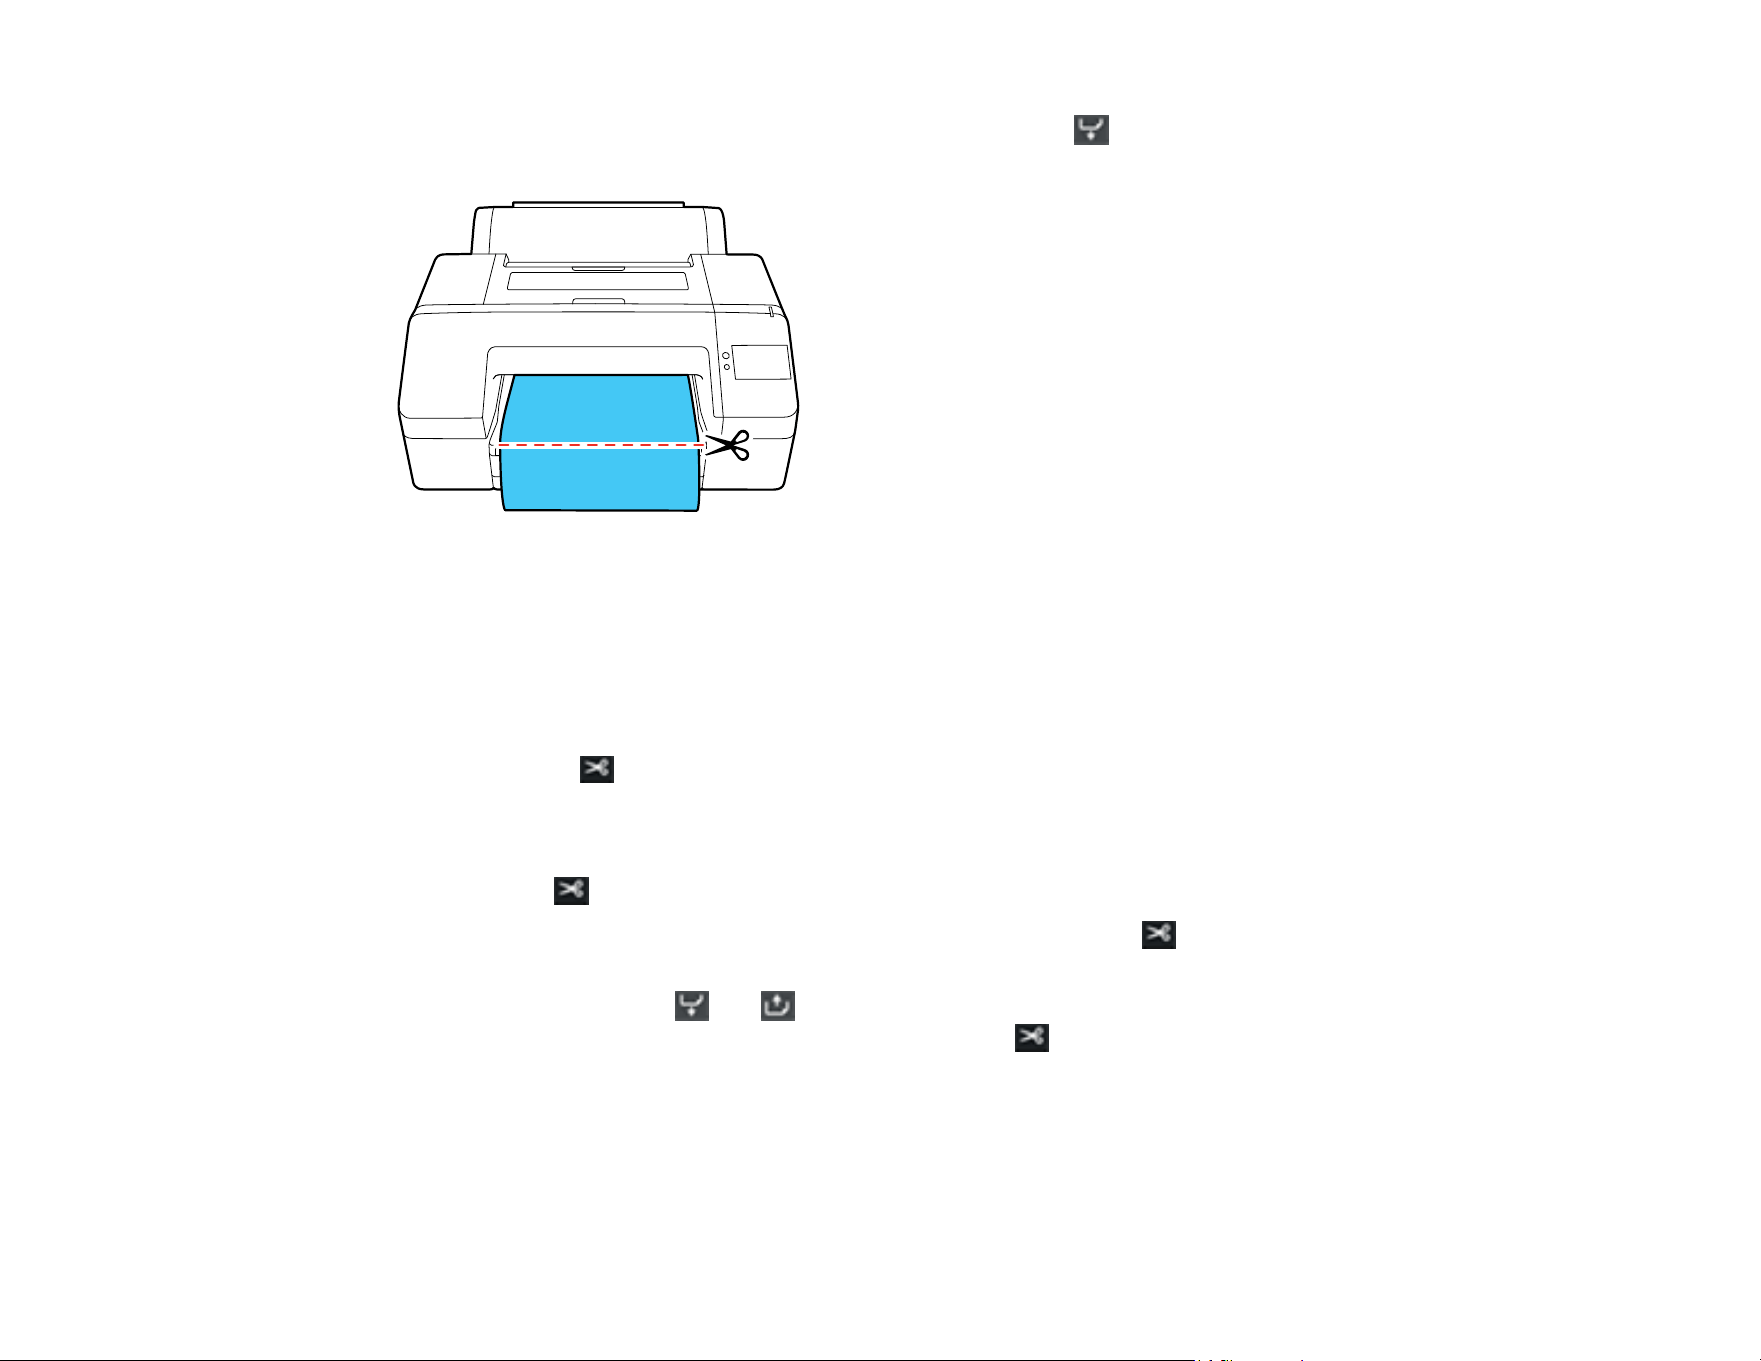
58
Note: If the paper cannot be cut by the built-in cutter, press the icon until your print is clear of the
printer, then cut the print by hand.
Parent topic: Cutting Roll Paper
Printing Cutting Guidelines
When you disable the Auto Cut setting, you can print a cutting guideline between print jobs as a guide for
manual cutting.
1. Do one of the following to disable the Auto Cut setting:
• Select the cut icon > Cut Settings > Auto Cut > Off.
• Select Off as the Auto Cut setting from the printer driver's Main tab.
2. Print your file.
3. Select the cut icon and do one of the following:
• If you do not need to reposition the cutting guideline, select the cut icon.
• If you need to reposition the cutting guideline, look through the printer cover while keeping it
closed and use the and feed icons to align the desired cutting guideline position with the
arrow mark on the printer. Once aligned, select the cut icon.
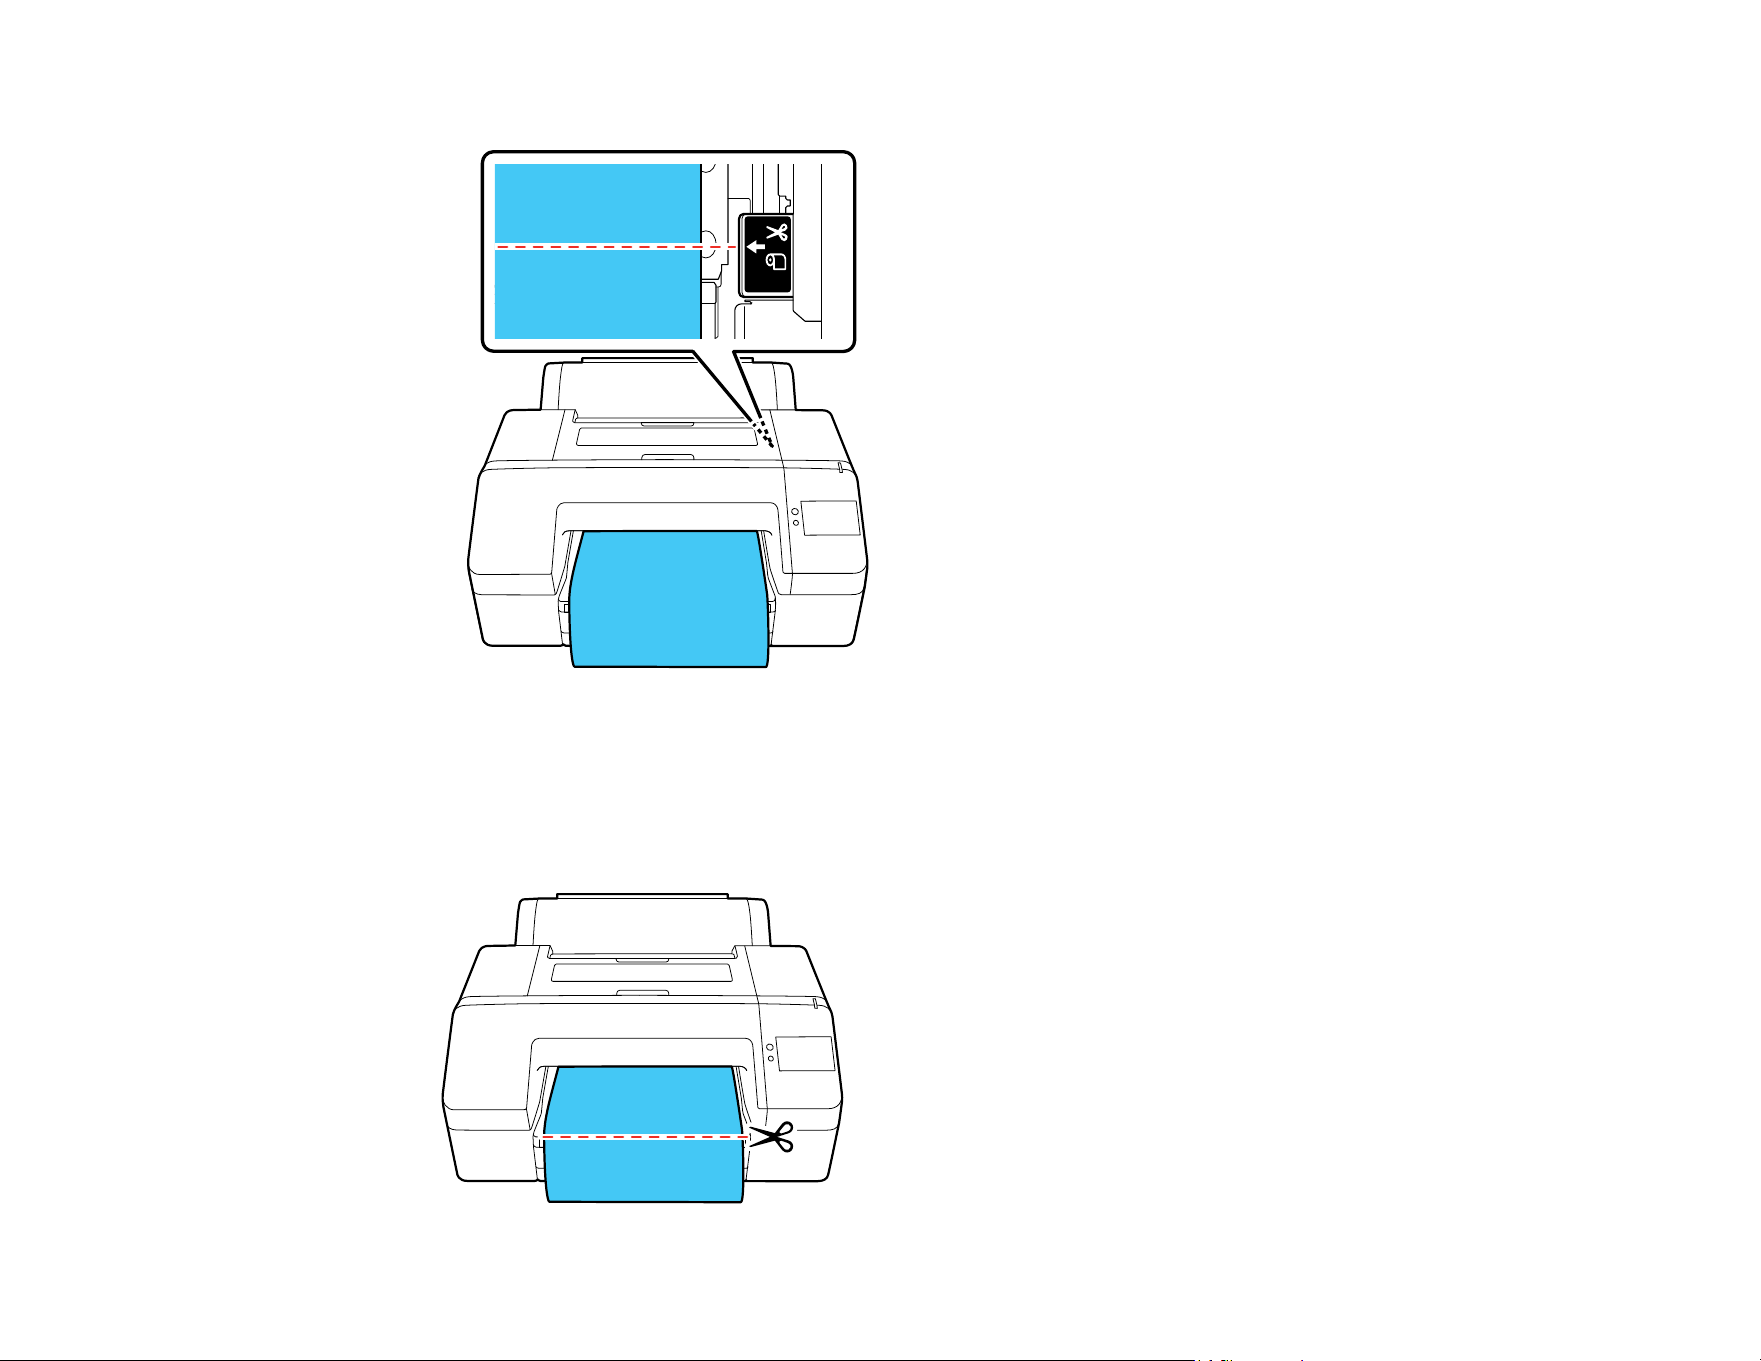
59
Note: You cannot print a cutting guideline inside the bottom margin.
4. Select Print Cutting Guideline.
The cutting guideline is printed and the paper is automatically ejected.
5. Use scissors to cut along the cutting guideline and then select Done.

60
The roll rewinds and the paper's leading edge returns to the print wait position.
Parent topic: Cutting Roll Paper
Related references
Paper Setting Menu
Removing Roll Paper
When you finish printing on roll paper, remove it from the printer to avoid indenting or creasing the paper.
Note: If you enabled Remaining Amount Management, the printer prints a barcode on the leading
edge of the roll when you remove the roll paper. When you reload the paper, the printer reads the
barcode and automatically sets the paper type and amount remaining.
1. Confirm that Ready to print appears on the LCD screen and then select Eject Paper.
Note: If printed paper is not cut and remains loaded in the printer, a confirmation message appears.
Select Cut to cut the paper at the default cut position or select Print Cutting Guideline to print a
cutting guideline at the default position. If you want to change the position of the cut or cutting
guideline, select Close to cancel the message and then select the cut icon to change the
position.
2. Select How To... on the control panel and follow the on-screen instructions to remove the roll paper.
Parent topic: Roll Paper Handling
Cut Sheet Handling
You can load a variety of types and sizes of cut sheet paper in your product.
Loading Cut Sheets in the Paper Cassette
Loading Cut Sheets in the Rear Manual Feeder
Loading Media in the Front Manual Feeder
Parent topic: Media Handling
Loading Cut Sheets in the Paper Cassette
You can print on a variety of paper types and sizes from 8 × 10 inches (203 × 254 mm) to A2
(16.5 × 23.4 inches [420 × 594 mm])/17 × 22 inches (432 × 559 mm), 8 to 17 in. (203 to 432 mm) wide,
10 to 23.4 in. (154 to 594 mm) long, and 0.003 to 0.01 in. (0.08 to 0.27 mm) thick from the paper
cassette.

61
Note:
• Do not load the following paper types in the paper cassette. Instead, feed and print these types of
paper as Cut Sheet or Poster Board:
• Epson Legacy Baryta II, Epson Legacy Platine, Epson Legacy Fibre, Epson Legacy Etching, or
Epson Legacy Textured
• Epson Exhibition Fiber Paper or Epson Exhibition Canvas Matte
• Epson Hot Press Bright or Epson Hot Press Natural
• Epson Cold Press Bright or Epson Cold Press Natural
• Epson Velvet Fine Art Paper
• Epson UltraSmooth Fine Art Paper
• Epson Watercolor Paper Radiant White
• We recommend refilling the paper cassette once paper has completely run out, rather than adding on
top of paper already in the cassette.
• If the paper eject support is raised, lower it before printing.
• The output tray can hold up to 50 cut sheets when printing on paper from the paper cassette.
However, when a paper's maximum number of sheets that can be loaded in the paper cassette is less
than 50, the maximum number of sheets the output tray can hold is the same as the number of sheets
in the paper cassette. Do not allow more than 50 cut sheets to stack up on the output tray and do not
mix roll paper and cut sheets on the output tray.
1. Make sure the printer is turned on.
2. On the control panel, select Menu > Paper Setting.
3. Select Paper Cassette and then select How To Load.
4. Follow the on-screen instructions to load the paper and then select the paper settings.
Note:
• The paper capacity is approximately 250 sheets of plain paper (depending on the paper thickness)
or 100 sheets of Epson Ultra Premium Photo Paper Luster.
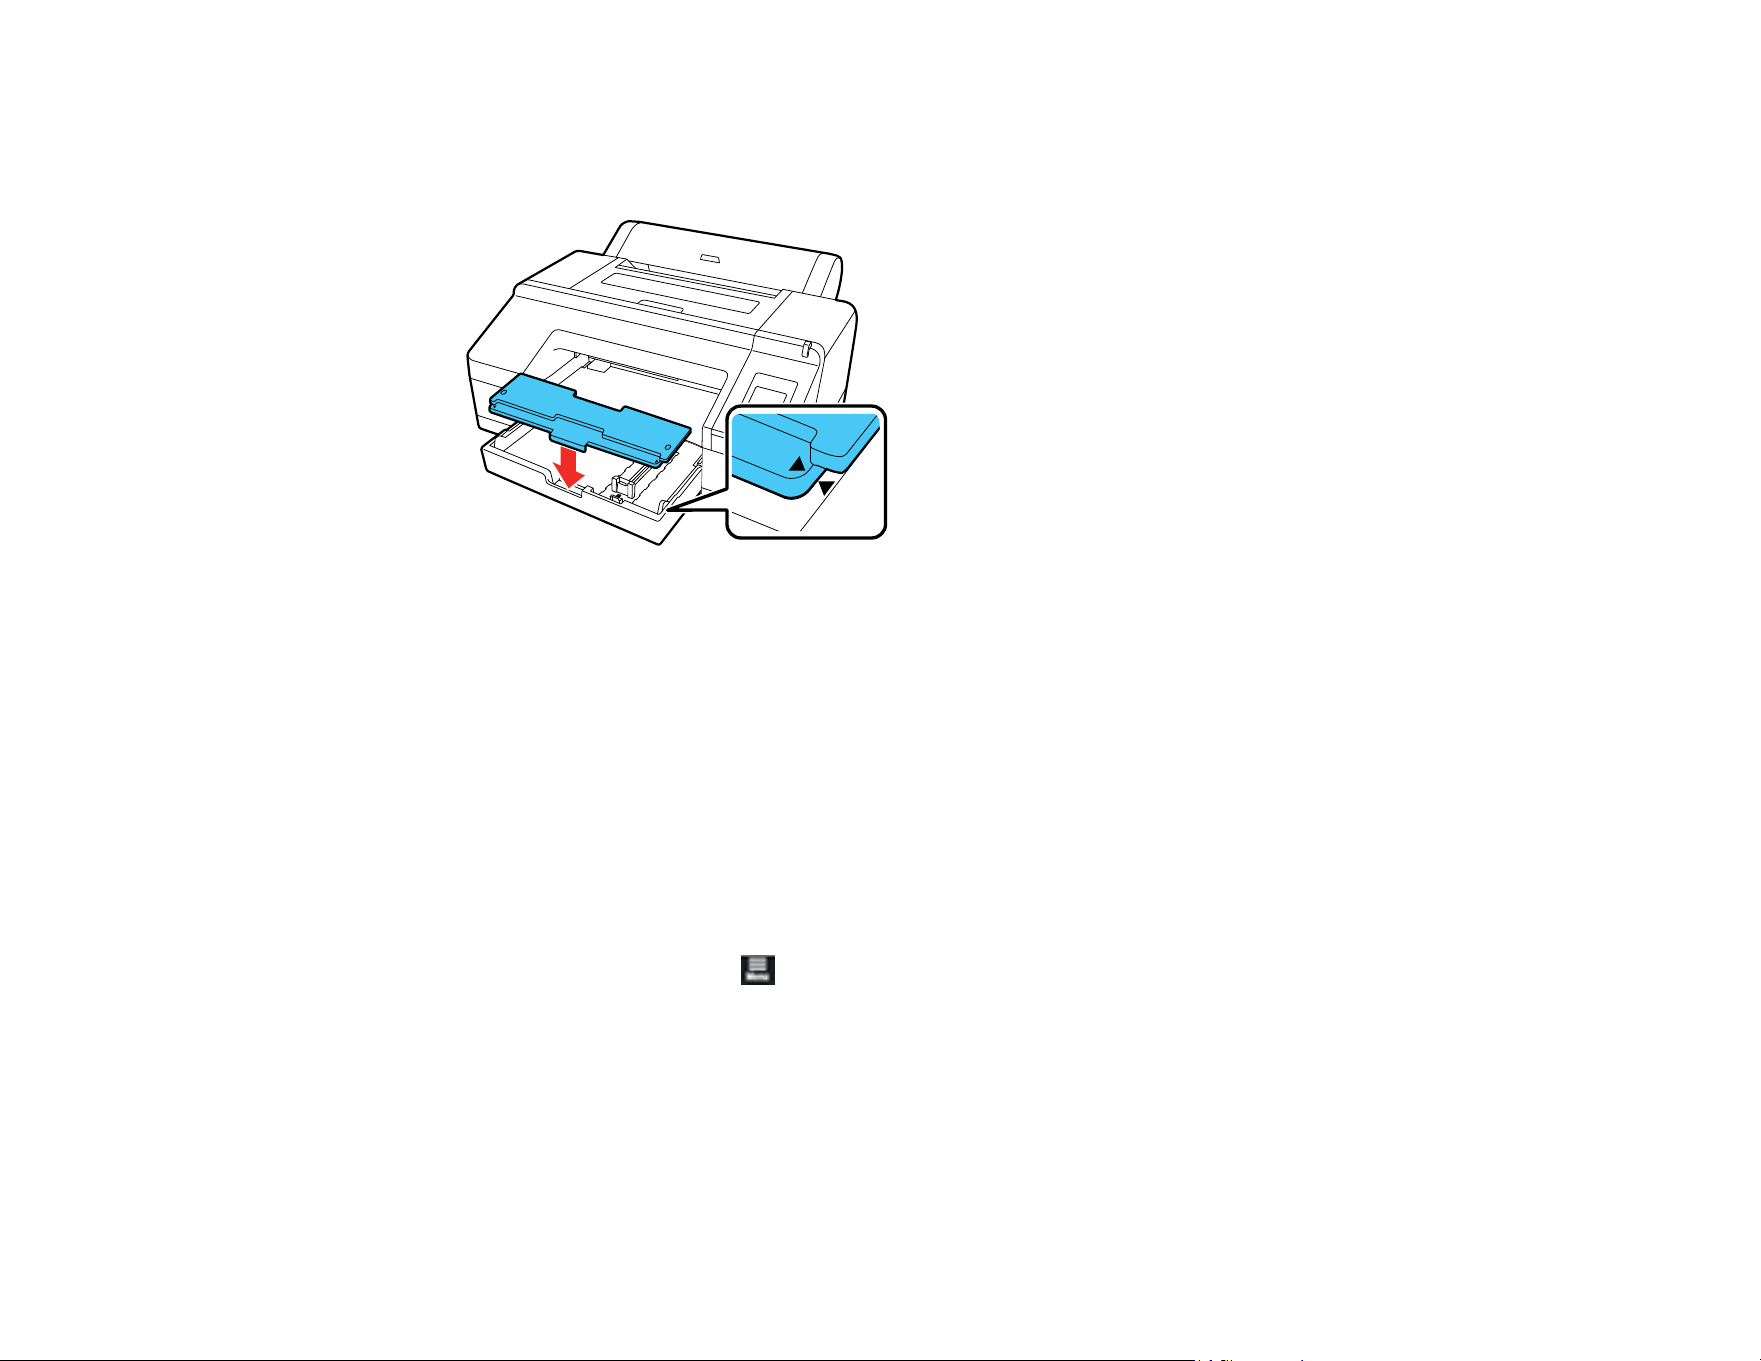
62
• If you loaded paper that is 13 × 19 inches (330 × 483 mm) or larger, install the paper cassette
cover, aligning the arrows as shown. This cover is important to limit dust from accumulating on cut
sheets in the paper cassette and will help reduce print head maintenance and cleanings.
Parent topic: Cut Sheet Handling
Related references
Available Epson Papers
Paper Specifications
Loading Cut Sheets in the Rear Manual Feeder
Use the rear manual feeder to load one cut sheet at a time from 8 × 10 inches (203 × 254 mm) to A2
(16.5 × 23.4 inches [420 × 594 mm])/17 × 22 inches (432 × 559 mm), 8 to 17 in. (203 to 432 mm) wide,
10 to 24 in. (154 to 610 mm) long, and 0.003 to 0.03 in. (0.08 to 0.8 mm) thick.
1. Make sure the printer is turned on.
2. On the control panel, select Menu > Paper Setting.
3. Select Cut Sheet and then select How To....
4. Follow the on-screen instructions to load the paper and then select the paper settings.
Note: Remove each sheet as it is printed and ejected without letting the sheets stack up on the
output tray.
Parent topic: Cut Sheet Handling
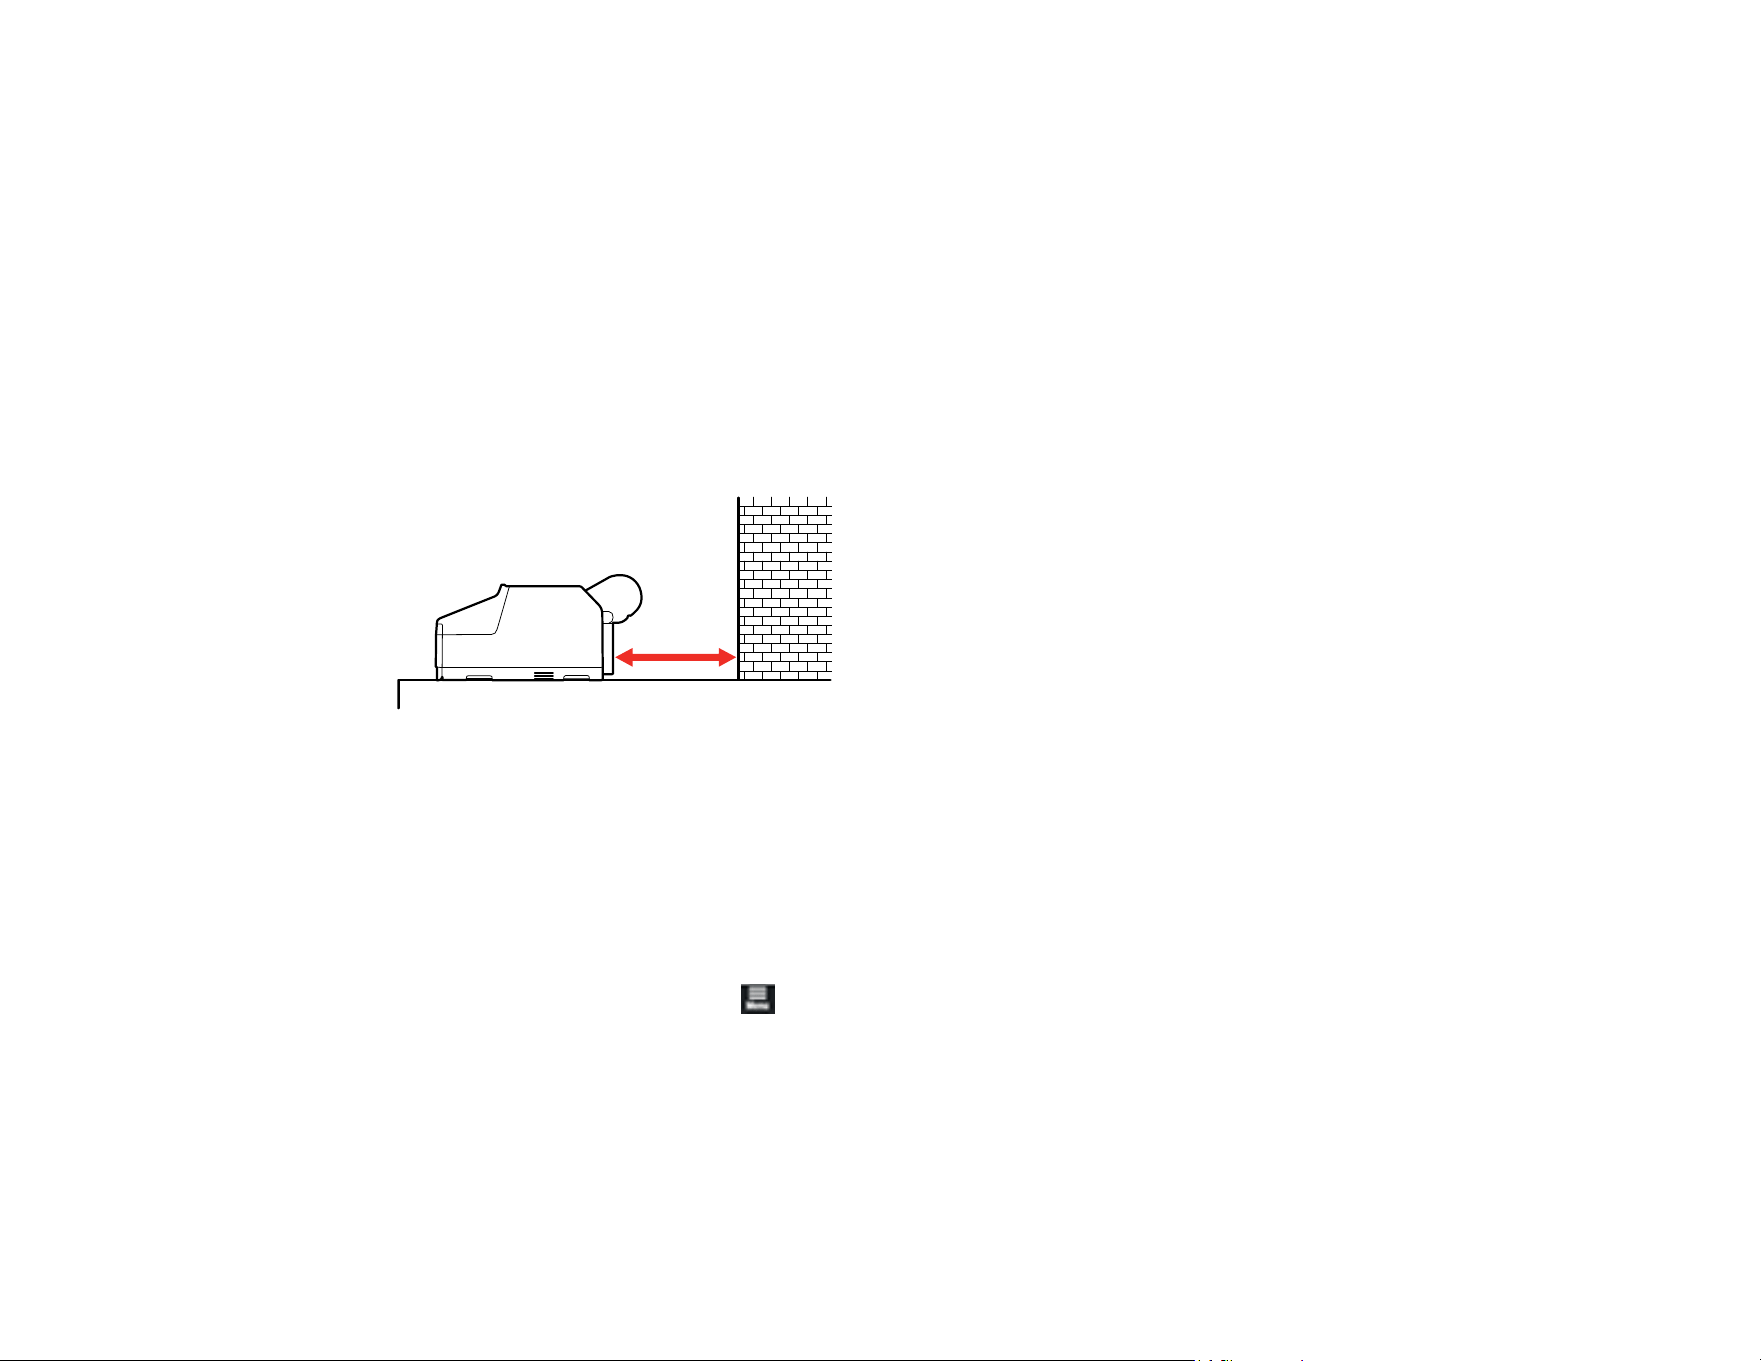
63
Related references
Available Epson Papers
Paper Specifications
Loading Media in the Front Manual Feeder
Use the front manual feeder to load one cut sheet or poster board at a time in sizes from 8 × 10 inches
(203 × 254 mm) to A2 (16.5 × 23.4 inches [420 × 594 mm])/17 × 22 inches (432 × 559 mm), 8 to 17 in.
(203 to 432 mm) wide, 10 to 24 in. (154 to 610 mm) long, and 0.003 to 0.06 in. (0.08 to 1.5 mm) thick.
Note: When printing on media loaded from the front manual feeder, part of it comes out from the back of
the printer during printing. Depending on the size of the cut sheet or poster board you are printing on,
make sure there is enough space behind the printer:
• A2 (16.5 × 23.4 inches [420 × 594 mm]): approximately 14.6 in. (370 mm)
• A3+ (13 × 19 inches [329 × 483 mm]): approximately 10.2 in. (260 mm)
• A3 (11.7 × 16.5 inches [297 × 420 mm]): approximately 7.9 in. (200 mm)
• A4 (8.3 × 11.7 inches [210 × 297 mm]): approximately 2.75 in. (70 mm)
1. Make sure the printer is turned on.
2. On the control panel, select Menu > Paper Setting.
3. Select Poster Board and then select How To....
4. Follow the on-screen instructions to load the poster board and then select the paper settings.
When printing is finished, select Start to release the pressure roller so you can pull out the poster
board.

64
Note: Remove each poster board as it is printed and ejected without letting them stack up on the
output tray.
Parent topic: Cut Sheet Handling
Related references
Available Epson Papers
Paper Specifications
Creating Custom Media Settings
You can use the printer control panel or Epson Media Installer to create and store up to 16 custom media
settings for printing on paper types that are not already in your product's control panel and printer driver
by default.
Note: Once you create and register a custom media setting, the registered setting can only be edited
from the source it was created with. For example, you cannot use the control panel to edit a Custom
Paper Setting that was created using Epson Media Installer.
Creating Custom Paper Settings Using the Control Panel
Using Epson Media Installer
Parent topic: Media Handling
Creating Custom Paper Settings Using the Control Panel
You can create custom paper settings from the printer control panel.
Note: If you are using non-Epson paper or media, consult the paper manufacturer for suggested
reference papers and print settings for use with the paper or media.
1. Load the type of paper that you want to configure in the printer.
2. Select Menu > General Settings > Printer Settings > Custom Paper Setting.
3. Select an open custom paper setting from the list.
Note: To modify an existing custom paper setting, select it from the list. You cannot change a
custom paper setting that was registered using Epson Media Installer.
4. Enter the name for the custom paper setting.

65
5. Select Change Reference Paper.
A confirmation message appears.
6. Select Yes and do one of the following:
• Select the reference paper recommended by the paper manufacturer.
• If no reference paper is available, follow these suggestions to select a paper preset that is similar
to the paper that you loaded:
• Photo paper: Baryta
• Fine art paper: UltraSmooth Fine Art
• Canvas: Canvas Satin or Canvas Matte
• Plain paper: Plain Paper
• Glossy paper: Photo Paper
• Thick, non-glossy paper: Matte Paper
• Thin, soft, non-glossy paper: Plain Paper
• Canvas-like paper: Canvas
• Cotton paper with a rough surface: UltraSmooth Fine Art
• Special media such as film, cloth, poster board, or tracing paper: Others
7. Select Advanced Paper Settings and enter a value for the following settings:
• Paper Thickness (check the Specification Sheet for the paper, if available)
• Roll Core Diameter (roll paper only)
• Paper Feed Offset (leave at 0 unless you see horizontal banding)
Note: The Paper Feed Offset setting allows you to adjust the difference between the data size
and the print size. For example, if you are printing at a data size of 3.9 inches (100 mm) and a print
size of 4 inches (101 mm), the offset is 1.0%. Therefore, you would enter a value of -1.0%. If you
change even one item set in the Paper menu, you need to perform Paper Feed Offset again.
8. Select any additional settings in the Advanced Paper Settings menu, as necessary.
After you create a new custom paper setting, it will appear in the list of available paper types. You should
perform a manual feed adjustment before printing on the custom media.
Selecting Custom Paper Configurations
Parent topic: Creating Custom Media Settings

66
Related references
Printer Settings Menu
Related topics
Using Epson Media Installer
Selecting Custom Paper Configurations
Once you have created a custom paper configuration, you can select the configuration whenever you
print on the associated media.
Note: When printing from the printer driver on a stored Custom Paper Setting, make sure the Media
Type in the printer driver matches the paper type selected for the Custom Paper Setting you are using.
1. Press the home button, if necessary.
2. Select Menu > Paper Setting.
3. Select the paper type you are printing on.
A list of recently selected paper types is displayed.
4. Select More Paper Types > Custom Paper.
5. Select the custom paper configuration you want to use.
6. Press the left arrow button to exit the menu.
Parent topic: Creating Custom Paper Settings Using the Control Panel
Related references
Paper Setting Menu
Using Epson Media Installer
Epson Media Installer allows you to add Epson and non-Epson media settings for paper types not
already in your product's control panel and printer driver. Epson Media Installer downloads selected
paper type settings from an online server and then registers those settings to your printer and printer
driver.
You can use Epson Media Installer to download settings for a paper type or use the settings as a starting
point for a similar paper and then edit them, as needed.
Note:
• To download and install media settings on the printer, you must be connected to the Internet and to
the printer.
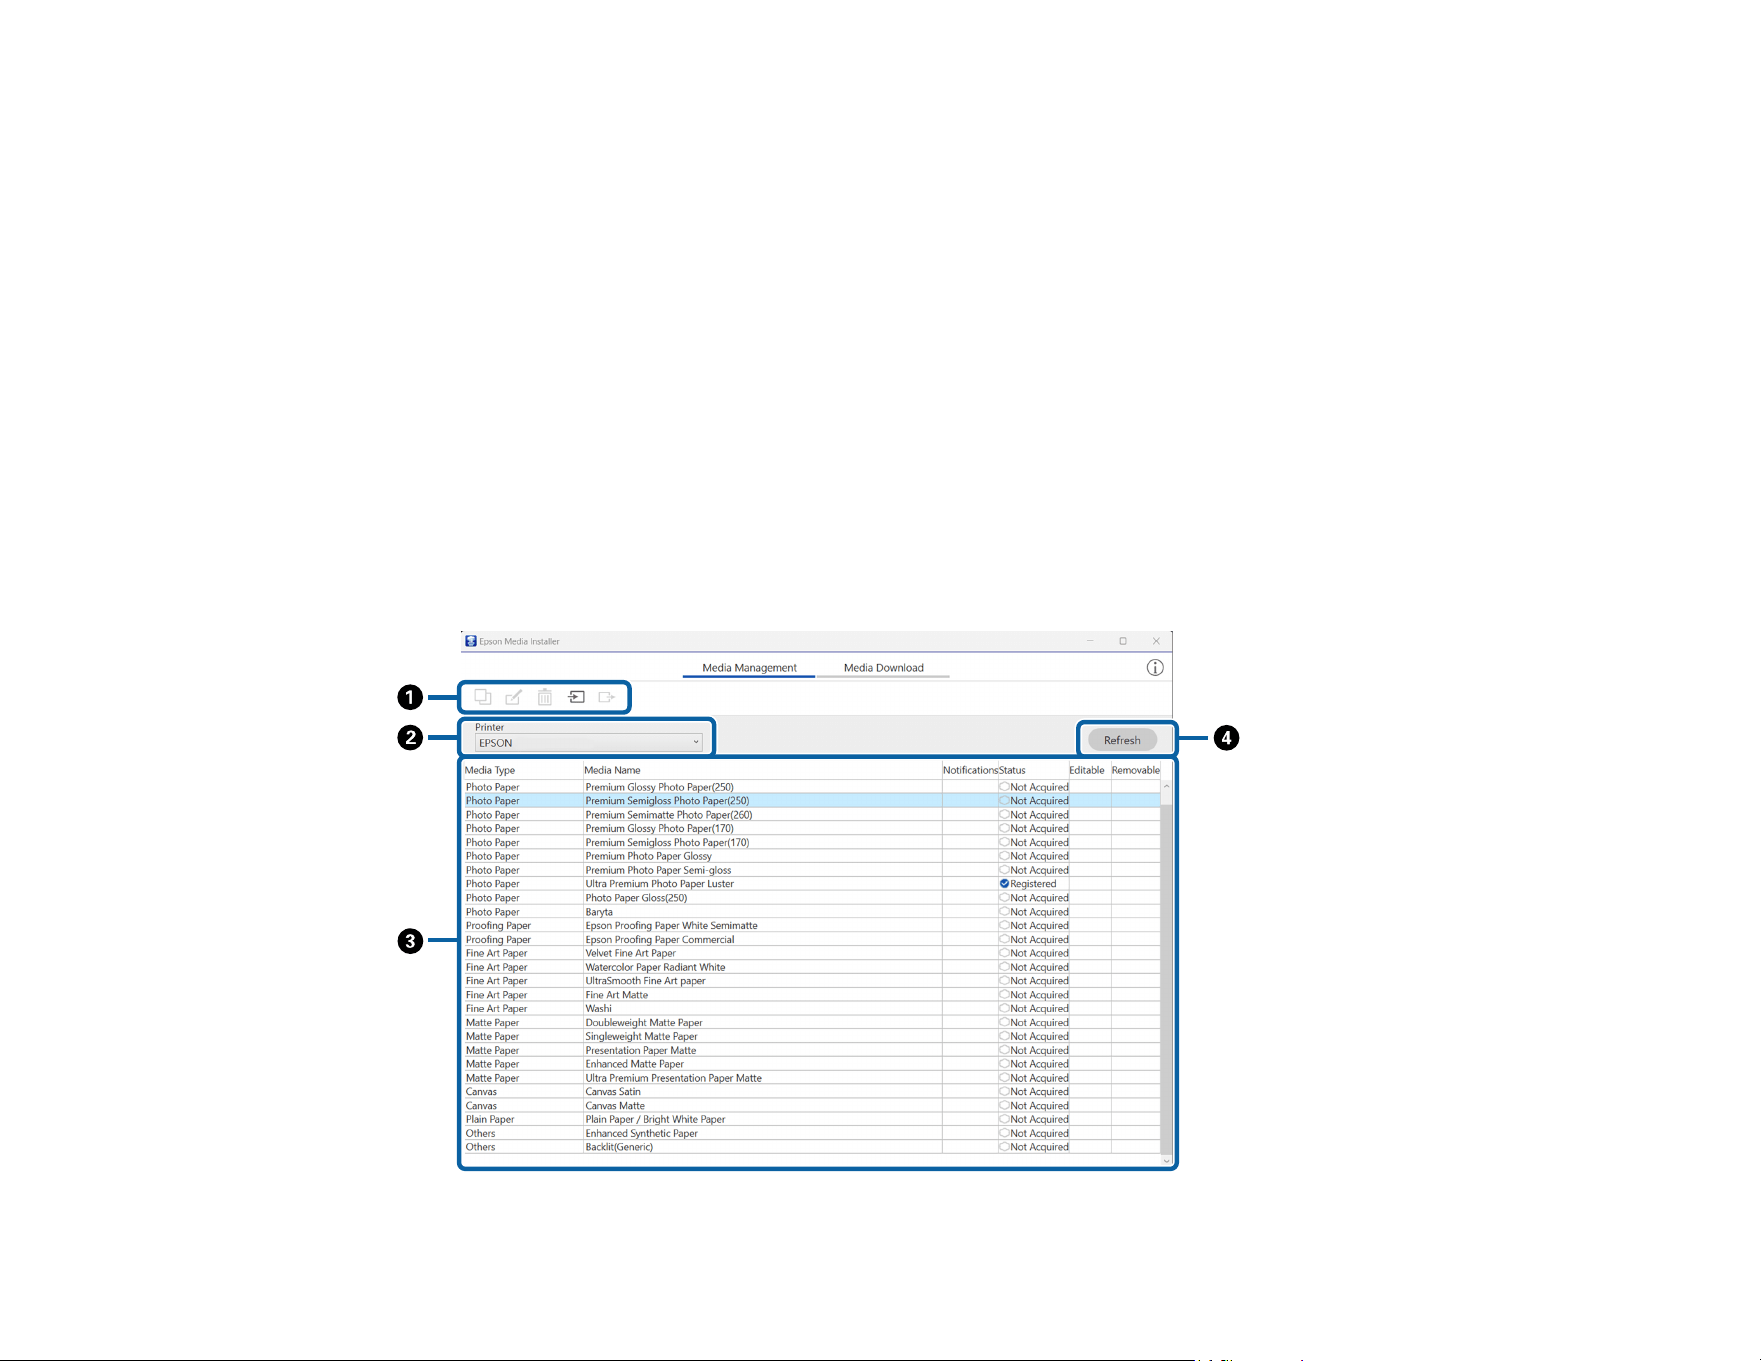
67
• On Mac, Epson Media Installer requires OS X 10.9.x or later to be installed.
Epson Media Installer Screens
Downloading Epson Media Settings
Creating Custom Media Settings Using Epson Media Installer
Edit Media Settings Options
Sharing Custom Media Settings with Other Computers
Parent topic: Creating Custom Media Settings
Related references
Roll Paper Options - Windows
Related tasks
Selecting Roll Paper Settings - Mac
Epson Media Installer Screens
Media Management

68
1 Main functions
(Copy Media): Makes a copy of the selected media settings and saves it in the printer or the
printer driver
(Edit): Opens the selected media settings for editing (the selected paper information must be
marked as Editable)
(Delete): Deletes the selected media settings from the printer or the printer driver (the selected
paper settings must be marked as Removable)
(Import from File): Imports a media settings file that was exported from computer connected to
the same printer (you can only import one file at a time)
(Export to File): Exports selected media settings to a file for sharing with other computers
connected to the same printer (you can only export one file at a time)
2 Displays the printer that is currently selected
3 Displays the media list for the currently selected printer
• Media Type: Displays the media settings that are registered with the printer and printer driver in
the same order as they are in the printer's control panel
• Media Name: Shows the name of the media setting (media settings that have been copied have
"(Copy)" at the end of the name)
• Notifications: Click the icon in the column to view additional information for the selected media
settings
• Status: Shows if the media settings have been downloaded to Epson Media Installer and saved
to the printer or printer driver (Registered) or not (Not Acquired).
Note: You can still print on Epson special media if the status is Not Acquired.
• Editable: The selected media settings can be edited
• Removable: The selected media settings can be deleted
4 Refreshes the media list
Click this if the media settings you previously added are not displayed in the printer driver
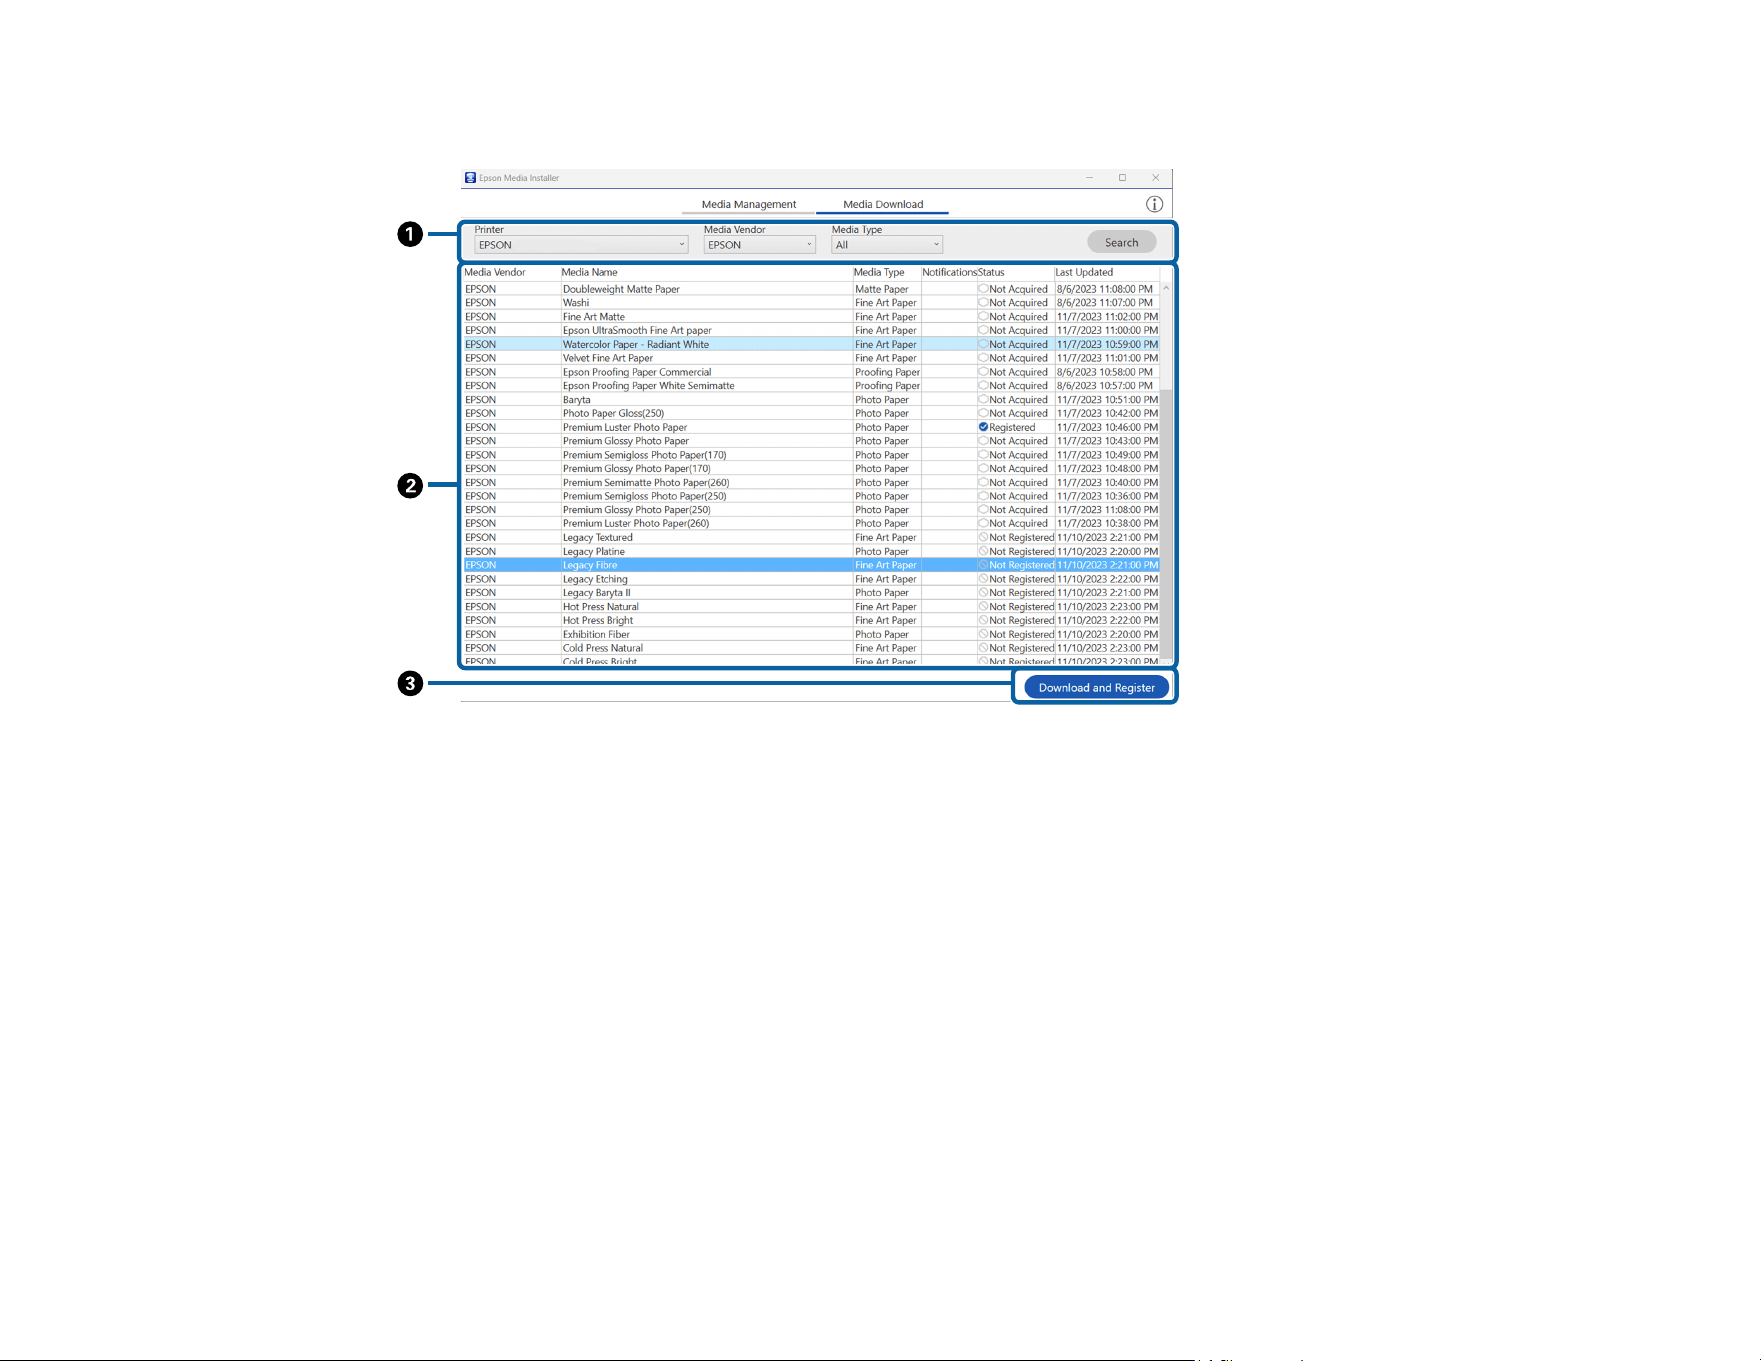
69
Media Download
1 Search conditions
• Printer: Specify the connected printer to display available media settings for
• Region: Specify the region
• Media Vendor: Specify the media vendor or brand
• Media Type: Specify the type of media
• Search: Click here to search the available media settings based on the conditions you selected

70
2 Displays the media settings that are available for the printer based on the search conditions
• Notifications: Click the icon in the column to view additional information for the selected media
settings
• Status: Shows the status of the available media settings
• Registered: Media settings have been downloaded to Epson Media Installer and saved to the
printer or printer driver
• Update Available: Media settings on the server have been updated. Download the selected
media settings again to update them on your printer or printer driver
• Not Registered: Media settings have not been saved to the printer or printer driver
• Not Acquired: Media settings have not been downloaded to Epson Media Installer
3 Downloads the selected media settings from the server and saves it to the printer or the printer
driver
Parent topic: Using Epson Media Installer
Downloading Epson Media Settings
You can download new or updated Epson media settings from the Media Download tab of the Epson
Media Installer utility.
Note:
• To download and install media settings on the printer, you must be connected to the Internet and to
the printer.
• On Mac, Epson Media Installer requires OS X 10.9.x or later to be installed.
1. Open the Epson Media Installer software.
• Windows 11: On the right side of the Windows taskbar, click the up arrow, click the icon, click
on your product, and then select Printer Settings.
Select the Utility tab and click Epson Media Installer.
• Windows (other versions): Access the Windows Desktop and right-click the icon for your
product in the right side of the Windows taskbar, or click the up arrow and right-click , then
select Printer Settings.
Select the Utility tab and click Epson Media Installer.
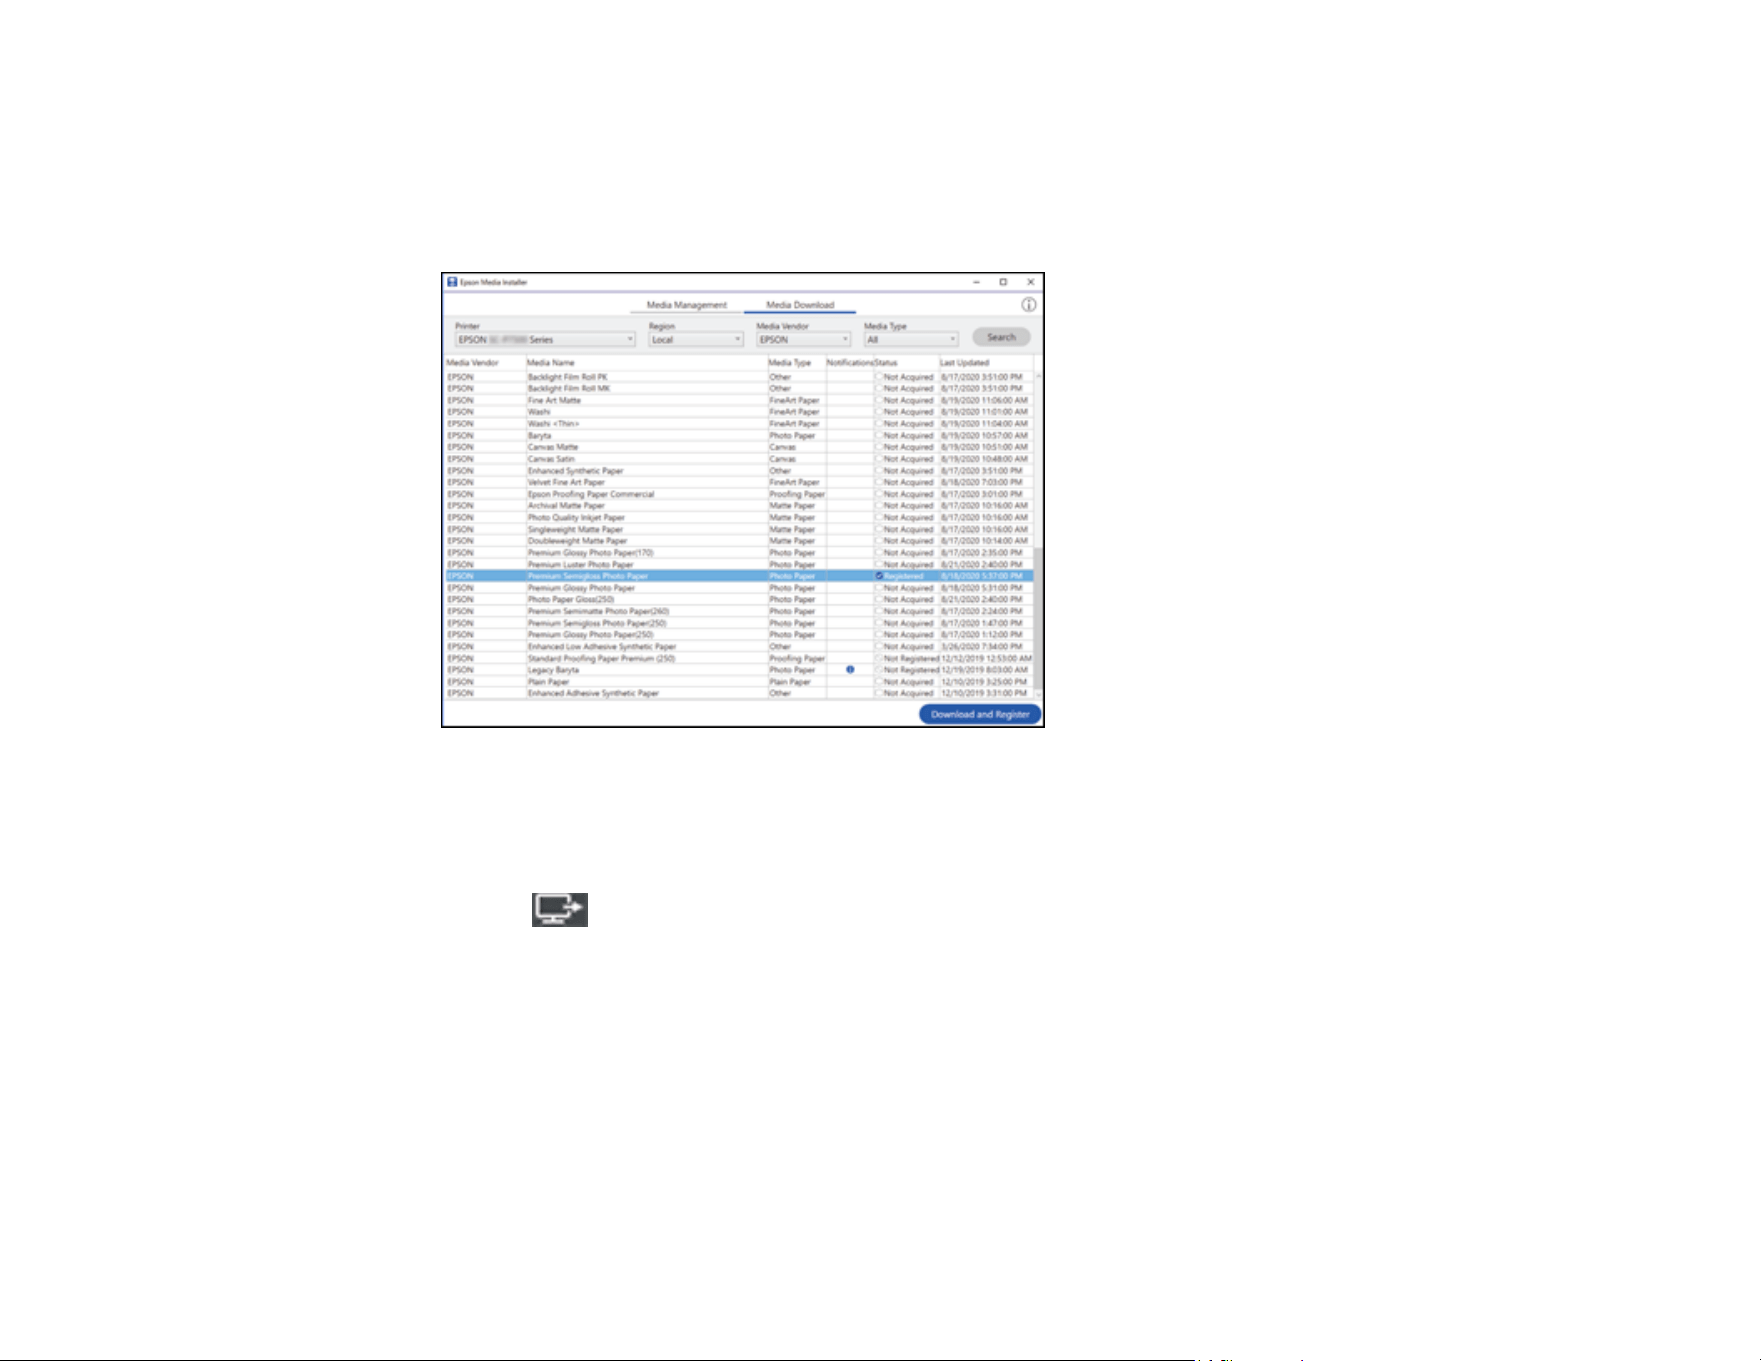
71
• Mac: Open the Applications > Epson Software > Epson Utilities folder and double-click Epson
Media Installer.
2. Click Media Download.
You see a screen like this:
3. Click the name of the media settings you want to download and click Download and Register.
The new settings are available in your printer driver and registered as a Custom Paper Setting on
the printer control panel.
You see the imported icon next to custom paper settings that were registered using Epson Media
Installer. Repeat these steps for any other computer that is connected to the printer that you want to add
the same media settings to.
Parent topic: Using Epson Media Installer
Creating Custom Media Settings Using Epson Media Installer
You can use Epson Media Installer to create custom paper settings by copying an existing paper setting,
renaming it, and assigning an ICC profile. After that, the custom paper setting can be selected from the
printer control panel or the printer driver.
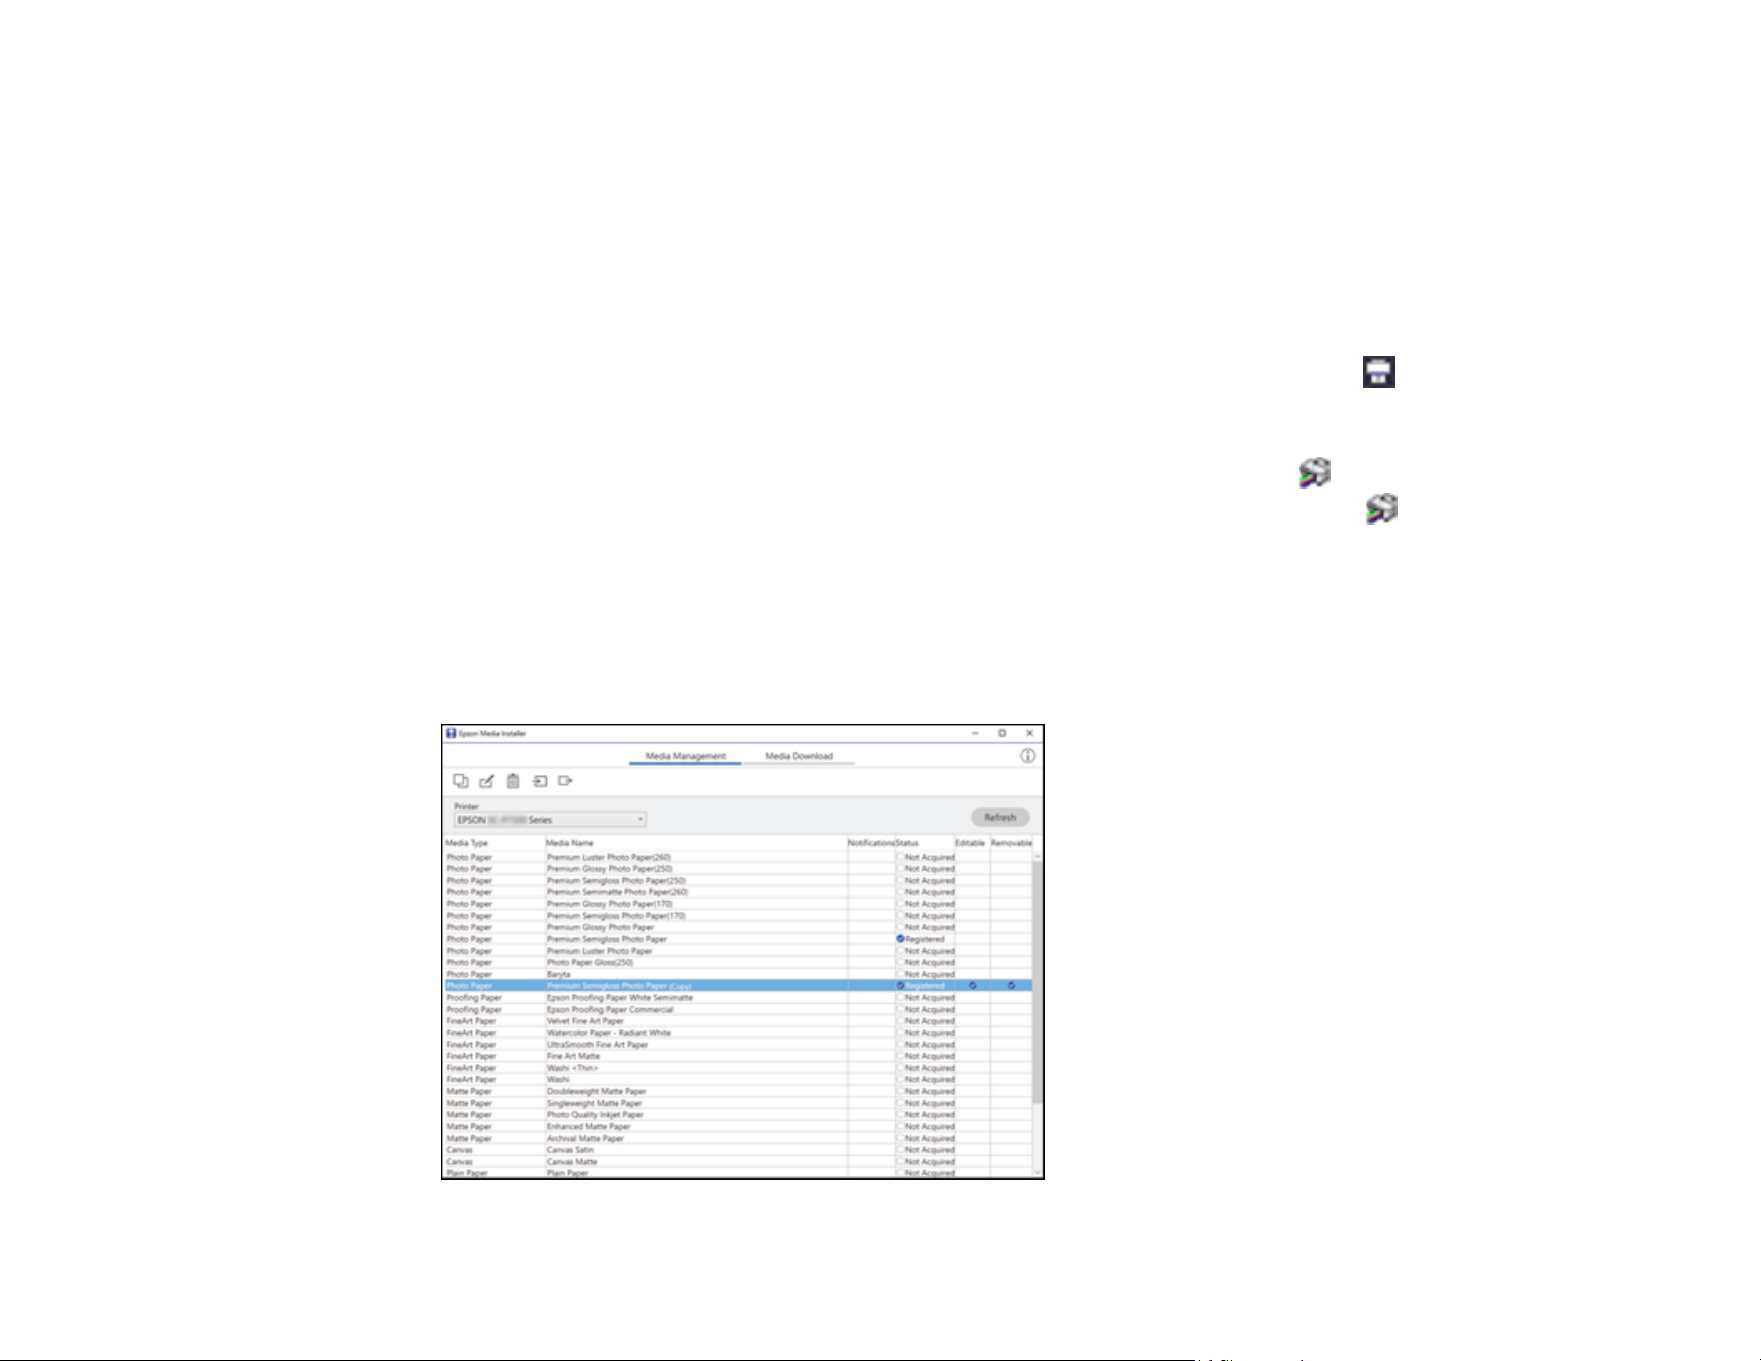
72
Note:
• You will need an ICC profile to assign to the custom paper setting.
• To download and install media settings on the printer, you must be connected to the Internet and to
the printer.
• On Mac, Epson Media Installer requires OS X 10.9.x or later to be installed.
1. Open the Epson Media Installer software.
• Windows 11: On the right side of the Windows taskbar, click the up arrow, click the icon, and
click on your product. Select Printer Settings, select the Utility tab, and click Epson Media
Installer.
• Windows (other versions): Access the Windows Desktop and right-click the icon for your
product in the right side of the Windows taskbar, or click the up arrow and right-click , select
Properties or Printing preferences, and click on the Utility tab. Click Epson Media Installer.
• Mac: Open the Applications > Epson Software > Epson Utilities folder and double-click Epson
Media Installer.app.
2. Click Media Management, if necessary.
You see a screen like this:
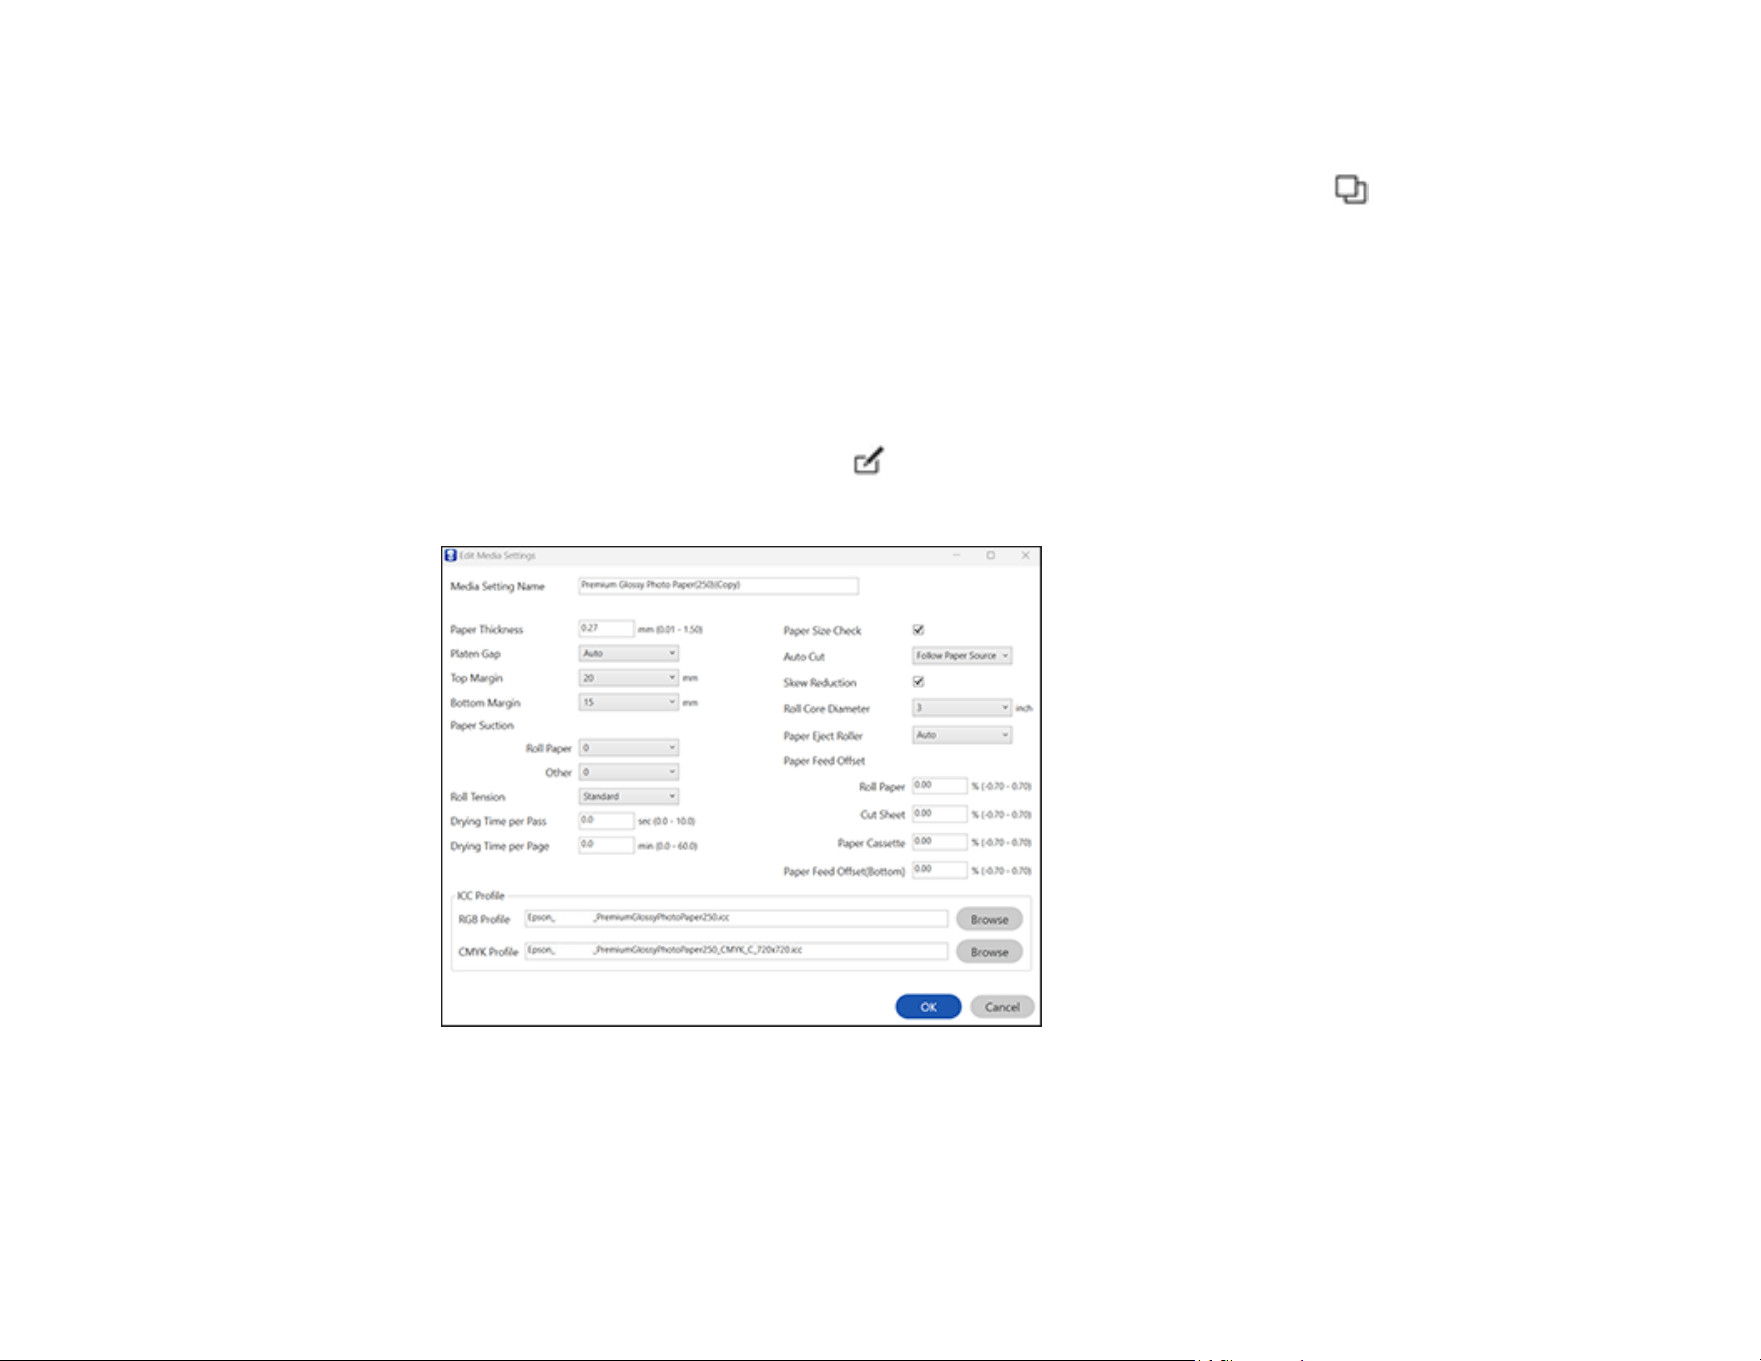
73
Note: Custom paper settings created from the printer control panel are not displayed.
3. Select the paper type you want to use as a base for the new paper setting and click (copy
media).
Note: You can only copy paper types with a Registered status.
A confirmation message appears.
4. Select OK.
A copy of the paper setting is created.
5. Select the new paper setting and click (edit).
The Edit Media Settings screen is displayed.
6. Enter a new name and click Browse to load the ICC profile file you want to use for the paper setting.
7. Edit any other settings, as desired.
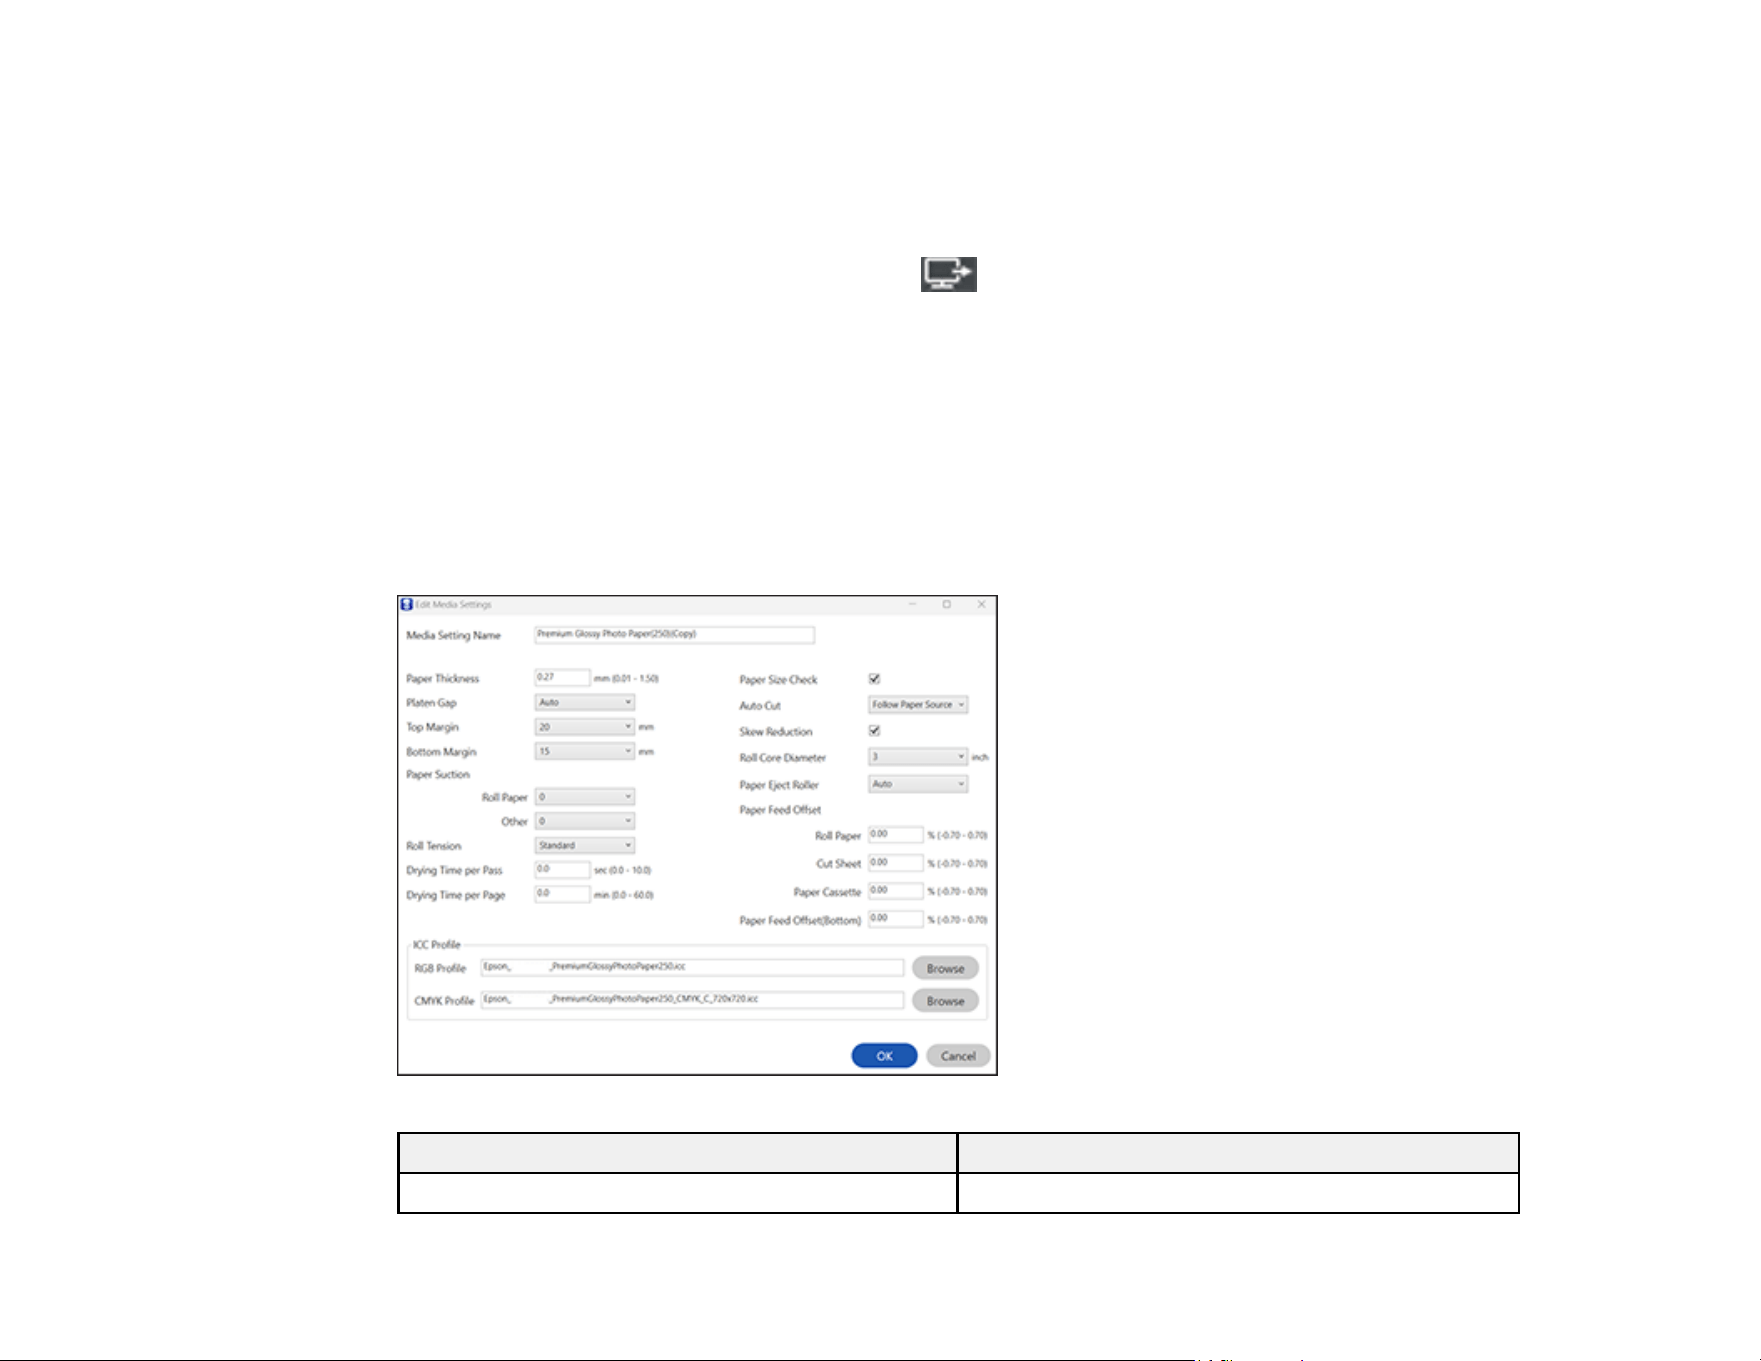
74
8. Click OK and confirm that you want to add the new paper setting to the driver and printer.
Note: The new paper type will be assigned as the next open custom paper setting on the printer.
The new Media Type setting is available in your printer driver and registered as a Custom Paper
Setting on the printer control panel. You see the imported icon next to custom paper settings that
were registered using Epson Media Installer.
Note: If the printer driver is uninstalled, paper types previously added using Epson Media Installer may
not appear when the driver is reinstalled. To re-register the paper information, open Epson Media
Installer, and click Media Management > Refresh.
Parent topic: Using Epson Media Installer
Edit Media Settings Options
You can select the following options on the Edit Media Settings screen.
Setting Description
Media Setting Name Change the media name

75
Setting Description
Paper Thickness Set the thickness of the paper
Platen Gap Set the distance between the print head and the
paper; choose a wider setting if prints are
frequently scratched or smudged
Margins Select the margin for the leading edge of the
printed image. Depending on the paper type and
printing environment, colors may be uneven near
the leading edge if the margin is small.
Paper Suction Select to adjust the printer's suction setting;
choose lower values for thinner papers
Roll Tension Adjust the roll tension setting if paper gets wrinkled
during printing
Drying Time Set the drying time for each print head pass or for
each page
Paper Size Check Select On to automatically detect the paper width
when paper is loaded.
Select Off when the paper roll is empty. This
allows you to set the paper width before feeding
the paper.
Auto Cut Select Follow Paper Source Settings to follow
the cut settings in Printer Settings > Paper
Source Settings > Roll Paper Setup > Cut
Settings.
Select Never Cut to cut paper manually.
Skew Reduction Turn this off if the front edge of thin paper or softer
paper folds
Roll Core Diameter Select the paper core size for the loaded roll paper
76
Setting Description
Paper Eject Roller Select to control the paper ejection roller.
Select Auto to use the roller automatically
depending on the type of Epson paper.
Select a Use option to always use the roller to
eject paper.
Select Do Not Use when you are concerned about
damaging the print surface.
Paper Feed Offset Select the amount of offset necessary to reduce
banding on uneven color in printouts
Paper Feed Offset(Bottom) If banding (horizontal banding) or uneven colors
occur on the bottom edge (0.59 inch [15 mm]) of
the paper, use this function to make adjustments
ICC Profile Set an ICC profile for the media type.
Select an RGB Profile when printing using the
printer driver or select an RGB Profile or CMYK
Profile when printing using a software RIP.
Parent topic: Using Epson Media Installer
Sharing Custom Media Settings with Other Computers
You can export custom media settings created in Epson Media Installer and then import them to other
computers connected to the same printer.
Note: To import custom media settings to a computer, it must be connected to the same printer as the
one that was used to create the custom settings.
1. Open the Epson Media Installer software.
• Windows 11: On the right side of the Windows taskbar, click the up arrow, click the icon, click
on your product, and then select Printer Settings.
Select the Utility tab and click Epson Media Installer.
• Windows (other versions): Access the Windows Desktop and right-click the icon for your
product in the right side of the Windows taskbar, or click the up arrow and right-click , then
select Printer Settings.

77
Select the Utility tab and click Epson Media Installer.
• Mac: Open the Applications > Epson Software > Epson Utilities folder and double-click Epson
Media Installer.
2. Create a custom media setting in Epson Media Installer. See the link below.
3. On the Media Management tab, select the custom media setting you created and then click
(export).
A confirmation message appears.
4. Click Next.
A message appears.
5. Read the on-screen text and click OK to continue.
6. Select the location where you want to save the custom media setting file.
7. Enter a name for the file and then click Save.
The custom media setting file is saved.
8. Transfer the file to the other computers you wish to import the settings to, if necessary.
9. Open the Epson Media Installer software on the computer you want to add the custom media setting
to.
Note: The computer must be connected to the same printer.
10. Select the Media Management tab, if necessary.
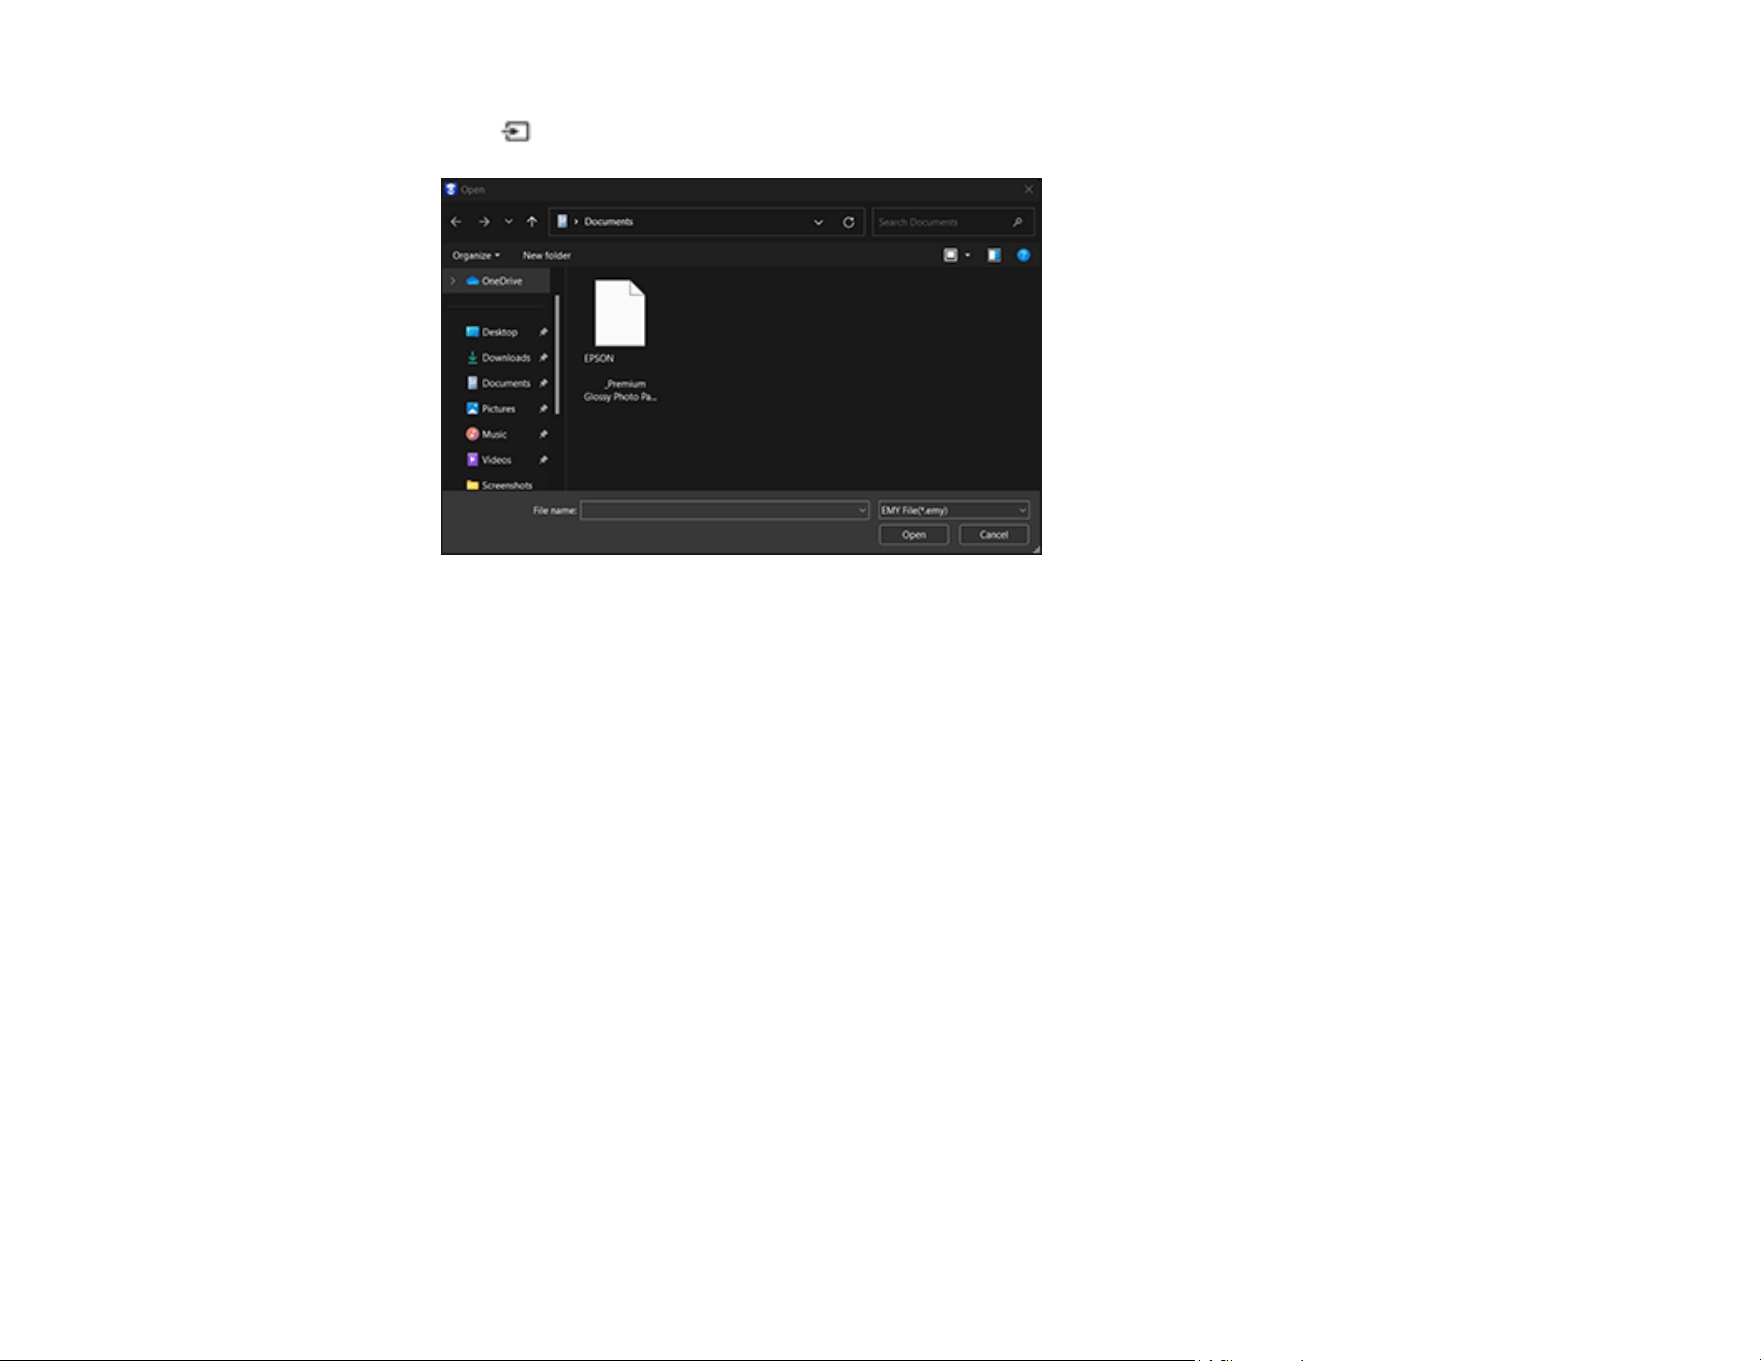
78
11. Click (import) and then navigate to the location of the custom media setting file.
Note: If you don't see the file, make sure the EMY (.emy) file type is selected from the drop-down
menu.
12. Select the file and then click Open.
The custom media setting is loaded and listed on the Media Management tab.
Repeat steps 8-12 for any remaining computers.
Parent topic: Using Epson Media Installer
Related tasks
Creating Custom Media Settings Using Epson Media Installer
Available Epson Papers
The following Epson special media is recommended for high-quality printing results.
Note: Paper/media availability varies by country.
U.S. and Canada:
You can purchase genuine Epson ink, paper, and accessories from an Epson authorized reseller. To
find the nearest reseller, visit proimaging.epson.com (U.S.) or proimaging.epson.ca (Canada), select
79
your product series and product, and click the Where to Buy button. Or call 800-GO-EPSON (800-463-
7766) in the U.S. or 800-807-7766 in Canada.
Note: For the most updated list of supported Epson papers, visit proimaging.epson.com (U.S.) or
proimaging.epson.ca (Canada).
Latin America:
You can purchase genuine Epson ink, paper, and accessories from an Epson authorized reseller. To
find the nearest reseller, visit latin.epson.com or call your nearest Epson sales office.
Note: For the most updated list of supported Epson papers, visit latin.epson.com or call your nearest
Epson sales office.
Paper Type Size Part number Sheet count
Epson Legacy Platine Letter (8.5 × 11 inches
[216 × 279 mm])
S450079 25
13 × 19 inches (330 × 483 mm) S450080 25
17 × 22 inches (432 × 559 mm) S450081 25
17 inches (432 mm) × 50 feet
(15.2 m)
S450076 1 roll
Epson Legacy Fibre Letter (8.5 × 11 inches
[216 × 279 mm])
S450085 25
13 × 19 inches (330 × 483 mm) S450086 25
17 × 22 inches (432 × 559 mm) S450087 25
17 inches (432 mm) × 50 feet
(15.2 m)
S450082 1 roll
Epson Legacy Etching Letter (8.5 × 11 inches
[216 × 279 mm])
S450091 25
13 × 19 inches (330 × 483 mm) S450092 25
17 × 22 inches (432 × 559 mm) S450093 25
17 inches (432 mm) × 50 feet
(15.2 m)
S450088 1 roll

80
Paper Type Size Part number Sheet count
Epson Legacy Baryta II Letter (8.5 × 11 inches
[216 × 279 mm])
S450403 25
13 × 19 inches (330 × 483 mm) S450404 25
17 × 22 inches (432 × 559 mm) S450405 25
17 inches (432 mm) × 50 feet
(15.2 m)
S450406 1 roll
Epson Legacy Textured Letter (8.5 × 11 inches
[216 × 279 mm])
S450308 25
13 × 19 inches (330 × 483 mm) S450309 25
17 × 22 inches (432 × 559 mm) S450310 25
Epson Legacy Paper Sample Pack Letter (8.5 × 11 inches
[216 × 279 mm])
S450183 12
Epson Cold Press Bright Letter (8.5 × 11 inches
[216 × 279 mm])
S042307 25
13 × 19 inches (330 × 483 mm) S042310 25
17 × 22 inches (432 × 559 mm) S042311 25
17 inches (432 mm) × 50 feet
(15.2 m)
S042313 1 roll
Epson Cold Press Natural Letter (8.5 × 11 inches
[216 × 279 mm])
S042297 25
13 × 19 inches (330 × 483 mm) S042300 25
17 × 22 inches (432 × 559 mm) S042301 25
17 inches (432 mm) × 50 feet
(15.2 m)
S042303 1 roll
Epson Velvet Fine Art Paper Letter (8.5 × 11 inches
[216 × 279 mm])
S041636 20
13 × 19 inches (330 × 483 mm) S041637 20
17 × 22 inches (432 × 559 mm) S042097 25
81
Paper Type Size Part number Sheet count
Epson Exhibition Fiber Paper Letter (8.5 × 11 inches
[216 × 279 mm])
S045033 25
13 × 19 inches (330 × 483 mm) S045037 25
17 × 22 inches (432 × 559 mm) S045039 25
17 inches (432 mm) × 50 feet
(15.2 m)
S045188 1 roll
Epson Hot Press Bright Letter (8.5 × 11 inches
[216 × 279 mm])
S042327 25
13 × 19 inches (330 × 483 mm) S042330 25
17 × 22 inches (432 × 559 mm) S042331 25
17 inches (432 mm) × 50 feet
(15.2 m)
S042333 1 roll
Epson Hot Press Natural Letter (8.5 × 11 inches
[216 × 279 mm])
S042317 25
13 × 19 inches (330 × 483 mm) S042320 25
17 × 22 inches (432 × 559 mm) S042321 25
17 inches (432 mm) × 50 feet
(15.2 m)
S042323 1 roll
Epson Signature Worthy Sample
Pack
Letter (8.5 × 11 inches
[216 × 279 mm])
S045234 14
Epson Ultra Premium Photo Paper
Glossy
Letter (8.5 × 11 inches
[216 × 279 mm])
S042182 25
S042175 50
8 × 10 inches (203 × 254 mm) S041946 20
82
Paper Type Size Part number Sheet count
Epson Premium Luster Photo
Paper (260)
8.3 inches (211 mm) × 32 feet
(9.8 m)
S041408 1 roll
13 inches (330 mm) × 32 feet
(9.8 m)
S041409 1 roll
10 inches (254 mm) × 100 feet
(30.5 m)
S042077 1 roll
16 inches (406 mm) × 100 feet
(30.5 m)
S042079 1 roll
Epson Metallic Photo Paper
Glossy
Letter (8.5 × 11 inches
[216 × 279 mm])
S045589 25
13 × 19 inches (330 × 483 mm) S045590 25
17 × 22 inches (432 × 559 mm) S045591 25
16 inches (406 mm) × 100 feet
(30.5 m)
S045585 1 roll
Epson Metallic Photo Paper Luster Letter (8.5 × 11 inches
[216 × 279 mm])
S045596 25
13 × 19 inches (330 × 483 mm) S045597 25
17 × 22 inches (432 × 559 mm) S045598 25
16 inches (406 mm) × 100 feet
(30.5 m)
S045592 1 roll
Epson Photo Paper Glossy Letter (8.5 × 11 inches
[216 × 279 mm])
S041141 20
S041649 50
S041271 100
A4 (8.3 × 11.7 inches
[210 × 297 mm])
S041140 20
11 × 17 inches (279 × 432 mm) S041156 20
13 × 19 inches (330 × 483 mm) S041143 20
83
Paper Type Size Part number Sheet count
Epson Premium Photo Paper
Glossy
Letter (8.5 × 11 inches
[216 × 279 mm])
S042183 25
S041667 50
8 × 10 inches (203 × 254 mm) S041465 20
11 × 14 inches (279 × 356 mm) S041466 20
11 × 17 inches (279 × 432 mm) S041290 20
A3 (11.7 × 16.5 inches
[297 × 420 mm])
S041288 20
13 × 19 inches (330 × 483 mm) S041289 20
17 × 22 inches (432 × 559 mm) S042092 25
13 inches (330 mm) × 32 feet
(9.8 m)
S041378 1 roll
Epson Premium Photo Paper
Semi-gloss
Letter (8.5 × 11 inches
[216 × 279 mm])
S041331 20
13 × 19 inches (330 × 483 mm) S041327 20
Epson Presentation Paper Matte Letter (8.5 × 11 inches
[216 × 279 mm])
S041062 100
Legal (8.5 × 14 inches
[216 × 356 mm])
S041067 100
11 × 17 inches (279 × 432 mm) S041070 100
13 × 19 inches (330 × 483 mm) S041069-L 100
16.5 × 23.4
inches (420 × 594 mm)
S041079 30
17 × 22 inches (432 × 559 mm) S041171 100
84
Paper Type Size Part number Sheet count
Epson Premium Presentation
Paper Matte
Letter (8.5 × 11 inches
[216 × 279 mm])
S041257 50
S042180 100
8 × 10 inches (203 × 254 mm) S041467 50
11 × 14 inches (279 × 356 mm) S041468 50
A3 (11.7 × 16.5 inches
[297 × 420 mm])
S041260 50
13 × 19 inches (330 × 483 mm) S041263 50
Epson Proofing Paper White
Semimatte
13 × 19 inches (330 × 483 mm) S042118 100
13 inches (300 mm) × 100 feet
(30.5 m)
S042002 1 roll
17 inches (432 mm) × 100 feet
(30.5 m)
S042003 1 roll
Epson Standard Proofing Paper 17 inches (432 mm) × 164 feet
(49.9 m)
S045079 1 roll
Epson Standard Proofing Paper
Commercial
13 inches (300 mm) × 100 feet
(30.5 m)
S042144 1 roll
17 inches (432 mm) × 100 feet
(30.5 m)
S042145 1 roll
Epson Standard Proofing Paper
(240)
13 × 19 inches (330 × 483 mm) S045115 100
17 inches (432 mm) × 100 feet
(30.5 m)
S045111 1 roll
Epson Standard Proofing Paper
Production
17 inches (432 mm) × 100 feet
(30.5 m)
S045313 1 roll
Epson Standard Proofing Paper
SWOP3
17 inches (432 mm) × 100 feet
(30.5 m)
S045154 1 roll
13 × 19 inches (330 × 483 mm) S045157 100
85
Paper Type Size Part number Sheet count
Epson Ultra Premium Photo Paper
Luster
Letter (8.5 × 11 inches
[216 × 279 mm])
S041405 50
S041913 250
A3 (11.7 × 16.5 inches
[297 × 420 mm])
S041406 50
13 × 19 inches (330 × 483 mm) S041407 50
S041604 100
17 × 22 inches (432 × 559 mm) S042084 25
Epson Ultra Premium Presentation
Paper Matte
Letter (8.5 × 11 inches
[216 × 279 mm])
S041341 50
S041914 250
A3 (11.7 × 16.5 inches
[297 × 420 mm])
S041343 50
13 × 19 inches (330 × 483 mm) S041339 50
S041605 100
17 × 22 inches (432 × 559 mm) S041908 50
Epson UltraSmooth Fine Art Paper 13 × 19 inches (330 × 483 mm) S041896 25
17 × 22 inches (432 × 559 mm) S041897 25
17 inches (432 mm) × 50 feet
(15.2 m)
S041856 1 roll
Epson Watercolor Paper Radiant
White
13 × 19 inches (330 × 483 mm) S041351 20
Epson Exhibition Canvas Matte 13 inches (330 mm) × 20 feet
(6.1 m)
S045255 1 roll
17 inches (432 mm) × 40 feet
(12.2 m)
S045256 1 roll
Epson Exhibition Canvas Satin 13 inches (330 mm) × 20 feet
(6.1 m)
S045248 1 roll
17 inches (432 mm) × 40 feet
(12.2 m)
S045249 1 roll
86
Paper Type Size Part number Sheet count
Epson Exhibition Canvas Gloss 13 inches (330 mm) × 20 feet
(6.1 m)
S045241 1 roll
17 inches (432 mm) × 40 feet
(12.2 m)
S045242 1 roll
Epson Premium Glossy Photo
Paper (250)
16 inches (406 mm) × 100 feet
(30.5 m)
S041742 1 roll
Epson Premium Semimatte Photo
Paper (260)
16 inches (406 mm) × 100 feet
(30.5 m)
S042149 1 roll
Epson Premium Glossy Photo
Paper (170)
16.5 inches (419 mm) × 100 feet
(30.5 m)
S042076 1 roll
Epson Premium Semigloss Photo
Paper (170)
16.5 inches (419 mm) × 100 feet
(30.5 m)
S042075 1 roll
Epson Enhanced Matte Paper 17 inches (432 mm) × 100 feet
(30.5 m)
S041725 1 roll
Epson Singleweight Matte Paper 17 inches (432 mm) × 131 feet
(40 m)
S041746 1 roll
Parent topic: Media Handling
Borderless Paper Type Compatibility
You can print borderless photos on compatible paper types in compatible paper widths:
Examples of Borderless Paper Types
• Epson Singleweight Matte Paper
• Epson Premium Glossy Photo Paper (250)
• Epson Premium Glossy Photo Paper (170)
• Epson Premium Luster Photo Paper (260)
• Epson Ultra Premium Photo Paper Luster
• Epson Velvet Fine Art Paper

87
Borderless Roll Paper Widths
• 8.27 inches (210 mm)
• 10 inches (254 mm)
• 11.7 inches (297 mm)
• 11.8 inches (300 mm)
• 13 inches (330 mm)
• 16 inches (406 mm)
• 17 inches (432 mm)
Borderless Roll Paper Widths for 2-inch Core Media
(requires use of the borderless spacer)
• 8 inches (203 mm)
• 11 inches (280 mm)
• 16.5 inches (420 mm)
Note: The printer software allows you to create and select custom page sizes. To print borderless on roll
media, make sure the standard or custom size uses a supported width or an error will occur on the
printer.
Parent topic: Media Handling
Related references
Roll Paper Options - Windows
Printable Area Specifications
Related tasks
Selecting Roll Paper Settings - Mac
Supported Paper Widths for Borderless Printing
The following paper widths support borderless printing.
Note: Depending on the media type, the print quality may decline or you may not be able to select
borderless printing.
88
Paper Width Roll paper Cut sheet
ISO A4 (210 mm) Supported Supported
ISO A3 (297 mm) Supported Supported
Super A3/B (329 mm) Supported Supported
SuperW A3 (329 mm) Supported Supported
ISO A2 (420 mm)* Supported —
US B/11 inches (279 mm)* Supported —
US C/17 inches (432 mm) Supported Supported
8 inches (203 mm)* Supported —
10 inches (254 mm) Supported Supported
16 inches (406 mm) Supported Supported
12 inches (300 mm) Supported Supported
* Requires borderless printing spacer and roll paper with a 2-inch core.
Parent topic: Media Handling

89
Printing from a Computer
Before printing from your computer, make sure you have set up your product and installed its software
as described on the Start Here sheet.
Note: If you have an Internet connection, it is a good idea to check for updates to your product software
on Epson's support website. If you see a Software Update screen, select Enable automatic checking
and click OK. The update scans your system to see if you have the latest product software. Follow the
on-screen instructions. You can also check for updates using Epson Software Updater in the Epson
software folder on your computer.
Printing with Windows
Printing on a Mac
Printing with Windows
You can print with your product using any Windows application, as described in these sections.
Note: If you are using your Epson product with the Windows 10 S operating system, you cannot use the
software described in this section. You also cannot download and install any Epson product software
from the Epson website for use with Windows 10 S; you must obtain software only from the Windows
Store.
Selecting Basic Print Settings - Windows
Selecting Print Layout Options - Windows
Selecting Additional Settings - Windows
Saving, Sharing, and Customizing the Printer Settings
Printing Your Document or Photo - Windows
Selecting Default Print Settings - Windows
Changing the Language of the Printer Software Screens
Changing Automatic Update Options
Parent topic: Printing from a Computer
Selecting Basic Print Settings - Windows
Select the basic settings for the photo or document you want to print.
1. Open a photo or document for printing.
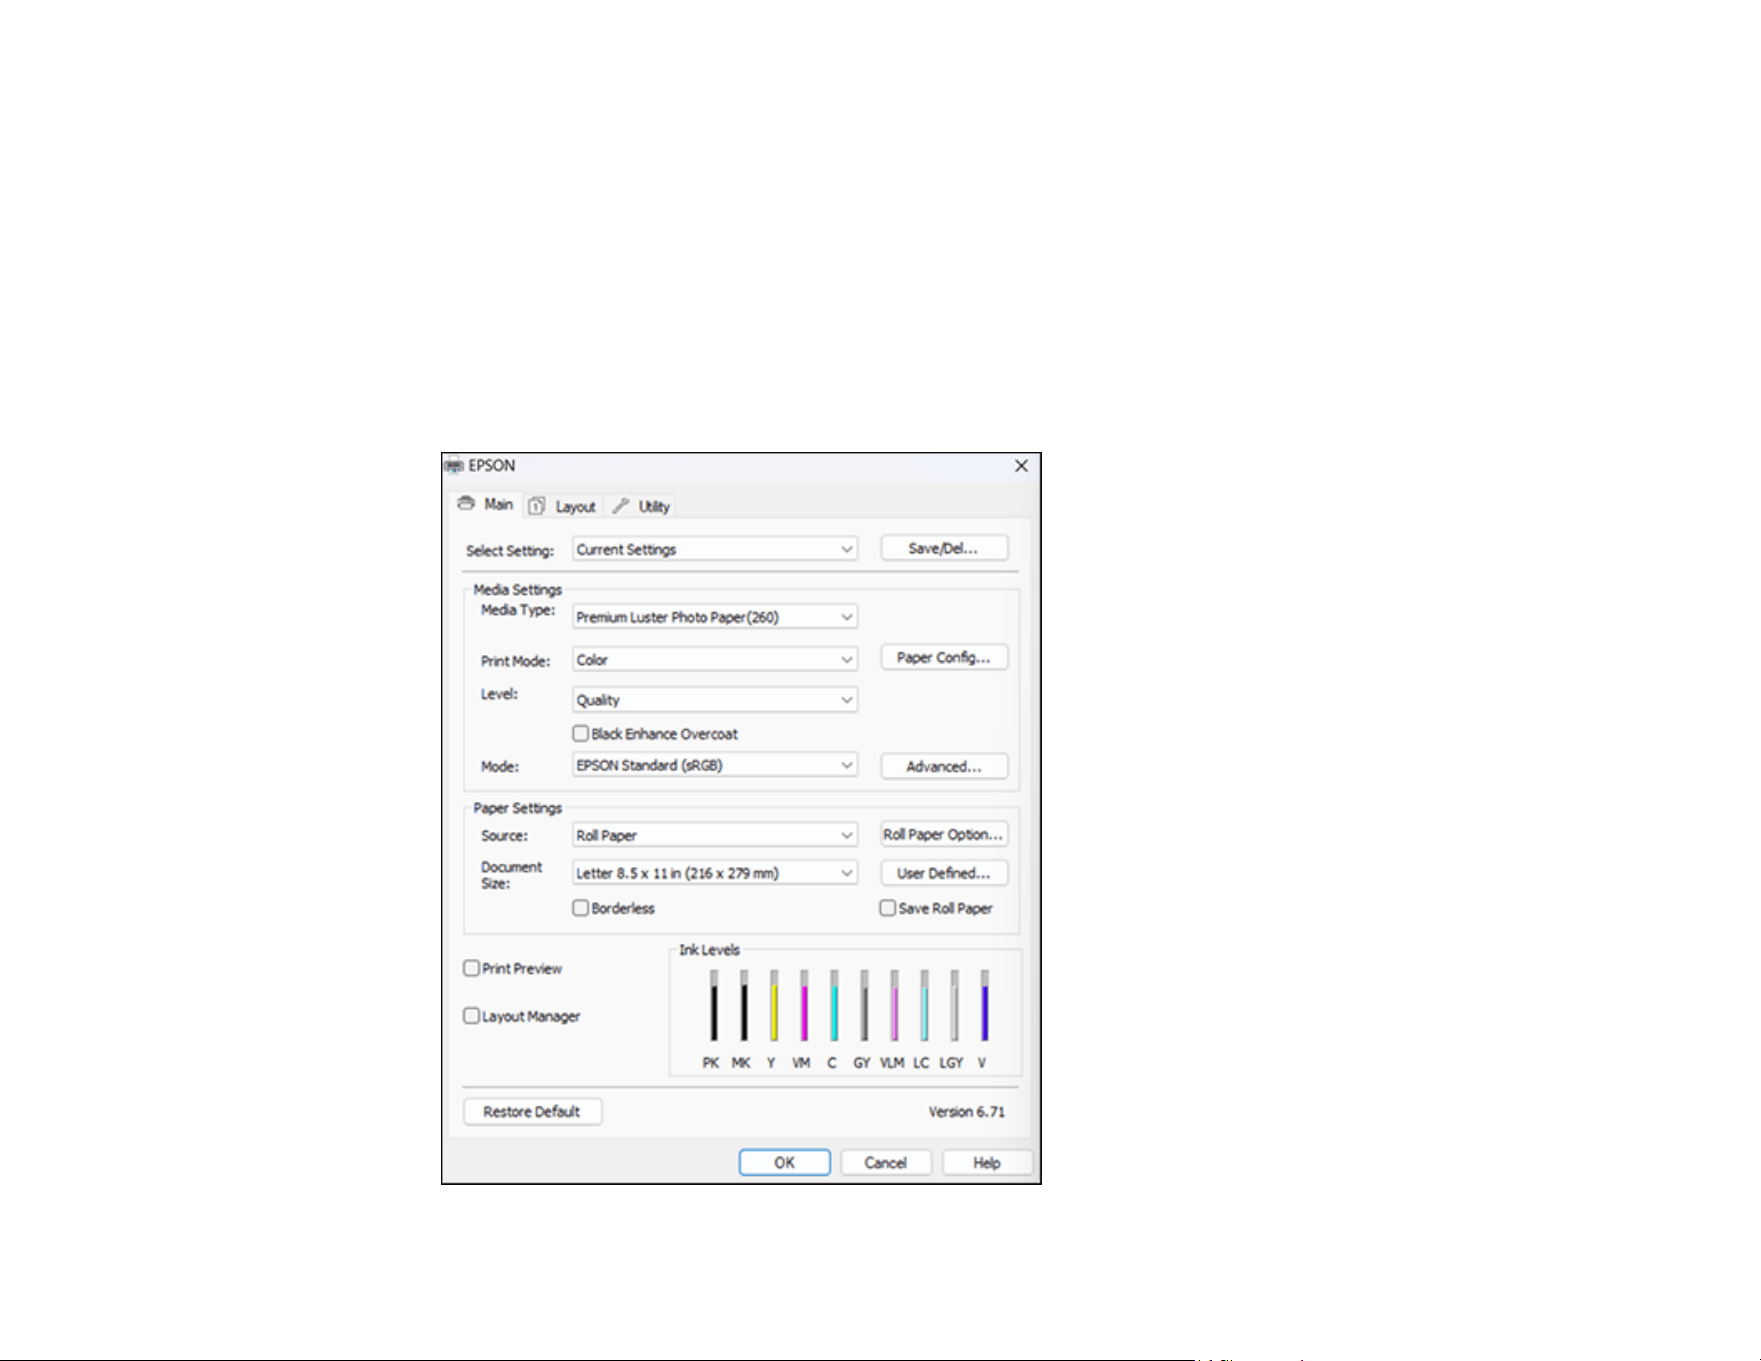
90
2. Select the print command in your application.
Note: You may need to select a print icon on your screen, the Print option in the File menu, or
another command. See your application's help utility for details.
3. If necessary, select your product name as the printer you want to use.
Note: You may also need to select Preferences, Properties, Print Settings, or Printer Properties
to view your print settings.
You see the Main tab of your printer settings window:

91
4. Select the Media Type setting that matches the paper you loaded.
Note:
• Click Acquire Info to refresh the settings if you loaded or changed paper after opening the print
window.
• When printing from the printer driver on a stored Custom Paper Setting, make sure the Media
Type in the printer driver matches the paper type selected for the Custom Paper Setting you are
using.
5. If you are using non-Epson paper or media and you need to fine-tune its performance, select the
Media Type setting that is closest to the paper you loaded, click the Paper Config button, and
adjust the paper configuration options as necessary.
6. Select a Color option:
• To print a color document or photo, select the Color setting.
• To print high quality black and white photos, select the Advanced B&W Photo setting.
• To print text and graphics when plain paper is the selected media type, select the Black setting.
7. For the Level setting, select a print quality setting or select Quality Options and choose the quality
option that matches the print quality you want to use.
Note: The available Level settings depend on the Media Type you selected.
8. Select Black Enhance Overcoat to increase the black density by overcoating light gray ink on the
dark parts of printouts.
Note: The Black Enhance Overcoat setting may not be available depending on the selected paper
type.
9. Select the desired color management option as the Mode setting.
10. Select the Source setting that matches the paper feeding method you are using.
11. Select the size of the paper you loaded as the Document Size setting.
Note: You can also select the User Defined setting to create a custom paper size.
12. If you are printing on roll paper, click the Roll Paper Option button and adjust the settings as
necessary.
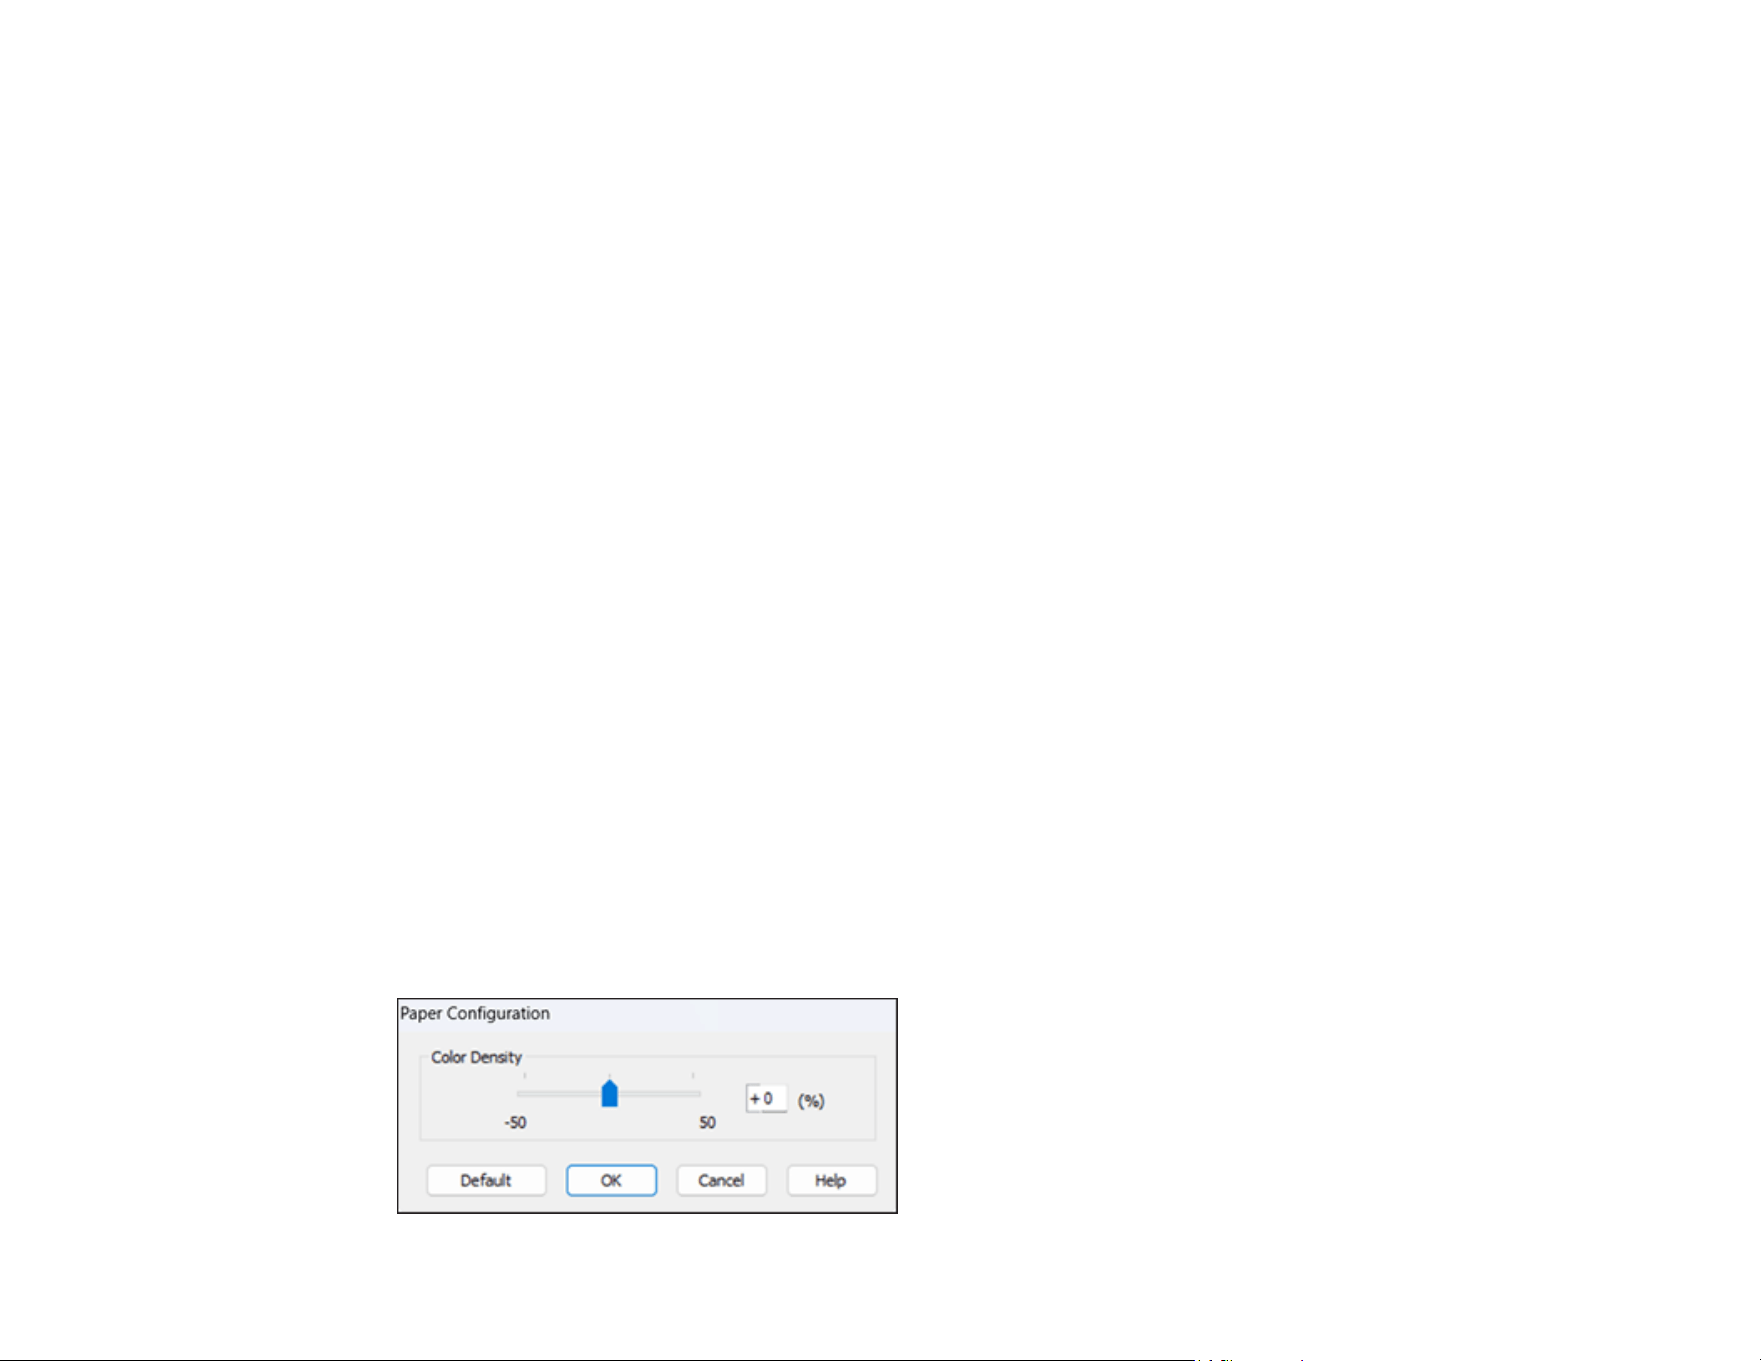
92
13. When Auto Cut is enabled, select the Save Roll Paper checkbox to have the printer cut the roll
paper at the end of the image as it is positioned on the page.
14. If you want to print a photo without borders, select Borderless.
Note: You must select a compatible borderless paper type and size to print without borders. Check
the borderless paper compatibility list for details.
15. To see a preview of how your document or photo will print, select Print Preview. (The preview
appears after you click Print but before printing starts.)
16. To layout multiple print jobs for printing all at once, select Layout Manager.
Paper Configuration Options - Windows
Advanced B&W Photo Options - Windows
Print Quality Options - Windows
Color Management Options - Windows
Advanced Color Controls - Windows
Paper Source Options - Windows
Roll Paper Options - Windows
Using Layout Manager - Windows
Parent topic: Printing with Windows
Related references
Borderless Paper Type Compatibility
Related tasks
Printing Your Document or Photo - Windows
Paper Configuration Options - Windows
If you are using non-Epson media and need to fine-tune its print quality, click Paper Config... from the
Main tab, then adjust the Color Density setting, as necessary.

93
Note: The Color Density setting is only available in the printer driver. It is not accessible from the
printer's control panel or Epson Media Installer.
Color Density
Adjusts the ink saturation level.
Parent topic: Selecting Basic Print Settings - Windows
Advanced B&W Photo Options - Windows
If you select Advanced B&W Photo as the Print Mode option, you can easily produce neutral and
toned black-and-white prints. Whether your photo is color or grayscale, you can use this screening and
color management technology to create stunning black-and-white prints. Select any Mode setting except
ICM and then click Advanced and select any of the available options. You can also use Black
Enhanced Overcoat to print darker tones of black.
Color Toning
Adds tone (hue) to your black-and-white output. The default is Neutral, which provides a neutral tonal
scale print. You can also choose other popular presets such as Cool, Warm, and Sepia. Note that
the presets affect the target in the tone color circle.
Tone
Changes the entire tonal scale of your black-and-white output. While Darker is the default setting, you
may see better results if you choose Dark. The tone color circle adjusts the hue of your black-and-
white print. Click on any portion of the color wheel or enter corresponding values to customize the
tone (hue) to add to your print. The closer you select to the edge of the wheel, the more color you add.
Brightness
Adjusts the overall lightness and darkness of your image.
Contrast
Adjusts the difference between the light and dark areas of your image.
Shadow Tonality
Controls tonality only in the shadow areas of your image.
Highlight Tonality
Controls tonality only in the highlight areas of your image.
Max Optical Density
Adjusts the overall density or focus of the print. Create a soft focus print by lowering the density
setting.
Highlight Point Shift
Helps reduce gloss differential on glossy media by adding density to the highlights of your image.
Parent topic: Selecting Basic Print Settings - Windows

94
Print Quality Options - Windows
You can use the Speed/Quality slider to set the desired quality level and select any of the available
Level options to fine-tune the quality of your print. Some settings may be unavailable, depending on the
paper type and border setting you have chosen.
High Speed
Speeds up printing but may reduce print quality.
Edge Smoothing
Smooths jagged edges in low-resolution images such as screen captures or images from the Web.
Finest Detail
Sharpens edges on vector-based data including text, graphics, and line art. (This setting does not
affect photographs.)
Note: Enabling Finest Detail may decrease the print speed.
Black Enhance Overcoat
Prints darker tones of black by overcoating the black ink with gray.
Note: Printing with Black Enhance Overcoat increases the edge margins.
Parent topic: Selecting Basic Print Settings - Windows
Color Management Options - Windows
You can adjust the Mode setting to fine-tune the colors in your printout or turn off color management in
your printer software.
EPSON Standard (sRGB)
Increases the contrast in images.
Note: This is the standard mode for most photos and documents when not using an ICC profile.
Adobe RGB
Matches image colors to the Adobe RGB color standard. Use this setting if your source file was
captured in Adobe RGB.
ICM
Automatically adjusts colors based on the printer’s ICC profile and the selected Media Type setting,
using the Image Color Matching system. Click the Advanced button to choose the input profile and
other settings.
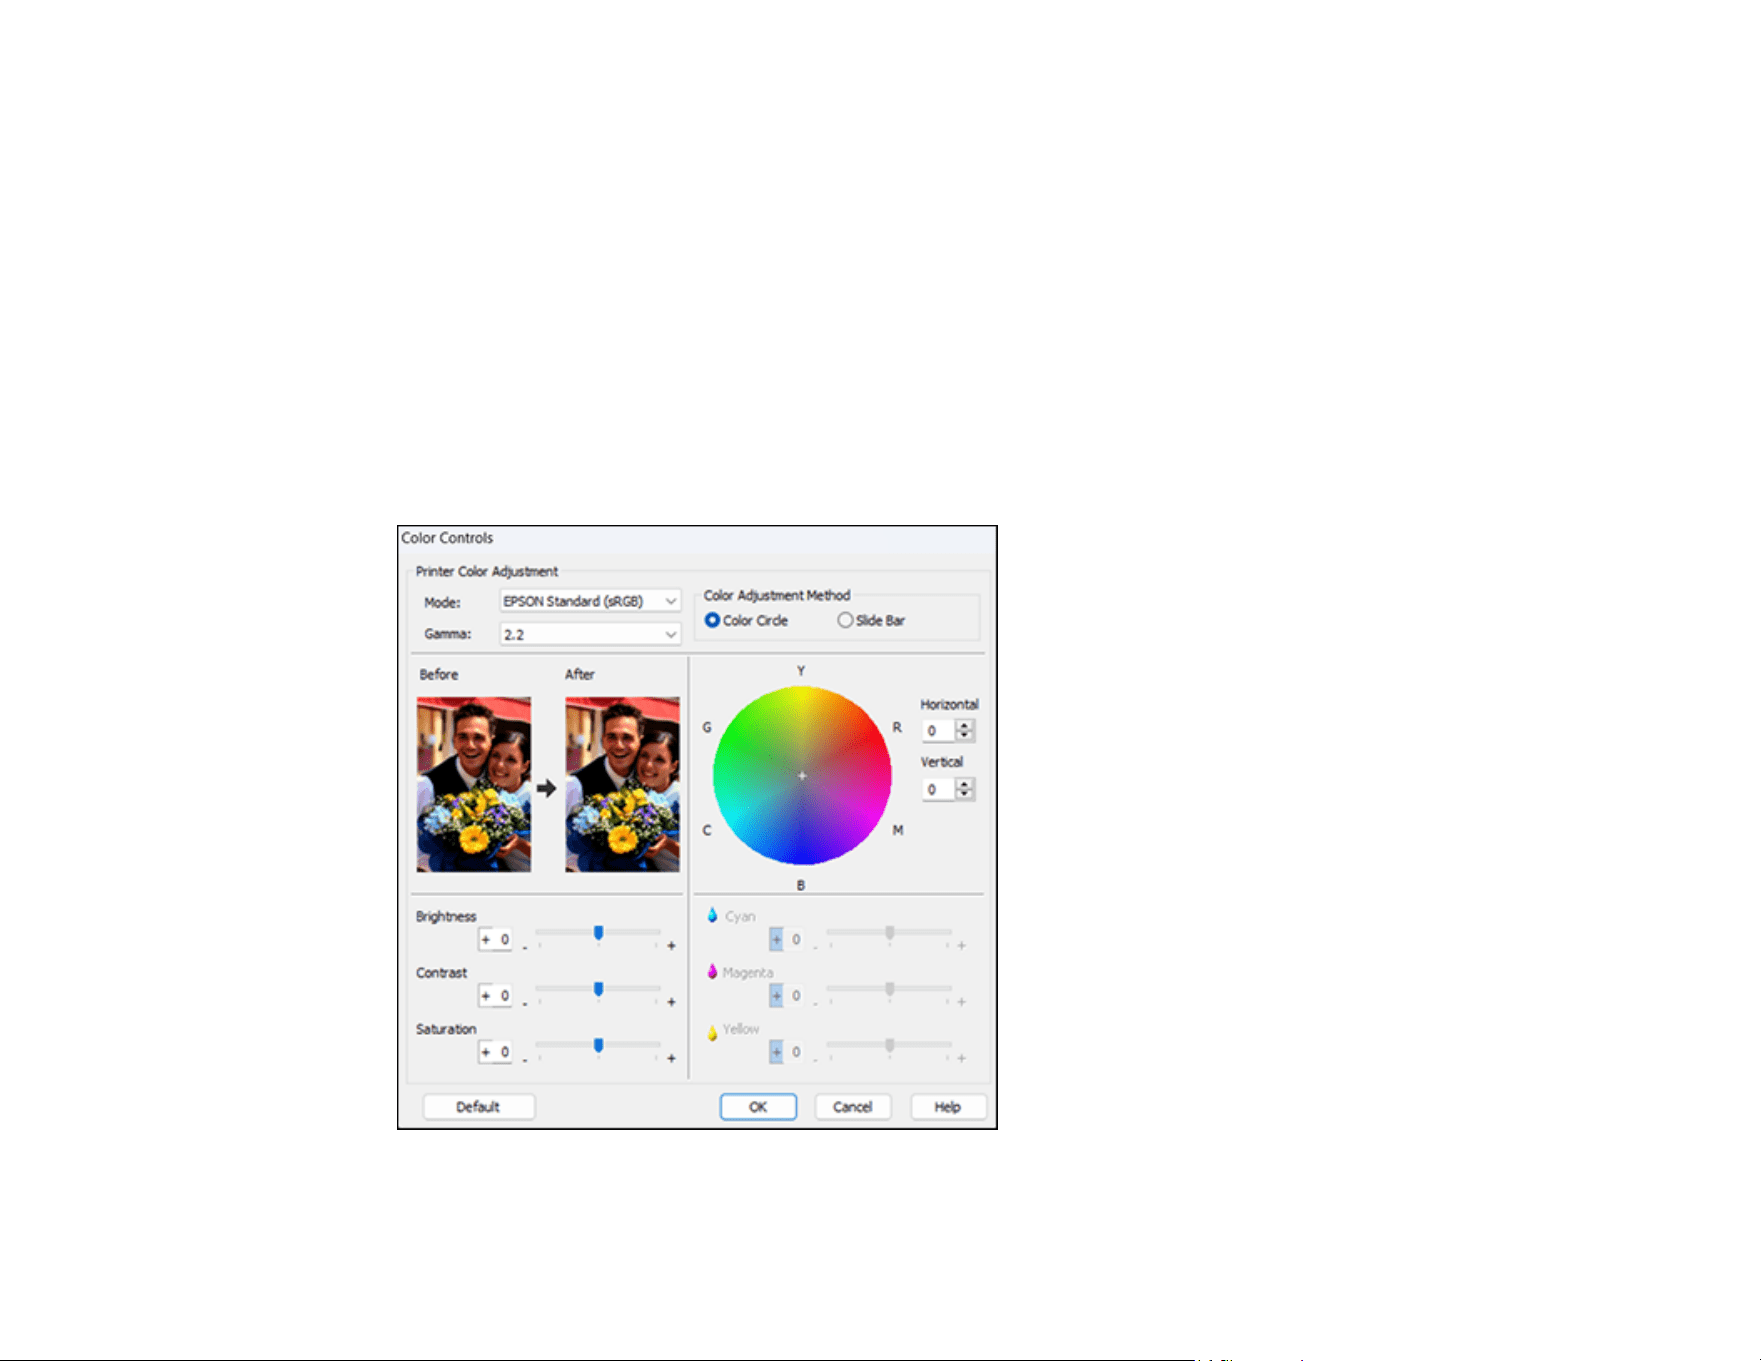
95
Note: In most cases, you get better results by applying color management in your application, rather
than in the printer driver.
Off (No Color Adjustment)
Turns off color management in your printer software so you can manage color using only your
application software.
Note: An ICC profile is required if color management is turned off.
Parent topic: Selecting Basic Print Settings - Windows
Advanced Color Controls - Windows
If you selected Color as the Print Mode setting and any setting except ICM as the Mode setting, you
can click the Advanced button to select detailed settings.
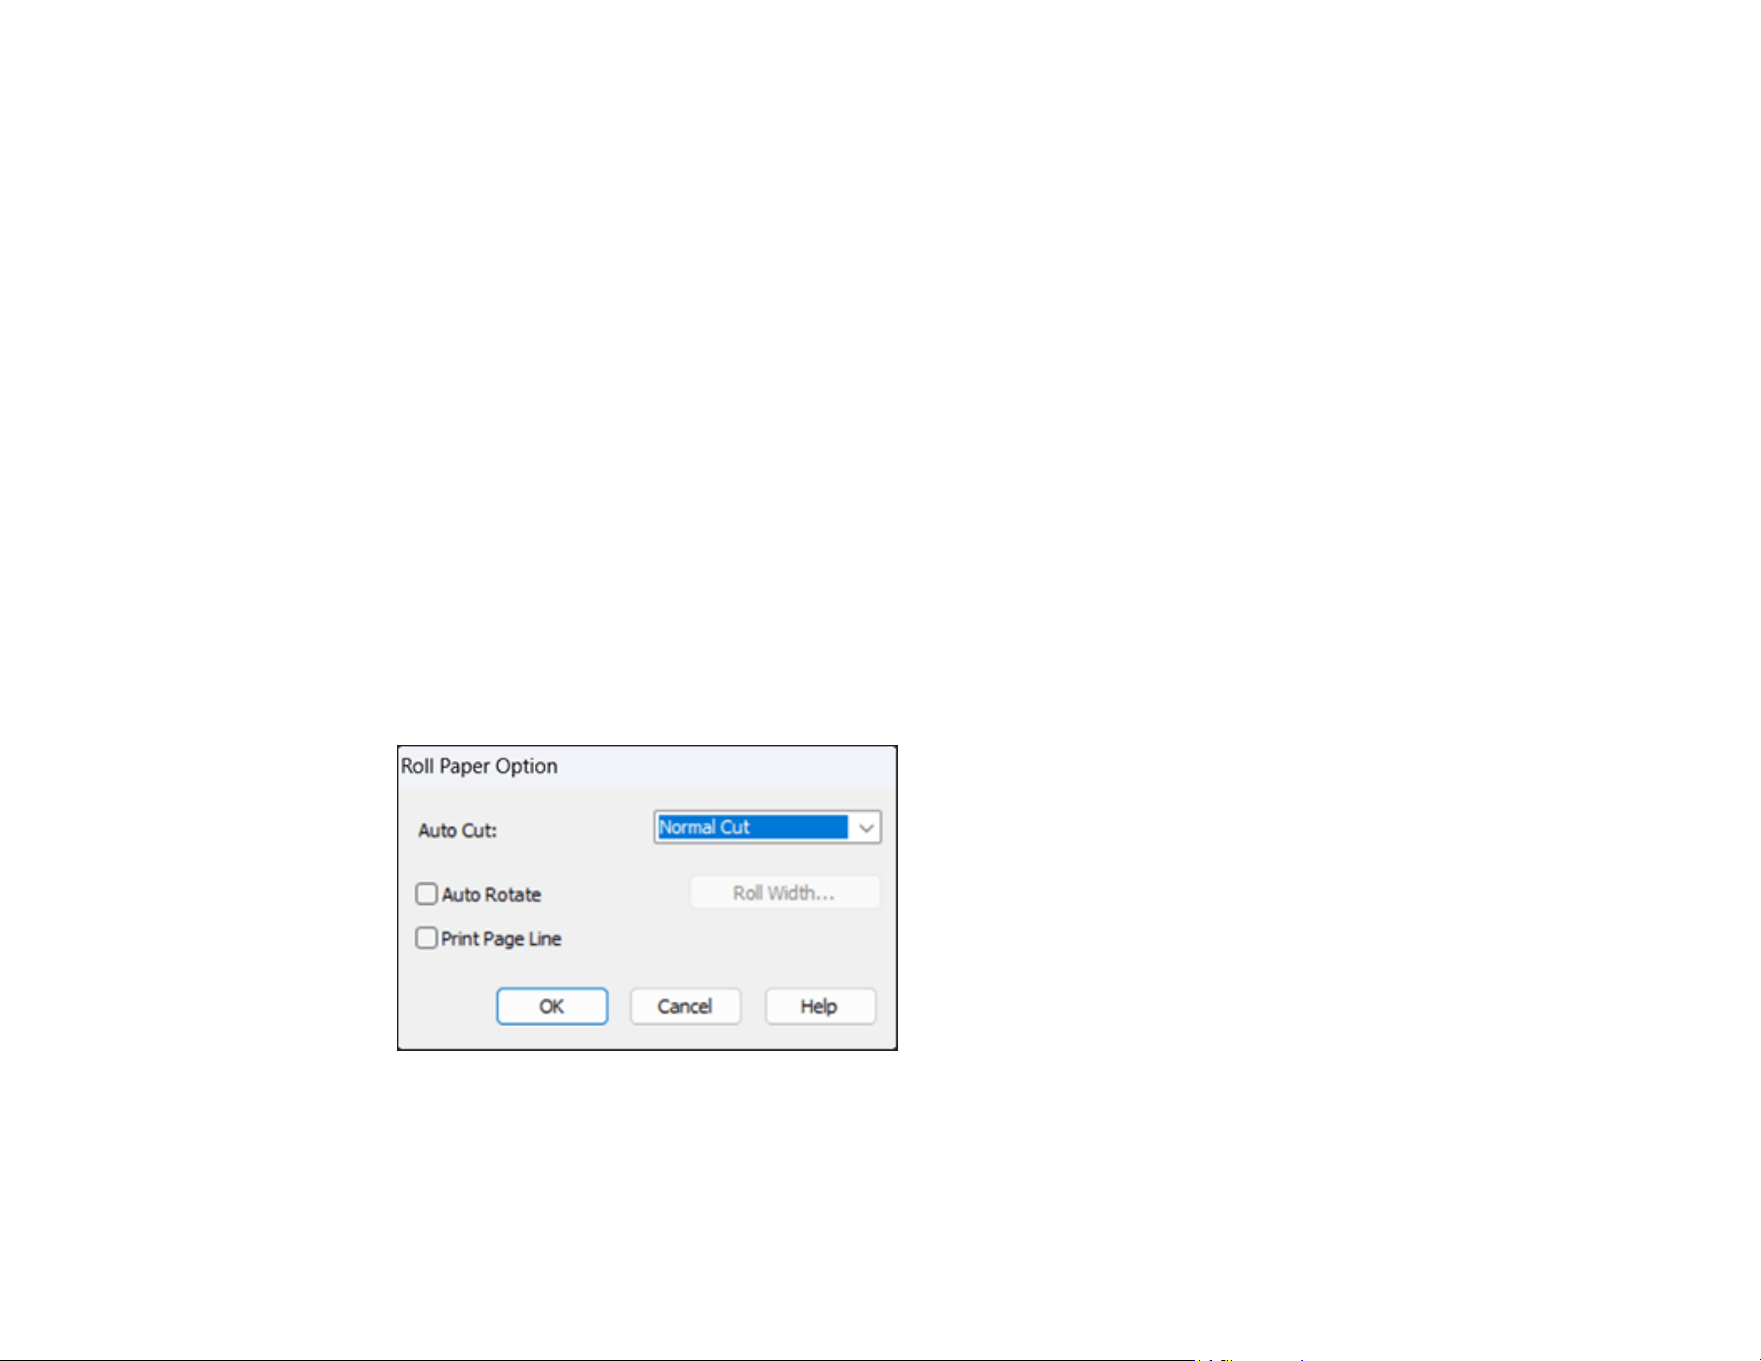
96
The Color Controls screen lets you specify values for adjusting brightness, contrast, saturation, and
individual Cyan, Magenta, and Yellow color tones. You can choose from two Printer Color Adjustment
modes and two Gamma settings, and use either a color circle or slide bar to adjust color.
Parent topic: Selecting Basic Print Settings - Windows
Paper Source Options - Windows
You can select any of the available options in the paper Source menu to print on the paper loaded in that
source.
Roll Paper
Selects roll paper loaded in the roll paper holder.
Paper Cassette
Selects the paper in the cassette as the paper source.
Manual Feed
Selects the paper in the front or rear manual feeder.
Poster Board
Selects poster board or other thick media loaded in the cut sheet feed slot.
Parent topic: Selecting Basic Print Settings - Windows
Roll Paper Options - Windows
Select any of the available roll paper options.
Note: Some settings may not be available, depending on the Roll Paper Option you selected for your
paper size.
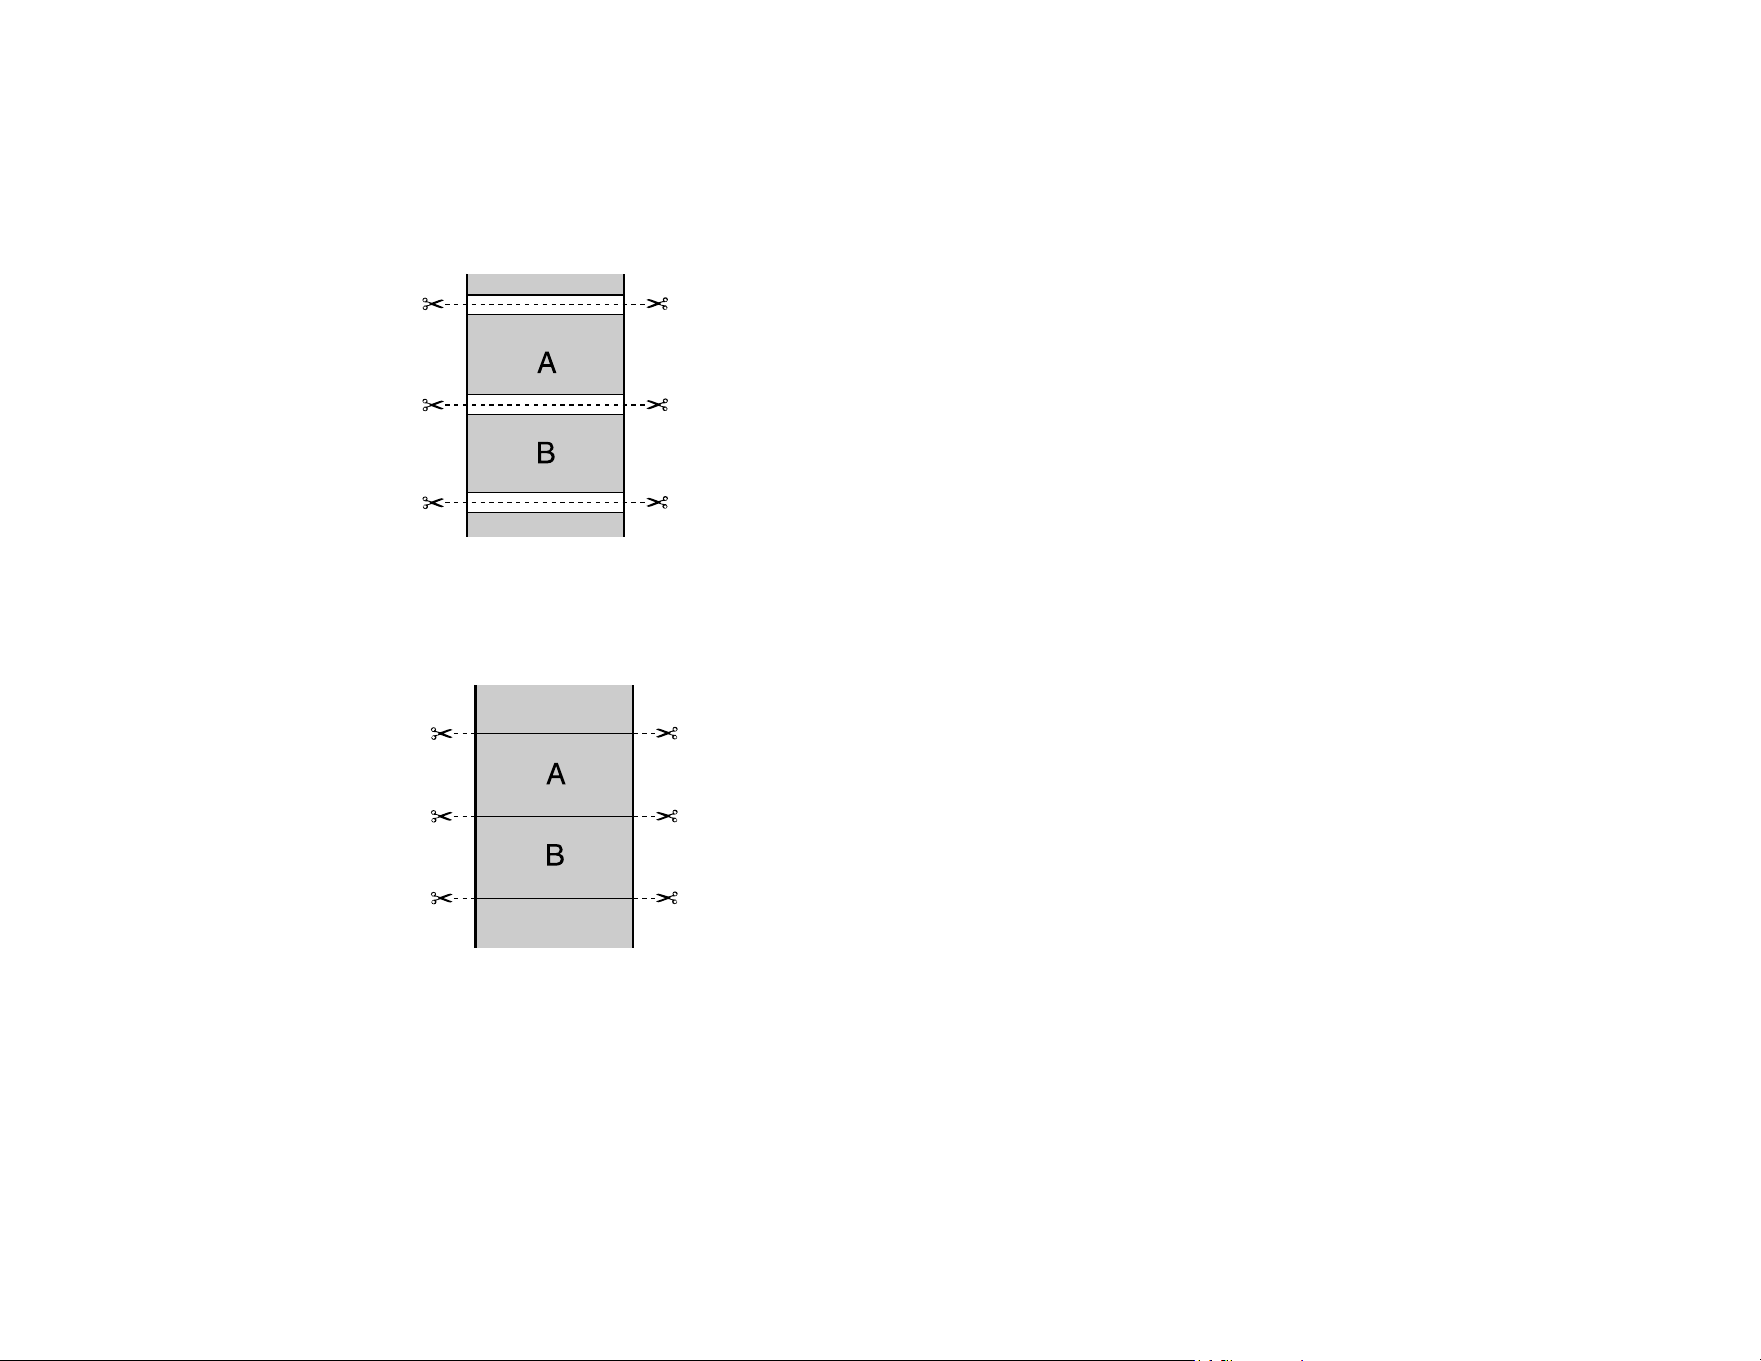
97
Auto Cut options:
• Off: Select this option to cut your prints manually.
• Normal Cut: Creates a margin at the top and bottom of your image. These margins vary by media
type and may be changed from their defaults using custom media settings.
• Single Cut: Prints images within the same print job end-to-end with no gap between them. Borderless
images may overlap slightly.
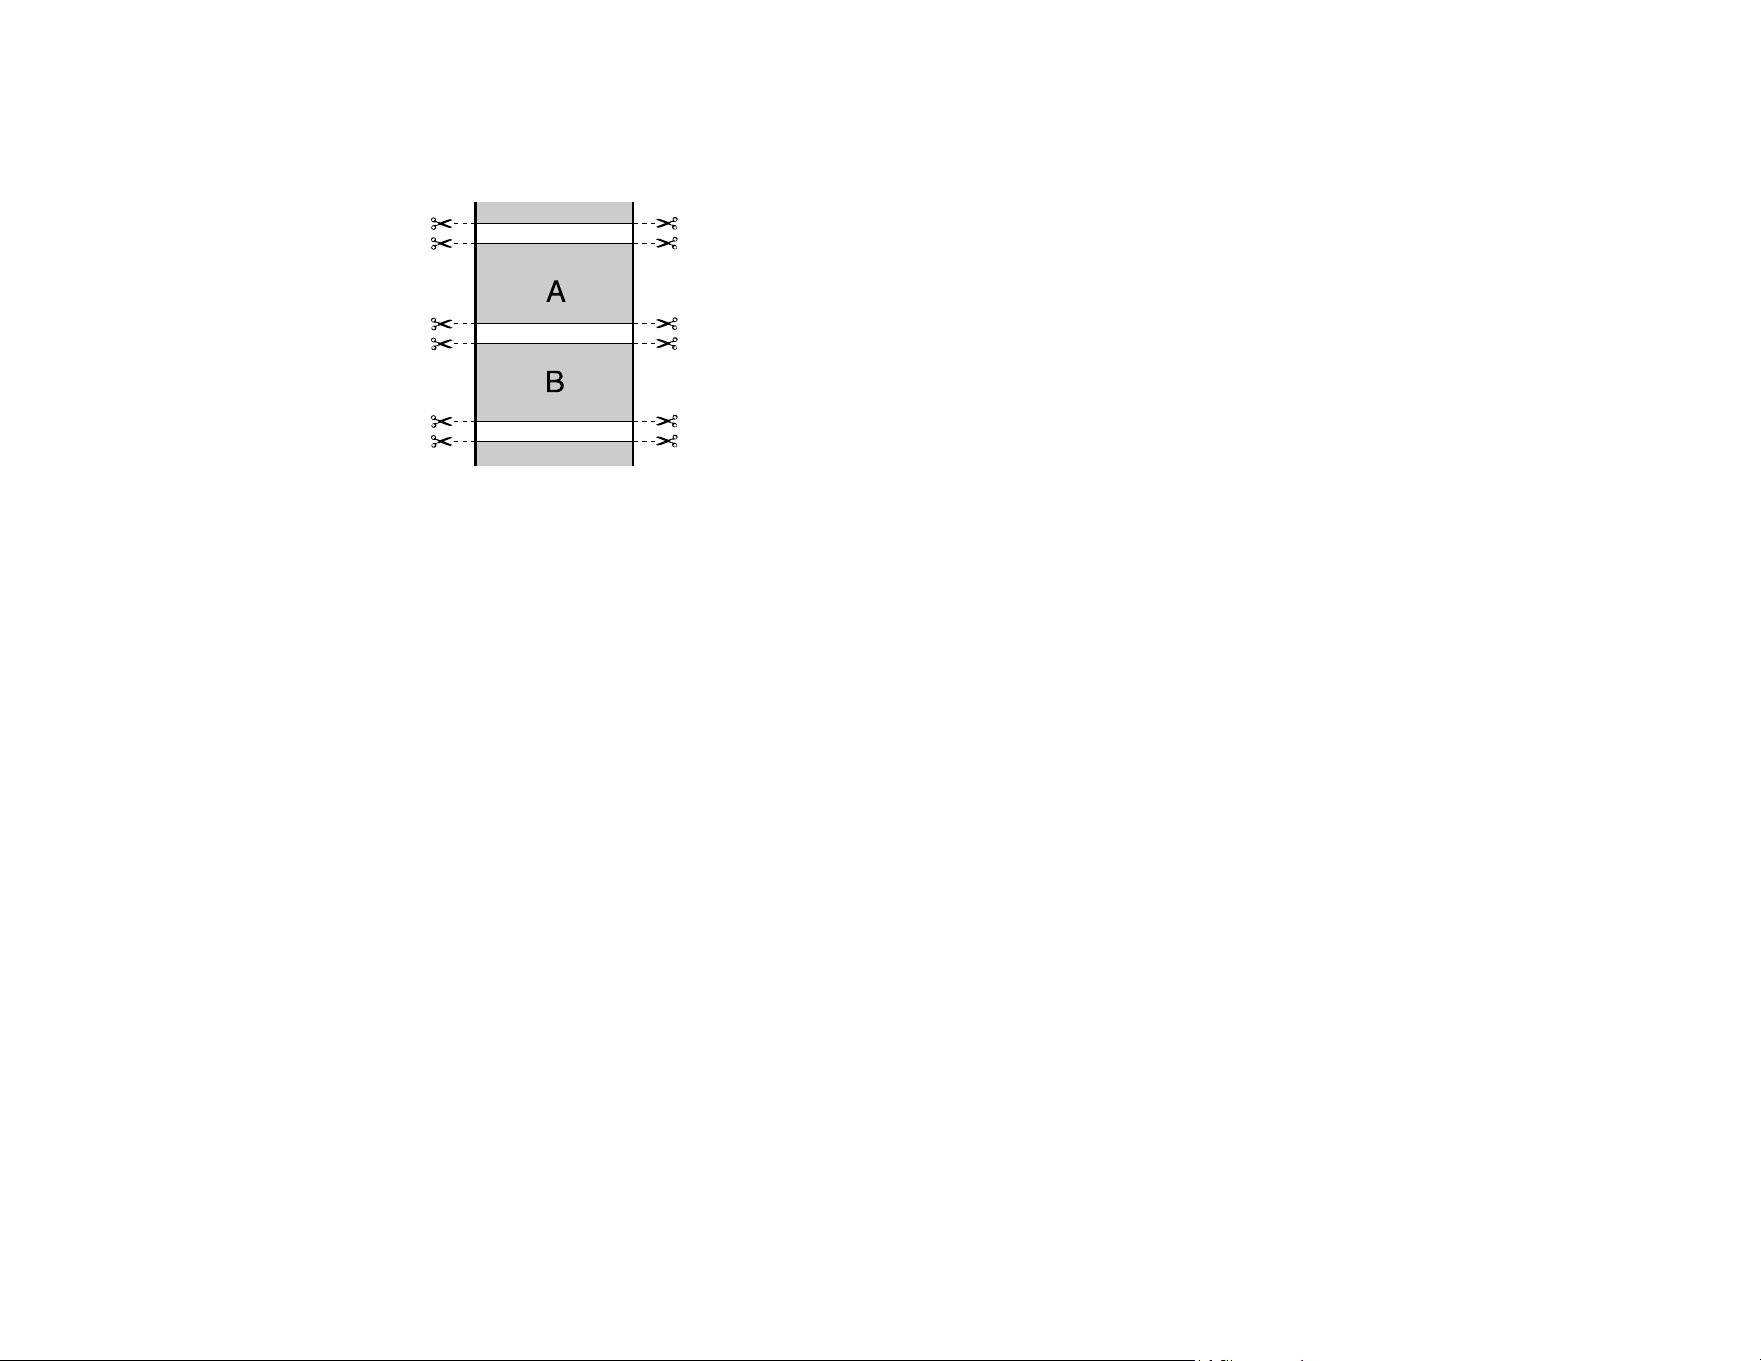
98
• Double Cut: Increases the space between each image and trims each print individually, providing the
cleanest edge with no image overlap for borderless printing.
Auto Rotate
Automatically positions the image or file to fit the roll paper. When Auto Rotate is selected, select the
width of the paper as the Roll Width setting.
Print Page Line
Prints lines between pages as a guide for manual cutting.
Parent topic: Selecting Basic Print Settings - Windows
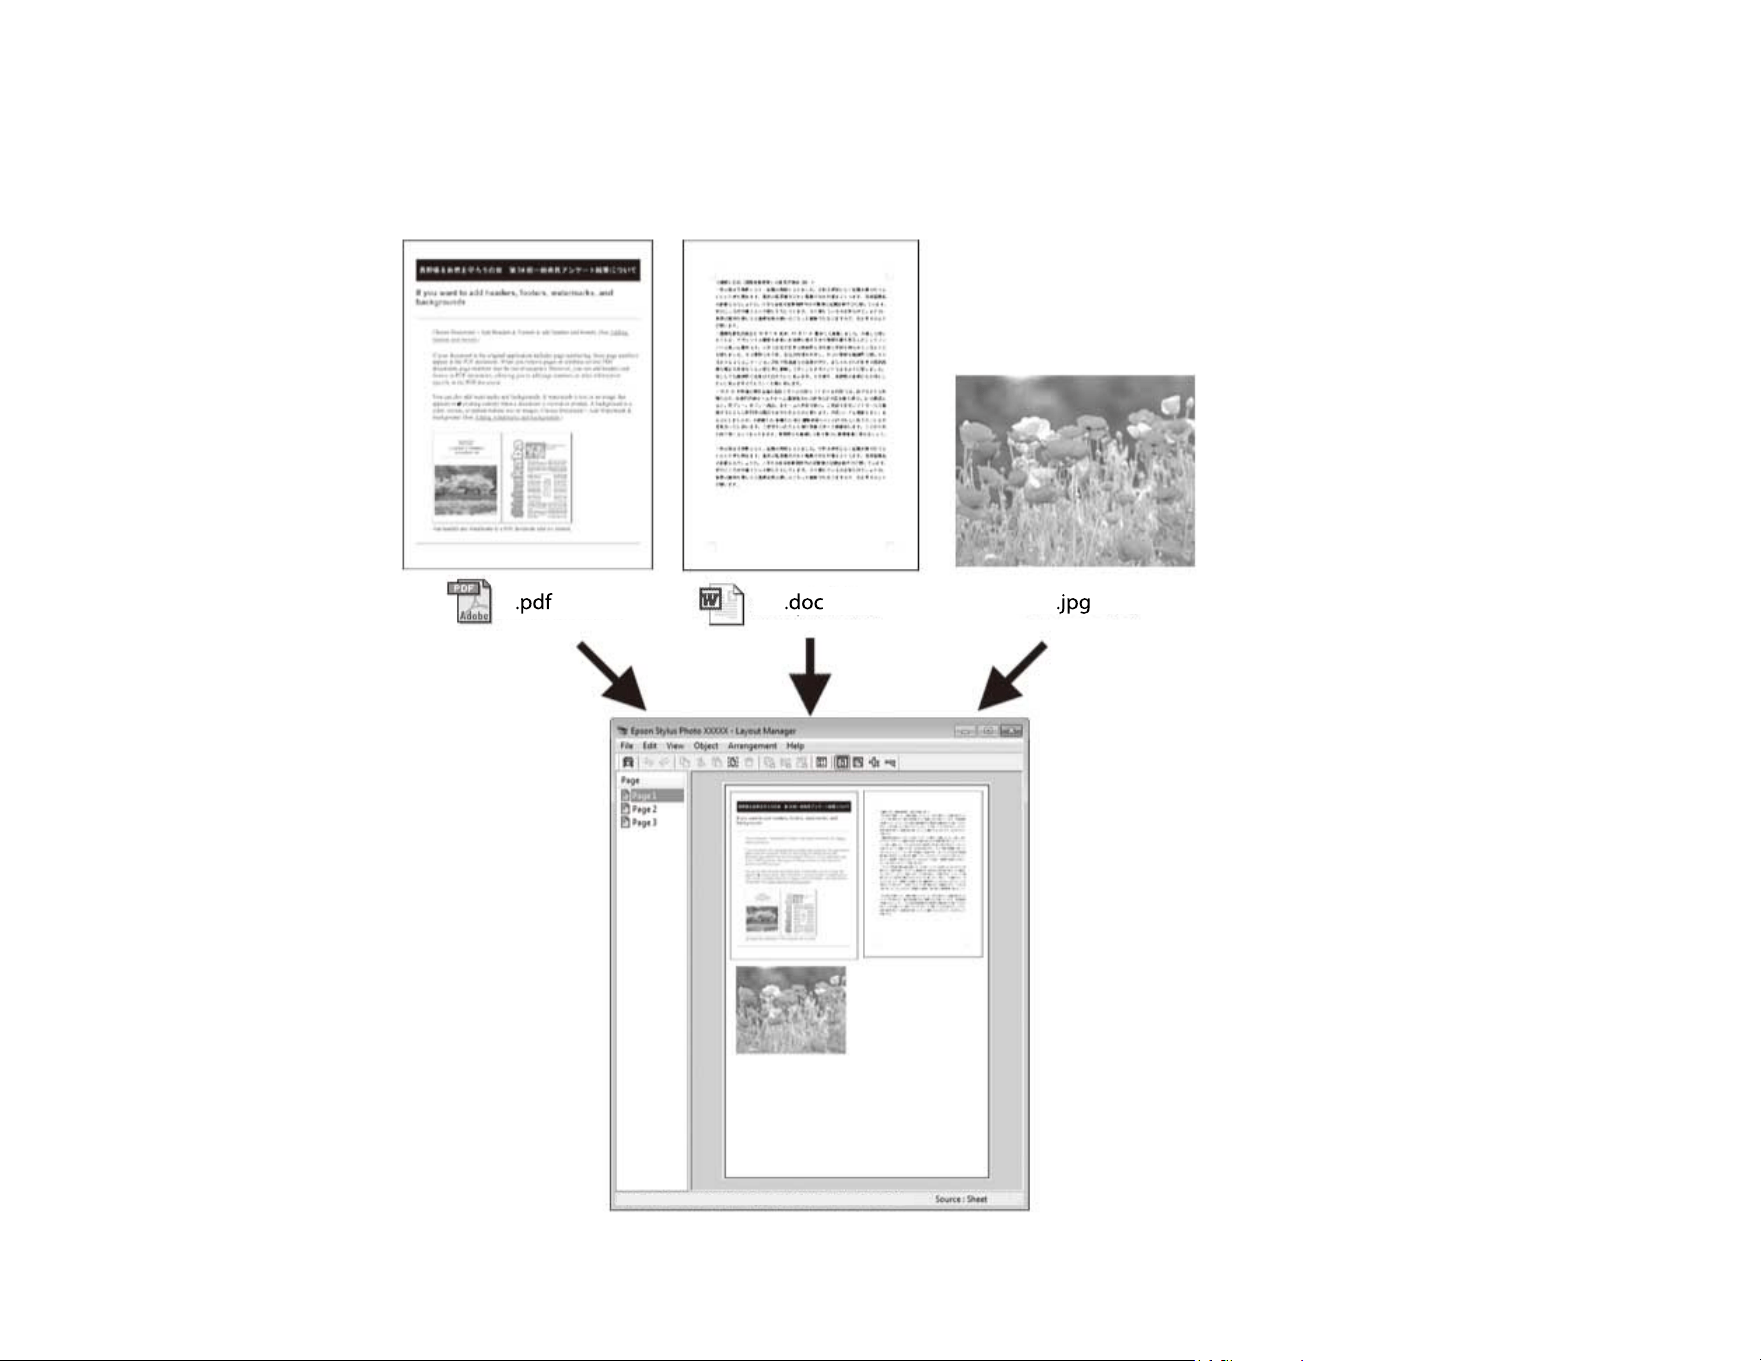
99
Using Layout Manager - Windows
Layout Manager lets you create a poster or display by dragging multiple pieces of print data created in
different applications onto one sheet of paper for printing.
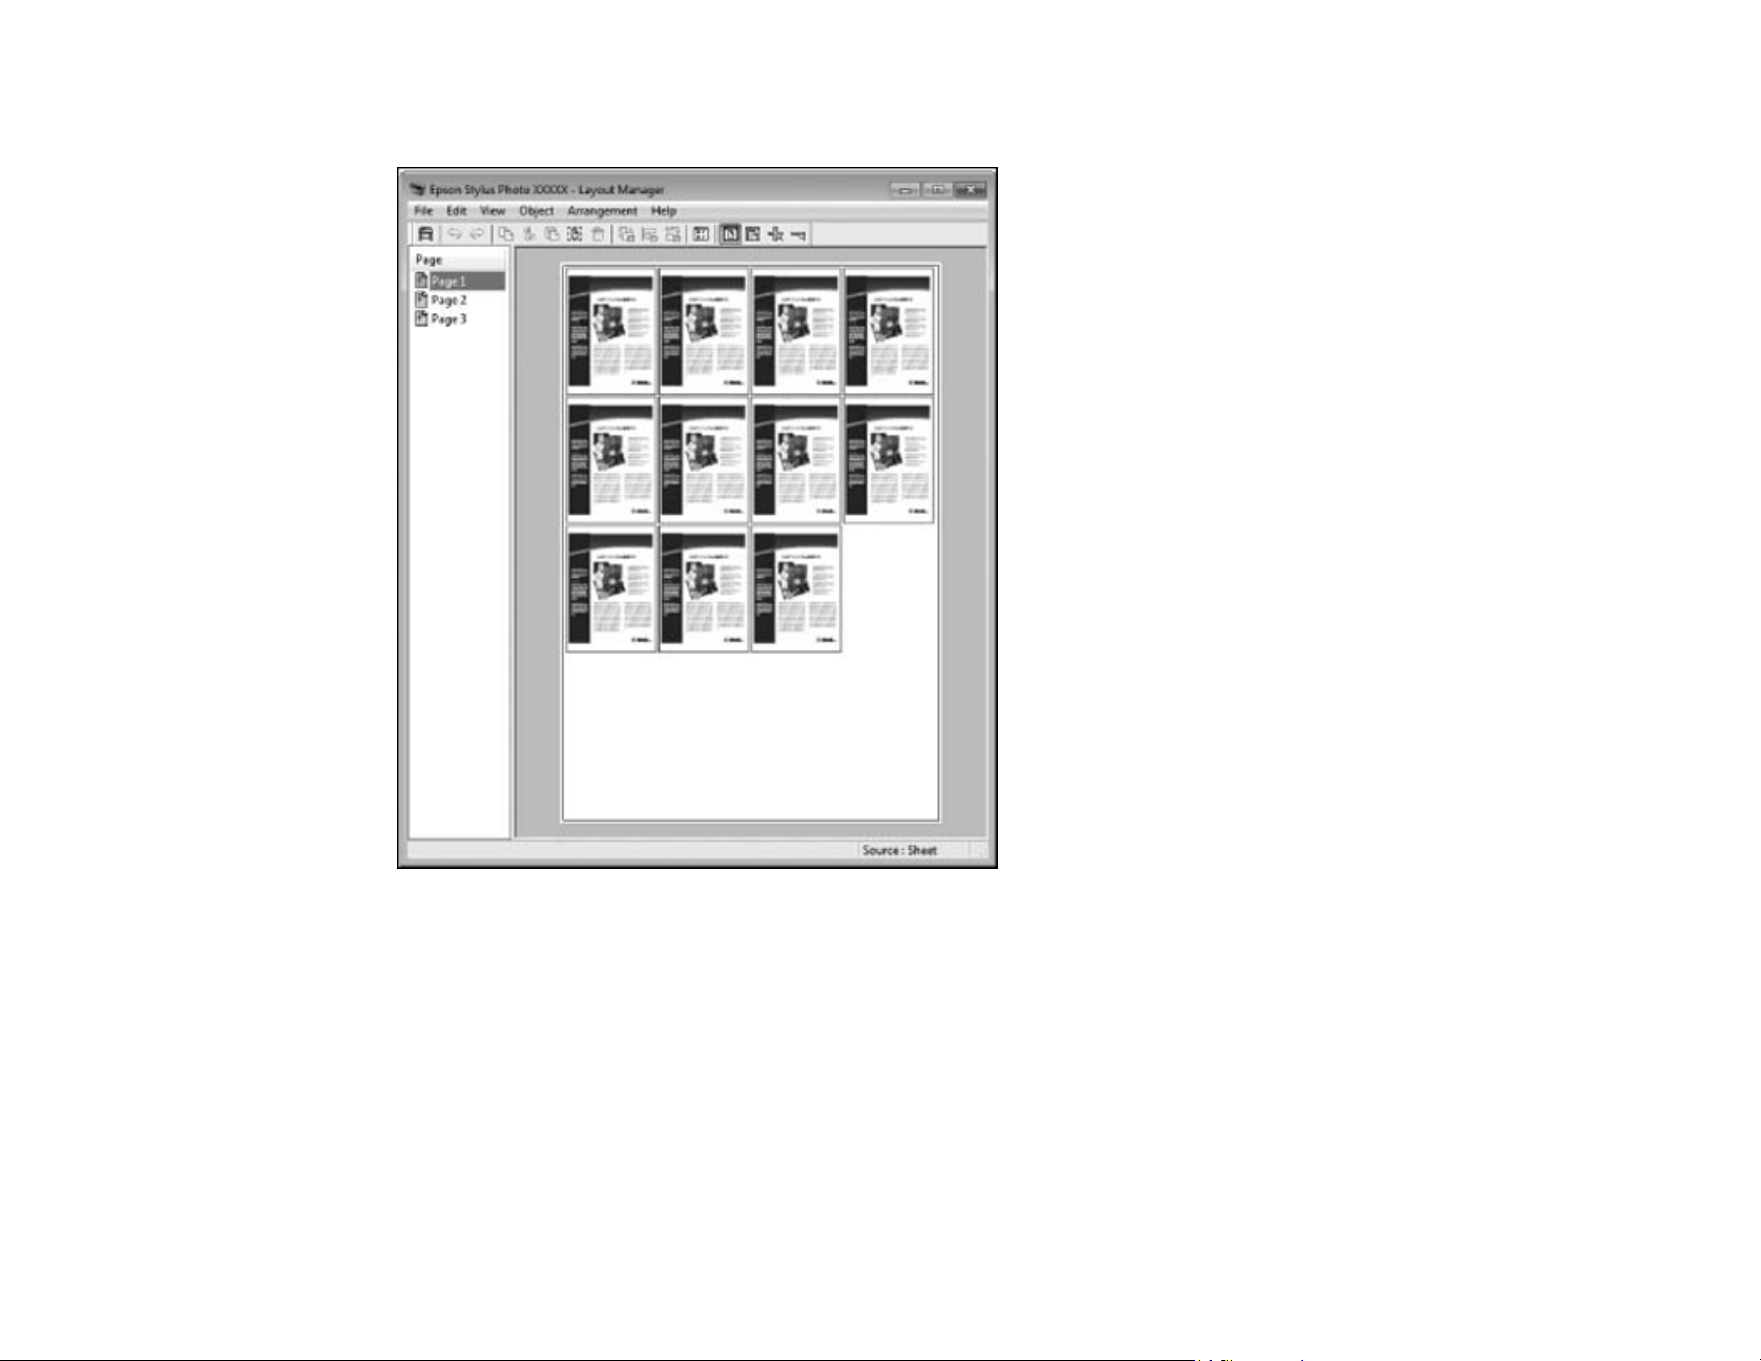
100
You can also place the same print data multiple times as shown here.
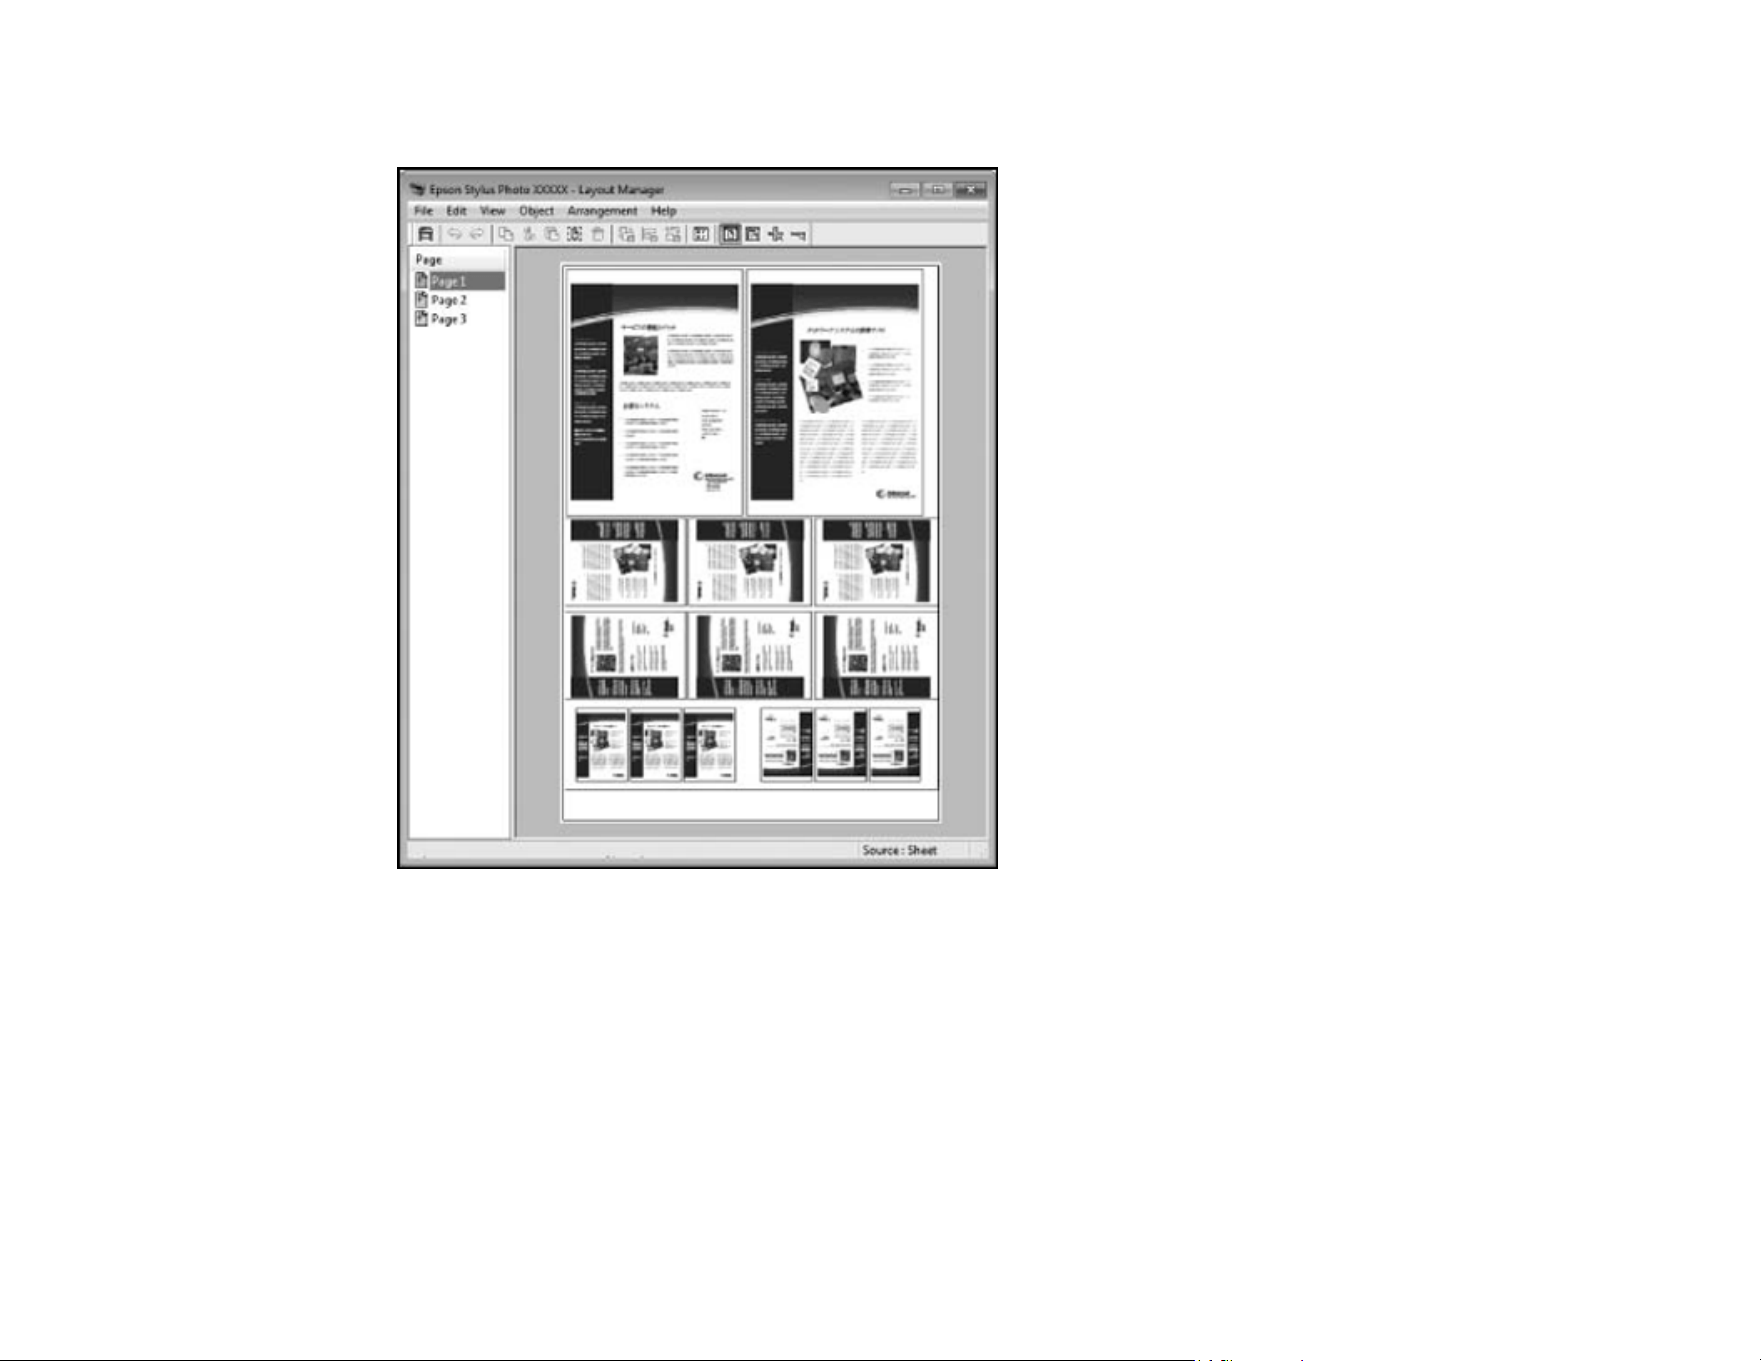
101
You can place print data in different sizes and orientations to maximize media usage, as shown here.
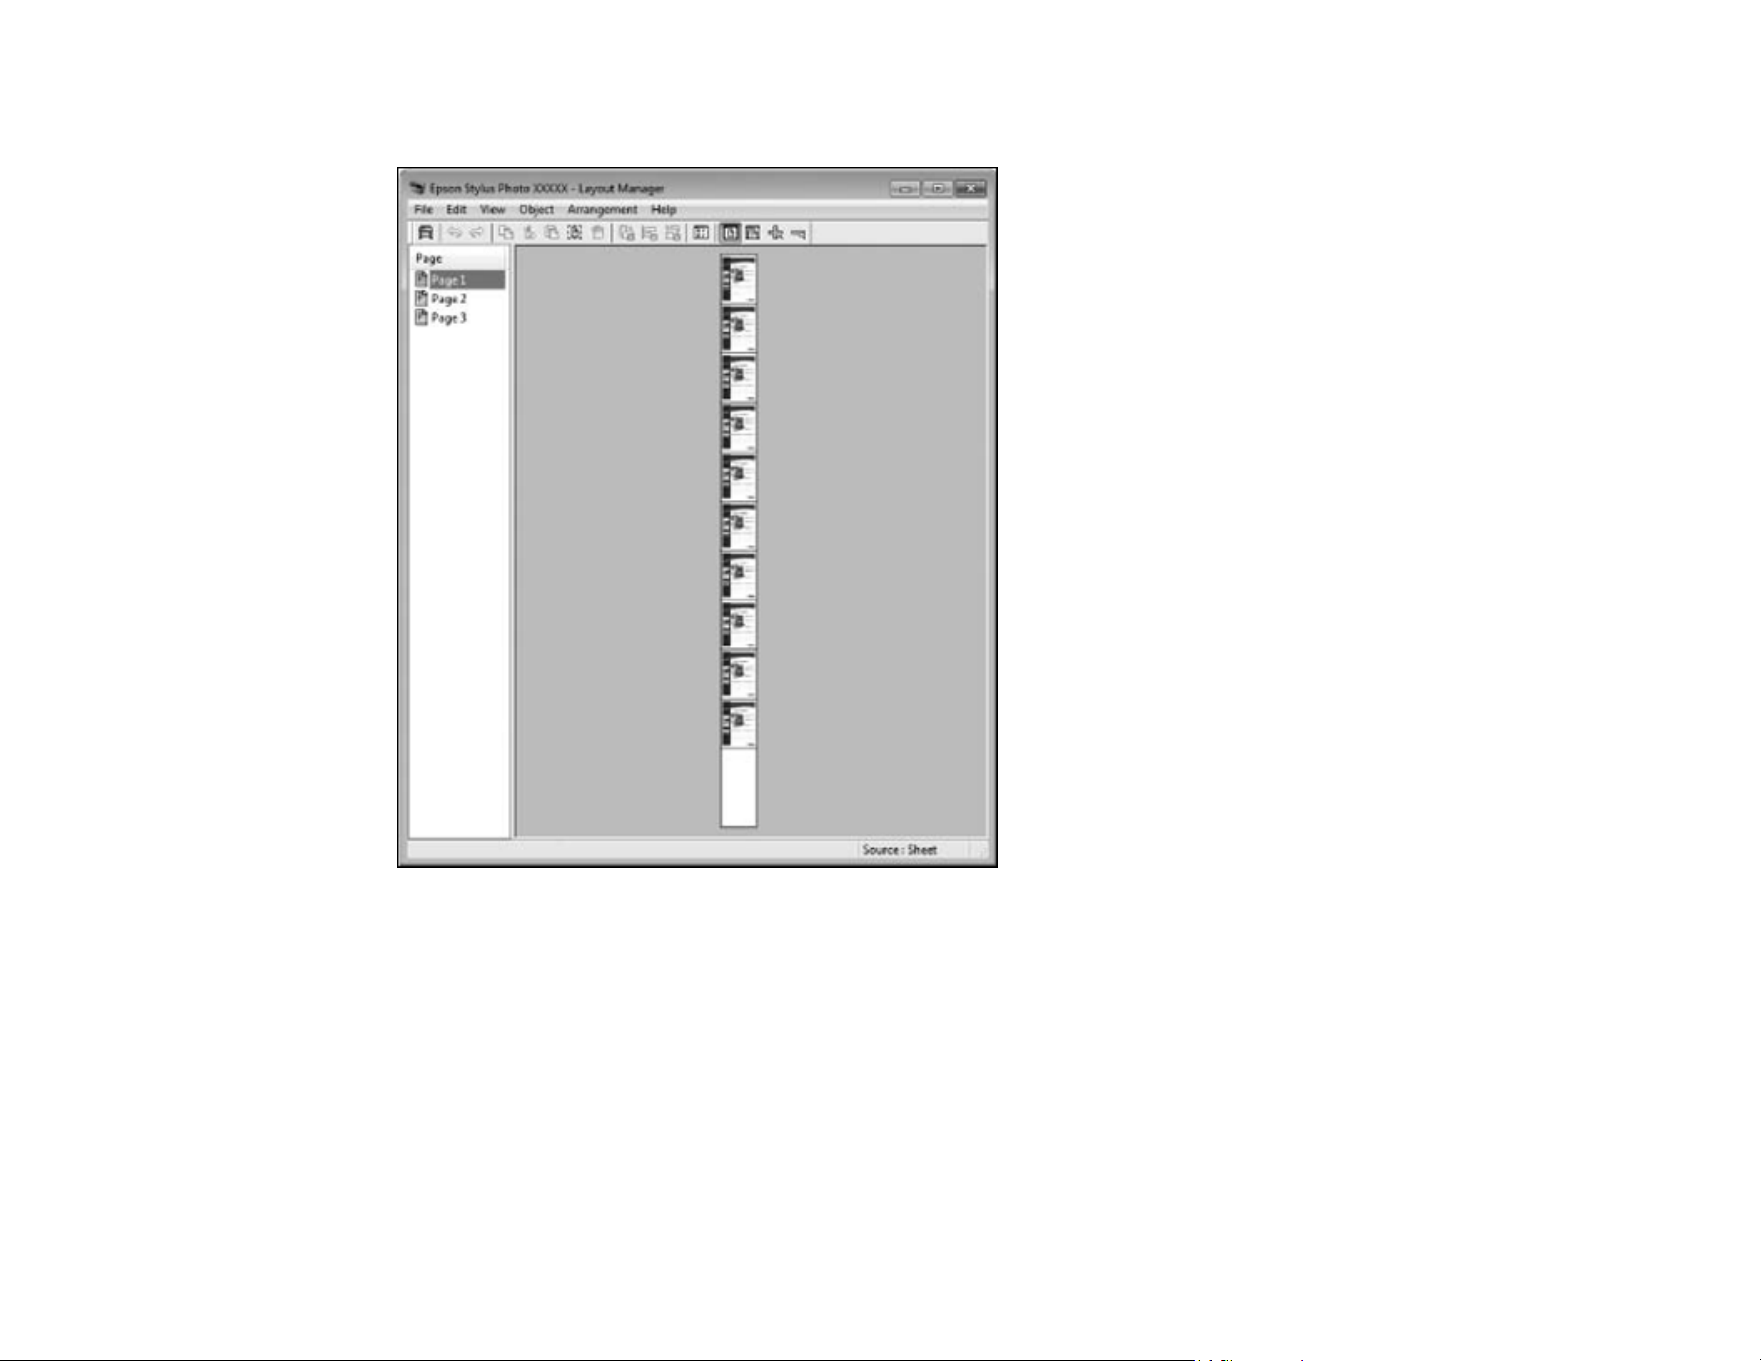
102
You can place print data on roll paper as shown here.
1. Open the file you want to print in your application.
2. Select the print command in your application.
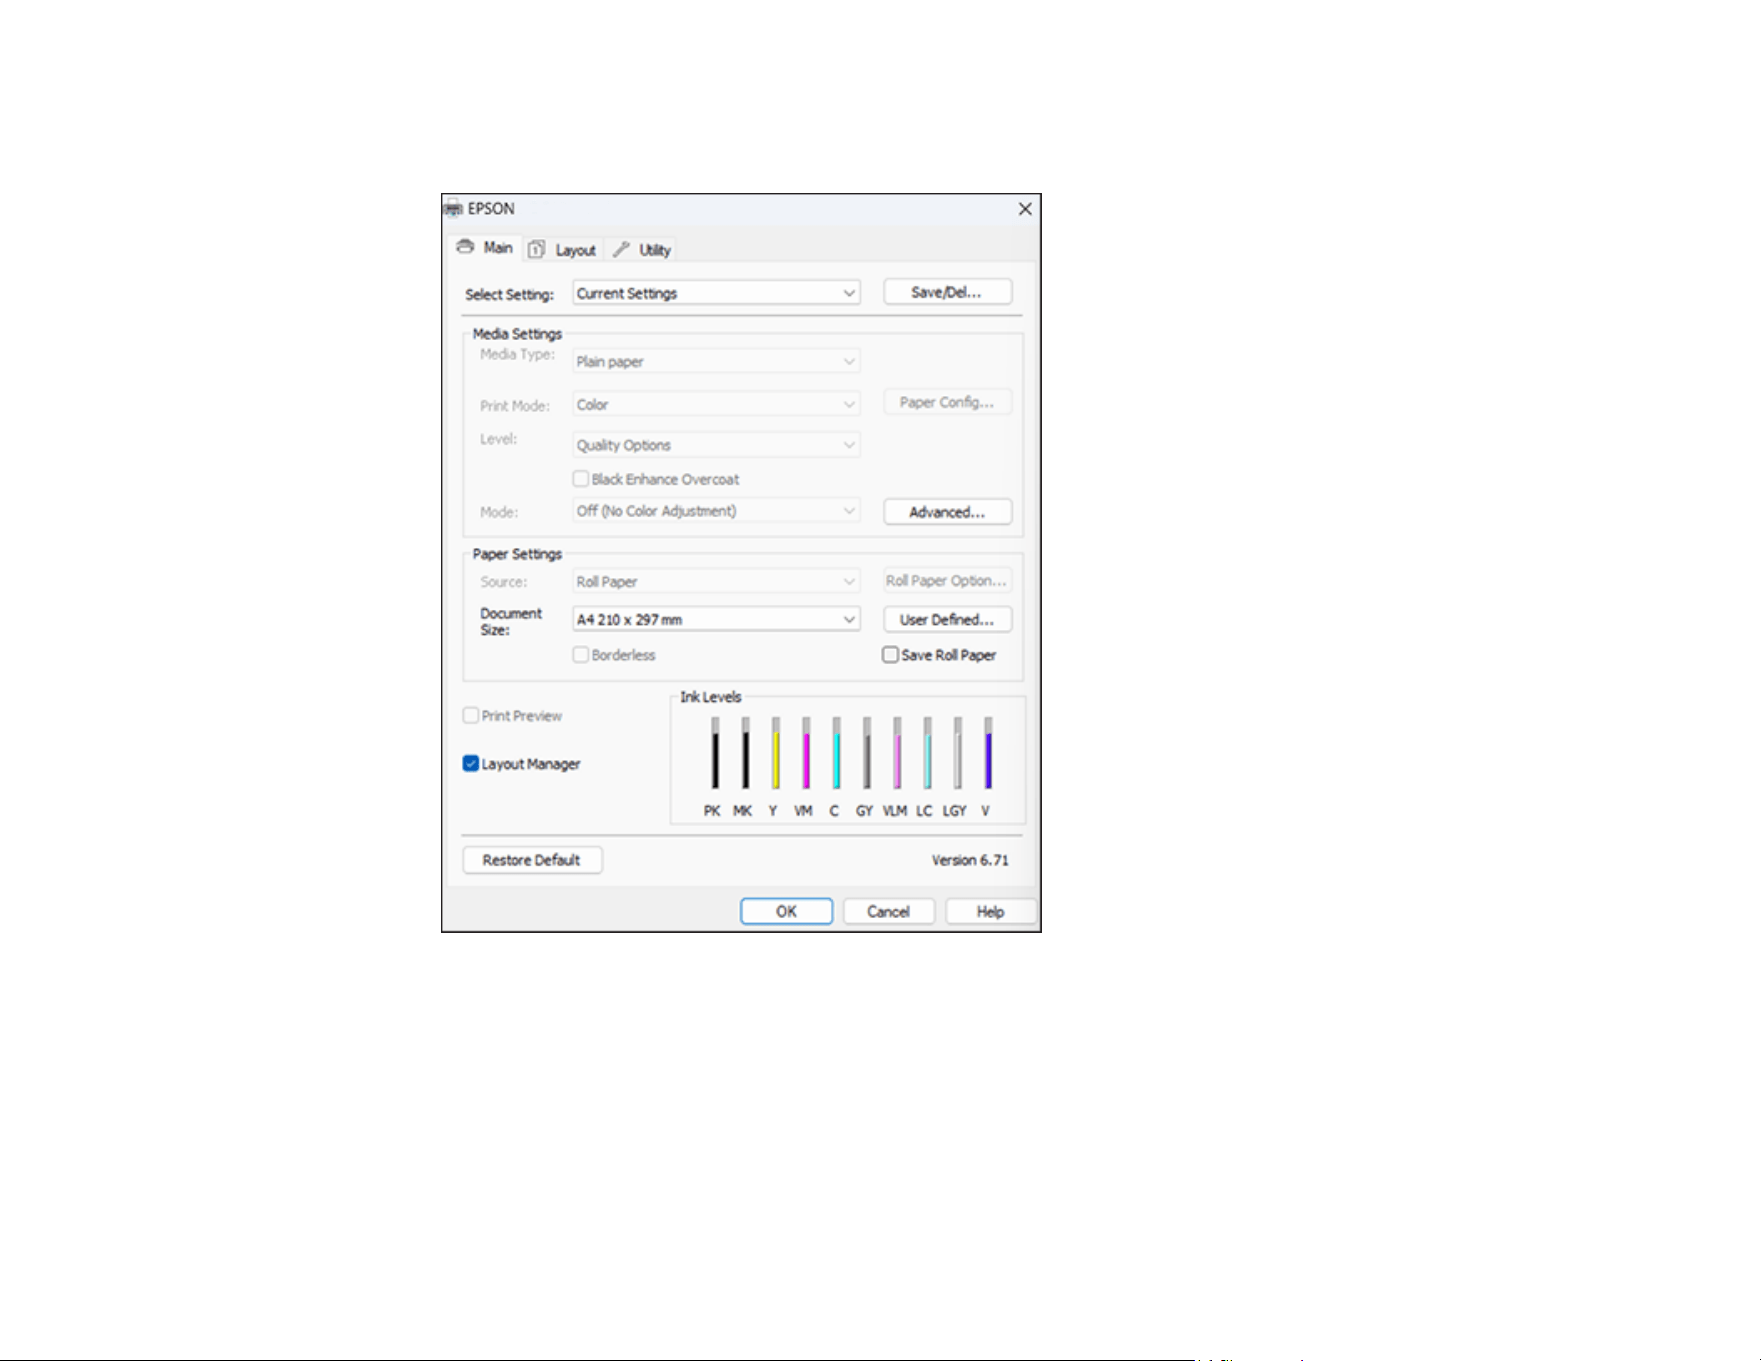
103
3. Select Layout Manager on the Main tab and choose an option for the Document Size setting that
matches the size of the document in your application.
Note: You select the size of the paper you are printing on in a later step.
4. Click OK and then click Print, if necessary.
The Layout Manager screen opens and displays one page in the layout.
5. Leave the Layout Manager screen open and repeat steps 1 to 4 to arrange additional print data. The
pages are added to the Layout Manager screen.

104
6. Do the following to arrange objects on the Layout Manager screen:
• Drag pages to move and resize them.
• Use the tool buttons and the Object menu to align and rotate pages.
• Resize and replace whole pages in the Preferences or Arrangement Settings screens.
Note: See the Layout Manager screen help for details.
7. Click File > Properties, then select your print settings, including the size of the paper you are
printing on, on the Main tab.
8. Click the File menu on the Layout Manager screen and click Print.
Note: To save the current job to a file, click the File menu on the Layout Manager screen, save the
file, and close the Layout Manager screen. To open the saved file later for editing or reprinting, right-
click the printer icon in the Windows taskbar, click Layout Manager, and open the file.
A confirmation message appears. Click OK to proceed.
Parent topic: Selecting Basic Print Settings - Windows
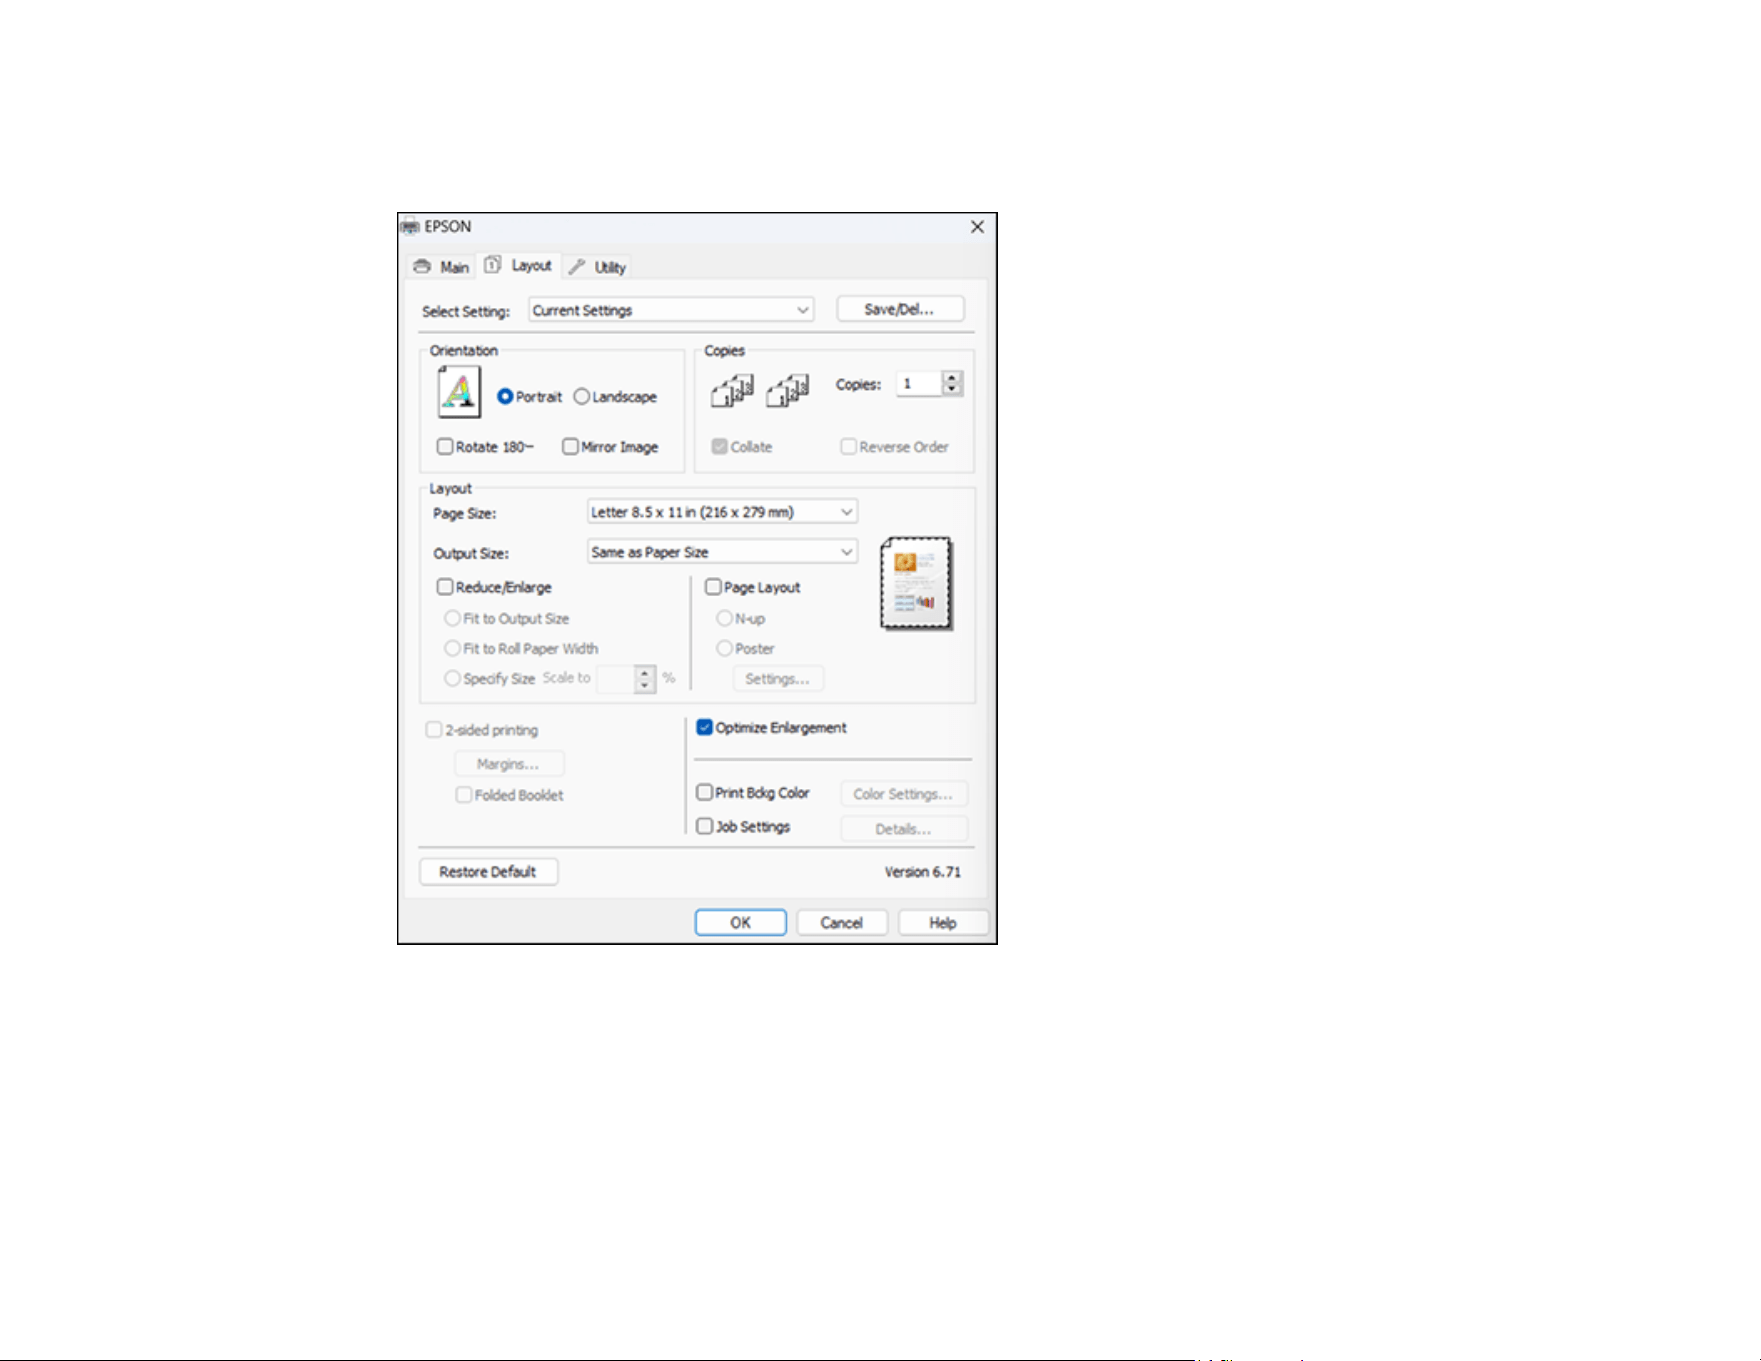
105
Selecting Print Layout Options - Windows
You can select a variety of sizing and layout options for your document or photo on the Layout tab.
• To change the orientation of your printed document or photo, select Portrait or Landscape.
• To rotate or flip the printed image, select the Rotate 180° or Mirror Image checkbox.
• To select multiple copies and their print order, select the Copies, Collate, and Reverse Order
options.
• To change the size of your printed document or photo, select the Reduce/Enlarge checkbox and
select sizing options.

106
• To print multiple pages on one sheet of paper, or print one image on multiple sheets of paper, select
the Page Layout checkbox and select the options you want.
• To enlarge your image beyond the limits of your application program, select the Optimize
Enlargement checkbox.
Note: The driver can increase the image size up to 650% and decrease the output resolution to stay
within the pixel limitations. Depending on the resolution of the original image and the print size, you
may see reduced print quality.
• To print a color background on the page, select the Print Bckg Color checkbox and click Color
Settings to select the color you want to use.
• To print the time, date, and other information about your print job at the top or bottom of the page,
select the Job Settings checkbox and click Details to select the settings you want to use.
• To print on both sides of the paper, select the 2-sided printing checkbox and select the options you
want.
Reduce/Enlarge Options - Windows
Page Layout Options - Windows
Parent topic: Printing with Windows
Reduce/Enlarge Options - Windows
You can select any of the Reduce/Enlarge options to size your printed image.
Fit to Output Size
Sizes your printed image to fit on the paper you loaded and selected as the Output Size setting.
Fit to Roll Paper Width
Sizes your printed image to fit the width of the roll paper you loaded.
Specify Size
Sizes your printed image by the percentage you select as the Scale to setting.
Parent topic: Selecting Print Layout Options - Windows
Page Layout Options - Windows
You can select these Page Layout options to set up your multi-page print job.
N-up
Prints 2 (2 Pages) or 4 (4 Pages) pages on one sheet of paper.

107
Poster
Prints one image on multiple sheets of paper to create a large poster with or without borders. Click the
Settings button to select the layout and guideline options.
Parent topic: Selecting Print Layout Options - Windows
Selecting Additional Settings - Windows
You can run maintenance utilities and select additional settings that apply to all the print jobs you send to
your product.
1. Access the Windows Desktop and right-click the icon for your product in the right side of the
Windows taskbar, or click the up arrow and right-click .
2. Select Printer Settings.
3. Click the Utility tab.
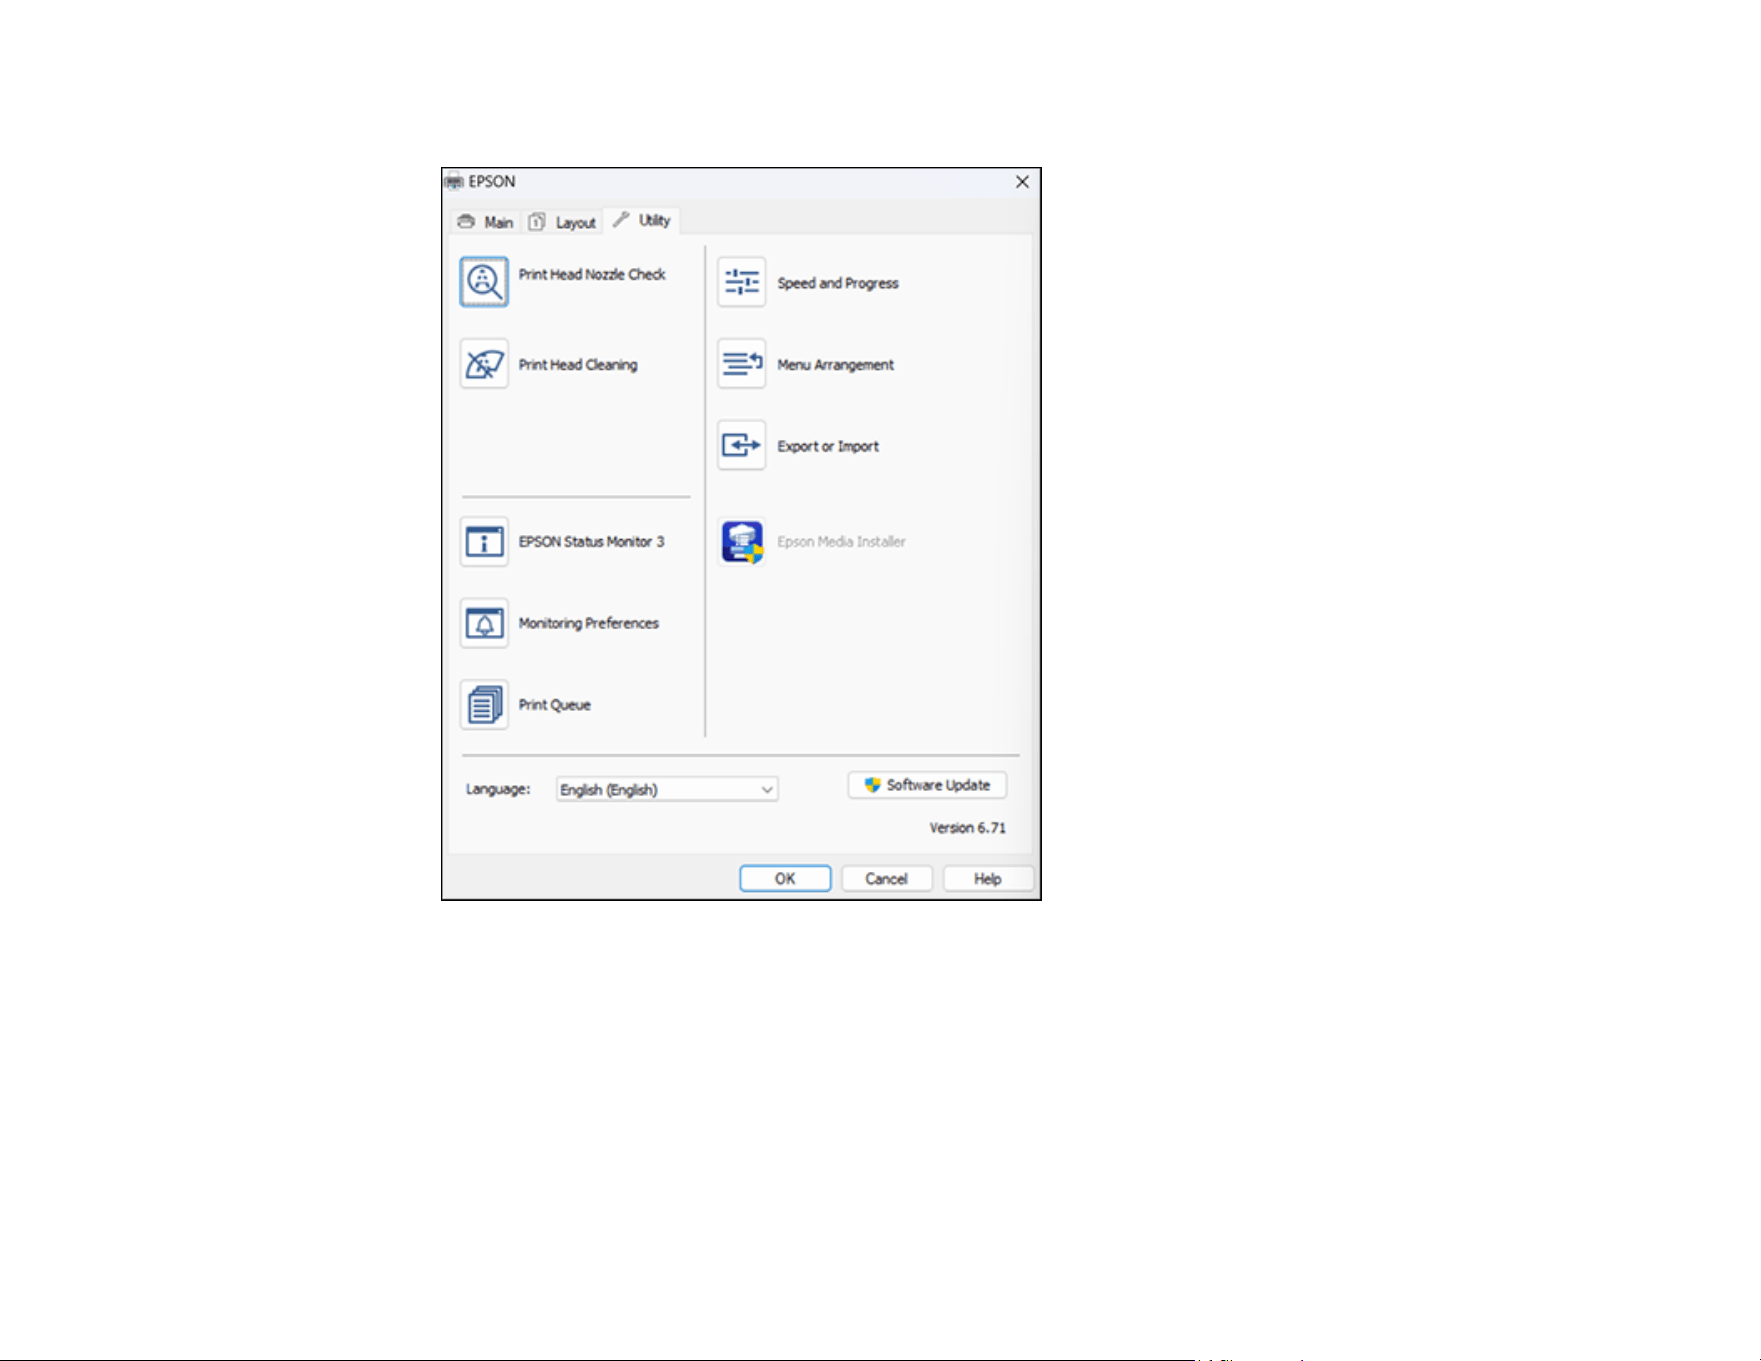
108
You see a window like this:
4. Select any of the following options, as necessary:
• Nozzle Check to print a nozzle check pattern to check whether the print head nozzles are
clogged.
• Head Cleaning to clean the print head if you notice banding or gaps in your printouts.
• Epson Status Monitor 3 to check the printer's status.
• Monitoring Preferences to select the error notifications displayed on the Epson Status Monitor 3
screen, or add a shortcut to the utility in the Windows taskbar.

109
• Print Queue to display a list of all waiting print jobs, view information on the data waiting to be
printed, and delete or reprint the jobs.
• Language to select the language you want to use for the printer software screens.
• Speed and Progress to select various printing options.
• Menu Arrangement to arrange the Setting, Media Type, and Paper Size options by frequency of
use.
• Export or Import to save the print settings to a file or import them from a file. This is useful when
you want to select the same print settings on multiple computers.
• Epson Media Installer to create and manage custom paper configurations.
5. Click OK to close the printer software window.
Parent topic: Printing with Windows
Related tasks
Checking the Nozzles Using a Computer Utility
Cleaning the Print Head Using a Computer Utility
Running a Power Cleaning Using a Computer Utility
Saving, Sharing, and Customizing the Printer Settings
You can save groups of print settings or media settings so you can reuse them for future print jobs. You
can export these settings as a file so you can share them with other users. You can also edit the settings
displayed in the printer software screens.
Saving and Sharing Print Settings - Windows
Editing Print Setting Displays - Windows
Parent topic: Printing with Windows
Saving and Sharing Print Settings - Windows
You can save your print settings so you can use them for future print jobs.
1. Select the print settings you want to save.
2. Click Save/Del at the top of the Main or Layout tab in your printer software.
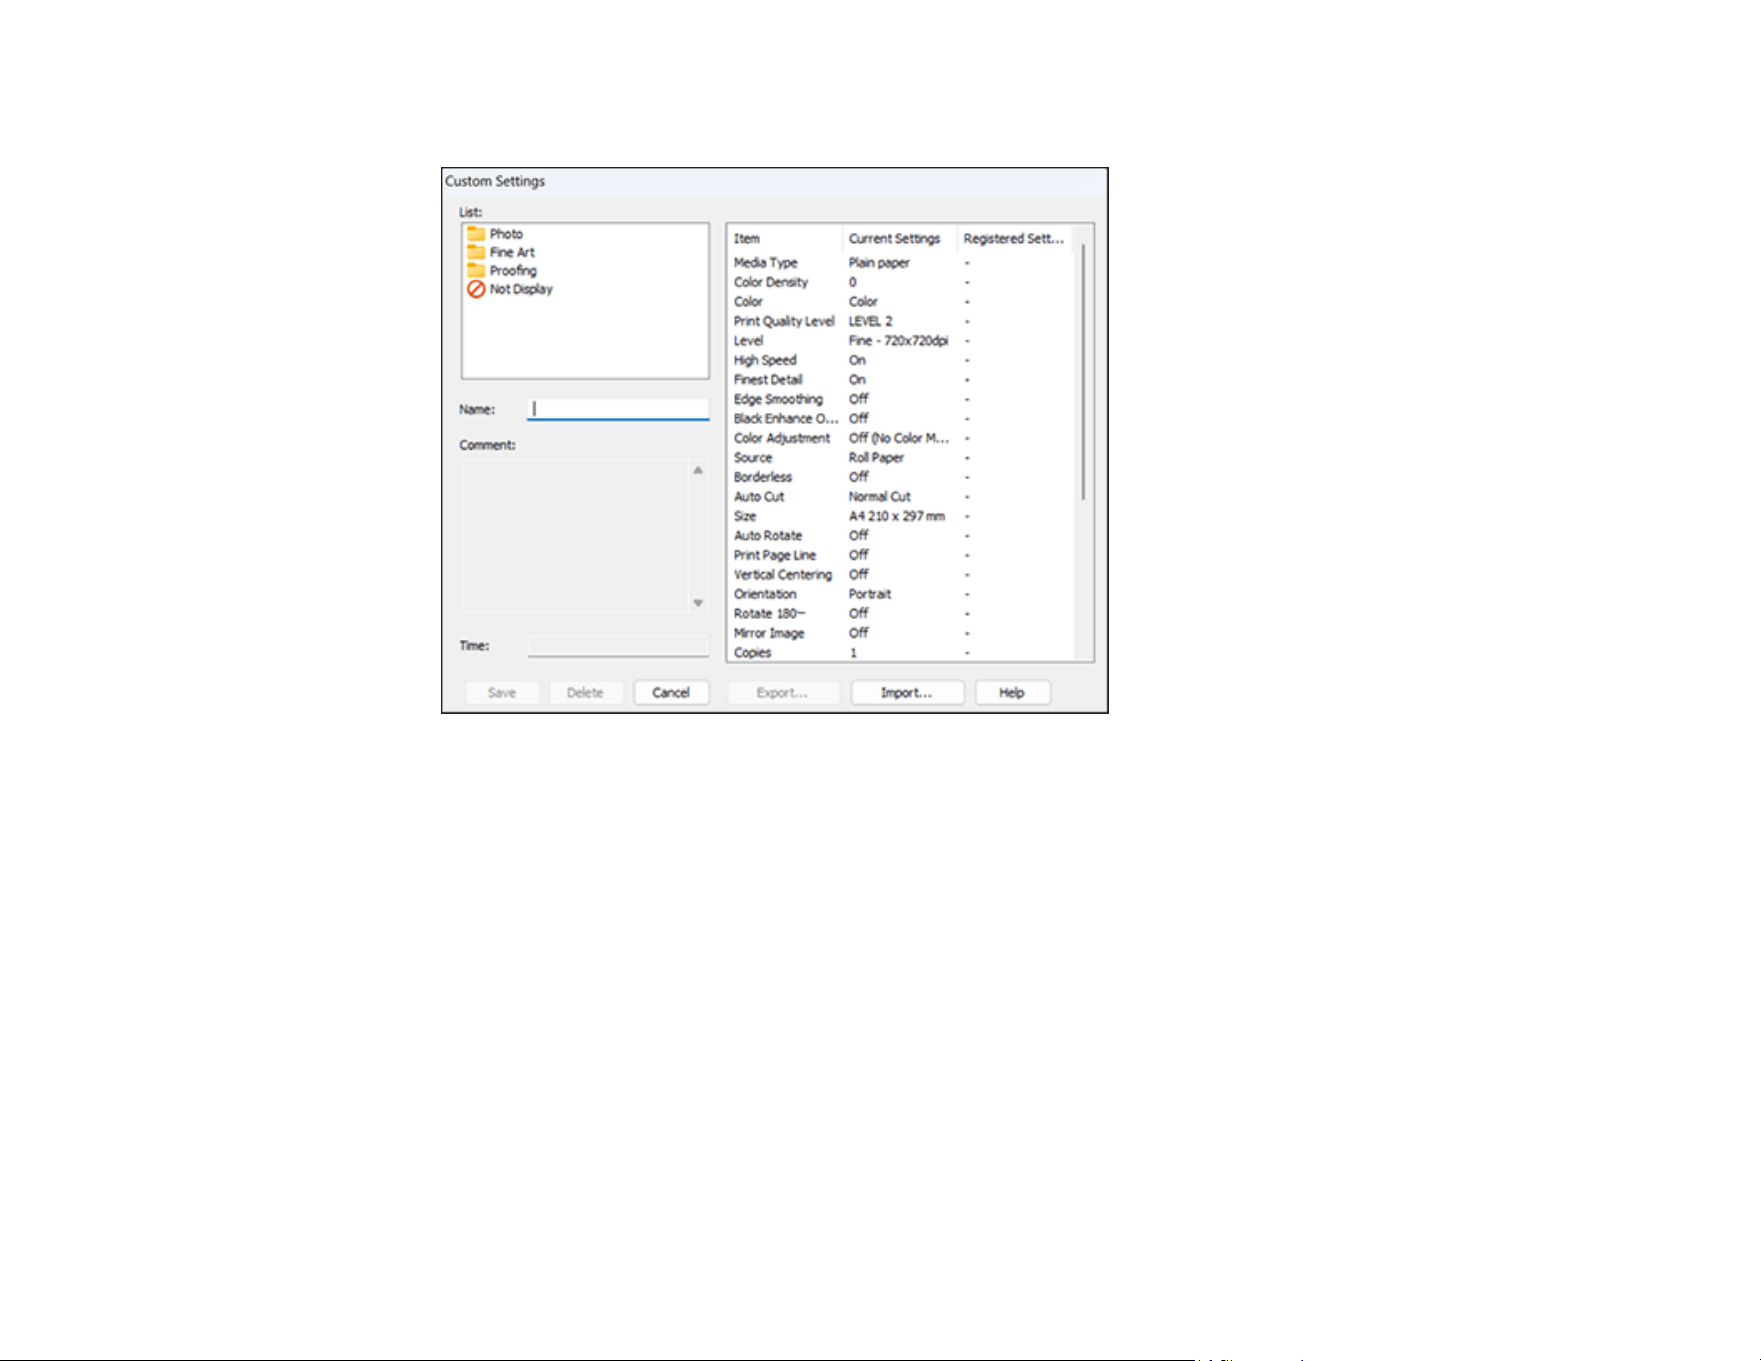
110
You see a window like this:
3. Verify that your settings are correct, enter a name for the group of settings in the Name field, and
click Save.
Note: If you need to delete a group of settings you have created, select the name of the group of
settings from the list and click Delete.
4. Do the following as necessary:
• Select the name of the group of settings from the Select Setting list and use them to print.
• To export the settings, click Save/Del, select the name of the group of settings, click Export,
select a location, and enter a file name.
• To import a group of settings, click Save/Del, click Import, select the file you want to use, and
click Open. Then use the settings to print.
Parent topic: Saving, Sharing, and Customizing the Printer Settings

111
Related tasks
Selecting Basic Print Settings - Windows
Printing Your Document or Photo - Windows
Editing Print Setting Displays - Windows
You can arrange the displayed print settings so you can easily select the settings you use most often.
1. Click the Utility tab in the printer software.
2. Select Menu Arrangement.
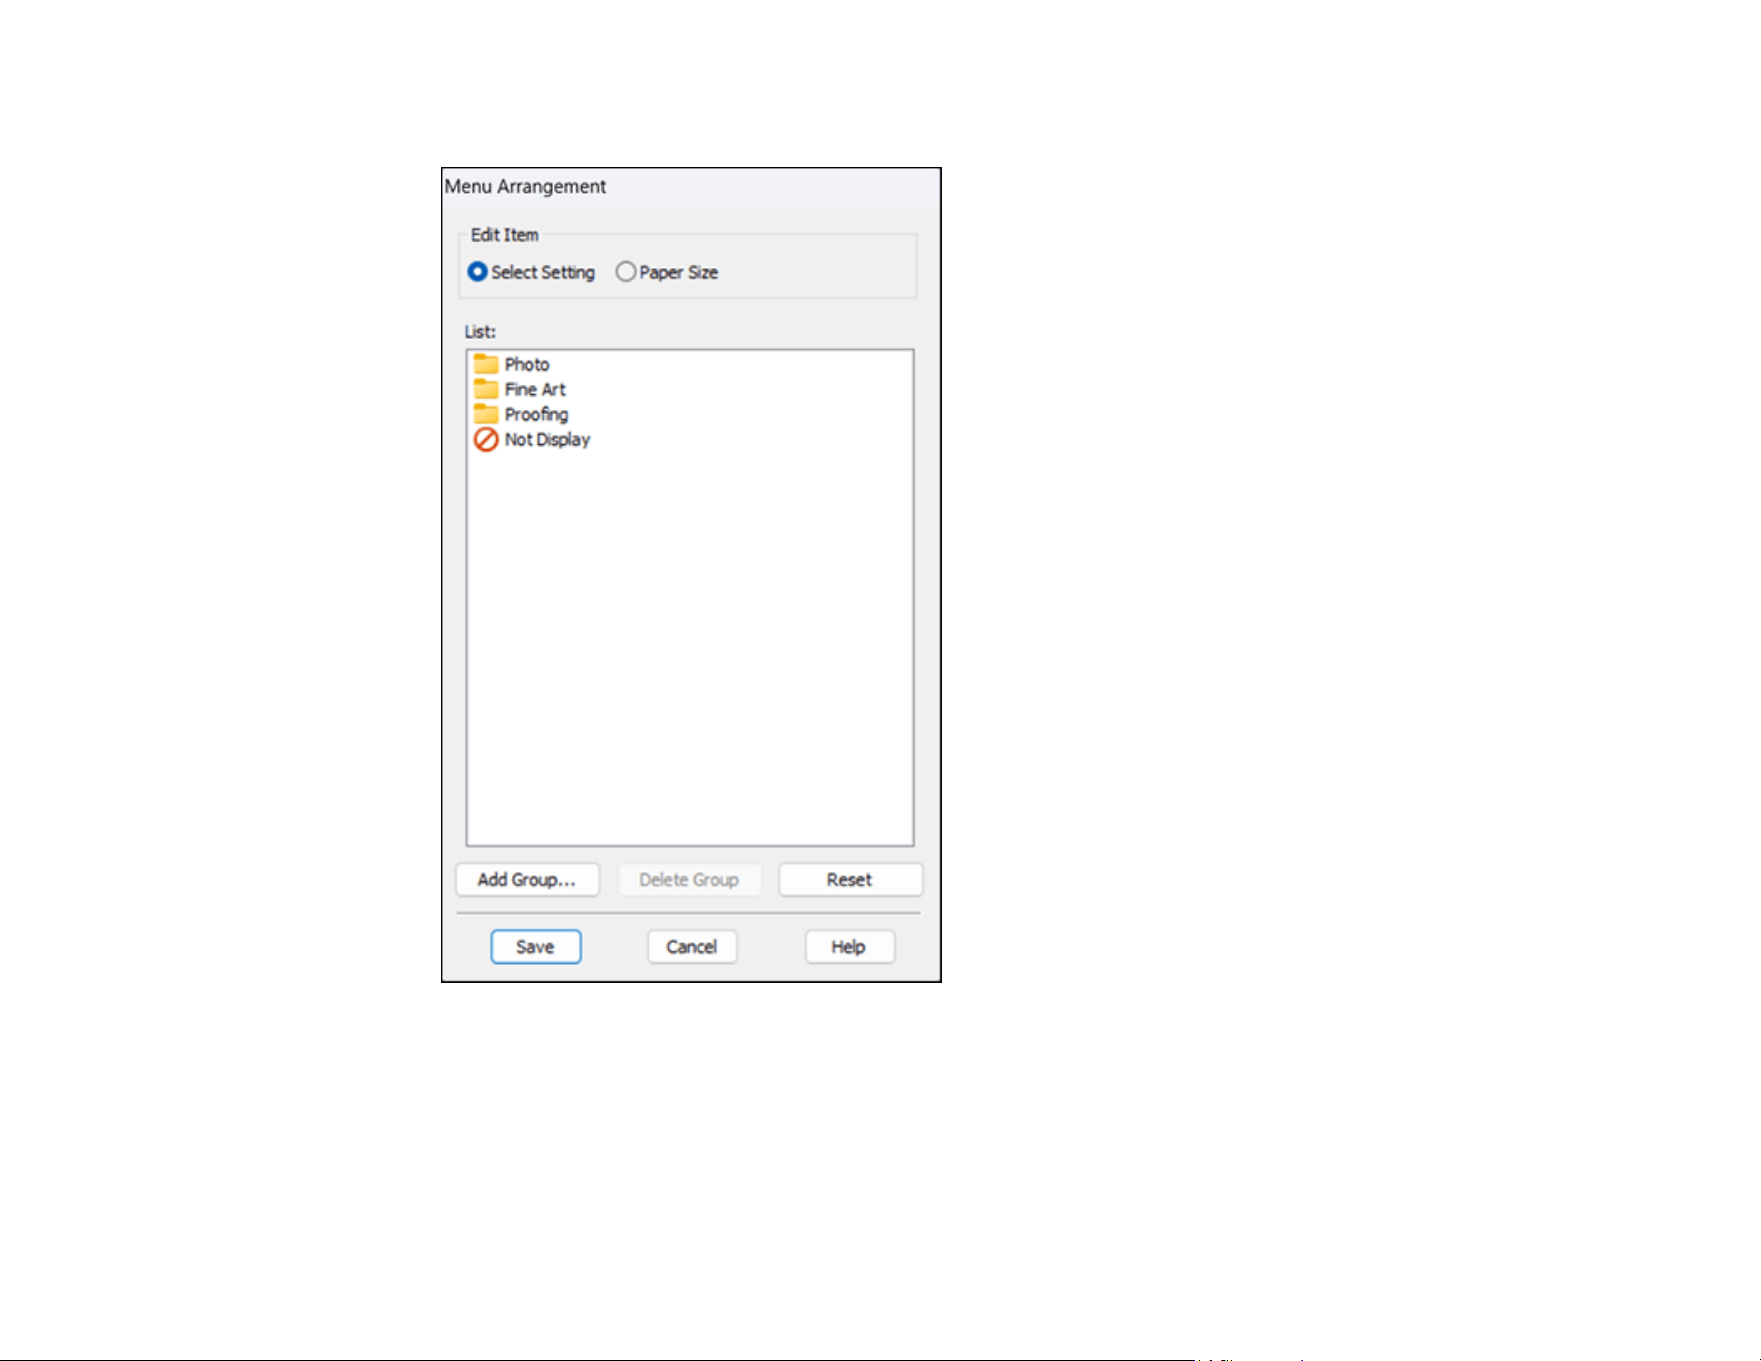
112
You see this window:
3. Select the item you want to edit.
4. Order or group items in the List box as follows:
• To move and reorder items, drag and drop them in the list.
• To add a new group (folder), click Add Group.
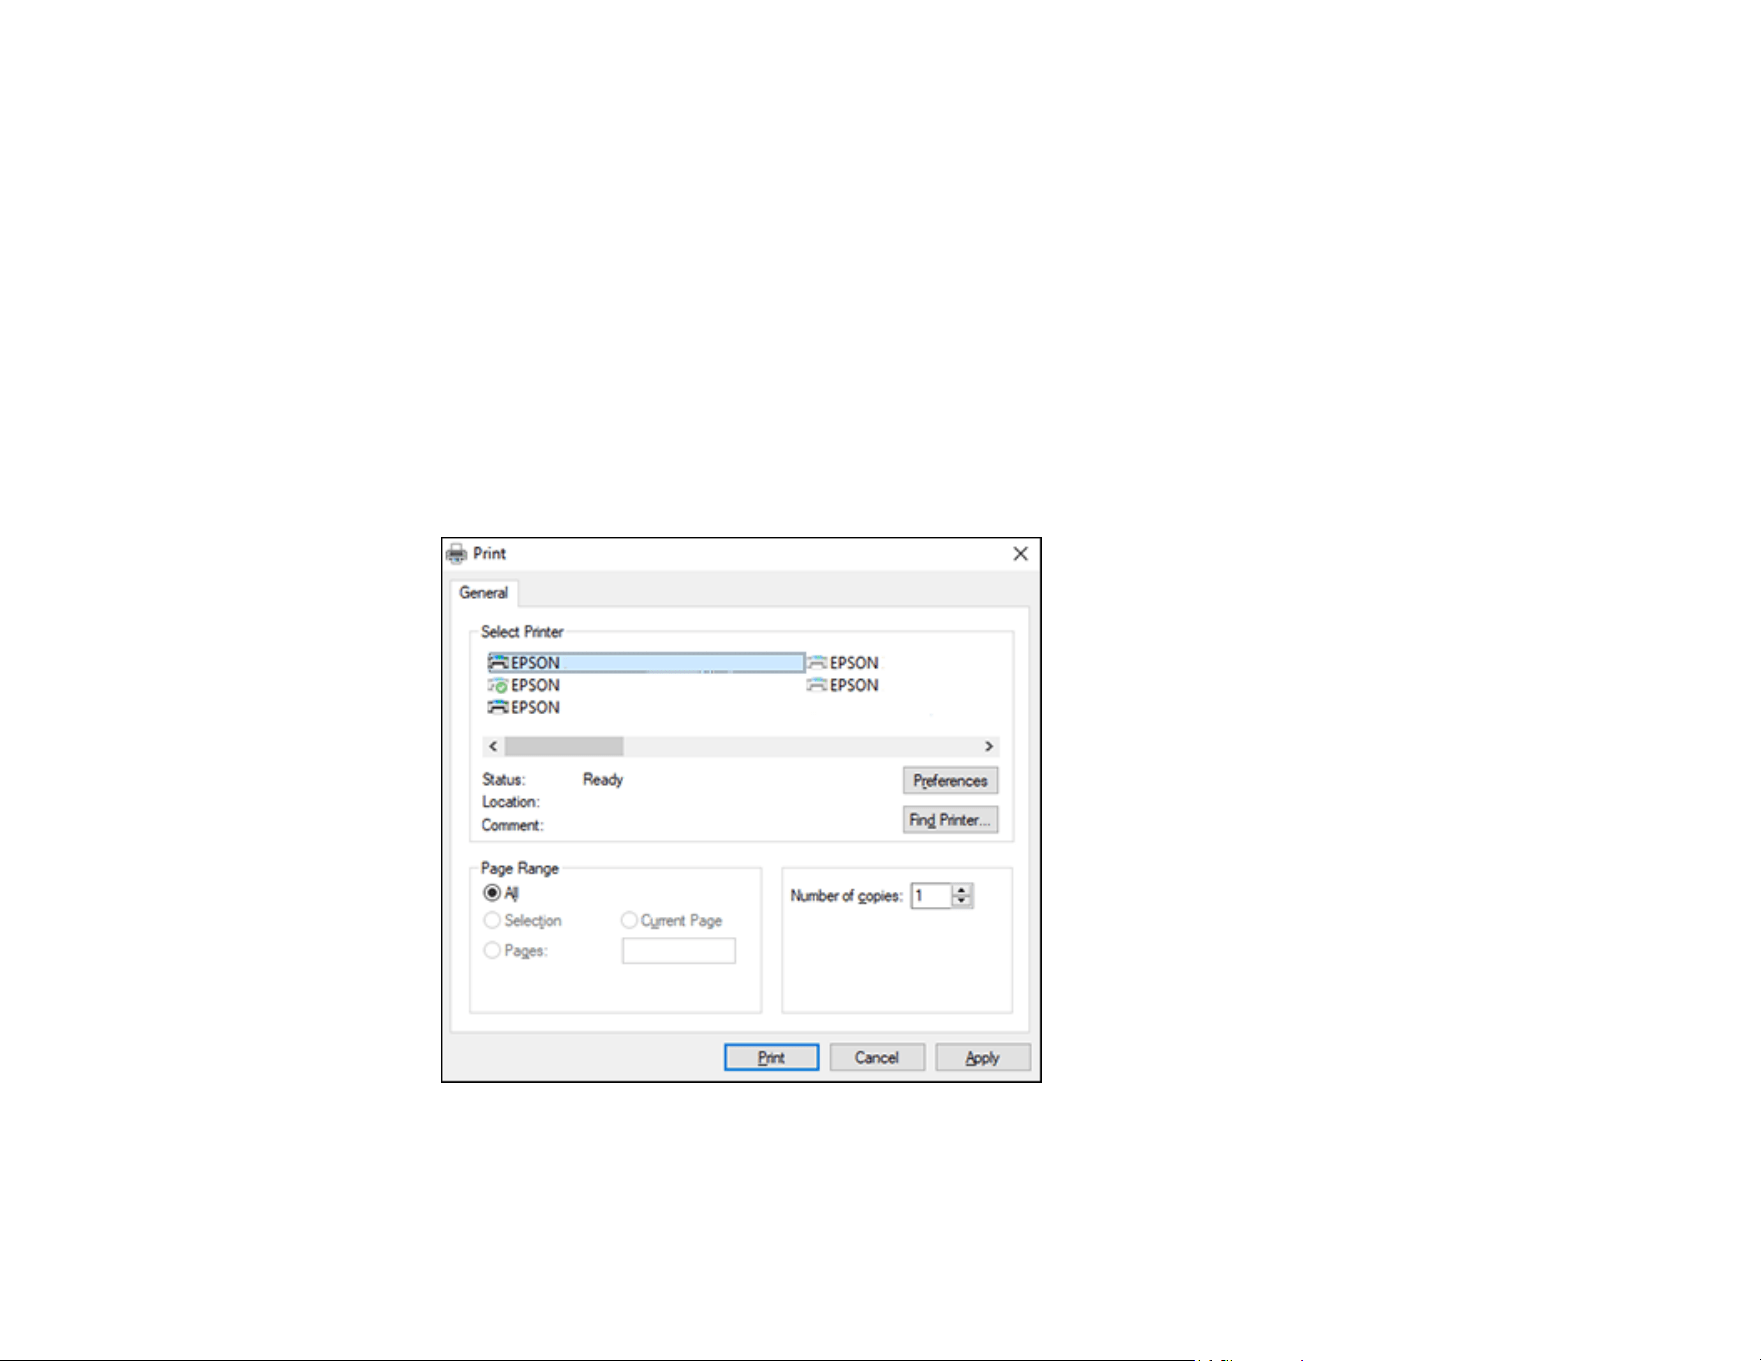
113
• To delete a group (folder), select the group and click Delete Group.
• To hide a group, drag and drop it to Not Display.
Note: If you delete a group, the group folder is deleted but the items within the folder remain.
5. Click Save.
Parent topic: Saving, Sharing, and Customizing the Printer Settings
Printing Your Document or Photo - Windows
Once you have selected your print settings, you are ready to save your settings and print.
1. Click OK to save your settings.
You see your application's Print window, such as this one:
2. Click OK or Print to start printing.
Checking Print Status - Windows
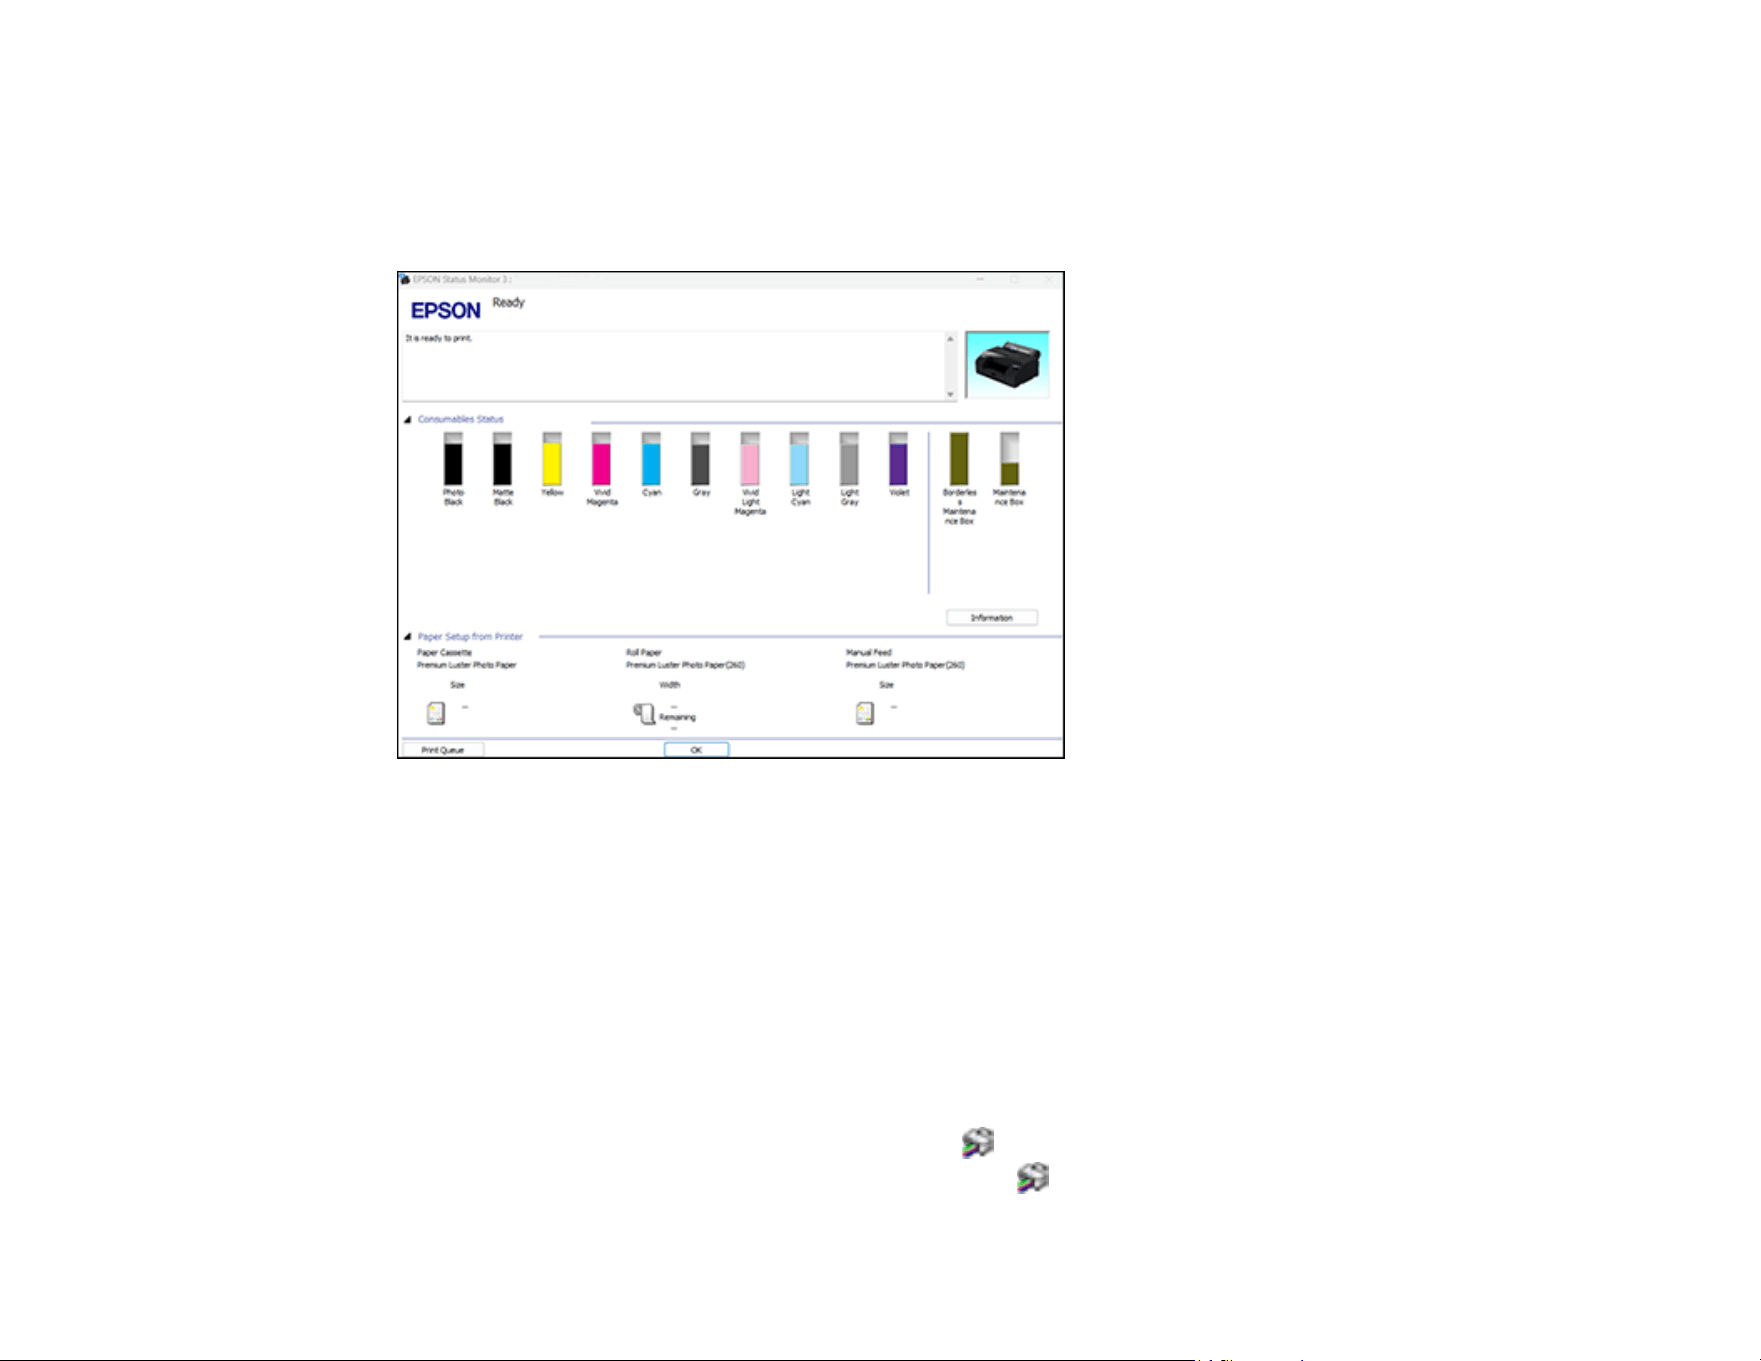
114
Parent topic: Printing with Windows
Checking Print Status - Windows
During printing, you see this window showing the progress of your print job. It allows you to control
printing and check ink cartridge status.
• To cancel printing, click Cancel.
• To see print jobs waiting to print or to cancel printing, click Print Queue.
• To close the status window, click OK.
Parent topic: Printing Your Document or Photo - Windows
Selecting Default Print Settings - Windows
When you change your print settings in a program, the changes apply only while you are printing in that
program session. If you want to change the print settings you use in all your Windows programs, you can
select new default print settings.
1. Access the Windows Desktop and right-click the icon for your product in the right side of the
Windows taskbar, or click the up arrow and right-click .
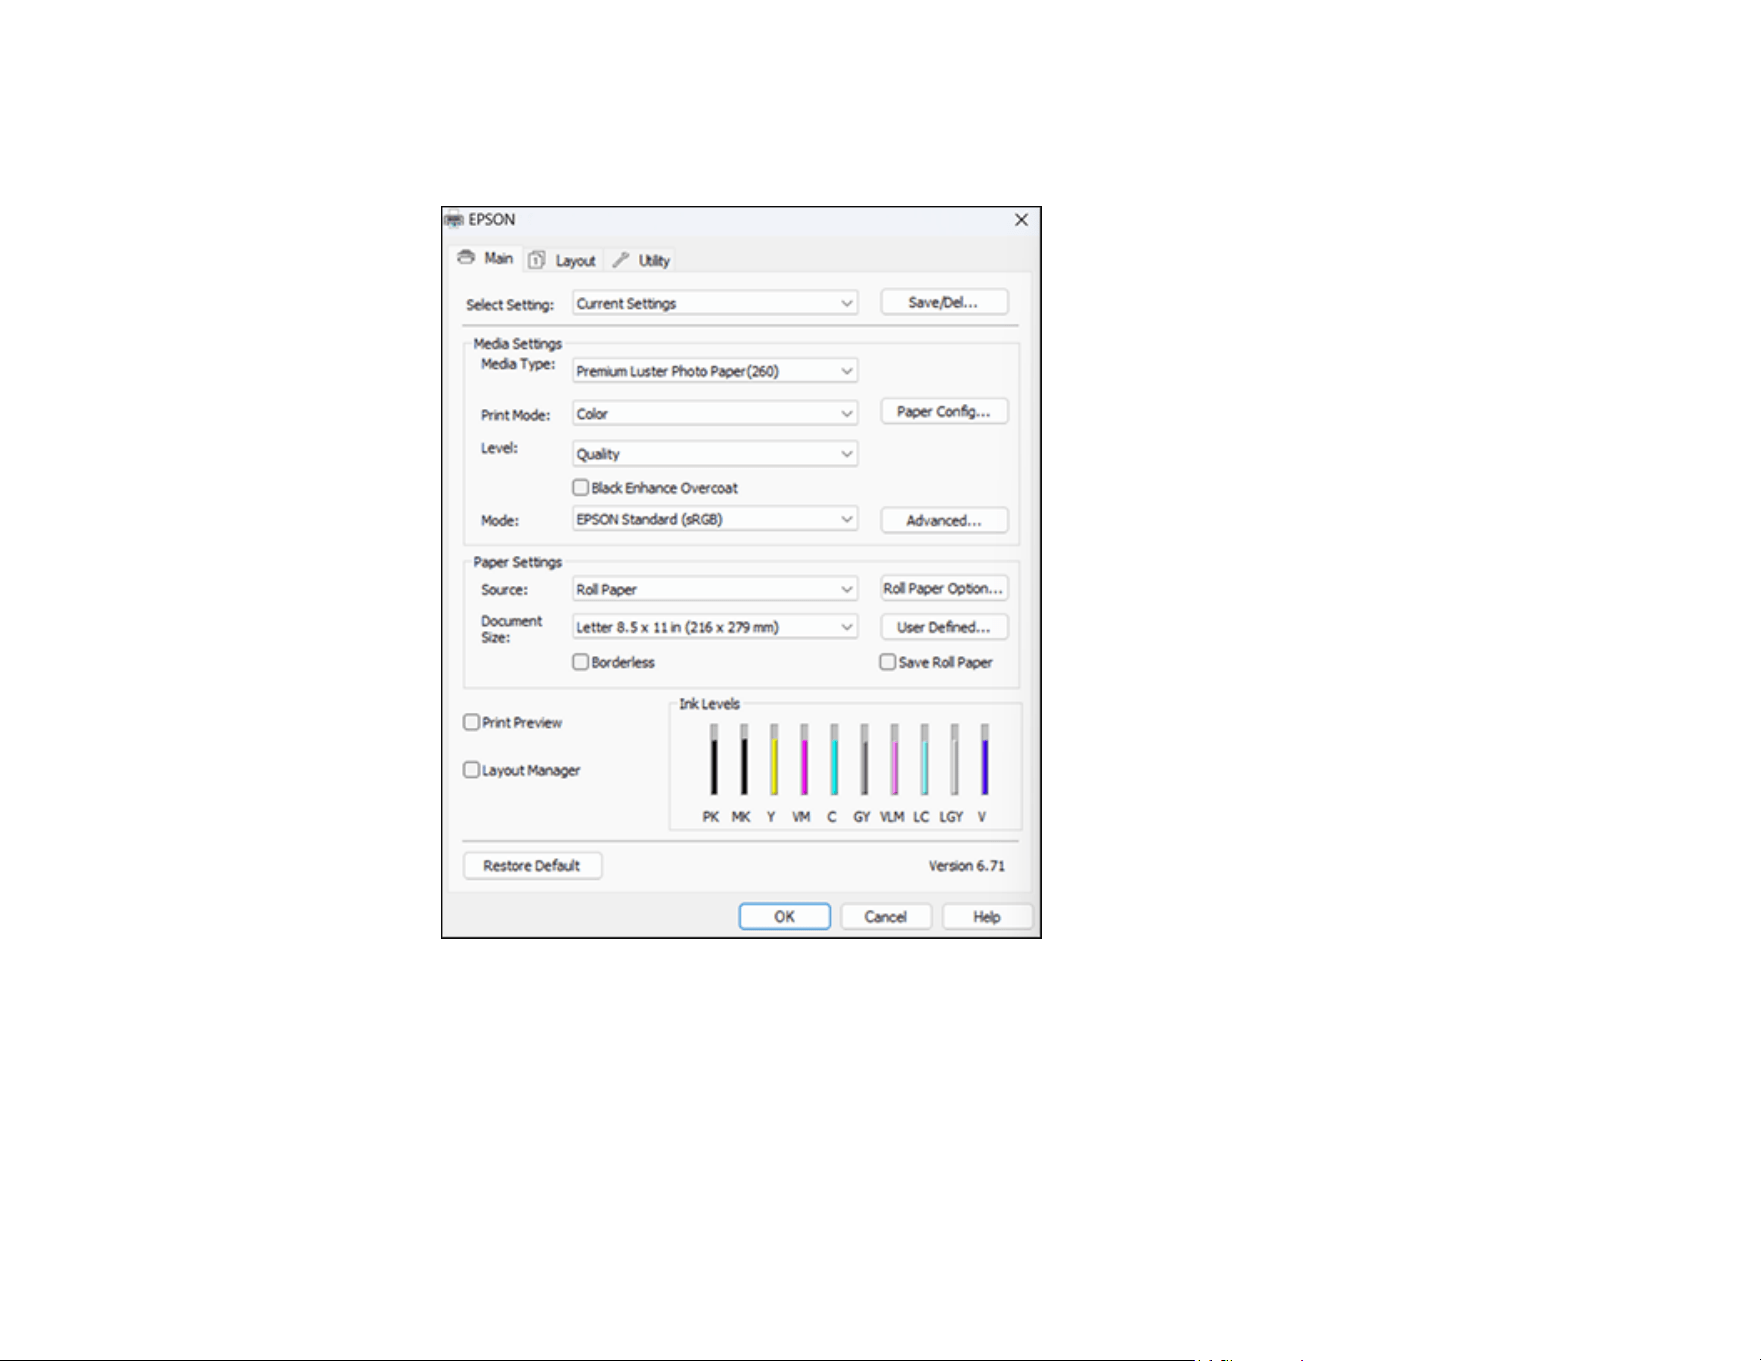
115
2. Select Printer Settings.
You see the printer settings window:
3. Select the print settings you want to use as defaults in all your Windows programs.
4. Click OK.
These settings are now the defaults selected for printing. You can still change them as needed for
printing in any program session.
Parent topic: Printing with Windows

116
Related tasks
Selecting Basic Print Settings - Windows
Changing the Language of the Printer Software Screens
You can change the language used on the Windows printer software screens.
1. Do one of the following:
• Windows 11: On the right side of the Windows taskbar, click the up arrow, click the icon, and
then click on your product.
• Windows (other versions): Access the Windows Desktop and right-click the icon for your
product in the right side of the Windows taskbar, or click the up arrow and right-click .
2. Select Printer Settings.
You see the printer settings window.
3. Click the Utility tab.
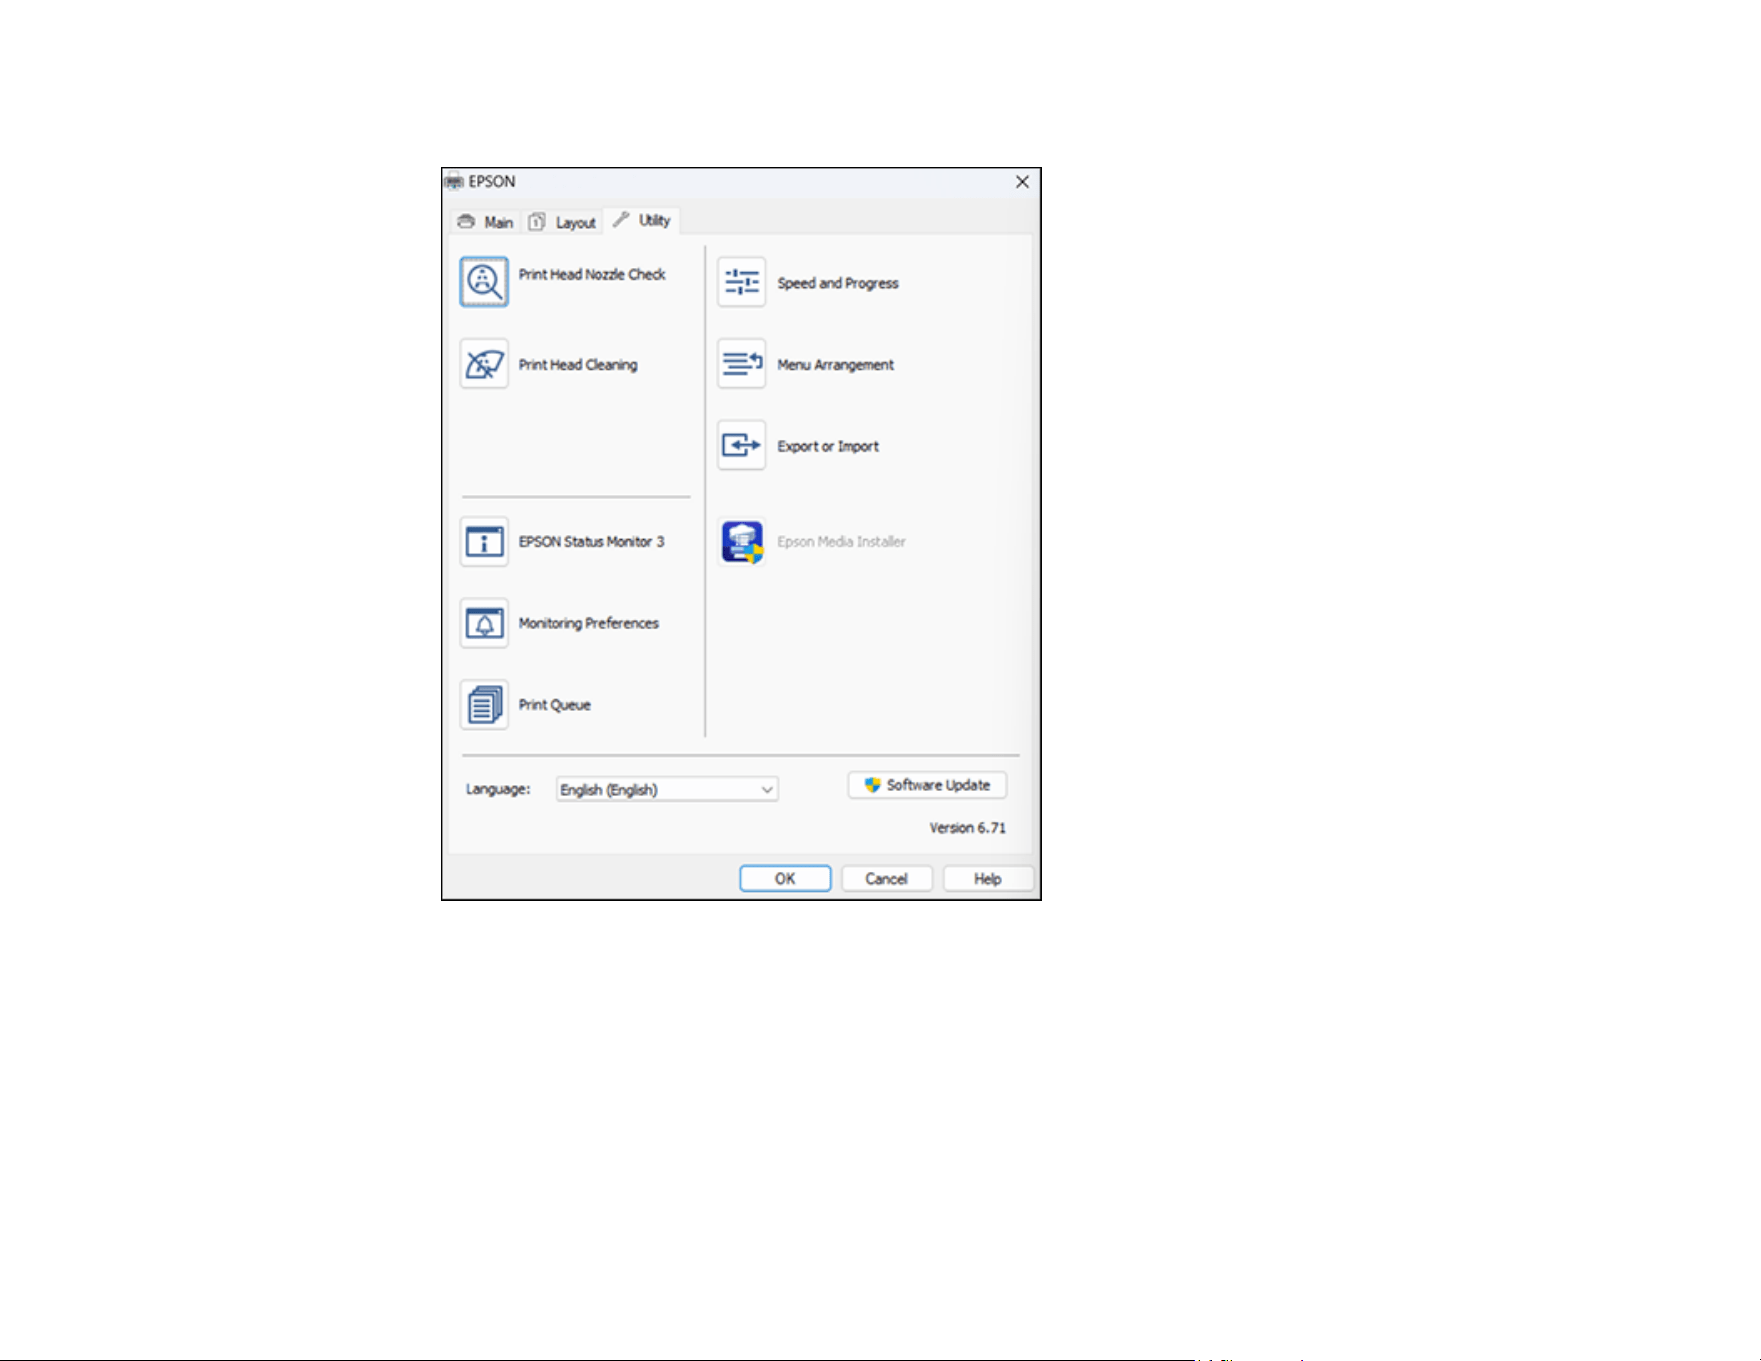
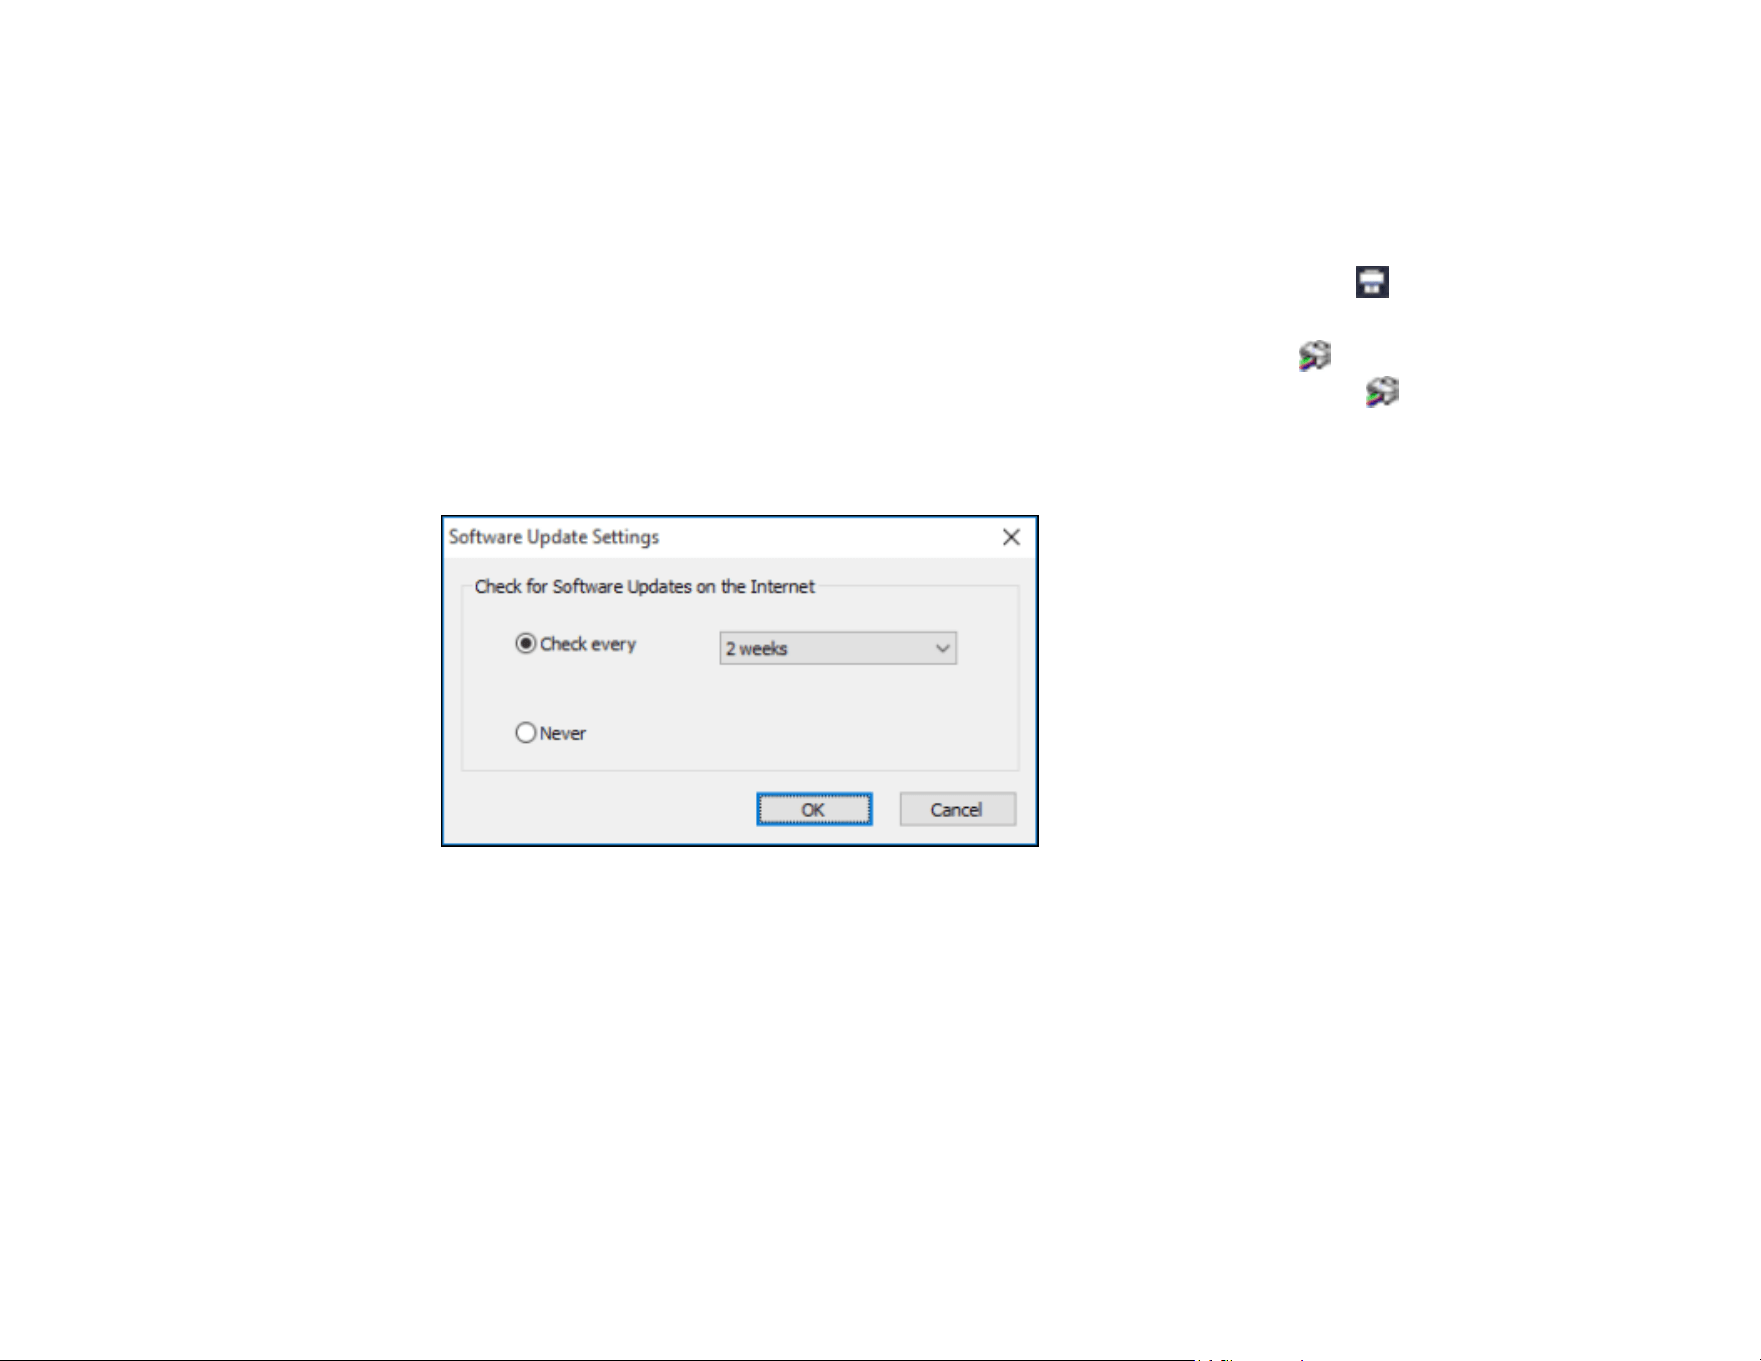
118
Changing Automatic Update Options
Your printer software for Windows automatically checks for updates to the product software. You can
change how often the software checks for updates or disable this feature.
1. Do one of the following:
• Windows 11: Click the up arrow on the right side of the Windows taskbar, click the icon, then
click on your product.
• Windows (other versions): Access the Windows Desktop and right-click the icon for your
product in the right side of the Windows taskbar, or click the up arrow and right-click .
2. Select Software Update Settings.
You see this window:
3. Do one of the following:
• To change how often the software checks for updates, select a setting in the Check every menu.
• To disable the automatic update feature, select the Never option.
4. Click OK to exit.
Note: If you choose to disable the automatic update feature, you can check for updates manually.
Parent topic: Printing with Windows

119
Related tasks
Checking for Software Updates
Printing on a Mac
You can print with your product using any Mac printing program, as described in these sections.
Note: If you have an Internet connection, it is a good idea to check for updates to your product software
on Epson's support website or using Epson Software Updater.
Selecting Basic Print Settings - Mac
Selecting Print Layout Options - Mac
Selecting Roll Paper Settings - Mac
Selecting Paper Configuration Settings - Mac
Managing Color - Mac
Sizing Printed Images - Mac
Selecting Printing Preferences - Mac
Printing Your Document or Photo - Mac
Parent topic: Printing from a Computer
Selecting Basic Print Settings - Mac
Select the basic settings for the photo or document you want to print.
Note: Some screens may look different, depending on the Mac OS version you are using.
1. Open a photo or document for printing.
2. Select the print command in your application.
Note: You may need to select a print icon on your screen, the Print option in the File menu, or
another command. See your application's help utility for details.
You see the printer settings window for your product.
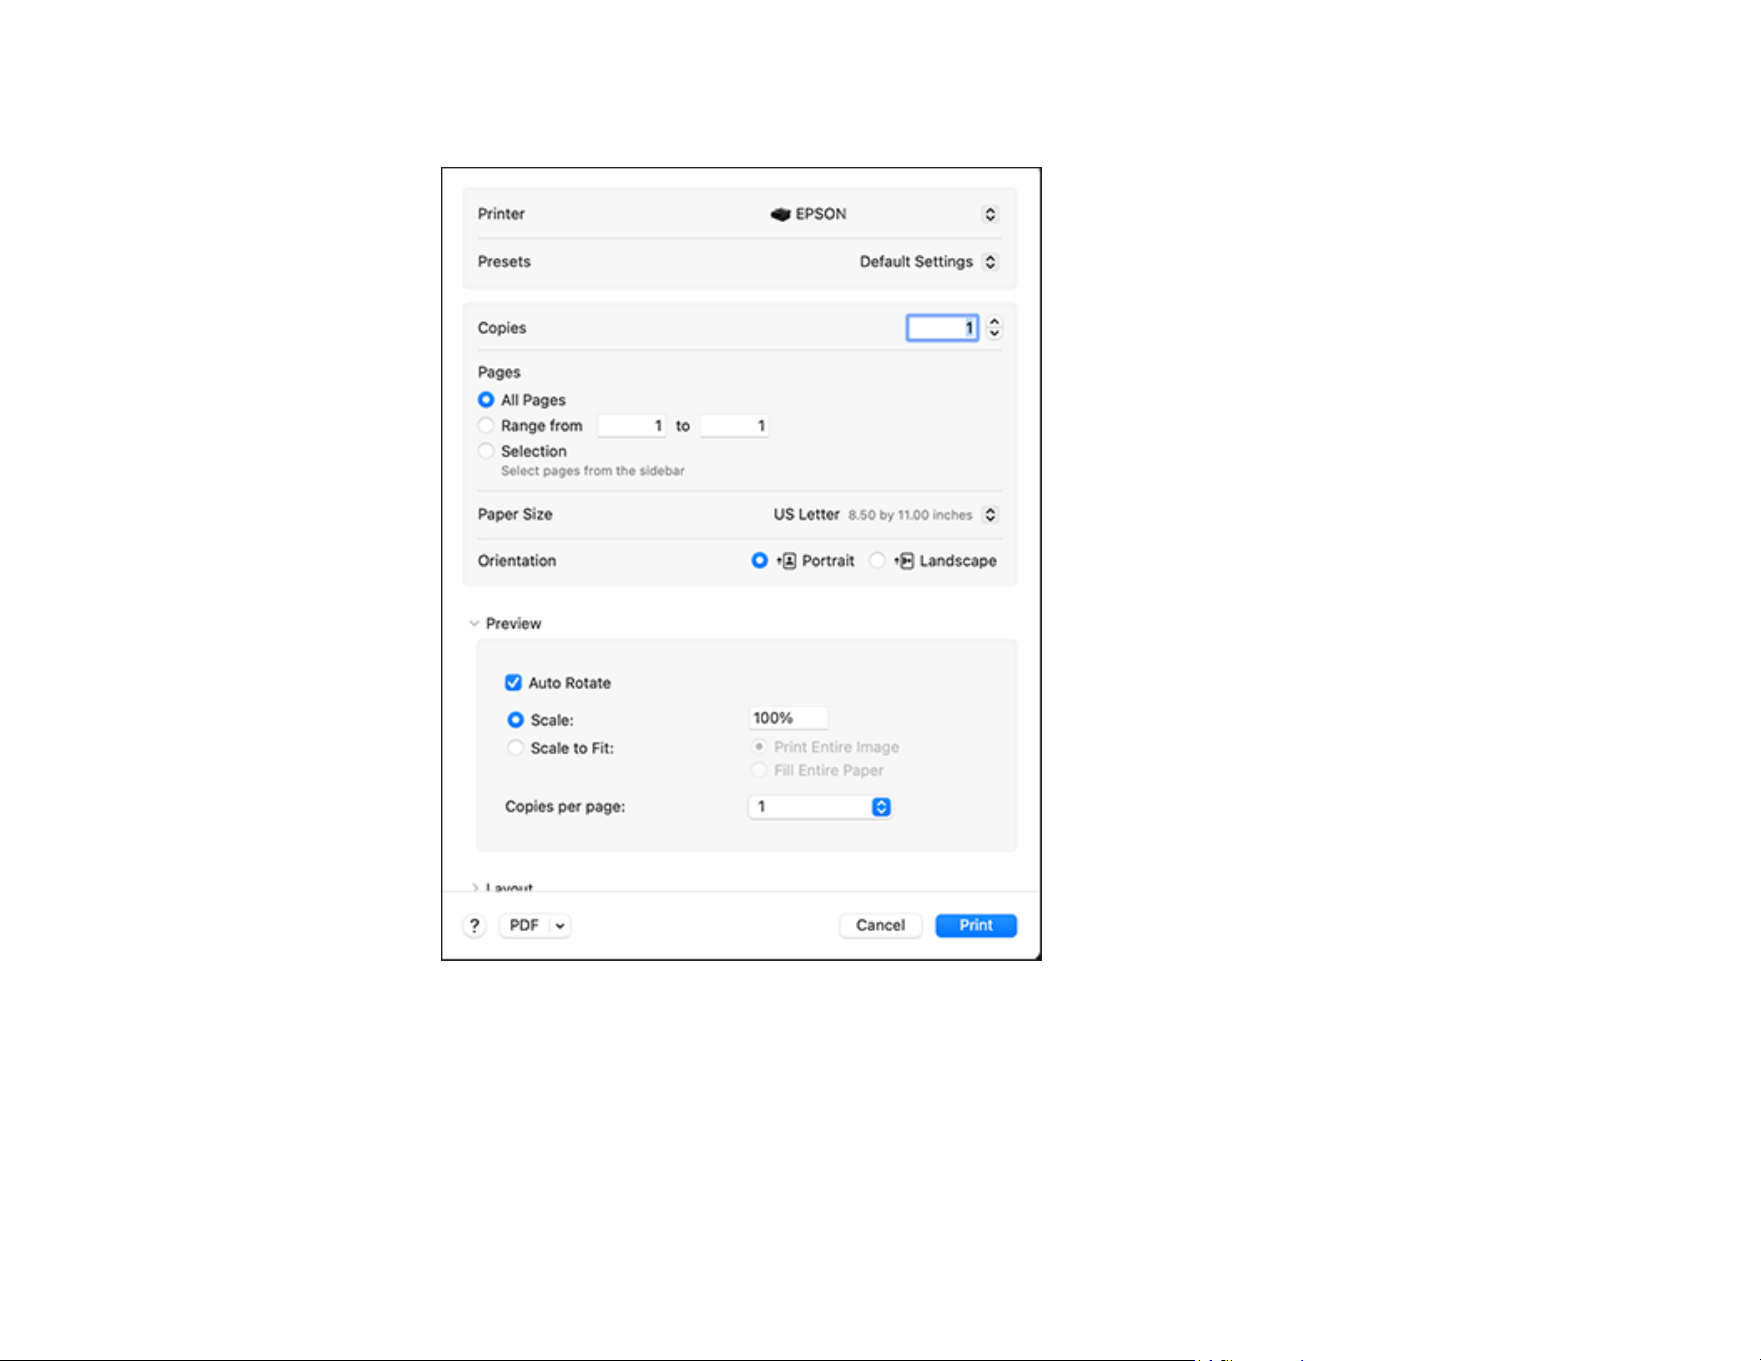
120
3. Select your product as the Printer setting.
Note: If necessary, click the arrow next to the Printer setting or the Show Details button to expand
the print window.
4. Select the Copies and Pages settings as necessary.
Note: If you do not see these settings in the print window, check for them in your application before
printing. They may be accessible by selecting Page Setup from the File menu.
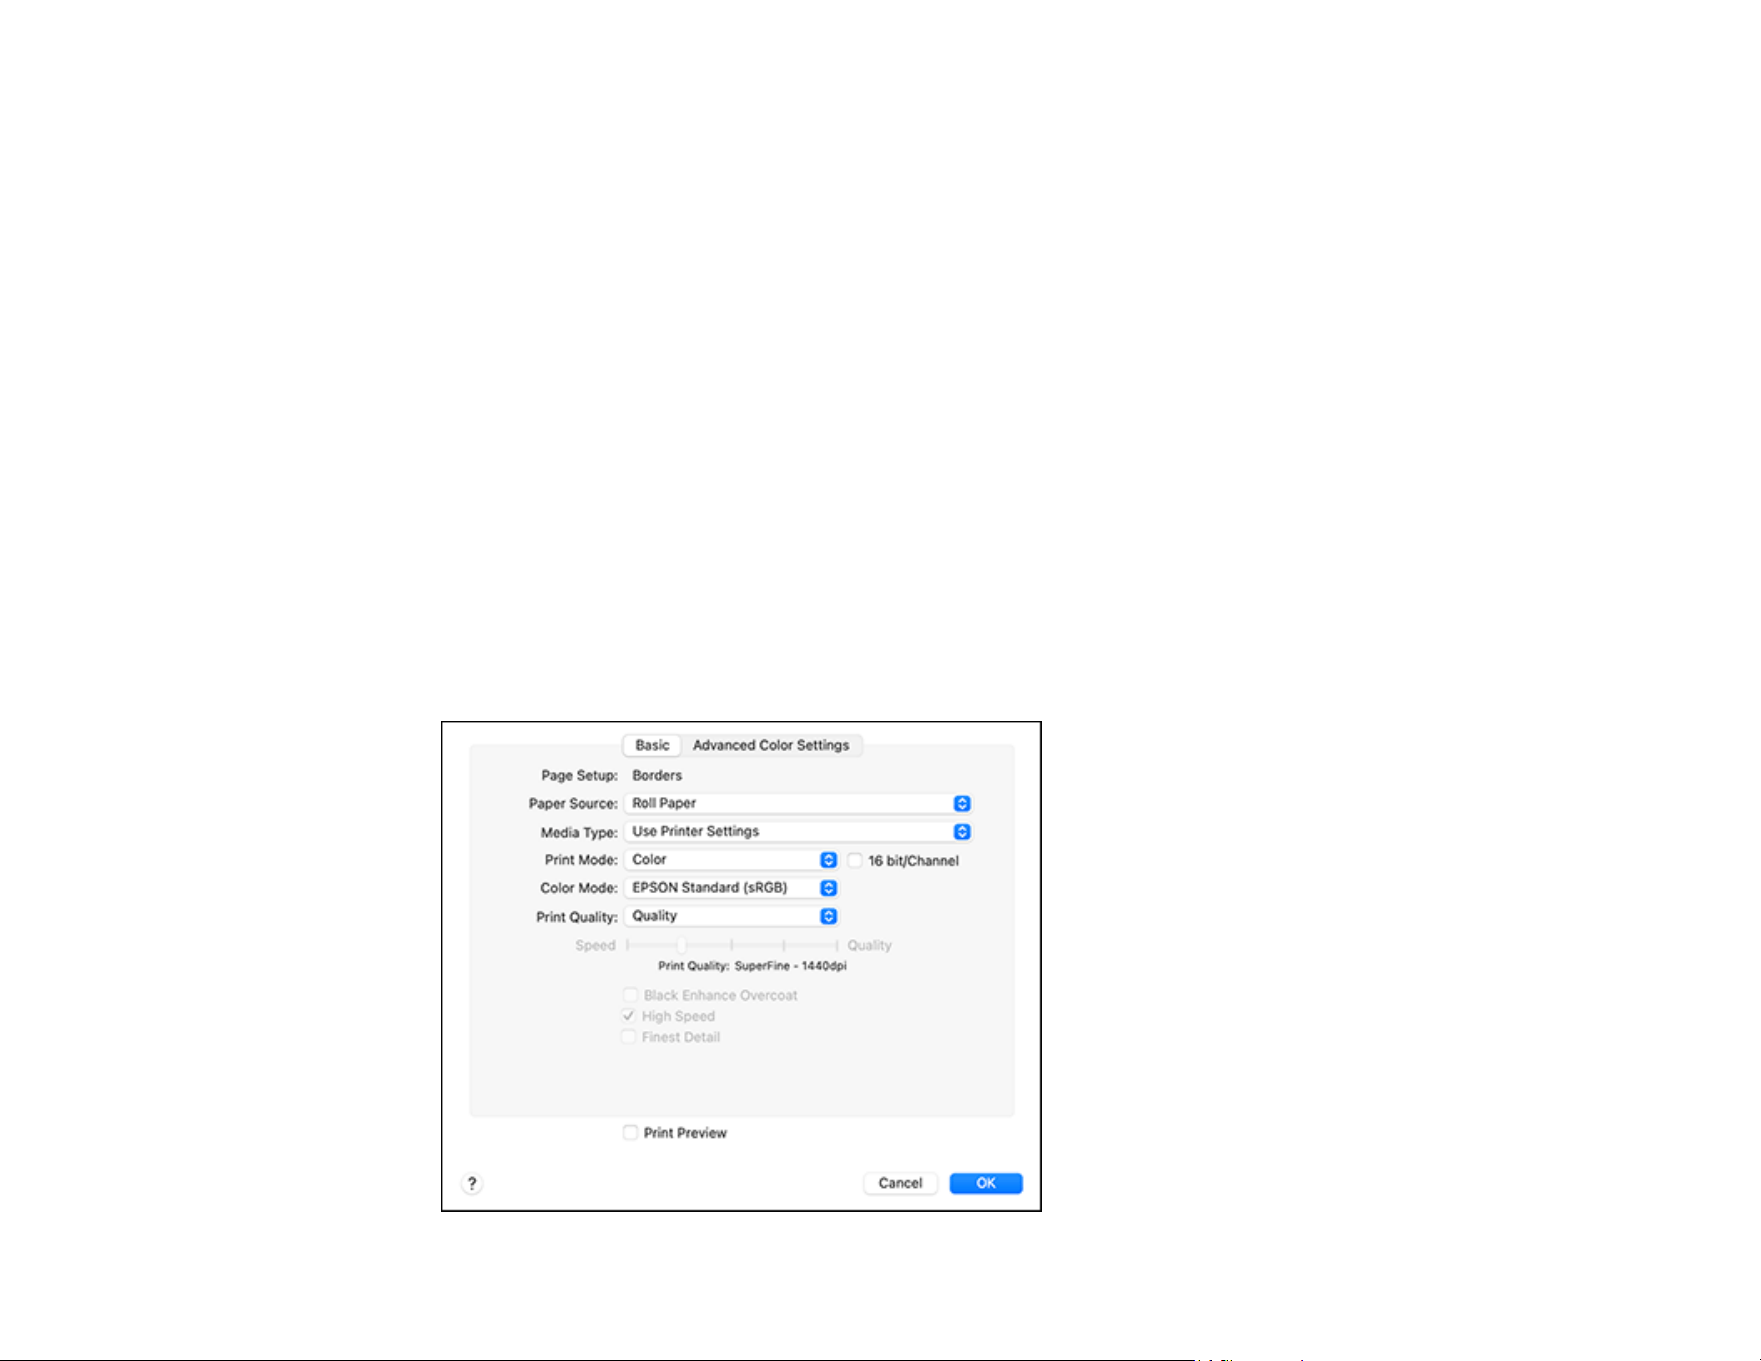
121
5. Select the size of the paper you loaded as the Paper Size setting.
• To print a borderless photo, select the Borderless checkbox or a paper size with a Borderless
option.
• To print on roll paper, select a roll paper size or one with a Borderless option.
Note: For roll paper, make sure the maximum width of your photo is set to 17 inches to fit in the
width of your roll paper (set the margins to 0 in your application software).
Note: You can reduce or enlarge the size of the printed image by expanding the Paper Handling
menu in the print window or selecting it from the pop-up menu and then selecting a scaling option.
6. Select the orientation of your document or photo as shown in the print window.
7. Select any application-specific settings that appear on the screen, such as those shown in the image
above for the Preview menu.
8. Do one of the following:
• macOS 13 and later: Expand the Printer Options menu and then select Print Settings.
• macOS 12 and earlier: Select Print Settings or Printer Features from the pop-up menu.
You see a menu like this:

122
Note: The available print settings and appearance of the print window may be different than those
covered here, depending on the Mac OS version and the application you are using.
9. Select the Paper Source setting.
10. Select the type of paper you loaded as the Media Type setting.
Note: The setting may not exactly match the name of your paper. Check the media type settings list
for details.
11. Select one of the following as the Print Mode setting:
• Select Color for any type of photographic printing.
• Select Advanced B&W Photo to print black-and-white photos on certain types of photo paper.
See the list of Advanced B&W Photo options for details.
• Select Black when using plain paper.
12. Select one of the following as the Color Mode setting:
• EPSON Standard (sRGB): Increases the contrast in images. Click the Advanced Color Settings
tab to use advanced color controls.
• Adobe RGB: Matches image colors to the Adobe RGB color standard. Use this setting if your
source file was captured in Adobe RGB. Click the Advanced Color Settings tab to use advanced
color controls.
• Off (No Color Adjustment): Turns off color management in your printer software so you can
manage color using only your application software.
Note: If desired, you can instead use ColorSync to manage colors. In most cases, you get better
results by applying color management in your application, rather than in the printer driver.
13. Select the Print Quality setting you want to use.
Note: You can select Quality Options to fine-tune the Print Quality settings.
14. Select any of the available print options.
Advanced Color Settings - Mac
Print Quality Settings - Mac
Print Options - Mac
Parent topic: Printing on a Mac
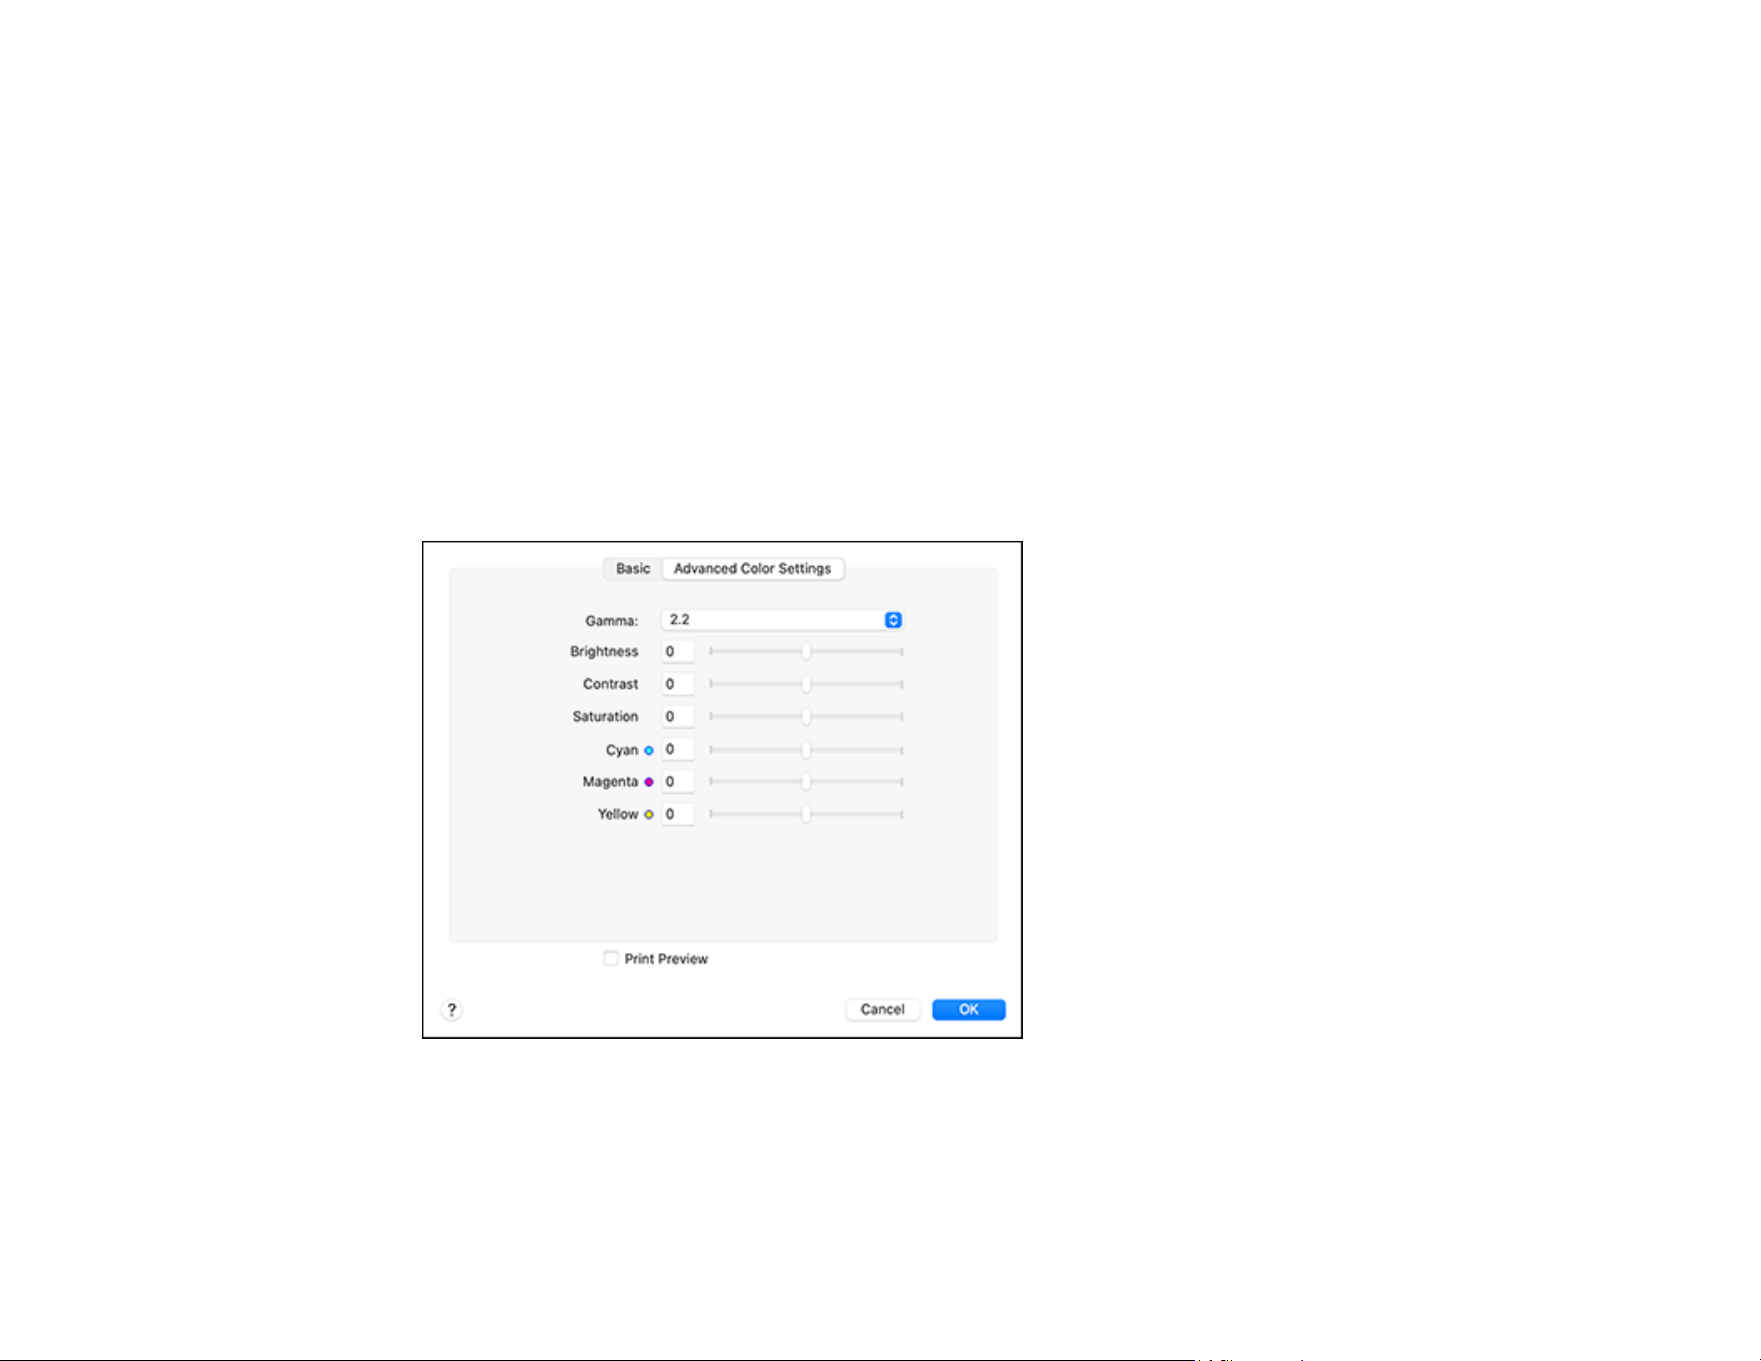
123
Related tasks
Selecting Print Layout Options - Mac
Selecting Roll Paper Settings - Mac
Selecting Paper Configuration Settings - Mac
Managing Color - Mac
Printing Your Document or Photo - Mac
Advanced Color Settings - Mac
When you click the Advanced Color Settings tab, you see one of the screens below depending on the
Print Mode and Color Mode settings you selected.
• EPSON Standard (sRGB) or Adobe RGB
You can specify values for adjusting brightness, contrast, saturation, and individual Cyan, Magenta,
and Yellow color tones.
• Advanced B&W Photo
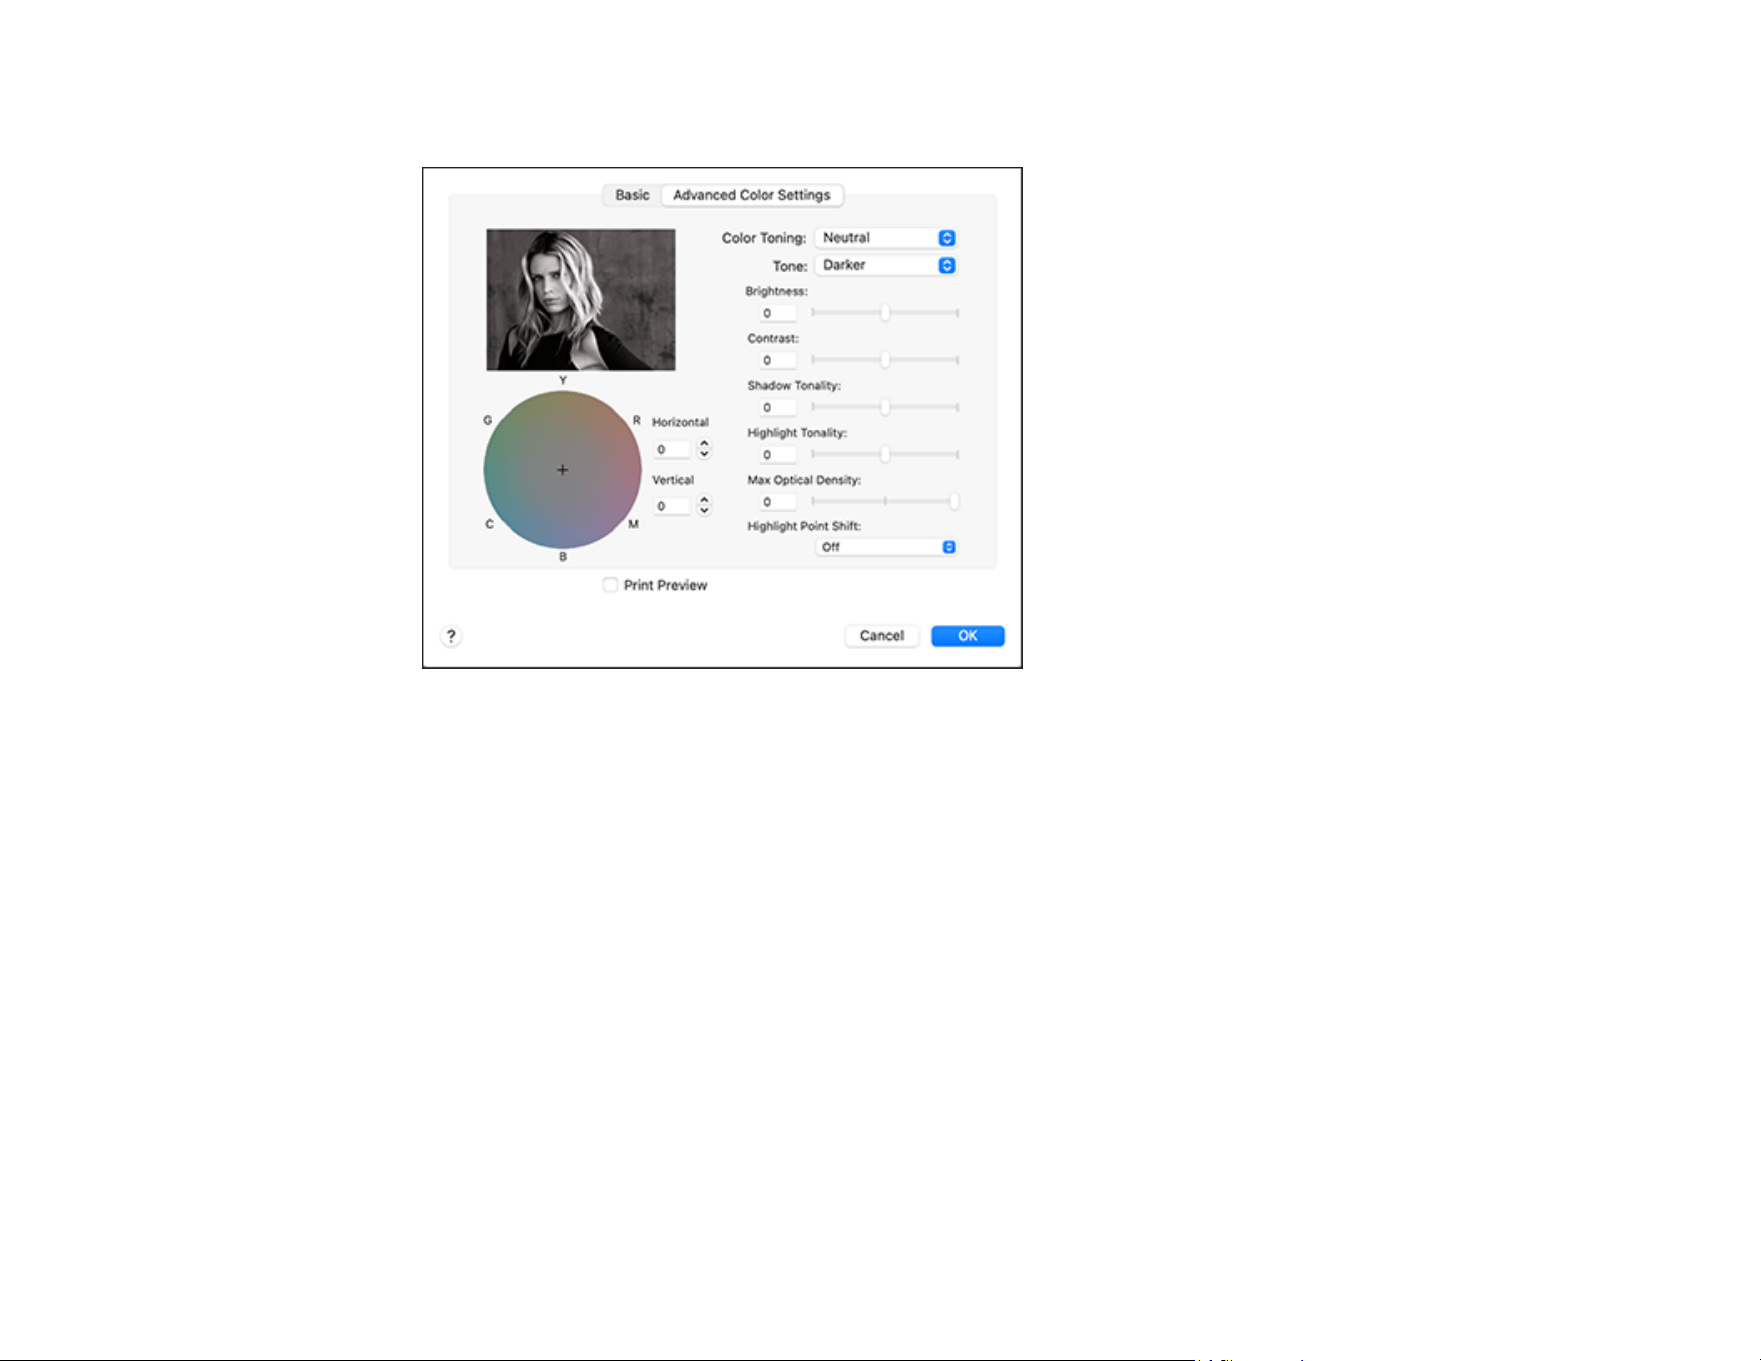
124
You can select any of the available options.
Color Toning
Adds tone (hue) to your black-and-white output. The default is Neutral, which provides a neutral
tonal scale print. You can also choose other popular presets such as Cool, Warm, and Sepia. Note
that the presets affect the target in the tone color circle.
Tone
Changes the entire tonal scale of your black-and-white output. While Darker is the default setting,
you may see better results if you choose Dark. The tone color circle adjusts the hue of your black-
and-white print. Click on any portion of the color wheel or enter corresponding values to customize
the tone (hue) to add to your print. The closer you select to the edge of the wheel, the more color
you add.
Brightness
Adjusts the overall lightness and darkness of your image.
Contrast
Adjusts the difference between the light and dark areas of the overall image.
Shadow Tonality
Controls tonality only in the shadow areas of your image.

125
Highlight Tonality
Controls tonality only in the highlight areas of your image.
Max Optical Density
Adjusts the overall density or focus of the print. Create a soft focus print by lowering the density
setting.
Highlight Point Shift
Helps reduce gloss differential on glossy media by adding density to the highlights of your image.
Parent topic: Selecting Basic Print Settings - Mac
Print Quality Settings - Mac
You can select any of the Print Quality settings to fine-tune the quality of your print. Some settings may
be unavailable, depending on the paper type and border setting you have chosen.
Standard
For everyday text and image printing.
Quality
For photos and graphics with good quality and print speed.
High Quality
For photos and graphics with high print quality.
Max Quality
For the maximum print quality, but the slowest print speed.
Max Quality (Carbon Black)
For increased black density, works best on glossy media, can reduce print speed.
Parent topic: Selecting Basic Print Settings - Mac
Print Options - Mac
You can select any of the print options to customize your print. Some options may be unavailable,
depending on other settings you have chosen.
Black Enhance Overcoat
Prints with enhanced image contrast and increased black density.
High Speed
Speeds up printing but may reduce print quality.
Finest Detail
Sharpens edges on vector-based data including text, graphics, and line art. (This setting does not
affect photographs.)
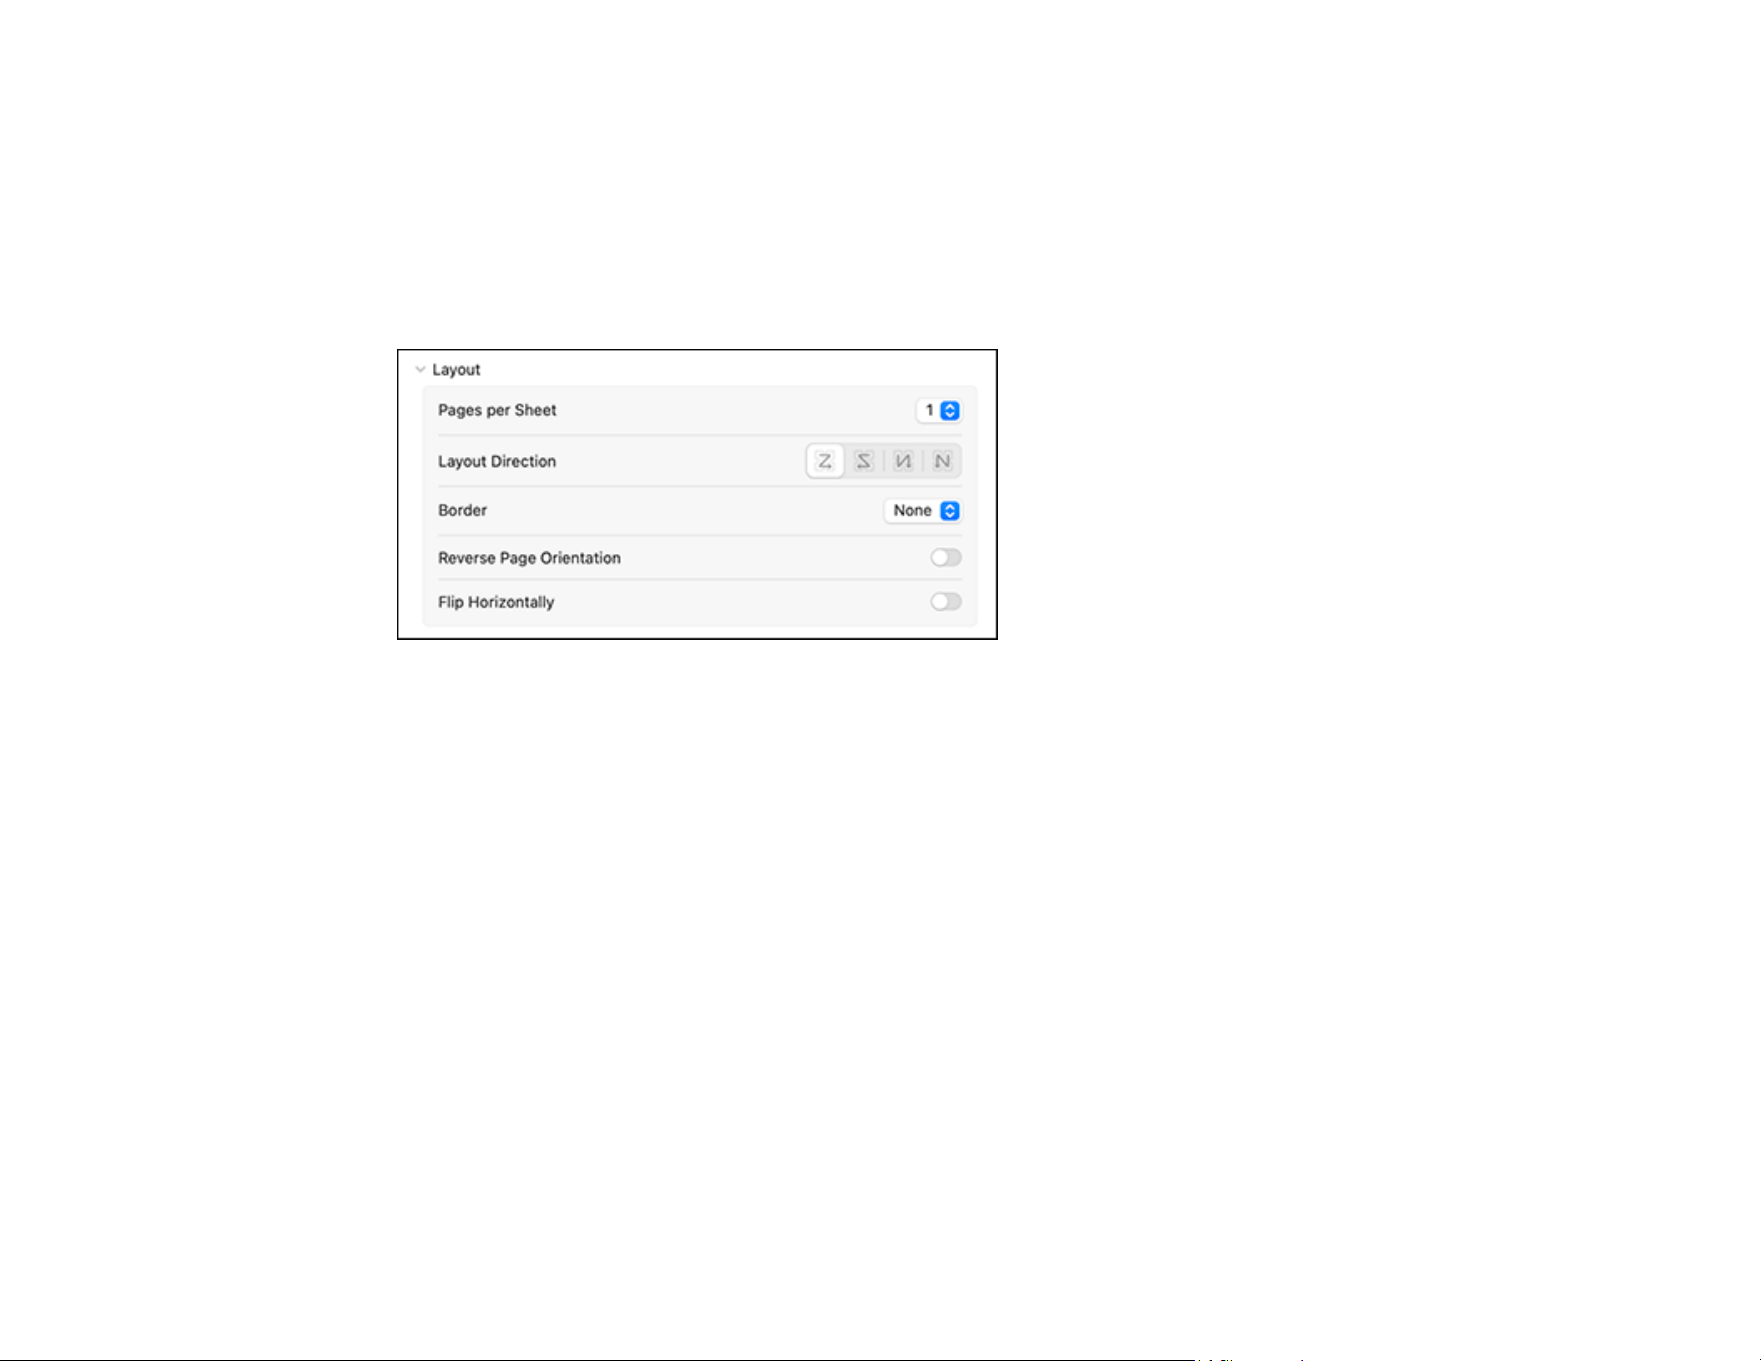
126
Note: Enabling Finest Detail may decrease the print speed.
Parent topic: Selecting Basic Print Settings - Mac
Selecting Print Layout Options - Mac
You can select a variety of layout options for your document or photo by selecting Layout from the pop-
up menu or expanding it on the print window.
• To print multiple pages on one sheet of paper, select the number of pages in the Pages per Sheet
pop-up menu. To arrange the print order of the pages, select a Layout Direction setting.
• To print borders around each page on the sheet, select a line setting from the Border pop-up menu.
• To invert or flip the printed image, select the Reverse page orientation or Flip horizontally settings.
Parent topic: Printing on a Mac
Selecting Roll Paper Settings - Mac
To print on roll paper, you select the roll paper options from the Printer Options menu.
1. Select Paper Layout Settings.
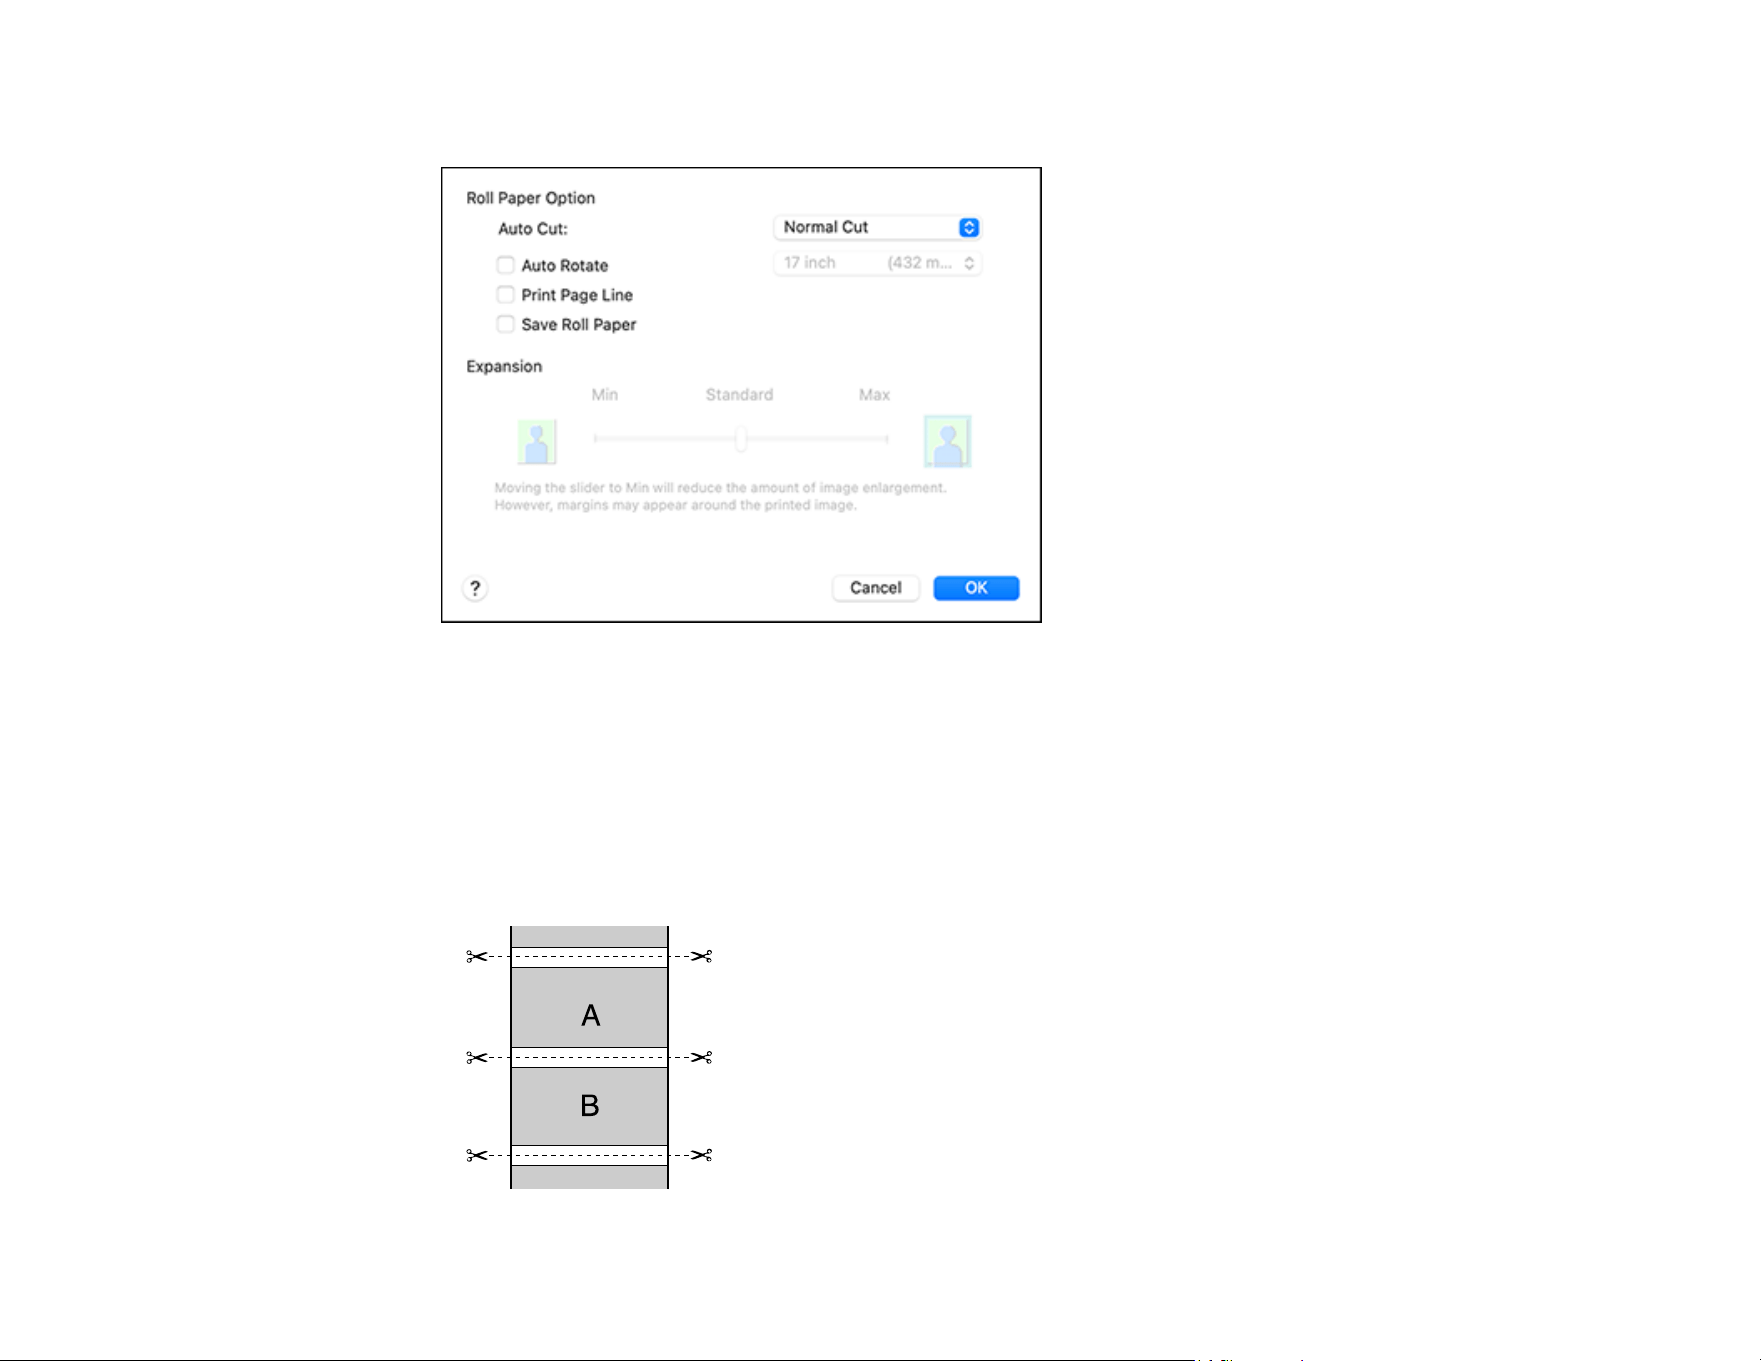
127
You see a window like this:
Note: Some settings may not be available, depending on the Roll Paper option you selected for your
Paper Size.
2. Select one of the following Auto Cut settings:
• Off: Select this option to cut your prints manually.
• Normal Cut: Creates a margin at the top and bottom of your image. These margins vary by media
type and may be changed from their defaults using custom media settings.
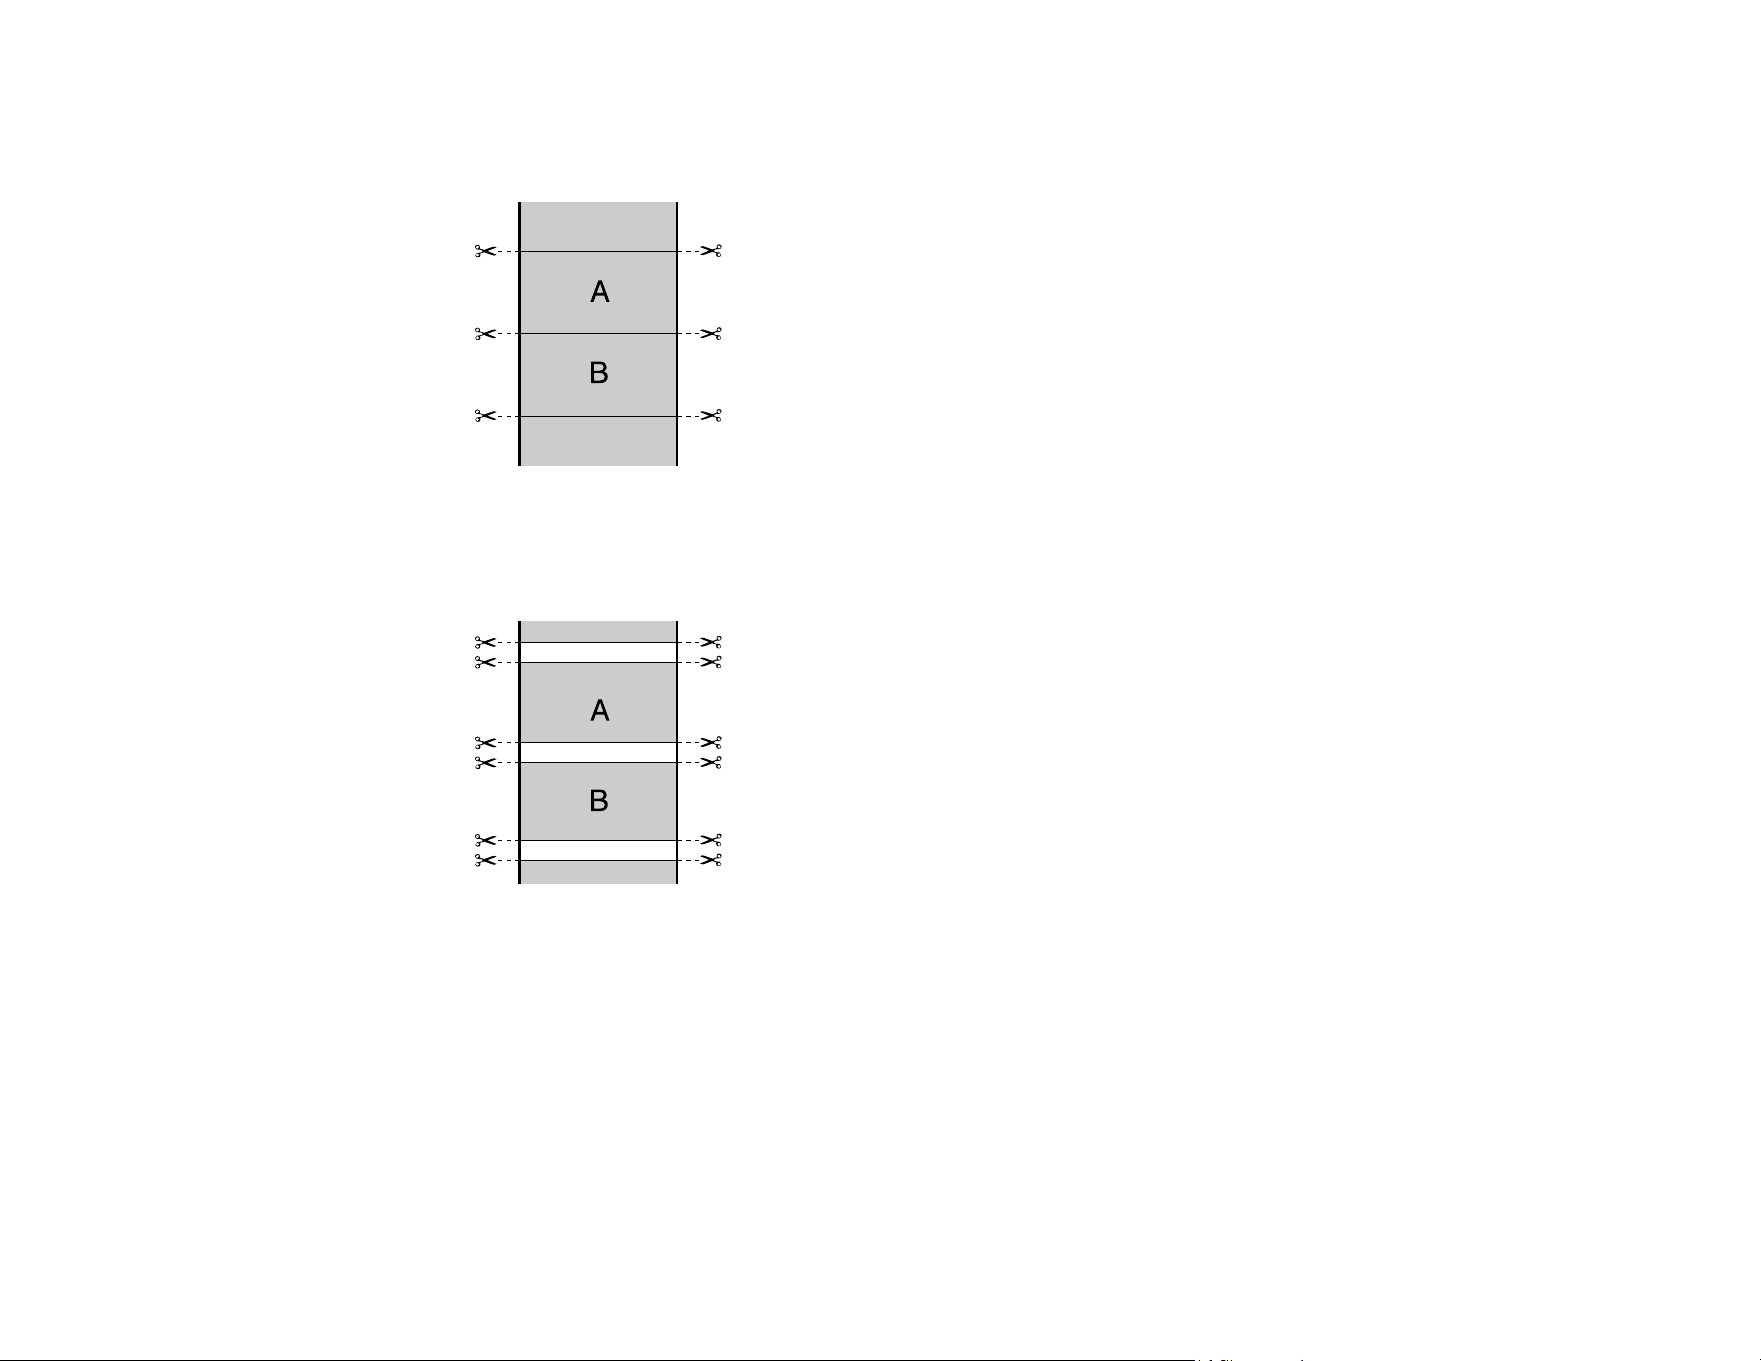
128
• Single Cut: Prints images within the same print job end-to-end with no gap between them.
Borderless images may overlap slightly.
• Double Cut: Increases the space between each image and trims each print individually, providing
the cleanest edge with no image overlap for borderless printing.
3. Select the following settings as necessary:
• Select the Auto Rotate checkbox and select the roll paper width to fit the images to the paper
size.
• Select the Print Page Line checkbox to print trim lines around images when you select a banner
paper size.
• Click Save Roll Paper to minimize the amount of blank paper wasted when you print on banner
paper.
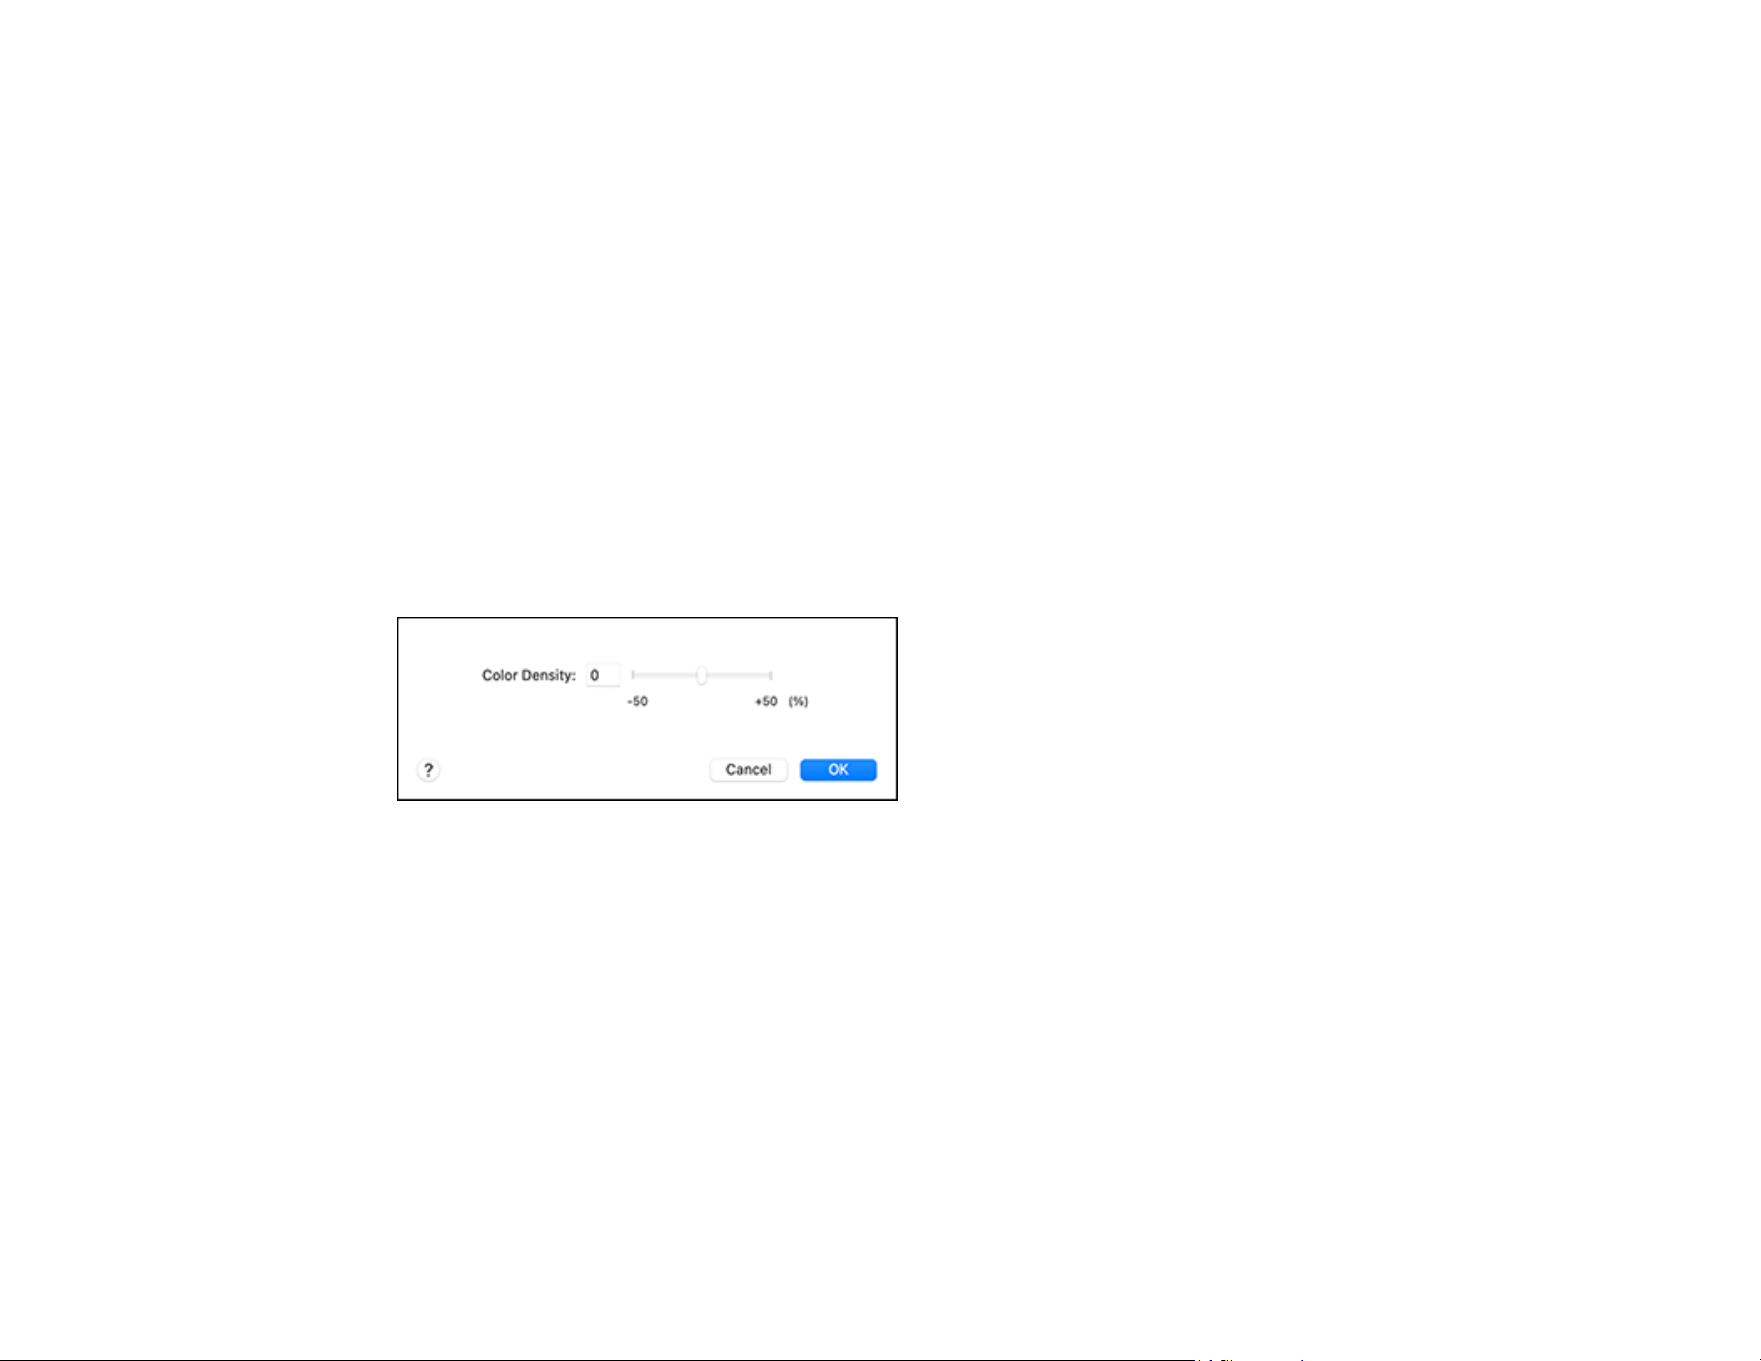
129
• Use the Expansion slider to adjust the amount of image expansion when printing borderless
images.
Note: This option is available only when you choose a Paper Size setting with a Borderless
option.
4. Click OK.
Parent topic: Printing on a Mac
Selecting Paper Configuration Settings - Mac
If you are using non-Epson media and need to fine-tune its print quality, select Paper Configuration
from the Printer Options menu or select Paper Configuration from the drop-down menu, then change
the Color Density setting to adjust the ink saturation level as necessary.
Note: The Color Density setting is only available in the printer driver. It is not accessible from the
printer's control panel or Epson Media Installer.
Parent topic: Printing on a Mac
Managing Color - Mac
You can adjust the Color Matching settings to fine-tune the colors in your printout, or turn off color
management in your printer software.
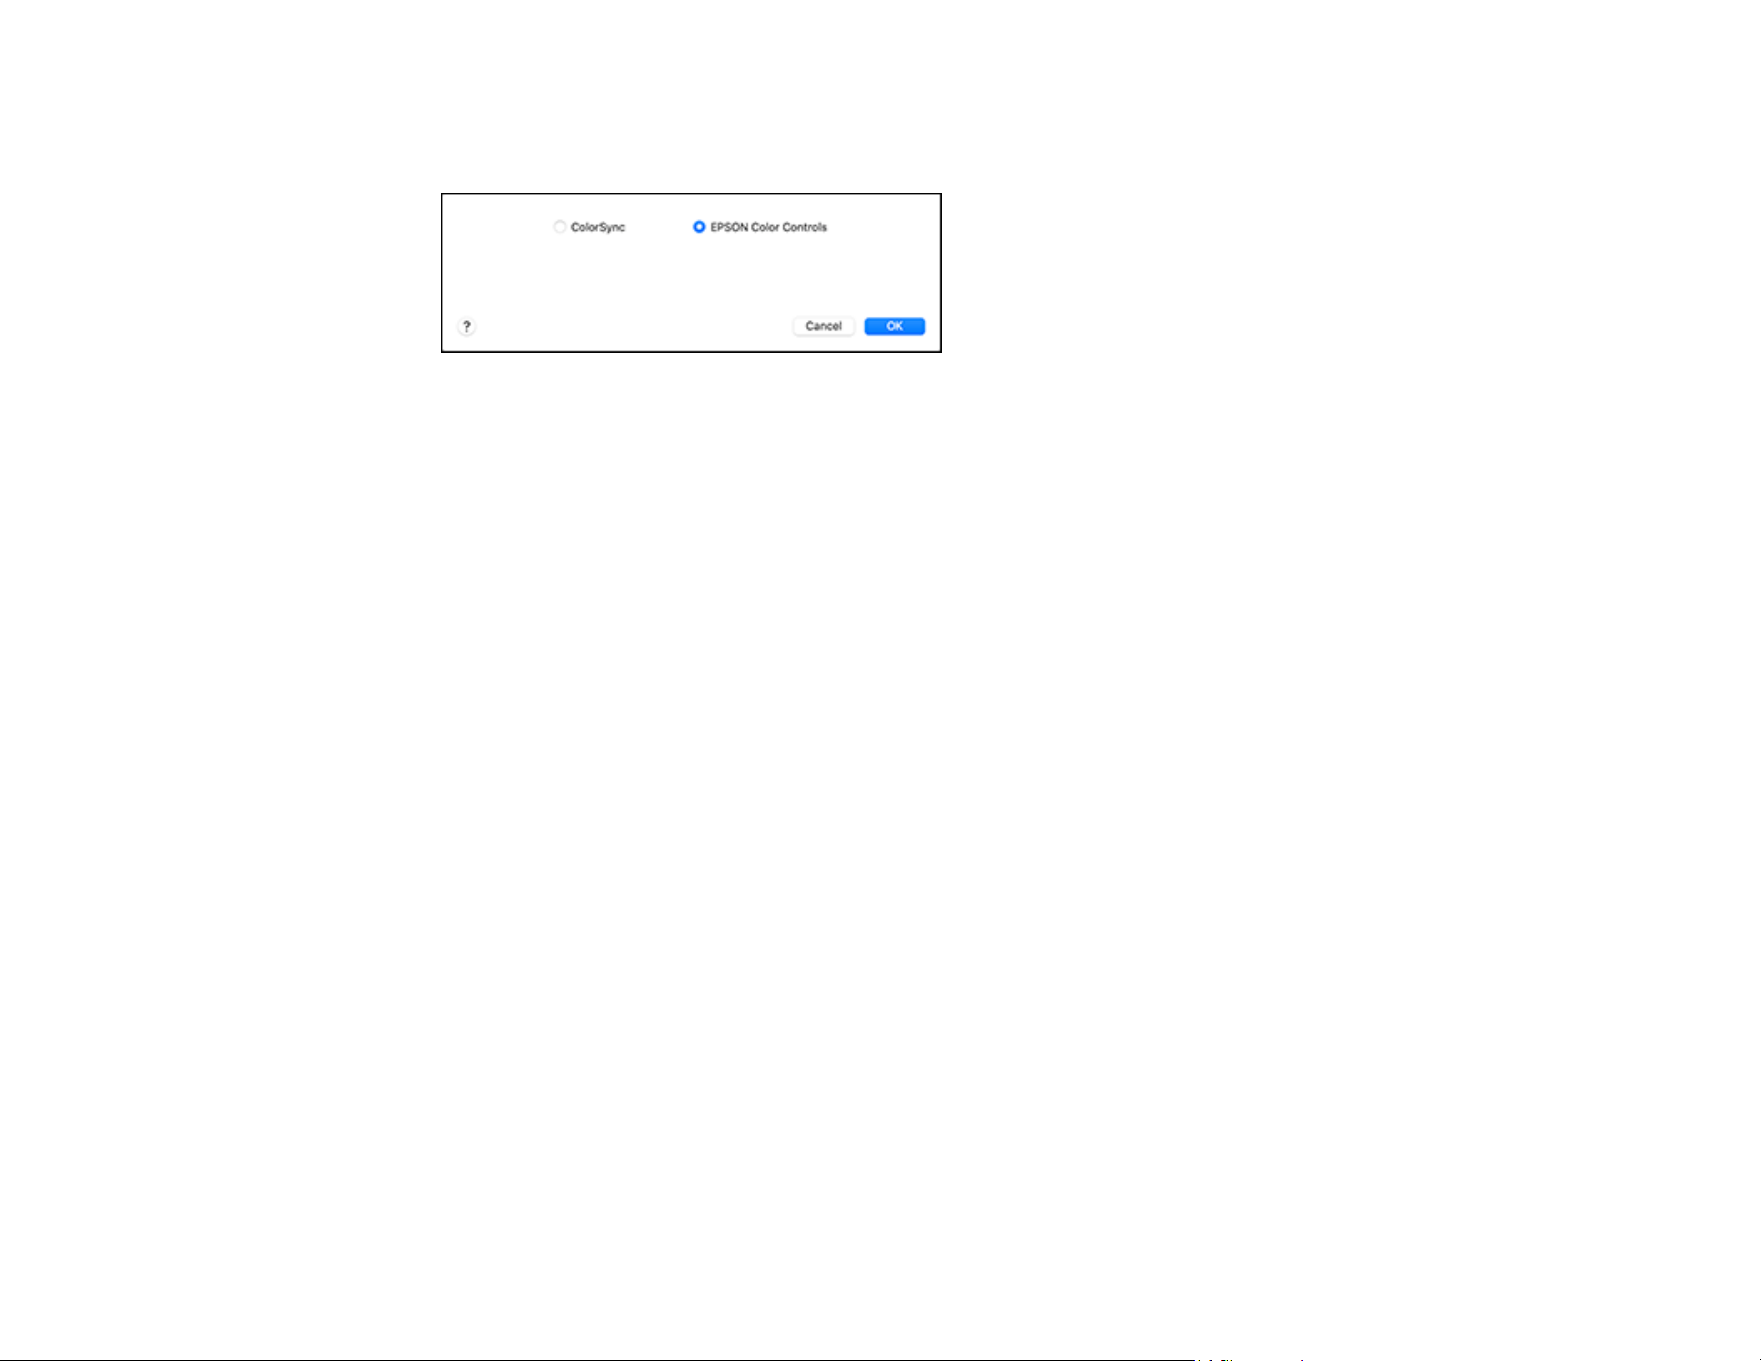
130
1. Select Color Matching from the Printer Options menu or select Color Matching from the pop-up
menu in the print window.
2. Select one of the available options.
Color Matching Options - Mac
Parent topic: Printing on a Mac
Color Matching Options - Mac
You can select from these settings on the Color Matching menu.
ColorSync
Prints using standard color profiles for your product and paper to help match image colors. You can
customize the conversion method and filter settings on the ColorSync pop-up menu in the print
window.
EPSON Color Controls
Lets you manage color using controls in your printer driver or turn off color management.
Parent topic: Managing Color - Mac
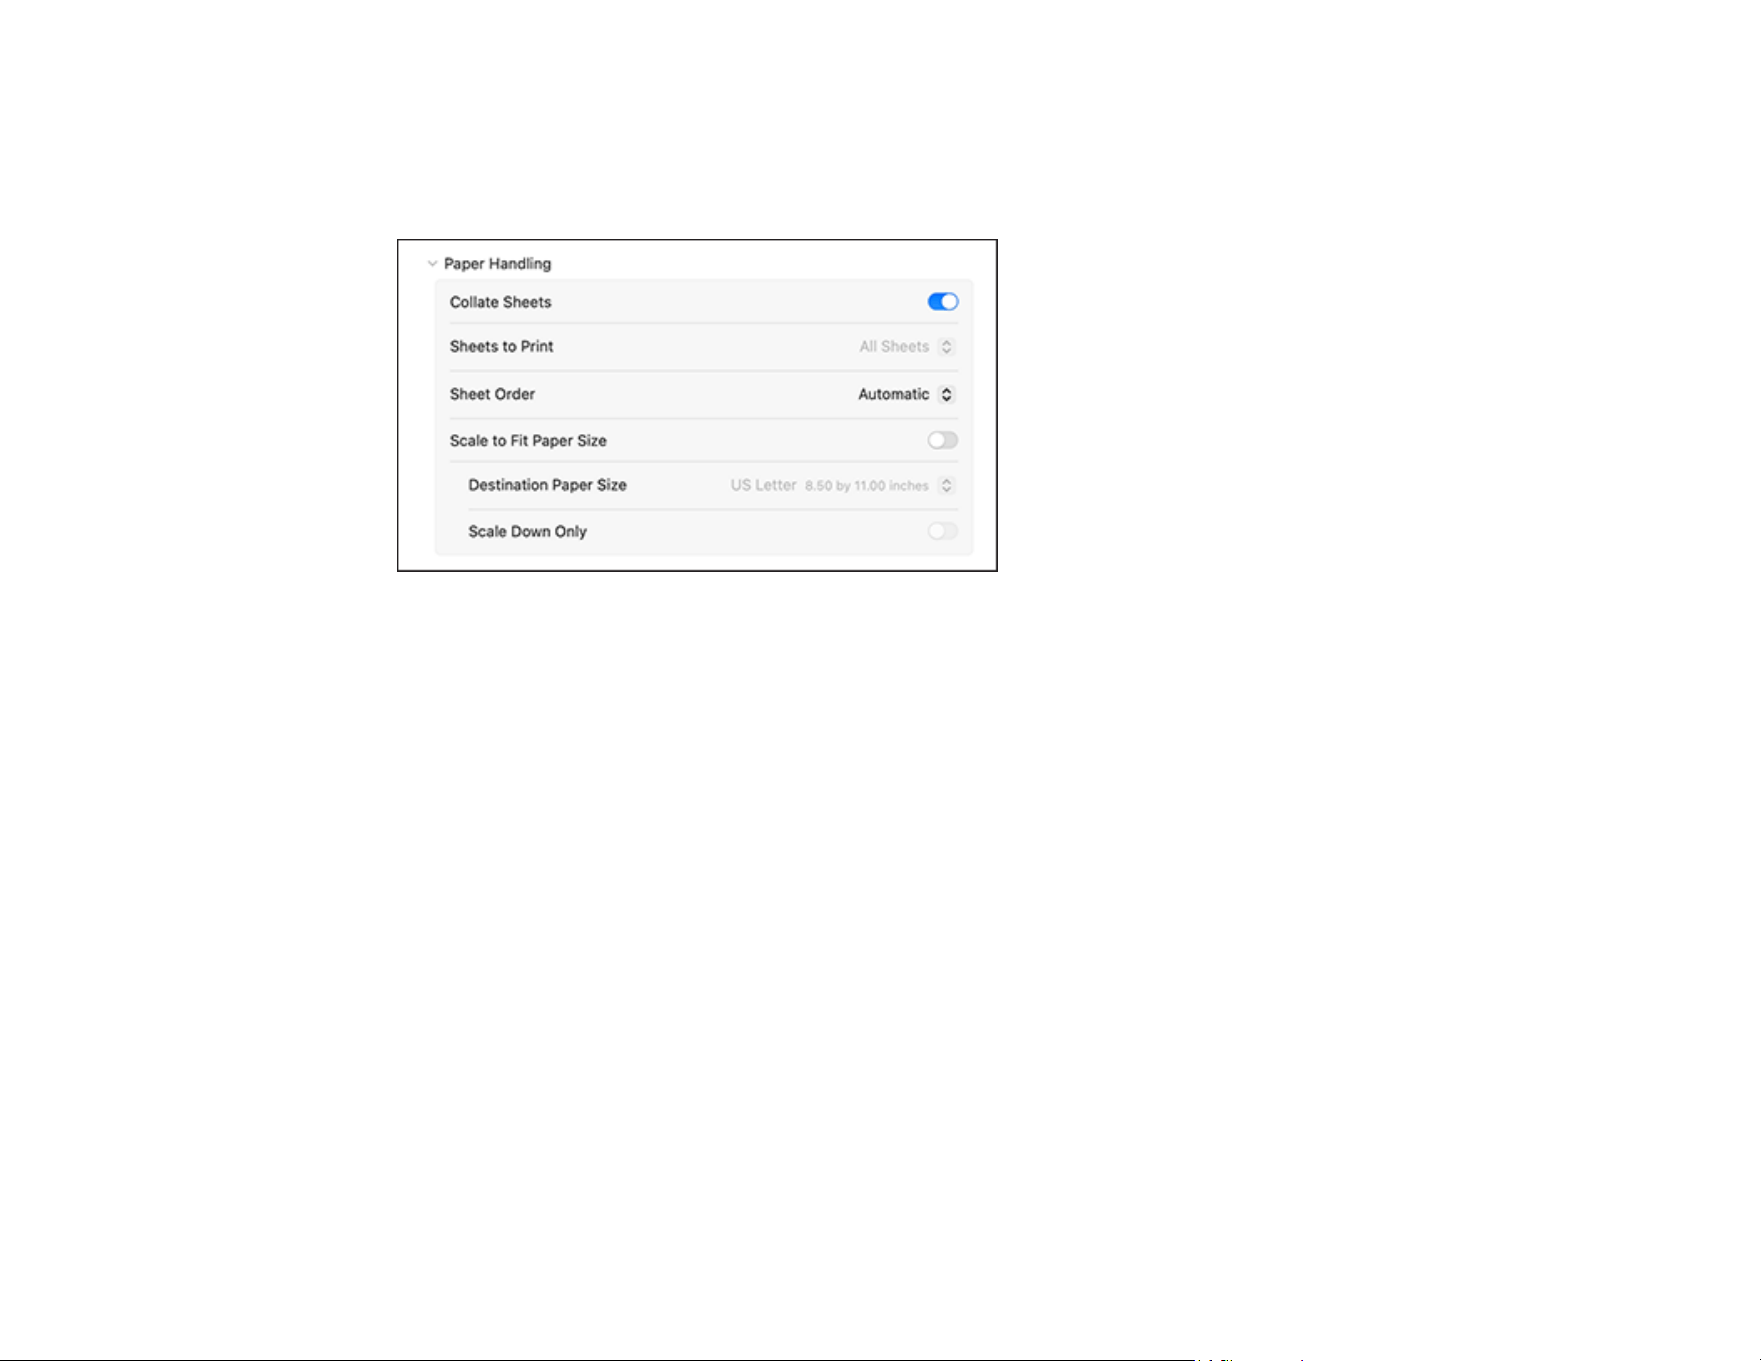
131
Sizing Printed Images - Mac
You can adjust the size of the image as you print it by expanding the Paper Handling menu in the print
window or selecting Paper Handling from the pop-up menu.
• To collate multiple copies into sets of documents, select Collate Sheets.
• To print only selected pages in a multi-page document, select an option from the Sheets to Print pop-
up menu.
• To adjust the order in which pages are printed, select an option from the Sheet Order pop-up menu.
• To scale the image to fit on a specific paper size, select Scale to Fit Paper Size and select a paper
size from the Destination Paper Size pop-up menu.
• To restrict scaling of the image to reduced sizing, select the Scale Down Only setting. (Deselect this
setting when enlarging the image.)
Parent topic: Printing on a Mac
Selecting Printing Preferences - Mac
You can select printing preferences that apply to all the print jobs you send to your product.
1. In the Apple menu or the Dock, select System Preferences or System Settings.
2. Select Print & Fax, Print & Scan, or Printers & Scanners, select your product, and select Options
& Supplies.
3. Select Driver or Options.
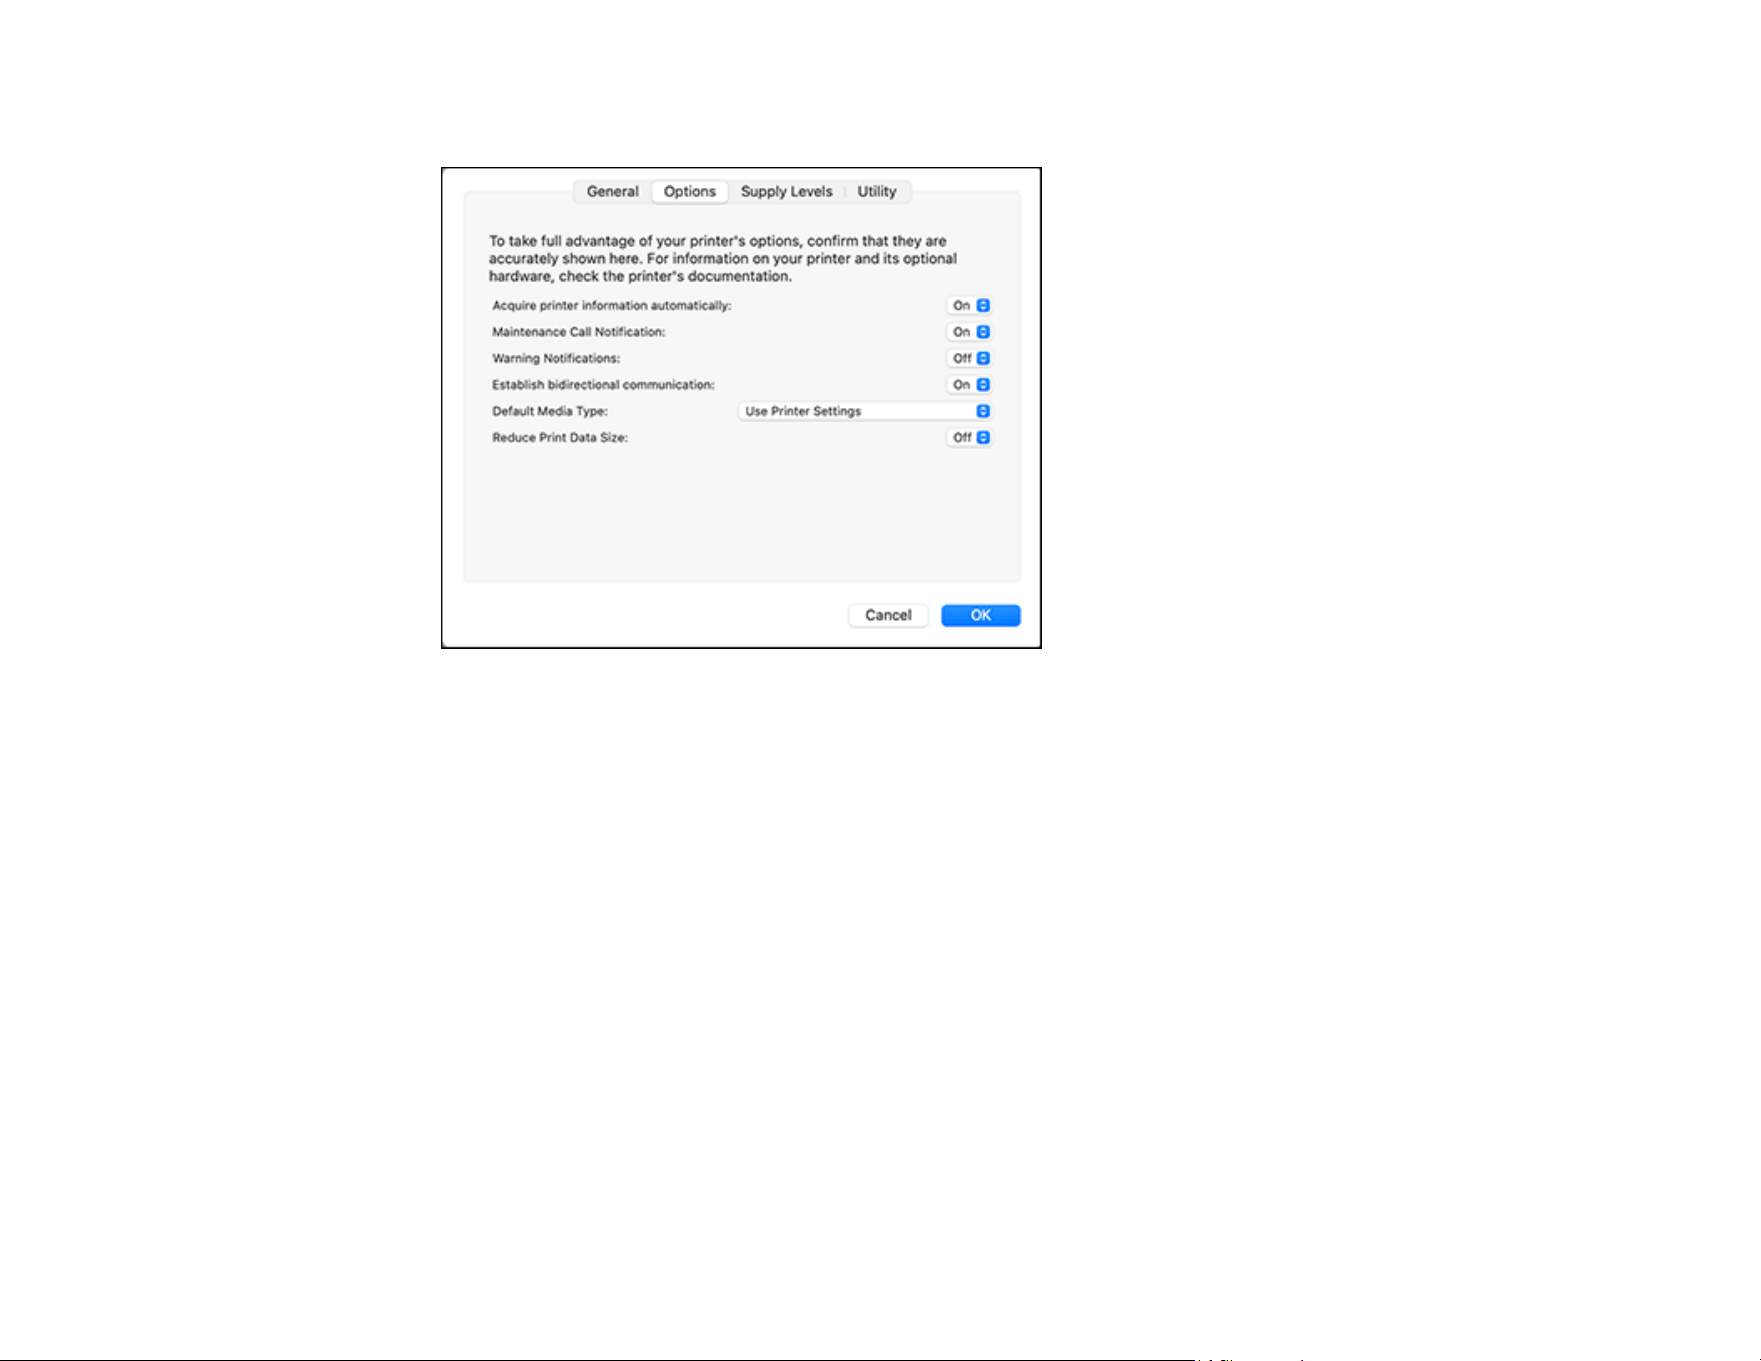
132
You see a screen like this:
4. Select any of the available printing options.
5. Click OK.
Printing Preferences - Mac
Parent topic: Printing on a Mac
Printing Preferences - Mac
You can select from these settings on the Options tab.
Acquire printer information automatically
Ensures that the paper size and paper type settings are automatically updated if paper is loaded or
changed after closing the print window.
Maintenance Call Notification
Alerts you if the maintenance tanks are nearing capacity or need to be replaced.
Warning Notifications
Lets you choose whether or not to receive warning notifications from the printer software for various
operating conditions.

133
Establish bidirectional communication
Allows the product to communicate with the computer. Do not change the default setting unless you
experience issues when using a shared printing pool.
Default Media Type
Select the Media Type that you want to use as the default in the printer driver.
Reduce Print Data Size
Increases print data compression to improve print speed. Not recommended when printing fine
patterns.
Parent topic: Selecting Printing Preferences - Mac
Printing Your Document or Photo - Mac
Once you have selected your print settings, you are ready to print.
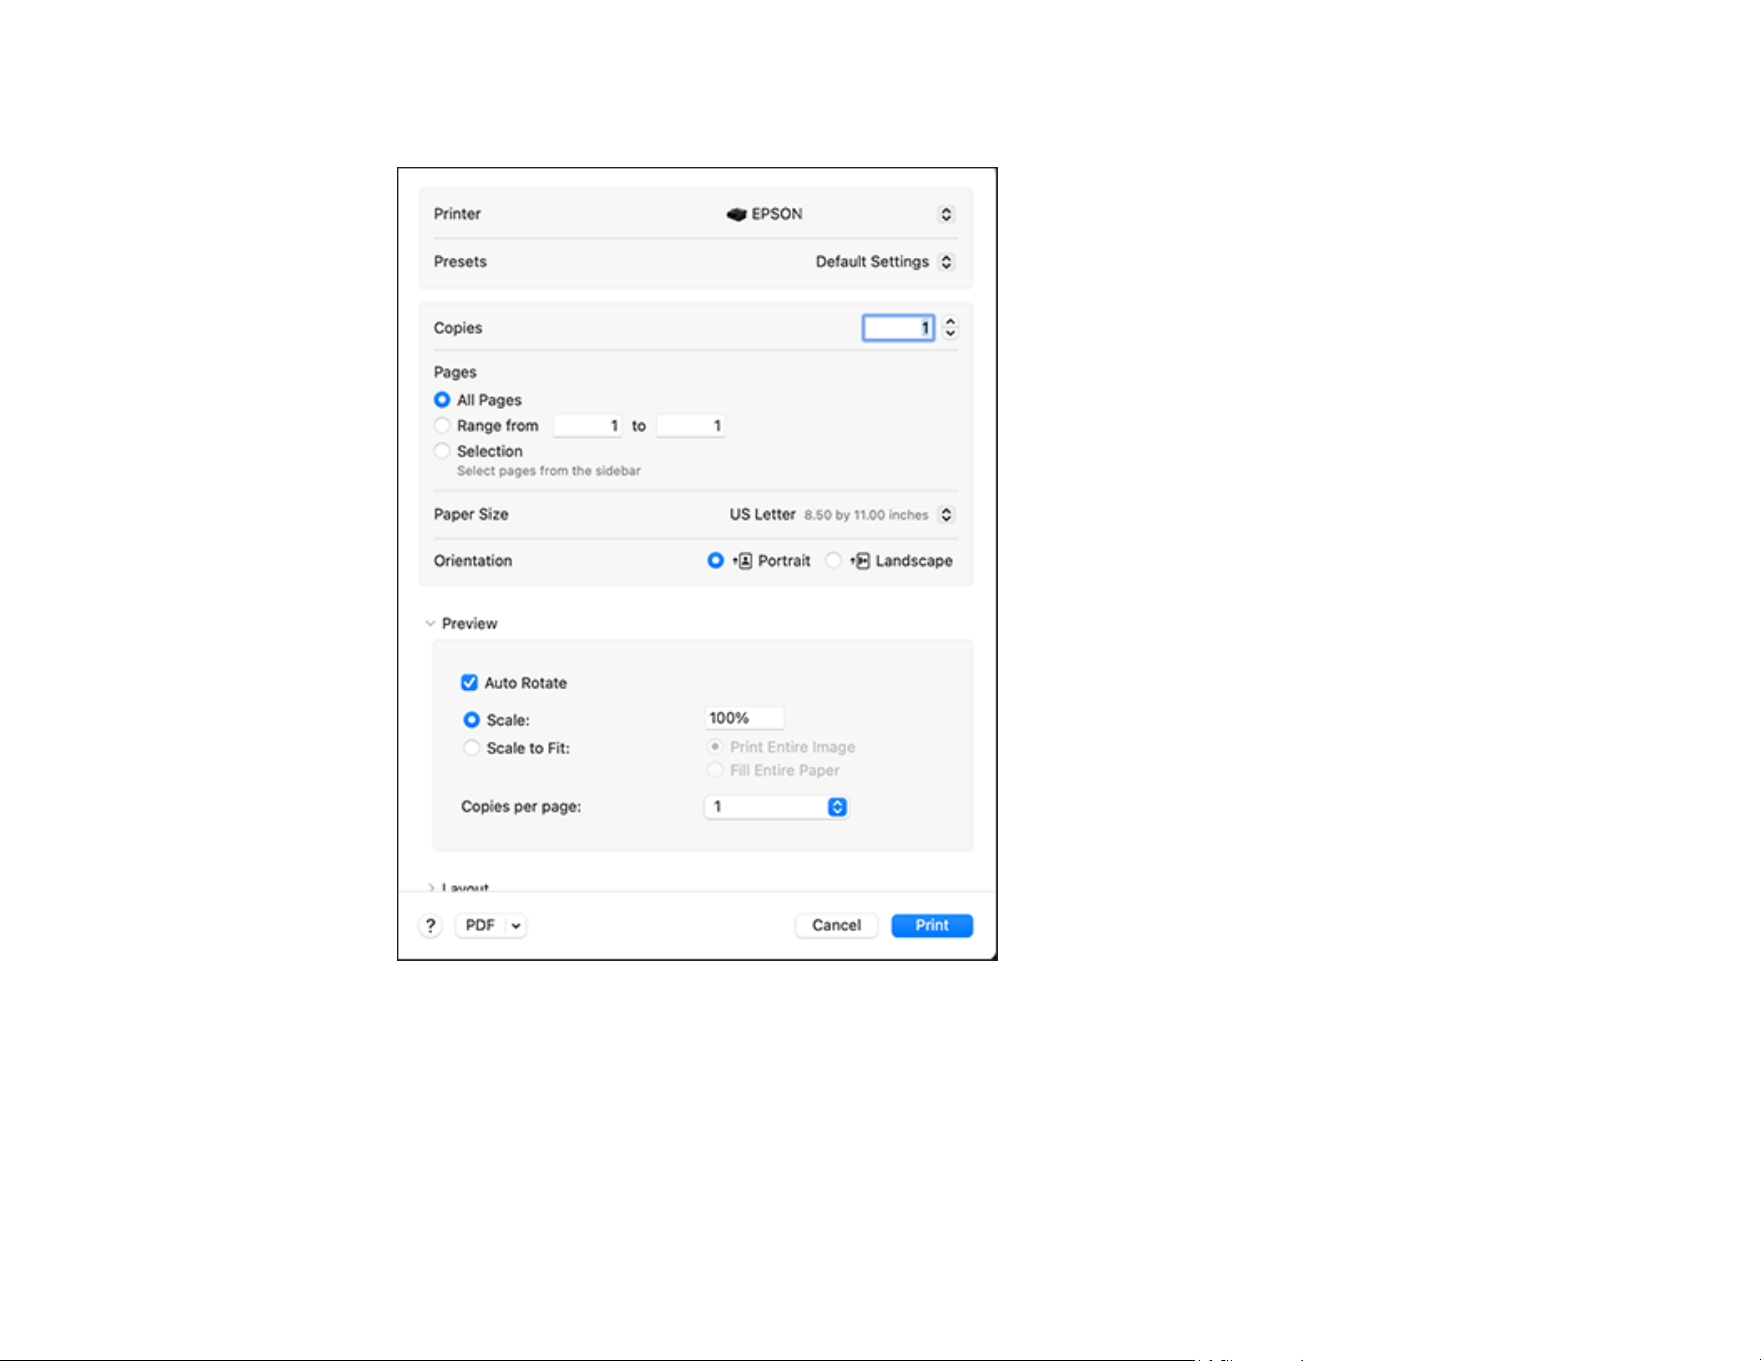
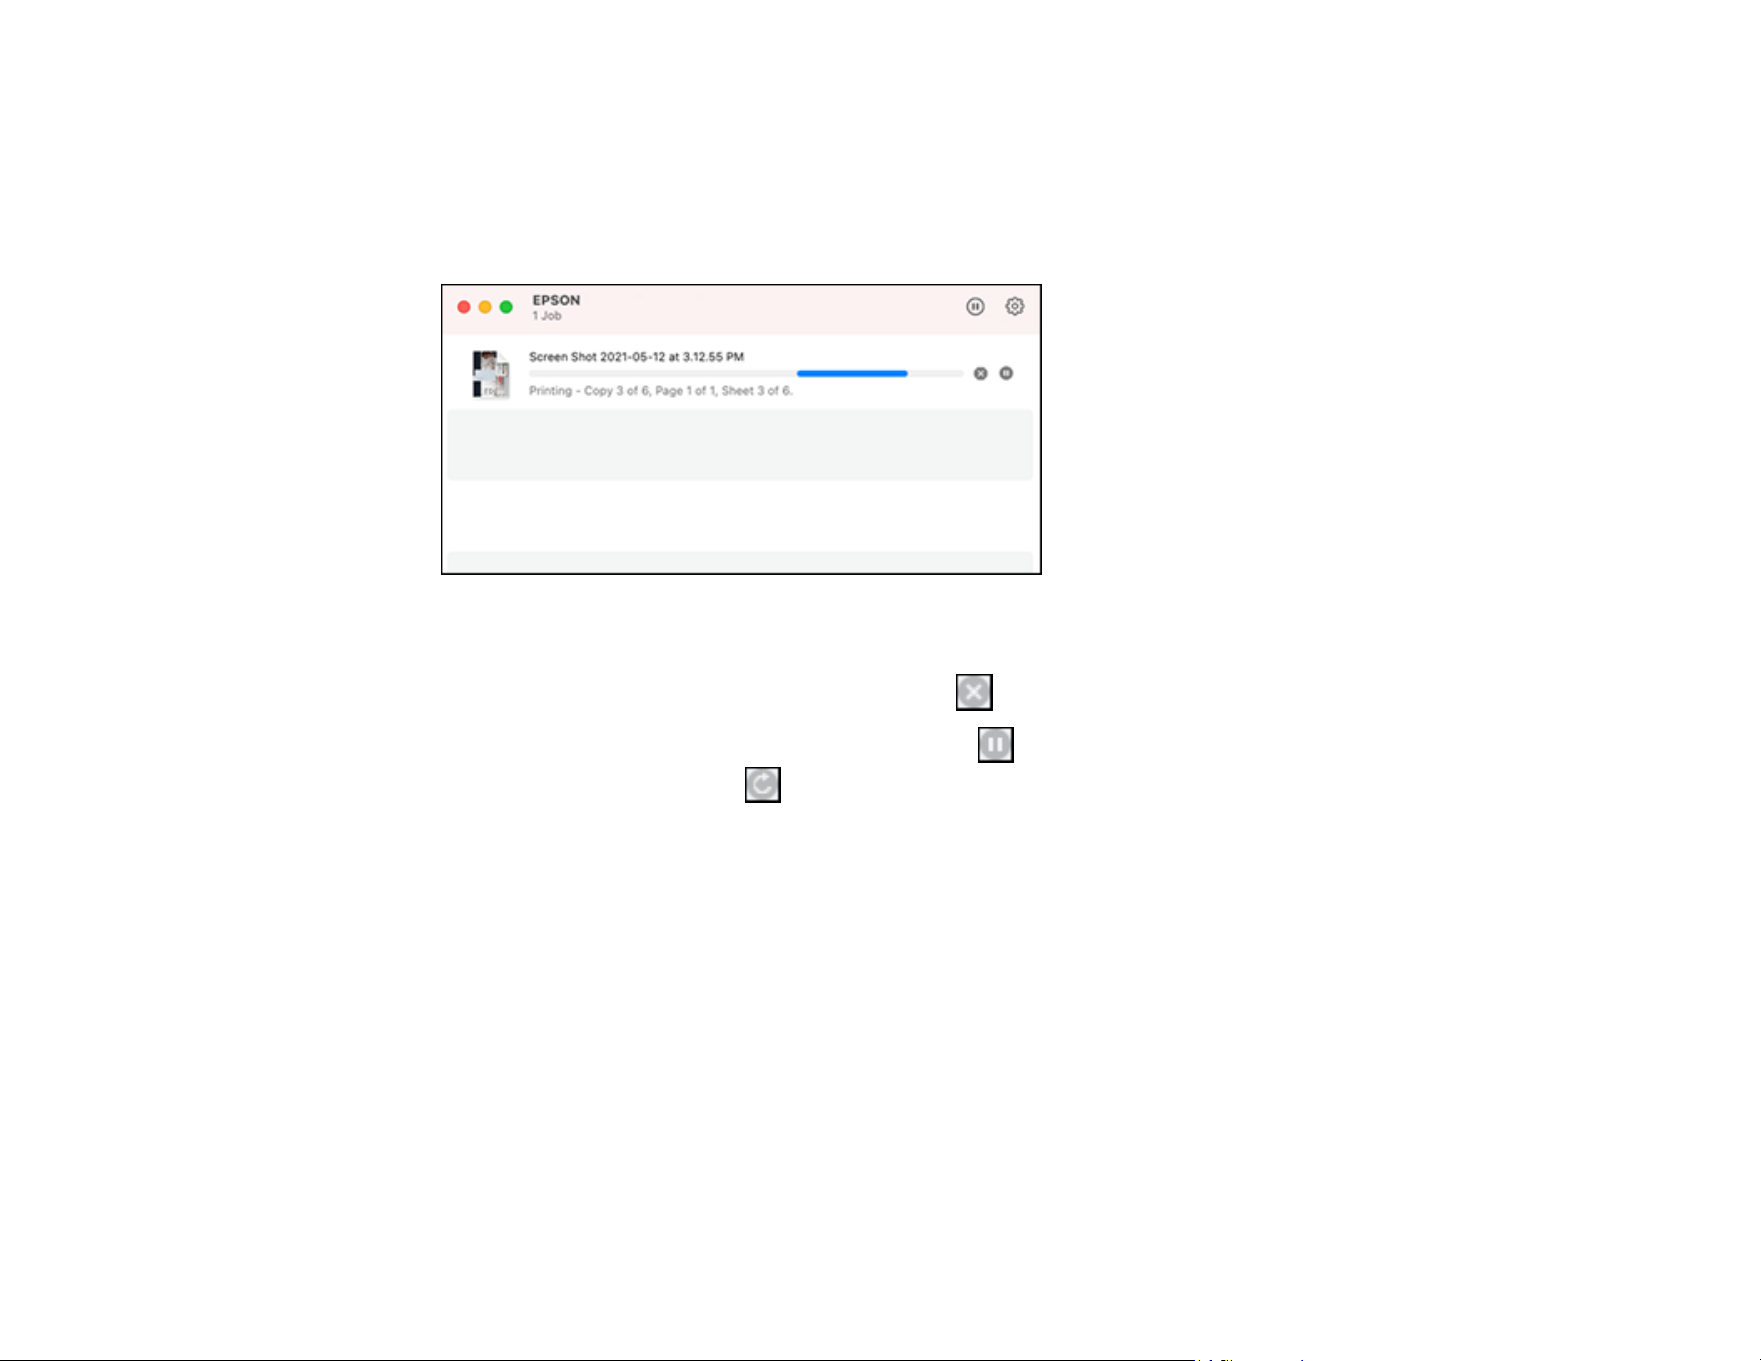
135
Checking Print Status - Mac
During printing, you can view the progress of your print job, control printing, and check ink status.
1. Click the printer icon when it appears in the Dock.
You see the print status window:
2. Select the following options as necessary for your Mac OS version:
• To cancel printing, click the print job and click or Delete.
• To pause a print job, click the print job and click or Hold. To resume a print job, click the
paused print job and click or Resume.
• To pause printing for all queued print jobs, click Pause or Pause Printer.
• To display other printer information, click Settings or Supply Levels.
Parent topic: Printing Your Document or Photo - Mac

136
Using the Control Panel Menus
Follow the instructions in these sections to access the printer menu system and select settings.
Accessing the Printer's Menus
Paper Setting Menu
Basic Settings Menu
Printer Settings Menu
Network Settings Menu
System Administration Menu
Maintenance Menu
Printer Status Menu
Accessing the Printer's Menus
You can use the printer menus to adjust the settings that control how your printer works.
1. Press the home button, if necessary.
2. Select the Menu icon.
3. Select the up or down arrow to scroll through the menus, or swipe up or down on the LCD screen.
Note: To return to the previous screen, select the left arrow icon.
4. Select the up or down arrow to move through the settings, or swipe up or down on the LCD screen.
5. To select a setting, select OK any time the OK option is displayed. You can also select a setting to
toggle it on or off.
6. When you finish changing settings on a menu, select the left arrow icon to go back or press the
home button on the control panel to completely exit the menu.
Parent topic: Using the Control Panel Menus
Paper Setting Menu
Select Menu > Paper Setting, then select a paper source to customize the paper options.
Roll Paper menu

137
Setting Options Description
Remove — Rewinds the loaded roll paper until it is
ejected from the paper feeder; information on
how to remove the roll paper is displayed on
the LCD screen.
Feed/Cut Paper Backward
Forward
Cut
Moves the paper backward or forward, or cuts
it using the built-in cutter.
Print Adjustments Paper Feed Adjust Select Auto to automatically adjust the paper
feed settings.
Select Manual if automatic adjustment results
are not satisfactory and you want to perform
adjustments based on specific printing needs;
select an adjustment setting from the
following:
• Select Quality First to print adjustment
patterns to adjust the feed for image quality.
• Select Length Accuracy First if you are
printing images that require more precise
dimensions and length, such as CAD files.
Print Head Alignment Select Auto(Standard) if printed ruled lines
are misaligned or print results are grainy or
otherwise unsatisfactory.
Select Auto(Details) if printed ruled lines are
misaligned at the edge of the paper or
Auto(Standard) alignment results are
unsatisfactory.
Select Manual(Standard) if automatic
alignment results are not satisfactory and you
want to precisely align the print head using the
printed adjustment patterns.
Select Manual(Details) if automatic and
standard manual alignment results are not
satisfactory and you want to select custom
settings according to specific print needs.
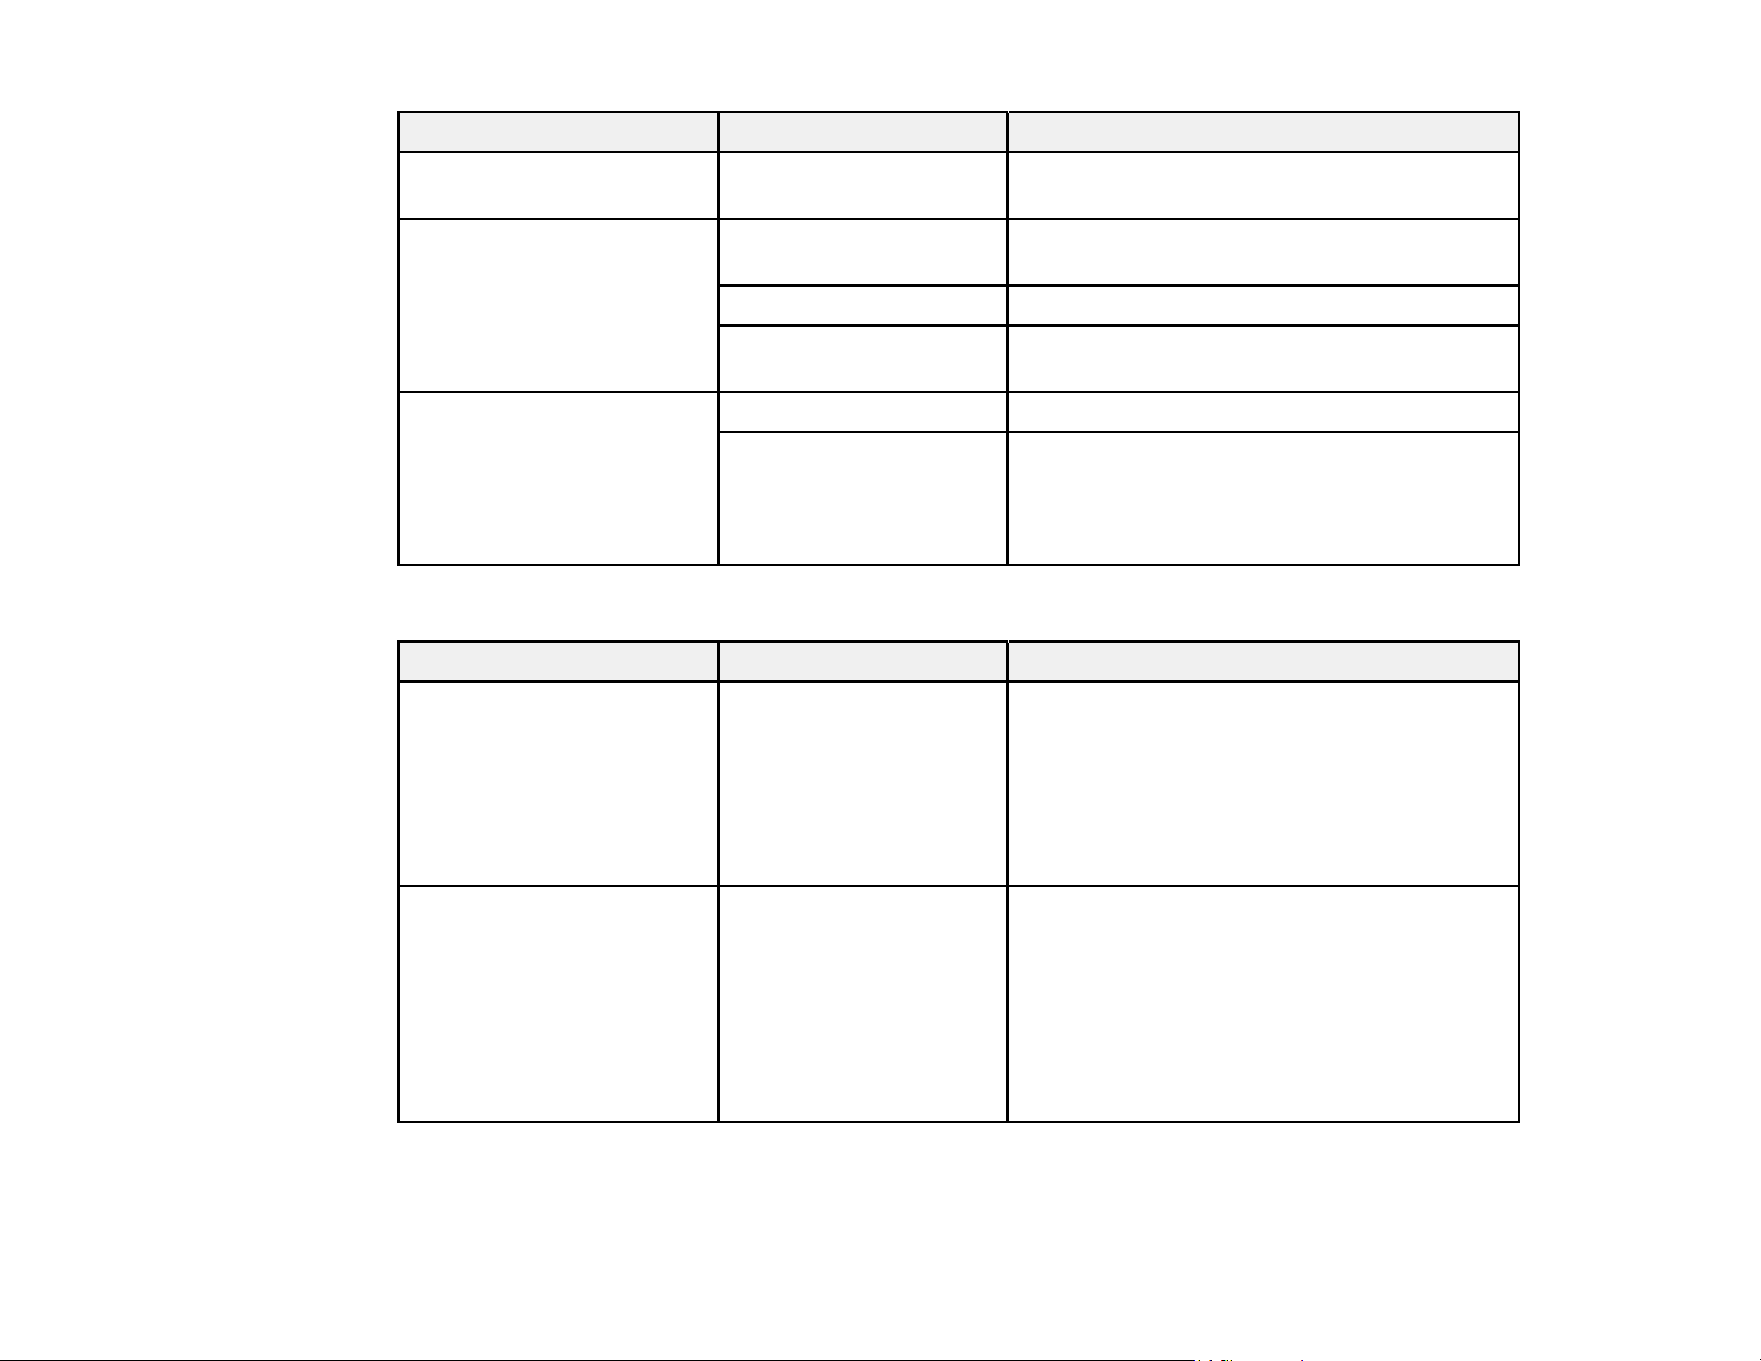
138
Setting Options Description
Advanced Paper Settings Various options See the Advanced Paper Settings table
below.
Remaining Amount
Management
Remaining Amount
Management
Select On to display and record the amount of
remaining roll paper.
Remaining Amount Select the amount of roll paper remaining.
Remaining Alert Select the amount of remaining roll paper
before a warning is displayed.
Change Paper Type or
Change Paper Type/Paper
Width
Paper Type Select a paper category and paper type.
Paper Width Change the paper width by setting Paper Size
Check to Off.
Select the width of the loaded paper, or select
User-Defined if the width is not listed.
Advanced Paper Settings menu (in the Roll Paper menu)
Setting Options Description
Paper Thickness 0.01 to 1.50 mm or
0.4 to 59.1 mil
Select the thickness of the roll paper;
displayed only when using a custom paper
type.
Note: Load paper that is 0.003 to 0.02 inch
(0.08 to 0.50 mm) thick and set the paper
thickness accordingly.
Platen Gap Auto
0.9
1.2
1.5
2.1
2.6
Select the distance between the print head
and the paper; displayed only when using a
custom paper type.

139
Setting Options Description
Top Margin 3 mm
15 mm
20 mm
35 mm
Select the margin for the leading edge of the
printed image.
Depending on the paper type and printing
environment, colors may be uneven near the
leading edge if the margin is small.
Bottom Margin 3 mm
15 mm
Select the margin for the trailing edge of the
printed image.
Paper Suction –4 to +4 Select to adjust the printer's suction setting;
choose lower values for thinner papers.
Back Tension Standard
High
Extra High
Select to adjust the paper feeding tension;
choose High or Extra High if paper wrinkles
during printing.
Drying Time Drying Time per Pass
Drying Time per Page
Set the amount of time the printer pauses to
allow drying after each pass or each printed
page.
Paper Size Check On
Off
Select On to detect the paper width when
paper is loaded.
Select Off when the paper roll is empty. This
allows you to set the paper width before
feeding the paper.
Auto Cut Follow Paper Source
Settings
Never Cut
Select Follow Paper Source Settings to
follow the cut settings in Printer Settings >
Paper Source Settings > Roll Paper Setup
> Cut Settings.
Select Never Cut to cut paper manually.
Skew Reduction On
Off
Select Off if the front edge of thin or softer
paper folds.
Roll Core Diameter 2inch
3inch
Select the paper core size for the loaded roll
paper.
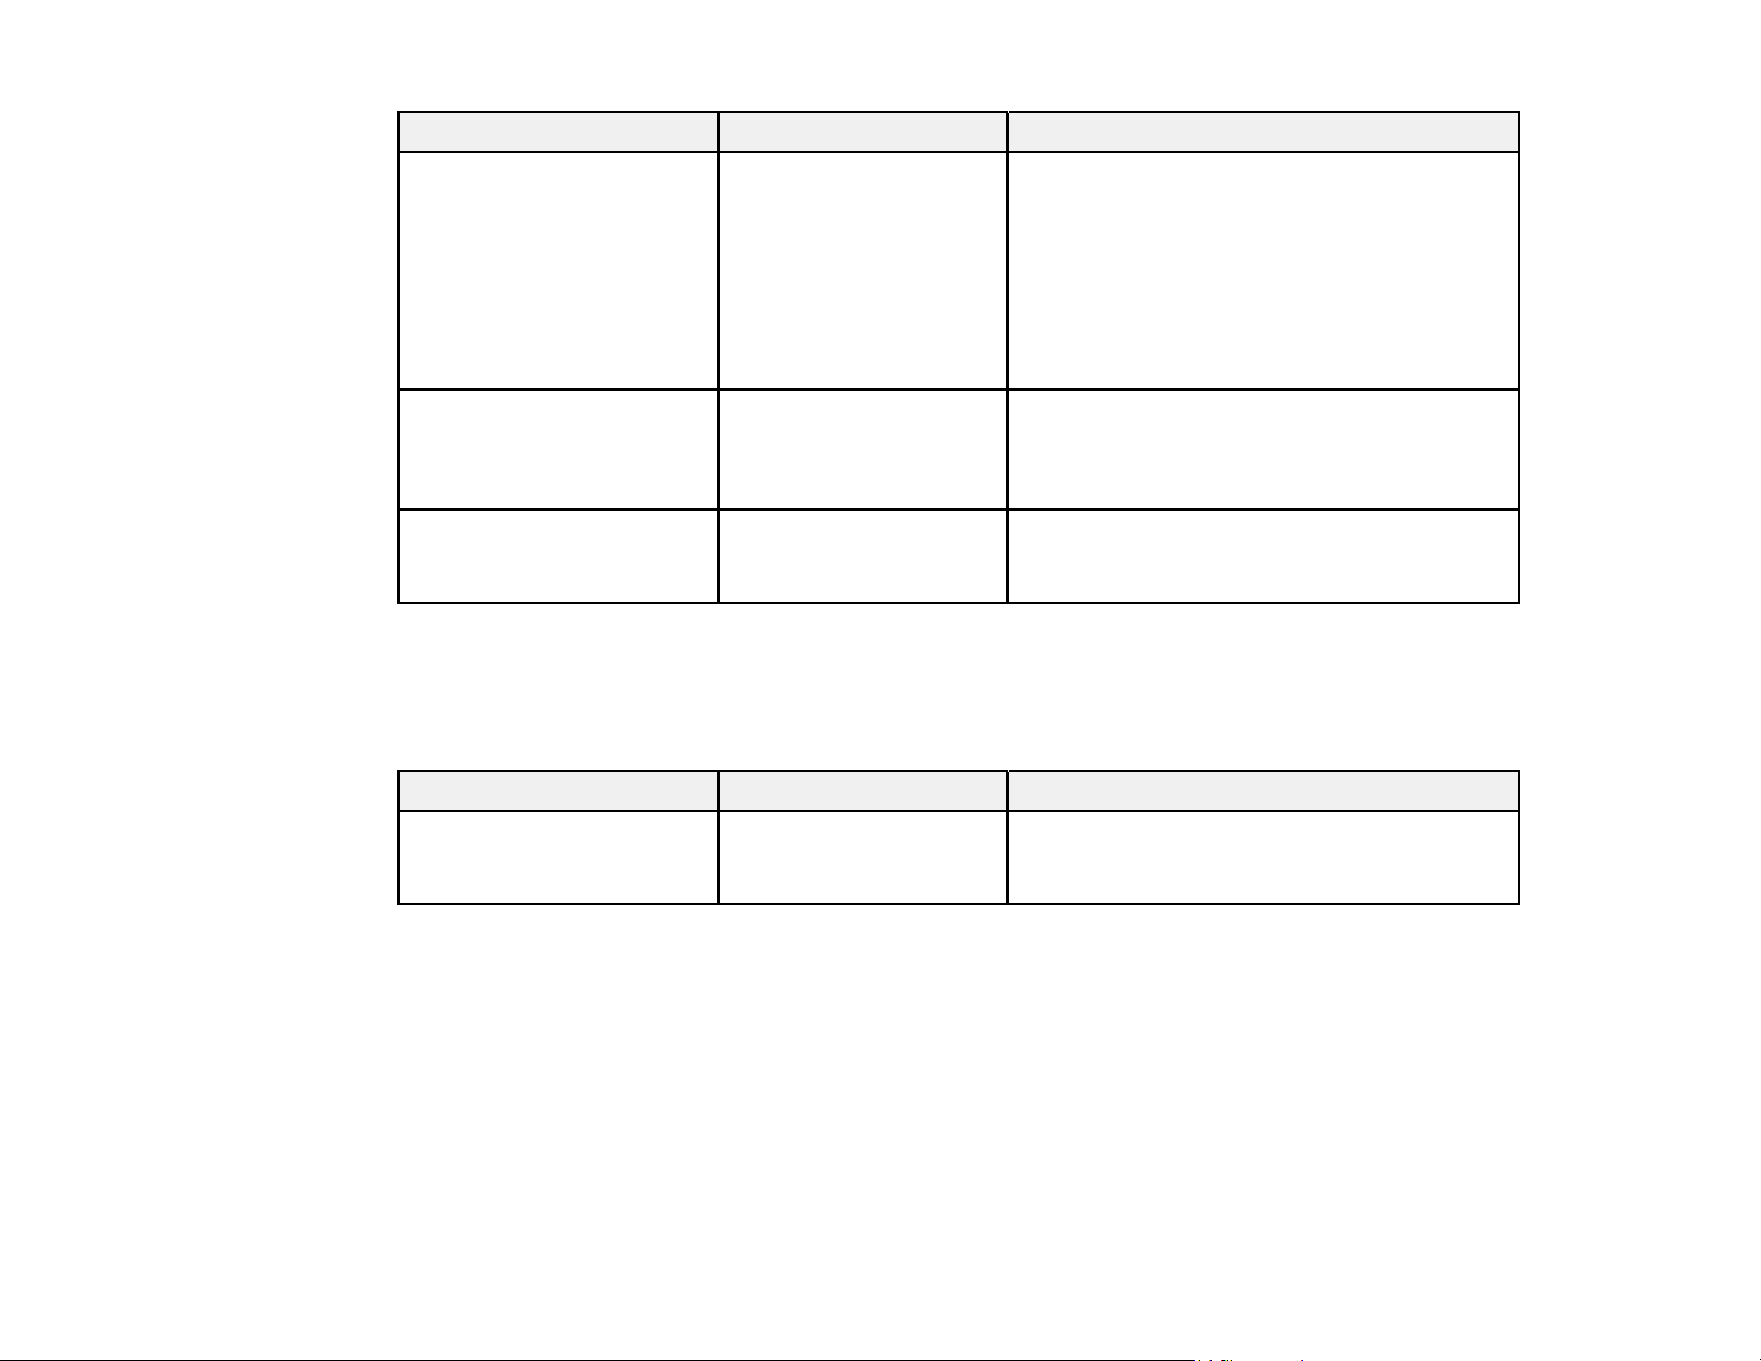
140
Setting Options Description
Paper Eject Roller Auto
Use (Heavy Load)
Use (Light Load)
Do Not Use
Select to control the paper ejection roller.
Select Auto to use the roller automatically
depending on the type of Epson paper.
Select a Use option to always use the roller to
eject paper.
Select Do Not Use when you are concerned
about damaging the print surface.
Paper Feed Offset –0.70 to +0.70% Select the amount of offset necessary to
reduce banding on uneven color in printouts;
displayed only when using a custom paper
type.
Restore Default Settings — Restores advanced paper settings to their
default values; not available with custom
paper types.
Caution: If the Paper Size Check setting is set to Off, the printer may print beyond the edges of the
paper, causing ink to get on the printer.
Cut Sheet menu
Setting Options Description
Remove — Ejects cut sheets; information on how to
remove the cut sheets is displayed on the
LCD screen.
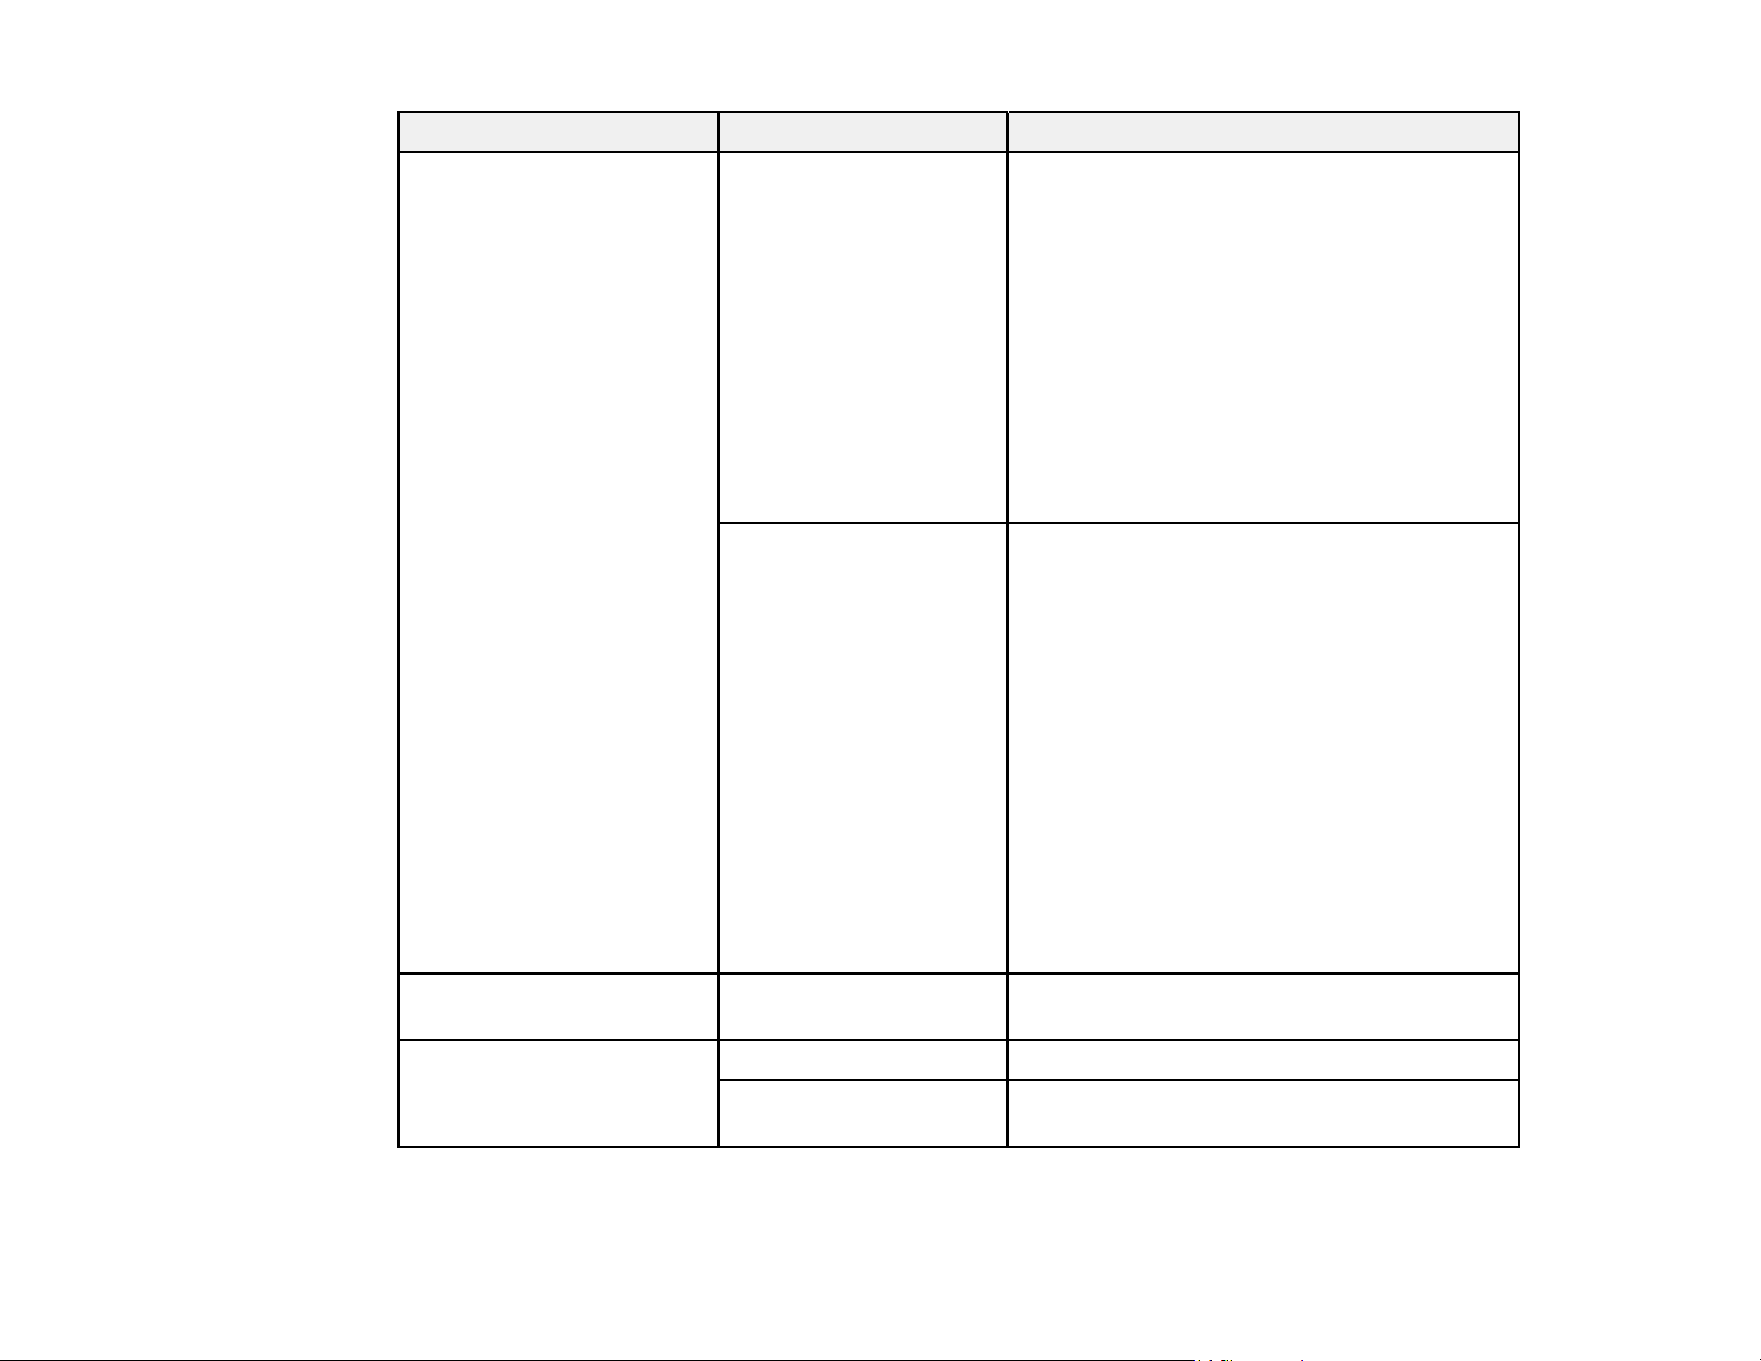
141
Setting Options Description
Print Adjustments Paper Feed Adjust Select Auto to automatically adjust the paper
feed settings.
Select Manual if automatic adjustment results
are not satisfactory and you want to perform
adjustments based on specific printing needs;
select an adjustment setting from the
following:
• Select Quality First to print adjustment
patterns to adjust the feed for image quality.
• Select Length Accuracy First if you are
printing images that require more precise
dimensions and length, such as CAD files.
Print Head Alignment Select Auto(Standard) if printed ruled lines
are misaligned or print results are grainy or
otherwise unsatisfactory.
Select Auto(Details) if printed ruled lines are
misaligned at the edge of the paper or
Auto(Standard) alignment results are
unsatisfactory.
Select Manual(Standard) if automatic
alignment results are not satisfactory and you
want to precisely align the print head using the
printed adjustment patterns.
Select Manual(Details) if automatic and
standard manual alignment results are not
satisfactory and you want to select custom
settings according to specific print needs.
Advanced Paper Settings Various options See the Advanced Paper Settings table
below.
Change Paper Type/Paper
Size
Paper Type Select a paper category and paper type.
Paper Size Select the width of the loaded paper, or select
User-Defined if the width is not listed.
Advanced Paper Settings menu (in the Cut Sheet menu)

142
Setting Options Description
Paper Thickness 0.01 to 1.50 mm or
0.4 to 59.1 mil
Sets the thickness of the paper; displayed
only when using a custom paper type.
Note: Load cut sheets that are 0.003 to 0.03
inch (0.08 to 0.8 mm) thick and set the paper
thickness accordingly.
Platen Gap Auto
0.9
1.2
1.5
2.1
2.6
Select the distance between the print head
and the paper; displayed only when using a
custom paper type.
Paper Suction –4 to +4 Select to adjust the printer's suction setting;
choose lower values for thinner papers.
Drying Time Drying Time per Pass
Drying Time per Page
Set the amount of time the printer pauses to
allow drying after each pass or each printed
page.
Paper Size Check On
Off
Select On to detect the paper width when
paper is loaded.
Select Off if a paper setting error occurs when
paper is correctly loaded.
Paper Eject Roller Auto
Use (Heavy Load)
Use (Light Load)
Do Not Use
Select to control the paper ejection roller;
select Auto to use the roller automatically
depending on the type of Epson paper.
Select a Use option to always use the roller to
eject paper.
Select Do Not Use when you are concerned
about damaging the print surface.
Paper Feed Offset –0.70 to +0.70% Select the amount of offset necessary to
reduce banding on uneven color in printouts;
displayed only when using a custom paper
type.
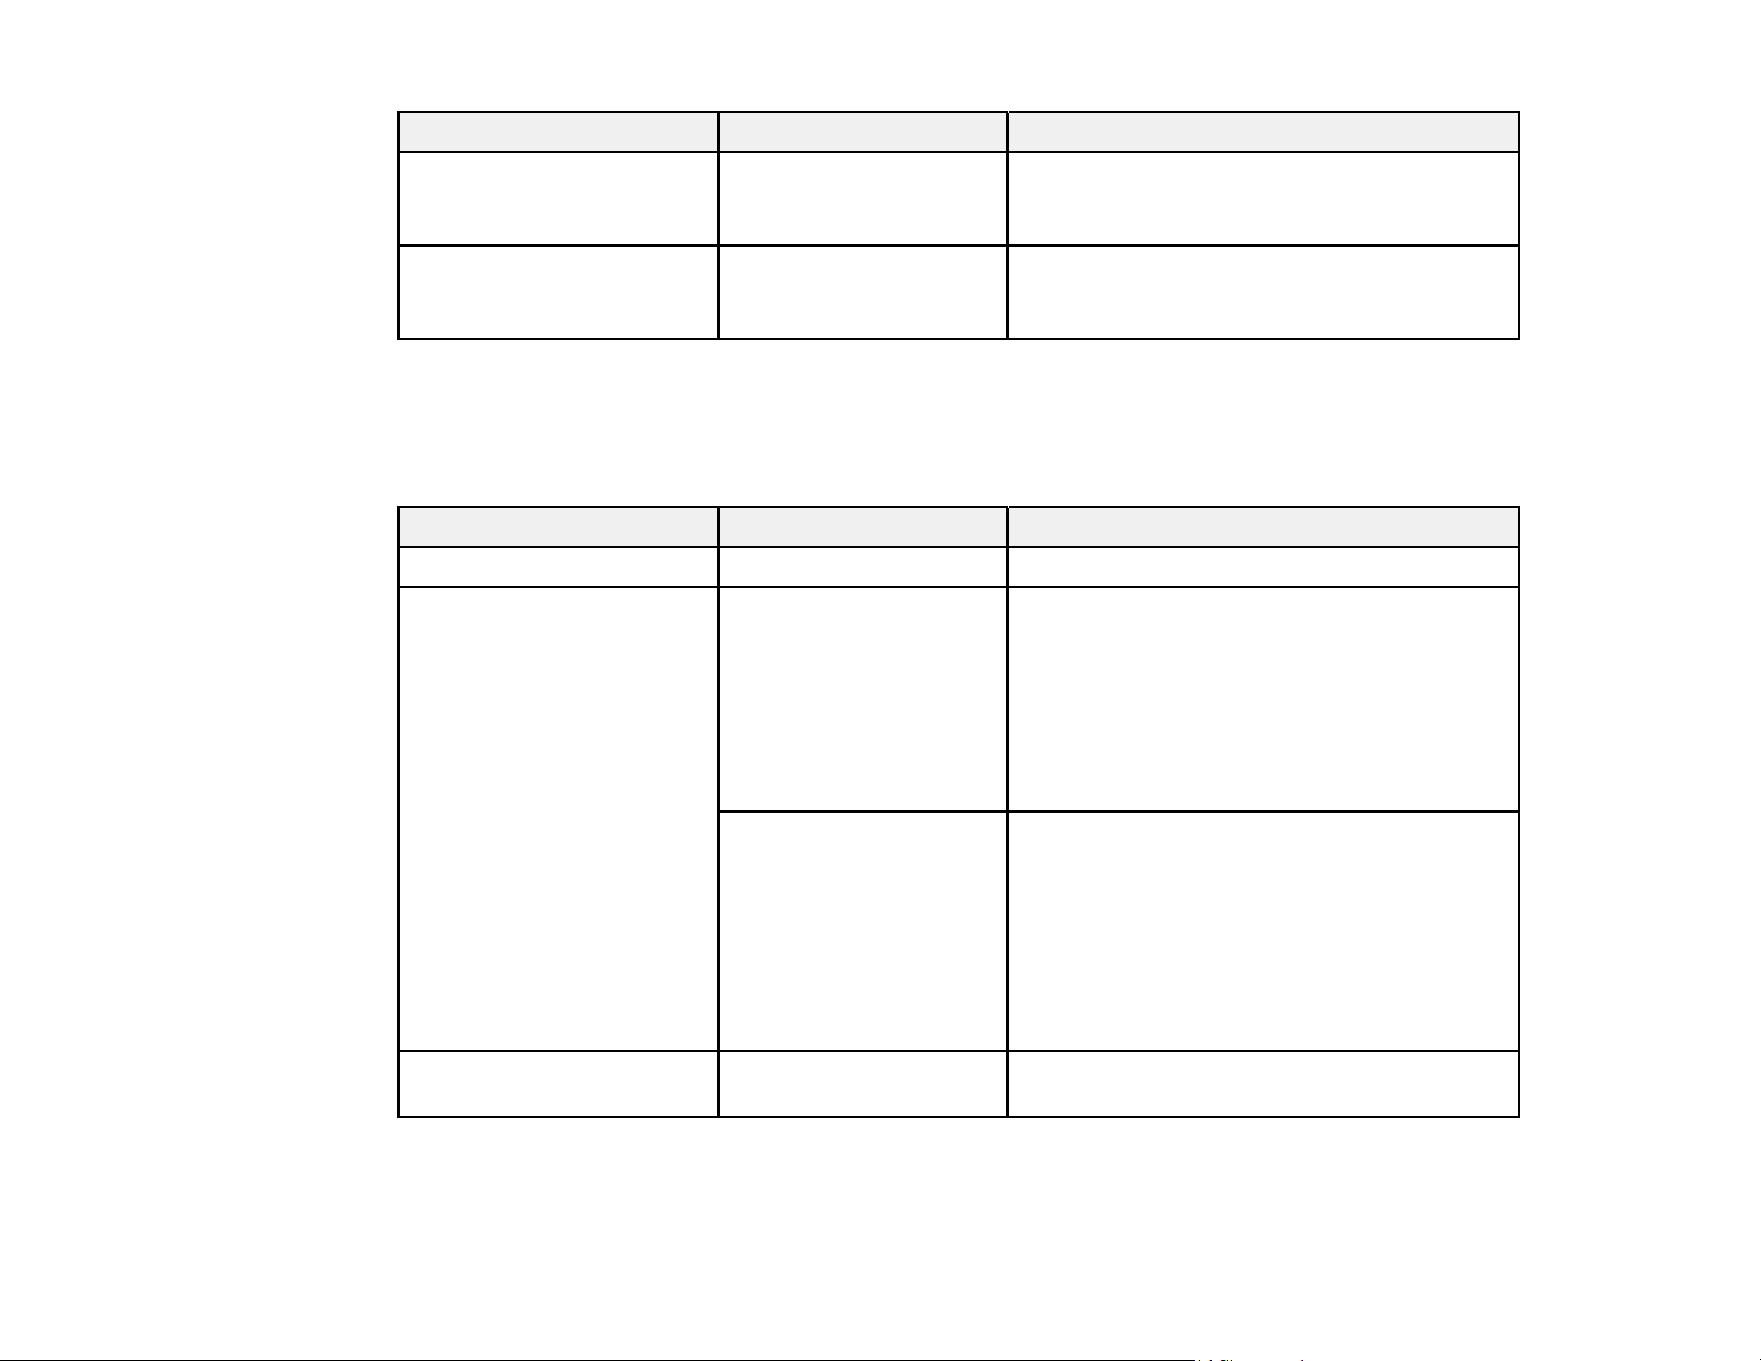
143
Setting Options Description
Paper Feed
Offset(Bottom)
–0.70 to +0.70% Adjust this setting if banding or uneven colors
appear on the bottom edge (0.59 inches [15
mm]) of the paper.
Restore Default Settings — Restores advanced media settings to their
default values; not available with custom
paper types.
Caution: If the Paper Size Check setting is set to Off, the printer may print beyond the edges of the
paper, causing ink to get on the printer.
Poster Board menu
Setting Options Description
Remove — Ejects the loaded poster board.
Print Adjustments Paper Feed Adjust Select Manual and select an adjustment
setting from the following:
• Select Quality First to print adjustment
patterns to adjust the feed for image quality.
• Select Length Accuracy First if you are
printing images that require more precise
dimensions and length, such as CAD files.
Print Head Alignment Select Manual(Standard) if automatic
alignment results are not satisfactory and you
want to precisely align the print head using the
printed adjustment patterns.
Select Manual(Details) if automatic and
standard manual alignment results are not
satisfactory and you want to select custom
settings according to specific print needs.
Advanced Paper Settings Various options See the Advanced Paper Settings table
below.
144
Setting Options Description
Change Paper Type/Paper
Size
Paper Type Select a paper category and paper type.
Paper Size Select a paper size or select User-Defined if
your desired size is not listed.
Advanced Paper Settings menu (in the Poster Board menu)
Setting Options Description
Paper Thickness 0.01 to 1.50 mm or
0.4 to 59.1 mil
Sets the thickness of the paper; displayed for
custom paper settings.
Note: Load poster board that is 0.031 to 0.059
inch (0.8 to 1.50 mm) thick and set the paper
thickness accordingly.
Paper Suction –4 to +4 Select to adjust the printer's suction setting;
choose higher values to increase the suction
of the paper to the platen.
Note: We recommend using the preset values
for each paper type.
Drying Time Drying Time per Pass
Drying Time per Page
Set the amount of time the printer pauses to
allow drying after each pass or each printed
page.
Paper Size Check On
Off
Select On to detect the paper width when
paper is loaded.
Select Off if a paper setting error occurs when
paper is correctly loaded.
Paper Feed Offset –0.70 to +0.70% Select the amount of offset necessary to
reduce banding on uneven color in printouts;
displayed when using a custom paper type.
Paper Feed
Offset(Bottom)
–0.70 to +0.70% Adjust this setting if banding or uneven colors
appear on the bottom edge (0.59 inches [15
mm]) of the paper.
145
Setting Options Description
Restore Default Settings — Restores advanced media settings to their
default values; not available with custom
paper types.
Caution: If the Paper Size Check setting is set to Off, the printer may print beyond the edges of the
paper, causing ink to get on the printer.
Paper Cassette menu
Setting Options Description
Change Paper Type/Paper
Size
Paper Type Select a paper category and paper type.
Paper Size Select a paper size or select User-Defined if
your desired size is not listed.
Print Adjustments Paper Feed Adjust Select Manual and select an adjustment
setting from the following:
• Select Quality First to print adjustment
patterns to adjust the feed for image quality.
• Select Length Accuracy First if you are
printing images that require more precise
dimensions and length, such as CAD files.
Print Head Alignment Select Manual(Standard) if automatic
alignment results are not satisfactory and you
want to precisely align the print head using the
printed adjustment patterns.
Select Manual(Details) if automatic and
standard manual alignment results are not
satisfactory and you want to select custom
settings according to specific print needs.
Advanced Paper Settings menu (in the Paper Cassette menu)

146
Setting Options Description
Paper Thickness 0.01 to 1.50 mm or
0.4 to 59.1 mil
Sets the thickness of the paper; displayed for
custom paper settings.
Note: Load paper that is 0.003 to 0.01 inch
(0.08 to 0.27 mm) thick and set the paper
thickness accordingly.
Platen Gap Auto
0.9
1.2
1.5
2.1
2.6
Select the distance between the print head
and the paper; displayed only when using a
custom paper type.
Paper Suction –4 to +4 Select to adjust the printer's suction setting;
choose lower values for thinner papers.
Drying Time Drying Time per Pass
Drying Time per Page
Set the amount of time the printer pauses to
allow drying after each pass or each printed
page.
Paper Size Check On
Off
Select On to detect the paper width when
paper is loaded.
Select Off if a paper setting error occurs when
paper is correctly loaded.
Paper Eject Roller Auto
Use (Heavy Load)
Use (Light Load)
Do Not Use
Select to control the paper ejection roller;
select Auto to use the roller automatically
depending on the type of Epson paper.
Select a Use option to always use the roller to
eject paper.
Select Do Not Use when you are concerned
about damaging the print surface.
Paper Feed Offset –0.70 to +0.70% Select the amount of offset necessary to
reduce banding on uneven color in printouts;
displayed when using a custom paper type.
147
Setting Options Description
Paper Feed
Offset(Bottom)
–0.70 to +0.70% Adjust this setting if banding or uneven colors
appear on the bottom edge (0.59 inches [15
mm]) of the paper.
Restore Default Settings — Restores advanced media settings to their
default values; not available with custom
paper types.
Parent topic: Using the Control Panel Menus
Related references
Available Epson Papers
Paper Specifications
Related tasks
Creating Custom Paper Settings Using the Control Panel
Loading Cut Sheets in the Rear Manual Feeder
Loading Media in the Front Manual Feeder
Loading Cut Sheets in the Paper Cassette
Loading Roll Paper
Related topics
Using Epson Media Installer
Cut Sheet Handling
Roll Paper Handling
Cutting Roll Paper
Basic Settings Menu
Select Menu > General Settings > Basic Settings to customize various display and power settings.
Setting Options Description
LCD Brightness 1 to 9 Adjusts LCD screen brightness

148
Setting Options Description
Sounds Button Press Adjusts the volume of control panel
sounds
Paper Set Adjusts the volume of load paper
alerts
Error Tone Adjusts the volume of error
notifications
Sound Type Adjusts the type of control panel
sounds
Alert Lamp Notice On
Off
Enables or disables the alert lamp
notice
Sleep Timer 1 to 60 minutes Select the amount of time until the
printer enters sleep mode
Power Off Timer Various times
Off
Select the amount of time until the
printer turns off automatically
Date/Time Settings Date/Time Enter the date and time
Daylight saving time Select the daylight saving option
Time Difference Sets the time difference for
coordinated universal time (UTC)
Language Various languages Select the language used on the LCD
screen
Screen Customization Background Color Changes the color of the Home screen
Print Screen Switches the Home screen between
Simple and Professional mode
Operation Time Out On
Off
Select On to return to the Home
screen after a few minutes of inactivity
Keyboard Various options Select the keyboard displayed on the
LCD screen
Length Unit m
ft/in
Select the unit of length displayed on
the LCD screen
149
Parent topic: Using the Control Panel Menus
Related tasks
Changing the Sleep Timer Settings
Changing the Power Off Timer Settings
Changing the LCD Screen Language
Printer Settings Menu
Select Menu > General Settings > Printer Settings to customize paper and printing options.
Setting Options Description
Paper Source Settings Various options See the Paper Source Settings table below
Custom Paper Setting 1 to 30 See the Custom Paper Setting table below
Print Nozzle Check Pattern
During Print
Every Pages
Off
Sets whether to print a nozzle check pattern
before the printer prints each page
Paper Source Settings
Setting Options Description
Roll Paper Setup Auto Loading Automatically feeds roll paper into the printer
Cut Settings
Auto Cut Automatically cuts the roll paper after printing
Print Cutting Guideline Select On to print cut lines on roll paper (if
Auto Cut is turned off)
Cut for Borderless Print Select Two Cuts to insert a margin and cut
twice between pages, or One Cut to cut once
between pages
Quick Cut Select On to cut once between pages while
the next page is still printing
Margin Refresh Select On to automatically remove ink stains
from a previous borderless print by trimming
the leading edge of the paper
150
Setting Options Description
Error Notice Paper Size Notice
Paper Type Notice
Detect Paper Skew
Select On to display an error message when
the output size or paper type settings differ
between the driver and printer, or if the paper
is skewed
Platen Gap Offset Narrow
Standard
Wide
Wider
Widest
Adjusts the distance between the print head
and the paper
Note: The Platen Gap Offset setting cannot
be set wider or narrower than the value set for
Platen Gap.
Custom Paper Setting
You can select individual paper settings for each registered custom paper setting that was created from
the printer control panel.
Note: You cannot change individual paper settings for custom paper settings registered through Epson
Media Installer. For custom paper settings created in Epson Media Installer, change the settings from
Epson Media Installer.
Setting Options Description
Change Name — Use the on-screen keyboard to enter a name
for the custom paper setting (this name is
displayed in the Paper Type list)
Change Reference Paper Various options Select the media type for the paper closest to
the one you are using
Advanced Paper Settings options
Paper Thickness 0.01 to 1.50 mm or
0.4 to 59.1 mil
Select the thickness of the roll paper;
displayed when using a custom paper type

151
Setting Options Description
Platen Gap Auto
0.9
1.2
1.5
2.1
2.6
Select the distance between the print head
and the paper; displayed only when using a
custom paper type
Top Margin 3 mm
15 mm
20 mm
35 mm
Select the margin for the leading edge of the
printed image; depending on the paper type
and printing environment, colors may be
uneven near the leading edge if the margin is
small
Bottom Margin 3 mm
15 mm
Select the margin for the trailing edge of the
printed image
Note: If you select 3 mm, the margins are
reduced but roller marks or scuffing may occur
on the back edge of the paper.
Paper Suction –4 to +4 Adjusts the printer's suction setting for the
selected source; choose lower values for
thinner papers
Back Tension Standard
High
Extra High
Select to adjust the paper feeding tension;
choose High or Extra High if paper wrinkles
during printing
Drying Time Drying Time per Pass
Drying Time per Page
Set the amount of time the printer pauses to
allow drying after each pass or each printed
page

152
Setting Options Description
Paper Size Check On
Off
Select On to detect the paper width when
paper is loaded
Select Off if a paper setting error occurs when
paper is correctly loaded
Note: If this setting is set to Off, the printer
may print beyond the edges of the paper,
causing ink to get on the printer.
Auto Cut Follow Paper Source
Settings
Never Cut
Select Follow Paper Source Settings to
automatically cut roll paper after each page is
printed depending on the paper source
settings
Select Never Cut to cut paper manually
Skew Reduction On
Off
Select Off if the front edge of thin or softer
paper folds
Roll Core Diameter 2inch
3inch
Set the paper core size for the loaded roll
paper
Paper Eject Roller Auto
Use(Heavy Load)
Use(Light Load)
Do Not Use
Presses down on paper as it is ejected
Select a Use option if the print head strikes
the paper. If you are printing on glossy paper,
select Do Not Use to avoid damaging the
paper surface.
Paper Feed Offset –0.70 to +0.70% Select the amount of offset necessary to
reduce banding on uneven color in printouts in
the selected source; displayed only when
using a custom paper type
Paper Feed
Offset(Bottom)
–0.70 to +0.70% Adjust this setting if banding or uneven colors
appear on the bottom edge (0.59 inches [15
mm]) of the paper
Delete — Deletes the registered custom paper setting
Parent topic: Using the Control Panel Menus
153
Related tasks
Creating Custom Paper Settings Using the Control Panel
Related topics
Using Epson Media Installer
Cut Sheet Handling
Roll Paper Handling
Cutting Roll Paper
Network Settings Menu
Select Menu > General Settings > Network Settings to configure your printer's network settings.
Setting Options Description
Wi-Fi Setup Router Displays the available Wi-Fi connection
methods (Wi-Fi Setup Wizard, Push Button
Setup(WPS), Others)
Wi-Fi Direct Select device (iOS or Other OS Devices)
and connection settings
Wired LAN Setup — Displays the status of the wired LAN
connection
Network Status Wired LAN/Wi-Fi Status Displays current communication status and
connection settings
Wi-Fi Direct Status Displays the number of connected devices
and connection settings
Print Status Sheet Prints the current network connection
information
Connection Check — Confirms the network status. You can also
print a connection check report.
Advanced Various settings Displays advanced information, such as
TCP/IP settings. You can enable or disable
other network settings.
Parent topic: Using the Control Panel Menus
154
Related tasks
Printing a Network Connection Report
Related topics
Wi-Fi or Wired Networking
System Administration Menu
Select Menu > General Settings > System Administration to configure security settings and
update firmware.
Note: You cannot update the firmware if there are print jobs in progress or queued. Wait for the jobs to
finish or cancel them.
Setting Options Description
Security Settings Restrictions See the Restrictions table below
Admin Settings Lets you add or change the
administrator password. If you
choose to add a password, set
the Lock Setting to On to enable
password entry for certain
features and settings.
Program Verification on Start
Up
If enabled, the system checks
whether unauthorized third
parties have tampered with the
program when the product starts
up
Password Encryption Sets an encryption key; select
Encryption Key Backup to back
up the encryption key
Restore Default Settings Network Settings Select Yes to restore all network
settings to their defaults
Clear All Data and Settings Select Yes to restore all settings
to their defaults (except
date/time, length unit, and
language settings)
155
Setting Options Description
Firmware Update Update Updates to the latest firmware
Notification Enable or disable firmware
update notifications
Restrictions
When Lock Setting is enabled, the following setting can be enabled or disabled.
Setting Description
Access to Language Allows users to change the display language on
the control panel.
Parent topic: Using the Control Panel Menus
Related tasks
Setting a Password and Locking the Control Panel
Maintenance Menu
Select the maintenance icon or Menu > Maintenance to run nozzle checks, cleaning cycles, and
other maintenance operations.
Caution: Follow the instructions in the topic links below the table to use these menu settings correctly.
Setting Description
Print Head Nozzle Check Prints a nozzle check pattern so you can check for clogged
nozzles
Head Cleaning Perform if the nozzle check pattern has faint or missing areas
Power Cleaning Perform if the nozzle check pattern still has faint or missing
areas after performing a head cleaning three times in a row
Replace Ink Cartridge Displays the amount of ink remaining and the model number
for the ink cartridge
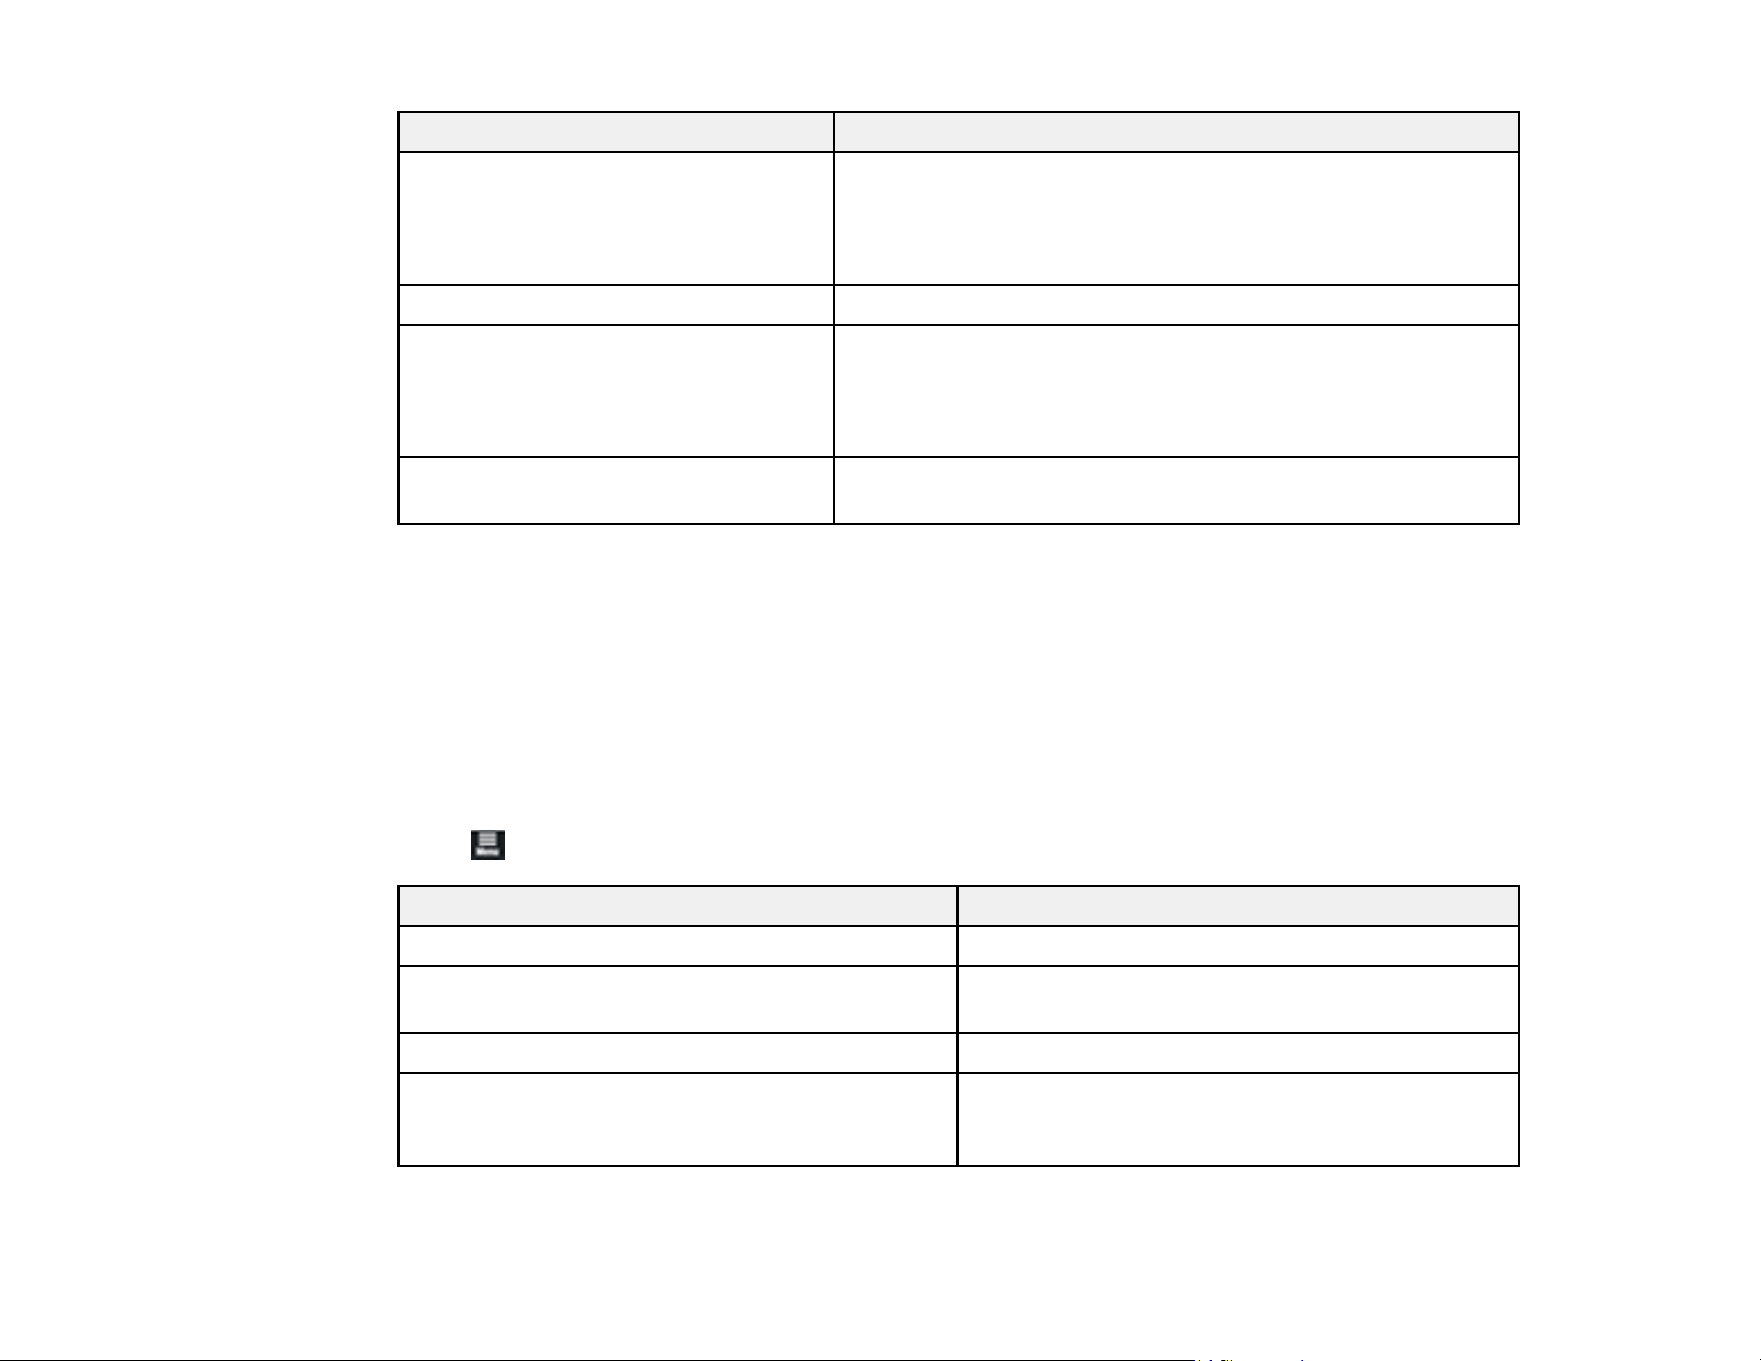
156
Setting Description
Replace Maintenance Box Displays the amount of free space remaining and the model
number of the selected maintenance box
Select How To... to view the replacement procedure on the
LCD screen.
Adjust Cut Position Adjust the position of the cutter between -3.0 to 3.0 mm
Capping Station/Wiper Cleaning Select to try and clean clogged nozzles if you have performed
Power Cleaning and the nozzles still appear clogged.
Select How To... to view the cleaning procedure on the LCD
screen.
Paper Guide Cleaning Perform if there is dirt or ink on your prints or when the paper
does not feed properly
Parent topic: Using the Control Panel Menus
Related concepts
Print Head Maintenance
Related topics
Replacing Consumables
Maintenance and Transportation
Printer Status Menu
Select Menu > Printer Status/Print to view current printer and network settings.
Setting Description
Print Status Sheet Prints a summary of current printer settings
Firmware Version Displays the firmware version for the printer and
any optional accessories connected to it
Platen Gap Value for Last Print Job Displays the platen gap value for the last print job
Network Displays current communication status and
connection settings for wired, Wi-Fi, and Wi-Fi
Direct. You can also print a Status Sheet.

158
Replacing Consumables
When the notification icon appears above an ink color on the LCD screen, the ink color is low or
expended. If one of the installed ink cartridges is expended, printing cannot be performed until the
expended ink is replaced. If an ink cartridge is expended while printing, the print job will stop and you can
continue printing after replacing the ink.
If you proceed to print with an ink cartridge that is running low, you may be required to replace the ink
while the print job is still in progress. If you have to install a new ink cartridge during a print job, colors in
your printout may look different depending on how the ink dries. To avoid this, Epson recommends that
you replace any low ink cartridges with new ones before printing large jobs. The removed ink can be
reinstalled later and used until the remaining ink is expended.
The maintenance box stores ink that gets flushed from the system during print head cleaning. If a
message appears or the notification icon appears above a maintenance box icon on the LCD screen,
the amount of available space in the maintenance box is low. When a maintenance box is full, you need
to replace it.
Note: Please dispose of your used Epson branded ink cartridges and maintenance boxes responsibly
and in accordance with local requirements. If you would like to return your used ink cartridges and
maintenance boxes to Epson for proper disposal, please go to epson.com/recycle for more information.
Ink Safety Precautions
Check Cartridge and Maintenance Box Status
Purchase Epson Ink and Maintenance Boxes
Removing and Installing Ink Cartridges
Replacing the Maintenance Box
Replacing the Borderless Maintenance Box
Ink Safety Precautions
Follow these guidelines as you handle the ink and maintenance boxes.
Ink Cartridge Handling Precautions
• Keep ink cartridges out of the reach of children and do not drink the ink.
• When using the installation ink cartridges included with the printer, most of the ink is consumed during
initial ink charging. Be sure to have replacement cartridges handy.

159
• Store ink cartridges at room temperature, out of direct sunlight, and use them before the expiration
date printed on the packaging.
• Allow ink cartridges that have been stored at low temperatures for an extended period of time to return
to room temperature over a period of three hours.
• To ensure print quality, use ink cartridges within six months of installing them.
• Do not shake the ink cartridges too hard, otherwise ink may leak.
• The green IC chip on each ink cartridge retains a variety of cartridge-related information, such as the
ink cartridge status, so that the cartridge may be removed and reinserted freely. Do not touch the
green IC chip on the ink cartridges. This may prevent normal operation and printing.
• Install ink cartridges in all the ink cartridge slots. You cannot print if any of the slots are empty.
• Do not leave the printer without ink cartridges installed. The ink in the printer will dry out and the printer
will not function as expected. Leave ink cartridges in all slots even when you are not using the printer.
• If you remove an ink cartridge for later use, protect the ink supply area from dirt and dust and store it in
the same environment as the product. Note that there is a valve in the ink supply port, making covers
or plugs unnecessary, but care is needed to prevent the ink from staining items that the cartridge
touches. Do not touch the ink cartridge ink supply port or surrounding area.
• Dried ink on the supply port may cause ink leaks when the cartridge is reinserted and used. Wipe off
any excess ink before reinserting.
• Do not dismantle or alter ink cartridges. This could damage the print head and may prevent the
product from printing properly. Ink could also get on your skin or in your eyes.
• Do not drop ink cartridges or subject them to impacts, otherwise ink may leak.
• The ink cartridges may contain recycled materials; this does not affect printer functions or
performance.
• To maintain the quality of the print head, this product stops printing before ink cartridges are
completely expended.
• If ink gets on your skin, wash it thoroughly with soap and water. If ink gets into your eyes, flush them
immediately with water. If discomfort or vision problems persist, see a doctor immediately. If ink gets
into your mouth, spit it out and see a doctor right away.
• Epson's warranties do not extend to any damage caused by the use of third-party ink or ink not
designed for your printer.
Maintenance Box Safety Precautions
• Keep maintenance boxes out of the reach of children. Do not allow children to drink from or handle the
maintenance boxes.

160
• Do not reuse maintenance boxes that have been removed from the printer and exposed to the air for a
long period of time. The box will not absorb any more ink.
• Do not disassemble the maintenance box; otherwise ink may get into your eyes or on your skin.
• Do not touch the chip on the side of the maintenance box or you may prevent normal operation and
printing.
• Be careful not to touch any ink when you handle the maintenance boxes.
• If ink gets on your skin, wash it thoroughly with soap and water. If ink gets into your eyes, flush them
immediately with water. If discomfort or vision problems persist, see a doctor immediately. If ink gets
into your mouth, spit it out and see a doctor right away.
• Do not replace the maintenance box while printing, otherwise ink may leak.
• When using the installation maintenance box included with the printer, some of the ink is absorbed
during initial ink charging. Be sure to have replacement maintenance boxes handy.
Parent topic: Replacing Consumables
Related references
Ink Specifications
Check Cartridge and Maintenance Box Status
Your product and its software will let you know when an ink cartridge is low or expended, or when a
maintenance box needs to be replaced.
Checking Ink and Maintenance Box Status on the LCD Screen
Checking Ink and Maintenance Box Status with Windows
Checking Ink and Maintenance Box Status - Mac
Parent topic: Replacing Consumables
Checking Ink and Maintenance Box Status on the LCD Screen
You can check the status of the ink cartridges and maintenance boxes from the product control panel. If
the icon appears on an ink color or a maintenance box, you need to replace it soon.
1. Press the home button, if necessary.
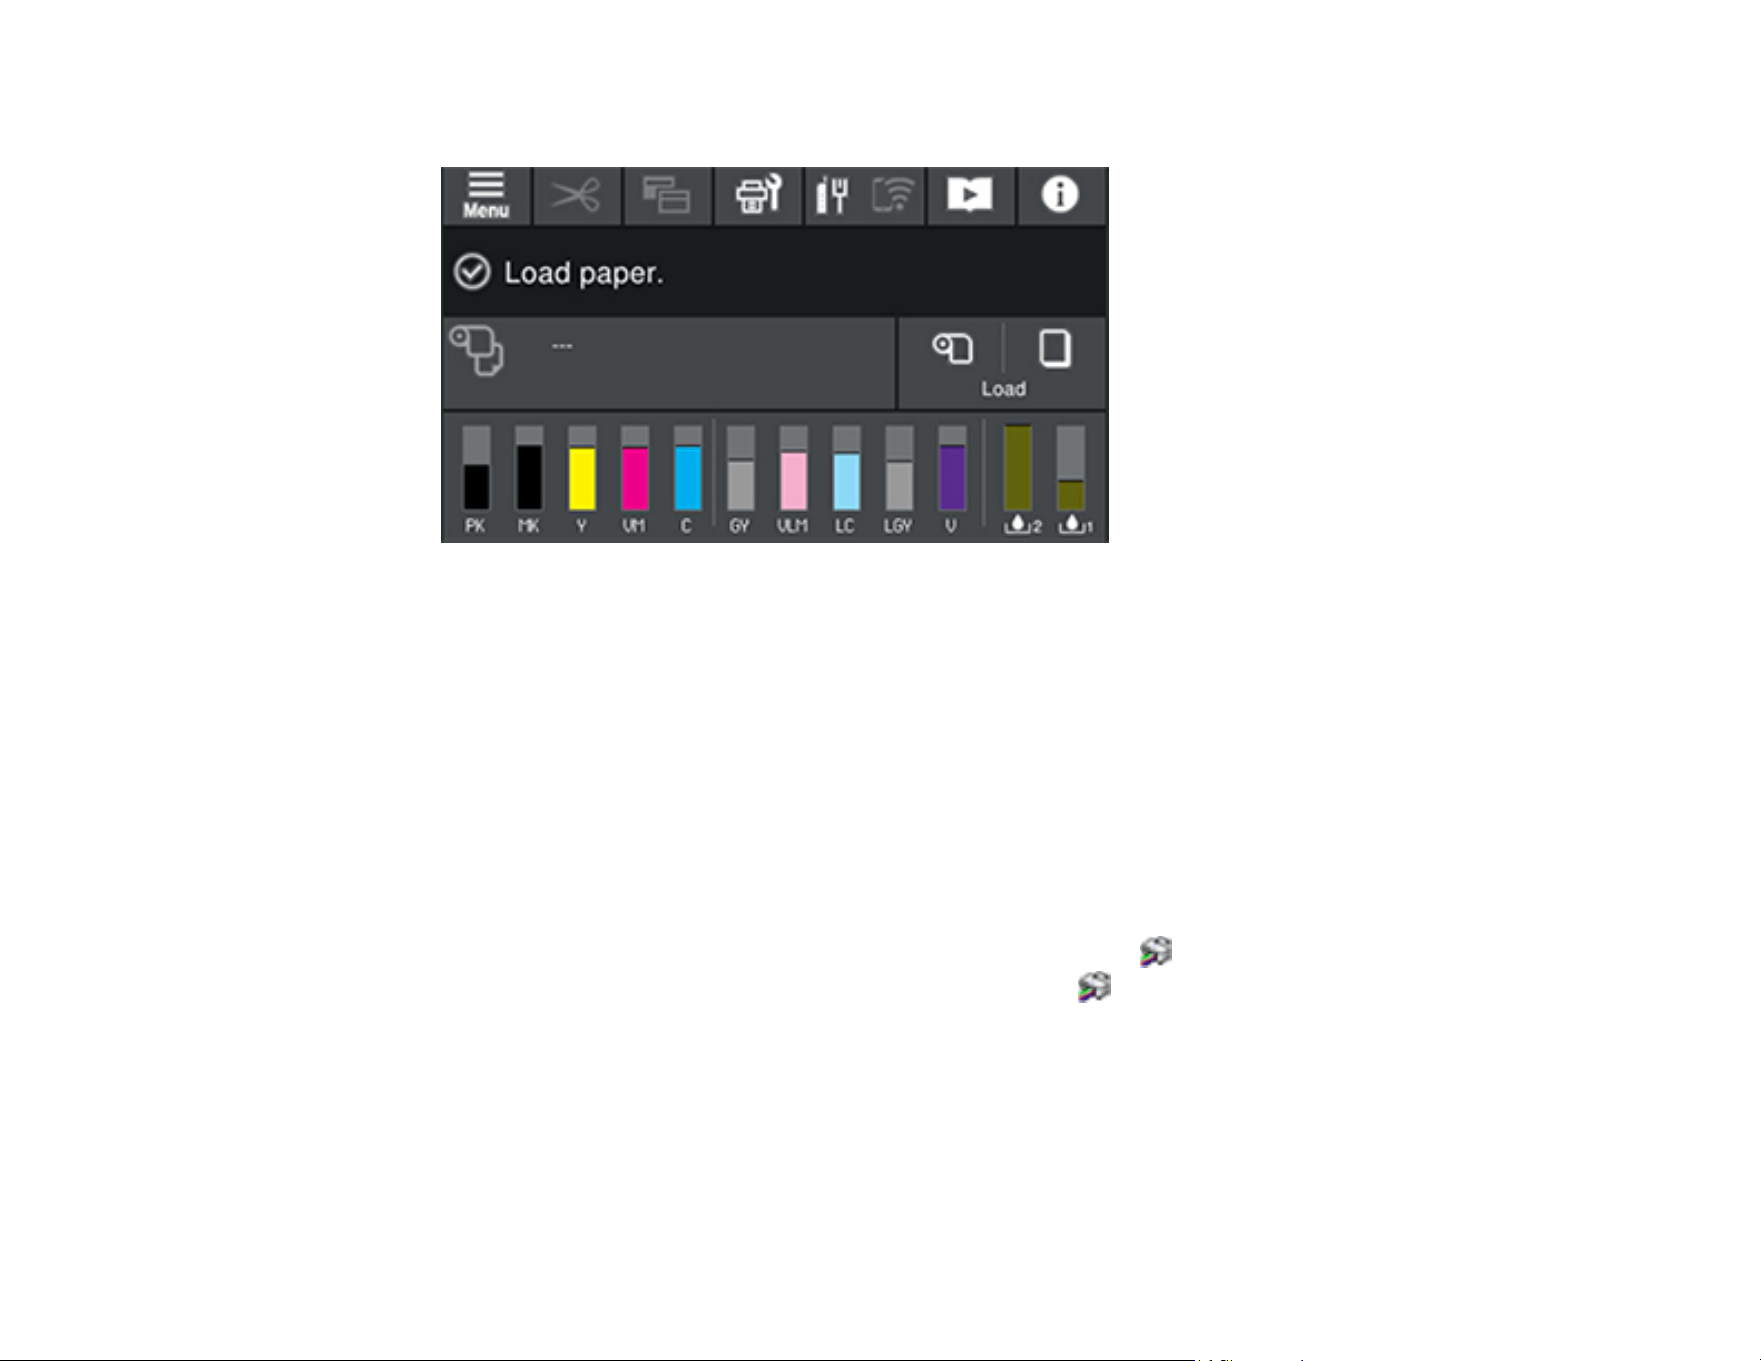
161
2. Check the ink color icons at the bottom of the home screen.
Note: The displayed ink and maintenance box levels are approximate.
Parent topic: Check Cartridge and Maintenance Box Status
Related tasks
Replacing the Borderless Maintenance Box
Replacing the Maintenance Box
Removing and Installing Ink Cartridges
Checking Ink and Maintenance Box Status with Windows
You can check your ink or maintenance box status at any time using a utility on your Windows computer.
1. To check your status, access the Windows Desktop and click the icon for your product in the right
side of the Windows taskbar, or click the up arrow and click . Then click your product name.
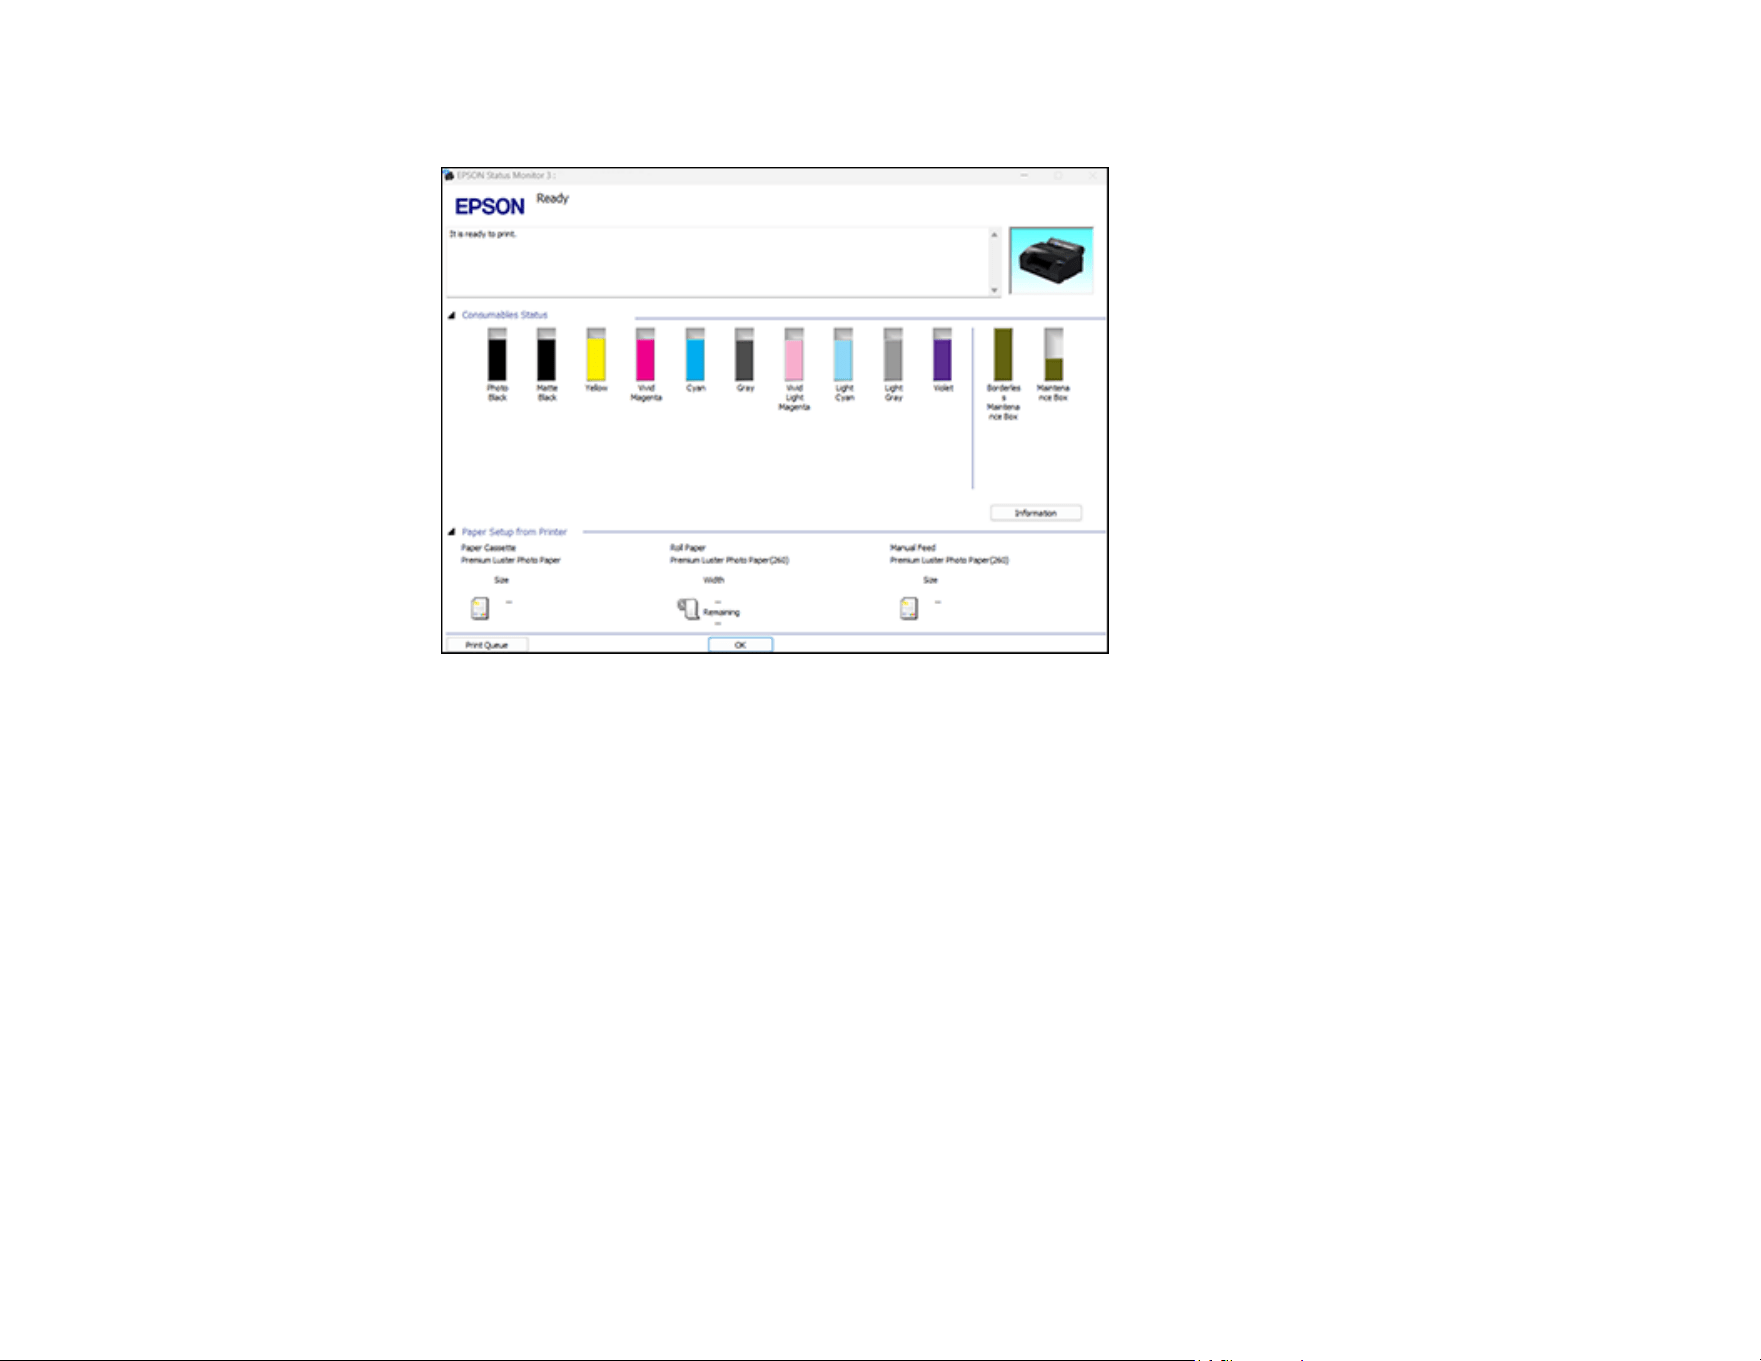
162
You see a screen like this:
2. Replace or reinstall the ink color or maintenance box as indicated on the screen.
Note: If any of the cartridges installed in the product are broken, incompatible with the product
model, or improperly installed, Epson Status Monitor will not display an accurate ink status.
Parent topic: Check Cartridge and Maintenance Box Status
Related tasks
Replacing the Borderless Maintenance Box
Replacing the Maintenance Box
Removing and Installing Ink Cartridges
Checking Ink and Maintenance Box Status - Mac
You can check the status of your ink and maintenance boxes using a utility on your Mac.
1. In the Apple menu or the Dock, select System Preferences or System Settings. Select Print &
Fax, Print & Scan, or Printers & Scanners, select your product, and select Options & Supplies.
Select Utility and select Open Printer Utility.
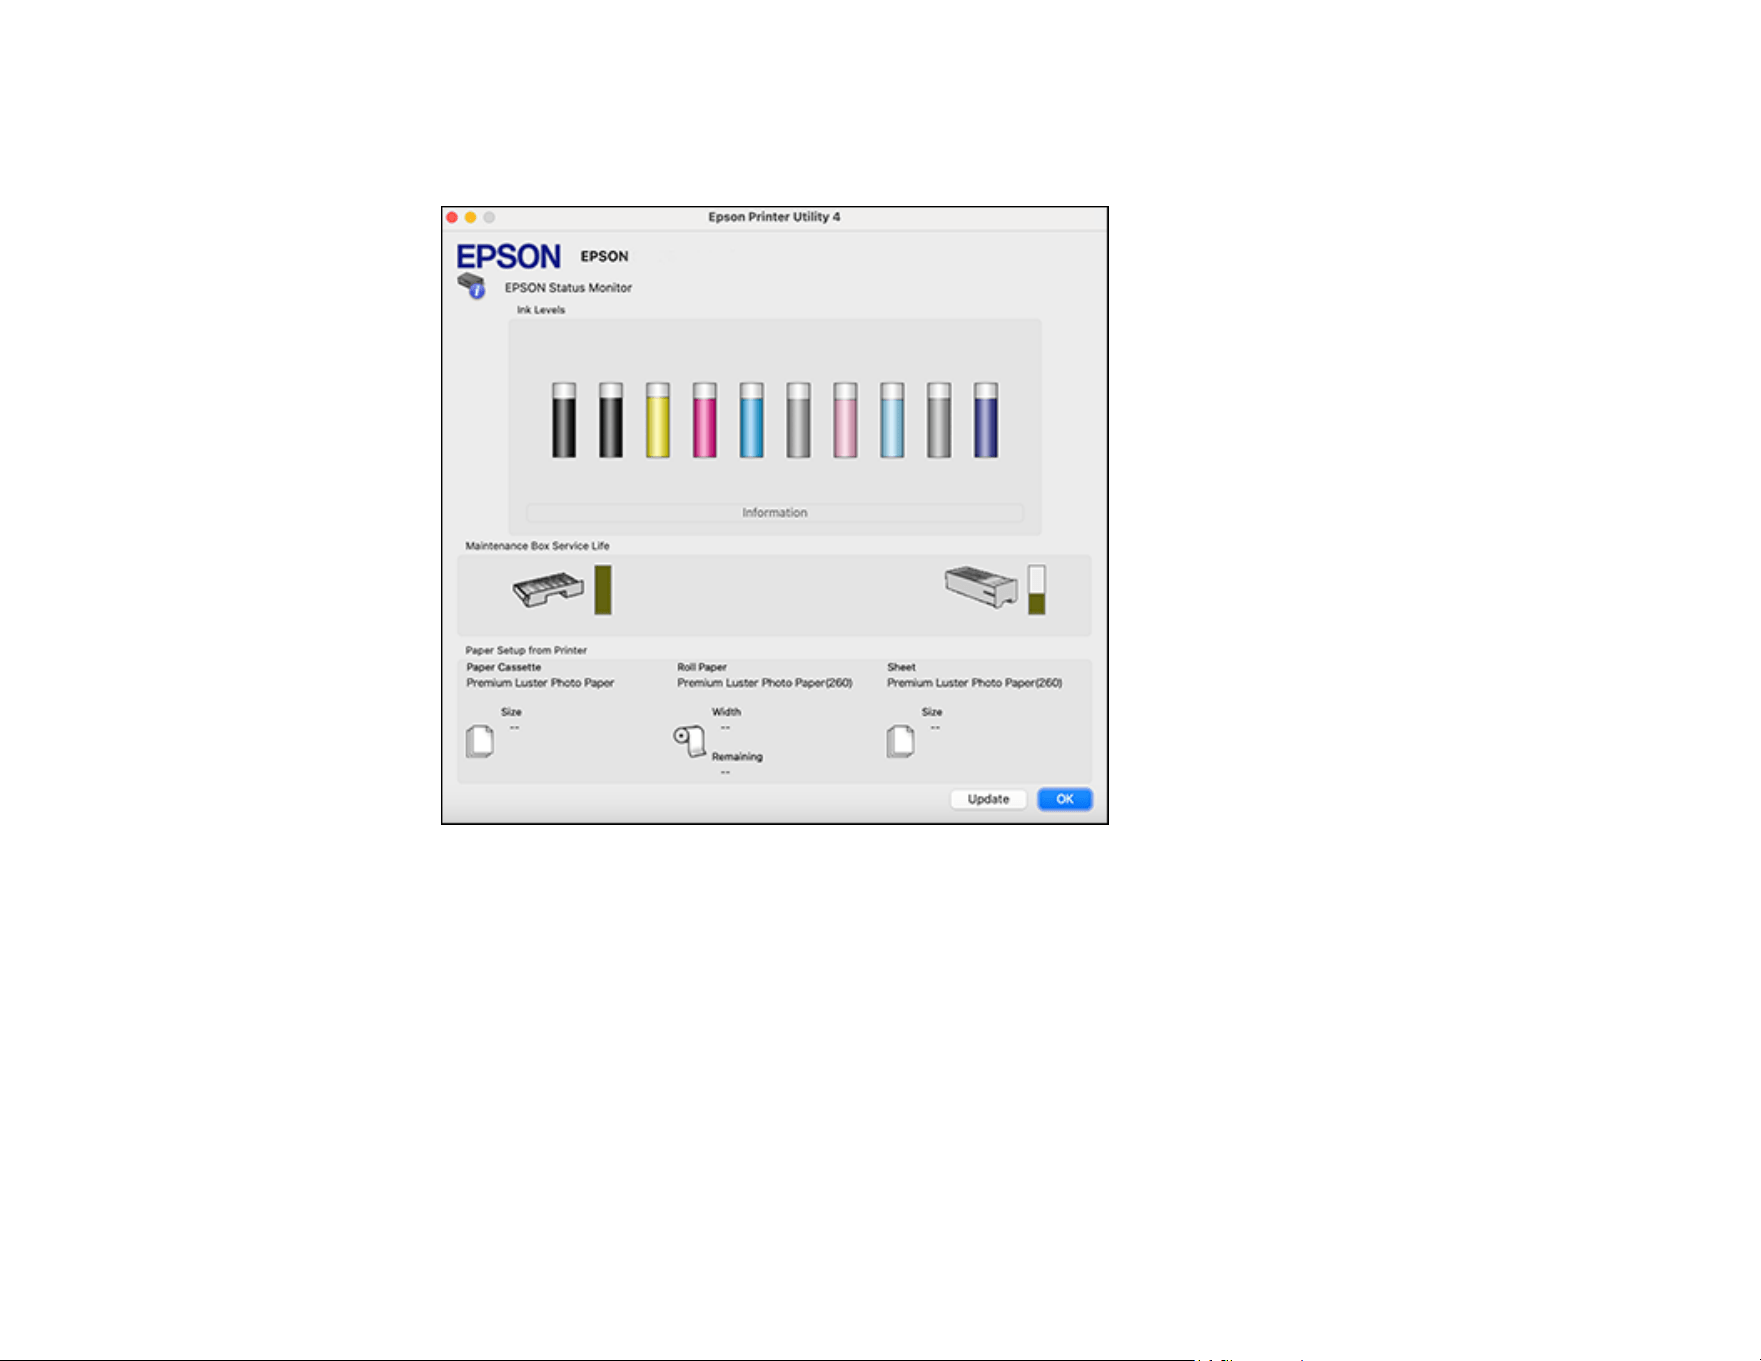
163
2. Select EPSON Status Monitor.
You see this window:
3. Do the following as necessary:
• You can update the ink and maintenance box status by clicking Update.
• Replace or reinstall the maintenance box or any ink color as indicated on the screen.
Note: If any of the cartridges installed in the product are broken, incompatible with the product
model, or improperly installed, Epson Status Monitor will not display an accurate ink status.
Parent topic: Check Cartridge and Maintenance Box Status
Related tasks
Replacing the Borderless Maintenance Box
164
Replacing the Maintenance Box
Removing and Installing Ink Cartridges
Purchase Epson Ink and Maintenance Boxes
U.S. and Canada:
You can purchase genuine Epson ink, maintenance boxes, and paper at epson.com (U.S. sales) or
epson.ca (Canadian sales). You can also purchase supplies from an Epson authorized reseller. To find
the nearest one, call 800-GO-EPSON (800-463-7766) in the U.S. or 800-807-7766 in Canada.
Latin America:
You can purchase genuine Epson ink, maintenance boxes, and paper from an Epson authorized
reseller. To find the nearest reseller, visit latin.epson.com or call your nearest Epson sales office.
Note: This product is designed to work with genuine Epson inks. Non-Epson ink or any other ink not
specified for this printer could cause damage not covered by Epson's warranties.
Ink Cartridge and Maintenance Box Part Numbers
Parent topic: Replacing Consumables
Ink Cartridge and Maintenance Box Part Numbers
Use these part numbers when you order or purchase new maintenance boxes or ink cartridges.
Note: For best printing results, use up a cartridge within 6 months of opening the package.
Ink maintenance box (maintenance box 1) part number: T619000
Borderless maintenance box (maintenance box 2) part number: T619100
Ink bay Slot Ink color Part number
Left 1 Photo Black (PK) T55V100
2 Matte Black (MK) T55V800
3 Yellow (Y) T55V400
4 Vivid Magenta (VM) T55V300
5 Cyan (C) T55V200
165
Ink bay Slot Ink color Part number
Right 6 Gray (GY) T55V700
7 Vivid Light Magenta (VLM) T55V600
8 Light Cyan (LC) T55V500
9 Light Gray (LGY) T55V900
10 Violet (V) T55VD00
Parent topic: Purchase Epson Ink and Maintenance Boxes
Removing and Installing Ink Cartridges
Make sure you have your replacement cartridges handy before you begin. You must install new
cartridges immediately after removing the old ones. Replace all expended ink cartridges. You cannot
print if any of the ink cartridges are expended or any ink slots are empty.
Note: If the remaining ink in a cartridge falls below the minimum amount, you can continue printing after
replacing the ink cartridge. If the remaining ink level is below the minimum amount and printing is
continued, then you may need to replace the ink cartridge during printing. If you replace it while printing,
colors may look different depending on how the ink dries. We recommend first replacing the ink cartridge
with a new one before printing. The removed ink cartridge can be reinstalled and used until the
remaining amount falls below the minimum amount.
Note: This product is designed to work with genuine Epson inks. Non-Epson ink or any other ink not
specified for this printer could cause damage not covered by Epson's warranties.
1. Turn on your product.
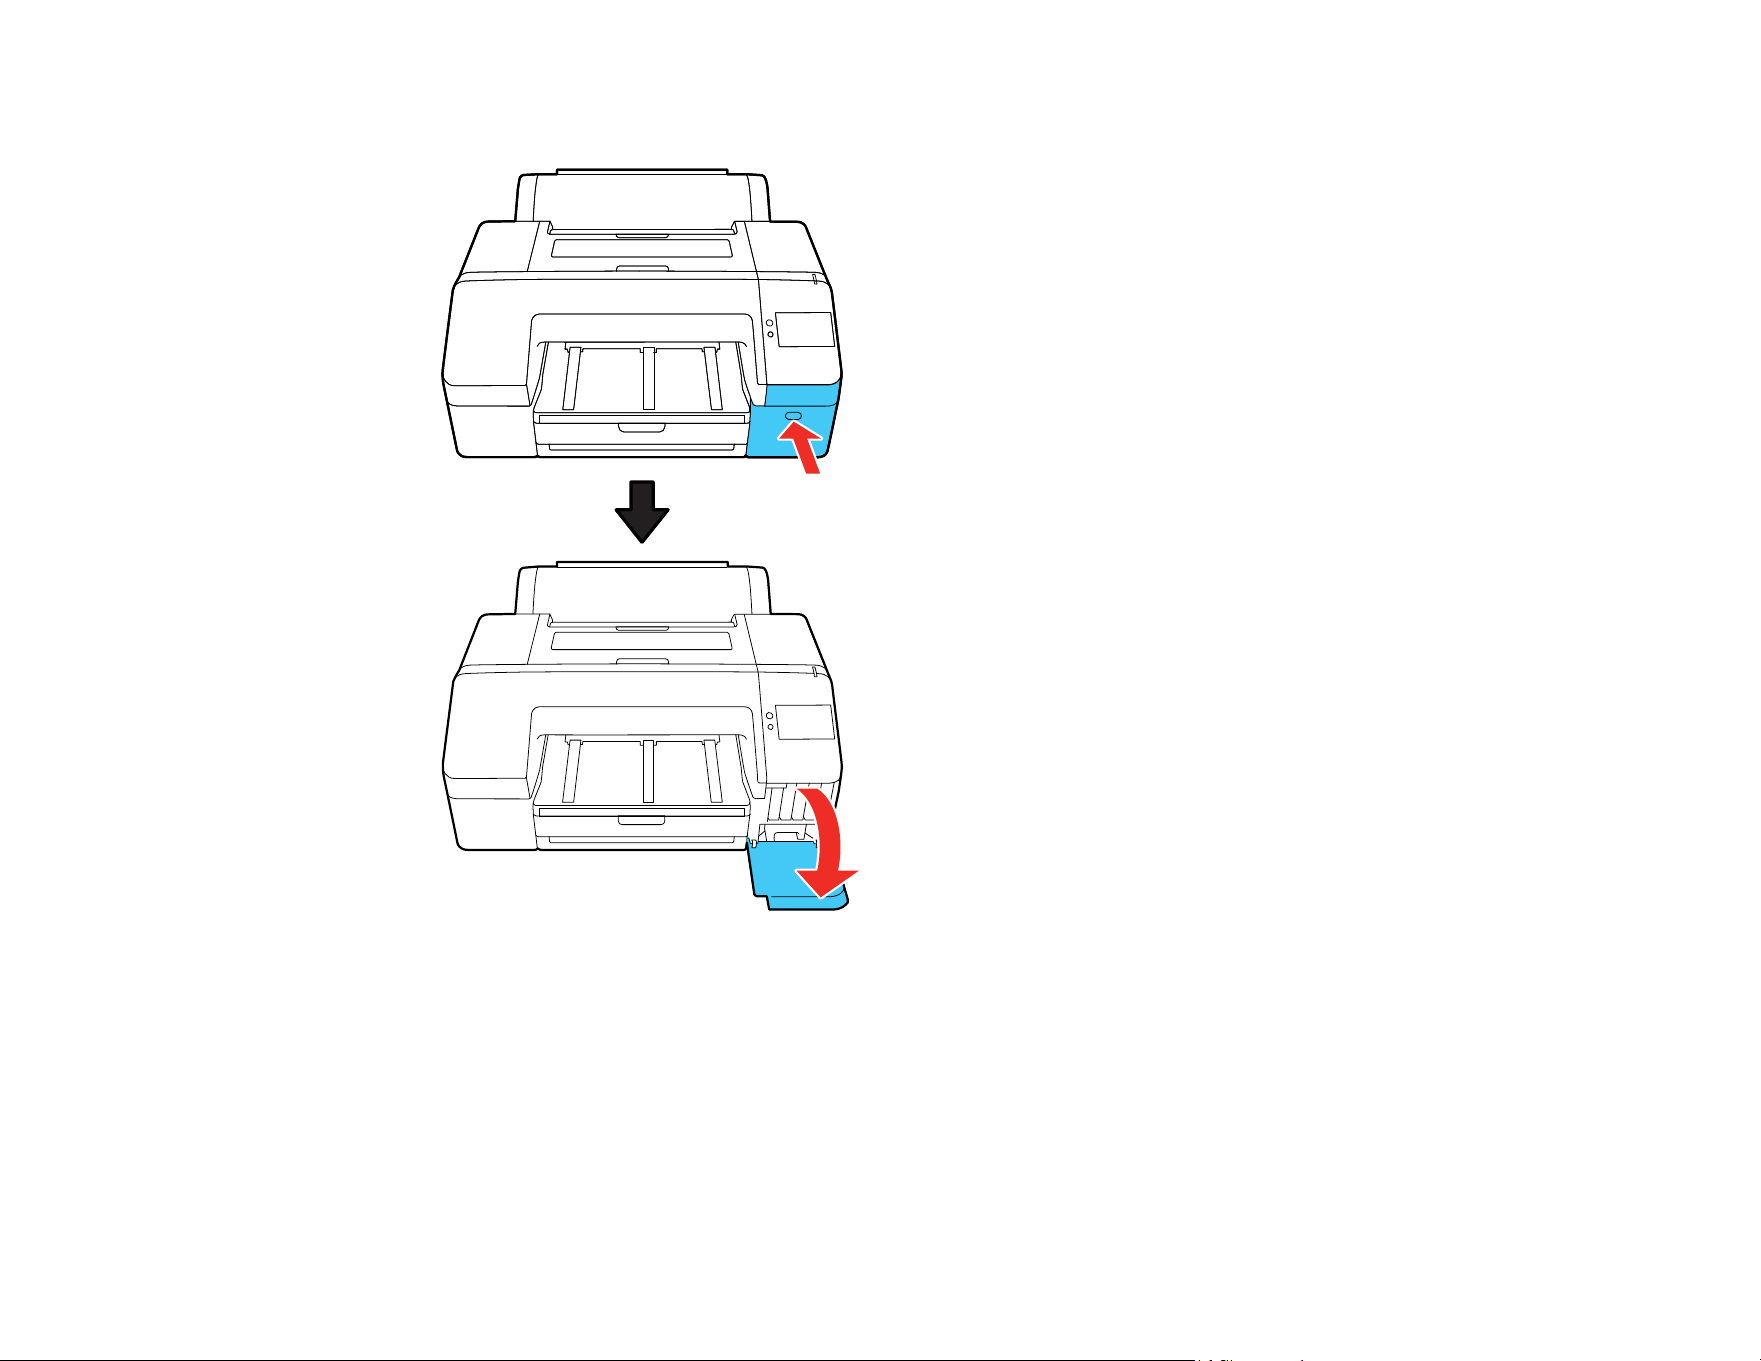
166
2. Press the ink cartridge cover to open it.
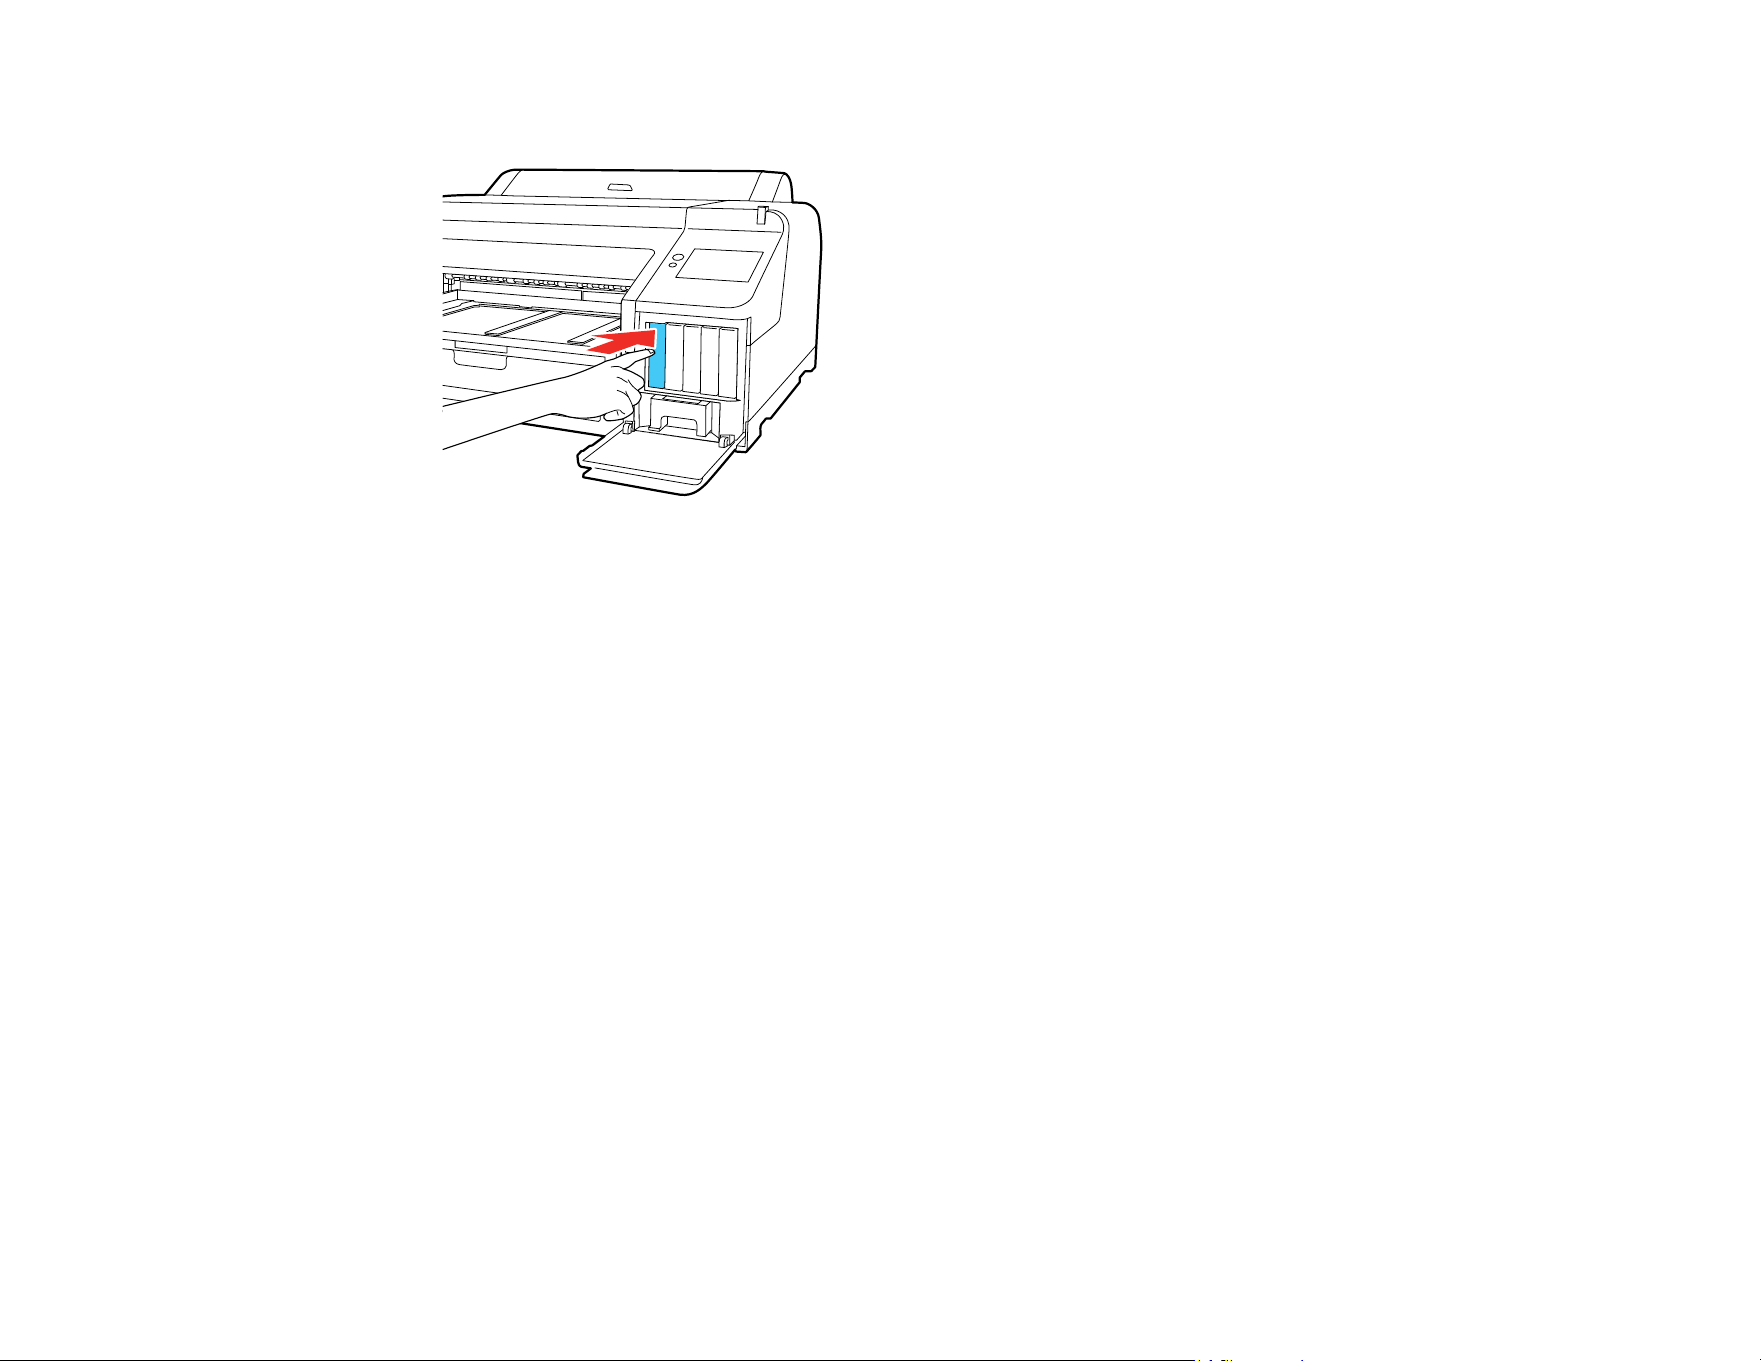
167
3. Press in on the ink cartridge you want to replace.
Note: Used ink cartridges may have ink around the ink supply port, so be careful not to get any ink
on the surrounding area when removing the cartridges. Dispose of used cartridges carefully. Do not
take the used cartridge apart or try to refill it.
Warning: If ink gets on your skin, wash it thoroughly with soap and water. If ink gets into your eyes,
flush them immediately with water. If ink gets into your mouth, spit it out and see a doctor right away.
If you swallow ink, swallow lots of water and induce vomiting and see a doctor right away. Keep ink
cartridges out of the reach of children.
You hear a click and the ink cartridge pops out slightly.
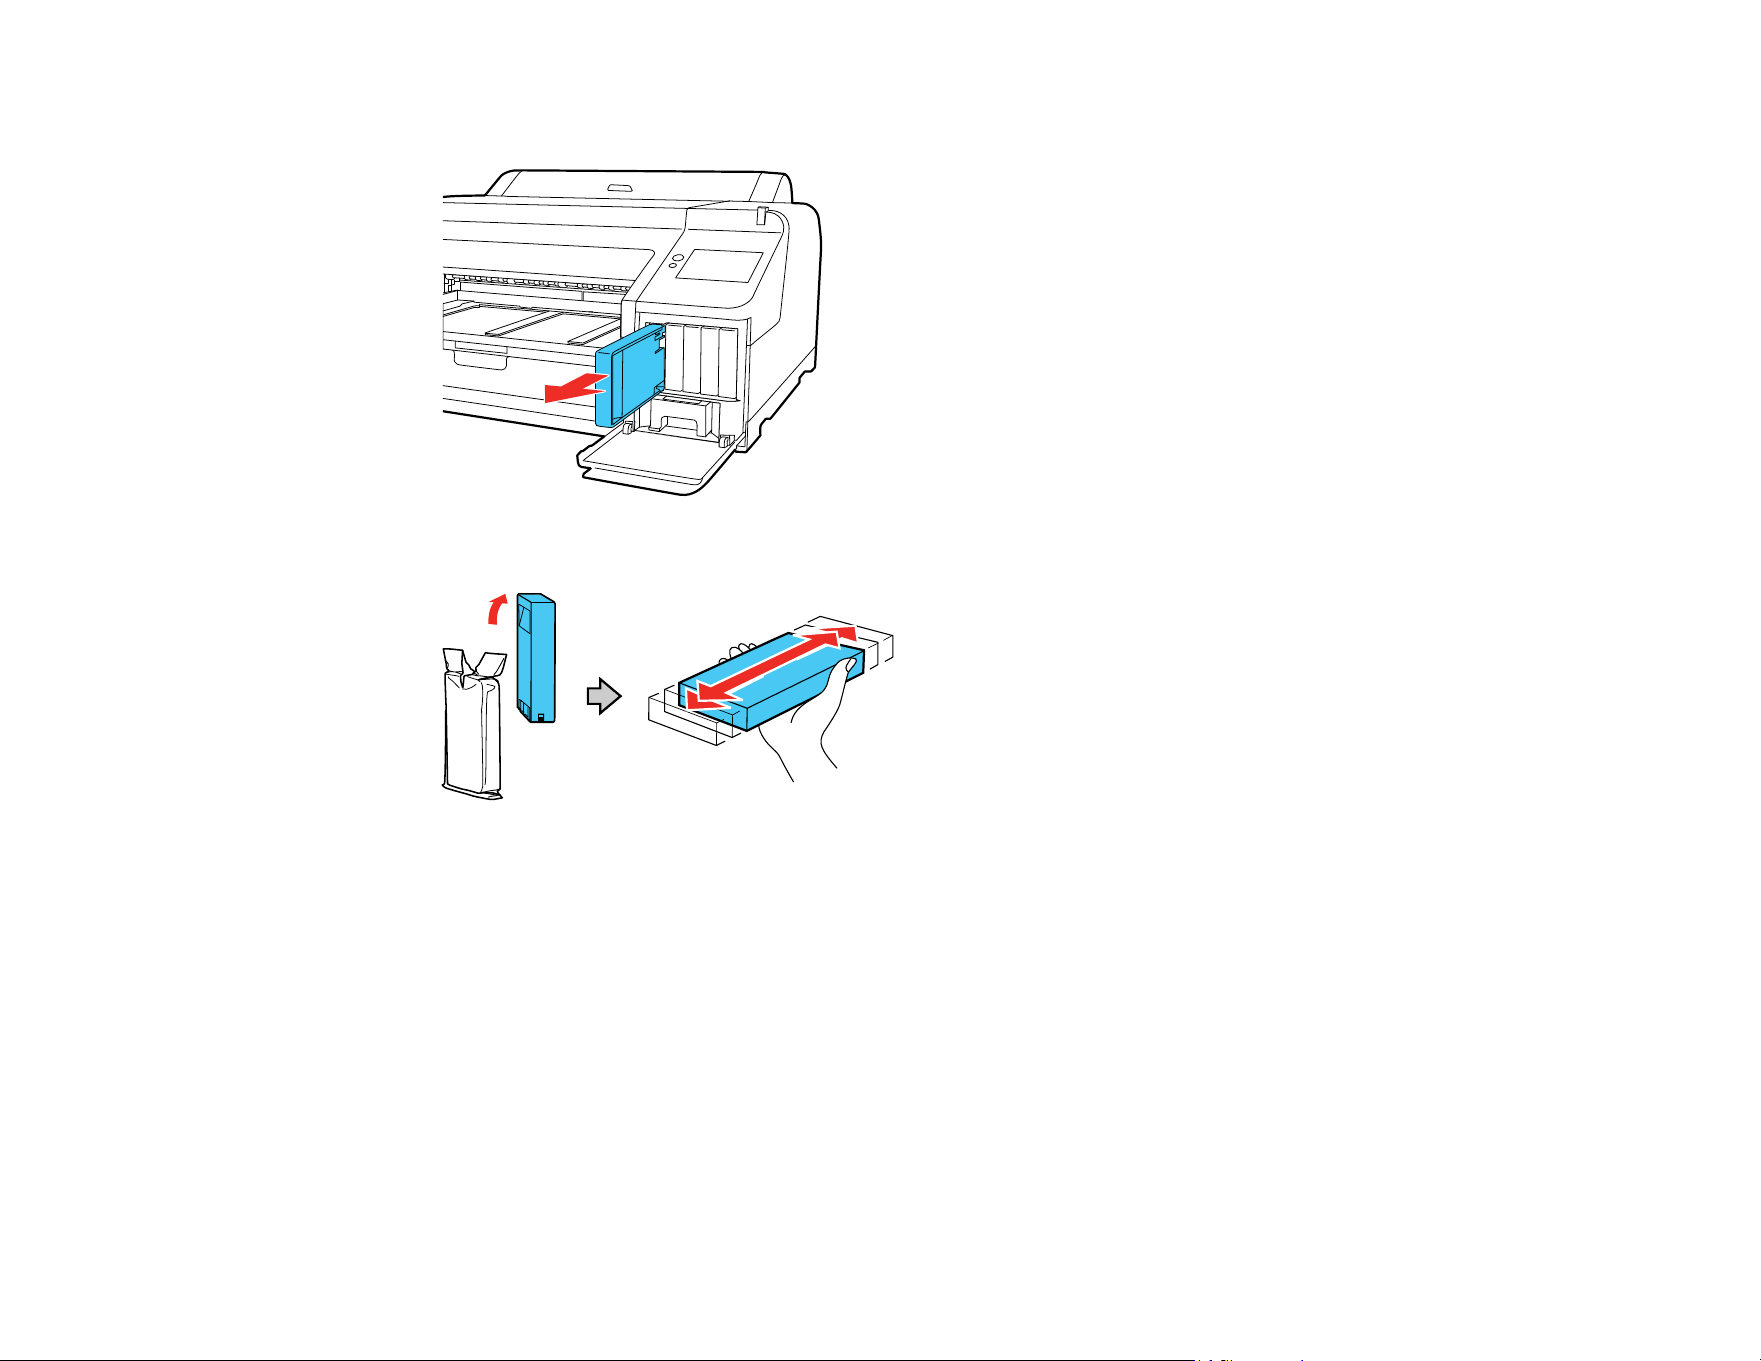
168
4. Carefully pull the ink cartridge straight out.
5. Remove the new cartridge from the package and then gently shake the cartridge for 5 seconds, or
about 15 times, in approximately 2 inch (5 cm) horizontal movements.
Caution: Do not touch the green chip on the ink cartridge or you may not be able to print.
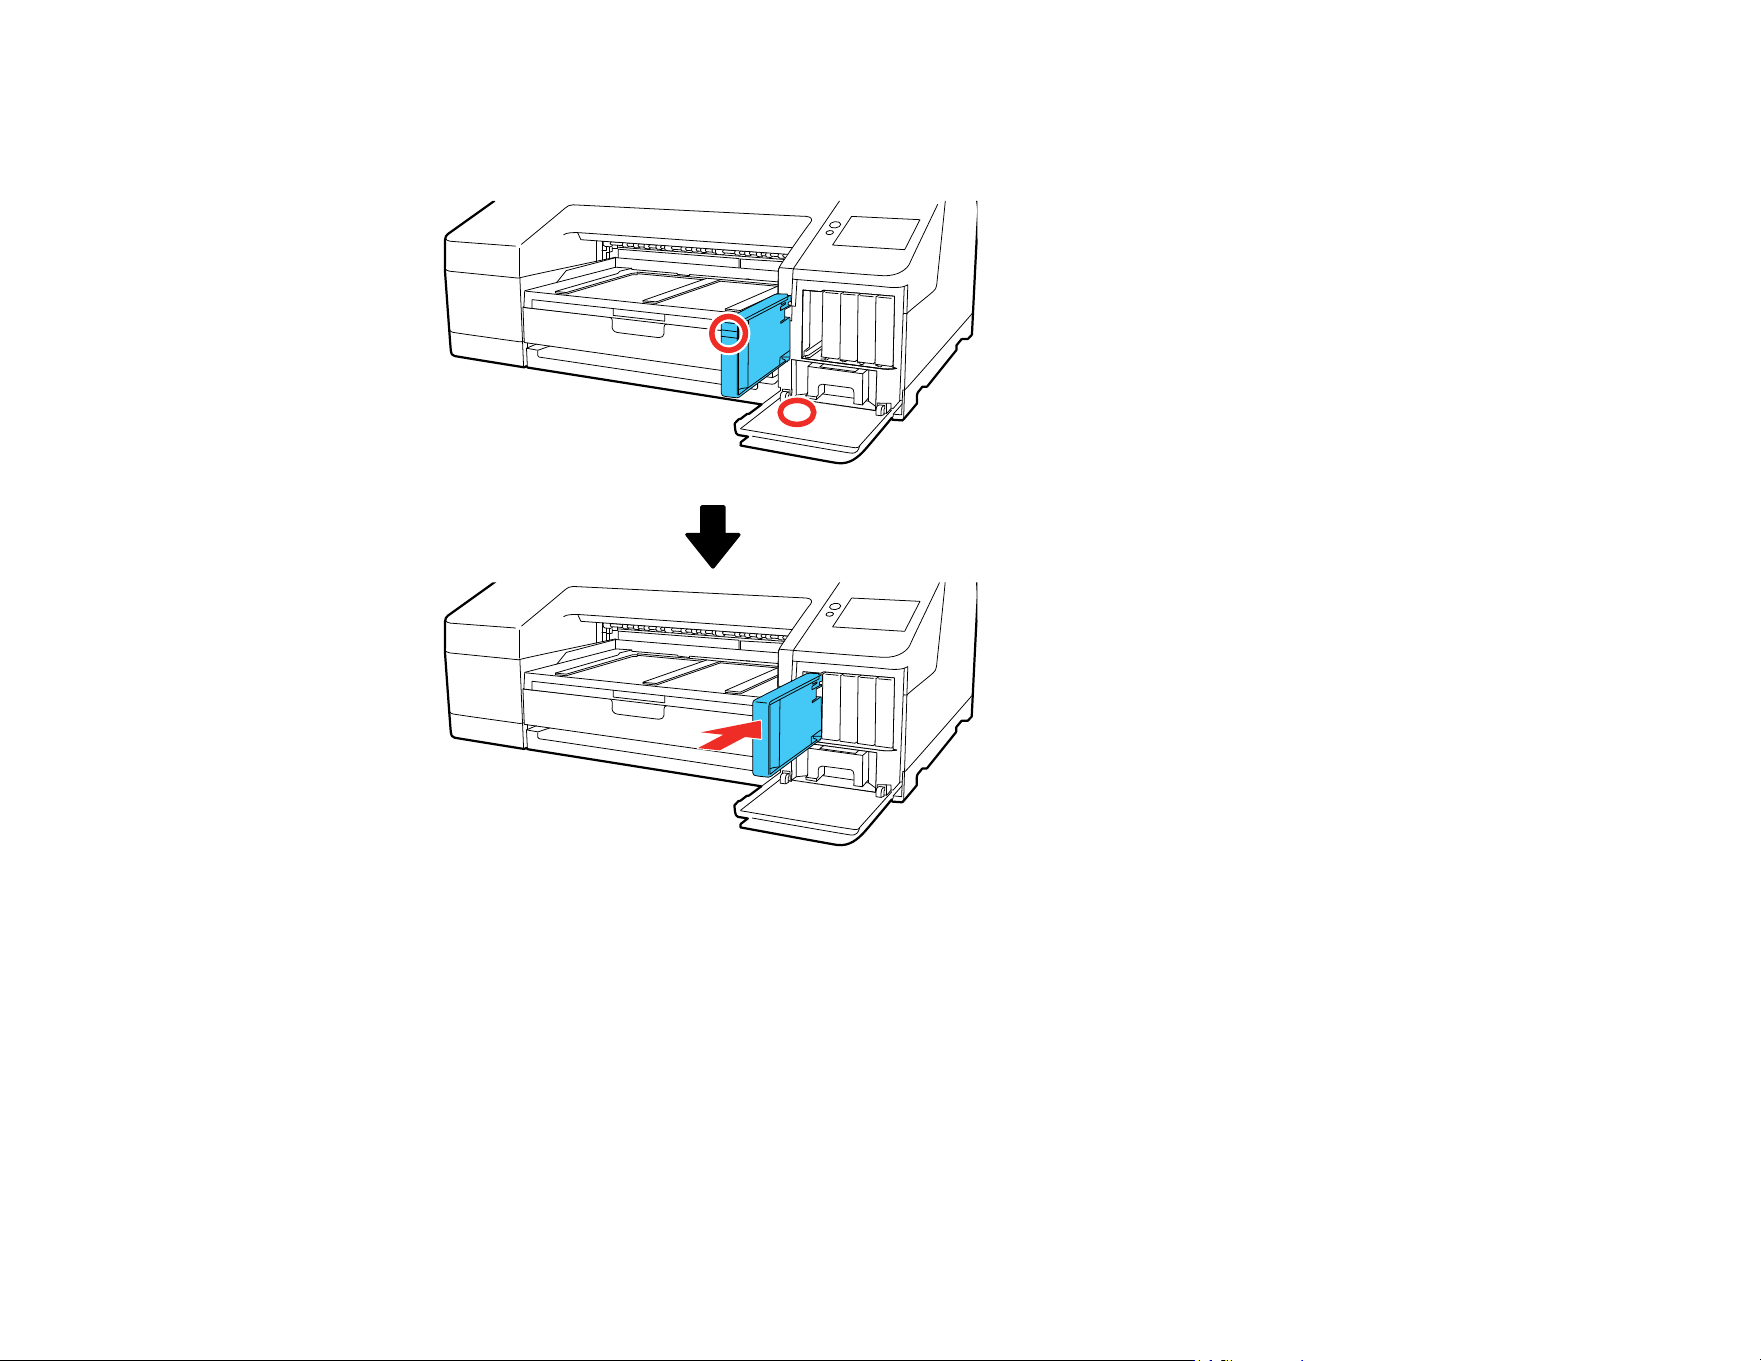
169
6. Make sure the color of the ink cartridge matches the color of the label on the inside of the ink
cartridge cover, and then insert the ink cartridge until it clicks.
7. Repeat the above steps for any other cartridge that needs to be replaced.
Note: Make sure to install ink cartridges into all slots. You cannot print if any of the slots are empty.
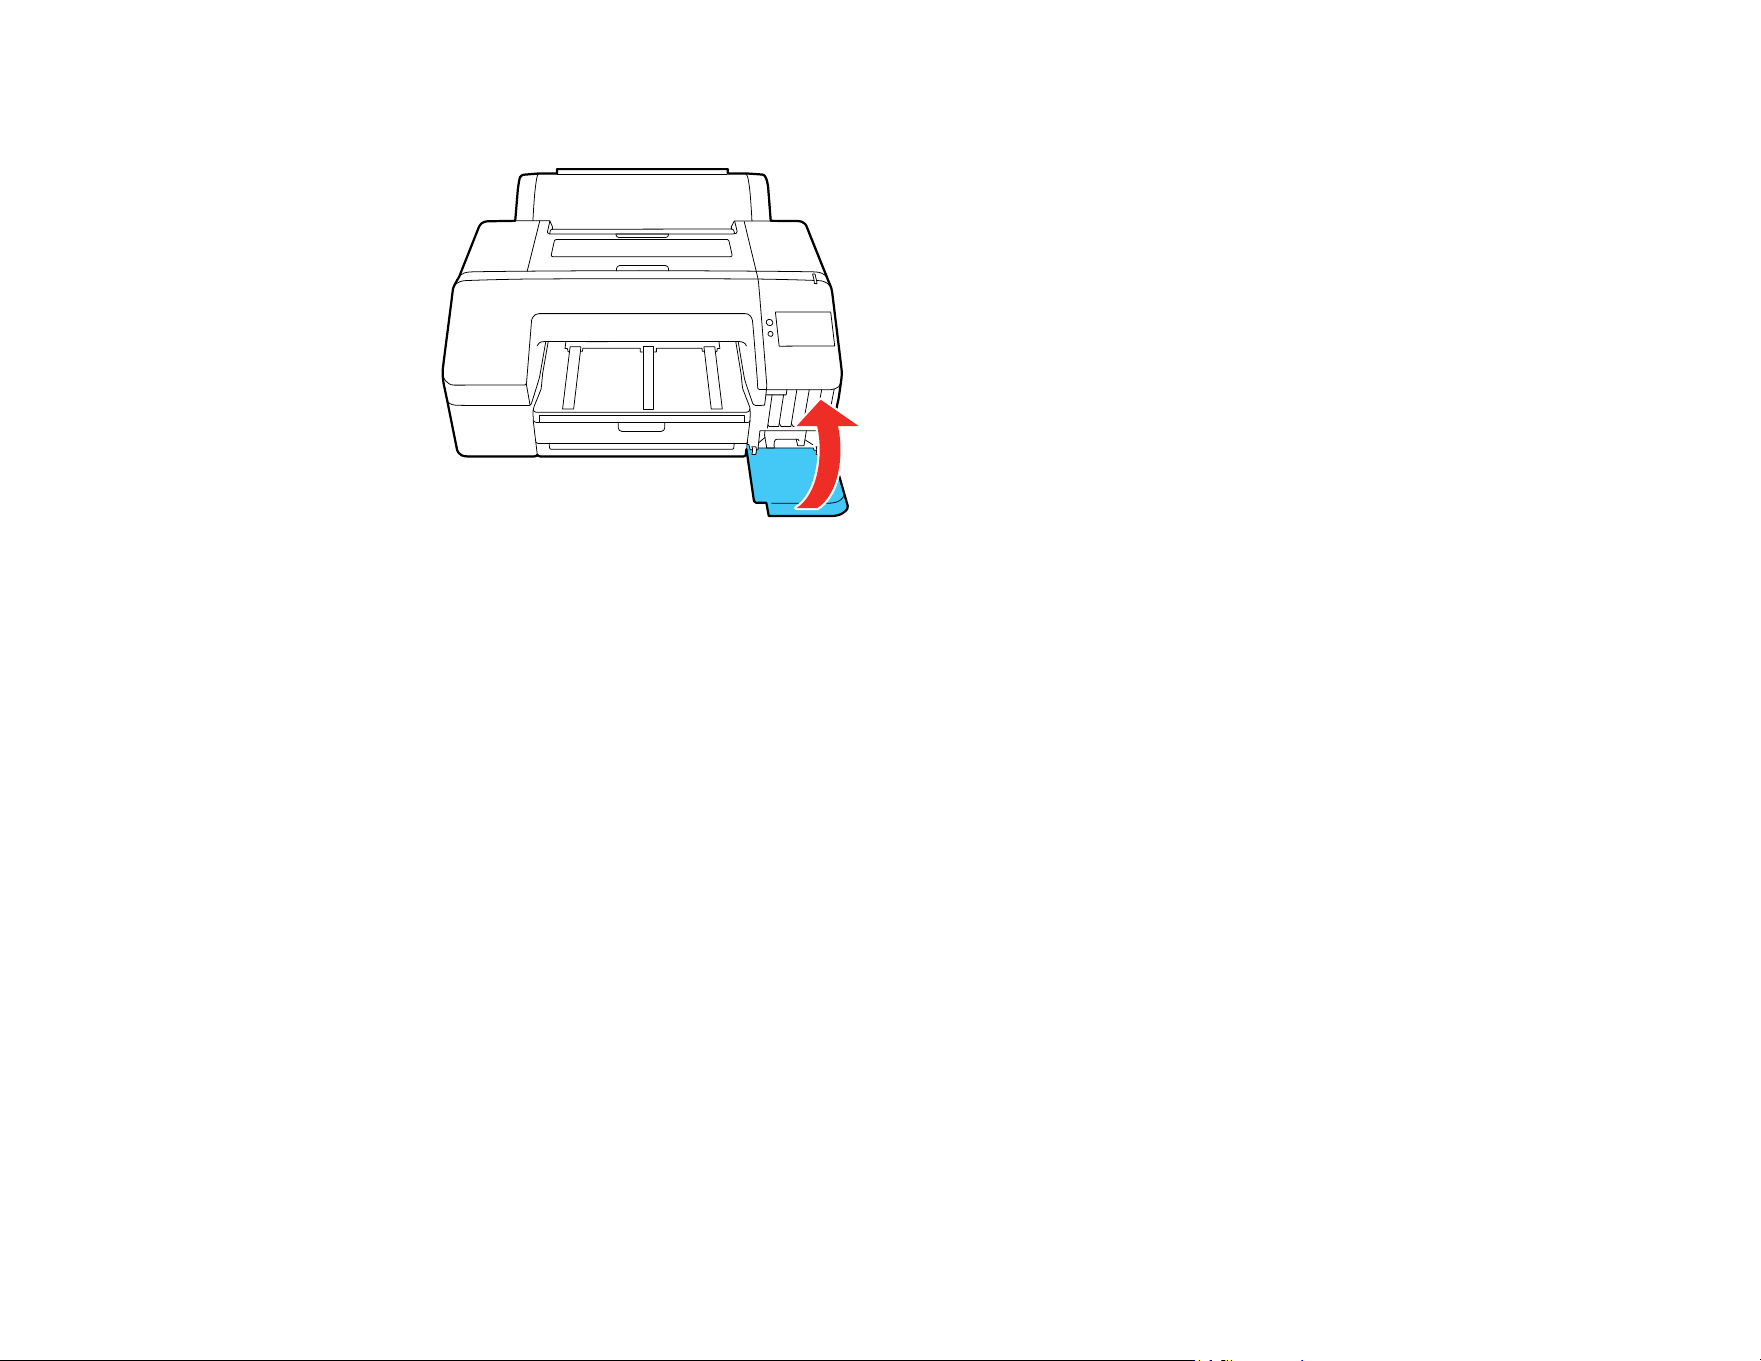
170
8. Close the ink cartridge cover.
Your product begins charging the ink delivery system. A message appears on the LCD screen when ink
replacement is complete.
Note: Do not open any covers or turn off the product during ink charging.
Caution: If you remove an ink cartridge for later use, protect the ink supply area from dirt and dust and
store it in the same environment as the printer. The valve in the ink supply port is designed to contain
any excess ink, but do not touch the ink supply port or surrounding area. Always store ink cartridges with
the label facing up; do not store cartridges upside-down.
Parent topic: Replacing Consumables
Related concepts
Purchase Epson Ink and Maintenance Boxes
Related references
Optional Equipment and Replacement Parts
Replacing the Maintenance Box
The maintenance box stores ink that gets flushed from the system during maintenance operations such
as head cleaning. Replace the maintenance box (maintenance box 1) when you see a message on the
LCD screen.

171
Note:
• Do not replace the maintenance box while printing, otherwise ink may leak.
• Do not reuse a maintenance box you have removed from the printer and exposed to air for a long
period of time. The box will not absorb any more ink.
• To view the replacement procedure on the LCD screen before the message appears, select
maintenance > Replace Maintenance Box > Maintenance Box > How To....
1. Check the LCD screen to determine which maintenance box needs to be replaced.
2. Select Maintenance Box > How To... and then follow the on-screen instructions.
Warning: If ink gets on your skin, wash it thoroughly with soap and water. If ink gets into your eyes,
flush them immediately with water. If ink gets into your mouth, spit it out and see a doctor right away.
Parent topic: Replacing Consumables
Related concepts
Purchase Epson Ink and Maintenance Boxes
Related references
Optional Equipment and Replacement Parts
Replacing the Borderless Maintenance Box
The borderless maintenance box (maintenance box 2) absorbs ink during borderless printing. When you
see a message on the LCD screen, replace the borderless maintenance box.
Note:
• Do not replace the borderless maintenance box while printing. Printing stops if the lock on the
borderless maintenance box is released, which may result in color variation and a decline in print
quality once printing is resumed.
• Do not reuse a borderless maintenance box you have removed from the printer and exposed to air for
a long period of time. The box will not absorb any more ink.
• To view the replacement procedure on the LCD screen before the message appears, select
maintenance > Replace Maintenance Box > Borderless Maintenance Box > How To....
1. Check the LCD screen to determine which maintenance box needs to be replaced.


173
Adjusting Print Quality
If your print quality declines, you may need to run a utility to clean or align the print head.
If running these utilities does not solve the problem, you may need to replace the ink cartridges, clean
the roll paper feeder, or run a Power Cleaning.
Print Head Maintenance
Print Head Maintenance
Print head maintenance ensures the best print quality.
Perform the following maintenance functions as necessary:
• Print Head Nozzle Check: Check for clogged nozzles before each print job or if you have not used
the printer for an extended period of time. Inspect the printed check pattern and clean the print head if
you notice faint or missing areas.
• Print Head Cleaning: Clean the print head if you notice faint areas or gaps in your printouts.
• Print Head Alignment: Adjust the position of the print head if your printouts are grainy or out of focus.
• Paper Feed Adjust: Adjust the paper feed if you are unable to resolve banding issues even after
cleaning and aligning the print head.
Print Head Nozzle Check
Print Head Cleaning
Media Setting Optimization
Parent topic: Adjusting Print Quality
Related tasks
Removing and Installing Ink Cartridges
Print Head Nozzle Check
You can print a nozzle check pattern to check for clogged nozzles.
Checking the Nozzles Using the Product Control Panel
Checking the Nozzles Using a Computer Utility
Parent topic: Print Head Maintenance
Related references
Maintenance Menu
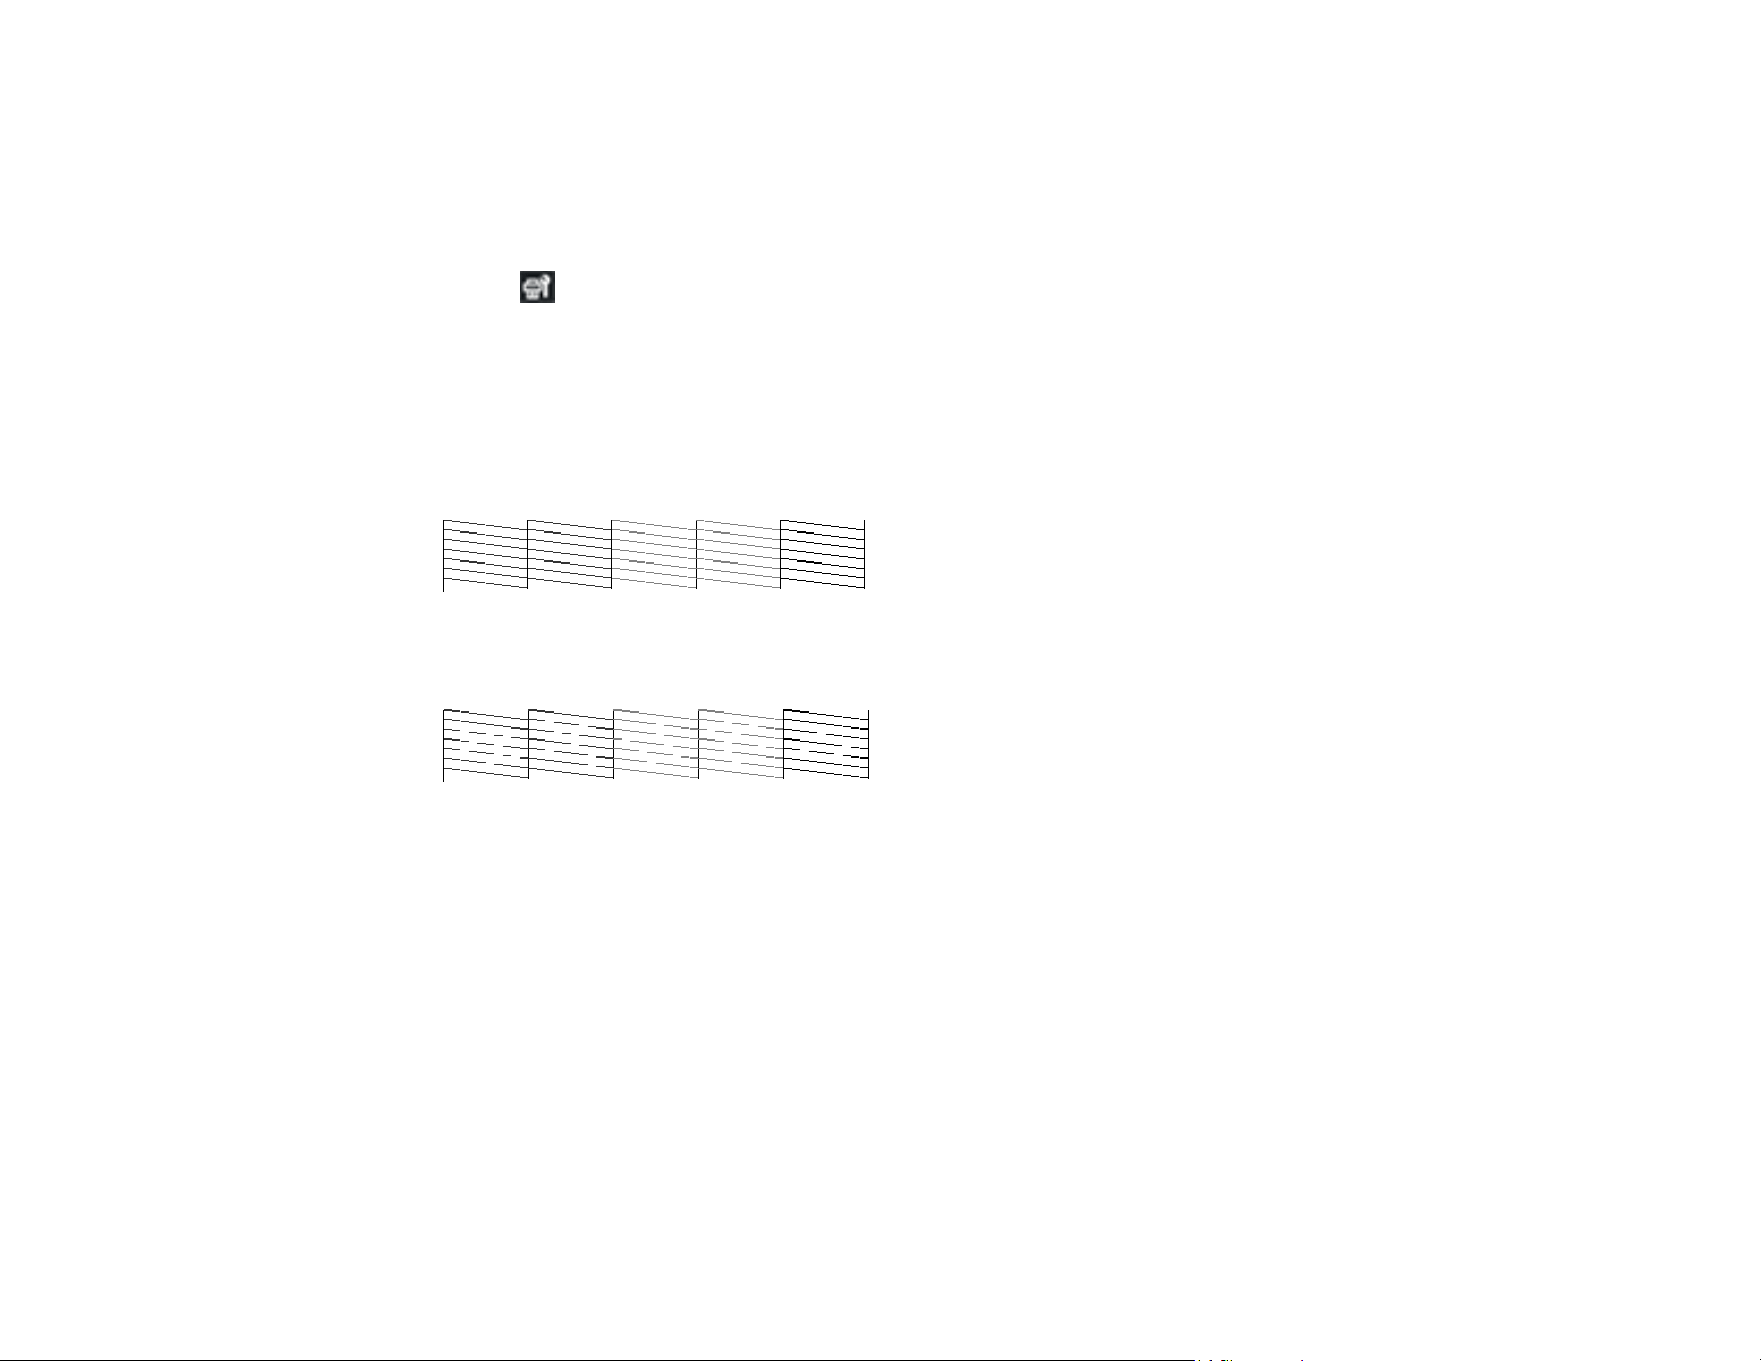
174
Checking the Nozzles Using the Product Control Panel
You can check the print head nozzles using the control panel on your product.
1. Make sure roll paper or cut sheet paper A4-size or larger is loaded in the printer.
2. Make sure the correct paper type is selected.
3. Select maintenance > Print Head Nozzle Check.
4. Make sure the displayed paper source matches the paper source for the paper you loaded and then
select Start.
The nozzle check pattern prints.
5. Check the printed pattern to see if there are gaps in the lines.
Print head is clean
Print head needs cleaning
6. Do one of the following:
• If there are no gaps, select O to exit.
• If there are gaps or the pattern is faint, select X to perform head cleaning.
7. Follow the instructions on the screen to clean the print head, check the nozzles, and repeat the
process as necessary.
Cleaning takes about 5 to 6 minutes.
Parent topic: Print Head Nozzle Check
Related tasks
Loading Cut Sheets in the Rear Manual Feeder
Loading Media in the Front Manual Feeder

175
Loading Cut Sheets in the Paper Cassette
Loading Roll Paper
Cleaning the Print Head Using the Product Control Panel
Running a Power Cleaning Using the Product Control Panel
Checking the Nozzles Using a Computer Utility
You can check the print head nozzles using a utility on your Windows or Mac computer.
1. Load roll or cut sheet paper A4-size or larger in the printer.
2. Make sure the correct paper type is selected.
3. Do one of the following:
• Windows 11: On the right side of the Windows taskbar, click the up arrow, click the icon, and
then click on your product.
• Windows (other versions): Access the Windows Desktop and right-click the icon for your
product in the right side of the Windows taskbar, or click the up arrow and right-click , select
Properties or Printing preferences, and click on the Utility tab.
• Mac: In the Apple menu or the Dock, select System Preferences. Select Print & Fax, Print &
Scan, or Printers & Scanners, select your product, and select Options & Supplies. Select
Utility and select Open Printer Utility.
4. Click Print Head Nozzle Check.
5. Click Print.
The nozzle pattern prints.
6. Check the printed pattern to see if there are gaps in the lines.
Print head is clean
Print head needs cleaning

176
7. If there are no gaps, click Finish.
If there are gaps or the pattern is faint, perform head cleaning.
Parent topic: Print Head Nozzle Check
Related tasks
Loading Cut Sheets in the Rear Manual Feeder
Loading Media in the Front Manual Feeder
Loading Cut Sheets in the Paper Cassette
Loading Roll Paper
Cleaning the Print Head Using a Computer Utility
Running a Power Cleaning Using a Computer Utility
Print Head Cleaning
If print quality has declined and the nozzle check pattern indicates clogged nozzles, you can clean the
print head.
Consider the following when preparing to clean the print head:
• Ink is consumed during print head cleaning. Clean the print head only if the print quality declines.
• Print head cleaning and Power Cleaning consume ink from all cartridges, even if you print primarily in
black and white.
• You cannot clean the print head if an ink cartridge is expended, and may not be able to clean it when a
cartridge is low. You must replace the ink cartridge first.
• Power Cleaning consumes more ink than print head cleaning. Check the remaining ink level in
advance, and prepare a new ink cartridge before you start cleaning if the ink is low. If the nozzles are
still clogged after performing Power Cleaning, turn off the printer and leave it off overnight. If the
nozzles are still clogged, contact Epson for support.
• Prepare a new maintenance box if the current maintenance box is low on space. Because ink used
during cleaning does not evaporate quickly, repeated head cleanings can fill the maintenance box.
• You cannot clean the print head if the temperature conditions are not within specifications. See the link
below.
• The printer may automatically perform head cleaning to help maintain print quality.
Cleaning the Print Head Using the Product Control Panel
Cleaning the Print Head Using a Computer Utility
Running a Power Cleaning Using the Product Control Panel
Running a Power Cleaning Using a Computer Utility

177
Parent topic: Print Head Maintenance
Related references
Optional Equipment and Replacement Parts
Environmental Specifications
Related tasks
Replacing the Borderless Maintenance Box
Replacing the Maintenance Box
Removing and Installing Ink Cartridges
Cleaning the Print Head Using the Product Control Panel
You can clean the print head using the control panel on your product.
1. Load roll or cut sheet paper in the printer.
2. Make sure the correct paper type is selected.
3. Select maintenance > Head Cleaning.
4. Select Start to start the cleaning cycle.
Note: A typical head cleaning cycle takes about 5 to 6 minutes.
The power light begins flashing. When the cleaning cycle is finished, the power light stops flashing
and a confirmation screen appears.
Caution: Never turn off the product during a cleaning cycle or you may damage it.
5. Select Yes to print a nozzle check pattern.

178
6. Check the printed pattern to see if there are gaps in the lines.
Print head is clean
Print head needs cleaning
7. Follow the instructions on the screen to clean the print head, check the nozzles, and repeat the
process as necessary.
If you don’t see any improvement after cleaning the print head three times, run a Power Cleaning.
Parent topic: Print Head Cleaning
Related tasks
Loading Cut Sheets in the Rear Manual Feeder
Loading Media in the Front Manual Feeder
Loading Cut Sheets in the Paper Cassette
Loading Roll Paper
Checking the Nozzles Using the Product Control Panel
Running a Power Cleaning Using the Product Control Panel
Cleaning the Print Head Using a Computer Utility
You can clean the print head using a utility on your Windows computer or Mac.
1. Load roll or cut sheet paper in the printer.
2. Make sure the correct paper type is selected.
3. Do one of the following:
• Windows 11: On the right side of the Windows taskbar, click the up arrow, click the icon, and
then click on your product.

179
• Windows (other versions): Access the Windows Desktop and right-click the icon for your
product in the right side of the Windows taskbar, or click the up arrow and right-click , select
Properties or Printing preferences, and click on the Utility tab.
• In the Apple menu or the Dock, select System Preferences. Select Print & Fax, Print & Scan, or
Printers & Scanners, select your product, and select Options & Supplies. Select Utility and
select Open Printer Utility.
4. Select Print Head Cleaning.
5. Select Cleaning and then click Next.
6. Click Start to begin the cleaning cycle.
Note: A typical head cleaning cycle takes about 5 to 6 minutes.
The power light begins flashing. When the cleaning cycle is finished, the power light stops flashing
and a confirmation screen appears.
Caution: Never turn off the product during a cleaning cycle or you may damage it.
7. Click Print Head Nozzle Check.
8. Click OK.
The nozzle pattern prints.
9. Check the printed pattern to see if there are gaps in the lines.
Print head is clean
Print head needs cleaning

180
10. Follow the instructions on the screen to clean the print head, check the nozzles, and repeat the
process as necessary.
If you don’t see any improvement after cleaning the print head three times, run a Power Cleaning.
Parent topic: Print Head Cleaning
Related tasks
Loading Cut Sheets in the Rear Manual Feeder
Loading Media in the Front Manual Feeder
Loading Cut Sheets in the Paper Cassette
Loading Roll Paper
Checking the Nozzles Using a Computer Utility
Running a Power Cleaning Using a Computer Utility
Running a Power Cleaning Using the Product Control Panel
If print head nozzles are still clogged after cleaning the print head several times, run the Power
Cleaning utility from the product control panel. This process consumes a lot of ink to clean the clogged
nozzles.
Note: Prepare a new maintenance box if the current maintenance box is low on space. If you perform a
Power Cleaning more than once, the maintenance box may fill up sooner than expected. Power cleaning
consumes more ink than a regular head cleaning. Check the ink cartridge levels before starting a Power
Cleaning cycle and prepare new cartridges, as necessary.
1. Load roll or cut sheet paper in the printer.
2. Make sure the correct paper type is selected.
3. Select maintenance > Power Cleaning.
4. Select Next.
A confirmation message appears.
5. Select Start to begin the power cleaning cycle.
Caution: Never turn off the product during a cleaning cycle or you may damage it.
Note: The power cleaning cycle takes about 5 minutes.
6. Select Yes to print a nozzle check pattern.

181
The nozzle pattern prints.
7. Check the printed pattern to see if there are gaps in the lines.
Print head is clean
Print head needs cleaning
If nozzles are still clogged, turn off the printer and leave it off overnight. If nozzles are still clogged,
contact Epson for support.
Parent topic: Print Head Cleaning
Related concepts
Purchase Epson Ink and Maintenance Boxes
Related references
Where to Get Help (U.S. and Canada)
Where to Get Help (Latin America)
Related tasks
Loading Cut Sheets in the Rear Manual Feeder
Loading Media in the Front Manual Feeder
Loading Cut Sheets in the Paper Cassette
Loading Roll Paper
Checking the Nozzles Using the Product Control Panel
Cleaning the Print Head Using the Product Control Panel
Checking Ink and Maintenance Box Status on the LCD Screen
Running a Power Cleaning Using a Computer Utility
You can clean the print head using a utility on your Windows computer or Mac.

182
1. Load roll or cut sheet paper in the printer.
2. Make sure the correct paper type is selected.
3. Do one of the following:
• Windows 11: On the right side of the Windows taskbar, click the up arrow, click the icon, and
then click on your product.
• Windows (other versions): Access the Windows Desktop and right-click the icon for your
product in the right side of the Windows taskbar, or click the up arrow and right-click , select
Properties or Printing preferences, and click on the Utility tab.
• In the Apple menu or the Dock, select System Preferences. Select Print & Fax, Print & Scan, or
Printers & Scanners, select your product, and select Options & Supplies. Select Utility and
select Open Printer Utility.
4. Select Print Head Cleaning.
5. Select Power Cleaning and then click Next.
A confirmation message appears.
6. Read the message, select the checkbox, and click Next.
7. Click Start to begin the cleaning cycle.
Note: Power Cleaning takes about 5 minutes.
The power light begins flashing. When the cleaning cycle is finished, the power light stops flashing
and a confirmation screen appears.
Caution: Never turn off the product during a cleaning cycle or you may damage it.
8. Click Print Head Nozzle Check.
9. Click OK.
The nozzle pattern prints.

183
10. Check the printed pattern to see if there are gaps in the lines.
Print head is clean
Print head needs cleaning
11. Follow the instructions on the screen to clean the print head, check the nozzles, and repeat the
process as necessary.
If you don’t see any improvement after running a Power Cleaning several times, turn off the printer and
leave it off overnight or longer, and then turn it on and check the results. If the nozzles are still clogged,
contact Epson Support.
Parent topic: Print Head Cleaning
Related concepts
Purchase Epson Ink and Maintenance Boxes
Related references
Where to Get Help (U.S. and Canada)
Where to Get Help (Latin America)
Related tasks
Loading Cut Sheets in the Rear Manual Feeder
Loading Media in the Front Manual Feeder
Loading Cut Sheets in the Paper Cassette
Loading Roll Paper
Checking the Nozzles Using a Computer Utility
Cleaning the Print Head Using a Computer Utility
Checking Ink and Maintenance Box Status with Windows
Checking Ink and Maintenance Box Status - Mac

184
Media Setting Optimization
Optimize the media settings when you have registered media settings or when you have changed any
Advanced settings for saved media settings. This helps correct any individual differences between the
media and the printer settings.
Be sure to run both a Paper Feed Adjust and a Print Head Alignment.
Before you make adjustments, note the following:
• Adjustment varies depending on the loaded media. Make adjustments using the media on which you
want to print and select the paper type that matches the paper in the printer. When adjusting using
non-Epson paper, make sure you register the custom paper in advance.
• When you add a paper setting value, be sure to select the name set in Custom Paper Setting from
the printer’s menu as the Paper Type.
• Run a nozzle check before you align the print head. If there are any gaps in the nozzle check pattern,
clean the print head.
• Load paper that is at least A4 (8.3 × 11.7 inches [210 × 297 mm]) size or larger.
Adjusting the Paper Feed Using the Product Control Panel
Aligning the Print Head Using the Product Control Panel
Parent topic: Print Head Maintenance
Related tasks
Checking the Nozzles Using the Product Control Panel
Loading Cut Sheets in the Rear Manual Feeder
Loading Media in the Front Manual Feeder
Loading Cut Sheets in the Paper Cassette
Loading Roll Paper
Adjusting the Paper Feed Using the Product Control Panel
If your printouts are grainy or blurry, or you still see dark or light horizontal bands, you may need to
adjust the paper feed using the product control panel.
1. Load the roll paper or cut sheet paper that you want to print on in the printer.
Note: Load paper that is A4-size or larger.

185
2. Make sure the correct paper type is selected.
Note: If you are using commercially available paper, make sure you create the custom paper
settings in advance.
3. Select Menu > Paper Setting > paper source > Print Adjustments > Paper Feed Adjust.
4. Select Start to print the adjustment patterns.
5. Follow the instructions on the LCD screen to select the best result in each pattern set. Look for the
result that looks closest to a rectangle with no design. In the following example, 0 is the best choice:
6. Once you have made selections for all adjustment patterns, select OK.
A confirmation screen is displayed.
7. Select OK.
When adjustments are complete, the Home screen is displayed.
Parent topic: Media Setting Optimization
Related tasks
Creating Custom Paper Settings Using the Control Panel
Loading Cut Sheets in the Rear Manual Feeder
Loading Media in the Front Manual Feeder
Loading Cut Sheets in the Paper Cassette
Loading Roll Paper
Related topics
Using Epson Media Installer
Aligning the Print Head Using the Product Control Panel
If your printouts become grainy or blurry, you notice misalignment of vertical lines, or you see dark or
light horizontal bands, you may need to align the print head.
1. Load the roll paper or cut sheet paper you want to print on in the printer.
Note: Load paper that is at least this size or larger: A4 (8.3 × 11.7 inches [210 × 297 mm]).

186
2. Make sure the correct paper type is selected.
Note: If you are using commercially available paper, make sure you create the custom paper
settings in advance.
3. Select Menu > Paper Setting > Print Adjustments > Print Head Alignment.
4. Select Start.
The printer prints the adjustment patterns.
5. Follow the instructions on the LCD screen to select the best result in each pattern set. Look for the
result with the least visible streaks. In the following example, 2 is the best choice:
6. Once you have made selections for all adjustment patterns, select OK.
A confirmation screen is displayed.
7. Select OK.
When adjustments are complete, the Home screen is displayed.
Parent topic: Media Setting Optimization
Related tasks
Loading Cut Sheets in the Rear Manual Feeder
Loading Media in the Front Manual Feeder
Loading Cut Sheets in the Paper Cassette
Loading Roll Paper

187
Maintenance and Transportation
See the instructions in these sections to maintain your printer for optimum results, or to move or
transport your printer.
Cleaning Your Product
Cleaning the Platen
Cleaning the Roll Paper Feed Slot
Replacing the Cutter
Cleaning the Print Head Cap Area
Moving or Transporting Your Product
Cleaning Your Product
To keep your product working at its best, you should clean it regularly (about once a month).
Note: Do not use a hard brush, benzene, alcohol, or paint thinner to clean the product or you may
damage it. Do not use oil or other lubricants inside the product or let water get inside.
1. Remove any paper from the product.
2. Turn off the product.
3. Make sure the printer and the LCD screen have turned off and then unplug the power cable.
4. Disconnect any connected cables.
5. Use a soft, clean cloth to remove any dust or dirt from the outside of the product.
6. If your product is still dirty, dampen the cloth with a small amount of water and a mild detergent,
firmly wring it out, and then wipe the printer's surface. Then wipe away any remaining moisture with
a soft, dry cloth.
Parent topic: Maintenance and Transportation
Cleaning the Platen
You should clean the interior of the printer about once a month to prevent ink and paper particles from
accumulating in the printer. Carefully follow the steps here to clean the platen to remove ink, paper
particles, and lint.
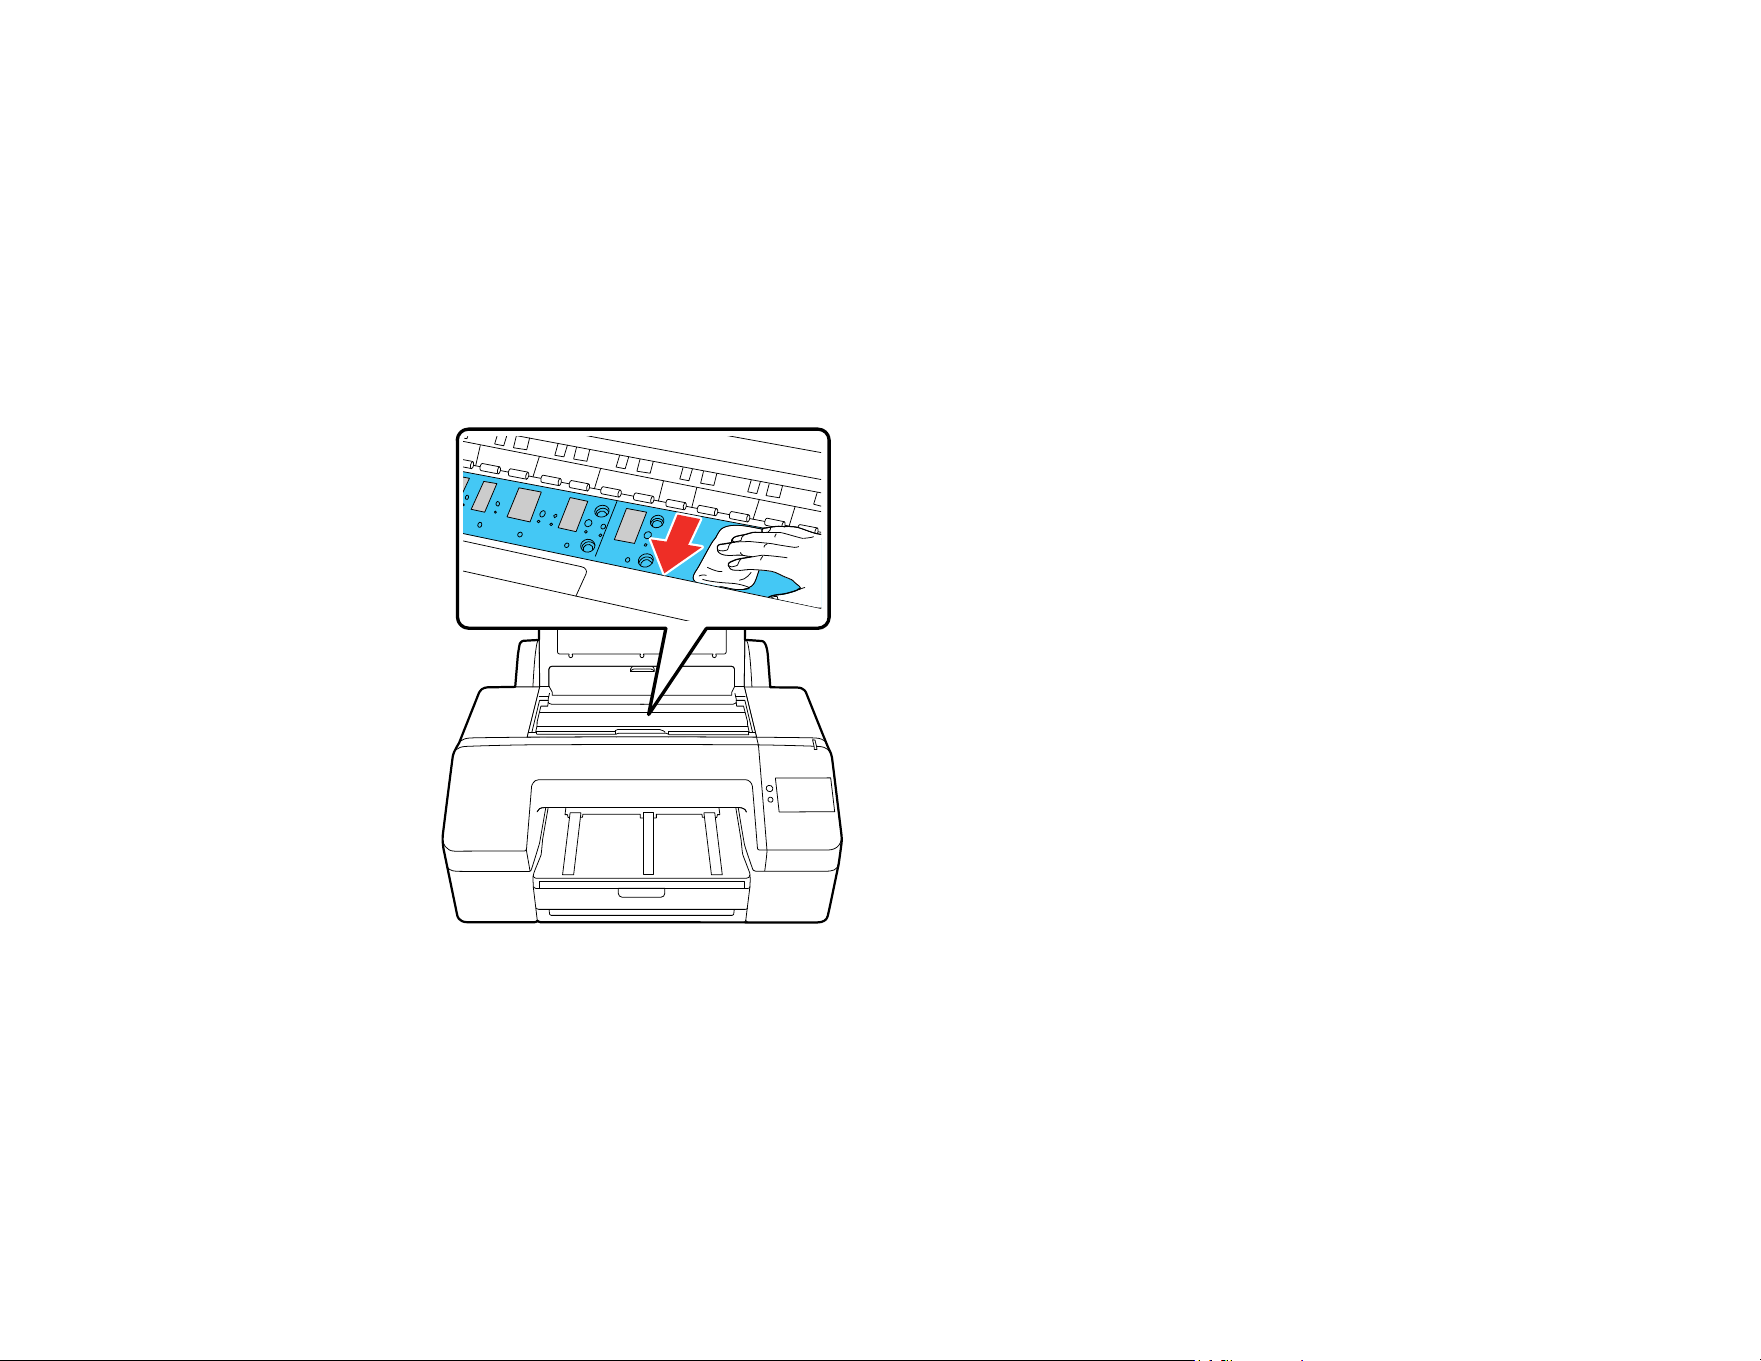
188
Caution: If ink remains on these parts, it could transfer to your printouts. Continued use of your product
with ink, paper particles, or lint on these surfaces could damage the print heads or clog the nozzles.
1. Turn off the product, wait for the LCD screen to turn off, and unplug the power cable from the
electrical outlet.
2. Wait for one minute before continuing.
3. Open the printer cover.
4. Use a soft, lint-free cloth to thoroughly remove dust and dirt from the platen as shown here. Wipe
from the back to the front of the platen to avoid spreading the dirt.
Caution: Do not touch the ink tubes inside the printer or the printer may be damaged. Do not touch
the rollers or ink absorption parts (parts in gray above) or prints may be soiled.
Note: For stubborn dirt, dampen a soft cloth with neutral detergent. Wring it out and clean the platen
as shown above. Dry the platen with a soft, dry, lint-free cloth when you are finished.
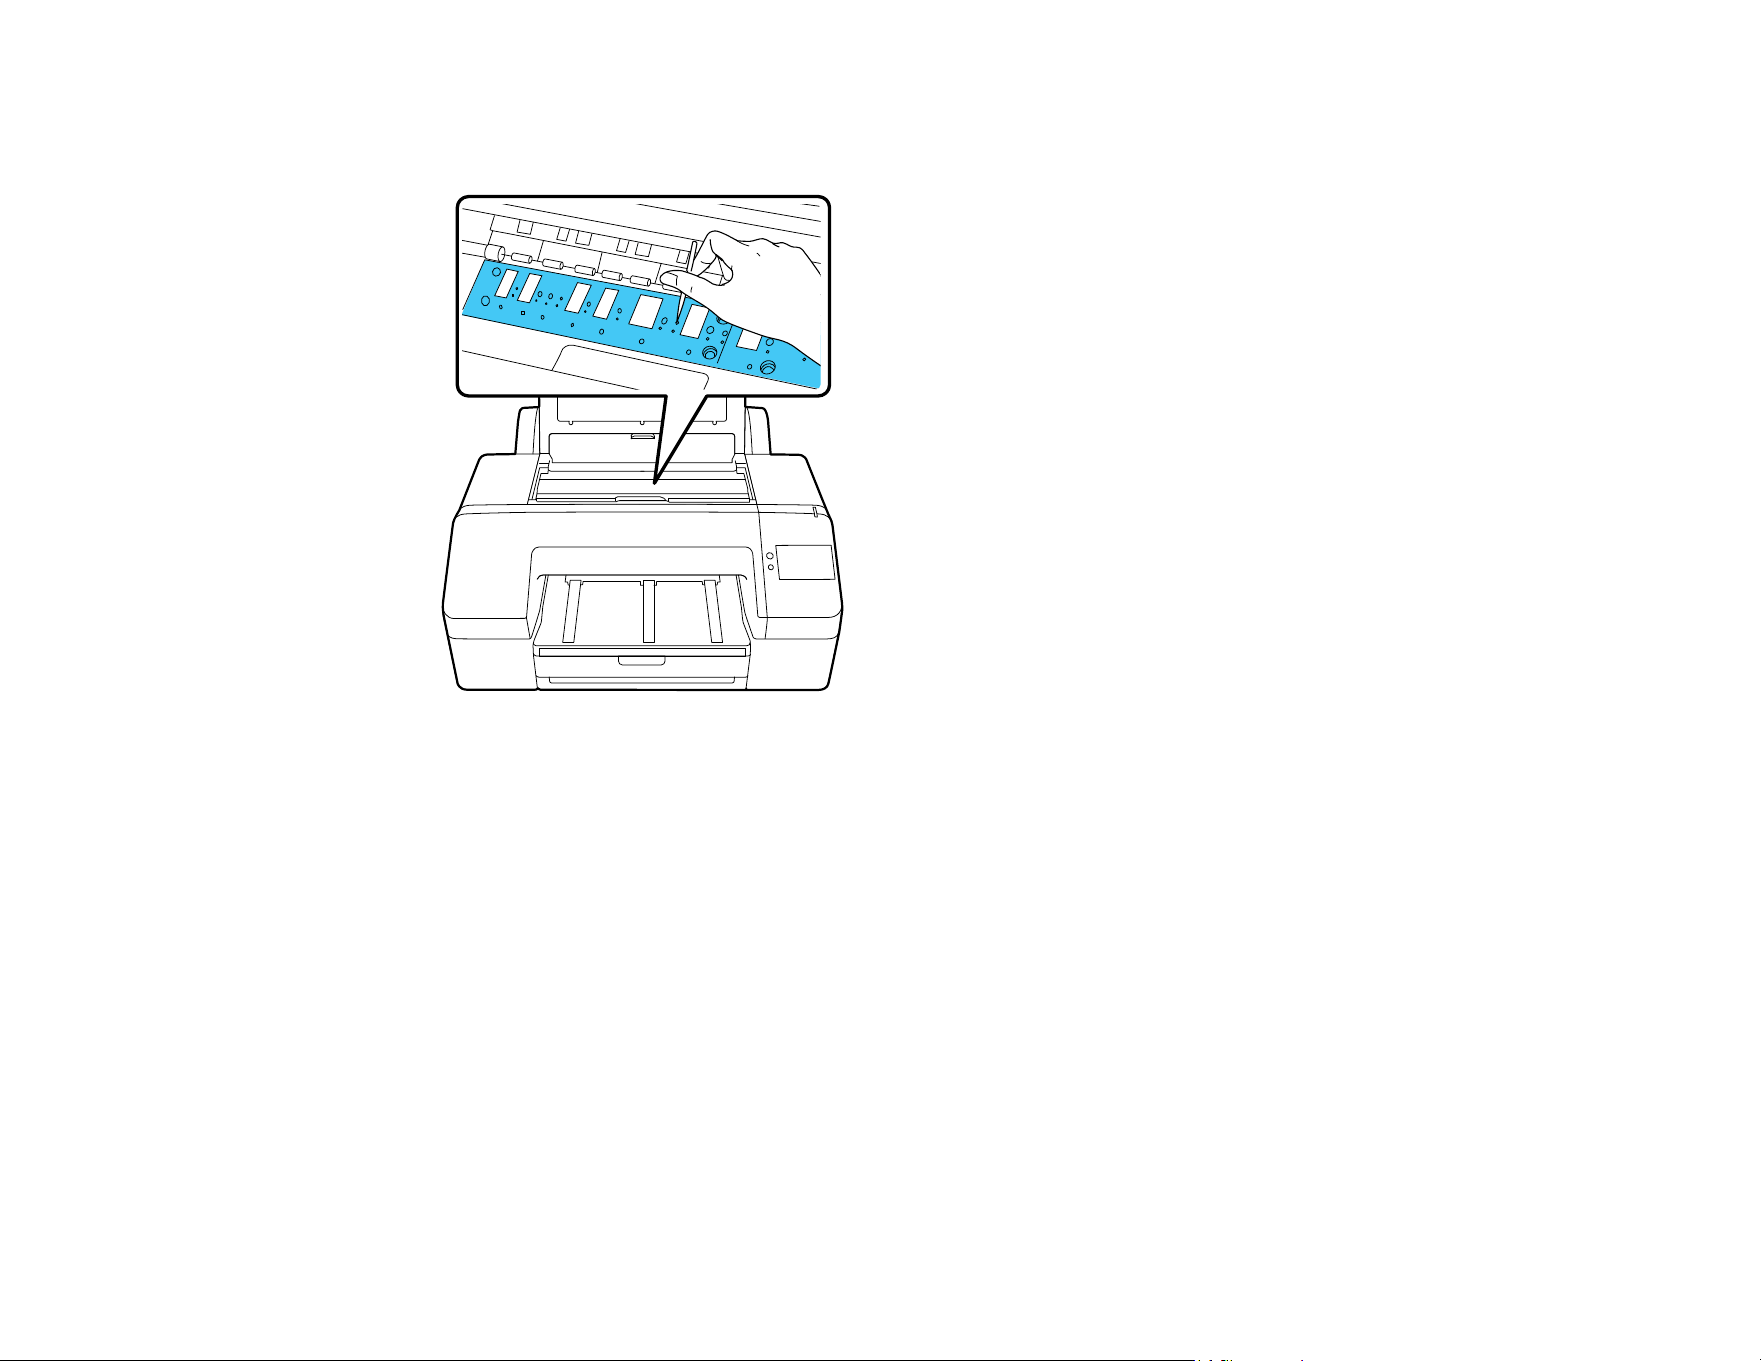
189
5. If any paper particles have accumulated in the holes shown here, use a pointed object such as a
toothpick to push the material into the holes.
6. Close the printer cover, plug in the power cord, and turn the product back on.
Parent topic: Maintenance and Transportation
Cleaning the Roll Paper Feed Slot
To keep your product working at its best, you should clean the roll paper feed slot once a year using a
new cleaning sheet.
Note: You can use a cleaning sheet only once.
You can purchase genuine Epson ink, paper, and accessories from an Epson authorized reseller. To
find the nearest reseller, visit proimaging.epson.com (U.S.) or proimaging.epson.ca (Canada), select
your product series and product, and click the Where to Buy button. Or call 800-GO-EPSON (800-463-
7766) in the U.S. or 800-807-7766 in Canada.
1. Turn on the printer.
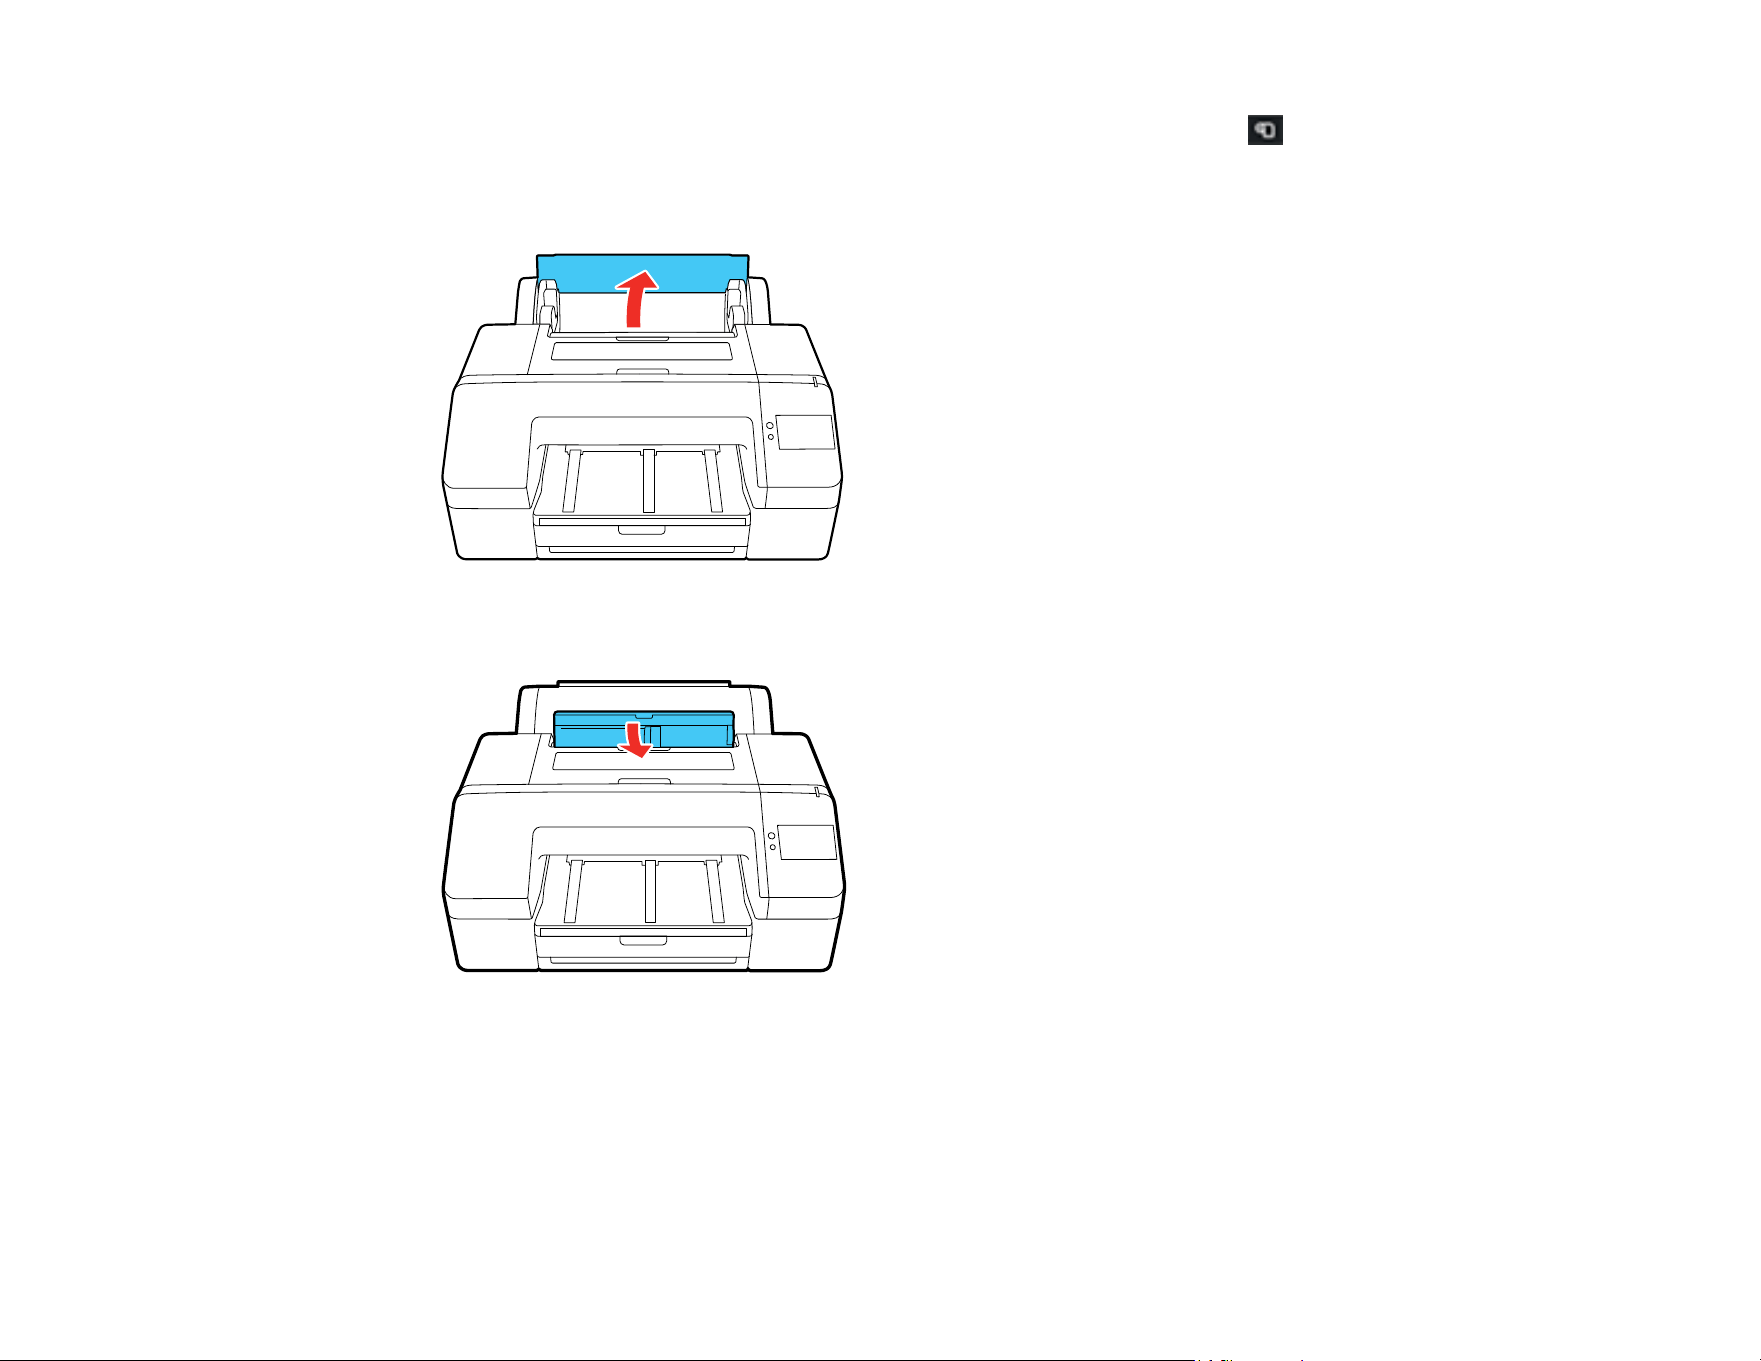
190
2. Make sure Load paper is displayed on the LCD screen and then select the icon.
A screen appears with guidance on how to load roll paper. Ignore these instructions.
3. Open the roll paper cover. Remove the roll paper, if necessary.
Note: Close the paper support if it is open.
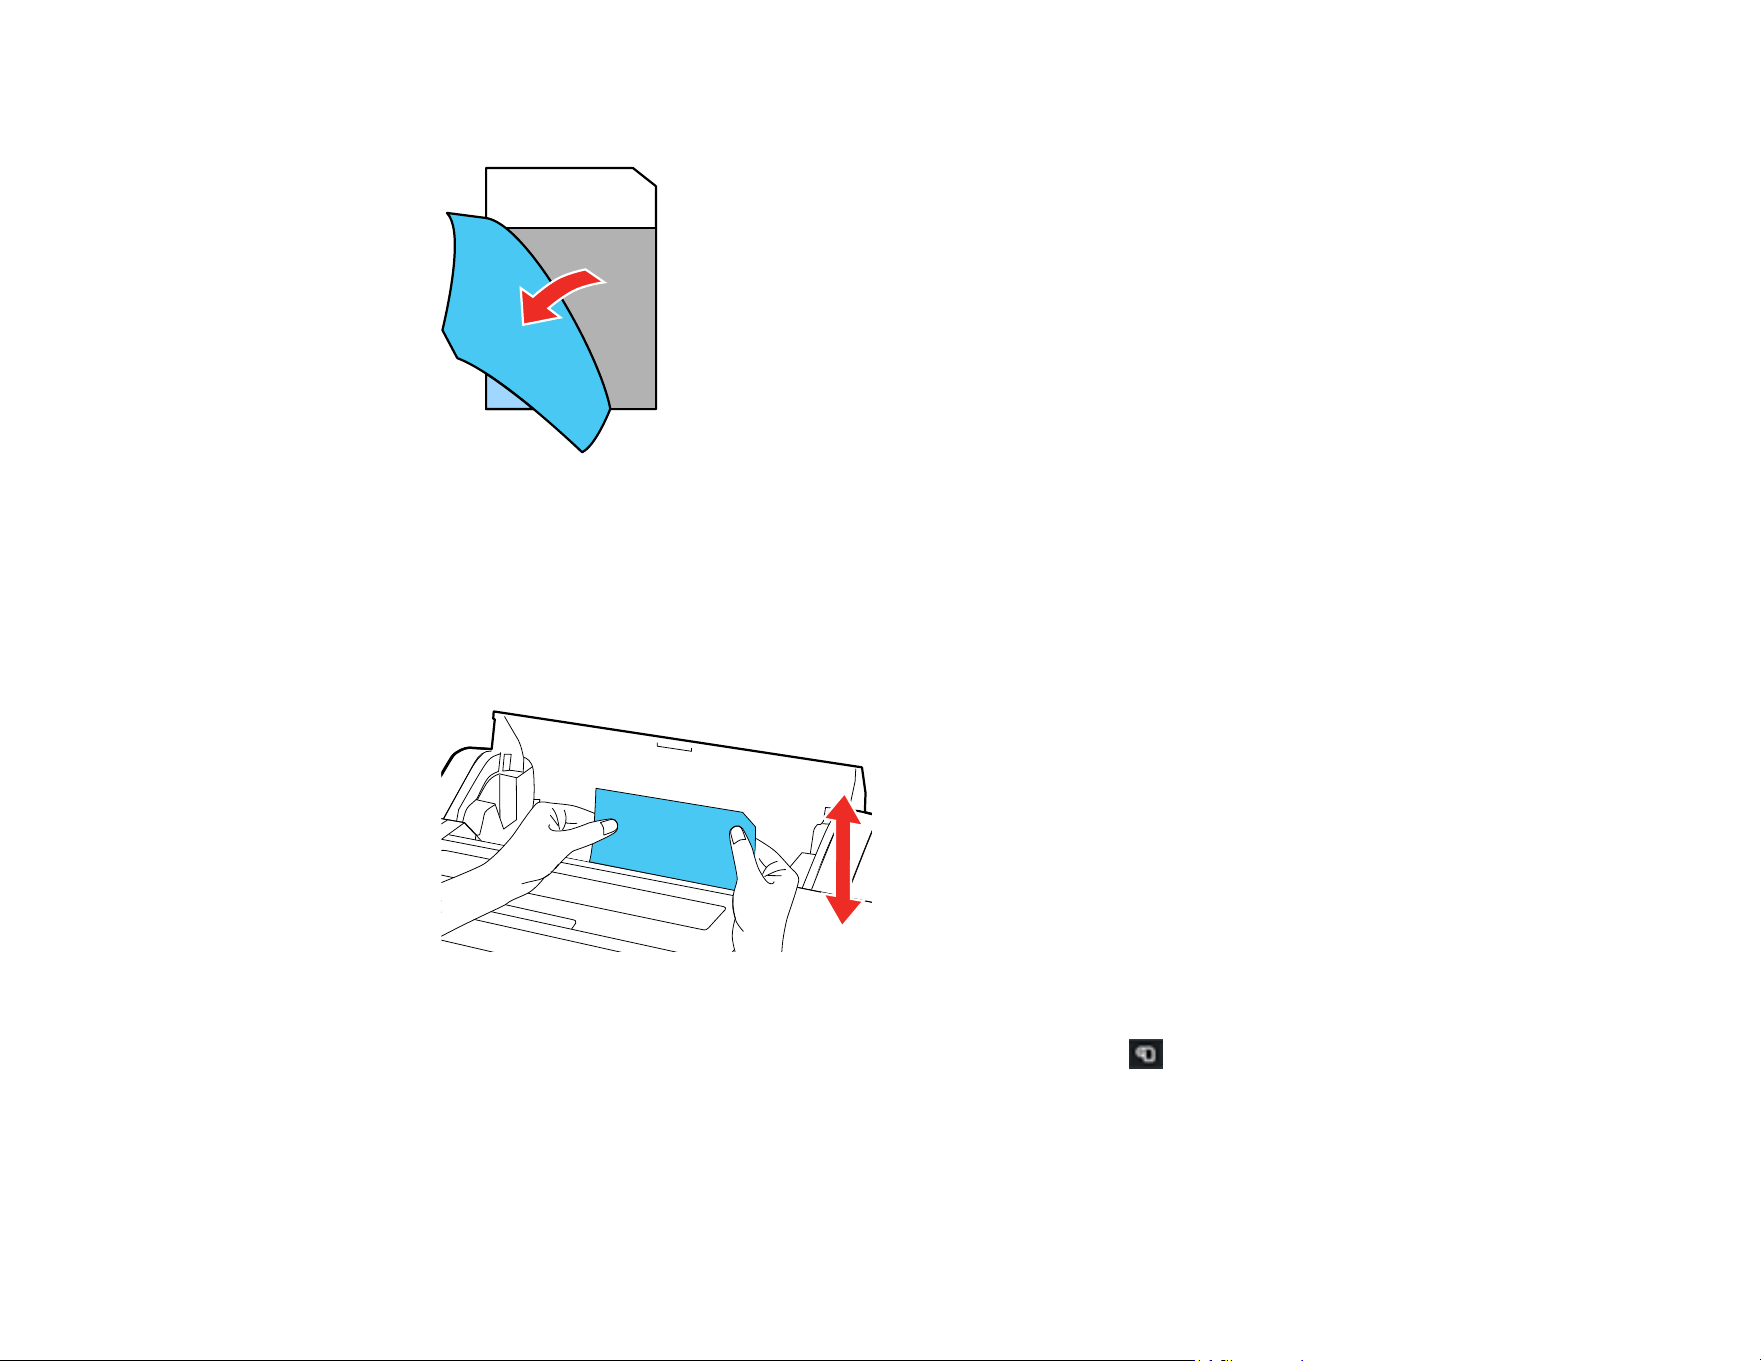
191
4. Remove the protective film from the cleaning sheet.
Note: Do not touch the adhesive on the sheet (the dark gray area).
5. With the adhesive facing toward you, insert the cleaning sheet on the left side of the printer until it
reaches the end of the roll paper feed slot, then pull it out. Repeat this two to three times. Repeat for
the center and right side of the roll paper feed slot.
Note: Do not feed the cleaning sheet through the printer like regular paper or it could cause a paper
jam. If the cleaning sheet gets fed through the printer, select the icon and then remove the
cleaning sheet.

192
6. Select Cancel on the LCD screen.
Note: If you want to stop a pending job, press the power button to turn off the printer. If you want
to continue a job, load the correct paper to print on.
Parent topic: Maintenance and Transportation
Related references
Optional Equipment and Replacement Parts
Related tasks
Removing Roll Paper
Replacing the Cutter
If you notice that your paper does not cut cleanly, you may need to replace the cutter.
Note: Take care not to damage the cutter blade. Dropping it or knocking it against hard objects may chip
the blade.
1. Turn off the printer.
2. Remove any paper from the printer.
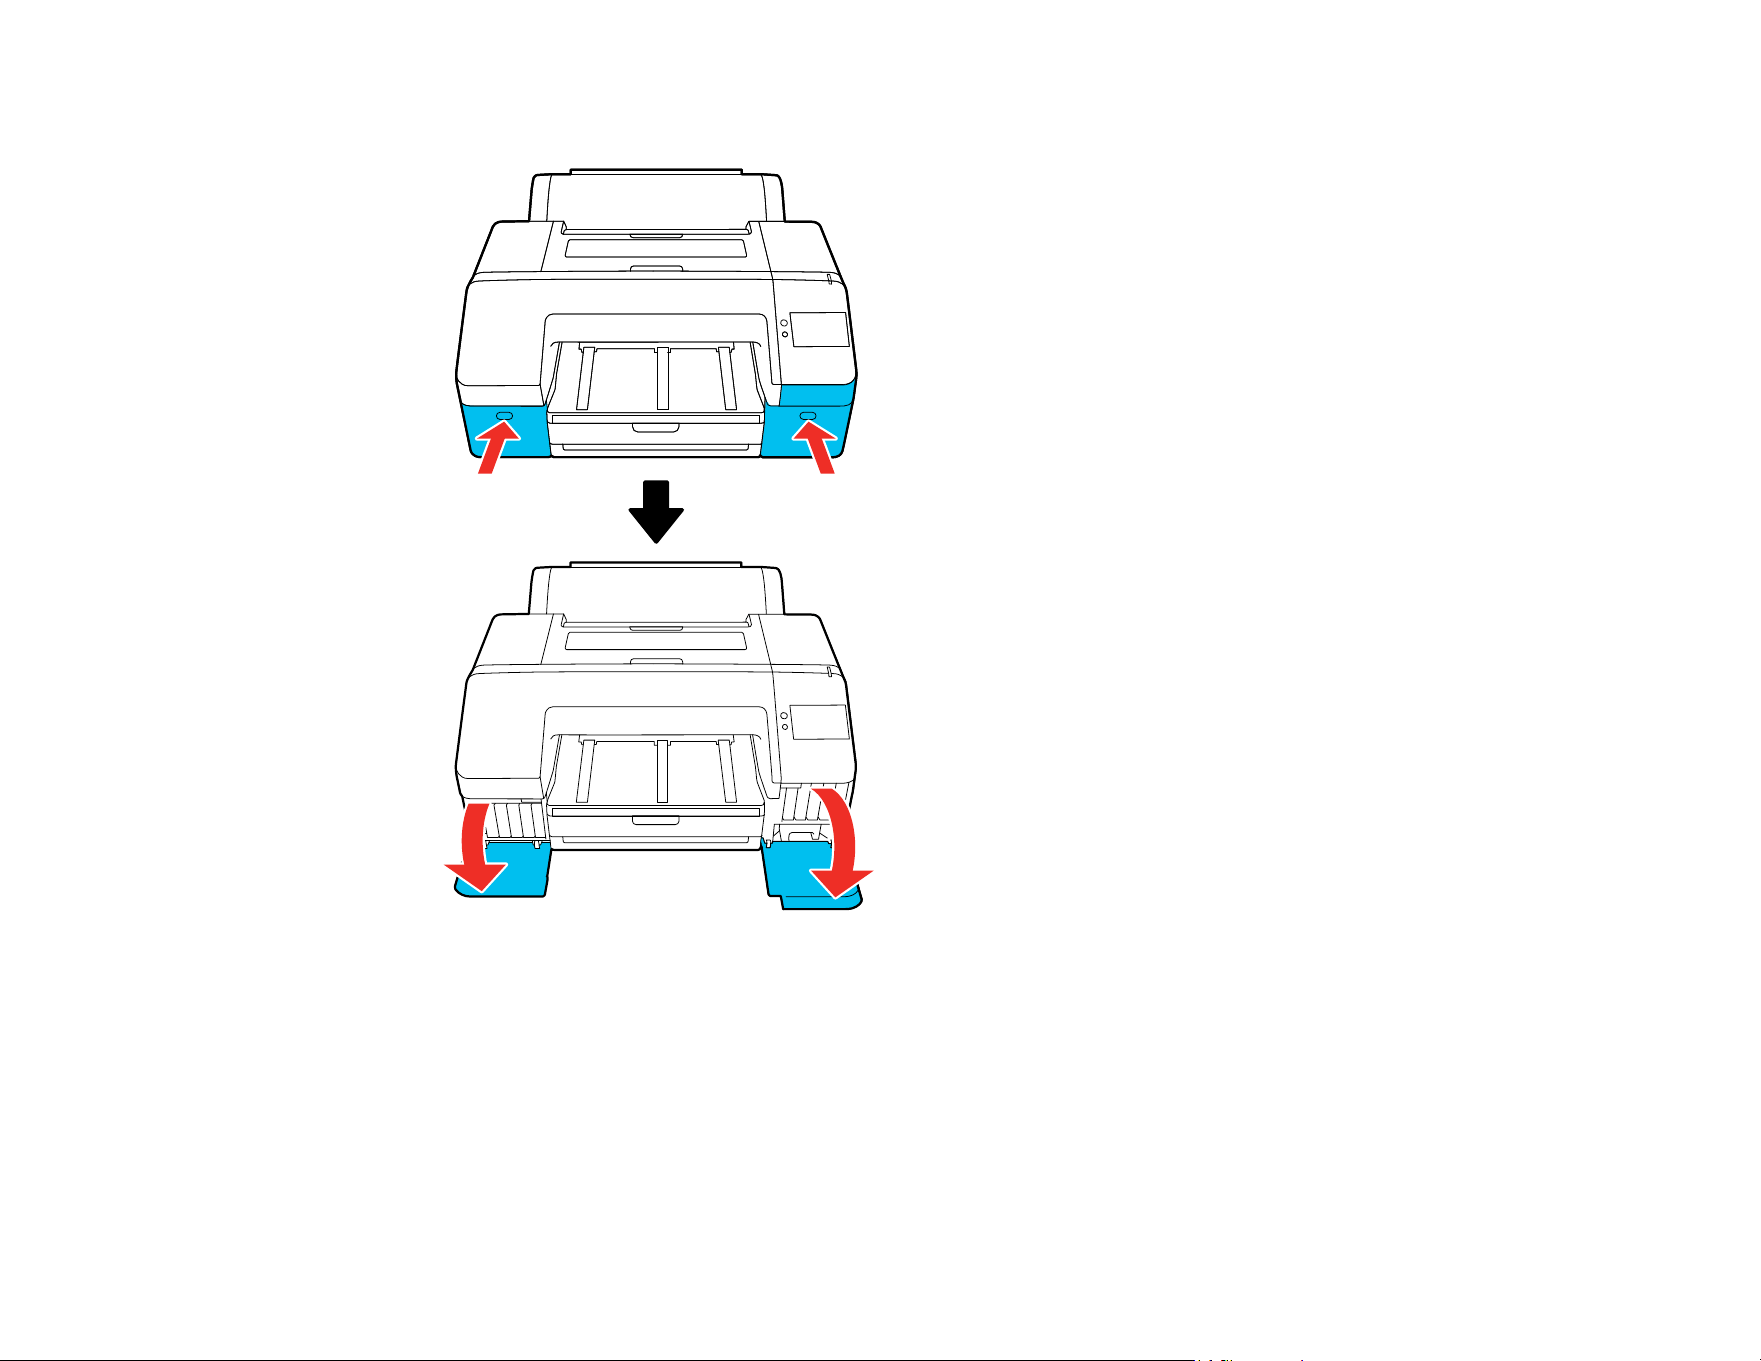
193
3. Open the left and right ink cartridge covers.
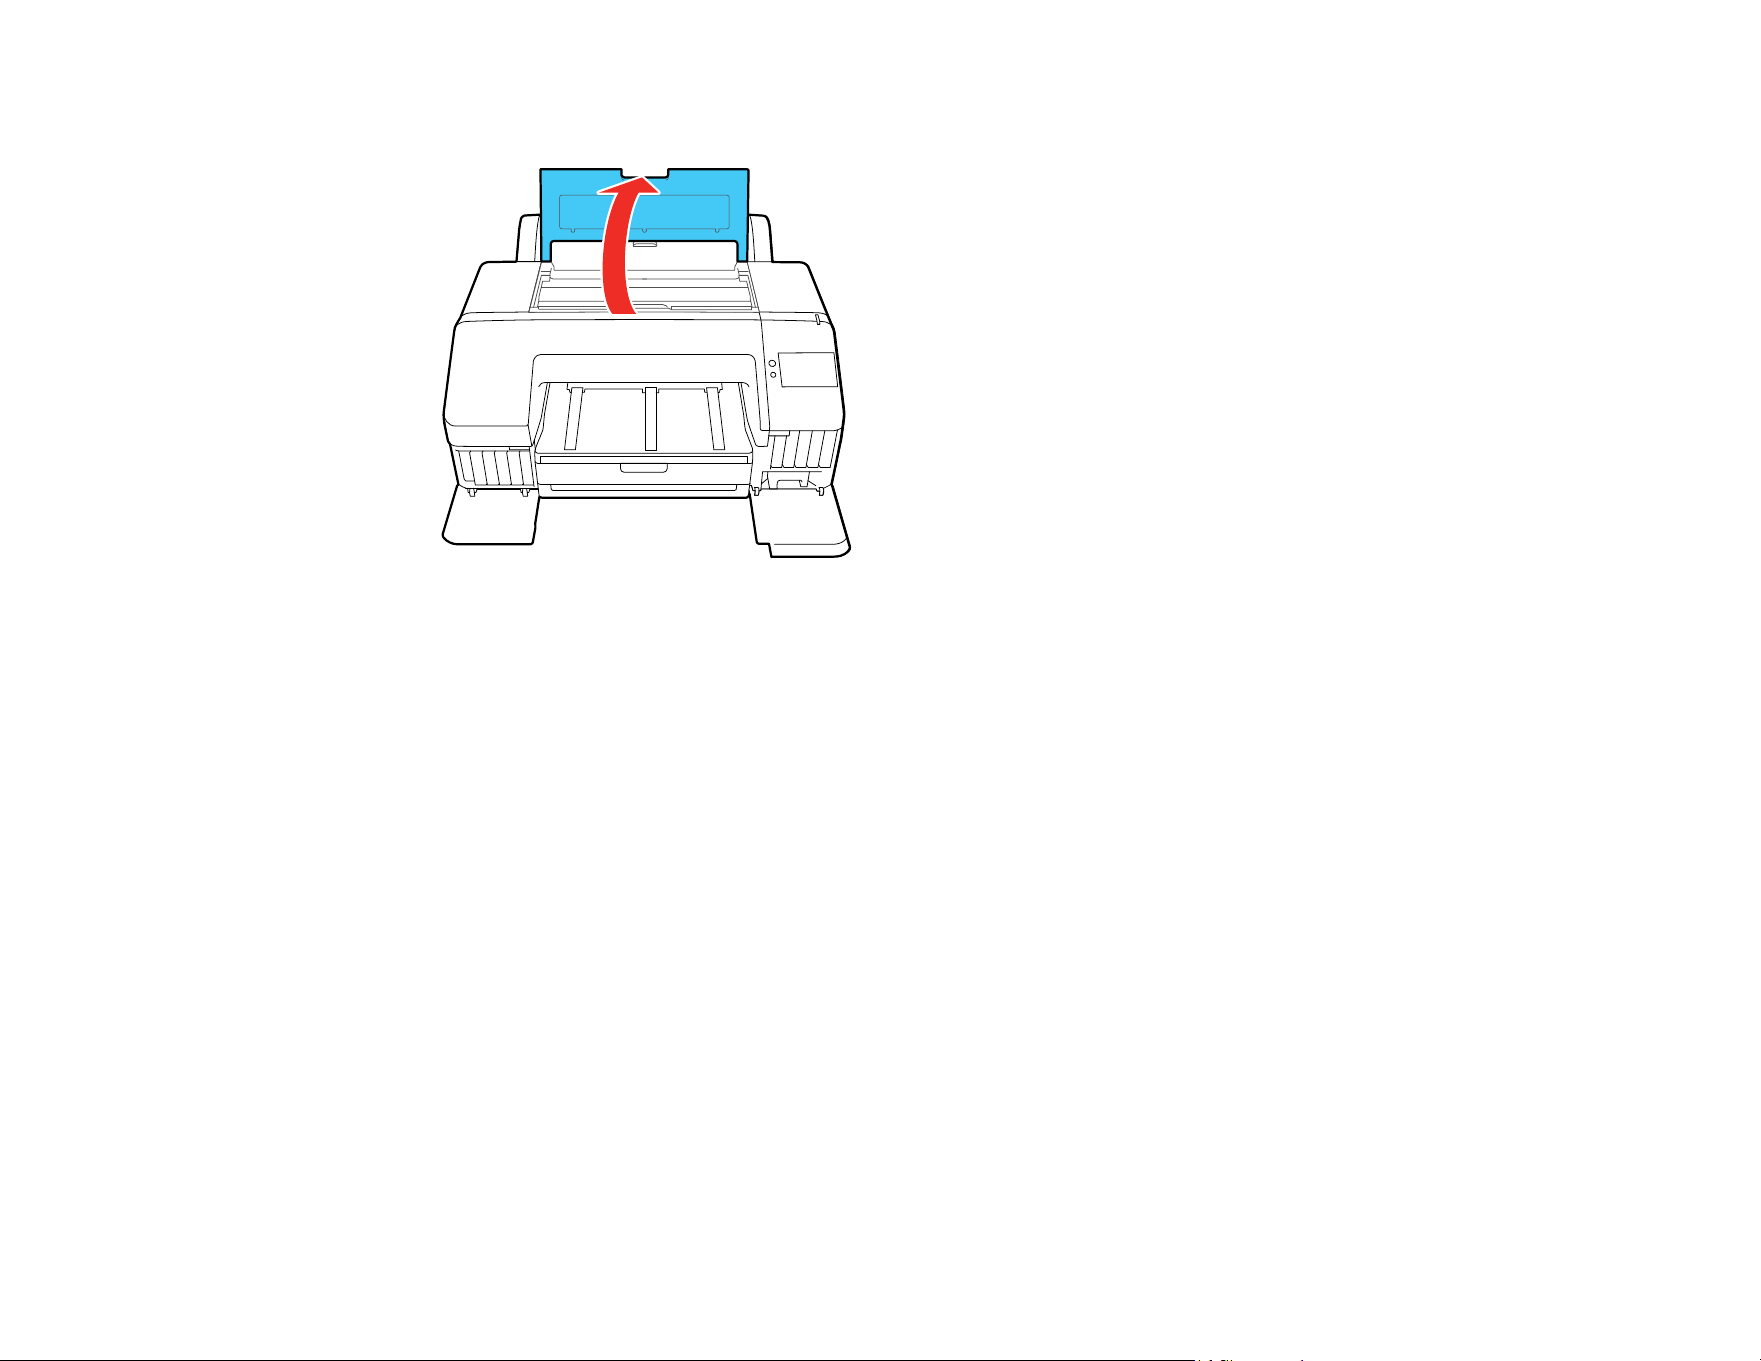
194
4. Open the printer cover.
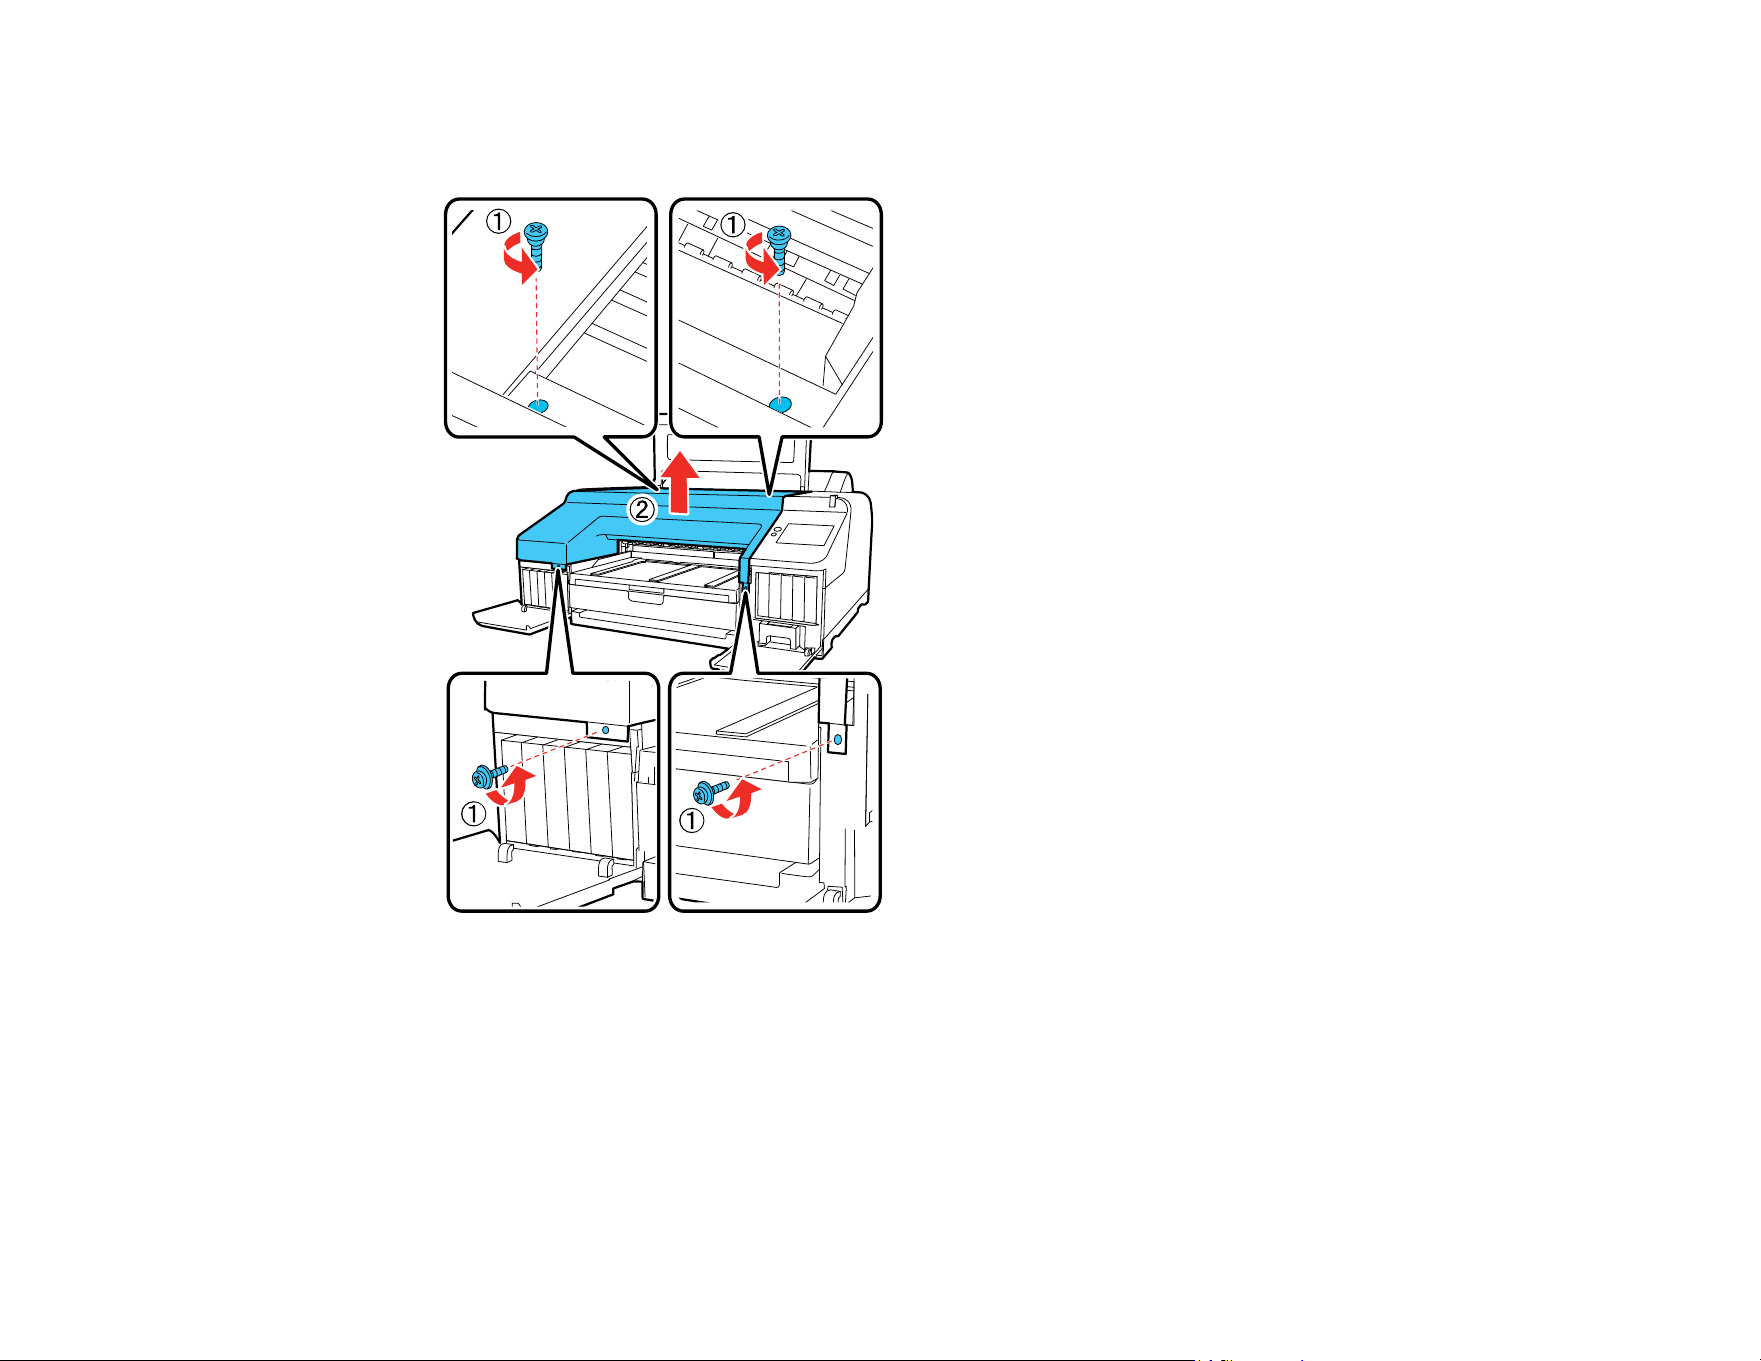
195
5. Use a Phillips-head screwdriver to remove the four screws securing the front cover, then remove the
front cover.
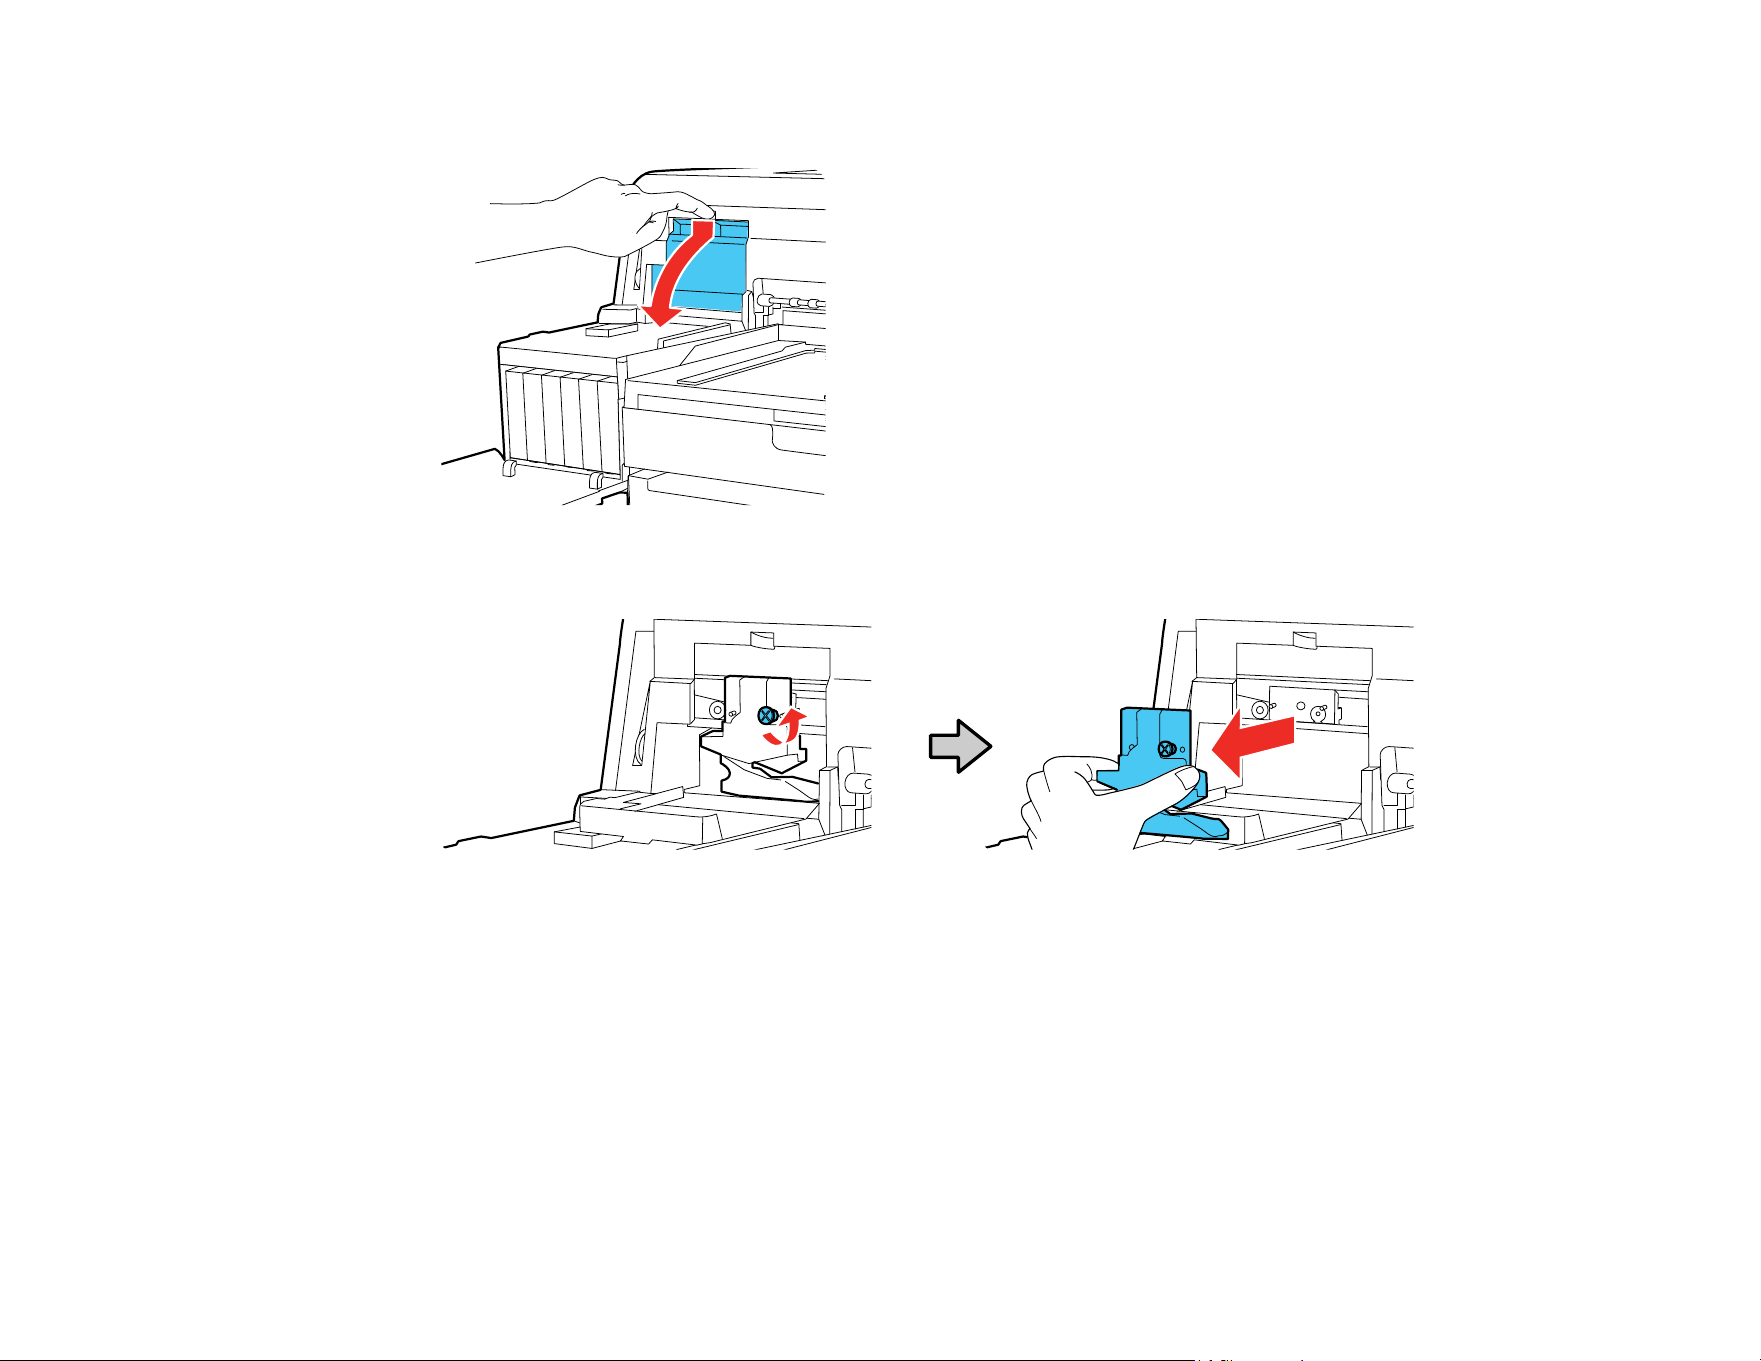
196
6. Press in on the tab on the cutter cover, release it, and pull down on the cutter cover to open it.
7. Loosen the screw holding the cutter in place and carefully remove the cutter.
Warning: Keep the cutter out of the reach of children. The blade is sharp and can cause injury.
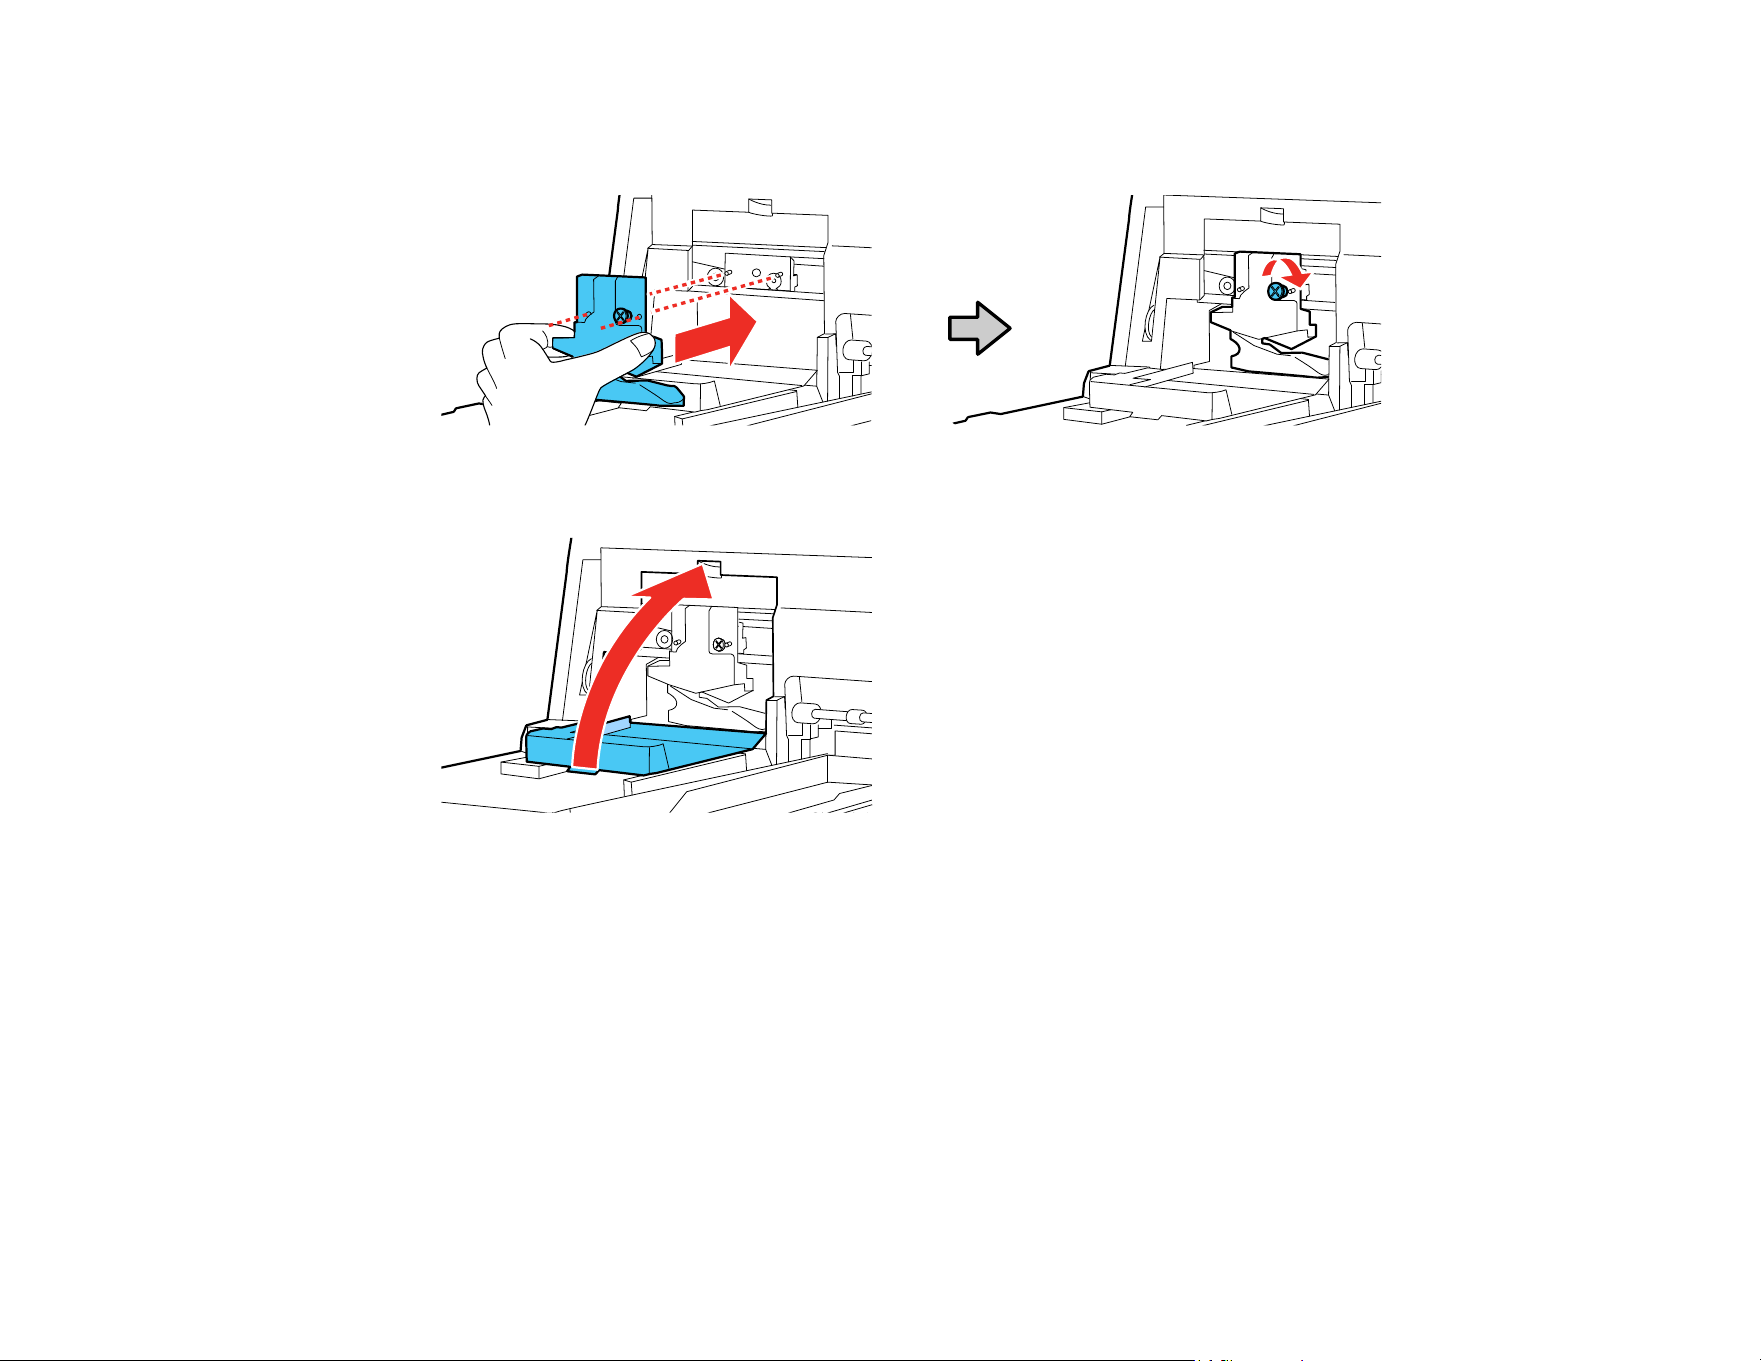
197
8. Align the pin on the new cutter with the hole in the product and insert it. Tighten the cutter screw
securely.
9. Close the cutter cover as shown and press it in until it clicks into place.
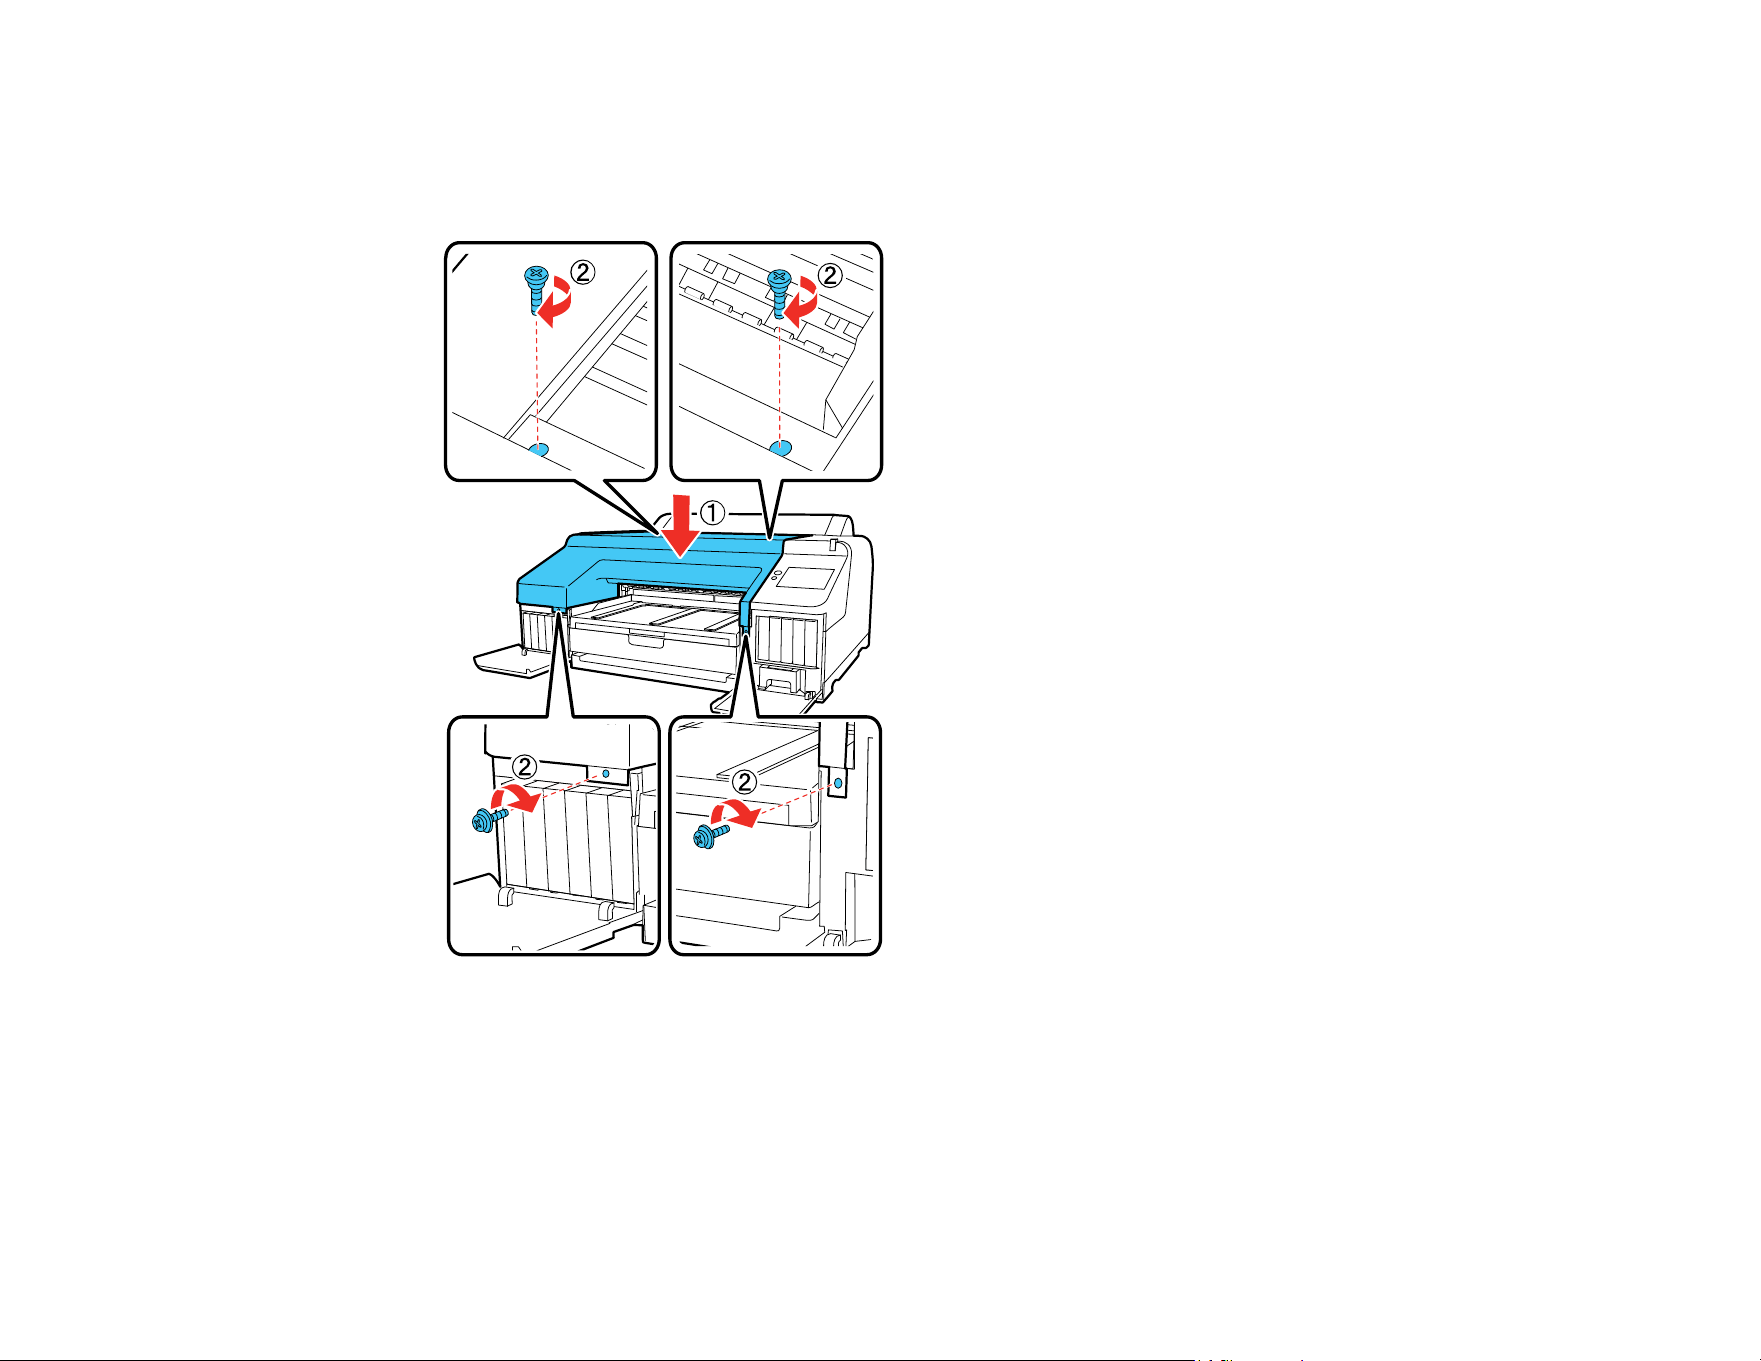
198
10. Replace the front cover. Insert and tighten the four screws.
Note: Use the screws with washers to secure the front section of the cover.
Note: If the front cover is not properly replaced, an error occurs and the printer does not respond.
11. Close the printer cover.
12. Close the left and right ink cartridge covers.
Parent topic: Maintenance and Transportation

199
Related references
Optional Equipment and Replacement Parts
Cleaning the Print Head Cap Area
If the print head is clogged and automatic cleaning does not fix the issue, you can clean the print head
and the area around the caps using the optional cleaning sticks (part number C13S090013).
Caution: Before beginning the cleaning process, note the following:
• Do not touch any circuit boards or any parts inside the printer besides those which need to be cleaned.
Doing so may cause the printer to malfunction or print quality may decline.
• Always use new cleaning sticks, or dirt may be transferred into the printer.
• Do not touch the tip of the cleaning stick. This may reduce the cleaning effect.
• Touch a metal object before cleaning to discharge any static electricity.
• Do not use an organic solvent such as alcohol to wipe the caps, as it may damage the print head.
• Do not move the print head by hand. Doing so could damage the printer.
• If paper is loaded in the printer, remove it.
1. On the LCD screen, select the maintenance icon > Capping Station/Wiper Cleaning > Start.
The print head moves to the cleaning position.
2. Select How To... and then follow the on-screen instructions.
3. Select Done to return the print head to its home position.
Parent topic: Maintenance and Transportation
Related references
Optional Equipment and Replacement Parts
Related tasks
Removing Roll Paper
Moving or Transporting Your Product
If you need to move or transport your product, prepare it as described here.
Caution: During transportation and storage, follow these guidelines:
• Avoid tilting the product, placing it vertically, or turning it upside down; otherwise ink may leak.
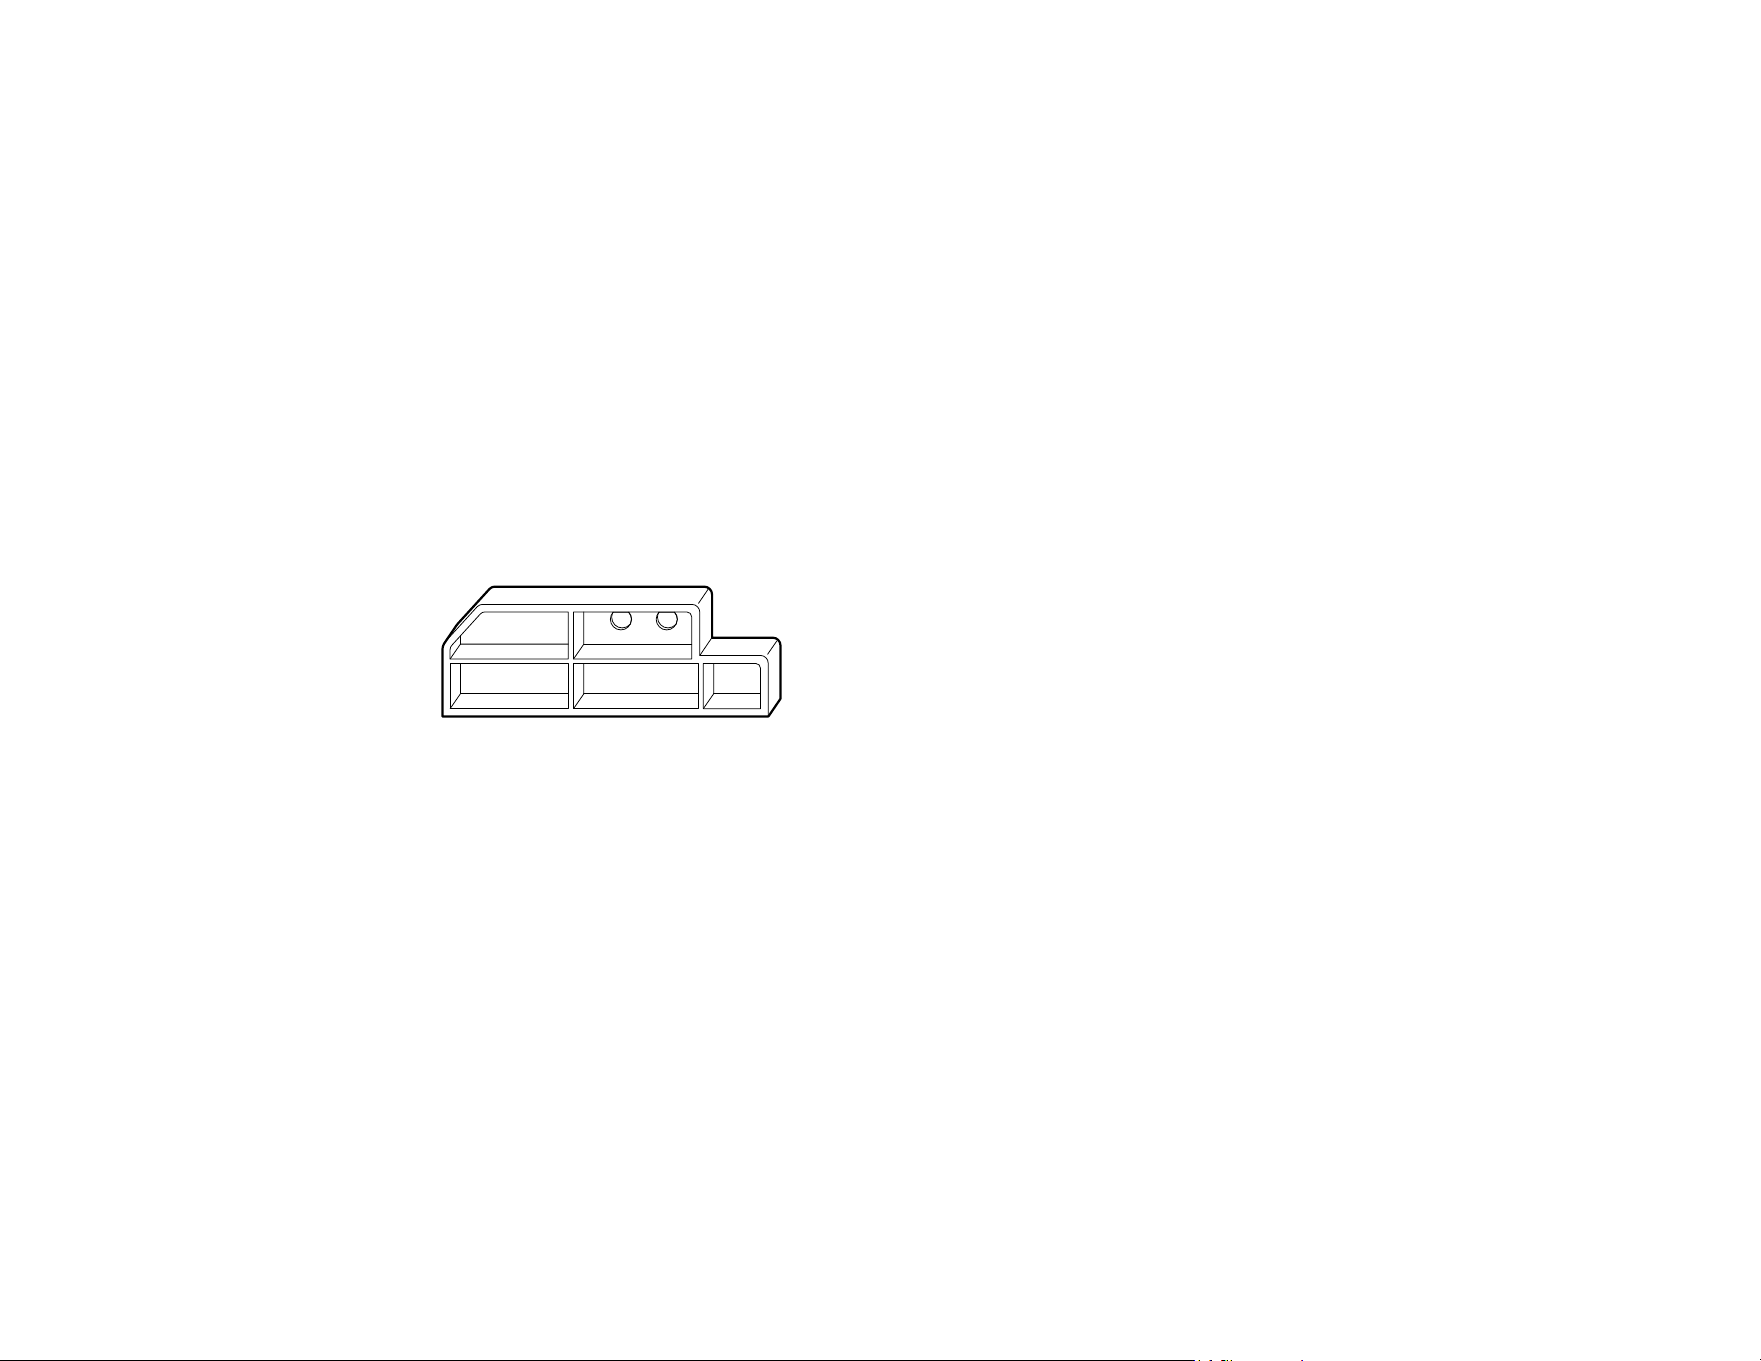
200
• Only hold the printer from the areas outlined below or you may damage the product.
• Leave the ink cartridges installed. Removing the cartridges can dry out the print head and may prevent
the product from printing, or ink may leak.
Note: Before storing your product for a long period, replace low, expended, or expired ink to help
prevent the print head from drying out. Store your product in a cool, dry place.
1. Remove all the paper from the product.
2. Turn off the product.
3. Unplug the power cable.
4. Disconnect any connected cables.
5. Make sure to reinstall the plastic protective piece you removed during setup so that the print head is
secure. See the printer's Start Here sheet and attach it in its original position in the reverse order of
removing it.
6. Close any open covers on the printer.
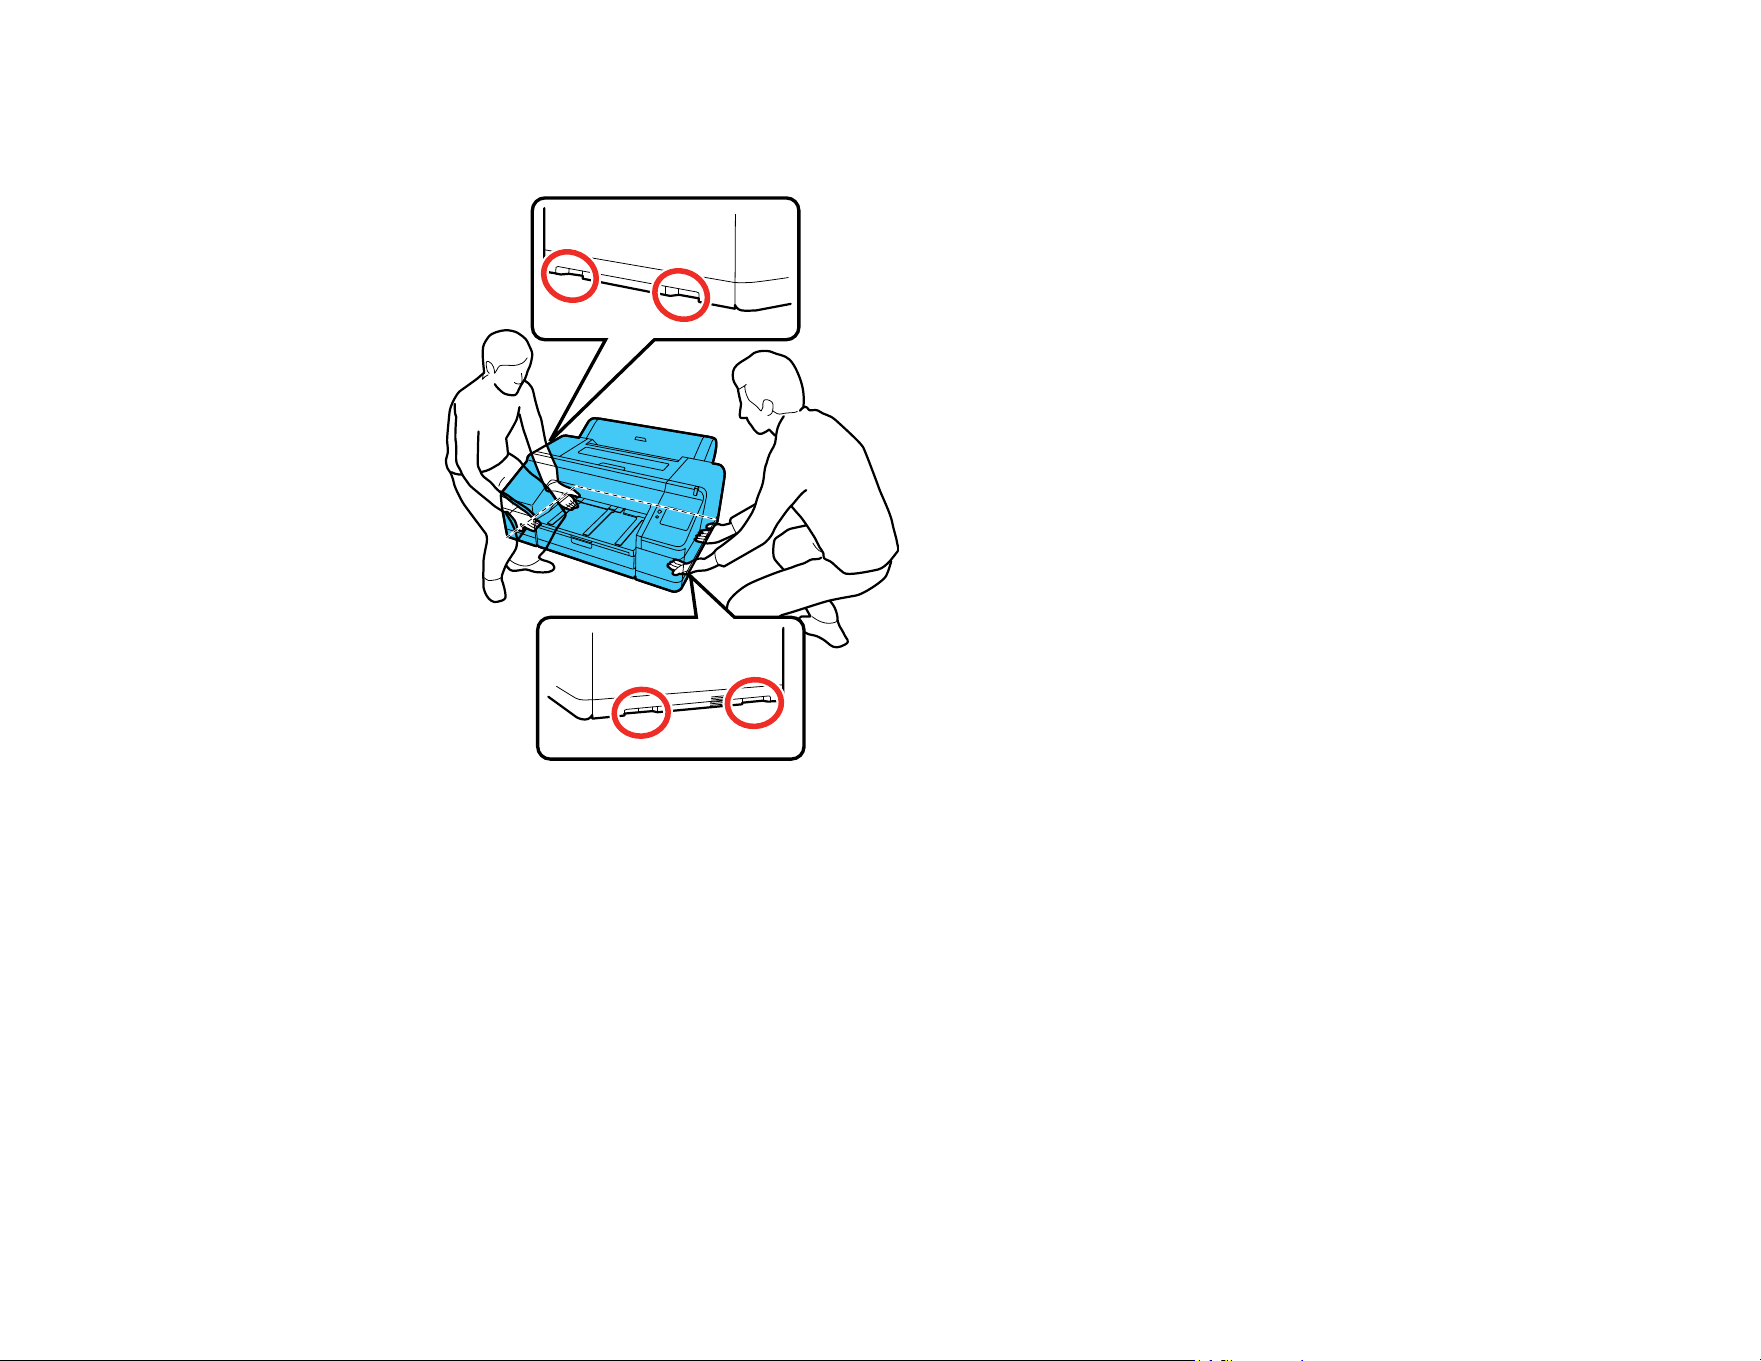
201
7. Have two people lift the printer by placing their hands in the indentations on the left and right sides
as shown.
Warning: This product is heavy and requires two people to move it.
8. Place the product in its original packing materials, if possible, or use equivalent materials with
cushioning around the product. Make sure the box adequately protects the product control panel.
9. After transporting the product, remove the plastic protective piece from the print head, connect the
power cable, and turn on the product.
10. Run a print head nozzle check and clean the print head, if necessary.
Parent topic: Maintenance and Transportation
Related concepts
Print Head Nozzle Check
Print Head Cleaning

202
Solving Problems
Check these sections for solutions to problems you may have using your product.
Checking for Software Updates
Product Status Messages
Resetting Control Panel Defaults
Solving Printer Problems
Solving Network Problems
Solving Printing Problems
Solving Paper Problems
Solving Print Quality Problems
Uninstall Your Product Software
Where to Get Help (U.S. and Canada)
Where to Get Help (Latin America)
Checking for Software Updates
If you disabled automatic software updates, it's a good idea to periodically check Epson's support
website for free updates to your product software. Visit epson.com/support (U.S.), epson.ca/support
(Canada), or latin.epson.com/support (Latin America) and select your product.
• Windows: You can also manually update the software by:
• Windows 11: Clicking the up arrow on the right side of the Windows taskbar, clicking the icon,
clicking on your product, and then selecting Software Update.
• Windows (other versions): Accessing the Windows Desktop and right-clicking the icon for your
product in the right side of the Windows taskbar, or clicking the up arrow and right-clicking , and
then selecting Software Update.
• Clicking on the Utility tab in the printer settings window and selecting Software Update
You can also update the software by selecting Epson Software Updater in the EPSON or Epson
Software program group, accessible by the Start button, or on the Start or Apps screens, depending
on your version of Windows.
• OS X: You can manually update the software by opening the Applications > Epson Software folder
and selecting EPSON Software Updater.

203
• macOS 10.12.x, 10.13.x, 10.14.x, 10.15.x, 11.x, 12.x, 13.x: You can manually update the software by
opening the App Store, selecting Updates, searching for a software update option for Epson
Software, and selecting Update.
Parent topic: Solving Problems
Related tasks
Changing Automatic Update Options
Product Status Messages
You can often diagnose problems with your product by checking the messages on the LCD screen.
LCD screen message Condition/solution
Change paper settings
Paper setting in the printer driver
is different from paper
information registered in the
printer. Change paper setting
from the application or the driver.
For details, see your
documentation.
To change paper information that was registered using Epson Media
Installer, load the paper and then use the control panel.
You can also use Epson Media Installer to change paper information
for paper that has not been loaded.
Depending on the version of Epson Media Installer you are using,
you may not be able to change the paper information.
Check the media settings on the driver to determine which media is
being used. To change the media, select Paper Setting > paper
source > Change Paper type > Paper Type, and select the media
that matches the driver setting.
You can also select Use Printer Settings when you select the
media, which will default to the paper that is set on the LCD screen.
We recommend replacing the
auto cutter blade.
For details, see your
documentation.
The cutter has worn out. Replace the cutter.
TCP/IP configuration failed
The combination of the IP
address and the subnet mask is
invalid. See your documentation
for more details.
Enter the correct values for the IP address and the default gateway.
Check with your network administrator if you do not know the correct
values.

204
LCD screen message Condition/solution
Communication between the
network and the printer is
unstable.
You may be able to resolve this
by setting IEEE802.3az (Energy
Efficient Ethernet) to "Off".
See your documentation for
details.
See the links below or contact your network administrator for more
details.
The initial password is the
product's serial number.
Please check the serial number.
For more details, please refer to
the user manual.
See the link below for more details.
The initial password is provided
on the label attached to the
product.
For more details, please refer to
the user manual.
Recovery Mode The printer restarted in recovery mode because the firmware update
failed. Make sure you downloaded the latest firmware from the
Epson website and that the computer and printer are connected via
USB. Then try updating the firmware again.
A printer part needs to be
replaced
Contact Epson Support. For
details, see your documentation.
XXXXXXXX
(maintenance request code)
A part used in the printer is nearing the end of its service life. Contact
Epson for support and provide them with the displayed maintenance
request code. The error persists until you replace the requested part.
If you continue to use the printer, a printer error will occur.

205
LCD screen message Condition/solution
Printer error. Turn power off and
on again. If the problem persists,
contact Epson support.
XXXXXXXX
(service code)
An error message occurs when:
• The power cable is not connected securely
• An error occurs that cannot be cleared
When a printer error has occurred, the printer automatically stops
printing. Turn off the printer, disconnect the power cable from the
outlet and the printer, and reconnect them. Turn the printer on and
off several times. If the same error message is displayed on the LCD
screen, contact Epson for support and provide them with the
displayed service code.
Parent topic: Solving Problems
Related references
Forgot the Administrator Password
Related tasks
Replacing the Cutter
Setting a Password and Locking the Control Panel
Related topics
Wi-Fi or Wired Networking
Resetting Control Panel Defaults
If you have a problem with settings on the product control panel, you can reset them to their factory
defaults. You can choose which settings to reset or reset them all.
Note: This setting can be locked by an administrator. If you cannot access or change this setting,
contact your administrator for assistance.
1. Select > General Settings > System Administration > Restore Default Settings
2. Select one of these options:
• Network Settings: Resets all network settings.
• Clear All Data and Settings: Resets all control panel settings except date and time, length unit,
and language settings.
You see a confirmation screen.

206
3. Select Yes to reset the selected settings. (Select No if you want to cancel the operation.)
Parent topic: Solving Problems
Related tasks
Setting a Password and Locking the Control Panel
Solving Printer Problems
Check these sections if you have problems operating your product.
Product Does Not Turn On or Turns Off Unexpectedly
LCD Screen Shuts Off
Media Does Not Cut Cleanly
Red Light Shines Inside the Printer
Product Stops Printing Unexpectedly
Forgot the Administrator Password
Software Installation Problems
Parent topic: Solving Problems
Product Does Not Turn On or Turns Off Unexpectedly
If the product does not turn on or turns off unexpectedly, try these solutions:
• Make sure the power cable is securely connected.
• Make sure the power outlet works by connecting the power cable for another electronic device.
• Turn off or adjust the Power Off Timer setting as necessary.
• If the product turned off due to a power outage or was unplugged before being turned off, the
printhead may not be correctly capped. If the printhead is left uncapped for a long time, the print
quality may decline. Turn on the printer and then turn it off to make sure the printhead is capped
(returns to the home position).
Parent topic: Solving Printer Problems
Related tasks
Changing the Power Off Timer Settings
LCD Screen Shuts Off
If the LCD screen shuts off intermittently, the printer may be in sleep mode. Try these solutions:
• Press the touchscreen or any of the buttons on the control panel to exit sleep mode.

207
• You can adjust the delay time before the product enters sleep mode in the Basic Settings menu.
Parent topic: Solving Printer Problems
Related references
Basic Settings Menu
Related tasks
Changing the Sleep Timer Settings
Media Does Not Cut Cleanly
If the built-in cutter does not cleanly cut your media, replace the cutter.
Depending on the paper, if Quick Cut on the control panel is set to On, the paper may not be cut
cleanly.
Parent topic: Solving Printer Problems
Related references
Paper Setting Menu
Related tasks
Replacing the Cutter
Red Light Shines Inside the Printer
The red light always shines inside the printer. This is normal.
Parent topic: Solving Printer Problems
Product Stops Printing Unexpectedly
If your product stops printing unexpectedly, try these solutions:
• Make sure the power cable is securely connected.
• Check the messages on the control panel. If an error has occurred, follow the instructions on the
screen to clear the error.
• If an error occurs during printing, the print queue enters Pause status and stops printing. Do one of the
following to check the status of the print queue:
• In Windows, double-click the printer icon in the Devices and Printers, Printers, or Printers and
Faxes folder; if printing is paused, open the Printer menu and clear the Pause check box.
• On a Mac, select System Preferences > Printers & Scanners or Print & Fax > Open Print
Queue. Double-click the icon for any printer that is Paused and click Resume Printer.

208
Parent topic: Solving Printer Problems
Related references
Product Status Messages
Forgot the Administrator Password
The preset value for the administrator password is the product serial number. Check the label on the
back of the product to locate the serial number. We recommend that you change the preset password as
soon as possible to prevent unauthorized access.
If you forgot the administrator password you created during network setup, contact Epson for support.
Parent topic: Solving Printer Problems
Related references
Where to Get Help (U.S. and Canada)
Where to Get Help (Latin America)
Software Installation Problems
If you have problems while installing your product software, try these solutions:
• Make sure your product is turned on and any necessary cables are securely connected at both ends. If
you still have problems installing software, disconnect the cable and carefully follow the instructions on
the Start Here sheet. Also make sure your system meets the requirements for your operating system.
• Close any other programs, including screen savers and virus protection software, and install your
product software again.
• In Windows, make sure your product is selected as the default printer and the correct port is shown in
the printer properties.
• For Mac, make sure your product is shown in the printer list. Click System Preferences or System
Settings > Printers & Scanners or Print & Fax. If the printer name is not displayed, add the printer.
• If you see any error message or your software does not install correctly in Windows, you may not have
software installation privileges. Contact your system administrator.
• If you are printing over a network, make sure your product is set up properly on the network.
• If the USB cable is not recognized, try using a different USB cable.
Parent topic: Solving Printer Problems
Related references
Windows System Requirements

209
Mac System Requirements
Related topics
Wi-Fi or Wired Networking
Solving Network Problems
Check these solutions if you have problems setting up or using your product on a network.
Note: Breakdown or repair of this product may cause loss of network data and settings. Epson is not
responsible for backing up or recovering data and settings during or after the warranty period. We
recommend that you make your own backup or print out your network data and settings.
Product Cannot Connect to a Wireless Router or Access Point
Network Software Cannot Find Product on a Network
Product Does Not Appear in Mac Printer Window
Wired Network Connection Becomes Unstable
Cannot Print Over a Network
Parent topic: Solving Problems
Product Cannot Connect to a Wireless Router or Access Point
If your product has trouble finding or connecting to a wireless router or access point, try these solutions:
• If you are connecting the product via Wi-Fi Protected Setup (WPS) and the Wi-Fi icon on your
product's LCD screen is not lit or does not appear, make sure you select one of the WPS options from
the product control panel within 2 minutes of pressing the WPS button on your router.
• Make sure to place your product within contact range of your router or access point. Avoid placing
your product near a microwave oven, cordless phone, or large metal object, such as a filing cabinet.
• Verify that your router or access point is operating correctly by connecting to it from your computer or
another device.
• Print a network connection report and check the codes and messages on the report to help determine
the cause of the problem.
• You may need to disable the firewall and any anti-virus software on your wireless router or access
point.
• Try restarting your router following the instructions in your router documentation.

210
Note: If you are reading these instructions online, you will lose your Internet connection when you
restart your router.
• Check to see if access restrictions, such as MAC address filtering, are set on the router or access
point. If access restrictions are set, add your product's MAC address to your router's address list. To
obtain your product's MAC address, print a network status sheet. Then follow the instructions in your
router or access point documentation to add the address to the list.
• If your router or access point does not broadcast its network name (SSID), follow the instructions that
came with your product to enter your wireless network name manually.
• If your router or access point has security enabled, determine the kind of security it is using and any
required password or passphrase for connection. Then make sure to enter the exact WEP key or WPA
passphrase correctly.
• Check if your computer is restricting the available wireless channels. If so, verify that your wireless
access point is using one of the usable channels and change to a usable channel, if necessary.
• If you cannot connect your product to a device using Wi-Fi Direct, you may have exceeded the
maximum number of devices connected to your product (8). Print a network status sheet or access
Web Config on the browser for your device and check the number of connected devices. If 8 devices
are already connected, disconnect a device by deleting the product's SSID from the Wi-Fi screen of
that device. If fewer than 8 devices are connected, check the accuracy of your other network settings,
move your device closer to your product, and try connecting again.
• If you are using a Wi-Fi Direct connection that suddenly disconnects, the Wi-Fi Direct password on
your device may have been changed. If necessary, delete the existing DIRECT-xxxxxxxx connection
settings from your device and enter a new password. See your device documentation for instructions.
Parent topic: Solving Network Problems
Related tasks
Printing a Network Connection Report
Printing a Network Status Sheet
Network Software Cannot Find Product on a Network
If EpsonNet Setup cannot find your product on a network, try these solutions:
• Make sure your product is turned on and connected to your network. Verify the connection using your
product control panel.
• Check if your network name (SSID) contains non-ASCII characters. Your product cannot display non-
ASCII characters.

211
• Print a network connection report and check the codes and messages on the report to help determine
the cause of the problem.
• Make sure your product is not connected to a guest network.
• If necessary, reinstall your product software and try running EpsonNet Setup again:
1. Reset your product's network settings to their factory defaults.
2. Windows only: Uninstall your product software.
3. Restart your router following the instructions in your router documentation.
Note: If you are reading these instructions online, you will lose your Internet connection when you
restart your router, so note the next step before restarting it.
4. Download your product software from the Epson website using the instructions on the Start Here
sheet.
• If you have replaced your router, reinstall your product software to connect to the new router.
• Check to see if your wireless router or access point has an enabled Privacy Separator function that is
preventing detection of your device over the network. See your router or access point documentation
for instructions on disabling the Privacy Separator function.
• Try accessing any website from your computer to make sure that your computer's network settings are
correct. If you cannot access any website, there is a problem on the computer. Check the network
connection of the computer. See the documentation provided with the computer for details.
Parent topic: Solving Network Problems
Related tasks
Printing a Network Connection Report
Product Does Not Appear in Mac Printer Window
If your product does not appear in the Mac printer window, try these solutions:
• Turn your product off, wait 30 seconds, then turn it back on again.
• If you are connecting the product via Wi-Fi Protected Setup (WPS) and the Wi-Fi icon on your
product's LCD screen is not lit, make sure you select one of the WPS options from the product control
panel within 2 minutes of pressing the WPS button on your router.
• If you are connecting the product wirelessly via EpsonNet Setup and the Wi-Fi icon on your product's
LCD screen is not lit, make sure your product software was installed correctly. If necessary, reinstall
your software.

212
Parent topic: Solving Network Problems
Related concepts
Uninstall Your Product Software
Wired Network Connection Becomes Unstable
When you connect the product to a wired network using a router or access point that supports IEEE
802.3az (Energy Efficient Ethernet), the connection may become unstable, you may be unable to
connect to the product, and the communication speed may become slow. If you experience any of these
issues, follow the steps below to disable IEEE 802.3az and then connect your product again.
1. Disconnect the Ethernet cables connected to the computer and your product.
2. Disable IEEE 802.3az for the computer's network adapter if it is enabled (check your operating
system's Ethernet connection settings).
3. Connect the computer and your product directly with an Ethernet cable.
4. Print a network connection report from your product.
5. Check the printer's IP address on the network connection report.
6. On the computer, open a web browser and enter your product's IP address from the network
connection report.
7. Select Network Settings > Ethernet.
8. Select OFF for IEEE 802.3az. and click Next.
9. Click Settings and remove the Ethernet cable connecting the computer and your product.
10. If you disabled IEEE 802.3az for your computer's network adapter, enable it.
11. Reconnect the Ethernet cables from the router or access point to your computer and product.
If problems still occur, other devices on the network may be causing them.
Parent topic: Solving Network Problems
Related tasks
Printing a Network Connection Report
Cannot Print Over a Network
If you cannot print over a network, try these solutions:
• Make sure that your product is turned on.
• Make sure you install your product's network software as described in your product documentation.

213
• Print a network status sheet and verify that the network settings are correct. If the network status is
Disconnected, check any cable connections and turn your product off and then on again.
• Print a network connection report and check the codes and messages on the report to help determine
the cause of the problem.
• If you are using TCP/IP, make sure the product's IP address is set correctly for your network. If your
network does not assign IP addresses using DHCP, set the IP address manually.
• Make sure that the latest version of your product's Epson printer driver is installed. If a genuine Epson
printer driver is not installed, the available functions are limited. If the printer driver is not correctly
installed, uninstall and reinstall the printer driver.
• If network printing is slow, print a network status sheet and check the signal strength. If it is poor, place
your product closer to your router or access point. Avoid placing your product near a microwave oven,
cordless phone, or large metal object, such as a filing cabinet.
• Try restarting your router following the instructions in your router documentation.
Note: If you are reading these instructions online, you will lose your Internet connection when you
restart your router.
• Connect your product directly via USB and try to print. If you are able to print, there is a problem with
the network settings. Verify your network settings before reconnecting your product to the network.
• Check to see if your wireless router or access point has an enabled Privacy Separator function that is
preventing printing from a device over the network. See your router or access point documentation for
instructions on disabling the Privacy Separator function.
• Check your wired LAN router or access point to see if the LED for the port to which your product is
connected is on or flashing. If the link LED is off, try the following:
• Make sure the Ethernet cable is securely connected to your product and to your router, access
point, switch, or hub.
• Try connecting your product to a different port or a different router, access point, switch, or hub.
• Try connecting with a different Ethernet cable.
• Try printing to your product from another computer on the network.
Parent topic: Solving Network Problems
Related concepts
Uninstall Your Product Software
Related tasks
Printing a Network Connection Report

214
Printing a Network Status Sheet
Solving Printing Problems
Check these sections if you have problems printing with your product.
Nothing Prints
Print Head Moves But Nothing Prints
Parent topic: Solving Problems
Nothing Prints
If you have sent a print job and nothing prints, try these solutions:
• Make sure your printer is turned on.
• Make sure there are no error messages on the product's LCD screen.
• Make sure any interface cables are connected securely at both ends. If you have a spare cable, try
connecting with the spare cable.
• Check the model and specifications of the interface cable to see if the cable is appropriate for your
computer and printer.
• If you connected your printer to a USB hub, make sure it is a first-tier hub. If it still does not print,
connect your printer directly to your computer instead of the hub.
• Make sure the USB hub is recognized correctly on the computer. Disconnect all USB hubs from the
computer and connect the printer directly to the computer's USB port.
• Make sure the USB cable length does not exceed 10 feet (3 m).
• If you are printing from a computer running a Windows operating system, make sure that the printer is
turned on and in ready status. Load paper A4-size or larger and then try printing a test page from the
printer driver (right-click on the printer icon, then select Properties > General tab > Print Test Page).
If you are able to print a test page, check the application you are trying to print from. If you are unable
to print a test page, re-check the items above.
Note: The "Driver Version" shown on the test page is the version number of the Windows internal
driver. This differs from the Epson printer driver version that you installed.
Parent topic: Solving Printing Problems

215
Print Head Moves But Nothing Prints
If the print head is moving and nothing prints, try these solutions:
• Print a nozzle check pattern. If the pattern does not print correctly, clean the print head again. (If the
printer has not been used for a long time the nozzles may be clogged.)
Parent topic: Solving Printing Problems
Related concepts
Print Head Nozzle Check
Print Head Cleaning
Solving Paper Problems
Check these sections if you have problems using paper with your product.
Paper Feeding Problems
Image Is Not Positioned Correctly On the Media
Paper Jam Problems
Parent topic: Solving Problems
Paper Feeding Problems
If you have problems feeding paper, try these solutions:
• Make sure paper is loaded in the correct orientation. Load cut sheets vertically (short edge first).
• For best results, follow these guidelines:
• Use new, smooth, high-quality paper that is not damp, curled, creased, old, too thin, or too thick.
• Follow any special loading instructions that came with the paper.
• Load paper just before printing.
• If roll paper does not feed, cut the end straight across and uncurl it by rolling it backward, if necessary.
Then reload the paper.
• If wrinkles appear on roll paper, adjust the Back Tension setting.
• If you cannot insert paper easily into the paper feed slot, make sure the paper is perfectly flat and not
curled.
• Do not load more than one piece of cut sheet paper.
• Make sure your paper meets the specifications for your product.

216
• If paper feeds at an angle, make sure Detect Paper Skew is set to On in the Printer Settings menu.
• If paper does not eject correctly, decrease the Paper Suction setting for the loaded paper type.
• Make sure that paper is not jammed inside the product.
• Make sure you are using the product at the proper room temperature.
• If you are using paper that curls easily, make sure you are in an environment with a room temperature
of 73 °F (23 °C) or higher.
Parent topic: Solving Paper Problems
Related references
Paper Specifications
Environmental Specifications
Paper Setting Menu
Image Is Not Positioned Correctly On the Media
If the printed image is not positioned correctly on your media, try these solutions:
• Make sure you loaded the media correctly and selected the correct margin and start positions for it on
the product control panel.
• Check the print area in the settings of your print application and the printer.
• Make sure the correct Page Size option is selected in the print settings. If the option selected for Roll
Width or Paper Size in the printer driver does not match the paper that is loaded in the printer, the
print may not be in the correct position or some of the data may be printed off of the paper.
• If Paper Size Check is set to Off, the printer may print outside the bounds of the paper. Change the
setting to On.
• Check the Top Margin settings in the Paper Settings on the control panel. The Top Margin settings
on the control panel are given priority over the margin settings of your print application.
Parent topic: Solving Paper Problems
Paper Jam Problems
If paper has jammed in the printer and a message appears on the LCD screen, follow the steps here to
clear the jam.
1. Check the error message displayed on the LCD screen.
2. Select Start.
3. Select See Description and follow the on-screen instructions to remove the jammed paper.

217
Parent topic: Solving Paper Problems
Solving Print Quality Problems
Check these sections if you have problems with print quality.
Nozzle Check Pattern Prints Incorrectly
Overall Print Quality is Poor
Lines Are Misaligned
Prints are Scuffed or Smeared
Prints are Wrinkled
Margins Appear in Borderless Prints
Parent topic: Solving Problems
Nozzle Check Pattern Prints Incorrectly
If the nozzle check pattern does not print correctly, try these solutions:
• Clean the print head and print the check pattern again. If cleaning the print head several times does
not solve the problem, run a Power Cleaning.
• If nozzles are still clogged after head cleaning at the strongest level, leave the product turned off
overnight and check the nozzles again. If you still cannot clear the nozzles, contact Epson support.
• If the printer has not been used for a long time, nozzles may be dried and clogged. Turn the printer on
at least once every few weeks and print a nozzle check pattern to prevent the nozzles from clogging.
Parent topic: Solving Print Quality Problems
Related concepts
Print Head Maintenance
Related references
Where to Get Help (U.S. and Canada)
Where to Get Help (Latin America)
Overall Print Quality is Poor
If you notice that your print quality is uneven, too light, too dark, or there are lines in the print (banding),
try these solutions:
• Run a nozzle check to see if any of the print head nozzles are clogged. Then clean the print head, if
necessary.

218
• If clogs are not cleared after cleaning the print head three times, run a Power Cleaning. If the situation
does not improve after running a Power Cleaning, clean the capping station and wiper, and then clean
the print head again. If you cleaned the print head another three times and the situation has not
improved, turn off the product and leave it off overnight or longer. When turned off for some time, the
clogged ink may dissolve. Turn on the printer and check the results. If the print quality still has not
improved, contact Epson Support.
• Align the print head.
• Adjust the paper feed.
• Make sure you are using genuine Epson ink cartridges. If you use non-Epson ink cartridges, printouts
may be faint, or the color of the printed image may be uneven because the remaining ink level is not
correctly detected.
• Make sure your ink cartridges have not expired. For best results, use ink cartridges before the
expiration date printed on the package (within six months of installation in the printer). Replace expired
cartridges with new ones.
• Shake the cartridges before installing them in the printer.
• Make sure you selected the correct Media Type setting in the printer driver that matches the paper
loaded in the printer.
• Compare the print result with the image on your computer screen. Since monitors and printers
produce colors differently, printed colors and screen colors do not always look the same.
• Make sure that the printer cover is closed during printing.
• Check the ink levels on the LCD screen. Replace any cartridges that are low on ink. If there is a
difference in color after replacing the ink cartridge, try cleaning the print head a few times.
• Enable color management in the software application or in the printer driver.
• If you are using non-Epson media, make sure you create a custom paper configuration for the media.
• If you have registered settings for non-Epson media, perform uni-directional printing. Follow the steps
below to clear the checkbox for High Speed in the printer driver.
• Windows: On the Main tab, select Quality from Level.
• Mac: Select Print Settings from the list, and then select the Advanced Color Settings tab.
• Check the quality setting that you selected in the printer driver. Using a faster printing method may
decrease the overall print quality. Select Level options that prioritize quality over speed.
Parent topic: Solving Print Quality Problems
Related concepts
Print Head Maintenance

219
Check Cartridge and Maintenance Box Status
Related references
Where to Get Help (U.S. and Canada)
Where to Get Help (Latin America)
Related tasks
Creating Custom Paper Settings Using the Control Panel
Cleaning the Print Head Cap Area
Removing and Installing Ink Cartridges
Related topics
Using Epson Media Installer
Lines Are Misaligned
With bidirectional printing, the print head prints while moving left and right. If the print head is misaligned,
ruled lines may be misaligned as a result. If you see vertical lines in the (bidirectional) print output, align
the print head.
Parent topic: Solving Print Quality Problems
Related concepts
Media Setting Optimization
Prints are Scuffed or Smeared
If your prints are scuffed or smeared, try these solutions:
• Make sure your paper meets the specifications for your product.
• Do not use paper with folds or creases and always use new media.
• If you are using cut sheet paper, check that changes in humidity and temperature have not made the
paper wavy or curled up on the edges. Load the paper just before printing and do not use wavy or
curled paper. For roll paper, cut off any wavy or curled parts and then load the roll again. For cut
sheets, use new paper.
• If the surface of the paper is scuffed, select a wider Platen Gap setting. If results do not improve, set
Paper Setting or Custom Paper Setting > Paper Eject Roller to Use (Heavy Load) or Use (Light
Load).
Caution: The Paper Eject Roller setting may damage glossy paper.

220
If your prints are still scuffed, try selecting a wider Platen Gap Offset setting.
Note: The Platen Gap Offset setting cannot be set wider or narrower than the value set for Platen
Gap.
• If ink is smeared on your prints, clean the rollers and the paper cassette printing path. For roll paper,
load blank A2 or 17-inch wide paper and select > Forward to feed it through the printer. Paper is
fed as long as the icon is pressed. Once the paper comes out clean, cleaning is complete. Then select
to cut the paper. For the paper cassette printing path, load several sheets of A2 (16.5 × 23.4 inches
[420 × 594 mm]) or 17-inch wide paper in the paper cassette. On the Home screen, select the
maintenance icon > Paper Guide Cleaning and then select Start. Select Run Again, as needed,
until the sheets come out clean, and then select Done.
• If you are using non-Epson media, make sure you create a custom paper configuration for the media.
• Lower the Color Density setting in the Paper Configuration dialog in the printer driver.
• Make sure the Paper Size Check setting is set to On, or the printer may print outside the edges of the
loaded paper and smear ink on the back of the print.
• Depending on the print density and type of paper you are using, the ink may take a while to dry. Do not
stack the prints until the ink is completely dry.
• Make sure that the printer driver's Media Type settings match the paper that you are using.
• If the bottom edge is scuffed, try widening the bottom margin.
• If the trailing edge is scuffed while printing, create your data with a wider margin.
• If the printhead is scuffing the edge of the paper, set a larger Top Margin in the paper settings.
• If the left or right edges of the paper are scuffed while printing, create your data with a wider left or
right margin. If the situation does not improve, rotate the data 90 degrees in the printer driver or your
software before you print.
• If you are printing multiple pages and Auto Cut is set to Never Cut, the area between pages may be
scuffed. Widen the margin between pages.
• Try cleaning inside of the printer and the roll paper feeder.
Parent topic: Solving Print Quality Problems
Related references
Paper Specifications
Paper Setting Menu
Maintenance Menu

221
Paper Configuration Options - Windows
Related tasks
Creating Custom Paper Settings Using the Control Panel
Cleaning the Roll Paper Feed Slot
Cleaning the Platen
Related topics
Using Epson Media Installer
Prints are Wrinkled
If you see wrinkles on your prints, try the following to solve the problem:
• Dry the paper after printing.
• Roll out the paper and stretch it.
• Lower the ink density in the Paper Configuration dialog in the printer driver.
• Lower the resolution in the Level setting in the printer driver.
• Make sure you are operating the printer at normal room temperature. The normal operating range for
Epson special media is 59 to 77 °F (15 to 25˚C), 40 to 60% humidity. For information about other
paper types, see the documentation supplied with the paper.
• Make sure you selected the correct Media Type setting in the printer driver that matches the paper
loaded in the printer.
• If you are using non-Epson media, make sure you create a custom paper configuration for the media.
Parent topic: Solving Print Quality Problems
Related references
Environmental Specifications
Paper Configuration Options - Windows
Related tasks
Creating Custom Paper Settings Using the Control Panel
Related topics
Using Epson Media Installer

222
Margins Appear in Borderless Prints
If borderless prints still have margins, try these solutions:
• Check the print settings selected in your print application you are using, as well as the printer driver.
• Make sure that the paper settings on the LCD screen match the paper you loaded.
• Make sure borderless enlargement is not set to Min in the printer driver.
• Paper that is stored incorrectly may expand or contract. Make sure you have stored the paper
according to the manufacturer's specifications.
• Check that the paper you are using supports borderless printing.
• If you are using roll paper, change the Adjust Cut Position setting. This may reduce the margins at
the top and bottom of the print.
Parent topic: Solving Print Quality Problems
Related references
Paper Setting Menu
Supported Paper Widths for Borderless Printing
Uninstall Your Product Software
If you have a problem that requires you to uninstall and re-install your software, follow the instructions for
your operating system.
Uninstalling Product Software - Windows
Uninstalling Product Software - Mac
Parent topic: Solving Problems
Uninstalling Product Software - Windows
You can uninstall and then re-install your printer software to solve certain problems.
1. Turn off the product.
2. Disconnect any interface cables.
3. Close all applications running on your computer.
4. Do one of the following:
• Windows 11: Click , then search for Settings and select it. Select Apps or System > Apps &
features. Then select the program you want to uninstall and select Uninstall.

223
• Windows 10: Right-click and select Control Panel > Programs > Programs and Features.
Select the uninstall option for your Epson product, then select Uninstall/Change.
Note: If you see a User Account Control window, click Yes or Continue.
Select your product again, if necessary, then select OK, and click Yes to confirm the
uninstallation.
• Windows 8.x: Navigate to the Apps screen and select Control Panel > Programs > Programs
and Features. Select the uninstall option for your Epson product, then select Uninstall/Change.
Note: If you see a User Account Control window, click Yes or Continue.
Select your product again, if necessary, then select OK, and click Yes to confirm the
uninstallation.
• Windows (other versions): Click or Start, and select All Programs or Programs. Select
Epson, select your product, then click EPSON Printer Software Uninstall.
Note: If you see a User Account Control window, click Yes or Continue.
In the next window, select your product and click OK. Then follow any on-screen instructions.
5. Restart your computer, then re-install your software.
Note: If re-installing your product software does not solve a problem, contact Epson support.
Parent topic: Uninstall Your Product Software
Related references
Where to Get Help (U.S. and Canada)
Where to Get Help (Latin America)
Uninstalling Product Software - Mac
In most cases, you do not need to uninstall your product software before re-installing it. However, you
can download the Uninstaller utility from the Epson support website to uninstall your product software as
described here.
Note: If re-installing your product software does not solve a problem, contact Epson support.

224
1. To download the Uninstaller utility, visit epson.com/support (U.S.), epson.ca/support (Canada), or
latin.epson.com/support (Latin America) and select your product.
2. Click Downloads.
3. Select your operating system, click Utilities, locate the Uninstaller utility, and click Download. (If
you do not see an Uninstaller utility, search for "Uninstaller" using the site search field.)
4. Run the file you downloaded.
5. Double-click the Uninstaller icon.
6. In the Epson Uninstaller screen, select the checkbox for each software program you want to
uninstall.
7. Click Uninstall.
8. Follow the on-screen instructions to uninstall the software.
9. Reinstall your product software.
Note: If you uninstall the printer driver and your product name remains in the Print & Fax, Print & Scan,
or Printers & Scanners window, select your product name and click the – (remove) icon to remove it.
Parent topic: Uninstall Your Product Software
Related references
Where to Get Help (U.S. and Canada)
Where to Get Help (Latin America)
Where to Get Help (U.S. and Canada)
Epson provides technical support and information on the installation, configuration, and operation of
professional printing products through the Epson Preferred Limited Warranty Plan. Dial (888) 377-6611,
7 a.m. to 4 p.m., Pacific Time, Monday through Friday. Days and hours of support are subject to change
without notice.
Note: If you experience difficulty with the toll-free number, call (562) 276-1305 (U.S.).
Before you call, make sure you have your printer serial number and proof of purchase.
Visit epson.com/support (U.S.) or epson.ca/support (Canada) and select your product for solutions to
common problems. You can download drivers, firmware, and documentation, get FAQs and
troubleshooting advice, or e-mail Epson with your questions.

225
Note: For help using any other software on your system, see the documentation for that software for
technical support information.
Purchase Supplies and Accessories
You can purchase genuine Epson ink, paper, and accessories from an Epson authorized reseller. To
find the nearest reseller, visit proimaging.epson.com (U.S.) or proimaging.epson.ca (Canada), select
your product series and product, and click the Where to Buy button. Or call 800-GO-EPSON (800-463-
7766) in the U.S. or 800-807-7766 in Canada.
Parent topic: Solving Problems
Where to Get Help (Latin America)
If you need additional help with your Epson product, contact Epson.
Epson provides these technical support services:
Internet Support
Visit Epson's support website at latin.epson.com/support and select your product for solutions to
common problems. You can download drivers, firmware, and documentation, get FAQs and
troubleshooting advice, or e-mail Epson with your questions.
Note: For help using any other software on your system, see the documentation for that software for
technical support information.
Speak to a Support Representative
Before you call Epson for support, please have the following information ready:
• Product name
• Product serial number (located on a label on the product)
• Proof of purchase (such as a store receipt) and date of purchase
• Computer configuration
• Description of the problem
Then call:
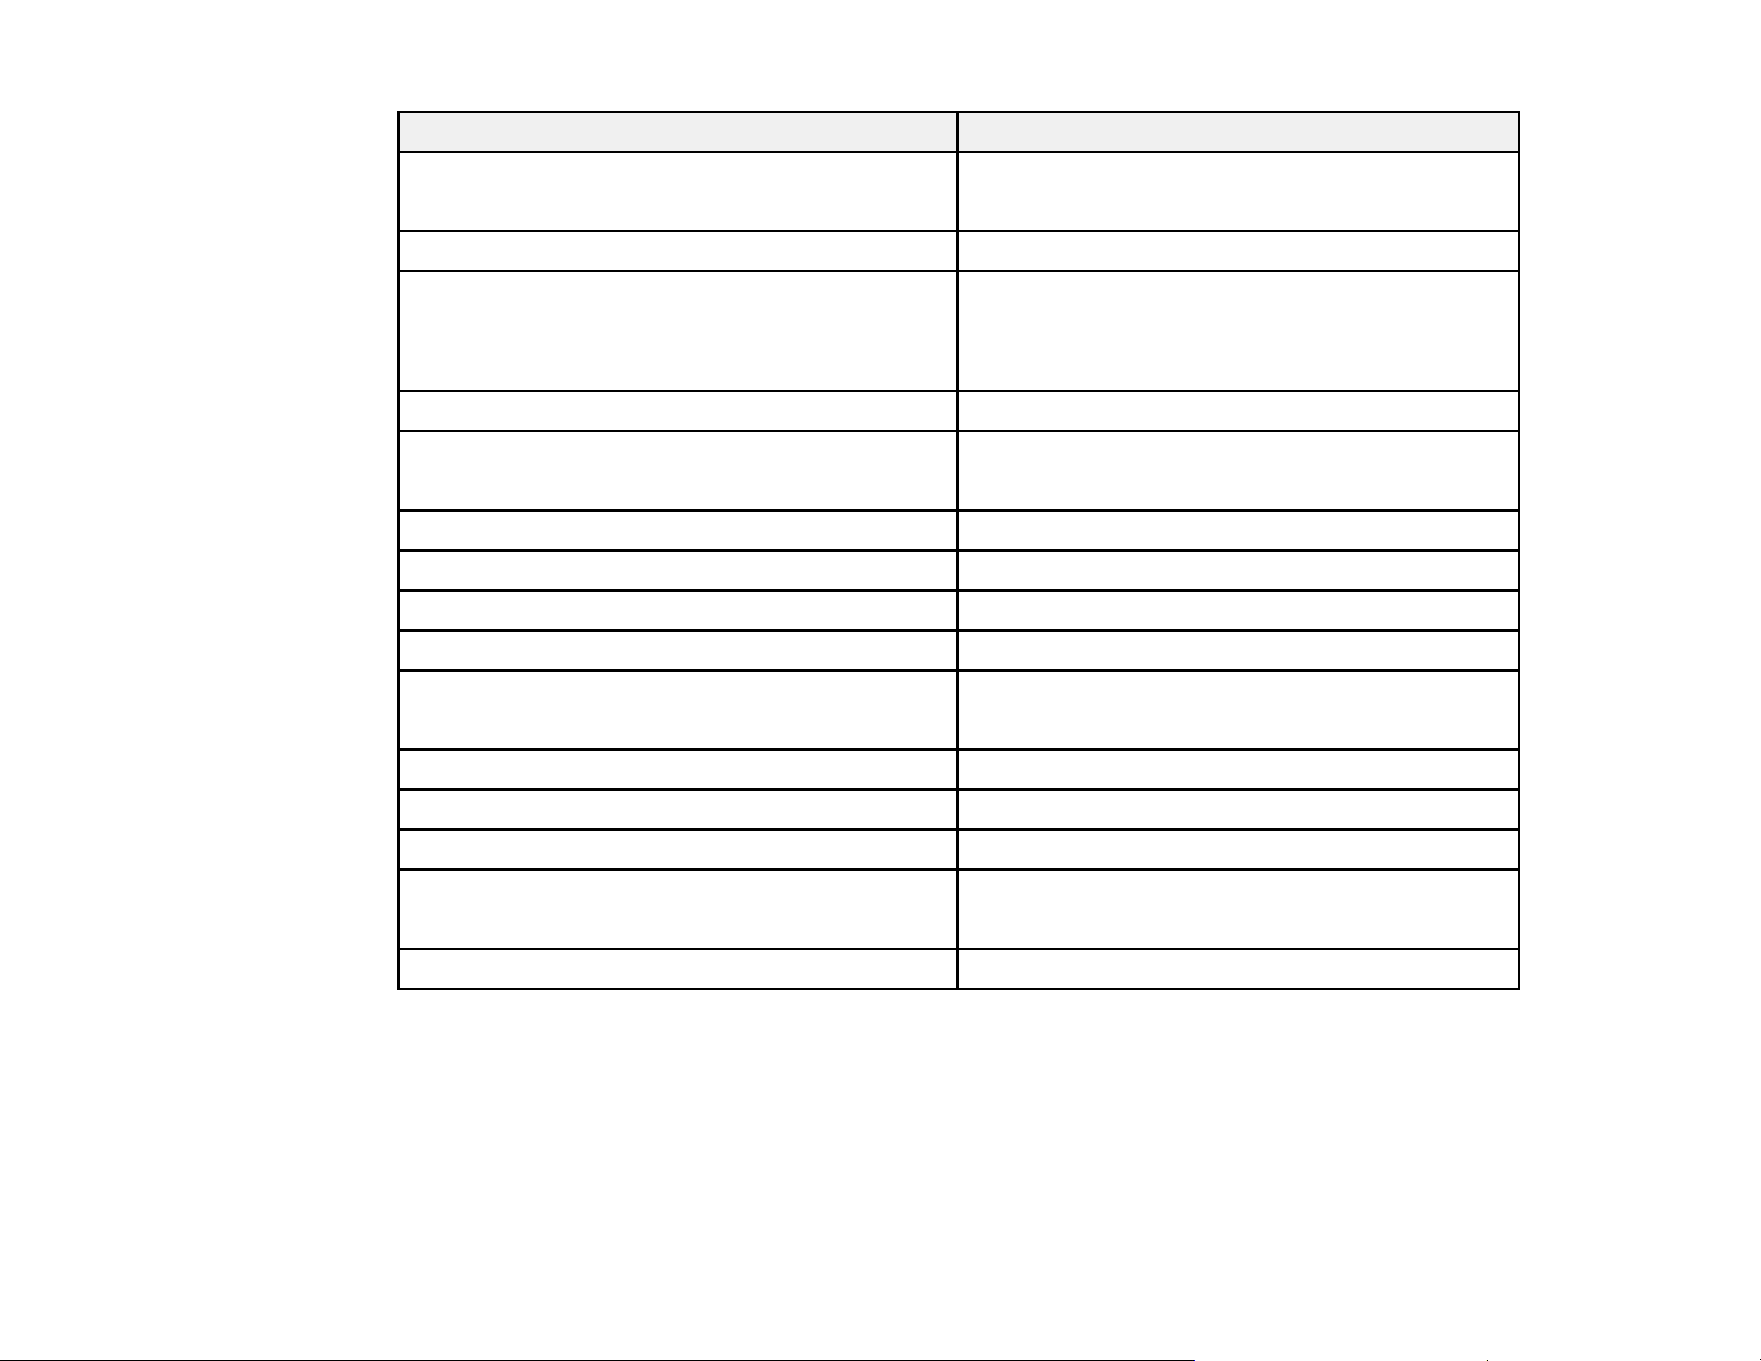
226
Country Telephone
Argentina (54 11) 5167-0300
0800-288-37766
Bolivia* 800-100-116
Brazil For the support phone number for your product,
visit Epson's support website at
epson.com.br/suporte, select your product, and
click the Contact Us tab.
Chile (56 2) 2484-3400
Colombia Bogota: (57 1) 602-4751
Other cities: 01-8000-915235
Costa Rica 800-377-6627
Ecuador* 1-800-000-044
El Salvador* 800-6570
Guatemala* 1-800-835-0358
Mexico Mexico City: (52 55) 1323-2052
Other cities: 800-087-1080
Nicaragua* 00-1-800-226-0368
Panama* 00-800-052-1376
Paraguay 009-800-521-0019
Peru Lima: (51 1) 418-0210
Other cities: 0800-10-126
Uruguay 00040-5210067
* Contact your local phone company to call this toll-free number from a mobile phone.
If your country does not appear in the list, contact the sales office in the nearest country. Toll or long
distance charges may apply.

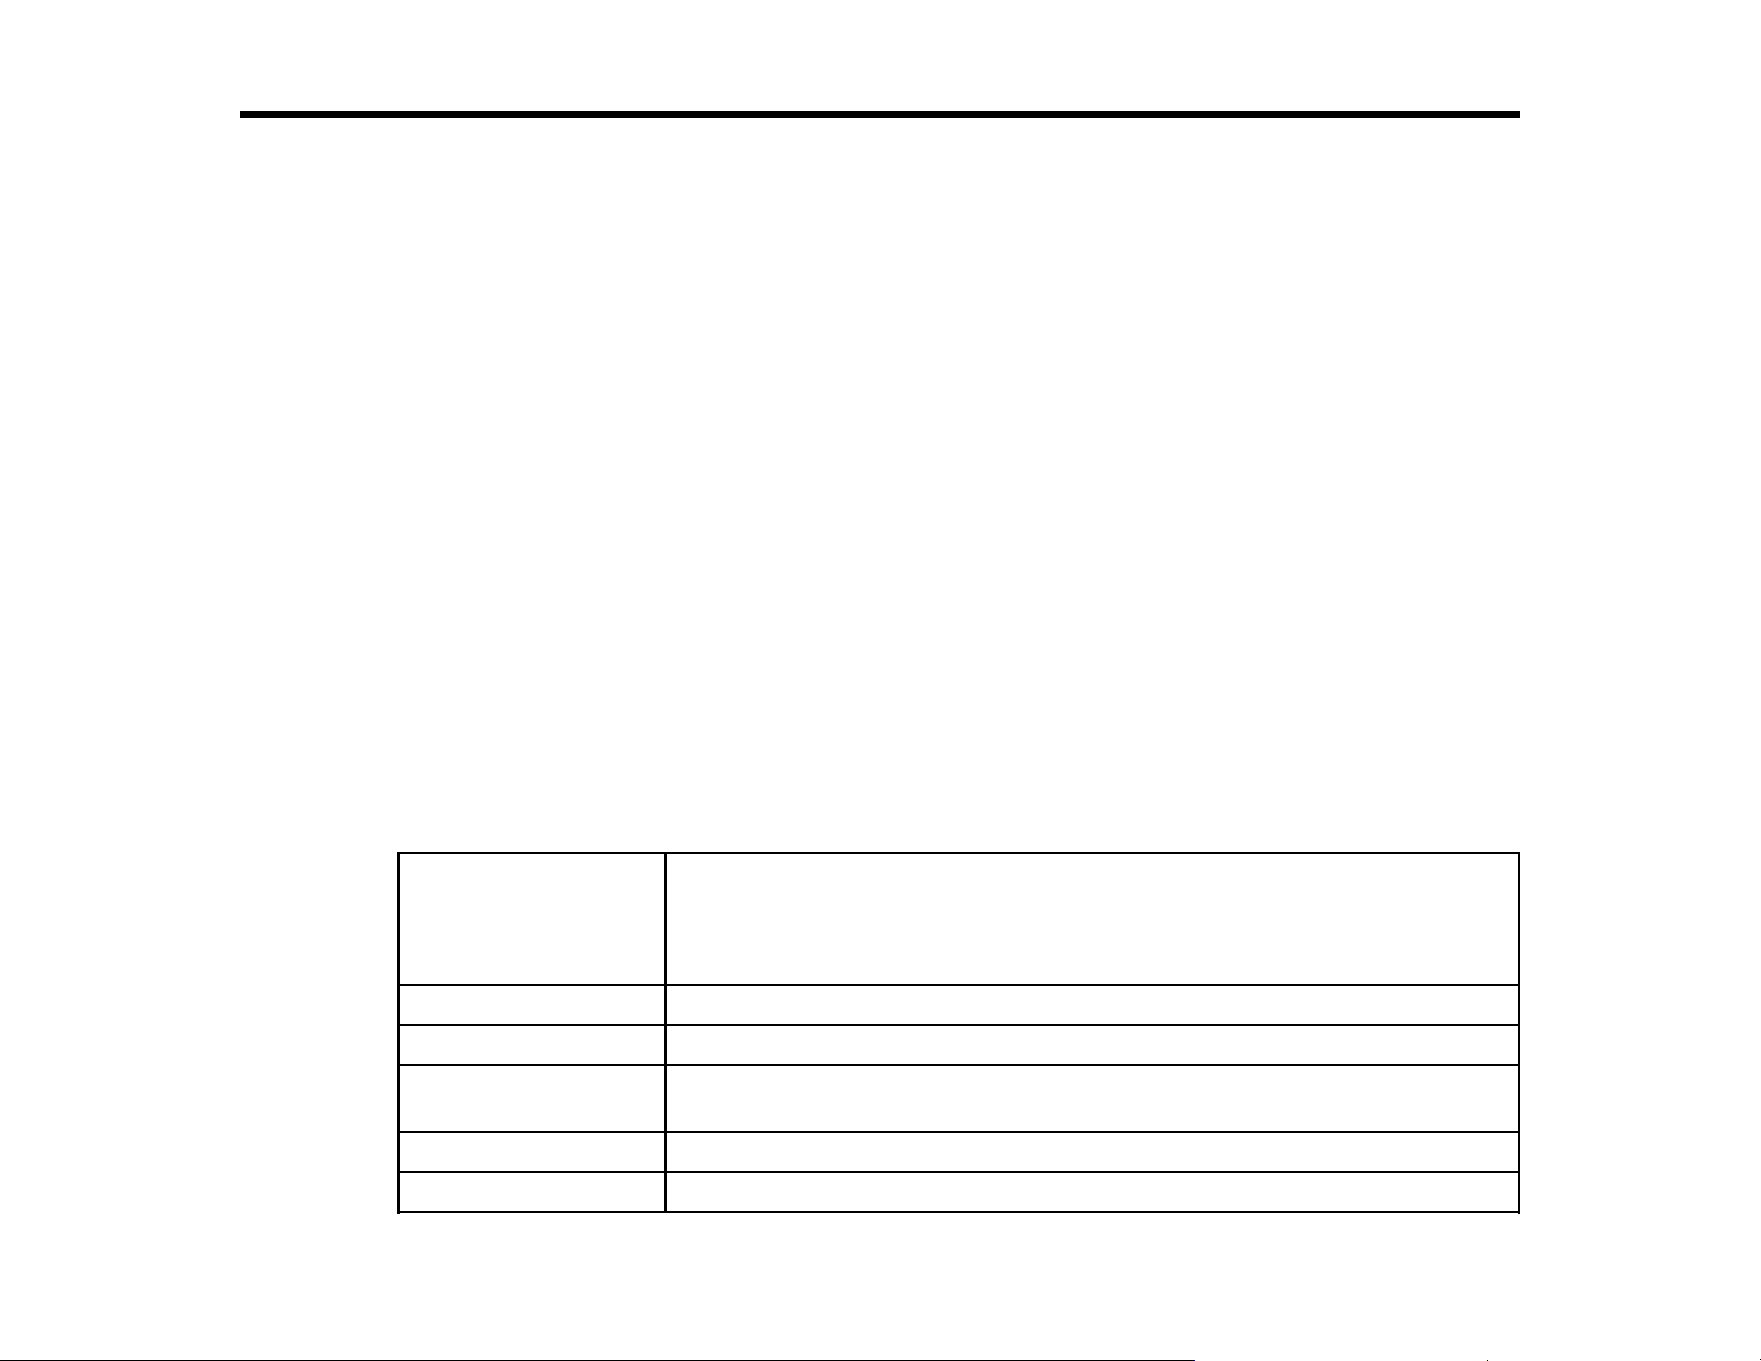
228
Technical Specifications
These sections list the technical specifications for your product.
Note: Epson offers a recycling program for end of life Epson products. Please go to this site (U.S.) or
this site (Canada) for information on how to return your Epson products for proper disposal.
Windows System Requirements
Mac System Requirements
Printing Specifications
Paper Specifications
Printable Area Specifications
Ink Specifications
Dimension Specifications
Electrical Specifications
Environmental Specifications
Interface Specifications
Network Interface Specifications
Safety and Approvals Specifications
Windows System Requirements
To use your product and its software, your computer should meet these requirements.
Microsoft Windows OS
version
(32- and 64-bit
compatible)
Windows 11, Windows 10, Windows 8.x, Windows 7, Windows Server 2022,
Windows Server 2019, Windows Server 2016, Windows Server 2012 R2,
Windows Server 2012, Windows Server 2008 R2, Windows Server 2008
CPU Intel Core 2 Duo 3.05 GHz or more
Memory 4 GB or more
Hard disk space
available
64 GB or more
Display resolution WXGA (1280 × 800) or higher
Connection method USB, Ethernet, or Wi-Fi

229
Note: For the latest product software available for your operating system, visit the Epson support site at
epson.com/support (U.S.), epson.ca/support (Canada), or latin.epson.com/support (Latin America),
select your product, and select Downloads.
Parent topic: Technical Specifications
Mac System Requirements
To use your product and its software, your Mac should meet these requirements.
OS X version 10.9.5 or later
CPU Intel Core2 Duo 2 GHz or more
Memory 8 GB or more
Hard disk space
available
128 GB or more
Display resolution 1440 × 900 or higher
Connection method USB, Ethernet, or Wi-Fi
Note: For the latest product software available for your operating system, visit the Epson support site at
epson.com/support (U.S.), epson.ca/support (Canada), or latin.epson.com/support (Latin America),
select your product, and select Downloads.
Parent topic: Technical Specifications
Printing Specifications
Printing method On-demand inkjet
Printhead AMC MicroPiezo
Nozzle configuration 180 nozzles × 10 colors
Ink droplet volume 1.5 pl minimum
Resolution 5760 × 1440 dpi maximum
Built-in memory 1 GB
Printer language ESC/P raster (undisclosed command)

230
Parent topic: Technical Specifications
Paper Specifications
Note:
• Since the quality of any particular brand or type of paper may be changed by the manufacturer at any
time, Epson cannot guarantee the quality of any non-Epson brand or type of paper. Always test a
sample of paper stock before purchasing large quantities or printing large jobs.
• Do not use paper that is wrinkled, scuffed, torn, or dirty.
Cut sheet paper
Size A4 (8.3 × 11.7 inches [210 × 297 mm])
A3 (11.7 × 16.5 inches [297 × 420 mm])
13 × 19 inches (330 × 483 mm)
A2 (16.5 × 23.4 inches [420 × 594 mm])
Letter (8.5 × 11 inches [216 × 279 mm])
Legal (8.5 × 14 inches [216 × 356 mm])
8 × 10 inches (203 × 254 mm)
9 × 12 inches (229 × 305 mm)
10 × 12 inches (254 × 305 mm)
11 × 14 inches (279 × 356 mm)
11 × 17 inches (279 × 432 mm)
12 × 12 inches (305 × 305 mm)
12 × 18 inches (305 × 457 mm)
16 × 20 inches (279 × 432 mm)
17 × 22 inches (432 × 559 mm)
Thickness 0.003 to 0.06 inch (0.08 to 1.5 mm)
Poster board: 0.031 to 0.059 inch (0.8 to 1.5 mm)

231
Roll paper
Paper feed method Friction feed (auto switching between cut sheet and roll paper)
Core size 2 inches (51 mm) and 3 inches (76 mm)
Outer diameter 2-inch core: up to 4 inches (103 mm)
3-inch core: up to 6 inches (150 mm)
Width 8 inches (203 mm) to 17 inches (432 mm)
Length 2-inch core: up to 147 feet (45 m)
3-inch core: up to 100 feet (30.5 m)
Thickness 0.00315 to 0.0196 inch (0.08 to 0.5 mm)
Parent topic: Technical Specifications
Printable Area Specifications
In the illustrations below, the gray area represents the printable area; the white arrow indicates the
direction in which the paper is ejected. If the margin set in an application is larger than the following
setting values, sections beyond the specified margins are not printed. For example, if 15 mm is selected
for the left and right margins in the printer menus and the document fills the page, the 15 mm at the left
and right sides of the page will not be printed.
Note: When printing borderless, quality may decline in the expanded printable area.
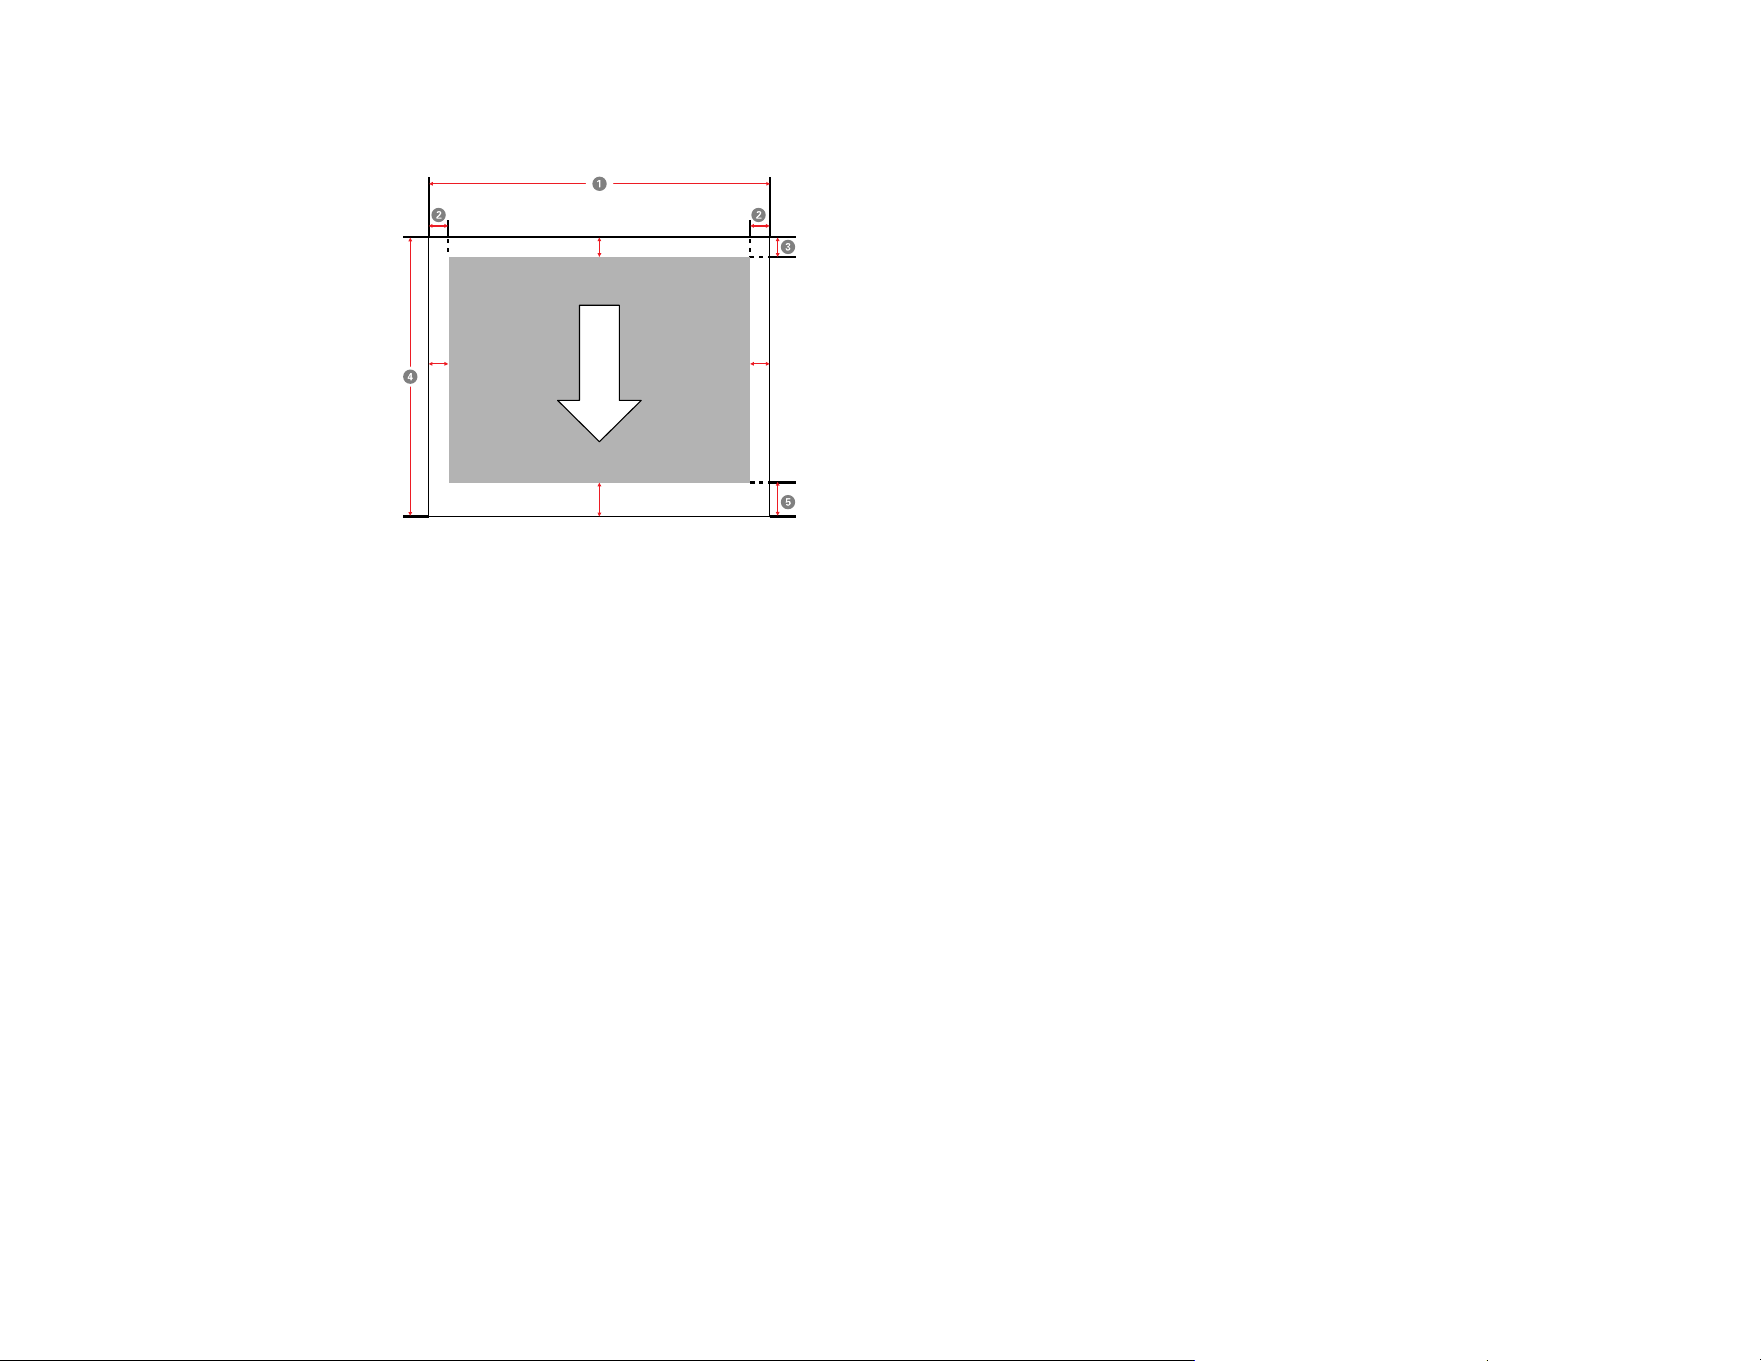
232
Roll paper
Note: Margins may change depending on the margin settings that you select. If you select Save Roll
Paper on the printer driver's Main tab, the top and bottom margins of the paper are set to 0 mm. The
margins listed below are the standard settings. When printing with the left and right borderless setting,
the left and right margins are set to 0 mm. When printing with the borderless on all sides setting, all
margins are set to 0 mm.
1 Printable width: 8 inches (203 mm) to 17 inches (432 mm)
2 Left/right margin: 0.12 inches (3 mm)
3 Top margin: 0.12 to 0.59 inches (3 to 15 mm)*
4 Printable length: 5 inches (127 mm) up to 59 feet (18 m)**
Note: Actual maximum print length depends on print application, paper size, printer driver
settings, and operating system.
5 Bottom margin: 0.12 to 1.38 inches (3 to 35 mm)*
* For these paper types the default top and bottom margins are 0.8 inch (20 mm): Epson Premium
Glossy Photo Paper (250), Epson Premium Semigloss Photo Paper (250), Epson Premium Luster Photo
Paper (260), and Epson Premium Semimatte Photo Paper (260).
** The maximum printable length using the Epson driver is 49.2 feet (15 m). To print longer images, you
need to use third-party banner printing software.
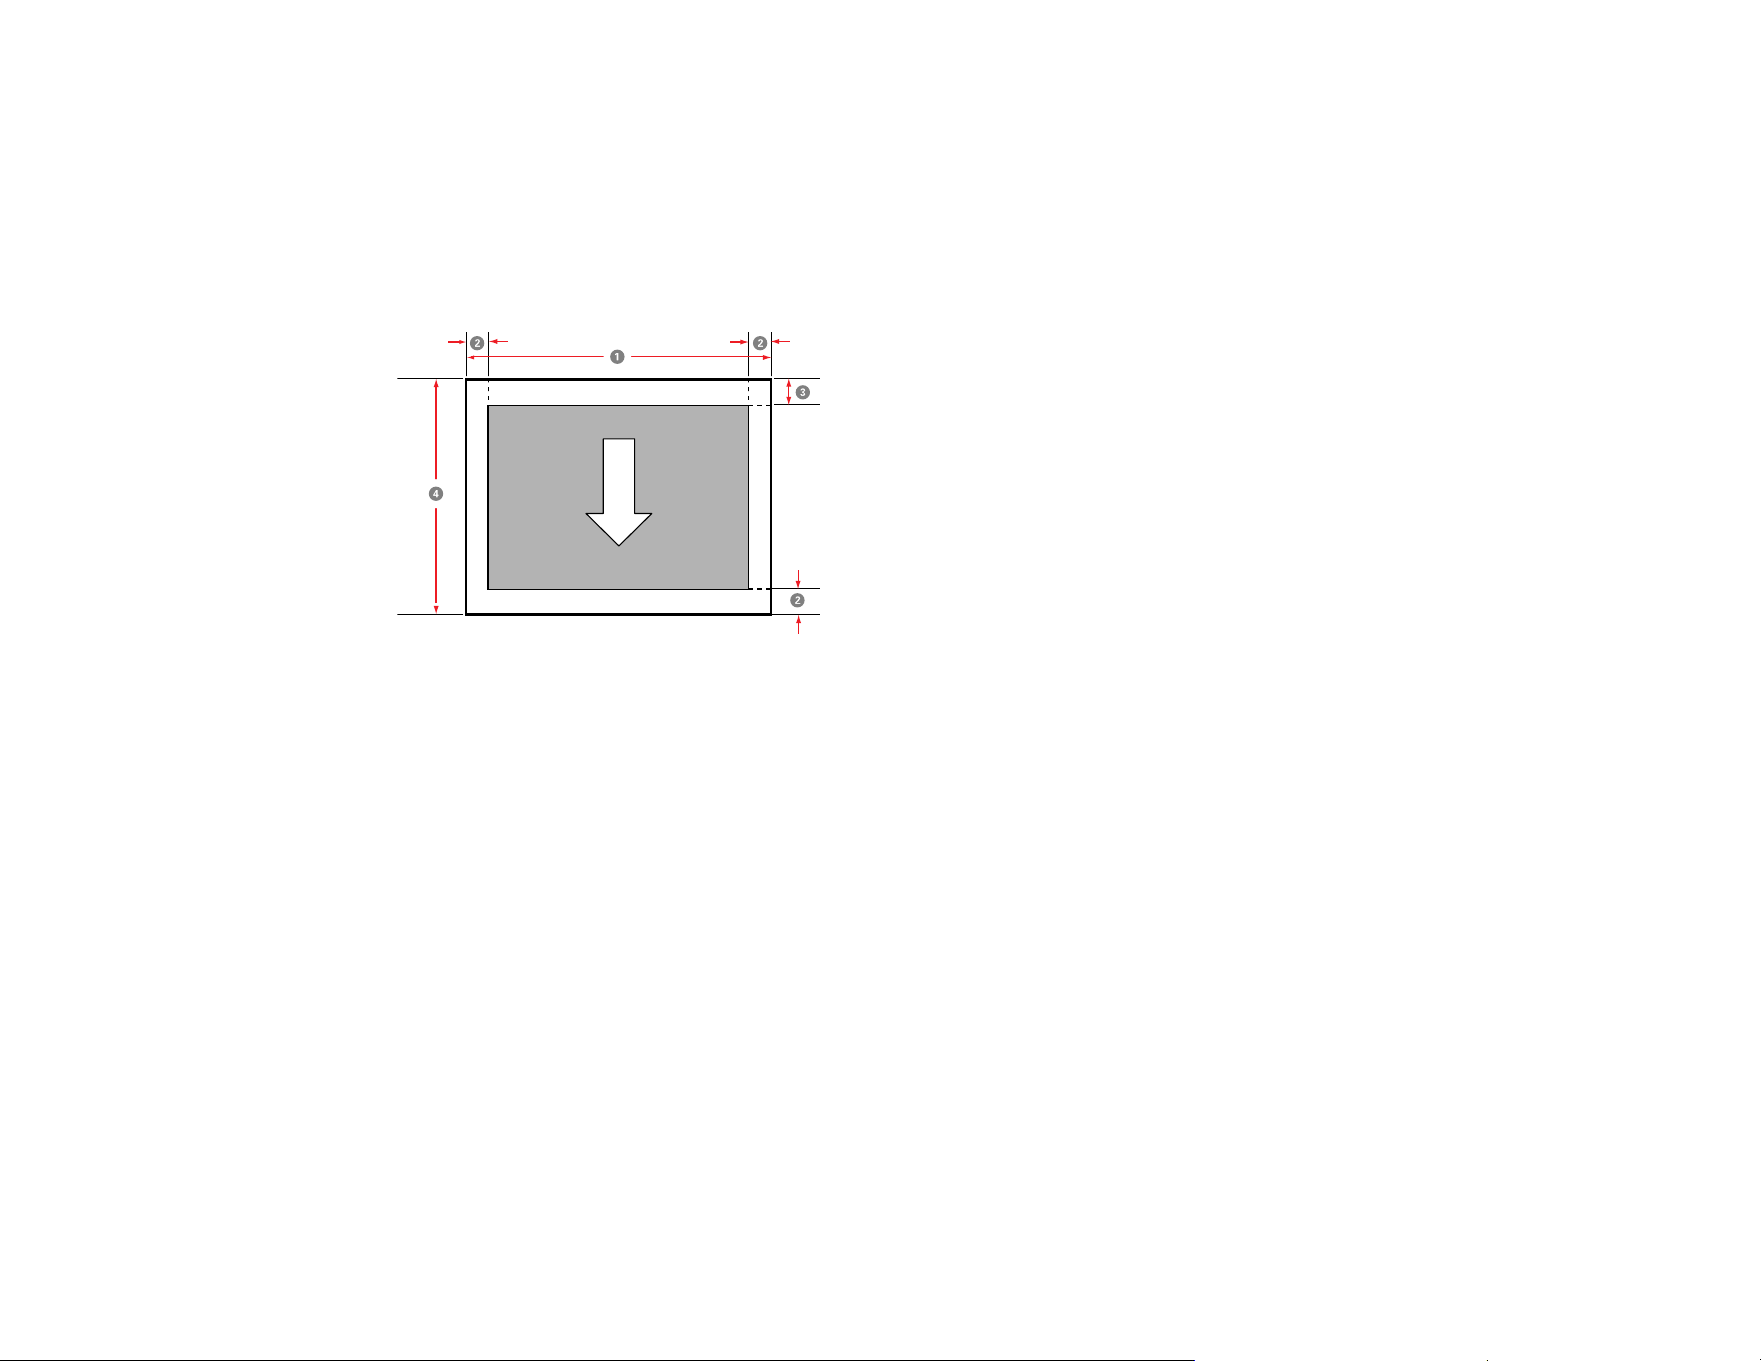
233
Note:
• Even if the margins change, the printed size does not change.
• Printing is distorted when the trailing edge of the roll paper comes off the core. Make sure the trailing
edge does not come inside the printing area.
Cut sheets
Note: When printing borderless, the left and right margins are set to 0.
1 Printable width: 8 inches (203 mm) to 17 inches (432 mm)
2 Left/right/bottom margin: 0.12 inches (3 mm)
3 Top margin: 0.12 inches/0.55 inches (3 mm/14 mm)
4 Printable length: 10 to 24 inches (254 to 610 mm)
Parent topic: Technical Specifications
Ink Specifications
Note: This product is designed to work with genuine Epson inks. Non-Epson ink or any other ink not
specified for this printer could cause damage not covered by Epson's warranties.

234
Type Dedicated ink cartridges
UltraChrome PRO10 ink
Water-based pigment ink Photo Black, Matte Black, Yellow, Vivid Magenta, Cyan, Gray, Vivid
Light Magenta, Light Cyan, Light Gray, Violet
Use by date See the expiration date printed on the package
Print quality guarantee After installation: 6 months (when stored at normal temperatures)
Temperature Transporting: –4 to 140 °F (–20 to 60 °C)
• 72 hours at 140 °F (60 °C)
• 4 days at –4 °F (–20 °C)
• 1 month at 104 °F (40 °C)
Uninstalled: –4 to 104 °F (–20 to 40 °C)
• 4 days at –4 °F (–20 °C)
• 1 month at 104 °F (40 °C)
Installed: –4 to 104 °F (–20 to 40 °C)
• 4 days at –4 °F (–20 °C)
• 1 month at 104 °F (40 °C)
Ink freezes at 14 °F (–10 °C)
Ink thaws and is usable after 3 hours at 77 °F (25 °C)
Ink capacity Ink cartridges: 200 ml
Initial charging cartridges: 80 ml
Parent topic: Technical Specifications
Related references
Ink Cartridge and Maintenance Box Part Numbers
Dimension Specifications
Height 16 inches (405 mm)
Width 34 inches (863 mm)

235
Depth Printing: 44.7 inches (1134 mm)
30 inches (766 mm)
Weight
(without ink cartridges)
Approximately 114.6 lb (52 kg)
Parent topic: Technical Specifications
Electrical Specifications
Power supply rating AC 100 to 240 V
Rated frequency range 50/60 Hz
Input frequency range 49.5/60.5 Hz
Rated current 1.4 A
Power consumption
(approximate)
Printing: 42 W (ISO/IEC24712)
Ready mode: 17 W
Sleep mode: 2.4 W
Power off mode: 0.2 W
Parent topic: Technical Specifications
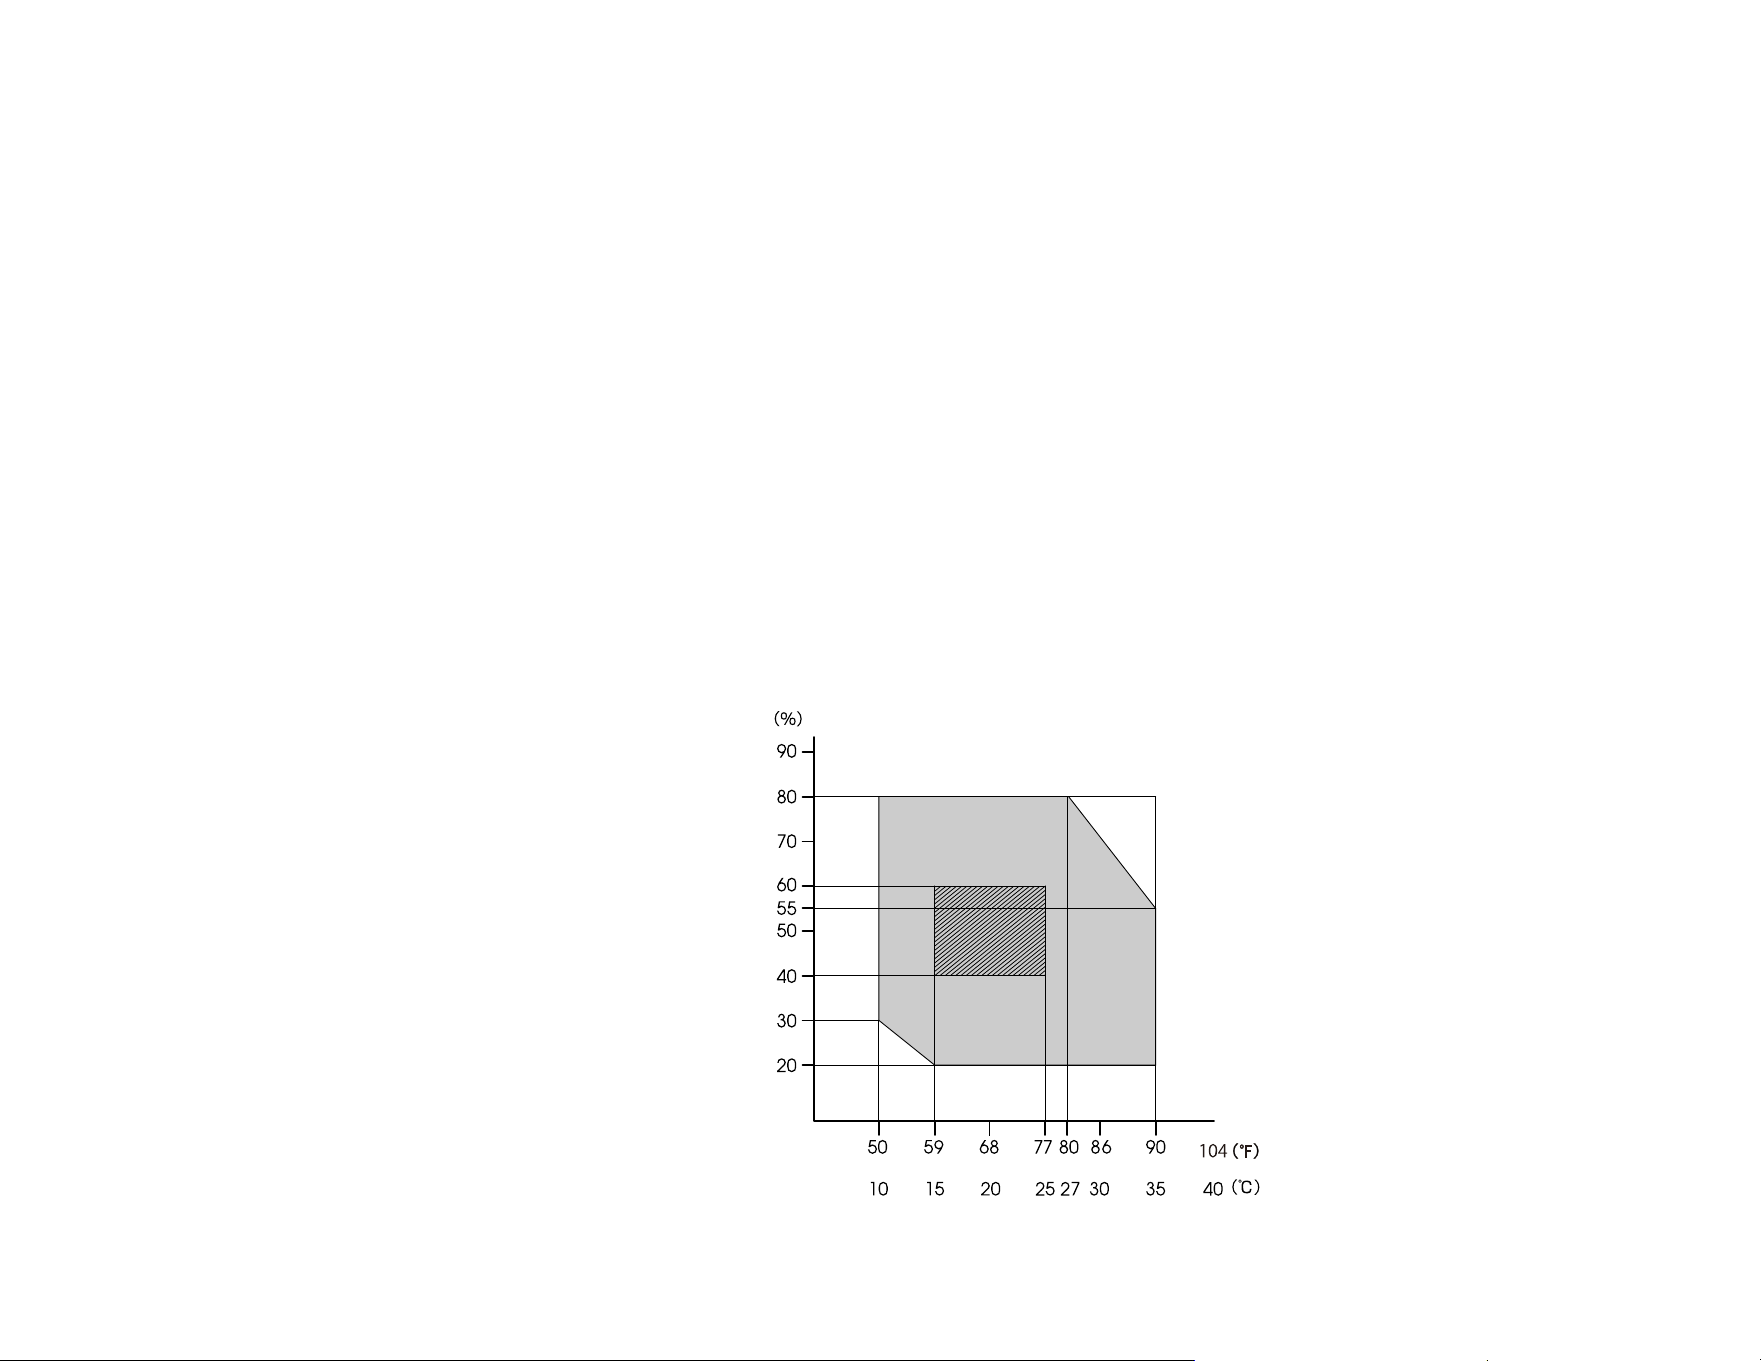
236
Environmental Specifications
Temperature Operating: 50 to 95 °F (10 to 35 °C)
Operating (recommended): 59 to 77 °F (15 to 25 °C)
Storage (before unpacking): –4 to 140 °F (–20 to 60 °C)
• 120 hours at 140 °F (60 °C)
• 1 month at 104 °F (40 °C)
Storage (after unpacking): –4 to 104 °F (-20 to 40 °C)
• 1 month at 104 °F (40 °C)
Note: Make sure you use the printer at an altitude of 6561 feet (2000
m) or less.
Humidity
(non-condensing)
Operating: 20 to 80%
Operating (recommended): 40 to 60%
Storage: 5 to 85%
Temperature and humidity
range
Operating: (diagonal lines represent recommended range)

237
Parent topic: Technical Specifications
Interface Specifications
USB Interface Hi-Speed USB-Compatible with the Universal Serial Bus
Specifications Revision 3.0
Ethernet Standards IEEE802.3i (10BASE-T)
IEEE802.3u (100BASE-TX)
IEEE802.3az (supports power-saving models); connected device
should comply with IEEE802.3az standards
(use a category 5e or higher shielded twisted pair cable)
Parent topic: Technical Specifications
Network Interface Specifications
Wi-Fi
Standards IEEE802.11b/g/n; IEEE802.11n (2.4 GHz, HT20 only)
IEEE802.11a/n/ac (5 GHz)
Securities WEP (64/128bit)
WPA-PSK (TKIP)
WPA2-PSK (AES) (complies with WPA2 standards with support for
WPA/WPA2 Personal)
WPA3-SAE
WPA2-Enterprise (AES) (EAP-TLS/PEAPTLS/PEAPMSCHAPv2/EAP-
TTLS)
WPA3-Enterprise
Frequency range IEEE802.11b/g: 2.4 GHz
IEEE802.11n: 2.4 GHz (HT20 only)
IEEE 802.11a/n/ac: 5 GHz

238
Communication mode Infrastructure
Wi-Fi Direct (Simple AP) (not supported for IEEE802.11b)
Network Printing
Protocols/Functions
Windows:
• EpsonNet Print (IPv4 only)
• Standard TCP/IP (IPv4/IPv6)
• WSD Printing (IPv4/IPv6)
• IPP Printing (IPv4/IPv6)
Mac:
• Bonjour (IPv4/IPv6)
• IPP Printing (IPv4/IPv6)
Security Protocols SSL/TLS (HTTPS Server/Client, IPPS)
IEEE802.1X
IPsec/IP Filtering
SNMPv3
Ethernet
Standards IEEE802.3i (10BASE-T)
IEEE802.3u (100BASE-TX)
IEEE802.3az (Energy Efficient Ethernet); connected device should
comply with IEEE802.3az standards
Note: Use a category 5e or higher shielded twisted pair cable for all interfaces.
Warning: To prevent radio interference to the licensed service, this device is intended to be operated
indoors and away from windows to provide maximum shielding. Equipment (or its transmit antenna) that
is installed outdoors is subject to licensing.
Parent topic: Technical Specifications

239
Safety and Approvals Specifications
United States Safety: UL62368-1
EMC: FCC part 15 Subpart B class A
Canada Safety: CAN/CSA-C22 No. 62368-1-14
EMC: CAN ICES-3 (A) / NMB-3 (A)
This equipment contains the following wireless module:
• Manufacturer: Epson
• Type: J26H005
Parent topic: Technical Specifications

240
Notices
Check these sections for important notices about your product.
Note: Epson offers a recycling program for end of life Epson products. Please go to this site (U.S.) or
this site (Canada) for information on how to return your Epson products for proper disposal.
Important Safety Instructions
FCC Compliance Statement
Binding Arbitration and Class Waiver
Trademarks
Copyright Notice
Important Safety Instructions
Before using your Epson product, read and follow these safety instructions.
General Product Safety Instructions
LCD Screen Safety Instructions
Wireless Connection Safety Instructions
Parent topic: Notices
General Product Safety Instructions
• Be sure to follow all warnings and instructions marked on the product.
• Use only the type of power source indicated on the product's label.
• Use only the power cord that comes with the product. Use of another cord may cause fires or shock.
Do not use the cord with any other equipment. Do not modify the cord.
• Place the product near a wall outlet where the plug can be easily unplugged.
• Do not route the power cord near heaters or other heat sources.
• Connect your product to a properly grounded power outlet. Avoid plugging the product into an outlet
on the same circuit as a photo copier or air control system that regularly switches on and off, or on an
outlet controlled by a wall switch or timer.
• Connect all equipment to properly grounded power outlets.
• Be sure your power cable meets relevant safety standards of the area where you plan to use it.

241
• Do not connect too many cables to the power outlet for the power cord; the temperature could rise and
cause a fire.
• Make sure the plug is fully inserted into the outlet.
• Do not connect the power cable to a power strip or a multi-outlet extension cord; otherwise an electric
shock or fire could occur. Supply power directly from a household power outlet (100 V AC).
• Do not let the power cord become damaged or frayed. Place it to avoid abrasions, cuts, fraying,
crimping, and kinking. Do not place objects on top of it and do not allow it to be stepped on or run over.
Be careful to keep the cord straight at each end.
• Do not modify the power cable. Do not place anything heavy on the power cable. Do not bend, twist, or
pull forcefully on the power cable.
• Do not use the power cord if it is damaged. An electric shock or fire could occur. If the power cord is
damaged, contact your dealer or Epson Support.
• If you use an extension cord with the product, make sure the total ampere rating of the devices
plugged into the extension cord does not exceed the cord's ampere rating. Also, make sure the total
ampere rating of all devices plugged into the wall outlet does not exceed the wall outlet's ampere
rating.
• If damage occurs to the plug, replace the cord set or consult a qualified electrician. If there are fuses in
the plug, make sure you replace them with fuses of the correct size and rating.
• Always turn off the product using the power button, and wait until the power light stops flashing before
unplugging the product or cutting off power to the electrical outlet.
• If you will not be using the product for a long period, unplug the power cord from the electrical outlet.
• When unplugging the plug, grip the plug itself; do not pull the power cord.
• Unplug the plug regularly and clean between the blades and around the base of the blades. If the plug
is plugged in for an extended period of time, dust collects around the base of the blades and a short
circuit or fire could occur.
• Do not use the plug if dust or any other foreign objects have adhered to the plug; otherwise an electric
shock or fire could occur.
• Place the product on a flat, stable surface that extends beyond its base in all directions. It will not
operate properly if it is tilted or at an angle.
• Do not tilt the product more than 10 degrees in any direction while moving it. Doing so may cause the
product to fall and cause damage or personal injury.
• Do not attempt to move the product alone; two people are required to move the product.

242
• When lifting the product, make sure you lift with your hands at the correct locations; otherwise, the
printer may fall or you may be injured. See the link below or the Start Here sheet for details on lifting
the product.
• Use correct posture when lifting the product.
• Make sure to remove all packing materials from the product and installation area.
• When placing the product on a stand with casters, make sure the casters are secured before you
perform any work so that they do not move. If the stand moves while you are performing any work, it
could cause an injury.
• When moving the product, make sure it is turned off, the power cables are unplugged from the outlets,
and all connecting cables have been removed. Avoid steps and uneven surfaces. If cables are
damaged, an electric shock or fire could occur.
• Avoid locations that are subject to rapid changes in heat or humidity, shocks or vibrations, or dust.
• Do not place or store the product outdoors.
• Do not place the product near excessive heat sources or in direct sunlight.
• Leave enough room around the product for sufficient ventilation. Do not block or cover openings in the
cabinet or insert objects through the slots.
• Do not obstruct the vents on the product. If the vents are obstructed, the internal temperature could
rise and cause a fire.
• Do not cover the printer with a cloth or install it in a location with poor ventilation.
• Make sure you secure sufficient space for installation of the product. See the link below.
• Do not install or store the printer in an unstable location or a location subject to vibrations from other
equipment. The printer could fall or tip over and cause an injury.
• Do not install the printer in locations subject to oily smoke and dust, or in locations subject to humidity
or where it could easily get wet. An electric shock or fire could occur.
• Keep the product away from potential sources of electromagnetic interference, such as loudspeakers
or the base units of cordless telephones.
• When connecting the product to a computer or other device with a cable, ensure the correct
orientation of the connectors. Each connector has only one correct orientation. Inserting a connector
in the wrong orientation may damage both devices connected by the cable.
• Do not put your hands inside the product or touch the flat white cable or print head during printing.
• Do not touch any areas inside the printer except for those indicated in the product's documentation;
otherwise, you may be shocked or burned.

243
• Do not sit on the product or place heavy objects on top of it.
• Do not move the print head by hand; this may damage the product.
• Do not insert or drop metallic or flammable items into the openings on the product.
• Do not spill liquid on the product or use the product with wet hands.
• Do not insert or unplug the plug with wet hands.
• Do not use aerosol products that contain flammable gases inside or around the product. Doing so may
cause fire.
• Except as specifically explained in your documentation, do not attempt to service the product yourself.
• Unplug the product and refer servicing to qualified service personnel under the following conditions: if
the power cord or plug is damaged; if liquid has entered the product; if the product has been dropped
or the cabinet damaged; if the product does not operate normally or exhibits a distinct change in
performance. Adjust only those controls that are covered by the operating instructions.
• When storing or transporting the product, do not tilt it, stand it on its side, or turn it upside down;
otherwise ink may leak.
• Do not use the printer in locations with volatile substances such as alcohol or thinner, or near naked
flames. An electric shock or fire could occur.
• Do not use the product if it is giving off smoke or if you notice any abnormal odors or noises. An
electric shock or fire could occur. If any abnormalities occur, turn off the power and unplug the power
cable immediately, then contact your dealer or Epson Support.
• Only route the cables as indicated in the Start Here sheet. When connecting cables or optional
accessories, make sure they are installed in the correct direction and that you follow the procedures
exactly.
• When opening and closing the roll paper cover, keep your hands away from the joint between the
cover and the body of the product.
• If any foreign objects or liquids enter the printer, stop using it immediately. An electric shock or fire
could occur. Turn off the power and unplug the power cable immediately and then contact your dealer
or Epson Support.
• Keep your fingers away from the paper ejection rollers when the power is on and during printing. If
your fingers get caught in the paper ejection rollers, they could be injured. Make sure the paper has
been completely ejected before you pick it up.
• When removing jammed paper, do not forcibly pull out the paper or the paper cassette, and do not
remove jammed paper from an unstable posture. The sudden momentum of pulling out the paper or
paper cassette could result in injury.

244
• Pay careful attention when replacing the cutter and store the cutter in a location out of the reach of
children. The cutter's blade could cause an injury.
Note: The lithium batteries in this product contain Perchlorate Material - special handling may apply.
Click here for details.
Parent topic: Important Safety Instructions
LCD Screen Safety Instructions
• Use only a dry, soft cloth to clean the LCD screen. Do not use liquid or chemical cleansers. Never use
volatile chemicals such as thinner, benzene, or alcohol. Doing so could damage the surface of the
control panel.
• If the panel is particularly dirty, dampen the cloth with water containing a small amount of neutral
detergent, firmly wring the cloth dry before using it to wipe the panel, and then finish by wiping with a
soft, dry cloth.
• If the LCD screen is damaged, contact Epson. If the liquid crystal solution gets on your hands, wash
them thoroughly using large volumes of soapy water. If the liquid crystal solution gets into your eyes,
flush them with clean water for at least 15 minutes. If discomfort or vision problems remain after a
thorough flushing, see a doctor immediately. If liquid enters your mouth, see a doctor immediately. If
ink is swallowed, swallow large quantities of water and vomit it back up, and see a doctor immediately.
• Do not press too hard on the LCD screen or subject it to heavy impacts. Doing so could damage the
control panel.
• Use only your finger to operate the LCD screen; it may not respond when operated with wet fingers or
gloved hands.
• Do not use a pointy or sharp object, such as a pen or your fingernail, to operate the LCD screen.
Doing so could damage the control panel.
• Make sure to remove the protective film from the LCD screen before operating; otherwise it may not
respond.
• If the LCD screen chips or cracks, do not touch or attempt to remove the broken pieces; contact Epson
for support.
• Do not subject your product to sudden changes in temperature or humidity; this may cause
condensation to develop inside the LCD screen and degrade its performance.
• The LCD screen may contain a few small bright or dark spots, and may display uneven brightness.
These are normal and do not indicate that the screen is damaged in any way.
Parent topic: Important Safety Instructions

245
Wireless Connection Safety Instructions
Radio waves from this product may adversely affect the operation of medical equipment or automatically
controlled devices, such as pacemakers, automatic doors or fire alarms. When using this product near
such devices or inside a medical facility, follow the directions from authorized staff members at the
facility, and follow all posted warnings and directions on the device to avoid causing an accident.
Parent topic: Important Safety Instructions
FCC Compliance Statement
For United States Users
This equipment has been tested and found to comply with the limits for a Class A digital device, pursuant
to Part 15 of the FCC Rules. These limits are designed to provide reasonable protection against harmful
interference when the equipment is operated in a commercial environment. This equipment generates,
uses, and can radiate radio frequency energy and, if not installed and used in accordance with the
instruction manual, may cause harmful interference to radio communications. Operation of this
equipment in a residential area is likely to cause harmful interference, in which case the user will be
required to correct the interference at his own expense.
This device complies with Part 15 of the FCC Rules. Operation is subject to the following two conditions:
1. this device may not cause harmful interference, and
2. this device must accept any interference received, including interference that may cause undesired
operation.
WARNING
The connection of a non-shielded equipment interface cable to this equipment will invalidate the FCC
Certification of this device and may cause interference levels which exceed the limits established by the
FCC for this equipment. It is the responsibility of the user to obtain and use a shielded equipment
interface cable with this device. If this equipment has more than one interface connector, do not leave
cables connected to unused interfaces. Changes or modifications not expressly approved by the
manufacturer could void the user’s authority to operate the equipment.
For Canadian Users
This Class A digital apparatus complies with Canadian ICES-003.
Cet appareil numérique de la classe A est conforme à la norme NMB-003 du Canada.

246
WARNING
This is a Class A product. In a domestic environment this product may cause radio interference, in which
case the user may be required to take adequate measures.
Parent topic: Notices
Binding Arbitration and Class Waiver
1. DISPUTES, BINDING INDIVIDUAL ARBITRATION, AND WAIVER OF CLASS ACTIONS AND
CLASS ARBITRATIONS
1.1 Disputes. The terms of this Section 1 shall apply to all Disputes between you and Epson. The term
"Dispute" is meant to have the broadest meaning permissible under law and includes any dispute, claim,
controversy or action between you and Epson arising out of or relating to this Agreement, Epson
branded products (hardware and including any related software), or other transaction involving you and
Epson, whether in contract, warranty, misrepresentation, fraud, tort, intentional tort, statute, regulation,
ordinance, or any other legal or equitable basis. "DISPUTE" DOES NOT INCLUDE IP CLAIMS, or more
specifically, a claim or cause of action for (a) trademark infringement or dilution, (b) patent infringement,
(c) copyright infringement or misuse, or (d) trade secret misappropriation (an "IP Claim"). You and Epson
also agree, notwithstanding Section 1.6,that a court, not an arbitrator, may decide if a claim or cause of
action is for an IP Claim.
1.2 Binding Arbitration. You and Epson agree that all Disputes shall be resolved by binding arbitration
according to this Agreement. ARBITRATION MEANS THAT YOU WAIVE YOUR RIGHT TO A JUDGE
OR JURY IN A COURT PROCEEDING AND YOUR GROUNDS FOR APPEAL ARE LIMITED.
Pursuant to this Agreement, binding arbitration shall be administered by JAMS, a nationally recognized
arbitration authority, pursuant to its code of procedures then in effect for consumer related disputes, but
excluding any rules that permit joinder or class actions in arbitration (for more detail on procedure, see
Section 1.6 below). You and Epson understand and agree that (a) the Federal Arbitration Act (9 U.S.C.
§1, et seq.) governs the interpretation and enforcement of this Section 1, (b) this Agreement
memorializes a transaction in interstate commerce, and (c) this Section 1 shall survive termination of this
Agreement.
1.3 Pre-Arbitration Steps and Notice. Before submitting a claim for arbitration, you and Epson agree to
try, for sixty (60) days, to resolve any Dispute informally. If Epson and you do not reach an agreement to
resolve the Dispute within the sixty (60) days), you or Epson may commence an arbitration. Notice to
Epson must be addressed to: Epson America, Inc., ATTN: Legal Department, 3131 Katella Ave., Los
Alamitos, CA 90720 (the "Epson Address"). The Dispute Notice to you will be sent to the most recent
address Epson has in its records for you. For this reason, it is important to notify us if your address
changes by emailing us at [email protected] or writing us at the Epson Address above. Notice of
the Dispute shall include the sender's name, address and contact information, the facts giving rise to the

247
Dispute, and the relief requested (the "Dispute Notice"). Following receipt of the Dispute Notice, Epson
and you agree to act in good faith to resolve the Dispute before commencing arbitration.
1.4 Small Claims Court. Notwithstanding the foregoing, you may bring an individual action in the small
claims court of your state or municipality if the action is within that court's jurisdiction and is pending only
in that court.
1.5 WAIVER OF CLASS ACTIONS AND CLASS ARBITRATIONS. YOU AND EPSON AGREE THAT
EACH PARTY MAY BRING DISPUTES AGAINST THE OTHER PARTY ONLY IN AN INDIVIDUAL
CAPACITY, AND NOT AS A PLAINTIFF OR CLASS MEMBER IN ANY CLASS OR
REPRESENTATIVE PROCEEDING, INCLUDING WITHOUT LIMITATION FEDERAL OR STATE
CLASS ACTIONS, OR CLASS ARBITRATIONS. CLASS ACTION LAWSUITS, CLASS-WIDE
ARBITRATIONS, PRIVATE ATTORNEY-GENERAL ACTIONS, AND ANY OTHER PROCEEDING
WHERE SOMEONE ACTS IN A REPRESENTATIVE CAPACITY ARE NOT ALLOWED.
ACCORDINGLY, UNDER THE ARBITRATION PROCEDURES OUTLINED IN THIS SECTION, AN
ARBITRATOR SHALL NOT COMBINE OR CONSOLIDATE MORE THAN ONE PARTY'S CLAIMS
WITHOUT THE WRITTEN CONSENT OF ALL AFFECTED PARTIES TO AN ARBITRATION
PROCEEDING.
1.6 Arbitration Procedure. If you or Epson commences arbitration, the arbitration shall be governed by
the rules of JAMS that are in effect when the arbitration is filed, excluding any rules that permit arbitration
on a class or representative basis (the "JAMS Rules"), available at http://www.jamsadr.com or by calling
1-800-352-5267, and under the rules set forth in this Agreement. All Disputes shall be resolved by a
single neutral arbitrator, and both parties shall have a reasonable opportunity to participate in the
selection of the arbitrator. The arbitrator is bound by the terms of this Agreement. The arbitrator, and not
any federal, state or local court or agency, shall have exclusive authority to resolve all disputes arising
out of or relating to the interpretation, applicability, enforceability or formation of this Agreement,
including any claim that all or any part of this Agreement is void or voidable. Notwithstanding this broad
delegation of authority to the arbitrator, a court may determine the limited question of whether a claim or
cause of action is for an IP Claim, which is excluded from the definition of "Disputes" in Section 1.1
above. The arbitrator shall be empowered to grant whatever relief would be available in a court under
law or in equity. The arbitrator may award you the same damages as a court could, and may award
declaratory or injunctive relief only in favor of the individual party seeking relief and only to the extent
necessary to provide relief warranted by that party's individual claim. In some instances, the costs of
arbitration can exceed the costs of litigation and the right to discovery may be more limited in arbitration
than in court. The arbitrator's award is binding and may be entered as a judgment in any court of
competent jurisdiction.
You may choose to engage in arbitration hearings by telephone. Arbitration hearings not conducted by
telephone shall take place in a location reasonably accessible from your primary residence, or in Orange
County, California, at your option.
a) Initiation of Arbitration Proceeding. If either you or Epson decides to arbitrate a Dispute, both parties
agree to the following procedure:

248
(i) Write a Demand for Arbitration. The demand must include a description of the Dispute and the amount
of damages sought to be recovered. You can find a copy of a Demand for Arbitration at
http://www.jamsadr.com ("Demand for Arbitration").
(ii) Send three copies of the Demand for Arbitration, plus the appropriate filing fee, to: JAMS, 500 North
State College Blvd., Suite 600 Orange, CA 92868, U.S.A.
(iii) Send one copy of the Demand for Arbitration to the other party (same address as the Dispute
Notice), or as otherwise agreed by the parties.
b) Hearing Format. During the arbitration, the amount of any settlement offer made shall not be disclosed
to the arbitrator until after the arbitrator determines the amount, if any, to which you or Epson is entitled.
The discovery or exchange of non-privileged information relevant to the Dispute may be allowed during
the arbitration.
c) Arbitration Fees. Epson shall pay, or (if applicable) reimburse you for, all JAMS filings and arbitrator
fees for any arbitration commenced (by you or Epson) pursuant to provisions of this Agreement.
d) Award in Your Favor. For Disputes in which you or Epson seeks $75,000 or less in damages exclusive
of attorney's fees and costs, if the arbitrator's decision results in an award to you in an amount greater
than Epson's last written offer, if any, to settle the Dispute, Epson will: (i) pay you $1,000 or the amount
of the award, whichever is greater; (ii) pay you twice the amount of your reasonable attorney's fees, if
any; and (iii) reimburse you for any expenses (including expert witness fees and costs) that your attorney
reasonably accrues for investigating, preparing, and pursuing the Dispute in arbitration. Except as
agreed upon by you and Epson in writing, the arbitrator shall determine the amount of fees, costs, and
expenses to be paid by Epson pursuant to this Section 1.6d).
e) Attorney's Fees. Epson will not seek its attorney's fees and expenses for any arbitration commenced
involving a Dispute under this Agreement. Your right to attorney's fees and expenses under Section
1.6d) above does not limit your rights to attorney's fees and expenses under applicable law;
notwithstanding the foregoing, the arbitrator may not award duplicative awards of attorney's fees and
expenses.
1.7 Opt-out. You may elect to opt-out (exclude yourself) from the final, binding, individual
arbitration procedure and waiver of class and representative proceedings specified in this
Agreement by sending a written letter to the Epson Address within thirty (30) days of your assent
to this Agreement (including without limitation the purchase, download, installation of the
Software or other applicable use of Epson Hardware, products and services) that specifies (i)
your name, (ii) your mailing address, and (iii) your request to be excluded from the final, binding
individual arbitration procedure and waiver of class and representative proceedings specified in
this Section 1. In the event that you opt-out consistent with the procedure set forth above, all
other terms shall continue to apply, including the requirement to provide notice prior to litigation.
1.8 Amendments to Section 1. Notwithstanding any provision in this Agreement to the contrary, you
and Epson agree that if Epson makes any future amendments to the dispute resolution procedure and

249
class action waiver provisions (other than a change to Epson's address) in this Agreement, Epson will
obtain your affirmative assent to the applicable amendment. If you do not affirmatively assent to the
applicable amendment, you are agreeing that you will arbitrate any Dispute between the parties in
accordance with the language of this Section 1 (or resolve disputes as provided for in Section 1.7, if you
timely elected to opt-out when you first assented to this Agreement).
1.9 Severability. If any provision in this Section 1 is found to be unenforceable, that provision shall be
severed with the remainder of this Agreement remaining in full force and effect. The foregoing shall not
apply to the prohibition against class or representative actions as provided in Section 1.5. This
means that if Section 1.5 is found to be unenforceable, the entire Section 1 (but only Section 1)
shall be null and void.
Parent topic: Notices
Trademarks
EPSON
®
, SureColor
®
, and UltraChrome
®
are registered trademarks, and the EPSON logo is a registered
logomark of Seiko Epson Corporation.
Epson Preferred
SM
is a service mark of Epson America, Inc.
App Store, Mac, macOS, and OS X are trademarks of Apple Inc., registered in the U.S. and other
countries.
Google
®
is a registered trademark of Google LLC.
Microsoft, Windows, and Windows Server are trademarks of the Microsoft group of companies.
Wi-Fi Direct
®
is a registered trademark of Wi-Fi Alliance
®
.
General Notice: Other product names used herein are for identification purposes only and may be
trademarks of their respective owners. Epson disclaims any and all rights in those marks.
Parent topic: Notices
Copyright Notice
All rights reserved. No part of this publication may be reproduced, stored in a retrieval system, or
transmitted in any form or by any means, electronic, mechanical, photocopying, recording, or otherwise,
without the prior written permission of Seiko Epson Corporation. The information contained herein is
designed only for use with this Epson product. Epson is not responsible for any use of this information as
applied to other products.

250
Neither Seiko Epson Corporation nor its affiliates shall be liable to the purchaser of this product or third
parties for damages, losses, costs, or expenses incurred by purchaser or third parties as a result of:
accident, misuse, or abuse of this product or unauthorized modifications, repairs, or alterations to this
product, or (excluding the U.S.) failure to strictly comply with Seiko Epson Corporation's operating and
maintenance instructions.
Seiko Epson Corporation shall not be liable for any damages or problems arising from the use of any
options or any consumable products other than those designated as Original Epson Products or Epson
Approved Products by Seiko Epson Corporation.
Seiko Epson Corporation shall not be held liable for any damage resulting from electromagnetic
interference that occurs from the use of any interface cables other than those designated as Epson
approved Products by Seiko Epson Corporation.
This information is subject to change without notice.
A Note Concerning Responsible Use of Copyrighted Materials
Default Delay Times for Power Management for Epson Products
Copyright Attribution
Parent topic: Notices
A Note Concerning Responsible Use of Copyrighted Materials
Epson encourages each user to be responsible and respectful of the copyright laws when using any
Epson product. While some countries' laws permit limited copying or reuse of copyrighted material in
certain circumstances, those circumstances may not be as broad as some people assume. Contact your
legal adviser for any questions regarding copyright law.
Parent topic: Copyright Notice
Default Delay Times for Power Management for Epson Products
This product will enter sleep mode after a period of nonuse. This is to ensure that the product meets
Energy Star standards of energy efficiency. More energy savings can be achieved by setting the time to
sleep to a shorter interval.
Parent topic: Copyright Notice
Copyright Attribution
© 2024 Epson America, Inc.
3/24