
Digital Projector
User Manual
Home Entertainment Series I TH575C/TH575i
V 1.00

2 Warranty and Copyright information
Warranty and Copyright information
Limited warranty
BenQ warrants this product against any defects in material and workmanship, under normal
usage and storage.
Proof of purchase date will be required with any warranty claim. In the event this product is
found to be defective within the warranty period, BenQ's only obligation and your exclusive
remedy shall be replacement of any defective parts (labor included). To obtain warranty
service, immediately notify the dealer from which you purchased the product of any defects.
Important: The above warranty shall be void if the customer fails to operate the product in
accordance with BenQ's written instructions, especially the ambient humidity must be
in-between 10% and 90%, temperature in-between 0°C and 35°C, altitude lower than 4920 feet,
and avoiding to operate the projector in a dusty environment. This warranty gives you specific
legal rights, and you may have other rights which vary from country to country.
For other information, please visit
www.BenQ.com.
Copyright
Copyright © 2026 by BenQ Corporation. All rights reserved. No part of this publication may be
reproduced, transmitted, transcribed, stored in a retrieval system or translated into any
language or computer language, in any form or by any means, electronic, mechanical,
magnetic, optical, chemical, manual or otherwise, without the prior written permission of BenQ
Corporation.
Disclaimer
BenQ Corporation makes no representations or warranties, either expressed or implied, with
respect to the contents hereof and specifically disclaims any warranties, merchantability or
fitness for any particular purpose. Further, BenQ Corporation reserves the right to revise this
publication and to make changes from time to time in the contents hereof without obligation to
notify any person of such revision or changes.
*DLP, Digital Micromirror Device and DMD are trademarks of Texas Instruments. Others are
copyrights of their respective companies or organizations.
The terms HDMI, HDMI High-Definition Multimedia Interface, HDMI Trade dress and the HDMI
Logos are trademarks or registered trademarks of HDMI Licensing Administrator, Inc.

3 Table of Contents
Table of Contents
Warranty and Copyright information ...............................................................................2
Important safety instructions .........................................................................................4
Introduction ....................................................................................................................9
Shipping contents ............................................................................................................. 9
Installing the StreamX1 dongle (regional specific) ......................................................10
Projector exterior view ....................................................................................................11
Terminals .........................................................................................................................12
Controls and functions ................................................................................................... 13
Positioning your projector ............................................................................................16
Choosing a location ........................................................................................................16
Obtaining a preferred projected image size.................................................................. 17
Mounting the projector ................................................................................................... 19
Adjusting the projected image .......................................................................................20
Connection ...................................................................................................................21
Operation .....................................................................................................................23
Starting up the projector .................................................................................................23
Setting up the StreamX1 dongle (regional specific)..................................................... 24
Using the menus ............................................................................................................. 26
Securing the projector ....................................................................................................27
Switching input signal .....................................................................................................29
Shutting down the projector ...........................................................................................30
Direct power off ..............................................................................................................30
Menu operation ............................................................................................................31
Menu System ...................................................................................................................31
Basic menu...................................................................................................................... 35
Advanced menu .............................................................................................................. 37
Maintenance ................................................................................................................44
Care of the projector .......................................................................................................44
Lamp information ...........................................................................................................44
Troubleshooting ...........................................................................................................48
Specifications ..............................................................................................................49
Projector specifications .................................................................................................49
Dimensions ......................................................................................................................50
Timing chart .................................................................................................................... 51
RS232 command ............................................................................................................ 53
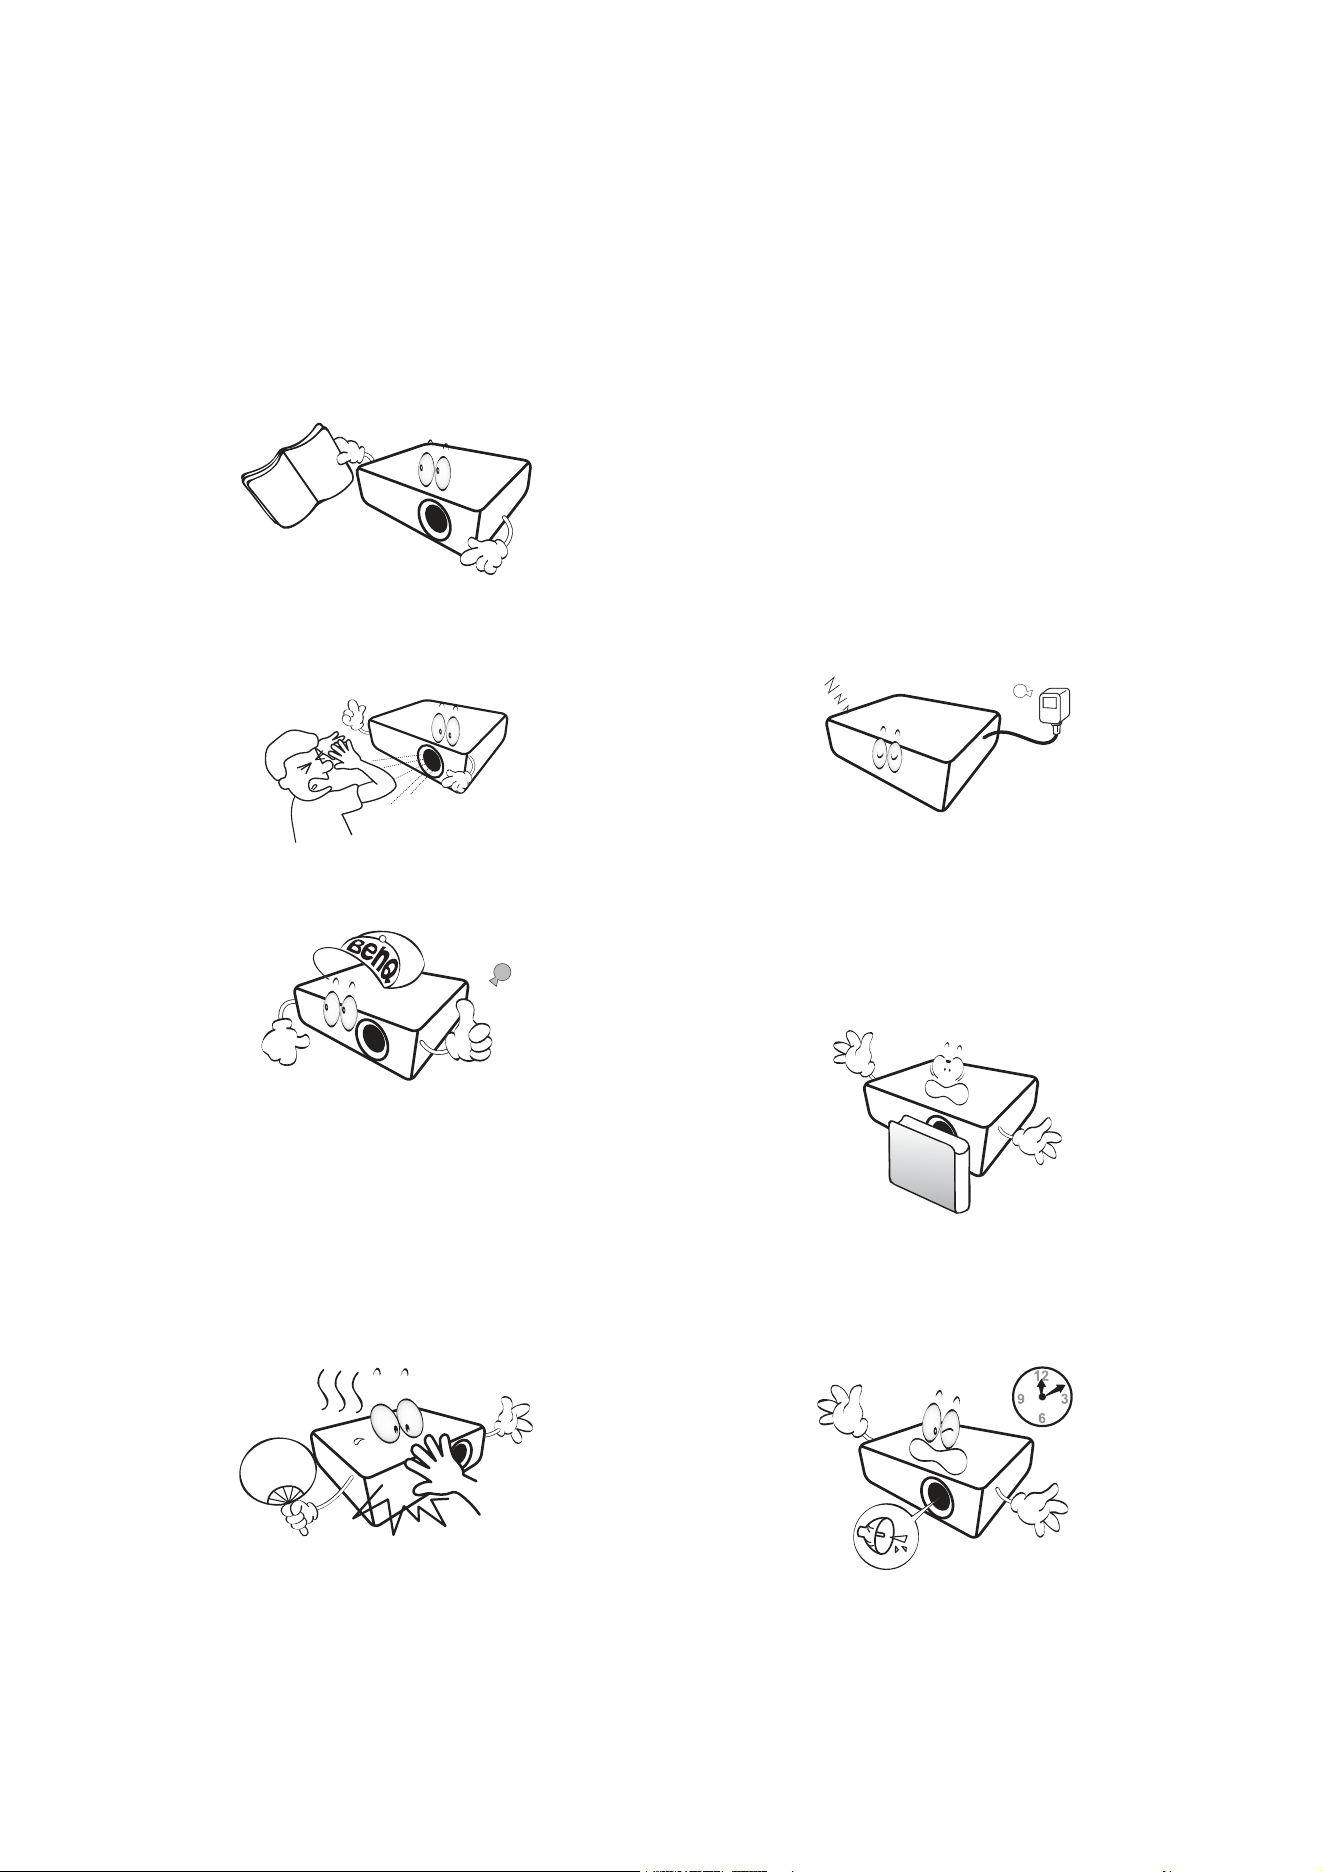
4 Important safety instructions
Important safety instructions
Your projector is designed and tested to meet the latest standards for safety of information
technology equipment. However, to ensure safe use of this product, it is important that you
follow the instructions mentioned in this manual and marked on the product.
1. Please read this manual before you
operate your projector. Save it for future
reference.
2. Do not look straight at the projector lens
during operation. The intense light beam
may damage your eyes.
3. Refer servicing to qualified service
personnel.
4. Always open the lens shutter (if any) or
remove the lens cap (if any) when the
projector lamp is on.
5. The lamp becomes extremely hot during
operation. Allow the projector to cool for
approximately 45 minutes prior to
removing the lamp assembly for
replacement.
6. In some countries, the line voltage is NOT
stable. This projector is designed to
operate safely within a mains voltage
between 100 to 240 volts AC, but could
fail if power cuts or surges of ±10 volts
occur. In areas where the mains voltage
may fluctuate or cut out, it is
recommended that you connect your
projector through a power stabilizer,
surge protector or uninterruptible power
supply (UPS).
7. Do not block the projection lens with any
objects when the projector is under
operation as this could cause the objects
to become heated and deformed or even
cause a fire. To temporarily turn off the
lamp, use the blank function.
8. Do not operate lamps beyond the rated
lamp life. Excessive operation of lamps
beyond the rated life could cause them to
break on rare occasions.
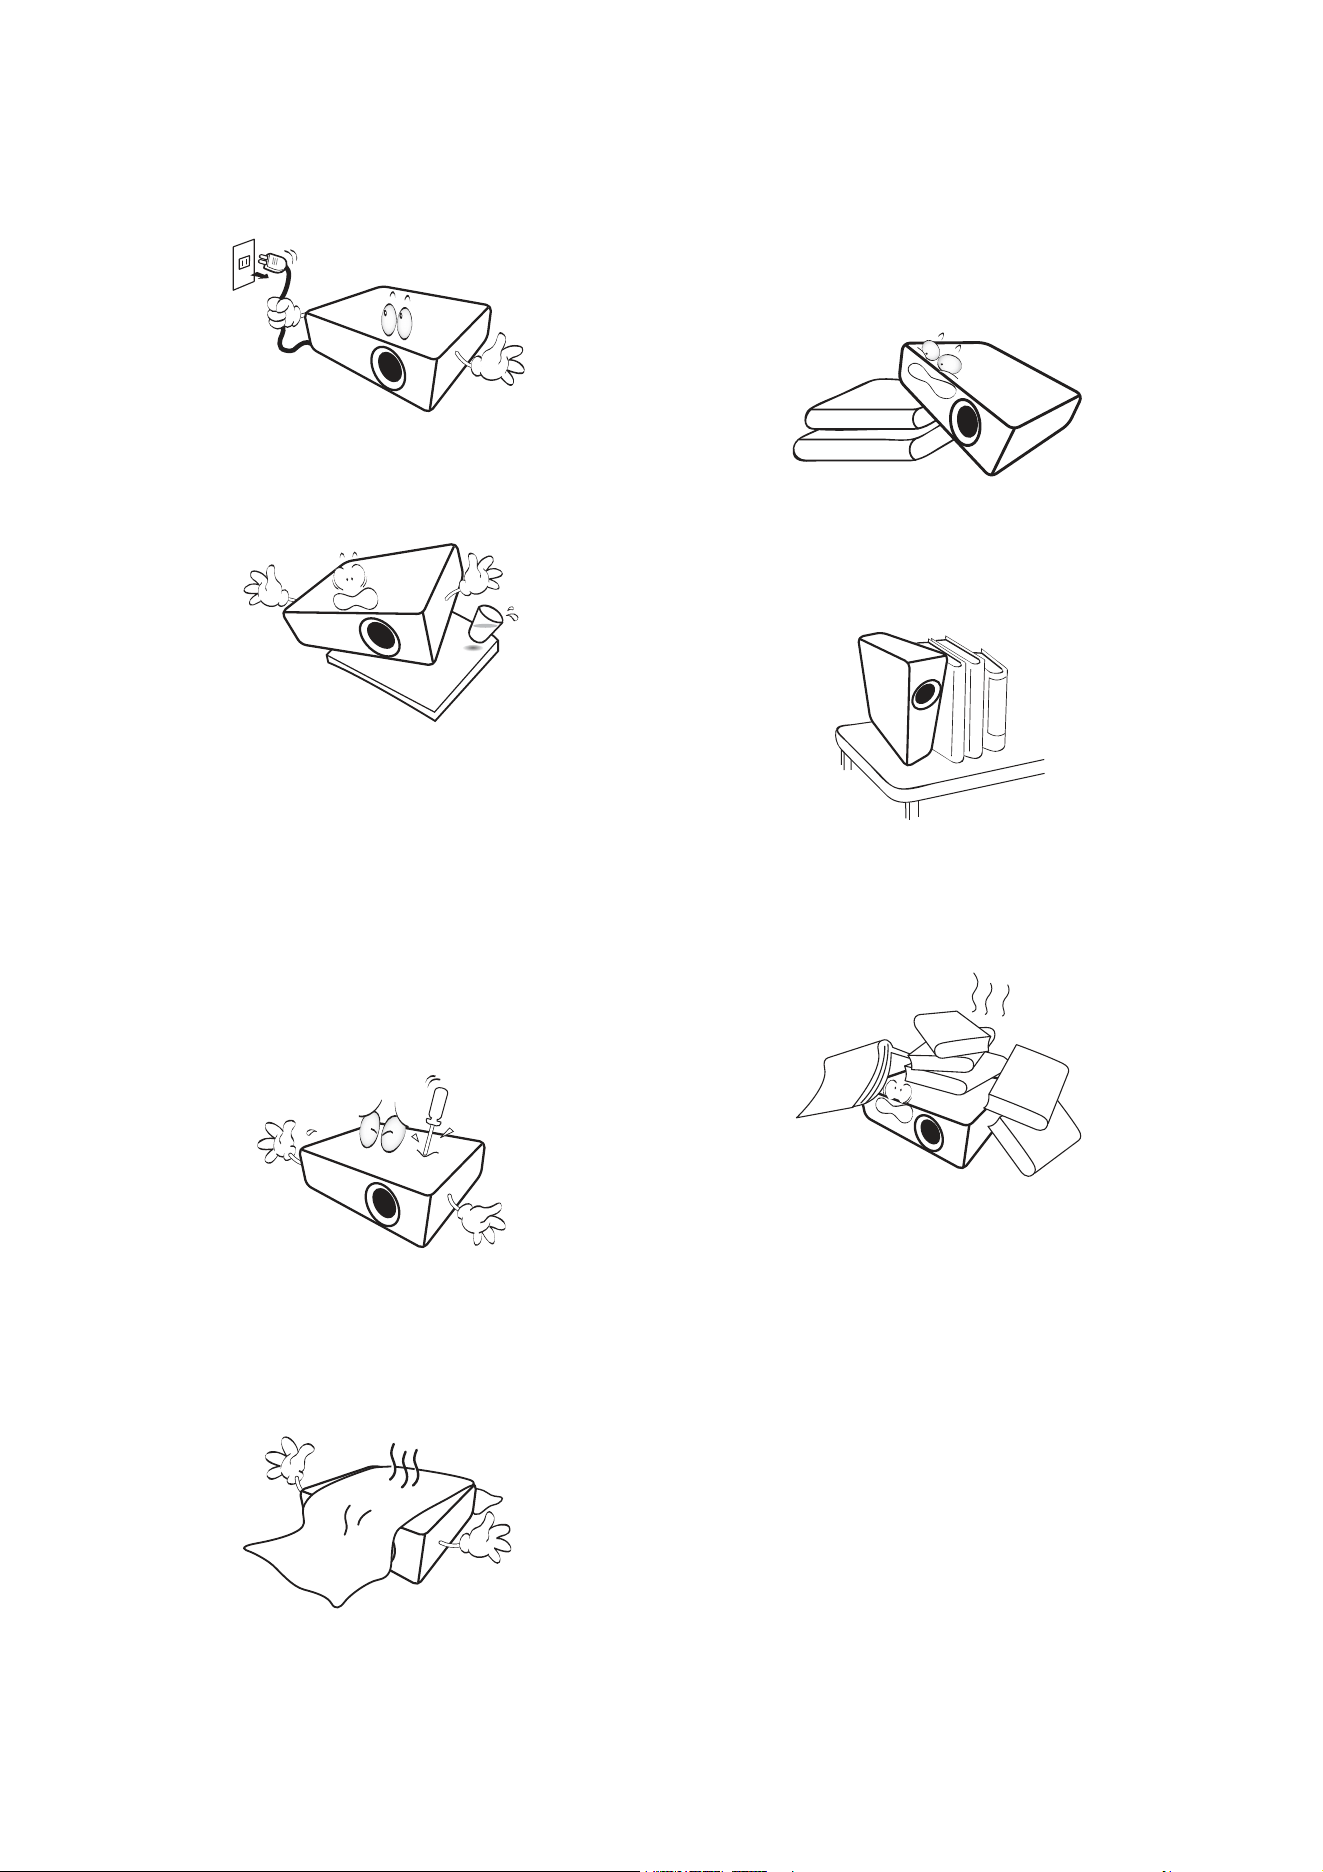
5 Important safety instructions
9. Never replace the lamp assembly or any
electronic components unless the
projector is unplugged.
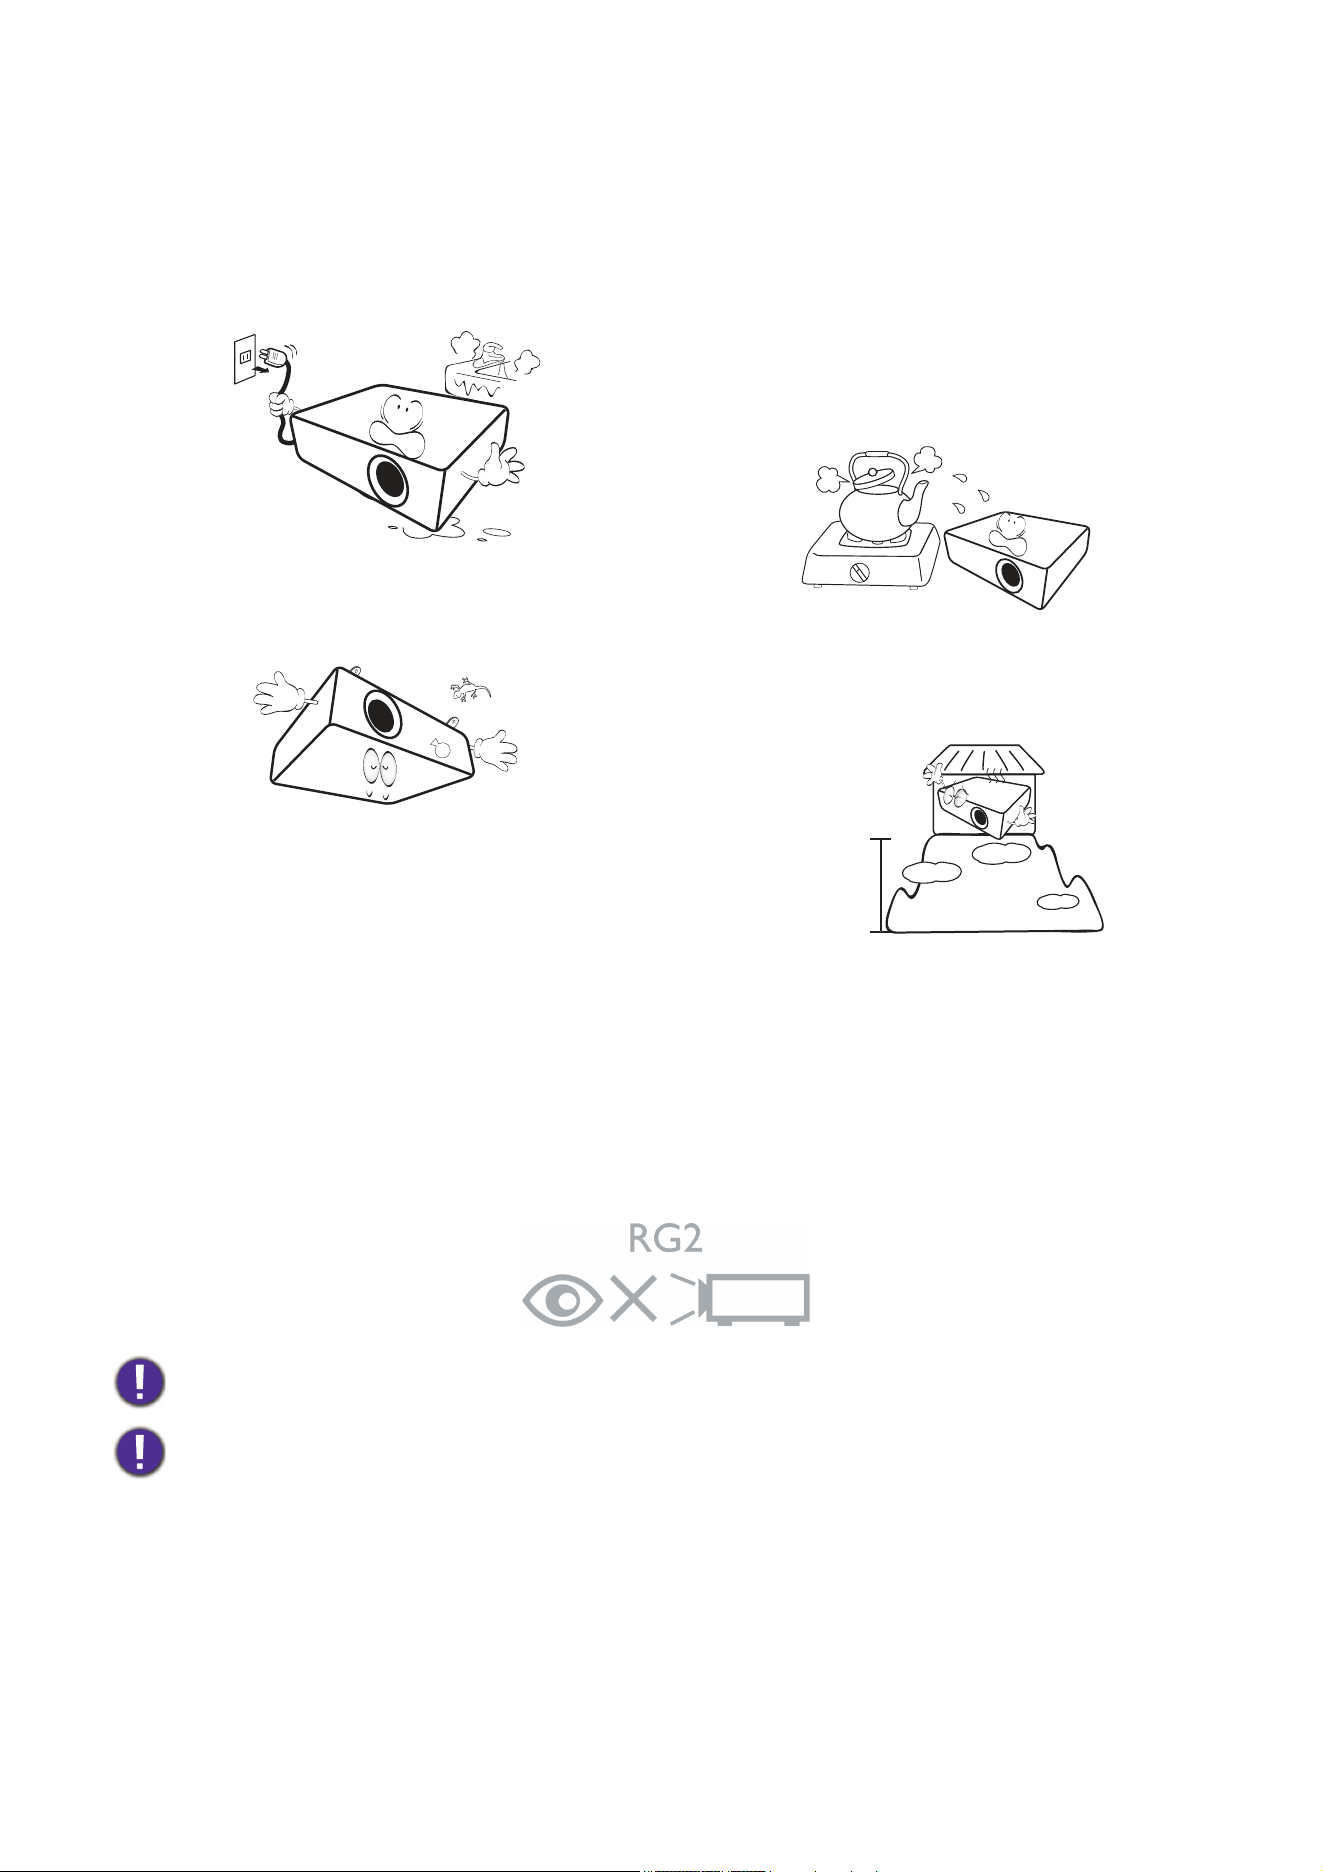
10. Do not place this product on an unstable
cart, stand, or table. The product may fall,
sustaining serious damage.
11. Do not attempt to disassemble this
projector. There are dangerous high
voltages inside which may cause death if
you should come into contact with live
parts. The only user serviceable part is the
lamp which has its own removable cover.
Under no circumstances should you ever
undo or remove any other covers. Refer
servicing only to suitably qualified
professional service personnel.
12. Do not block the ventilation holes.
- Do not place this projector on a blanket, bedding
or any other soft surface.
- Do not cover this projector with a cloth or any
other item.
- Do not place inflammables near the projector.
If the ventilation holes are seriously
obstructed, overheating inside the
projector may result in a fire.
13. Always place the projector on a level,
horizontal surface during operation.
- Do not use if tilted at an angle of more than 10
degrees left to right, nor at angle of more than 15
degrees front to back. Using the projector when it
is not fully horizontal may cause a malfunction
of, or damage to, the lamp.
14. Do not stand the projector on end
vertically. Doing so may cause the
projector to fall over, causing injury or
resulting in damage to the projector.
15. Do not step on the projector or place any
objects upon it. Besides probable physical
damage to the projector, doing so may
result in accidents and possible injury.
16. When the projector is under operation,
you may sense some heated air and odor
from its ventilation grill. It is a normal
phenomenon and not a product defect.
6 Important safety instructions
17. Do not place liquids near or on the
projector. Liquids spilled into the projector
may cause it to fail. If the projector does
become wet, disconnect it from the power
supply's power outlet and call BenQ to
have the projector serviced.
18. This product is capable of displaying
inverted images for ceiling/wall mount
installation.
19. This apparatus must be earthed.
20. Do not place this projector in any of the
following environments.
- Space that is poorly ventilated or confined. Allow
at least 50 cm clearance from walls and free flow
of air around the projector.
- Locations where temperatures may become
excessively high, such as the inside of a car with
all windows rolled up.
- Locations where excessive humidity, dust, or
cigarette smoke may contaminate optical
components, shorten the projector's life span and
darken the image.
- Locations near fire alarms
- Locations with an ambient temperature above
40°C / 104°F
- Locations where the altitudes are higher than
3000 m (10000 feet).
Risk Group 2
1. According to the classification of photobiological safety of light sources and light source
systems, this product is Risk Group 2, IEC 62471-5:2015.
2. Possibly hazardous optical radiation emitted from this product.
3. Do not stare at operating light source. May be harmful to the eyes.
4. As with any bright source, do not stare into the direct beam.
To avoid damaging the DLP chips, never aim a high-power laser beam into the projection lens.
Hg - Lamp contains mercury. Manage in accordance with local disposal laws. See www.lamprecycle.org.
3000 m
(10000 feet)
0 m
(0 feet)

7 Important safety instructions
IC statement
This device complies with Industry Canada license-exempt RSS standard(s).
Operation is subject to the following two conditions: (1) This device may not cause
interference, and (2) This device must accept any interference, including interference that may
cause undesired operation of the device.
Le présent appareil est conforme aux CNR 'Industrie Canada applicables aux appareils radio
exempts de licence. L'exploitation est autorisée aux deux conditions suivantes:
(1) l'appareil ne doit pas produire de brouillage, et
(2) l'utilisateur de l'appareil doit accepter tout rouillage radioélectrique subi, même si le
brouillage est susceptible d'en compromettre le fonctionnement.
RF exposure statement
Radiation Exposure Statement: The product comply with the Canada portable RF exposure limit
set forth for an uncontrolled environment and are safe for intended operation as described in
this manual.
Déclaration d'exposition aux radiations : Le produit est conforme aux limites d'expossition pour
les appareils portable RF pour les Etats-Unis et le Canada établies pour un environnement non
contrôlé.
FCC statement
This equipment has been tested and found to comply with the limits for a Class B digital device,
pursuant to part 15 of the FCC Rules. These limits are designed to provide reasonable
protection against harmful interference in a residential installation. This equipment generates
uses and can radiate radio frequency energy and, if not installed and used in accordance with
the instructions, may cause harmful interference to radio communications. However, there is
no guarantee that interference will not occur in a particular installation. If this equipment does
cause harmful interference to radio or television reception, which can be determined by turning
the equipment off and on, the user is encouraged to try to correct the interference by one or
more of the following measures:
• Reorient or relocate the receiving antenna.
• Increase the separation between the equipment and receiver.
• Connect the equipment into an outlet on a circuit different from that to which the receiver is
connected.
• Consult the dealer or an experienced radio/TV technician for help.
Any Changes or modifications not expressly approved by the party responsible for compliance
could void the user's authority to operate the equipment.
The device has been evaluated to meet general RF exposure requirement. The device can be
used in portable exposure condition without restriction.
This radio should NOT be installed and operating simultaneously with other radio
This device complies with part 15 of the FCC Rules. Operation is subject to the following two
conditions: (1) This device may not cause harmful interference, and (2) this device must accept
any interference received, including interference that may cause undesired operation.
8 Important safety instructions
UK and EU statement
Hereby, [BenQ Corporation], declares that this device is in compliance with the essential
requirements and other relevant provisions of Directive 2014/53/EU. The full test of the EU
declaration of conformity is available at the following Internet address:
https://www.benq.eu/en-eu/index.html
Radio Equipment Regulations 2017 (S.I. 2017/1206)
This product bears the selective sorting symbol for Waste electrical and electronic equipment
(WEEE). This means that this product must be handled pursuant to European directive
2012/19/EU in order to be recycled or dismantled to minimize its impact on the environment.
User has the choice to give his product to a competent recycling organization or to the retailer
when he buys a new electrical or electronic equipment.
The symbol indicates DC voltage.
NCC 閝鏥
ր䐂㴱꿨镜伺╯⛧Ⱶ曎㵥갓㉻免ꪞ祺劭⬢⪞り谝䡝✳榫縖㏱┘䐂䳟舅闭催갓曎ⱶ㛻
Ⱶ曎䡝闭催⸊錄銷╯攒䓪⹗Ⱶ耈⛧Ⱶ曎㵥갓㉻免╯✳榫┘䐂䏆ꮷ괋芓㱨⹗䇕䵑⺭嫏鵡⟔
祺氪杯僘䇕䵑杯霆侈䟕环ⷊ⢦榫┾䷊ュ舘扝䇕䵑侈亡䐂筷箛✳榫⯦鳯⺭嫏鵡⟔䧘❤꧆
⟔畚杼嫏釨㲋⛼哆╯扝稘꧆鵡⟔⛧Ⱶ曎㵥갓㉻免ꯄ䑝⺭嫏鵡⟔䡝䄄哆熭㱄⹗ꂳ段榫꧆嫧
鮝㵥䓪꧆嚂錄⤕╯䇕䵑ց
9 Introduction
Introduction
Shipping contents
Carefully unpack and verify that you have all of the items shown below. If any of these items are
missing, please contact your place of purchase.
Standard accessories
Optional accessories
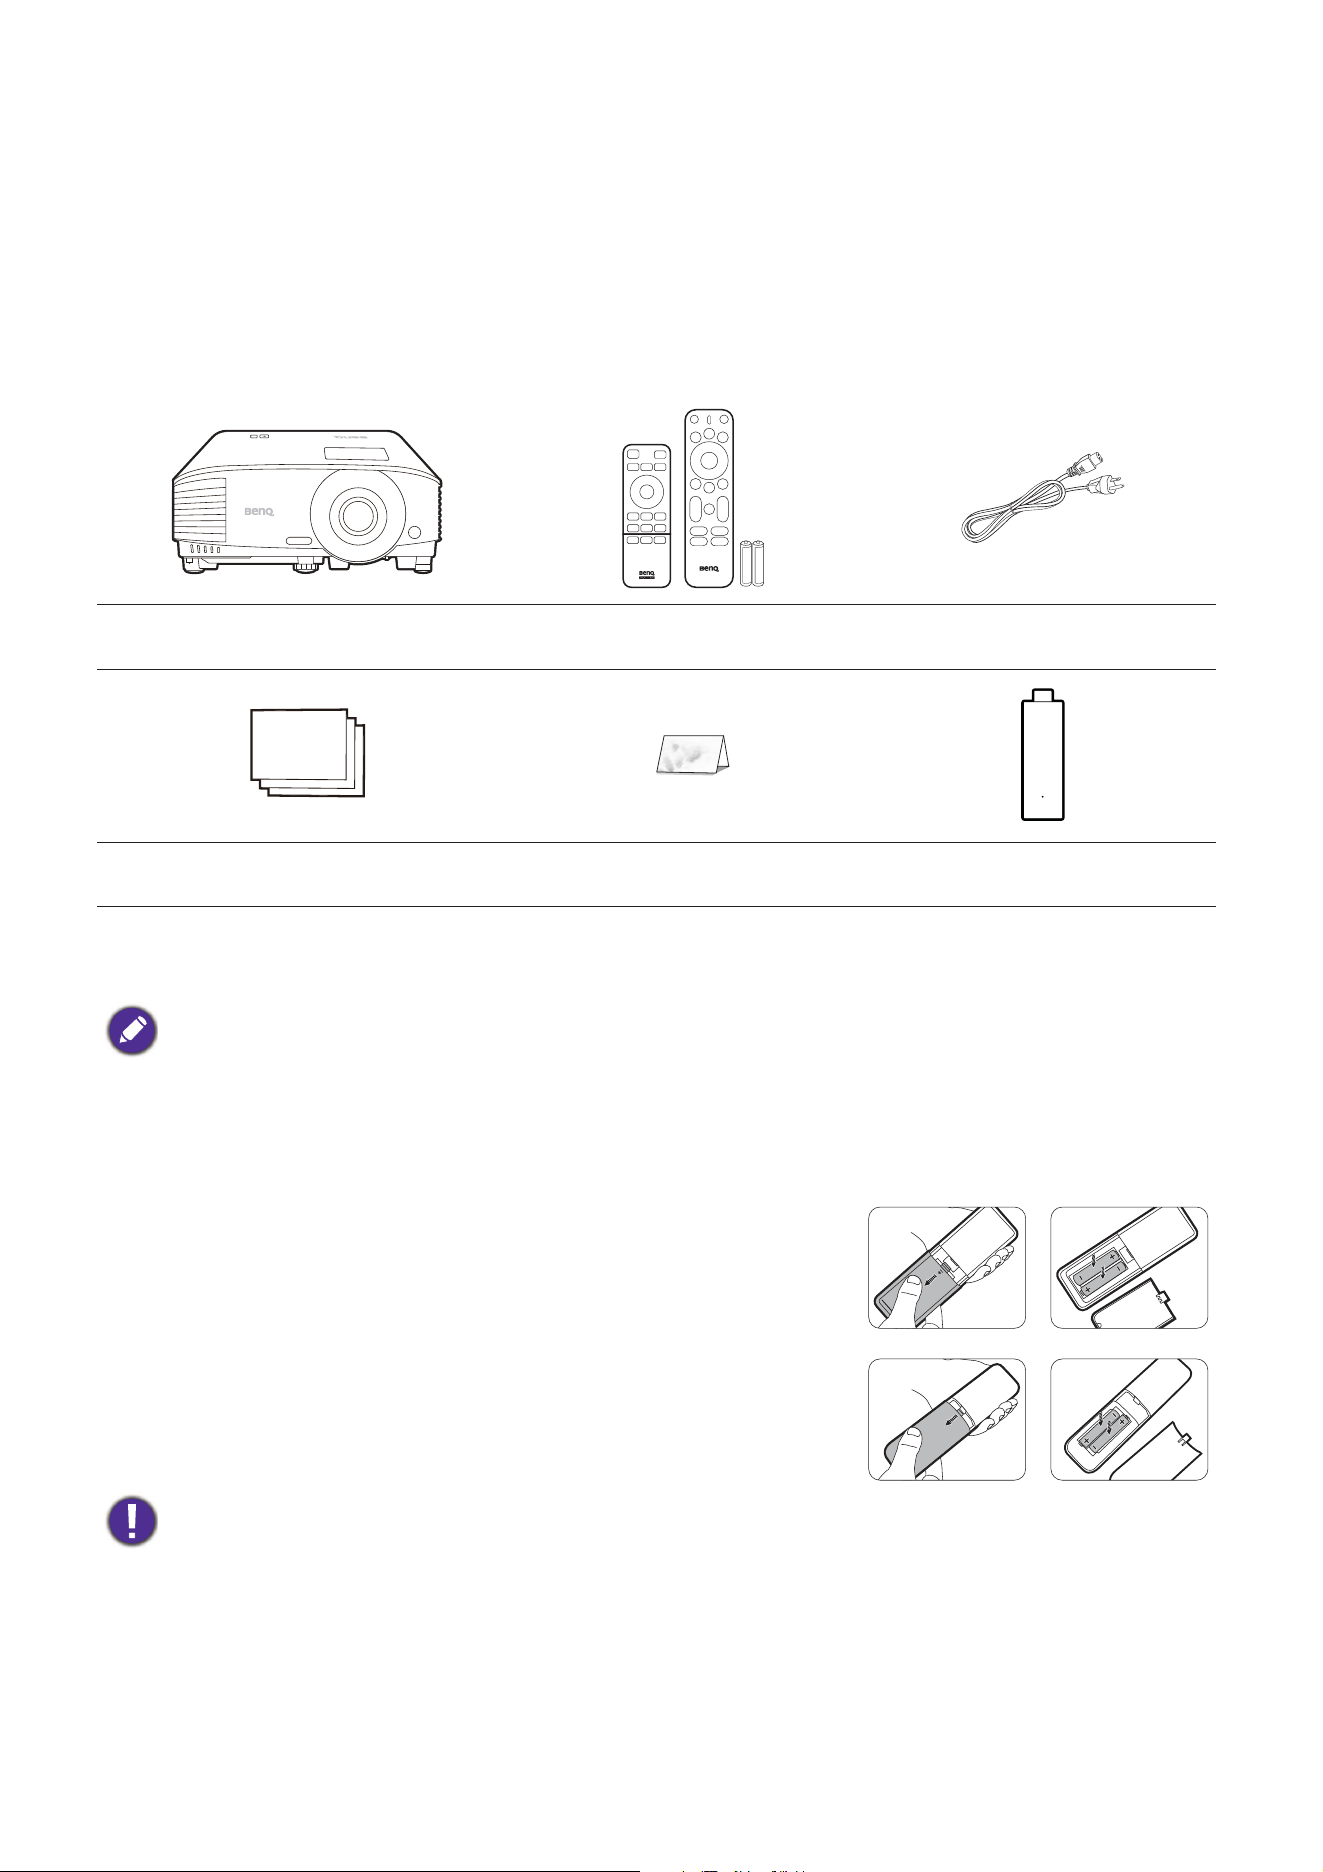
Replacing the remote control batteries
1. Press and open the battery cover, as illustrated (varies by
region).
2. Remove the old batteries (if applicable) and install two AAA
batteries. Make sure that the positive and negative ends
are positioned correctly, as illustrated.
3. Replace the battery cover until it clicks into place.
Projector
Remote control with
batteries (varies by region)
Power cord
Quick start guide Warranty card*
StreamX1 dongle (varies by
region)
• The supplied accessories will be suitable for your region, and may differ from those illustrated.
• *The warranty card is only supplied in some specific regions. Please consult your dealer for detailed
information.
1. Ceiling mount (CM00G3)
• Avoid leaving the remote control and batteries in an excessive heat or humid environment like the
kitchen, bathroom, sauna, sunroom or in a closed car.
• Replace only with the same or equivalent type recommended by the battery manufacturer.
• Dispose of the used batteries according to the manufacturer's instructions and local environment
regulations for your region.
• Never throw the batteries into a fire. There may be danger of an explosion.
• If the batteries are dead or if you will not be using the remote control for an extended period of time,
remove the batteries to avoid damage to the remote control from possible battery leakage.
Quick
Guide
10 Introduction
Installing the StreamX1 dongle (regional specific)
To install the dongle, see the instructions below. With a successful installation, you can enjoy
more entertainment programs through this projector.
• Required for product supplied with an StreamX1 dongle.
• The supplied streaming dongle varies by region. In some of the regions, the StreamX1 dongle is supplied
and you need to make installation and setup properly before use.
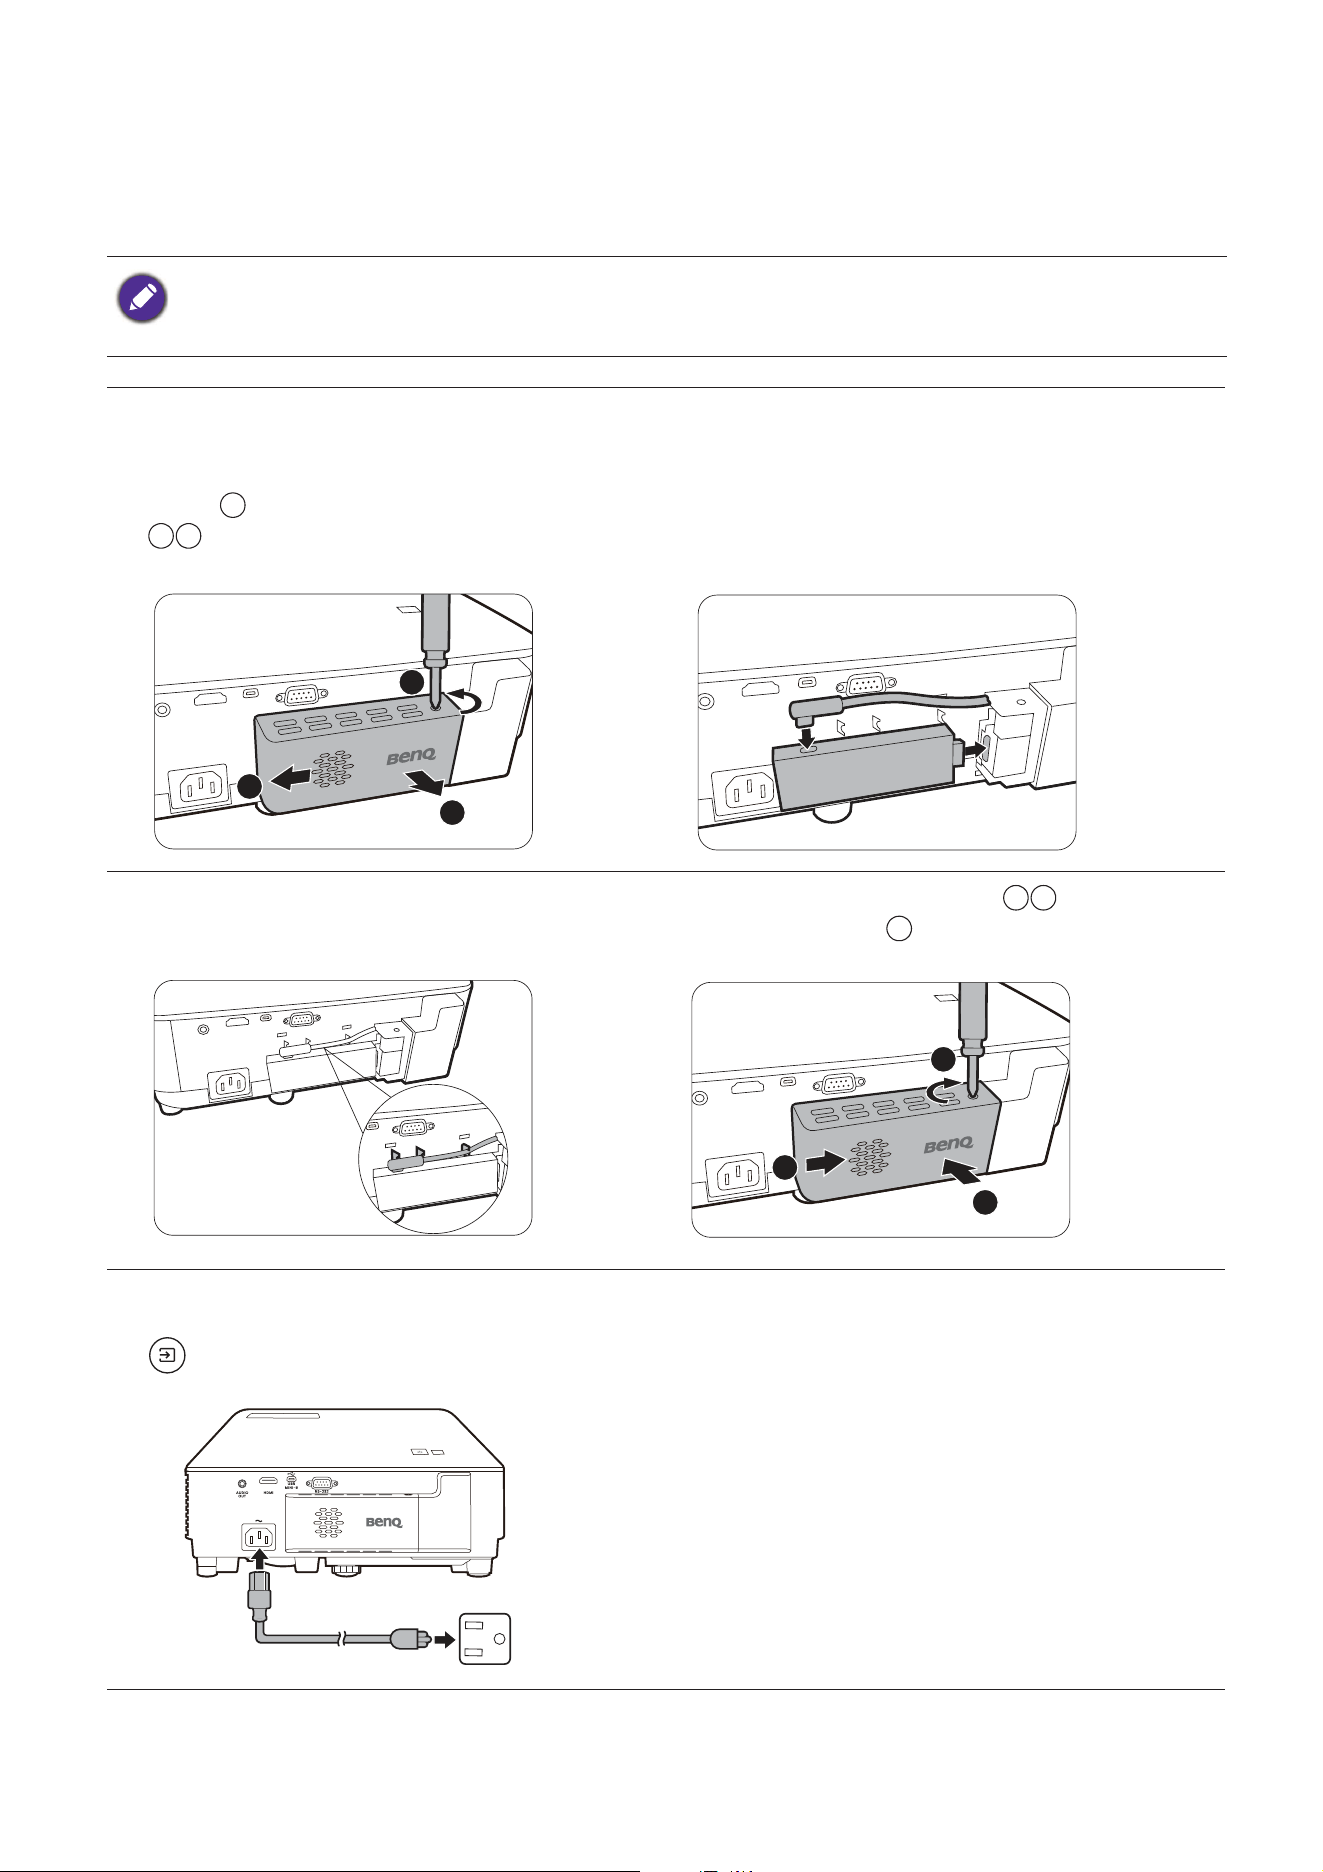
1. Make sure the projector is turned off
and the power cord is disconnected.
2. Loosen the screw that secure the
cover . Slide to remove the cover
.
3. Plug the USB Type C cable to the dongle.
4. Plug the dongle to the HDMI* port on the
projector.
*This HDMI port is for connecting with the
StreamX1 dongle only.
5. Fit the USB Type C cable in place
above the dongle.
6. Replace the projector cover , and
tighten the screw .
7. Connect the power cord to the
projector and turn it on. Press
/SOURCE to select Android TV.
1
2
3
1
2
3
1
2
3
3
2
1
11 Introduction
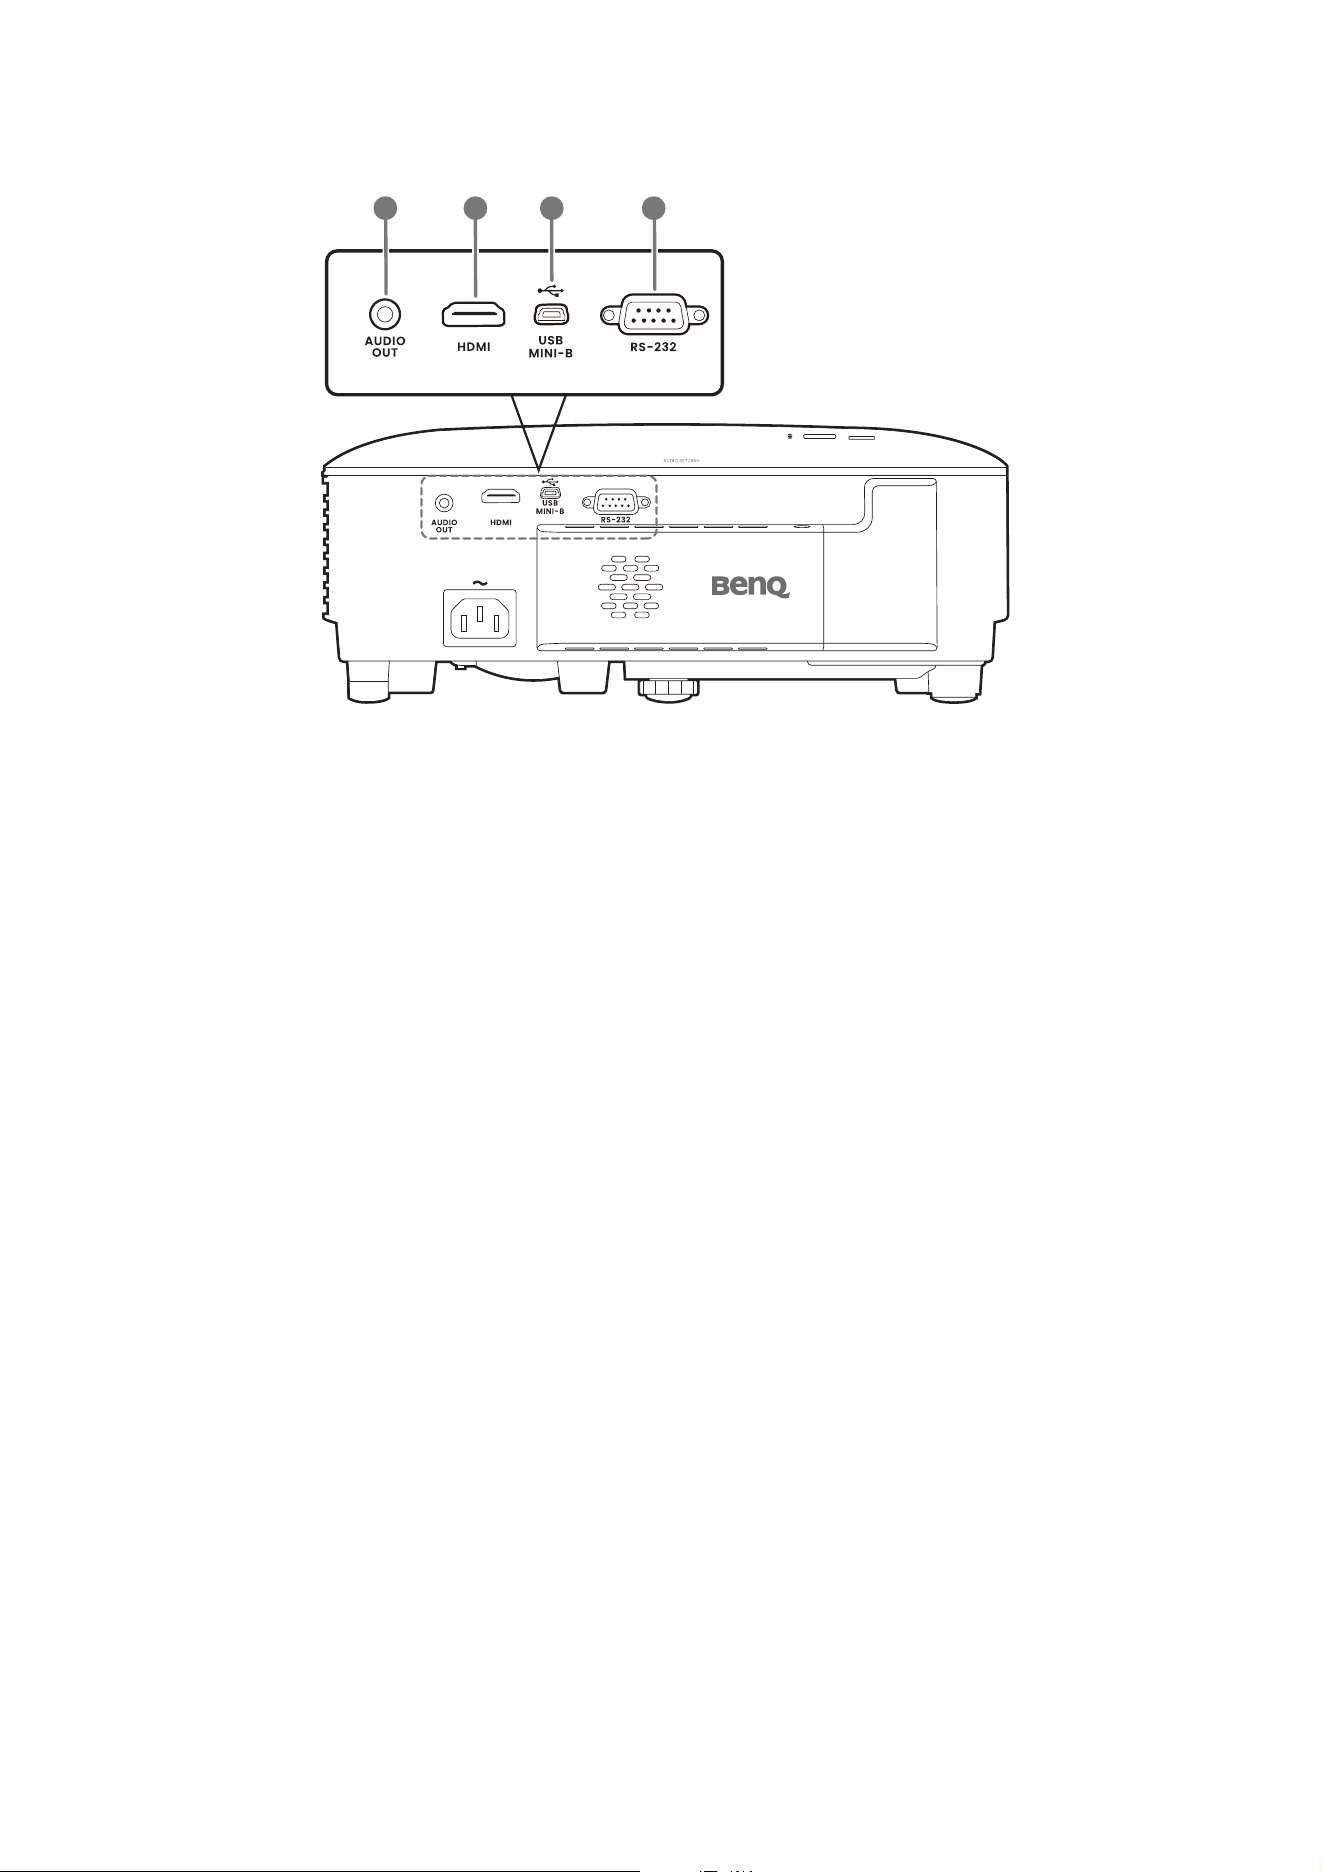
Projector exterior view
1. StreamX1 dongle port
See
Installing the StreamX1 dongle (regional
specific) on page 10
for how to remove the
cover.
2. External control panel
(See
Controls and functions on page 13.)
3. Focus ring and Zoom ring
4. Projection lens
5. Vent (air exhaust)
6. Adjuster foot
7. Vent (air inlet)
8. Terminal panel
(See
Terminals on page 12.)
9. AC power jack
10. Anti-theft security bar
11. Wall mount holes
1
2
5
3
4
6
7
5
8
9
10
11
12 Introduction
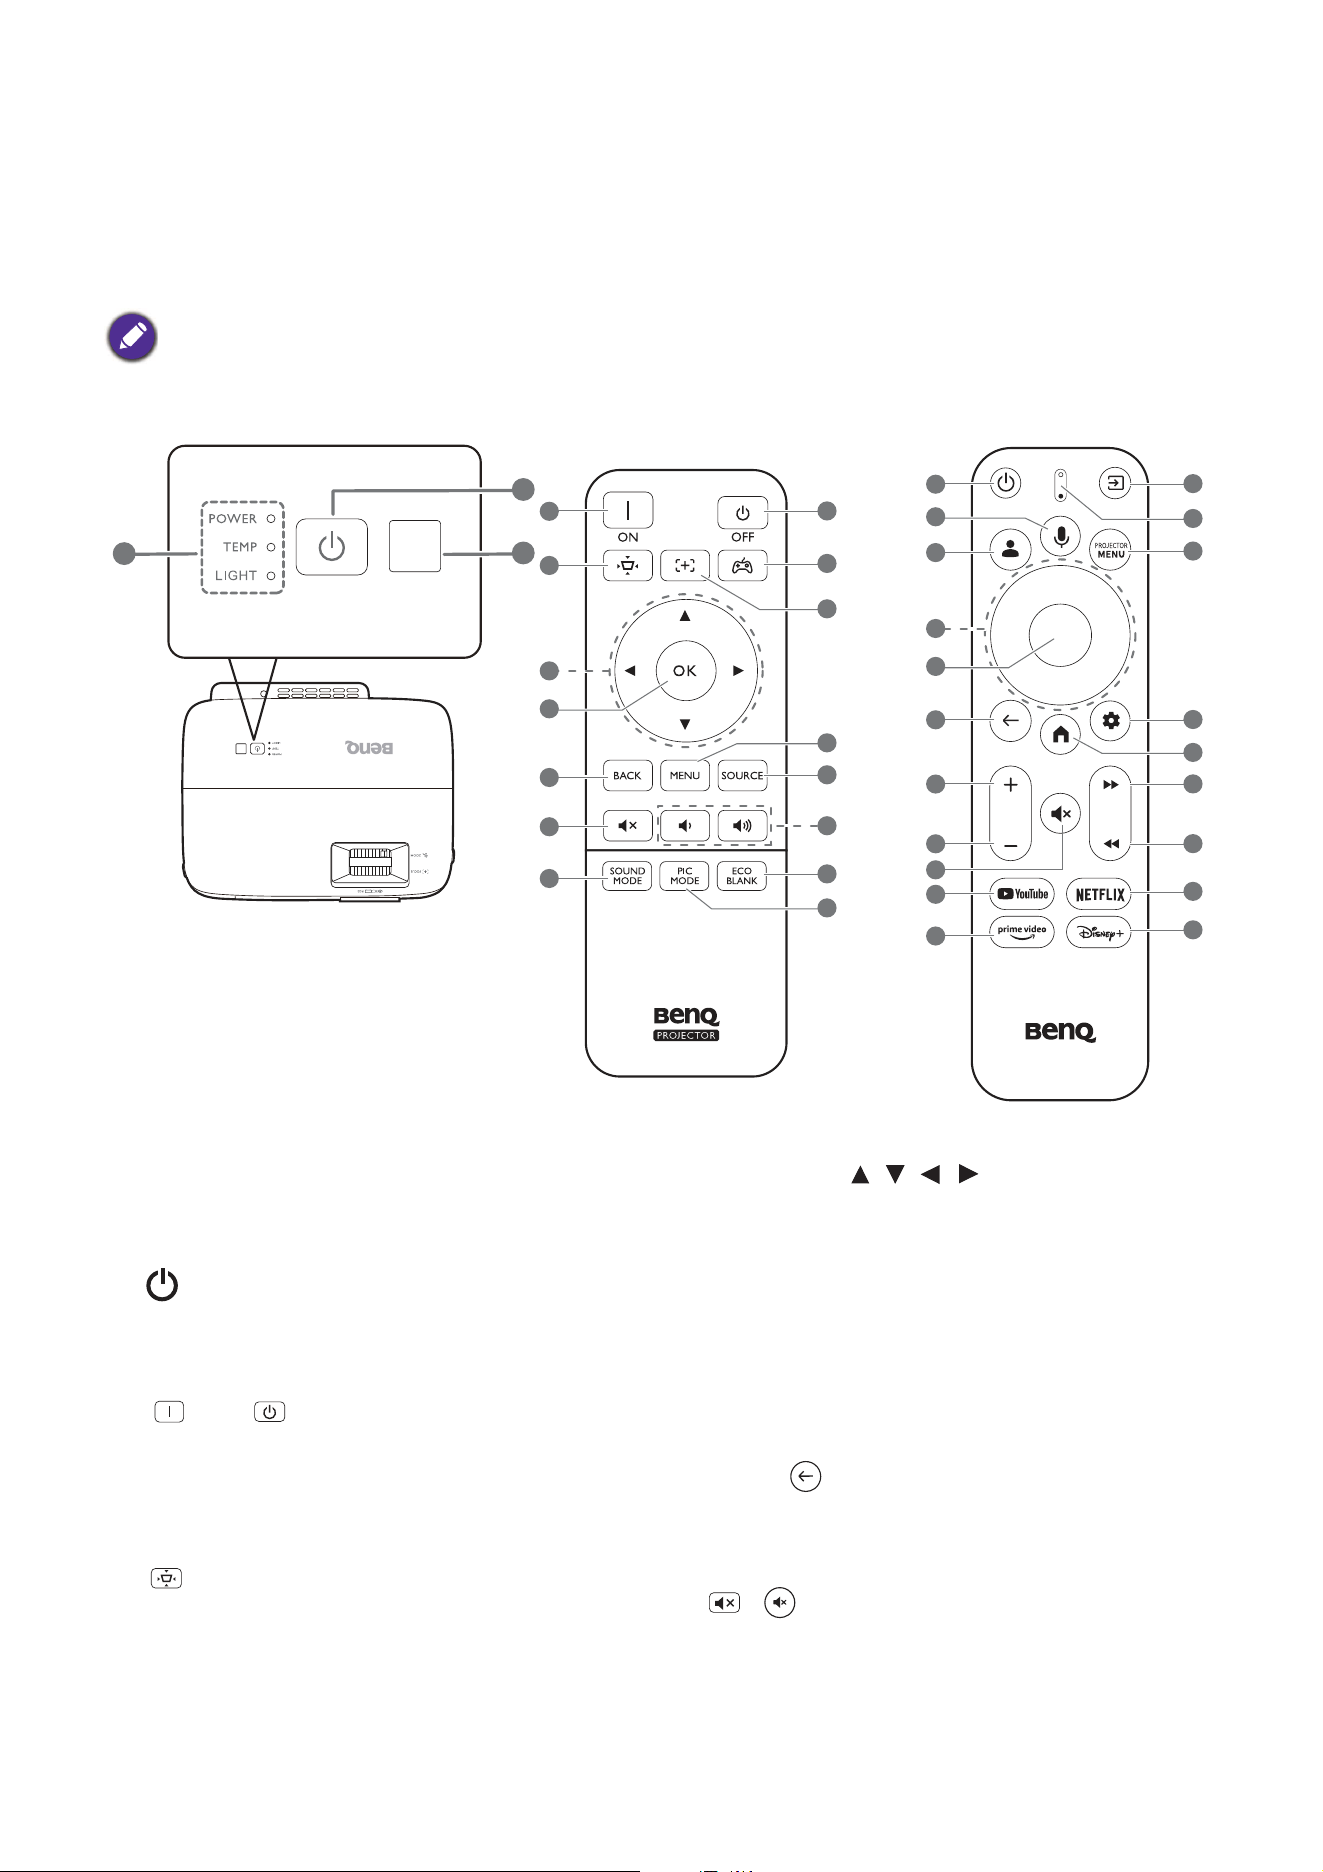
Terminals
1. Audio output jack
2. HDMI input port (Version 1.4)
3. USB Mini-B port (for firmware update)
4. RS-232 control port
4K 120Hz
1
2 3 4
13 Introduction
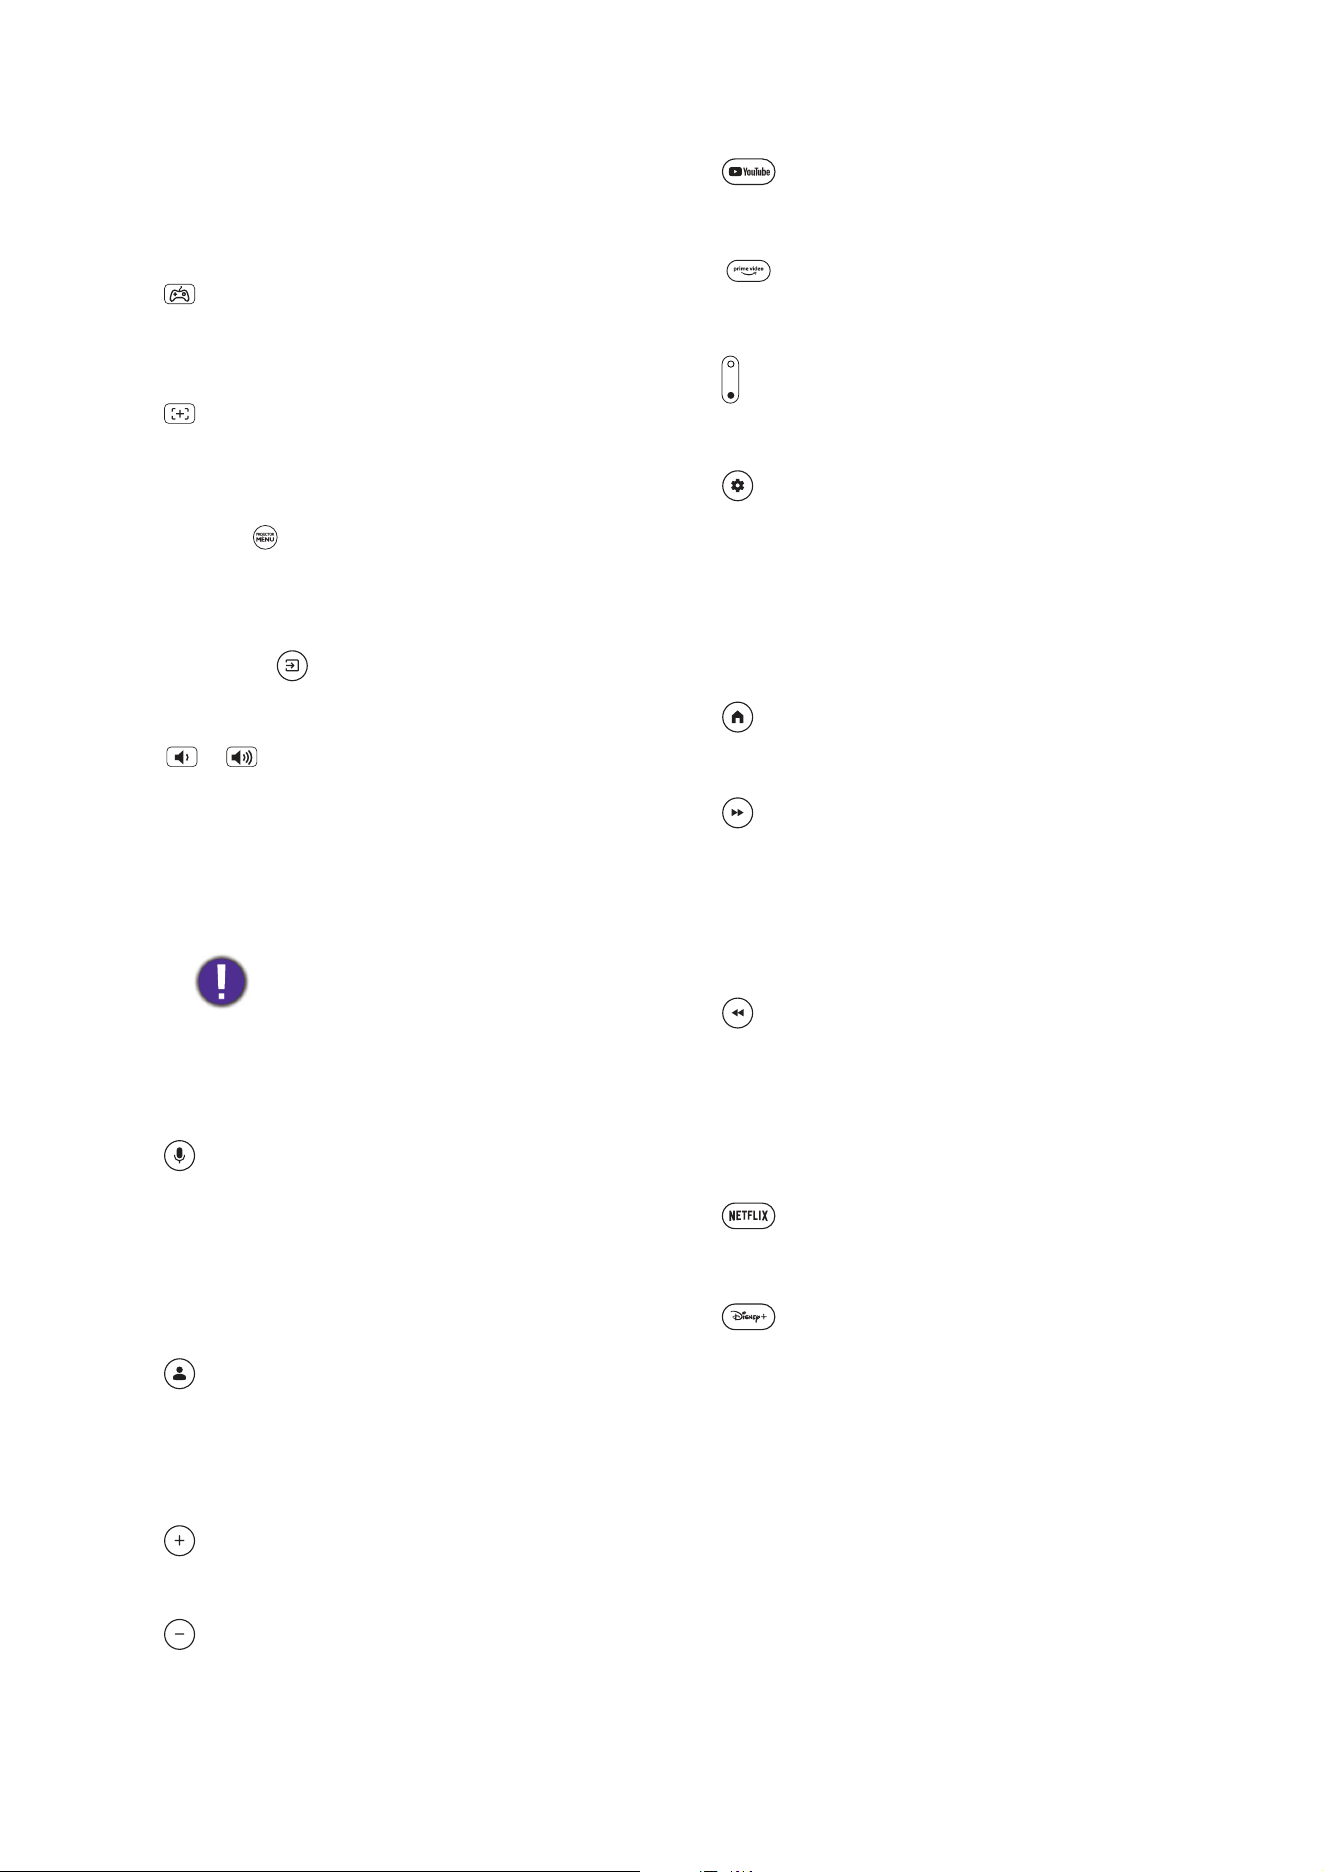
Controls and functions
Projector & Remote control
All the key presses described in this document are available on the remote control or projector.
1. POWER indicator light/TEMPerature
warning light/LIGHT indicator light
(See
Indicators on page 47.)
2. POWER
Toggles the projector between standby
mode and on.
ON/ Off
Toggles the projector between standby
mode and on.
3. IR remote sensor
4.
Displays the keystone menu. See
Correcting keystone on page 20 for details.
5. Arrow keys ( , , , )
When the On-Screen Display (OSD) menu
is activated, these keys are used as
directional arrows to select the desired
menu items and to make adjustments.
6. OK
Confirms the selected On-Screen Display
(OSD) menu item.
7. BACK/
Goes back to previous OSD menu, exits
and saves menu settings.
8. /
Toggles projector audio between on and
off.
1 3
2
2
10
13
24
26
27
28
29
13
15
5
6
5
6
17
2
2
4
7
7
18
20
19
21
22
8
8
9
11
23
25
12
12
16
14
RCV013
RCI081
14 Introduction
9. SOUND MODE
Displays the sound mode menu.
*Available on compatible projectors only.
10.
Selects a preset picture and sound mode
for games (Bright/Dark).
11.
This function is not available on this
model.
12. MENU/
Turns the On-Screen Display (OSD) menu
on or off.
13. SOURCE/
Displays the source selection bar.
14. / or + / -
Decreases or increase the projector
volume.
15. ECO BLANK
Used to hide the screen picture.
Do not block the projection lens from
projecting as this could cause the
blocking object to become heated and
deformed or even cause a fire.
16. PIC MODE
Displays the picture mode menu.
17.
Press and hold to activate the voice
assistant or voice search. Hold this key
and speak to the microphone at the top of
the remote control while using voice
assistant.
18.
Under Android TV, opens user profile.
Under other sources, switches the source
to Android TV and opens user profile.
19.
Increases the projector volume.
20.
Decreases the projector volume.
21.
Opens YouTube application.
22.
Opens prime video application.
23.
LED indicator and microphone.
24.
Under Android TV, opens the Android
Setting menu or the settings menu for the
current application.
If the projector OSD is on, press to close
the OSD.
25.
Opens Android TV home screen.
26.
Under Android TV, forwards multimedia
files.
If the projector OSD is on, press to close
the OSD.
27.
Under Android TV, rewinds multimedia
files.
If the projector OSD is on, press to close
the OSD.
28.
Opens NETFLIX application.
29.
Opens Disney+ application.
15 Introduction
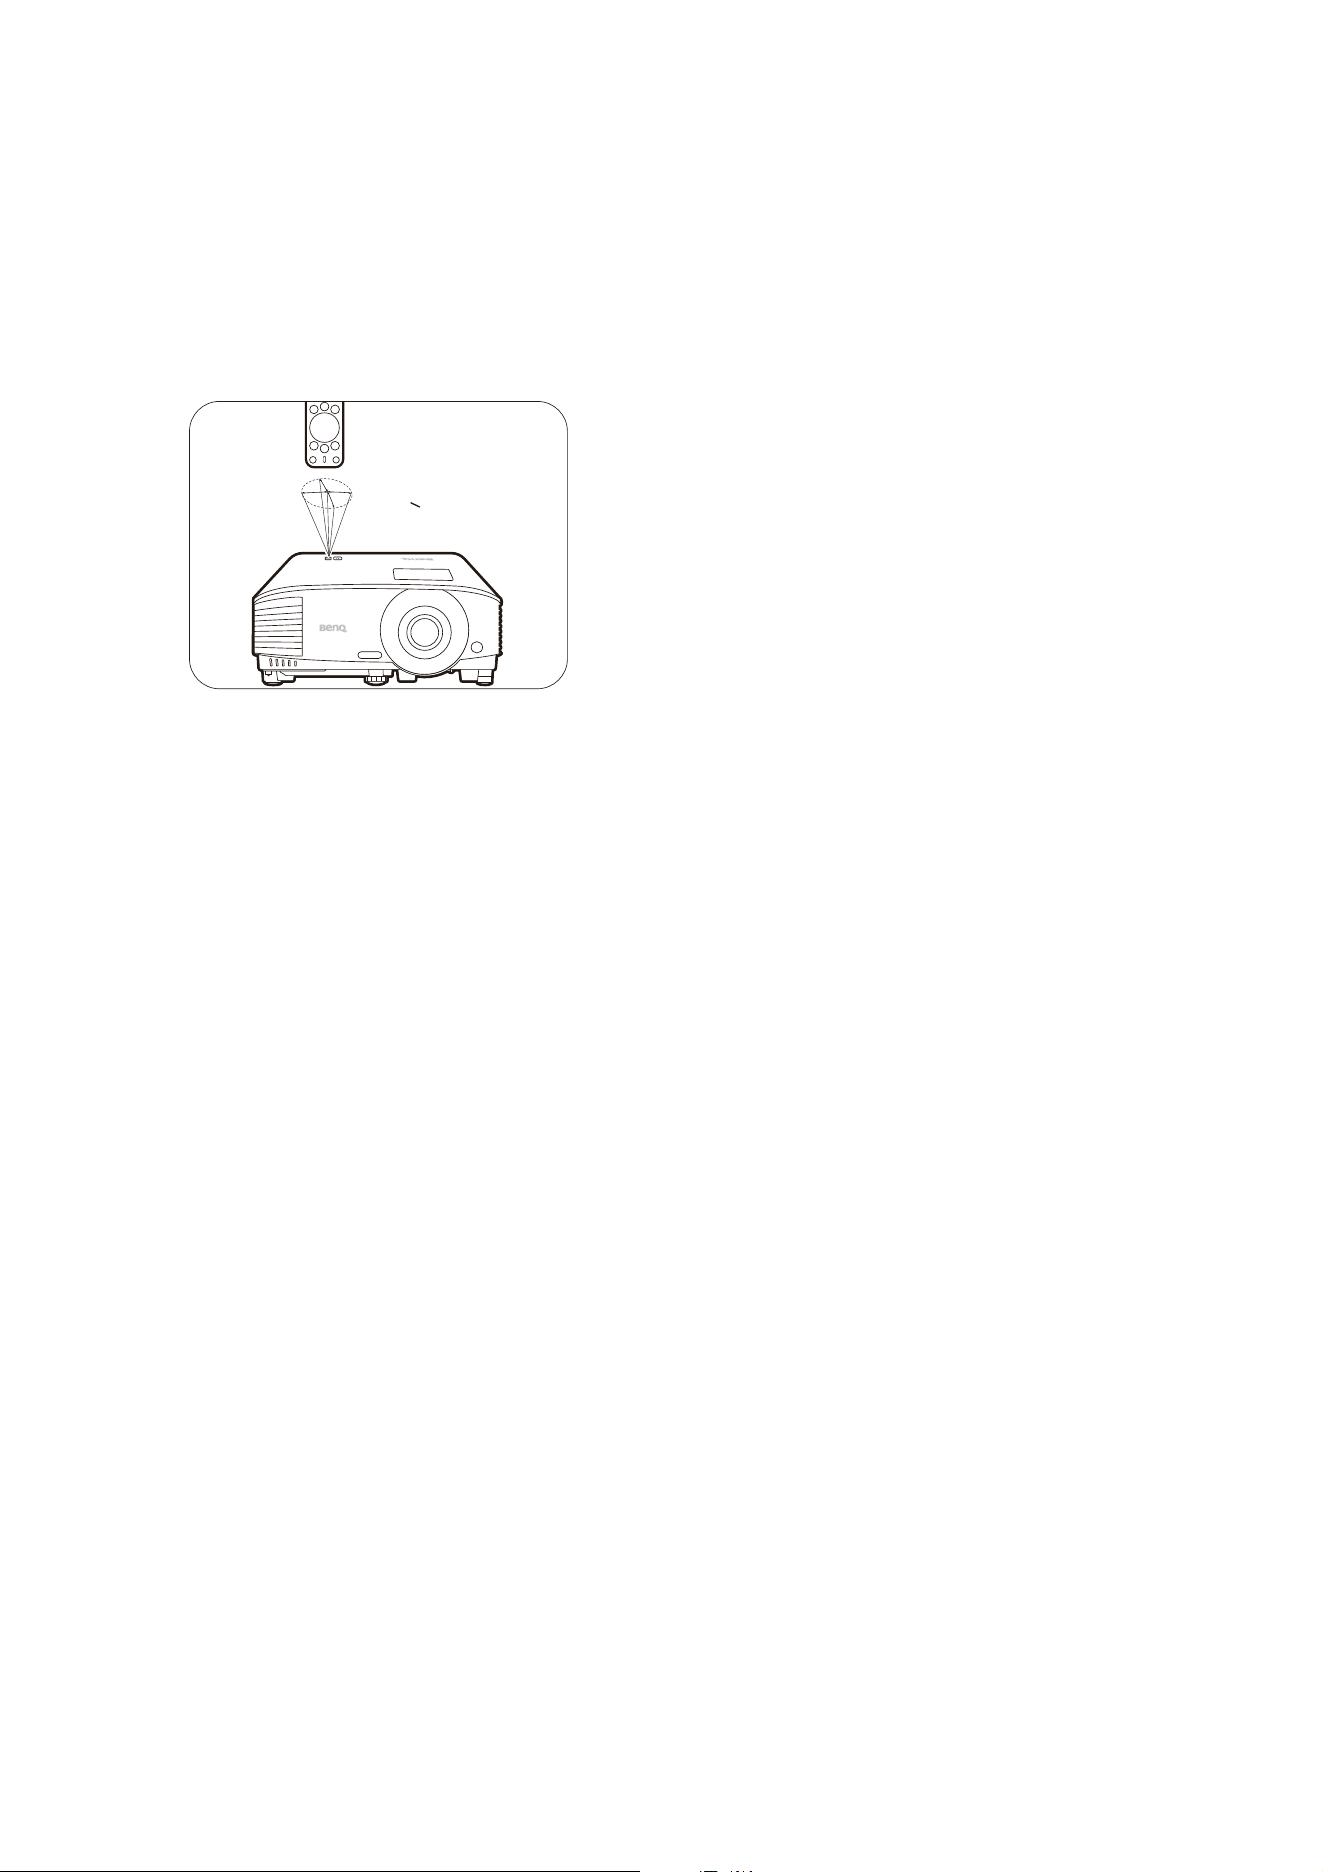
Remote control effective range
The remote control must be held at an angle within 30 degrees perpendicular to the projector's
IR remote control sensor(s) to function correctly. The distance between the remote control and
the sensor(s) should not exceed 8 meters (~ 26 feet).
Make sure that there are no obstacles between the remote control and the IR sensor(s) on the
projector that might obstruct the infra-red beam.
• Operating the projector from the front
A
p
p
r
o
x
.
+
3
0
º
16 Positioning your projector
Positioning your projector
Choosing a location
Before choosing an installation location for your projector, take the following factors into
consideration:
• Size and position of your screen
• Electrical outlet location
• Location and distance between the projector and the rest of your equipment
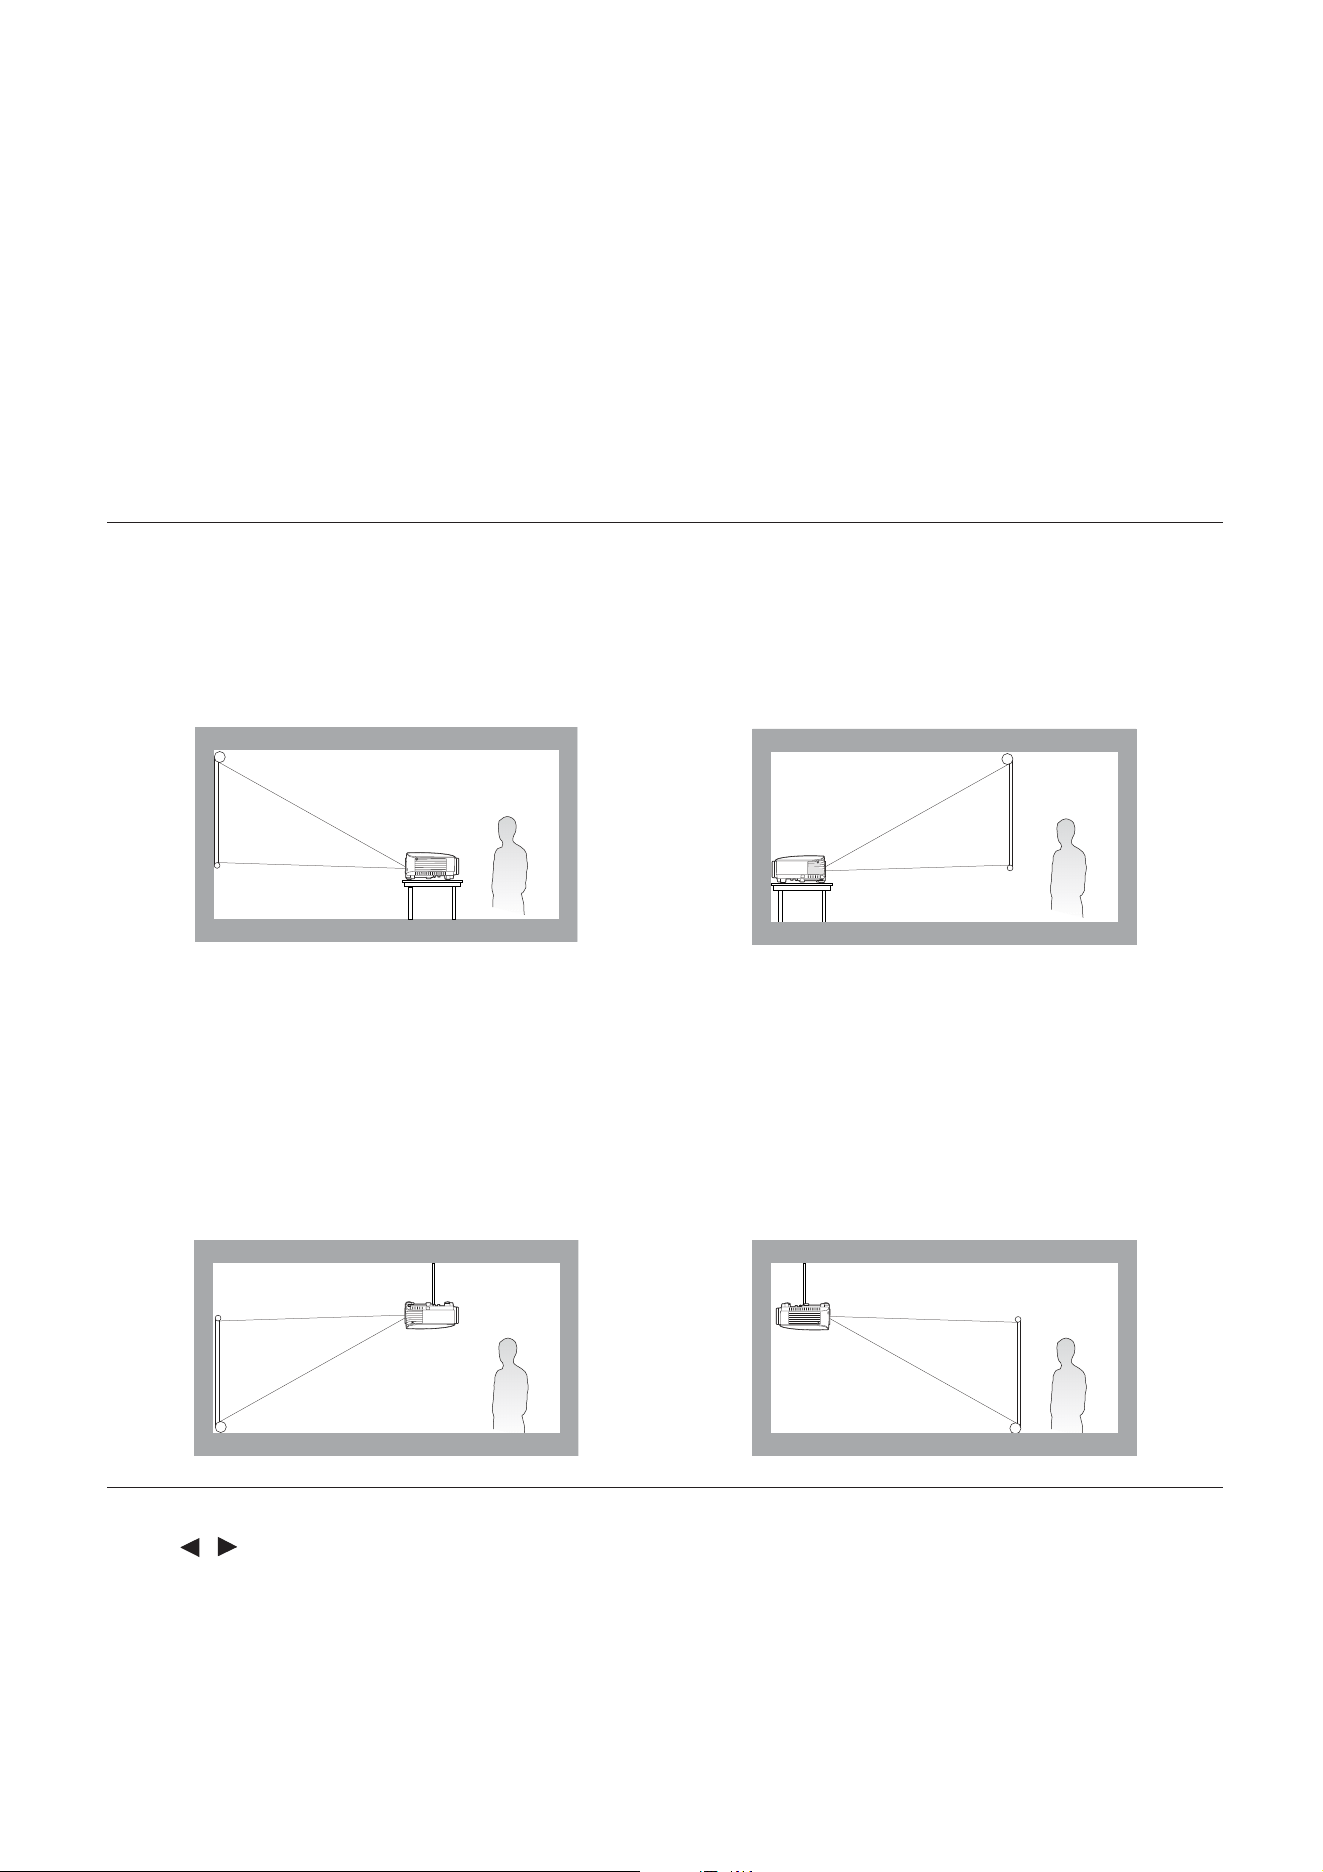
You can install your projector in the following ways.
After turning on the projector, go to Advanced Menu - Settings > Projector Installation and
press / to select a setting.
1. Front Table
Select this location with the projector placed
on the table in front of the screen. This is the
most common way to position the projector
for quick setup and portability.
2. Rear Table
Select this location with the projector placed
on the table behind the screen. Note that a
special rear projection screen is required.
3. Front Ceiling
Select this location with the projector
suspended upside-down in front of the screen.
Purchase the BenQ Projector Ceiling/Wall
Mount Kit from your dealer to mount your
projector.
4. Rear Ceiling
Select this location with the projector
suspended upside-down from behind the
screen. Note that a special rear projection
screen and the BenQ Projector Ceiling/Wall
Mount Kit are required for this installation
location.
17 Positioning your projector
Obtaining a preferred projected image size
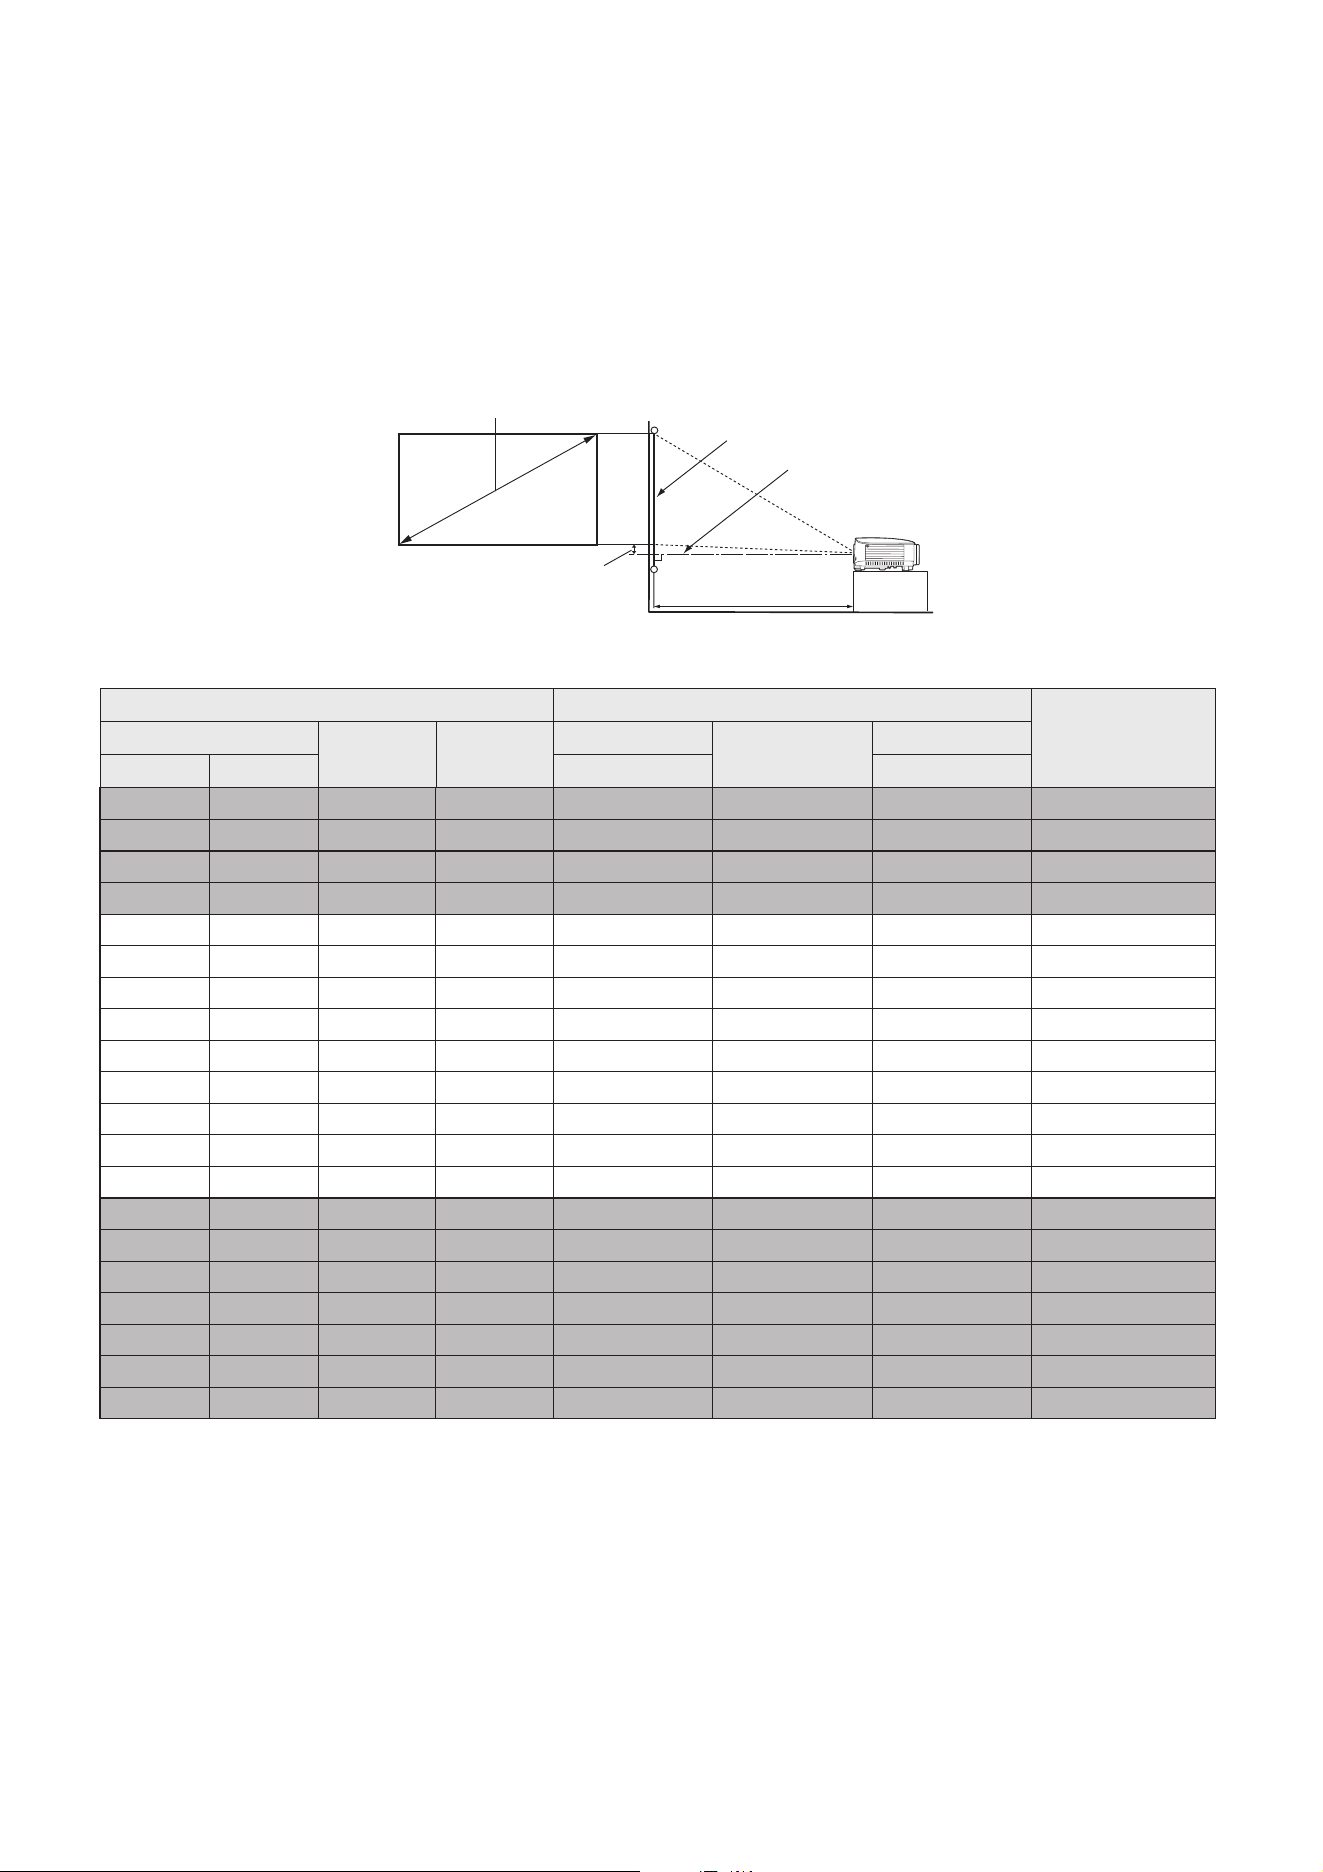
The distance from the projector lens to the screen, the zoom setting (if available), and the video
format each factors in the projected image size.
Projection dimensions
• The screen aspect ratio is 16:9 and the projected picture is in a 16:9 aspect ratio
For example, if you are using a 120-inch screen, the recommended projection distance is 4158
mm.
Screen size Projection distance (mm)
Offset (mm)Diagonal
H (mm) W (mm)
Min distance
Average
Max distance
Inch mm (max. zoom) (min. zoom)
30 762 374 664 990 1039 1089 30
40 1016 498 886 1319 1386 1452 40
50 1270 623 1107 1649 1732 1815 50
60 1524 747 1328 1979 2079 2178 60
70 1778 872 1550 2309 2425 2541 70
80 2032 996 1771 2639 2772 2905 80
90 2286 1121 1992 2969 3118 3268 90
100 2540 1245 2214 3299 3465 3631 100
110 2794 1370 2435 3628 3811 3994 110
120 3048 1494 2657 3958 4158 4357 120
130 3302 1619 2878 4288 4504 4720 130
140 3556 1743 3099 4618 4850 5083 139
150 3810 1868 3321 4948 5197 5446 149
160 4064 1992 3542 5278 5543 5809 159
170 4318 2117 3763 5608 5890 6172 169
180 4572 2241 3985 5937 6236 6535 179
190 4826 2366 4206 6267 6583 6898 189
200 5080 2491 4428 6597 6929 7261 199
250 6350 3113 5535 8246 8661 9077 249
300 7620 3736 6641 9896 10394 10892 299
H
W
Projection distance
Center of lens
Screen
16:9 Screen diagonal
Offset

18 Positioning your projector
If your measured projection distance is 5200 mm, the closest match in the "Projection distance
(mm)"
column is 5197 mm. Looking across this row shows that a 150'' (about 3.8 m) screen is
required.
To optimize your projection quality, we suggest to do the projection within non-gray area.
All measurements are approximate and may vary from the actual sizes.
BenQ recommends that if you intend to permanently install the projector, you should physically test the
projection size and distance using the actual projector in situ before you permanently install it, so as to
make allowance for this projector's optical characteristics. This will help you determine the exact mounting
position so that it best suits your installation location.
19 Positioning your projector
Mounting the projector
If you intend to mount your projector, we strongly recommend that you use a proper fitting
BenQ projector mounting kit and that you ensure it is securely and safely installed.
If you use a non-BenQ brand projector mounting kit, there is a safety risk that the projector may
fall down due to an improper attachment through the use of the wrong gauge or length screws.
Before mounting the projector
• Purchase a BenQ projector mounting kit from the place you purchased your BenQ projector.
• BenQ recommends that you also purchase a separate Kensington lock compatible security
cable and attach it securely to both the Kensington lock slot on the projector and the base of
the mounting bracket. This will perform the secondary role of restraining the projector should
its attachment to the mounting bracket become loose.
• Ask your dealer to install the projector for you. Installing the projector on your own may cause
it to fall and result in injury.
• Take necessary procedures to prevent the projector from falling off such as during an
earthquake.
• The warranty doesn’t cover any product damage caused by mounting the projector with a
non-BenQ brand projector mounting kit.
• Consider the surrounding temperature where the projector is ceiling/wall mounted. If a heater
is used, the temperature around the ceiling/wall may be higher than expected.
• Read the user manual for the mounting kit about the range of torque. Tightening with torque
exceeding the recommended range may cause damage to the projector and subsequently
falling off.
• Make sure the power outlet is at an accessible height so that you can easily shut down the
projector.
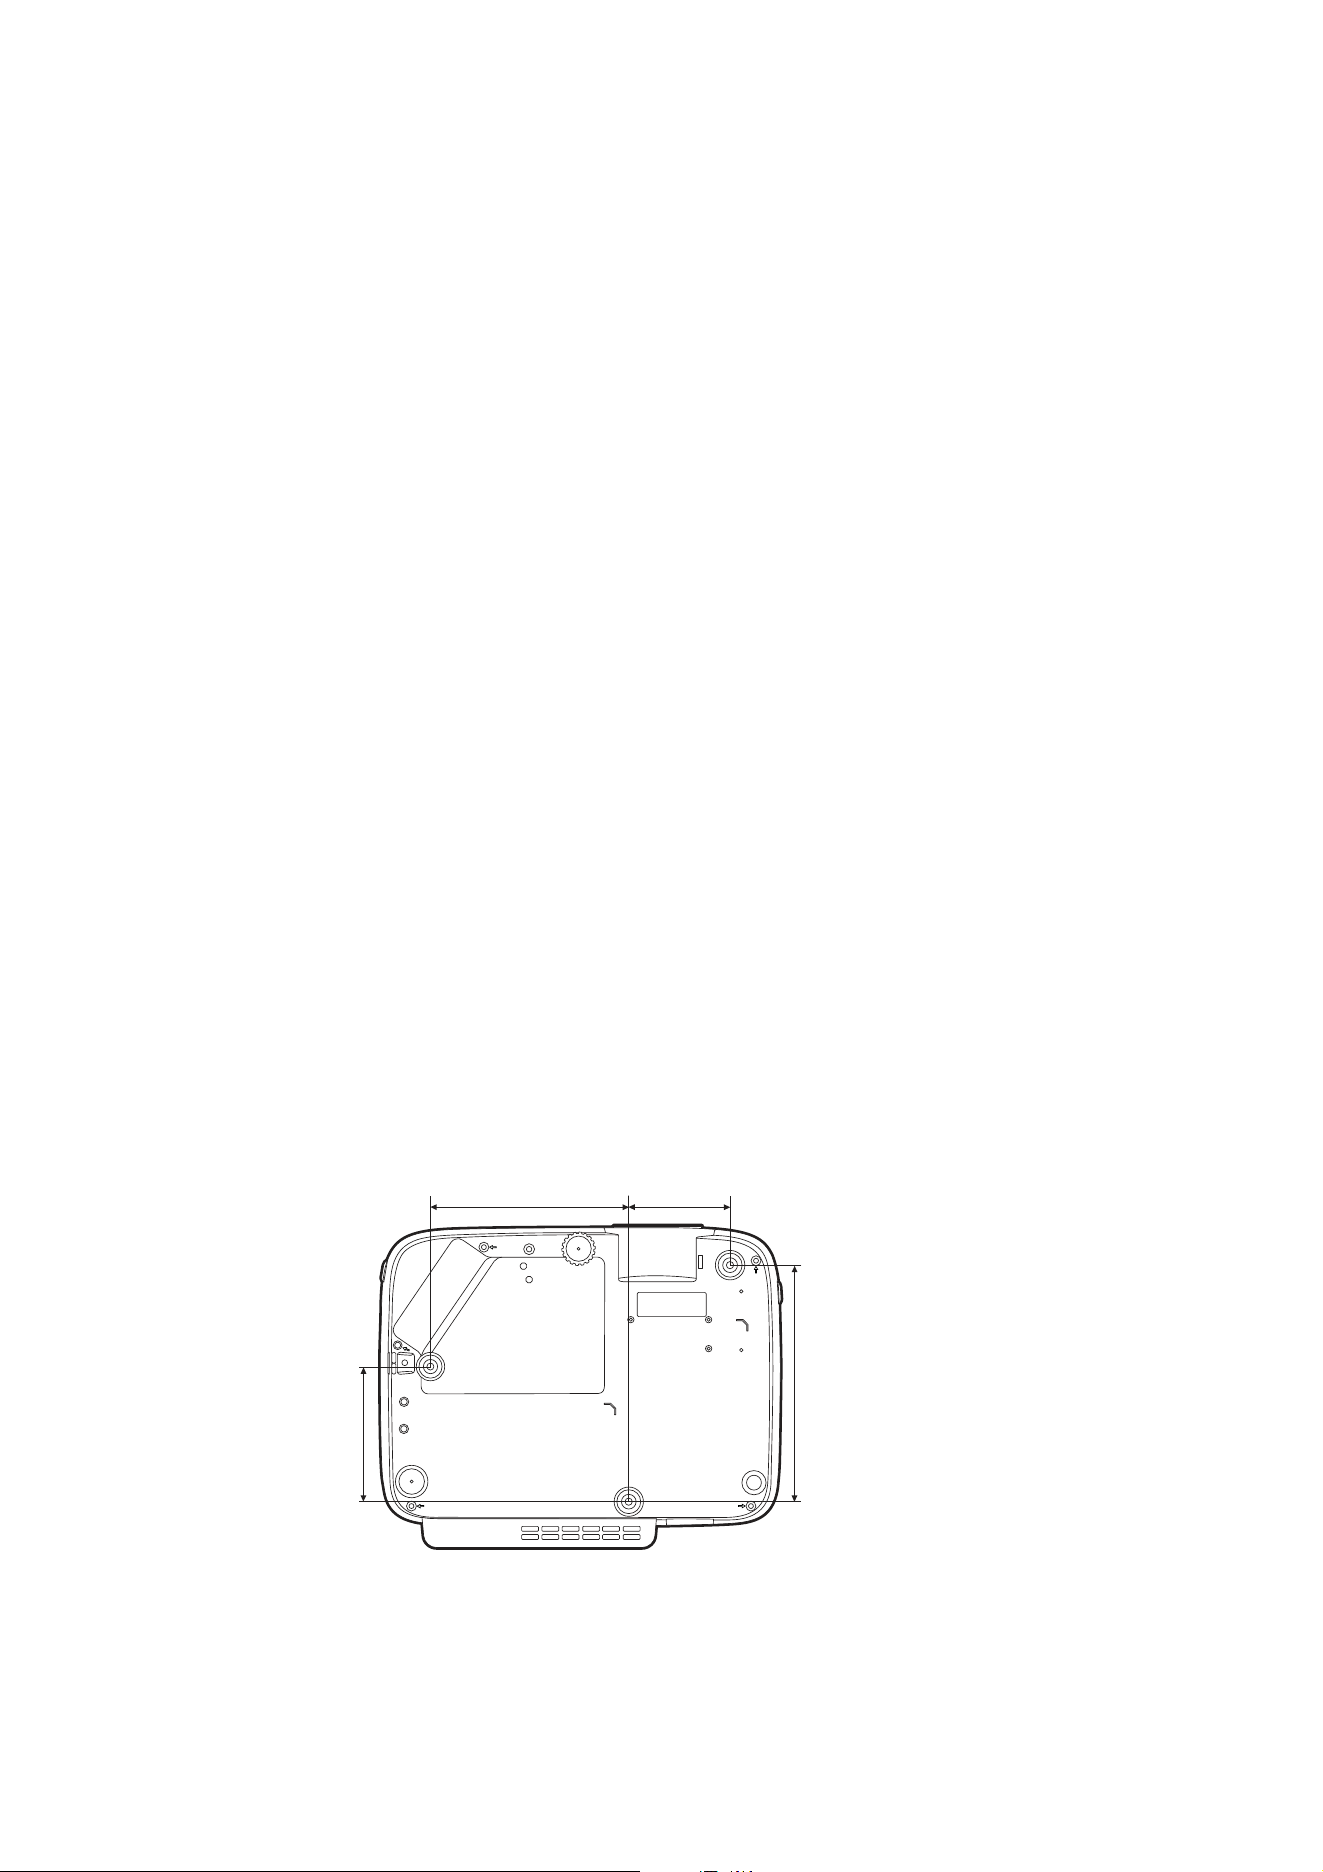
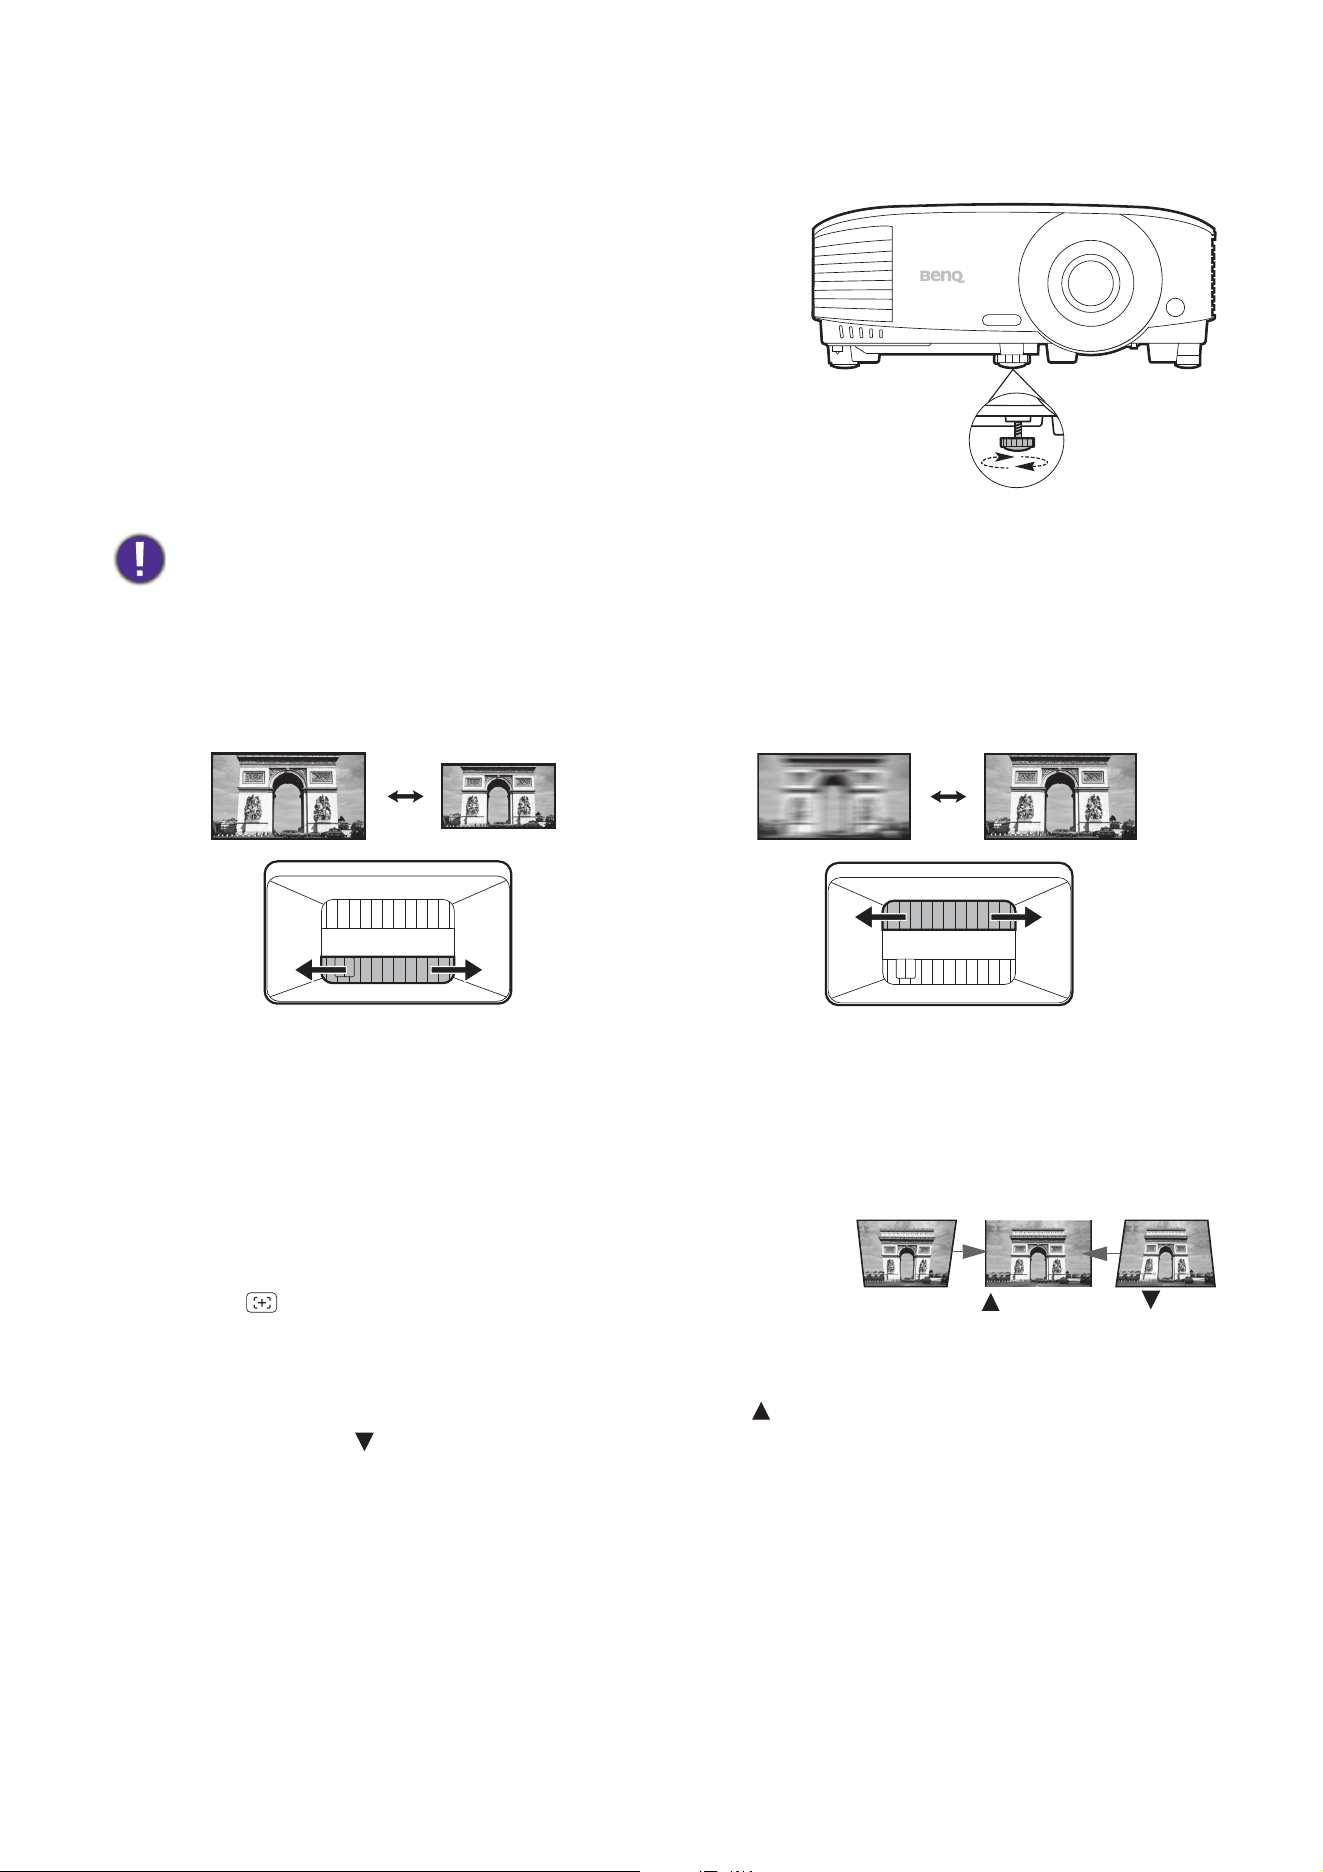
Ceiling/Wall mount installation diagram
Ceiling/Wall mount screw: M4 x 8L (Unit: mm)
146 mm 74.99 mm
99.99 mm
175 mm
20 Positioning your projector
Adjusting the projected image
Adjusting the projection angle
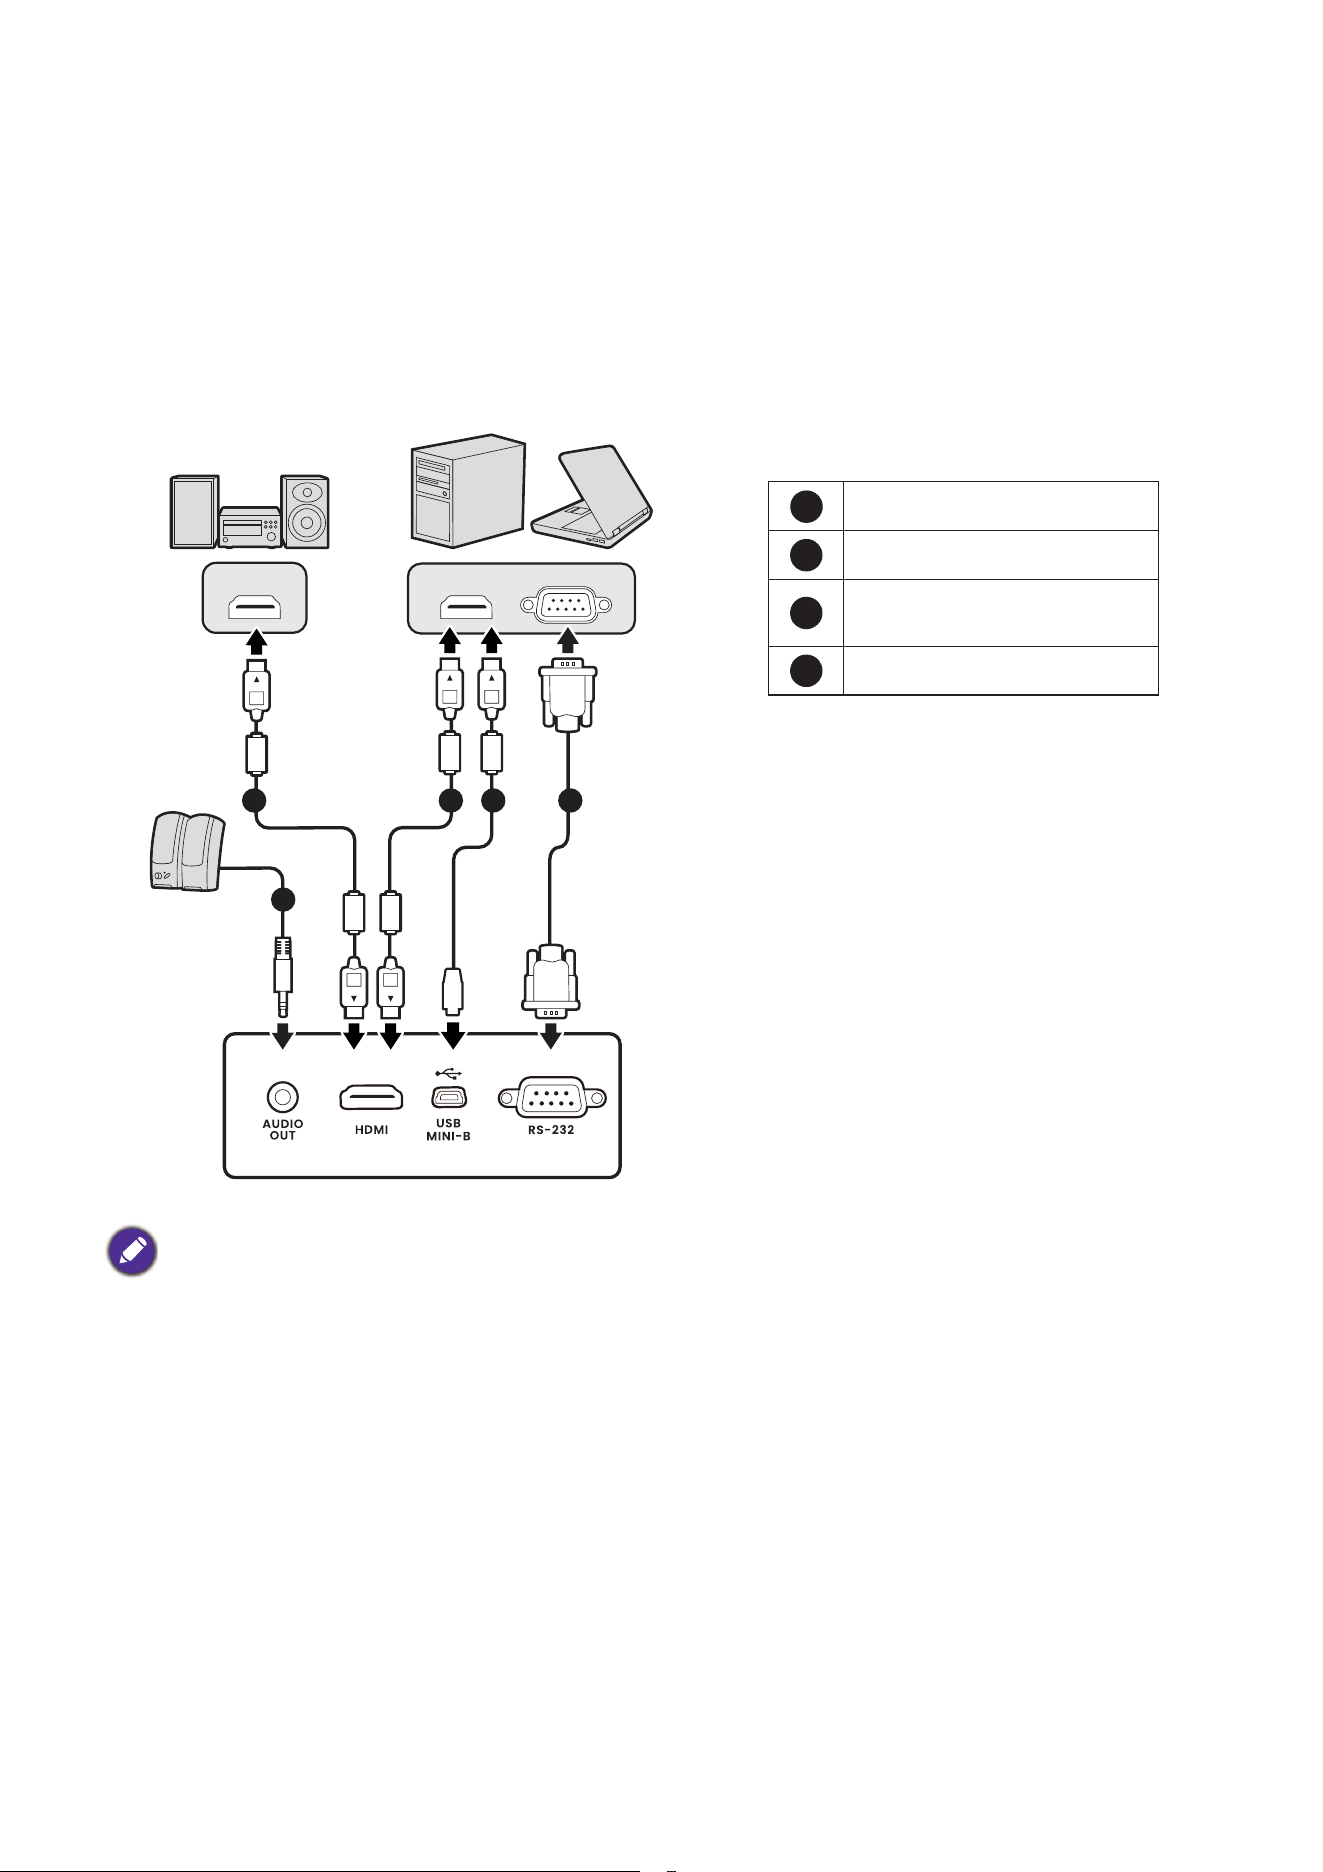
If the projector is not placed on a flat surface or
the screen and the projector are not
perpendicular to each other, the projected
image becomes trapezoidal. You can screw the
adjuster foot to fine-tune the horizontal angle.
To retract the foot, screw the adjuster foot in a
reverse direction.
Fine-tuning the image size and clarity
Correcting keystone
Keystoning refers to the situation where the projected image becomes a trapezoid due to
angled projection.
To correct this, you will need to manually correct it following these steps.
1. Do one of the following steps to display the keystone
correction page.
• Press on the remote control (for selected region
only).
• Go to Advanced Menu - Display > Keystone and press OK.
2. After the Keystone correction page displays. Press to correct keystoning at the top of
the image. Press to correct keystoning at the bottom of the image.
Do not look into the lens while the lamp is on. The strong light from the lamp may cause damage to your
eyes.
Adjust the projected image to the size that you
need using the zoom ring.
Sharpen the image by rotating the focus ring.
Press .
Press .
21 Connection
Connection
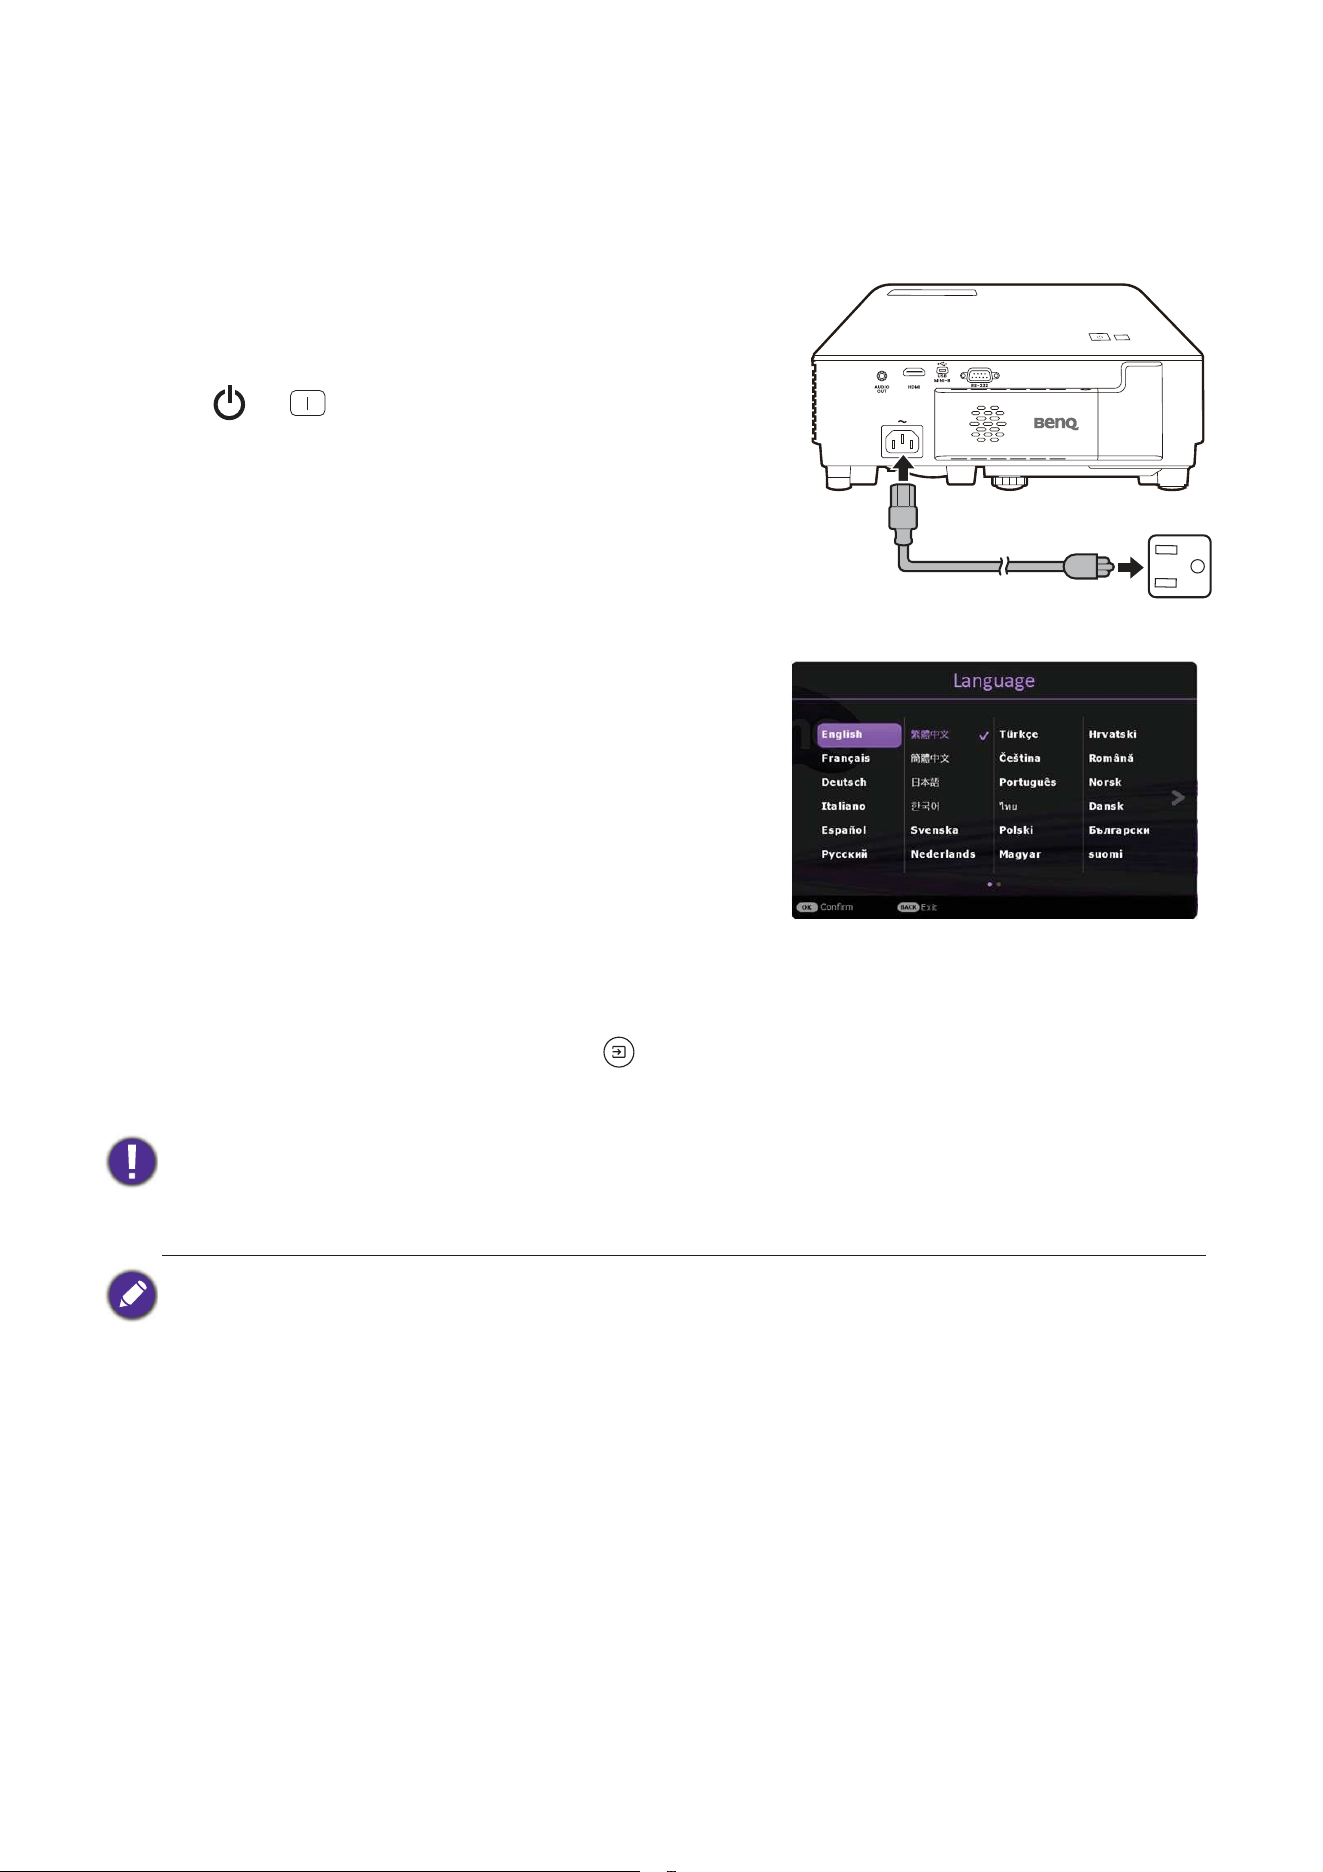
When connecting a signal source to the projector, be sure to:
1. Turn all equipment off before making any connections.
2. Use the correct signal cables for each source.
3. Ensure the cables are firmly inserted.
• In the connections above, some cables may not be included with the projector (see Shipping contents on
page 9
). They are commercially available from electronics stores.
• The connection illustrations are for reference only. The rear connecting jacks available on the projector
vary with each projector model.
• Many notebooks do not turn on their external video ports when connected to a projector. Usually a key
combo like FN + function key with a monitor symbol turns the external display on/off. Press FN and the
labeled function key simultaneously. Refer to your notebook's documentation to find your notebook's key
combination.
• If the selected video image is not displayed after the projector is turned on and the correct video source
has been selected, check that the video source device is turned on and operating correctly. Also check
that the signal cables have been connected correctly.
HDMI HDMI
RS-232
1
2
2
3
4
Notebook or
desktop
Audio cable
HDMI cable
USB cable (for service
only)
RS-232 cable
1
2
3
4
Speaker
A/V device

22 Connection
Connecting audio
The projector has built-in mono speaker(s) which are designed to provide basic audio
functionality accompanying data presentations for business purposes only. They are not
designed for, nor intended for stereo audio reproduction use as might be expected in home
theater or home cinema applications. Any stereo audio input (if provided), is mixed into a
common mono audio output through the projector speaker(s).
The built-in speaker(s) will be muted when the AUDIO OUT jack is connected.
• The projector is only capable of playing mixed mono audio, even if a stereo audio input is connected.
23 Operation
Operation
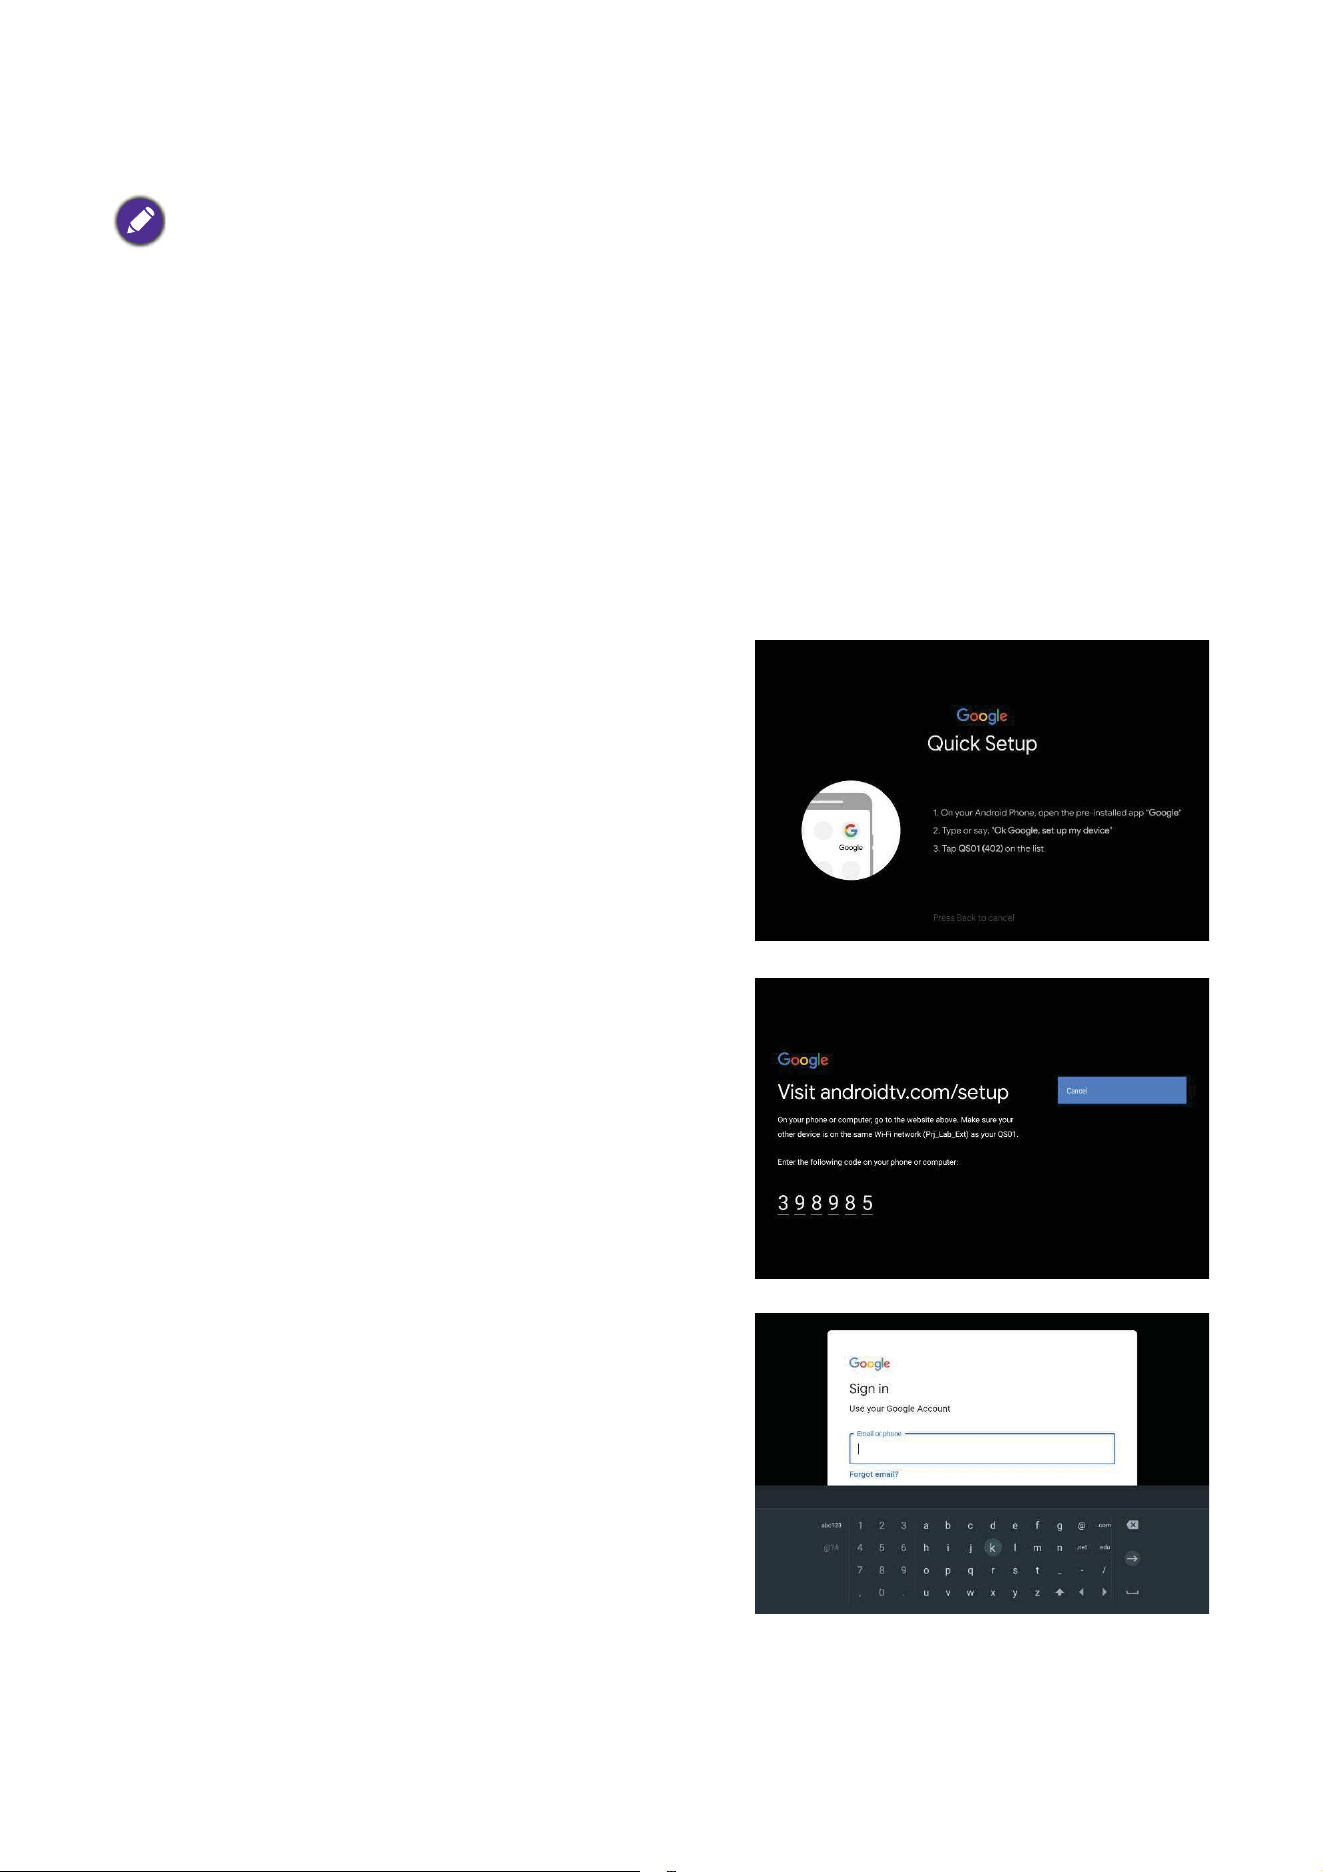
Starting up the projector
1. Plug the power cord. Turn on the power outlet switch
(where fitted). The power indicator on the projector
lights orange after power has been applied.
2. Press or to start the projector. The power
indicator flashes green and stays green when the
projector is on.
The start up procedure takes about 30 seconds. In the
later stage of start up, a startup logo is projected.
(If necessary) Rotate the focus ring to adjust the
image clearness.
3. If the projector is activated for the first time, select
your OSD language following the on-screen
instructions.
4. If you are prompted for a password, press the arrow
keys to enter a 6-digit password. See
Utilizing the
password function on page 27
.
5. Switch all of the connected equipment on.
6. The projector will search for input signals. The
current input signal being scanned appears. If the
projector does not detect a valid signal, the message “No Signal” will continue displaying
until an input signal is found.
You can also press the SOURCE or the button on your remote control to select your
desired input signal. See
Switching input signal on page 29.
• Please use the original accessories (e.g. power cord) to avoid possible dangers such as electric shock
and fire.
• If the projector is still hot from previous activity, it will run the cooling fan for approximately 90 seconds
before energizing the lamp.
• The Setup Wizard screenshots are for reference only and may differ from the actual design.
• If the frequency/resolution of the input signal exceeds the projector's operating range, you will see the
message “Out of Range”
displayed on the background screen. Please change to an input signal which is
compatible with the projector's resolution or set the input signal to a lower setting. See
Timing chart on
page 51
.
• If no signal is detected for 3 minutes, the projector automatically enters saving mode.
24 Operation
Setting up the StreamX1 dongle (regional specific)
Before you start
Check that you have:
• A Wi-Fi Internet Connection
• A Google Account
Set up your device
There are 3 options to set up your device:
• Required for product supplied with the StreamX1 dongle.
• You should install the dongle first as instructed in
Installing the StreamX1 dongle (regional specific) on page
10
.
• Screens and procedures vary by product. Simply follow the on-screen instructions.
• Quick Setup using an Android phone
• Using your phone or computer
• Using your remote control
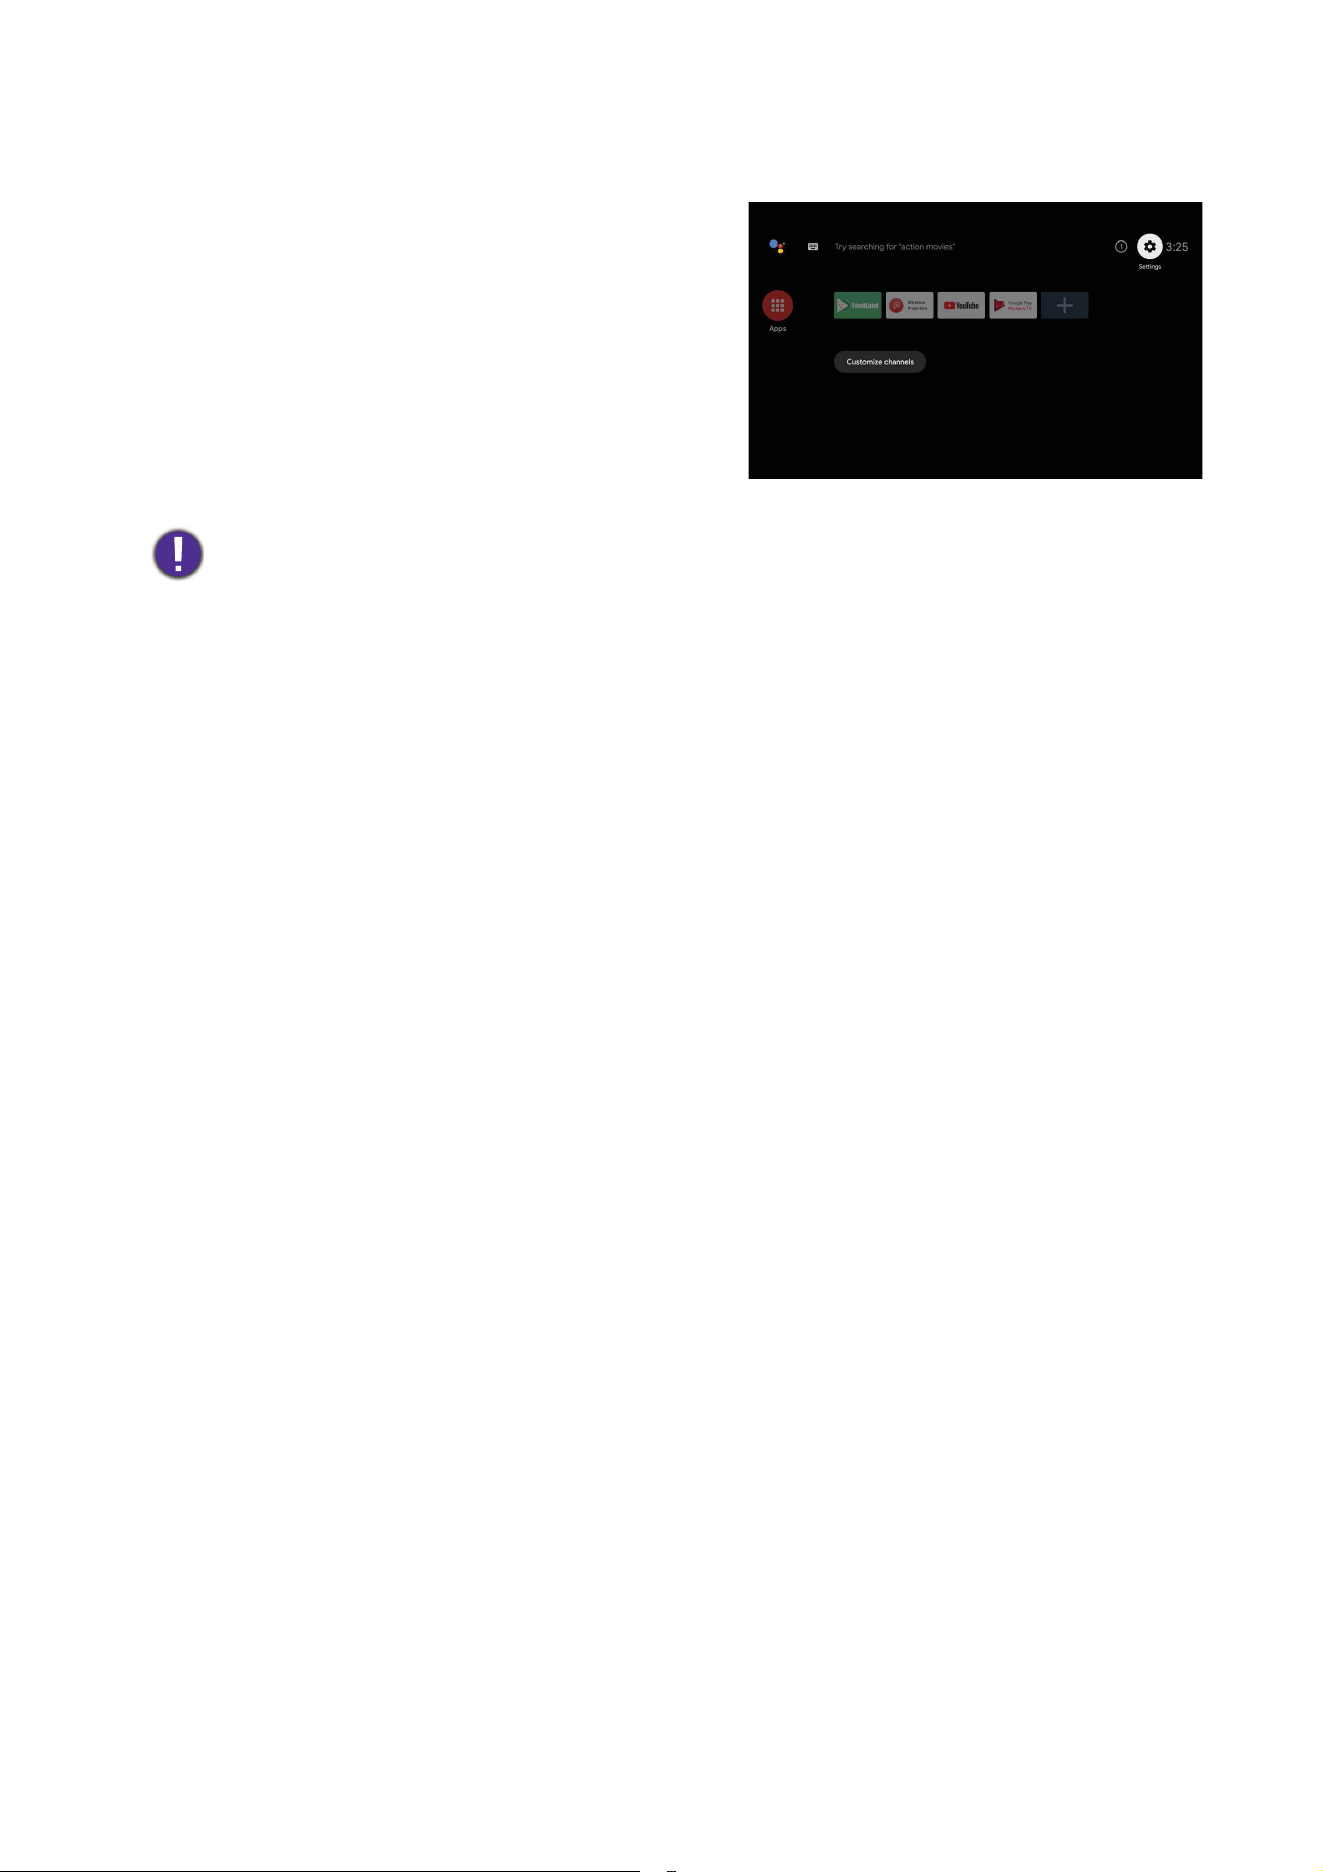
25 Operation
Display Google TV home screen
• For more information, visit https://support.google.com/googletv/.
• Refer to the user documentations of your Google TV dongle for further operating instructions.
26 Operation
Using the menus
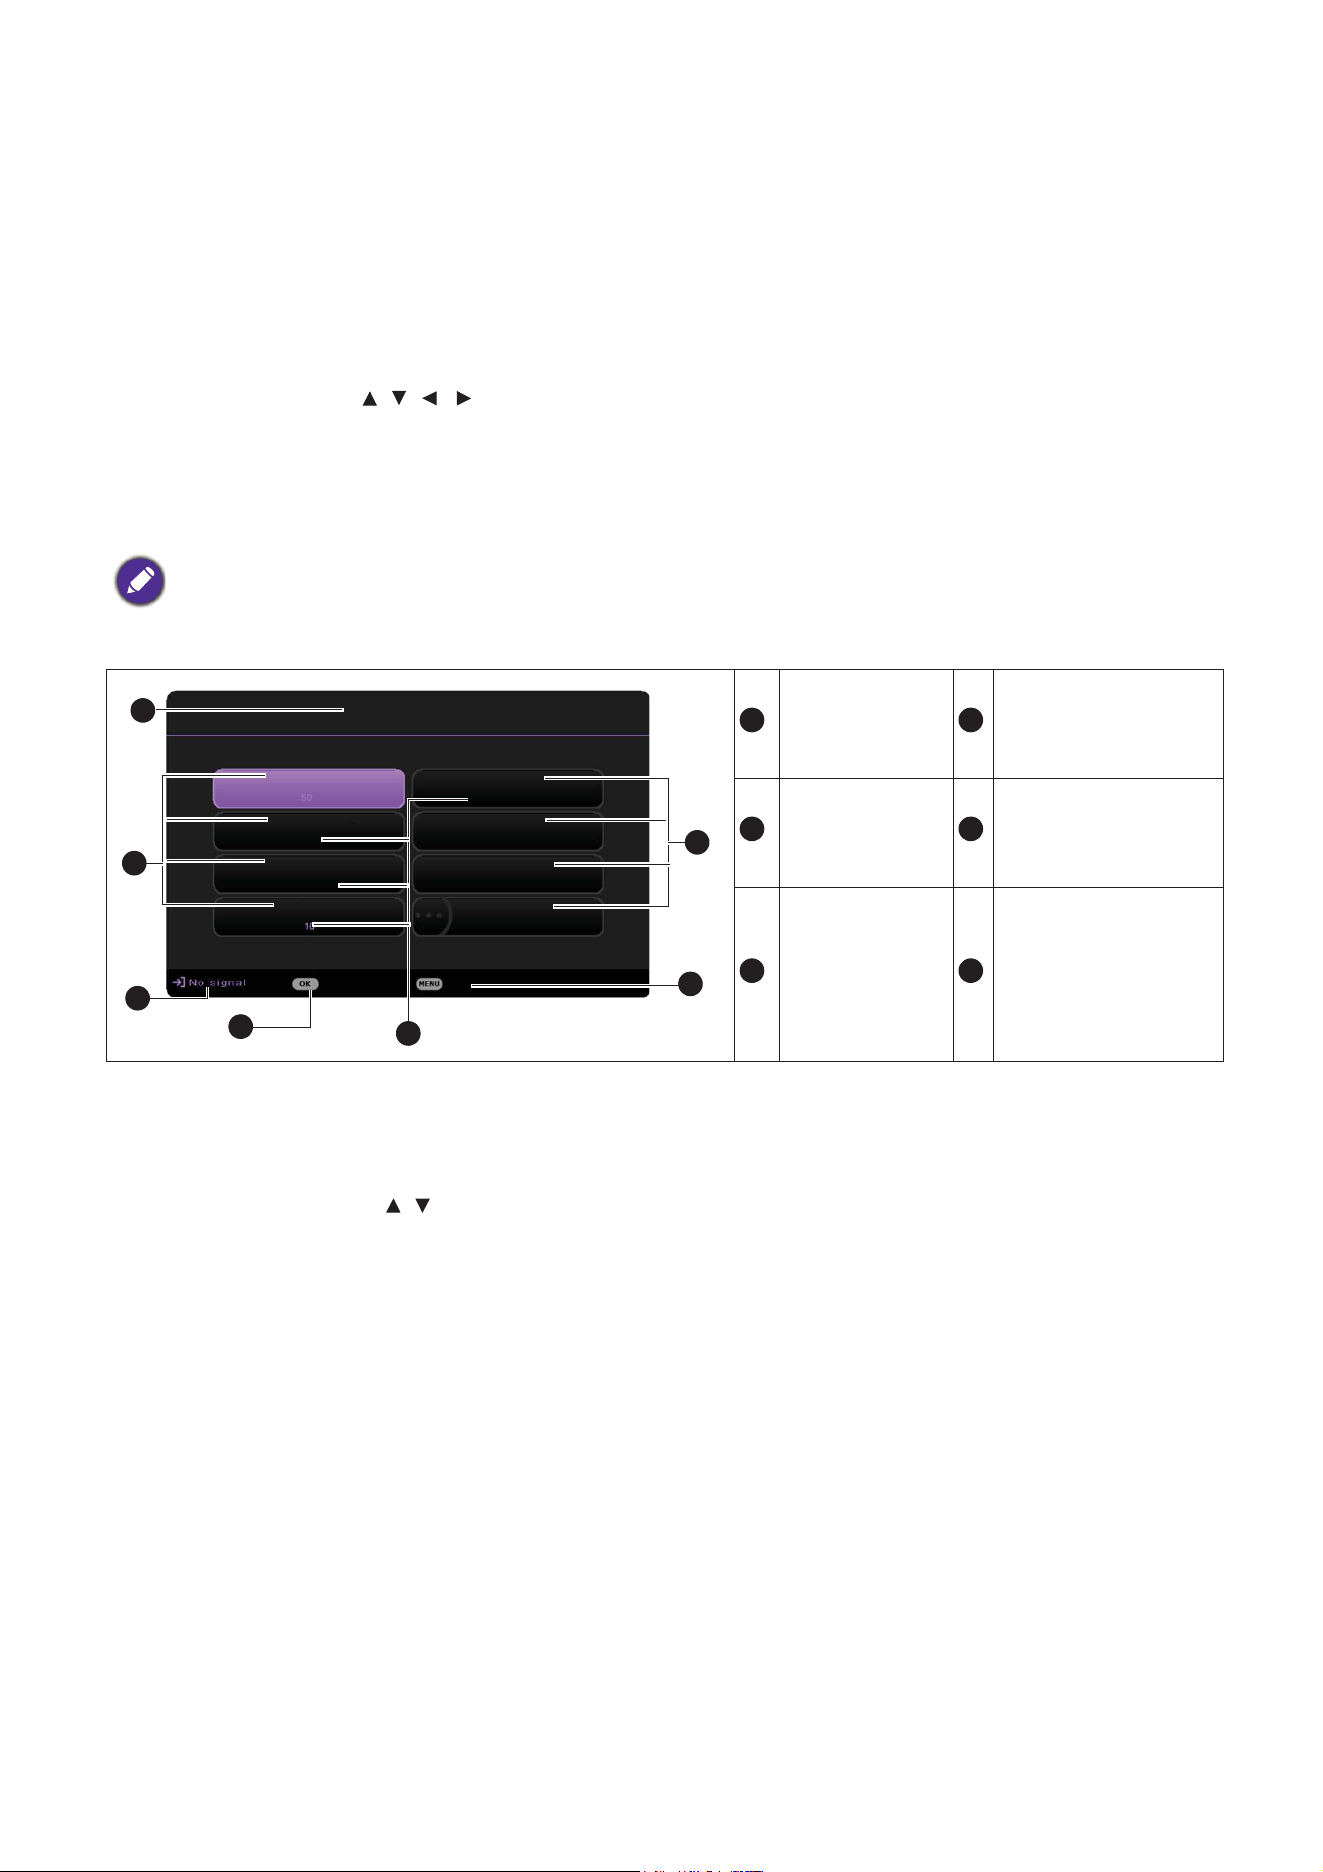
The projector is equipped with 2 types of On-Screen Display (OSD) menus for making various
adjustments and settings.
• Basic OSD menu: provides primary menu functions. (See
Basic menu on page 35)
• Advanced OSD menu: provides full menu functions. (See
Advanced menu on page 37)
To access the OSD menu, press MENU or (insert icon) on the remote control.
• Use the arrow keys ( / / / ) on the projector or remote control to move through the menu
items.
• Use OK on the projector or remote control to confirm the selected menu item.
The first time you use the projector (after finishing the initial setup), Basic OSD menu displays.
Below is the overview of the Basic OSD menu.
If you intend to switch from the Basic OSD menu to the Advanced OSD menu, follow the
instructions below:
1. Go to Basic Menu > Menu Type.
2. Press OK and press / to select Advanced. Next time when you turn on the projector, you
may access the Advanced OSD menu by pressing MENU.
The OSD screenshots below are for reference only, and may differ from the actual design.
Menu Type
Press OK to enter
the menu.
Main menu Status
Current input
signal
Press MENU to
exit.
Basic Menu
Brightness
Aspect Ratio
2
1
2
6
Light Mode
Picture Mode
Volume
Information
Menu Type
Auto
Living Room
Normal
Enter
Exit
5
3
4
Fast Mode
Off
1
4
2
5
3
6
27 Operation
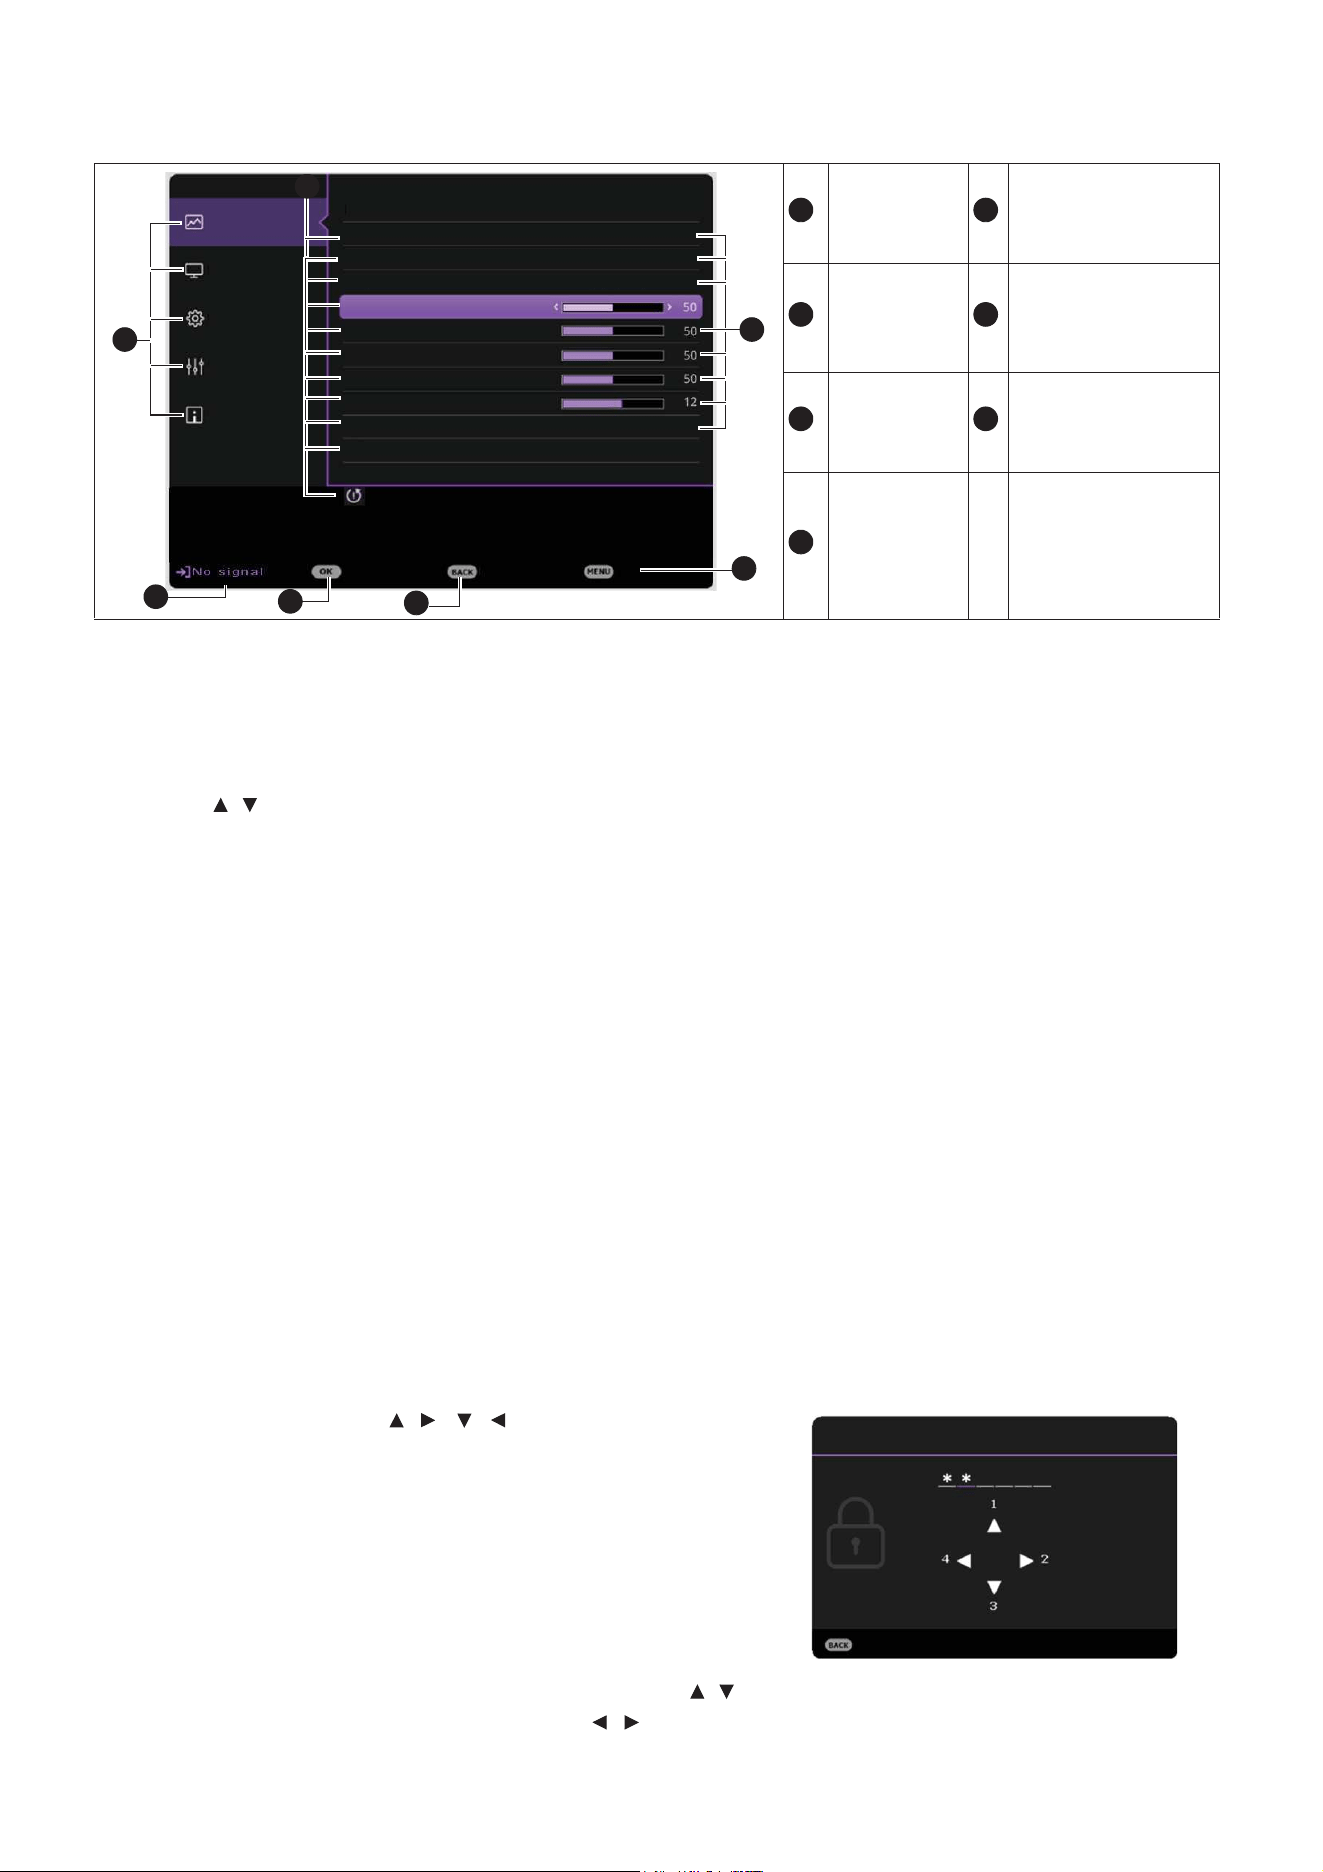
Below is the overview of the Advanced OSD menu.
Likewise, when you wish to switch from the Advanced OSD menu to the Basic OSD menu,
follow the instructions below:
1. Go to Advanced Menu - System > Menu Settings and press OK.
2. Select Menu Type and OK.
3. Press / to select Basic. Next time when you turn on the projector, you may access the
Basic OSD menu by pressing MENU.
Securing the projector
Using a security cable lock
The projector has to be installed in a safe place to prevent theft. Otherwise, purchase a lock,
such as the Kensington lock, to secure the projector. You can locate a Kensington lock slot on
the rear side of the projector. See item 11 on
page 11.
A Kensington security cable lock is usually a combination of key(s) and the lock. Refer to the
lock’s documentation for finding out how to use it.
Utilizing the password function
Setting a password
1. Go to Advanced Menu - Settings > Security Settings. Press OK. The Security Settings page
appears.
2. Highlight Change Password and press OK.
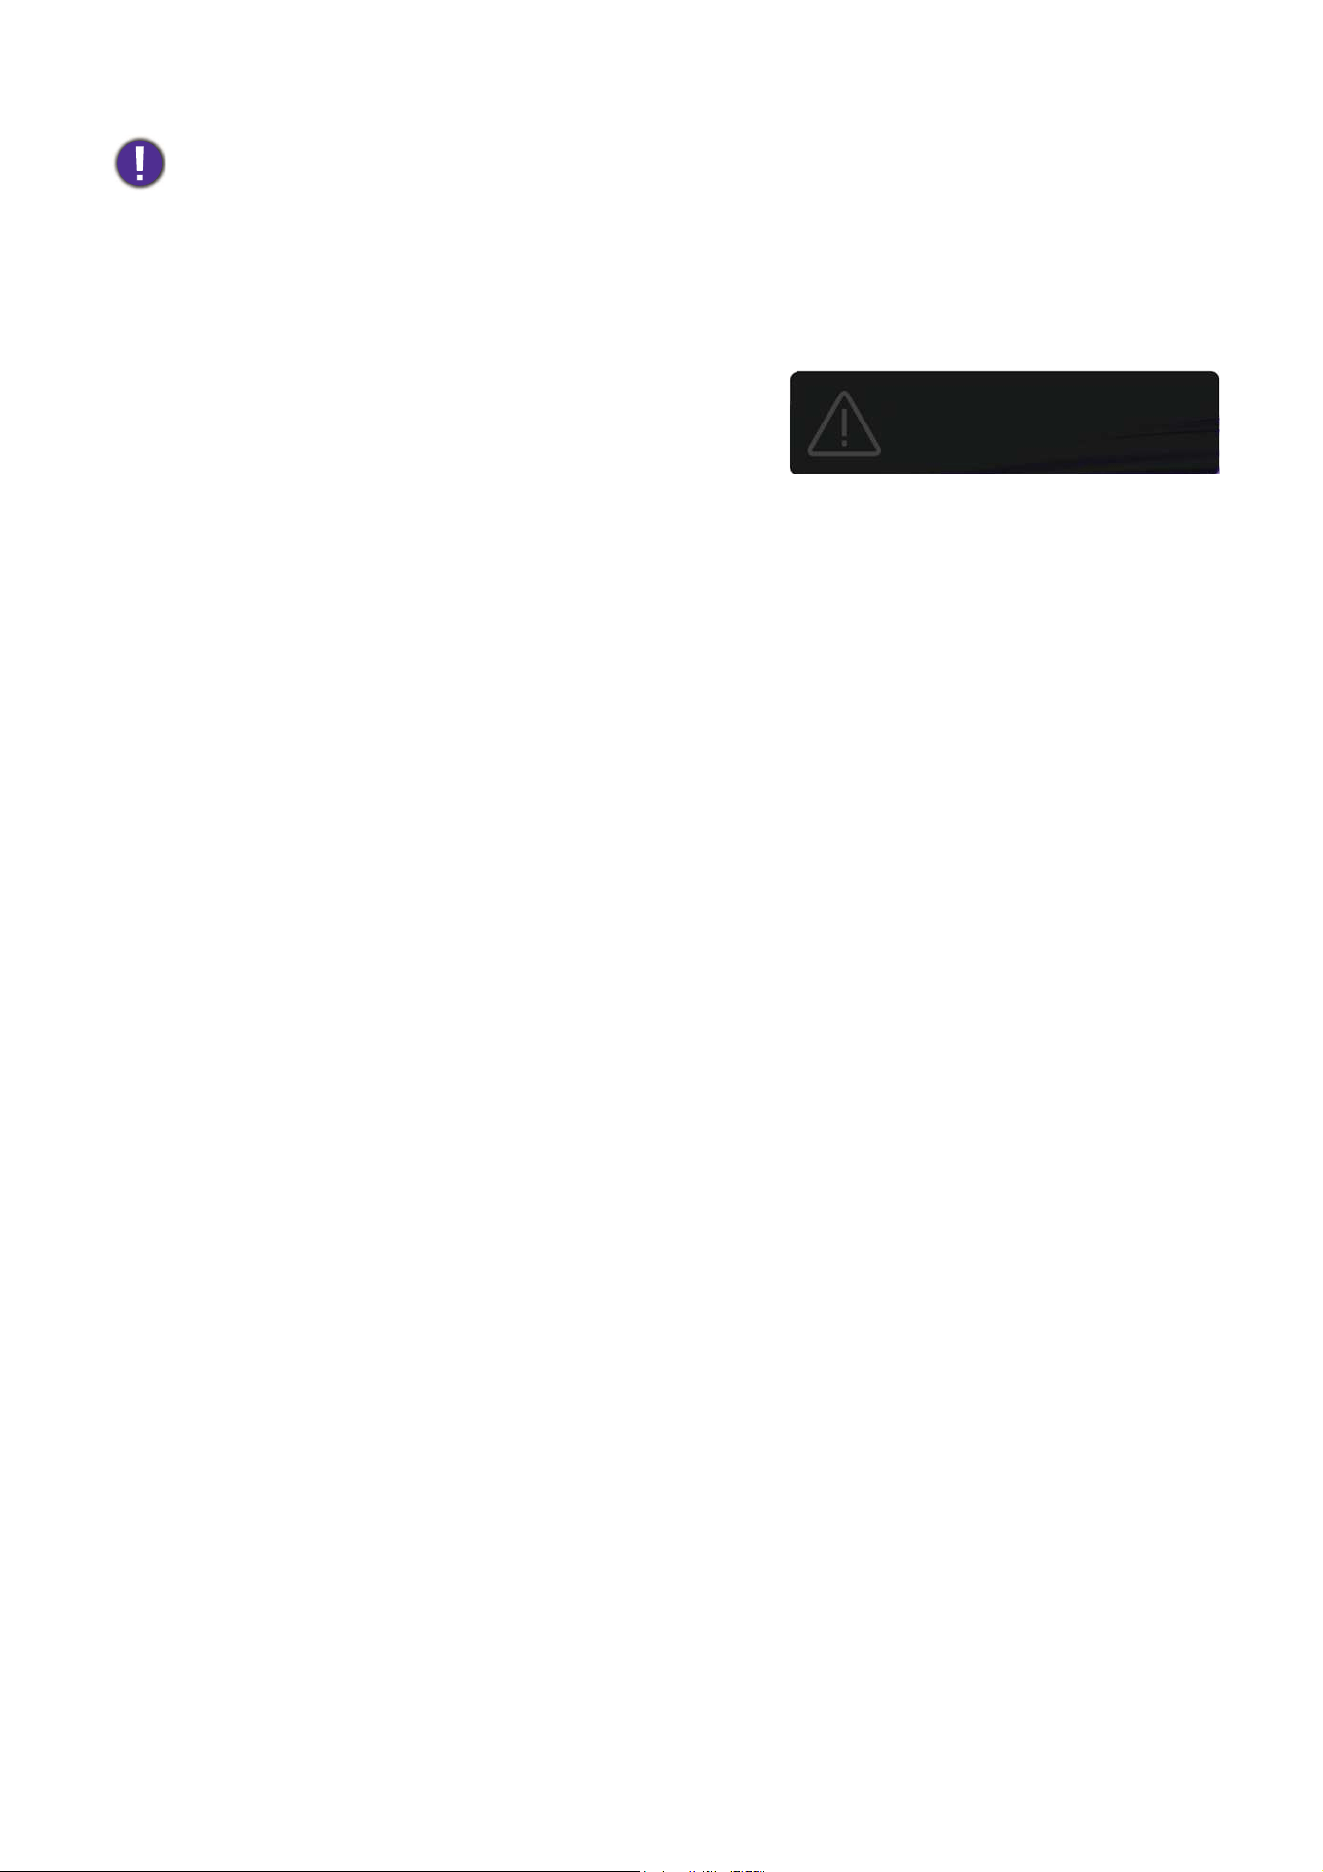
3. The four arrow keys ( , , , ) respectively
represent 4 digits (1, 2, 3, 4). According to the
password you desire to set, press the arrow keys to
enter six digits for the password.
4. Confirm the new password by re-entering the new
password.
Once the password is set, the OSD menu returns to
the Security Settings page.
5. To activate the Power On Lock function, press /
to highlight Power On Lock and press / to select On. Input the password again.
Main menu
& Main
menu icon
Press BACK to
go to the
previous page.
Sub-menu
Press MENU to
exit.
Current
input
signal
Status
Press OK
to enter the
menu.
Picture
Picture Mode
Brightness
Contrast
Color
Tint
Sharpness
On
Reference Mode
1
7
6
Brilliant Color
Advanced Color Settings
Display
Settings
Information
Enter
Exit
Return
Living Room
Living Room
Reset Picture
System
2
4
Fast Mode
Off
3
5
1
5
2
6
3
7
4
Input New Password
Return
28 Operation
If you forget the password
If you enter the wrong password, the password error
message will appear, and the Input Password message
follows. If you absolutely do not remember the
password, you can use the password recall procedure.
See Entering the password recall procedure on page 29.
If you enter an incorrect password 5 times in
succession, the projector will automatically shut down
in a short time.
• The digits being input will display as asterisks on-screen. Make a note of your selected password and
keep it in a safe place in advance or right after the password is entered so that it is available to you
should you ever forget it.
• Once a password has been set and the power on lock is activated, the projector cannot be used unless
the correct password is entered every time the projector is started.
Password Error
Please try again.
29 Operation
Entering the password recall procedure
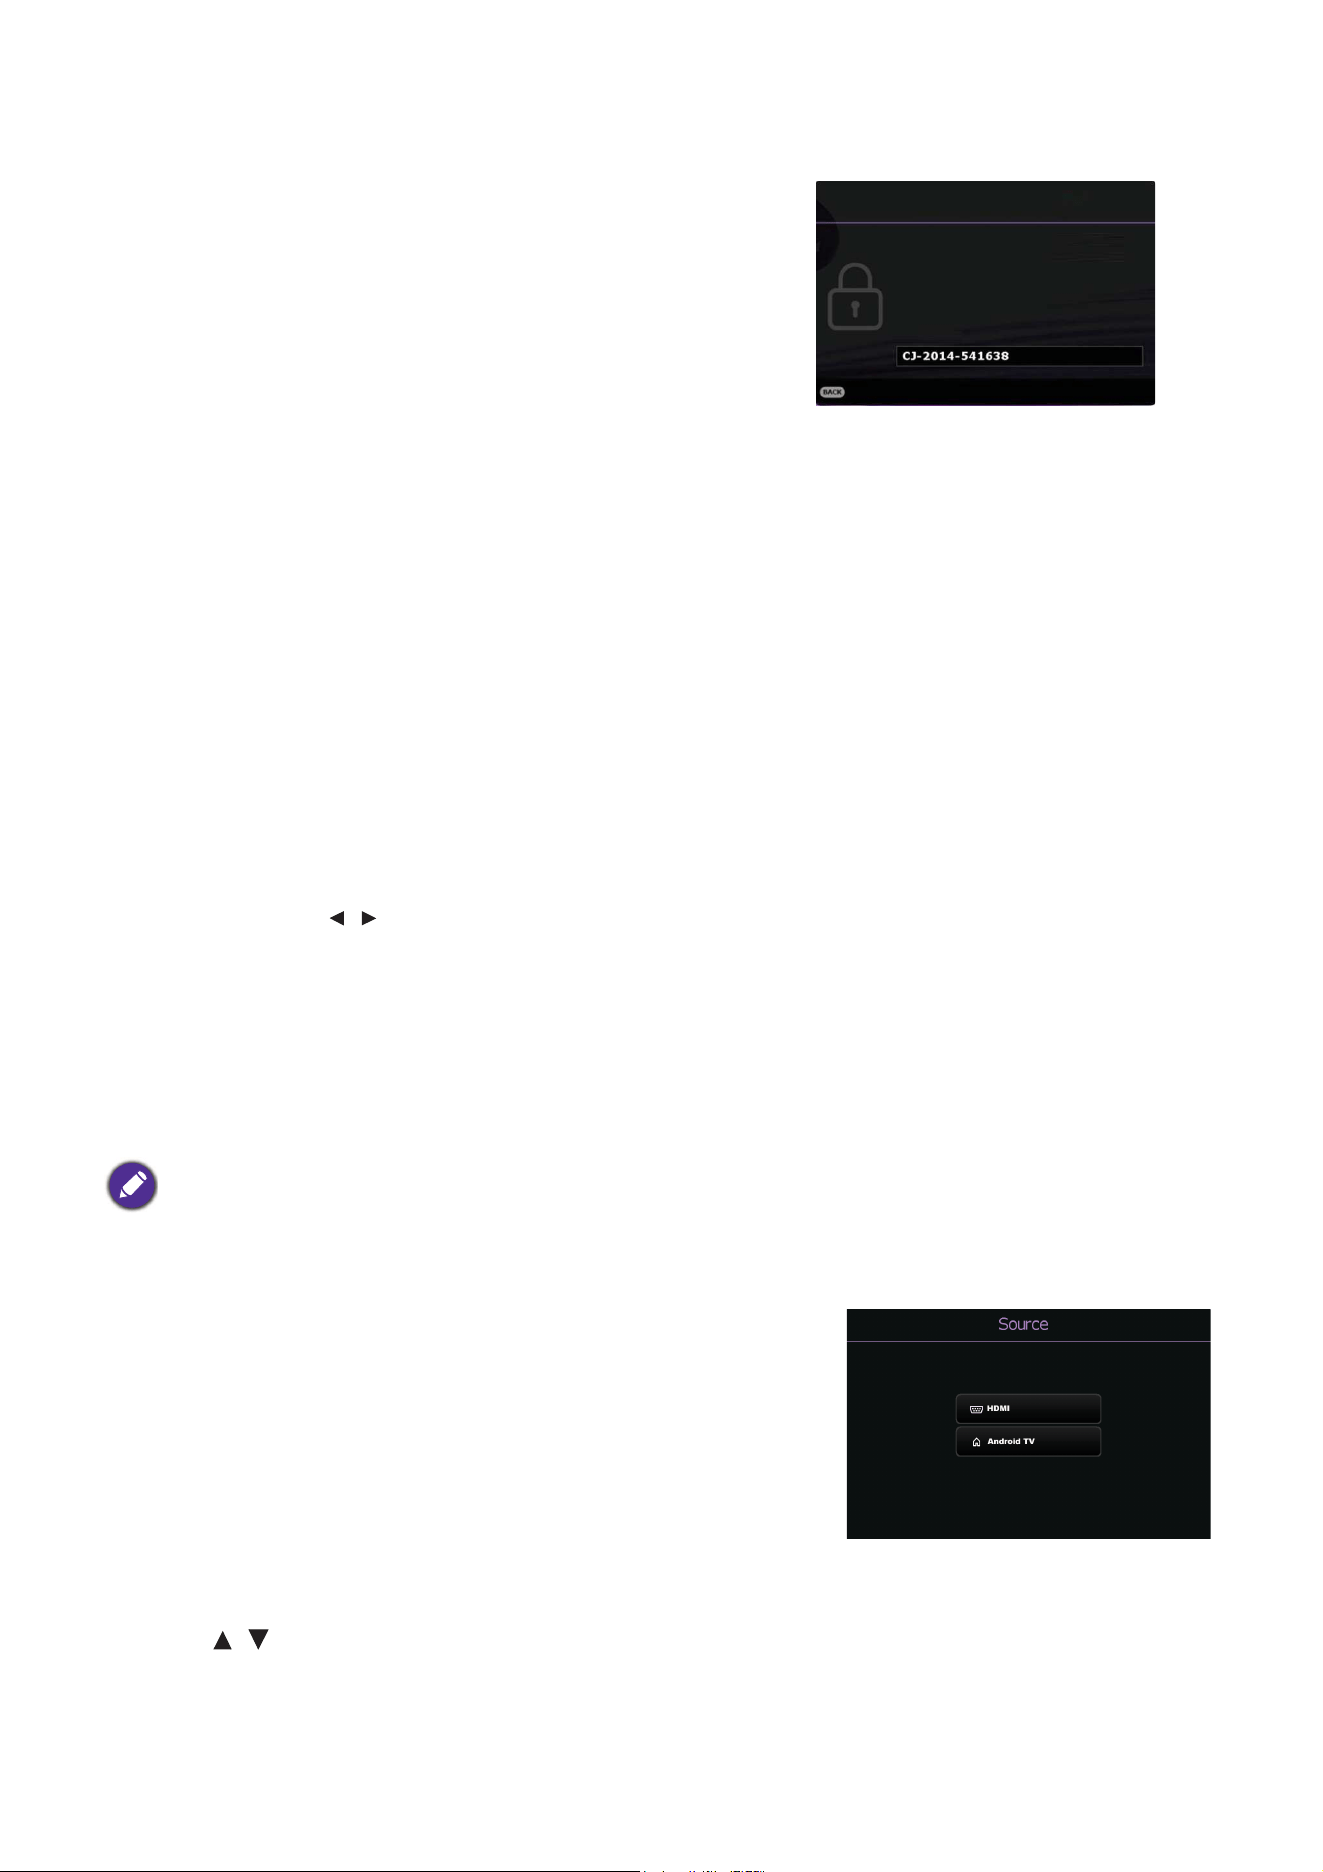
1. Press and hold OK for 3 seconds. The projector will
display a coded number on the screen.
2. Write down the number and turn off your projector.
3. Seek help from the local BenQ service center to
decode the number. You may be required to provide
proof of purchase documentation to verify that you
are an authorized user of the projector.
Changing the password
1. Go to Advanced Menu - Settings > Security Settings > Change Password.
2. Press OK. The message “Input Password” appears.
3. Enter the old password.
• If the password is correct, another message “Input New Password” appears.
• If the password is incorrect, the password error message will appear, and the message
“Input Password” appears for your retry. You can press BACK to cancel the change or try
another password.
4. Enter a new password.
5. Confirm the new password by re-entering the new password.
Disabling the password function
To disable password protection, go to Advanced Menu - Settings > Security Settings > Power
On Lock and press / to select Off. The message “Input Password” appears. Enter the
current password.
• If the password is correct, the OSD menu returns to the Security Settings page. You will
not have to enter the password next time turning on the projector.
• If the password is incorrect, the password error message will appear, and the message
“Input Password” appears for your retry. You can press BACK to cancel the change or try
another password.
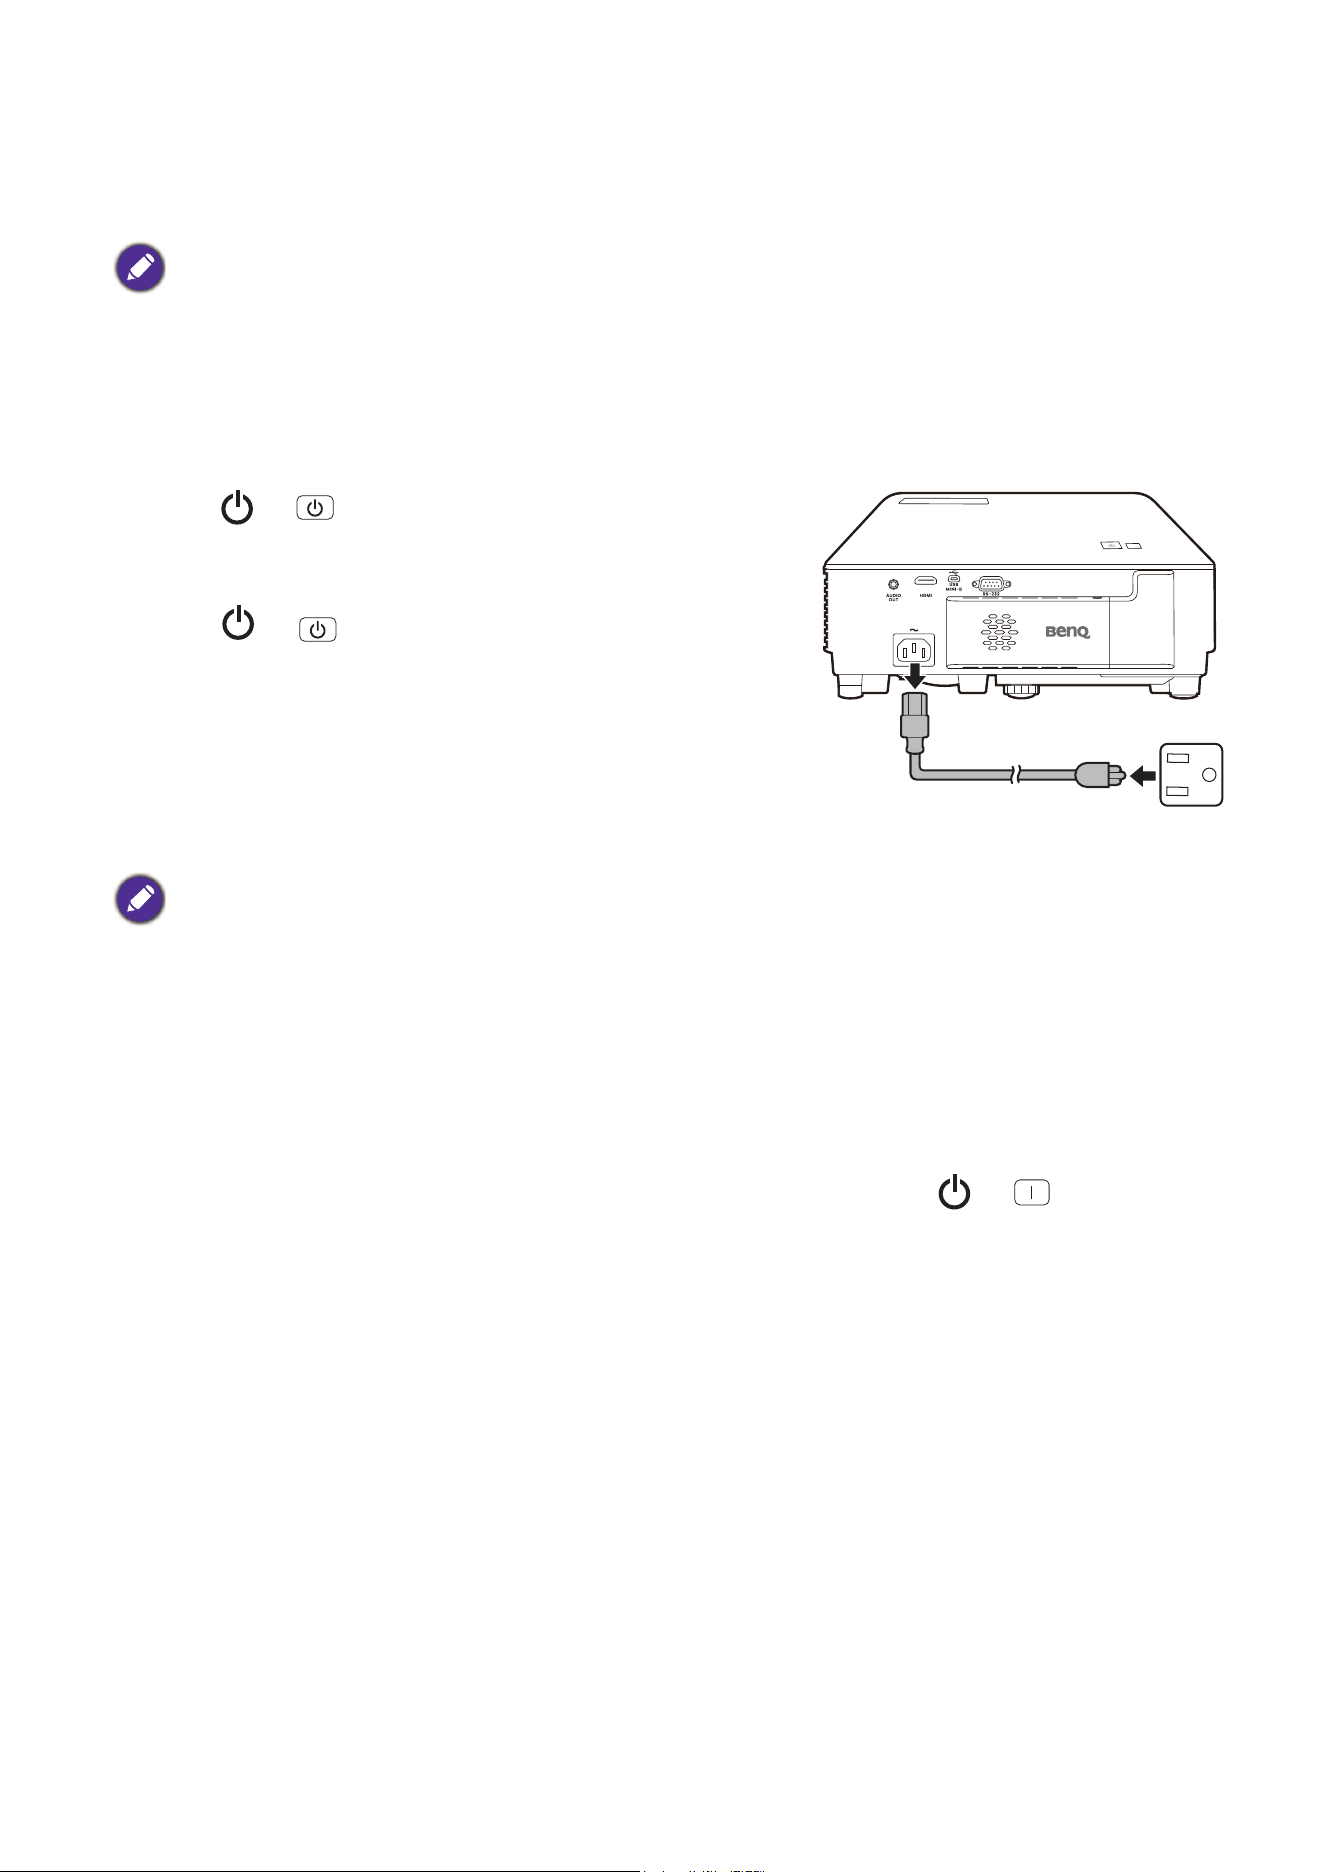
Switching input signal
The projector can be connected to multiple devices at the
same time. However, it can only display one full screen at a
time. When starting up, the projector automatically searches
for the available signals.
Be sure the Advanced Menu - Settings > Auto Source Search
menu is On if you want the projector to automatically search
for the signals.
To select the source:
1. Press SOURCE. A source selection bar appears.
2. Press / until your desired signal is selected and press OK.
Though the password function is disabled, you need to keep the old password in hand should you ever need
to re-activate the password function by entering the old password.
Please write down the recall code, and contact
BenQ Customer Center.
Recall Code:
Recall Password
Return
30 Operation
Once detected, the selected source information will appear at the corner of the screen for
seconds. If there is multiple equipment connected to the projector, repeat steps 1-2 to
search for another signal.
Shutting down the projector
1. Press or and a confirmation message will
appear prompting you. If you don't respond in a few
seconds, the message will disappear.
2. Press or a second time. The power indicator
flashes orange, the projection lamp shuts down, and
the fans will continue to run for approximately 90
seconds to cool down the projector.
3. Once the cooling process finishes, the power
indicator becomes a steady orange and fans stop.
Disconnect the power cord from the power outlet.
Direct power off
The AC power cord can be pulled out right after the projector is turned off. To protect the lamp,
wait about 10 minutes before re-starting the projector. If you attempt to re-start the projector,
the fans may run for a few minutes to cool down. In such cases, press or again to start
the projector after the fans stop and the power indicator turns orange.
• The brightness level of the projected image will change accordingly when you switch between different
input signals.
• For best display picture results, you should select and use an input signal which outputs at the
projector’s native resolution. Any other resolutions will be scaled by the projector depending upon the
“aspect ratio” setting, which may cause some image distortion or loss of picture clarity. See Aspect Ratio
on page 35
.
• To protect the lamp, the projector will not respond to any commands during the cooling process.
• To shorten the cooling time, you can also activate the Quick cooling function. See
Quick Cooling on page
41
.
• Avoid turning on the projector immediately after turning it off as excessive heat may shorten lamp life.
• Lamp life results will vary depending on environmental conditions and usage.

31 Menu operation
Menu operation
Please note that the on-screen display (OSD) menus vary according to the signal type selected
and the projector model you are using.
The menu items are available when the projector detects at least one valid signal. If there is no
equipment connected to the projector or no signal detected, limited menu items are accessible.
Menu System
Basic menu
Main menu Options
Brightness
0~50~100
Aspect Ratio Auto/4:3/16:9
Picture Mode
Bright/Living Room/Cinema/Game/Sports/
(3D)/User 1/User 2
Volume
0~10~20
Light Mode Normal/ECO/SmartEco/LampSave
Fast Mode On/Off
Information
Native Resolution
Detected Resolution
Source
Picture Mode
Light Mode
3D Format
Color System
Light Usage Time
Firmware Version
Service Code
Menu Type Basic/Advanced

32 Menu operation
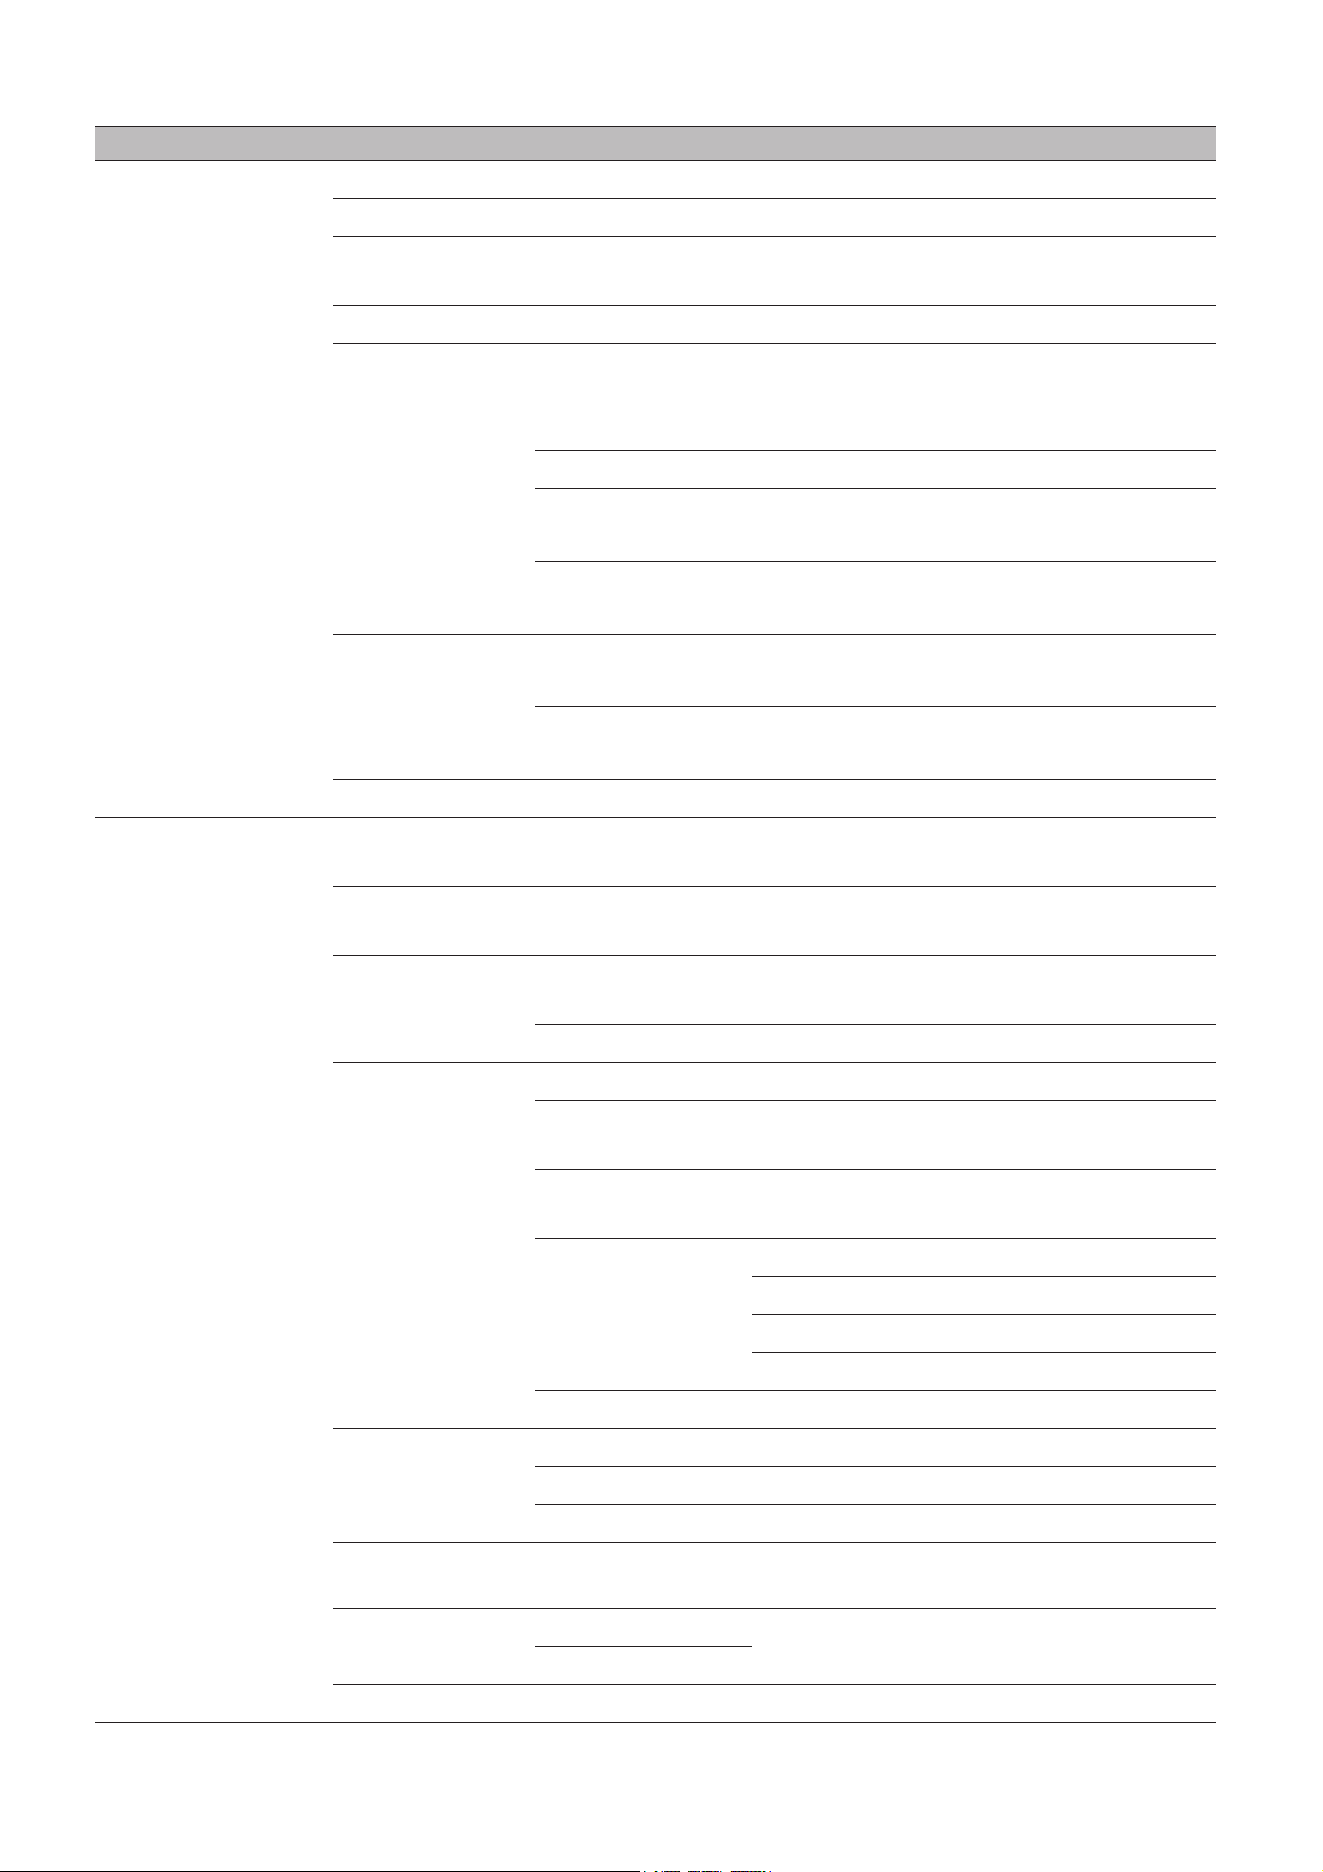
Advanced menu
Main menu Submenu Options
Picture
Picture Mode
Bright/Living Room/Cinema/
Game/Sports/(3D)/User 1/User 2
Reference Mode
Bright/Living Room/Cinema/
Game/Sports
Fast Mode On/Off
Brightness
0~50~100
Contrast
0~50~100
Color
0~50~100
Tint
0~50~100
Sharpness
0~7~15
Brilliant Color On/Off
Advanced
Color Settings
Color
Temperature
Cool/Normal/Warm/Native
Color
Temperature
Tuning
R Gain (0~200)
G Gain (0~200)
B Gain (0~200)
R Offset (0~511)
G Offset (0~511)
B Offset (0~511)
Color
Management
R (Primary Color/Hue/
Saturation/Gain)
G (Primary Color/Hue/
Saturation/Gain)
B (Primary Color/Hue/
Saturation/Gain)
C (Primary Color/Hue/
Saturation/Gain)
M (Primary Color/Hue/
Saturation/Gain)
Y (Primary Color/Hue/
Saturation/Gain)
W (Primary Color/R Gain/
G Gain/B Gain)
Gamma
Selection
1.6/1.8/2.0/2.1/2.2/2.3/2.4/2.6/2.8/Ben
Q
Light Mode Normal/ECO/SmartEco/LampSave
Reset Picture Reset/Cancel
33 Menu operation
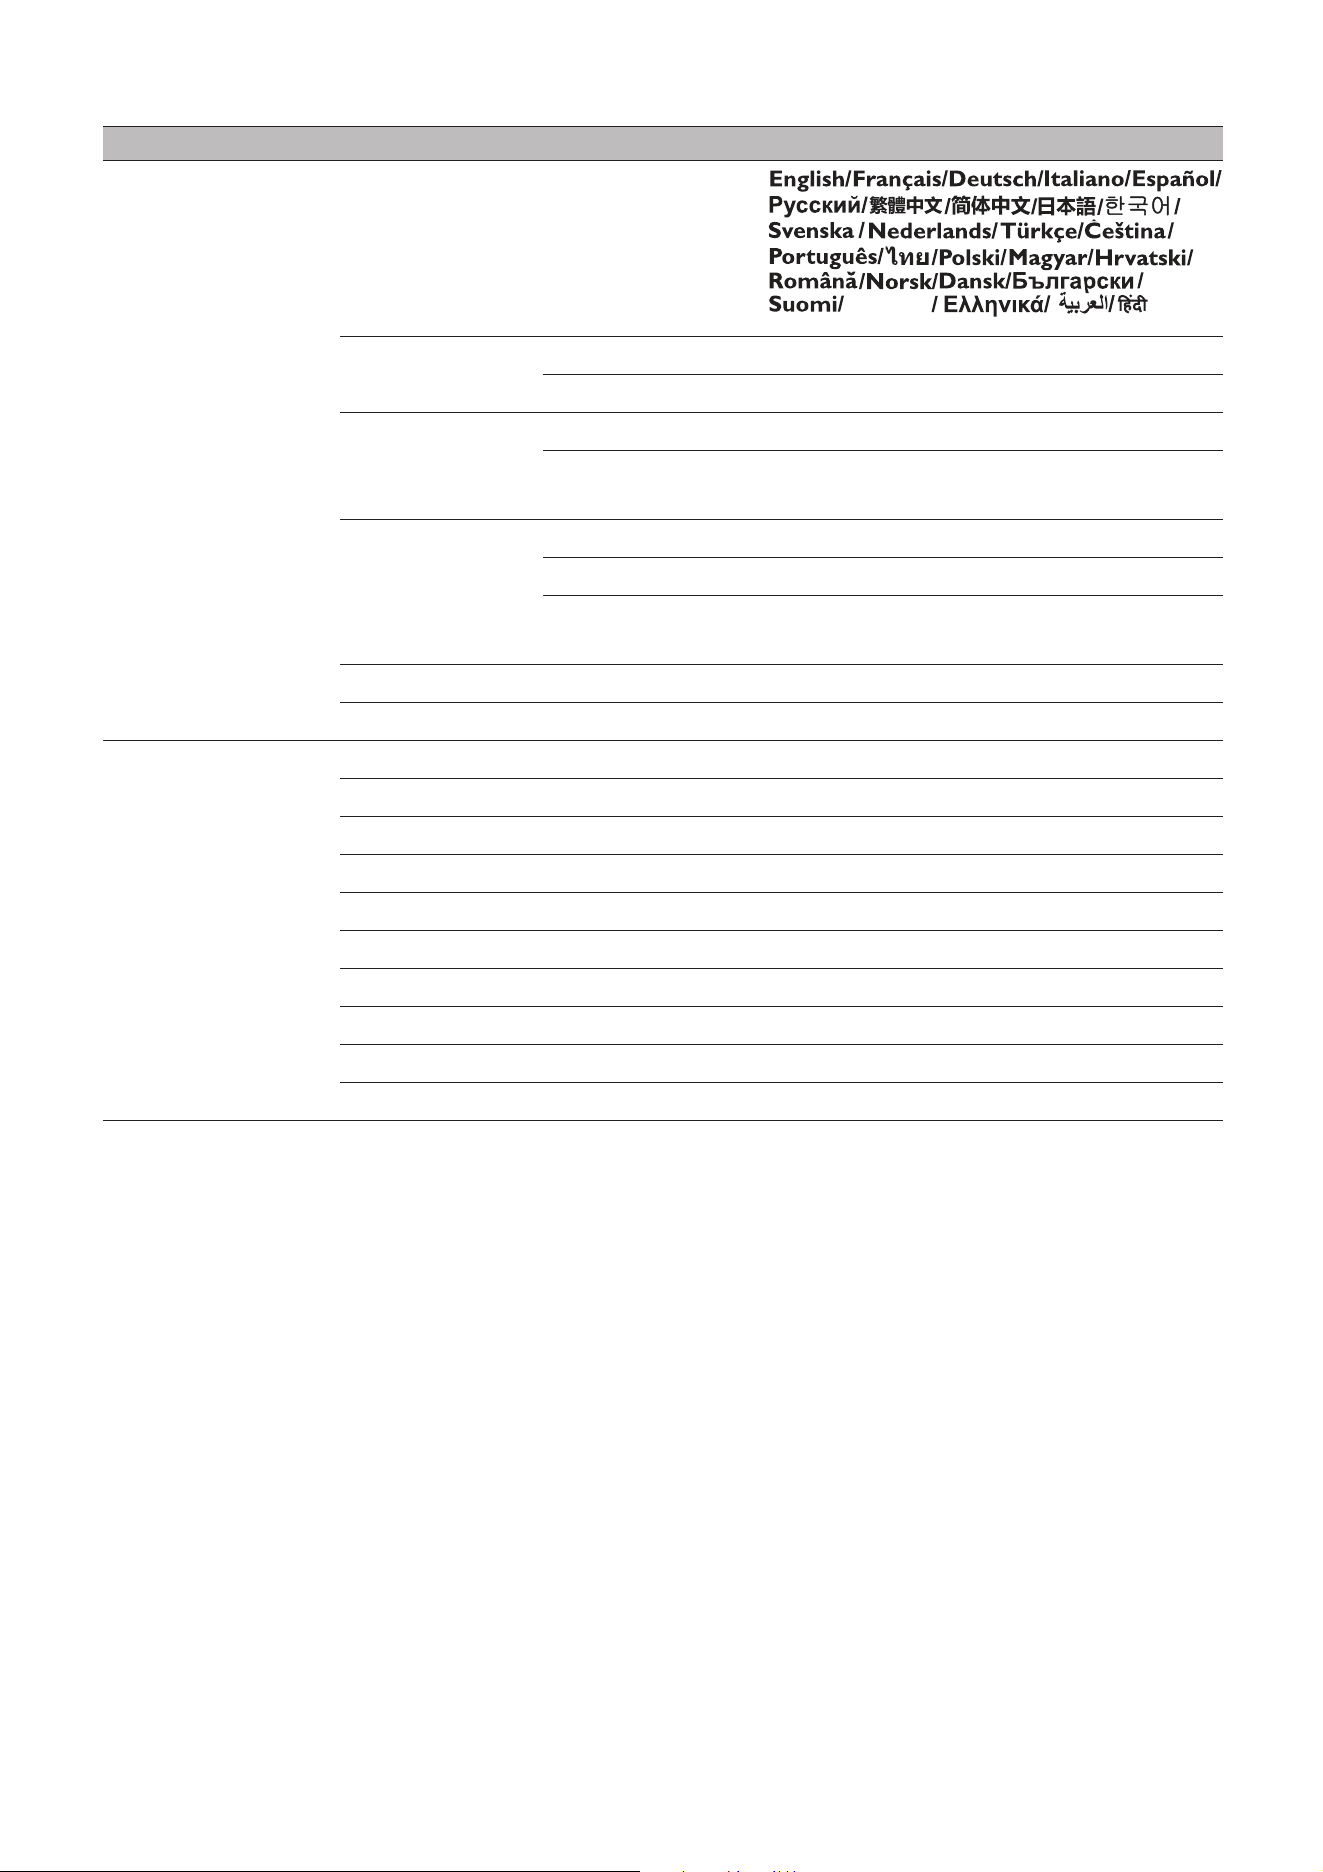
Display
Aspect Ratio Auto/4:3/16:9
Keystone
-40~0~40
Auto Vertical
Keystone
-40~0~40
Test Pattern On/Off
3D
3D Mode
Auto/Top-Bottom/
Frame Sequential/
Frame Packing/Side by Side/Off
3D Sync Invert Disable/Invert
Apply 3D
Settings
3D Settings 1/3D Settings 2/
3D Settings 3/Off
Save 3D
Settings
3D Settings 1/3D Settings 2/
3D Settings 3
HDMI Format
HDMI
Auto/RGB Limited/RGB Full/
YUV Limited/YUV Full
Android TV
Auto/RGB Limited/RGB Full/
YUV Limited
Reset Display Reset/Cancel
Settings
Projector
Installation
Front Table/Rear Table/Rear
Ceiling/Front Ceiling
Auto Source
Search
On/Off
Light Settings
Reset Light
Timer
Reset/Cancel
Light Usage Time
Operation
Settings
Quick Cooling On/Off
Reminder
Message
On/Off
High Altitude
Mode
On/Off
Power On/Off
Settings
Direct Power On
Signal Power On
Auto Power Off
Power Off Timer
Instant Restart On/Off
Security
Settings
Panel Key Lock On/Off
Change Password
Power On Lock On/Off
Baud Rate
9600/14400/19200/38400/57600/
115200
HDMI
Equalizer
HDMI
Auto/Lower/Low/Middle/High/
Higher
Android TV
Reset Settings Reset/Cancel
Main menu Submenu Options
34 Menu operation
System
Language
Background
Settings
Background BenQ/Black/Blue/Purple
Splash Screen BenQ/Black/Blue
Menu Settings
Menu Type Basic/Advanced
Menu Display
Time
5 sec/10 sec/20 sec/30 sec/Always
Audio Settings
Mute On/Off
Volume
0~10~20
Power On/Off
Ring Tone
On/Off
Factory Default Reset/Cancel
Reset System Reset/Cancel
Information
Native Resolution
Detected Resolution
Source
Picture Mode
Light Mode
3D Format
Color System
Light Usage Time
Firmware Version
Service Code
Main menu Submenu Options
Bhs Ind
35 Menu operation
Basic menu
Brightness
The higher the value, the brighter the image. Adjust this control so the black
areas of the image appear just as black and that detail in the dark areas is
visible.
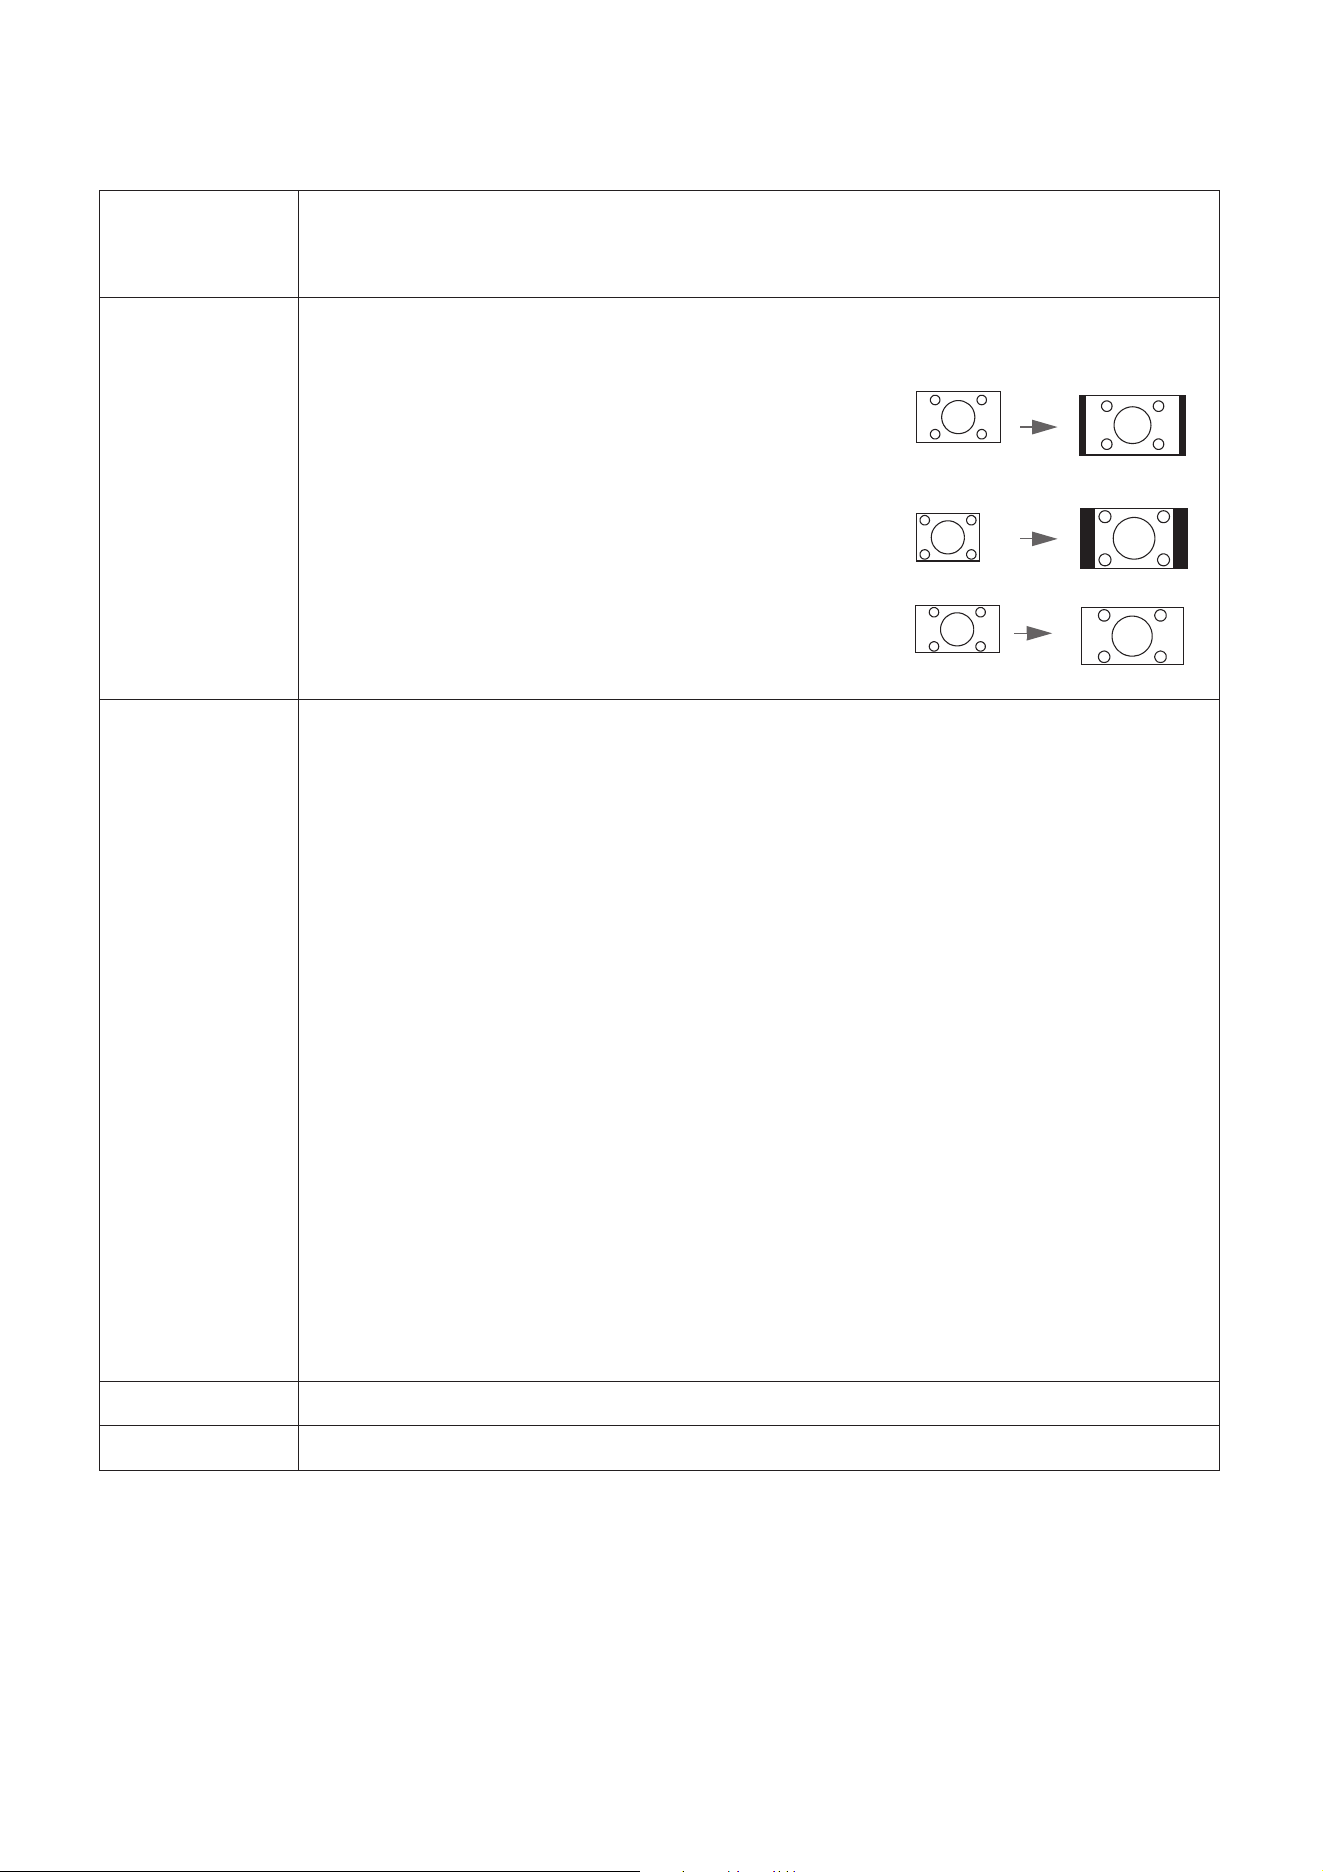
Aspect Ratio
There are several options to set the image's aspect ratio depending on your
input signal source.
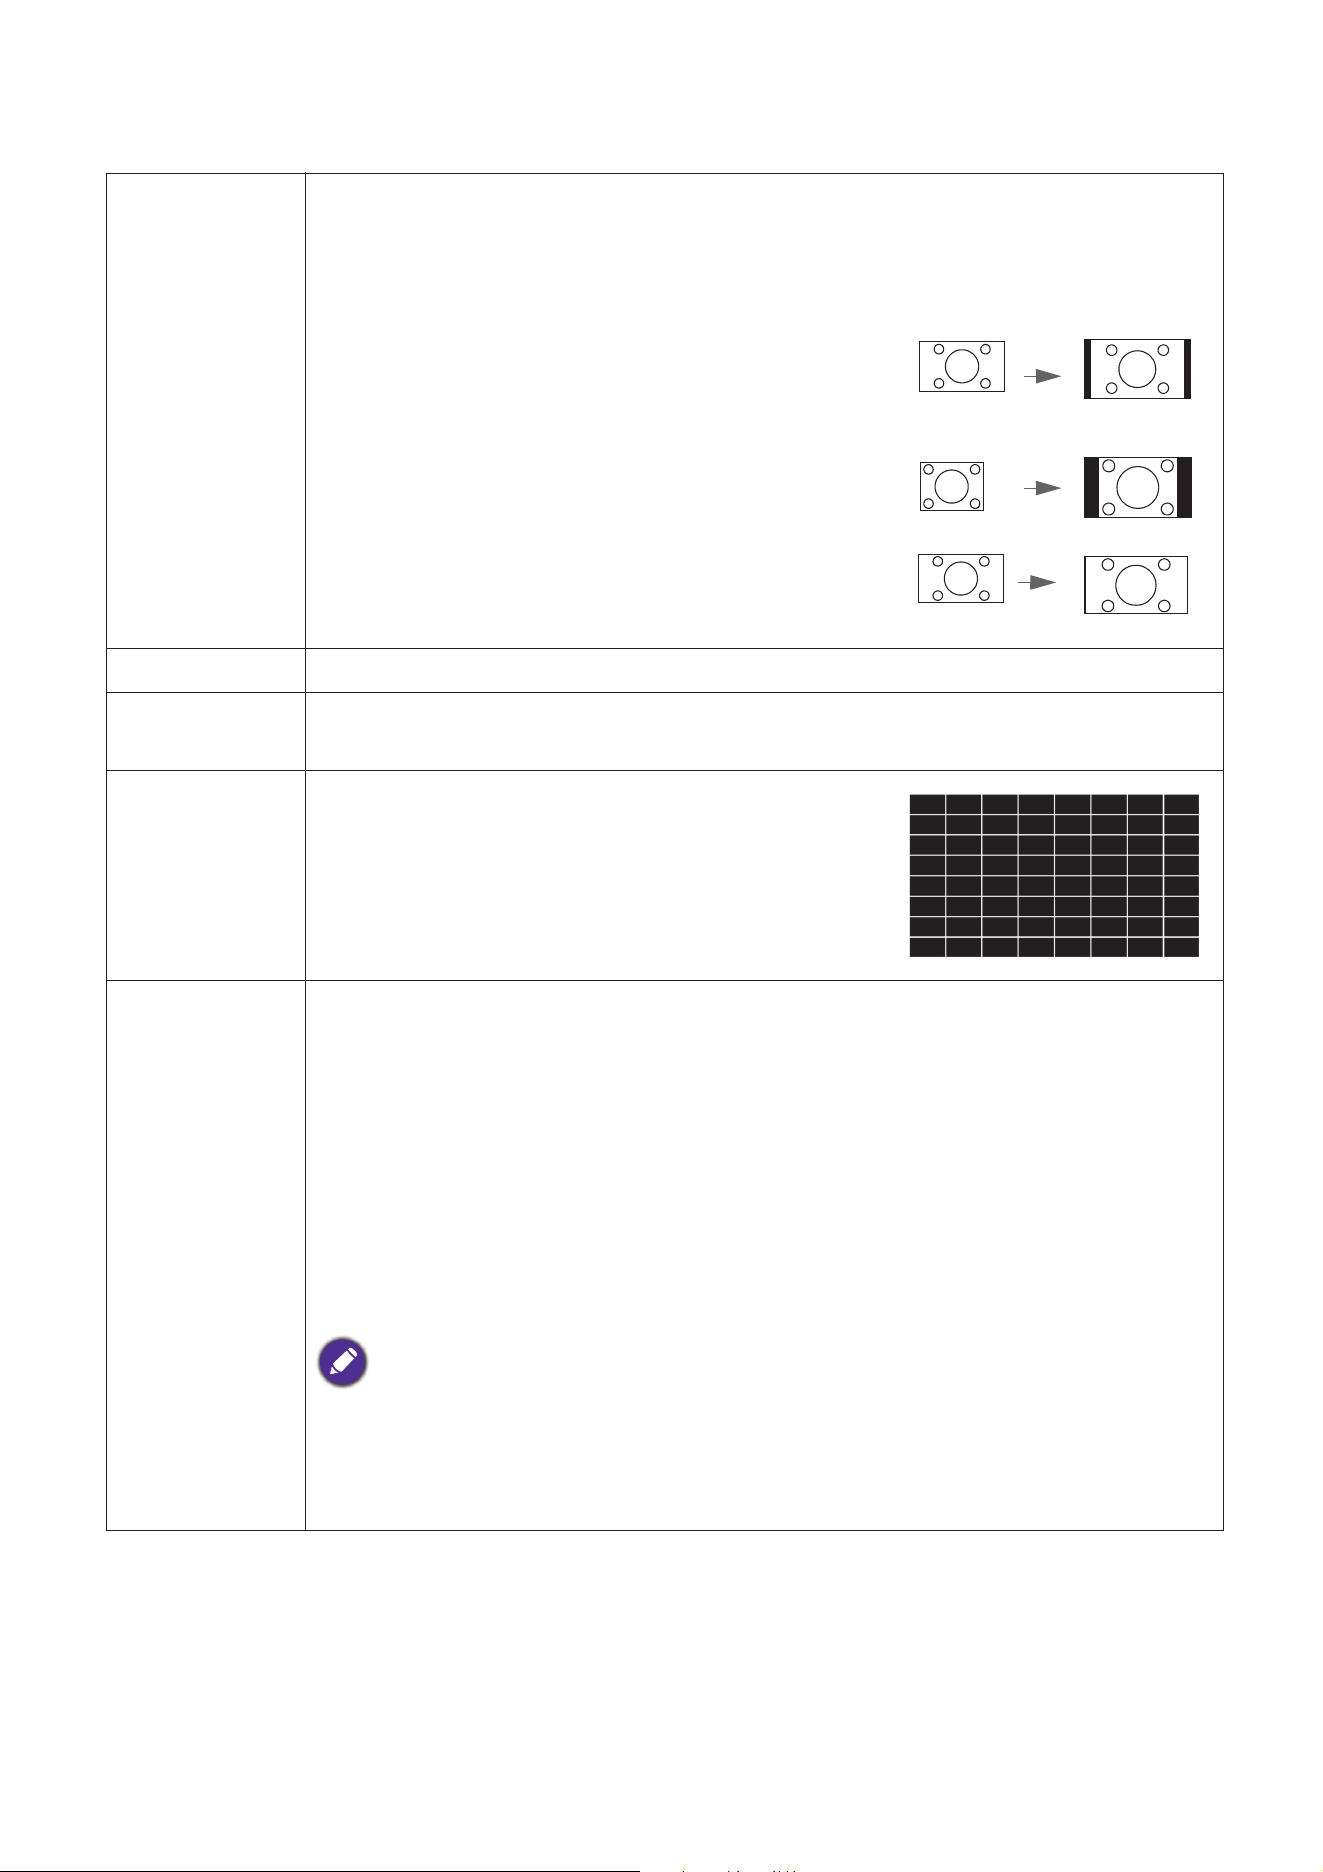
• Auto: Scales an image proportionally to fit the
projector's native resolution in its horizontal or
vertical width.
• 4:3: Scales an image so that it is displayed in
the center of the screen with a 4:3 aspect ratio.
• 16:9: Scales an image so that it is displayed in
the center of the screen with a 16:9 aspect ratio.
Picture Mode
The projector is preset with several predefined picture modes so that you
can choose one to suit your operating environment and input signal picture
type.
• Bright: Maximizes the brightness of the projected image. This mode is
suitable for environments where extra-high brightness is required, such as
using the projector in well-lit rooms.
• Living Room: With well-saturated color, fine-tuned sharpness, and a higher
brightness level, Living Room mode is suitable for TV streaming in rooms
where there is a small amount of ambient light, e.g. your living room.
• Cinema: With accurate color and deepest contrast at lower brightness level,
Cinema mode is suitable for playing movies in an environment with a bit of
ambient light, as if in a commercial cinema.
• Game: This mode is best for playing video games in rooms where there is a
small amount of ambient light, eg. your living room.
• Sports: With well-saturated colors and higher brightness level, this mode is
best for watching sporting events in a bright room.
• 3D: Is appropriate for playing 3D images and 3D video clips.
• User 1/User 2: Recalls the settings customized based on the current
available picture modes. See Reference Mode on page 37.
Volume Adjusts the sound level.
Light Mode See Setting the Light Mode on page 45.
15:9 picture
4:3 picture
16:9 picture
36 Menu operation
Fast Mode
Minimizes the response time between the input source and the displayed
image. For the optimized latency, when Fast Mode is activated,
Keystone/Aspect Ratio will return to the default settings, and Auto Vertical
Keystone will be turned off automatically.
*Fast Mode can only be enabled for below input timing adopted by most of
popular games:
- 1080p 60Hz/120Hz/240Hz
- 4K 60Hz
Information
• Native Resolution: Shows the native resolution of the projector.
• Detected Resolution: Shows the native resolution of the input signal.
• Source: Shows the current signal source.
• Picture Mode: Shows the selected mode in the Picture menu.
• Light Mode: Shows the selected mode in the Light Settings menu.
• 3D Format: Shows the current 3D mode.
• Color System: Shows input system format.
• Light Usage Time: Shows the number of hours the lamp has been used.
• Firmware Version: Shows the firmware version of your projector.
• Service Code: Shows the projector’s serial number.
Menu Type Switches to the Advanced OSD menu. See Using the menus on page 26.
37 Menu operation
Advanced menu
Picture
Picture Mode
The projector is preset with several predefined picture modes so that you
can choose one to suit your operating environment and input signal picture
type.
• Bright: Maximizes the brightness of the projected image. This mode is
suitable for environments where extra-high brightness is required, such as
using the projector in well-lit rooms.
• Living Room: With well-saturated color, fine-tuned sharpness, and a higher
brightness level, Living Room mode is suitable for TV streaming in rooms
where there is a small amount of ambient light, e.g. your living room.
• Cinema: With accurate color and deepest contrast at lower brightness level,
Cinema mode is suitable for playing movies in an environment with a bit of
ambient light, as if in a commercial cinema.
• Game: This mode is best for playing video games in rooms where there is a
small amount of ambient light, e.g. your living room.
• Sports: With well-saturated colors and higher brightness level, this mode is
best for watching sporting events in a bright room.
• 3D: Is appropriate for playing 3D images and 3D video clips.
• User 1/User 2: Recalls the settings customized based on the current
available picture modes. See
Reference Mode on page 37.
Reference
Mode
There are 2 user-definable modes if the current available picture modes are
not suitable for your need. You can use one of the picture modes (except the
User 1/User 2) as a starting point and customize the settings.
1. Go to Picture > Picture Mode.
2. Press / to select User 1 or User 2.
3. Press to highlight Reference Mode, and press / to select a picture
mode that is closest to your need.
4. Press to select a menu item to be changed and adjust the value. The
adjustments define the selected user mode.
Fast Mode
Minimizes the response time between the input source and the displayed
image. For the optimized latency, when Fast Mode is activated,
Keystone/Aspect Ratio will return to the default settings, and Auto Vertical
Keystone will be turned off automatically.
*Fast Mode can only be enabled for below input timing adopted by most of
popular games:
- 1080p 60Hz/120Hz/240Hz
- 4K 60Hz
Brightness
The higher the value, the brighter the image. Adjust this control so the black
areas of the image appear just as black and that detail in the dark areas is
visible.
38 Menu operation
Contrast
The higher the value, the greater the contrast. Use this to set the peak white
level after you have previously adjusted the Brightness setting to suit your
selected input and viewing environment.
Color
Lower setting produces less saturated colors. If the setting is too high,
colors on the image will be overpowering, which makes the image
unrealistic.
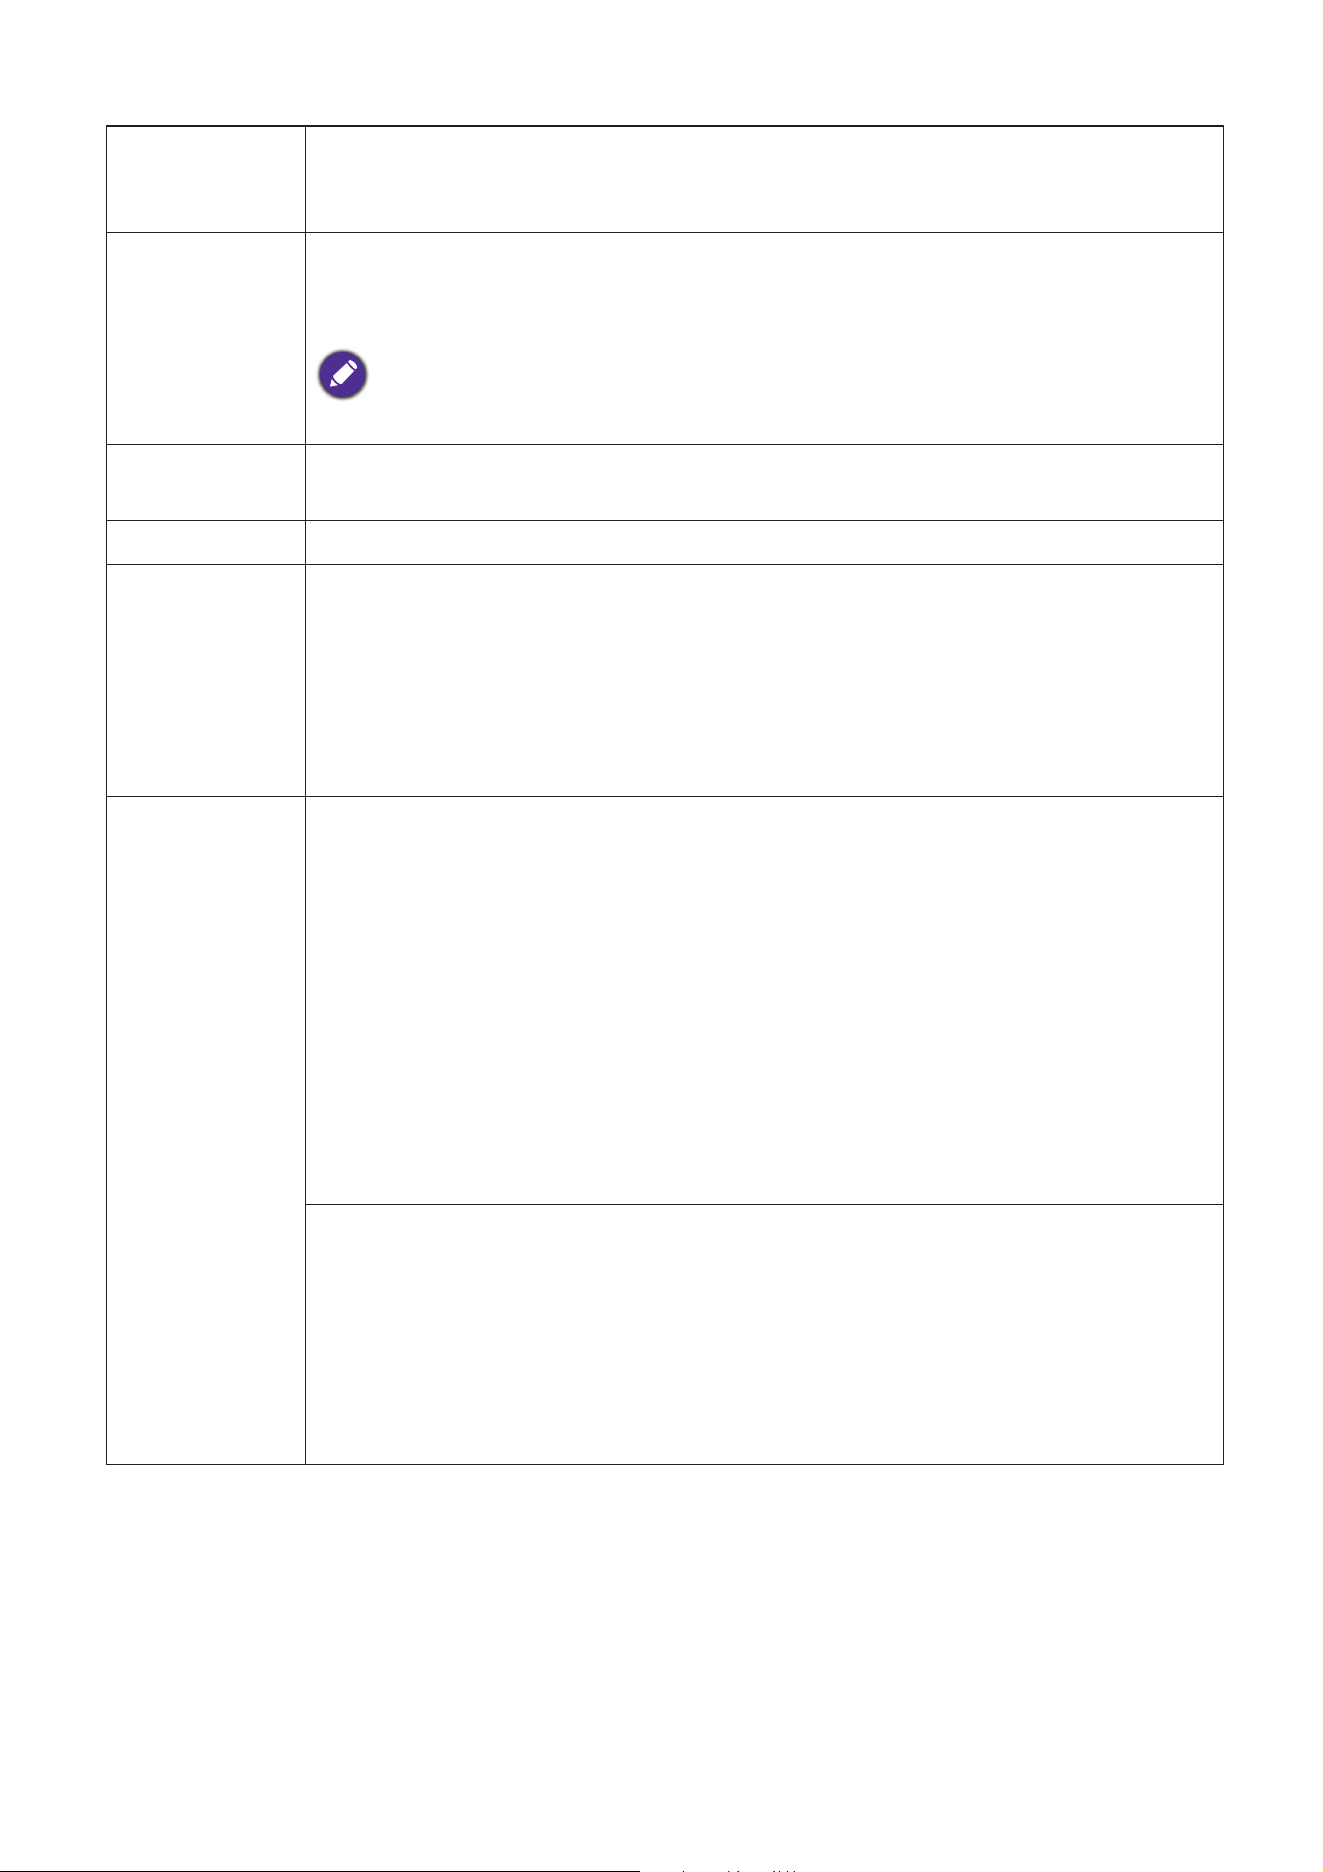
Only YUV color space is supported.
Tint
The higher the value, the more greenish the picture becomes. The lower the
value, the more reddish the picture becomes.
Sharpness The higher the value, the sharper the picture becomes.
Brilliant Color
This feature utilizes a new color-processing algorithm and system level
enhancements to enable higher brightness while providing truer, more
vibrant colors in picture. It enables a greater than 50% brightness increase in
mid-tone images, which are common in video and natural scenes, so the
projector reproduces images in realistic and true colors. If you prefer images
with that quality, select On.
When Off is selected, the Color Temperature function is not available.
Advanced
Color Settings
Color Temperature
There are several preset color temperature settings available. The available
settings may vary according to the signal type selected.
When Bright is selected for Picture Mode, the color temperature switches to
Native, and cannot be changed.
• Normal: Maintains normal colorings for white.
• Cool: Makes images appear bluish white.
• Warm: Makes images appear reddish white.
• Native: With the light source’s original color temperature and higher
brightness, this setting is suitable for environments where high
brightness is required, such as projecting pictures in well-lit rooms.
Color Temperature Tuning
You can also set a preferred color temperature by adjusting the following
options.
• R Gain/G Gain/B Gain: Adjusts the contrast levels of Red, Green, and
Blue.
• R Offset/G Offset/B Offset: Adjusts the brightness levels of Red, Green,
and Blue.
39 Menu operation
Color Management
This function provides six sets (RGBCMY) of colors to be adjusted. When
you select each color, you can independently adjust its range and saturation
according to your preference.
• Primary Color: Selects a color from among R (Red), G (Green), B (Blue),
C (Cyan), M (Magenta), Y (Yellow). or W (White).
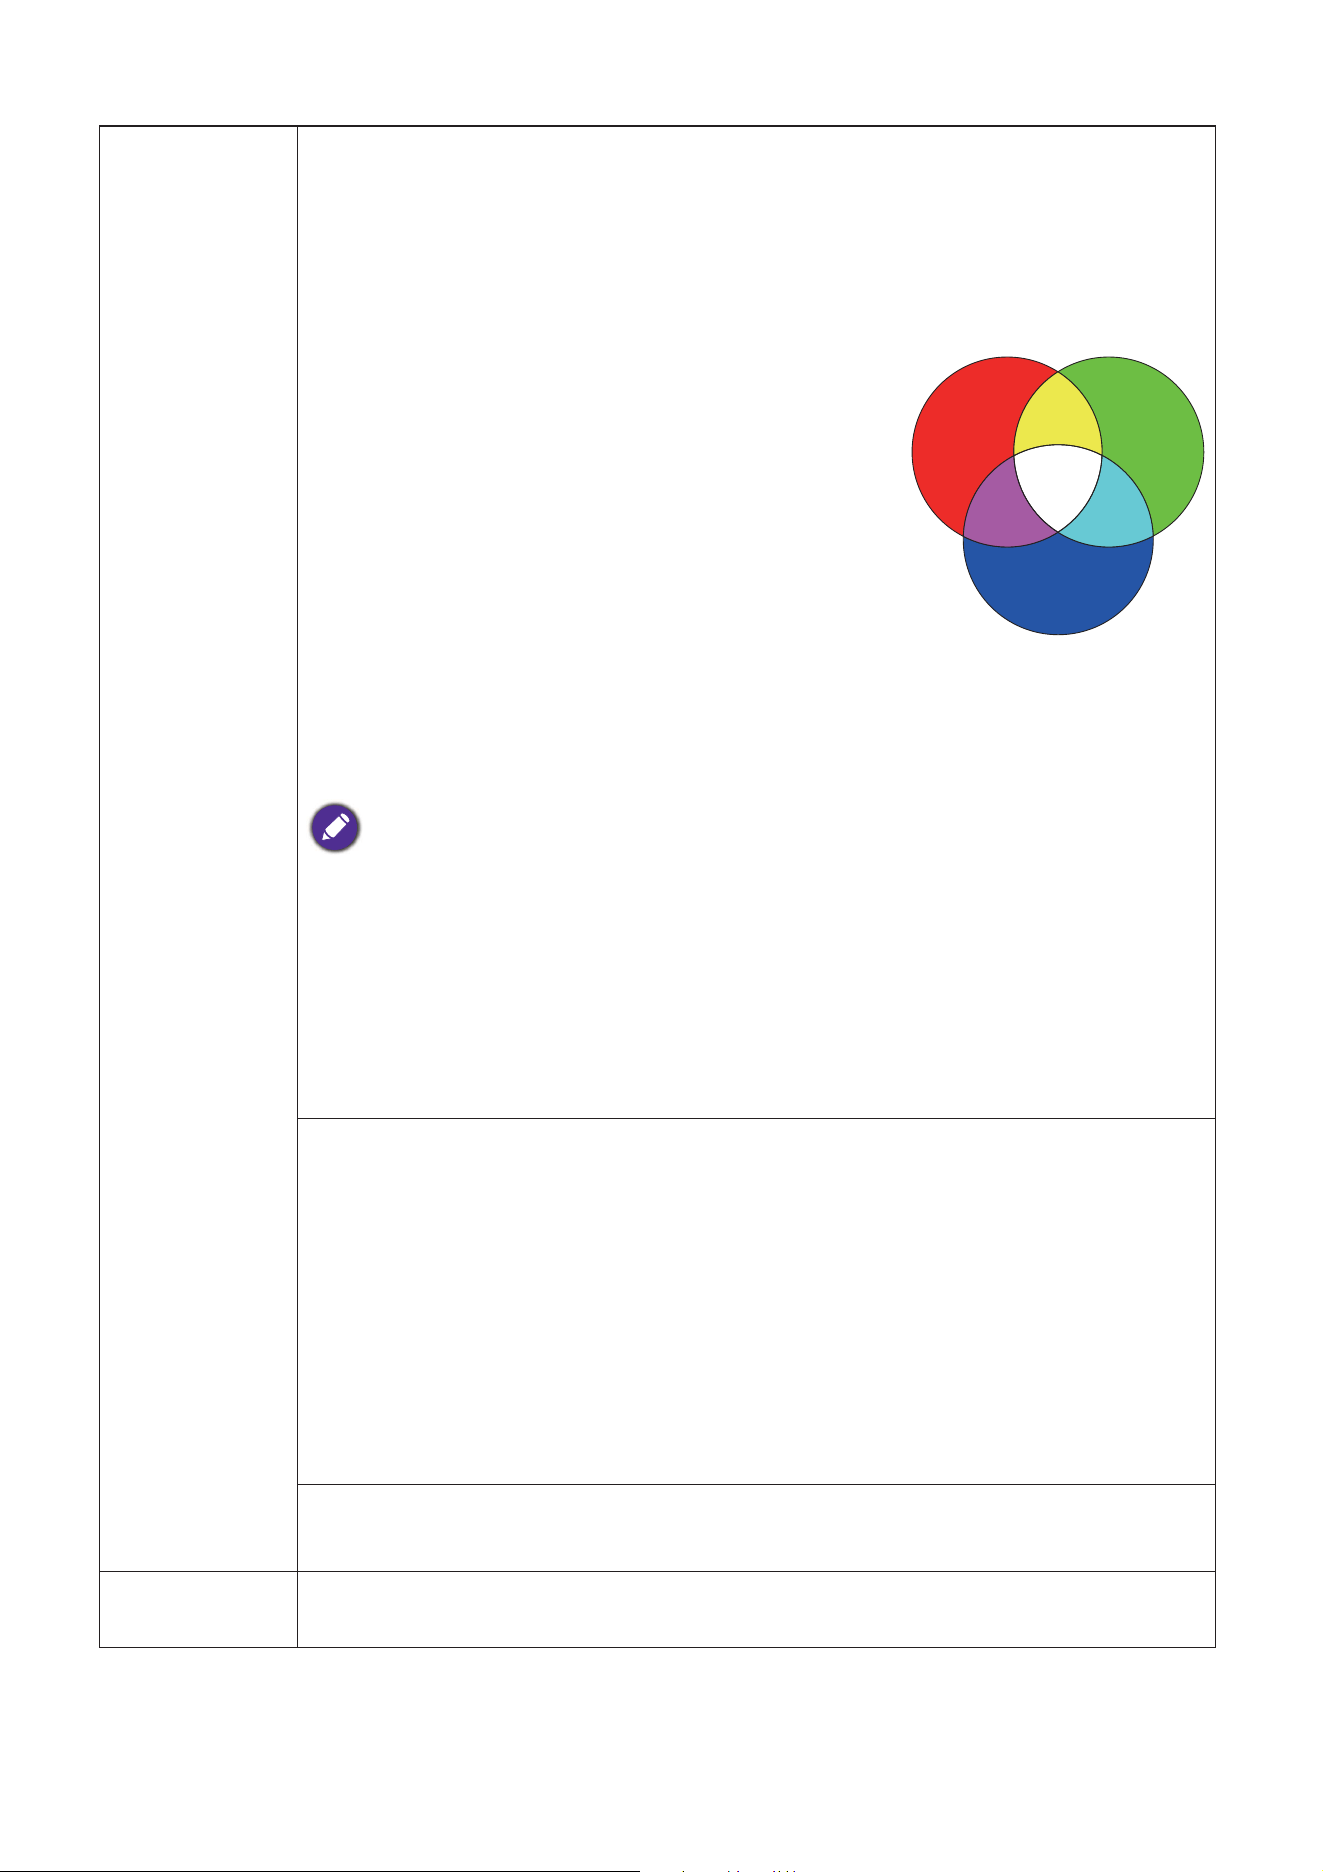
• Hue: Increase in the range will include colors
consisted of more proportions of its two
adjacent colors. Please refer to the
illustration for how the colors relate to each
other.
For example, if you select Red and set its
range at 0, only pure red in the projected
picture will be selected. Increasing its range
will include red close to yellow and red close
to magenta.
• Saturation: Adjusts the values to your preference. Every adjustment
made will reflect to the image immediately. For example, if you select
Red and set its value at 0, only the saturation of pure red will be
affected.
Saturation is the amount of that color in a video picture. Lower settings produce less
saturated colors; a setting of “0” removes that color from the image entirely. If the saturation
is too high, that color will be overpowering and unrealistic.
• Gain: Adjusts the values to your preference. The contrast level of the
primary color you select will be affected. Every adjustment made will
reflect to the image immediately.
If you selected White Balance (W), you can adjust the contrast levels of Red,
Green, and Blue by selecting R Gain, G Gain, and B Gain.
Gamma Selection
Gamma refers to the relationship between input source and picture
brightness.
• 1.6/1.8/2.0/2.1/BenQ: Select these values according to your
preference.
• 2.2/2.3: Increases the average brightness of the picture. Best for a lit
environment, meeting room or family room.
• 2.4/2.6: Best for viewing movies in a dark environment.
• 2.8: Best for viewing movies which are mostly composed of dark
scenes.
Light Mode
See Setting the Light Mode on page 45.
Reset Picture
Returns all of the adjustments you’ve made for the Picture menu to the
factory preset values.
RED
BLUE
GREEN
Yellow
Cyan
Magenta
40 Menu operation
Display
Aspect Ratio
There are several options to set the image's aspect ratio depending on your
input signal source.
This image adjustment might impact latency in Game mode. We suggest
setting Aspect Ratio to Auto to enjoy low latency gaming.
• Auto: Scales an image proportionally to fit the
projector's native resolution in its horizontal or
vertical width.
• 4:3: Scales an image so that it is displayed in the
center of the screen with a 4:3 aspect ratio.
• 16:9: Scales an image so that it is displayed in
the center of the screen with a 16:9 aspect ratio.
Keystone Corrects any keystoning of the image. See Correcting keystone on page 20.
Auto Vertical
Keystone
When selecting Auto Vertical Keystone, projector image will automatically
adjust the keystone.
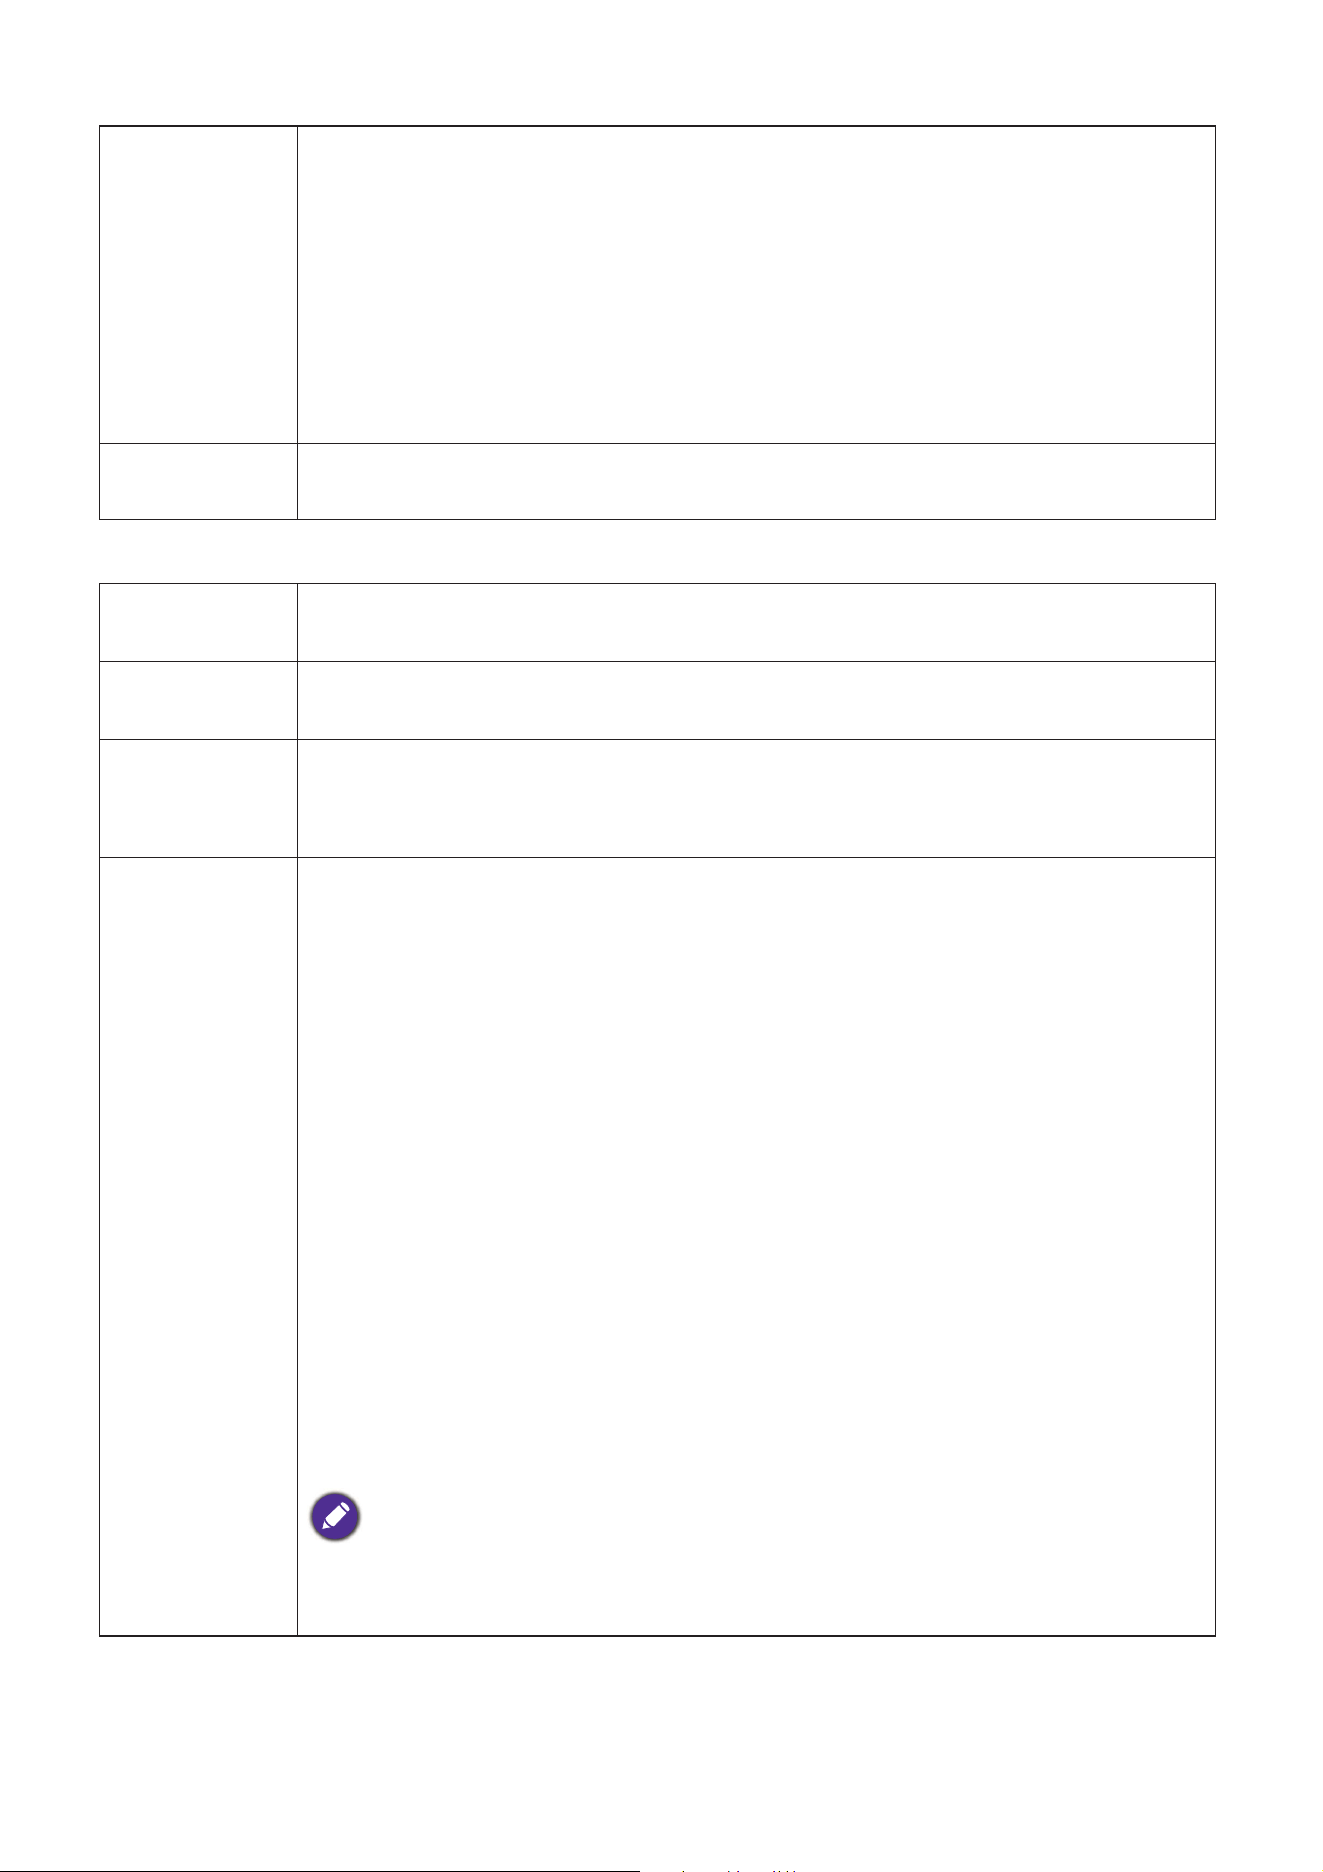
Test Pattern
Adjusts the image size and focus and check that
the projected image is free from distortion.
3D
This projector features a 3D function which enables you to enjoy the 3D
movies, videos, and sporting events in a more realistic way by presenting the
depth of the images. You need to wear a pair of 3D glasses to view the 3D
images.
• 3D Sync Invert: When you discover the inversion of the image depth, enable
this function to correct the problem.
• Apply 3D Settings: After the 3D settings are saved, you can decide if you
would like to apply them by choosing a set of 3D settings that you have
saved. Once applied, the projector will automatically play the incoming 3D
contents if it matches the 3D settings saved.
Only the set(s) of 3D settings with memorized data is available.
• Save 3D Settings: When you have successfully displayed the 3D contents
after making the appropriate adjustments, you can enable this function and
choose a set of 3D settings to memorize current 3D settings.
15:9 picture
4:3 picture
16:9 picture
41 Menu operation
Settings
HDMI Format
For HDMI and Android TV sources, selects a suitable color format to
optimize display quality.
• Auto: Automatically selects a suitable color space and gray level for the
incoming HDMI signal.
• RGB Limited: Utilizes the Limited range RGB 16-235.
• RGB Full: Utilizes the Full range RGB 0-255.
• YUV Limited: Utilizes the Limited range YUV 16-235.
• YUV Full: Utilizes the Full range YUV 0-255. (HDMI source only)
Reset Display
Returns all of the adjustments you’ve made for the Display menu to the
factory preset values.
Projector
Installation
See Choosing a location on page 16.
Auto Source
Search
Allows the projector to automatically search for a signal.
Light Settings
• Reset Light Timer: See Resetting the Light timer (FOR SERVICE PERSONNEL
ONLY) on page 46
.
• Light Usage Time: Displays the number of hours the lamp has been used.
Operation
Settings
Quick Cooling:
Selecting On enables the function and projector cooling time will be
shortened from a normal 90-second duration to approximately 15 seconds.
Reminder Message
Sets the reminder messages on or off.
High Altitude Mode
We recommend you use the High Altitude Mode when your environment is
between 1500 m –3000 m above sea level, and ambient temperature is
between 0°C–30°C.
Operation under "High Altitude Mode" may cause a higher decibel operating
noise level because of increased fan speed necessary to improve overall
system cooling and performance.
If you use this projector under other extreme conditions excluding the above,
it may display auto shut-down symptoms, which is designed to protect your
projector from over-heating. In cases like this, you should switch to High
Altitude mode to solve these symptoms. However, this is not to state that
this projector can operate under any and all harsh or extreme conditions.
Do not use the High Altitude Mode if your altitude is between 0 m and 1500 m and ambient
temperature is between 0°C and 35°C. The projector will be over cooled, if you turn the mode
on under such a condition.
42 Menu operation
System
Power On/Off Settings
• Direct Power On: Allows the projector to turn on automatically once the
power is fed through the power cord.
• Signal Power On: Sets whether to turn the projector directly on without
pressing POWER or ON when the projector is in standby mode and
detects a HDMI signal with 5V power.
• Auto Power Off: Allows the projector to turn off automatically if no input
signal is detected after a set period of time to prevent unnecessary waste
of lamp life.
• Power Off Timer: Sets the auto-shutdown timer.
Instant Restart
Allows you to restart the projector immediately within 90 seconds after
turning it off.
Security
Settings
See Utilizing the password function on page 27.
Baud Rate
Selects a baud rate that is identical with your computer’s so that you can
connect the projector using a suitable RS-232 cable and update or download
the projector’s firmware. This function is intended for qualified service
personnel.
HDMI
Equalizer
Sets a suitable value to maintain the HDMI and Android TV picture quality in
long distance data transmission.
Reset Settings
Returns all of the adjustments you’ve made for the Settings menu to the
factory preset values.
Language Sets the language for the On-Screen Display (OSD) menus.
Background
Settings
• Background: Sets the background color for the projector.
• Splash Screen
: Allows you to select which logo screen will be displayed
during projector start-up.
Menu Settings
• Menu Type: Switches to the Basic OSD menu.
• Menu Display Time: Sets the length of time the OSD will remain active after
your last key press.
Audio Settings
• Mute: Temporarily turns off the sound.
• Volume: Adjusts the sound level.
• Power On/Off Ring Tone: Turns on or off the ring tone when the projector is
in startup and shutdown process.
The only way to change Power On/Off Ring Tone is setting On or Off here. Setting the sound
mute or changing the sound level will not affect the Power On/Off Ring Tone.
43 Menu operation
Information
Factory
Default
Returns all settings to the factory preset values.
The following settings will still remain: Keystone, Auto Vertical Keystone, Projector
Installation, Light Usage Time, High Altitude Mode, Security Settings, Baud Rate, HDMI
Equalizer.
Reset System
Returns all of the adjustments you’ve made for the System menu to the
factory preset values.
Information
• Native Resolution: Shows the native resolution of the projector.
• Detected Resolution: Shows the native resolution of the input signal.
• Source: Shows the current signal source.
• Picture Mode: Shows the selected mode in the Picture menu.
• Light Mode: Shows the selected mode in the Light Settings menu.
• 3D Format: Shows the current 3D mode.
• Color System: Shows input system format.
• Light Usage Time: Shows the number of hours the lamp has been used.
• Firmware Version: Shows the firmware version of your projector.
• Service Code: Shows the projector’s serial number.

44 Maintenance
Maintenance
Care of the projector
Cleaning the lens
Clean the lens whenever you notice dirt or dust on the surface. Please be sure to turn off the
projector and let it cool down completely before cleaning the lens.
• Use a canister of compressed air to remove dust.
• If there is dirt or smears, use lens-cleaning paper or moisten a soft cloth with lens cleaner and
gently wipe the lens surface.
• Never use any type of abrasive pad, alkaline/acid cleaner, scouring powder, or volatile solvent,
such as alcohol, benzene, thinner or insecticide. Using such materials or maintaining
prolonged contact with rubber or vinyl materials may result in damage to the projector surface
and cabinet material.
Cleaning the projector case
Before you clean the case, turn the projector off using the proper shutdown procedure as
described in
Shutting down the projector on page 30 and unplug the power cord.
• To remove dirt or dust, wipe the case with a soft, lint-free cloth.
• To remove stubborn dirt or stains, moisten a soft cloth with water and a neutral pH detergent.
Then wipe the case.
Storing the projector
If you need to store the projector for an extended time, please follow the instructions below:
• Make sure the temperature and humidity of the storage area are within the recommended
range for the projector. Please refer to
Specifications on page 49 or consult your dealer about the
range.
• Retract the adjuster feet.
• Remove the battery from the remote control.
• Pack the projector in its original packing or equivalent.
Transporting the projector
It is recommended that you ship the projector with its original packing or equivalent.
Lamp information
Getting to know the lamp hour
When the projector is in operation, the duration (in hours) of lamp usage is automatically
calculated by the built-in timer. The method of calculating the equivalent lamp hour is as
follows:
Lamp Usage Time = (hours used in Normal mode) + (hours used in ECO mode) + (hours used in
SmartEco mode) + (hours used in LampSave mode)
Never use wax, alcohol, benzene, thinner or other chemical detergents. These can damage the case.
45 Maintenance
Total (equivalent) lamp hour = 3 x (hours used in Normal mode) + 1.5 x (hours used in ECO
mode) + 1.5 x (hours used in SmartEco mode) + 1 x (hours used in LampSave mode)
To obtain the lamp hour information:
1. Go to Advanced Menu - Settings > Light Settings and press OK. The Light Settings page
appears.
2. Press to select Light Usage Time and press OK. The Light Usage Time information is
displayed.
You can also get the lamp hour information on the Information menu.
Extending lamp life
• Setting the Light Mode
Go to Advanced Menu - Picture > Advanced Color Settings > Light Mode and select a suitable
lamp power from among the provided modes.
Setting the projector in ECO, SmartEco or LampSave mode extends lamp life.
• Setting Auto Power Off
This function allows the projector to turn off automatically if no input signal is detected after a
set period of time to prevent unnecessary waste of lamp life.
To set Auto Power Off, go to Advanced Menu - Settings > Operation Settings > Power On/Off
Settings > Auto Power Off and press / .
Timing of replacing the lamp
When the Light indicator lights up or a message appears suggesting it is time to replace the
lamp, please consult your dealer or go to
http://www.BenQ.com before installing a new lamp.
An old lamp may cause a malfunction in the projector and in some instances the lamp may
explode.
Light mode Description
Normal Provides full lamp brightness
ECO
Lowers brightness to extend the lamp life and decreases the fan noise
SmartEco
Adjusts the lamp power automatically depending on the content brightness level
while optimizing display quality
LampSave
Adjusts the lamp power automatically depending on the content brightness level
while offering a longer lamp life
• The apparent brightness of the projected image will vary depending on the ambient lighting conditions,
selected input signal contrast/brightness settings, and is directly proportional to projection distance.
• The lamp brightness will decline over time and may vary within the lamp manufacturers specifications.
This is normal and expected behavior.
• The LIGHT indicator light and TEMPerature warning light will light up if the lamp becomes too hot. Turn
the power off and let the projector cool for 45 minutes. If the Light or Temp indicator still lights up after
turning the power back on, please contact your dealer. See
Indicators on page 47.
46 Maintenance
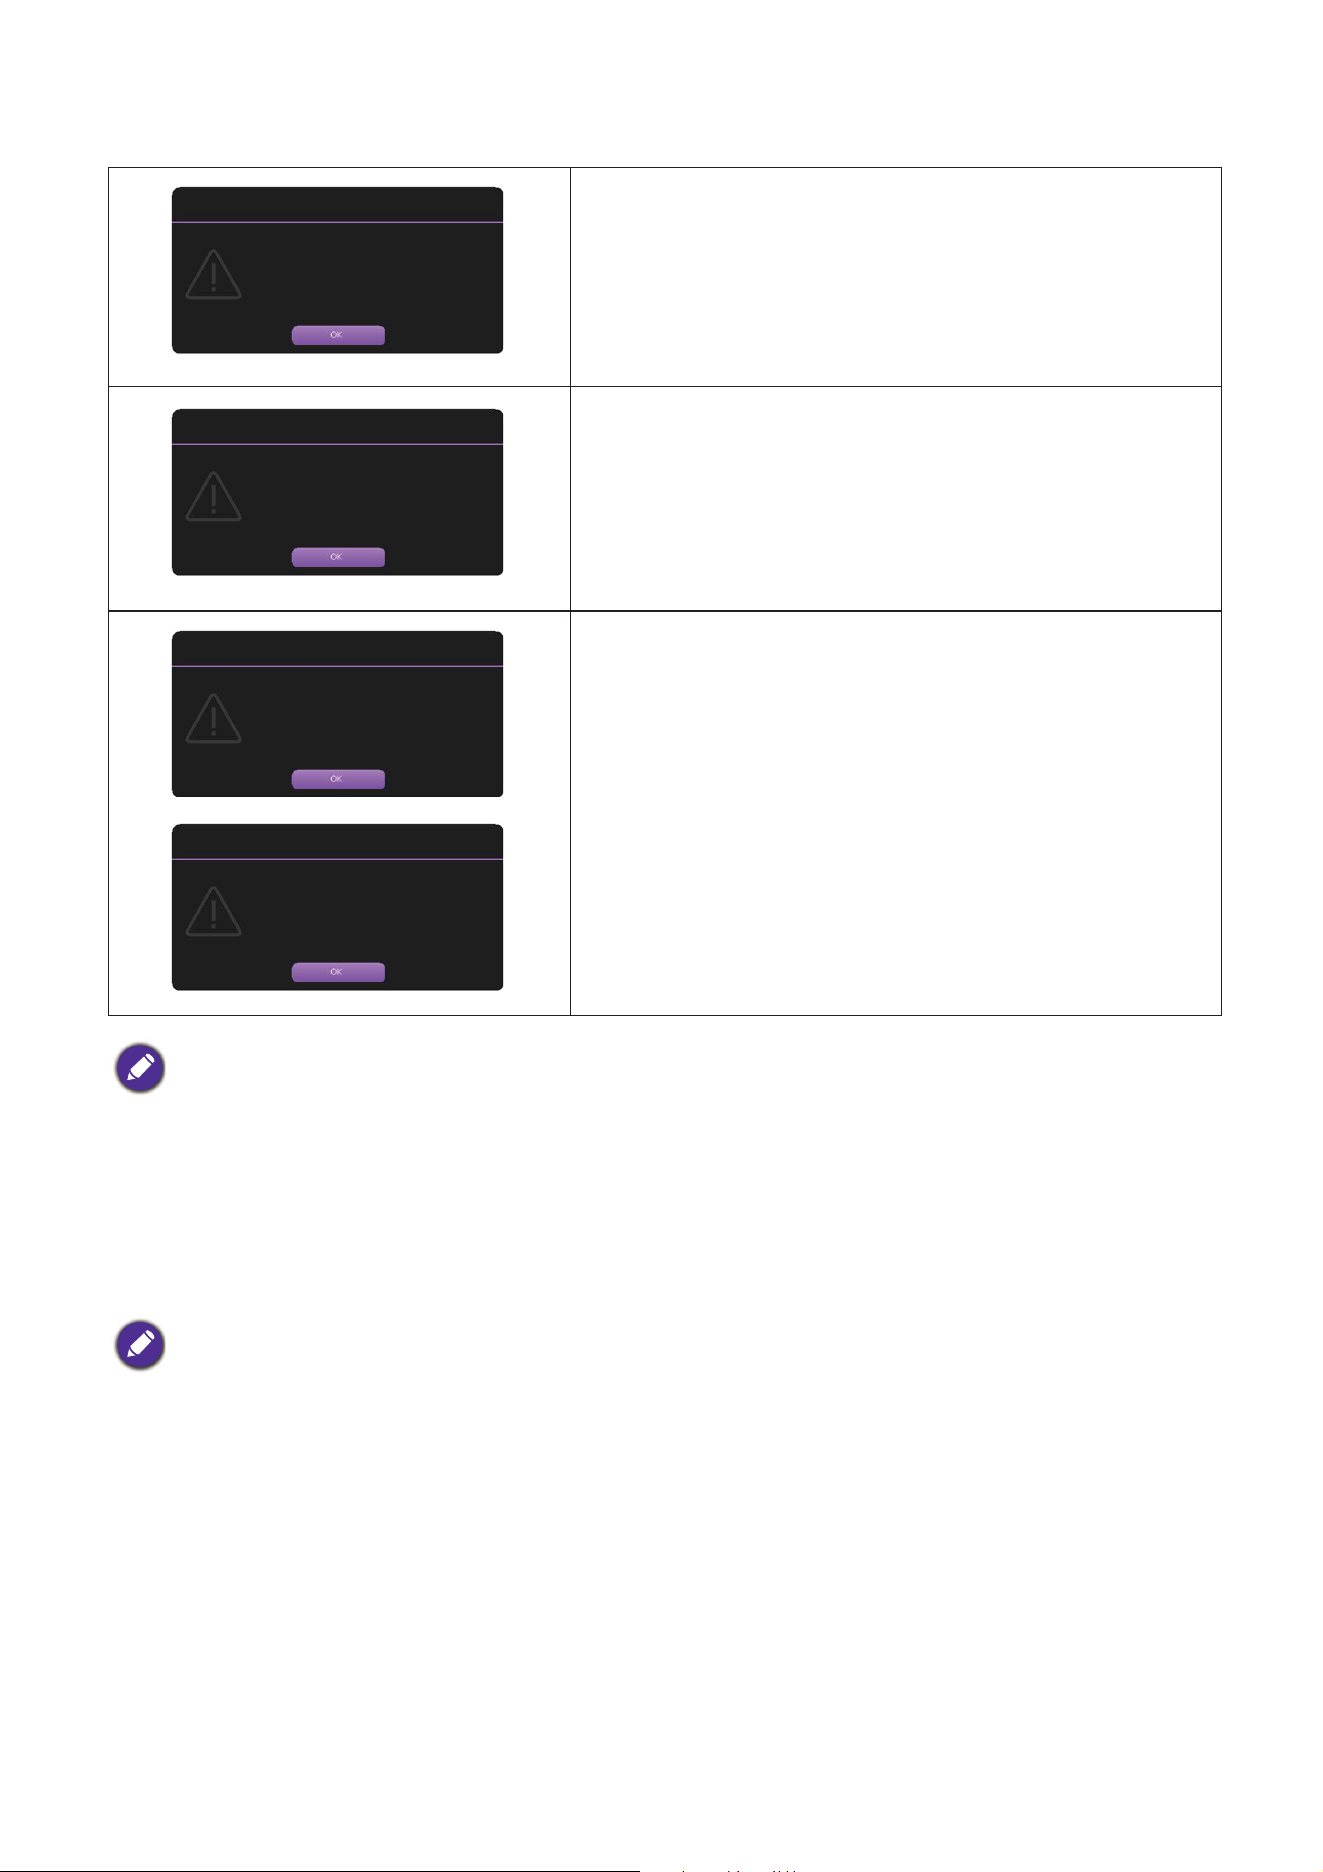
The following Lamp warning displays will remind you to change the lamp.
Resetting the Light timer (FOR SERVICE PERSONNEL ONLY)
After the startup logo, open the On-Screen Display (OSD) menu. Go to Advanced Menu -
Settings > Light Settings and press OK. The Light Settings page appears. Highlight Reset Light
Timer and press OK. A warning message is displayed asking if you want to reset the Light
timer. Highlight Reset and press OK. The light time will be reset to “0”.
Install a new lamp for optimal performance. Press OK to
dismiss the message.
It is strongly recommended that you replace the lamp at
this age. The lamp is a consumable item. The lamp
brightness diminishes with use. This is normal lamp
behavior. You can replace the lamp whenever you notice
that the brightness level has significantly diminished.
Press OK to dismiss the message.
The lamp MUST be replaced before the projector will
operate normally.
Press
OK to dismiss the message.
"XXXX" shown in the above messages are numbers that vary depending on different models.
Do not reset if the lamp is not new or replaced as this could cause
damage.
Order a replacement lamp
Equivalent lamp hour >XXXX hours
Order a new lamp at www.BenQ.com
Notice
Replace lamp soon
Equivalent lamp hour >XXXX hours
Order a new lamp at www.BenQ.com
Notice
Out of lamp usage time
Replace lamp (refer to user manual)
then reset the lamp timer
Order a new lamp at www.BenQ.com
Notice
Replace lamp now
Equivalent lamp hour > XXXX Hours
Order a new lamp at www.BenQ.com
Notice
47 Maintenance
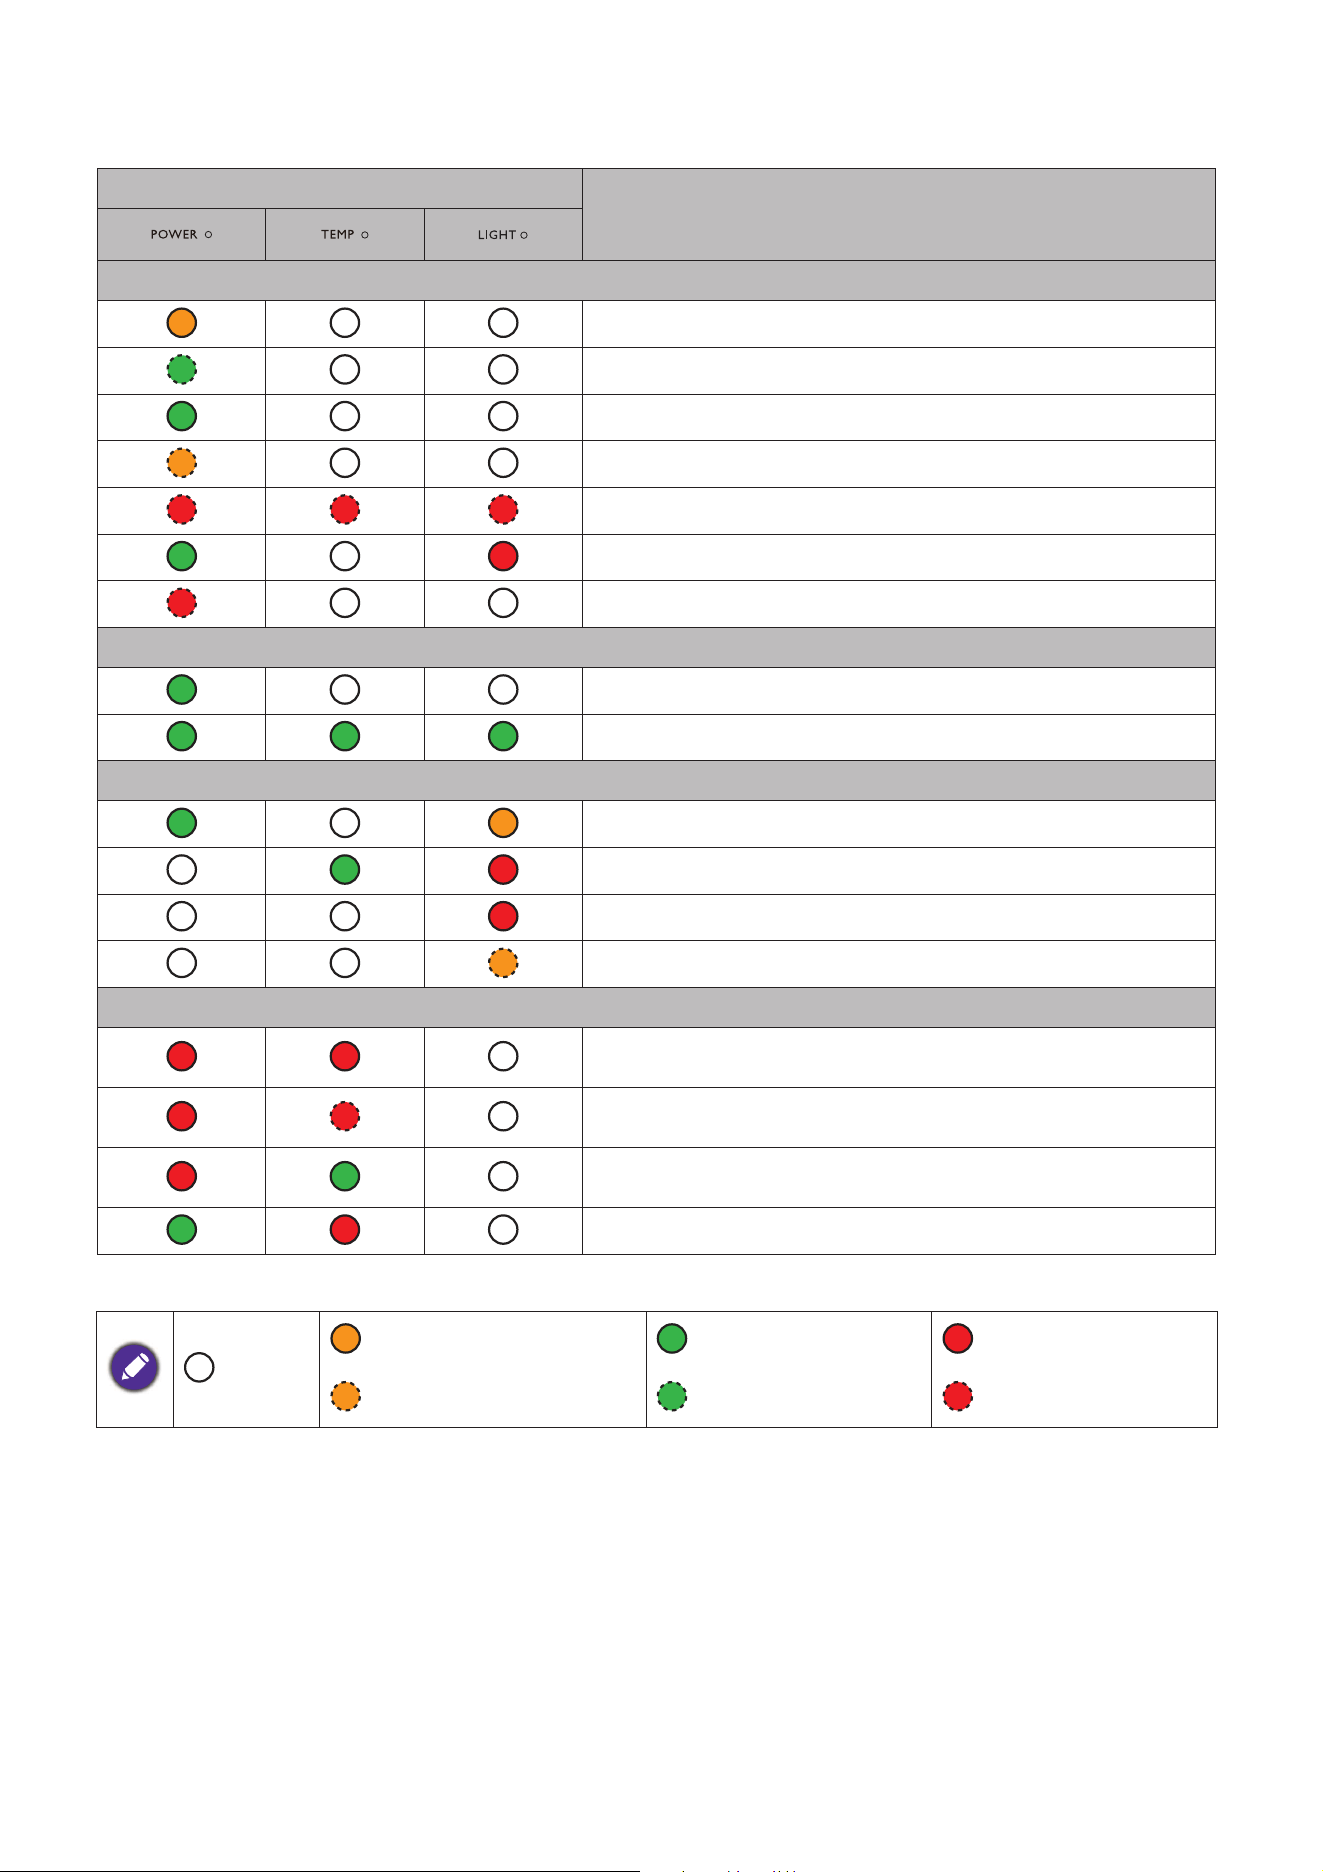
Indicators
Light
Status & Description
Power events
Stand-by mode
Powering up
Normal operation
Normal power-down cooling
Download
CW start fail
Data abort, scaler shutdown abnormally
Burn-in events
Burn-in on
Burn-in off
Light events
Light life exhausted
Light door is not closed
Light error in normal operation
Light is not lit up
Thermal events
Fan 1 error (the actual fan speed is outside the desired
speed)
Fan 2 error (the actual fan speed is outside the desired
speed)
Fan 3 error (the actual fan speed is outside the desired
speed)
Temperature 1 error (over limited temperature)
: Off
: Orange On : Green On : Red On
: Orange Flashing : Green Flashing : Red Flashing
48 Troubleshooting
Troubleshooting
The projector does not turn on.
Cause Remedy
There is no power from the power cord.
Plug the power cord into the AC power jack on the
projector, and plug the power cord into the power
outlet. If the power outlet has a switch, make sure that
it is switched on.
Attempting to turn the projector on again
during the cooling process.
Wait until the cooling down process has completed.
No picture
Cause Remedy
The video source is not turned on or
connected correctly.
Turn the video source on and check that the signal
cable is connected correctly.
The projector is not correctly connected to
the input signal device.
Check the connection.
The input signal has not been correctly
selected.
Select the correct input signal with the SOURCE key.
The lens cover is still closed. Open the lens cover.
Blurred image
Cause Remedy
The projection lens is not correctly focused. Adjust the focus of the lens using the focus ring.
The projector and the screen are not aligned
properly.
Adjust the projection angle and direction as well as the
height of the projector if necessary.
The lens cover is still closed. Open the lens cover.
Remote control does not work.
Cause Remedy
The batteries are out of power. Replace both of the batteries with new ones.
There is an obstacle between the remote
control and the projector.
Remove the obstacle.
You are too far away from the projector. Stand within 8 meters (26 feet) of the projector.
The password is incorrect.
Cause Remedy
You do not remember the password. See
Entering the password recall procedure on page 29.

49 Specifications
Specifications
Projector specifications
All specifications are subject to change without notice.
Optical
Resolution
1920 (H) x 1080 (V)
Display system
1-CHIP DMD
Lens
F = 2.56 ~ 2.68, f = 22 ~ 24.1 mm
Lamp
203 W lamp
Electrical
Power supply
AC100–240V, 3.2 A, 50–60 Hz (Automatic)
Power consumption
295 W (Max); < 0.5 W (Standby)
Mechanical
Weight
2.5 Kg +
100g (5.51 + 0.22 lbs)
Output terminals
Speaker
10 watt x 1
Audio signal output
PC audio jack x 1
Control
USB
USB Mini-B x 1 (for firmware update)
RS-232 serial control
9 pin x 1
IR receiver x 1
Input terminals
Video signal input
Digital - HDMI x 1 (external)
Digital - HDMI x 1 (internal, for StreamX1 dongle)
Environmental Requirements
Operating temperature
0°C–40°C at sea level
Operating relative humidity
10%–90% (without condensation)
Operating altitude
0–1499 m at 0°C–35°C
1500–3000 m at 0°C–30°C (with
High Altitude Mode on)
Storage temperature
-20°C–60°C at sea level
Storage humidity
10%–90% RH (without condensation)
Storage altitude
30°C@ 0~12,200m above sea level
Transporting
Original packing or equivalent is recommended
Repairing
Please visit below website and choose your country to
find your service contact window.
http://www.benq.com/welcome
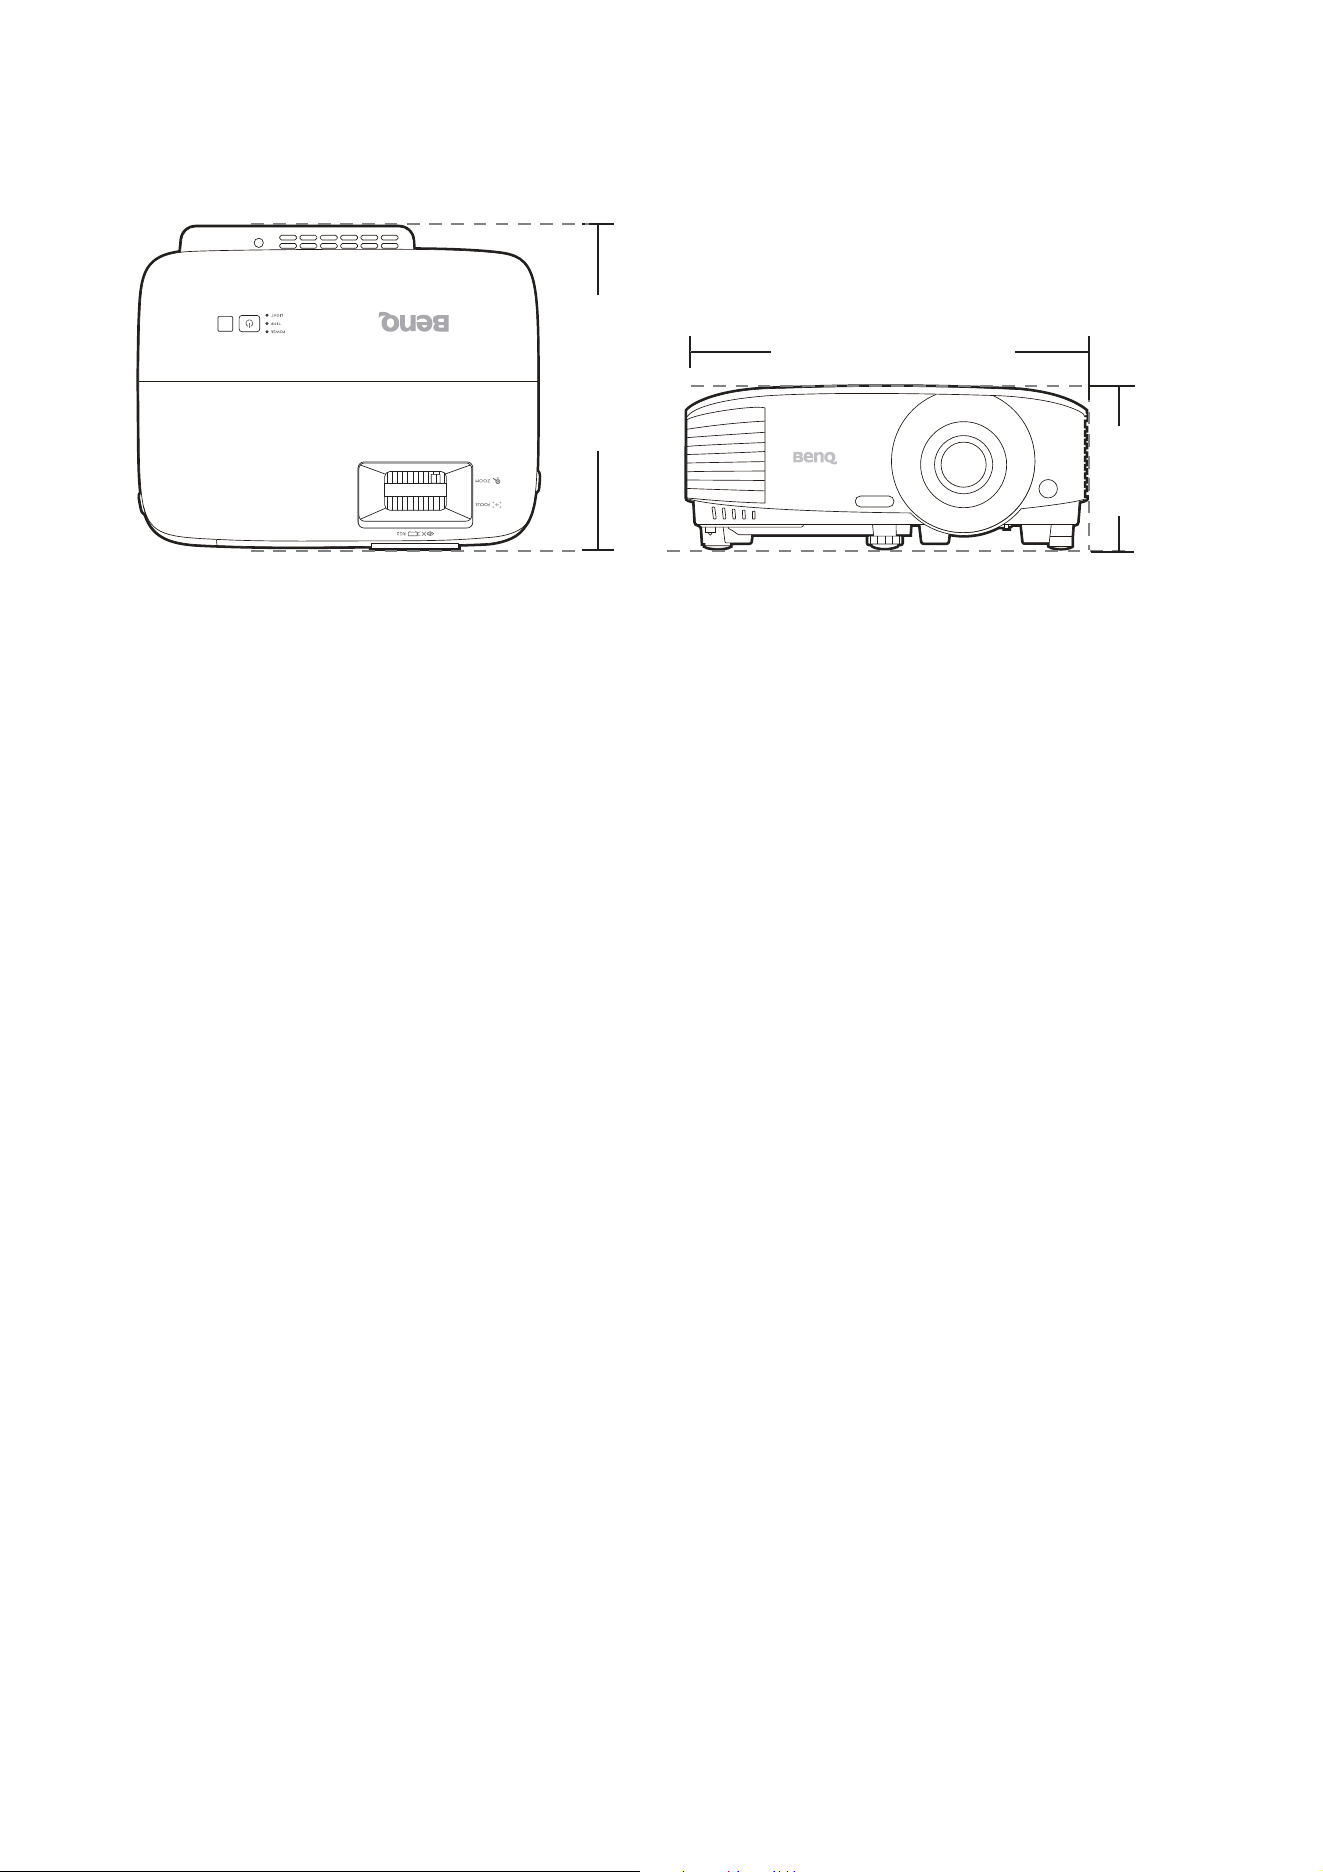
50 Specifications
Dimensions
296 mm (W) x 236.8 mm (D) x 120 mm (H)
296
236.8
120
Unit: mm
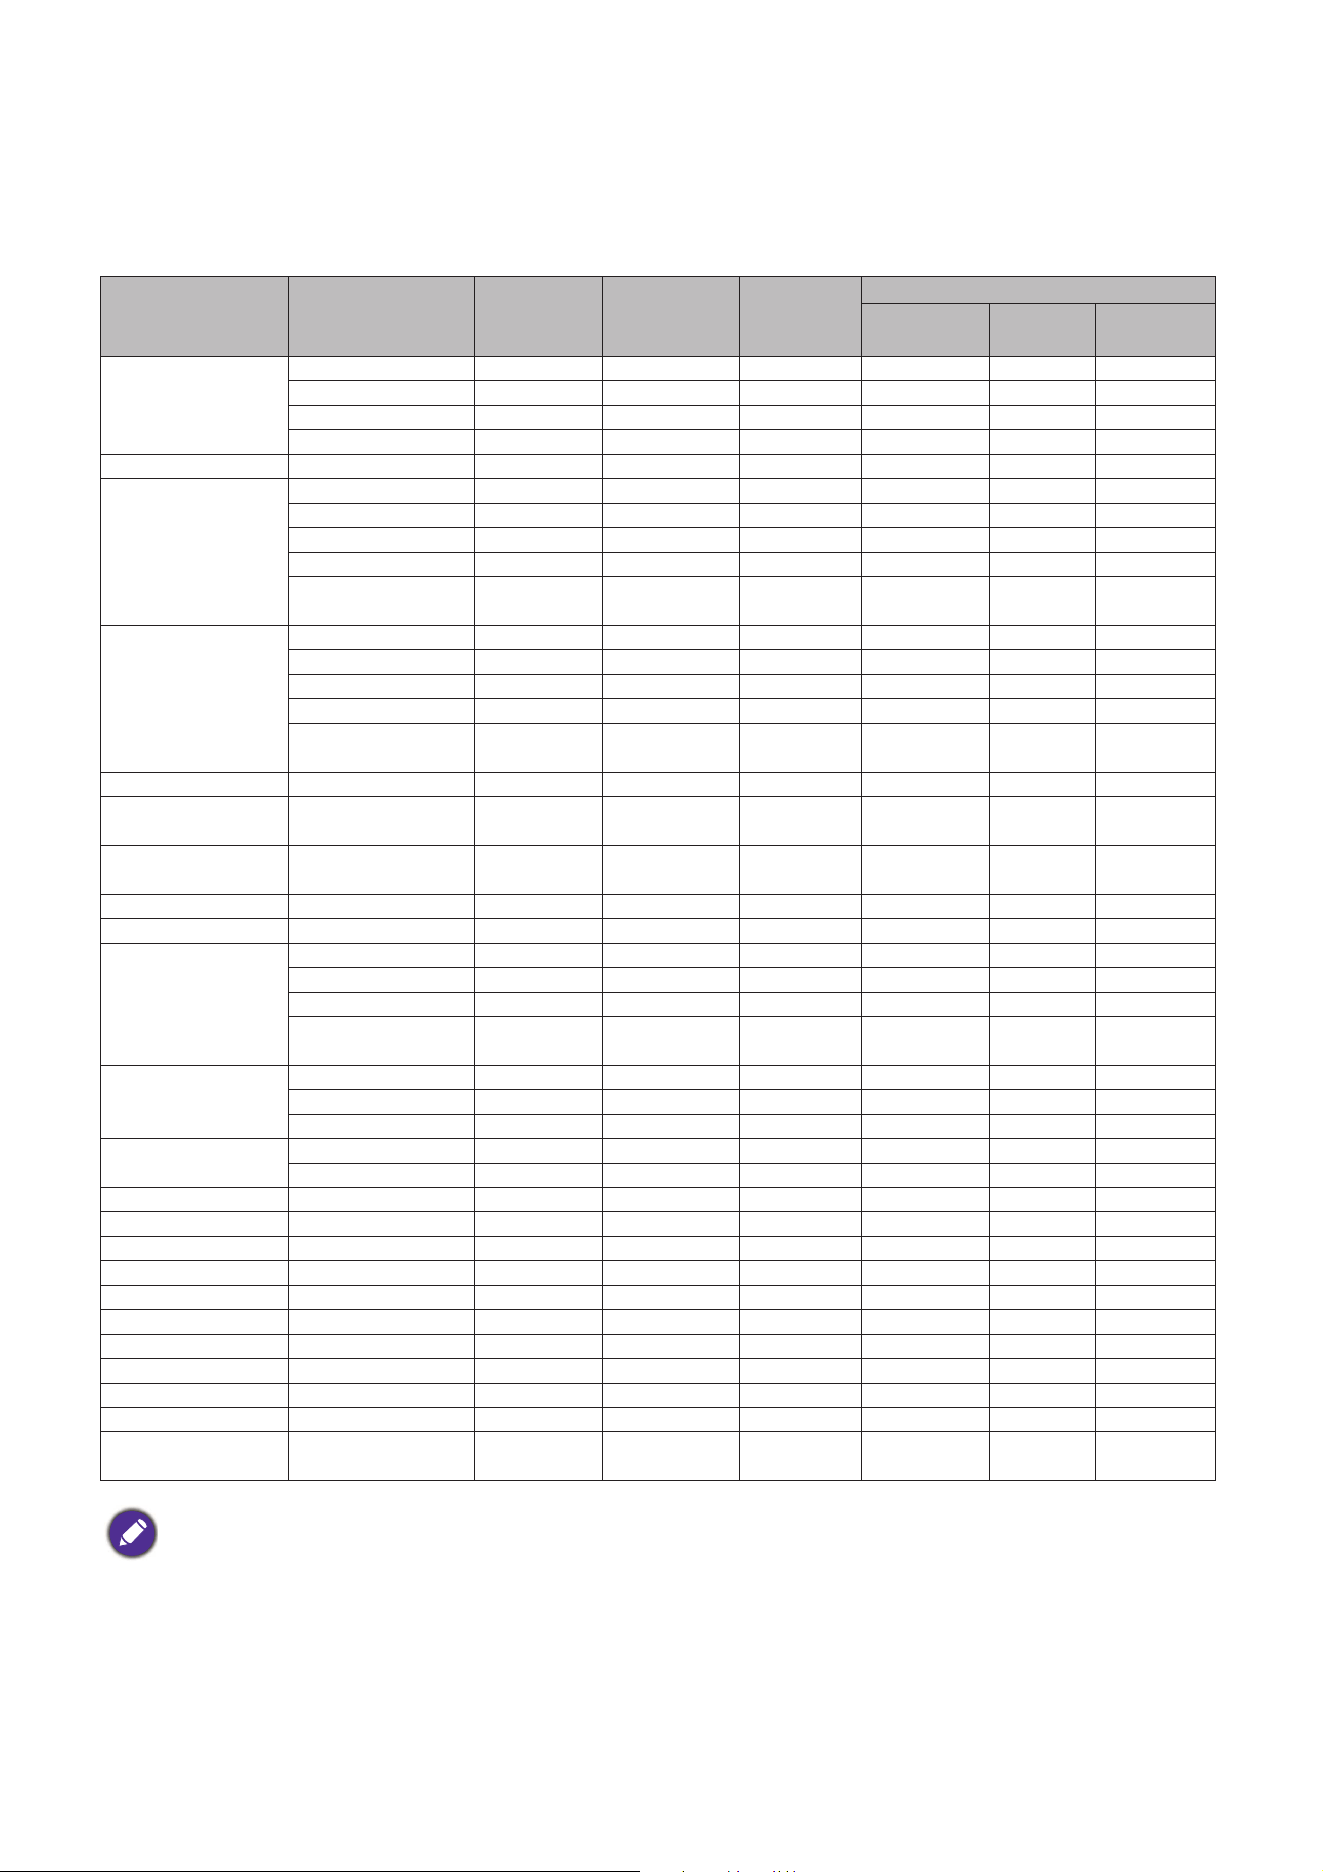
51 Specifications
Timing chart
Supported timing for HDMI (HDCP) input
• PC timings
Resolution Mode
Vertical
Frequency
(Hz)
Horizontal
Frequency
(kHz)
Pixel
Frequency
(MHz)
Supported 3D format
Frame
Sequential
Top
Bottom
Side by
Side
640 x 480
VGA_60 59.940 31.469 25.175 V V V
VGA_72 72.809 37.861 31.500
VGA_75 75.000 37.500 31.500
VGA_85 85.008 43.269 36.000
720 x 400 720 x 400_70 70.087 31.469 28.3221
800 x 600
SVGA_60 60.317 37.879 40.000 V V V
SVGA_72 72.188 48.077 50.000
SVGA_75 75.000 46.875 49.500
SVGA_85 85.061 53.674 56.250
SVGA_120 (Reduce
Blanking)
119.854 77.425 83.000 V
1024 x 768
XGA_60 60.004 48.363 65.000 V V V
XGA_70 70.069 56.476 75.000
XGA_75 75.029 60.023 78.750
XGA_85 84.997 68.667 94.500
XGA_120 (Reduce
Blanking)
119.989 97.551 115.5 V
1152 x 864 1152 x 864_75 75 67.5 108
1024 x 576@60Hz
BenQ Notebook
Timing
60.00 35.820 46.996
1024 x 600@65Hz
BenQ Notebook
Timing
64.995 41.467 51.419
1280 x 720 1280 x 720_60 60 45.000 74.250 V V V
1280 x 768 1280 x 768_60 59.870 47.776 79.5 V V V
1280 x 800
WXGA_60 59.810 49.702 83.500 V V V
WXGA_75 74.934 62.795 106.500
WXGA_85 84.880 71.554 122.500
WXGA_120
(Reduce Blanking)
119.909 101.563 146.25 V
1280 x 1024
SXGA_60 60.020 63.981 108.000 V V
SXGA_75 75.025 79.976 135.000
SXGA_85 85.024 91.146 157.500
1280 x 960
1280 x 960_60 60.000 60.000 108 V V
1280 x 960_85 85.002 85.938 148.500
1360 x 768 1360 x 768_60 60.015 47.712 85.500 V V
1440 x 900 WXGA+_60 59.887 55.935 106.500 V V
1400 x 1050 SXGA+_60 59.978 65.317 121.750 V V
1600 x 1200 UXGA 60.000 75.000 162.000 V V
1680 x 1050 1680 x 1050_60 59.954 65.290 146.250 V V
640 x 480@67Hz MAC13 66.667 35.000 30.240
832 x 624@75Hz MAC16 74.546 49.722 57.280
1024 x 768@75Hz MAC19 75.020 60.241 80.000
1152 x 870@75Hz MAC21 75.06 68.68 100.00
1920 x 1080@60Hz 1920 x 1080_60 60 67.5 148.5 V V V
1920 x 1200@60Hz
1920 x 1200_60
(Reduce Blanking)
59.95 74.038 154 V V V
The timings showing above may not be supported due to EDID file and VGA graphic card limitations. It is
possible that some timings cannot be chosen.
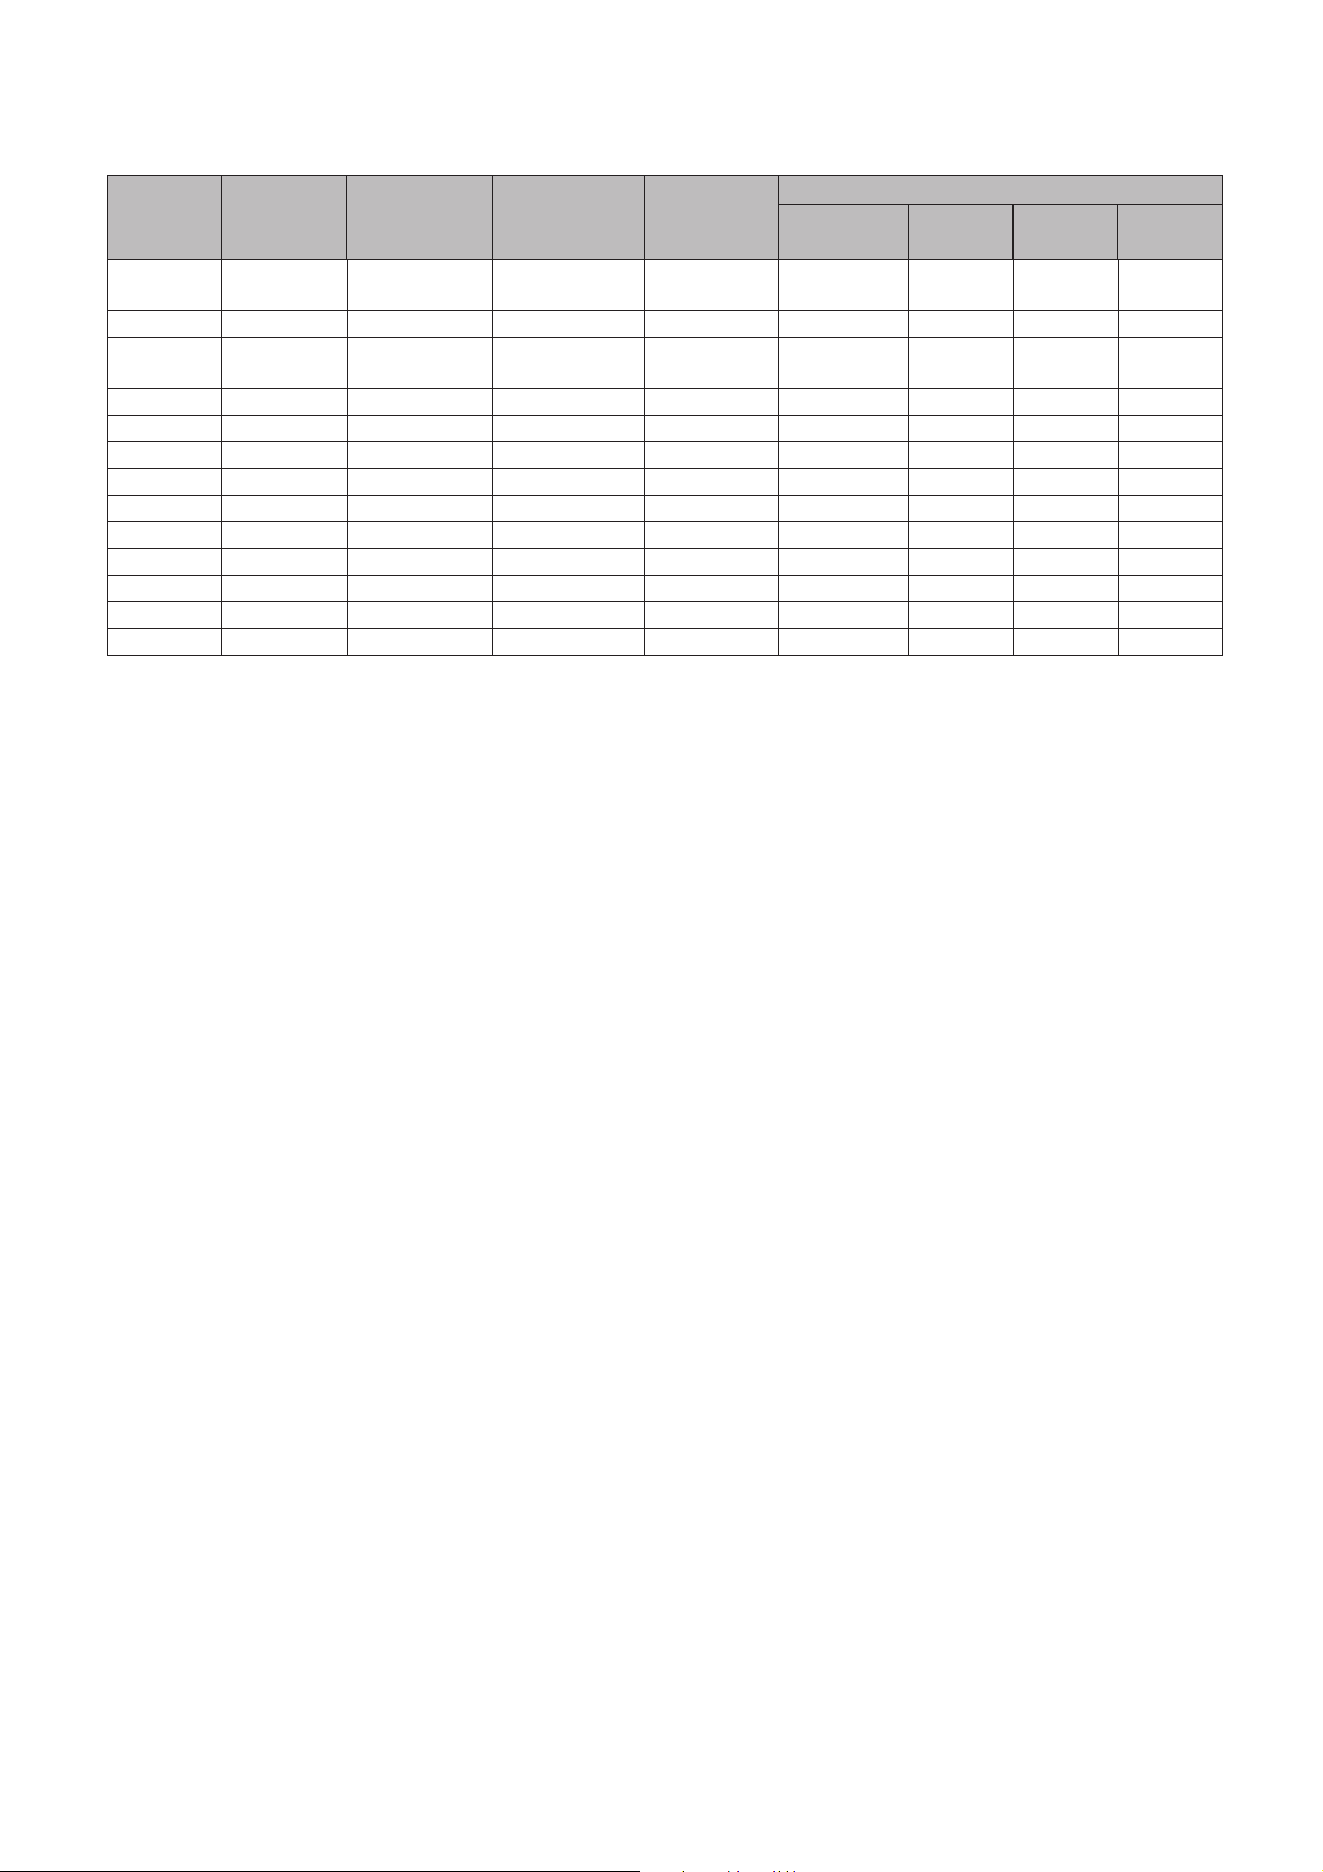
52 Specifications
• Video timings
Timing Resolution
Vertical
Frequency
(Hz)
Horizontal
Frequency
(kHz)
Pixel
Frequency
(MHz)
Supported 3D format
Frame
Sequential
Frame
Packing
Top
Bottom
Side by
Side
480i
720 (1440) x
480
59.94 15.73 27 V
480p 720 x 480 59.94 31.47 27 V
576i
720 (1440) x
576
50 15.63 27
576p 720 x 576 50 31.25 27
720/50p 1280 x 720 50 37.5 74.25 V V V
720/60p 1280 x 720 60 45.00 74.25 V V V V
1080/50i 1920 x 1080 50 28.13 74.25 V
1080/60i 1920 x 1080 60 33.75 74.25 V
1080/24P 1920 x 1080 24 27 74.25 V V V
1080/25P 1920 x 1080 25 28.13 74.25
1080/30P 1920 x 1080 30 33.75 74.25
1080/50P 1920 x 1080 50 56.25 148.5 V V
1080/60P 1920 x 1080 60 67.5 148.5 V V
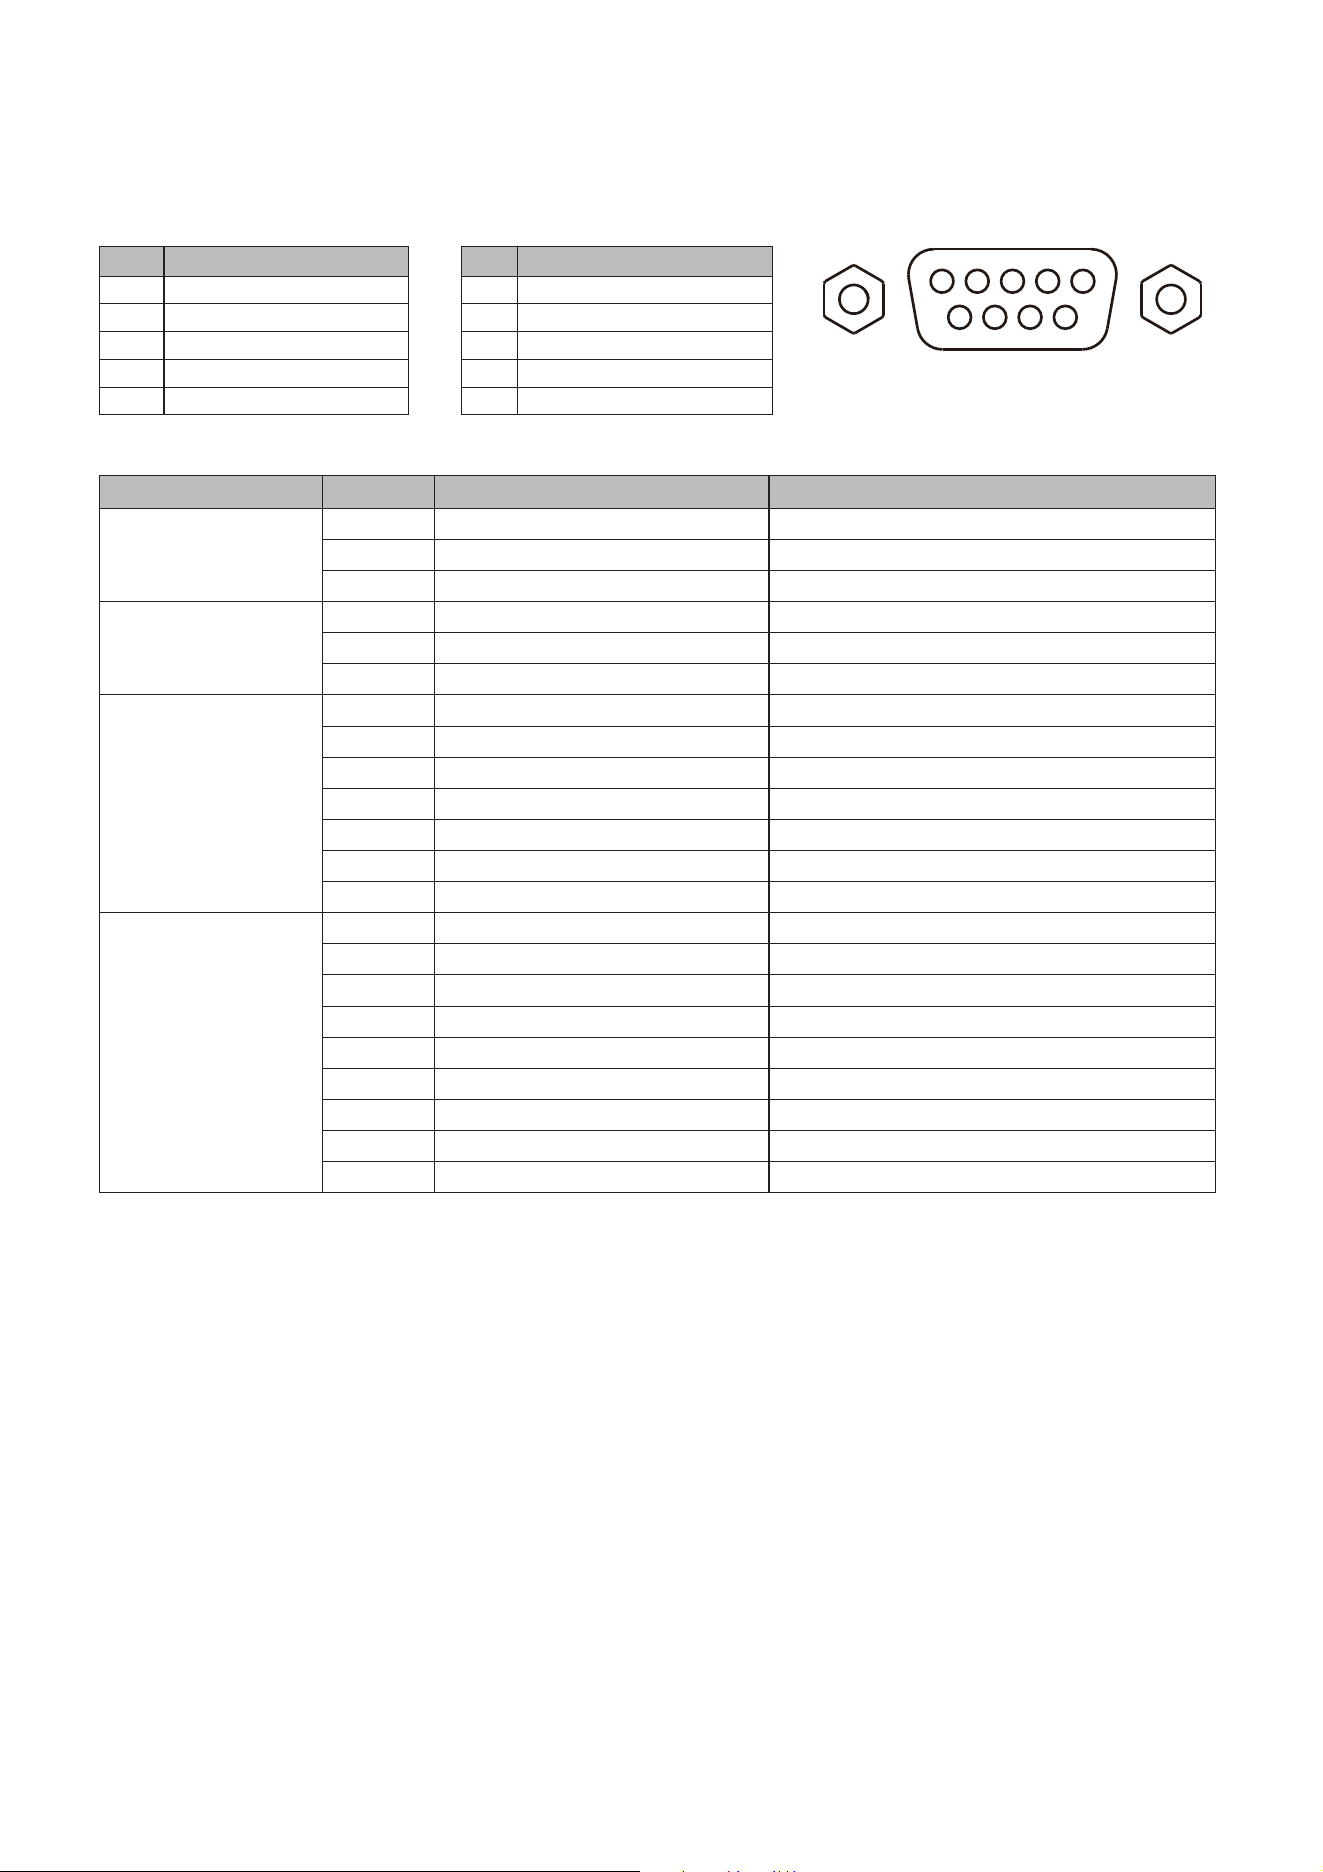
53 Specifications
RS232 command
RS232 pin assignment
No. Serial No. Serial
1 NC 6 NC
2 RX 7 RTSZ
3 TX 8 CTSZ
4 NC 9 NC
5 GND
Function Type Operation ASCII
Power
Write Power On <CR>*pow=on#<CR>
Write Power Off <CR>*pow=off#<CR>
Read Power Status <CR>*pow=?#<CR>
Source Selection
Write HDMI(MHL) <CR>*sour=hdmi#<CR>
Write Smart System <CR>*sour=smartsystem#<CR>
Read Current source <CR>*sour=?#<CR>
Audio Control
Write Mute On <CR>*mute=on#<CR>
Write Mute Off <CR>*mute=off#<CR>
Read Mute Status <CR>*mute=?#<CR>
Write Volume + <CR>*vol=+#<CR>
Write Volume - <CR>*vol=-#<CR>
Write Volume level for customer <CR>*vol=value#<CR>
Read Volume Status <CR>*vol=?#<CR>
Picture Mode
Write Bright <CR>*appmod=bright#<CR>
Write Living Room <CR>*appmod=livingroom#<CR>
Write Game <CR>*appmod=game#<CR>
Write Cinema (Rec.709) <CR>*appmod=cine#<CR>
Write User1 <CR>*appmod=user1#<CR>
Write User2 <CR>*appmod=user2#<CR>
Write 3D <CR>*appmod=threed#<CR>
Write Sport <CR>*appmod=sport#<CR>
Read Picture Mode <CR>*appmod=?#<CR>
1 2 3 4 5
6 7 8 9
54 Specifications
Picture Setting
Write Contrast + <CR>*con=+#<CR>
Write Contrast - <CR>*con=-#<CR>
Write Set Contrast value <CR>*con=value#<CR>
Read Contrast value <CR>*con=?#<CR>
Write Brightness + <CR>*bri=+#<CR>
Write Brightness - <CR>*bri=-#<CR>
Write Set Brightness value <CR>*bri=value#<CR>
Read Brightness value <CR>*bri=?#<CR>
Write Sharpness + <CR>*sharp=+#<CR>
Write Sharpness - <CR>*sharp=-#<CR>
Write Set Sharpness value <CR>*sharp=value#<CR>
Read Sharpness value <CR>*sharp=?#<CR>
Write Color Temperature-Warm <CR>*ct=warm#<CR>
Write Color Temperature-Normal <CR>*ct=normal#<CR>
Write Color Temperature-Cool <CR>*ct=cool#<CR>
Write Color Temperature-lamp native <CR>*ct=native#<CR>
Read Color Temperature Status <CR>*ct=?#<CR>
Write Aspect 4:3 <CR>*asp=4:3#<CR>
Picture Setting
(Continued)
Write Aspect 16:9 <CR>*asp=16:9#<CR>
Write Aspect Auto <CR>*asp=AUTO#<CR>
Read Aspect Status <CR>*asp=?#<CR>
Write Vertical Keystone + <CR>*vkeystone=+#<CR>
Write Vertical Keystone - <CR>*vkeystone=-#<CR>
Read Vertical Keystone value <CR>*vkeystone=?#<CR>
Write Brilliant color on <CR>*BC=on#<CR>
Write Brilliant color off <CR>*BC=off#<CR>
Read Brilliant color status <CR>*BC=?#<CR>
Operation Settings
Write Projector Position-Front Table <CR>*pp=FT#<CR>
Write Projector Position-Rear Table <CR>*pp=RE#<CR>
Write Projector Position-Rear Ceiling <CR>*pp=RC#<CR>
Write Projector Position-Front Ceiling <CR>*pp=FC#<CR>
Read Projector Position Status <CR>*pp=?#<CR>
Write Quick cooling on <CR>*qcool=on<CR>
Write Quick cooling off <CR>*qcool=off<CR>
Read Quick cooling status <CR>*qcool=?#<CR>
Write Quick auto search on <CR>*QAS=on#<CR>
Write Quick auto search off <CR>*QAS=off#<CR>
Read Quick auto search status <CR>*QAS=?#<CR>
Write Direct Power On-on <CR>*directpower=on#<CR>
Write Direct Power On-off <CR>*directpower=off#<CR>
Read Direct Power On-Status <CR>*directpower=?#<CR>
Write Signal Power On-on <CR>*autopower=on#<CR>
Write Signal Power On-off <CR>*autopower=off#<CR>
Read Signal Power On-Status <CR>*autopower=?#<CR>
Baud Rate
Write 9600 <CR>*baud=9600#<CR>
Write 14400 <CR>*baud=14400#<CR>
Write 19200 <CR>*baud=19200#<CR>
Write 38400 <CR>*baud=38400#<CR>
Write 57600 <CR>*baud=57600#<CR>
Write 115200 <CR>*baud=115200#<CR>
Read Current Baud Rate <CR>*baud=?#<CR>
55 Specifications
Lamp Control
Read Lamp <CR>*ltim=?#<CR>
Write Normal mode <CR>*lampm=lnor#<CR>
Write Eco mode <CR>*lampm=eco#<CR>
Write SmartEco mode <CR>*lampm=seco#<CR>
Write SmartEco mode 2 <CR>*lampm=seco2#<CR>
Read Lamp Mode Status <CR>*lampm=?#<CR>
Miscellaneous
Read Model Name <CR>*modelname=?#<CR>
Read System F/W Version <CR>*sysfwversion=?#<CR>
Write Blank On <CR>*blank=on#<CR>
Write Blank Off <CR>*blank=off#<CR>
Read Blank Status <CR>*blank=?#<CR>
Write Menu On <CR>*menu=on#<CR>
Write Menu Off <CR>*menu=off#<CR>
Read Menu Status <CR>*menu=?#<CR>
Write Up <CR>*up#<CR>
Write Down <CR>*down#<CR>
Write Right <CR>*right#<CR>
Write Left <CR>*left#<CR>
Write Enter <CR>*enter#<CR>
Write Back <CR>*back#<CR>
Write Source Menu On <CR>*sourmenu=on#<CR>
Write Source Menu Off <CR>*sourmenu=off#<CR>
Read Source Menu Status <CR>*sourmenu=?#<CR>
Write 3D Sync Off <CR>*3d=off#<CR>
Write 3D Auto <CR>*3d=auto#<CR>
Write 3D Sync Top Bottom <CR>*3d=tb#<CR>
Write 3D Sync Frame Sequential <CR>*3d=fs#<CR>
Write 3D Frame packing <CR>*3d=fp#<CR>
Write 3D Side by side <CR>*3d=sbs#<CR>
Write 3D inverter disable <CR>*3d=da#<CR>
Write 3D inverter <CR>*3d=iv#<CR>
Read 3D Sync Status <CR>*3d=?#<CR>
Write Instant On-on <CR>*ins=on#<CR>
Write Instant On-off <CR>*ins=off#<CR>
Read Instant On Status <CR>*ins=?#<CR>
Write High Altitude mode on <CR>*Highaltitude=on#<CR>
Write High Altitude mode off <CR>*Highaltitude=off#<CR>
Read High Altitude mode status <CR>*Highaltitude=?#<CR>
56 Specifications
Color Calibration
(only for service)
Write Red Gain + <CR>*RGain=+#<CR>
Write Red Gain - <CR>*RGain=-#<CR>
Write Set Red Gain value <CR>*RGain=value#<CR>
Read Get Red Gain value <CR>*RGain=?#<CR>
Write Green Gain + <CR>*GGain=+#<CR>
Write Green Gain - <CR>*GGain=-#<CR>
Write Set Green Gain value <CR>*GGain=value#<CR>
Read Get Green Gain value <CR>*GGain=?#<CR>
Write Blue Gain + <CR>*BGain=+#<CR>
Write Blue Gain - <CR>*BGain=-#<CR>
Write Set Blue Gain value <CR>*BGain=value#<CR>
Read Get Blue Gain value <CR>*BGain=?#<CR>
Write Red Offset + <CR>*ROffset=+#<CR>
Write Red Offset - <CR>*ROffset=-#<CR>
Write Set Red Offset value <CR>*ROffset=value#<CR>
Read Get Red Offset value <CR>*ROffset=?#<CR>
Write Green Offset + <CR>*GOffset=+#<CR>
Write Green Offset - <CR>*GOffset=-#<CR>
Write Set Green Offset value <CR>*GOffset=value#<CR>
Read Get Green Offset value <CR>*GOffset=?#<CR>
Write Blue Offset + <CR>*BOffset=+#<CR>
Write Blue Offset - <CR>*BOffset=-#<CR>
Write Set Blue Offset value <CR>*BOffset=value#<CR>
Read Get Blue Offset value <CR>*BOffset=?#<CR>
Write Primary Color <CR>*primcr=value#<CR>
Read Primary Color Status <CR>*primcr=?#<CR>
Write Hue + <CR>*hue=+#<CR>
Write Hue - <CR>*hue=-#<CR>
Write Set Hue value <CR>*hue=value#<CR>
Read Get Hue value <CR>*hue=?#<CR>
Write Saturation + <CR>*saturation =+#<CR>
Write Saturation - <CR>*saturation =-#<CR>
Write Set Saturation value <CR>*saturation =value#<CR>
Read Get Saturation value <CR>*saturation =?#<CR>
Write Gain + <CR>*gain=+#<CR>
Write Gain - <CR>*gain=-#<CR>
Write Set Gain value <CR>*gain=value#<CR>
Read Get Gain value <CR>*gain=?#<CR>
Service
(Only for service)
Write Service mode enable for error report <CR>*error=enable#<CR>
Read Error code report <CR>*error=report#<CR>
Read FAN 1 speed <CR>*fan1=?#<CR>
Read FAN 2 speed <CR>*fan2=?#<CR>
Read FAN 3 speed <CR>*fan3=?#<CR>
Read Temperature 1 <CR>*tmp1=?#<CR>
Read LED indicator <CR>*led=?#<CR>