1
User Manual
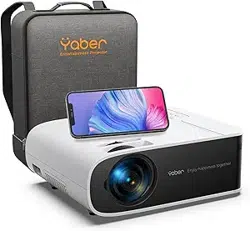
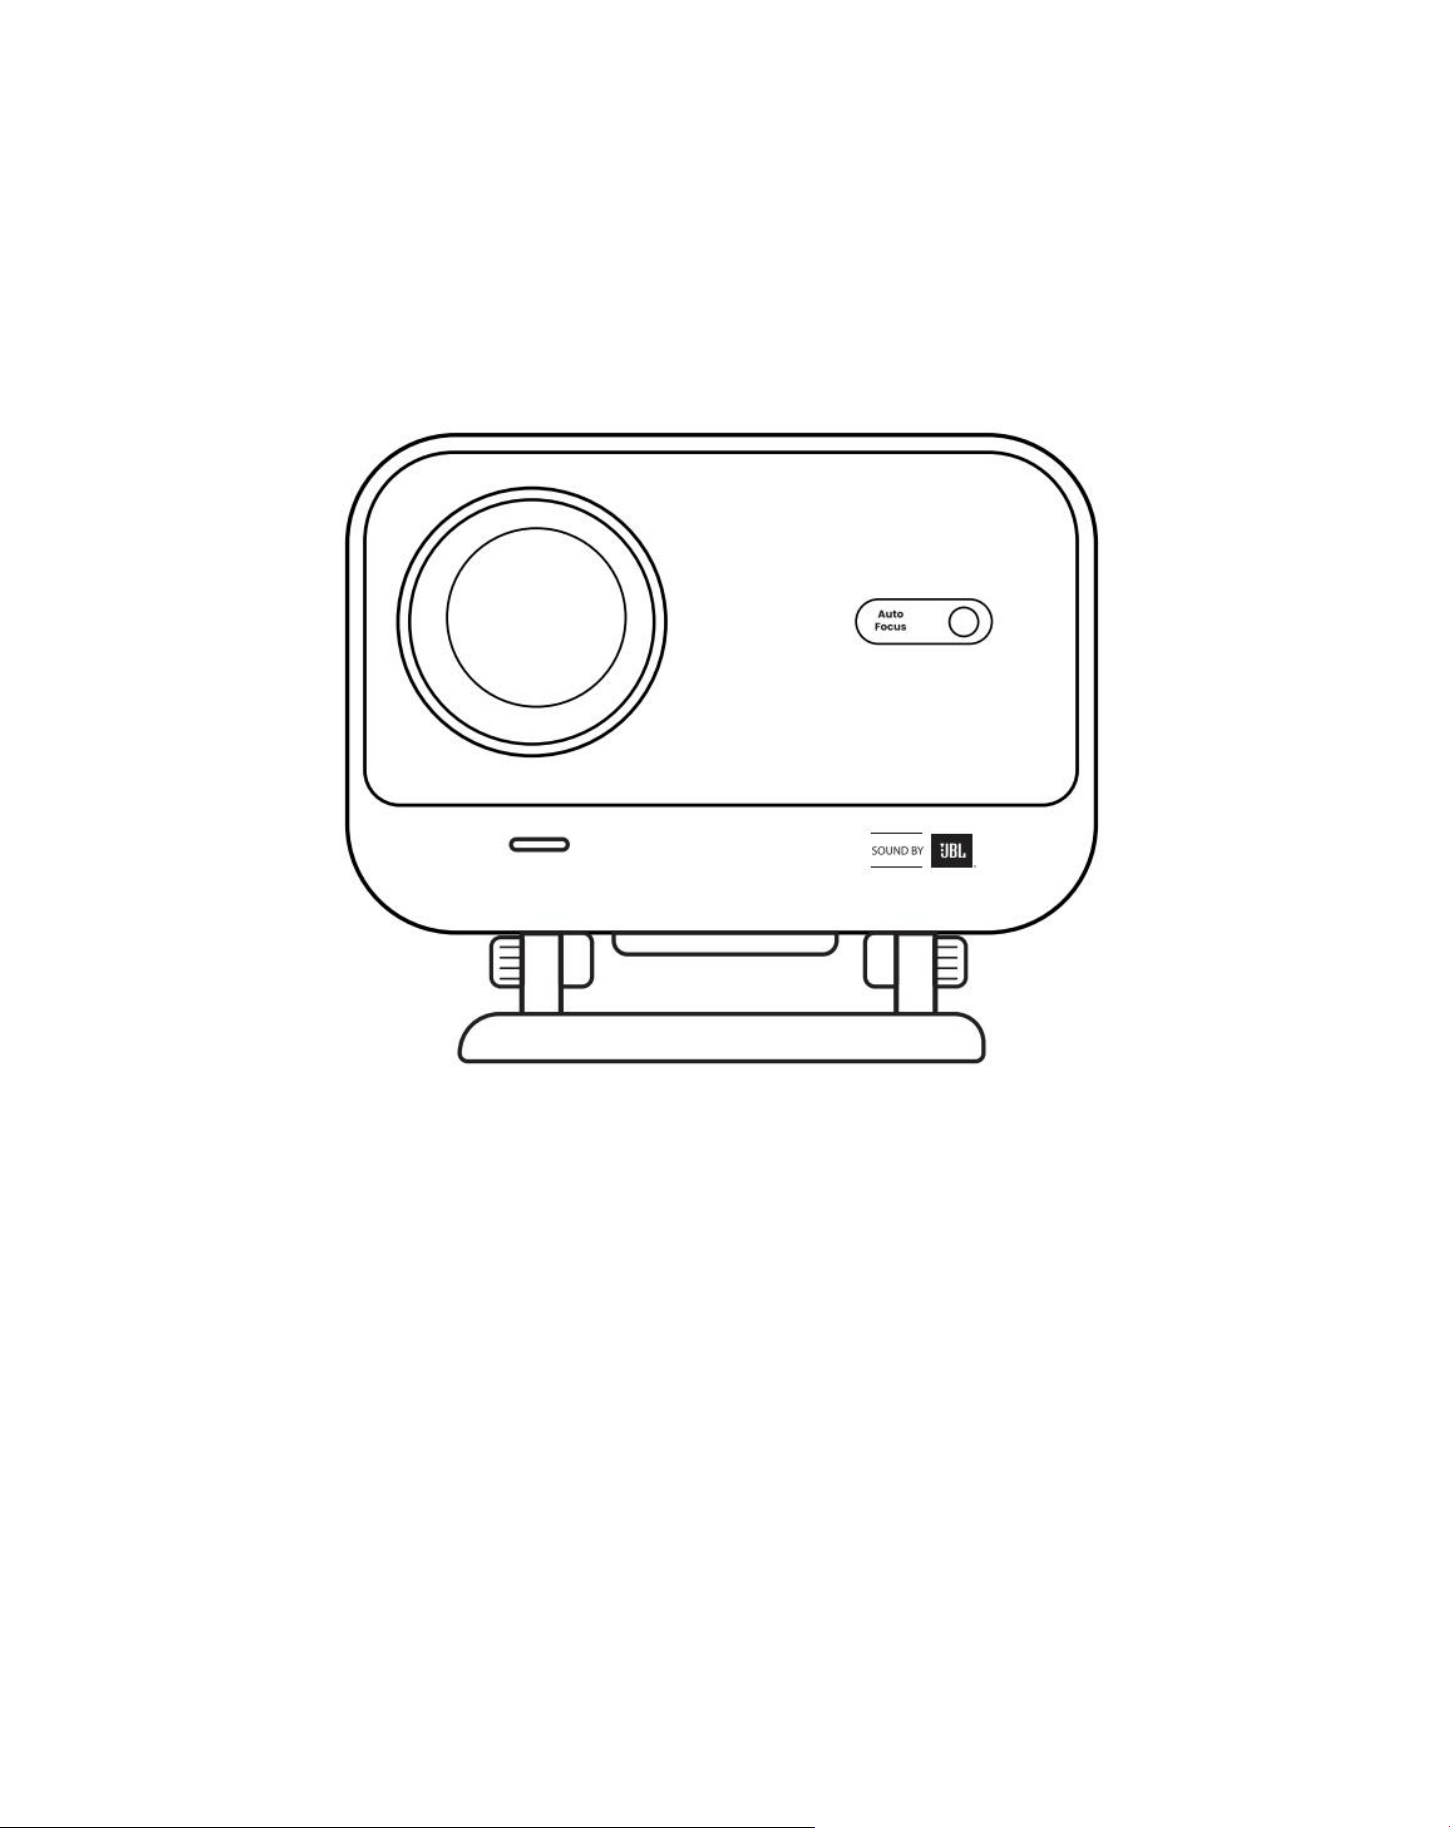
Projector L2 Plus
EN

2
Contents
English———————————————————— 1
French———————————————————— 21
German————————————————————39
Traditional Chinese———————————————57
Turkish———————————————————— 74
Indonesian—————————————————— 92

3
1 YABER Lifetime Professional Support
Dear Valued Customer,
Thank you for choosing the Yaber L2 Plus Projector. Please read the User Manual carefully before using your
L2 Plus Projector.
We understand that you may encounter various questions and issues while using the projector. However,
leaving a review on the product page may not improve your experience. (Please let us help you! We truly
appreciate your feedback and will promptly provide a satisfying solution.)
Your satisfaction is our top priority. If you encounter any problems, we sincerely hope that you will give us
the opportunity to resolve them.
We are dedicated to offering you the best possible solution. We appreciate your understanding and patience
in advance.
Yaber Projector Customer Service Team
2 WARRANTY
Thank you for your purchase and support. We offer a 3-year warranty for Yaber L2 Plus Projector.
If you have any questions, please feel free to contact us.
✉ support@yaber.com
3
Important Precautions
For safe and optimal use of the device, please follow these guidelines:
●
Do not face the lens towards eyes because the strong projector light may cause injury to the eyes.
●
Do not block the air inlet or outlet of the device to prevent overheating, which could damage internal
components.
● Do not wipe the lens directly with cleaning tools such as paper or cloth. Instead, remove dust from the
lens using clean air blowing.
● Do not wash the device with chemicals, detergents, or any liquid as they may corrode the circuit board.
● Keep the device and its components and accessories out of reach of children.
● Make sure that the device is used in a dry, well-ventilated environment.
●
Do not store the device in excessively hot or cold places, as this can reduce the lifespan of electronic
components. Use and store it within a temperature range of 0°C-40°C.
● Do not put the device into any heating equipment (e.g., dryer or microwave) for drying.
4
● Do not press down firmly on the device or place objects on top or behind it to avoid damage to the
device.
● Do not throw, drop, or strongly shake the device to protect its internal circuit board.
●
Make sure to clean the dust filter every six months to a year to keep the machine running cool.
4
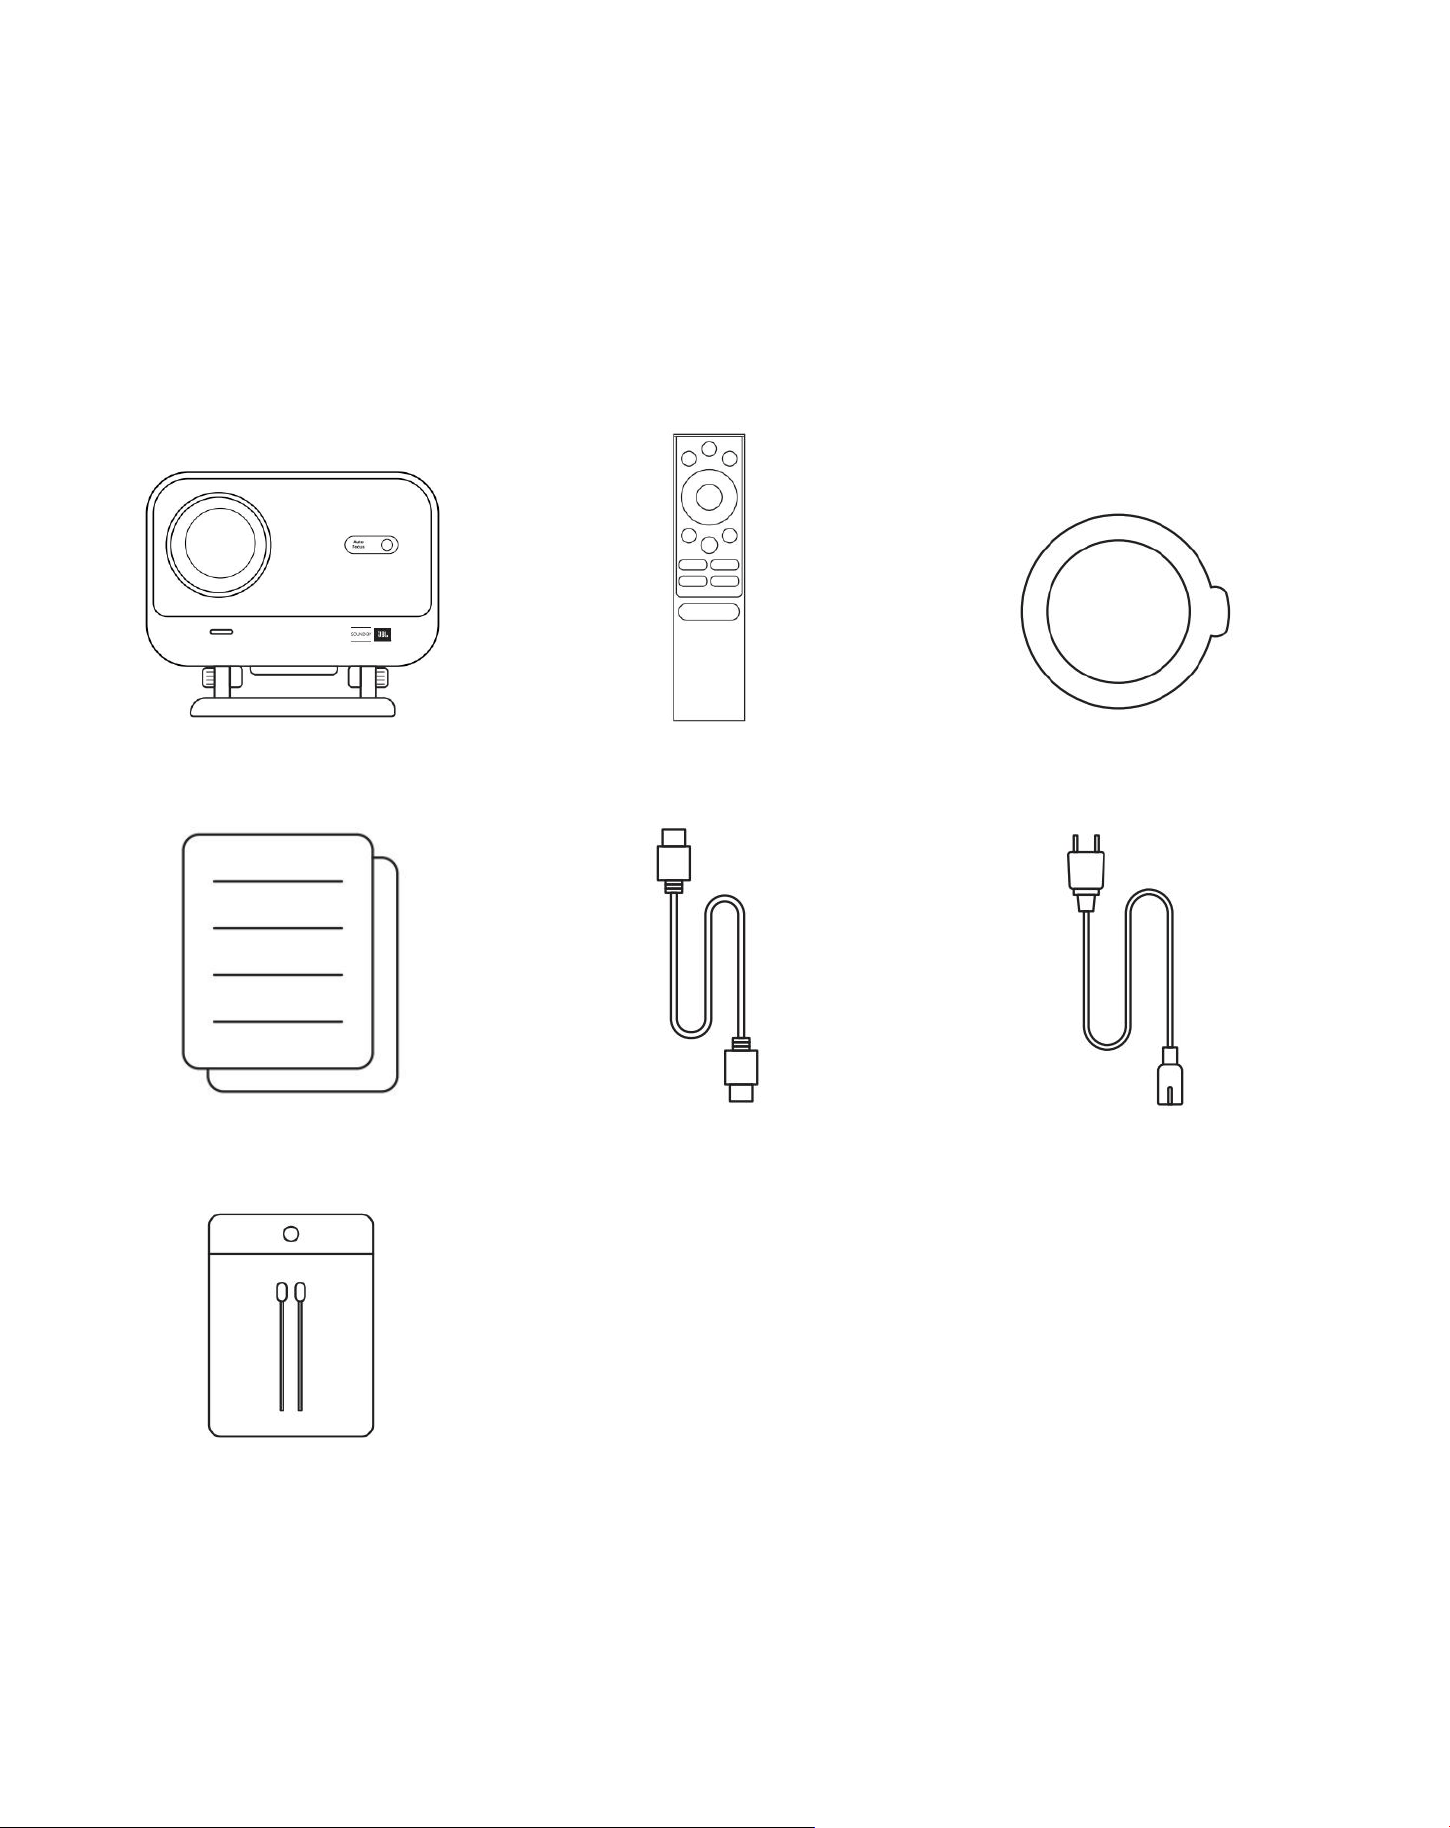
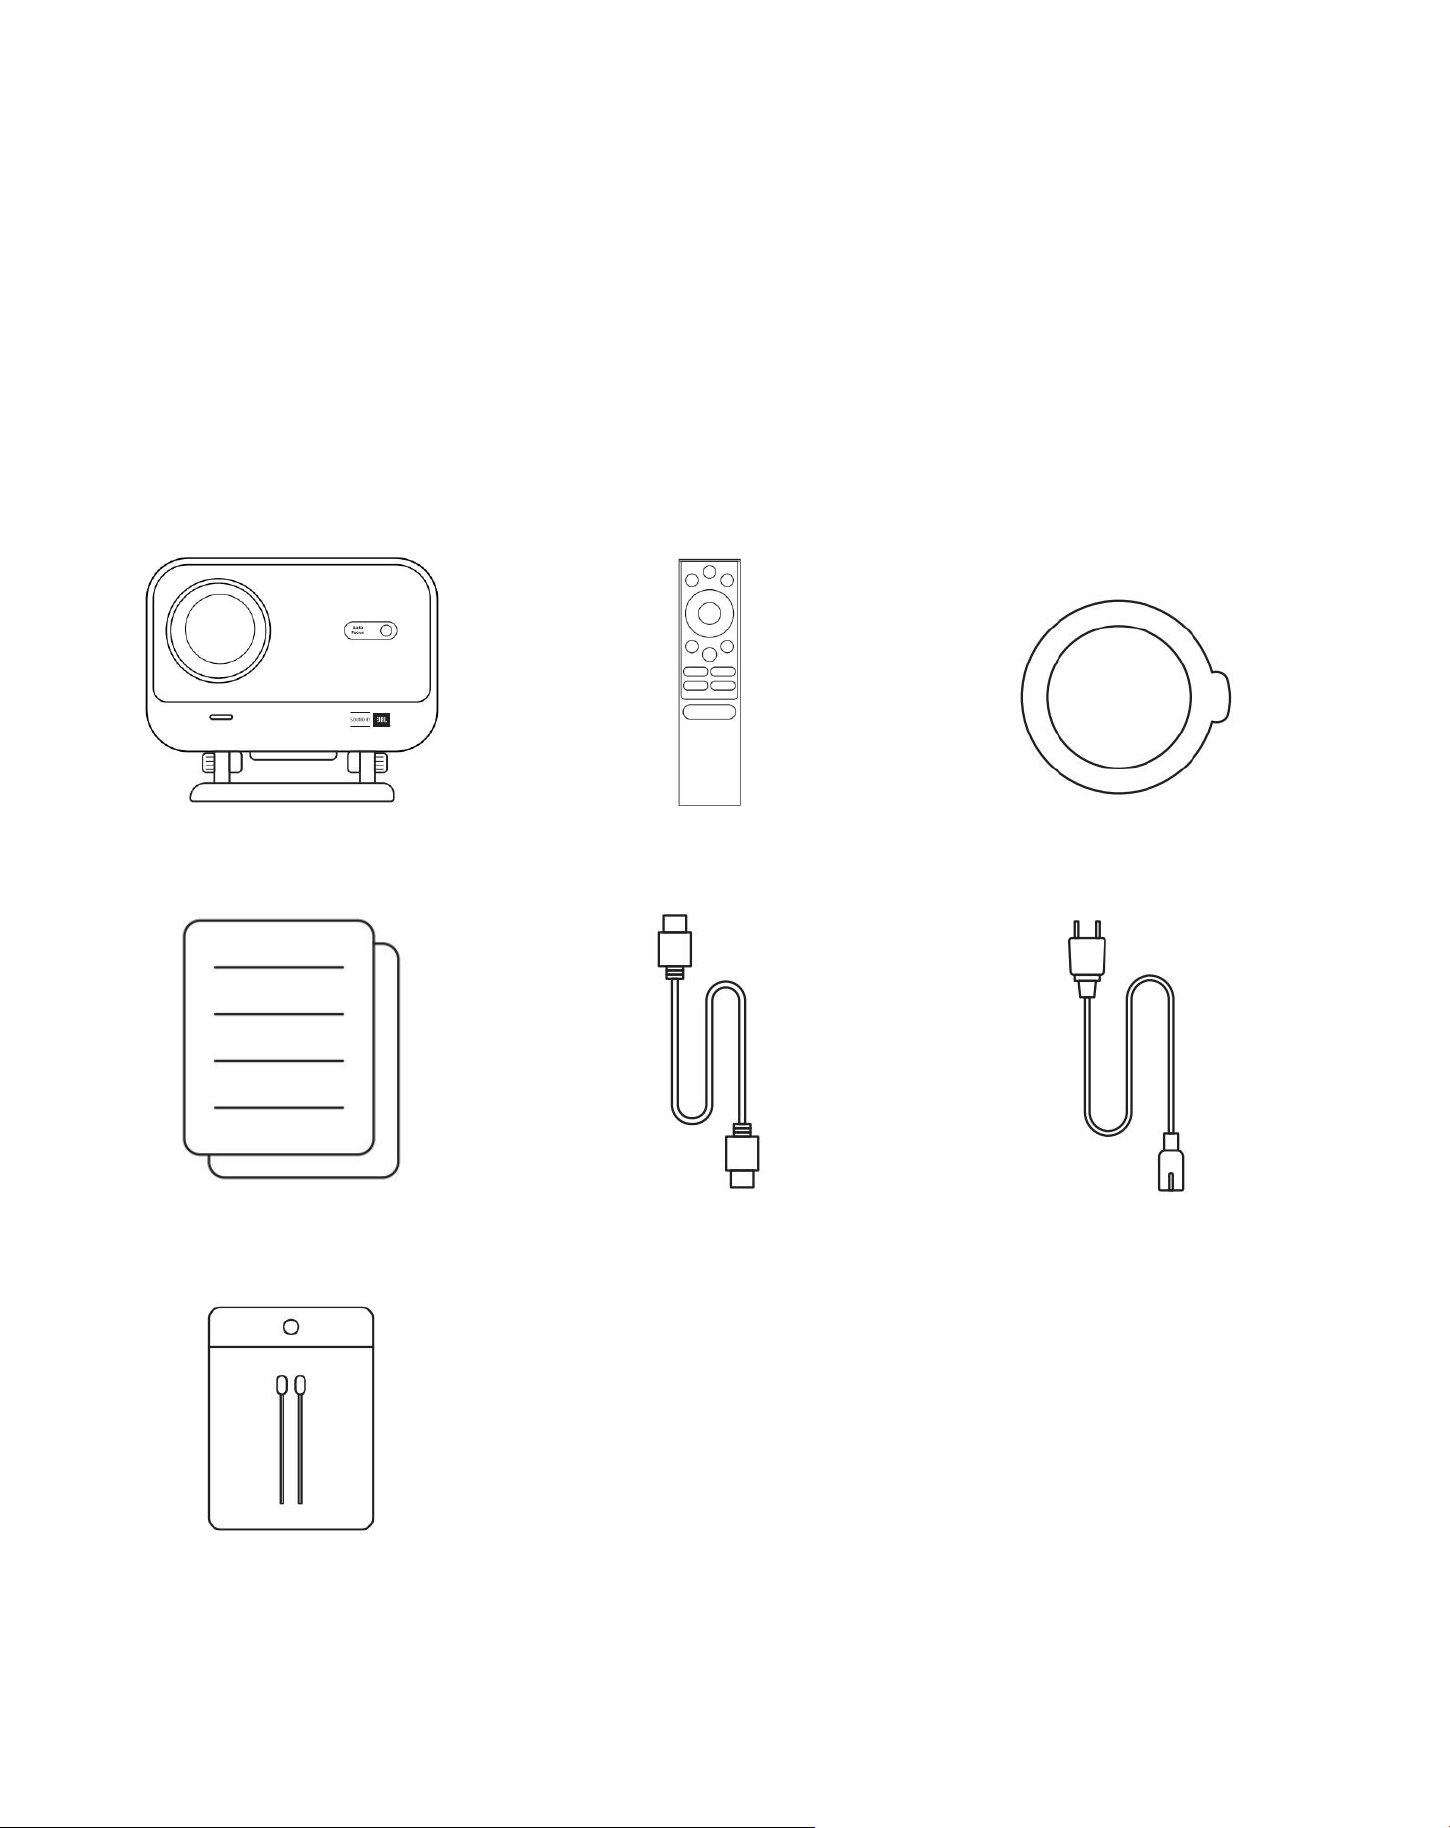
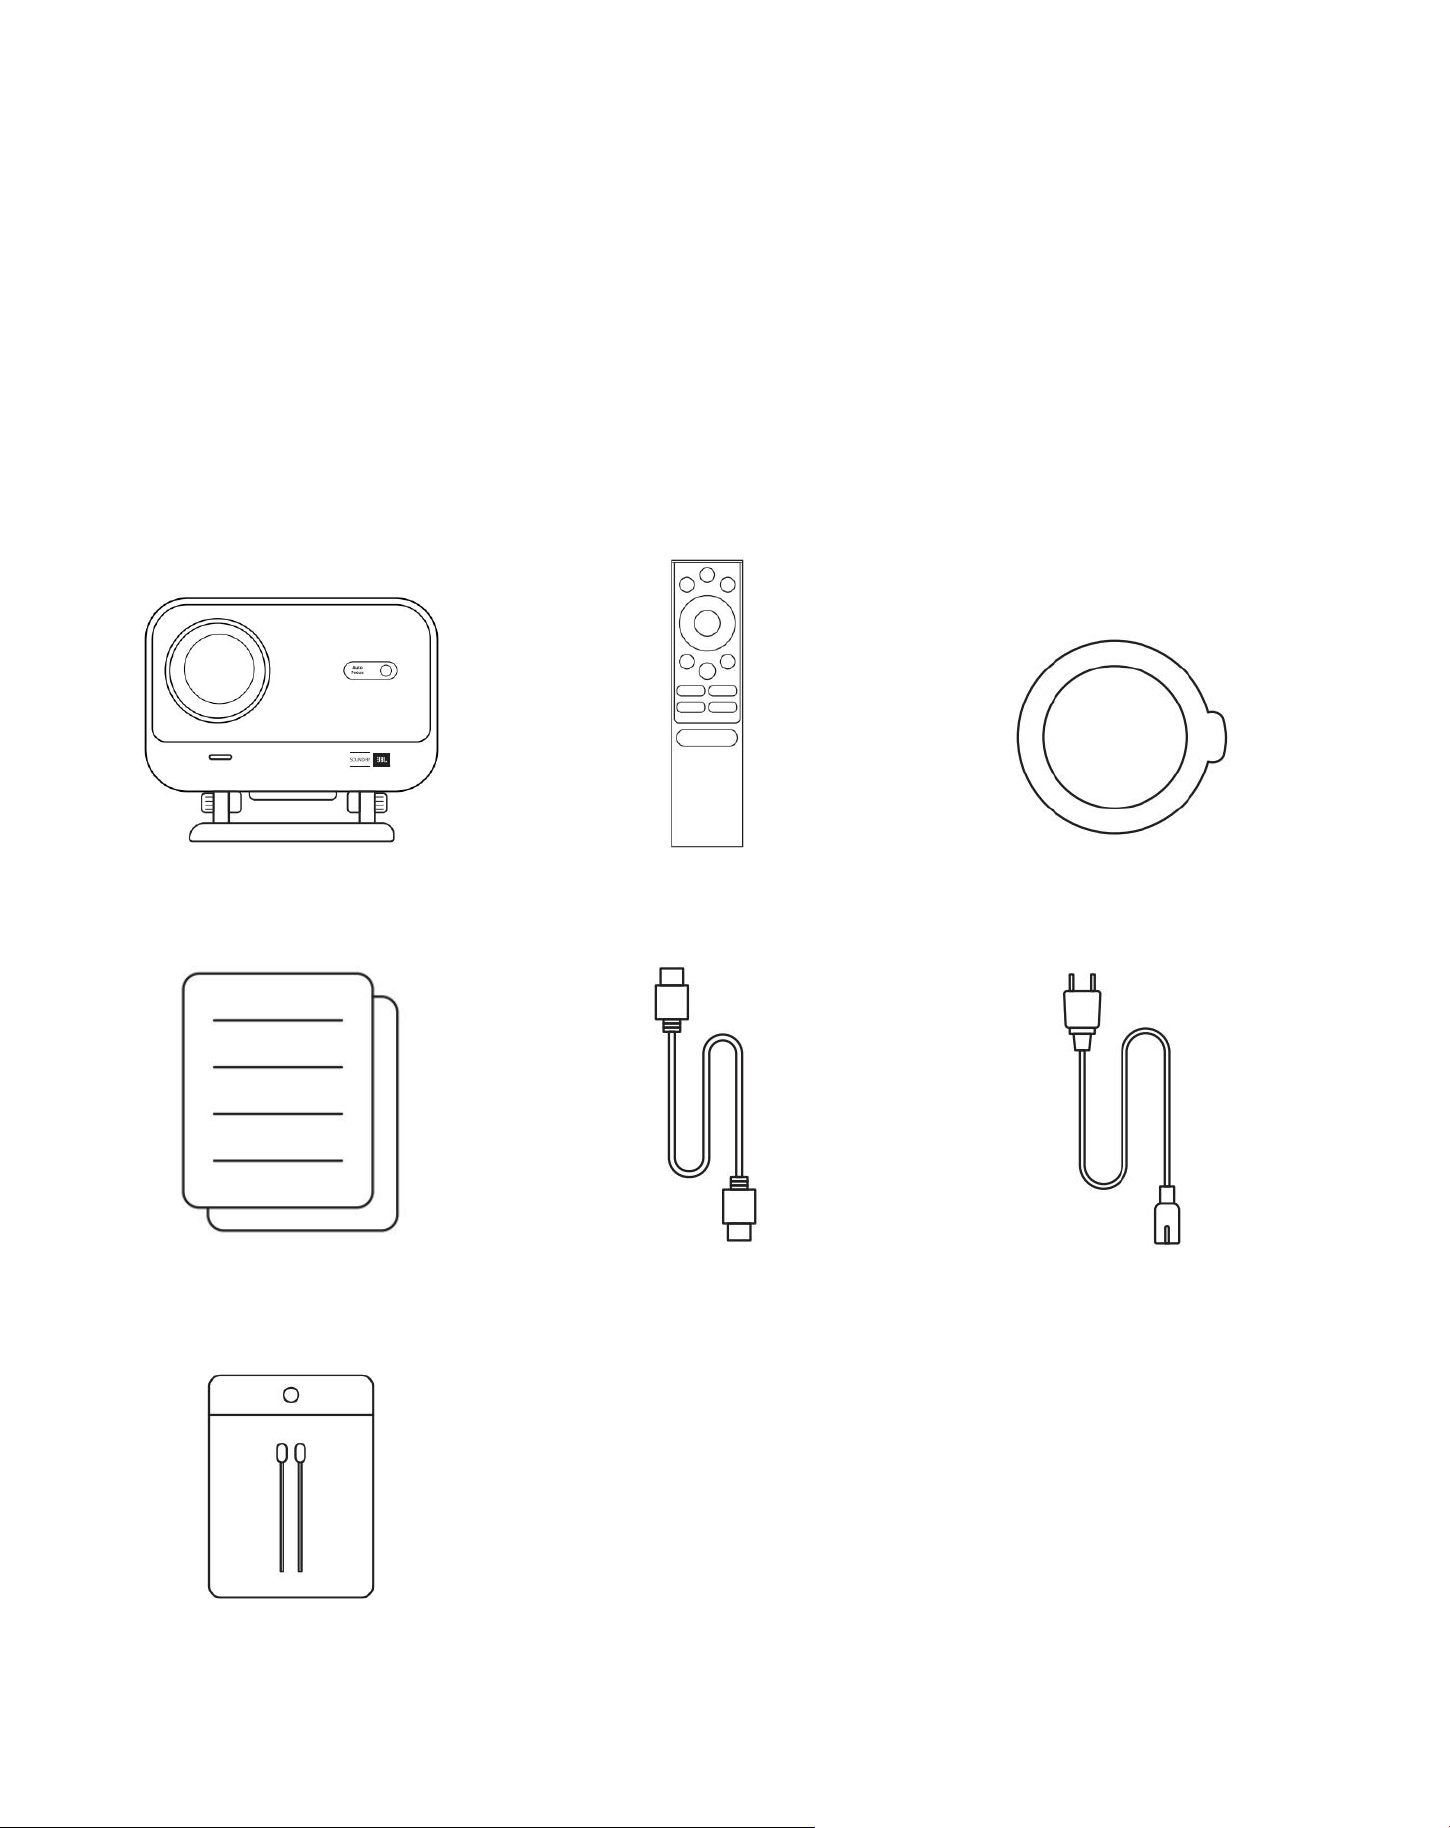
What's Included
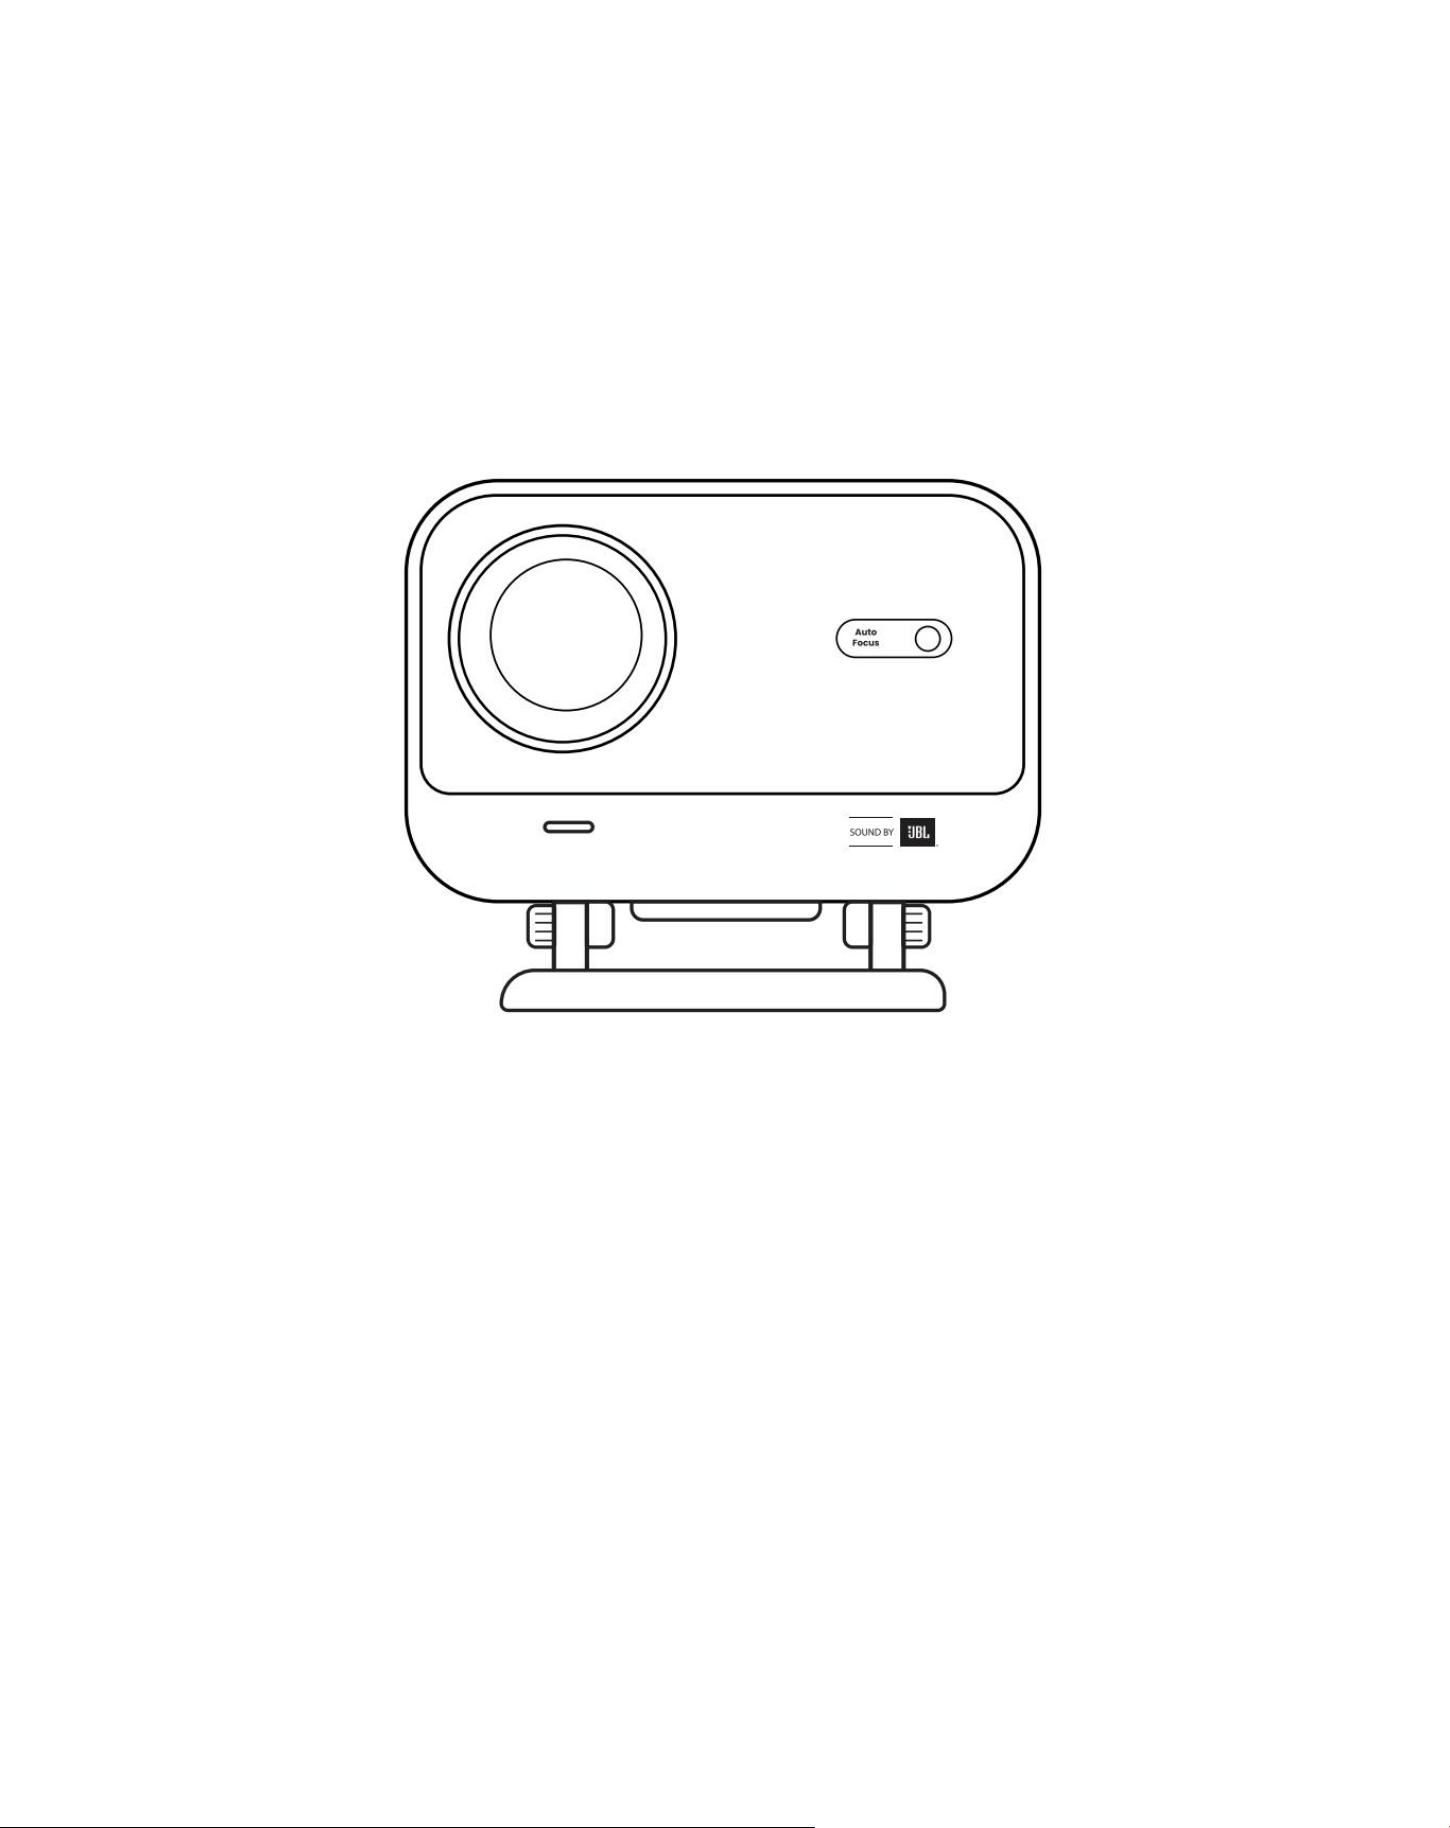
L2 Plus Projector
Remote Control
Lens Cover
QSG
HDMI Cable
Power Cord
Cleaning Kits

5
5 Specification
Model No. L2 Plus
Native Resolution
1920*1080
Light Source
LED
Focus
Auto/Eletric
Keystone Correction
Auto / Manual
Interface
USB×1
HDMI×1
Audio Out×1
Unit Dimension
22.7
×
20.4
×
18.4 cm
8.9
×
8
×
7.2 inches
Projection Ratio
1.38:1
Projection Distance
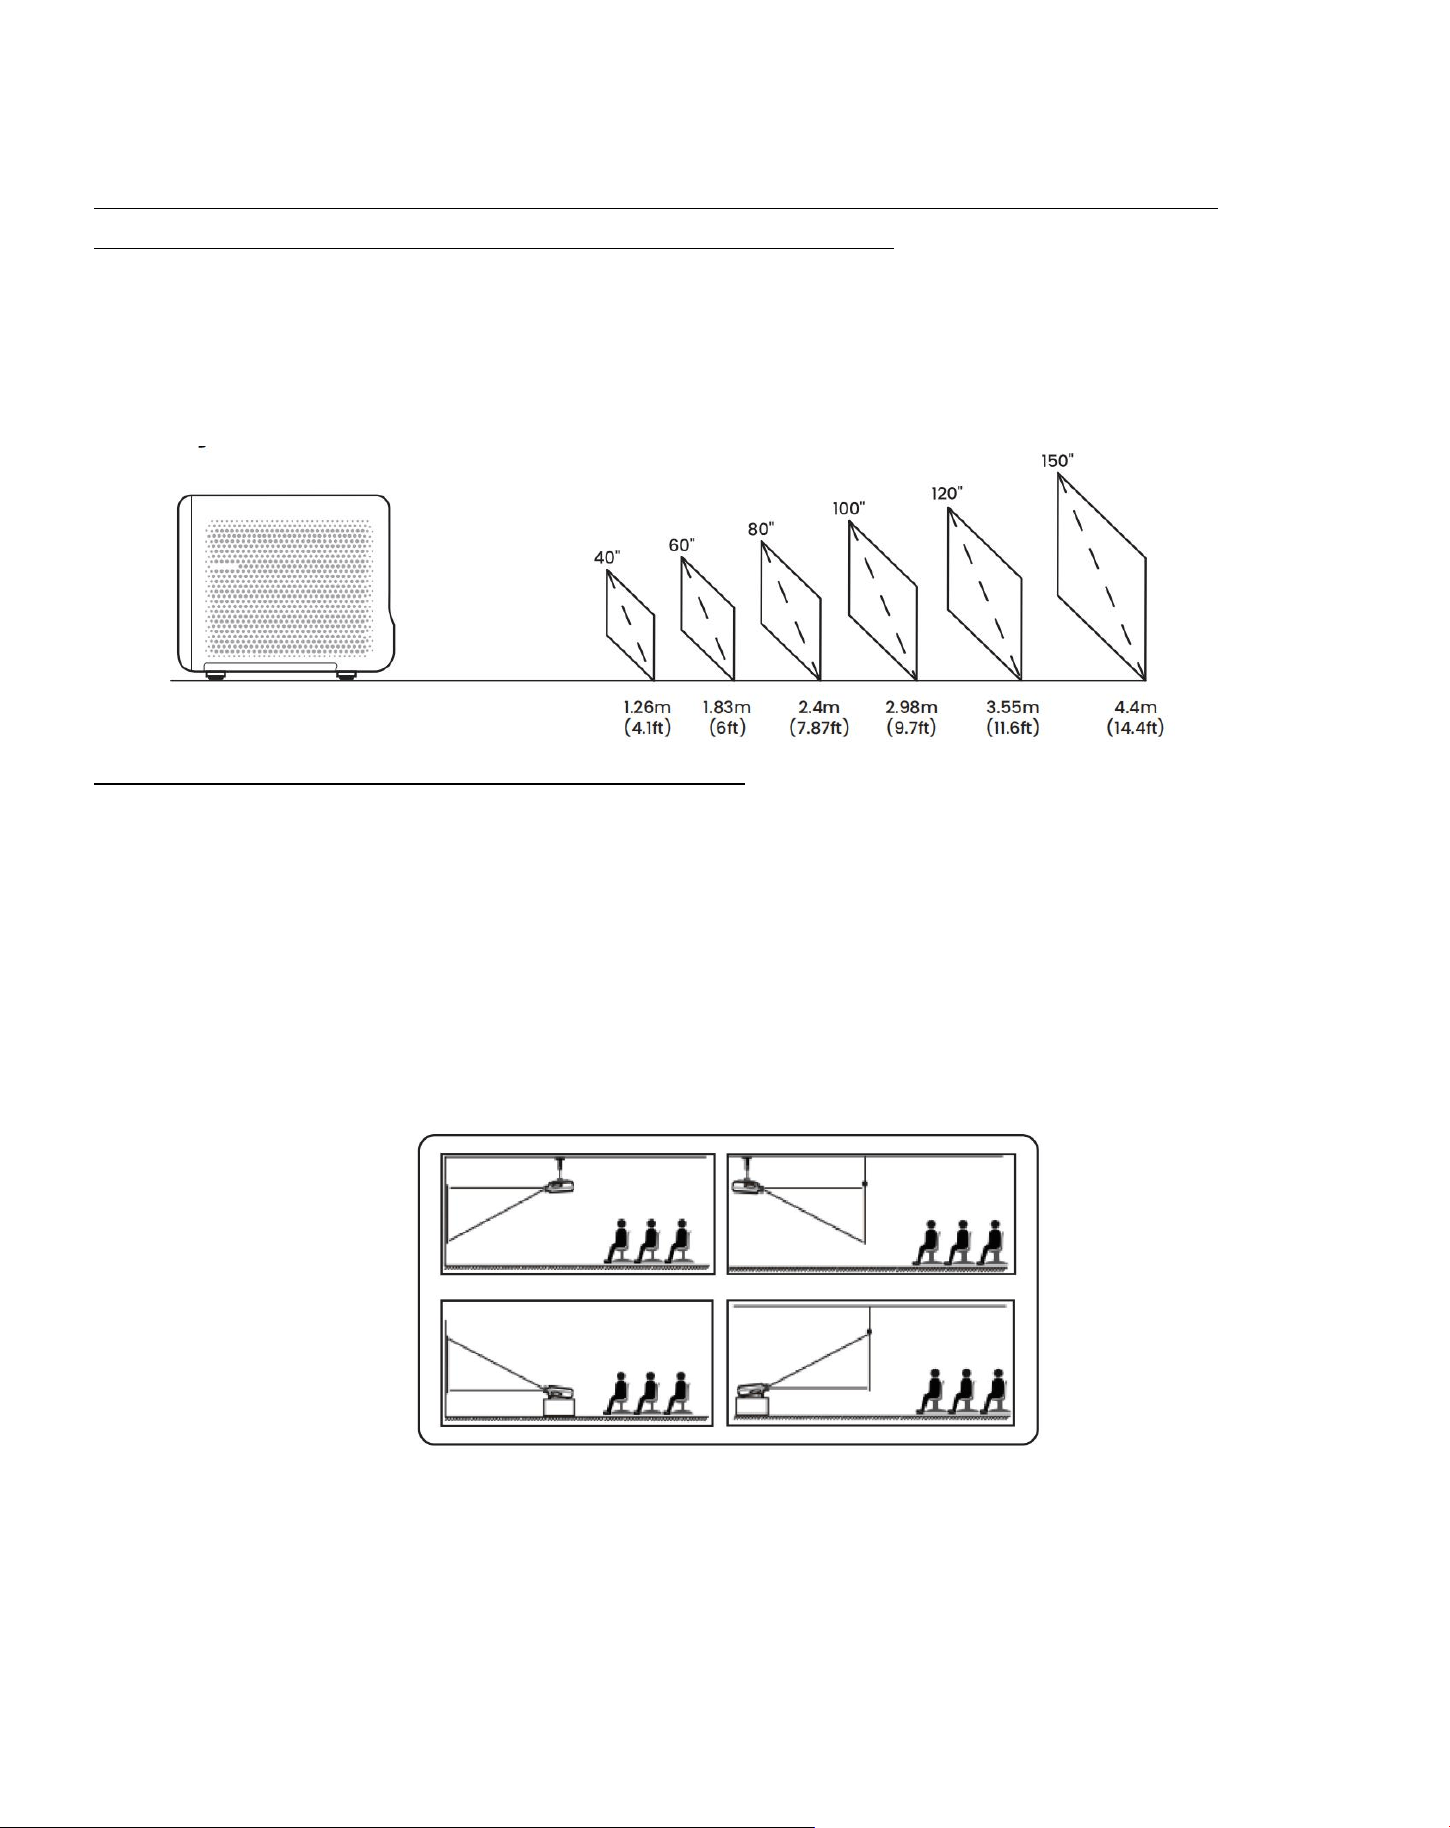
Min 1.26m ~ Max 4.4m
Min 40 ~ Max 150 inches
Power Voltage
AC 100-240V / 50-60Hz
Power Consumption
110W
Projector Weight
2.44 kg
5.38 lbs
Projection Method
Front/Rear on Desk
Front/Rear on Celling
Aspect Ratio
16:9
Projection Zoom
50% - 100%
Picture Format
JPG, PNG, BMP, JPEG
Audio Format
MP3, WAV, ASF, 3GP, MP4, MPEG
Video Format
MKV, MP4, 3GP, MPEG, ASF, WMV, WebM,
USB Format
FAT 32, NTFS, exFAT
6
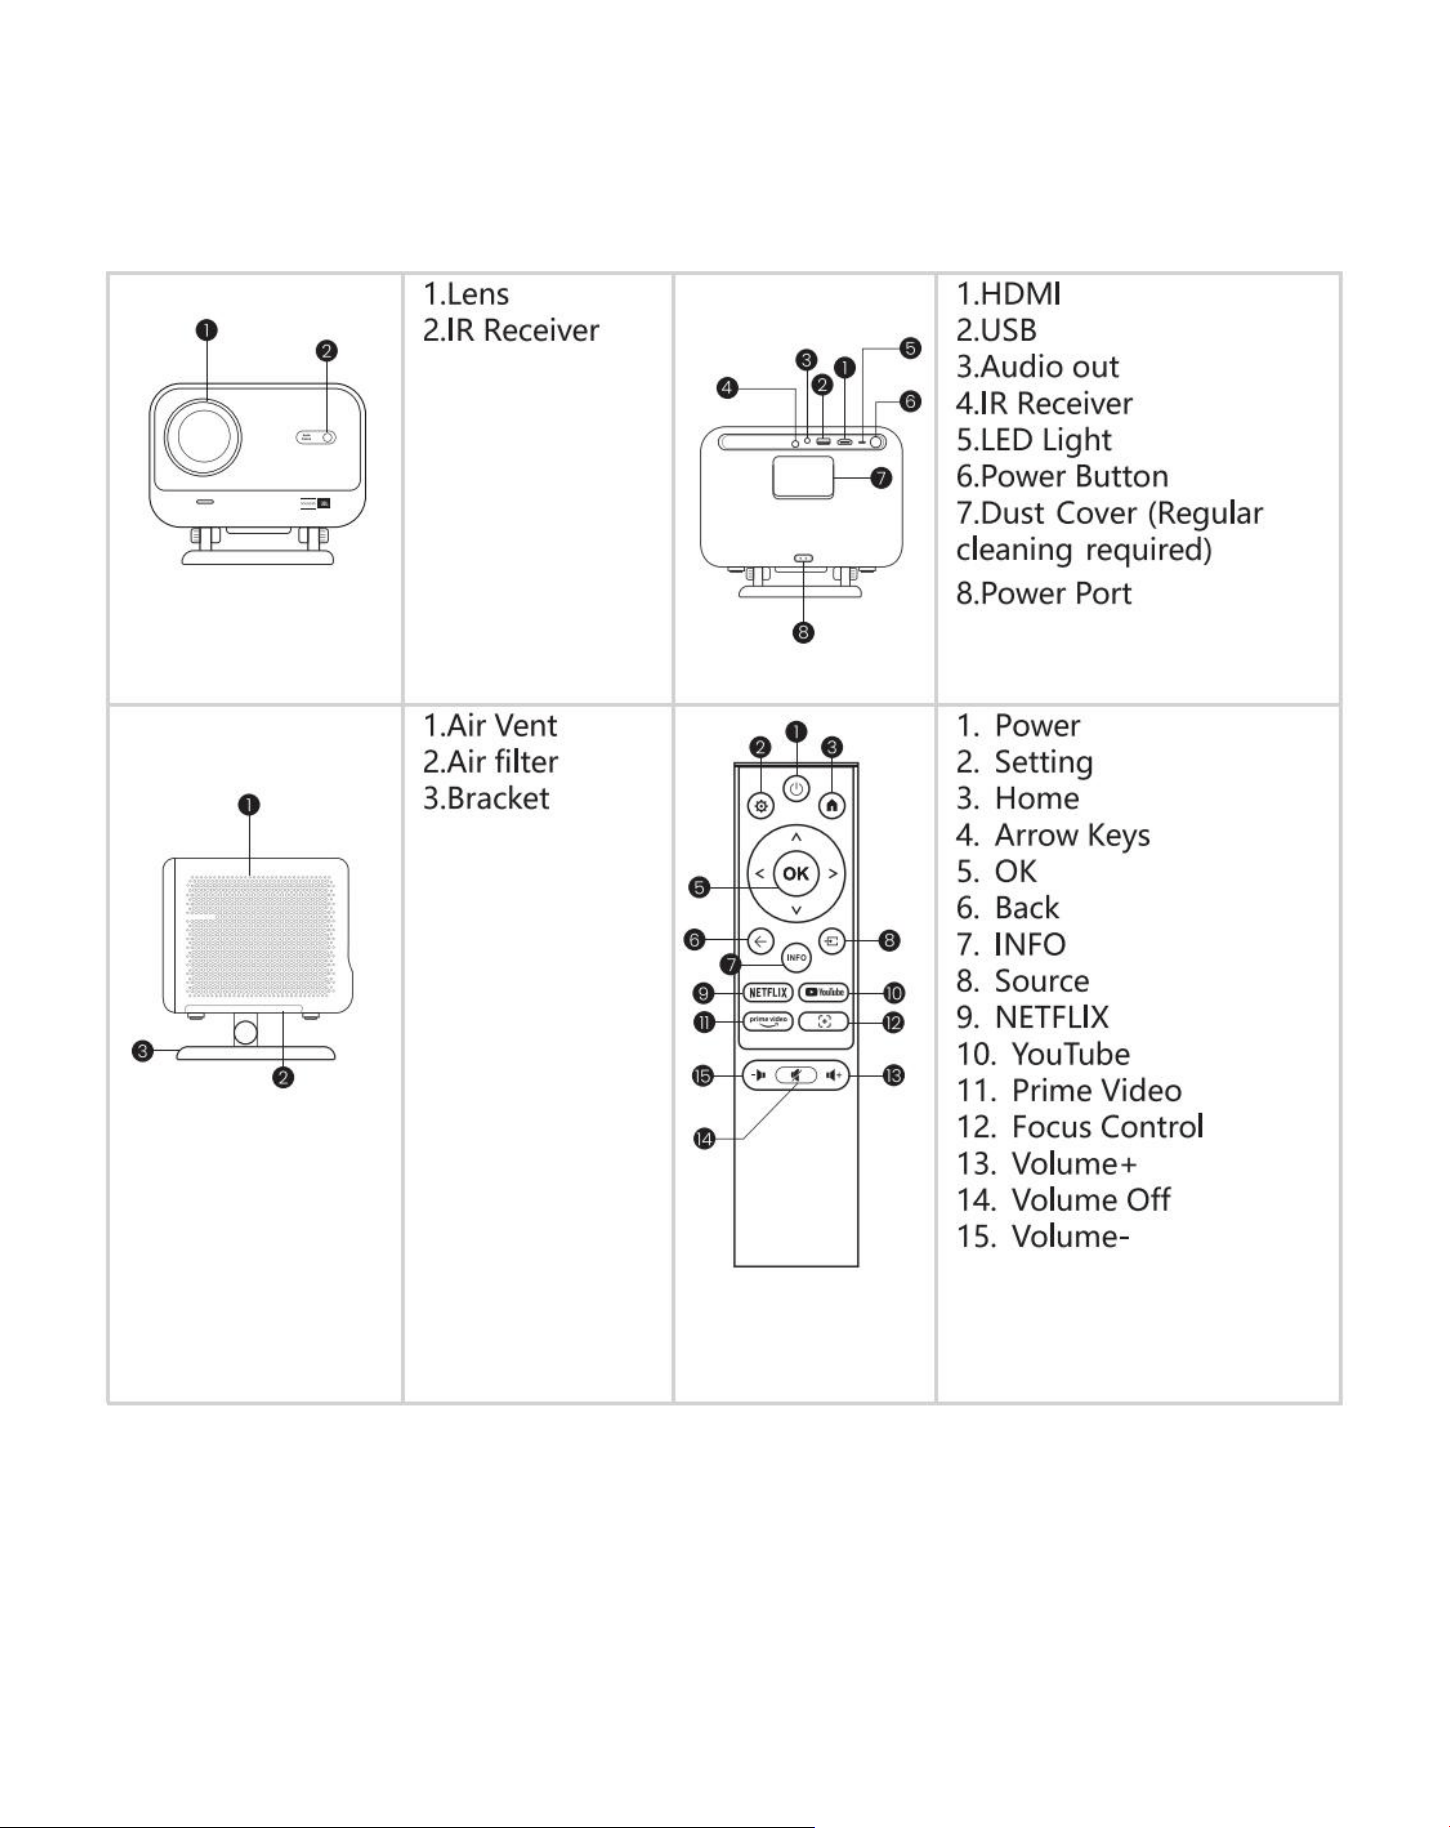
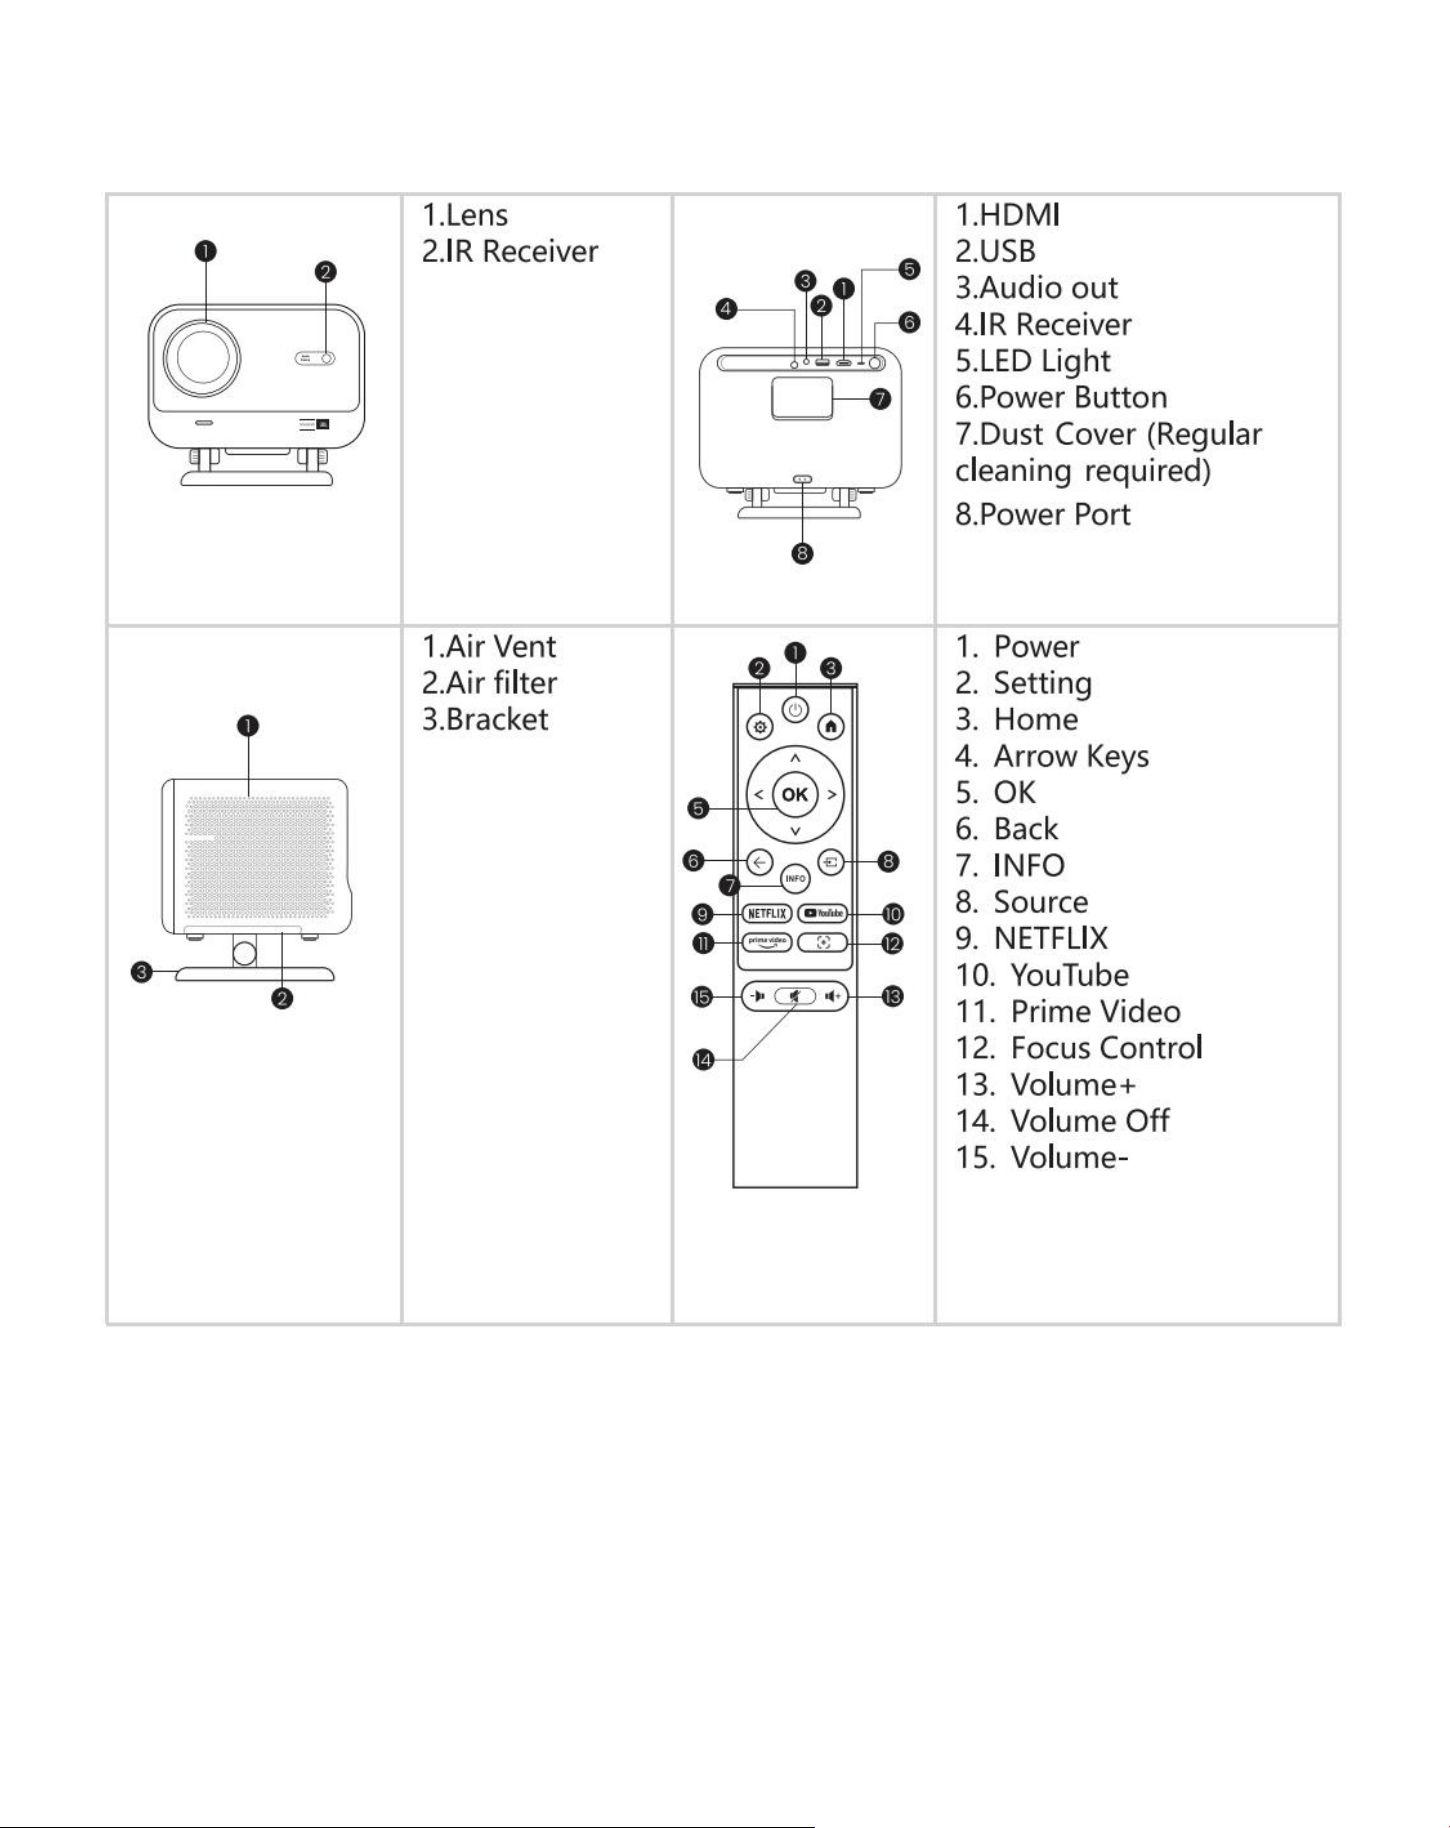
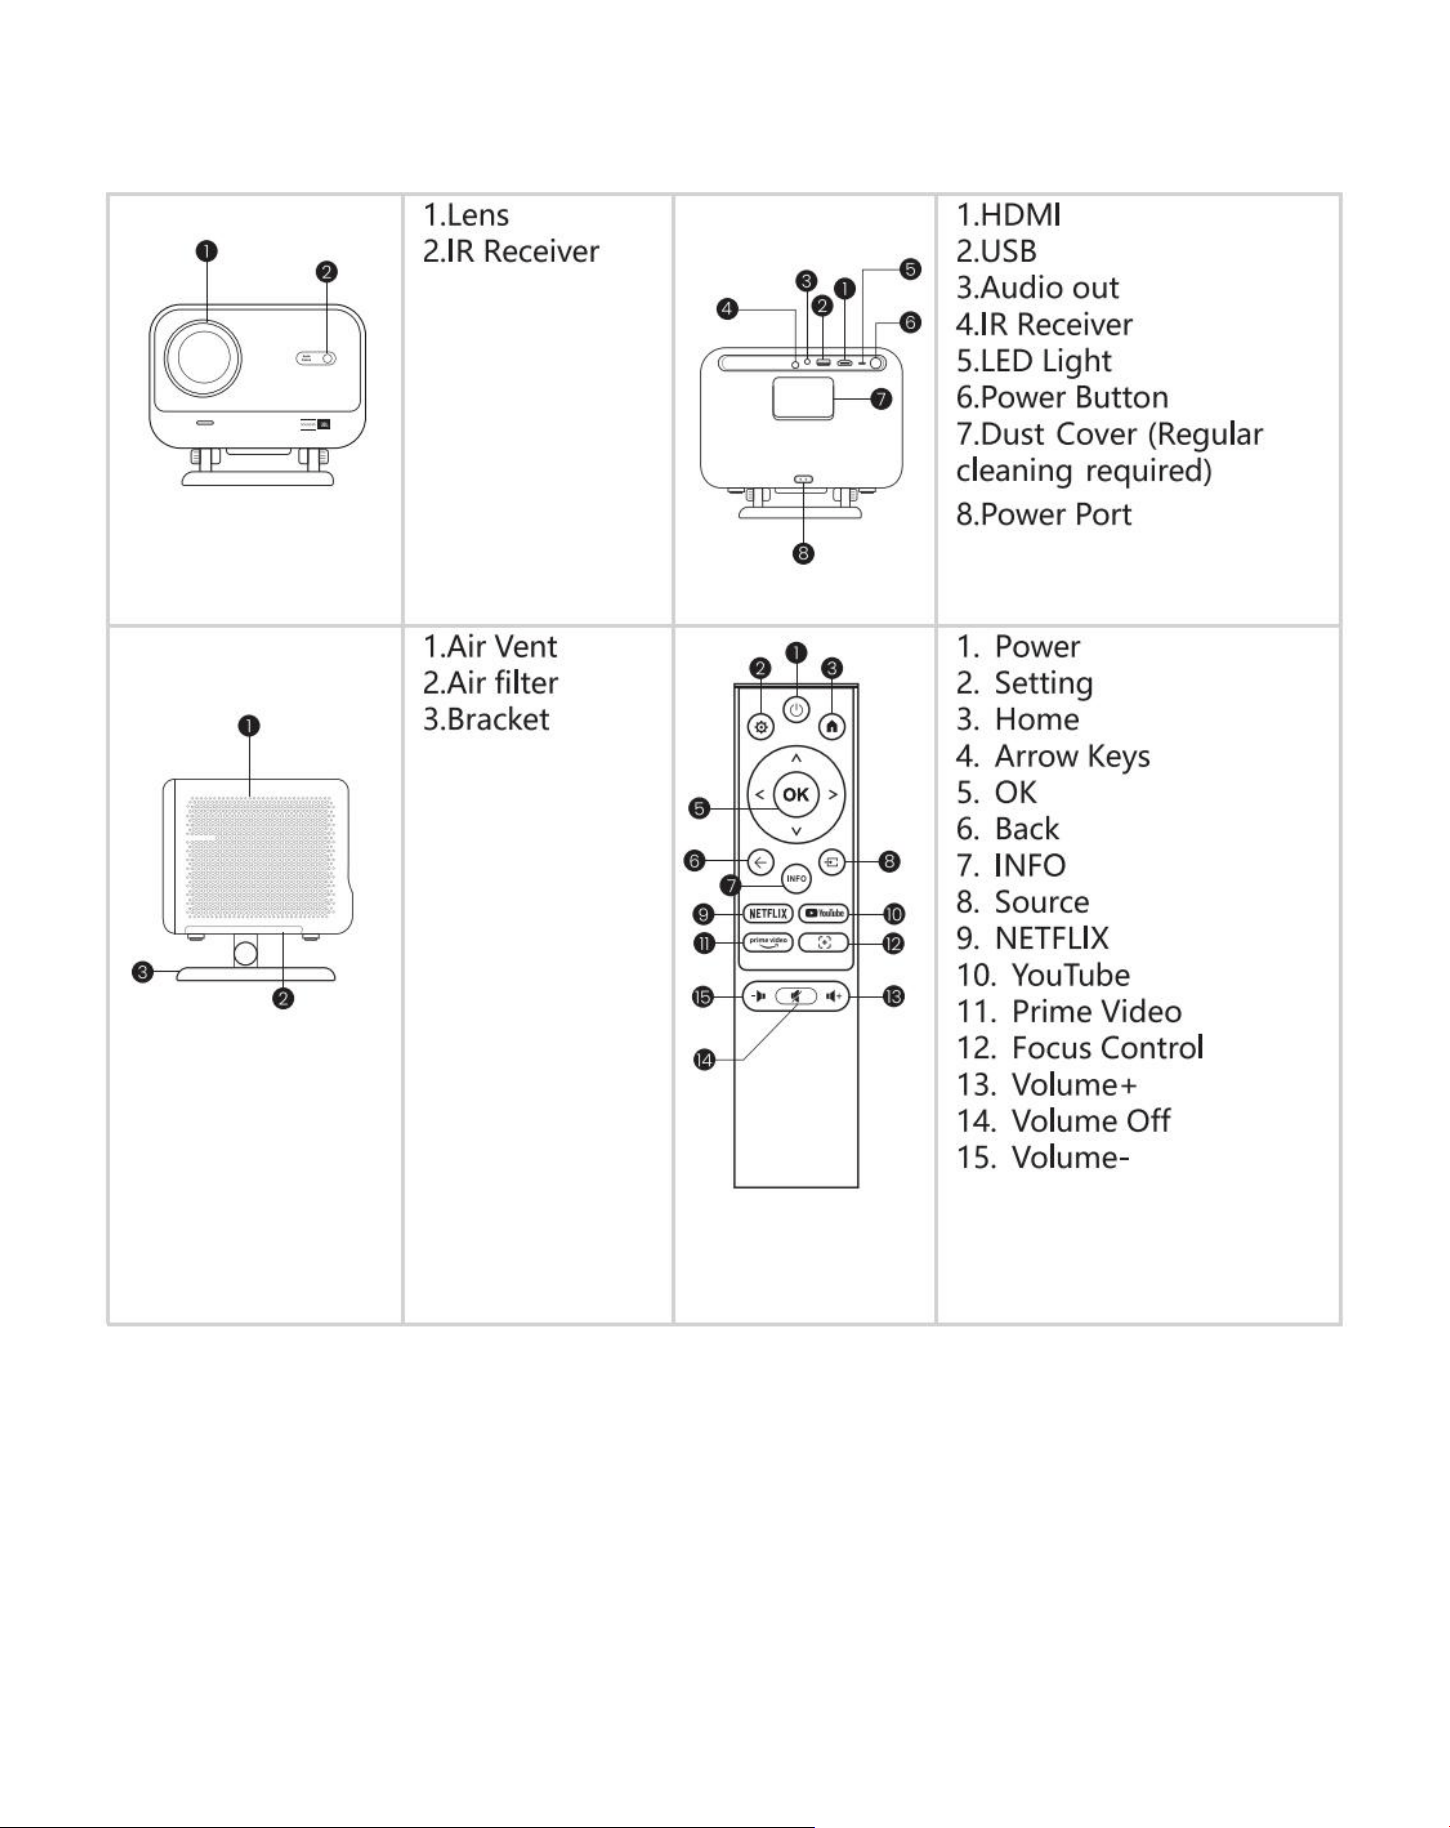
6 Product Overview
7
7 Installation
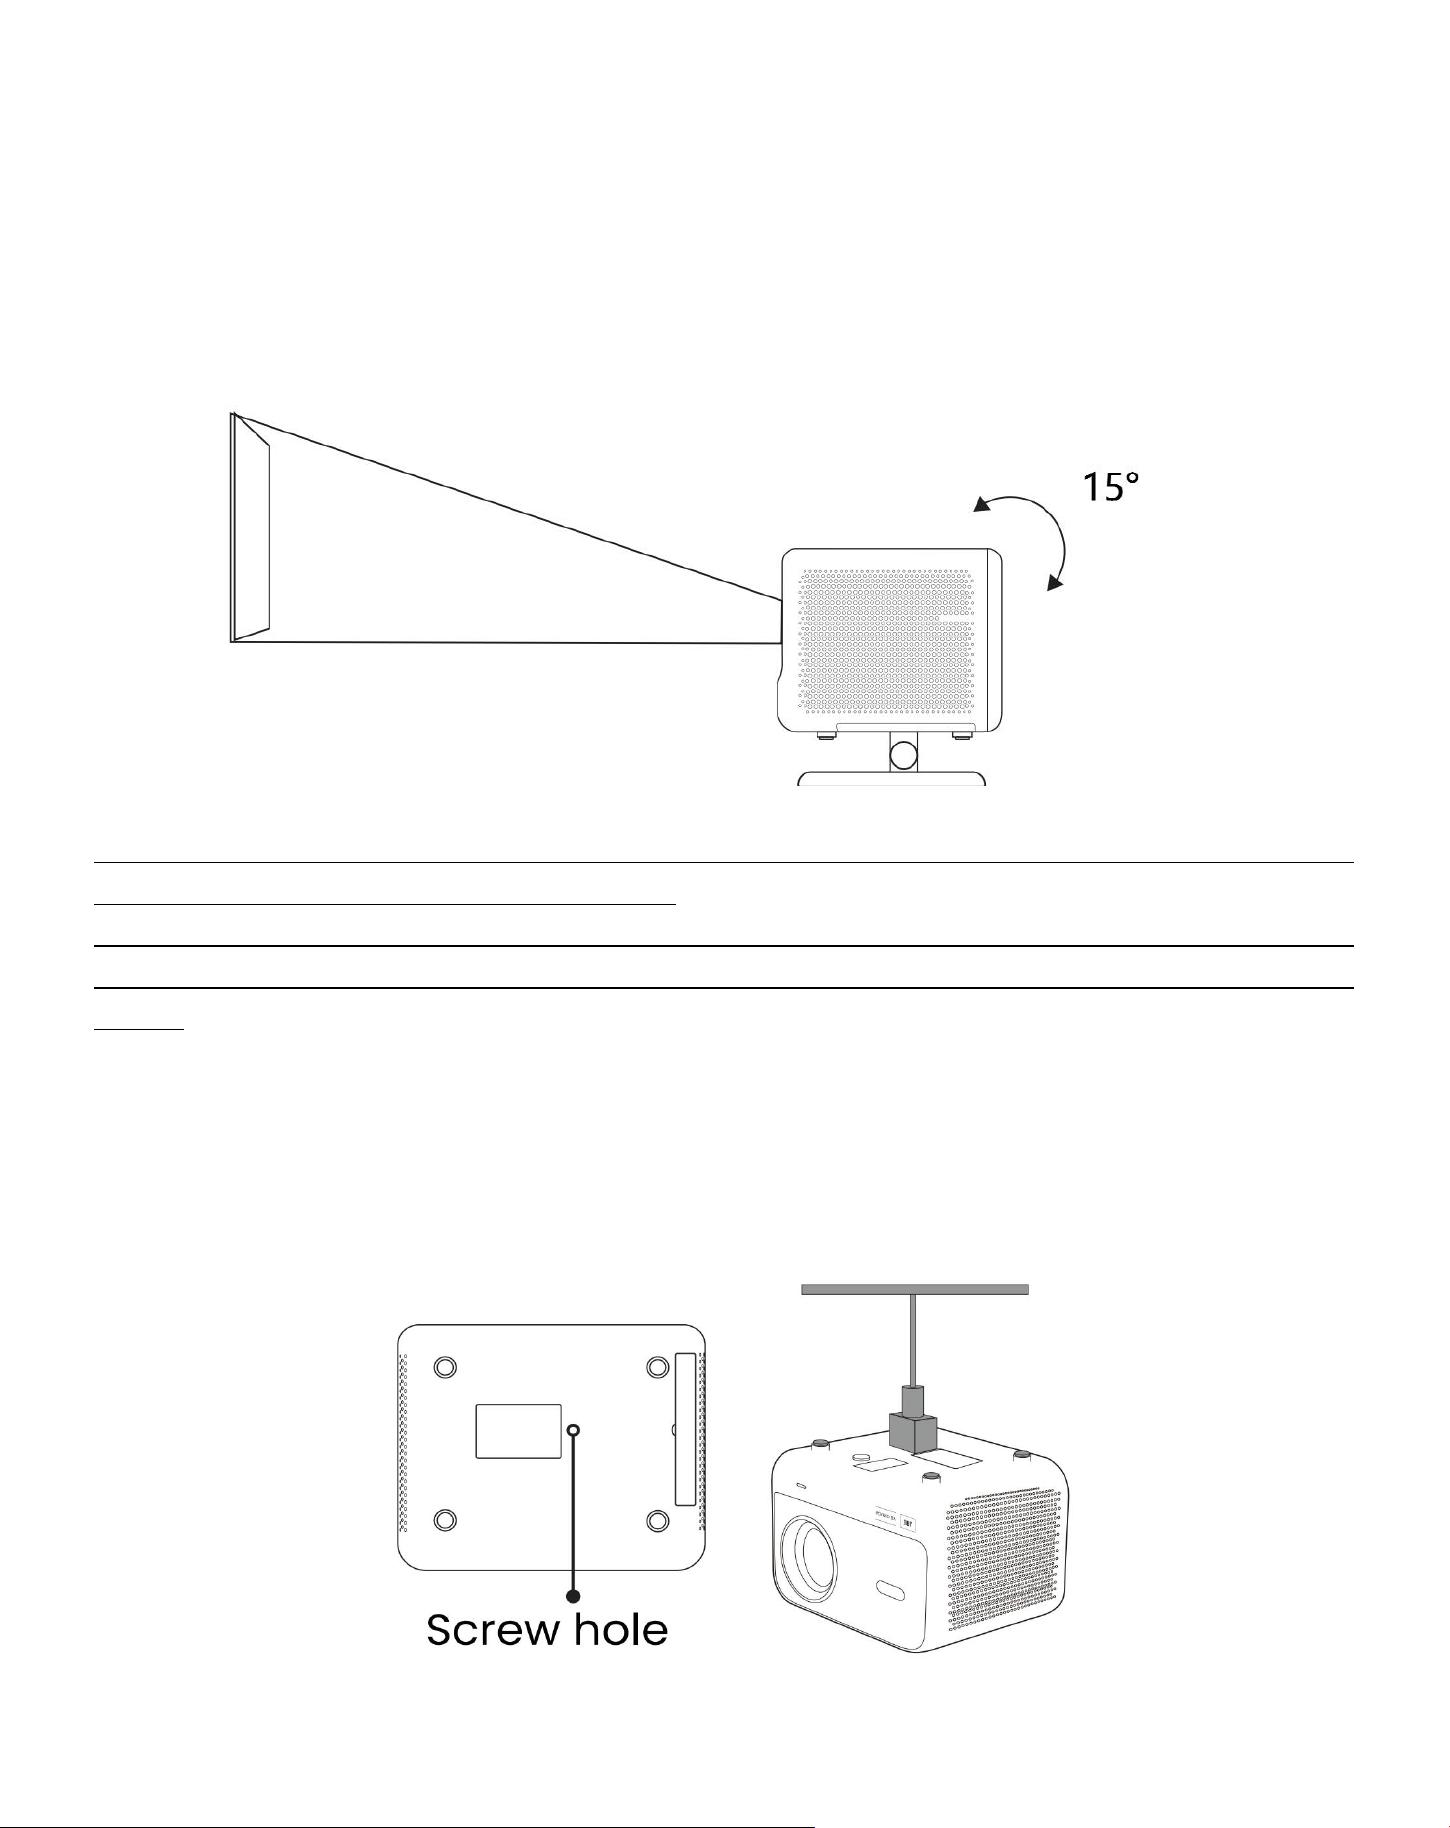
7.1 Desktop projection
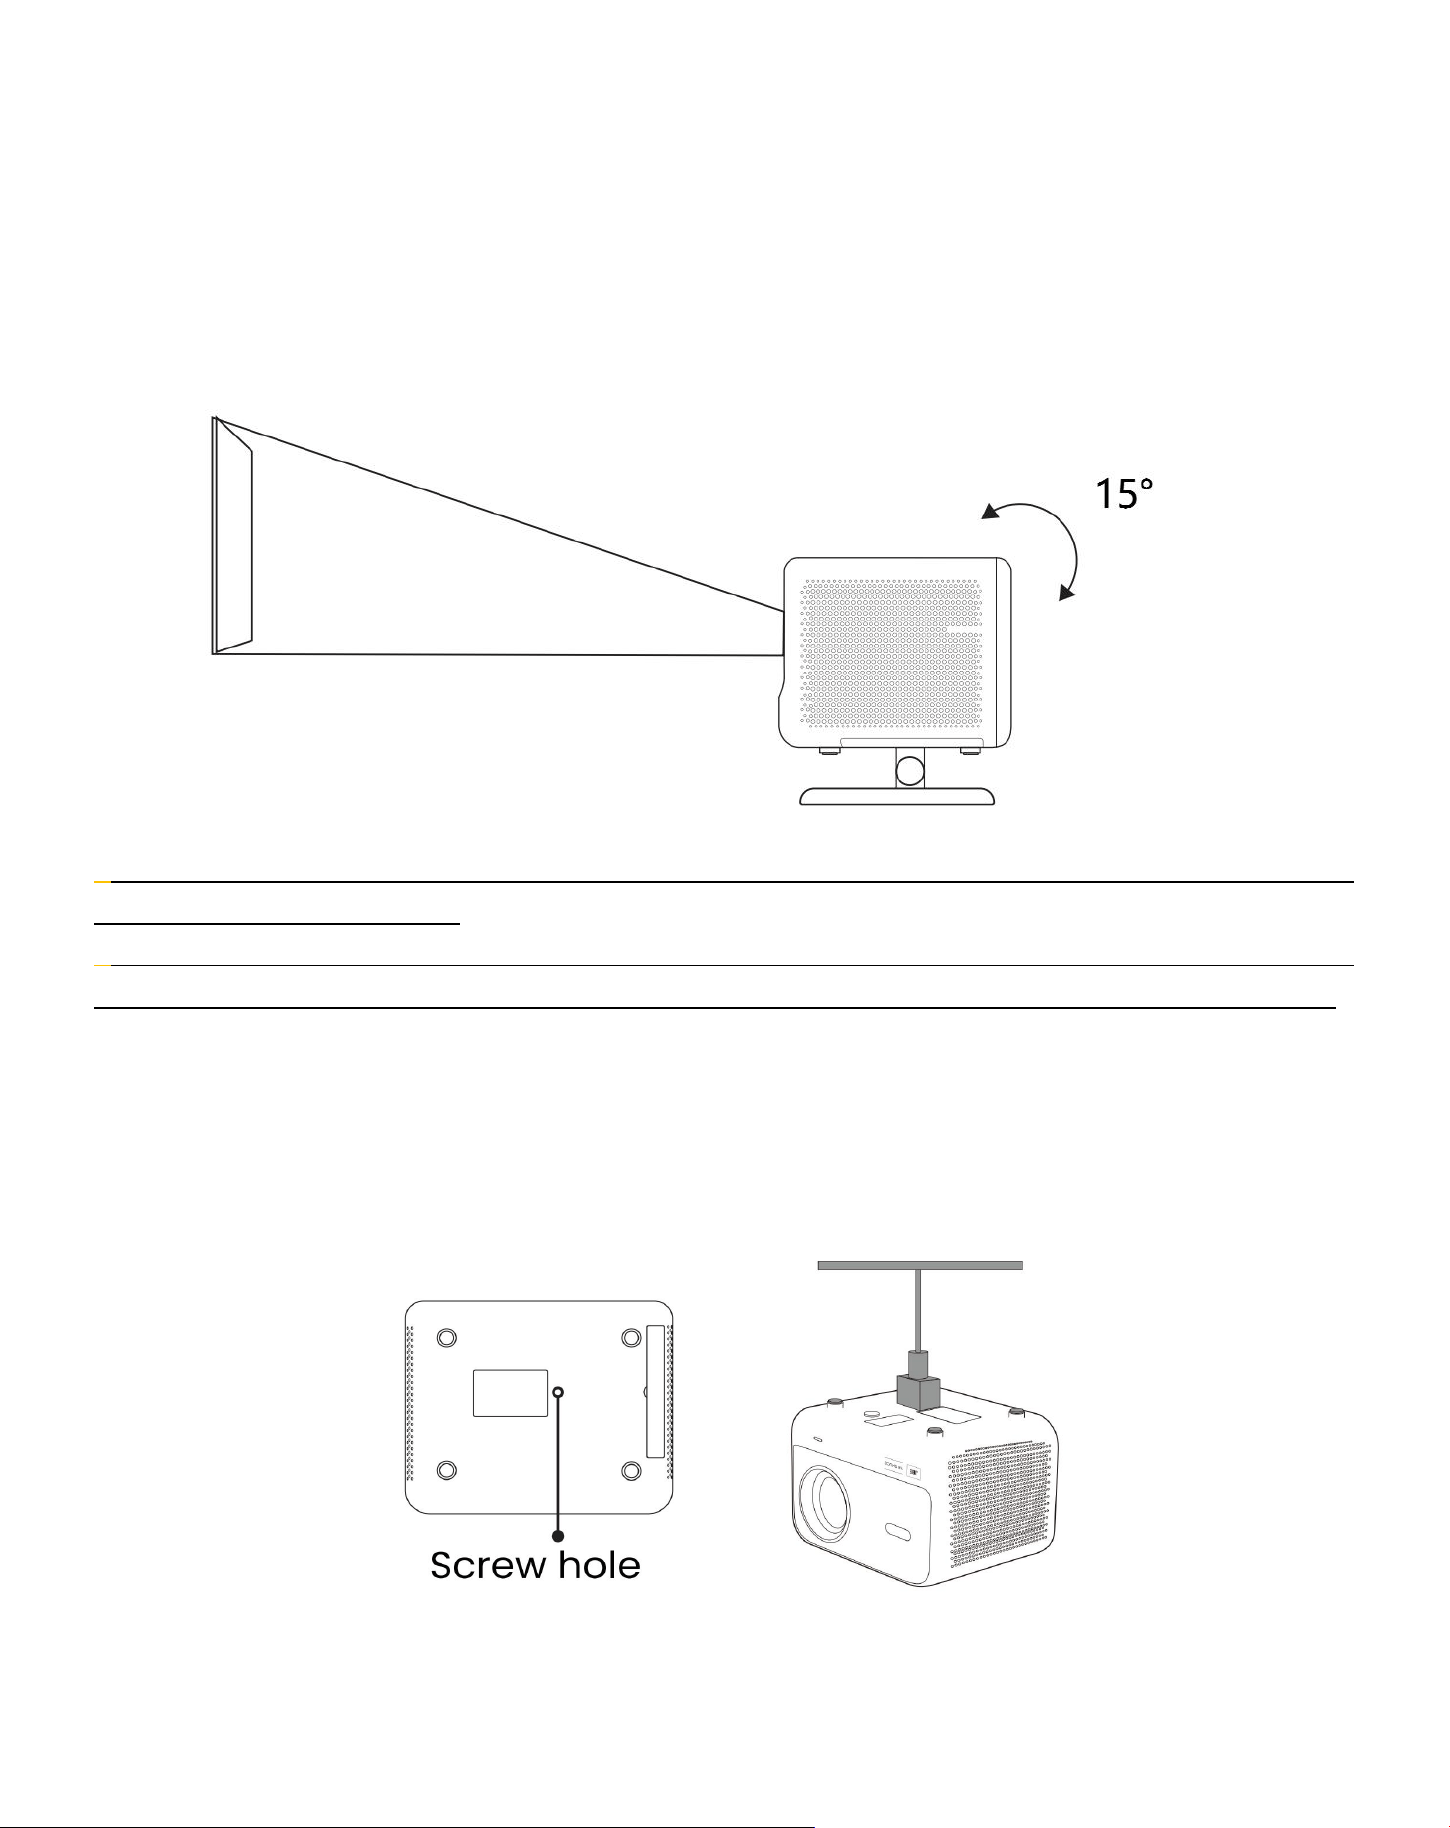
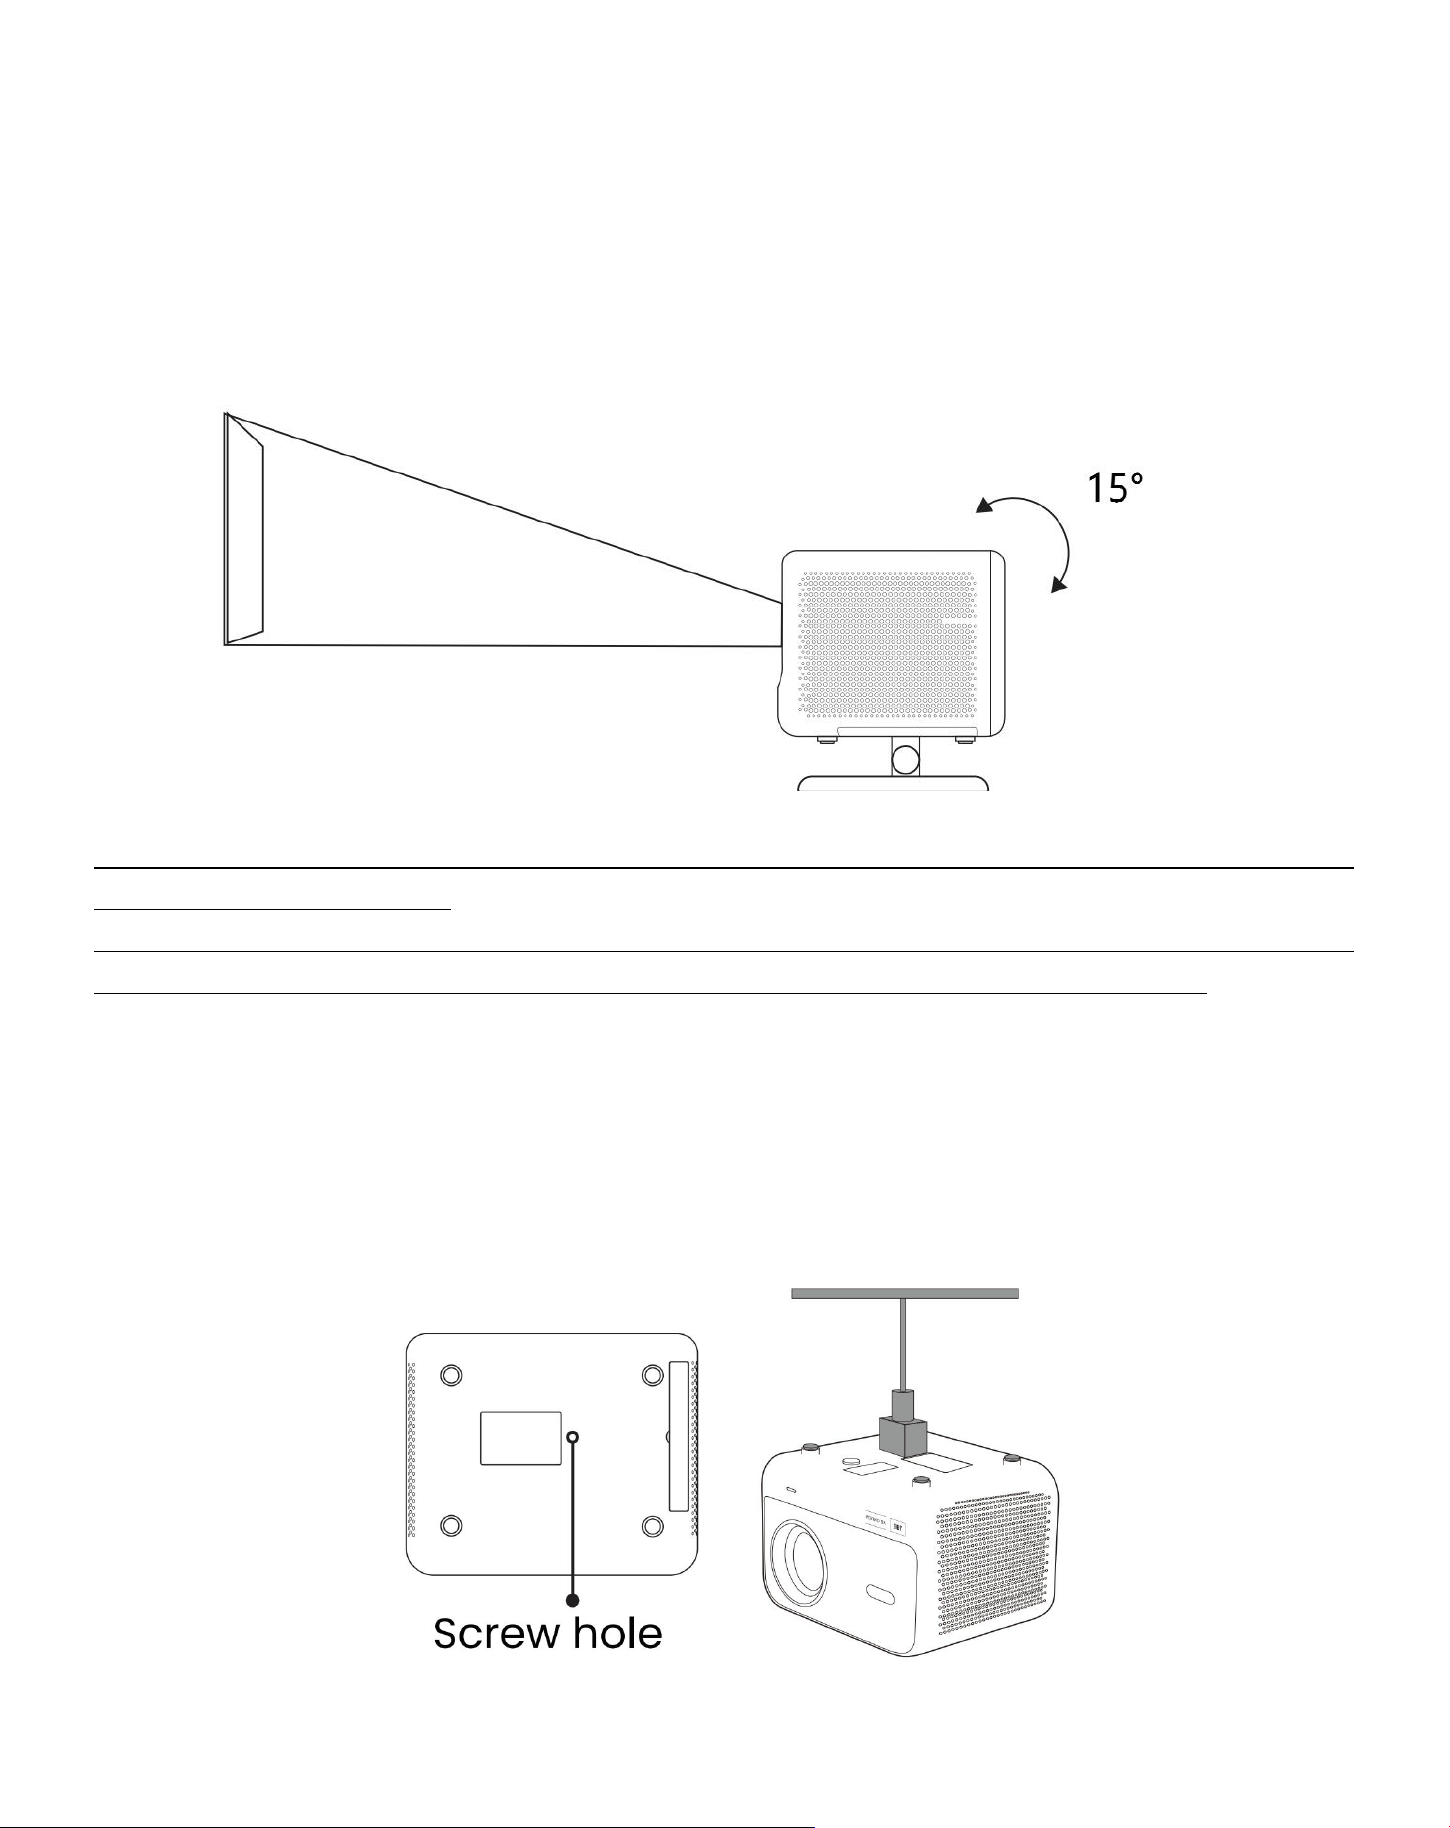
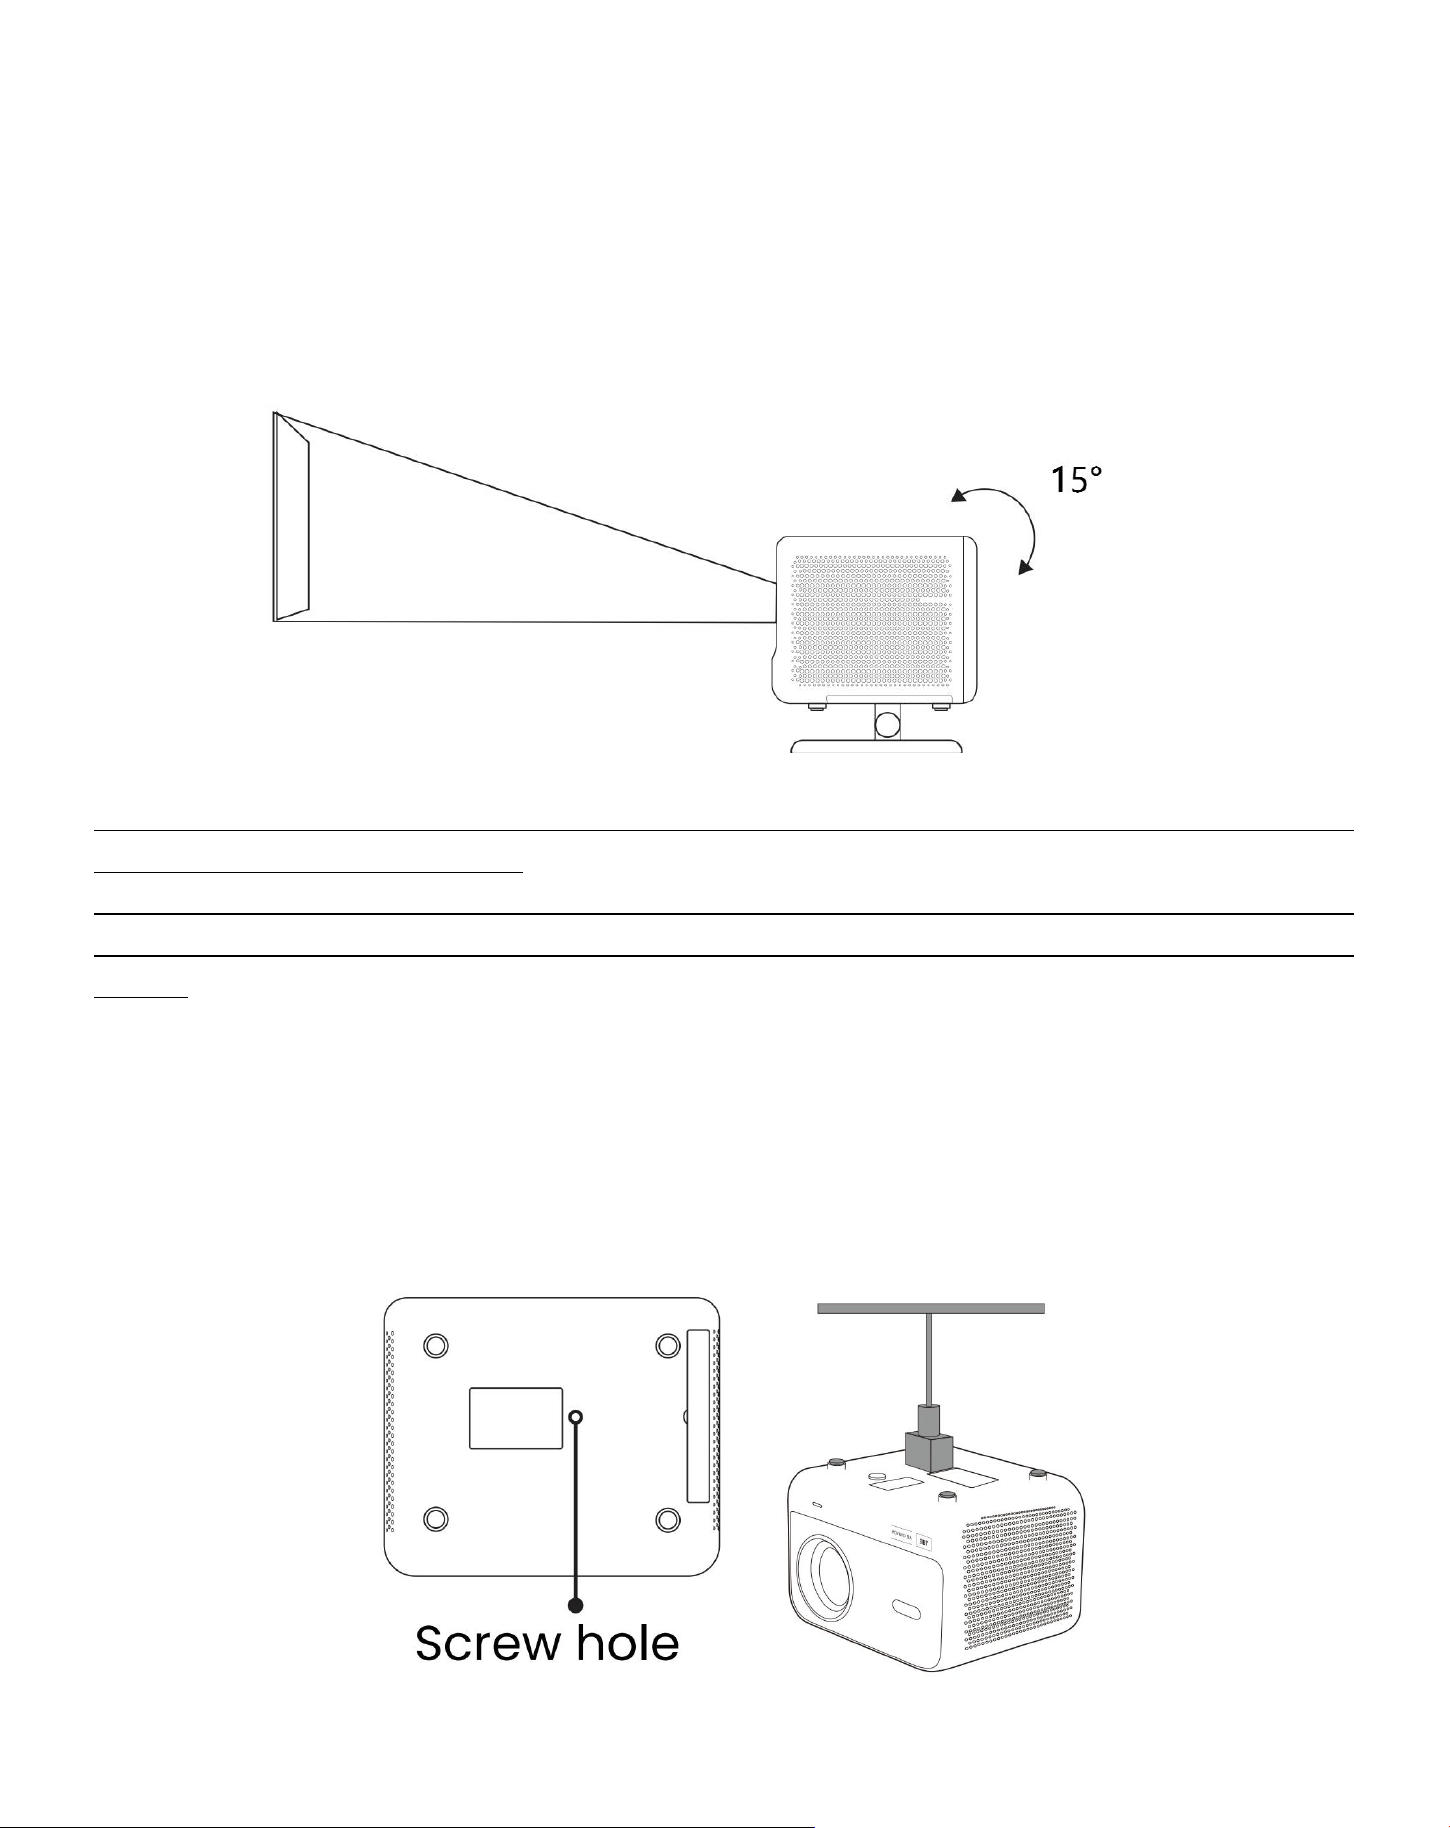
The projector is equipped with an rotatable stand for effortless adjustments。
Step1: Place the projector on a flat surface.
Step2: Please adjust the stand angle corresponding projection screen, keep the angle within this range for
optimal picture clarity.
Notice: The L2 Plus supports horizontal keystone correction. You do not need to place the projector
directly in front of the screen.
Notice: To keep the image quality optimal, it is recommended to maintain the adjustment within 15
degrees. However, Please ensure the angle with the screen's vertical line does not exceed 25 degrees.
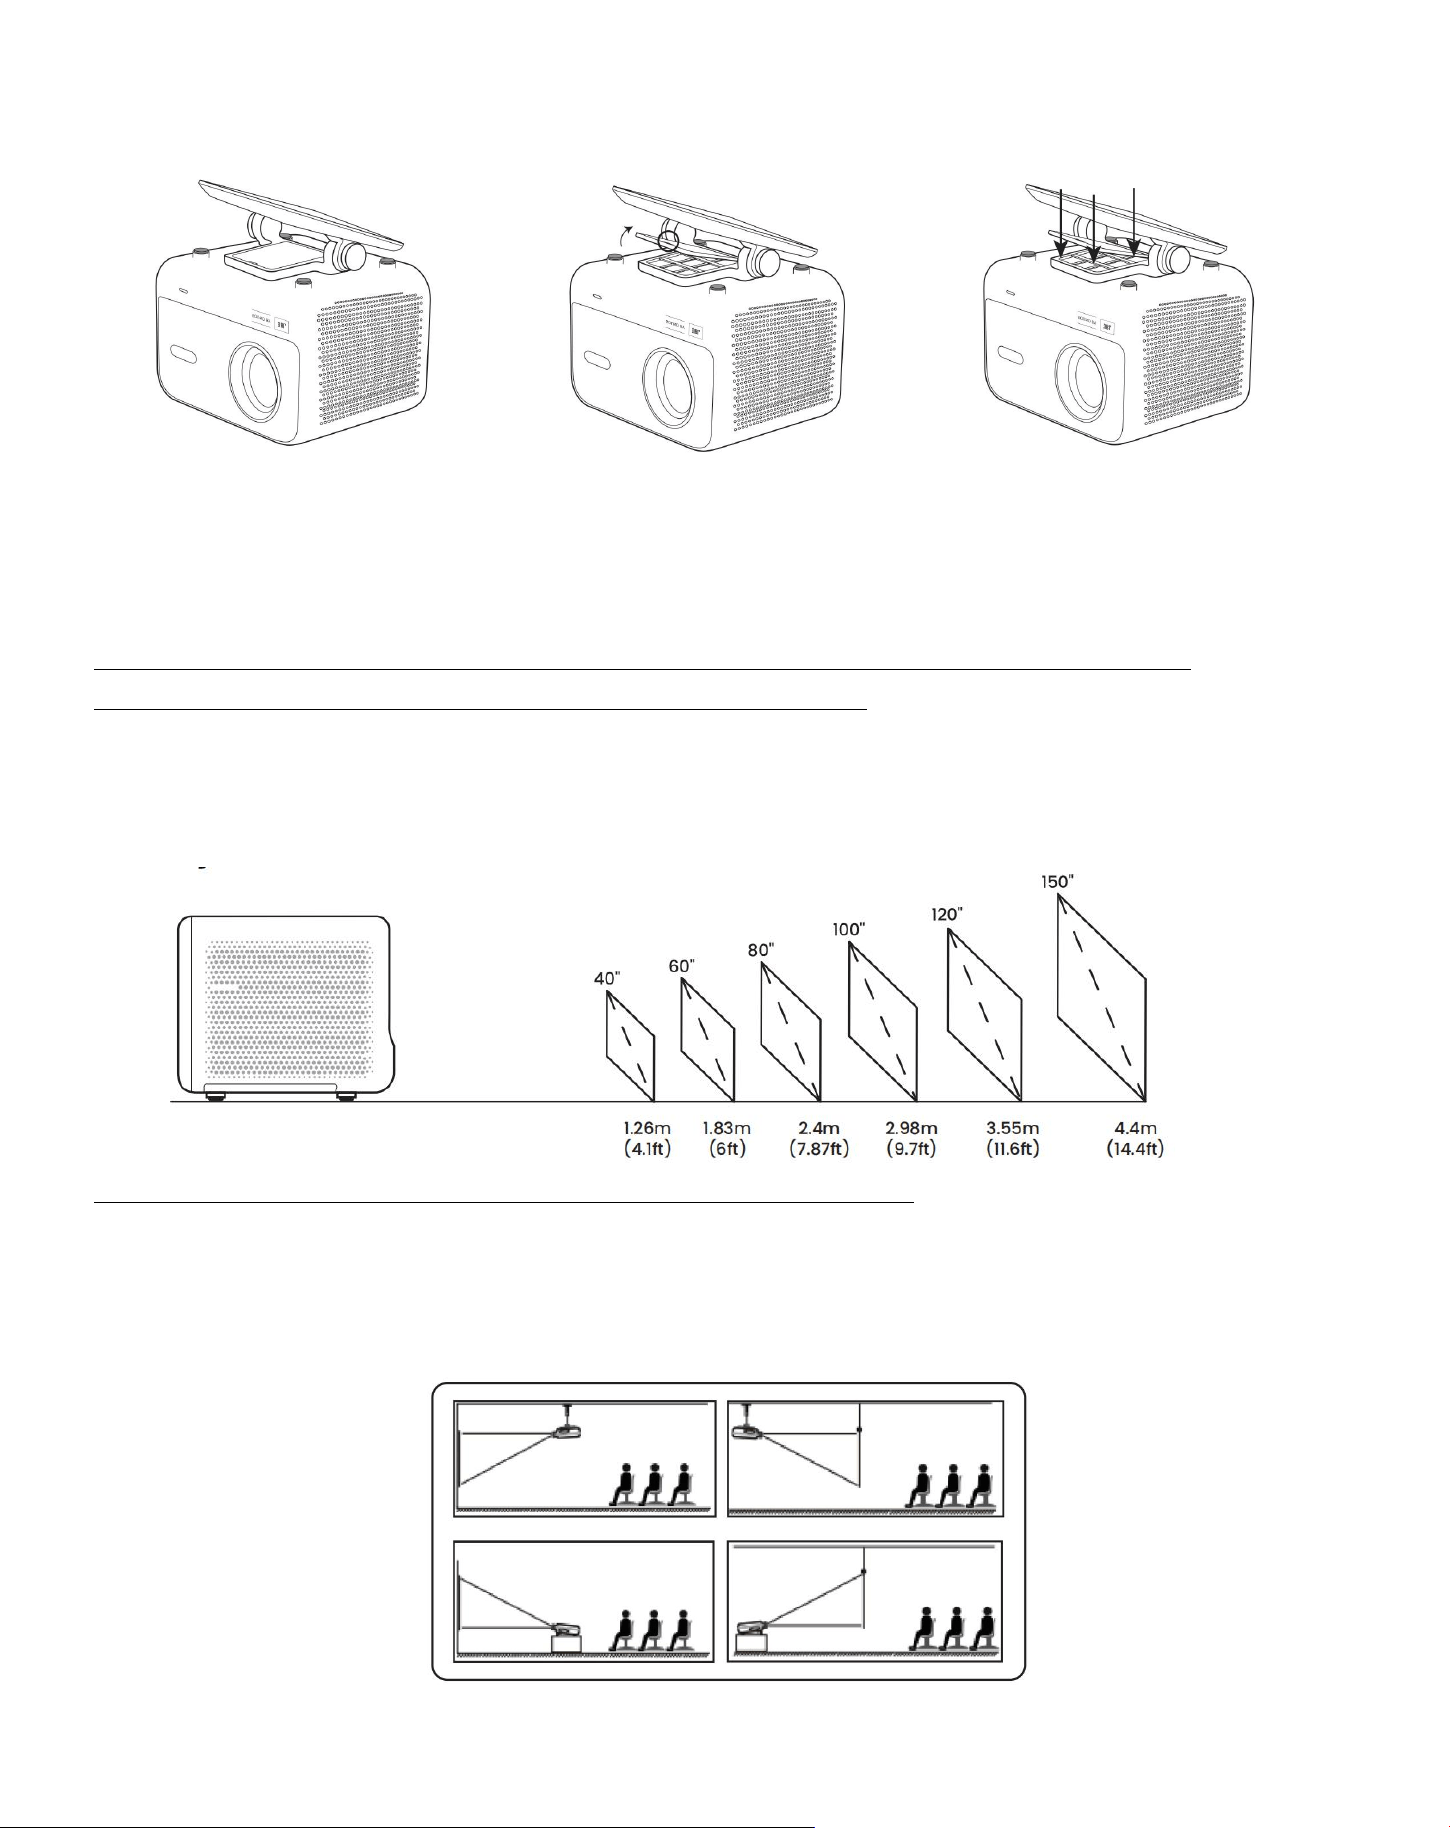
7.2 Ceiling Mounting
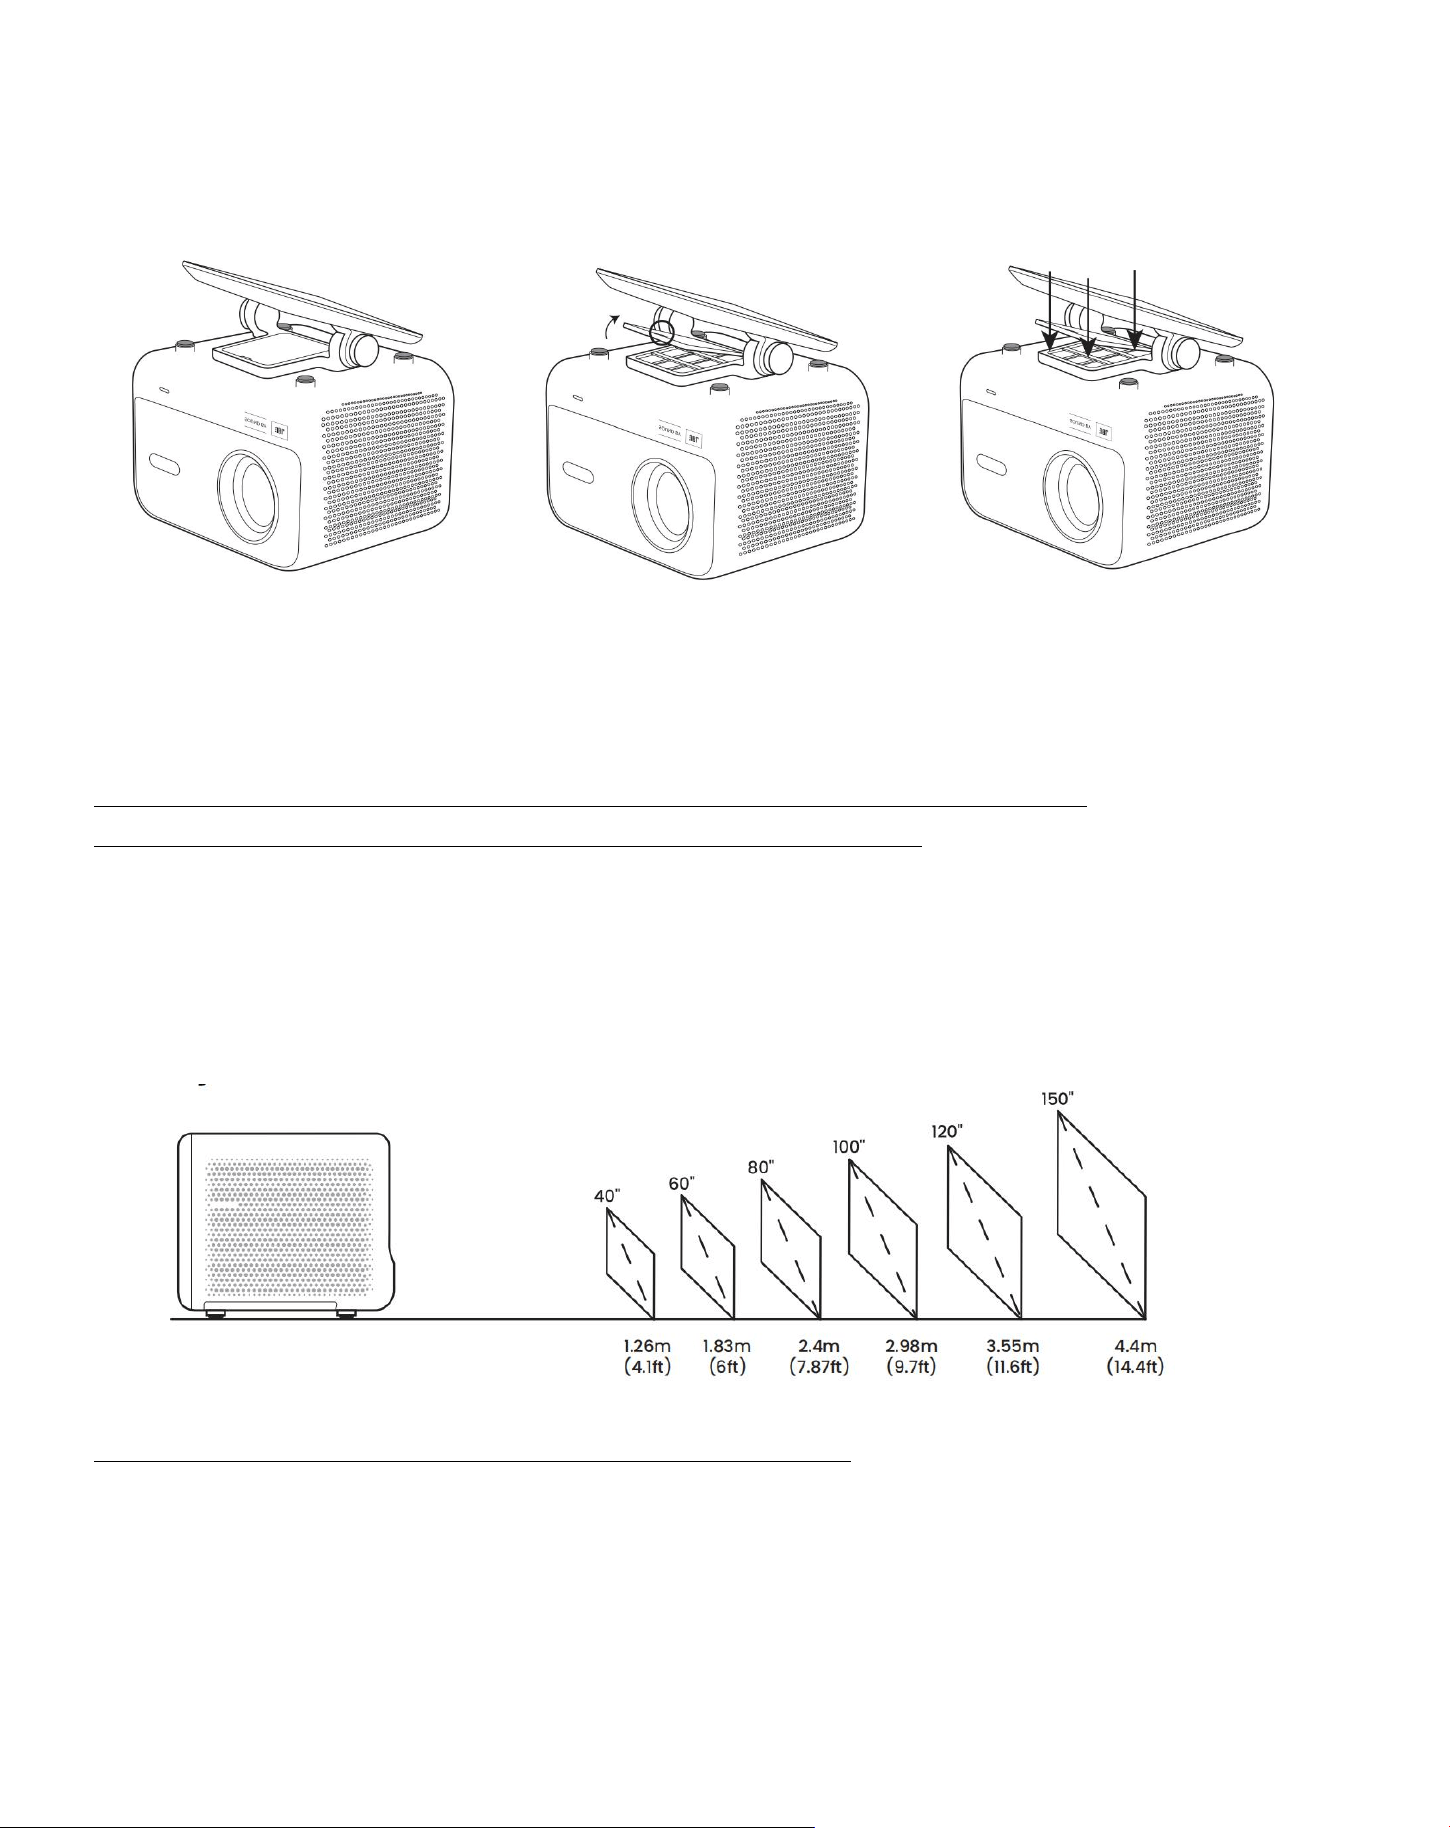
1. Installation Method
The projector can be mounted from the ceiling using a bracket and 1/4 Screw (not included) , or placed
horizontally on a flat surface.
8
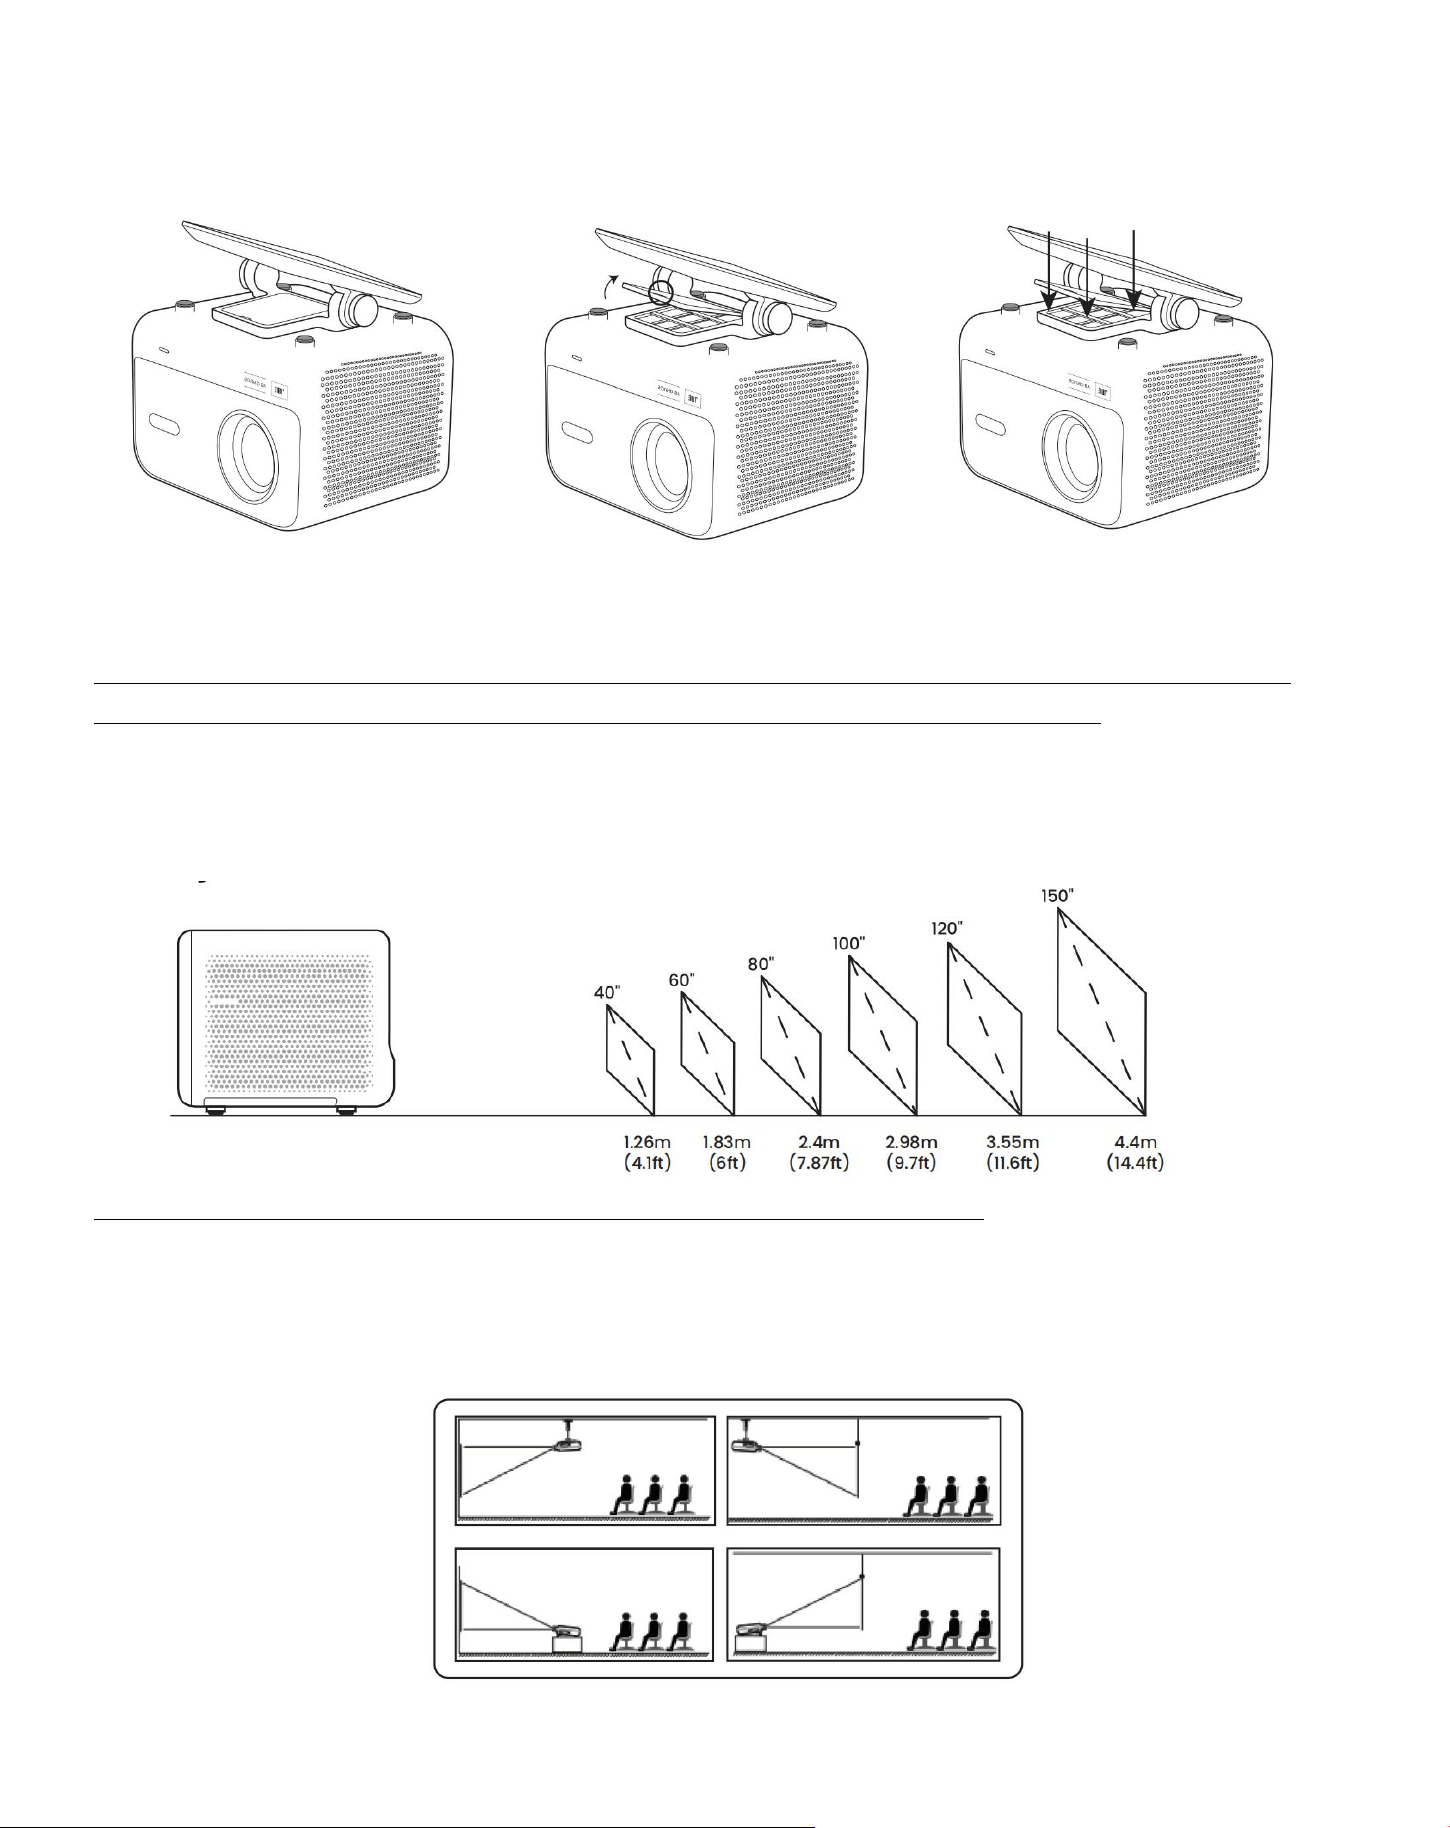
2. Base Removal
1. Reverse the machine.
2. Use a prybar to pry open the
cover.
3. Unscrew the three screws at
the bottom and remove the
bracket.
Notice: Make sure you have a universal mounting bracket that can fit the projector.
Notice: L2 Plus Plus does not support four-corner mount installation.
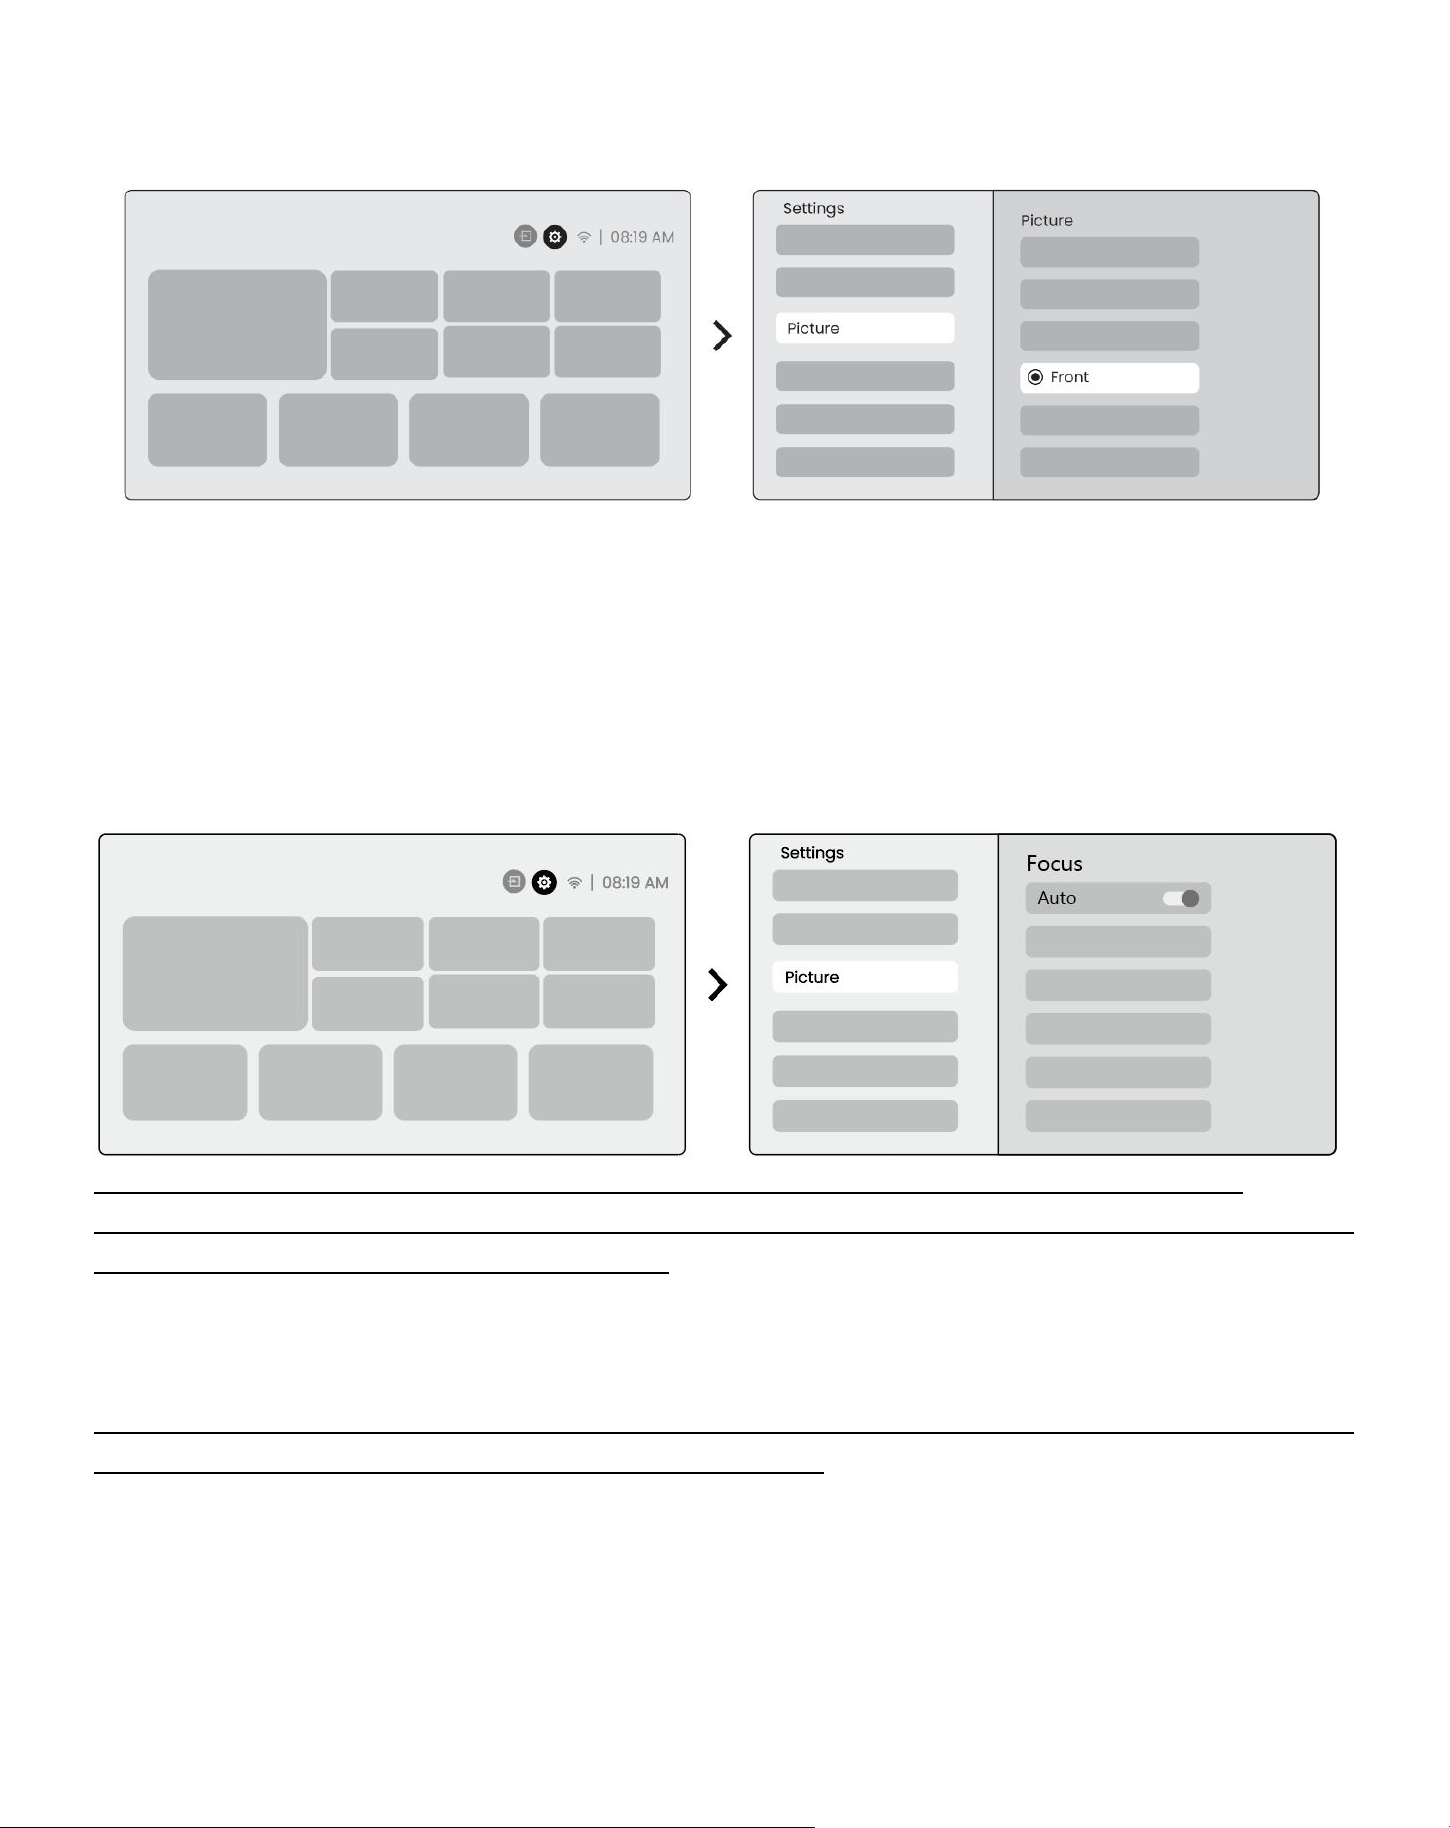
7.3 Projection Distance
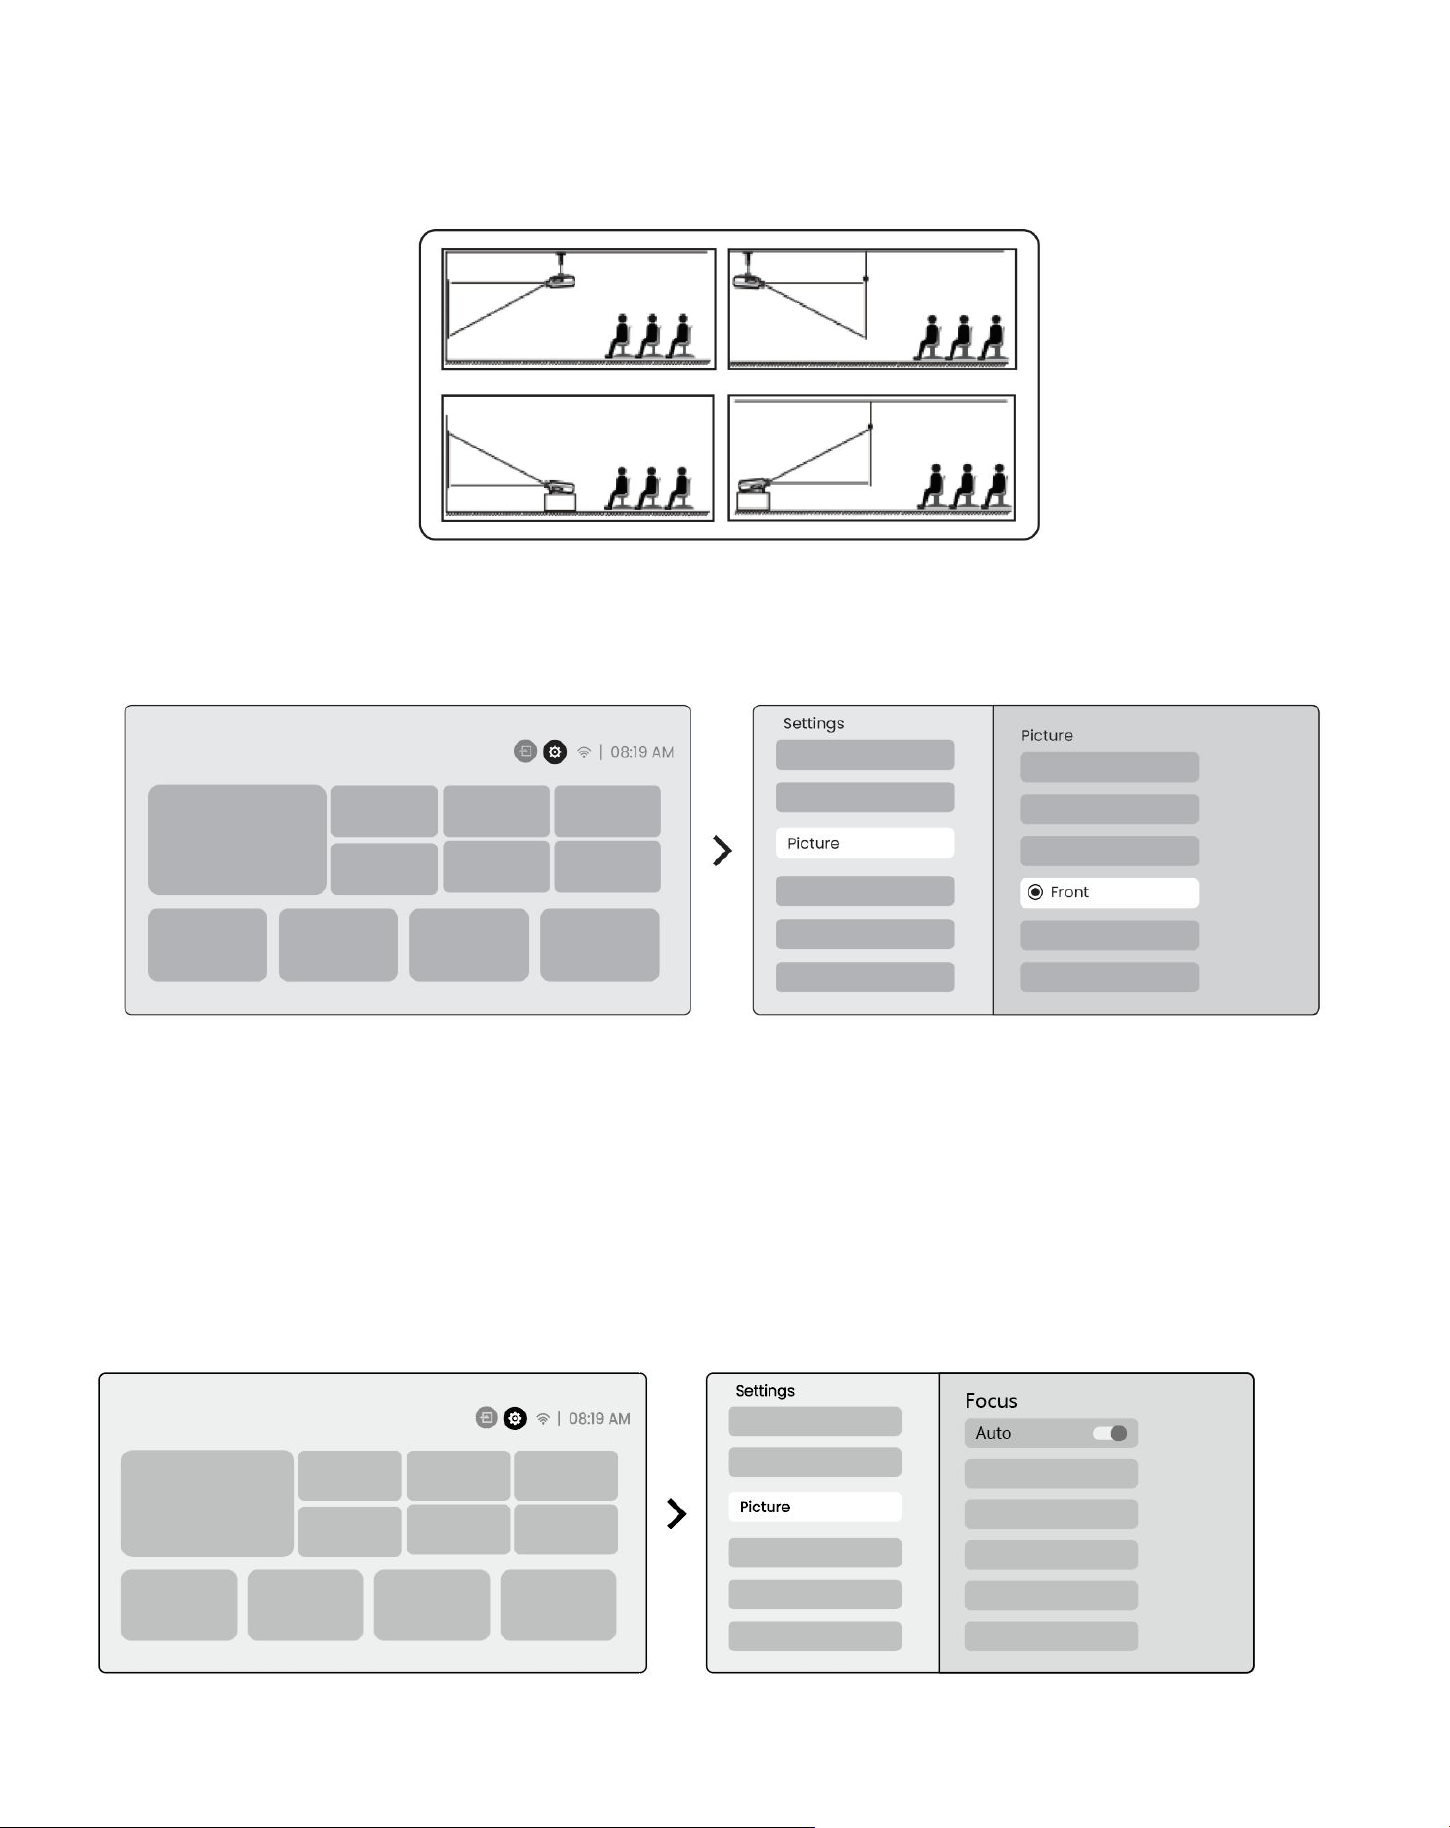
The projection distance of the L2 Plus plus ranges from 1.26m to 4.4m.
Tips:The recommended projection distance is about 7.87ft.
9
8 Projection Settings
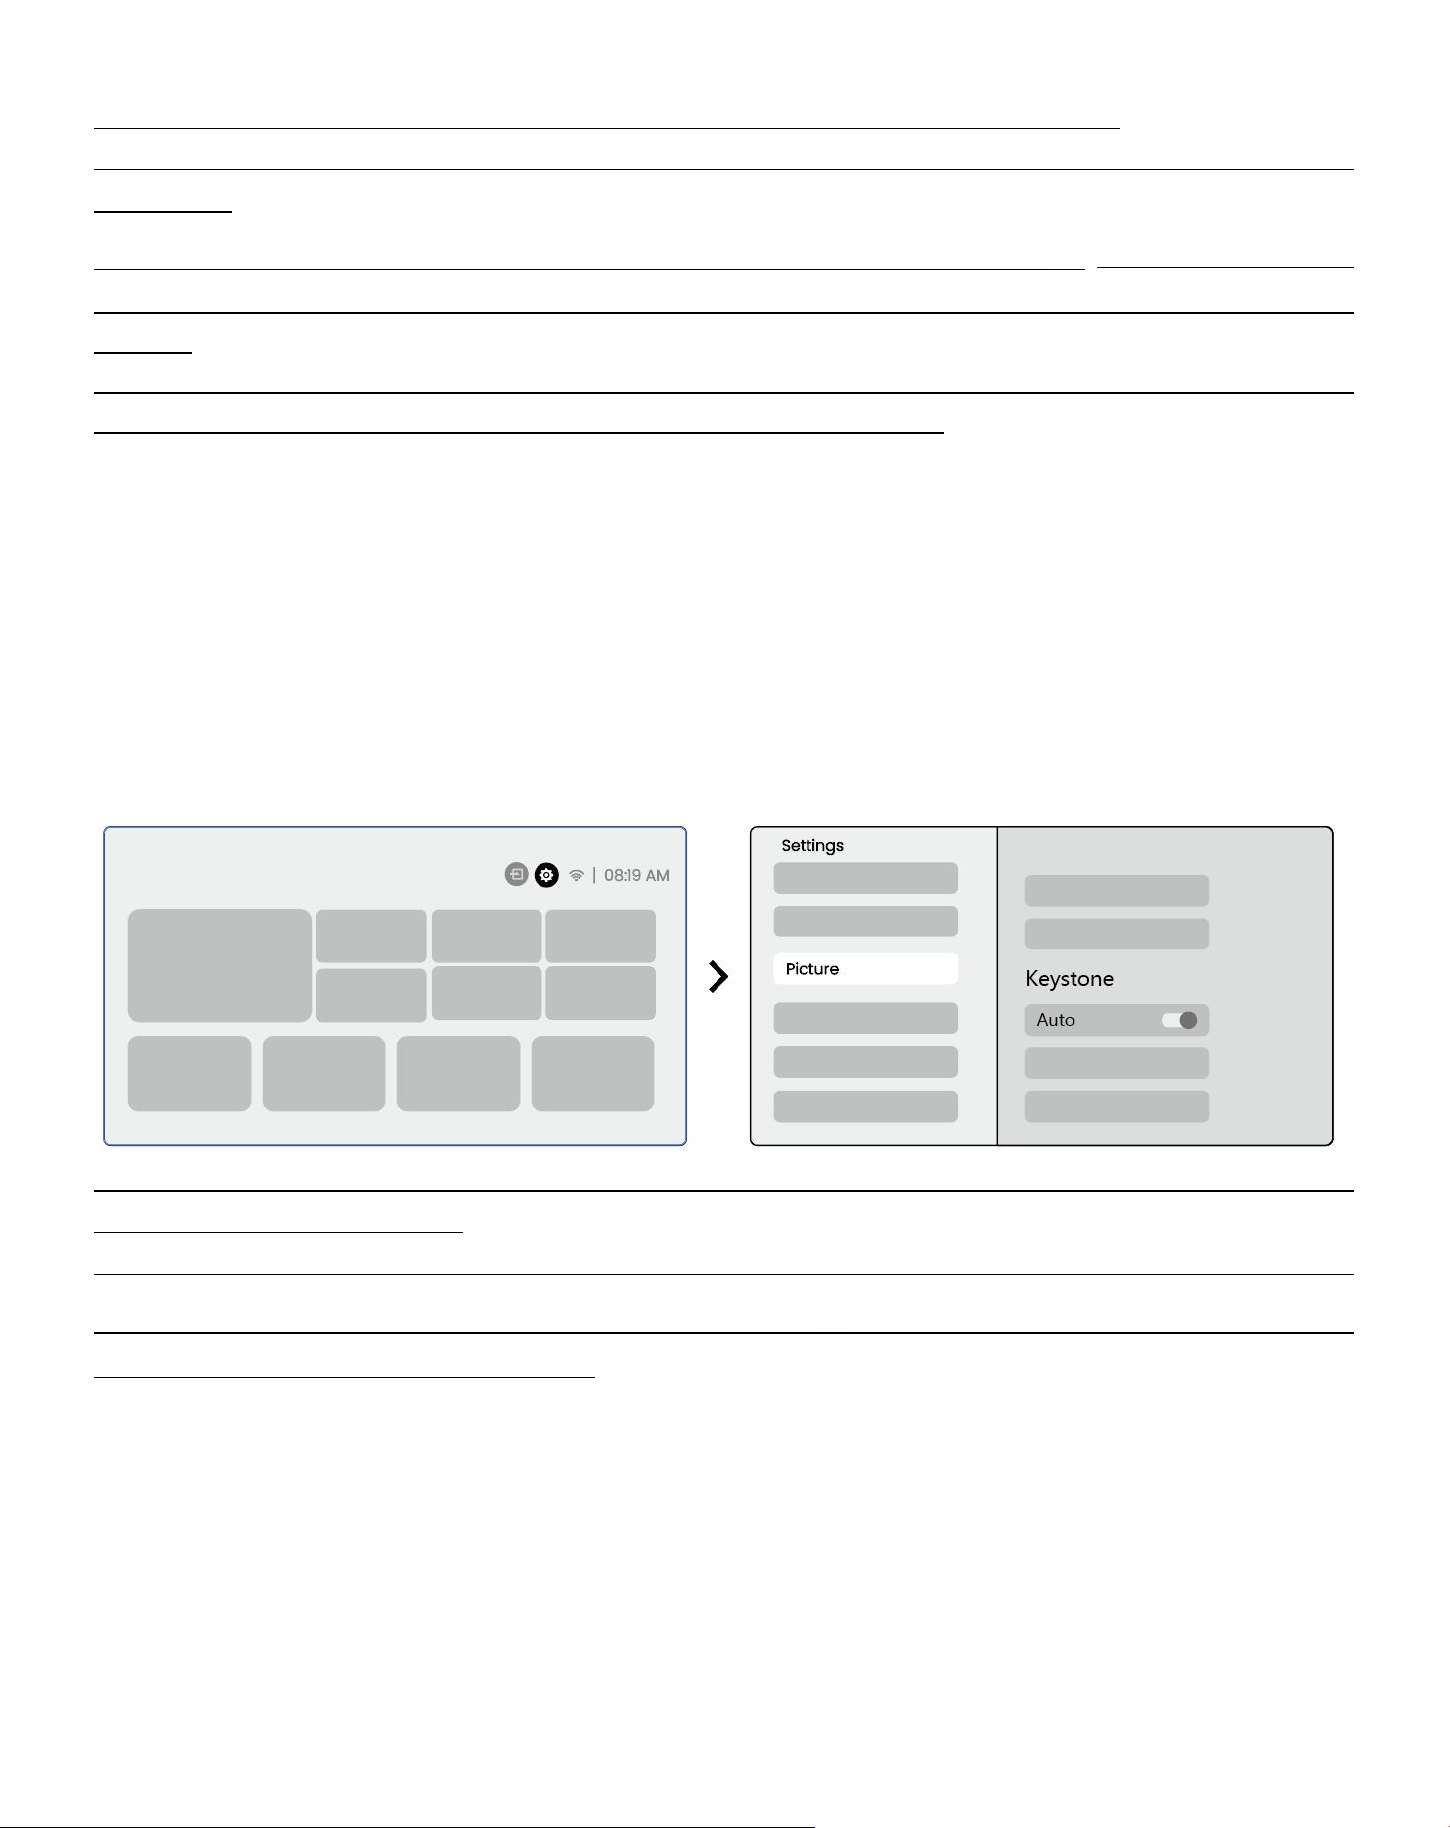
L2 Plus Plus supports four projection modes, you can choose the preferred way.
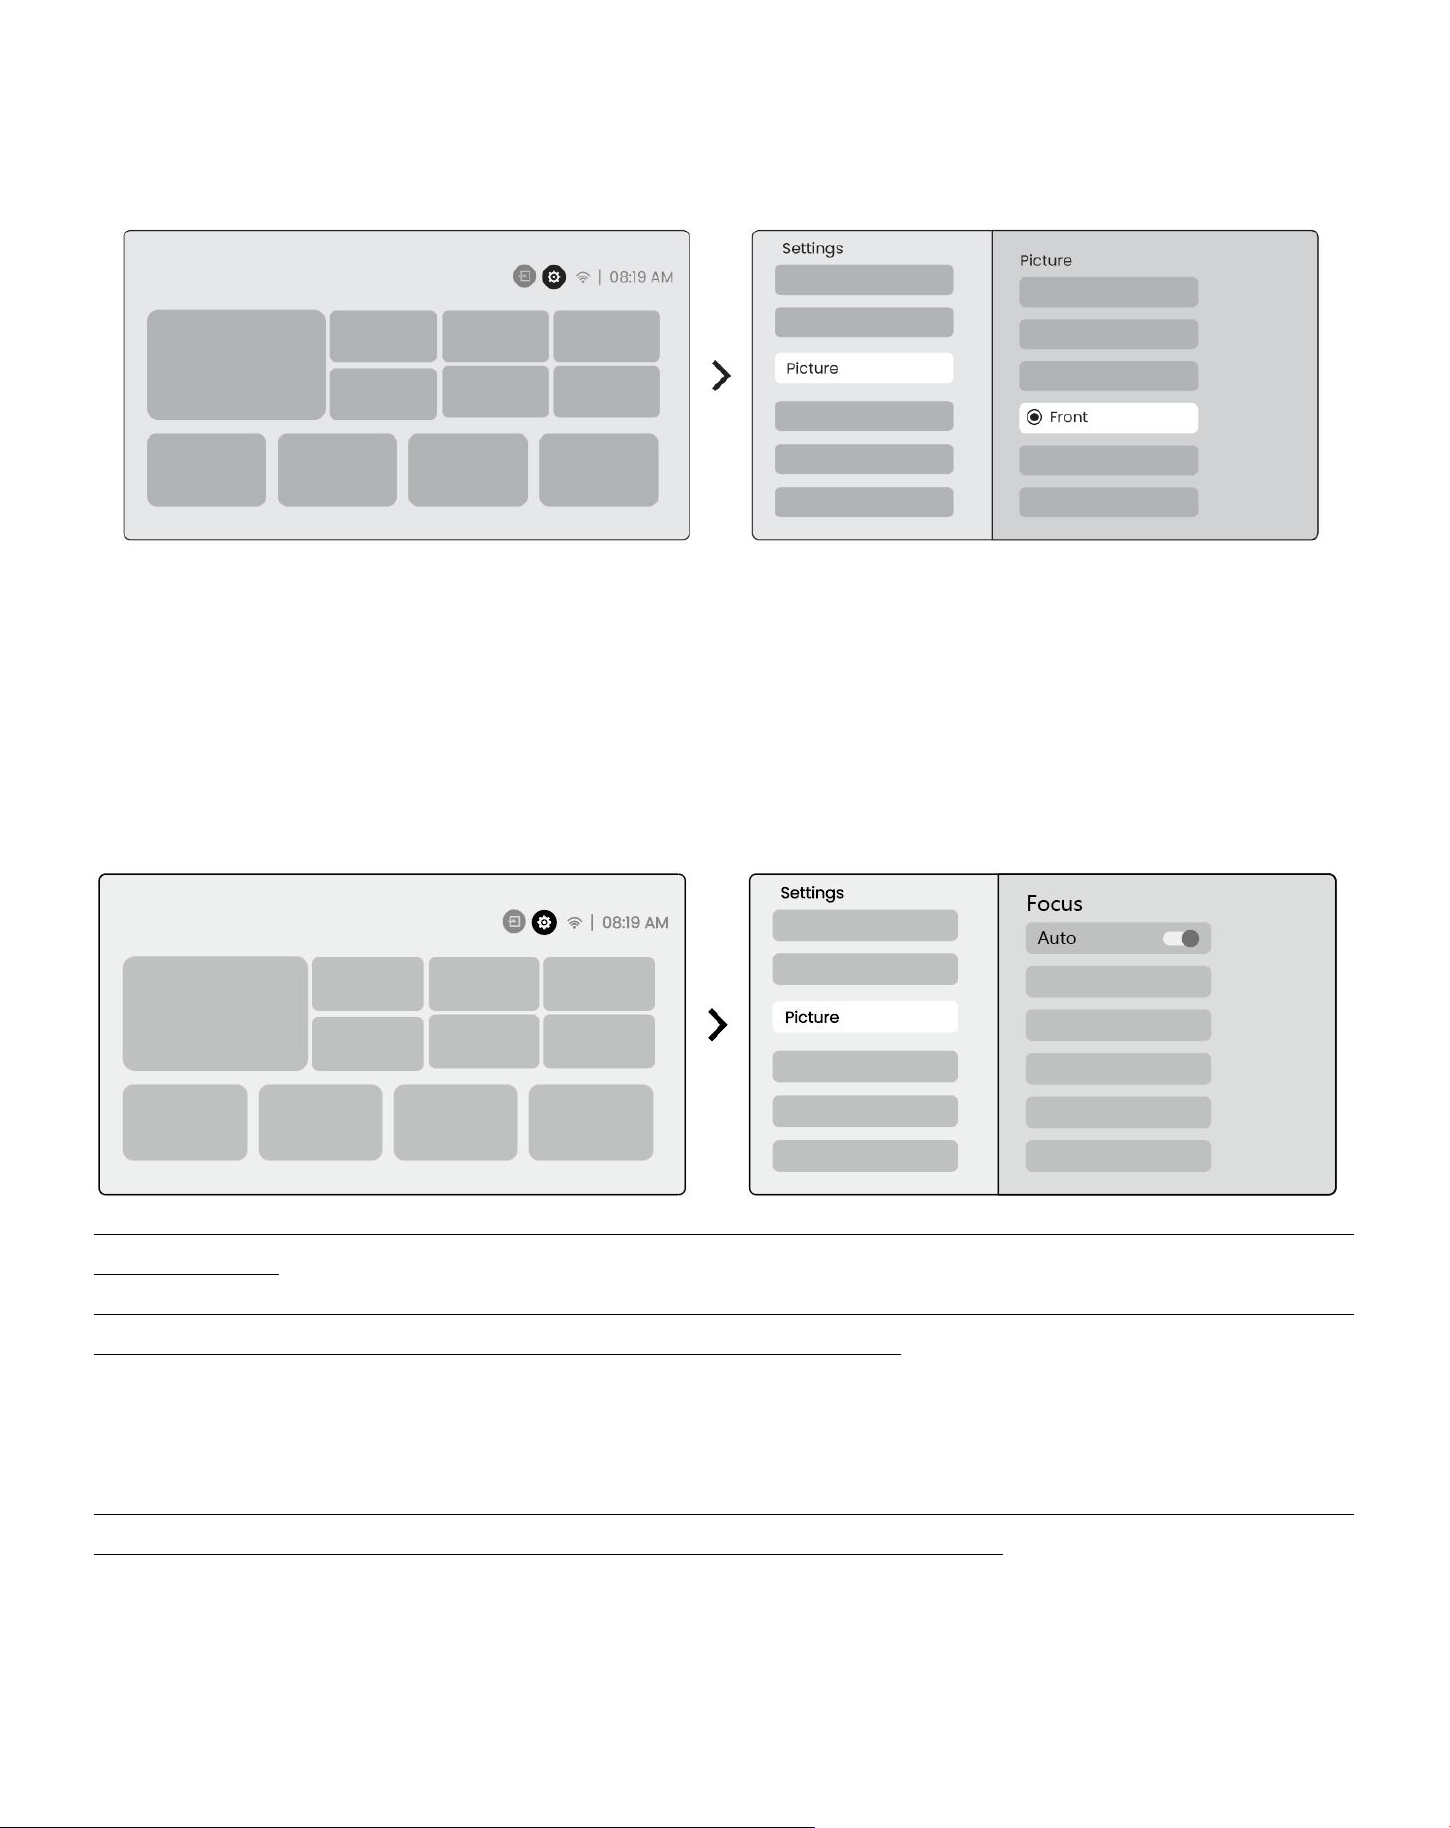
If you choosing ceiling mounting or rear projection, please go to homepage -> select the Settings [ ⚙] ->
select [Picture] -> In [Projection] select an appropriate projection mode -> press [OK] to switch projection
mode.
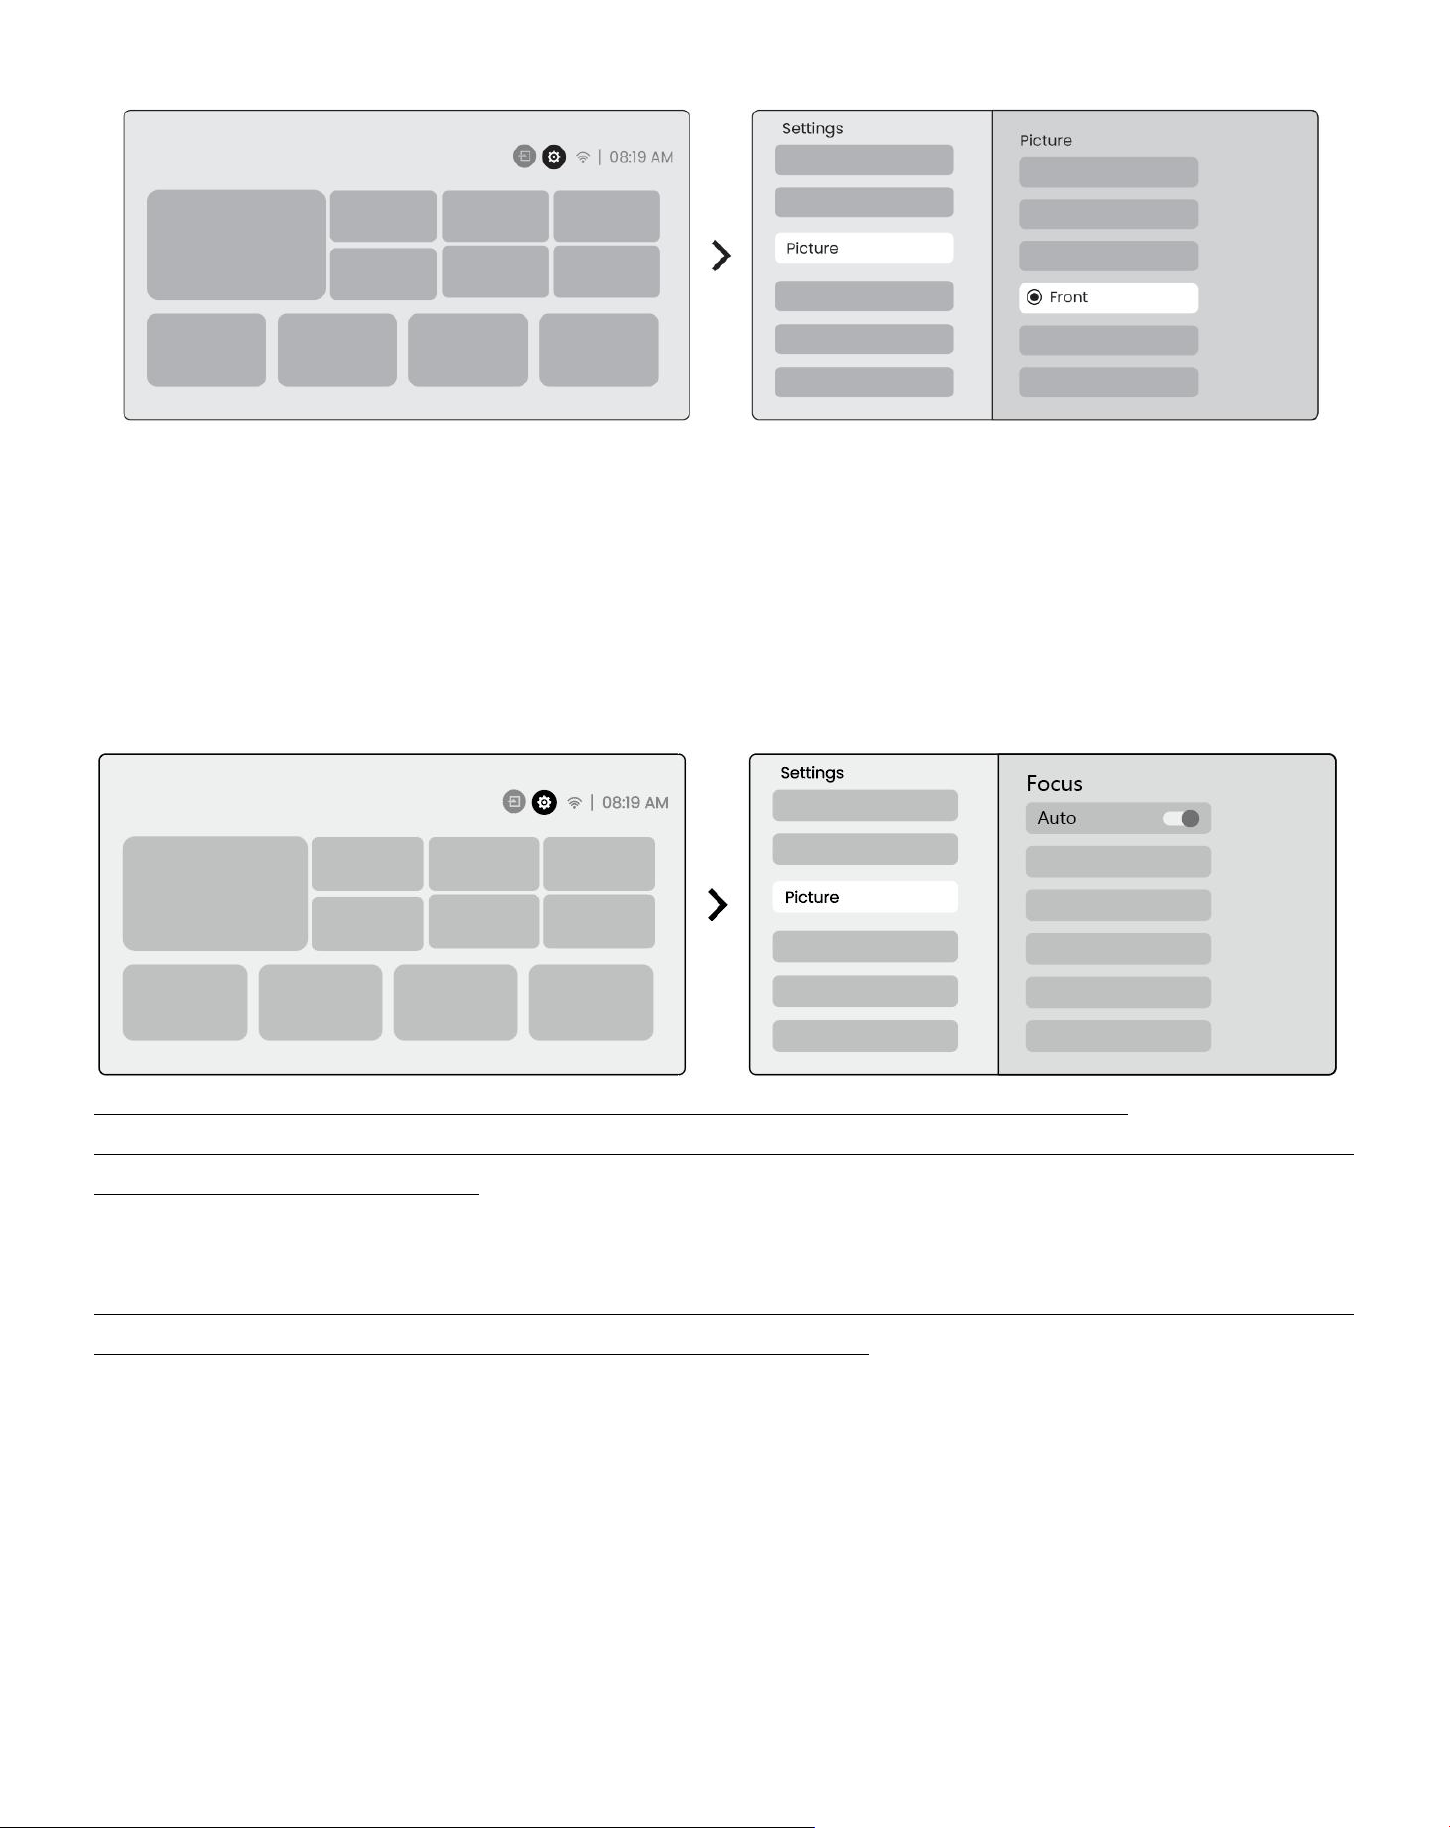
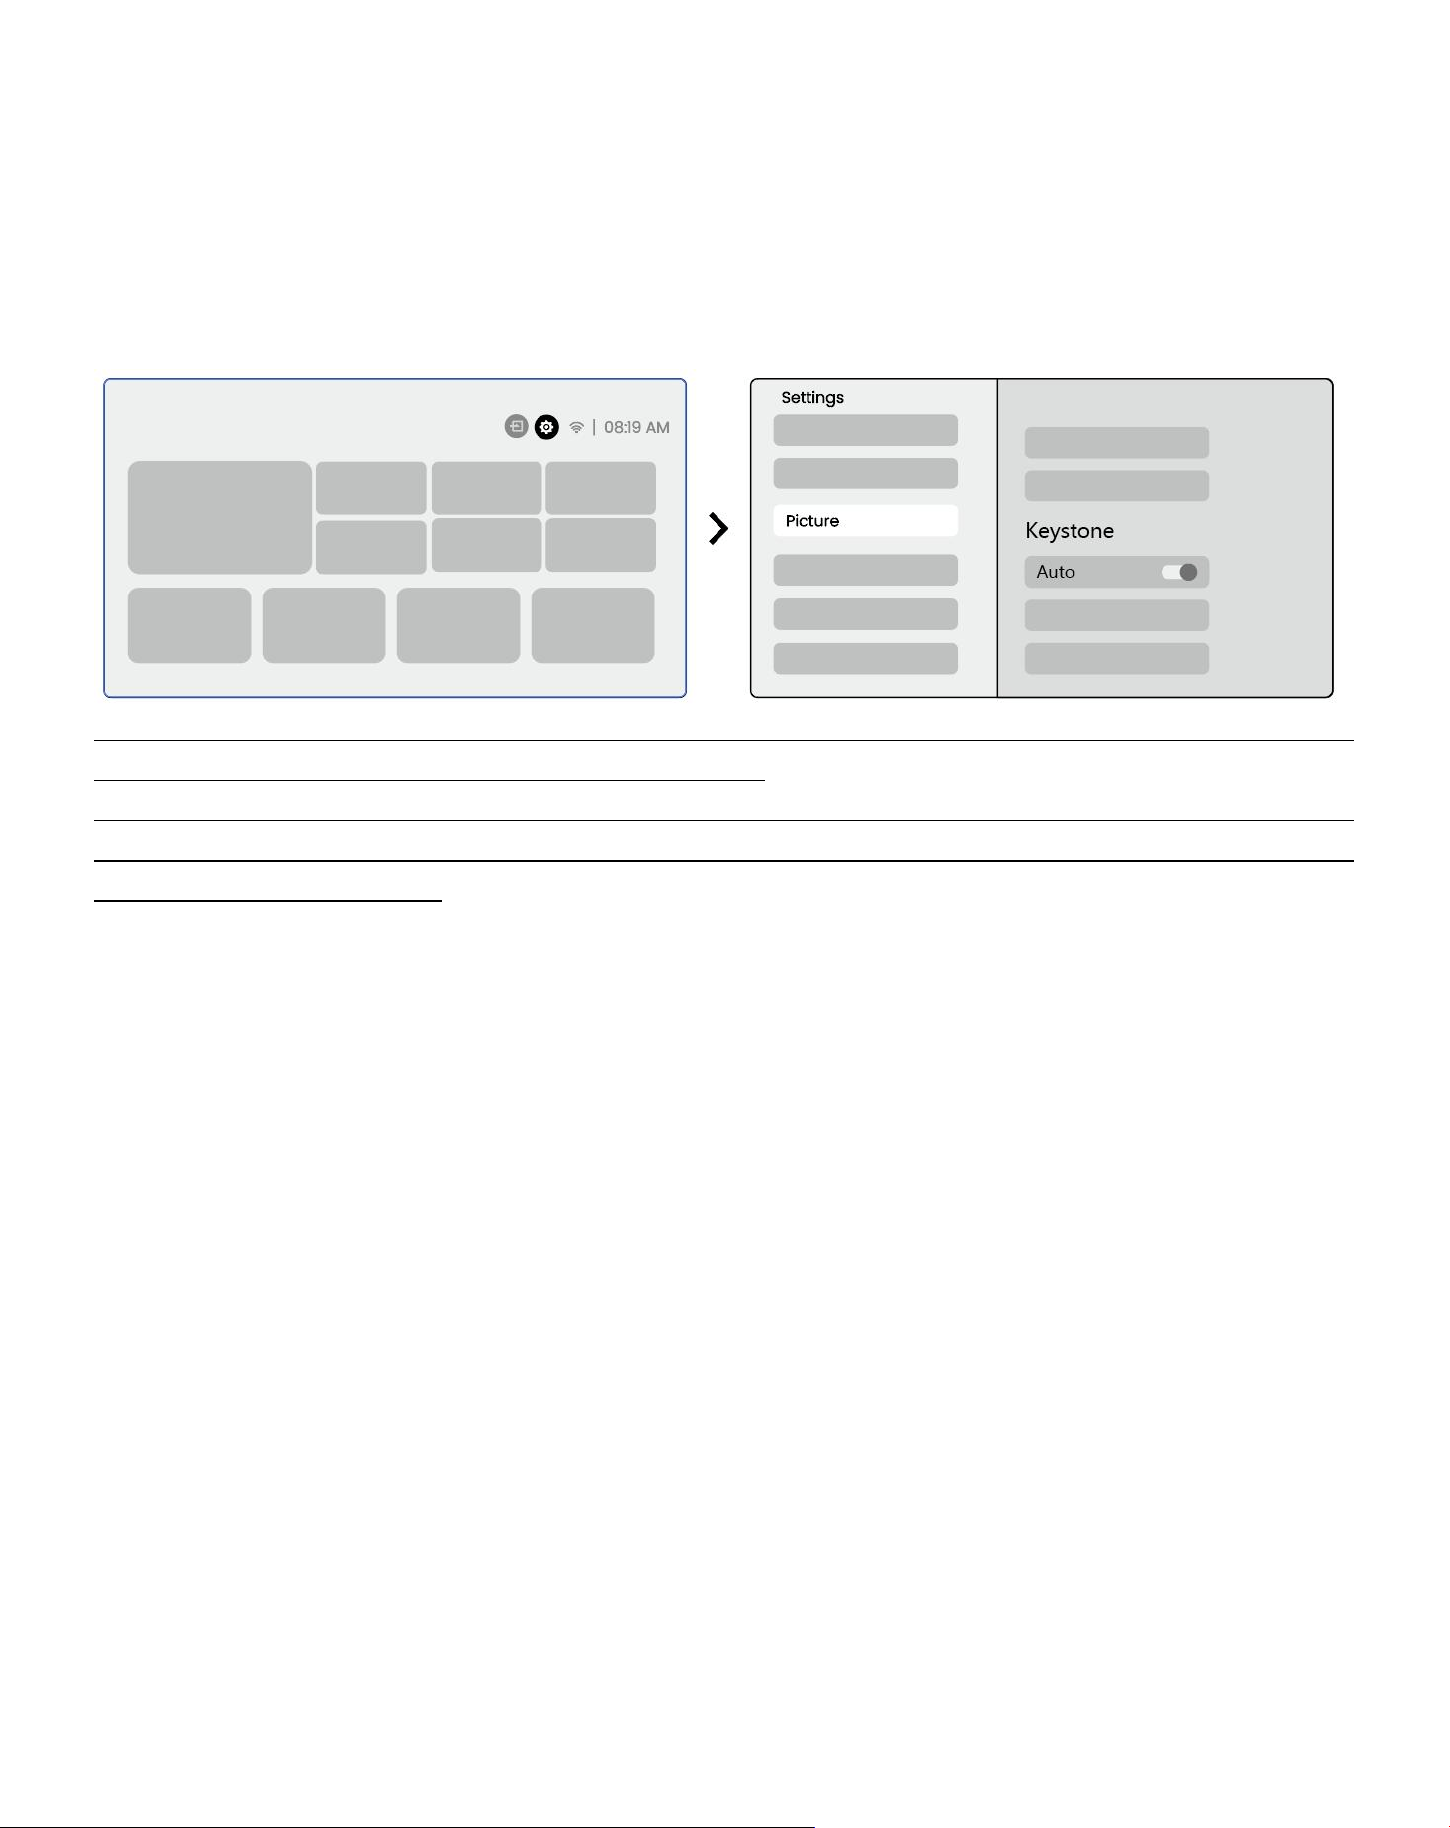
8.2 Auto Focus
This function automatically detects the clarity of the projected image and optimizes the focal length in real
time, ensuring the image remains sharp and clear at all times.You can find this feature in the Settings [ ⚙]
-> [Picture] -> [Focus].
10
Notice: Auto Focus will be activated after each shift once it is turned on in the setting.
Notice: If you are unsatisfied with the current Auto Focus result, you can select [Execute Auto Focus] to
recalibrate.
Notice: If picture remains blurry, please go to homepage -> select the Settings
[ ⚙]
-> select [Picture] ->
select [Manual Focusing] -> Use the up and down arrow keys to manually adjust the FOCUS until the image
is sharp.
Notice: If picture remains blurry, please try adjusting the projection distance and make sure the projection
distance is within the appropriate range (Please check [ 7.3 ] for details).
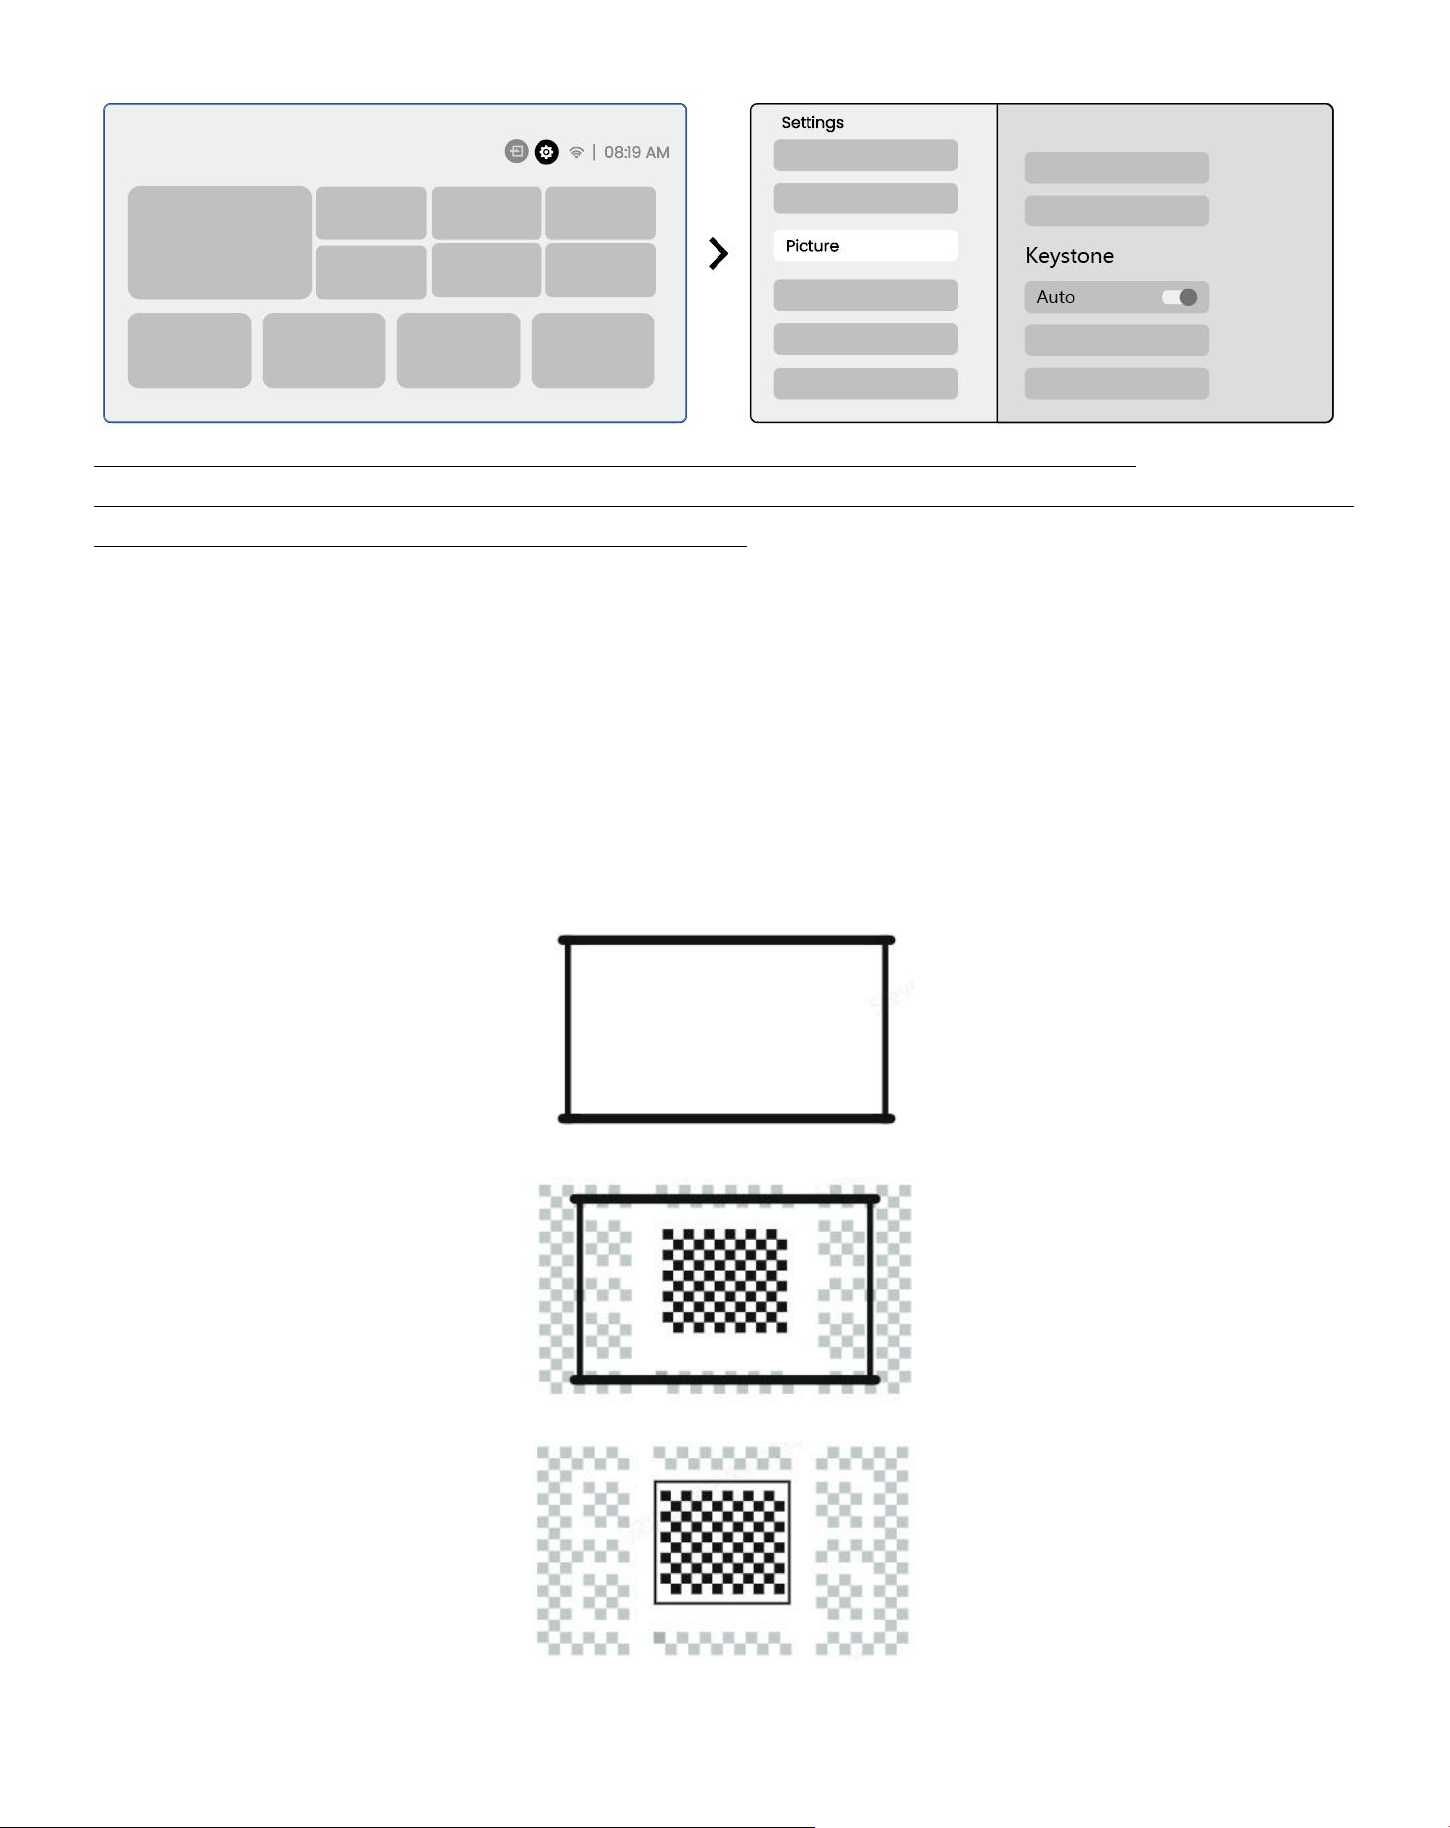
8.3 Keystone
8.3.1 Auto Keystone Correction
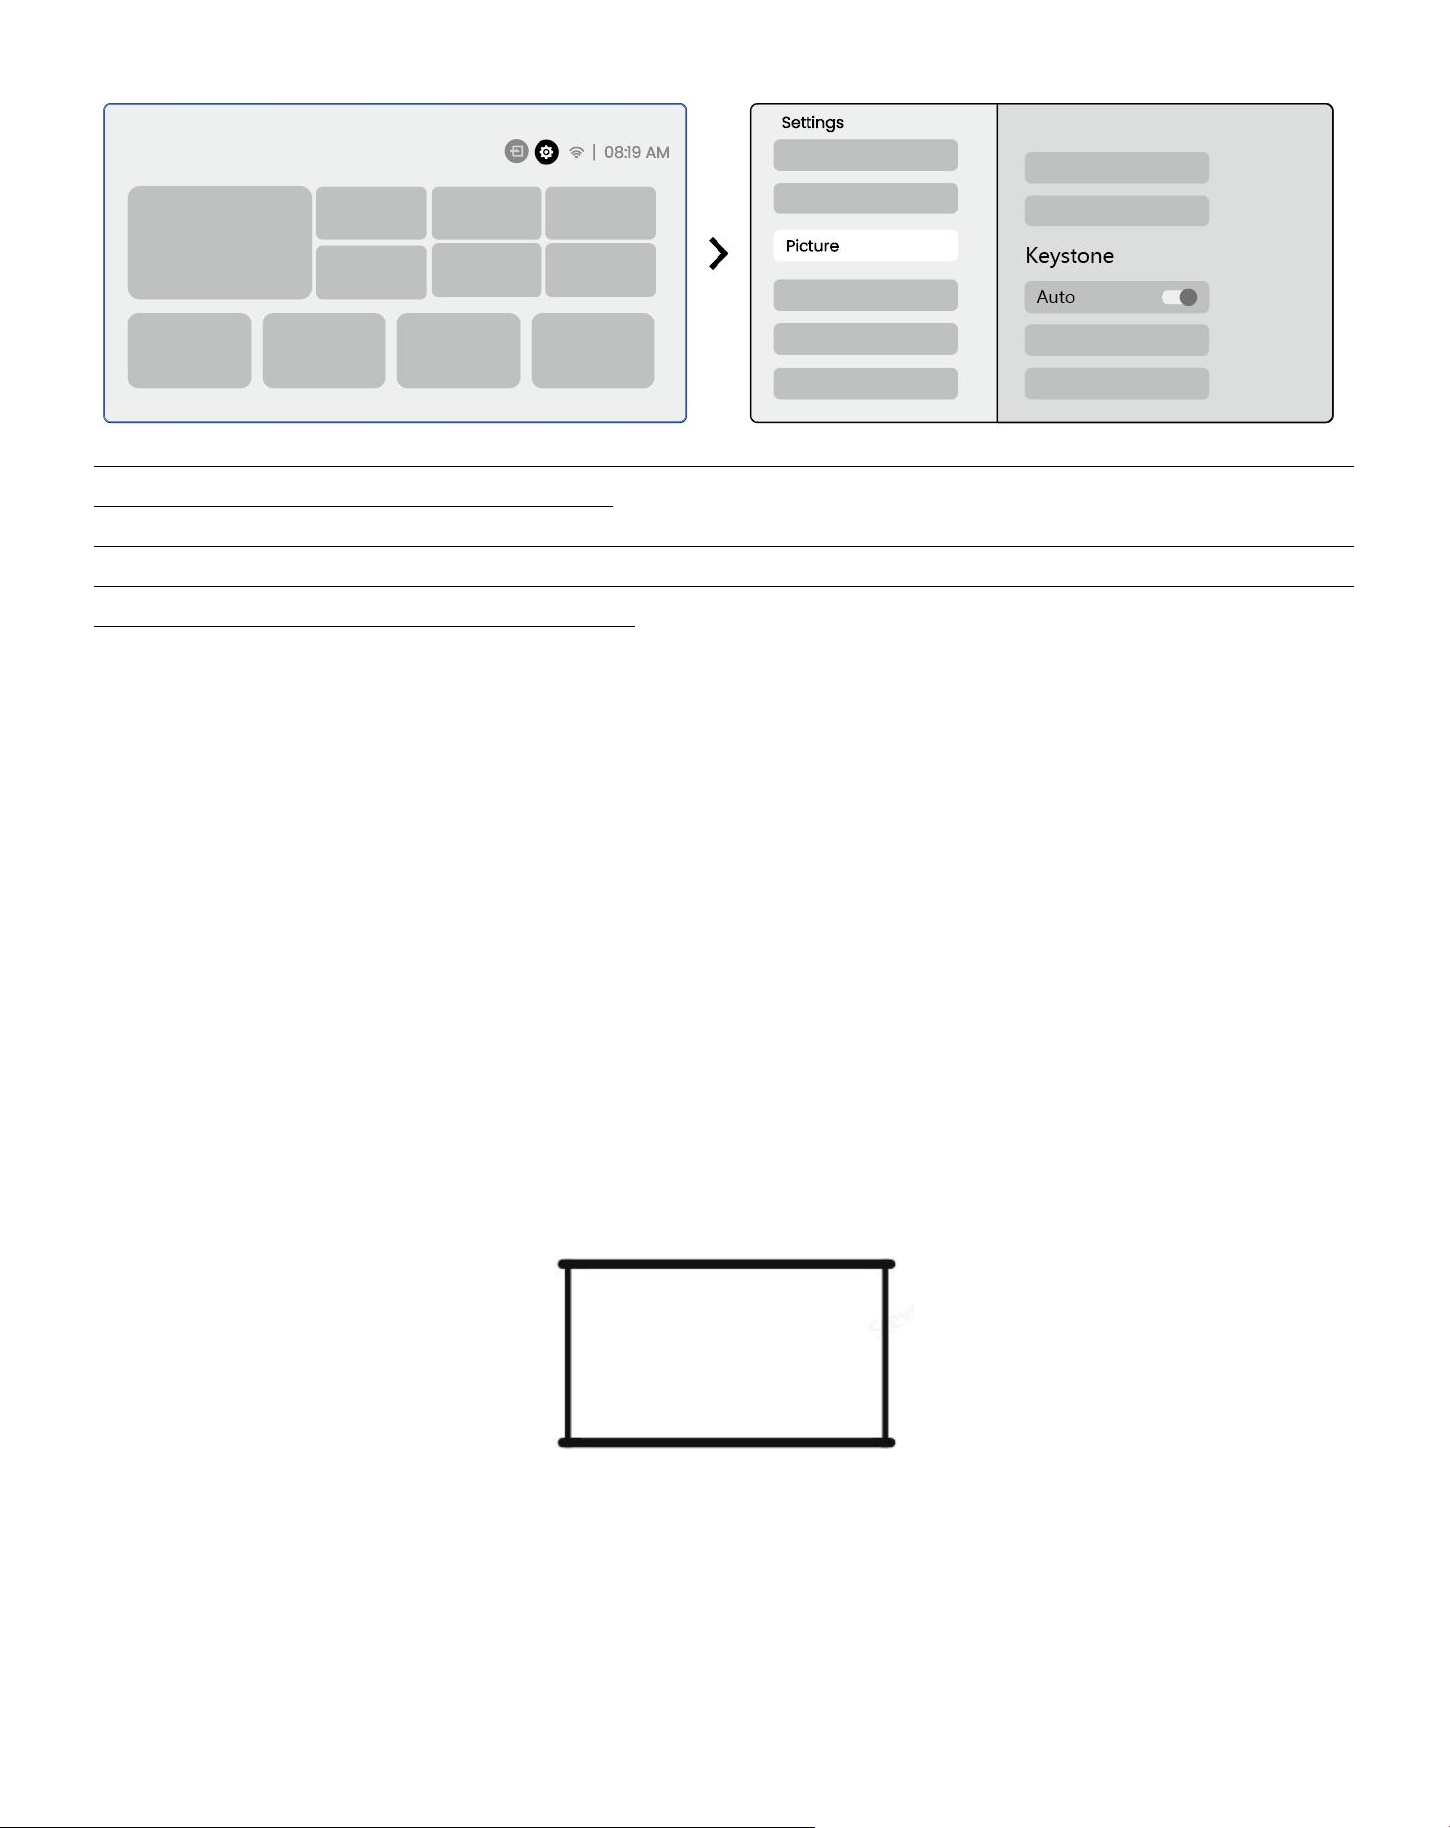
The Auto Keystone Correction on L2s Plus automatically corrects trapezoidal distortion, ensuring the image
stays square without manual adjustment. You can find this feature in the Settings [ ⚙] -> [Picture] ->
[Keystone ].
Notice:
If you are unsatisfied with the current Auto Keystone Correction result, you can select [Execute
Auto Keystone] to recalibrate.
Notice: Auto Keystone Correction is enabled by default when the machine is first used. If you want to
turn it off,please go to homepage -> select the Settings [ ⚙] -> select [Picture] -> In [Keystone ]->
select [Auto ]-> press [OK] to switch Off.
8.3.2 Auto Keystone After Boot
This function automatically detects and corrects both vertical and horizontal keystone distortion of the projected
image each time the projector is powered on, ensuring that you can immediately enjoy a clear, rectangular picture.
11
8.3.4 Automatic Screen Aligment
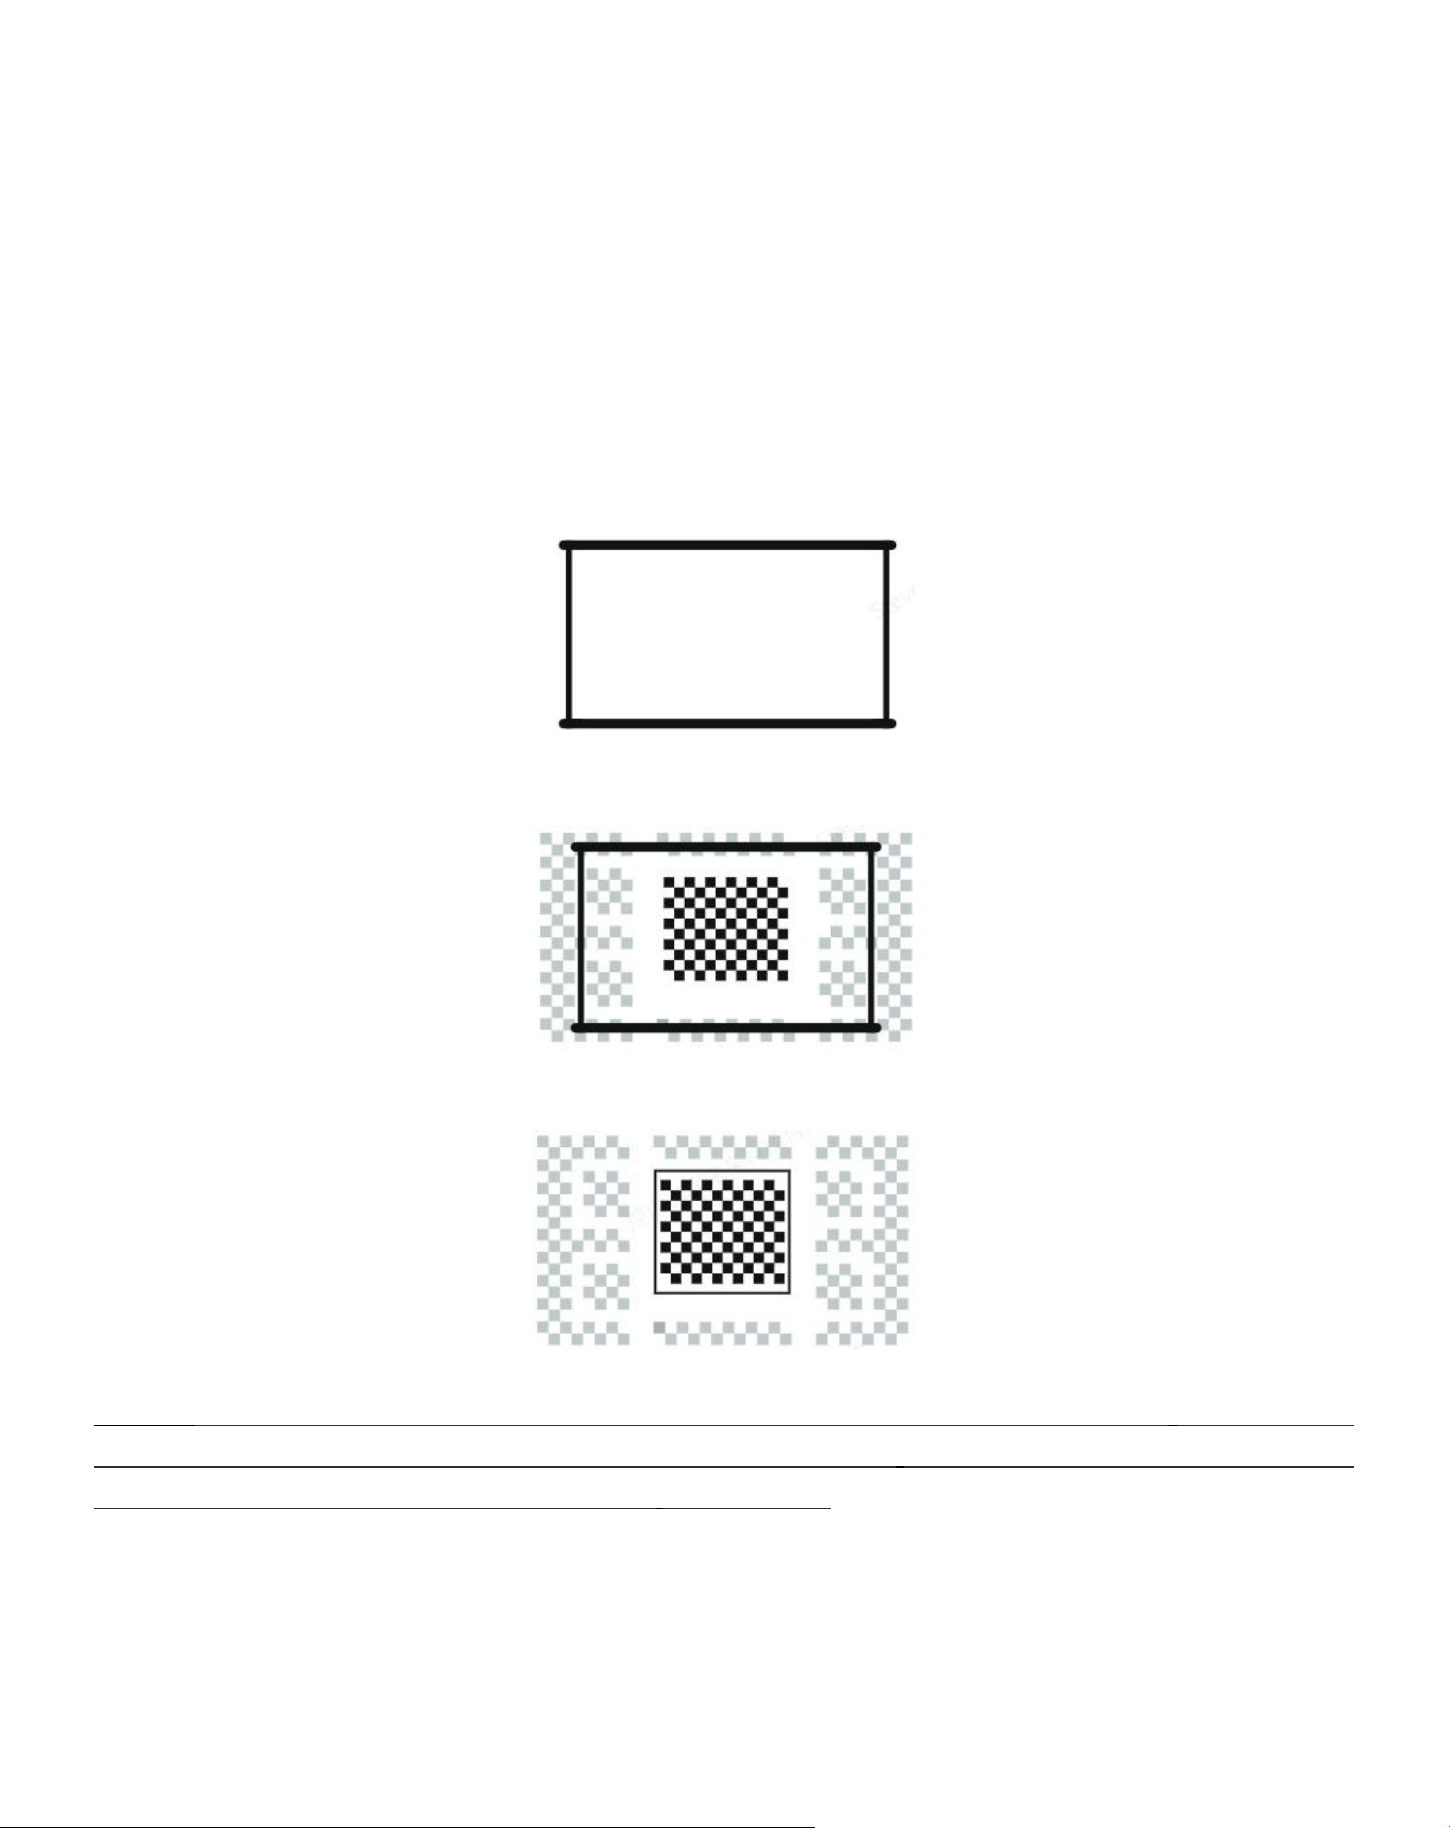
This function automatically detects screen boundaries and adjusts the image position to ensure precise
alignment with the screen edges, avoiding image overflow or blank spaces and enabling quick centering of
the display.
1. The white background screen should have a black or other clear border, while the light-resistant screen
has no border requirement.
2. The projected image before the Screen Fitting needs to be larger than the screen area.
3.
When using the Screen Fitting function, please do not block the center of the screen.
Notice:
Before using the Auto Screen Fitting and Auto Obstacle Avoidance functions, make sure the
Auto Keystone and Auto Focus functions are turned on. Obstacle avoidance may not work when there
are white or other light-colored objects in the target screen.
12
8.3.3 Automatic Obstacle Avoidance
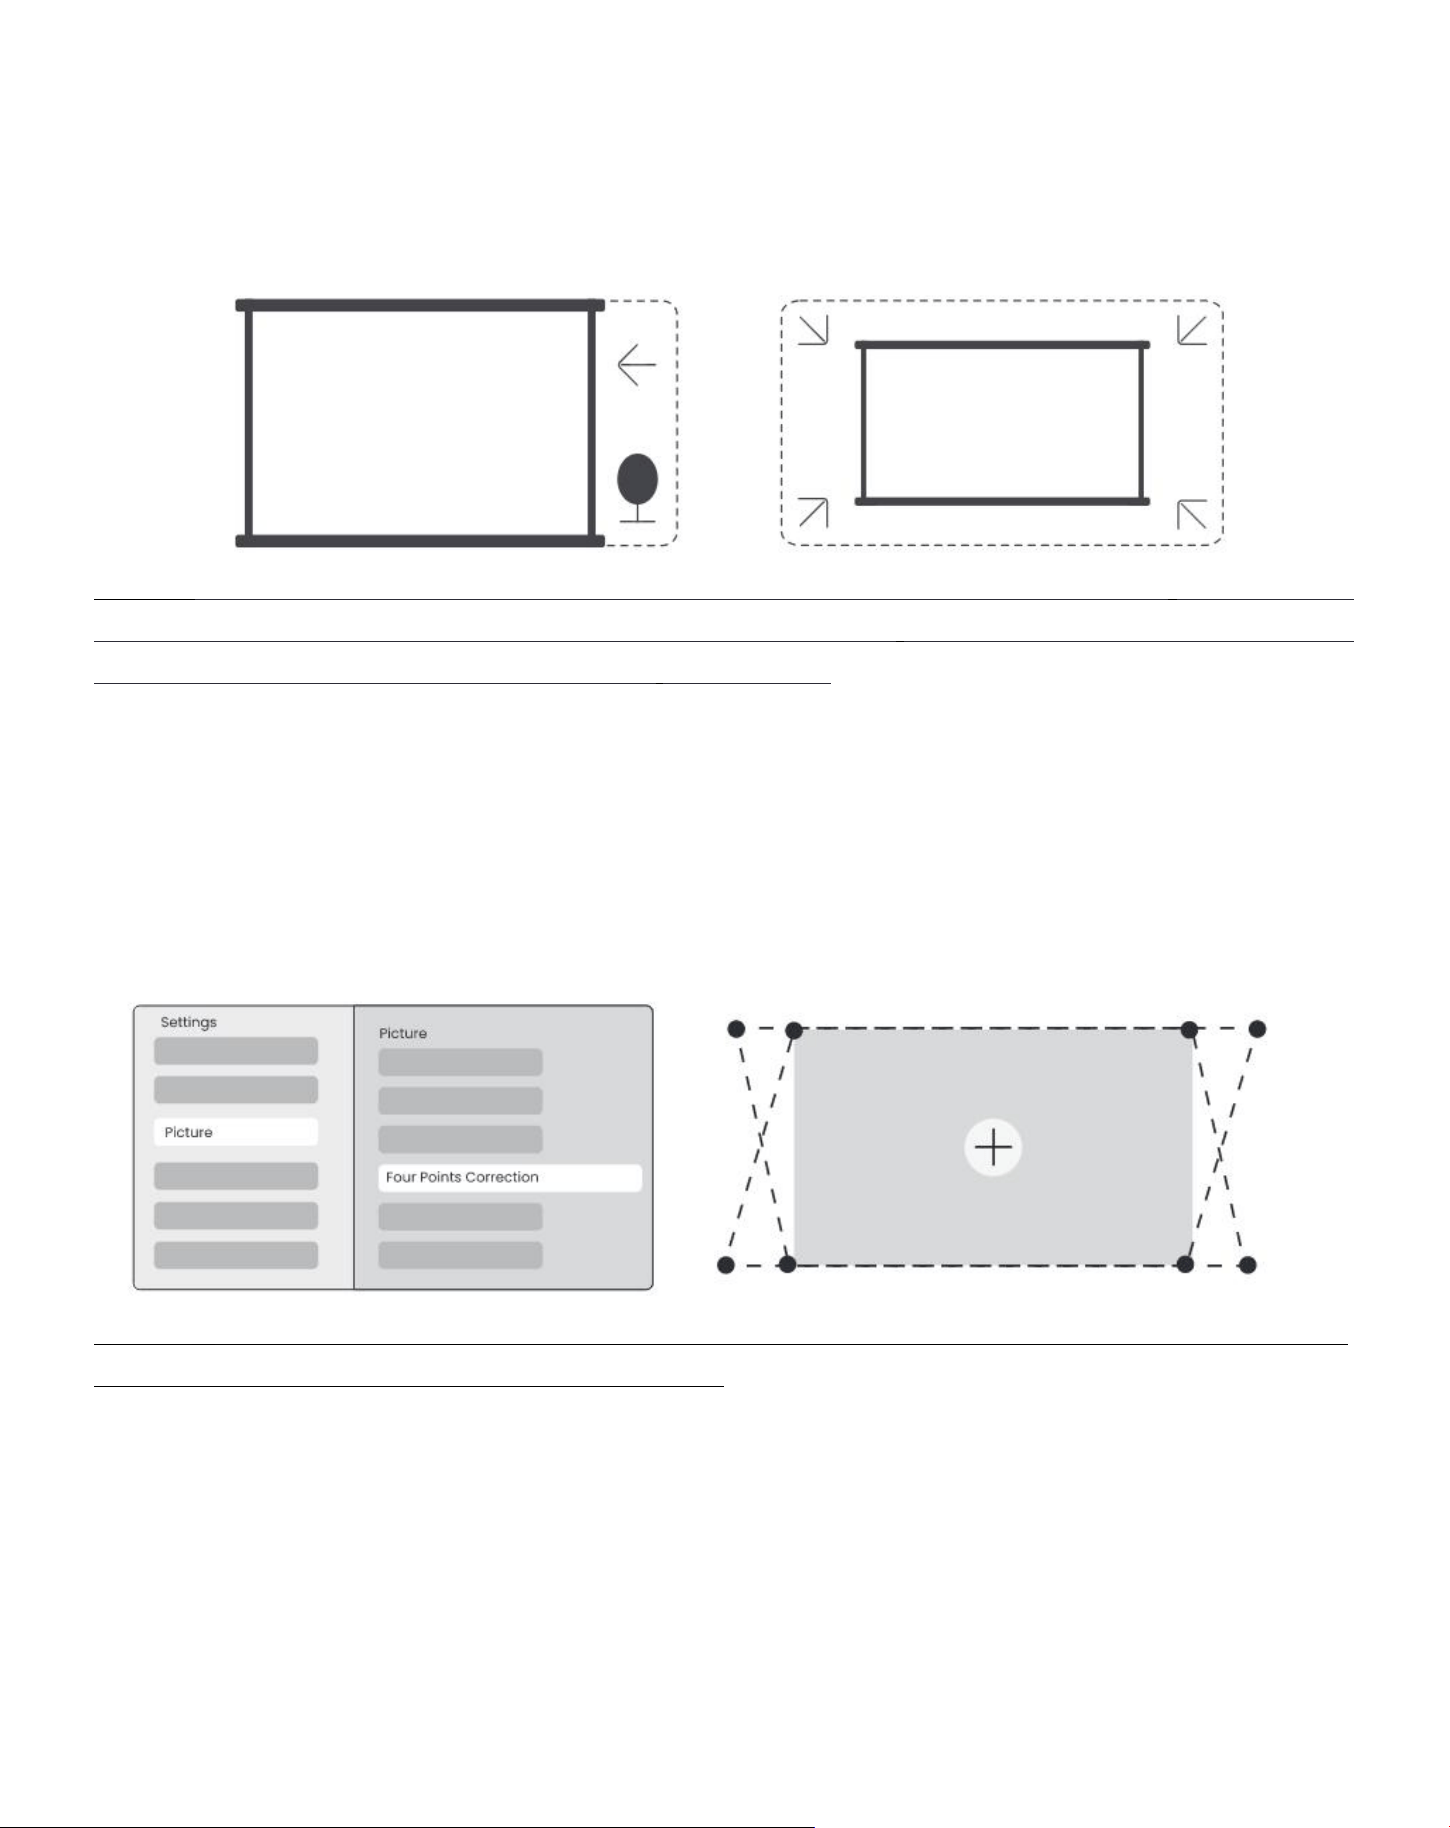
This function automatically detects obstacles in the projection path and intelligently adjusts the image angle
or position to prevent image obstruction, ensuring clear and complete projection.
Notice:
Before using the Auto Screen Fitting and Auto Obstacle Avoidance functions, make sure the
Auto Keystone and Auto Focus functions are turned on. Obstacle avoidance may not work when there
are white or other light-colored objects in the target screen.
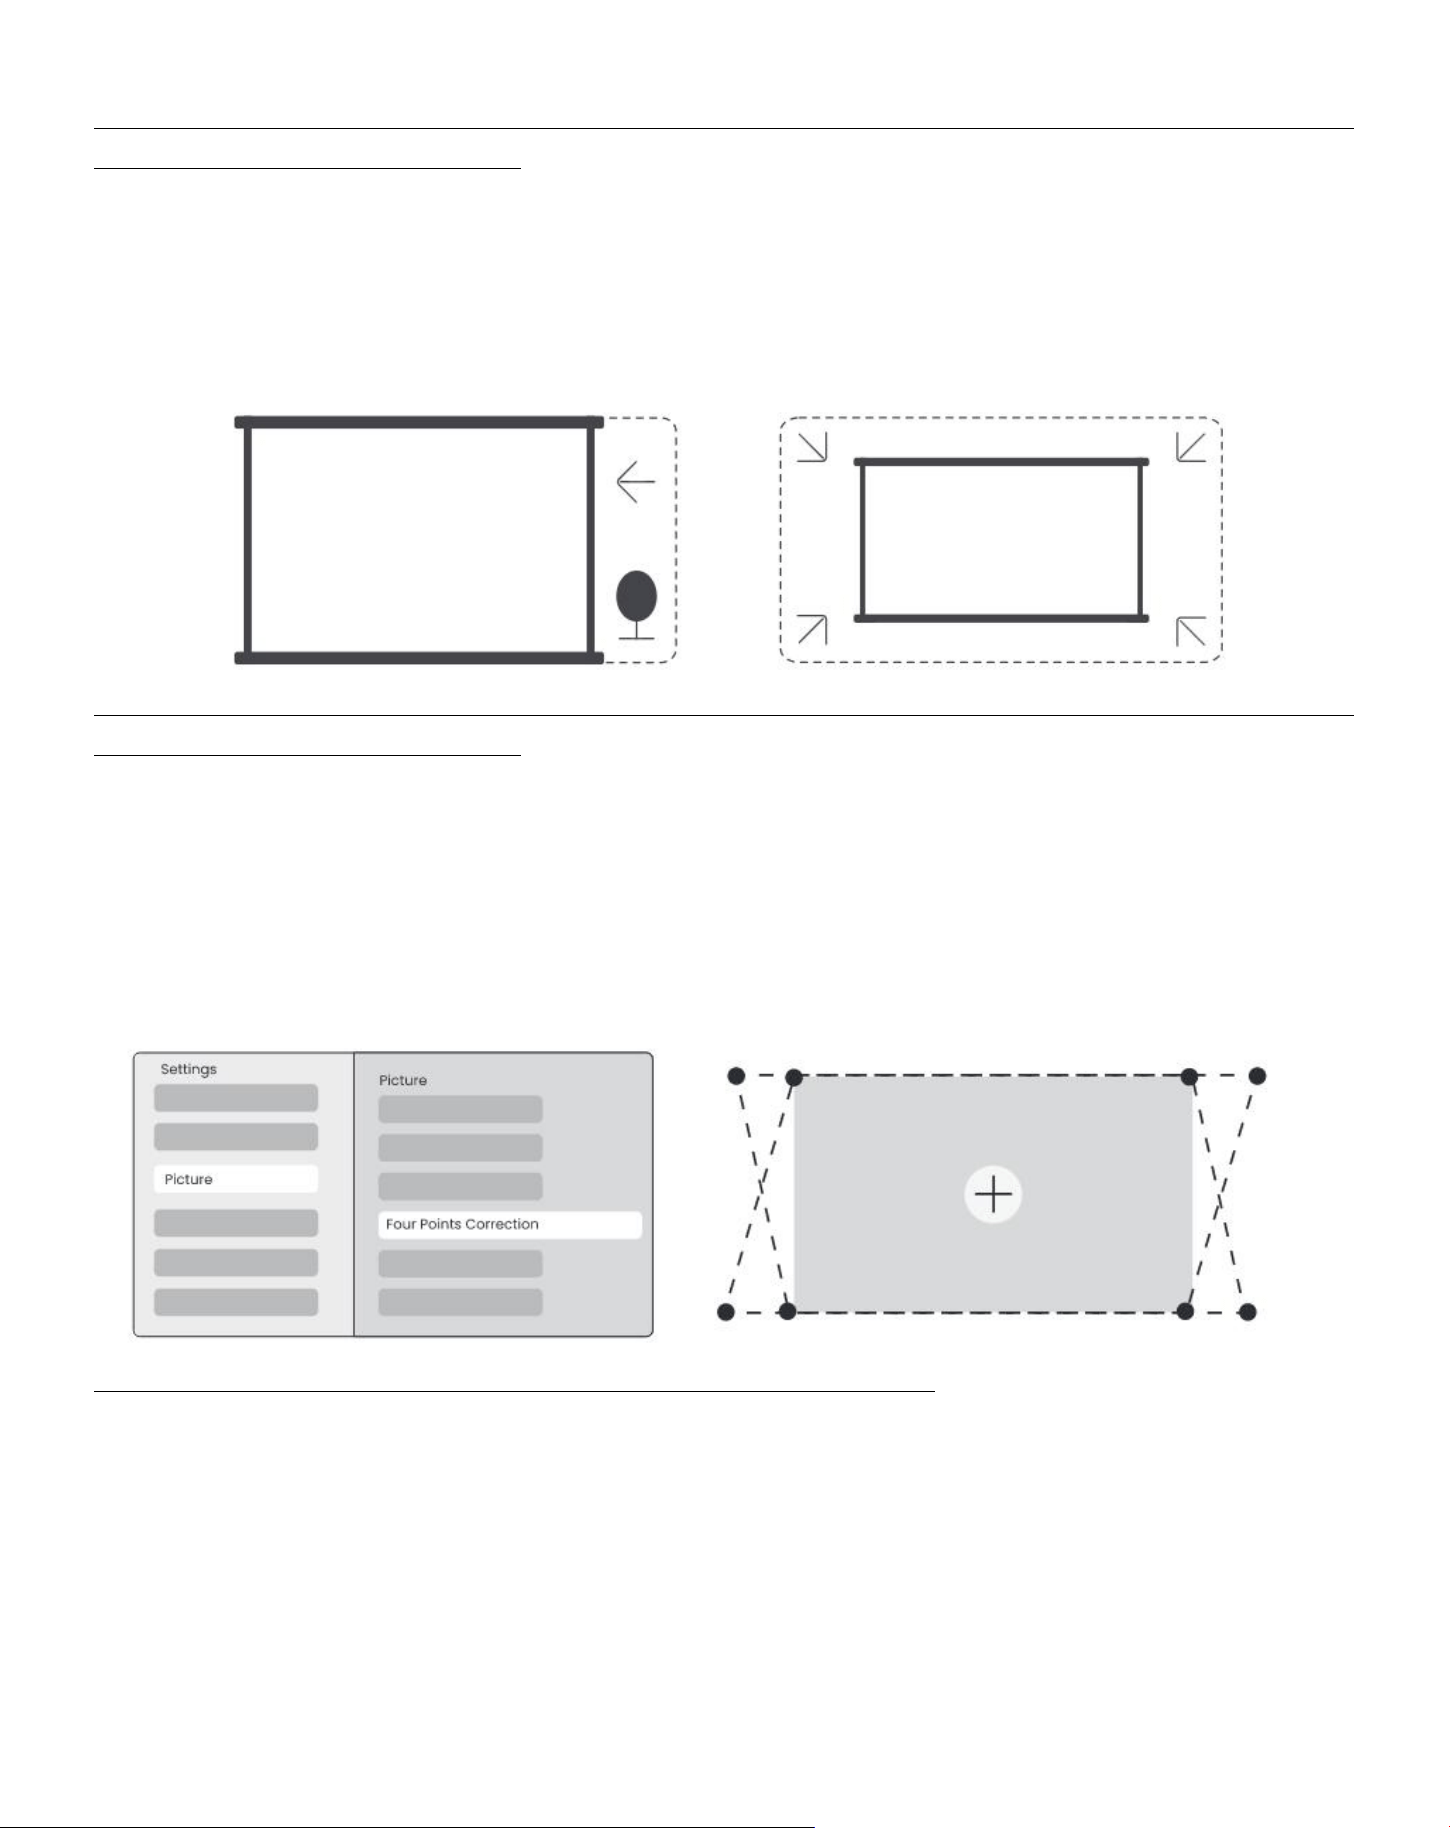
8.3.5 Manual Keystone Correction
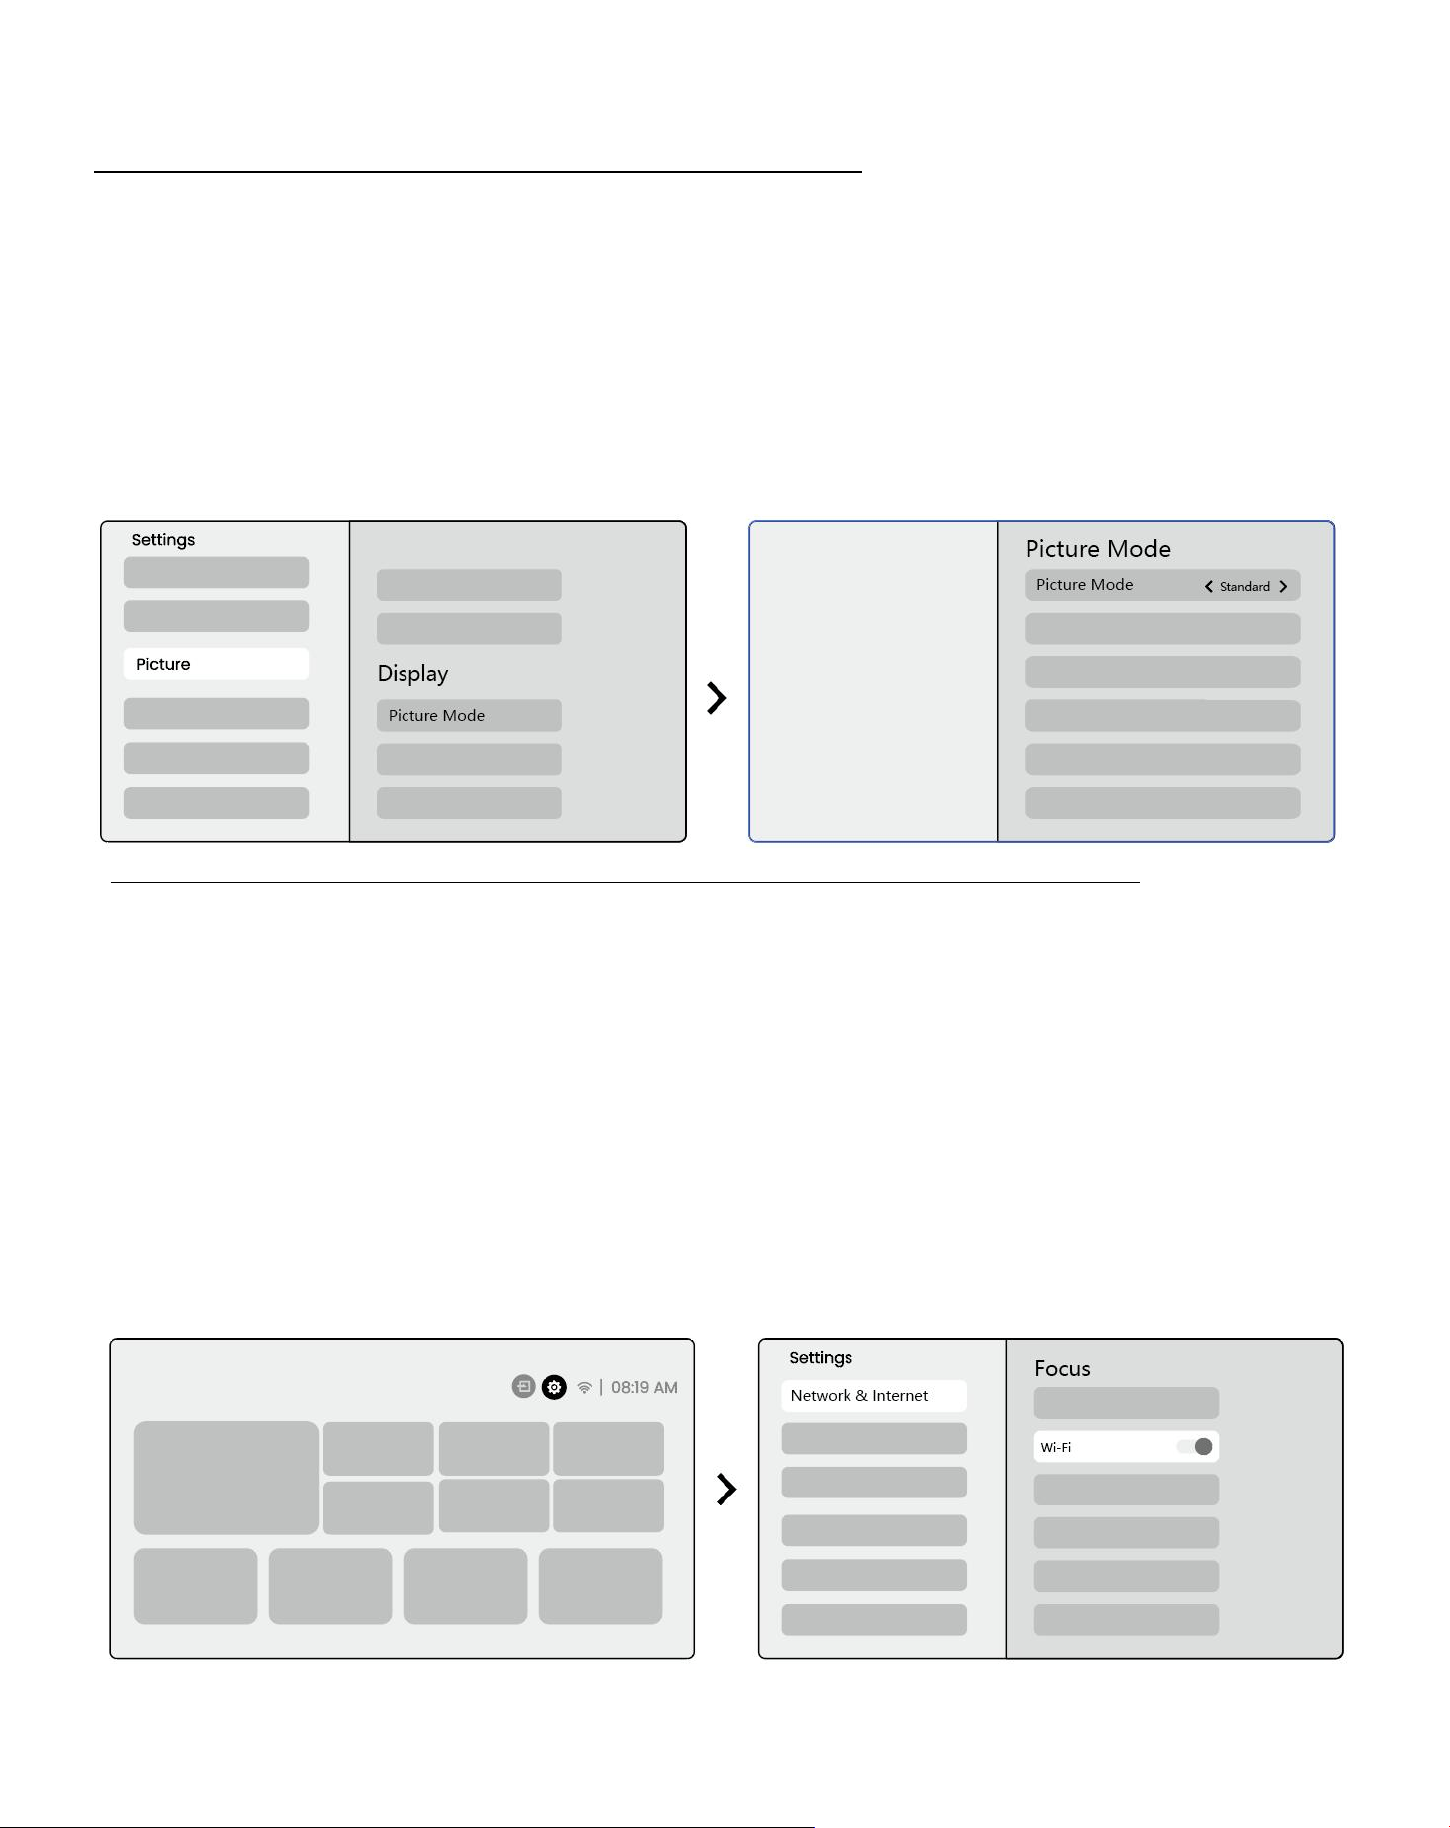
If you need to further adjust the screen, you can use the Manual Keystone Correction feature.
Step1: please go to homepage -> select the Settings [ ⚙] -> select [Picture]
Step2: In [Picture]-> select [
Four Points Correction
] ->
adjust the screen by dragging the arrows.
Notice
:
Please make sure the projector does not tilt more than 15 degrees vertically or horizontally.
Please ensure the automatic focus work effectively.
8.4 Image Zoom
You can adjust the size of the image according to your needs.
Step1: please go to homepage -> select the Settings [ ⚙] -> select [Picture]
Step2: In [Picture] ->
select [Image Zoom] ->
Use the up and down arrow keys to manually adjust the Zoom until
13
the image is desired.(附示意图)
Tips:The recommended screen size is between 60 to 100 inches.
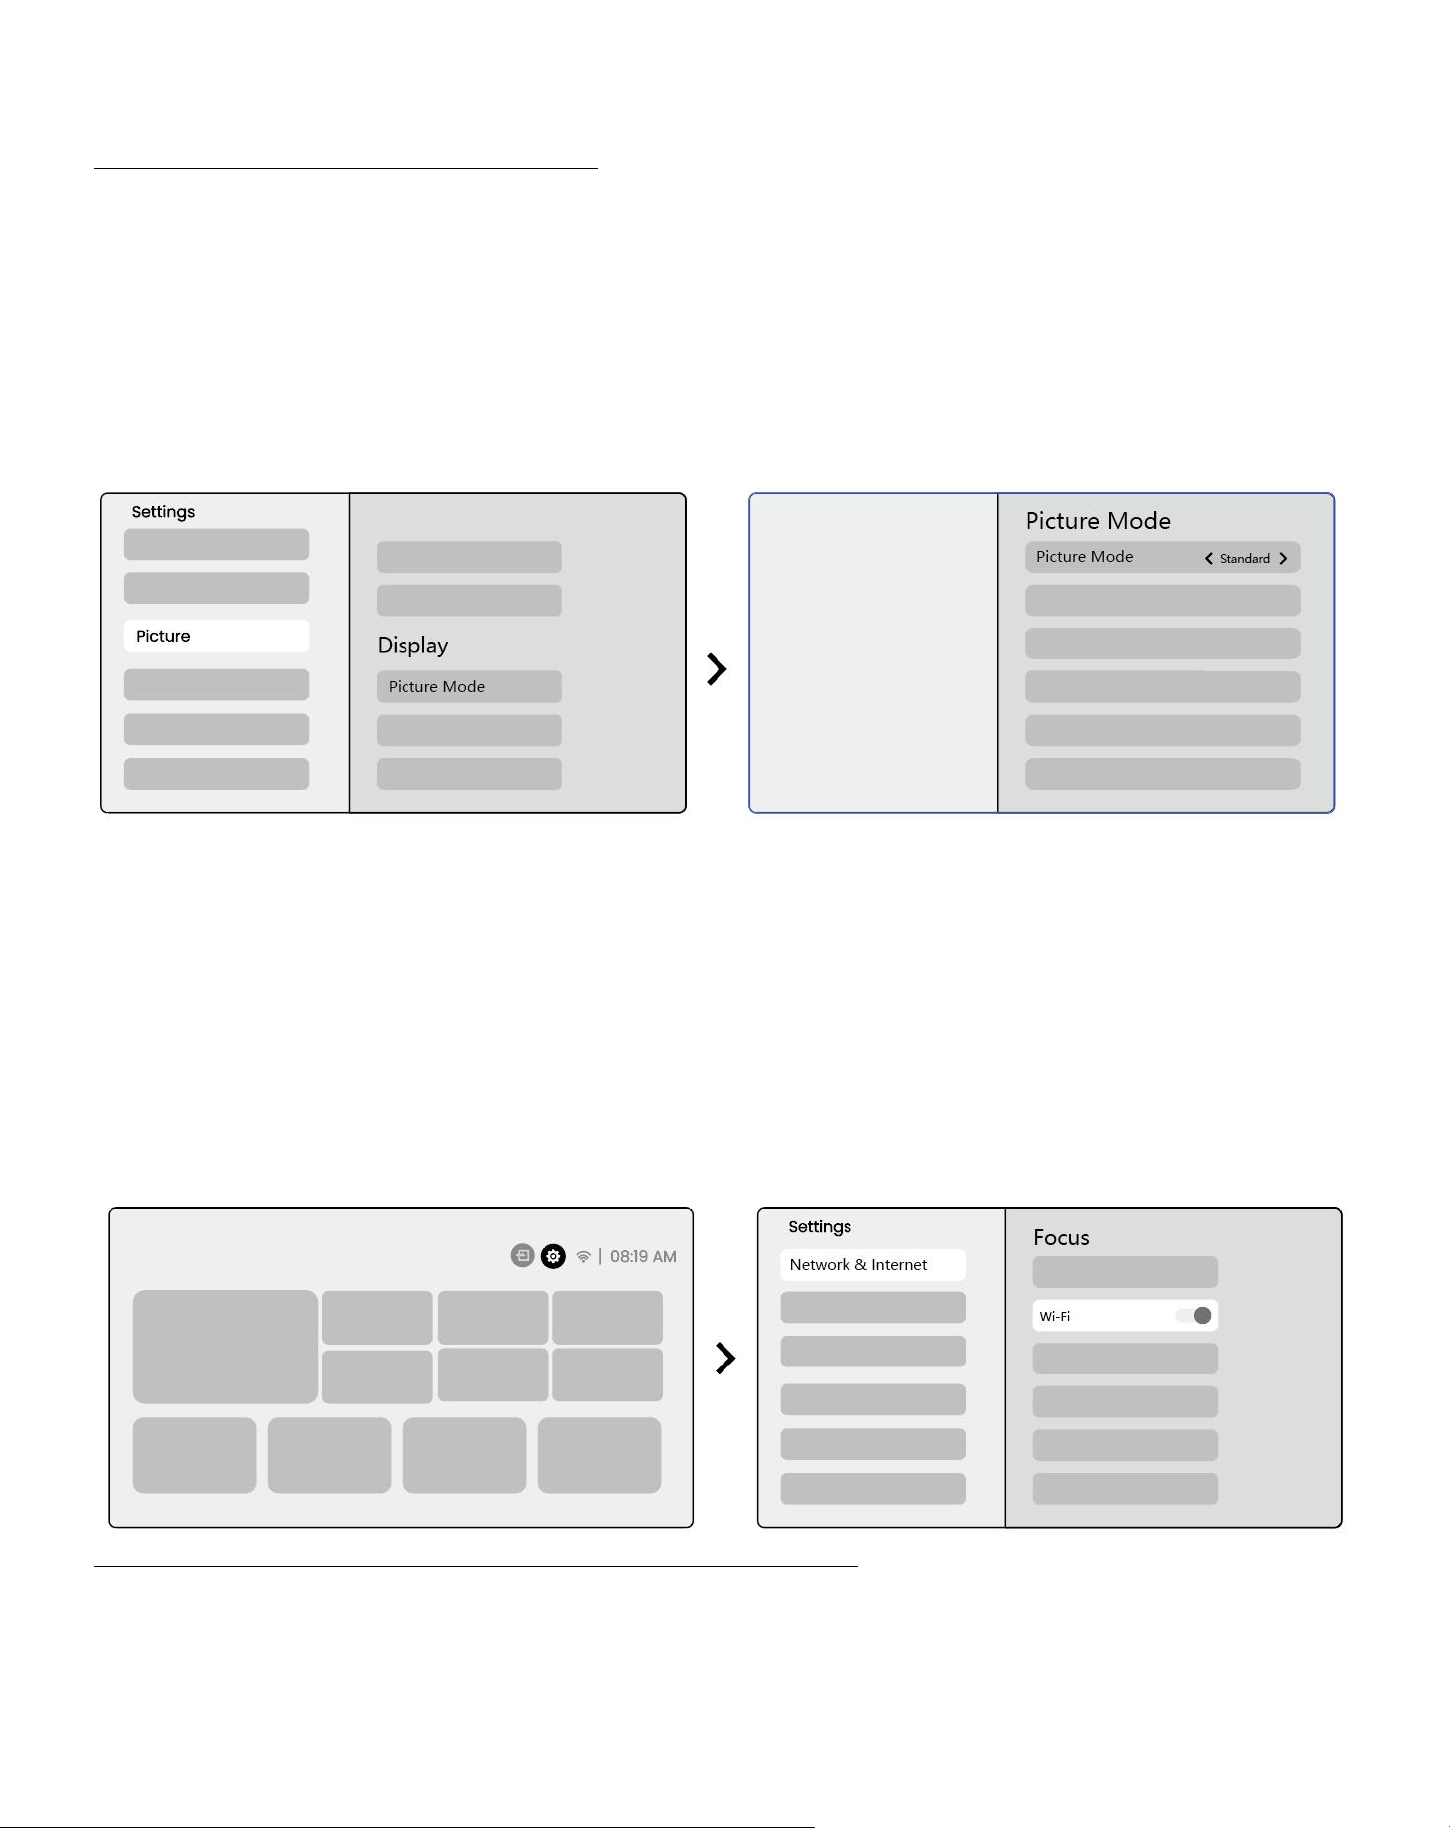
8.5 Display
You can adjust the Picture Mode according to your needs.
Step1: please go to homepage -> select the Settings [ ⚙] -> select [Picture]
Step2: In [Picture] ->
select [
Picture Mode
]
Attention: The Image color setting will only take effect when playing pictures or videos.
9
Screen Mirroring
9.1 WiFi Settings
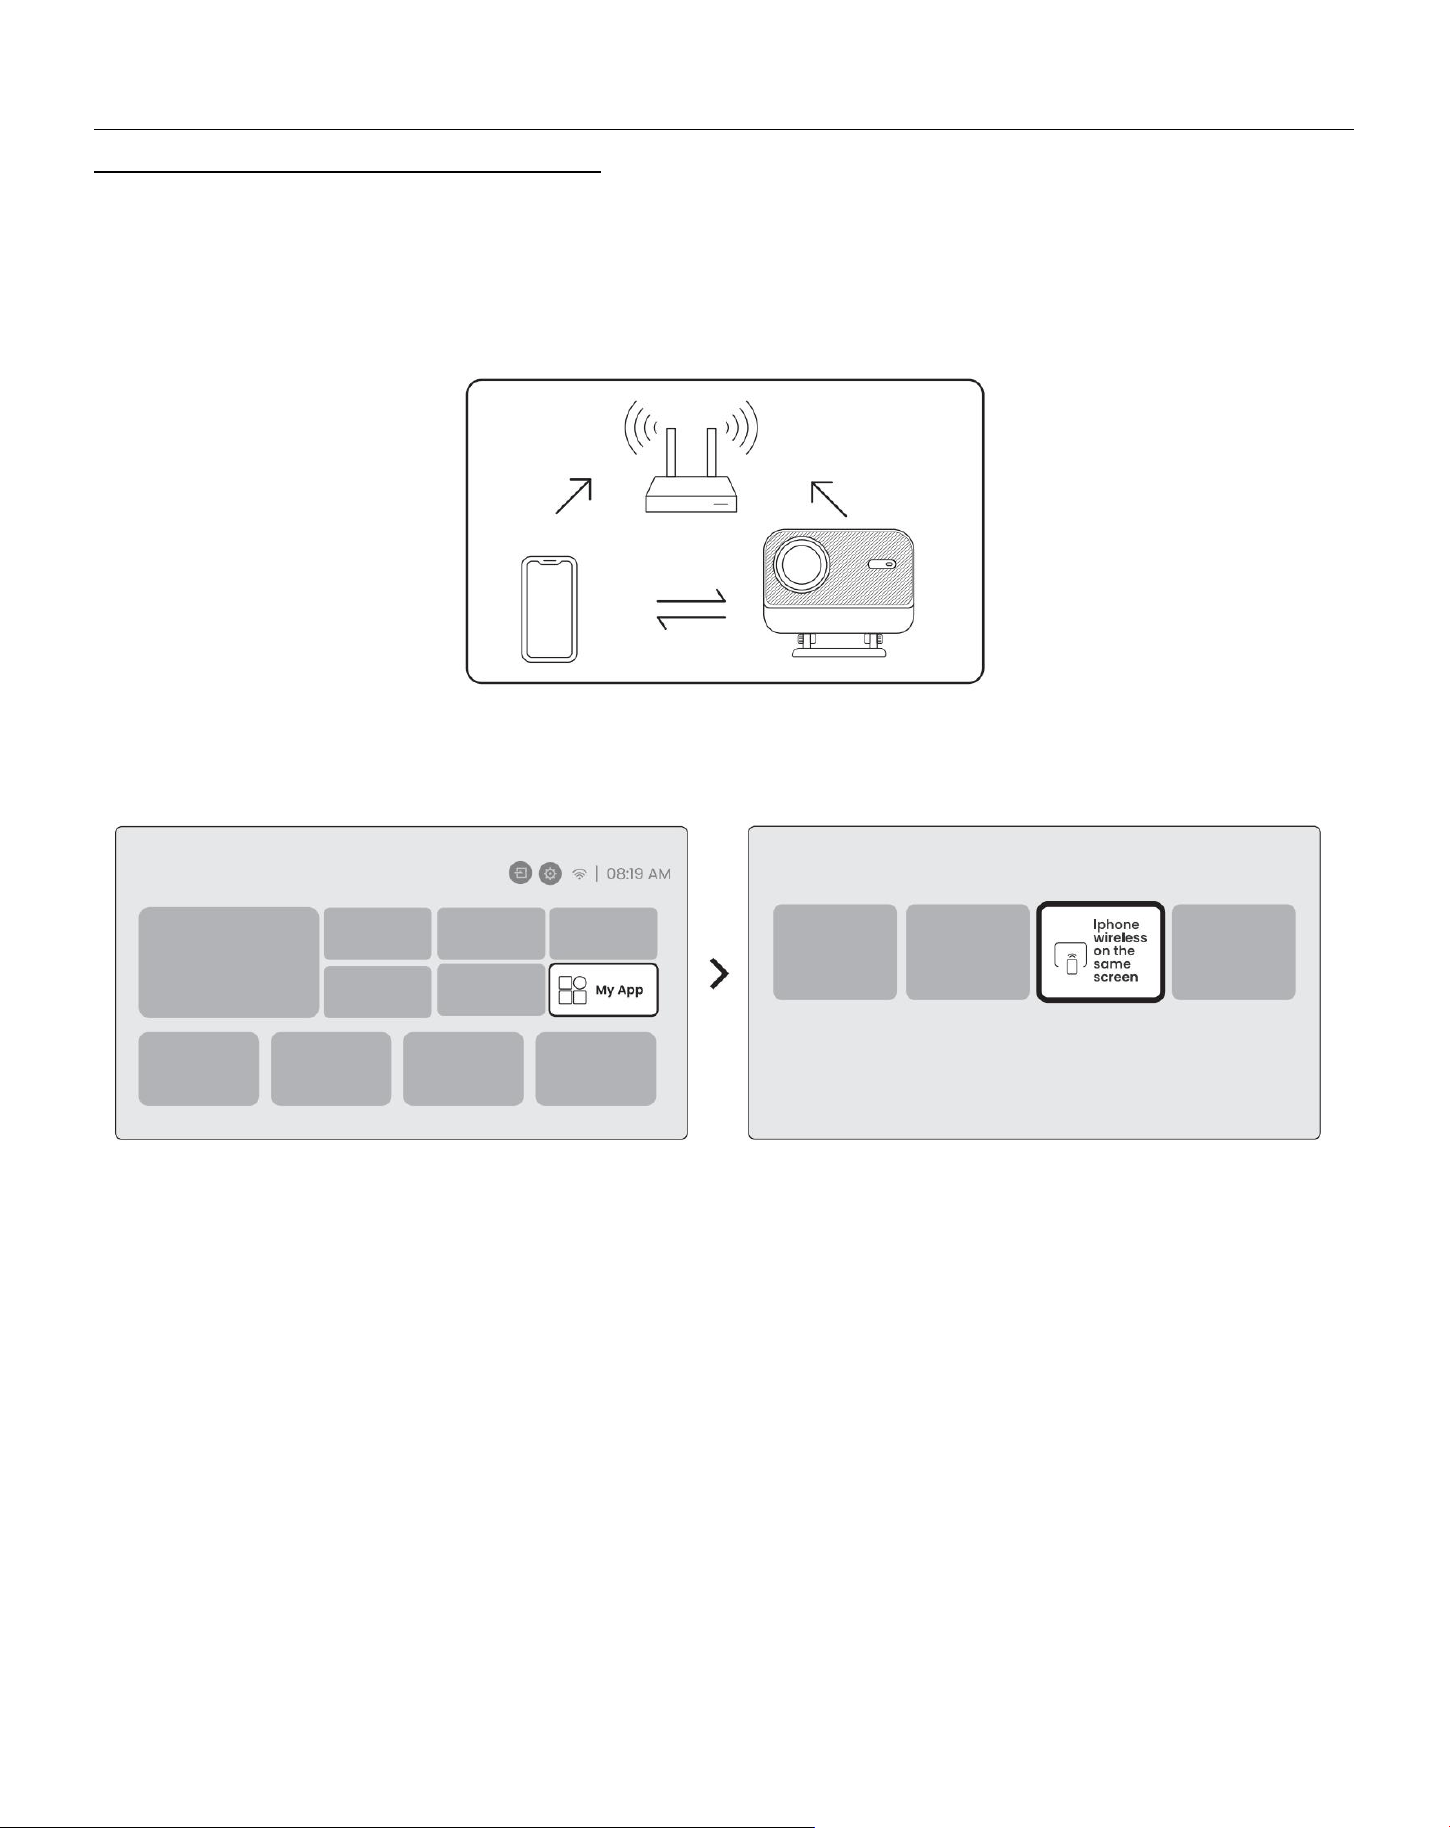
Step1: Press the Settings [ ⚙] button -> Select [Network & Internet] -> Turn on [Internet Connection]
button -> Select [Wi-Fi]
Step2: In [Available Networks] list-> Search your desired Wi-Fi network -> enter the password -> Select
[OK]-> Wait for the projector to connect.
14
Notice: The smoothness of screen mirroring will be affected by the network environment. It is
recommended to use a faster bandwidth.
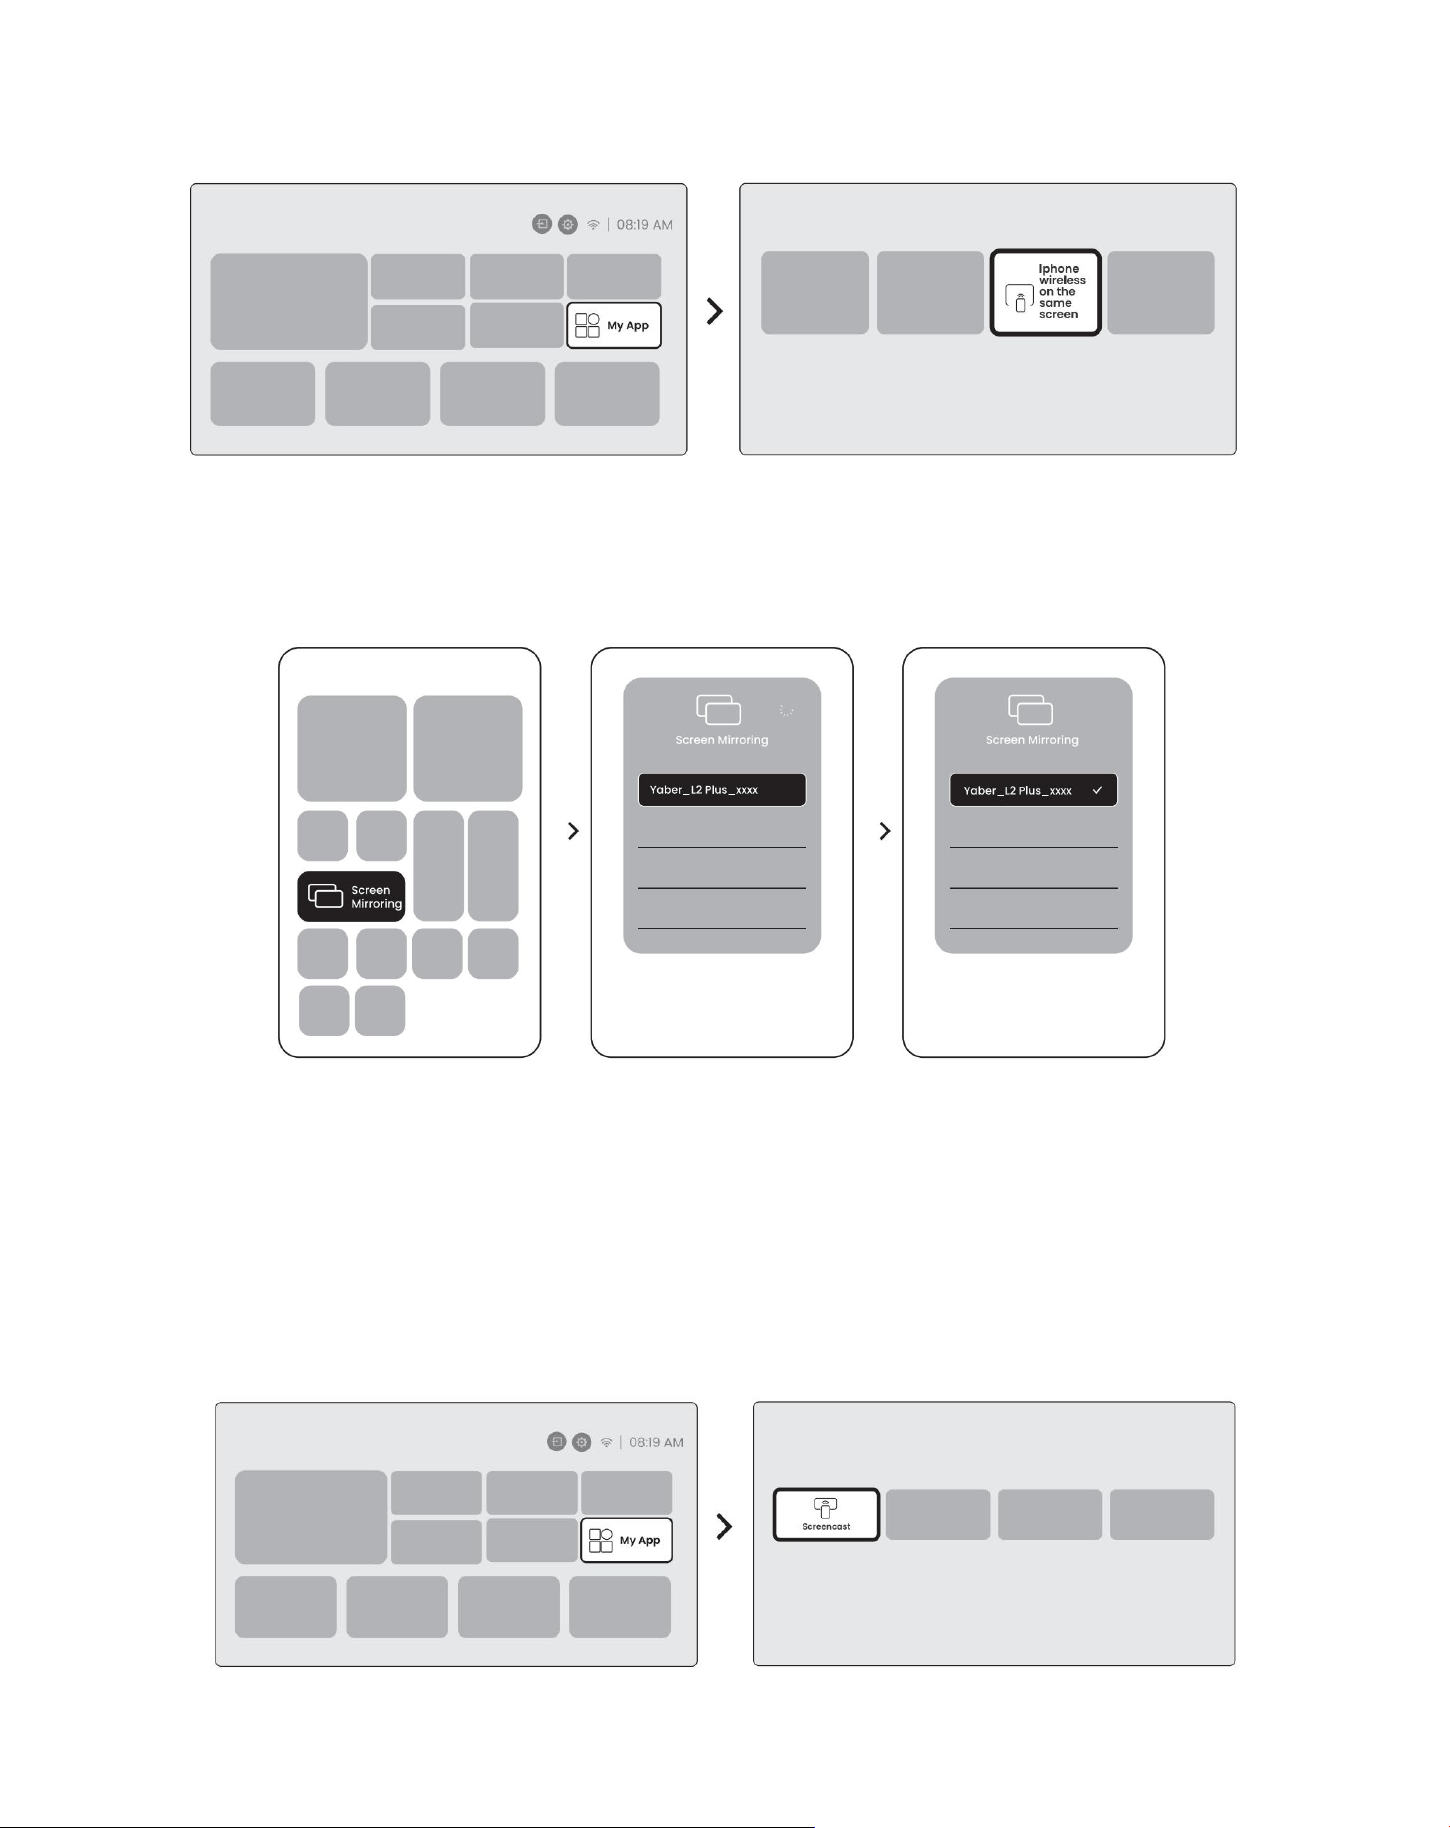
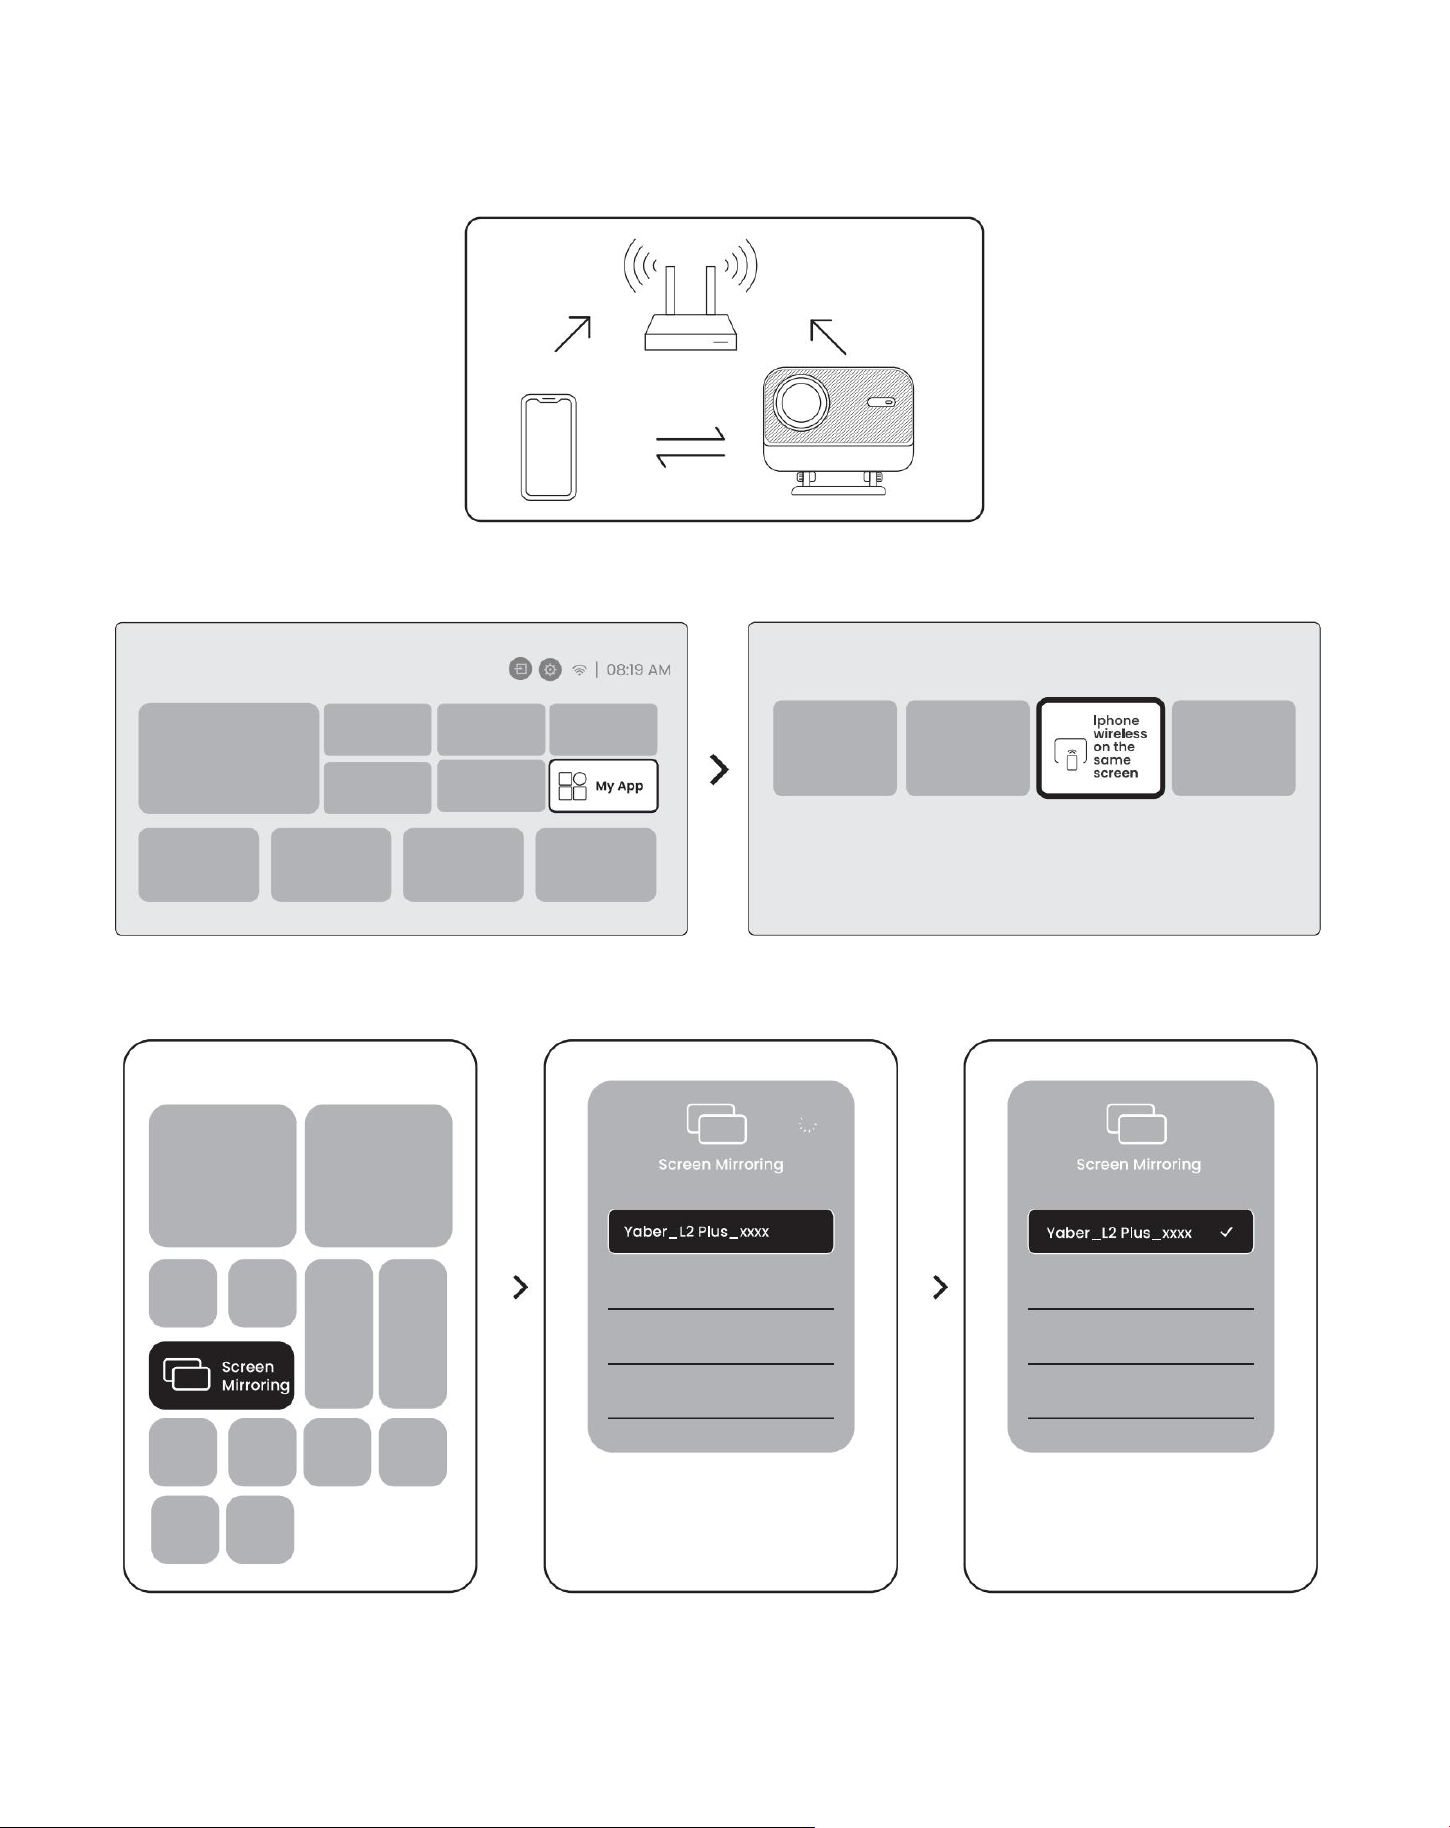
9.2.1 iOS Cast (For iOS Devices)
Step1: Ensure Compatibility and Network Connection: Make sure your iOS device and the L2 Plus Plus are
connected to the same Wi-Fi network.
Step2: Go to the homepage -> select [My App] menu -> press [iPhone wireless onthe same screen]-> Enter
and stay on the [iPhone wireless on the same
screen]page.
Step3: Open [Control Center] on your iOS device -> Select the screen mirroring function -> Connect the iOS
Cast receiver named [Yaber_L2Plus_xxxx] -> Succeed.
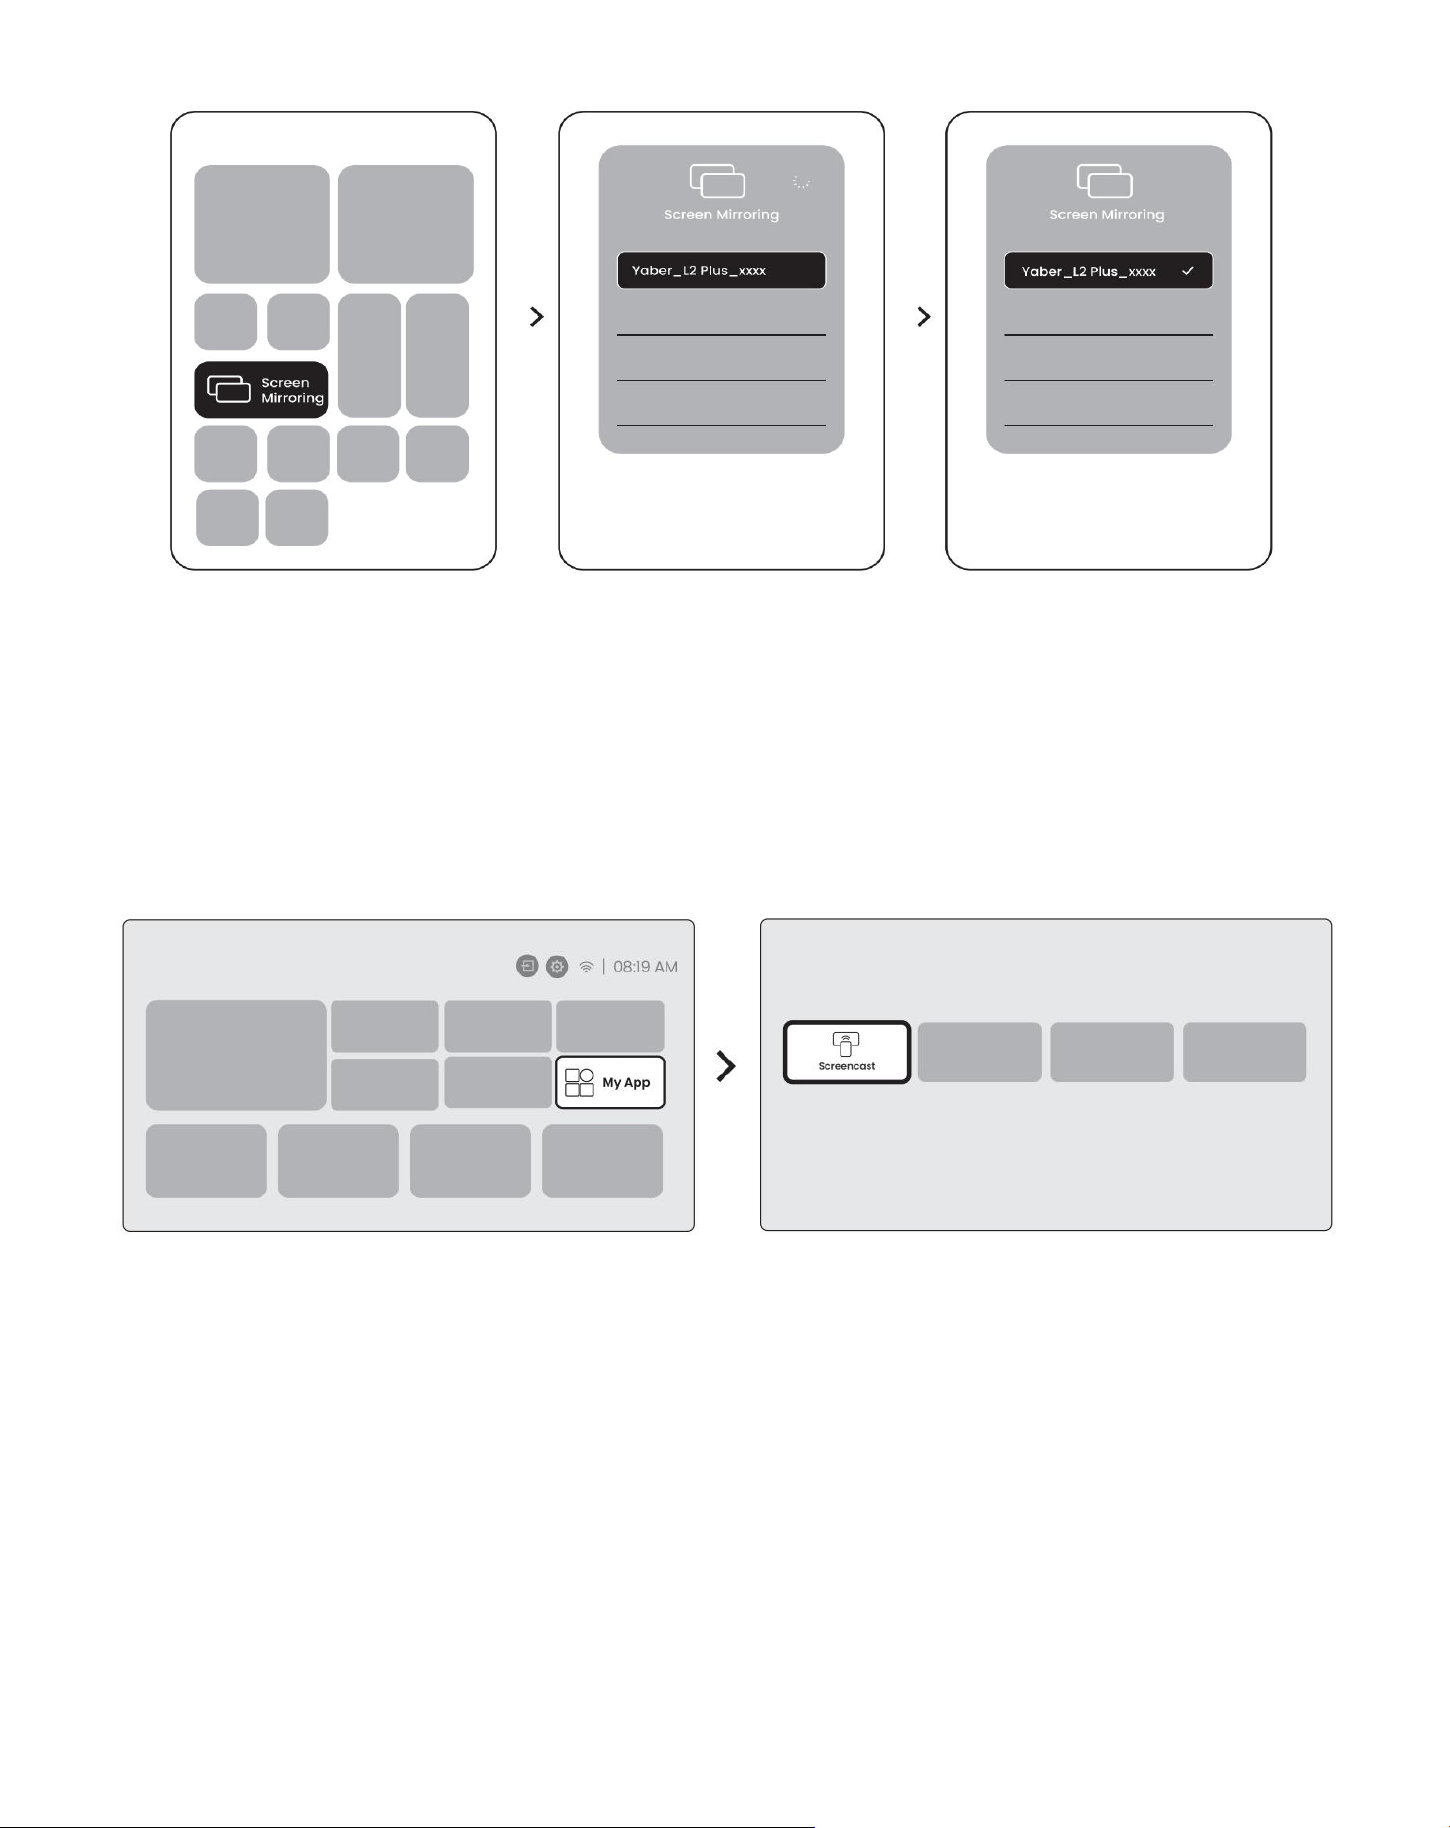
15
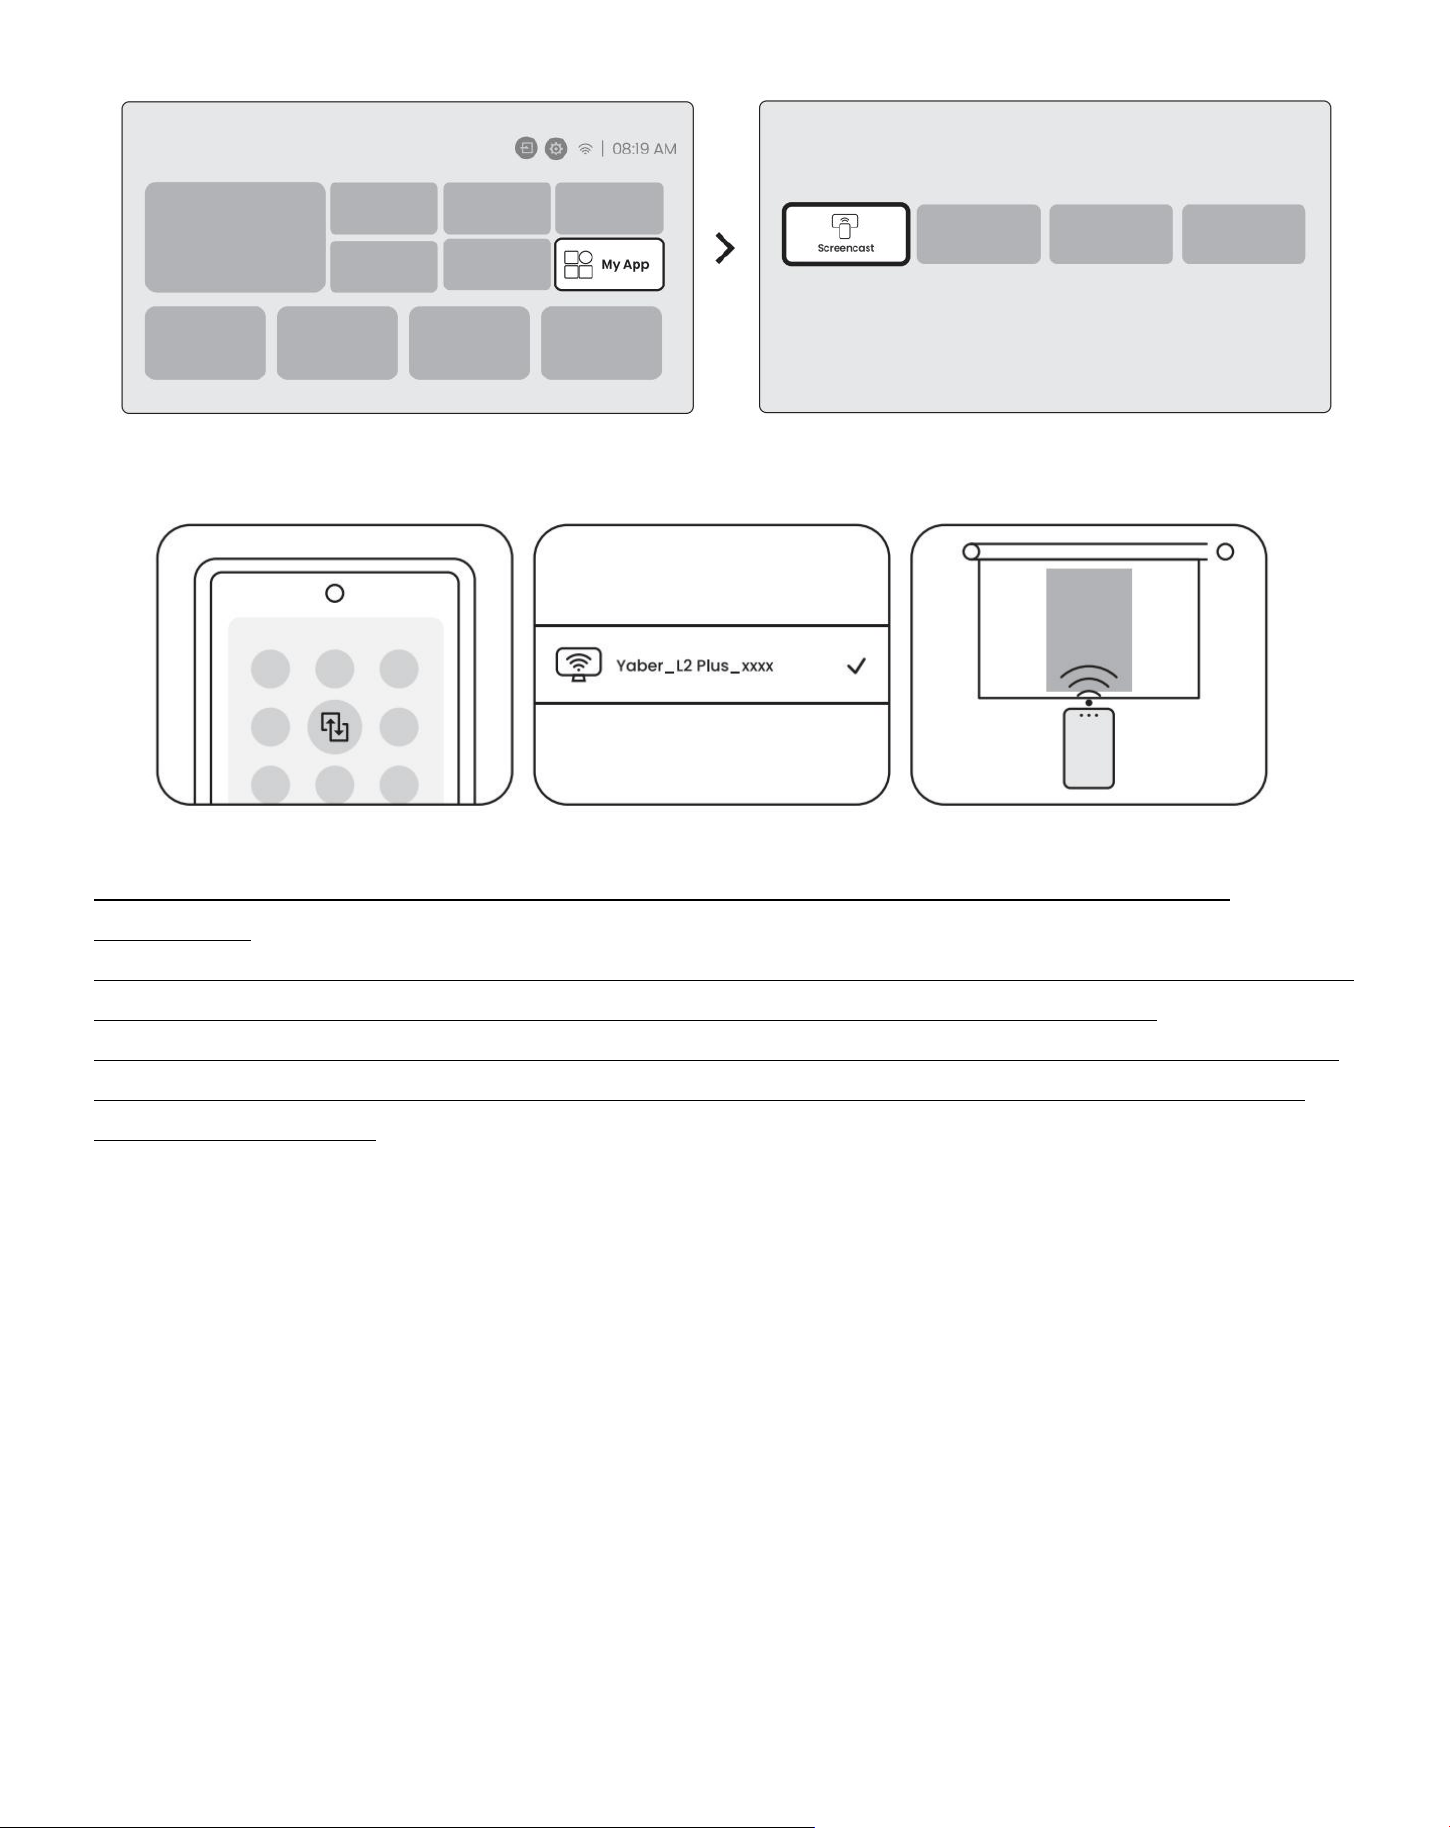
9.2.2 Miracast (For Android Devices)
Step1: Please enable the Wi-Fi function on your Android phone (Not necessary to connect to Wi-Fi).
Step2: Go to the homepage -> select the [My App] menu -> press [Screencast] ->Enter and stay on the
[Android Screen Share] page.
Step3: Access the [Control Center] on your Android device -> Select [Screen Mirroring/Smart View].Select
and connect the Miracast receiver named [Yaber_L2Plus_xxxx] ->Succeed.
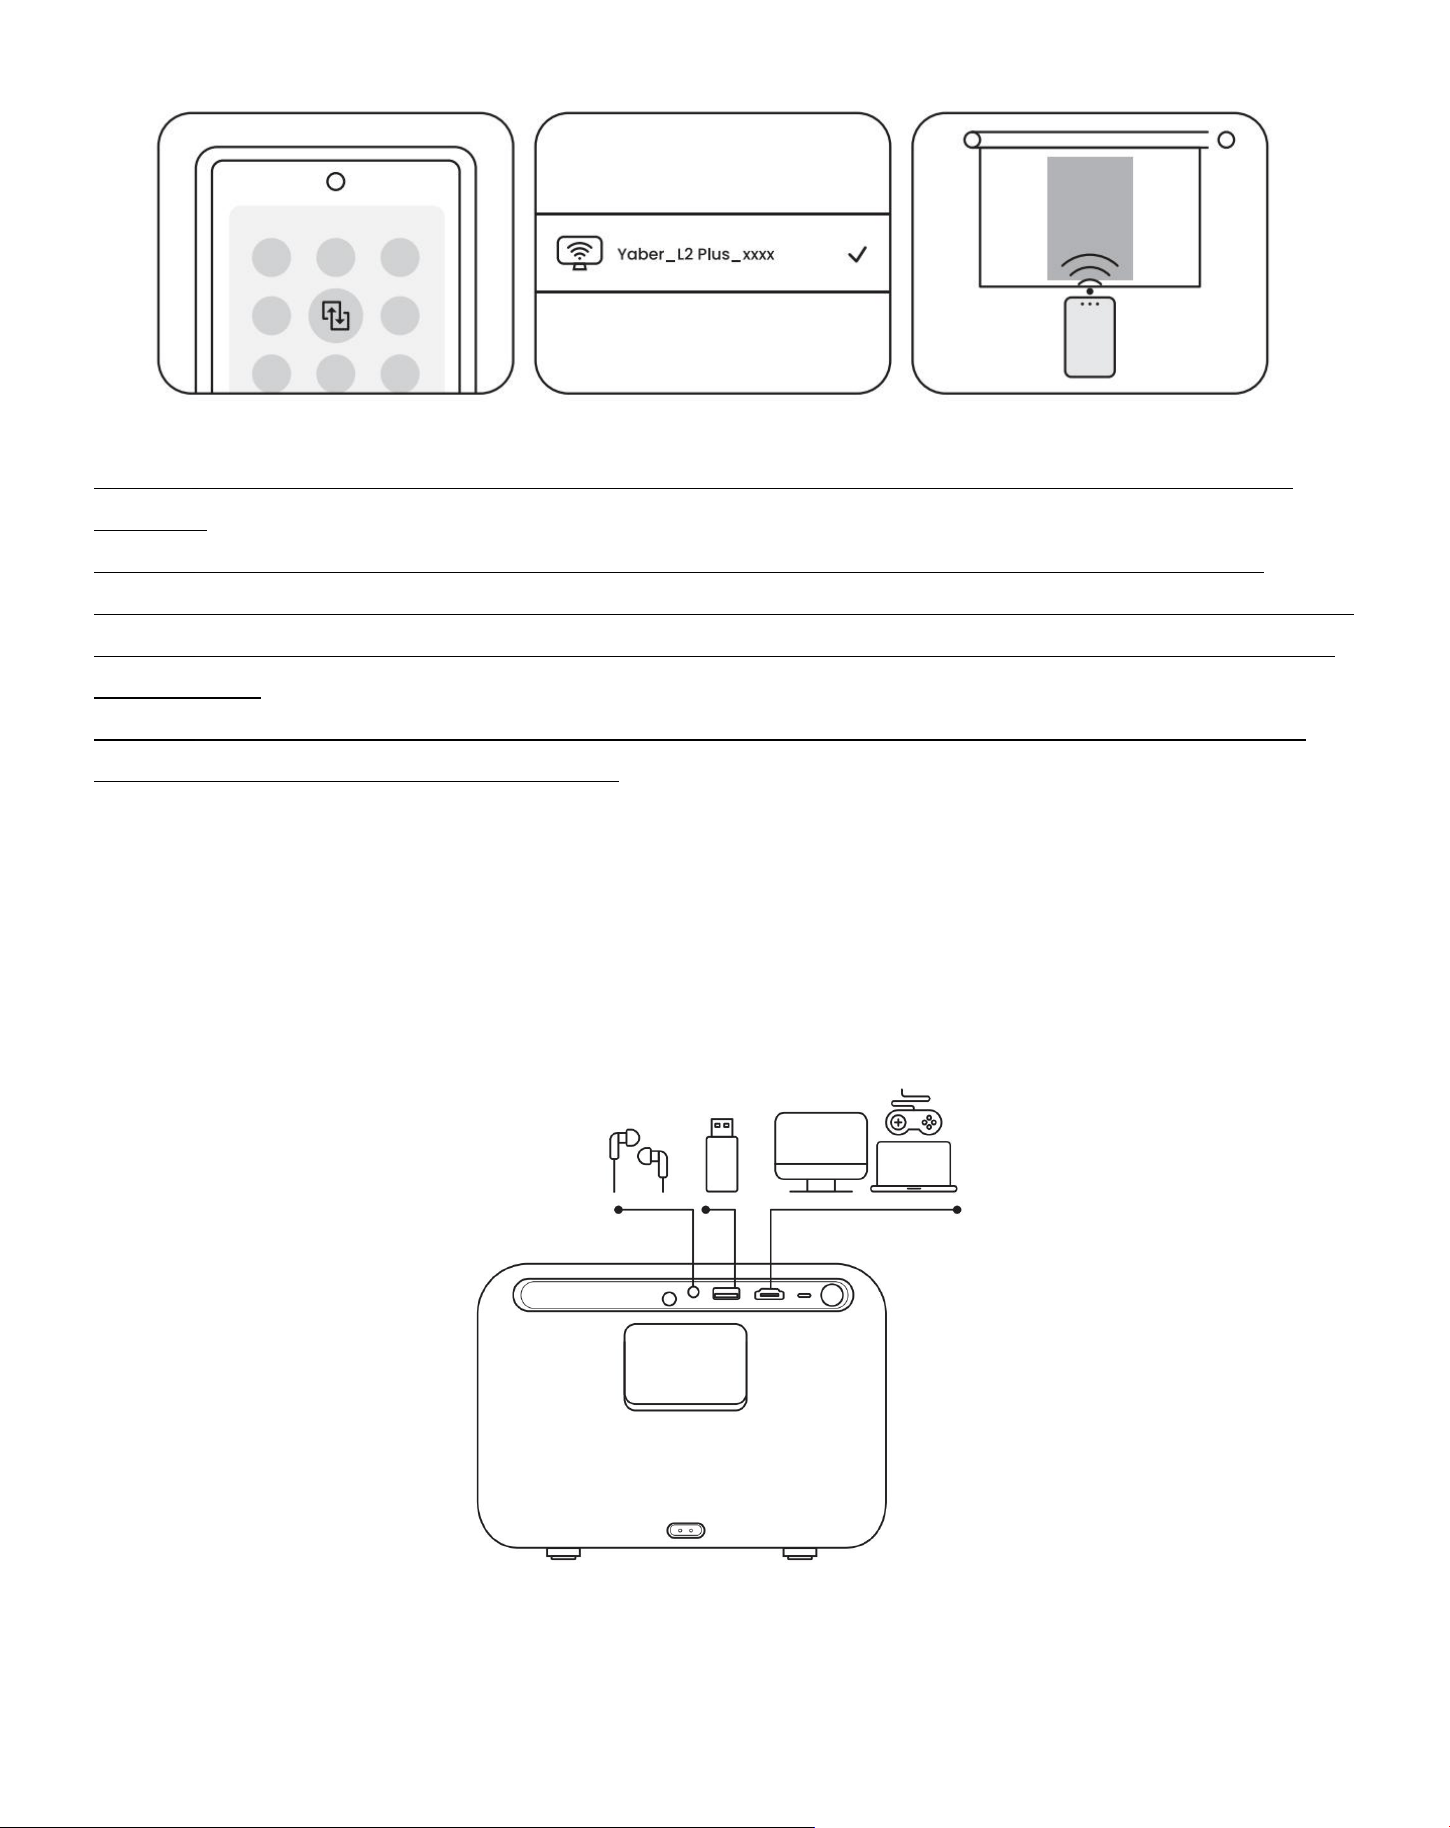
16
Notice: Some google mobile devices only support chromecast and can not be cast by Airplay or
Miracast.
Notice: Due to copyright protection, some copyrighted content (Netflix, Hulu, etc.) cannot be
mirrored directly from the phone. Need to be used with a TV stick. If you need help, please contact us.
Notice:
Mobile phone mirroring can only be realized by entering and staying on the wireless screen
sharing page.
Notice: Please ensure that your mobile device is close to the projector. The smoothness of screen
mirroring will also be affected by distance.
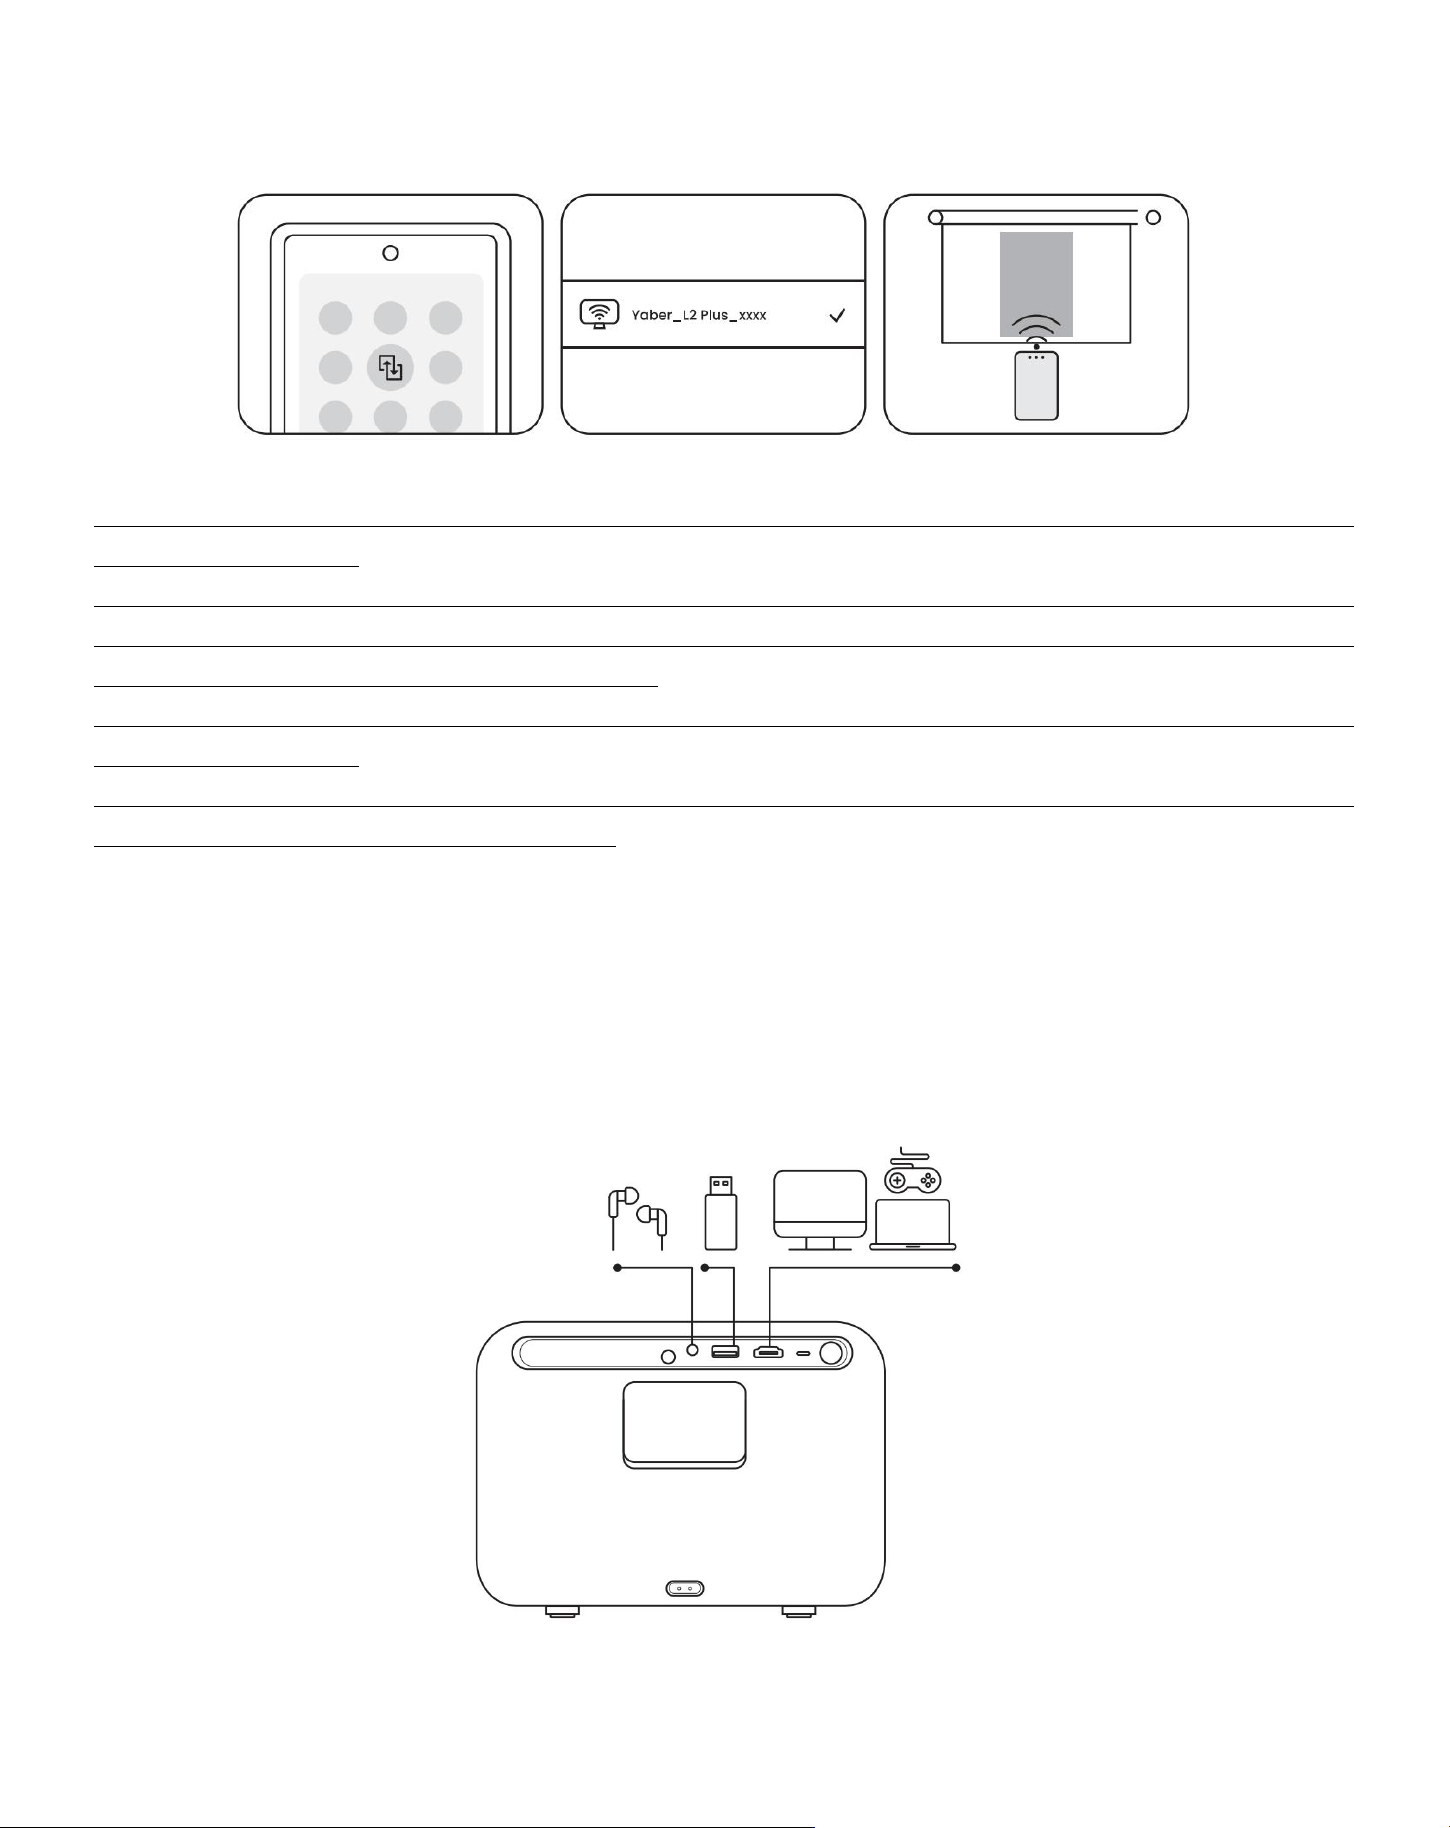
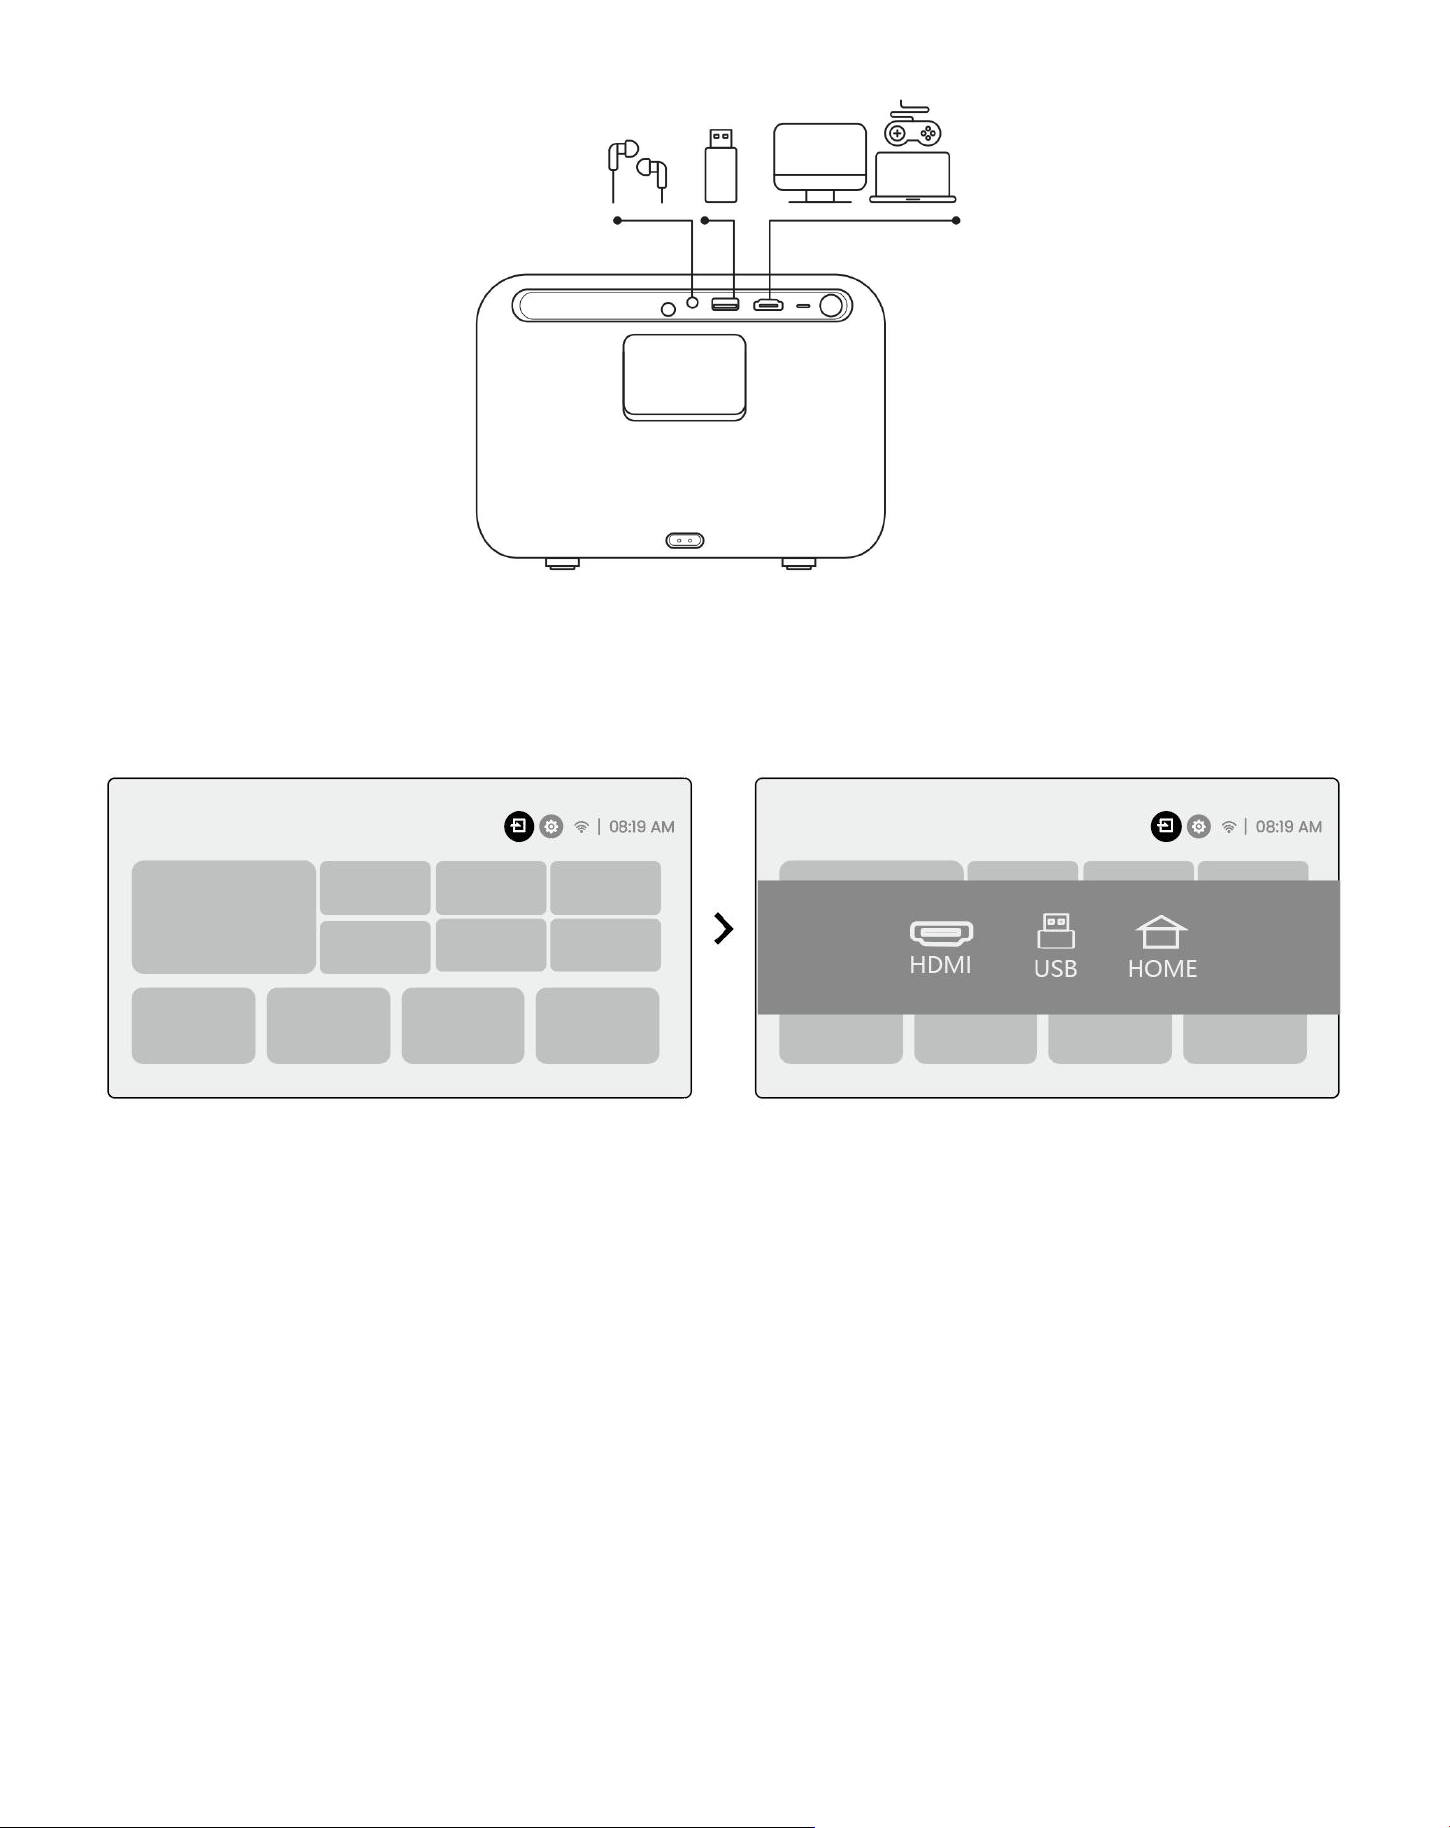
10Connectivity
10.1 HDMI, USB, 3.5mm Audio out
Yaber L2 Plus projector has 3 interfaces, HDMI port / USB port / 3.5mm audio port. Please select the right one to
connect your device (PC, Phone, DVD Player, Soundbar, USB, PS5, etc.)
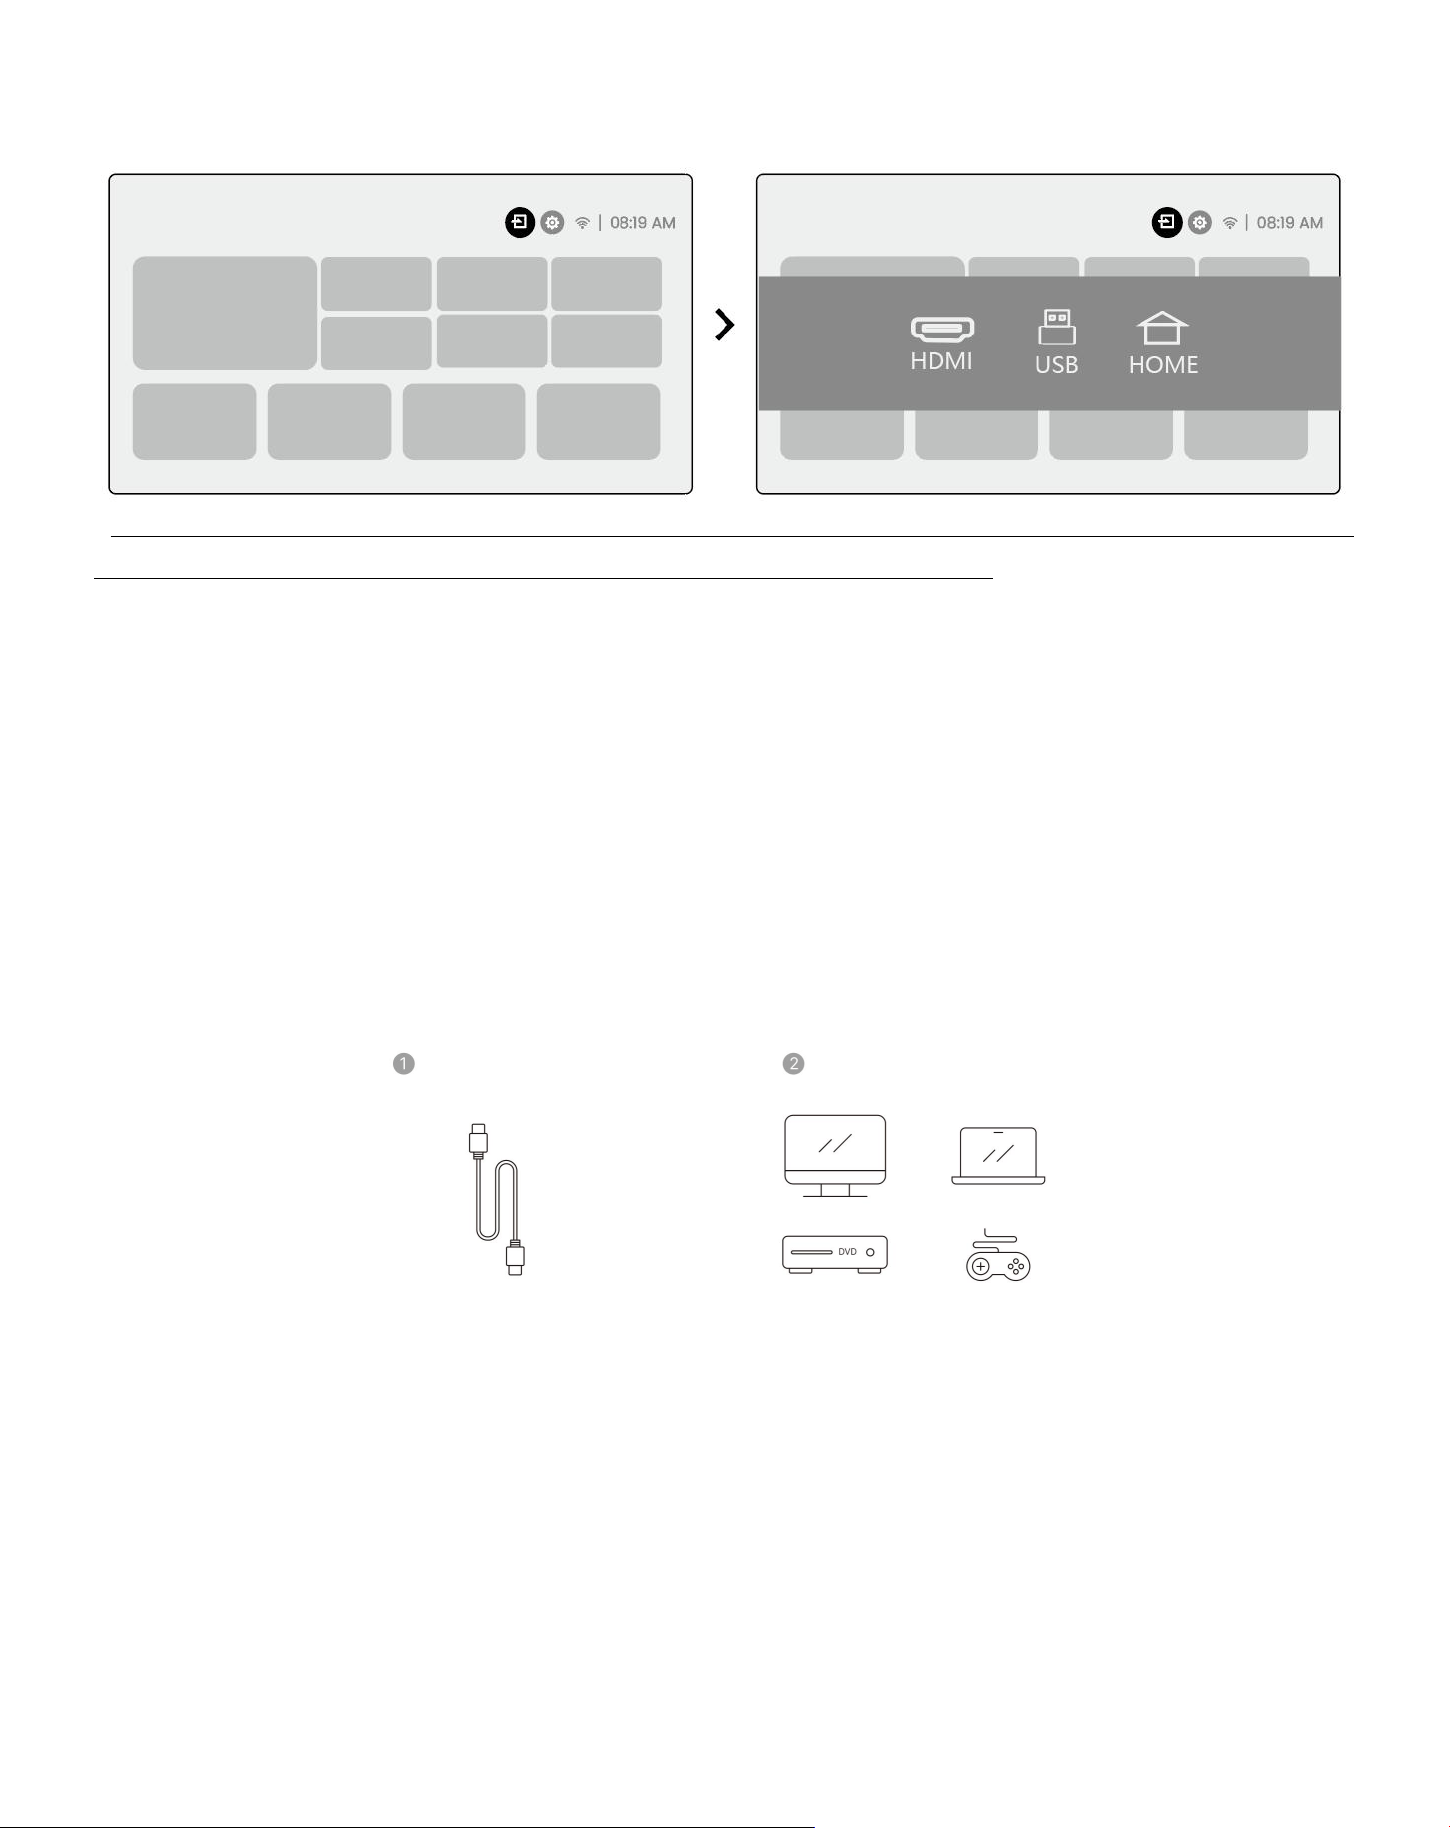
17
10.2 USB
Notice: When searching for files on the USB device, please select the correct file category from
"Video", "Music", "Image", otherwise you may not find the file you want.
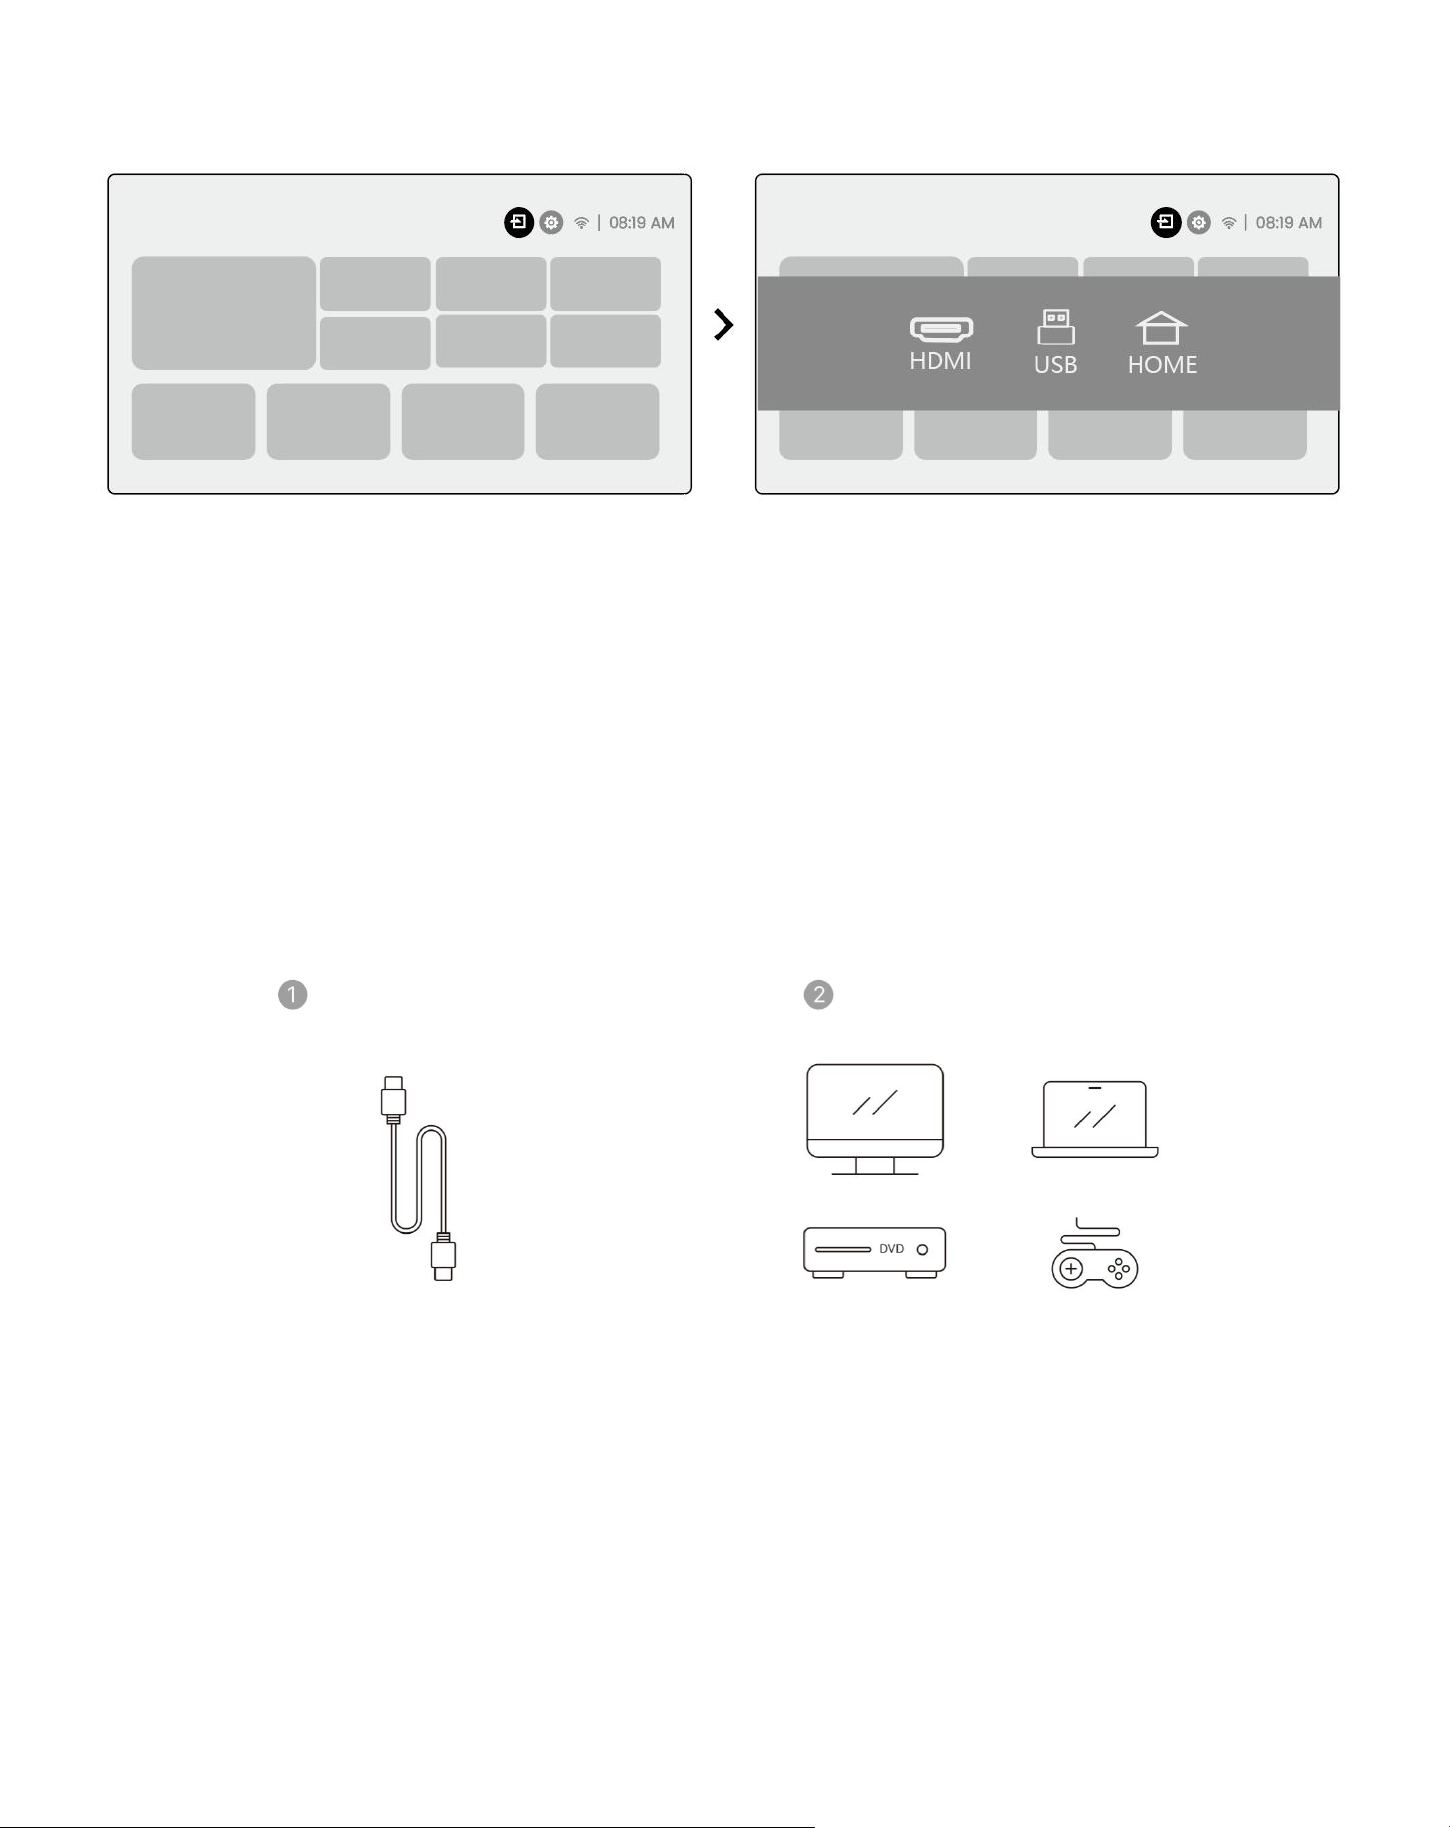
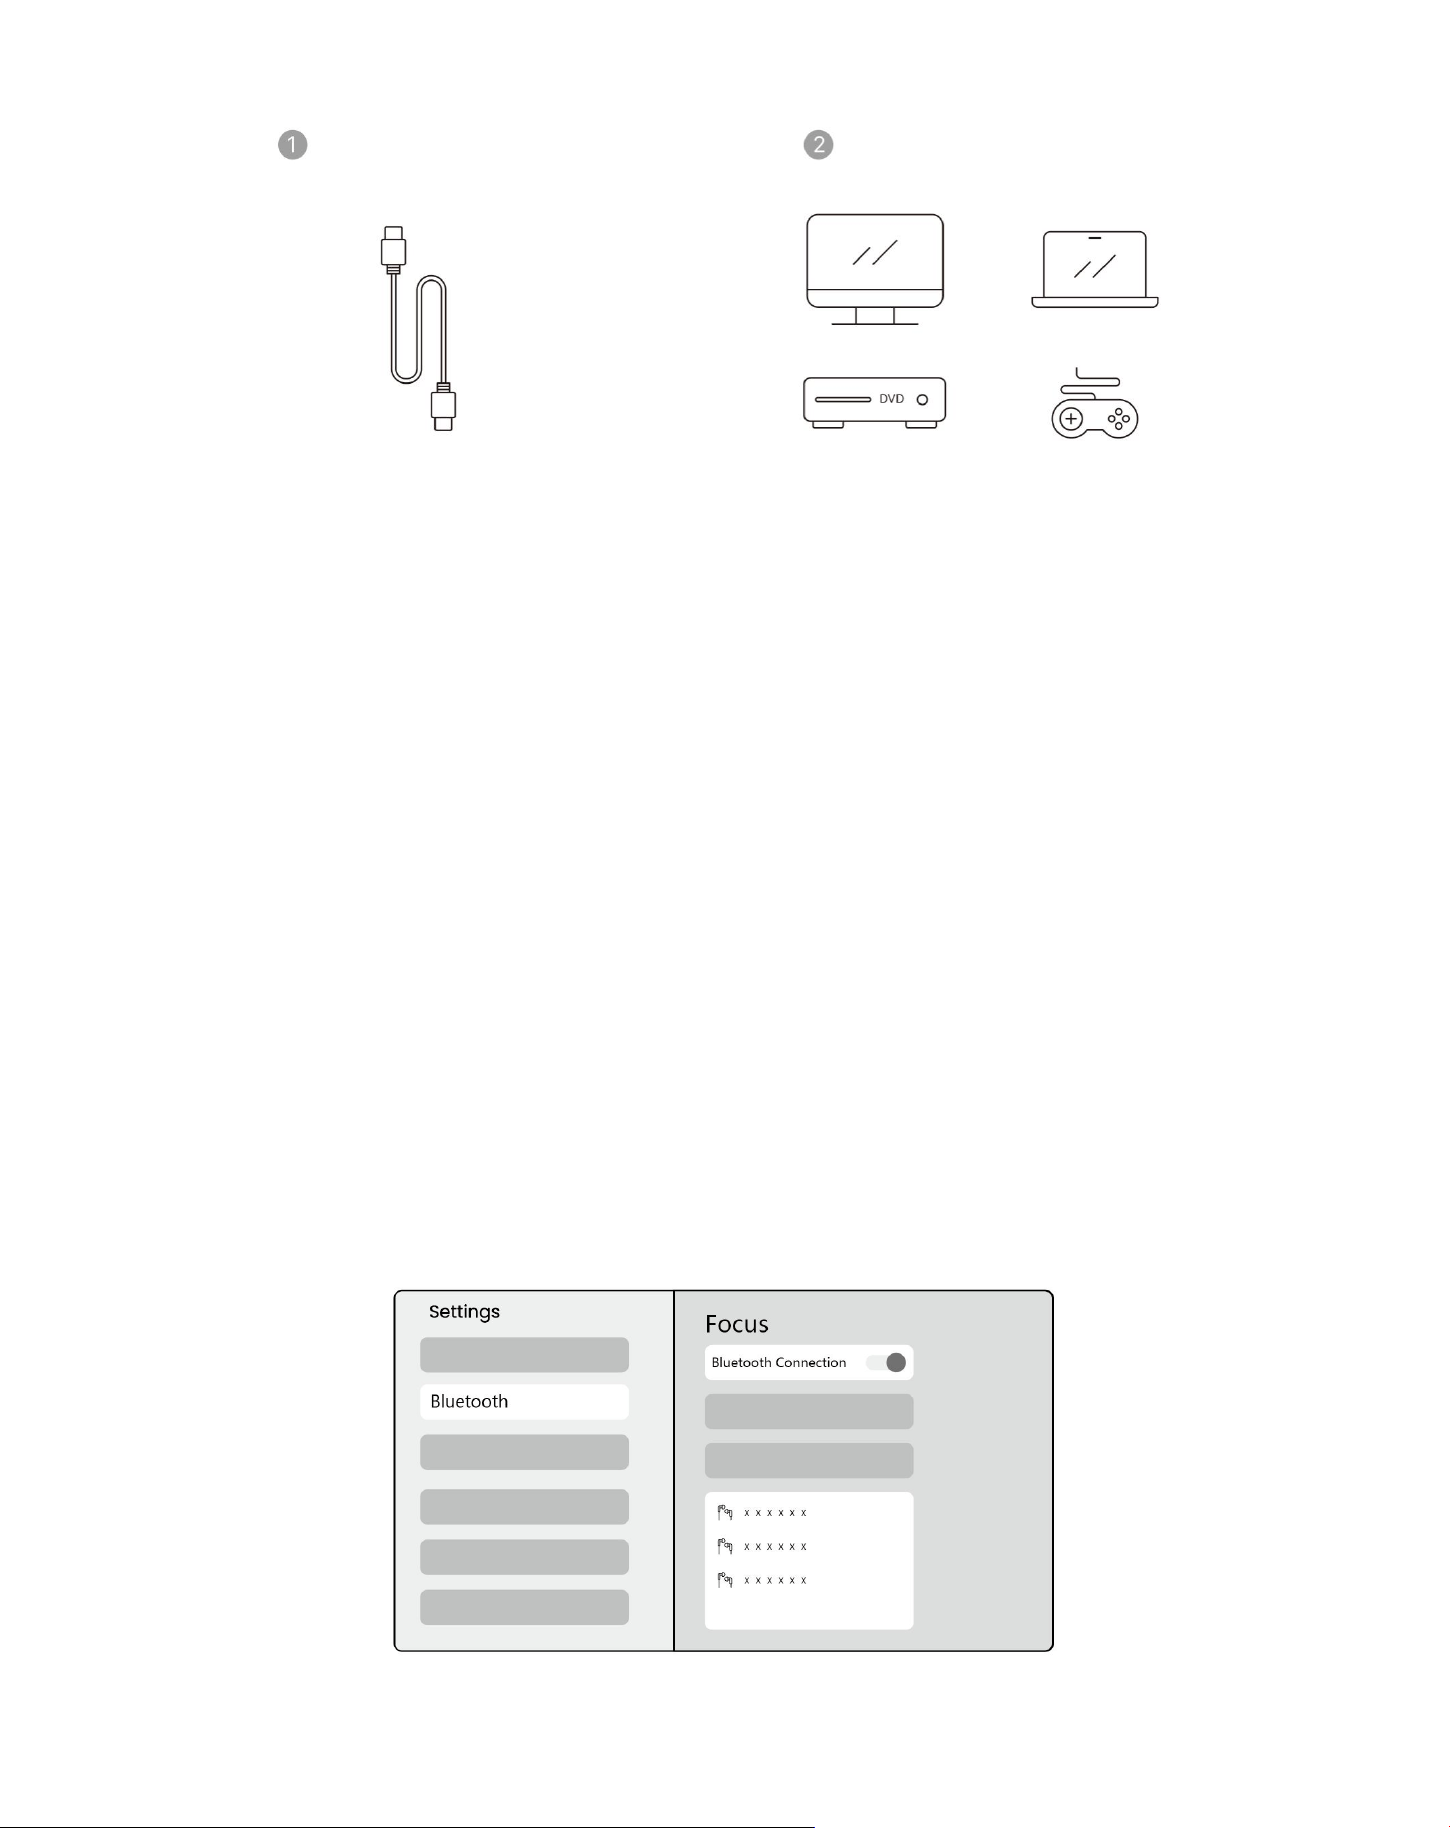
10.3 HDMI
If you're meet some troubles while using HDMI, please try these solutions below:
Method 1. Switch HDMI EDID version to 1.4 in your external device settings.
Method 2. Try changing the HDMI cable.
Method 3. Try to replace other external devices with HDMI function and check whether the HDMI interface of
external device is working.
Note: Since the HDMI interface does not support the ARC function, you cannot use HDMI to connect the
Soundbar. Please use Bluetooth or a 3.5mm audio cable instead.
10.4 Audio Out
Note: If you experience stuttering or delay when using a Bluetooth speaker connection, you can use
devices that support 3.5mm audio cable to play audio.
18
10.5 Wireless Connections
Notice:
If you need to mirror Netflix, Prime Video, etc. to the projector, please connect a TV Dongle/Stick or
other products with these streaming media via HDMI.
11
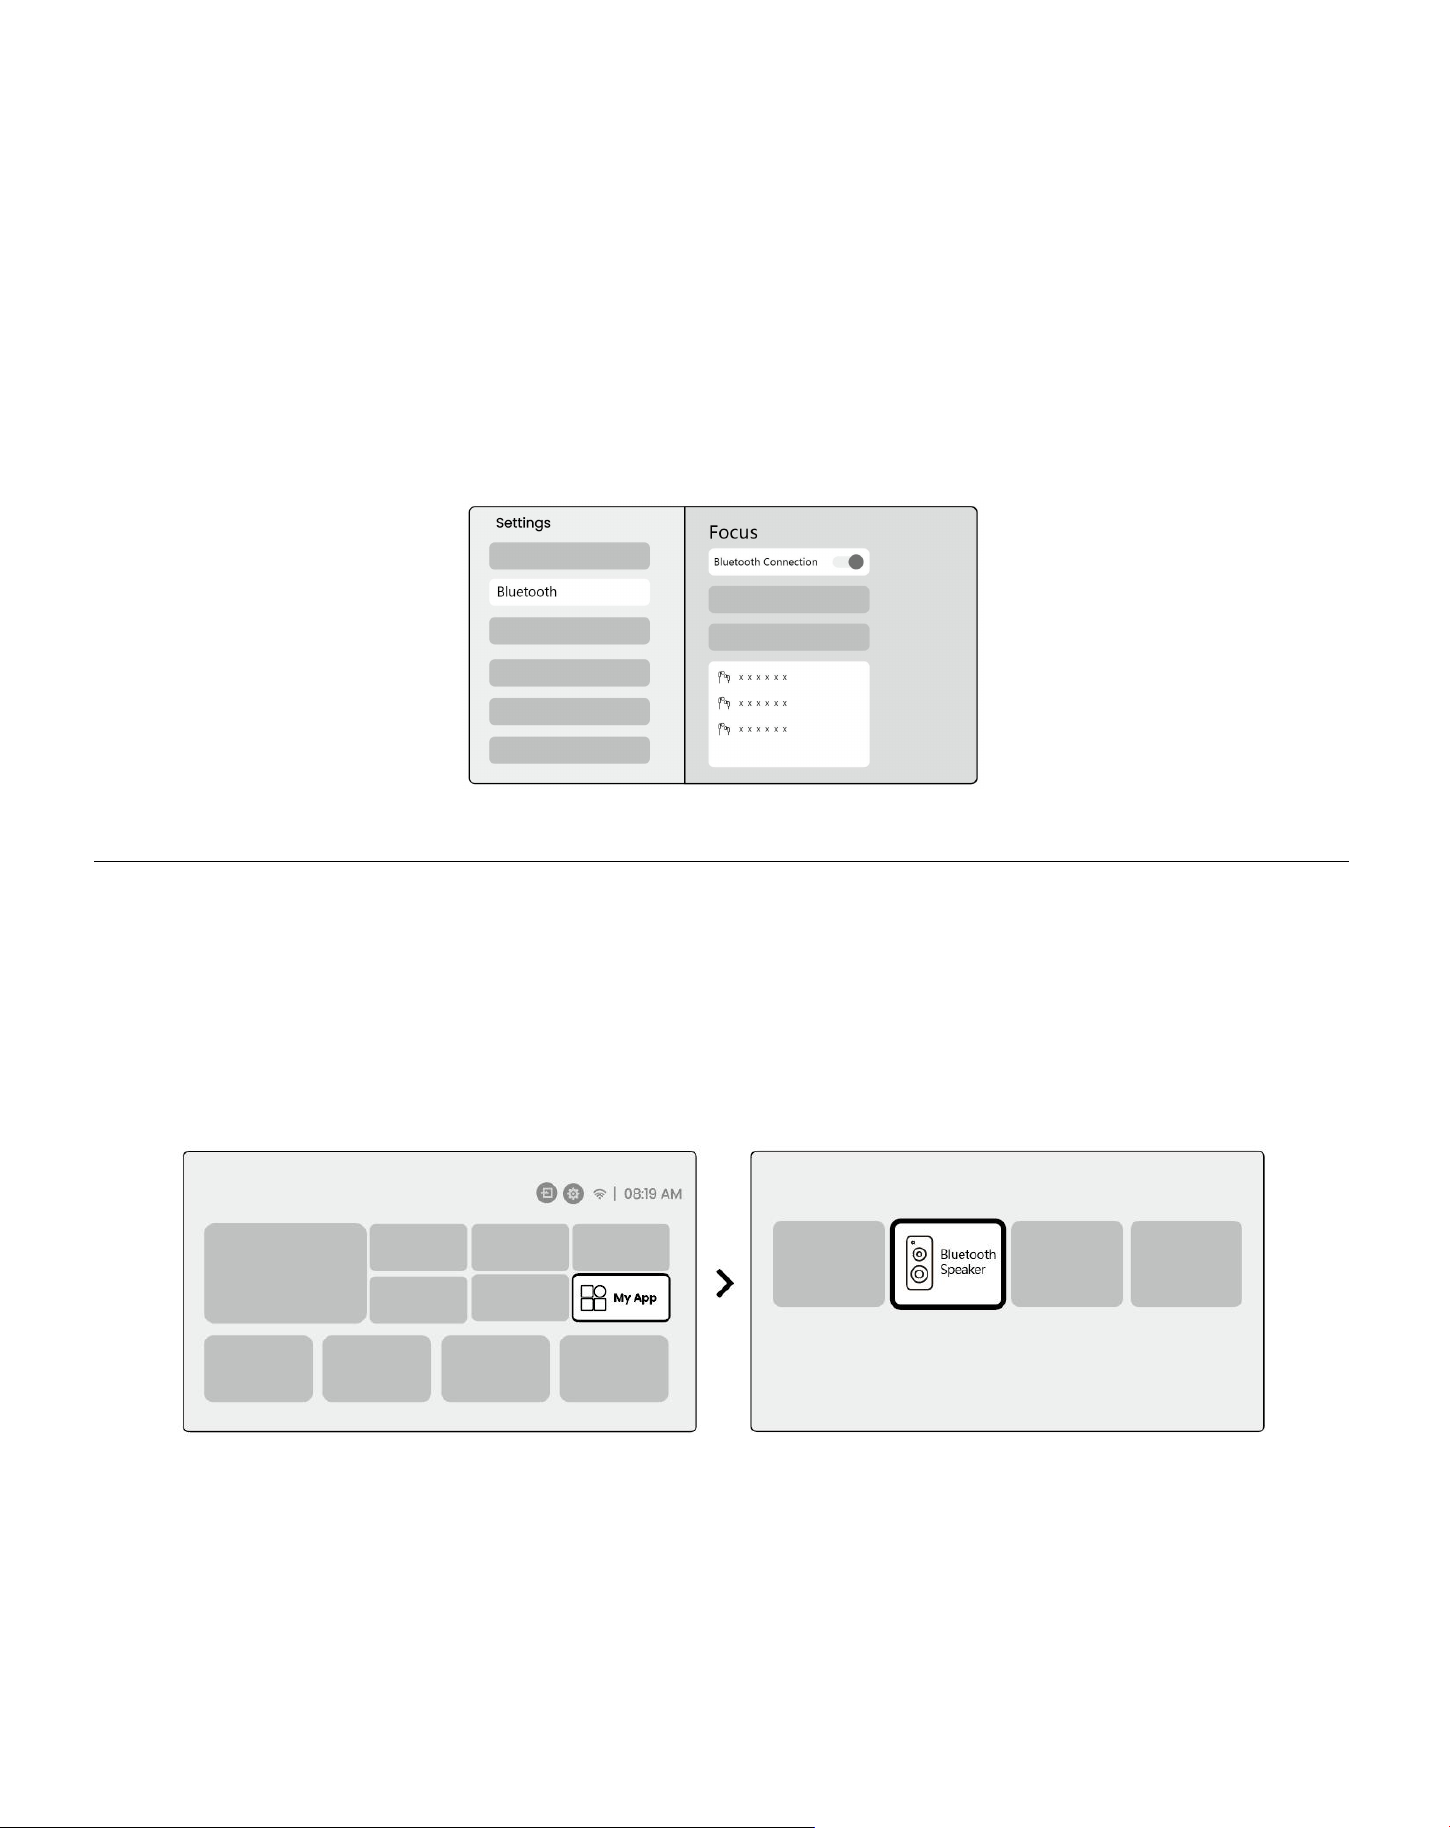
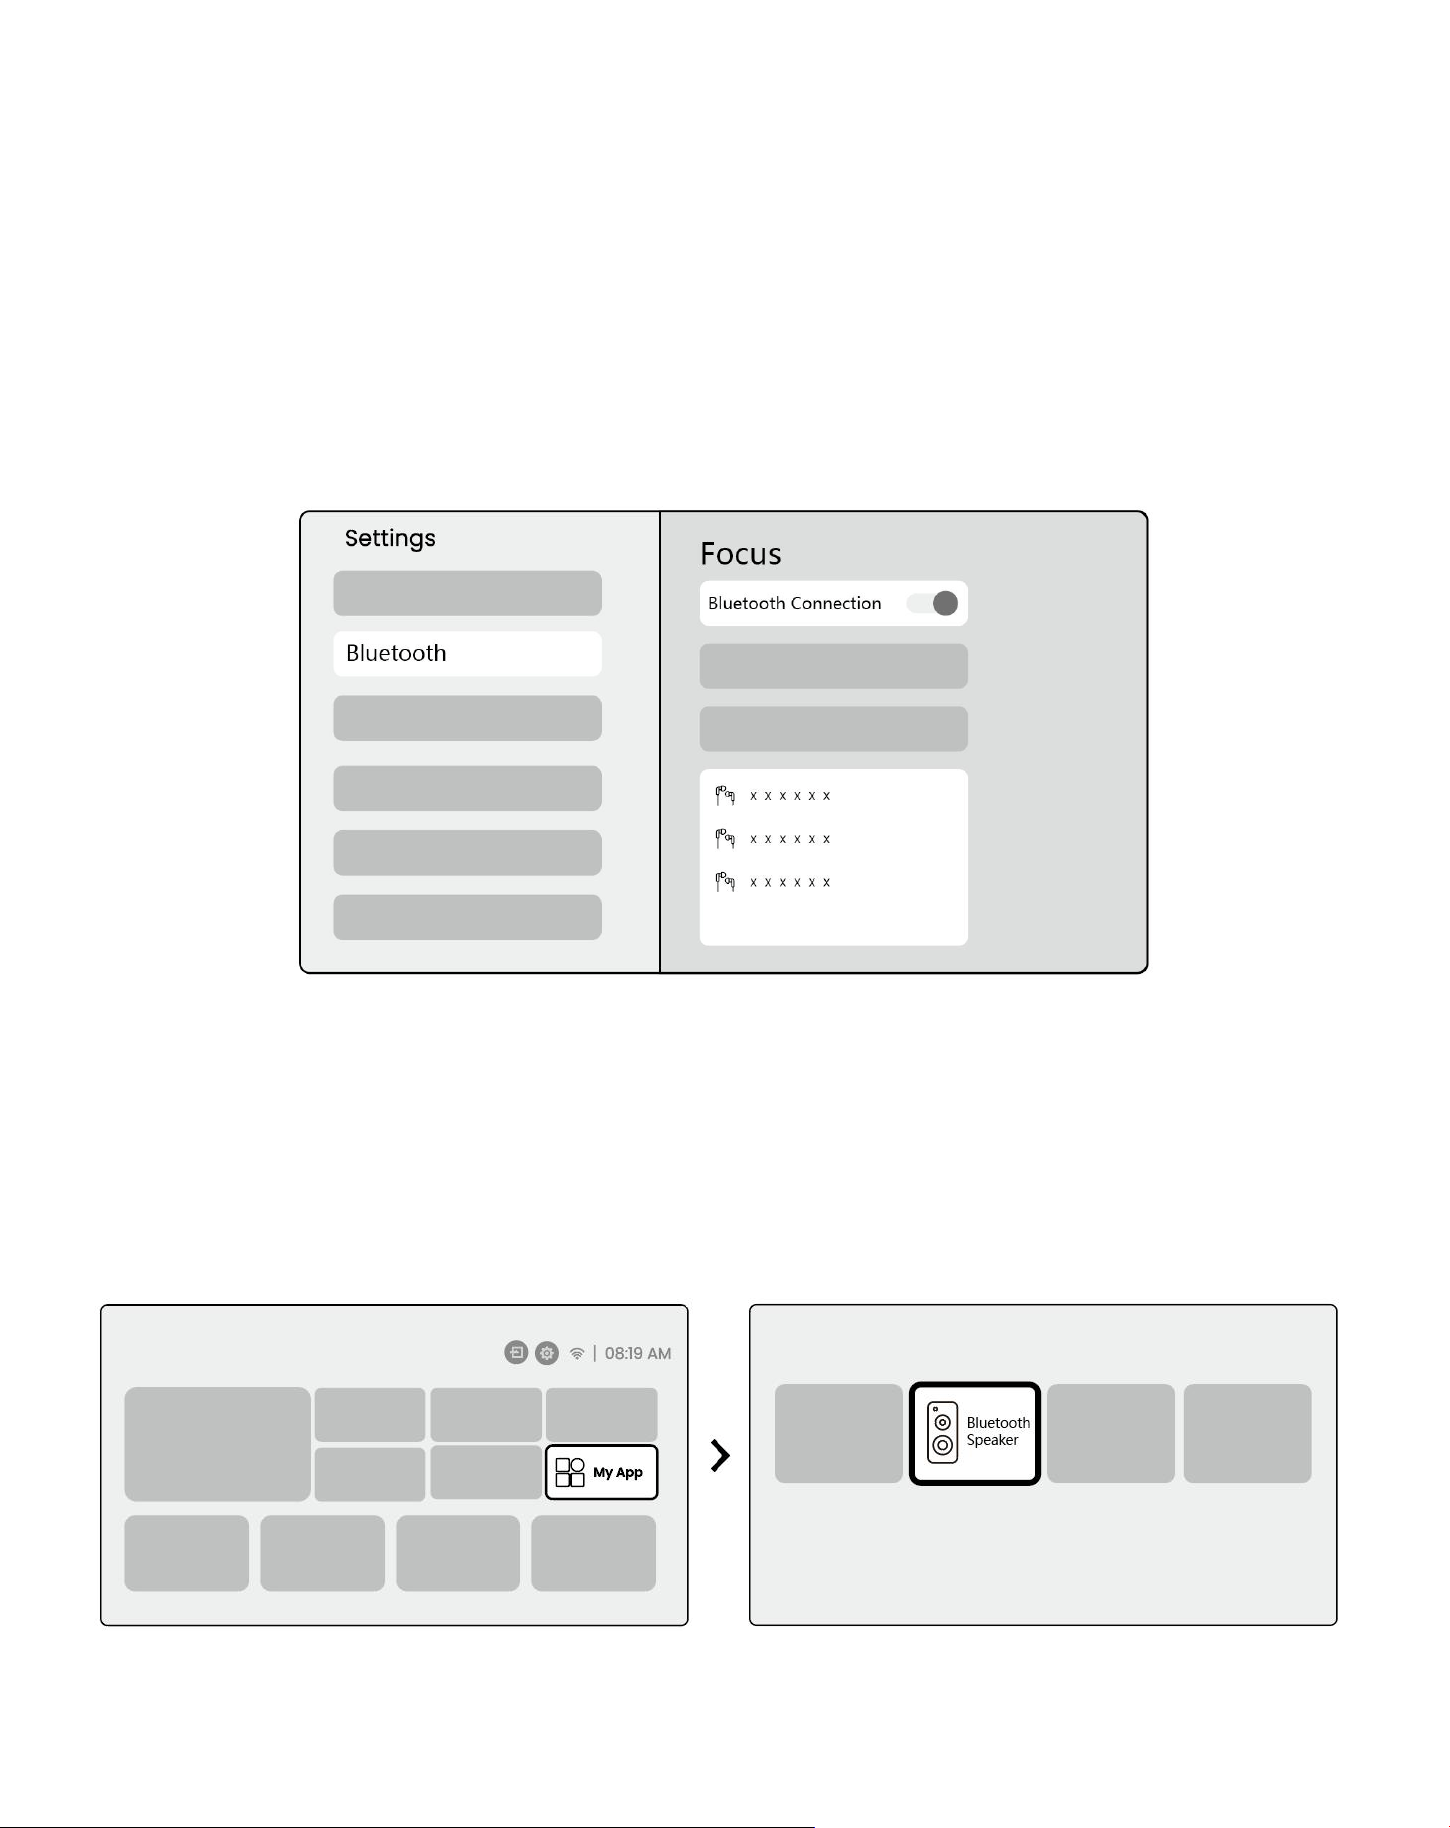
Bluetooth Settings
Step1: Turn on your Bluetooth device and prepare for Bluetooth connection.
Step2: Select [Bluetooth] menu -> Turn on Bluetooth button -> Select the Bluetooth device to pair and
connect.
Notice: Please ensure the device is either disconnected from other devices or has Bluetooth mode enabled.
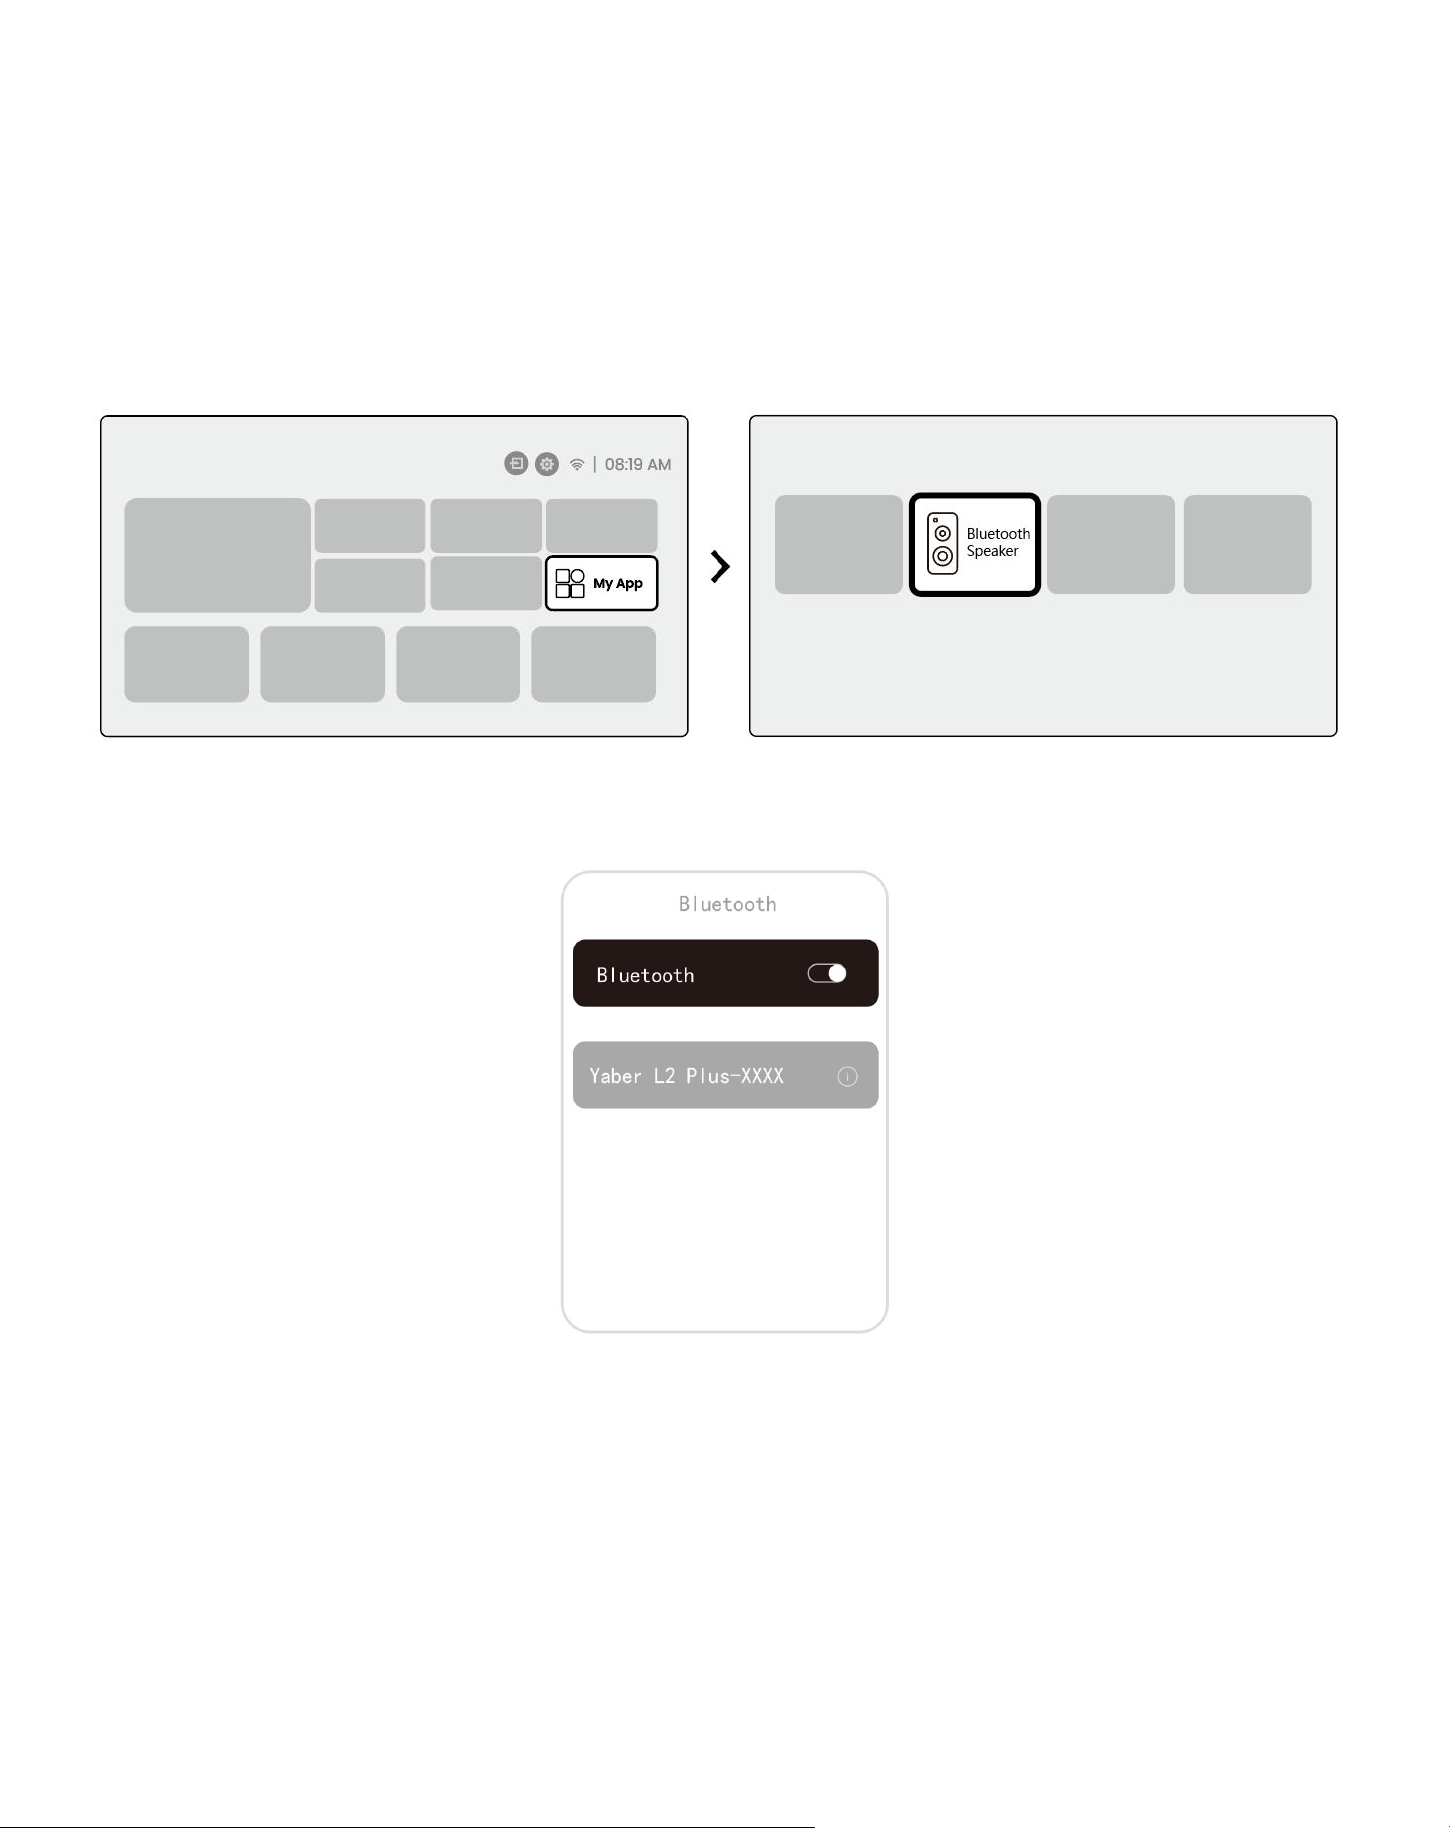
11.2 Bluetooth Speaker
Step1: On the homepage, select the [My App] menu.
Step2: Turn on the Bluetooth Speaker, Enter and stay on this page.
Step3: Search for [Yaber L2Plus-XXXXX] on your phone's Bluetooth interface.
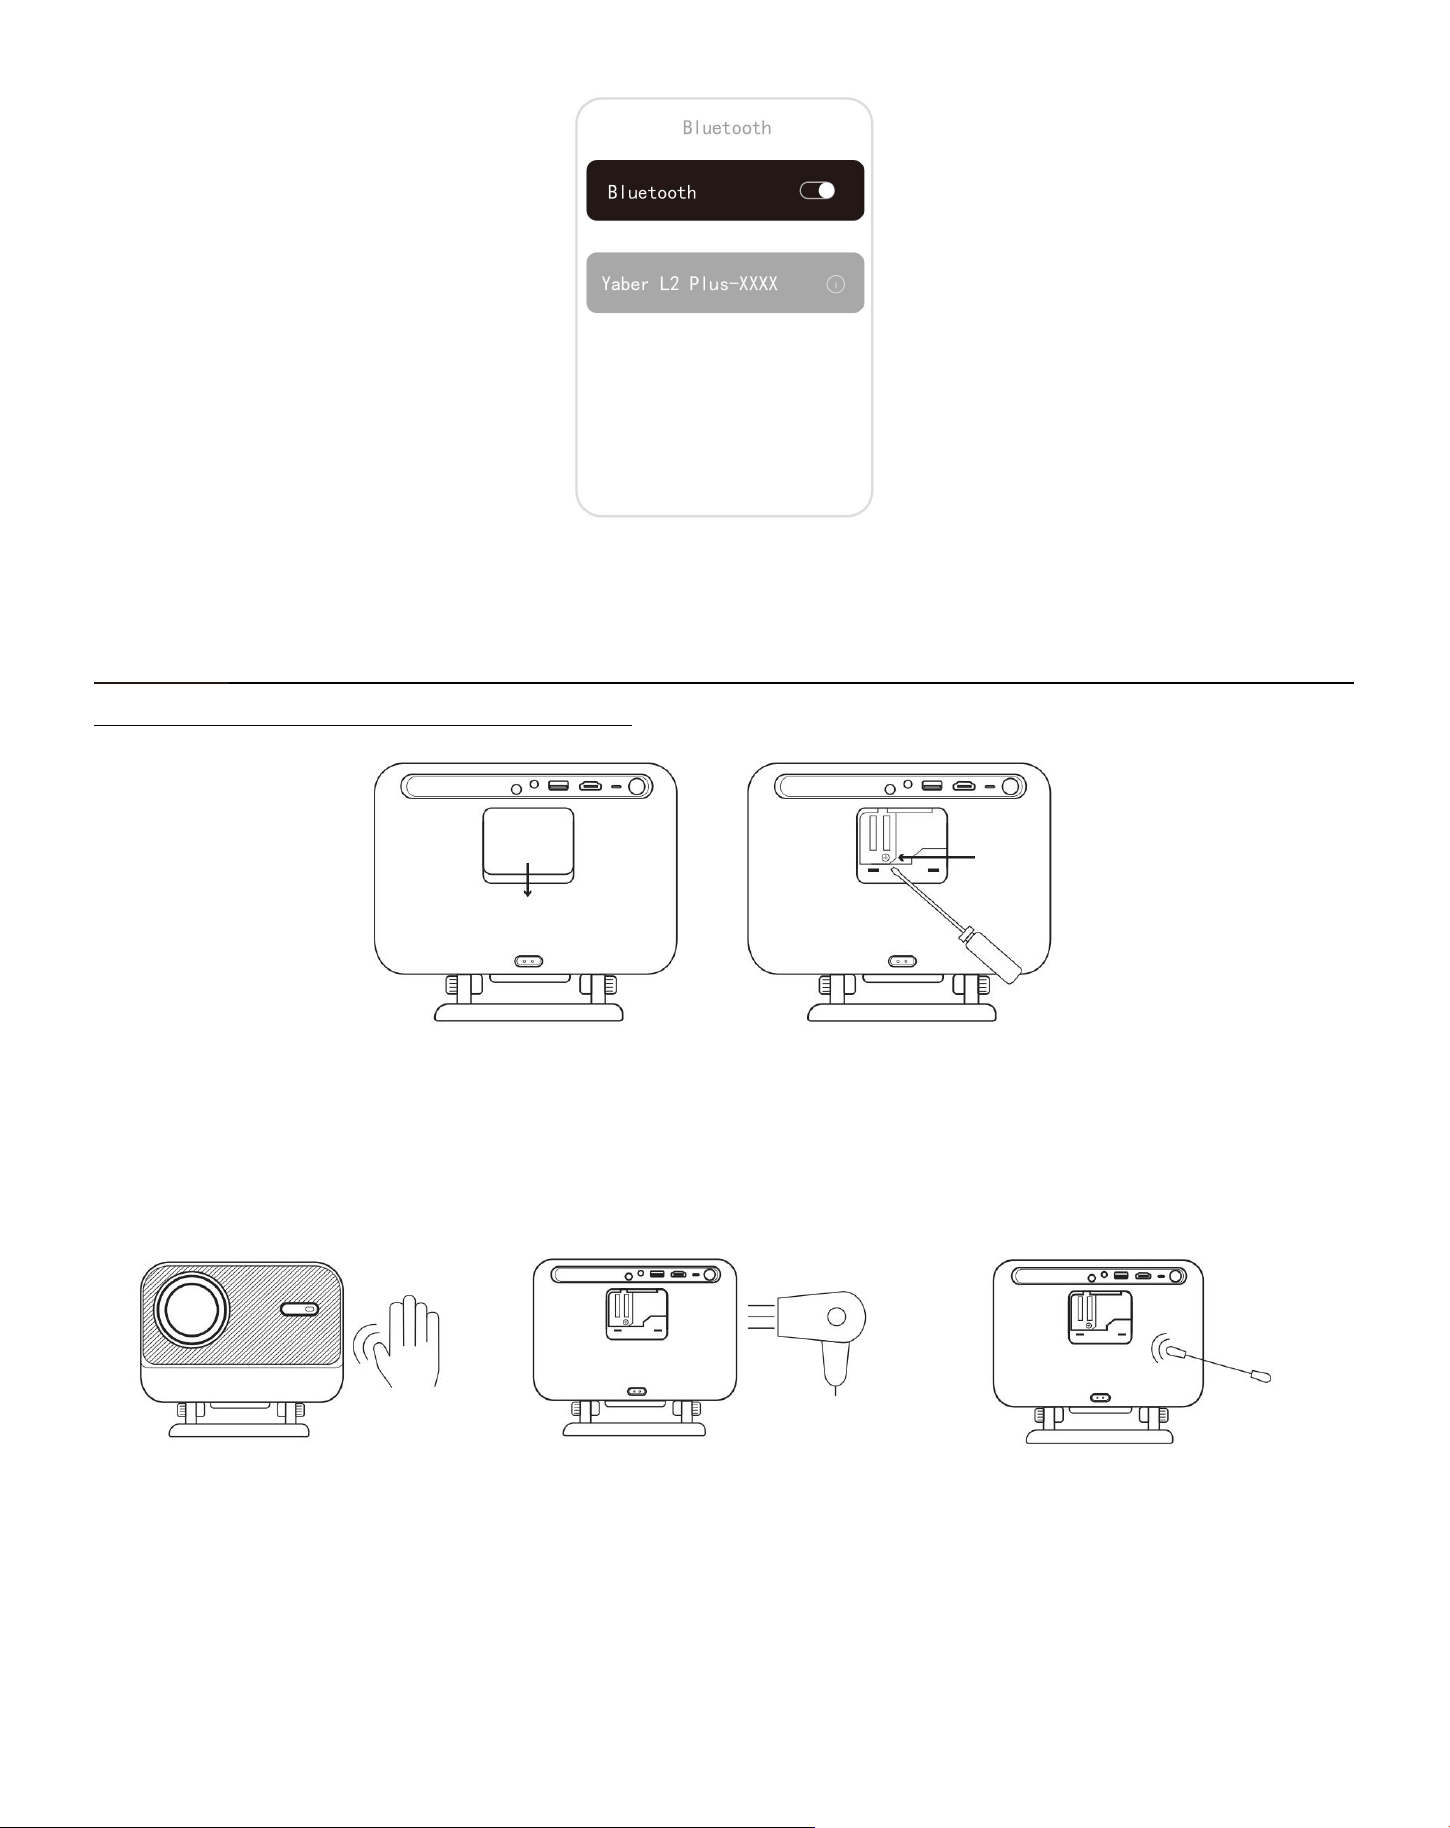
19
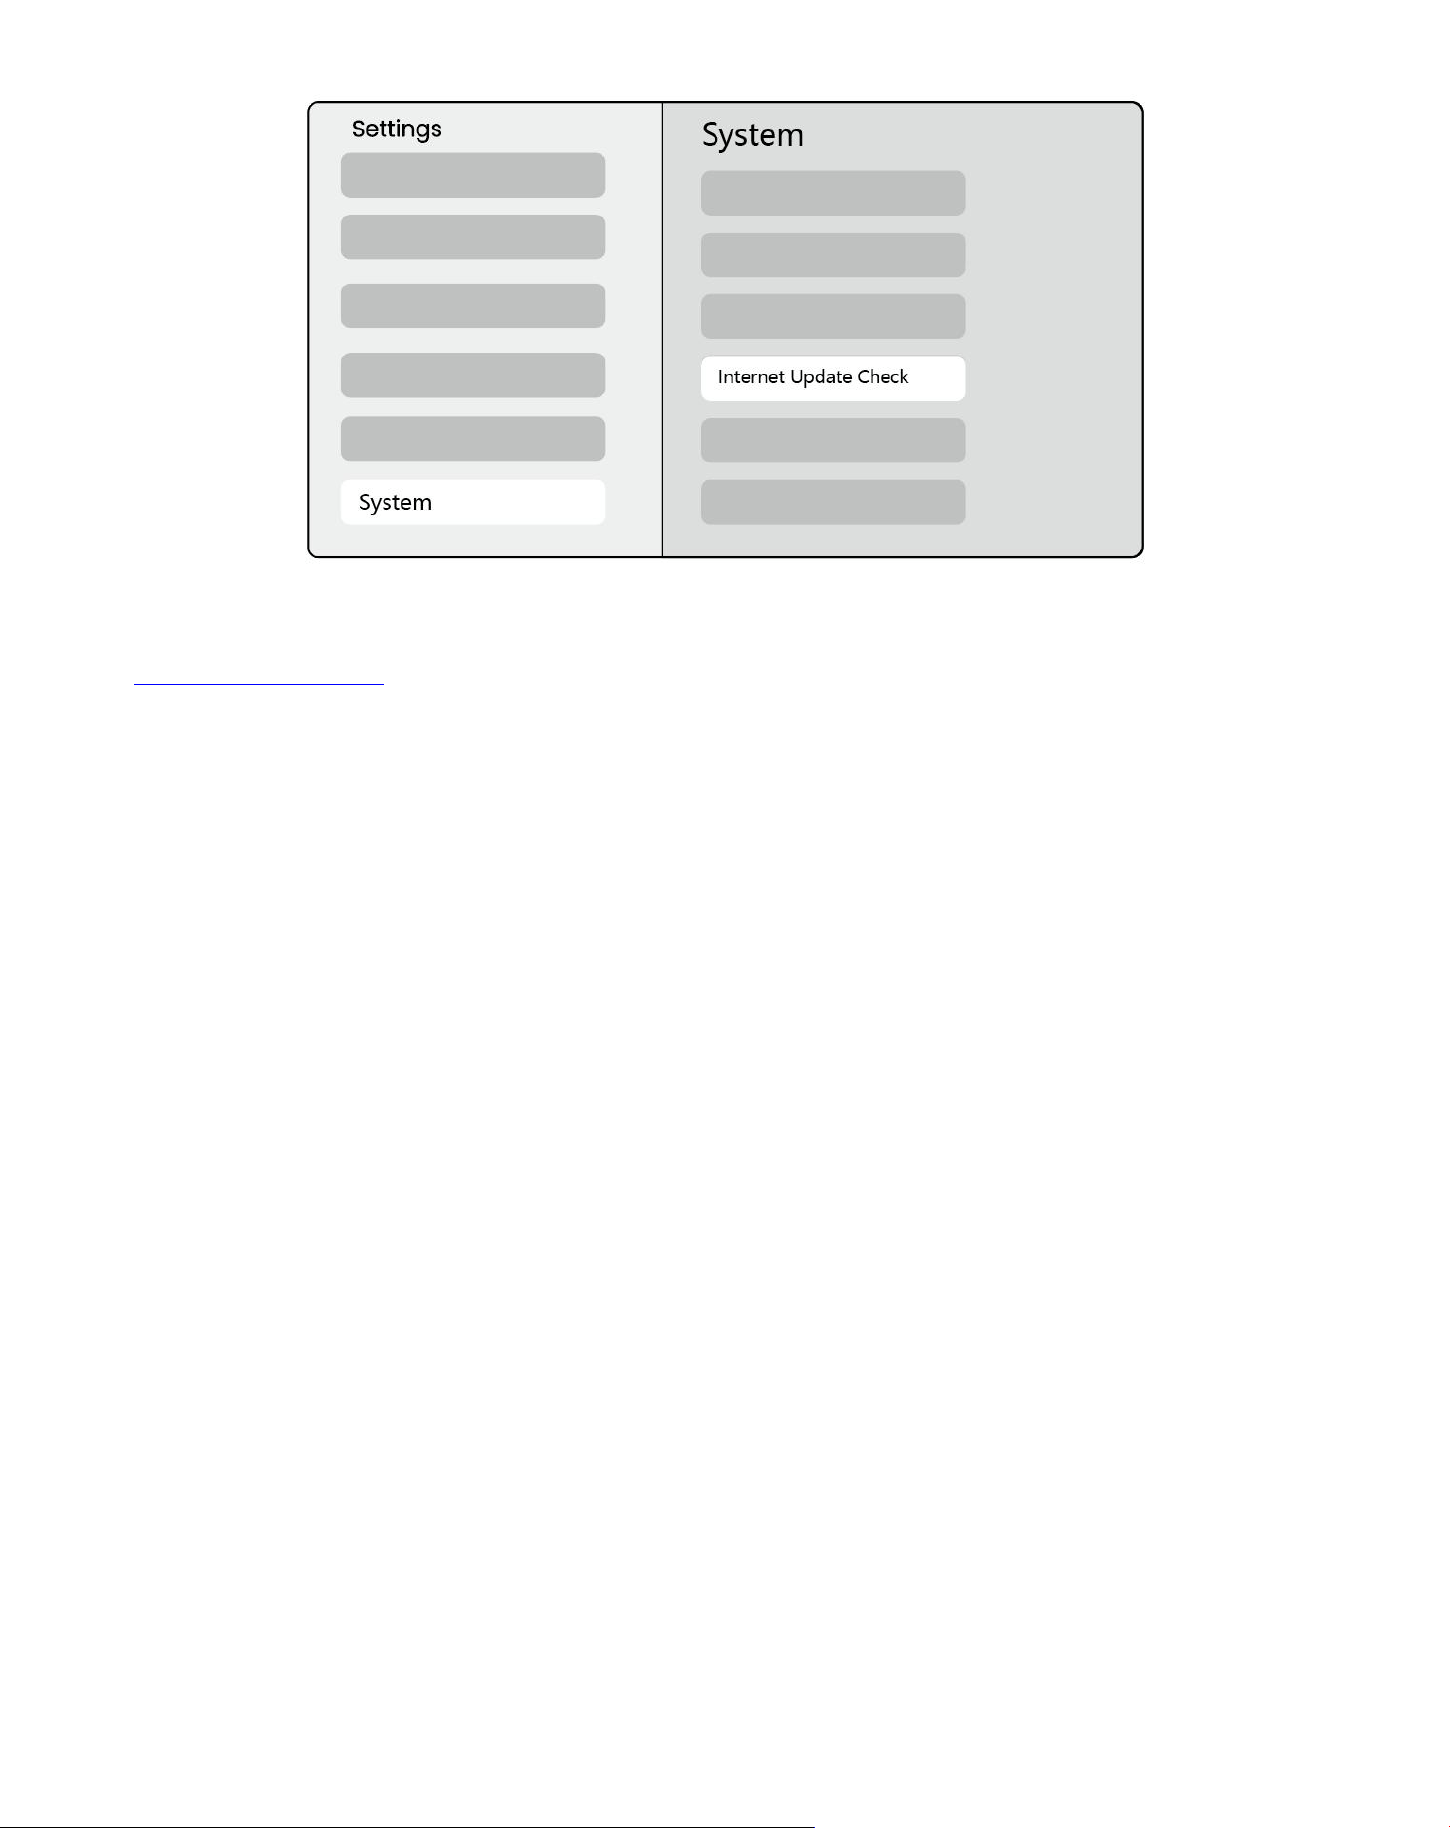
12Regular Cleaning
⚠ Notice: Since L2 Plus uses an open optical machine, a small amount of dust may be inhaled during
use. It is recommended to clean it regularly.
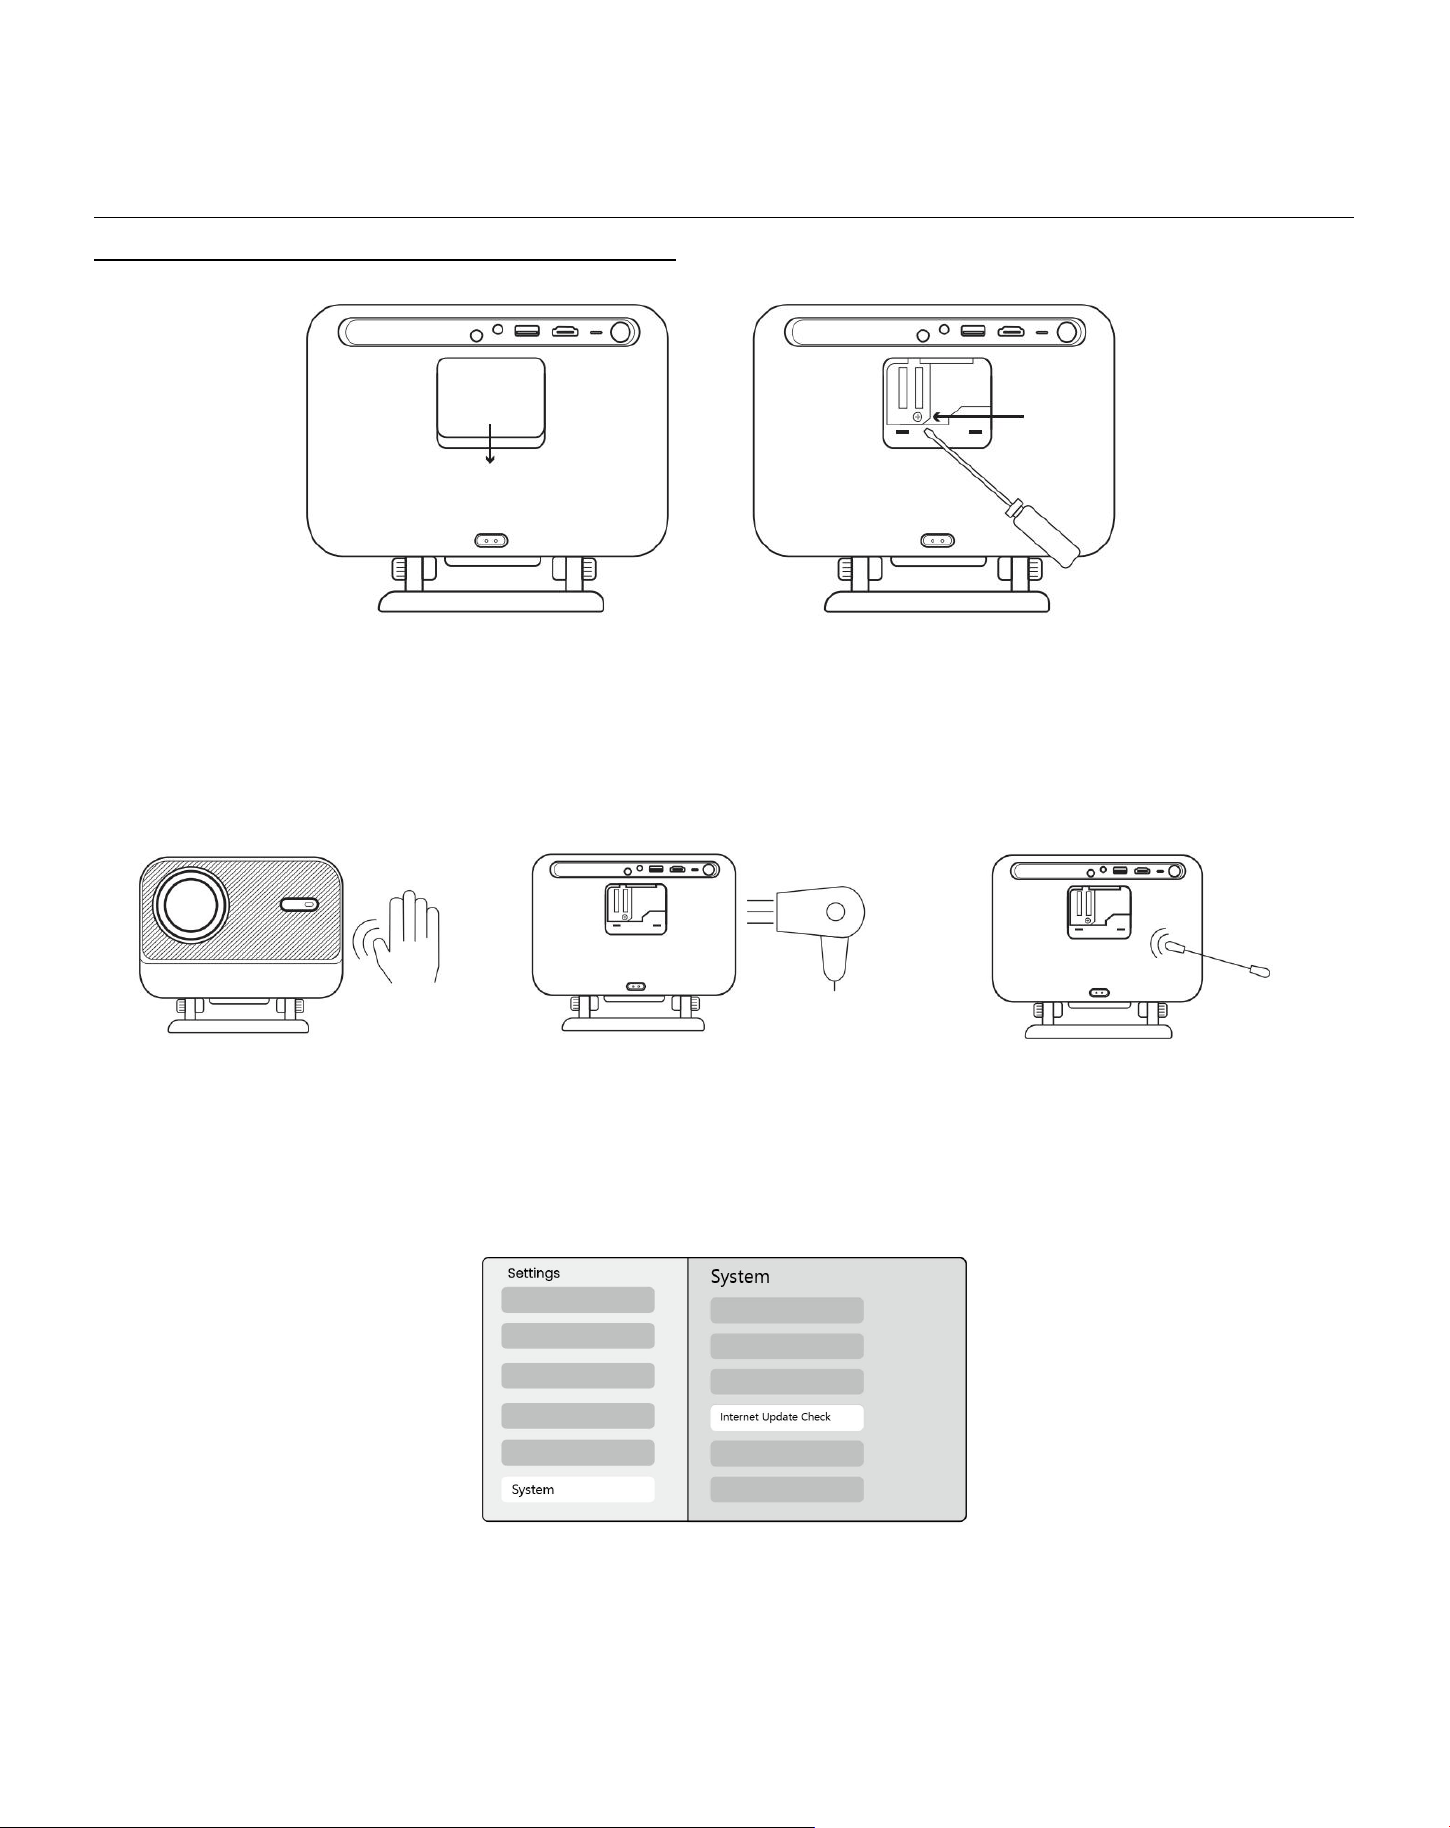
Remove the cover at the back of the machine and then remove the sealing cover with a screwdriver.
Method 1
Lightly pat the projector.
Method 2
Use cold air to blow into the
dusting port.
Method 3
Use cotton swabs to remove
stubborn stains.
13
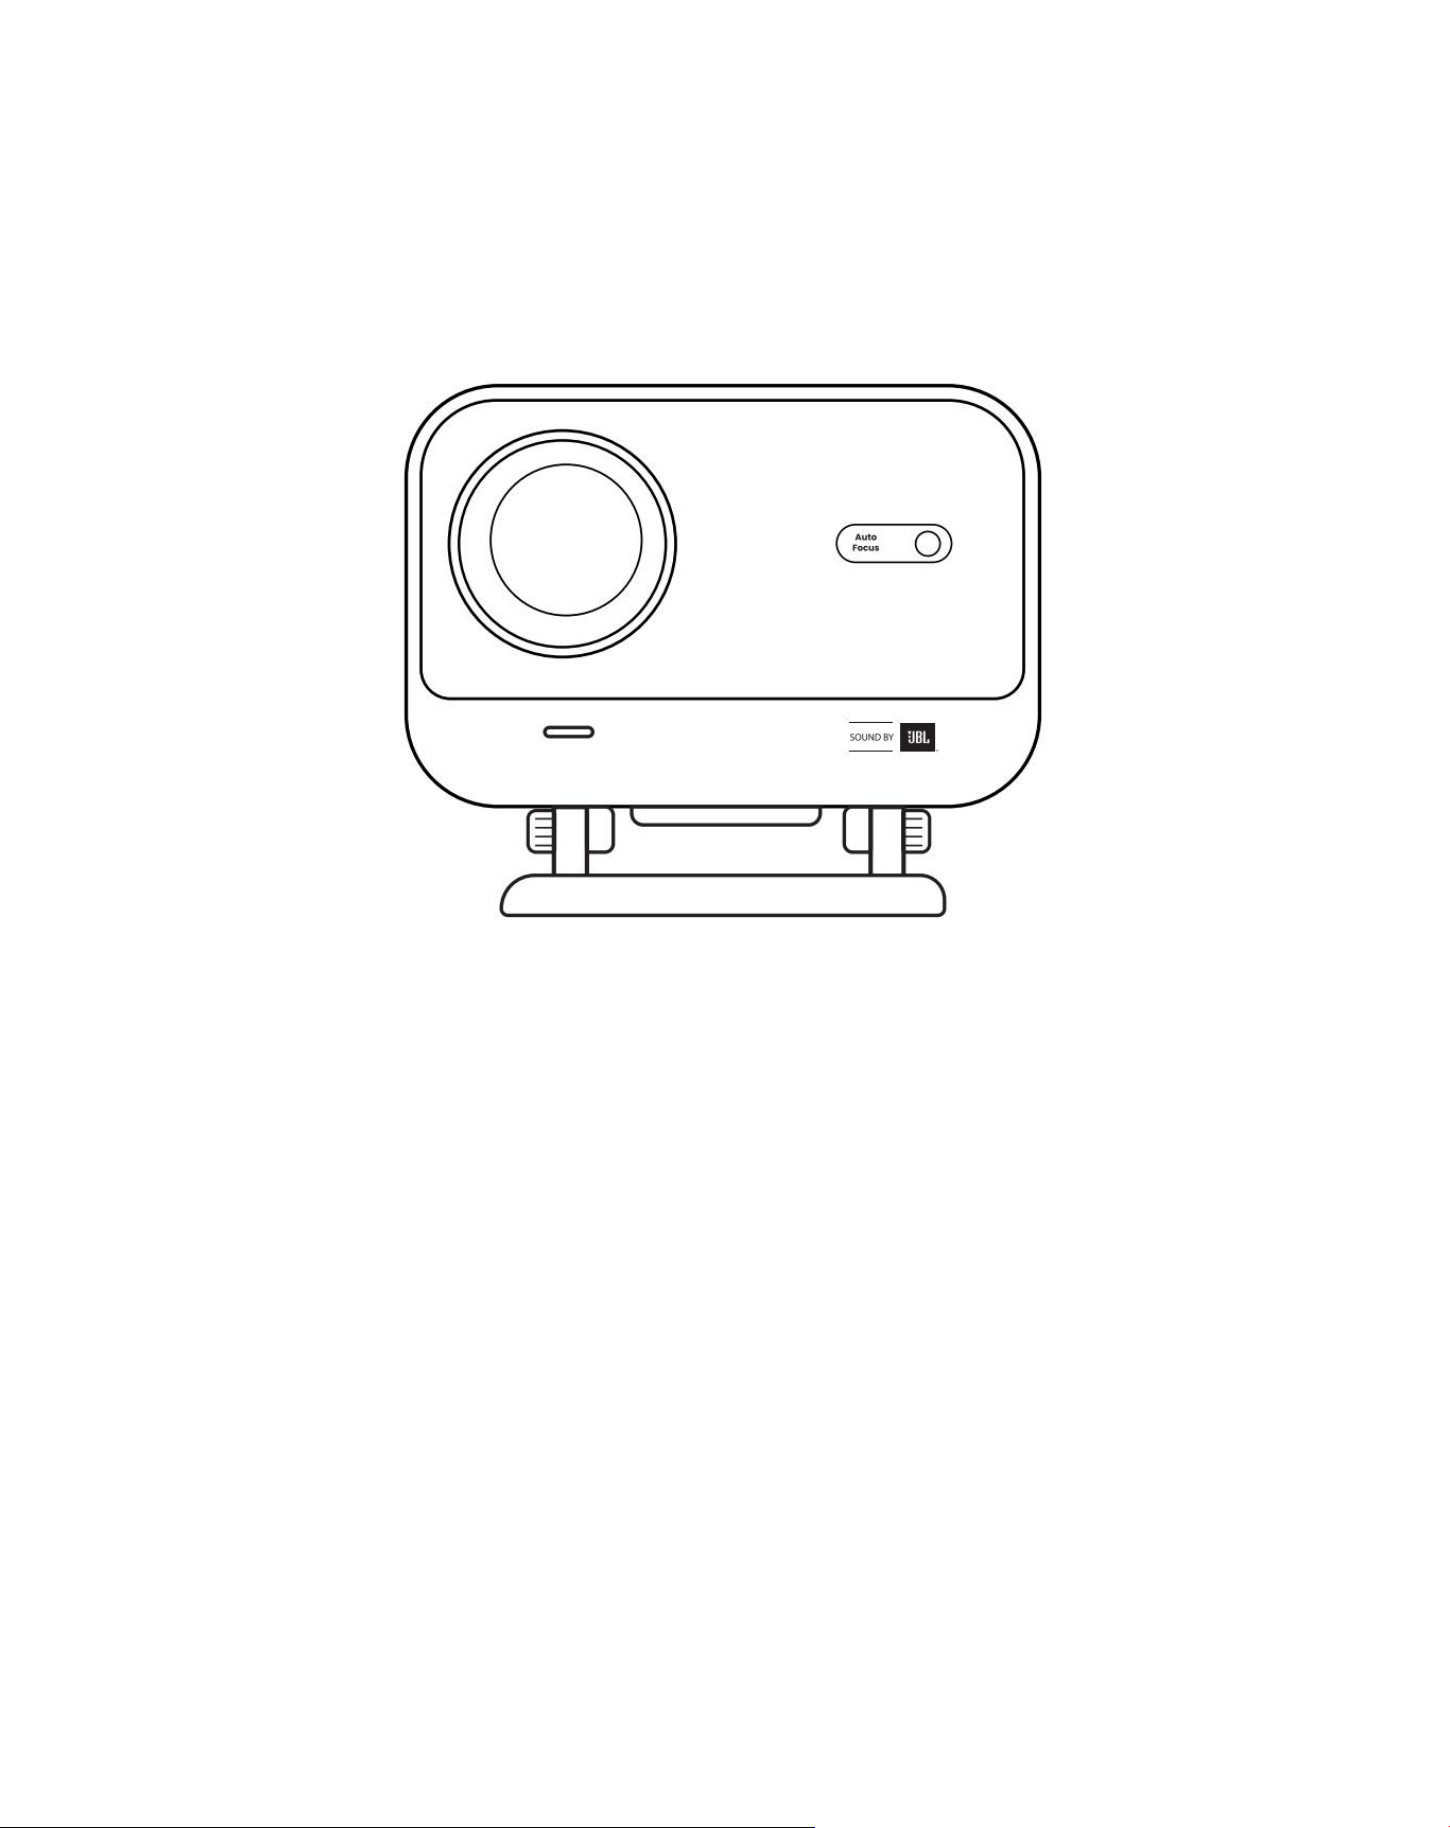
System Upgrade
You can check the system status of your device in [Settings]-[System]-[Internet Update Check].
21
Manuel de l'utilisateur
Projecteur L2 Plus
FR

22
YABER Soutien professionnel à vie
Cher client,
Nous vous remercions d'avoir choisi le projecteur Yaber L2 Plus. Veuillez lire attentivement le manuel de
l'utilisateur avant d'utiliser votre projecteur L2 Plus.
Nous comprenons que vous pouvez rencontrer diverses questions et problèmes lors de l'utilisation du
projecteur. Cependant, laisser un commentaire sur la page du produit peut ne pas améliorer votre
expérience.(Laissez-nous vous aider! Nous apprécions vraiment vos commentaires et nous vous fournirons
rapidement une solution satisfaisante.)
Votre satisfaction est notre priorité absolue. Si vous rencontrez des problèmes, nous espérons sincèrement
que vous nous donnerez l'occasion de les résoudre.
Nous nous engageons à vous offrir la meilleure solution possible. Nous apprécions votre compréhension et
votre patience à l'avance.
Équipe de service à la clientèle de projecteur de Yaber
GARANTIE (GARANTIE)
Merci pour votre achat et votre soutien. Nous offrons une garantie de 3 ans pour le projecteur Yaber L2 Plus.
Si vous avez des questions, n'hésitez pas à nous contacter.
✉Support@yaber.com
Précautions importantes
Pour une utilisation sûre et optimale de l'appareil, veuillez suivre ces directives:
● Ne pas faire face à la lentille vers les yeux, car la forte lumière du projecteur peut causer des blessures
aux yeux.
●
Ne bloquez pas l'entrée ou la sortie d'air de l'appareil pour éviter une surchauffe, ce qui pourrait
endommager les composants internes.
● N'essuyez pas l'objectif directement avec des outils de nettoyage tels que du papier ou un chiffon.
Enlevez plutôt la poussière de l'objectif en soufflant de l'air propre.
●
Ne lavez pas l'appareil avec des produits chimiques, des détergents ou tout autre liquide, car ils peuvent
corroder la carte de circuit imprimé.
● Gardez l'appareil et ses composants et accessoires hors de portée des enfants.
● Assurez-vous que l'appareil est utilisé dans un environnement sec et bien ventilé.
●
Ne rangez pas l'appareil dans des endroits excessivement chauds ou froids, car cela peut réduire la durée
de vie des composants électroniques.Utilisez-le et conservez-le dans une plage de température
comprise entre 0 °C et 40 °C.
23
● Ne pas mettre l'appareil dans un appareil de chauffage (par exemple, sèche-linge ou micro-ondes) pour
le séchage.
● N'appuyez pas fermement sur l'appareil et ne placez pas d'objets sur le dessus ou derrière pour éviter
d'endommager l'appareil.
●
Ne pas jeter, laisser tomber ou secouer fortement l'appareil pour protéger sa carte de circuit interne.
● Assurez-vous de nettoyer le filtre à poussière tous les six mois à un an pour garder la machine en
marche froide.
Ce qui est inclus
Projecteur L2 Plus
Télécommande
Couverture de lentille
QSG
Câble HDMI
Cordon d'alimentation
Kits de nettoyage

24
Spécification
Modèle n ° L2 Plus
Résolution native
1920*1080
Source de lumière
LED
Focus
Auto/électrique
Correction Keystone
Auto/Manuel
Interface
USB × 1
HDMI× 1
Audio Out× 1
Dimension de l'unité
22,7 × 20,4 × 18,4 cm
8,9 × 8 × 7,2 pouces
Rapport de projection
1,38: 1
Distance de projection
Min 1.26m ~ Max 4.4m
Min 40 ~ Max 150 pouces
Tension de puissance
AC 100-240V / 50-60Hz
Consommation de
puissance
110W
Poids du projecteur
2,44 kg
5.38 lbs
Méthode de projection
Avant/arrière sur le bureau
Avant/arrière sur Celling
Rapport d'aspect
16:9
Zoom de projection
50% - 100%
Format de l'image
JPG, PNG, BMP, JPEG
Format audio
MP3, WAV, ASF, 3GP, MP4, MPEG
Format vidéo
MKV, MP4, 3GP, MPEG, ASF, WMV, WebM,
Format USB
FAT 32, NTFS, exFAT
25
Aperçu des produits
26
Installation
7.1 Projection de bureau
Le projecteur est équipé d'un support rotatif pour des ajustements sans effort 。
Étape 1: Placez le projecteur sur une surface plane.
Étape 2: Veuillez ajuster l'écran de projection correspondant à l'angle du support, gardez l'angle dans cette plage
pour une clarté d'image optimale.
Avis: Le L2 Plus prend en charge la correction horizontale de la clé de voûte. Vous n'avez pas besoin de
placer le projecteur directement devant l'écran.
Avis: Pour garder la qualité d'image optimale, il est recommandé de maintenir le réglage dans les 15
degrés.Cependant, veuillez vous assurer que l'angle avec la ligne verticale de l'écran ne dépasse pas 25
degrés.
7.2 Montage au plafond
2. Méthode d'installation
Le projecteur peut être monté au plafond à l'aide d'un support et d'une vis 1/4 (non incluse), ou placé
horizontalement sur une surface plane.
27
3. Enlèvement de base
1. inverser la machine.
2. Utilisez un prybar pour
ouvrir le couvercle.
3. Dévissez les trois vis en bas
et retirez le support.
Avis: Assurez-vous que vous avez un support de montage universel qui peut s'adapter au projecteur.
Notice: L2 Plus Plus ne prend pas en charge l'installation de montage à quatre coins.
7.3 Distance de projection
La distance de projection du L2 Plus plus varie de 1,26 m à 4,4 m.
Conseils: La distance de projection recommandée est d'environ 7,87 pieds.
14Réglages de projection
L2 Plus Plus prend en charge quatre modes de projection, vous pouvez choisir la manière préférée.
28
Si vous choisissez montage au plafond ou la projection arrière, s'il vous plaît aller à la page d'accueil->
sélectionnez les paramètres [⚙-> Sélectionnez [Image] -> Dans [Projection], sélectionnez un mode de projection
approprié-> appuyez sur [OK] pour changer de mode de projection.
8.2 Auto Focus
Cette fonction détecte automatiquement la clarté de l'image projetée et optimise la distance focale en temps réel,
garantissant que l'image reste nette et claire à tout moment.Vous pouvez trouver cette fonctionnalité dans les
paramètres [⚙] -> [Image] -> [Focus].
Notice: La mise au point automatique sera activée après chaque quart de travail une fois qu'il est activé
dans le réglage.
Notice: Si vous n'êtes pas satisfait du résultat de mise au point automatique actuel, vous pouvez
sélectionner [Exécuter la mise au point automatique] pour recalibrer.
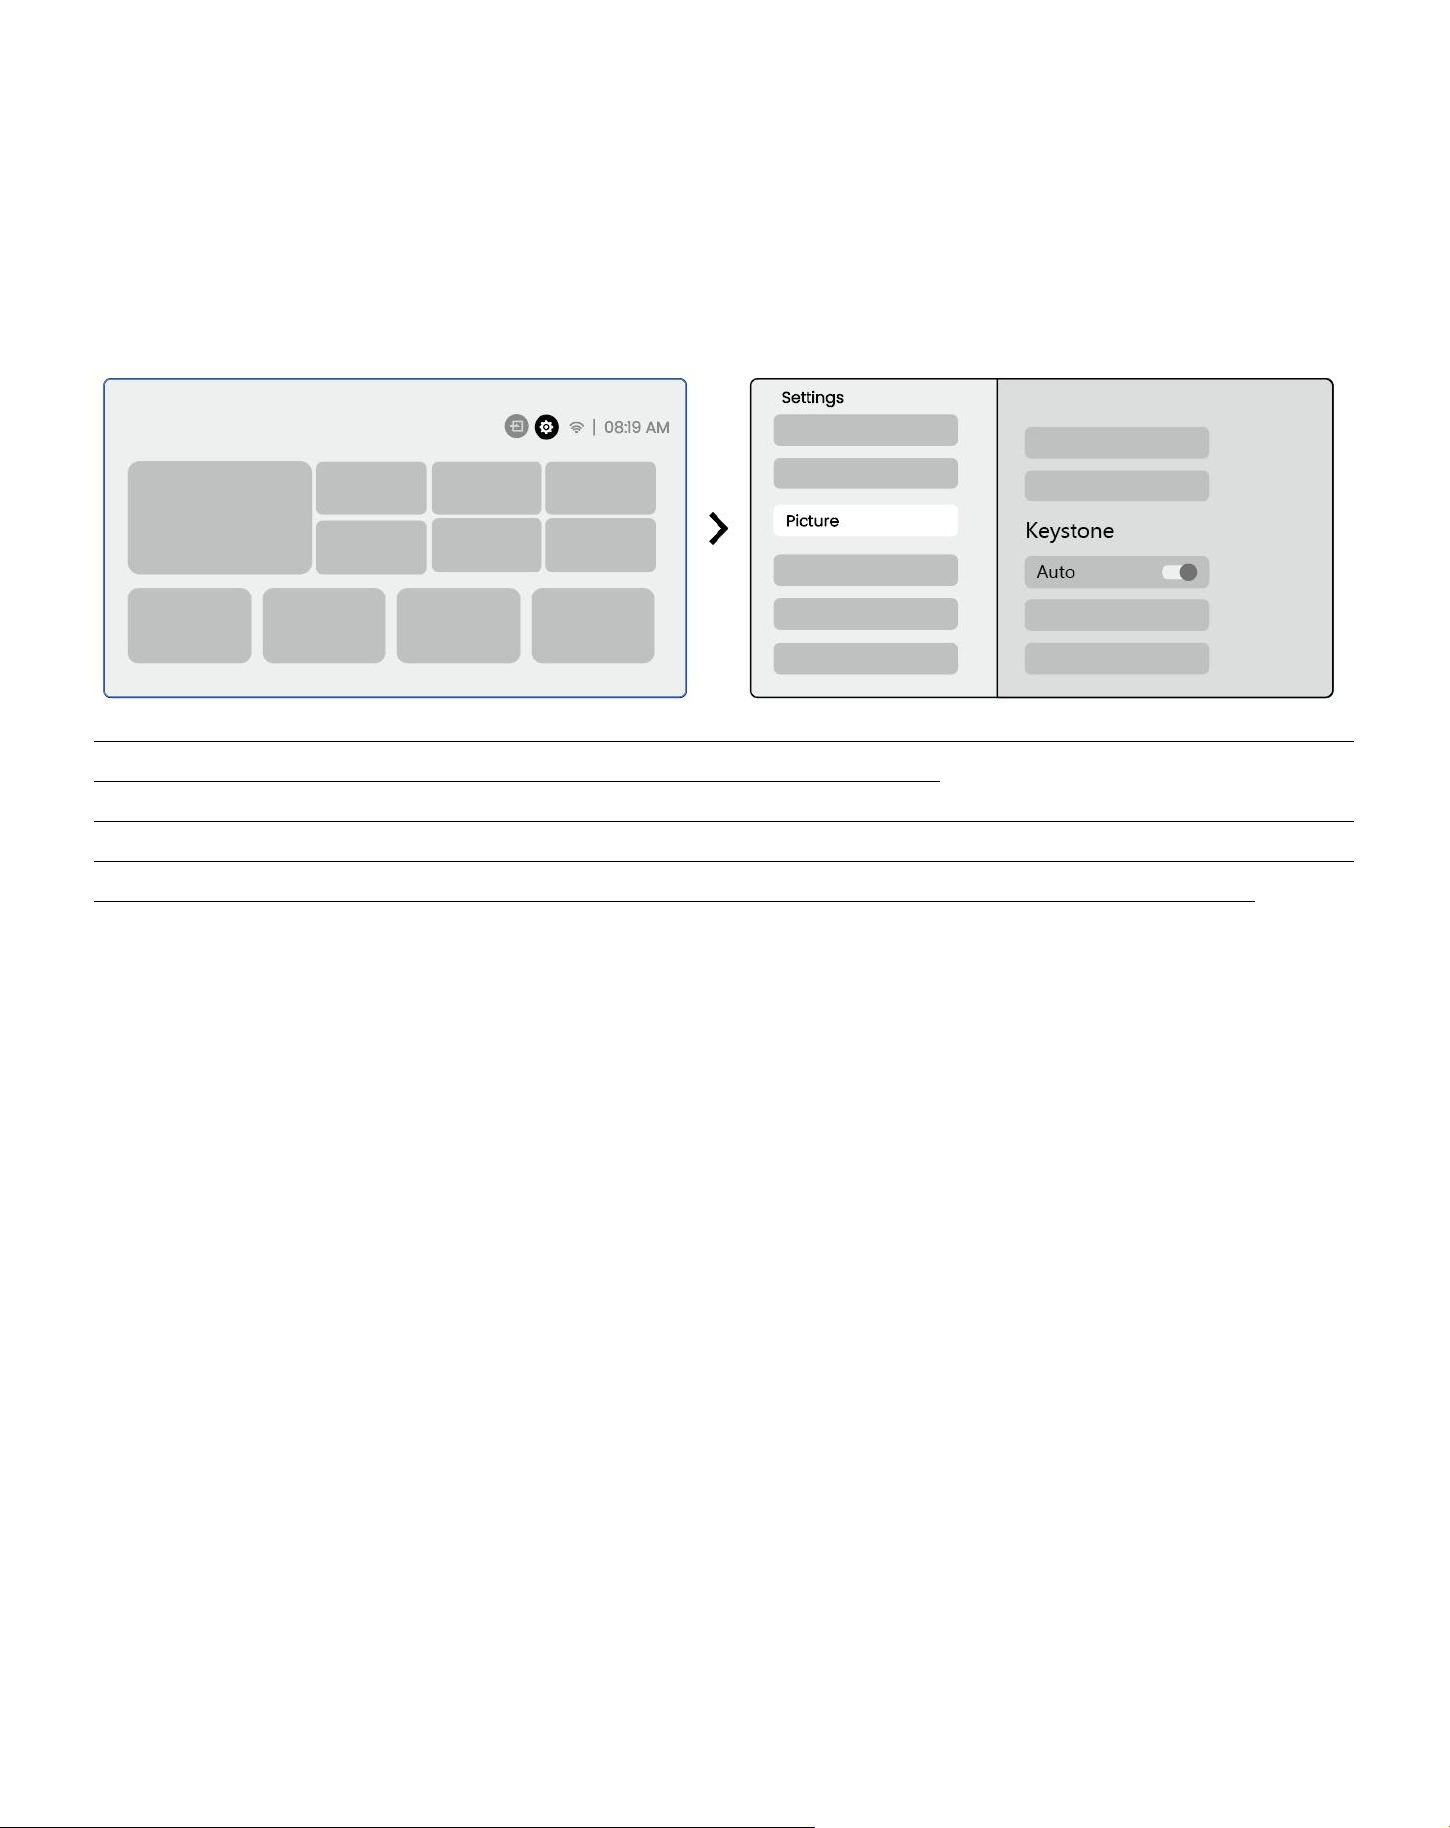
Avis: Si l'image reste floue, s'il vous plaît aller à la page d'accueil-> sélectionnez les paramètres [ ⚙] ->
Sélectionnez [Image] -> sélectionnez [Mise au point manuelle] -> Utilisez les touches fléchées haut et bas pour
régler manuellement le FOCUS jusqu'à ce que l'image soit nette.
Avis: Si l'image reste floue, essayez d'ajuster la distance de projection et assurez-vous que la distance de
projection est dans la plage appropriée (veuillez vérifier [7.3] pour les détails.
29
8.3 Keystone
8.3.1 Correction de Keystone automatique
La correction automatique Keystone sur L2s Plus corrige automatiquement la distorsion trapézoïdale, garantissant
que l'image reste carrée sans réglage manuel.Vous pouvez trouver cette fonctionnalité dans les paramètres [⚙->
[Image] -> [Keystone ].
Notice: Si vous n'êtes pas satisfait du résultat actuel de la correction de Keystone automatique, vous
pouvez sélectionner [Exécuter la Keystone automatique] pour recalibrer.
Notice: Auto Keystone Correction est activé par défaut lorsque la machine est utilisée pour la première fois.
Si vous voulez l'éteindre,S'il vous plaît aller à la page d'accueil-> sélectionnez les paramètres [ ⚙->
Sélectionnez [Image]-> Dans [Keystone ]-> sélectionnez [Auto ]-> appuyez sur [OK] pour éteindre.
8.3.2 Auto Keystone après le démarrage
Cette fonction détecte et corrige automatiquement la distorsion trapèze verticale et horizontale de l'image
projetée chaque fois que le projecteur est sous tension, garantissant que vous pouvez immédiatement profiter
d'une image claire et rectangulaire.
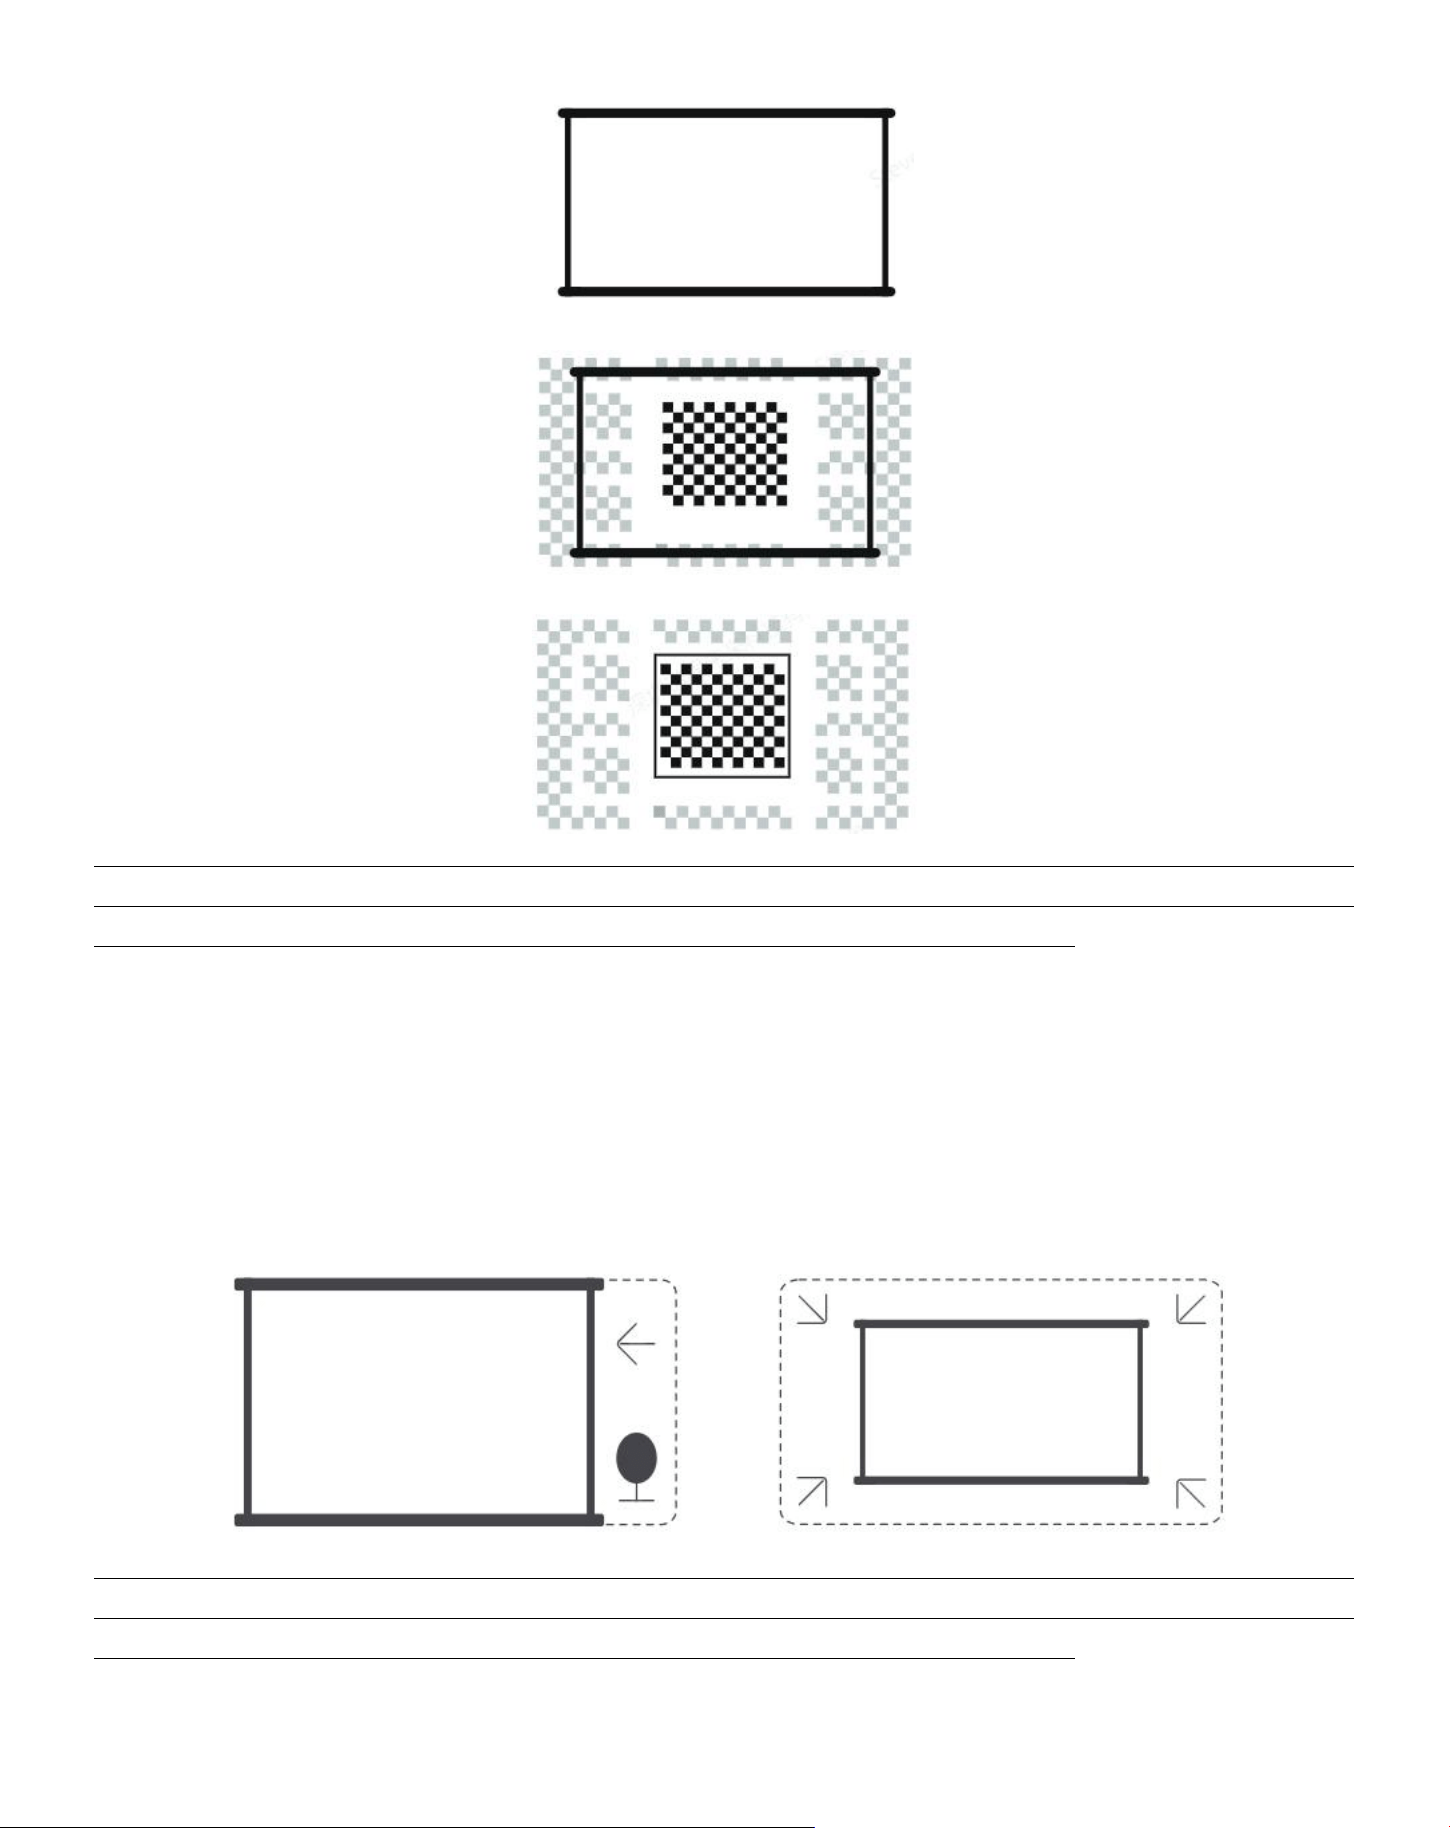
8.3.4 Alignement automatique de l'écran
Cette fonction détecte automatiquement les limites de l'écran et ajuste la position de l'image pour assurer
un alignement précis avec les bords de l'écran, en évitant le débordement de l'image ou les espaces vides et
en permettant un centrage rapide de l'affichage.
4. L'écran de fond blanc doit avoir une bordure claire noire ou autre, tandis que l'écran résistant à la lumière n'a
aucune exigence de bordure.
30
5. L'image projetée avant le montage d'écran doit être plus grande que la zone de l'écran.
6. Lorsque vous utilisez la fonction de montage de l'écran, ne bloquez pas le centre de l'écran.
Notice: Avant d'utiliser les fonctions Auto Screen Fitting et Auto Obstacle Evitance, assurez-vous que les
fonctions Auto Keystone et Auto Focus sont activées.L'évitement d'obstacles peut ne pas fonctionner
lorsqu'il y a des objets blancs ou d'autres objets de couleur claire dans l'écran cible.
8.3.3 Évitement automatique des obstacles
Cette fonction détecte automatiquement les obstacles dans le chemin de projection et ajuste intelligemment
l'angle ou la position de l'image pour éviter l'obstruction de l'image, assurant une projection claire et
complète.
Notice: Avant d'utiliser les fonctions Auto Screen Fitting et Auto Obstacle Evitance, assurez-vous que les
fonctions Auto Keystone et Auto Focus sont activées.L'évitement d'obstacles peut ne pas fonctionner
lorsqu'il y a des objets blancs ou d'autres objets de couleur claire dans l'écran cible.
31
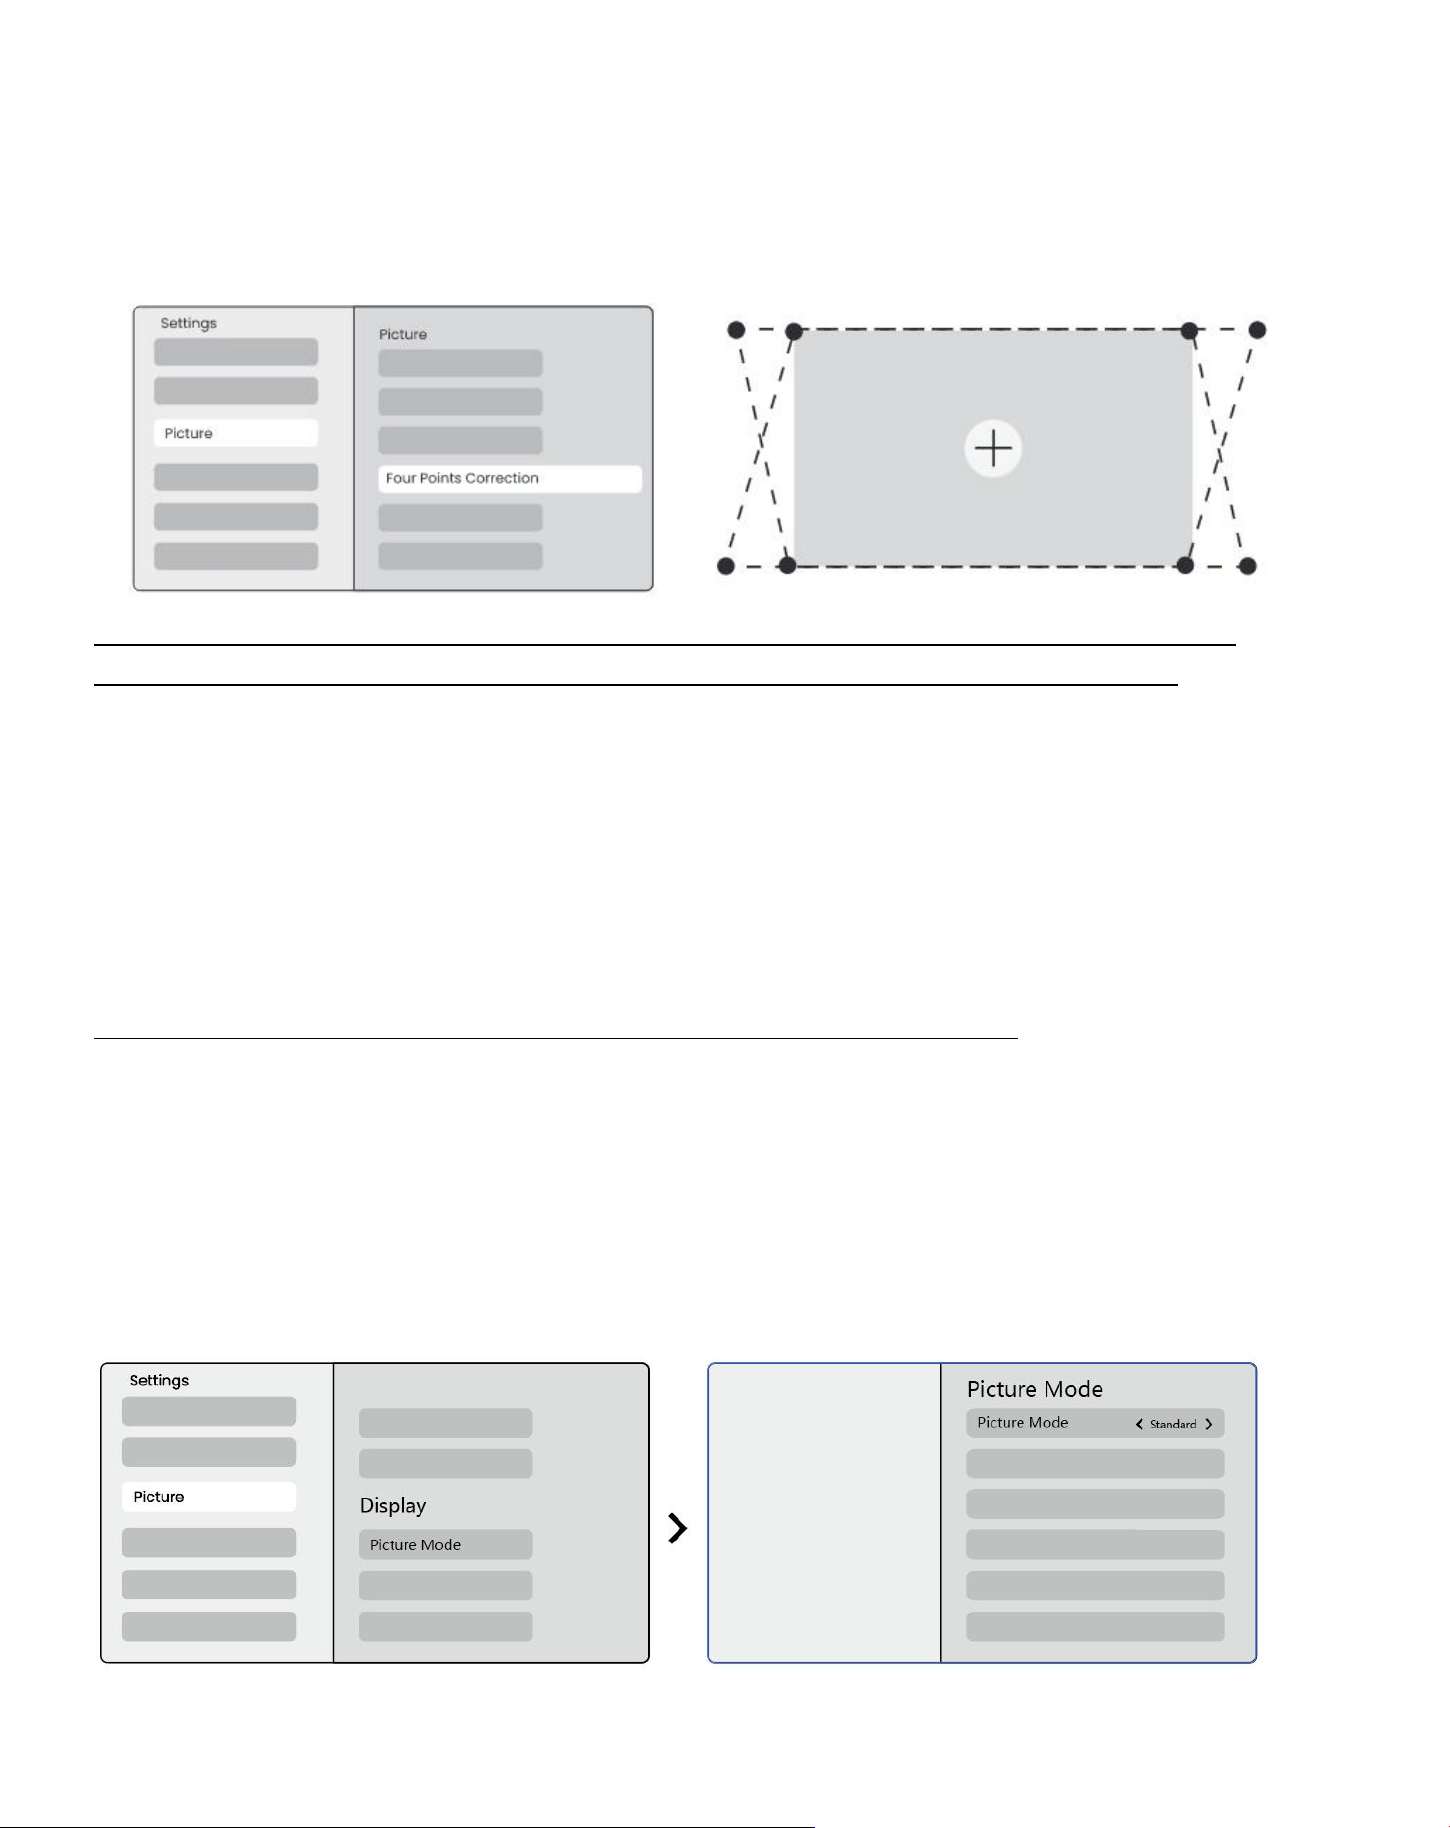
8.3.5 Correction de Keystone manuelle
Si vous devez ajuster davantage l'écran, vous pouvez utiliser la fonction de correction manuelle de Keystone.
Étape 1: s'il vous plaît aller à la page d'accueil-> sélectionnez les paramètres [⚙] -> Sélectionnez [Image]
Étape 2: Dans [Image]-> sélectionnez [Correction des quatre points]-> ajustez l'écran en faisant glisser les flèches.
Avis: Veuillez vous assurer que le projecteur ne s'incline pas plus de 15 degrés verticalement ou
horizontalement.S'il vous plaît assurer le travail de mise au point automatique efficacement.
8.4 Zoom de l'image
Vous pouvez ajuster la taille de l'image en fonction de vos besoins.
Étape 1: s'il vous plaît aller à la page d'accueil-> sélectionnez les paramètres [⚙] -> Sélectionnez [Image]
Étape 2: Dans [Image] -> sélectionnez [Image Zoom] -> Utilisez les touches fléchées haut et bas pour ajuster
manuellement le zoom jusqu'à ce que l'image soit souhaitée.(Schéma ci-joint)
Conseils: La taille d'écran recommandée est comprise entre 60 et 100 pouces.
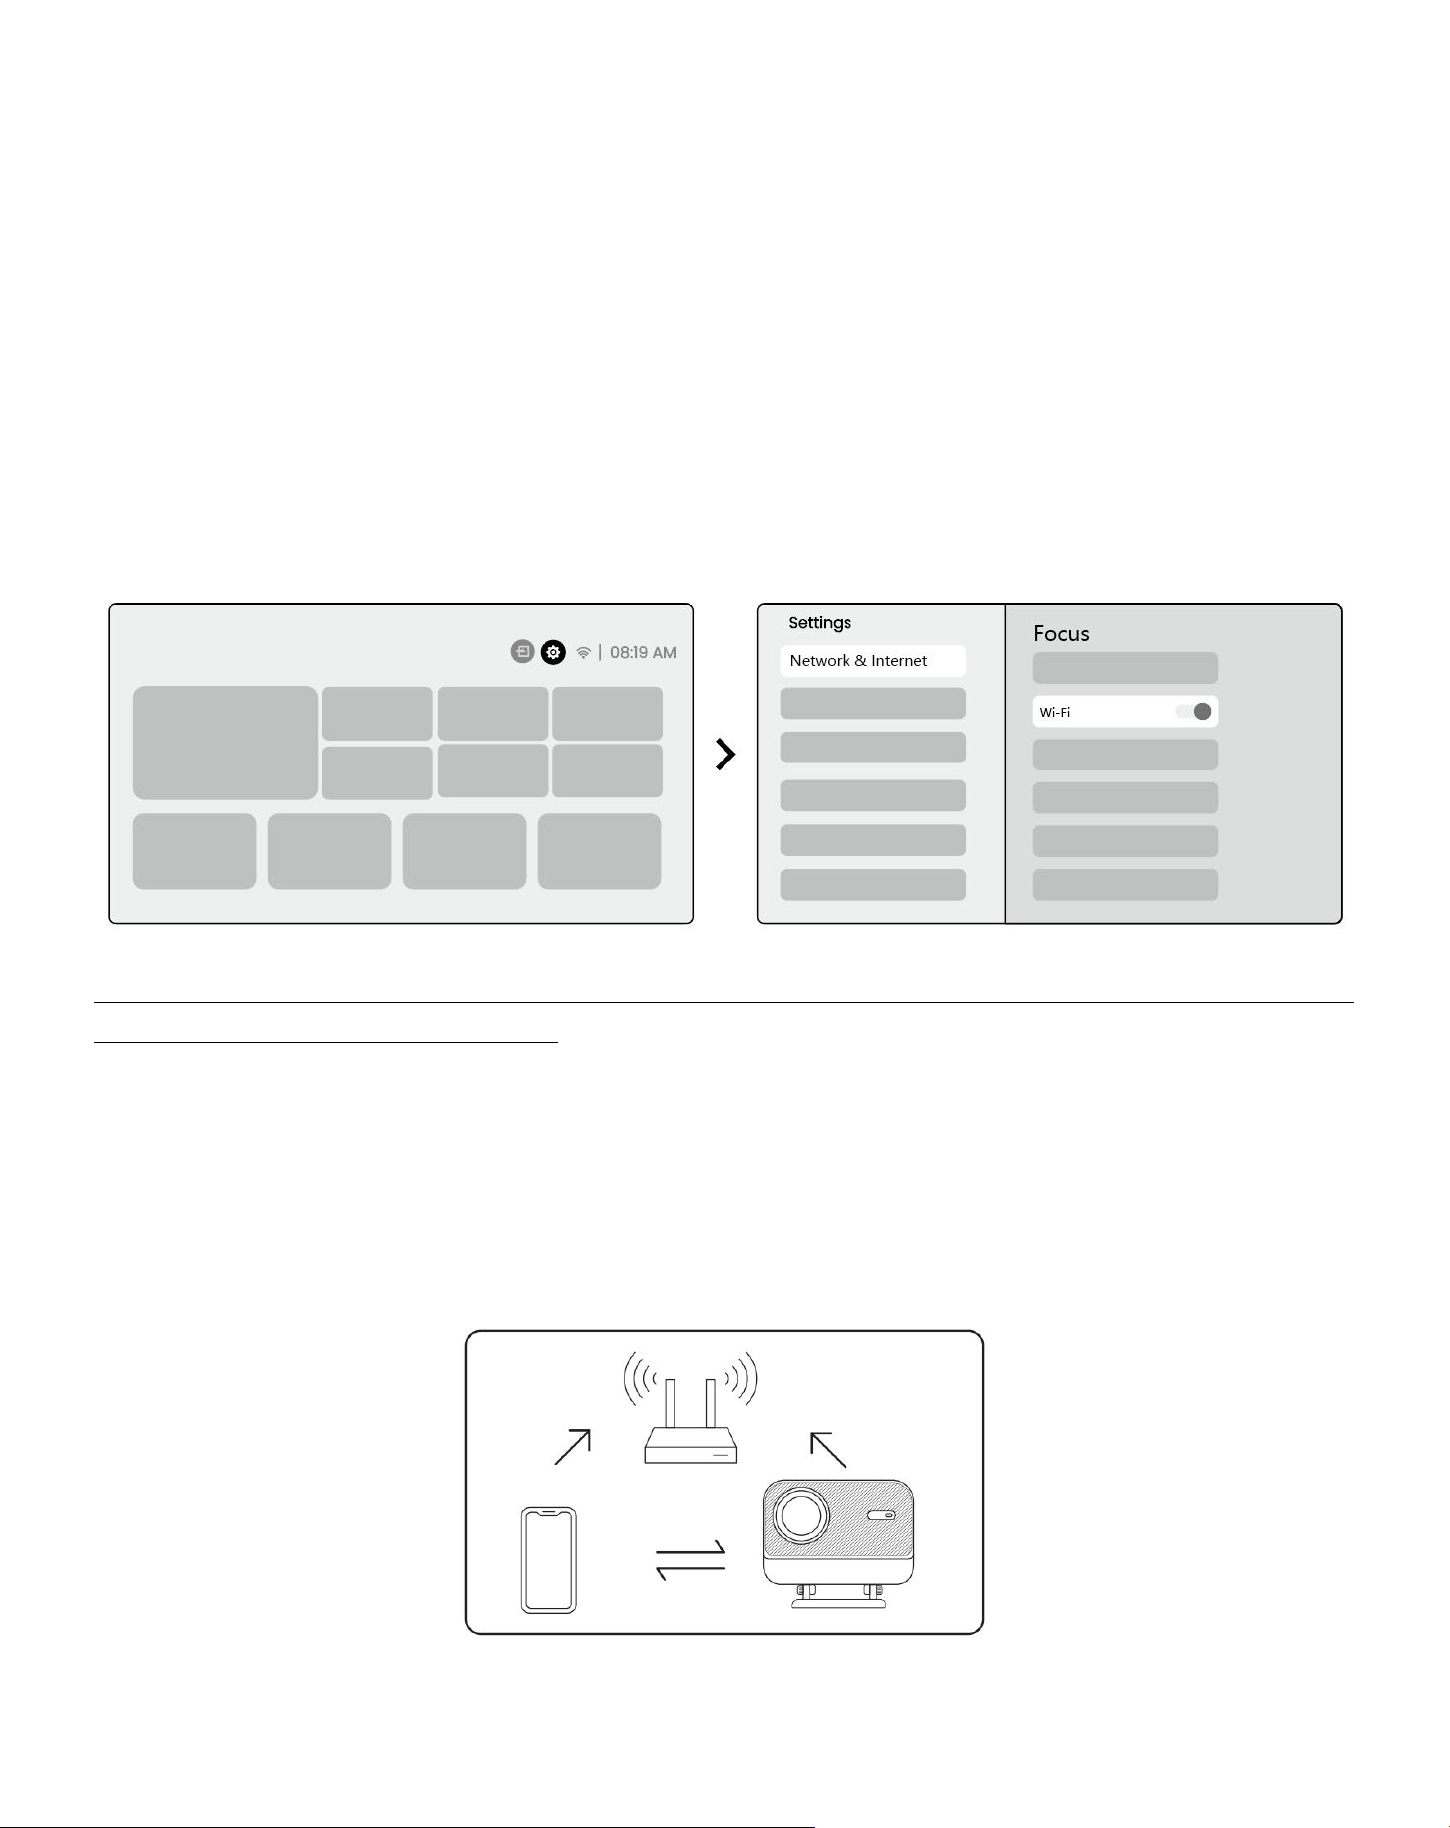
8.5 Affichage
Vous pouvez ajuster le Mode Image en fonction de vos besoins.
Étape 1: s'il vous plaît aller à la page d'accueil-> sélectionnez les paramètres [⚙] -> Sélectionnez [Image]
Étape 2: Dans [Image] -> sélectionnez [Mode Image]
32
Attention: Le réglage de couleur de l'image ne prendra effet que lors de la lecture d'images ou de vidéos.
15Mise en miroir de l'écran
9.1 Réglages WiFi
Étape 1: Appuyez sur Réglages [⚙Bouton] -> Sélectionner [Réseau et Internet] -> Activer le bouton [Connexion
Internet] -> Sélectionner [Wi-Fi]
Étape 2: Dans la liste [Réseaux disponibles]-> Recherchez votre réseau Wi-Fi souhaité-> entrez le mot de
passe-> Sélectionnez [OK]-> Attendez que le projecteur se connecte.
Notice: La fluidité de la mise en miroir de l'écran sera affectée par l'environnement réseau. Il est recommandé
d'utiliser une bande passante plus rapide.
9.2.1 iOS Cast (pour les appareils iOS)
Etape 1: Assurer la compatibilité et la connexion réseau: Assurez-vous que votre appareil iOS et le L2 Plus Plus sont
connectés au même réseau Wi-Fi.
33
Etape 2:allez à la page d'accueil-> sélectionnez le menu [My App]-> appuyez sur [iPhone sans fil sur le même
écran]-> Entrez et restez sur la page [iPhone sans fil sur le même
écran].
Étape3: Ouvrez [Centre de contrôle] sur votre appareil iOS-> Sélectionnez la fonction de mise en miroir de
l'écran-> Connectez le récepteur iOS Cast nommé [Yaber _ L2Plus _ xxxx] -> Réussir.
9.2.2 Miracast (pour les appareils Android)
Step1: Veuillez activer la fonction Wi-Fi sur votre téléphone Android (pas nécessaire de se connecter au
Wi-Fi).
Étape 2: Allez à la page d'accueil-> sélectionnez le menu [My App] -> appuyez sur [Screencast] -> Entrée et
restez sur la page [Android Screen Share].
34
Étape3: Accédez au [Centre de contrôle] sur votre appareil Android-> Sélectionnez [Screen Mirroring/Smart
View] Sélectionnez et connectez le récepteur Miracast nommé [Yaber _ L2Plus _ xxxx] -> Réussir.
Avis: Certains appareils mobiles Google ne prennent en charge que le chromecast et ne peuvent pas être lancés
par Airplay ou Miracast.
⚠En raison de la protection du droit d'auteur, certains contenus protégés par le droit d'auteur (Netflix, Hulu, etc.)
ne peuvent pas être mis en miroir directement à partir du téléphone.Doit être utilisé avec un bâton de télévision.
Si vous avez besoin d'aide, veuillez nous contacter.
Notice: La mise en miroir du téléphone portable ne peut être réalisée qu'en entrant et en restant sur la page de
partage d'écran sans fil.
Avis: Veuillez vous assurer que votre appareil mobile est proche du projecteur. La fluidité de la mise en miroir de
l'écran sera également affectée par la distance.
16Connectivité
10,1 HDMI, USB, sortie audio 3,5mm
Le projecteur Yaber L2 Plus dispose de 3 interfaces, port HDMI/port USB/port audio 3,5mm. Veuillez sélectionner
le bon pour connecter votre appareil (PC, téléphone, lecteur DVD, barre de son, USB, PS5, etc.)
35
10.2 USB
Notice: Lors de la recherche de fichiers sur le périphérique USB, veuillez sélectionner la catégorie de fichier
correcte dans "Vidéo", "Musique", "Image", sinon vous risquez de ne pas trouver le fichier souhaité.
10.3 HDMI
Si vous rencontrez des problèmes lors de l'utilisation HDMI, veuillez essayer ces solutions ci-dessous:
Méthode 1. Passez la version HDMI EDID à 1.4 dans les paramètres de votre appareil externe.
Méthode 2 Essayez de changer le câble HDMI.
Méthode 3 Essayez de remplacer d'autres appareils externes par la fonction HDMI et vérifiez si l'interface
HDMI du périphérique externe fonctionne.
Remarque: Étant donné que l'interface HDMI ne prend pas en charge la fonction ARC, vous ne pouvez pas
utiliser HDMI pour connecter la Soundbar.Veuillez utiliser le Bluetooth ou un câble audio de 3,5mm à la place.
10.4 Sortie audio
Remarque: Si vous rencontrez un bégaiement ou un retard lorsque vous utilisez une connexion haut-parleur
Bluetooth, vous pouvez utiliser des périphériques qui prennent en charge 3.Câble audio 5mm pour lire l'audio.
36
10.5 Connexions sans fil
Notice: Si vous avez besoin de mettre en miroir Netflix, Prime Video, etc. au projecteur, veuillez connecter un
Dongle TV/Stick ou d'autres produits avec ces médias en streaming via HDMI.
Réglages Bluetooth
Étape 1: Allumez votre appareil Bluetooth et préparez-vous à la connexion Bluetooth.
Étape 2: Sélectionnez le menu [Bluetooth]-> Activer le bouton Bluetooth-> Sélectionnez l'appareil Bluetooth
à coupler et à connecter.
Notice: Veuillez vous assurer que l'appareil est déconnecté des autres appareils ou que le mode Bluetooth est
activé.
11.2 Haut-parleur Bluetooth
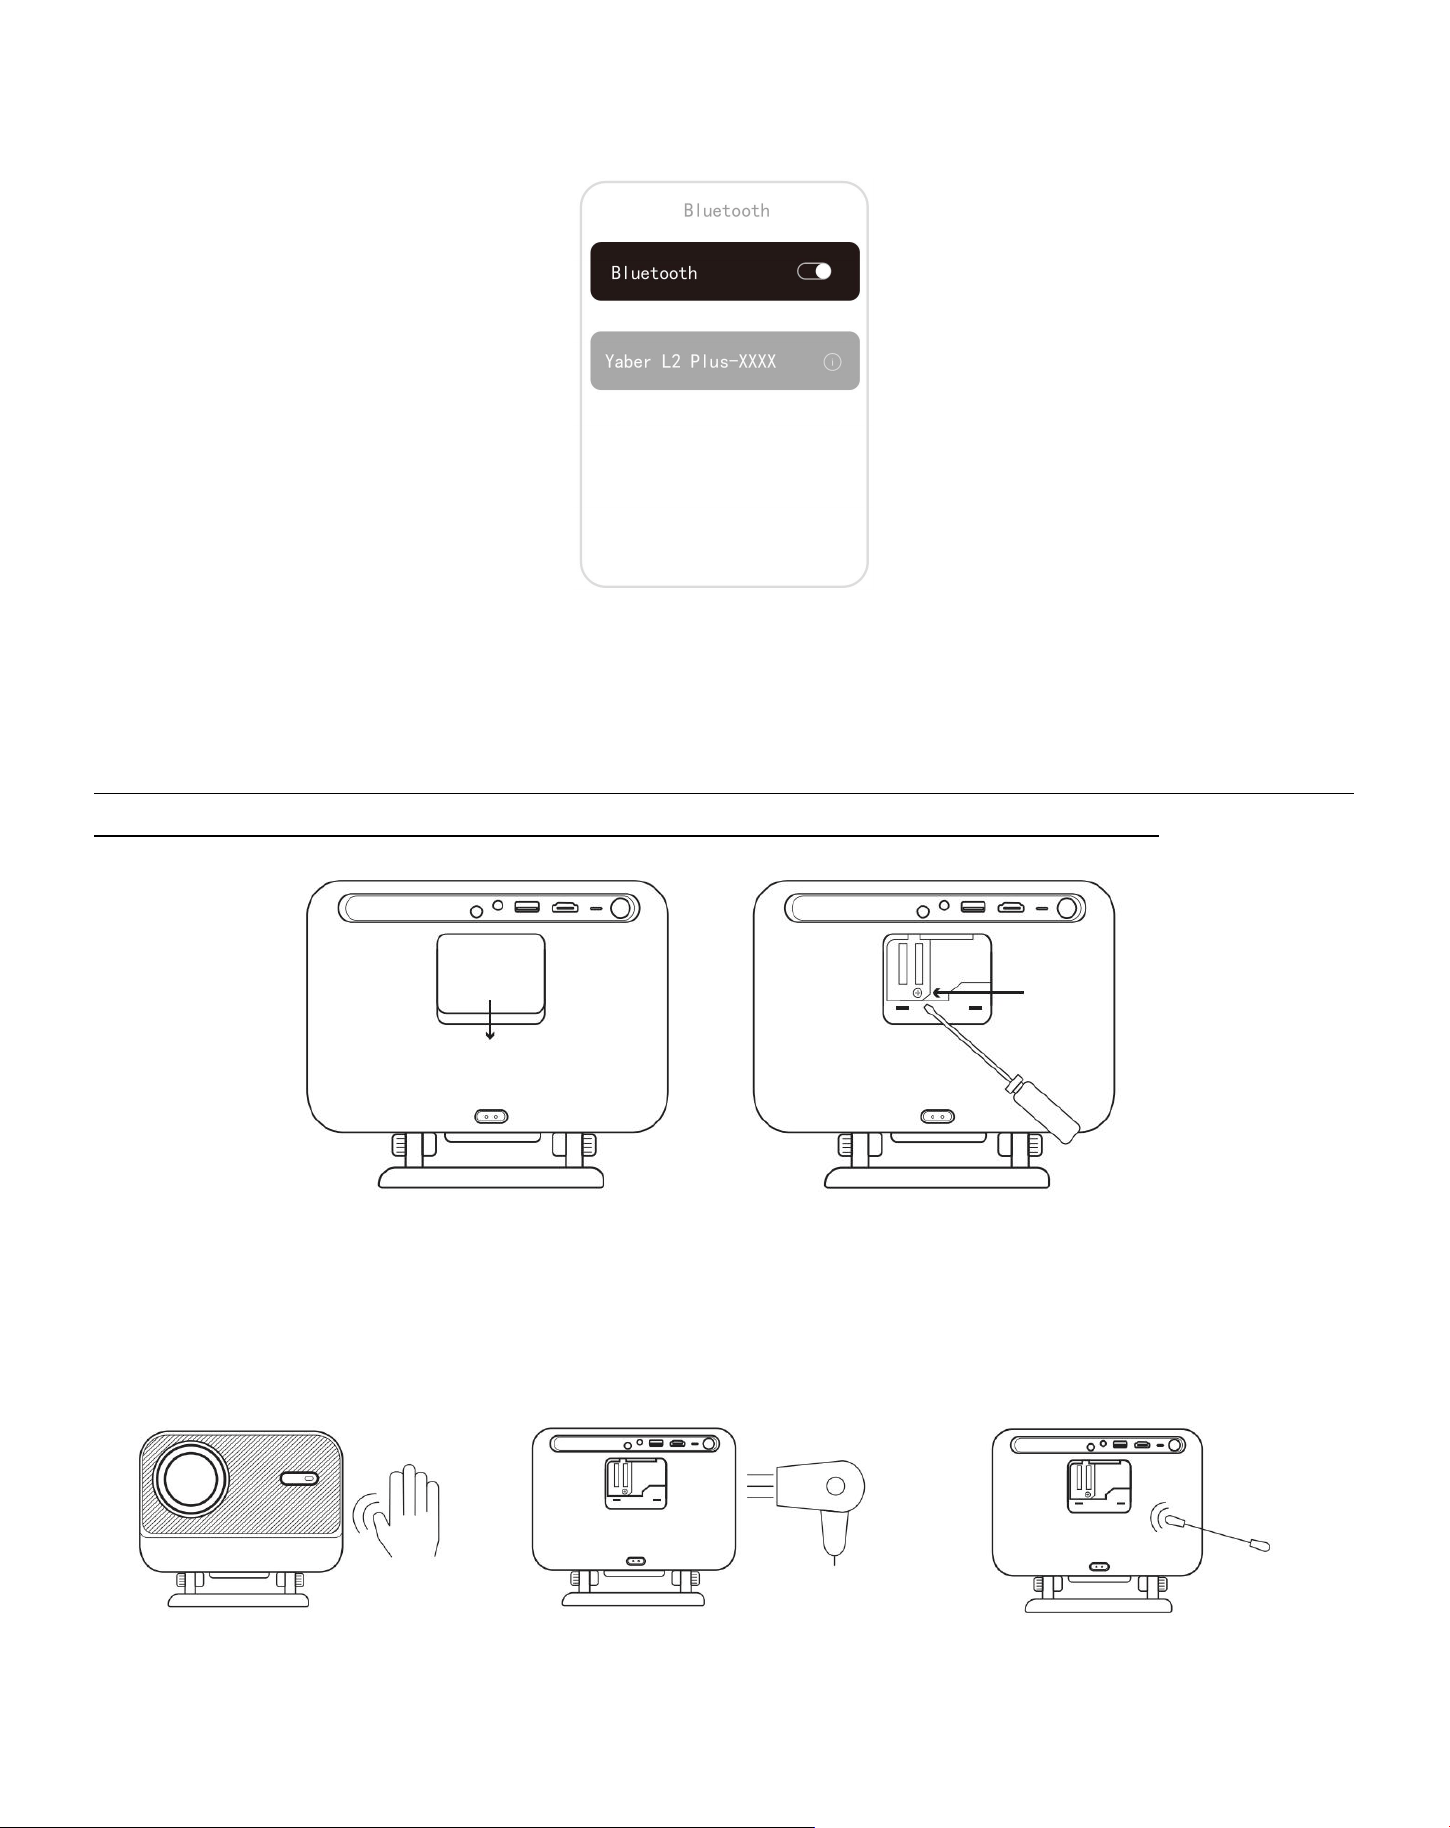
Etape 1: Sur la page d'accueil, sélectionnez le menu [My App].
Étape 2: Allumez le haut-parleur Bluetooth, entrez et restez sur cette page.
37
Étape 3: Recherchez [L2Plus-XXXXX Yaber] sur l'interface Bluetooth de votre téléphone.
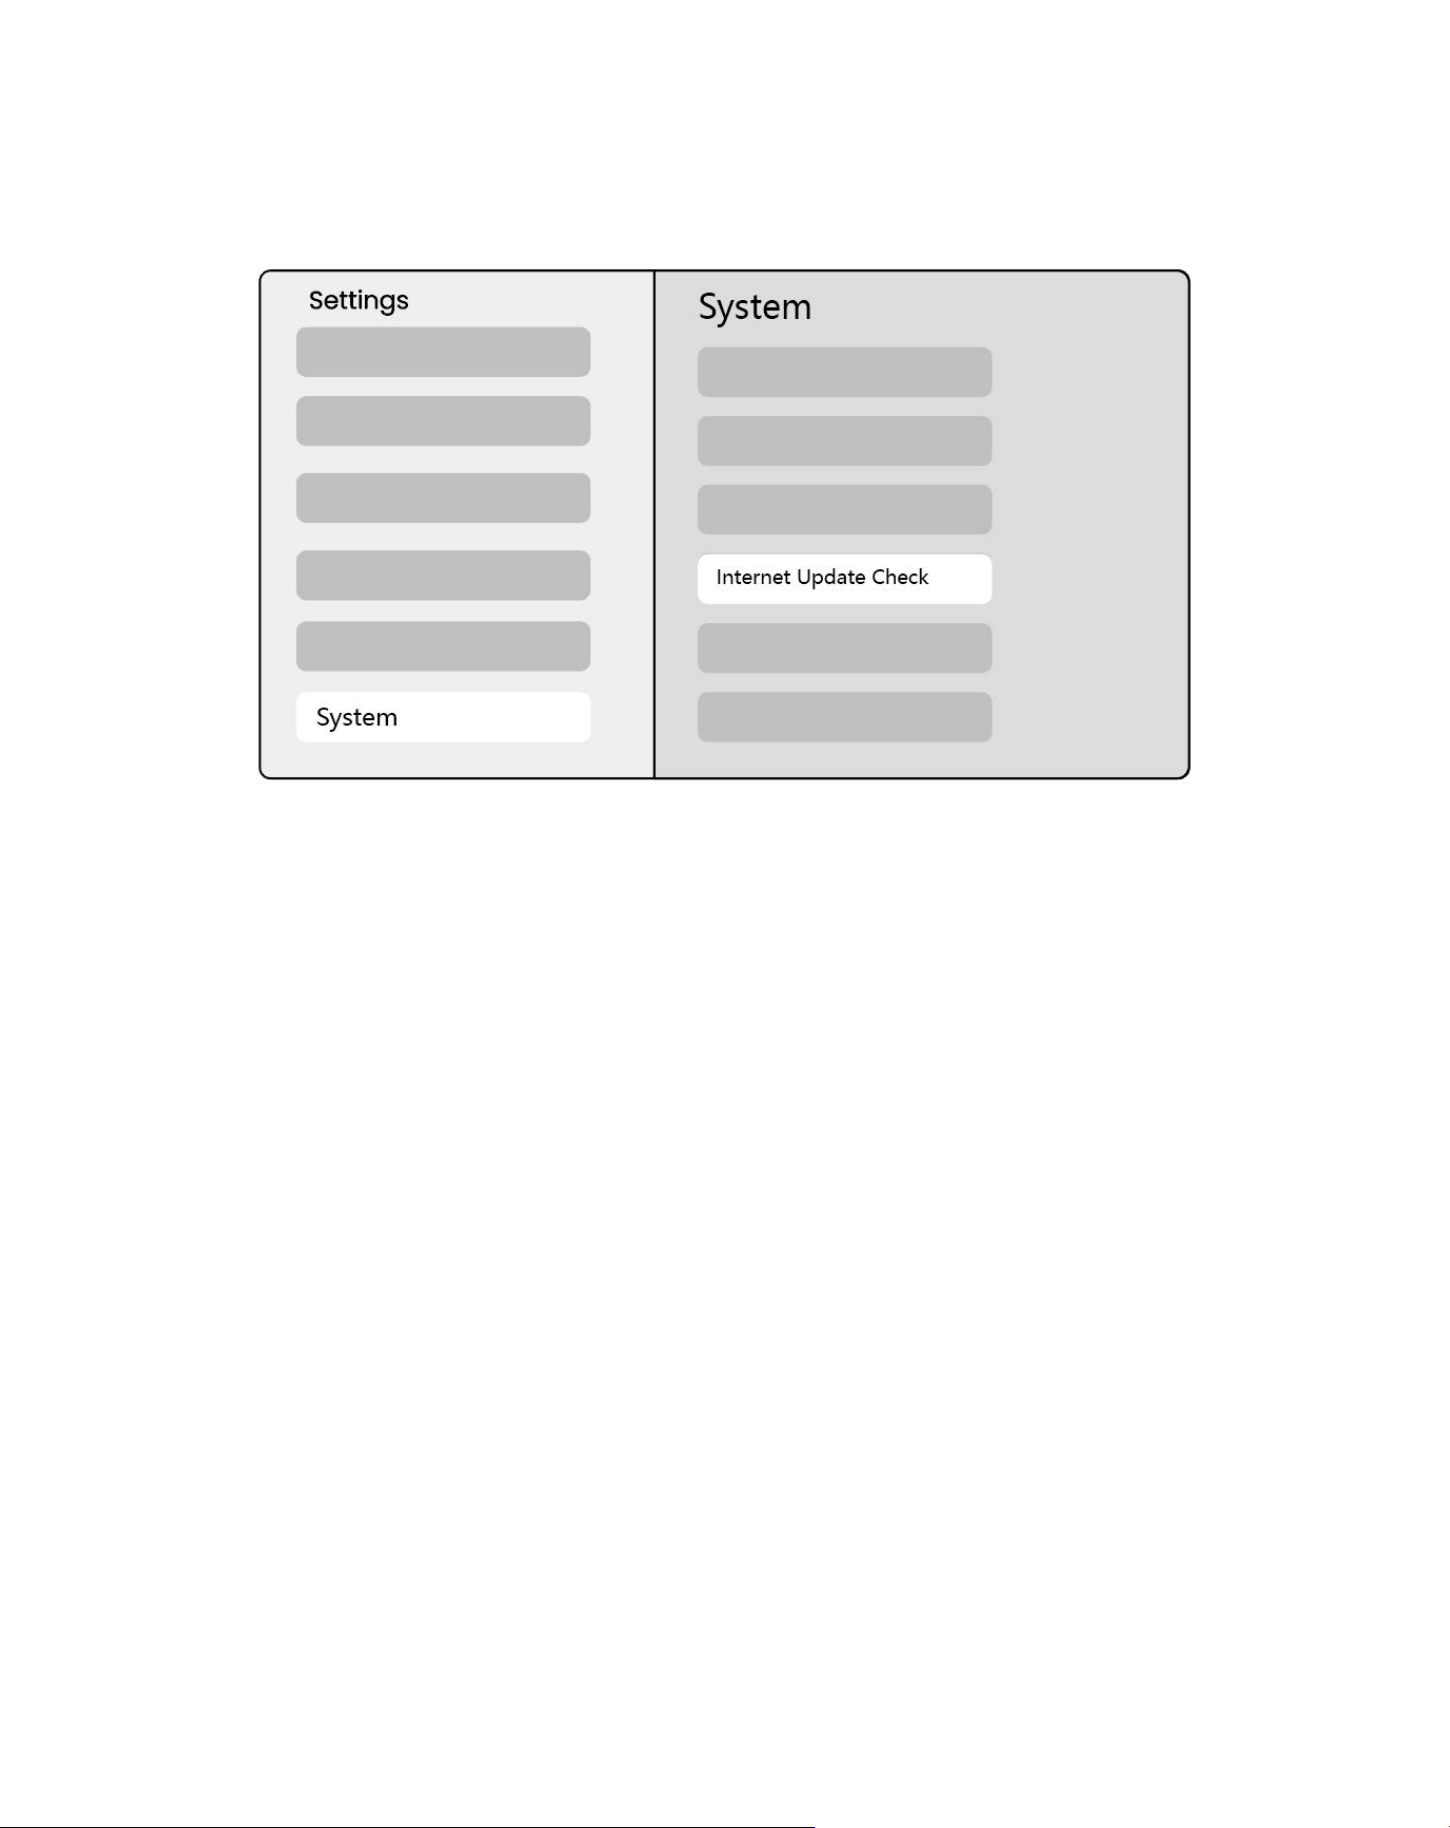
Nettoyage régulier
⚠Remarque: Comme L2 Plus utilise une machine optique ouverte, une petite quantité de poussière
peut être inhalée pendant l'utilisation.Il est recommandé de le nettoyer régulièrement.
Retirez le couvercle à l'arrière de la machine, puis retirez le couvercle d'étanchéité avec un tournevis.
Méthode 1
Tapotez légèrement le projecteur
.
Méthode 2
Utilisez de l'air froid pour souffler
dans le port de dépoussiérage.
Méthode 3
Utilisez des cotons-tiges pour
enlever les taches tenaces.
38
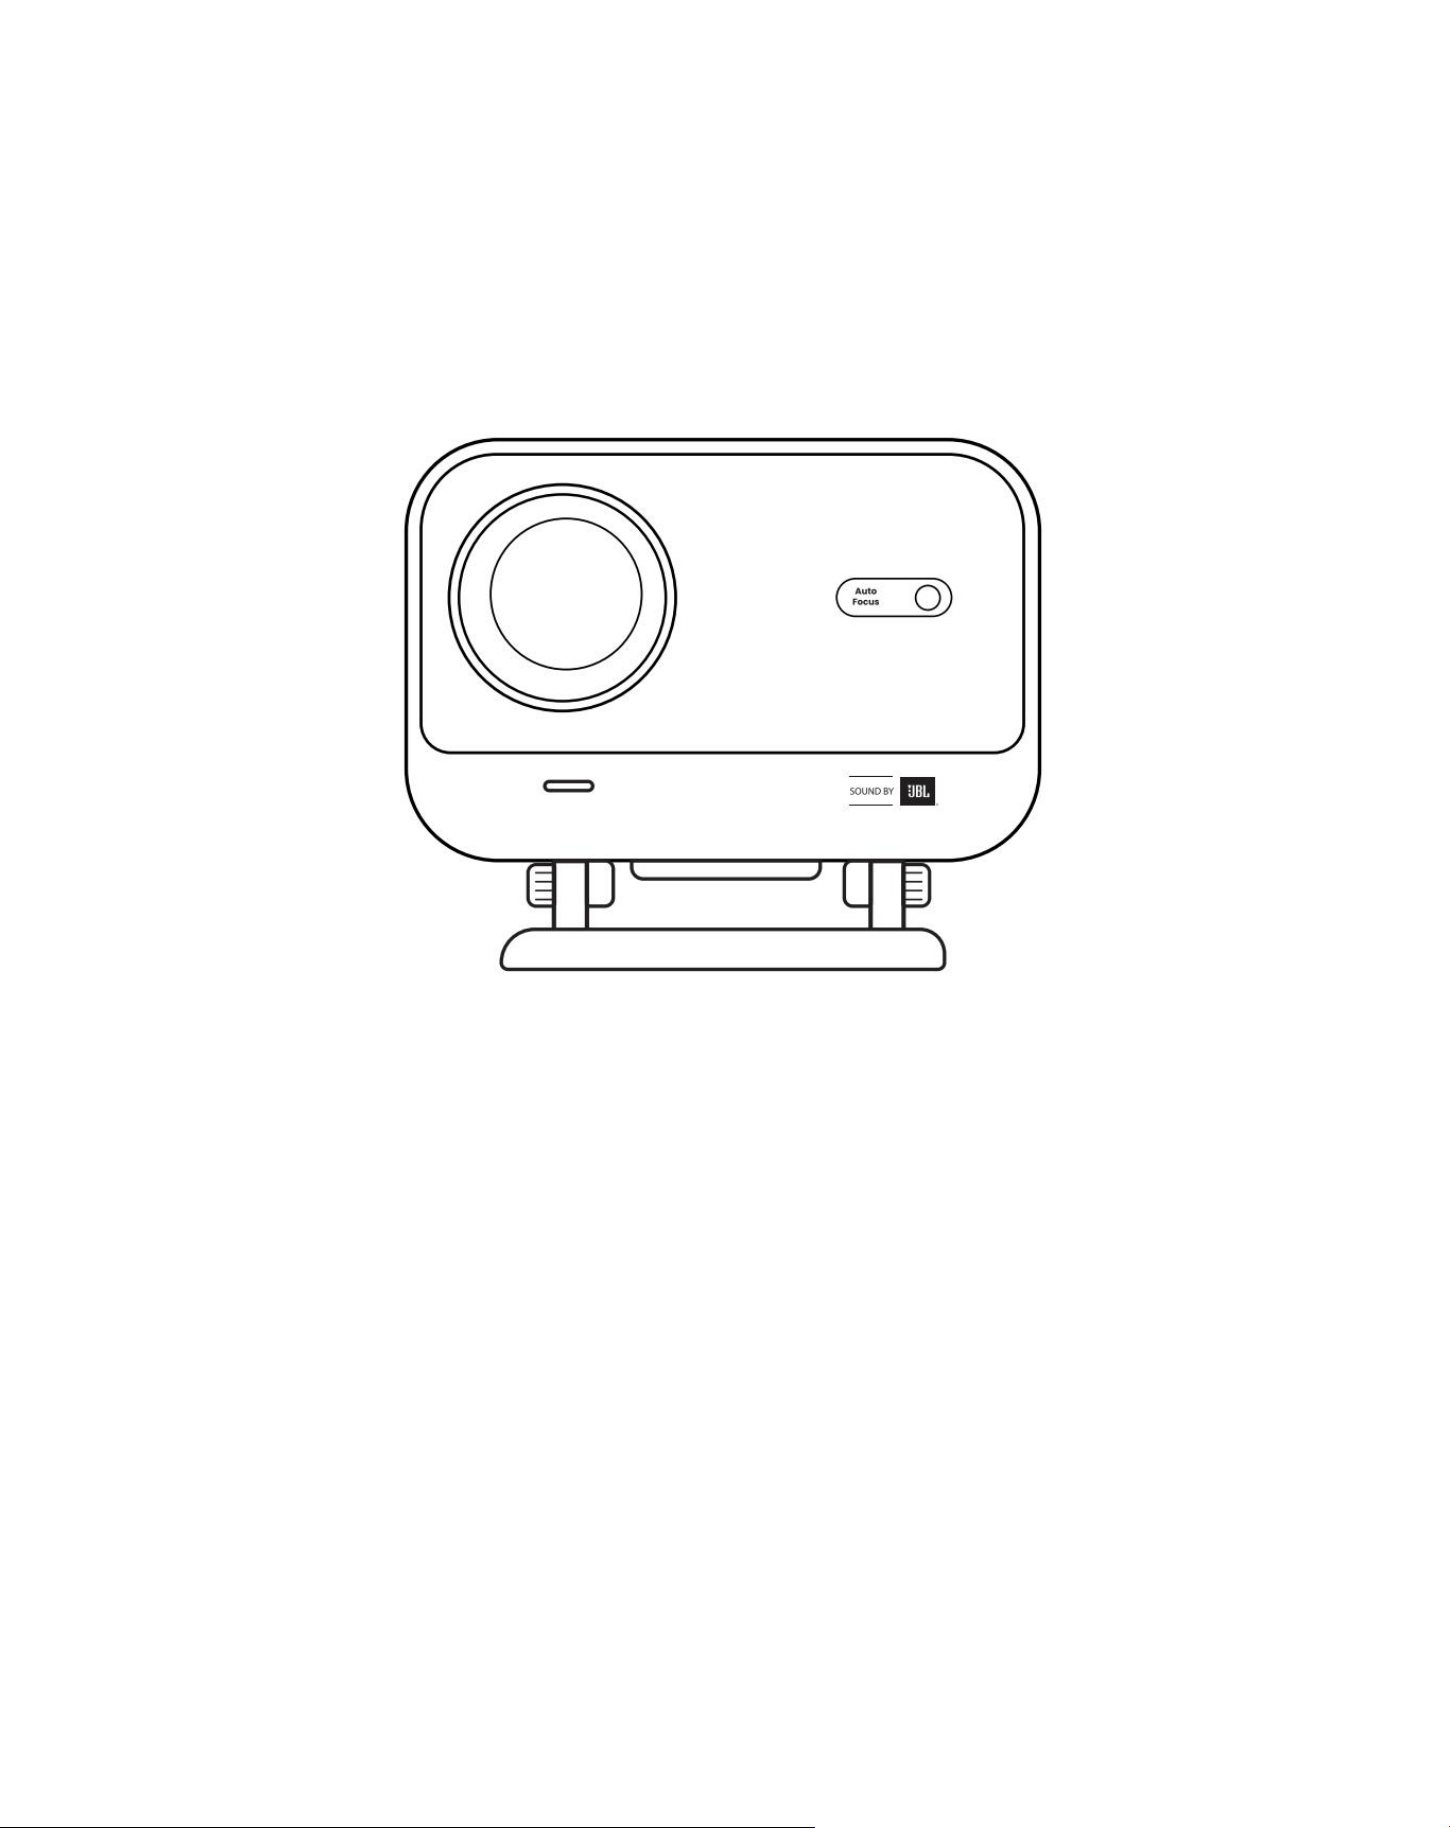
Mise à niveau du système
Vous pouvez vérifier l'état du système de votre appareil dans [Paramètres]-[Système]-[Vérification des
mises à jour Internet].
Si vous avez des questions, n'hésitez pas à nous contacter.
✉Support@yaber.com
39
Benutzer handbuch
Projektor L2 Plus
DE

40
YABER Lebenszeit Profession elle Unterstützung
Sehr geehrter, wertvoller Kunde,
Vielen Dank, dass Sie sich für den Yaber L2 Plus Projektor entschieden haben. Bitte lesen Sie das Benutzer
handbuch sorgfältig durch, bevor Sie Ihren L2 Plus Projektor verwenden.
Wir verstehen, dass Sie bei der Verwendung des Projektors auf verschiedene Fragen und Probleme stoßen
können. Wenn Sie jedoch eine Bewertung auf der Produkts eite hinterlassen, wird Ihre Erfahrung möglicher
weise nicht verbessert.(Bitte lassen Sie uns Ihnen helfen! Wir freuen uns sehr über Ihr Feedback und werden
Ihnen umgehend eine zufriedenstellende Lösung bieten.)
Ihre Zufriedenheit ist unsere oberste Priorität. Wenn Sie auf Probleme stoßen, hoffen wir aufrichtig, dass Sie
uns die Möglichkeit geben, sie zu lösen.
Wir sind bestrebt, Ihnen die bestmögliche Lösung anzubieten. Wir freuen uns über Ihr Verständnis und Ihre
Geduld im Voraus.
Yaber Projektor Kunden service Team
GARANTIE (GARANTIE)
Vielen Dank für Ihren Kauf und Unterstützung. Wir bieten eine 3-jährige Garantie für Yaber L2 Plus Projektor.
Wenn Sie Fragen haben, wenden Sie sich bitte an uns.
✉Support@yaber.com
Wichtige Vorsicht maßnahmen
Für eine sichere und optimale Nutzung des Geräts folgen Sie bitte diesen Richtlinien:
● Stellen Sie die Linse nicht in Richtung Augen, da das starke Licht des Projektors die Augen verletzen
kann.
●
Blockieren Sie nicht den Lufteinlass oder-auslass des Geräts, um eine Überhitzung zu verhindern, die
interne Komponenten beschädigen könnte.
● Wischen Sie das Objektiv nicht direkt mit Reinigungs werkzeugen wie Papier oder Tuch ab. Entfernen Sie
stattdessen Staub von der Linse mit sauberer Luft.
● Waschen Sie das Gerät nicht mit Chemikalien, Reinigungs mitteln oder Flüssigkeiten, da diese die
Leiterplatte angreifen können.
● Halten Sie das Gerät und seine Komponenten und Zubehörteile außerhalb der Reichweite von Kindern.
●
Stellen Sie sicher, dass das Gerät in einer trockenen, gut belüfteten Umgebung verwendet wird.
●
Lagern Sie das Gerät nicht an übermäßig heißen oder kalten Orten, da dies die Lebensdauer
elektronischer Komponenten verkürzen kann.Verwenden und lagern Sie es in einem Temperatur bereich
41
von 0 °C-40 °C.
● Stellen Sie das Gerät zum Trocknen nicht in Heizgeräte (z. B. Trockner oder Mikrowelle).
● Drücken Sie nicht fest auf das Gerät oder legen Sie Gegenstände darauf oder dahinter, um Schäden am
Gerät zu vermeiden.
●
Das Gerät nicht werfen, fallen lassen oder stark schütteln, um seine interne Leiterplatte zu schützen.
● Stellen Sie sicher, dass Sie den Staub filter alle sechs Monate bis zu einem Jahr reinigen, damit die
Maschine kühl läuft.
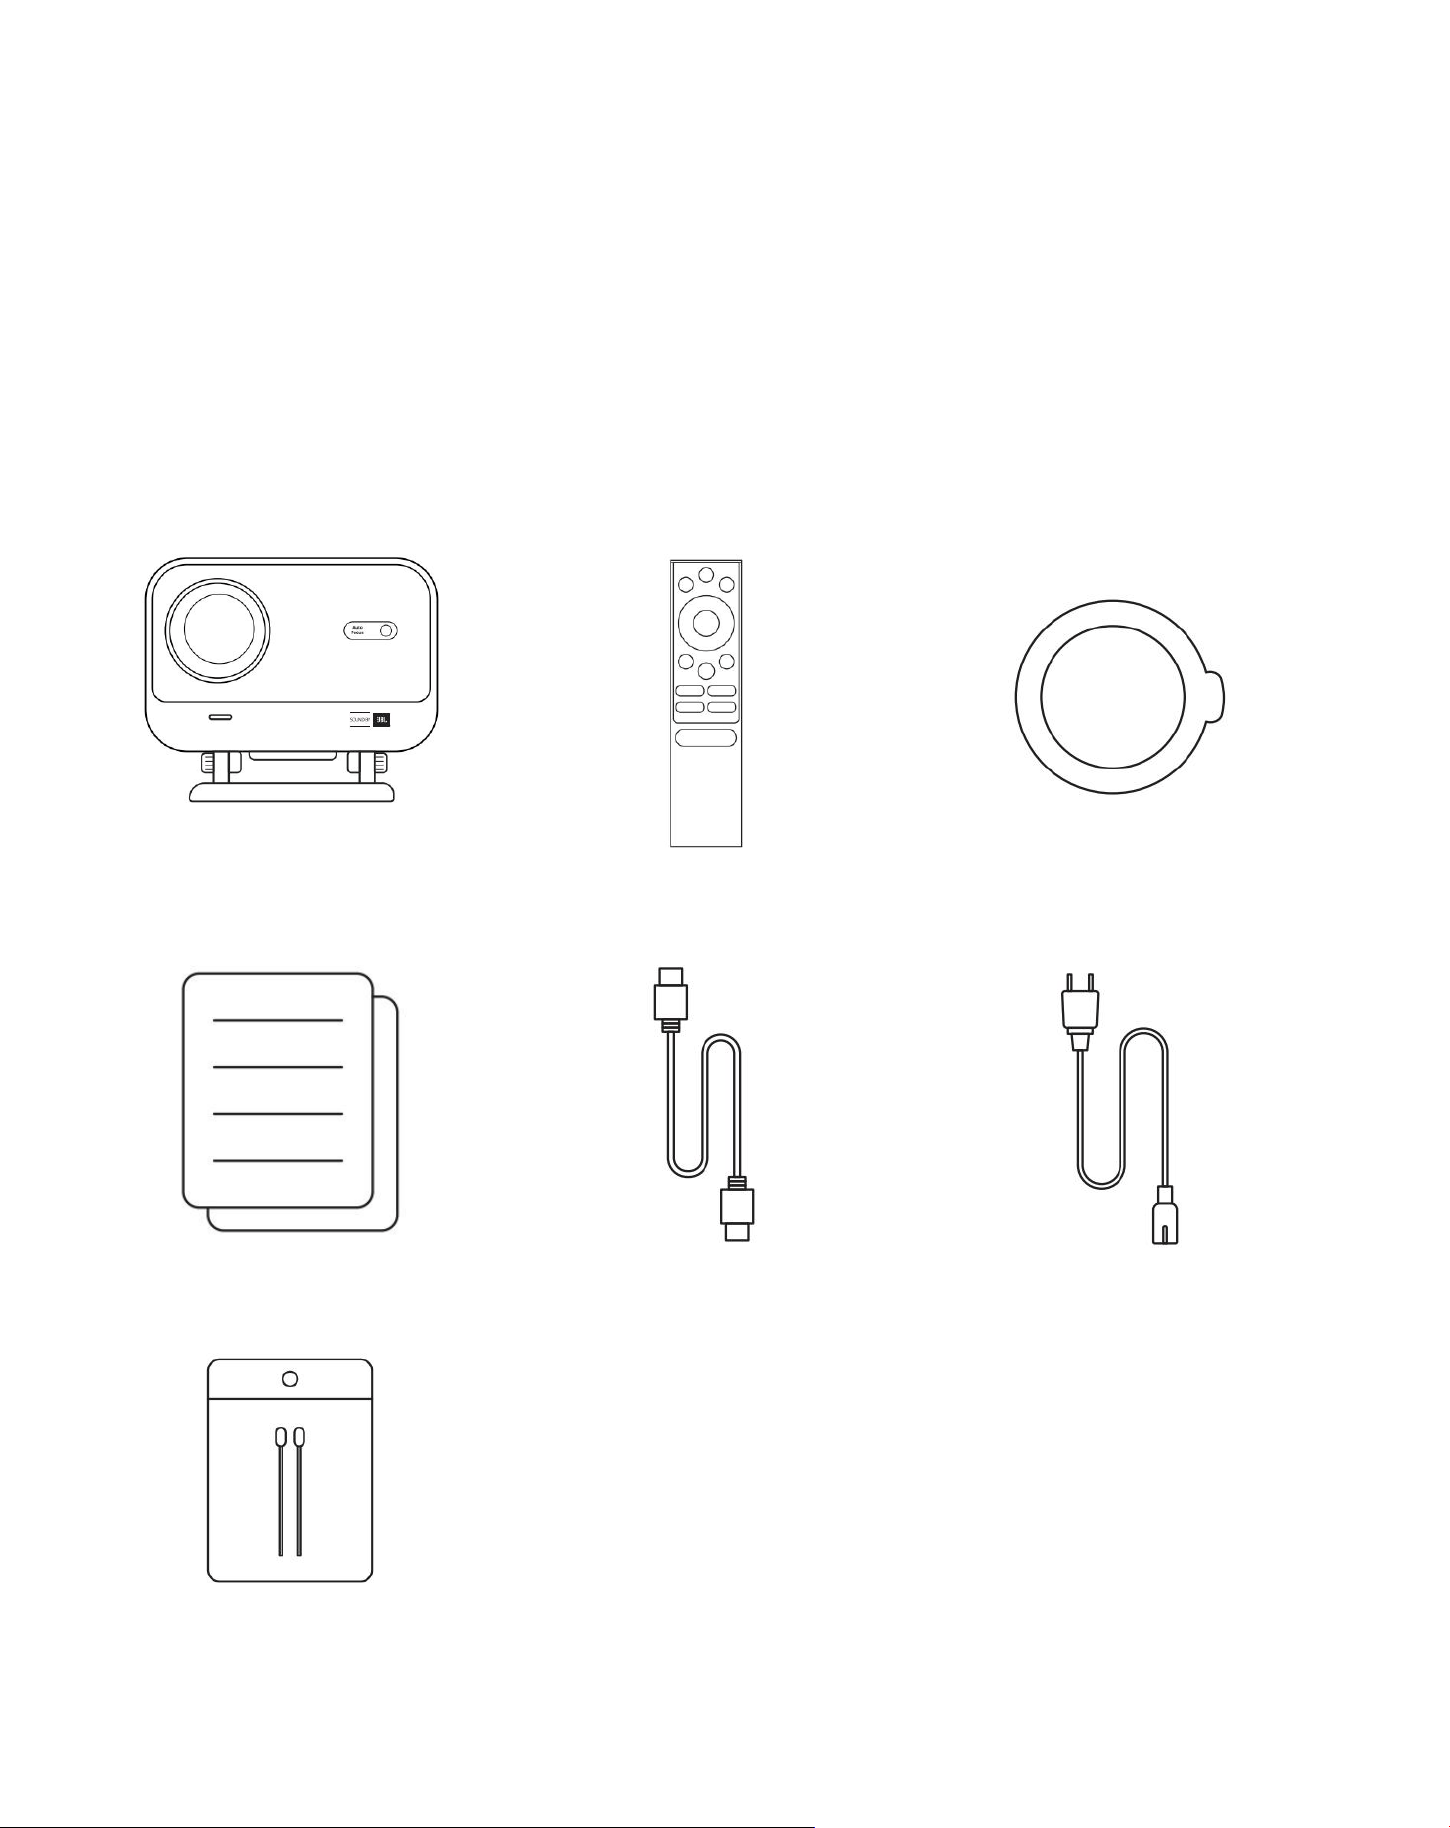
Was ist enthalten
L2 Plus Projektor
Fernbedienung
Objektiv abdeckung
QSG
HDMI-Kabel
Netz kabel
Reinigungs kits

42
Spezifikation
Modell Nr. L2 Plus
Native Auflösung
1920*1080
Lichtquelle
LED
Fokus
Auto/Elektro
Keystone-Korrektur
Auto/Handbuch
Schnitts telle
USB× 1
HDMI× 1
Audio Out× 1
Einheits dimension
22,7 × 20,4 × 18,4 cm
8,9 × 8 × 7,2 Zoll
Projektions verhältnis
1.38:1
Projektions abstand
Min. 1,26 m ~ Max 4,4 m
Min 40 ~ Max 150 Zoll
Leistungs spannung
AC 100-240V / 50-60Hz
Strom verbrauch
110W
Projektor gewicht
2,44 kg
5.38 lbs
Projektions methode
Vorder-/Rückseite auf
Schreibtisch
Vorne/Hinten auf Celling
Seiten verhältnis
16:9
Projektions zoom
50% - 100%
Bildformat
JPG, PNG, BMP, JPEG
Audioformat
MP3, WAV, ASF, 3GP, MP4, MPEG
Videoformat
MKV, MP4, 3GP, MPEG, ASF, WMV, WebM,
USB-Format
FAT 32, NTFS, exFAT
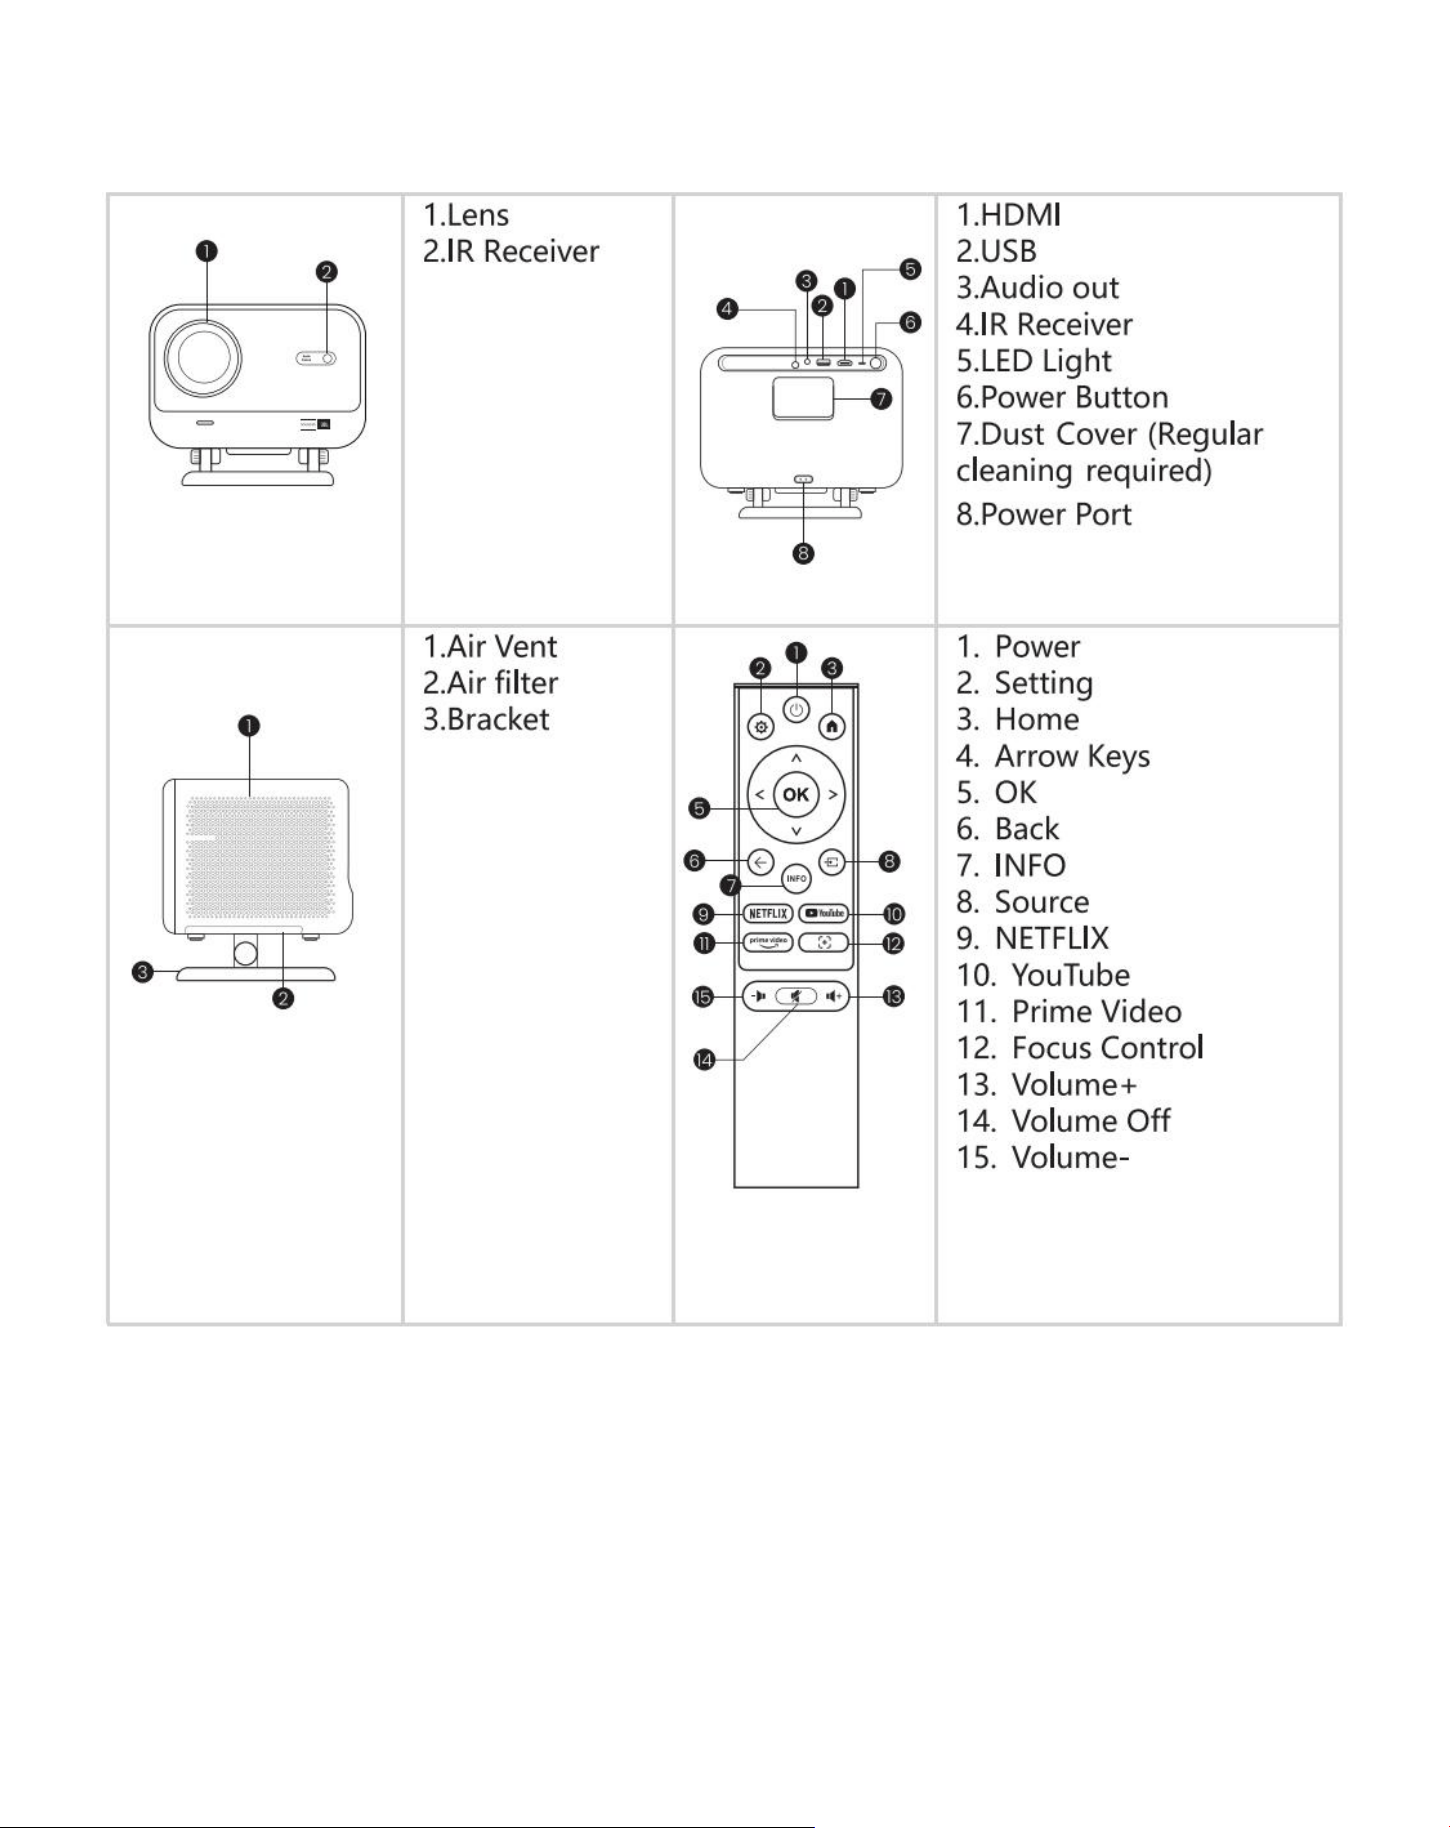
43
Produkt übersicht
44
Installation
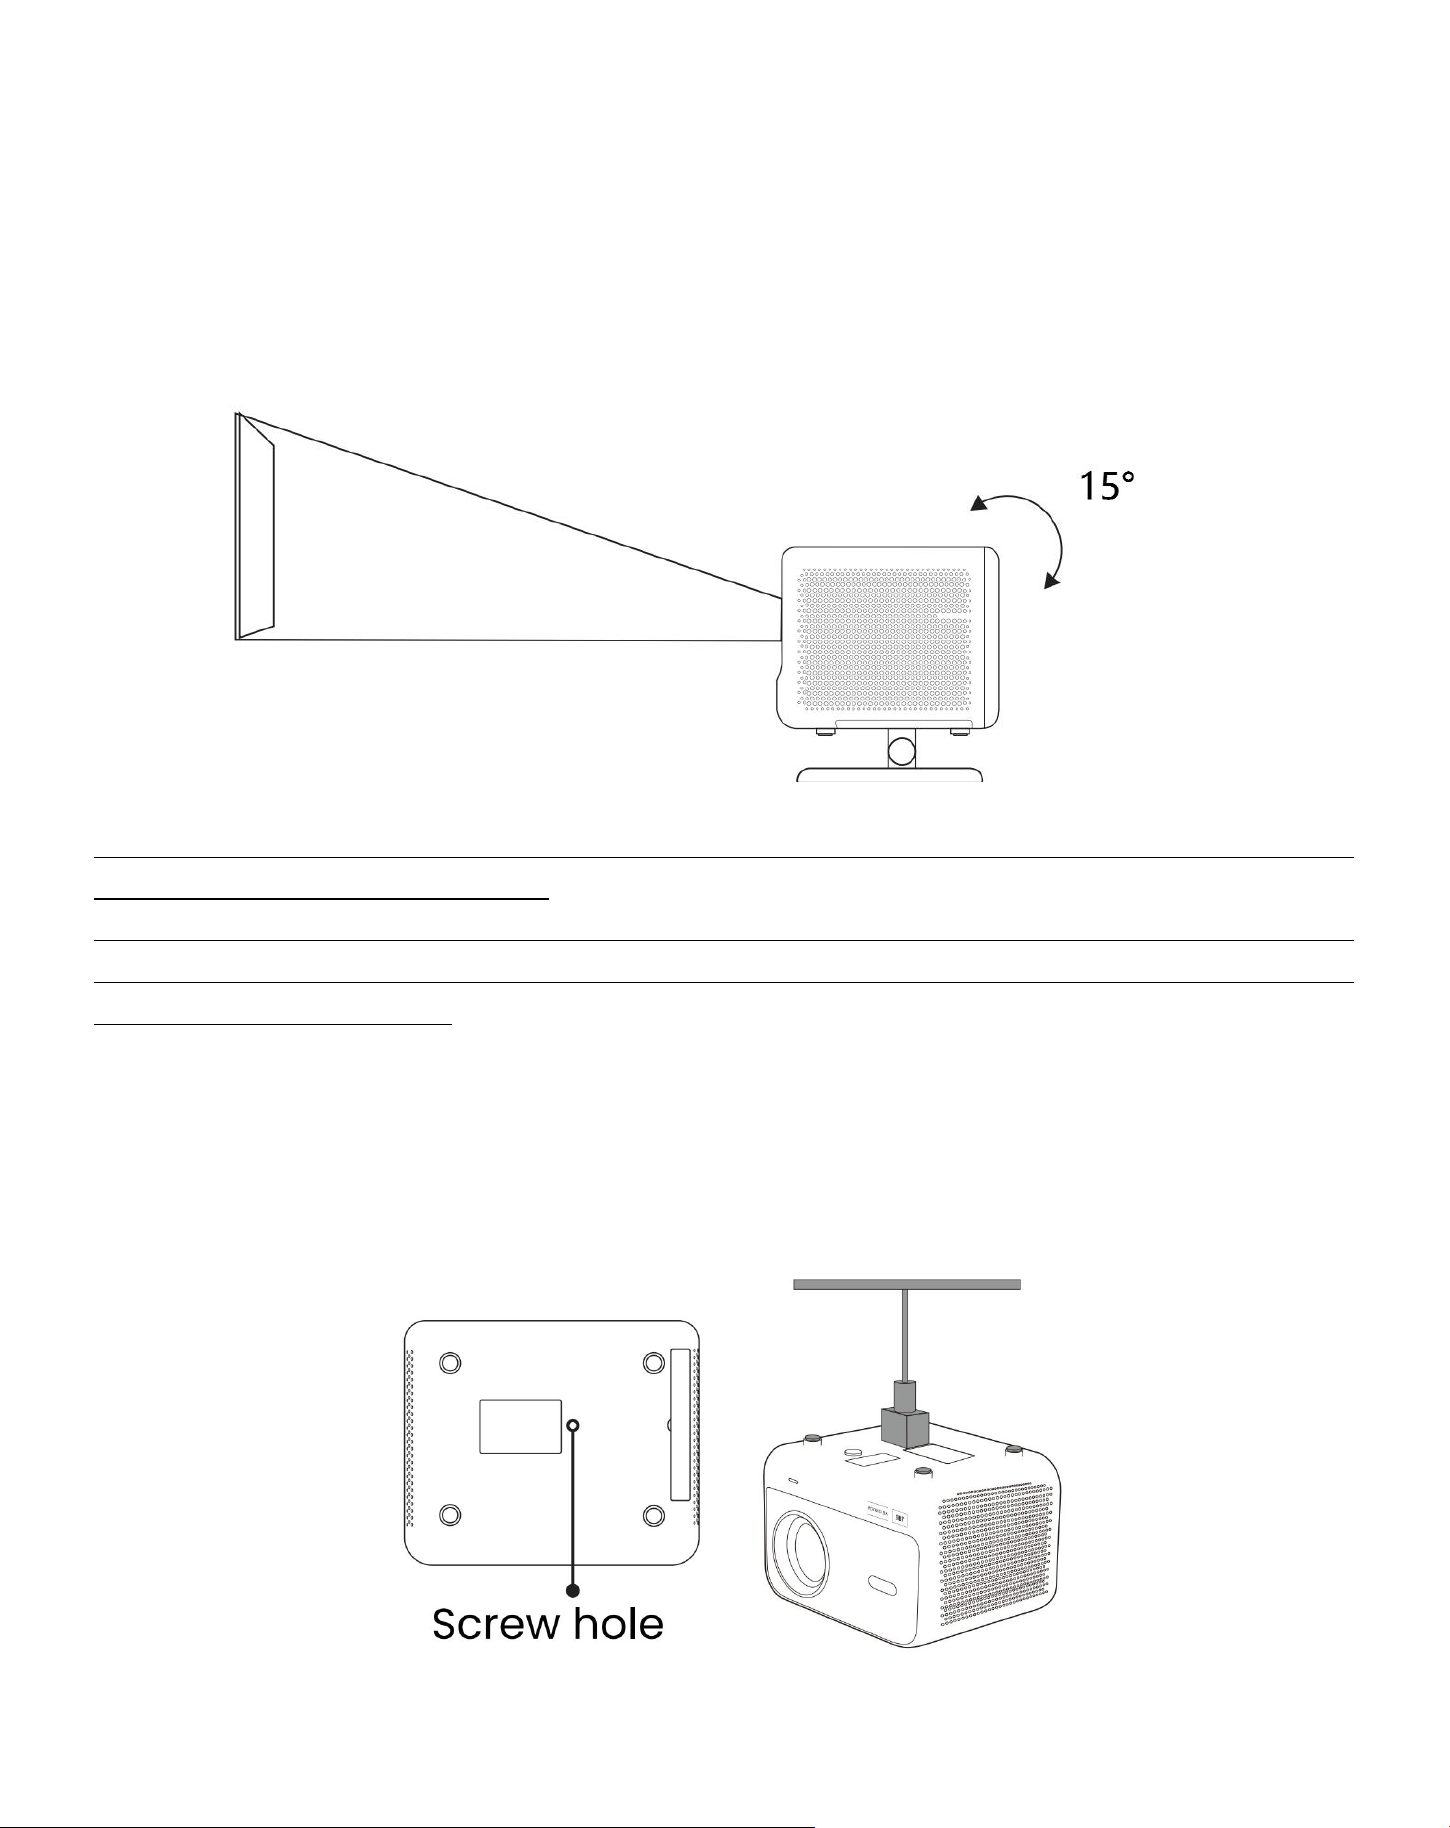
7.1 Desktop-Projektion
Der Projektor ist mit einem drehbaren Ständer für mühelose Anpassungen ausgestattet.
Schritt 1: Platzieren Sie den Projektor auf einer ebenen Fläche.
Schritt 2: Bitte stellen Sie den Stand winkel entsprechende Projektions wand, halten Sie den Winkel innerhalb
dieses Bereichs für optimale Bild klarheit.
Hinweis: Das L2 Plus unterstützt die horizontale Traystone-Korrektur. Sie müssen den Projektor nicht
direkt vor dem Bildschirm platzieren.
Hinweis: Um die Bildqualität optimal zu halten, wird empfohlen, die Einstellung innerhalb von 15
Grad beizu behalten.Stellen Sie jedoch sicher, dass der Winkel mit der vertikalen Linie des Bildschirms
25 Grad nicht übers ch reitet.
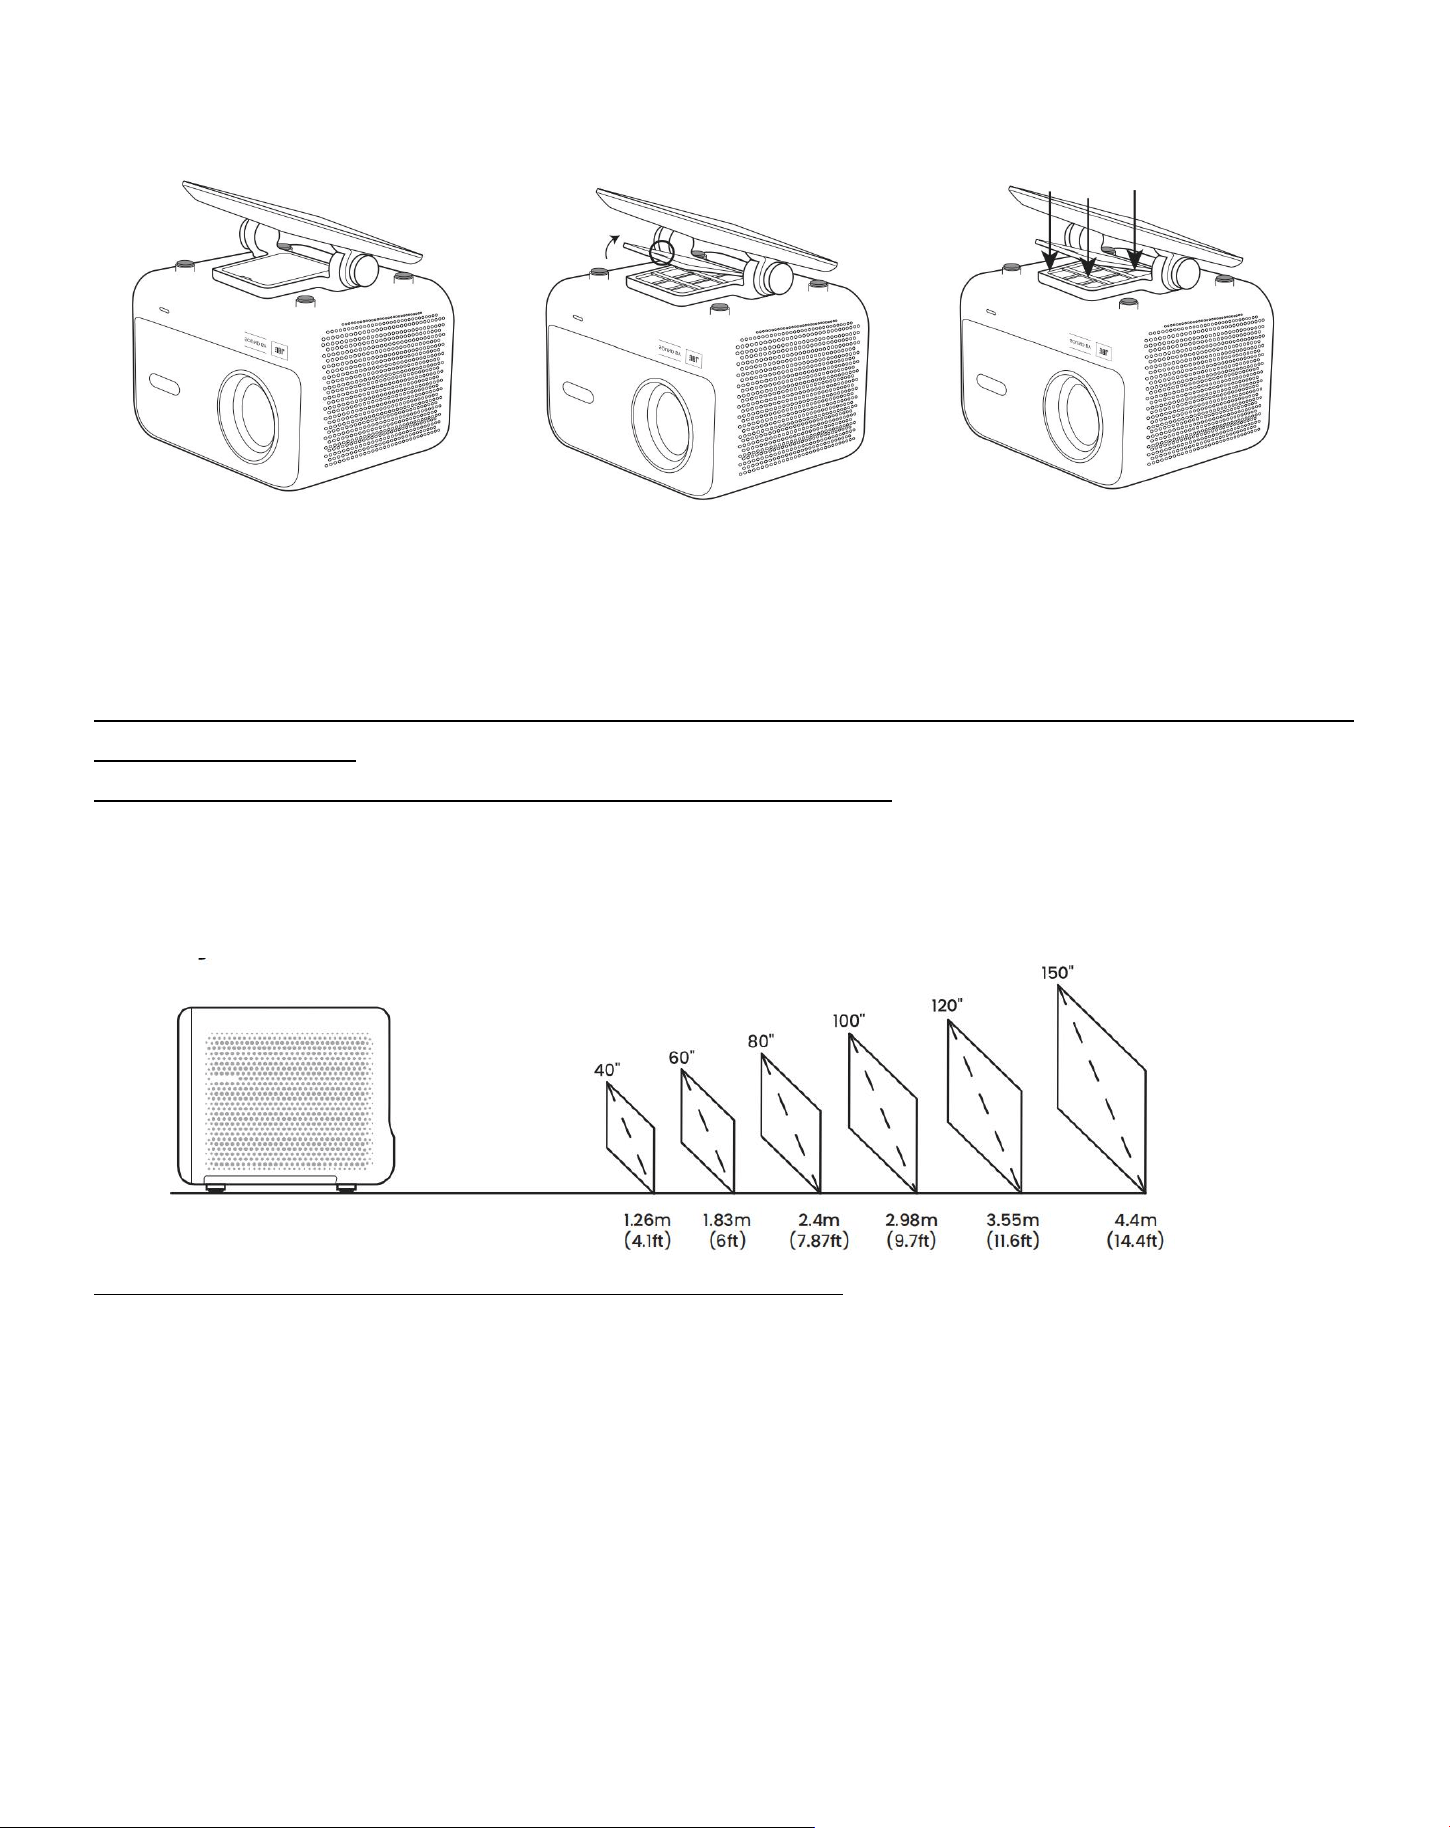
7.2 Decken montage
3. Installation methode
Der Projektor kann mit einer Halterung und einer 1/4 Schraube (nicht im Lieferumfang enthalten) von der
Decke aus montiert oder horizontal auf einer ebenen Fläche platziert werden.
45
4. Entfernen der Basis
1. Reverse die Maschine.
2. Verwenden Sie einen Prybar,
um die Abdeckung zu öffnen.
3. Lösen Sie die drei Schrauben
an der Unterseite und
entfernen Sie die Halterung.
Hinweis: Stellen Sie sicher, dass Sie über eine universelle Montage halterung verfügen, die für den
Projektor geeignet ist.
Hinweis: L2 Plus Plus unterstützt keine Installation mit vier Ecken.
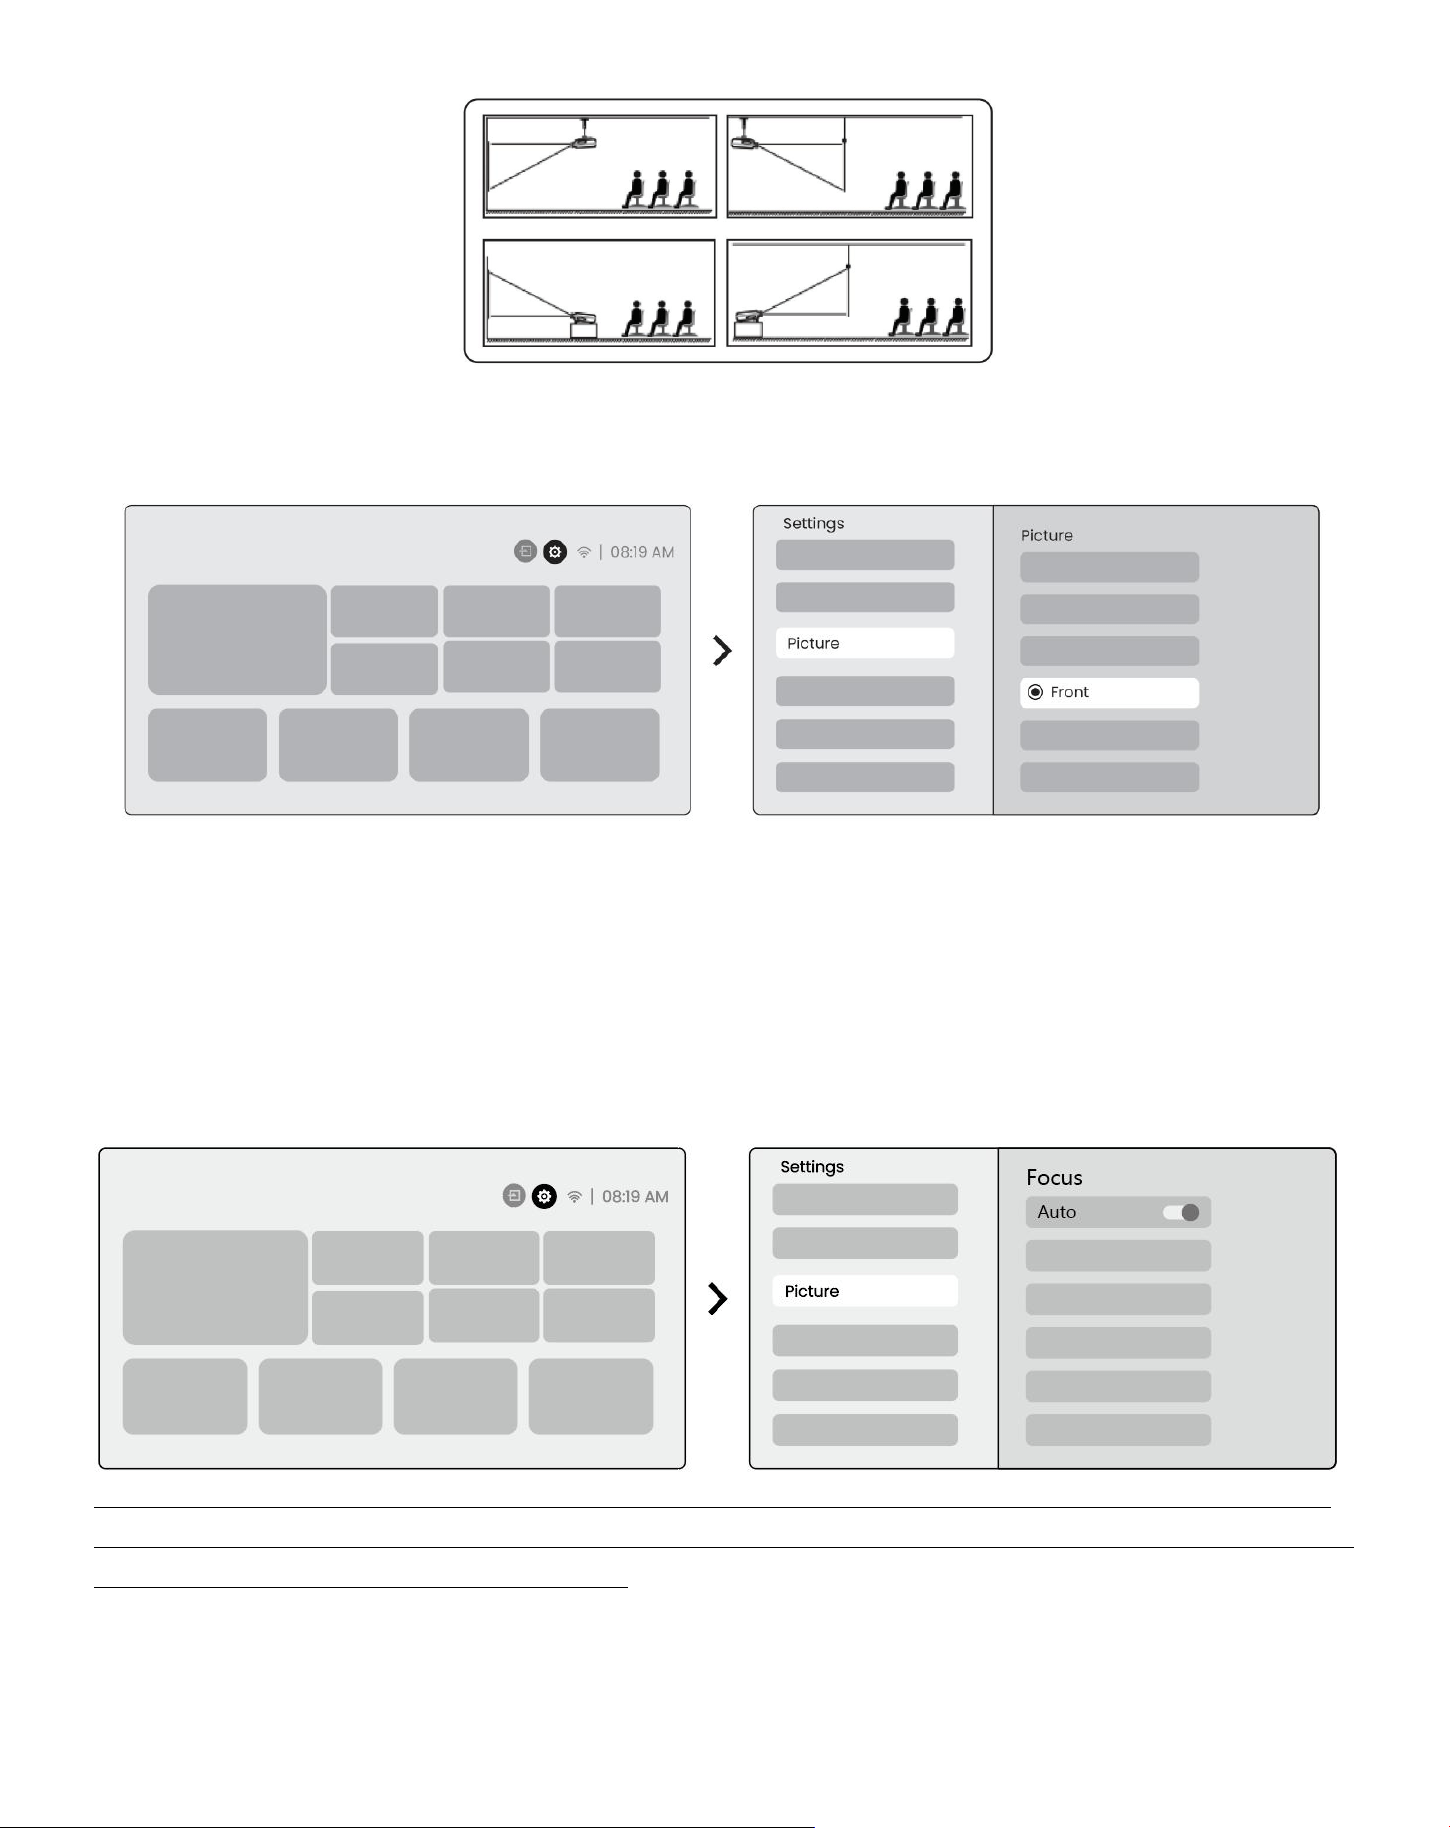
7.3 Projektions abstand
Der Projektions abstand des L2 Plus plus reicht von 1,26 m bis 4,4 m.
Tipps: Der empfohlene Projektions abstand beträgt ca. 7,87 ft.
Projektions einstellungen
L2 Plus Plus unterstützt vier Projektions modi, Sie können den bevorzugten Weg wählen.
46
Wenn Sie Decken montage oder Rückprojektion wählen, gehen Sie bitte zur Homepage-> wählen Sie die
Einstellungen [⚙] -> Wählen Sie [Bild] -> In [Projektion] wählen Sie einen geeigneten Projektions modus->
drücken Sie [OK], um den Projektions modus zu wechseln.
8.2 Autofokus
Diese Funktion erkennt automatisch die Klarheit des projizierten Bildes und optimiert die Brennweite in Echtzeit,
um sicher zustellen, dass das Bild jederzeit scharf und klar bleibt.Sie finden diese Funktion in den Einstellungen [⚙]
-> [Bild] -> [Fokus].
Hinweis: Der Autofokus wird nach jeder Schicht aktiviert, sobald er in der Einstellung eingesc haltet ist.
Hinweis: Wenn Sie mit dem aktuellen Autofokus-Ergebnis nicht zufrieden sind, können Sie [Autofokus
ausführen] auswählen, um neu zu kalibrieren.
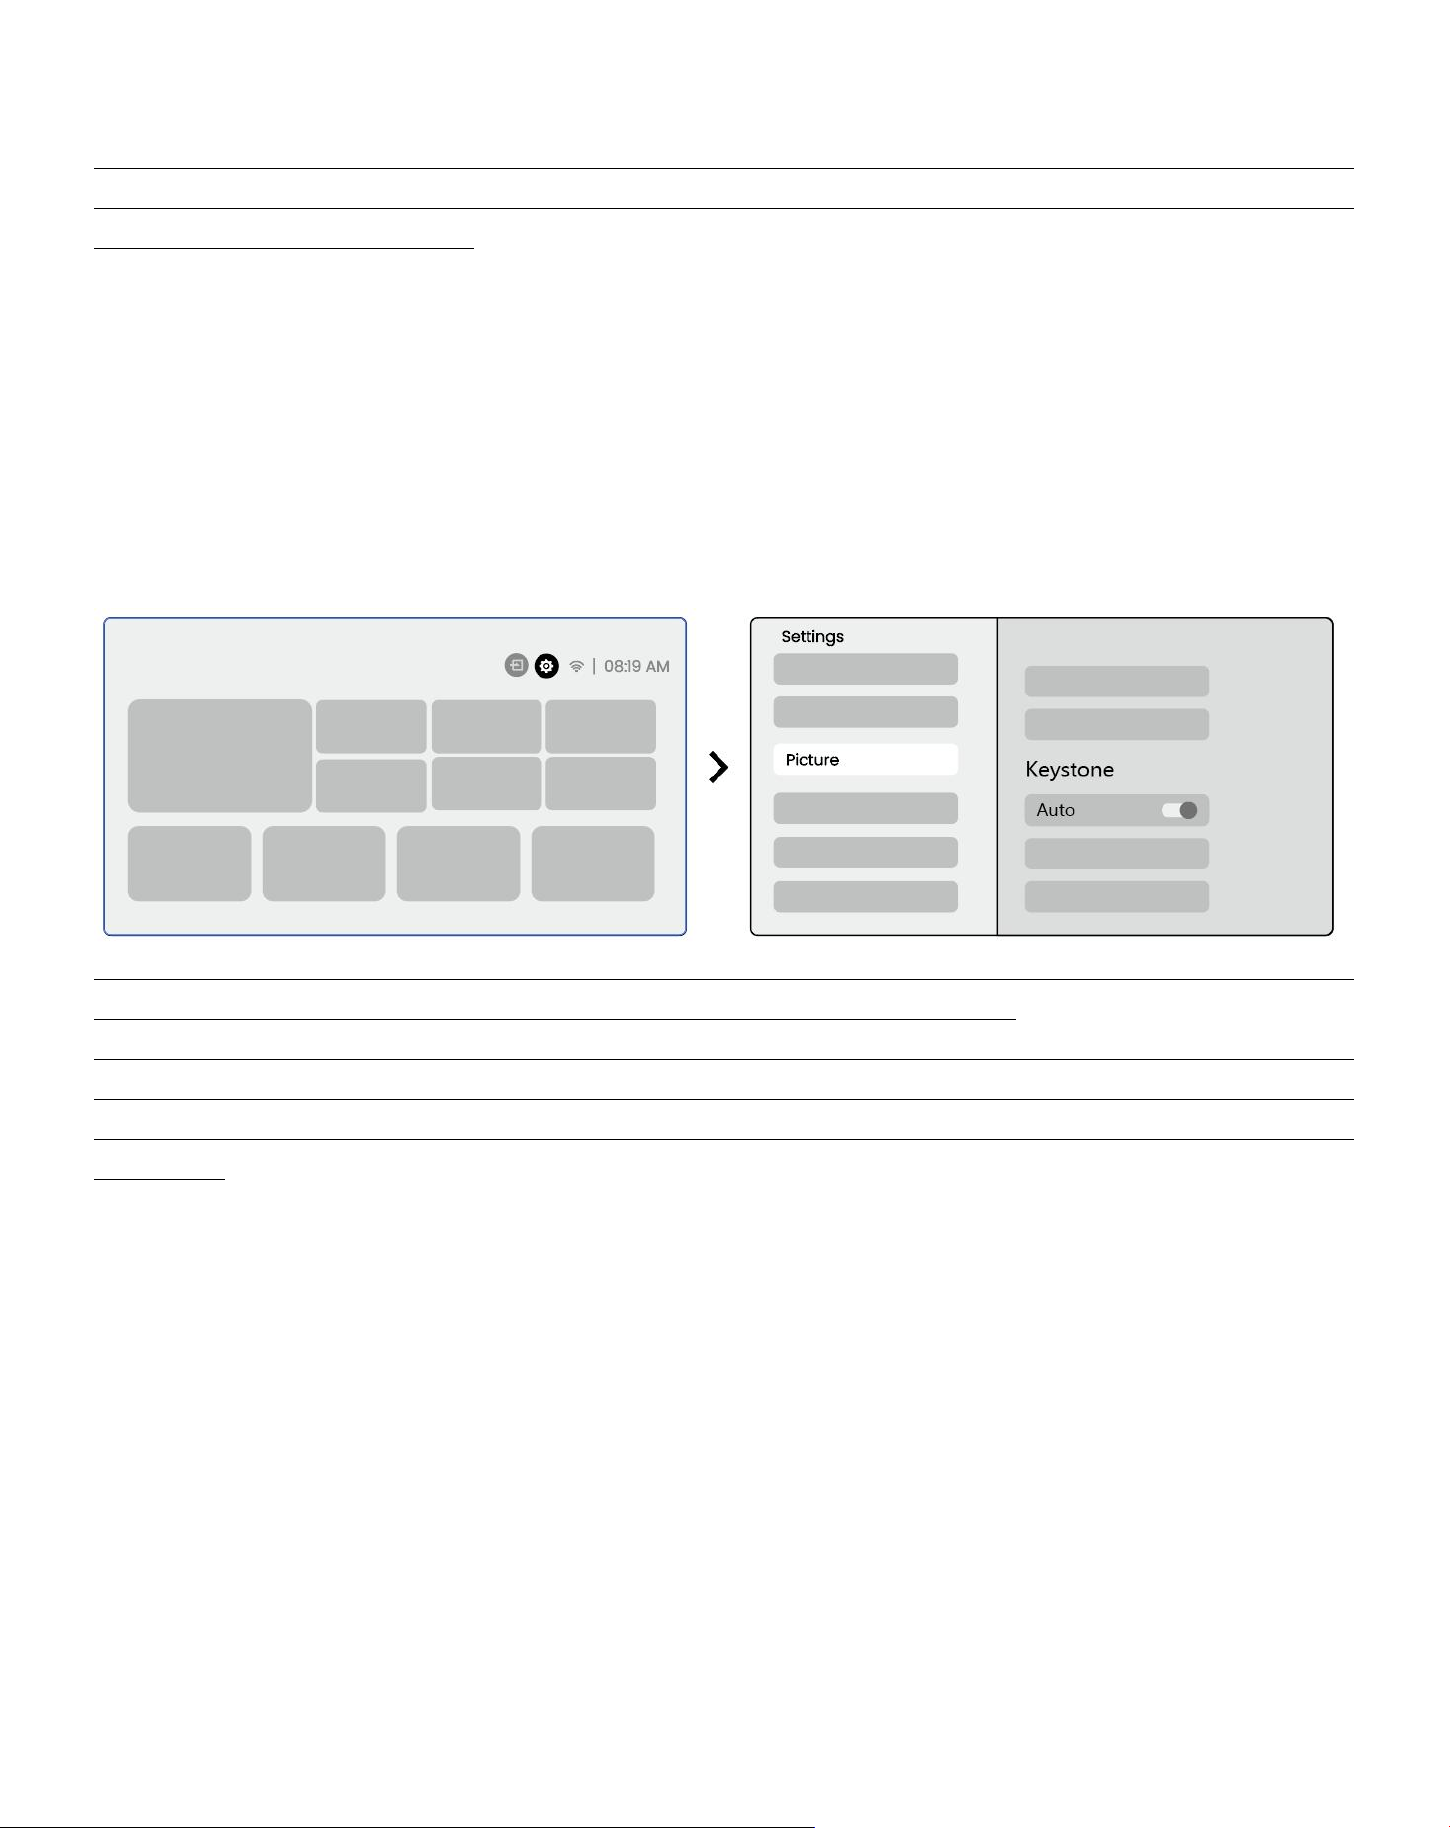
Hinweis: Wenn das Bild verschwommen bleibt, gehen Sie bitte zur Startseite-> wählen Sie die Einstellungen [⚙]
-> Wählen Sie [Bild] -> wählen Sie [Manuelle Fokussierung] -> Verwenden Sie die Pfeil taste nach oben und unten,
47
um den FOCUS manuell anzupassen, bis das Bild scharf ist.
⚠Beachten Sie: Wenn das Bild verschwommen bleibt, versuchen Sie, den Projektions abstand anzupassen,
und stellen Sie sicher, dass der Projektions abstand innerhalb des entsprechenden Bereichs liegt (Bitte
überprüfen Sie [7.3] für Details).
8.3 Keystone
8.3.1 Automatische Keystone-Korrektur
Die Auto Keystone Correction auf L2s Plus korrigiert automatisch trapezförmige Verzerrungen, um sicher zustellen,
dass das Bild ohne manuelle Anpassung quadratisch bleibt.Sie finden diese Funktion in den Einstellungen [⚙] ->
[Bild] -> [Keystone ].
Hinweis: Wenn Sie mit dem aktuellen Ergebnis der automatischen Keystone-Korrektur nicht zufrieden
sind, können Sie [Auto Keystone ausführen] auswählen, um neu zu kalibrieren.
Hinweis: Die automatische Keystone-Korrektur ist standard mäßig aktiviert, wenn das Gerät zum ersten
Mal verwendet wird. Wenn du es ausschalten willst,Bitte gehen Sie zur Homepage-> wählen Sie die
Einstellungen [⚙]-> Wählen Sie [Bild]-> In [Keystone ]-> wählen Sie [Auto ]-> drücken Sie [OK], um aus
zuschalten.
8.3.2 Auto Keystone nach dem Stiefel
Diese Funktion erkennt und korrigiert automatisch sowohl vertikale als auch horizontale Traystone-Verzerrungen
des projizierten Bildes jedes Mal, wenn der Projektor eingesc haltet wird, um sicher zustellen, dass Sie sofort ein
klares, rechteckiges Bild genießen können.
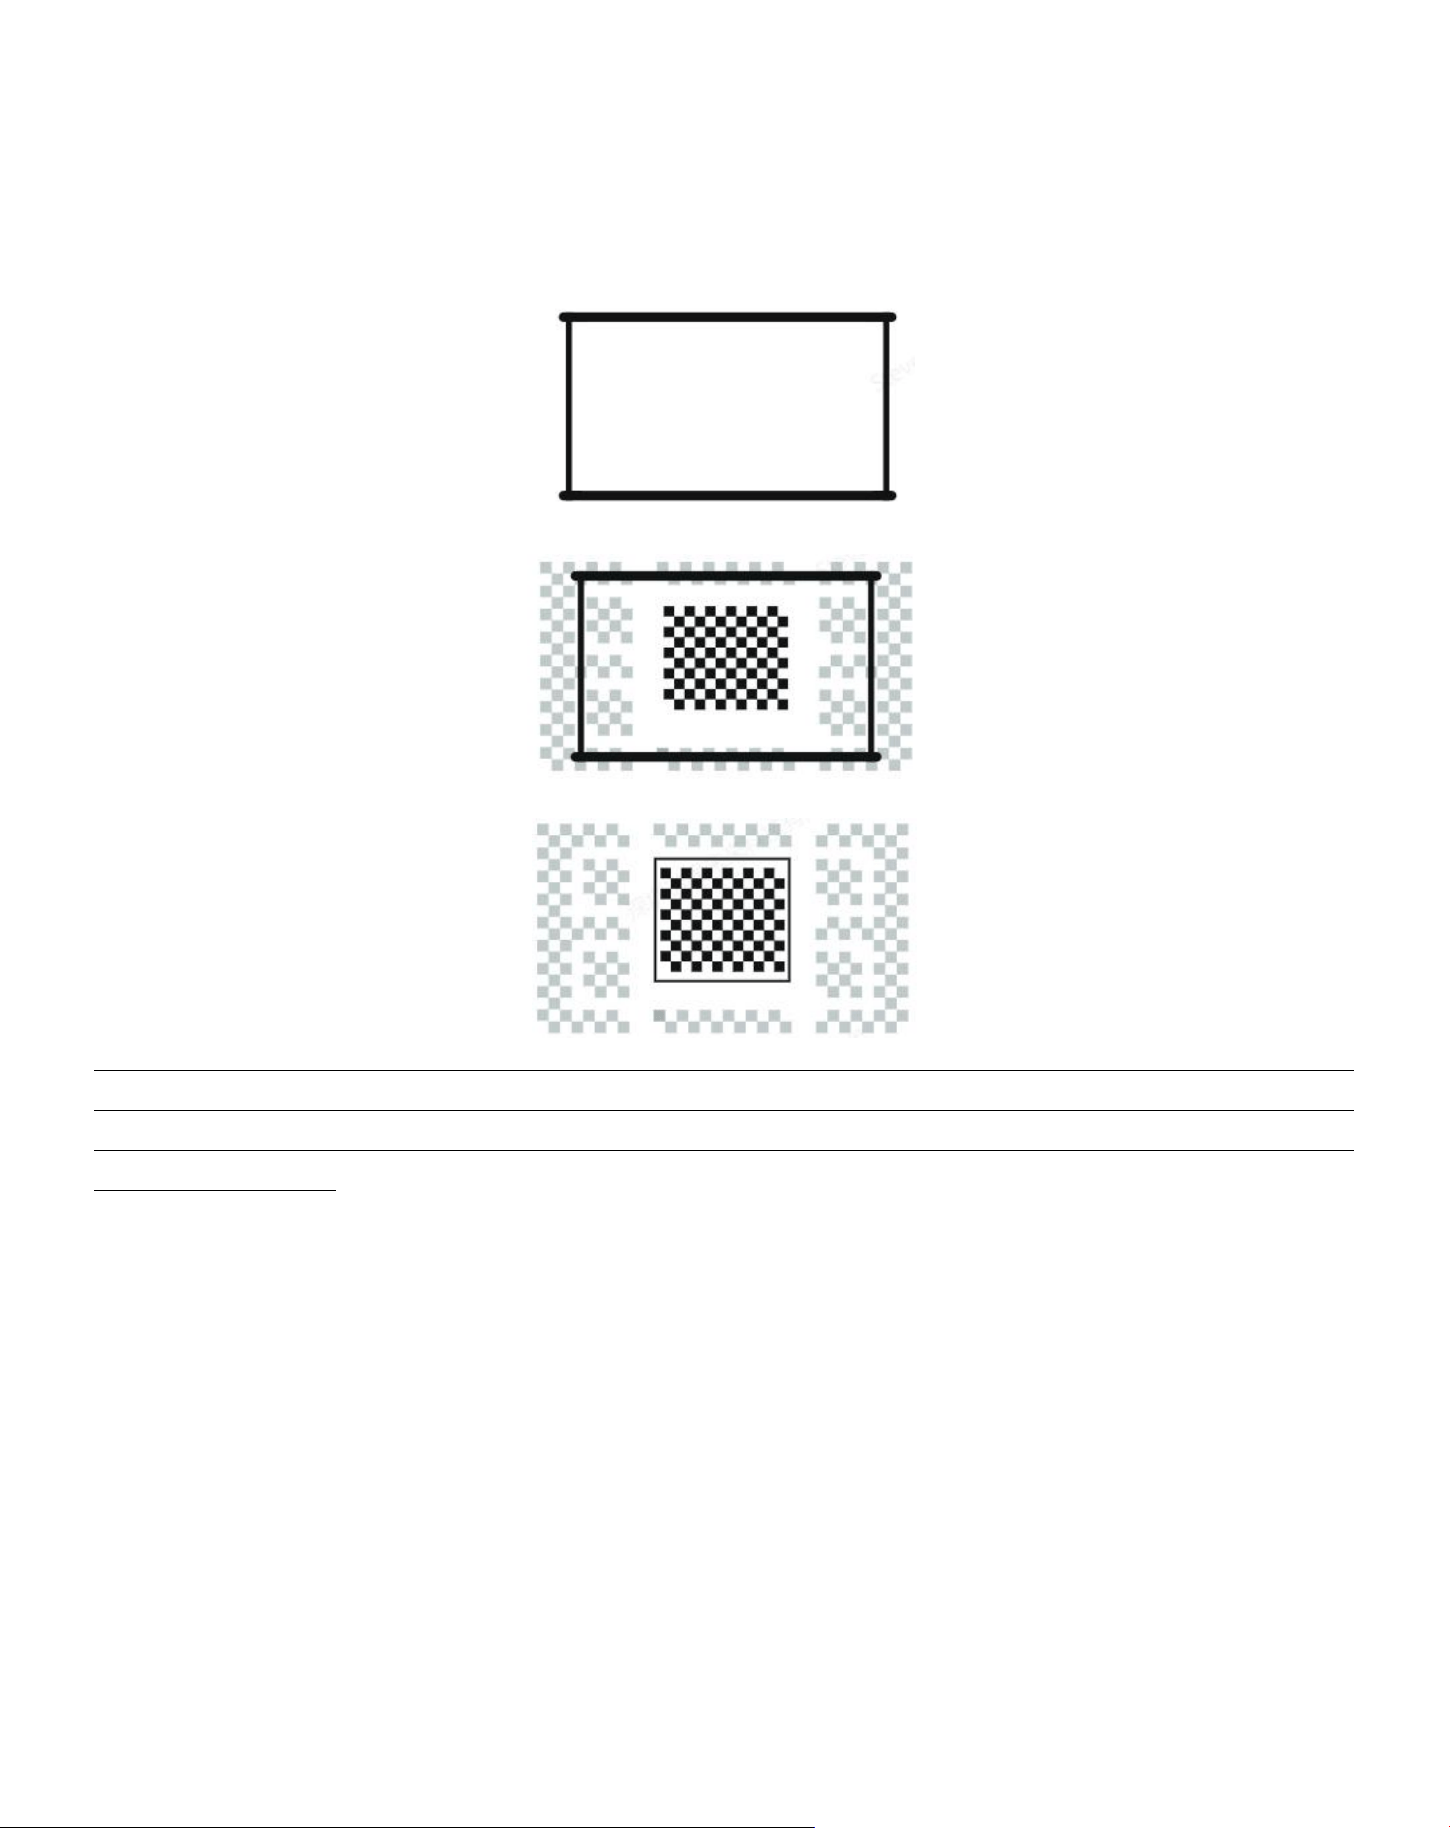
8.3.4 Automatische Bildschirm ausrichtung
Diese Funktion erkennt automatisch Bildschirm grenzen und passt die Bild position an, um eine präzise
48
Ausrichtung mit den Bildschirm rändern sicher zustellen, Bild überlauf oder Leerzeichen zu vermeiden und
eine schnelle Zentrierung des Displays zu ermöglichen.
7. Der weiße Hintergrund bildschirm sollte einen schwarzen oder anderen klaren Rand haben, während der licht
beständige Bildschirm keine Rand anforderung hat.
8. Das projizierte Bild vor der Bildschirm anlage muss größer sein als der Bildschirm bereich.
9. Wenn Sie die Funktion Screen Fitting verwenden, blockieren Sie bitte nicht die Mitte des Bildschirms.
⚠Beachten Sie: Bevor Sie die Funktionen Auto Screen Fitting und Auto Hindernis vermeidung verwenden,
stellen Sie sicher, dass die Funktionen Auto Keystone und Auto Focus aktiviert sind.Die Vermeidung von
Hindernissen funktioniert möglicher weise nicht, wenn sich weiße oder andere helle Objekte auf dem Ziel
bildschirm befinden.
8.3.3 Automatische Hindernis vermeidung
Diese Funktion erkennt automatisch Hindernisse im Projektions pfad und passt den Bildwinkel oder die
Position intelligent an, um eine Bild behinderung zu verhindern und eine klare und vollständige Projektion zu
gewährleisten.
49
⚠Beachten Sie: Bevor Sie die Funktionen Auto Screen Fitting und Auto Hindernis vermeidung verwenden,
stellen Sie sicher, dass die Funktionen Auto Keystone und Auto Focus aktiviert sind.Die Vermeidung von
Hindernissen funktioniert möglicher weise nicht, wenn sich weiße oder andere helle Objekte auf dem Ziel
bildschirm befinden.
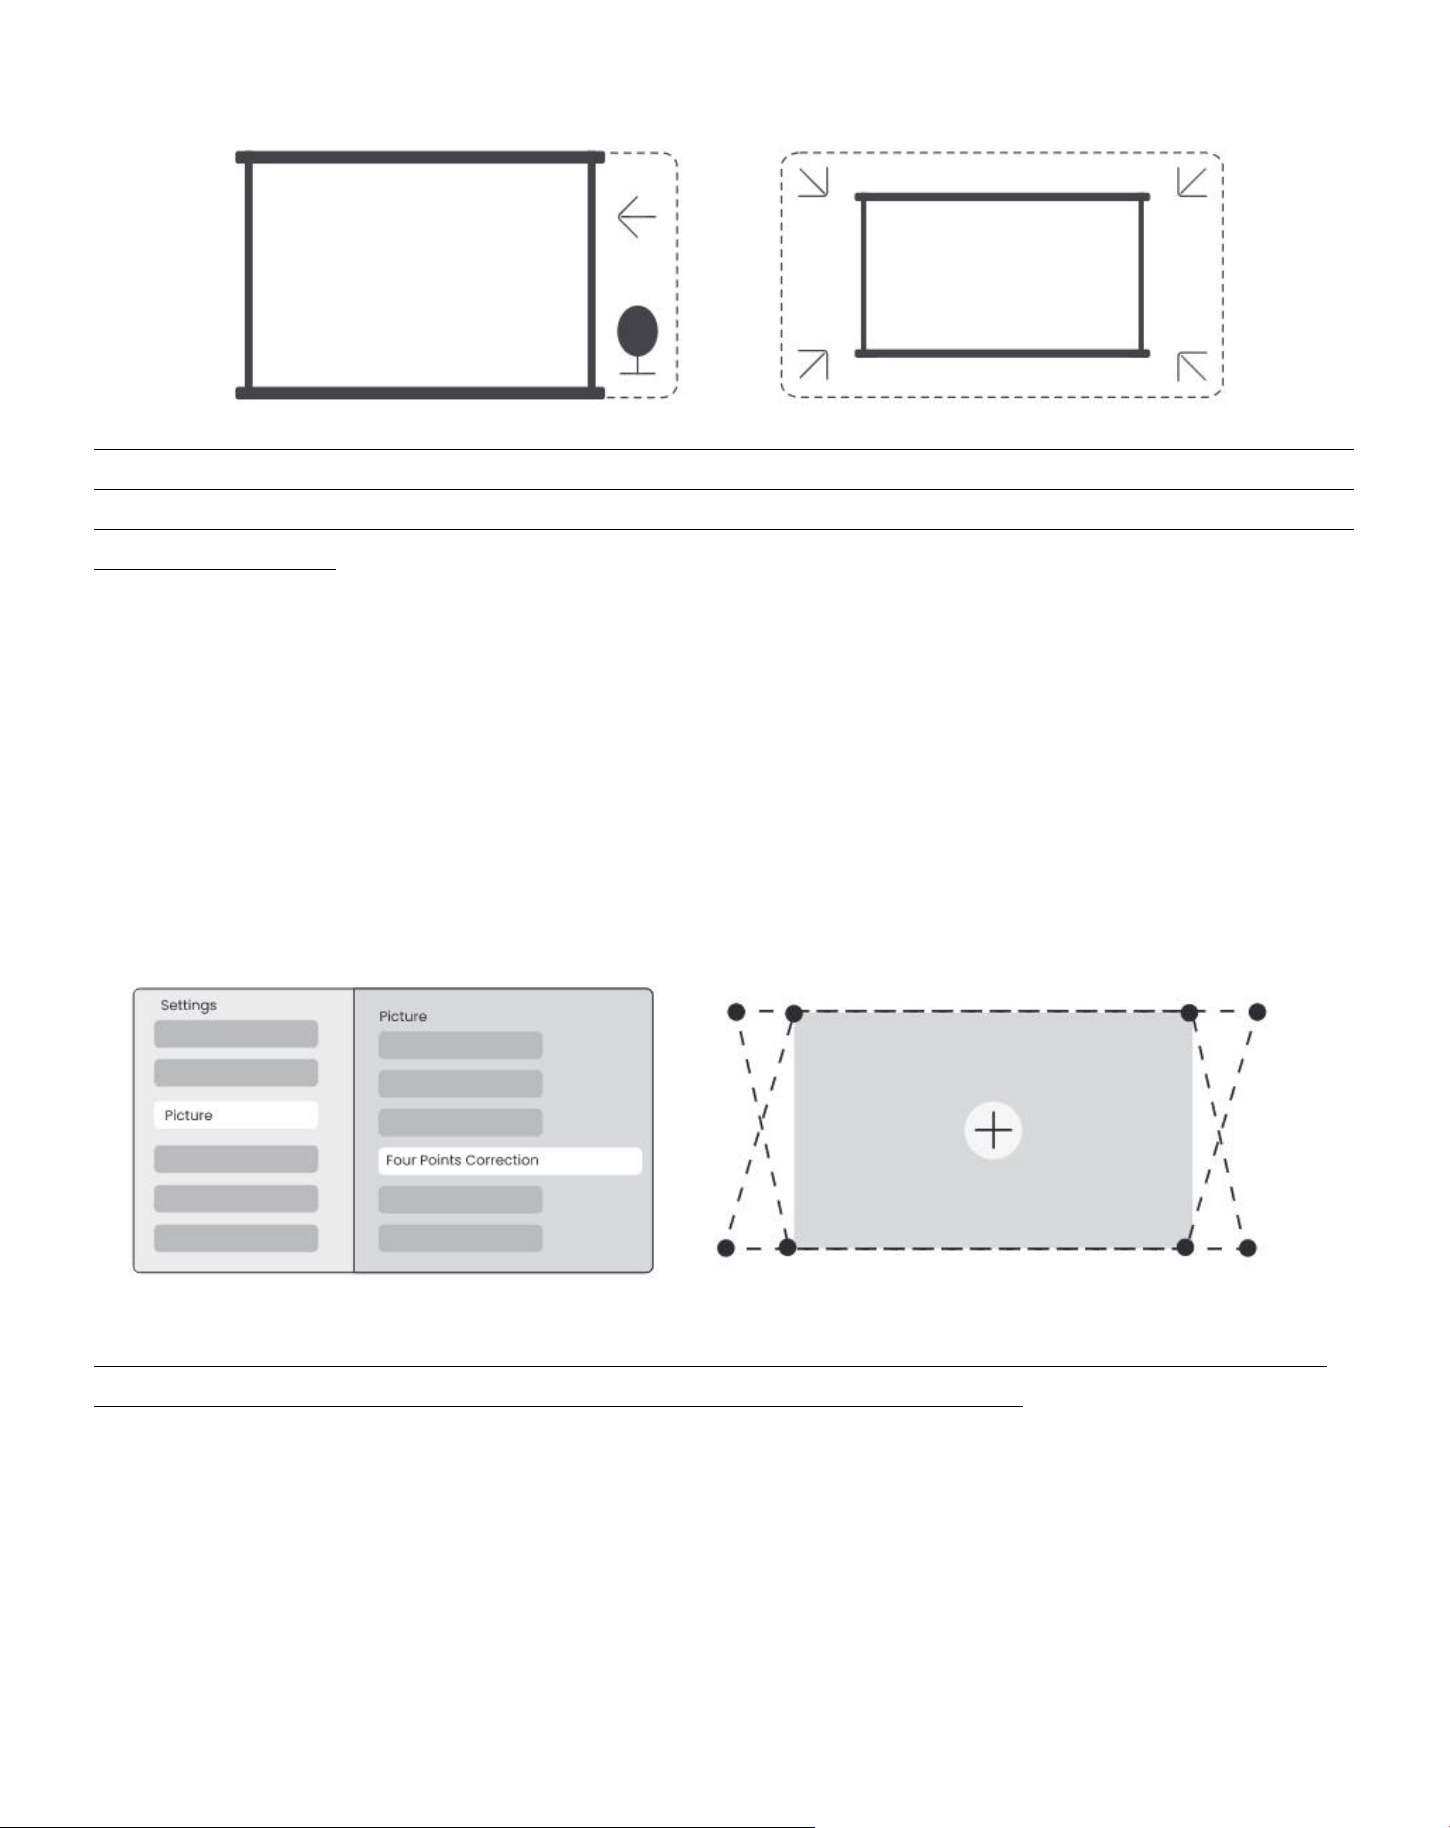
8.3.5 Manuelle Keystone-Korrektur
Wenn Sie den Bildschirm weiter anpassen müssen, können Sie die Funktion manuelle Keystone-Korrektur
verwenden.
Schritt 1: bitte gehen Sie zur Homepage-> wählen Sie die Einstellungen [⚙] -> Wählen Sie [Bild]
Schritt 2: In [Bild]-> wählen Sie [Vier Punkte Korrektur]-> Passen Sie den Bildschirm an, indem Sie die Pfeile
ziehen.
⚠Beachten Sie: Bitte stellen Sie sicher, dass der Projektor nicht mehr als 15 Grad vertikal oder horizontal
kippt.Bitte stellen Sie sicher, dass der automatische Fokus effektiv funktioniert.
8.4 Bild Zoom
Sie können die Größe des Bildes nach Ihren Bedürfnissen anpassen.
Schritt 1: bitte gehen Sie zur Homepage-> wählen Sie die Einstellungen [⚙] -> Wählen Sie [Bild]
50
Schritt 2: In [Bild] -> wählen Sie [Bild Zoom] -> Verwenden Sie die Pfeil taste nach oben und unten, um den Zoom
manuell anzupassen, bis das Bild gewünscht wird.(Schematische Darstellung beigefügt)
Tipps: Die empfohlene Bildschirm größe liegt zwischen 60 bis 100 Zoll.
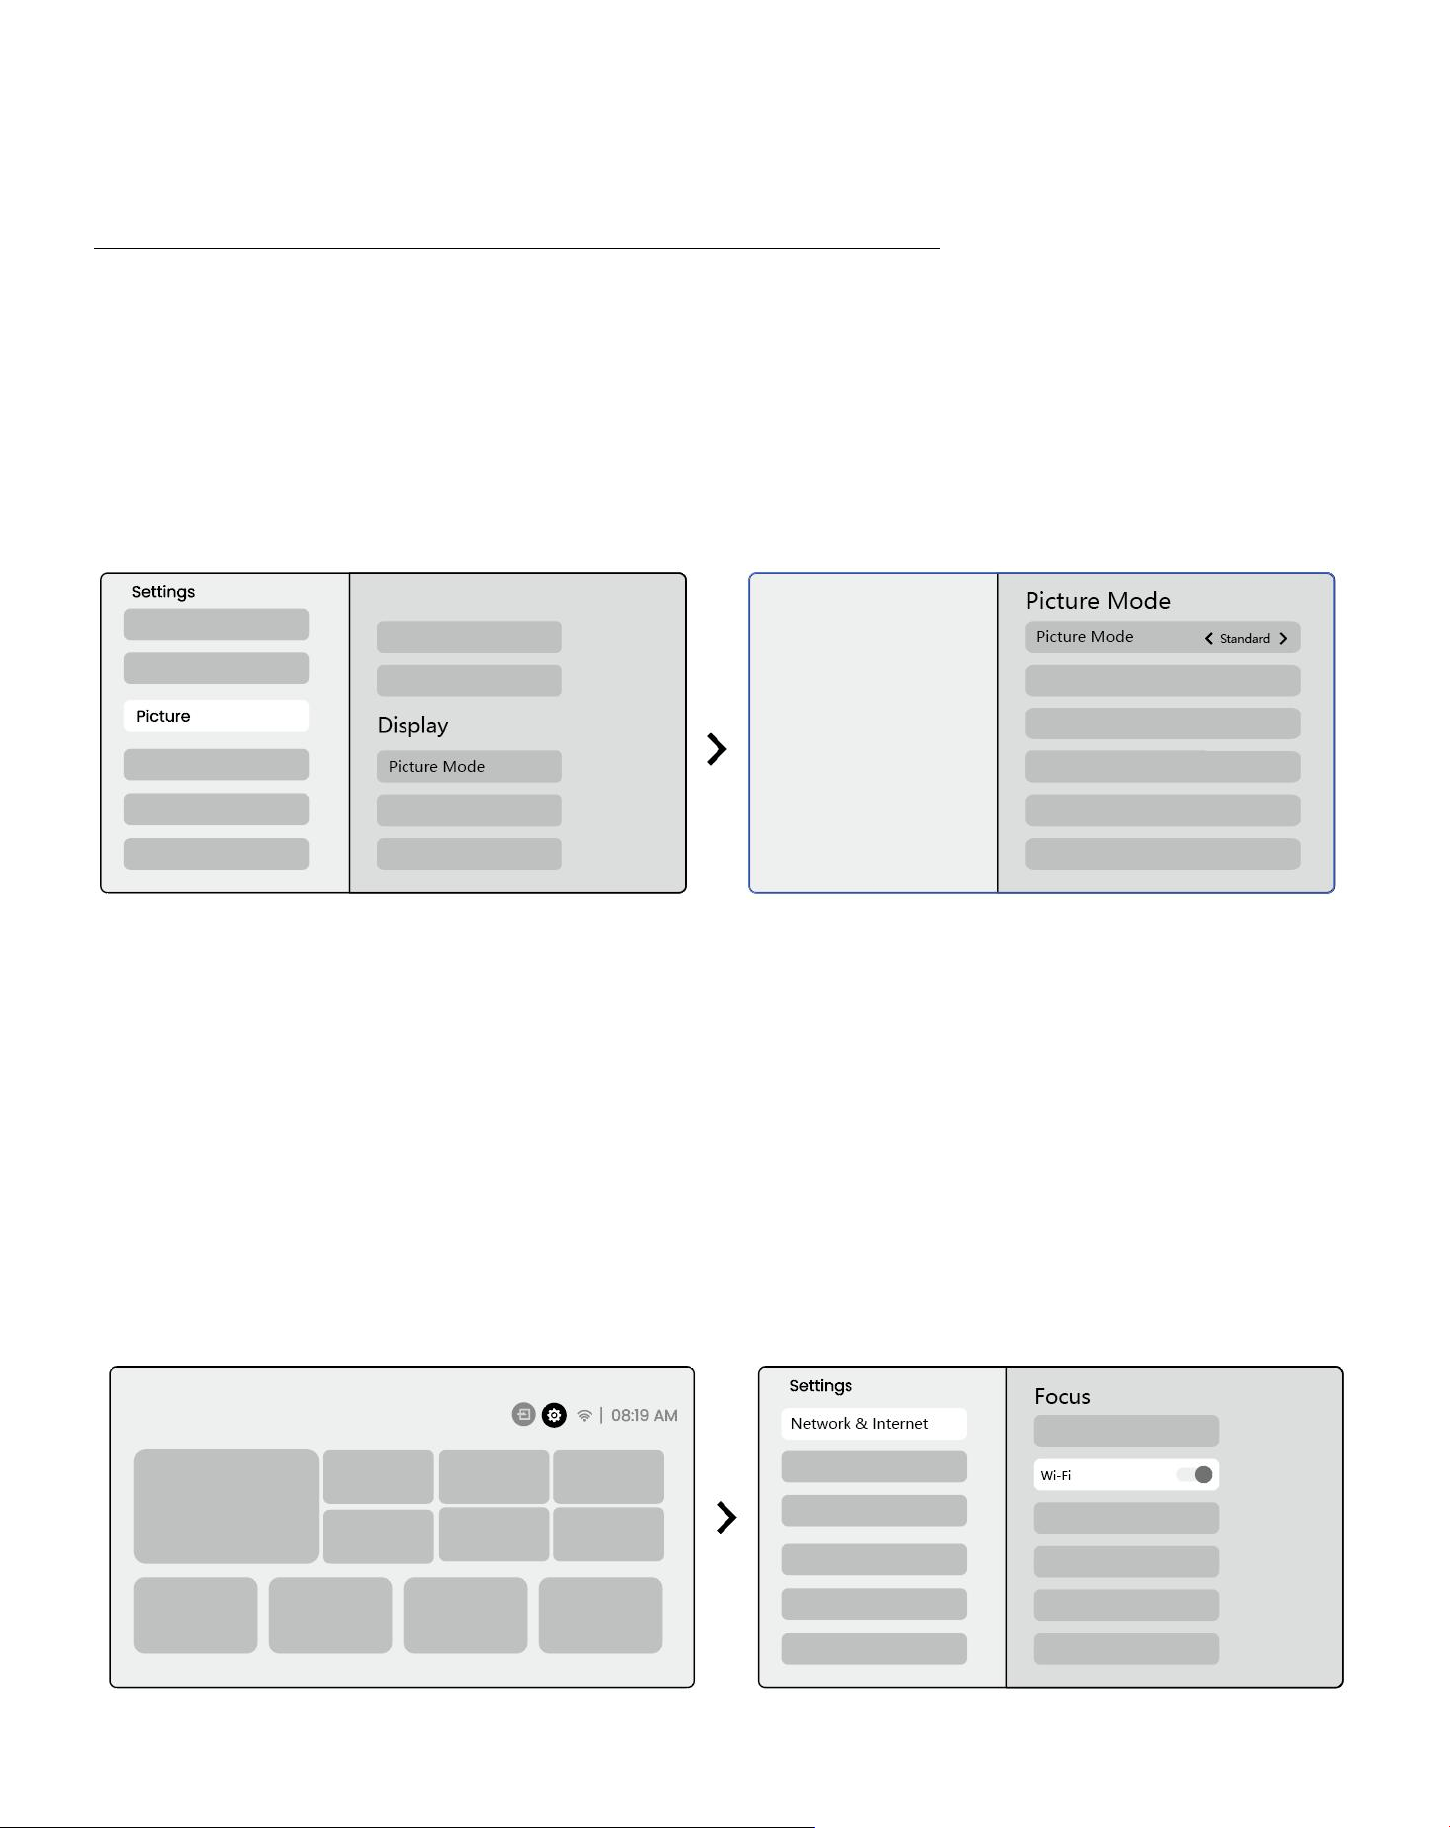
8.5 Anzeige
Sie können den Bild modus an Ihre Bedürfnisse anpassen.
Schritt 1: bitte gehen Sie zur Homepage-> wählen Sie die Einstellungen [⚙] -> Wählen Sie [Bild]
Schritt 2: In [Bild] -> wählen Sie [Bild modus]
Achtung: Die Einstellung der Bild farbe wird nur beim Abspielen von Bildern oder Videos wirksam.
17
Bildschirms piegelung
9.1 WiFi-Einstellungen
Schritt 1: Drücken Sie die Einstellungen [⚙] -> Wählen Sie [Netzwerk & Internet] -> Schalten Sie die Schaltfläche
[Internet verbindung] ein-> Wählen Sie [Wi-Fi]
Schritt 2: In [Verfügbare Netzwerke] Liste-> Suchen Sie Ihr gewünschtes Wi-Fi-Netzwerk-> geben Sie das
Passwort ein-> Wählen Sie [OK]-> Warten Sie, bis der Projektor eine Verbindung hergestellt hat.
51
Hinweis: Die Glätte der Bildschirms piegelung wird von der Netzwerk umgebung beeinflusst. Es wird empfohlen,
eine schnellere Bandbreite zu verwenden.
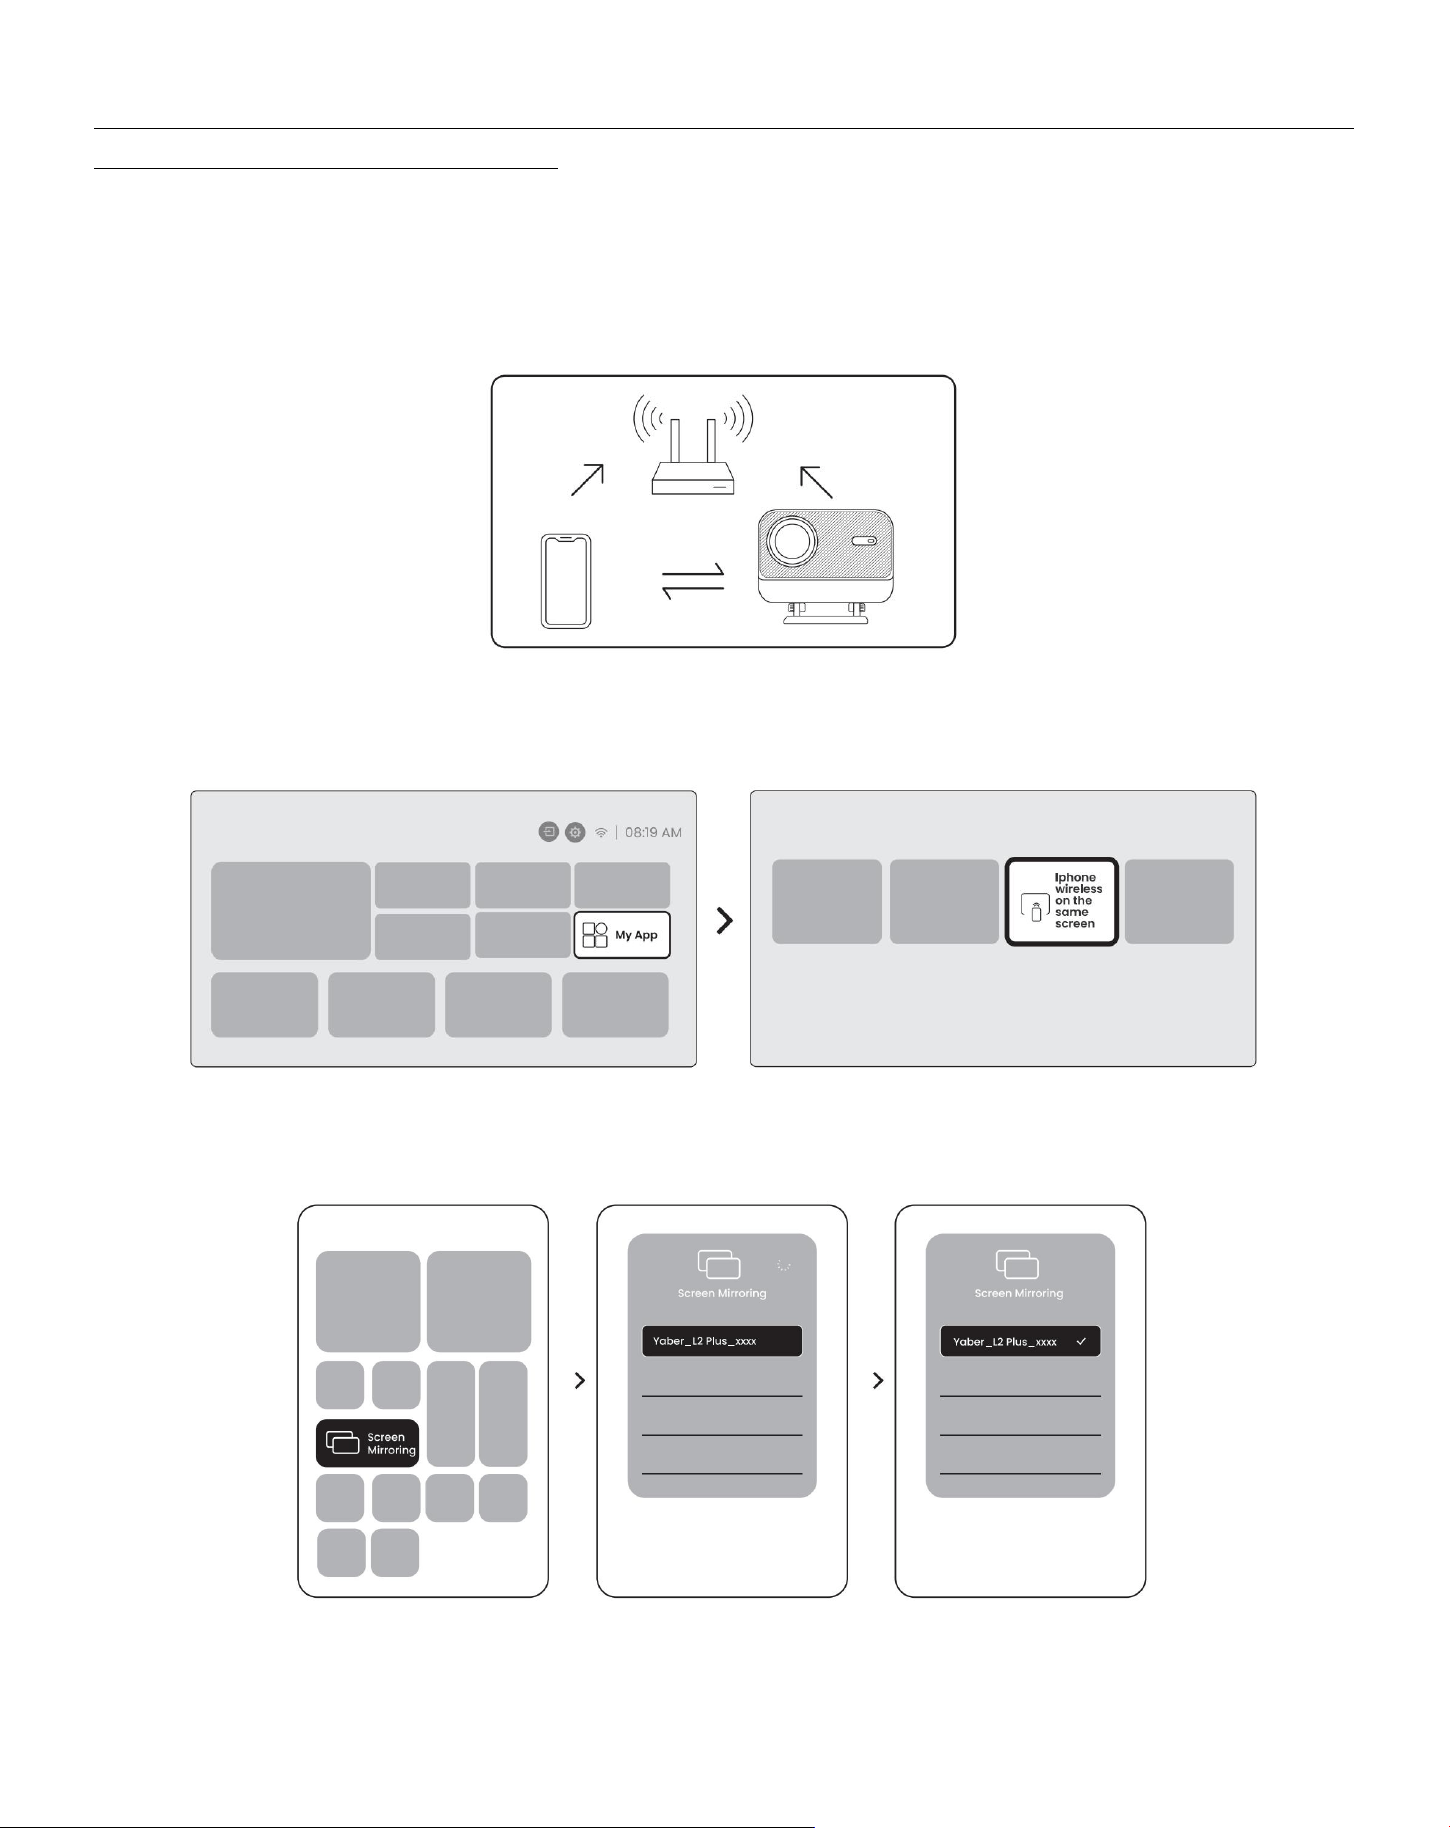
9.2.1 iOS Cast (für iOS-Geräte)
Schritt 1: Kompatibilität und Netzwerk verbindung sicherstellen: Stellen Sie sicher, dass Ihr iOS-Gerät und das L2
Plus Plus mit demselben Wi-Fi-Netzwerk verbunden sind.
Step2: gehen Sie zur Startseite-> wählen Sie das Menü [Meine App]-> drücken Sie [iPhone Wireless auf dem
gleichen Bildschirm]-> Geben Sie ein und bleiben Sie auf der Seite [iPhone Wireless auf demselben
Bildschirm].
Schritt 3: Öffnen Sie [Control Center] auf Ihrem iOS-Gerät-> Wählen Sie die Bildschirms piegelung funktion->
Verbinden Sie den iOS Cast-Empfänger mit dem Namen [Yaber _ L2Plus _ xxxx] -> Erfolg.
52
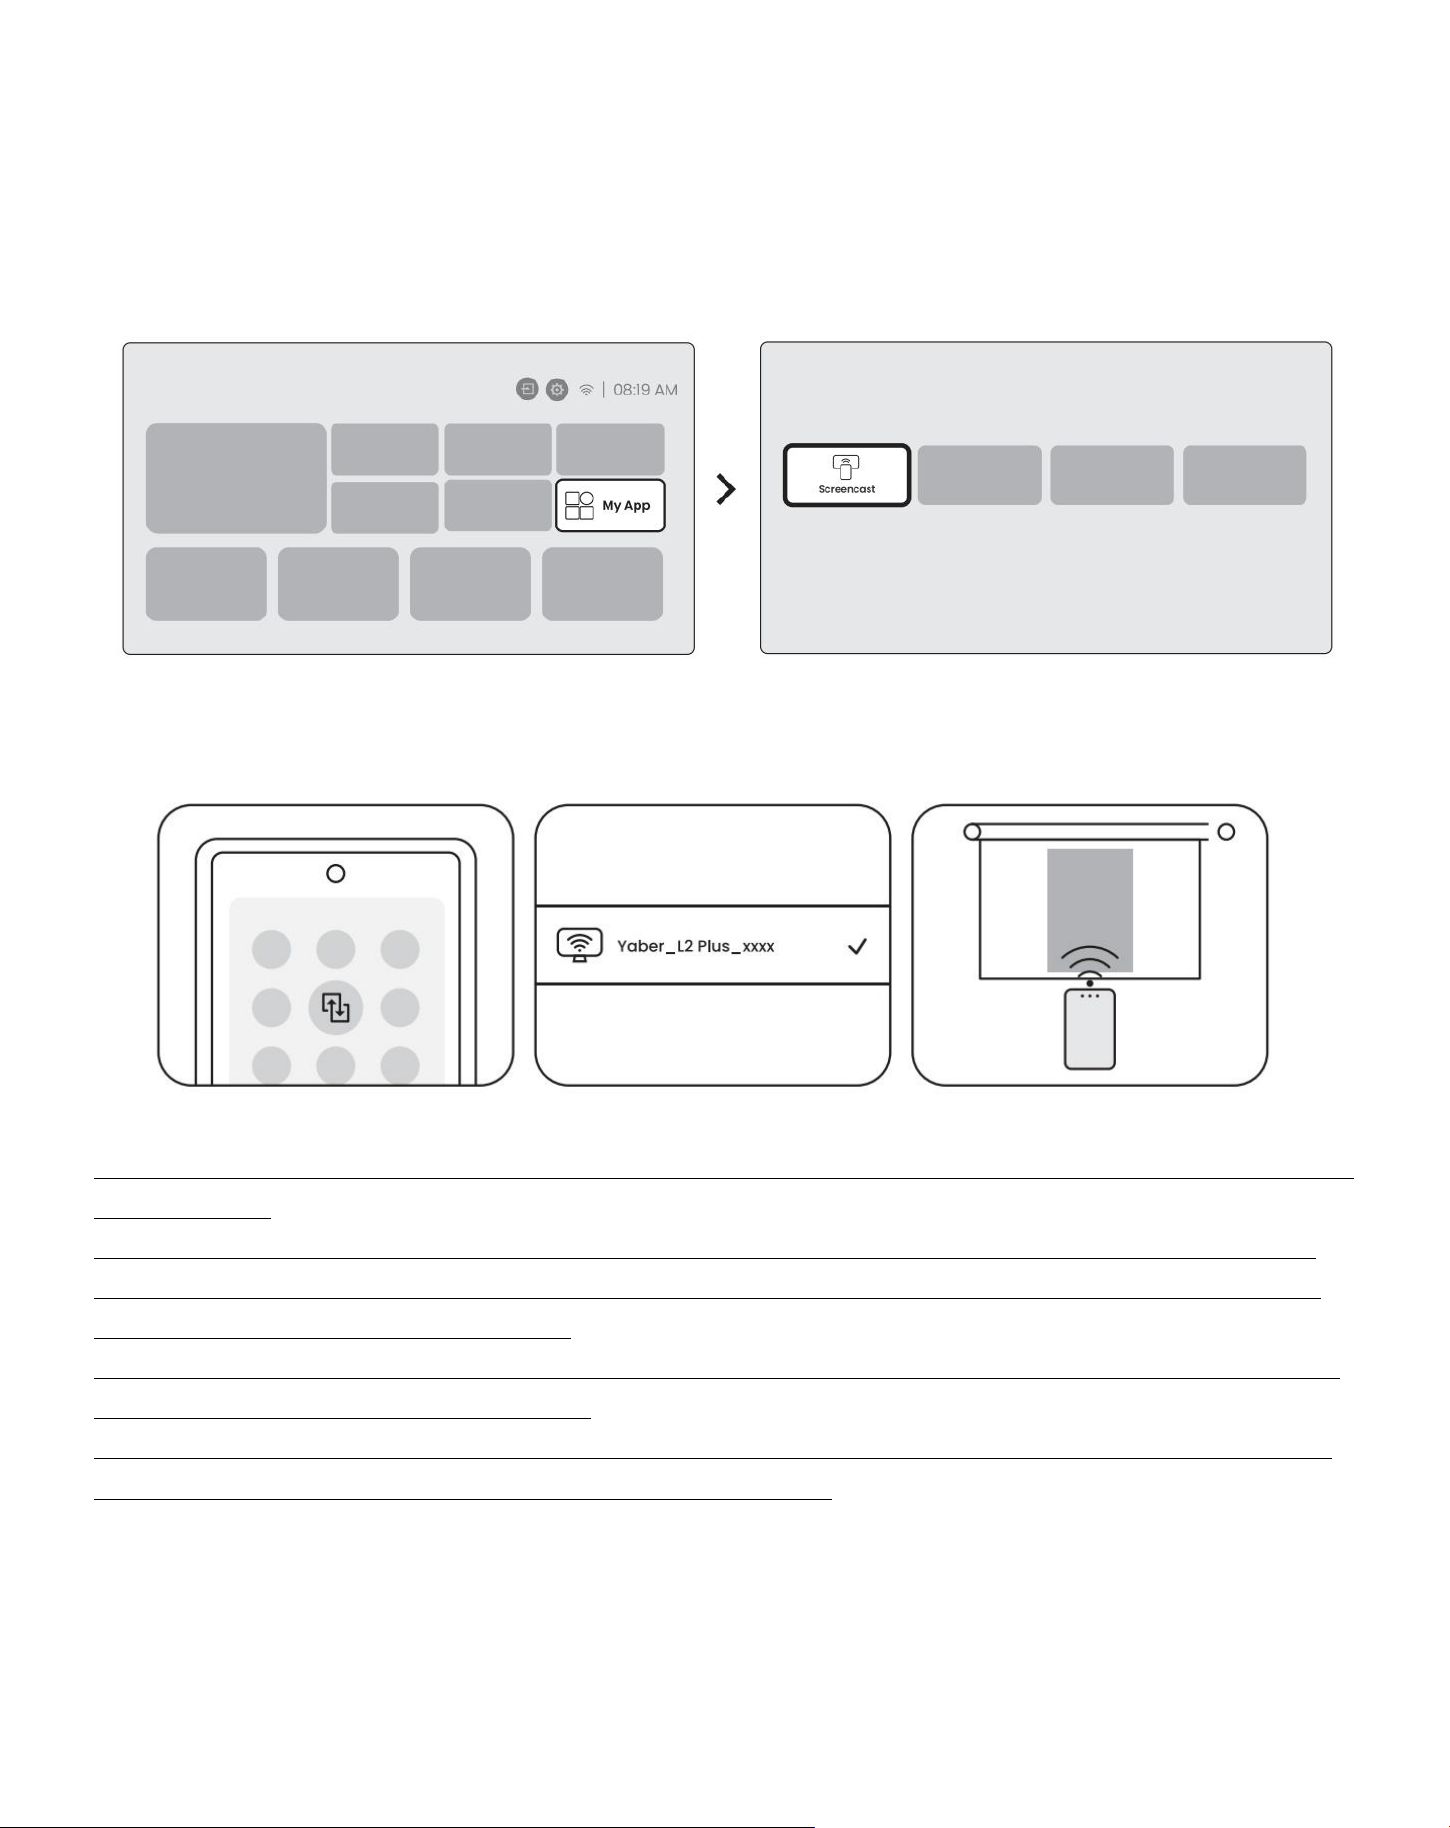
9.2.2 Miracast (für Android-Geräte)
Schritt 1: Bitte aktivieren Sie die Wi-Fi-Funktion auf Ihrem Android-Handy (Nicht notwendig, um Wi-Fi zu
verbinden).
Schritt 2: Gehen Sie zur Startseite-> wählen Sie das Menü [Meine App] -> drücken Sie [Screen cast] -> Geben
Sie ein und bleiben Sie auf der Seite [Android Screen Share].
Schritt 3: Zugriff auf das [Control Center] auf Ihrem Android-Gerät-> Wählen Sie [Bildschirms
piegelung/Smart View]. Wählen Sie den Miracast-Empfänger mit dem Namen [Yaber _ L2Plus _ xxxx] ->
Erfolg.
Hinweis: Einige Google-Mobilgeräte unterstützen nur Chromecast und können nicht von Airplay oder Miracast
besetzt werden.
Hinweis: Aufgrund des Urheberrechts schutzes können einige urheberrecht lich geschützte Inhalte (Netflix,
Hulu usw.) nicht direkt vom Telefon gespiegelt werden.Muss mit einem TV-Stick verwendet werden. Wenn Sie
Hilfe benötigen, kontaktieren Sie uns bitte.
Hinweis: Die Spiegelung von Mobiltelefonen kann nur durch Eingabe und Verbleib auf der Seite zur Freigabe
des drahtlosen Bildschirms realisiert werden.
⚠Beachten: Bitte stellen Sie sicher, dass sich Ihr Mobilgerät in der Nähe des Projektors befindet. Die Glätte der
Bildschirms piegelung wird auch durch die Entfernung beeinflusst.
53
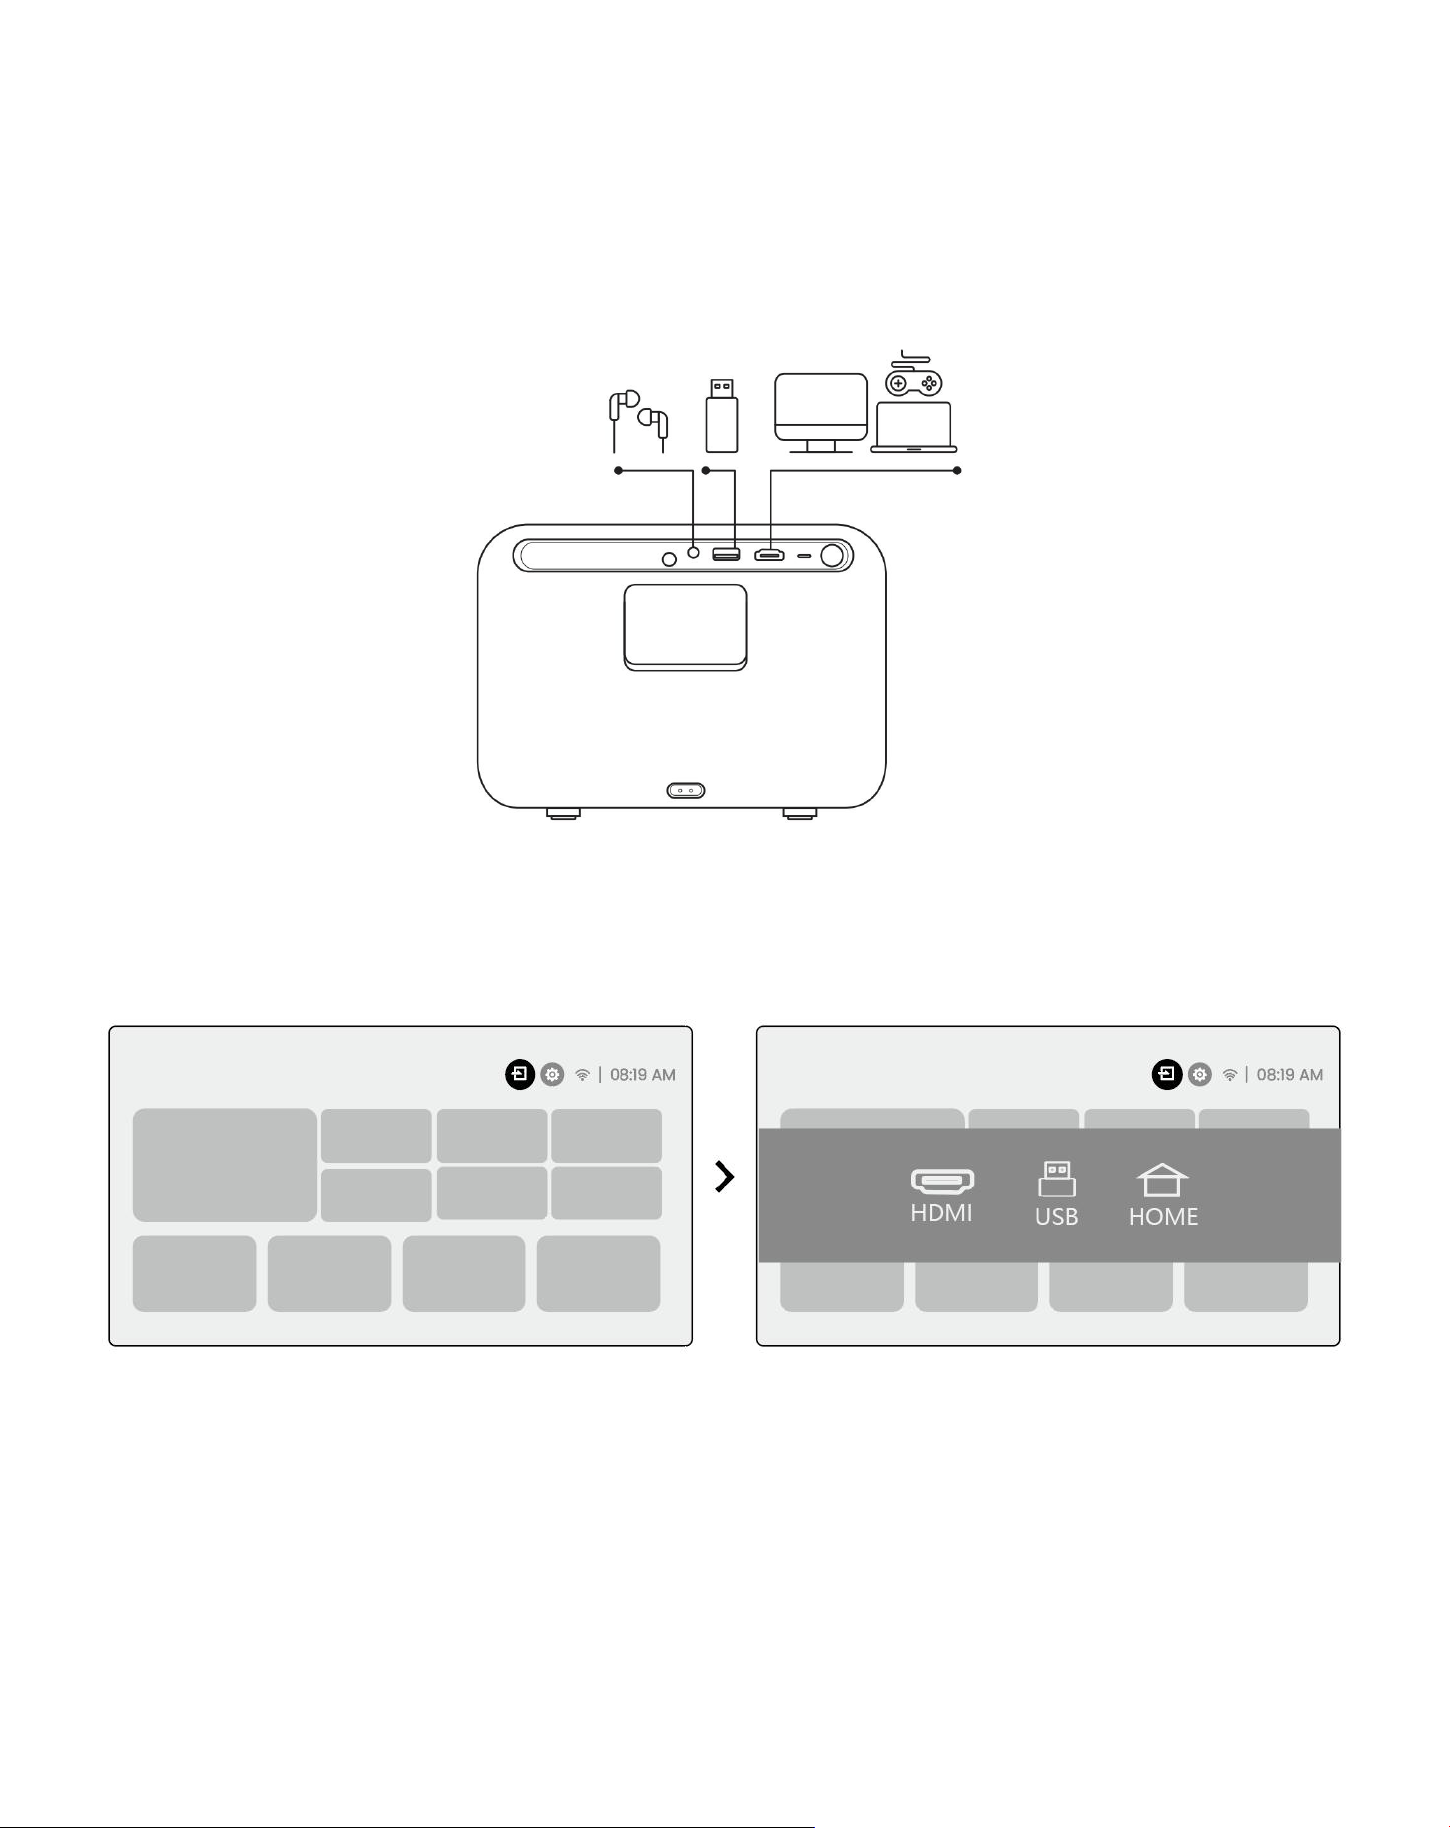
Konnektivität
10.1 HDMI, USB, 3,5mm Audio ausgang
Yaber L2 Plus Projektor verfügt über 3 Schnitts tellen, HDMI-Port/USB-Port/3,5mm Audio-Port. Bitte wählen Sie
die richtige, um Ihr Gerät zu verbinden (PC, Telefon, DVD-Player, Sound bar, USB, PS5, etc.)
10.2 USB
Hinweis: Wenn Sie auf dem USB-Gerät nach Dateien suchen, wählen Sie bitte die richtige Datei kategorie aus
"Video", "Musik", "Bild". Andernfalls finden Sie die gewünschte Datei möglicher weise nicht.
10.3 HDMI
Wenn Sie einige Probleme bei der Verwendung von HDMI treffen, versuchen Sie bitte diese Lösungen unten:
Methode 1. Schalten Sie die HDMI EDID-Version in Ihren externen Geräte einstellungen auf 1.4 um.
54
Methode 2. Versuchen Sie, das HDMI-Kabel zu wechseln.
Methode 3. Versuchen Sie, andere externe Geräte mit HDMI-Funktion zu ersetzen und prüfen Sie, ob die
HDMI-Schnitts telle des externen Geräts funktioniert.
⚠Note: Da die HDMI-Schnitts telle die ARC-Funktion nicht unterstützt, können Sie die Sound bar nicht mit HDMI
verbinden.Bitte verwenden Sie stattdessen Bluetooth oder ein 3,5-mm-Audiokabel.
10.4 Audio ausgang
Hinweis: Wenn Sie bei der Verwendung einer Bluetooth-Lautsprecher verbindung stottern oder verzögern,
können Sie Geräte verwenden, die 3 unterstützen.5mm Audio kabel, um Audio zu spielen.
10.5 Drahtlose Verbindungen
⚠Beachten Sie: Wenn Sie Netflix, Prime Video usw. mit dem Projektor spiegeln müssen, schließen Sie bitte einen
TV Dongle/Stick oder andere Produkte mit diesen Streaming-Medien über HDMI an.
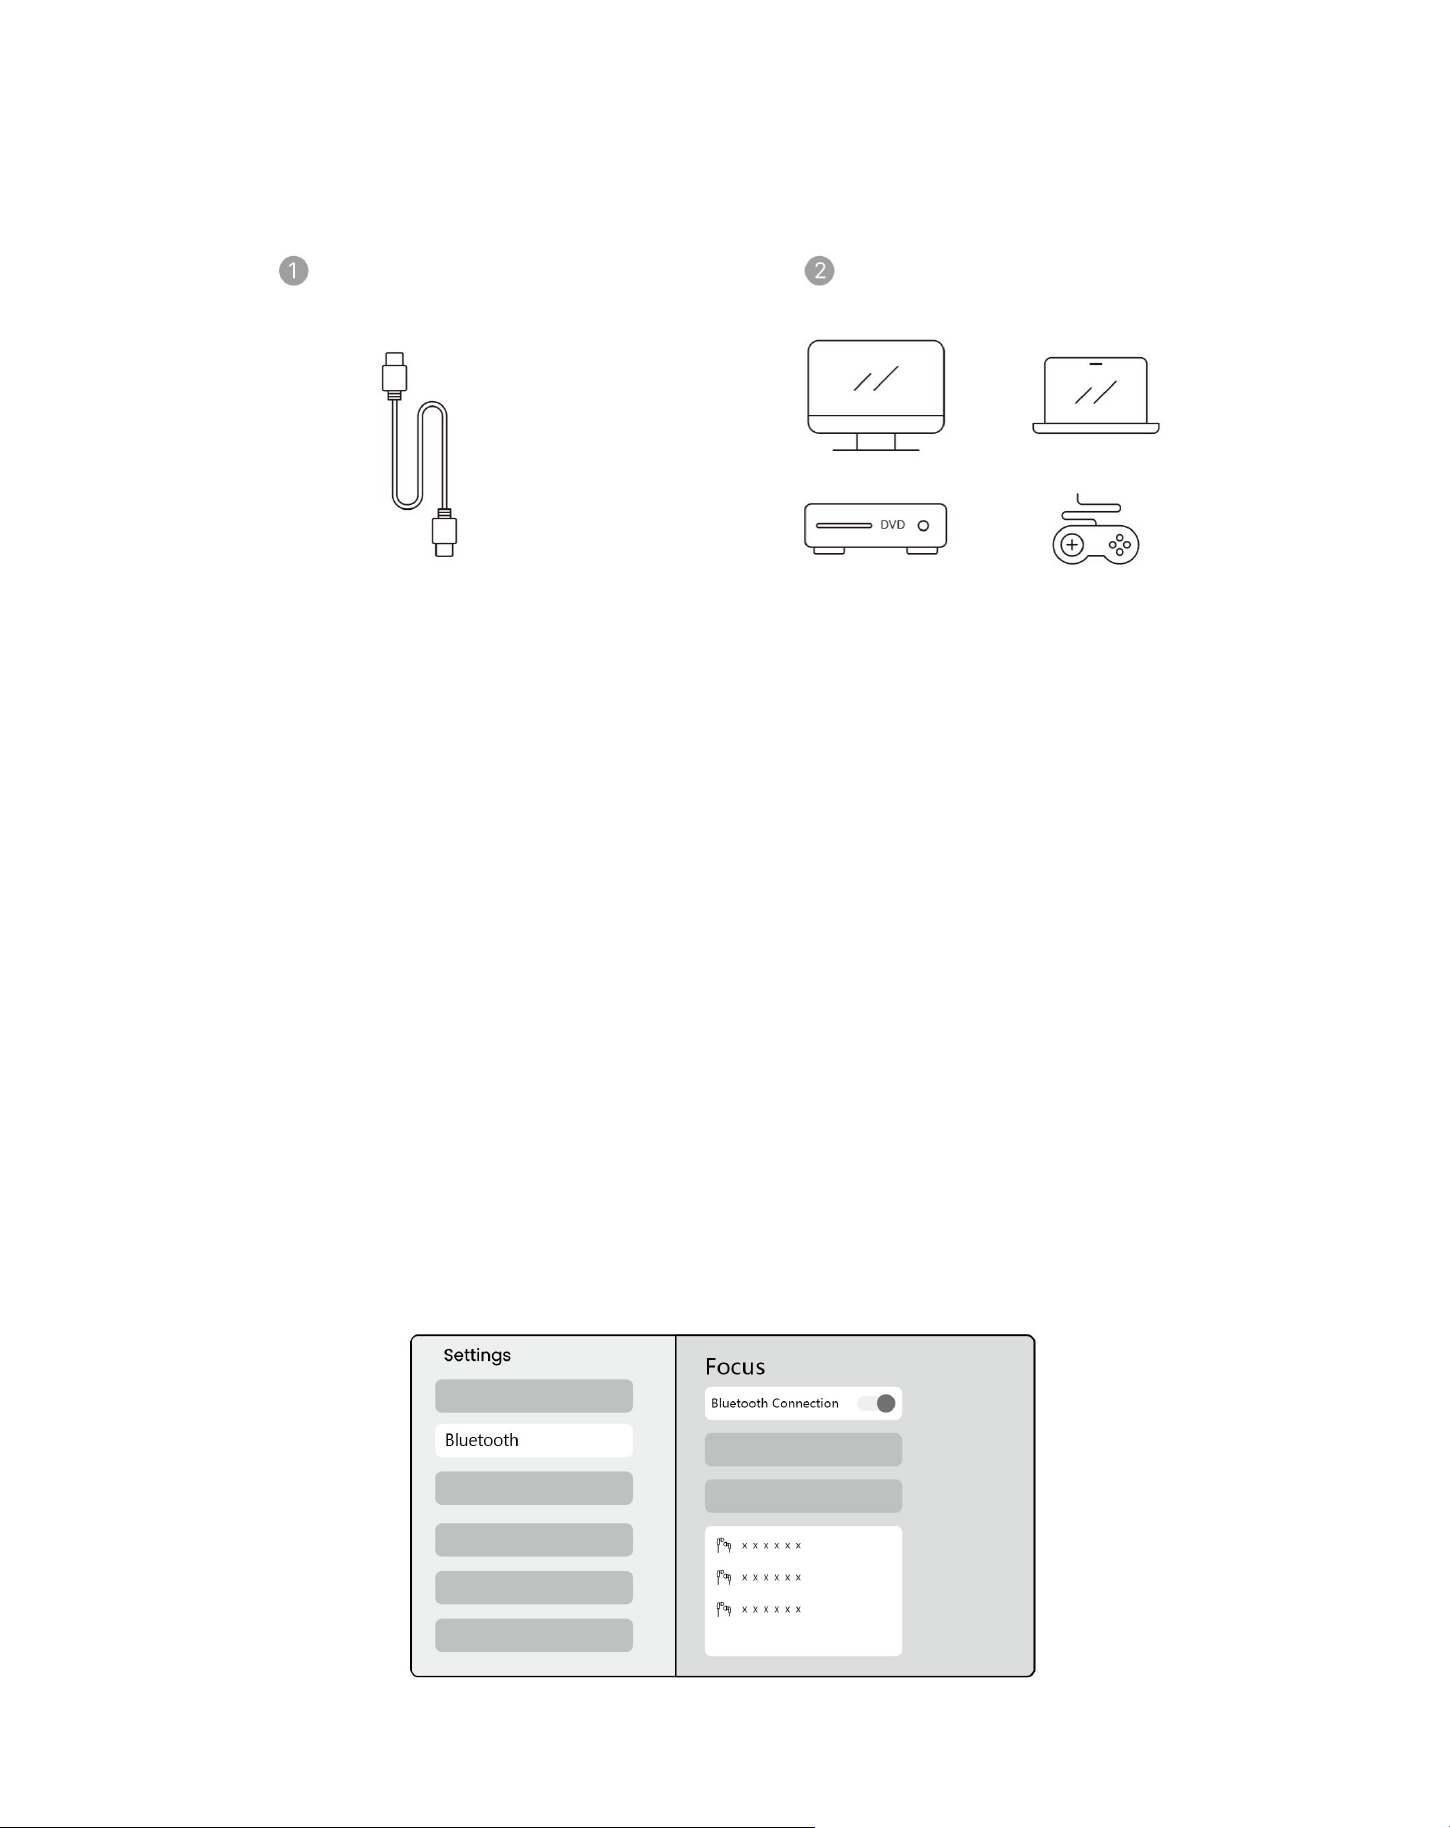
Bluetooth-Einstellungen
Schritt 1: Schalten Sie Ihr Bluetooth-Gerät ein und bereiten Sie sich auf die Bluetooth-Verbindung vor.
Schritt 2: Wählen Sie [Bluetooth]-Menü-> Bluetooth-Taste einschalten-> Wählen Sie das Bluetooth-Gerät
zum Koppeln und Verbinden.
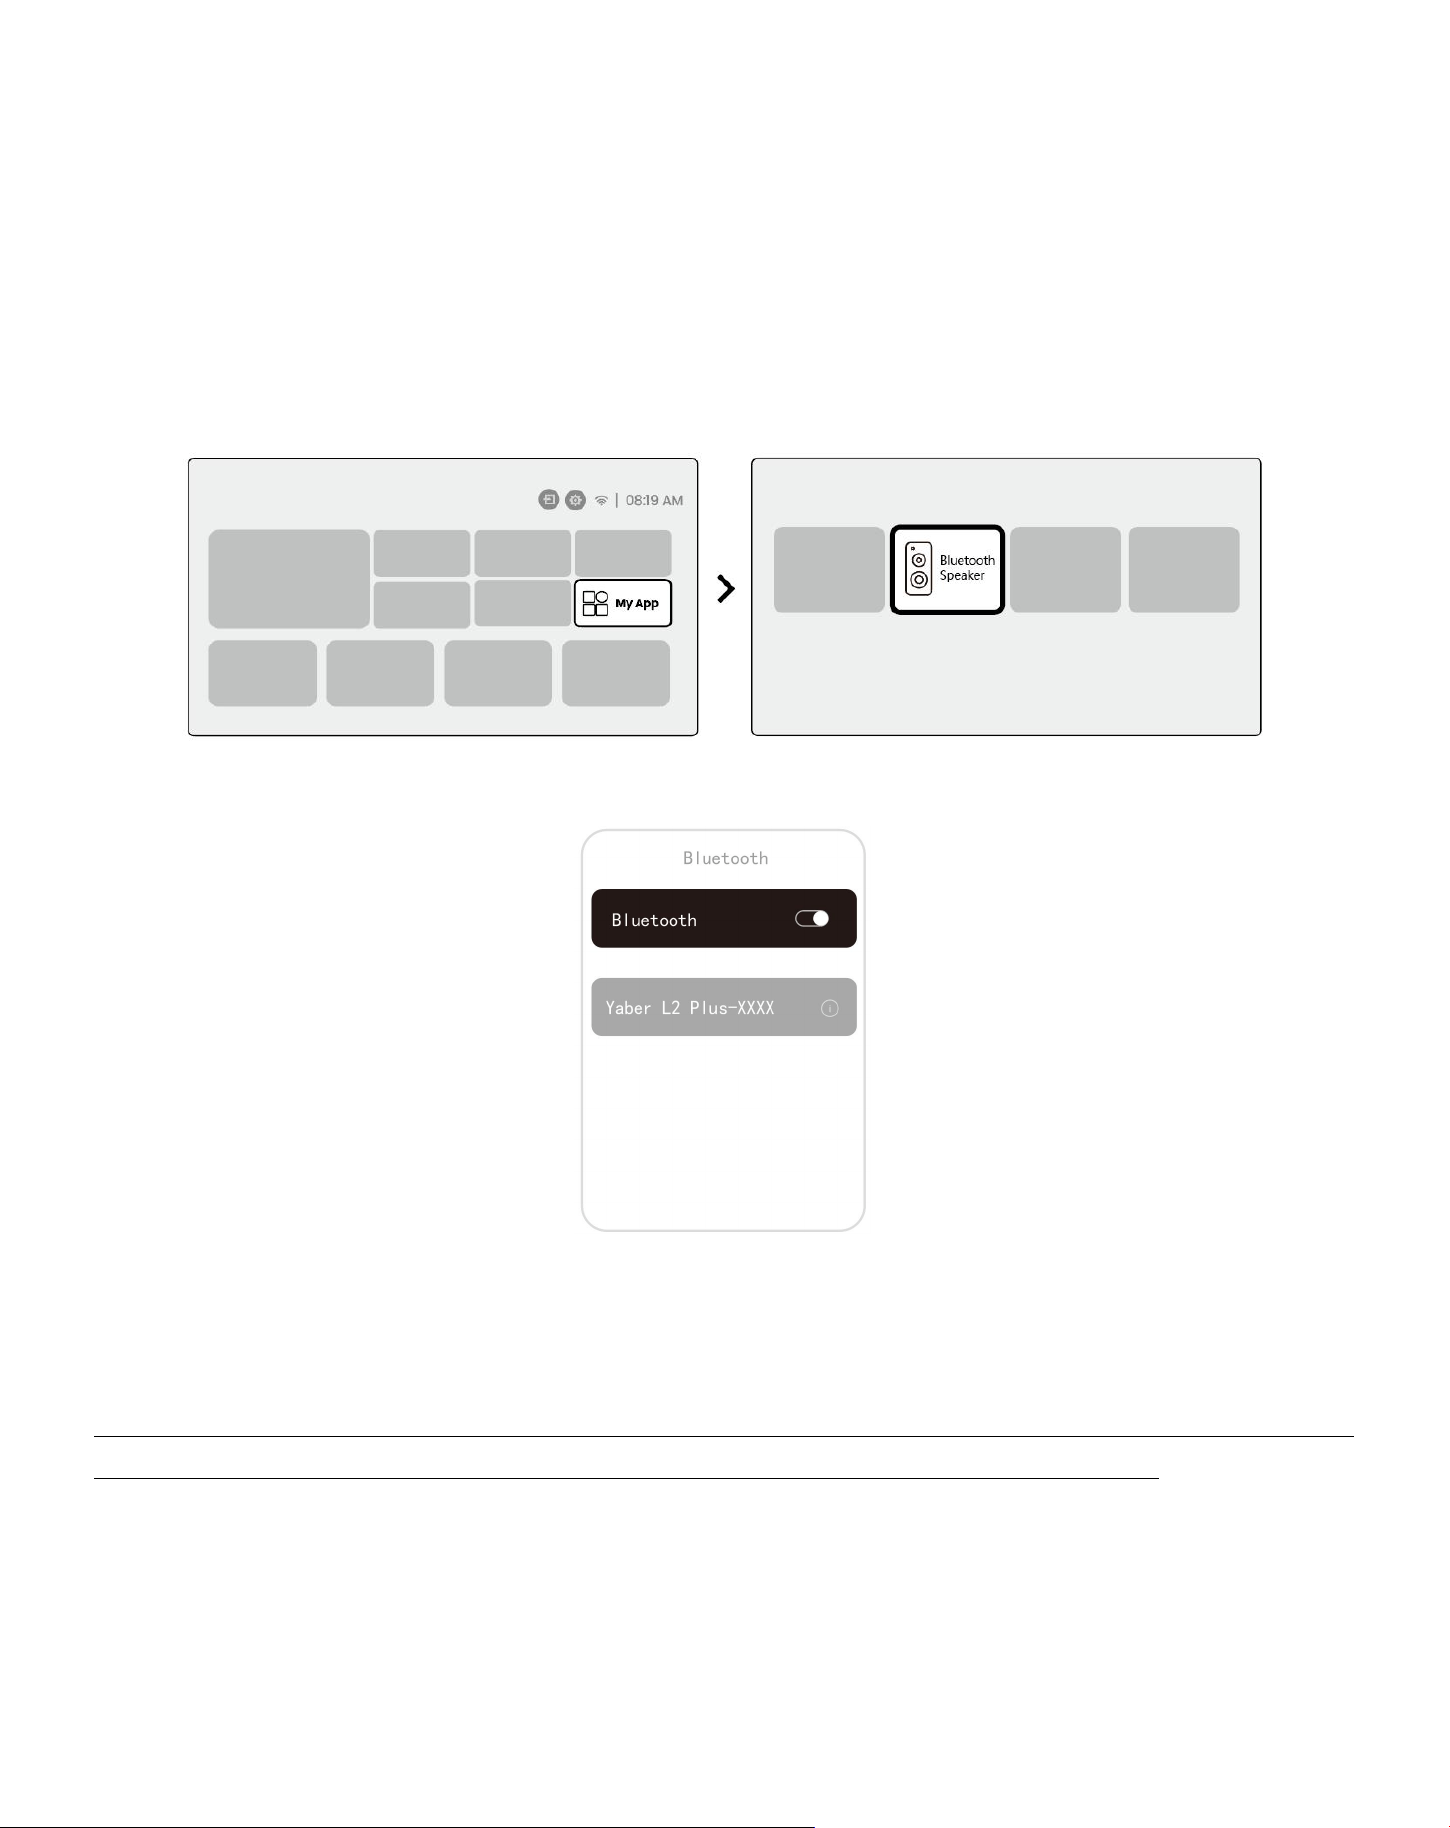
55
⚠Beachten: Bitte stellen Sie sicher, dass das Gerät entweder von anderen Geräten getrennt ist oder der
Bluetooth-Modus aktiviert ist.
11.2 Bluetooth-Lautsprecher
Schritt 1: Wählen Sie auf der Startseite das Menü [Meine App].
Schritt 2: Schalten Sie den Bluetooth-Lautsprecher ein, geben Sie ein und bleiben Sie auf dieser Seite.
Schritt 3: Suchen Sie nach [Yaber L2Plus-XXXXX] auf der Bluetooth-Schnitts telle Ihres Telefons.
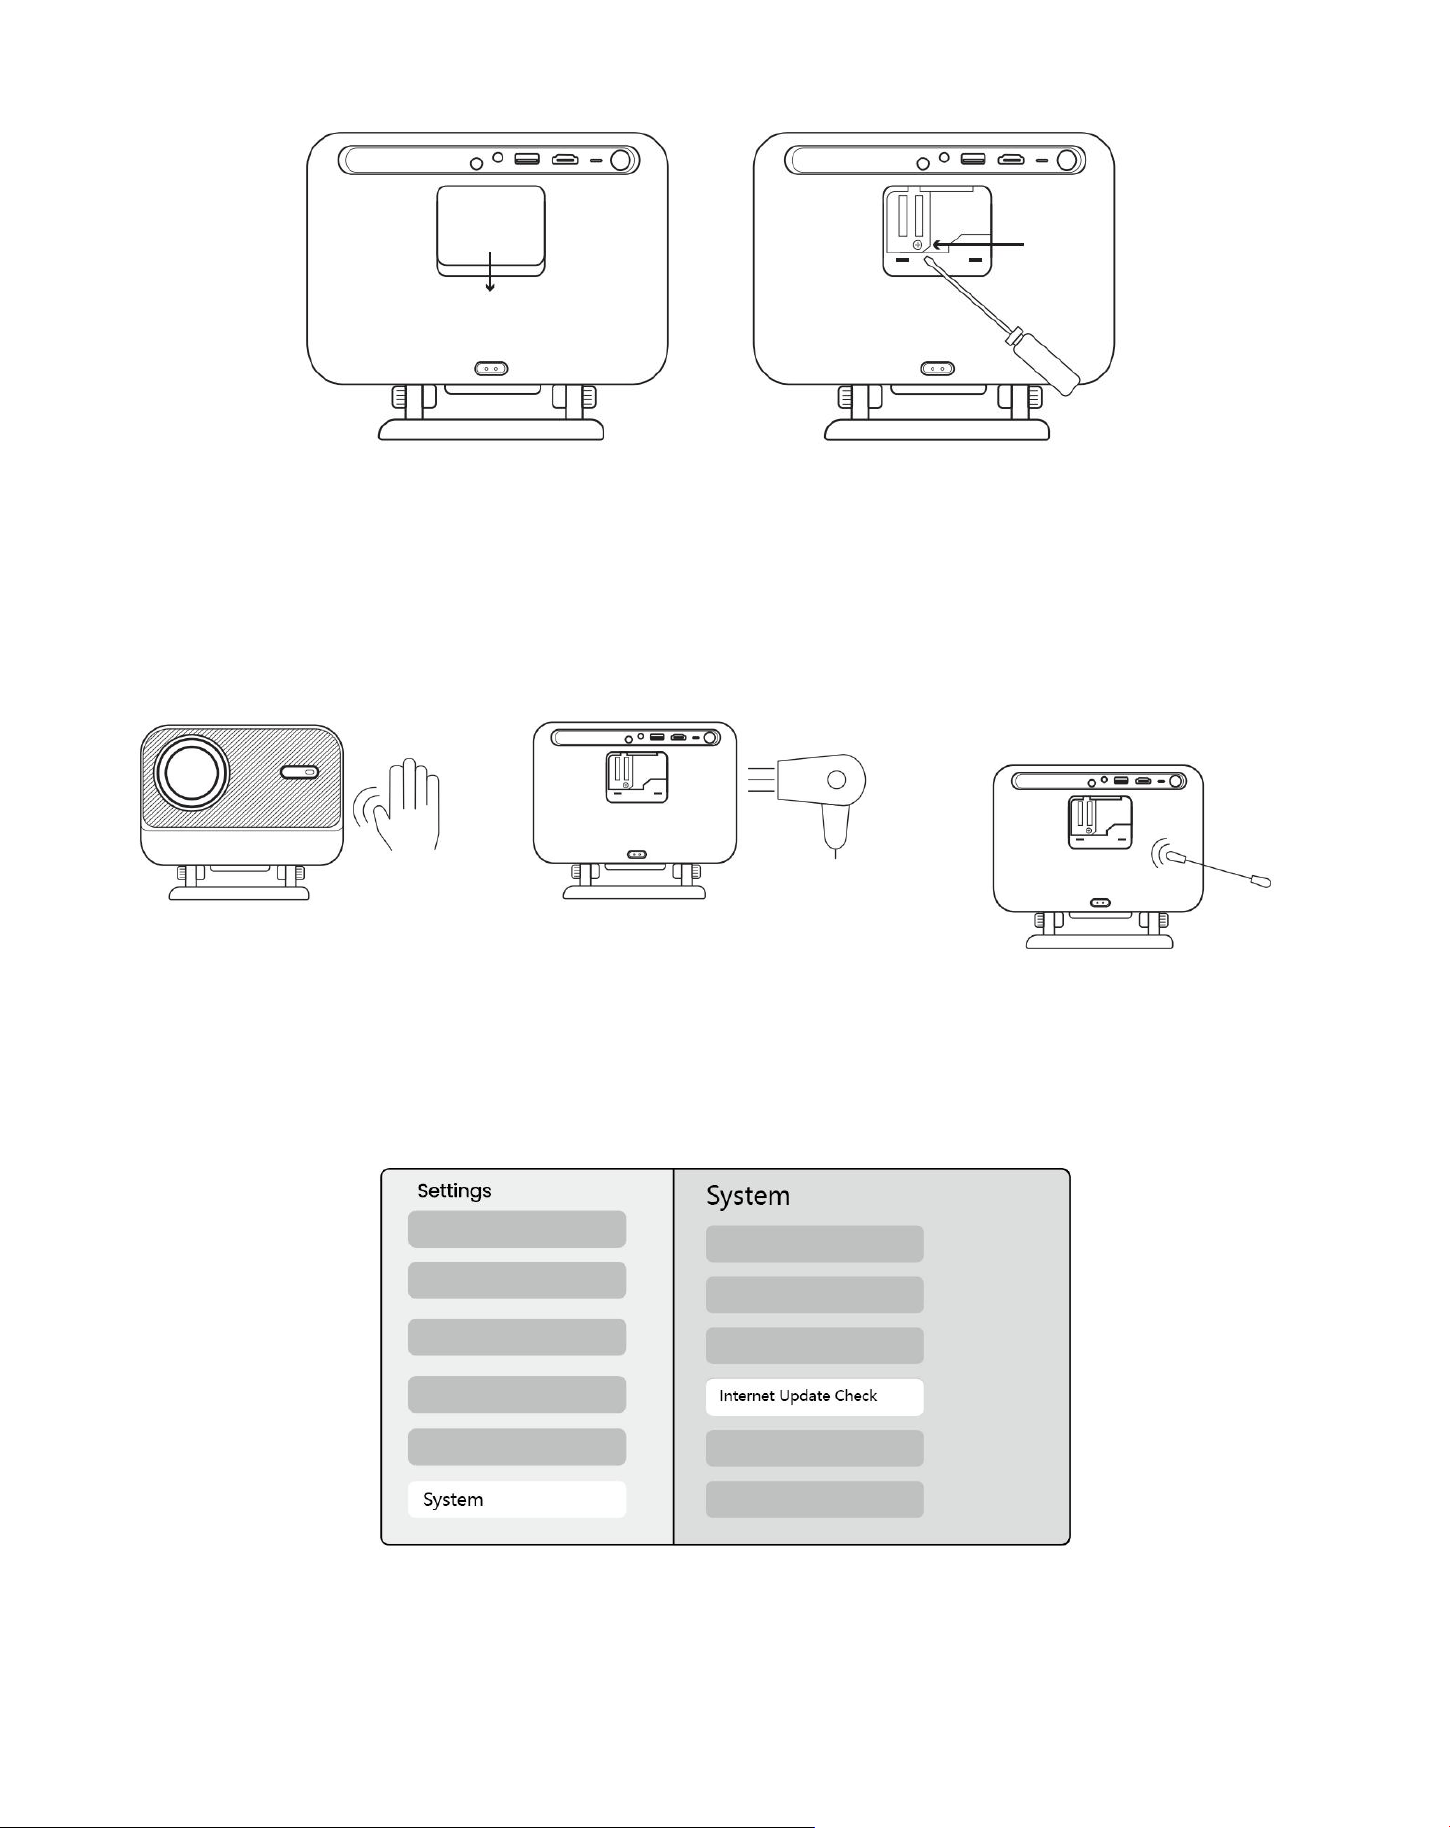
18Regelmäßige Reinigung
⚠Hinweis: Da L2 Plus eine offene optische Maschine verwendet, kann während des Gebrauchs eine
kleine Menge Staub eingeatmet werden.Es wird empfohlen, es regelmäßig zu reinigen.
56
Entfernen Sie die Abdeckung auf der Rückseite der Maschine und entfernen Sie dann die Dichtung
abdeckung mit einem Schrauben zieher.
Methode 1
Stoppen Sie den Projektor leicht.
Methode 2
Verwenden Sie kalte Luft, um in
den Staub hafen zu blasen.
Methode 3
Verwenden Sie Wattes täbchen,
um hartnäckige Flecken zu
entfernen.
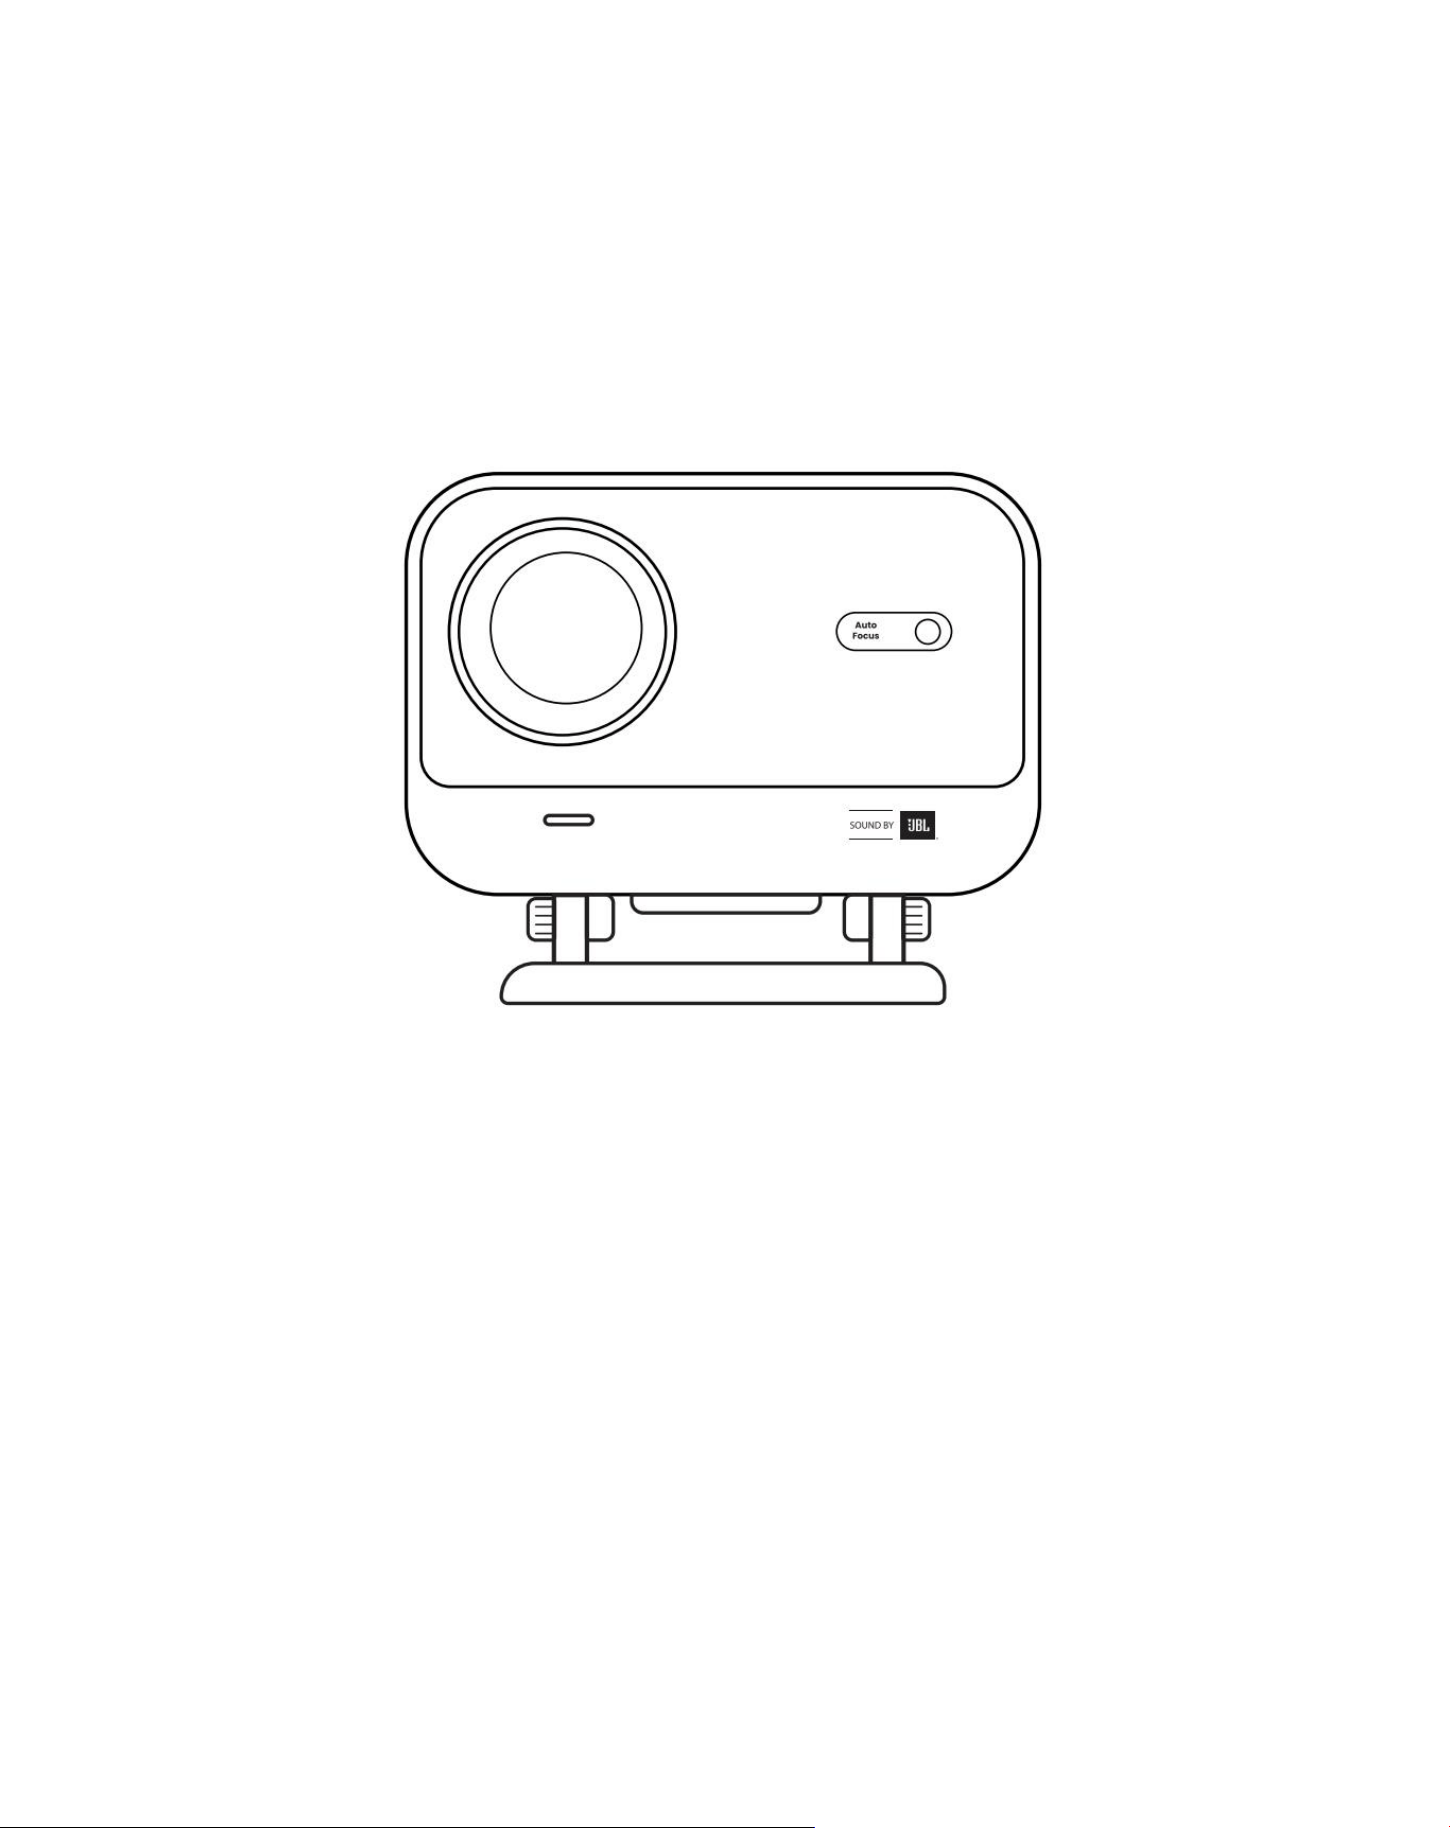
System-Upgrade
Sie können den Systems tatus Ihres Geräts unter [Einstellungen]-[System]-[Internet Update Check]
überprüfen.
Wenn Sie Fragen haben, wenden Sie sich bitte an uns.
✉Support@yaber.com
57
用戶手冊
投影儀 L2 Plus

58
YABER 終身專業支持
尊敬的客戶,
感謝您選擇 Yaber L2 Plus 投影機。 在使用 L2 Plus 投影儀之前,請仔細閱讀用戶手冊。
我們了解您在使用投影機時可能會遇到各種問題。 但是,在產品頁面上留下評論可能不會改善您的體驗。 (請讓我們幫
助您! 我們非常感謝您的反饋,並將及時提供令人滿意的解決方案。)
您的滿意是我們的首要任務。 如果您遇到任何問題,我們真誠地希望您能給我們解決這些問題的機會。
我們致力於為您提供最好的解決方案。 我們感謝您的理解和耐心提前。
亞伯投影機客服團隊:
WARRANTY(保修單)
感謝您的購買和支持。 我們為 Yaber L2 Plus 投影儀提供 3 年保修。
如果您有任何問題,請隨時與我們聯繫。
✉Support@yaber.com
重要注意事項
為了安全和最佳使用設備,請遵循以下準則:
●
不要將鏡頭對著眼睛,因為強烈的投影光線可能會對眼睛造成傷害。
●
請勿堵塞設備的進氣口或出氣口,以防過熱損壞內部組件。
● 請勿用紙或布等清潔工具直接擦拭鏡頭。 相反,請使用清潔空氣吹除鏡頭上的灰塵。
● 請勿使用化學藥品,清潔劑或任何液體清洗設備,因為它們可能會腐蝕電路板。
●
將設備及其組件和附件放在兒童接觸不到的地方。
● 確保設備在乾燥,通風良好的環境中使用。
● 請勿將設備存放在過熱或過冷的地方,因為這會縮短電子組件的使用壽命。在 0 ° C-40 °C 的溫度範圍內使用和儲
存。
●
請勿將設備放入任何加熱設備 (例如乾燥機或微波爐) 中進行乾燥。
●
請勿用力向下壓設備或在其頂部或後面放置物體,以免損壞設備。
● 請勿投擲,跌落或強烈搖動設備,以保護其內部電路板。
● 確保每六個月至一年清潔一次灰塵過濾器,以保持機器運行涼爽。
59
包括什麼
L2 Plus 投影儀
遠程控制
鏡頭蓋
QSG
HDMI 電纜
電源線
清潔套件

60
規格
型號 L2 Plus
原生分辨率
1920*1080
光源
LED 指示燈
焦點
汽車/電動
梯形校正
自動/手動
接口
USB× 1
HDMI× 1
音頻輸出 × 1
單位尺寸
22.7 × 20.4 × 18.4 厘米
8.9 × 8 × 7.2 英寸
投影比
1.38:1
投影距離
最小 1.26m ~ 最大 4.4m
最小 40 ~ 最大 150 英寸
電源電壓
交流 100-240v/50-60hz
功耗
110W
投影儀重量
2.44 kg
5.38 磅
投影法
桌子上的前/後
電池上的前/後
縱橫比
16:9
投影縮放
50% - 100%
圖片格式
JPG, PNG, BMP, JPEG
音頻格式
MP3, WAV, ASF, 3GP, MP4, MPEG
視頻格式
MKV, MP4, 3GP, MPEG, ASF, WMV, WebM,
USB 格式
FAT 32, NTFS, exFAT
61
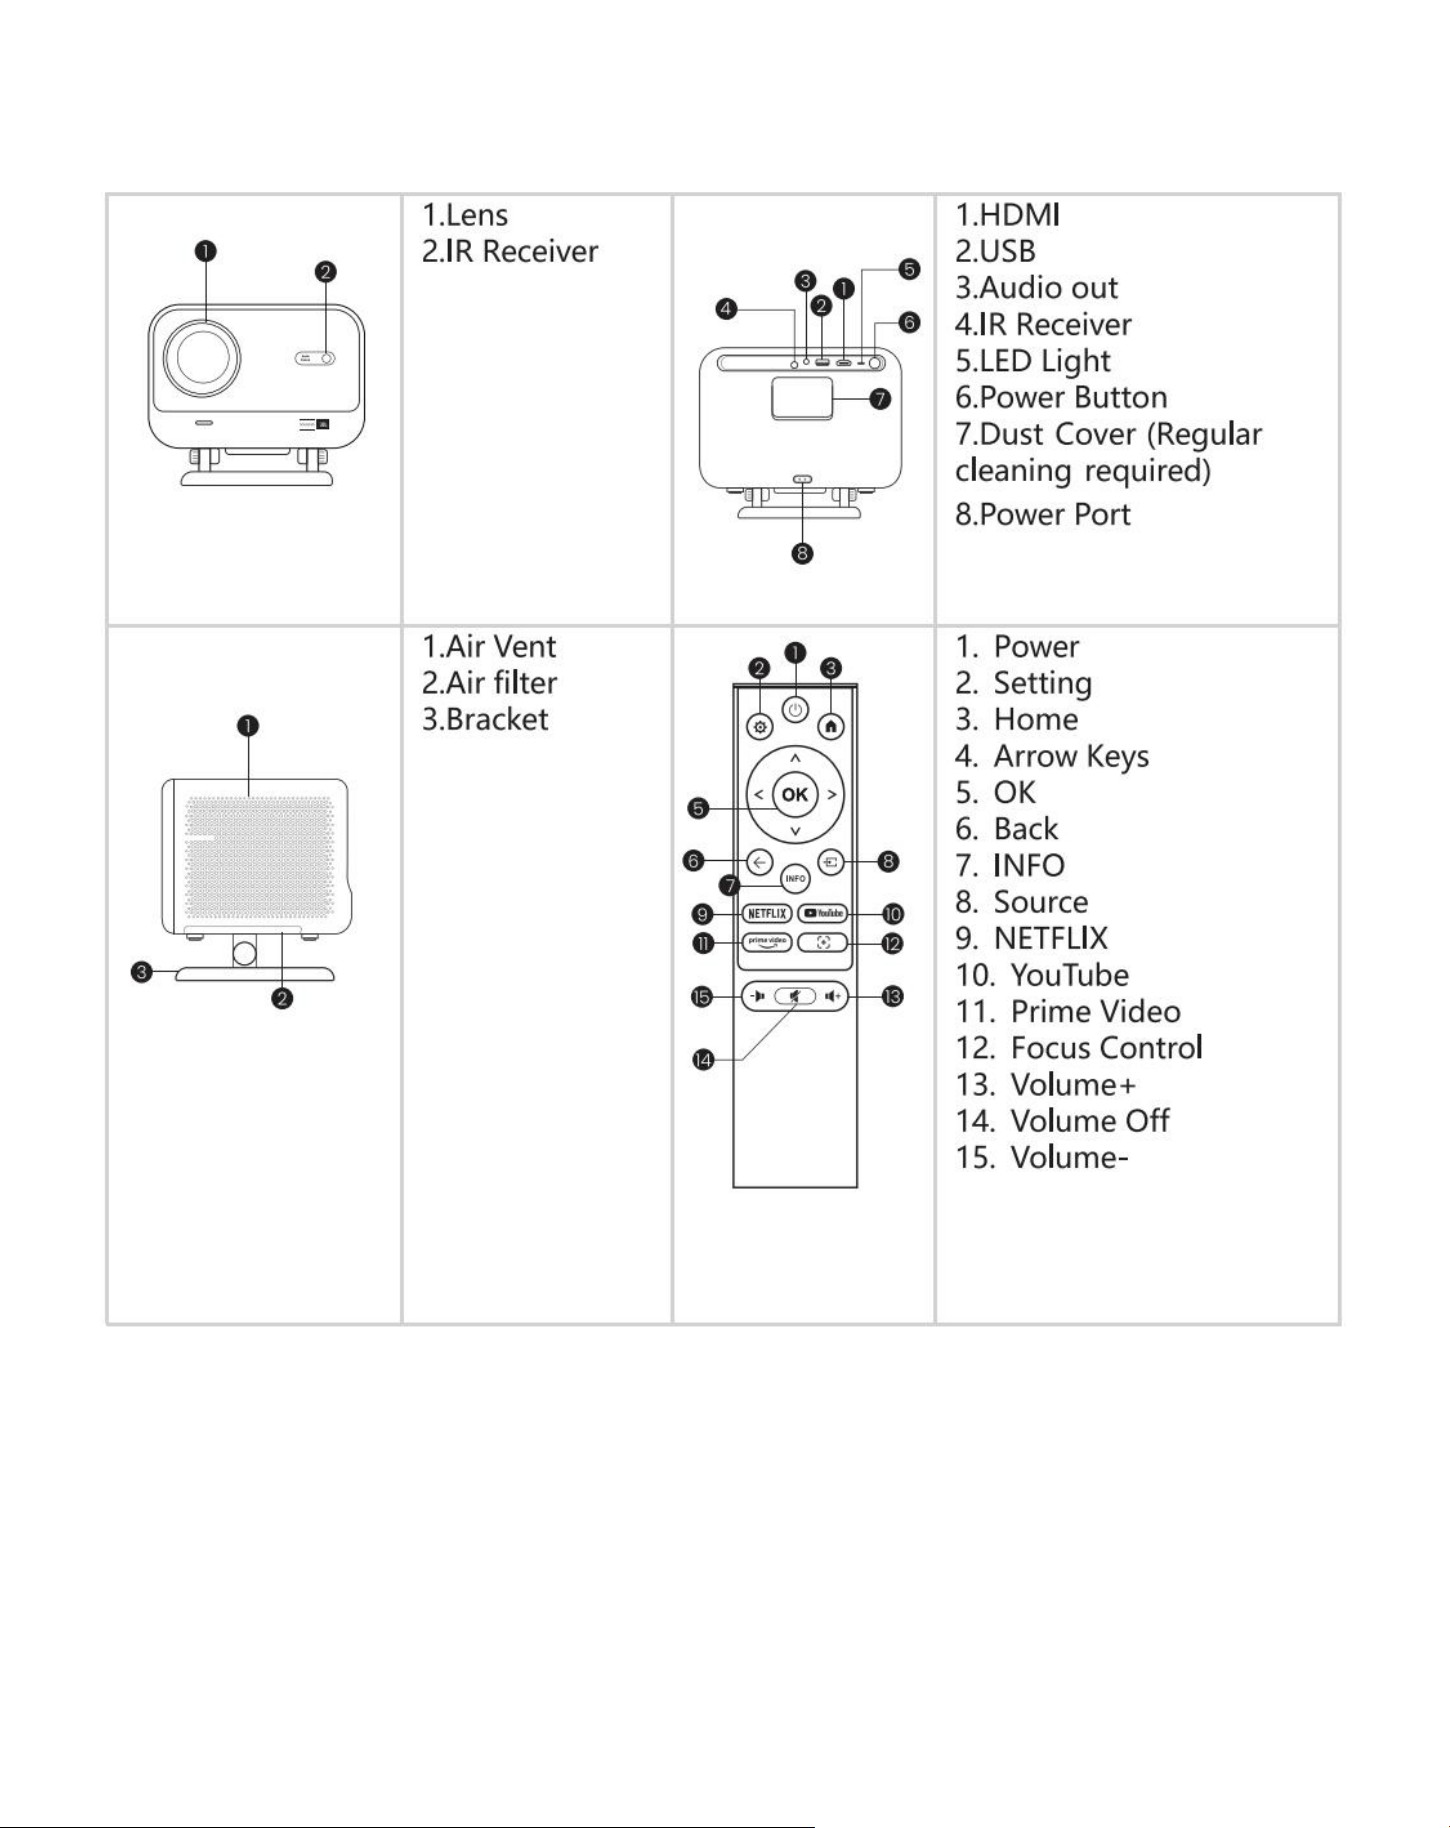
產品概述
62
安裝
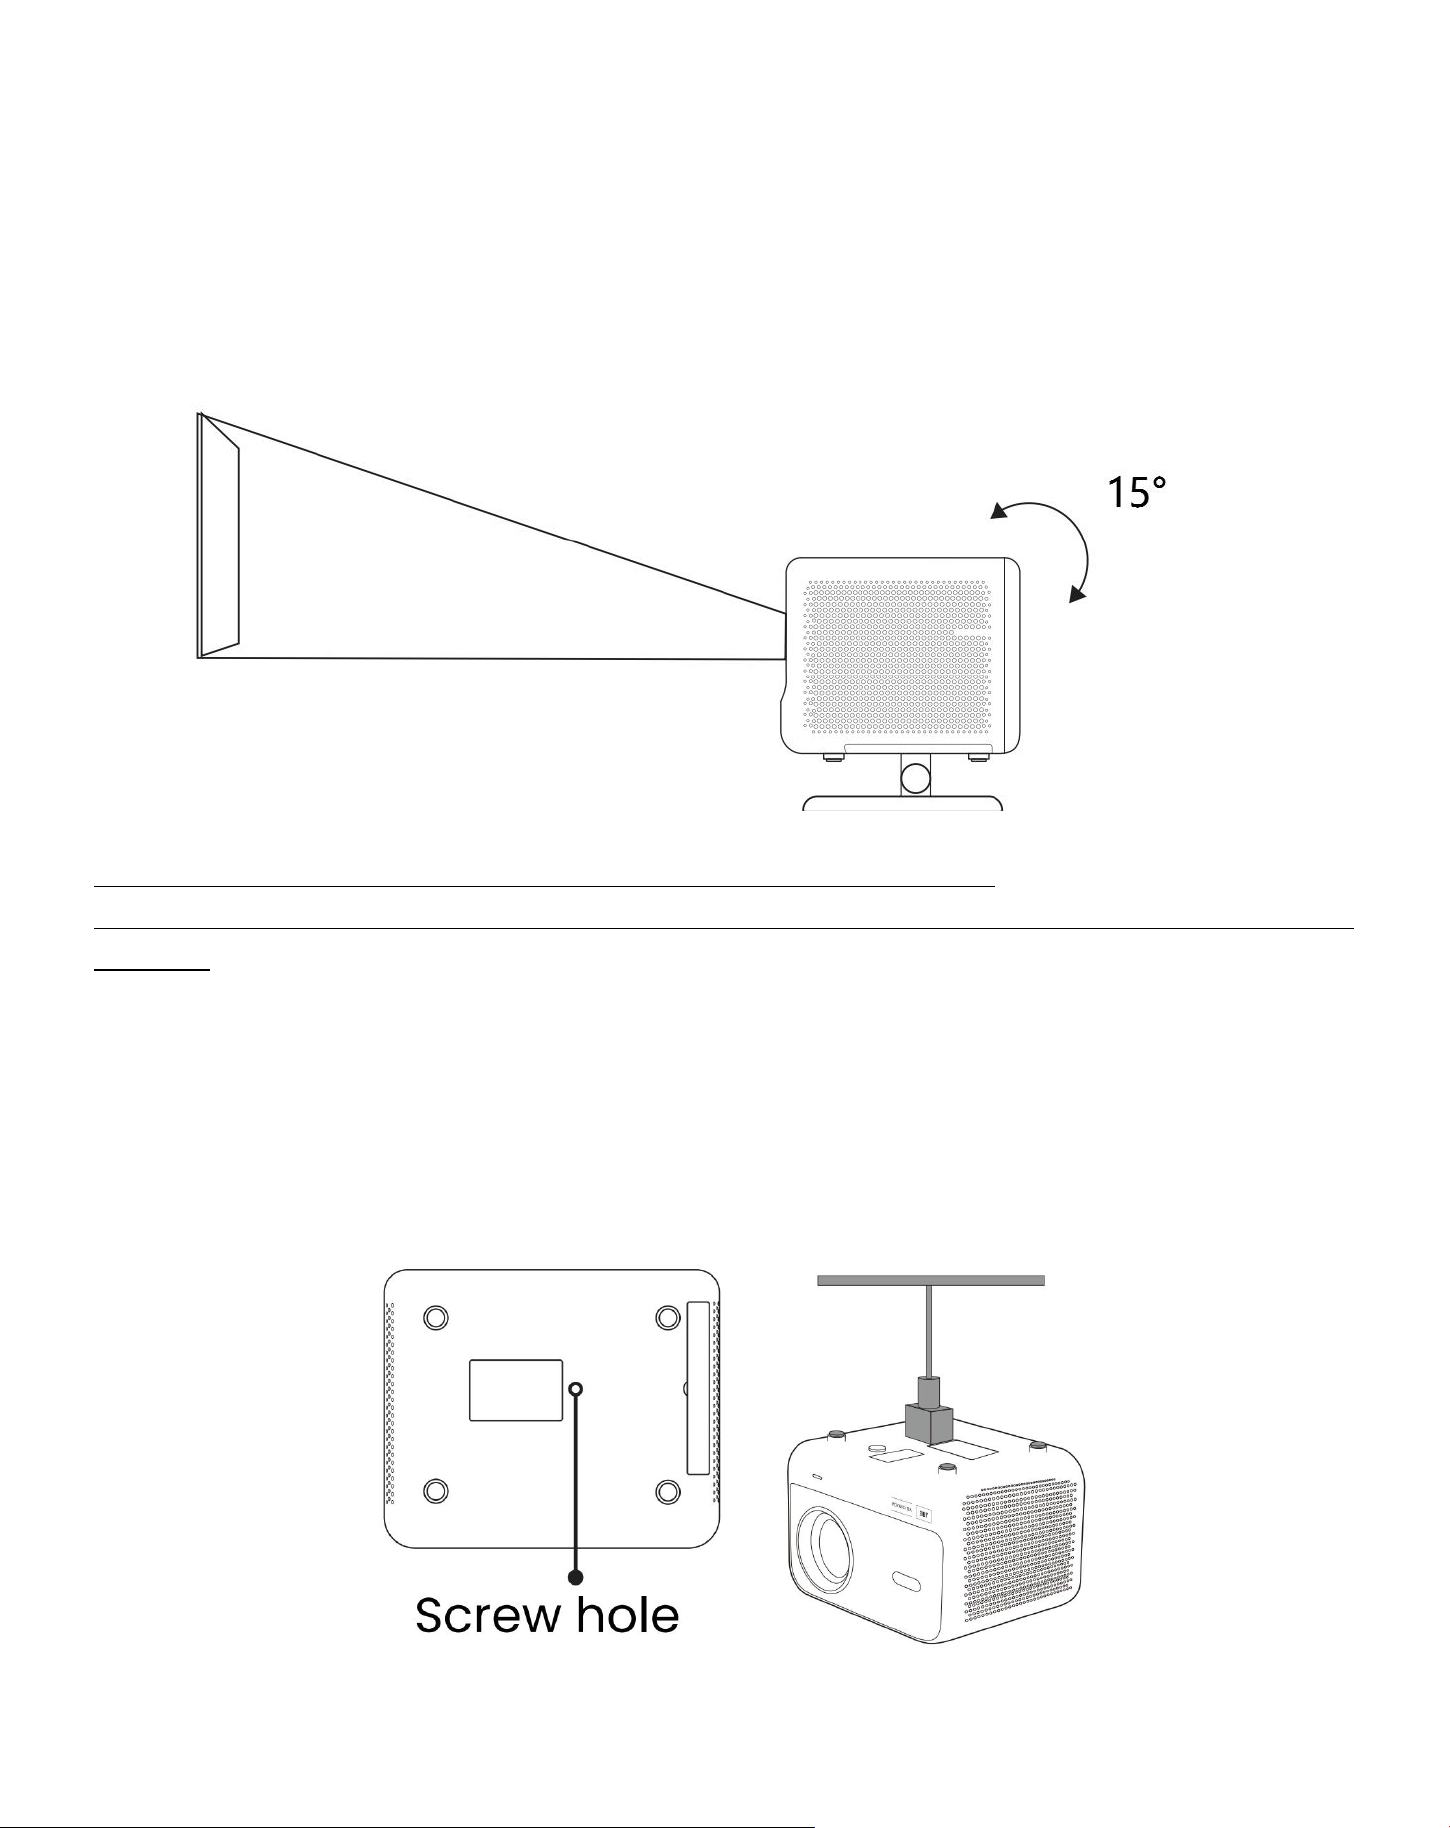
7.1 桌面投影
投影儀配有可旋轉支架,可輕鬆調整。
第一步: 將投影儀放置在平面上。
Step2: 請調整相應投影屏幕的支架角度,保持角度在此範圍內,以獲得最佳的圖像清晰度。
⚠�� 通知: L2 Plus 支持水平梯形校正。您不需要將投影儀直接放在屏幕前面。
⚠�� Notice: 為使圖像質量保持最佳狀態, 建議將調整保持在 15 度以內。但是,請確保與屏幕垂直線的角度不超
過 25 度。
7.2 天花板安裝
4. 安裝方法
投影機可以使用支架和 1/4 螺釘 (不包括在內) 從天花板上安裝,也可以水平放置在平坦的表面上。
63
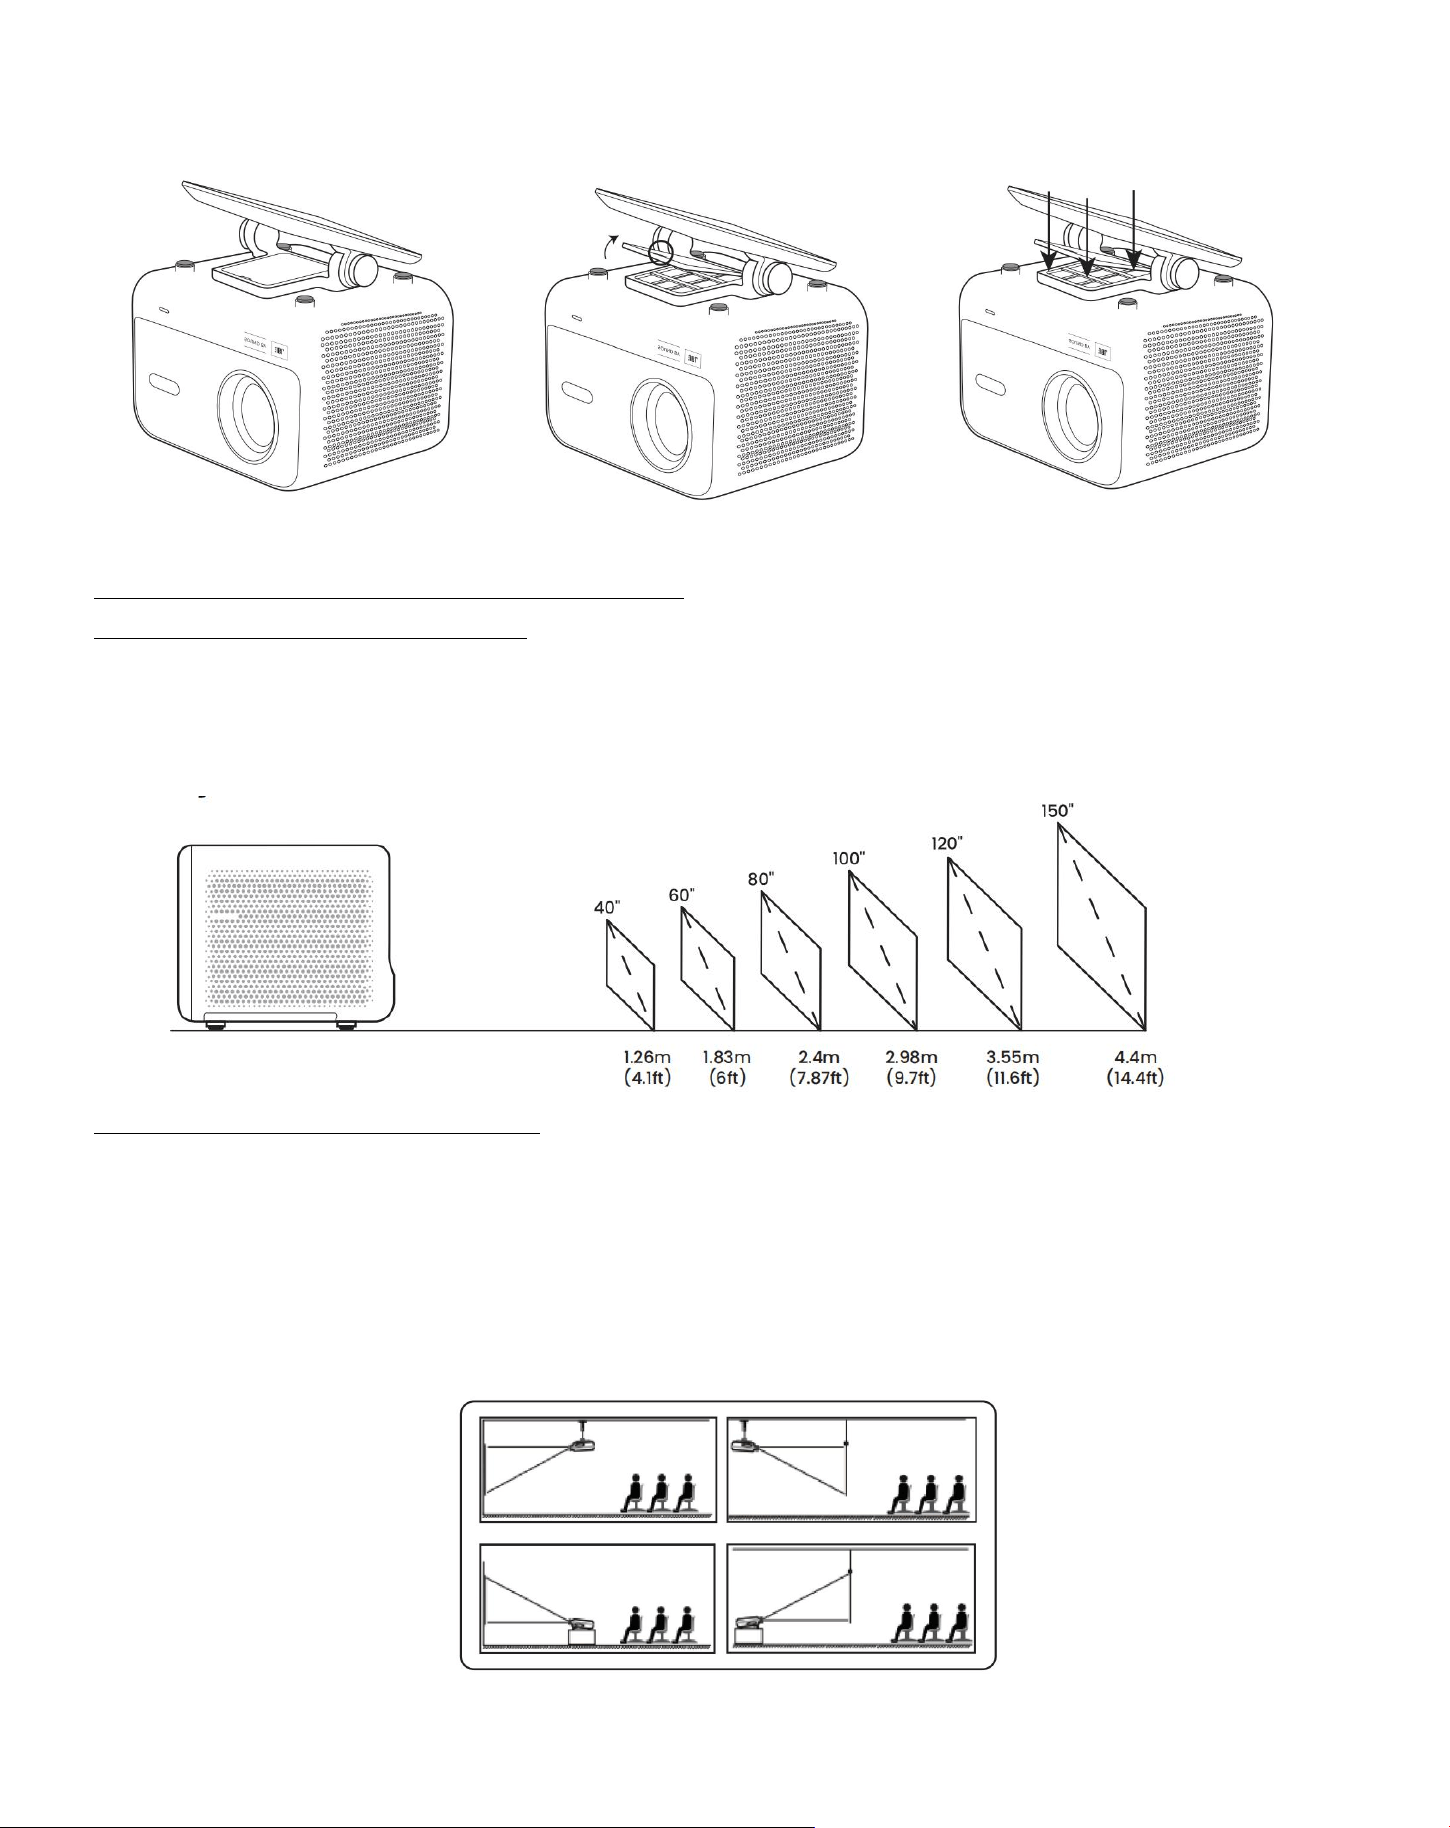
5. 底座拆卸
1.反轉機器。
2.使用 prybar 撬開蓋子。
3.擰下底部的三顆螺絲,取下支架。
⚠通知: 確保您有一個可以適合投影機的通用安裝支架。
⚠注意: L2 Plus Plus 不支持四角安裝。
7.3 投影距離
L2 Plus plus 的投影距離為 1.26m 至 4.4m。
小貼士: 建議的投影距離約為 7.87 英尺。
投影設置
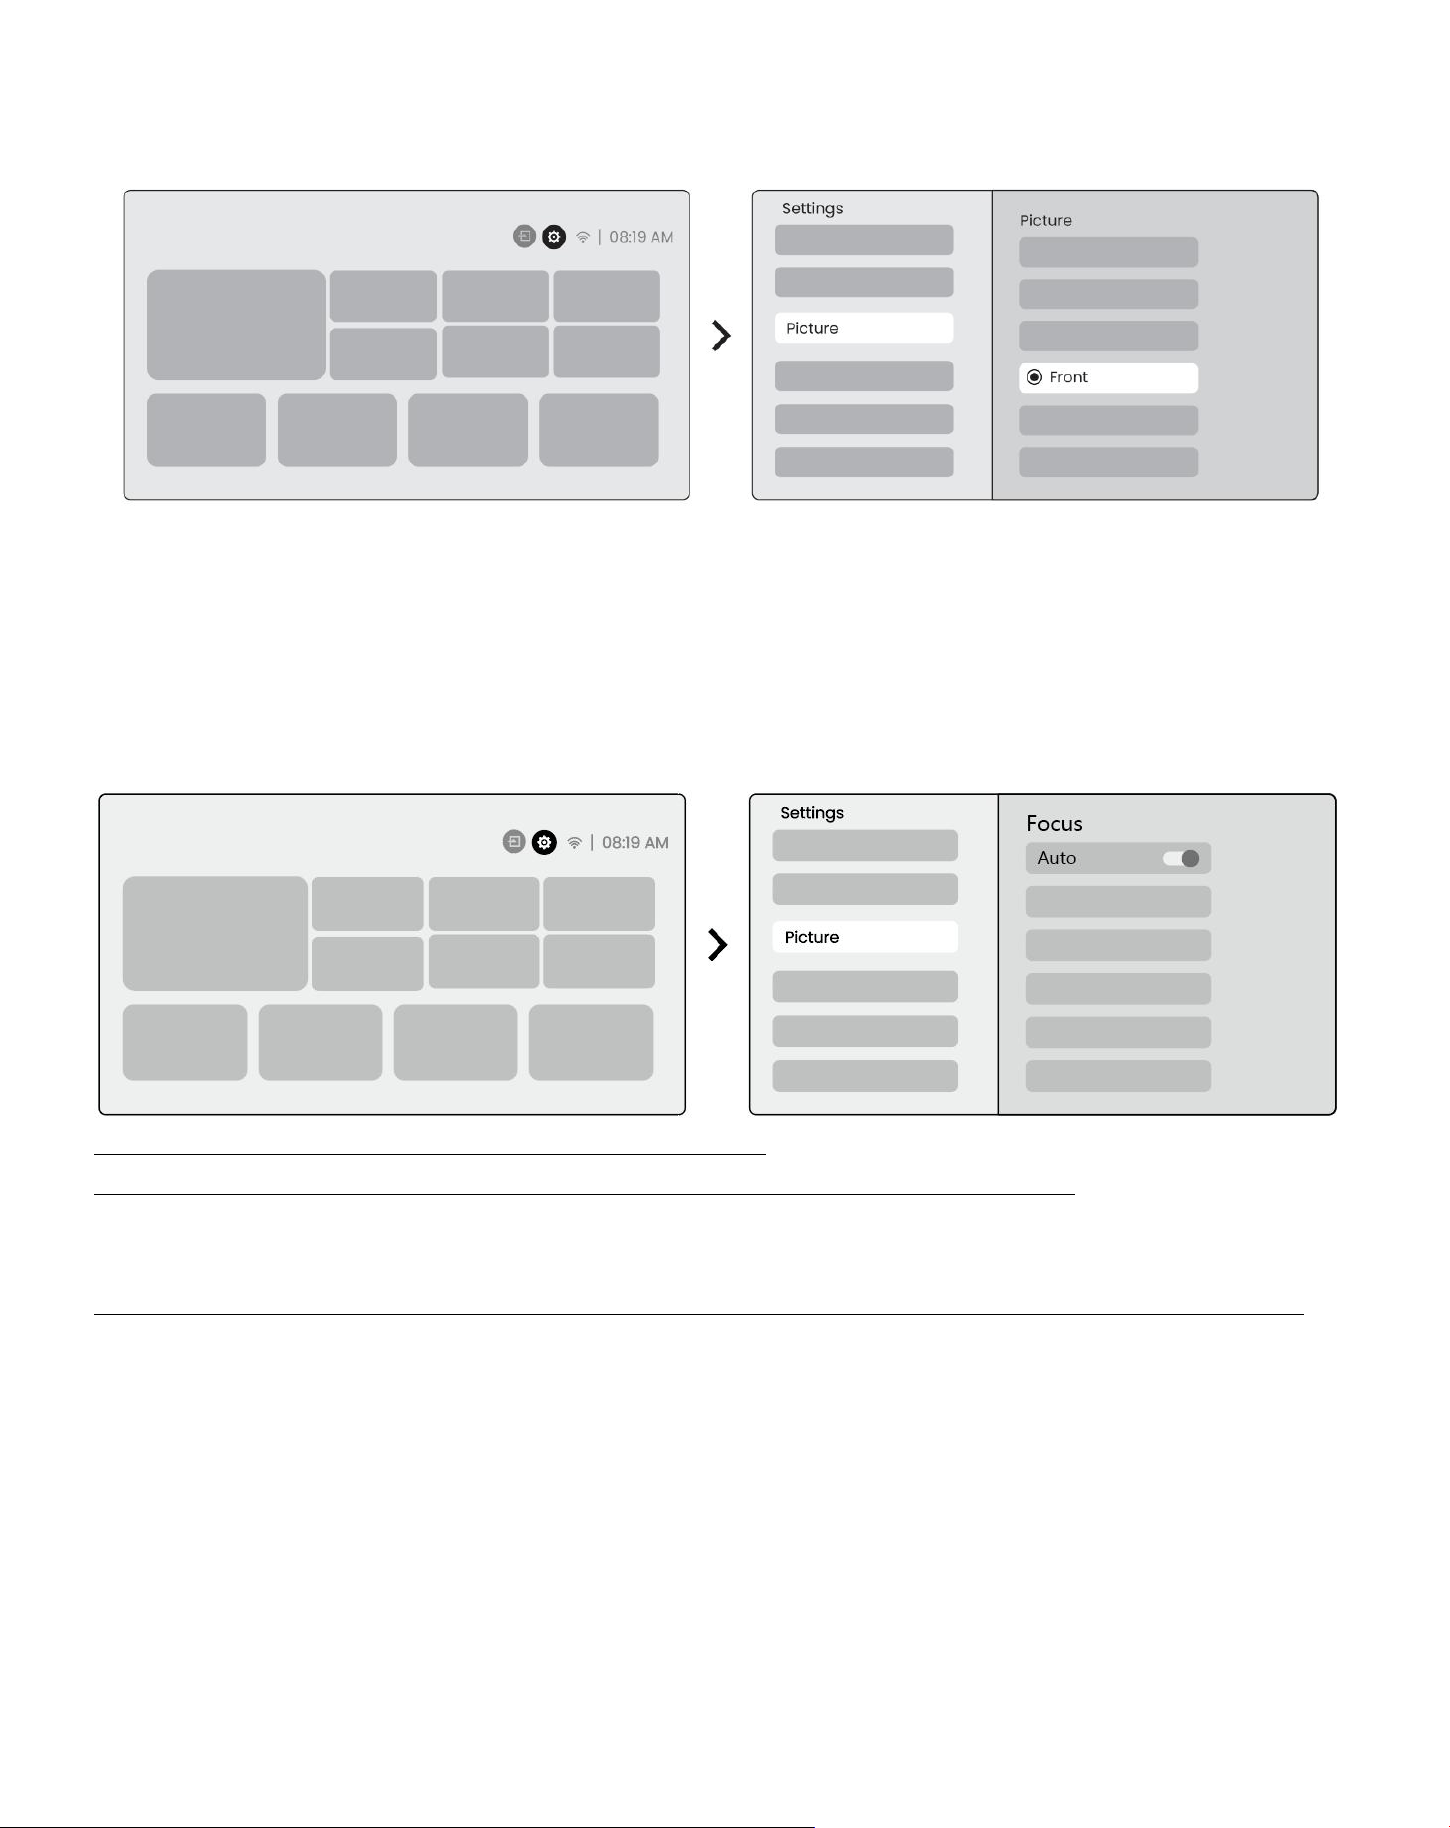
8.1 投影模式
L2 Plus Plus 支持四種投影模式,您可以選擇首選方式。
64
如果您選擇天花板安裝或背投,請轉到主頁-> 選擇設置 [ ⚙ ] -> 選擇 [圖像] -> 在 [投影] 中選擇適當的投影模式-> 按
[確定] 切換投影模式。
8.2 自動對焦
此功能自動檢測投影圖像的清晰度並實時優化焦距,確保圖像始終保持清晰清晰。 您可以在設置中找到此功能 [⚙] -> [圖片]
-> [焦點]。
⚠�� 通知: 在設置中打開後, 自動對焦將在每次換檔後激活。
⚠�� 通知: 如果您對當前的自動對焦結果不滿意,可以選擇 [執行自動對焦] 進行重新校準。
⚠�� Notice: 如果圖片仍然模糊, 請轉到主頁-> 選擇設置 [⚙] -> 選擇 [圖片] -> 選擇 [手動對焦] -> 使用向上和向
下箭頭鍵手動調整對焦,直到圖像清晰。
⚠�� 通知: 如果圖片仍然模糊, 請嘗試調整投影距離, 並確保投影距離在適當的範圍內 (請檢查 [7 。 3] 詳情)。
8.3 Keystone
8.3.1 自動梯形校正
L2s Plus 上的自動梯形校正自動校正梯形失真,確保圖像保持正方形,無需手動調整。 您可以在設置中找到此功能 [⚙] -> [圖
片] -> [梯形圖]。
65
⚠Notice: 如果您對當前的自動梯形校正結果不滿意,可以選擇 [執行自動梯形校正] 進行重新校準。
⚠ 通知: 首次使用機器時, 默認情況下會啟用自動梯形校正。如果你想關掉它,請進入主頁-> 選擇設置 [⚙]-> 選擇 [圖
像]-> 在 [Keystone] 中-> 選擇 [自動]-> 按 [確定] 關閉。
8.3.2 開機後自動梯形圖
每次打開投影機電源時,此功能會自動檢測並糾正投影圖像的垂直和水平梯形失真,確保您可以立即欣賞清晰的矩形圖像。
8.3.4 自動屏幕對準
此功能自動檢測屏幕邊界並調整圖像位置,以確保與屏幕邊緣精確對齊,避免圖像溢出或空白,並實現顯示屏的快速居中。
10. 白色背景屏幕應具有黑色或其他清晰的邊框,而耐光屏幕則沒有邊框要求。
11. 在屏幕適配之前的投影圖像需要大於屏幕面積。
12. 使用屏幕適配功能時,請不要遮擋屏幕中心。
66
⚠�� 注意: 在使用自動屏幕適配和自動避障功能之前, 請確保已打開自動梯形失真和自動對焦功能。當目標屏幕上有白
色或其他淺色物體時,避障可能不起作用。
8.3.3 自動避障
該功能自動檢測投影路徑中的障礙物,並智能調整圖像角度或位置,防止圖像遮擋,確保投影清晰完整。
⚠�� 注意: 在使用自動屏幕適配和自動避障功能之前, 請確保已打開自動梯形失真和自動對焦功能。當目標屏幕上有白
色或其他淺色物體時,避障可能不起作用。
8.3.5 手動梯形校正
如果需要進一步調整屏幕,可以使用手動梯形校正功能。
Step1: 請轉到主頁-> 選擇設置 [⚙] -> 選擇 [圖片]
步驟 2: 在 [圖片]-> 選擇 [四點校正]-> 拖動箭頭調整屏幕。
⚠注意: 請確保投影機垂直或水平傾斜不超過 15 度。請確保自動對焦有效工作。
8.4 圖像縮放
您可以根據需要調整圖像的大小。
Step1: 請轉到主頁-> 選擇設置 [⚙] -> 選擇 [圖片]
步驟 2: 在 [圖片] -> 選擇 [圖像縮放] -> 使用向上和向下箭頭鍵手動調整縮放,直到需要圖像。 (附示意圖)
67
提示: 推薦的屏幕尺寸在 60 到 100 英寸之間。
8.5 顯示
您可以根據需要調整圖像模式。
Step1: 請轉到主頁-> 選擇設置 [⚙] -> 選擇 [圖片]
步驟 2: 在 [圖片] -> 選擇 [圖片模式]
⚠注意: 圖像顏色設置僅在播放圖片或視頻時生效。
屏幕鏡像
9.1 WiFi 設置
Step1: 按設置 [⚙] 按鈕-> 選擇 [網絡和互聯網] -> 打開 [互聯網連接] 按鈕-> 選擇 [Wi-Fi]
步驟 2: 在 [可用網絡] 列表中-> 搜索所需的 Wi-Fi 網絡-> 輸入密碼-> 選擇 [確定]-> 等待投影儀連接。
⚠通知: 屏幕鏡像的流暢性會受到網絡環境的影響。建議使用更快的帶寬。
68
9.2.1 iOS Cast (適用於 iOS 設備)
步驟 1: 確保兼容性和網絡連接: 確保您的 iOS 設備和 L2 Plus Plus 連接到相同的 Wi-Fi 網絡。
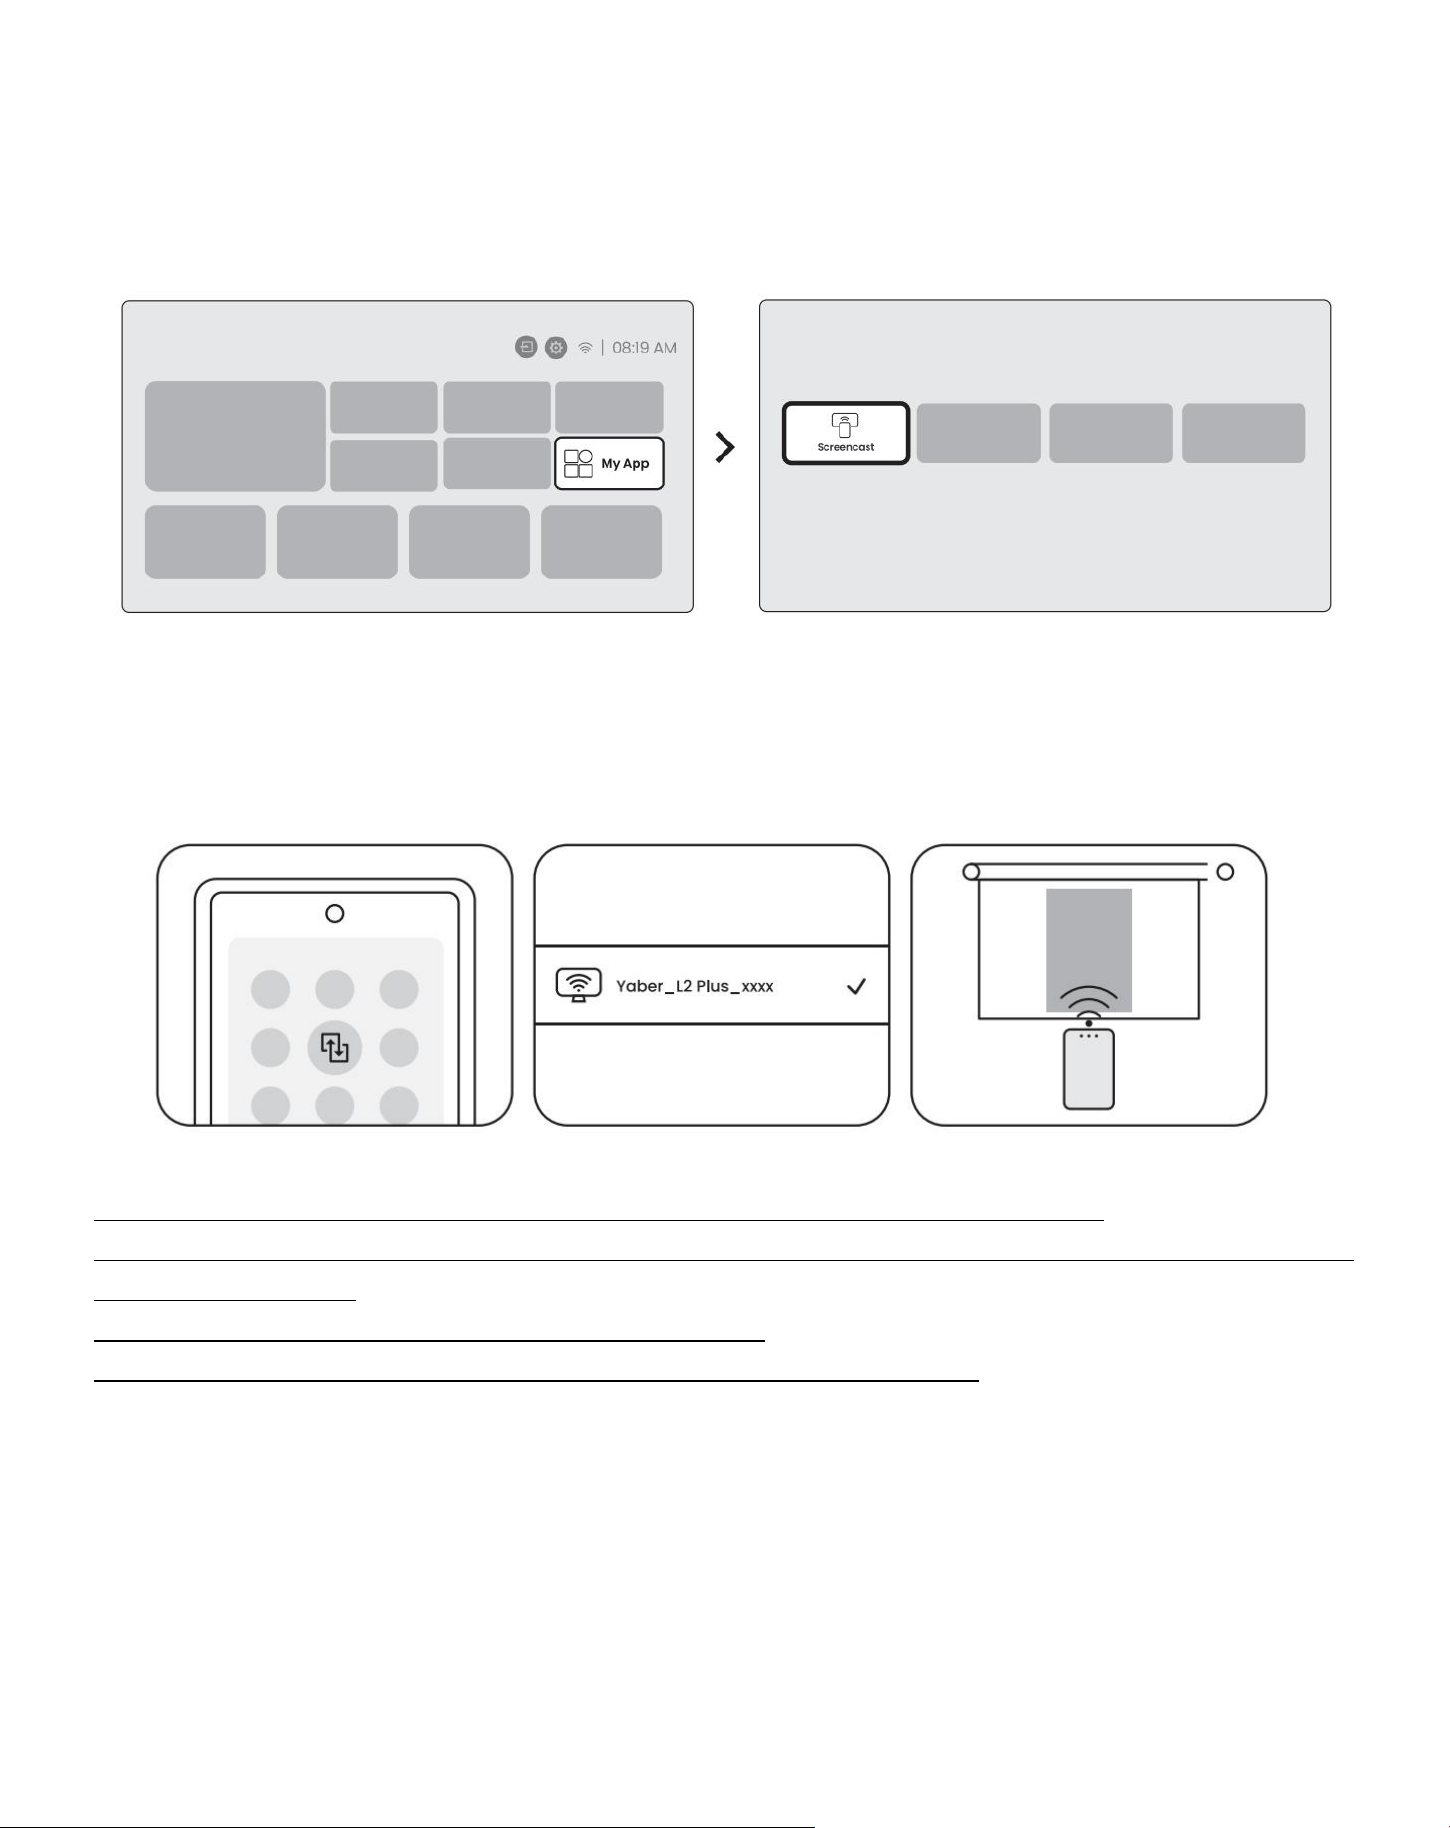
第二步: 轉到主頁-> 選擇 [我的應用程序] 菜單-> 按 [同一屏幕上的 iPhone 無線]-> Enter 並停留在 [同一屏幕上的
iPhone 無線] 頁面上。
Step3: 在 iOS 設備上打開 [控制中心] -> 選擇屏幕鏡像功能-> 連接名為 [Yaber_L2Plus_xxxx] 的 iOS Cast 接收器-> 成
功。
69
9.2.2 Miracast (適用於 Android 設備)
步驟 1: 請啟用您的 Android 手機上的 Wi-Fi 功能 (不需要連接到 Wi-Fi)。
步驟 2: 轉到主頁-> 選擇 [我的應用程序] 菜單-> 按 [截屏] ->Enter 並停留在 [Android 屏幕共享] 頁面上。
Step3: 訪問Android設備上的 [控制中心] -> 選擇 [屏幕鏡像/智能視圖]。選擇並連接名為 [Yaber_L2Plus_xxxx] 的
Miracast 接收器-> 成功。
⚠通知: 某些 google 移動設備僅支持 chromecast, 無法通過 Airplay 或 Miracast 進行投射。
⚠Notice: 由於版權保護, 某些受版權保護的內容 (Netflix,Hulu 等) 無法直接從手機上鏡像。需要與電視棒一起使用。如果
您需要幫助,請聯繫我們。
⚠通知: 手機鏡像只有進入並停留在無線屏幕共享頁面才能實現。
⚠Notice: 請確保您的移動設備靠近投影儀。屏幕鏡像的平滑度也會受到距離的影響。
70
連通性
10.1 HDMI,USB,3.5mm 音頻輸出
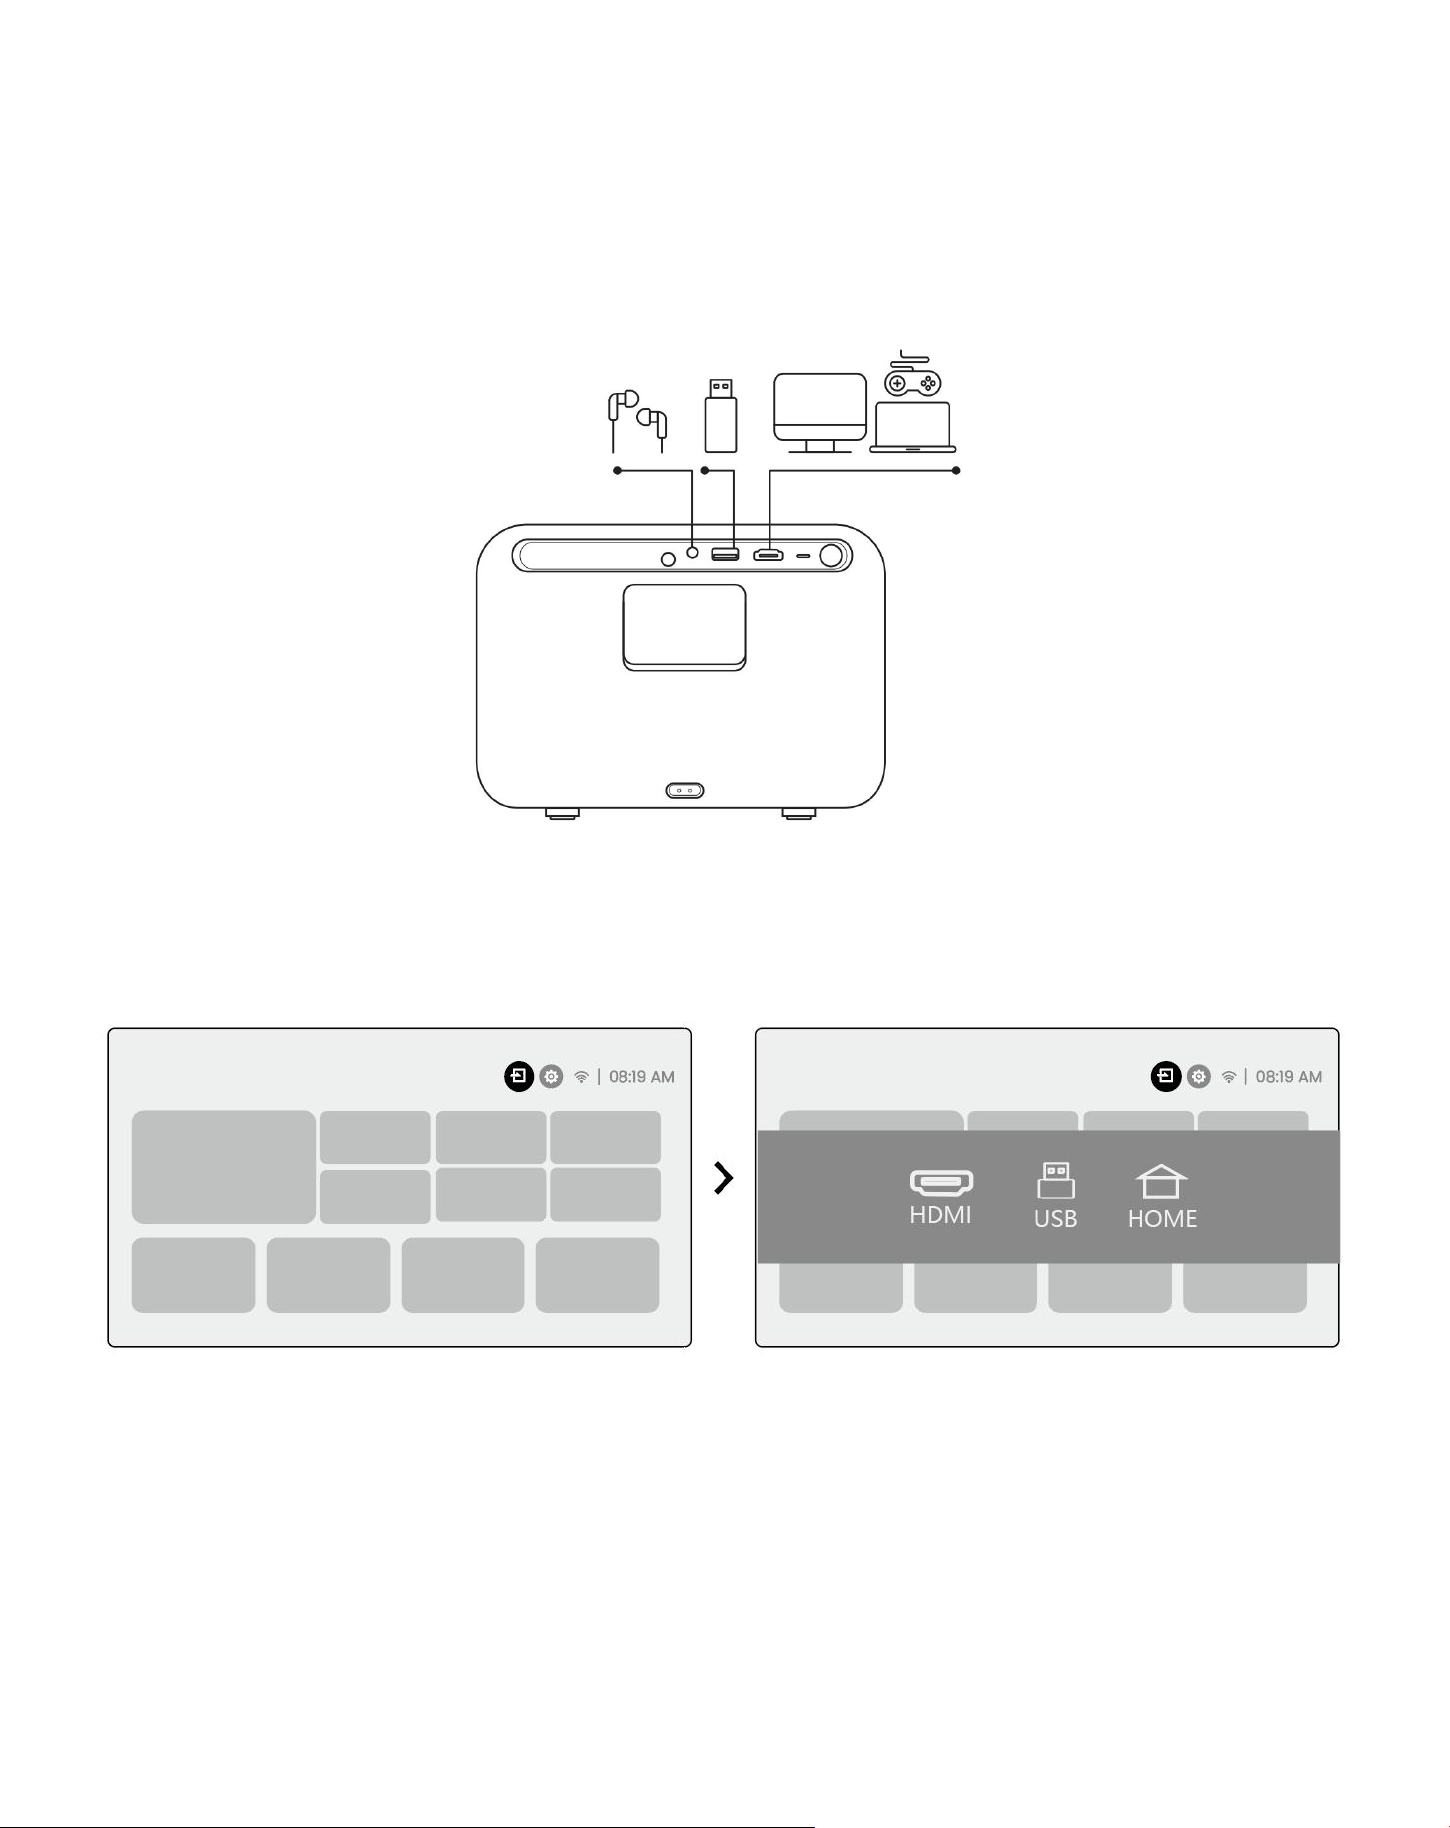
雅伯L2 Plus 投影機擁有 3 個接口,HDMI端口/USB端口/3.5mm音頻端口.請選擇正確的一個來連接您的設備 (PC,電話,DVD
播放器,Soundbar,USB,PS5 等。)
10.2 USB
⚠通知: 在 USB 設備上搜索文件時, 請從「視頻」,「音樂」,「圖像」中選擇正確的文件類別, 否則可能找不到所需的文件。
71
10.3 HDMI
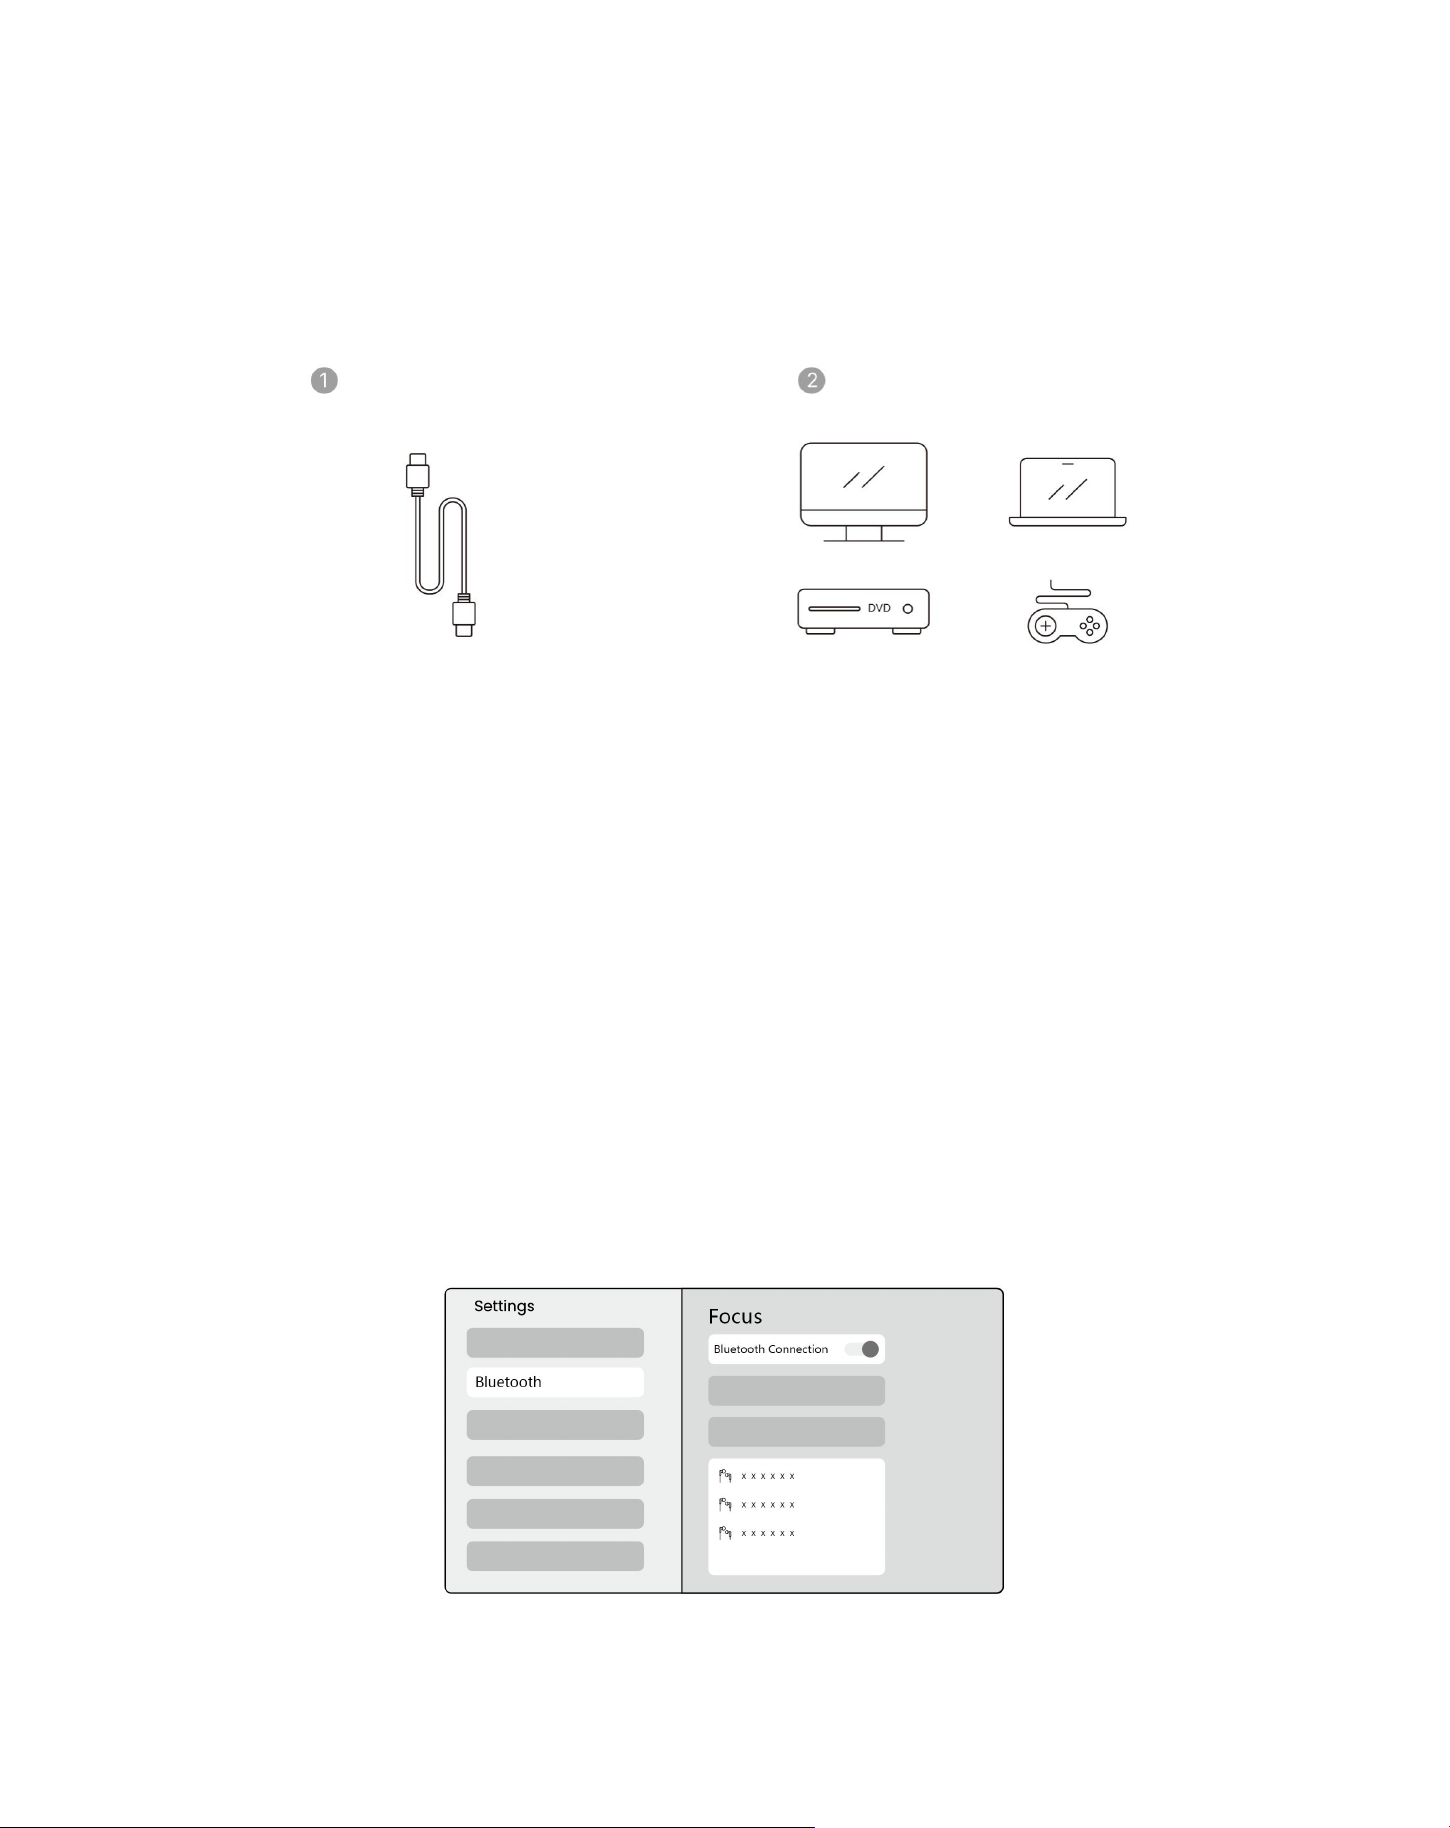
如果您在使用 HDMI 時遇到一些麻煩,請嘗試以下解決方案:
方法 1.在外部設備設置中將 HDMI EDID 版本切換為 1.4。
方法 2.嘗試更換 HDMI 電纜。
方法 3.嘗試更換其他具有 HDMI 功能的外部設備,並檢查外部設備的 HDMI 接口是否正常工作。
⚠注意: 由於 HDMI 接口不支持 ARC 功能,因此無法使用 HDMI 連接條形音箱。請使用藍牙或 3.5 毫米音頻線代替。
10.4 音頻輸出
⚠注意: 如果在使用藍牙揚聲器連接時遇到口吃或延遲, 則可以使用支持 3 的設備。 5mm 音頻電纜播放音頻。
10.5 無線連接
通知: 如果您需要將 Netflix, prime Video 等鏡像到投影機上, 請通過 HDMI 將電視加密狗/棒或其他產品與這些流媒體
連接。
藍牙設置
步驟 1: 打開藍牙設備並準備藍牙連接。
步驟 2: 選擇 [藍牙] 菜單-> 打開藍牙按鈕-> 選擇要配對和連接的藍牙設備。
⚠通知: 請確保設備與其他設備斷開連接或啟用了藍牙模式。
72
11.2 藍牙音箱
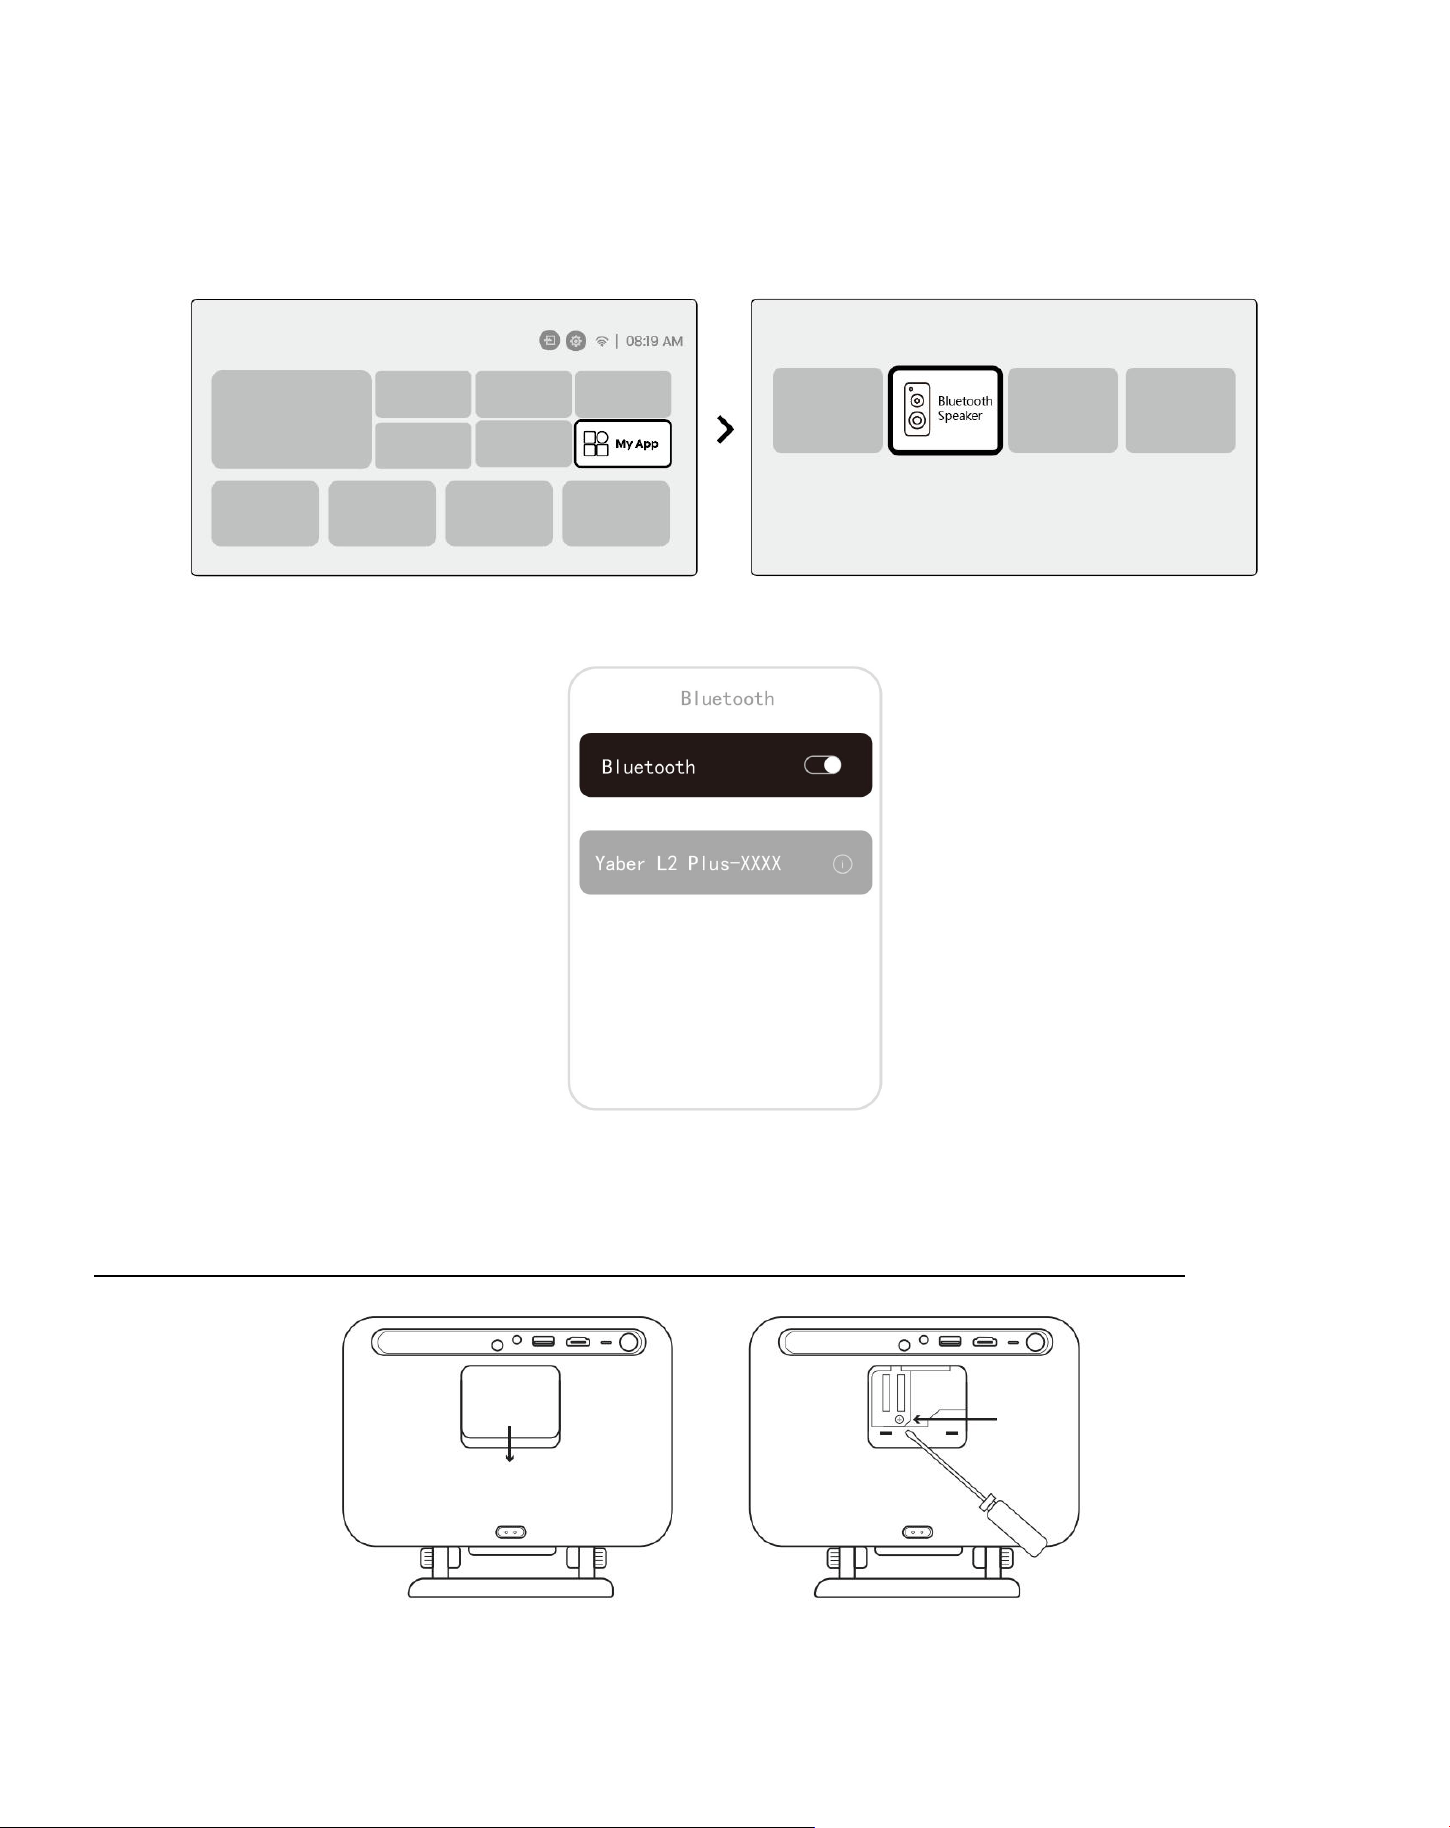
步驟 1: 在主頁上,選擇 [我的應用] 菜單。
Step2: 打開藍牙揚聲器,進入並停留在此頁面。
Step3: 在手機的藍牙接口上搜索 [Yaber L2Plus-XXXXX]。
定期清潔
⚠注意: 由於 L2 Plus 使用開放式光學機器,因此在使用過程中可能會吸入少量灰塵。 建議定期清洗。
拆下機器後部的蓋子,然後用螺絲刀拆下密封蓋。
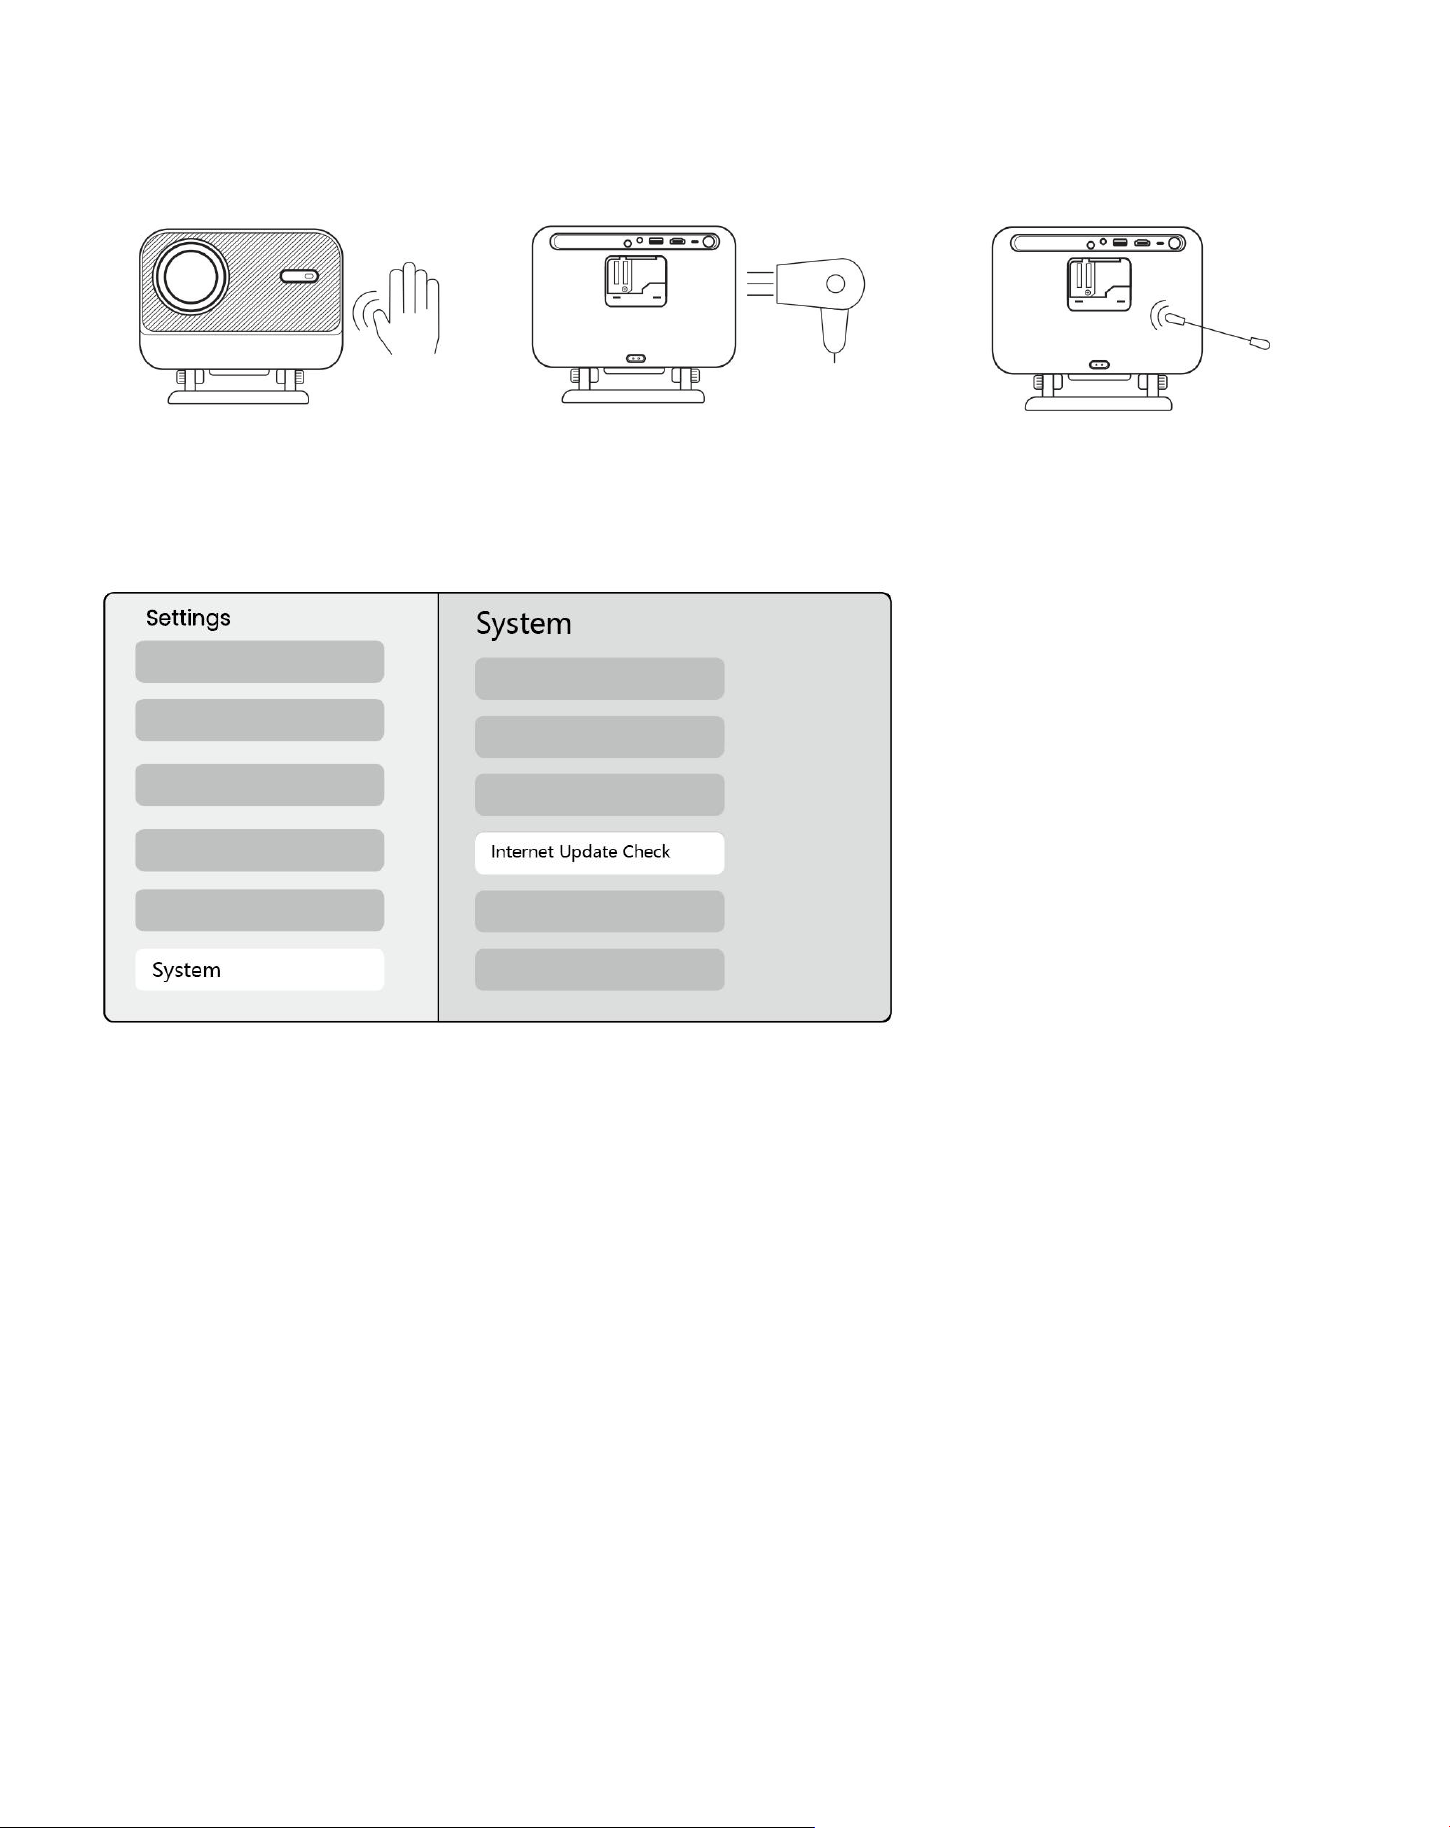
73
方法 1
輕輕拍一下投影儀。
方法 2
用冷空氣吹入除塵口。
方法 3
使用棉籤去除頑固污漬。
系統升級
您可以在 [設置]-[系統]-[互聯網更新檢查] 中檢查設備的系統狀態。
如果您有任何問題,請隨時與我們聯繫。
✉Support@yaber.com
74
Kullanım kılavuzu
Projektör l2 artı
TK

75
Yaber ömür boyu profesyonel destek
Değerli müşterimiz,
Yaber l2 plus projektörünü seçtiğiniz için teşekkür ederiz. L2 plus projektörünüzü kullanmadan önce lütfen
kullanım kılavuzunu dikkatlice okuyunuz.
Projektörü kullanırken çeşitli sorular ve sorunlarla karşılaşabileceğinizi anlıyoruz. Ancak, ürün sayfasında bir
inceleme bırakmak deneyiminizi iyileştirmeyebilir.(Lütfen size yardım edelim! Geri bildiriminizi gerçekten
takdir ediyoruz ve derhal tatmin edici bir çözüm sunacağız.)
Memnuniyetiniz bizim önceliğimizdir. Herhangi bir sorunla karşılaşırsanız, içtenlikle bize bunları çözme fırsatı
vereceğinizi umuyoruz.
Size mümkün olan en iyi çözümü sunmaya adadık. Anlayışınız ve sabrınız için şimdiden teşekkür ederiz.
Yaber projektör müşteri hizmetleri ekibi
Garanti (garanti)
Satın aldığınız ve desteğiniz için teşekkür ederiz. Yaber l2 plus projektör için 3 yıl garanti veriyoruz.
Herhangi bir sorunuz varsa, lütfen bizimle iletişime geçmekten çekinmeyin.
✉Support@yaber.com
Önemli önlemler
Cihazın güvenli ve en uygun kullanımı için lütfen şu yönergeleri izleyin:
● Lensi gözlere doğru yüzmeyin çünkü güçlü projektör ışığı gözlere zarar verebilir.
●
Dahili bileşenlere zarar verebilecek aşırı ısınmayı önlemek için cihazın hava girişini veya çıkışını
engellemeyin.
● Lensi doğrudan kağıt veya bez gibi temizleme araçlarıyla silmeyin. Bunun yerine, temiz hava üfleme
kullanarak lensten tozu çıkarın.
●
Devre kartını aşındırabileceğinden cihazı kimyasallarla, deterjanlarla veya herhangi bir sıvıyla yıkamayın.
●
Cihazı ve bileşenlerini ve aksesuarlarını çocukların erişemeyeceği yerlerde saklayın.
● Cihazın kuru, iyi havalandırılmış bir ortamda kullanıldığından emin olun.
● Elektronik bileşenlerin ömrünü azaltabileceğinden, cihazı aşırı sıcak veya soğuk yerlerde saklamayın.0 °
76
c-40 ° c sıcaklık aralığında kullanın ve saklayın.
● Cihazı kurutma için herhangi bir ısıtma ekipmanına (örn., kurutucu veya mikrodalga) koymayın.
● Cihaza sıkıca basmayın veya cihaza zarar vermemek için nesneleri üstüne veya arkasına yerleştirmeyin.
●
Dahili devre kartını korumak için cihazı atmayın, düşürmeyin veya kuvvetle sallayın.
●
Makinenin serin çalışmasını sağlamak için her altı ayda bir ila bir yıl arasında toz filtresini
temizlediğinizden emin olun.
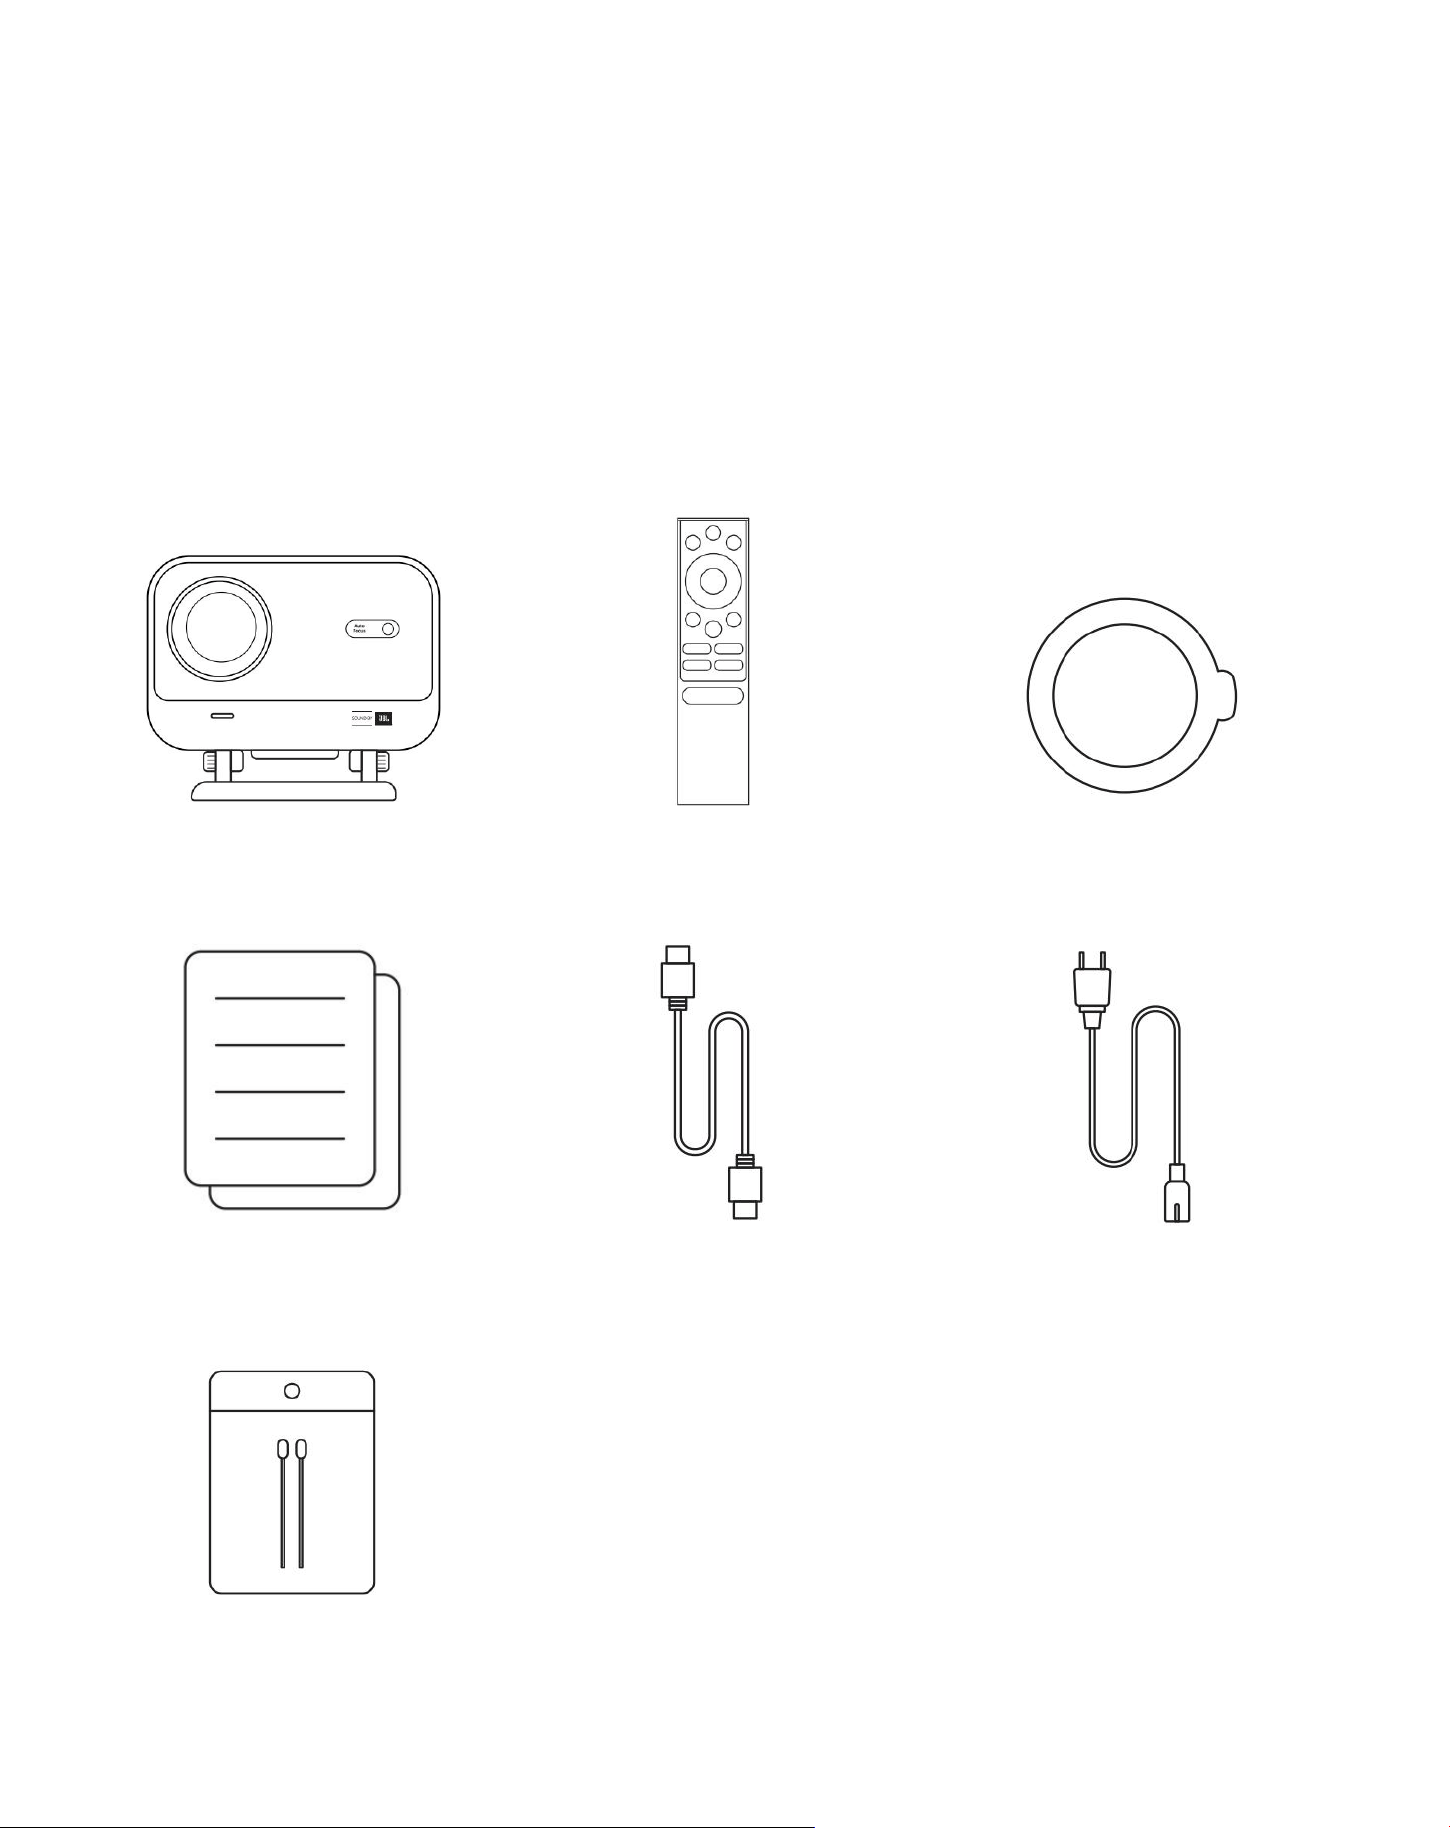
Ne dahil
L2 artı projektör
Uzaktan kumanda
Lens kapağı
Qsg
Hdmi kablosu
Güç kablosu
Temizleme kitleri

77
Şartname
Model no. l2 artı
Doğal çözünürlük
1920*1080
Işık kaynağı
Led
Odak
Otomatik/elektrik
Keystone düzeltme
Otomatik/manuel
Arayüz
Usb× 1
Hdmi× 1
Ses çıkışı × 1
Birim boyutu
22.7 × 20.4 × 18.4 cm
8.9 × 8 × 7.2 inç
Projeksiyon oranı
1.38:1
Projeksiyon mesafesi
Min 1.26m ~ max 4.4m
Min 40 ~ max 150 inç
Güç voltajı
Ac 100-240v/50-60hz
Güç tüketimi
110w
Projektör ağırlığı
2.44 kg
5.38 lbs
Projeksiyon yöntemi
Ön/arka masanın üzerinde
Celling üzerinde ön/arka
En boy oranı
16:9
Projeksiyon
yakınlaştırma
% 50-% 100
Resim formatı
Jpg, png, bmp, jpeg
Ses formatı
Mp3, wav, asf, 3gp, mp4, mpeg
Video formatı
Mkv, mp4, 3gp, mpeg, asf, web, webm,
Usb formatı
Yağ 32, ntfs, exfat
78
Ürüne genel bakış
79
Kurulum
7.1 masaüstü projeksiyonu
Projektör zahmetsiz ayarlamalar için dönebilir bir stand ile donatılmıştır 。
Step1: projektörü düz bir yüzeye yerleştirin.
Step2: lütfen projeksiyon ekranına karşılık gelen stand açısını ayarlayın, optimum görüntü netliği için bu aralıkta
açı tutun.
Notice: l2 plus yatay kilit taşı düzeltmesini destekler. Projektörü doğrudan ekranın önüne
yerleştirmenize gerek yoktur.
Notice: görüntü kalitesini en iyi şekilde tutmak için, ayarlamayı 15 derece içinde sürdürmeniz
önerilir.Ancak, lütfen ekranın dikey çizgisi ile açının 25 dereceyi geçmediğinden emin olun.
7.2 tavan montajı
5. Kurulum yöntemi
Projektör, bir braket ve 1/4 vida (dahil değildir) kullanarak tavana monte edilebilir veya düz bir yüzeye yatay
olarak yerleştirilebilir.
80
Taban kaldırma
Projector: projektöre uyabilecek evrensel bir montaj braketine sahip olduğunuzdan emin olun.
Notice: l2 plus plus, dört köşeli montaj kurulumunu desteklemiyor.
7.3 projeksiyon mesafesi
L2 plus plus'ın projeksiyon mesafesi 1,26 m ila 4.4m arasındadır.
İpuçları: önerilen projeksiyon mesafesi yaklaşık 7.87ft.
Projeksiyon ayarları
8.1 projeksiyon modu
L2 plus plus, dört projeksiyon modunu destekler, tercih edilen yolu seçebilirsiniz.
Tavan montajı veya arka projeksiyonu seçerseniz, lütfen ana sayfaya gidin-> ayarları seçin [⚙] -> [Resim] ->
[projeksiyon] seçeneğini seçin uygun bir projeksiyon modu seçin-> projeksiyon modunu değiştirmek için [ok]
tuşuna basın.
81
8.2 otomatik odaklama
Bu işlev, öngörülen görüntünün netliğini otomatik olarak algılar ve odak uzunluğunu gerçek zamanlı olarak
optimize eder ve görüntünün her zaman keskin ve net kalmasını sağlar.Bu özelliği ayarlarda bulabilirsiniz [⚙] ->
[Resim] -> [odak].
Notice: ayarda açıldığında her vardiyadan sonra otomatik odaklama etkinleştirilecektir.
Notice: mevcut otomatik odaklama sonucundan memnun değilseniz, yeniden kalibre etmek için [otomatik
odaklama] işlemini seçebilirsiniz.
Notice: resim bulanık kalırsa, lütfen ana sayfaya gidin-> ayarları seçin [⚙] -> [Resim] -> seç [manuel odaklama]
-> görüntü keskin olana kadar odağı manuel olarak ayarlamak için yukarı ve aşağı ok tuşlarını kullanın.
Notice: resim bulanık kalırsa, lütfen projeksiyon mesafesini ayarlamayı deneyin ve projeksiyon mesafesinin
uygun aralıkta olduğundan emin olun (lütfen [7).3] ayrıntılar için).
8.3 keystone
8.3.1 otomatik kilit taşı düzeltme
L2s plus'daki otomatik kilit taşı düzeltmesi, görüntünün manuel ayar yapmadan kare kalmasını sağlayan trapez
bozulmasını otomatik olarak düzeltir.Bu özelliği ayarlarda bulabilirsiniz [⚙] -> [Resim] -> [keystone].
82
Notice: mevcut otomatik kilit taşı düzeltme sonucundan memnun değilseniz, yeniden kalibre etmek için
[otomatik kilit taşı] seçeneğini seçebilirsiniz.
Machine: makine ilk kullanıldığında otomatik kilit taşı düzeltmesi varsayılan olarak etkinleştirilir. Eğer
kapatmak istiyorsan,Lütfen ana sayfaya gidin-> ayarları seçin [ ⚙]-> [Resim]-> [keystone]-> seç
[otomatik]-> kapatmak için [ok] tuşuna basın.
Önyükleme sonrası 8.3.2 otomatik kilit taşı
Bu işlev, projektörün her açıldığında yansıtılan görüntünün dikey ve yatay kilit taşı bozulmasını otomatik olarak
algılar ve düzeltir, böylece net, dikdörtgen bir resmin hemen tadını çıkarabilirsiniz.
8.3.4 otomatik ekran aligment
Bu işlev ekran sınırlarını otomatik olarak algılar ve ekran kenarları ile hassas hizalama sağlamak için görüntü
konumunu ayarlar, görüntü taşmasını veya boş alanlardan kaçınır ve ekranın hızlı bir şekilde merkezlenmesini
sağlar.
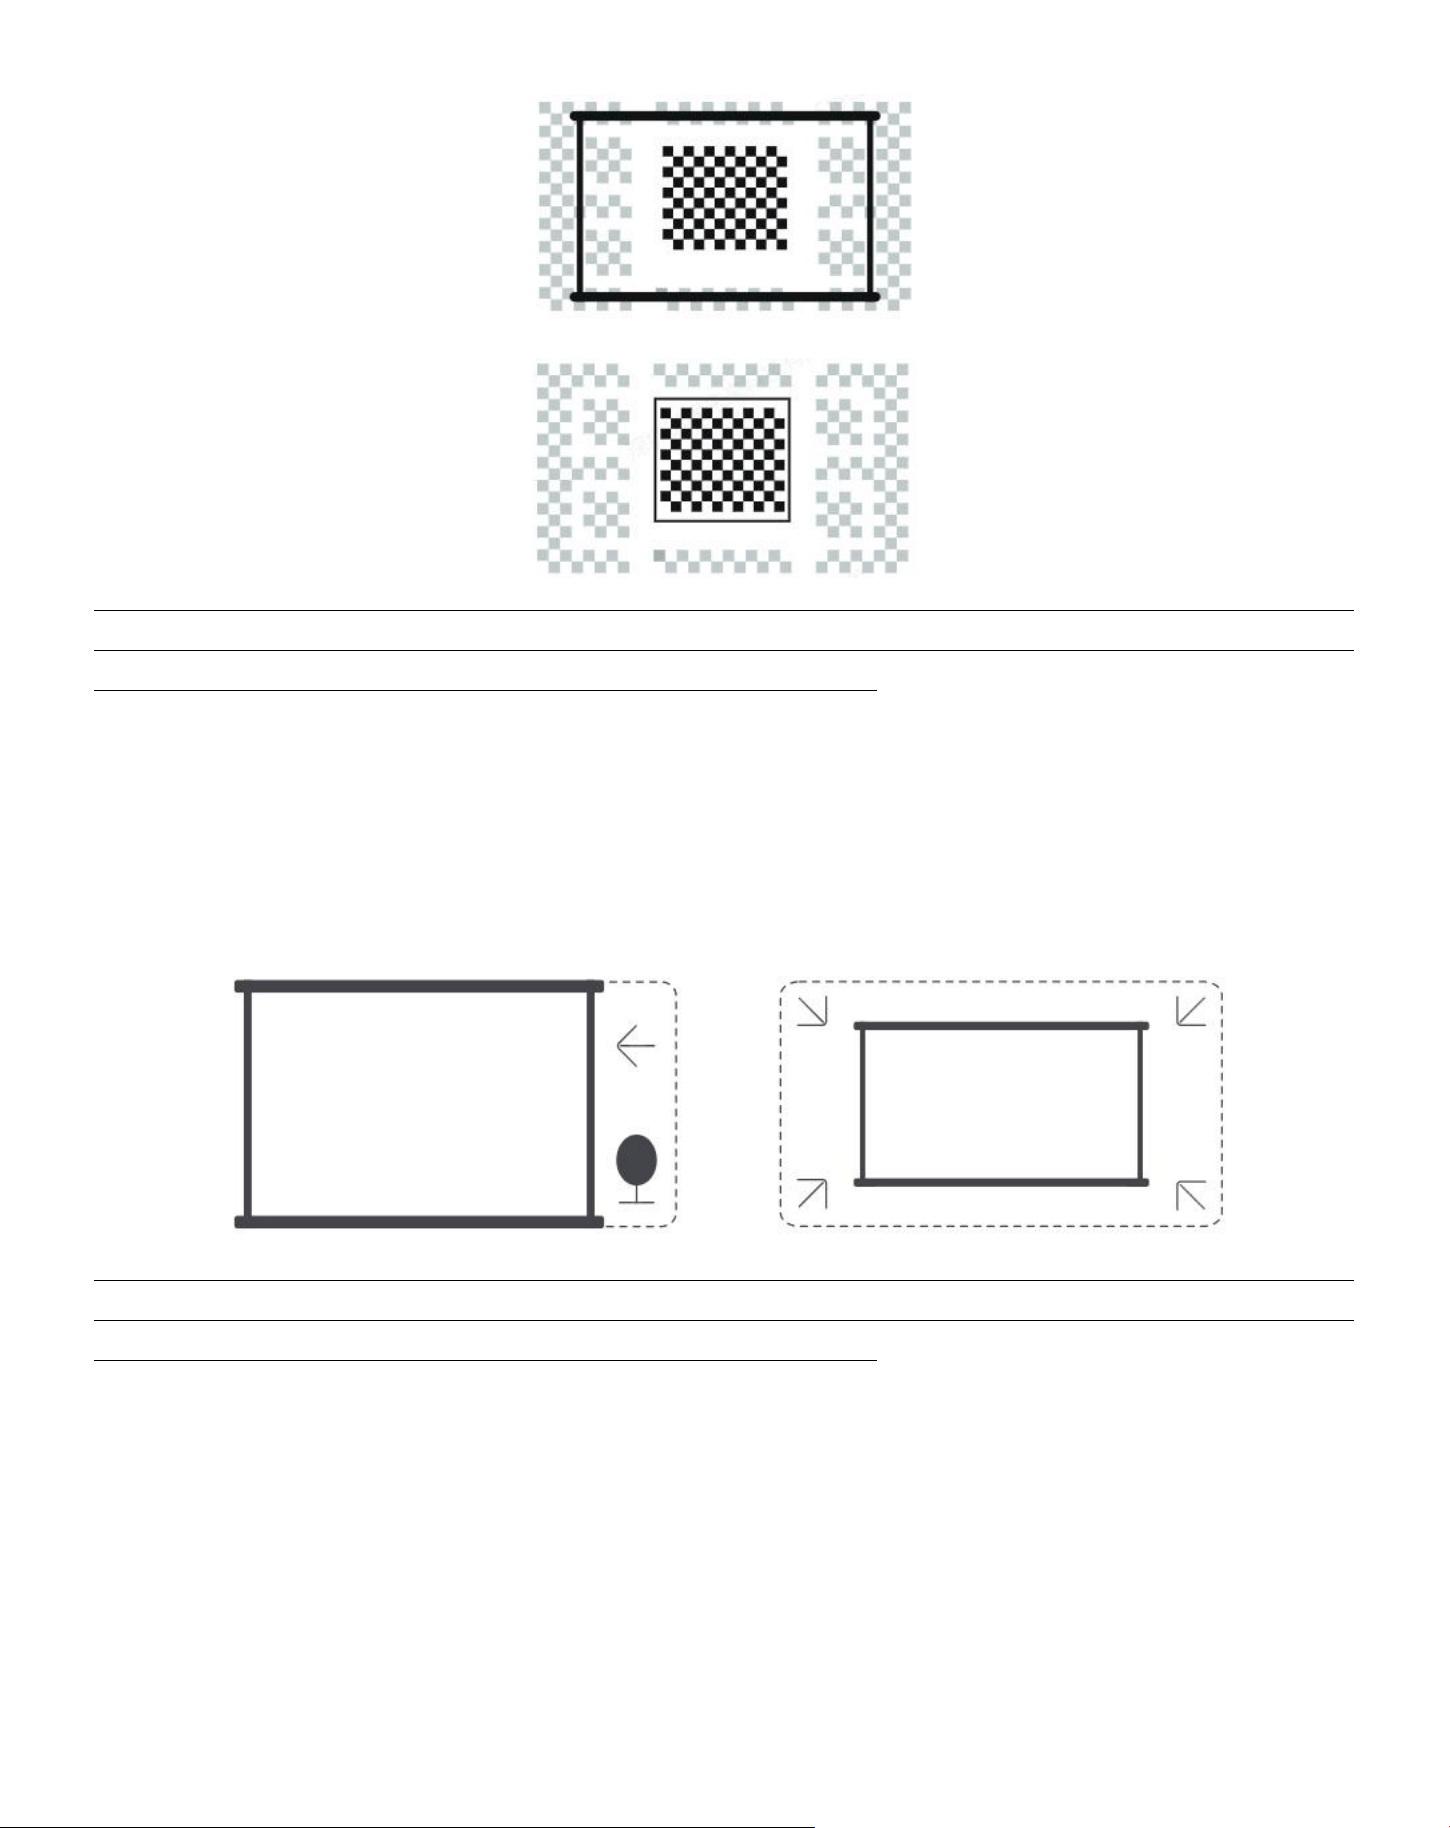
13. Beyaz arka plan ekranının siyah veya başka bir açık kenarlığa sahip olması gerekirken, ışığa dayanıklı ekranın
sınır gereksinimi yoktur.
14. Ekran bağlantısından önceki yansıtılan görüntü, ekran alanından daha büyük olmalıdır.
83
15. Ekran montaj işlevini kullanırken, lütfen ekranın merkezini engellemeyin.
Notice: otomatik ekran uydurma ve otomatik engel kaçınma fonksiyonlarını kullanmadan önce, otomatik
kilit taşı ve otomatik odaklama fonksiyonlarının açık olduğundan emin olun.Hedef ekranda beyaz veya diğer
açık renkli nesneler olduğunda engellerden kaçınma çalışmayabilir.
8.3.3 otomatik engel kaçınma
Bu işlev, projeksiyon yolundaki engelleri otomatik olarak algılar ve görüntü tıkanıklığını önlemek için görüntü
açısını veya konumunu akıllıca ayarlar, net ve eksiksiz projeksiyon sağlar.
Notice: otomatik ekran uydurma ve otomatik engel kaçınma fonksiyonlarını kullanmadan önce, otomatik
kilit taşı ve otomatik odaklama fonksiyonlarının açık olduğundan emin olun.Hedef ekranda beyaz veya diğer
açık renkli nesneler olduğunda engellerden kaçınma çalışmayabilir.
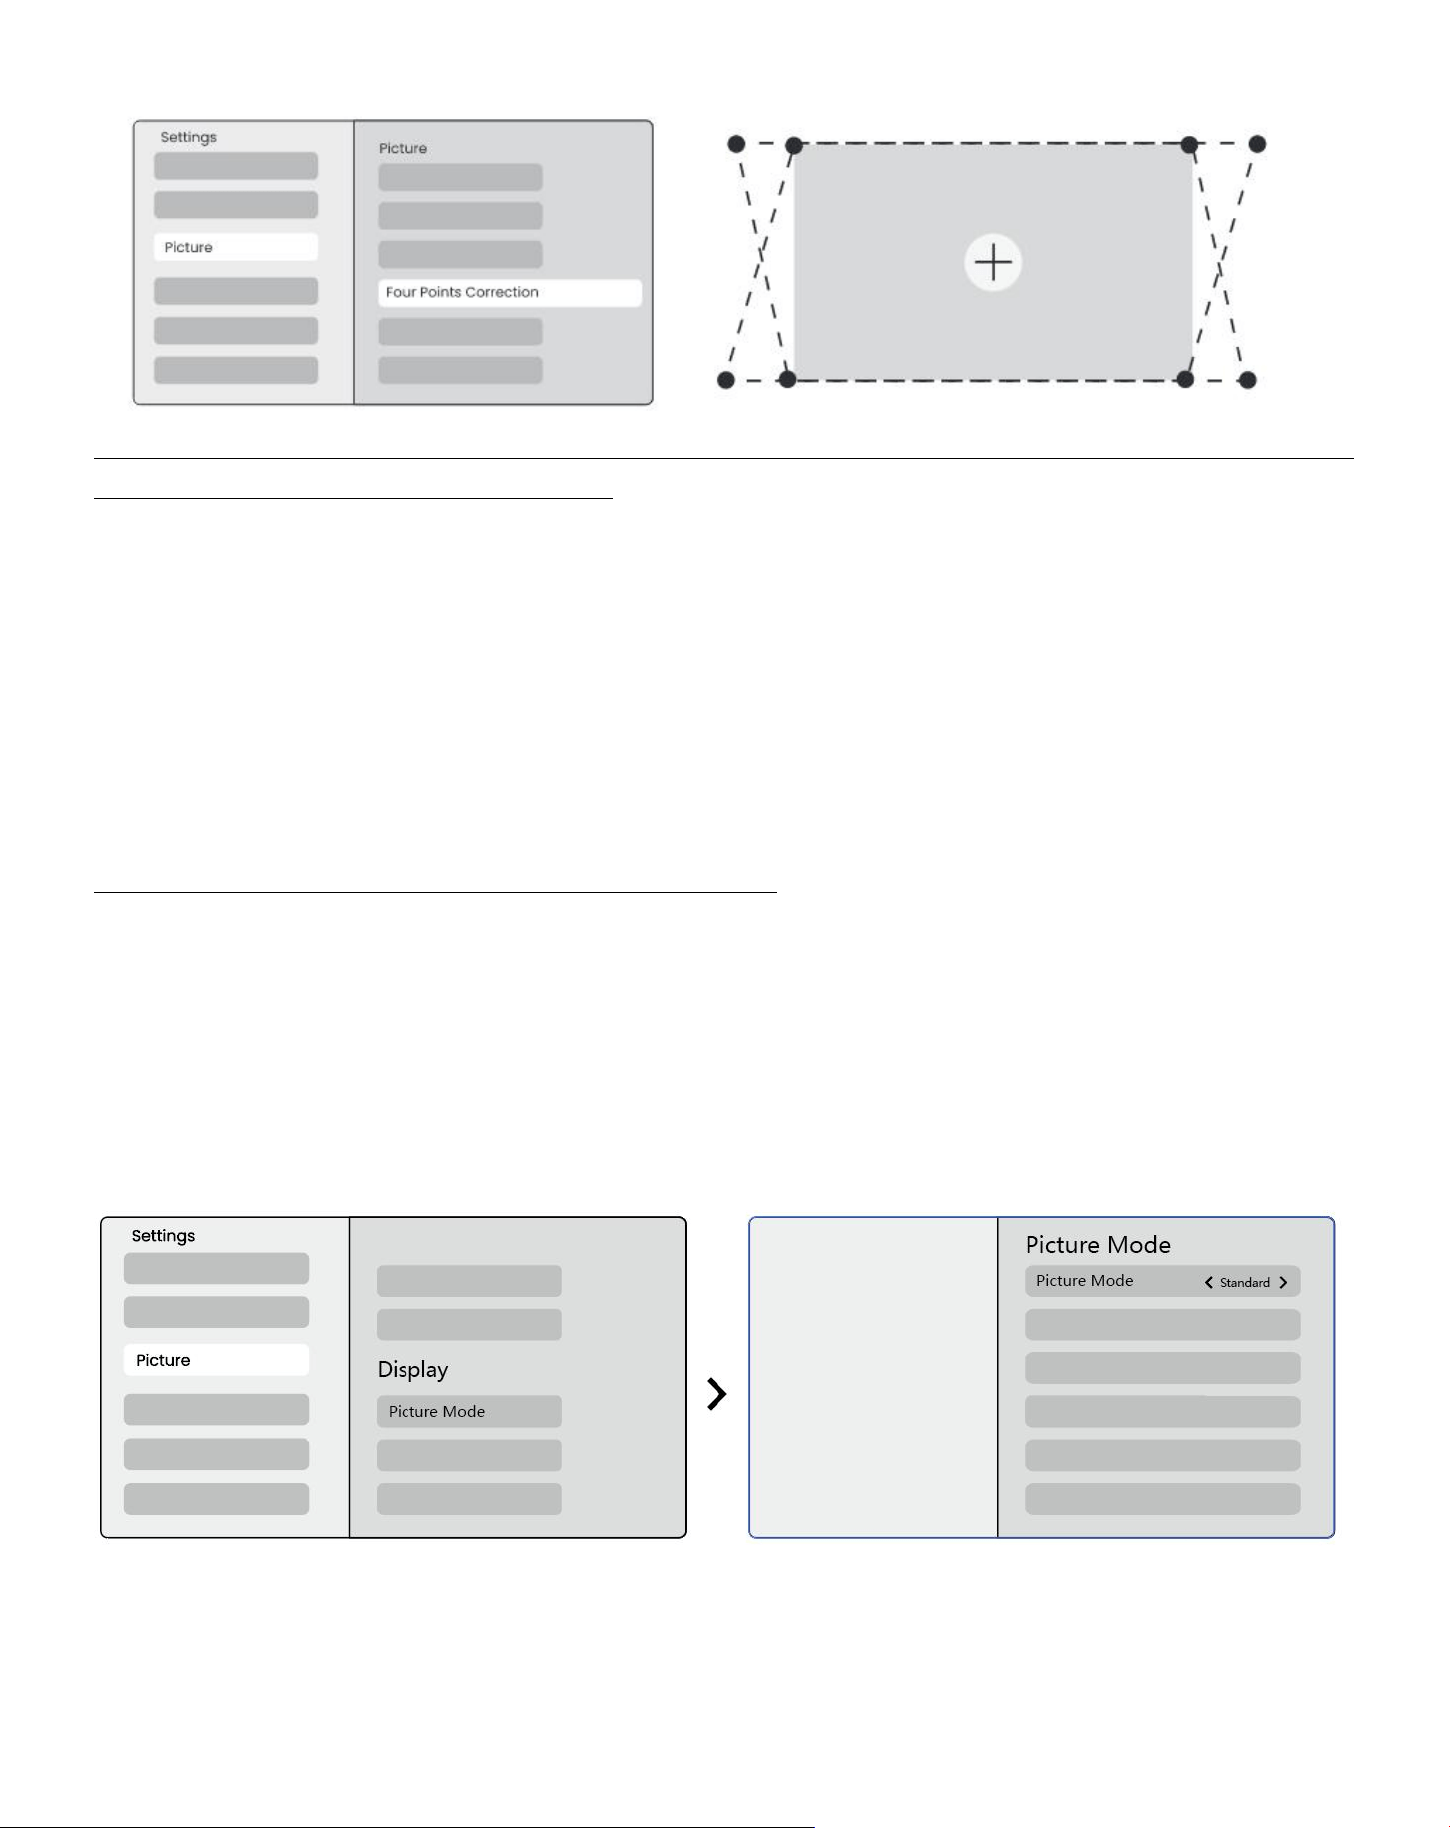
8.3.5 manuel keystone düzeltme
Ekranı daha fazla ayarlamanız gerekiyorsa, manuel kilit taşı düzeltme özelliğini kullanabilirsiniz.
Step1: lütfen ana sayfaya gidin-> ayarları seçin [⚙] -> Seç [resim]
Step2: [resim]-> [dört nokta düzeltme]-> okları sürükleyerek ekranı ayarlayın.
84
Notice: projektörün dikey veya yatay olarak 15 dereceden fazla eğilmediğinden emin olun.Lütfen otomatik
odağın etkili bir şekilde çalışmasını sağlayın.
8.4 görüntü yakınlaştırma
Görüntünün boyutunu ihtiyaçlarınıza göre ayarlayabilirsiniz.
Step1: lütfen ana sayfaya gidin-> ayarları seçin [⚙] -> Seç [resim]
Step2: [resim] -> [görüntü yakınlaştırma] -> görüntü istenilene kadar yakınlaştırmayı manuel olarak ayarlamak için
yukarı ve aşağı ok tuşlarını kullanın.(Şematik diyagram ekli)
İpuçları: önerilen ekran boyutu 60 ila 100 inç arasındadır.
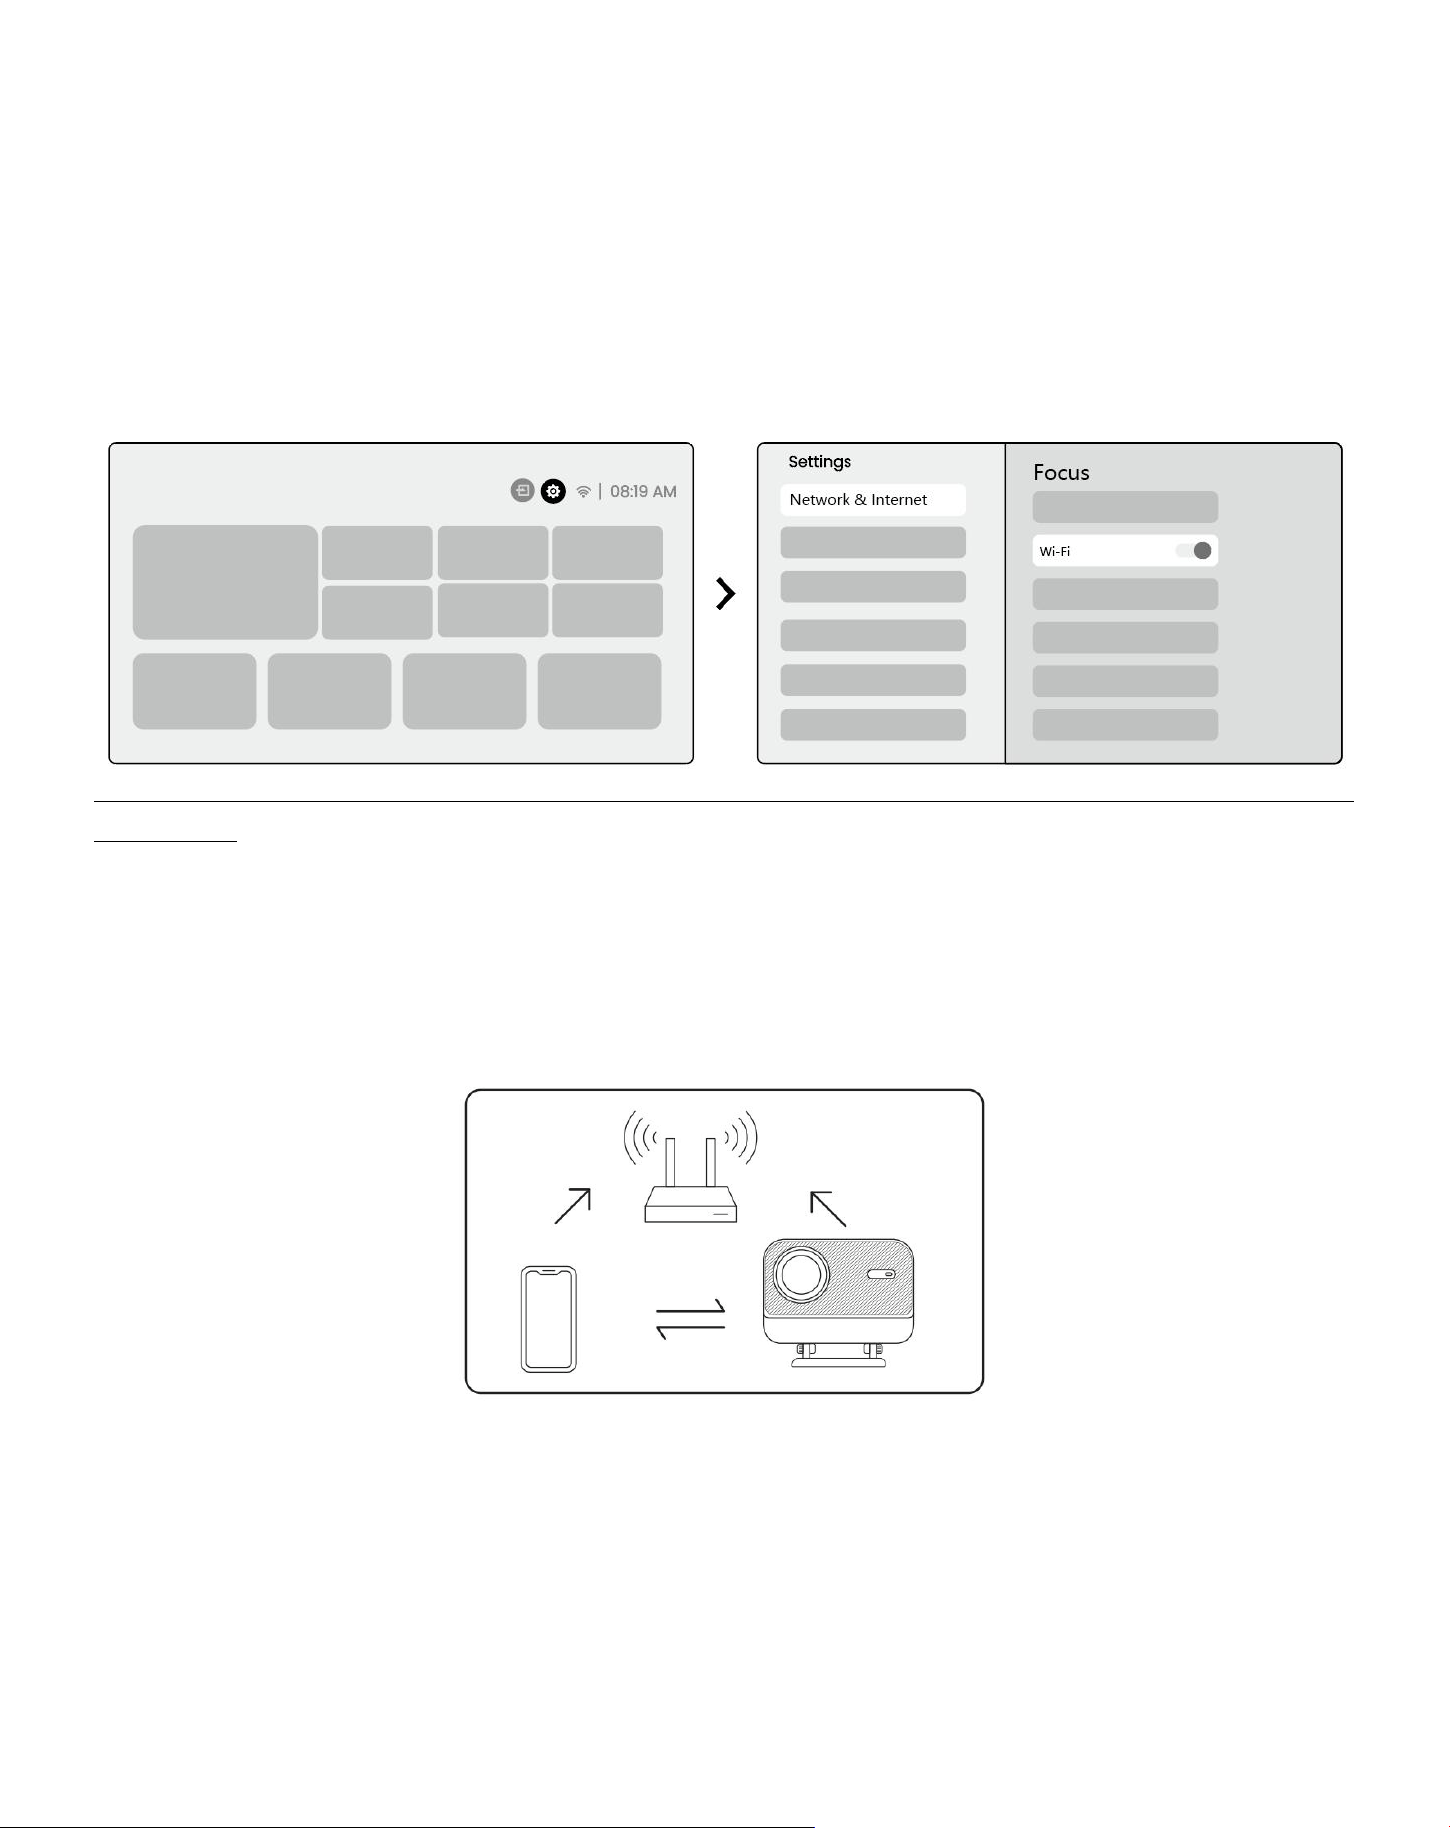
8.5 ekran
Resim modunu ihtiyaçlarınıza göre ayarlayabilirsiniz.
Step1: lütfen ana sayfaya gidin-> ayarları seçin [⚙] -> Seç [resim]
Step2: [resim] -> [resim modunu] seç
Attention: resim renk ayarı sadece resim veya video oynatırken etkili olacaktır.
85
Ekran yansıtma
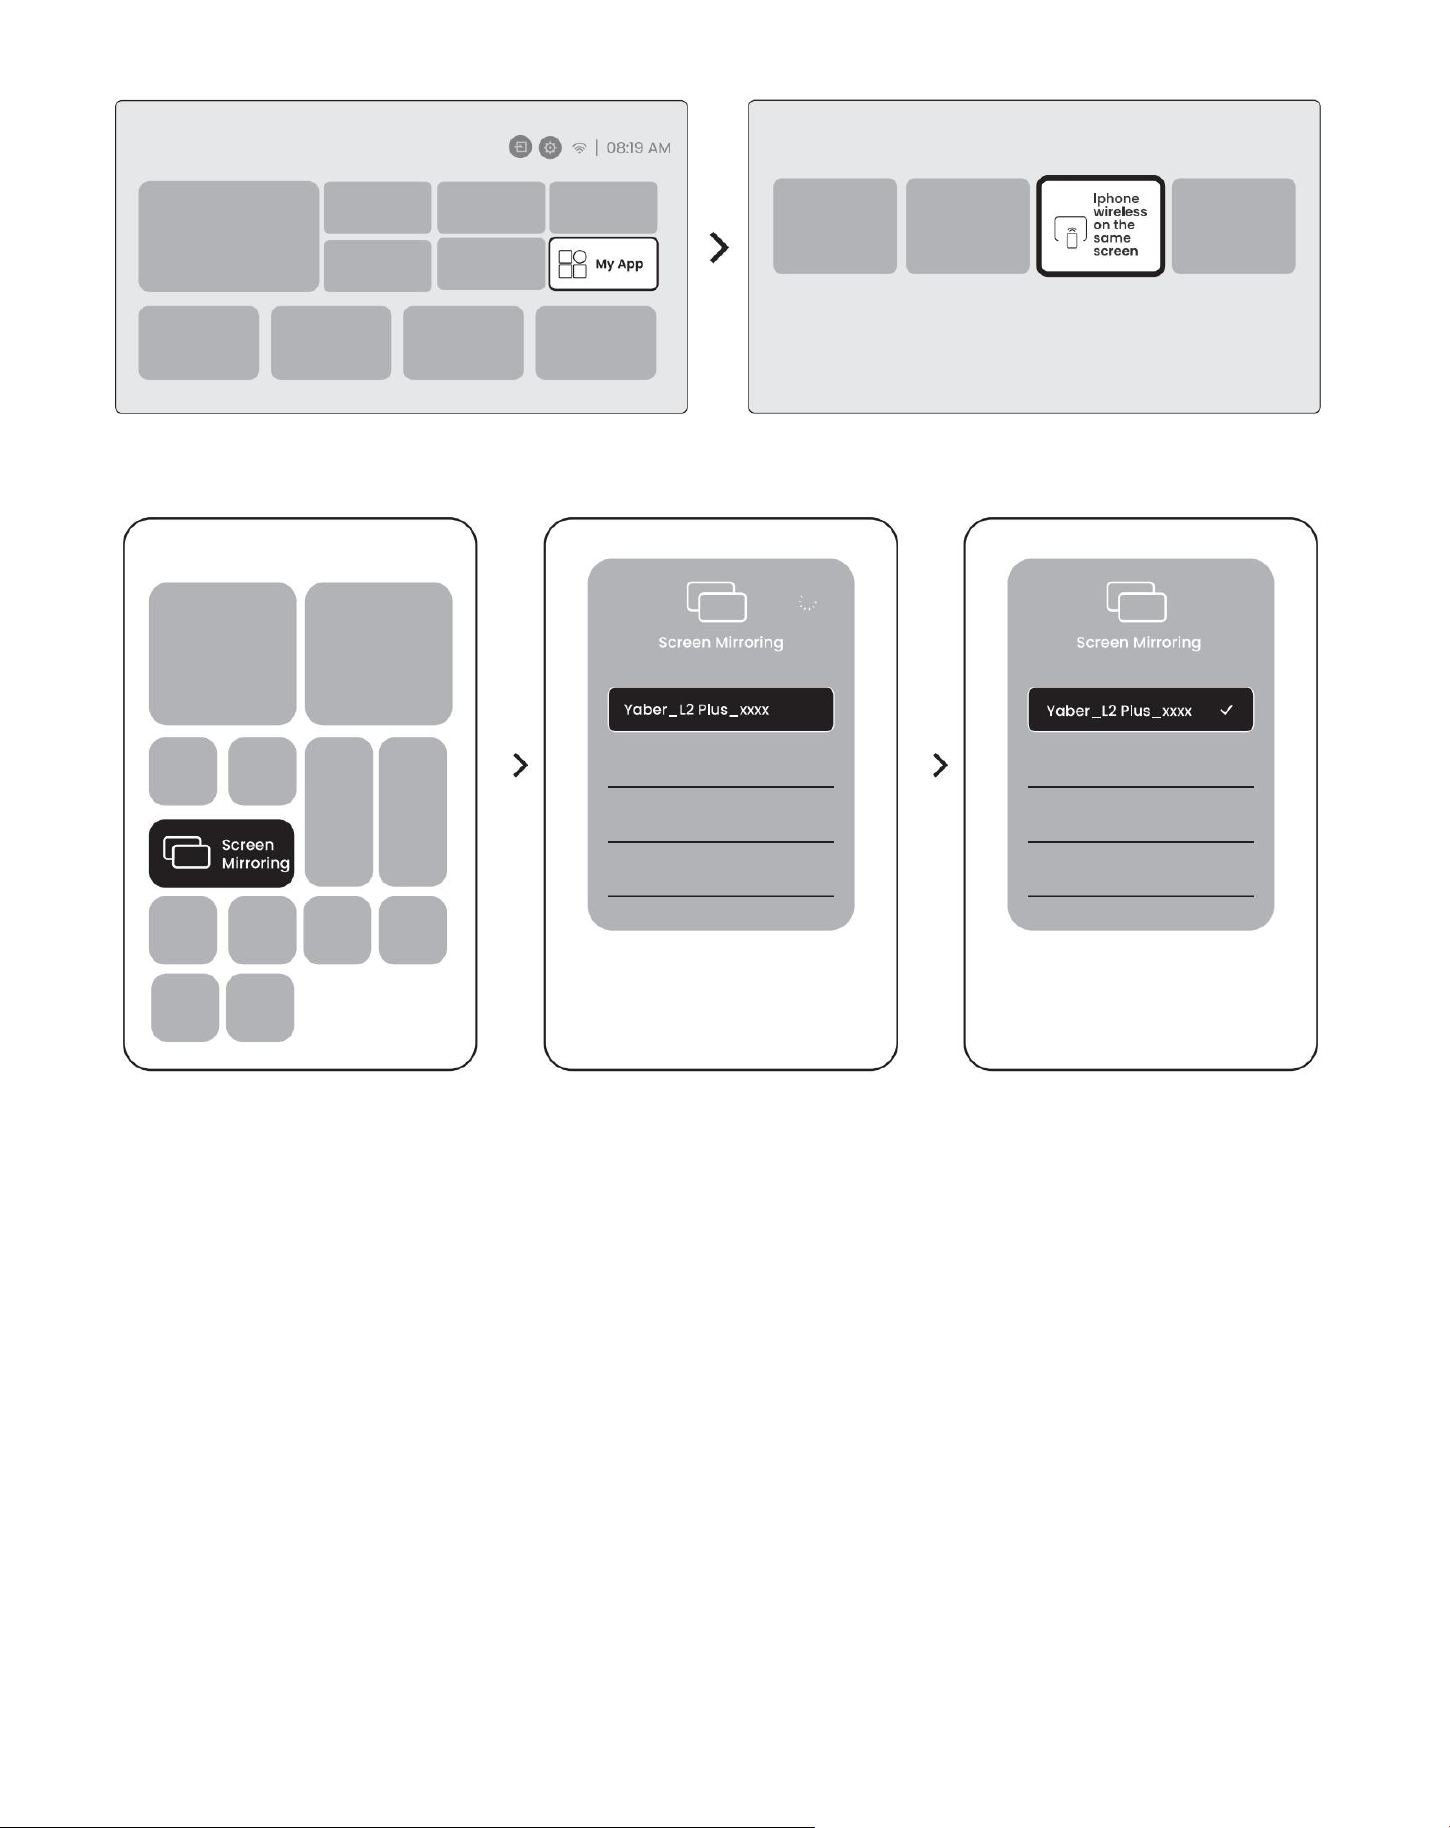
9.1 wifi ayarları
Step1: ayarlara basın [ ⚙] Düğme-> [ağ ve İnternet] seçin-> [İnternet bağlantısı] düğmesini açın-> [wi-fi]
seçeneğini seçin
Step2: [mevcut ağlar] listesinde-> İstediğiniz wi-fi ağını arayın-> şifreyi girin-> [tamam]-> projektörün
bağlanmasını bekleyin.
Notice: ekran yansıtma düzgünlüğü ağ ortamından etkilenecektir. Daha hızlı bir bant genişliği kullanılması
tavsiye edilir.
9.2.1 ios cast (ios cihazlar için)
Step1: uyumluluk ve ağ bağlantısı sağlayın: ios cihazınızın ve l2 plus plus'ın aynı wi-fi ağına bağlı olduğundan emin
olun.
Step2: ana sayfaya gidin-> [uygulamam] menüsünü seçin-> aynı ekranda [iphone wireless] tuşuna basın->
girin ve aynı ekranda [iphone wireless] sayfasında
kalın.
86
Step3: ios cihazınızda [kontrol merkezi] açın-> ekran yansıtma işlevini seçin-> ios cast alıcısını [yaber_l2plus_xxxx]
-> başarılı olarak bağlayın.
9.2.2 miracast (android cihazlar için)
Step1: lütfen android telefonunuzdaki wi-fi işlevini etkinleştirin (wi-fi 'ye bağlanmak için gerekli değildir).
Step2: ana sayfaya git-> [my app] menüsünü seçin-> [screencast] tuşuna basın-> [android ekran paylaşım]
sayfasında girin ve kalın.
87
Step3: android cihazınızda [kontrol merkezine] erişin-> [ekran yansıtma/akıllı görünüm] seçeneğini seçin ve
[yaber_l2plus_xxxx] -> succeed adlı miracast alıcısını bağlayın.
Notice: bazı google mobil cihazlar sadece chromecast'i destekler ve airplay veya miracast tarafından
yayınlanamaz.
Notice: telif hakkı koruması nedeniyle, bazı telif hakkıyla korunan içerikler (netflix, hulu, vb.) doğrudan telefondan
yansıtılamaz.Bir tv çubuğu ile kullanılması gerekiyor. Yardıma ihtiyacınız varsa, lütfen bize ulaşın.
Notice: cep telefonu yansıtma sadece kablosuz ekran paylaşım sayfasında girerek ve kalarak gerçekleştirilebilir.
Notice: lütfen mobil cihazınızın projektöre yakın olduğundan emin olun. Ekran yansıtmanın düzgünlüğü de
mesafeden etkilenecektir.
Bağlantı
10.1 hdmi, usb, 3.5mm ses çıkışı
Yaber l2 plus projektörün 3 arabirimi, hdmi bağlantı noktası/usb bağlantı noktası/3.5mm ses bağlantı noktası
vardır. Cihazınızı bağlamak için lütfen doğru olanı seçin (pc, telefon, dvd oynatıcı, ses çubuğu, usb, ps5, vb.)
88
10.2 usb
Notice: usb cihazındaki dosyaları ararken, lütfen "video", "müzik", "görüntü" adresinden doğru dosya category
isini seçin, aksi takdirde istediğiniz dosyayı bulamazsınız.
10.3 hdmi
Hdmi kullanırken bazı sorunlarla karşılaşırsanız, lütfen aşağıdaki çözümleri deneyin:
Yöntem 1. harici cihaz ayarlarınızda hdmi edid sürümünü 1.4 olarak değiştirin.
Yöntem 2. hdmi kablosunu değiştirmeyi deneyin.
Yöntem 3. diğer harici cihazları hdmi fonksiyonu ile değiştirmeye çalışın ve harici cihazın hdmi arayüzünün
çalışıp çalışmadığını kontrol edin.
89
⚠Not: hdmi arayüzü ark işlevini desteklemediğinden, ses çubuğunu bağlamak için hdmi kullanamazsınız.Bunun
yerine bluetooth veya 3.5mm ses kablosu kullanın.
10.4 ses çıkışı
⚠Not: bluetooth hoparlör bağlantısı kullanırken kekeme veya gecikme yaşarsanız, 3'ü destekleyen cihazları
kullanabilirsiniz.Ses çalmak için 5mm ses kablosu.
10.5 kablosuz bağlantı
Projector: projektöre netflix, prime video, vb ayna gerekiyorsa, lütfen hdmi üzerinden bu akış medya ile bir tv
dongle/sopa veya diğer ürünleri bağlayın.
Bluetooth ayarları
Step1: bluetooth cihazınızı açın ve bluetooth bağlantısı için hazırlanın.
Step2: [bluetooth] menüsünü seçin-> bluetooth düğmesini açın-> eşleştirmek ve bağlamak için bluetooth
cihazını seçin.
90
Notice: lütfen cihazın diğer cihazlardan ayrıldığından veya bluetooth modunun etkinleştirildiğinden emin olun.
11.2 bluetooth hoparlör
Step1: ana sayfada [my app] menüsünü seçin.
Step2: bluetooth hoparlörü açın, bu sayfaya girin ve kalın.
Step3: telefonunuzun bluetooth arayüzünde [yaber L2Plus-XXXXX] arayın.
91
Düzenli temizlik
⚠ Uyarı: l2 plus açık bir optik makine kullandığından, kullanım sırasında az miktarda toz
solunabilir.Düzenli olarak temizlemeniz önerilir.
Makinenin arkasındaki kapağı çıkarın ve sızdırmazlık kapağını bir tornavida ile çıkarın.
Yöntem 1
Projektörü hafifçe patlat.
Yöntem 2
Tozlama limanına üflemek için
soğuk hava kullanın.
Yöntem 3
İnatçı lekeleri çıkarmak için
pamuklu çubuklar kullanın.
Sistem yükseltmesi
Cihazınızın sistem durumunu [ayarlar]-[sistem]-[İnternet güncelleme kontrolü] olarak kontrol edebilirsiniz.
Herhangi bir sorunuz varsa, lütfen bizimle iletişime geçmekten çekinmeyin.
✉Support@yaber.com
92
Panduan Pengguna
Proyektor L2 Plus
IN

93
Dukungan profesional obber seumur hidup
Pelanggan yang terhormat,
Terima kasih telah memilih proyektor yber L2 Plus. Mohon Baca Manual pengguna dengan saksama sebelum
menggunakan proyektor L2 Plus.
Kami memahami bahwa Anda mungkin mengalami berbagai pertanyaan dan masalah saat menggunakan
proyektor. Namun, meninggalkan Ulasan di halaman produk mungkin tidak dapat meningkatkan
pengalaman anda.(Tolong beritahu kami! Kami sungguh menghargai umpan balik Anda dan akan segera
memberikan solusi yang memuaskan.)
Kepuasan anda adalah prioritas utama kami. Jika Anda mengalami masalah, kami dengan tulus berharap
bahwa Anda akan memberikan kami kesempatan untuk menyelesaikannya.
Kami berdedikasi untuk menawarkan solusi terbaik. Kami sangat menghargai pengertian dan kesabaran
Anda sebelumnya.
Tim Layanan Pelanggan proyektor abber
Garansi (garansi)
Terima kasih atas pembelian dan dukungan Anda. Kami menawarkan garansi 3 tahun untuk obber L2 Plus
proyektor.
Jika Anda memiliki pertanyaan, jangan ragu untuk menghubungi kami.
✉Support@yaber.com
Pengamanan penting
Untuk penggunaan perangkat yang aman dan optimal, ikuti pedoman berikut:
●
Jangan menghadap lensa ke mata karena cahaya Proyektor yang kuat dapat menyebabkan cedera mata.
●
Jangan memblokir saluran masuk udara atau outlet perangkat untuk mencegah terlalu panas, yang
dapat merusak komponen internal.
● Jangan menyeka lensa secara langsung dengan alat pembersih seperti kertas atau kain. Sebagai
gantinya, menghilangkan debu dari lensa menggunakan meniup udara bersih.
● Jangan mencuci perangkat dengan bahan kimia, deterjen, atau cairan apa pun karena dapat
menimbulkan korosi pada papan sirkuit.
●
Jaga perangkat dan komponennya serta aksesori tidak menjangkau anak-anak.
●
Pastikan perangkat digunakan di lingkungan yang kering dan berventilasi baik.
●
Jangan menyimpan perangkat di tempat yang terlalu panas atau dingin, karena hal ini dapat mengurangi
masa pakai dari komponen elektronik.Gunakan dan simpan dalam rentang suhu 0 °C-40 °C.
94
● Jangan memasukkan perangkat ke dalam peralatan pemanas apa pun (misalnya, Pengering atau
microwave) untuk pengeringan.
● Jangan menekan dengan tegas pada perangkat atau menempatkan objek di atas atau di belakangnya
untuk menghindari kerusakan pada perangkat.
●
Jangan melempar, jatuh, atau sangat kocok perangkat untuk melindungi papan sirkuit internalnya.
● Pastikan Anda membersihkan filter debu setiap enam bulan hingga satu tahun untuk menjaga
mesin tetap sejuk.
Apa yang termasuk
Proyektor L2 Plus
Kendali jarak jauh
Penutup lensa
QSG
Kabel HDMI
Kabel listrik
Kit pembersihan

95
Spesifikasi
Nomor modelnya L2 Plus
Resolusi asli
1920*1080
Sumber cahaya
LED
Fokus
Otomatis/listrik
Koreksi Keystone
Otomatis/Manual
Antarmuka
USB X 1
HDMI× 1
Audio Out× 1
Dimensi Unit
22.7 × 20.4 × 18.4 cm
8.9 × 8 × 7.2 inci
Rasio proyeksi
1.38:1
Jarak proyeksi
Min 1.26m ~ maks 4.4m
Min 40 ~ maks 150 inci
Tegangan daya
AC 100-240V / 50-60Hz
Konsumsi daya
110W
Berat proyektor
2.44 kg
5.38 lbs
Metode proyeksi
Depan/belakang di meja
Depan/belakang di
langit-langit
Rasio aspek
16:9
Zoom proyeksi
Pemasangan 50% 100%
Format gambar
JPG, PNG, BMP, JPEG
Format Audio
MP3, WAV, ASF, 3GP, MP4, MPEG
Format Video
MKV, MP4, 3GP, MPEG, ASF, WMV, WebM,
Format USB
FAT 32, NTFS, exFAT
96
Ikhtisar produk
97
Instalasi
Proyeksi Desktop 7.1
Proyektor dilengkapi dengan dudukan yang dapat diputar untuk pengaturan mudah 。
Langkah 1: tempatkan proyektor pada permukaan datar.
Step2: sesuaikan sudut tegakan yang sesuai dengan layar proyeksi, jaga sudut dalam rentang ini untuk kejelasan
gambar yang optimal.
Perhatikan: L2 Plus mendukung koreksi keystone horisontal. Anda tidak perlu menempatkan
proyektor langsung di depan layar.
Perhatikan: untuk menjaga kualitas gambar tetap optimal, dianjurkan untuk mempertahankan
penyesuaian dalam 15 derajat.Namun, pastikan sudut dengan garis vertikal layar tidak melebihi 25
derajat.
Pemasangan langit-langit 7.2
6.
Metode pemasangan
Proyektor dapat dipasang dari langit-langit menggunakan braket dan sekrup 1/4 (tidak termasuk), atau
ditempatkan secara horizontal di permukaan yang datar.
98
6. Penghapus dasar
1. Membalikkan mesin.
2. Gunakan prybar untuk
membuka penutup.
3. Lepaskan tiga sekrup di
bagian bawah dan lepaskan
braket.
Notice: Pastikan anda memiliki braket pemasangan universal yang sesuai dengan proyektor.
Perhatikan: L2 Plus tidak mendukung pemasangan empat sudut.
7.3 jarak proyeksi
Jarak proyeksi L2 Plus berkisar dari 1.26m hingga 4.4m.
Tips: jarak proyeksi yang direkomendasikan adalah sekitar 7,87 kaki.
Pengaturan proyeksi
L2 Plus mendukung empat mode proyeksi, Anda dapat memilih cara yang disukai.
99
Jika Anda memilih pemasangan langit-langit atau proyeksi belakang, silakan buka beranda-> pilih pengaturan [⚙]
-> Pilih [Gambar] -> dalam [proyeksi] pilih mode proyeksi yang sesuai-> tekan [OK] untuk beralih mode proyeksi.
8.2 fokus otomatis
Fungsi ini secara otomatis mendeteksi kejernihan gambar yang dipompa dan mengoptimalkan panjang fokus
dalam waktu nyata, memastikan Gambar tetap tajam dan jelas setiap saat.Anda dapat menemukan fitur ini di
pengaturan [⚙] -> [Picture] -> [Focus].
Perhatikan: Auto Focus akan diaktifkan setelah setiap shift setelah diaktifkan dalam pengaturan.
Pemberitahuan: Jika Anda tidak puas dengan hasil fokus otomatis saat ini, Anda dapat memilih
[menjalankan fokus otomatis] untuk mengulang.
Perhatikan: Jika Gambar tetap buram, silakan buka beranda-> pilih pengaturan [⚙] -> Pilih [image] -> Pilih
[Manual memfokuskan] -> gunakan tombol panah atas dan bawah untuk menyesuaikan fokus secara Manual
hingga Gambar tajam.
Pemberitahuan: Jika Gambar tetap buram, coba sesuaikan jarak proyeksi dan pastikan jarak proyeksi
berada dalam rentang yang sesuai (periksa [7.3] untuk detail).
100
8.3 Keystone
Koreksi Keystone otomatis 8.3.1
Koreksi Keystone otomatis pada L2s Plus secara otomatis memperbaiki distorsi trapesium, memastikan Gambar
tetap persegi tanpa penyesuaian manual.Anda dapat menemukan fitur ini di pengaturan [⚙] -> [Picture] ->
[Keystone ].
Pemberitahuan: Jika Anda tidak puas dengan hasil koreksi Keystone otomatis saat ini, Anda dapat memilih
[menjalankan Keystone otomatis] untuk memperhatikan.
Notice: Koreksi Auto Keystone diaktifkan secara default ketika mesin digunakan pertama kali. Jika Anda
ingin mematikannya,Buka beranda-> pilih pengaturan [⚙]-> Pilih [image]-> In [Keystone ]-> Pilih [Auto ]->
tekan [OK] untuk mematikan.
8.3.2 Auto Keystone setelah Boot
Fungsi ini secara otomatis mendeteksi dan memperbaiki distorsi keystone vertikal dan horizontal dari gambar
yang diproyeksikan setiap kali proyektor didukung, memastikan bahwa Anda dapat segera menikmati gambar
persegi panjang yang jelas.
Aliadan layar otomatis 8.3.4
Fungsi ini secara otomatis mendeteksi batas layar dan menyesuaikan posisi gambar untuk memastikan
kesejajaran tepat dengan tepian layar, menghindari gambar meluap atau spasi kosong dan memungkinkan
pemusatan cepat dari layar.
16. Layar latar belakang putih harus memiliki batas hitam atau bening lainnya, sementara layar tahan cahaya
tidak memiliki kebutuhan batas.
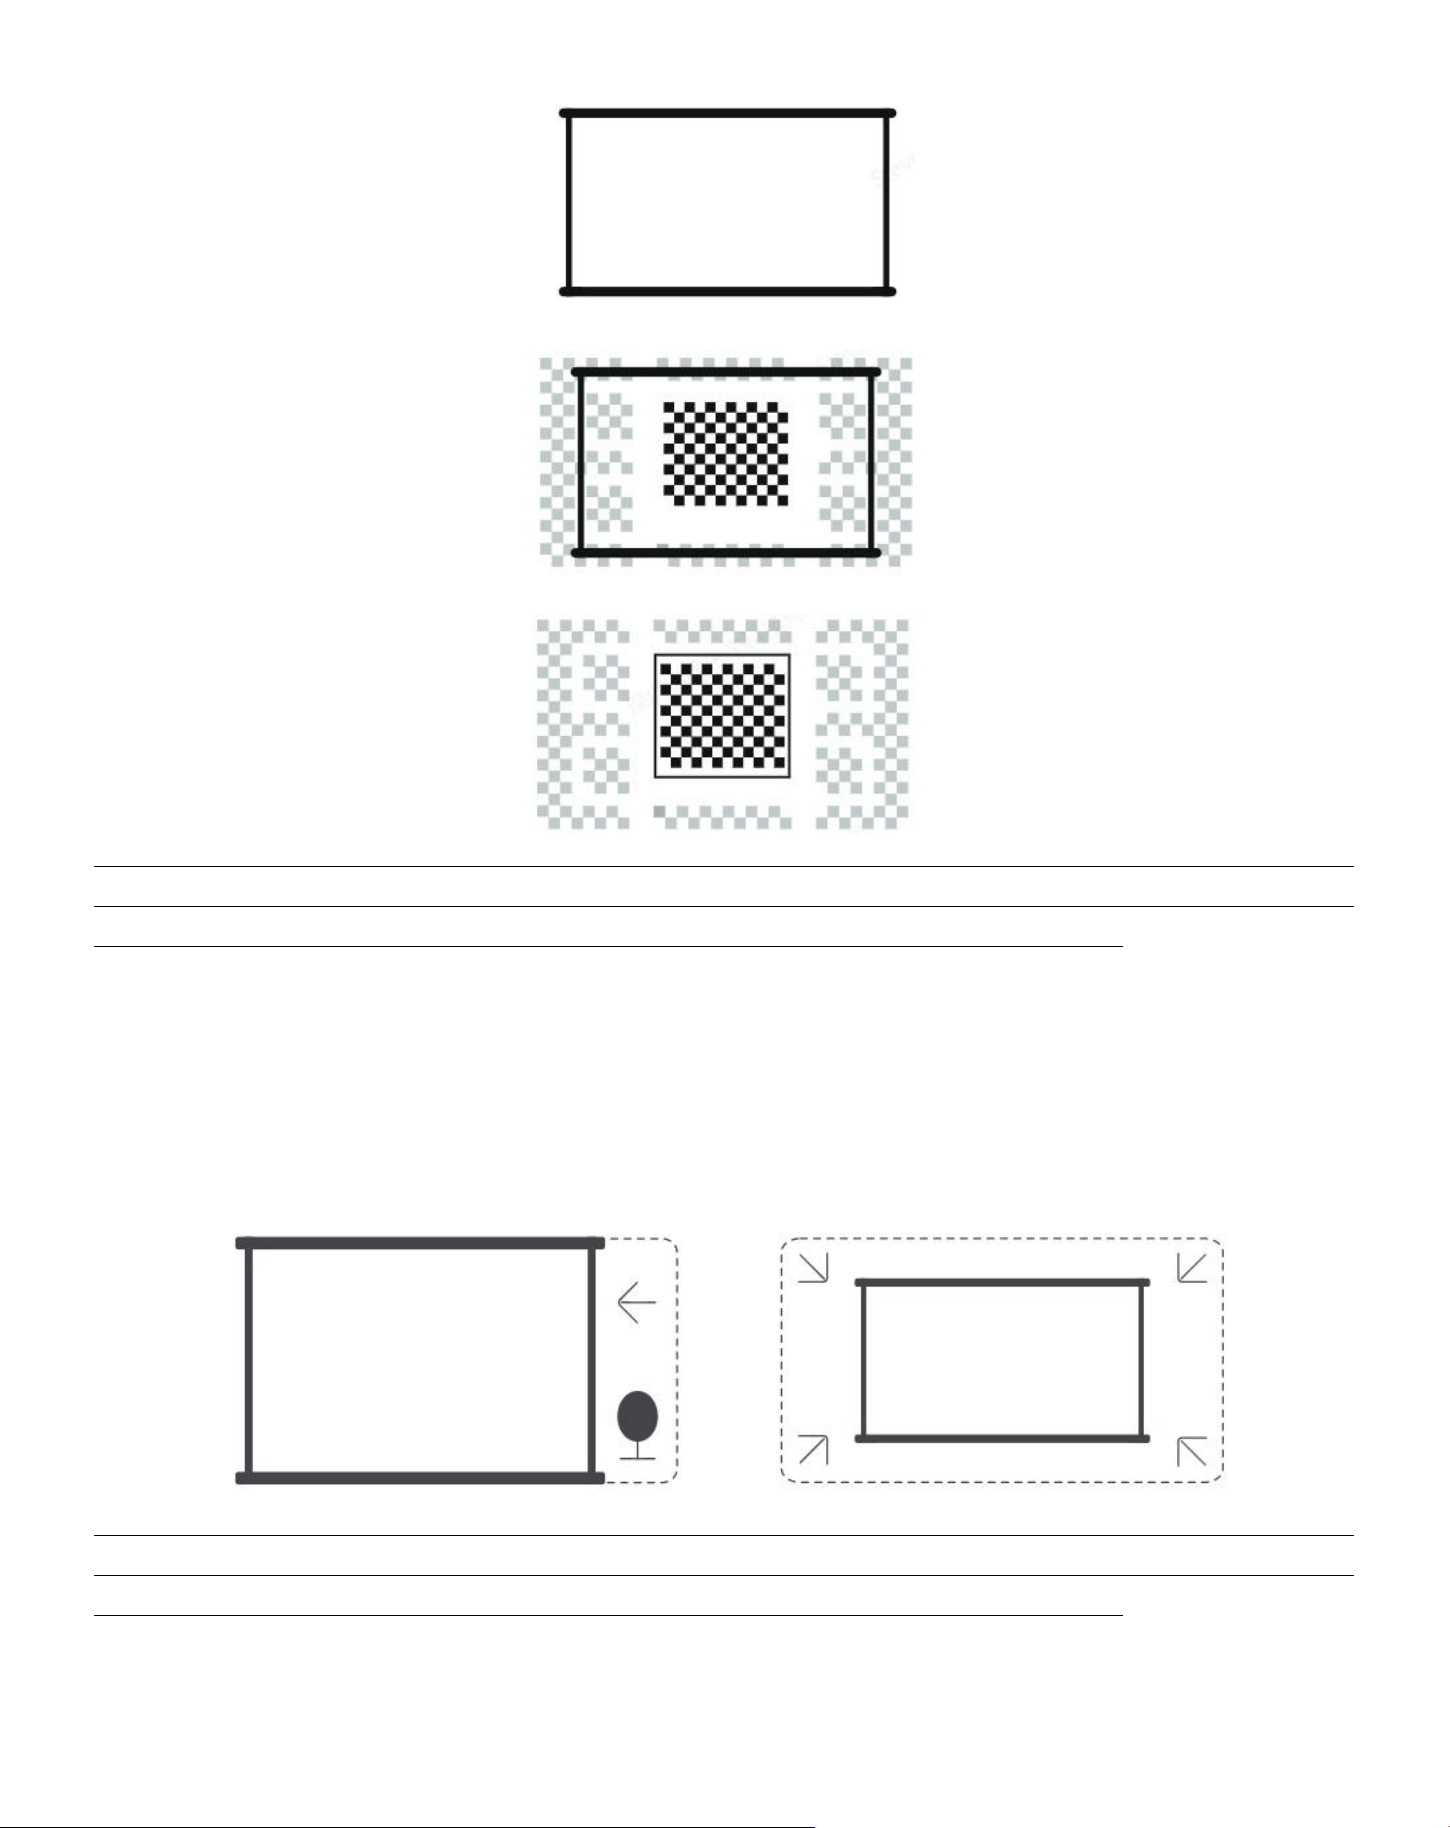
101
17. Gambar yang dipompa sebelum fiting layar harus lebih besar dari area layar.
18. Saat menggunakan fungsi pemasangan layar, jangan menghalangi bagian tengah layar.
Perhatikan: sebelum menggunakan pemasangan layar otomatis dan fungsi penghindar halangan otomatis,
pastikan Keystone otomatis dan fungsi fokus otomatis diaktifkan.Penghindar halangan mungkin tidak
bekerja ketika ada objek berwarna putih atau lain yang berwarna terang di layar target.
8.3.3 penghindar halangan otomatis
Fungsi ini secara otomatis mendeteksi hambatan dalam jalur proyeksi dan secara cerdas menyesuaikan
sudut gambar atau posisi untuk mencegah obstruksi gambar, memastikan proyeksi yang jelas dan lengkap.
Perhatikan: sebelum menggunakan pemasangan layar otomatis dan fungsi penghindar halangan otomatis,
pastikan Keystone otomatis dan fungsi fokus otomatis diaktifkan.Penghindar halangan mungkin tidak
bekerja ketika ada objek berwarna putih atau lain yang berwarna terang di layar target.
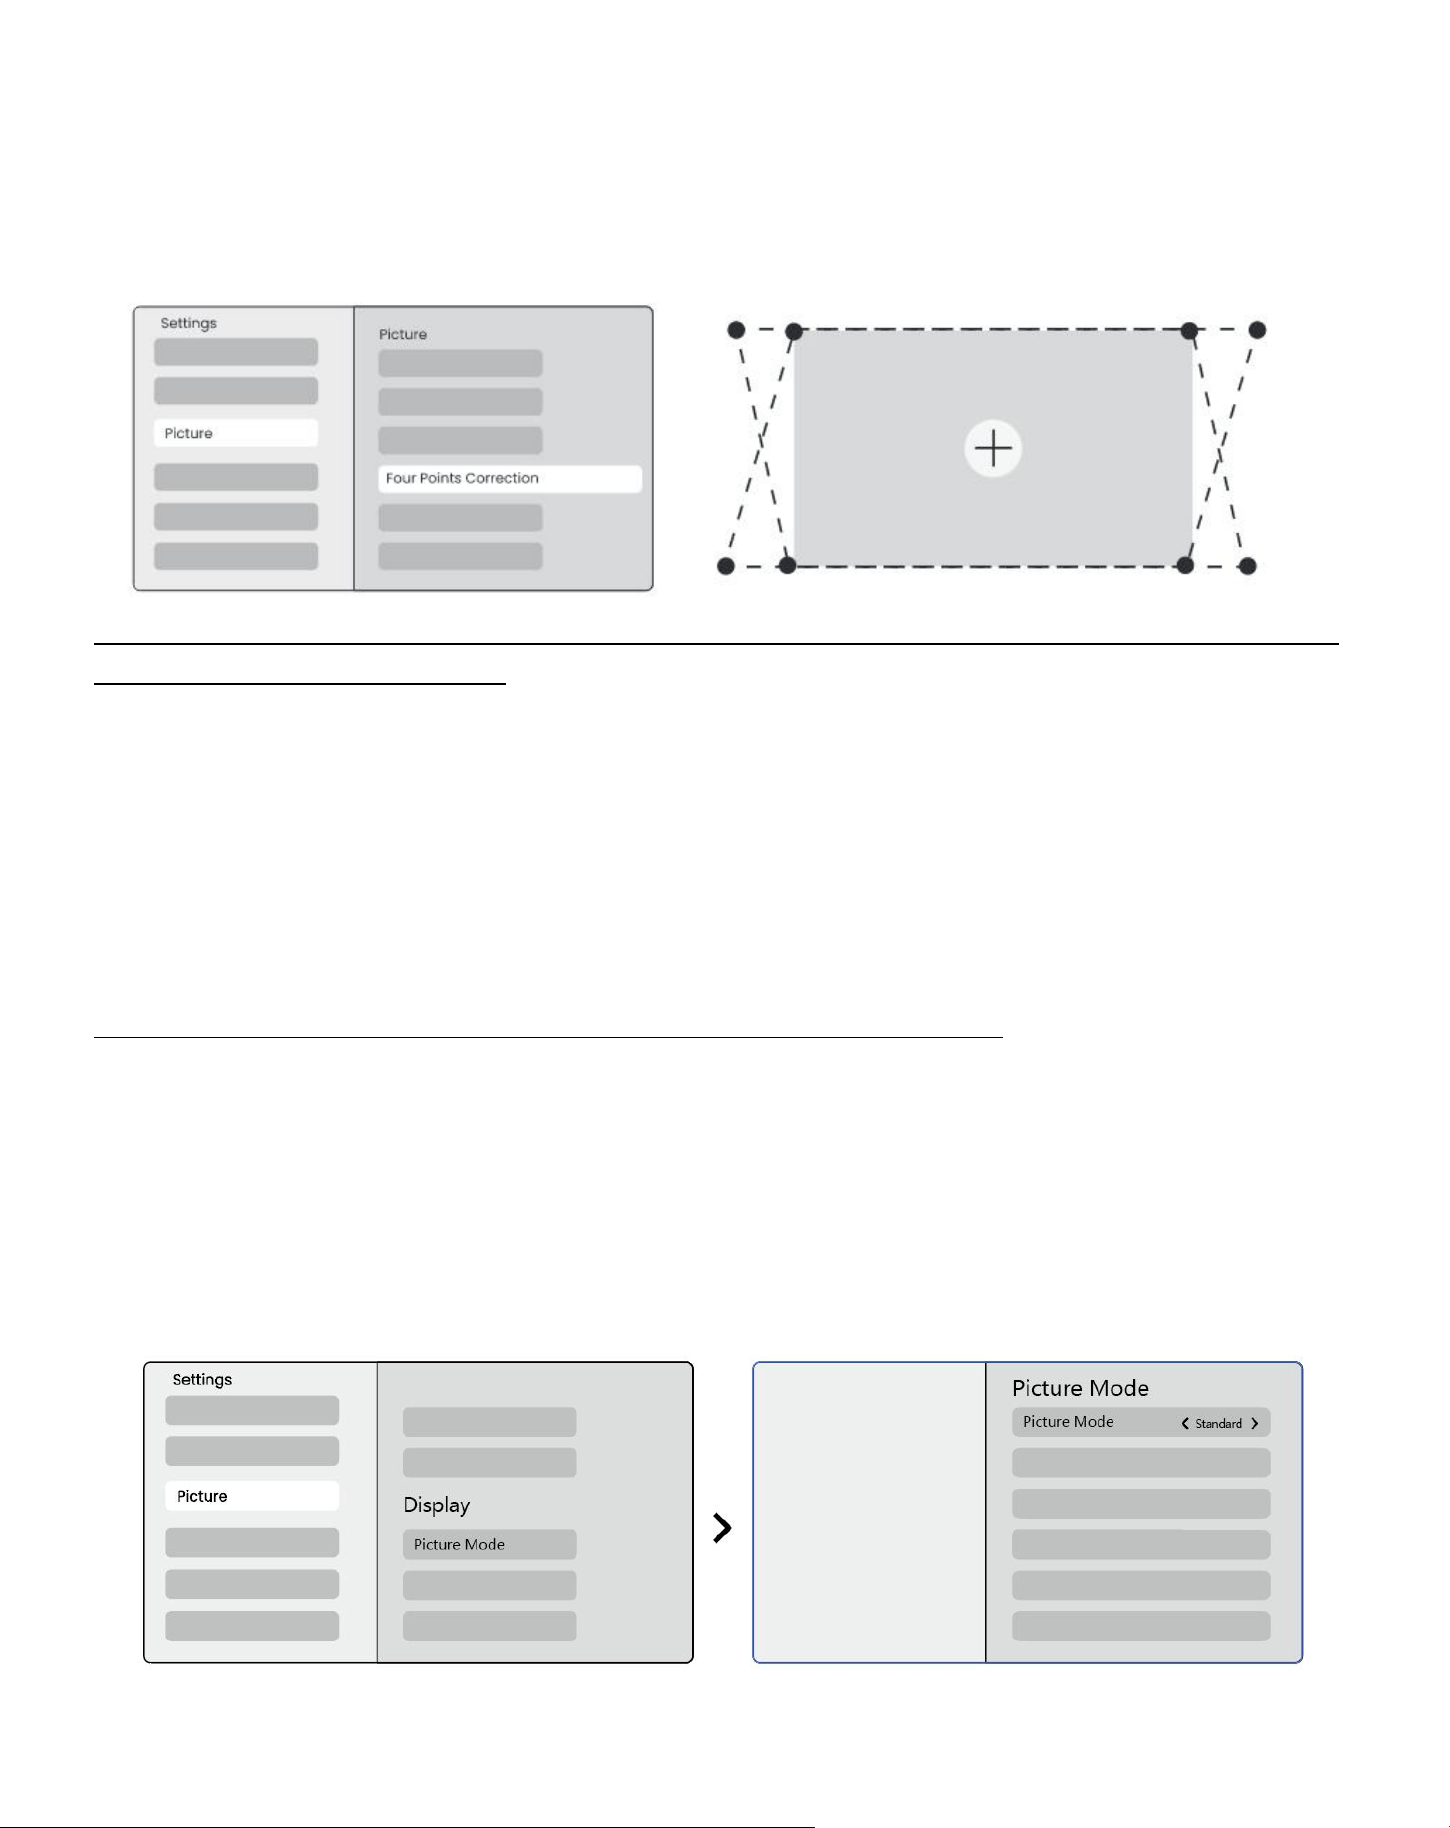
102
Koreksi Keystone Manual 8.3.5
Jika Anda perlu menyesuaikan layar lebih jauh, Anda dapat menggunakan fitur koreksi Keystone Manual.
Langkah1: Buka beranda-> pilih pengaturan [⚙] -> Pilih [Gambar]
Step2: dalam [image]-> Pilih [Four Points]-> sesuaikan layar dengan seret panah.
Perhatikan: Pastikan proyektor tidak miring lebih dari 15 derajat secara vertikal atau horizontal.Pastikan
kerja fokus otomatis secara efektif.
Perbesaran gambar 8.4
Anda dapat menyesuaikan ukuran gambar sesuai dengan kebutuhan Anda.
Langkah1: Buka beranda-> pilih pengaturan [⚙] -> Pilih [Gambar]
Langkah2: dalam [Image] -> Pilih [image Zoom] -> gunakan tombol panah atas dan bawah untuk menyesuaikan
Zoom secara manual sampai gambar yang diinginkan.(Diagram skematis terpasang)
Tips: ukuran layar yang direkomendasikan adalah antara 60 hingga 100 inci.
Pajangan 8.5
Anda dapat menyesuaikan Mode gambar sesuai dengan kebutuhan Anda.
Langkah1: Buka beranda-> pilih pengaturan [⚙] -> Pilih [Gambar]
Langkah2: dalam [Gambar] -> Pilih [Mode gambar]
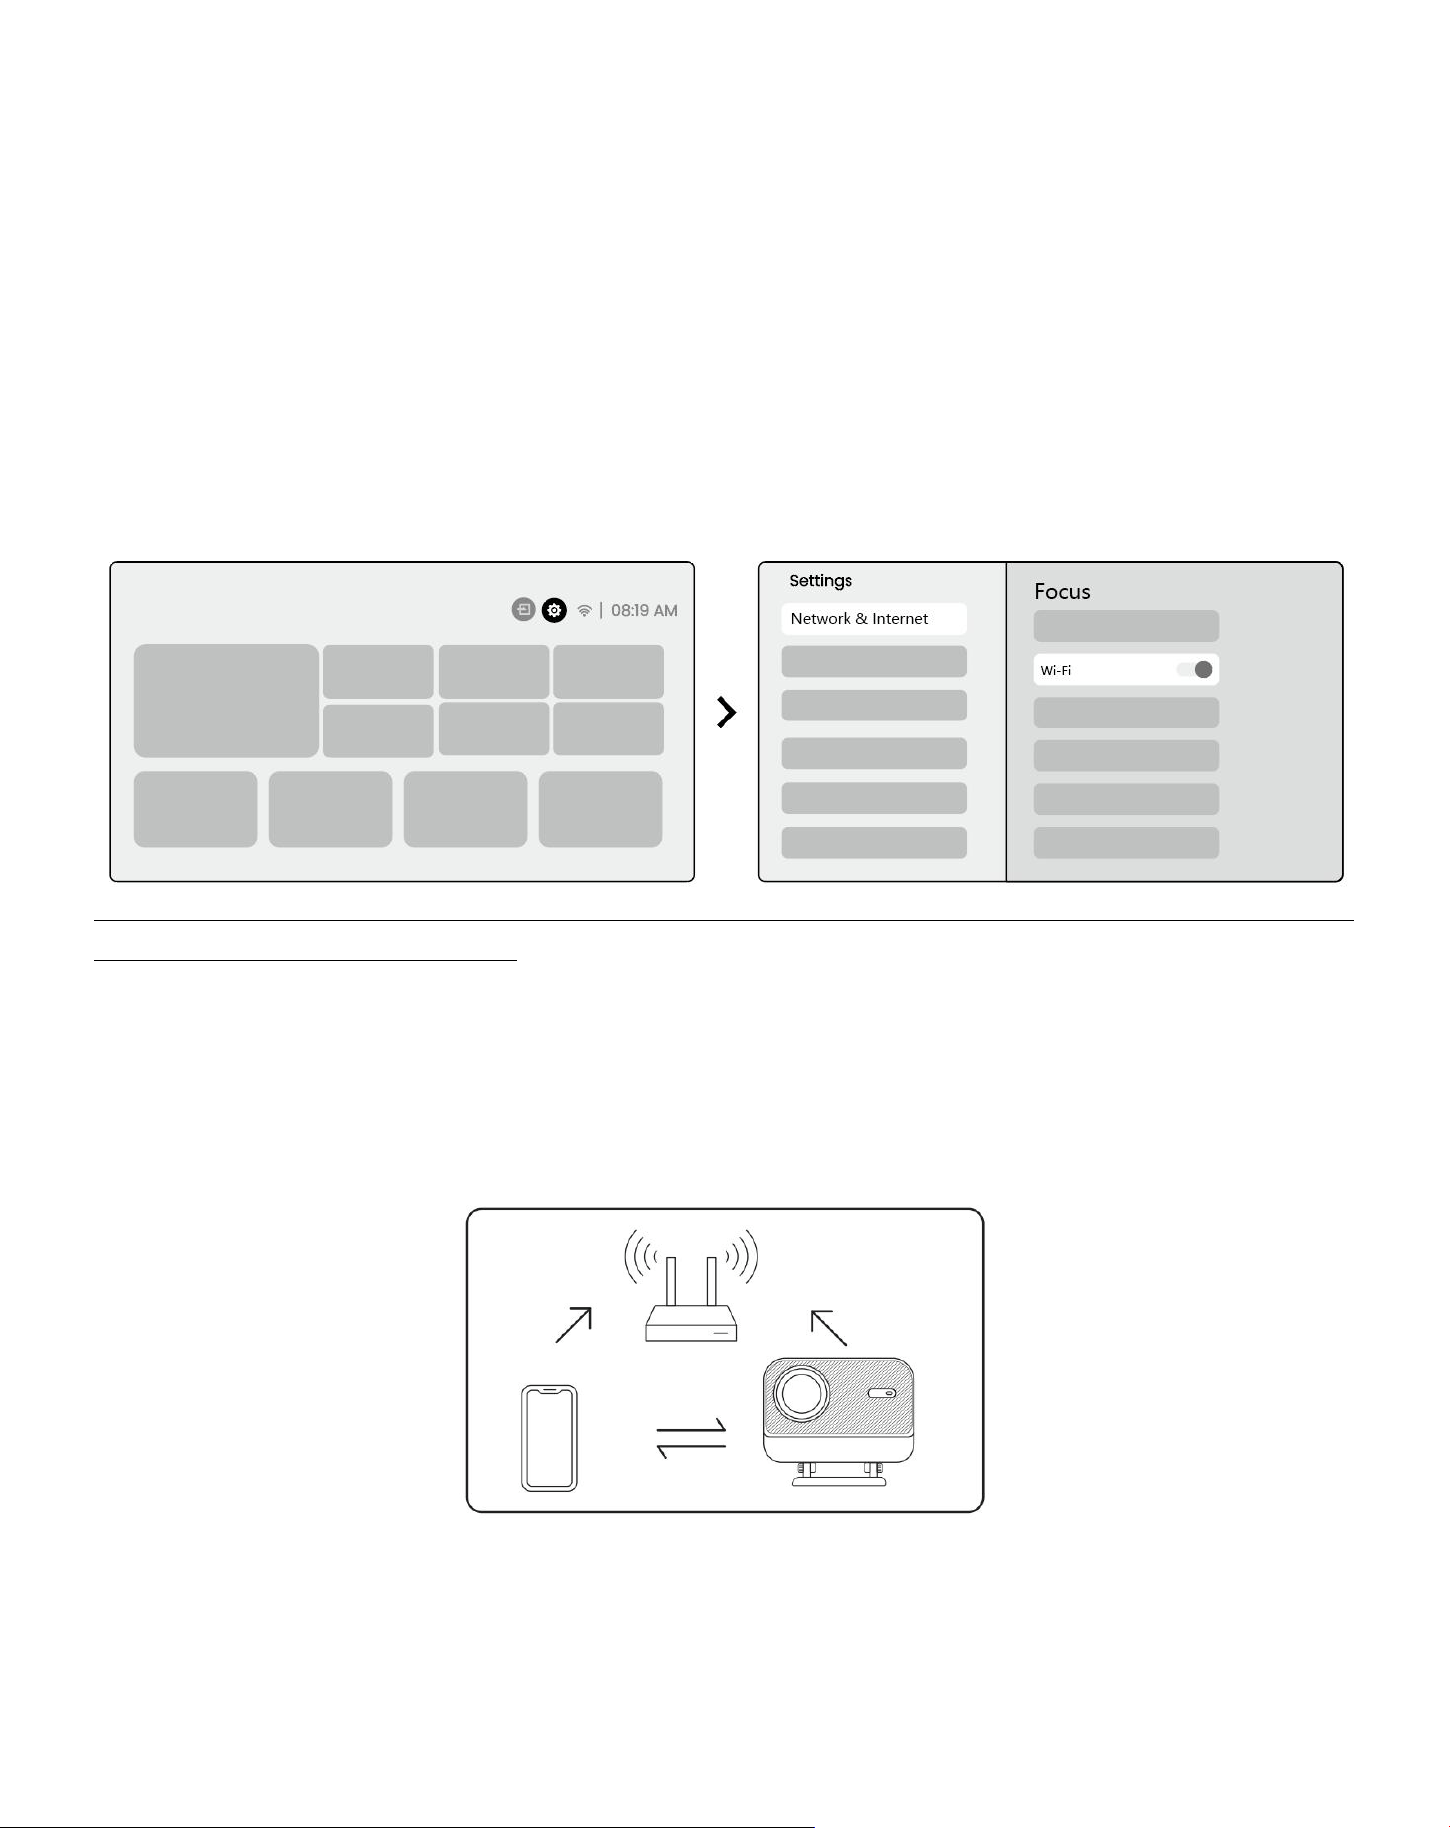
103
⚠Perhatian: pengaturan warna gambar hanya akan berlaku saat bermain gambar atau video.
Cermin layar
9.1 pengaturan WiFi
Langkah1: tekan pengaturan [⚙] Tombol-> Pilih [jaringan & Internet] -> Aktifkan [koneksi Internet] tombol->
Pilih [Wi-Fi]
Step2: dalam daftar [jaringan tersedia]-> Cari jaringan Wi-Fi yang Anda inginkan-> masukkan kata sandi->
Pilih [OK]-> Tunggu proyektor untuk terhubung.
Pemberitahuan: kelancaran mirrororing layar akan dipengaruhi oleh lingkungan jaringan. Disarankan untuk
menggunakan bandwidth lebih cepat.
IOS Cast 9.2.1 (untuk perangkat iOS)
Step1: memastikan kompatibilitas dan koneksi jaringan: Pastikan perangkat iOS Anda dan L2 Plus terhubung ke
jaringan Wi-Fi yang sama.
Step2: buka Laman-> Pilih [aplikasi saya] menu -> tekan [iPhone nirkabel pada layar yang sama]->
masukkan dan tetap di halaman [nirkabel iPhone pada layar yang
sama].
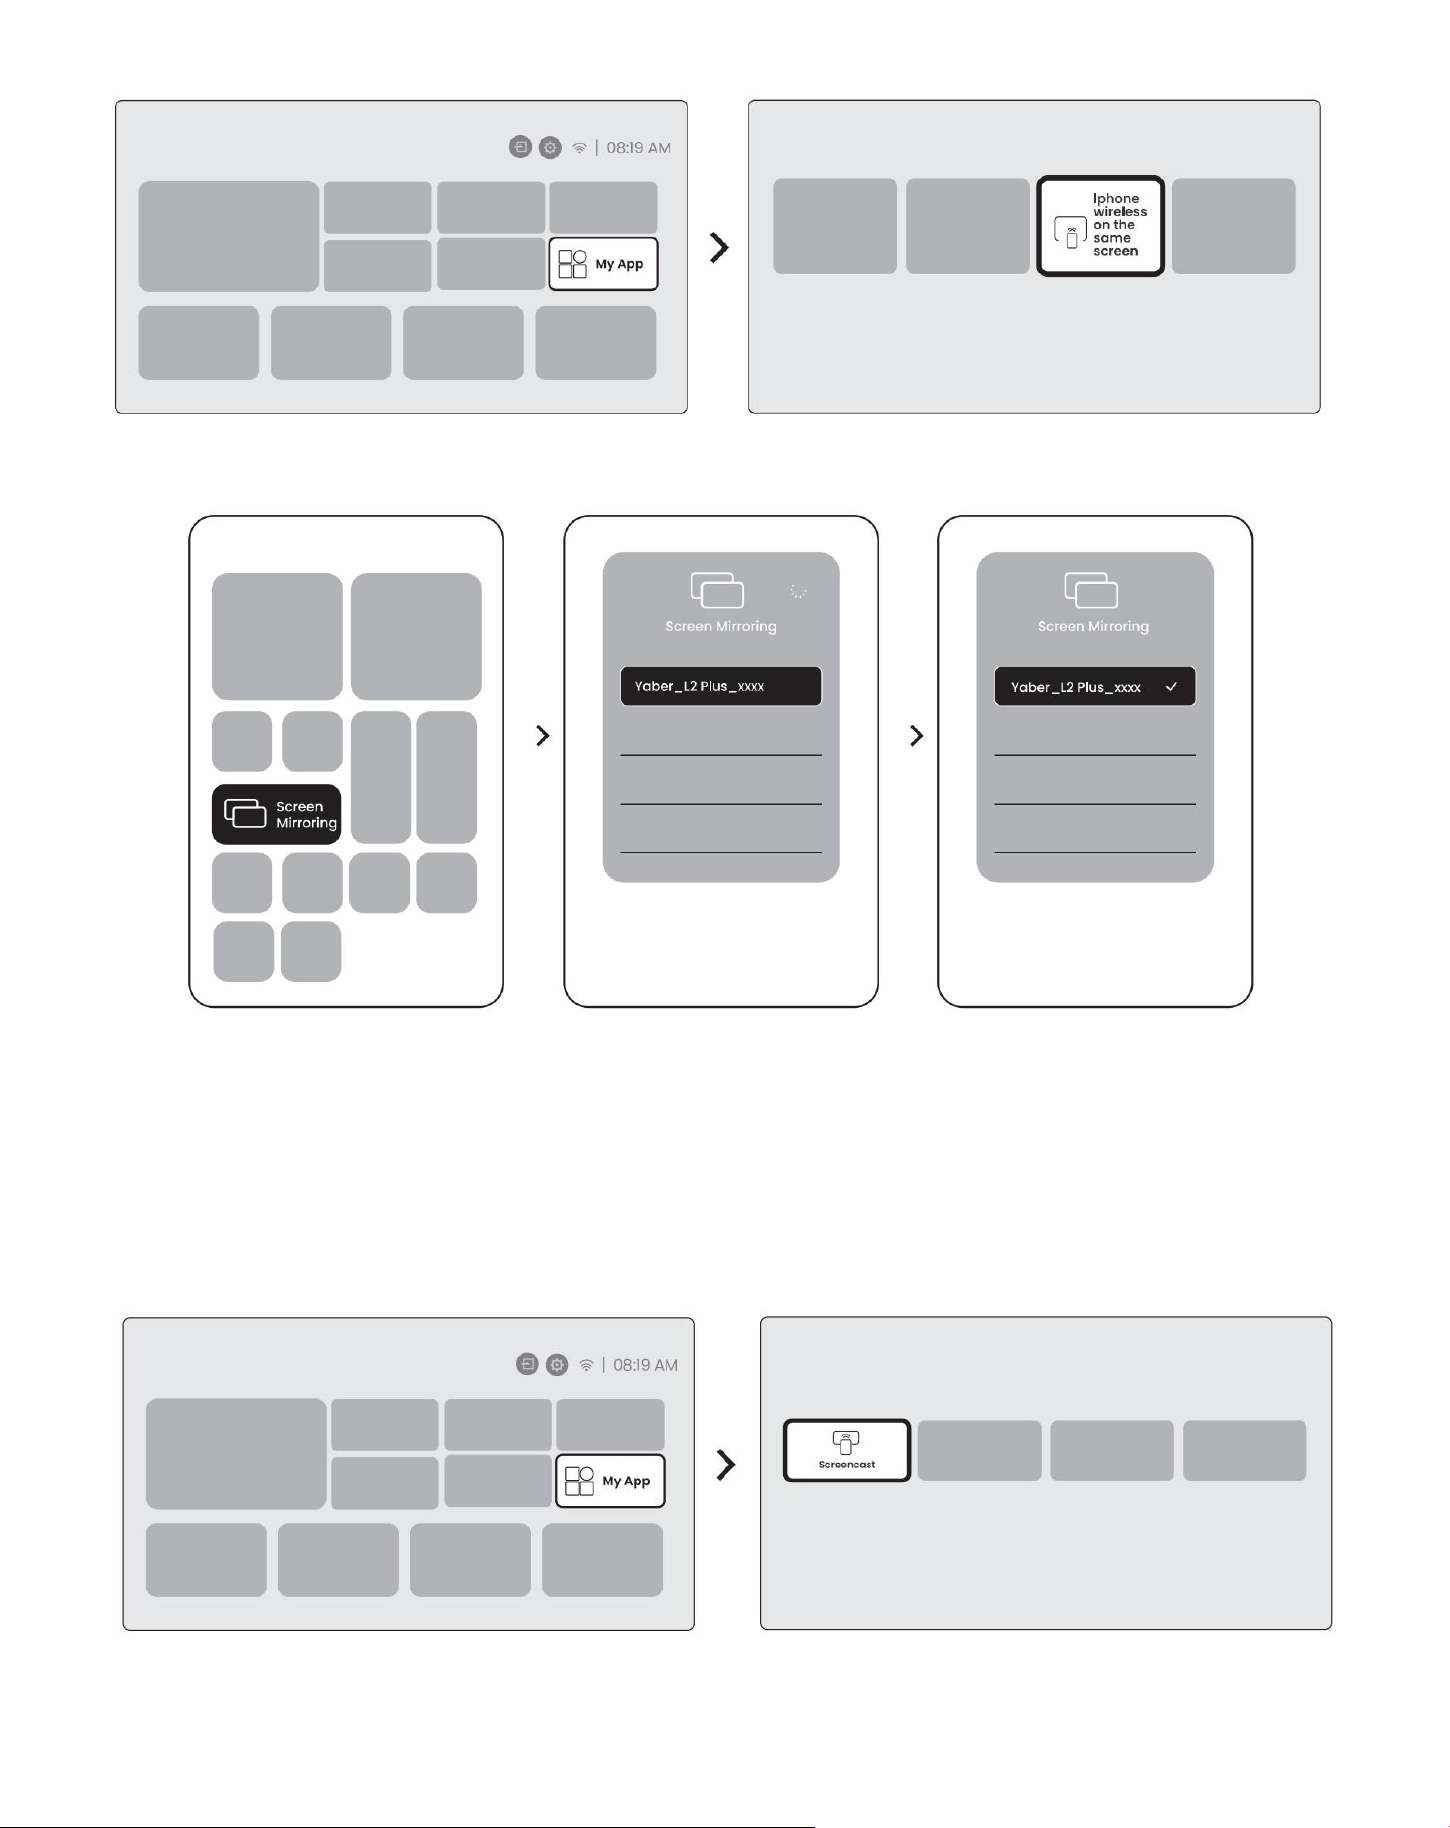
104
Step3: Buka [pusat kontrol] pada perangkat iOS Anda-> Pilih fungsi screen mirroring-> hubungkan penerima iOS
Cast nama [-] -> berhasil.
9.2.2 Miracast (untuk perangkat Android)
Step1: Aktifkan fungsi Wi-Fi di ponsel Android Anda (tidak perlu terhubung ke Wi-Fi).
Step2: Buka beranda-> Pilih menu [App saya] -> tekan [Screencast] -> masukkan dan tetap di halaman
[berbagi layar Android].
Step3: akses [pusat kontrol] pada perangkat Android Anda-> Pilih [Screen Mirroring/Smart View]. Pilih dan
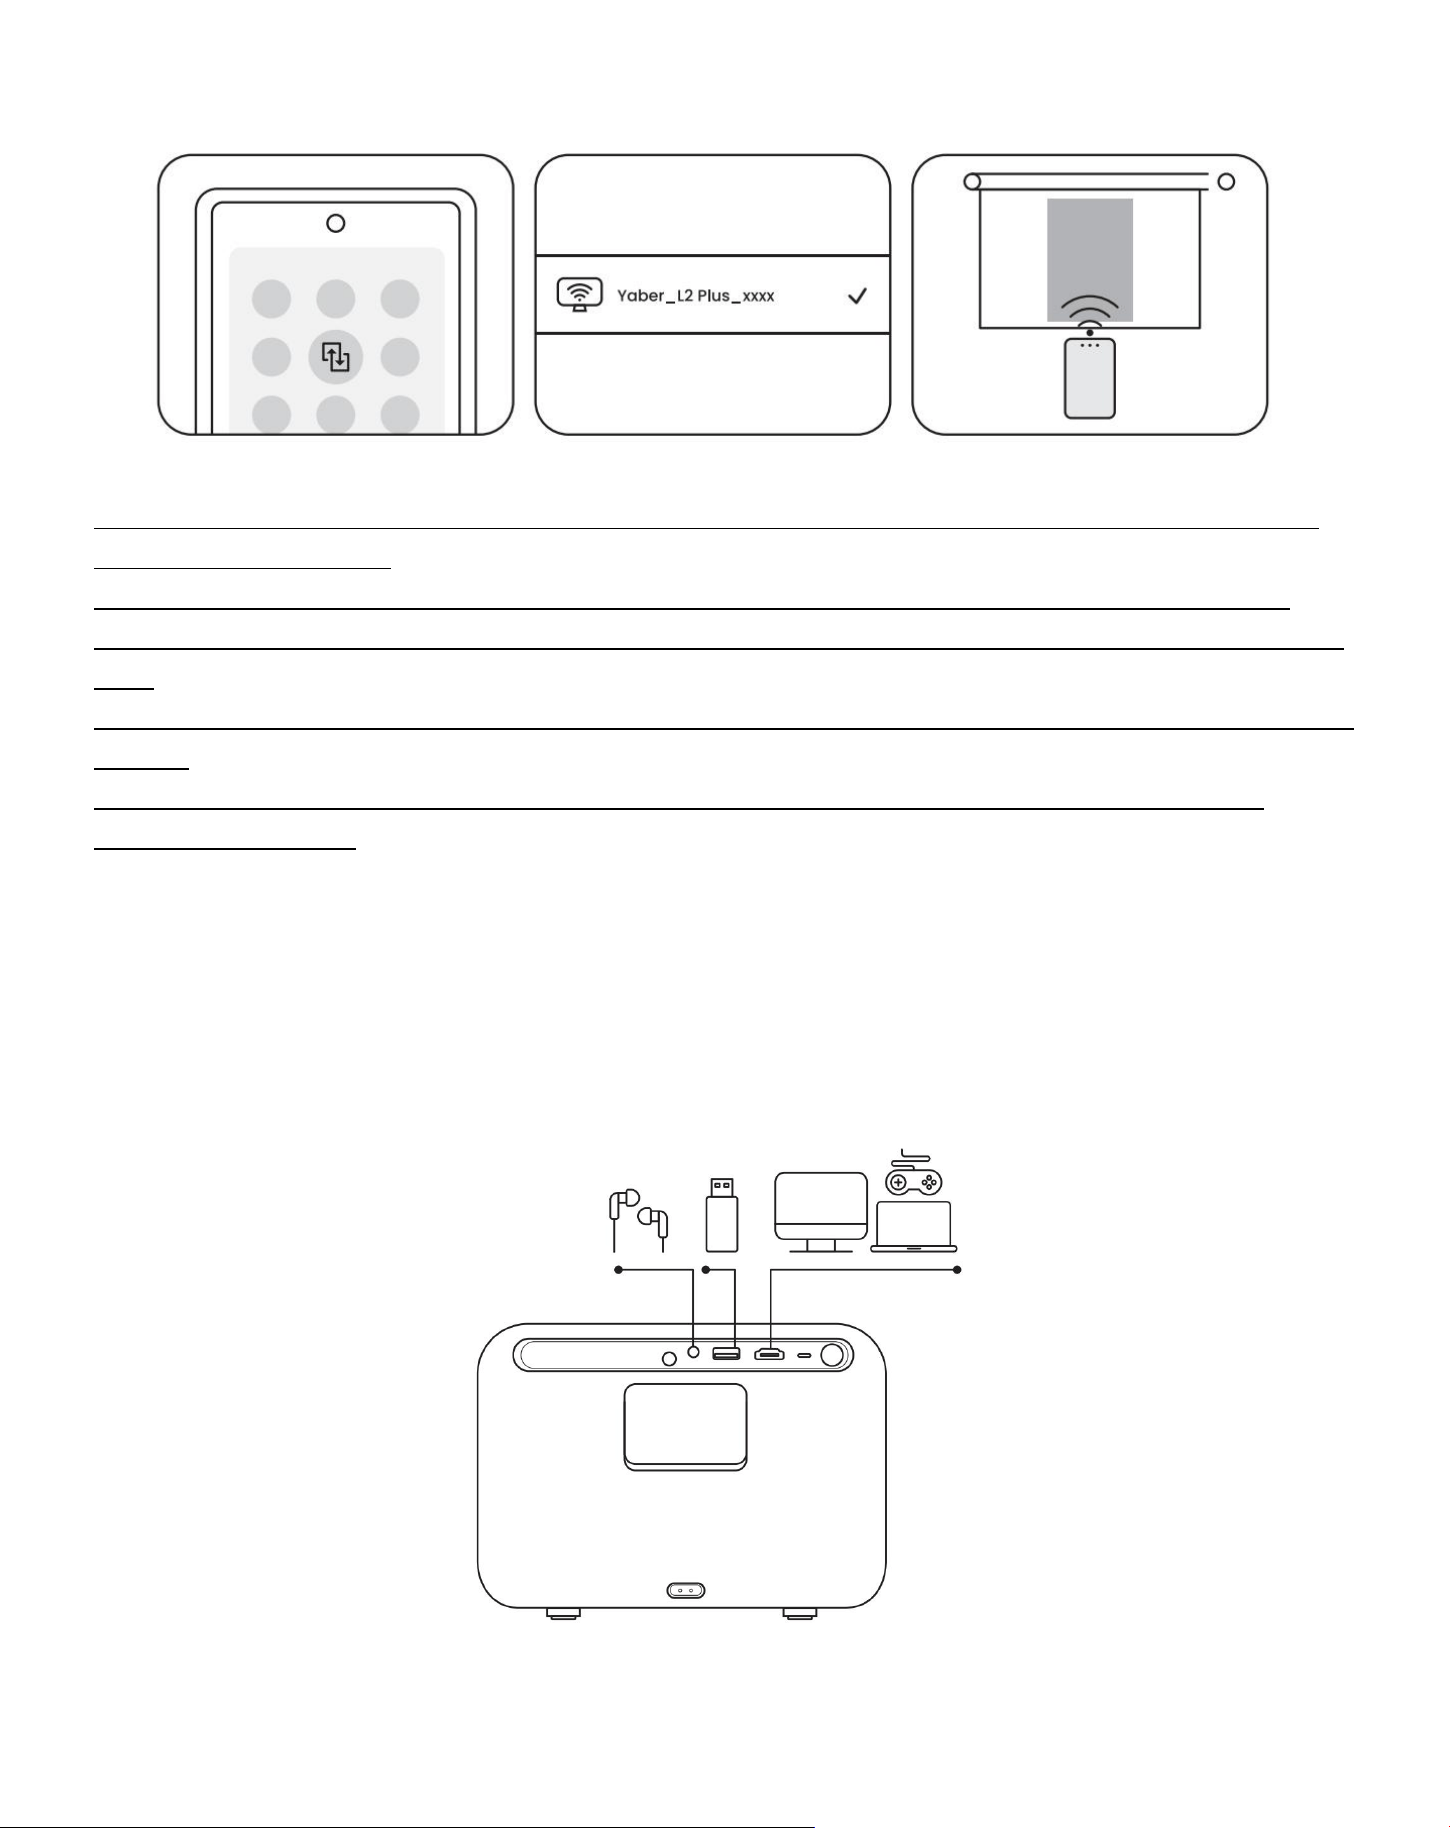
105
hubungkan penerima Miracast nama [-] -> sukses.
Perhatikan: beberapa perangkat seluler google hanya mendukung chromecast dan tidak dapat dilemparkan
oleh Airplay atau Miracast.
Pemberitahuan: karena perlindungan hak cipta, beberapa konten hak cipta (Netflix, Hulu, dll.) tidak dapat
langsung pantul dari telepon.Harus digunakan dengan stik TV. Jika Anda memerlukan bantuan, silakan hubungi
kami.
Pemberitahuan: mirroring ponsel hanya bisa terwujud dengan memasukkan dan tetap di halaman berbagi layar
nirkabel.
Perhatikan: Pastikan perangkat seluler Anda dekat dengan proyektor. Kehalusan cermin layar juga akan
terpengaruh oleh jarak.
Konektivitas
10.1 HDMI, USB, 3.5mm Audio keluar
Obber L2 Plus proyektor memiliki 3 antarmuka, port HDMI/port USB/port audio 3.5mm. Silakan pilih yang tepat
untuk menghubungkan perangkat ANDA (PC, ponsel, pemutar DVD, Soundbar, USB, PS5, dll.)
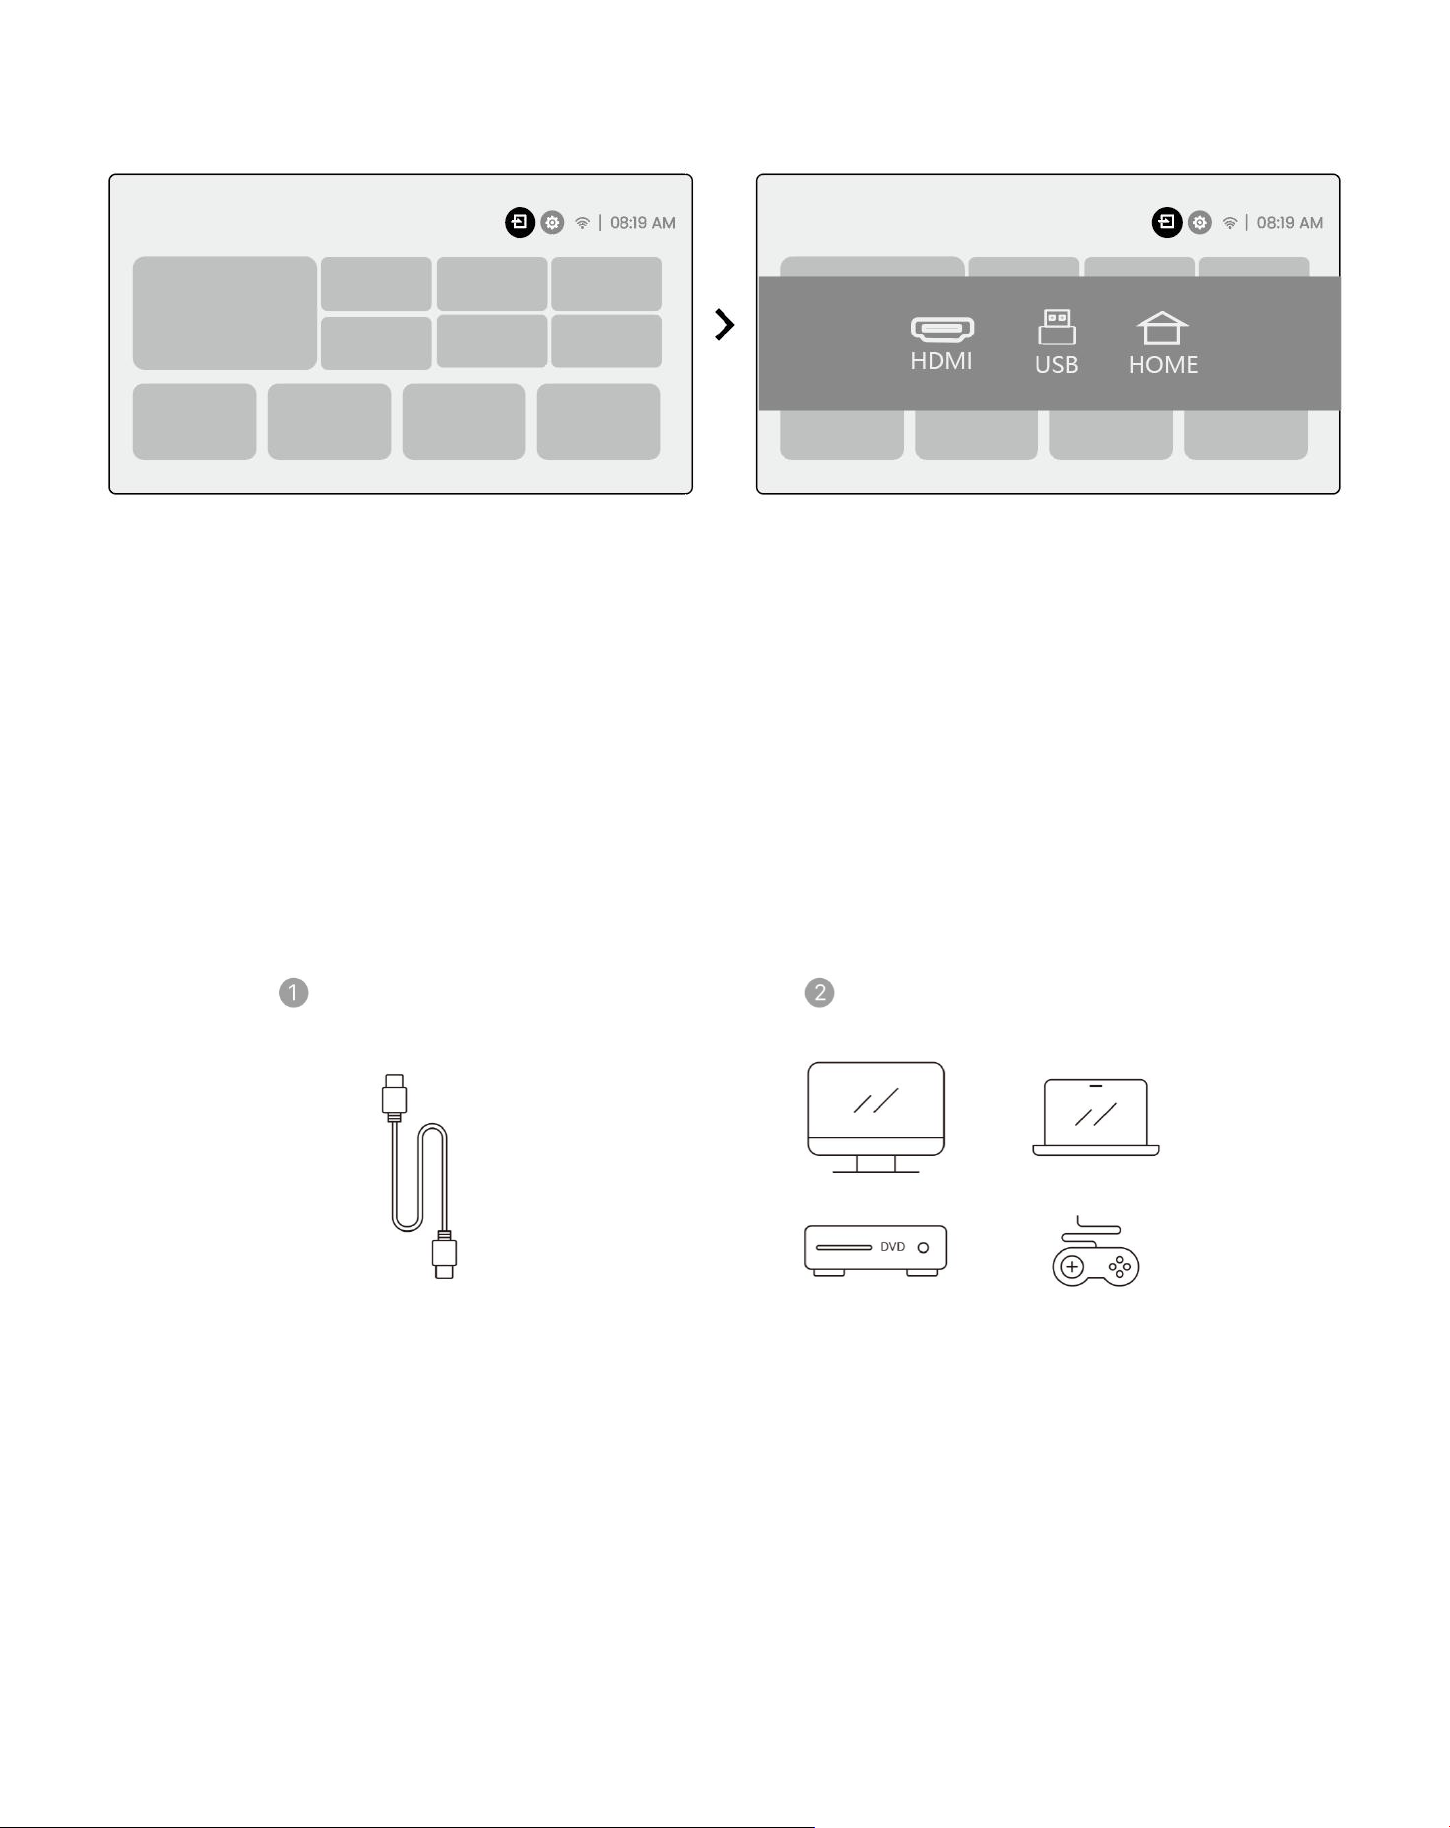
106
10.2 USB
Perhatikan: ketika mencari file di perangkat USB, silakan pilih kategori file yang benar dari Video, musik, gambar,
jika tidak Anda tidak dapat menemukan file yang Anda inginkan.
10.3 HDMI
Jika anda menemui banyak masalah saat menggunakan HDMI, coba solusi berikut ini:
Metode 1. Beralih versi HDMI EDID untuk 1.4 dalam pengaturan perangkat eksternal Anda.
Metode 2. Coba ubah kabel HDMI.
Metode 3. Coba ganti perangkat eksternal lain dengan fungsi HDMI dan periksa apakah antarmuka HDMI
perangkat eksternal bekerja.
Catatan: karena antarmuka HDMI tidak mendukung fungsi ARC, Anda tidak dapat menggunakan HDMI untuk
menghubungkan Soundbar.Silakan gunakan Bluetooth atau kabel audio 3.5mm sebagai gantinya.
10.4 Audio keluar
Catatan: Jika Anda mengalami interupsi atau keterlambatan saat menggunakan koneksi speaker Bluetooth, Anda
dapat menggunakan perangkat yang mendukung 3.Kabel audio 5mm untuk memutar audio.
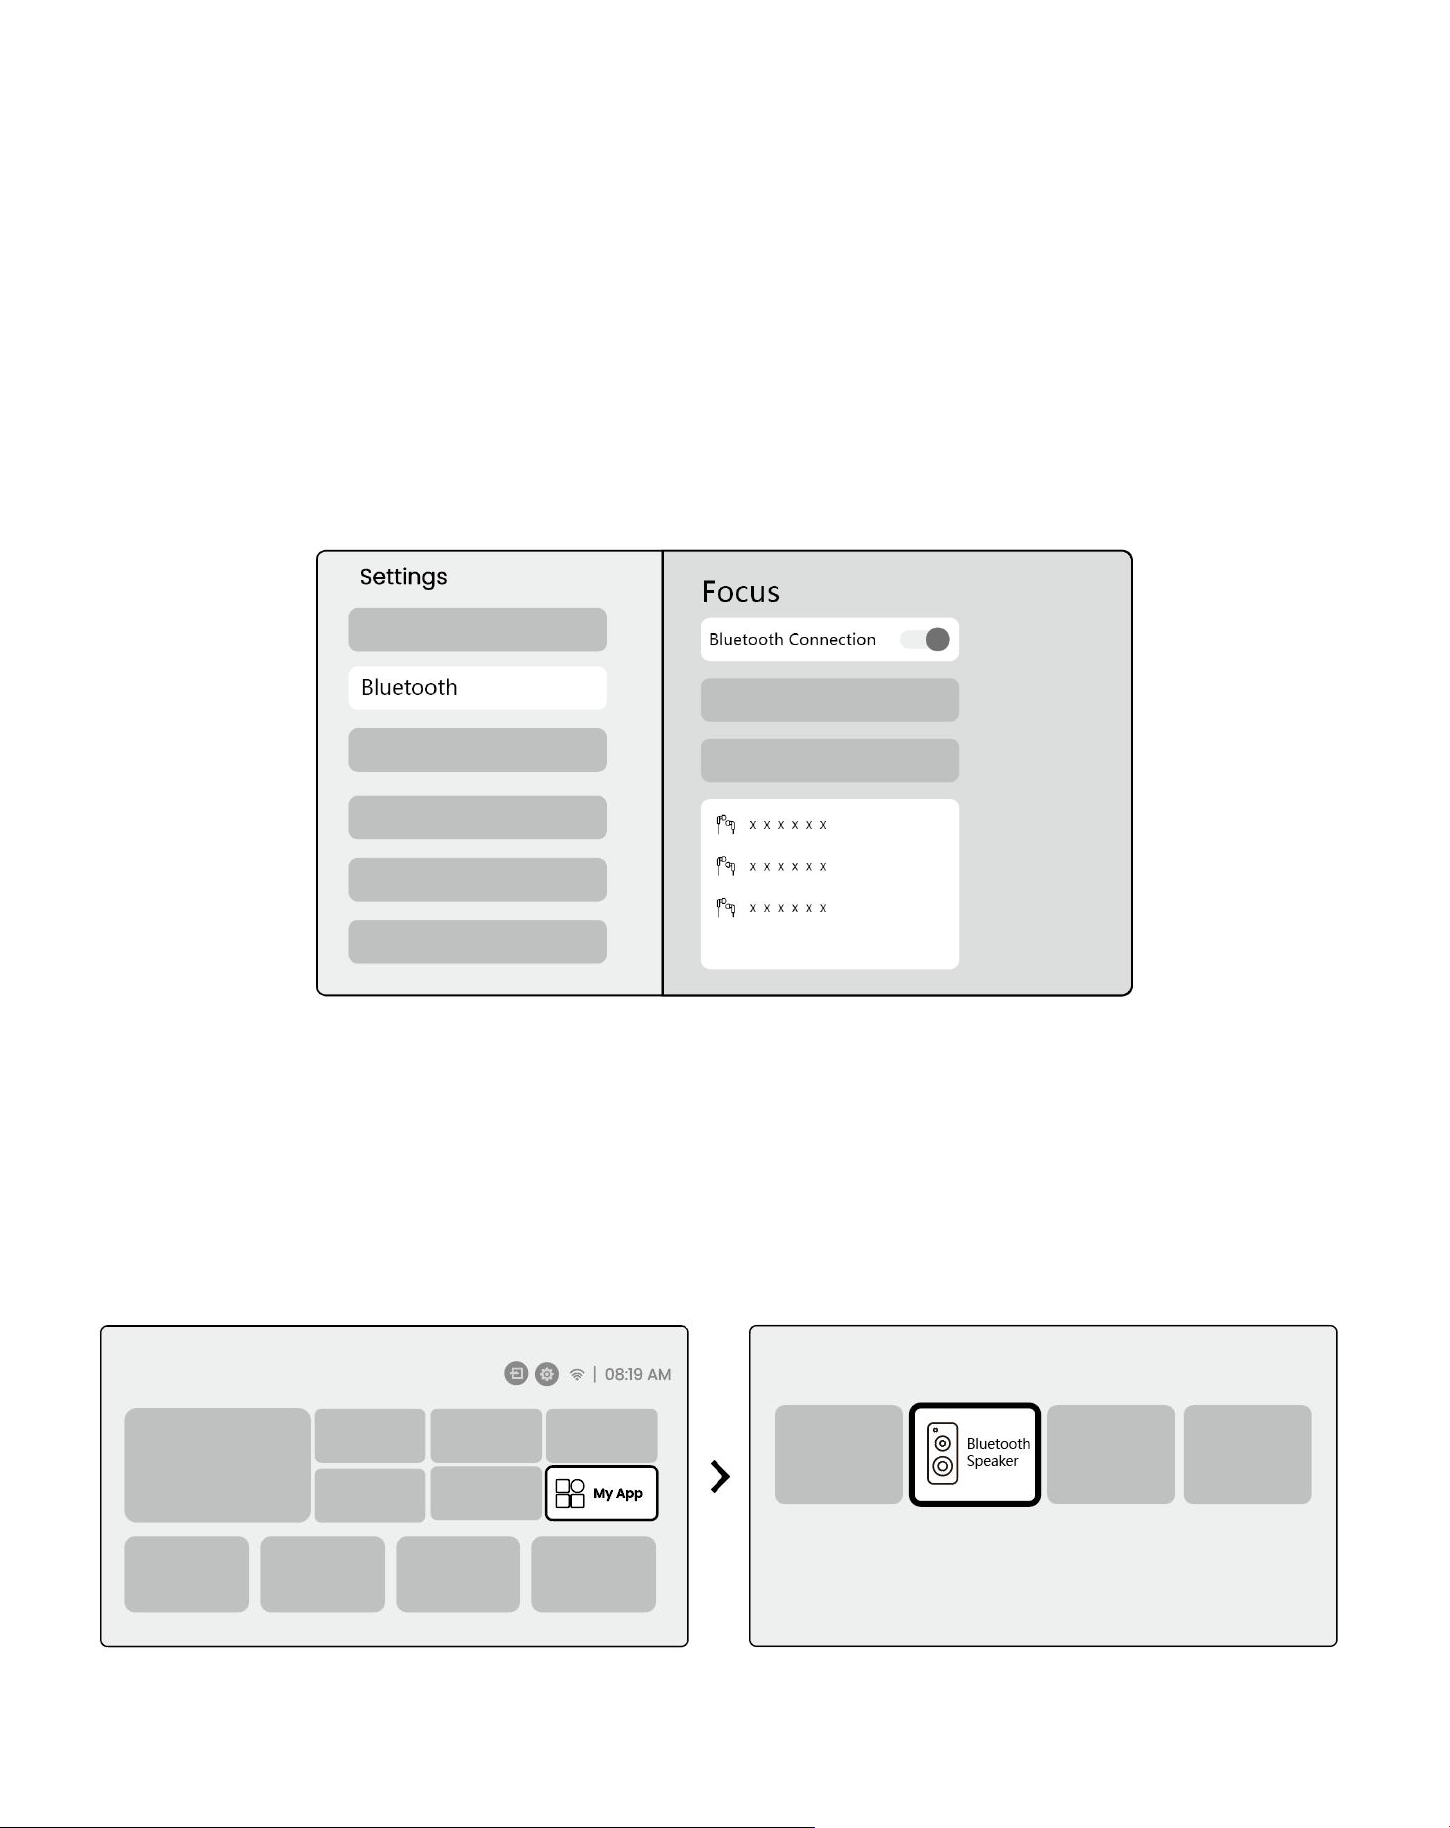
107
Koneksi nirkabel 10.5
Perhatikan: Jika Anda perlu mirror Netflix, Video Prime, dll. Ke proyektor, silakan hubungkan Dongle TV/stik atau
produk lain dengan streaming media melalui HDMI.
19
Pengaturan Bluetooth
Langkah1: nyalakan perangkat Bluetooth Anda dan bersiaplah untuk koneksi Bluetooth.
Step2: pilih menu [Bluetooth]-> nyalakan tombol Bluetooth-> Pilih perangkat Bluetooth untuk dipasangkan
dan terhubung.
Pemberitahuan: Pastikan perangkat terputus dari perangkat lain atau memiliki mode Bluetooth diaktifkan.
Pengeras suara Bluetooth 11.2
Langkah1: di laman, pilih menu [aplikasi saya].
Step2: Aktifkan Speaker Bluetooth, masukkan dan tetap pada halaman ini.
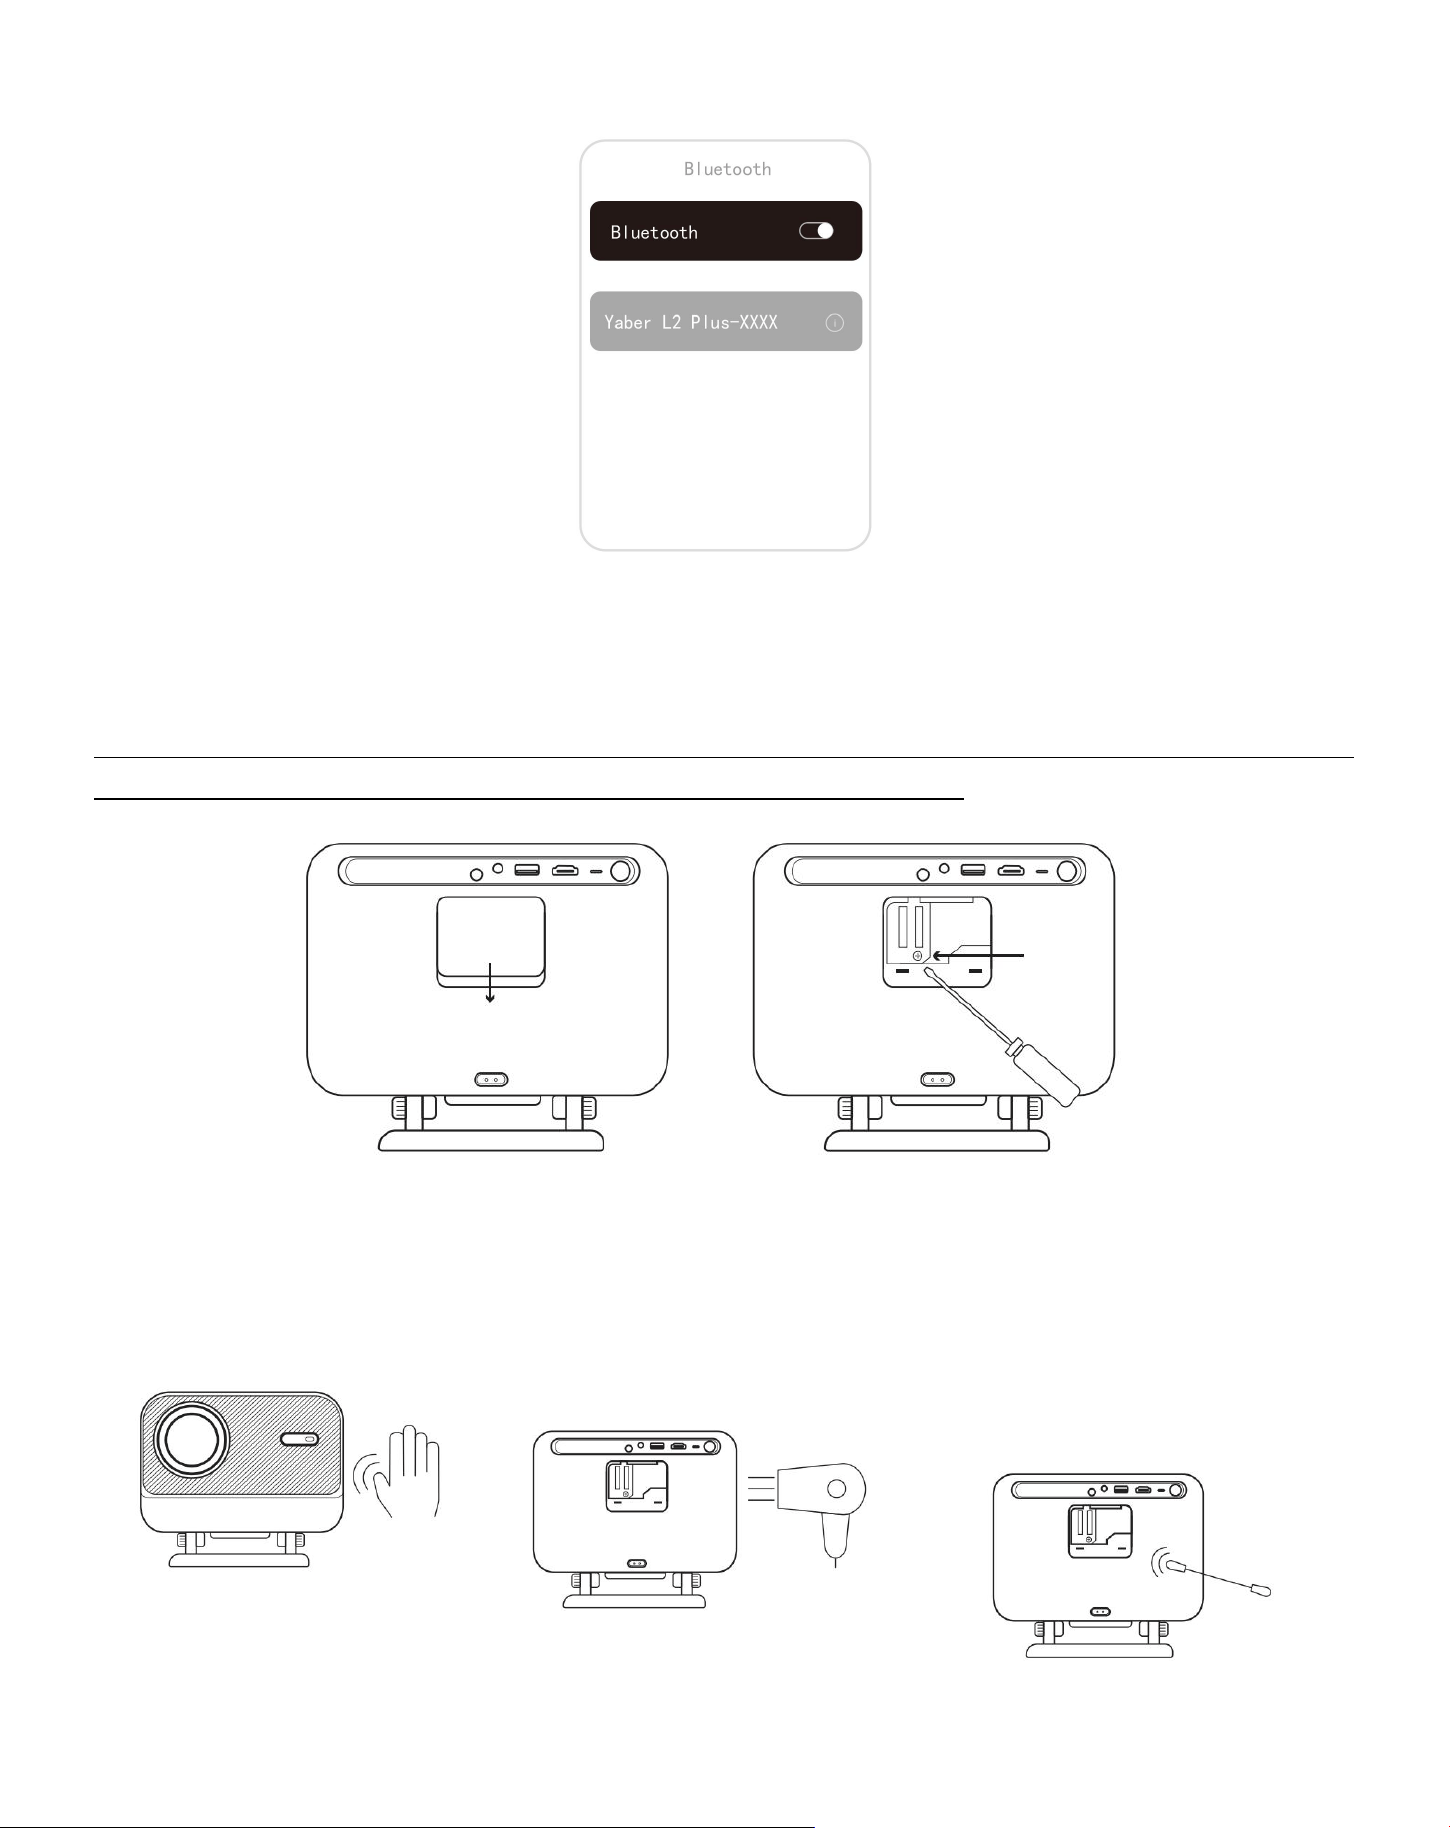
108
Step3: cari [Jaber L2Plus-XXXXX] pada Antarmuka Bluetooth ponsel Anda.
Pembersihan reguler
⚠Perhatian: karena L2 Plus menggunakan mesin optik terbuka, sejumlah kecil debu dapat inhalasi saat
digunakan.Direkomendasikan untuk membersihkannya secara berkala.
Lepaskan penutup di bagian belakang mesin dan kemudian lepaskan penutup segel dengan obeng.
Metode 1
Tepuk proyektor dengan ringan.
Metode 2
Gunakan udara dingin untuk
masuk ke dalam port debu.
Method 3
Gunakan kapas penyeka untuk
menghilangkan noda
membandel.
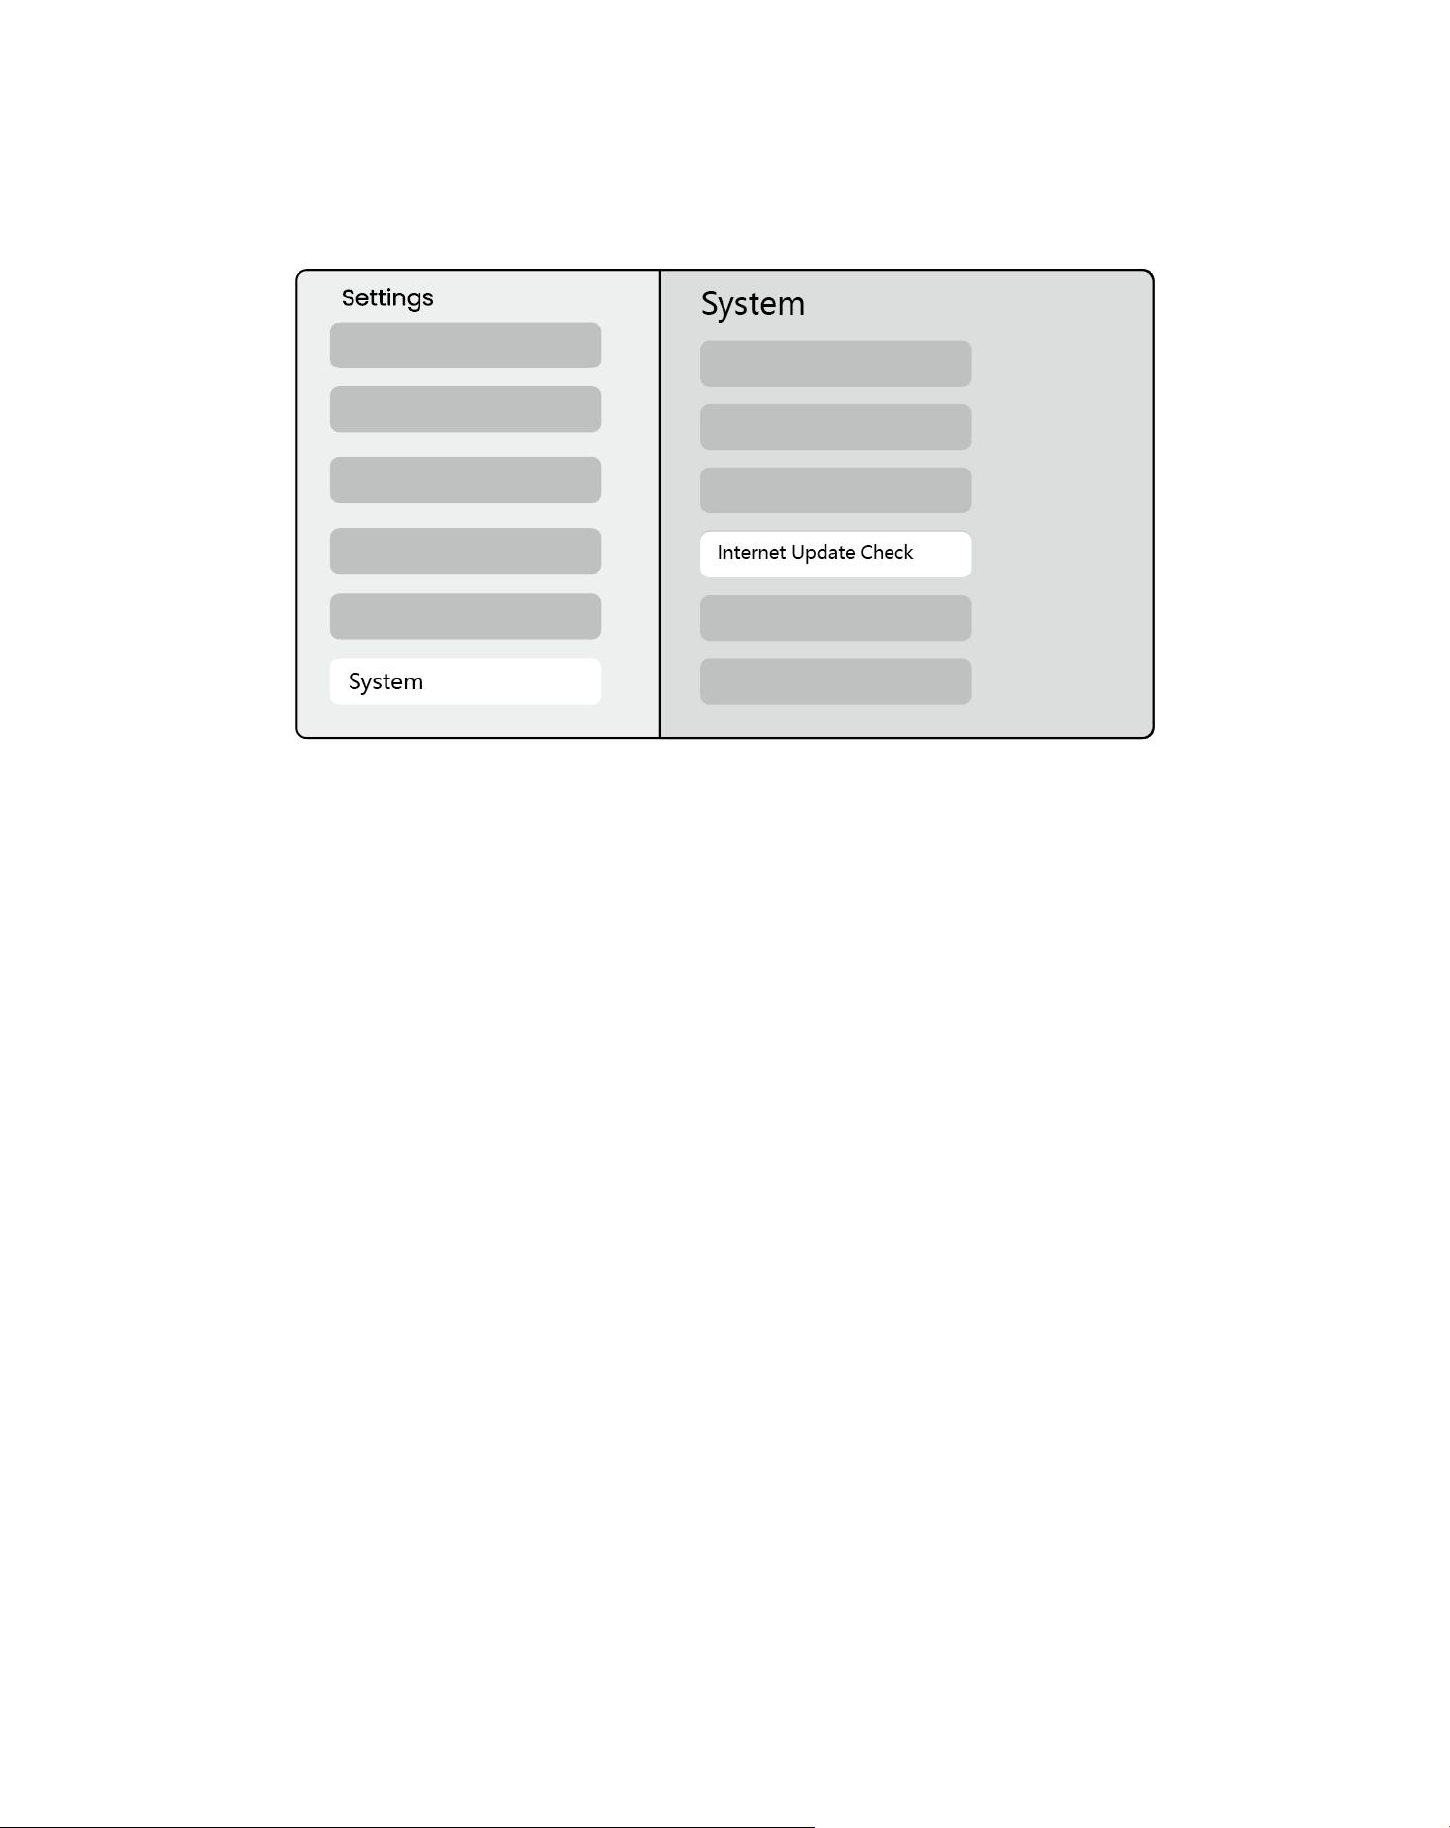
109
Peningkatan sistem
Anda dapat memeriksa status sistem perangkat Anda di [pengaturan]-[Sistem]-[cek pembaruan Internet].
Jika Anda memiliki pertanyaan, jangan ragu untuk menghubungi kami.
✉Support@yaber.com