
US_CA
845-219_845-219V70
IN230200357V065_UK
1
Warning! Danger.
Read the user manual before using the machine
Wear safety goggles to protect your eyes
Wear ear protector to protect against noise
Remove plug from the mains immediately if the cable is damaged or cut.
Do not expose to rain
Hold and operate the saw properly with both hands.
Never cut with the tip of the blade as this may result in kickback and cause personal
in
j
ur
y
Double Insulation.
Waste electrical products must not be disposed of with household waste. This tool
should be taken to
y
our re
cy
clin
g
centre for safe treatment.
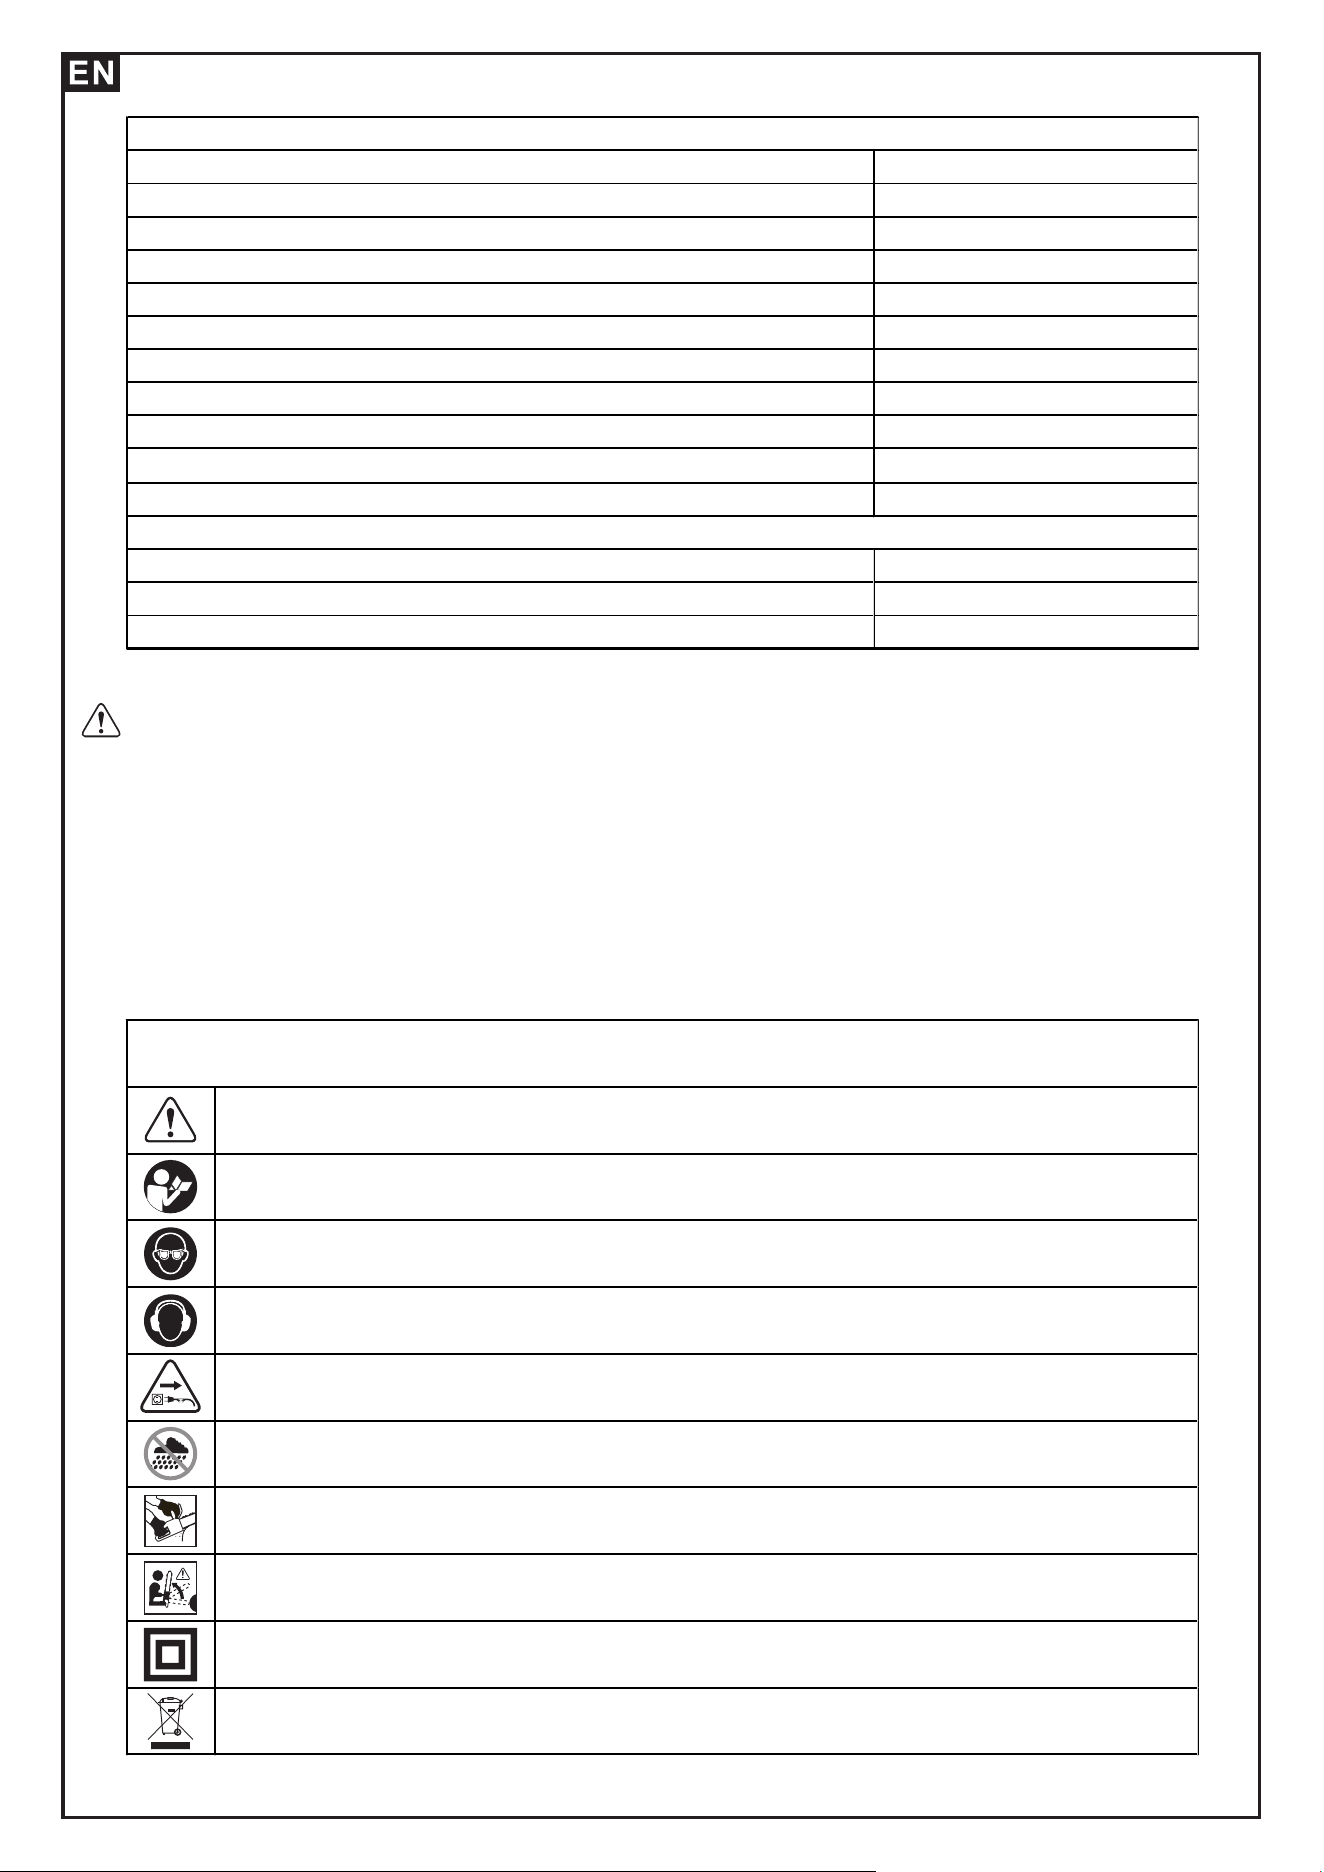
Meaning of symbols marked on the product
Model No. HT7101D16-0
Input 230V 50Hz,2000W
No Land Speed 7000rpm±250rpm
Cutting Speed 13m/sec
Maximum cutting lengths 395mm
Maximum length of the guide bar 460mm
Oil Capacity 110ml
Low Kick-back Chain Type 3/8LP 050 56
Type of Guide Bar ZLA16-56-507P
Braking Time ≤0.12s
Vibration(k=1.5) 8.393m/s²
Operator position sound pressure level(k=) 90.2dB
Measured Sound power level(k=3) 103.2dB
Guaranteed sound power level 107dB
2000/14/EC amended b
y
2005/88/EC
S
p
ecification: Technical Data
Warning!
Read this instruction manual carefully before putting this chain saw into operation
for the first time and strictly comply with the safety rules.
Children and youths are not permitted to operate the chain saw.
Failure to comply can result in accidents involving fire, electric shock, or serious
personal injury. The manufacturer is not responsible for losses and damages
resulting from improper or incorrect usage.

2
GENERAL SAFETY RULES
GENERAL POWER TOOL SAFETY WARNINGS
WARNING: Take care not to expose this tool to rain and remove plug from mains
immediately if the supply cable is damaged.
WARNING! Read all safety warnings and all instructions.
Failure to follow all warnings and instructions may result in electric shock, fire
and/or serious injury.
Save all Warnings and Instructions for future reference.
1. WORK AREA SAFETY
a. Keep work area clean and well lit. Cluttered and dark areas invite accidents.
b. Do not operate power tools in explosive atmospheres, such as in the presence of
flammable liquids, gases or dust.
Power tools create sparks which may ignite the dust or fumes.
c. Keep children and bystanders away while operating a power tool. Distractions
can cause you to lose control.
2.ELECTRICAL SAFETY
a. Power tool plugs must match the outlet. Never modify the plug in any way. Do not
use any adapter plugs with earthed (grounded) power reduce risk of electric shock.
b. Avoid body contact with earthed or grounded surfaces such as pipes, radiators,
ranges and refrigerators. There is an increased risk of electric shock if your body is
earthed or grounded.
c. Do not expose power tools to rain or wet conditions. Water entering a power tool
will increase the risk of electric shock.
d. Do not abuse the cord. Never use the cord for carrying, pulling or unplugging the
power tool. Keep cord away from heat, oil, sharp edges or moving parts. Damaged
or entangled cords increase the risk of electric shock.
e. When operating a power tool outdoors, use an extension cord suitable for
outdoor use. Use of a cord suitable for outdoor use reduces the risk of electric
shock.
f. If operating a power tools in a damp location is unavoidable, use a residual
current device (RCD) protected supply. Use of an RCD reduces the risk of electric
shock.
3.PERSONAL SAFETY
a. Stay alert, watch what you are doing and use common sense when operating a
power tool. Do not use a power tool while you are tired or under the influence of
drugs, alcohol or medication. A moment of inattention while operating power tools
may result in serious personal injury.
b. Use personal protective equipment. Always wear eye protection. Protective
equipment such as dust mask, non-skid safety shoes, hard hat, or hearing
protection used for appropriate conditions will reduce personal injuries.
c. Prevent unintentional starting. Ensure the switch is in the off-position before
connecting to power source and/or battery pack, picking up or carrying the tool.
Carrying power tools with your finger on the switch or energizing power tools that
have the switch on invites accidents.

3
d. Remove any adjusting key or wrench before turning the power tool on. A wrench
or a key left attached to a rotating part of the power tool may result in personal
injury.
e. Do not overreach. Keep proper footing and balance at all times. This enables
better control of the power tool in unexpected situations.
f. Dress properly. Do not wear loose clothing or jewelry. Keep your hair, clothing
and gloves away from moving parts. Loose clothes, jewelry or long hair can be
caught in moving parts.
g. lf devices are provided for the connection of dust extraction and collection
facilities, ensure these are connected and properly used. Use of these devices can
reduce dust related hards.
4. POWER TOOL USE AND CARE
a. Do not force the power tool. Use the correct power tool for your application. The
correct power tool will do the job better and safer at the rate for which it was
designed.
b. Do not use the power tool if the switch doses not turn it on and off. Any power tool
that cannot be controlled with the switch is dangerous and must be repaired.
c. Disconnect the plug from the power source before making any adjustments,
changing accessories, or storing power tools. Such preventive safety measures
reduce the risk of starting the power tool accidentally.
d. Store idle power tools out of the reach of children and do not allow persons
unfamiliar with the power tool or these instructions to operate the power tool. Power
tools are dangerous in the hands of untrained users.
e. Maintain power tools. Check for misalignment or binding of moving parts,
breakage of parts and any other condition that may affect the power tools
operation. If damaged, have the power tool repaired before use. Many accidents
are caused by poorly maintained power tools.
f. Keep cutting tools sharp and clean. Properly maintained cutting tools with sharp
cutting edges are less likely to bind and are easier to control;
g. Use the power tool, accessories and tool bits etc., in accordance with these
instructions and in the manner intended for the particular type of power tool, taking
into account the working conditions and the work to be performed. Use of the power
tool for operations different from intended could result in a hazardous situation.
5.SERVICE
a. Have your power tool serviced by a qualified repair person using only identical
replacement parts. This will ensure that the safety of the power tool is maintained.
CHAIN SAW SAFETY WARNINGS
1.Keep all parts of the body away from the saw chain when the chain saw is
operating. Before you start the chain saw, make sure the saw chain is not
contacting anything. A moment of inattention while operating chain saws may
cause entanglement of your clothing or body with the saw chain.

4
2.Always hold the chain saw with your right hand on the rear handle and your left
hand on the front handle. Holding the chain saw with a reversed hand configuration
increases the risk of personal injury and should never be done.
3.Wear safety glasses and hearing protection. Further protective equipment for
head, hands, legs and feet is recommended. Adequate protective clothing will
reduce personal injury by flying debris or accidental contact with the saw chain.
4. Do not operate a chain saw in a tree. Operation of a chain saw while up in a tree
may result in personal injury.
5.Always keep proper footing and operate the chain saw only when standing on
fixed, secure and level surface. Slippery or unstable surfaces such as ladders may
cause a loss of balance or control of the chain saw.
6.When cutting a limb that is under tension be alert Aor spring back. When the
tension in the wood fibers is released the spring loaded limb may strike the operator
and/or throw the chain saw out of control.
7.Use extreme caution when cutting brush and saplings. The slender material may
catch the saw chain and be whipped toward you or pull you off balance.
8.Carry the chain saw by the front handle with the chain saw switched of and away
from your body. When transporting or storing, the chain saw always fit the guide bar
cover. Proper handling of the chain saw will reduce the likelihood of accidental
contact with the moving saw chain.
9.Follow instructions for lubricating, chain tensioning and changing accessories.
Improperly tensioned or lubricated chain may either break or increase the chance
for kickback.
10.Keep handles dry, clean, and free from oil and grease. Greasy, oily handles are
slippery causing loss of control.
11. Cut wood only. Do not use chain saw for purposes not intended. For example:
do not use chain saw for cutting plastic, masonry or non-wood building materials.
Use of the chain saw for operations different than intended could result in a
hazardous situation.
· CAUSES AND OPERATOR PREVENTION OF KICKBACK
Kickback may occur when the nose or tip of the guide bar touches an object, or
when the wood closes in and pinches the saw chain in the cut. Tip contact in some
cases may cause a sudden reverse reaction, kicking the guide bar up and back
towards the operator.
Pinching the saw chain along the top of the guide bar may push the guide bar
rapidly back towards the operator.
Either of these reactions may cause you to lose control of the saw which could
result in serious personal injury. Do not rely exclusively upon the safety devices
built into your saw. As a chain saw user, you should take several steps to keep your
cutting jobs free from accident or injury.
Kickback is the result of tool misuse and/or incorrect operating procedures or
conditions and can be avoided by taking proper precautions as given below:
·Maintain a firm grip, with thumbs and fingers encircling the chain saw handles, with
both hands on the saw and position your body and arm to allow you to resist
kickback forces. Kickback forces can be controlled by the operator if proper
precautions are taken. Do not let go of the chain saw.
5
· Do not overreach and do not cut above shoulder height. This helps prevent
unintended tip contact and enables better control of the chain saw in unexpected
situations.
·only use replacement bars and chains specified by the manufacturer. Incorrect
replacement bars and chains may cause chain breakage and/or kickback.
·Follow the manufacturer's sharpening and maintenance instructions for the saw
chain. Decreasing the depth gauge height can lead to increased kickback.
·The cord should be positioned so that it will not be caught on branches and the
like, during cutting.
·Recommendation that the first-time user should, as a minimum practice, cut logs
on a saw-horse or cradle.
WARNING: the vibration emission during actual use of the power tool can differ
from the declared total value depending on the way the machine is operated.
WARNING: avoid vibration risk suggestion:
1) wear glove during operation;
2) limit operating time and shorten trigger time.
IMPORTANT SAFETY
HOW TO READ SYMBOLS AND COLORS
WARNING: RED Used to warn that an unsafe procedure should not be perform
GREEN RECOMMENDED
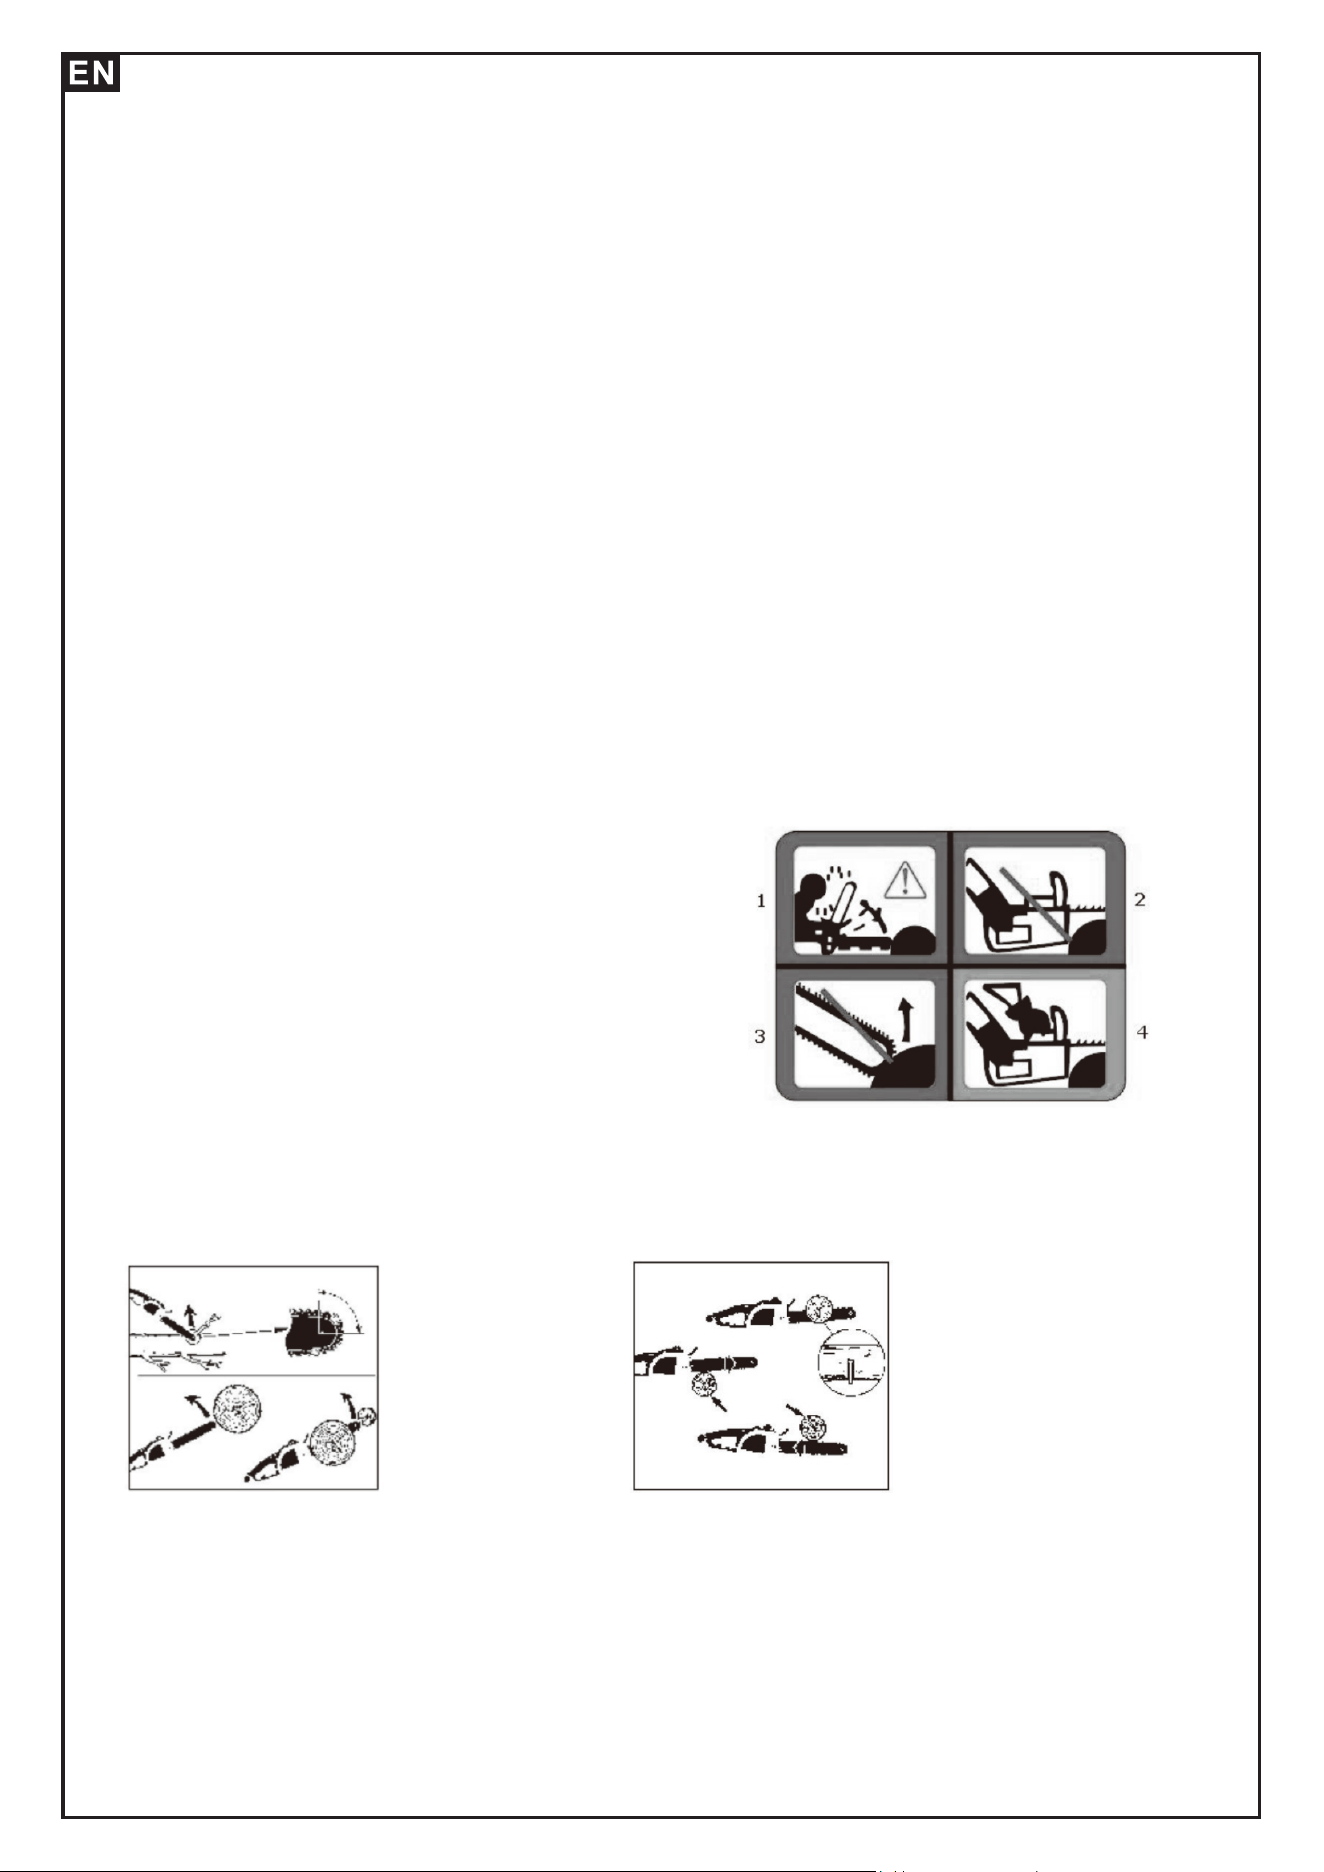
Recommended cutting procedure
WARNING
1:Beware of kick back.
2.Do not attempt to hold saw with one hand
3.Avoid bar nose contact
RECOMMENDED
4.Hold Saw properly with both hands
DANGER! BEWARE OF KICKBACK
WARNING: Kickback can lead to dangerous loss of control of the chain saw and
result in serious or fatal injury to the saw operator or to anyone standing close by.
Always be alert because rotational kickback and pinch kickback are major chain
saw operational dangers and the leading cause of most accidents
KICKBACK may occur when the NOSE or TIP of the guide bar touches an object, or
when wood closes in and pinches the saw chain in the cut
TIP contact in some cases may cause a lightning-fast reverse reaction, kicking the
guide bar up and back toward the operator PINCHING the saw chain along the
BOTTOM of the guide bar may PULL the saw forward, away form the operator.
PINCHING the saw chain along the TOP of guide bar may PUSH the guide bar
rapidly back toward the operator. Any of these reactions may cause you to lose
control of the saw ,which could result in serious personal injury.
BEWARE OF:
ROTATIONAL
KICKBACK
THE PUSH(PINCH
KICKBACK) AND PULL
REACTIONS
6
Chain saw Installation and chain tensioning.
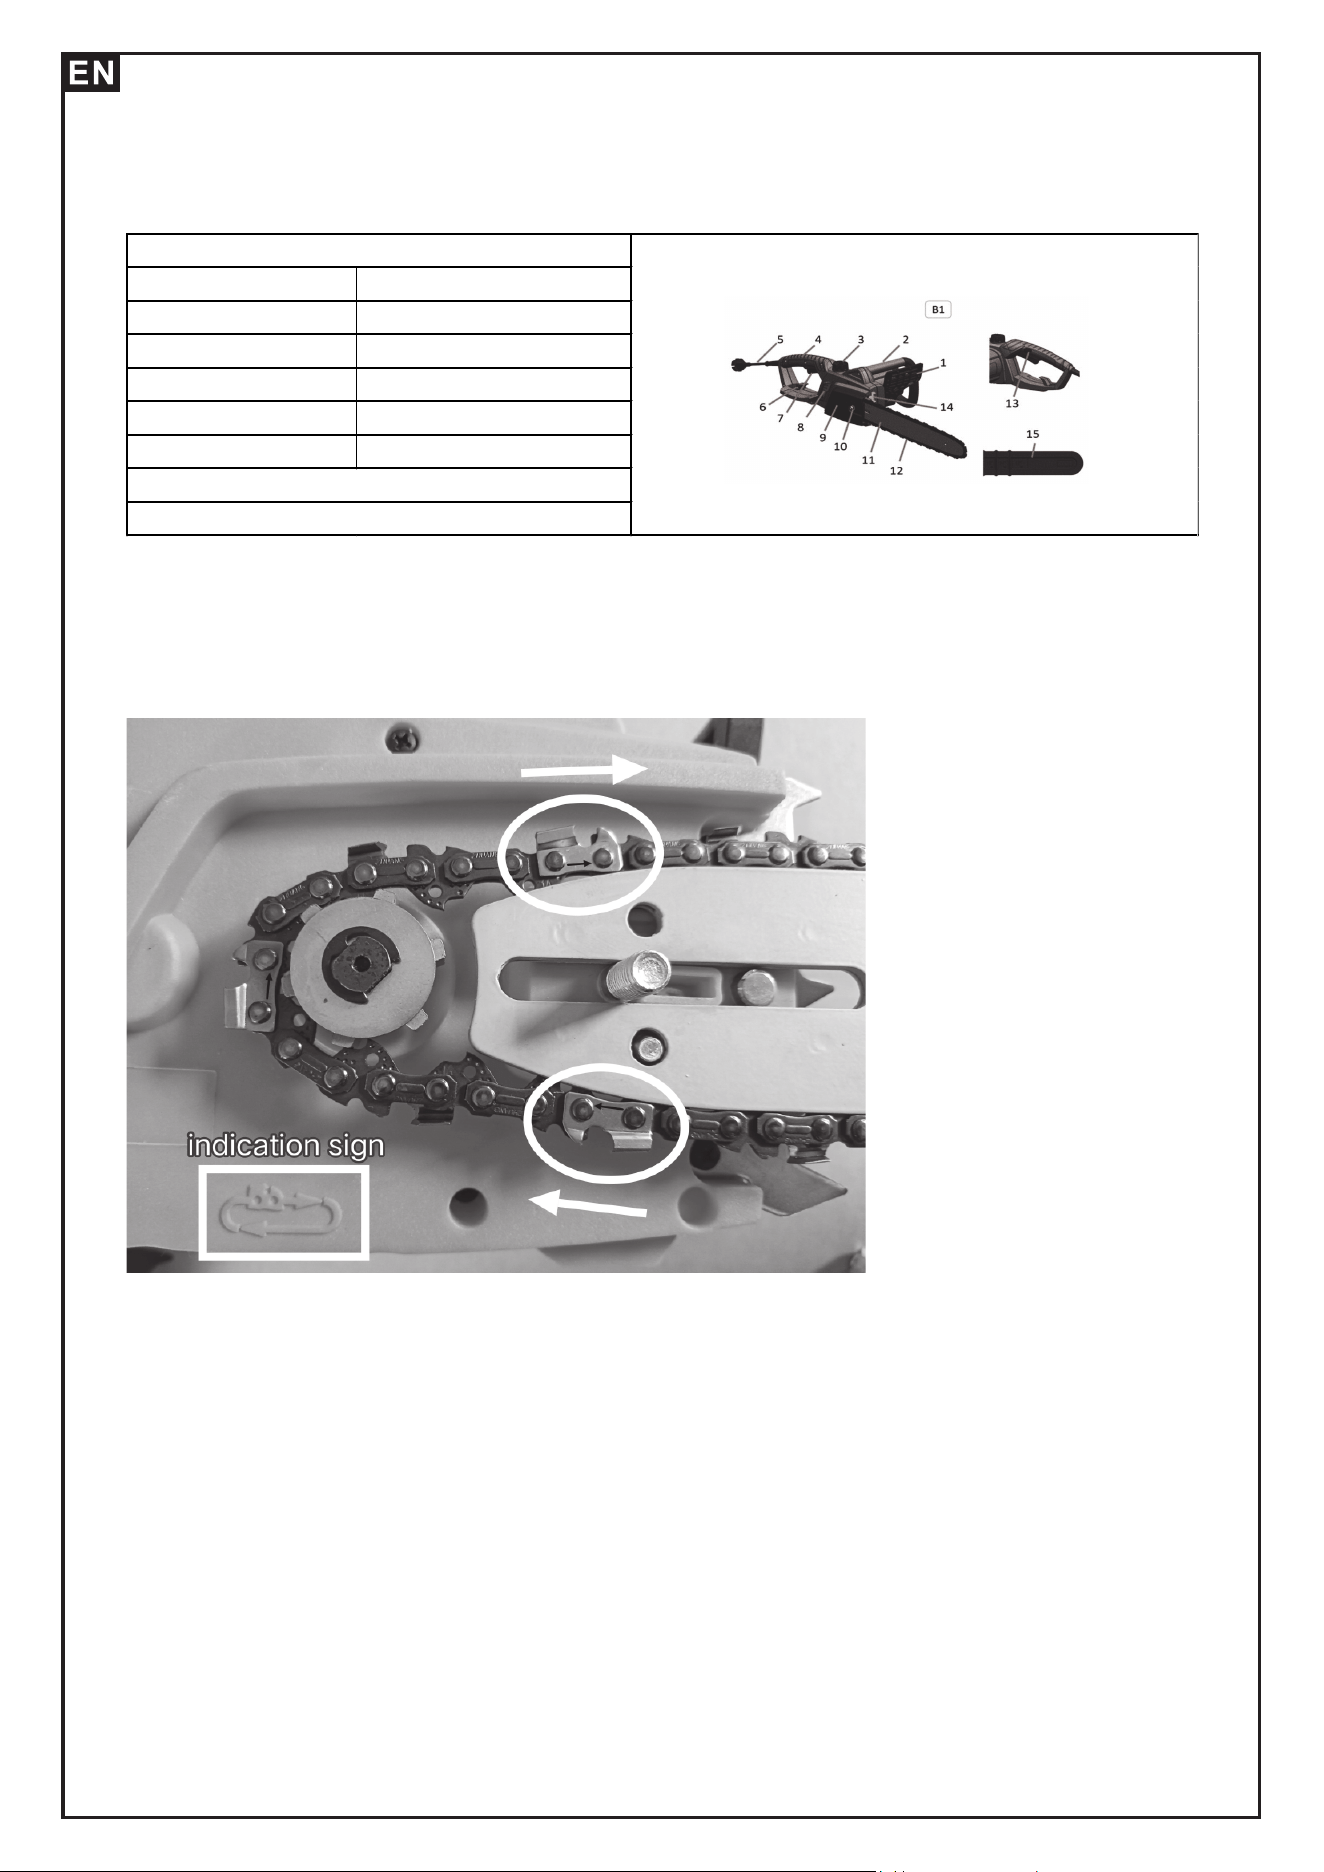
Denomination of Components and Installation of guide bar and chain(Without tool
less tension adjustment)
2 Front handle 10 Cover Screw
3 Oil tank cap 11 Guide bar
4 Real handle 12 Saw chain
5 Electric cord 13 Switch lock button
6 Cord retainer 14 Spike bar
7 Trigger Start 15 Guide bar Cover
8 Oil Tank Inspection
1 Hand guard(release for chain brake)
9 Sprocket Cover
Seat the chain into the guiding groove on the guide bar. The correct seating
direction is indicated on the chain saw. Check that the saw teeth are facing in the
correct direction.
7
Chain saw Installation and chain tensioning.
Always pull out the power supply plug and wear protective gloves before doing any
work on chain saw!
7)Remove the guide bar cover by turning the guide bar cover screw (10) to the left.
8)Set the saw chain over the guide bar (NOTE: saw teeth must point forward the tip
of sword)
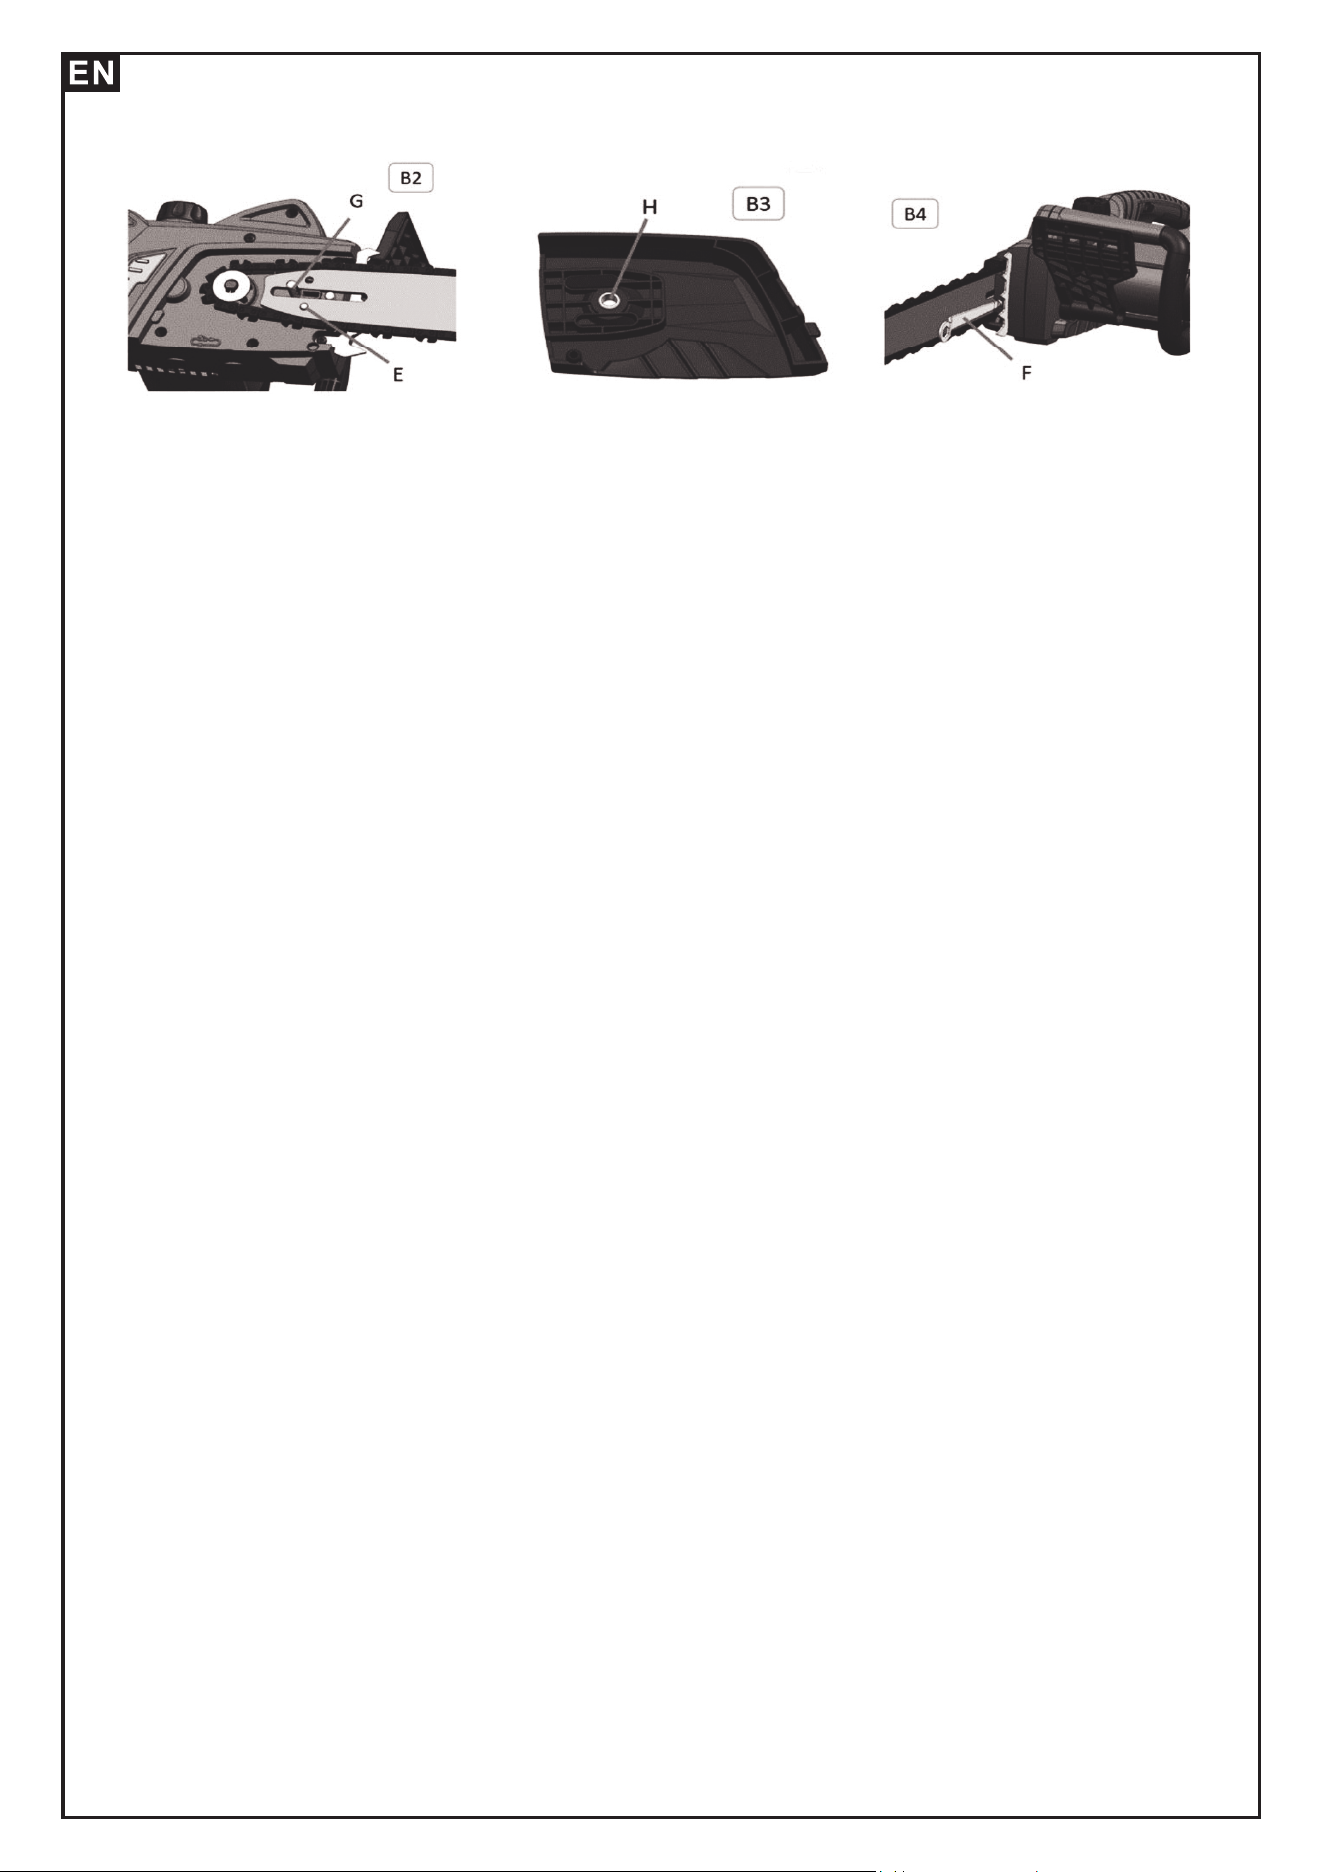
9) Place the guide bar with saw chain on the guiding bolt (G).
10) Set the guide bar cover back in place (NOTE: make sure guiding bolt (G) fx in
the screw hole (H)and the adjust pin (F) fit into the tensioning hole (E)on the guide
bar.), and lightly attach it by turning the guide bar cover screw (10) to the right.
11) Tensioning the saw chain by using the supplied spanner (B4).
12)Set the supplied screw tightly on the left(G).
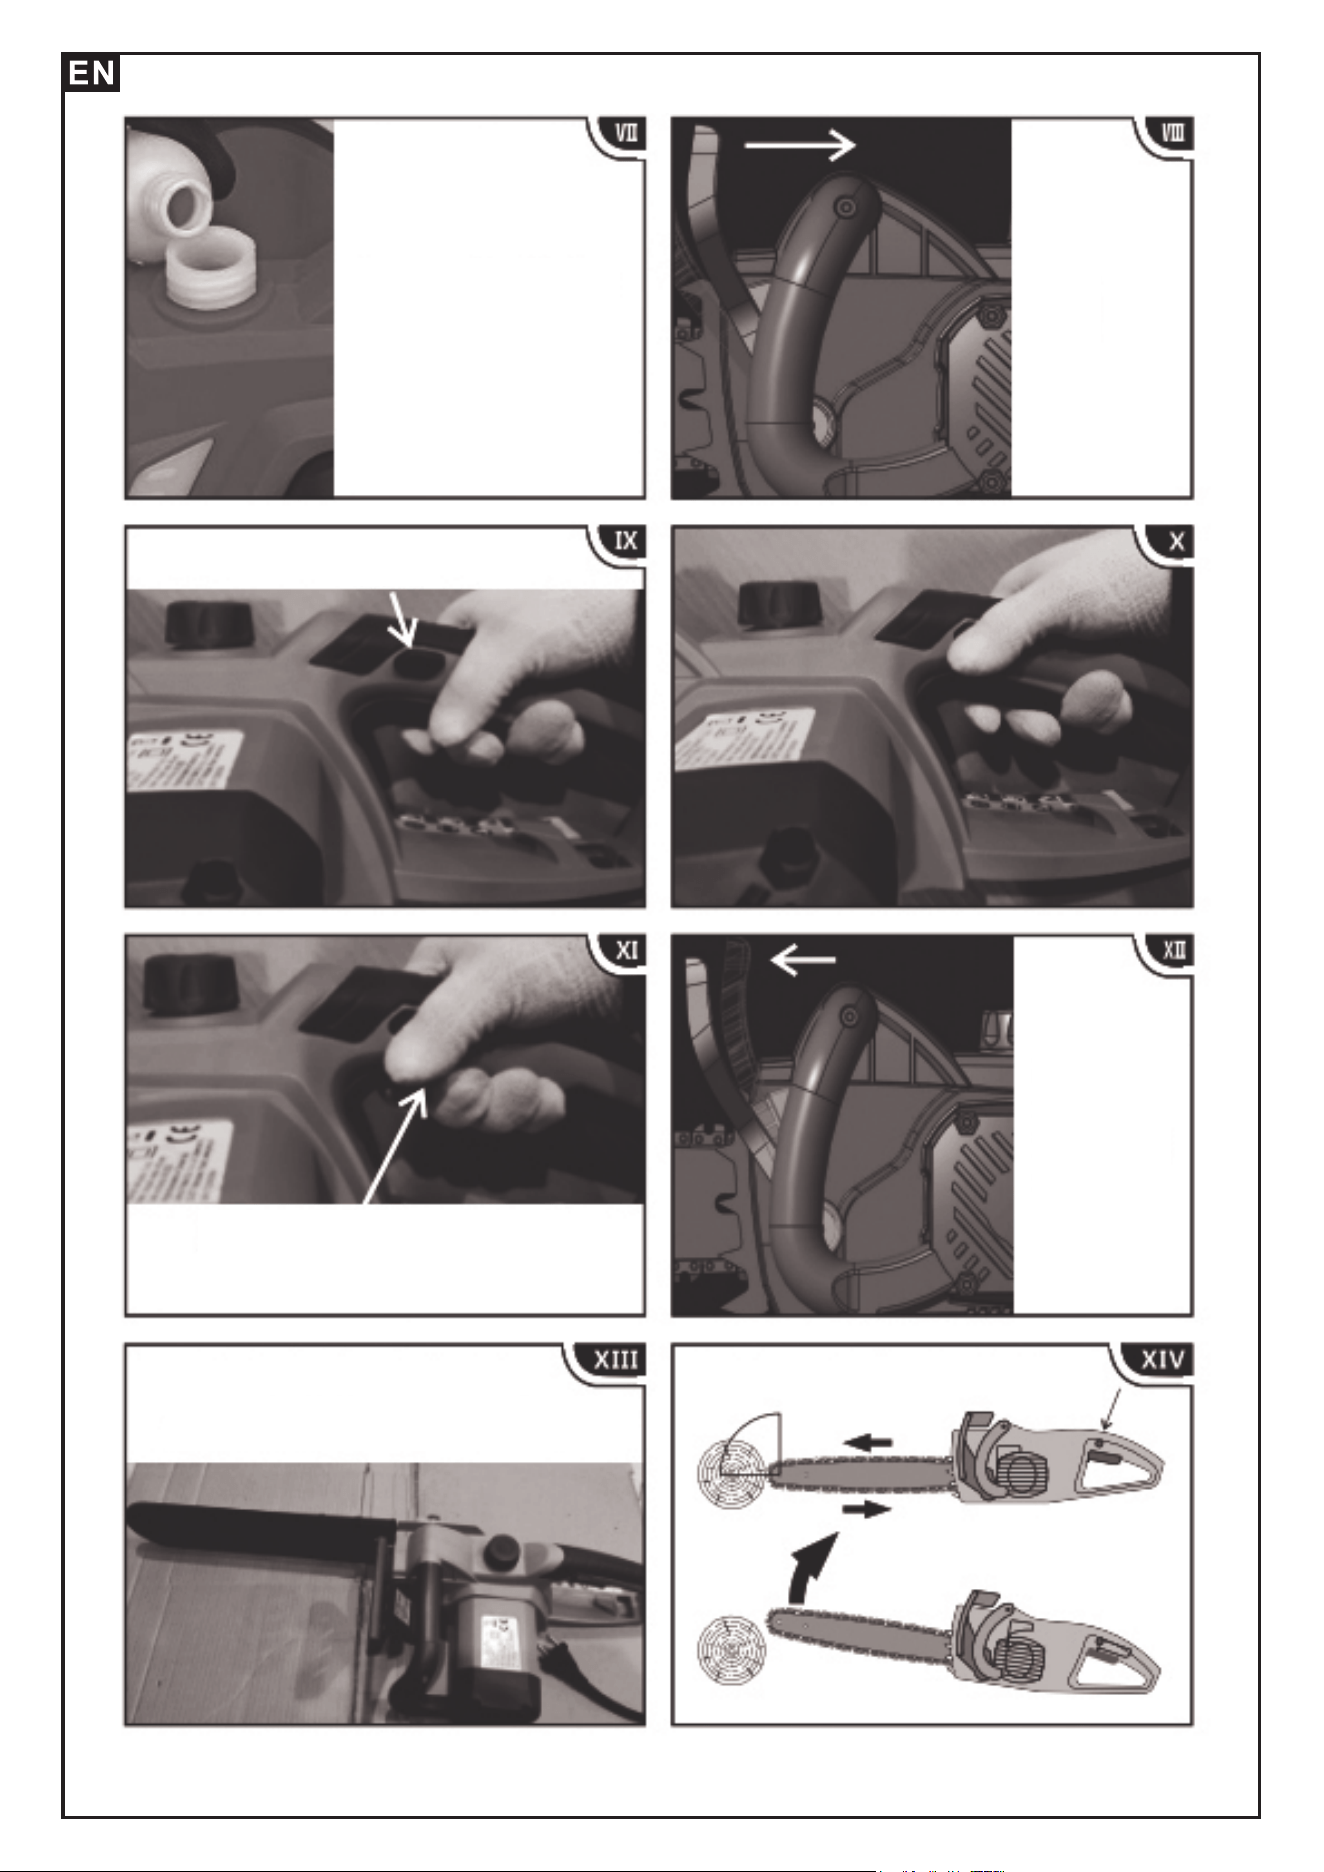
Switching on/Switch off
The mains voltage must match the voltage on the rating plate of the chain saw. Hold
the chain saw with both hands when starting up and during operation.
Switch on - Press the switch lock button (13), and then power switch (7).
In case the chain saw does not start, release the brake lever (1).
switch off- release pressure on the switch (7).
Operating the Chain Saw
Before starting to cut, pull the brake lever (front hand guard) back towards the front
handle.
Before plugging in, check the plug and cable for damage.
lf damage is discovered, have it repaired by a specialist immediately. Never use a
damaged cable, connection or plug or a power cable which does not comply with
the requirements.
The power cable must always behind the chain saw operator.
8
Please add
lubricating oil
before use. Do
not use without
lubricant.
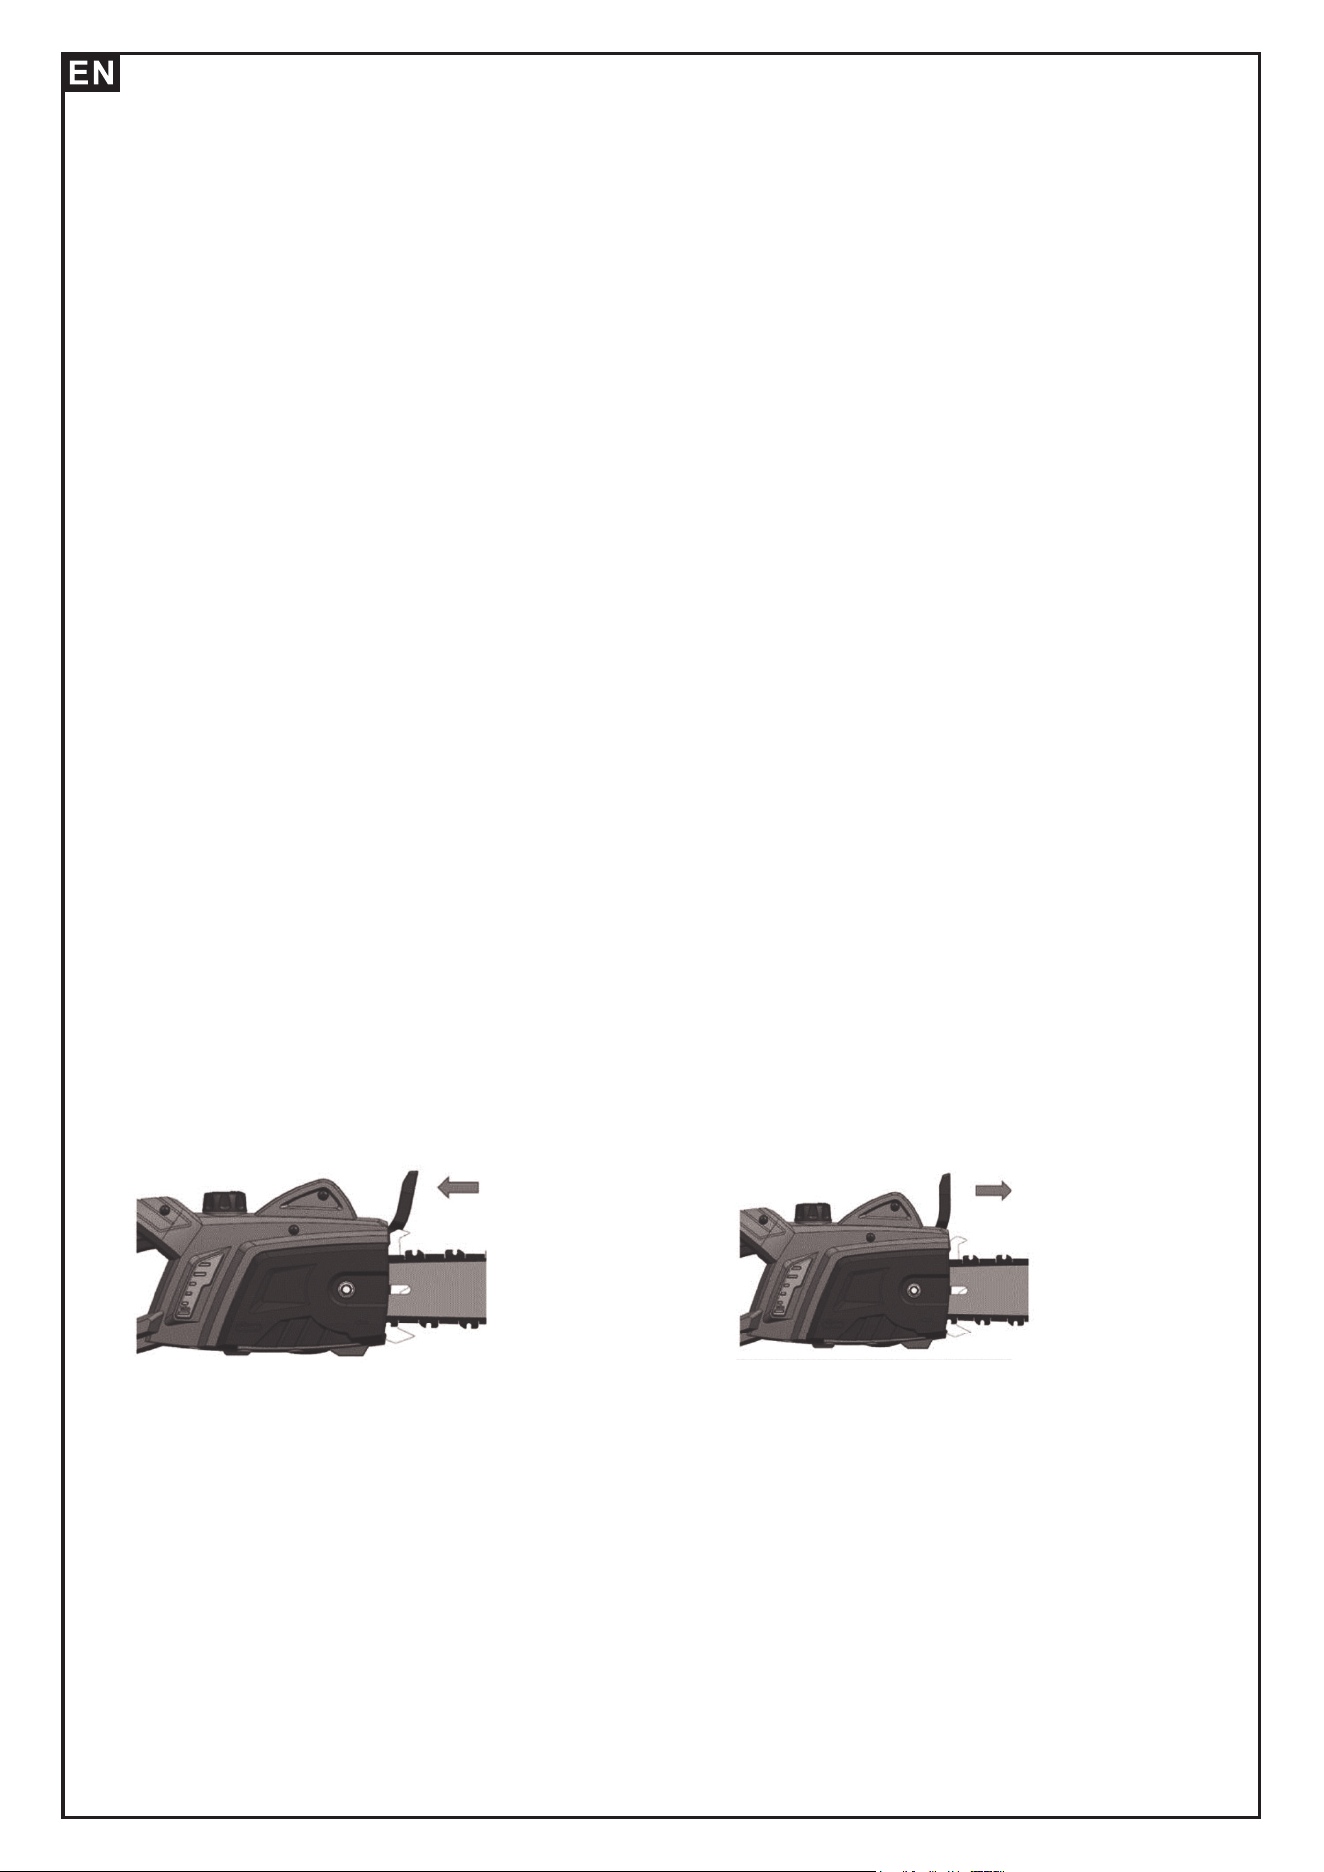
Push back.
Push
Push
forward
When not
in use.
Start working after pressing
Protect the knife set when not
in use.
9
Always start cutting with the chainsaw already switched on. When starting the saw,
its cutting chain must not rest on the processed material.
Move chain saw away from the material being cut only when the cutting chain is
working.
In case the cut cannot be completed in one run, slide the saw out, position the
bumper spike and continue the cut by lifting rear handle.
Switch off the chain saw engine before releasing the chain brake.
Do not let the chain saw touch the ground when it is running.
The saw heats considerable during operation. Be careful and do not touch hot parts
if the saw with unprotected parts of your body.
Always stand to the side of predicted fall line of the tree that is to be cut.
When performing several cuts, the chain saw must be switched off in between.
CHAIN BRAKE/ HAND GUARD
CAUTION: A loose chain can jump off the bar while you are cutting, as well as wear
the bar and chain. A chain that is too tight can damage the saw. Either situation,
chain too loose or too tight, could cause serious personal injury.
All chain saws are equipped with a Chain brake / Hand guard which stops a moving
chain in milliseconds, helping to reduce the hazard of kickback, a fast upward
motion of the guide bar which occurs when the saw chain at the nose of the bar
accidentally strikes an object or is pinched in the cut.
The Hand Guard also protects your left hand in the event it slips off the front handle.
The chain brake is a safety feature which is activated if pressure is applied against
the guard or when, in the event of kickback, the operator's hand strikes the lever.
When the chain brake is activated, chain movement abruptly stops and the power
supply to the motor is immediately cut off.
The purpose of the chain brake is to reduce the possibility of injury due to kickback.
The chain brake cannot, however, provide the measure of intended protection if the
saw is carelessly operated.
The chain brake is disengaged (chain can move) when the brake is pulled back and
locked. This is the normal running position (Fig.1A).
The chain brake is engaged (chain cannot move) when the brake is in forward
position(Fig.1B).
NOTE: The motor will not start if the chain brake is in the engaged position.
CAUTION: The chain brake should not be used for starting and stopping the saw
during normal operation.
CHAIN BRAKE TEST
Before cutting with your saw, the chain brake should be tested as follows:
A. Make sure the chain brake is disengaged (Fig. 1A).
B. Place the saw on a firm, fat, dry surface that is clear of any debris. Do not let the
saw come in contact with any objects.
C. Plug the unit into the power source.
D. Grasp the front handle(not the Chain Brake/Hand Guard Lever) with your left
hand. Thumb and fingers should encircle the handle.
E. Grasp the rear handle with your right hand. Thumb and fingers should encircle
the handle.
Fig.1A Fig.1B
10
F. Depress the LOCK/OFF button with your right thumb. Squeeze the trigger with
your index finger.
G While the motor is running; activate the chain brake by rolling your left hand
forward against the lever.
H. Chain and motor should stop abruptly.
WARNING: If the chain and motor fail to stop when the chain brake is engaged, take
the saw to the nearest professional Service Center. Do not use the saw if the chain
brake is not in proper working order.
GENERAL CUTTING INSTRUCTION
FELLING
Felling is the term for cutting down a tree. Small trees up to 15-18cm in diameter
are usually cut in a single cut. Larger trees require notch cuts. Notch cuts
determine the direction the tree will fall.
FELLING A TREE:
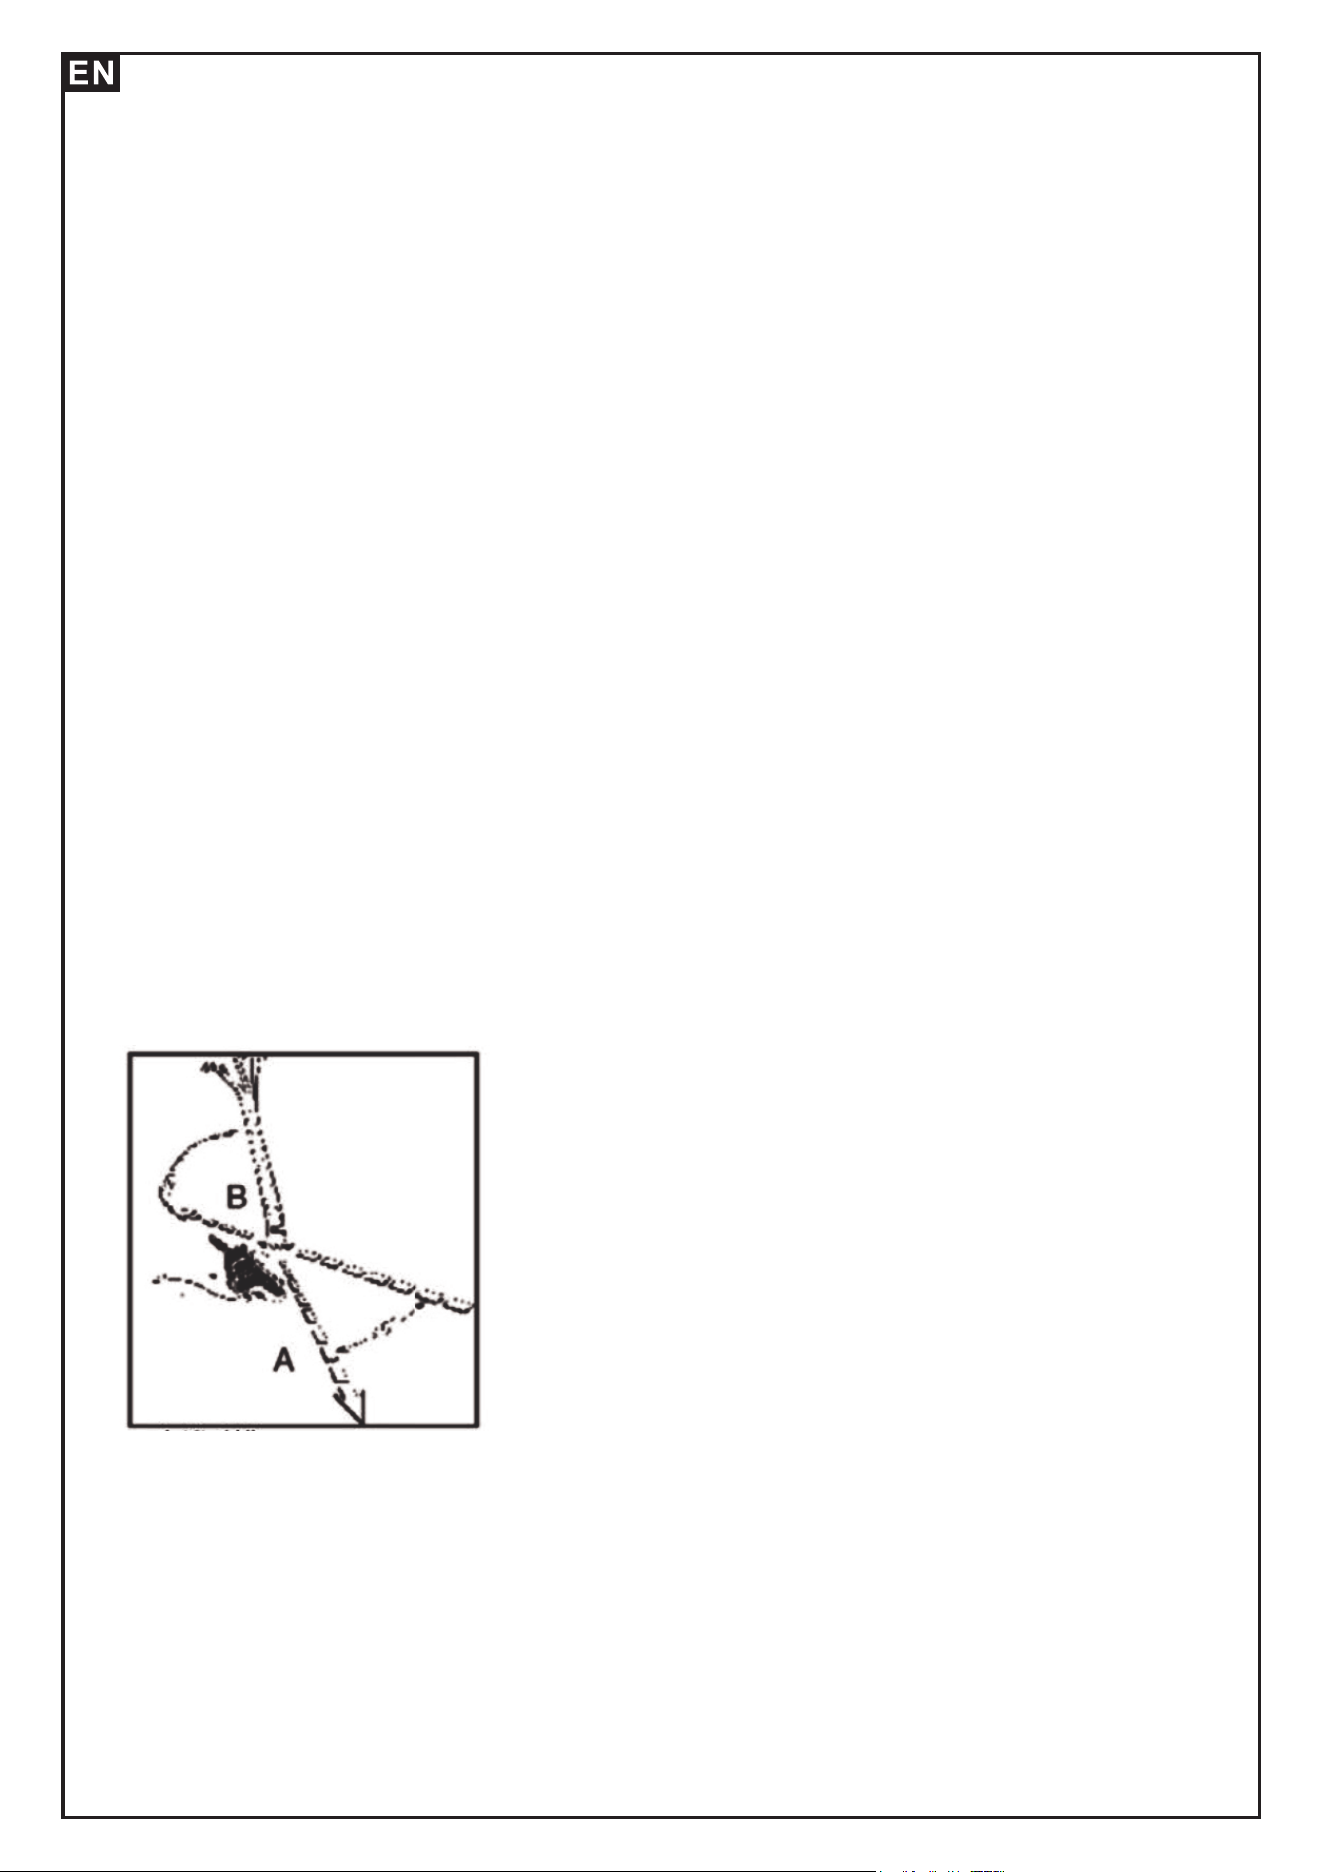
WARNING: A retreat path (A) should be planned and cleared as necessary before
cuts are started. The retreat path should extend back and diagonally to the rear of
the expected line of fall, as illustrated in Fig. 2.
WARNING: If felling a tree on sloping ground, the chain saw operator should keep
on the uphill side of the terrain, as the tree is likely to roll or slide downhill after it is
felled.
NOTE: Direction of fall(B) is controlled by the notching cut. Before any cuts are
made, consider the location of larger branches and natural lean of the tree to
determine the way the tree will fall.
WARNING: Do not cut down a tree during high or changing winds or if there is a
danger to properly.
Consult a tree professional. Do not cut down a tree if there is a danger of striking
utility wires; notify the utility company before making any cuts.
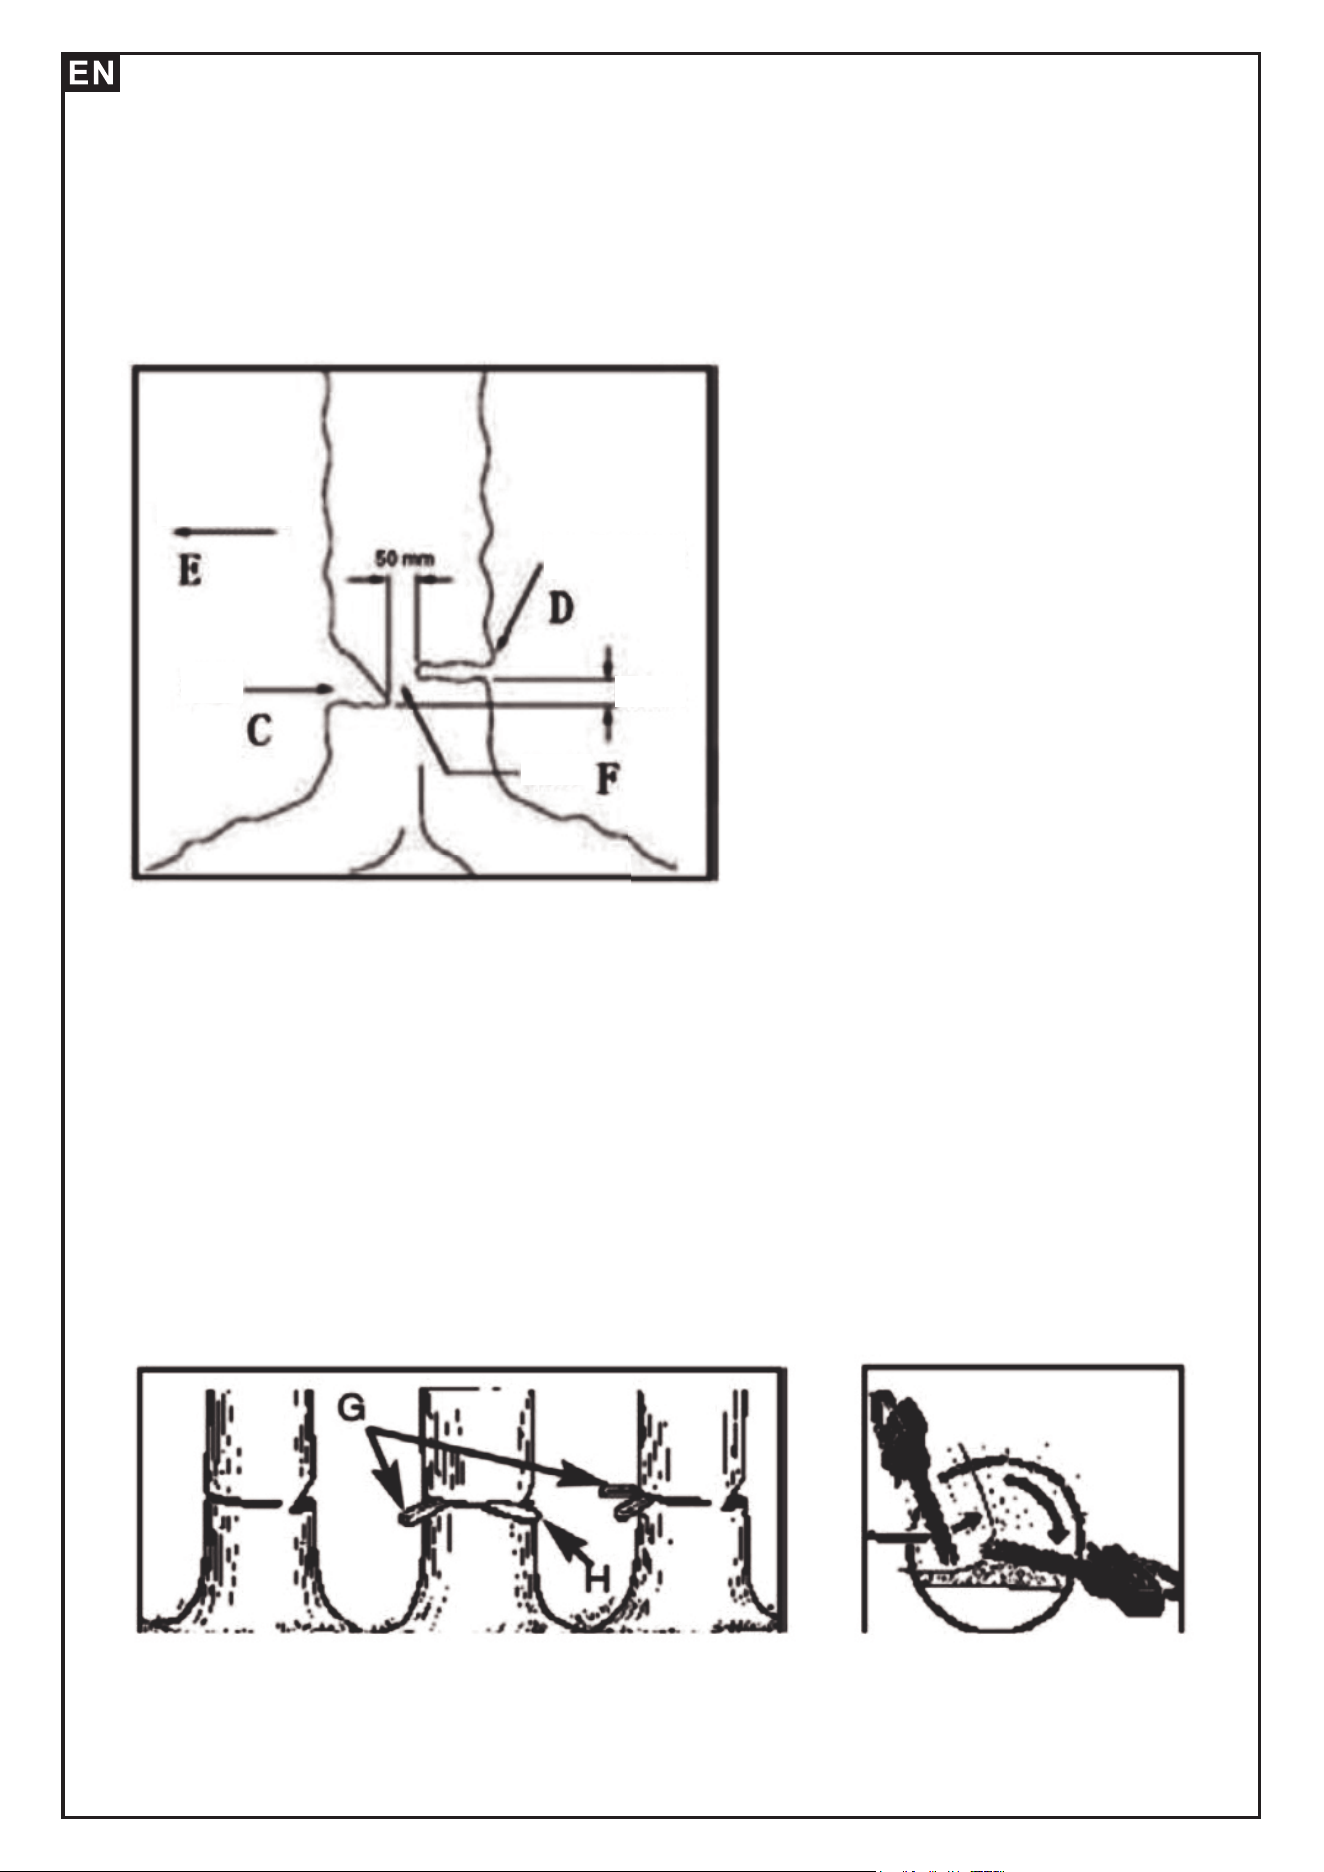
GENERAL GUIDELINES FOR FELLING TREES
Normally felling consists of 2 main cutting operations, notching (C) and making the
felling cut (D).Start making the upper notch cut (C) on the side of the tree facing the
felling direction (E)
Be sure you don't make the lower cut too deep into the trunk.
Fig.2A
11
The notch (C) should be deep enough to create a hinge (F) of sufficient width and
strength.
The notch should be wide enough to direct the fall of the tree for as long as
possible.
WARNING: Never walk in front of a tree that has been notched. Make the felling cut
(D) from the other side of the tree and 3-5cm above the edge of the notch (C) (Fig.
2B)
Never saw completely through the trunk. Always leave a hinge. The hinge guides
the tree. If the trunk is completely cut through, control over the felling direction is
lost.
Insert a wedge or felling lever in the cut well before the tree becomes unstable and
starts to move. This will prevent the guide bar from binding in the felling cut if you
have misjudged the falling direction. Make sure no bystanders have entered the
range of the falling tree before you push it over.
FELLING CUT:
1.Use wooden or plastic wedges (G) to prevent binding the bar or chain (H) in the
cut. Wedges also control felling (Fig. 2C).
2. When diameter of wood being cut is greater than the bar length, make 2 cuts as
shown (Fig. 2D).
Fig.2B
Fig. 2D
Fig. 2C
direction of tall
felling back cut
notch
50mm
hinge
12
WARNING: As the felling cut gets close to the hinge, the tree should begin to fall.
When tree begins to fall, remove saw from cut, unplug, put chain saw down, and
leave area along retreat path (Fig.2A).
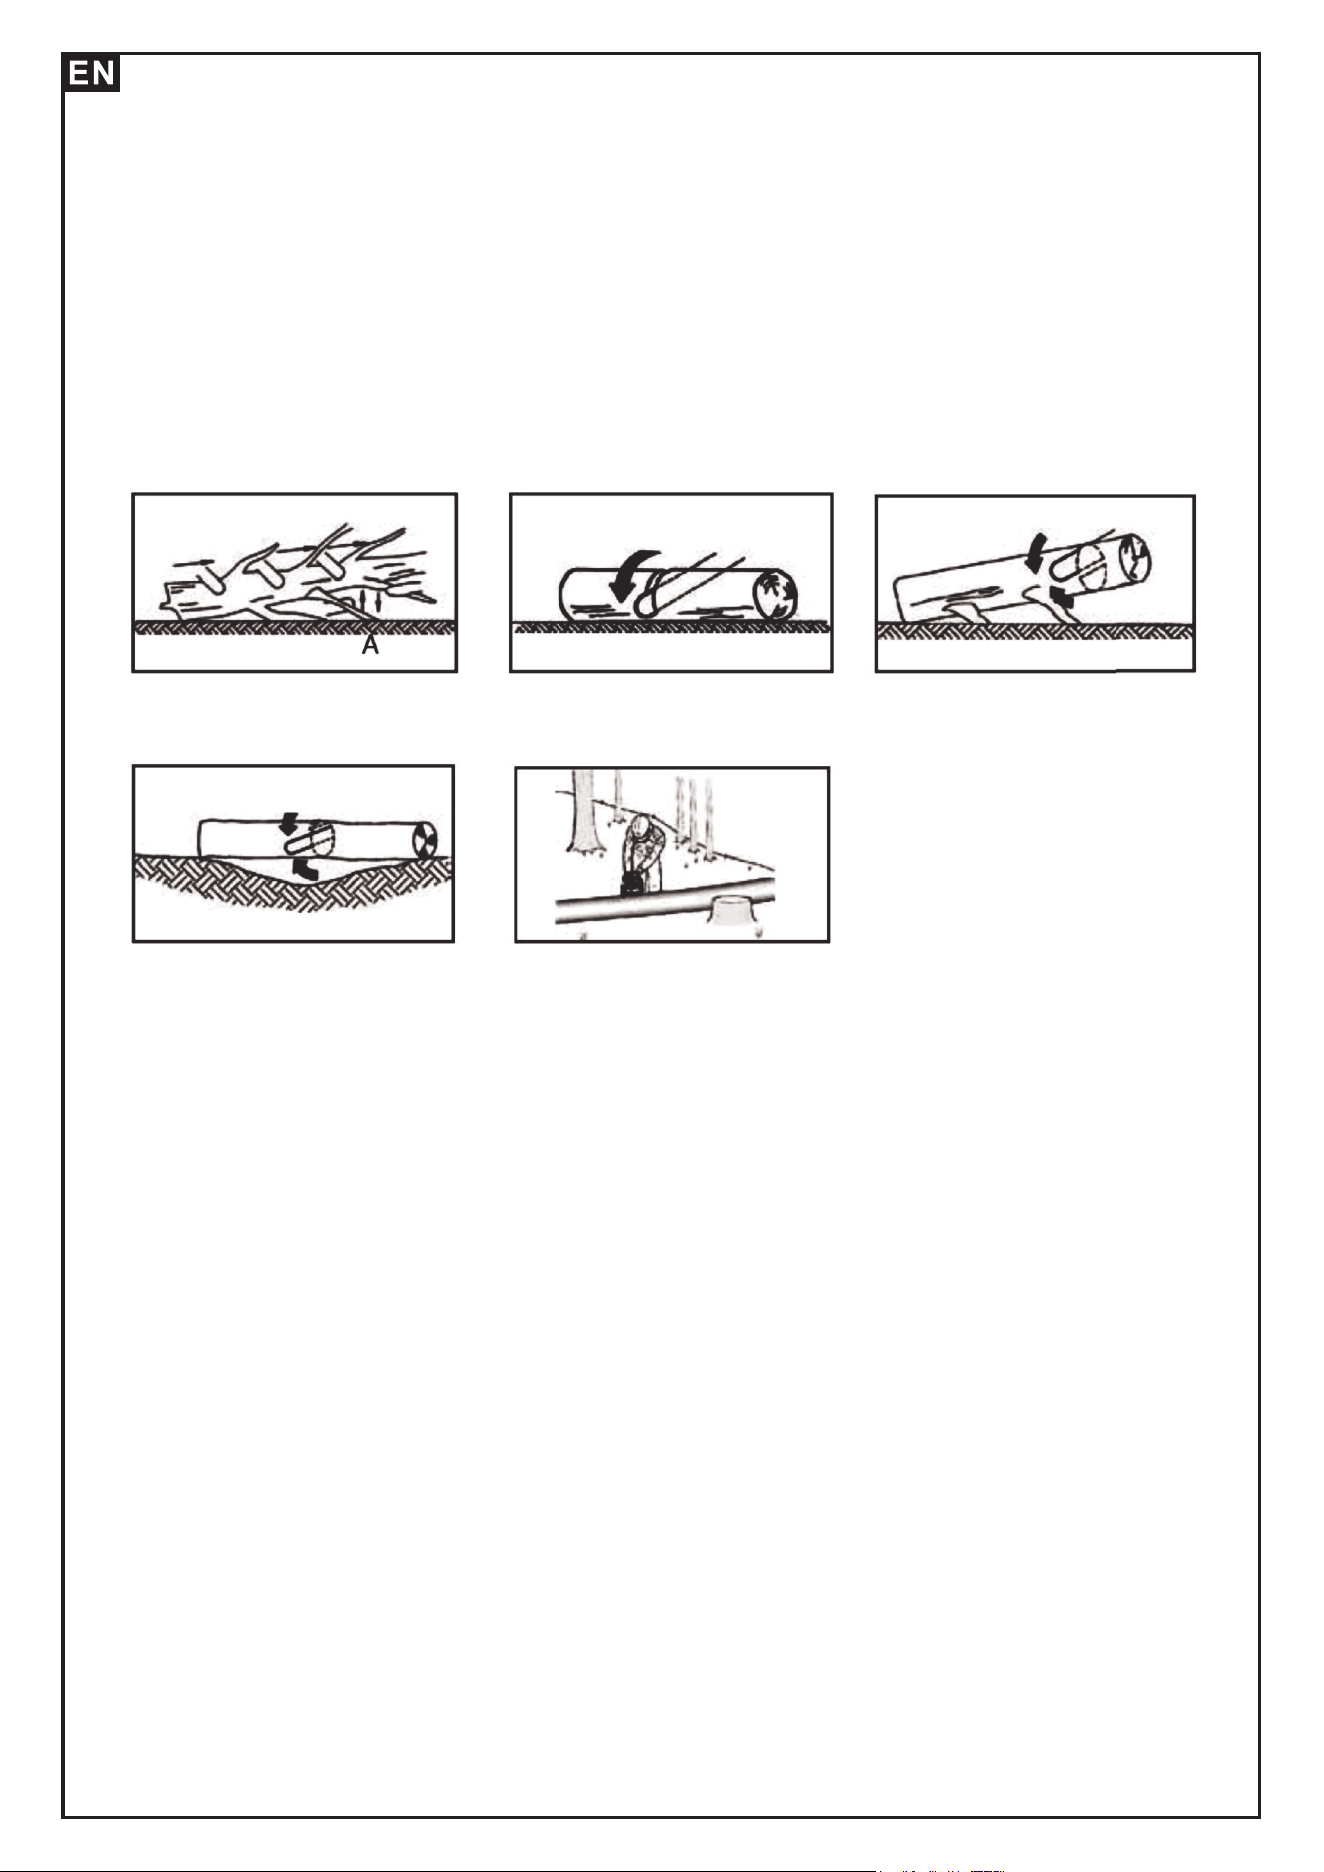
LIMBING
Limbing a tree is the process of removing the branches from a fallen tree. Do not
remove supporting limbs (A) until after the log is bucked(cut) into lengths
(Fig.3).Branches under tension should be cut from the bottom up to avoid binding
the chain saw.
WARNING: Never cut tree limbs while standing on tree trunk.
BUCKING
Bucking is cutting a fallen log into lengths. Make sure you have a good footing and
stand uphill of the log when cutting on sloping ground. If possible, the log should be
supported so that the end to be cut off is not resting on the ground . if the log is
supported at both ends and you must cut in the middle, make a downward cut
halfway through the log and then make the undercut. This will prevent the log from
pinching the bar and chain. Be careful that the chain does not cut into the ground
when bucking as this causes rapid dulling of the chain.
When bucking on a slope, always stand on the uphill side.
1.Log supported along entire length: Cut from top (over buck), being careful to
avoid cutting into the ground(Fig.4A).2.Log supported on 1 end: First, cut from
bottom (under buck)1/3 diameter of log to avoid splintering. Second, cut from
above (over buck) to meet first cut and avoid pinching (Fig. 4B).
3.Log supported on both ends: First, over buck 1/3 diameter of log to avoid
splintering. Second, under buck to meet first cut and avoid pinching (Fig. 4C).
4.When bucking on a slope always stand on the uphill side of the log, as illustrated
in Fig.4D.When“cutting through”, to maintain complete control release the cutting
pressure near the end of the cut without relaxing your grip on the chain saw
handles. Dont let the chain contact the ground. After completing the cut, wait for the
saw chain to stop before you move the chain saw. Always stop the motor before
moving from tree to tree.
NOTE: The best way to hold a log while bucking is to use a sawhorse. When this is
not possible, the log should be raised and supported by the limb stumps or by
using supporting logs. Be sure the log being cut is securely supported.
Fig.4C
Fig.4D
Fig.3
Fig.4A
Fig.4B
13
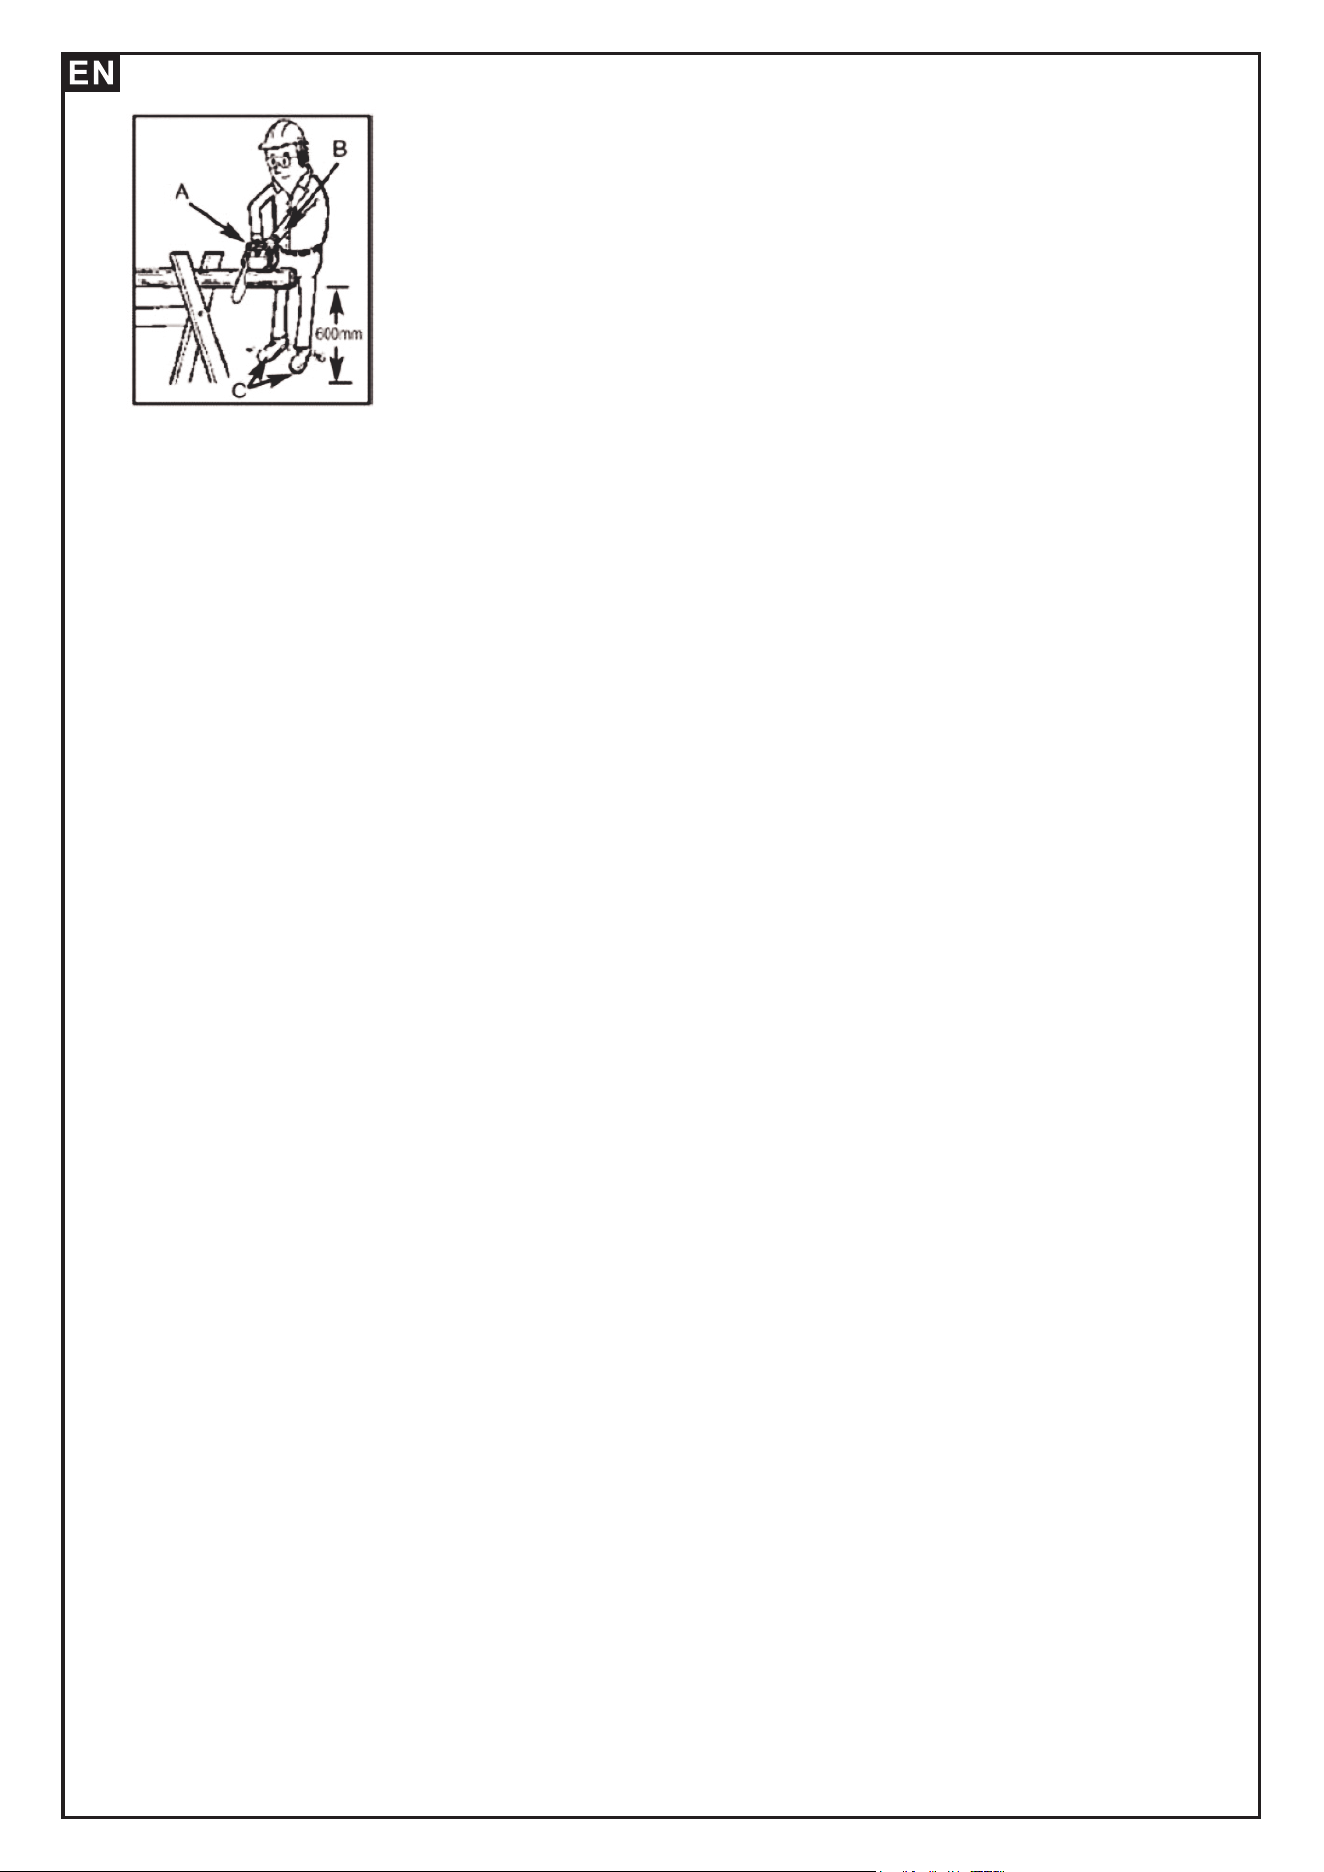
BUCKING USING A SAWHORSE
For personal safety and ease of cutting, the correct position for vertical bucking is
essential (Fig.5).
VERTICAL CUTTING:
A. Hold the saw firmly with both hands and keep the saw to the right of your body
while cutting.
B. Keep the left arm as straight as possible.
C. Keep weight on both feet.
CAUTION: While the saw is cutting, be sure the chain and bar are being properly
lubricated. Bar/ Chain Maintenance
GUIDE BAR MAINTENANCE
WARNING: Ensure that the power cord is disconnected before performing any
maintenance on your saw.
Proper maintenance of the guide bar, as explained in this section, is essential to
keep your saw in good working order.
SPROCKET TIP LUBRICATION:
CAUTION: Failure to lubricate the guide bar sprocket tip as explained below will
result in poor performance and seizure, voiding the manufacturer's warranty.
(For units supplied with sprocket tip guide bars only.) Lubrication of the sprocket tip
is recommended after each saw use. Always thoroughly clean the guide bar
sprocket tip before lubrication.
Tool for lubrication: Talon Lube Gun (disposable)
This grease gun is designed to fit the small lubrication point on the guide bar. The
disposable Lube Gun is packed with grease.
TO LUBRICATE SPROCKET TIP:
WARNING: Wear heavy duty work gloves when performing this application to
reduce risk of personal injury.
1.Unplug the chain saw from the power source.
NOTE: lt is not necessary to remove the saw chain to lubricate the guide bar
sprocket tip. Lubrication can be done on the job.
2.Clean the guide bar sprocket tip.
3.Using disposable Lube gun, insert needle nose into the lubrication hole and inject
grease until it appears at the outside edge of the sprocket tip (Fig.6).
4.Make sure that the chain brake is deactivated. Rotate the saw chain by hand.
Repeat the lubrication procedure until the entire sprocket tip has been greased.
Fig.5
14
. GUIDE BAR MAINTENANCE
Most guide bar problems can be prevented merely by keeping the chain saw well
maintained. Incorrect fling and non-uniform cutter and depth gauge settings cause
most guide bar problems, primarily resulting in uneven bar wear. As the bar wears
unevenly, the rails widen, which may cause chain clatter and difficulty in making
straight cuts.
Insufficient guide bar lubrication and operating the saw with a chain that is TOO
TIGHT will contribute to rapid bar wear (see Section CHAIN MAINTENANCE
INSTRUCTIONS).
To help minimize bar wear, the following guide bar maintenance is recommended.
GUIDE BAR - The bar should be reversed every 8 working hours to ensure uniform
wear.
Keep the bar groove and lubrication hole clean using the bar groove cleaner
supplied optional. (Fig.7A)
Check the bar rails frequently for wear and, if necessary, remove the burs and
square-up the rails using the flat fie (Fig.7B).
WARNING: Never mount a new chain on a worn sprocket or self-aligning ring.
Fig.6
Fig. 7BFig. 7A
BAR WEAR-Turn guide bar frequently at regular intervals (for example, after 5
hours of use) to ensure even wear on top and bottom of bar.
BAR GROOVES - Bar grooves (or rails which support and carry the chain) should
be cleaned if the saw has been heavily used or if the saw chain appears dirty. Rails
should always be cleaned every time the saw chain is removed.
OIL PASSAGES - Oil passages at bar pad should be cleaned to ensure proper
lubrication of the bar and chain during operation. This can be done using a soft wire
small enough to insert into the oil discharge hole.
NOTE: The condition of the oil passages can be easily checked. If the passages are
clear, the chain will automatically give off a spray of oil within seconds of starting
the saw. Your saw is equipped with an automatic oiler system
15
CHAIN MAINTENANCE INSTRUCTIONS
WARNING:
Unless you have experience and specialized training for dealing with kickback (see
Safety Precautions), always use a low-kickback saw chain, which significantly
reduces the danger of kickback. Low-kickback saw chain does not completely
eliminate kickback. A low-kickback or "safety 1chain", should never be regarded as
total protection against injury.
A low-kickback saw chain should always be used in conjunction with other kickback
protection devices such as the chain brake/Hand Guard furnished with your unit.
Always use a replacement saw chain designed as “Tow-kickback" or a saw chain
which meets the low-kickback performance.
A standard saw chain (a chain which does not have the kickback reducing guard
links) should only be used by an experienced professional chain saw operator.
WARNING: Always wear protective gloves during maintenance operations. Do not
carry out maintenance when the engine is hot.
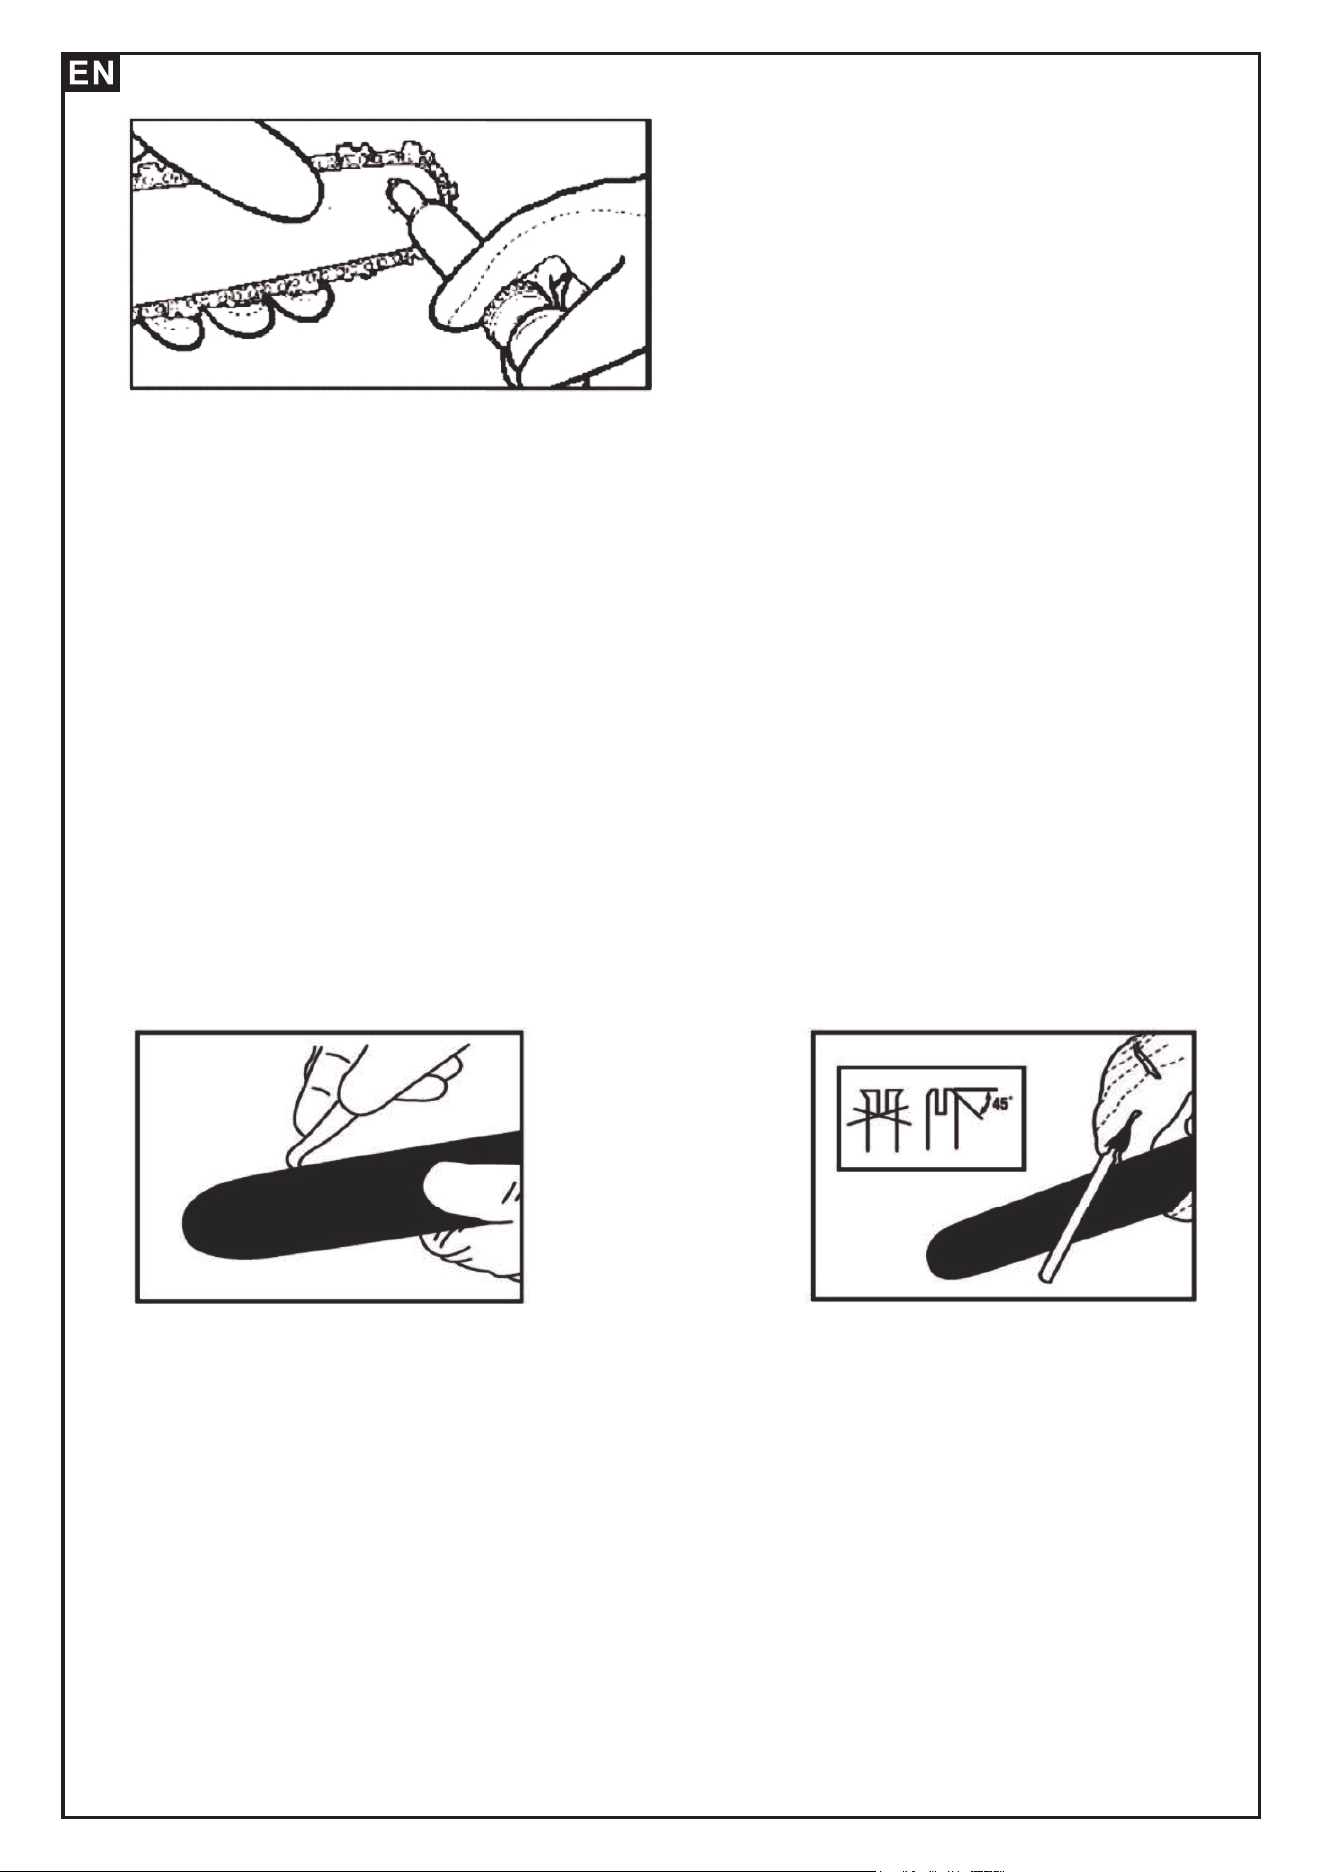
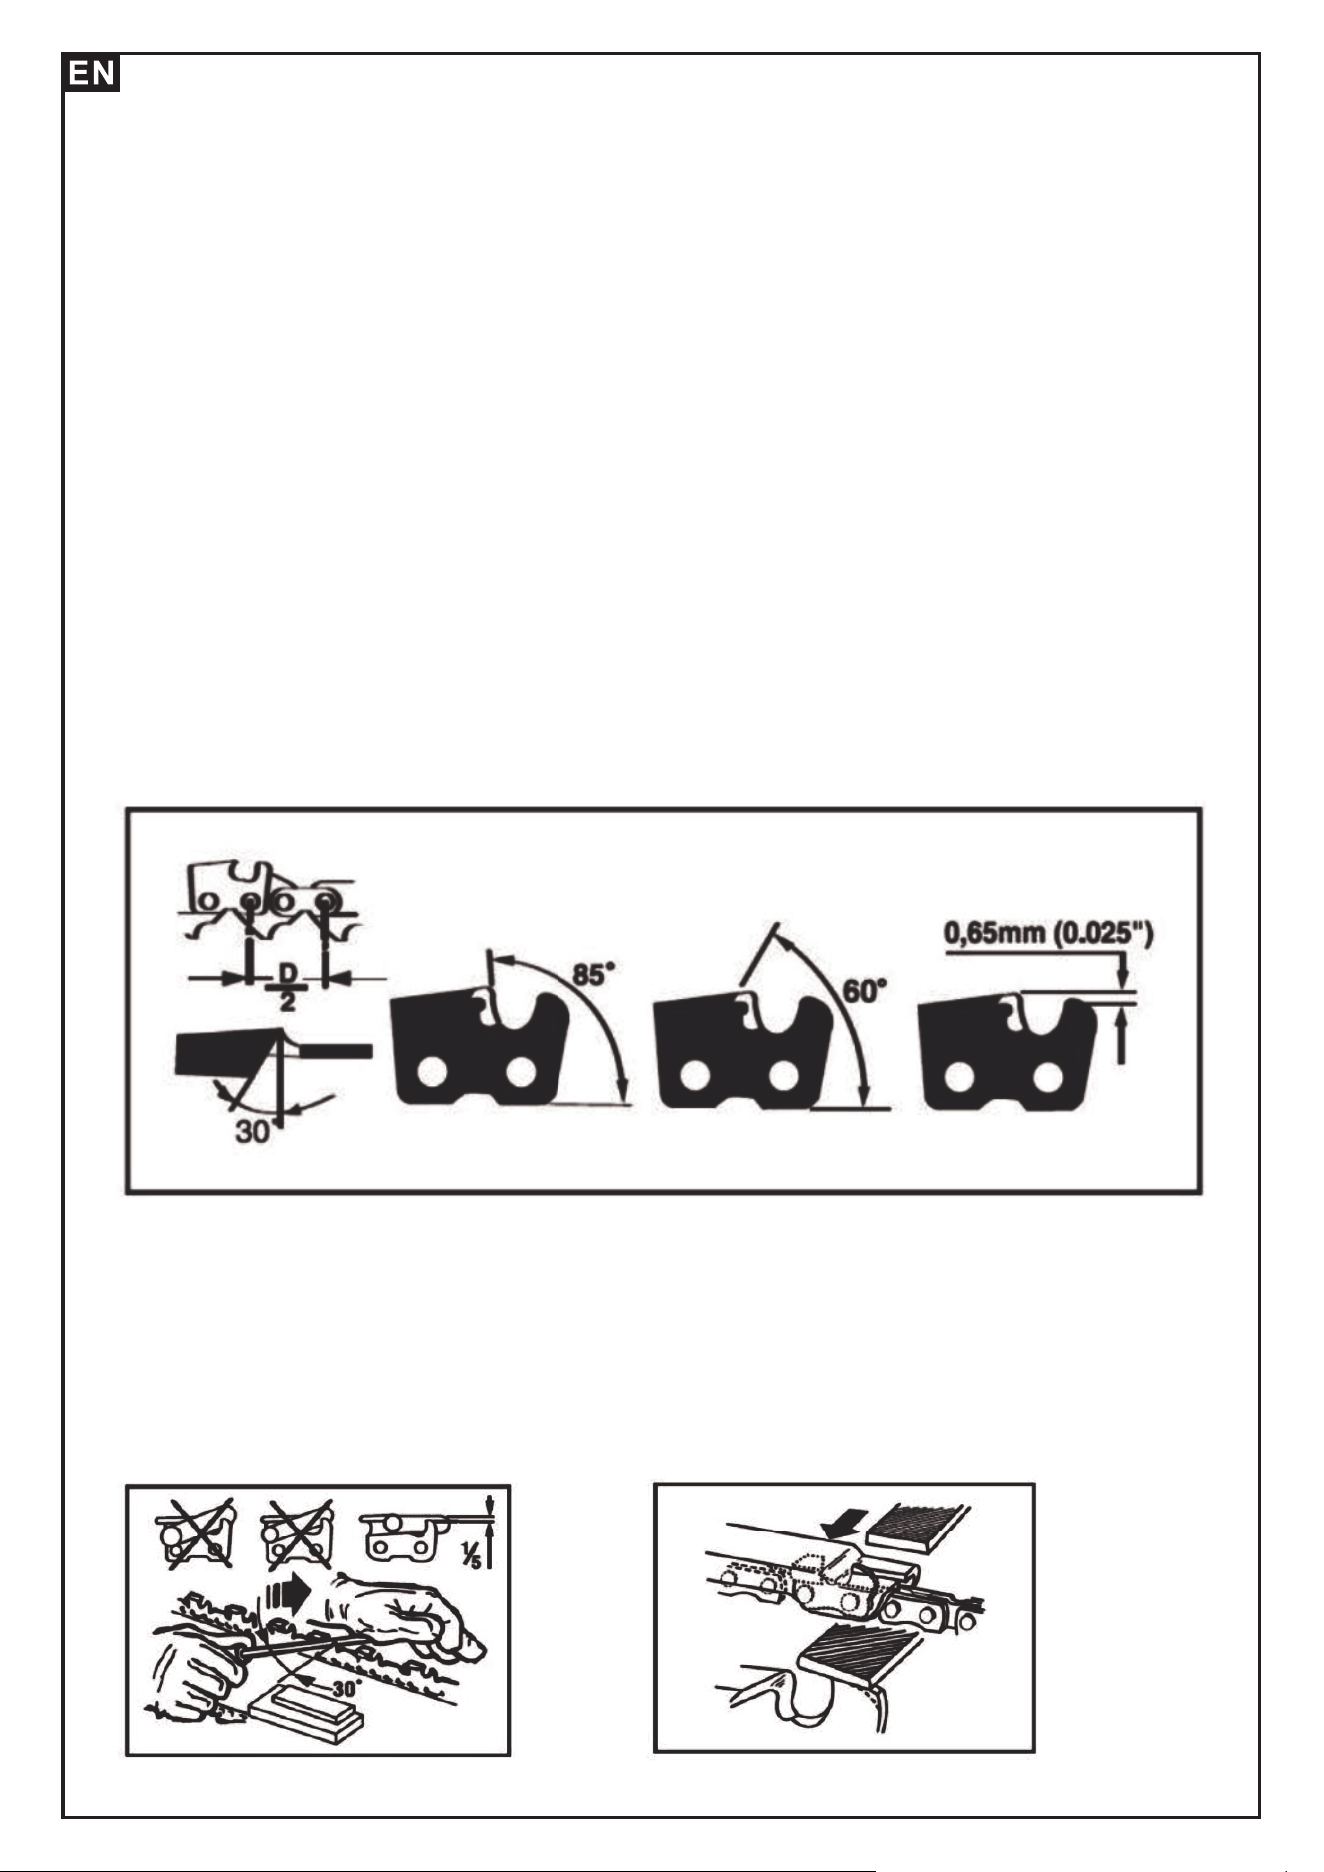
CHAIN SHARPENING - The pitch of the chain (Fig. 8) is 3/8”LoPro x .050".
Sharpen the chain using protective gloves and a round file of φ3/16" (4.8mm).
Always sharpen the cutters only with outward strokes (Fig.9) observing the values
given in Fig. 8.
After sharpening, the cutting links must all have the same width and length.
WARNING: A sharp chain produces welldefined chips. When your chain starts to
produce sawdust, it is time to sharpen.
After every 3-4 times the cutters have been sharpened you need to check the height
of the depth gauges and, if necessary lower them using the flat file and template
supplied optional, then round off the front corner.(Fig.10)
WARNING: Proper adjustment of the depth gauge is as important as proper
sharpening of the chain.
Fig.9
Fig.10
Fig.8

16
WHAT IS A LOW-KICKBACK SAW CHAIN?
A low-kickback saw chain is a chain which has met the kickback performance
requirements of lS0 9518. By keeping the chain brake and saw chain in good
working condition and correctly serviced as recommended in this manual, you will
be able to maintain the safety system of your chain saw over the life of the product.
WARNING: Never remove, modify or make inoperative any safety device furnished
with your unit. The Chain Brake/Hand Guard and low-kickback saw chain are major
safety features provided for your protection.
WARNING: Always wear heavy duty protection work gloves and disconnect the
extension cord when working on the saw chain.
CHAIN TENSION
Check the chain tension frequently and adjust as often as necessary to keep the
chain snug on the bar, but loose enough to be pulled around by hand.(See Section
SAW CHAIN TENSION ADJUSTMENT).
BREAKING IN A NEW SAW CHAIN
A new chain and bar will need readjustment after as few as 5 cuts. This is normal
during the break-in period, and the interval between future adjustments will begin
to lengthen quickly.
Over a period of time, however, the moving parts of the saw chain will become
worn, resulting in what is called CHAIN STRETCH. This is normal. When it is no
longer possible to obtain correct chain tension adjustment, a link will have to be
removed to shorten the chain.
WARNING: Never have more than 3 links removed from a loop of chain this could
cause damage to the sprocket.
CHAIN LUBRICATION
Always make sure the automatic oiler system is working properly.
Keep the oil tank filled with Talon Chain, Bar and Sprocket Oi.
Adequate lubrication of the bar and chain during cutting operations is essential to
minimize friction with the guide bar.
Never starve the bar and chain of lubricating oil. Running the saw dry or with too
little oil will decrease rapid cutting efficiency, shorten saw chain life, cause rapid
dulling of the chain, and lead to excessive wear of the bar from overheating. Too
little oil is evidenced by smoke or bar discoloration.
PREVENTATIVE MAINTENANCE
SERVICING A DOUBLE INSULATED APPLIANCE
In this double insulated appliance, 2 systems of insulation instead of grounding, are
provided. No grounding means is provided on a double insulated appliance, nor
should a means for grounding be added to the appliance. No serviceable parts are
inside. A double insulated appliance is marked with the words, “DOUBLE
INSULATION” or “DOUBLE INSULATED".The symbol (a square within a
square) may also be marked on the appliance.
17
1.Place switch in OFF position and unplug the power supply before the appliance is
serrviced, cleaned, or maintenance is performed.
2.Keep the air intake clean and air vents free of debris to avoid overheating the
motor.
3.Clean with a damp sponge and mild soap. Do not squirt with a water hose or
douse with water or other liquids.
4. Inspect the saw chain for proper tension before each use and frequently during
cutting. Sharpen as required.
5.Clean the guide bar and bar pad to ensure free path for oil.
6.Turn the bar over after each use to achieve even wear.
7.No motor lubrication is necessary. The motor is equipped with lifetime lubricated
bearings.
8.If the saw does not operate, turn switch to OFF position and disconnect the
extension cord, first from the power supply, then from the saw. Check the power
supply for blown fuses or tripped circuit breakers. lf it still does not operate, contact
the Product Service Department, through the toll-free number listed on the back
cover of this manual, for service information. Do not attempt to repair it yourself.
No serviceable parts are inside.
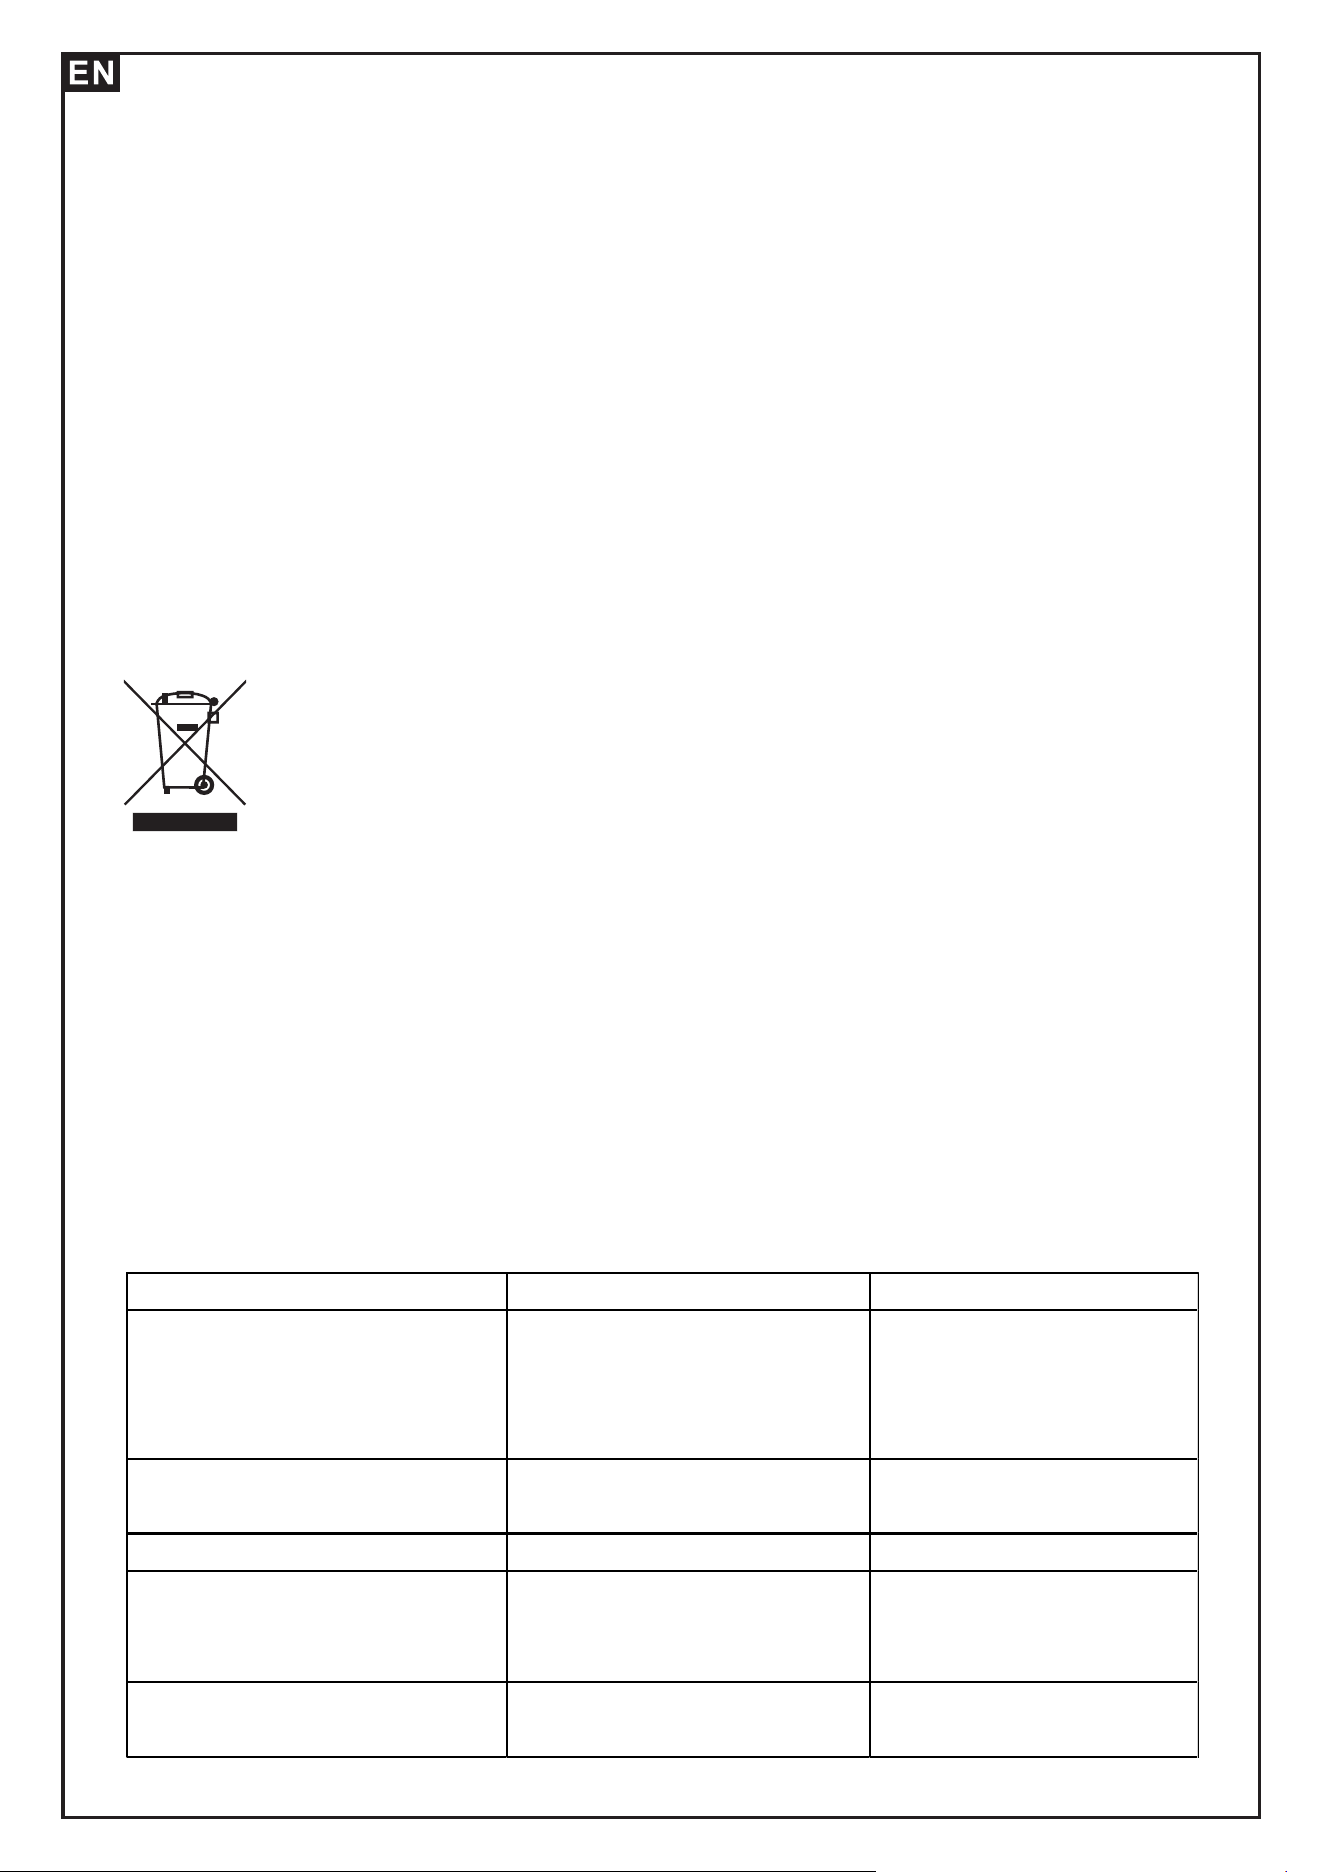
1.Meaning of crossed-out wheeled dustbin: Do not dispose of electrical appliances
as unsorted municipal waste, use separate collection facilities.
2. Contact you local government for information regarding the collection system
available.
3.If electrical appliances are disposed of in landfills or dumps, hazardous
substances can leak into the groundwater and get into the foodchain damaging
your health and well-being
4.When replacing old appliances with new ones, the retailer is legally obligated to
take back your old appliance for disposal at least free of charge
Trouble Shooting
Fault Possible Causes Remedies
Chain saw doesn't start
Power failure
Detective power cable
Detective fuse
Chain brake hasn't release
Check power supply
Check, exchange
Exchange
Release the chain brake
Chain saw runs intermittently
On/off switch defective
Defective
p
ower cable
Find a specialized
worksho
p
Exchan
g
e
Saw chain is dr
y
No oil in the tank Fill with oil
Chain saw doesn't saw
correctly, jumps, or knocks
Chain tension too low
Chain is dull
Chain is defective
Set chain tension
Sharpen/replace chain
Re
p
lace chain
Chain becomes hot Chain lubrication
Check oil level
Check Chain lubrication
18