2
• Read all instructions before using the
dishwasher.
• The manual does not cover every possible
condition and situation that may occur.
• Load sharp items and knives so that they
are not likely to damage the door seal
and tub.
• Load sharp items and knives with the
handles up to reduce the risk of injury.
• This manual does not cover every
possible condition and situation that
may occur. Use common sense and
maintaining any appliance.
• Water supply inlet temperature should
be between 120°F (48.9°C) and 135°F
(57.2°C).
• Dispose of the discarded appliance and
packing material properly.
• The dishwasher must be properly
of electric shock. See Installation
Instructions for details.
•
attempt to repair or replace any part by
yourself.
• Do not wash plastic items unless they
are marked dishwasher safe. If not
recommendation. Items that are not
dishwasher safe may melt and create a
• If the dishwasher drains in to a food
empty before running dishwasher.
• Do not tamper with controls.
• Do not operate your dishwasher unless all
enclosure panels are properly in place.
• Do not touch the heating element during
•
children to play in or on a dishwasher.
•
door or racks of the dishwasher.
•
Important Safety Instructions .....................2
Product Registration ..................................3
Features at a Glance ..................................4
Operating Instructions ...............................5
Preparing and Loading Dishes ....................7
Detergent and Rinse Aid Dispenser ...........
Care and Cleaning ...................................1
Before You Call ....................................... 1
Major Appliance Warranty ........................ 1
3
Thank you for choosing
1. Load the dishwasher. (See Dish
Preparation and Loading sections)
2. Add detergent. (See Filling the detergent
dispenser)
4. Close door.
5. Select desired CYCLE. (See Cycle Chart)
6. Select desired OPTIONS. The indicator
light will glow when selected. (See Control
Panel)
7. Run hot water faucet nearest dishwasher
(See Control Panel)
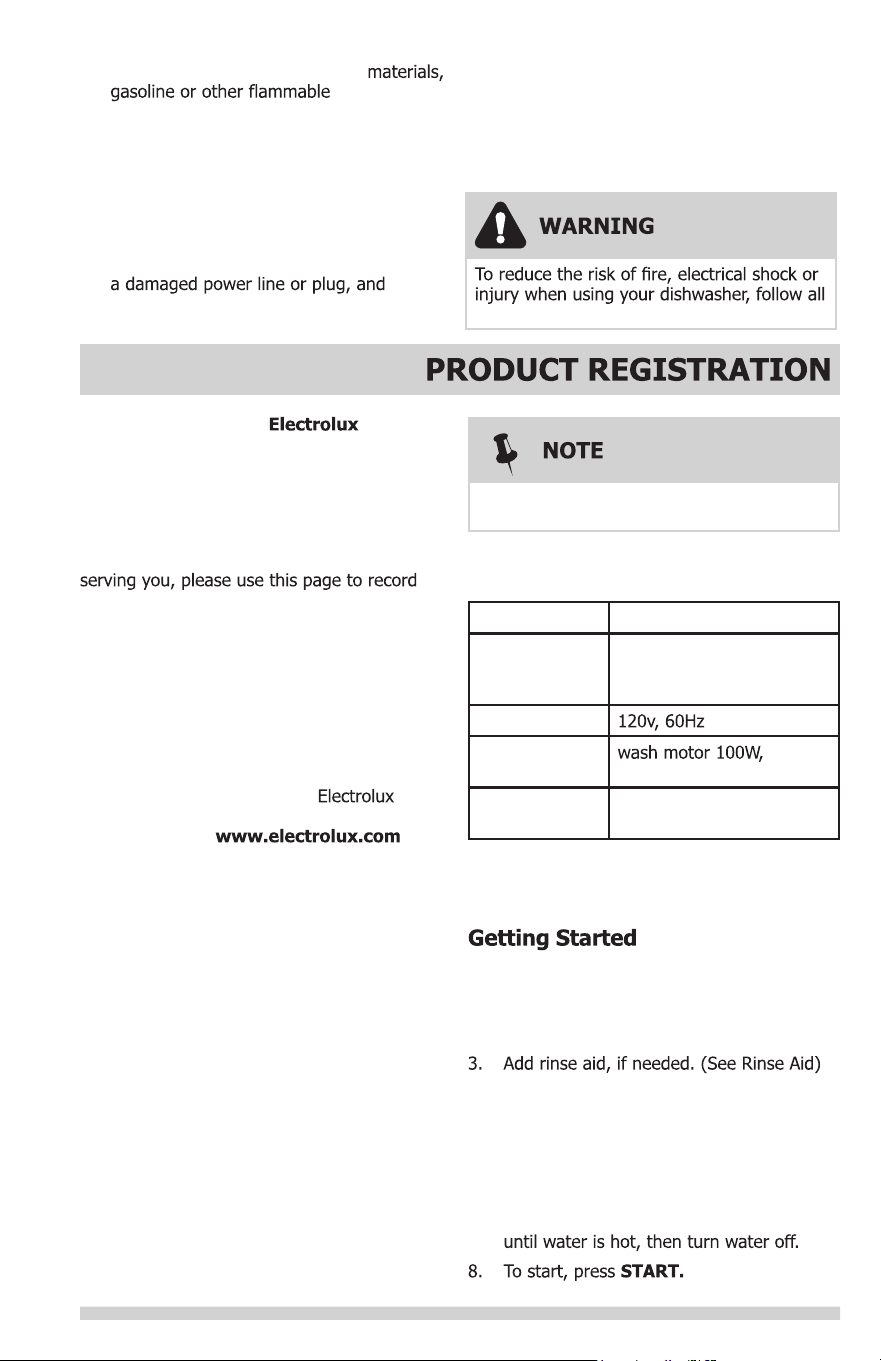
Capacity 10 place settings
Dimensions 23.5 x 21.7 x 32.5 inches
596 x 550 x 825 mm
(W x D x H)
Power Supply
Rated Power
Usage
heater 700W
Water feed
pressure
20 psi–120 psi
(0.14 MPa–0.82 MPa)
Not all cycles and options available on all
models.
This Use & Care Guide is part of our
commitment to customer satisfaction and
product quality throughout there service life of
your new appliance.
We view your purchase as the beginning of a
relationship. To ensure our ability to continue
important product information.
_________________________________
Purchase Date
_________________________________
Model Number
_________________________________
Serial Number
Registering your product with
enhances our ability to serve you. You can
register online at
or by
dropping your Product Registration Card in
the mail.
basic precautions.
• Do not store or use combustible
vapors and
liquids in the vicinity of this or any other
appliance.
•
•
Use only detergents or rinse agents
recommended for use in a dishwasher and
keep them out of the reach of children.
Keep young children and infants away
from dishwasher when it is operating.
• Do not use the dishwasher if it has
do not plug the dishwasher into a
damaged outlet. Failure to observe these
instructions may result in electrical shock.
• Remove the door to the washing
compartment when removing an old
dishwasher from service or discarding it.
Product Specifications:
4
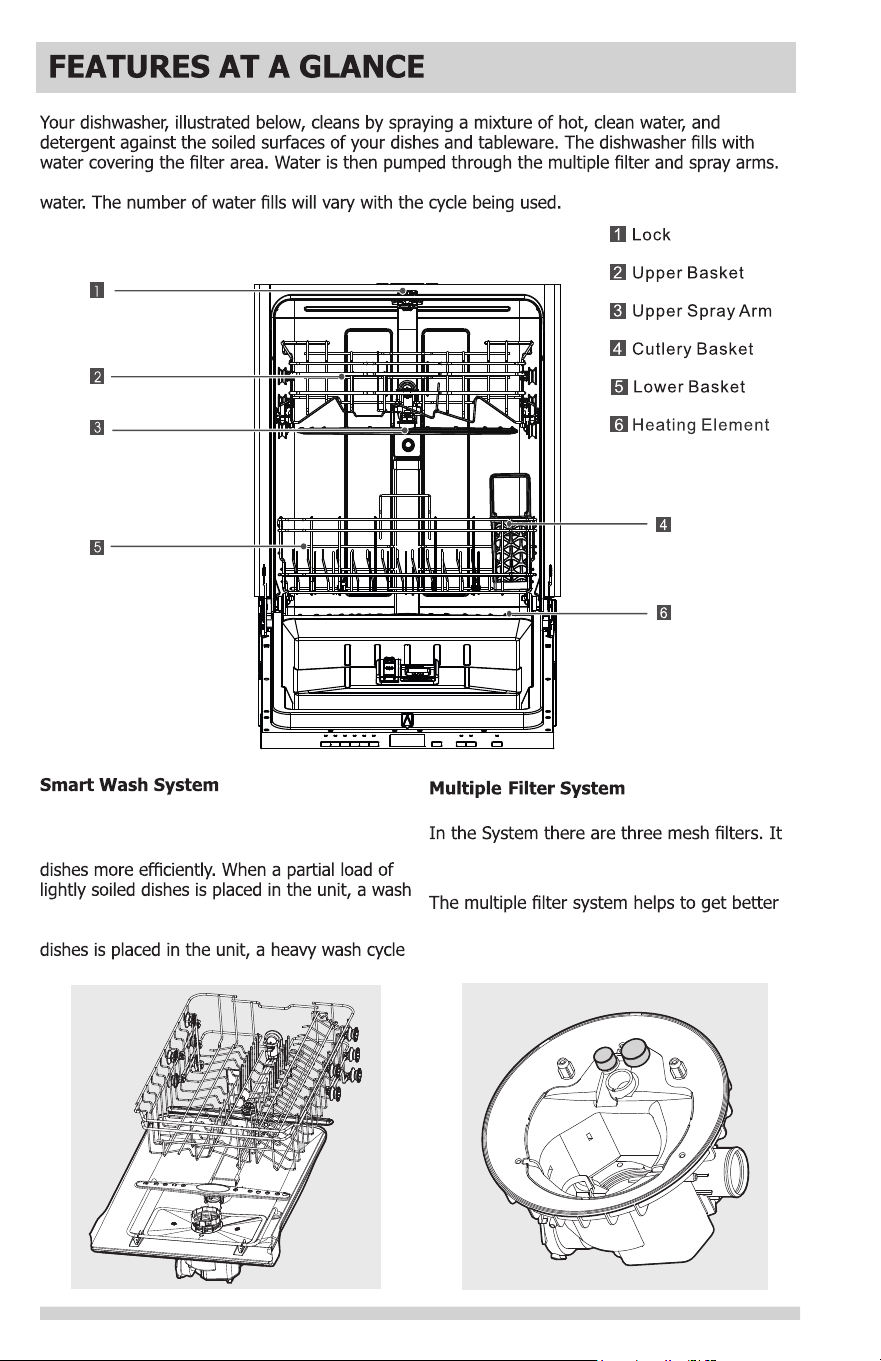
Separated soil particles go down the drain as the water is pumped out and replaced with clean
This dishwasher has a multiple Filter System.
can separate soiled water and clean water in
different chambers.
performance with less water and less energy.
This dishwasher has a Smart Wash System. It
can determine the type of cycle required and
automatically adjust the cycle to clean the
cycle similar to a short wash will automatically
be performed. When a full load of heavily soiled
will automatically be performed.
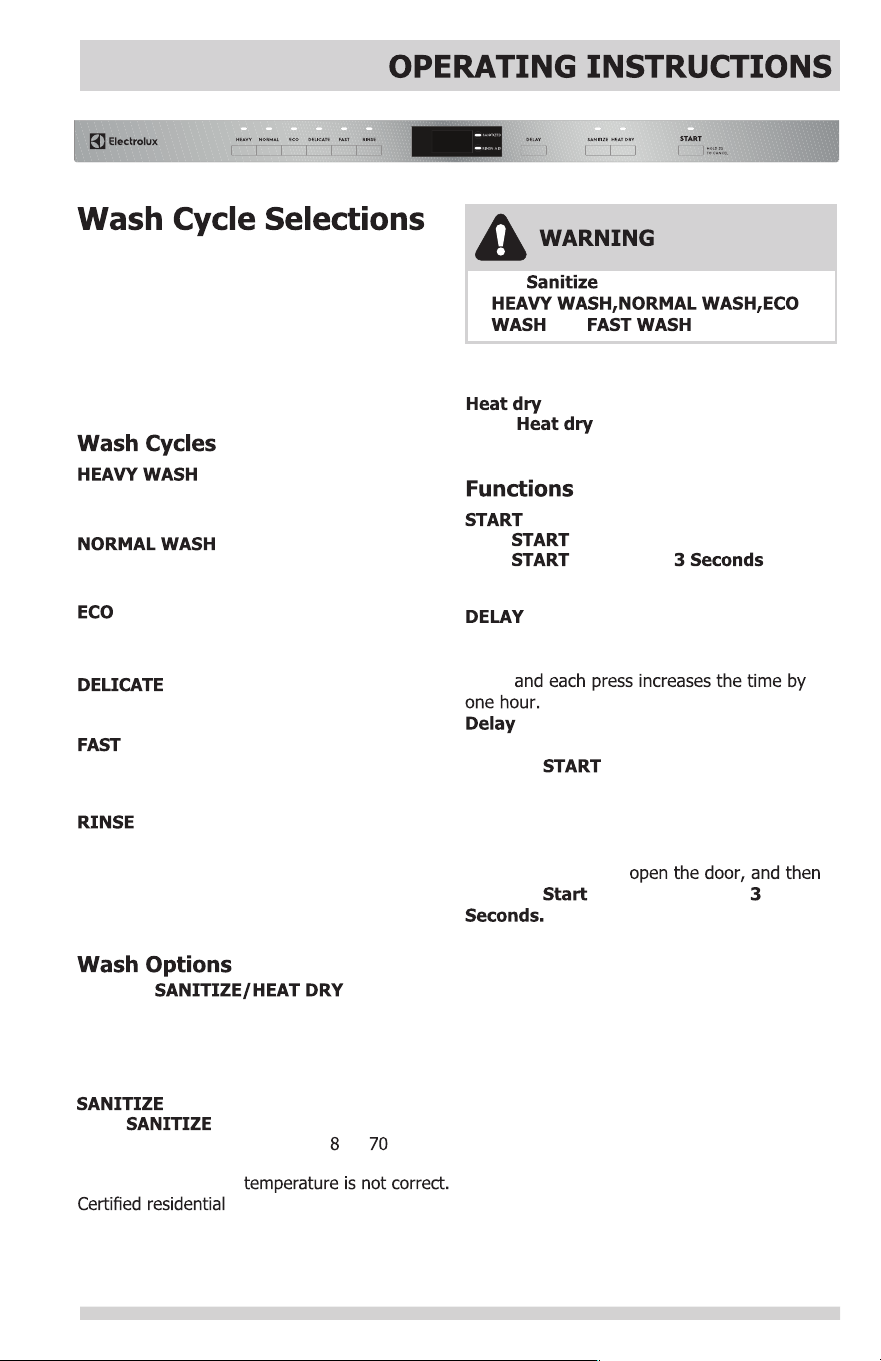
5
The option is only available with
and cycles.
Cycle times are approximate and will vary with
the options selected. Hot water is neces-
sary to activate the detergent and melt fatty
food soils. An automatic sensor will check the
incoming water temperature. If it is not at the
appropriate temperature the timer will delay
the cycle to allow automatic water heating
during the main wash.
Recommended for pots, pans, casseroles and
dinnerware having light to heavily soiled loads.
Recommended for lightly to heavily soiled
loads.
Recommended for lightly soiled and pre-rinsed
dishes and silverware.
Recommended for lightly soiled China and Crystal.
A shorter wash recommended for lightly soiled
loads that do not need drying.
Recommended for pre-rinsing dishes or
glasses. This is only a rinse that keeps food
from drying on your dishes and reduces odor
buildup in your dishwasher until you are ready
to wash a full load. Do not use detergent.
Press the button to
scroll through the options. The indicator light
will illuminate when the option has been
selected.
When is selected, the temperature
of water will be maintained at 15
°F ( °C)
max. The max temperature may not be reached
if the incoming water
dishwashers are not intended
for licensed food
establishments.
When is selected, the heater will
work during the drying process.
Press to start a wash cycle.
Press and hold for to
cancel a cycle that is already in progress.
The Delay option allows you to automatically
delay starting your dishwasher from 1-12
hours
To start 1-12 hour delay, press the
button until the desired delay time
shows in the display window (1h-12h) and
press the
button. The digital screen
will display the delay time to indicate the
delay start has been activated, and will
remain until the cycle starts. To cancel the
Delay option and begin the cycle before the
delay period is over,
press the button and hold for
6
This LED screen displays the minutes
remaining in a running cycle, hours of delay
before the unit is set to start, error codes, etc.
• If the machine is in operation, the
•
•
The remaining time could suddenly increase
or drop several minutes. This means the
Smart Sensor has checked the soil level and
• If an error occurs which is critical to the
machines function and safe operation,
the control shall shut down and indicate
an error code in the display window.
(See Error Codes).
If Error codes are displayed, contact the dealer
to provide assistance in trouble shooting the
problem and/or locate and authorized service
technician if needed.
remaining time (mins) of the selected
cycle will be shown in the display window.
If the
option is selected, the
number of hours of delay (1h- 2h) will be
shown in the display window. When the
start of the cycle has been delayed,
.After the machine starts, the
remaining time of the selected cycle will
be shown in minutes on the display
window.
If the
is selected, the
light will illuminate after the
cycle has ended.
SANITIZE,
HEAT DRY
6.6 gal.
24.8 liters
167 mins.
SANITIZE,
HEAT DRY
2.9-6.6 gal.
10.8-24.8 liters
115-155 mins.
4.7 gal.
17.8 liters
135 mins.
HEAT DRY
4.7 gal.
17.8 liters
110 mins.
SANITIZE,
HEAT DRY
3.8 gal.
14.3 liters
60 mins.
HEAT DRY
1.9 gal.
7 liters
20 mins.
SANITIZE,
HEAT DRY
•
7
Scrape away large pieces of food, bones,
pits, toothpicks, etc. The continuously filtered
wash system will remove the remaining food
particles. Burned on foods should be
loosened before loading. Empty liquids from
glasses and cups. Foods such as mustard,
mayonnaise, vinegar, lemon juice and tomato
based products may cause discoloration of
stainless steel and plastics if allowed to sit for
a long period of time.
Unless the dishwasher is to be operated at
once it is best to rinse off these food soils. If
the dishwasher drains into a food disposer,
that the front of each plate faces the back of
the plate in front of it, and the open sides of
the plates at the center of the dishwasher face
each other.
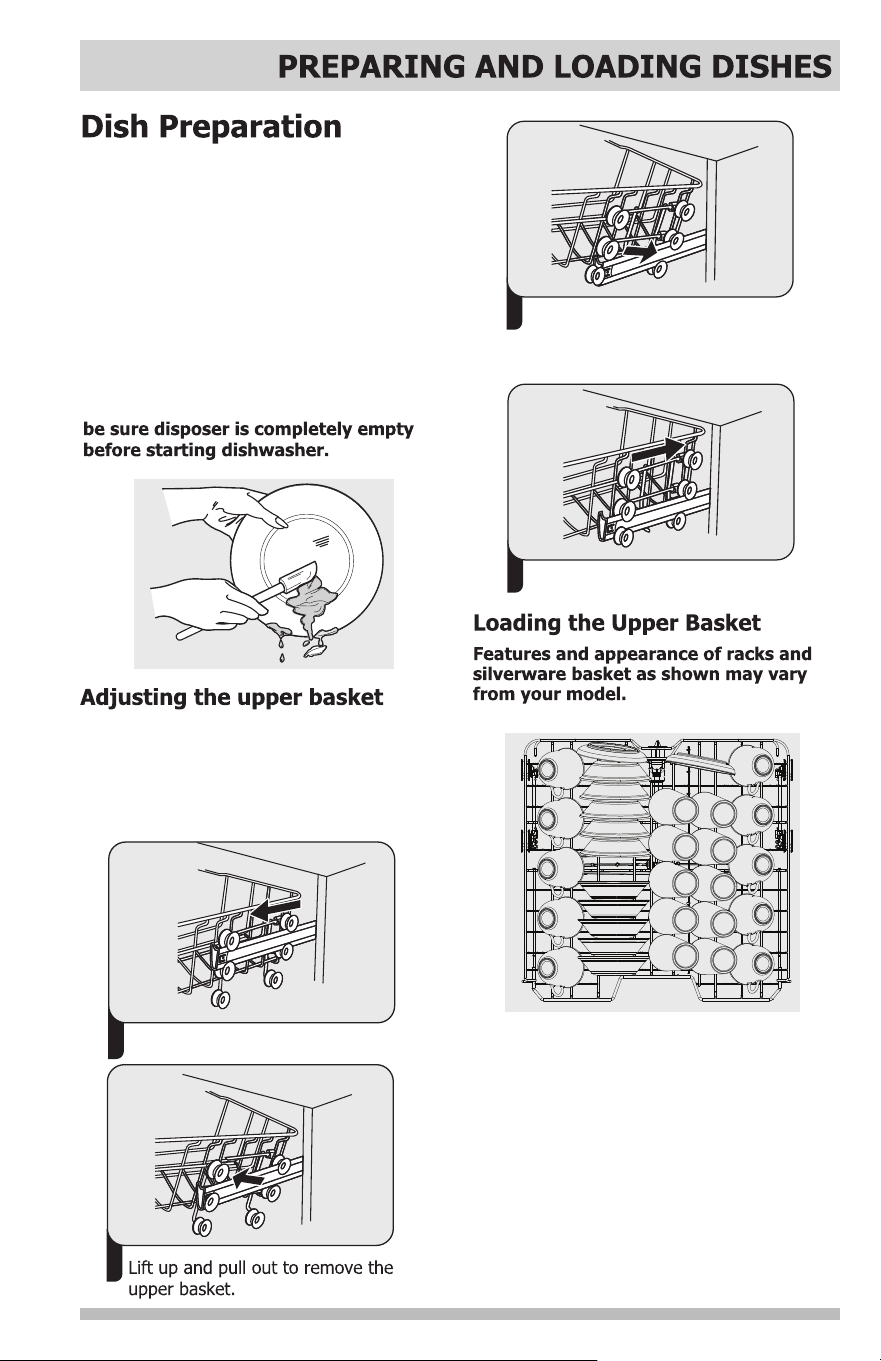
Standard10 place settings for upper basket.
The upper basket has been designed for
small plates, mugs, glasses, and plastic items
marked “dishwasher safe”, etc. For best
results, place the bowls, cups, glasses with
soiled surface facing down or toward the
center. Tilt slightly for better drainage. Load
small plates and bowls in two half rows, so
2
3
Re-attach the upper basket to
upper
or lower rollers.
1
Pull out the upper basket.
lower position
4
Push in the upper basket.
upper position
The height of the upper basket can be easily
adjusted to accommodate taller dishes in
either the upper or lower basket.
To adjust the height of the upper rack,
follow these steps:
Make sure the loaded dishes do not interfere
with the rotation of the spray arm located at
the bottom of the upper basket. (Check this
by rotating the spray arm by hand.)
• The adjustable basket space will allow
you to load items with a maximum height
of 11 inches.
• The fold-down tines in the bottom basket
make it easy to load those extra large and
hard-to-fit items. The tines may be left up
for normal use or folded down for more
flexible loading. Fold down for more space
to load large pots or pans.
When loading dishes, pull the upper basket out
sufficiently so you can load it without striking
the counter.
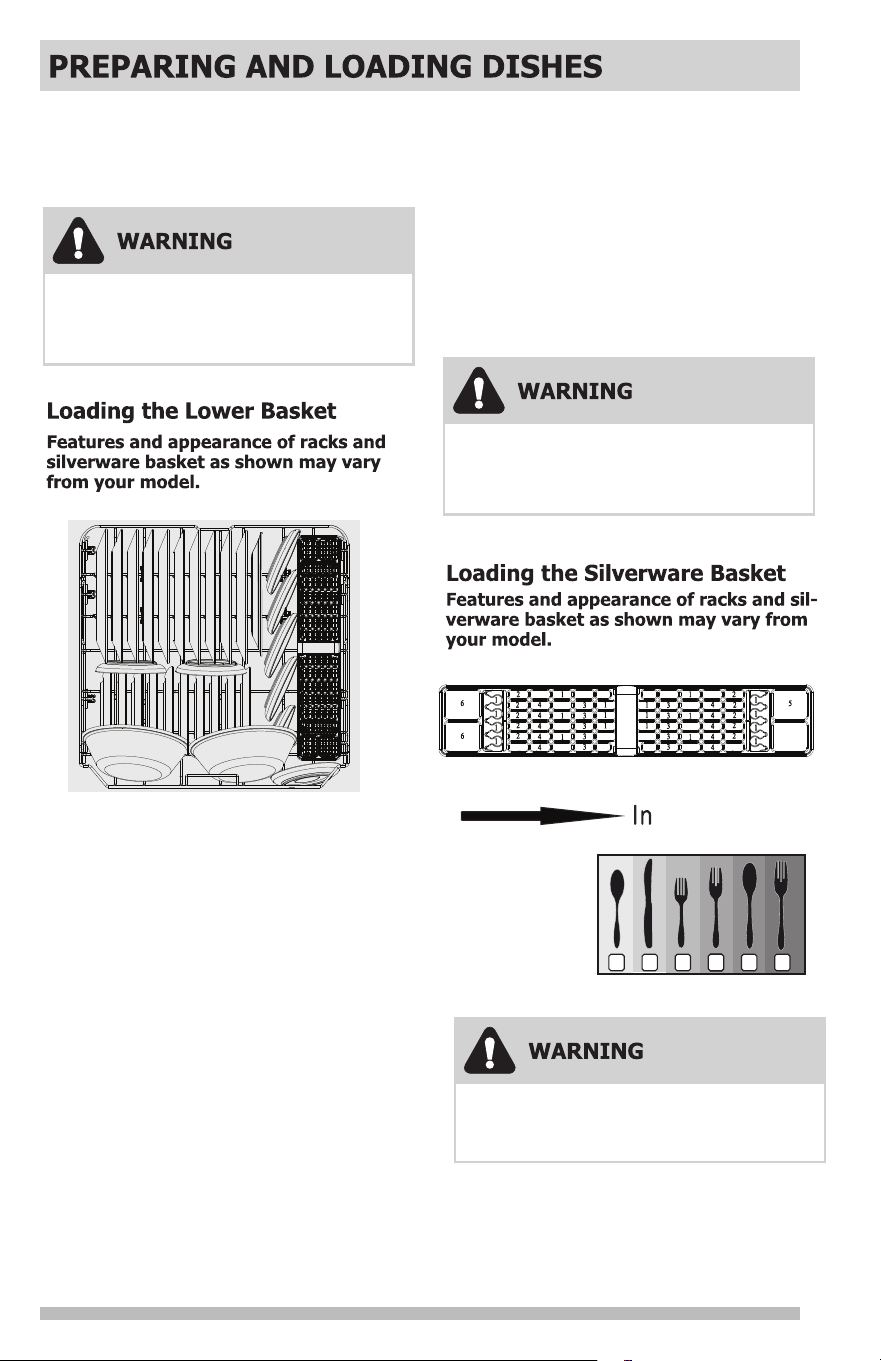
Standard 10 place settings for lower basket.
The bottom basket is designed to load plates,
soup bowls, plates, saucers and cookware.
Load your plates into the dishwasher in two
half rows, so that the front of each plate faces
the back of the plate in front of it, and the
open sides of the plates at the center of the
dishwasher face each other.
8
Make sure the loaded dishes do not interfere
with the rotation of the spray arm located at
the bottom of the upper basket. (Check this
by rotating the spray arm by hand.)
Load sharp items (knives, skewers, etc.)
pointing down.
Failure to do so may result in injury.
Large items should be turned so that the
inside faces downward. Load large items such
as pans and pots into the dishwasher so their
open sides face downwards. We recommend
loading cups, stemware, and small plates into
the upper basket.
Larger items should be placed along the edge
so they do not interfere with the spray arm
rotation. Check to ensure that they do not
prevent the detergent dispenser from opening.
1. Spoons
2. Knives
3. Salad forks
4. Forks
5. Large spoons
6. Large forks
1 32 6444 5
10 place settings
9
To add or remove items after wash cycle
starts:
Make sure there is a full wash cycle yet to
be completed so that any added items are
thoroughly washed and rinsed.
Open door slightly until wash action stops
before completely opening.
Add the item.
Make sure the loaded items do not interfere
with the rotation of the spray arm located at
the bottom of the upper basket. (Check this
by rotating the spray arm by hand.)
TO AVOID BURN INJURY: Slightly open
door and wait until spray arms and wash
action stop. Hot water may splash out of
dishwasher. Failure to do so may result in
injury.
10
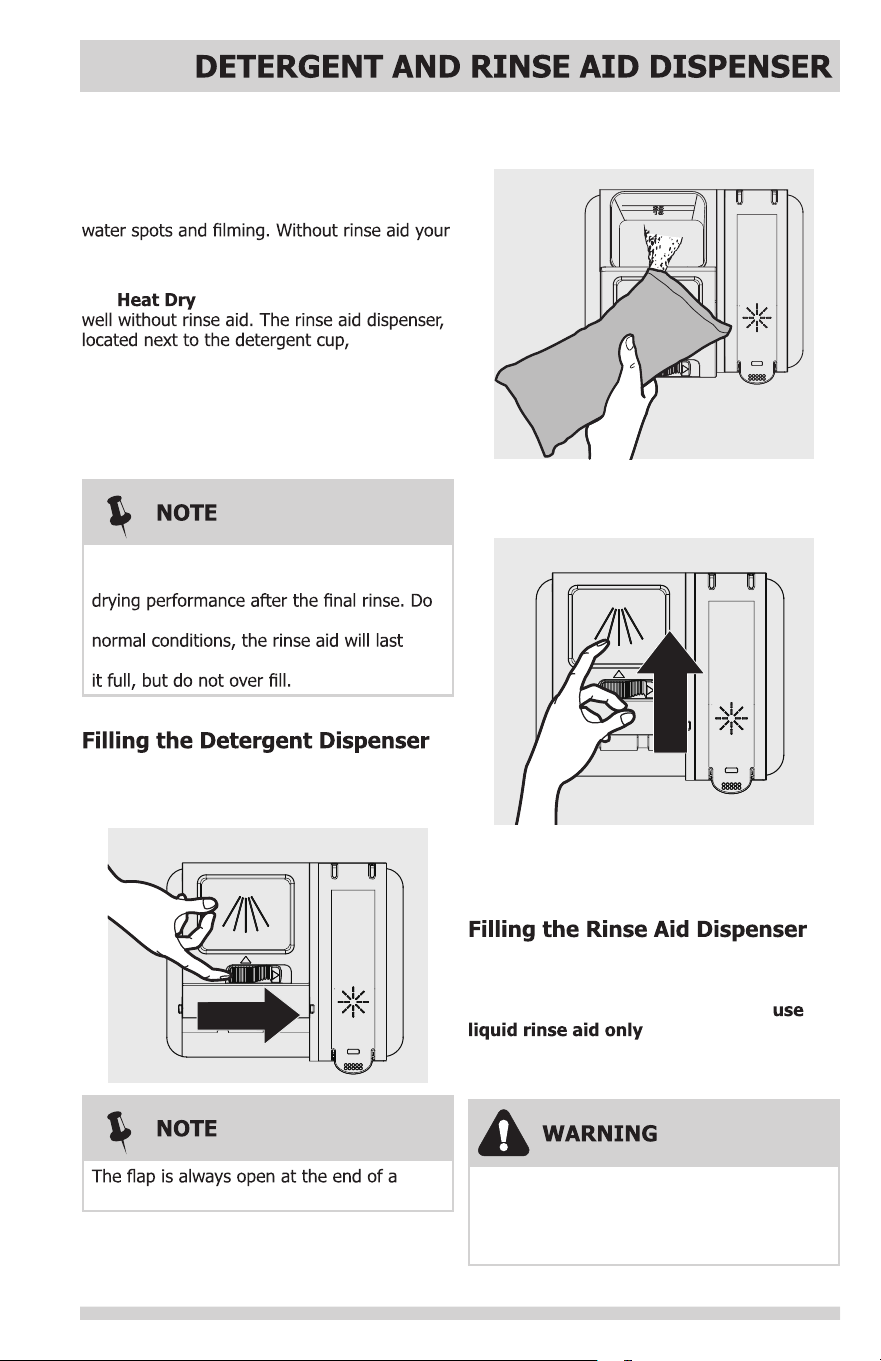
Your dishwasher is designed to use a liquid
rinse aid. The use of rinse greatly improves
not use a solid or bar-type rinse aid. Under
approximately one month. It is best to keep
1. Push the dispenser cover release catch
to open the main wash detergent
compartment.
dishwashing cycle.
Rinse aid improves the drying performance of
the dishwasher.
This dishwasher has been designed to
. Using a powdered rinse
aid will clog the reservoir opening and cause
the dishwasher to malfunction.
• DO NOT add regular detergent to the
rinse aid dispenser.
• DO NOT use powdered rinse aid in the
rinse aid dispenser.
2. Add the recommended amount of
detergent to the detergent compartment.
3. Press down on the top of the cover to
secure.
The detergent and rinse aid dispenser will
automatically release the measured amount of
detergent and rinse aid at the appropriate time
during the dishwasher cycles.
Rinse aid greatly improves drying and reduces
dishes and dishwasher interior will have exces-
sive moisture.
The
option will not perform as
automatically releases a measured amount
of rinse aid during the last rinse.
Check the viewing port over rinse aid dispenser
to determine if the rinse aid is low. Fill as
needed.
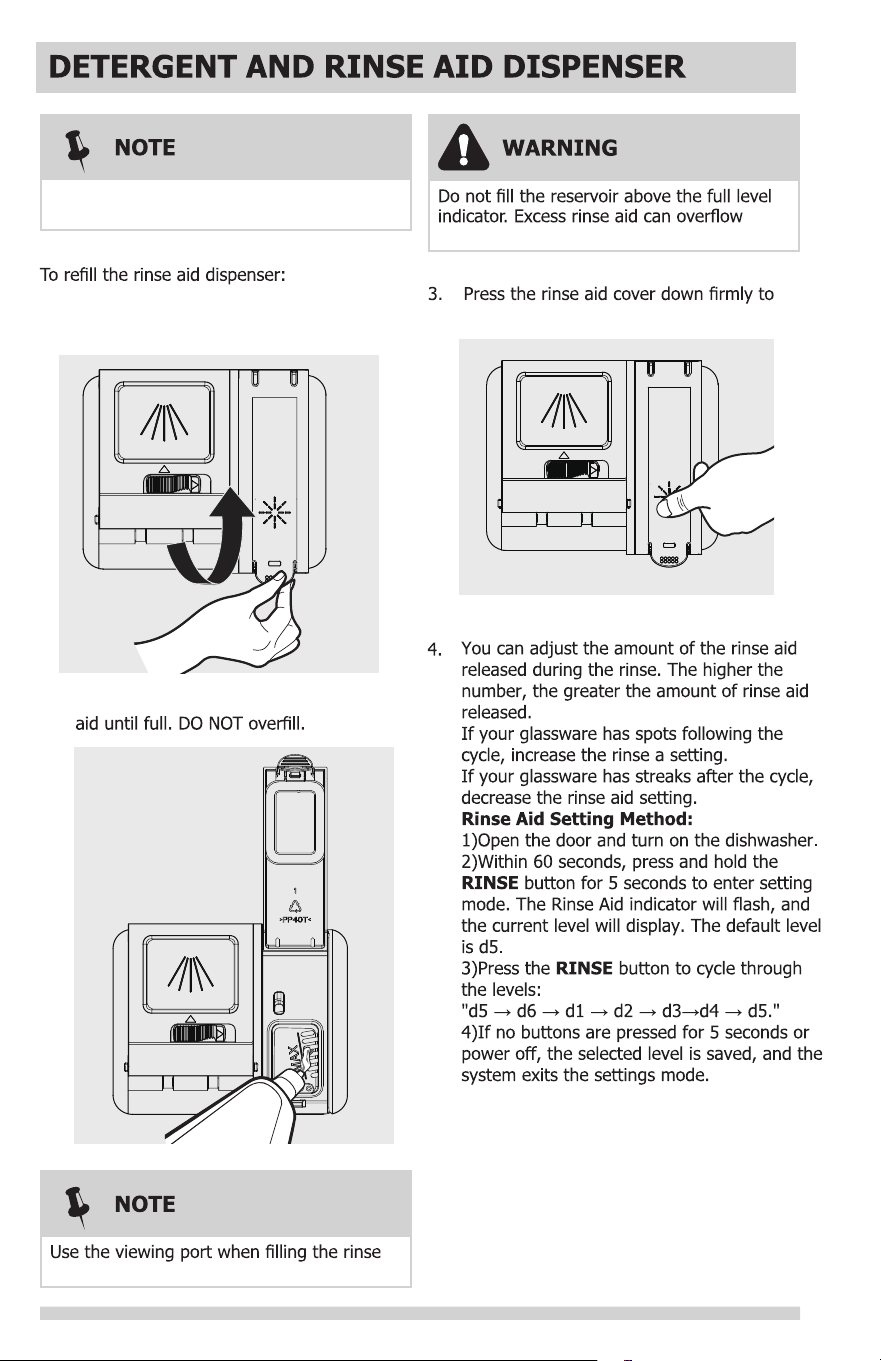
11
2. Fill the rinse aid dispenser with liquid rinse
close.
1. Lift up the end tab of rinse aid cover to
open.
aid reservoir.
during the wash cycle.
Visually check viewing port to determine if
rinse aid is low. Fill as needed.
12
Allow heating element to cool
before cleaning the interior. Failure
to do so can result in burns.
Keeping your dishwasher clean improves its
lengthens its life.
It’s best to clean spills on the outside of your
cloth on the control panel to gently wipe away
materials may discolor the inner walls and
cause stains. Do not clean the dishwasher by
sprinkling water over it and avoid letting water
come into contact with any of the electrical
parts.
If your dishwasher has a stainless steel door
cleaner for Home Appliances or a similar
Do not remove the tub front seal (the long
rubber seal enclosing the opening of the
dishwasher).
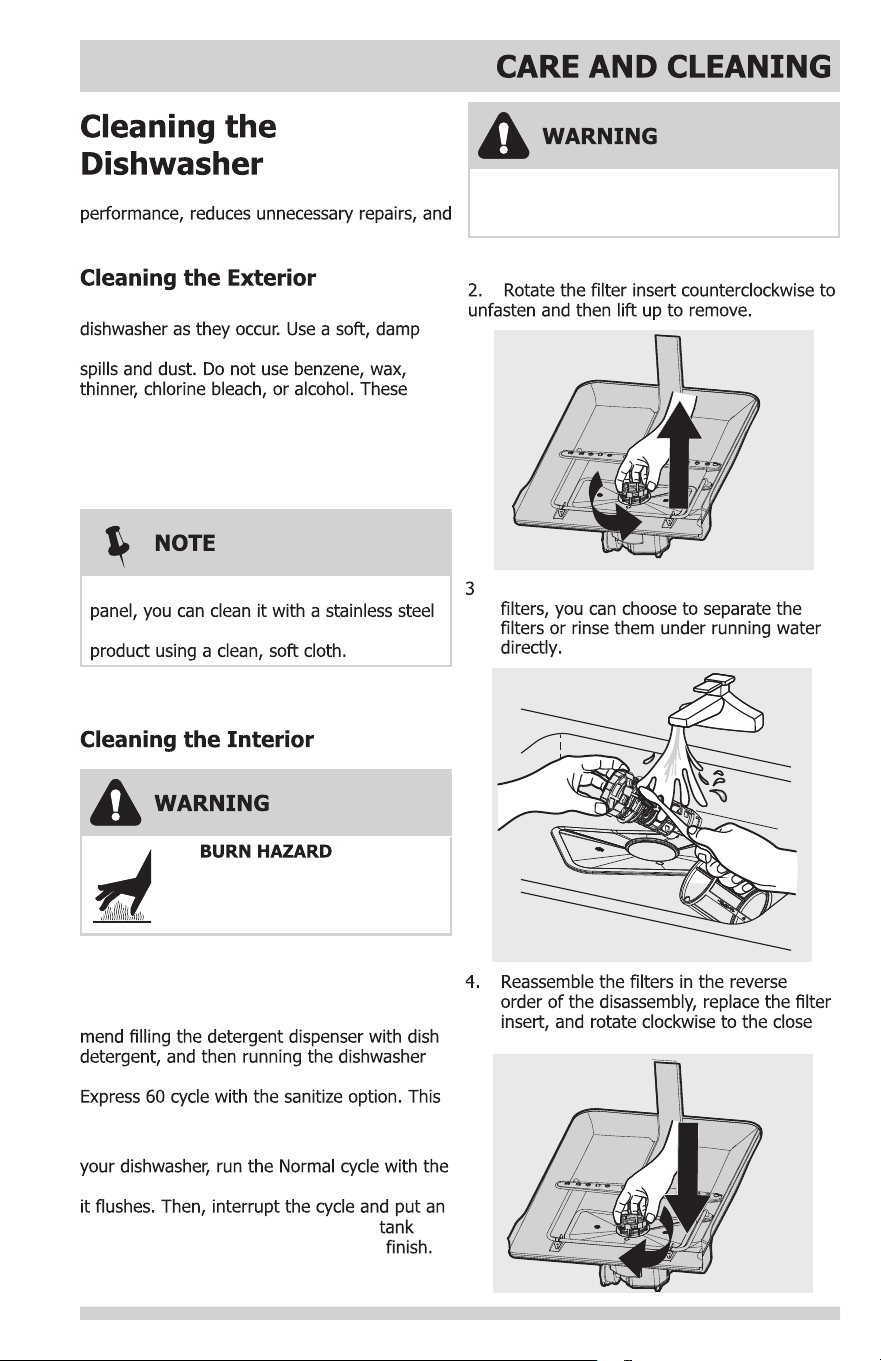
Clean the interior of y
our dishwasher periodi-
cally to remove any dirt or food particles. Wipe
the inside of the dishwasher and the inner part
of the door with a wet dishcloth. We recom-
empty periodically using either the Normal or
will keep your dishwasher clean.
If white spots and odor are still present in
dishwasher empty and without detergent until
8 ounce cup of white vinegar into the .
Close the dishwasher and let the cycle
1. Turn off the dishwasher.
. Remove any dirt or other remains from the
arrow.
13
performance will be decreased.
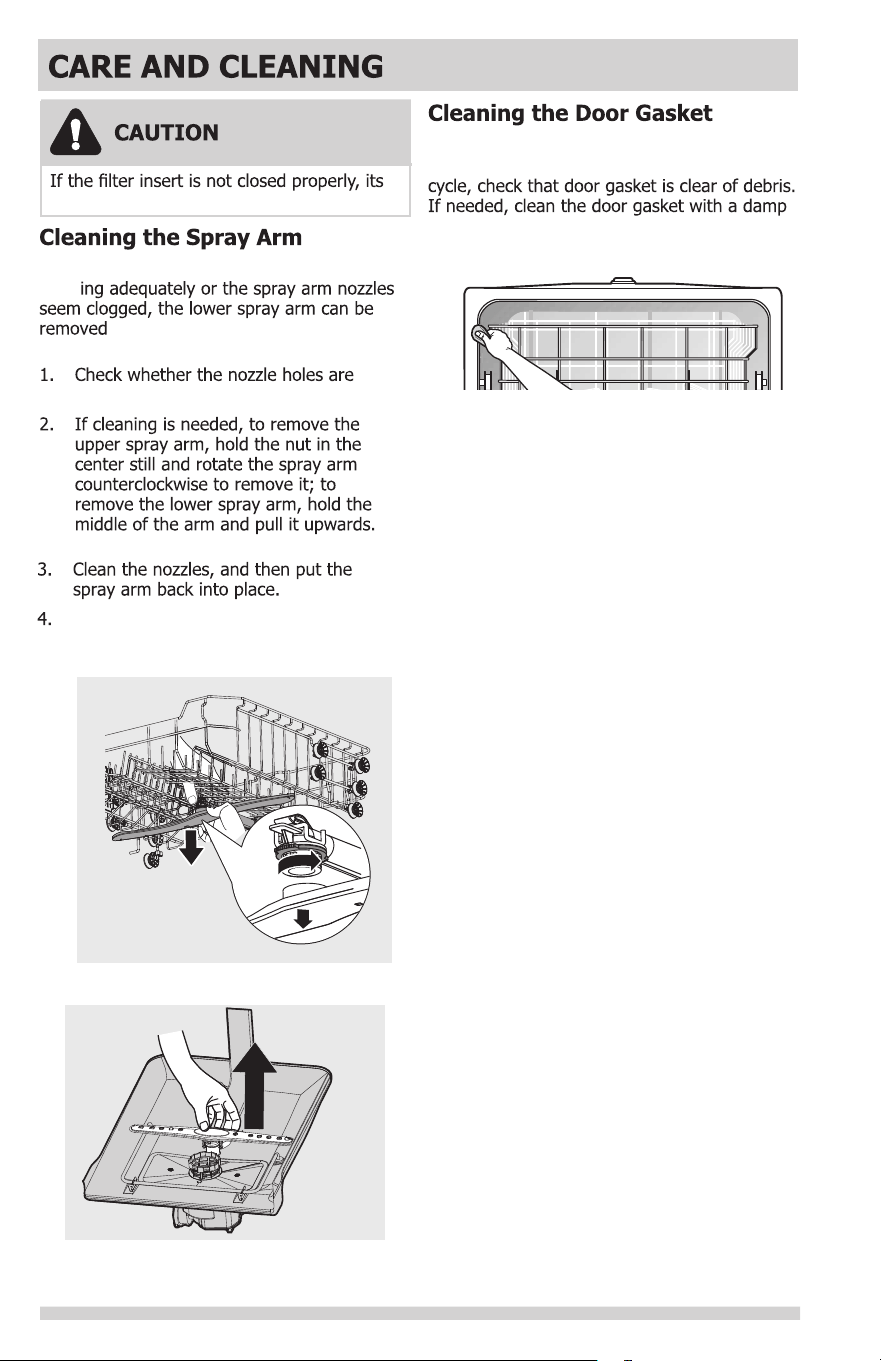
If your dishwasher does not seem to be
clean
and cleaned. Remove spray arm
carefully to avoid damage.
clogged by food particles.
Rotate the spray arm to check that it is
properly in place.
If the dishwasher door is not closing properly
or if water is leaking from the door during the
cloth to remove food particles and ensure a
tight seal.
14
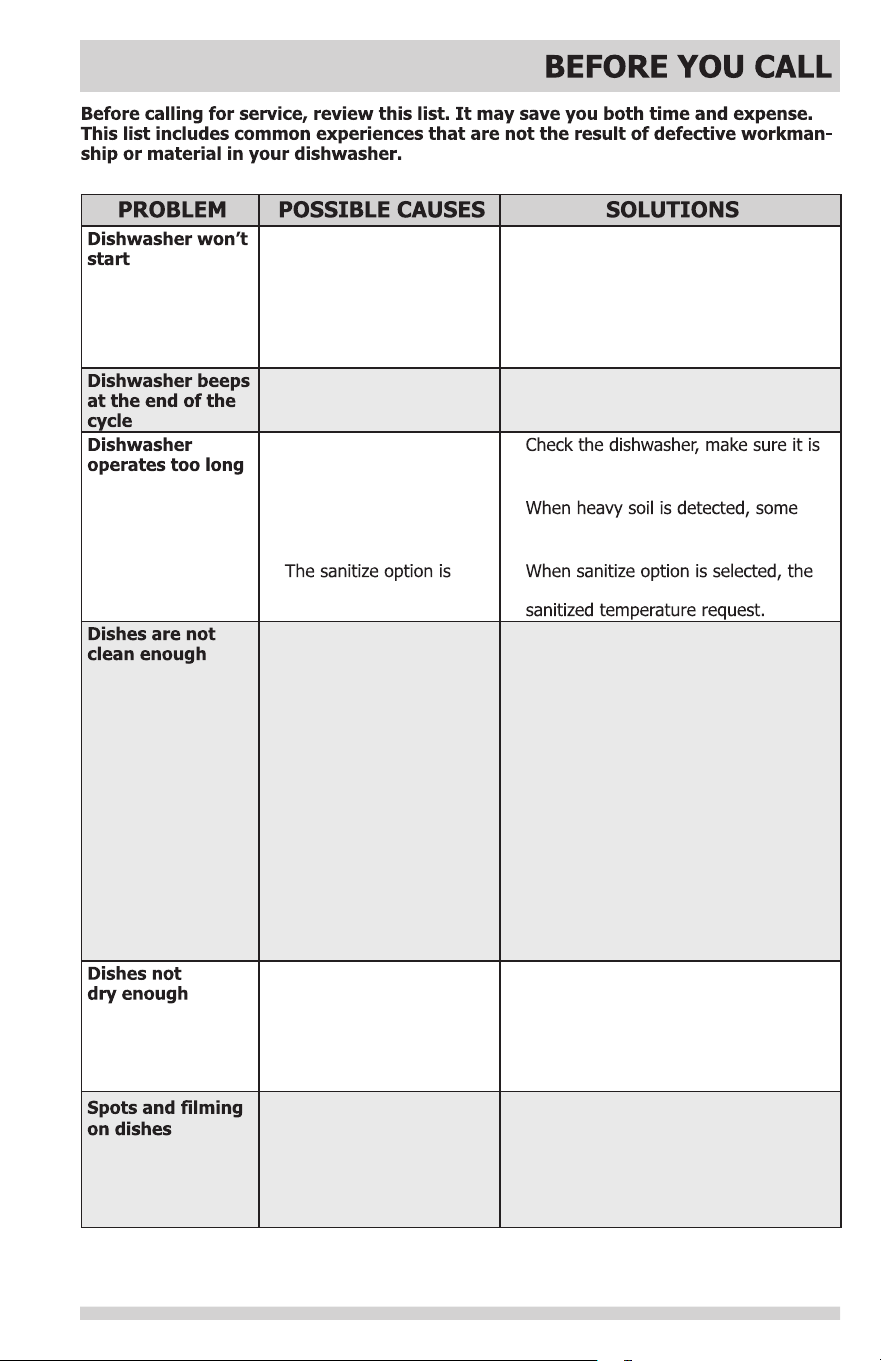
• Dishwasher won’t start.
• Power supply or power
line is not connected.
• Delay option has been
selected.
• Shut the door completely make sure it
is latched.
• Check and connect the power supply.
• Refer to Delay section in this manual
to reset.
• The wash cycle will beep
to indicate the end of the
cycle.
• The dishwasher is
connected to cold water.
• The cycle time will vary
due to the soil.
•
selected.
•
properly connected to the hot water
supply.
•
cycles will automatically increase the
cycle time.
•
cycle time will be increase to meet the
• Water pressure is
temporarily low.
• The inlet water
temperature is low.
• Dishes are loaded too
close together.
• Improper use of detergent.
• The selected cycle is
not suitable for food soil
condition.
• Spay arms is blocked by
some items.
• Use you dishwasher when the water
pressure is normal.
• Make sure the dishwasher is connected
to the hot water supply Try not use
your dishwasher when hot water is
being used elsewhere in the house.
• Load the dishes again as per the
manual.
• Add detergent depending on the water
hardness and the cycle you chose. Use
fresh detergent.
• Choose anther cycle for longer washing
time.
• Make sure the spay arm is rotated
freely.
• Rinse aid dispenser is
empty.
• Improper loading of
dishes.
• The cycle you chose did
not included the drying.
• Fill rinse aid dispenser or increase the
amount of rinse aid.
• Load the dishes again as the manual
instructs.
• Choose the proper cycle with drying.
• Water hardness is too
high.
• Improper loading of
dishes.
• Old rinse aid is used.
• Rinse dispenser empty.
• For extremely hard water install a
water softener.
• Load the dishes again as the manual
indicates.
• Use fresh rinse aid.
• Add rinse aid to the dispenser.
15
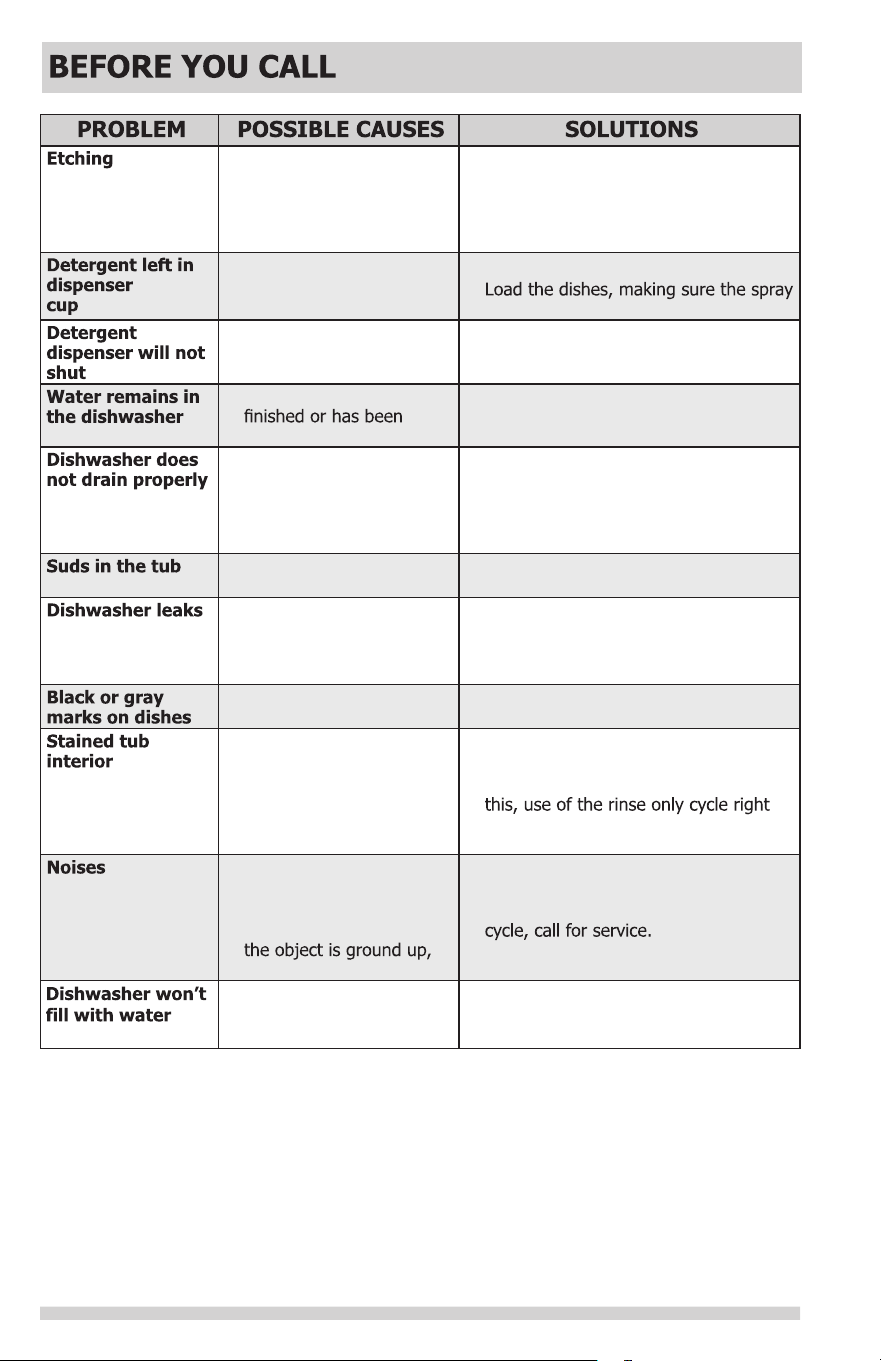
• Using too much detergent.
• The inlet water
temperature exceeds
158°F (70°C).
• Use less detergent if you have soft
water.
• Lower the inlet water temperature.
• Detergent may be too old.
• Spray arm is blocked.
• Use fresh detergent.
•
arms are not blocked.
• Improper operation of the
detergent cover.
• Add the detergent and rinse aid as
indicated by the manual.
• Previous cycle has not
interrupted.
• Select the proper cycle explained in the
manual.
• Drain is clogged.
• Drain hose is kinked.
• Check the air gap if you have one.
Make sure the disposer is empty if
dishwasher is connected to disposer.
• Make sure the drain hose is properly
connected to the sink.
• Improper detergent is
used.
• Make sure to use only the automatic
dishwasher detergent.
• Excessive suds caused
by using the improper
detergent.
• Dishwasher is not level.
• Make sure to use only the proper
dishwasher detergent.
• Level the dishwasher.
• Aluminum utensils have
rubbed against dishes.
• Rearrange the dishes.
• Coffee and tea soil.
• Reddish stain.
• Using an approved spot cleaner to
remove the soil.
• Some tomato-based foods will cause
after loading this will decrease the
staining.
• Detergent cup opening\
Drain pump sound.
• A hard object has entered
the wash module. When
the sound should stop.
• This is normal.
• If the noise persists after a complete
• Water valve is turn off.
• Door latch may not be
properly seated.
• Check if the water valve is turn on.
• Make sure the door is closed.
16
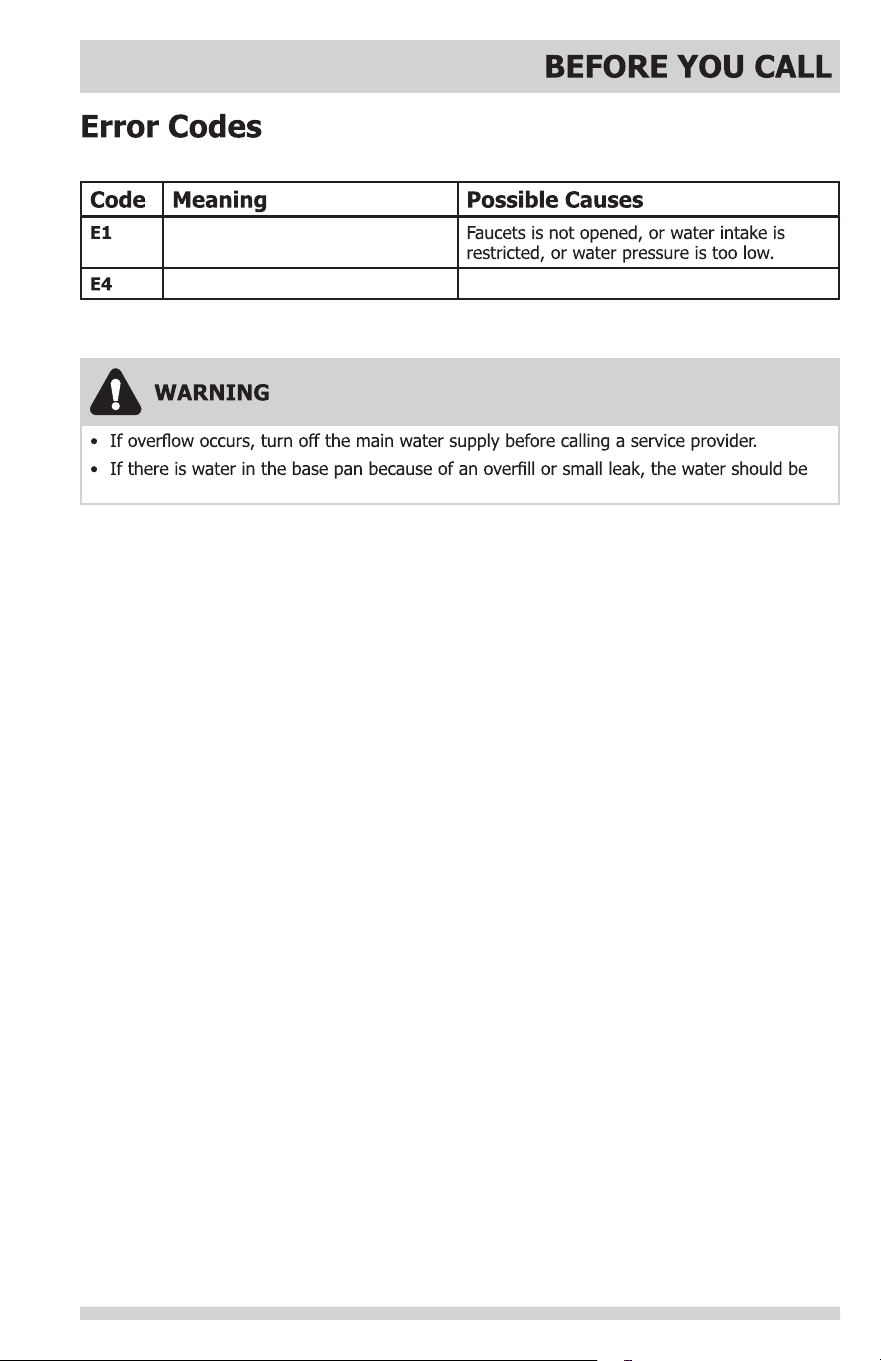
Error codes will display on the display window when the following errors occur:
Longer inlet time
Unit leaking Some element of dishwasher leaks.
removed before restarting the dishwasher.
17
Your appliance is covered by a one year limited warranty. For one year from your original date of
accordance with the provided instructions.
Product that has been transferred from its original owner to another party or removed outside
the USA
Rust on the interior or exterior of the unit.
Products purchased “as-is” are not covered by this warranty.
Products used in a commercial setting.
not in ordinary household use or used other than in accordance with the provided instructions.
Service calls to correct the installation of your appliance or to instruct you how to use your appliance.
CUSTOMER’S SOLE AND EXCLUSIVE REMEDY UNDER THIS LIMITED WARRANTY SHALL BE PRODUCT
YEAR. ELECTROLUX SHALL NOT BE LIABLE FOR CONSEQUENTIAL OR INCIDENTAL DAMAGES SUCH
AS PROPERTY DAMAGE AND INCIDENTAL EXPENSES RESULTING FROM ANY BREACH OF THIS
WRITTEN LIMITED WARRANTY OR ANY IMPLIED WARRANTY. SOME STATES AND PROVINCES DO
EXCLUSIONS MAY NOT APPLY TO YOU. THIS WRITTEN WARRANTY GIVES YOU SPECIFIC LEGAL
RIGHTS. YOU MAY ALSO HAVE OTHER RIGHTS THAT VARY FROM STATE TO STATE.
keep all receipts. Service under this warranty must be obtained by contacting Electrolux at the
addresses or phone numbers below.
or add to any
obligations under this warranty. Obligations for service and parts under this warranty
as
described or illustrated are subject to change without notice.

$2FWREHU