OXI-NB20
OXI-NB20
A trademark of OXIPRO MEDICAL LTD
INSTRUCTION MANUAL
MODEL:
TABLE OF CONTENT
1. INSTRUCTION ························•··························
··
·········
··
············
2. SYMBOLS ·································•
···
·····················
··
··
··
··
··
··
···
··········· 1
3. SAFETY INFORMATION ·····--·-----·-· ··································
-··-·--·--·
1
4.
MAIN
UNIT
.................. ····· ··················· ··················· 3
5.
PREPARING
THE
NEBULIZER
FOR
USE
············ ····-•··-······· ······ 4
6.
USING
THE
DEVICE
··-·····
••••••••••••••
•••
•••••••••
••••••
••
••
•••••
••
•••
•••··•
4
7. REPROCESSING
······················
··
···········-···········
••
············· ..... 5
8.
CARING
FOR
THE
DEVICE ··················· ········-········ ····· 5
9.
STORING
THE
DEVICE ········-····· ·····•··-········
··
··
··
··
·-
···
··
············-··· 6
10.TROUBLESHOOTING ····························•·· 6
11.
WARRANTY OBLIGATIONS ··········
·-
···
···············
··
··········
··
··
·······
··
6
12
. CLASSIFICATION
••••
•••
·•· ·
··
········-·················-······· 6
13.
PERIODIC SAFETY CHECKS ····
••
····························
··
···
··
·········· 6
14
. SPECIFICATIONS ·········· ·········-·······
•••••••••
•
••••••
•
••
••
•••
••
••
•••
••
7
15.
GUIDANCE
AND
MANUFACTURER'S DECLARATION ··············· 7
16.
QUALITY GUARANTEE ···-······· 8
17.
REQUIRING
RECORD
········-·
-•
··
········-···············
··
-··
··
··
·
···
·······-··· 8
INSTRUCTION
Thank
you
for purchasing the compressor nebulizer.The
device is single-patient
use.
Intended purpose: This compressor nebulizer is a medical device
that used
to
aerosolize medications for inhalation
by
the
patient to
achieve the expected therapeutic effect.
The
device
can
be
used with
adult or pediatric patients.
Intended user: Healthcare professionals; patients or their caregivers.
Intended patient: Pediatric (defined
by
the prescribed medication)
and adult patients
Applicable place: hospitals, clinics,
home
.
Contraindications: None.
SYMBOLS
Symbols
Meaning
Mai
Manufacturer
~
Authorized Representative
in
the European
community
R
Symbol for
the
marking of electrical and
electronics devices according
to
Directive
-
2002/96/EC.
[gJ
CLASS
II
= "
CE
0123
CE
marking
in
conformity with
EC
directive
93/42/EEC
IP
22
Protected
against
solid
foreign
objects
12.5
mm
in
diameter
and
larger,
and
against
drops
of
water
when
the
housing
is
angled
up
to
15
°
e
Observe the instructions for
use
II]
Type
BF
Applied Part
"""
aOxiPrd
M
ED
IC A L
PR
O D
UC
TS
IMDI
Medical device
SAFETY INFORMATION
To
assure the correct use of the product, basic safety measures
should always be followed including the warnings and cautions
listed
in
this instruction manual.
WARNING
• When there is a
HF
magnetic field , high-power equipment, air
compressor, heating equipment or other equipment that may affect
the use
of
the product, please confirm whether the nebulizer can
work /fog out normally before use.
•
Do
not place the device
in
an
environment that contains a lot
of
dust and fluff. Fluff
in
the air, large particles
of
dust or insects may
block the filter port and prevent the device from fogging out proper-
ly.Therefore, check whether the filter port
is
blocked
by
foreign
matter before use.
• When pets or children play, the air tube may be bent or the
device may be accidentally dropped, affecting the product
performance. Therefore, please protect the device to prevent pets
and children from affecting the use
of
the product when use .
• The air tube
is
long, please properly place or store it
in
the
storage bin
of
the nebulizer to prevent strangulation or suffocation
risk to children.
• For regime of medication shall follow the instructions of your
physician or licensed healthcare practitioner.
•
Do
not cover the compressor with a blanket, towel, or any other
type
of
cover during using. This could result
in
the compressor
overheating or malfunctioning.
•
Do
not use the device where the device may be exposed to
flammable gas or vapors.
•
Do
not use only water
in
the nebulizer for nebulizing purposes.
• Always dispose
of
any remaining medication
in
the medication tank
after each use.
Use
fresh medication each time you use the device.
• Do not leave the device or its parts where
it
will be exposed to
extreme temperatures or changes in humidity, such as leaving
the device
in
a vehicle during warm
or
hot months, or where
ii
will be exposed to direct sunlight.
• Do not use the accessories from other manufacturers. Using
such accessories may could have
an
impact on the device's
safety and performance.
CAUTION
• Provide close supervision when this device is used by,
on
, or
near infants, children
or
compromised individuals.
•
Do
not insert any object into the compressor.
• Make sure that the air filter is clean .
If
the air filter has changed
color
or
has not been used for 60 days, replace the filter.
• Make sure that the nebulizer kit is correctly assembled, the air
filter
is
properly installed, and the air tube is correctly connected
to the compressor and the nebulizer kit.
Air
may leak from the air
tube during use
if
not securely connected.
• Inspect the compressor (main unit) and the nebulizer parts
each time before using the device. Make sure no parts are
damaged, the nozzle and air tube are not blocked and the
compressor operates normally.
•
Do
not use the device
if
the air lube is bent.
•
Do
not block the air filter cover.
• Do not alter the baffle, the nozzle in the medication tank
or
any
part
of
the nebulizer kit.
•
Do
not add more than 10ml
of
medication to the medication lank.
CAUTION
• The material
of
the device and accessories in contact with
human body has been tested
for
biological safely, among which
both the skin irritation and sensitization meet the standard
requirements
of
ISO10993 series.
• Do not operate the device at temperatures greater than 40"
C.
• Do not tilt the nebulizer kit so the angle
of
the kit is greater
than
45
". Medication may flow into the mouth.
•
Do
not shake the nebulizer kit while using the device.
• Do not subject the compressor,
or
any
of
the components to
strong shocks, such as dropping
on
the floor.
• This device is approved for human use only.
•
Do
not disassemble or attempt
to
repair
the
device or components.
• Use the device only
for
its intended use as described
in
the
instruction manual. Do not use attachments not recommended
by the manufacturer.
• Dispose
of
the device, components and optional accessories
according to applicable local regulations. Unlawful disposal may
cause environmental pollution.
• Make sure that the air tube
is
securely attached to the
compressor (main unit) and nebulizing parts, and does not come
loose. Twist the
air
tube slightly when inserting
ii
into the
connectors to avoid the tube disconnecting during use.
•
Do
not use the device in the MRI environment.
• The patient should choose the suitable size
of
mask based
on
their face size.
RISK
OF
ELECTRICAL
SHOCK
• Do not use the compressor (main unit) and the AC adapter
while they are wet.
WARNING
(a)
Every
time before use,
please
check
the
adaptor
,
once
damaged, never to use.
(b) Please clean the plug
of
adapter plug at least once a year.
Too much dust on plug may cause the fire.
• Do not plug
or
unplug the power cord into the electrical outlet
with wet hands.
•
Do
not immerse the compressor (main unit)
in
water or other liquid.
• Do not spill
water
or other liquids
on
the compressor .These
parts are not waterproof. If liquid spills on these parts, please
unplug the power cord and wipe
off
the liquid with gauze
or
other
soft absorbent material immediately.
•
Do
not use or store the device
in
humid locations or outdoors. Use
the device within the operating temperature and humidity.
• Do not overload power outlets. Plug the device into the
appropriate voltage outlet.
• Do not use extension cords. Plug the power plug directly into
the electrical outlet.
• Unplug the power plug from
the
electrical outlet after using the
device. Never leave this product unattended when plugged in .
• Unplug the power plug from the electrical outlet before
cleaning the device.
• Completely read all
of
the instructions included the optional
accessories before using them.
2
MAINTENANCE AND STORAGE
• Keep the device out of the reach of unsupervised infants and
children. The device may contain small parts that can
be
swallowed.
• Do not leave the cleaning solution in the nebulizer parts. Rinse
the nebulizer parts with clean hot tap water after disinfecting .
• Wash the nebulizer parts after each use. Dry the parts immedi-
ately after washing.
• Do not store the air tube with moisture
or
medication remaining
in the air tube. This could result in infection as a result
of
bacteria.
• Store the device and the components
in
a clean, safe location.
• Do not carry or leave the nebulizer with medication in the
medication tank.
•
Do
not place or attempt to
dry
the device, components or any
of
the nebulizer parts in a microwave oven .
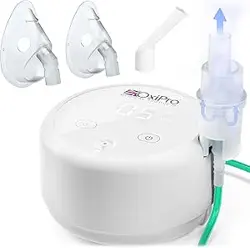
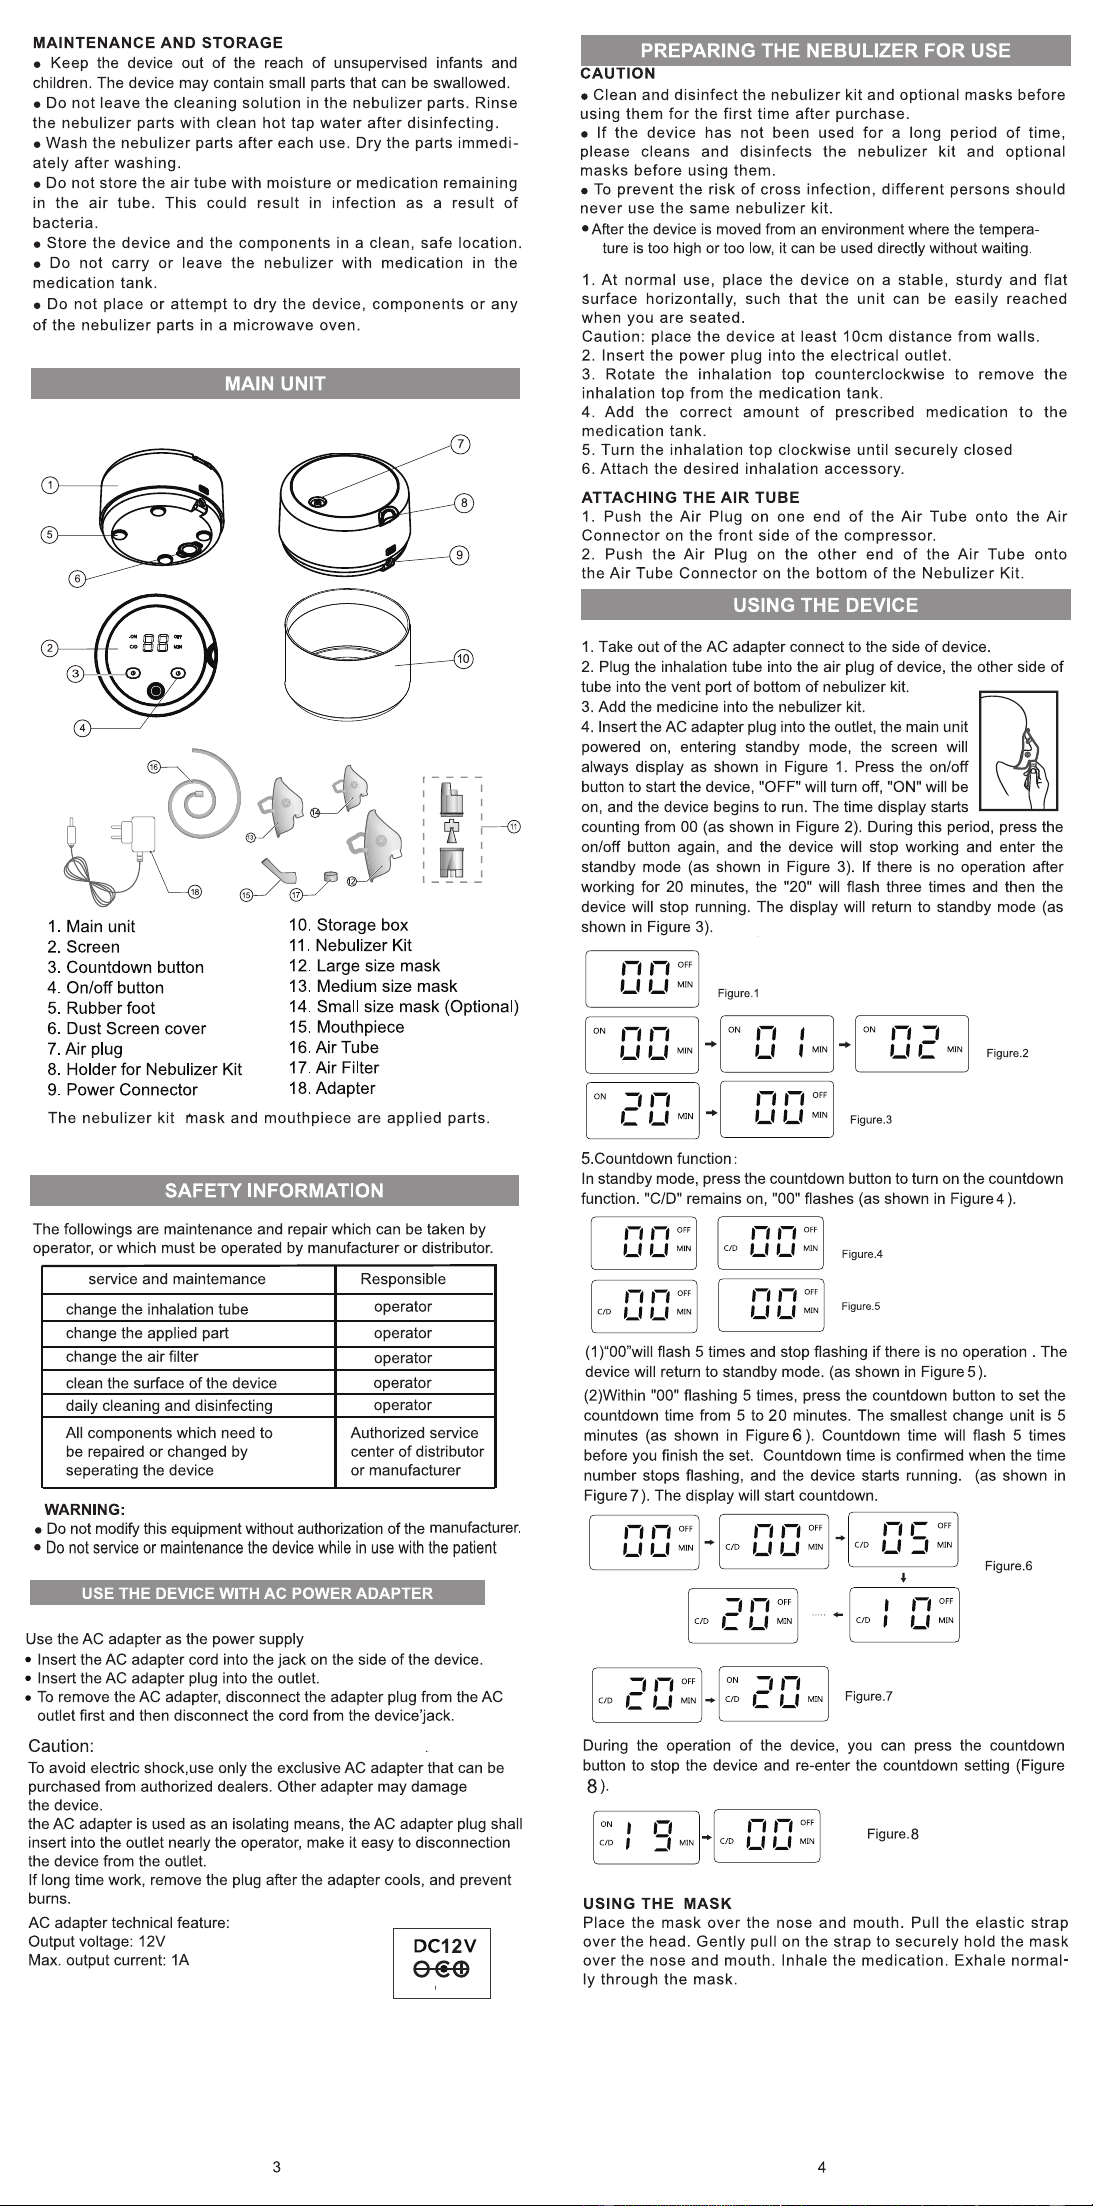
MAIN UNIT
1. Main unit
2. Screen
3. Countdown button
4. On/off button
5. Rubber foot
6. Dust Screen cover
7.
Air
plug
8. Holder for Nebulizer Kit
9.
Power Connector
10. Storage box
11
. Nebulizer Kit
12
. Large size
mask
13. Medium size
mask
14. Small size
mask
(Optional)
15. Mouthpiece
16.AirTube
17.
Air
Filter
18.
Adapter
The nebulizer kit mask and mouthpiece are applied parts.
SAFETY INFORMATION
The followings are maintenance and repair which
can
be
taken by
operator, or which must
be
operated
by
manufacturer or distributor.
service
and
maintemance
Responsible
change the inhalation tube
operator
change the applied part
operator
change the air filter
operator
clean the surface of the device operator
daily cleaning
and
disinfecting operator
All components which need
to
Authorized service
be
repaired or changed
by
center of distributor
separating the device
or manufacturer
WARNING:
•
Do
not modify this equipment without authorization of the manufacturer.
•
Do
not
service
or
maintenance
the
device
wh
i
le in
use
wi
th
the
patient
USE THE DEVICE WITH AC POWER ADAPTER
Use
the
AC
adapter
as
the
power supply
• Insert the
AC
adapter cord into the jack
on
the side of the device.
• Insert the
AC
adapter
plug
into the outlet.
•
To
remove the
AC
adapter, disconnect the adapter
plug
from
the
AC
outlet first
and
then disconnect the
cord
from the device'jack.
Caution
:
To
avoid electric shock.use only the exclusive
AC
adapter
1hat
can
be
purchased from authorized dealers. Other adapter may damage
the device.
the AC adapter is used
as
an
isolating means, the
AC
adapter plug shall
insert into the outlet nearly the operator, make it easy to disconnection
the device from
the
outlet.
If long time work, remove the plug after the adapter cools,
and
prevent
burns.
AC adapter technical feature:
o"'"t m1tago'12V I
gc
_~~ I
Max.
output current:
1A
3
PREPARING THE NEBULIZER FOR USE
CAUTION
• Clean and disinfect the nebulizer kit and optional masks before
using them for the first time after purchase.
•
If
the device has not been used
for
a long period
of
time,
please cleans and disinfects the nebulizer kit and optional
masks before using them.
•
To
prevent the risk
of
cross infection, different persons should
never use the same nebulizer kit.
• After
the
device
is
moved
from
an
environment
where
the
tempera-
ture is
too
hi
gh
or
too
low,
it
can
be
used
directly without waiting.
1.
At normal use, place the device on a stable, sturdy and flat
surface horizontally, such that the unit can be easily reached
when you are seated.
Caution: place the device at least 10cm distance from walls.
2. Insert the power plug into the electrical outlet.
3. Rotate the inhalation top counterclockwise to remove the
inhalation top from the medication tank.
4. Add the correct amount
of
prescribed medication to the
medication tank.
5. Turn the inhalation top clockwise until securely closed
6. Attach
1he
desired inhalation accessory.
ATTACHING THE AIR TUBE
1.
Push the Air Plug
on
one end
of
the Air Tube onto the Air
Connector
on
the front side
of
the compressor.
2. Push the
Air
Plug
on
the
other
end
of
the
Air
Tube onto
the
Air
Tube Connector on the bottom
of
the Nebulizer Kit.
USING THE DEVICE
1.
Take out of the AC adapter connect to the side of device.
2.
Plug
the
inhalaUon
tube into the air plug of device, the other side of
tube into the vent port
of
bottom
of
nebulizer
kit.
3.
Add
the
med
icine into the nebulizer
kit.
~
4. Insert the
AC
adapter plug into the outlet, the main unit
powered
on
, entering standby mode, the screen will
always display
as
shown
in
Figure
1.
Press
the
on/off
button to start the device, "OFF" will turn off, "ON" will
be
on,
and
the device begins to
run.
The time display starts
counting from
00
(as shown
in
Figure
2).
During this period, press the
on/off button again,
and
the device will stop working
and
enter the
standby mode
(as
shown
in
Figure
3).
If there
is
no
operation after
working for
20
minutes, the "20" will flash three times
and
then the
device will stop running. The display will return
to
standby mode
(as
shown
in
Figure
3)
.
17
,-,
O
FF
LI
,_1
MIN
ON
,-,
17
LI
LI
MIN
ON
-,
,-,
C
'-'
MIN
Ftgure
.1
ON
17
'-'
,-,
17
OFF
,_,
,_1
MIN
5.Countdown function :
ON
,-,
-,
,_,
C
MIN
Figure.2
Figure.3
In
standby
mode,
press
the
countdown button
to
turn
on
the countdown
function. "CID" remains
on,
"
00
" flashes
(as
shown
in
Figure 4 ).
1717
0 FF
.-,
17
OF
F
LI,_,
MIN
CID
,_,
'-'
MIN
Figure.4
17 17
OFF
1717
m
Figure.5
C/0
LI,_,
MI
N
,_1
,_,
MI
N
( 1 )"00"will flash 5 times
and
stop flashing if there
is
no
operation . The
device will return
to
standby mode.
(as
shown
in
Figure 5 ).
(2)Within "00" flashing 5 times, press the countdown button
to
set the
countdown time from 5 to 20 minutes. The smallest change unit
is
5
minutes
(as
shown
in
Figure 6
).
Countdown time will flash 5 times
before
you
finish the
set.
Countdown time
is
confirmed when the time
number stops flashing,
and
the device starts running . (as shown
in
Figure 7 ). The display will start countdown.
17
1-,
OF
F
17 17
OFF
LI
LI
MIN
..
C
ID
,_1
'-'
MIN
,-,
,-
OFF
..
U
□
,_,
=·
MIN
7
,-,
OFF
C/0
·=
Lf
MIN
..
...
..
C/D
,-,
OFF
,_,
MIN
-,
,-,
O
FF
CID C
LI
MIN
ON
-,
,-,
cro
C I_I MIN Figure. 7
Figure
.6
During the operation of
the
device, you can press the countdown
button
to
stop the device and re-enter
the
countdown setting (Figure
8)
.
17
1-, 1-,
Off
.:l
MIN
..
C/0
LI
LI
MI
N
USING THE MASK
Figure
.a
Place the mask over the nose and mouth. Pull the elastic strap
over the head . Gently pull
on
the strap to securely hold the mask
over the nose and mouth. Inhale the medication. Exhale normal-
ly through the mask.
4
OXI-NB20
OXI-NB20
A trademark of OXIPRO MEDICAL LTD
INSTRUCTION MANUAL
MODEL:
TABLE OF CONTENT
1. INSTRUCTION ························•··························
··
·········
··
············
2. SYMBOLS ·································•
···
·····················
··
··
··
··
··
··
···
··········· 1
3. SAFETY INFORMATION ·····--·-----·-· ··································
-··-·--·--·
1
4.
MAIN
UNIT
.................. ····· ··················· ··················· 3
5.
PREPARING
THE
NEBULIZER
FOR
USE
············ ····-•··-······· ······ 4
6.
USING
THE
DEVICE
··-·····
••••••••••••••
•••
•••••••••
••••••
••
••
•••••
••
•••
•••··•
4
7. REPROCESSING
······················
··
···········-···········
••
············· ..... 5
8.
CARING
FOR
THE
DEVICE ··················· ········-········ ····· 5
9.
STORING
THE
DEVICE ········-····· ·····•··-········
··
··
··
··
·-
···
··
············-··· 6
10.TROUBLESHOOTING ····························•·· 6
11.
WARRANTY OBLIGATIONS ··········
·-
···
···············
··
··········
··
··
·······
··
6
12
. CLASSIFICATION
••••
•••
·•· ·
··
········-·················-······· 6
13.
PERIODIC SAFETY CHECKS ····
••
····························
··
···
··
·········· 6
14
. SPECIFICATIONS ·········· ·········-·······
•••••••••
•
••••••
•
••
••
•••
••
••
•••
••
7
15.
GUIDANCE
AND
MANUFACTURER'S DECLARATION ··············· 7
16.
QUALITY GUARANTEE ···-······· 8
17.
REQUIRING
RECORD
········-·
-•
··
········-···············
··
-··
··
··
·
···
·······-··· 8
INSTRUCTION
Thank
you
for purchasing the compressor nebulizer.The
device is single-patient
use.
Intended purpose: This compressor nebulizer is a medical device
that used
to
aerosolize medications for inhalation
by
the
patient to
achieve the expected therapeutic effect.
The
device
can
be
used with
adult or pediatric patients.
Intended user: Healthcare professionals; patients or their caregivers.
Intended patient: Pediatric (defined
by
the prescribed medication)
and adult patients
Applicable place: hospitals, clinics,
home
.
Contraindications: None.
SYMBOLS
Symbols
Meaning
Mai
Manufacturer
~
Authorized Representative
in
the European
community
R
Symbol for
the
marking of electrical and
electronics devices according
to
Directive
-
2002/96/EC.
[gJ
CLASS
II
= "
CE
0123
CE
marking
in
conformity with
EC
directive
93/42/EEC
IP
22
Protected
against
solid
foreign
objects
12.5
mm
in
diameter
and
larger,
and
against
drops
of
water
when
the
housing
is
angled
up
to
15
°
e
Observe the instructions for
use
II]
Type
BF
Applied Part
"""
aOxiPrd
M
ED
IC A L
PR
O D
UC
TS
IMDI
Medical device
SAFETY INFORMATION
To
assure the correct use of the product, basic safety measures
should always be followed including the warnings and cautions
listed
in
this instruction manual.
WARNING
• When there is a
HF
magnetic field , high-power equipment, air
compressor, heating equipment or other equipment that may affect
the use
of
the product, please confirm whether the nebulizer can
work /fog out normally before use.
•
Do
not place the device
in
an
environment that contains a lot
of
dust and fluff. Fluff
in
the air, large particles
of
dust or insects may
block the filter port and prevent the device from fogging out proper-
ly.Therefore, check whether the filter port
is
blocked
by
foreign
matter before use.
• When pets or children play, the air tube may be bent or the
device may be accidentally dropped, affecting the product
performance. Therefore, please protect the device to prevent pets
and children from affecting the use
of
the product when use .
• The air tube
is
long, please properly place or store it
in
the
storage bin
of
the nebulizer to prevent strangulation or suffocation
risk to children.
• For regime of medication shall follow the instructions of your
physician or licensed healthcare practitioner.
•
Do
not cover the compressor with a blanket, towel, or any other
type
of
cover during using. This could result
in
the compressor
overheating or malfunctioning.
•
Do
not use the device where the device may be exposed to
flammable gas or vapors.
•
Do
not use only water
in
the nebulizer for nebulizing purposes.
• Always dispose
of
any remaining medication
in
the medication tank
after each use.
Use
fresh medication each time you use the device.
• Do not leave the device or its parts where
it
will be exposed to
extreme temperatures or changes in humidity, such as leaving
the device
in
a vehicle during warm
or
hot months, or where
ii
will be exposed to direct sunlight.
• Do not use the accessories from other manufacturers. Using
such accessories may could have
an
impact on the device's
safety and performance.
CAUTION
• Provide close supervision when this device is used by,
on
, or
near infants, children
or
compromised individuals.
•
Do
not insert any object into the compressor.
• Make sure that the air filter is clean .
If
the air filter has changed
color
or
has not been used for 60 days, replace the filter.
• Make sure that the nebulizer kit is correctly assembled, the air
filter
is
properly installed, and the air tube is correctly connected
to the compressor and the nebulizer kit.
Air
may leak from the air
tube during use
if
not securely connected.
• Inspect the compressor (main unit) and the nebulizer parts
each time before using the device. Make sure no parts are
damaged, the nozzle and air tube are not blocked and the
compressor operates normally.
•
Do
not use the device
if
the air lube is bent.
•
Do
not block the air filter cover.
• Do not alter the baffle, the nozzle in the medication tank
or
any
part
of
the nebulizer kit.
•
Do
not add more than 10ml
of
medication to the medication lank.
CAUTION
• The material
of
the device and accessories in contact with
human body has been tested
for
biological safely, among which
both the skin irritation and sensitization meet the standard
requirements
of
ISO10993 series.
• Do not operate the device at temperatures greater than 40"
C.
• Do not tilt the nebulizer kit so the angle
of
the kit is greater
than
45
". Medication may flow into the mouth.
•
Do
not shake the nebulizer kit while using the device.
• Do not subject the compressor,
or
any
of
the components to
strong shocks, such as dropping
on
the floor.
• This device is approved for human use only.
•
Do
not disassemble or attempt
to
repair
the
device or components.
• Use the device only
for
its intended use as described
in
the
instruction manual. Do not use attachments not recommended
by the manufacturer.
• Dispose
of
the device, components and optional accessories
according to applicable local regulations. Unlawful disposal may
cause environmental pollution.
• Make sure that the air tube
is
securely attached to the
compressor (main unit) and nebulizing parts, and does not come
loose. Twist the
air
tube slightly when inserting
ii
into the
connectors to avoid the tube disconnecting during use.
•
Do
not use the device in the MRI environment.
• The patient should choose the suitable size
of
mask based
on
their face size.
RISK
OF
ELECTRICAL
SHOCK
• Do not use the compressor (main unit) and the AC adapter
while they are wet.
WARNING
(a)
Every
time before use,
please
check
the
adaptor
,
once
damaged, never to use.
(b) Please clean the plug
of
adapter plug at least once a year.
Too much dust on plug may cause the fire.
• Do not plug
or
unplug the power cord into the electrical outlet
with wet hands.
•
Do
not immerse the compressor (main unit)
in
water or other liquid.
• Do not spill
water
or other liquids
on
the compressor .These
parts are not waterproof. If liquid spills on these parts, please
unplug the power cord and wipe
off
the liquid with gauze
or
other
soft absorbent material immediately.
•
Do
not use or store the device
in
humid locations or outdoors. Use
the device within the operating temperature and humidity.
• Do not overload power outlets. Plug the device into the
appropriate voltage outlet.
• Do not use extension cords. Plug the power plug directly into
the electrical outlet.
• Unplug the power plug from
the
electrical outlet after using the
device. Never leave this product unattended when plugged in .
• Unplug the power plug from the electrical outlet before
cleaning the device.
• Completely read all
of
the instructions included the optional
accessories before using them.
2
MAINTENANCE AND STORAGE
• Keep the device out of the reach of unsupervised infants and
children. The device may contain small parts that can
be
swallowed.
• Do not leave the cleaning solution in the nebulizer parts. Rinse
the nebulizer parts with clean hot tap water after disinfecting .
• Wash the nebulizer parts after each use. Dry the parts immedi-
ately after washing.
• Do not store the air tube with moisture
or
medication remaining
in the air tube. This could result in infection as a result
of
bacteria.
• Store the device and the components
in
a clean, safe location.
• Do not carry or leave the nebulizer with medication in the
medication tank.
•
Do
not place or attempt to
dry
the device, components or any
of
the nebulizer parts in a microwave oven .
MAIN UNIT
1. Main unit
2. Screen
3. Countdown button
4. On/off button
5. Rubber foot
6. Dust Screen cover
7.
Air
plug
8. Holder for Nebulizer Kit
9.
Power Connector
10. Storage box
11
. Nebulizer Kit
12
. Large size
mask
13. Medium size
mask
14. Small size
mask
(Optional)
15. Mouthpiece
16.AirTube
17.
Air
Filter
18.
Adapter
The nebulizer kit mask and mouthpiece are applied parts.
SAFETY INFORMATION
The followings are maintenance and repair which
can
be
taken by
operator, or which must
be
operated
by
manufacturer or distributor.
service
and
maintemance
Responsible
change the inhalation tube
operator
change the applied part
operator
change the air filter
operator
clean the surface of the device operator
daily cleaning
and
disinfecting operator
All components which need
to
Authorized service
be
repaired or changed
by
center of distributor
separating the device
or manufacturer
WARNING:
•
Do
not modify this equipment without authorization of the manufacturer.
•
Do
not
service
or
maintenance
the
device
wh
i
le in
use
wi
th
the
patient
USE THE DEVICE WITH AC POWER ADAPTER
Use
the
AC
adapter
as
the
power supply
• Insert the
AC
adapter cord into the jack
on
the side of the device.
• Insert the
AC
adapter
plug
into the outlet.
•
To
remove the
AC
adapter, disconnect the adapter
plug
from
the
AC
outlet first
and
then disconnect the
cord
from the device'jack.
Caution
:
To
avoid electric shock.use only the exclusive
AC
adapter
1hat
can
be
purchased from authorized dealers. Other adapter may damage
the device.
the AC adapter is used
as
an
isolating means, the
AC
adapter plug shall
insert into the outlet nearly the operator, make it easy to disconnection
the device from
the
outlet.
If long time work, remove the plug after the adapter cools,
and
prevent
burns.
AC adapter technical feature:
o"'"t m1tago'12V I
gc
_~~ I
Max.
output current:
1A
3
PREPARING THE NEBULIZER FOR USE
CAUTION
• Clean and disinfect the nebulizer kit and optional masks before
using them for the first time after purchase.
•
If
the device has not been used
for
a long period
of
time,
please cleans and disinfects the nebulizer kit and optional
masks before using them.
•
To
prevent the risk
of
cross infection, different persons should
never use the same nebulizer kit.
• After
the
device
is
moved
from
an
environment
where
the
tempera-
ture is
too
hi
gh
or
too
low,
it
can
be
used
directly without waiting.
1.
At normal use, place the device on a stable, sturdy and flat
surface horizontally, such that the unit can be easily reached
when you are seated.
Caution: place the device at least 10cm distance from walls.
2. Insert the power plug into the electrical outlet.
3. Rotate the inhalation top counterclockwise to remove the
inhalation top from the medication tank.
4. Add the correct amount
of
prescribed medication to the
medication tank.
5. Turn the inhalation top clockwise until securely closed
6. Attach
1he
desired inhalation accessory.
ATTACHING THE AIR TUBE
1.
Push the Air Plug
on
one end
of
the Air Tube onto the Air
Connector
on
the front side
of
the compressor.
2. Push the
Air
Plug
on
the
other
end
of
the
Air
Tube onto
the
Air
Tube Connector on the bottom
of
the Nebulizer Kit.
USING THE DEVICE
1.
Take out of the AC adapter connect to the side of device.
2.
Plug
the
inhalaUon
tube into the air plug of device, the other side of
tube into the vent port
of
bottom
of
nebulizer
kit.
3.
Add
the
med
icine into the nebulizer
kit.
~
4. Insert the
AC
adapter plug into the outlet, the main unit
powered
on
, entering standby mode, the screen will
always display
as
shown
in
Figure
1.
Press
the
on/off
button to start the device, "OFF" will turn off, "ON" will
be
on,
and
the device begins to
run.
The time display starts
counting from
00
(as shown
in
Figure
2).
During this period, press the
on/off button again,
and
the device will stop working
and
enter the
standby mode
(as
shown
in
Figure
3).
If there
is
no
operation after
working for
20
minutes, the "20" will flash three times
and
then the
device will stop running. The display will return
to
standby mode
(as
shown
in
Figure
3)
.
17
,-,
O
FF
LI
,_1
MIN
ON
,-,
17
LI
LI
MIN
ON
-,
,-,
C
'-'
MIN
Ftgure
.1
ON
17
'-'
,-,
17
OFF
,_,
,_1
MIN
5.Countdown function :
ON
,-,
-,
,_,
C
MIN
Figure.2
Figure.3
In
standby
mode,
press
the
countdown button
to
turn
on
the countdown
function. "CID" remains
on,
"
00
" flashes
(as
shown
in
Figure 4 ).
1717
0 FF
.-,
17
OF
F
LI,_,
MIN
CID
,_,
'-'
MIN
Figure.4
17 17
OFF
1717
m
Figure.5
C/0
LI,_,
MI
N
,_1
,_,
MI
N
( 1 )"00"will flash 5 times
and
stop flashing if there
is
no
operation . The
device will return
to
standby mode.
(as
shown
in
Figure 5 ).
(2)Within "00" flashing 5 times, press the countdown button
to
set the
countdown time from 5 to 20 minutes. The smallest change unit
is
5
minutes
(as
shown
in
Figure 6
).
Countdown time will flash 5 times
before
you
finish the
set.
Countdown time
is
confirmed when the time
number stops flashing,
and
the device starts running . (as shown
in
Figure 7 ). The display will start countdown.
17
1-,
OF
F
17 17
OFF
LI
LI
MIN
..
C
ID
,_1
'-'
MIN
,-,
,-
OFF
..
U
□
,_,
=·
MIN
7
,-,
OFF
C/0
·=
Lf
MIN
..
...
..
C/D
,-,
OFF
,_,
MIN
-,
,-,
O
FF
CID C
LI
MIN
ON
-,
,-,
cro
C I_I MIN Figure. 7
Figure
.6
During the operation of
the
device, you can press the countdown
button
to
stop the device and re-enter
the
countdown setting (Figure
8)
.
17
1-, 1-,
Off
.:l
MIN
..
C/0
LI
LI
MI
N
USING THE MASK
Figure
.a
Place the mask over the nose and mouth. Pull the elastic strap
over the head . Gently pull
on
the strap to securely hold the mask
over the nose and mouth. Inhale the medication. Exhale normal-
ly through the mask.
4
OXI-NB20
UK and Irish Distributor
OxiPro Medical Ltd
Unit 3, Maidenhead Enterprise Centre
Cordwallis Street
Maidenhead
SL6 7BE
United Kingdom
www.oxipro.io
Tel: +44 1628 290244
E-mail: [email protected]
REPROCESSING
WARNING
• Ensure that the remove the plug before the clean and disinfection.
•
Do
not place or attempt
to
dry the device, components or any of the
nebulizer parts
in
a microwave oven.
LIMITATIONS
ON
PROCESSING
As with any plastic parts, nebulizer kit
and
their accessories are
affected
by
a certain amount of wear and tear when used and
hygienically prepared
on
a frequent basis. Over time, this can lead
to
a
change
in
the aerosol, which
can
have a negative effect
on
the
efficiency of the treatment.
The permitted number
of
processing cycles
of
the nebulizer
kit
and
other accessories
is
300.
PREPARATION BEFORE CLEANING
The nebulizer kit
and
the accessories used must
be
cleaned
thoroughly after each application
and
disinfected
at
least once a
day.
1.Remove
the
accessory (mask or mouthpiece) from the nebulizer kit.
2.Detach the air tube from the nebulizer kit.
3.Dismanlle the nebulizer kit into its individual parts.
4.Make sure that all medication residues are removed from the
nebulizer kit.
5.Rinse all parts of the nebulizer cup and accessory under running tap
water. This must
be
done especially thoroughly if cleaning and
disinfection are not carried out straight
away.
The air tube does not need
to
be
cleaned or disinfected. If
condensation occurs
in
the air tube, please clear it
as
follows.
1.Connect the air tube to the compressor.
2.Switch the compressor
on.
3.Leave the compressor running until any condensation
in
the tubing
has been removed by the air flowing into the tube.
CLEANING
1.Place all disassembled parts
in
warm tap water (
40
C-50
C)
for at
least
10
min. If necessary, use a clean brush to remove loose dirt (the
brush must
be
reserved exclusively for this purpose).
.
mse
a
pa
s oroug y
in
running wa er e wa er ow s
ou
more than 3 liters per minute ) and each part for at least 1 min.
3.Whether disinfect immediately or not, dry all parts with a new medical
gauze.
You
can
remove excess water more quickly
by
shaking them.
CAUTION
• Inadequate disinfection encourages the growth of bacteria
and
thus
increases the risk of infection. Adequate cleaning with disinfection
can only
be
assured
if
application time are adhered to,
and
if all
individual parts are completely immersed
in
the solution for the
entire application lime. There must not
be
any cavities or
air
bubbles.
DISINFECTING
After cleaning, disinfect the dismantled nebulizer kit and accessory
used (except for the air tube). Effective disinfection
is
only possible
if
the nebulizer kit and accessory have been cleaned.
Use 2.0% (w/w) Hydrogen Peroxide solution to disinfect the nebulizer
kit and accessories.
To
ensure safety when handling chemicals, follow the instructions for
use of the disinfecting agent, particularly the accompanying safety
instructions.
For complete disinfection of nebulizer kit and accessory, thoroughly
clean, rinse and rough dry surfaces before immersed
in
chemical
disinfection solution.
1.Place all pre-cleaned, rinsed
and
dried disassembled components
in
undiluted
2.0% (w/w) Hydrogen Peroxide solution. Ensure that all components'
surfaces have been fully contacted with solution.
2.Once all components have been immersed
and
all surfaces
in
contact with the disinfectant solution, soak all components for 8
minutes. Track the soak time using a timer.
3.Rinse all components with sterile water or potable tap water.
4.Dry the parts with a new medical gauze as soon
as
disinfection has
finished.
You
can
remove excess water more quickly
by
shaking them.
5.Dispose of the used solution.
CAUTION
• amp envIronmen may encourage e grow o ac eria.
Therefore, dry the parts with a new medical gauze as soon
as
disinfection has finished. The risk of infection
is
reduced when the
parts are dried.
CARING FOR THE DEVICE
To
keep your device in the best condition and protect the unit
from damage follow these directions:
CLEANING THE DEVICE
Clean the casing
of
the main unit by using a soft cloth moistened
with water
or
a mild detergent.
Do
not use abrasive cleaners. Dry
the casing immediately using a soft clean cloth.
CHANGE THE
AIR
FILTER
Change the air filter every
60
days even if the air filter does not
appear dirty. If the air filter appears dirty, or if water or medication
has spilled
on
the air filter, replace with a new air filter immediately.
1.
Pull
the air filter cover
to
remove
from
the
front side of the compressor.
2. Remove the dirty filter with hand.
CAUTION:
Do not attempt to wash or clean the air filter. Damp air filters can
cause blockages. Do not substitute cotton or any
other
material
for the air filter.
CAUTION:
Wash the air filter cover regularly to prevent any blockage in the
cover. Do not boil. Make sure the cover is dry before inserting
the new air filter.
3. Insert a new air
filler
into the air
filter
cover.
CAUTION:
Before inserting the new air filter makes sure the air filter is clean
and free of dust.
Do
not operate the device without the air filter.
4. Put the air filter cover back on the compressor.
5
STORING THE DEVICE
1.
Put the nebulizer kit and the inhalation accessory (mouthpiece,
or mask) in a dry, sealed bag. Place the
bag
in
the storage pocket
of the carrying bag.
2. Coil the
air
tubing and place in the storage pocket.
3. Place the compressor in the carrying bag.
4. Zipper the bag closed.
5.
Store the device
in
a safe, clean location. Do not store the
device in extreme hot
or
cold temperature, high humidity
or
in
direct sunlight.
WARNING
•
Do
not leave the device or its parts where it will be exposed to
extreme temperatures or changes in humidity, such as leaving
the device in a vehicle during warm or hot months, or where it
will be exposed to direct sunlight.
• Keep the device out
of
the reach
of
unsupervised infants and
children. The device may contain small parts that can be
swallowed.
CAUTION
Do
not
carry
or
leave
the
nebulizer
with
medication
in the
medication tank.
Do
not disassemble or attempt to repair the device or components.
TROUBLESHOOTING
TROUBLESHOOTING GUIDE
PROBLEM CAUSE SOLUTION
No power on unit The AC power cord is Turn the power switch
when the power not plugged into an off. Plug the power plug
switch
is on.
electrical
outlet.
into
an
electrical
outlet.
No medication in the Add the correct amount
medication tank.
Too
of
prescribed medication
much
or
too little to the medication tank.
medication
in
the
medication tank.
The nebulizer kit is not Make sure the nebulizer
correctly assembled. kit is correctly assembled
and the inhalation
accessory is correctly
attached.
No nebulization
or
The nebulizer kit is
Hold the nebulizer kit
low
tilted
at
an incorrect
correctly.
Do
not tilt the
nebulization rate
angle.
nebulizer kit so the angle
when the power is
of
the kit is greater than
on.
45 degrees.
The air tube is Make sure the air tube is
incorrectly attached. correctly attached to the
compressor and the
nebulizer kit.
The air tube is folded Make sure the air tube is
or
damaged. The air not folded, kinked
or
tube is blocked. bent. Inspect the air tube
for any damage. Replace
the air tube
if
damaged.
The device is
very The compressor is Do not cover the
hot.
covered. The device compressor with
any
type
has been used for
of
cover during use. Turn
longer than 20 the device off. Wait 40
minutes. minutes before using the
device again.
WARRANTY OBLIGATIONS
1.
Warranty
for
this compact compressor nebulizer is 12 months
since the date
of
purchase.
2. The warranty obligations are prescribed by warranty certificate
for buyer.
are present
in
the warranty certificate.
CLASSIFICATION
Equipment Classification with respect to protection from electric
shock: CLASS
II
Degree
of
protection from electric shock: TYPE BF
Degree
of
protection against ingress
of
water
is rated as IPX2.
Equipment not suitable
for
use in the presence
of
flammable
anesthetic mixture with air, oxygen or nitrous oxide.
PERIODIC SAFETY CHECKS
If
you
use
the
device
with
power
adapter,
preventive
inspection
and
maintenance
to
be
performed
including the
frequency
of
such
maintenance.
•
Every
time
before
use,
please
check
the adapter,
once
damaged,
never
to
use.
•
Please
clean
the
plug
of
adapter
plug
at
least
once
a year. Too
much
dust
on
plug
may
cause
fire
6
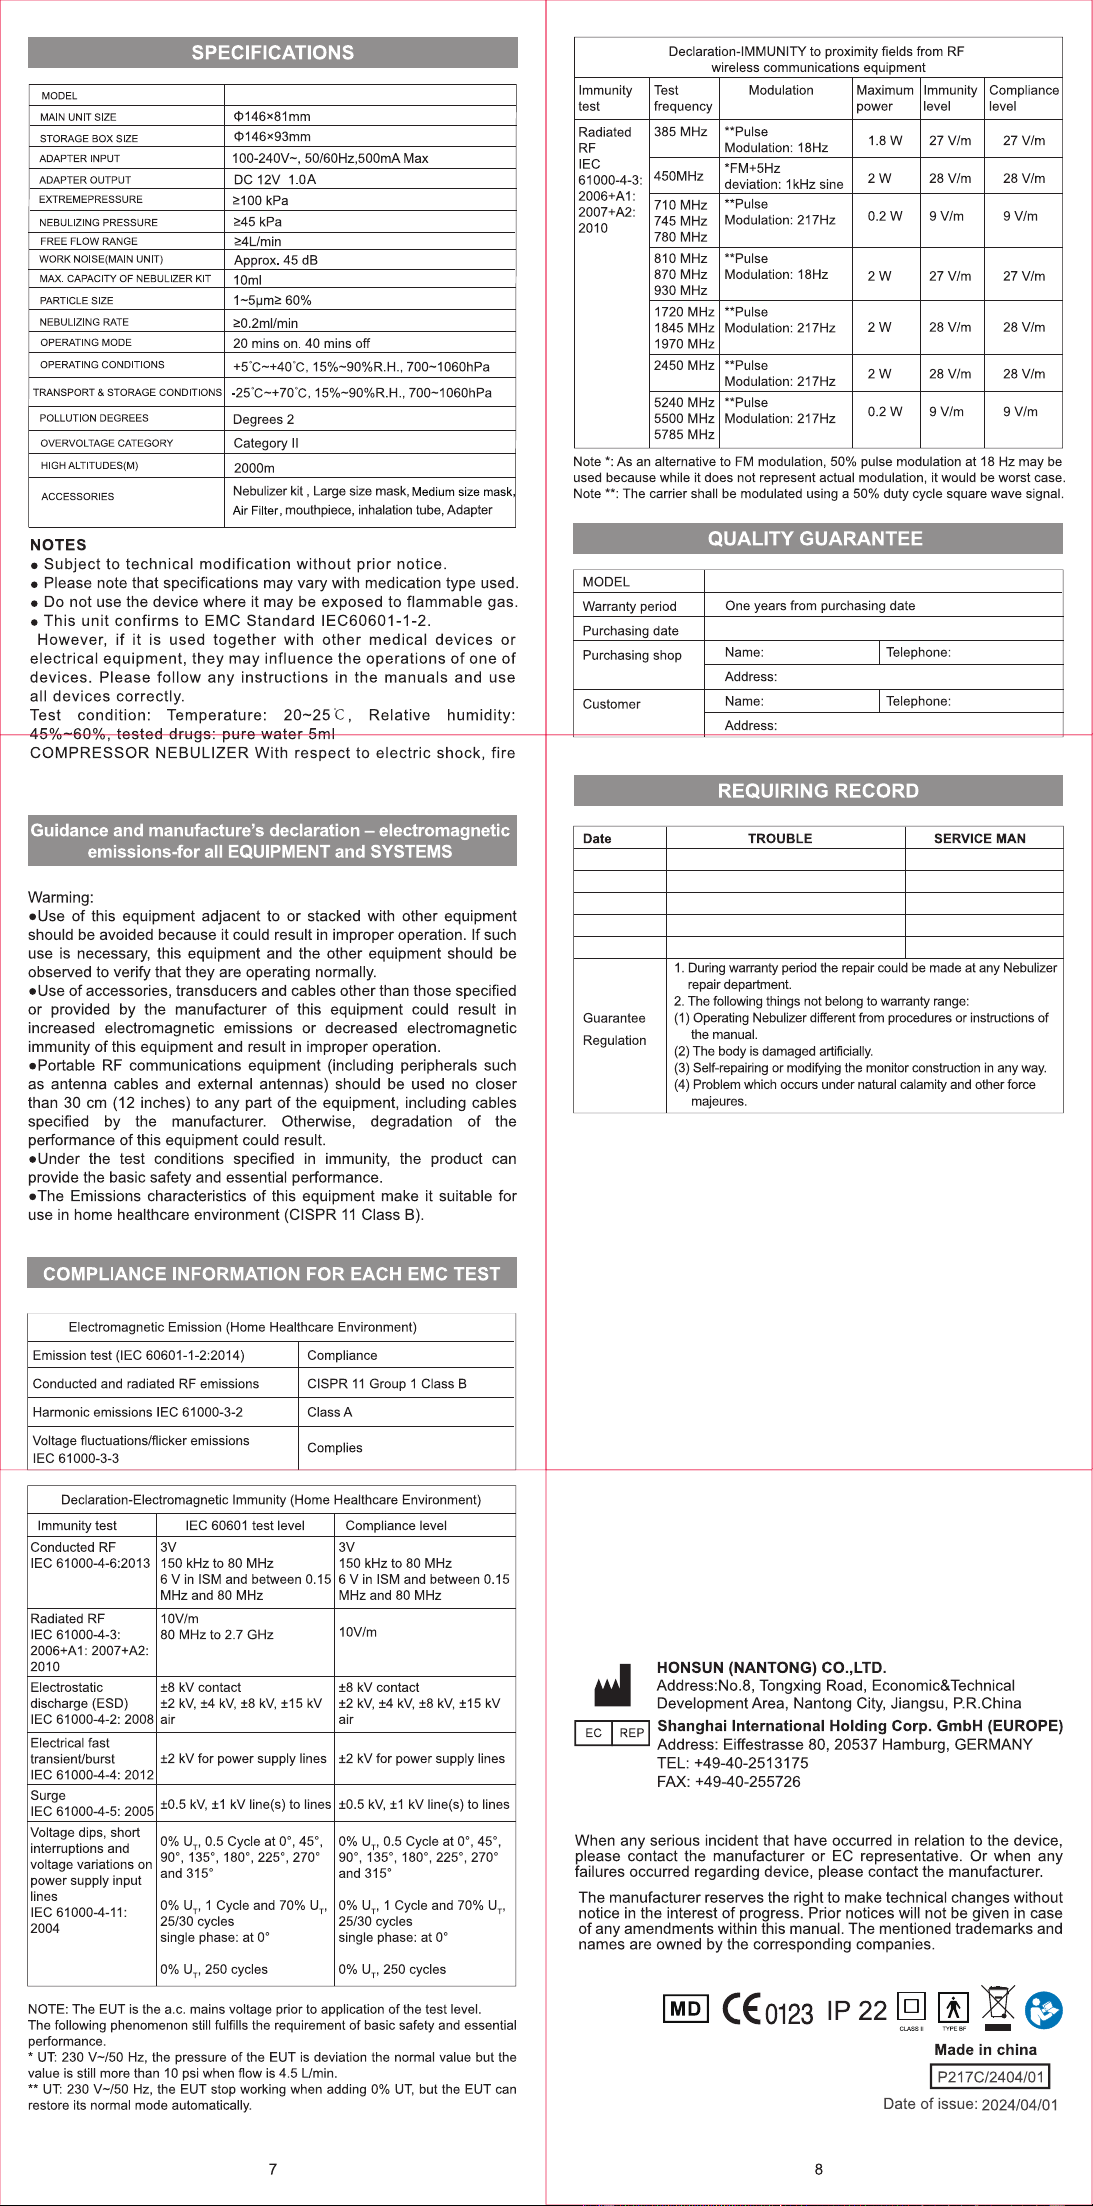
SPECIFICATIONS
MODEL
MAIN
UNIT
SIZE
<!>146x81mm
STORAGE BOX SIZE
<l>146x93mm
ADAPTER
INPUT
100-240V-, 50/60Hz,500mA Max
ADAPTER
OUTPUT
DC
12V 1.0A
EXTREMEPRESSURE
2:100
kPa
NEBULIZING PRESSURE ~45 kPa
FREE FLOW RANGE
~Umin
WORK
NOISE(MAIN
UNIT)
Approx. 45
dB
MAX.
CAPACITY
OF
NEBULIZER
KIT
10ml
PARTICLE SIZE 1 ~5µm~ 60%
NEBULIZING
RATE
2:0.2ml/min
OPERATING MODE 20 mins on. 40 mins off
OPERATING
CONDITIONS
+5"C-+4Q"C, 15%-90%R.H., 700-106QhPa
TRANSPORT
&
STORAGE
CONDITIONS
-25"C-+70"C. 15%-90%R.H
..
700-1060hPa
POLLUTION
DEGREES
Degrees 2
OVERVOLTAGE CATEGORY
Category
II
HIGH
AL
TITUDES(M)
2000m
ACCESSORIES
Nebulizer kit, Large size mask,
Medium
size
mask
Air
Filter
,
mouthpiece,
inhalation
tube,
Adapter
NOTES
• Subject to technical modification without prior notice.
• Please note that specifications may vary with medication type used.
•
Do
not
use
the device where it may be exposed to flammable gas.
• This unit confirms to EMC Standard IEC60601-1-2.
However,
if
ii
is used together with other medical devices
or
electrical equipment, they may influence the operations
of
one
of
devices. Please follow any instructions in the manuals and use
all devices correctly.
Test condition: Temperature:
20-25
C,
Relative humidity:
COMPRESSOR NEBULIZER With respect to electric shock, fire
Guidance and manufacture's declaration - electromagnetic
emissions-for all EQUIPMENT and SYSTEMS
Warming:
•Use of this equipment adjacent
to
or stacked with other equipment
should
be
avoided because it could result
in
improper operation. If such
use
is
necessary, this equipment
and
the
other equipment should
be
observed to verify that they
are
operating normally.
•Use of accessories, transducers
and
cables other
than
those specified
or provided
by
the manufacturer of this equipment could result
in
increased electromagnetic emissions or decreased electromagnetic
immunity of this equipment and result
in
improper operation.
•Portable
RF
communications equipment (including peripherals such
as
antenna cables
and
external antennas) should
be
used
no
closer
than
30
cm
(12
inches)
to
any part of
the
equipment, including cables
specified
by
the manufacturer. Otherwise, degradation of the
performance of this equipment could result.
•Under
the
test conditions specified
in
immunity, the product
can
provide the basic safety
and
essential performance.
• The Emissions characteristics of this equipment make it suitable for
use
in
home
healthcare environment (CISPR
11
Class
B).
COMPLIANCE
INFORMATION
FOR
EACH
EMC
TEST
Electromagnetic Emission (Home Healthcare Environment)
Emission test (IEC 60601-1-2:2014)
Conducted and radiated RF emissions
Harmonic emissions
IEC
61000-3-2
Voltage fluctuations/flicker emissions
IEC
61000-3-3
Compliance
CISPR
11
Group 1 Class B
Class A
Complies
Declaration-Electromagnetic Immunity (Home Healthcare Environment)
Immunity test
IEC
60601
test level
Compliance level
Conducted
RF
3V 3V
IEC 61000-4-6:2013 150
kHz
to
80
MHz
150
kHz
to
80
MHz
6 V
in
ISM
and
between 0.15 6 V
in
ISM
and
between 0.15
MHz
and
80 MHz
MHz
and
80
MHz
Radiated
RF
10V/m
IEC 61000-4-3:
80
MHz
to
2.7 GHz
10V/m
2006+A1: 2007+A2:
2010
Electrostatic
±8
kV
contact
±8
kV
contact
discharge (ESD)
±2
kV,
±4
kV,
±8
kV,
±15
kV
±2
kV,
±4
kV,
±8
kV,
±15
kV
IEC 61000-4-2: 2008 air air
Electrical fast
transienUburst
±2
kV
for power supply lines
±2
kV
for power supply lines
IEC 61000-4-4: 2012
~Eu?:
1000
_
4
_
5
:
2005
±0.5
kV,
±1
kV
line(s) to lines ±0.5
kV,
±1
kV
line(s)
to
lines
Voltage dips, short
interruptions
and
voltage variations
on
power supply input
lines
IEC 61000-4-11:
2004
0%
UT'
O
.5
Cycle at 0°, 45°,
90°, 135°, 180°, 225°, 270°
and
315°
0%
UT,
0.5 Cycle at
0°,
45°,
90°, 135°, 180°, 225°, 270°
and
315°
0%
UT'
1 Cycle
and
70%
UT'
0%
UT,
1 Cycle and
70%
UT,
25/30 cycles 25/30 cycles
single phase: at
0°
single phase: at
0°
0%
UP
250 cycles
0%
UT,
250 cycles
NOTE:
The EUT
is
the
a.c. mains voltage prior to application of
the
test level.
The following phenomenon still fulfills the requirement of basic safety
and
essential
performance.
•
LIT:
230 V-/50
Hz,
the pressure of the EUT
is
deviation the
nonmal
value but the
value
is
still more than 1 O
psi
when
flow
is
4.5 Umin.
••
UT:
230 V-/50
Hz,
the
EUT
stop working when adding
0%
UT,
but
the
EUT
can
restore its normal mode automatically.
7
Declaration-IMMUNITY
to
proximity fields
from
RF
wireless communications equipment
Immunity
Test
Modulation Maximum Immunity Compliance
test
frequency power level level
Radiated
385
MHz
**Pulse
1.8W
27V/m
27V/m
RF
Modulation: 18Hz
IEC
•FM+5Hz
61000-4-3:
450MHz
deviation: 1
kHz
sine
2W
28V/m 28V/m
2006+A1:
710
MHz
**Pulse
2007+A2:
745
MHz
Modulation: 217Hz
0.2W
9V/m
9V/m
2010
780
MHz
810
MHz
..
Pulse
870
MHz
Modulation: 18Hz
2W
27V/m 27V/m
930
MHz
1720 MHz **Pulse
1845 MHz Modulation: 217Hz
2W
28V/m 28V/m
1970 MHz
2450 MHz
**Pulse
2W
28V/m 28V/m
Modulation: 217Hz
5240 MHz
..
Pulse
0.2W
9V/m
9V/m
5500 MHz Modulation: 217Hz
5785 MHz
Note •:
As
an
alternative
to
FM
modulation,
50%
pulse modulation at
18
Hz may
be
used because while
it
does not represent actual modulation, it would
be
worst case.
Note
..
: The carrier shall
be
modulated using a
50%
duty cycle square wave signal.
QUALITY GUARANTEE
MODEL
Warranty period
One
years from purchasing date
Purchasing date
Purchasing shop
Name: Telephone:
Customer
Date
Guarantee
Regulation
Address:
Name: Telephone:
Address:
REQUIRING RECORD
TROUBLE SERVICE MAN
1.
During
warranty
period
the
repair
could
be
made
at
any
Nebulizer
repair department.
2.
The
following
things
not
belong
to
warranty
range:
(1)
Operating Nebulizer different
from
procedures or instructions of
the
manual.
(2)
The
body
is
damaged
artificially.
(3)
Self-repailing or
modifying
the
monitor construction
in
any
way.
(4)
Problem
which
occurs under
natural
calamity
and
other force
majeures.
HONSUN (NANTONG) CO.,LTD.
Address:No.8, Tongxing
Road,
Economic&Technical
Development Area, Nantong
City,
Jiangsu, P.R.China
EC
I
REP
I Shanghai International Holding Corp. GmbH (EUROPE)
~~-~~-
Address: Eiffestrasse
80,
20537 Hamburg, GERMANY
TEL: +49-40-2513175
FAX:
+49-40-255726
When any serious incident that have occurred
in
relation
to
the
device,
please contact the manufacturer or
EC
representative. Or when any
failures occurred regarding device, please contact
the
manufacturer.
The manufacturer reserves the right
to
make technical changes without
notice
in
the interest of progress. Prior notices will not
be
given
in
case
of any amendments within this manual. The mentioned trademarks and
names are owned
by
the corresponding companies.
~
CE0123
IP
22
~
~
~
{)
8
Made in china
I P217C/2404/01 I
Date of issue:
2024/04/01
OXI-NB20
UK and Irish Distributor
OxiPro Medical Ltd
Unit 3, Maidenhead Enterprise Centre
Cordwallis Street
Maidenhead
SL6 7BE
United Kingdom
www.oxipro.io
Tel: +44 1628 290244
E-mail: [email protected]
REPROCESSING
WARNING
• Ensure that the remove the plug before the clean and disinfection.
•
Do
not place or attempt
to
dry the device, components or any of the
nebulizer parts
in
a microwave oven.
LIMITATIONS
ON
PROCESSING
As with any plastic parts, nebulizer kit
and
their accessories are
affected
by
a certain amount of wear and tear when used and
hygienically prepared
on
a frequent basis. Over time, this can lead
to
a
change
in
the aerosol, which
can
have a negative effect
on
the
efficiency of the treatment.
The permitted number
of
processing cycles
of
the nebulizer
kit
and
other accessories
is
300.
PREPARATION BEFORE CLEANING
The nebulizer kit
and
the accessories used must
be
cleaned
thoroughly after each application
and
disinfected
at
least once a
day.
1.Remove
the
accessory (mask or mouthpiece) from the nebulizer kit.
2.Detach the air tube from the nebulizer kit.
3.Dismanlle the nebulizer kit into its individual parts.
4.Make sure that all medication residues are removed from the
nebulizer kit.
5.Rinse all parts of the nebulizer cup and accessory under running tap
water. This must
be
done especially thoroughly if cleaning and
disinfection are not carried out straight
away.
The air tube does not need
to
be
cleaned or disinfected. If
condensation occurs
in
the air tube, please clear it
as
follows.
1.Connect the air tube to the compressor.
2.Switch the compressor
on.
3.Leave the compressor running until any condensation
in
the tubing
has been removed by the air flowing into the tube.
CLEANING
1.Place all disassembled parts
in
warm tap water (
40
C-50
C)
for at
least
10
min. If necessary, use a clean brush to remove loose dirt (the
brush must
be
reserved exclusively for this purpose).
.
mse
a
pa
s oroug y
in
running wa er e wa er ow s
ou
more than 3 liters per minute ) and each part for at least 1 min.
3.Whether disinfect immediately or not, dry all parts with a new medical
gauze.
You
can
remove excess water more quickly
by
shaking them.
CAUTION
• Inadequate disinfection encourages the growth of bacteria
and
thus
increases the risk of infection. Adequate cleaning with disinfection
can only
be
assured
if
application time are adhered to,
and
if all
individual parts are completely immersed
in
the solution for the
entire application lime. There must not
be
any cavities or
air
bubbles.
DISINFECTING
After cleaning, disinfect the dismantled nebulizer kit and accessory
used (except for the air tube). Effective disinfection
is
only possible
if
the nebulizer kit and accessory have been cleaned.
Use 2.0% (w/w) Hydrogen Peroxide solution to disinfect the nebulizer
kit and accessories.
To
ensure safety when handling chemicals, follow the instructions for
use of the disinfecting agent, particularly the accompanying safety
instructions.
For complete disinfection of nebulizer kit and accessory, thoroughly
clean, rinse and rough dry surfaces before immersed
in
chemical
disinfection solution.
1.Place all pre-cleaned, rinsed
and
dried disassembled components
in
undiluted
2.0% (w/w) Hydrogen Peroxide solution. Ensure that all components'
surfaces have been fully contacted with solution.
2.Once all components have been immersed
and
all surfaces
in
contact with the disinfectant solution, soak all components for 8
minutes. Track the soak time using a timer.
3.Rinse all components with sterile water or potable tap water.
4.Dry the parts with a new medical gauze as soon
as
disinfection has
finished.
You
can
remove excess water more quickly
by
shaking them.
5.Dispose of the used solution.
CAUTION
• amp envIronmen may encourage e grow o ac eria.
Therefore, dry the parts with a new medical gauze as soon
as
disinfection has finished. The risk of infection
is
reduced when the
parts are dried.
CARING FOR THE DEVICE
To
keep your device in the best condition and protect the unit
from damage follow these directions:
CLEANING THE DEVICE
Clean the casing
of
the main unit by using a soft cloth moistened
with water
or
a mild detergent.
Do
not use abrasive cleaners. Dry
the casing immediately using a soft clean cloth.
CHANGE THE
AIR
FILTER
Change the air filter every
60
days even if the air filter does not
appear dirty. If the air filter appears dirty, or if water or medication
has spilled
on
the air filter, replace with a new air filter immediately.
1.
Pull
the air filter cover
to
remove
from
the
front side of the compressor.
2. Remove the dirty filter with hand.
CAUTION:
Do not attempt to wash or clean the air filter. Damp air filters can
cause blockages. Do not substitute cotton or any
other
material
for the air filter.
CAUTION:
Wash the air filter cover regularly to prevent any blockage in the
cover. Do not boil. Make sure the cover is dry before inserting
the new air filter.
3. Insert a new air
filler
into the air
filter
cover.
CAUTION:
Before inserting the new air filter makes sure the air filter is clean
and free of dust.
Do
not operate the device without the air filter.
4. Put the air filter cover back on the compressor.
5
STORING THE DEVICE
1.
Put the nebulizer kit and the inhalation accessory (mouthpiece,
or mask) in a dry, sealed bag. Place the
bag
in
the storage pocket
of the carrying bag.
2. Coil the
air
tubing and place in the storage pocket.
3. Place the compressor in the carrying bag.
4. Zipper the bag closed.
5.
Store the device
in
a safe, clean location. Do not store the
device in extreme hot
or
cold temperature, high humidity
or
in
direct sunlight.
WARNING
•
Do
not leave the device or its parts where it will be exposed to
extreme temperatures or changes in humidity, such as leaving
the device in a vehicle during warm or hot months, or where it
will be exposed to direct sunlight.
• Keep the device out
of
the reach
of
unsupervised infants and
children. The device may contain small parts that can be
swallowed.
CAUTION
Do
not
carry
or
leave
the
nebulizer
with
medication
in the
medication tank.
Do
not disassemble or attempt to repair the device or components.
TROUBLESHOOTING
TROUBLESHOOTING GUIDE
PROBLEM CAUSE SOLUTION
No power on unit The AC power cord is Turn the power switch
when the power not plugged into an off. Plug the power plug
switch
is on.
electrical
outlet.
into
an
electrical
outlet.
No medication in the Add the correct amount
medication tank.
Too
of
prescribed medication
much
or
too little to the medication tank.
medication
in
the
medication tank.
The nebulizer kit is not Make sure the nebulizer
correctly assembled. kit is correctly assembled
and the inhalation
accessory is correctly
attached.
No nebulization
or
The nebulizer kit is
Hold the nebulizer kit
low
tilted
at
an incorrect
correctly.
Do
not tilt the
nebulization rate
angle.
nebulizer kit so the angle
when the power is
of
the kit is greater than
on.
45 degrees.
The air tube is Make sure the air tube is
incorrectly attached. correctly attached to the
compressor and the
nebulizer kit.
The air tube is folded Make sure the air tube is
or
damaged. The air not folded, kinked
or
tube is blocked. bent. Inspect the air tube
for any damage. Replace
the air tube
if
damaged.
The device is
very The compressor is Do not cover the
hot.
covered. The device compressor with
any
type
has been used for
of
cover during use. Turn
longer than 20 the device off. Wait 40
minutes. minutes before using the
device again.
WARRANTY OBLIGATIONS
1.
Warranty
for
this compact compressor nebulizer is 12 months
since the date
of
purchase.
2. The warranty obligations are prescribed by warranty certificate
for buyer.
are present
in
the warranty certificate.
CLASSIFICATION
Equipment Classification with respect to protection from electric
shock: CLASS
II
Degree
of
protection from electric shock: TYPE BF
Degree
of
protection against ingress
of
water
is rated as IPX2.
Equipment not suitable
for
use in the presence
of
flammable
anesthetic mixture with air, oxygen or nitrous oxide.
PERIODIC SAFETY CHECKS
If
you
use
the
device
with
power
adapter,
preventive
inspection
and
maintenance
to
be
performed
including the
frequency
of
such
maintenance.
•
Every
time
before
use,
please
check
the adapter,
once
damaged,
never
to
use.
•
Please
clean
the
plug
of
adapter
plug
at
least
once
a year. Too
much
dust
on
plug
may
cause
fire
6
SPECIFICATIONS
MODEL
MAIN
UNIT
SIZE
<!>146x81mm
STORAGE BOX SIZE
<l>146x93mm
ADAPTER
INPUT
100-240V-, 50/60Hz,500mA Max
ADAPTER
OUTPUT
DC
12V 1.0A
EXTREMEPRESSURE
2:100
kPa
NEBULIZING PRESSURE ~45 kPa
FREE FLOW RANGE
~Umin
WORK
NOISE(MAIN
UNIT)
Approx. 45
dB
MAX.
CAPACITY
OF
NEBULIZER
KIT
10ml
PARTICLE SIZE 1 ~5µm~ 60%
NEBULIZING
RATE
2:0.2ml/min
OPERATING MODE 20 mins on. 40 mins off
OPERATING
CONDITIONS
+5"C-+4Q"C, 15%-90%R.H., 700-106QhPa
TRANSPORT
&
STORAGE
CONDITIONS
-25"C-+70"C. 15%-90%R.H
..
700-1060hPa
POLLUTION
DEGREES
Degrees 2
OVERVOLTAGE CATEGORY
Category
II
HIGH
AL
TITUDES(M)
2000m
ACCESSORIES
Nebulizer kit, Large size mask,
Medium
size
mask
Air
Filter
,
mouthpiece,
inhalation
tube,
Adapter
NOTES
• Subject to technical modification without prior notice.
• Please note that specifications may vary with medication type used.
•
Do
not
use
the device where it may be exposed to flammable gas.
• This unit confirms to EMC Standard IEC60601-1-2.
However,
if
ii
is used together with other medical devices
or
electrical equipment, they may influence the operations
of
one
of
devices. Please follow any instructions in the manuals and use
all devices correctly.
Test condition: Temperature:
20-25
C,
Relative humidity:
COMPRESSOR NEBULIZER With respect to electric shock, fire
Guidance and manufacture's declaration - electromagnetic
emissions-for all EQUIPMENT and SYSTEMS
Warming:
•Use of this equipment adjacent
to
or stacked with other equipment
should
be
avoided because it could result
in
improper operation. If such
use
is
necessary, this equipment
and
the
other equipment should
be
observed to verify that they
are
operating normally.
•Use of accessories, transducers
and
cables other
than
those specified
or provided
by
the manufacturer of this equipment could result
in
increased electromagnetic emissions or decreased electromagnetic
immunity of this equipment and result
in
improper operation.
•Portable
RF
communications equipment (including peripherals such
as
antenna cables
and
external antennas) should
be
used
no
closer
than
30
cm
(12
inches)
to
any part of
the
equipment, including cables
specified
by
the manufacturer. Otherwise, degradation of the
performance of this equipment could result.
•Under
the
test conditions specified
in
immunity, the product
can
provide the basic safety
and
essential performance.
• The Emissions characteristics of this equipment make it suitable for
use
in
home
healthcare environment (CISPR
11
Class
B).
COMPLIANCE
INFORMATION
FOR
EACH
EMC
TEST
Electromagnetic Emission (Home Healthcare Environment)
Emission test (IEC 60601-1-2:2014)
Conducted and radiated RF emissions
Harmonic emissions
IEC
61000-3-2
Voltage fluctuations/flicker emissions
IEC
61000-3-3
Compliance
CISPR
11
Group 1 Class B
Class A
Complies
Declaration-Electromagnetic Immunity (Home Healthcare Environment)
Immunity test
IEC
60601
test level
Compliance level
Conducted
RF
3V 3V
IEC 61000-4-6:2013 150
kHz
to
80
MHz
150
kHz
to
80
MHz
6 V
in
ISM
and
between 0.15 6 V
in
ISM
and
between 0.15
MHz
and
80 MHz
MHz
and
80
MHz
Radiated
RF
10V/m
IEC 61000-4-3:
80
MHz
to
2.7 GHz
10V/m
2006+A1: 2007+A2:
2010
Electrostatic
±8
kV
contact
±8
kV
contact
discharge (ESD)
±2
kV,
±4
kV,
±8
kV,
±15
kV
±2
kV,
±4
kV,
±8
kV,
±15
kV
IEC 61000-4-2: 2008 air air
Electrical fast
transienUburst
±2
kV
for power supply lines
±2
kV
for power supply lines
IEC 61000-4-4: 2012
~Eu?:
1000
_
4
_
5
:
2005
±0.5
kV,
±1
kV
line(s) to lines ±0.5
kV,
±1
kV
line(s)
to
lines
Voltage dips, short
interruptions
and
voltage variations
on
power supply input
lines
IEC 61000-4-11:
2004
0%
UT'
O
.5
Cycle at 0°, 45°,
90°, 135°, 180°, 225°, 270°
and
315°
0%
UT,
0.5 Cycle at
0°,
45°,
90°, 135°, 180°, 225°, 270°
and
315°
0%
UT'
1 Cycle
and
70%
UT'
0%
UT,
1 Cycle and
70%
UT,
25/30 cycles 25/30 cycles
single phase: at
0°
single phase: at
0°
0%
UP
250 cycles
0%
UT,
250 cycles
NOTE:
The EUT
is
the
a.c. mains voltage prior to application of
the
test level.
The following phenomenon still fulfills the requirement of basic safety
and
essential
performance.
•
LIT:
230 V-/50
Hz,
the pressure of the EUT
is
deviation the
nonmal
value but the
value
is
still more than 1 O
psi
when
flow
is
4.5 Umin.
••
UT:
230 V-/50
Hz,
the
EUT
stop working when adding
0%
UT,
but
the
EUT
can
restore its normal mode automatically.
7
Declaration-IMMUNITY
to
proximity fields
from
RF
wireless communications equipment
Immunity
Test
Modulation Maximum Immunity Compliance
test
frequency power level level
Radiated
385
MHz
**Pulse
1.8W
27V/m
27V/m
RF
Modulation: 18Hz
IEC
•FM+5Hz
61000-4-3:
450MHz
deviation: 1
kHz
sine
2W
28V/m 28V/m
2006+A1:
710
MHz
**Pulse
2007+A2:
745
MHz
Modulation: 217Hz
0.2W
9V/m
9V/m
2010
780
MHz
810
MHz
..
Pulse
870
MHz
Modulation: 18Hz
2W
27V/m 27V/m
930
MHz
1720 MHz **Pulse
1845 MHz Modulation: 217Hz
2W
28V/m 28V/m
1970 MHz
2450 MHz
**Pulse
2W
28V/m 28V/m
Modulation: 217Hz
5240 MHz
..
Pulse
0.2W
9V/m
9V/m
5500 MHz Modulation: 217Hz
5785 MHz
Note •:
As
an
alternative
to
FM
modulation,
50%
pulse modulation at
18
Hz may
be
used because while
it
does not represent actual modulation, it would
be
worst case.
Note
..
: The carrier shall
be
modulated using a
50%
duty cycle square wave signal.
QUALITY GUARANTEE
MODEL
Warranty period
One
years from purchasing date
Purchasing date
Purchasing shop
Name: Telephone:
Customer
Date
Guarantee
Regulation
Address:
Name: Telephone:
Address:
REQUIRING RECORD
TROUBLE SERVICE MAN
1.
During
warranty
period
the
repair
could
be
made
at
any
Nebulizer
repair department.
2.
The
following
things
not
belong
to
warranty
range:
(1)
Operating Nebulizer different
from
procedures or instructions of
the
manual.
(2)
The
body
is
damaged
artificially.
(3)
Self-repailing or
modifying
the
monitor construction
in
any
way.
(4)
Problem
which
occurs under
natural
calamity
and
other force
majeures.
HONSUN (NANTONG) CO.,LTD.
Address:No.8, Tongxing
Road,
Economic&Technical
Development Area, Nantong
City,
Jiangsu, P.R.China
EC
I
REP
I Shanghai International Holding Corp. GmbH (EUROPE)
~~-~~-
Address: Eiffestrasse
80,
20537 Hamburg, GERMANY
TEL: +49-40-2513175
FAX:
+49-40-255726
When any serious incident that have occurred
in
relation
to
the
device,
please contact the manufacturer or
EC
representative. Or when any
failures occurred regarding device, please contact
the
manufacturer.
The manufacturer reserves the right
to
make technical changes without
notice
in
the interest of progress. Prior notices will not
be
given
in
case
of any amendments within this manual. The mentioned trademarks and
names are owned
by
the corresponding companies.
~
CE0123
IP
22
~
~
~
{)
8
Made in china
I P217C/2404/01 I
Date of issue:
2024/04/01
