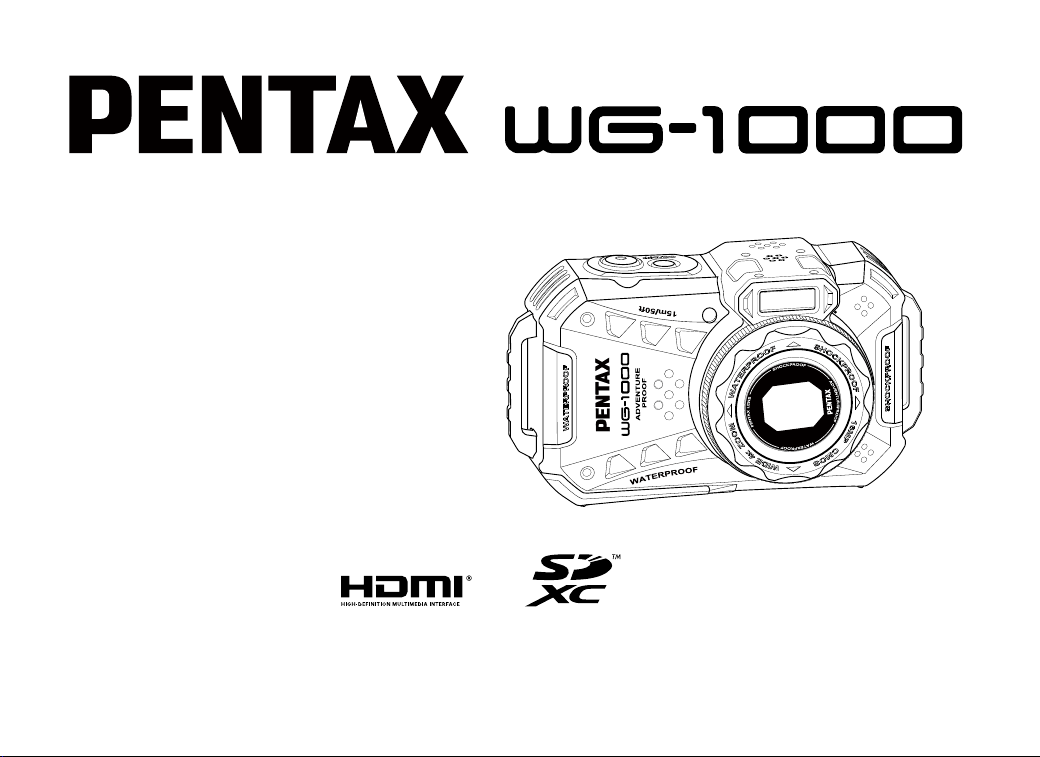
Operating Manual
To ensure the best performance from your camera, please read the Operating
Manual before using the camera.
Model: R08040

1
BEFORE YOU START
For Customers in USA
STATEMENT OF FCC COMPLIANCE
Supplier’s Declaration of Conformity 47 CFR § 2.1077 Compliance Information
Product Name: PENTAX WG-1000
Model: R08040
This device complies with Part 15 of the FCC Rules. Operation is subject to the following two conditions: (1)
This device may not cause harmful interference, and (2) this device must accept any interference received,
including interference that may cause undesired operation.
Responsible party: RICOH IMAGING AMERICAS CORPORATION
Address: 2 Gatehall Drive Suite 204, Parsippany, New Jersey 07054, U.S.A.
Phone: 800-877-0155
Changes or modifications not expressly approved by the party responsible for compliance could void the
user’s authority to operate the equipment.
FCC Part 15 Subpart B Class B
This equipment has been tested and found to comply with the limits for a Class B digital device, pursuant
to part 15 of the FCC Rules. These limits are designed to provide reasonable protection against harmful
interference in a residential installation. This equipment generates, uses and can radiate radio frequency
energy and, if not installed and used in accordance with the instructions, may cause harmful interference
to radio communications. However, there is no guarantee that interference will not occur in a particular
installation. If this equipment does cause harmful interference to radio or television reception, which can be
determined by turning the equipment off and on, the user is encouraged to try to correct the interference by
one or more of the following measures:
• Reorient or relocate the receiving antenna.
• Increase the separation between the equipment and receiver.
• Connect the equipment into an outlet on a circuit different from that to which the receiver is connected.
• Consult the dealer or an experienced radio/TV technician for help.
2
For Customers in Canada
Innovation, Science and Economic Development Canada (ISED) Regulatory Compliance Notice
This Class B digital apparatus complies with Canadian ICES-003 (B).
Pour les utilisateurs au Canada
Avis de conformité à la réglementation d’Innovation, Sciences et Développement économique Canada (ISDE)
Cet appareil numérique de la classe B est conforme à la norme NMB-003 (B) du Canada.
For Customers in Europe
Information for Users on Collection and Disposal of Old Equipment and Used Batteries
1. In the European Union
These symbols on the products, packaging and/or accompanying documents mean that used electrical
and electronic equipment and batteries should not be mixed with general household waste.
Used electrical/electronic equipment and batteries must be treated separately and in accordance with
legislation that requires proper treatment, recovery and recycling of these products.
By disposing of these products correctly you will help ensure that the waste undergoes the necessary
treatment, recovery and recycling and thus prevent potential negative effects on the environment and
human health which could otherwise arise due to inappropriate waste handling.
If a chemical symbol is added beneath the symbol shown above, in accordance with the Battery
Directive, this indicates that a heavy metal (Hg = Mercury, Cd = Cadmium, Pb = Lead) is present in the
batteryataconcentrationaboveanapplicablethresholdspeciedintheBatteryDirective.
For more information about collection and recycling of used products, please contact your local
authorities, your waste disposal service or the point of sale where you purchased the products.
2. In other countries outside the EU
These symbols are only valid in the European Union. If you wish to discard used products, please
contact your local authorities or dealer and ask for the correct method of disposal.
3
For Switzerland: Used electrical/electronic equipment can be returned free of charge to the dealer,
even when you don’t purchase a new product. Further collection facilities are listed on the home page
of www.swico.ch or www.sens.ch.
Notice to Users in Countries that Require the CE Marking
This product complies with the essential requirements and provisions of EMC Directive 2014/30/EU.
Importer(CE marking): RICOH IMAGING EUROPE S.A.S.
7-9, avenue Robert Schuman, 94150 RUNGIS, FRANCE
Manufacturer: RICOH IMAGING COMPANY, LTD.
1-3-6, Nakamagome, Ohta-ku, Tokyo 143-8555, JAPAN
The CE Mark is a Directive conformity mark of the European Union.
Notice to Users in Countries that Require the UKCA Marking
This product complies with the essential requirements and provisions of Electromagnetic Compatibility
Regulations 2016.
Manufacturer: RICOH IMAGING COMPANY, LTD.
1-3-6, Nakamagome, Ohta-ku, Tokyo 143-8555, JAPAN
The UKCA Mark is a Regulation conformity mark of the United Kingdom.
Batteries: Please dispose of used batteries at designated collection centers.
Packaging: Please follow local regulations for the recycling of packaging.
4
About this Manual
Thank you for purchasing this RICOH WG-1000.
Please read this manual before using the camera in order to get the most out of all the features and
functions. Keep this manual safe, as it can be a valuable tool in helping you to understand all the camera’s
capabilities.
RICOH IMAGING COMPANY, LTD. reserves all rights of this document. No part of this published manual
may be reproduced, transmitted, transcribed, stored in a retrieval system or translated into any language
or computer language, in any form, by any means, without the prior written permission of RICOH
IMAGING COMPANY, LTD.
All trademarks mentioned in this manual are used for identification purposes only and are properties of
their respective owners.
This manual provides you with instructions on how to use your new RICOH WG-1000. Every effort has
been made to ensure that the contents of this manual are accurate; however RICOH IMAGING COMPANY,
LTD. reserves the right to make changes without notice.
Throughout this manual, the following symbols are used to help you locate information quickly and easily:
Indicates useful information.
The following symbols may be used throughout this manual to facilitate your understanding of how to
operate the camera:
[Item properties]: The optional properties in the camera interface are indicated by the [ ] symbol.
5
WATERPROOF/DUSTPROOF/SHOCKPROOF
JIS / IEC waterproof grade 8 (IPX8).
JIS / IEC dustproof grade 6 (IP6X).
Height for shockproof rating is 2m (6.6 feet).
Waterproofing Notes:
Do not use the product below 15 meters (49.2
feet) underwater. The product can remain
waterproof for one hour at the depth of 15m
(49.2 feet).
Do not use this product in a geothermal
spring or in water at a temperature greater
than 40 °C (104°F).
Please do not open the battery cover
underwater.
If water accidentally comes in contact with
the product, please do not open the battery
cover. Turn the product off, and dry it with a
clean, dry and lint free cloth. Then open the
battery cover, and remove the battery and
the memory card.
When opening the battery cover, if there are
water drops on the contact surface between
the inside of the battery cover and the body,
please dry the water drops.
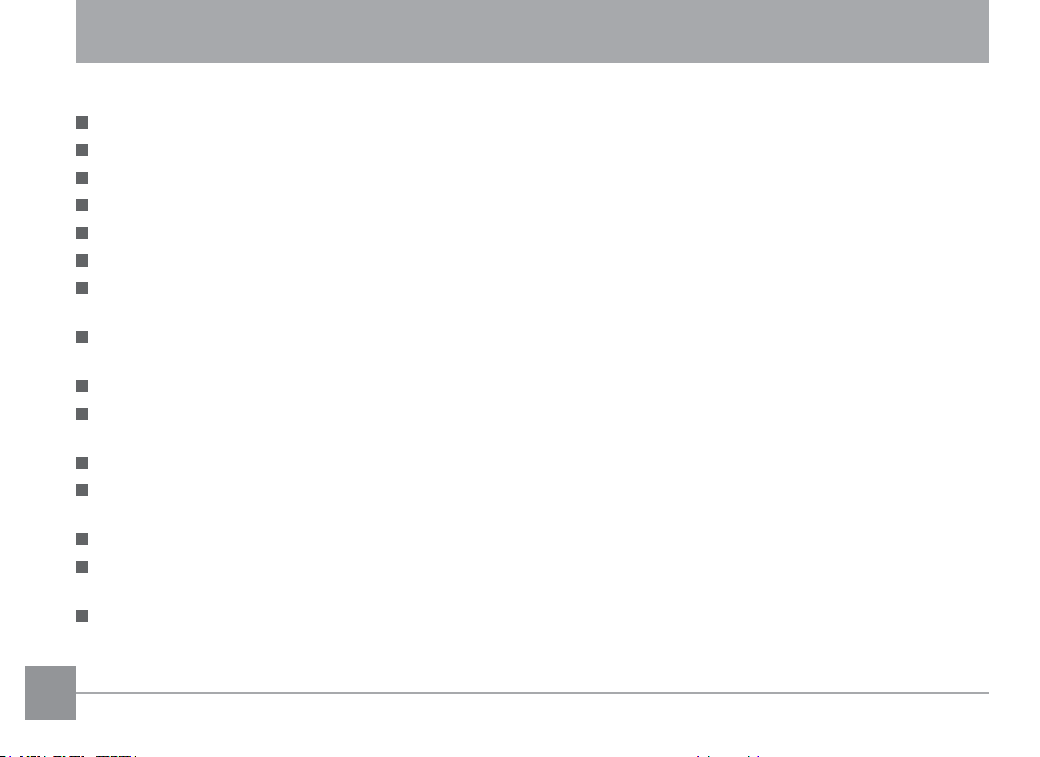
Waterproof Rubber
After using the product in water or near sand, mud
or other foreign materials, please rinse it with clean
water (close the battery cover before cleaning). After
cleaning, dry the product with a clean, dry and lint
free cloth.
If there is dust, sand or other foreign materials on
the waterproof rubber of the battery cover and its
contact surface, please wipe it with a clean, dry and
lint free cloth as soon as possible.
Before using the product underwater, make sure
that there is no damage to or foreign debris on the
waterproof rubber gasket. Then close the battery
cover tightly to ensure the waterproof capability of
the product.
Waterproof rubber with scratches and cracks will
allow water to penetrate into the product. Contact
customer service immediately for maintenance
with replacement of new waterproof rubber.
6
Safety Notes for this Camera
Do not drop the camera or allow it to hit solid objects.
Do not attempt to disassemble or repair the camera.
Do not use or store the camera in a hot environment or in direct sunlight.
Do not use or store the camera near powerful magnetic fields, for example near a magnet or transformer.
Avoid touching the lens of the camera.
Do not expose the camera to direct sunlight for a long period of time.
If water accidentally comes in contact with the interior of the camera, turn the camera off immediately,
remove the battery and the memory card and dry it completely within 24 hours.
When you take the camera from a cold environment to a warmer environment, condensation may occur.
Please wait for a reasonable period of time before you turn the camera on.
Make sure the camera is turned off before you remove the battery and memory card.
When you clean the body of the camera, do not use abrasive, alcohol-based or organic cleansers or
solvents.
Use a professional lens cleaning cloth and appropriate cleaner to wipe and clean the lens.
Download your photos and remove the memory card when you are going to store the camera for long
periods of time.
If this camera is not in use for a long period of time, please keep it in a dry and clean storage location.
Wrapping the strap of the camera around your neck is also dangerous. Please take care that small
children do not hang the strap around their necks.
Don’t place your finger on the flash when it is discharging as there is a risk of burns.
SAFETY NOTES
7
If any irregularities occur during use, such as smoke or a strange odor, stop use immediately, remove the
battery or the power adapter, and contact your nearest service center. Continuing to use the product can
cause a fire or electric shock.
Don’t discharge the flash while it is touching your clothing as there is a risk of discoloring.
Some portions of the camera heat up during use, so please take care, as there is a risk of low temperature
burns if such portions are held for long periods of time.
Should the LCD be damaged, be careful of glass fragments. Also, be careful not to allow the liquid crystal
to get on your skin, in your eyes, or in your mouth.
Depending on your individual factors or physical condition, the use of the camera may cause itching,
rashes or blisters. In case of any abnormality, stop using the camera and get medical attention
immediately.
Safety Notes for Battery
Please use a battery that is the same type as the one included.
Please use the included USB power adapter to charge the battery inside the camera.
If battery fluid leaks inside the camera, contact our customer service department immediately. If battery
fluid leaks onto your skin, rinse your skin with clean water and seek immediate medical attention.
Disposal of used batteries should be carried out in accordance with your local (national or regional)
regulations.
To prevent the battery from being damaged, do not drop the battery or allow it to hit solid objects or to be
scratched by foreign objects.
Do not let the battery come in contact with metal objects (including coins) to avoid short circuiting,
discharging, excessive heat or possible leakage.
8
Do not attempt to disassemble the battery.
Do not expose the battery to water. Always keep the battery contacts dry.
Do not heat the battery or throw it into a fire to avoid a possible explosion.
Do not store the battery in a hot environment or in direct sunlight.
If the battery overheats during charging or use, stop charging or stop use immediately. Turn off the
product, remove the battery carefully and wait until it cools down.
When the camera is stored for a long period of time, remove the battery and keep it in a safe, dry place
that is not accessible to infants and children.
In colder environments, the performance of the battery could be noticeably reduced.
When you install the battery, align the battery markings according to the positive and negative markings
inside the camera battery compartment. Never force the battery into the battery compartment.
Replacement of the battery with an incorrect type that can defeat a safeguard. (for example, in the case of
some lithium battery type);
Disposal of the battery into fire or a hot oven, or mechanically crushing or cutting of the battery, that can
result in an explosion.
Leaving the battery in an extremely high temperature surrounding environment that can result in an
explosion or leakage of flammable liquid or gas.
Subjecting the battery to extremely low air pressure that may result in an explosion or leakage of
flammable liquid or gas.
9
Safety Notes for the USB Power Adapter
Always use the USB power adapter exclusively developed for this product, with the specified power and
voltage. Using a power adapter not exclusive to this product, or using the exclusive power adapter with an
unspecified power or voltage can cause a fire, electric shock, or camera breakdown. The specified voltage
is 100- 240V AC.
Do not disassemble or modify the product. This can cause a fire or electric shock.
Do not subject the product to strong impacts or allow it to drop onto a hard surface. This can cause a
malfunction.
Do not short or touch the output terminals of the product while it is still plugged in.
If water should happen to get inside the product, consult your nearest service center. Continuing to use
the product can cause a fire or electric shock.
If the generation of smoke or strange odor from the product or other abnormality occurs, immediately
discontinue its use and consult your nearest service center. Continuing to use the product can cause a fire
or electric shock.
Do not use the power adapter to charge a battery other than the rechargeable lithium-ion battery D-LI96.
This can cause overheating, explosion, or power adapter failure.
Do not plug in the USB power adapter with wet hands. This can cause an electric shock.
Do not place heavy objects on the USB cable, allow heavy objects to drop onto it or allow it to become
damaged due to excessive bending. If the USB cable becomes damaged, consult our customer service
center.
10
Safety Notes for Memory Cards
The memory card referred to in this user manual is a SD/SDHC/SDXC memory card that is Class 6 or
higher.
We highly suggest buying only well-known, name brand memory cards to ensure peak performance and
reliability.
Format the memory card using the camera before you use it to store photo or video files or when you
insert a new memory card.
Do not drop the memory card or allow it to hit solid objects to avoid damaging it.
Do not attempt to disassemble or repair the memory card.
Do not expose the memory card to water. Always keep it dry.
Do not remove the memory card when the camera is turned on. Otherwise, the memory card and photo/
video files could be permanently damaged.
Do not directly edit the data on the memory card. Copy the data to your computer before you edit files.
When the camera is stored for long periods of time, be sure to download your photos and remove the
memory card. Store the memory card in a dry environment.
Do not modify the name of the files or folders of the memory card using your computer. Modifying the file
names may cause the files to not be recognized on the camera or a possible permanent error may occur.
A photo taken with the camera will be stored in the folder that is automatically generated on the memory
card. Do not store photos that are not taken using this camera in these folders as the pictures cannot be
recognized during playback.
When you insert the memory card, make sure the notch of the card matches the markings on the top of
the camera card slot.
11
Other Safety Notes
Do not disconnect the power or turn the camera off during the updating process. Doing so may cause
incorrect data to be written and the camera may not power on later.
When using your camera on an airplane, observe the relevant rules specified by the airline and FAA
regulations.
Due to the limitations of manufacturing technology, the monitor may have a few dead or bright pixels.
These pixels do no effect the quality or performance of the camera, photos or video.
If the monitor is damaged, pay particular attention to the liquid crystal in the screen. If any of the
following situations arise, take the recommended immediate action indicated below:
1. If liquid crystal comes in contact with your skin, please wipe with a dry cloth, wash thoroughly with
soap, and rinse with plenty of clean water.
2. If liquid crystal gets into your eye, flush the eye immediately with plenty of clean water for at least 15
minutes and then seek for medical assistance.
3. If liquid crystal is swallowed, immediately flush your mouth thoroughly with clean water and induce
vomiting. Seek for medical assistance.
Be sure to keep the camera and its accessories out of the reach of small children.
1. Injuries may result from the product falling or from unexpected movement.
2. Suffocation may result from wrapping the strap around the neck.
3. Small accessories such as battery or a SD Card may be swallowed. Seek medical attention immediately
if an accessory is accidentally swallowed.
WARNING
Altering, tampering or modifying the any parts of RICOH WG-1000 are unauthorized and will void the
manufacturer’s warranty and “could” void Federal and/or State Compliance.
12
CONTENTS
BEFORE YOU START ............................. 1
WATERPROOF/DUSTPROOF/
SHOCKPROOF ....................................... 5
SAFETY NOTES ...................................... 6
CONTENTS .......................................... 12
GETTING STARTED ............................. 16
Accessories Included ...........................................16
Part Names ...........................................................17
Installing Battery and Memory Card .................18
Charging the Battery ...........................................20
Installing Silicone Case ........................................22
Attaching the Carabiner Strap ............................ 23
Turning Camera On and Off ...............................24
How to Take Pictures ...........................................25
Set your Language, Date/Time ........................... 26
Set your Language, Date/Time after
the First Power-On .........................................26
Resetting your Language .............................27
Resetting Date/Time......................................28
MODE OVERVIEW ............................... 29
Display Setting ...................................................... 29
Monitor Display ....................................................30
Overview of the Screen Icons in Photo
Shooting Mode...............................................30
Overview of the Screen Icons in
Movie Mode .................................................... 31
Using the MODE button ......................................32
Auto Mode
..............................................33
Program AE
............................................. 35
Manual Mode
..........................................35
Movie Mode
............................................35
Scene Mode
.......................................... 36
13
Panorama Mode .....................................38
Underwater Mode
................................40
CALS Mode
.............................................40
BASIC OPERATION ............................. 41
Using the Zoom Function .................................... 41
Macro Mode .......................................................... 42
Self-timer Setting..................................................43
Flash Mode ............................................................ 44
EV Setting ..............................................................45
Exposure Compensation ..............................46
ISO ...................................................................46
Shutter Adjustment .......................................46
Aperture Adjustment ....................................46
Using Quick Recording ........................................47
PLAYBACK ........................................... 49
Overview of the Screen Icons in
Playback Mode......................................................49
Switching Screen............................................50
Viewing Photos and Videos ................................. 51
Using Zoom Playback (for Still Pictures Only) ... 54
Animation Panorama Play ...................................55
Slideshow ..............................................................56
Deleting Photos and Videos ................................ 57
USING THE MENUS ............................ 58
Shooting Menu .....................................................58
Scene ...............................................................59
Expo Metering (Exposure Metering) ...........59
Image Size ......................................................60
Video Quality ..................................................61
Continuous Auto Focus (Cont. AF) ...............62
Continuous Shot ............................................62
Focus Setting .................................................. 63
14
White Balance Setting ...................................64
Color Effect .....................................................65
Menu ...............................................................66
Playback Menu .....................................................68
Display Mode ..................................................68
HDR (High Dynamic Range) ..........................69
Red-Eye Reduction .........................................69
Rotate .............................................................. 70
Resize ..............................................................71
Color Effect .....................................................72
USING THE MENUS BUTTON ............ 73
Shoot Settings .......................................................74
Quality ............................................................. 74
AF Assist Beam ............................................... 75
Digital Zoom ................................................... 75
Quick Review ..................................................76
Date Imprint ................................................... 76
Face Detection ...............................................77
Playback Settings .................................................78
Protect ............................................................. 78
Delete ..............................................................79
Trim .................................................................80
General Settings ...................................................81
Sound Settings ...............................................81
World Time .....................................................82
Date & Time .................................................... 82
Power Saver ....................................................82
Language ........................................................ 82
LCD Brightness ..............................................83
Folder Name ................................................... 83
End screen ......................................................83
Connection Settings ............................................. 84
Transferring Files to Your Computer ..........84
Viewing Images on Computer .....................85
HDMI Connected TV Output .........................85

15
File Settings ........................................................... 86
Format .............................................................86
Copy to Card ................................................... 87
File Numbering ..............................................87
Reset ................................................................88
FW Version ...................................................... 88
APPENDICES ....................................... 89
Specifications ........................................................89
Prompts and Warning Messages .......................94
Troubleshooting ................................................... 98
Trademark Information ..............................100
LZF Lib Open Source....................................101
Warranty Policy ............................................102
16
GETTING STARTED
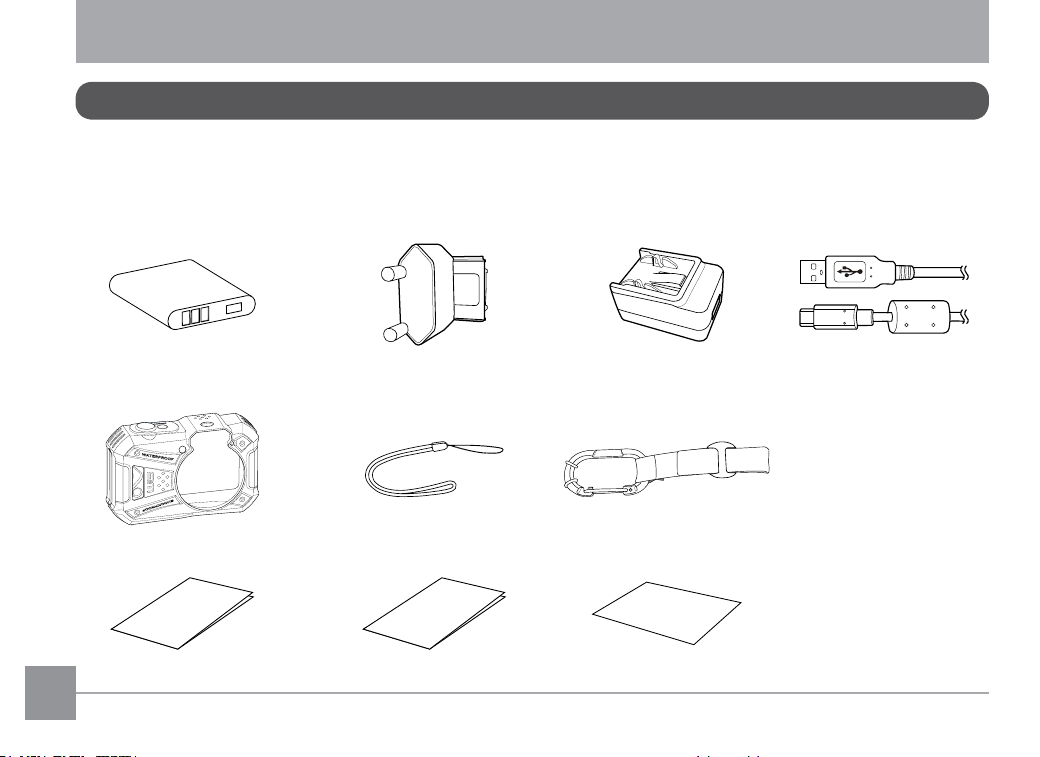
Your camera box should contain the camera model you purchased along with the following accessories.
If anything is missing or appears to be damaged, please contact your retailer first or our customer service
center. (The Power plug of the USB power adapter may be a little different in shape due to the difference of
countries or regions this type of cameras are sold to, and are subject to matching the physical product).
Accessories Included
USB cableRechargeable lithium-ion
battery D-LI96
USB power adapterPower plug
Battery operating manual
Operating
Manual of
Batteries
Quick Start Guide
Warranty Card
Quick start guide Warranty card
Strap Carabiner strapSilicone case
17
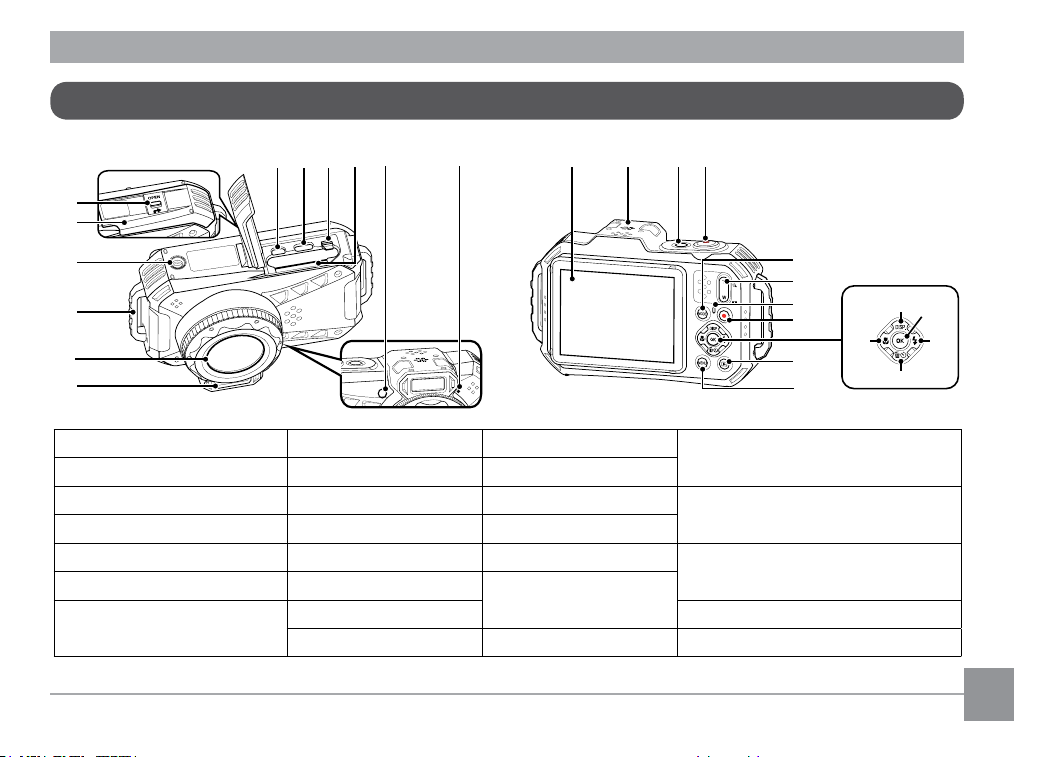
Part Names
1
2
3
4
5
6
7891011
12 13 14 15 16
17
18
19
20
26
27
23
21
22
24
25
1 Flash 8 USB terminal 16 Shutter button 23 Flash button/
Arrow button (Right)
2 Lens 9 Battery lock lever 17 MODE button
3 Strap attachment 10 Card slot 18 Zoom button 24 Delete button/Self-timer
button/ Arrow button (Down)
4 Tripod socket 11 AF assist light 19 Indicator lamp
5 Battery cover 12 Microphone 20 Movie button 25 Macro button/Arrow button
(Left)
6 Battery cover lock lever 13 Monitor 21 DISP. button/
Arrow button (Up)
7 HDMI micro output
terminal (Type D)
14 Speaker 26 Playback button
15 Power button 22 OK button 27 MENU button
18
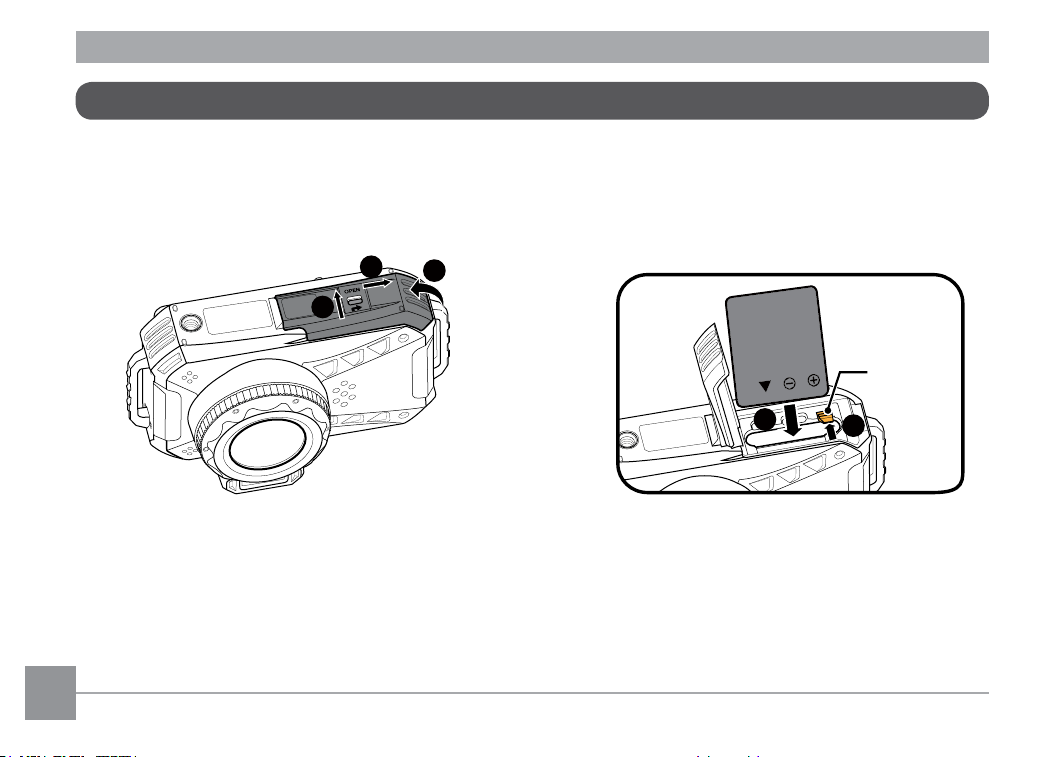
1. Push the Battery cover lock lever as shown in
step ①, push the battery cover as shown in
step ② to open the battery cover.
2. While checking the positive and negative of the
battery, use the side of the battery to release the
battery lock lever in the direction of the arrow to
install the battery correctly.
1
2
3
1
2
Battery lock
lever
Installing Battery and Memory Card
19
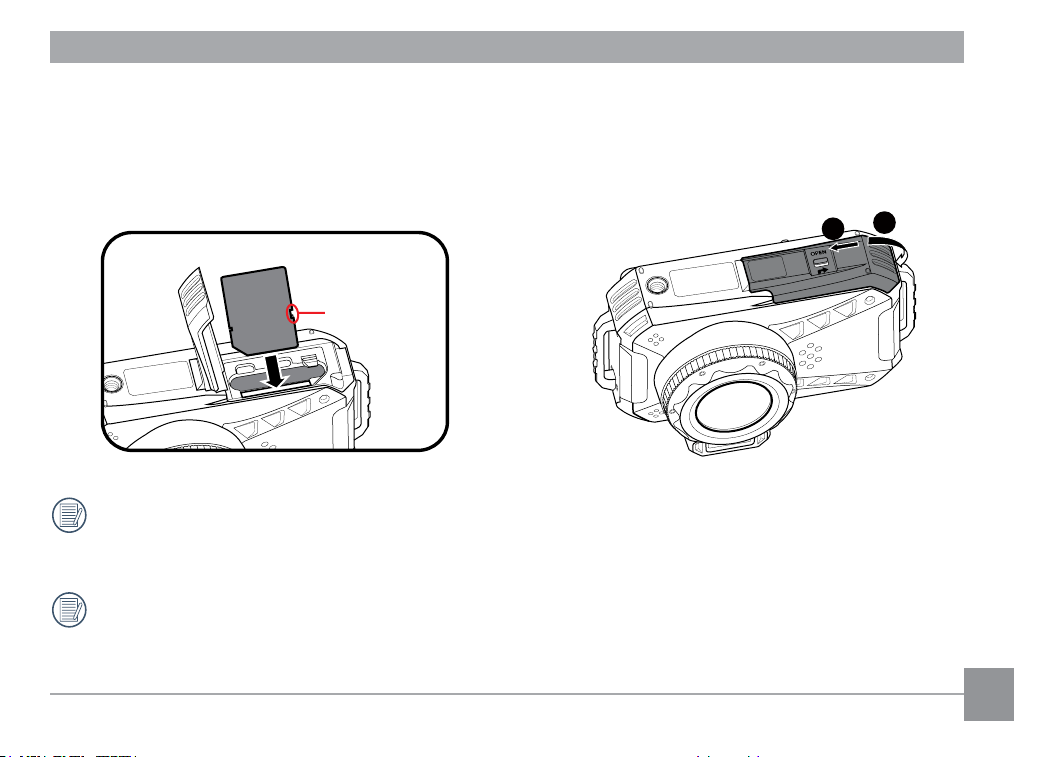
3. Insert the memory card into the memory card
slot as shown in the figure, push exposed edge
of the memory card fully into the slot with your
fingertip.
4. Close the battery cover as shown in step ①
and slide the battery cover as shown in step
②. Make sure that a red mark appears on the
battery cover lock lever and that the battery
cover is securely closed.
Write Protection
Toggle Switch
1
2
A memory card (SD / SDHC / SDXC) is necessary to store photos and videos and not included in all
camera packaging. It needs to be purchased separately. Please use a memory card which is Class 6 or
higher and has a capacity of 4 GB to 512 GB.
To remove your memory card, open the Battery cover, gently press the memory card to eject it and
remove it carefully.
20
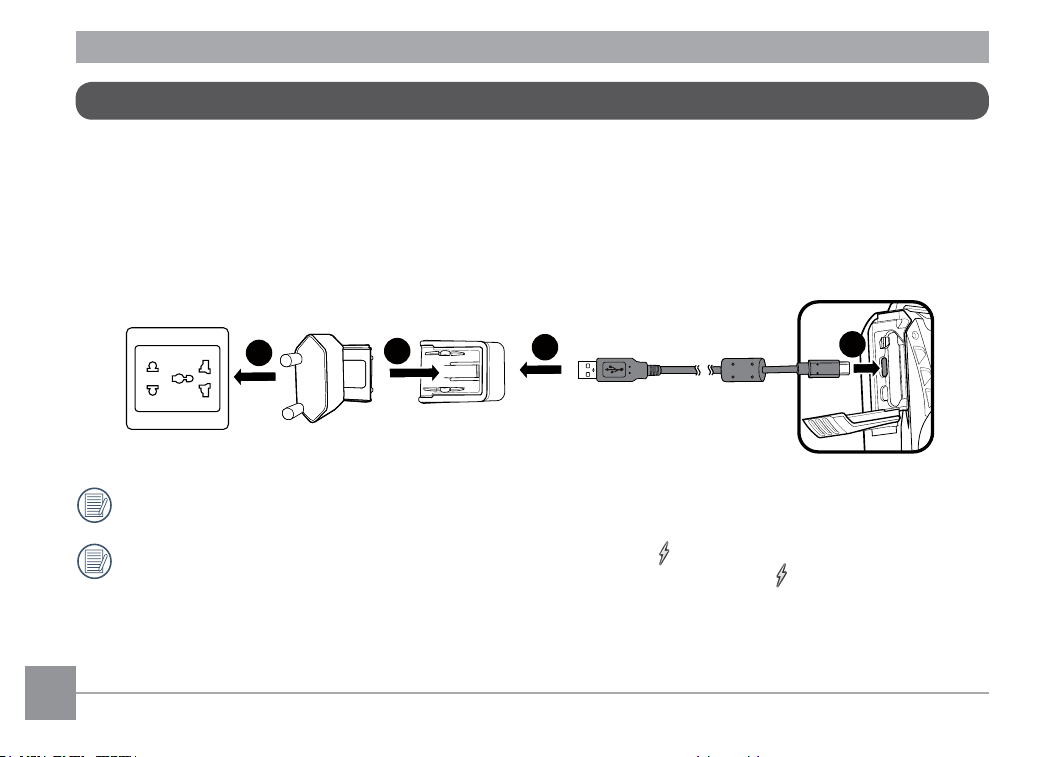
Before you charge your battery, make sure the camera is off and the battery is inserted correctly.
1. Insert the Power plug to the USB power adapter as show in ❶.
2. Connect the camera to the USB power adapter using the supplied USB cable as show in ❷, ❸.
3. Insert the Power plug into the wall outlet to charge the battery as show in ❹.
2
3
1
4
The charger is for indoor use only.
During charging, the Indicator lamp lights orange and displays [
Charging...] on the monitor, and
turns off after 5 seconds. You can press any button of your camera to display [
Charging...]. When the
charging is complete, the Indicator lamp lights up green, [100%] is displayed on the monitor, and the
camera turns off after 5 seconds.
Please charge the battery at least 4 hours for the first time after purchase.
Charging the Battery
21
After the battery is stored for long periods of time, use the supplied power charger to fully charge the
battery prior to use.
When the camera is turned off, you can also connect the camera to your PC using a USB cable to charge
the battery.
Please charge the battery indoors between 0°C and 40°C (32°F and 104°F).
22
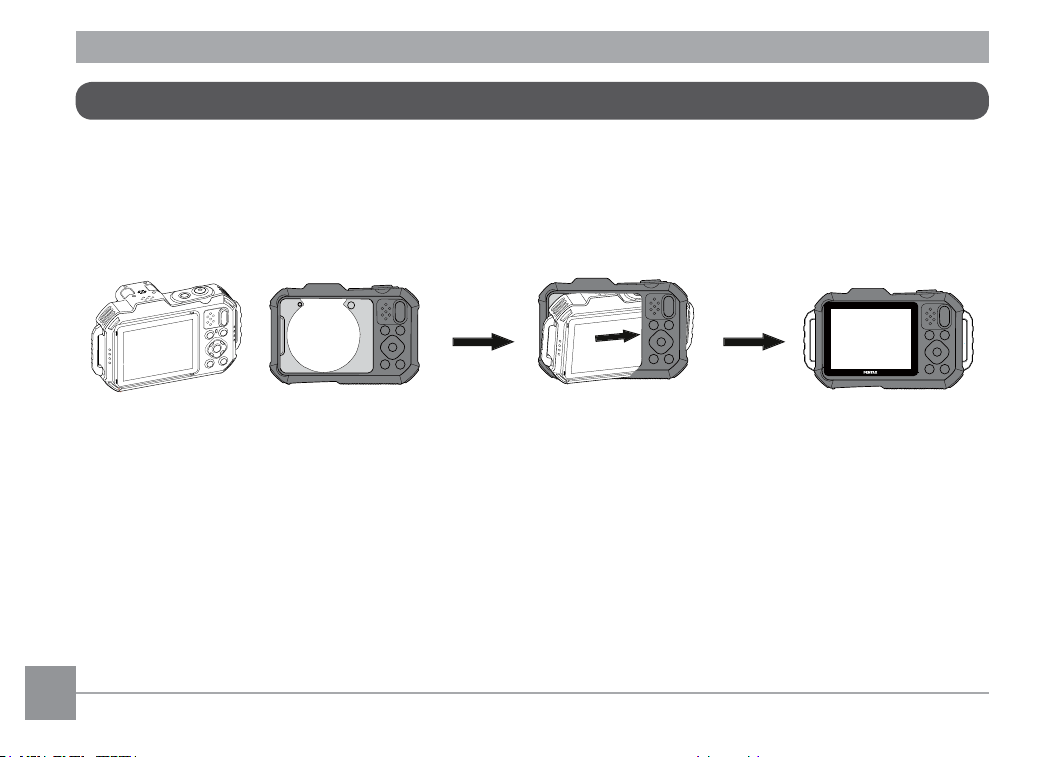
Installing Silicone Case
To protect the main body, please confirm that the Silicone case is clean, free of sand, dust, eg. or other
foreign objects inside.
1. Thread the side with buttons protection of the Silicone case through the strap attachment of the main
body.
2. Match the shape of the main body’s lens and pass the other strap attachment part.
23
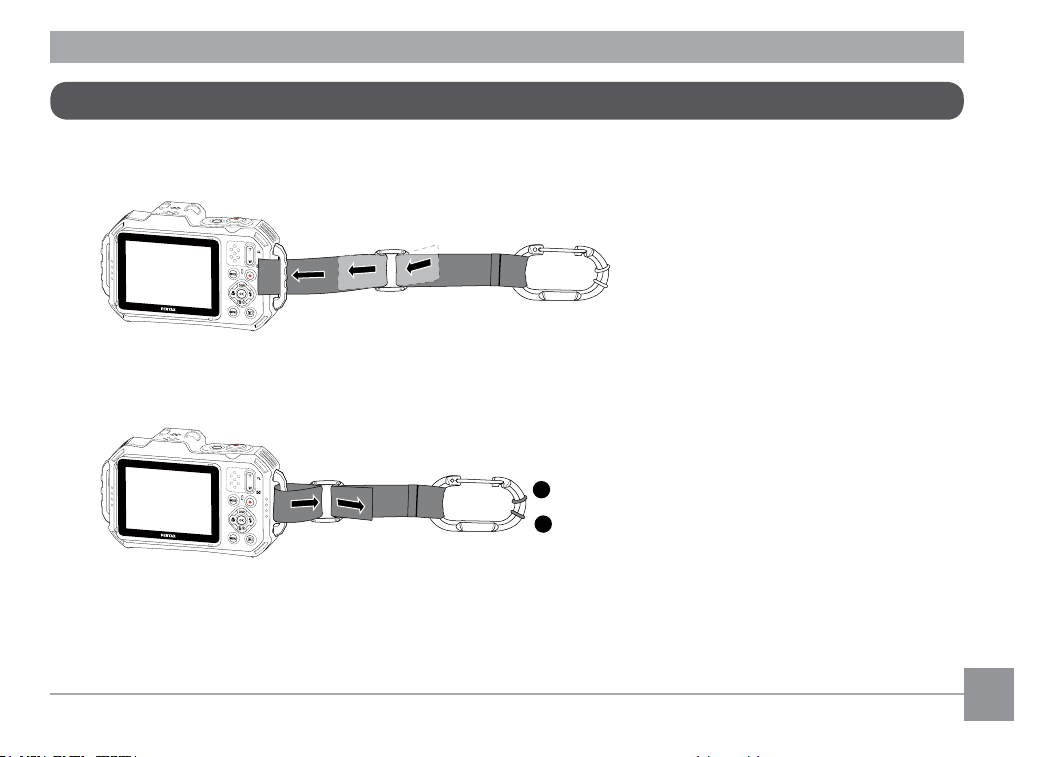
Attaching the Carabiner Strap
1. Pass the tip of the carabiner strap through the strap attachment part of the main body as shown in the
figure and fix it to the fastener.
2. In order to prevent scratches when the carabiner strap and the main body against each other, please
adjust the position of the rubber rings so that they do not influence each other.
2
1
24
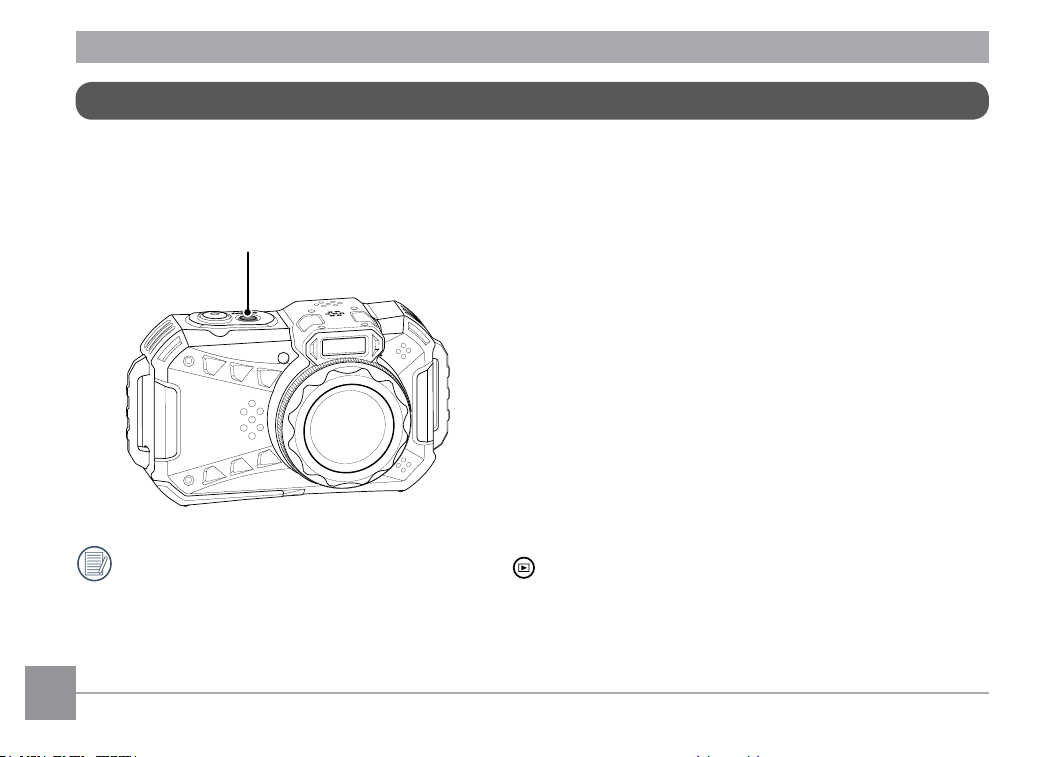
Turning Camera On and Off
Press the Power button, the Indicator lamp and monitor will light up. Please follow the steps of Page 27 to
28 to set the language, date and time which displayed by the monitor. Press the Power button again, the the
Indicator lamp and monitor will be turned off.
Power button
When the power is off, press and hold the play
button to power on and enter Playback mode.
25
How to Take Pictures
1. Hold the camera with both hands, being careful to not block the flash and lens with fingers.
2. Point the Lens toward the object you want to take a picture of, then frame it with the monitor.
3. Use the Zoom button to select Tele or Wide position to zoom in or out on your subject(s).
4. Gently press the Shutter button half-way down to focus on your subject(s). When the focus frame turns
green, press the Shutter button completely down to take your photo.
26
Set your Language, Date/Time
Set your Language, Date/Time after the First Power-On
1. When you turn the camera on for the first time, the language selection screen appears.
2. Press the [
]/[ ]/[ ]/[ ] buttons to select your desired language.
3. After you press the
button to confirm your language selection, the Date/Time settings screen will
appear.
4. Press the [
]/[ ] buttons to select the Date/Time to be adjusted: Time is displayed in YYYY.MM.DD/
HH:MM.
5. Press the [
]/[ ] buttons to adjust the value for the desired Date/Time.
6. Press the
button to confirm the time settings and the snapshot screen will appear.
27
Resetting your Language
After you set your language for the first time, follow the instructions below to reset your desired language.
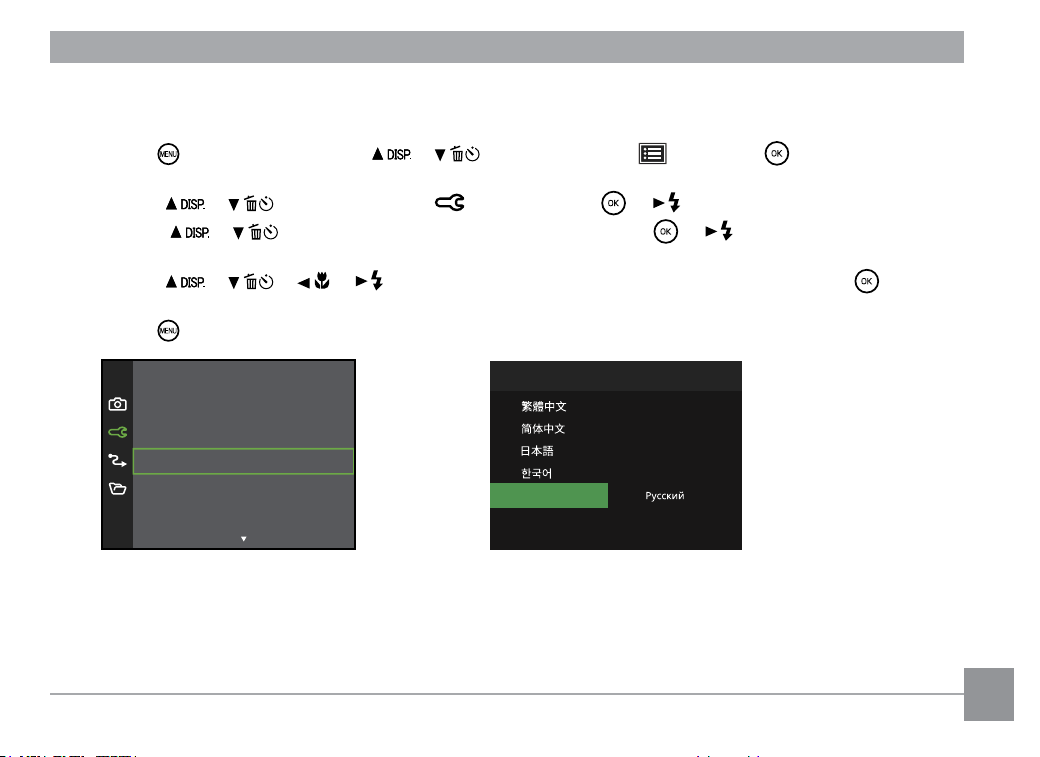
1. Press the
button and press the [ ]/[ ] buttons to select . Press the button to enter the
menu.
2. Press the [
]/[ ] buttons to select , and press the / [ ] button to enter the menu.
3. Press the [
]/[ ] buttons to select [Language] and press the / [ ] button to enter the
menu.
4. Press the [
]/[ ]/[ ]/[ ] buttons to select your desired language and press the button to
confirm.
5. Press the
button and the snapshot screen will appear.
Sound Settings
Power Save
rA
uto
Language English
World Time Home
Date & Time 2024.01.01 00:00
Español
English
Français
Português
Italiano
Deutsch
Svenska
Language
28
Resetting Date/Time
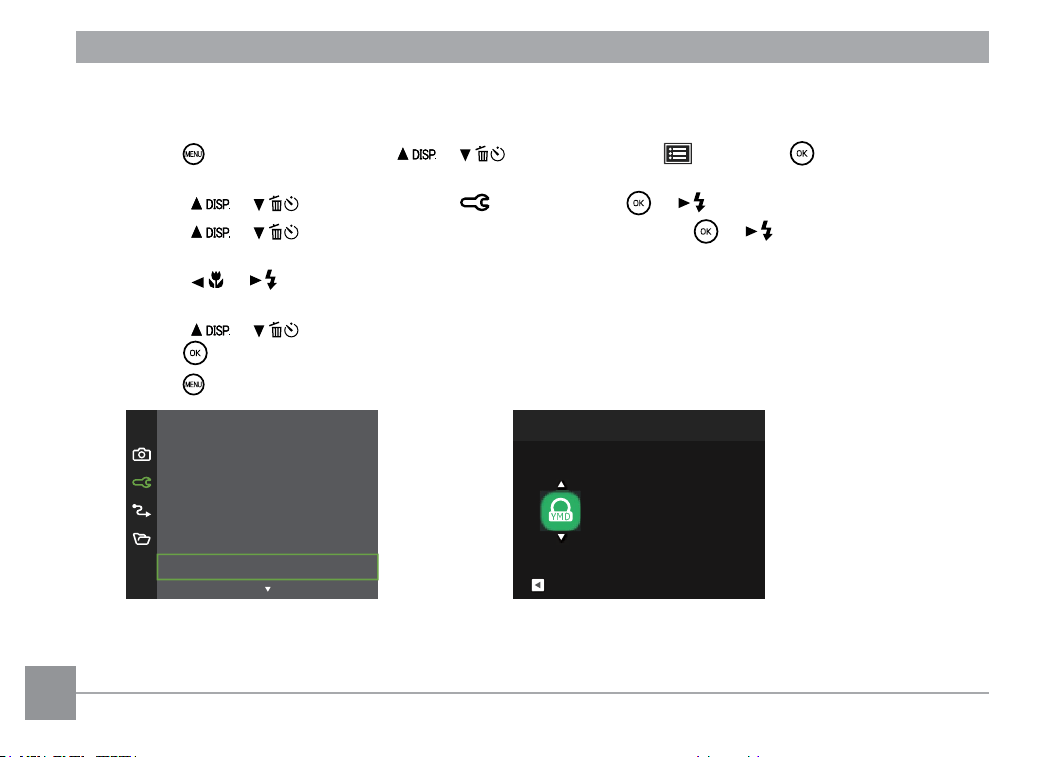
After you set your Date/Time for the first time, follow the instructions below to reset date and time.
1. Press the
button and press the [ ]/[ ] buttons to select . Press the button to enter the
menu.
2. Press the [
]/[ ] buttons to select , and press the / [ ] button to enter the menu.
3. Press the [
]/[ ] buttons to select [Date & Time] and press the / [ ] button to enter the
menu.
4. Press the [
]/[ ] buttons to select the Date/Time to be adjusted: Time is displayed in YYYY.MM.DD/
HH:MM.
5. Press the [
]/[ ] buttons to press the value for your selected entry. After you finish your settings,
press the button to confirm.
6. Press the
button and the following snapshot screen will appear.
Sound Settings
Power Save
rA
uto
Language English
World Time Home
Date & Time 2024.01.01 00:00
Date & Time
: . .
01 01 00 00
Back
H-M
2024
29
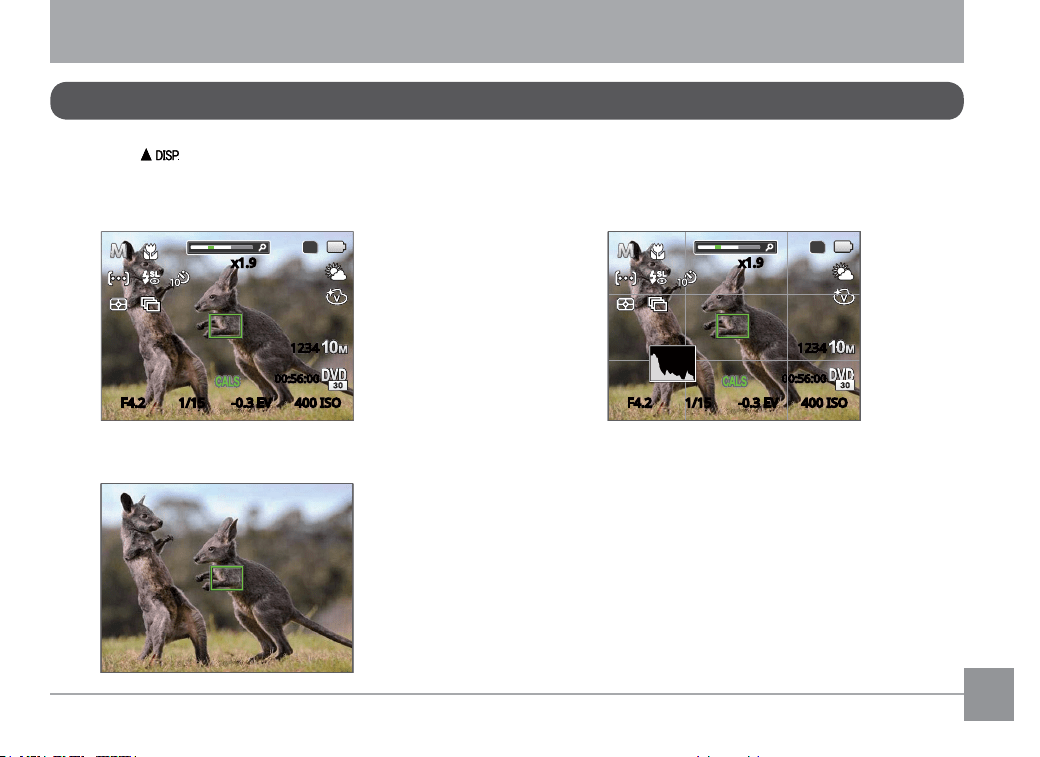
Display Setting
MODE OVERVIEW
Press the [ ] button to display the settings: Classic, Full, Off.
Classic: Displays the camera parameters on screen Full: Camera parameters with Grid and
Histogram
x1.9x1.9
F4.2 1/15 -0.3 EV 400 ISOF4.2 1/
15
-0.3 EV 400 ISO
12341234
00:56:00
00:56:00
SD
x1.9
12341234
00:56:00
00:56:00
SD
x1.9
F4.2 1/15 -0.3 EV 400 ISO
F4.2 1/
15
-0.3 EV 400 ISO
Off: Does not display any additional icons on screen
30
Monitor Display
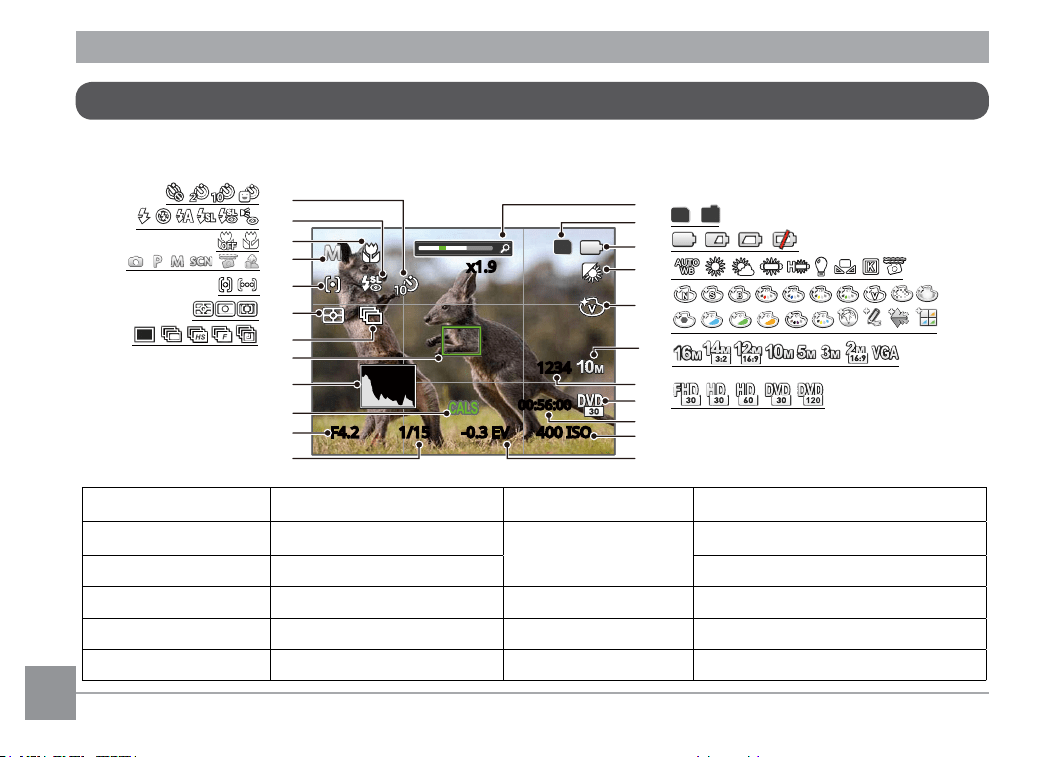
Overview of the Screen Icons in Photo Shooting Mode
x1.9x1.9
F4.2 1/15 -0.3 EV 400 ISO
F4.2 1/
15
-0.3 EV 400 ISO
1234
1234
00:56:00
00:56:00
IN
SD
SD
12
9
10
11
8
7
6
4
5
2
3
1
13
16
17
18
19
20
21
22
23
15
14
1
Shutter Speed
7
Expo Metering
13
Zoom Display
18
Image Size
2
Aperture Value
8
Auto Focus (AF) Mode
14 Memory Card/
Built-In Memory
19 Number of Remaining Shots
3
CALS Mode
9
Shooting Mode 20 Video Quality
4
Histogram
10
Macro Mode
15
Battery Status 21 Remaining Recording Time
5
Focus Frame
11
Flash Mode
16
White Balance 22 ISO Value
6
Continuous Shot
12
Self-timer
17
Color Effect 23 Exposure Compensation
31
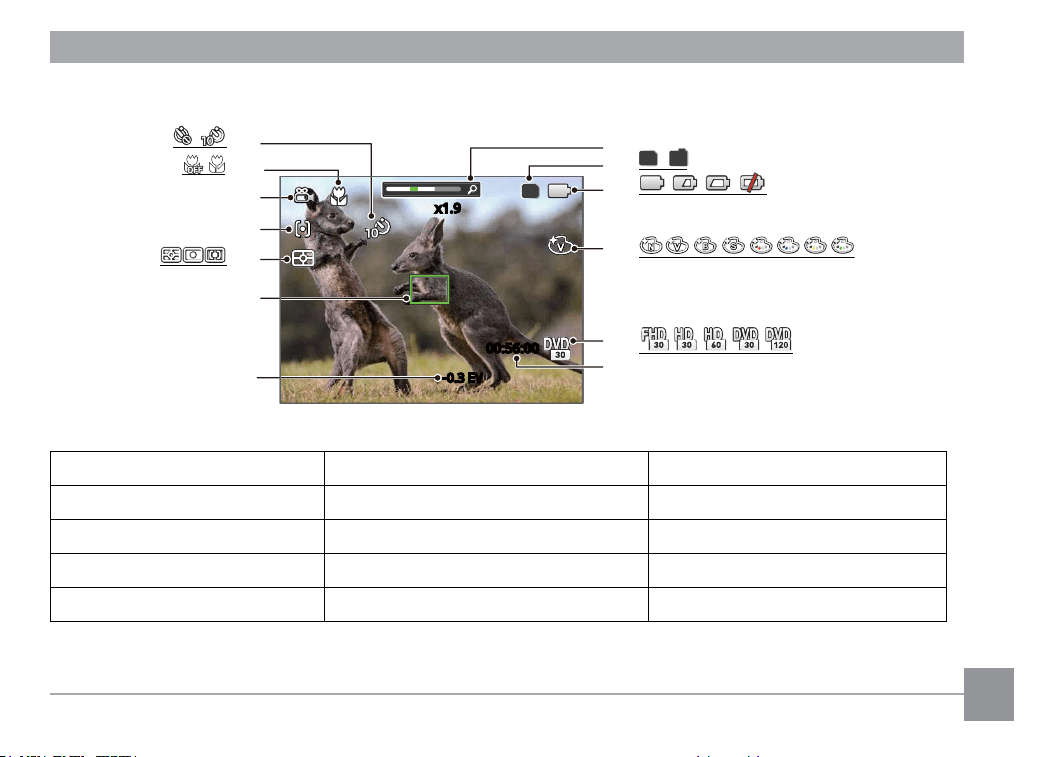
Overview of the Screen Icons in Movie Mode
x1.9
x1.9
-0.3 EV
00:56:00
SD
00:56:00
00:56:00
IN
SD
-0.3 EV
7
5
6
4
3
2
1
8
11
12
13
10
9
1
Exposure Compensation
6
Macro Mode 11 Color Effect
2
Focus Frame
7
Self-timer 12 Video Quality
3
Expo Metering
8
Zoom Display 13 Remaining Recording Time
4
Single-AF
9
Memory Card/Built-In Memory
5
Movie Mode
10
Battery Status
32
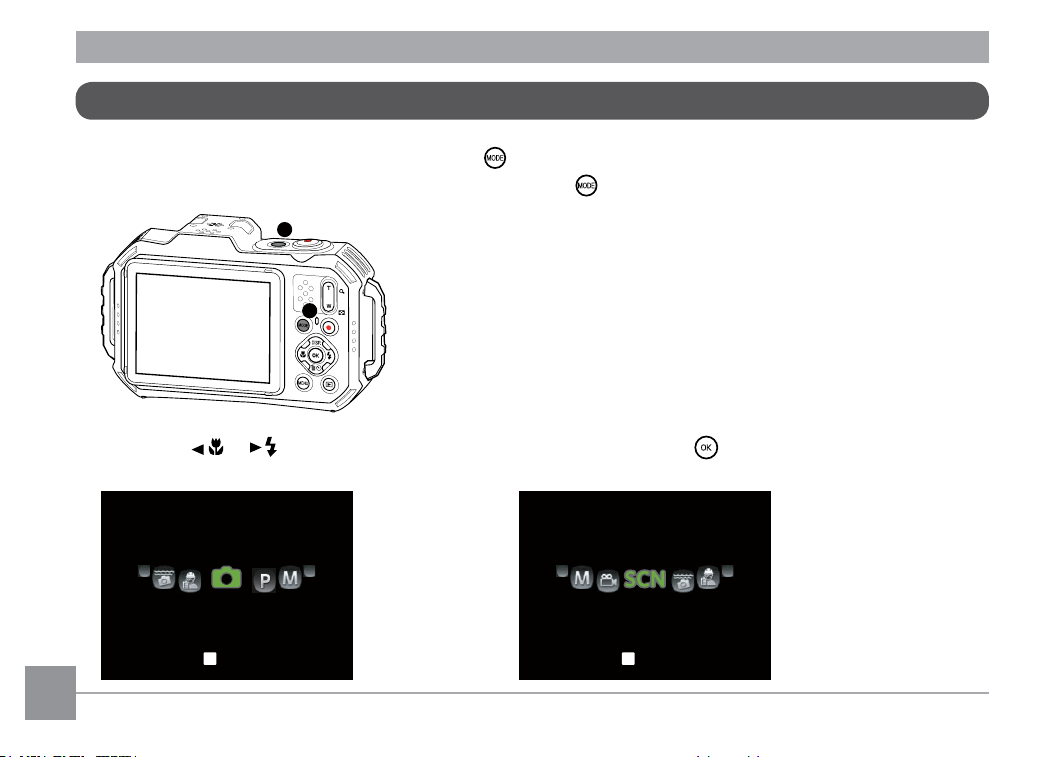
Using the MODE button
This camera provides a convenient MODE button that allows you to switch easily between different modes.
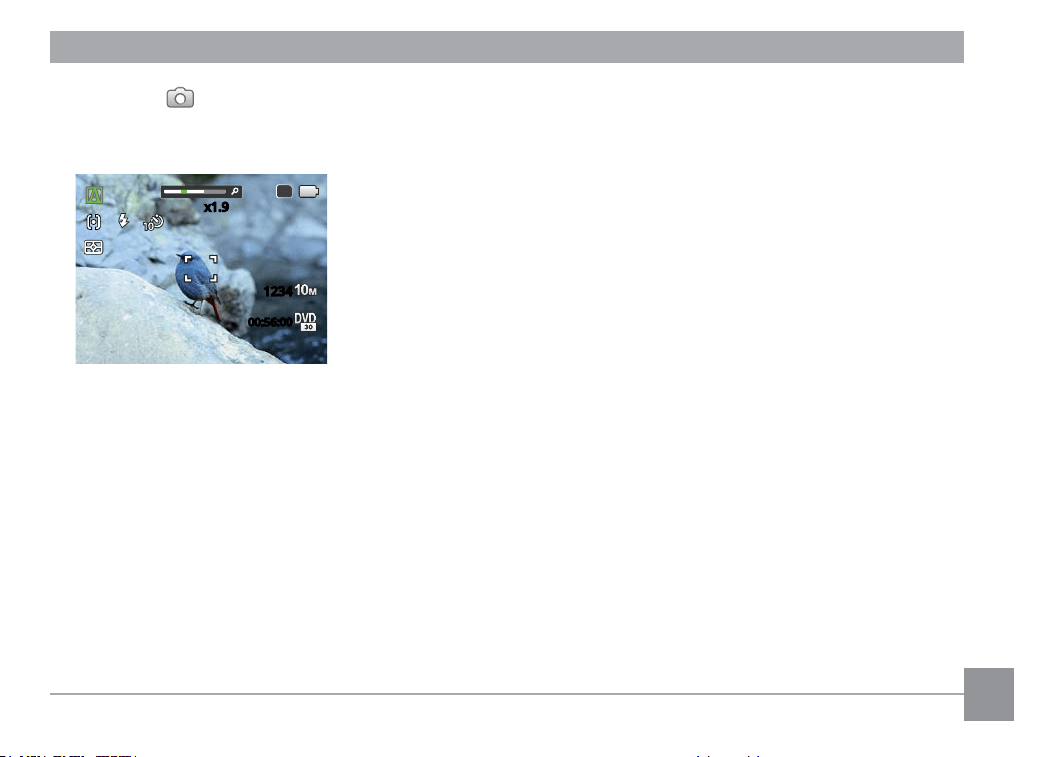
1. Press the Power button to turn the camera on. Press the
button to enter the Mode Selection Menu.
1
2
2. Press the [
]/[ ] buttons to choose the selected mode. Press the button to confirm your
selection.
Auto mode
Save
Auto Mode
Save
OK
Scene Mode
Save
OK
33
Auto Mode
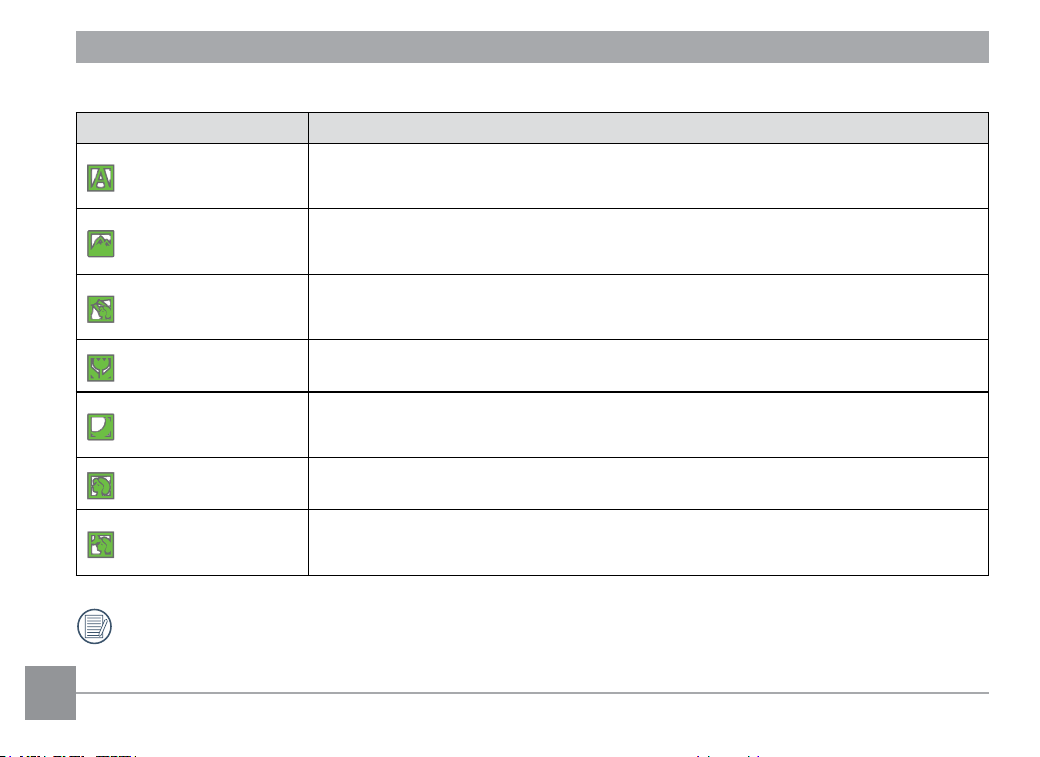
Auto mode is the most common and easiest mode to take photos. While operating in this mode, the camera
automatically optimizes numerous camera settings to take photos and videos with the best possible results.
x1.9x1.9
12341234
00:56:0000:56:00
SD
1. Hold the camera steadily and aim at the subject. The optimum scene mode will be selected automatically.
2. Compose your picture in the monitor and press the Shutter button halfway down to focus on your
subject
(s).
3. The monitor will show a green focus frame when the subject is in focus.
4. Fully press down the Shutter button to take your photo.
34
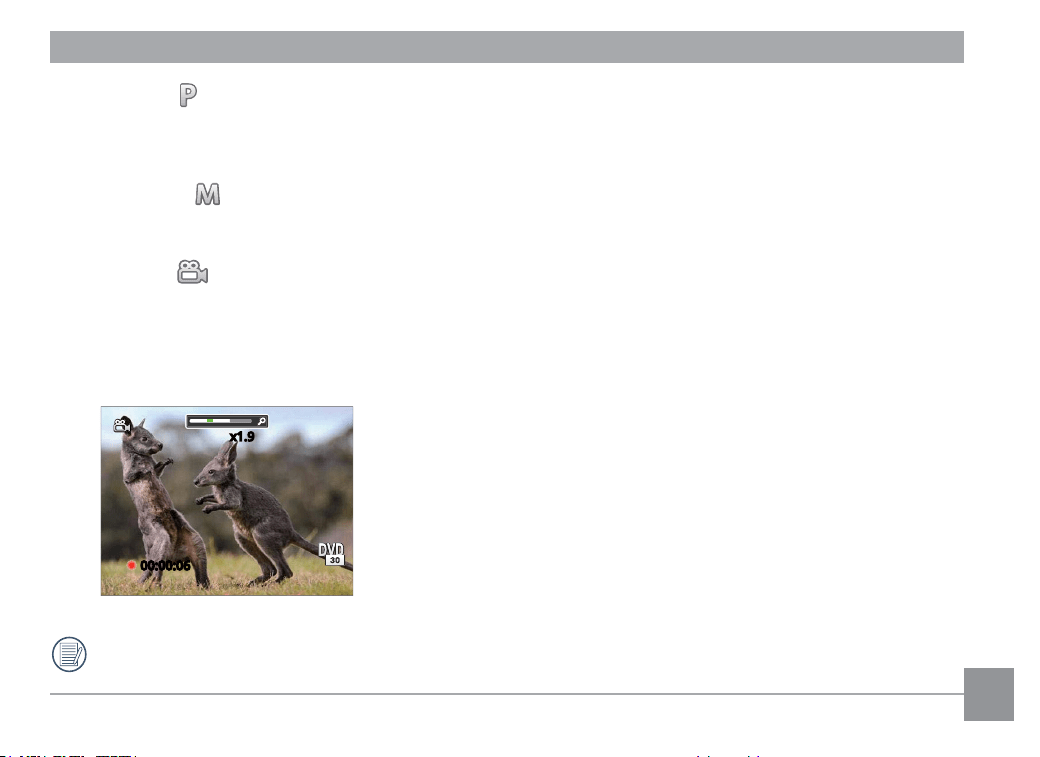
The camera will automatically detect the most suitable scene to capture the best pictures.
Mode Name Description
Auto Mode
The camera automatically adjusts the exposure and focus to ensure the best
possible pictures.
Landscape Mode
For landscapes, automatically adjusts the exposure and reproduces vivid green
and blue colors.
Backlit Portrait
When the sun or any other light source is behind you, automatically adjusts the
foreground exposure to produce the best pictures possible.
Macro Mode The macro setting is ideal for shooting small objects or close-up photos.
Night Landscape
Mode
For night scenes, automatically increases the ISO value to compensate for low
light.
Portrait Mode Most suitable for capturing people with focus on their faces.
Night Portrait
When you take portraits at night, or in low light conditions, automatically
adjusts the exposure for people and night scenes.
Macro ON/OFF and flash are automatically controlled, users cannot change the settings.
35
Program AE
Under different scenes, the user can switch the ISO and EV value according to personal preference, the
camera can automatically set the shutter speed and aperture value.
Manual Mode
Aperture, Shutter Speed and ISO can be configured manually in this mode.
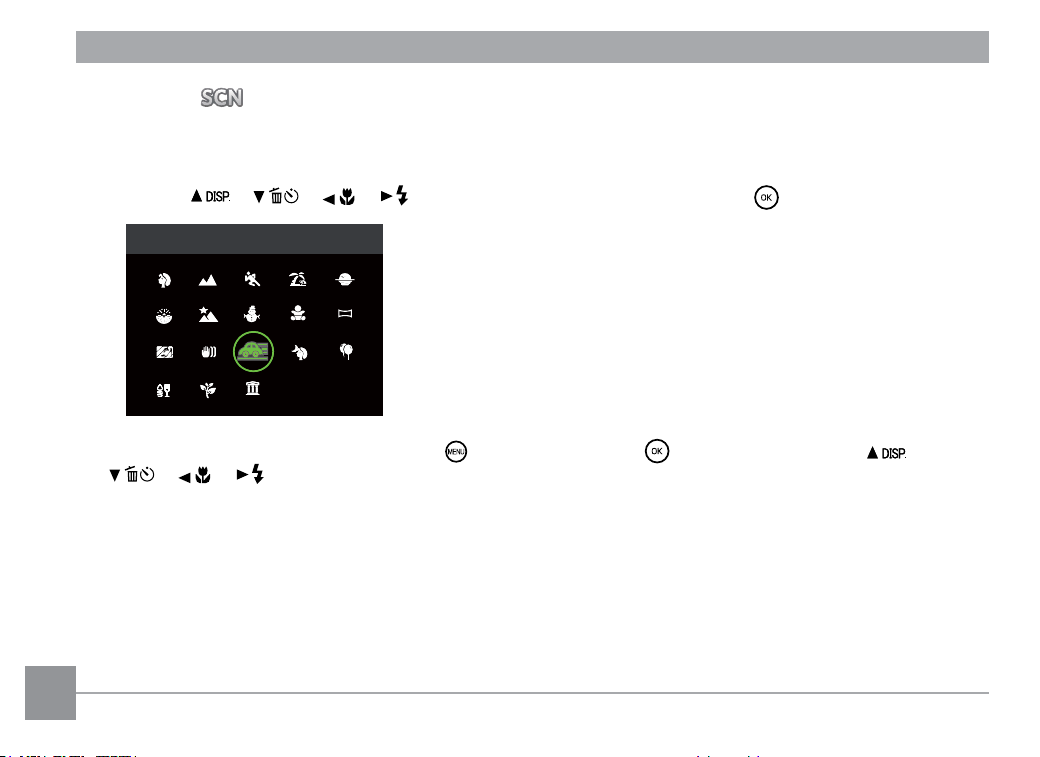
Movie Mode
Switch to this mode to record videos.
1. Press down the Shutter button to start recording.
2. Once you are finished, press the Movie button or the Shutter button to stop recording and return to the
shooting screen.
00:00:06
00:00:06
x1.9x1.9
In the recording process, you can push the Zoom buttons to Zoom in or out on the subject.
36
Scene Mode
You can select an appropriate mode from the 18 scene modes according to the type of environment you are
shooting in. The camera then automatically configures the most appropriate settings for the best possible
photos.
1. Press the [
]/[ ]/[ ]/[ ] buttons to select a scene and press the button to confirm.
Panning Shot
2. To change to a different scene, press the button and then the button and finally the [ ]/
[ ]/[ ]/[ ] buttons to to reselect the scene.
37
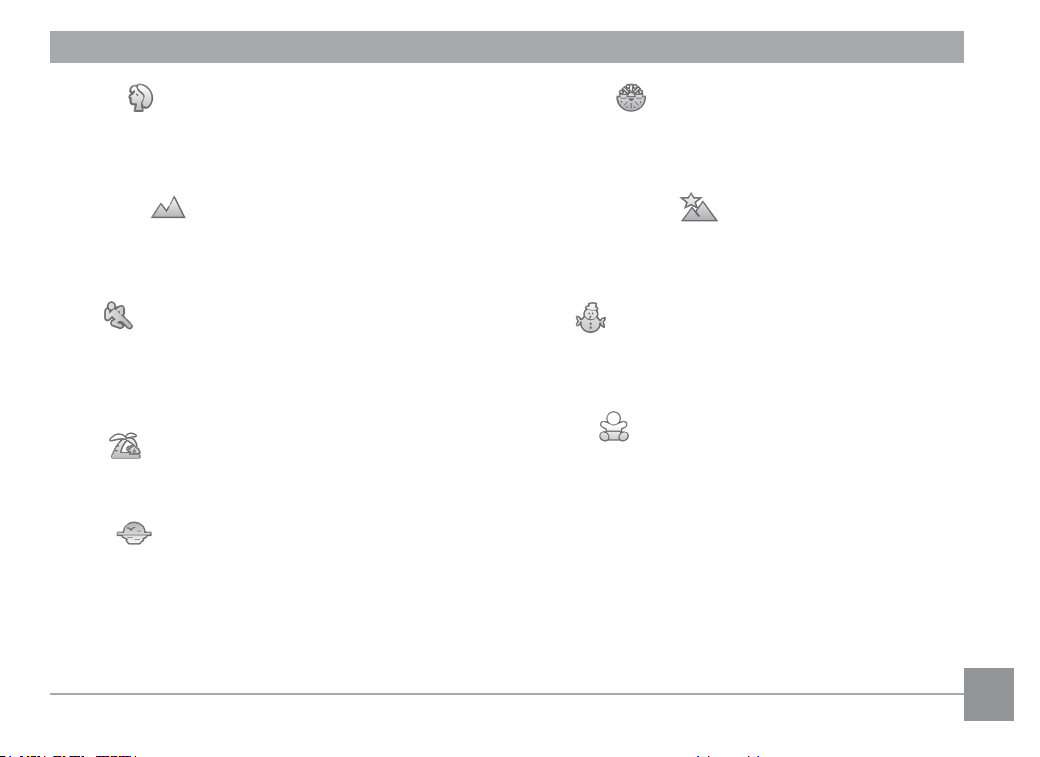
Portrait
Most suitable for capturing people, focusing on their
face.
Landscape
For landscapes and outdoor shots. Vivid
reproduction of greens and blues.
Sport
For fast-moving subjects. Captures sharp,
action shots with minimal blur. This mode is not
recommended for shooting indoors.
Beach
For taking pictures in areas with strong sunlight.
Sunset
For sunsets. Captures subjects in strong sunlight.
Use of a tripod is recommended with this setting.
Fireworks
For fireworks at night. Use of a tripod is
recommended with this setting.
Night Landscape
For night scenes. Use of a tripod is recommended
with this setting.
Snow
For snowy conditions. Reproduces natural, clear,
white scenes.
Children
Turns flash off automatically. Avoids disturbing the
subject and is suitable for taking photos of children
and pets.
38
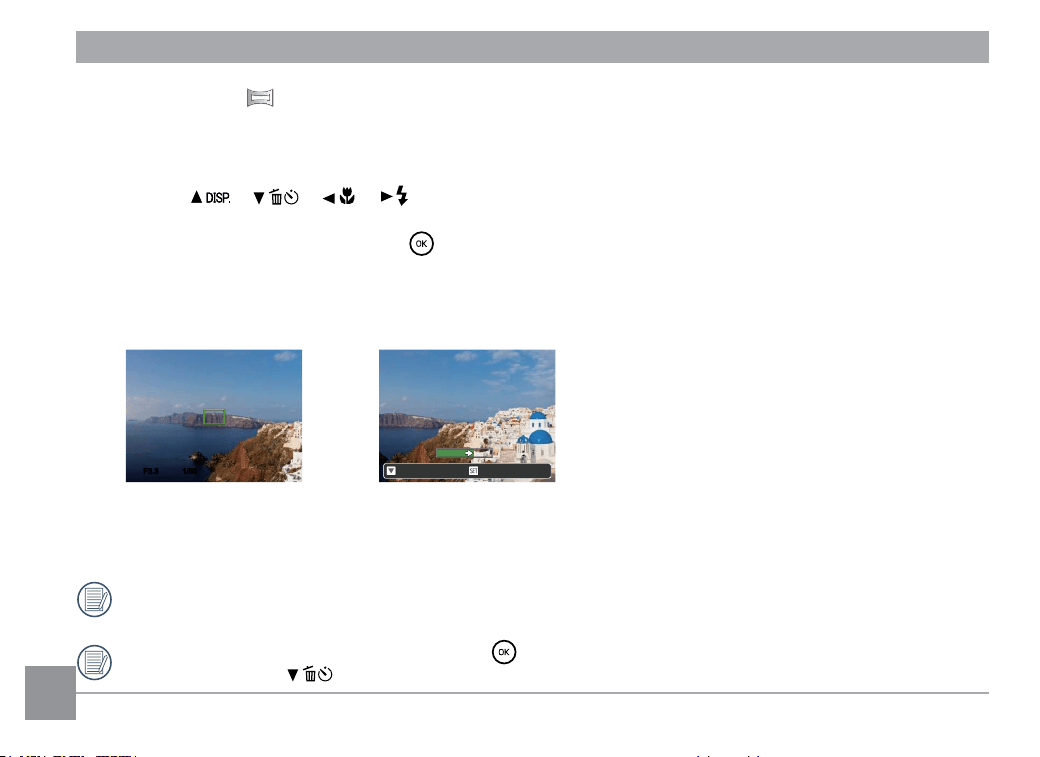
Panorama Mode
This feature allows you to capture a panoramic view that will have significantly more content than a single
photograph. Follow the arrow while keeping the camera steady to seamlessly shoot an ultra-wide scene of up
to 360 degrees.
1. Press the [
]/[ ]/[ ]/[ ] buttons to select a desired shooting direction. Should you not
select a direction, the default shooting direction is “right.”. 2 seconds later, the camera will be ready to
take pictures. You can also press the button or press the Shutter button halfway down to get ready to
take panaramic pictures.
2. Compose your shot on the monitor and half press the Shutter button to focus on the subject. After
focusing, fully press the Shutter button down to take the first picture. At this time, the process dialog of
panorama mode stitching appears on the screen.
1/50F3.3
Save
Cancel
3. Pan the camera according to the set direction. When the range of motion does not exceed the range that
the camera can detect, the progress bar behind the arrow partially turns green. When it completely turns
green, panorama mode shooting is finished.
In Panorama Mode, the Flash, Self-timer, Macro Modes and Exposure Compensation are not available.
Focus Adjustment is also not available at this time.
During Panorama Mode shooting, press the
button to interrupt shooting and save the current
pictures. Press the [ ] button to cancel shooting and delete previously taken pictures.
39
During panorama mode shooting, when the
moving direction of the camera is wrong or the
angle deviates from the internal settings, the
monitor shows a warning message [Improper
alignment. Please try again.] and the current
pictures taken are saved.
Panoramic image can be played back by
the method of flash playing. Please see the
animation panoramic playback on page 55.
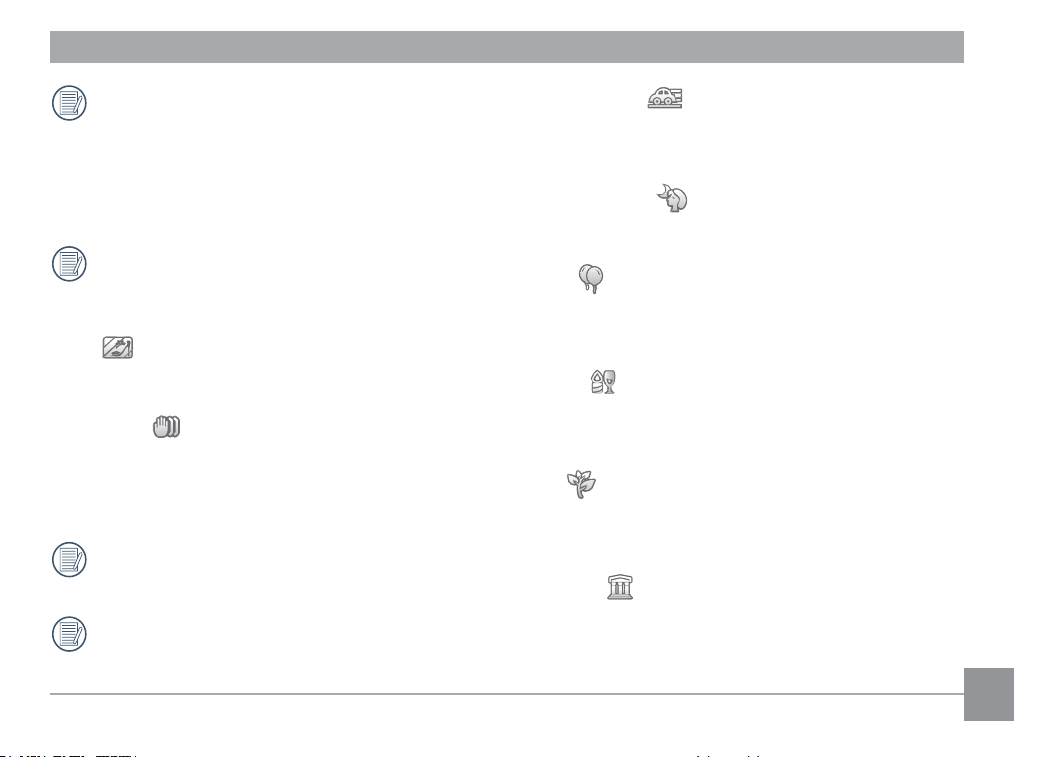
Glass
For objects behind transparent glass.
Anti-shake
This mode can help reduce photo blur caused by
shakiness of hands, low light and/or slow shutter
speed.
Use Anti-Shake mode in dark environments or
when using a slower shutter speed.
Shooting in a windy or unstable environment
(such as a moving vehicle) may cause blurry
images.
Panning Shot
Suitable for capturing fast moving objects to have a
clear subject with a blurred background.
Night Portrait
For portraits against night scenery.
Party
Suitable for taking indoor party pictures, even under
complicated lighting conditions.
Indoor
For indoor settings. Reduces blur and improves
color accuracy.
Leaf
For plants. Captures brilliant shots of greenery and
blossoms.
Museum
For museums or flash-free areas. Retains color and
reduces blur.
40
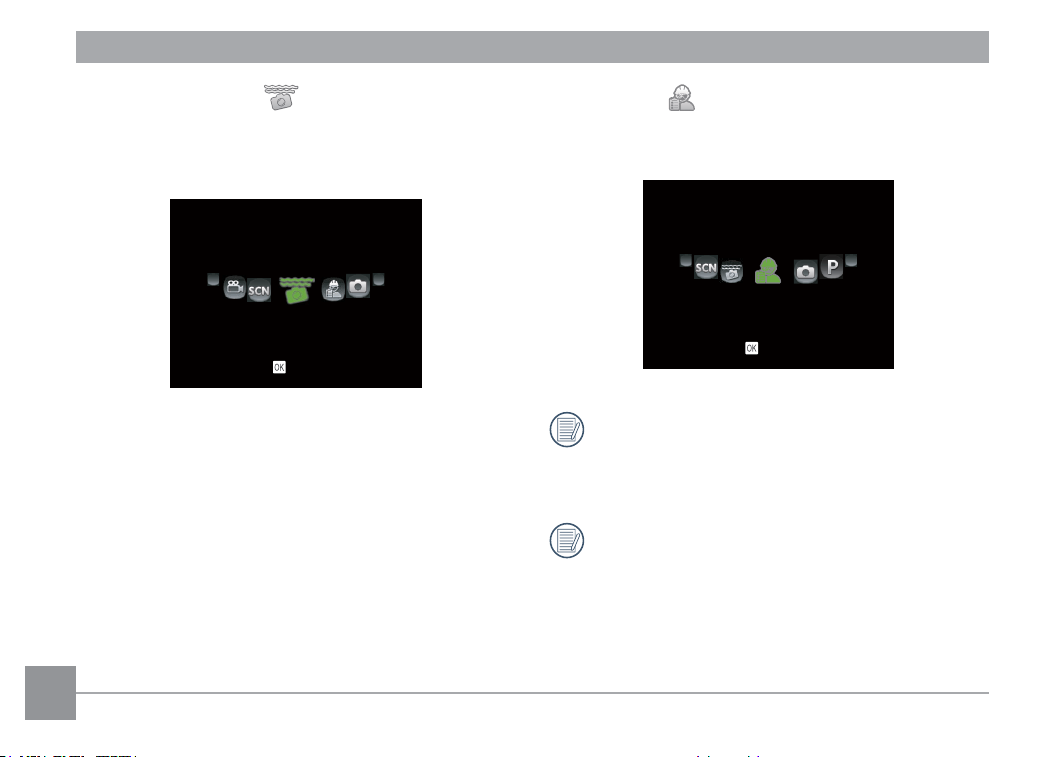
Underwater Mode
When you are in the water, you can select
Underwater Mode in the Mode Selection Menu to
take pictures under water.
Underwater Mode
Save
CALS Mode
Records in a size suitable for electronic delivery in
accordance with construction CALS.
CALS Mode
(Construction Purposes)
Save
This product has excellent water resistance,
dust resistance, and impact resistance, and can
be photographed even in harsh environments
such as construction sites.
In CALS Mode, there are three options for
Image Size:
1M: 1280 x 960 (Initial value)
2M: 1600 x 1200
3M: 2048 x 1536
41
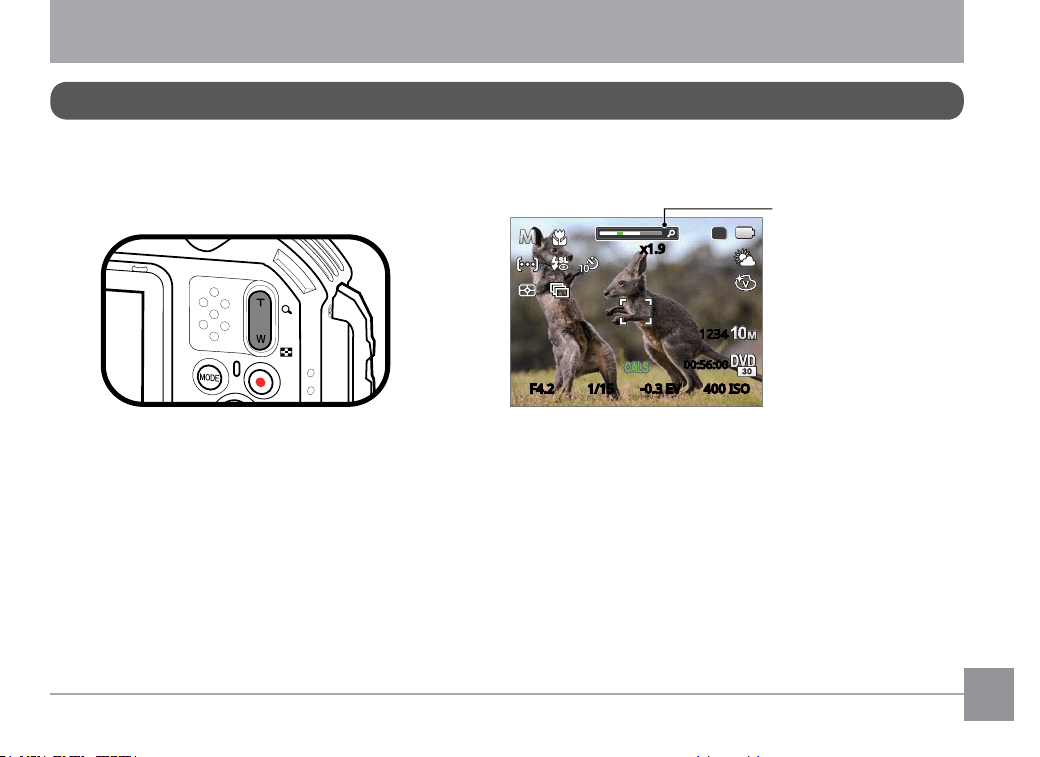
Your camera is equipped with two types of Zoom Functions: Optical Zoom and Digital Zoom. Press the Zoom
button of the camera to zoom in or out on the subject while taking pictures.
x1.9x1.9
F4.2 1/15 -0.3 EV 400 ISOF4.2 1/
15
-0.3 EV 400 ISO
12341234
00:56:00
00:56:00
SD
When the Optical Zoom reaches the threshold as Digital Zoom, release and turn the Zoom button to T to
switch between the Optical Zoom and Digital Zoom.
Using the Zoom Function
BASIC OPERATION
Zoom Indicator
42
Macro Mode
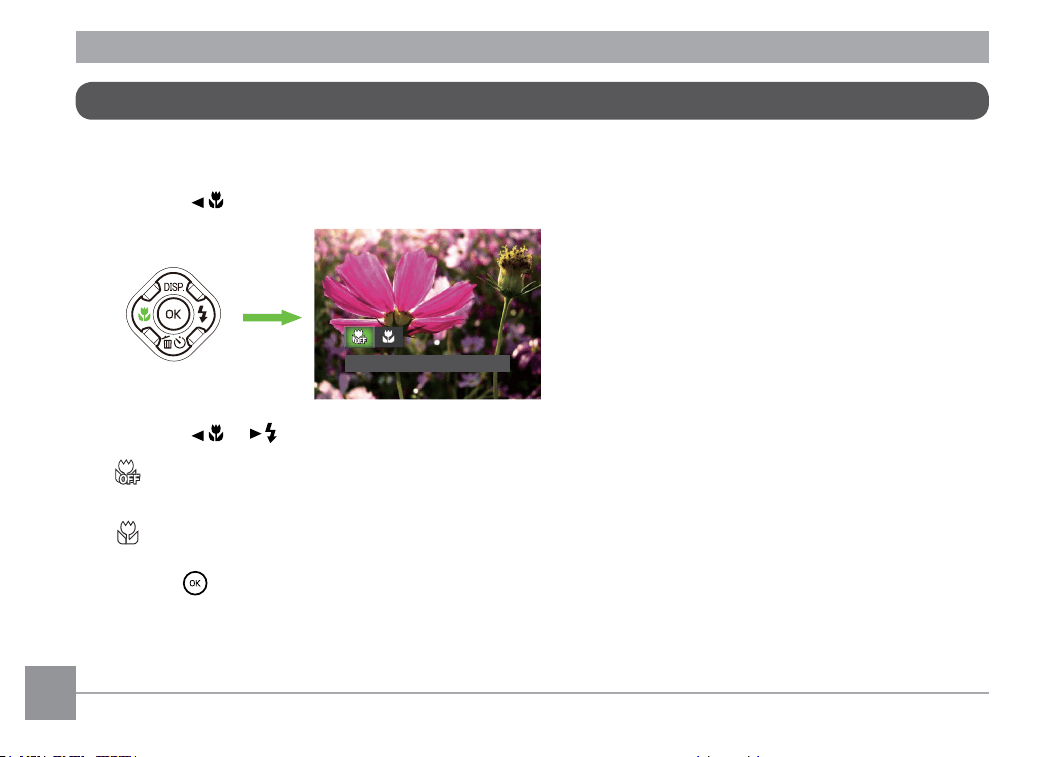
The Macro Setting is ideal for shooting small objects or close-up photos. This mode allows you to focus on
subjects very close to the camera.
1. Press the [
] button to enter the Macro Menu.
M
acro Off
2. Press the [ ]/[ ] buttons to select the following 2 modes:
•
Macro Off
Select this option to disable Macro.
•
Macro On
Select this to focus on subjects 5cm from the lens.
3. Press the
button to confirm the settings and exit the menu.
43
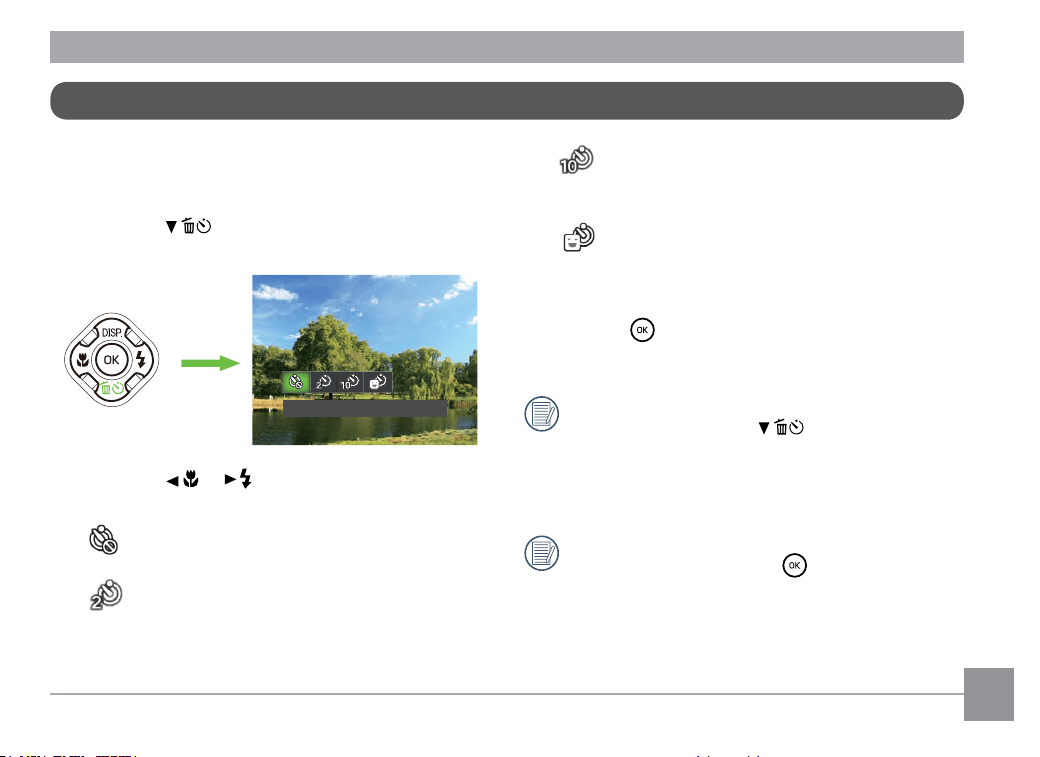
Use this function to take pictures at pre-set intervals.
The camera shutter speed can be set to 2 seconds,
10 seconds or when a smile is detected.
1. Press the [
] button to enter the Self-timer
Menu.
S
elf-timer Off
2. Press the [ ]/[ ] buttons to select the
following 4 modes:
•
Self-timer Off
Disables the Self-Timer.
•
Self-timer 2sec
A single picture is shot 2 seconds after
the Shutter button is pressed.
•
Self-timer 10sec
A single picture is shot 10 seconds after
the Shutter button is pressed.
•
Self-timer Smile
Press the Shutter button and a picture
will be taken immediately after a smile is
detected.
3. Press the
button to confirm the settings and
exit the menu.
When enabling the Self-Timer, pressing the
Shutter button or the [
] button will select
the highlighted Self-Timer option and return to
the shooting screen, and keep the Self-Timer
setting.
When enabling the smile detection, pressing
the Shutter button or the
button will select
the Self-Timer smile option (if highlighted) and
return to the shooting screen, and keeping the
Self-Timer smile setting.
Self-timer Setting
44
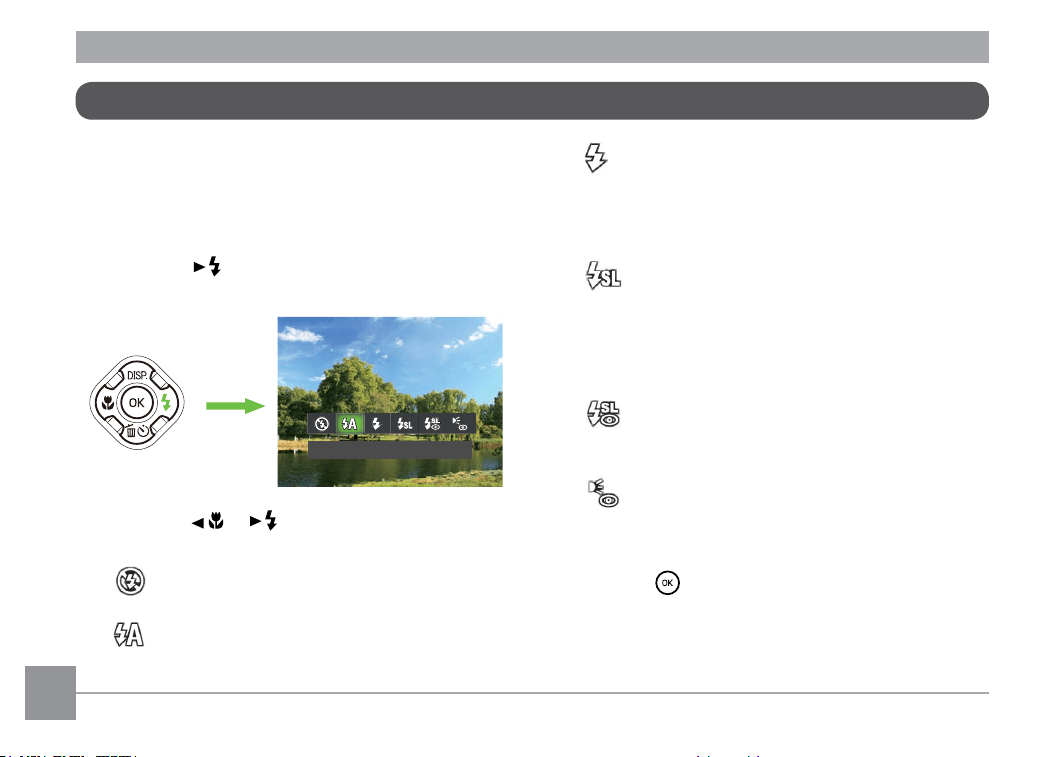
• Fill Flash
The flash will engage with each shot
even, supplementing the existing light
in a scene and helping to eliminate
shadows.
•
Slow Sync.
This allows you to take pictures of people
at night that clearly show both your
subjects and the night time backdrop.
The use of a tripod is recommended
when shooting with this setting.
•
Slow Sync.+Red-Eye
Use this mode for slow synchrony shots
with red-eye reduction.
•
Red-Eye Reduction
The camera emits a brief pre-flash before
the picture is taken to reduce red-eye
effects.
3. Press the
button to confirm the settings and
exit the menu.
The flash provides supplemental light for scenes.
The flash is usually used when shooting against the
light to highlight the object; it is also suitable for
metering and shooting in darker scenes to improve
the exposure.
1. Press the [
] button to enter the Flash Settings
Menu.
Flash Auto
2. Press the [ ]/[ ] buttons to select the
following 6 modes:
•
Force Off
Flash is turned off.
•
Flash Auto
Camera flash goes off automatically
based on lighting conditions.
Flash Mode
45
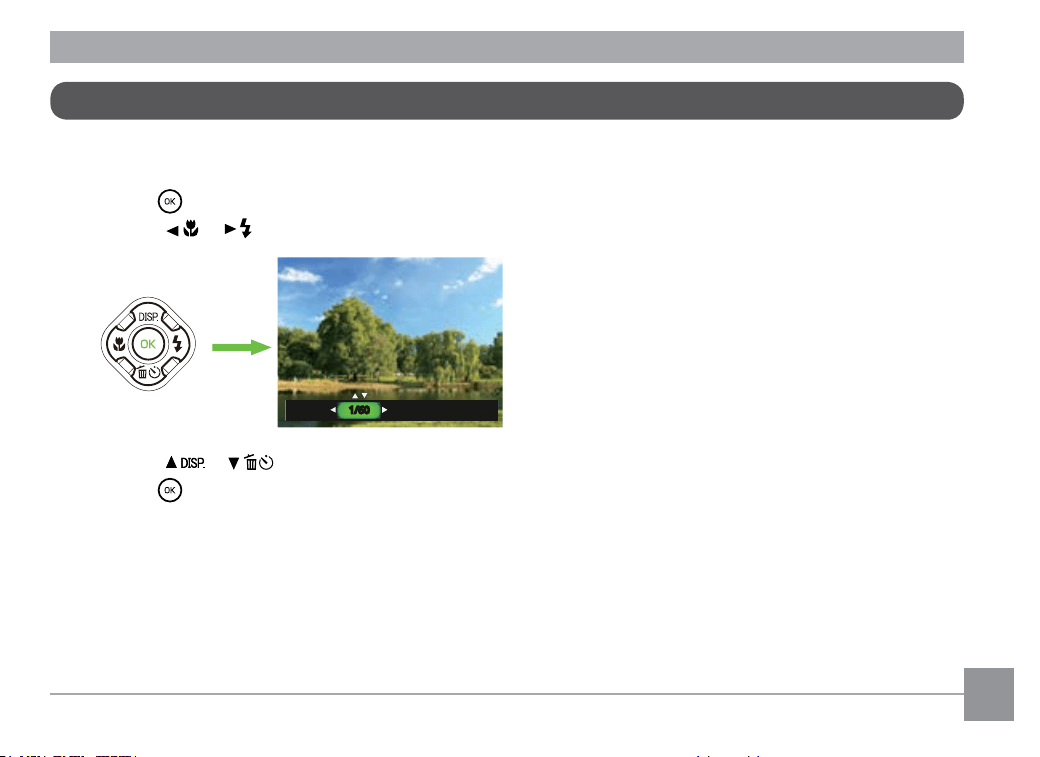
EV Setting
The EV function menu of the camera includes functions, such as EV (Exposure Value) Adjustment, ISO, Shutter
Adjustment, Aperture Adjustment, etc. Using the appropriate function settings can improve your pictures.
1. Press the
button to display the Settings screen.
2. Press the [
]/[ ] buttons to select the Setting options.
F3.0
100 ISO
F3.0
-3.0 EV
1/60
3. Press the [ ]/[ ] buttons to adjust the option values.
4. Press the
button to complete the setting and enter Shooting Mode.
46
Exposure Compensation
Set up to adjust the picture brightness. In the case of a very high contrast between the photographed object
and the background, the brightness of the picture can be appropriately adjusted.
The adjustable range of exposure value is from EV -3.0 to EV +3.0.
ISO
ISO allows you to set the sensitivity of the camera sensor. Please use a higher ISO value in darker places and
a lower value in brighter conditions.
The camera’s ISO settings include: Auto, 100, 200, 400, 800, 1600 and 3200.
Shutter Adjustment
For shutter speed, the camera may automatically set the aperture value corresponding to the manually
set shutter speed to obtain the most suitable exposure value. The movement of objects may be shown by
adjusting the shutter speed. High shutter value can help you more clearly capture fast moving objects, while
low shutter value can better show the movement of objects.
Aperture Adjustment
You can adjust the aperture size value. Selecting a large aperture opening will emphasize the point of focus
and show a blurry background. A small aperture opening will keep both the background and main object in
clear focus.
47
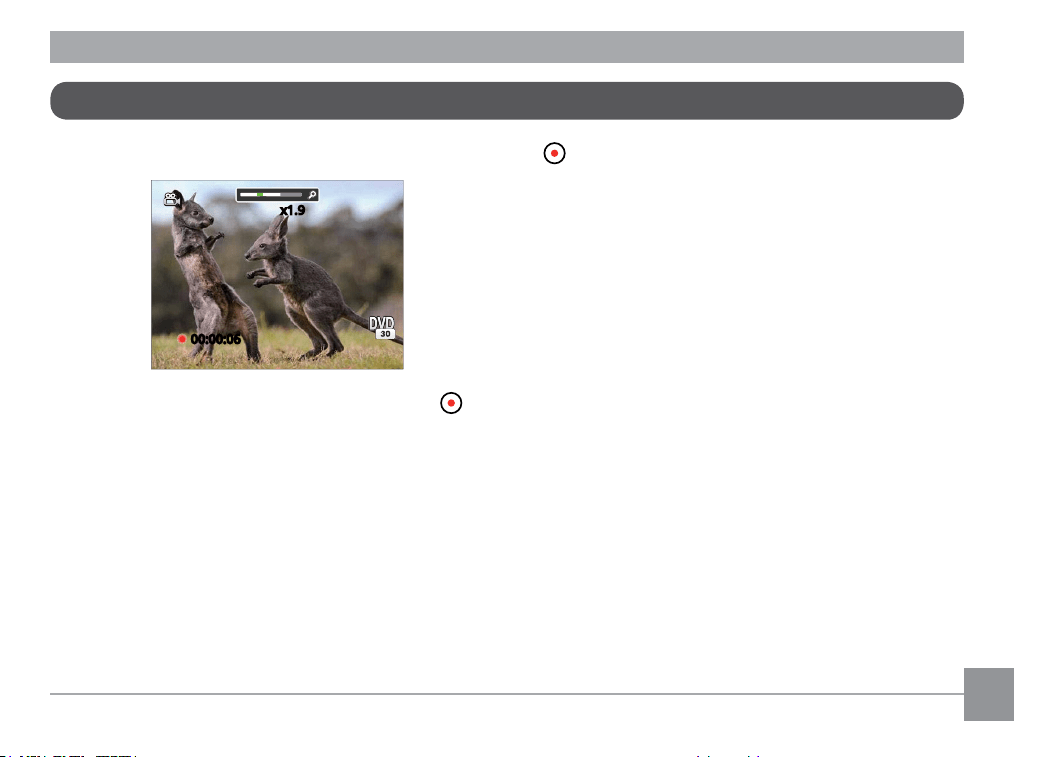
Using Quick Recording
While in the Photo Shooting Mode, press the Movie button to begin recording a video.
00:00:06
00:00:06
x1.9x1.9
Once you are finished, press the Movie button or the Shutter button to stop and store the video. The
camera’s Memory Card will store the video and return to the shooting screen.
48
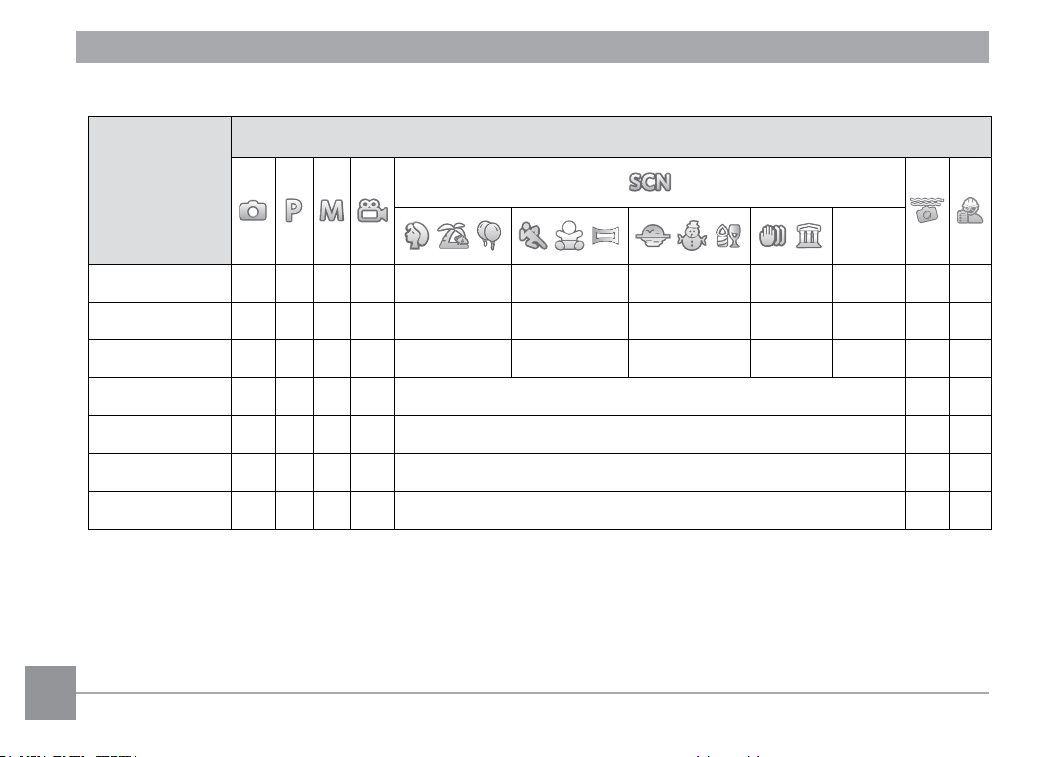
•Optionsintheshootingmode(✓: Available)
Options
Shooting Mode
Others
Macro
✽1 ✓ ✓ ✓ ✓ ✓ ✓ ✓
Self-timer
✓ ✓ ✓ ✓ ✓ ✓ ✓ ✓ ✓ ✓
Flash
✽2 ✓ ✓ X ✓ ✓ ✓ ✓
Aperture
✓
Shutter Speed
✓
EV
✓ ✓ ✓ ✓
ISO
✓ ✓ ✓
✽1: If the camera detects the shooting distance, it will automatically switch to Macro Mode.
✽2: The camera will automatically determine the shooting scene, and the flash will automatically light up in
case of insufficient exposure.
When the camera determine the scence is Macro or Night Landscape, the flash willn't light up.
49
PLAYBACK
1/45
15:37
00:01:23
SD
SD
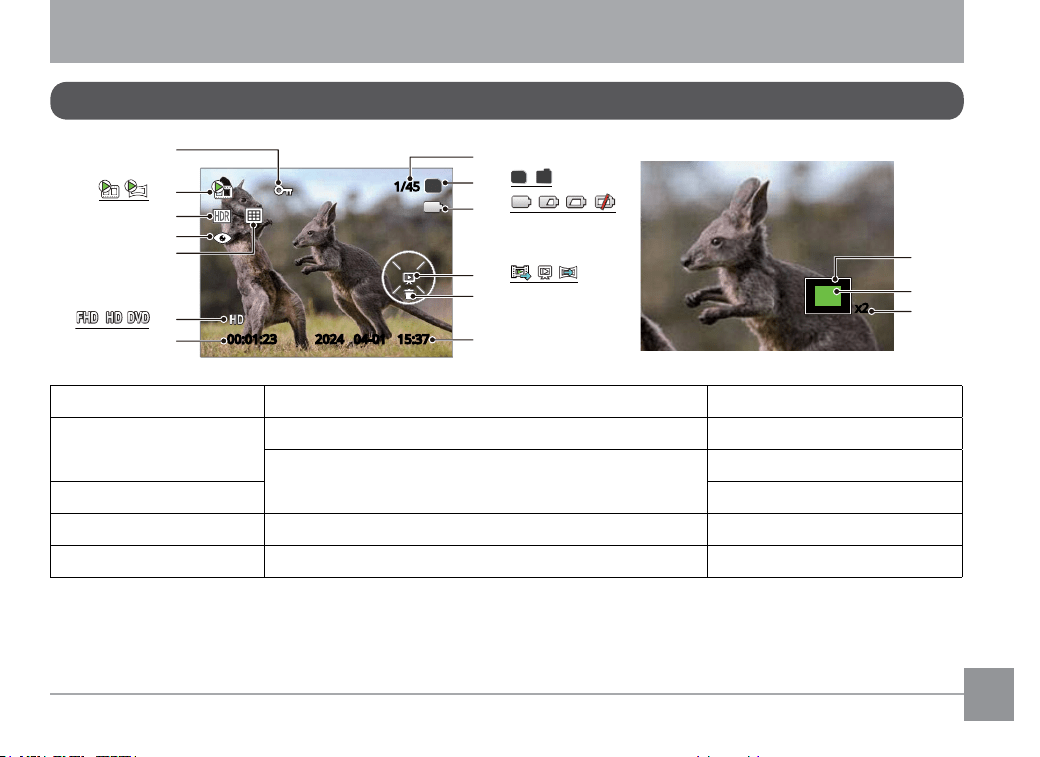
1
2
3
4
5
6
7
10
11
12
13
15
14
16
9
8
IN
SD
2024 04-01
x2
1 File Protection 6 Video Quality 11 Playback Type
2 Movies /Animated
panoramas
7 Record Time 12 Deletion
8 Memory space (indicating the current number
of photos and total number of photos)
13 Shooting Date
3 HDR 14 Image Zone
4 Red-Eye Reduction 9 Memory Card/Built-In Memory 15 Zoom Magnification Are
5 Date Folder 10 Battery Status 16 Image Zoom Ratios
Overview of the Screen Icons in Playback Mode
50
Switching Screen
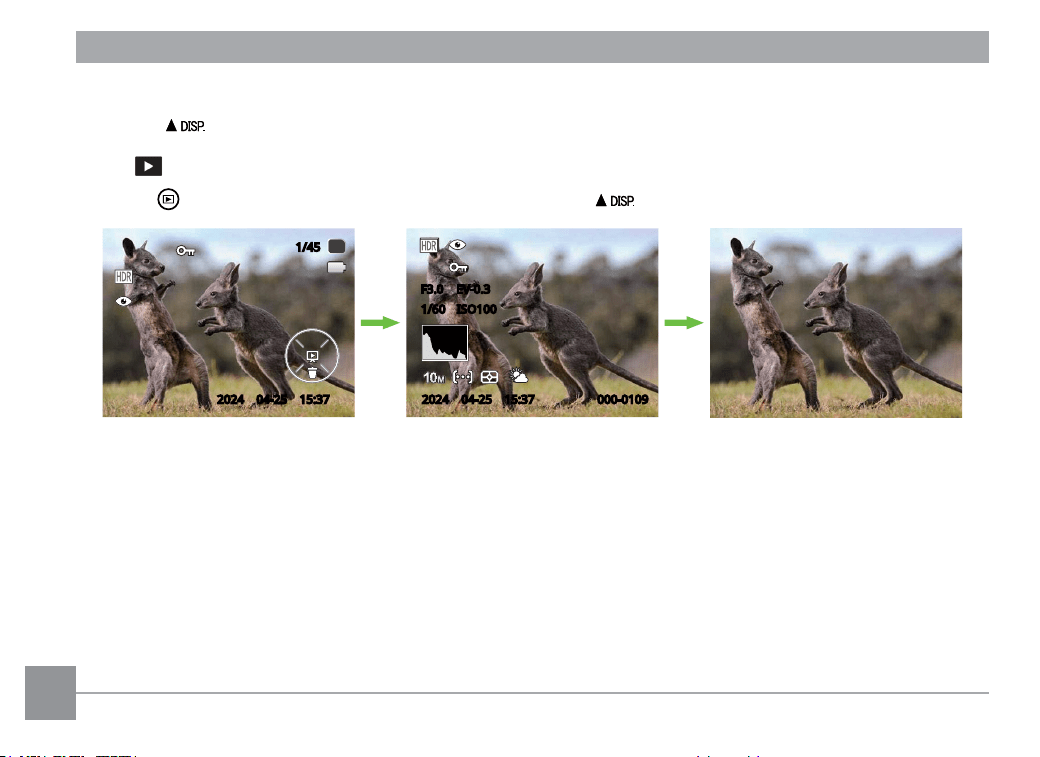
Press the [ ] button to switch among 3 screens.
Mode:
Press the button to display the playback screen, press the [ ] button to switch among 3 screens.
2024 04-25 15:372024 04-25 15:37
1/45
1/45
SD
SD
000-0109
000-0109
EV-0.3
EV-0.3
1/60
1/60
F3.0
ISO100
ISO100
2024 04-25 15:372024 04-25 15:37
F3.0
Function Message Display Detailed Message Display No Message Display
51
Viewing Photos and Videos
To view captured photos and video clips on the monitor:
1. After pressing the
button, the last photo or video clip taken will be displayed on the monitor.
2. Use the [
]/[ ] buttons to scroll through the photos or video clips stored on the built-in memory or
on the Memory Card in the camera.
3. To play a selected video clip, press the
button to enter the Movie Playback Mode.
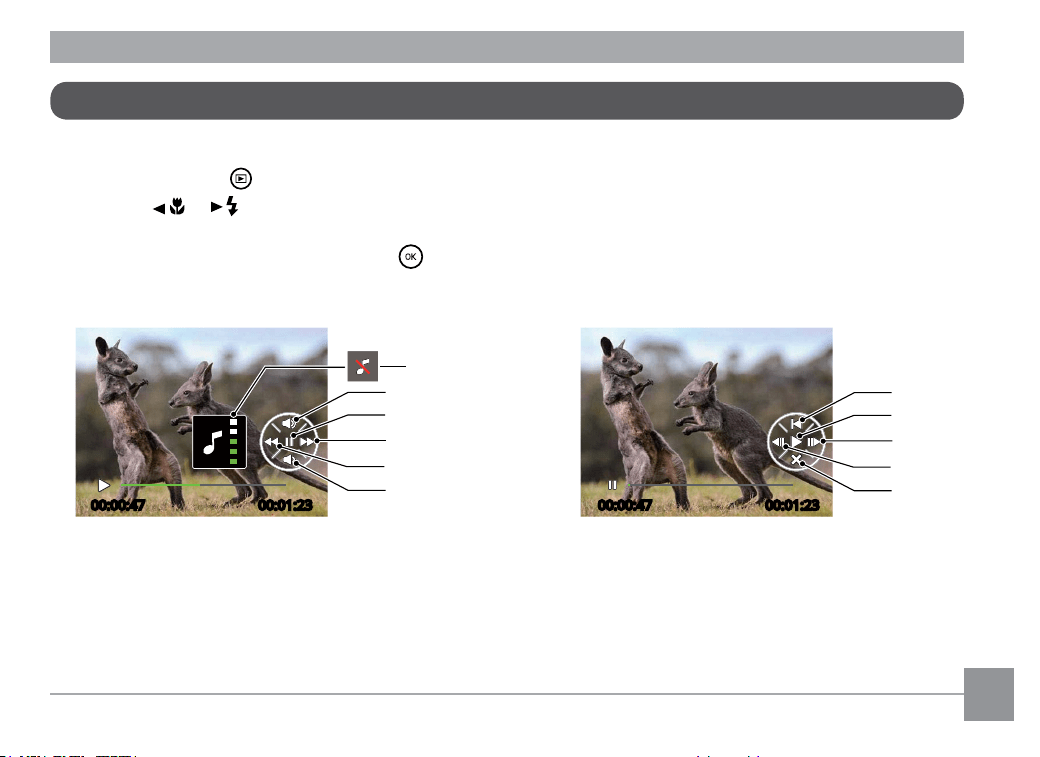
An operation guide appears on the screen when playing back a video. Press the appropriate buttons to
enable the corresponding functions.
1
2
3
4
5
00:00:47 00:01:23
00:00:47 00:01:23
6
7
8
9
10
1
Increase Volume 6 Return back to the beginning of the video
2
Pause 7 Play
3
Fast Forward 8 Frame Forward
4 Rewind 9 Frame Backward
5 Decrease Volume 10 Cancel Playback
Mute
52
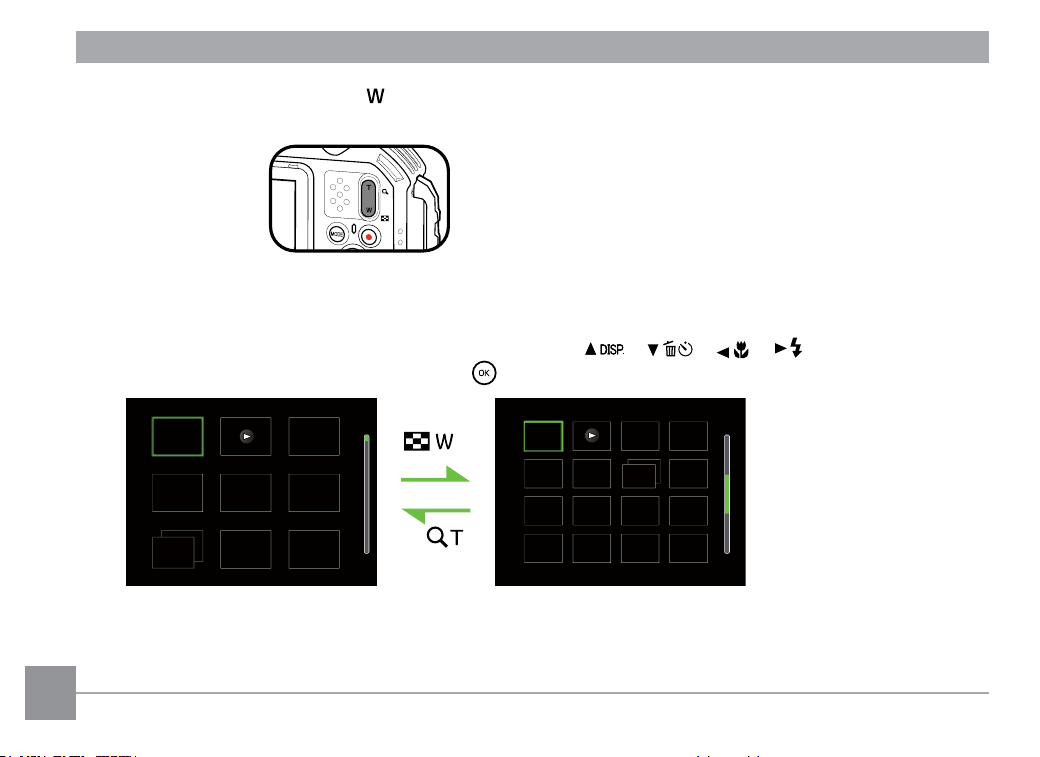
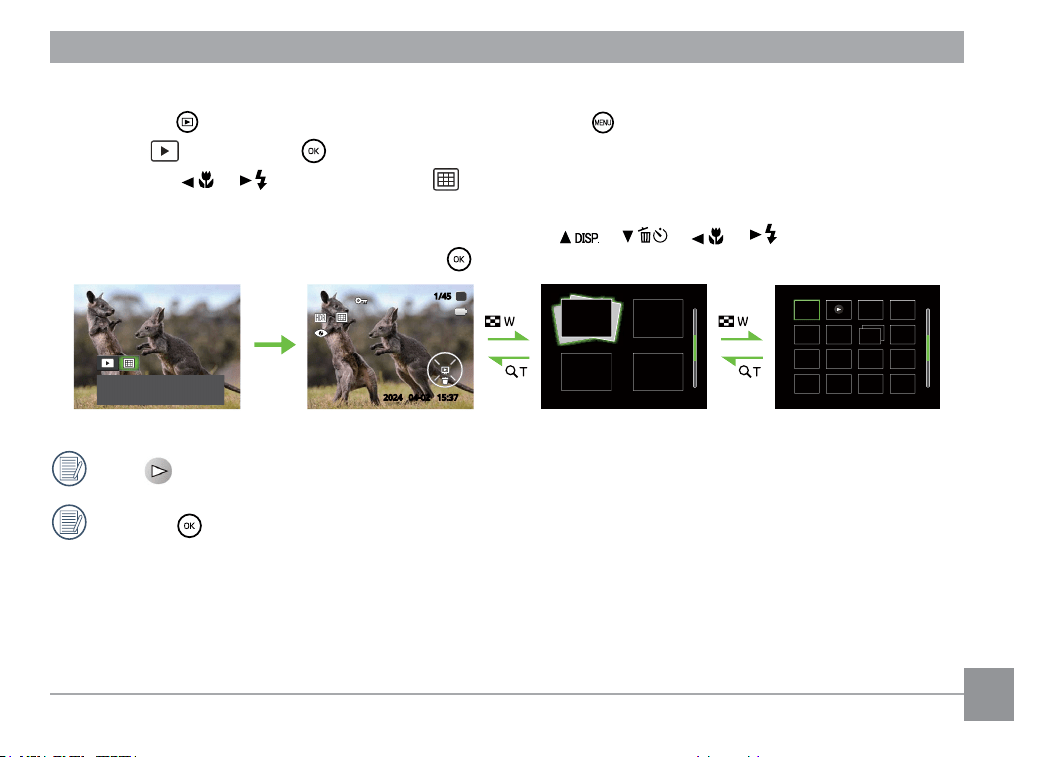
When in Playback Mode, press the on the Zoom button to display thumbnail images of photos and videos
on the screen.
W Zoom Out T Zoom In
• For Normal Mode
1. Slide the Zoom button to switch between 3 x 3 and 4 x 4 thumbnails.
2. When a 3 x 3 or 4 x 4 thumbnail is displayed, press the [
]/[ ]/[ ]/[ ] buttons to select
the picture or video clip to view. Press the button to restore it to the original size.
53
• For Date Mode
1. Press the
button to enter playback screen and press the button to enter Menu screen.
2. Select
and press the button to confirm.
3. Press the [
]/[ ] buttons to select .
4. Slide the Zoom button to switch between 2 x 2 and 4 x 4 thumbnails.
5. When a 2 x 2 or 4 x 4 thumbnail is displayed, press the [
]/[ ]/[ ]/[ ] buttons to select
the picture or video clip to view. Press the button to restore it to the original size.
‘24-05-01
‘24-05-07 ‘24-06-21
‘24-04-02
1/45
SD
04-02
15:372024
Date Mode: Arranged by
date.
If the indicator appears on the monitor, then a movie file is currently being displayed.
Press the
button to restore a preview icon to its original image size.
54
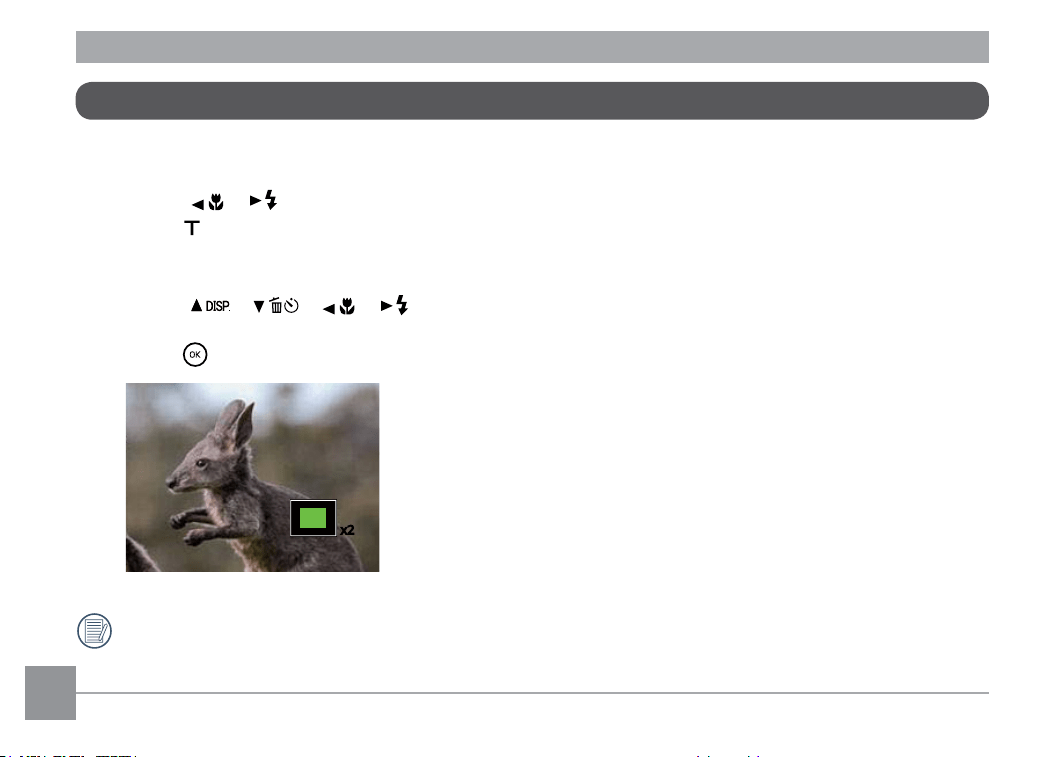
Using Zoom Playback (for Still Pictures Only)
When playing back photos, you can also use the Zoom button to zoom in on the photos, 2 to 8 times their
original magnification.
1. Press the [
]/[ ] buttons to select the picture on which to use the zoom feature.
2. Press the
on the Zoom button to zoom in.
3. The bottom right corner of the screen will display the amount zoomed in as well as the area of the photo
shown.
4. Press the [
]/[ ]/[ ]/[ ] buttons to navigate and select the desired portion of the photo to
be zoomed in on.
5. Press the
button to return the image to its original scale.
x2
Movie images cannot be magnified.
55
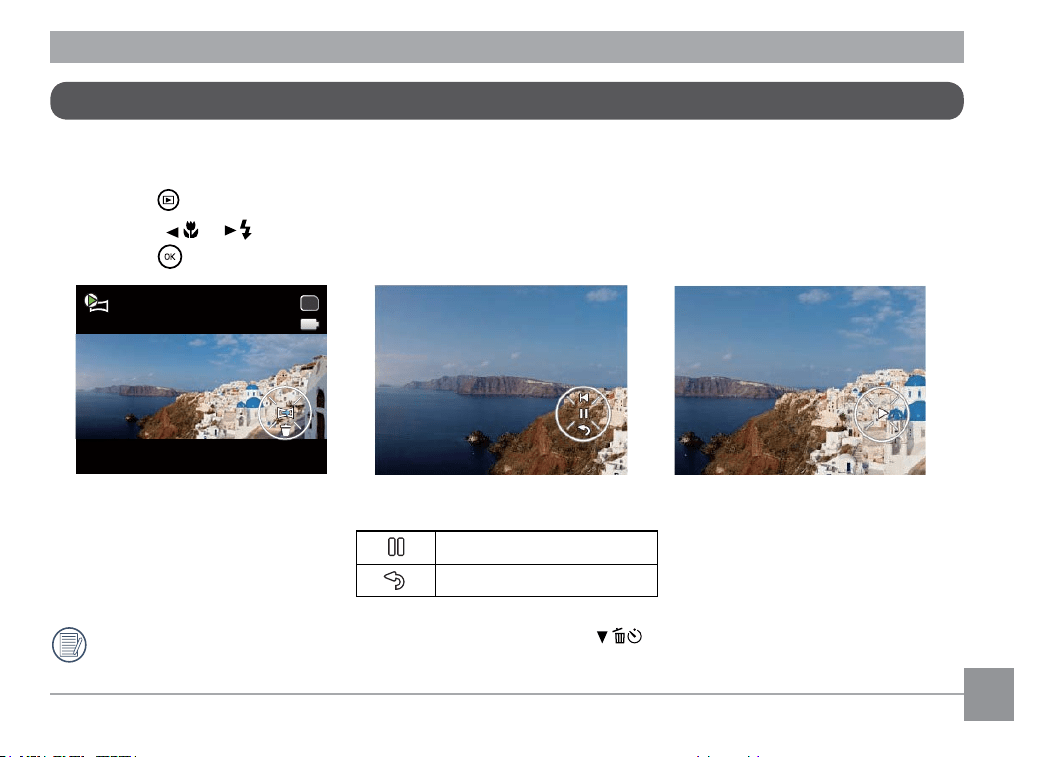
Panoramic Animation Playing is when full size images are played in accordance with the shooting direction.
After playing, it will automatically return to the initial panorama screen.
1. Press the
button to enter Playback Screen.
2. Press the [
]/[ ] buttons to select animated panoramic photos.
3. Press the
button to play in selected shooting direction.
1/45
04-25 15:37
2024
SD
Video Panorama Playing Pause
Pause
Cancel Play
In the process of panoramic animation playback, press the [
] button to stop playing and return to
the playback screen.
Animation Panorama Play
56
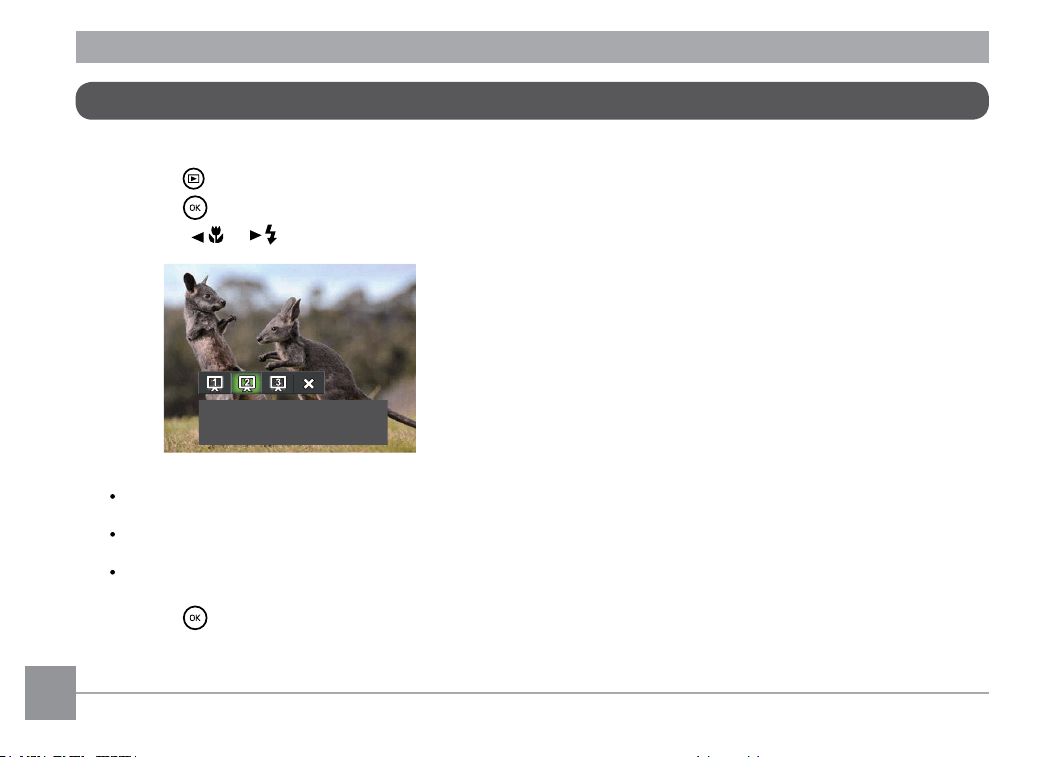
This setting allows you to view all the stored pictures as a slideshow.
1. Press the
button to enter playback screen.
2. Press the
button to enter slide option.
3. Press the [
]/[ ] buttons to select slideshow playing or [Cancel] to return to the playback screen.
Play Slide Show
Effect 2
Play Slide Show Effect 1 Fade in and out
Play Slide Show Effect 2 Left and right interlaced
Play Slide Show Effect 3 Animated photo tile effect
4. Press the
button to confirm the setting.
Slideshow
57
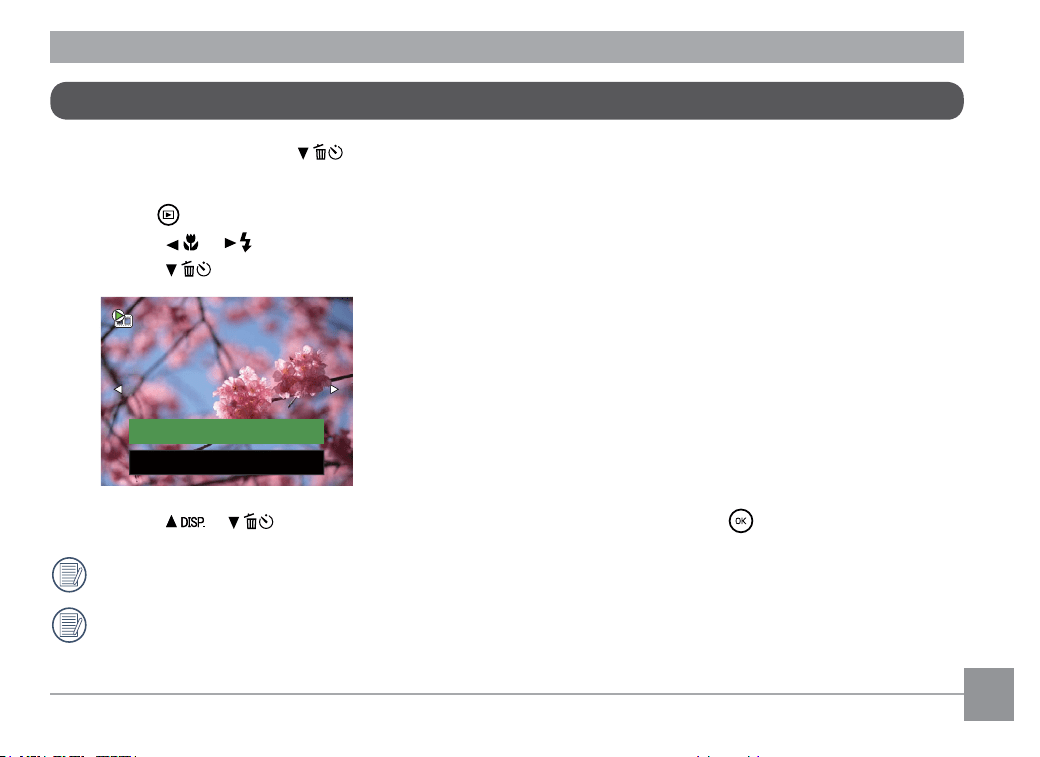
Deleting Photos and Videos
In Playback Mode, press the [ ] button to select your desired photos and videos.
To delete photos or videos:
1. Press the
button to switch to Playback Mode.
2. Press the [
]/[ ] buttons to select the photos and videos to be deleted.
3. Press the [
] button and the deletion screen is displayed.
Exit
Delete One
4. Press the [ ]/[ ] buttons to select [Delete One] or [Exit] and press the button to confirm.
Erased photos/video clips cannot be recovered.
Please refer to page 79 for instructions on deleting more than one image at a time.
58
Shooting Menu
USING THE MENUS
Mode:
1. In Shooting Mode, press the button to enter the Shooting Menu.
• Scene
• ExpoMetering
• ImageSize
• VideoQuality
• Cont.AF
• ContinuousShot
• FocusSetting
• WhiteBalance
• ColorEffect
• Menu
Functions that can be enabled are different under each mode. For more details, please refer to P67 of this
manual.
2. Press the [
]/[ ] buttons to select the Shooting Menu and settings.
3. Press the [
]/[ ] buttons to select the Shooting Menu to be set and press the button to confirm.
59
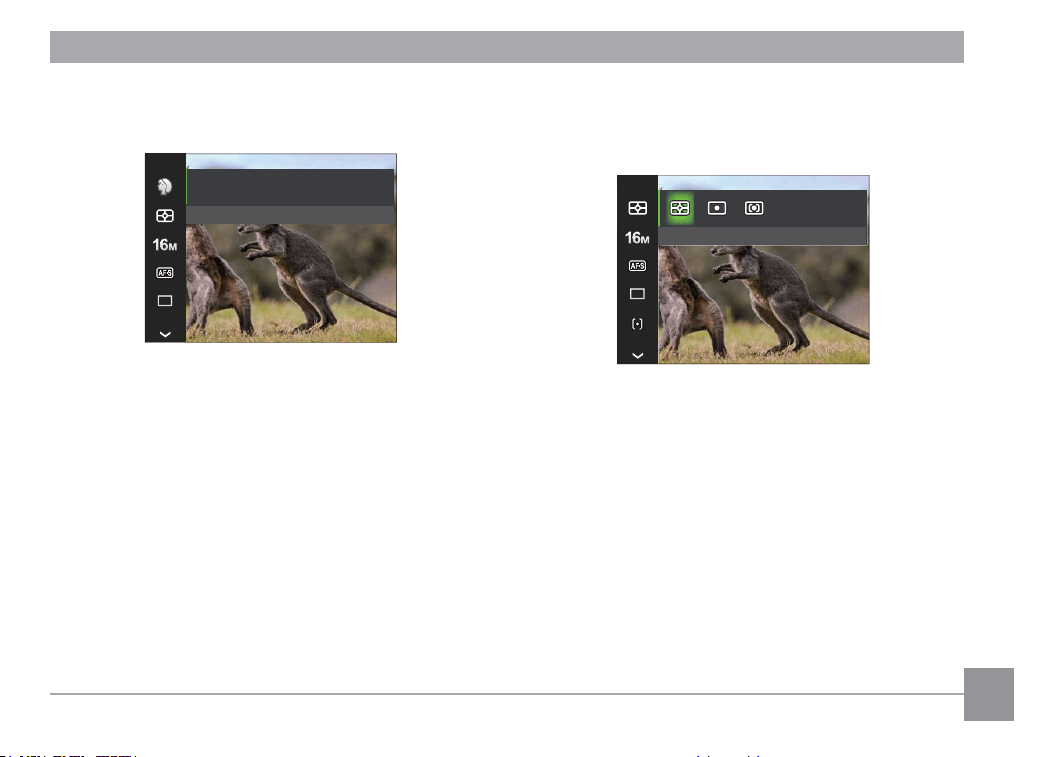
Expo Metering (Exposure Metering)
Use this setting to select the “target” size of the
camera’s field of view to be metered.
Expo Metering: AiAE
There are 3 options:
• AiAE(ArtificialIntelligenceAE)
Evaluates the light intensity at multiple points
in the frame and automatically determines
the best value for the light meter.
• Spot
Metering targets a small area in the center of
the camera’s field of view.
• Center
Metering targets a slightly larger area in the
center of the camera’s field of view.
Scene
Select a scene under Scene Mode .
Portrait
Press OK To Select Scene
For more details, please refer to the “Scene Mode"
section on P36 of this manual.
60
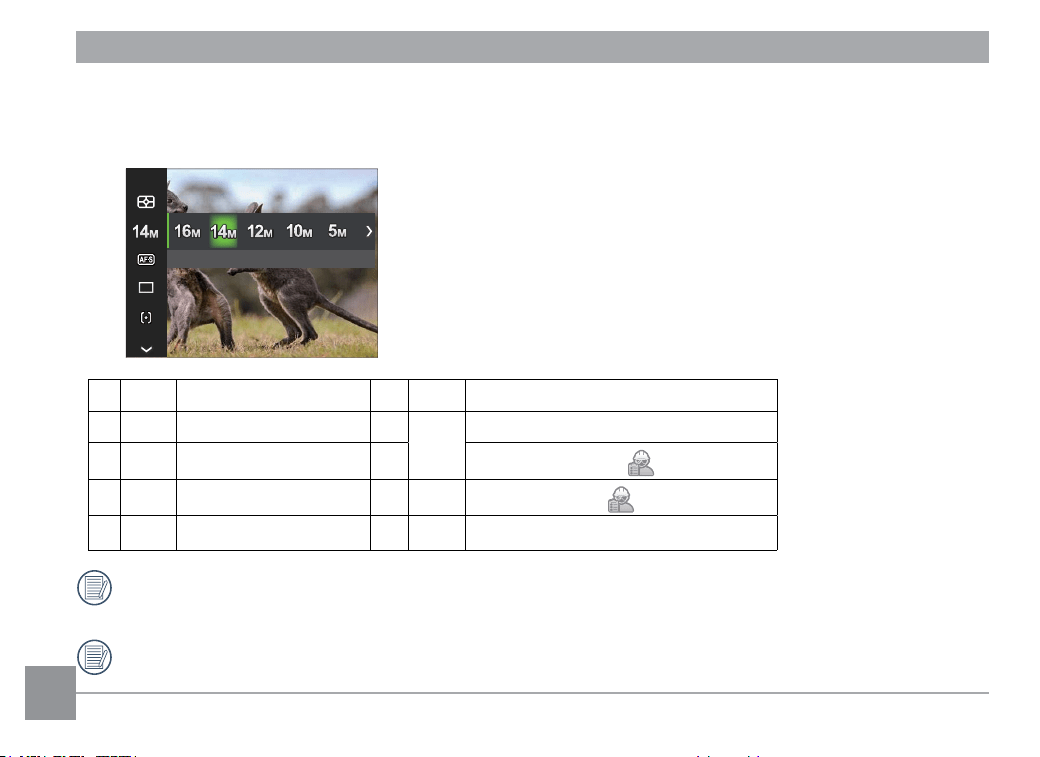
Image Size
The size setting refers to the image resolution in pixels. A higher image resolution allows you to print that
image in larger sizes without degrading the photo image quality.
4608×3072(3:2)
• 16M 4608×3456 (4:3) • 3M 2048x1536 (4:3)
• 14M 4608×3072 (3:2) •
2M
1920x1080 (16:9)
•
12M 4608x2592 (16:9)
•
1600x1200 (4:3) ( (
)
•
10M 3648x2736 (4:3)
• 1M
1280x960 (4:3) (
)
•
5M 2592x1944 (4:3)
• 0.3M 640x480 (4:3)
The bigger the number of recorded pixels is, the better the image quality becomes. As the number of
recorded pixels lessens, you will be able to record more images on a memory card.
Under CALS Mode, the aspect ratio of the still image is fixed at 4:3, and the image size can only be
selected from 1M, 2M and 3M. The default value is 1M.
61
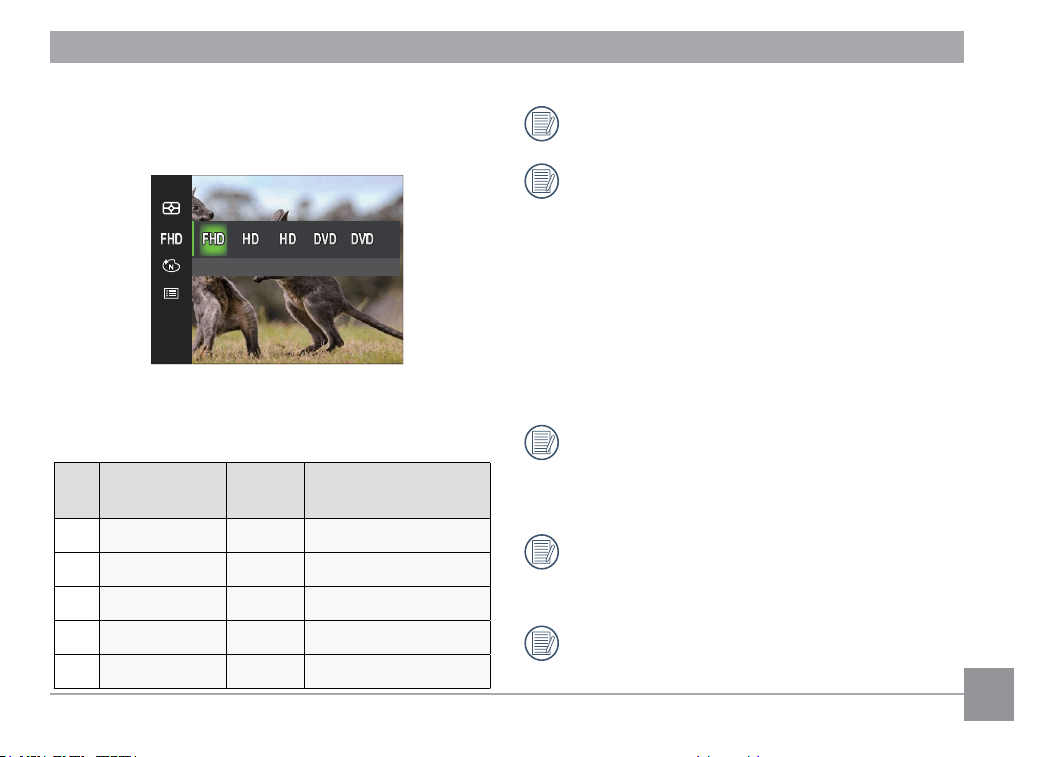
Video Quality
Set the image resolution used during video
recording.
Size: 1080p 30fps
The speed requirements for reading and writing
high resolution image pixel images to an SD card
are as follows:
No.
Image Pixels
Frames
Recording Time
(32GB) About
1
1920 x 1080 * 30
247 Minutes
2
1280 x 720 * 60
268 Minutes
3 1280 x 720 *
30
482 Minutes
4 640 x 480 30 865 Minutes
5 640 x 480 120 441 Minutes
* The recording limit is 29 minutes at one time.
If the recorded video segment/file exceeds
4GB(Use FAT 32 memory card):
1) The camera will automatically generate a
new separate file(s) sequentially and will
continue recording until the SD memory card
is full.
2) Each sequential recorded file of 4GB (max)
will be a separate file and cannot be played
back continuously.
To playback files, please manually select
each one to view.
When recording in higher pixel resolutions for
extended periods of time, this can cause the
camera to generate heat. This is not a camera
malfunction.
When the video format is set as 640 x 480
(120fps), shooting time is 30 seconds, playback
time is 2 minutes.
Sound recording is disabled when 640 x 480
(120fps) is chosen.
62
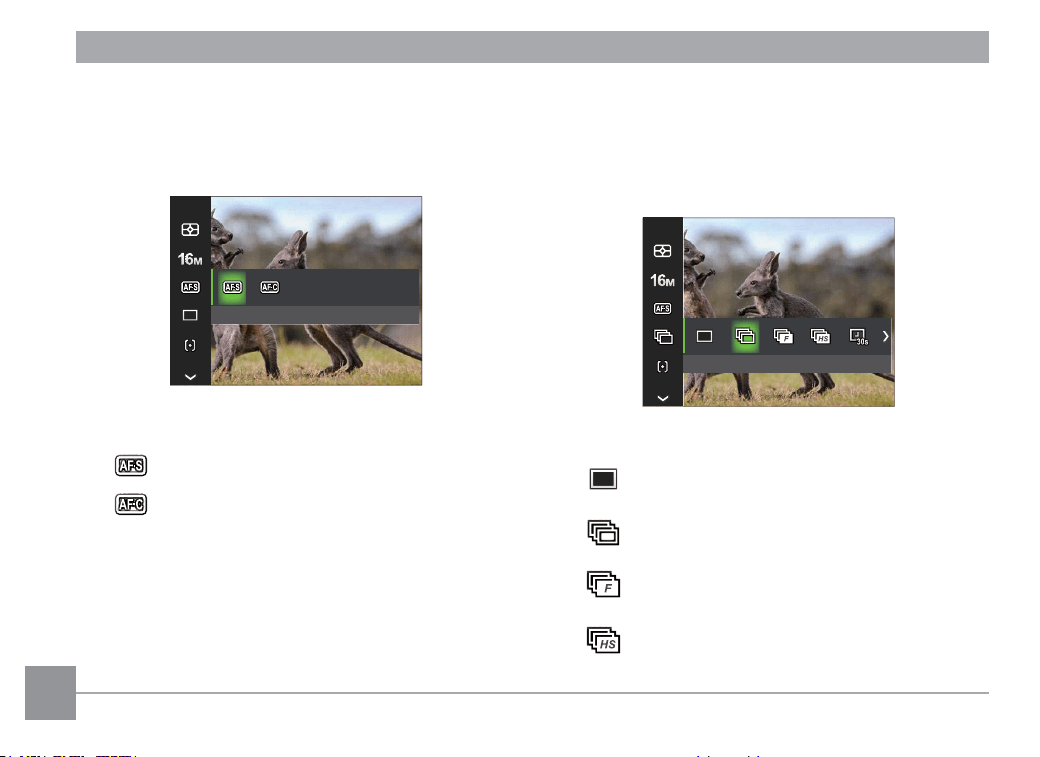
Continuous Auto Focus (Cont. AF)
Use the Continuous AF setting to be able to
continuously focus automatically when taking
pictures.
Cont. AF:Off
Cont.AF: Off
There are 2 options:
•
Cont.AF: Off
•
Cont.AF: On
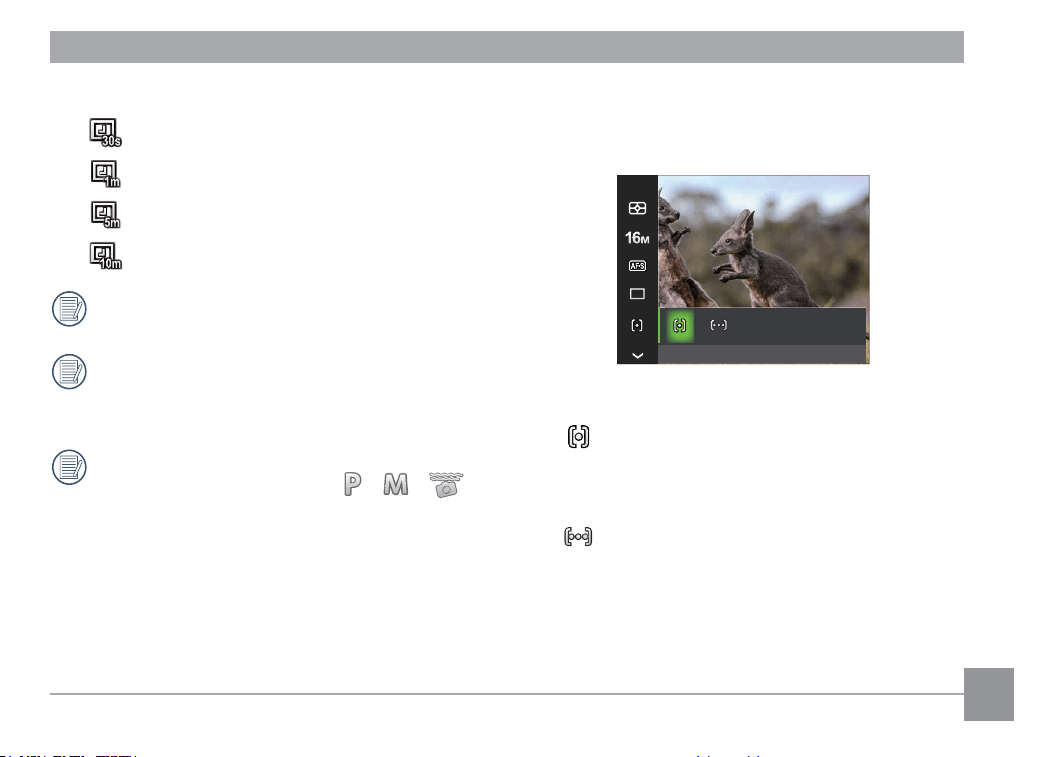
Continuous Shot
Use this setting to perform continuous shooting.
After entering this mode, you can shoot multiple
images by continuously holding the Shutter button
down.
Continuous Shot
There are 8 options:
•
Single
Capture a single shot only.
•
Continuous Shot
Take several pictures at a time.
•
Cont.Shot-Fast (4M)
For continuous shot with 4M pixels.
•
Cont.Shot-High Speed (VGA)
For continuous shot with VGA pixel.
63
• Time-Lapse 30sec
•
Time-Lapse 1min
•
Time-Lapse 5min
•
Time-Lapse 10min
Press the Shutter button to start shooting.
In Continuous Shot mode, the flash is
automatically set to Force Off in order to
achieve quick succession of shots.
Cont.Shot-Fast (4M) and Cont.Shot-High Speed
(VGA) only can be enabled in
/ /
mode.
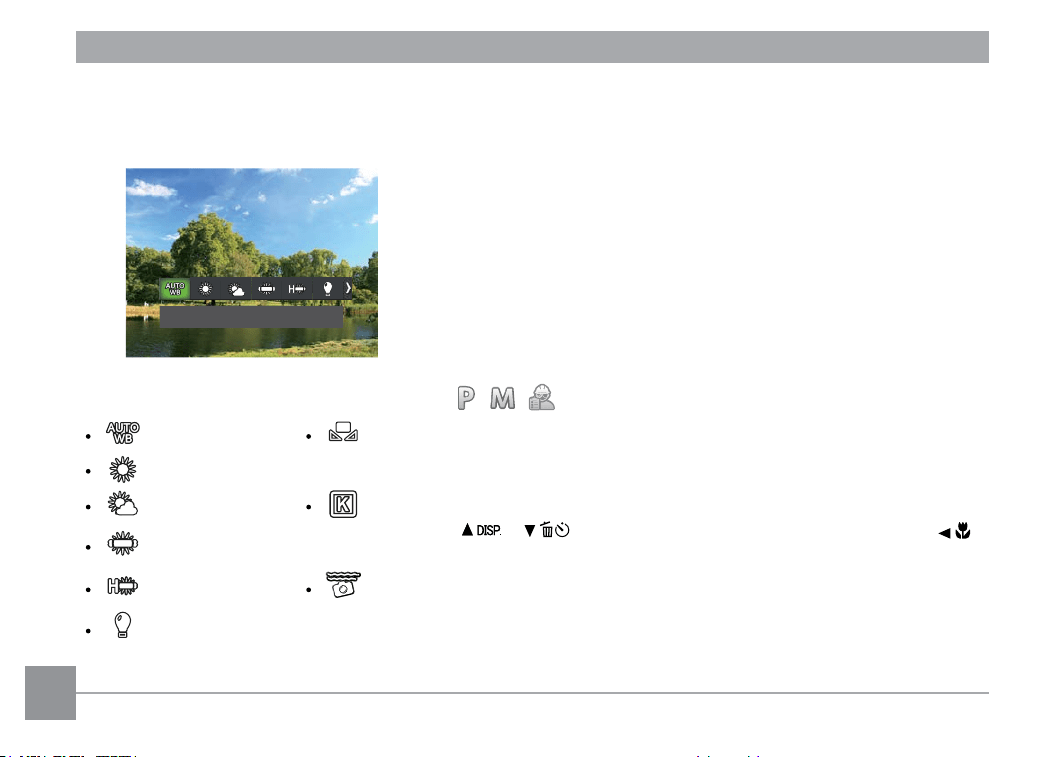
Focus Setting
This setting allows you to select different modes for
optimum focus.
Cont. AF:Off
Single-AF
There are 2 options:
•
Single-AF
The focus frame appears on the center
of the monitor to help you focus on the
subject.
•
Multi-AF
The camera automatically focuses the
subject in a wider area to find the focal
point.
64
White Balance Setting
The white balance setting allows you to adjust the color temperature for different lighting conditions to
ensure the most accurate color reproduction.
AWB
mode
AWB
Manual WB
Fully press the Shutter button to detect the white balance value.
Daylight
Cloudy
Color Temp. (1900K~10000K)
Press the [
]/[ ] buttons to "Adjust the K value"; Press the [ ]
button left to exit the K value.
Fluorescent
Fluorescent CWF Underwater
Incandescent
65
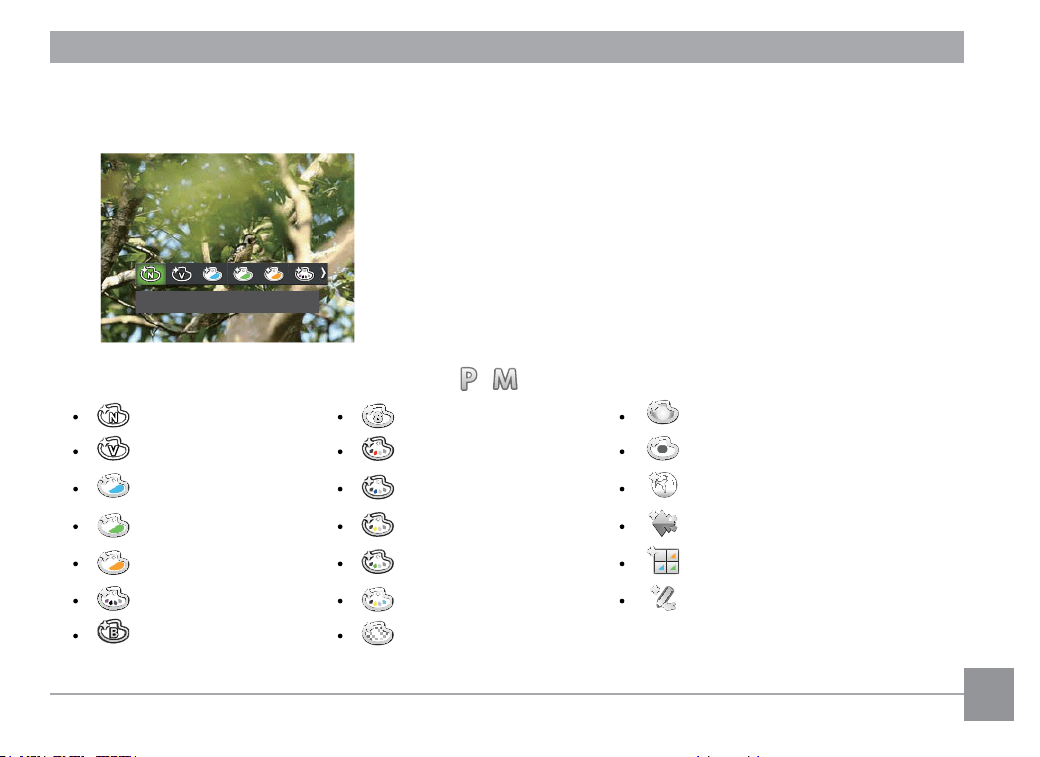
Color Effect
The Image Color Setting allows you to select different color effects.
Normal
Mode
Normal Sepia Vignetting
Vivid Partial Color-Red Salon
Japan Style Partial Color-Blue Fish Eye
Italian Style Partial Color-Yellow Reflection
French Style Partial Color-Green 4 Grids - Stylish (2M)
Punk Negative Sketch
Black and White Dreamy
66
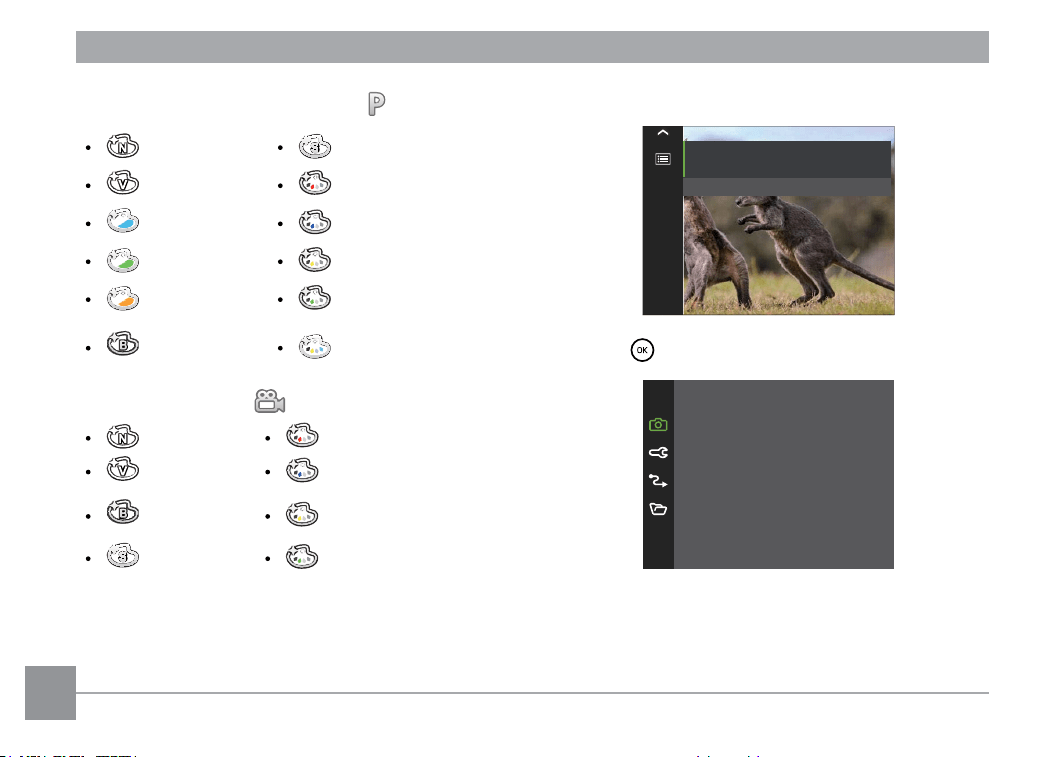
Activate Continuous Shot ( Mode)
Normal Sepia
Vivid Partial Color-Red
Japan Style Partial Color-Blue
Italian Style Partial Color-Yellow
French Style Partial Color-Green
Black and
White
Negative
Mode
Normal Partial Color-Red
Vivid Partial Color-Blue
Black and
White
Partial Color-Yellow
Sepia Partial Color-Green
Menu
Menu
Press OK To Enter
Press the button to enter the menu.
Quality
AF Assist Beam On
Digital Zoom On
Date Imprin
tO
ff
Best
Quick Review Off
67
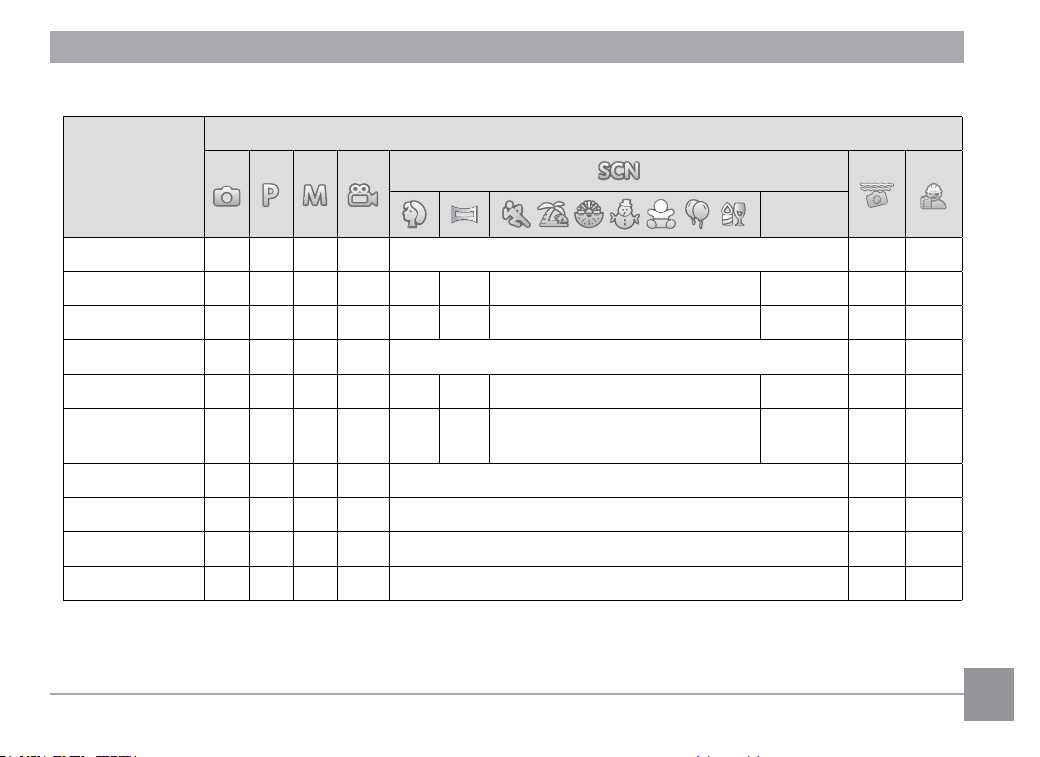
•Optionsintheshootingmode(✓: Available )
Menu
Shooting Mode
Others
Scene
✓
Expo Metering
✓ ✓ ✓ ✓ ✓ ✓ ✓ ✓ ✓
Image Size
✓ ✓ ✓ ✓ ✓ ✓ ✓ ✓
Video Quality
✓
Cont. AF
✓ ✓ ✓ ✓ ✓
Continuous
Shot
✓ ✓ ✓ ✓ ✓ ✓
Focus
✓ ✓ ✓ ✓
White Balance
✓ ✓ ✓ ✓
Color Effect
X ✓ ✓ ✓
Menu
✓ ✓ ✓ ✓ ✓ ✓ ✓
68
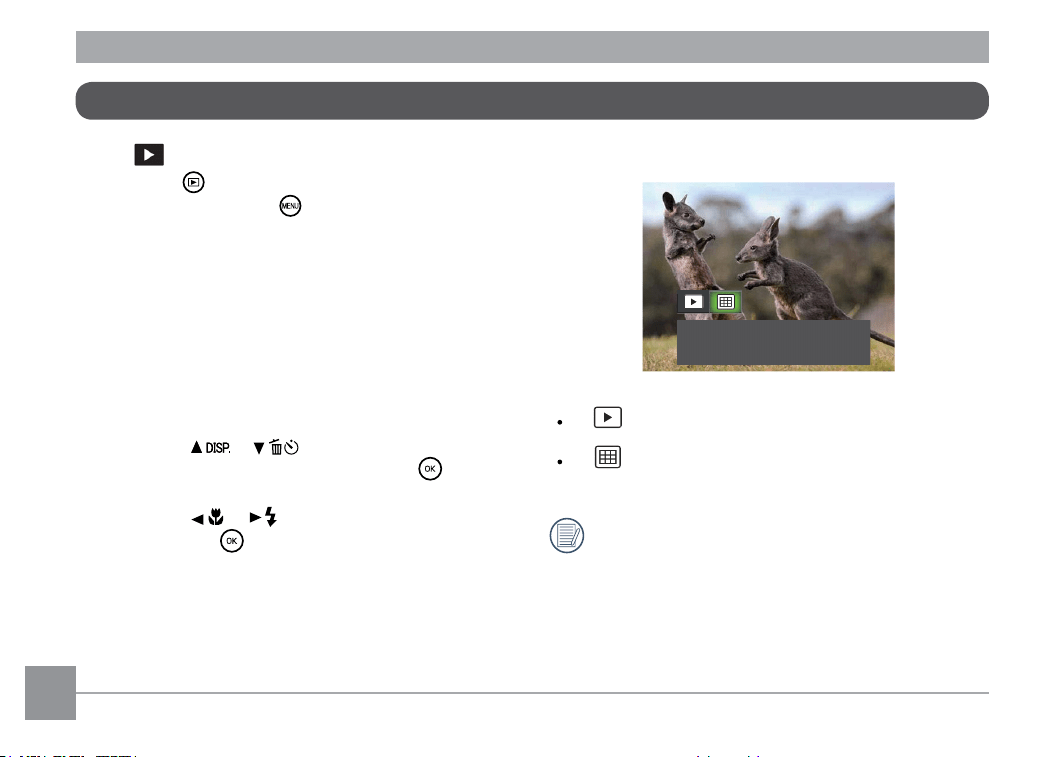
Playback Menu
Mode:
1. Press the button to display the playback
screen and press the button to enter the
menu.
• DisplayMode
• HDR(HighDynamicRange)
• Red-EyeReduction
• Rotate
• Resize
• ColorEffect
• Menu
2. Press the [
]/[ ] buttons to select the
playback desired menu and press the
button
to enter.
3. Press the [
]/[ ] buttons to select an option
and press the button to confirm.
Display Mode
Date Mode: Arranged by date.
Normal Mode: Display all images.
Date Mode: Arranged by date.
The Date Folder is displayed in date order
based on photo shooting date/time.
69
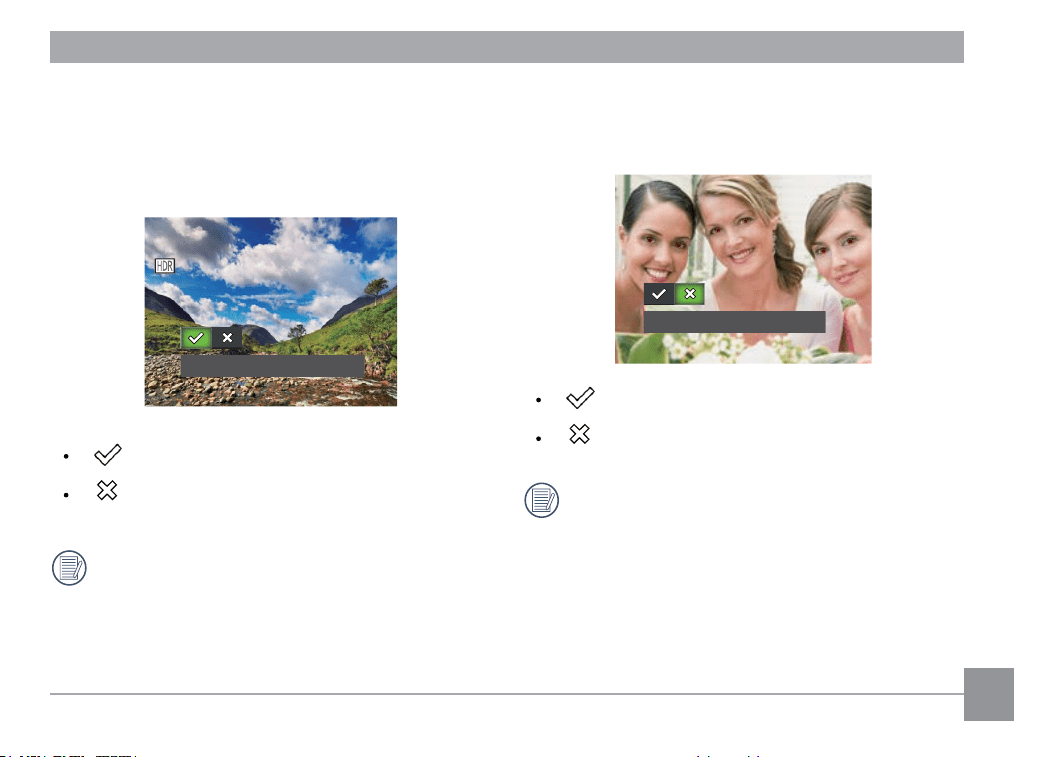
HDR (High Dynamic Range)
With the HDR function, pictures that are
overexposed may be corrected to optimize the
highlights and lowlights captured to more accurately
represent the actual scene.
HDR
HDR
Cancel
After using the HDR function, the image will be
saved as a new file and the original file is still
stored on the memory card.
Red-Eye Reduction
You can use this setting to reduce the red-eye of the
picture.
Cancel
Red-Eye Reduction
Cancel
This setting is not available for videos.
70
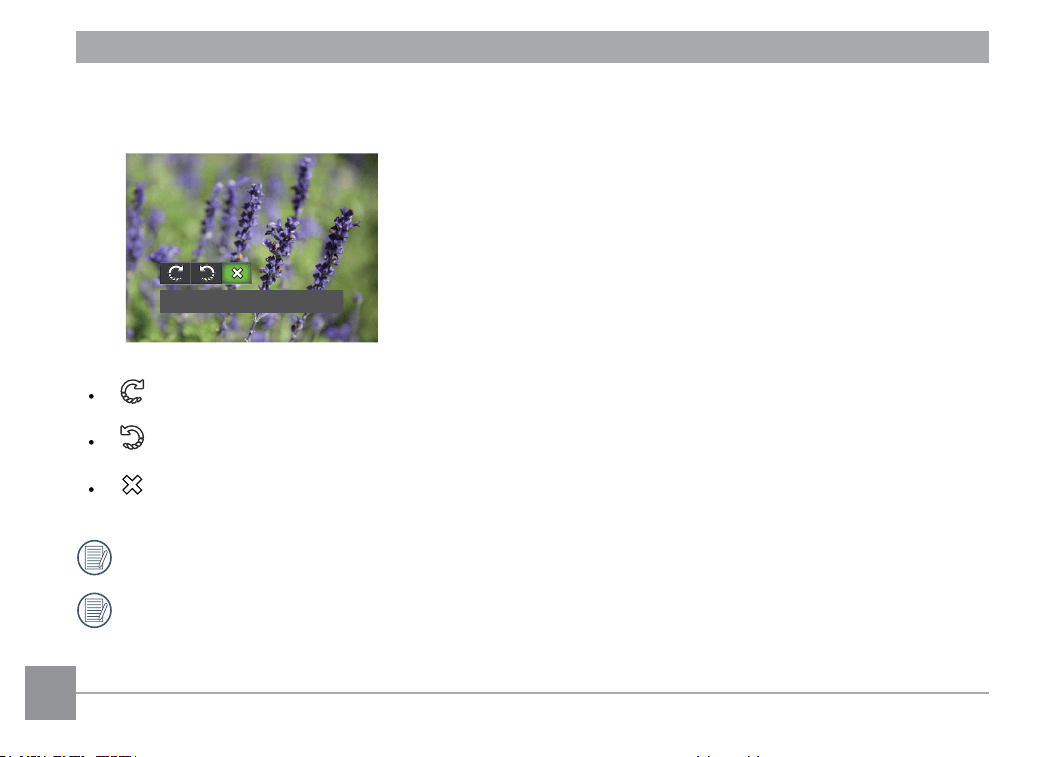
Rotate
You can use this setting to change the orientation of the picture.
Cancel
Turn Right
Turn Left
Cancel
Videos and panoramic pictures cannot be rotated.
The rotated picture file will replace the original photo.
71
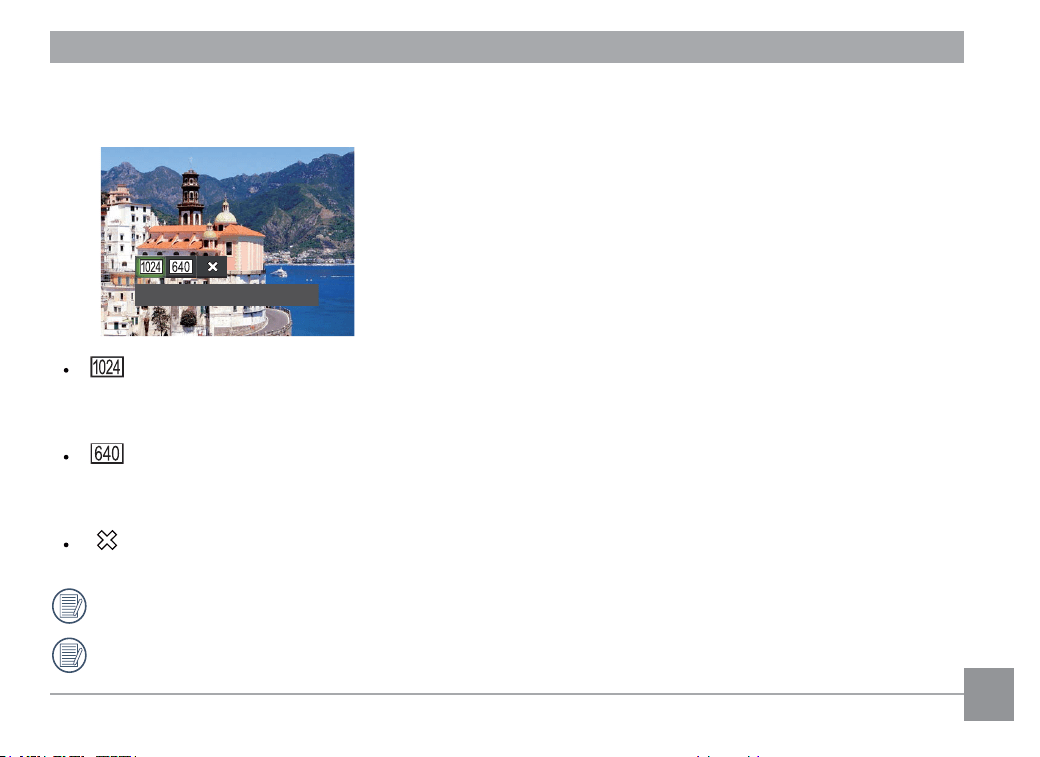
Resize
This setting allows you to resize a picture to a particular resolution and saves it as a new picture.
Resize to 1024x768
Resize to 1024x680
Resize to 1024x576
Resize to 640x480
Resize to 640x424
Resize to 640x360
Cancel
This function can only be used to downsize photos to a lower resolution.
Sizes of photos taken in panorama mode and sizes of rotated photos cannot be adjusted.
Resize to 1024x768
72
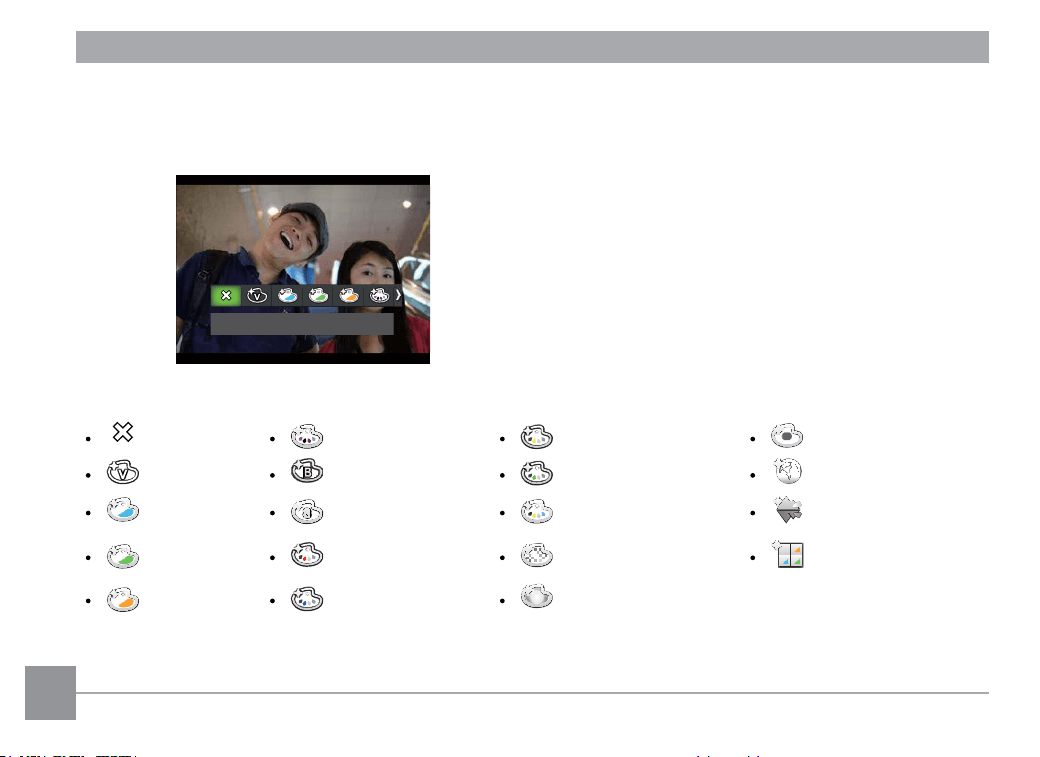
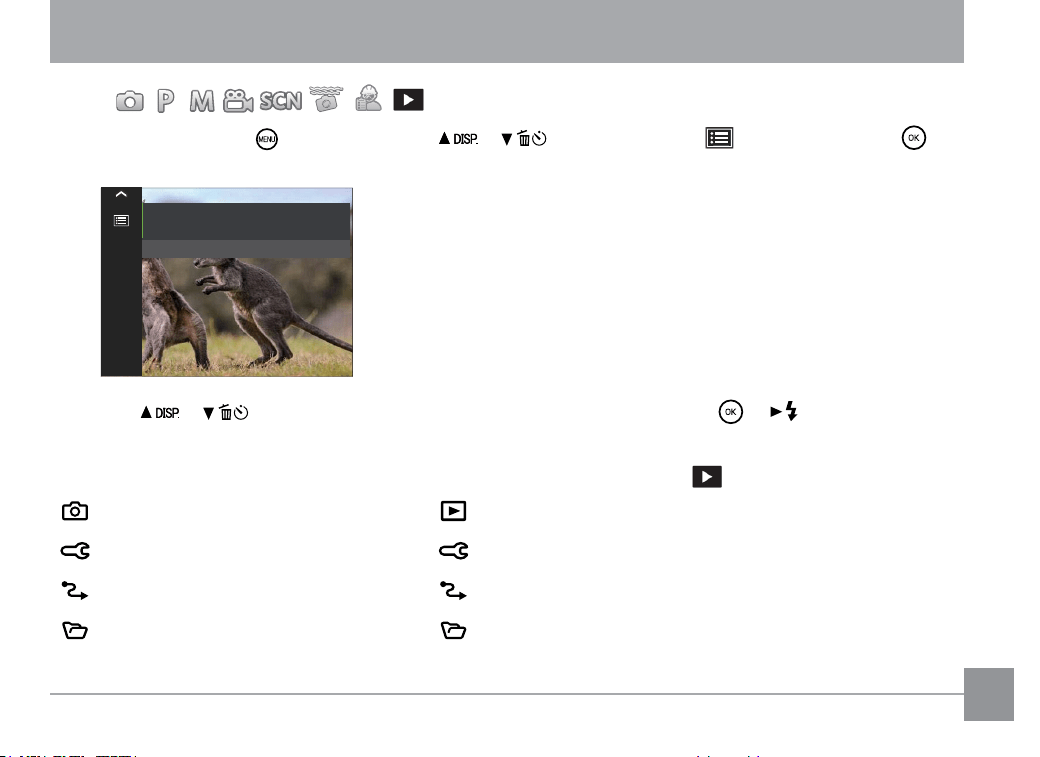
Color Effect
This setting allows you to change the picture color effect. The file is saved as a new photo and stored in
memory together with the original photo.
Cancel
There are 19 options available:
Cancel Punk Partial Color-Yellow Salon
Vivid Black and White Partial Color-Green Fish Eye
Japan Style Sepia Negative Reflection
Italian Style Partial Color-Red Dreamy
4 Grids - Stylish
(2M)
French Style Partial Color-Blue Vignetting
73
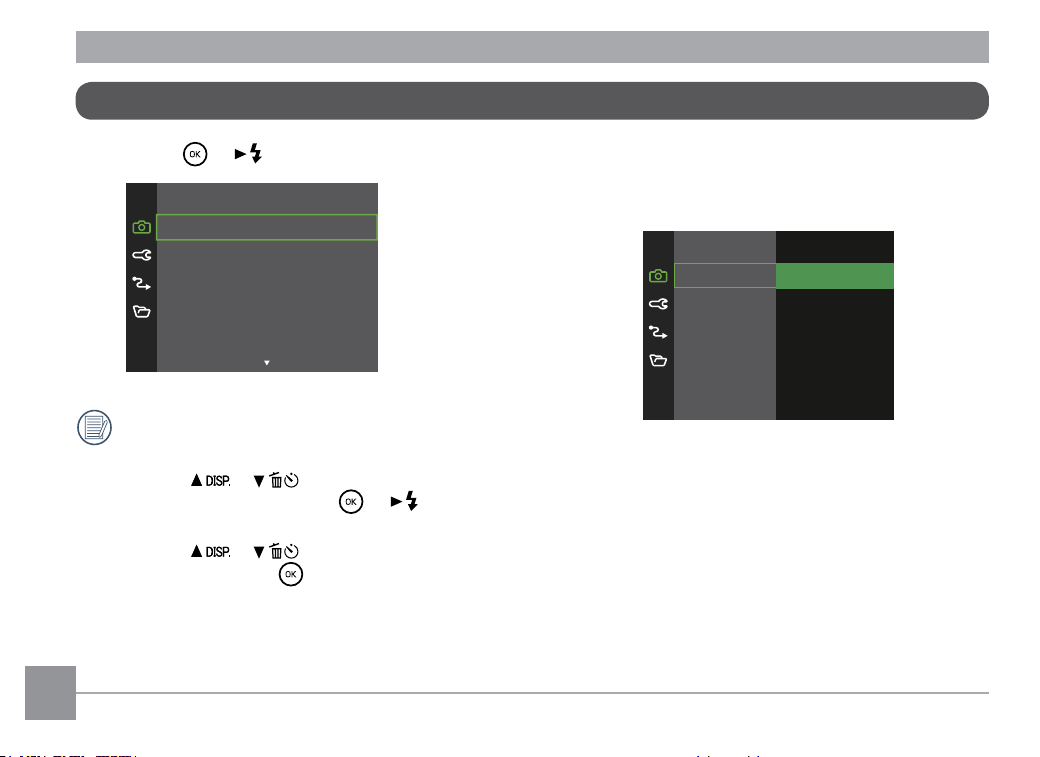
USING THE MENUS BUTTON
Mode:
In each mode, press the button, press the [ ]/[ ] buttons to select and then press the
button to enter the menu.
Menu
Press OK To Enter
Press the [ ]/[ ] buttons to select the item to be set and then press the / [ ] button to enter
the menu.
Menus of Shooting Mode Menus of Playback Mode (
)
Shoot Settings Playback Settings
General Settings General Settings
Connection Settings Connection Settings
File Settings File Settings
74
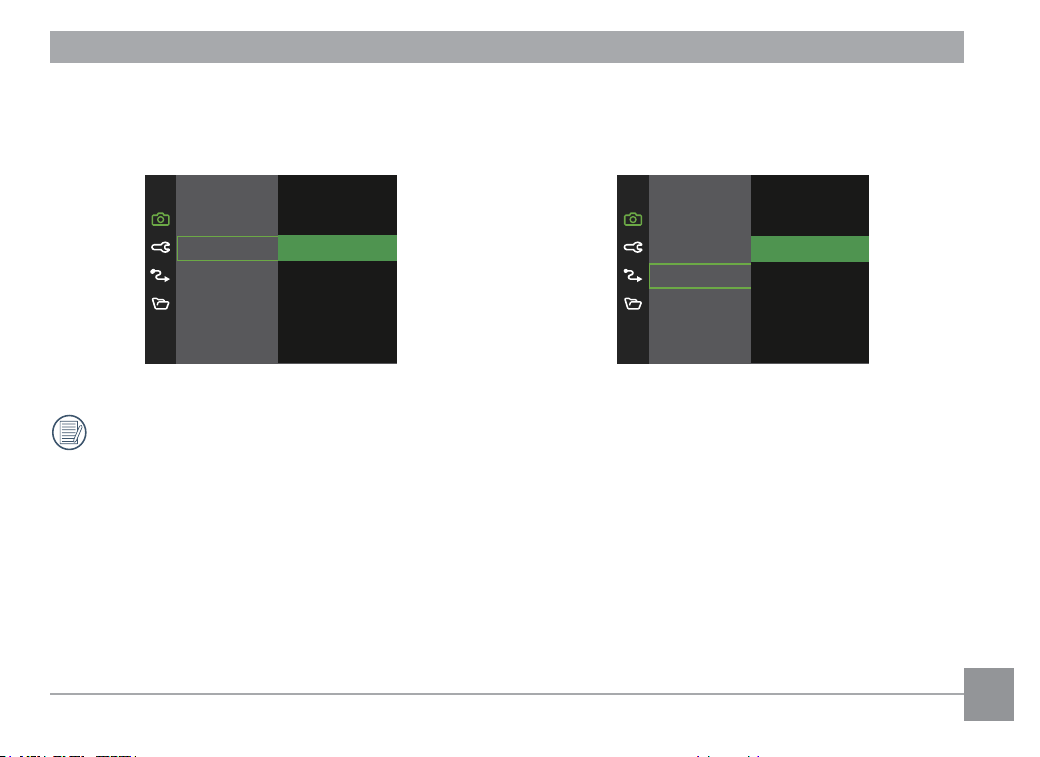
1. Press the / [ ] button to enter the menu.
Quality
AF Assist Beam On
Digital Zoom On
Date Imprin
tO
ff
Best
Quick Review Off
Functions that can be enabled are different
under each mode.
2. Press the [
]/[ ] buttons to select the
item to be set and press the
/ [ ] button to
enter the menu.
3. Press the [
]/[ ] buttons to select an
option and press the button to confirm.
Shoot Settings
Quality
The quality setting can be used to adjust the image
compression ratio.
Quality
Best
Fine
Normal
•Best(16MAverageFileSize:5.5MB)
•Fine(16MAverageFileSize:3.5MB)
•Normal(16MAverageFileSize:3.0MB)
75
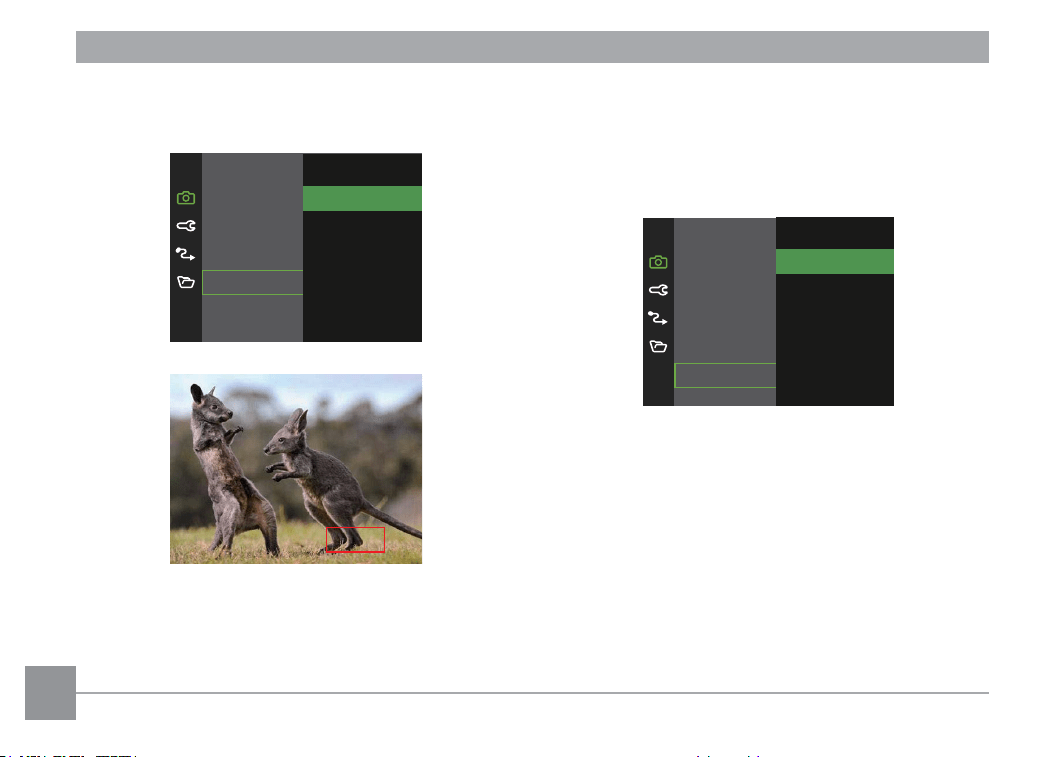
AF Assist Beam
In a darker environment, the AF assist beam setting
can be turned on for better focus.
AF Assist Beam
Off
On
When AF assist beam is turned on, press the
Shutter button halfway and the camera will
project the AF assist beam onto the subject,
making it easier to focus.
Digital Zoom
This setting is for adjusting digital zoom. If this
function is disabled, only optical zoom can be used.
Digital Zoom
Off
On
76
Date Imprint
Include a Date/Time stamp on the photo image.
Date Imprint
Off
Date
Date/Time
2024/01/01
08:00
Quick Review
This option allows quick review of the photos
immediately after they are taken. Each photo is
displayed on the monitor based on the selected
time.
Quick Review
Off
1 sec
2 sec
3 sec
77
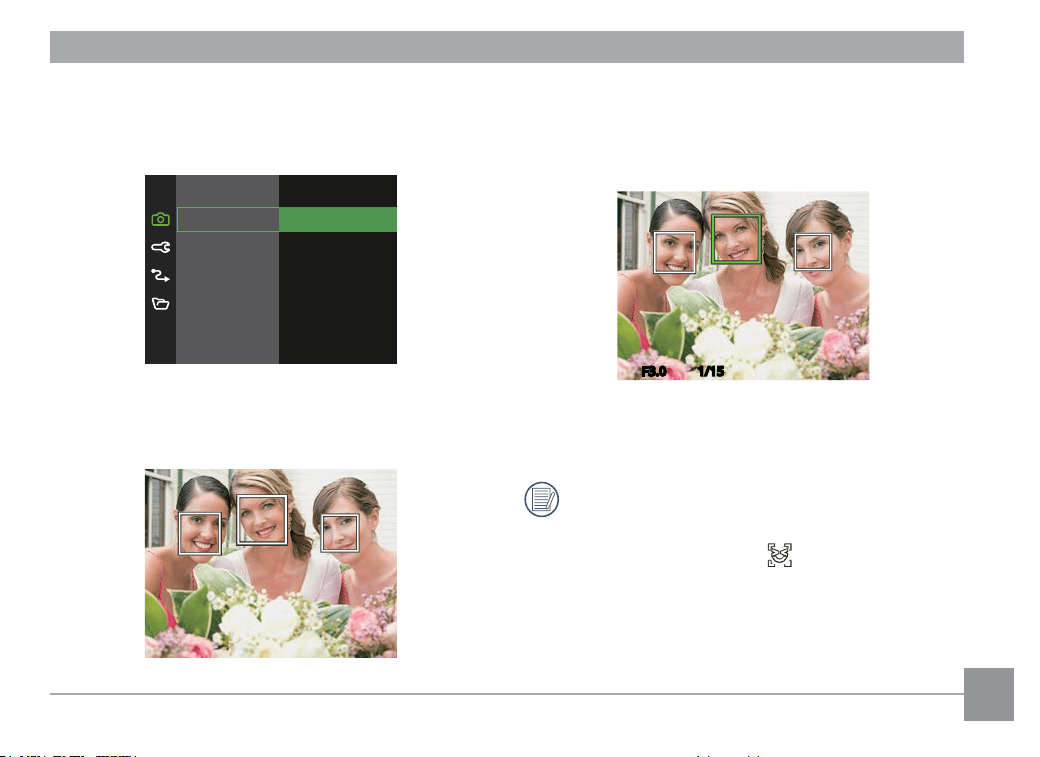
Face Detection
Detects and focuses on faces to make all faces as
clear as possible in Photo Mode.
Face Detection
Off
On
1. Hold the camera steadily and then focus on the
object to detect its face. A focus frame will appear
at the face on the screen when a face is detected.
2. Press the Shutter button half-way down to focus.
The LCD will show a green focus frame when the
subject is in focus.
1/151/15
F3.0F3.0
3. Press the Shutter button all the way down to take
pictures.
The closed eyes detection is usually on. If the
camera detects in the course of quick review
there is a face with eyes closed, a prompt of
closed eyes will appear
.
78
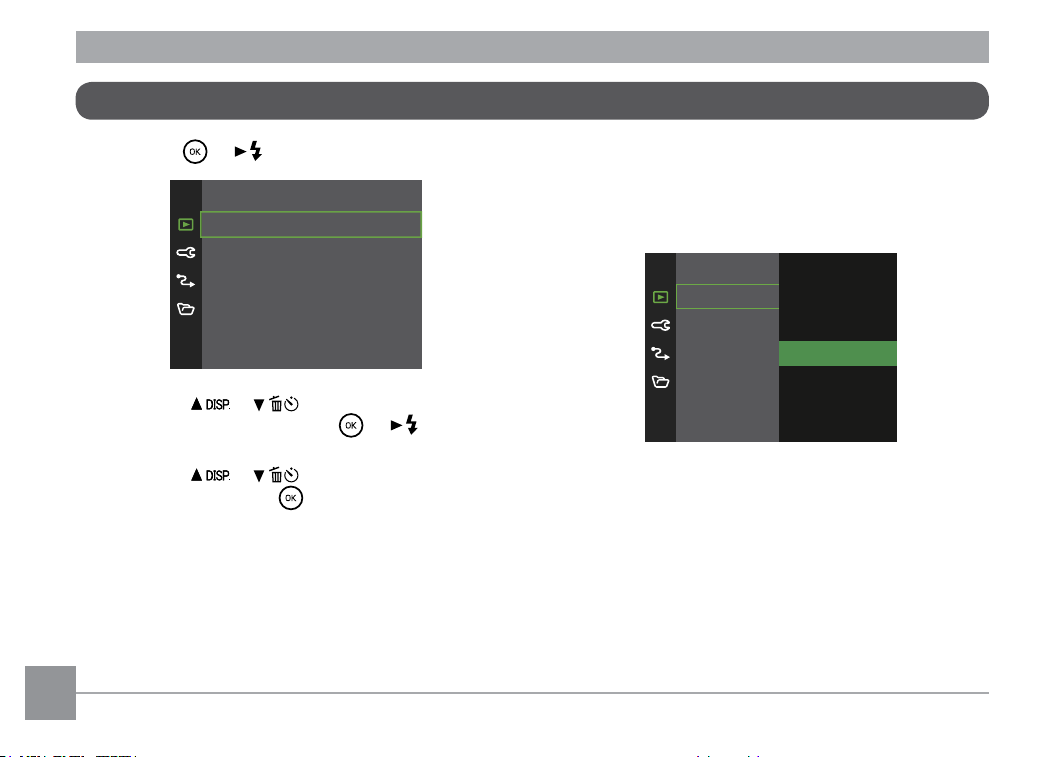
Playback Settings
1. Press the / [ ] button to enter the menu.
Protect
Delete
Trim
2. Press the [ ]/[ ] buttons to select the
item to be set and press the
/ [ ] button to
enter the menu.
3. Press the [
]/[ ] buttons to select an
option and press the button to confirm.
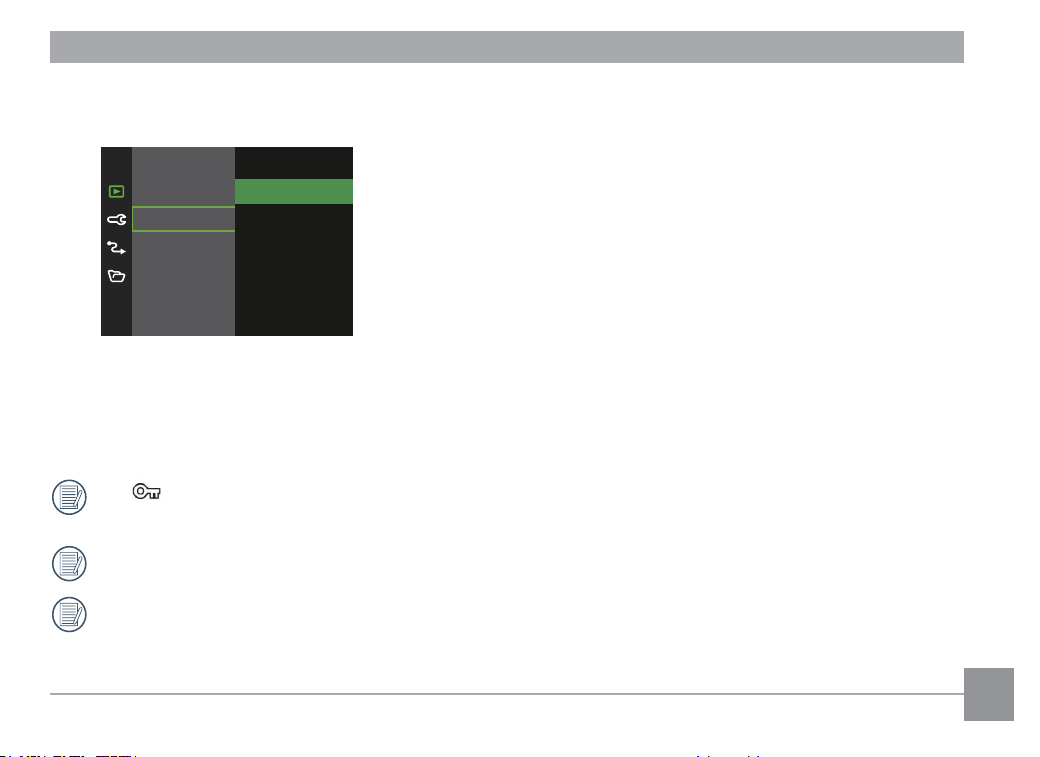
Protect
To prevent any pictures or videos from being
accidentally erased, use this setting to lock one or all
of the files.
Protect
One
Date folder
All
Reset
•One: Lock the selected photo or
video if they are unprotected;
unlock the selected photo or
video if they are protected.
•Date Folder: Protect all photos in the Date
Folder.
•All: Lock all photos or videos.
•Reset: Cancel all locked photos or
videos.
79
Delete
You can delete one or all photo/video files.
Delete
One
Date folder
All
•One: Delete one photo or video.
•Date Folder: Delete all photos in the Date Folder.
•All: Delete all photos or videos.
The
indicator means a file is protected. File protection must be removed before a file can be
deleted.
Deleted files will be permanently deleted and will not be able to be recovered or restored.
When one photo Date Folders is protected, it will be kept but any other photos will be deleted.
80
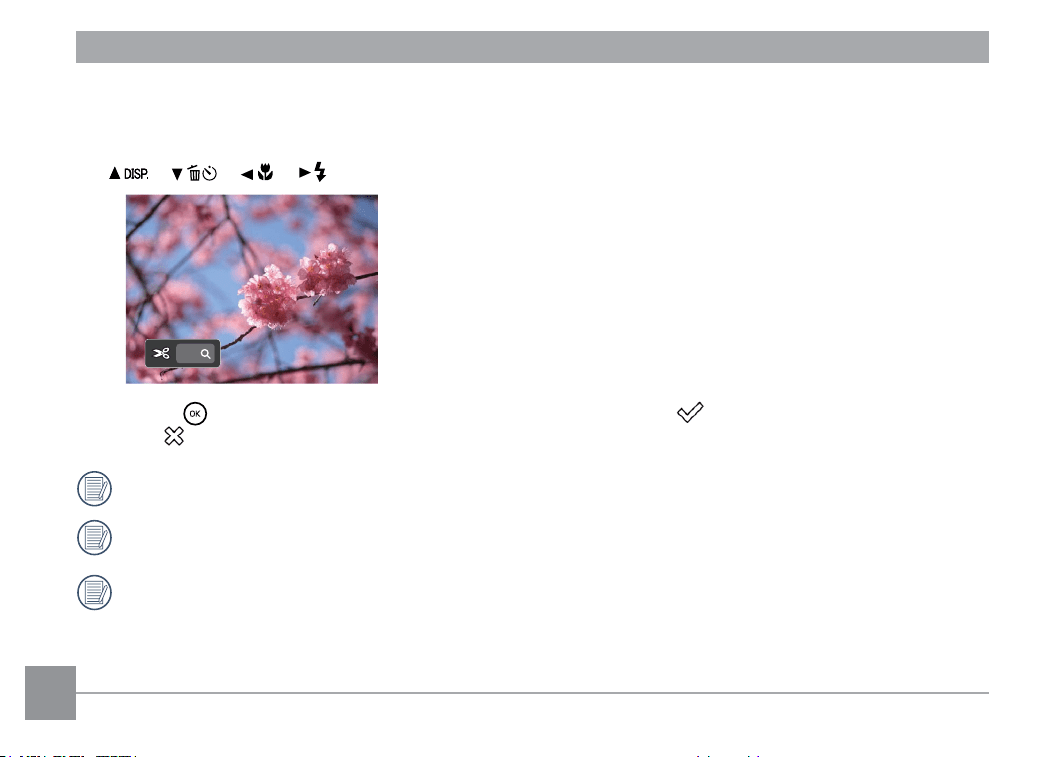
Trim
The Trim setting allows you to crop photos and save them as new pictures.
1. Select [Yes] to confirm trim. Select a section of the photo to be trimmed using the Zoom button and
[
]/[ ]/[ ]/[ ] buttons to trim a photo.
2X
2. Press the button and the [Save change?] prompt appears. Select [ ] to change and save the picture.
Select [
] to cancel changes and return to the trim prompt screen.
The image cannot be clipped/trimmed again once it has been clipped to 640 X 480.
A trimmed picture cannot be trimmed again.
The images which have be rotated and resized cannot be cropped.
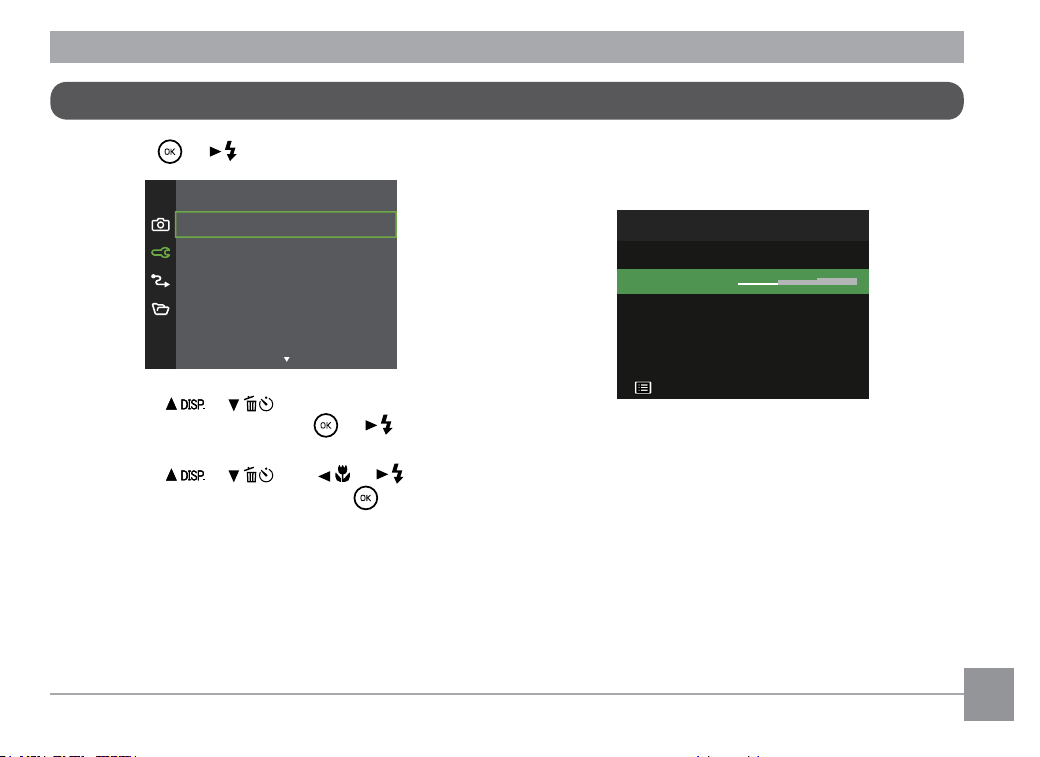
81
General Settings
1. Press the / [ ] button to enter the menu.
Sound Settings
Power Save
rA
uto
Language English
World Time Home
Date & Time 2024.01.01 00:00
2. Press the [ ]/[ ] buttons to select the
item to be set and press the
/ [ ] button to
enter the menu.
3. Press the [
]/[ ] or [ ]/[ ] buttons
to select an option and press the button to
confirm.
Sound Settings
With this setting you may adjust the sound volume.
Sound Settings
Volume
Back
82
Power Saver
This setting allows you to save power and get the
maximum possible running time for your camera’s
battery. Follow the steps below to turn the monitor
and camera off automatically after a consecutive
period of inactivity.
Power Saver
Auto
Normal
Best
Power Saver Monitor power off time Turn off time
Auto 3 min 5 min
Normal 1 min 3 min
Best 30 sec 1 min
Language
Refer to the “Resetting your Language” section on
page 27.
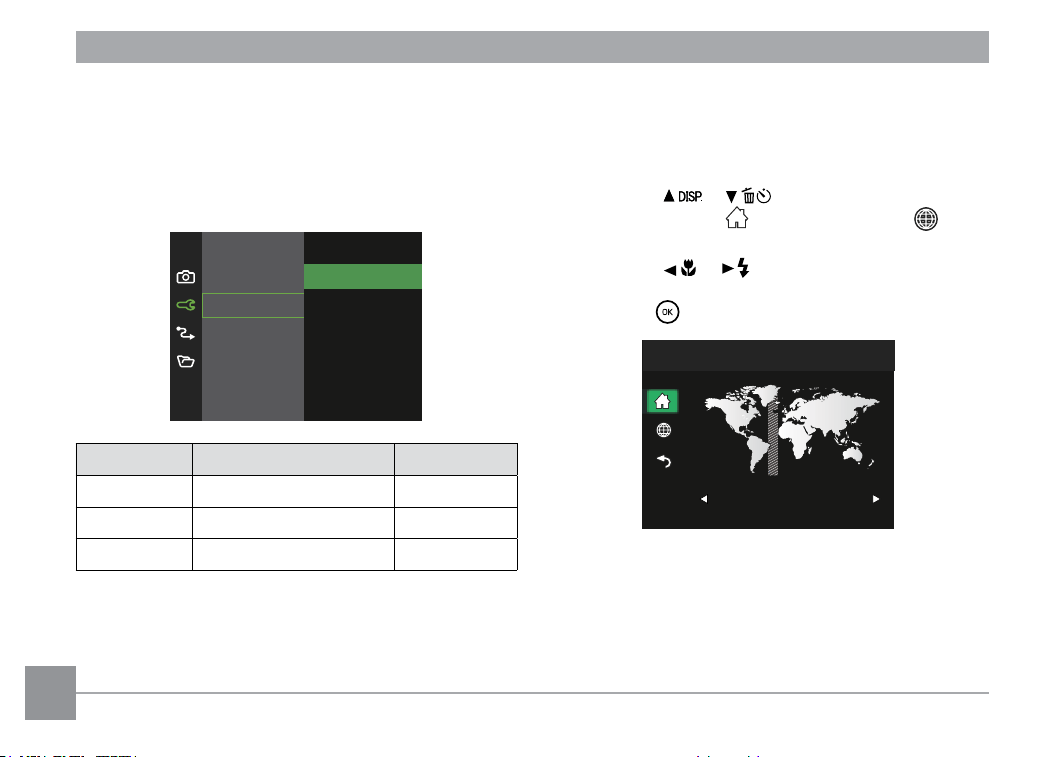
World Time
The World Time setting is a useful function for your
overseas trips. This feature enables you to display
the local time on the monitor while you are abroad.
1. Press the [
]/[ ] buttons to select the
departure place (
) and destination ( )
fields.
2. Press the [
]/[ ] buttons to select a city
located in the same time zone as that of the field.
Press the
button to confirm settings.
World Time
Trindade. Martim Vaz
London, Iceland
Date & Time
Refer to the “Resetting Date/Time” section on page
28.
83
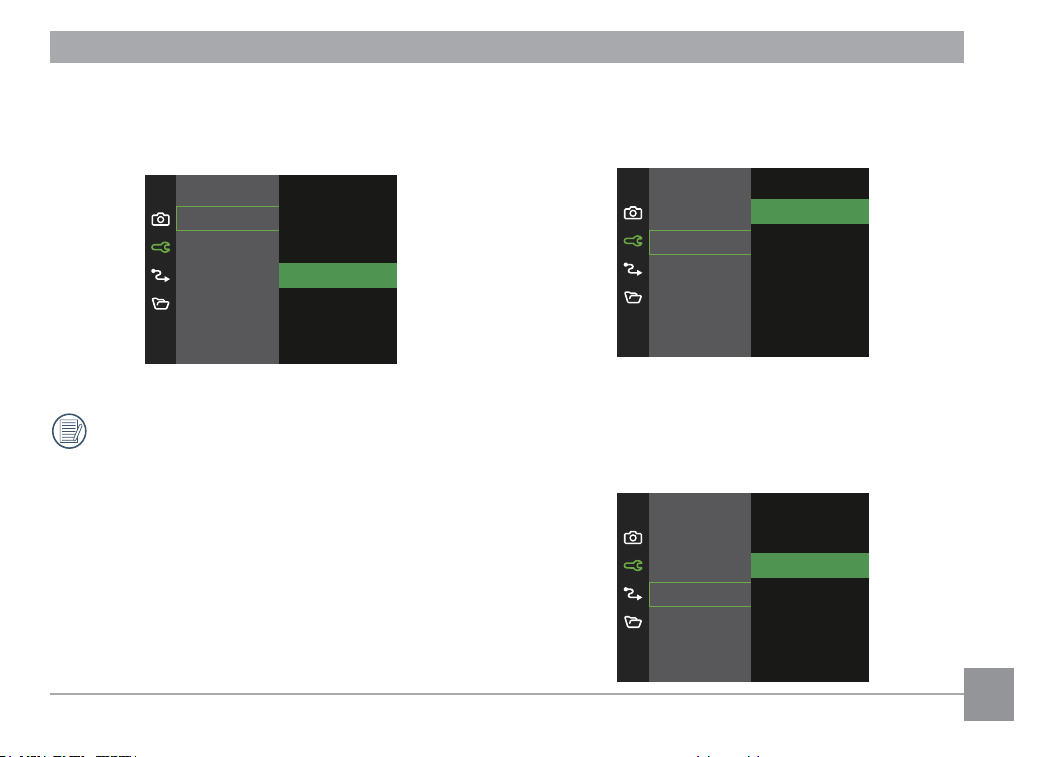
LCD Brightness
Use this setting to adjust the brightness of your
monitor.
LCD Brightness Normal
+2
+1
Normal
-1
-2
Setting and adjusting your camera’s LCD
brightness to the lowest setting will help
conserve your camera’s battery life and
longevity. Using the monitor on the brightnest
setting will drain your batteries more quickly.
Folder Name
Select the saved folder name for the picture taken
by the camera.
***_MMDD
***_DDMM
Folder Name
***PENTX
End screen
Displays the end screen. Select [On] will display the
end screen before shutting down. Select [Off] will
directly turn off the camera with black screen.
End screen
Off
On
84
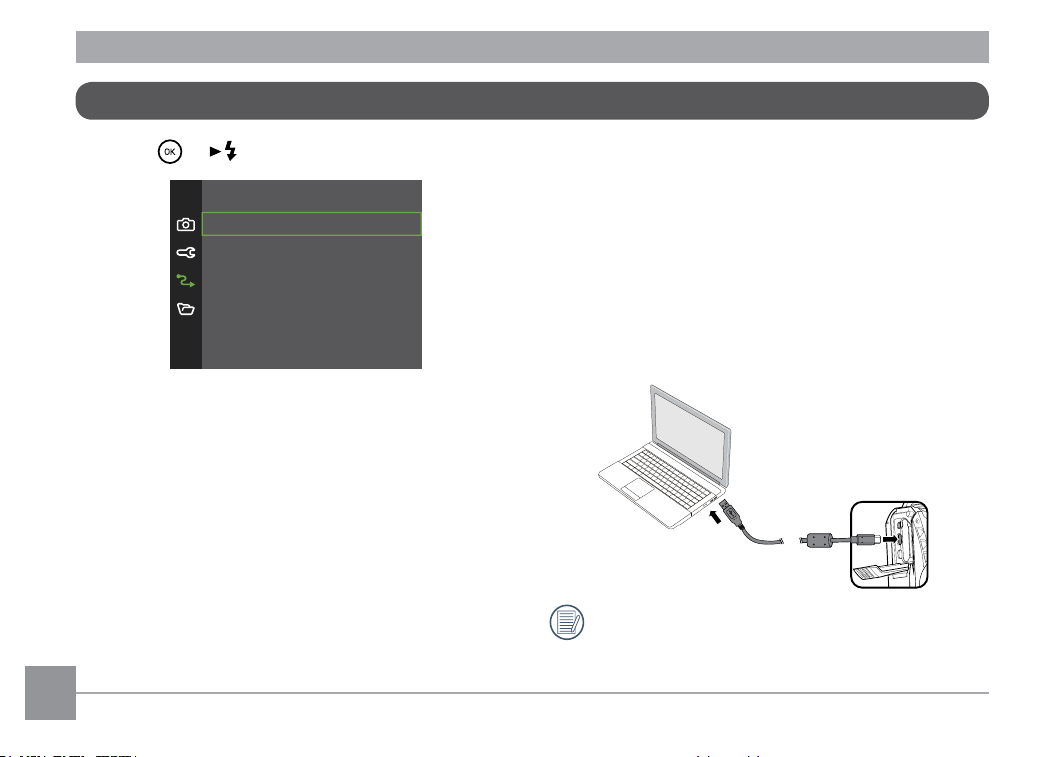
Connection Settings
Press the / [ ] button to enter the menu.
US
BP
C
Transferring Files to Your Computer
You can use a USB cable to connect the camera
and copy (transmit) photos to a computer or other
device.
The computer will automatically detect the
camera as a removable drive. Double-click the
“My Computer“ icon on the desktop to locate the
removable drive and to copy folders and files in the
drive to a directory on your PC as you would copy
any typical folder or file.
Follow the steps below to connect the camera to a
computer:
1. Make sure both the camera and computer are
turned on.
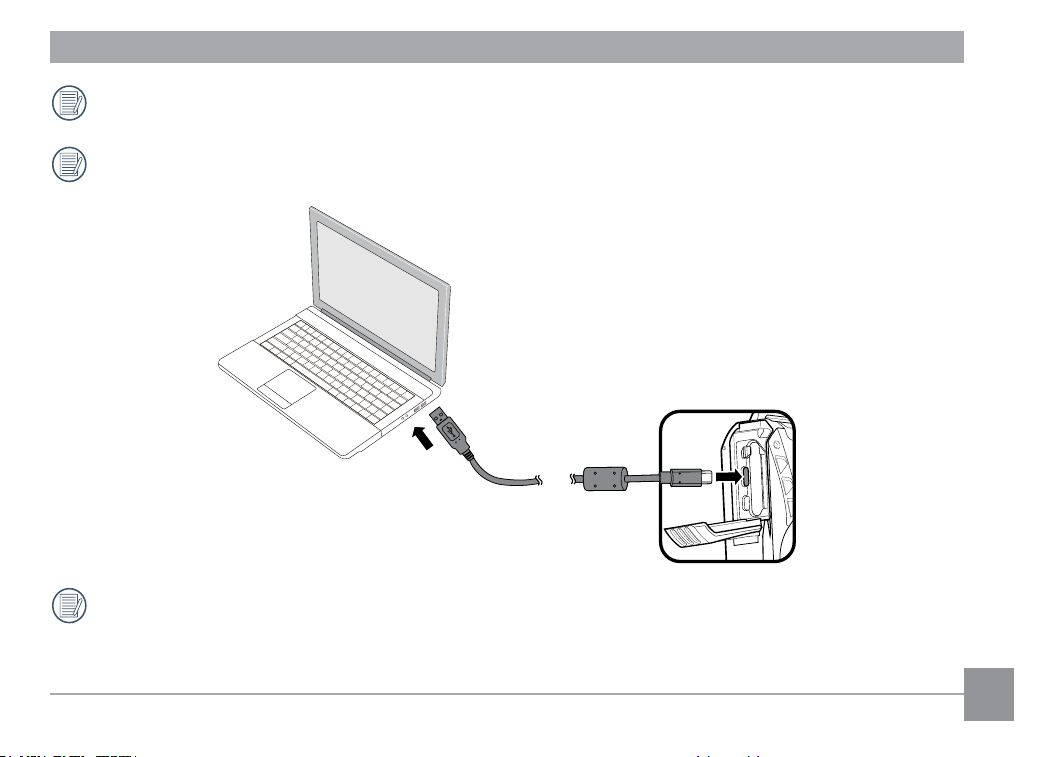
2. Connect one end of the supplied USB cable to the
USB terminal on your camera.
3. Connect the other end of the cable to an available
USB terminal on your computer.
4. After the transmission is complete, disconnect
the USB cable according to your computer
manufacturer's instructions specifying how to
safely remove USB devices.
The battery will drain when connected to a
PC. If you want to connect to a PC for a long
time, please use a memory card reader (sold
separately).
85
Viewing Images on Computer
Display transferred images on a standard image viewer etc. that an OS has. For details about viewing images,
see the help menu on the viewer.
Supported OS==>Windows: Windows® 11 / Windows® 10 / Windows® 8.1
Macintosh: Mac OS X 10.15, OS X 11 / 12 / 13 / 14
If a memory card is inserted in the product, only files in the memory card will be read. If needing to read
the files in the internal memory, please pull out the memory card before connecting to the computer.
HDMI Connected TV Output
The product is capable of realizing movie and photo playback on a TV through an HDMI cable.
Steps:
1. Open the battery/card cover of the product, connect one end of an HDMI cable (not included) to a TV
which is up to the HDMI standard (the TV and the product both need to be turned on) and the other end
to the cable to the HDMI port of the product;
2. The product will automatically enter the playback mode after the connection is complete. The operating
method is the same as [Viewing Photos and Videos] on page 51.
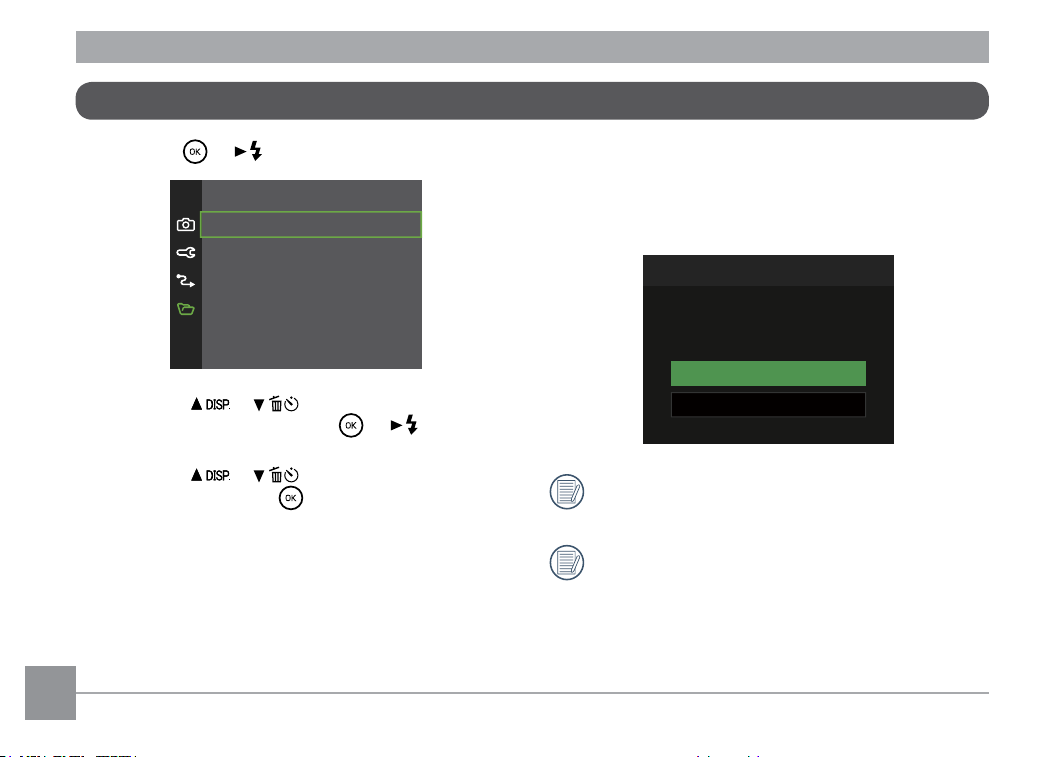
86
Format
Please Note: formatting enables you to delete all
contents on the memory card and camera’s built-in
memory, including protected photo and movie files.
Format
Doing so will clear all data.
Yes
No
If you select [Yes] the camera will format its
memory.
If there is no memory card in the camera, the
built-in memory will be formatted; if there is
a memory card, only the memory card will be
formatted.
File Settings
1. Press the / [ ] button to enter the menu.
Format
Copy to Card
File Numbering
Reset
FW Versio
nV
1.00
2. Press the [ ]/[ ] buttons to select the
item to be set and press the
/ [ ] button to
enter the menu.
3. Press the [
]/[ ] buttons to select an
option and press the button to confirm.
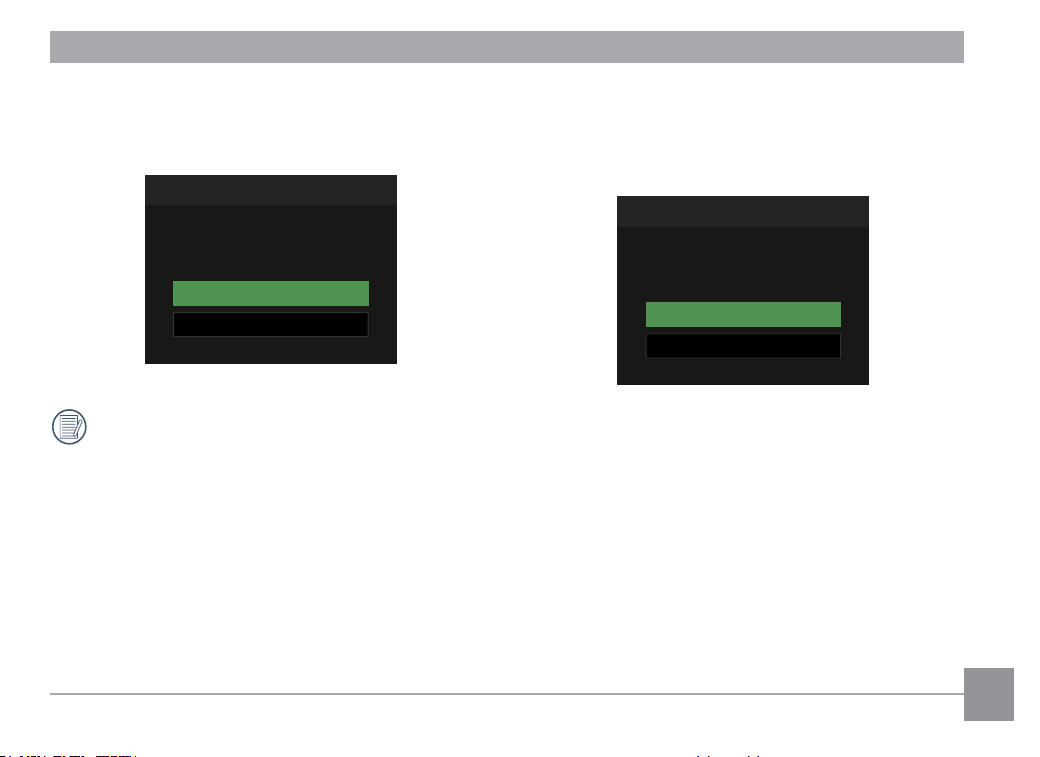
87
File Numbering
After you take a picture or video clip, the camera will
automatically save it with a sequential number. You
can use this to reset the file numbering to 1.
File Numbering
Create a new directory and reset
the file number.
Yes
No
Copy to Card
Use this setting to copy the files stored in the
camera’s built-in memory to a memory card.
Copy to Card
Copy files from built-in memory to
the memory card.
Yes
No
If there is no card available in the camera, this
function will not be displayed.
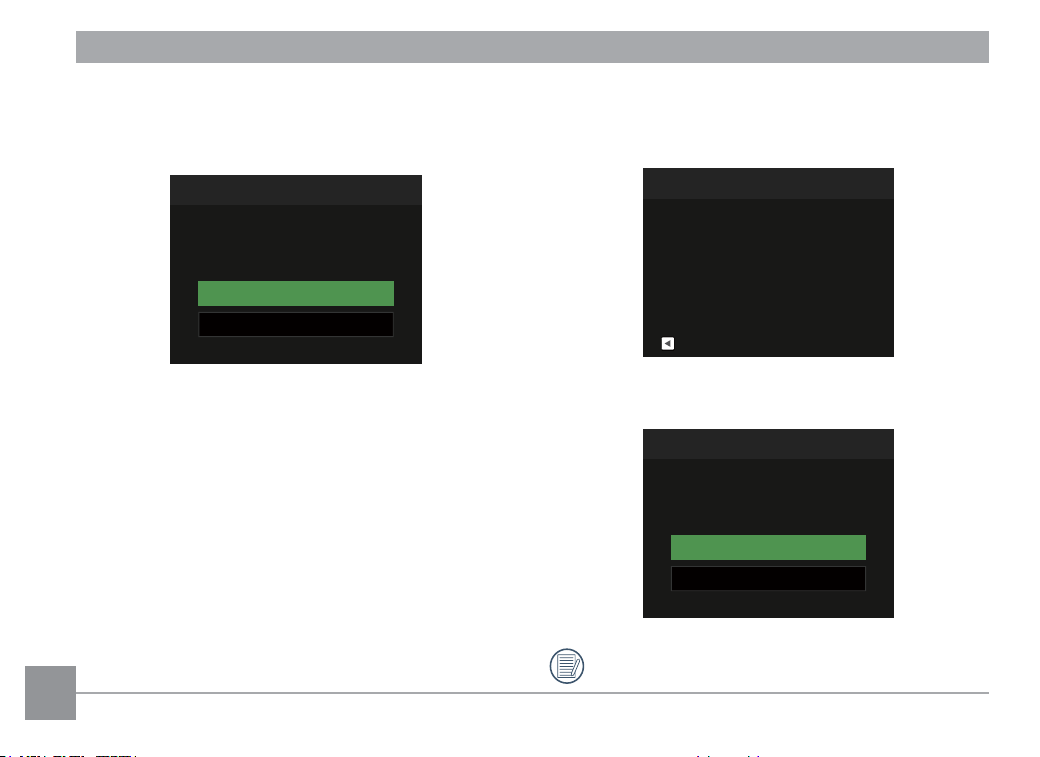
88
Reset
Use this setting to restore the camera to its original
factory default settings.
Reset
Reset camera settings to factory
defaults.
Yes
No
FW Version
Use this setting to view the current camera firmware
version.
FW Version
Back
Current Ver: V1.00
When there is a new firmware version saved on the
SD card, select [Yes] to update.
FW Version
Current Ver: V1.00
New Ver: VX.XX
Update Firmware?
Cancel
Yes
When the battery is low, the firmware cannot
be updated.
89
APPENDICES
Specifications
Design and specifications are subject to change without notice.
Image
Sensor
Type 1/2.3" BSI CMOS
Effective Pixels 16.35 Megapixels
Total Pixels 16.76 Megapixels
Lens
Focal Length 4.9mm (Wide) — 19.6mm (Tele)
35mm Film
Equivalent
27mm (Wide) — 108mm (Tele)
F Number F3.0 (Wide) — F6.6 (Tele)
Lens Construction 7 groups 7 elements
Optical Zoom 4x
Focusing Range
Normal:(Wide)60cm~∞
(Tele)100cm~∞
Macro:5cm~∞(WideOnly)
Autofocus System TTL Autofocus
Anti-Handshake Digital Image Stabilization
Digital Zoom 6x Digital Zoom (Combined Zoom: 24x)
90
Number of
Recording
Pixels
Still Image
(4:3)
16MP: 4608 x 3456
10MP: 3648 x 2736
5MP: 2592 x 1944
3MP: 2048 x 1536
2MP: 1600 x 1200
1MP: 1280 x 960
0.3MP: 640 x 480
(3:2)
14MP: 4608 × 3072
(16:9)
12MP: 4608 x 2592
2MP: 1920 x 1080
Movie
1920 x 1080 (30fps), 1280 x 720 (60/30fps), 640 x 480 (30fps),
High-Speed Movie: 640 x 480 (120fps)
File Format
Still Image Exif 2.3 (JPEG)
Movie MOV [Image: H.264; Audio: Linear PCM (Monaural)]
Shooting Modes
Auto Mode, Program AE, Manual Mode, Movie Mode, Scene Mode, Underwater
Mode, CALS Mode
Scene Mode
Portrait, Landscape, Sport, Beach, Sunset, Fireworks, Night Landscape, Snow,
Children, Panorama Mode, Glass, Anti-Shake, Panning Shot, Night Portrait,
Party, Indoor, Leaf, Museum
Detection Features Face, Smile, Blink
Waterproof Up to 15m
91
Shockproof Up to 2m
Dustproof Equivalent to JIS/IEC (IP6X)
Red-Eye Removal Yes
HDR Yes (Post-Processing)
Panorama Up to 360°
Monitor Display 2.7 inch (230k Pixels)
ISO Sensitivity Auto, ISO 100/200/400/800/1600/3200
AF Method Single-AF, Multi-AF (TTL 25-point), Face Detection
Exposure Metering Method AiAE, Spot, Center, Face AE
Exposure Control Method Program AE (AE-Lock Available)
Exposure Compensation ±3 EV in 1/3 Step Increments
Shutter Speed 1/2000 ~ 4 Seconds (Manual: 30 Seconds)
Burst Mode Up to 6 fps at Full Resolution
Playback Modes Slide Show, HDR, Red-Eye Reduction, Rotate, Resize, Color (
※
19 options) , Trim
White Balance Control
AWB, Daylight, Cloudy, Fluorescent, Fluorescent CWF, Incandescent, Manual
WB, Color Temp.(1900k-10000k), Underwater
92
Flash
Flash Method Internal
Flash Modes
Force Off, Flash Auto, Fill Flash, Slow Sync.,
Slow Sync.+Red-Eye Reduction, Red-Eye Reduction
Recording Media
Internal Memory: Approx. 29MB
SD/SDHC/SDXC Card (Up to 512GB Support)
Multi-Language Support 26 Languages
Jacks
USB2.0 TypeC, Micro HDMI (Type D)
Power
Rechargeable lithium-ion battery D-LI96, 3.7v 890mAh
Battery Performance
Number of shots: Approx. 300 Shots
* Based on CIPA Standards and varies depending
on the usage conditions.
Playback time: Approx. 150 minutes
* Based on our measurement conditions and varies
depending on the shooting conditions.
Video recording time: Approx. 90 minutes
* Based on our measurement conditions and
varies depending on the shooting conditions.
Operation Environment Temperature: 0 ~ 40°C, Humidity: 0 ~ 90%
Dimensions (W×H×D) Approx. 116 × 68.5 × 50.5 (Excluding protrusions)
Weight Approx. 200g (Body Only)
93
USB power adapter D-PA180
Power Supply 100 to 240V AC(50/60 Hz), 0.2A
Output 5.0V DC, 1.0A, 5.0W
Average Active Efficiency 75%
No-Load Power Consumption 35mW
Operating Temperature 0 to 40 °C *
Storage Temperature -20 to 60 °C
Dimensions
34.5 mm (W) × 47 mm (H) × 26.5 mm (D) (1.4 in. (W) × 1.9 in. (H) ×1.1 in. (D)
(excluding the power plug)
Weight Approx. 40 g (1.4 oz) (excluding the power plug)
* Depends on the temperature of the camera’s movable property.
Rechargeable lithium-ion battery D-LI96
Nominnal Voltage 3.7V
Rated Capacity 890mAh, 3.293Wh
Operating Temperature -20 to 60 °C *
Storage Temperature -20 to 45 °C
Dimensions Approx. 39.8 × 34.2 × 6.8 mm (H/W/T) (1.57” × 1.35” × 0.27”)
Weight Approx. 20 g (0.7 oz.)
* Depends on the operating temperature of the camera body.
94
Prompts and Warning Messages
Message Description Action
Warning! Battery
exhausted.
The camera battery is depleted. It is a
warning indicating that the camera is going
to shut off.
Charge battery or replace with a
charged battery. The camera will
shut down in 2 seconds.
Lens obstruction, Re-
start Camera.
The lens is jammed or some foreign object
is preventing the lens from functioning
properly.
Turn the camera off and restart it
to reset the lens.
Suggest using tripod.
When Fireworks, Sunset, Night Landscape is
enabled, this prompt message is displayed
when the photo shooting screen is displayed
for the first time
The message will disappear after 2
seconds.
Battery temperature is
too high.
Battery temperature is too high.
Let the batteries cool before
attempting to use the camera
again. This message will disappear
after 2 seconds.
Built-in memory error!
An error has occurred in the internal
memory.
Try shutting off the camera and
turning it on again. This message
will disappear after 2 seconds.
Improper alignment.
Please try again.
The offset is too big for panorama shooting.
Keep the camera steady while
shooting to maintain alignment.
95
Message Description Action
Warning! Do not turn
off your camera during
update!
The message appears during the
firmware update process.
The message disappears after the camera
update and restart.
Connection Failed!
Failure to connect to your PC, TV.
Remove USB cable, reinsert cable, and retry
connection.
Please update firmware
after the battery is fully
charged!
The firmware cannot be updated
when power is insufficient.
Charge the battery fully before reattempting
to update firmware.
Card Full !
Indicates that the memory card
is full.
Replace memory card with another that
has available memory or delete photos or
videos to create more room on the card. This
message will disappear after 2 seconds.
Memory Full !
Indicates that the camera
memory is full.
Erase files or insert a memory card that has
available memory. It will disappear after 2
seconds.
Card Error !
During power-on, the memory
card cannot be recognized or a
read/write error has occurred.
Format the memory card. WARNING:
Formatting the memory card will erase all
data on the card. Copy the data from the
memory card to another storage, such
as a computer. Otherwise, all data will be
erased during formatting. This message will
disappear after 2 seconds.
96
Message Description Action
Card is not formatted.
When an error occurs in the
memory card, the message "Not
Formatted" will appear.
Format the memory card. WARNING:
Formatting the memory card will erase all
data on the card. Copy the data from the
memory card to another storage, such
as a computer. Otherwise, all data will be
erased after the format.
Cannot write to SD card.
The photo shooting or video
recording has been interrupted, so
recording cannot continue.
Turn the camera off. Then remove and
reinsert the memory card and turn on the
camera to restart.
Slow access
When a memory card lower than
Class 4 is used to record a HD
movie, the writing speed will be
slower and recording will not
continue.
Replace the memory card with a card that
is Class 6 or higher.
This message will disappear after 2
seconds.
No Red-Eye Detected!
Red eyes have not been detected in
the image.
The message will disappear after 2
seconds.
This image cannot be
edited.
The file format does not support
editing or the edited file cannot be
edited again.
The message will disappear after 2
seconds.
97
Message Description Action
This image cannot be
edited.
The file format does not support editing
or the edited file cannot be edited again.
The message will disappear after 2
seconds.
Too many pictures for
fast processing.
During the playback by date, the images
exceed specifications so that it is not
possible to play by date.
The message disappears after 2 seconds
and the camera returns to normal
playback mode.
Unable to recognize
files.
The format of the file to be viewed is not
supported or the file is corrupted so it
cannot be properly read.
The message disappears only after the
file is deleted.
No Picture!
No image files exist in the camera or on
memory card.
The message disappears after 2 seconds
and returns to the photo shooting
screen.
Protected!
Undeletable!
The file is protected. The message
appears when you go into delete mode.
If you want to delete a protected file,
first unlock the selected photo or video
(see page 79).
This message will disappear after 2
seconds.
98
Troubleshooting
Problem Possible causes Solution
Camera does not
turn on
The battery has been depleted.
The battery is not inserted correctly.
Replace the battery.
Correctly reinstall the battery.
Camera turns off
suddenly during
operation
The battery has been depleted.
Replace the battery.
Charge the battery.
Make sure the camera is actually
shutting off and not entering
Power Save Mode, where the
monitor will turn off after the
camera has been idle for a
period of time.
The picture is blurred
Camera movement while taking a
picture.
Turn on Anti-Shake mode.
Images and video
files cannot be saved
The memory card is full.
Use another memory card or
delete unnecessary files.
99
Problem Possible causes Solution
Saving data to
memory card is slow
Using a memory card below Class 4 may
result in slower recording times.
Use a memory card with
Class 6 or higher to improve
performance.
Too many movies to
process
The number of pictures or folders in the
memory card exceed the specifications,
so the playback can not be displayed.
Delete unwanted files.
The flash
flashes
on the monitor.
Current shooting environment requires
flash.
Turn on flash.
100
Trademark Information
SDXC logo is a trademark of SD-3C, LLC.
HDMI, the HDMI logo, and High-Definition Multimedia Interface are trademarks or registered trademarks
of HDMI Licensing, LLC in the United States and/or other countries.
Microsoft, Windows and Windows Vista are registered trademarks of Microsoft Corporation in the United
States of America and other countries.
Macintosh, Mac OS, OS X and App Store are trademarks of Apple Inc., registered in the U.S. and other
countries.
USB Type-C is a trademark of USB Implementers Forum.
This product is licensed under the AVC Patent Portfolio License for the personal use of a consumer or
other uses in which it does not receive remuneration to (i)encode video in compliance with the AVC
standard (“AVC video”) and/or (ii) decode AVC video that was encoded by a consumer engaged in a
personal activity and/or was obtained from a video provider licensed to provide AVC video. No license is
granted or shall be implied for any other use.
Additional information may be obtained from VIA-LA, LLC.
See http://www.via-la.com.
All other trademarks are the property of their respective owners.

101
LZF Lib Open Source
Copyright (c) 2000-2008 Marc Alexander Lehmann <[email protected]>
Redistribution and use in source and binary forms, with or without modification, are permitted provided that
the following conditions are met:
1. Redistributions of source code must retain the above copyright notice, this list of conditions and the
following disclaimer.
2. Redistributions in binary form must reproduce the above copyright notice, this list of conditions and the
following disclaimer in the documentation and/or other materials provided with the distribution.
THIS SOFTWARE IS PROVIDED BY THE AUTHOR “AS IS” AND ANY EXPRESS OR IMPLIED WARRANTIES,
INCLUDING, BUT NOT LIMITED TO, THE IMPLIED WARRANTIES OF MER-CHANTABILITY AND FITNESS FOR
A PARTICULAR PURPOSE ARE DISCLAIMED. IN NO EVENT SHALL THE AUTHOR BE LIABLE FOR ANY DIRECT,
INDIRECT, INCIDENTAL, SPE-CIAL, EXEMPLARY, OR CONSEQUENTIAL DAMAGES (INCLUDING, BUT NOT
LIMITED TO, PROCUREMENT OF SUBSTITUTE GOODS OR SERVICES; LOSS OF USE, DATA, OR PROFITS;
OR BUSINESS INTERRUPTION) HOWEVER CAUSED AND ON ANY THEORY OF LIABILITY, WHETHER IN
CONTRACT, STRICT LIABILITY, OR TORT (INCLUDING NEGLIGENCE OR OTH-ERWISE) ARISING IN ANY WAY
OUT OF THE USE OF THIS SOFTWARE, EVEN IF ADVISED OF THE POSSIBILITY OF SUCH DAMAGE.
Alternatively, the contents of this file may be used under the terms of the GNU General Public License
("GPL") version 2 or any later version, in which case the provisions of the GPL are applicable instead of the
above. If you wish to allow the use of your version of this file only under the terms of the GPL and not to
allow others to use your version of this file under the BSD license, indicate your decision by deleting the
provisions above and replace them with the notice and other provisions required by the GPL. If you do not
delete the provisions above, a recipient may use your version of this file under either the BSD or the GPL.
102
Warranty Policy
■ Allourcameraspurchasedthroughauthorizedbonafidephotographicdistributionchannelsare
guaranteed against defects of material or workmanship for a period of twelve months from the date of
your purchase. Service will be rendered, and defective parts will be replaced without cost to you within
that period, provided the camera does not show evidence of impact, sand or liquid damage, mishandling,
tampering, battery or chemical corrosion, operation contrary to operating instructions, or modification
by an unauthorized repair shop. The manufacturer or its authorized representatives shall not be liable for
any repair or alterations except those made with its written consent and shall not be liable for damages
from delay or loss of use or from other indirect or consequential damages of any kind, whether caused
by defective material or workmanship or otherwise; and it is expressly agreed that the liability of the
manufacturer or its representatives under all guarantees or warranties, whether expressed or implied, is
strictly limited to the replacement of parts as herein before provided. No refunds will be made on repairs
by non-authorized service facilities.
■ ProcedureDuring12-monthWarrantyPeriodAnycamerawhichprovesdefectiveduringthe12-month
warranty period should be returned to the dealer from whom you purchased the camera or to the
manufacturer. If there are no representatives of the manufacturer in your country, send the camera to
the manufacturer, with postage prepaid. In this case, it will take a considerable length of time before the
camera can be returned to you owing to the complicated customs procedures required. If the camera
is covered by warranty, repairs will be made and parts replaced free of charge, and the camera will be
returned to you upon completion of servicing. If the camera is not covered by warranty, regular charges
of the manufacturer or of its representatives will apply. Shipping charges are to be borne by the owner. If
your camera was purchased outside of the country where you wish to have it serviced during the warranty
period, regular handling and servicing fees may be charged by the manufacturer’s representatives in that
country. Notwithstanding this, your camera returned to the manufacturer will be serviced free of charge
according to this procedure and warranty policy. In any case, however, shipping charges and customs
clearance fees to be borne by the sender.

103
To prove the date of your purchase when required, please keep the receipt or bills covering the purchase
of your camera for at least a year. Before sending your camera for servicing, please make sure that you
are sending it to the manufacturer’s authorized representatives or their approved repair shops, unless
you are sending it directly to the manufacturer. Always obtain a quotation for the service charge, and only
after you accept the quoted service charge, instruct the service station to proceed with the servicing.
• Thiswarrantypolicydoesnotaffectthecustomer’sstatutoryrights.
• Thelocalwarrantypoliciesavailablefromourdistributorsinsomecountriescansupersedethis
warranty policy. Therefore, we recommend that you review the Warranty card supplied with your
product at the time of purchase or contact our distributor in your country for more information and to
receive a copy of the warranty policy.

RICOH IMAGING COMPANY, LTD.
RICOH IMAGING EUROPE S.A.S.
RICOH IMAGING
AMERICAS CORPORATION
RICOH IMAGING CANADA INC.
RICOH IMAGING CHINA CO., LTD.
1-3-6, Nakamagome, Ohta-ku, Tokyo 143-8555, JAPAN
(https://www.ricoh-imaging.co.jp)
7-9, avenue Robert Schuman, 94150 RUNGIS, FRANCE
(https://www.ricoh-imaging.eu)
2 Gatehall Drive Suite 204, Parsippany, New Jersey
07054, U.S.A.
(https://www.us.ricoh-imaging.com)
5560 Explorer Drive Suite 100, Mississauga, Ontario,
L4W 5M3, CANADA
(https://www.ricoh-imaging.ca)
Room A 23F Lansheng Building, 2-8 Huaihaizhong Road,
Huangpu District, Shanghai, 200021, CHINA
(http://www.ricoh-imaging.com.cn)
https://www.ricoh-imaging.co.jp/english/
This contact information may change without notice. Please check the latest information on our websites.
• Specificationsandexternaldimensionsaresubjecttochangewithoutnotice.
Copyright © RICOH IMAGING COMPANY, LTD. 2024
202403