226KS12, 226KD24
EN Operator's manual 2-18
PT-BR Manual do operador 19-36
Contents
Introduction..................................................................... 2
Safety..............................................................................3
Assembly........................................................................ 8
Operation...................................................................... 10
Maintenance................................................................. 13
Troubleshooting............................................................ 16
Transportation and storage...........................................17
Disposal........................................................................ 17
Technical data.............................................................. 18
Introduction
Product description
This product is a coffee harvesting attachment with a
combustion engine.
Work is constantly in progress to increase your safety
and efficiency during operation. Speak to your servicing
dealer for more information.
Intended use
Use the product with a harvesting attachment for coffee
harvest. Do not use the product for other tasks.
Note: National regulations can set limit to the
operation of the product. Comply to given regulations.
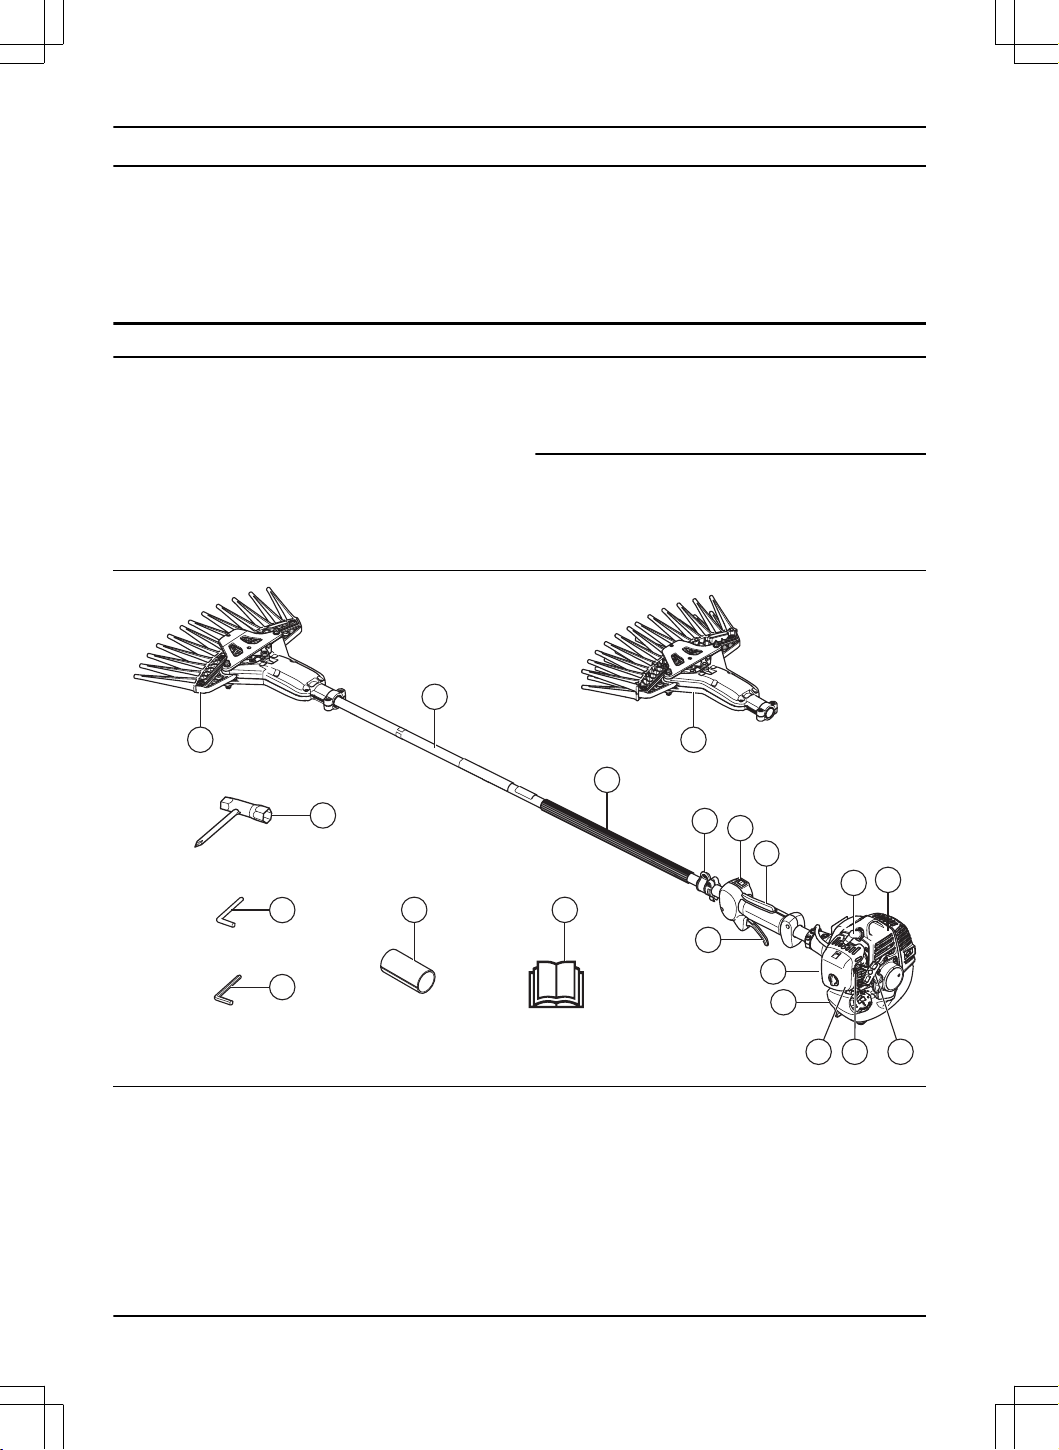
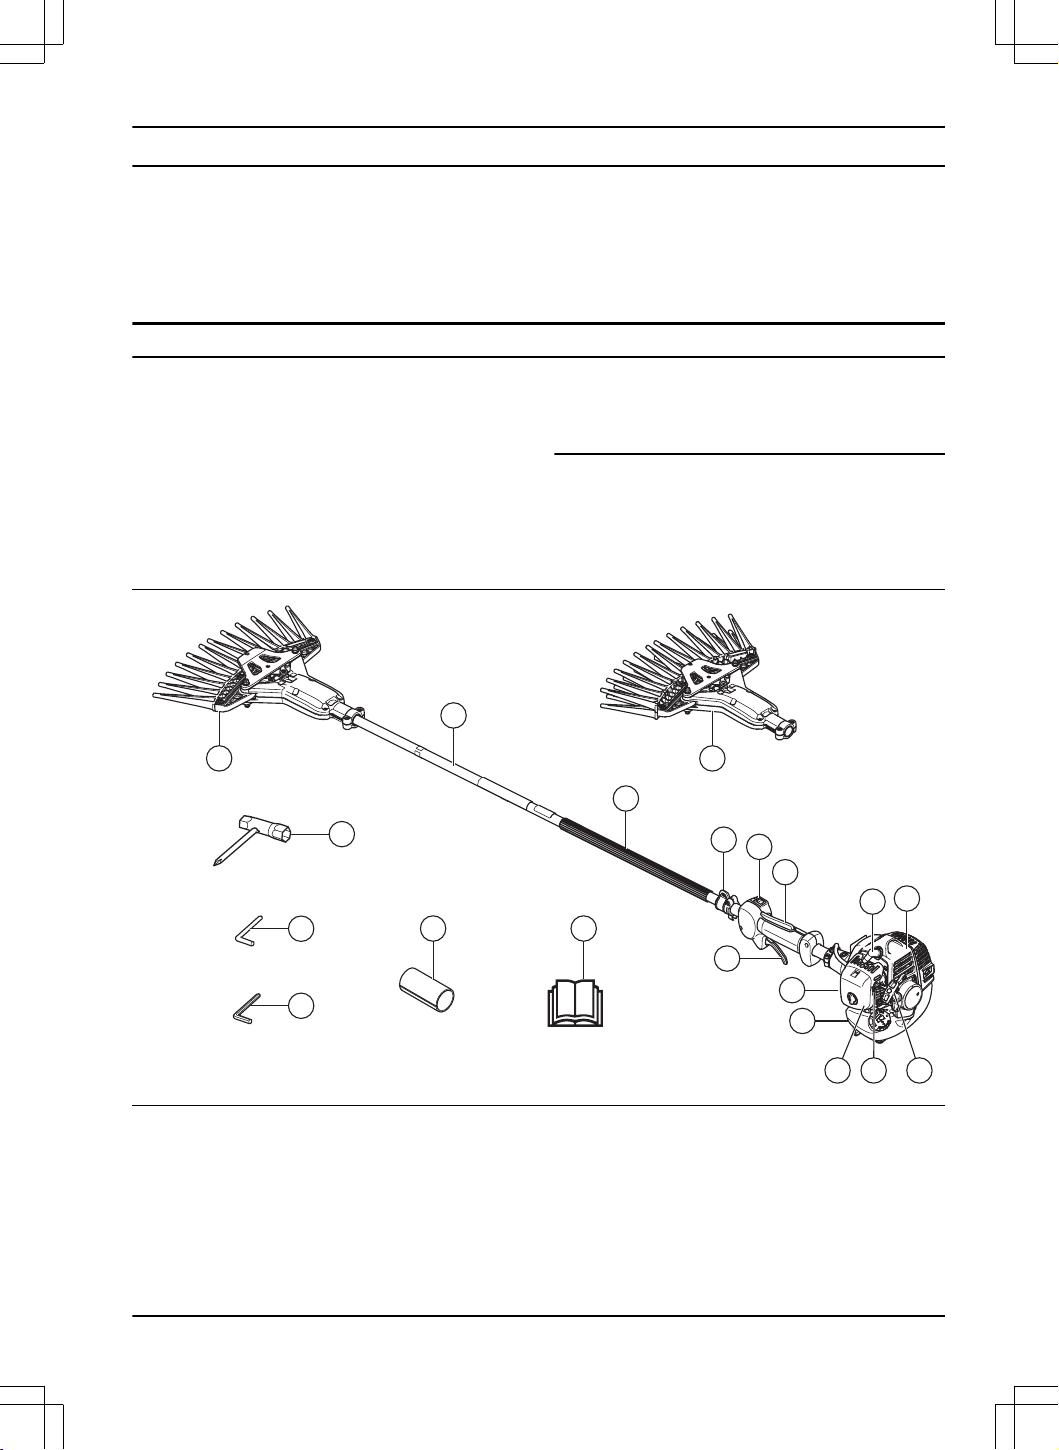
Product overview
1
2
2018
4
5
6
8
9
101112
7
15
17
16
13
14
3 19
1. Shaft
2. Front handle
3. Harvesting attachment
4. Harness support hook
5. Stop switch
6. Throttle trigger lockout
7. Throttle trigger
8. Spark plug cap and spark plug
9. Cylinder cover
10. Starter rope handle
11. Choke control
12. Air filter cover
13. Fuel tank
14. Air purge bulb
15. Combination wrench
16. Locking pin
17. Hex key
18. Tube attachment
2 2399 - 002 - 14.02.2025
19. Double finger attachment
20. Operator's manual
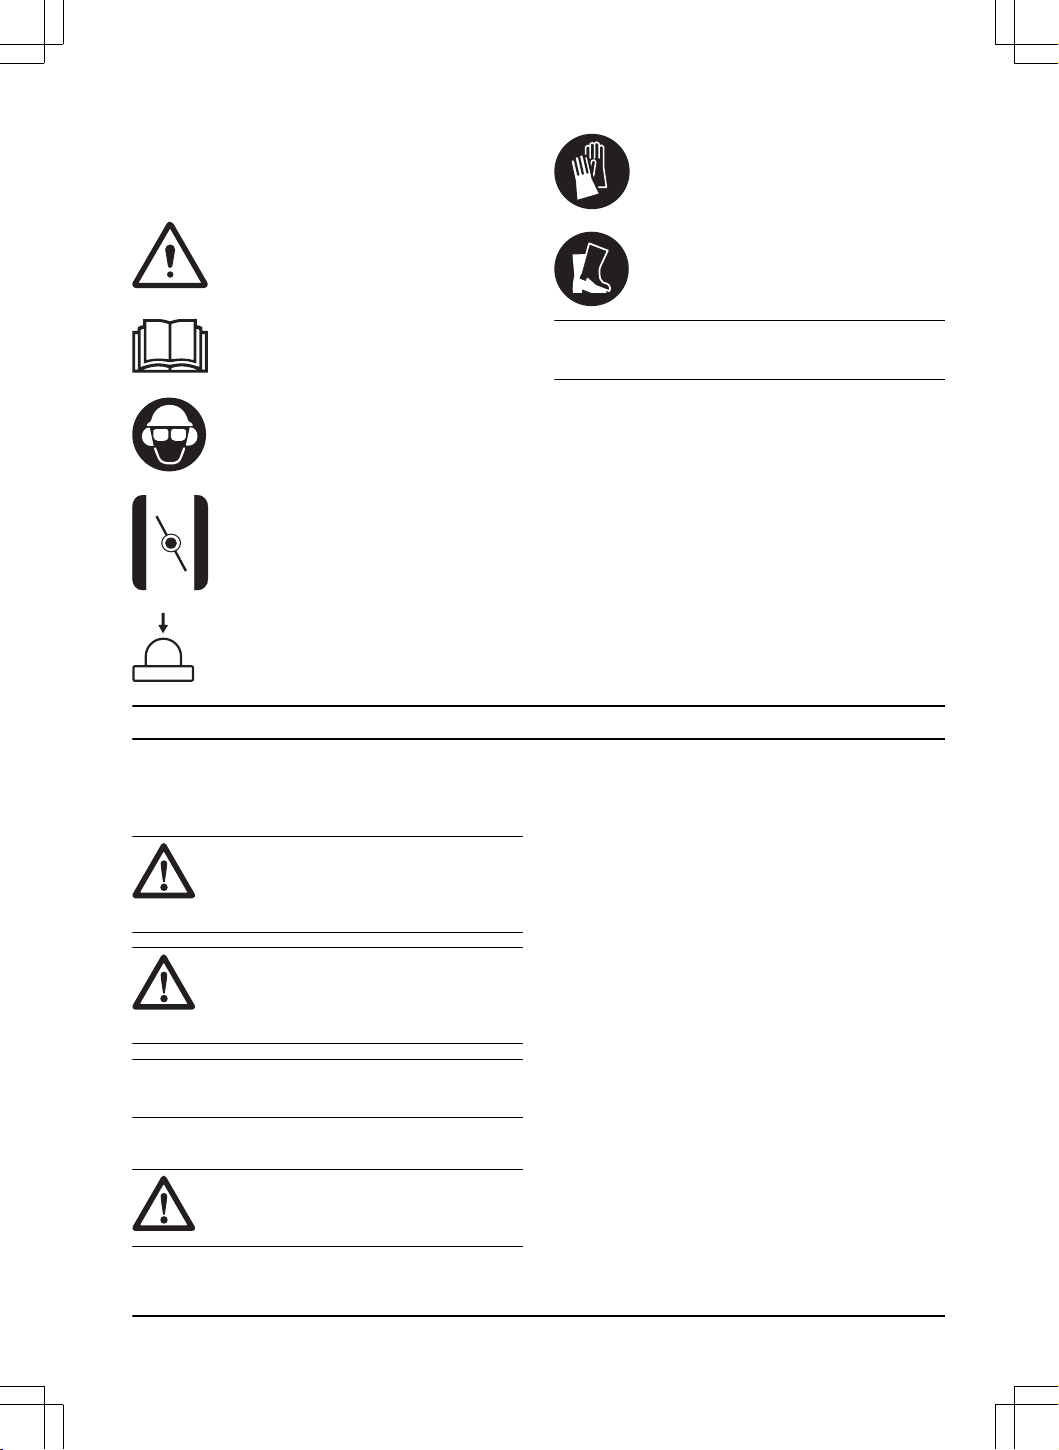
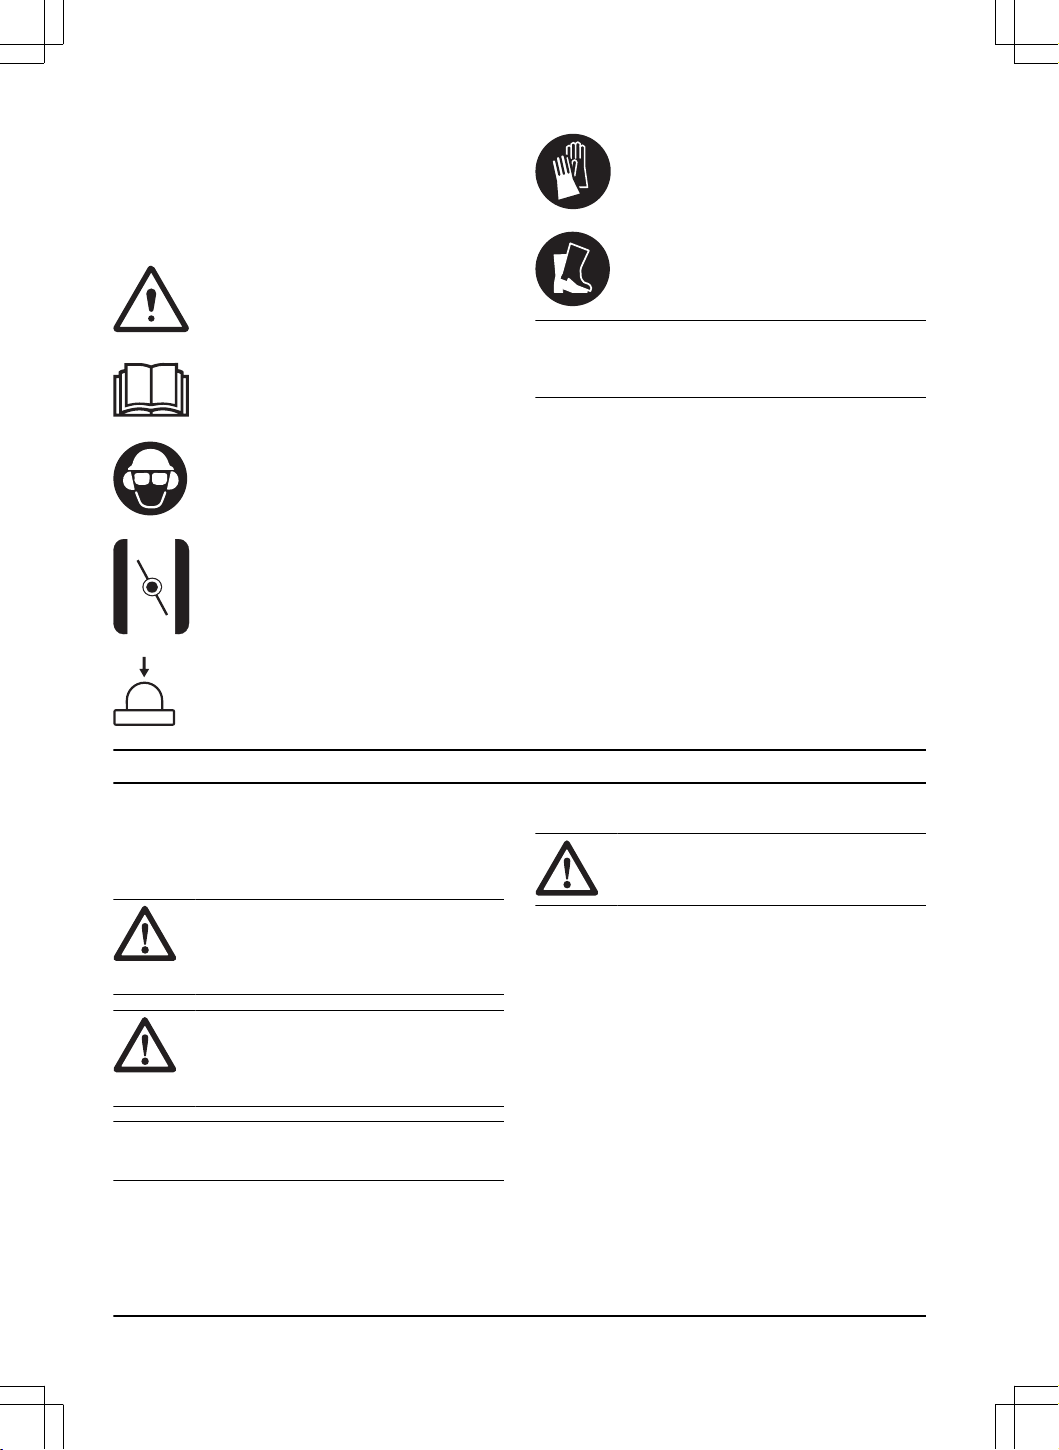
Symbols on the product
WARNING: This product can be
dangerous and cause serious injury or
death to the operator or others. Be careful
and use the product correctly.
Read the operator's manual carefully
and make sure that you understand the
instructions before you use this product.
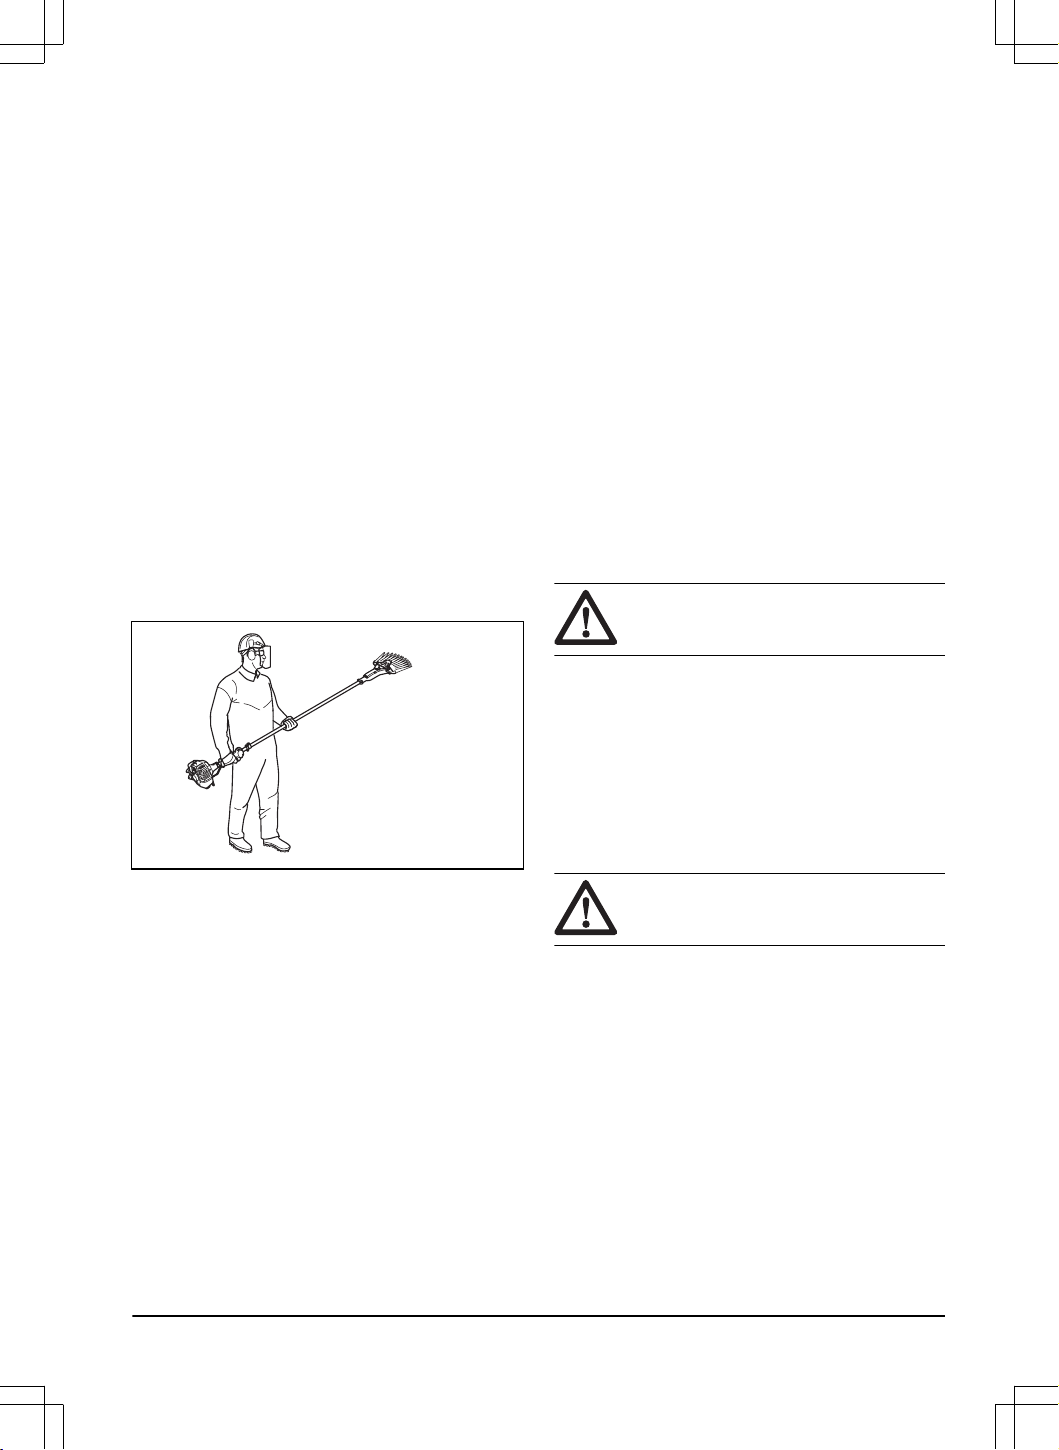
Use a protective helmet in locations where
objects can fall on you. Use approved
hearing protection and approved eye
protection.
Choke.
Air purge bulb.
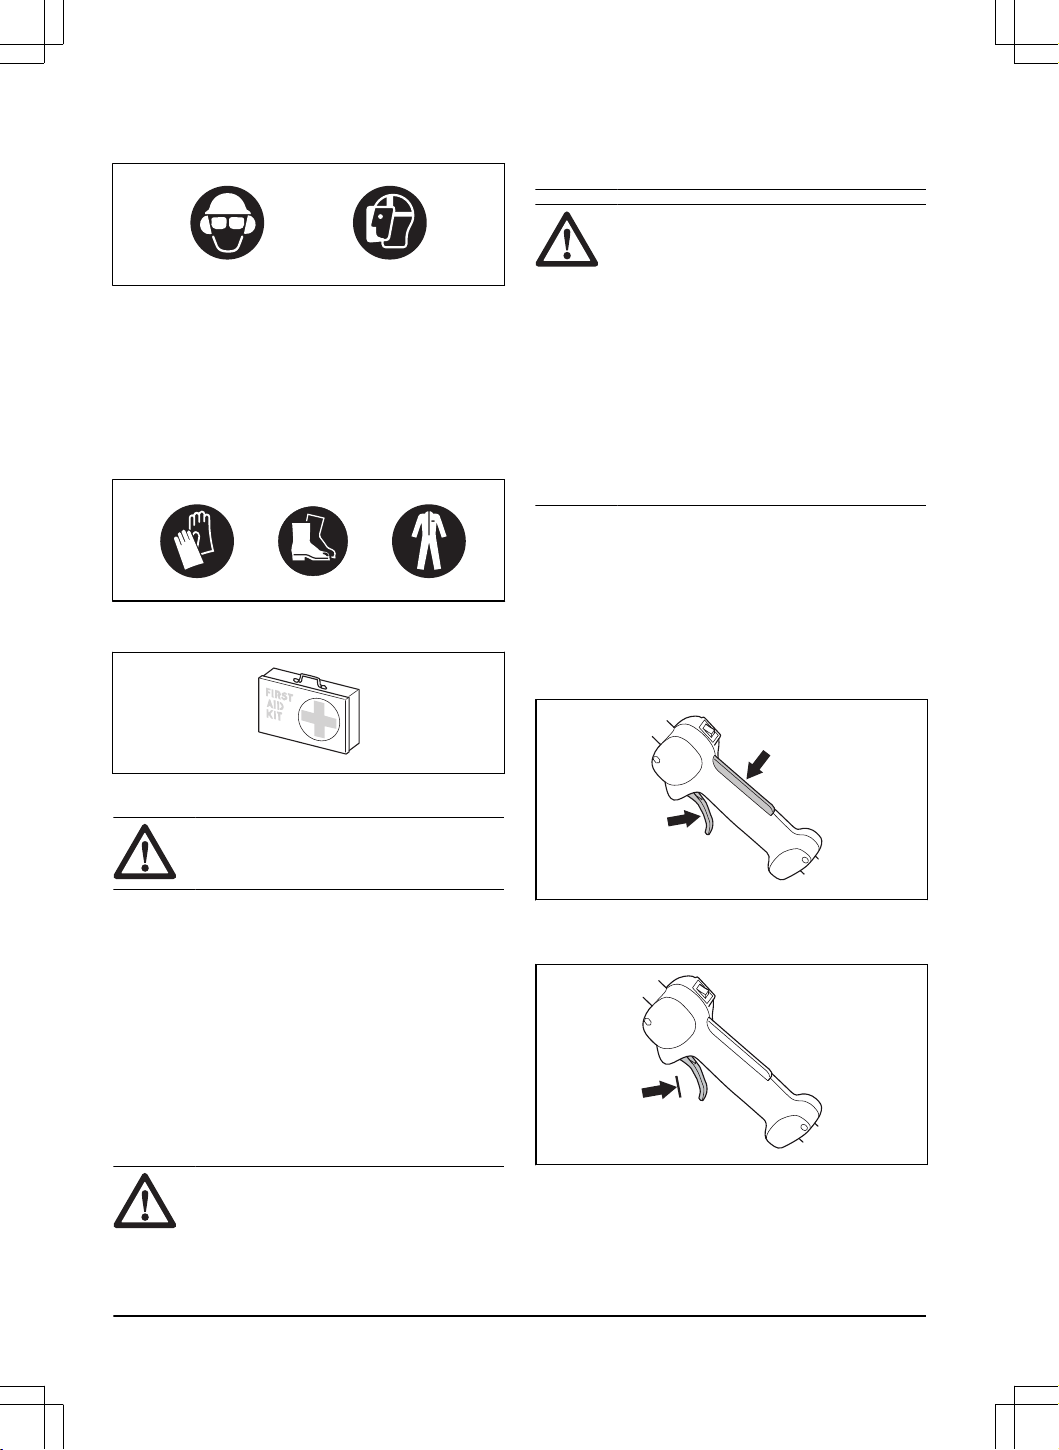
Use approved protective gloves.
Use heavy-duty slip-resistant boots.
Note: Other symbols/decals on the product refer to
certification requirements for other commercial areas.
Product damage
We are not responsible for damages to our product if:
• the product is incorrectly repaired.
• the product is repaired with parts that are not
from the manufacturer or not approved by the
manufacturer.
• the product has an accessory that is not from the
manufacturer or not approved by the manufacturer.
• the product is not repaired at an approved service
center or by an approved authority.
Safety
Safety definitions
Warnings, cautions and notes are used to point out
specially important parts of the manual.
WARNING: Used if there is a risk of
injury or death for the operator or bystanders
if the instructions in the manual are not
obeyed.
CAUTION: Used if there is a risk of
damage to the product, other materials or
the adjacent area if the instructions in the
manual are not obeyed.
Note: Used to give more information that is necessary
in a given situation.
General safety instructions
WARNING: Read the warning
instructions that follow before you use the
product.
• This product is a dangerous tool if you are not
careful or if you use the product incorrectly. This
product can cause serious injury or death to the
operator or others. Before you use the product,
you must read and understand the contents of this
operator’s manual.
• Do not do modifications to this product.
• Do not operate the product if it is possible that other
persons have done modifications to the product.
• Accessories that are not approved by the
manufacturer can cause serious injury or death.
Always use original accessories.
• This product produces an electromagnetic field
during operation. This field can under some
circumstances interfere with active or passive
medical implants. To decrease the risk of serious
injury or death, we recommend persons with medical
implants to speak to their physician and the medical
implant manufacturer before operating this product.
Safety instructions for operation
• Never allow children to use the product.
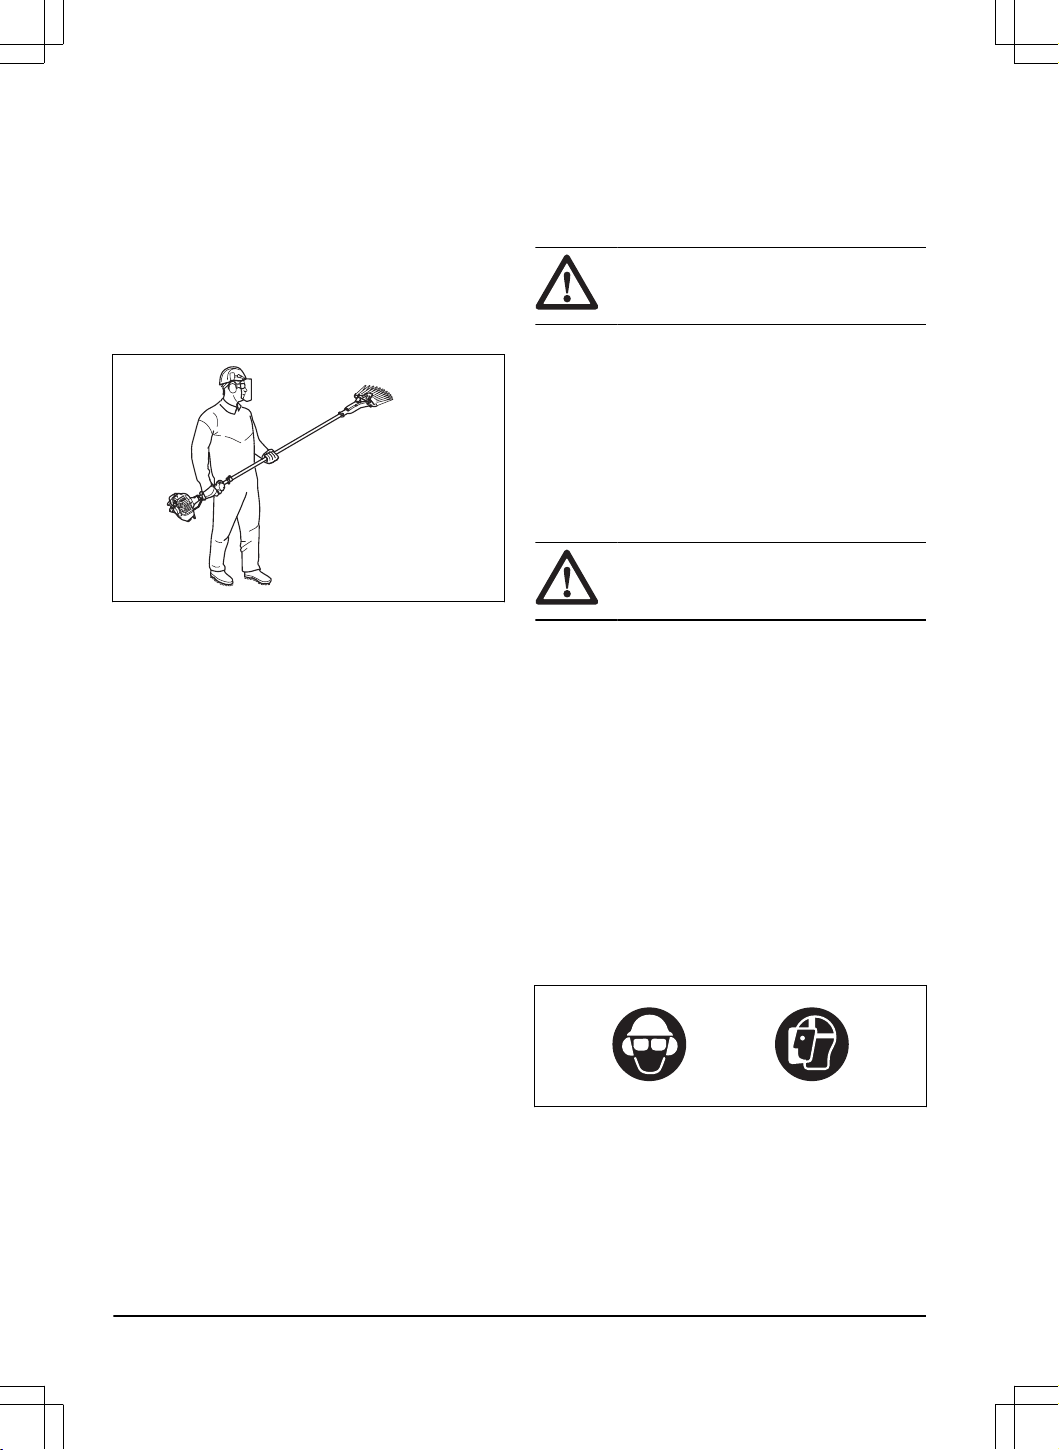
• Use personal protective equipment. Refer to
Personal protective equipment on page 4
.
• Keep unauthorized persons at a distance. Children,
animals, onlookers and helpers should be kept
2399 - 002 - 14.02.2025 3
outside the safety zone of 15 meters while you work.
Stop the product immediately if anyone approaches.
• Never allow anyone else to use the product without
first ensuring that they have read and understood the
contents of the operator’s manual.
• Never work from a ladder, stool or any other raised
position that is not fully secured.
• Always ensure you have a safe and stable working
position.
• Always use both hands to hold the product. Hold the
product at the side of your body.
• Use your right hand to control the power trigger.
• If an emergency occurs, let go of the product and let
it fall to the ground.
• Make sure that your hands and feet do not come
near the harvesting attachment when the engine is
running.
• When the engine is switched off, keep your hands
and feet away from the harvesting attachment until it
has stopped completely.
• Always put the product on the ground when you are
not using it.
• Check the working area for foreign objects such
as electricity cables, insects and animals, etc, or
other objects that could damage the harvesting
attachment, such as metal items.
• If a foreign object is hit or if vibrations occur, stop the
product immediately. Make sure that the product is
not damaged. Repair the product if it is damaged.
• If anything gets caught up in the harvesting
attachment while you are working, switch off the
engine and let it stop completely before cleaning the
harvesting attachment.
• Do not use the coffee harvester while you are
tired or under the influence of drugs, alcohol or
medication.
• Overexposure to vibration can lead to circulatory
damage or nerve damage in persons who have
poor circulation. Speak to your physician if you
experience symptoms of overexposure to vibration.
Such symptoms include numbness, loss of feeling,
tingling, pricking, pain, loss of strength, changes
in skin color or condition. These symptoms usually
show in the fingers, hands or wrists. The risk
increases at low temperatures.
• Before operation, do an inspection for damages on
the product. If the product falls or hits something, do
an inspection for damages. Repair the product if it is
damaged.
Safety instructions for assembly
WARNING: Read the warning
instructions that follow before you use the
product.
• Remove the spark plug cap from the spark plug
before you assemble the product.
• Use approved protective gloves.
• Attach the clutch cover and the shaft correctly before
you start the product. This is to make sure that the
clutch does not fall off.
• Make sure that you assemble the cover and the
shaft correctly before you start the engine.
Personal protective equipment
WARNING: Read the warning
instructions that follow before you use the
product.
• Always use approved personal protective equipment
when you use the product. Personal protective
equipment cannot fully prevent injury but it
decreases the degree of injury if an accident does
occur. Let your dealer help you select the right
equipment.
• Use a protective helmet where there is a risk of
falling objects.
• Use approved hearing protection that provides
adequate noise reduction. Long-term exposure to
noise can result in permanent hearing impairment.
• Use approved eye protection. If you use a visor,
you must also use approved protective goggles.
Approved protective goggles must comply with the
ANSI Z87.1 standard in the USA or EN 166 in EU
countries.
• Use a visor for face protection. A visor is not enough
for protection of the eyes.
+
• Use gloves when necessary, for example when you
attach, examine or clean the harvesting equipment.
• Use sturdy non-slip boots.
• Use clothing made of a strong fabric. Always use
heavy, long pants and long sleeves. Do not use
loose clothing that can catch on twigs and branches.
Do not wear jewelry, short pants, sandals or go with
4
2399 - 002 - 14.02.2025
bare feet. Put your hair up safely above shoulder
level.
• Keep first aid equipment close at hand.
Safety devices on the product
WARNING: Read the warning
instructions that follow before you use the
product.
In this section the product’s safety features, its purpose
and how checks and maintenance should be carried
out to ensure that it operates correctly. See instructions
under the heading
Product overview on page 2
to find
where these parts are located on your product.
The life span of the product can be reduced and the risk
of accidents can increase if product maintenance is not
carried out correctly and if service and/or repairs are not
carried out professionally. If you need further information
please contact your nearest servicing dealer.
WARNING:
Never use a product with
damaged safety components. The product's
safety equipment must be inspected and
maintained as described in this section.
If your product fails any of these checks,
contact your service agent to get it repaired.
CAUTION: All servicing and repair work
on the machine requires special training.
This is especially true of the machine′s
safety equipment. If your machine fails
any of the checks described below you
must contact your service agent. When
you buy any of our products we guarantee
the availability of professional repairs and
service. If the retailer who sells your
machine is not a servicing dealer, ask him
for the address of your nearest service
agent.
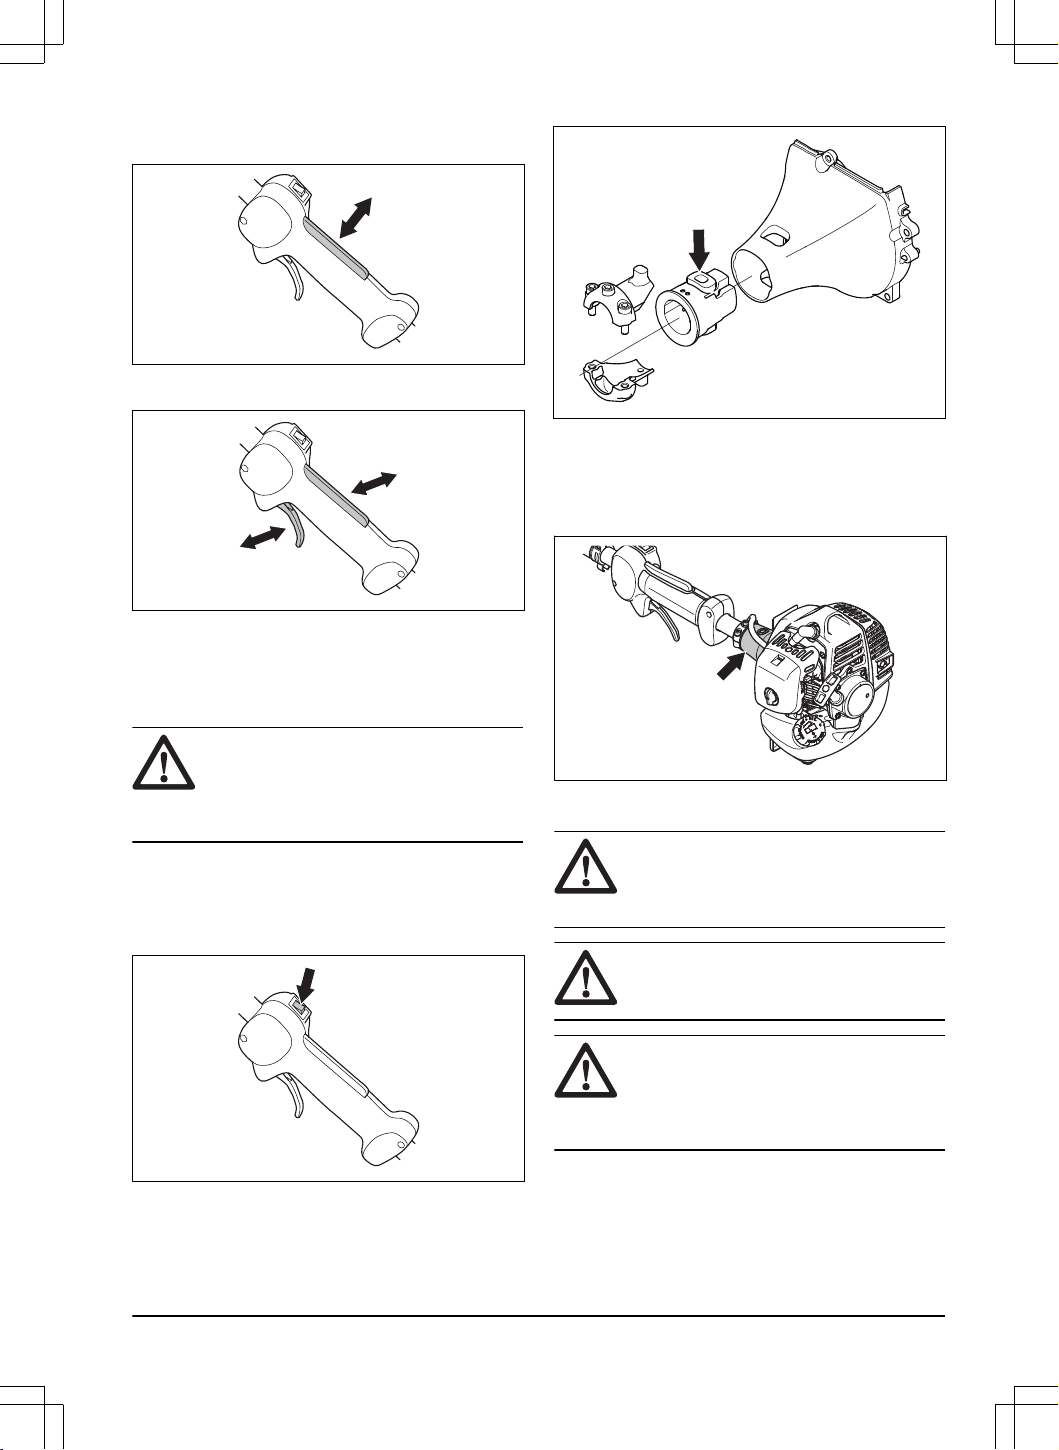
To do a check of the throttle trigger lockout
The throttle trigger lockout locks the throttle trigger at
the idle position to prevent accidental operation of the
throttle trigger. When you release the handle of the
throttle trigger and the throttle trigger lockout the two
move back to their initial positions.
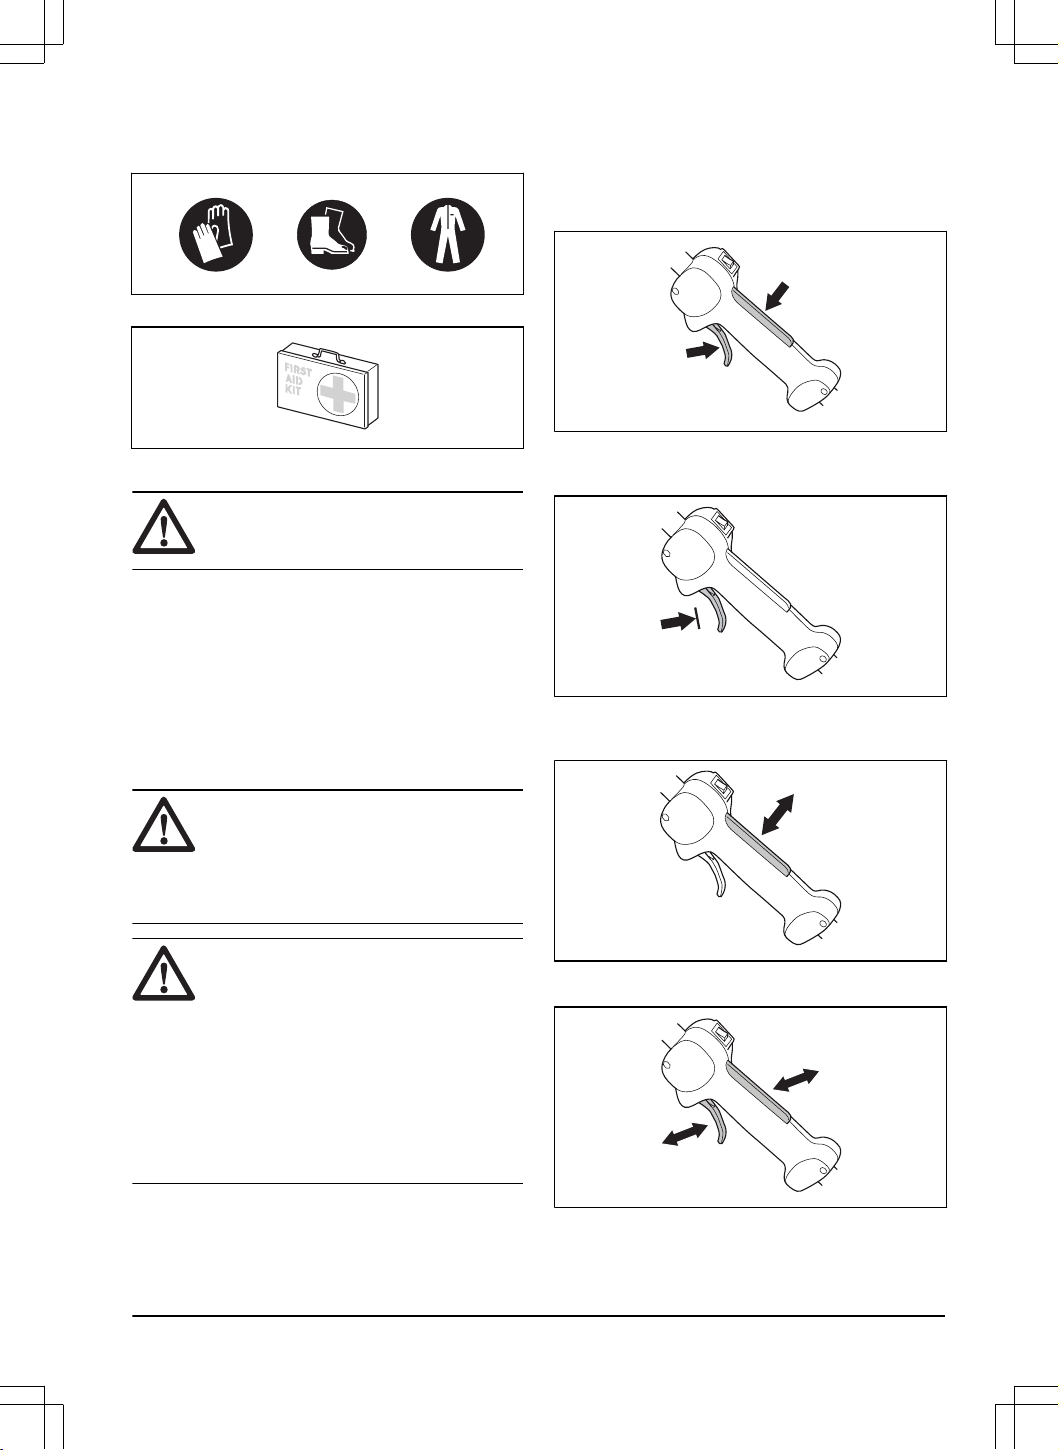
1. Push the throttle trigger lockout (A). Make sure that
the throttle trigger (B) is released.
A
B
2. Make sure that the throttle trigger (B) is locked at
the idle position when the throttle trigger lockout is
released.
3. Push the throttle trigger lockout (A) and make sure
that it goes back to its initial position when you
release it.
4. Make sure that the throttle trigger lockout (A) and the
throttle trigger (B) move freely.
5. Start the product and apply full throttle. Refer to
To
start the product on page 12
.
2399 - 002 - 14.02.2025
5
6. Release the throttle trigger (B) and make sure
that the harvesting attachment stops and stays
stationary.
WARNING: If the harvesting
attachment moves when the throttle trigger
is in the idle position, adjust the idle speed.
Refer to
To adjust the idle speed on page
14
.
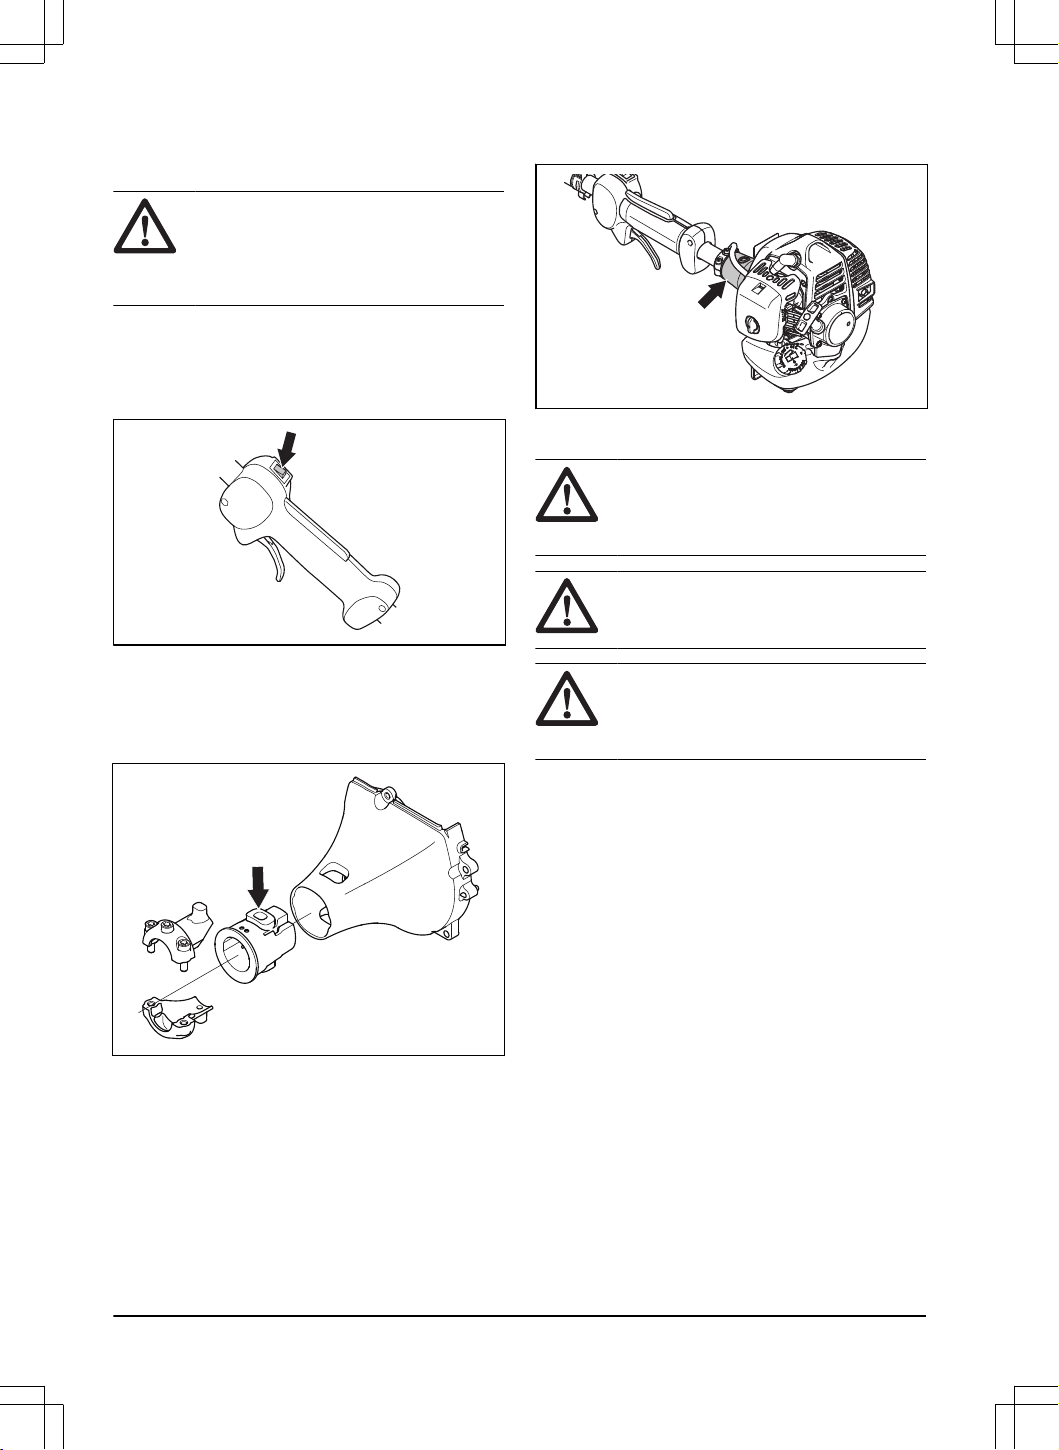
To do a check of the stop switch
1. Start the engine.
2. Move the stop switch to the stop position and make
sure that the engine stops.
To do a check of the vibration damping system
The vibration damping system decreases vibration in
the handles to a minimum which makes the operation
easier.
1. Stop the engine.
2. Do a visual check for deformation and damage, for
example cracks.
3. Make sure that the elements of the vibration
damping system are attached correctly.
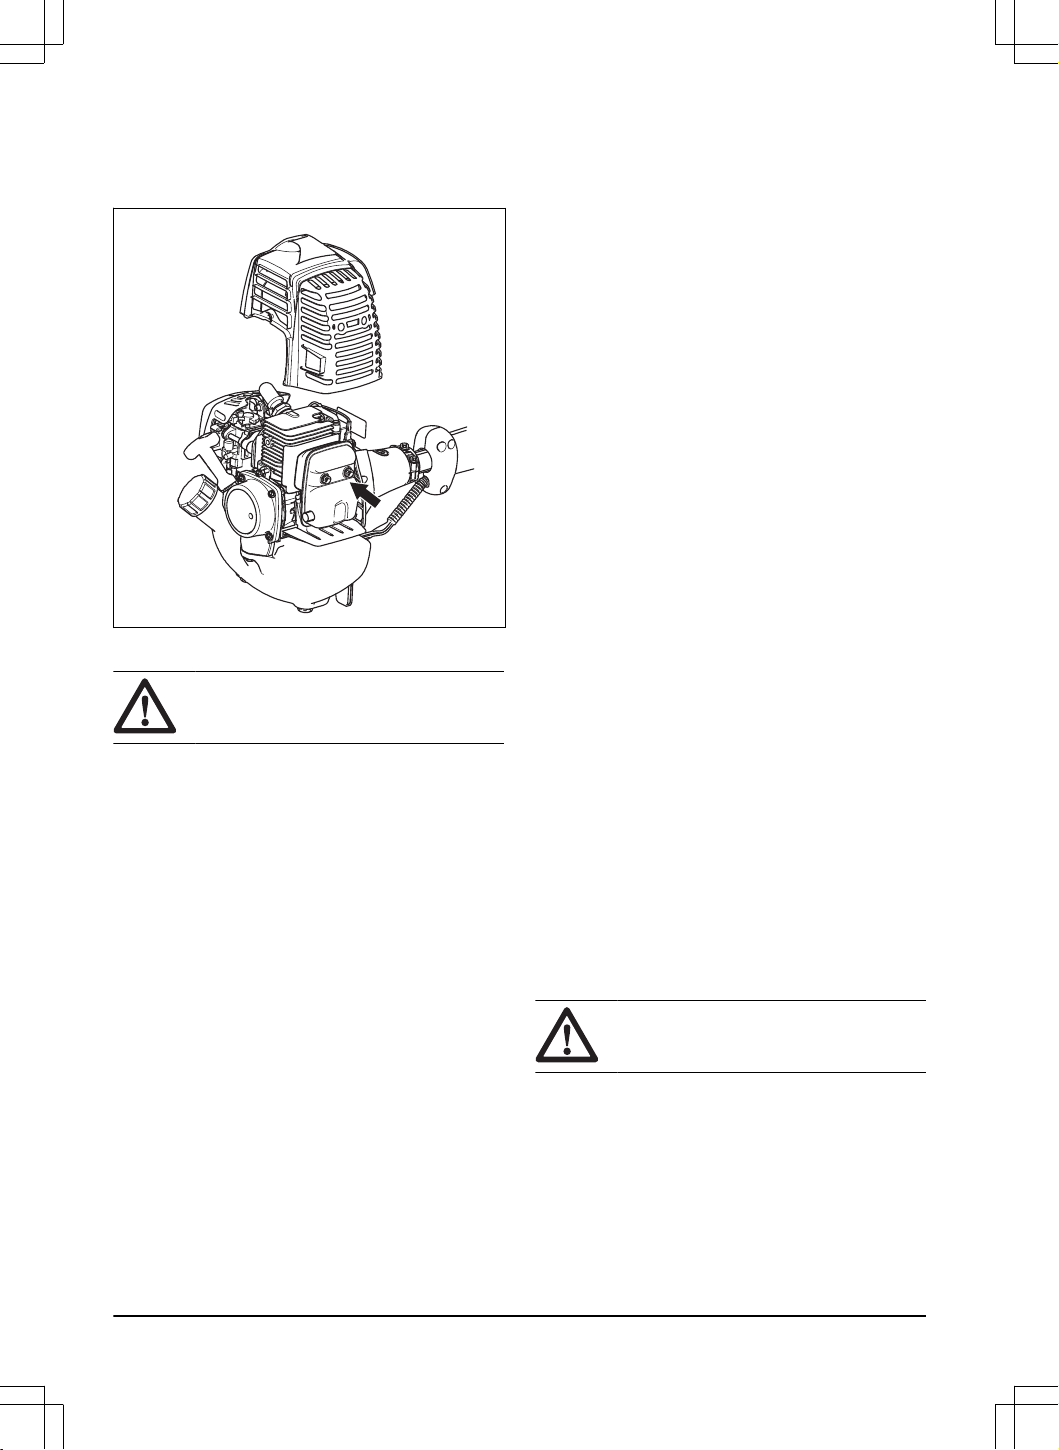
To do a check of the muffler
WARNING: Do not operate the product
without a muffler or a defective muffler. A
defective muffler can increase the noise
level and the risk of fire.
WARNING: The mufflers become very
hot during and after operation, also at idle
speed.
WARNING: The inner surfaces of the
muffler contain chemicals that can cause
cancer. Be careful not to touch these
elements if the muffler is damaged.
The muffler keeps the noise levels to a minimum and
points the exhaust fumes away from the operator
1. Stop the engine.
2. Do a visual check for damage and deformation.
6
2399 - 002 - 14.02.2025
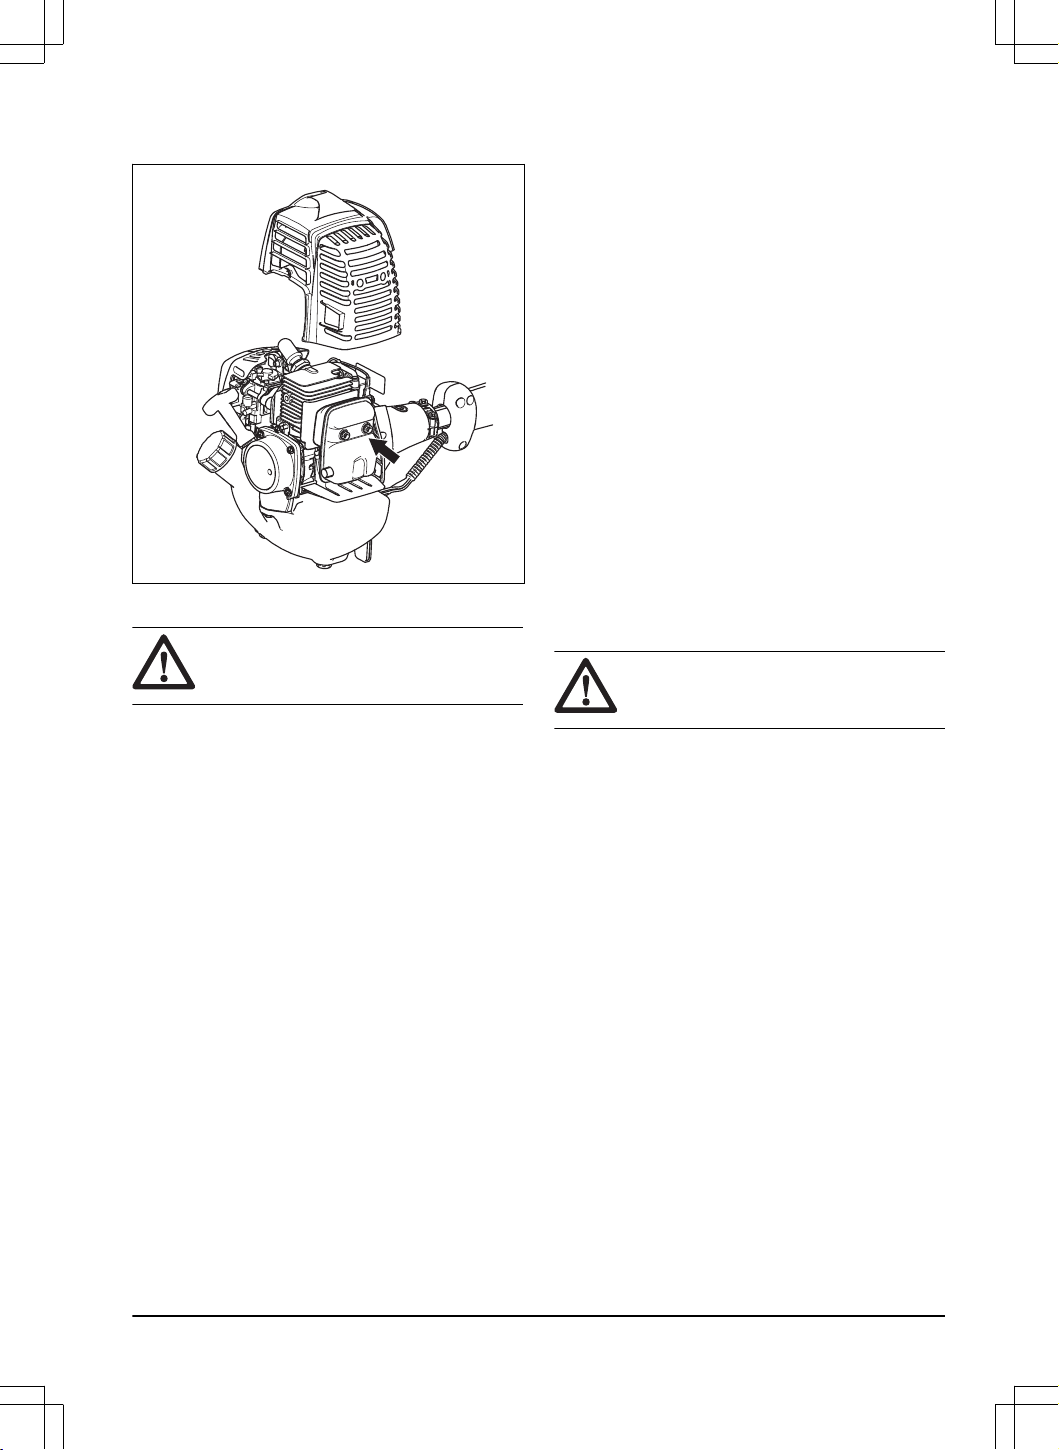
3. Make sure that the muffler is correctly attached to
the product.
Fuel safety
WARNING: Read the warning
instructions that follow before you use the
product.
• Do not mix the fuel indoor or near a heat source.
• Do not start the product if there is fuel or engine oil
on the product. Remove the unwanted fuel/oil and
let the product dry. Remove unwanted fuel from the
product.
• If you spill fuel on your clothing, change clothing
immediately.
• Do not get fuel on your body, it can cause injury. If
you get fuel on your body, use a soap and water to
remove the fuel.
• Do not start the engine if you spill oil or fuel on the
product or on your body.
• Do not start the product if the engine has a leak.
Examine the engine for leaks regularly.
• Be careful with fuel. Fuel is flammable and the fumes
are explosive and can cause injuries or death.
• Do not breathe in the fuel fumes, it can cause injury.
Make sure that there is sufficient airflow.
• Do not smoke near the fuel or the engine.
• Do not put warm objects near the fuel or the engine.
• Do not add the fuel when the engine is on.
• Make sure that the engine is cool before you refuel.
• Before you refuel, open the fuel tank cap slowly and
release the pressure carefully.
• Make sure there are sufficient airflow when refueling
and mixing fuel (petrol and two-stroke oil) or draining
the fuel tank.
• Fuel and fuel vapor are highly flammable and can
cause serious injury when inhaled or allowed to
come into contact with the skin. For this reason,
observe caution when handling fuel and make sure
there is sufficient airflow.
• Tighten the fuel tank cap carefully or a fire can
occur.
• Move the product at a minimum of 3 m (10 ft) from
the position where you filled the tank before a start.
• Do not put too much fuel in the fuel tank.
• Make sure that a leak cannot occur when you move
the product or fuel container.
• Do not put the product or a fuel container where
there is an open flame, spark or pilot light. Make
sure that the storage area does not contain an open
flame.
• Only use approved containers when you move the
fuel or put the fuel into storage.
• Empty the fuel tank before long-term storage. Obey
the local law on where to dispose fuel.
• Clean the product before long-term storage.
• Remove the spark plug cap before you put the
product into storage to make sure that the engine
does not start accidentally.
Vibration safety
WARNING: Read the warning
instructions that follow before you use the
product.
• During operation of the product, vibrations go from
the product to the operator. Regular and frequent
operation of the product can cause or increase the
degree of injuries to the operator. Injuries can occur
in fingers, hands, wrists, arms, shoulders, and/or
nerves and blood supply or other body parts. The
injuries can be debilitating and/or permanent, and
can increase gradually during weeks, months or
years. Possible injuries include damage to the blood
circulation system, the nervous system, joints, and
other body structures.
• Symptoms can occur during operation of the product
or at other times. If you have symptoms and
continue to operate the product, the symptoms can
increase or become permanent. If these or other
symptoms occur, get medical aid:
• Numbness, loss of feeling, tingling, pricking,
pain, burning, throbbing, stiffness, clumsiness,
loss of strength, changes in skin color or
condition.
• Symptoms can increase in cold temperatures. Use
warm clothing and keep your hands warm and dry
when you operate the product in cold environments.
• Do maintenance on and operate the product as
given in the operator's manual, to keep a correct
vibration level.
• Let the product do the work. Do not push the product
with force. Hold the product at the handles lightly,
2399 - 002 - 14.02.2025
7
but make sure that you control the product and
operate it safely.
• Keep your hands on the handles only. Keep all other
body parts away from the product.
• Stop the product immediately if strong vibrations
suddenly occurs. Do not continue the operation
before the cause of the increased vibrations is
removed.
•
Safety instructions for maintenance
WARNING: Read the warning
instructions that follow before you use the
product.
• Stop the engine, make sure that the harvest
attachment stops and let the product become cool
before you do the maintenance.
• Disconnect the spark plug cap before you do the
maintenance.
• The exhaust fumes from the engine contain carbon
monoxide, an odourless, poisonous and very
dangerous gas that can cause death. Do not operate
the product indoors or in closed spaces.
• The exhaust fumes from the engine are hot and can
contain sparks. Do not operate the product indoors
or near flammable material.
• Accessories and changes to the product that are not
approved by the manufacturer, can cause serious
injury or death. Do not do modifications to the
product. Always use original accessories.
• If the maintenance is not done correctly and
regularly, there is an increased risk of injury and
damage to the product.
• Only do the maintenance as this operator's manual
recommends. Let an approved Husqvarna service
agent do all other servicing.
• Let an approved Husqvarna service agent do
servicing on the product regularly.
• Replace damaged, worn or broken parts.
Assembly
Introduction
WARNING: Before you assemble the
product, you must read and understand the
safety chapter.
WARNING: Remove the spark plug
cable from the spark plug before you
assemble the product.
To attach the body of the product
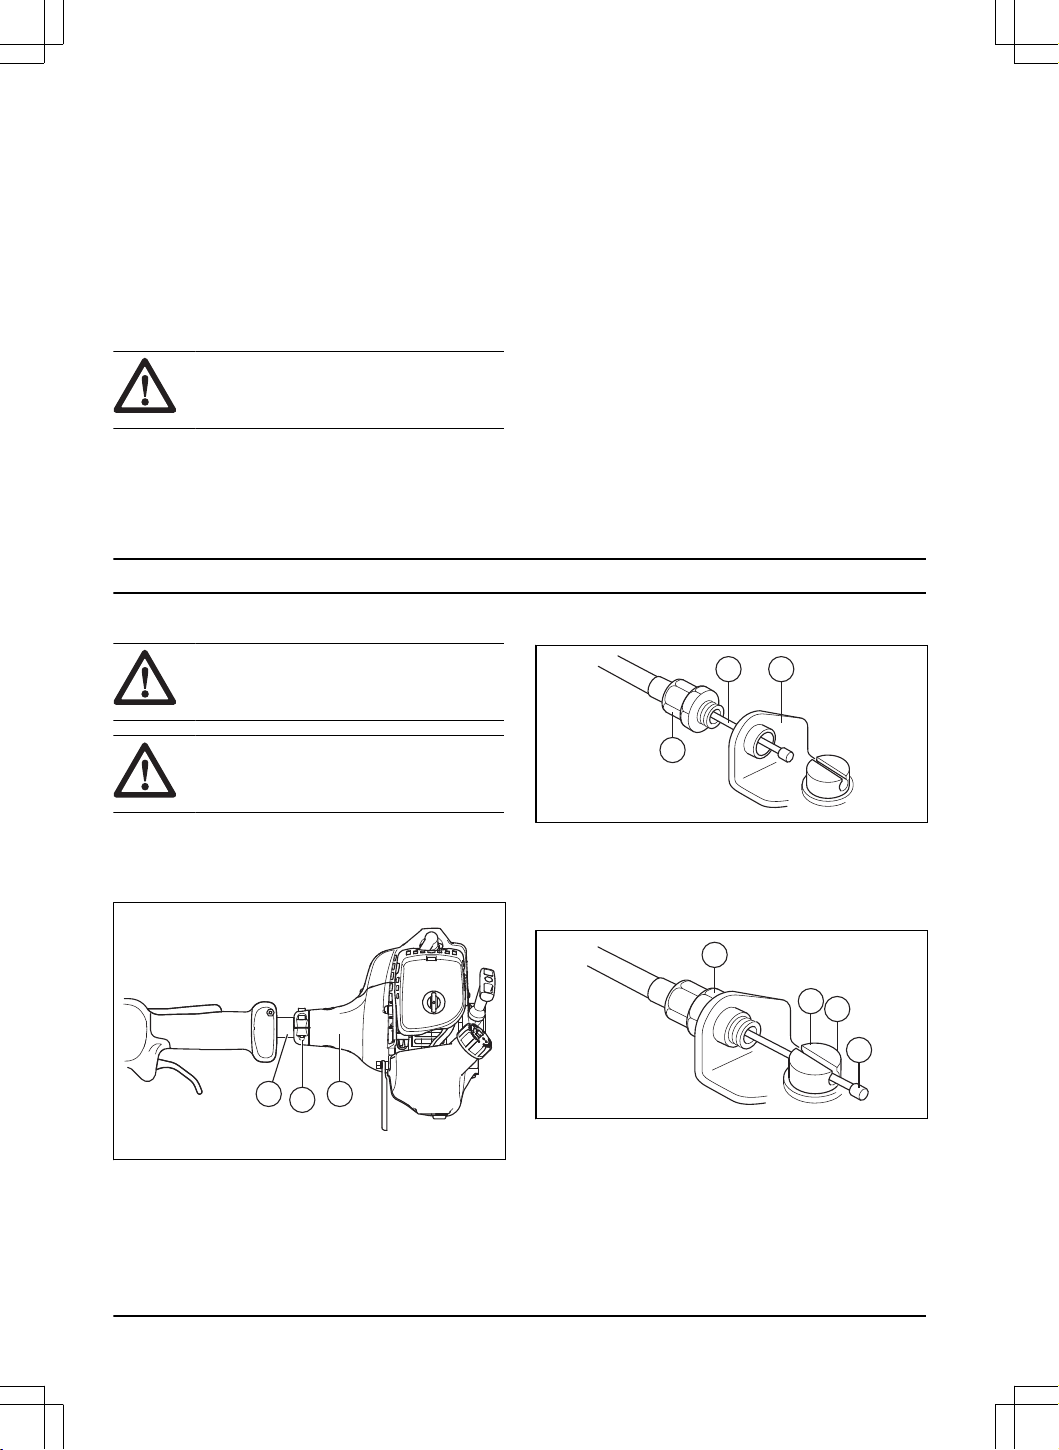
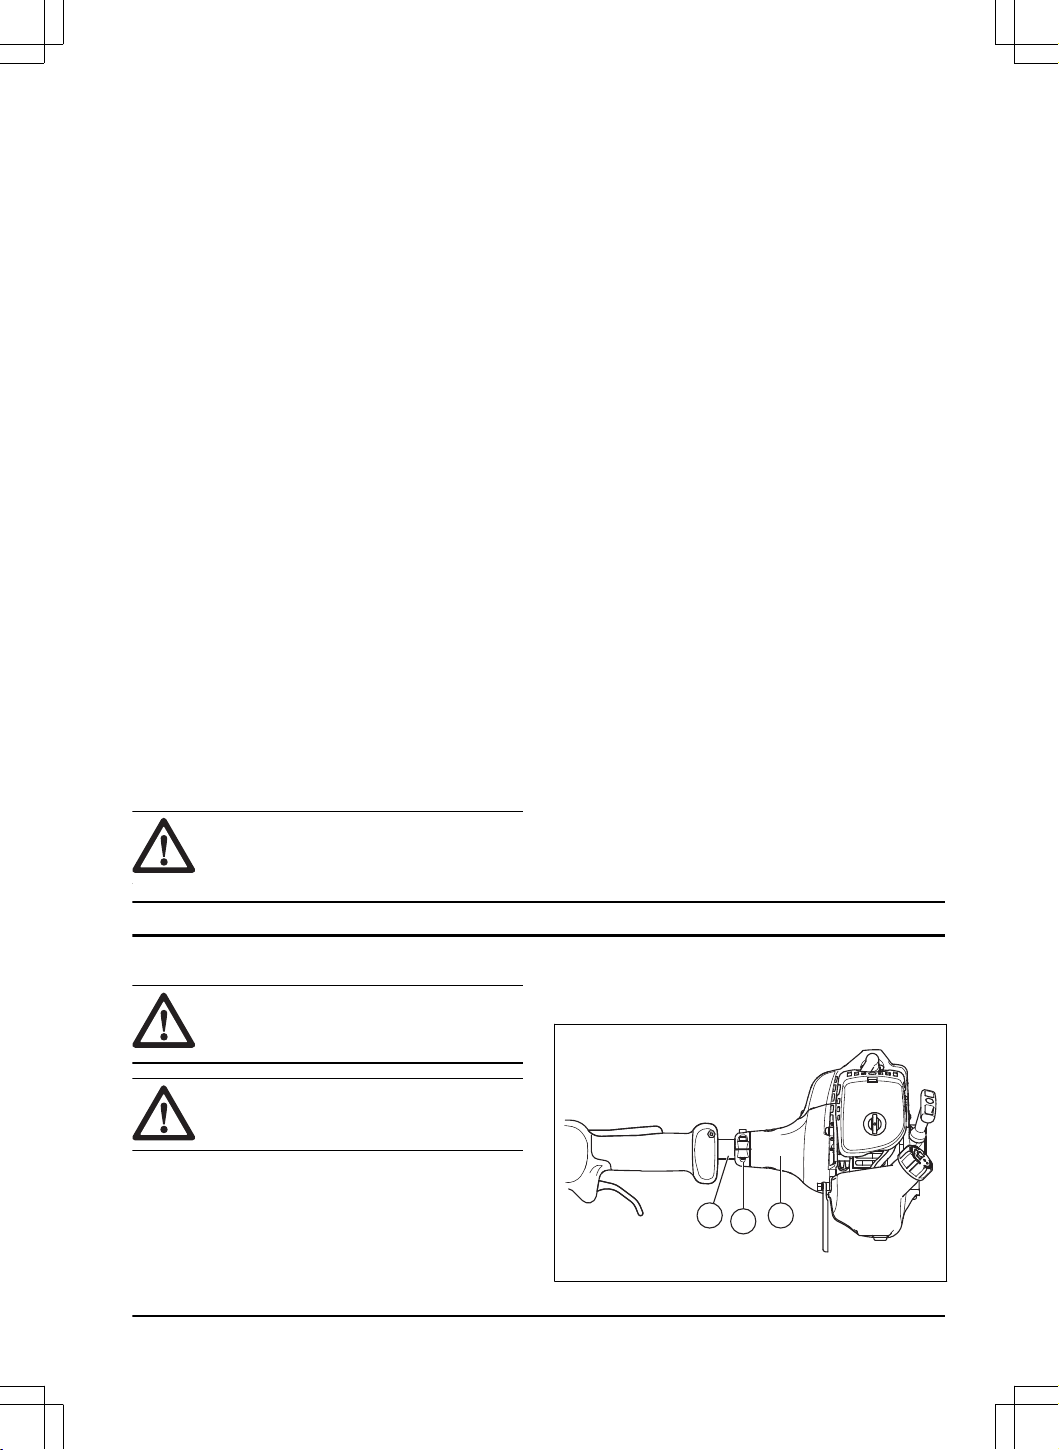
1. Attach the engine (A) to the tube (B) with 3 screws
(C).
AB
C
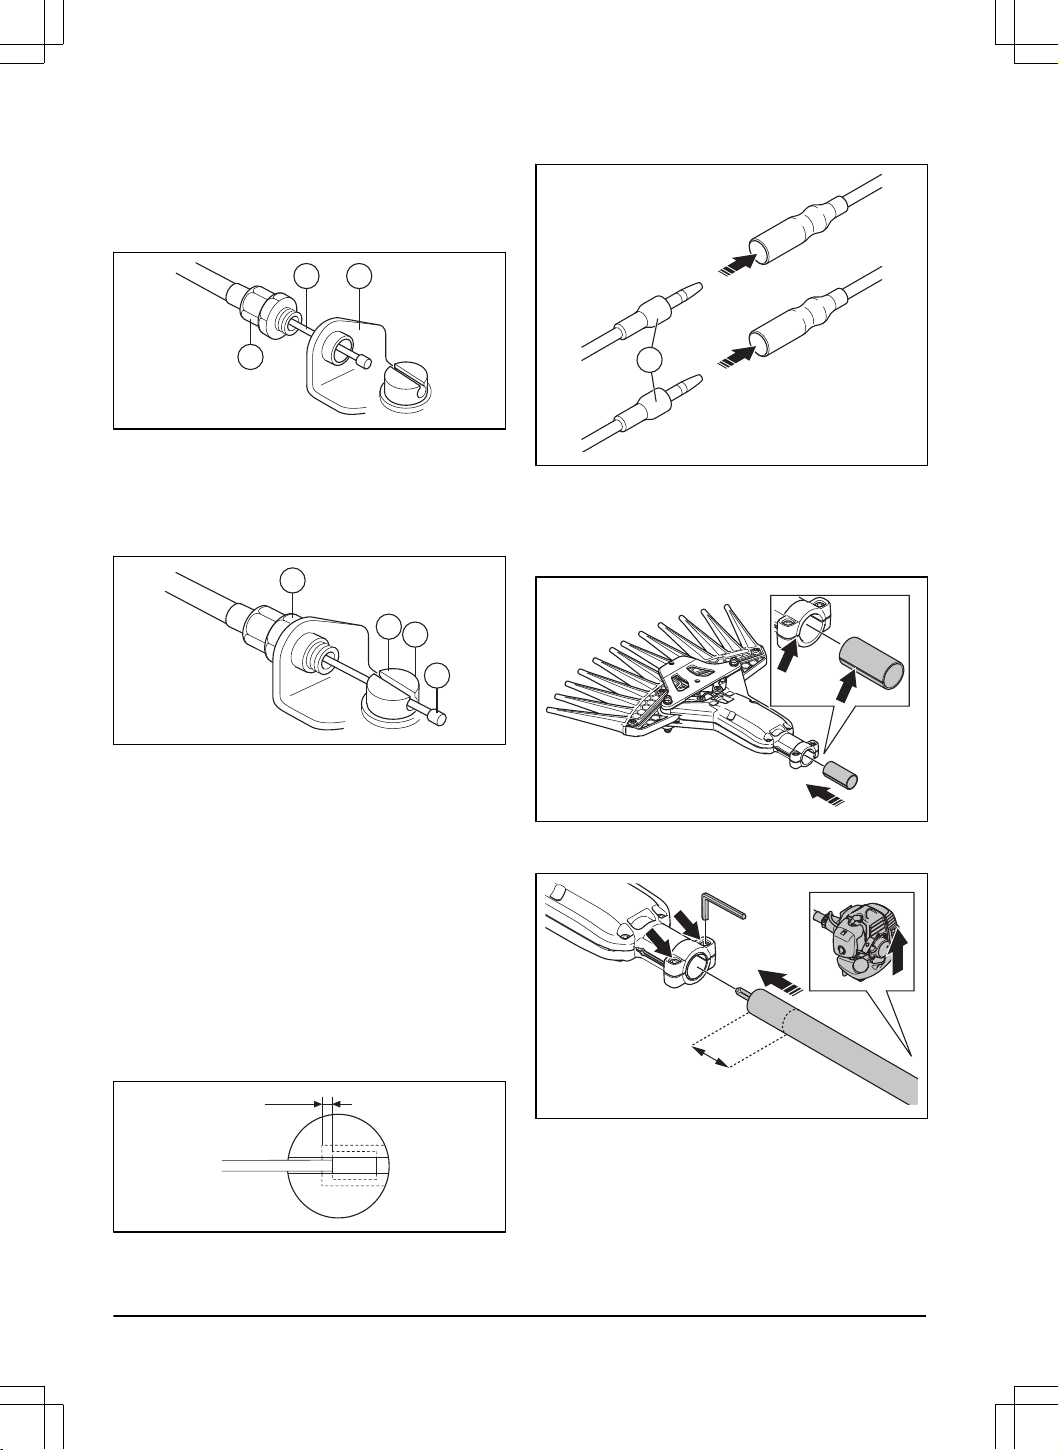
To connect the throttle cable and stop
switch wires
1. Remove the air filter cover.
2. Install the throttle cable (A) through the carburettor
bracket (B).
A B
C
3. Turn the cable adjuster sleeve (C) into the
carburettor bracket fully.
4. Put the slot fitting (D) on the carburettor. At this time,
the recessed hole (E) for the cable lug (F) is away
from the cable adjuster sleeve (C).
G
D
E
F
5. Rotate the carburettor throttle cam and move the
throttle cable (A) through the slot in the slot fitting.
6. Make sure the cable lug (F) drops into the recessed
hole.
7. Operate the throttle trigger some times to make sure
that it operates correctly.
8. Adjust the cable adjuster sleeve (C).
8
2399 - 002 - 14.02.2025
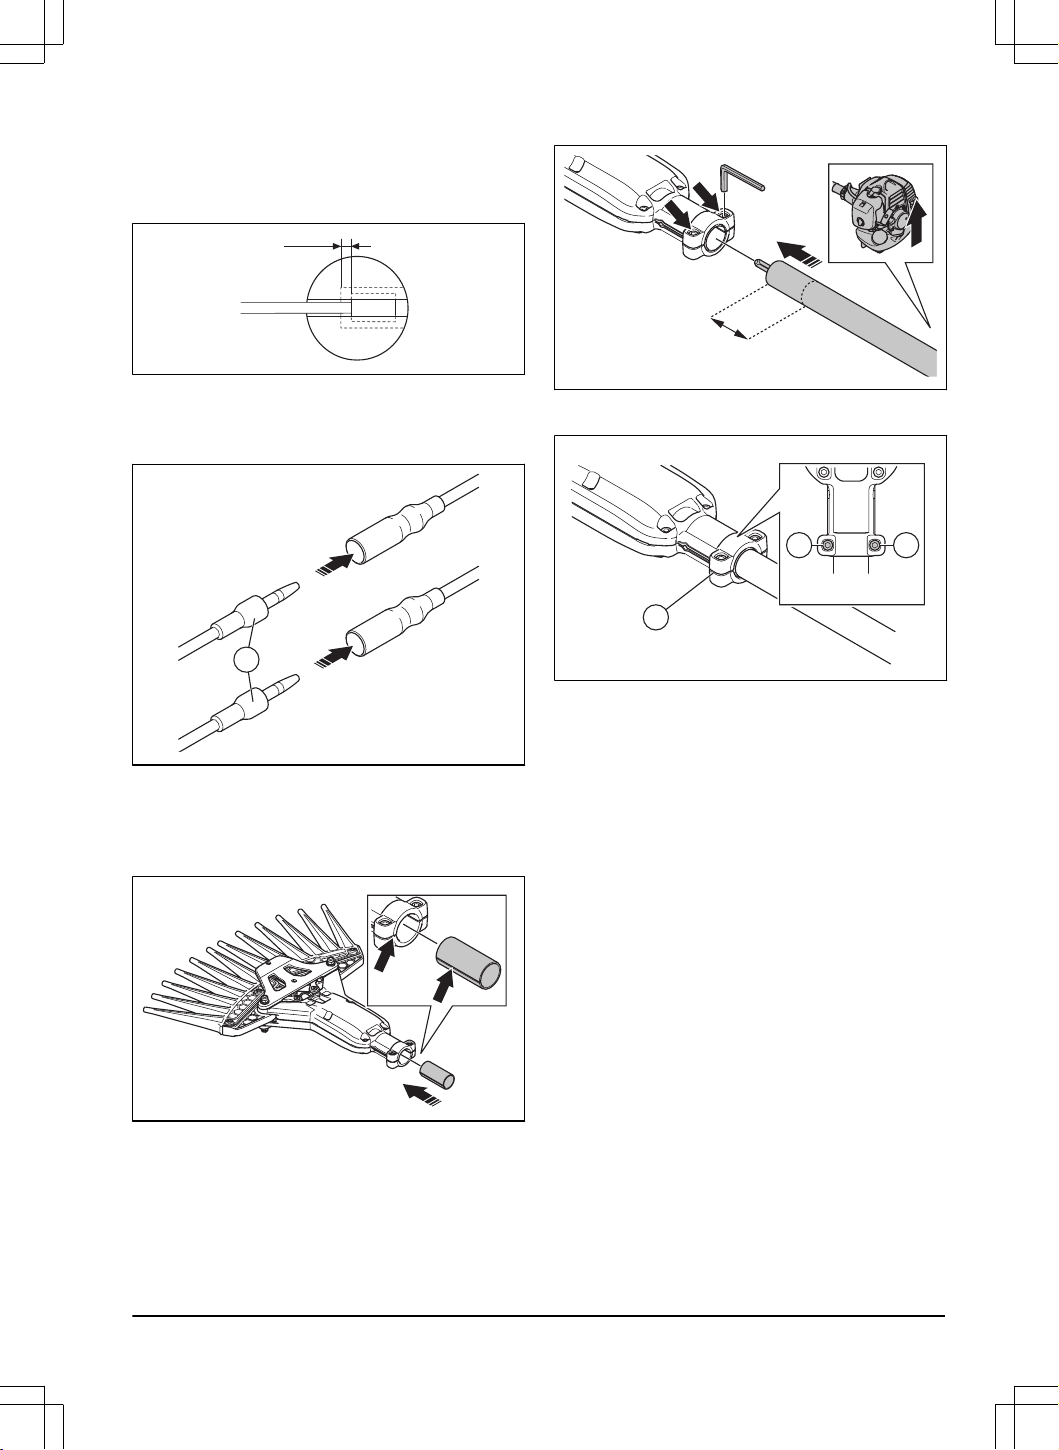
a) Make sure the stop on the carburettor throttle
cam touches the throttle stop correctly.
b) Make sure the cable position keeps 1-2 mm
between cable lug (F) and slot fitting when the
throttle trigger is fully pushed.
1-2mm
9. When the throttle cable (A) is adjusted correctly,
tighten the locknut (G).
10. Connect the stop switch wires (H) with the
connectors from the engine.
H
11. Install the air filter cover.
To assemble the harvesting attachment
1. Align the groove on the tube attachment with the
groove on the tube clamp.
2. Push the tube attachment into the tube clamp.
3. Install the harvesting attachment on the shaft.
50 mm
4. Tighten the 2 screws on the tube clamp but do not
tighten the screws fully.
5 Nm
A
C
B
5. Tighten the screw (A) and then the screw (B) on
the tube clamp fully. Make sure that the space (C)
between the clamps is approximately 0.8 mm.
2399 - 002 - 14.02.2025
9
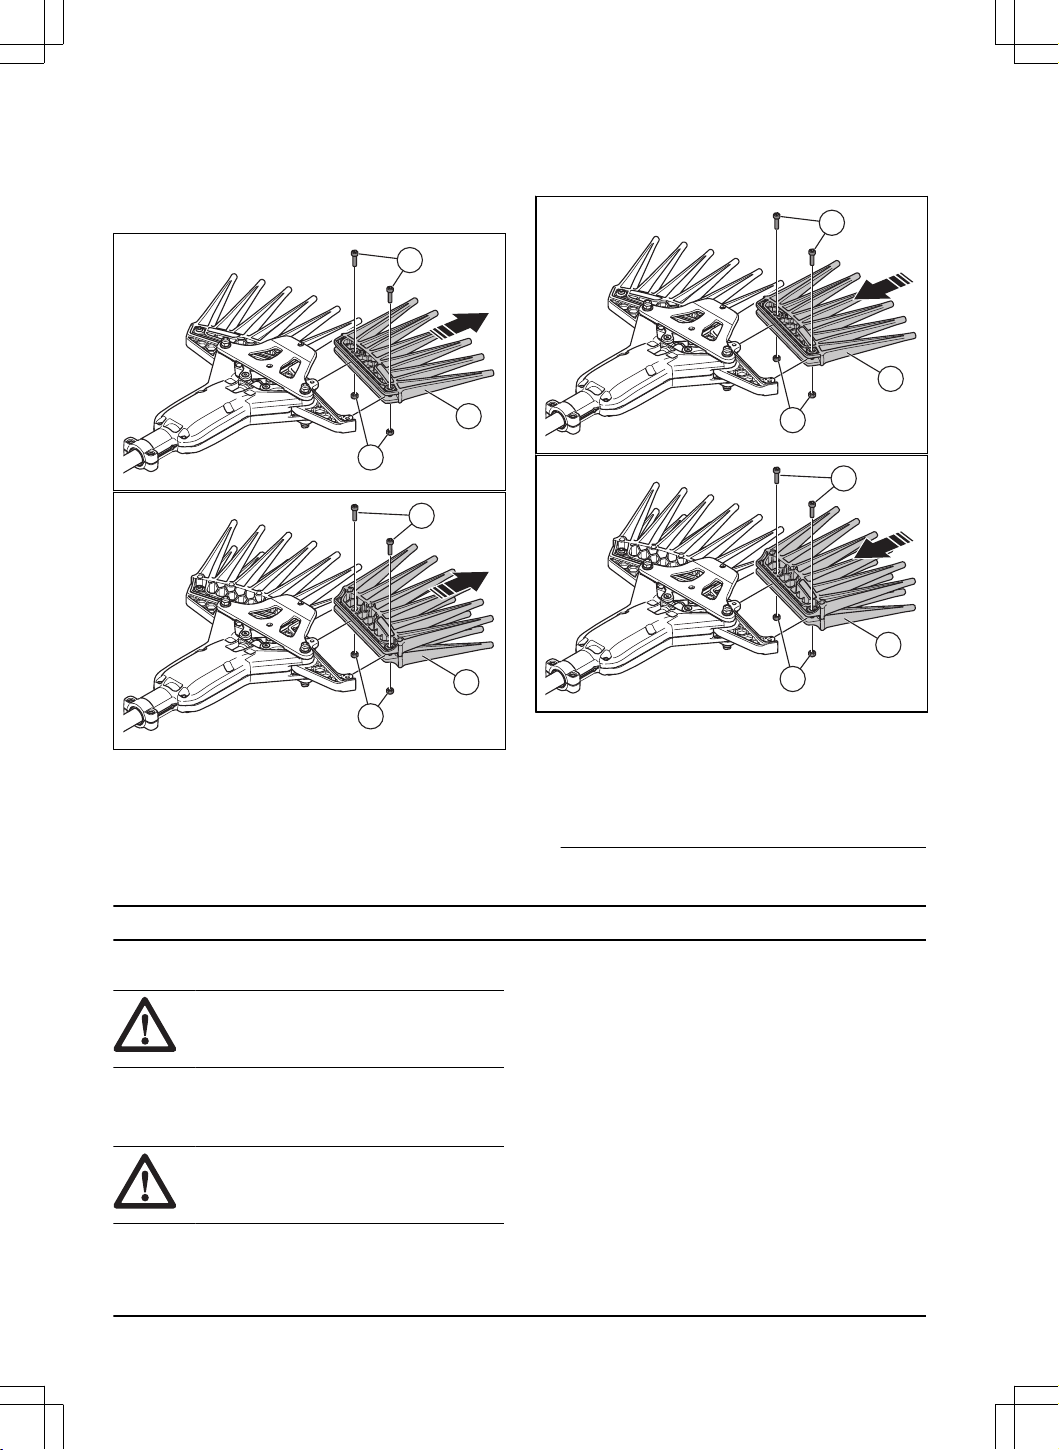
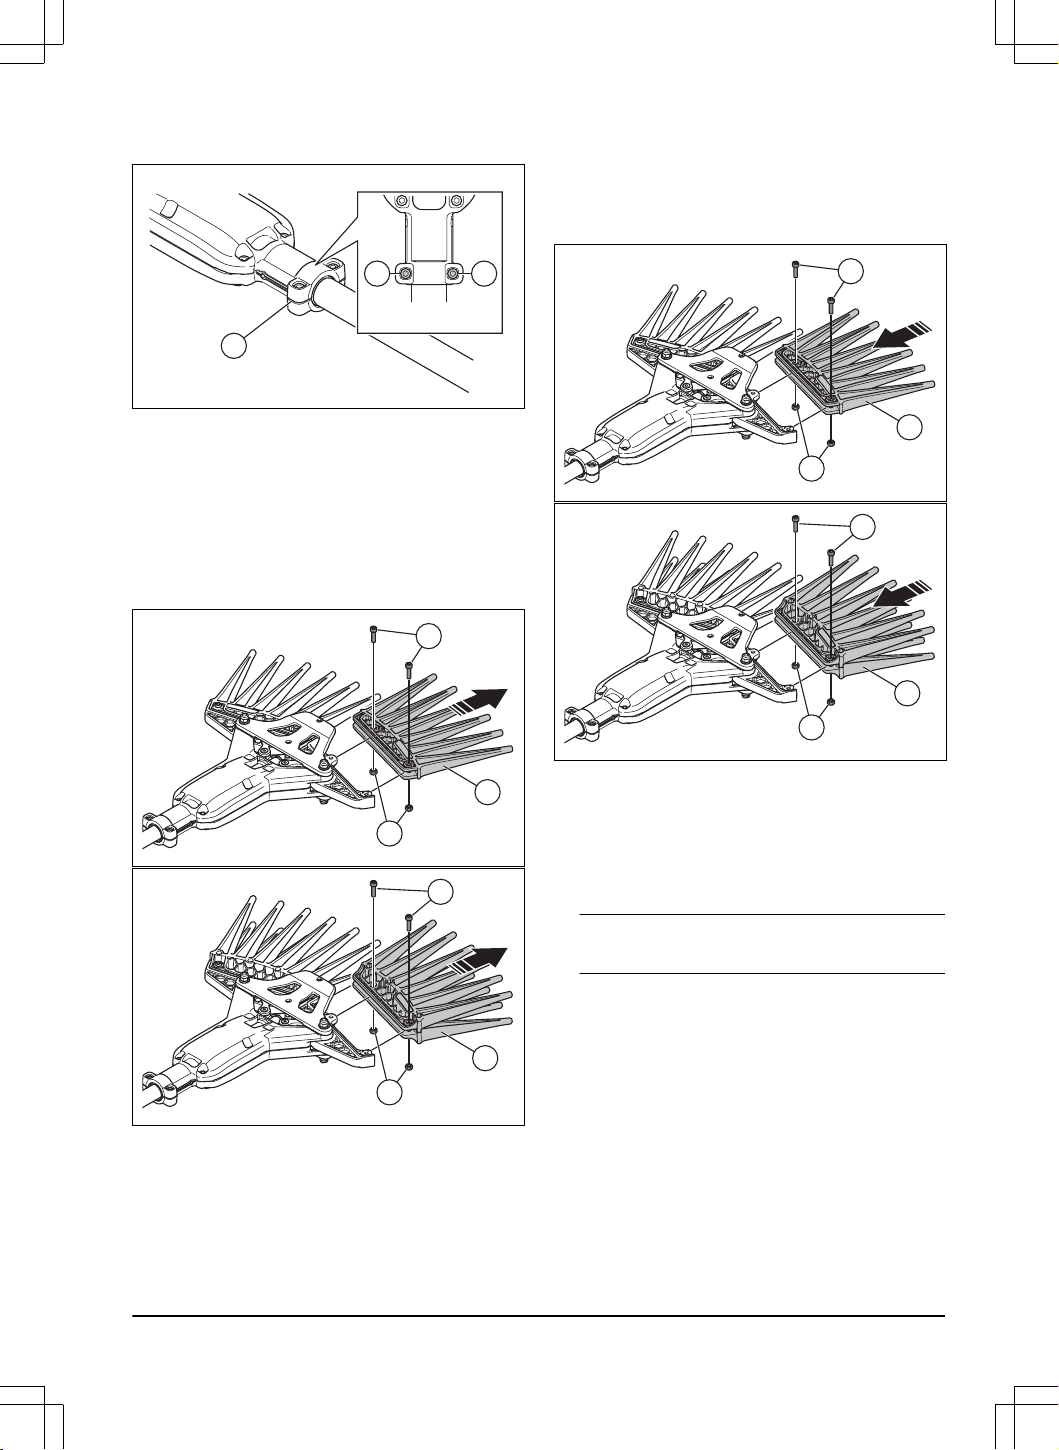
To remove the finger attachment
1. Use a M6 solid wrench to hold the nut (B) in position.
At the same time, use a M6 hex key to remove the 4
screws (A) from the single/double finger attachment
(C).
A
C
B
A
C
B
2. Remove the single/double finger attachment (C)
from the harvesting attachment.
To install the finger attachment
1. Attach the single/double finger attachment (D) on the
harvesting attachment.
E
D
F
E
D
F
2. Use a M6 hex key to hold the nut (F) in position. At
the same time, use a M6 solid wrench to install the
4 screws (E) on the single/double finger attachment.
Do not tighten the screws fully.
3. Tighten the 4 screws fully on the single/double finger
attachment (D).
Note:
Tightening torque 9–10 Nm.
Operation
Introduction
WARNING: Before you operate the
product, you must read and understand the
safety chapter.
Fuel
This product has a two-stroke engine.
CAUTION: Incorrect type of fuel can
result in engine damage. Use a mixture of
gasoline and two-stroke oil.
Premixed fuel
• Use Husqvarna premixed alkylate fuel for best
performance and extension of the engine life. This
fuel contains less harmful chemicals compared
to regular fuel, which decreases harmful exhaust
fumes. The quantity of remains after combustion is
lower with this fuel, which keeps the components of
the engine more clean.
To mix fuel
Gasoline
• Use good quality unleaded gasoline with a maximum
of 27% ethanol contents.
10 2399 - 002 - 14.02.2025
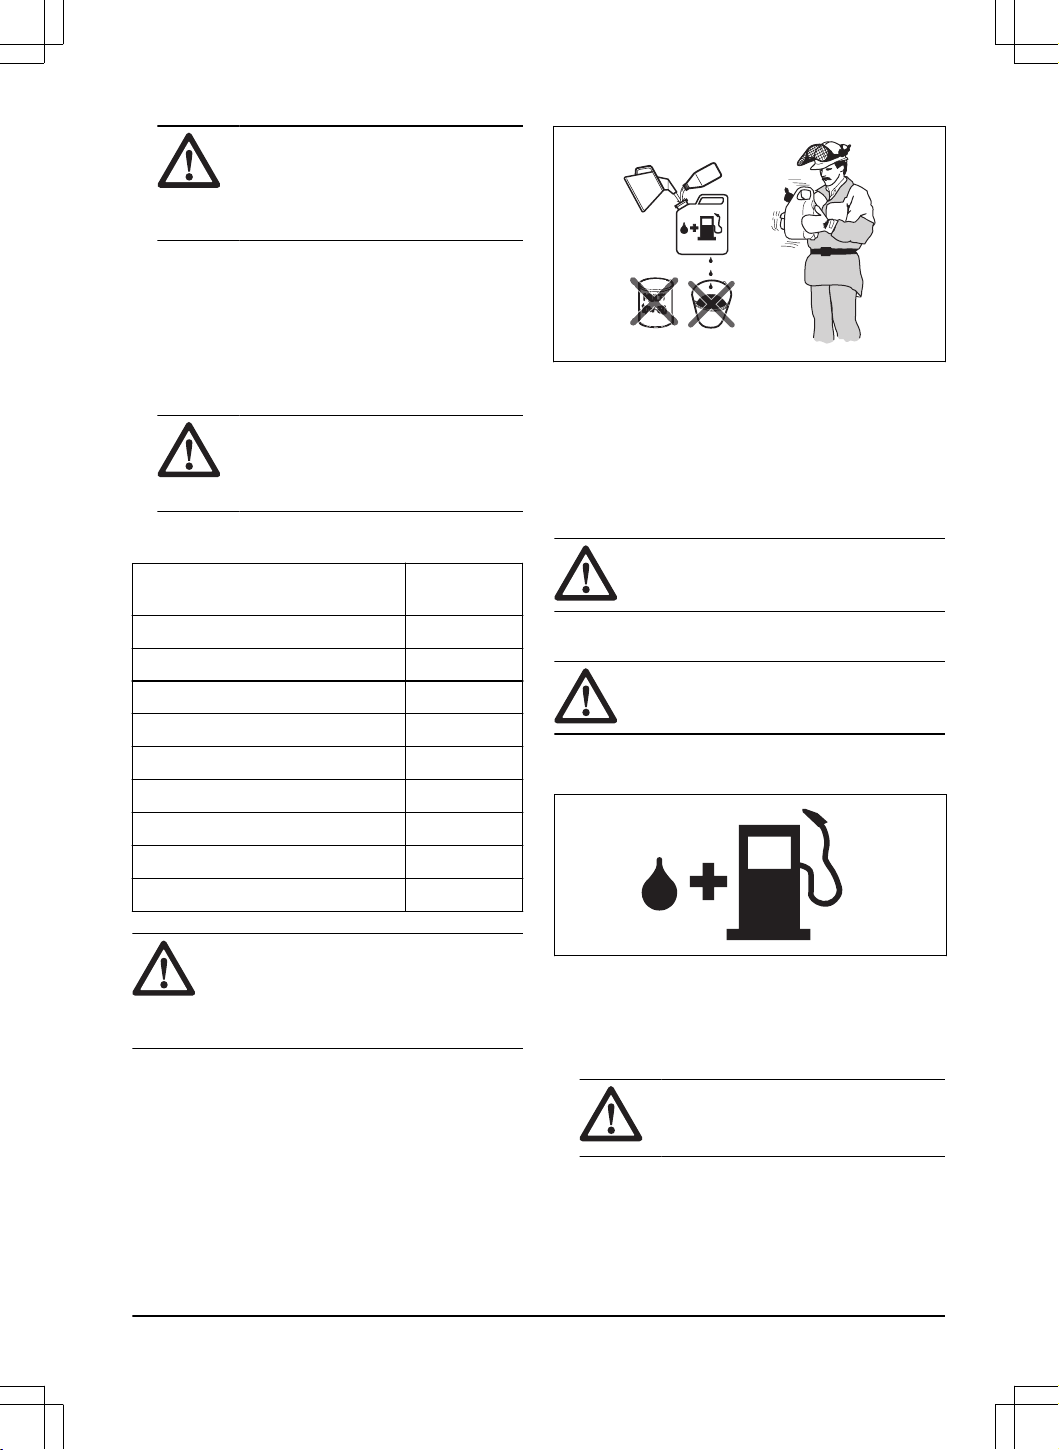
CAUTION: Do not use gasoline with
an octane grade less than 90 RON/87
AKI. Use of a lower octane grade can
cause engine knocking, which causes
engine damages.
Two-stroke oil
• For best results and performance use Husqvarna
two-stroke oil.
• If Husqvarna two-stroke oil is not available, use a
two-stroke oil of good quality for air-cooled engines.
Speak to your servicing dealer to select the correct
oil.
CAUTION: Do not use two-stroke
oil for water-cooled outboard engines,
also referred to as outboard oil. Do not
use oil for four-stroke engines.
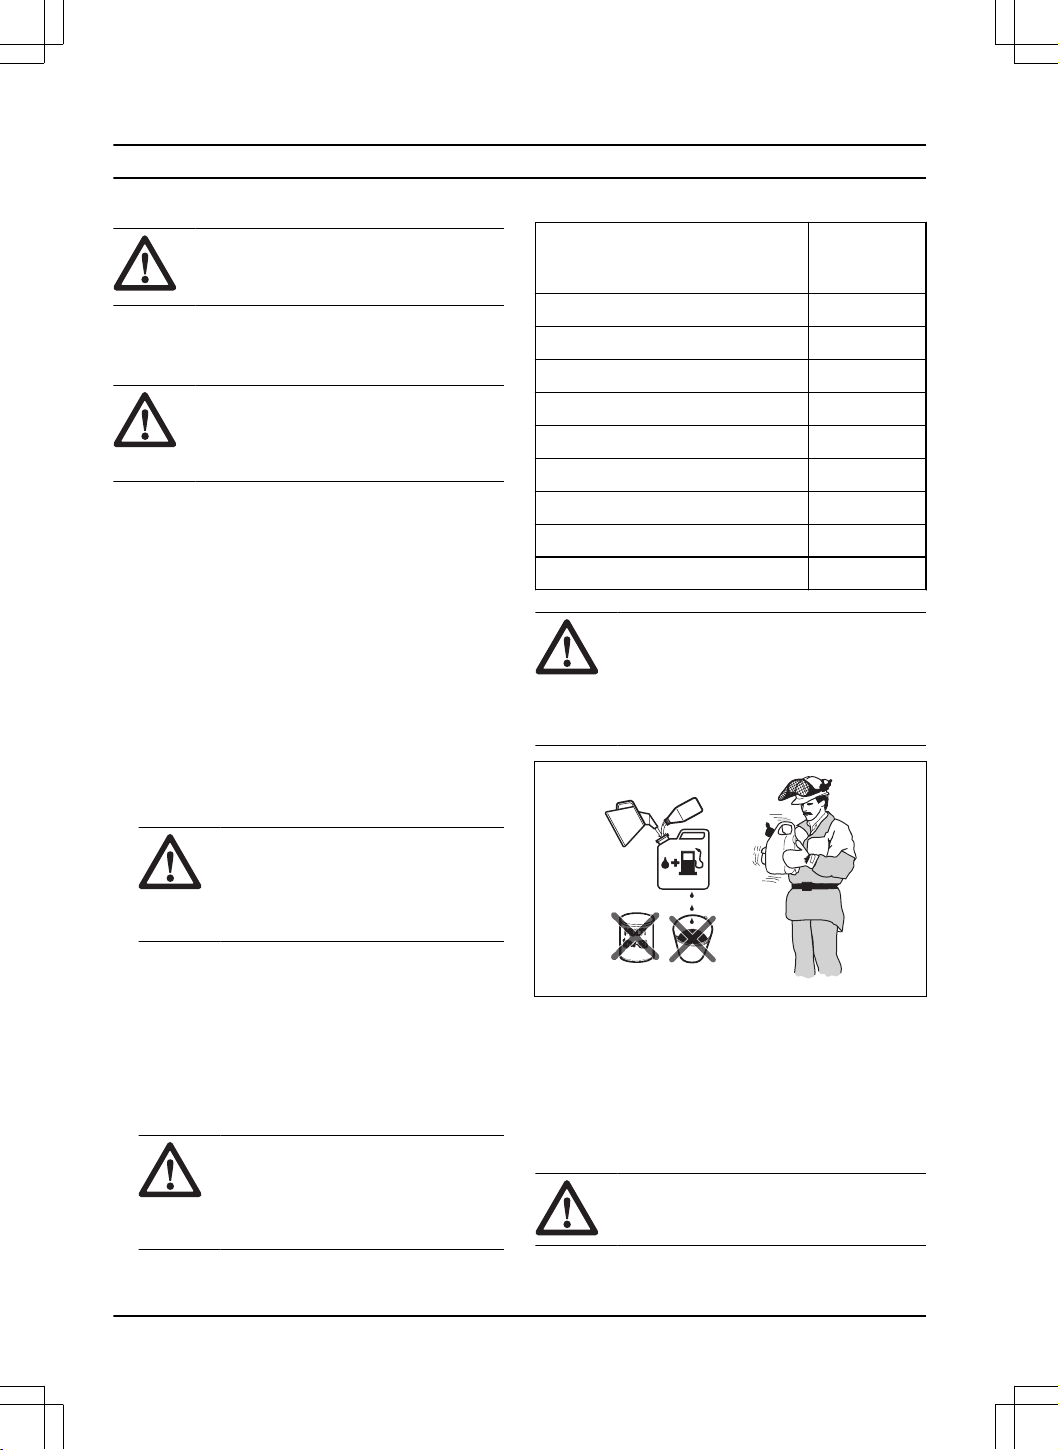
To mix gasoline and two-stroke oil
Gasoline, liter Two-stroke oil,
liter
2% (50:1)
5 0.10
10 0.20
15 0.30
20 0.40
US gallon US fl. oz.
1 2 ½
2 1/2 6 ½
5 12 ⅞
CAUTION: Small errors can influence
the ratio of the mixture drastically when you
mix small quantities of fuel. Measure the
quantity of oil carefully and make sure that
you get the correct mixture.
1. Fill half the quantity of gasoline in a clean container
for fuel.
2. Add the full quantity of oil.
3. Shake the fuel mixture.
4. Add the remaining quantity of gasoline to the
container.
5. Carefully shake the fuel mixture.
CAUTION: Do not mix fuel for more
than 1 month at a time.
To fill the fuel tank
WARNING: Obey the procedure that
follows for your safety.
1. Stop the engine and let the engine become cool.
2. Clean the area around the fuel tank cap.
3. Shake the container and make sure that the fuel is
fully mixed.
4. Remove the fuel tank cap slowly to release the
pressure.
5. Fill the fuel tank.
CAUTION:
Make sure that there is
not too much fuel in the fuel tank. The
fuel expands when it becomes hot.
6. Tighten the fuel tank cap carefully.
7. Clean fuel spillage on and around the product.
8. Move the product 3 m/10 ft or more away from the
refueling area and fuel source before you start the
engine.
2399 - 002 - 14.02.2025
11
Note: To see where the fuel tank is on your product,
refer to
Product overview on page 2
.
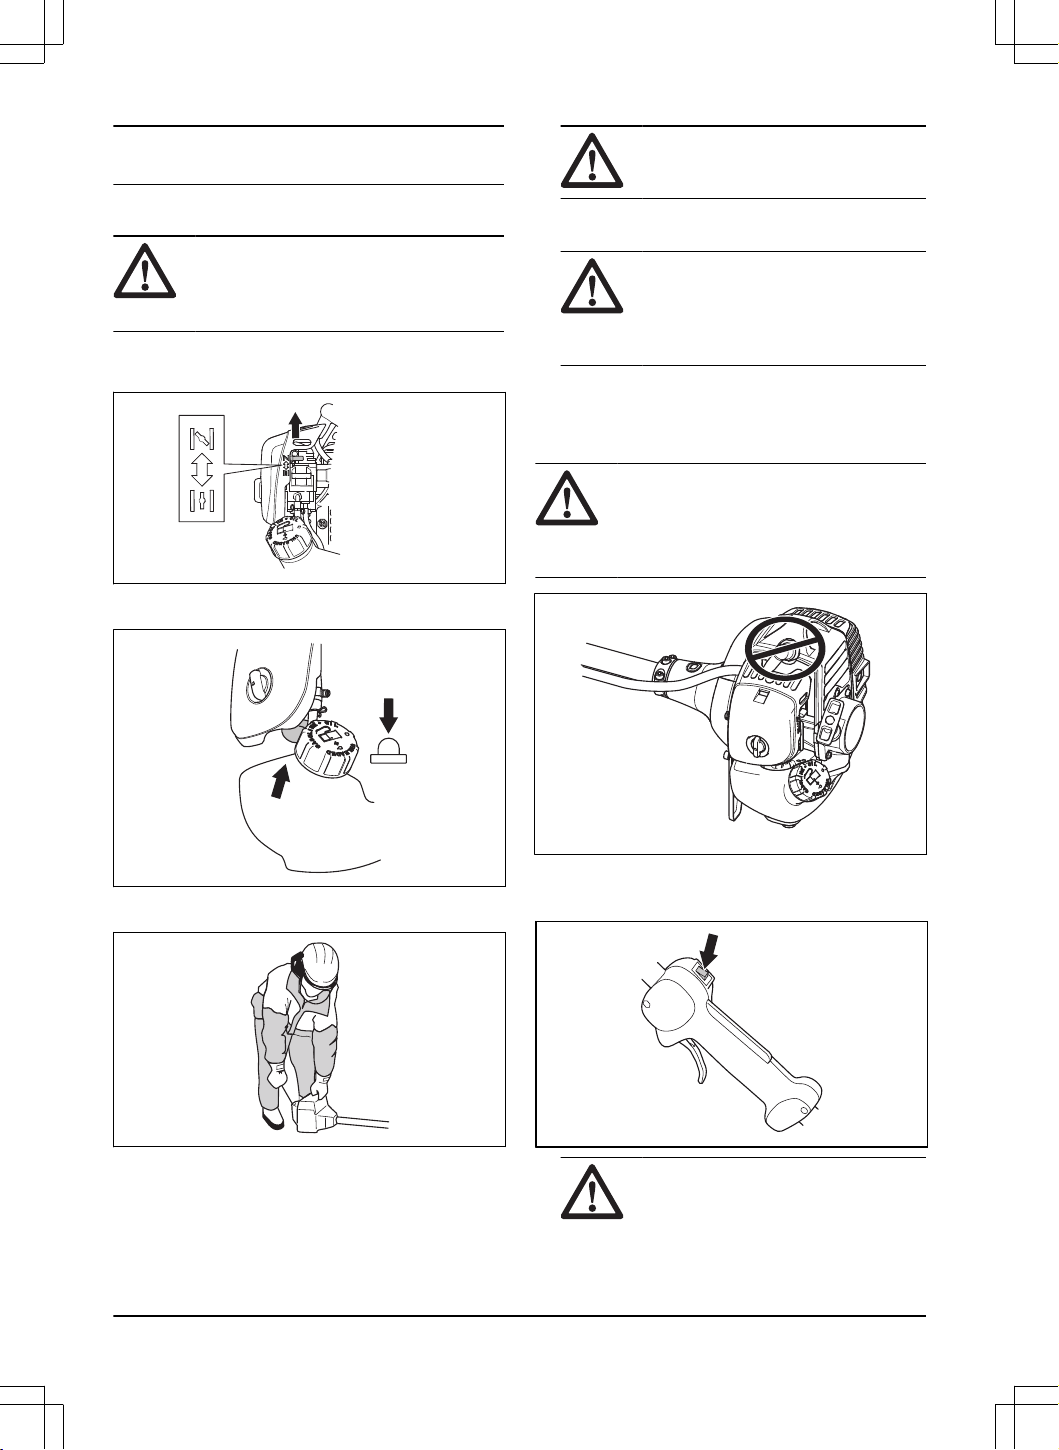
To start the product
WARNING: Keep the safety distance of
15 m/50 ft when the engine starts. There is
a risk that the harvest attachment starts to
move.
1. Set the stop switch to the start position.
2. Set the choke control in the choke position.
3. Push the air purge bulb until the bulb starts to fill with
fuel.
4. Hold the body of the product on the ground with your
left hand. Do not put your feet on the product.
5. Pull the starter rope handle slowly until you feel
some resistance, then pull the starter rope handle
with force.
WARNING:
Do not wind the starter
rope around your hand.
6. Continue to pull the starter rope handle until the
engine starts.
CAUTION: Do not pull the starter
rope until it stops. Do not let go of the
starter rope when it is fully extended.
Release the starter rope slowly. Risk of
damage to the product.
7. When the engine starts, put the choke control in the
run position and apply full throttle. The throttle trigger
automatically disengages from the start position.
8. Make sure that the engine runs smoothly.
WARNING: Keep body parts away
from the spark plug cap to prevent burn
injuries. Risk of burn injuries. Do not use
the product with a damaged spark plug cap.
Risk of electrical shock.
To stop the product
1. Turn off the ignition to stop the engine.
CAUTION:
The stop switch
automatically returns to the start
position. In order to prevent unintentional
starting, the spark plug cap must be
removed from the spark plug when
12 2399 - 002 - 14.02.2025
assembling, checking and/or performing
maintenance.
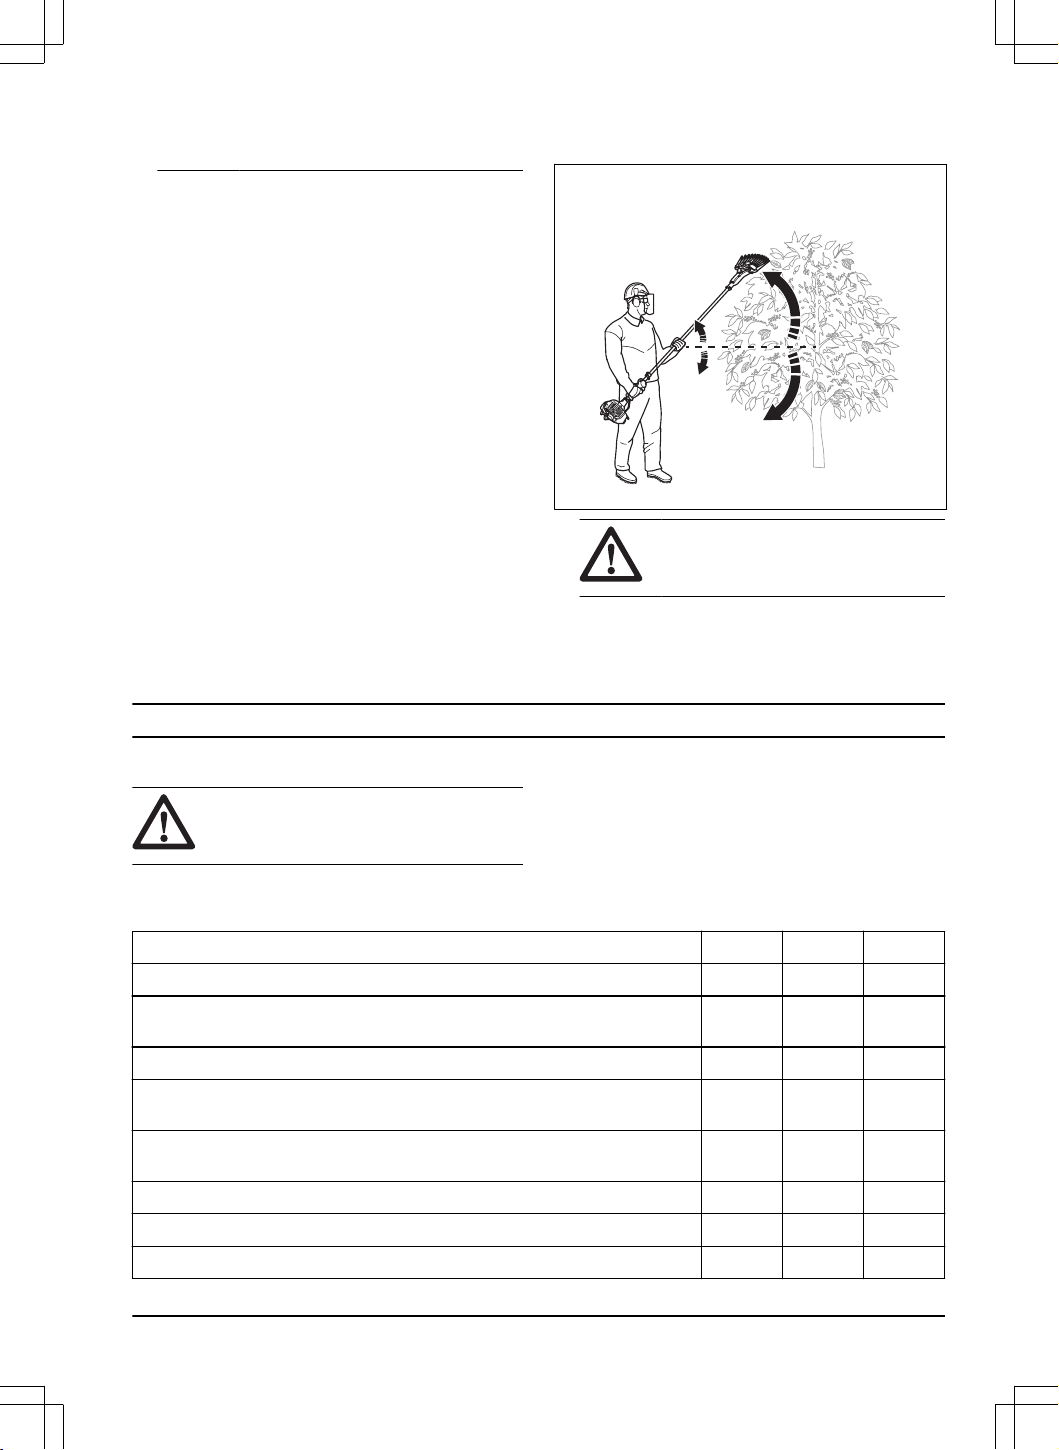
General work instructions
• Hold the product as close to your body as possible to
get the best balance.
• Make sure that the tip does not touch the ground.
• Do not rush the work, but work steadily until all
the coffee beans have been harvested from the
branches.
• Always slow the engine to idle speed after each
working operation. Long periods at full throttle
without any load on the engine can lead to serious
engine damage.
• Always work at full throttle.
To operate the product
1. Put the harvesting attachment at the bottom of the
branch.
2. Hold the product tightly with your two hands to keep
the product balanced.
3. Push the power trigger and move the harvesting
attachment along the branch.
WARNING: Make sure to operate
the product safely. Refer to
Safety
instructions for operation on page 3
.
4. Operate the product continuously until all coffee
beans are harvested.
5. Release the power trigger when the harvesting
attachment is off the branches.
Maintenance
Introduction
WARNING: Read and understand the
safety chapter before you do maintenance
on the product.
Maintenance schedule
Maintenance Daily Weekly Monthly
Clean the external surface. X
Do a check of the throttle trigger lockout and the throttle trigger. Refer to
To do a
check of the throttle trigger lockout on page 5
.
X
Make sure that the harvesting attachment does not move at idle speed. X
Do a check of the stop switch. Refer to
To do a check of the stop switch on page
6
.
X
Do a check of the handles for damages and make sure that they are attached
correctly.
X
Tighten the locking screw fully for harvest attachments. X
Do a check of the engine, the fuel tank and the fuel lines for leaks. X
Clean the air filter. Replace it if it is damaged. X
2399 - 002 - 14.02.2025 13
Maintenance Daily Weekly Monthly
Tighten nuts and screws. X
Make sure that the harvesting attachment does not rotate at idle speed X
Do a check of the harvesting attachment for damages and cracks. X
Do a check of the starter and the starter rope for damages. X
Do a check of the vibration damping units for damages and cracks.
1
X
Do a check of the spark plug. Refer to
To do a check of the spark plug on page
15
.
X
Clean the cooling system. X
Clean the external surface of the carburetor and the area around it. X
Do a check the fuel filter for contamination and the fuel hose for cracks and other
defects. Replace if it is necessary.
X
Do a check of all cables and connections. X
Do a check of the clutch, clutch springs and clutch drum for wear. Replace it if it
is necessary.
X
Replace the spark plug. X
Lubricate the drive shaft.
2
X
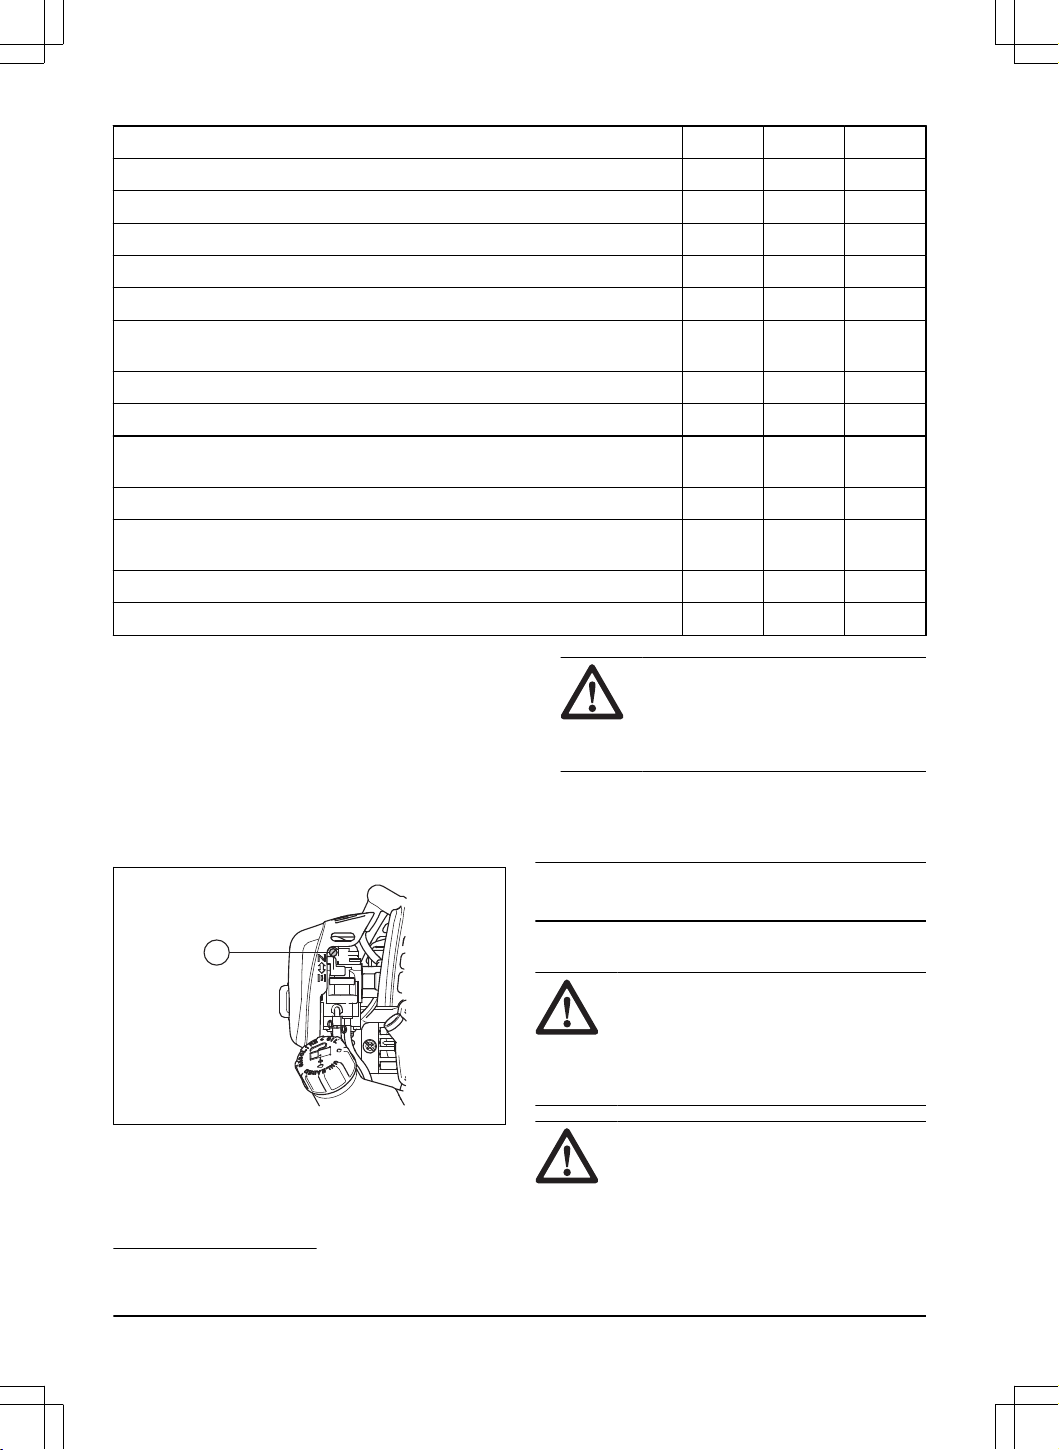
To adjust the idle speed
Your Husqvarna product is made to specifications that
decrease harmful emissions.
1. Make sure that the air filter is clean and the air filter
cover is attached before you adjust the idle speed.
2. Adjust the idle speed with the idle speed screw T
which is identified with "T" mark.
a) Turn the idle speed screw T clockwise until the
harvesting attachment starts to move.
T
b) Turn the idle speed screw T counterclockwise
until the harvesting attachment stops.
WARNING: If the harvesting
attachment does not stop when you
adjust the idle speed, speak to your
servicing dealer. Do not use the product
until it is correctly adjusted or repaired.
3. The idle speed is correct when the engine operates
smoothly in all positions. The idle speed must be
below the speed when the harvesting attachment
starts to move.
Note: Refer to
Technical data on page 18
for the
recommended idle speed.
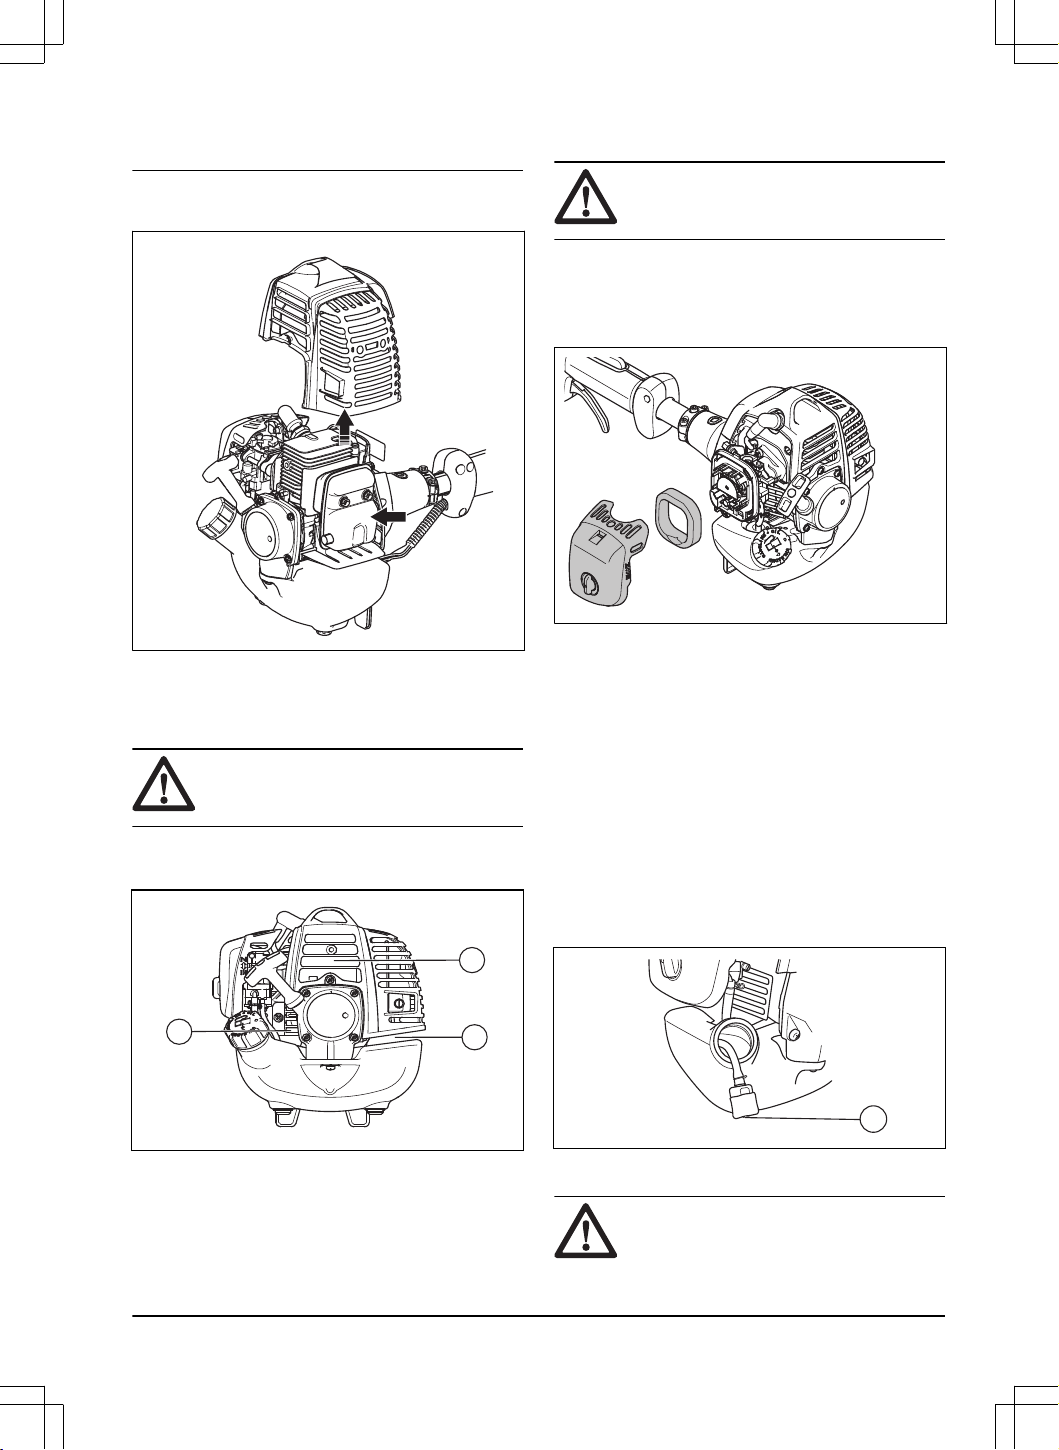
To replace the muffler
WARNING: The muffler decreases
the noise level and points the exhaust
gases away from the operator. The exhaust
gases are hot and can contain sparks. This
can cause fire if pointed against dry and
flammable material.
WARNING: Mufflers with catalytic
converters become hot during operation.
Risk of burn or fire. This also applies at idle
speed. To examine if your product has a
1
Replace the vibration damping unit after each season or at a minimum of one time each year.
2
At an interval of 3 months.
14 2399 - 002 - 14.02.2025
catalytic converter, refer to
Product overview
on page 2
.
1. Stop the engine and let the muffler become cool.
2. Remove the muffler cover.
3. Replace the muffler.
4. Attach the muffler cover.
To clean the cooling system
CAUTION:
A dirty or blocked cooling
system can make the product too hot, which
can cause damage to the product.
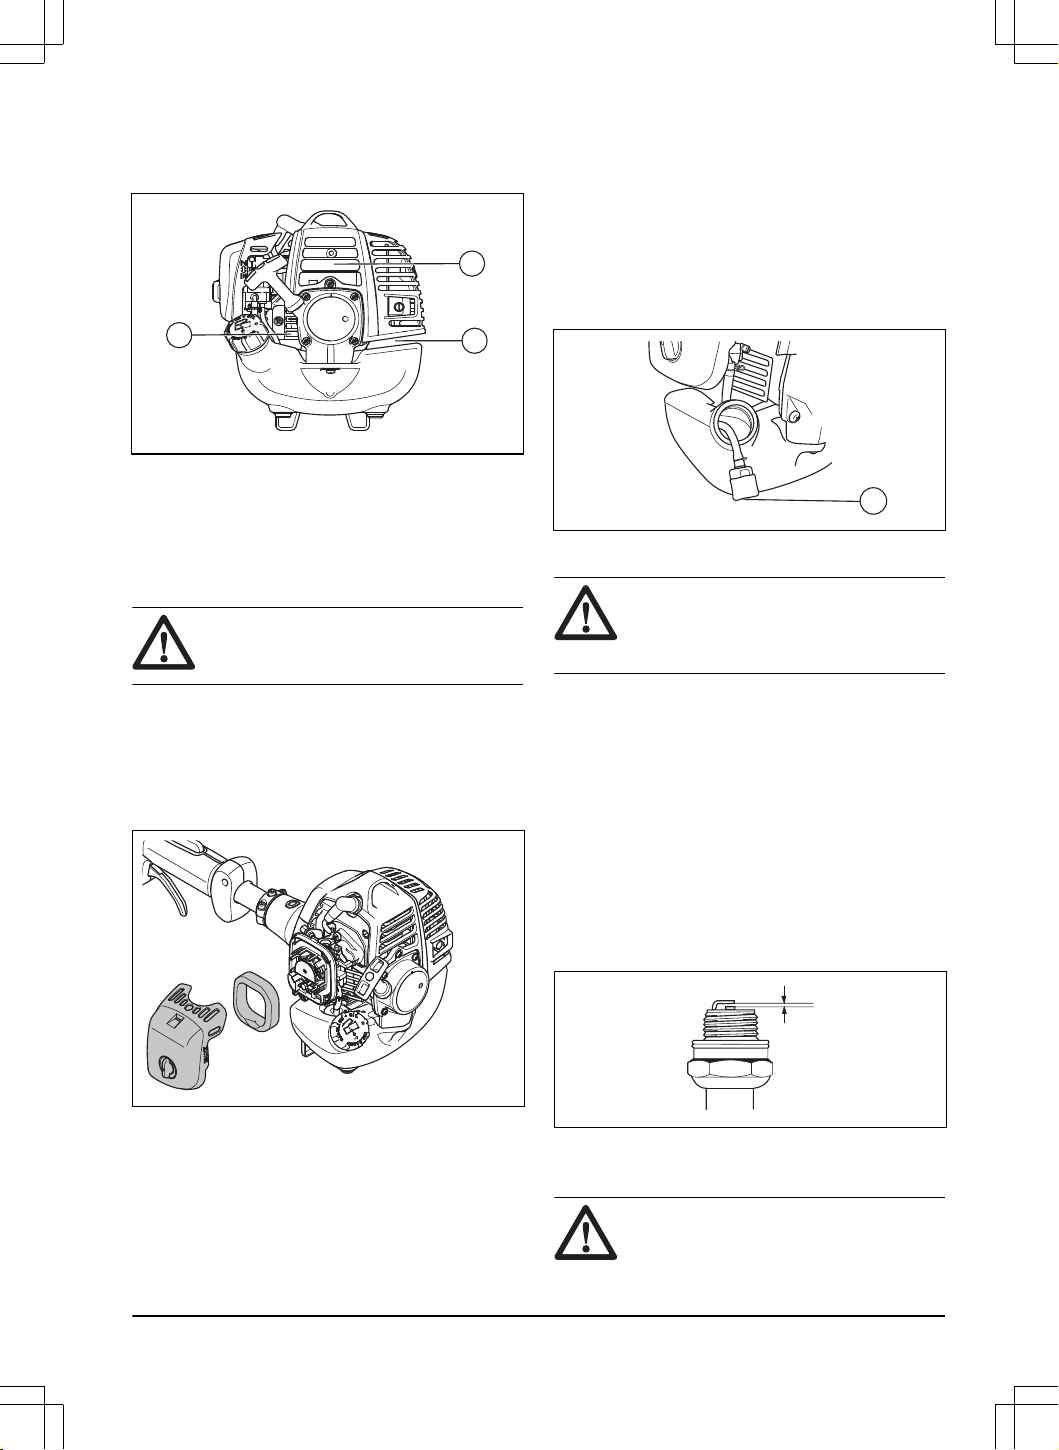
The cooling system includes the cooling fins on the
cylinder (A) and the air intake screen (B).
A
B
B
• Make sure that the cooling system is not dirty or
blocked.
• Clean the cooling system with a brush weekly or
more frequently if it is necessary.
To clean the air filter
CAUTION: An air filter that is damaged,
very dirty or soaked with fuel must always be
replaced.
If you use an air filter for a long time, it cannot be fully
cleaned. Replace the air filter at regular intervals.
1. Move the choke lever up, to close the choke valve.
2. Remove the air filter cover and remove the air filter.
3. Clean the air filter with warm soap water. Make sure
that the air filter is dry before you install it.
4. Replace the air filter if it is too dirty to fully clean it.
Always replace a damaged air filter.
5. Also clean the inner surface of the filter cover. Use
air or a brush.
6. Examine the surface of the rubber seal. Replace the
filter on the rubber seal if it is damaged.
7. Make sure that the filter on the rubber seal is dry
before you assemble it.
Fuel filter
When the engine runs short of fuel, make sure that the
air hole in the fuel tank cap and the fuel filter (A) are
clean.
A
To do a check of the spark plug
CAUTION: Always use the
recommended spark plug type. Incorrect
2399 - 002 - 14.02.2025 15
spark plug type can cause damage to the
product.
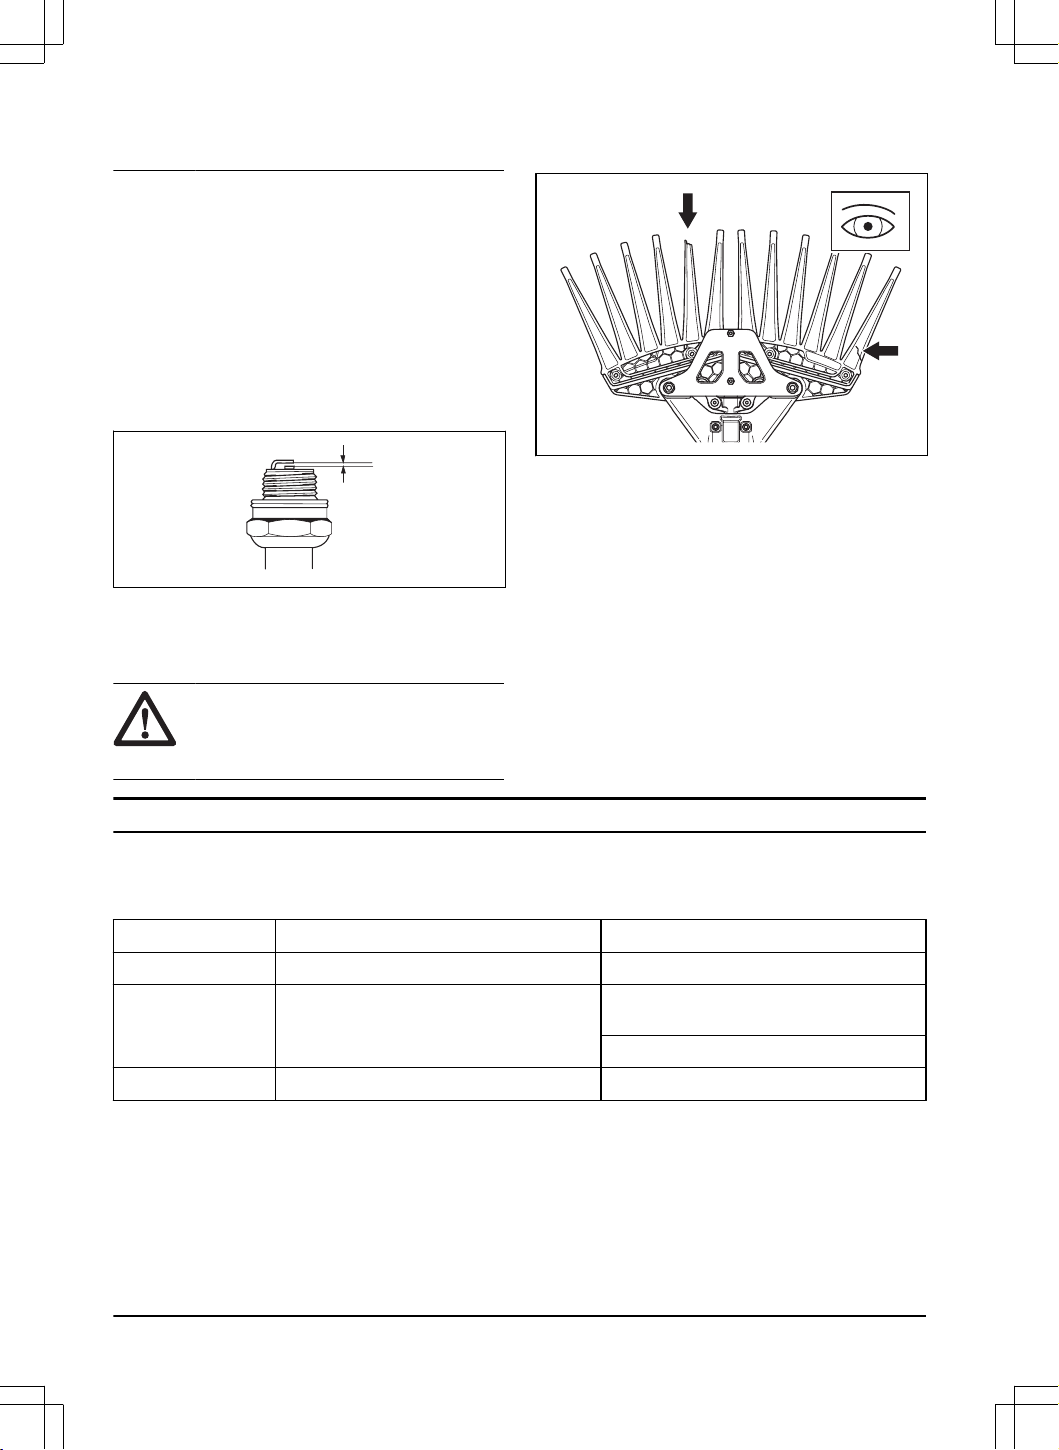
• Do a check of the spark plug if the engine is low
on power, is not easy to start or does not operate
correctly at idle speed.
• To decrease the risk of unwanted material on the
spark plug electrodes, obey these instructions:
a) Make sure that the idle speed is correctly
adjusted.
b) Make sure that the fuel mixture is correct.
c) Make sure that the air filter is clean.
• If the spark plug is dirty, clean it and make sure that
the electrode gap is correct, refer to
Technical data
on page 18
.
• Replace the spark plug if it is necessary.
To do a check of the harvesting
attachment
WARNING: An incorrect or damaged
harvesting attachment can cause serious
injury. Refer to
To remove the finger
attachment on page 10
.
1. Do a visual check for damages, for example cracks
or broken parts on the harvesting attachment finger.
2. Replace the harvesting attachment finger if it is
damaged, refer to
To remove the finger attachment
on page 10
.
Troubleshooting
The engine does not start
Check Possible cause Procedure
Stop switch. The stop switch is in the stop position. Set the stop switch to the start position.
Starter pawls. The starter pawls cannot move freely. Remove the starter cover and clean around
the starter pawls.
Let an approved service agent help you.
Fuel tank. Incorrect fuel type. Drain the fuel tank and fill with correct fuel.
16 2399 - 002 - 14.02.2025
Check Possible cause Procedure
Spark plug. The spark plug is dirty or wet. Make sure that the spark plug is dry and
clean.
The spark plug electrode gap is incorrect. Clean the spark plug. Make sure that the
electrode gap is correct. Make sure that the
spark plug has a supressor.
Refer to technical data for correct electrode
gap.
The spark plug is loose. Tighten the spark plug.
The engine starts but stops again
Check
Possible cause Procedure
Fuel tank. Incorrect fuel type. Empty the fuel tank and fill it with cor-
rect fuel.
Air filter. The air filter is clogged. Clean the air filter.
Transportation and storage
• Let the product cool before transportation or storage.
• Remove the spark plug cap before long-term
storage.
• Attach the product during transportation. Make sure
that it cannot move.
• Make sure that there is no risk of fuel leaks, fuel
fumes, sparks or flames during transportation and
storage.
• Clean and do servicing on the product before long-
term storage.
Disposal
Symbols on the product or the packaging of the product
indicate that this product cannot be handled as domestic
waste. It must be submitted to an appropriate recycling
station for the recovery of electrical and electronic
equipment.
By ensuring that this product is taken care of correctly,
you can help to counteract the potential negative impact
on the environment and people that can otherwise
result through the incorrect waste management of this
product. For more detailed information about recycling
this product, contact your municipality, your domestic
waste service or the shop from where you purchased
the product.
2399 - 002 - 14.02.2025 17
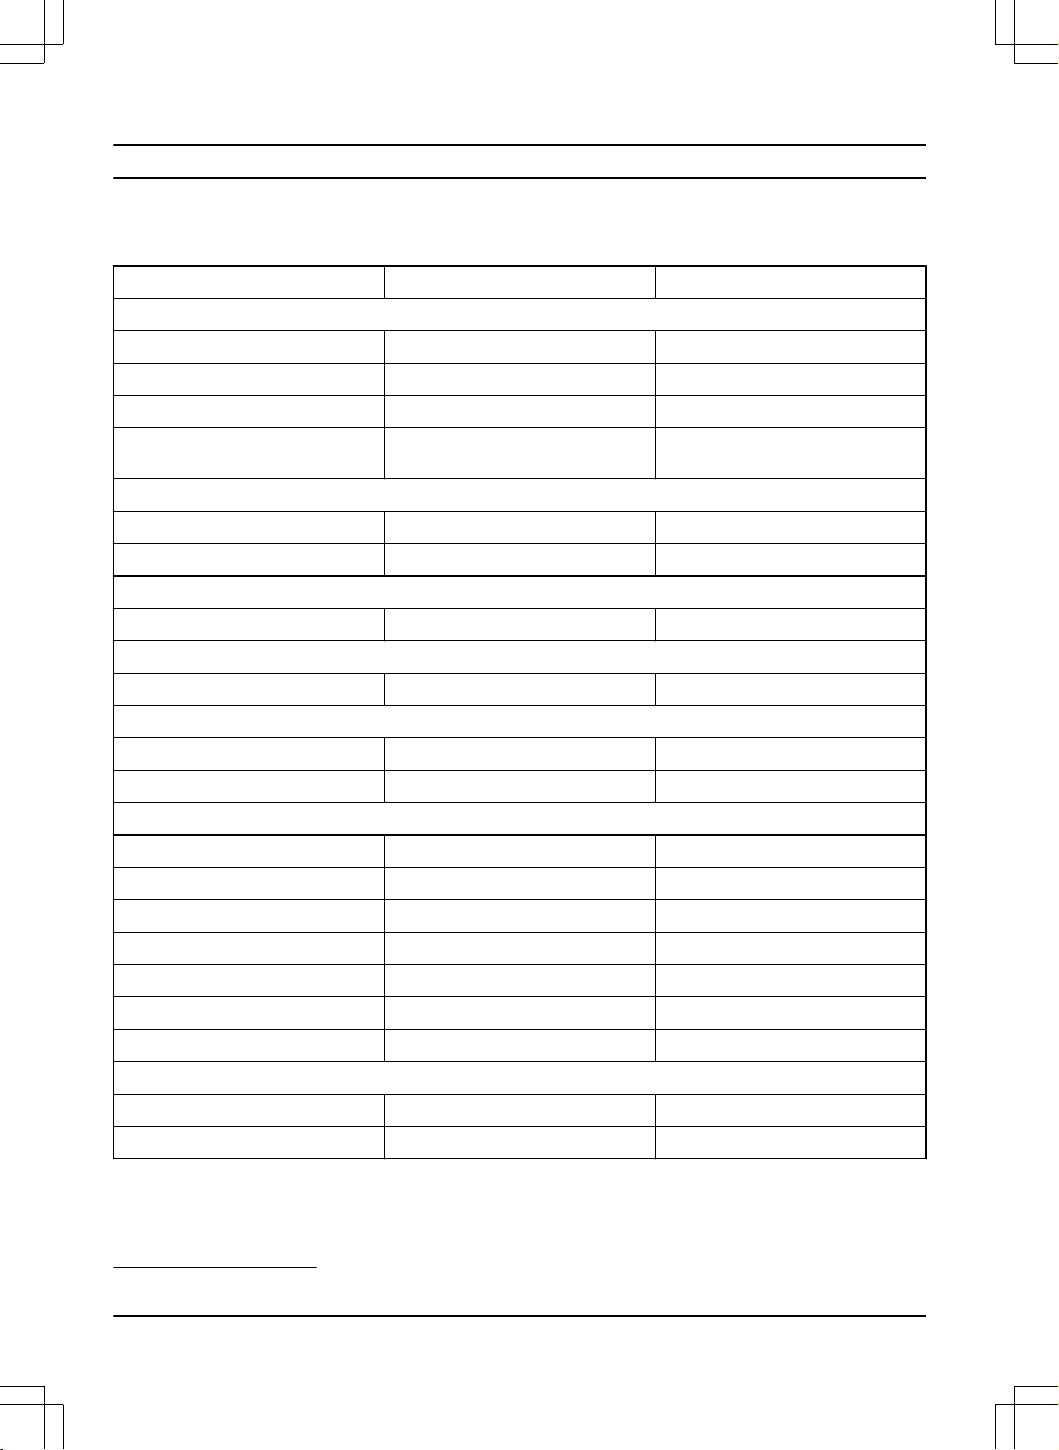
Technical data
Technical data
226KS12 226KD24
Engine
Cylinder displacement, cm
3
25.4 25.4
Idle speed, rpm 3000 3000
Recommended max. speed, rpm 11500 11500
Max. engine power, acc.to ISO 8893,
kW/hp @ rpm
0.81/1.1 @ 7500 0.81/1.1 @ 7500
Ignition system
Spark plug BGK BPMR 7A BGK BPMR 7A
Electrode gap, mm 0.6-0.7 0.6-0.7
Fuel and lubrication system
Fuel tank capacity, l/cm
3
0.75/750 0.75/750
Weight
Weight, kg 4.3 4.3
Shaft
Outer tube diameter, mm 26 + adapter to 24 26 + adapter to 24
Driveshaft, output shape, mm 7T 7T
Harvesting attachment
Transmission Fully sealed Fully sealed
Attachment weight, kg 1.8 2.1
Gear ratio 3.92 3.92
Area of coverage, mm 410-460 410-460
Grease retainers Yes Yes
Grease type HP-R HP-R
Coupling 7T 7T
Vibration data
3
Rear handle, m/s
2
5.9 6.2
Front handle, m/s
2
6.8 6.6
3
Reported data for vibration level has a typical statistical dispersion (standard deviation) of 1.5 m/s
2
.
18 2399 - 002 - 14.02.2025
Conteúdo
Introdução.....................................................................19
Segurança.................................................................... 20
Montagem.....................................................................25
OPERAÇÃO................................................................. 28
Manutenção.................................................................. 31
Solução de problemas.................................................. 34
Transporte e armazenamento...................................... 35
Descarte....................................................................... 35
Dados técnicos............................................................. 36
Introdução
Descrição do produto
Este produto é um acessório de colheita de café com
motor a combustão.
Um trabalho de aperfeiçoamento constante é realizado
para aumentar sua segurança e eficiência durante a
operação. Para obter mais informações, fale com o seu
centro de assistência.
Uso previsto
Use o produto com um acessório de colheita para a
colheita do café. Não use o produto para outras tarefas.
Observação: O funcionamento do produto pode
ser limitado por regulamentações nacionais. Obedeça
às regulamentações estabelecidas.
Visão geral do produto
1
2
2018
4
5
6
8
9
101112
7
15
17
16
13
14
3 19
1. Eixo
2. Alça dianteira
3. Acessório de colheita
4. Gancho de suporte do chicote
5. Interruptor de parada
6. Trava do acelerador
7. Acelerador
8. Capa da vela de ignição e vela de ignição
9. Tampa do cilindro
10. Puxador do cabo de arranque
11. Afogador
12. Tampa do filtro de ar
13. Tanque de combustível
14. Bulbo da bomba de combustível
15. Chave combinada
16. Pino de travamento
2399 - 002 - 14.02.2025 19
17. Chave sextavada
18. Tubo de encaixe
19. Acessório com dupla fileira de dentes
20. Manual do operador
Símbolos no produto
AVISO: Este produto pode ser perigoso
e causar ferimentos graves ou morte do
operador ou de outras pessoas. Seja
cuidadoso e use o produto corretamente.
Leia atentamente o manual do operador
e certifique-se de que tenha entendido as
instruções antes de usar este produto.
Use um capacete de proteção em locais
onde objetos possam cair sobre você.
Use protetores acústicos e proteção
ocular aprovados.
Afogador.
Bulbo da bomba de combustível.
Use luvas de proteção aprovadas.
Sempre use botas antiaderentes e
resistentes.
Observação: Outros símbolos/adesivos no produto
referem-se aos requisitos de certificação para outras
áreas comerciais.
Danos ao produto
Não assumimos responsabilidade por danos ao nosso
produto se:
• o produto seja reparado incorretamente.
• o produto seja reparado com peças que não
sejam da marca do fabricante ou aprovadas pelo
fabricante.
• o produto tenha um acessório que não seja da
marca do fabricante ou não seja aprovado pelo
fabricante.
• o produto não seja reparado em um centro de
atendimento aprovado ou por uma autoridade
aprovada.
Segurança
Definições de segurança
Avisos, cuidados e observações são utilizados
para chamar a atenção para partes especialmente
importantes do manual.
AVISO: Utilizado se existir um risco de
ferimentos ou morte para o operador ou a
terceiros se as instruções no manual não
forem respeitadas.
CUIDADO: Utilizado se existir um risco
de danos para o produto, outros materiais
ou para a área adjacente, se as instruções
no manual não forem respeitadas.
Observação: Utilizados para conferir mais
informações necessárias em uma determinada situação.
Instruções gerais de segurança
AVISO: Antes de usar o produto, leia as
instruções de aviso que seguem.
• Este produto é uma ferramenta perigosa: tenha
cuidado e o use corretamente. Este produto pode
causar ferimentos graves ou morte do operador ou
de outras pessoas. Antes de usar este produto,
leia e compreenda o conteúdo deste manual do
operador.
• Não modifique este produto.
• Não opere o produto se houver a possibilidade de
que outras pessoas o tenham modificado.
• Acessórios não aprovados pelo fabricante podem
causar ferimentos graves ou morte. Use sempre
acessórios originais.
• Este produto produz um campo eletromagnético
durante a operação. Sob certas circunstâncias esse
campo poderá interferir com implantes médicos de
natureza ativa ou passiva. Para reduzir o risco de
lesões graves ou fatais, recomendamos que as
pessoas que tenham implantes médicos consultem
20 2399 - 002 - 14.02.2025
seu médico e o fabricante do implante antes de
operar este produto.
Instruções de segurança para
operação
• Nunca permita que crianças operem o produto.
• Use sempre equipamentos de proteção individual.
Consulte
Equipamento de Proteção Individualna
página21
.
• Mantenha pessoas não autorizadas distantes.
Crianças, animais, pessoas que estejam observando
e ajudantes devem permanecer fora da zona de
segurança de 15 metros. Caso alguém se aproxime,
pare o produto imediatamente.
• Nunca permita que outra pessoa use o produto sem
estar certo de que leu e compreendeu o conteúdo
do manual do operador.
• Nunca trabalhe em escadas, banquetas ou qualquer
outra posição elevada que não esteja totalmente
segura.
• Certifique-se sempre de que existe uma posição de
trabalho segura e estável.
• Sempre use as duas mãos para segurar o produto.
Segure o produto ao lado do seu corpo.
• Use a mão direita para controlar o interruptor.
• Em caso de emergência, solte o produto e deixe-o
cair no chão.
• Não deixe que as mãos e os pés se aproximem
do equipamento de colheita quando o motor estiver
ligado.
• Quando o motor estiver desligado, mantenha as
mãos e os pés afastados do equipamento de
colheita até que o motor esteja totalmente parado.
• Sempre coloque o produto no chão quando não
estiver em uso.
• Verifique a área de trabalho quanto a objetos
estranhos, como cabos de eletricidade, insetos
e animais, etc., ou outros objetos que possam
danificar o acessório de colheita, como itens
metálicos.
• Se a lâmina atingir um objeto ou se ocorrerem
vibrações, desligue o produto imediatamente.
Certifique-se de que o produto não esteja
danificado. Em caso de dano, providencie o reparo.
• Se alguma coisa ficar presa no acessório de colheita
durante o trabalho, desligue o motor e espere-o
parar completamente antes de limpá-lo.
• Não utilize a colheitadeira de café se estiver
cansado ou sob a influência de drogas, álcool ou
medicamentos.
• A exposição excessiva à vibração pode causar
danos circulatórios ou nervosos em pessoas com
problemas de circulação. Caso tenha sintomas
de exposição excessiva à vibração, consulte um
médico. Esses sintomas incluem dormência, perda
de sensibilidade, formigamento, pontadas, dor,
perda de força, e alterações na cor ou na condição
da pele. Esses sintomas normalmente aparecem
nos dedos, nas mãos ou nos pulsos. O risco
aumenta a baixas temperaturas.
• Antes da operação, inspecione o produto em busca
de danos. Se o produto cair ou bater em alguma
coisa, inspecione-o para ver se há danos. Em caso
de dano, providencie o reparo.
Instruções de segurança para
montagem
AVISO: Antes de usar o produto, leia as
instruções de aviso que seguem.
• Retire a capa da vela de ignição antes de montar o
produto.
• Use luvas de proteção aprovadas.
• Prenda corretamente a tampa da embreagem e o
eixo antes de dar a partida no produto. Isso evitará a
queda da embreagem.
• Monte a tampa e o eixo corretamente antes de ligar
o motor.
Equipamento de Proteção Individual
AVISO:
Antes de usar o produto, leia as
instruções de aviso que seguem.
• Sempre utilize equipamentos de proteção individual
aprovados ao operar o produto. O equipamento de
proteção individual não evita totalmente ferimentos,
mas diminui a gravidade do ferimento em caso
de acidente. Deixe seu revendedor ajudar você a
escolher o equipamento certo.
• Use um capacete de proteção onde houver risco de
queda de objetos.
• Use protetores acústicos aprovados que forneçam
redução de ruído adequada. A exposição
prolongada a ruídos pode resultar em danos
permanentes à audição.
• Use proteção ocular aprovada. Se você usar uma
viseira, também deverá usar óculos de proteção
aprovados. Os óculos de proteção aprovados devem
estar em conformidade com a norma ANSI Z87.1
nos EUA ou EN 166 nos países europeus.
2399 - 002 - 14.02.2025
21
• Use viseira para proteção facial. Uma viseira não é
suficiente para proteger os olhos.
+
• Use luvas quando necessário, por exemplo, ao ligar,
examinar ou limpar o equipamento de colheita.
• Use botas resistentes e antiderrapantes.
• Use roupas de tecido resistente. Sempre use
calças compridas e resistentes, além de mangas
compridas. Não use roupas largas que possam ficar
presas em galhos e ramos. Não use joias, calças
curtas e sandálias e não ande descalço. Prenda o
cabelo de forma segura acima dos ombros.
• Mantenha o equipamento de primeiros socorros
perto de você.
Dispositivos de segurança no produto
AVISO:
Antes de usar o produto, leia as
instruções de aviso que seguem.
Esta seção descreve os recursos de segurança do
produto, sua finalidade e como as verificações e
a manutenção devem ser realizadas para garantir
o funcionamento correto. Consulte as instruções
presentes sob o título
Visão geral do produtona
página19
para verificar onde essas peças estão
localizadas no seu produto.
A vida útil do produto pode ser reduzida e o risco de
acidentes aumentar, caso a manutenção do produto não
seja executada corretamente e os serviços e/ou reparos
não sejam efetuados de maneira profissional. Se você
precisar de mais informações, entre em contato com a
concessionária de serviços mais próxima.
AVISO:
Nunca use um produto com
componentes de segurança danificados. O
equipamento de segurança do produto deve
ser verificado e mantido conforme descrito
nesta seção. Se o seu produto for reprovado
em qualquer uma dessas verificações, entre
em contato com o seu agente de serviço
para fazer o reparo.
CUIDADO: Toda a manutenção e
trabalhos de reparo na máquina requerem
treinamento especial. Essas informações se
referem especificamente ao equipamento
de segurança da máquina. Se a sua
máquina for reprovada em qualquer uma
das verificações descritas abaixo, entre em
contato com o seu agente de serviço.
Ao comprar qualquer um dos nossos
produtos, garantimos a disponibilidade de
reparos e manutenção. Se o revendedor
que vendeu sua máquina não for um de
nossos representantes autorizados, peça o
endereço da sua oficina autorizada mais
próxima.
Para verificar a trava do gatilho do acelerador
A trava do gatilho do acelerador bloqueia o gatilho
na posição de marcha lenta, para evitar a operação
acidental do gatilho do acelerador. Ao soltar a alça do
gatilho do acelerador e a trava do gatilho do acelerador,
as duas voltam às suas posições iniciais.
1. Pressione a trava do gatilho do acelerador (A). Solte
o gatilho do acelerador (B).
A
B
2. Verifique se o gatilho do acelerador (B) está travado
na posição de marcha lenta quando a trava do
gatilho do acelerador for liberada.
22
2399 - 002 - 14.02.2025
3. Empurre a trava do acelerador (A) e certifique-se de
que ela volte à posição inicial ao liberá-la.
4. Verifique se a trava do gatilho do acelerador (A) e o
gatilho do acelerador (B) se movem livremente.
5. Dê partida no produto e aplique aceleração total.
Consulte
Para ligar o produtona página29
.
6. Solte o gatilho do acelerador (B) e certifique-se
de que o acessório de colheita pare e permaneça
imóvel.
AVISO: Se o acessório de colheita
se mover quando o gatilho do acelerador
estiver na posição de marcha lenta, a
marcha lenta deve ser ajustada. Consulte
Para ajustar a marcha lentana página32
.
Para fazer uma verificação do interruptor de parada
1. Dê a partida no motor.
2. Mova o interruptor de parada para a posição STOP
e certifique-se de que o motor seja interrompido.
Para fazer uma verificação no sistema antivibração
O sistema antivibração reduz a vibração nas alças ao
mínimo, o que facilita a operação.
1. Pare o motor.
2. Faça uma verificação visual quanto à presença de
deformação e danos, como rachaduras.
3. Certifique-se de que os elementos do sistema
antivibração estejam conectados corretamente.
Para fazer uma verificação do silenciador
AVISO:
Não utilize o produto sem um
silenciador ou com um silenciador com
defeito. Um silenciador com defeito aumenta
o nível de ruído e o risco de incêndio.
AVISO: Os silenciadores ficam
extremamente quentes durante e após a
utilização, também à marcha lenta.
AVISO: As superfícies internas do
silenciador contém químicos que podem
provocar câncer. Tenha cuidado para não
tocar nesses elementos se o silenciador
estiver danificado.
O silenciador mantém os níveis de ruído em um nível
mínimo e desvia os gases de escape para longe do
operador
1. Pare o motor.
2399 - 002 - 14.02.2025
23
2. Faça uma verificação visual quanto a danos e
deformações.
3. Certifique-se de que o silenciador esteja fixado ao
produto.
Segurança do combustível
AVISO: Antes de usar o produto, leia as
instruções de aviso que seguem.
• Não misture o combustível em ambientes internos
ou próximo a uma fonte de calor.
• Não ligue o produto se houver combustível ou óleo
de motor sobre ele. Remova o combustível/óleo
indesejado e deixe o produto secar. Remova o
combustível indesejado do produto.
• Se você derramar combustível em sua roupa, troque
as roupas imediatamente.
• Não deixe combustível cair no seu corpo, ele pode
causar lesões. Se você derramar combustível no
seu corpo, use sabão e água para removê-lo.
• Não dê partida no motor se tiver derramado óleo ou
combustível sobre o produto ou sobre o seu corpo.
• Não ligue o produto se o motor tiver um vazamento.
Examine o motor à procura de vazamentos
regularmente.
• Tome cuidado com o combustível. Combustível é
inflamável e os gases são explosivos e podem
causar lesões ou morte.
• Não inspire os gases do combustível, eles podem
causar lesões. Certifique-se de que haja fluxo de ar
suficiente.
• Não fume nas proximidades do combustível ou do
motor.
• Não coloque objetos quentes nas proximidades do
combustível ou do motor.
• Não adicione combustível quando o motor estiver
ligado.
• Certifique-se de que o motor esteja frio antes de
reabastecer.
• Antes de reabastecer, abra lentamente a tampa do
tanque de combustível e libere cuidadosamente a
pressão.
• Certifique-se de que haja fluxo de ar suficiente ao
reabastecer e misturar combustível (gasolina e óleo
de dois tempos) ou drenar o tanque de combustível.
• O combustível e o vapor do combustível são
altamente inflamáveis e podem causar lesões
graves quando inalados ou se entrarem em contato
com a pele. Por esse motivo, seja cauteloso ao
manusear combustível e certifique-se de que haja
fluxo de ar suficiente.
• Aperte cuidadosamente a tampa do tanque de
combustível, caso contrário, haverá um incêndio.
• Mova o produto a, no mínimo, 3 m (10 pés) da
posição na qual você abasteceu o tanque antes de
ligar o motor.
• Não coloque combustível demais no tanque de
combustível.
• Certifique-se de que não há possibilidade de haver
um vazamento quando você mover o produto ou o
recipiente de combustível.
• Não coloque o produto ou um recipiente de
combustível em um local onde há uma chama
aberta, faísca ou luz piloto. Certifique-se de que a
área de armazenamento não contenha uma chama
aberta.
• Use apenas recipientes aprovados ao mover o
combustível ou armazená-lo.
• Esvazie o tanque de combustível antes de
armazenar por períodos prolongados. Respeite a
legislação local quanto ao local de descarte do
combustível.
• Limpe o produto antes de armazenar por períodos
prolongados.
• Remova a tampa da vela de ignição antes de
armazenar o produto para evitar o arranque
acidental do motor.
Segurança contra vibração
AVISO:
Antes de usar o produto, leia as
instruções de aviso que seguem.
• Durante a operação do produto, as vibrações
passam dele para o operador. A operação regular
e frequente do produto pode causar ou aumentar
o grau de ferimentos ao operador. Podem ocorrer
ferimentos nos dedos, mãos, punhos, braços,
ombros e/ou nervos e suprimento sanguíneo ou
outras partes do corpo. As lesões podem ser
debilitantes e/ou permanentes, e podem aumentar
gradualmente ao longo de semanas, meses ou
anos. Possíveis ferimentos incluem danos ao
24
2399 - 002 - 14.02.2025
sistema de circulação sanguínea, ao sistema
nervoso, às articulações e a outras estruturas do
corpo.
• Os sintomas podem ocorrer durante a operação do
produto ou em outros momentos. Caso apresente
sintomas e continue operando o produto, eles
poderão aumentar ou tornar-se permanentes. Se
estes ou outros sintomas ocorrerem, procure ajuda
médica:
• Dormência, perda de sensibilidade,
formigamento, pontadas, dor, queimadura,
latejamento, rigidez, descompasso, perda de
força, e alterações na cor ou condição da pele.
• Os sintomas podem aumentar em temperaturas
frias. Ao operar o produto em ambientes frios, use
roupas de frio e mantenha as mãos aquecidas e
secas.
• Para manter o nível correto de vibração, faça a
manutenção e opere o produto conforme indicado
no manual do operador.
• Deixe o produto fazer o trabalho. Não empurre
o produto com força. Segure-o levemente pelas
alças, certificando-se de controlá-lo e operá-lo com
segurança.
• Mantenha as mãos somente nas alças. Mantenha as
demais partes do corpo afastadas do produto.
• Se vibrações fortes surgirem repentinamente,
interrompa a operação do produto no mesmo
instante. Antes de prosseguir com a operação,
solucione o problema do aumento das vibrações.
•
Instruções de segurança para
manutenção
AVISO:
Antes de usar o produto, leia as
instruções de aviso que seguem.
• Pare o motor, certifique-se de que o acessório de
colheita seja interrompido e deixe que o produto
esfrie antes de realizar a manutenção.
• Remova a tampa da vela de ignição antes de efetuar
a manutenção.
• Os gases de escape do motor contém monóxido de
carbono, um gás inodoro, tóxico e muito perigoso,
que pode causar morte. Não opere o produto em
ambientes internos ou fechados.
• Os gases de escape do motor são quentes e podem
conter faíscas. Não opere o produto em ambientes
internos ou próximo de material inflamável.
• Acessórios e alterações no produto não aprovados
pelo fabricante podem causar ferimentos graves
ou morte. Não modifique o produto. Use sempre
acessórios originais.
• Se a manutenção não for feita correta e
regularmente, o risco de ferimentos e danos ao
produto aumenta.
• Faça a manutenção somente como indicado no
manual do operador. Deixe que uma oficina
autorizada Husqvarna faça todas as outras
operações de manutenção.
• Leve o produto regularmente a uma Husqvarna
oficina autorizada.
• Substitua peças danificadas, desgastadas ou
quebradas.
Montagem
Introdução
AVISO: Antes de montar o produto,
você deve ler e entender o capítulo sobre
segurança.
AVISO: Retire o cabo da vela de ignição
antes de montar o produto.
Para conectar o corpo do produto
1. Conecte o motor (A) ao tubo (B) com 3 parafusos
(C).
AB
C
2399 - 002 - 14.02.2025 25
Para conectar o cabo do acelerador e
os fios do interruptor de parada
1. Remova a tampa do filtro de ar.
2. Instale o cabo do acelerador (A) através do suporte
do carburador (B).
A B
C
3. Gire totalmente a manga do regulador de cabo (C)
no suporte do carburador.
4. Coloque o encaixe do compartimento (D) no
carburador. Nesse momento, o orifício rebaixado (E)
do terminal do cabo (F) está longe da manga do
regulador de cabo (C).
G
D
E
F
5. Gire o came do acelerador do carburador e mova
o cabo do acelerador (A) pelo compartimento no
encaixe do compartimento.
6. Certifique-se de que o terminal do cabo (F) caia no
orifício rebaixado.
7. Opere o gatilho do acelerador algumas vezes para
garantir que ele funcione corretamente.
8. Ajuste a manga do regulador de cabo (C).
a) Certifique-se de que o batente no came do
acelerador do carburador toque corretamente no
batente do acelerador.
b) Certifique-se de que a posição do cabo
mantenha um espaço de 1 a 2 mm entre
o terminal do cabo (F) e o encaixe do
compartimento quando o gatilho do acelerador
for totalmente pressionado.
1-2mm
9. Quando o cabo do acelerador (A) estiver ajustado
corretamente, aperte a contraporca (G).
10. Conecte os fios do interruptor de parada (H) com os
conectores do motor.
H
11. Instale a tampa do filtro de ar.
Montar o acessório de colheita
1. Alinhe a ranhura no tubo de encaixe com a ranhura
na braçadeira do tubo.
2. Empurre o tubo de encaixe na braçadeira do tubo.
3. Instale o acessório de colheita no eixo.
50 mm
26
2399 - 002 - 14.02.2025
4. Aperte os 2 parafusos na braçadeira do tubo, mas
não aperte totalmente.
5 Nm
A
C
B
5. Aperte totalmente o parafuso (A) e, em seguida, o
parafuso (B) na braçadeira do tubo. Certifique-se
de que o espaço (C) entre as braçadeiras seja de
aproximadamente 0,8 mm.
Remover o acessório com fileira de dentes
1. Use uma chave fixa M6 para manter a porca (B)
na posição. Ao mesmo tempo, use uma chave
sextavada M6 para remover os 4 parafusos (A) do
acessório com fileira única/dupla de dentes (C).
A
C
B
A
C
B
2. Remova o acessório de fileira única/dupla de dentes
(C) do acessório de colheita.
Instalar o acessório com fileira de dentes
1. Encaixe o acessório com fileira única/dupla de
dentes (C) no acessório de colheita.
E
D
F
E
D
F
2. Use uma chave sextavada M6 para manter a
porca (F) na posição. Ao mesmo tempo, use uma
chave fixa M6 para instalar os 4 parafusos (E) no
acessório com fileira única/dupla de dentes. Não
aperte totalmente os parafusos.
3. Aperte totalmente os 4 parafusos no acessório com
fileira única/dupla de dentes (D).
Observação:
O torque de aperto é de 9 a 10
Nm.
2399 - 002 - 14.02.2025 27
OPERAÇÃO
Introdução
AVISO: Antes de operar o produto,
você deve ler e entender o capítulo sobre
segurança.
Combustível
Este produto tem um motor de dois tempos.
CUIDADO: O tipo incorreto de
combustível pode resultar em danos ao
motor. Use uma mistura de gasolina e óleo
para motor de dois tempos.
Combustível pré-misturado
• Use Husqvarna combustível alquilado pré-misturado
de boa qualidade para obter o melhor
desempenho e extensão da vida útil do motor. O
combustível contém menos substâncias perigosas
em comparação com o combustível normal, o que
reduz os perigosos gases de escape. A quantidade
de resíduos após a combustão é menor com esse
combustível, o que mantém os componentes do
motor mais limpos.
Para misturar o combustível
Gasolina
• Utilize gasolina de boa qualidade, sem chumbo, com
no máximo 27% de etanol.
CUIDADO:
Não use gasolina com
octanagem menor que 90 RON/87 AKI.
A utilização de um índice de octanagem
inferior pode causar batimento do motor,
causando danos no motor.
Óleo para motor de dois tempos
• Para obter melhores resultados e desempenho, use
Husqvarnaóleo de dois tempos.
• Se o óleo para motor de dois tempos Husqvarnanão
estiver disponível, você pode usar outro óleo dois
tempos de boa qualidade destinado a motores
refrigerados a ar. Fale com seu revendedor para
selecionar o óleo correto.
CUIDADO:
Não use óleo de dois
tempos para motores refrigerados a
água, também conhecido como óleo
para motor de popa. Não use óleo para
motores de quatro tempos.
Para misturar gasolina e óleo de dois tempos
Gasolina, litro Óleo para mo-
tor de dois
tempos, litro
2% (50:1)
5 0,10
10 0,20
15 0,30
20 0,40
Galão EUA fl. oz. EUA
1 2 ½
2 1/2 6 ½
5 12 ⅞
CUIDADO: Pequenos erros podem
influenciar drasticamente a proporção da
mistura quando você mistura pequenas
quantidades de combustível. Meça a
quantidade de óleo cuidadosamente e
certifique-se de obter a mistura correta.
1. Encha metade da quantidade de gasolina em um
recipiente limpo para combustível.
2. Adicione a quantidade total de óleo.
3. Mexa a mistura de combustível.
4. Adicione a quantidade restante de gasolina ao
recipiente.
5. Mexa a mistura de combustível com cuidado.
CUIDADO: Não misture combustível
por mais de 1 mês de cada vez.
28 2399 - 002 - 14.02.2025
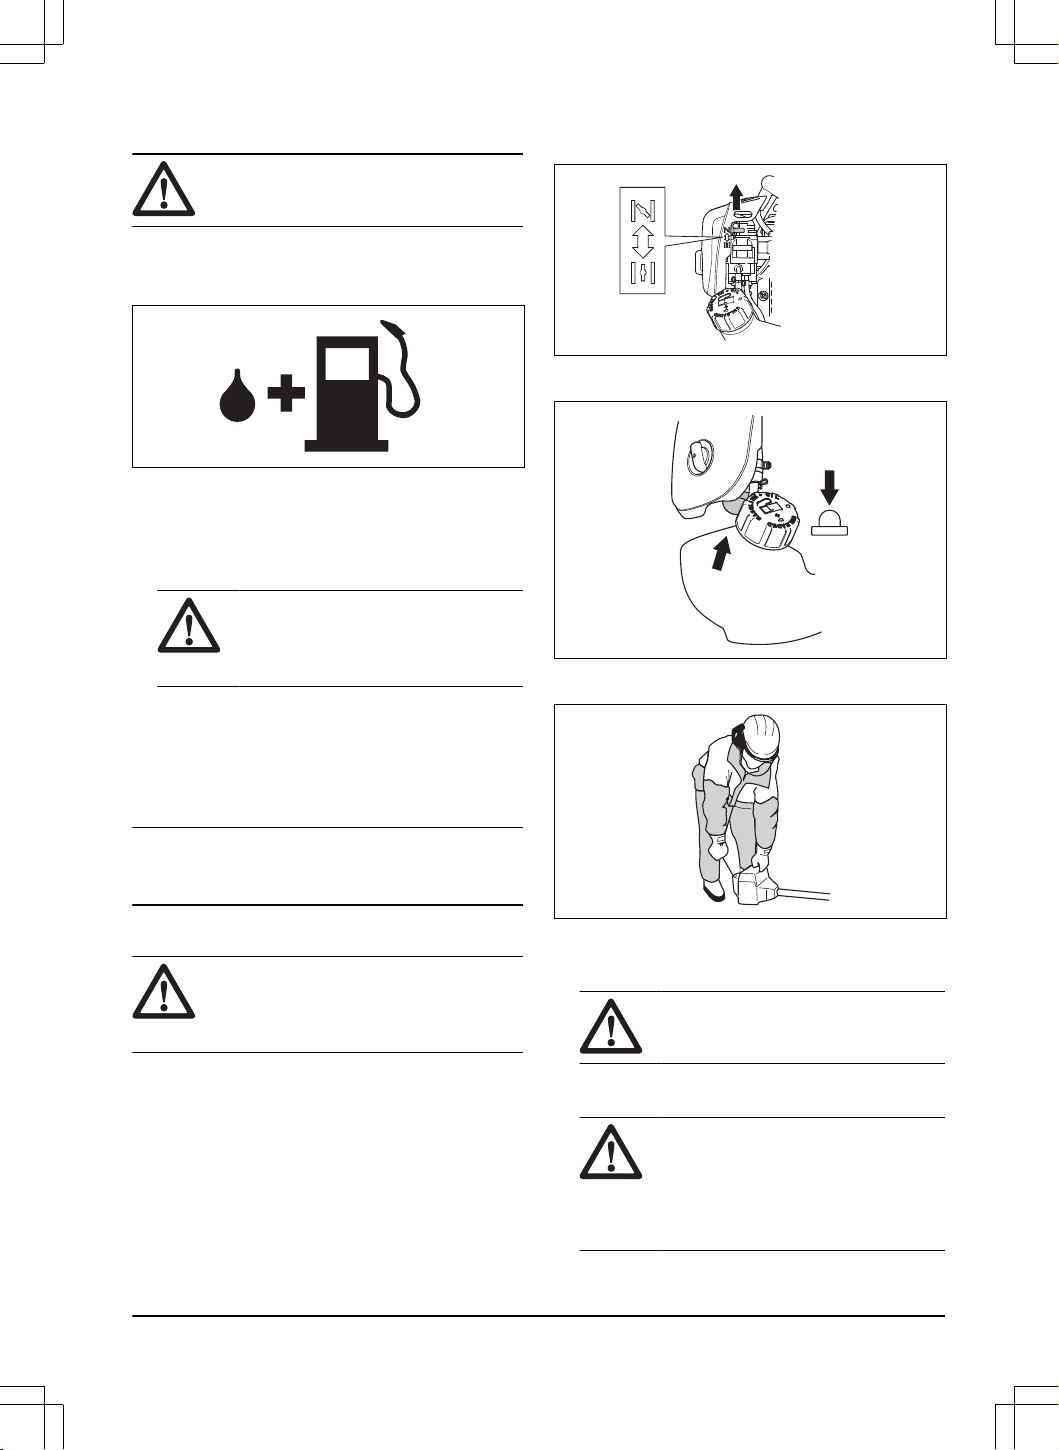
Abastecer o reservatório de combustível
AVISO: Obedeça o procedimento a
seguir para sua segurança.
1. Desligue o motor e deixe o motor esfriar.
2. Limpe a área ao redor da tampa do tanque de
combustível.
3. Agite ligeiramente o recipiente e certifique-se de que
o combustível é misturado totalmente.
4. Remova a tampa do tanque de combustível
devagar, para liberar a pressão.
5. Abasteça o reservatório de combustível.
CUIDADO: Certifique-se de que
não haja combustível em excesso no
tanque. O combustível se expande
quando fica quente.
6. Aperte a tampa do tanque de combustível.
7. Limpe o derramamento de combustível sobre o
produto e ao seu redor.
8. Mova o produto 3 m/10 ft ou mais longe do local de
abastecimento e da fonte de combustível antes de
ligar o motor.
Observação:
Para ver os locais onde o depósito
de combustível se encontra no seu produto, consulte
Visão geral do produtona página19
.
Para ligar o produto
AVISO:
Mantenha a distância de
segurança de 15 m/50 pés quando o motor
der a partida. Há um risco de o acessório de
colheita começar a se mover.
1. Coloque o interruptor de parada na posição de
partida.
2. Posicione o controle do afogador na posição de
afogador acionado.
3. Empurre o bulbo da bomba de combustível até que
o bulbo comece a encher com combustível.
4. Segure o corpo do produto sobre o solo com a sua
mão esquerda. Não coloque os pés no produto.
5. Puxe a alça da corda de arranque lentamente até
sentir resistência e, em seguida, puxe a alça da
corda de arranque com força.
AVISO:
Não enrole a corda de
arranque ao redor de sua mão.
6. Continue a puxar a alça da corda de arranque até o
motor entrar em funcionamento.
CUIDADO:
Não puxe a corda de
arranque até que ela pare. Não solte a
corda de arranque quando ela estiver
totalmente estendida. Solte a corda de
arranque lentamente. Risco de danos ao
produto.
2399 - 002 - 14.02.2025 29
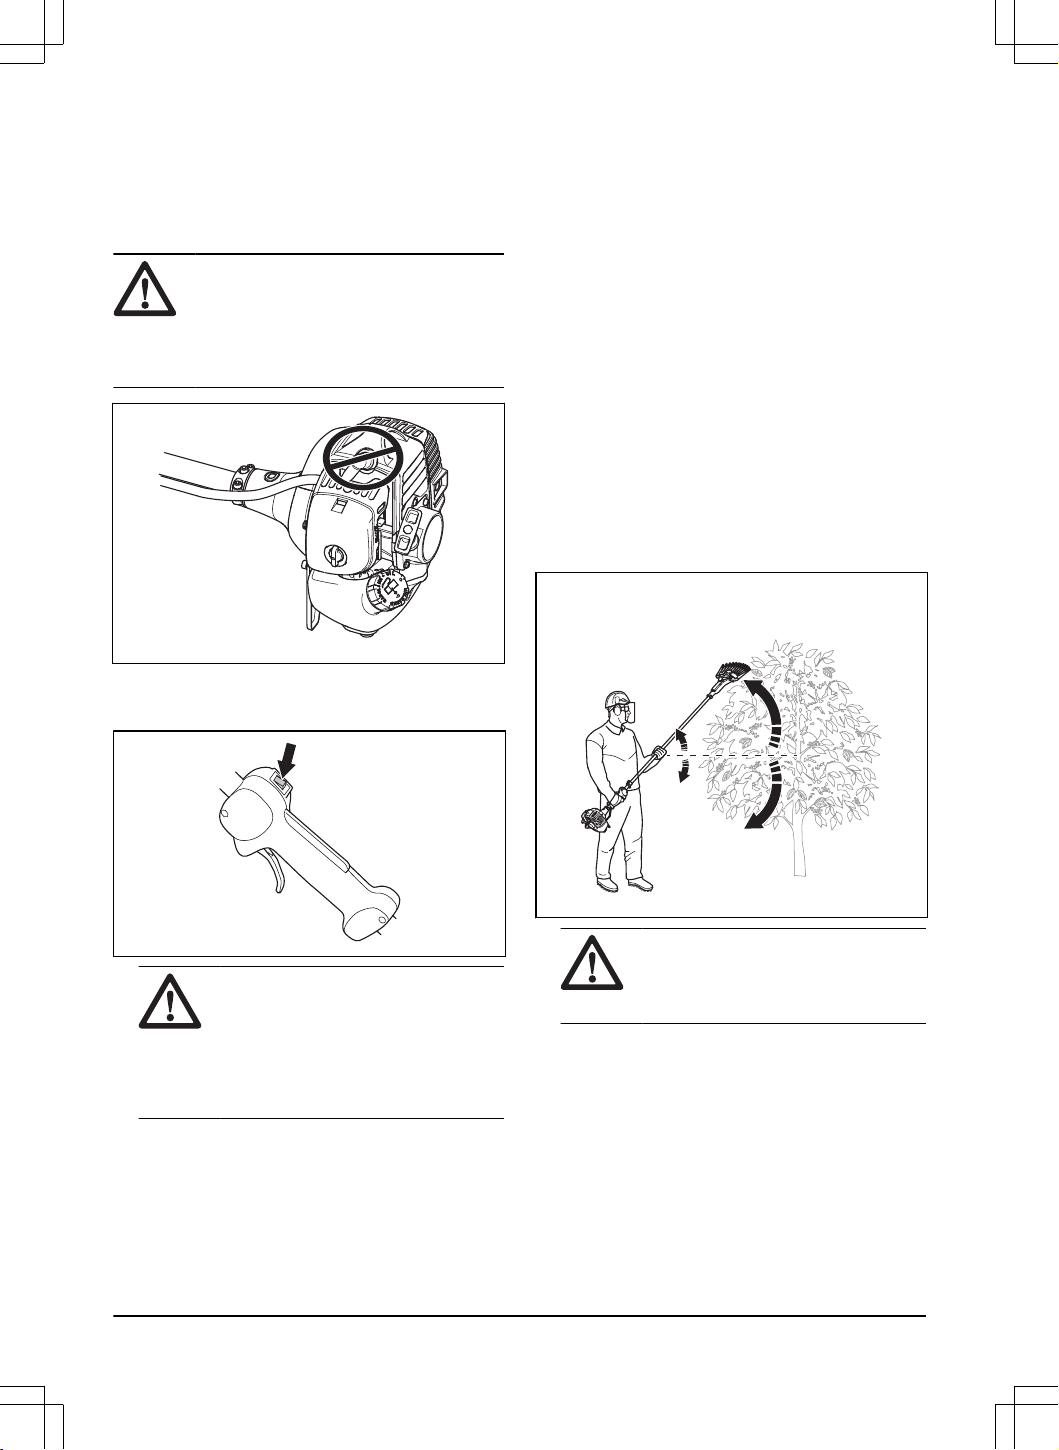
7. Quando o motor der a partida, coloque o afogador
na posição de funcionamento e aplique aceleração
total. O gatilho do acelerador sai automaticamente
da posição inicial.
8. Certifique-se de que o motor esteja funcionando
normalmente.
AVISO: Mantenha as partes do corpo
afastadas da tampa da vela de ignição para
evitar ferimentos por queimadura. Risco
de lesões por queimadura. Não utilize o
produto com uma tampa da vela de ignição
danificada. Risco de choque elétrico.
Para parar o produto
1. Desligue a ignição para desligar o motor.
CUIDADO:
O interruptor de parada
retorna automaticamente para a posição
de partida. Para evitar uma partida não
intencional, a tampa da vela de ignição
deve ser removida da vela de ignição
durante a montagem, verificação e/ou
manutenção.
Instruções gerais de operação
• Para obter o melhor equilíbrio, segure o produto o
mais próximo possível do seu corpo.
• Evite que a ponta toque no solo.
• Não apresse o trabalho, mas trabalhe de forma
constante até que todos os grãos de café tenham
sido colhidos dos ramos.
• Sempre reduza a rotação do motor para marcha
lenta após cada operação de trabalho. Períodos
prolongados em aceleração total, sem qualquer
carga no motor, podem resultar em danos sérios ao
motor.
• Trabalhe sempre com aceleração total.
Para operar o produto
1. Coloque o acessório de colheita na parte inferior do
ramo.
2. Segure o produto firmemente com as duas mãos
para mantê-lo equilibrado.
3. Empurre o interruptor e mova o acessório de
colheita ao longo do ramo.
AVISO: Certifique-se de operar
o produto com segurança. Consulte
Instruções de segurança para
operaçãona página21
.
4. Opere o produto continuamente até que todos os
grãos de café sejam colhidos.
5. Solte o interruptor quando o acessório de colheita
não estiver ao alcance dos ramos.
30
2399 - 002 - 14.02.2025
Manutenção
Introdução
AVISO: Leia e compreenda o capítulo de
segurança antes realizar a manutenção no
produto.
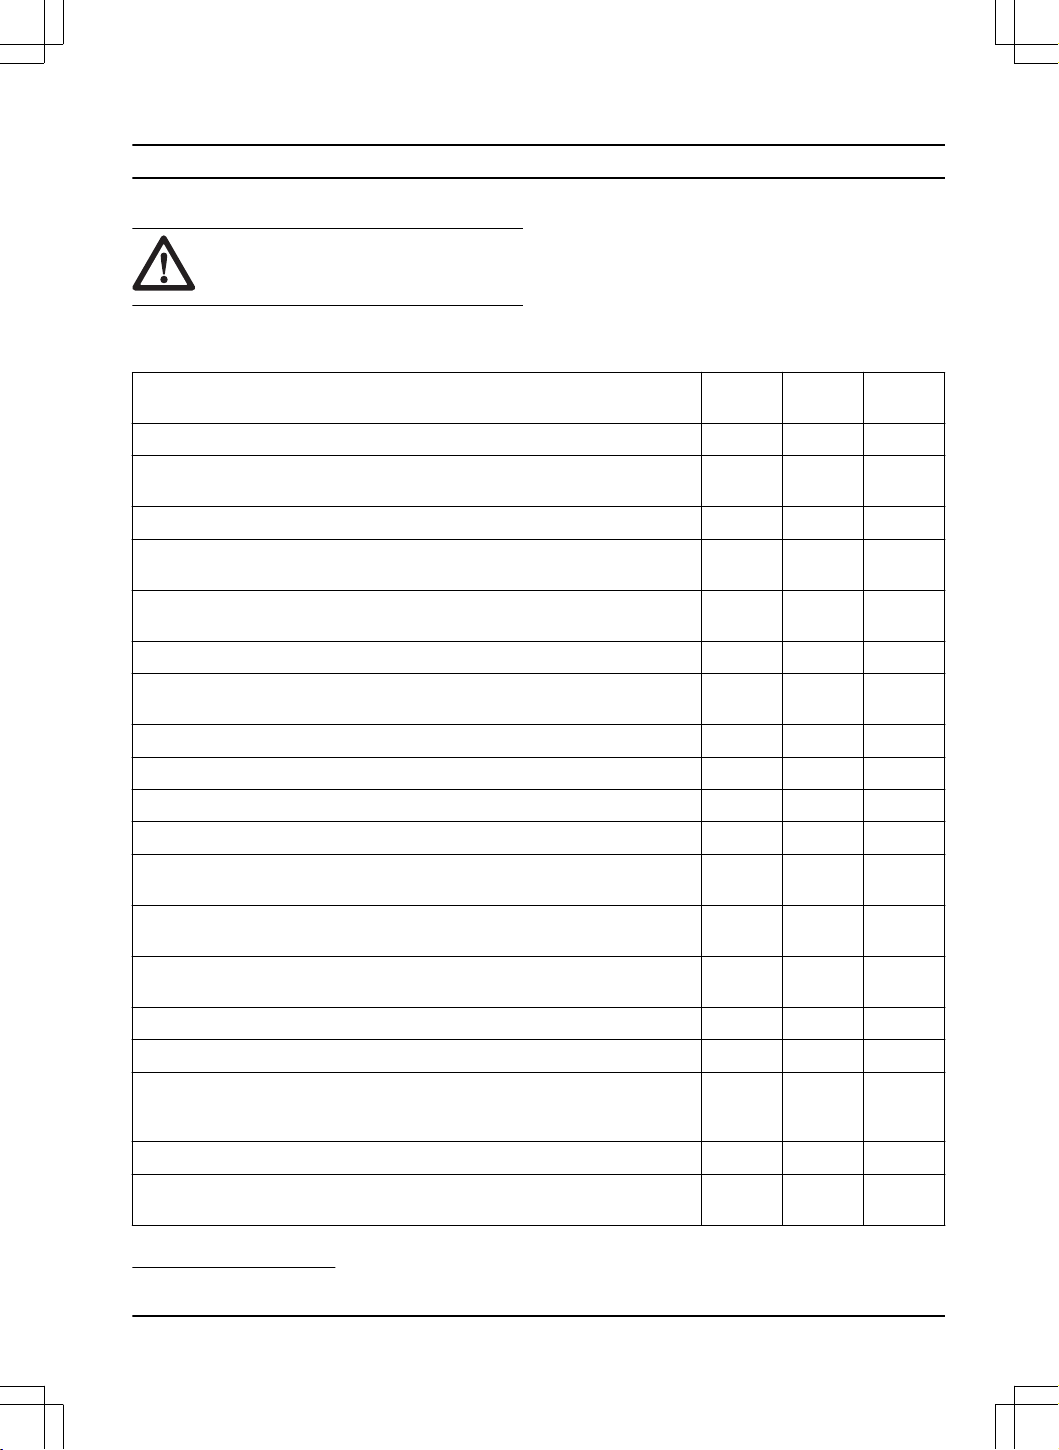
Cronograma de manutenção
Manutenção Diaria-
mente
Semanal-
mente
Mensal-
mente
Limpe a superfície externa. X
Faça uma verificação da trava do gatilho do acelerador e do gatilho. Consulte
Para verificar a trava do gatilho do aceleradorna página22
.
X
Certifique-se de que o acessório de colheita não se mova em marcha lenta. X
Faça uma verificação do interruptor de parada. Consulte
Para fazer uma verifi-
cação do interruptor de paradana página23
.
X
Faça uma verificação das alças para ver se há danos e certifique-se de que elas
estejam encaixadas corretamente.
X
Aperte totalmente o parafuso de travamento dos acessórios de colheita. X
Faça uma verificação do motor, do tanque de combustível e das linhas de
combustível para ver se há vazamentos.
X
Limpe o filtro de ar. Substitua em caso de danos. X
Aperte porcas e parafusos. X
Certifique-se de que o acessório de colheita não gire em marcha lenta X
Faça uma verificação do acessório de colheita quanto a danos ou rachaduras. X
Faça uma verificação do motor de partida e da corda de arranque quanto a
danos.
X
Faça uma verificação das unidades de amortecimento de vibrações quanto a
danos e rachaduras.
4
X
Faça uma verificação da vela de ignição. Consulte
Para verificar a vela de
igniçãona página33
.
X
Limpe o sistema de arrefecimento. X
Limpe a superfície externa do carburador e as áreas ao redor. X
Faça uma verificação do filtro de combustível quanto a contaminação e a man-
gueira de combustível para ver se há rachaduras ou outros defeitos. Substitua
se necessário.
X
Faça uma verificação de todos os cabos e conexões. X
Faça uma verificação da embreagem, das molas da embreagem e do tambor da
embreagem para ver se há desgaste. Substitua se necessário.
X
4
Substitua a unidade de amortecimento de vibrações após cada temporada ou pelo menos uma vez por ano.
2399 - 002 - 14.02.2025 31
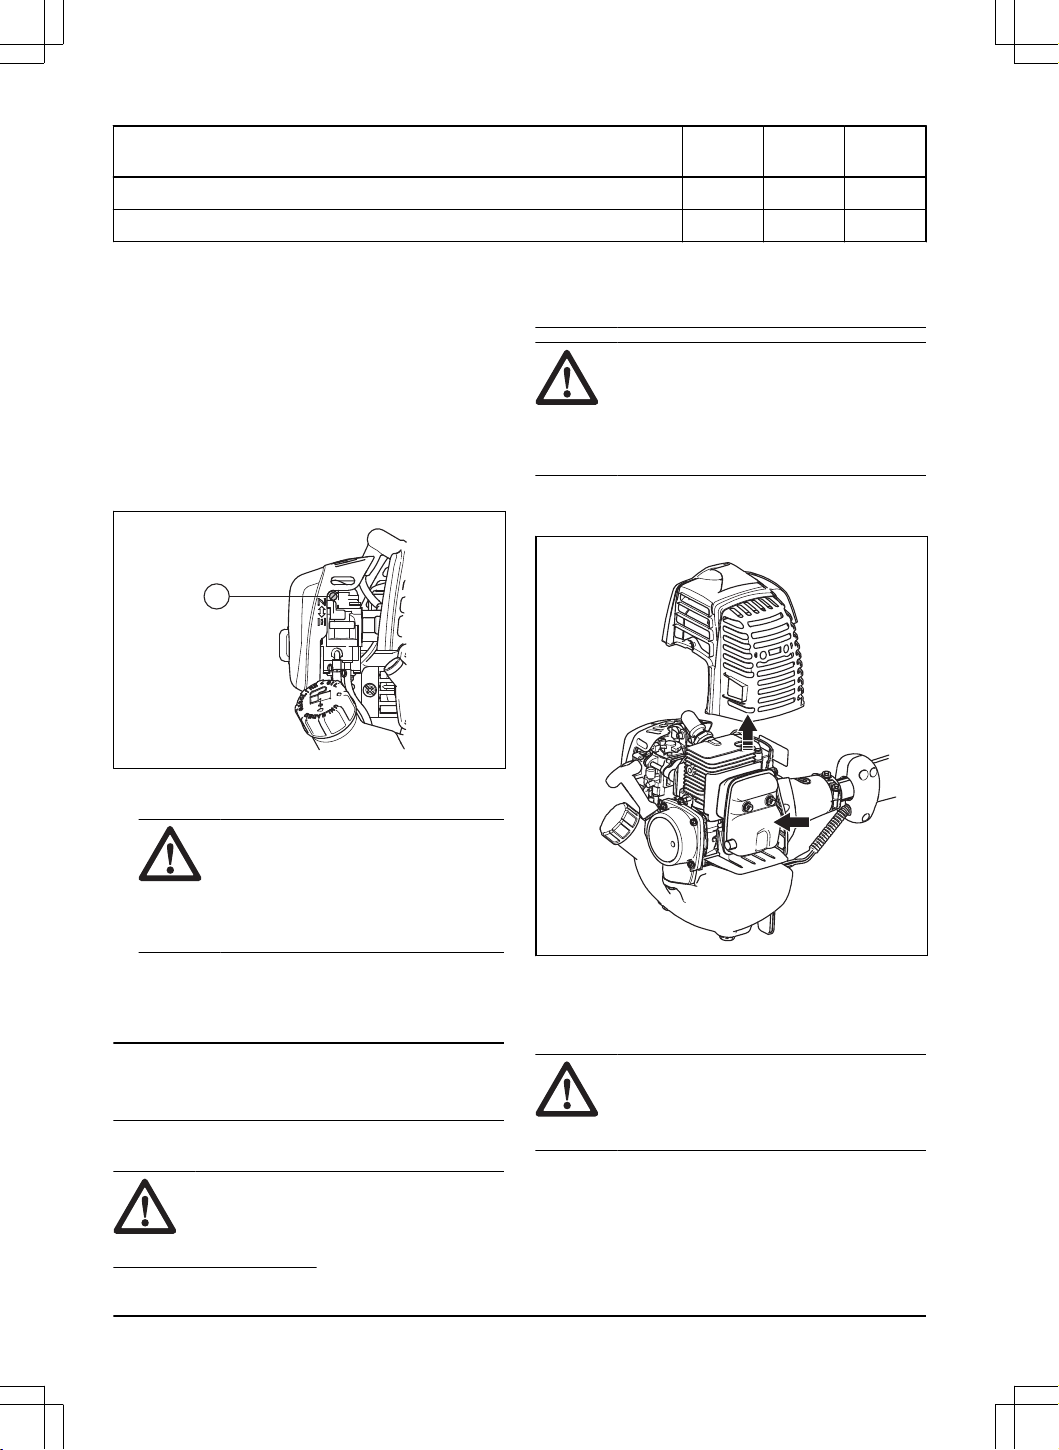
Manutenção Diaria-
mente
Semanal-
mente
Mensal-
mente
Substitua a vela de ignição. X
Lubrifique o eixo propulsor.
5
X
Para ajustar a marcha lenta
O produto Husqvarna foi criado de acordo com as
especificações para diminuir emissões nocivas.
1. Certifique-se de que o filtro de ar esteja limpo e a
tampa do filtro de ar, conectada antes de ajustar a
marcha lenta.
2. Ajuste a marcha lenta com o parafuso T de marcha
lenta que é identificado com a marca "T".
a) Gire o parafuso T de marcha lenta no sentido
horário até o equipamento de colheita começar a
mover-se.
T
b) Gire o parafuso T de marcha lenta no sentido
anti-horário até que o acessório de colheita pare.
AVISO: Se o acessório de colheita
não parar quando você ajustar a
marcha lenta, fale com seu centro de
assistência. Não use o produto até
que ele seja corretamente ajustado ou
reparado.
3. A marcha lenta está correta quando o motor opera
suavemente em todas as posições. A marcha lenta
deve estar abaixo da rotação de quando o acessório
de colheita começar a mover-se.
Observação:
Consulte
Dados técnicosna
página36
para obter informações de marcha lenta
recomendada.
Para substituir o silenciador
AVISO:
O silenciador diminui o nível de
ruído e desvia os gases de escape para
longe do operador. Os gases de escape
são quentes e podem conter faíscas. Isso
pode causar incêndio se apontado contra
materiais secos e inflamáveis.
AVISO: Silenciadores com catalisadores
ficam quentes durante a operação. Risco
de queimadura ou incêndio. Isso também
se aplica à marcha lenta. Para examinar se
o seu produto tem um catalisador, consulte
Visão geral do produtona página19
.
1. Desligue o motor e deixe o silenciador esfriar.
2. Remova a tampa do silenciador.
3. Substitua o silenciador.
4. Conecte a tampa do silenciador.
Para limpar o sistema de arrefecimento
CUIDADO:
Um sistema de
arrefecimento sujo ou obstruído pode deixar
o produto muito quente, o que pode causar
danos ao produto.
5
Em um intervalo de 3 meses.
32 2399 - 002 - 14.02.2025
O sistema de arrefecimento inclui aletas de
arrefecimento no cilindro (A) e na tela de entrada de
ar (B).
A
B
B
• Certifique-se de que o sistema de arrefecimento não
está sujo ou bloqueado.
• Limpe o sistema de arrefecimento com uma escova
uma vez por semana ou com mais frequência, caso
necessário.
Para limpar o filtro de ar
CUIDADO: Um filtro de ar danificado,
muito sujo ou encharcado com combustível
deve sempre ser substituído.
Se você usar um filtro de ar por muito tempo, ele
não pode ser totalmente limpo. Substitua o filtro de ar
regularmente.
1. Mova a alavanca do afogador para cima, para fechar
a válvula do afogador.
2. Remova a tampa do filtro de ar e remova o filtro.
3. Limpe o filtro de ar com água morna e sabão.
Certifique-se de que o filtro de ar esteja seco antes e
instalá-lo.
4. Se o filtro de ar estiver sujo demais para limpá-lo
totalmente, substitua-o. Sempre substitua um filtro
de ar danificado.
5. Além disso, limpe a superfície interna da tampa do
filtro. Utilize ar ou uma escova.
6. Examine a superfície da vedação de borracha.
Substitua o filtro na vedação de borracha se ele
estiver danificado.
7. Certifique-se de que o filtro na vedação de borracha
esteja seco antes de montá-lo.
Filtro de combustível
Quando o motor ficar sem combustível, certifique-se de
que o orifício de ar na tampa do tanque de combustível
e o filtro de combustível (A) estejam limpos.
A
Para verificar a vela de ignição
CUIDADO: Use sempre o tipo de vela
de ignição recomendado. O tipo errado
de vela de ignição pode causar danos ao
produto.
• Se o motor apresentar baixa potência, não iniciar
com facilidade ou não operar corretamente em
marcha lenta, verifique a vela de ignição.
• Para diminuir o risco de presença de material
indesejado nos eletrodos da vela de ignição, siga as
seguintes instruções:
a) Certifique-se de que a marcha lenta esteja
ajustada corretamente.
b) Certifique-se de que a mistura de combustível
esteja correta.
c) Certifique-se de que o filtro de ar esteja limpo.
• Se a vela de ignição estiver suja, limpe-a e verifique
se a folga do eletrodo está correta, consulte
Especificações técnicasna página36
.
• Substitua a vela de ignição, se for necessário.
Para verificar o acessório de colheita
AVISO: Um acessório de colheita
incorreto ou danificado pode causar
2399 - 002 - 14.02.2025 33
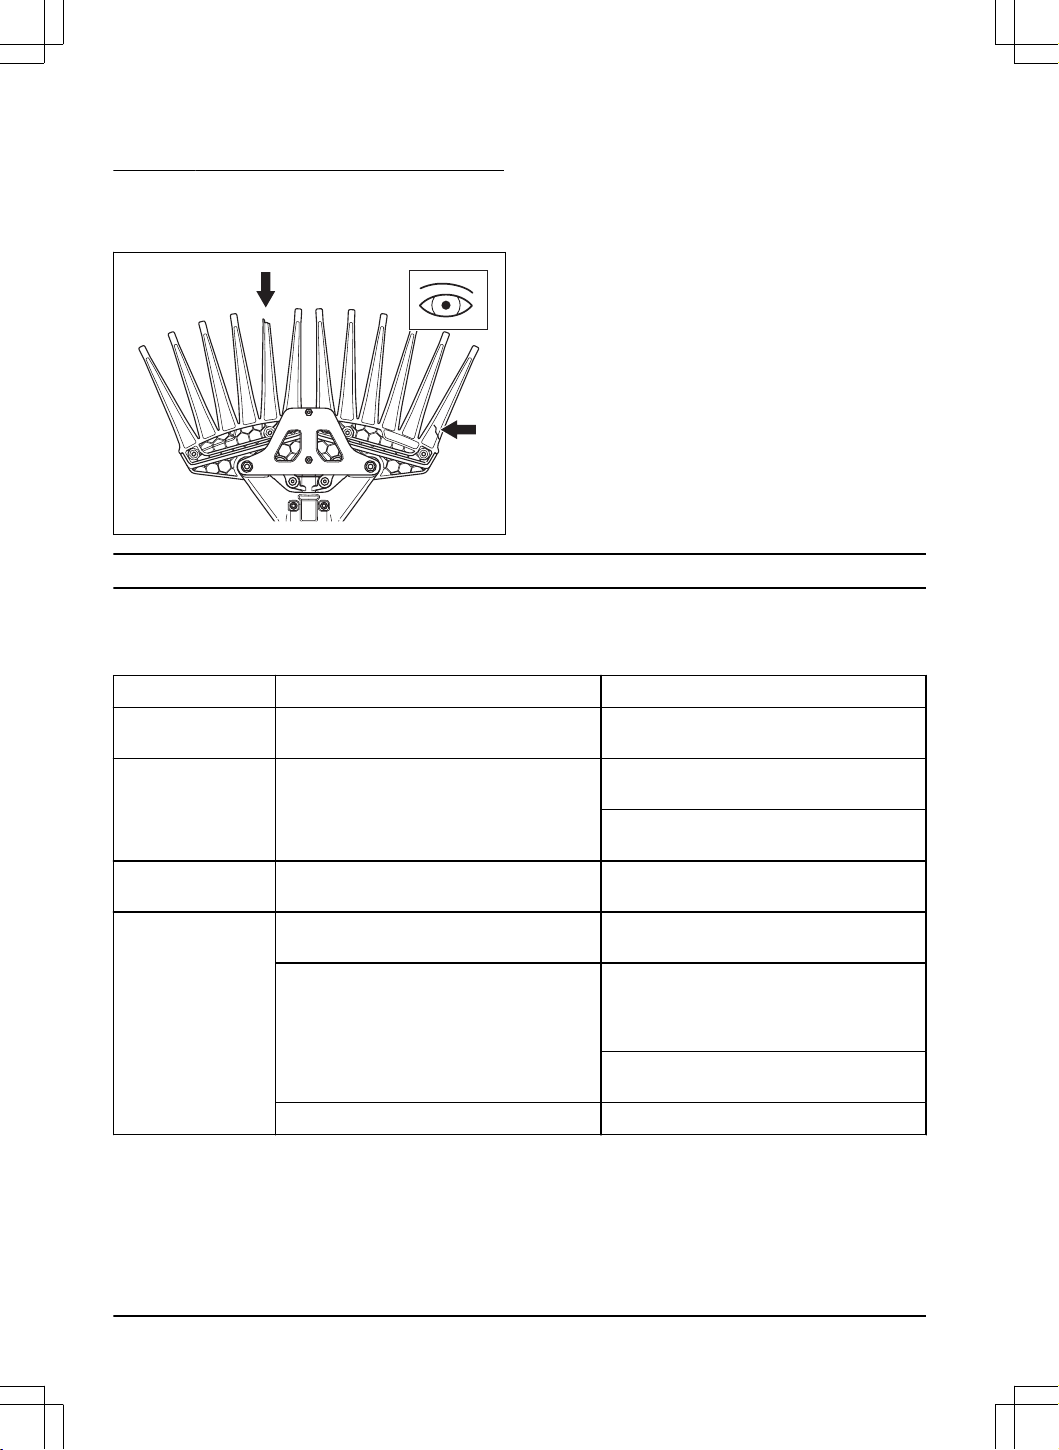
ferimentos graves. Consulte
Remover o
acessório com fileira de dentesna página27
.
1. Faça uma verificação visual quanto a danos, por
exemplo, rachaduras ou peças quebradas nos
dentes do acessório de colheita.
2. Substitua a fileira de dentes do acessório de colheita
se estiver danificada, consulte
Remover o acessório
com fileira de dentesna página27
.
Solução de problemas
O motor não liga
Verificar Possível causa Procedimento
Interruptor de para-
da.
O interruptor de parada está na posição pa-
rado.
Coloque o interruptor de parada na posição
de partida.
Linguetas do motor
de partida.
As linguetas do motor de partida não se mo-
vem livremente.
Remova a tampa do motor de partida e limpe
ao redor das linguetas.
Deixe um agente de serviço aprovado ajudar
você.
Tanque de combustí-
vel.
Tipo de combustível incorreto. Drene o tanque de combustível e encha com
combustível correto.
Vela de ignição. A vela de ignição está suja ou molhada. Certifique-se de que a vela de ignição esteja
seca e limpa.
A folga do eletrodo da vela de ignição está
incorreta.
Limpe a vela de ignição. Verifique se o ele-
trodo está com a folga correta. Certifique-se
de que a vela de ignição tenha um supres-
sor.
Consulte os dados técnicos para obter a fol-
ga correta do eletrodo.
A vela de ignição está solta. Aperte a vela de ignição.
34 2399 - 002 - 14.02.2025
O motor dá partida, mas para novamente
Verificar Possível causa Procedimento
Tanque de combustível. Tipo de combustível incorreto. Drene o tanque de combustível e en-
cha-o com combustível correto.
Filtro de ar. O filtro de ar está entupido. Limpe o filtro de ar.
Transporte e armazenamento
• Deixe o produto esfriar antes do transporte ou
armazenamento.
• Remova a tampa da vela de ignição antes de
guardar o produto por muito tempo.
• Prenda o produto durante o transporte. Certifique-se
de que ele não possa se mover.
• Certifique-se de que não haja risco de vazamentos
de combustível, vapores de combustível, faíscas ou
chamas durante o transporte e armazenamento.
• Limpe o produto e faça a sua manutenção antes do
armazenamento por períodos prolongados.
Descarte
Os símbolos no produto ou em sua embalagem indicam
que este produto não pode ser tratado como lixo
doméstico. O produto deve ser enviado a uma estação
de reciclagem para a recuperação do equipamento
elétrico e eletrônico.
Ao garantir que este produto seja manuseado
corretamente, você pode ajudar a neutralizar o potencial
impacto negativo no meio ambiente e nas pessoas, o
que poderia resultar da gestão incorreta dos resíduos
deste produto. Para obter informações detalhadas sobre
a reciclagem deste produto, entre em contato com seu
município, com o centro de resíduos domésticos da sua
região ou com a loja onde você adquiriu o produto.
2399 - 002 - 14.02.2025 35
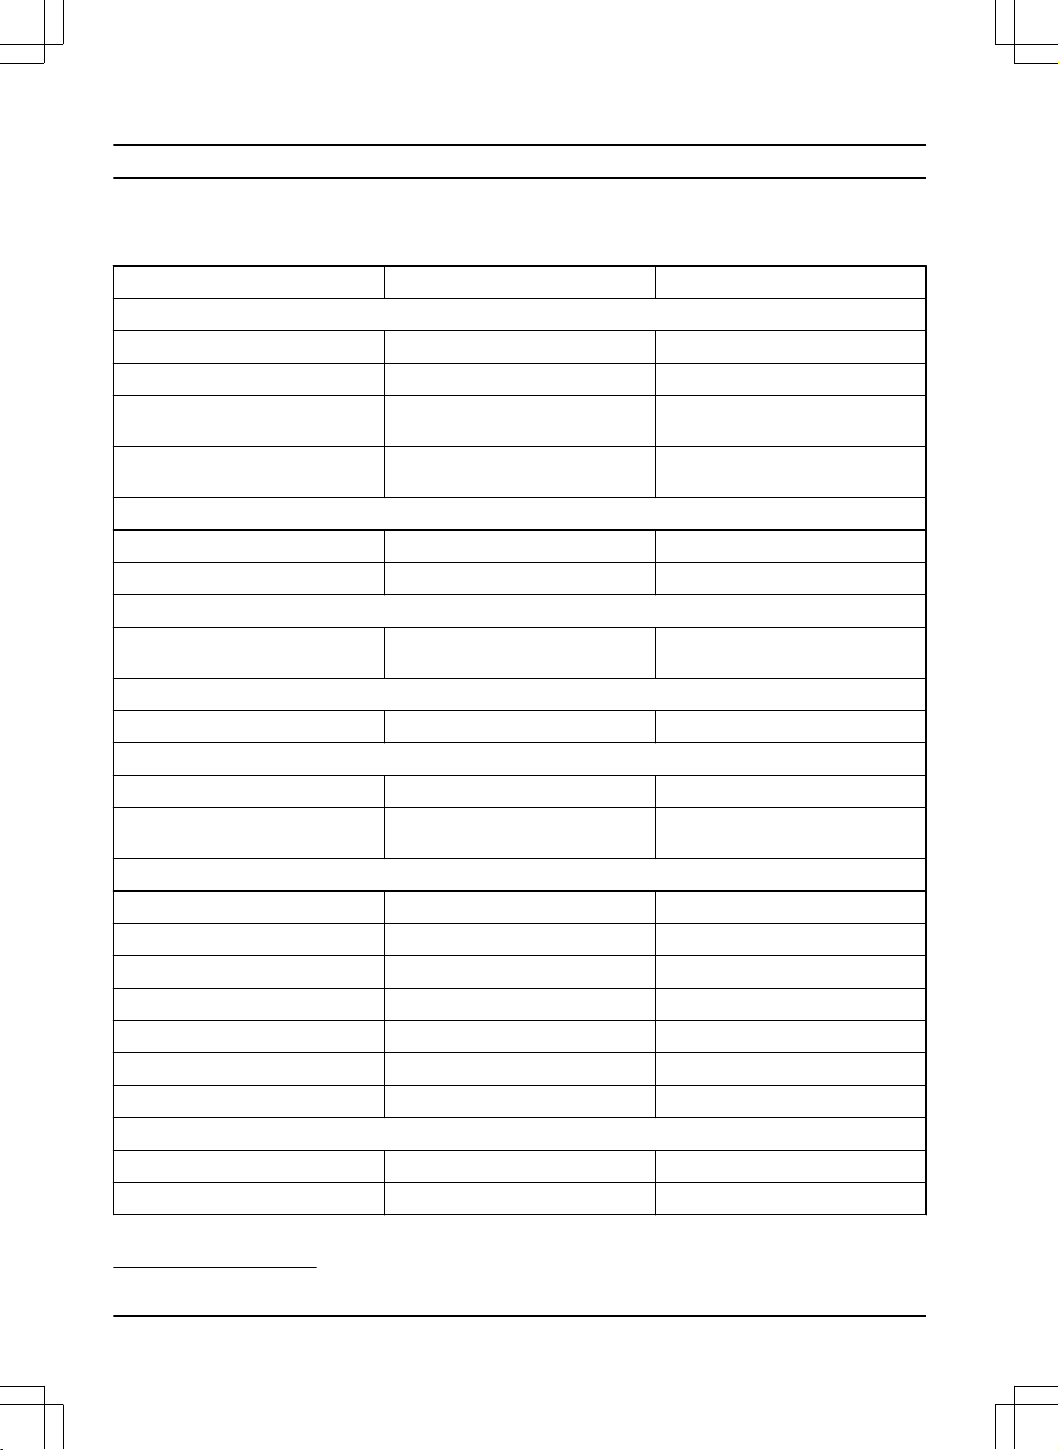
Dados técnicos
Especificações técnicas
226KS12 226KD24
Motor
Cilindrada, cm
3
25,4 25,4
Marcha lenta, rpm 3000 3000
Velocidade máxima recomendada,
rpm
11500 11500
Potência máxima do motor, conforme
ISO 8893, kW/hp @ rpm
0,81/1,1 @ 7500 0,81/1,1 @ 7500
Sistema de ignição
Vela de ignição BGK BPMR 7A BGK BPMR 7A
Folga do eletrodo 0,6-0,7 0,6-0,7
Sistema de combustível e lubrificação
Capacidade do tanque de combustí-
vel, l/cm
3
0,75/750 0,75/750
Peso
Peso, kg 4,3 4,3
Eixo
Diâmetro externo do tubo, mm 26 e adaptador para 24 26 e adaptador para 24
Eixo de transmissão, formato de saí-
da, mm
7T 7T
Acessório de colheita
Transmissão Totalmente vedada Totalmente vedada
Peso do acessório, kg 1,8 2,1
Relação de marchas 3,92 3,92
Área de cobertura, mm 410-460 410-460
Retentores de graxa Sim Sim
Tipo de graxa HP-R HP-R
Acoplamento 7T 7T
Dados de vibração
6
Puxador traseiro, m/s
2
5,9 6,2
Punho dianteiro, m/s
2 6,8 6,6
6
Os dados relatados de nível de vibração têm uma dispersão estatística típica (desvio padrão) de 1,5 m/s
2
.
36 2399 - 002 - 14.02.2025

2399 - 002 - 14.02.2025 37

38 2399 - 002 - 14.02.2025

2399 - 002 - 14.02.2025 39

www.husqvarna.com
Original instructions
Instruções originais
1143974-70 Rev. B
2025-07-08