User Manual
SECTION 1: GETTING STARTED
Topics
- Key Items in Your Jitterbug Box
- Your Jitterbug Smart2
- Charging the Battery
- Understanding Touch Gestures
- Phone Overview
- Home Screen Overview
- Making a Call
- Sending a Text Message
- Voice Typing
- Taking a Photo
- Setting Up Your Voicemail Greeting
- Adding a Contact
- Setting Up Wi-Fi
Key Items in Your Jitterbug Box
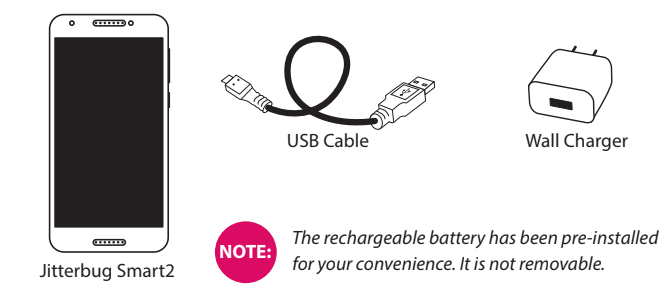
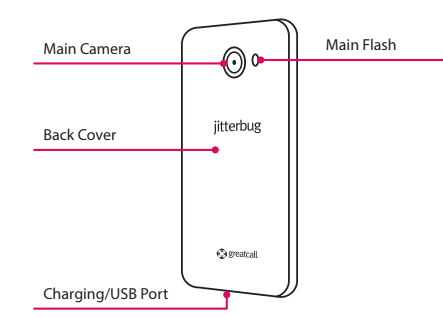
Your Jitterbug Smart2
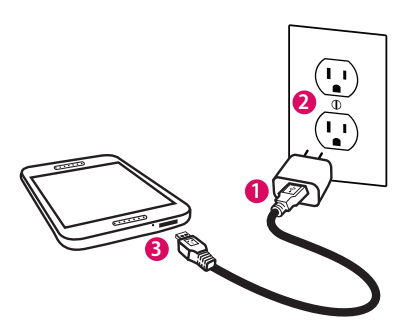
Charging the Battery
- Plug larger end of USB Cable into Wall Charger
- Plug Wall Charger into a wall outlet.
- Plug smaller end of USB Cable into the bottom of your Jitterbug.
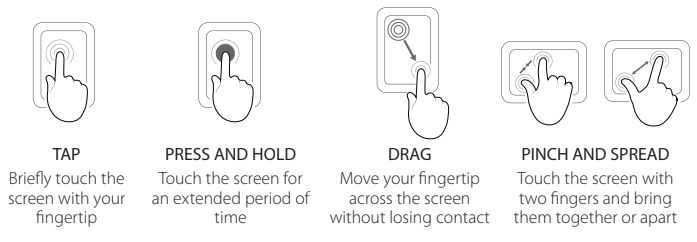
Understanding Touch Gestures
These are the most common touch gestures you will use when interacting with your Jitterbug touch screen:
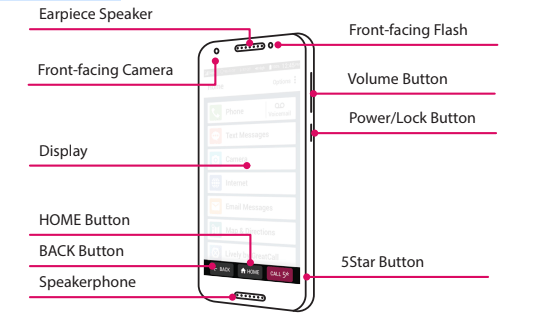
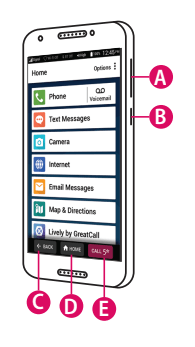
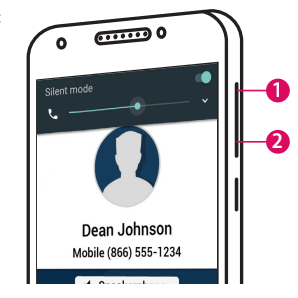
Phone Overview
A) Volume Button – PRESS upper end of button to increase volume; PRESS lower end of button to decrease volume.
B) Power/Lock Button – QUICKLY PRESS to lock or wake your phone; PRESS AND HOLD to power your phone on or off.
C) BACK Button – TAP to return to the previous screen.
D) HOME Button – TAP to return to the Home Screen.
E) 5Star Button – PRESS AND HOLD to get help in any unsafe or uncertain situation (requires Health & Safety Package).
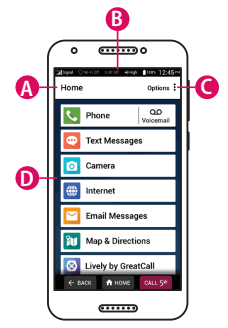
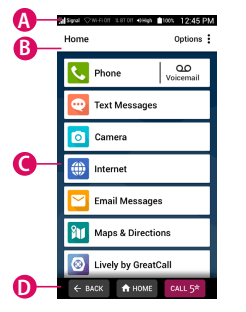
Home Screen Overview
A) Title Bar – Name of the screen you are viewing.
B) Status Bar – Shows you wireless connectivity, ringer volume, battery and current time information.
C) Options – TAP to view more options relevant to the screen you are currently viewing.
D) App List – A list of the apps you use most.
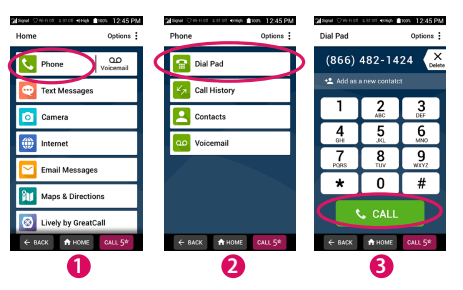
Making a Call
- On the Home Screen, TAP Phone.
- TAP Dial Pad.
- Enter the 10-digit phone number and TAP CALL.
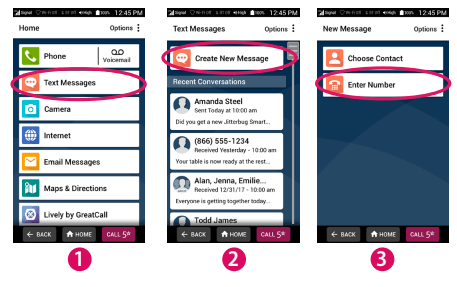
Sending a Text Message
1. On the Home Screen, TAP Text Messages.
2. TAP Create New Message.
3. TAP Enter Number.
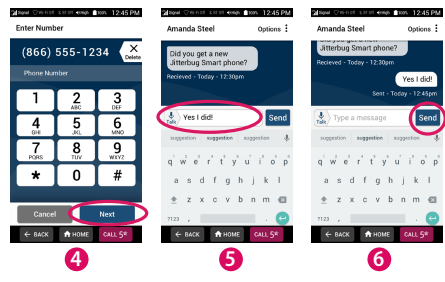
4. Enter the 10-digit phone number and TAP Next.
5. Compose your text message using the keyboard.
6. TAP Send.
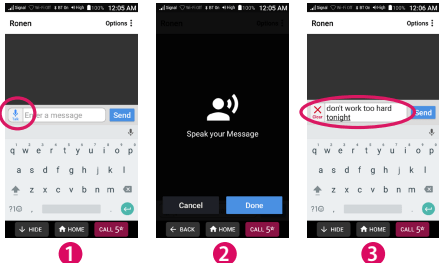
Voice Typing
- When using the keyboard, TAP the Talk icon.
- Speak your message.
- If needed, edit your message using the keyboard or by using the Talk icon again.
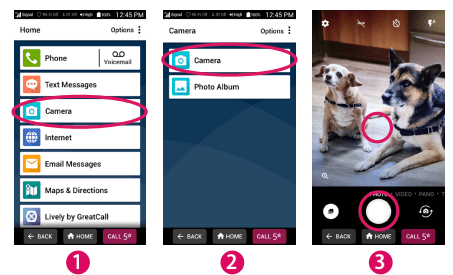
Taking a Photo
- On the Home Screen, TAP Camera.
- TAP Camera.
- TAP where you want to focus, then TAP the circle Shutter button.
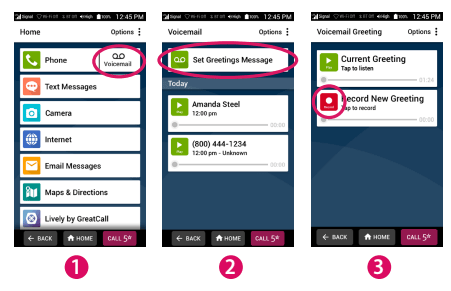
Setting Up Your Voicemail Greeting
1. On the Home Screen, TAP Voicemail.
2. TAP Set Greetings Message.
3. TAP Record New Greeting and begin speaking your greeting.
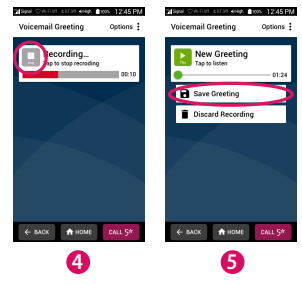
4. TAP Stop to finish your recording.
5. TAP Save Greeting if you are satisfied or Discard Recording if you would like to record a new greeting.
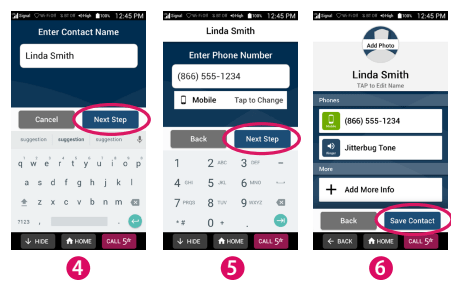
Adding a Contact
1. On the Home Screen, TAP Phone.
2. TAP Contacts.
3. TAP Add New Contact.
4. Enter contact name and TAP Next Step.
5. Enter contact phone number and TAP Next Step.
6. TAP Save Contact.
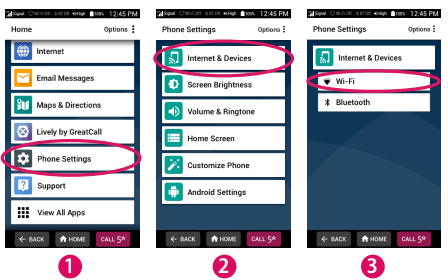
Setting Up Wi-Fi
1. On the Home Screen, DRAG to scroll down and TAP Phone Settings.
2. TAP Internet & Devices.
3. TAP Wi-Fi.
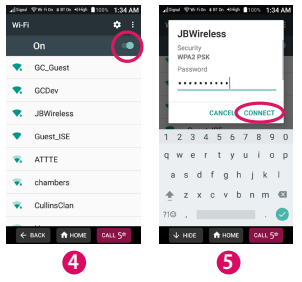
4. TAP the switch to turn on Wi-Fi and then TAP your network name.
5. Enter the network password and TAP CONNECT.
Section 2: The Jitterbug Experience
Topics
- Jitterbug Home Screen
- Navigation Buttons
- Title Bar
- App List
- Status Bar
- Lock Screen
- Checking Talk, Text and Data Usage
- What is Data?
- Using Wi-Fi to Reduce Your Plan Usage
- Connecting to Wi-Fi
- 5Star Service
- The Learning Center
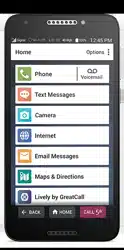
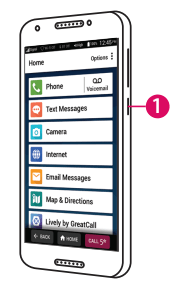
Jitterbug Home Screen
The Home Screen is the first thing you see every time you unlock your phone. From this screen you can access all features of your Jitterbug. The Home Screen is organized into four sections:
A) Status Bar – Shows you important status information.
B) Title Bar – Where you are and relevant options.
C) App List – A list of the apps you use most.
D) Navigation Buttons – Navigate around your phone
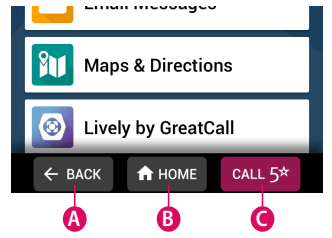
Navigation Buttons
At the bottom of your screen you will find three buttons that are used frequently to navigate around your phone.
A) BACK Button – Takes you one step back from your last action.
B) HOME Button – Takes you back to the Home Screen.
C) 5Star Button – PRESS AND HOLD to get help in any unsafe or uncertain situation requires Health & Safety Package).
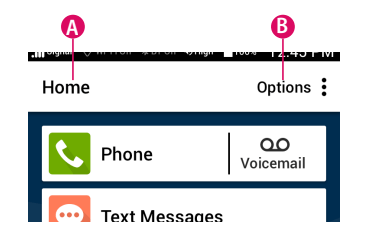
Title Bar
The Title Bar will appear at the top of your Home Screen, as well as many of the other apps you will use on your Jitterbug. It contains the following:
A) Screen Name – The name of the screen you are currently viewing. When viewing the Home Screen you will see “Home”.
B) Options – Additional options relevant to the screen you are viewing. You will also find helpful learning tips here.
App List
An “app” is a small application designed to do a specific task for you. Your favorite apps will be displayed in the Home Screen. We’ve added some here to get you started, but you can always adjust this list by using the Options button in the Title Bar.
 Phone
Phone – Make calls.
 Voicemail
 – Listen to voice messages people have left you.
 Text Messages
 – Send and receive text messages.
 Camera
 – Capture photos or videos.
 Internet
 – Find websites that interest you.
 Email
Email – Send and receive email messages.
 Maps & Directions
 – Get directions to your destination.
 Lively
 – Update your Personal Emergency Profile.
 Phone Settings
 – Adjust important settings of your phone.
 Support
 – Check your plan usage and find helpful tips.
 All Apps
 – Additional apps that you may find useful.
Status Bar

The Status Bar, at the top of your screen, shows you important information about the state of your phone.
 Cellular Signal Strength – Affects your call quality. The more bars you have the stronger your signal.
 Wi-Fi Status – Use a Wi-Fi network to save Data usage on your plan. You can turn this on or off under Phone Settings.
 Bluetooth Status – Let’s you know if you’re connected to a Bluetooth device such as a car stereo or wireless headphones. Turn this feature on or off under Phone Settings.
 Ringer Volume – Adjust the Ringer Volume using the Volume Button on the side of your phone.
 Battery Level – Allows you to keep track if you need to charge your phone.
 Current Time – The current time automatically set by the GreatCall network.
Lock Screen
Your Jitterbug is equipped with a Lock Screen that prevents accidental dialing as well as an extra layer of security if you happen to misplace your phone.
To lock and unlock your phone:
- QUICKLY PRESS the Power/Lock Button on the side of your phone.
NOTE: Your Jitterbug will lock automatically if you haven’t interacted with your phone for a few moments.
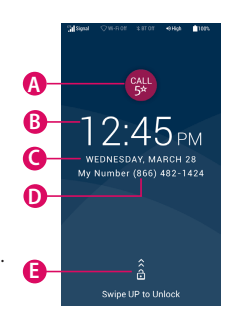
Lock Screen Overview
A) 5Star Button – PRESS AND HOLD to get help in any unsafe or uncertain situation (requires Health & Safety Package).
B) Current Time
C) Current Date
D) Your Phone Number
E) Swipe to Unlock – DRAG your finger from the bottom of the screen to the top in one, quick “swiping” motion.
Managing Your Lock Screen Secret Key
You may have setup a lock screen during the initial setup process, but you can always change it later by:
- On the Home Screen, TAP Phone Settings.
- TAP Android Settings.
- TAP Lock Screen.
- TAP Screen lock.
- TAP the lock screen option that you desire.
Lock Screen Options
There are five lock screen options you can choose from:
- None – No Lock Screen will appear at all. QUICKLY PRESSING the Power/Lock Button will take you immediately to the Home Screen.
- Swipe – Unlocking your phone will only require you to “swipe” your finger from the bottom of the screen to the top in one, quick motion.
- Pattern – After swiping to unlock, you will be required to draw a pattern that only you know.
- PIN –After swiping to unlock, you will be required to enter a numerical PIN that only you know.
- Password – After swiping to unlock, you will be required to enter an alpha- numeric password that only you know.
NOTE: Do not forget your Lock Screen Secret Key! Use the inside cover of this User Guide to take a note of your Secret Key!
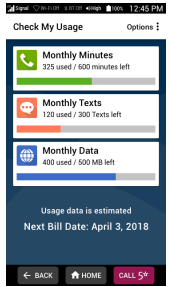
Checking Talk, Text and Data Usage
Your Jitterbug allows you to do much more than just calling your friends and family. It’s an easy-to-use smartphone with a broad range of capabilities from sending pictures and videos via Text Message or Email, browsing the Internet to catch up on the latest news, to downloading the latest apps and games.
To avoid overage fees, periodically check your Talk, Text and Data usage by:
- On the Home Screen, TAP the Support app.
- TAP Check my Usage.
What is Data?
Data is electronic information sent wirelessly between your phone and GreatCall’s network. Examples of features that typically use Data on your Data Plan allowance:
- Sharing photos or videos on social media sites like Facebook
- Sending and receiving Email messages
- Browsing the Internet
- Watching streaming videos on a website or using an app like YouTubeTM
- Listening to music on a website or using an app like Pandora®
- Turn-by-turn directions using the Maps & Directions app
- Downloading apps from the Google PlayTM Store
Using Wi-Fi to Reduce Your Data Plan Usage
If your home already has Internet access and a Wi-Fi network, sometimes called a “wireless network”, you can connect your Jitterbug to your Wi-Fi connection to reduce Data usage on your monthly GreatCall Data Plan allowance.
When successfully connected to your Wi-Fi network, all Data usage will go through your home’s Internet access instead of GreatCall’s cellular network.
NOTE:
Periodically check the Status Bar to confirm if you are connected to Wi-Fi. If not, Data use may be deducted from your monthly GreatCall Data allowance. If you are connected to Wi-Fi, you will see this in the Status Bar: 
Connecting to Wi-Fi
On the Home Screen, DRAG to scroll down and TAP Phone Settings.
- TAP Internet & Devices.
- TAP Wi-Fi.
- TAP the switch to turn on Wi-Fi and then TAP your network name.
- Enter the network password and TAP CONNECT.
NOTE: Use the inside cover of this User Guide to take note of your Wi-Fi settings for future reference.
5Star Service
The 5Star Button on your Jitterbug gets you access to GreatCall’s unique 5Star
Service. This service provides easy-to-use and reliable access to IAED-Certified 5Star
Agents who will confirm your location, evaluate your situation, and get you the help you need. Available with all Health & Safety Packages.
PRESS AND HOLD the 5Star Button to call 5Star in an uncertain or unsafe situation.

NOTE:
If you accidentally call 5Star, please stay on the line and advise the Agent that it is not an emergency. Our Agents are notified of attempted calls, take each one seriously and are trained to call back to confirm your situation.
The Learning Center
At GreatCall, we provide you with easy-to-follow educational tools for the way you want to learn. Whether it’s your first smartphone or you are ready for advanced features, our Learning Center is here to help every step of the way.
Section 3: Phone Calls
Topics
- Phone App Overview
- Dial Pad
- Call History
- Contacts
- Voicemail
- Answering or Ignoring a Call
- Speakerphone
- Accessing the Dial Pad during Calls
- Adjusting the Call Volume
- Adjusting the Ringer Volume
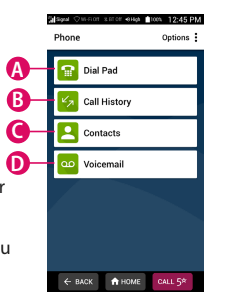
Phone App Overview
TAPPING Phone from the Home Screen will give you the following options:
A) Dial Pad – Make a call by dialing the number.
B) Call History – See your incoming and outgoing call history.
C) Contacts – Save phone numbers with a contact name for quicker dialing.
D) Voicemail – Listen to any voice messages from callers you may have missed.
Dial Pad
These are the features of the Dial Pad:
A) Phone Number Field – This shows the phone number you’re about to call as you are dialing. Use the Delete button if you make a mistake.
B) Add Contact – You have the option of adding this number to a contact name for quicker dialing in the future.
C) Dial Pad – This is where you dial the phone number.
D) CALL Button – TAP this when you are ready to call.

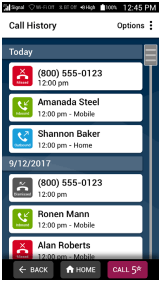
Call History
From Call History you can view your inbound, outbound, missed and dismissed call history. TAP any record for more options like calling back, sending a text message and viewing caller details. These are the types of call history records:
 Inbound
 – Incoming calls that were answered.
 Outbound
 – All outgoing calls.
 Dismissed
 – Incoming calls that you hung up on before answering.
 Missed
 – Incoming calls that ended before you could answer.
Contacts
Contacts is where you can save your most frequently called contacts so that you don’t have to manually dial their number each time. To add a new contact:
- TAP Add New Contact at the top.
- Enter their name.
- Enter their phone number.
- TAP Save Contact.
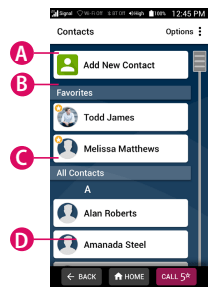
Once a contact is saved, you can TAP their name in the Contacts list to call them.
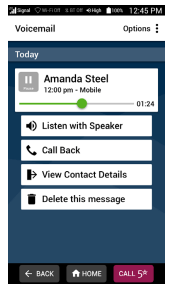
Voicemail
In Voicemail you can configure your greeting message that’s played to callers when you can’t answer the phone. You can also listen to voice messages left for you.
- To update your greeting, TAP Set Greeting Message.
- To listen to your voice messages, TAP the Play button on any voice message history.
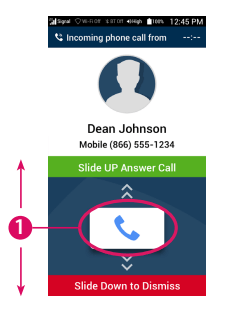
Answering or Ignoring a Call
Your Jitterbug will vibrate and/or ring to notify you when someone is calling. On your screen you will see any information available about the caller as well as an option to answer or to dismiss the call. Dismissing a call will send them to your Voicemail.
To answer or dismiss the call:
- PRESS AND HOLD your finger on the Phone Icon button and DRAG your finger UP to answer or DOWN to dismiss.
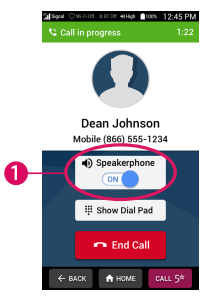
Speakerphone
Once in a call, you will have the ability to route the caller’s voice to either the Earpiece Speaker or the Speakerphone. The Earpiece allows you to have a private conversation if you are in a public setting, while the Speakerphone allows you to free your hands or allow other people surrounding you to participate in the conversation.
To switch between the Earpiece Speaker and Speakerphone, while on an active call:
- TAP the Speakerphone On/Off switch.
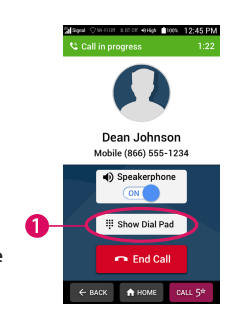
Accessing the Dial Pad During Calls
There are instances while on an a call that you will need to access the Dial Pad to dial an extension or to make a selection on an Interactive Voice Response prompt (i.e. press ‘1’ to speak to a representative”).
To access the Dial Pad, while on an active call:
- TAP the Show Dial Pad button.
- TAP the Hide Dial Pad button to go back to the active call information screen or to access the Speakerphone setting.
Adjusting the Call Volume
To adjust the Call Volume, while on an active call:
- PRESS upper end of the Volume Button to increase the Call Volume
- PRESS lower end of the Volume Button to decrease the Call Volume.
Adjusting the Ringer Volume
To adjust the Ringer Volume, while viewing the Home Screen:
- PRESS upper end of the Volume Button to increase the Ringer Volume
- PRESS lower end of the Volume Button to decrease the Ringer Volume.
NOTE: As you adjust the Ringer Volume, you will see the indicator change in the Status Bar.
Section 4: Text Messages
Topics
- Text Messages App Overview
- Sending New Text Messages
- Reading and Replying to Text Messages
- Sending Photo Messages
- Deleting Text Messages
Text Messages App Overview
Text Messages are a quick and simple way to send short messages to anyone that has a cell phone capable of receiving them.
TAPPING Text Messages from the Home Screen will give you the following options:
A) Create New Message – Compose a new Text Message.
B) Conversation History – A list of Text Message conversations you have had and can reply.

Sending New Text Messages
- TAP Create New Message.
- TAP either Choose Contact or Enter Number.
- Select the recipient from Contacts or enter the phone number.
- Compose your message using the On-screen Keyboard or the Voice Typing feature (Talk Button).
- TAP Send.
Reading and Replying to Text Messages
- TAP any Text Message in your Conversation History.
- DRAG your finger up and down to read the Text Message conversation.
- TAP anywhere in the “Enter a message” box to open the On-screen Keyboard.
- Compose your message using the On-screen Keyboard or the Voice Typing feature (Talk Button).
- TAP Send.
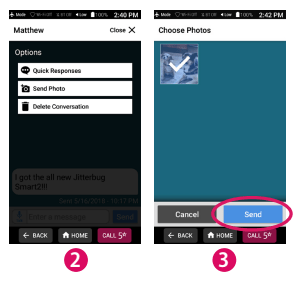
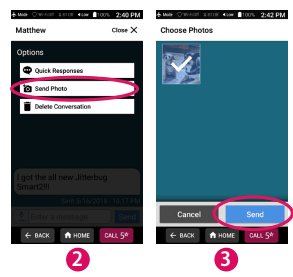
Sending Photo Messages
While composing a new Text Message or replying to an existing Text Message conversation:
- TAP Options at the top-right of the screen.
- TAP Send Photo.
- TAP the photo you would like to send from your Photo Album. A checkbox will appear on the photo when selected.
- TAP Send.
Deleting Text Messages
- TAP any Text Message in your Conversation History.
- TAP Options at the top-right of the screen.
- TAP Delete Conversation.
- TAP Delete Conversation in the pop-up to confirm.
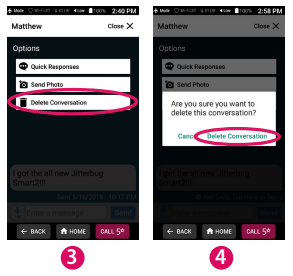
NOTE: Text Messages cannot be recovered once deleted.
Section 5: Camera
Topics
- Camera App Overview
- Taking a Photo
- Recording a Video
- Viewing Your Photos and Videos
- Deleting Your Photos and Videos
- Sharing Your Photos
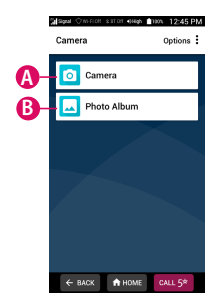
Camera App Overview
The Camera allows you to take pictures and videos of precious moments and share with friends and family.
TAPPING Camera from the Home Screen will give you the following options:
A) Camera – Take photos and videos.
B) Photo Album – View photos and videos you have captured.
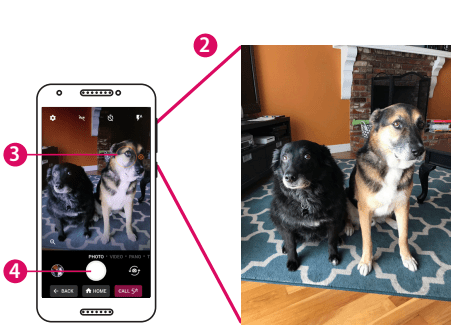
Taking a Photo
- TAP Camera to open the Viewfinder
- Aim the back of your phone towards your subject.
- TAP where you would like to focus.
- TAP the circle Shutter button.
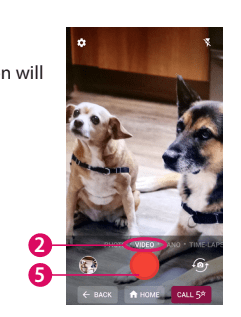
Recording a Video
- TAP Camera to open the Viewfinder.
- TAP VIDEO near the Shutter button. The Shutter button will turn red.
- Aim the back of your phone towards your subject.
- TAP where you would like to focus.
- TAP the circle Shutter button to start recording.
- TAP the circle Shutter button again to stop recording.
Viewing Your Photos and Videos
After you have captured a photo or video, you can view it by accessing the Photo Album.
- TAP Photo Album.
- TAP any photo or video to view it in full screen.

Deleting Your Photos and Videos
While viewing your Photo Album, you can delete any photos that you no longer need.
- TAP on a photo in your Photo Album to view it.
- TAP the Trash Can icon on the bottom-right of the screen.
- TAP DELETE in the pop-up to confirm.

Sharing Your Photos
While composing a new Text Message or replying to an existing Text Message conversation:
- TAP Options at the top-right of the screen.
- TAP Send Photo.
- TAP the photo you would like to send from your Photo Album. A checkbox will appear on the photo when selected.
- TAP Send.
Topics
- Setting up Your Email Account
- Composing and Sending Email
- Reading and Replying to an Email
- Sending an Email with a Photo or Video
- Adjusting the Screen Brightness
- Bluetooth
- Airplane Mode
- Downloading More Apps
- Changing Your Color Theme
- Changing the Lock Screen Photo
- Contacting Us
Setting up Your Email Account
1. On the Home Screen, TAP Email Messages.
2. Enter your email address, then TAP NEXT >.
3. Enter your password, then TAP NEXT >.
4. On the "Account options" screen, TAP NEXT >.
5. Enter an account name (ex. "Personal").
6. Enter how you would like your name to appear in outgoing emails.
7. TAP FINISH >.
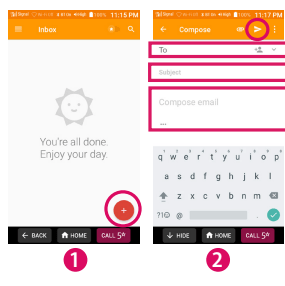
Composing and Sending Email
- From your Email Inbox, TAP the + Button.
- Enter in the recipient's email address in the "To" field.
- Enter in a Subject.
- Compose your email message.
- TAP the Paper Airplane icon at the top-right of the screen to send your email.
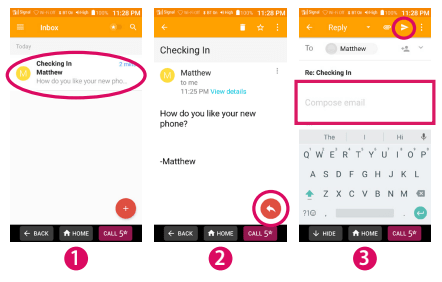
Reading and Replying to an Email
- TAP an email in your Inbox to read it.
- To reply, TAP the Reply Arrow Button at the bottom-right of the screen.
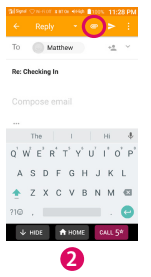
- Compose your email message.
- TAP the Paper Airplane icon at the top-right of the screen to send your email.
Sending an Email with a Photo or Video
- Start composing an email.
- TAP the Paper Clip icon.
- Choose the photos or videos you would like to attach to your email message.
- TAP the Paper Airplane icon to send your email message with attachments.
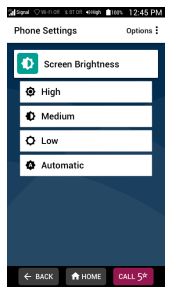
Adjusting the Screen Brightness
- On the Home Screen, TAP Phone Settings.
- TAP Screen Brightness.
- TAP the desired brightness setting.
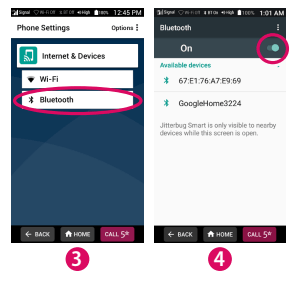
Bluetooth
Bluetooth allows you to connect wirelessly to devices such as car stereos, portable speakers and wireless headphones. To connect to a
Bluetooth device:
- On the Home Screen, TAP Phone Settings.
- TAP Internet & Devices.
- TAP Bluetooth.
- TAP the switch to turn on Bluetooth and then TAP your Bluetooth device name.
- If prompted, enter the device PIN.
NOTE: Due to the wide variety of Bluetooth devices available, please refer to the device manufacturer's user documentation for setup tips.
Airplane Mode
When traveling on an airplane, you may be required to put your phone in Airplane Mode. In Airplane Mode, all of your Jitterbug's wireless features will be disabled.
To turn on Airplane Mode:
- On the Home Screen, TAP Phone Settings.
- TAP Android Settings.
- Under "WIRELESS & NETWORKS", TAP More.
- TAP the Airplane Mode switch to enable this mode. You will notice that the Cellular Signal Strength icon will change into an airplane.
Downloading More Apps
In order to download more apps to your phone, you will need a Google Account. If you don't have one, you will have an opportunity to create one for free. Once logged into Google, you can download apps from the Play Store.
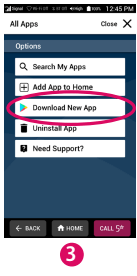
1. On the Home Screen, TAP View All Apps.
2. While viewing All Apps, TAP Options.
3. TAP Download New App.
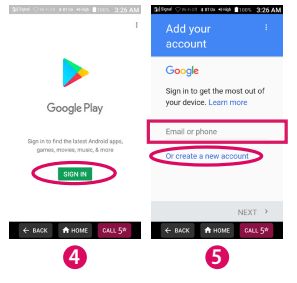
4. TAP SIGN IN.
5. Sign in with your Google Account, or create a new account:
- If you already have a Google Account, enter your account information and follow the prompts.
- If you do not have a Google Account, TAP "Or create a new account" and follow the prompts.
Uninstalling Apps
If you no longer need an app that you installed:
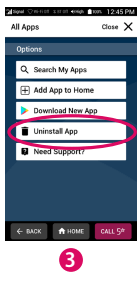
- On the Home Screen, TAP View All Apps.
- While viewing All Apps, TAP Options.
- TAP Uninstall App.
- TAP the app you would like to uninstall.
- TAP OK to confirm.
NOTE: You can only uninstall apps that you have installed. You cannot uninstall the pre-loaded apps.
Changing Your Color Theme
Personalize your phone by changing the color theme:
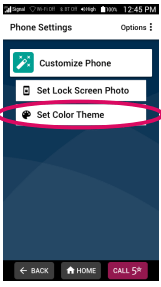
- On the Home Screen, TAP Phone Settings.
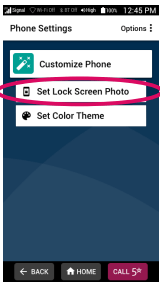
- TAP Customize Phone.
- TAP Set Color Theme.
- TAP the color that you like.
- TAP Set Color.
Changing the Lock Screen Photo
Personalize your phone by changing the Lock Screen photo:
- On the Home Screen, TAP Phone Settings.
- TAP Customize Phone.
- TAP Set Lock Screen Photo.
- TAP a photo that you like from your Gallery.
- PINCH/SPREAD and DRAG your fingers to reposition the photo to fit the screen.
- TAP SET WALLPAPER at the top of the screen.