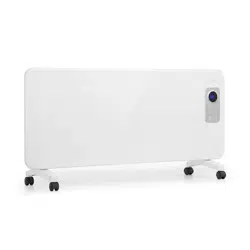
BORNHOLM
SMART
Konvektions-Heizung
Convection Heater
Radiador de convección
Radiateur convecteur
Radiatore a convezione
Convectieverwarming
Hinweis: Dieses Produkt ist nur für gut isolierte Räume
oder für den gelegentlichen Gebrauch geeignet.
Note: This product is only suitable for well insulated
spaces or occasional use.
Nota: Este producto está indicado únicamente en
lugares abrigados o para una utilización punctual.
Remarque : Ce produit ne peut être utilisé que dans
des locaux bien isolés ou de manière occasionnelle.
Advertencia: Questo prodotto è adatto solo per spazi
ben isolati o uso occasionale.
Let op! Dit artikel is alleen geschikt voor goed geïsoleer-
de ruimtes
www.klarstein.com
10034390 10034391
Rev: 04/26

3
DE
Sehr geehrter Kunde,
wir gratulieren Ihnen zum Erwerb Ihres Gerätes. Lesen Sie
die folgenden Hinweise sorgfältig durch und befolgen Sie
diese, um möglichen Schäden vorzubeugen. Für Schäden,
die durch Missachtung der Hinweise und unsachgemäßen
Gebrauch entstehen, übernehmen wir keine Haftung.
Scannen Sie den folgenden QR-Code, um Zugriff auf die
aktuellste Bedienungsanleitung und weitere Informationen
rund um das Produkt zu erhalten.
INHALTSVERZEICHNIS
TECHNISCHE DATEN
Artikelnummer
10034190, 10034391
Stromversorgung 220-240 V ~ 50 Hz
Leistung 1000 W / 2000 W
WiFi-Standard
802.11 b/g/n
WiFi-Frequenz
2,4 GHz
WiFi-Sendeleistung (max.)
20 dBm
English 17
Español 29
Français 41
Italiano 53
Nederlands 65
Sicherheitshinweise 4
Produktdatenblatt 5
Geräteübersicht 6
Montage 6
Bedienfeld 8
Bedienung 8
Gerätesteuerung per Smartphone 11
Reinigung und Pege 12
Spezielle Entsorgungshinweise für Verbraucher in Deutschland 13
Hinweise zur Entsorgung 15
Konformitätserklärung 15
4
DE
SICHERHEITSHINWEISE
• Prüfen Sie vor der Benutzung die Spannung auf der Geräteplakette und
schließen Sie das Gerät nur an Steckdosen an, die der Spannung des Geräts
entsprechen.
• Falls das Netzkabel beschädigt ist, lassen Sie es von einer ausgebildeten Fachkraft
ersetzen.
• Stellen Sie die Heizung nicht direkt unter der Steckdose auf.
• Halten Sie einen Meter Abstand zu brennbaren Materialien wie Möbeln,
Vorhängen oder Ähnlichem.
• Benutzen Sie das Gerät außerhalb der Reichweite von Kindern. Kinder dürfen
das Gerät nur unter Aufsicht bedienen.
• Das Gerät ist nicht für den kommerziellen Gebrauch, sondern nur für
Gebrauch im Haushalt und in ähnlichen Umgebungen vorgesehen.
• Benutzen Sie das Gerät nicht wenn es Fehlfunktionen aufweist oder in
irgendeiner Form beschädigt wurde.
• Reparaturen dürfen nur von ausgebildeten Fachkräften durchgeführt werden.
• Falsch oder eigenständig ausgeführte Reparaturen stellen ein
Verletzungsrisiko dar.
• Verlegen Sie das Netzkabel nicht unter Teppichen oder Läufern.
• Achten Sie darauf, dass das Netzkabel nicht über scharfe Kanten oder heiße
Oberächen verläuft.
• Decken Sie die Heizung nicht ab, um Überhitzen zu vermieden.
• Benutzen Sie das Gerät nicht mit einem externen Timer, einer ferngesteuerten
Steckdose oder einem anderen Gerät, das die Heizung automatisch ein- und
ausschaltet.
• Tauchen Sie das Gerät nicht in Wasser oder andere Flüssigkeiten.
• Benutzen Sie das Gerät nicht in der Nähe von Badewannen, Duschen oder
Swimmingpools.
• Benutzen Sie das Gerät nicht im Freien.
• Benutzen Sie das Gerät nicht mit nassen Händen.
• Benutzen Sie das Gerät nicht auf oder in der Nähe heißer Oberächen.
• Benutzen Sie das Gerät nicht mit beschädigtem Netzkabel.
• Ziehen Sie vor der Reinigung den Stecker aus der Steckdose und lassen Sie
das Gerät vollständig abkühlen.
• Benutzen Sie zur Reinigung keine Scheuermittel.
• Verwenden Sie nur Zubehör, das vom Hersteller ausdrücklich dafür
zugelassen ist.
• Kinder ab 8 Jahren, psychisch, sensorisch und körperlich eingeschränkte
Menschen dürfen das Gerät nur benutzen, wenn sie vorher von einer für
sie verantwortlichen Aufsichtsperson ausführlich mit den Funktionen und
den Sicherheitsvorkehrungen vertraut gemacht wurden und die damit
verbundenen Risiken verstehen.
• Kinder dürfen nicht mit dem Gerät spielen.
VORSICHT
Verbrennungsgefahr! Einige Geräteteile können sehr heiß werden.
Achten Sie darauf, dass Sie oder Ihre Kinder sich nicht daran
verbrennen.
5
DE
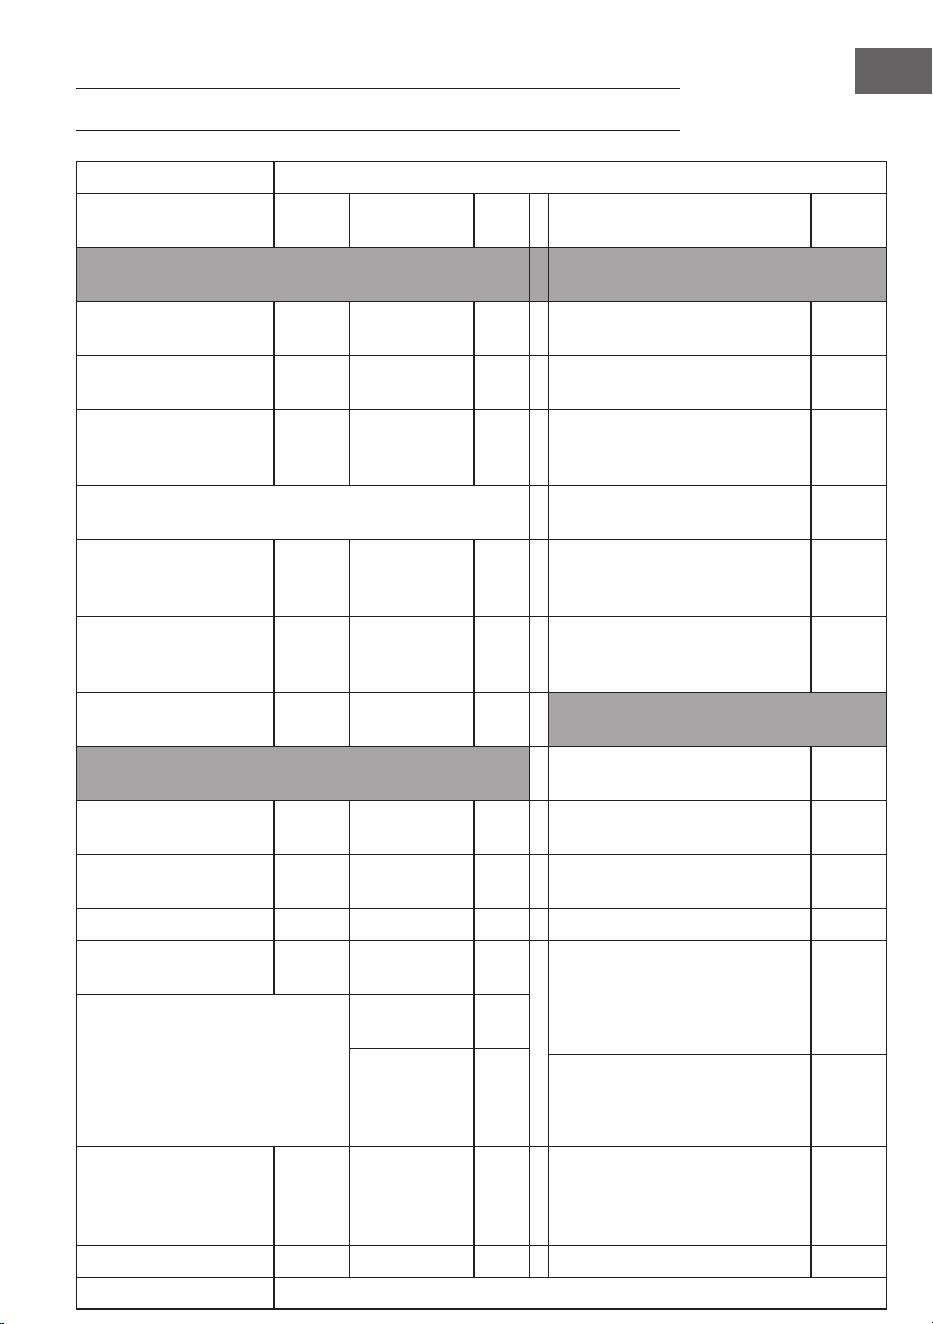
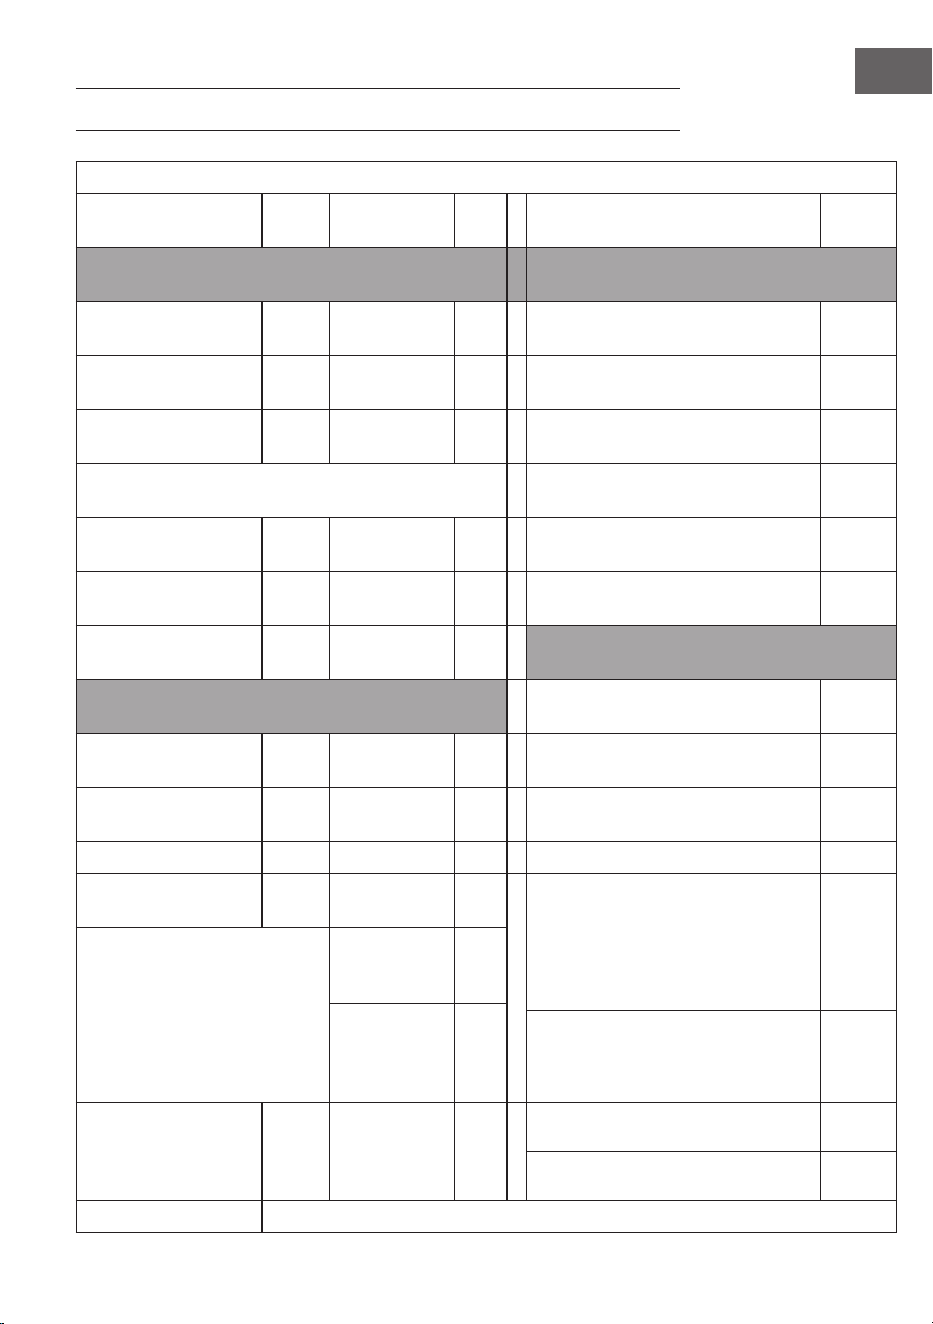
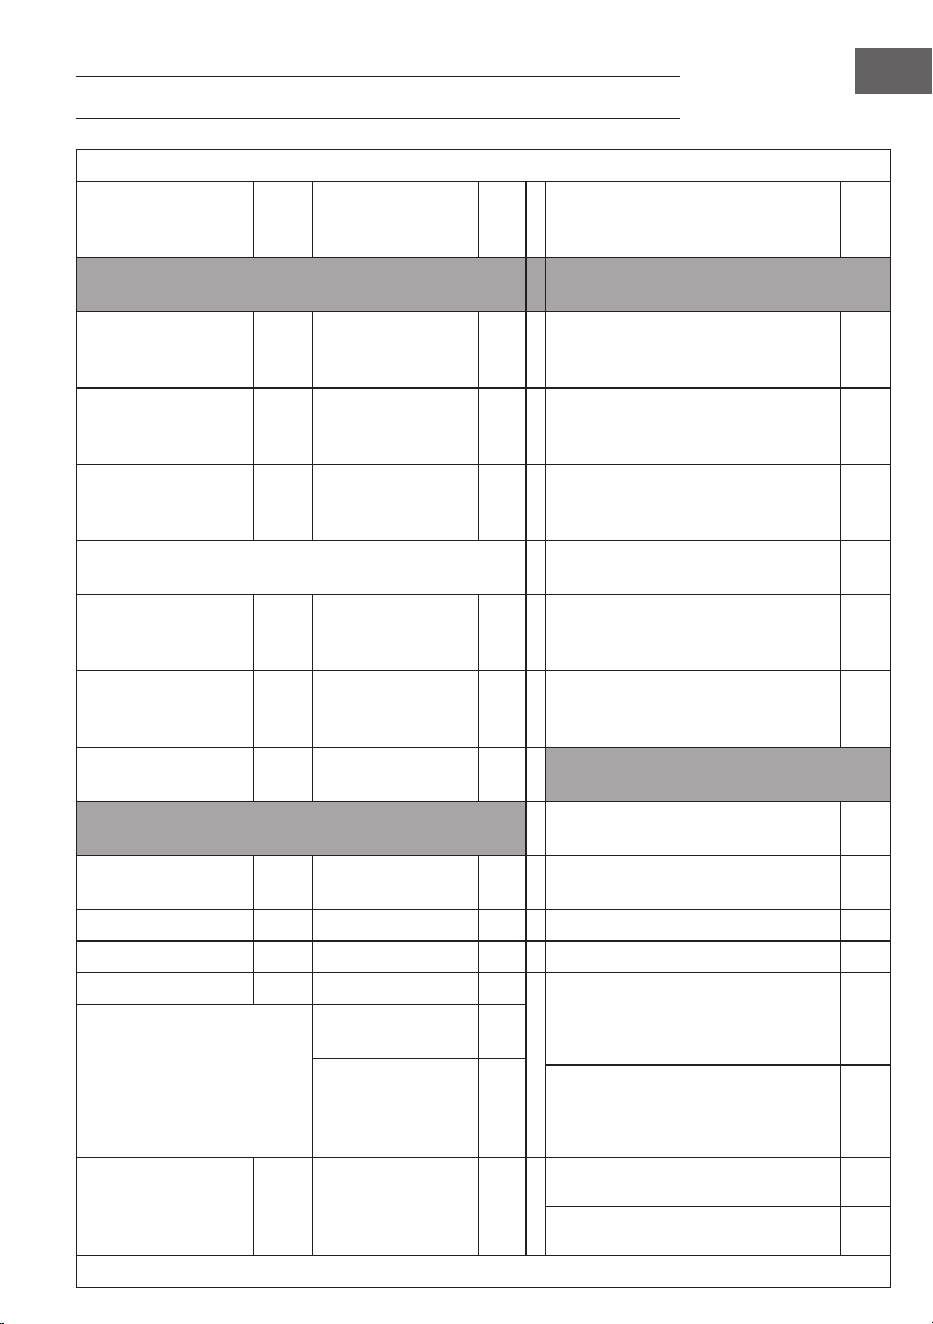
PRODUKTDATENBLATT
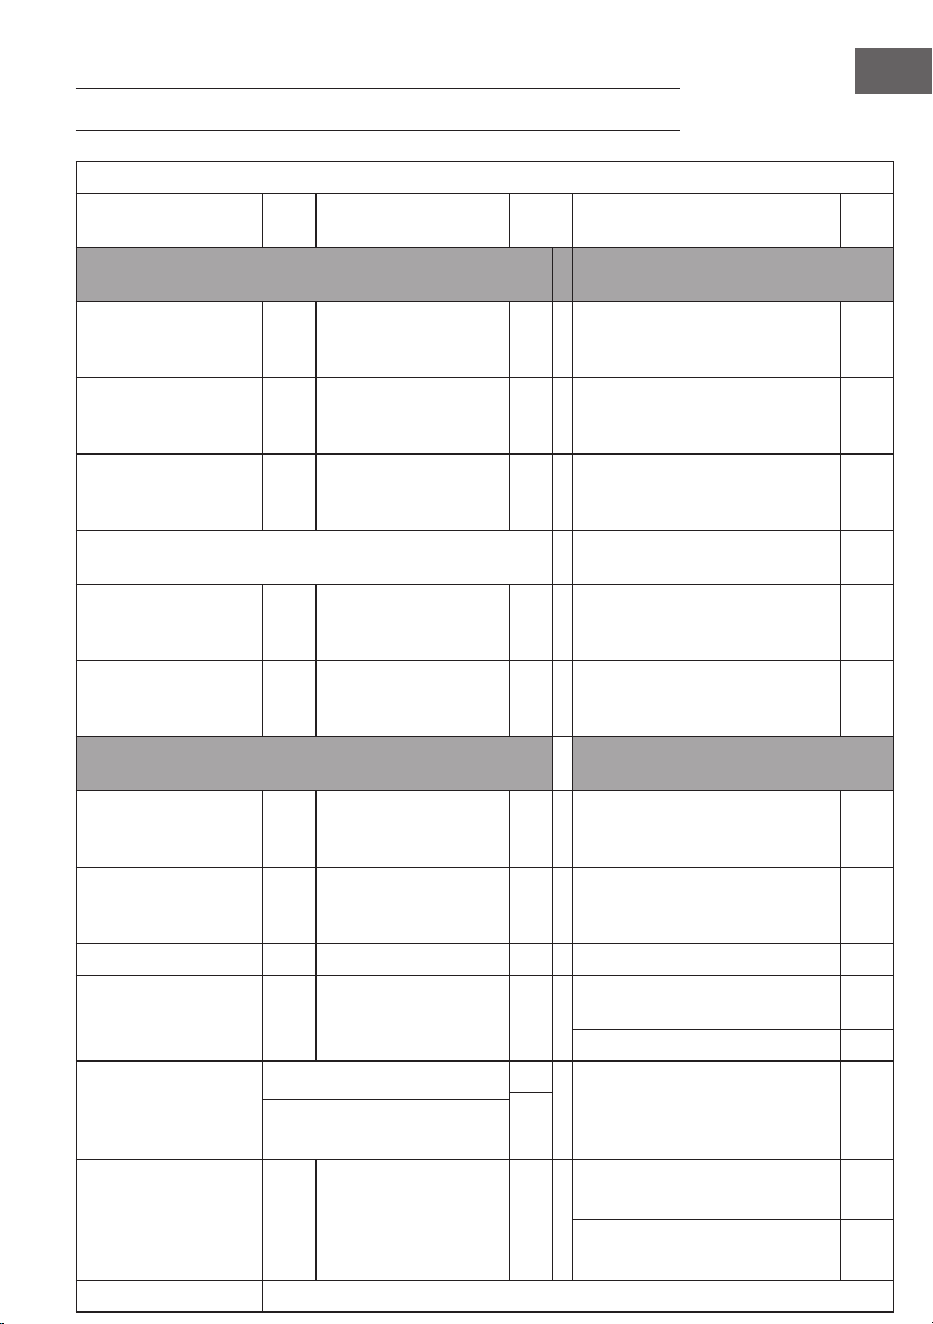
Modellkennung(en): 10034390, 10034391
Artikel Symbol Wert Ein-
heit
Artikel Einheit
Wärmeleistung Art der Wärmeleistung/
Raumtemperaturkontrolle
Nennwärmeleistung P
nom
2,000
kW Einstuge Wärmeleistung und
keine Raumtemperaturkontrolle
nein
Minimale Heizleistung
(indikativ)
P
min
1,000
kW Zwei oder mehr manuelle Stufen,
keine Raumtemperaturkontrolle
nein
Maximale
kontinuierliche
Wärmeleistung
P
max,c
2,000
kW Raumtemperaturkontrolle mit
mechanischem Thermostat
nein
Hilfsstromverbrauch bei Nennwärmeleistung Mit elektronischer
Raumtemperaturkontrolle
nein
Bei
Nennwärmeleistung
el
max
1,775
kW Mit elektronischer
Raumtemperaturkontrolle und
Tages-Zeitschaltuhr
nein
Bei Mindest-
wärmeleistung
el
min
0,894
kW Mit elektronischer
Raumtemperaturkontrolle und
Wochen-Zeitschaltuhr
ja
Weitere Kontrollmöglichkeiten
(Mehrfachauswahl möglich)
Stromverbrauch Raumtemperaturkontrolle mit
Präsenzerkennung
nein
In ausgeschaltetem
Modus
P
o
0,00 W Raumtemperaturkontrolle mit
Erkennung offener Fenster
ja
Im Standby-Modus P
sm
0,55 (Anzeige
ein)
W Mit Fernbedienungsoption nein
Im Ruhezustand P
idle
/ W Adaptive Startsteuerung nein
Im Netzwerk-Standby-
Modus
P
nsm
/ W Arbeitszeitbegrenzung ja
Standby-Modus mit Anzeige von
Informationen oder Status
Timer-
Einstellung
ja
Mechanischer
Schalter bei
und nach dem
Betrieb
nein
Schwarzkugelsensor ja
Saisonale
Raumheizungs-
energieezienz im
aktiven Modus
n
S, on
94,5 (tragbar)
/ 92,0
(befestigt)
% Selbstlernende Funktionalität nein
Steuerungsgenauigkeit nein
Kontaktangaben Chal-Tec GmbH, Mühlenstraße 25, 10243, Berlin, Deutschland
6
DE
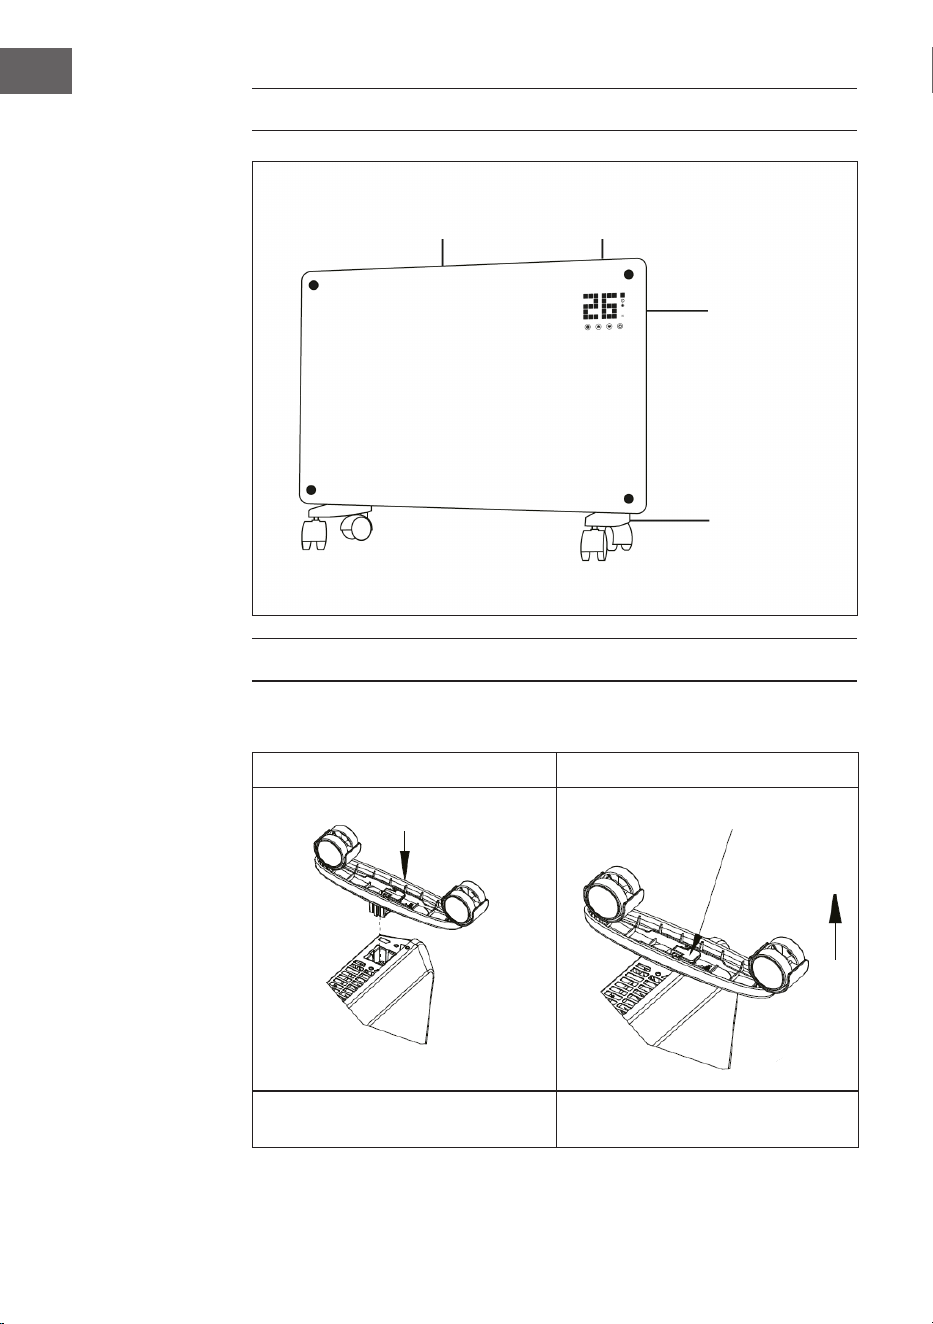
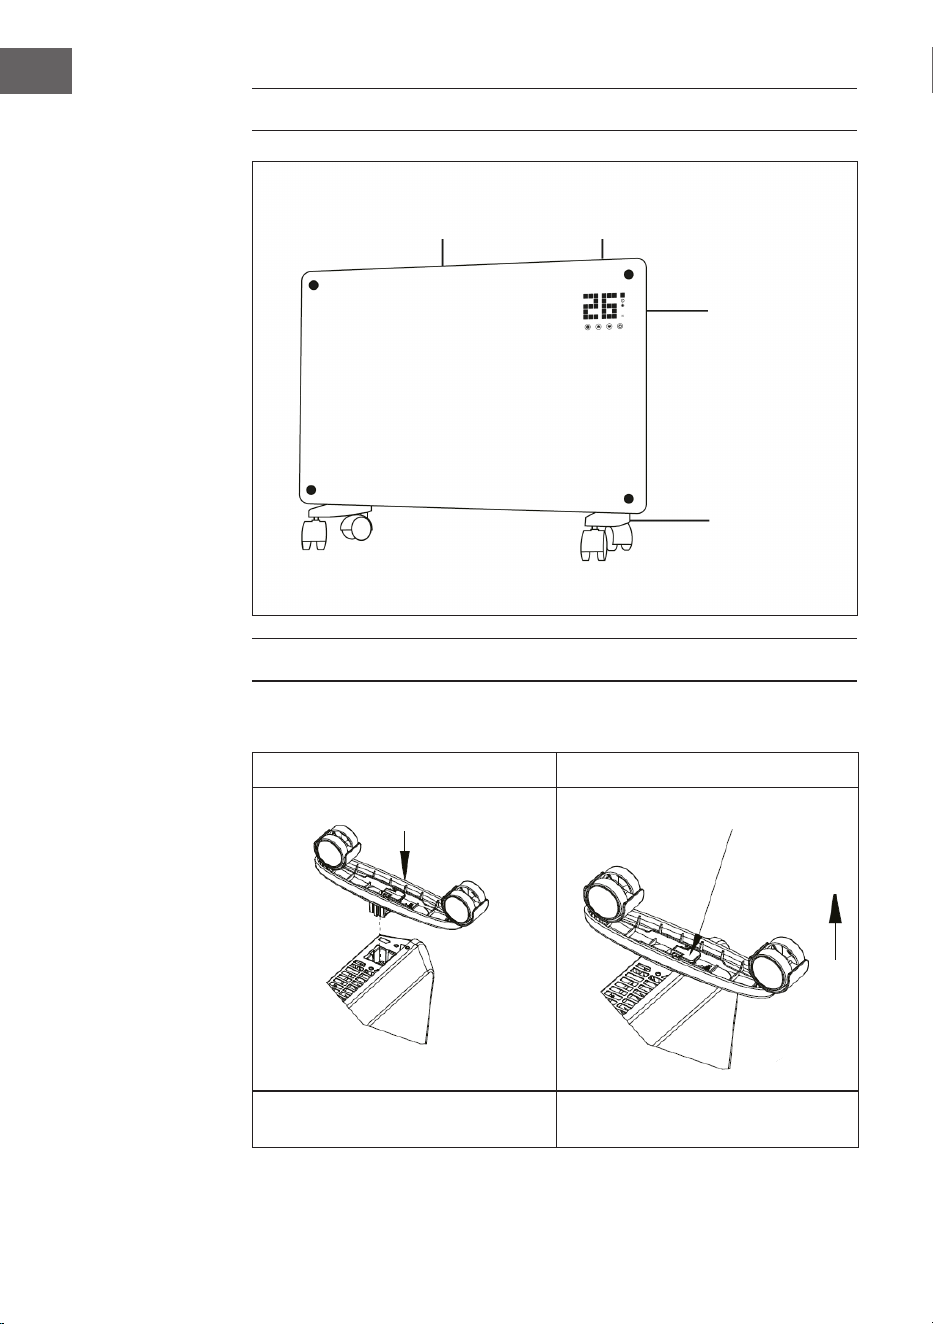
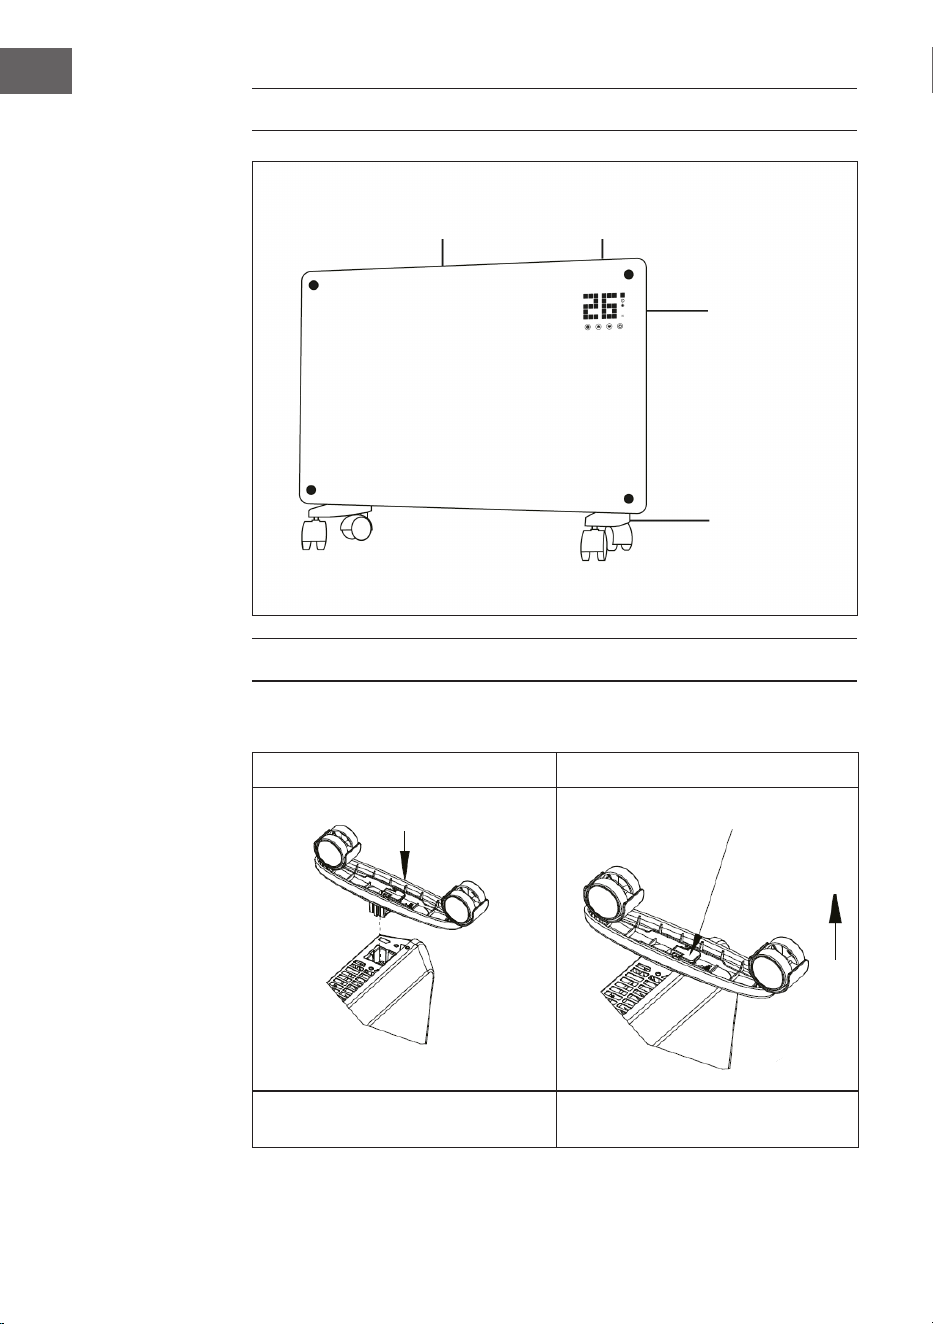
GERÄTEÜBERSICHT
MONTAGE
Freistehende Montage mit Rollen
Rollen montieren Rollen entfernen
Wenn die Montage abeschlossen ist
hören Sie einen Klick.
Knopf drücken, um die Rollen
abzunehmen.
Luftauslass Bedienfeld
Schalter
Füße mit
Rollen
Schieben
Ziehen
Knopf drücken
7
DE
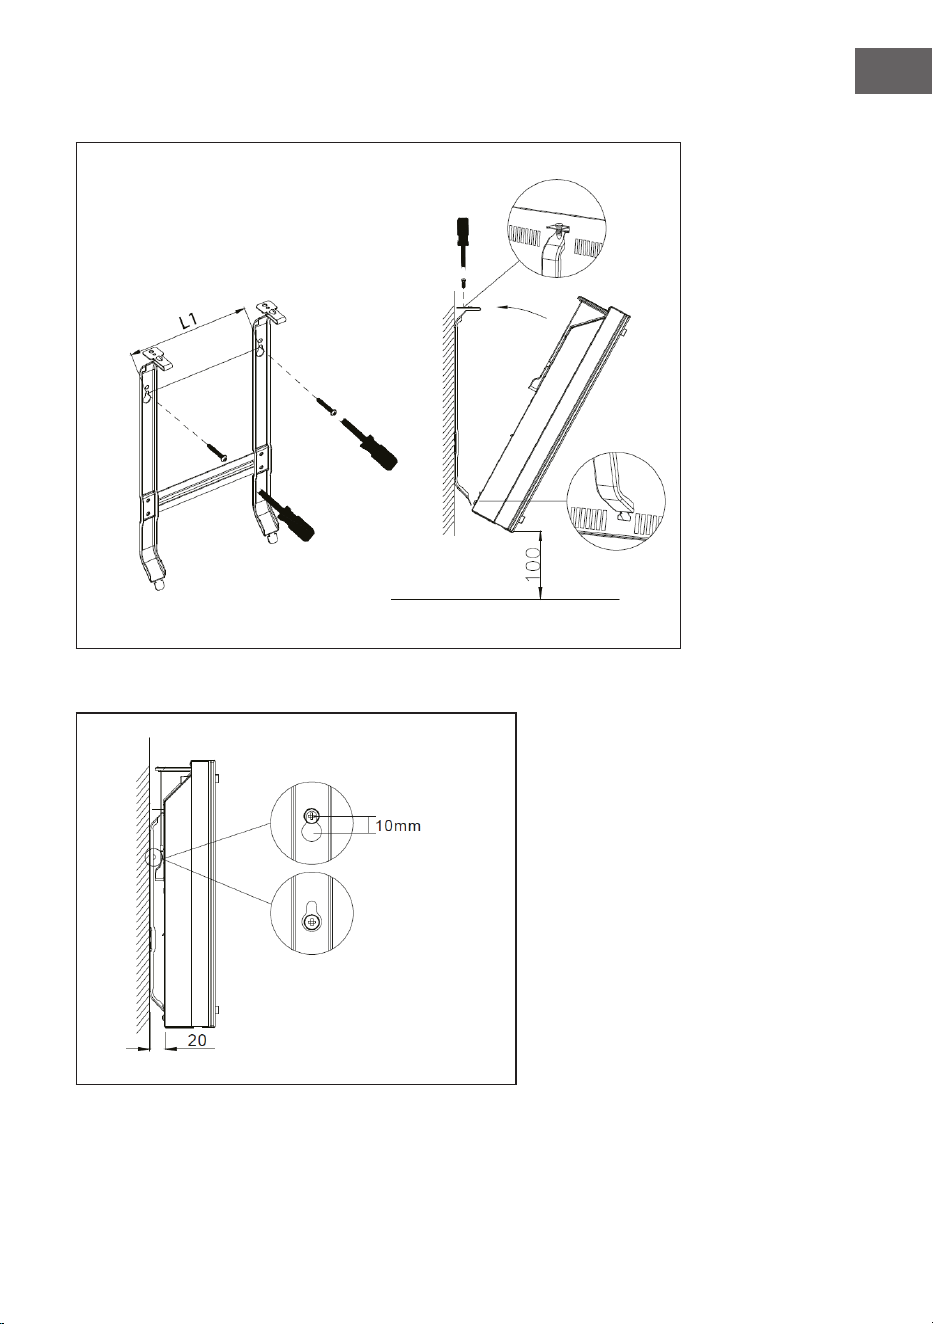
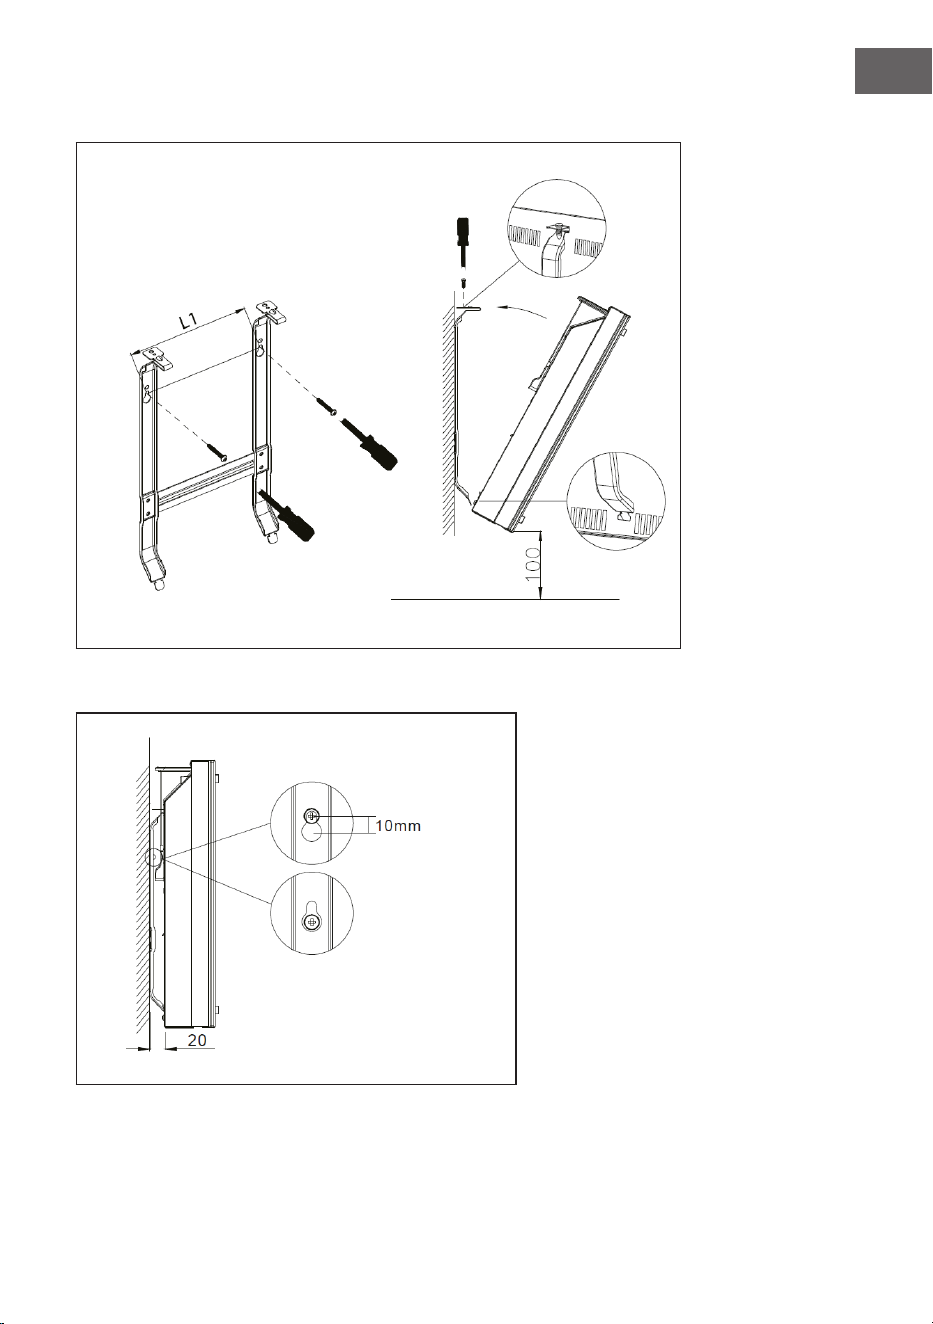
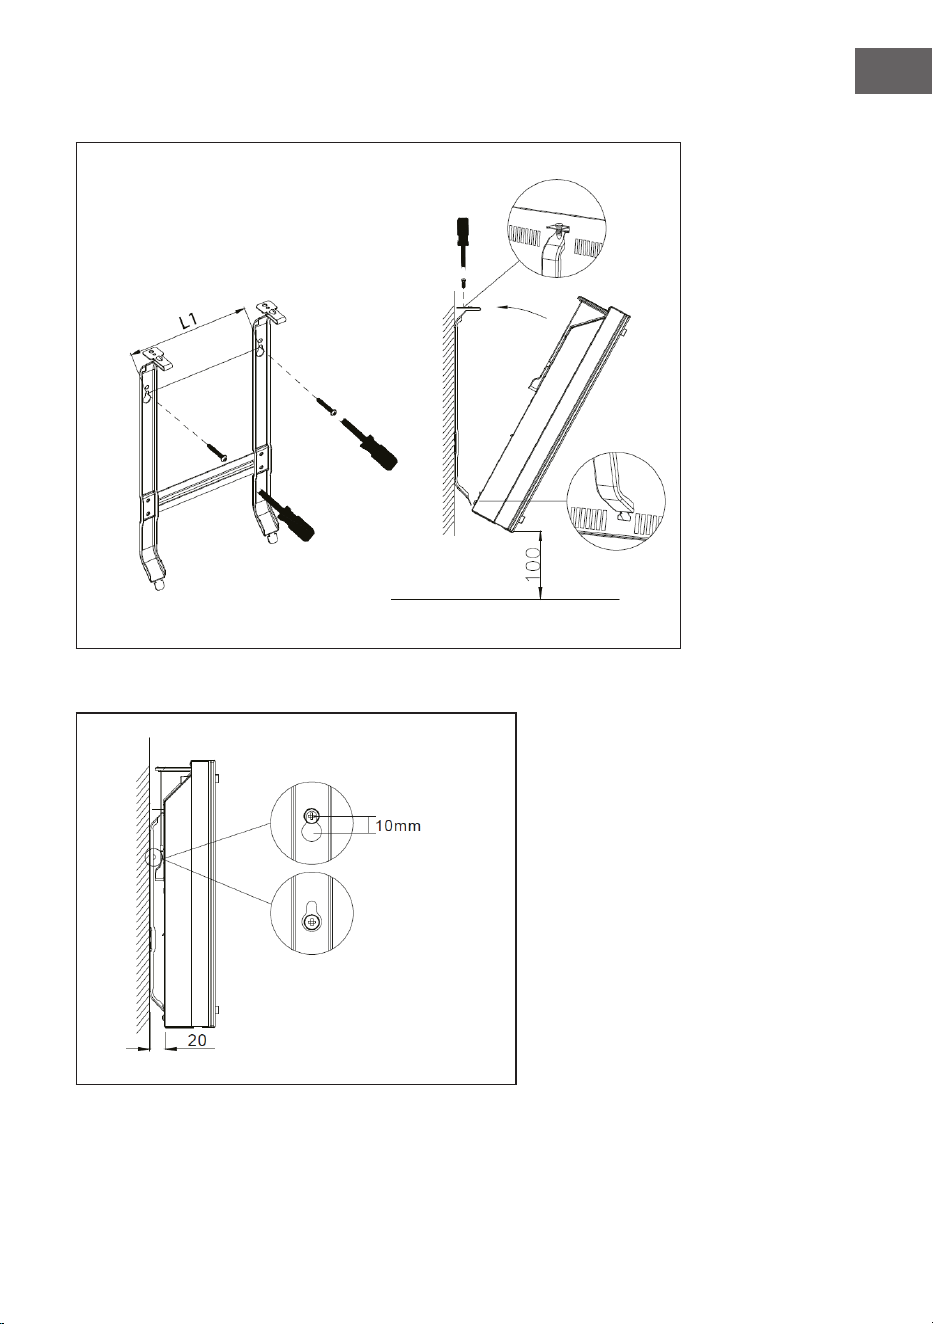
Wandmontage
Von der Wand herunternehmen
Heizung 10 mm hochziehen
und dann abnehmen.
8
DE
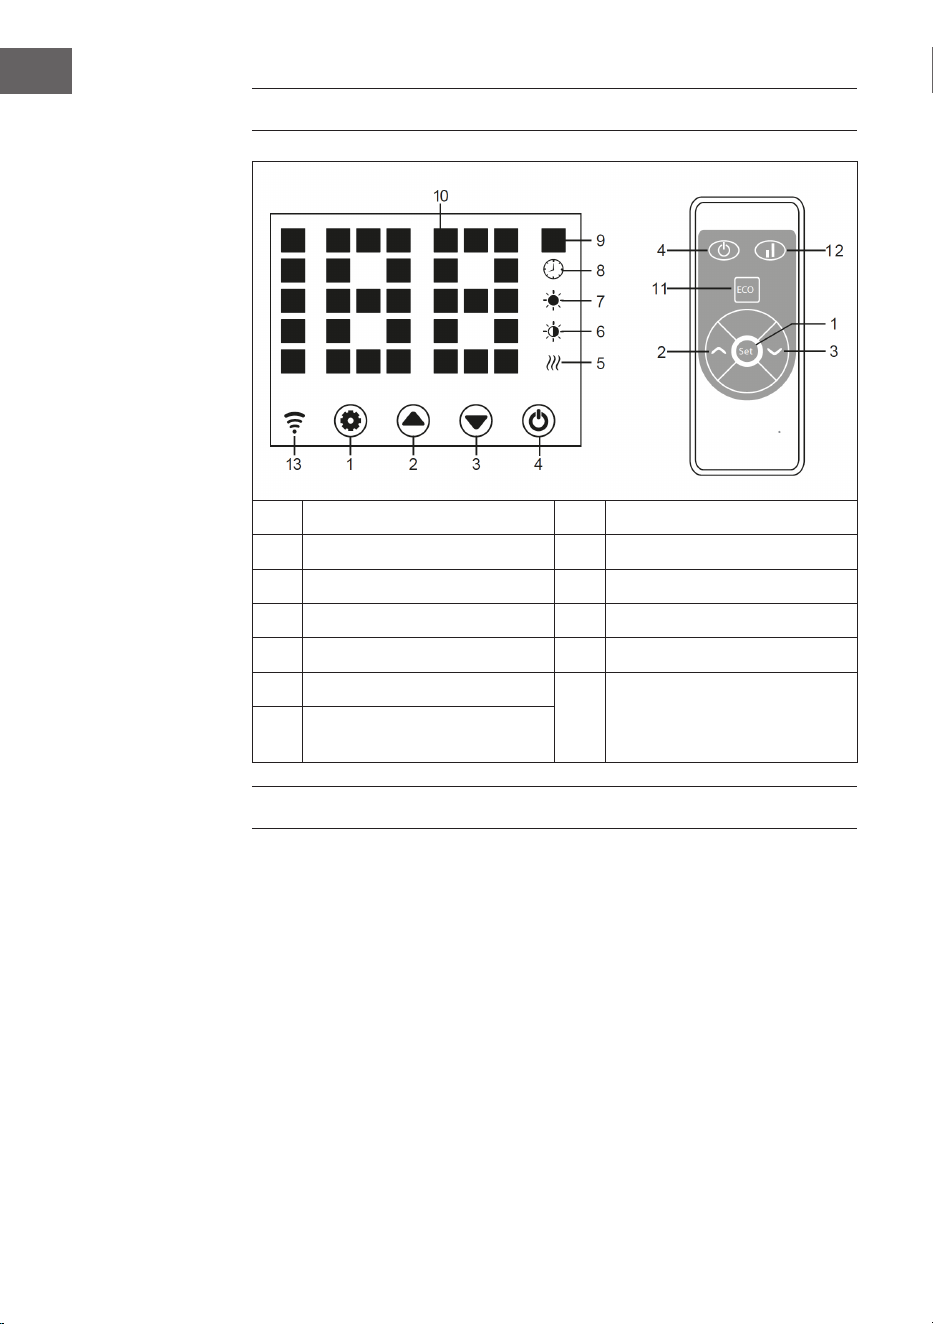
BEDIENFELD
1 Taste: Einstellungen 8 Anzeige: Timer
2 Taste: Wert hoch 9 Anzeige: Temperatur
3 Taste: Wert runter 10 LED-Ziffernanzeige
4 Taste: Ein/Aus 11 Taste: LED-Anzeige deaktivieren
5 Betriebsleuchte: Heizelement 12 Taste: Heizstufe hoch/runter
6 Anzeige: niedrige Heizstufe
13
Anzeige: Wi
Verbunden: an
Verbindung fehlgeschlagen:
aus
7 Anzeige: hohe Heizstufe
BEDIENUNG
Inbetriebnahme
1. Nehmen Sie das Gerät vorsichtig aus dem Karton. Heben Sie den Karton für
die Lagerung außerhalb der Saison auf.
2. Achten Sie darauf, dass die Ein/Aus-Taste ausgeschaltet ist, bevor Sie das
Gerät anschließen.
3. Die Heizung muss nach der Montageanleitung vollständig zusammengebaut
und montiert sein.
4. Es ist besser, denselben elektrischen Anschluss nicht mit anderen
leistungshungrigen Geräten zu nutzen, um eine Überlastung des
Stromkreislaufs zu vermeiden.

9
DE
Einschalten
Das Gerät an die Stromversorgung anschließen. Die Betriebslampe geht an
einem kurzen Brummen an. Das Gerät mit der Ein/Aus-Taste (4) einschalten.
Nun leuchtet in der Anzeige die aktuelle Raumtemeratur auf. Die werkseitig
voreingestellte Temperatur ist 35 °C.
Einstellen der Temperatur
Drücken Sie Einstellungstaste (1). Die Zahlen „10“ und „9“ blinken. Dann die
Pfeiltasten (2) und (3) drücken, um die Temperatur um 1 °C zu erhöhen oder zu
verringern.
Einstellung des Timers
Einschaltzeit: Im ausgeschalteten Zustand zweimal die Taste (1) drücken, um den
Timer auf 1-24 Stunden einzustellen. Drücken Sie die Tasten (2) und (3), um die
Temperatur einzustellen. Nach der Einstellung wird die Umgebungstemperatur
angezeigt. Die Anzeige (8) leuchtet bei laufendem Timer auf und geht aus, wenn
der Timer abgelaufen ist.
Ausschaltzeit: Im Heizbetrieb die Taste (1) drücken, um den Timer auf 1-24
Stunden einzustellen. Nach der Einstellung wird die Umgebungstemperatur
angezeigt. Die Anzeige (8) leuchtet bei laufendem Timer auf und geht aus, wenn
der Timer abgelaufen ist. Dann stellt das Gerät den Heizbetrieb ein.
Einstellung der Heizstufe
a. Im Betriebsmodus wechselt die Taste (2) zwischen hoher Heizstufe und
Heizstopp (Anzeige (7) leuchtet bei hoher Heizstufe auf und geht bei
ausgeschaltetem Heizen aus).
b. Im Betriebsmodus schaltet die Taste (3) zwischen niedriger Heizung und
ausgeschalteter Heizung hin und her (die Anzeige 6 leuchtet bei niedriger
Heizstufe und geht bei ausgeschaltem Zustand aus).
c. Im Betriebsmodus wechselt die Taste (12) zwischen Off/Low/High Heating. Bei
hoher Heizstufe leuchtet die Anzeige (7), bei niedriger Heizstufe leuchtet die
Anzeige (6).

10
DE
Kindersicherung
Drücken Sie im Heizbetrieb die Tasten (2) und (3) gleichzeitig. Die Kindersicherung
ist nun aktiv und das System ist gesperrt. Es können keine Einstellungen
vorgenommen werden. Nach 5 Sekunden erscheint in der Anzeige die
Umgebungstemperatur.
Zum Entsperren die Tasten (2) und (3) für 3 Sekunden gedrückt halten.
Aktivierung der Anzeige
Wenn das Gerät in Betrieb ist, ist die Anzeige ausgeschaltet. Mit einem Druck auf
das Bedienfeld geht die Anzeige an.
ECO-Funktion (Nachtmodus)
Im Heizbetrieb die Tasten (1) und (3) für 3 Sekunden gedrückt halten (bzw. die
Taste ECO auf der Fernbedienung), damit die ECO-Funktion eingeschaltet wird. In
diesem Betriebsmodus werden nur die Anzeigen (5), (6), (7) oder (8) angezeigt, je
nach vorher gewählter Einstellung.
Anzeigewechsel der Temperatur in Grad Celsius oder Fahrenheit
Halten Sie die Taste für die Einstellungen (1) und die Pfeiltaste „Hoch“ (2) 10
Sekunden lang gleichzeitig gedrückt.
Funktion zur Erkennung geöffneter Fenster
Wenn die Temperatur innerhalb von 2 Minuten um 3 °C oder mehr sinkt, wird
die Funktion zur Erkennung geöffneter Fenster ausgelöst. Das Gerät hört auf
zu heizen und die Anzeige (9) blinkt. Drücken Sie die Taste (4), um das Gerät
auszuschalten. Wenn Sie das Gerät nun wieder einschalten, ist die Funktion zur
Erkennung geöffneter Fenster deaktiviert.
WLAN zurücksetzen
Halten Sie die Taste (1) im Heizbetrieb 3 Sekunden lang gedrückt. Die WLAN-
Einstellungen werden zurückgesetzt und die entsprechende Anzeige blinkt schnell
(zweimal pro Sekunde).
Ausschalten
Die Ein/Aus-Taste (4) gedrückt halten. Die Betriebslampe leuchtet auf.
11
DE
GERÄTESTEUERUNG PER SMARTPHONE
Wenn Sie Ihr Klarstein-Gerät in Ihr heimisches WLAN einbinden, können Sie es
ganz bequem über die dazugehörige Klarstein-App bedienen. Die App ermöglicht
es Ihnen, nicht nur das Gerät über Ihr Smartphone fernzusteuern, sondern bietet
Ihnen zudem Zugang zu Rezepten und weiterführenden Informationen.
Gehen Sie folgendermaßen vor, um Ihr Smartphone mit Ihrem Klarstein-Gerät zu
verbinden:
1 Laden Sie zuerst die Klarstein-App herunter, indem Sie mit Ihrem Smartphone
den QR-Code scannen (siehe unten) oder laden Sie diese direkt aus dem App
Store oder bei Google Play herunter.
2 Versichern Sie sich, dass Ihr Smartphone mit demselben WLAN-Netzwerk
verbunden ist, mit dem Ihr Klarstein-Gerät verbunden werden soll.
3 Öffnen Sie die Klarstein-App.
4 Melden Sie sich mit Ihrem Konto an. Wenn Sie noch keinen Account haben,
registrieren Sie sich in der Klarstein-App.
5 Folgen Sie den Anweisungen der App.
App-Download
Verwenden Sie die Scan-Funktion Ihres Handys, um den QR-Code zu scannen,
und speichern Sie die App auf Ihrem Smartphone.
Hinweis: Weitere Hinweise zur Bedienung der App und Hilfestellungen zur
Herstellung der Verbindung mit Ihrem Gerät liefert Ihnen die App, sobald Sie sie
das erste Mal öffnen.
iOS Android

12
DE
REINIGUNG UND PFLEGE
Hinweis: Schalten Sie das Gerät aus und ziehen Sie den Stecker aus der
Steckdose. Warten Sie, bis das Gerät vollständig abgekühlt ist, bevor Sie sie
reinigen.
• Benutzen Sie zur Reinigung der Lüftungsschlitze und Gitter einen
Staubsauger.
• Entfernen Sie Staub auf den Außenächen mit einem feuchten (nicht nassen)
Tuch.
• Verwenden Sie keine scharfen Reinigungsmittel oder Scheuermittel.
• Besprühen Sie das Gerät nicht mit Flüssigkeiten und tauchen Sie es nicht in
Wasser oder andere Flüssigkeiten.
• Öffnen Sie niemals das Gehäuse der Heizung.
Fehlerbehebung bei Verbindungsproblemen
Wenn Ihr Klarstein-Gerät im WLAN nicht gefunden werden kann, überprüfen Sie
Folgendes:
1 Das Gerät ist nicht eingesteckt. Stellen Sie sicher, dass Ihr Gerät an eine
Steckdose angeschlossen ist.
2 Das Gerät bendet sich nicht im Kopplungsmodus. Stellen Sie sicher, dass
die WLAN-Anzeige (LED) auf dem Bedienfeld des Smart-Geräts blinkt, wie
in der Anweisung „WLAN-Einstellungen zurücksetzen“ Ihres Smart-Geräts
beschrieben (Anweisungen nden Sie in der Regel unter Geräteanschluss).
3 Der WLAN-Zugangspunkt arbeitet nicht auf 5 GHz. Vergewissern Sie sich, dass
Ihr Zugangspunkt auf dem 2,4-GHz-Band arbeitet und Sie eine eigene SSID
auf dem 2,4-GHz-Band haben. Wenn Sie sich über das Betriebsband Ihres
Zugangspunkts unsicher sind, wenden Sie sich bitte an Ihren Internetanbieter.
Wichtig: Bitte beachten Sie, dass, wenn Ihr WLAN-Router über ein Dualband
verfügt - also sowohl im 2,4-GHz- als auch im 5-GHz-Band arbeitet - Sie die SSIDs
für jedes Band trennen und die 2,4-GHz-SSID für die Verbindung verwenden
müssen.
4 Überprüfen Sie die Firewall-Einstellungen Ihres WLAN-Netzwerks. Die Firewall-
Einstellung Ihres WLAN-Netzwerks erlaubt der Klarstein-App möglicherweise
nicht, die WLAN-Einstellungen auf Ihrem Smart-Gerät zu kongurieren. Bitte
stellen Sie sicher, dass Sie kein öffentliches WLAN-Netzwerk nutzen, z. B.
Flughäfen, Wohnheime, Firmen, etc.
5 Unterschiedliche Anmeldedaten im Smartphone und in der App. Stellen Sie
sicher, dass die in der Klarstein-App eingegebenen WLAN-Anmeldedaten mit
denen übereinstimmen, mit denen Ihr Smartphone verbunden ist.
Wenn Sie die oben genannten Punkte befolgt haben und Ihr Smartphone sich
immer noch nicht mit der App verbinden kann, wenden Sie sich bitte per E-Mail
an uns, um Unterstützung zu erhalten: [email protected]
13
DE
SPEZIELLE ENTSORGUNGSHINWEISE FÜR
VERBRAUCHER IN DEUTSCHLAND
Entsorgen Sie Ihre Altgeräte fachgerecht. Dadurch wird gewährleistet, dass die
Altgeräte umweltgerecht verwertet und negative Auswirkungen auf die Umwelt
und menschliche Gesundheit vermieden werden. Bei der Entsorgung sind
folgende Regeln zu beachten:
• Jeder Verbraucher ist gesetzlich verpichtet, Elektro- und
Elektronikaltgeräte (Altgeräte) sowie Batterien und Akkus
getrennt vom Hausmüll zu entsorgen. Sie erkennen die
entsprechenden Altgeräte durch folgendes Symbol der
durchgestrichenen Mülltonne (WEEE-Symbol).
• Sie haben Altbatterien und Altakkumulatoren, die nicht vom Altgerät
umschlossen sind, sowie Lampen, die zerstörungsfrei aus dem Altgerät
entnommen werden können, vor der Abgabe an einer Entsorgungsstelle vom
Altgerät zerstörungsfrei zu trennen.
• Bestimmte Lampen und Leuchtmittel fallen ebenso unter das Elektro- und
Elektronikgesetz und sind dementsprechend wie Altgeräte zu behandeln.
Ausgenommen sind Glühbirnen und Halogenlampen. Entsorgen Sie
Glühbirnen und Halogenlampen bitte über den Hausmüll, sofern sie nicht das
WEEE-Symbol tragen.
• Jeder Verbraucher ist für das Löschen von personenbezogenen Daten auf dem
Elektro- bzw. Elektronikgerät selbst verantwortlich.
Rücknahmepicht der Vertreiber
Vertreiber mit einer Verkaufsäche für Elektro- und Elektronikgeräte von
mindestens 400 Quadratmetern sowie Vertreiber von Lebensmitteln mit einer
Gesamtverkaufsäche von mindestens 800 Quadratmetern, die mehrmals im
Kalenderjahr oder dauerhaft Elektro- und Elektronikgeräte anbieten und auf dem
Markt bereitstellen, sind verpichtet,
1 bei der Abgabe eines neuen Elektro- oder Elektronikgerätes an einen Endnutzer
ein Altgerät des Endnutzers der gleichen Geräteart, das im Wesentlichen die
gleichen Funktionen wie das neue Gerät erfüllt, am Ort der Abgabe oder in
unmittelbarer Nähe hierzu unentgeltlich zurückzunehmen und
2 auf Verlangen des Endnutzers Altgeräte, die in keiner äußeren Abmessung
größer als 25 Zentimeter sind, im Einzelhandelsgeschäft oder in unmittelbarer
Nähe hierzu unentgeltlich zurückzunehmen; die Rücknahme darf nicht an den
Kauf eines Elektro- oder Elektronikgerätes geknüpft werden und ist auf drei
Altgeräte pro Geräteart beschränkt.

14
DE
• Bei einem Vertrieb unter Verwendung von Fernkommunikationsmitteln
ist die unentgeltliche Abholung am Ort der Abgabe auf Elektro- und
Elektronikgeräte der Kategorien 1, 2 und 4 gemäß § 2 Abs. 1 ElektroG, nämlich
„Wärmeüberträger“, „Bildschirmgeräte“ (Oberäche von mehr als 100 cm²)
oder „Großgeräte“ (letztere mit mindestens einer äußeren Abmessung
über 50 Zentimeter) beschränkt. Für andere Elektro- und Elektronikgeräte
(Kategorien 3, 5, 6) ist eine Rückgabemöglichkeit in zumutbarer Entfernung
zum jeweiligen Endnutzer zu gewährleisten.
• Altgeräte dürfen kostenlos auf dem lokalen Wertstoffhof oder in folgenden
Sammelstellen in Ihrer Nähe abgegeben werden: www.take-e-back.de
• Für Elektro- und Elektronikgeräte der Kategorien 1, 2 und 4 bieten wir auch die
Möglichkeit einer unentgeltlichen Abholung am Ort der Abgabe. Beim Kauf
eines Neugeräts haben Sie die Möglichkeit, eine Altgerätabholung über die
Webseite auszuwählen.
• Batterien können überall dort kostenfrei zurückgegeben werden, wo sie
verkauft werden (z. B. Super-, Bau-, Drogeriemarkt). Auch Wertstoff- und
Recyclinghöfe nehmen Batterien zurück. Sie können Batterien auch per Post
an uns zurücksenden. Altbatterien in haushaltsüblichen Mengen können Sie
direkt bei uns von Montag bis Freitag zwischen 08:00 und 16:00 Uhr unter der
folgenden Adresse unentgeltlich zurückgeben:
Chal-Tec Fulllment GmbH
Norddeutschlandstr. 3
47475 Kamp-Lintfort
• Wichtig zu beachten ist, dass Lithiumbatterien aus Sicherheitsgründen vor der
Rückgabe gegen Kurzschluss gesichert werden müssen (z. B. durch Abkleben
der Pole).
• Finden sich unter der durchgestrichenen Mülltonne auf der Batterie zusätzlich
die Zeichen Cd, Hg oder Pb ist das ein Hinweis darauf, dass die Batterie
gefährliche Schadstoffe enthält (»Cd« steht für Cadmium, »Pb« für Blei und
»Hg« für Quecksilber).
Hinweis zur Abfallvermeidung
Indem Sie die Lebensdauer Ihrer Altgeräte verlängern, tragen Sie dazu bei,
Ressourcen ezient zu nutzen und zusätzlichen Müll zu vermeiden. Die
Lebensdauer Ihrer Altgeräte können Sie verlängern, indem Sie defekte Altgeräte
reparieren lassen. Wenn sich Ihr Altgerät in gutem Zustand bendet, könnten Sie
es spenden, verschenken oder verkaufen.
15
DE
HINWEISE ZUR ENTSORGUNG
Wenn es in Ihrem Land eine gesetzliche Regelung
zur Entsorgung von elektrischen und elektronischen
Geräten gibt, weist dieses Symbol auf dem Produkt oder
auf der Verpackung darauf hin, dass dieses Produkt
nicht im Hausmüll entsorgt werden darf. Stattdessen
muss es zu einer Sammelstelle für das Recycling von
elektrischen und elektronischen Geräten gebracht
werden. Durch regelkonforme Entsorgung schützen
Sie die Umwelt und die Gesundheit Ihrer Mitmenschen
vor negativen Konsequenzen. Informationen zum
Recycling und zur Entsorgung dieses Produkts,
erhalten Sie von Ihrer örtlichen Verwaltung oder Ihrem
Hausmüllentsorgungsdienst.
Dieses Produkt enthält Batterien. Wenn es in Ihrem
Land eine gesetzliche Regelung zur Entsorgung von
Batterien gibt, dürfen die Batterien nicht im Hausmüll
entsorgt werden. Informieren Sie sich über die örtlichen
Bestimmungen zur Entsorgung von Batterien. Durch
regelkonforme Entsorgung schützen Sie die Umwelt
und die Gesundheit Ihrer Mitmenschen vor negativen
Konsequenzen.
KONFORMITÄTSERKLÄRUNG
Hersteller:
Chal-Tec GmbH, Mühlenstraße 25, 10243 Berlin
Kontakt: [email protected]
Hiermit erklärt Chal-Tec GmbH, dass der Funkanlagentyp
Bornholm Smart der Richtlinie 2014/53/EU entspricht. Der
vollständige Text der EU-Konformitätserklärung ist unter
der folgenden Internetadresse verfügbar: use.berlin/
Bornholm Smart

17
EN
Dear Customer,
Congratulations on purchasing this device. Please read the
following instructions carefully and follow them to prevent
possible damages. We assume no liability for damage
caused by disregard of the instructions and improper use.
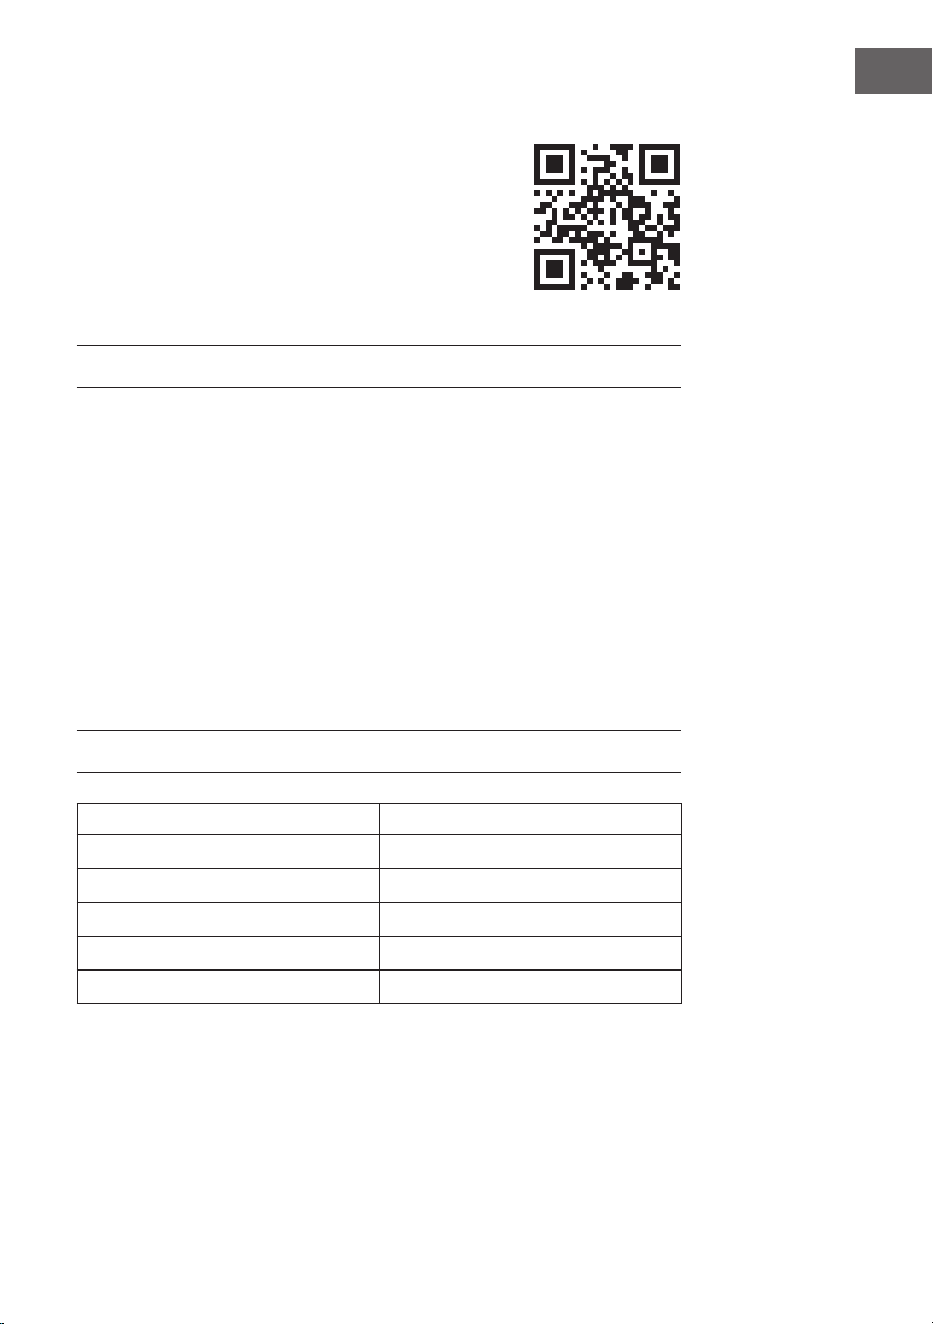
Scan the QR code to get access to the latest user manual
and more product information.
CONTENT
TECHNICAL DATA
Item number
10034190, 10034391
Power supply 220-240 V ~ 50 Hz
Power 1000 W / 2000 W
WiFi standard
802.11 b/g/n
WiFi frequency
2,4 GHz
WiFi radio-frequency power (max.)
20 dBm
Safety Instructions 18
Product Data Sheet 19
Product Overview 20
Installation 20
Control panel 22
Operation 22
Device Control by Smartphone 25
Cleaning and Care 26
Disposal Considerations 27
Declaration of Conformity 27
18
EN
SAFETY INSTRUCTIONS
• Check that the voltage indicates on the data plate corresponds with that of the
local network before connecting the appliance to the mains power supply.
• If the supply cord is damaged, it must be replaced by a qualied engineer in
order to avoid a hazard.
• The heater must not be positioned directly under the power socket.
• Keep furniture, curtains and other ammable material at least 1 meter away
from the appliance.
• Keep out of reach of children and do not allow them to operate this appliance.
• This appliance is intended for household use only and should not be used for
industrial purposes.
• Do not operate this appliance after a malfunction or after being damaged in any
way.
• Repairs to electrical appliances should only be performed by a qualied
electrician.
• Improper repairs may place user at serious risk.
• Do not run the mains cable under carpets, rugs, etc.
• Do not allow the mains cable to hang over sharp edges or come in contact with hot
surfaces.
• In order to avoid overheating, do not cover the heater.
• Do not use this heater with a programmer, timer, separate remote control
system or any other device that switches the heater on automatically, since a
re risk exists if the heater is covered or positioned incorrectly.
• Never immerse the product in water or any other liquid for any reasons.
• Do not use this heater in the immediate surroundings of a bath, a shower or a
swimming pool.
• Do not use the appliance outdoors.
• Do not use if you have wet hands.
• Never use the appliance on or near hot surfaces.
• Do not operate with a damaged cord.
• Before cleaning the appliance, make sure it is unplugged from the power and that
it is completely cooled.
• Do not clean the appliance with abrasive chemicals.
• Never use accessories that are not recommended or supplied by the
manufacturer. It could cause danger to the user or damage to the appliance.
• This device may be only used by children 8 years old or older and persons with
limited physical, sensory and mental capabilities and / or lack of experience
and knowledge, provided that they have been instructed in use of the device
by a responsible person who understands the associated risks.
• Children shall not play with the appliance.
CAUTION
Risk of burns! Some parts of this product can become very hot and
cause burns. Particular attention has to be given where children
and vulnerable people are present.
19
EN
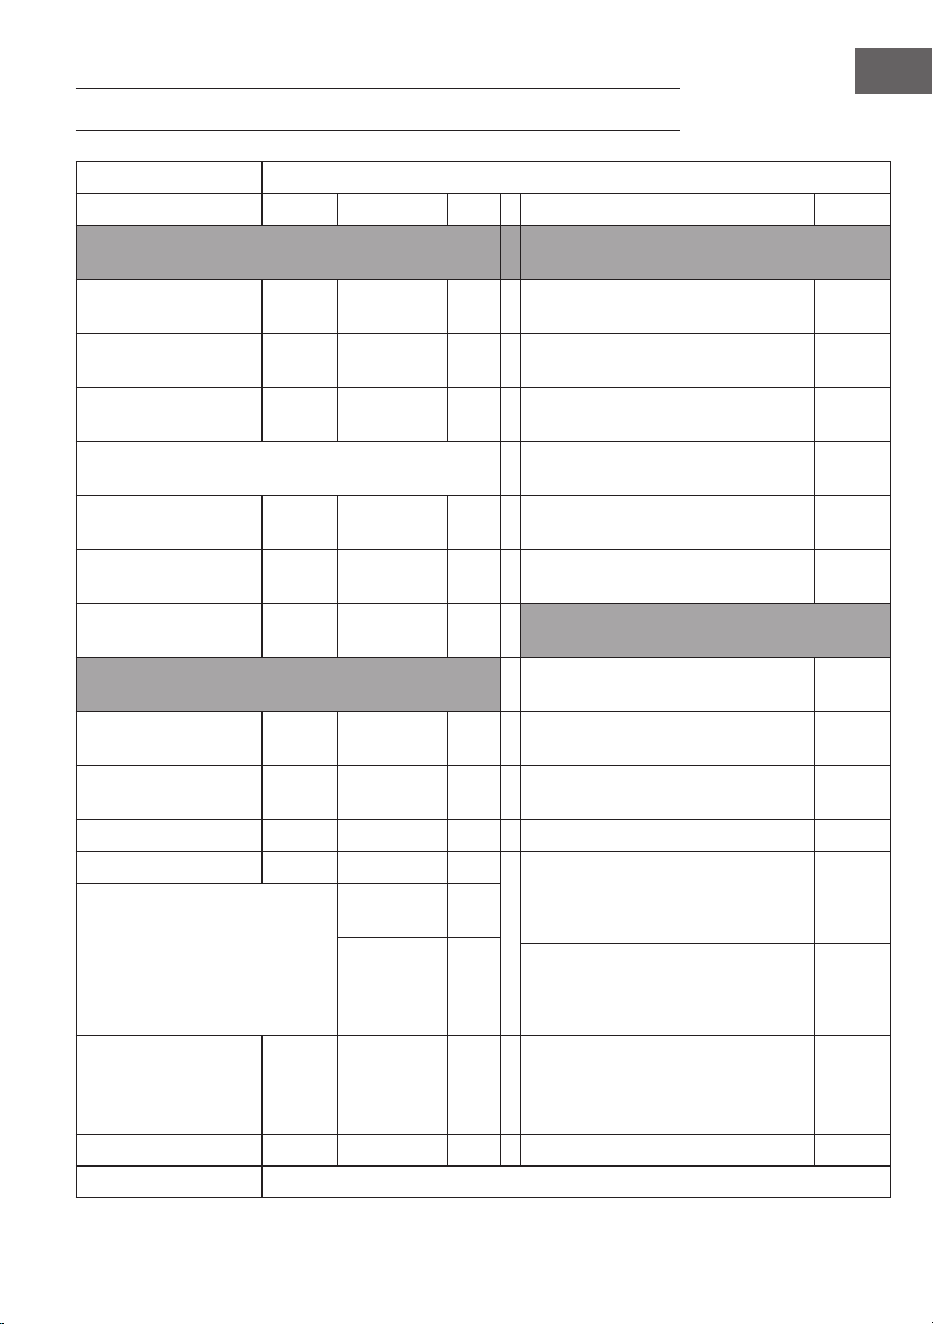
PRODUCT DATA SHEET
Model identier(s): 10034390, 10034391
Item Symbol Value Unit Item Unit
Heat output Type of heat output/room temperature
control
Nominal heat output P
nom
2.000
kW single stage heat output and no room
temperature control
no
Minimum heat output
(indicative)
P
min
1.000
kW Two or more manual stages, no room
temperature control
no
Maximum continuous
heat output
P
max,c
2.000
kW With mechanic thermostat room
temperature control
no
Auxiliary electricity consumption at nominal heat
output
With electronic room temperature
control
no
At nominal heat
output
el
max
1.775
kW Electronic room temperature control
plus day timer
no
At minimum heat
output
el
min
0.894
kW electronic room temperature control
plus week timer
yes
Other control options (multiple selections
possible)
Power consumption room temperature control, with
presence detection
no
In off mode P
o
0.00 W Room temperature control, with open
window detection
yes
In standby mode P
sm
0.55 (display
on)
W Distance control option no
In idle mode P
idle
/ W Adaptive start control no
In network standby P
nsm
/ W Working time limitation yes
Standby mode with display of
information or status
Timer
setting
yes
Mechanical
switch on
and after
work
no
Black bulb sensor yes
Seasonal space
heating energy
eciency in active
mode
n
S, on
94.5
(portable) /
92.0 (xed)
% Self-learning functionality no
Control accuracy no
Contact details Chal-Tec GmbH, Mühlenstraße 25, 10243, Berlin, Germany
20
EN
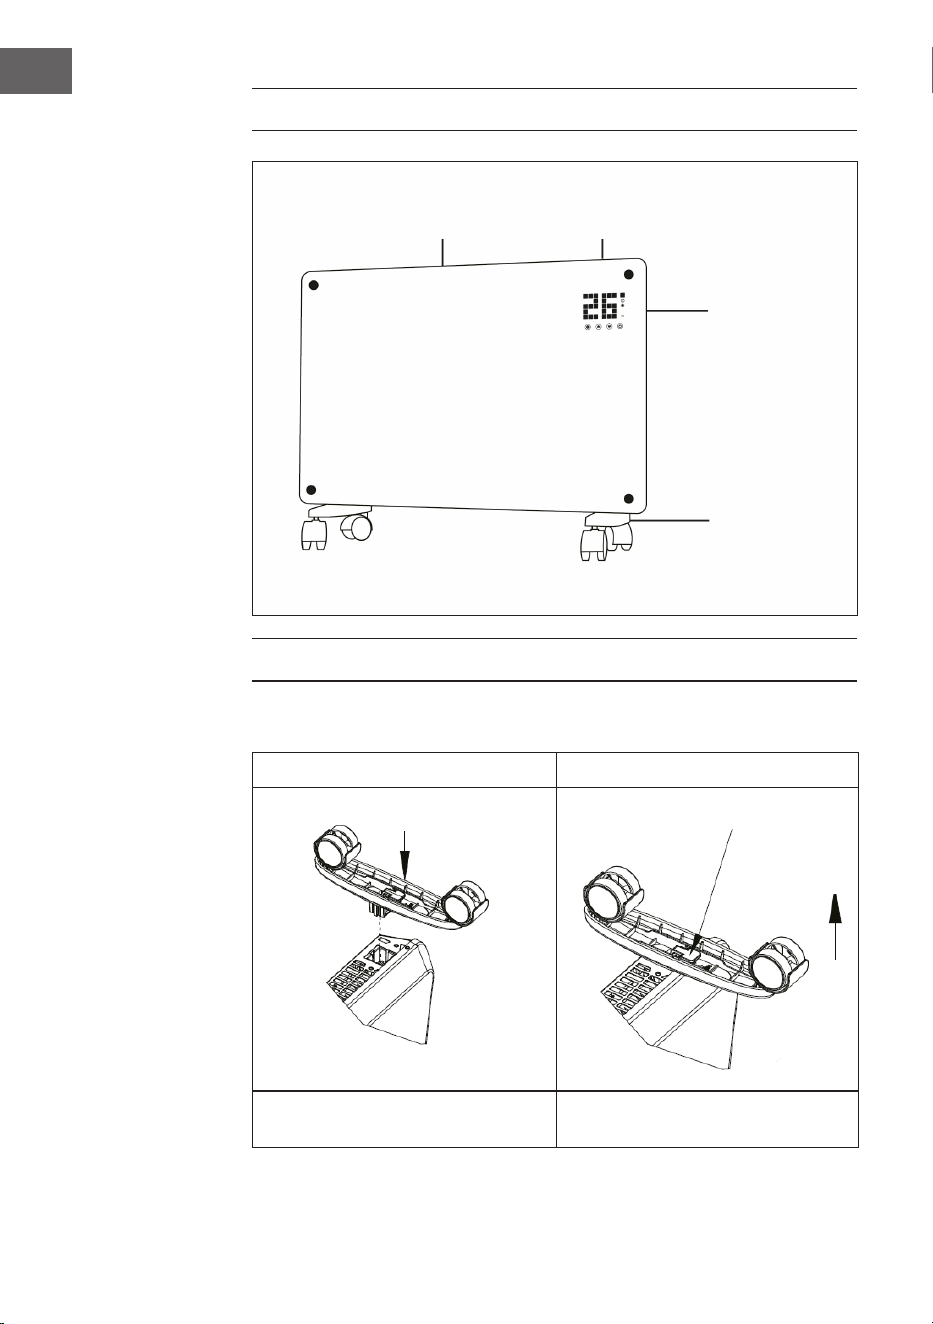
PRODUCT OVERVIEW
INSTALLATION
Freestanding installation with rollers
Assemble rollers Removing the rollers
When the assembly is complete, you
will hear a click.
Press the button to remove the rollers.
Air outlet Control panel
Switch
Feet with
rollers
Push
Pull
Push button
21
EN
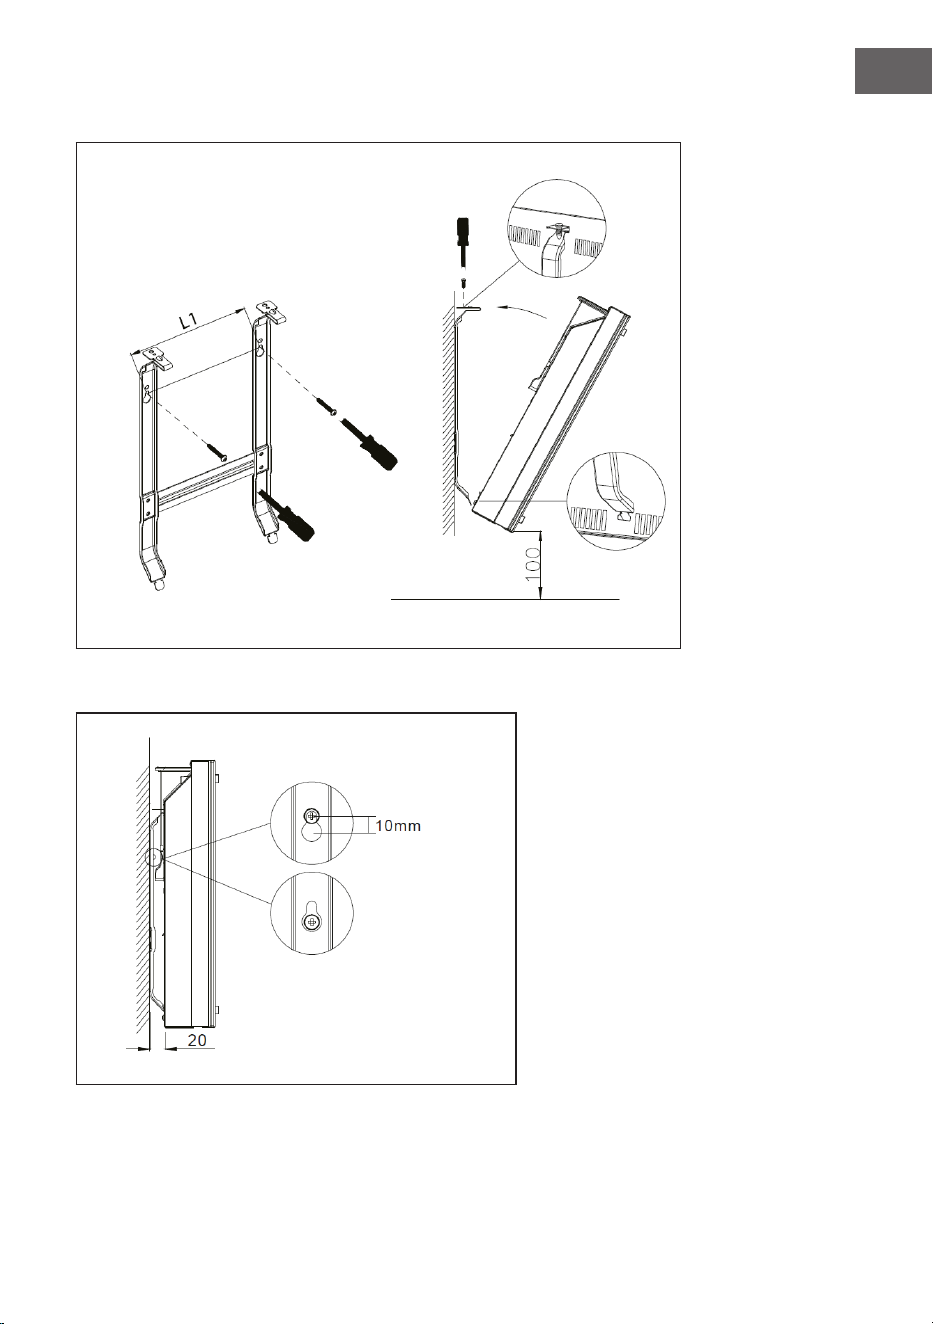
Wall mounting
Take down from the wall
Raise heater 10 mm and
then remove.
22
EN
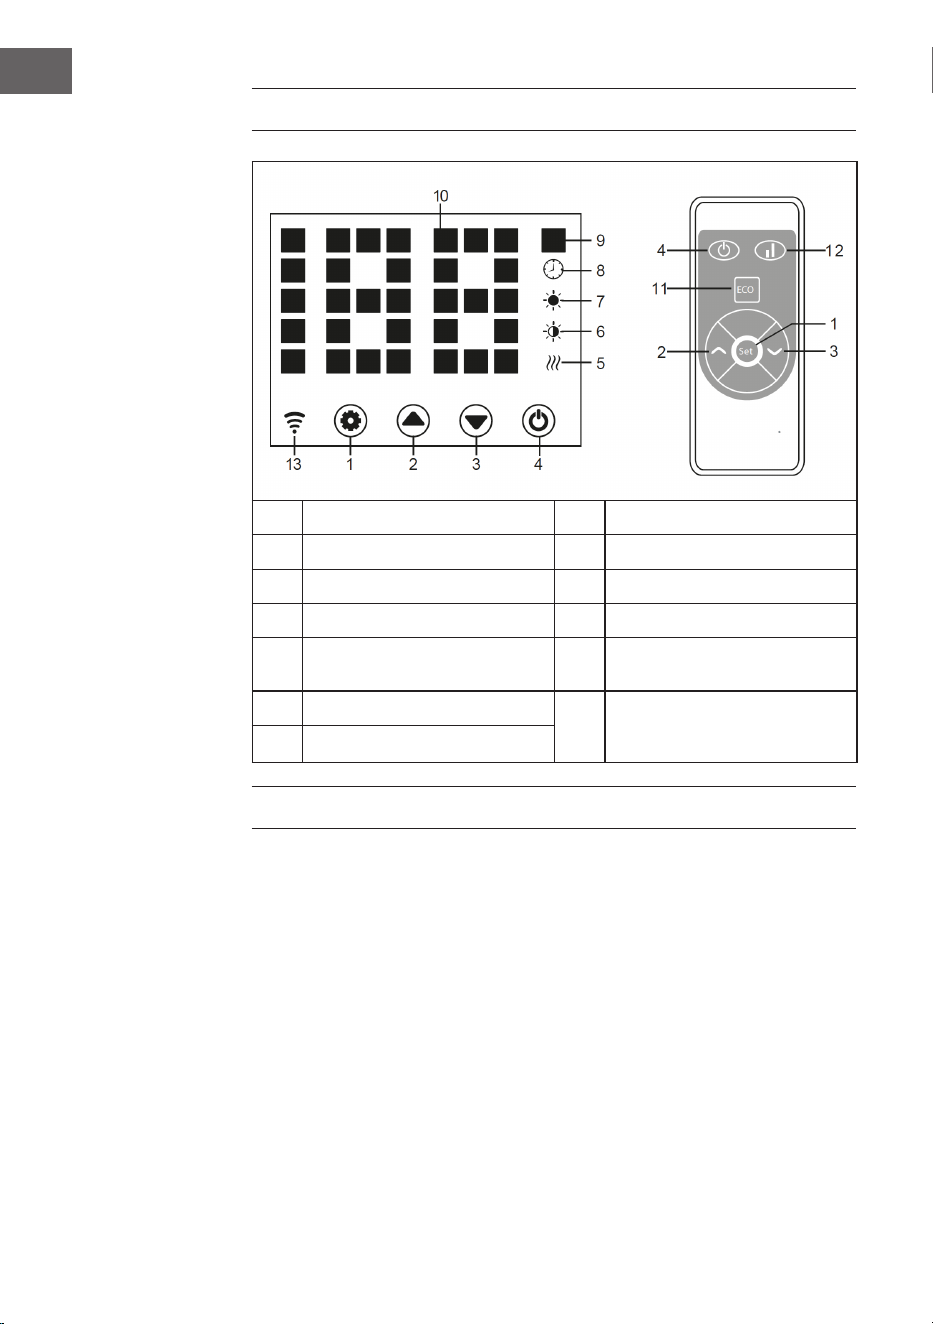
CONTROL PANEL
1 Key: Settings 8 Display: Timer
2 Key :Value up 9 Display: Temperature
3 Key: Value down 10 LED digit display
4 Key: On/Off 11 Key: Deactivate LED display
5
Operating light: heating
element
12 Key: Heating level up/down
6 Indicator: low heating level
13
Display: Wi
Connected: on
Connection failed: off
7 Indicator: high heating level
OPERATION
Commissioning
1. Carefully remove the unit from the carton. Save the carton for off-season
storage.
2. Make sure the on/off switch is off before connecting the unit.
3. The heater must be fully assembled and mounted according to the assembly
instructions.
4. It is better not to use the same electrical connection with other power hungry
devices to avoid overloading the circuit.

23
EN
Switching on
Connect the device to the power supply. The operating lamp comes on with a
short humming sound. Switch on the device with the On/Off key (4). Now the
current room temperature lights up in the display. The factory preset temperature
is 35 °C.
Setting the temperature
Press the setting key (1). The numbers „10“ and „9“ ash. Then press arrow keys
(2) and (3) to increase or decrease the temperature by 1 °C.
Setting the timer
Switch-on time: In the switched-off state, press key (1) twice to set the timer
to 1-24 hours. Press keys (2) and (3) to set the temperature. After setting, the
ambient temperature is displayed. The indicator (8) lights up when the timer is
running and goes off when the timer has expired.
Switch-off time: In heating mode, press the key (1) to set the timer to 1-24 hours.
After setting, the ambient temperature is displayed. The indicator (8) lights up
when the timer is running and goes off when the timer has expired. Then the
device stops heating operation.
Setting the heating level
a. In operation mode, button (2) alternates between high heating level and
heating stop (indicator (7) lights up when high heating level is on and goes off
when heating is off).
b. In operation mode, button (3) toggles between low heat and heat off
(indicator 6 lights when low heat is on and goes off when heat is off).
c. In operation mode, button (12) toggles between off/low/high heating. When
the heating level is high, the indicator (7) lights up, and when the heating level
is low, the indicator (6) lights up.

24
EN
Child lock
Press keys (2) and (3) simultaneously in heating mode. The child lock is now active
and the system is locked. No settings can be made. After 5 seconds, the ambient
temperature appears in the display.
To unlock, keep keys (2) and (3) pressed for 3 seconds.
Activation of the display
When the instrument is in operation, the display is off. Pressing the control panel
turns the display on.
ECO function (night mode)
In heating mode, press and hold keys (1) and (3) for 3 seconds (or the ECO key on
the remote control) to activate the ECO function. In this operating mode, only the
displays (5), (6), (7) or (8) are shown, depending on the previously selected setting.
Display change of temperature in degrees Celsius or Fahrenheit.
Press and hold the Settings button (1) and the Up arrow button (2) simultaneously
for 10 seconds.
Open window detection function
If the temperature drops by 3 °C or more within 2 minutes, the open window
detection function is triggered. The unit stops heating and the display (9) ashes.
Press the key (4) to switch the unit off. If you now switch the device back on, the
open window detection function is deactivated.
Resetting WLAN
Press and hold the key (1) for 3 seconds in heating mode. The WLAN settings are
reset and the corresponding indicator ashes quickly (twice per second).
Switching off
Press and hold the on/off key (4). The operating lamp lights up.
25
EN
DEVICE CONTROL BY SMARTPHONE
If you integrate the device into your home WiFi, you can conveniently operate it via
the associated Klarstein app. The app not only allows you to remotely control the
device via your smartphone, but also gives you access to recipes and additional
information.
Follow these steps to connect your smartphone to your Klarstein device:
1 Download the Klarstein app rst by scanning the QR code with your
smartphone (see below), or download it directly from App Store or Google
Play.
2 Make sure your smartphone is connected to the same WiFi network that your
Klarstein device is to be connected to.
3 Open the Klarstein app.
4 Sign in to your account. If you do not have an account, sign up in the Klarstein
app.
5 Follow the instructions from the app.
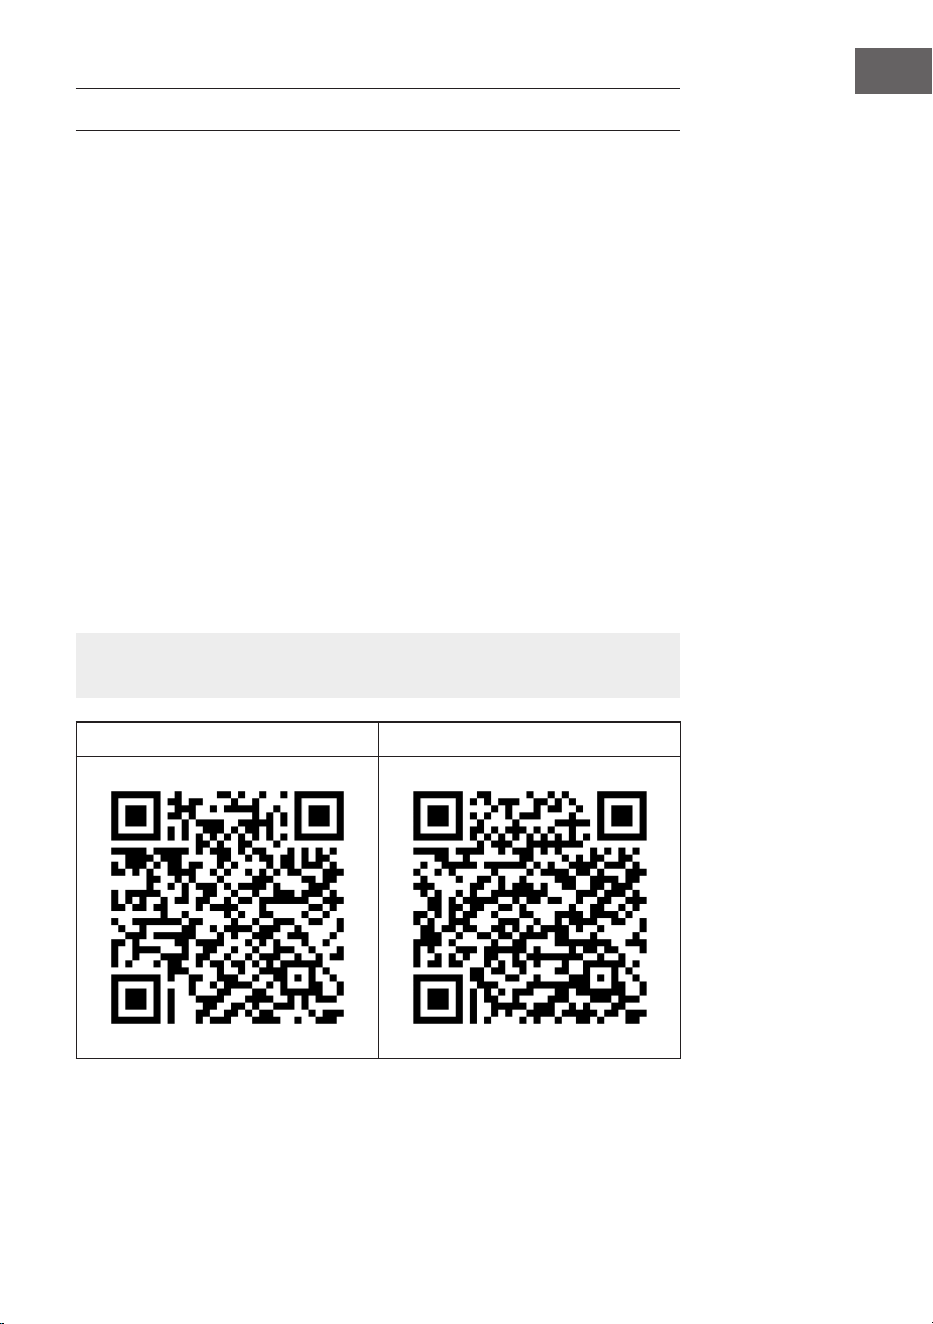
App Download
Use the scan function of your smartphone to scan the QR code and save the app
on your smartphone.
Note: The app provides further information on how to use the app and help on
how to connect to your device as soon as you open it for the rst time.
iOS Android

26
EN
CLEANING AND CARE
Note: Turn off the unit and unplug it from the power outlet. Wait until the unit
has completely cooled down before cleaning it.
• Use a vacuum cleaner to clean the ventilation slots and grilles.
• Remove dust on the outside surfaces with a damp (not wet) cloth.
• Do not use strong cleaning agents or abrasives.
• Do not spray the device with liquids or immerse it in water or other liquids.
• Never open the heater housing.
Troubleshooting connection problems
If your Klarstein device cannot be found in the WiFi, check the following:
1 The device is not plugged in. Make sure that your device is plugged into an
electric socket.
2 The device is not in pairing mode. Make sure that the WiFi indicator (LED)
on the smart device control panel is blinking as described in the ‘Reset WiFi
settings‘ instruction of your smart device (instructions are usually available on
device connection process).
3 The WiFi access point does not operate on 5 GHz. Make sure that your access
point operates on 2.4 GHz band and you have a separate SSID on 2.4 GHz
band. If you are not sure about the operating band of your access point,
please contact your internet provider company.
Important: please note that if your WiFi router is dual band - operating on both
2.4 GHz and 5 GHz band - you need to separate the SSIDs for each band and use
the 2.4 GHz SSID for connection.
4 Firewall settings of your WiFi network; the rewall setting of your WiFi network
may not allow the Klarstein app to congure the WiFi settings on your smart
device. Please make sure that you are not using a public WiFi network, e.g.
airports, dormitories, companies, etc.
5 Different credentials used in smartphone and the app. Make sure that the WiFi
credentials entered in the Klarstein app are the same as the ones that your
smartphone is connected to.
Following the above mentioned points, if your smart device still fails to connect
to the app, please contact us via email for support:
27
EN
DISPOSAL CONSIDERATIONS
If there is a legal regulation for the disposal of electrical
and electronic devices in your country, this symbol on the
product or on the packaging indicates that this product
must not be disposed of with household waste. Instead,
it must be taken to a collection point for the recycling
of electrical and electronic equipment. By disposing of
it in accordance with the rules, you are protecting the
environment and the health of your fellow human beings
from negative consequences. For information about the
recycling and disposal of this product, please contact your
local authority or your household waste disposal service.
This product contains batteries. If there is a legal regulation
for the disposal of batteries in your country, the batteries must
not be disposed of with household waste. Find out about local
regulations for disposing of batteries. By disposing of them in
accordance with the rules, you are protecting the environment
and the health of your fellow human beings from negative
consequences.
DECLARATION OF CONFORMITY
Manufacturer & Importer for Great Britain:
Chal-Tec GmbH, Mühlenstraße 25, 10243 Berlin, Germany.
Contact: [email protected]
Hereby, Chal-Tec GmbH declares that the radio equipment
type Bornholm Smart is in compliance with Directive 2014/53/
EU. The full text of the EU declaration of conformity is available
at the following internet address: use.berlin/10034390
For Great Britain: Hereby, Chal-Tec GmbH declares that the
radio equipment type Bornholm Smart is in compliance
with the relevant statutory requirements. The full text of the
declaration of conformity is available at the following internet
address: use.berlin/10034390

29
ES
Estimado cliente:
Le felicitamos por la adquisición de este producto. Lea
atentamente el siguiente manual y siga cuidadosamente
las instrucciones de uso con el n de evitar posibles daños.
La empresa no se responsabiliza de los daños ocasionados
por un uso indebido del producto o por haber desatendido
las indicaciones de seguridad. Escanee el código QR para
obtener acceso al manual de usuario más reciente y otra
información sobre el producto:
ÍNDICE DE CONTENIDOS
DATOS TÉCNICOS
Número de artículo
10034190, 10034391
Alimentación 220-240 V ~ 50 Hz
Potencia 1000 W / 2000 W
WiFi estándar
802.11 b/g/n
WiFi frecuencia
2,4 GHz
WiFi potencia de radiofrecuencia (max.)
20 dBm
Indicaciones de seguridad 30
Hoja de datos del producto 31
Descripción del producto 32
Montaje 32
Panel de control 34
Funcionamiento 34
Control del dispositivo por smartphone 37
Limpieza y cuidado 38
Retirada del aparato 39
Declaración de conformidad 39
30
ES
INDICACIONES DE SEGURIDAD
• Antes de utilizar el aparato, compruebe la tensión en la placa técnica del mismo
y conecte el aparato solamente a tomas de corriente que se adecuen a dicha
tensión.
• Si el cable de alimentación está dañado, deberá ser sustituido por un servicio
técnico.
• No coloque el calefactor justo bajo una toma de corriente.
• Mantenga los materiales inamables, como muebles, cortinas o similares, a
un metro de distancia.
• Mantenga el aparato fuera del alcance de los niños. Los niños solamente
podrán manejar el aparato si se encuentran bajo supervisión.
• Este aparato no ha sido concebido para un uso comercial, sino doméstico o
para entornos similares.
• No utilice el aparato si detecta fallos en su funcionamiento o si se ha visto
dañado de otro modo.
• Las reparaciones solamente podrán realizarse por parte de un servicio técnico
cualicado.
• Las reparaciones mal realizadas o por cuenta del usuario representan un
riesgo de lesiones.
• No coloque el cable de alimentación bajo alfombras.
• Asegúrese de que el cable de alimentación no entre en contacto con
supercies calientes ni cantos alados.
• No cubra el calefacto para evitar un sobrecalentamiento.
• No conecte el aparato a tomas de corriente manejadas por control remoto ni
con temporizador ni otro aparato que encienda o apague automáticamente el
calefacto.
• No sumerja el aparato en agua ni en ningún otro líquido.
• No utilice el aparato cerca de bañeras, duchas o piscinas.
• No utilice el aparato al aire libre.
• No manipule el aparato con las manos mojadas.
• No utilice el aparato encima o cerca de supercies calientes.
• No utilice el aparato con el cable de alimentación dañado.
• Desconecte el enchufe antes de limpiar el aparato y deje que este se enfríe por
completo.
• Para la limpieza, no utilice productos abrasivos.
• Utilice exclusivamente los accesorios recomendados por el fabricante.
• Este aparato puede ser utilizado por niños mayores de 8 años y personas con
discapacidades físicas, sensoriales y mentales y/o con falta de experiencia
y conocimientos, siempre y cuando hayan sido instruidos sobre el uso del
aparato y comprendan los peligros y riesgos asociados.
• Los niños no deben jugar con el aparato.
ATENCIÓN
Existe riesgo de quemaduras. Las piezas del aparato pueden
alcanzar temperaturas muy elevadas. Tenga cuidado de que los
niños no se quemen.
31
ES
HOJA DE DATOS DEL PRODUCTO
Identicador(es) del modelo: 10034390, 10034391
Artículo Sím-
bolo
Valor Uni-
dad
Artículo Unidad
Potencia caloríca Tipo de control de la potencia caloríca/
temperatura ambiente
Potencia caloríca
nominal
P
nom
2,000
kW potencia caloríca de una etapa y sin
control de la temperatura ambiente
no
Potencia caloríca
mínima (indicativa)
P
min
1,000
kW Dos o más etapas manuales, sin
control de temperatura ambiente
no
Máxima potencia
caloríca continua
P
max, c
2,000
kW Con termostato mecánico de control
de la temperatura ambiente
no
Consumo eléctrico auxiliar a potencia caloríca
nominal
Con control electrónico de la
temperatura ambiente
no
A potencia caloríca
nominal
el
máx
1,775
kW Control electrónico de la temperatura
ambiente y programador diario
no
A potencia caloríca
mínima
el
mín
0,894
kW control electrónico de la temperatura
ambiente y programador semanal
sí
Otras opciones de control (posibilidad de
selección múltiple)
Consumo de energía control de la temperatura ambiente,
con detección de presencia
no
En modo apagado P
o
0,00 W Control de temperatura ambiente,
con detección de ventana abierta
sí
En modo de espera P
sm
0,55 (pantalla
encendida)
W Opción de control de distancia no
En modo de reposo P
idle
/ W Control de arranque adaptativo no
En modo de espera
de red
P
nsm
/ W Limitación del tiempo de trabajo sí
Modo de espera con
visualización de información o
estado
Conguración
del
temporizador
sí
Encendido y
apagado del
interruptor
mecánico
no
Sensor de bombilla negra sí
Eciencia energética
estacional de la
calefacción en modo
activo
n
S, on
94,5 (portátil)
/ 92,0 (jado)
% Función de autoaprendizaje no
Control de la precisión no
Datos de contacto Chal-Tec GmbH, Mühlenstraße 25, 10243, Berlin, Alemania
32
ES
DESCRIPCIÓN DEL PRODUCTO
MONTAJE
Instalación independiente con ruedas
Montar los ruedines Quitar los rudines
Cuando llegue al tope oirá un click. Presiona el botón para quitar las
ruedas.
Salida de aire
Panel de
control
Interruptor
Pies con
ruedas
Empujar
Deslizar
Presiona la tecla
33
ES
Instalación mural
Para quitar la unidad de la pared
Levante el radiador 10 mm
y retírelo.
34
ES
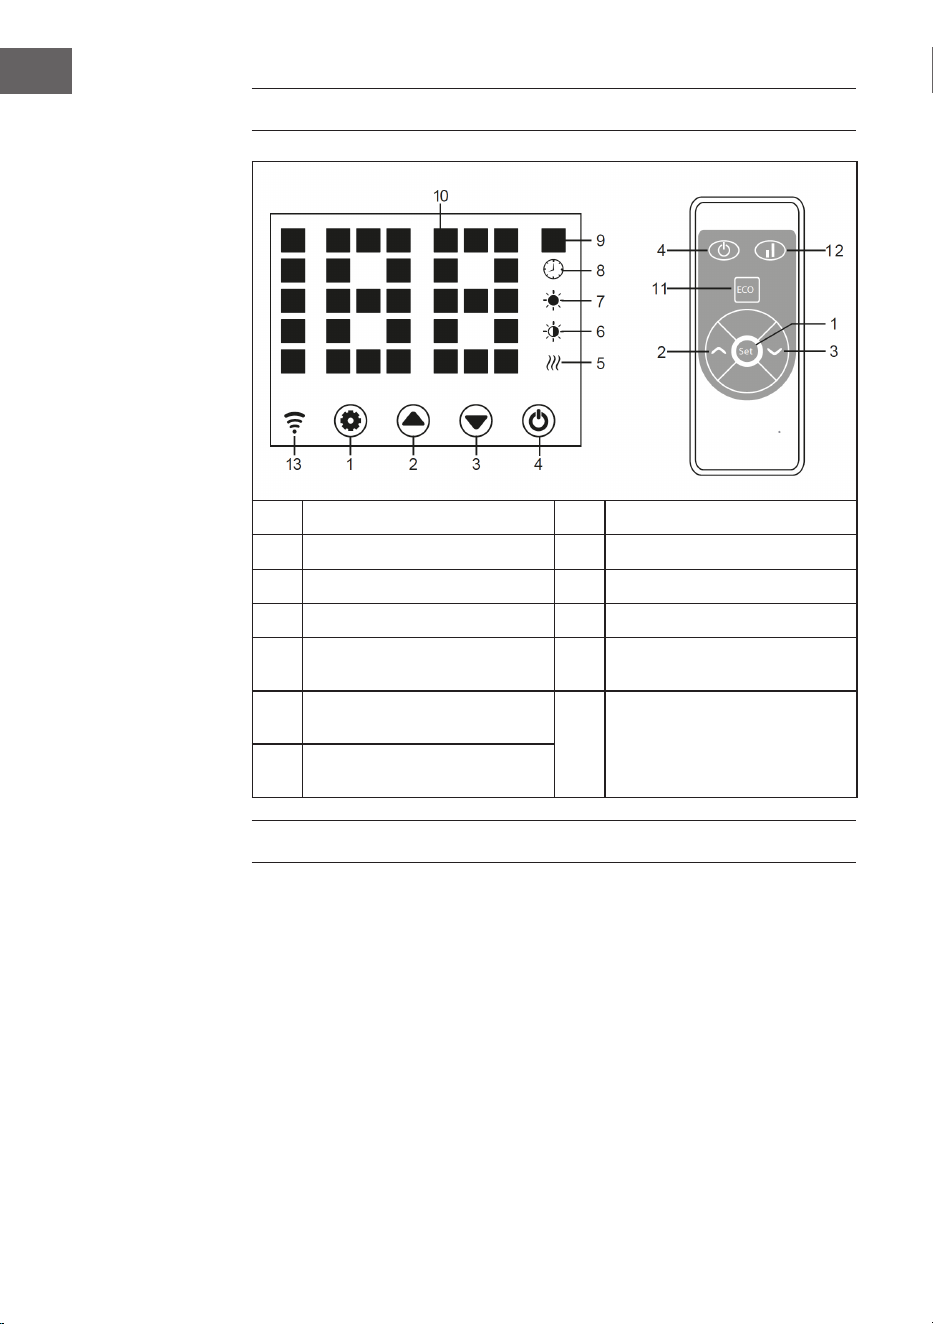
PANEL DE CONTROL
1 Tecla: Ajustes 8 Indicador: Temporizador
2 Tecla :Valor arriba 9 Indicador: temperatura
3 Tecla: Valor abajo 10 Pantalla numérica de LED
4 Tecla: On/Off 11 Tecla: Desactivar la pantalla LED
5
Luz de funcionamiento:
Elemento calefactor
12
Tecla: Subir/bajar el nivel de
calor
6
Indicador: nivel de
calentamiento bajo
13
Pantalla: Wi
Cuando se conecta: encendido
Si la conexión falla: apagado
7 Indicador: alto nivel de
calentamiento
FUNCIONAMIENTO
Puesta en marcha
1. Retire cuidadosamente el dispositivo de la caja. Guarde la caja para metr fuera
de la temporada.
2. Asegúrese de que el botón de encendido/apagado esté apagado antes de
conectar el aparato.
3. El calentador debe estar completamente montado e instalado de acuerdo con
las instrucciones de instalación.
4. Es mejor no utilizar la misma conexión eléctrica con otros aparatos que
requieran mucha energía para evitar la sobrecarga del circuito eléctrico

35
ES
Encendido
Conecte el dispositivo a la fuente de alimentación. La indicador de funcionamiento
se enciende con un breve zumbido. Encienda la unidad con el botón de
encendido/apagado (4). La temperatura ambiente actual se ilumina en la pantalla.
La temperatura jada en fábrica es de 35 °C.
Ajustar la temperatura
Presione el botón de ajuste (1). Los números „10“ y „9“ parpadean. A continuación,
pulse las teclas de echa (2 y 3) para aumentar o disminuir la temperatura en 1 °C.
Ajustar el temporizador
Tiempo de encendido: En el estado de apagado, presione el botón (1) dos veces
para ajustar el temporizador a
1-24 horas. Presione los botones (2) y (3) para ajustar la temperatura. Después del
ajuste, se visualiza la temperatura ambiente. La pantalla (8) se enciende cuando el
temporizador está en marcha y se apaga cuando el temporizador ha caducado.
Tiempo de apagado: En el modo de calefacción, pulse el botón (1) para ajustar
el temporizador a 1-24 horas. Después del ajuste, se visualiza la temperatura
ambiente. La pantalla (8) se enciende cuando el temporizador está en marcha y se
apaga cuando el temporizador ha expirado. La unidad entonces deja de funcionar
como calefacción.
Ajustar el nivel de calentamiento
a. En el modo de funcionamiento, la tecla 2 cambia entre el nivel de calefacción
alto y la parada de la calefacción (el indicador 7 se enciende en el nivel de
calefacción alto y se apaga cuando se apaga la calefacción).
b. En el modo de funcionamiento, la tecla 3 conmuta entre el nivel de calefacción
bajo y la calefacción apagada (el indicador 6 se enciende en el nivel de
calefacción bajo y se apaga cuando se apaga la calefacción).
c. En el modo de funcionamiento, el botón 12 cambia entre Apagado/Bajo/Alto
Calentamiento. Cuando el nivel de calentamiento es alto, el 7º se ilumina y el
6º.

36
ES
Control parental
En el modo de calefacción, presione los botones (2) y (3) simultáneamente. El
seguro para niños está ahora activo y el sistema está bloqueado. No se pueden
hacer ajustes. Después de 5 segundos la pantalla muestra la temperatura
ambiente.
Para desbloquear, mantenga los botones (2) y (3) pulsados durante 3 segundos.
Activar la pantalla
Cuando la unidad está en funcionamiento, la pantalla se apaga. Presione el panel
de control para encender la pantalla.
Función ECO (modo nocturno)
En el modo de calefacción, mantenga pulsados los botones (1) y (3) durante 3
segundos (o el botón ECO del mando a distancia) para activar la función ECO. En
este modo de funcionamiento, sólo se muestran las pantallas (5), (6), (7) o (8),
dependiendo del ajuste previamente seleccionado.
Mostrar el cambio de temperatura en grados Celsius o Fahrenheit
Mantenga pulsados el botón de ajustes (1) y el botón de la echa hacia arriba (2)
simultáneamente durante 10
segundos.
Función de detección de ventanas abiertas
Si la temperatura baja 3 °C o más en 2 minutos, se activa la función de detección
de ventana abierta. La unidad deja de calentarse y la pantalla (9) parpadea.
Presione el botón (4) para apagar el aparato. Si ahora enciende el aparato de
nuevo, la función de detección de ventanas abiertas se desactiva.
Reiniciar W-Lan
Presione y mantenga presionado el botón (1) durante 3 segundos en el modo de
calentamiento. Los ajustes de la W-Lan se reajustan y la pantalla correspondiente
parpadea rápidamente (dos veces por segundo).
Apagar
Mantenga el botón de encendido/apagado (4) presionado. La lámpara de
operación se enciende.
37
ES
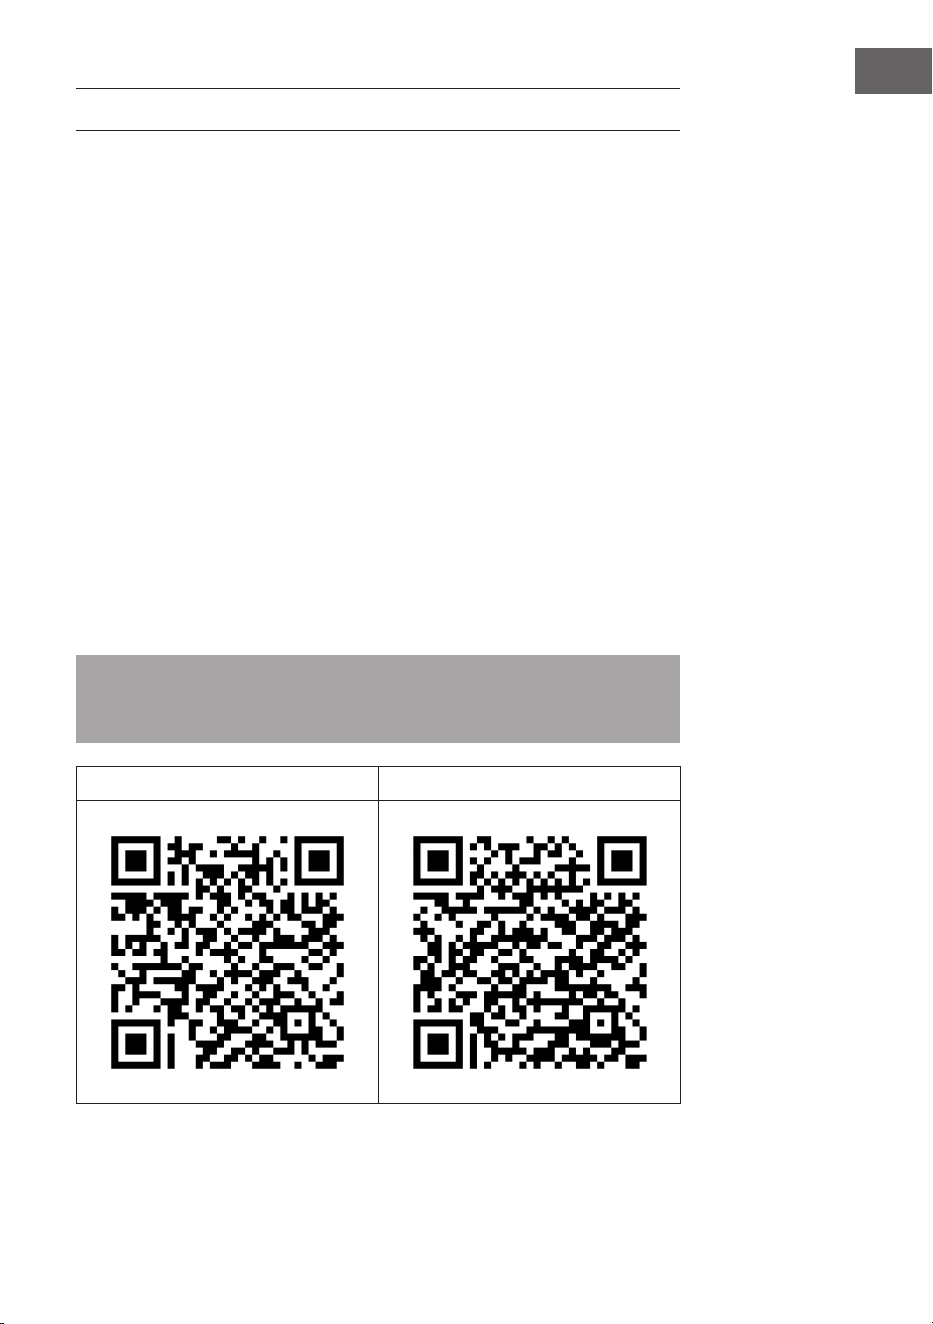
CONTROL DEL DISPOSITIVO POR SMARTPHONE
Si conecta el aparato a su red WLAN doméstica, podrá controlarlo cómodamente
mediante la App correspondiente de Klarstein. La App le permite no solo controlar
el aparato mediante su smartphone, sino que también le ofrece acceso a recetas y
otra información adicional.
Proceda del siguiente modo para conectar su smartphone al dispositivo
Klarstein.
1 Descargue primero la App de Klarstein escaneando el código QR con su
smartphone (véase más abajo) o descárguelo directamente de la App Store o
de Google Play.
2 Asegúrese de que su smartphone esté conectado a la misma red WiFi a la que
debe conectarse su dispositivo Klarstein.
3 Abra la App de Klarstein.
4 Inicie sesión con su cuenta. Si aún no tiene una cuenta, regístrese en la
aplicación Klarstein.
5 Siga las instrucciones que aparecerán en la app.
Descarga la aplicación
Utilice la función de escaneado de su teléfono para escanear el código QR y
guarde la app en su smartphone.
Nota: La aplicación proporciona más información sobre cómo usar la aplicación
y ayuda sobre cómo conectarse al dispositivo tan pronto como se abre por
primera vez.
iOS Android

38
ES
LIMPIEZA Y CUIDADO
Nota: Apague la unidad y desenchúfela de la toma de corriente. Espere hasta
que la unidad se haya enfriado completamente antes de limpiarla.
• Use una aspiradora para limpiar las ranuras de ventilación y las rejillas.
• Elimine el polvo de las supercies exteriores con un paño húmedo (no
mojado).
• No utilice productos de limpieza o abrasivos fuertes.
• No rocíe el aparato con líquidos ni lo sumerja en agua u otros líquidos.
• No abra nunca la carcasa del calentador.
Solución de problemas de conexión
Si su dispositivo Klarstein no se puede encontra en la WLAN, verique lo siguiente:
1 El aparato no está enchufado. Asegúrese de que su dispositivo esté conectado
a un enchufe.
2 El aparato no se encuentra en modo sincronización. Asegúrese de que el
indicador de WiFi (LED) parpadea en el panel de control del dispositivo
inteligente, tal y como se describe en las instrucciones „Restablecer la
conguración de WiFi“ de su dispositivo inteligente (las instrucciones en
general se encuentran en el apartado „Conexión del dispositivo“).
3 El punto de acceso WiFi no funciona en 5 GHz. Asegúrese de que su punto
de acceso funcione en la banda de 2,4 GHz y que tenga su propio SSID en la
banda de 2,4 GHz. Si no está seguro de la banda operativa de su punto de
acceso, comuníquese con su proveedor de Internet.
Importante: tenga en cuenta que si su enrutador WiFi tiene una banda dual, es
decir, si funciona tanto en la banda de 2,4 GHz como en la de 5 GHz, separe los
SSID para cada banda y use el SSID de 2,4 GHz para conectarse.
4 Supervise los ajustes Firewall de su red WiFi. Es posible que la conguración
del Firewall de su red WiFi no permita que la aplicación Klarstein congure
los ajustes de WiFi en su dispositivo inteligente. Asegúrese de que no está
usando ninguna red WiFi pública, como por ejemplo de aeropuertos, otros
hogares, empresas, etc.
5 Los diferentes datos de inicio de sesión en el teléfono inteligente y en
la aplicación le aseguran de que los datos de inicio de sesión WiFi de la
aplicación de Klarstein coincidan con los que está conectado su teléfono
inteligente.
Si ha seguido todos los pasos anteriores y su teléfono inteligente aún no puede
conectarse a la aplicación, envíenos un correo electrónico para obtener ayuda:
39
ES
RETIRADA DEL APARATO
Si en su país existe una disposición legal relativa a la
eliminación de aparatos eléctricos y electrónicos, este
símbolo estampado en el producto o en el embalaje
advierte que no debe eliminarse como residuo doméstico.
En lugar de ello, debe depositarse en un punto de
recogida de reciclaje de aparatos eléctricos y electrónicos.
Una gestión adecuada de estos residuos previene
consecuencias potencialmente negativas para el medio
ambiente y la salud de las personas. Puede consultar más
información sobre el reciclaje y la eliminación de este
producto contactando con su administración local o con
su servicio de recogida de residuos.
Este producto contiene baterías. Si en su país existe una
disposición legal relativa a la eliminación de baterías,
estas no deben eliminarse como residuo doméstico.
Infórmese sobre la normativa vigente relacionada con
la eliminación de baterías. Una gestión adecuada de
estos residuos previene consecuencias potencialmente
negativas para el medio ambiente y la salud de las
personas.
DECLARACIÓN DE CONFORMIDAD
Fabricante:
Chal-Tec GmbH, Mühlenstraße 25, 10243 Berlín, Alemania.
Contacto: [email protected]
Por la presente, Chal-Tec GmbH declara que el tipo de
equipo radioeléctrico Bornholm Smart es conforme con la
Directiva 2014/53/UE. El texto completo de la declaración
UE de conformidad está disponible en la dirección Internet
siguiente: use.berlin/10034390

41
FR
Cher client,
Toutes nos félicitations pour l’acquisition de ce nouvel
appareil. Veuillez lire attentivement les instructions suivantes
de branchement et d’utilisation an d’éviter d’éventuels
dommages. Le fabricant ne saurait être tenu pour responsable
des dommages dus au non-respect des consignes de sécurité
et à la mauvaise utilisation de l’appareil. Scannez le QR-Code
pour accéder à la dernière version du mode d‘emploi et à
d‘autres informations concernant le produit:
SOMMAIRE
FICHE TECHNIQUE
Numéro d'article
10034190, 10034391
Alimentation 220-240 V ~ 50 Hz
Puissance 1000 W / 2000 W
WiFi standard
802.11 b/g/n
WiFi fréquence
2,4 GHz
WiFi puissance de radiofréquence
(max.)
20 dBm
Consignes de sécurité 42
Fiche de données produit 43
Aperçu de l‘appareil 44
Montage 44
Panneau de commande 46
Utilisation 46
Contrôle de l‘appareil par smartphone 49
Nettoyage et entretien 50
Conseils pour le recyclage 51
Déclaration de conformité 51
42
FR
CONSIGNES DE SÉCURITÉ
• Avant utilisation, vériez la tension sur l‘étiquette de l‘appareil et ne branchez
l‘appareil que sur des prises correspondant à la tension de l‘appareil.
• Si le câble d‘alimentation est endommagé, faites-le remplacer par un
professionnel qualié.
• Ne placez pas le radiateur directement sous une prise.
• Tenez l‘appareil à un mètre de distance des matériaux combustibles tels que
meubles, rideaux ou similaires.
• Utilisez l‘appareil hors de portée des enfants. Les enfants ne sont autorisés à
utiliser l‘appareil que sous surveillance.
• L‘appareil n‘est pas destiné à un usage commercial, mais seulement pour une
utilisation domestique et dans des environnements similaires.
• N‘utilisez pas l‘appareil s‘il fonctionne mal ou a été endommagé de quelque
façon que ce soit.
• Les réparations ne peuvent être effectuées que par des spécialistes qualiés.
• Les réparations mal effectuées ou de votre propre chef représentent un
risque de blessure.
• Ne faites pas passer le câble d‘alimentation sous des tapis ou moquettes.
• Assurez-vous que le câble d‘alimentation ne passe pas sur des recoins pointus
ou des surfaces chaudes.
• Ne recouvrez pas le radiateur pour éviter la surchauffe.
• N‘utilisez pas l‘appareil avec une minuterie externe, une prise de courant
télécommandée ou un autre appareil qui allume et éteint automatiquement le
poêle.
• Ne plongez pas l‘appareil dans l‘eau ou d‘autres liquides.
• N‘utilisez pas l‘appareil près d‘une baignoire, d‘une douche ou d‘une piscine.
• N‘utilisez pas l‘appareil à l‘extérieur.
• N‘utilisez pas l‘appareil avec des mains mouillées.
• N‘utilisez pas l‘appareil sur ou à proximité de surfaces chaudes.
• N‘utilisez pas l‘appareil avec un câble d‘alimentation endommagé.
• Avant le nettoyage, débranchez la che de la prise et laissez l‘appareil refroidir
complètement.
• N‘utilisez pas d‘abrasifs pour le nettoyage.
• N‘utilisez que des accessoires expressément approuvés par le fabricant.
• Cet appareil peut être utilisé par des enfants de 8 ans ou plus et des
personnes ayant des capacités physiques, sensorielles et mentales limitées
et / ou dénuées d‘expérience et de connaissances, à condition d‘avoir été
instruits au fonctionnement de l‘appareil par une personne responsable et
d‘en comprendre les risques associés.
• Les enfants ne doivent pas jouer avec l'appareil.
ATTENTION
Risque de brûlures ! Certaines parties de l‘appareil peuvent
devenir très chaudes. Veillez à ne pas vous brûler ni vous-même ni
vos enfants.
43
FR
FICHE DE DONNÉES PRODUIT
Identiant(s) du modèle : 10034390, 10034391
Article Sym-
bole
Valeur Ap-
pa-
reil
Article Ap-
pa-
reil
Puissance calorique Type de chauffage/régulation de la
température ambiante
Puissance calorique
nominale
P
nom
2
kW production de chaleur en une
seule étape et pas de contrôle de la
température ambiante
non
Puissance calorique
minimale (indicative)
P
min
1
kW Deux étapes manuelles ou plus,
pas de contrôle de la température
ambiante
non
Puissance calorique
maximale continue
P
max,c
2
kW Avec thermostat mécanique de
régulation de la température
ambiante
non
Consommation d'électricité auxiliaire Avec contrôle électronique de la
température ambiante
non
À puissance
calorique
nominale
el
max
1,775
kW Avec contrôle électronique de la
température ambiante et minuterie
quotidienne
non
Au débit calorique
minimum
el
min
0,894
kW Avec contrôle électronique de la
température ambiante et minuterie
hebdomadaire
oui
Autres options de contrôle (plusieurs
sélections possibles)
Consommation électrique contrôle de la température ambiante,
avec détection de présence
non
En mode arrêt P
o
0,00 W Contrôle de la température ambiante,
avec détection de fenêtre ouverte
oui
En mode veille P
sm
0,55 (écran allumé) W option contrôle à distance non
En mode veille P
idle
/ W contrôle adaptatif du démarrage non
En attente de réseau P
nsm
/ W limitation du temps de
fonctionnement
oui
Mode veille avec achage
d'informations ou d'état
Réglage de la
minuterie
oui
Commutateur
mécanique
pendant/ après le
fonctionnement
non
capteur à ampoule noire oui
Ecacité énergétique
saisonnière du
chauffage des locaux
en mode actif
n
S, on
94,5 (portable) /
92,0 (xe)
% Fonction d'auto-apprentissage non
Précision du contrôle non
Coordonnées de contact : Chal-Tec GmbH, Mühlenstrasse 25, 10243 Berlin, Allemagne.
44
FR
APERÇU DE L‘APPAREIL
MONTAGE
Installation sur pied avec roulettes
Montage des roulettes Démontage des roulettes
Vous entendrez un clic lorsque le
montage sera réalisé.
Appuyez sur le bouton pour retirer
les roulettes
Sortie d‘air Panneau de commande
Interrupteur
Pieds avec
roulettes
Enfoncez
Tirez
Appuyez sur le bouton
45
FR
Installation murale
Pour démonter l‘appareil du mur
Soulevez le radiateur de 10
mm puis retirez-le.
46
FR
PANNEAU DE COMMANDE
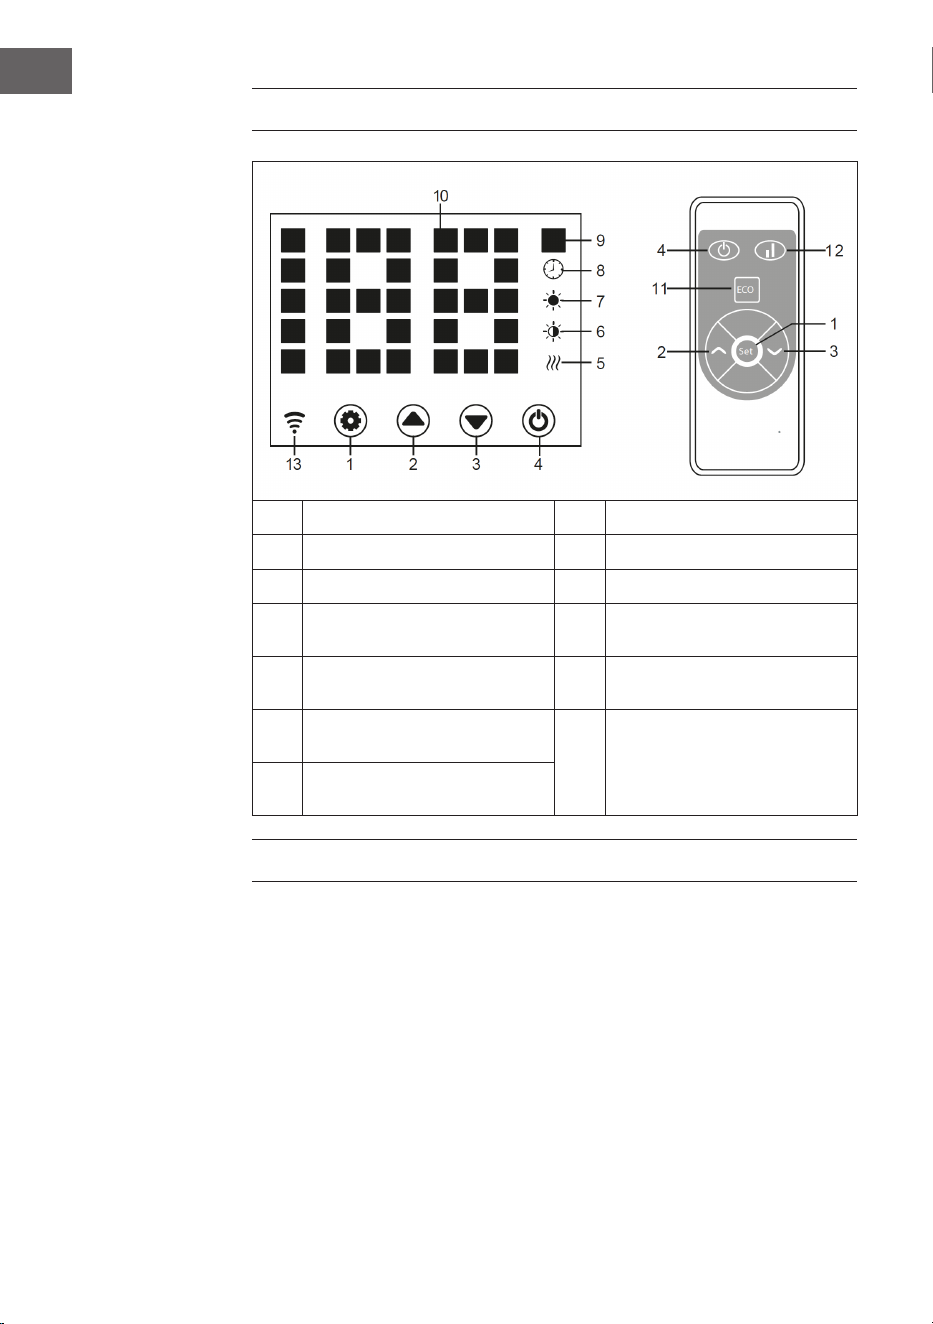
1 Touche : réglages 8 Achage : minuterie
2 Touche : augmenter la valeur 9 Achage: température
3 Touche: réduire la valeur 10 Achage LED numérique
4 Touche : marche/arrêt 11
Touche : désactiver l'achage
LED
5
Témoin de marche : élément
chauffant
12
Touche : augmenter / diminuer
le niveau de chauffage
6
Voyant : bas niveau de
chauffage
13
Témoin WiFi
Wi connecté: allumé
Si la connexion a échoué: éteint
7 Voyant : niveau de chauffage
élevé
UTILISATION
Mise en marche
1. Retirez délicatement l‘appareil de l‘emballage. Conservez l‘emballage pour le
stockage hors saison.
2. Assurez-vous que la touche marche / arrêt est sur arrêt avant de connecter
l‘appareil.
3. Le radiateur doit être entièrement assemblé et installé conformément aux
instructions de montage.
4. Il est préférable de ne pas utiliser la même prise électrique que d‘autres
appareils énergivores pour éviter de surcharger le circuit.

47
FR
Pour allumer l‘appareil
Connectez l‘appareil à l‘alimentation. Le témoin de fonctionnement s‘allume avec
un bref bourdonnement. Allumez l‘appareil avec la touche Marche / Arrêt (4). La
température ambiante actuelle s‘ache maintenant sur l‘écran. La température
préréglée en usine est de 35 °C.
Réglage de la température
Appuyez sur la touche de réglage (1). Les chiffres „10“ et „9“ clignotent. Appuyez
ensuite sur les touches échées (2) et (3) pour augmenter ou diminuer la
température de 1 °C.
Réglage de la minuterie
Heure de mise en marche : l‘appareil étant éteint, appuyez deux fois sur la touche
(1) pour régler la minuterie sur 1 à 24 heures. Appuyez sur les touches (2) et (3)
pour régler la température. Après le réglage, la température ambiante s‘ache.
L‘indicateur (8) s‘allume lorsque la minuterie fonctionne et s‘éteint lorsque la
minuterie est expirée.
Heure d‘arrêt : appuyez sur la touche (1) en mode chauffage pour régler la
minuterie sur 1-24 heures. Après le réglage, la température ambiante s‘ache.
L‘indicateur (8) s‘allume lorsque la minuterie fonctionne et s‘éteint lorsque la
minuterie est expirée. L‘appareil cesse alors de chauffer.
Réglage du niveau de chauffage
a. En mode de fonctionnement, la touche (2) bascule entre le niveau de
chauffage élevé et l‘arrêt du chauffage (le voyant (7) s‘allume lorsque le
niveau de chauffage est élevé et s‘éteint lorsque le chauffage est arrêté).
b. En mode de fonctionnement, la touche (3) bascule entre le chauffage bas et le
chauffage éteint (le voyant (6) s‘allume lorsque le niveau de chauffage est bas
et s‘éteint lorsque l‘état est désactivé).
c. En mode de fonctionnement, la touche (12) bascule entre Arrêt / Chauffage
bas / élevé. Lorsque le niveau de chauffage est élevé, le voyant (7) s‘allume.

48
FR
Verrouillage parental
En mode chauffage, appuyez simultanément sur les touches (2) et (3). Le
verrouillage parental est maintenant actif et le système est verrouillé. Aucun
réglage ne peut être effectué. La température ambiante apparaît sur l‘achage
après 5 secondes.
Pour déverrouiller, appuyez et maintenez les touches (2) et (3) pendant 3
secondes.
Activation de l‘achage
L‘achage est éteint lorsque l‘appareil fonctionne. L‘écran s‘allume lorsque vous
appuyez sur le panneau de commande.
Fonction ECO (mode nuit)
En mode chauffage, maintenez les touches (1) et (3) pendant 3 secondes (ou la
touche ECO de la télécommande) pour activer la fonction ECO. Dans ce mode de
fonctionnement, seuls les indicateurs (5), (6), (7) ou (8) sont actifs en fonction du
réglage précédemment sélectionné.
Achage de la température en degrés Celsius ou Fahrenheit
Appuyez simultanément sur la touche des réglages (1) et la touche èche vers le
haut (2) pendant 10 secondes.
Fonction détection de fenêtre ouverte
Si la température baisse de 3 °C ou plus en 2 minutes, la fonction de détection
de fenêtre ouverte se déclenche. L‘appareil arrête de chauffer et le voyant (9)
clignote. Appuyez sur la touche (4) pour éteindre l‘appareil. Lorsque vous rallumez
l‘appareil, la fonction de détection des fenêtres ouvertes est désactivée.
Réinitialisation du Wi
En mode chauffage, appuyez sur la touche (1) et maintenez-la pendant 3
secondes. Les paramètres Wi sont réinitialisés
et le voyant correspondant clignote rapidement (deux fois par seconde).
Pour éteindre l‘appareil
Maintenez la touche marche / arrêt (4). Le témoin de fonctionnement s‘éteint.
49
FR
CONTRÔLE DE L‘APPAREIL PAR SMARTPHONE
Si vous connectez l‘appareil à votre réseau Wi-Fi domestique, vous pouvez l‘utiliser
facilement via l‘application Klarstein associée. L‘application vous permet non
seulement de contrôler à distance l‘appareil via votre smartphone, mais vous
donne également accès à des recettes et à des informations supplémentaires.
Procédez comme suit pour connecter votre smartphone avec votre appareil
Klarstein :
1 Téléchargez d‘abord l‘application Klarstein en scannant le code QR avec votre
smartphone (voir ci-dessous) ou téléchargez-le directement depuis l‘App
Store ou Google Play.
2 Assurez-vous que votre smartphone est connecté au même réseau WiFi que
votre appareil Klarstein.
3 Ouvrez l‘application Klarstein.
4 Connectez-vous avec votre compte. Si vous n‘avez pas encore de compte,
inscrivez-vous dans l‘application Klarstein.
5 Suivez les indications de l‘application.
Téléchargement de l‘application
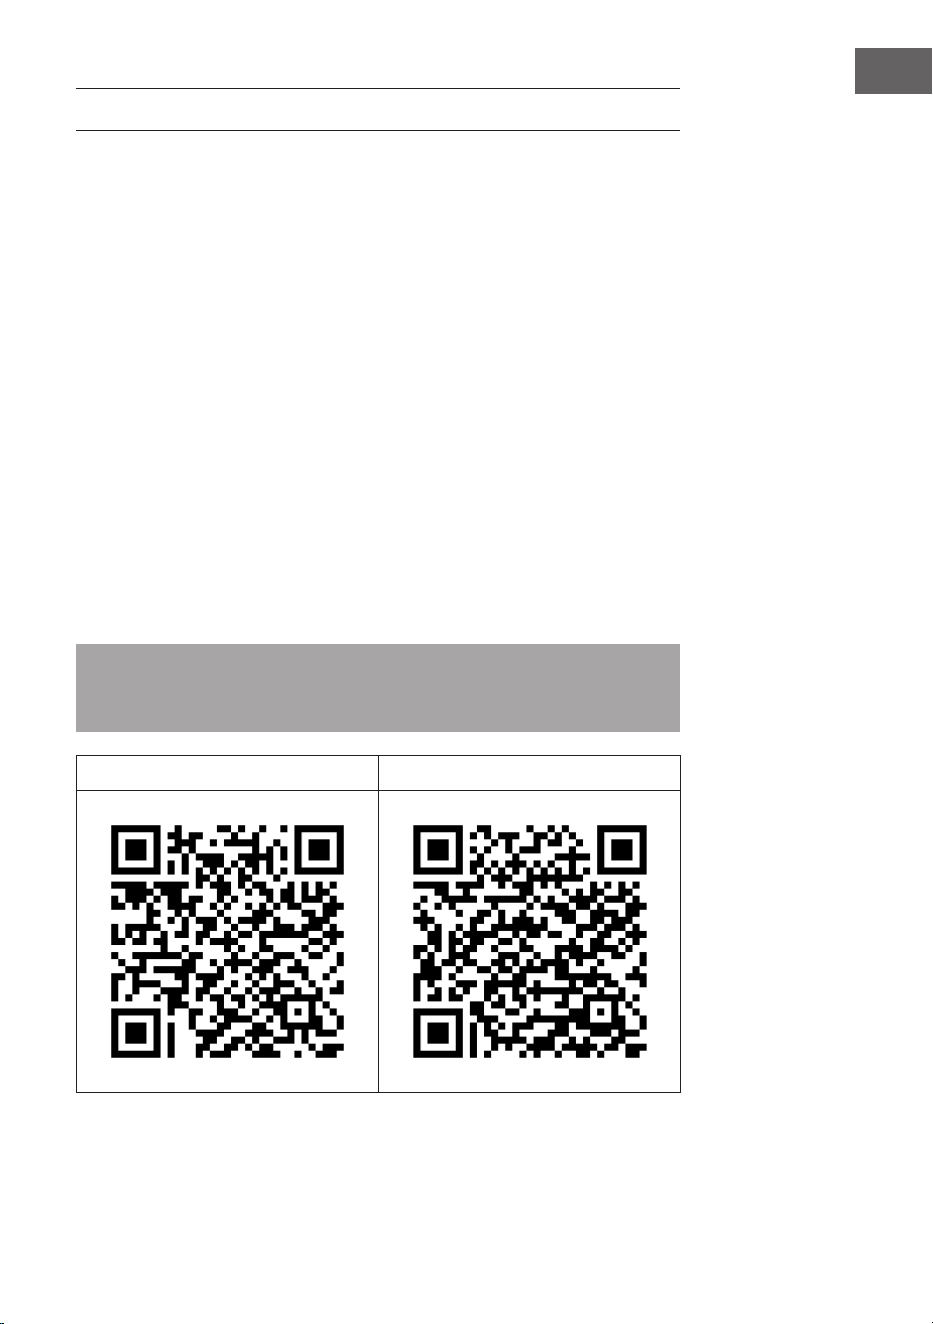
Utilisez la fonction de scan de votre téléphone portable pour scanner le QR Code
et télécharger l‘application sur votre smartphone.
Remarque : L‘application fournit des informations supplémentaires sur la façon
d‘utiliser l‘application et de l‘aide sur la façon de se connecter à votre appareil
dès que vous l‘ouvrez pour la première fois.
iOS Android

50
FR
NETTOYAGE ET ENTRETIEN
Remarque : Mettez l‘appareil hors tension et débranchez-le de la prise
de courant. Attendez que l‘appareil soit complètement refroidi avant de le
nettoyer.
• Utilisez un aspirateur pour nettoyer les fentes d‘aération et les grilles.
• Enlever la poussière sur les surfaces extérieures à l‘aide d‘un chiffon umide (non
mouillé).
• N‘utilisez pas de produits de nettoyage ou d‘abrasifs puissants.
Ne pas vaporiser l‘appareil avec des liquides ou l‘immerger dans de l‘eau ou
d‘autres liquides.
• N‘ouvrez jamais le boîtier de l‘appareil de chauffage.
Résolution des problèmes de connexion
Si votre appareil Klarstein est introuvable dans le Wi, vériez les points suivants :
1 L‘appareil n‘est pas branché. Vériez que votre appareil est branché à une
prise.
2 L‘appareil ne se trouve pas en mode d‘appairage. Vériez que le voyant WiFi
(LED) du panneau de commande de l‘appareil intelligent clignote comme
décrit dans les instructions „Réinitialiser les paramètres WiFi“ pour votre
appareil intelligent (les instructions se trouvent généralement sous Connexion
de l‘appareil).
3 Le point d‘accès WiFi ne fonctionne pas sur 5 GHz. Assurez-vous que votre
point d‘accès fonctionne sur la bande 2,4 GHz et que vous disposez de votre
propre SSID sur la bande 2,4 GHz. Si vous n‘êtes pas sûr de la bande de
fonctionnement de votre point d‘accès, veuillez contacter votre fournisseur
d‘accès Internet.
Important : veuillez noter que si votre routeur WiFi a une double bande - c‘est-
à-dire qu‘il fonctionne à la fois dans les bandes 2,4 GHz et 5 GHz - vous devez
séparez les SSID pour chaque bande et les 2,4 GHz Utilisez le SSID GHz pour
vous connecter.
4 Vériez les paramètres du pare-feu de votre réseau WiFi. Le paramétrage de
pare-feu de votre réseau Wi-Fi peut ne pas permettre à l‘application Klarstein
de congurer les paramètres Wi-Fi sur votre appareil connecté. Veuillez vous
assurer que vous n‘utilisez pas un réseau WiFi public, par ex. aéroports,
dortoirs, entreprises, etc.
5 Différentes données de connexion dans le smartphone et dans l‘application.
Vériez que les données de connexion WiFi saisies dans l‘application Klarstein
correspondent à celles de votre smartphone.
Si vous avez suivi les instructions ci-dessus et que votre smartphone ne parvient
toujours pas à se connecter à l‘application, veuillez nous envoyer un e-mail pour
obtenir de l‘aide : [email protected]
51
FR
CONSEILS POUR LE RECYCLAGE
S‘il existe une réglementation pour l‘élimination ou le
recyclage des appareils électriques et électroniques dans
votre pays, ce symbole sur le produit ou sur l‘emballage
indique que cet appareil ne doit pas être jeté avec les
ordures ménagères. Vous devez le déposer dans un point
de collecte pour le recyclage des équipements électriques
et électroniques. La mise au rebut conforme aux règles
protège l‘environnement et la santé de vos semblables
des conséquences négatives. Pour plus d‘informations
sur le recyclage et l‘élimination de ce produit, veuillez
contacter votre autorité locale ou votre service de
recyclage des déchets ménagers.
Ce produit contient des piles. S‘il existe une
réglementation pour l‘élimination ou le recyclage des
piles dans votre pays, vous ne devez pas les jeter avec les
ordures ménagères. Renseignez-vous sur les dispositions
locales relatives à la collecte des piles usagées. La mise au
rebut conforme aux règles protège l‘environnement et la
santé de vos semblables des conséquences négatives.
DÉCLARATION DE CONFORMITÉ
Fabricant :
Chal-Tec GmbH, Mühlenstraße 25, 10243 Berlin,
Allemagne.
Contact: [email protected]
Le soussigné, Chal-Tec GmbH, déclare que l’équipement
radioélectrique du type Bornholm Smart est conforme à la
directive 2014/53/UE. Le texte complet de la déclaration UE
de conformité est disponible à l’adresse internet suivante :
use.berlin/10034390

53
IT
Gentile cliente,
La ringraziamo per aver acquistato il dispositivo. La
preghiamo di leggere attentamente le seguenti istruzioni
per l’uso e di seguirle per evitare possibili danni tecnici. Non
ci assumiamo alcuna responsabilità per danni scaturiti da
una mancata osservazione delle avvertenze di sicurezza e
da un uso improprio del dispositivo. Scansionare il codice
QR seguente, per accedere al manuale d’uso più attuale e
per ricevere informazioni sul prodotto.
INDICE
DATI TECNICI
Numero articolo
10034190, 10034391
Alimentazione 220-240 V ~ 50 Hz
Potenza 1000 W / 2000 W
WiFi standard
802.11 b/g/n
WiFi frequenza
2,4 GHz
WiFi potenza a radiofrequenza (max.)
20 dBm
Avvertenze di sicurezza 54
Scheda informativa del producto 55
Descrizione del dispositivo 56
Montaggio 56
Pannello di controllo 58
Utilizzo 58
Gestione tramite smartphone 61
Pulizia e manutenzione 62
Smaltimento 63
Dichiarazione di conformità 63
54
IT
AVVERTENZE DI SICUREZZA
• Prima dell‘uso, controllare la tensione sulla targhetta del dispositivo e
collegare il dispositivo solo ad una presa che corrisponde alla tensione
indicata.
• Se il cavo di alimentazione è danneggiato, farlo sostituire da un tecnico
qualicato.
• Non posizionare il dispositivo direttamente sotto la presa.
• Tenere materiali inammabili come mobili, tende o simili ad un metro di
distanza.
• Tenere il dispositivo fuori dalla portata dei bambini. I bambini possono
utilizzare il dispositivo solo se sorvegliati.
• Il dispositivo non è per un uso commerciale, bensì per un uso domestico e per
ambienti simili.
• Non utilizzare il dispositivo se presenta malfunzionamenti o se è danneggiato
in qualche modo.
• Le riparazioni possono essere eseguite solo da un tecnico qualicato.
• Le riparazioni eseguite in modo errato o autonomamente comportano il
rischio di infortuni.
• Non sistemare il cavo di alimentazione sotto tappeti o simili.
• Assicurarsi che il cavo di alimentazione non sia collocato su spigoli vivi o
superci calde.
• Non coprire il dispositivo per evitare il pericolo di surriscaldamento.
• Non utilizzare il dispositivo con un timer esterno, una presa con telecomando
o un altro apparecchio che accende e spenge automaticamente il dispositivo.
• Non immergere il dispositivo in acqua o in altri liquidi.
• Non utilizzare il dispositivo vicino a vasche da bagno, docce o piscine.
• Non utilizzare il dispositivo all‘aperto.
• Non utilizzare il dispositivo con le mani bagnate.
• Non utilizzare il dispositivo sopra o vicino a superci calde.
• Non utilizzare il dispositivo con un cavo di alimentazione danneggiato.
• Prima di eseguire la pulizia, disinserire la spina dalla presa e far raffreddare
completamente il dispositivo.
• Non utilizzare prodotti abrasivi per la pulizia.
• Utilizzare solo accessori espressamente approvati dal produttore.
• Questo dispositivo può essere utilizzato da bambini a partire da 8 anni
e da persone con limitate capacità siche e psichiche o con conoscenza
ed esperienza limitate, solo se sono stati istruiti sulle modalità d’uso e
comprendono i rischi e i pericoli connessi.
• I bambini non devono giocare con l'apparecchio.
ATTENZIONE
Pericolo di ustioni! Alcuni componenti del dispositivo possono
diventare molto caldi. Prestare la massima attenzione in presenza
di bambini e di persone vulnerabili.
55
IT
SCHEDA INFORMATIVA DEL PRODUCTO
Identicatore/-i del modello: 10034390, 10034391
Articolo Sim-
bolo
Valore Uni-
tà
Articolo Uni-
tà
Potenza termica Tipo di potenza termica/controllo della
temperatura ambiente
Potenza termica
nominale
P
nom
2,000
kW Potenza termica a singolo
stadio e nessun controllo della
temperatura ambiente
no
Potenza termica
minima (indicativa)
P
min
1,000
kW Due o più fasi manuali, senza
controllo della temperatura
ambiente
no
Potenza termica
massima continua
P
max,c
2,000
kW Con termostato meccanico per
il controllo della temperatura
ambiente
no
Consumo di elettricità ausiliaria alla potenza termica
nominale
Con controllo elettronico della
temperatura ambiente
no
Alla potenza termica
nominale
el
max
1,775
kW Controllo elettronico della
temperatura ambiente con timer
giornaliero
no
Alla potenza termica
minima
el
min
0,894
kW Controllo elettronico della
temperatura ambiente con timer
settimanale
sì
Consumo di energia Altre opzioni di controllo (è possibile
effettuare più selezioni)
A dispositivo spento P
o
0,00 W Controllo della temperatura
ambiente, con rilevamento di
presenza
no
In modalità standby P
sm
0,55 (display acceso) W Controllo della temperatura
ambiente, con rilevamento di
nestre aperte
sì
In modalità inattiva P
idle
/ W Opzione di controllo a distanza no
In standby di rete P
nsm
/ W Controllo adattativo
dell'avviamento
no
Limitazione della durata operativa sì
Modalità standby
con indicazione delle
informazioni o dello
stato
Impostazione del timer sì Sensore a bulbo nero sì
no
Interruttore meccanico
all'accensione e dopo il lavoro
Ecienza energetica
stagionale per il
riscaldamento degli
ambienti in modalità
attiva
n
S, on
94,5 (portatile)/92,0
(sso)
% Funzionalità di
autoapprendimento
no
Accuratezza del controllo no
Dettagli di contatto Chal-Tec GmbH, Mühlenstrasse 25, 10243 Berlino, Germania.
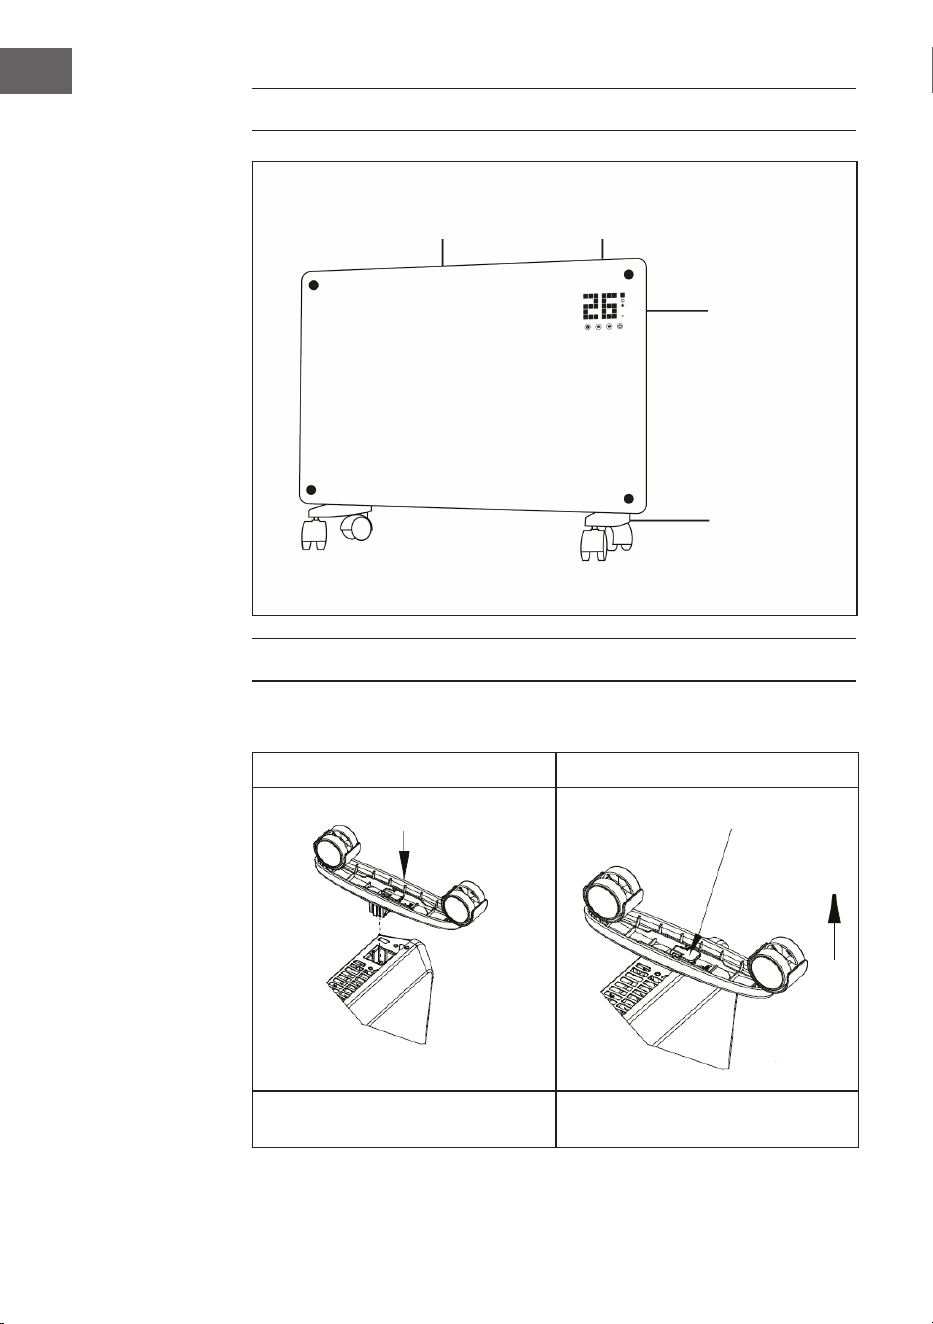
56
IT
DESCRIZIONE DEL DISPOSITIVO
MONTAGGIO
Montaggio a posizionamento libero con rotelle
Montare le rotelle Togliere le rotelle
Quando il montaggio è terminato
si sente un clic.
Premere il tasto per togliere le rotelle.
Uscita dell’aria Pannello di controllo
Interruttore
Piedi con
rotelle
Inserire
Tirare
Premere il tasto
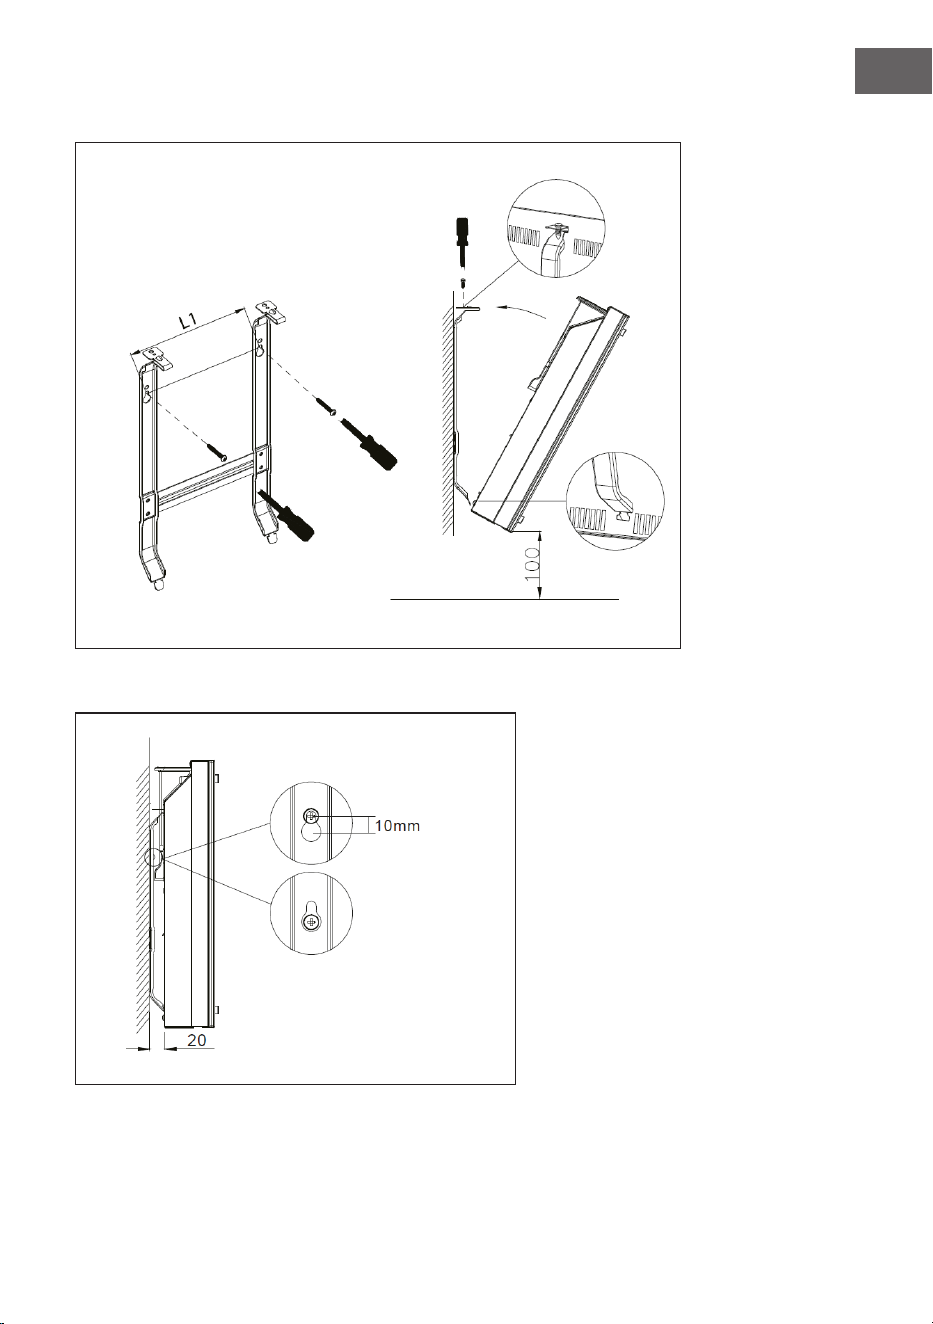
57
IT
Montaggio a parete
Rimuovere l´apparecchio dalla parete
Sollevare il convettore di 10
mm e poi staccarlo.
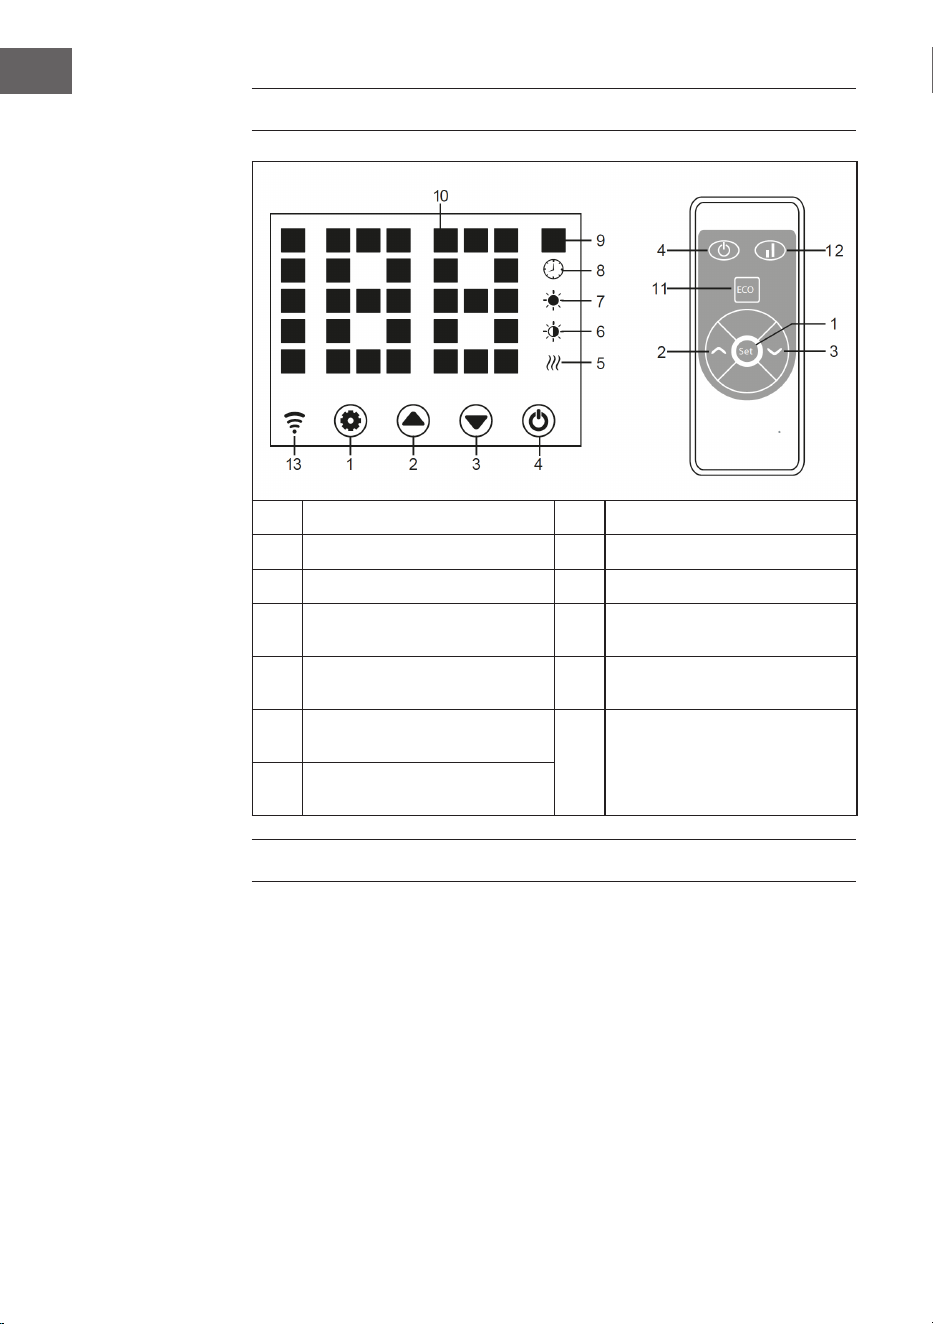
58
IT
PANNELLO DI CONTROLLO
1 Tasto: impostazioni 8 Indicazione: timer
2 Tasto: aumentare valore 9 Indicazione: temperatura
3 Tasto: diminuire valore 10 Indicazione numerica a LED
4 Tasto: on/off 11
Tasto: disattivare l’indicazione
LED
5
Spia di funzionamento:
elemento riscaldante
12
Tasto: aumentare/diminuire il
livello riscaldante
6
Indicazione: livello riscaldante
basso
13
Indicazione: Wi-Fi
Connesso: on
La connessione non è riuscita:
off
7 Indicazione: livello riscaldante
alto
UTILIZZO
Messa in funzione
1. Togliere il dispositivo dalla scatola facendo attenzione. Conservare la scatola
per stoccare il dispositivo nei periodi di non utilizzo.
2. Assicurarsi che il tasto On/Off sia spento prima di collegare il dispositivo.
3. Assemblare e montare completamente il dispositivo seguendo le indicazioni
del manuale d’uso.
4. È meglio non utilizzare la stessa connessione elettrica di altri dispositivi con
potenza assorbita elevata, in modo da evitare un sovraccarico del circuito
elettrico.

59
IT
Accensione
Collegare il dispositivo all’alimentazione elettrica. La spia di funzionamento si
accende con un breve ronzio. Accendere il dispositivo con On/Off (4). Ora sullo
schermo si illumina la temperatura ambiente attuale. La temperatura predenita
in fabbrica è di 35 °C.
Impostare la temperatura
Premere il tasto delle impostazioni (1). Le cifre “10” e “9” lampeggiano. Premere i
tasti freccia (2 e 3) per alzare o abbassare la temperatura di 1 °C.
Impostare il timer
Tempo no all’accensione: a dispositivo acceso, premere due volte il tasto (1)
per impostare il timer su 1-24 ore. Premere i tasti (2) e (3) per impostare la
temperatura. Terminata l’impostazione, viene mostrata la temperatura ambiente.
L’indicazione (8) si illumina a timer in funzione e si spegne quando è giunto al
termine.
Tempo no allo spegnimento: a dispositivo in funzione di riscaldamento, premere
due volte il tasto (1) per impostare il timer su 1-24 ore. Premere i tasti (2) e (3)
per impostare la temperatura. Terminata l’impostazione, viene mostrata la
temperatura ambiente. L’indicazione (8) si illumina a timer in funzione e si spegne
quando è giunto al termine. Il dispositivo interrompe la funzione di riscaldamento.
Impostare il livello riscaldante
a. In modalità di funzionamento il tasto 2 permette di cambiare tra livello
riscaldante alto e arresto della funzione riscaldante (indicazione 7 si illumina
durante il livello riscaldante alto e si spegne se la funzione di riscaldamento è
spenta).
b. In modalità di funzionamento il tasto 3 permette di passare avanti e indietro
tra livello riscaldante basso e funzione riscaldante spenta (indicazione 6 si
illumina durante il livello riscaldante basso e si spegne a dispositivo spento).
c. In modalità di funzionamento, il tasto 12 passa tra livello riscaldante Off/
Basso/Alto. In caso di livello alto si illumina l’indicazione 7, in caso di livello
basso si illumina 6 e se la funzione riscaldante è spenta, non si illumina alcuna
indicazione.

60
IT
Sicura per i bambini
In modalità di riscaldamento, premere contemporaneamente (2) e (3). La
sicura per i bambini è attiva e l’impianto è bloccato. Non è possibile effettuare
impostazioni. Dopo 5 secondi, sullo schermo compare la temperatura ambiente.
Per sbloccare tenere premuti i tasti (2) e (3) per 3 secondi.
Attivare lo schermo
Se il dispositivo è in funzione, lo schermo è spento. Premendo una volta sul
pannello di controllo, si accende lo schermo.
Funzione ECO (modalità notturna).
Tenere premuti i tasti (1) e (3) per 3 secondi in funzione di riscaldamento (oppure
premere ECO sul telecomando), in modo da accendere la funzione ECO. In
questa modalità vengono mostrate solo le indicazioni (5), (6), (7) o (8), in base
all’impostazione selezionata.
Selezionare l’indicazione della temperatura in gradi Celsius o Fahrenheit
Tenere premuti contemporaneamente per 10 secondi i tasti per le impostazioni (1)
e il tasto freccia “In alto” (2).
Funzione di rilevamento nestra aperta
Se la temperatura scende di 3 °C o più nel giro di 2 minuti, viene attivata la
funzione di rilevamento nestra aperta. Il dispositivo smette di scaldare e
l’indicazione (9) lampeggia. Premere il tasto (4) per spegnere il dispositivo, Se si
riaccende il dispositivo, la funzione di rilevamento nestra aperta è disattivata.
Resettare il Wi-Fi
Tenere premuto per 3 secondi il tasto (1) in modalità di riscaldamento. Le
impostazioni del Wi-Fi vengono resettate e la relativa indicazione lampeggia
rapidamente (due volte al secondo).
Spegnimento
Tenere premuto il tasto On/Off (4). La spia di funzionamento si illumina.
61
IT
GESTIONE TRAMITE SMARTPHONE
Se si collega l‘apparecchio al WiFi, è possibile gestirlo comodamente con la relativa
applicazione Klarstein. L‘app non solo consente di controllare l´apparecchio da
remoto dal proprio smartphone, ma consente anche di accedere a ricette e ad
altre informazioni.
Per collegare il telefono al dispositivo Klarstein, procedere come segue:
1 Per prima cosa scaricare l‘app Klarstein scansionando il codice QR con lo
smartphone (vedere sotto) o scaricarla direttamente dall‘App Store o da
Google Play.
2 Accertarsi che lo smartphone sia connesso alla stessa rete WiFi a cui deve
collegarsi il dispositivo Klarstein.
3 Aprire l‘applicazione Klarstein.
4 Accedere con il proprio account. Se non si possiede ancora un account,
registrarsi nell‘app Klarstein.
5 Seguire le istruzioni contenute nell‘App.
App-Download
Utilizzare la funzione di scansione del telefono per eseguire la scansione del
codice QR e salvare l‘applicazione sullo smartphone.
Nota: L‘applicazione fornisce ulteriori informazioni su come utilizzarla e su
come connettersi al dispositivo non appena viene aperta per la prima volta.
iOS Android

62
IT
PULIZIA E MANUTENZIONE
Nota: Spegnere l‘unità e scollegarla dalla presa di corrente. Attendere che
l‘unità si sia raffreddata completamente prima di pulirla.
• Pulire le fessure e le griglie di aerazione con un aspirapolvere.
• Rimuovere la polvere dalle superci esterne con un panno umido (non
bagnato).
• Non utilizzare detergenti o abrasivi aggressivi.
• Non spruzzare liquidi sull‘apparecchio e non immergerlo in acqua o altri
liquidi.
• Non aprire mai l‘alloggiamento del riscaldatore.
Correzione degli errori in caso di problemi di connessione
Se non è possibile trovare il dispositivo Klarstein nella rete Wi-Fi, controllare i
seguenti punti:
1 La spina non è collegata. Assicurarsi che il dispositivo sia collegato a una presa
elettrica.
2 Il dispositivo non si trova in modalità di accoppiamento. Assicurarsi che
l‘indicazione Wi-Fi (LED) sul pannello di controllo del dispositivo smart
lampeggi come descritto alla voce „Resettare le impostazioni Wi-Fi“ del
dispositivo smart in questione (indicazioni a riguardo possono essere
normalmente trovate alla voce „Connessione dei dispositivi“).
3 Il punto di accesso Wi-Fi non opera sulla banda da 5 GHz. Assicurarsi che il
punto di accesso utilizzato operi sulla banda da 2,4 GHz e che sia disponibile
un SSID personale sulla banda da 2,4 GHz. Se non si è sicuri del tipo di banda
del punto di accesso, rivolgersi al fornitore di Internet.
Importante: tenere presente che se il router Wi-Fi è dotato di dualband e opera
dunque sia sulla banda da 2,4 GHz che su quella da 5 GHz, è necessario dividere
gli SSID per ogni banda e utilizzare per il collegamento l‘SSID della banda da 2,4
GHz.
4 Controllare le impostazioni del rewall della rete Wi-Fi. L‘impostazione
del rewall della rete Wi-Fi potrebbe non permettere alla app Klarstein di
congurare le impostazioni Wi-Fi sul dispositivo smart. Assicurarsi di non
utilizzare reti Wi-Fi pubbliche, come ad es. presso aeroporti, hotel, aziende,
ecc.
5 Diversi dati di registrazione su smartphone e app. Assicurarsi che i dati di
registrazione Wi-Fi inseriti nella app Klarstein corrispondano a quelli con cui è
collegato lo smartphone.
Se sono stati rispettati i punti citati in precedenza e lo smartphone continua a
non connettersi alla app, si prega di inviare un‘email al seguente indirizzo per
ricevere supporto: [email protected]
63
IT
SMALTIMENTO
Se nel proprio paese si applicano le regolamentazioni
inerenti lo smaltimento di dispositivi elettrici ed
elettronici, questo simbolo sul prodotto o sulla confezione
segnala che questi prodotti non possono essere
smaltiti con i riuti normali e devono essere portati a
un punto di raccolta di dispositivi elettrici ed elettronici.
Grazie al corretto smaltimento dei vecchi dispositivi si
tutela il pianeta e la salute delle persone da possibili
conseguenze negative. Informazioni riguardanti il riciclo
e lo smaltimento di questi prodotti si ottengono presso
l’amministrazione locale oppure il servizio di gestione dei
riuti domestici.
Il prodotto contiene batterie. Se nel proprio paese si
applicano le regolamentazioni inerenti lo smaltimento
di batterie, non possono essere smaltite con i normali
riuti domestici. Preghiamo di informarvi sulle
regolamentazioni vigenti sullo smaltimento delle
batterie. Grazie al corretto smaltimento dei vecchi
dispositivi si tutela l’ambiente e la salute delle persone da
conseguenze negative.
DICHIARAZIONE DI CONFORMITÀ
Produttore:
Chal-Tec GmbH, Mühlenstraße 25, 10243 Berlino,
Germania.
Contatto: [email protected]
Il fabbricante, Chal-Tec GmbH, dichiara che il tipo di
apparecchiatura radio Bornholm Smart è conforme alla
direttiva 2014/53/UE. Il testo completo della dichiarazione
di conformità UE è disponibile al seguente indirizzo
Internet: use.berlin/10034390

65
NL
Geachte klant,
gefeliciteerd met de aanschaf van dit apparaat. Lees de
hierna volgende handleiding aandachtig door en volg
de instructies op om schade te voorkomen. Voor schade
veroorzaakt door het niet in acht nemen van de instructies of
door onjuist gebruik nemen wij geen verantwoordelijkheid.
Scan de QR code voor toegang tot de meest actuele
gebruikershandleiding en voor meer informatie rondom
het artikel.
INHOUDSOPGAVE
TECHNISCHE GEGEVENS
Artikelnummer
10034190, 10034391
Stroomvoorziening 220-240 V ~ 50 Hz
Vermogen 1000 W / 2000 W
Wi norm
802.11 b/g/n
Wi frequentie
2,4 GHz
Wi zendvermogen (max.)
20 dBm
Veiligheidsinstructies 66
Productinformatieblad 67
Overzicht apparaat 68
Montage 68
Controlepaneel 70
Gebruik 70
Bediening via smartphone 73
Reiniging en onderhoud 74
Instructies voor afvoer 75
Verklaring van overeenstemming 75
66
NL
VEILIGHEIDSINSTRUCTIES
• Controleer voor gebruik de spanning op het typeplaatje en sluit het apparaat
alleen aan als deze overeenkomt met de spanning van het stopcontact.
• Wanneer de stroomkabel of stekker beschadigd is laat u deze vervangen door een
gediplomeerde kracht.
• Plaats de verwarming niet direct onder een stopcontact.
• Houdt een meter afstand tot brandbare materialen, zoals meubels, gordijnen
e.d.
• Gebruik het apparaat buiten bereik van kinderen. Kinderen mogen het
apparaat alleen onder toezicht bedienen.
• Het apparaat is niet bestemd voor commercieel gebruik, maar voor gebruik in
een conventioneel huishouden en gelijkwaardige omgevingen.
• Gebruik het apparaat niet wanneer het een foutmelding geeft of in welke
vorm dan beschadigd is.
• Reparaties mogen alleen door gekwaliceerde krachten worden uitgevoerd.
• Verkeerde en eigenhandig uitgevoerde reparaties vormen een risico.
• Leg de stroomkabel niet onder tapijt of loper.
• Leg de stroomkabel niet langs scherpe hoeken of hete oppervlaktes.
• Bedek de verwarming niet om oververhitting te voorkomen.
• Gebruik het apparaat niet met een externe timer, tijdschakelaar of ander
apparaat dat de verwarming automatisch aanzet en uitschakelt.
• Dompel het apparaat niet in water of andere vloeistof(fen) onder.
• Gebruik het apparaat niet nabij bad, douche of zwembad.
• Gebruik het apparaat niet buitenshuis.
• Gebruik het apparaat niet met natte handen.
• Gebruik het apparaat niet op of nabij hete oppervlaktes.
• Gebruik het apparaat niet wanneer de stekker of stroomkabel beschadigd is.
• Neem voor het reinigen de stekker uit het stopcontact en laat het apparaat,
indien nodig, volledig afkoelen.
• Gebruik geen schuurmiddel voor het schoonmaken.
• Gebruik alleen accessoires die nadrukkelijk door de fabrikant zijn
goedgekeurd.
• Kinderen vanaf 8 jaar en personen met een beperkte lichamelijke, sensorische
en/of geestelijke gezondheid mogen het apparaat alleen gebruiken wanneer
ze van tevoren door een voor hen verantwoordelijke persoon uitvoerig met de
functies en veiligheidsinstructies van het apparaat vertrouwd zijn gemaakt en
de hieraan verbonden risico's begrijpen.
• Kinderen mogen niet met het apparaat spelen.
LET OP!
Verbrandingsgevaar! Sommige onderdelen kunnen heel heet
worden. Let erop dat u, uw kinderen of uw huisdieren zich niet
verbranden.
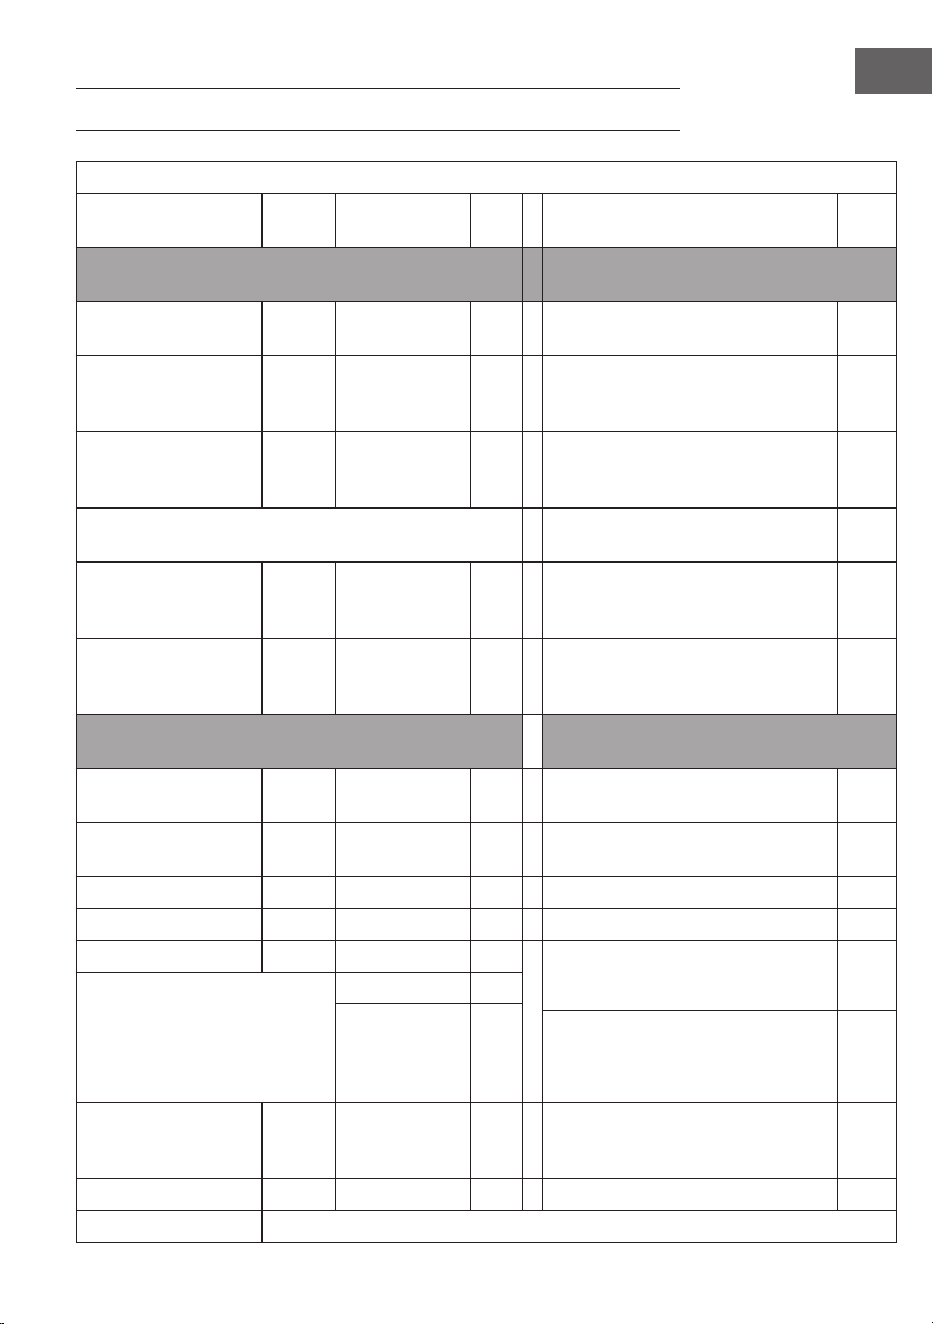
67
NL
PRODUCTINFORMATIEBLAD
Identicatie model(len): 10034390, 10034391
Artikel Sym-
bool
Waarde Een-
heid
Artikel Een-
heid
Warmteafgifte Soort warmteafgifte/
kamertemperatuurcontrole
Nominale
warmteafgifte
P
nom
2.000
kW Enkelfasige warmteafgifte bij
afwezige kamertemperatuurcontrole
Nee
Minimale
warmteafgifte
(indicatief)
P
min
1.000
kW Twee of meer handmatige stadia,
geen kamertemperatuurcontrole
Nee
Maximale
voortdurende
warmteafgifte
P
max,c
2.000
kW Kamertemperatuurcontrole met
mechanische thermostaat
Nee
Additioneel energieverbruik bij nominale
warmteafgifte
Met elektronische
kamertemperatuurcontrole
Nee
Bij nominale
warmteafgifte
el
max
1.775
kW Elektronische
kamertemperatuurcontrole plus
dagtimer
Nee
Bij minimale
warmteafgifte
el
min
0.894
kW Elektronische
kamertemperatuurcontrole plus
weektimer
Ja
Stroomverbruik Overige controleopties (diverse keuzes
mogelijk)
In uitgeschakelde
modus
P
o
0,00 W Kamertemperatuurcontrole met
aanwezigheidsdetectie
Nee
In stand-by modus P
sm
0,55 (display
actief)
W Kamertemperatuurcontrole met open
raamdetectie
Ja
In ruststand P
idle
/ W Met controle op afstand-optie Nee
In stand-by netwerk P
nsm
/ W Met adaptieve startregeling Nee
Met bedrijfstijdbeperking Ja
In stand-by modus met
weergave van informatie of
status
Timerinstelling Ja
Mechanische
schakelaar na
bedrijfstijd
Nee
Met zwarte bolsensor Ja
Seizoensgebonden
energie-eciëntie in
actieve modus
n
S, on
94.5
(draagbaar) /
92.0 (gexeerd)
% Automatisch lerende functie Nee
Regelnauwkeurigheid Nee
Contactgegevens Chal-Tec GmbH, Mühlenstrasse 25, 10243 Berlijn, Duitsland.
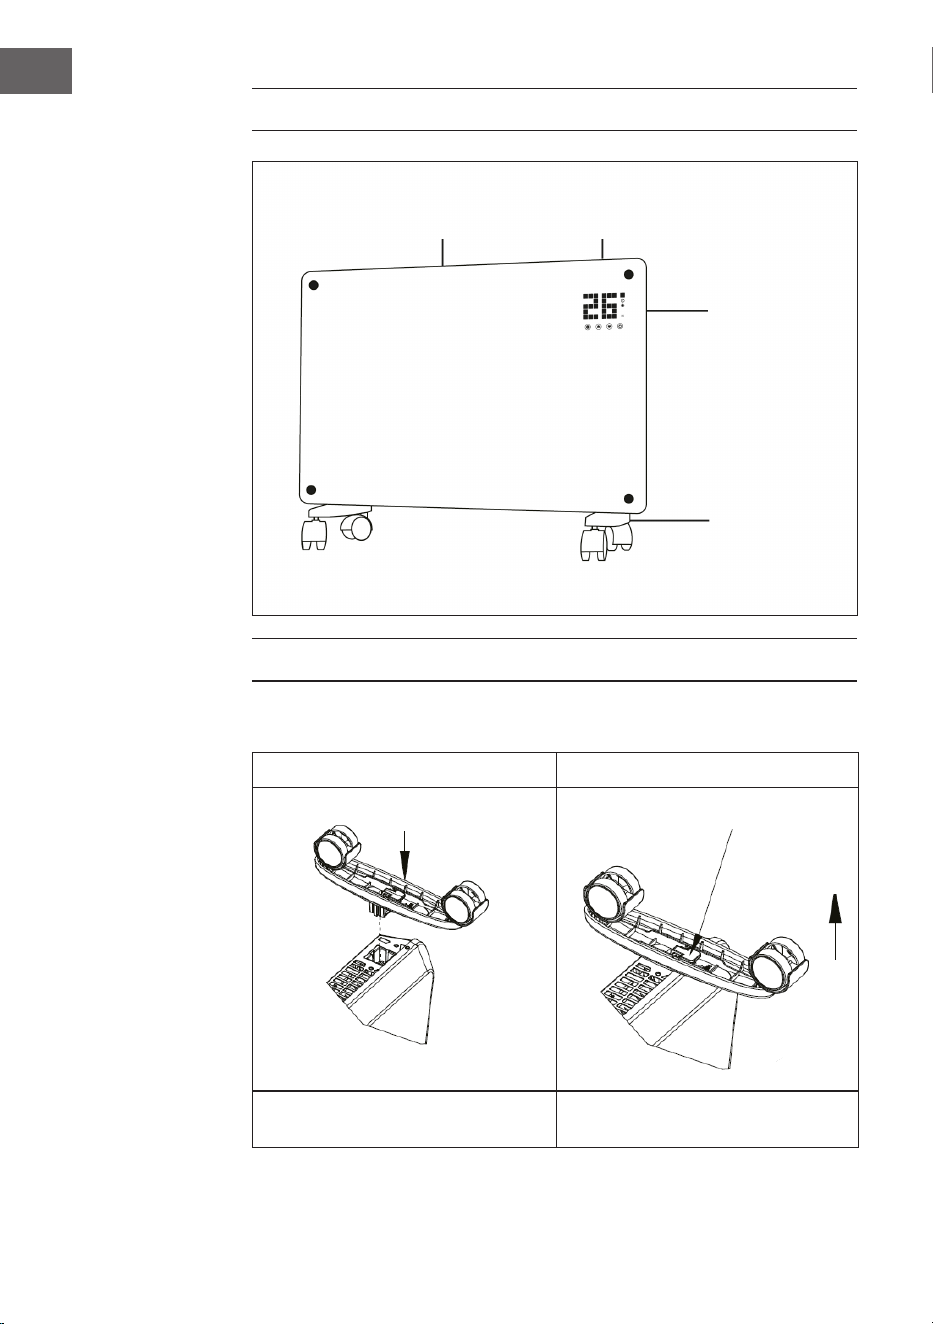
68
NL
OVERZICHT APPARAAT
MONTAGE
Vrijstaande montage met wieltjes
Wieltjes monteren Wieltjes verwijderen
Wanneer de montage afgesloten is
hoort u een klik.
Knop indrukken om de wieltjes weg
te halen.
Luchtuitlaat
Controlepaneel
Schakelaar
Pootjes met
wieltjes
Schuiven
Trekken
Knop indrukken
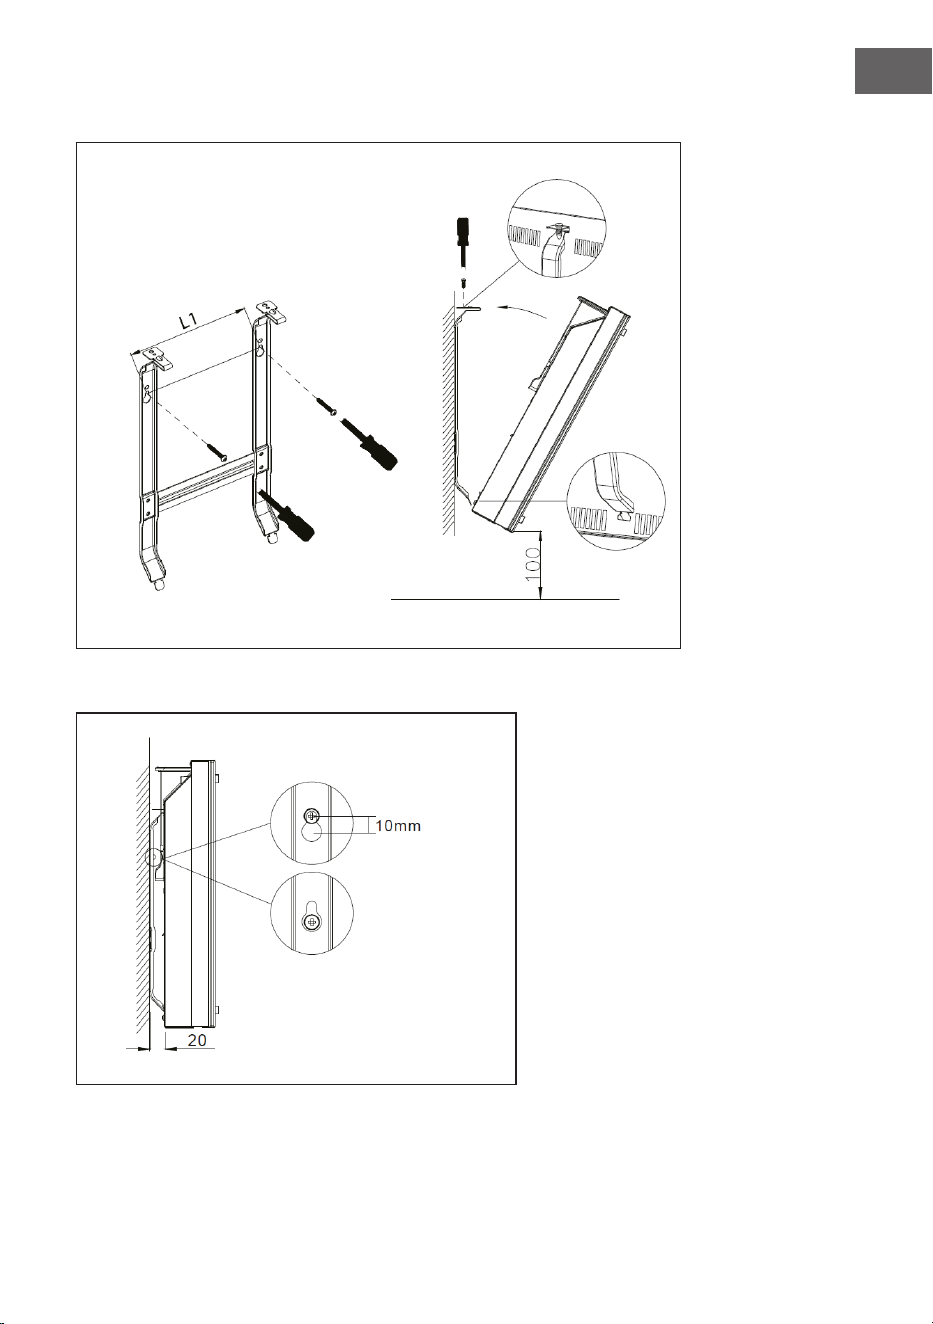
69
NL
Wandmontage
Van de muur afhalen
Verwarming 10 mm
omhoog trekken en dan
weghalen
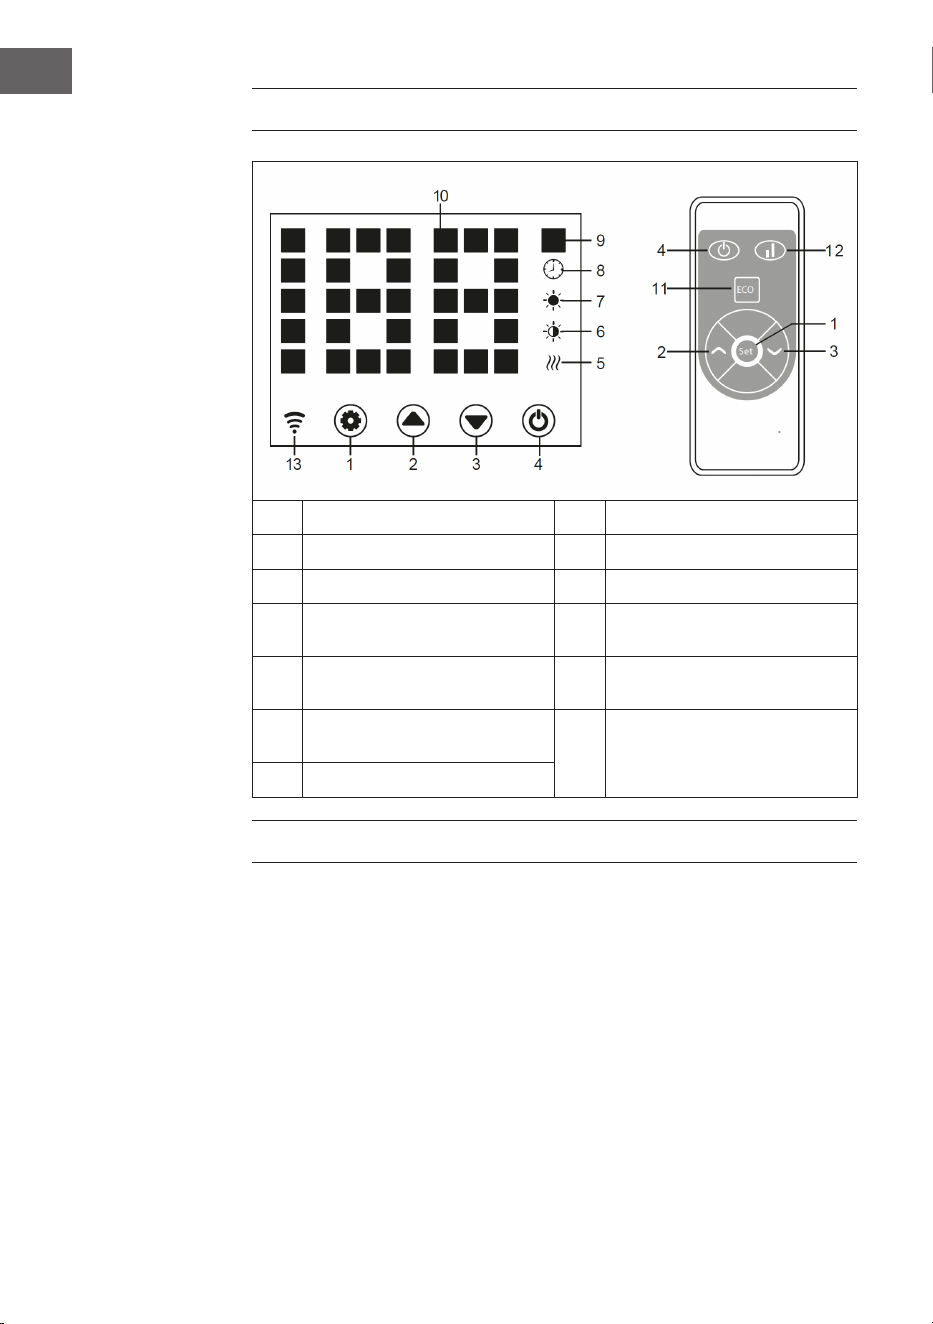
70
NL
CONTROLEPANEEL
1 Toets: instellingen 8 Weergave: timer
2 Toets: waarde omhoog 9 Weergave: temperatuur
3 Toets: waarde omlaag 10 Led cijferdisplay
4 Toets: aan / uit 11
Toets: led weergave
deactiveren
5
Bedrijfslampje:
verwarmingselement
12
Toets: warmtestand omhoog /
omlaag
6
Weergave: geringe
warmtestand
13
Weergave: wi
verbinding: actief
Verbinding mislukt: inactief
7 Weergave: hoge warmtestand
GEBRUIK
Ingebruikname
1. Neem het apparaat voorzichtig uit de doos. Bewaar de doos zodat u het
toestel erin op kan bergen buiten het seizoen.
2. Let erop dat het apparaat op uitgeschakeld staat voordat u het aansluit.
3. De verwarming moet in zijn geheel conform de montagehandleiding worden
gemonteerd en geïnstalleerd.
4. Het is beter het stopcontact niet met andere energieverslindende apparaten
te gebruiken om een overbelasting van het energiecircuit te voorkomen.

71
NL
Inschakelen
Het apparaat aansluiten op het stroomcircuit. Het bedrijfslampje gaat met een
kort brommend geluid aan. Het apparaat aanzetten met de Aan / Uit toets
(4). U ziet in het display nu de actuele kamertemperatuur. De in de fabriek
voorgeprogrammeerde temperatuur is 35 °C.
Instellen van de temperatuur
Druk op de instellingentoets (1). De getallen '10' en '9' knipperen. Druk op de
pijltjestoetsen (2) en (3) om de temperatuur met 1°C te verhogen of te verlagen.
Instellen van de timer
Inschakeltijd: in gedeactiveerde toestand tweemaal op toets (1) indrukken om de
timer op 1-24 uur in te stellen. Druk op de toetsen (2) en (3) om de temperatuur
in te stellen. Na de instelling wordt de kamertemperatuur weergegeven. Het
display (8) licht op wanneer de timer geactiveerd is en gaat uit wanneer de timer
afgelopen is.
Uitschakeltijd: in verwarmingsmodus toets (1) drukken om de timer op 1-24 uur
in te stellen. Na de instelling wordt de kamertemperatuur weergegeven. Het
display (8) licht op wanneer de timer geactiveerd is en gaat uit wanneer de timer
afgelopen is. Het toestel schakelt vervolgens de verwarmingsmodus in.
Instellen van de verwarmingsmodus
a. In de bedrijfsmodus wisselt toets (2) tussen hoge warmtestand en
verwarmingsstop (indicator (7) licht op bij hoge warmtestand en gaat uit
wanneer de verwarming uitgeschakeld is).
b. In de bedrijfsmodus schakelt toets (3) tussen geringe warmtestand en
uitgeschakelde verwarming heen en weer (indicator 6 licht op bij geringe
warmtestand en gaat uit wanneer de verwarming in uitgeschakelde toestand
is).
c. In de bedrijfsmodus wisselt de toets (12) tussen Off/ Low/ High heating. Bij
een hoge warmtestand licht de indicator (7) op en bij geringe warmtestand
licht de indicator (6) op.

72
NL
Kinderslot
Druk in verwarmingsmodus de toetsen (2) en (3) tegelijk in. Het kinderslot is
nu actief en het systeem is geblokkeerd. Er kunnen geen instellingen worden
uitgevoerd. Na 5 seconden verschijnt de kamertemperatuur in het display.
Voor het vrijgeven de toetsen (2) en (3) gedurende 3 seconden ingedrukt houden.
Activering van het display
Wanneer het apparaat in gebruik is is het display uitgeschakeld. Met een druk op
het controlepaneel wordt het display actief.
ECO functie (nachtmodus)
In verwarmingsmodus de toetsen (1) en (3) (of de toets ECO op de
afstandsbediening) gedurende 3 seconden ingedrukt houden om de ECO functie
in te schakelen. In deze bedrijfsmodus worden alleen de indicators (5), (6), (7) of
(8) weergegeven, afhankelijk van de eerder gekozen instelling.
Wijzigen van de temperatuurweergave in graden Celsius of Fahrenheit
Druk de toets voor de instellingen (1) en de pijltjestoets ‘omhoog’ (2) gedurende
10 seconden tegelijk in.
Open raam detectie
Wanneer de temperatuur binnen 2 minuten met 3°C of meer daalt wordt de
open raam detectie actief. Het apparaat stopt met verwarmen en de indicator (9)
knippert. Druk op toets (4) om het apparaat uit te zetten. Wanneer u het apparaat
nu weer aanzet is de open raam detectie gedeactiveerd.
Wi resetten
Houdt toets (1) in verwarmingsmodus gedurende 3 seconden ingedrukt. De wi
instellingen worden gereset en de bijbehorende indicator knippert snel (tweemaal
per seconde)
Uitschakelen
Houdt de Aan / Uit toets (4) ingedrukt. Het bedrijfslampje licht op.
73
NL
BEDIENING VIA SMARTPHONE
Als u het apparaat in het wi-systeem van uw woning integreert, kunt u het
gemakkelijk bedienen via de bijbehorende Klarstein app. Met de app kunt u het
apparaat niet alleen op afstand bedienen via uw smartphone, maar heeft u ook
toegang tot recepten en aanvullende informatie.
Volg deze stappen om uw smartphone te verbinden met uw Klarstein ap-
paraat:
1 Download eerst de Klarstein app door de QR-code te scannen met uw
smartphone (zie hieronder), of download de app direct via App Store of
Google Play.
2 Zorg ervoor dat uw smartphone is verbonden met hetzelfde wi-netwerk als
waarmee uw Klarstein apparaat moet worden verbonden.
3 Open de Klarstein app.
4 Meld u aan bij uw account. Als u nog geen account heeft, meld u dan aan in de
Klarstein app.
5 Volg de instructies van de app.
App-download
Gebruik de scanfunctie van uw smartphone om de QR-code te scannen en sla de
app vervolgens in uw smartphone op.
Info: L‘applicazione fornisce ulteriori informazioni su come utilizzarla e su come
connettersi al dispositivo non appena viene aperta per la prima volta.
iOS Android

74
NL
Verbindingsproblemen oplossen
Als uw Klarstein apparaat niet in de wi wordt gevonden, controleer dan het
volgende:
1 Het apparaat is niet aangesloten. Zorg ervoor dat het apparaat is aangesloten
op een stopcontact.
2 Het apparaat staat niet in verbindingsmodus. Zorg ervoor dat de wi-indicator
(LED) op het bedieningspaneel van het slimme apparaat knippert, zoals
beschreven in de instructie 'wi-instellingen opnieuw instellen' van uw slimme
apparaat (instructies zijn meestal beschikbaar tijdens het verbindingsproces
van het apparaat).
3 De wi hotspot werkt niet op 5 GHz. Zorg ervoor dat uw hotspot op de 2,4
GHz-band functioneert en dat u een aparte SSID op de 2,4 GHz-band heeft.
Neem contact op met uw internetprovider als u niet zeker bent van de
bandbreedte van uw toegangspunt.
Let op! Hou er rekening mee dat als uw wi-router dual is - dus op zowel de 2,4
GHz als de 5 GHz band werkt - u de SSID‘s voor elke band moet scheiden en de
2,4 GHz SSID moet gebruiken om verbinding te maken.
4 Firewall-instellingen van je wi-netwerk: het kan zijn dat de Klarstein app door
de rewall-instellingen van uw wi-netwerk de wi-instellingen op uw slimme
apparaat niet kan congureren. Zorg ervoor dat u geen gebruik maakt van
een openbaar wi-netwerk, zoals op luchthavens, studentenats, bedrijven,
enz.
5 Verschillende referenties gebruikt in de smartphone en de app. Zorg ervoor
dat de wi-gegevens die zijn ingevoerd in de Klarstein app dezelfde zijn als die
waarmee uw smartphone is verbonden.
Als u na het volgen van de bovenstaande instructies nog steeds geen
verbinding kunt maken met de app, neem dan via e-mail contact met ons op
voor ondersteuning: [email protected]
REINIGING EN ONDERHOUD
Info: schakel het apparaat uit en neem de stekker uit het stopcontact. Wacht
tot het apparaat volledig is afgekoeld voordat u het schoonmaakt.
• Gebruik de stofzuiger voor het reinigen van de ventilatieopeningen en het
rooster.
• Verwijder stof aan de buitenkant met een vochtige (niet natte) doek.
• Gebruik geen agressieve reinigingsmiddelen of schuurmiddel.
• Besproei het apparaat niet met vloeistof(fen) en dompel het niet in water of
andere vloeistof(fen) onder.
• Open nooit de behuizing.

75
NL
INSTRUCTIES VOOR AFVOER
Wanneer in uw land een wettelijke regeling geldt voor
het afvoeren van elektrische en elektronische apparaten,
wijst het hiernaast afgebeelde symbool, op het product
zelf of op de verpakking, erop dat het betreffende product
niet met het huisvuil afgevoerd mag worden. In plaats
daarvan dient het naar een centraal depot voor het
recyclen van elektrische en elektronische apparaten te
worden gebracht. Door het afval volgens de voorschriften
af te voeren beschermt u het milieu en de gezondheid
van uw medemensen tegen de negatieve consequenties.
Informatie over recycling en de afvoer van dit product
ontvangt u van uw gemeente of van uw plaatselijke
grondstoffen- en afvaldienst.
Dit artikel bevat batterijen. Wanneer in uw land
een wettelijke regeling geldt voor het afvoeren van
batterijen, mogen deze niet met het normale huisvuil
worden weggegooid. Informeer naar de plaatselijke
regelgeving inzake de gescheiden afvoer van batterijen.
Door de batterijen volgens de voorschriften af te voeren
beschermt u het milieu en de gezondheid van uw
medemensen tegen de negatieve consequenties.
VERKLARING VAN OVEREENSTEMMING
Fabrikant:
Chal-Tec GmbH, Mühlenstraße 25, 10243 Berlijn, Duitsland.
Neem contact met ons op: [email protected]
Importeur voor Groot-Brittannië:
Hierbij verklaart Chal-Tec GmbH dat dit type
radioapparatuur Bornholm Smart in overeenstemming
is met Richtlijn 2014/53/EU. De volledige tekst van de
EU-verklaring van overeenstemming is te vinden op de
volgende website: use.berlin/10034390